

You have the stitches down, you love the feel of thread and fabric, but you feel a gentle pull for something more—a way to make your work feel truly and uniquely yours.
The secret isn’t always learning a hundred new stitches. Often, it’s about thoughtfully combining what you already know with other materials: a splash of paint, a layer of paper, or the unexpected texture of chunky yarn. This is where your embroidery evolves from a craft into a distinct art form.
Think of these ideas not as strict patterns, but as invitations to experiment. See how a simple change—stitching on paper instead of fabric, or adding a fabric collage background—can completely transform the emotional impact of your work. Let’s explore how to blend these worlds and create pieces with depth, intention, and a polished, modern finish.
1. Celestial Art with Paint, Paper & Thread
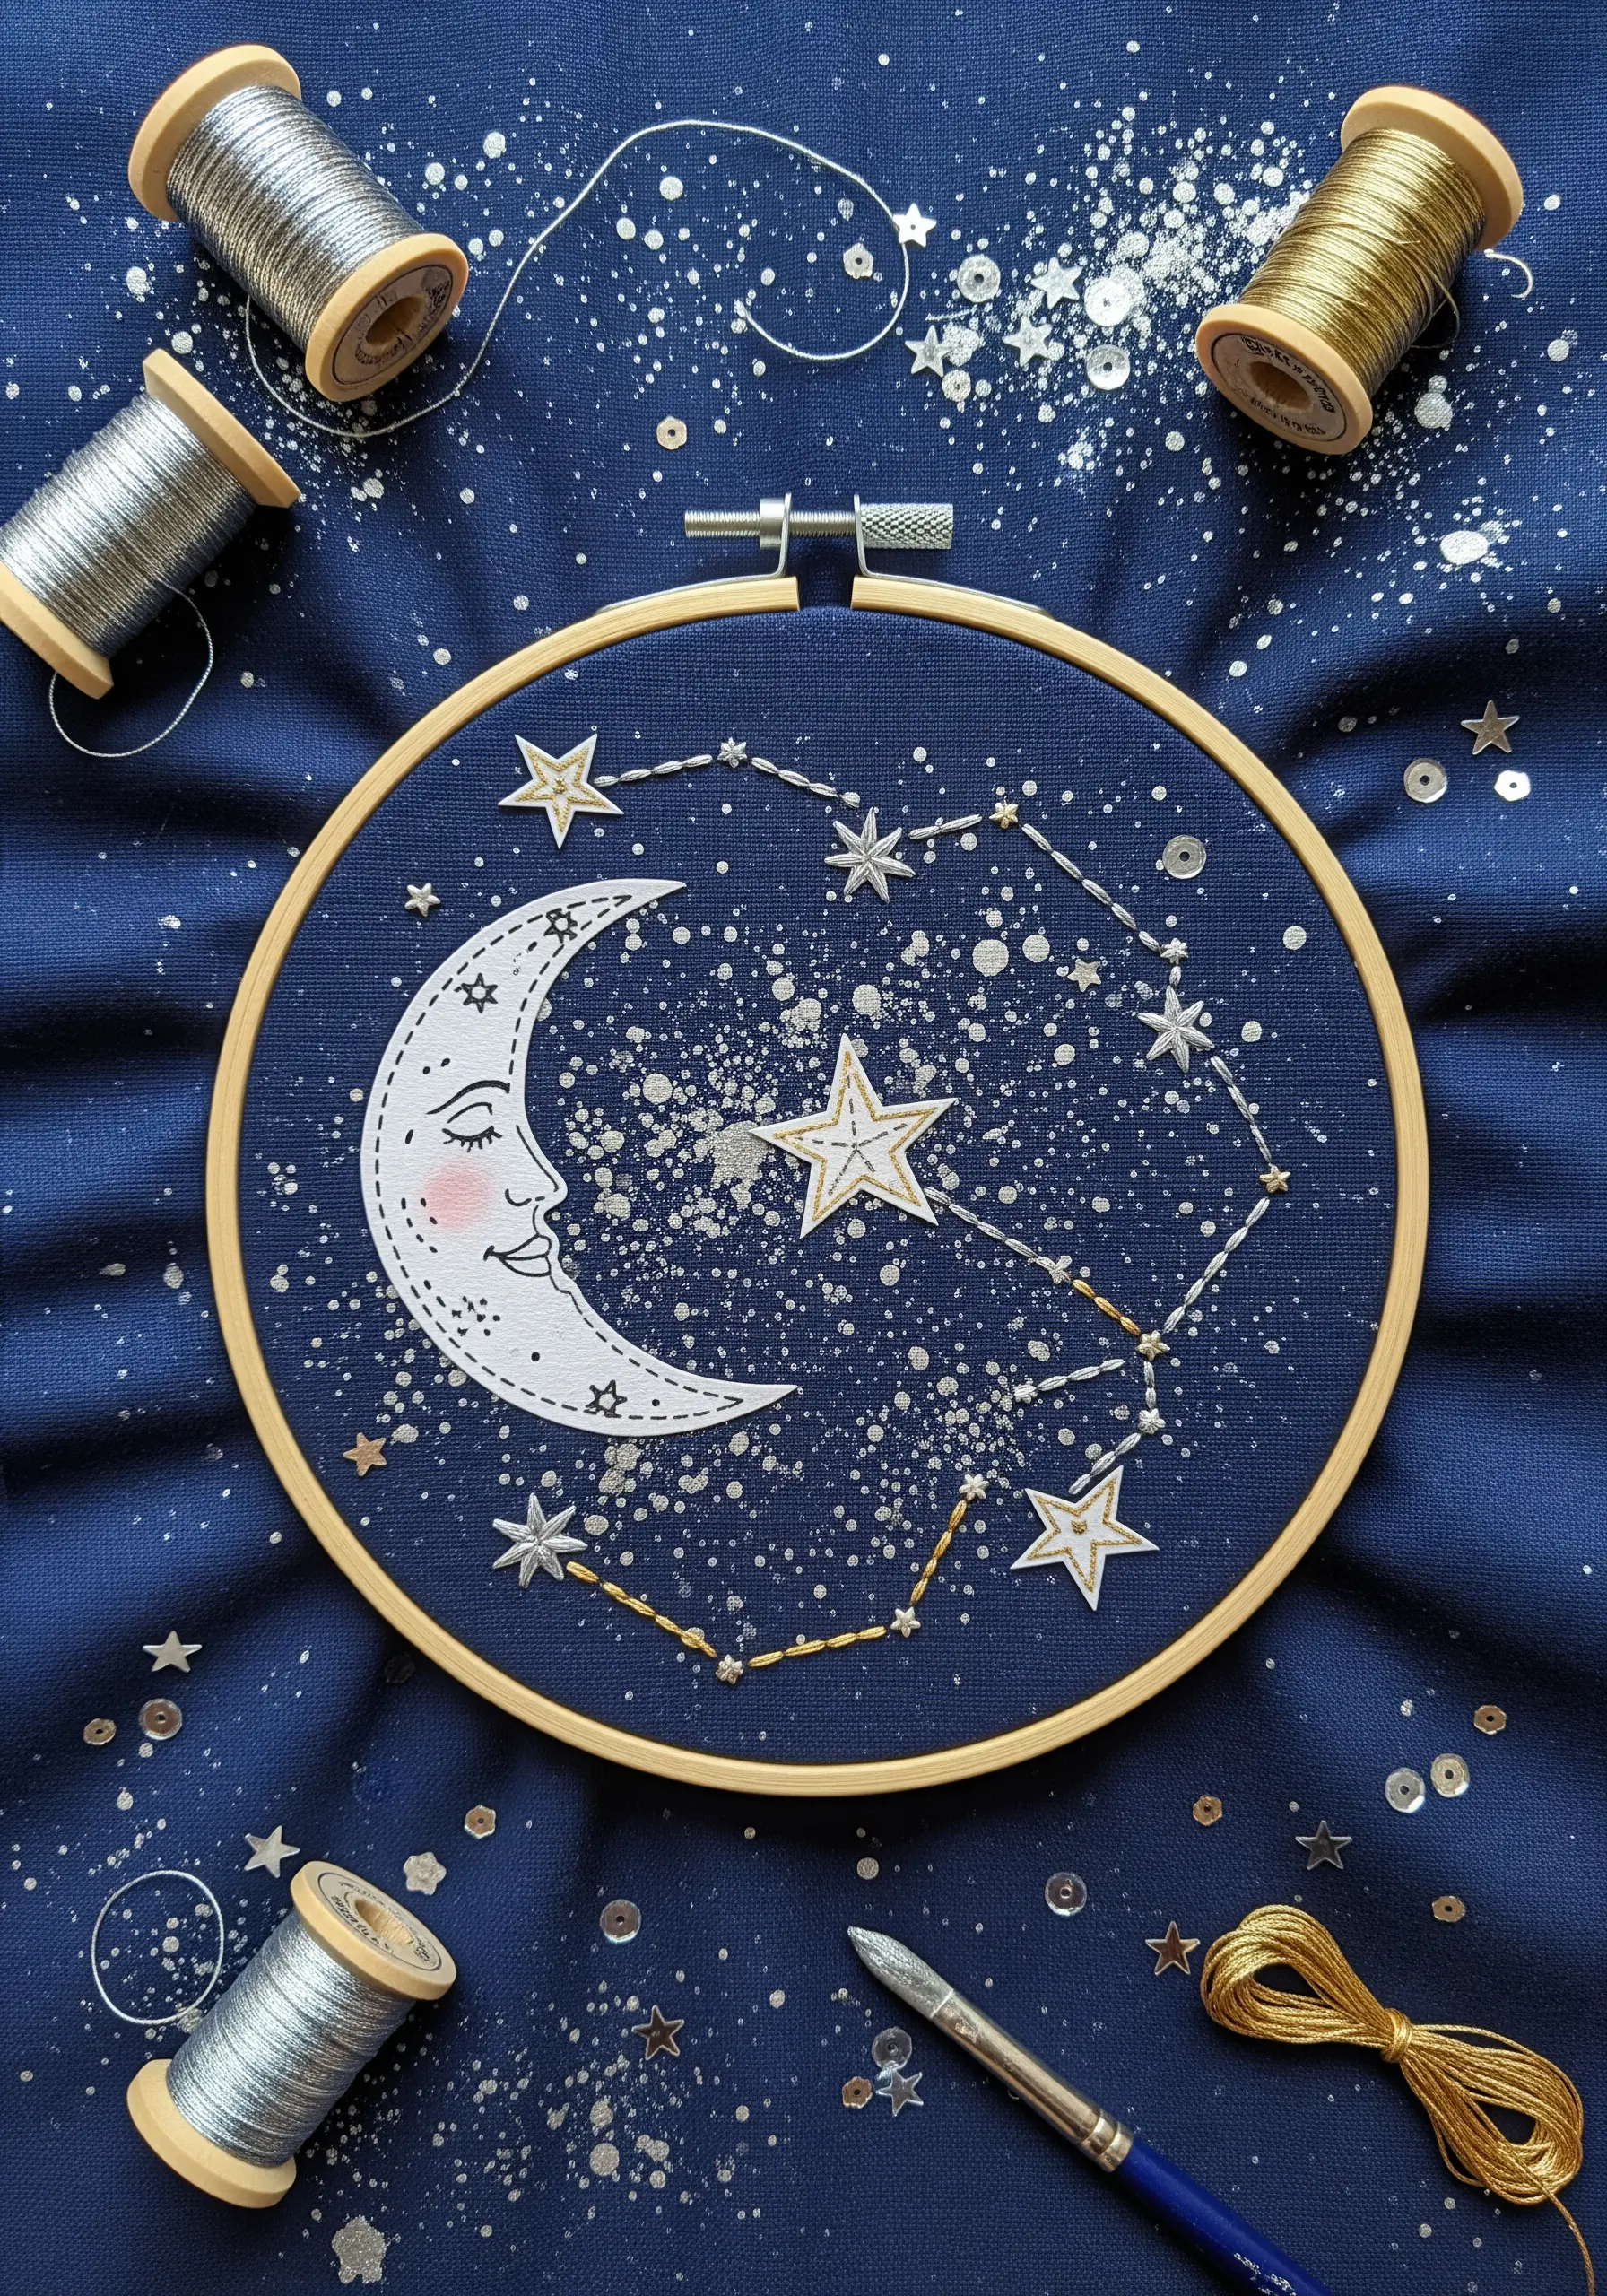
Begin by creating your galaxy backdrop directly on dark fabric using a fine brush to splatter white and silver acrylic paint.
To incorporate paper elements like the moon, stitch them on using a fine, sharp needle and just two strands of floss to prevent tearing.
Select high-quality metallic threads for constellations; work with shorter lengths (about 12 inches) to minimize tangling and fraying, which preserves their shimmer.
Finally, add texture with scattered seed beads and sequins, securing each with a tiny stitch to mimic a dense starfield.
2. Weaving Botanicals onto Handmade Paper

Start with a thick, textured canvas made from handmade paper or a layered paper pulp base, which provides a sturdy yet organic foundation.
Carefully arrange your pressed botanicals, like ferns and lavender, onto the surface.
Instead of glue, use a simple couching technique: lay down your primary threads and use a second, finer thread to tack them down, securing the delicate stems without piercing them.
This method preserves the plants’ integrity while creating a beautiful, earth-inspired texture that feels both rustic and refined.
3. Geometric Stitches Over Fluid Watercolor

Lay down bold, overlapping washes of watercolor on heavy, cold-press paper (at least 140 lb) to prevent buckling.
Once completely dry, use an awl or a thick needle to gently pre-pierce holes for your geometric patterns; this ensures clean entry points and prevents paper damage.
Stitch your lines with a crisp backstitch and fill select areas with dense French knots or seed beads for a surprising textural shift.
The contrast between the unpredictable flow of paint and the controlled precision of the thread is what gives the piece its modern, graphic energy.
4. Stitching a Narrative onto Journal Covers
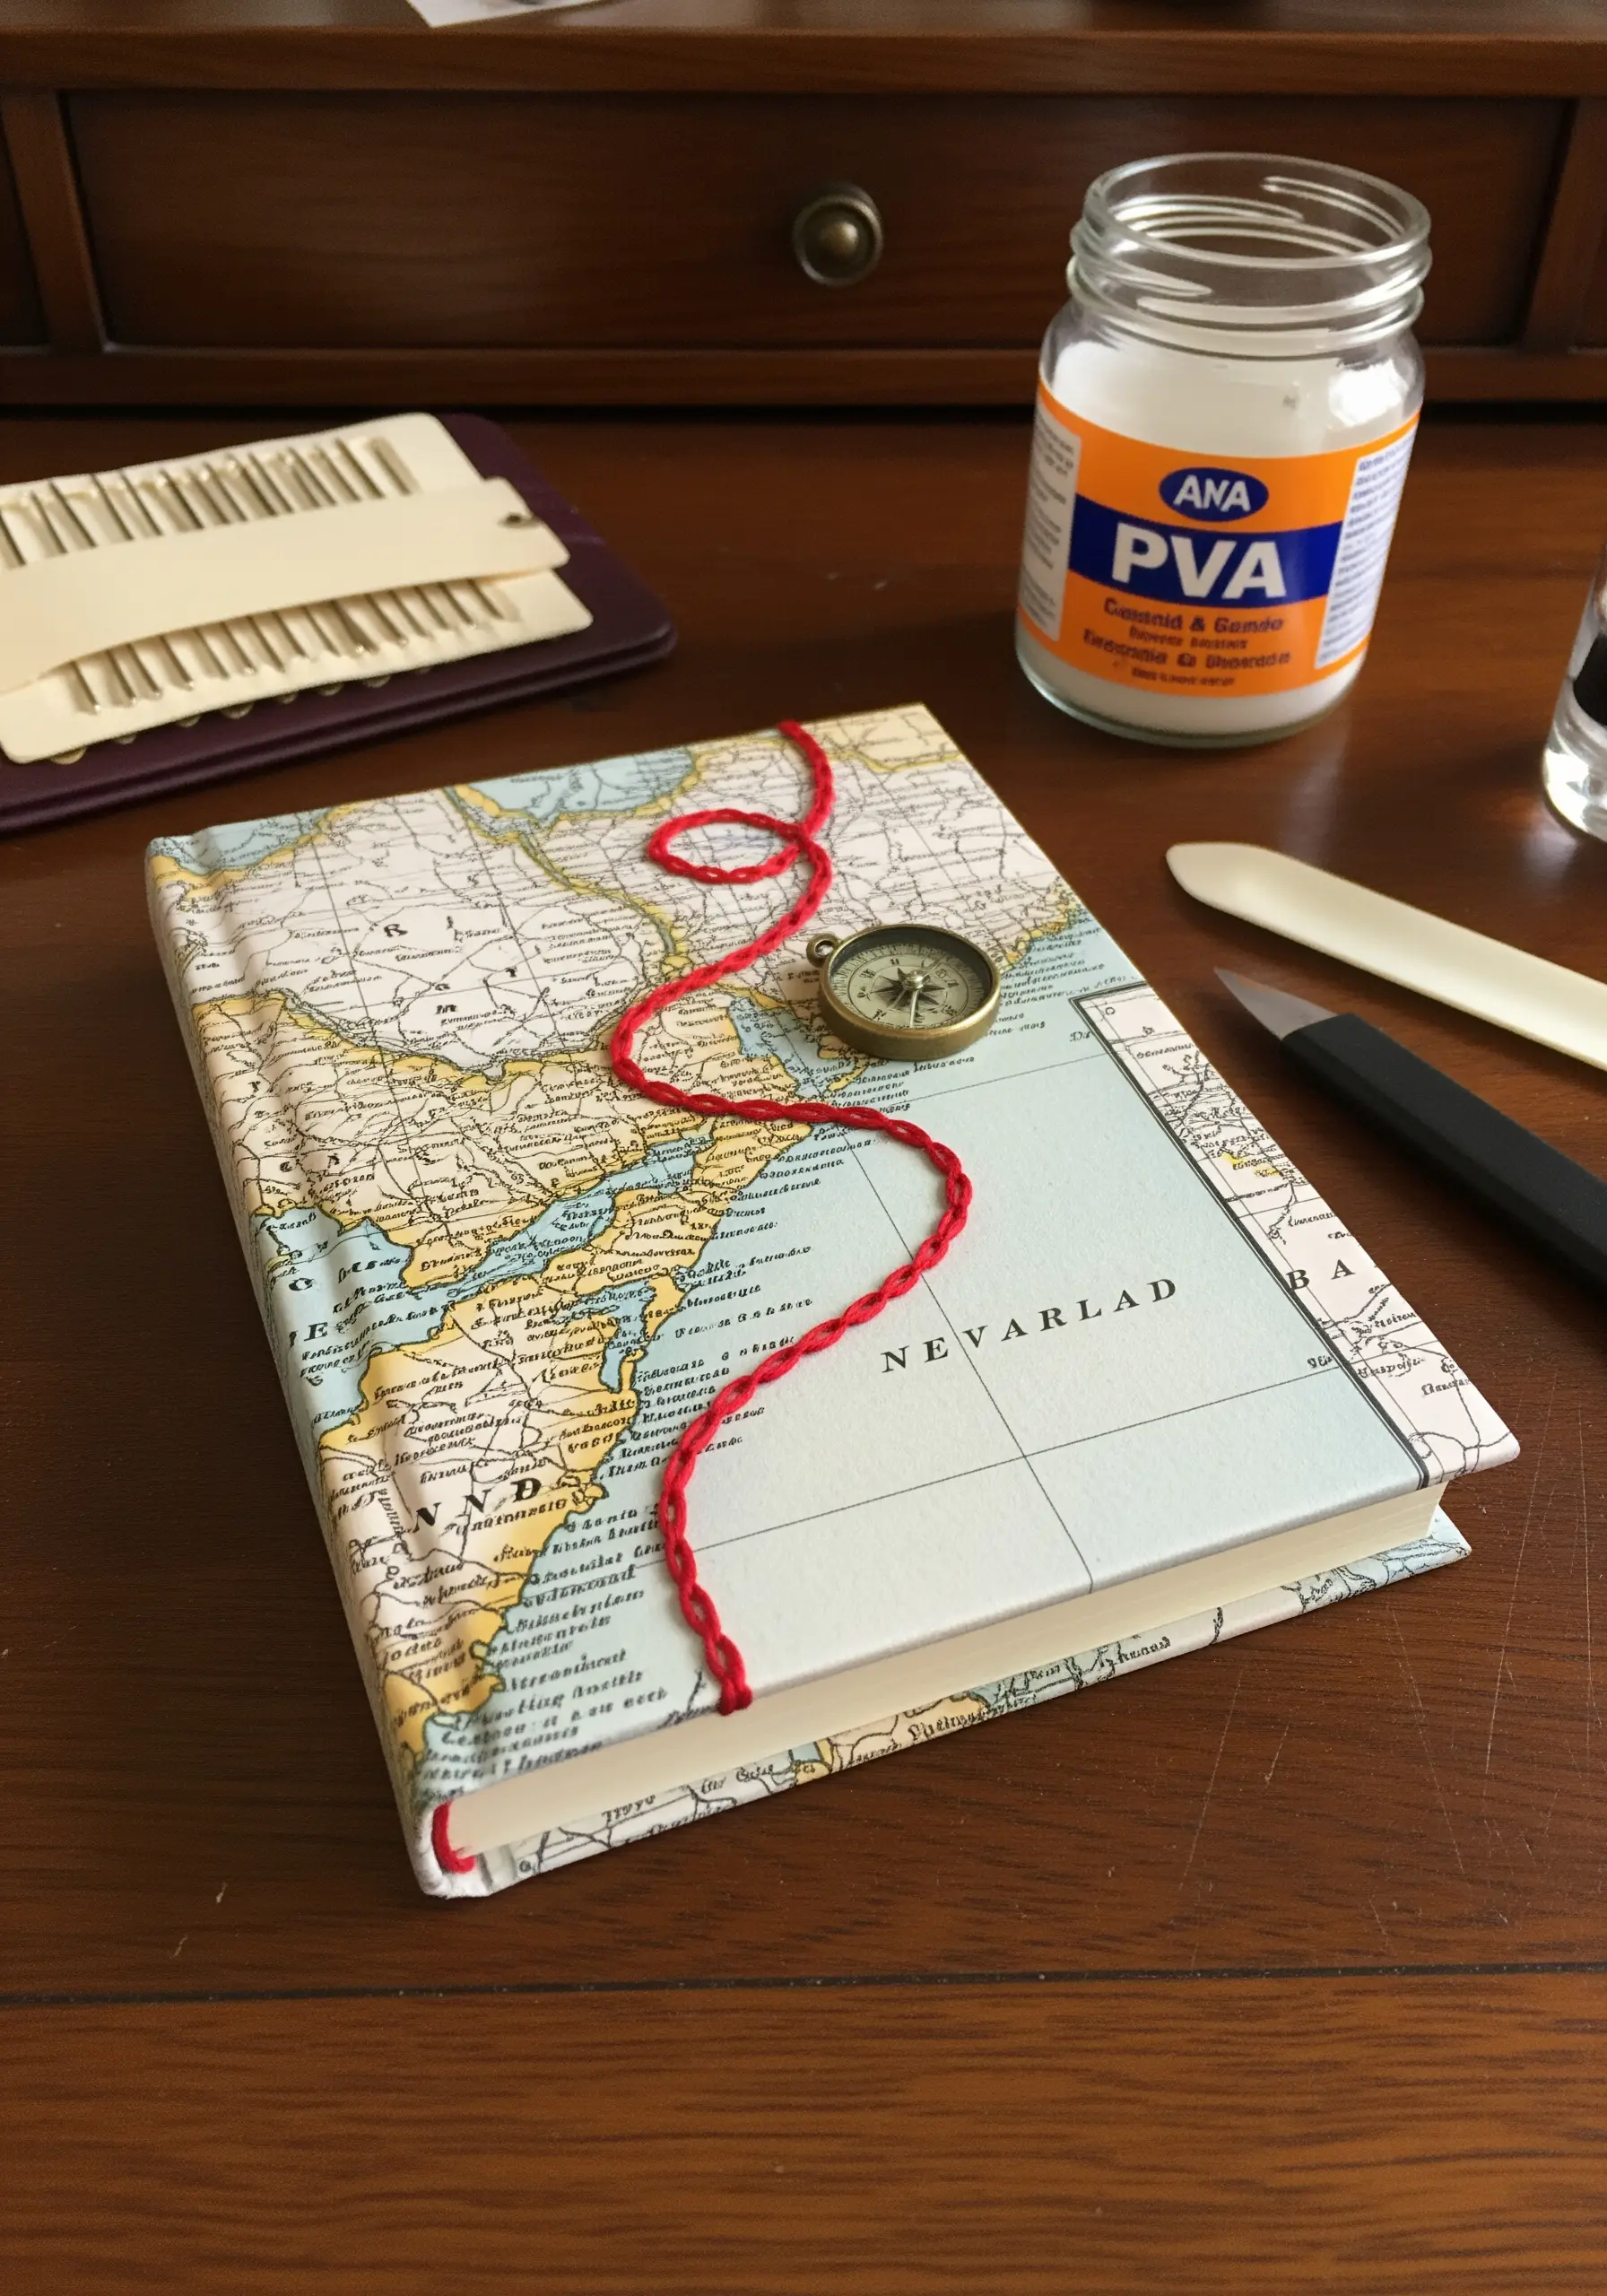
Transform a simple notebook by covering it with a vintage map or decorative paper using PVA glue for a smooth, bubble-free finish.
Before the glue fully sets, use a bookbinding awl to pierce a path for your thread, allowing you to stitch without struggling against the hard cover.
Choose a contrasting, thick thread like waxed linen or cotton perle to create a tactile line that invites touch.
This single stitched element can represent a journey, a connection, or an abstract thought, turning a simple object into a personal artifact.
5. Creating Oceanic Depth with Fabric Collage
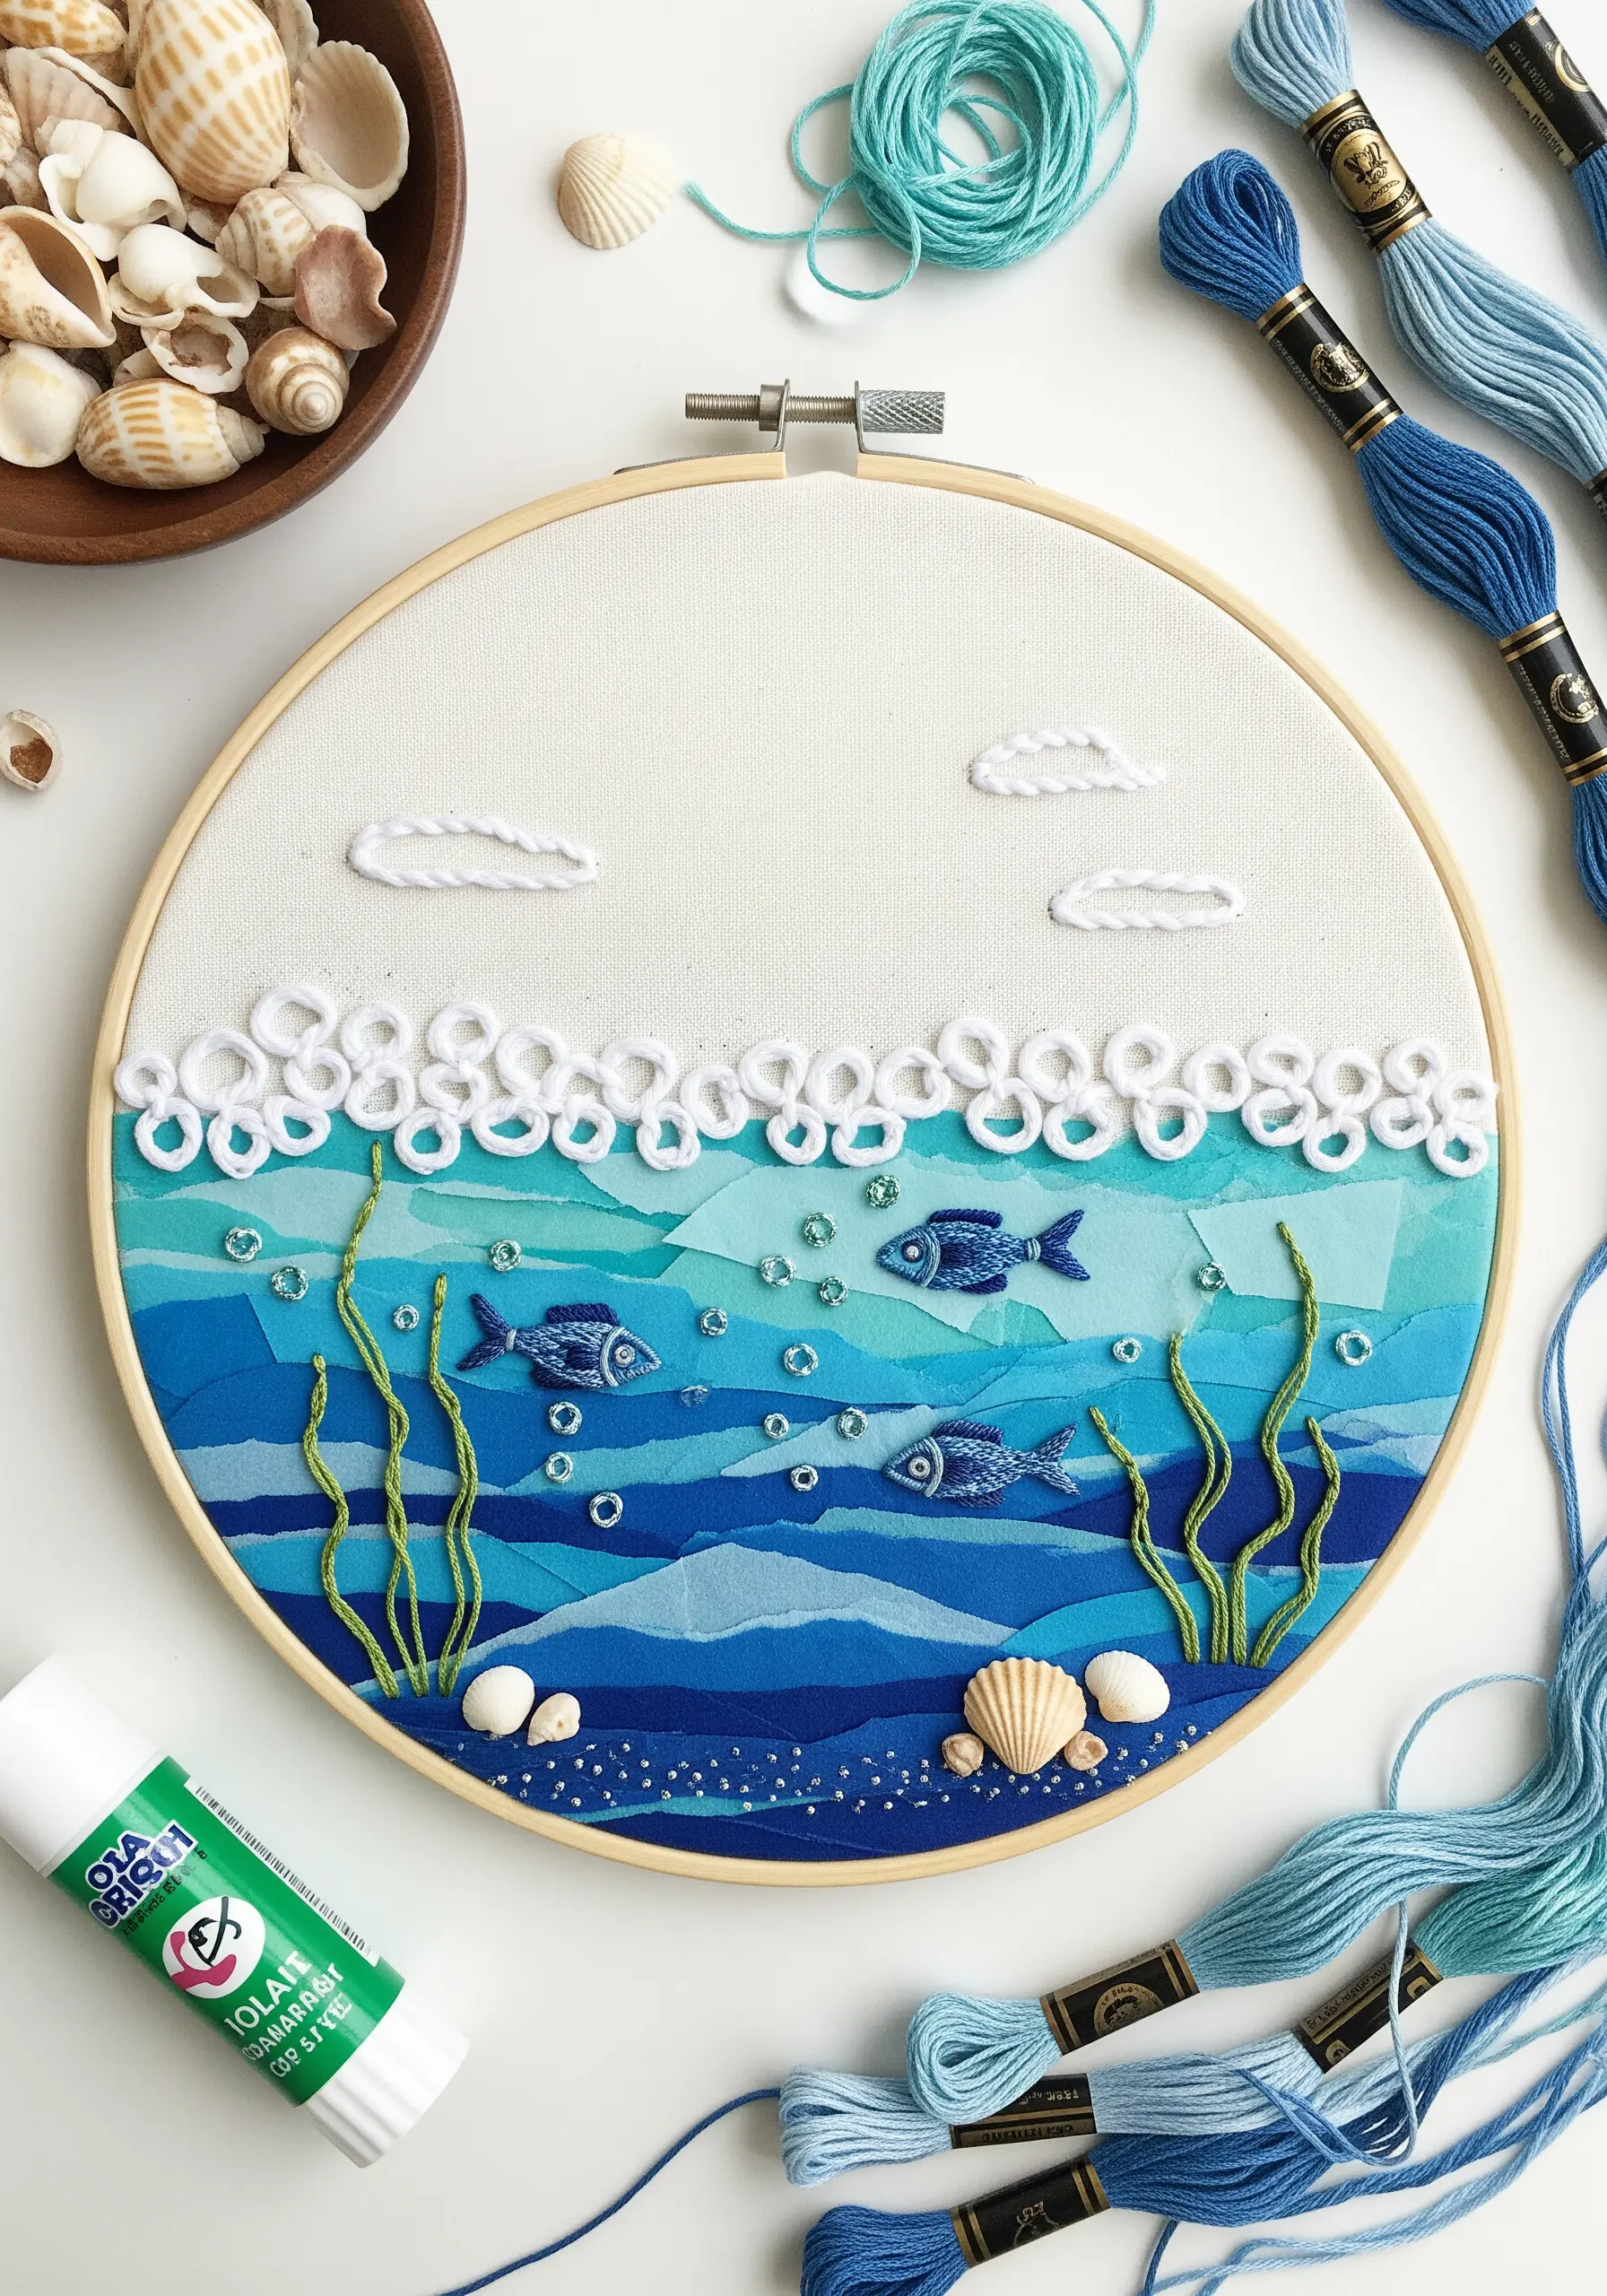
Build your underwater scene by layering torn strips of sheer and semi-sheer blue fabrics like organza and chiffon to mimic the light filtering through water.
Secure the fabric pieces with a minimal amount of fabric glue stick, focusing only on the edges to maintain fluidity.
Use embroidery to add definition: detached chain stitches (lazy daisies) become rising air bubbles, while straight stitches in variegated green thread create swaying seaweed.
Finally, introduce sculpted bubble texture with bullion knots or raised chain stitch bands, adding a sophisticated, three-dimensional element to your coastal-inspired fabric collage.
6. Elevating Stationery with Miniature Stitched Motifs

Create your miniature embroidery on a small piece of tightly woven cotton, then trim it, leaving a small border.
Mount the finished piece onto high-quality cardstock using double-sided archival tape for a clean, professional finish.
To create a soft background, apply a light watercolor wash to the card before mounting your embroidery.
This technique turns a simple card into a treasured keepsake, combining the textures of thread, fabric, and paper in a single, elegant presentation.
7. Sculpting Landscapes with Fabric Appliqué

Build your mountain range by layering torn or sharply cut pieces of felt and textured fabric, creating natural-looking strata and shadows.
Tack the pieces down with a few hidden stitches, then use embroidery to add the finer details that bring it to life.
Use dense French knots and seed stitches for the foreground meadow, creating a rich texture that draws the eye forward.
This technique allows you to achieve a sense of scale and depth that would be difficult and time-consuming with thread alone.
8. Transforming Denim with a Floral Pocket Patch

Select a vibrant, patterned fabric scrap that complements the denim and cut it to the shape of the pocket flap.
Secure the patch with a decorative blanket stitch or a simple running stitch around the edges for a handmade feel.
Then, use the fabric’s pattern as a guide for your embroidery, adding satin-stitched flowers that pop against the background.
This not only adds a burst of color but also integrates the patch seamlessly, making it an intentional design element rather than just a cover-up.
9. An Autumnal Tree with Felt Appliqué Leaves

For clean, crisp shapes, use felt for your appliqué leaves; its non-fraying edge is perfect for this graphic style.
Secure each leaf with a single, contrasting stitch down the center to represent the vein, which is both decorative and functional.
For the tree trunk and branches, use a textured stitch like a whipped backstitch or heavy chain stitch in a dark brown thread to create a tactile contrast against the smooth felt.
This combination of textures is what makes the simple design feel so dynamic and visually interesting.
10. Crafting Soft-Sculpture Nursery Decor
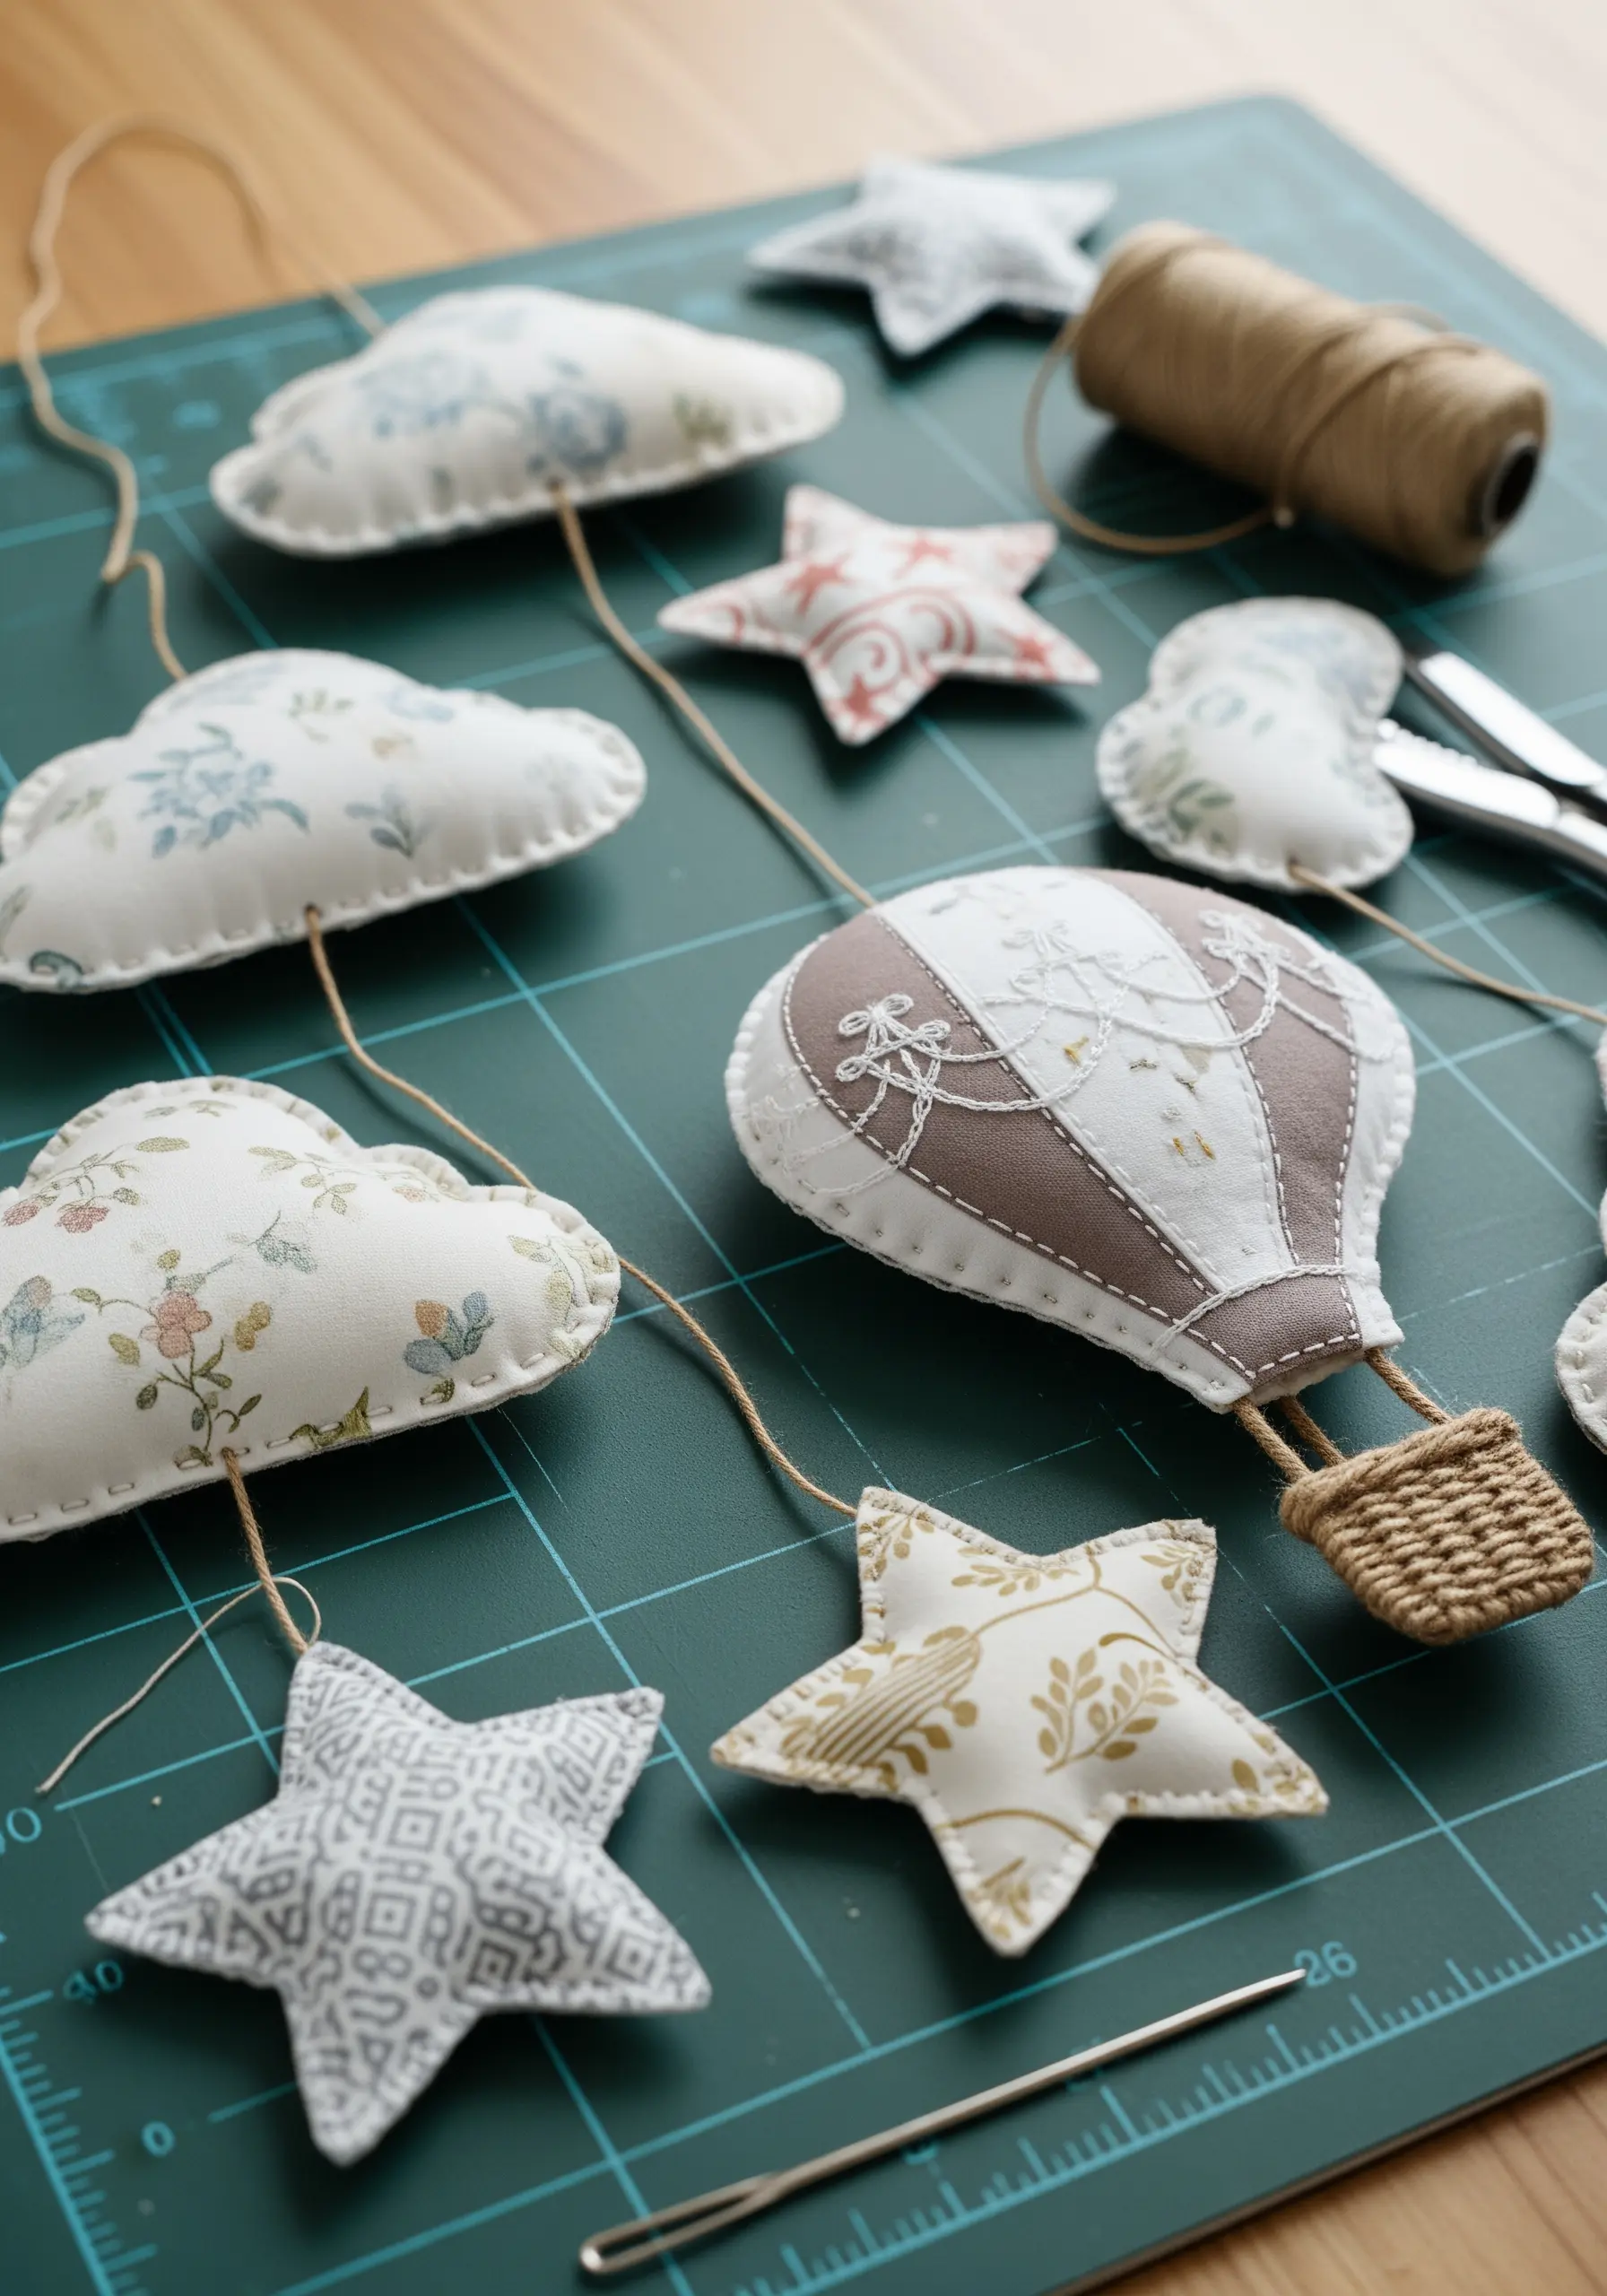
Add all your delicate embroidery details—like the basket weave on the balloon—*before* you sew the front and back fabric pieces together.
For a professional finish, stitch your patterned fabric pieces right-sides together, leaving a small opening for turning.
Once turned and stuffed with polyester fiberfill, close the opening with an invisible ladder stitch.
This construction method creates plush, three-dimensional handmade objects perfect for a gentle, tactile nursery mobile.
11. Sculptural Dimension with Fabric & Thread Collage
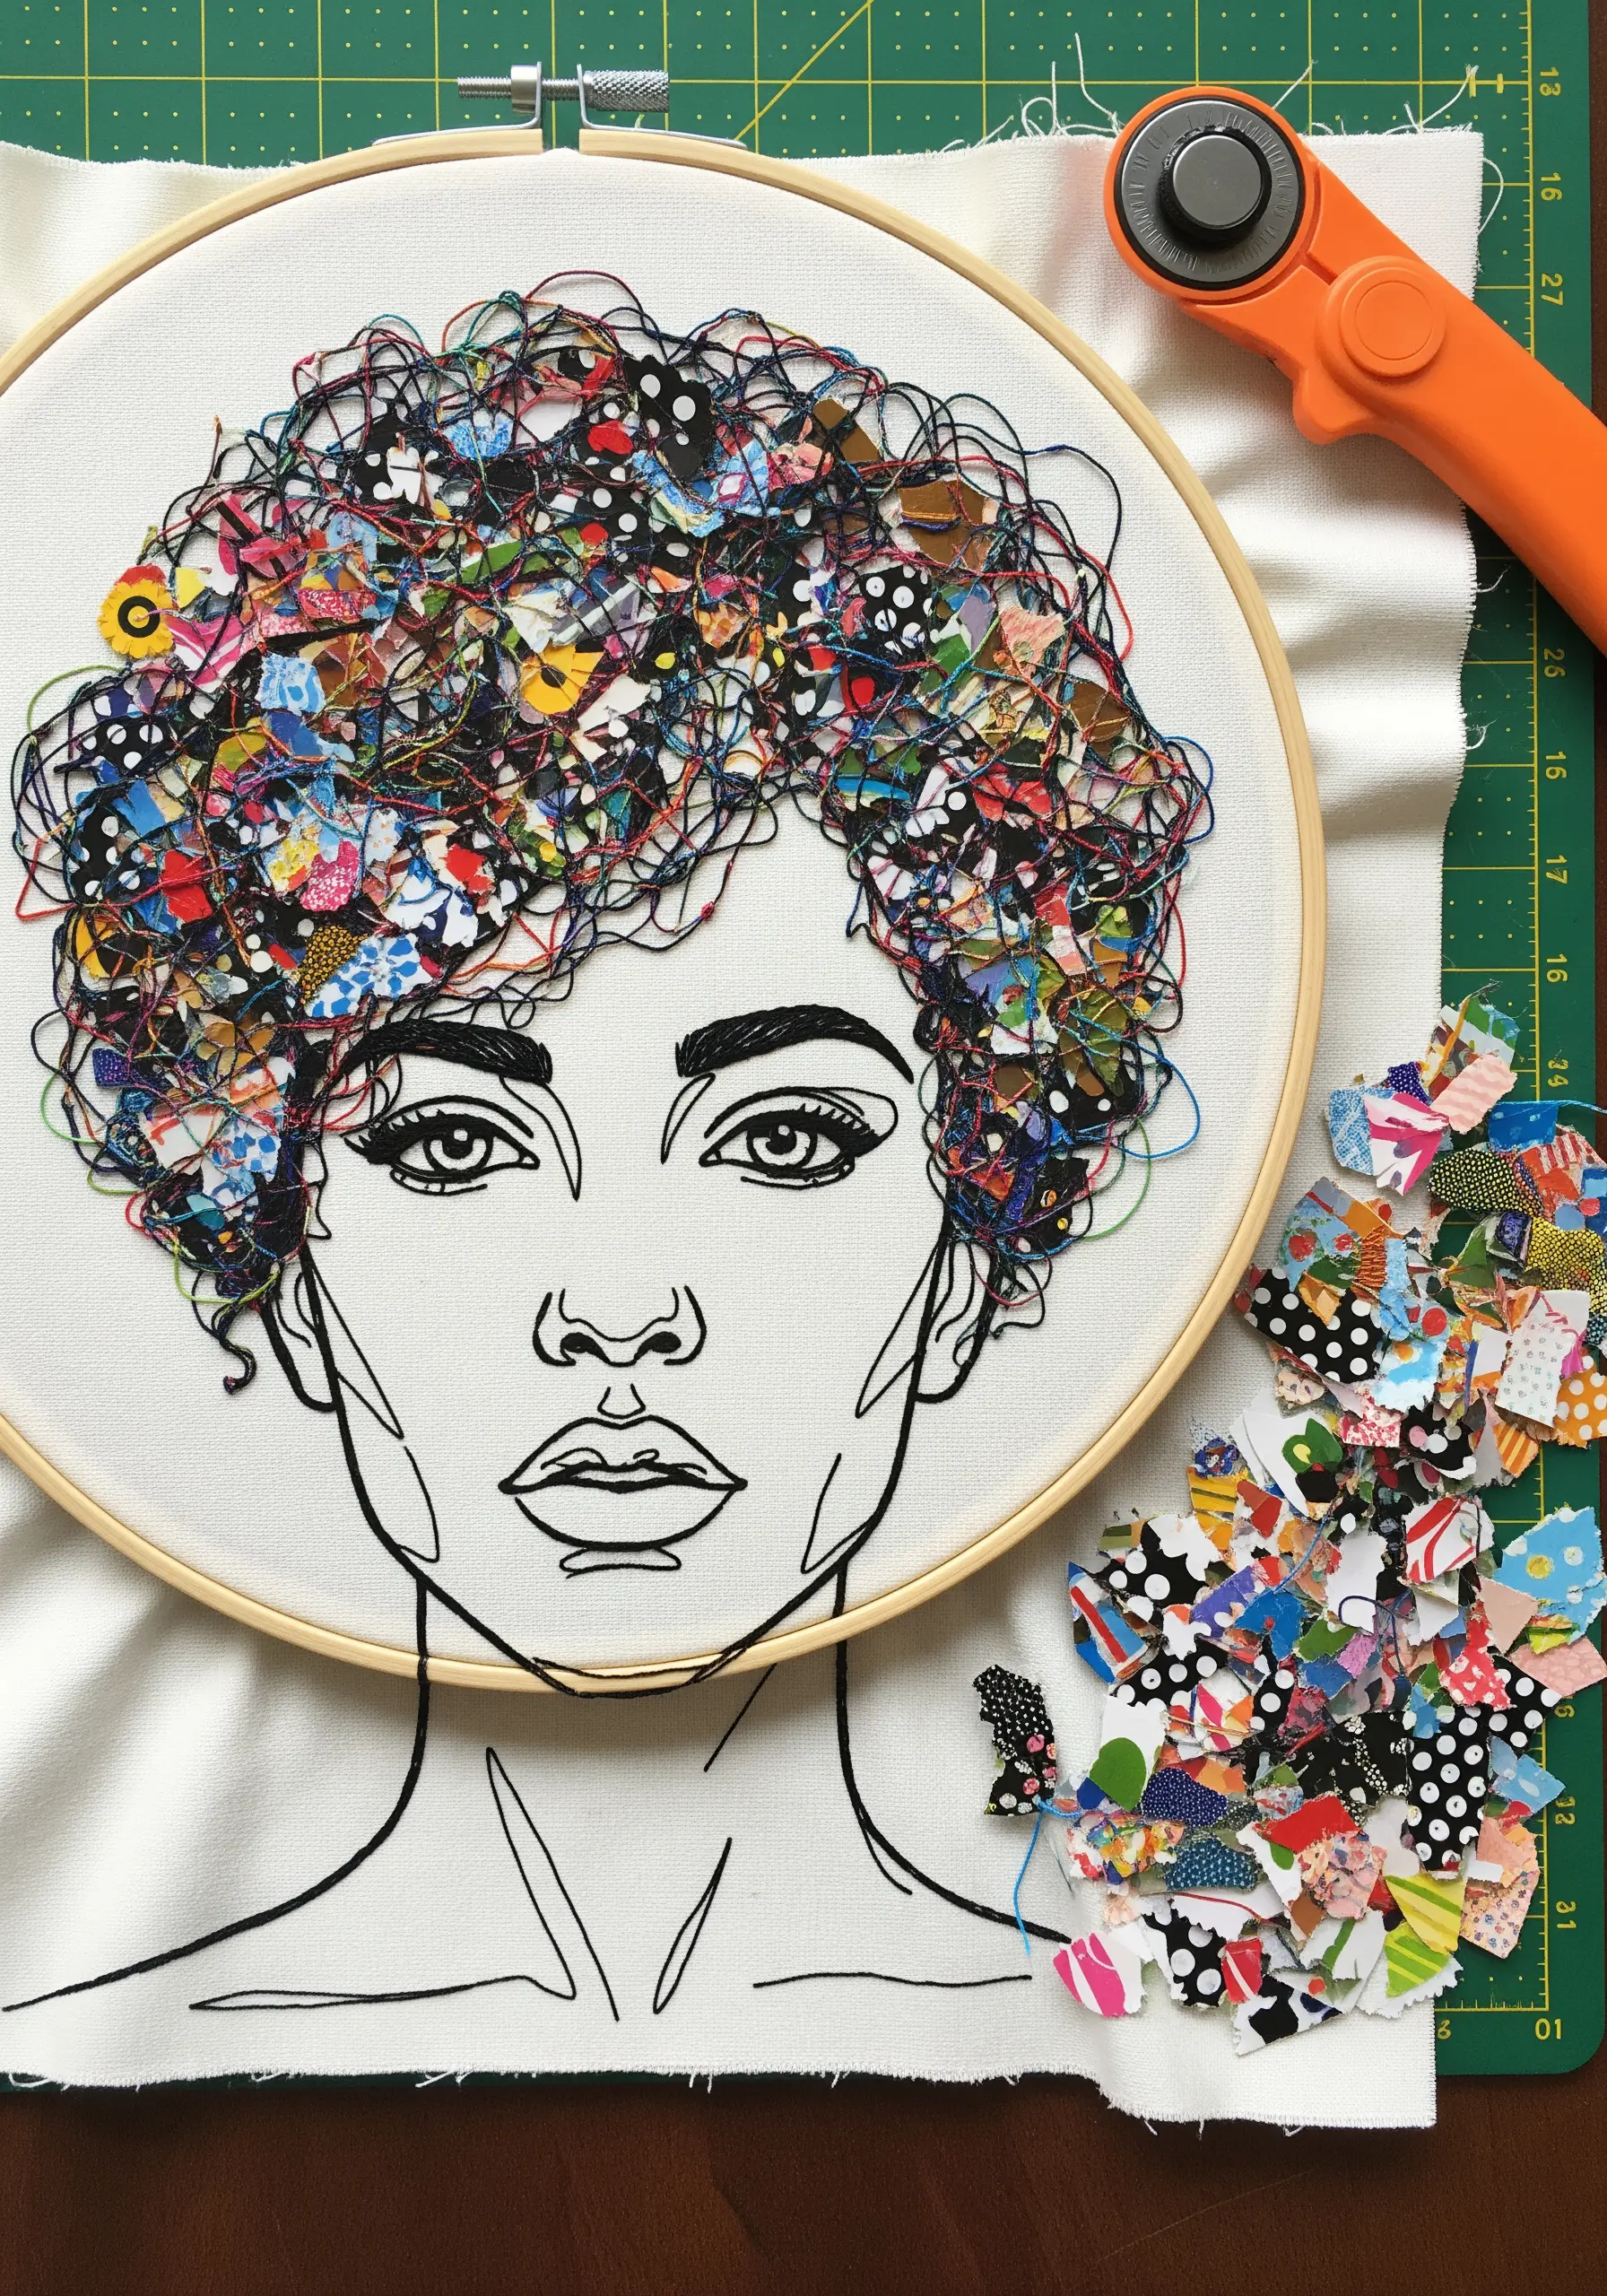
Begin by stitching a clean, minimal line-art portrait on a neutral fabric background using a simple backstitch.
To create the hair, build up layers of tiny, colorful fabric scraps and lengths of thread, securing them with intentionally chaotic, free-form stitches.
This method adds incredible volume and texture, turning a flat portrait into a dynamic piece of textile art.
The contrast between the controlled line work of the face and the wild energy of the hair is the key to this design’s power.
12. A Stumpwork Beetle on a Decoupage Box

Create a raised, 3D beetle using stumpwork techniques: embroider the body sections over felt padding and use wire-edged stitches for the legs and antennae.
Once complete, carefully cut the beetle from its base fabric, leaving a tiny fabric border.
Decorate a simple wooden box with botanical papers using decoupage, then mount your finished beetle on top with a strong fabric glue.
This transforms the embroidery into a stunning sculptural element, making the box a true conversation piece.
13. Dynamic Thread Art on a Woven Paper Base
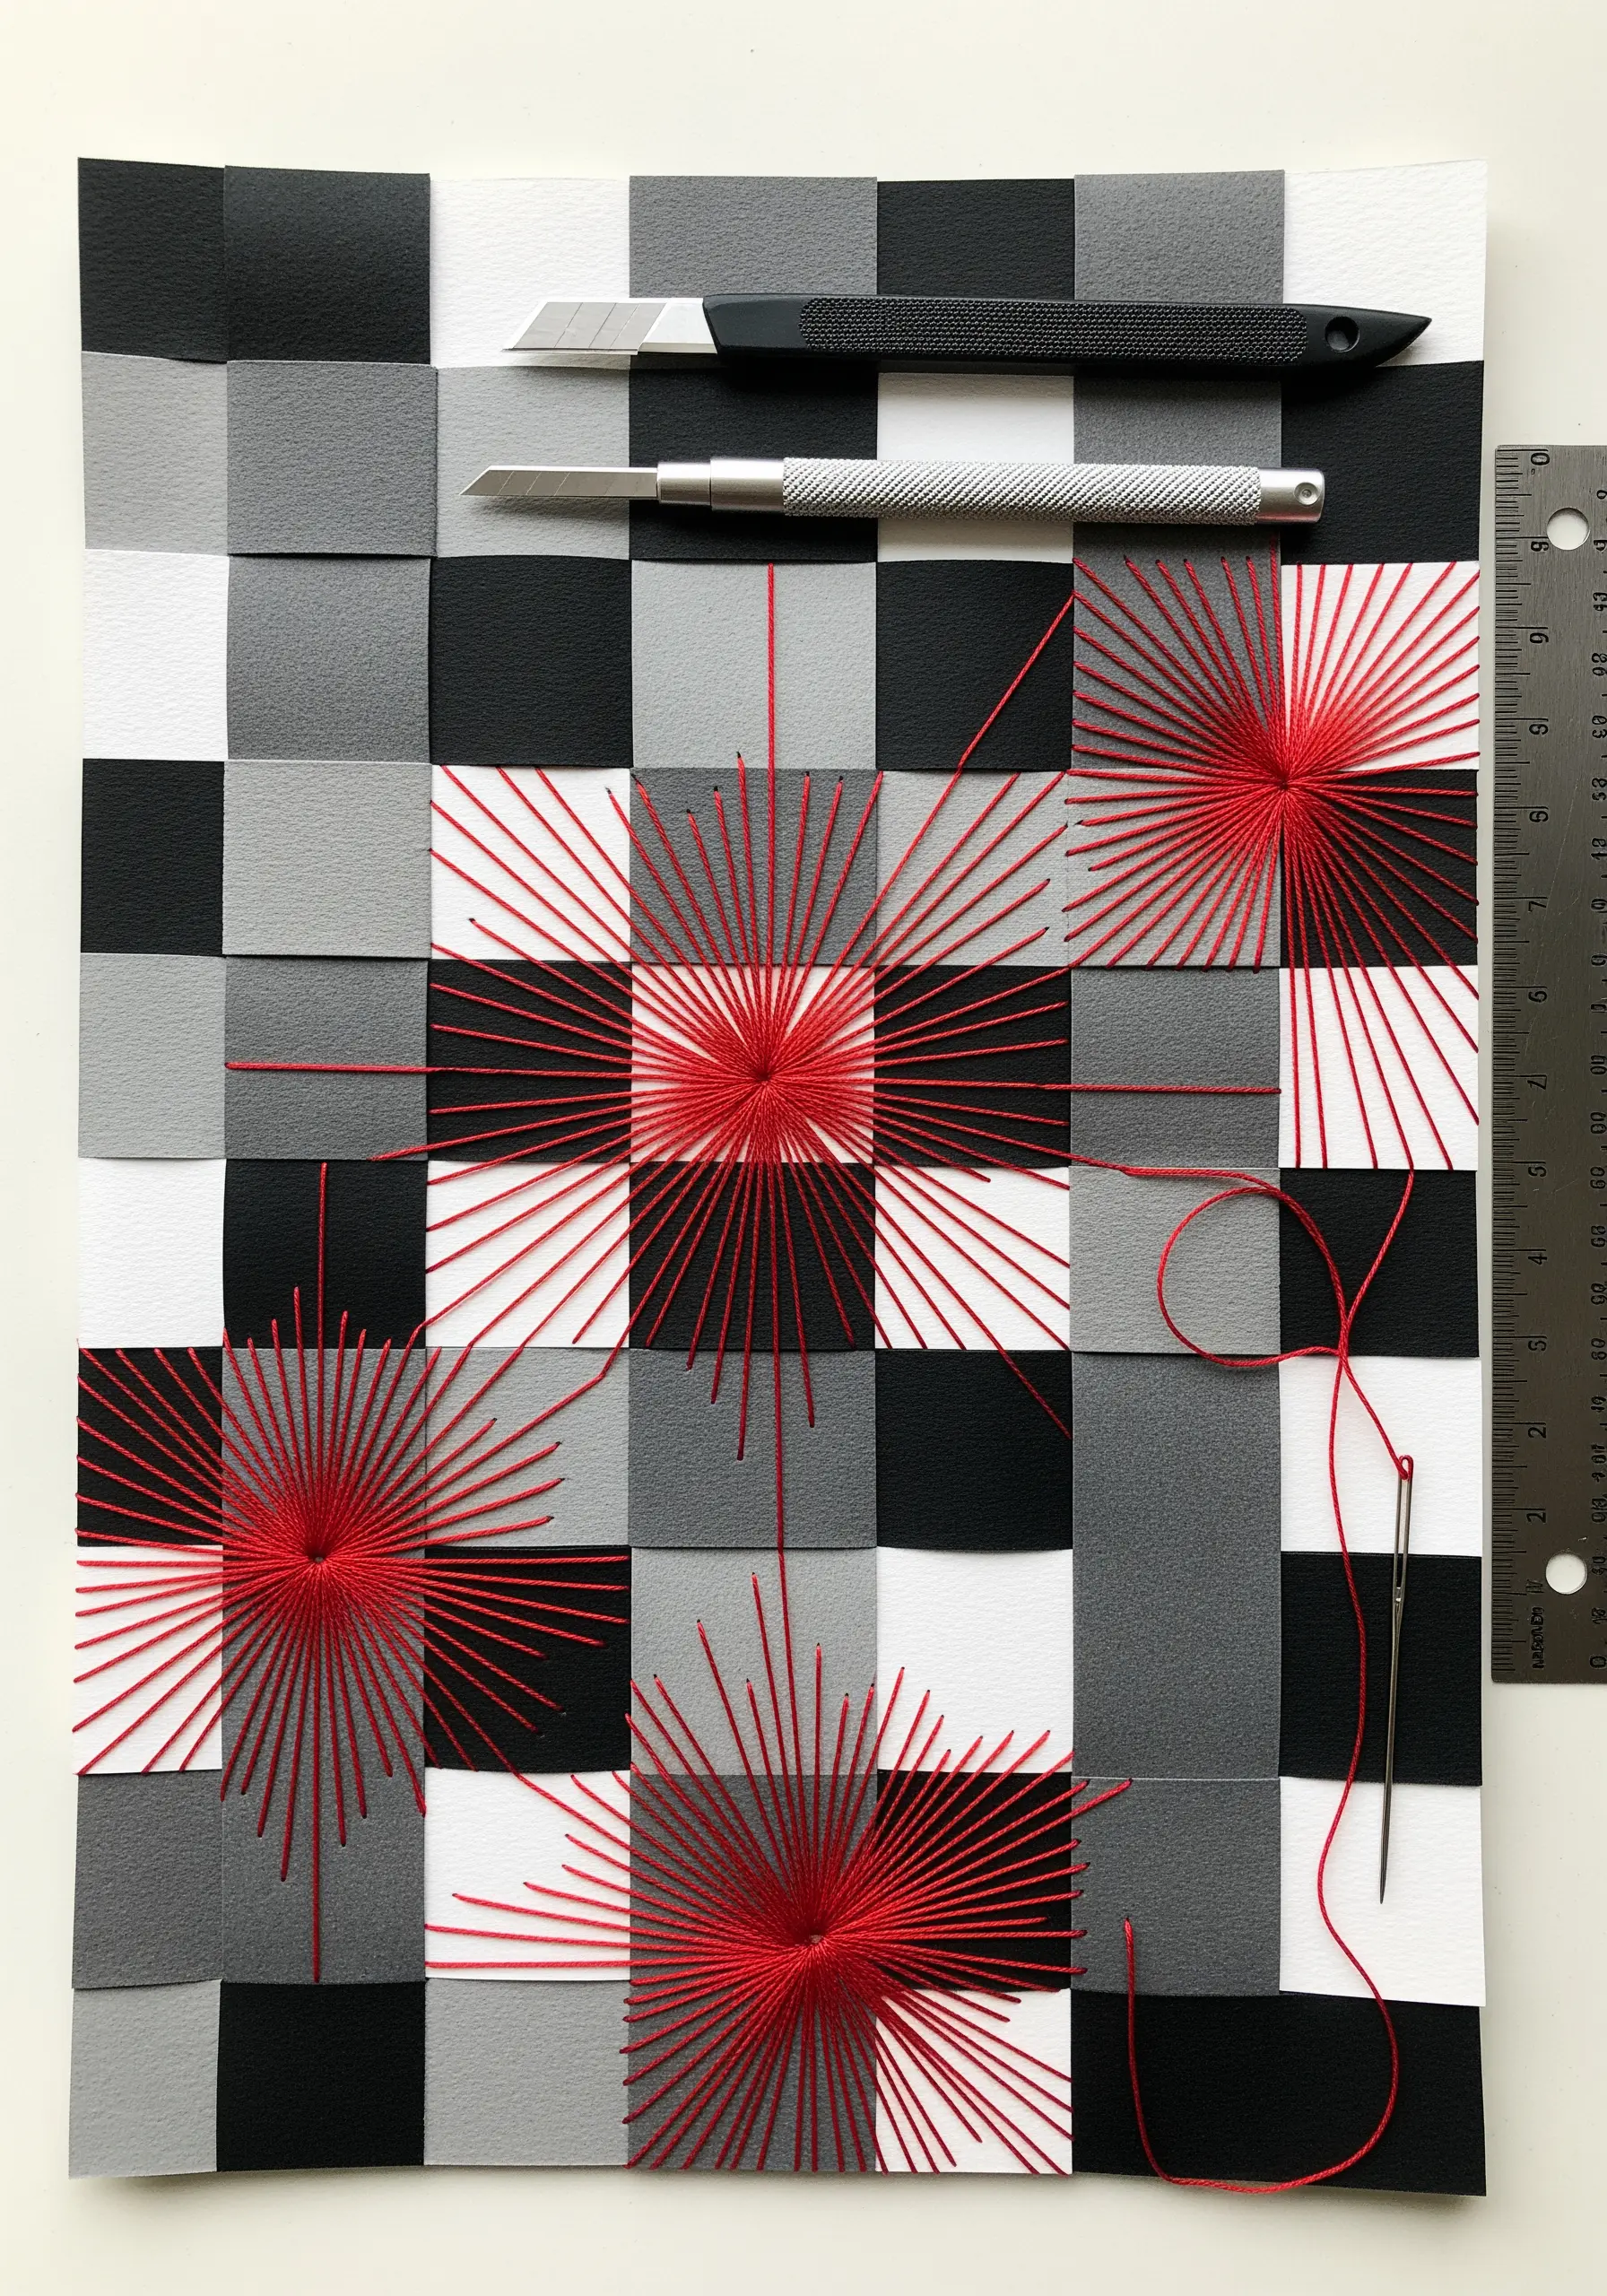
Construct your canvas by weaving strips of high-quality cardstock in contrasting colors to form a stable, graphic grid.
Use this grid as a guide for your embroidery, stitching radiating lines from the intersections of the woven paper.
Always pre-pierce your holes with a fine awl to avoid tearing the paper and to ensure perfectly straight lines.
The thread sits on top of the woven base, creating a third layer of texture that is both visually and tactilely engaging.
14. Layered Bookmarks with Stitched Lettering
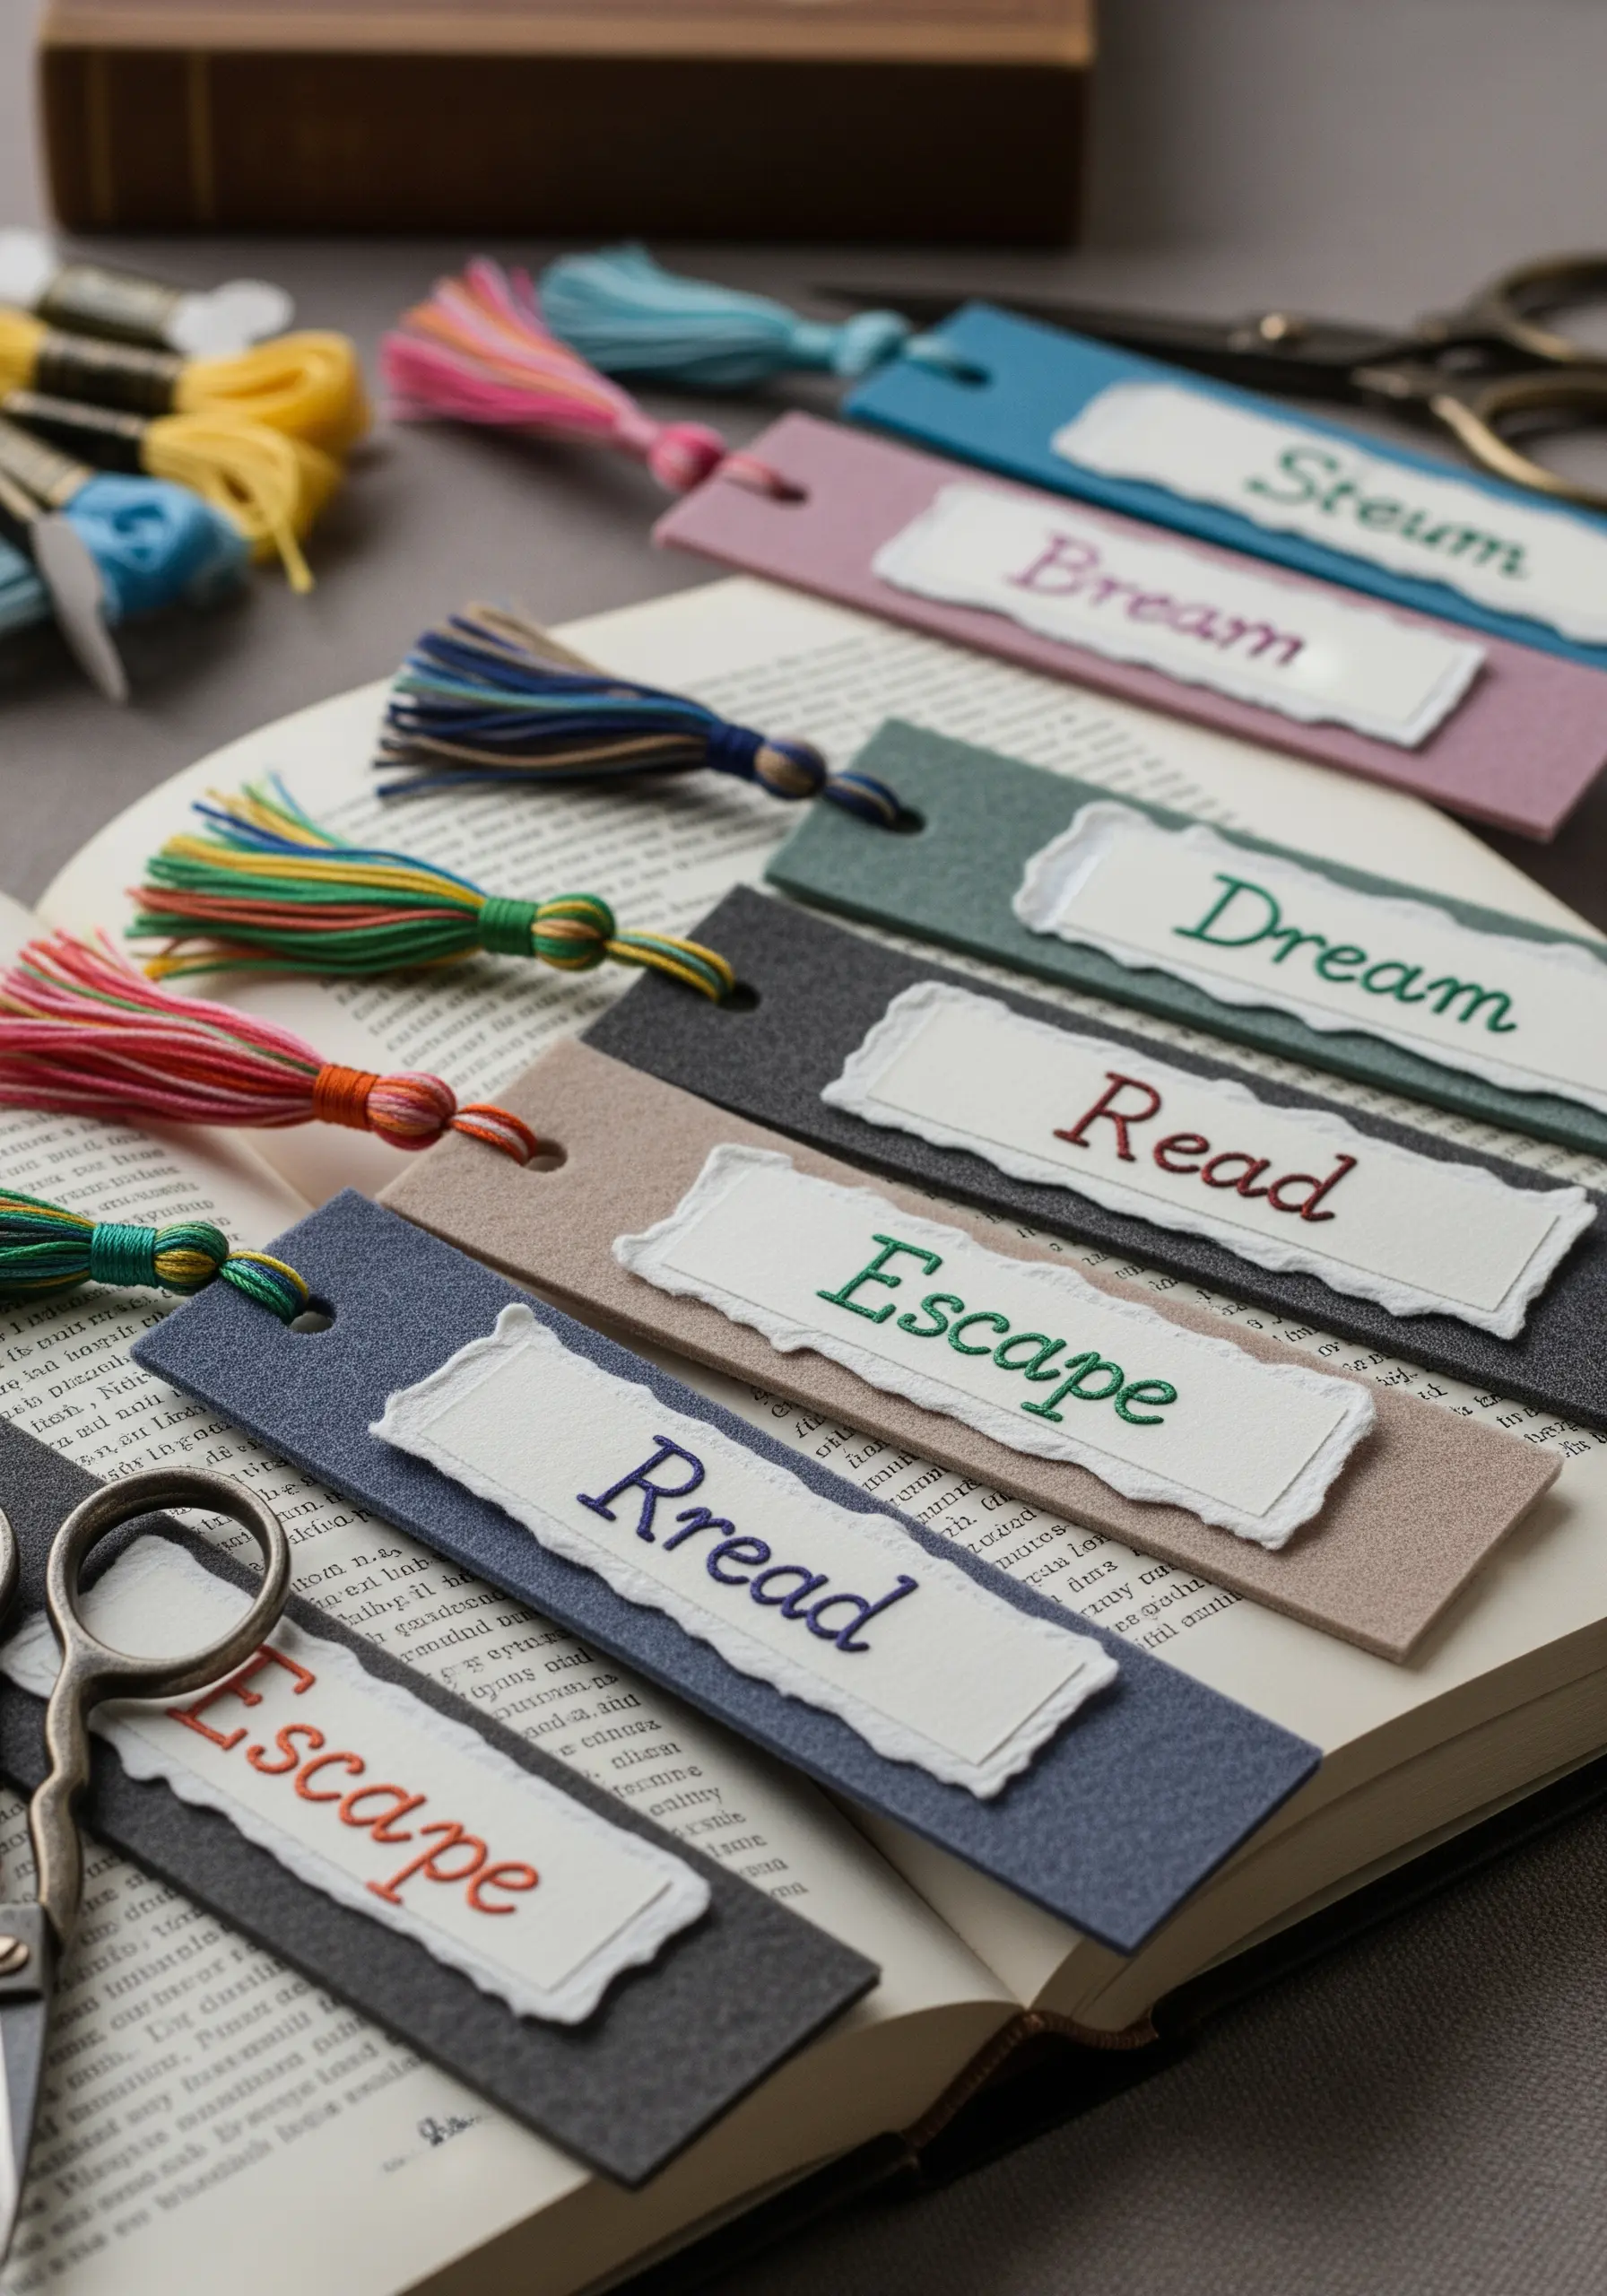
For a rich, textured feel, layer different materials: start with a sturdy cardstock base, add a rectangle of felt or handmade paper, and top it with a smaller piece of fabric with frayed edges.
Embroider a single, meaningful word onto the fabric piece *before* assembling the bookmark.
Use a simple backstitch or stem stitch for clear, elegant lettering.
Secure the layers with a minimal amount of fabric glue, then add a handmade tassel for a final, polished touch.
15. Curating a Mixed-Media Textile Sampler

Divide a larger piece of neutral fabric, like linen or canvas, into a precise grid using a disappearing ink pen.
Dedicate each square to a different mixed-media technique, treating it like a miniature art study.
Try incorporating watercolor on a fabric patch, applying tiny beads, creating a small fabric collage, or layering sheer fabrics.
This project is a fantastic way to experiment with new ideas and create a visual diary of your skills and inspirations in one cohesive piece.
16. Adding Stitched Texture to Photographs
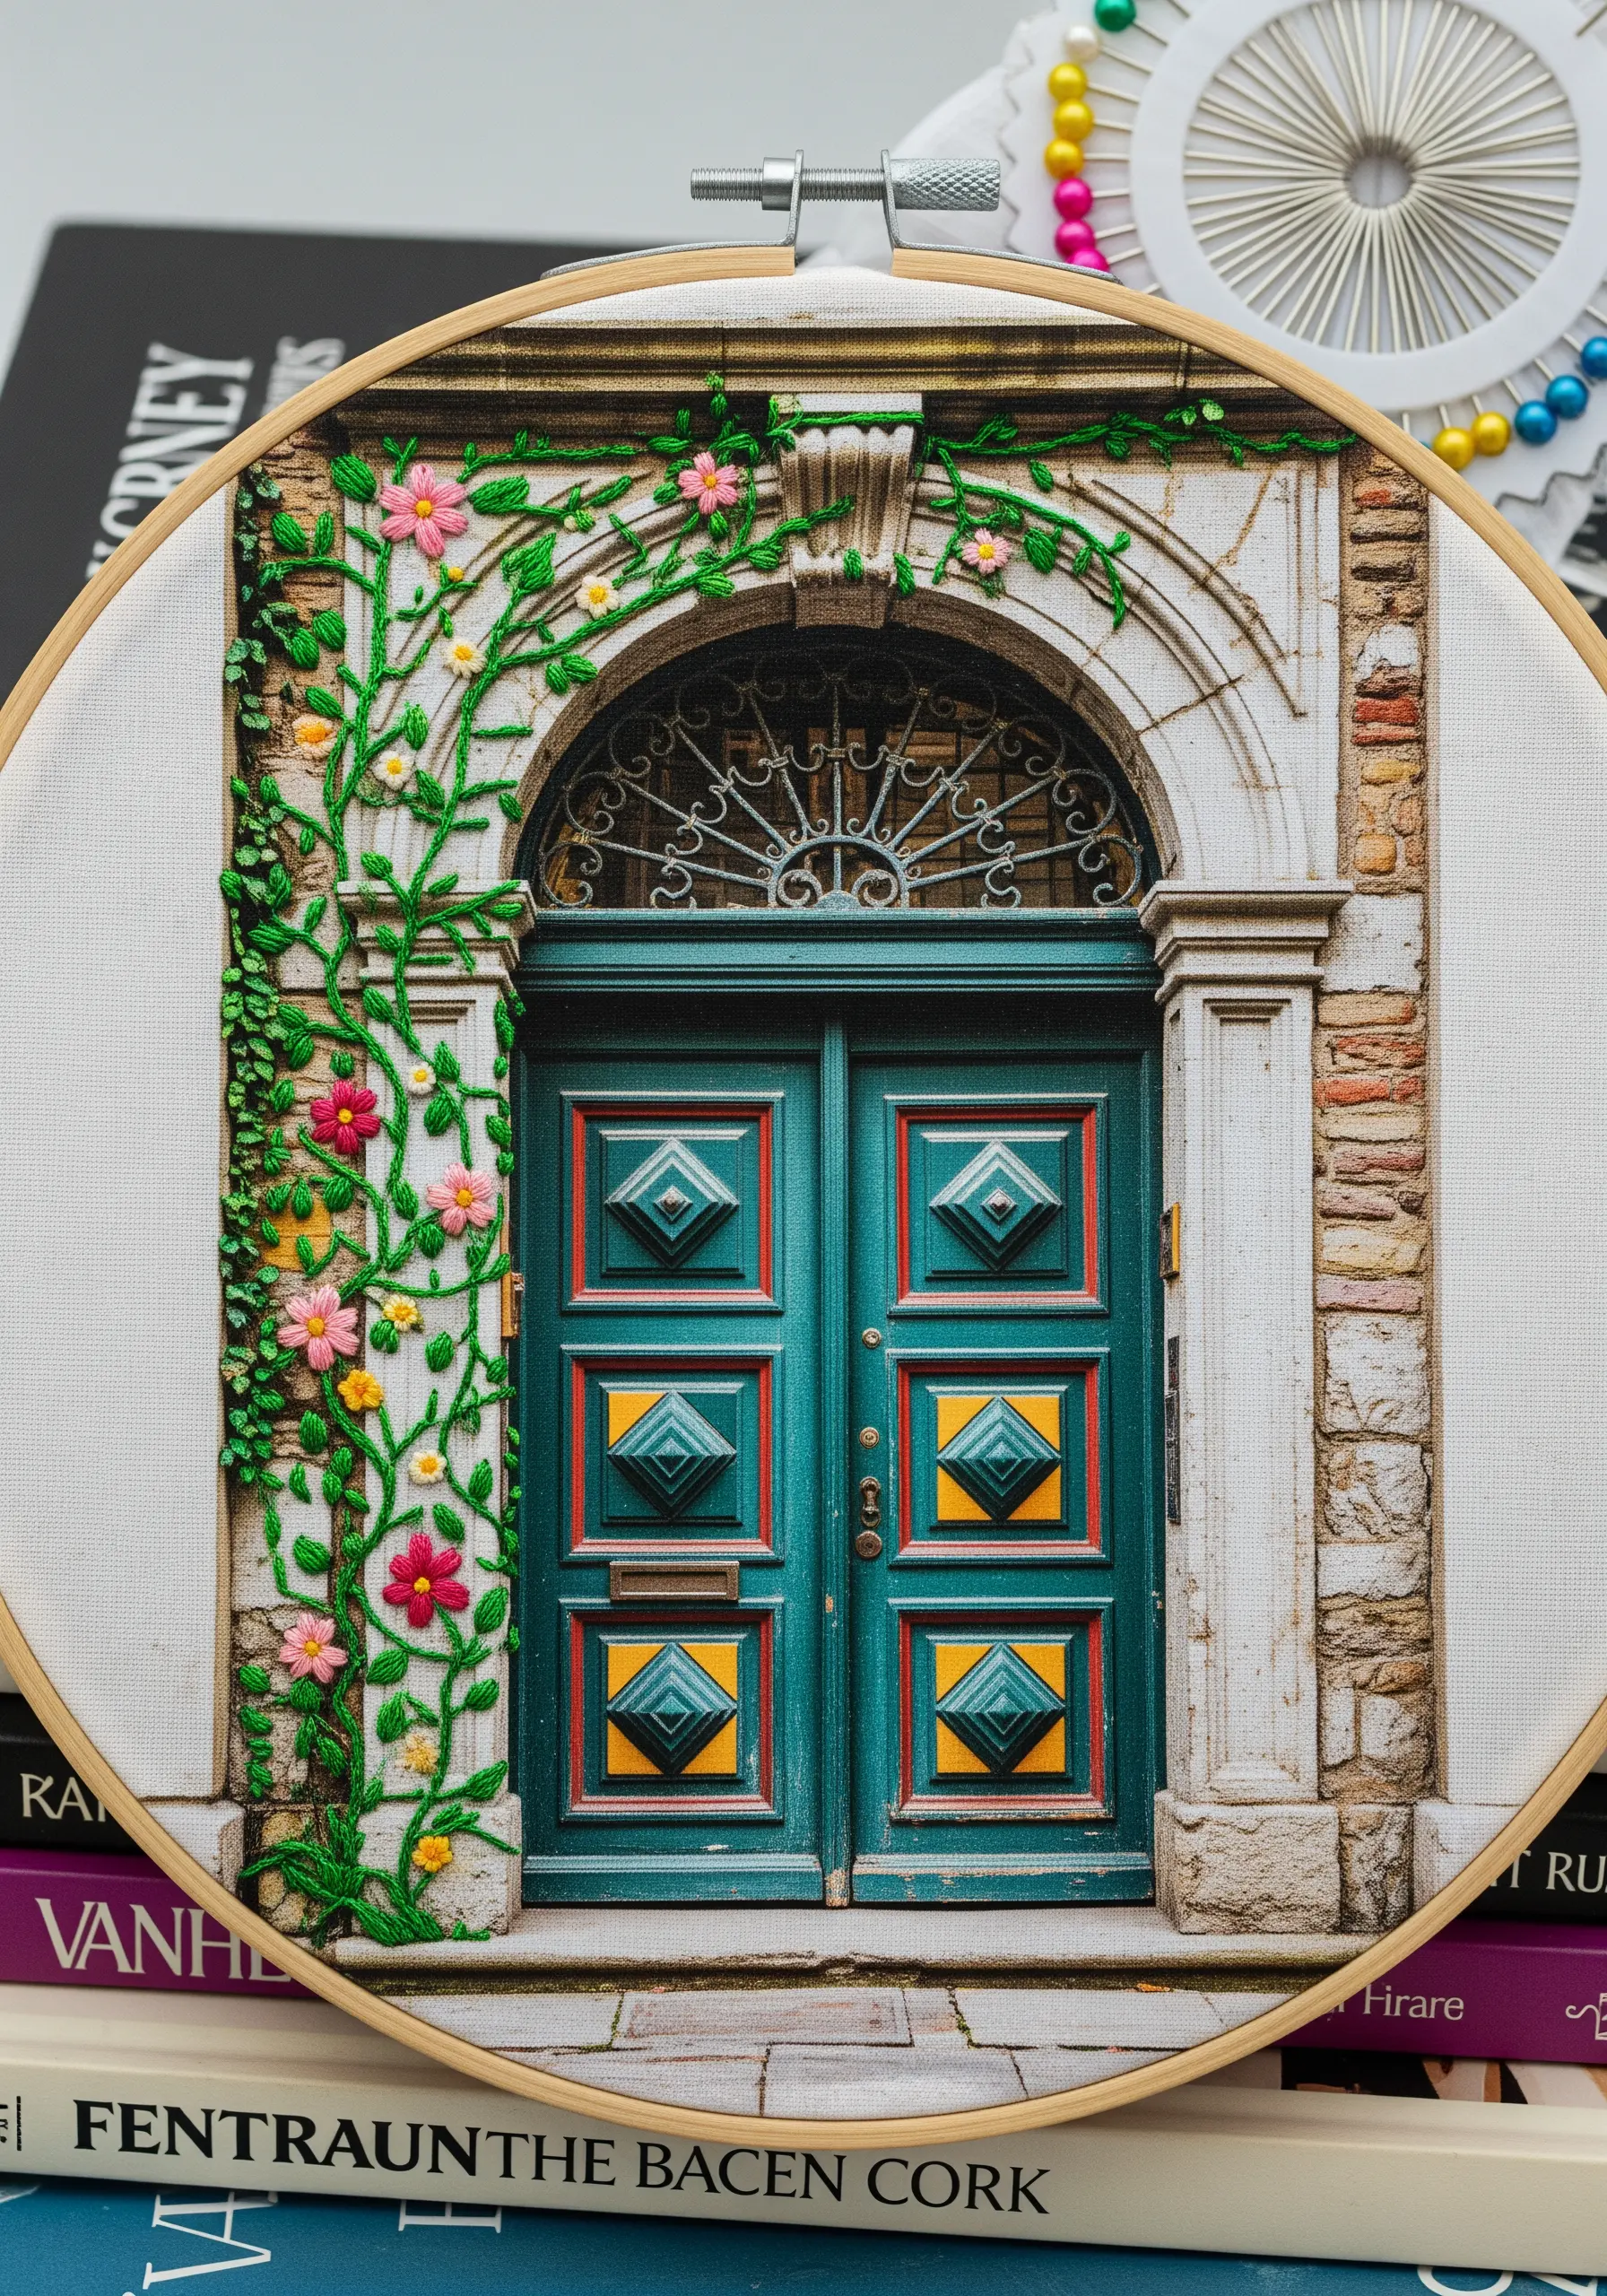
Choose a photograph with strong compositional elements and print it onto high-quality, matte, printable fabric for the best stitching surface.
Instead of stitching the entire image, select key details to accentuate with thread—climbing vines, window frames, or floral elements.
Use stitches that add texture, like French knots for flower centers or stem stitch for vines, to create a subtle 3D effect.
This thoughtful enhancement turns a simple photograph into a unique, tactile piece of art that bridges two mediums.
17. Framing Paper Keepsakes with Botanical Stitches
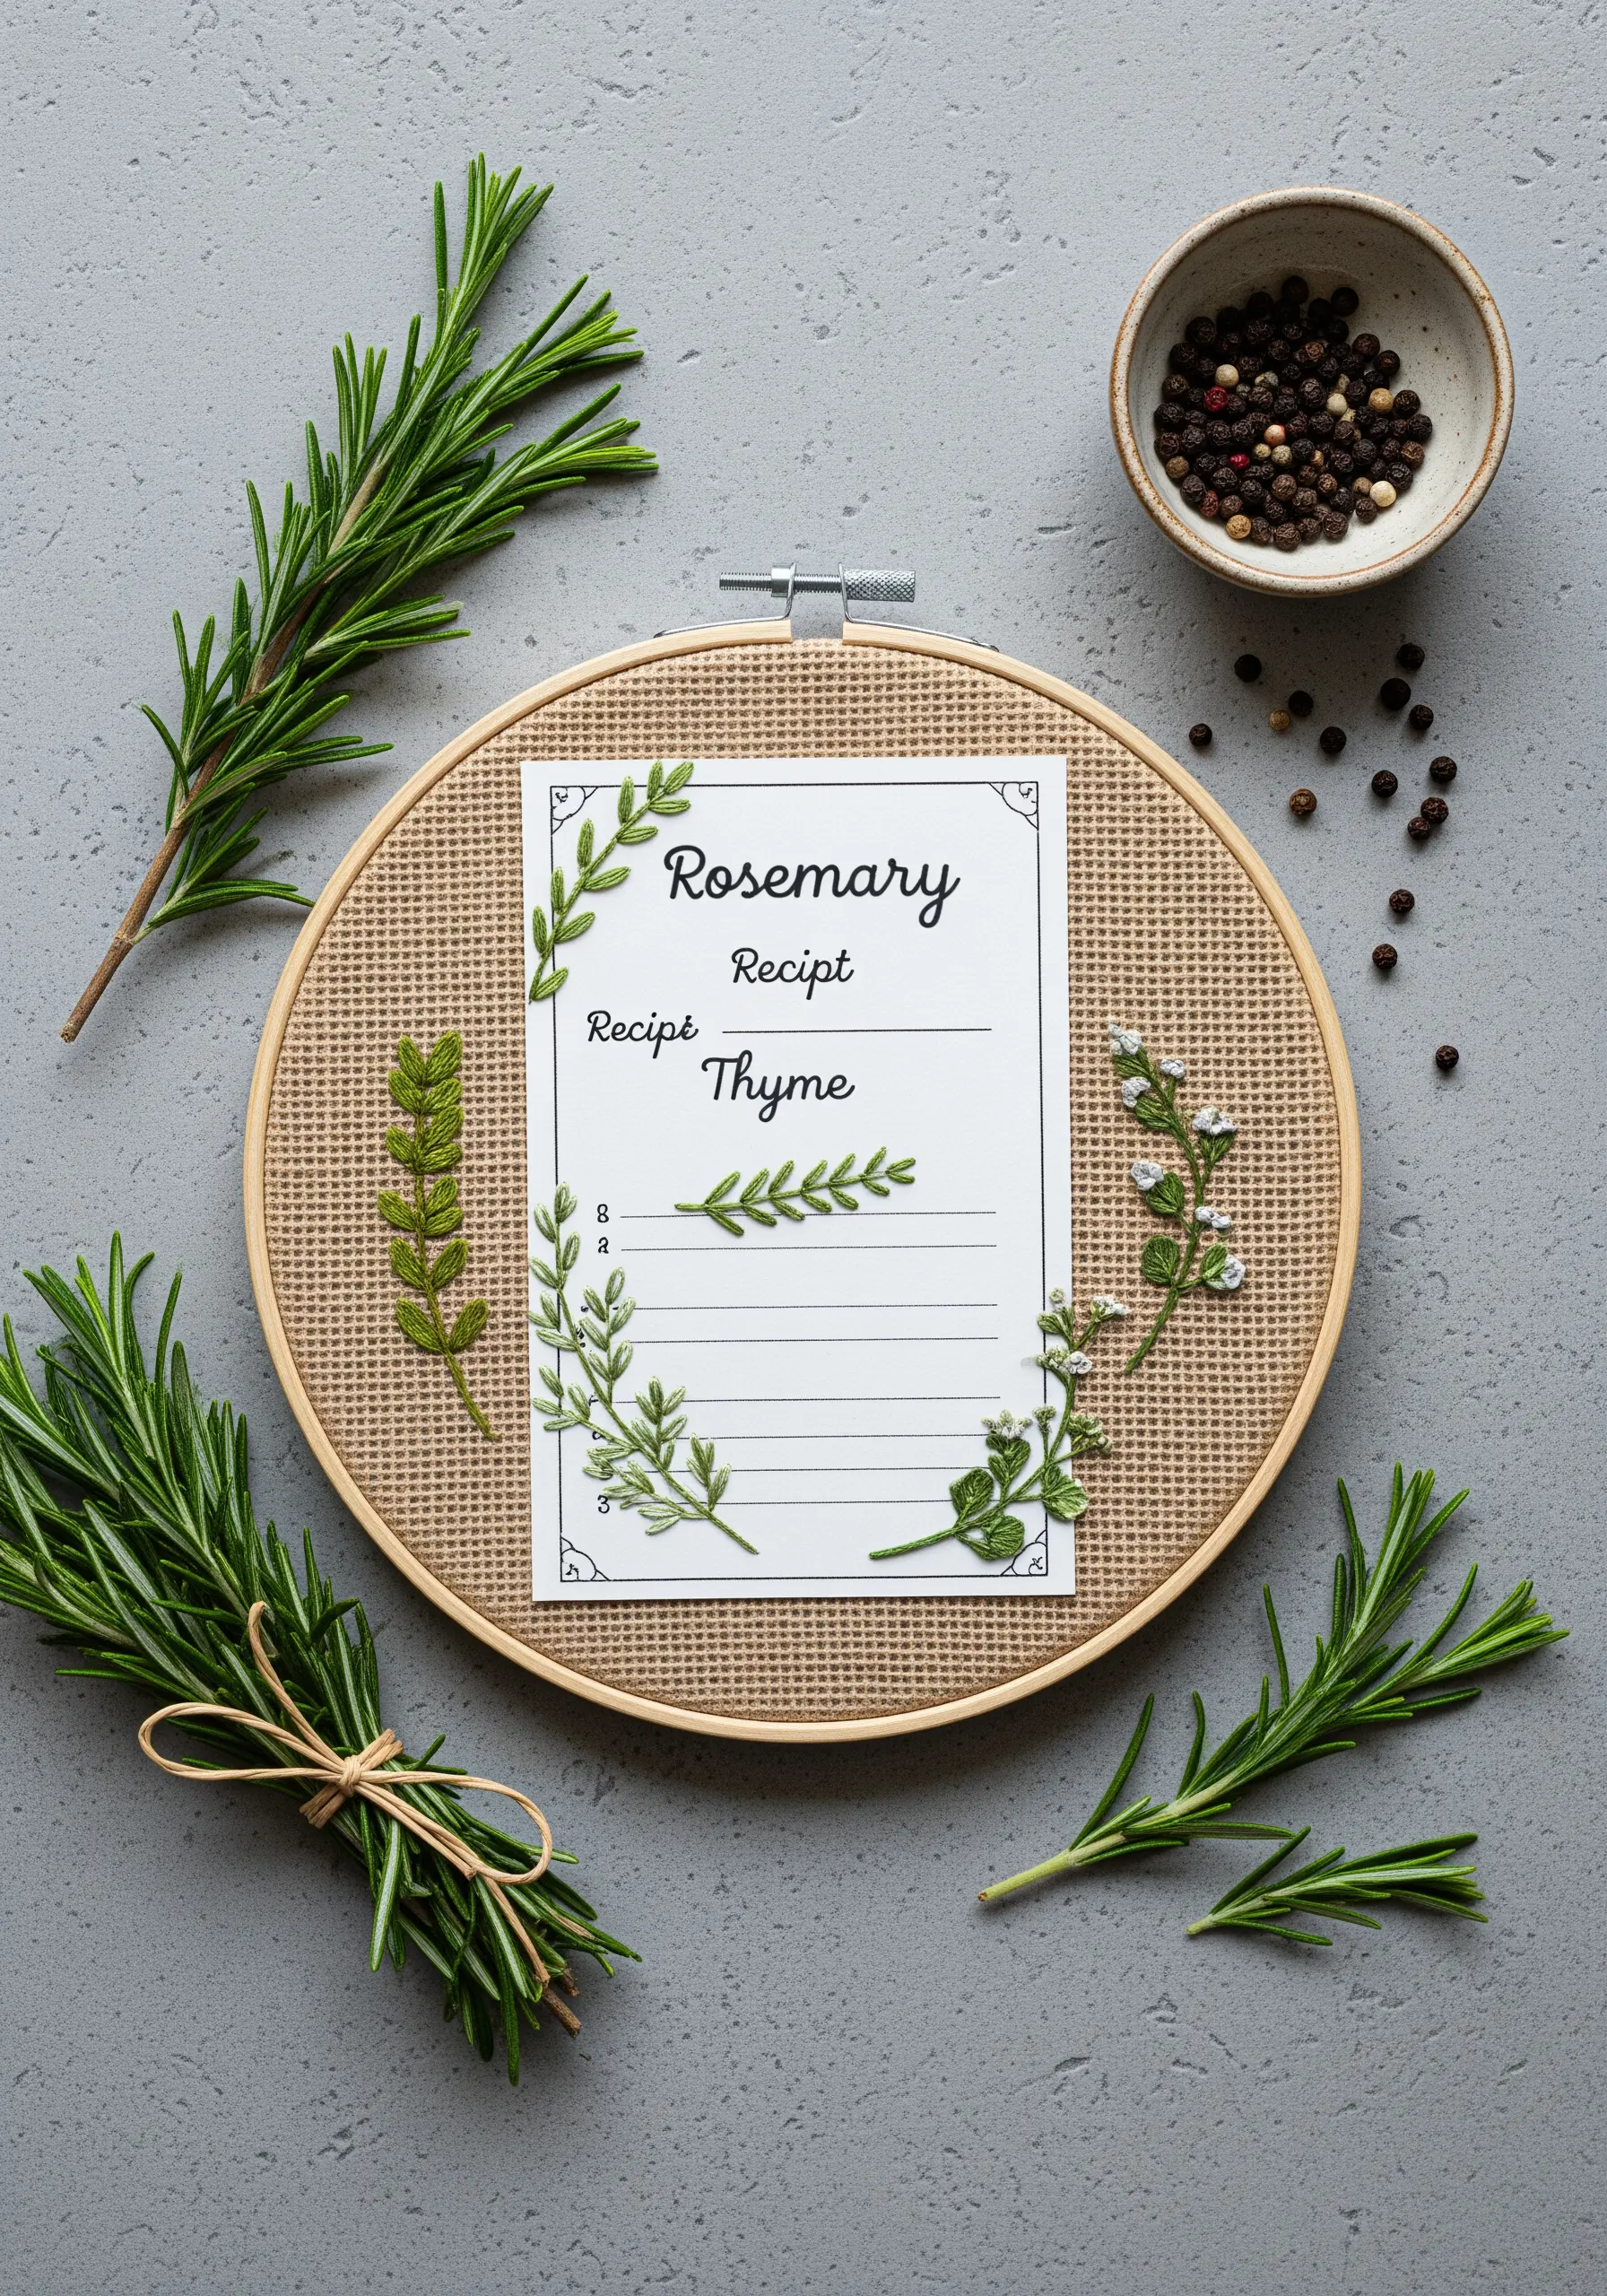
Select a fabric with a visible weave, like Aida cloth or even-weave linen, which provides a natural grid for your stitches.
Mount a printed recipe card, poem, or note in the center using archival double-sided tape.
Then, frame the paper by embroidering botanical motifs around the edges, as if the leaves and flowers are growing around it.
Use stitches like fishbone for leaves and bullion knots for buds to create realistic, dimensional foliage that transforms the piece into a cherished heirloom.
18. Building Sculptural Forms with Wire and Thread
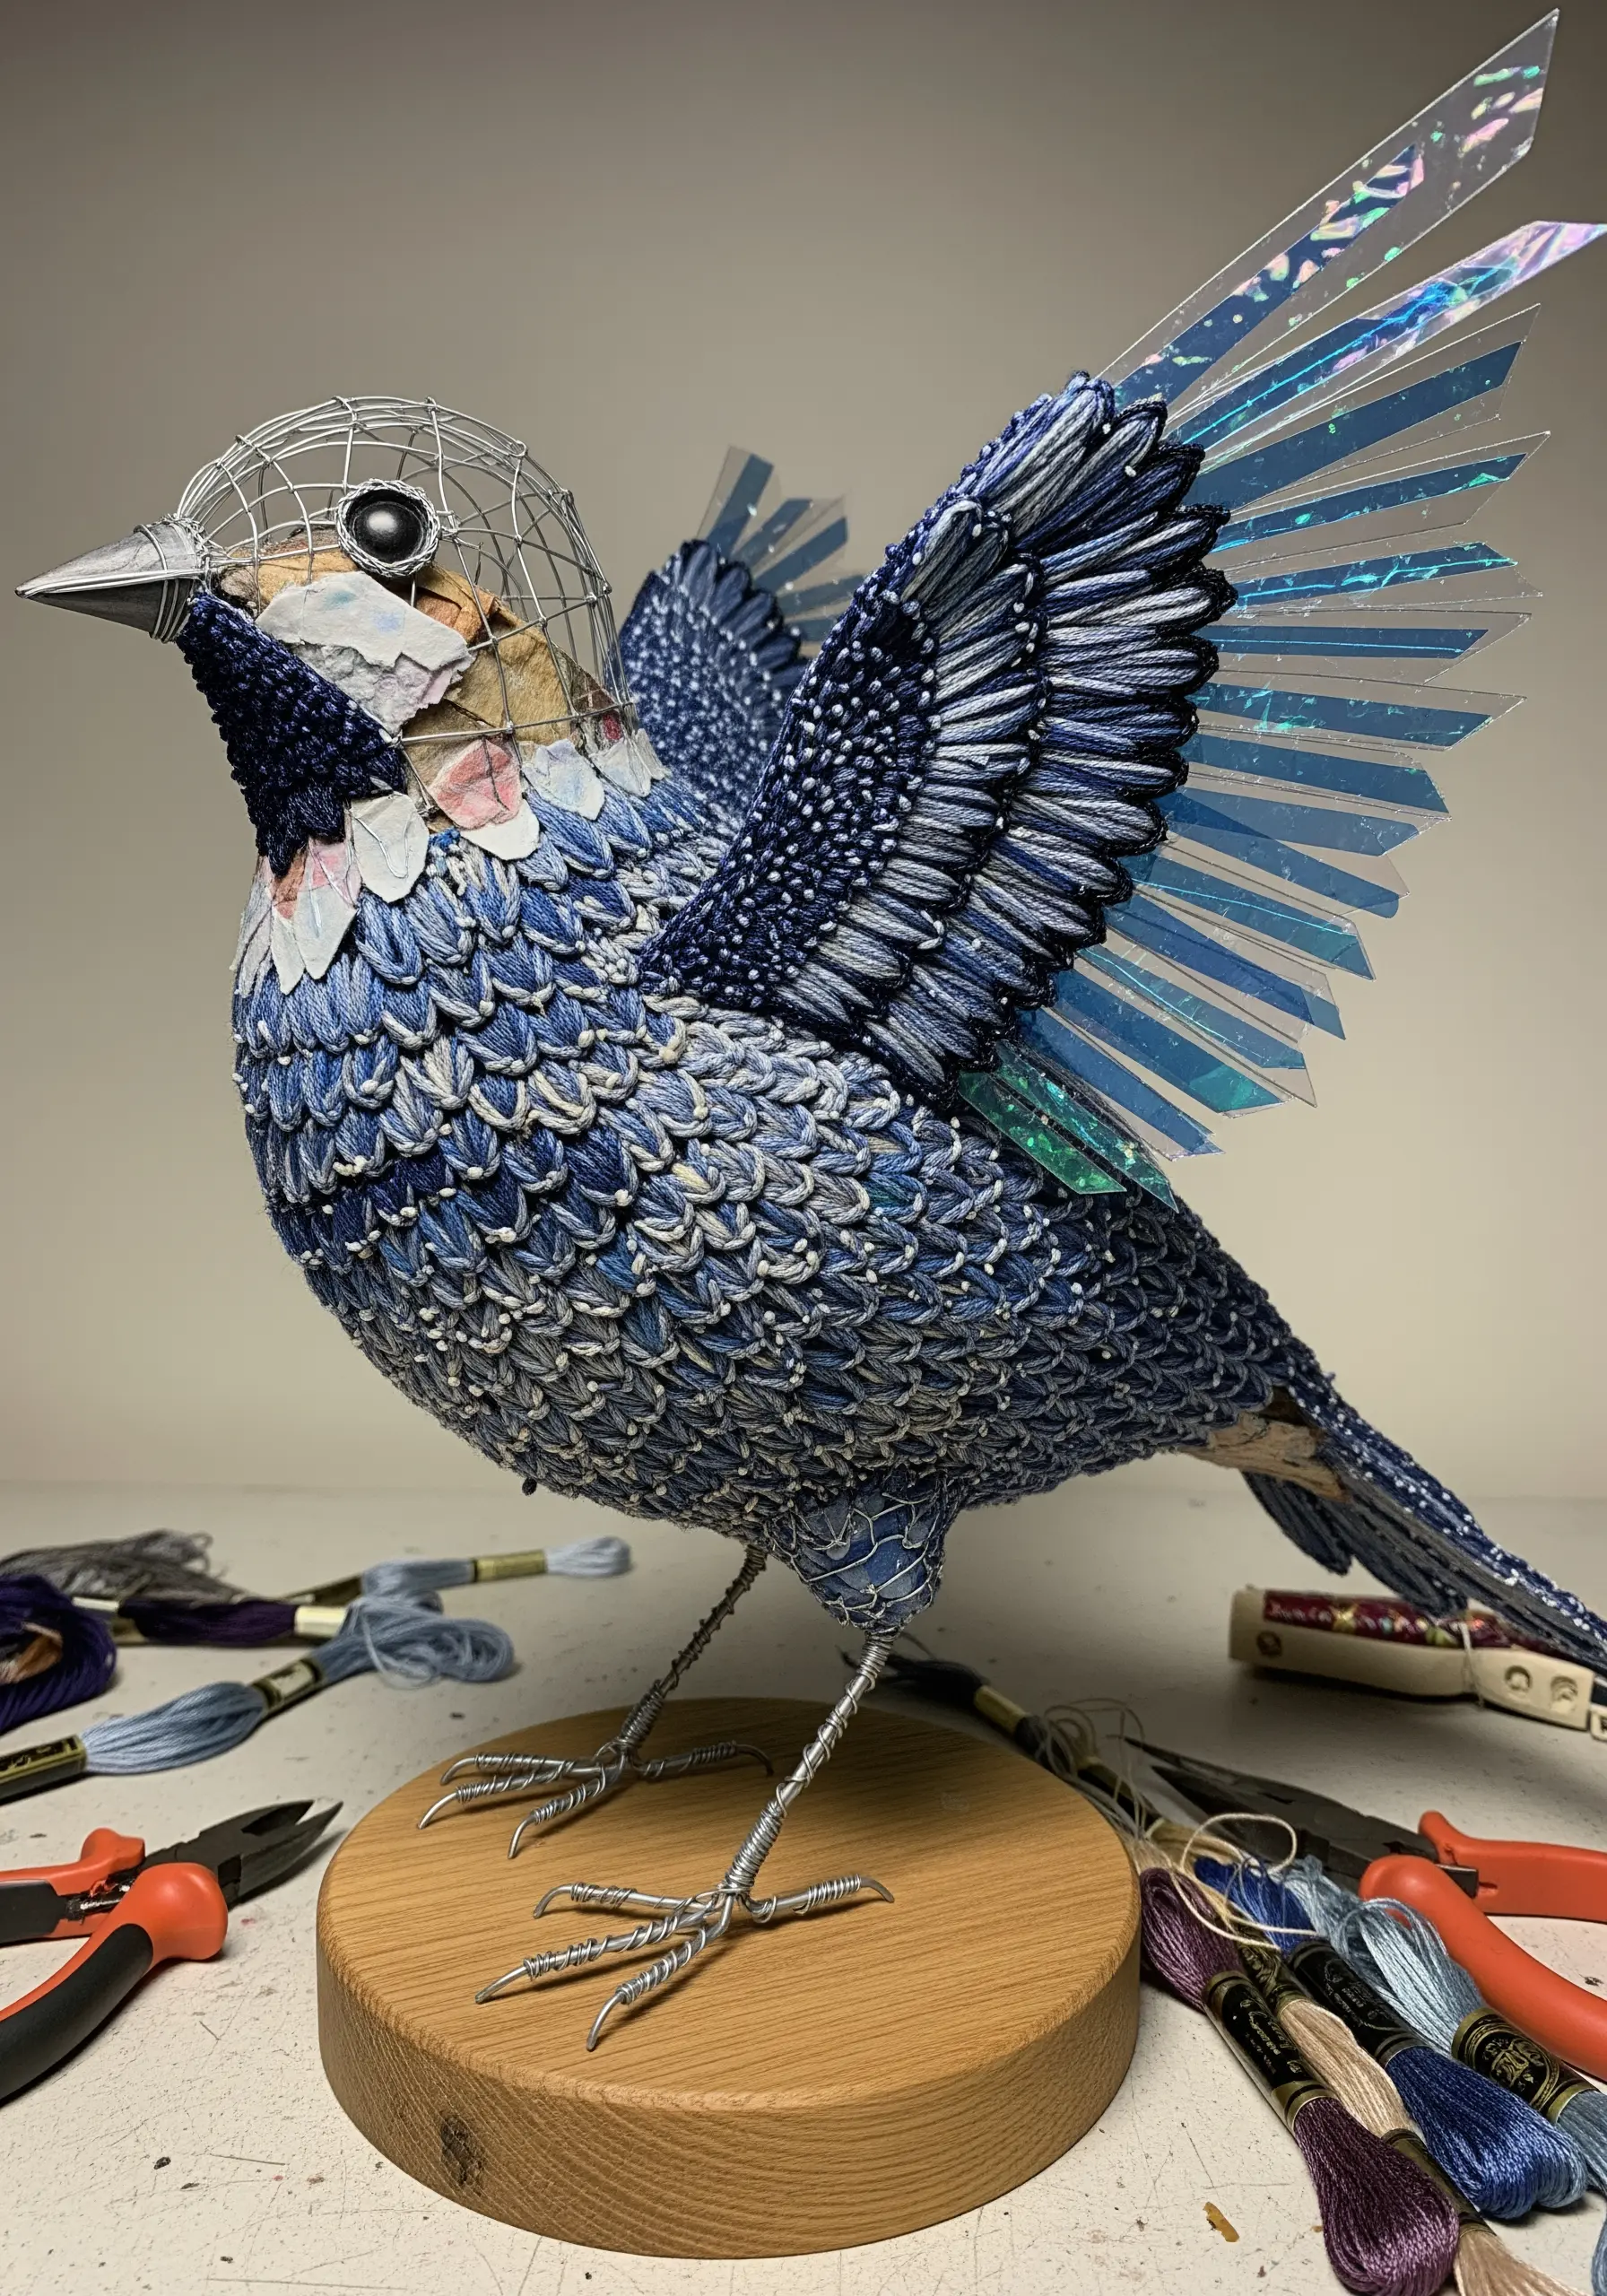
This advanced technique begins with a sturdy wire armature that defines the animal’s skeleton and posture.
Pad the wire frame with batting and fabric scraps to build up the body’s volume.
The final layer is a ‘skin’ of fabric, which you then cover with dense, layered stitches—like overlapping fishbone or satin stitch—to simulate feathers or fur.
Incorporate unconventional materials like iridescent plastic or metallic threads to add highlights and create a truly unique handmade sculpture.
19. Minimalist Portraits with Thread on Paper

For this technique, use heavyweight watercolor paper with a deckled edge to add an organic, artistic feel.
Instead of stitching through the paper, lay down a single, continuous line of thick black thread or fine-gauge wire to create your portrait.
Secure this primary line by ‘couching’ it to the paper with a second, much finer thread, making tiny, almost invisible stitches over the top.
This method achieves a clean, graphic line that appears to float on the surface, perfect for minimal portrait line embroidery.
20. Painting with Fabric: A Landscape Collage
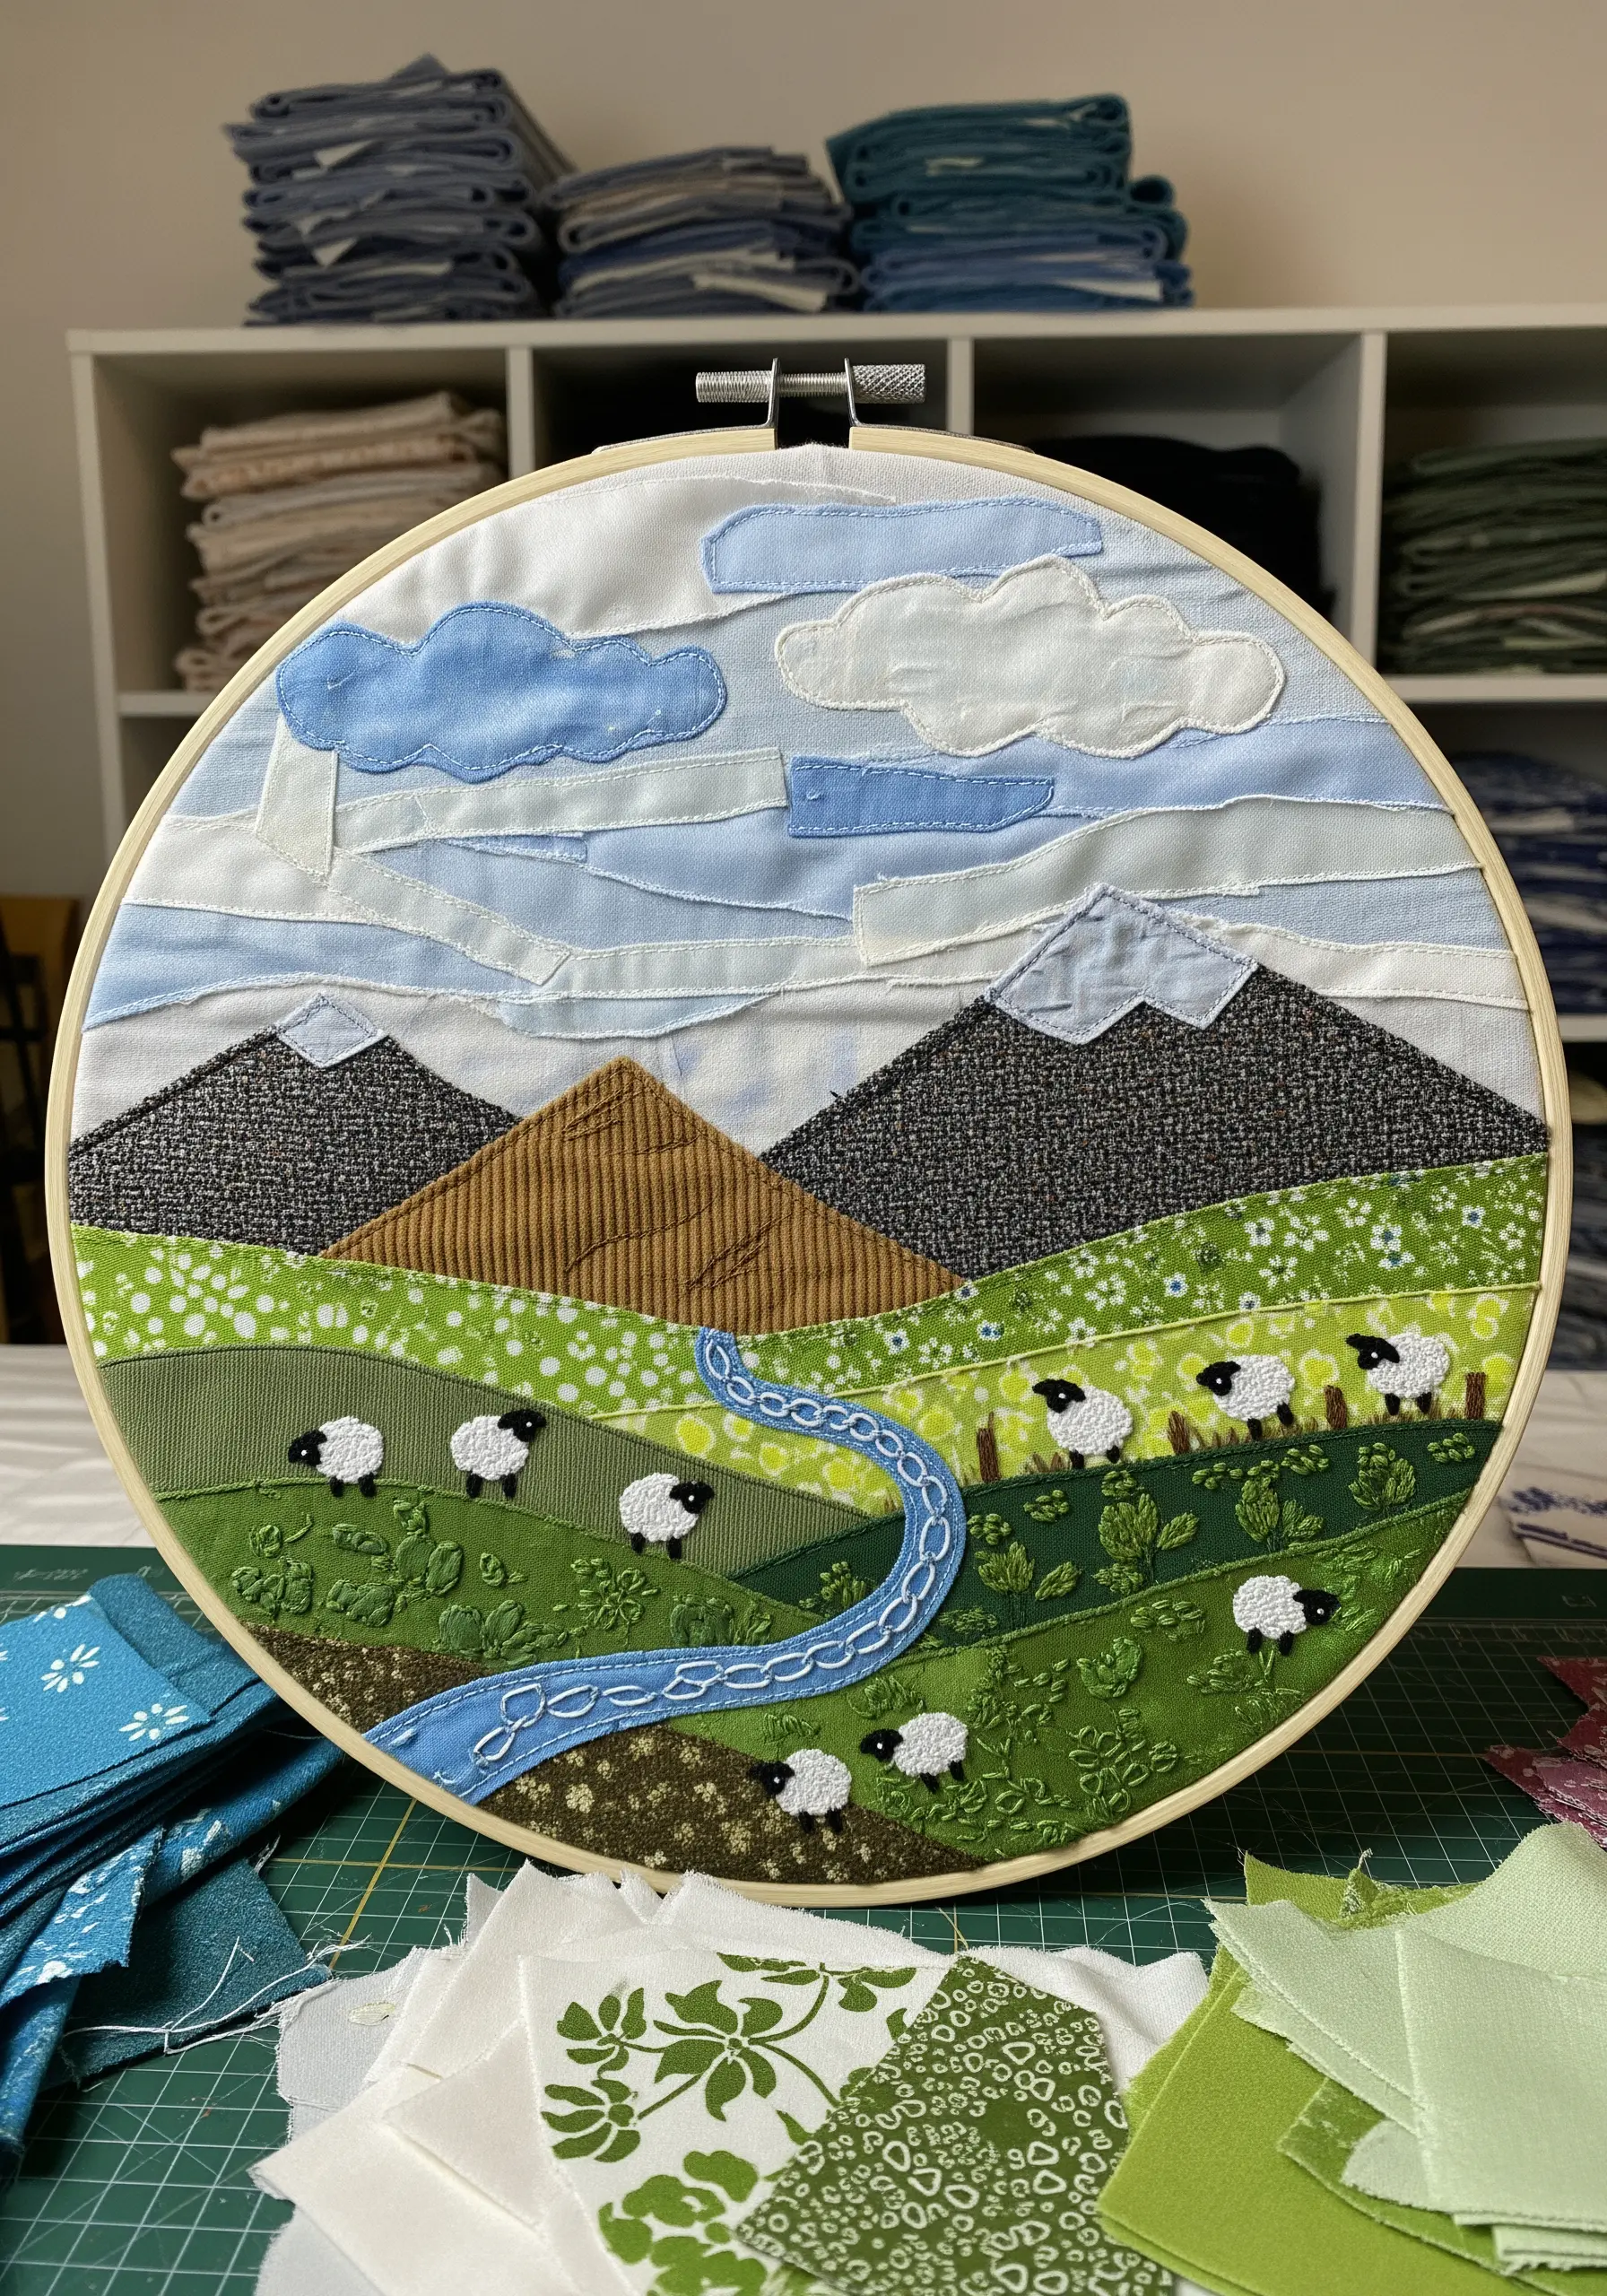
Think like a painter and use large pieces of fabric to block in the main areas of your landscape—corduroy for plowed fields, tweed for mountains, soft cotton for the sky.
Layer the pieces to create a sense of perspective, securing them with a running stitch or fabric glue.
Reserve your embroidery for the smallest details, like French knot sheep or straight-stitched fence posts.
This approach celebrates the inherent texture of different textiles, letting the fabrics do most of the visual work.
21. Embroidering Mandalas on Fabric-Covered Stones

To create a stitchable surface, select smooth, flat stones and wrap them tightly in a piece of felt or linen, like you’re wrapping a gift.
Secure the fabric on the underside of the stone with a hot glue gun, pulling it taut for a smooth embroidery canvas on top.
Use a sharp needle to stitch your mandala patterns directly onto the fabric-covered surface.
This surprising combination of hard and soft textures turns a simple found object into a tactile piece of art.
22. Personalized Paper Gift Tags with Simple Stitches

Choose a sturdy, high-quality cardstock for your gift tags that can withstand piercing without tearing.
Use a pin or needle to carefully pre-punch holes for your design—a constellation, a monogram, or a simple border—before you begin stitching.
A simple backstitch using three strands of embroidery floss provides a clean, visible line that makes a big impact.
These small embroidery ideas add a deeply personal and handmade touch to any present.
23. Tracing Memories by Embroidering on a Map
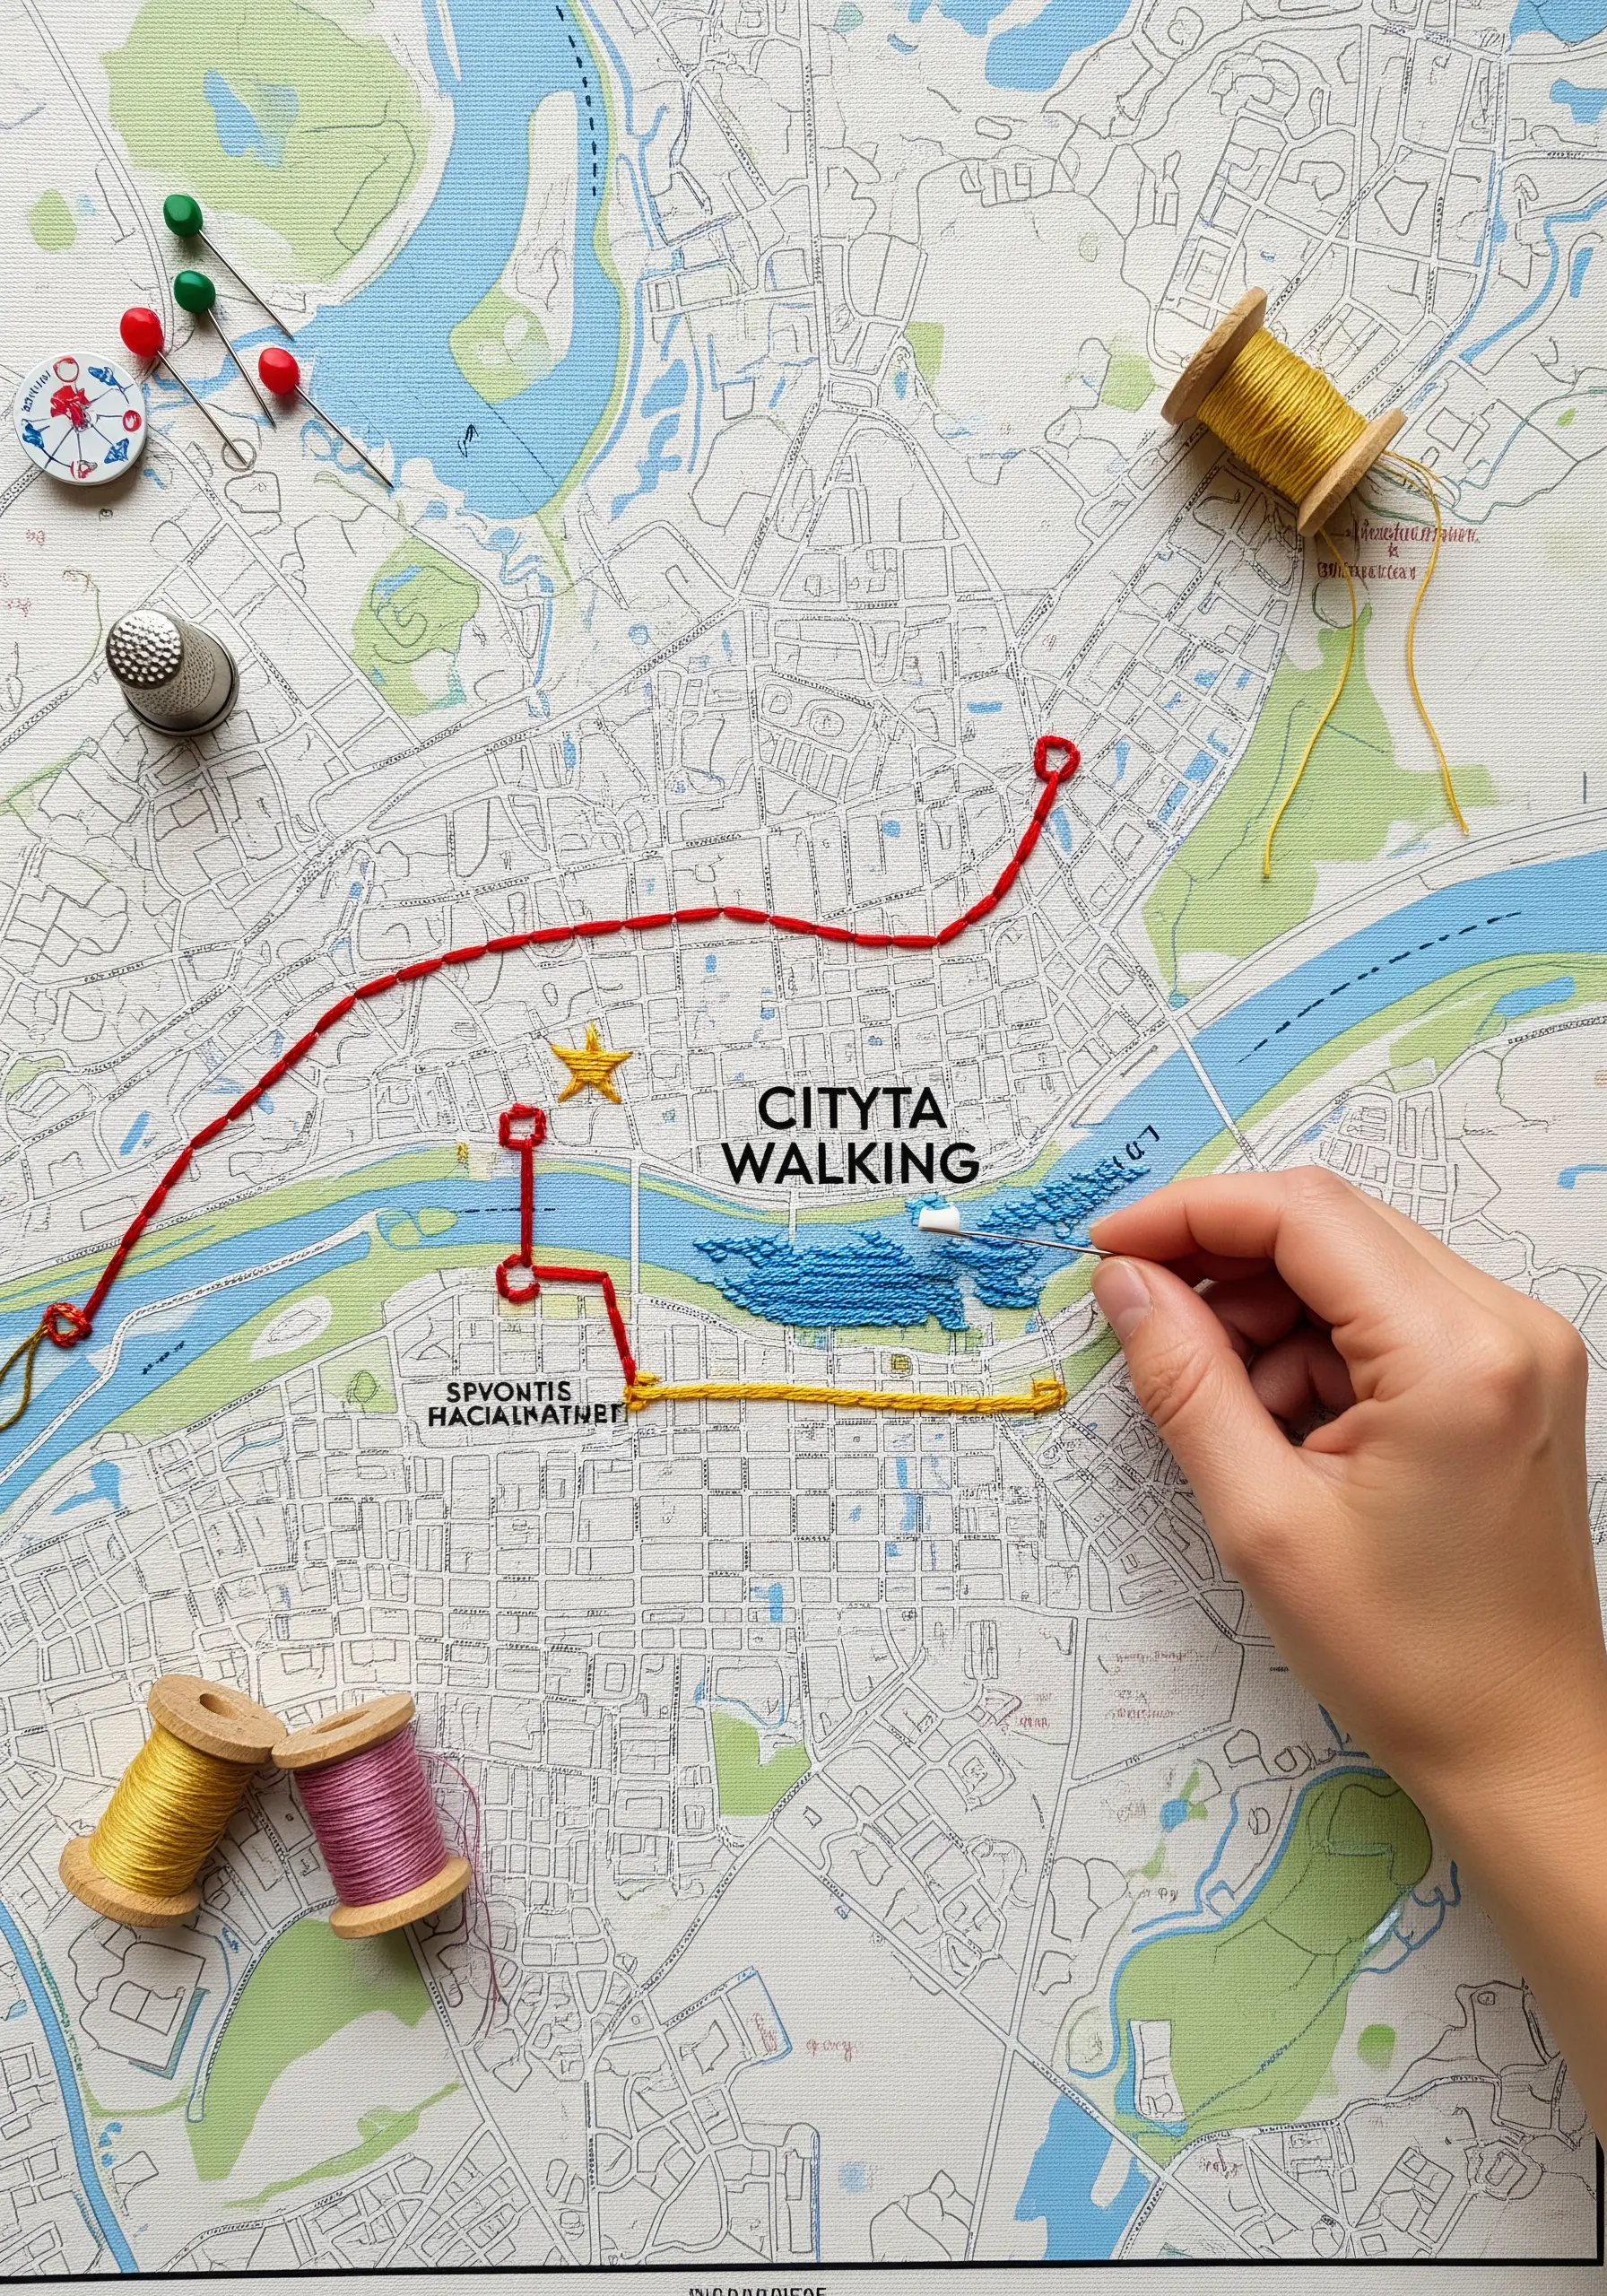
For a durable and easy-to-stitch surface, mount your paper map onto a piece of foam core using spray adhesive.
Select a bold, contrasting thread color that will stand out against the map’s details.
Use a simple backstitch or running stitch to trace a significant route—a favorite walk, a family vacation, or the path between two homes.
You can also add small star stitches or French knots to mark special locations, turning a standard map into a visual storyteller.
24. Shaping and Stitching Fabric Catch-All Bowls

Cut two circles of your chosen fabrics and place them wrong-sides together before saturating them with fabric stiffener.
Drape the wet fabric over an inverted bowl or cup and allow it to dry completely for 24 hours to create a rigid, permanent shape.
Once hardened, embellish the rim with a decorative stitch like a blanket stitch or cross-stitch.
This adds a touch of color and a polished, handmade finish to your functional DIY textile decor.
25. Embellishing Fashion Illustrations with Beads and Fabric

Start with a clean fashion sketch on heavy cardstock.
Bring the gown to life by layering delicate fabrics like tulle or organza for the skirt, creating ruffles and volume; secure them with a clear-drying craft glue.
For the bodice, apply a dense layer of tiny metallic seed beads or pearls to create a dazzling, textured effect.
This mixed-media approach transforms a flat drawing into a tactile piece that captures the luxury and dimension of haute couture.
26. Creating a Layered Paper & Felt Shadow Box
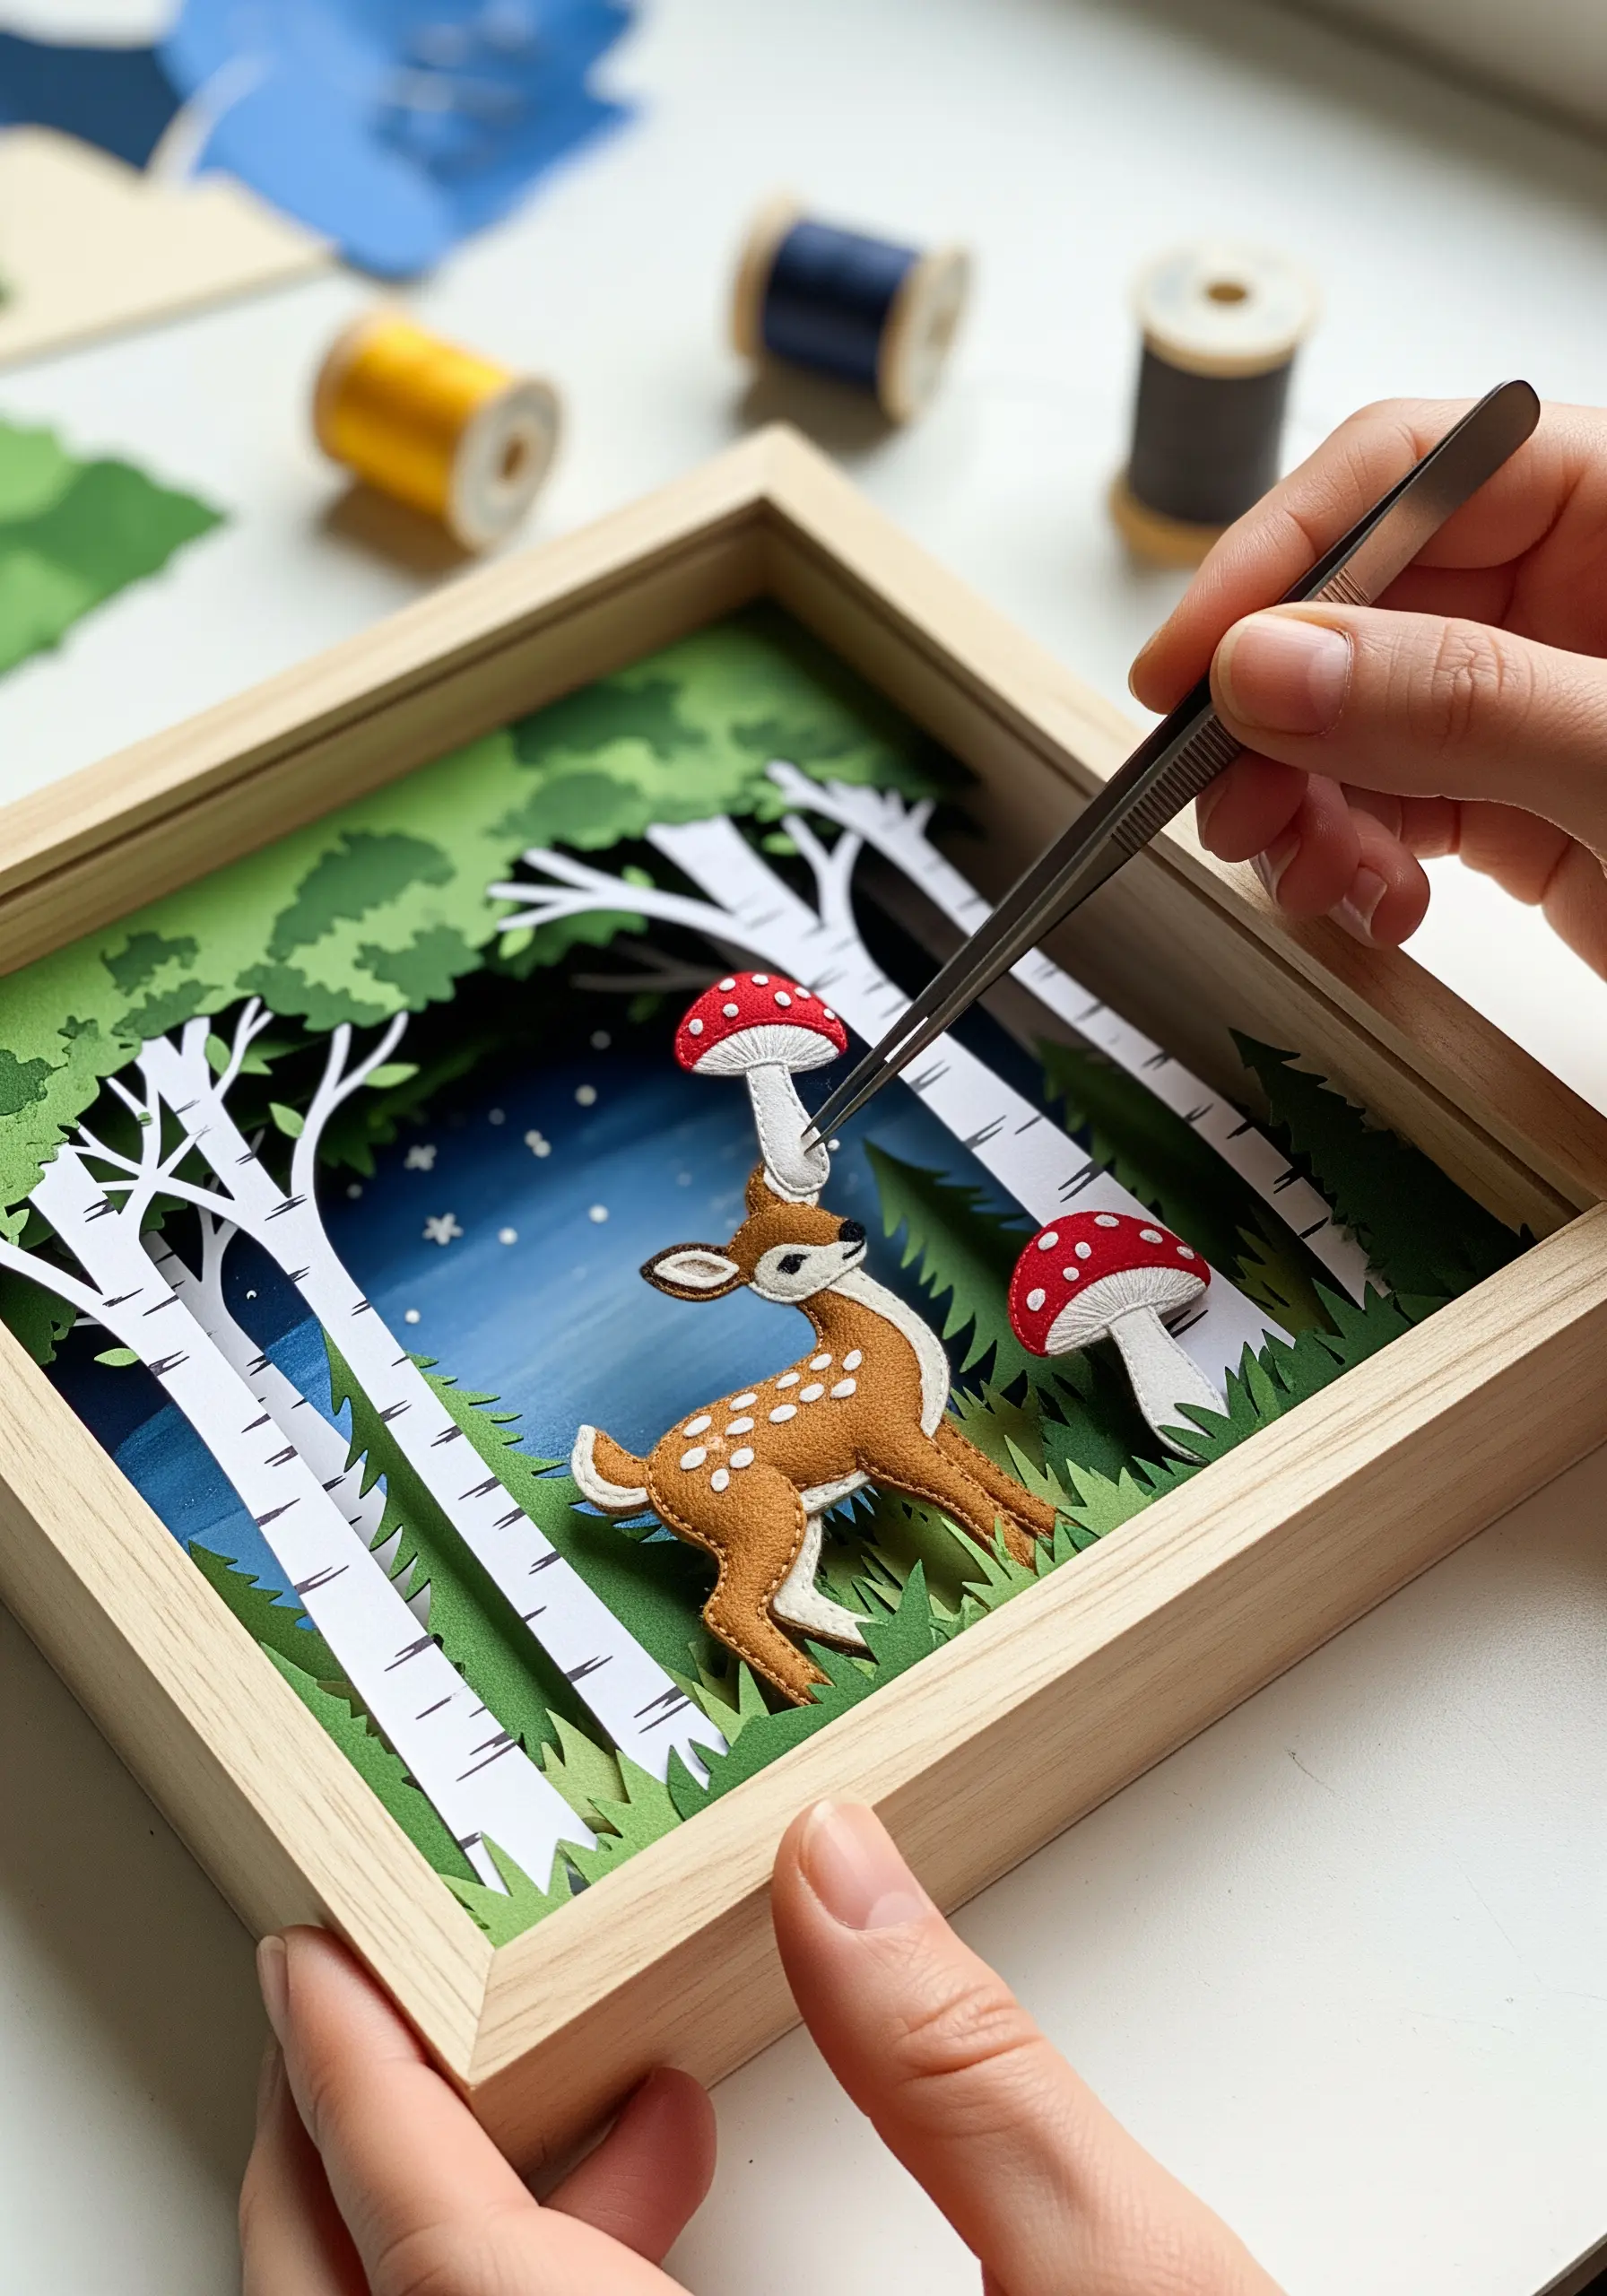
Construct your diorama inside a deep shadow box frame, creating depth by cutting landscape elements from different colors of cardstock.
Place small foam adhesive squares between the paper layers to make them stand apart, creating realistic perspective and shadows.
For your focal point, create a small creature from felt, lightly stuffed with batting and detailed with a few simple stitches.
This combination of papercraft and textile art results in a magical, three-dimensional woodland scene.
27. Stitching Sound: Embroidering a Sound Wave
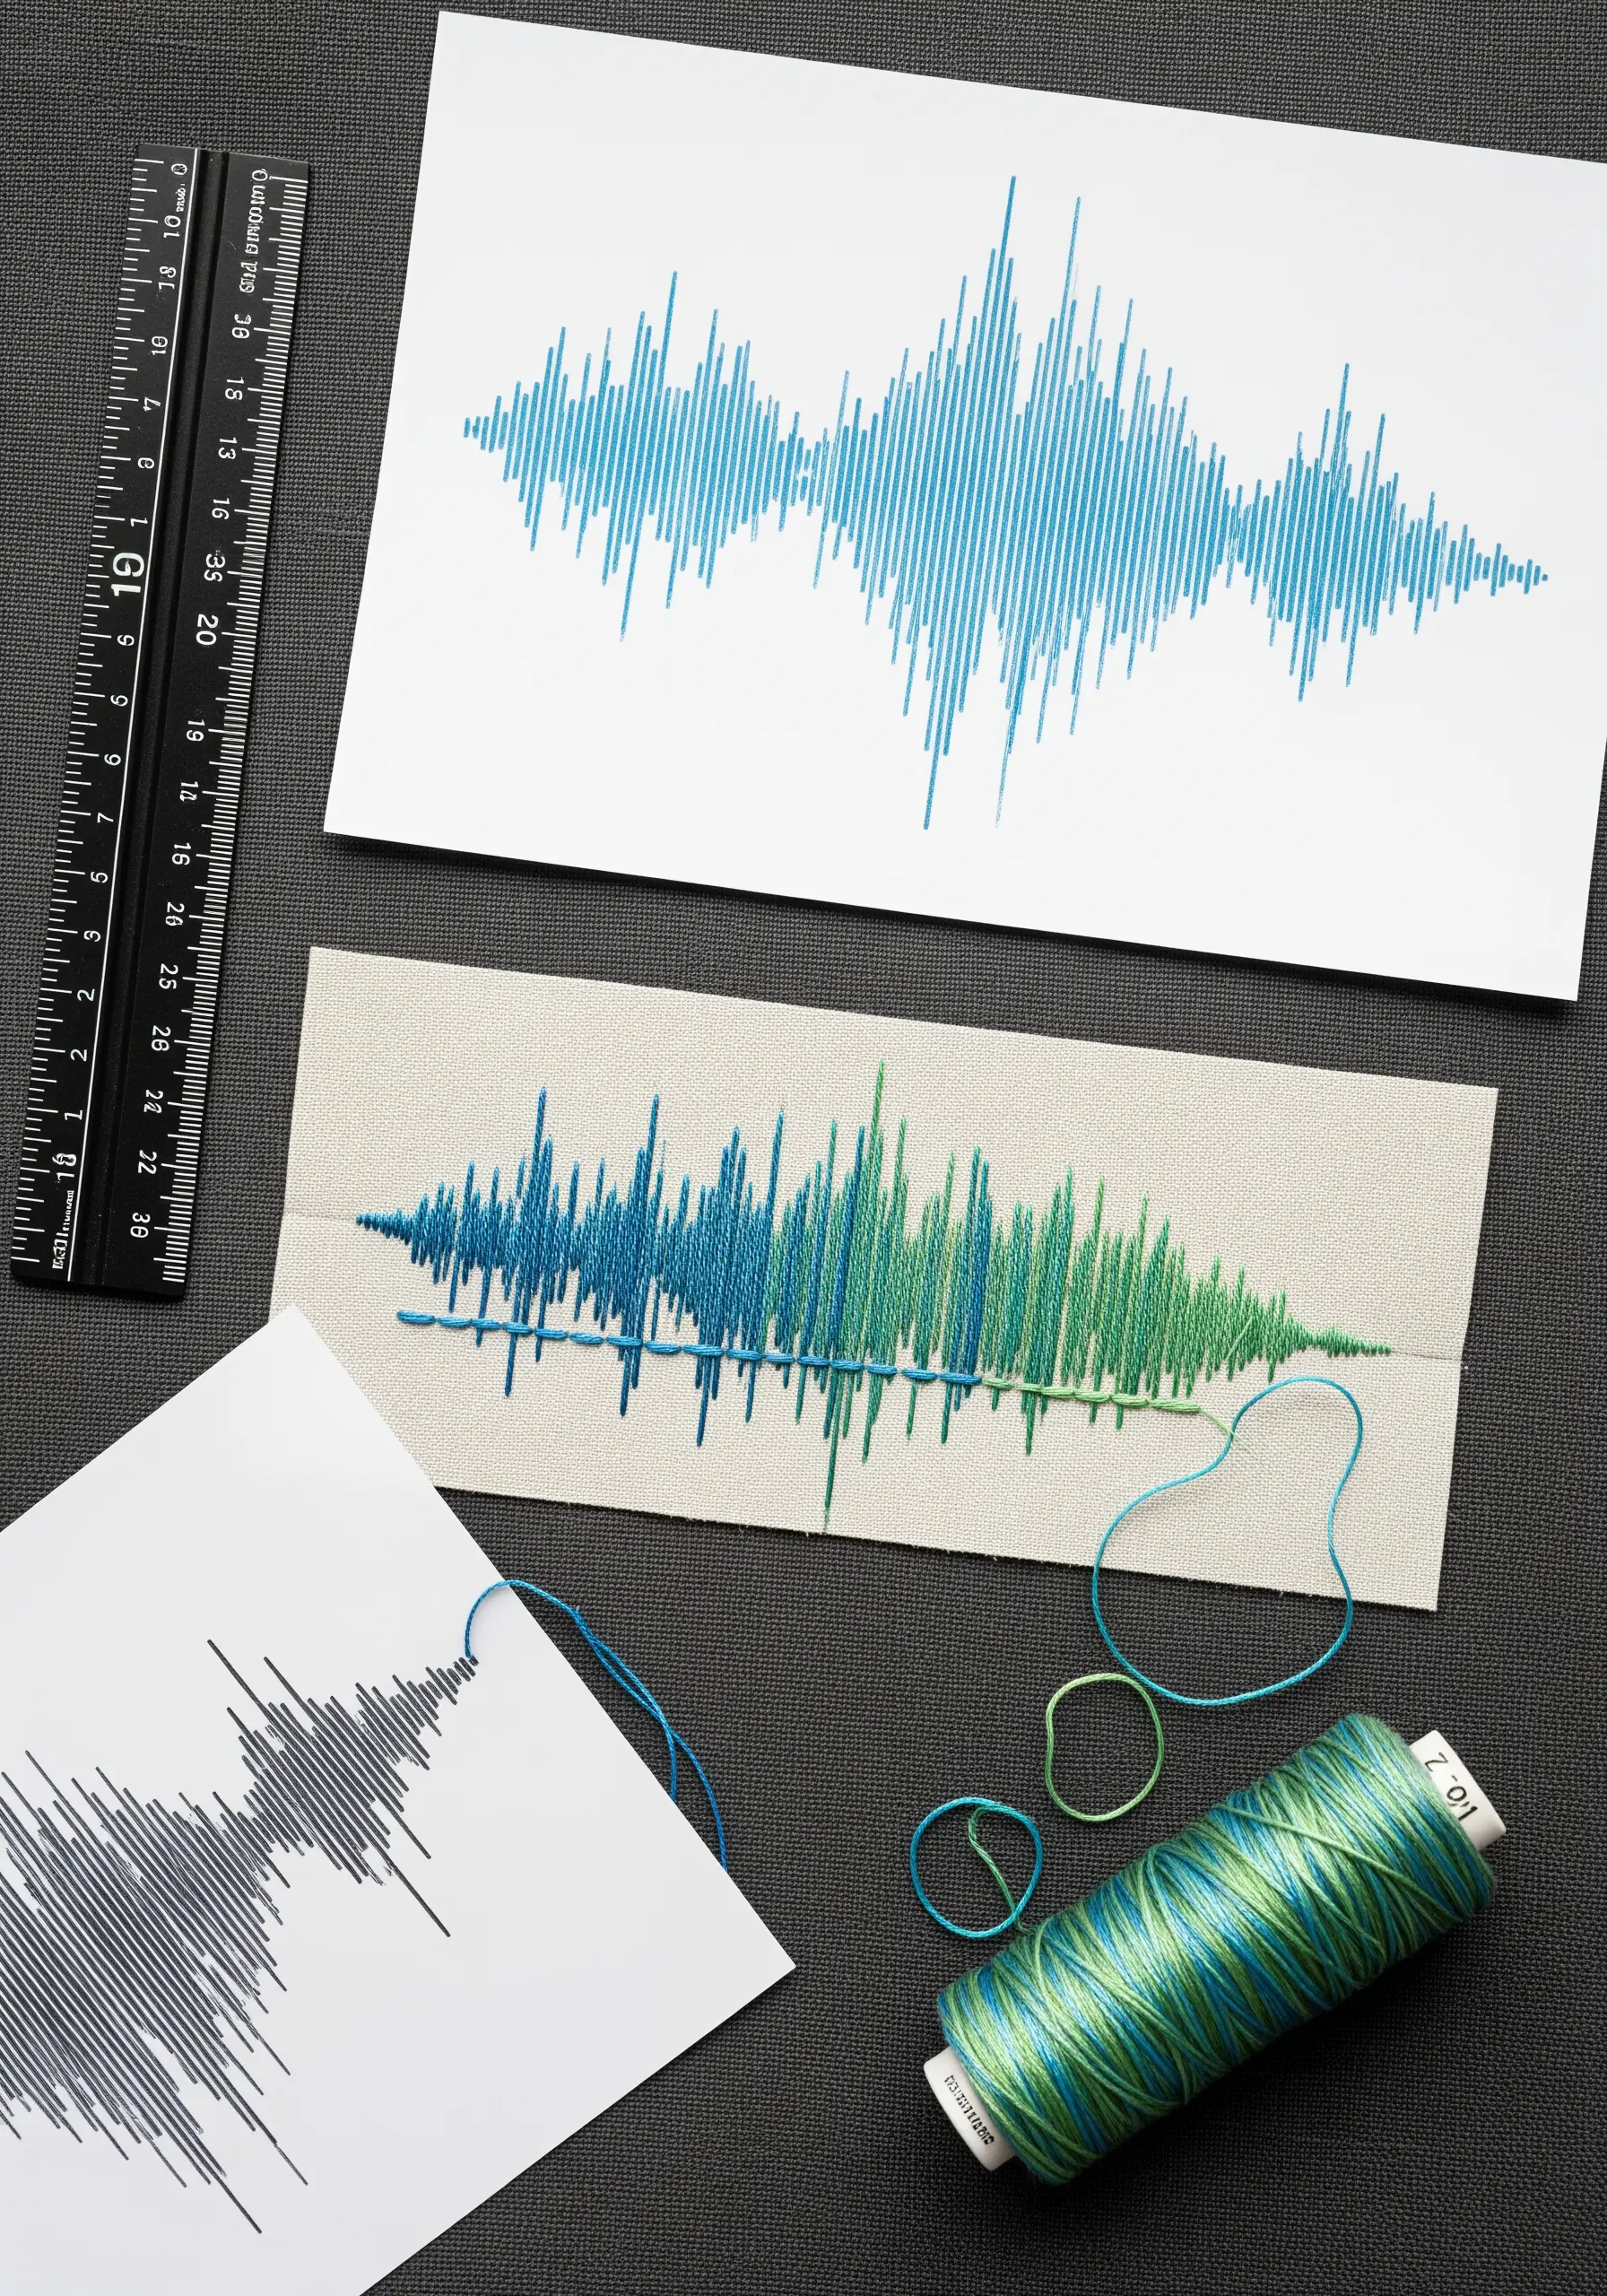
Find an online tool to generate a visual image of a short audio clip—a name, a laugh, or a favorite quote.
Transfer this unique pattern onto your fabric using a water-soluble pen.
Use a series of dense, vertical straight stitches to replicate the waveform, varying their height precisely according to your pattern.
Using a variegated thread adds a beautiful, subtle color gradient that enhances the sense of movement and frequency, turning sound into tangible art.
28. Botanical Illustrations with 3D Stitched Elements

Use decoupage glue to cover a stretched canvas with vintage botanical illustration paper, creating a rich, layered background.
Stitch directly onto the canvas to add dimension, using a whipped backstitch for sturdy, textured stems and fishbone stitch for leaves.
For the flower heads, create large, chunky knots with thick yarn or build them from layers of cut paper petals.
This multi-layered approach makes the botanicals appear to grow right off the surface.
29. Abstract Landscapes with Chunky Fibers and Lace
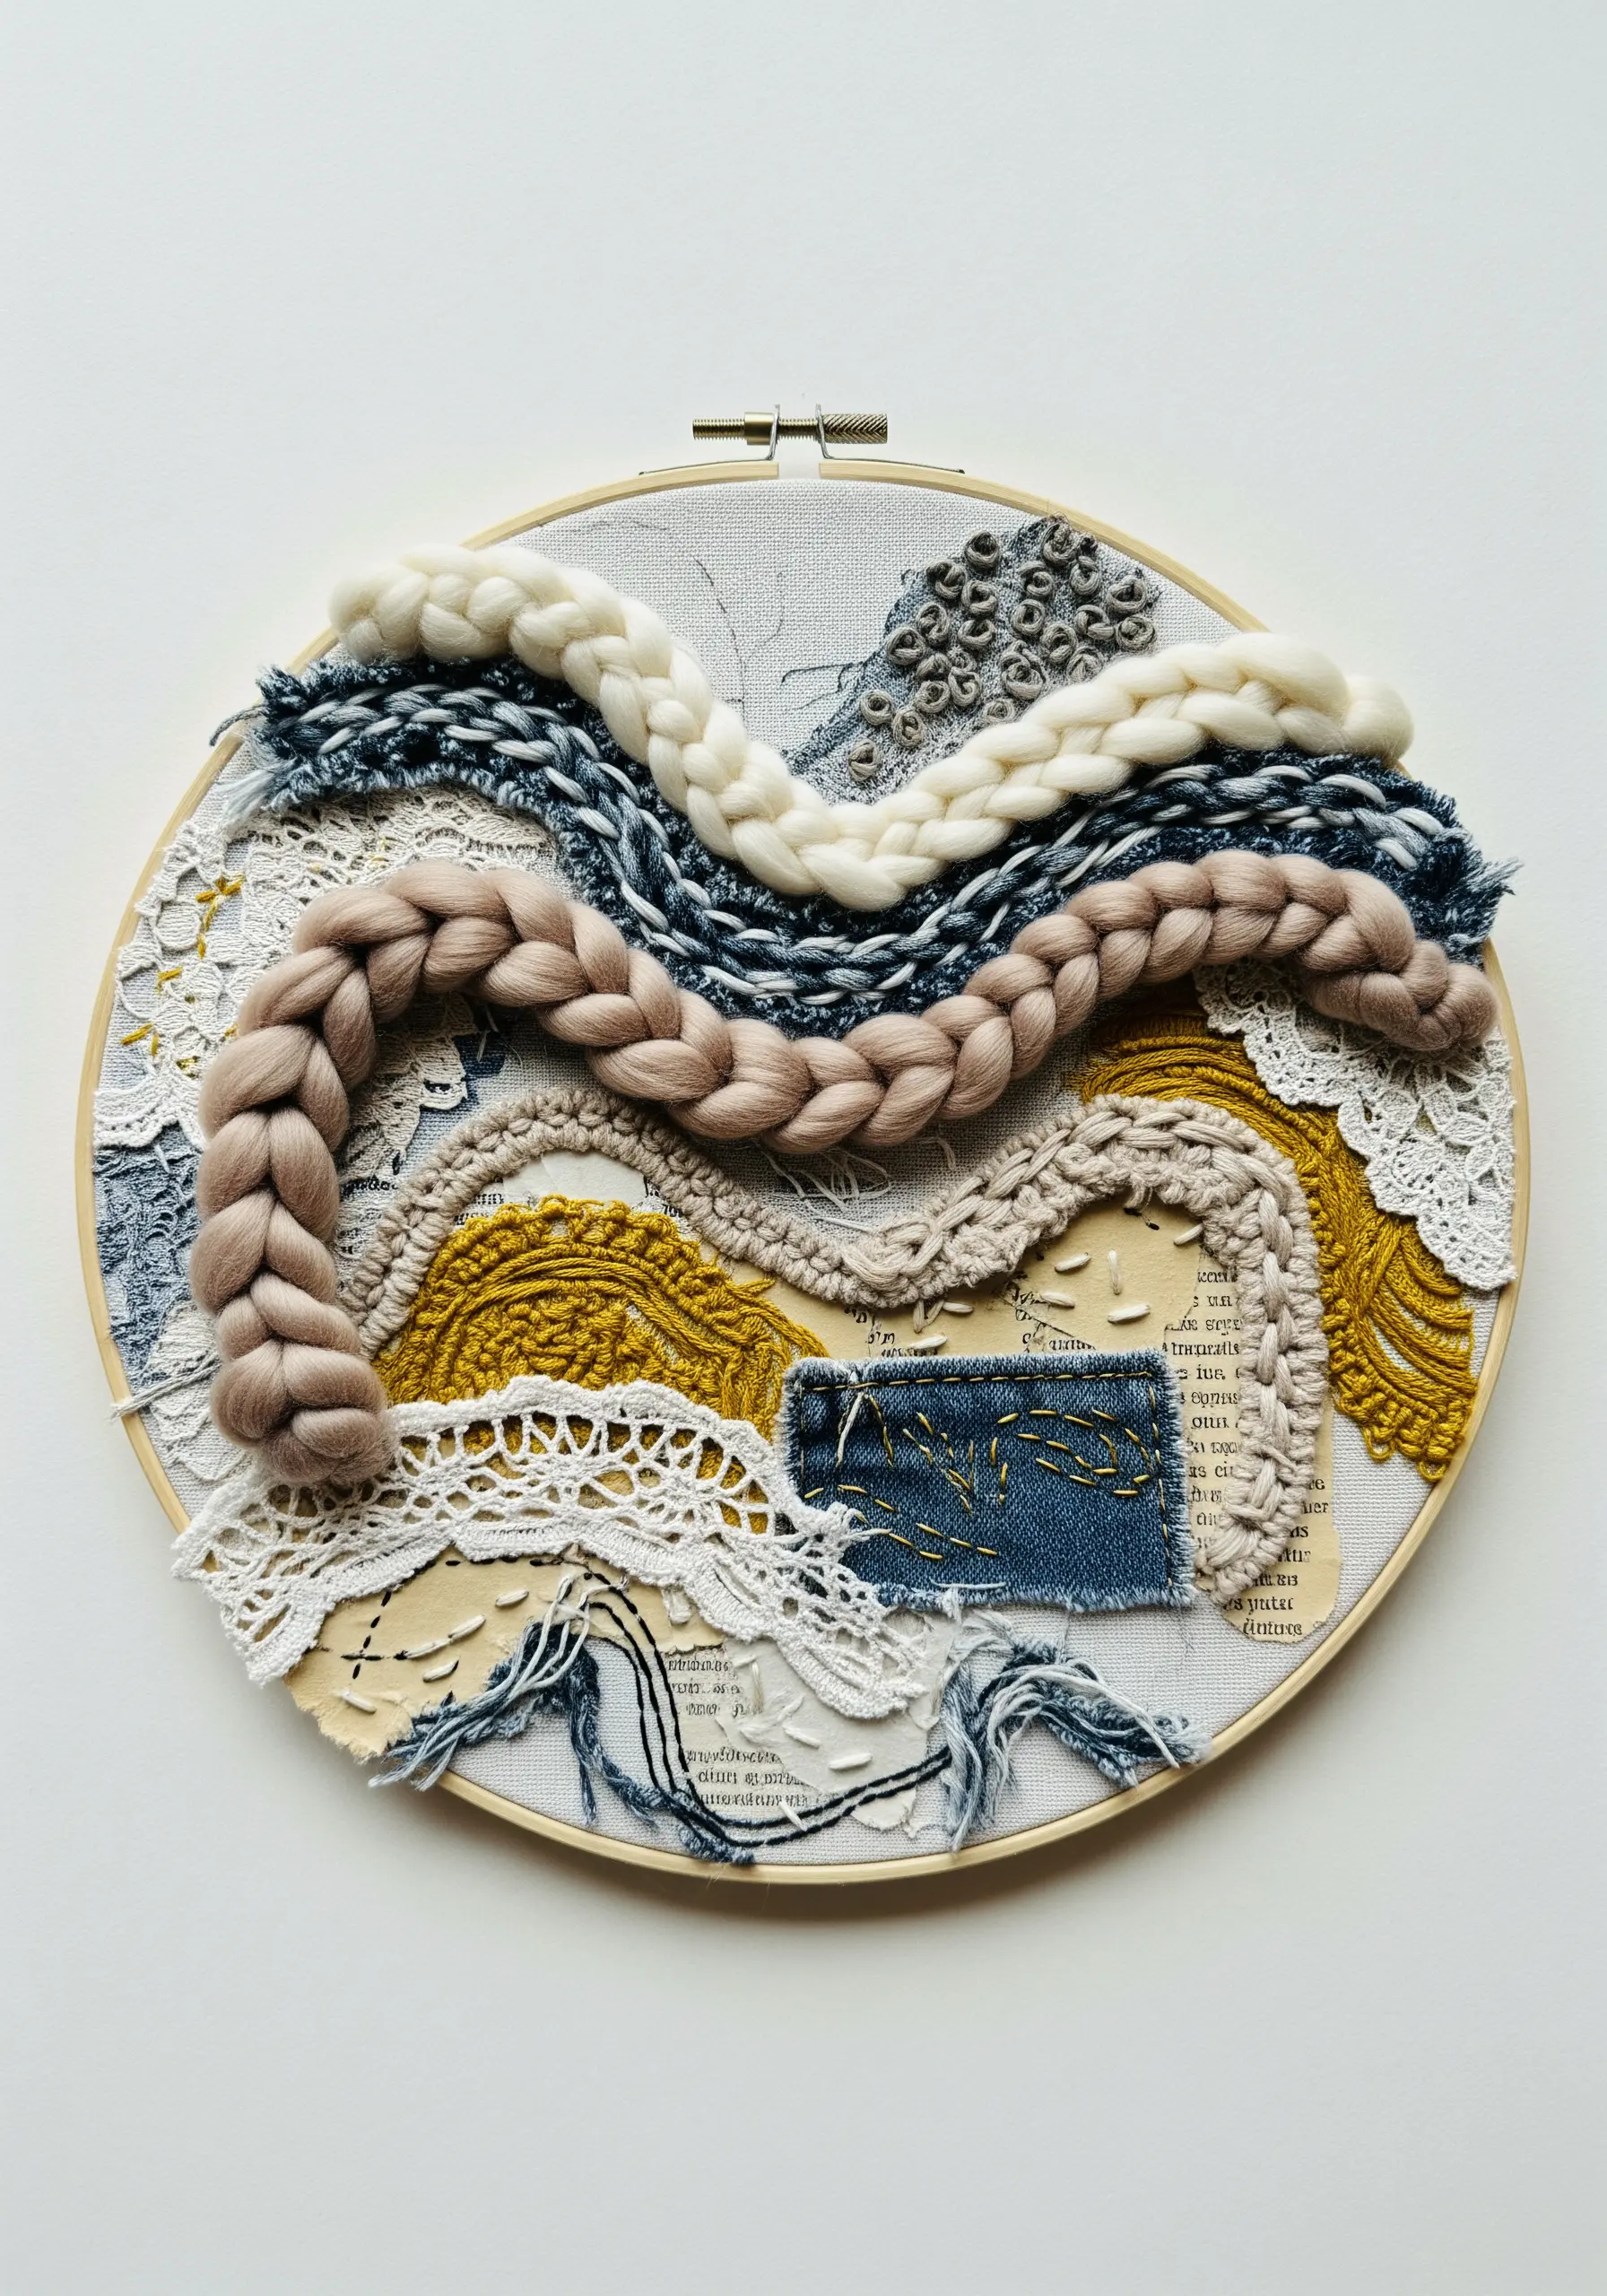
Use your hoop as a canvas for pure textural exploration.
Incorporate non-traditional materials like chunky, braided wool roving, scraps of vintage lace, frayed denim, and even stitched-on pieces of old book pages.
Secure these elements by couching them down with a thinner thread or by stitching directly through them.
This intuitive, freeform process is less about a specific image and more about creating an abstract earthy texture that celebrates a variety of materials.
30. Upcycling Tin Cans with Embroidered Bands
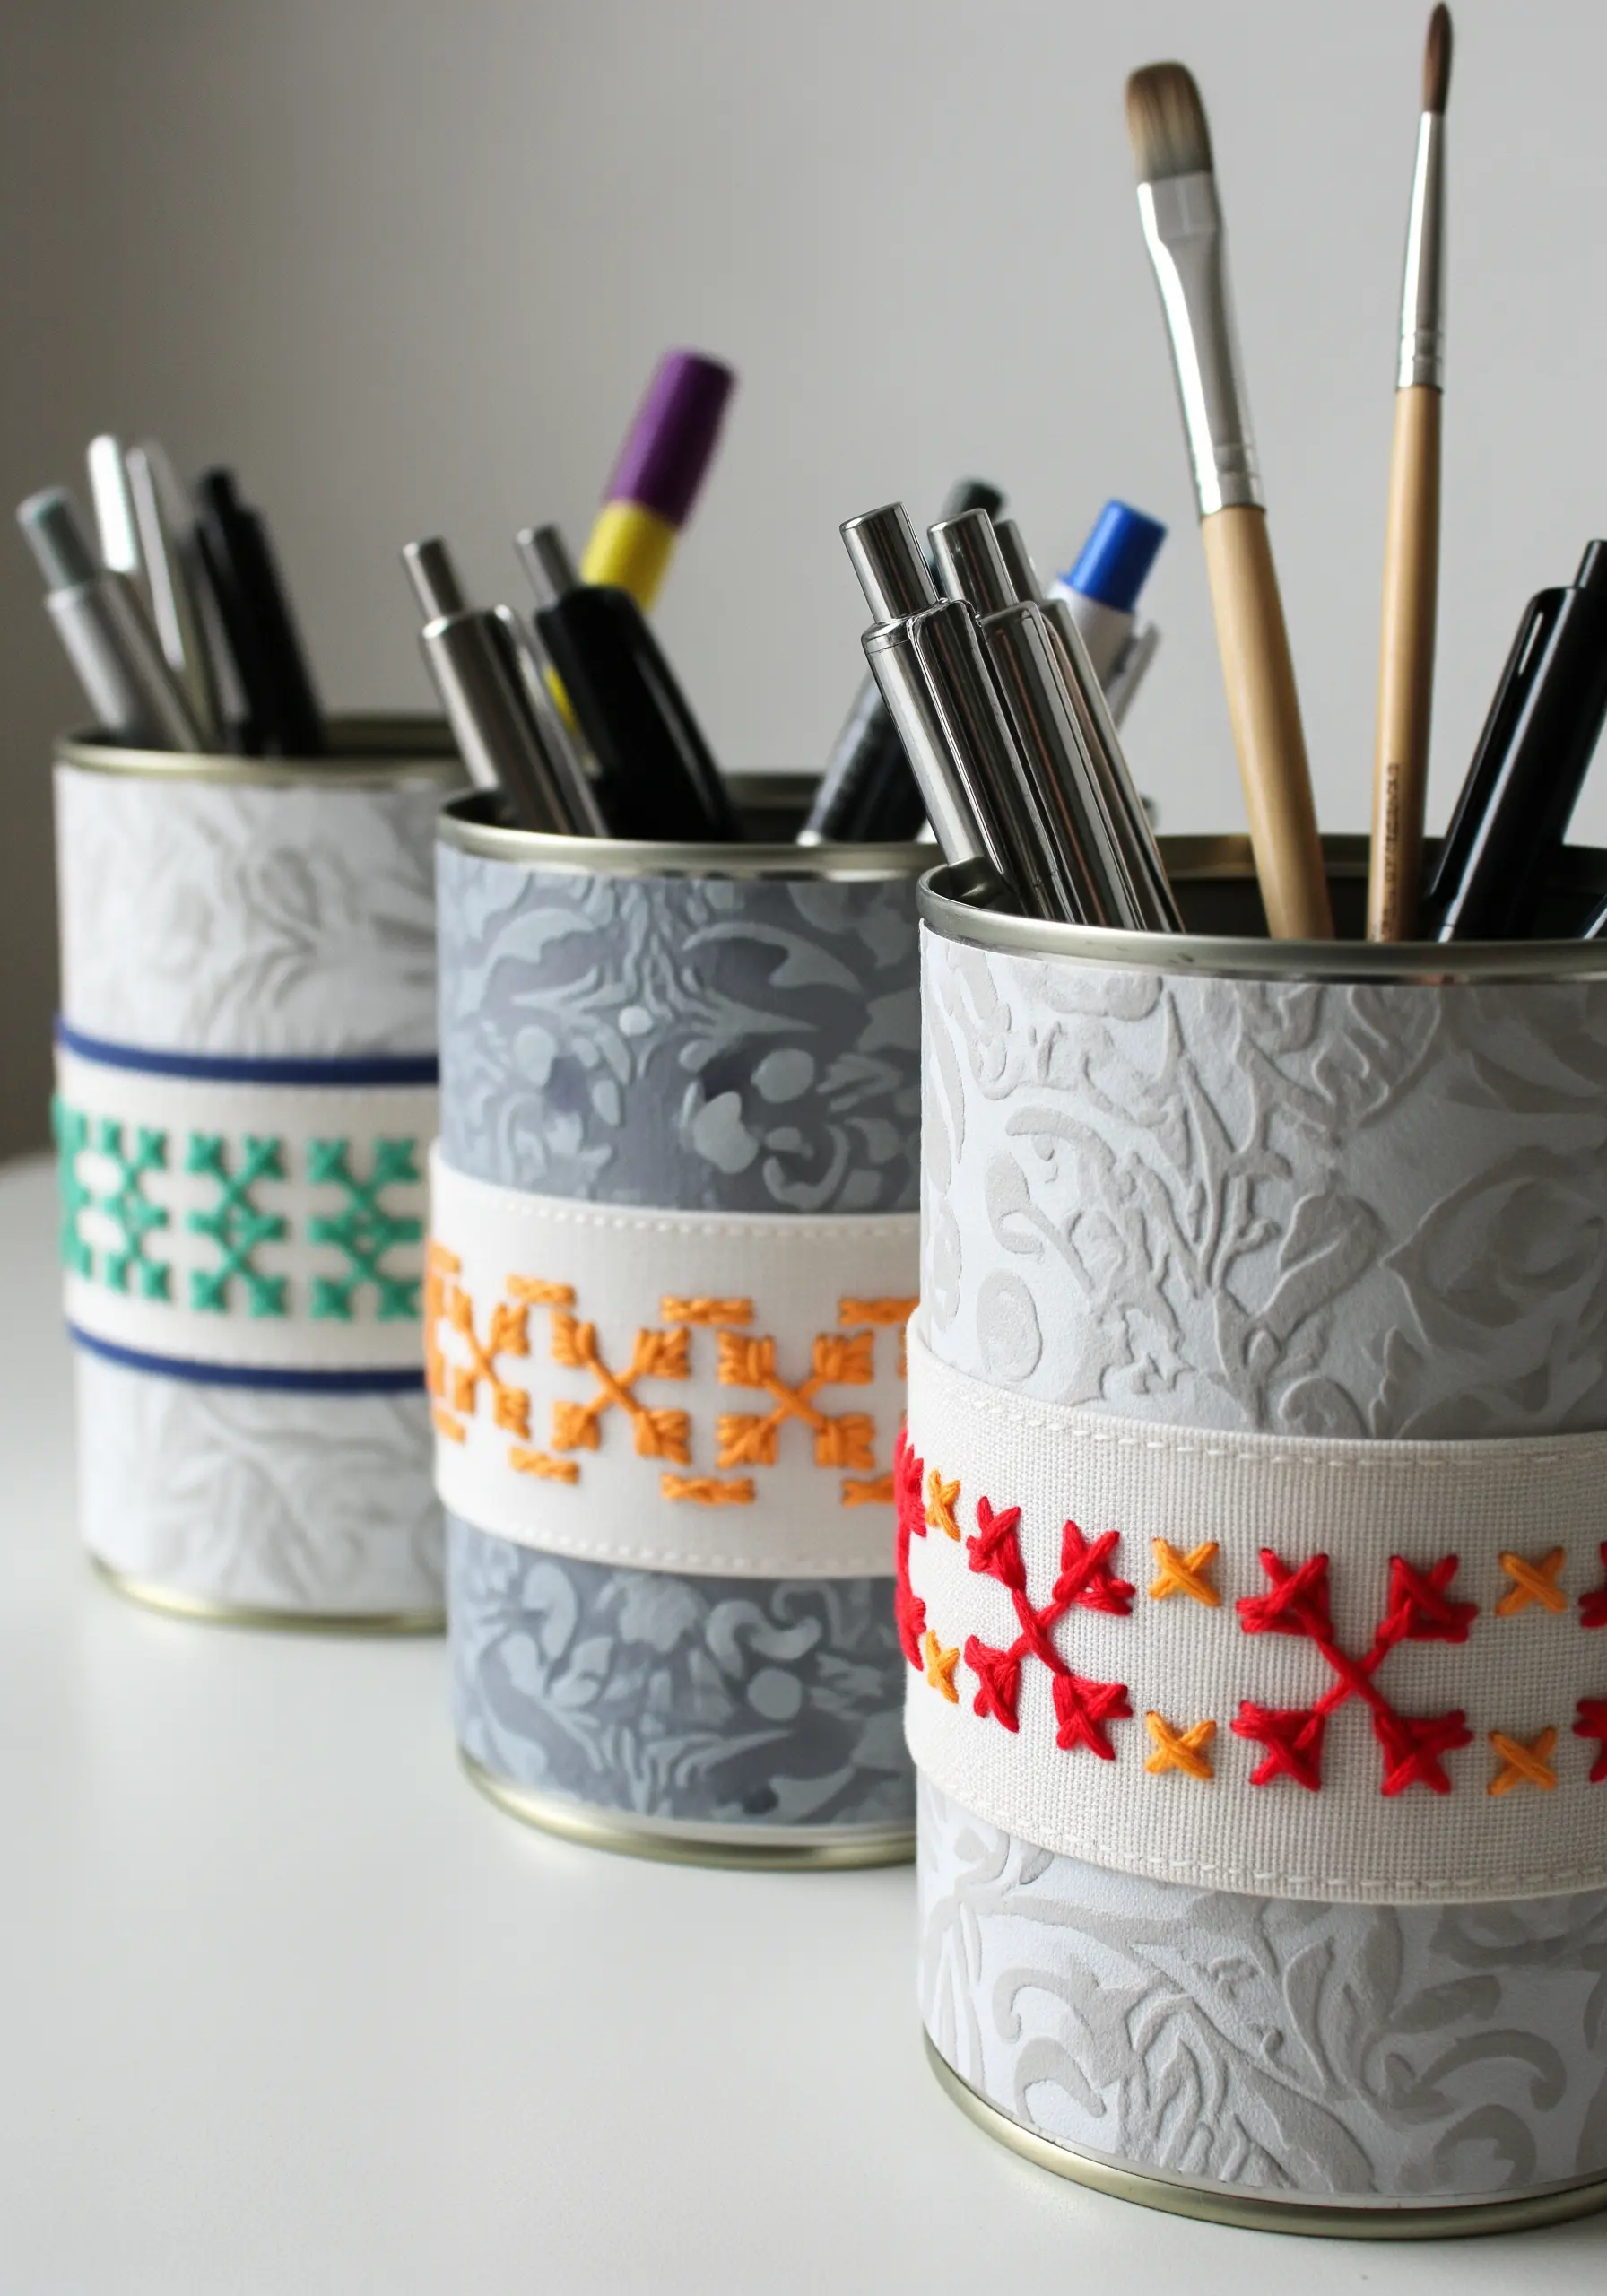
Give clean tin cans a sophisticated new life by wrapping them in textured wallpaper or heavy, embossed paper.
Embroider a simple, repeating geometric pattern onto a strip of linen or cotton twill tape.
Wrap this finished embroidered band around the center of the can, securing it at the back with a strong craft glue.
This simple project turns everyday recycling into stylish and functional desk organizers or small planters.


