
This holiday season, let’s move beyond generic decor and create something that feels truly personal—a pillow that not only cozies up a chair but also holds a story in its stitches.
You don’t need a complete new set of skills to elevate your work. Often, the most significant transformations come from a small shift in technique: choosing a thicker thread for emphasis, angling your satin stitch to catch the light, or adding a few beads for a touch of sparkle.
Think of these 21 designs not just as patterns to follow, but as invitations to explore texture, light, and detail. Here, you’ll find the specific adjustments that turn a simple project into a cherished heirloom, empowering you to stitch with confidence and create something beautiful for your home.
1. Create Depth with Directional Satin Stitch
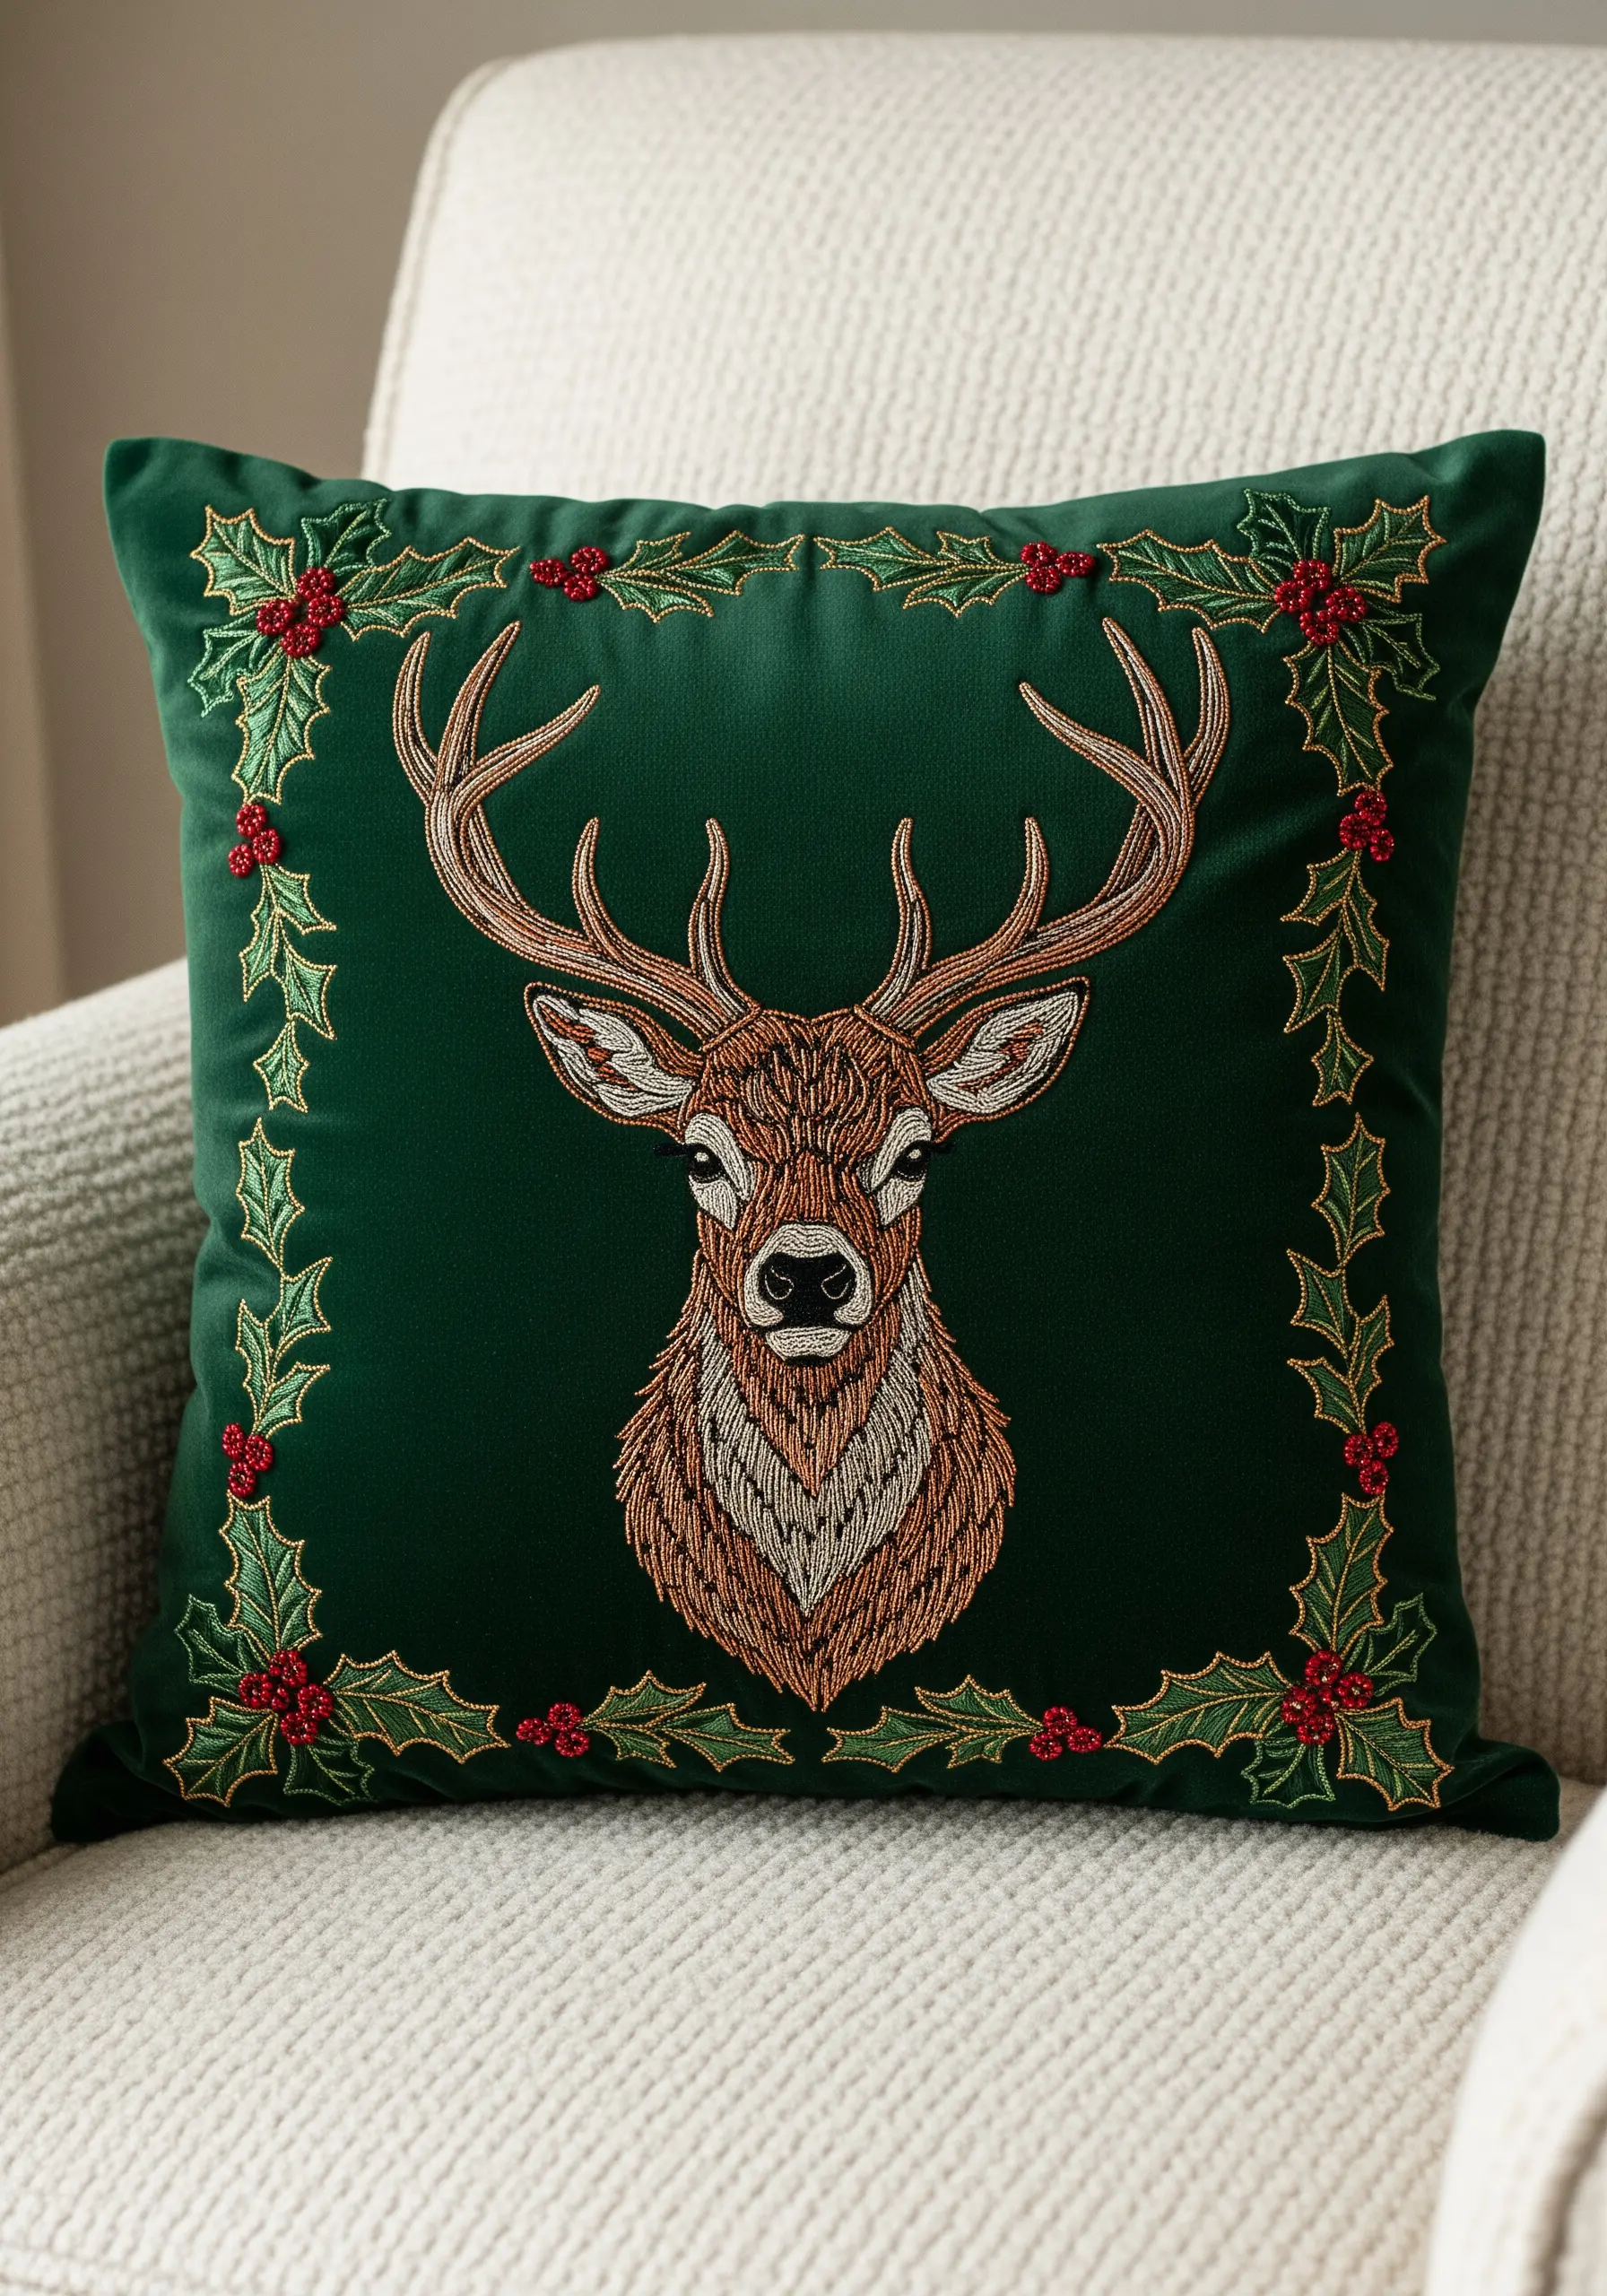
To achieve a realistic, sculpted look for motifs like this stag, focus entirely on the direction of your satin stitches.
Vary the angle of your stitches to follow the natural contours of the animal’s face and fur, creating highlights and shadows without changing your thread color.
For the antlers, use a metallic thread couched with a matching single strand of cotton floss to ensure it lies flat and maintains its sharp shape against the rich velvet.
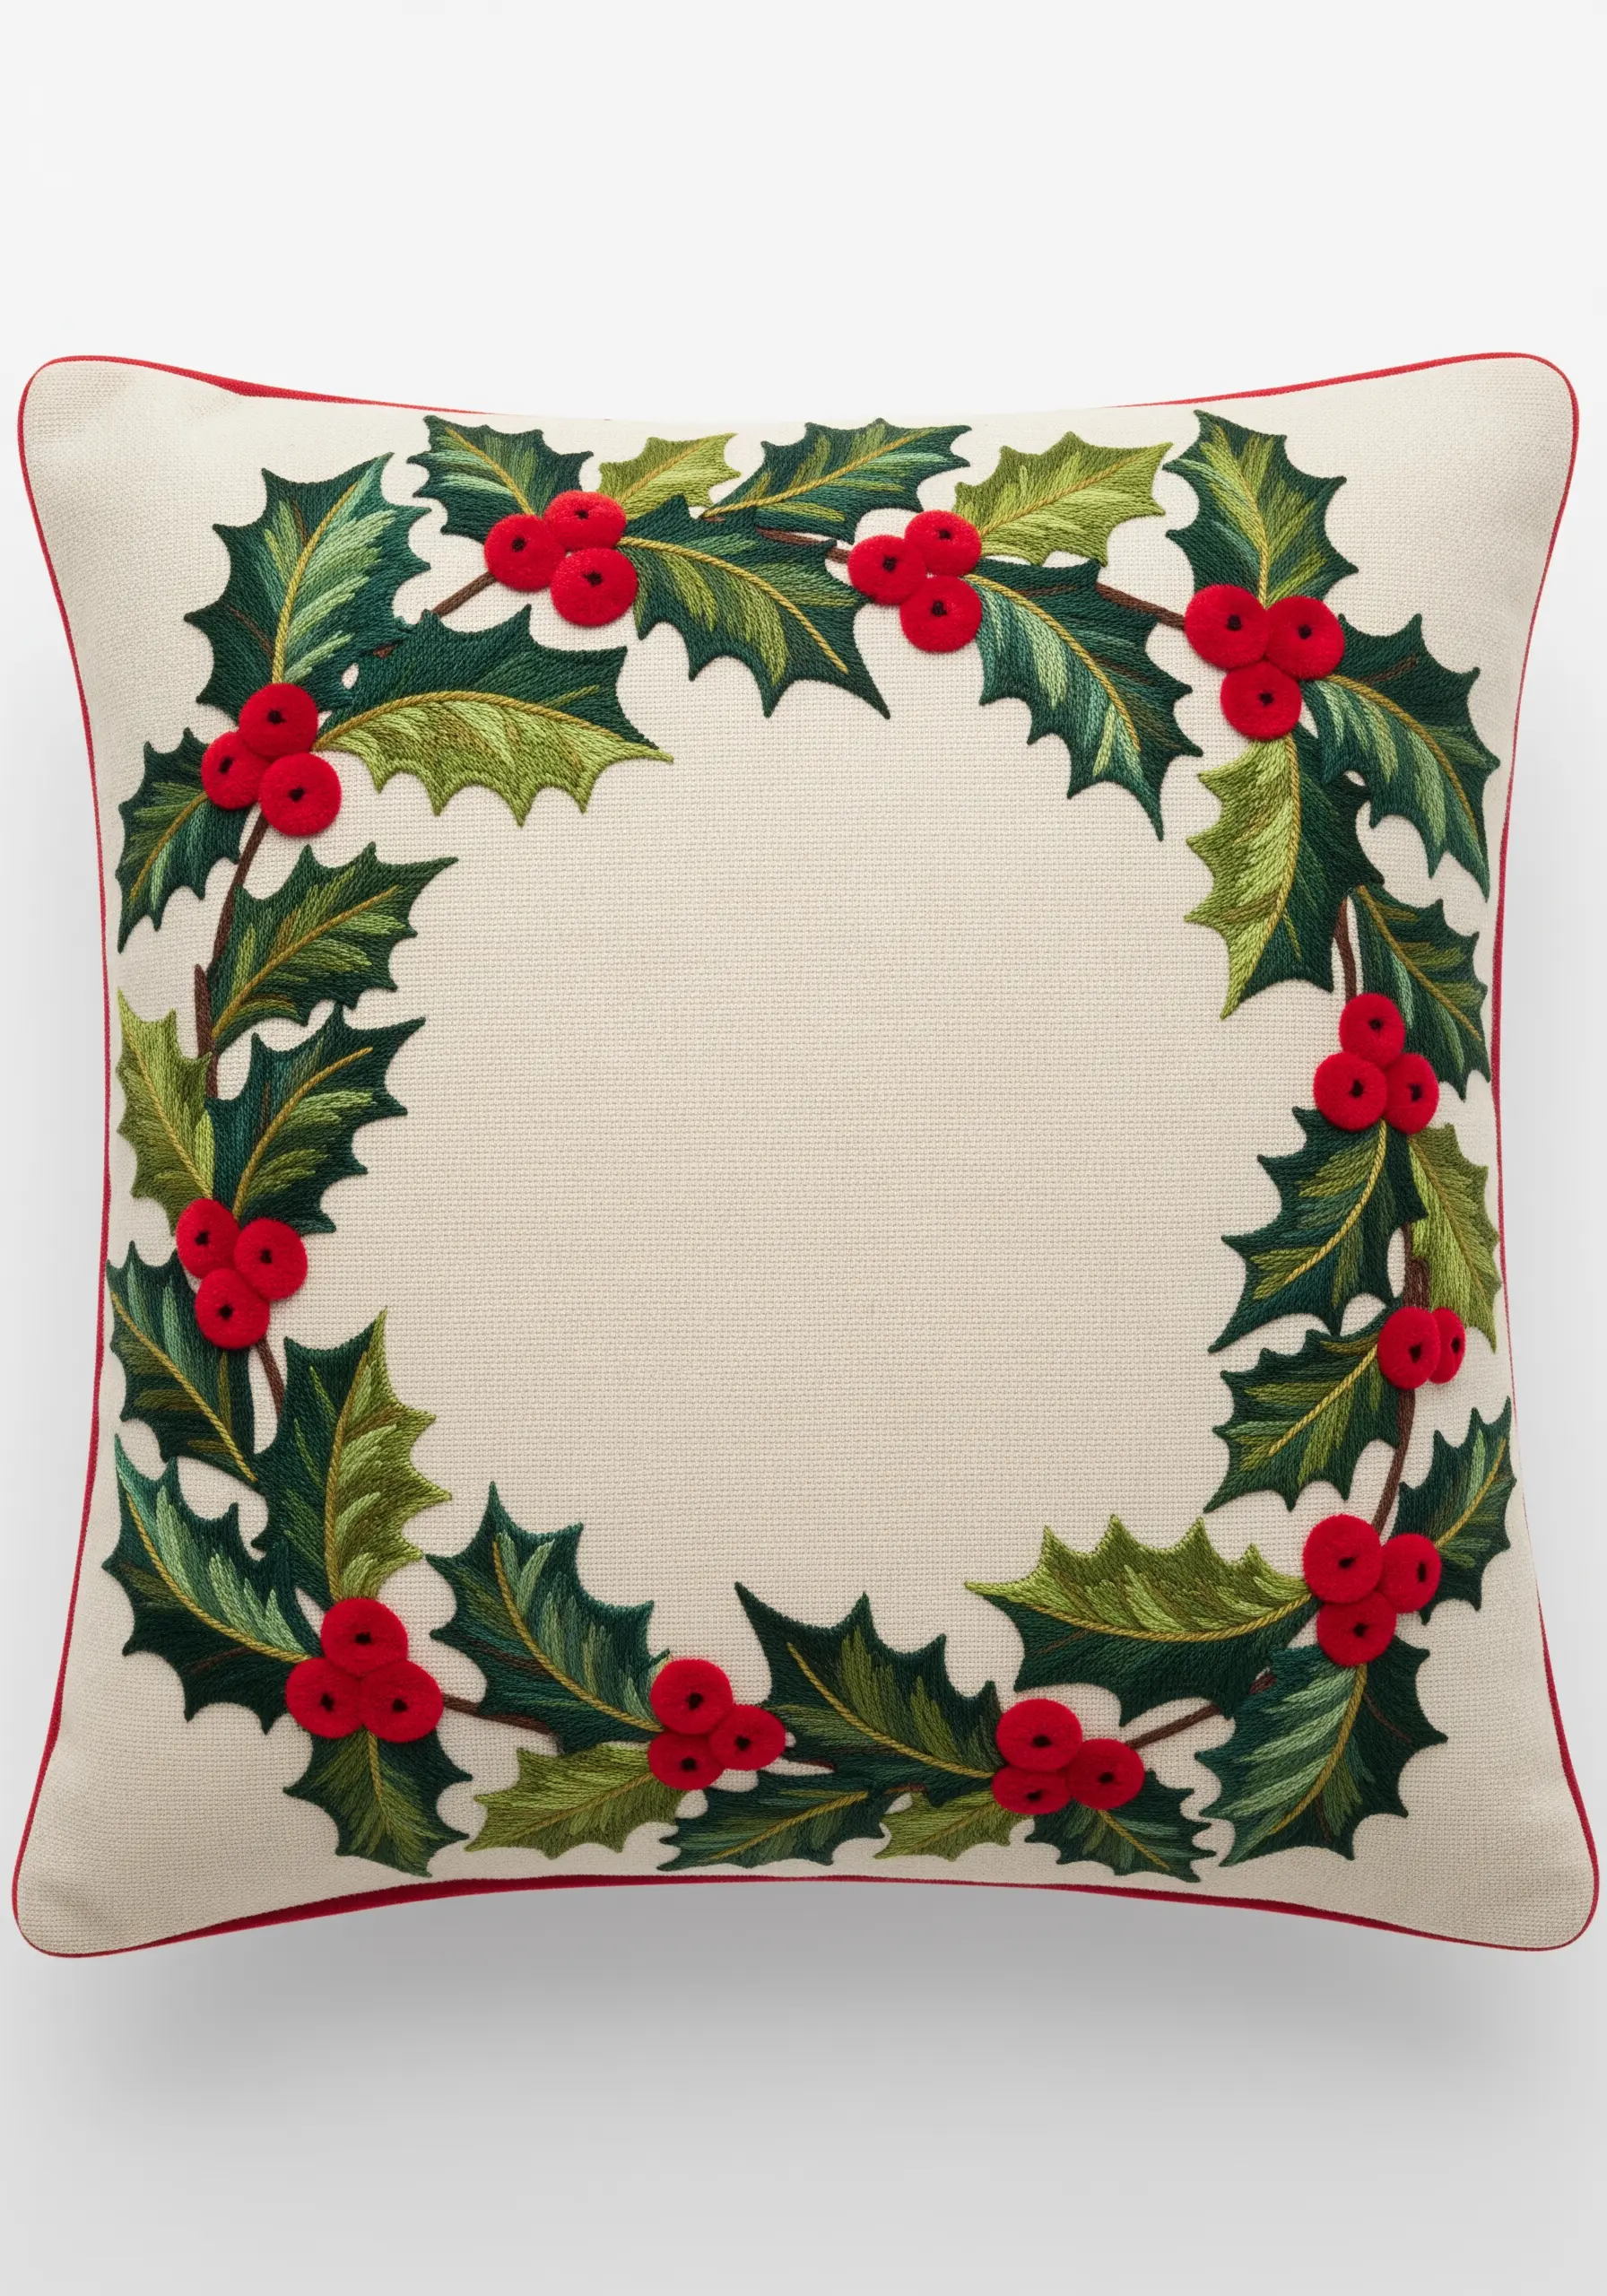
The holly border uses a simple fishbone stitch for the leaves and tight French knots for the berries, framing the central figure with classic texture.
2. Play with Thread Weight for Delicate Detail
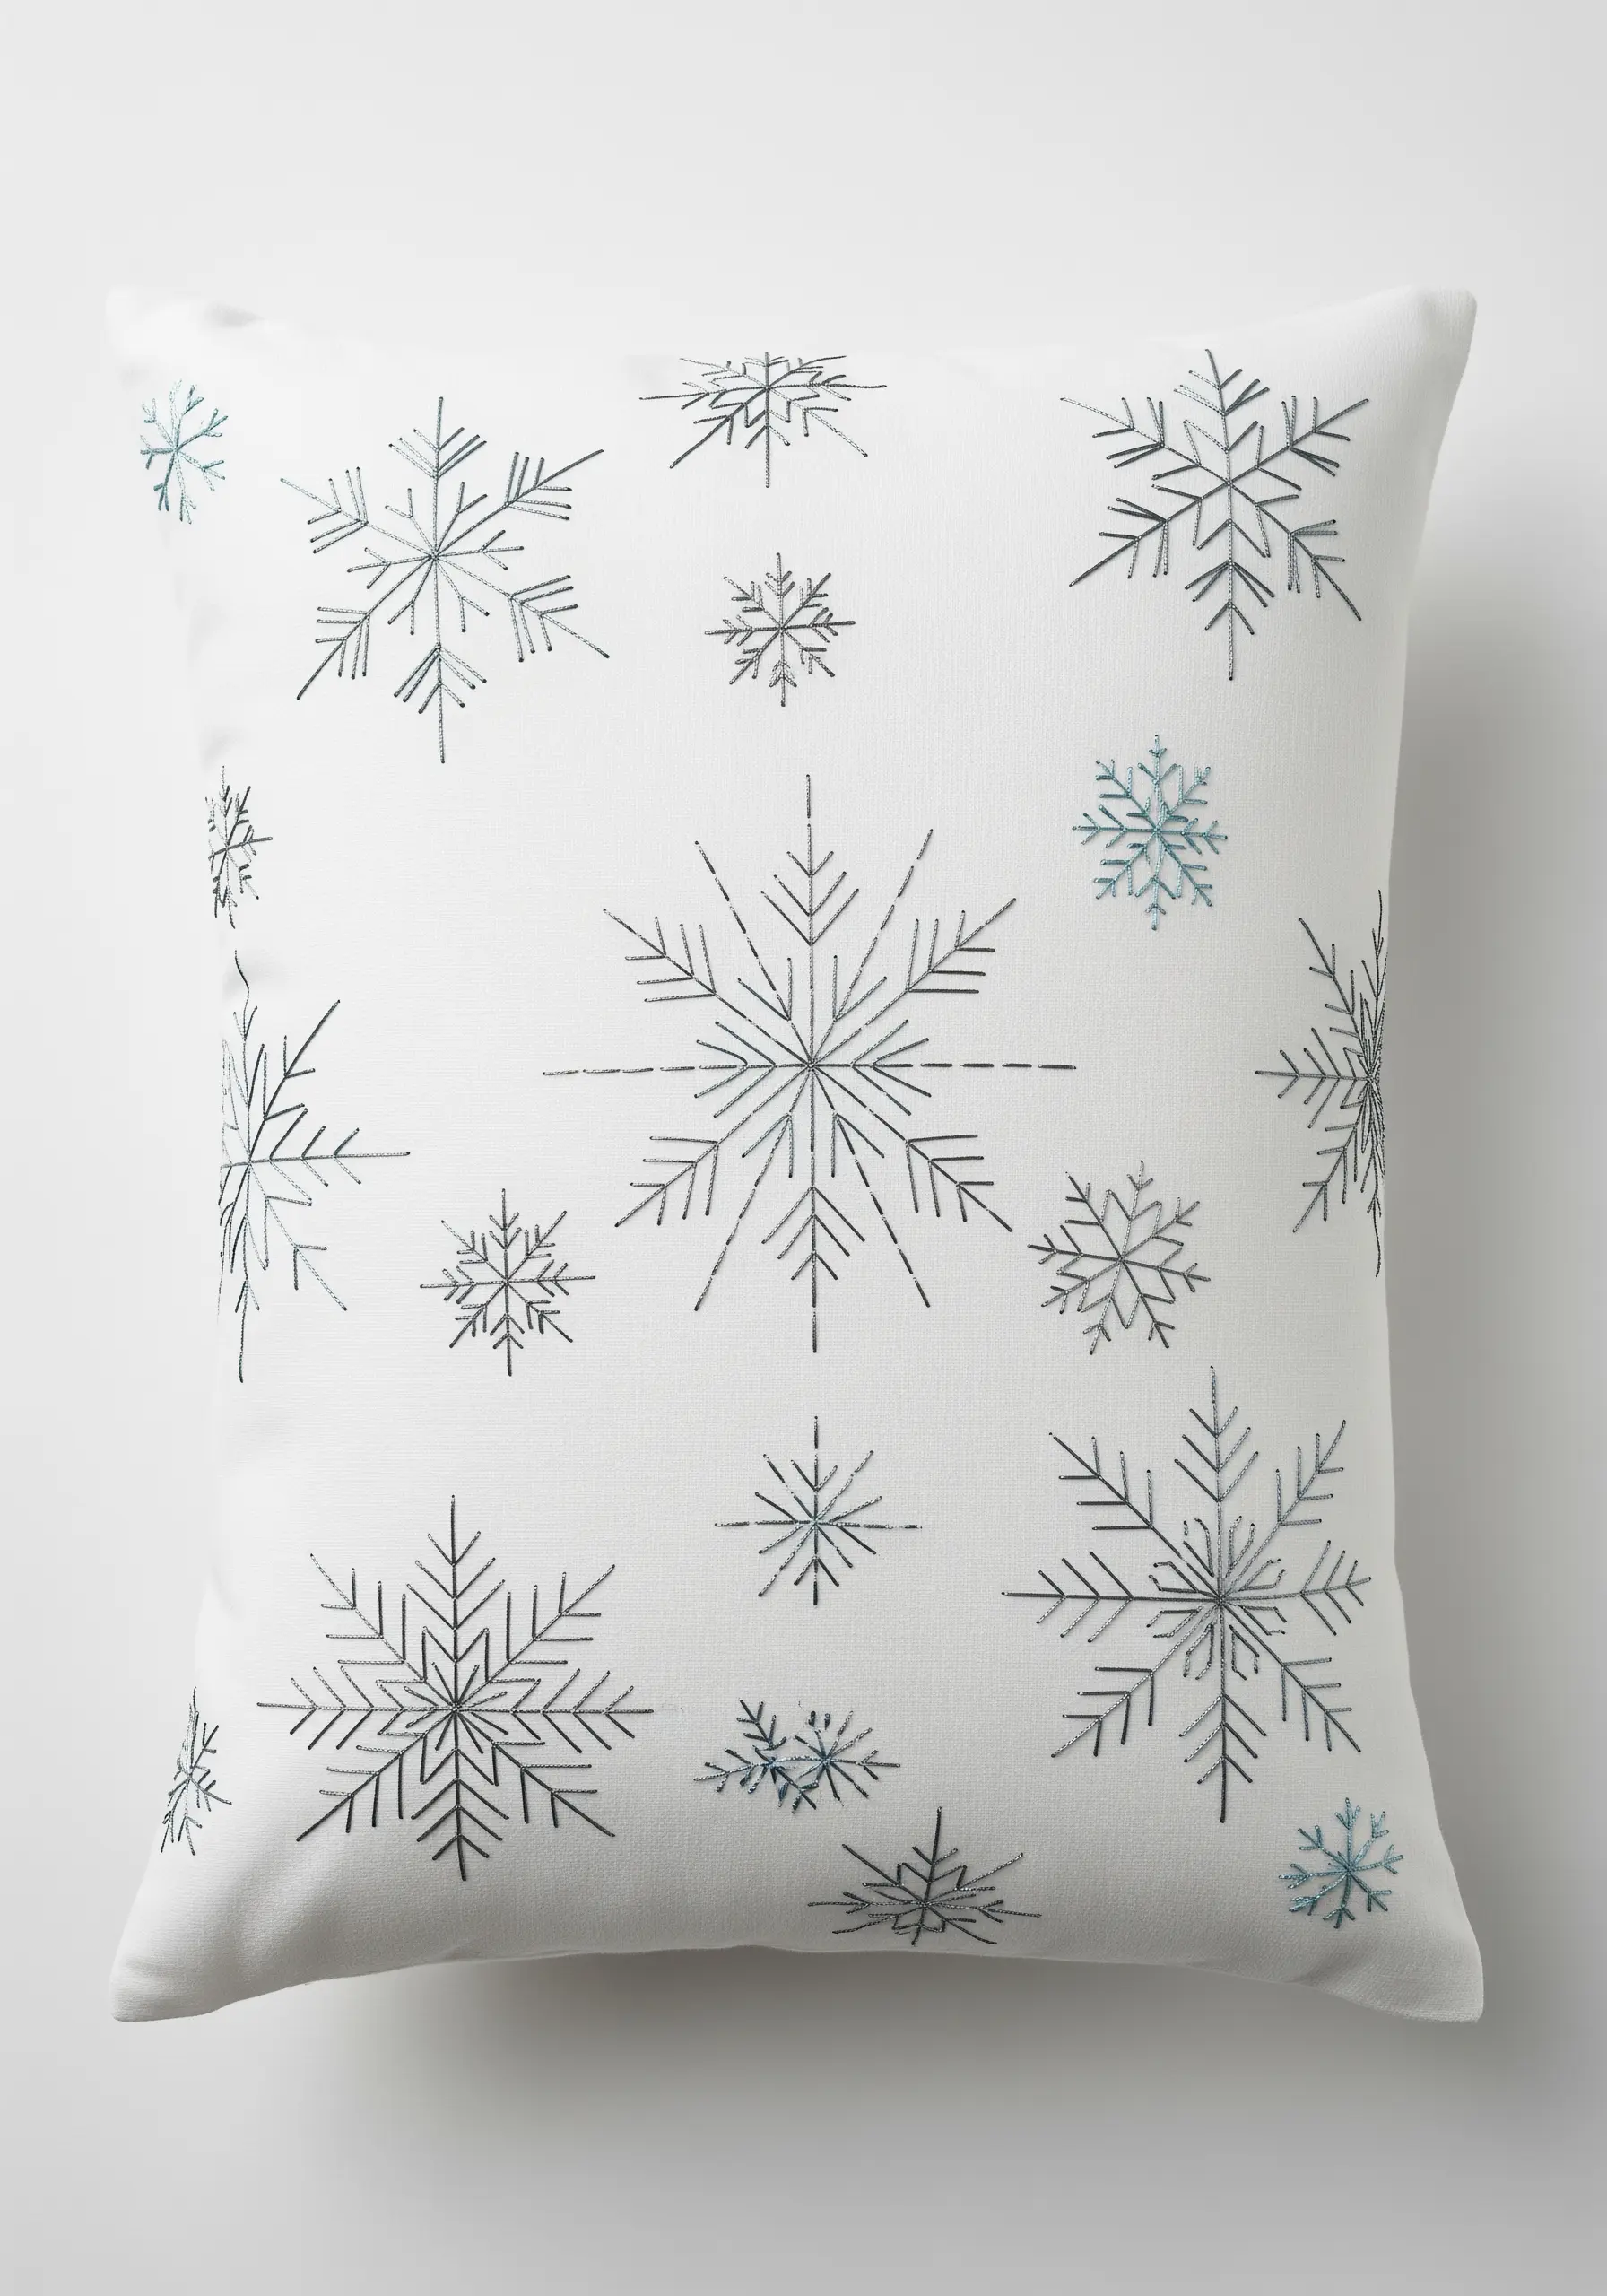
For an airy, scattered snowflake pattern, the key is varying your thread weight.
Use a three-strand metallic floss for the larger, more prominent snowflakes to catch the light, and switch to a single strand for the smaller, more distant flakes.
This subtle shift creates an illusion of depth and movement across the fabric.
Stitch on a crisp, bright white linen or cotton to ensure the silver and ice-blue threads provide a clean, graphic contrast.
These are all simple straight stitches, proving that composition and material choice are more impactful than complex techniques.
3. Combine Couching and Sequins for a Jeweled Effect
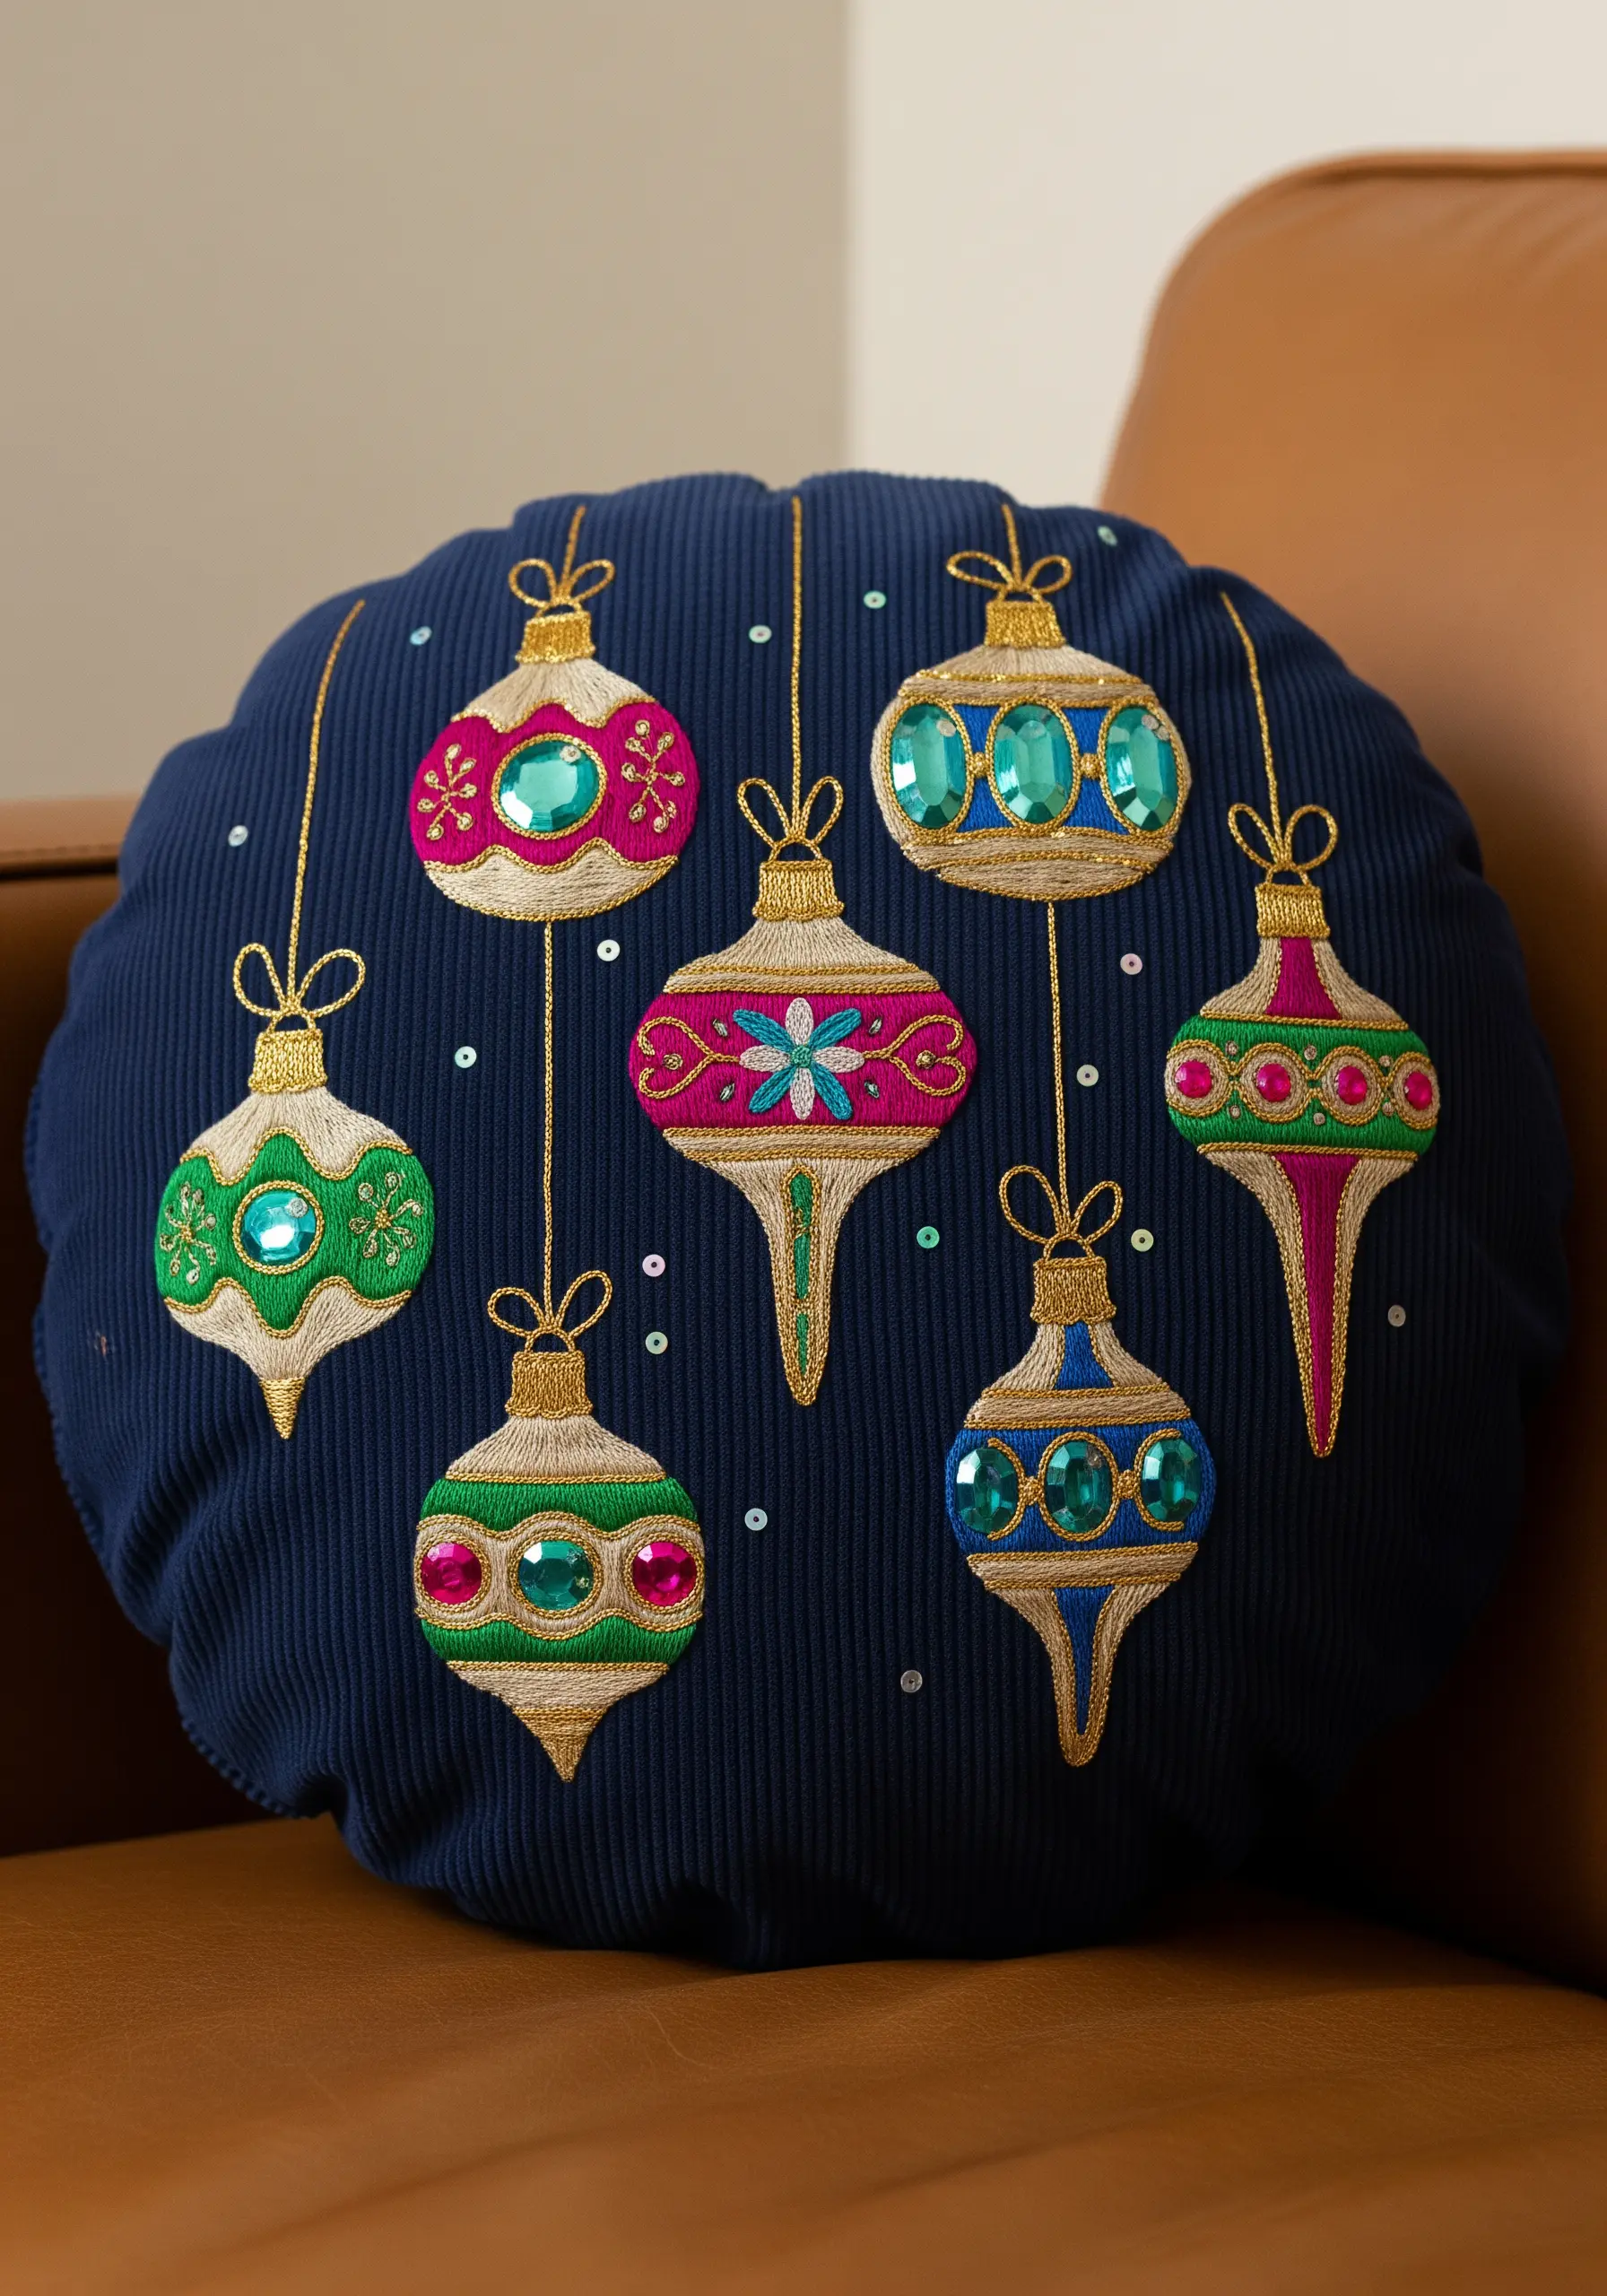
Recreate the look of vintage glass ornaments by combining bold satin stitch with high-shine embellishments.
First, fill the colored sections with a dense, smooth satin stitch using a high-sheen rayon or silk thread.
Then, outline each shape by couching a thick metallic cord; this technique involves laying the cord on the surface and tacking it down with small, discreet stitches, creating a perfectly clean and raised edge.
Finish by securing sequins or large beads in the center to mimic faceted jewels, adding a touch of glamour that elevates the entire design.
4. Embroider on Knit Fabric for Ultimate Coziness
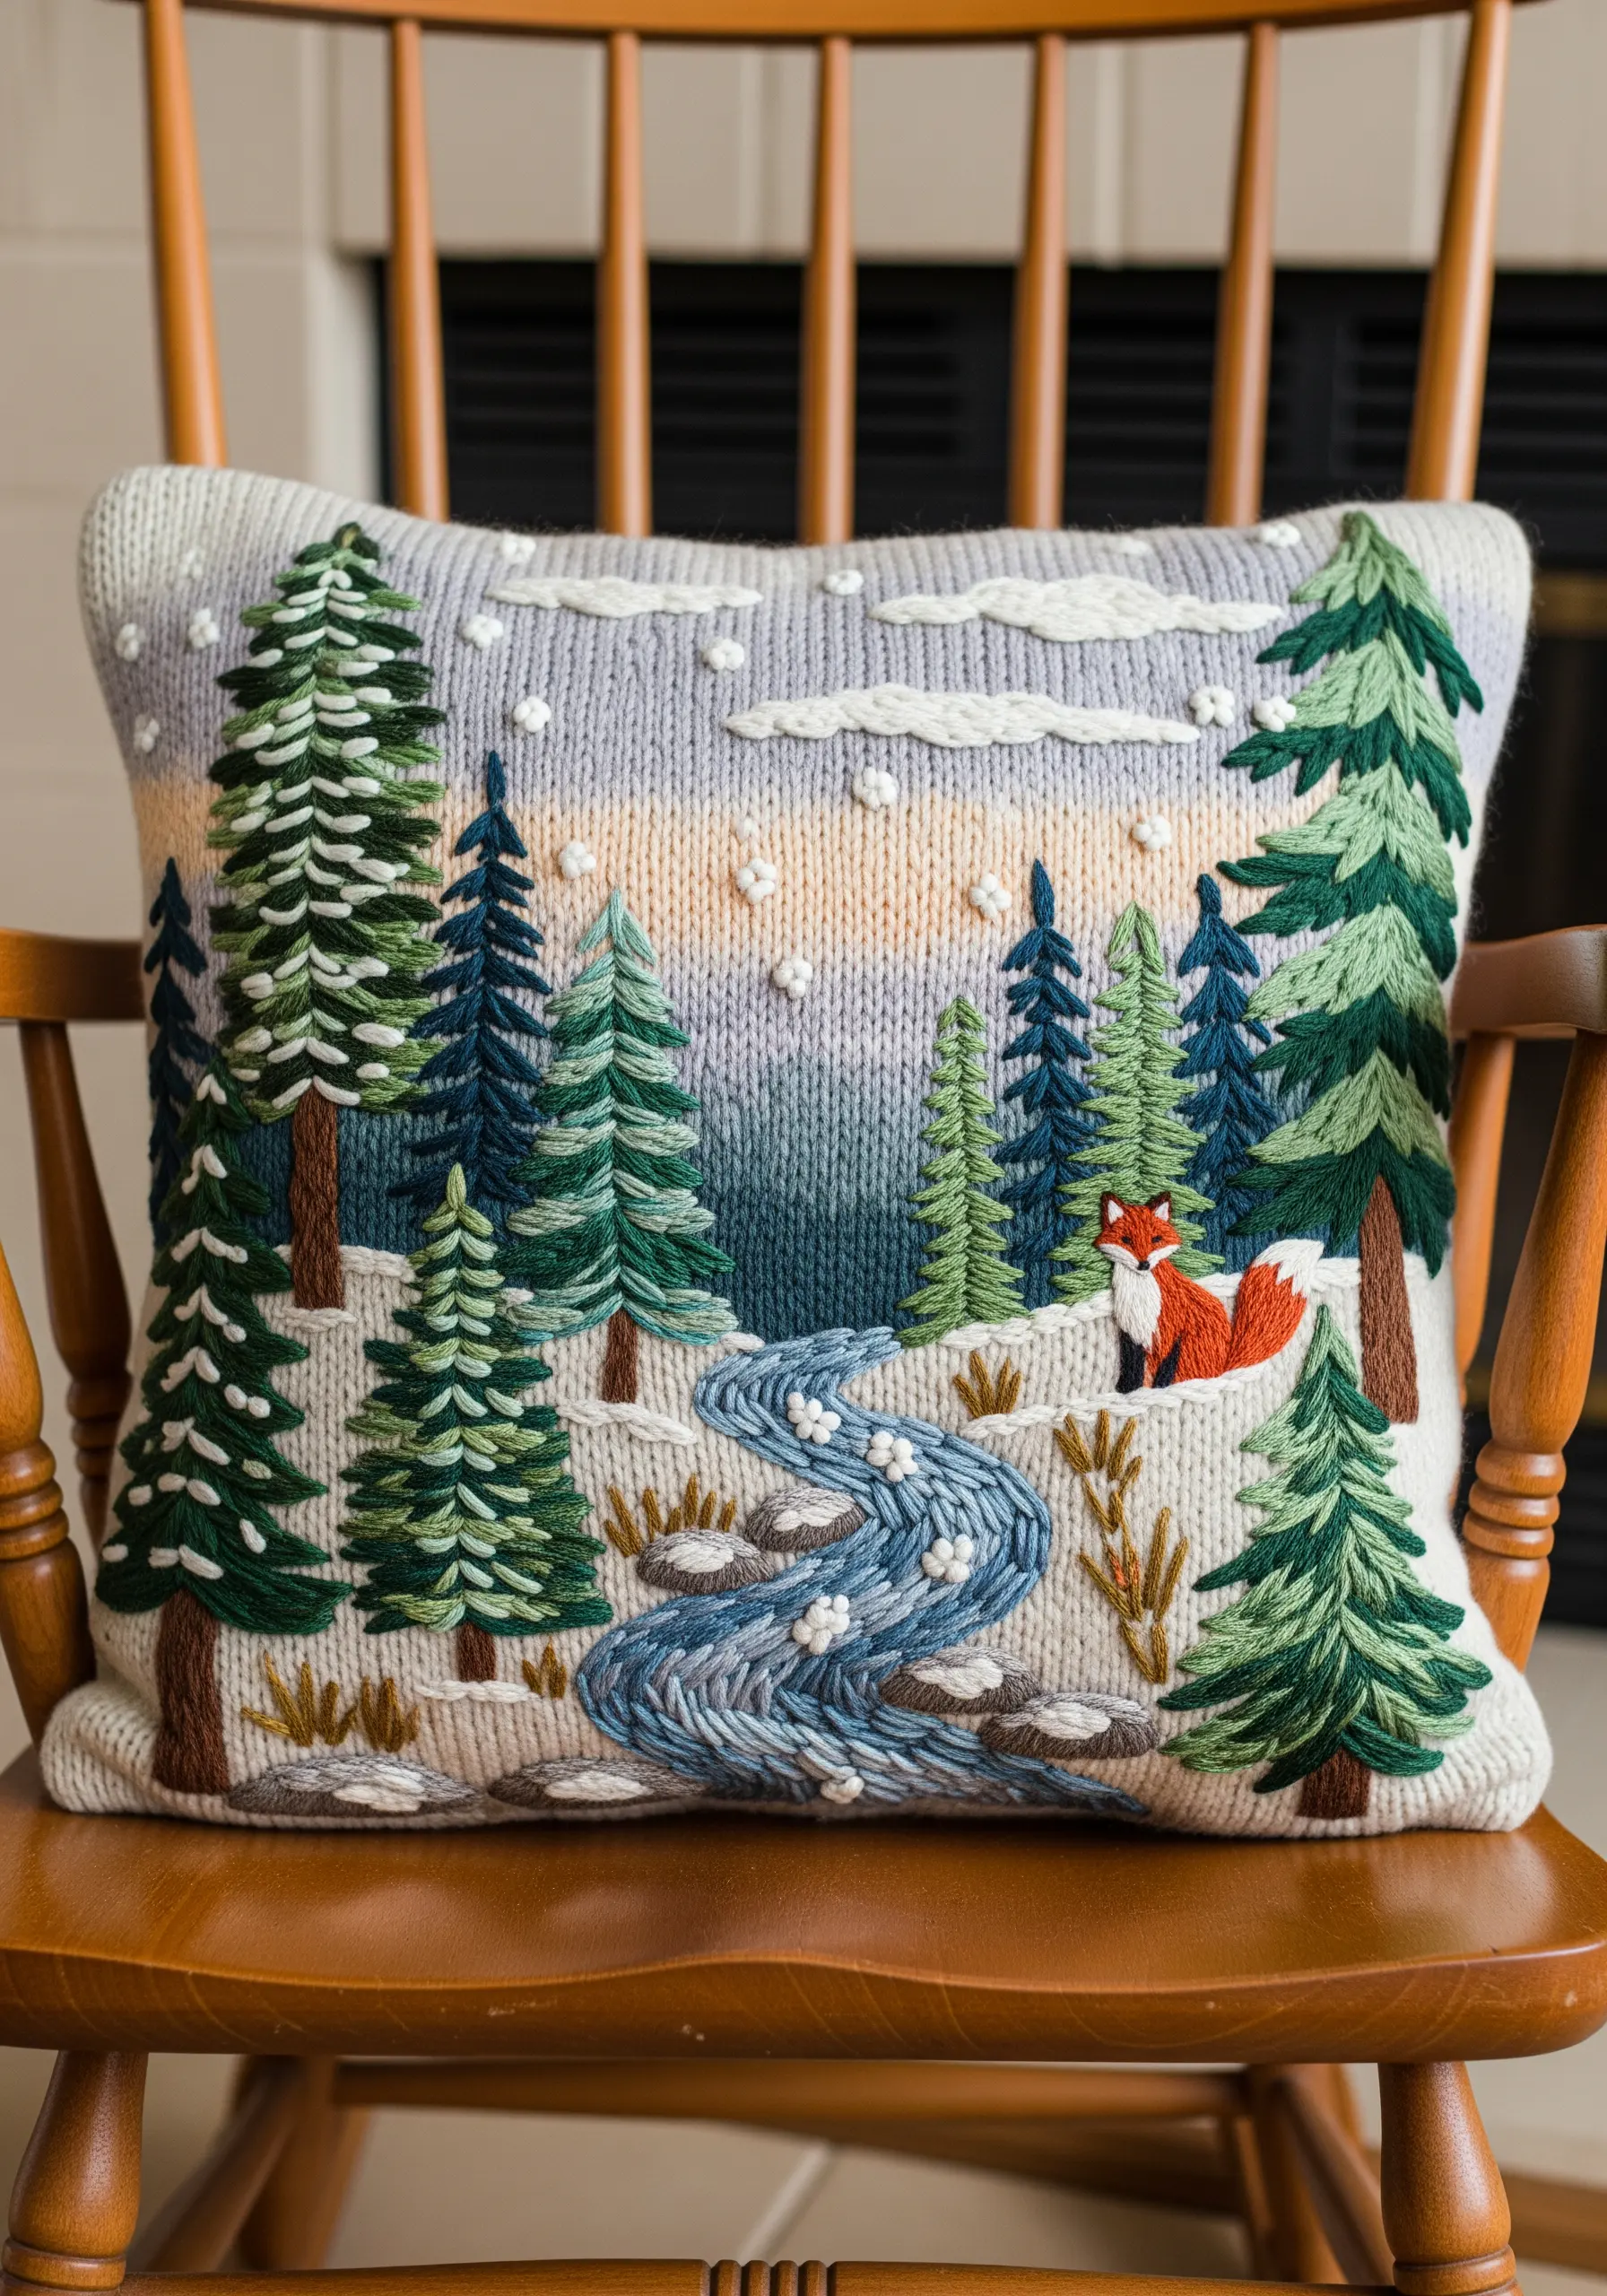
Stitching on a knit surface offers incredible texture, but it requires preparation to prevent stretching.
Always use a stick-on, wash-away stabilizer on the front of your pillow to create a solid foundation for your stitches.
Embrace a variety of textural stitches: use vertical satin stitches for tree trunks, layered fishbone stitches for pine boughs, and dense French knots for snow.
For the flowing river, a variegated blue thread in a simple backstitch creates the illusion of moving water with just one floss.
This approach turns the pillow’s knit texture into a seamless part of your nature texture embroidery projects that feel amazingly real.
5. Master the Padded Satin Stitch for 3D Berries
Give your holly berries a plush, three-dimensional form using a padded satin stitch.
Before you begin your red satin stitches, create a small foundation of underlying stitches (seed stitches or a few horizontal straight stitches) within the berry’s outline.
Work your final satin stitch over this padding; the extra height makes the berries pop from the surface, creating a much more dynamic and tactile design.
For the leaves, use a classic fishbone stitch to create that essential central vein and graceful shape.
6. Couch Chunky Yarn for Bold Lettering
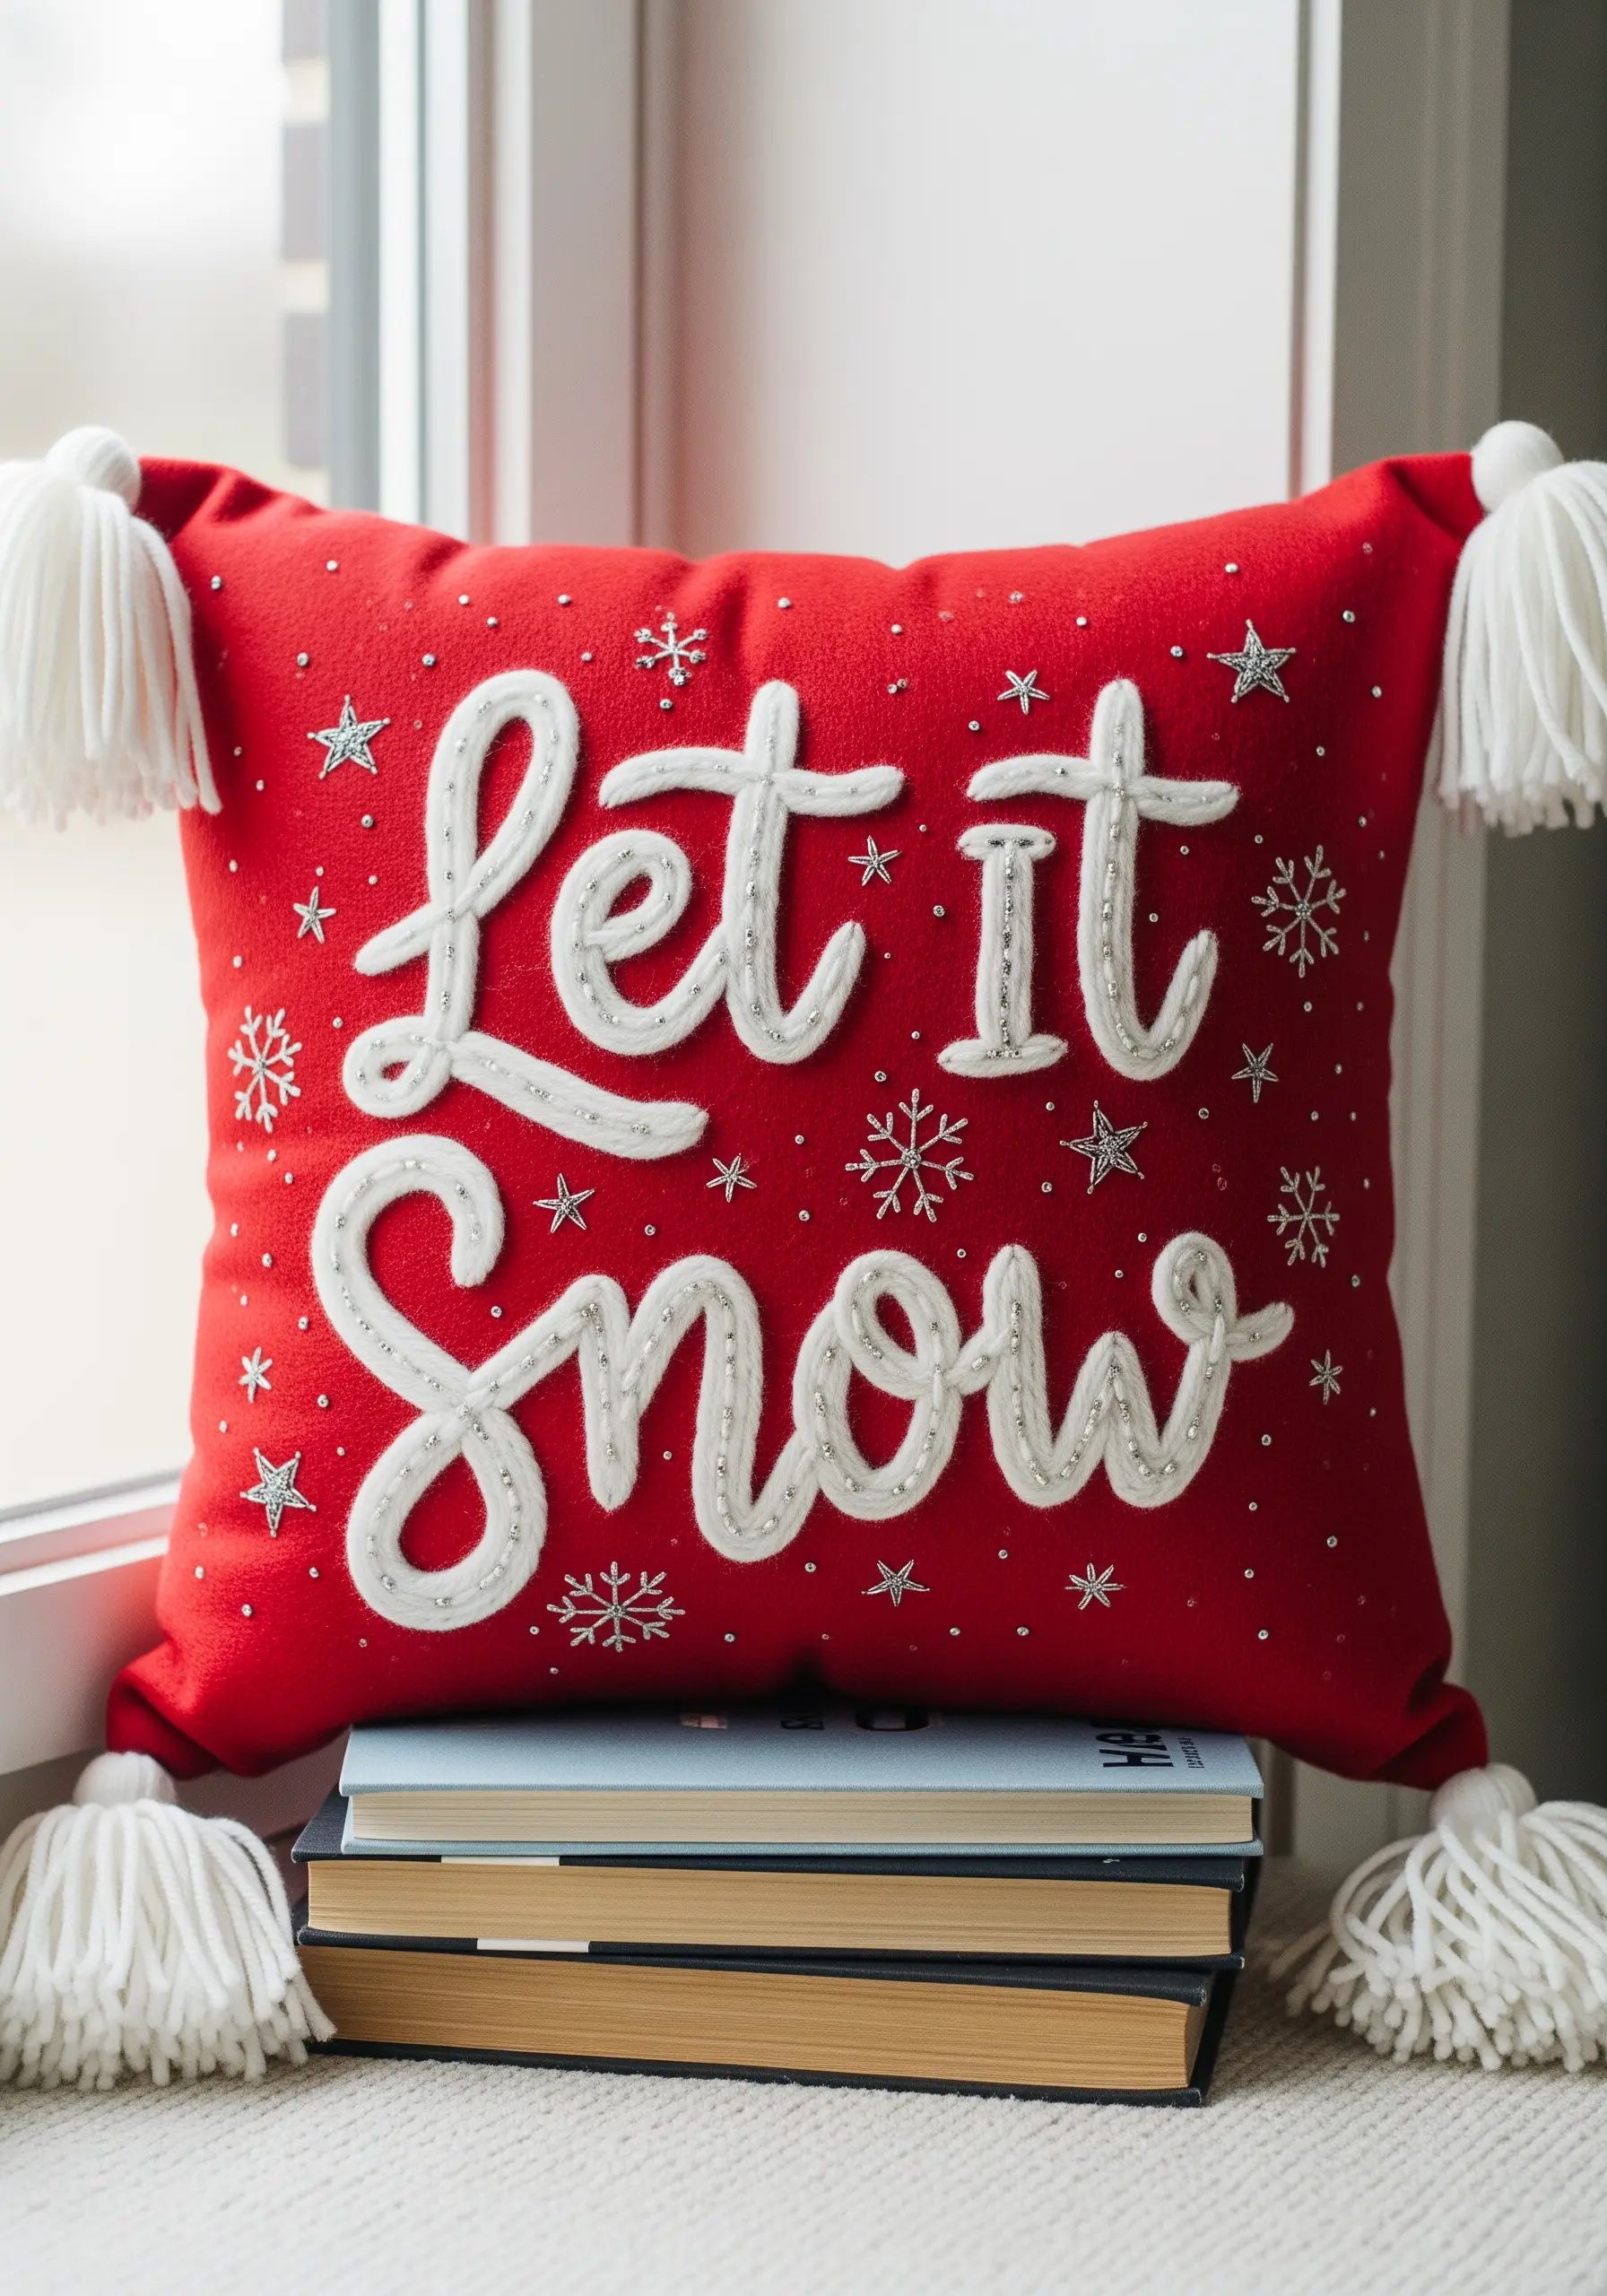
For large-scale, soft lettering that stands out, skip the satin stitch and opt for couched yarn instead.
Lay down a thick, fluffy yarn (like chenille or roving) along your drawn cursive letters.
Using a single strand of matching embroidery floss, make small, evenly spaced tacking stitches over the yarn to secure it to the pillow.
This method is faster than filling the letters and creates a delightful, plush texture that you can enhance with scattered seed beads or sequins for a snowy sparkle.
7. Embrace Graphic Style with Cross-Stitch
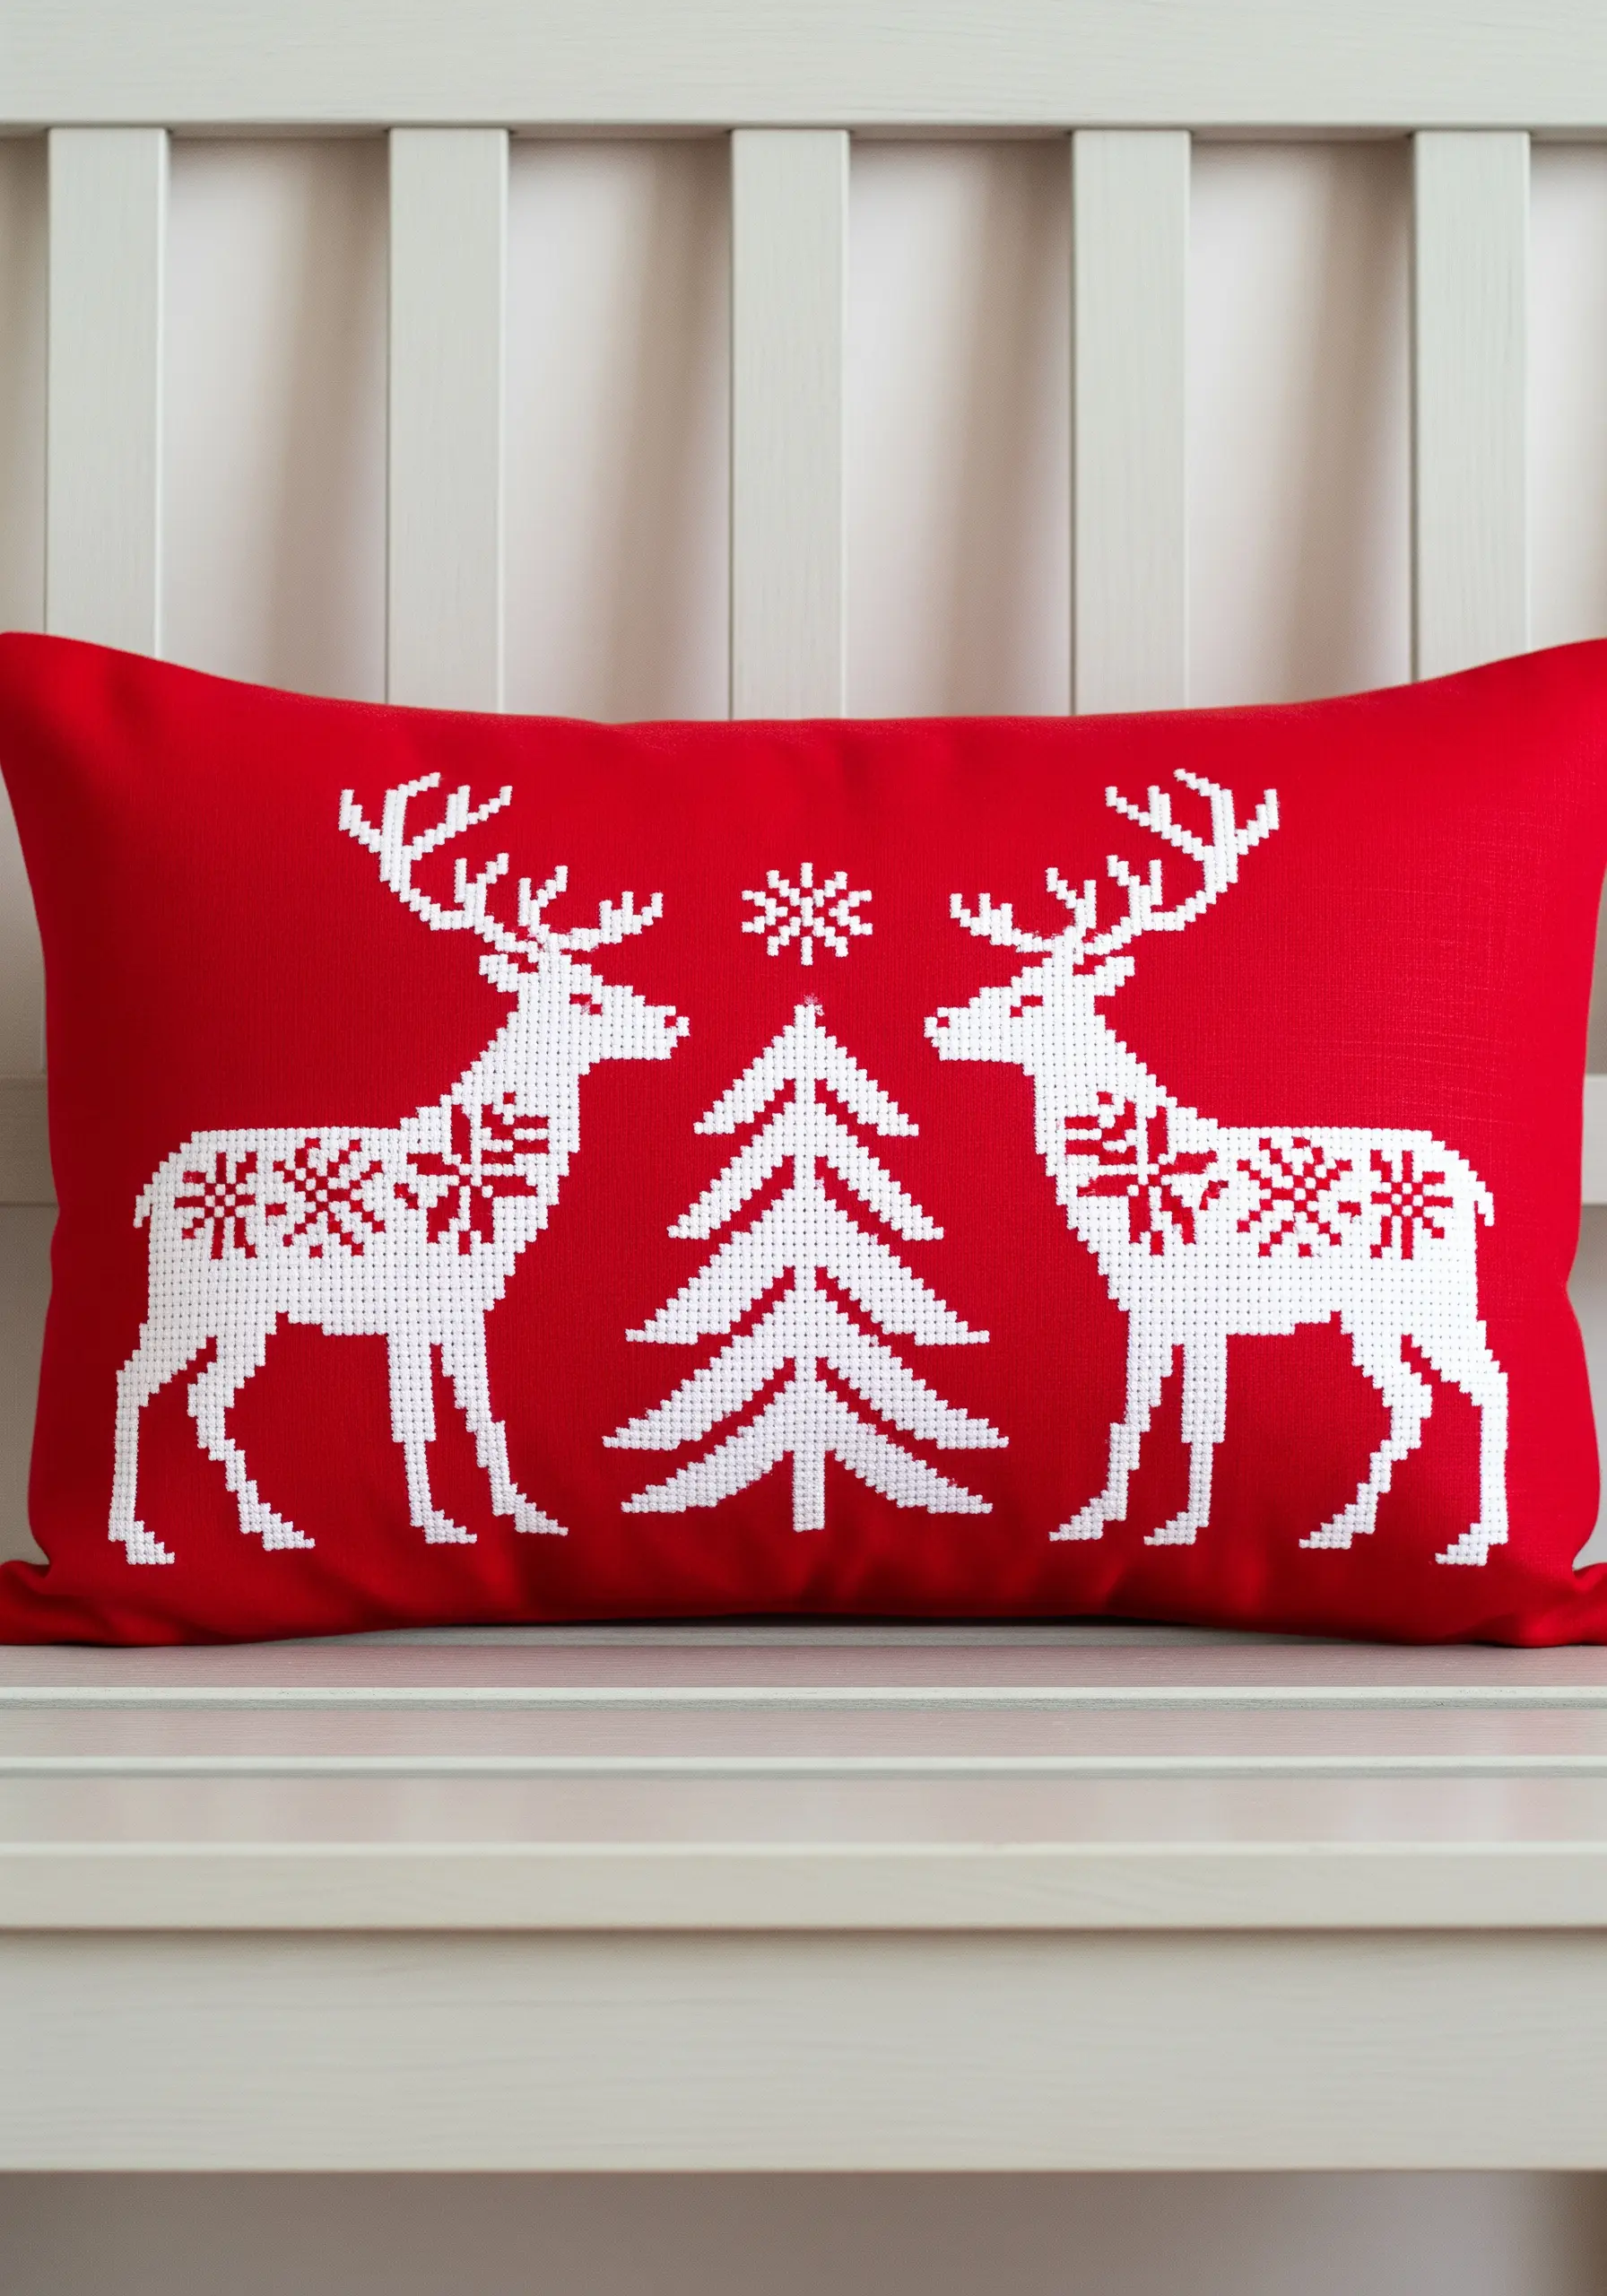
For a clean, Scandinavian-inspired aesthetic, translate your holiday motifs into cross-stitch.
This technique creates a charming, stylized look that pairs perfectly with modern or rustic decor.
To stitch on plain pillow fabric that isn’t Aida cloth, use a waste canvas—you baste it onto your pillow, stitch your design following its grid, and then pull out the canvas threads one by one when you’re done.
The result is a perfectly gridded design on any fabric you choose.
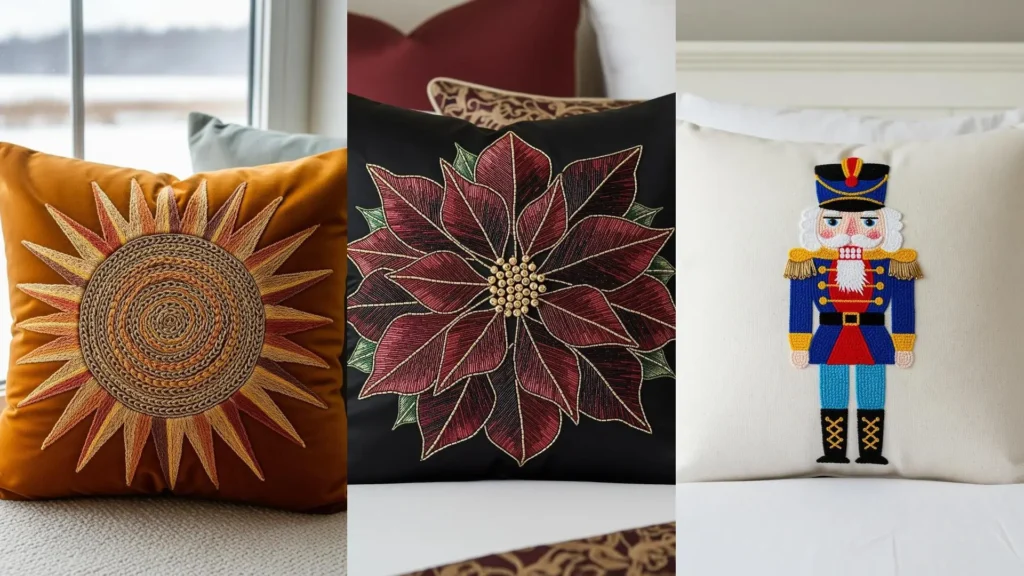
8. Use Metallics to Define and Illuminate
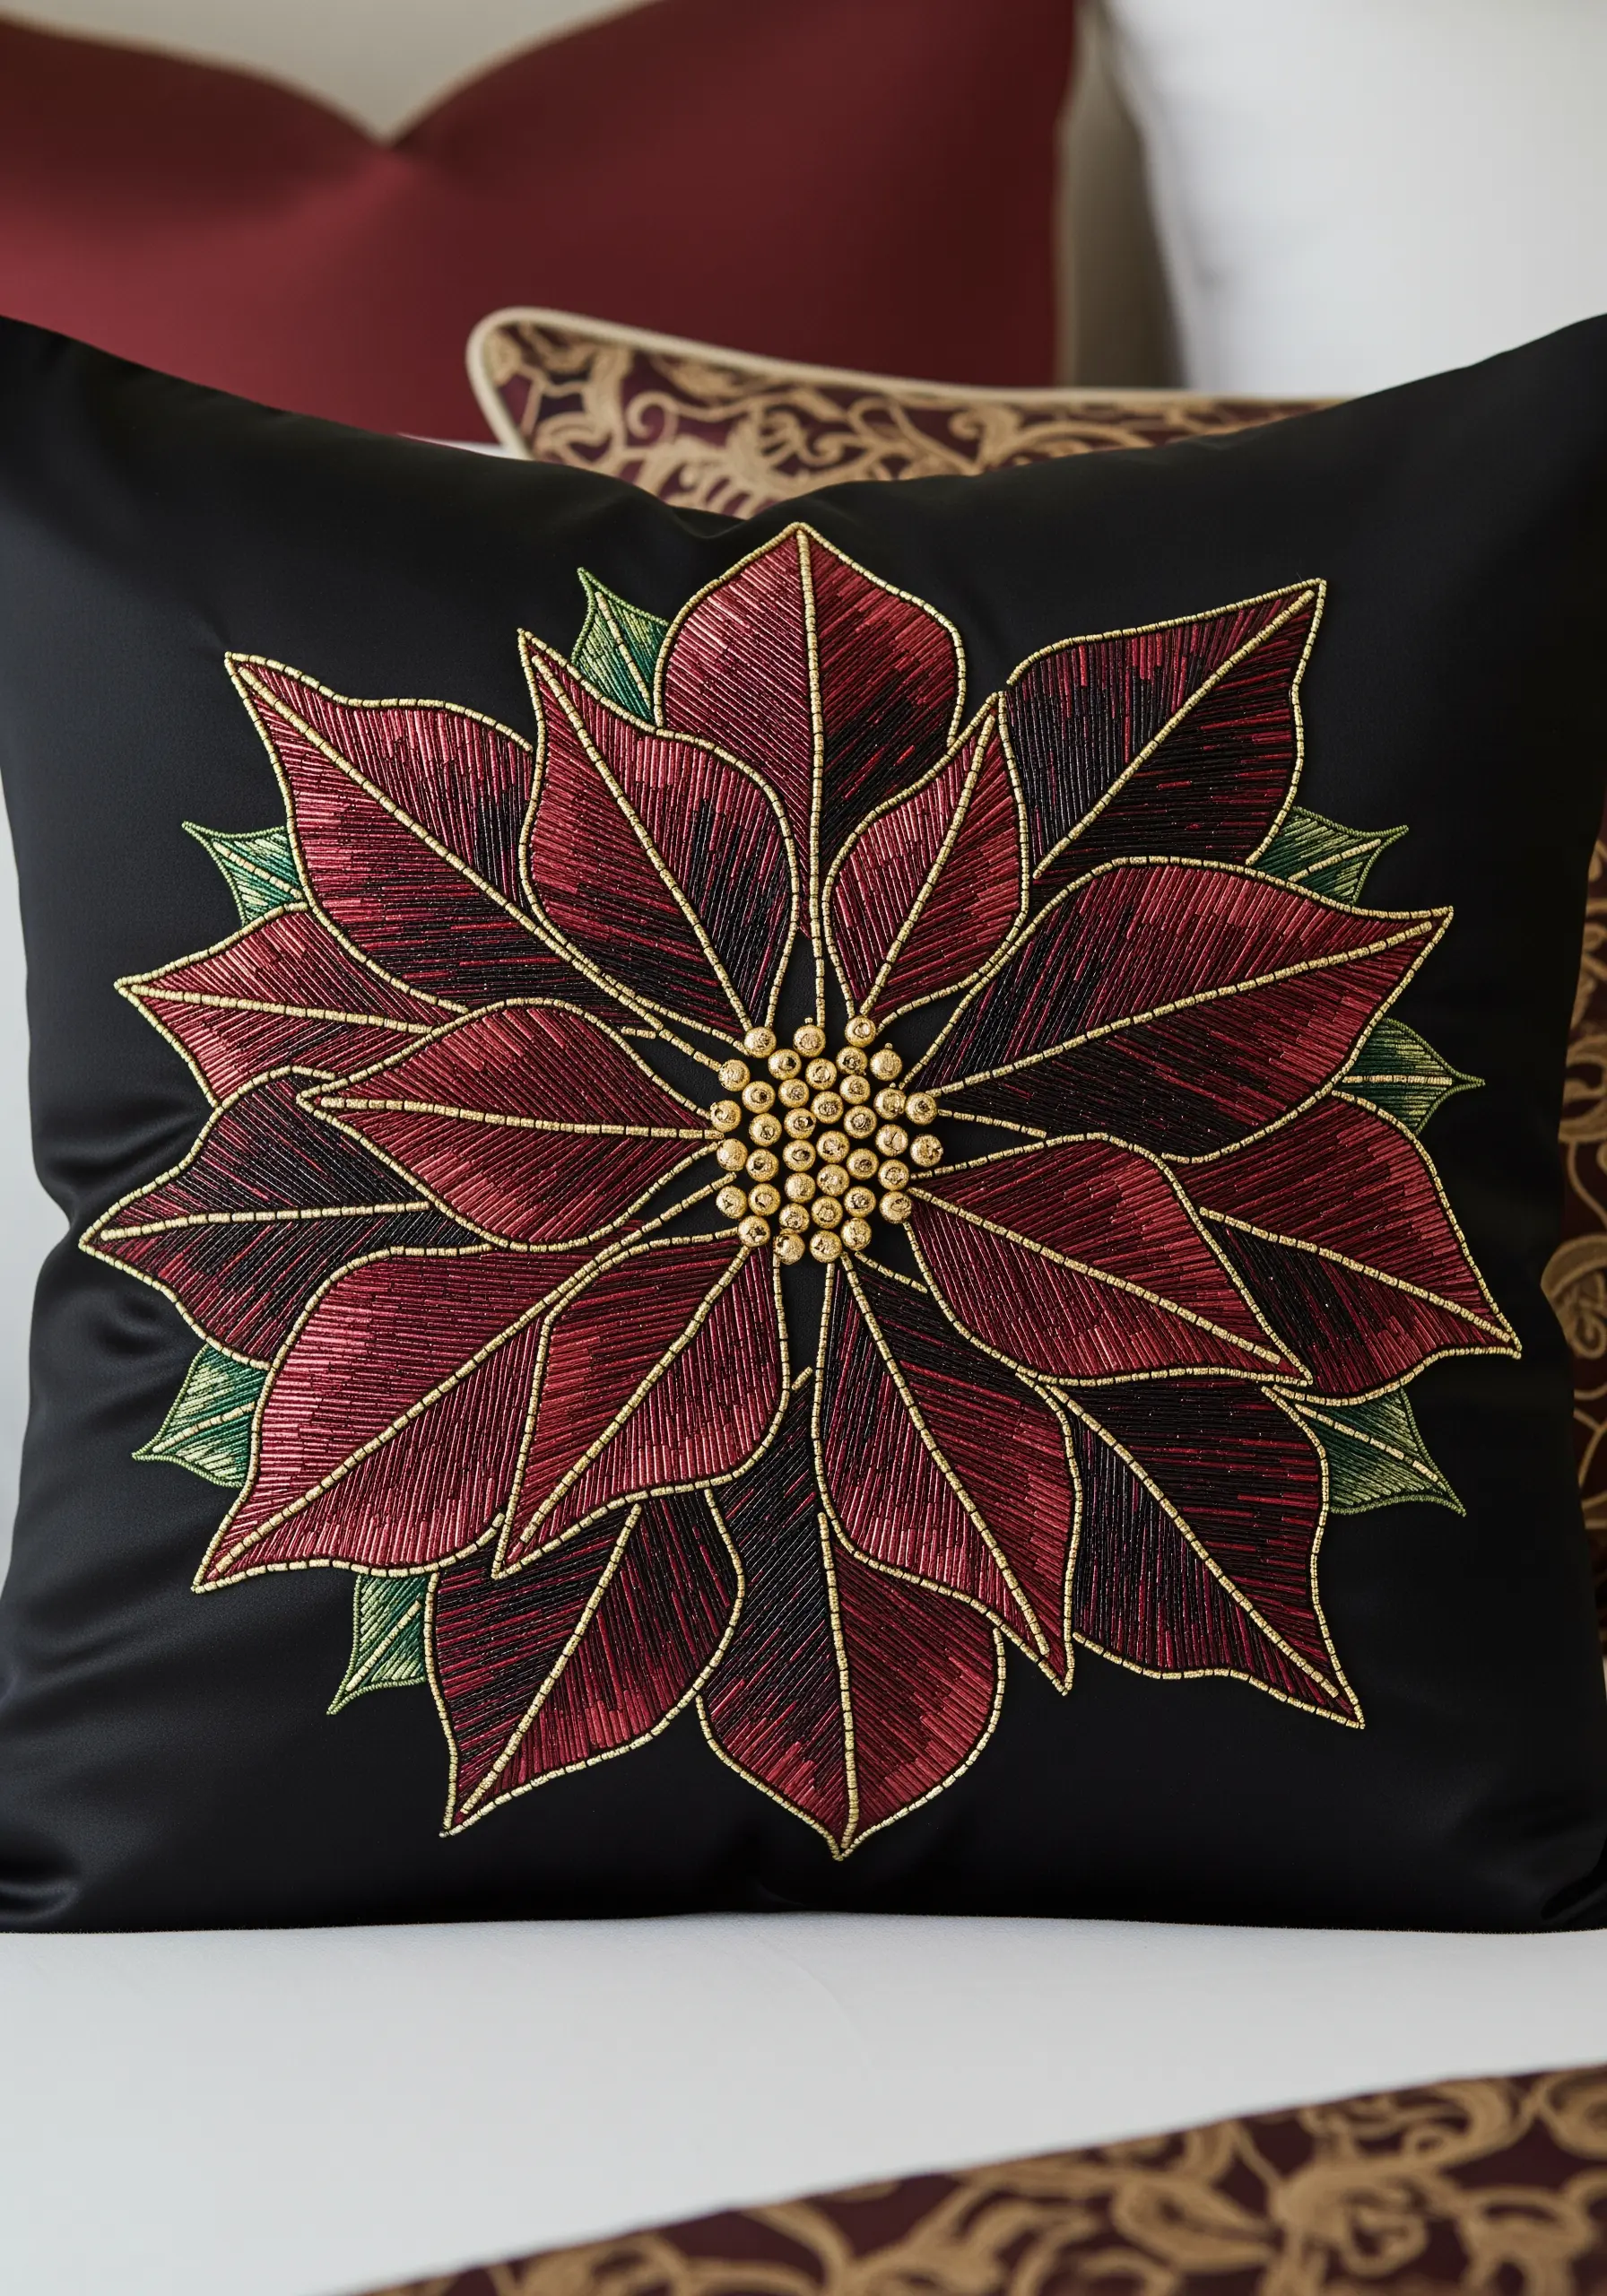
Make your poinsettia petals glow by outlining each one with a fine metallic thread.
Fill the petals with a rich red long-and-short stitch, ensuring your stitches all flow outward from the center.
Then, carefully outline each petal’s edge with a single strand of gold thread using a backstitch or stem stitch.
This technique not only defines the shapes but also mimics the way light would catch the edges, adding sophistication and structure.
A dense cluster of gold French knots or beads at the center provides the perfect focal point.
9. Achieve Uniform Texture with Needlepoint
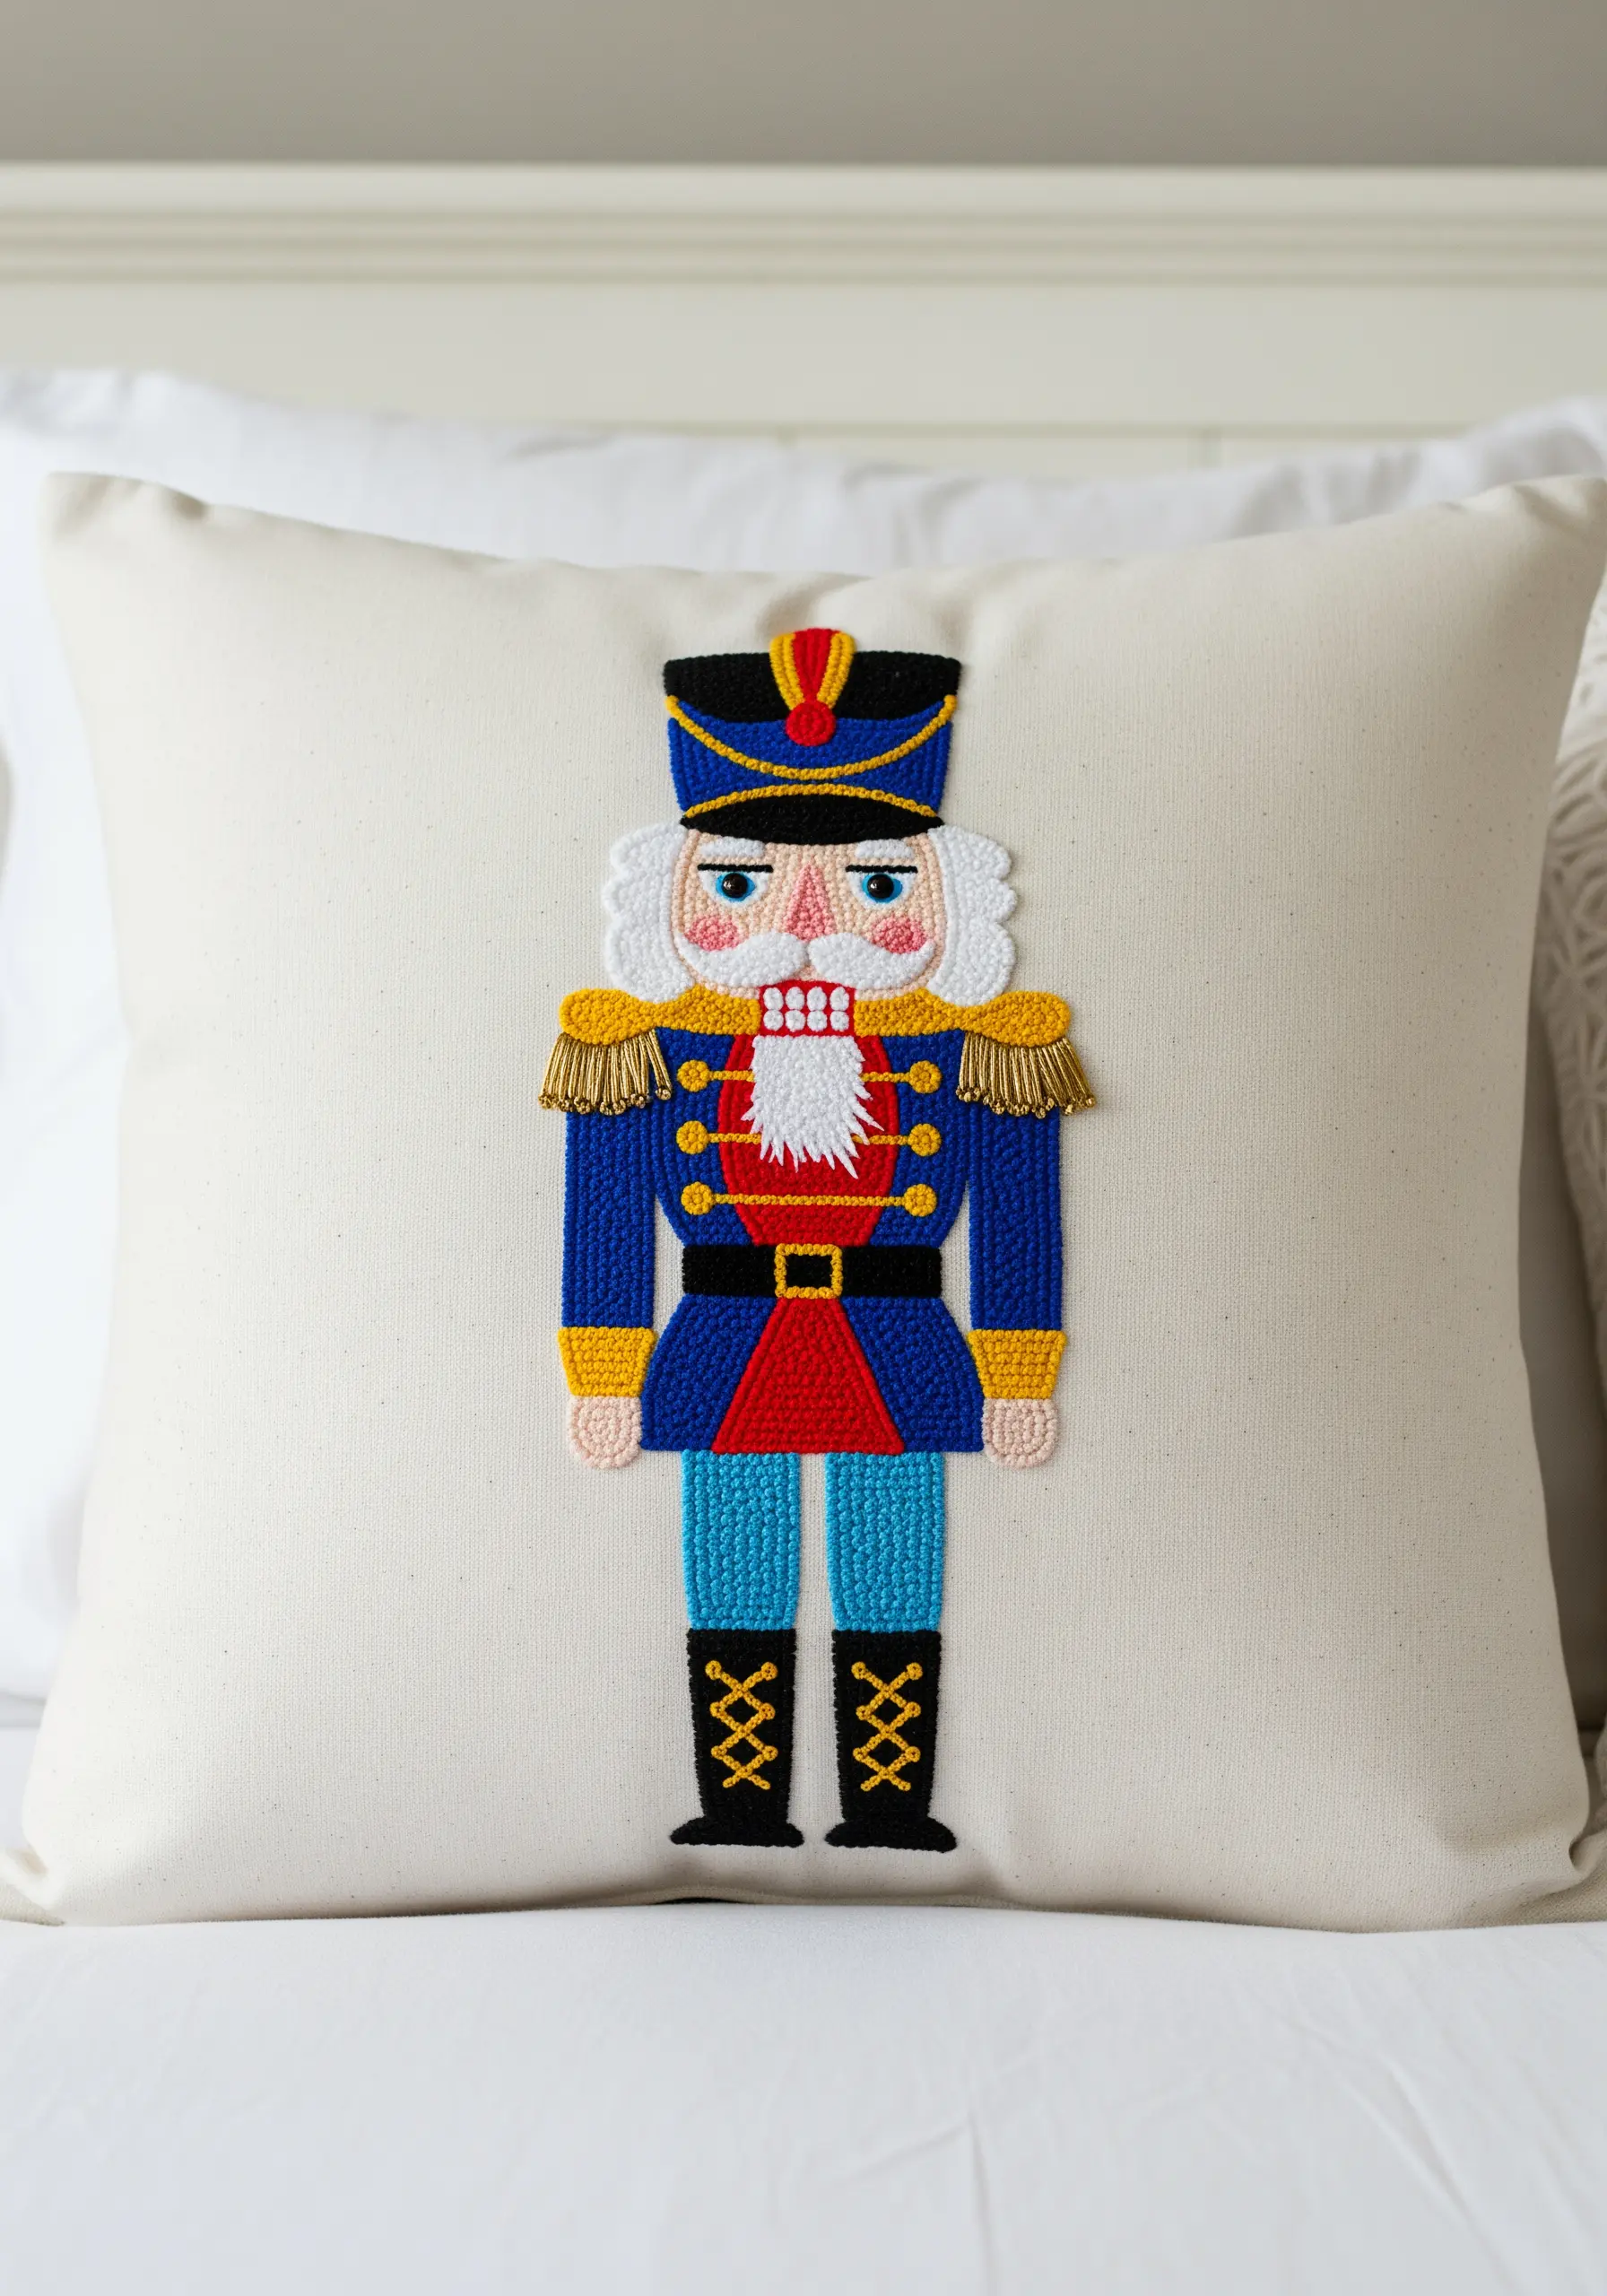
For a design with bold color blocks like this nutcracker, needlepoint offers a satisfyingly uniform and durable texture.
Unlike surface embroidery, needlepoint involves stitching through a canvas grid, with each stitch covering an intersection of the canvas.
Use a simple tent stitch (half cross-stitch) with non-divisible wool thread for a classic, plush finish.
This technique is exceptionally sturdy, making it ideal for a functional pillow that will see a lot of use.
10. Create a Celestial Cascade with Beads and Metallics
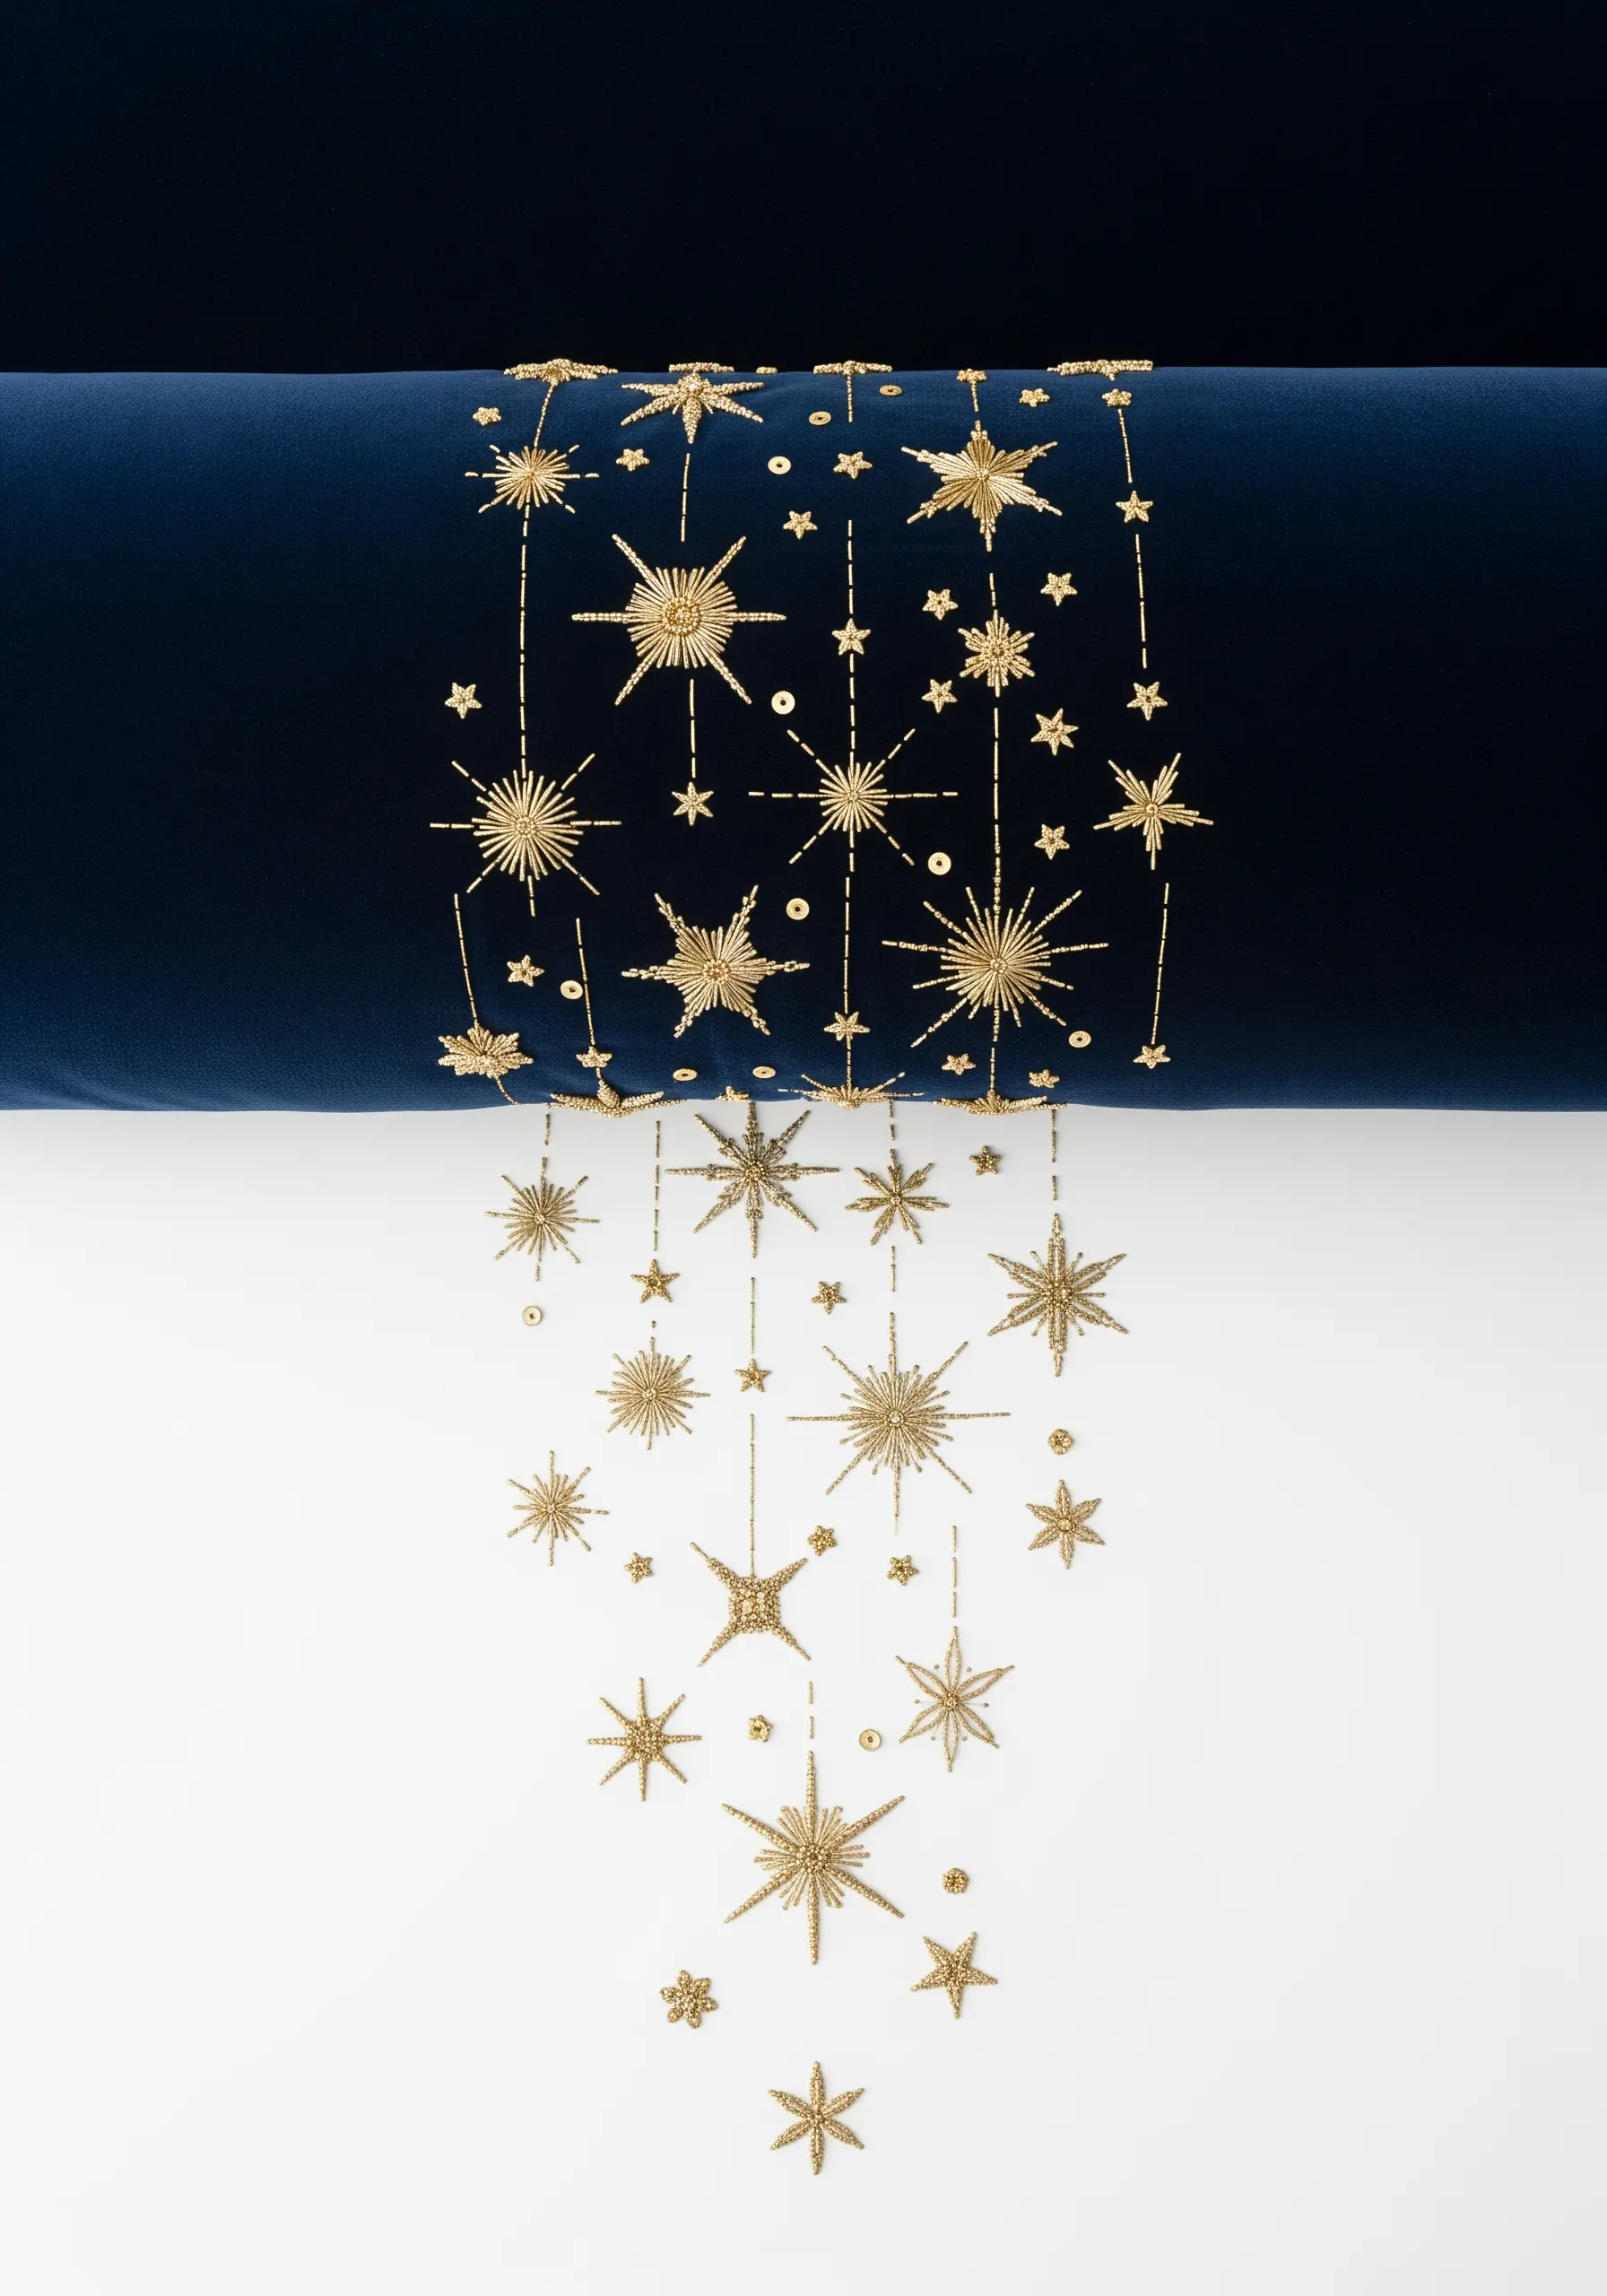
Design a dynamic, cascading starburst pattern using a strategic mix of thread and beads.
Vary the size of your starbursts, stitching them with straight stitches in a high-shine gold metallic thread.
To create depth, use more strands (e.g., four) for the larger, closer stars and fewer strands (one or two) for the smaller, distant ones.
Add tiny gold seed beads to the center of some stars or at the tip of the rays to create focal points of light, turning a simple motif into a glamorous, light-reflecting interior piece.
11. Use Fabric Texture as Your Canvas
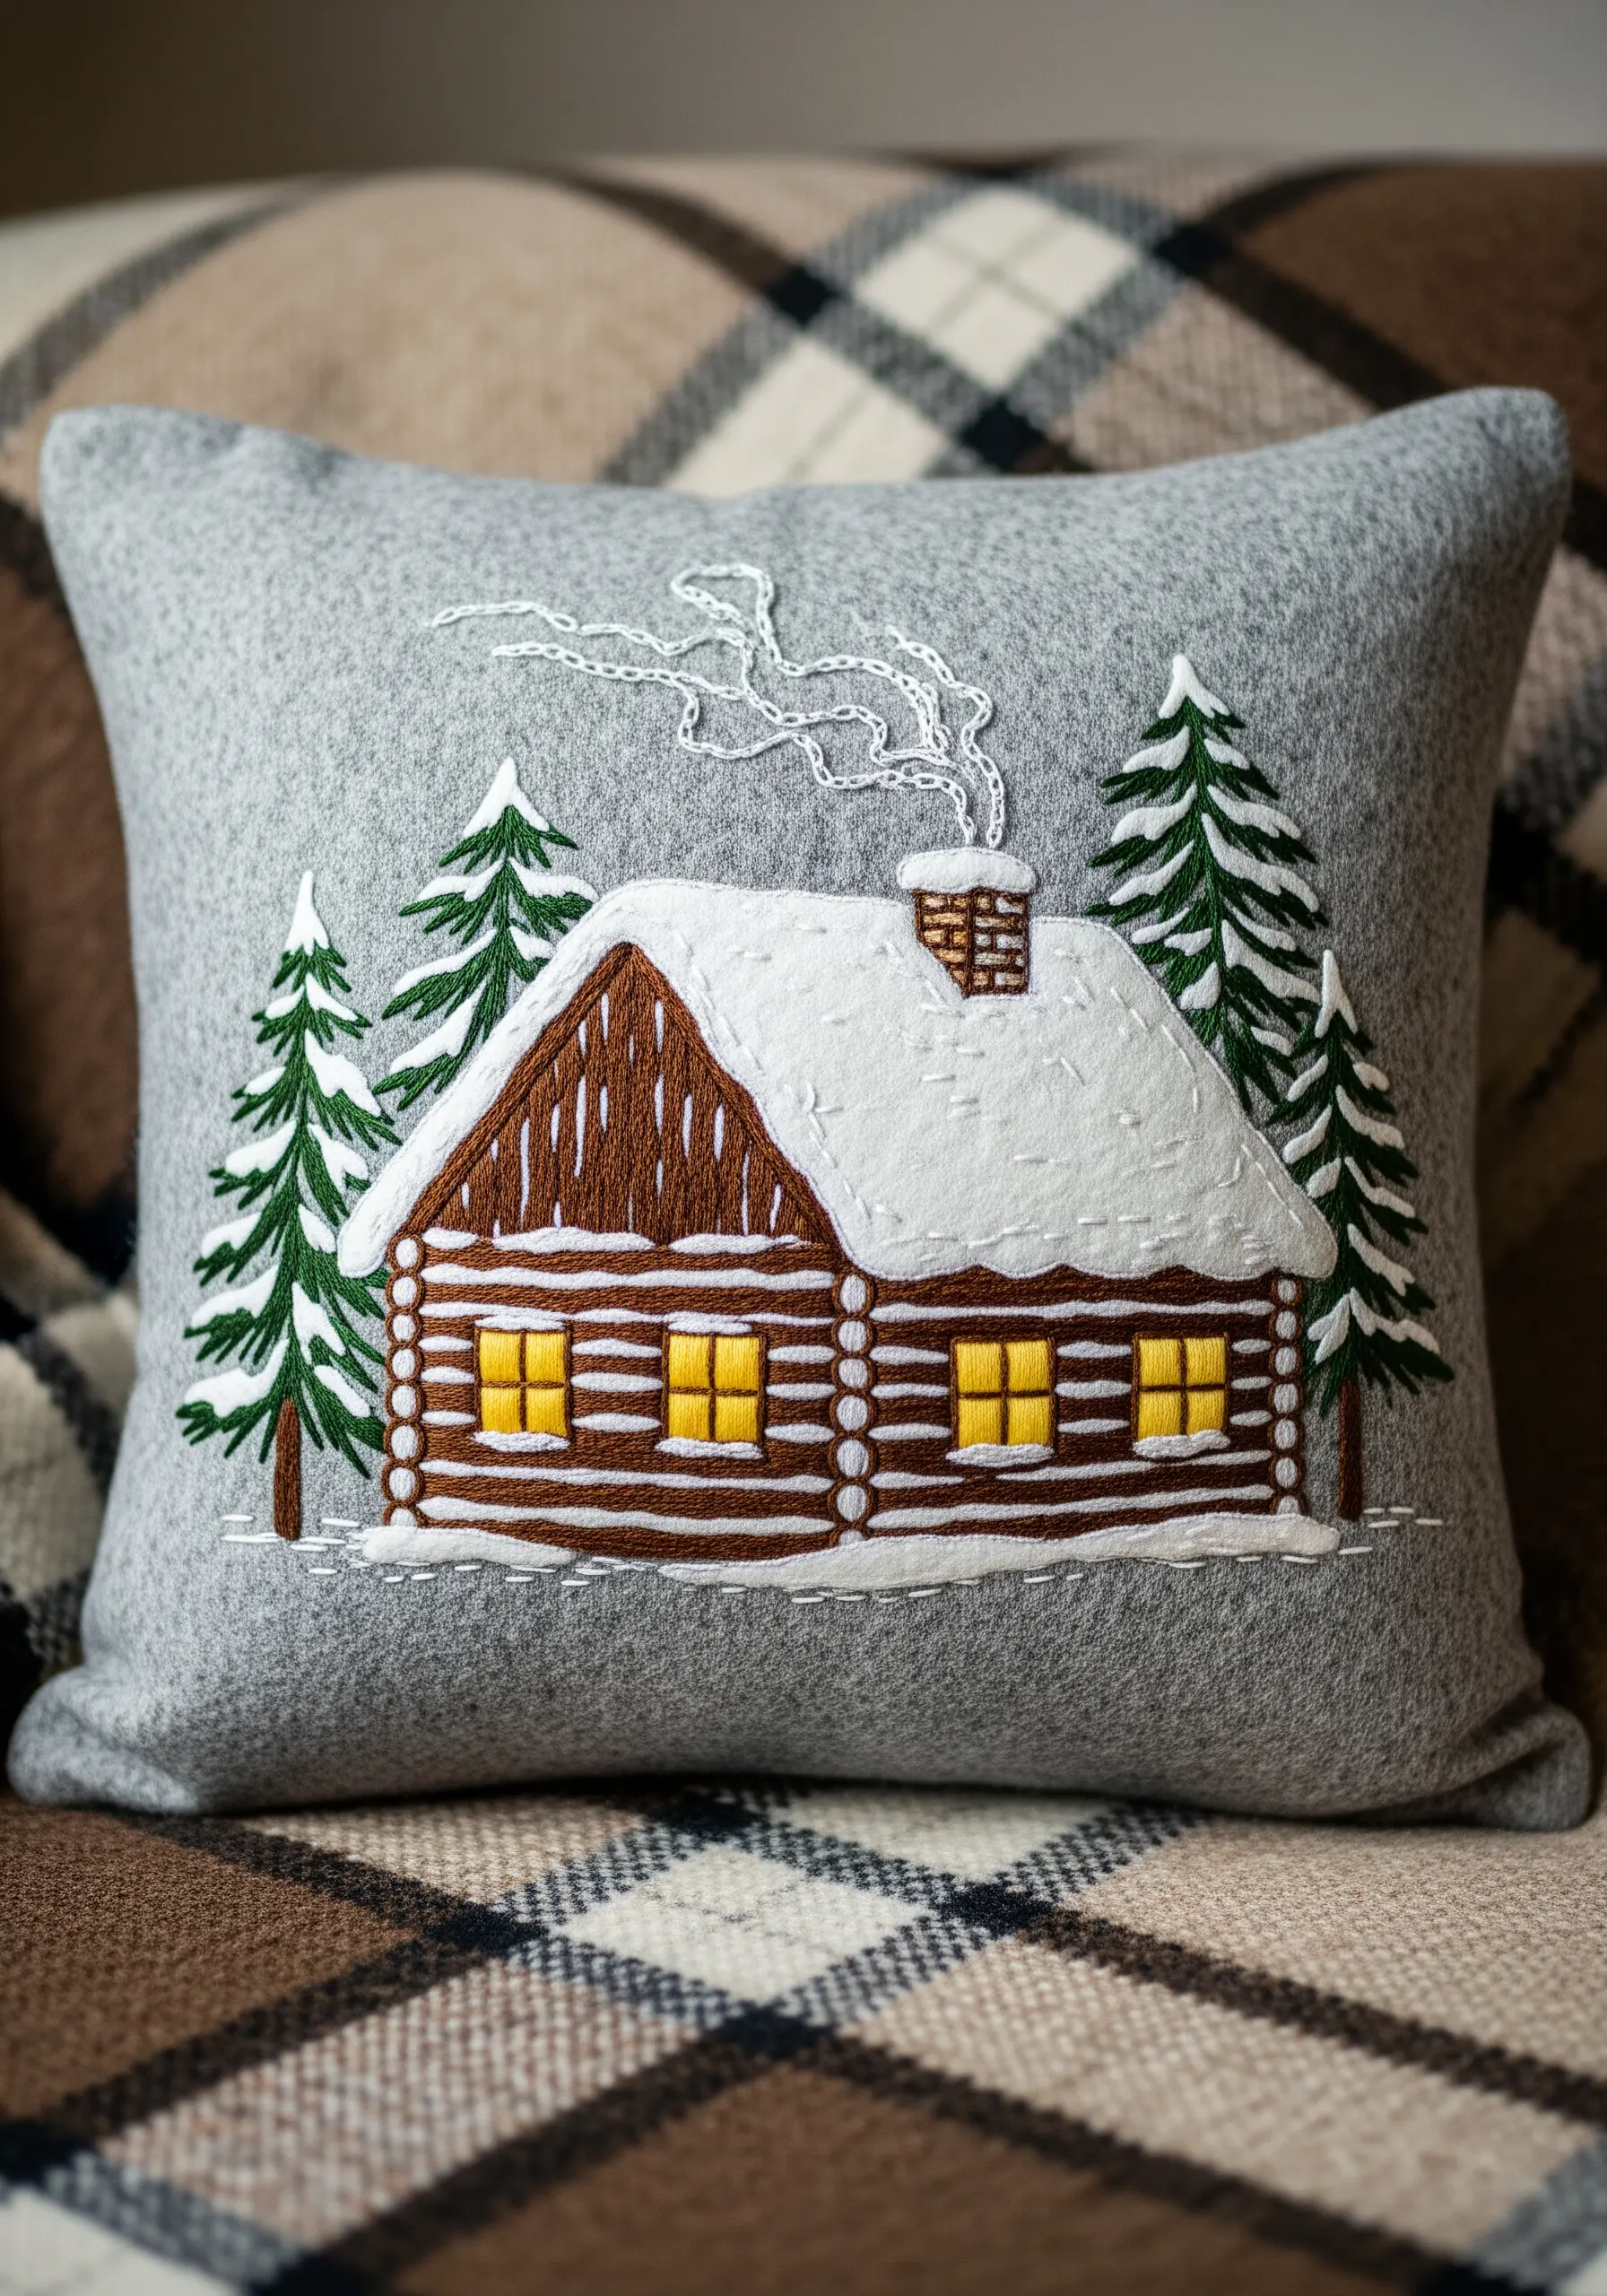
Choose a fabric with its own distinct texture, like this gray wool felt, to add instant warmth and depth to your scene.
The slightly fuzzy surface of the felt complements the cozy log cabin theme perfectly.
To create the snow on the roof, use an appliqué of white felt and add simple straight stitches for texture, rather than filling the whole area with floss.
For the smoke, use a wispy, freeform stem stitch with a loosely twisted thread to give it a sense of movement.
12. Mimic Woven Patterns with Geometric Stitches
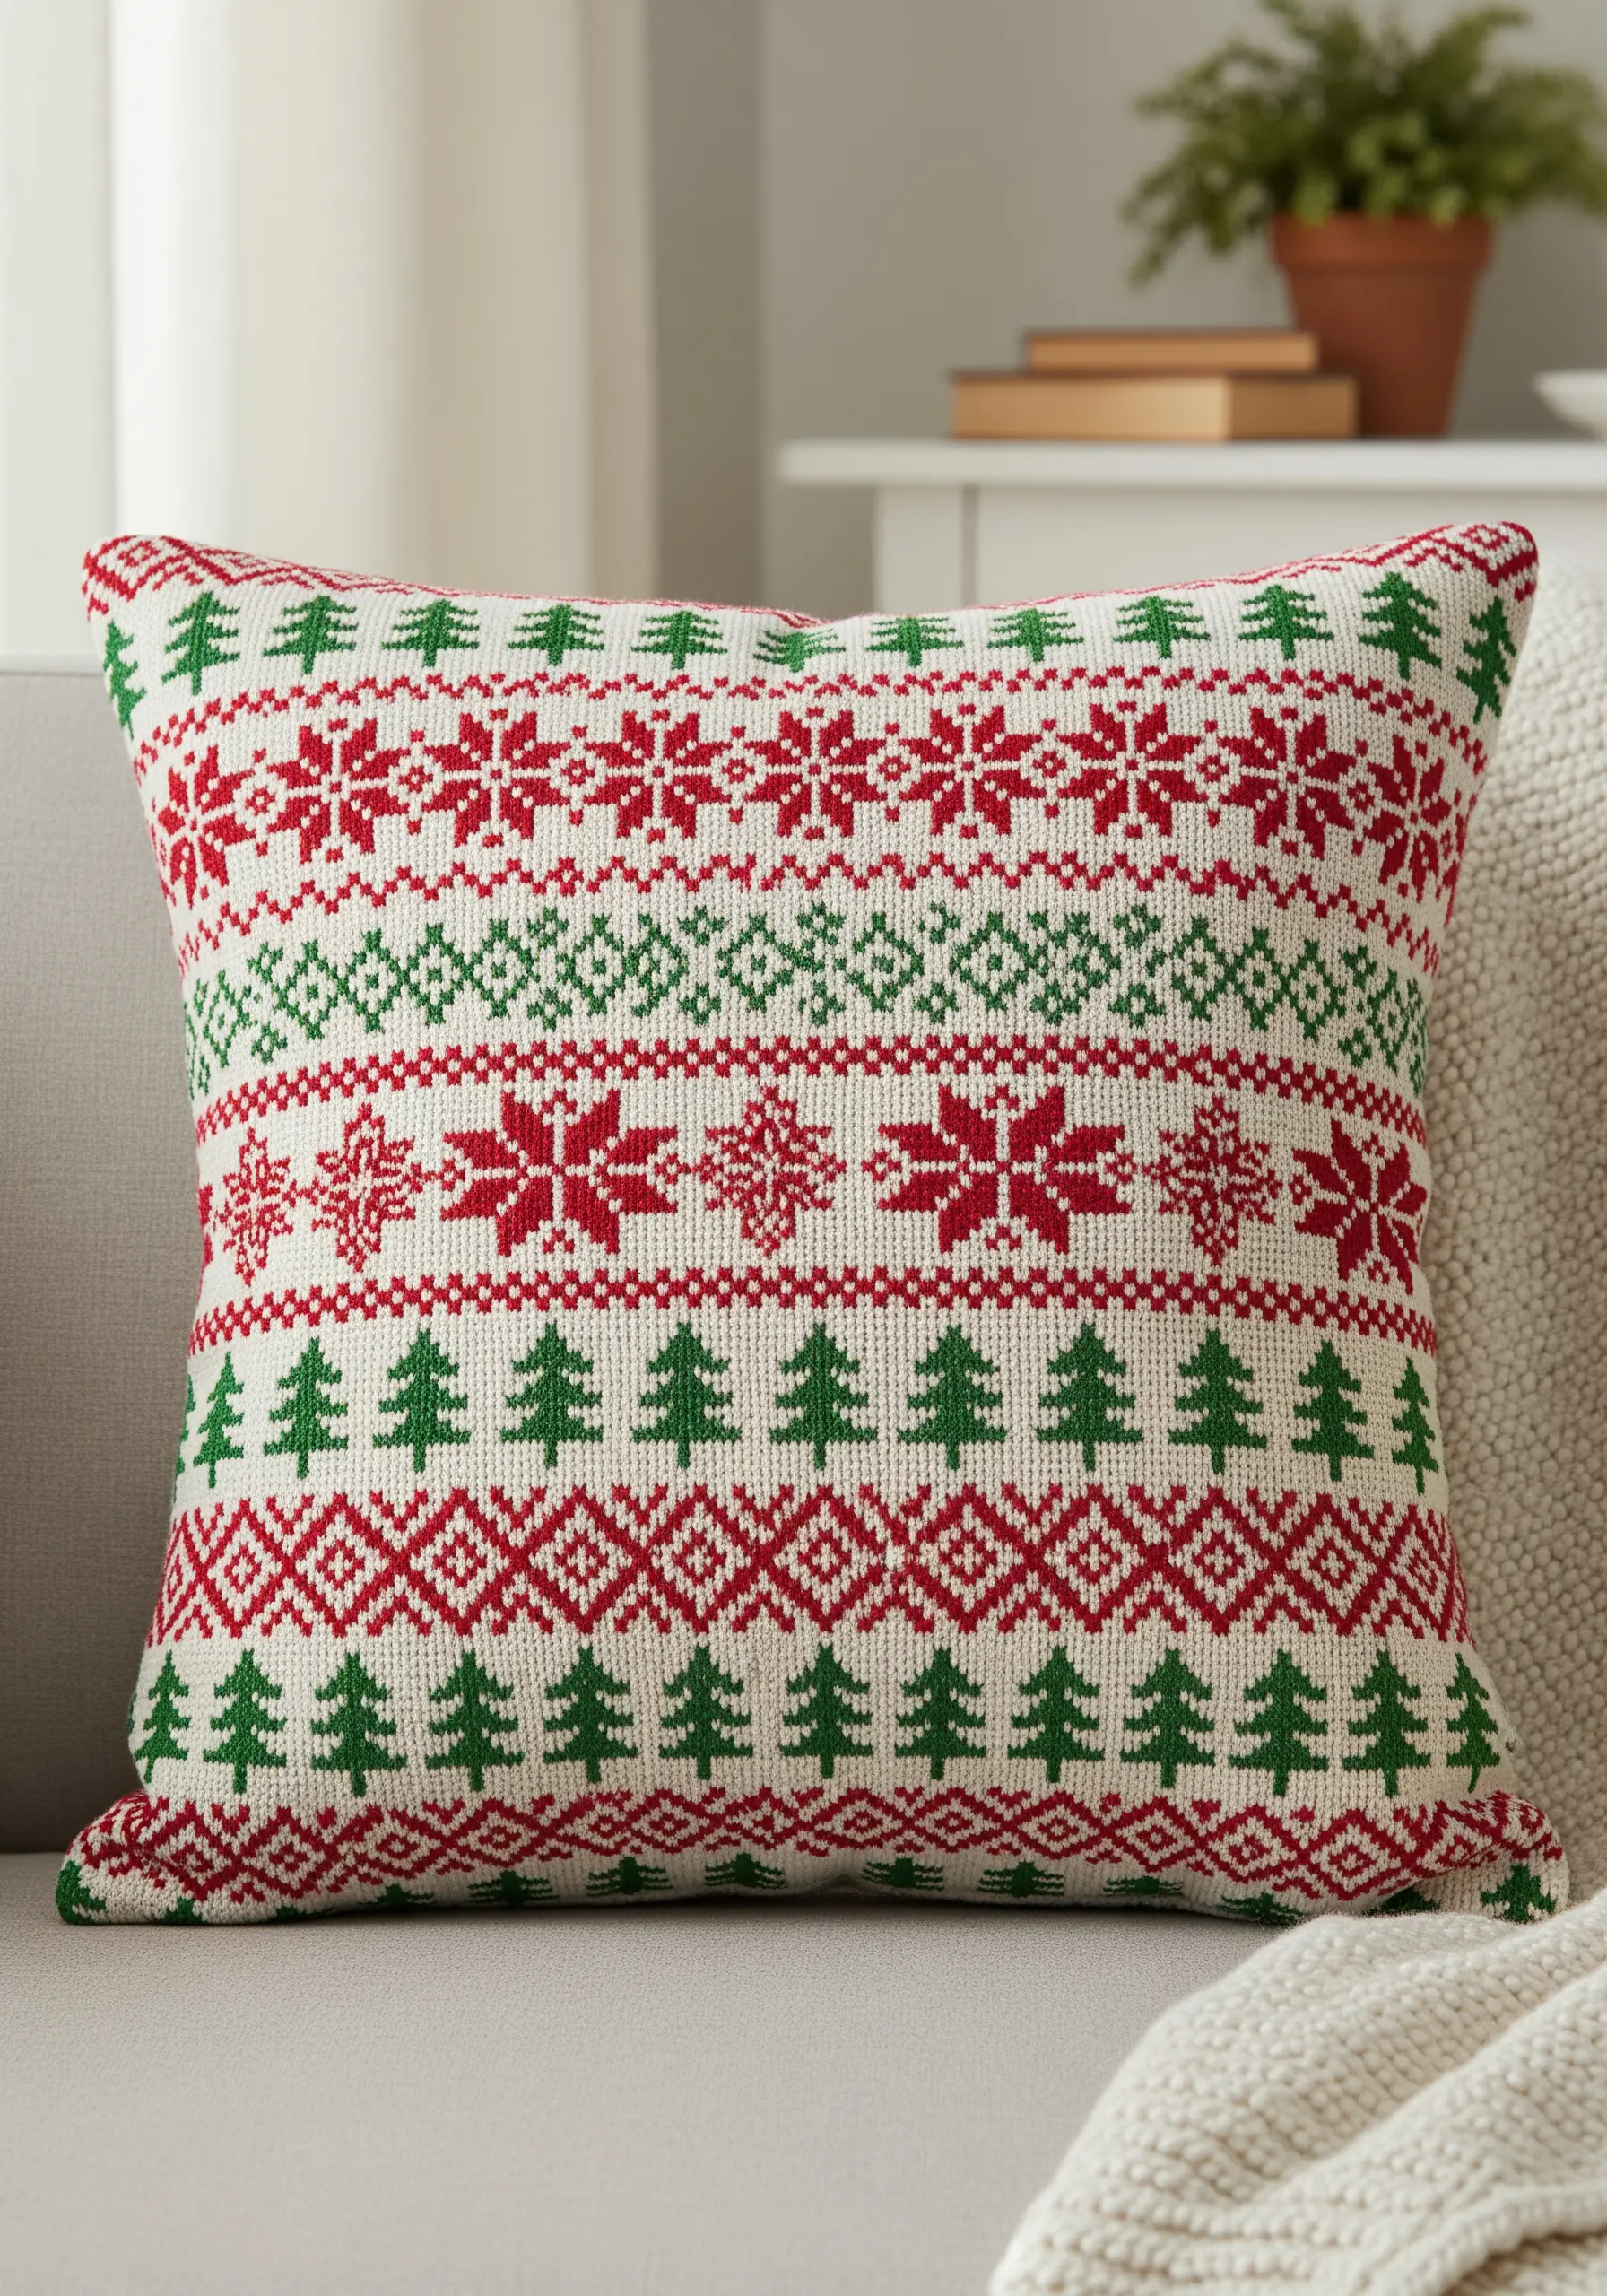
You can replicate the look of a Fair Isle knit pattern using simple, repetitive cross-stitches or satin stitch blocks.
Work in horizontal bands, alternating between motifs like snowflakes, trees, and geometric shapes.
The key to a successful design is strict adherence to a grid pattern and a limited color palette—traditionally red, green, and cream.
This creates a cohesive, rhythmic design that feels both traditional and graphically modern.
13. Add Dimension with Selective Appliqué
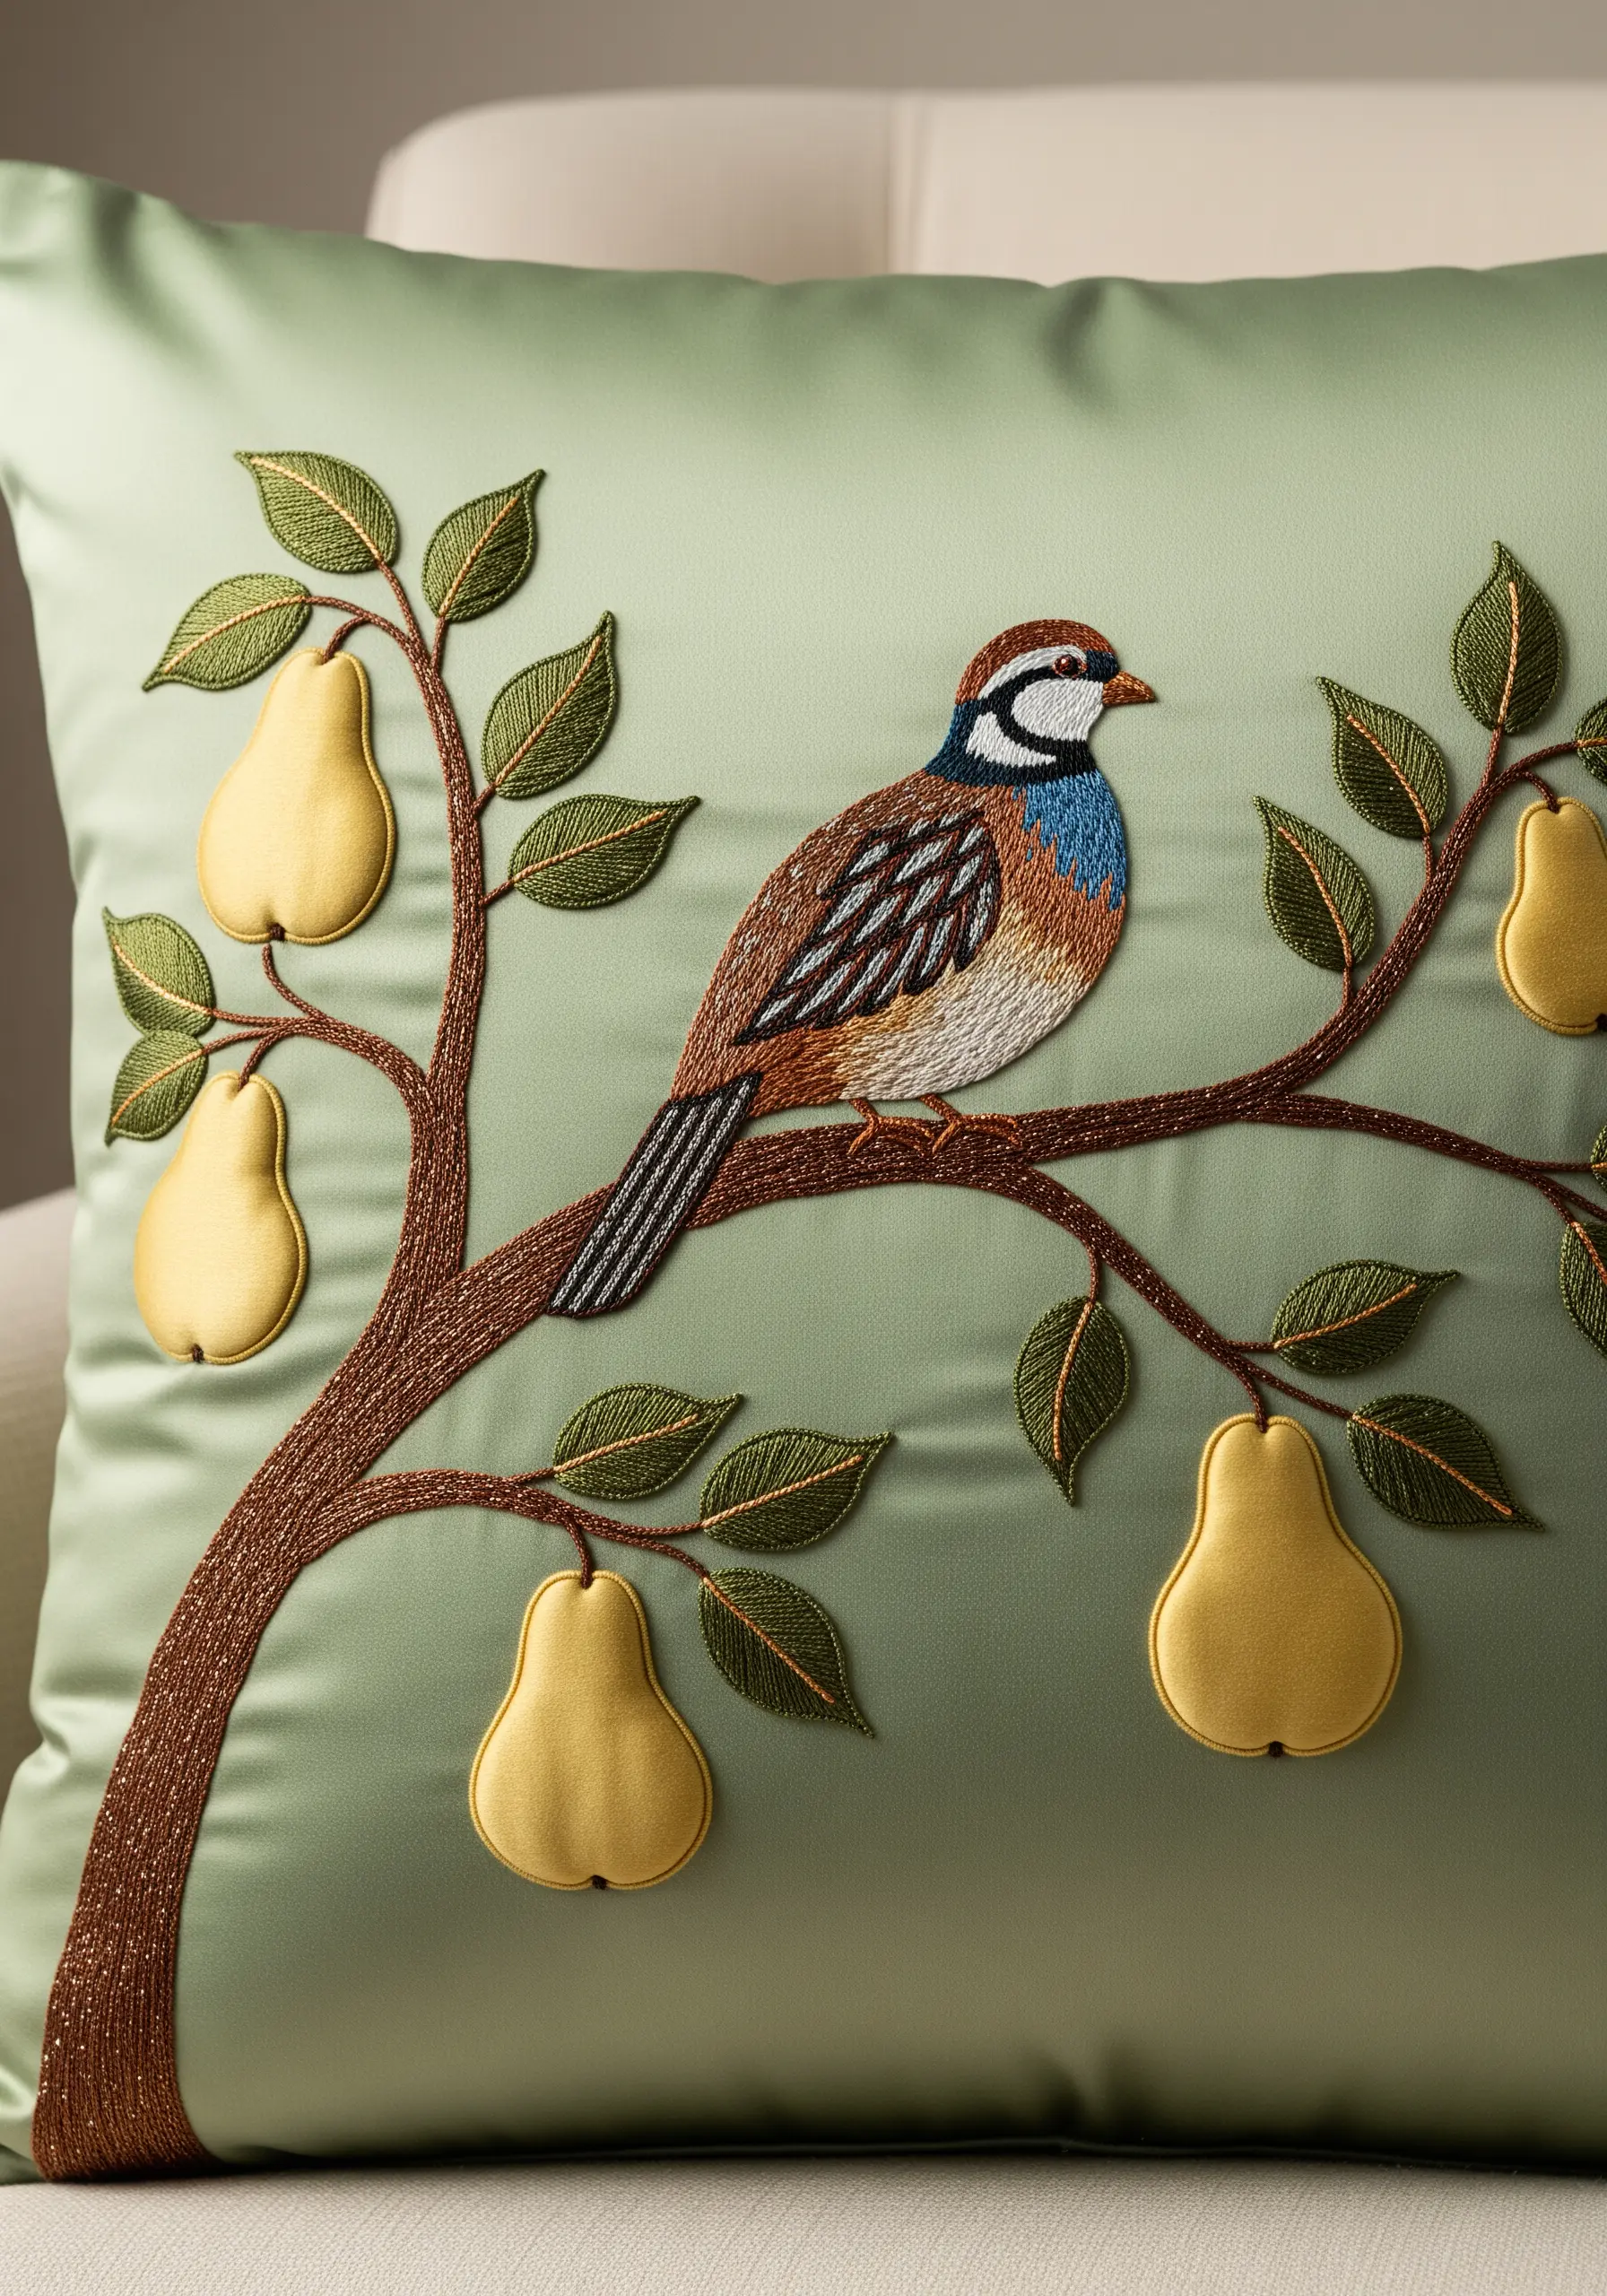
Instead of embroidering every element, use appliqué for larger shapes to create smooth, bold areas of color and subtle dimension.
For the pears, cut the shapes from a satin or sateen fabric, which has a natural sheen that contrasts beautifully with the embroidered leaves and bird.
Tuck the raw edges under or use a fusible backing, then secure the shape with a neat blanket stitch or a tight satin stitch border.
This technique saves time and adds a professional, layered quality to your work.
14. Build a Playful Scene with Felt Appliqué
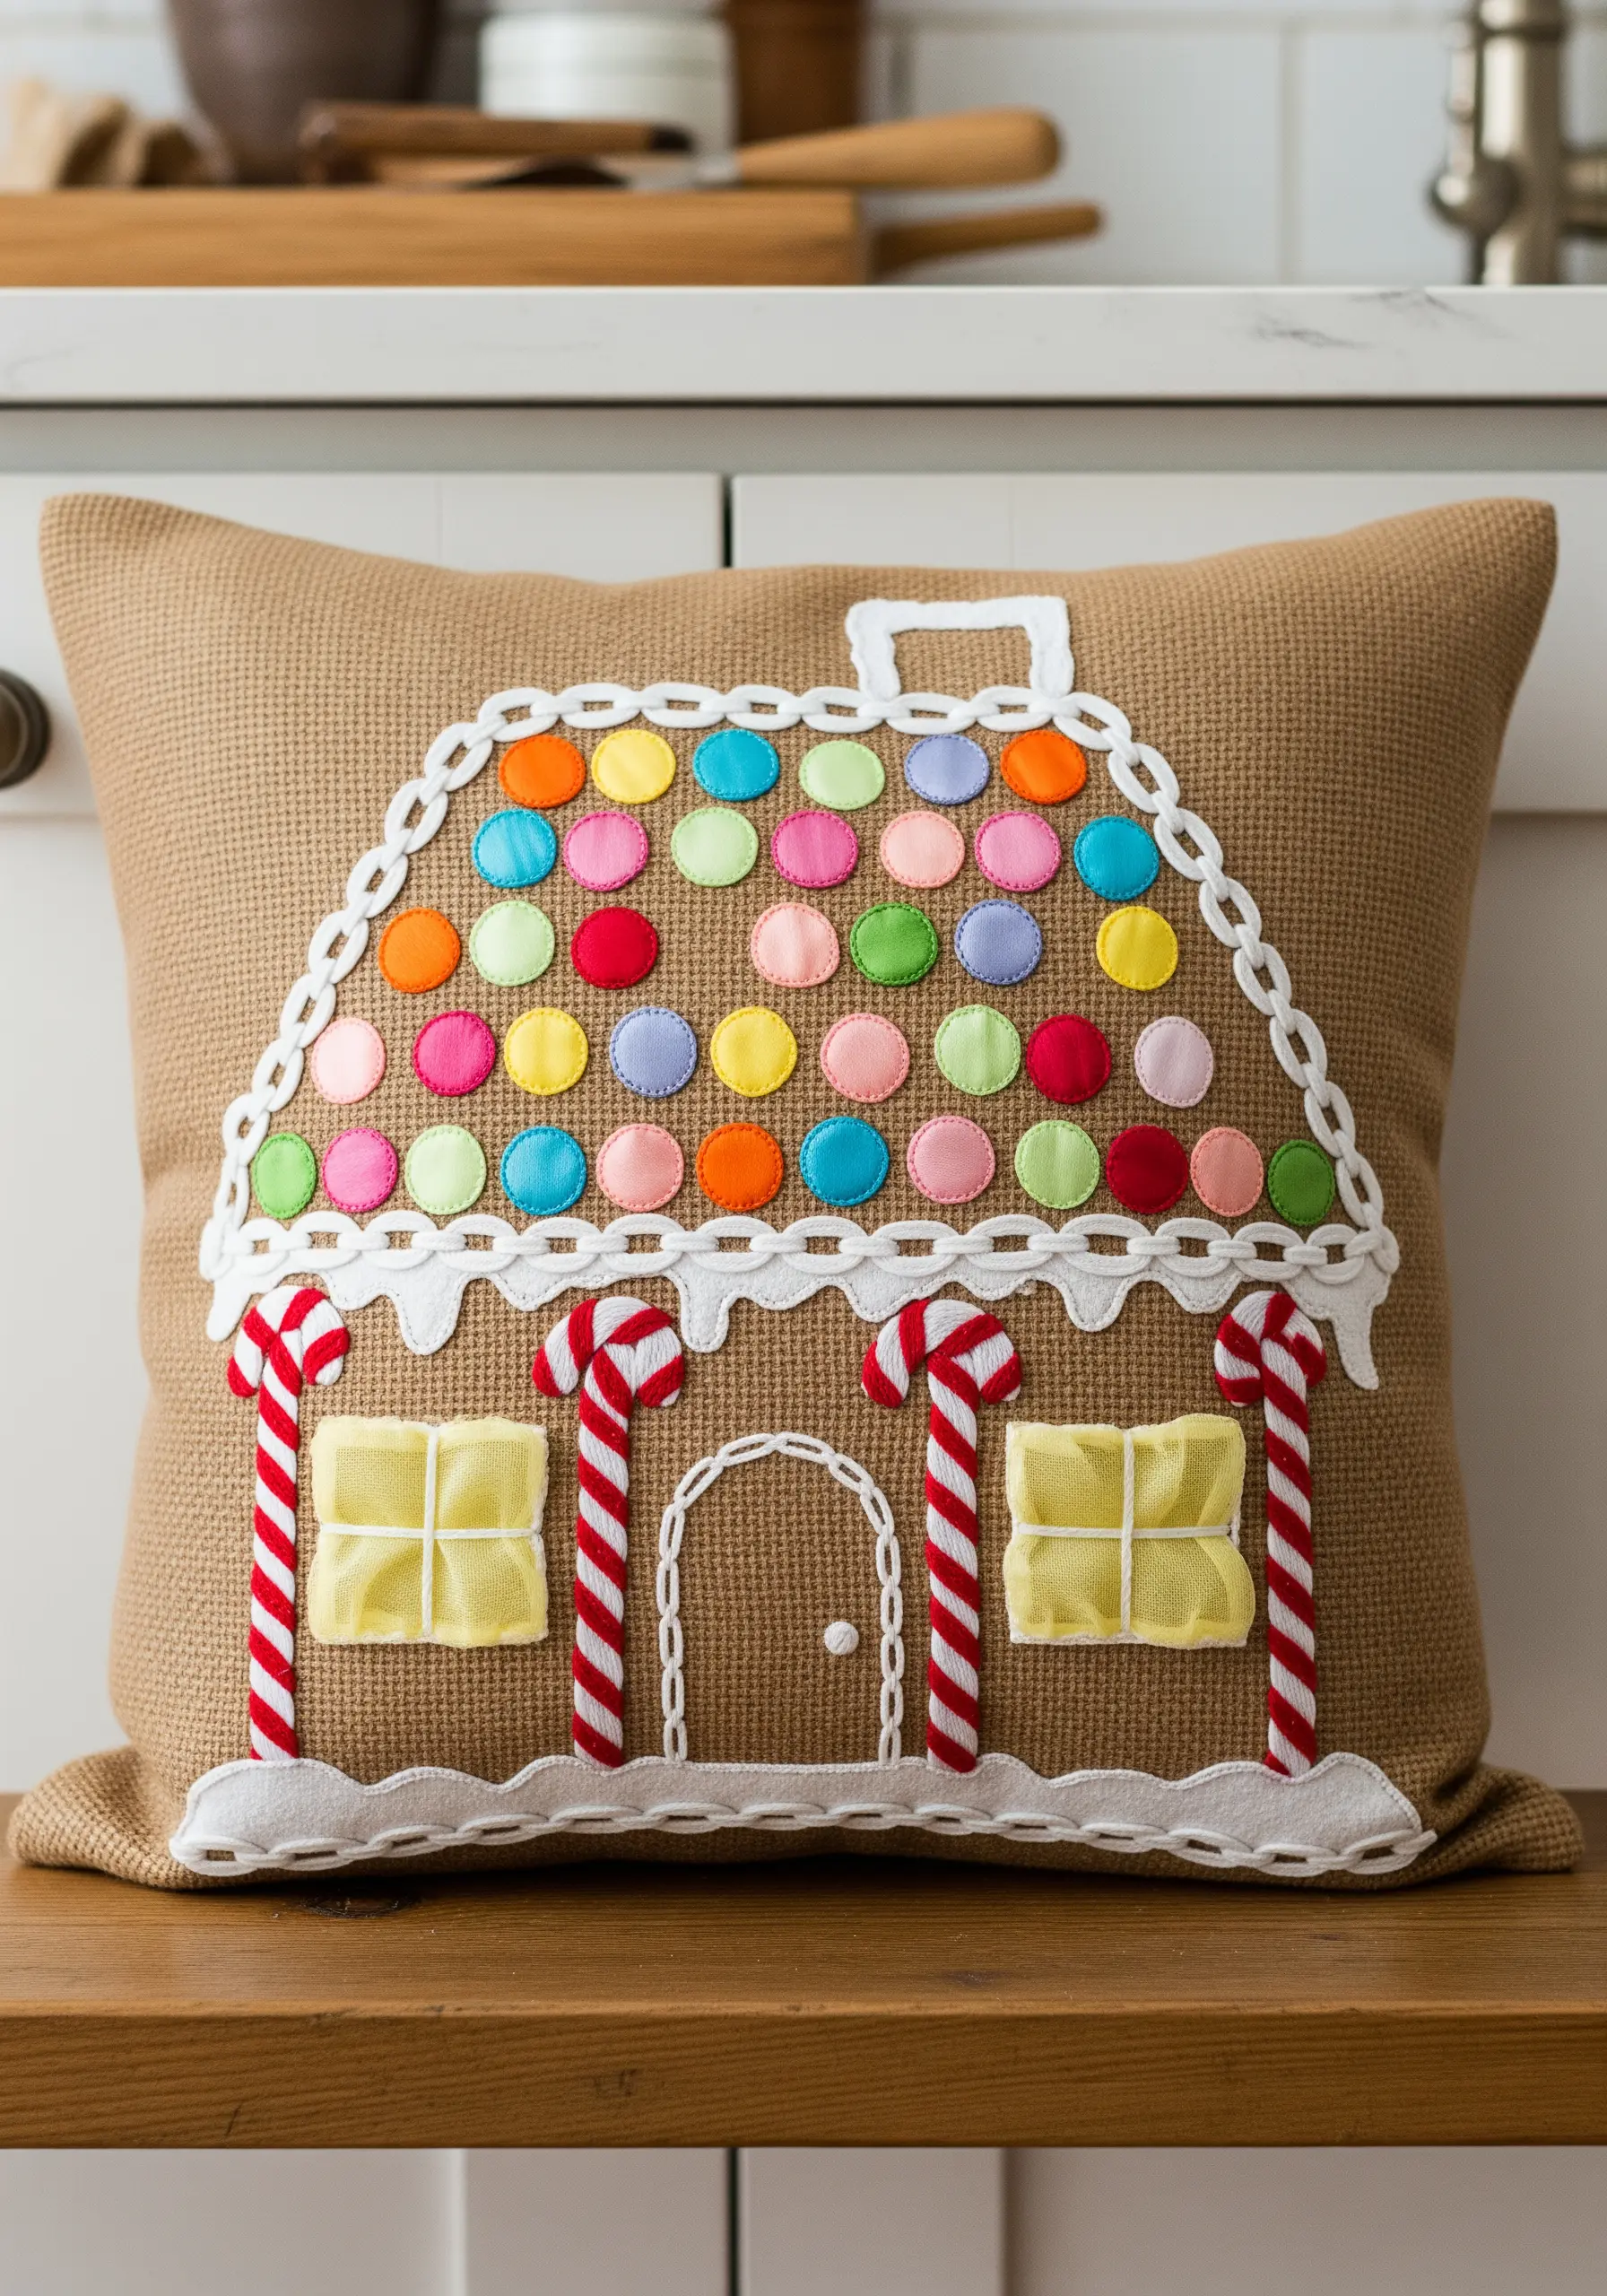
Create a whimsical gingerbread house using layers of felt—an ideal material for appliqué as its edges don’t fray.
Simply cut your shapes (candy dots, windows, doors) and attach them with a simple running stitch in a contrasting color for a charming, hand-stitched look.
For the scalloped icing details, use a thick white chain stitch or couch down a piece of rickrack trim.
This is a fun, low-pressure project that’s perfect for using up colorful scraps.
15. Couch Thick Yarn for Bold Abstract Textures
For a modern, abstract winter scene, create a dramatic textural landscape by couching thick yarn.
Lay down rows of a chunky, soft white yarn across the bottom portion of your pillow, tacking it into place with a matching fine thread.
This technique quickly fills a large area with a uniform, raised texture that suggests snowy hills.
Contrast this heavy texture with delicate, flowing lines of backstitched metallic thread above to represent wind or water, creating a beautiful study in contrasts.
16. Master the Chain Stitch for Crisp Outlines
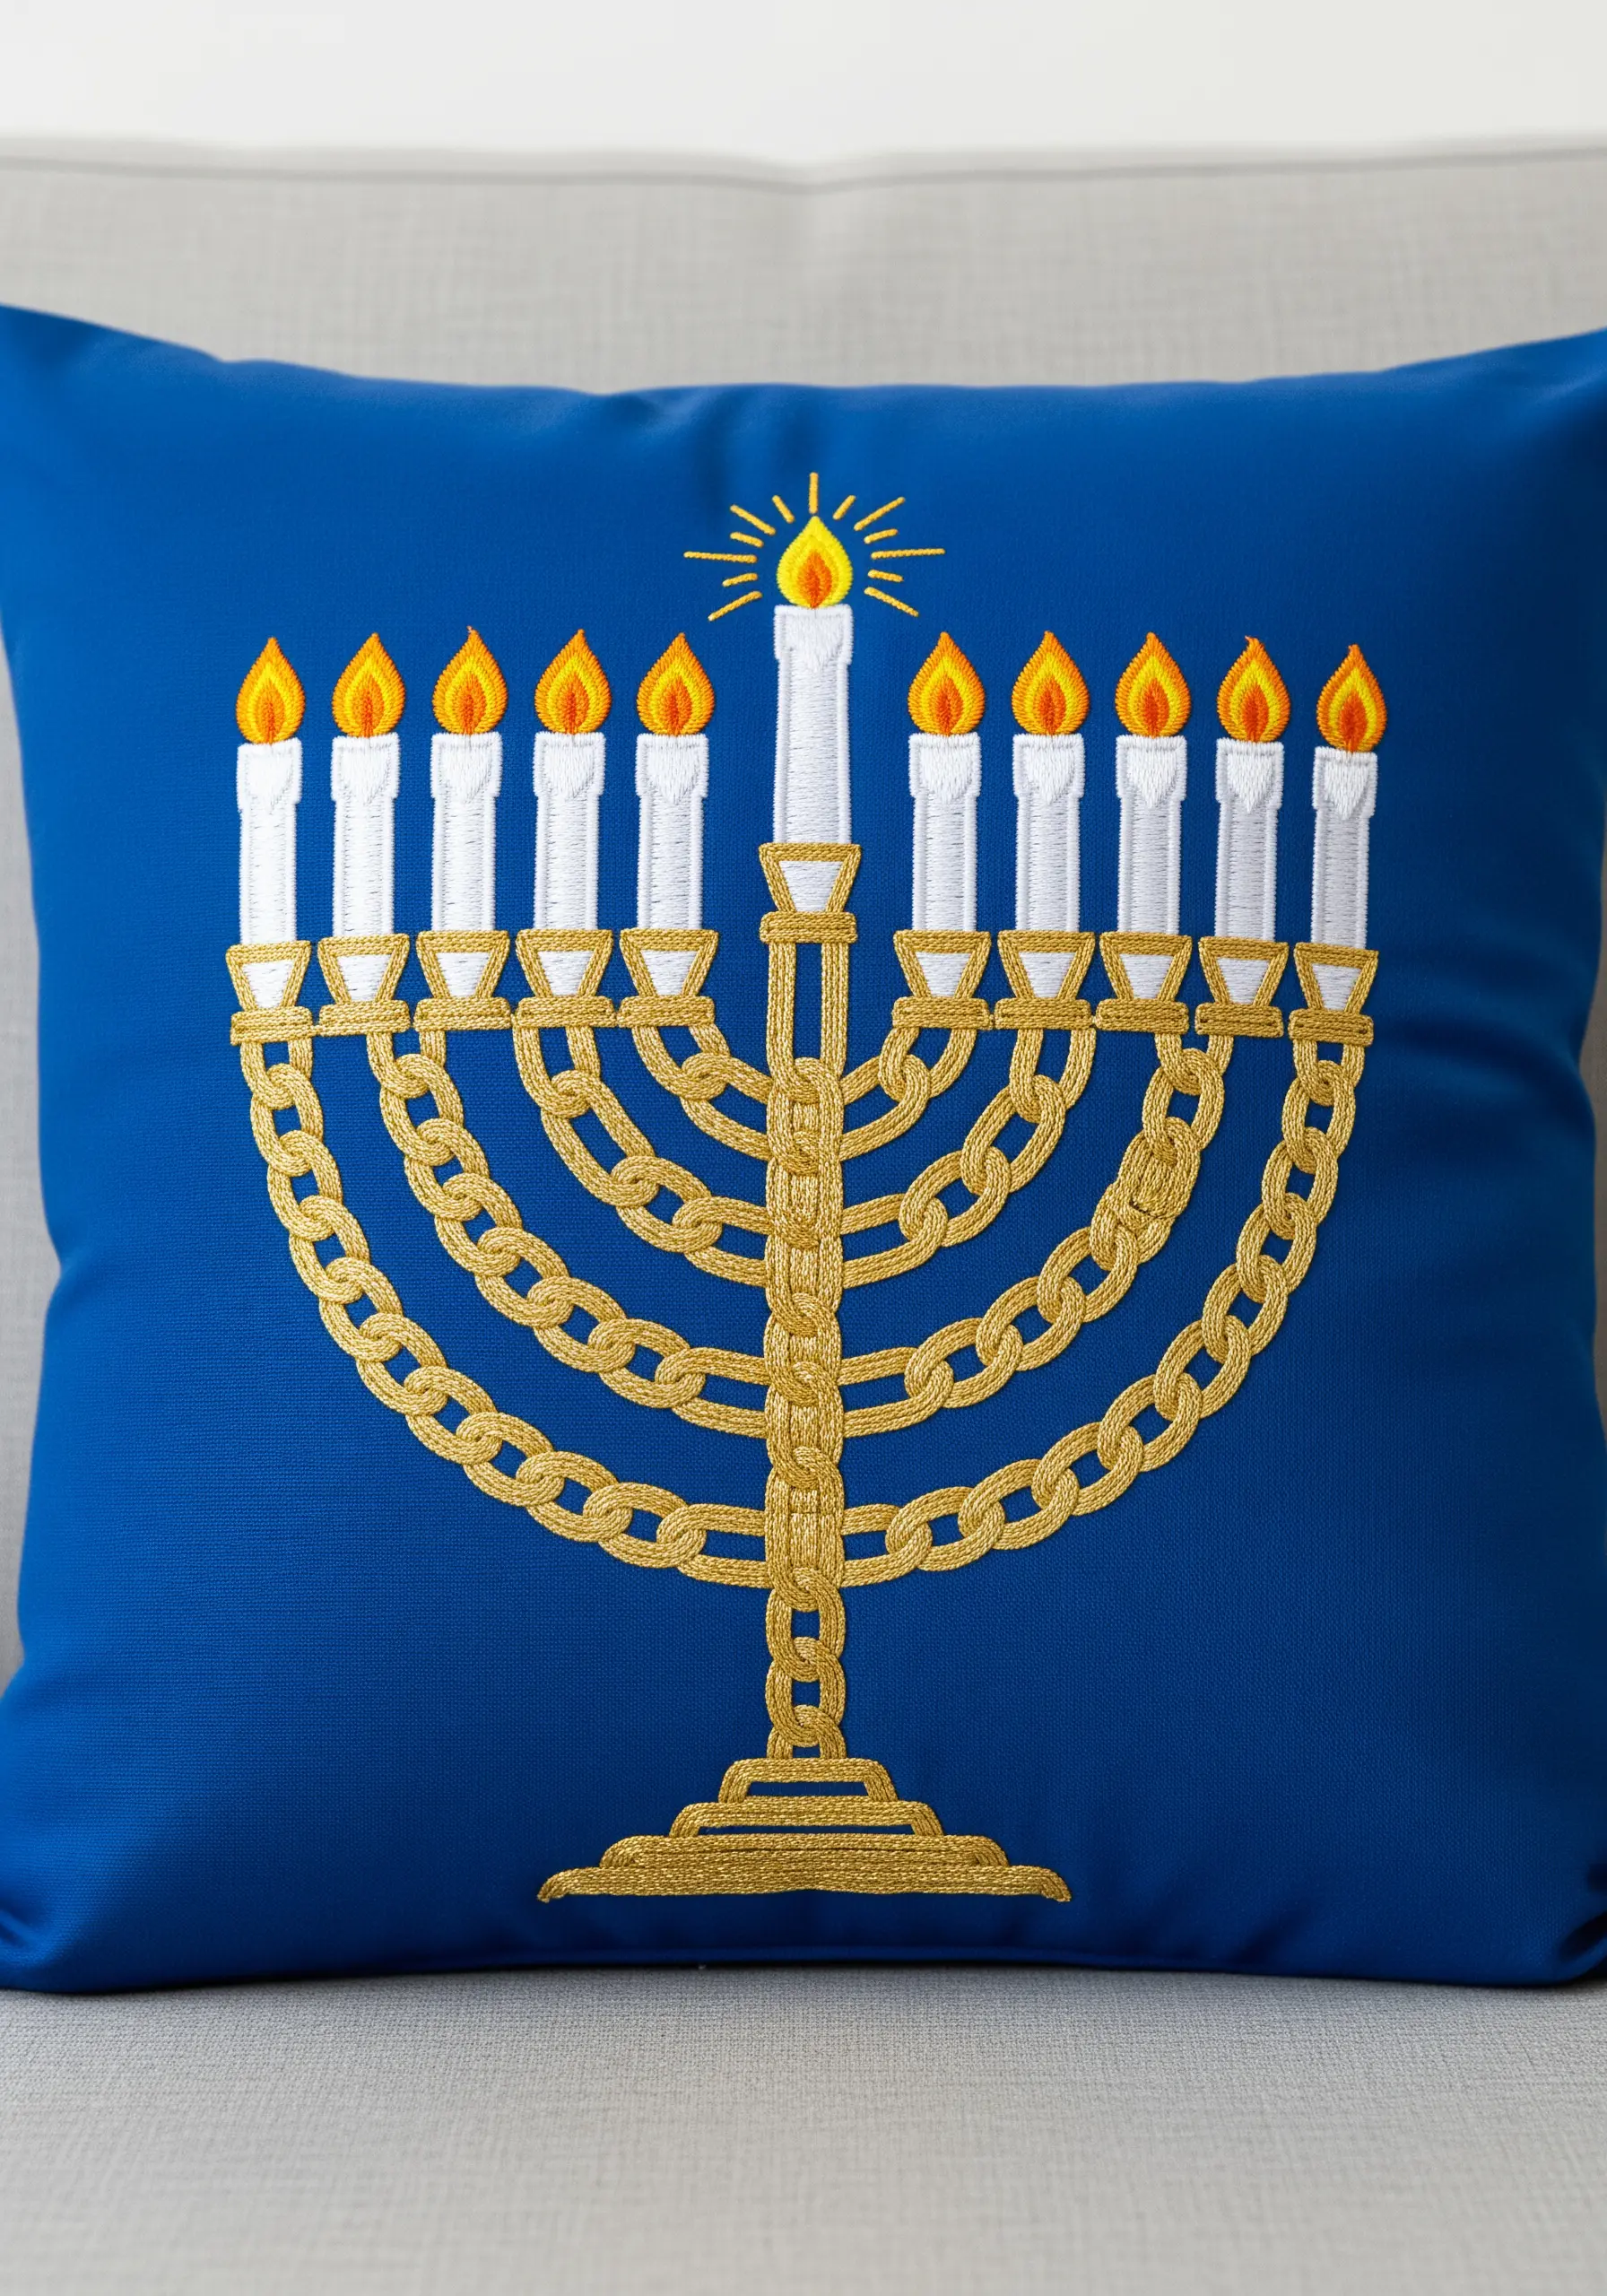
For motifs that require bold, continuous lines, the chain stitch is your best friend.
Use a gold metallic thread to work the entire menorah in chain stitch; this stitch creates a line that looks like a tiny, linked rope, which is perfect for representing the intricate metalwork.
The texture of the chain stitch is more substantial than a backstitch, giving the design weight and presence against the solid blue background.
For the candle flames, a single detached chain stitch (lazy daisy) in yellow topped with a smaller orange one creates a perfect teardrop shape.
17. Define Appliqué with Subtle Outline Stitching

Elevate a simple felt appliqué by adding delicate embroidered details that define its form.
After securing your white felt dove, use a single strand of matching white or light gray floss to add details like feather lines with a simple backstitch.
This tone-on-tone stitching adds sophisticated texture without overpowering the clean silhouette of the bird.
The contrast of the smooth felt and the fine stitched lines creates a professional, polished finish on the soft wool pillow base.
18. Create Natural Forms with Angled Stitches
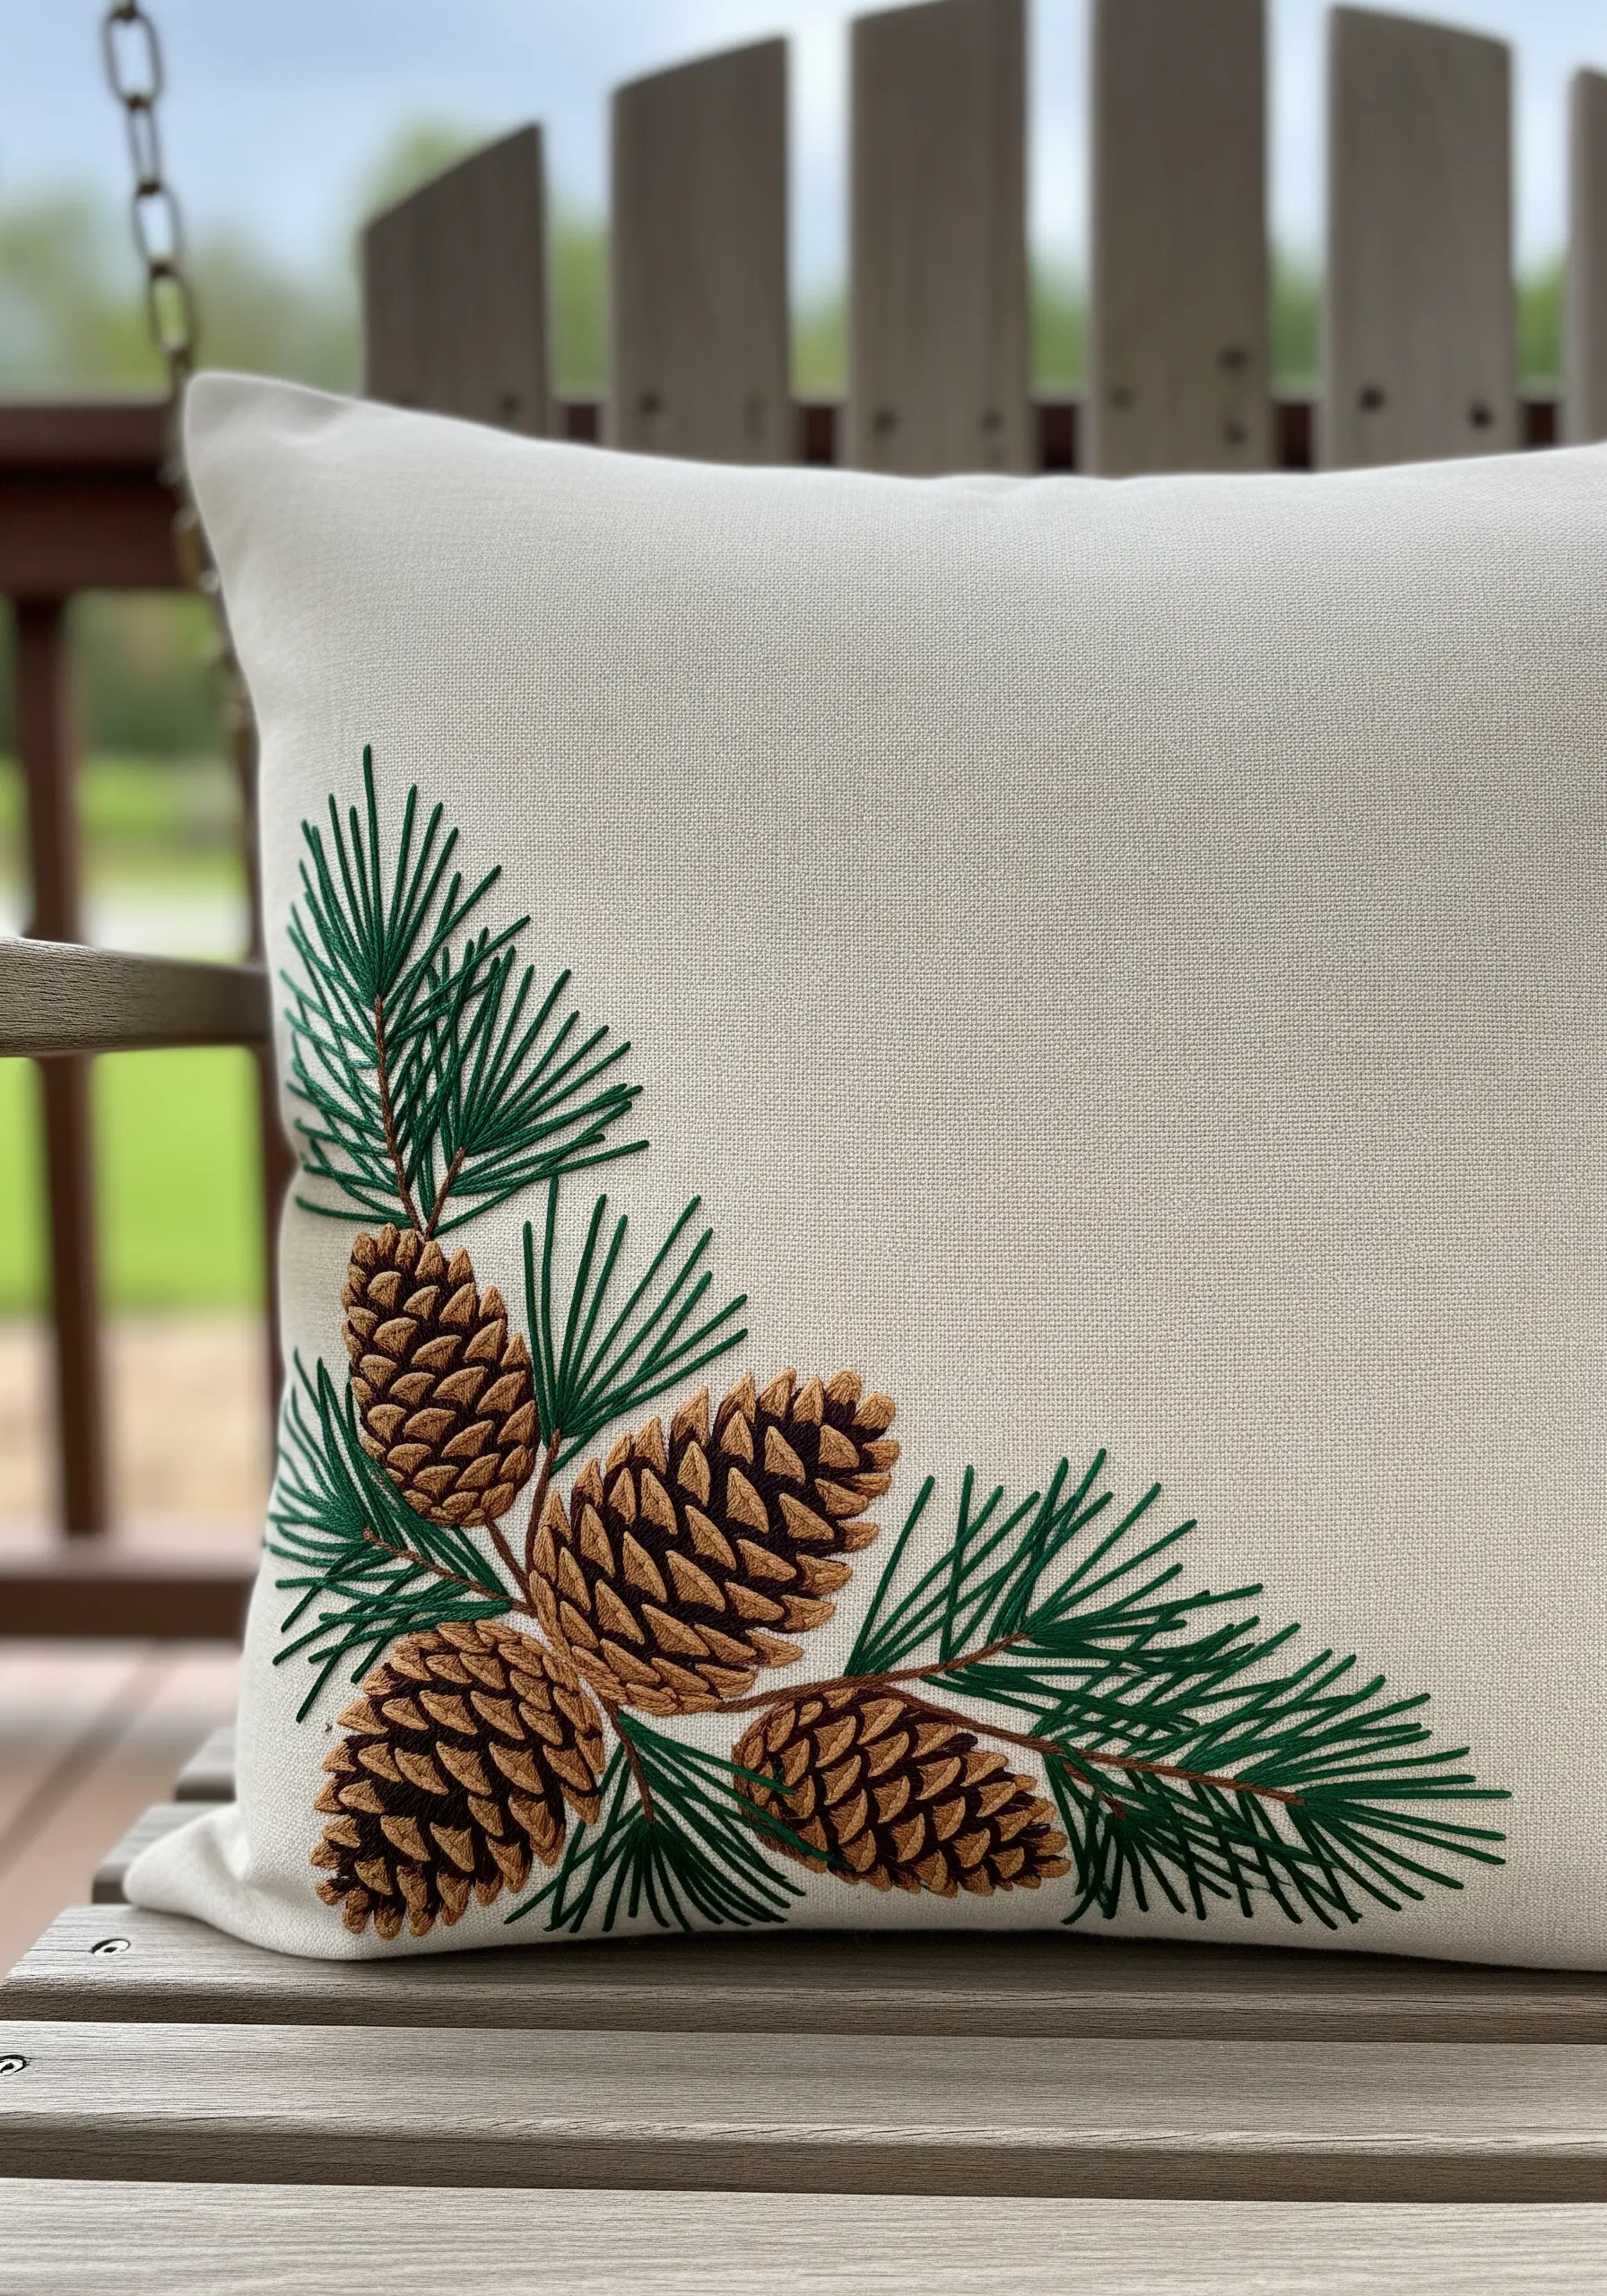
To make pinecones look realistic, the direction of your stitches is everything.
Use a fishbone stitch or angled satin stitches for the individual scales, ensuring they radiate outward from the central core.
Slightly overlap the rows of stitches to mimic the way pinecone scales layer over one another.
For the needles, use simple straight stitches, but vary their length and angle to create a natural, slightly irregular cluster rather than a perfectly uniform fan.
19. Build Tactile Snow with Bullion Knots
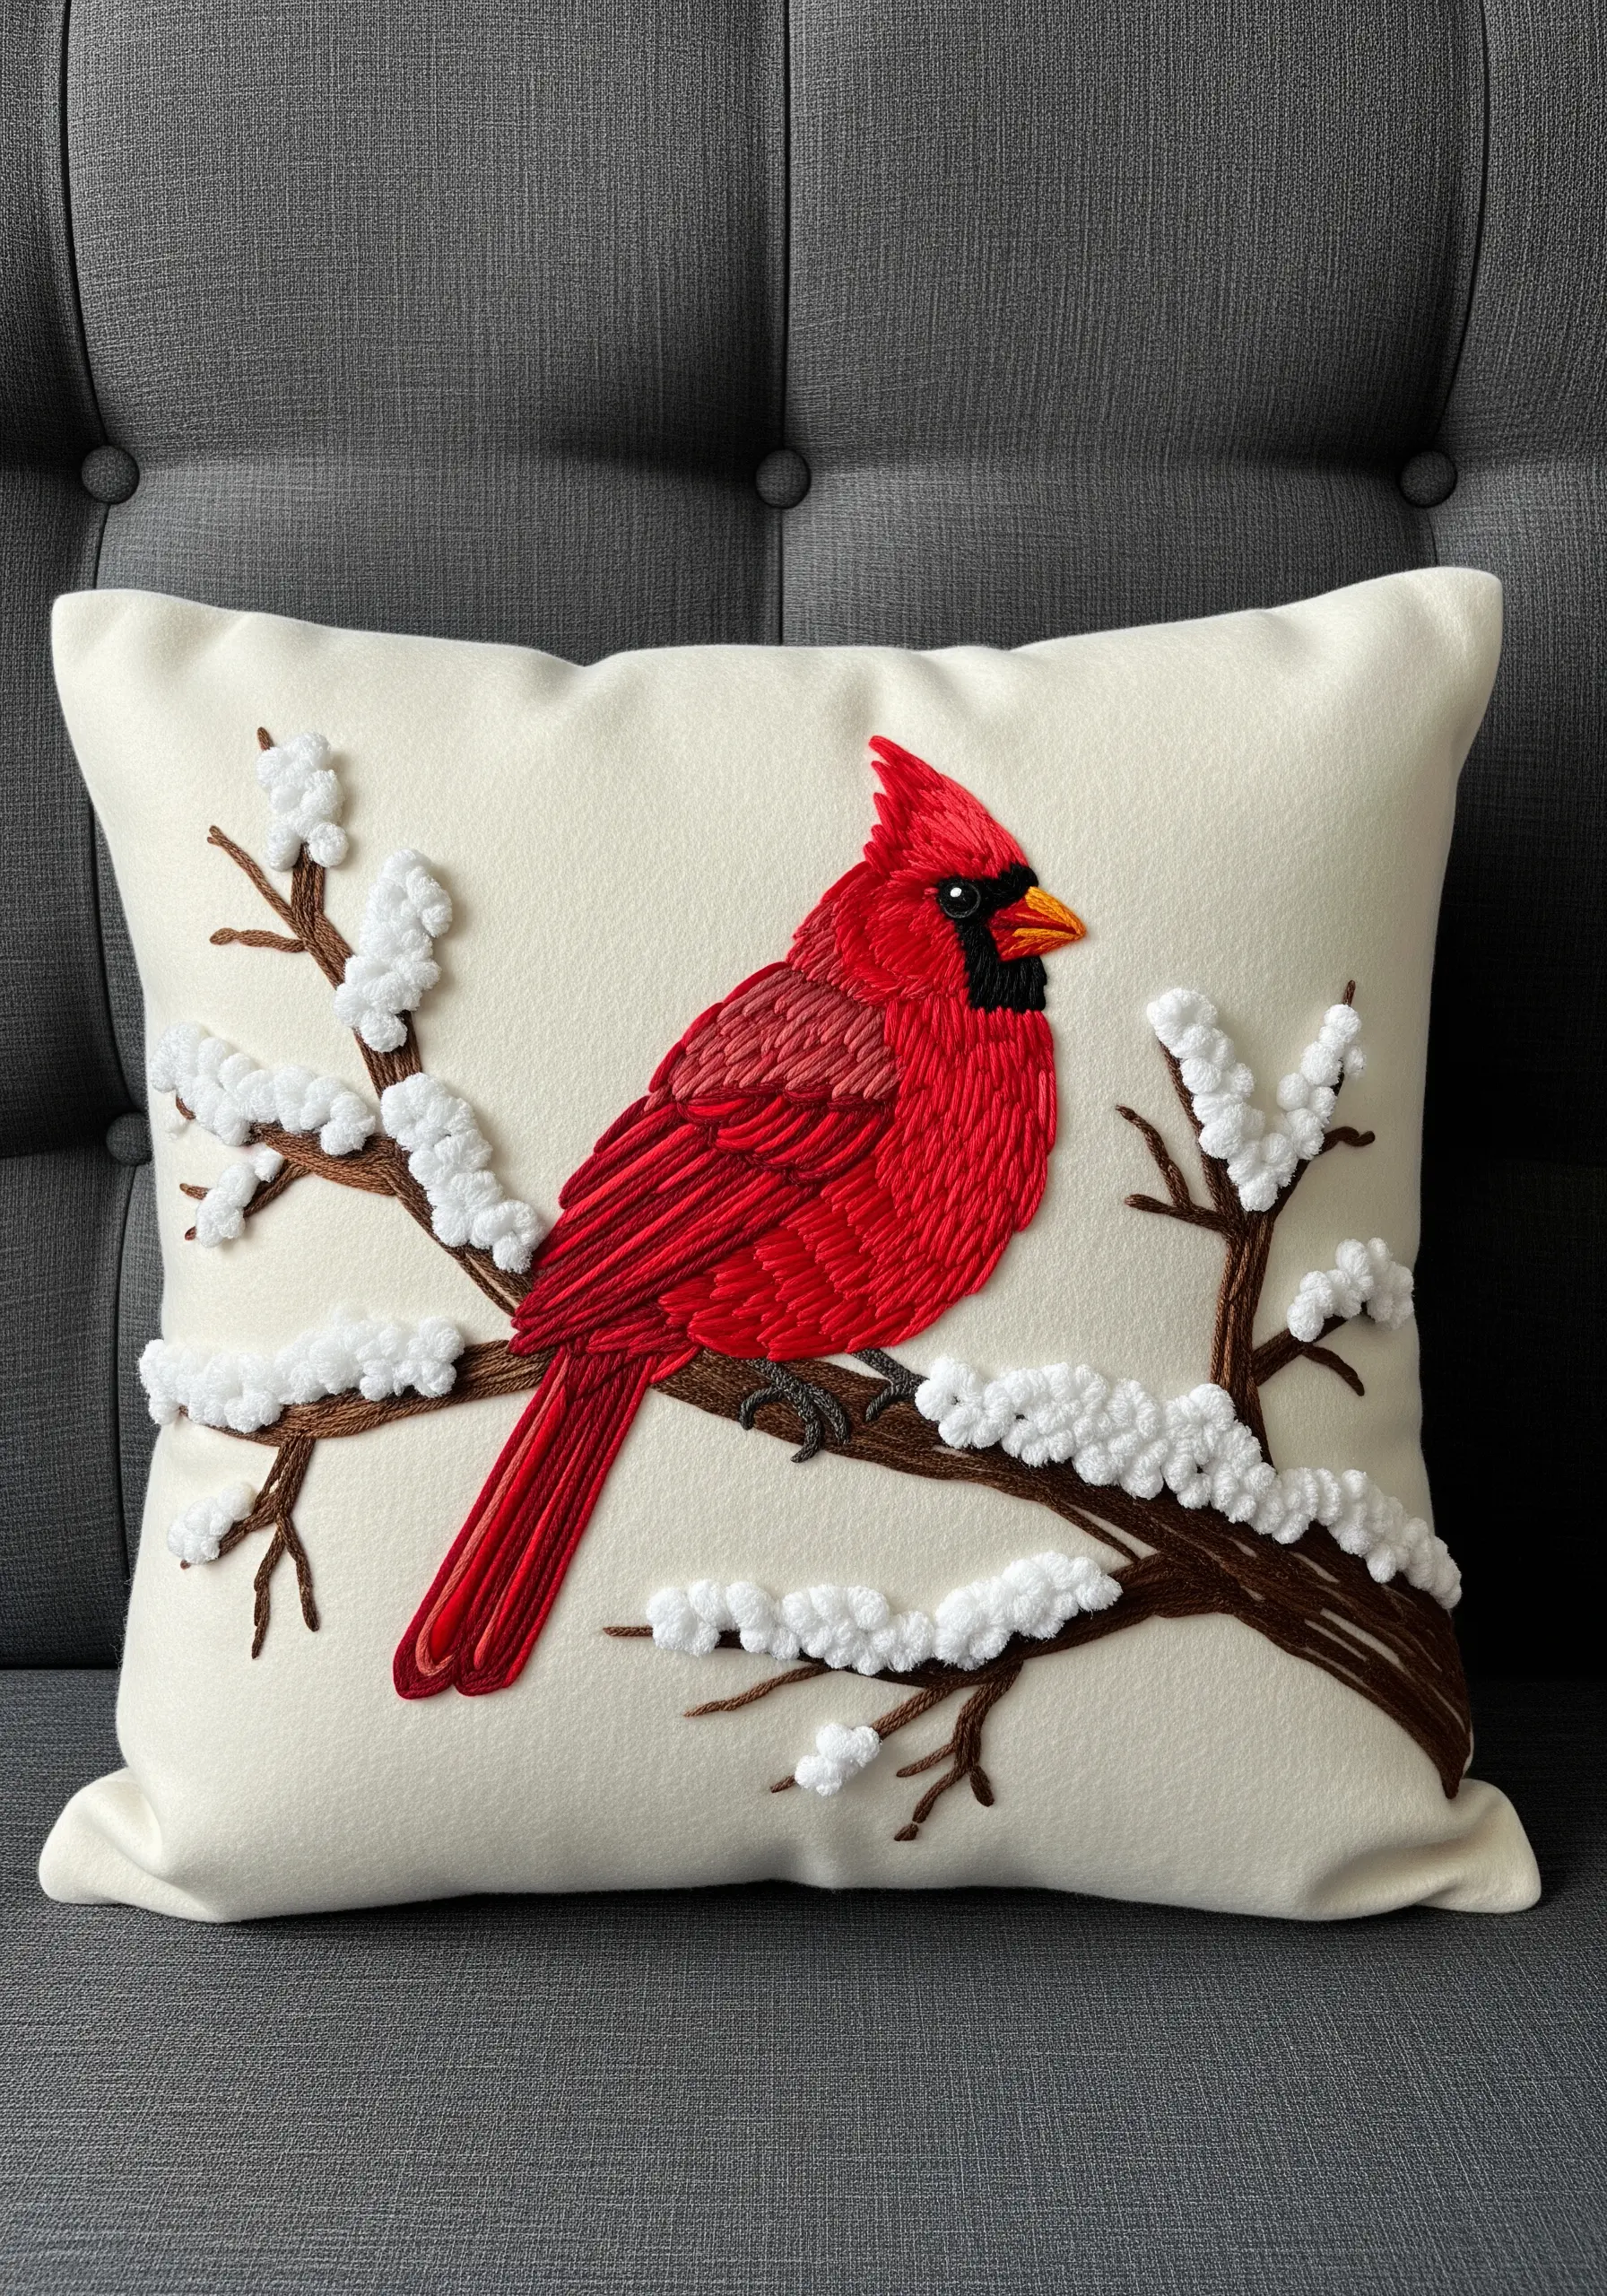
For snow that looks and feels like soft clumps on a branch, use dimensional stitches like bullion knots or turkey work.
To make a bullion knot, wrap your thread around the needle several times before pulling it through the fabric, creating a small, raised worm of thread that you can cluster with others.
Contrast this highly tactile snow with the smooth, directional satin stitch of the cardinal’s feathers for a piece that engages both sight and touch, and creative ways to stitch natural textures like a pro.
20. Achieve Luxe Lettering with Padded Satin Stitch
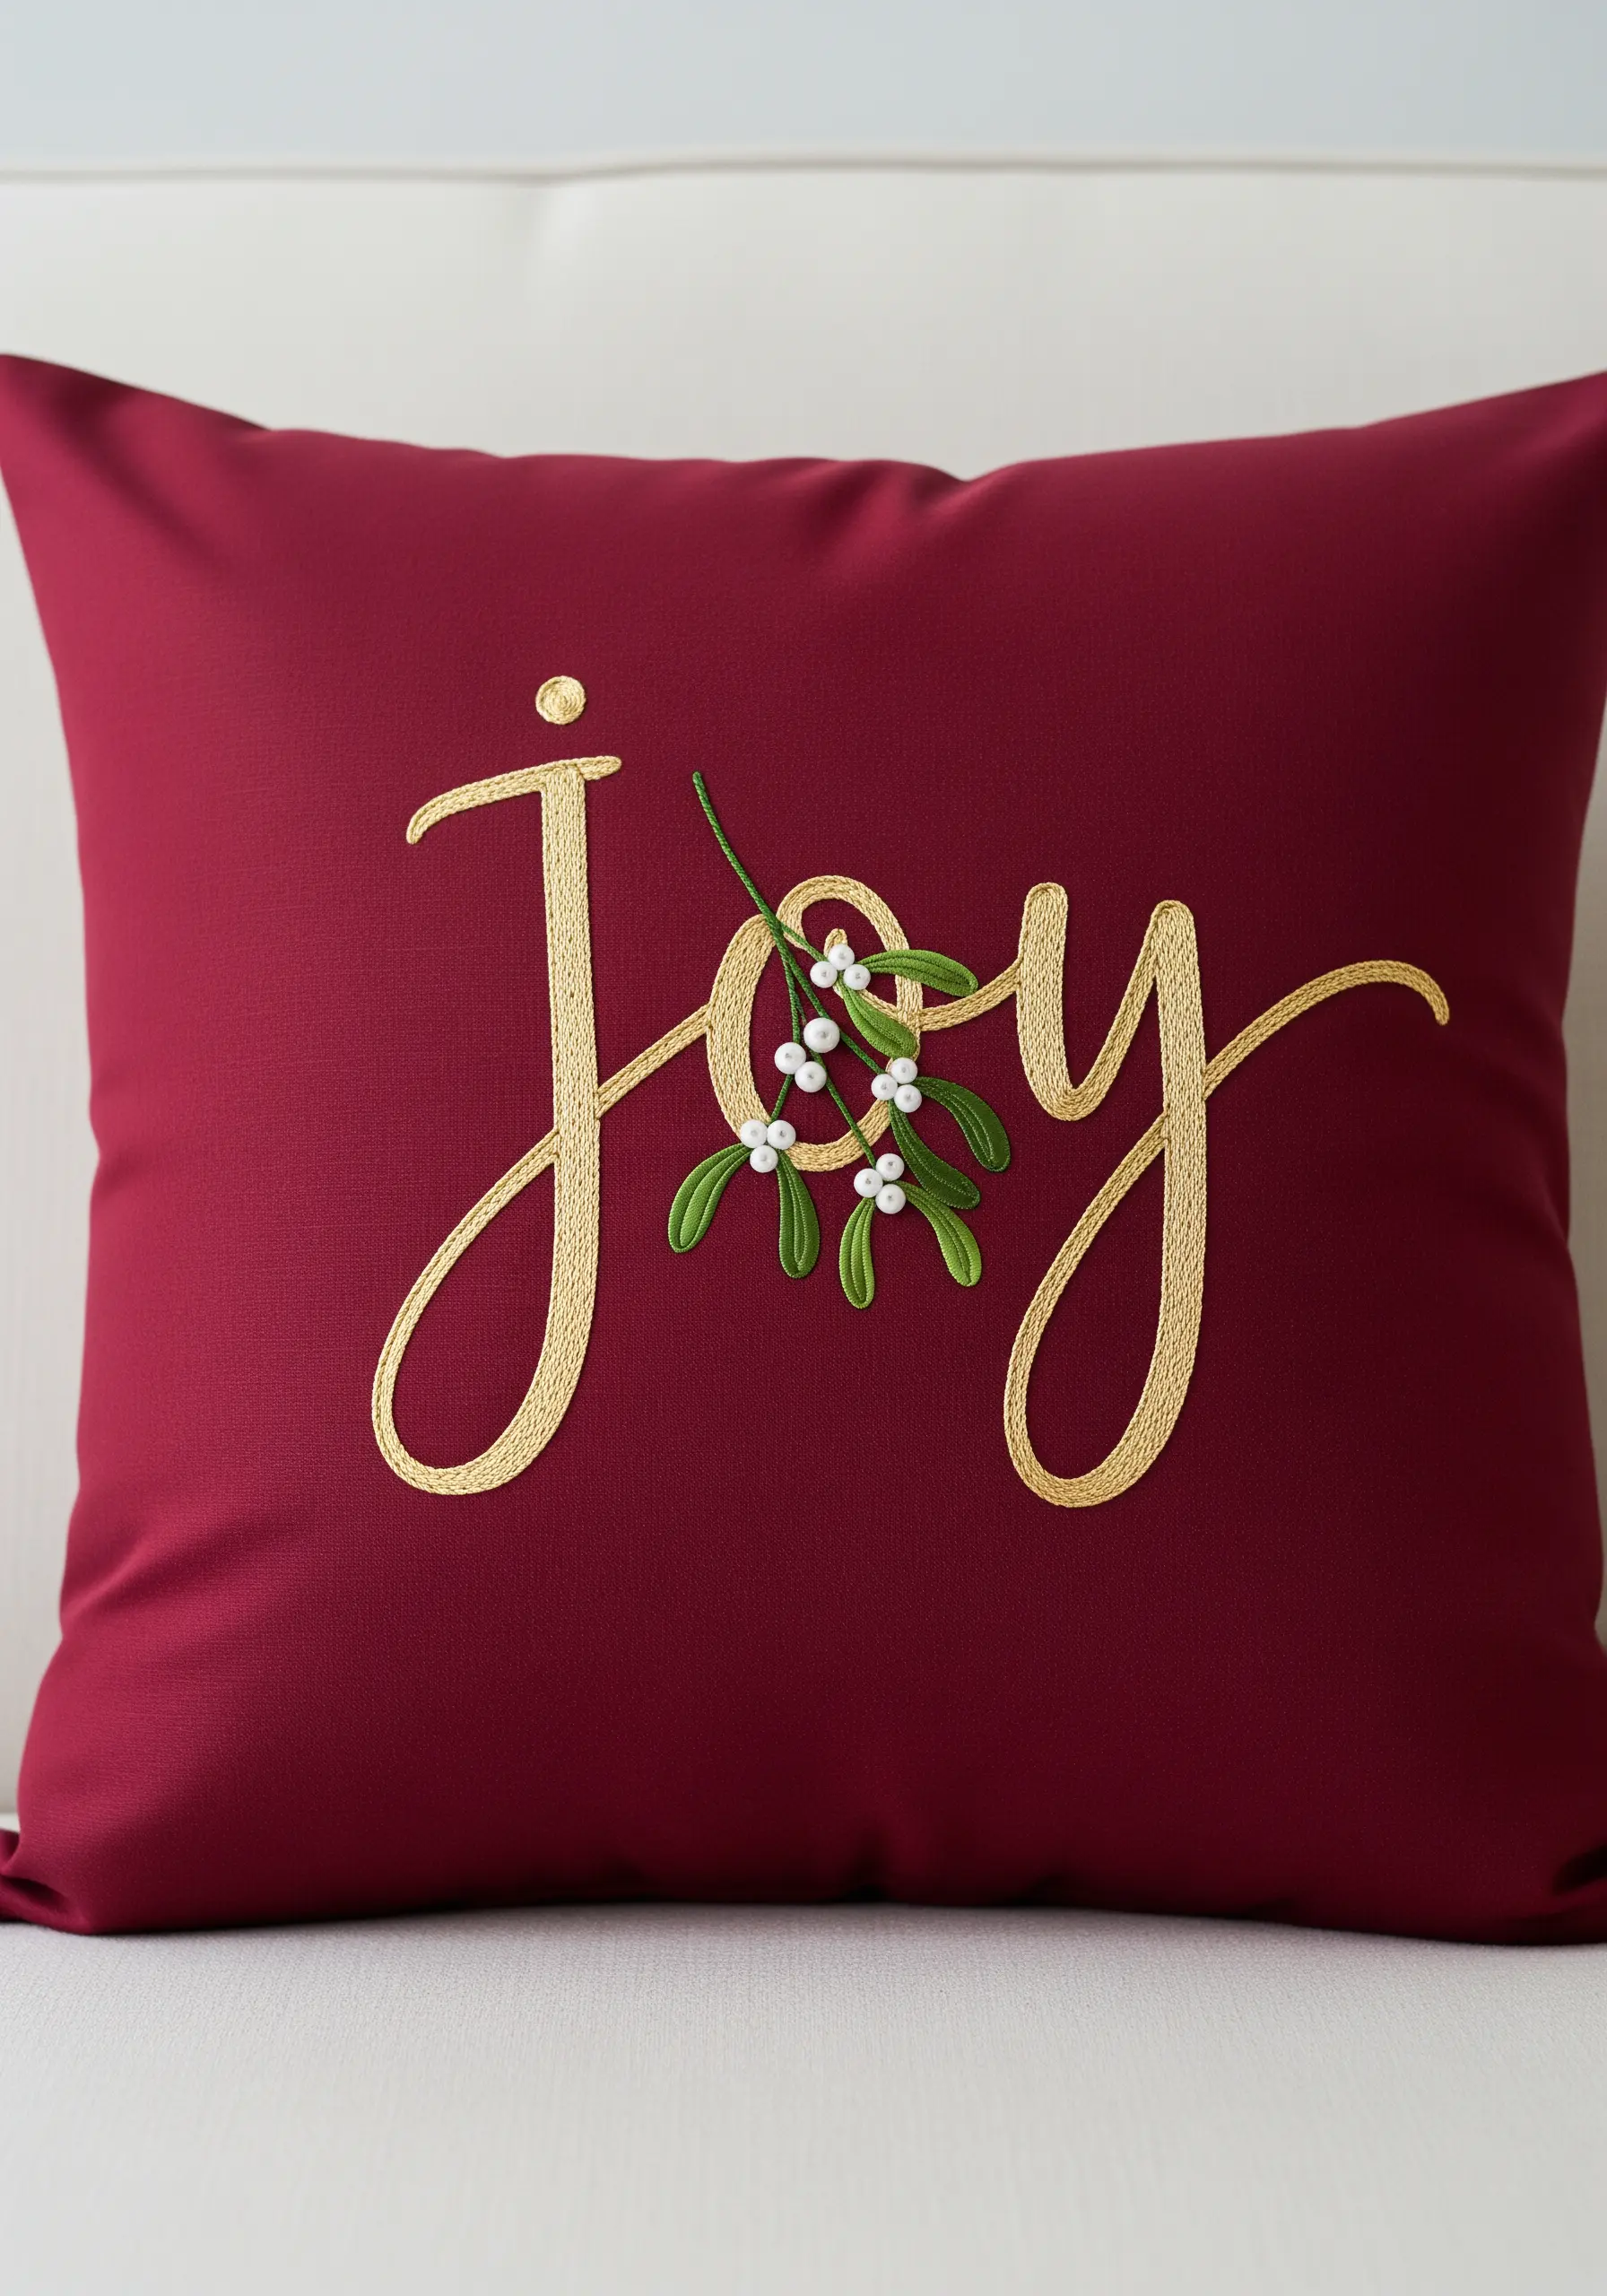
Give your embroidered words a raised, elegant profile by using a padded satin stitch.
First, outline your letters with a split stitch. Then, fill the inside of that outline with rows of straight stitches or seed stitches—this is your padding.
Finally, work your final satin stitch in metallic gold over the padding, going just beyond your split stitch outline for a perfectly smooth and raised edge.
This technique makes the lettering look rich and substantial.
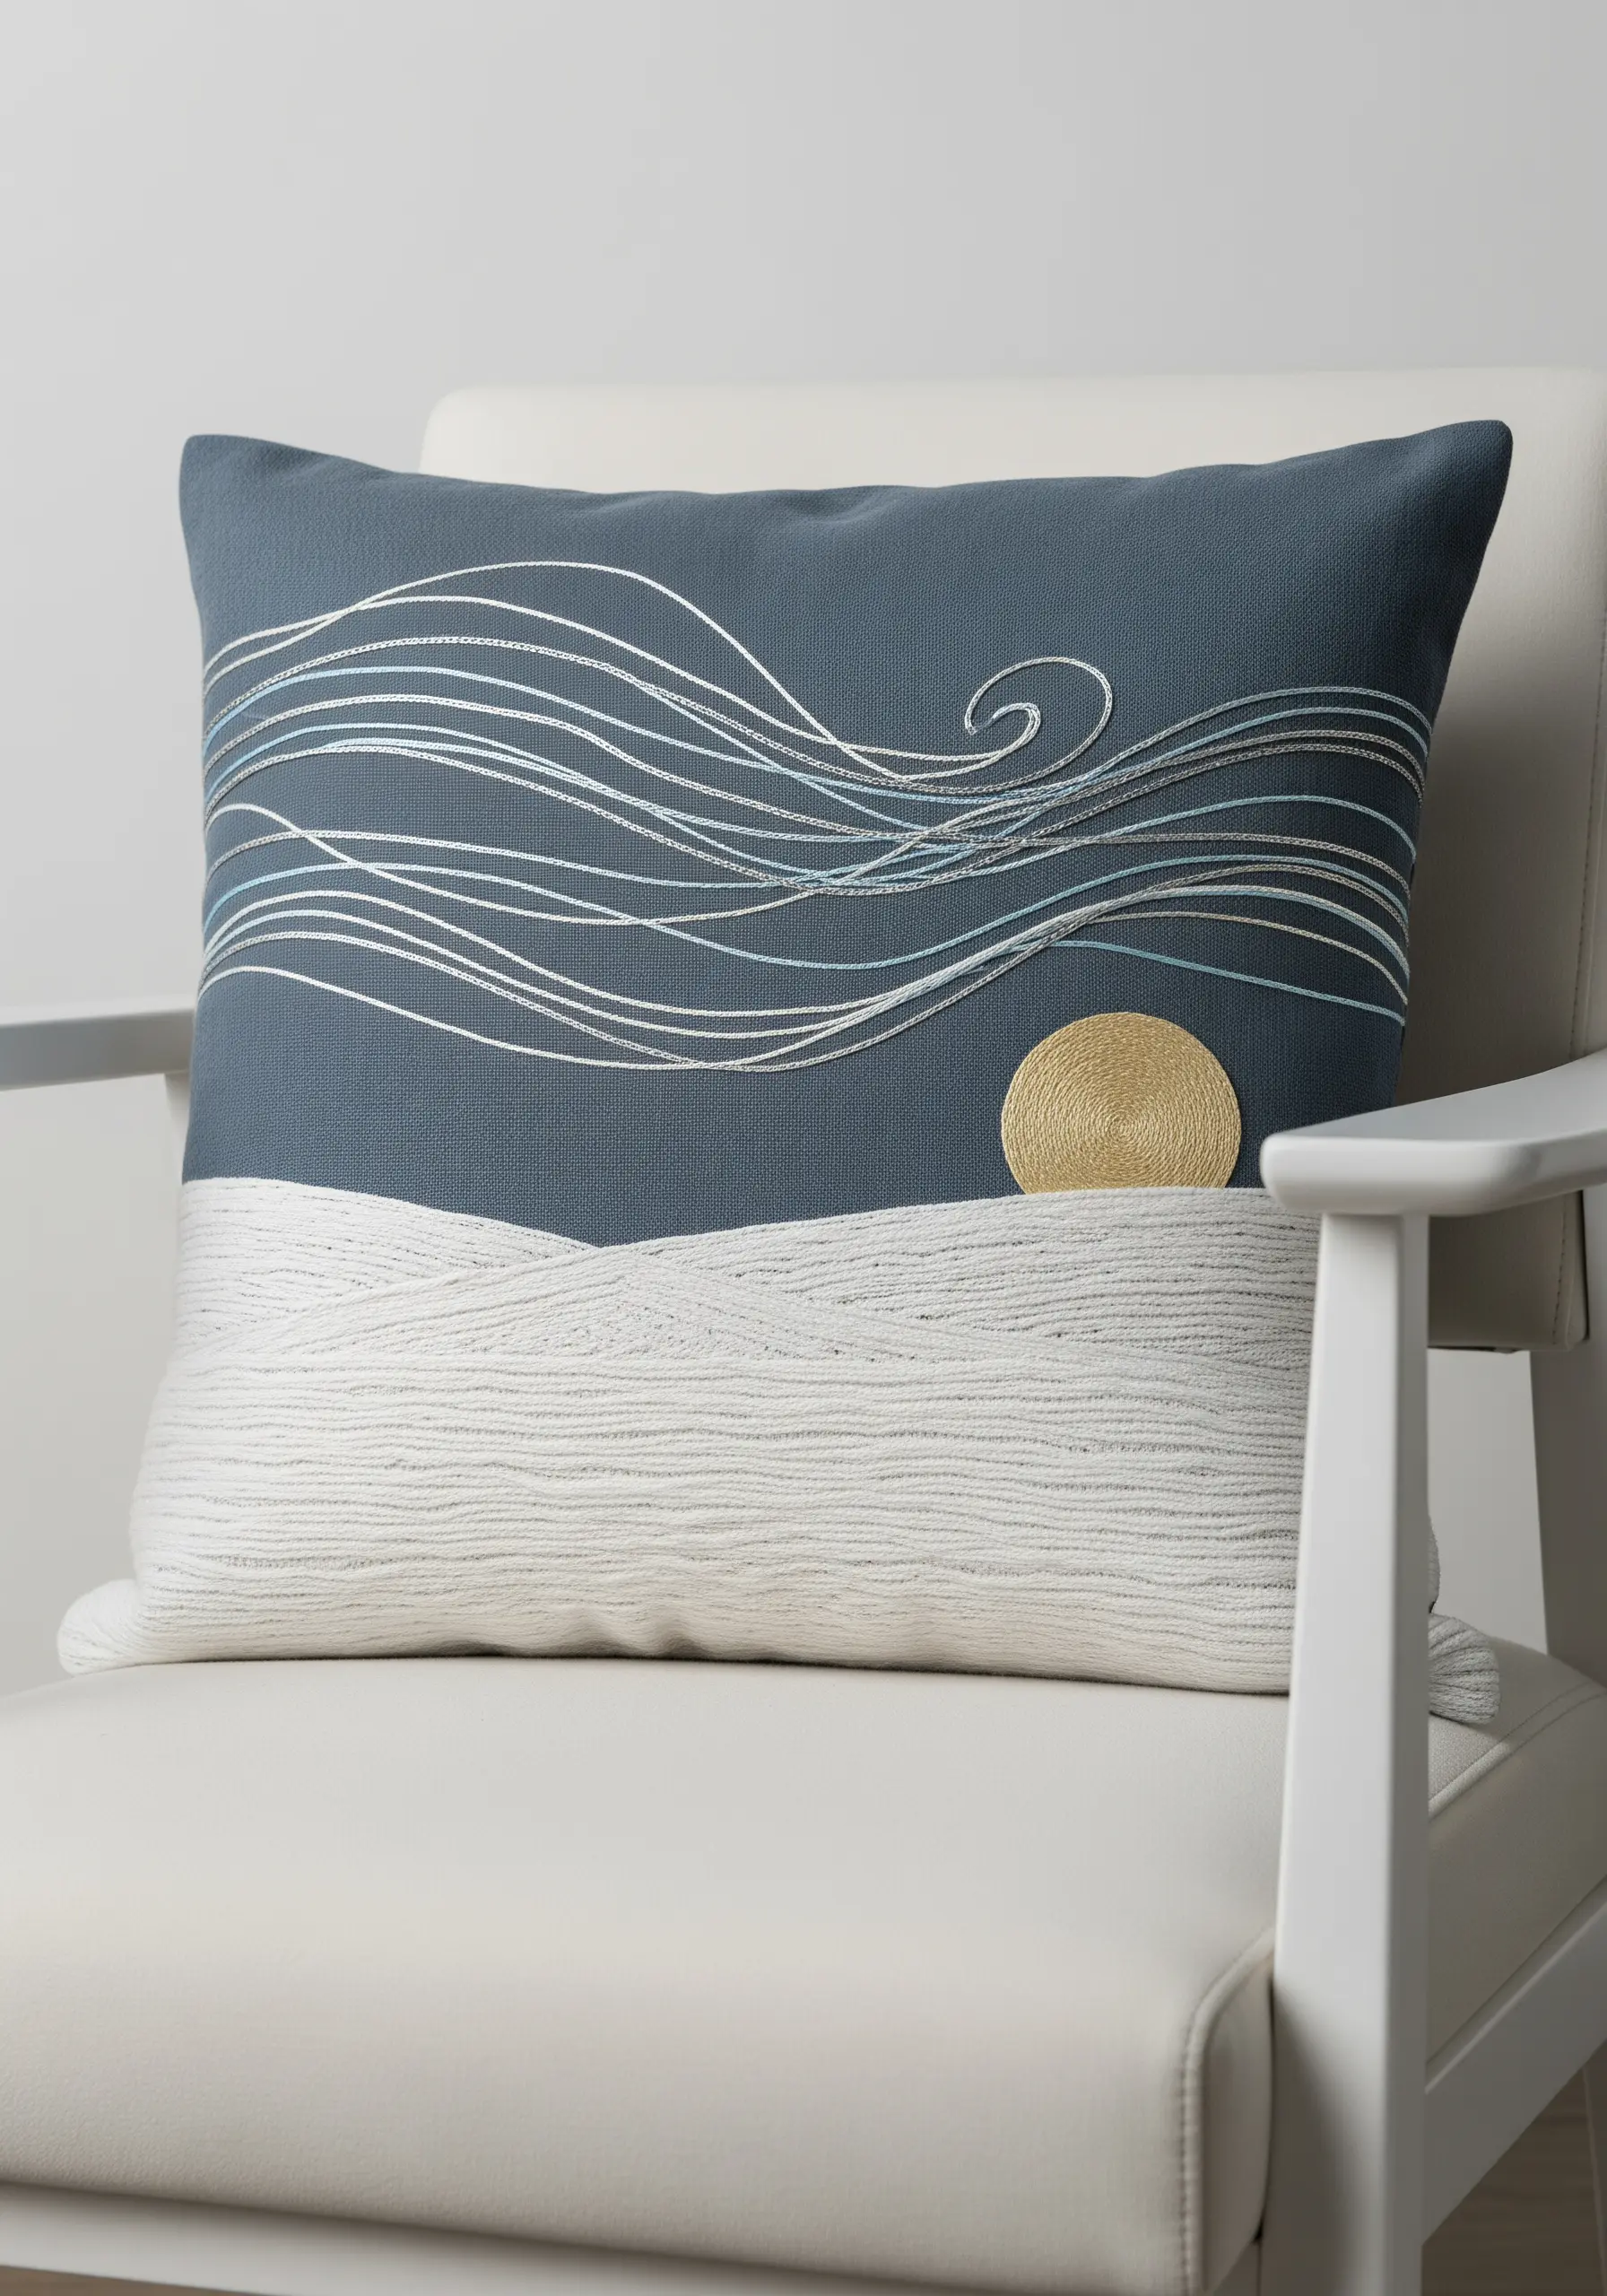
21. Create a Meditative Spiral with Couching
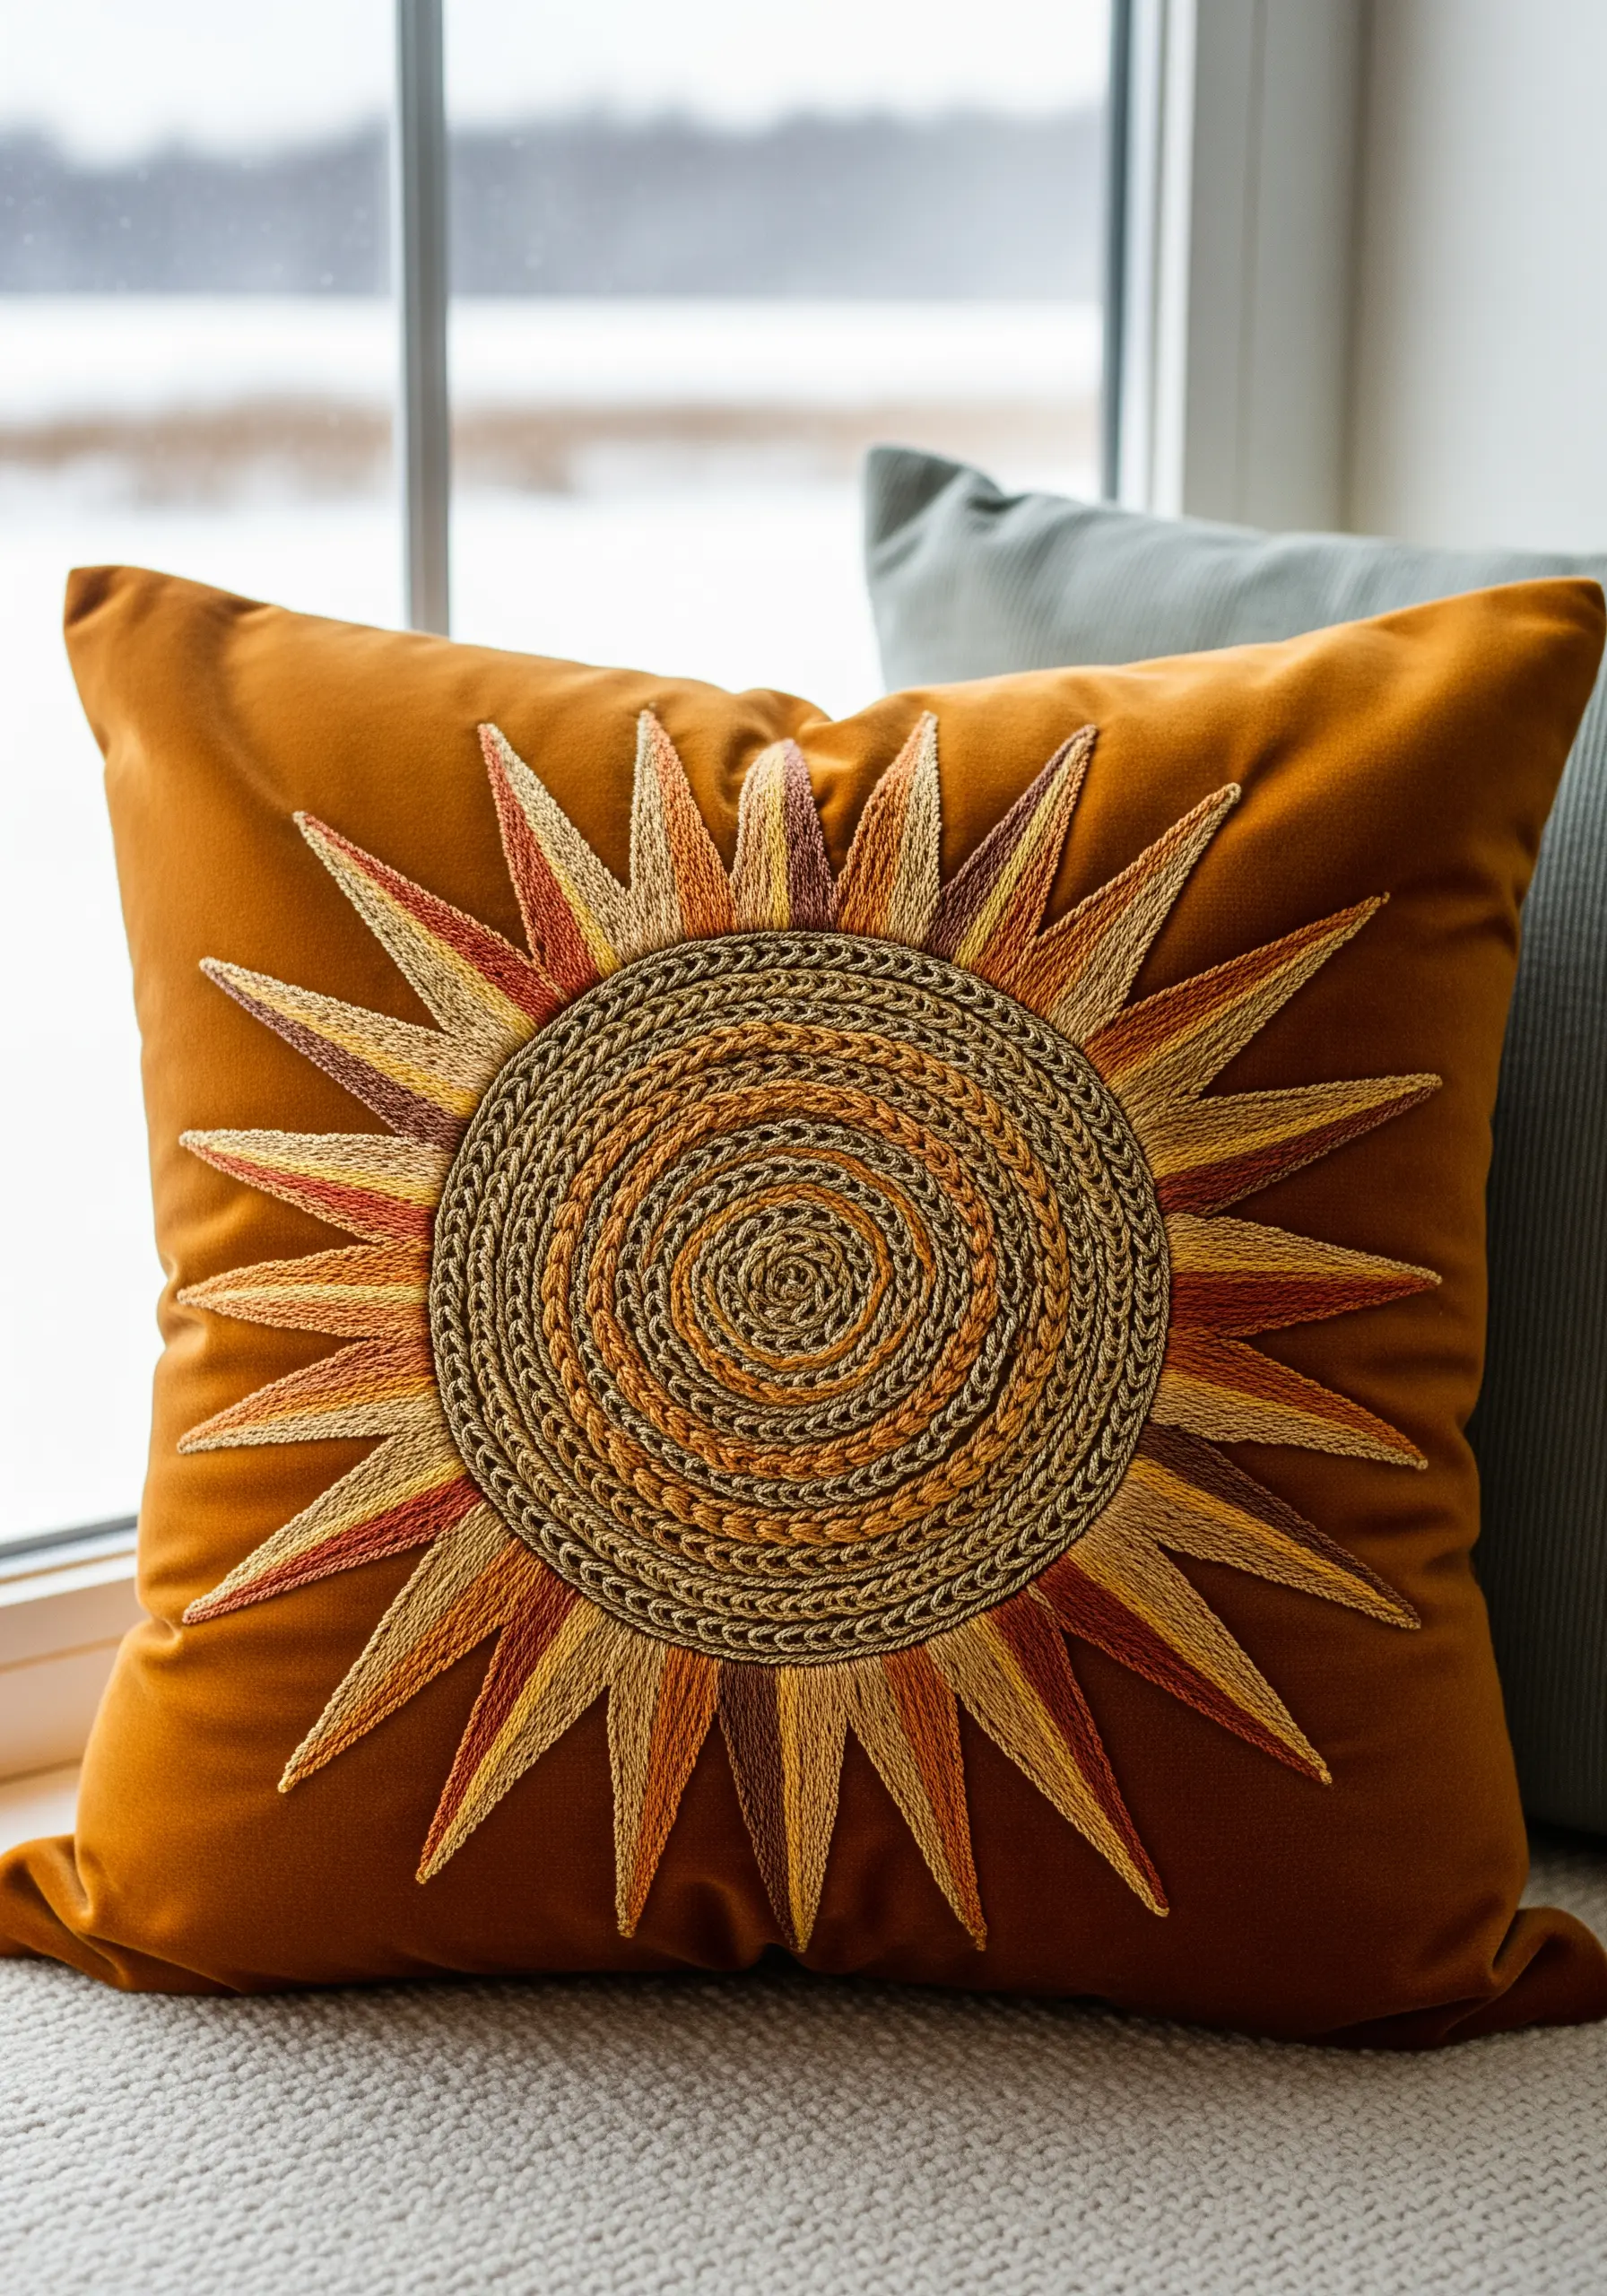
For a large, graphic sun motif, couching is the perfect meditative technique to create texture and form.
Start at the center and spiral outwards, laying down a thick cord or braided thread and tacking it in place with a thinner, coordinating floss.
Using a variegated or multi-toned cord adds instant color variation without ever changing your thread.
Contrast the coiled texture of the center with sharp, radiating satin-stitched sunrays for a design that is both graphically bold and texturally rich.


