

Sometimes the desire to create something beautiful feels at odds with the time we actually have. You see intricate, large-scale projects and feel inspired, but the commitment feels too great for a quiet Tuesday evening. That’s where the magic of the miniature project comes in.
These tiny designs are not about simplifying your craft, but refining it. Each small motif is a focused study in precision—an opportunity to perfect your stitch tension, to master the smooth curve of a stem stitch, or to finally achieve a flawless satin stitch. They are meditations in thread, where every single stitch matters and contributes to the whole.
Think of each one as a building block for your skill and confidence. The control you gain stitching a tiny, perfect leaf will translate to every botanical wreath you make in the future. The patience you learn with a single strand of metallic thread will elevate your most ambitious pieces. Let’s begin.
1. Mastering Directional Satin Stitch
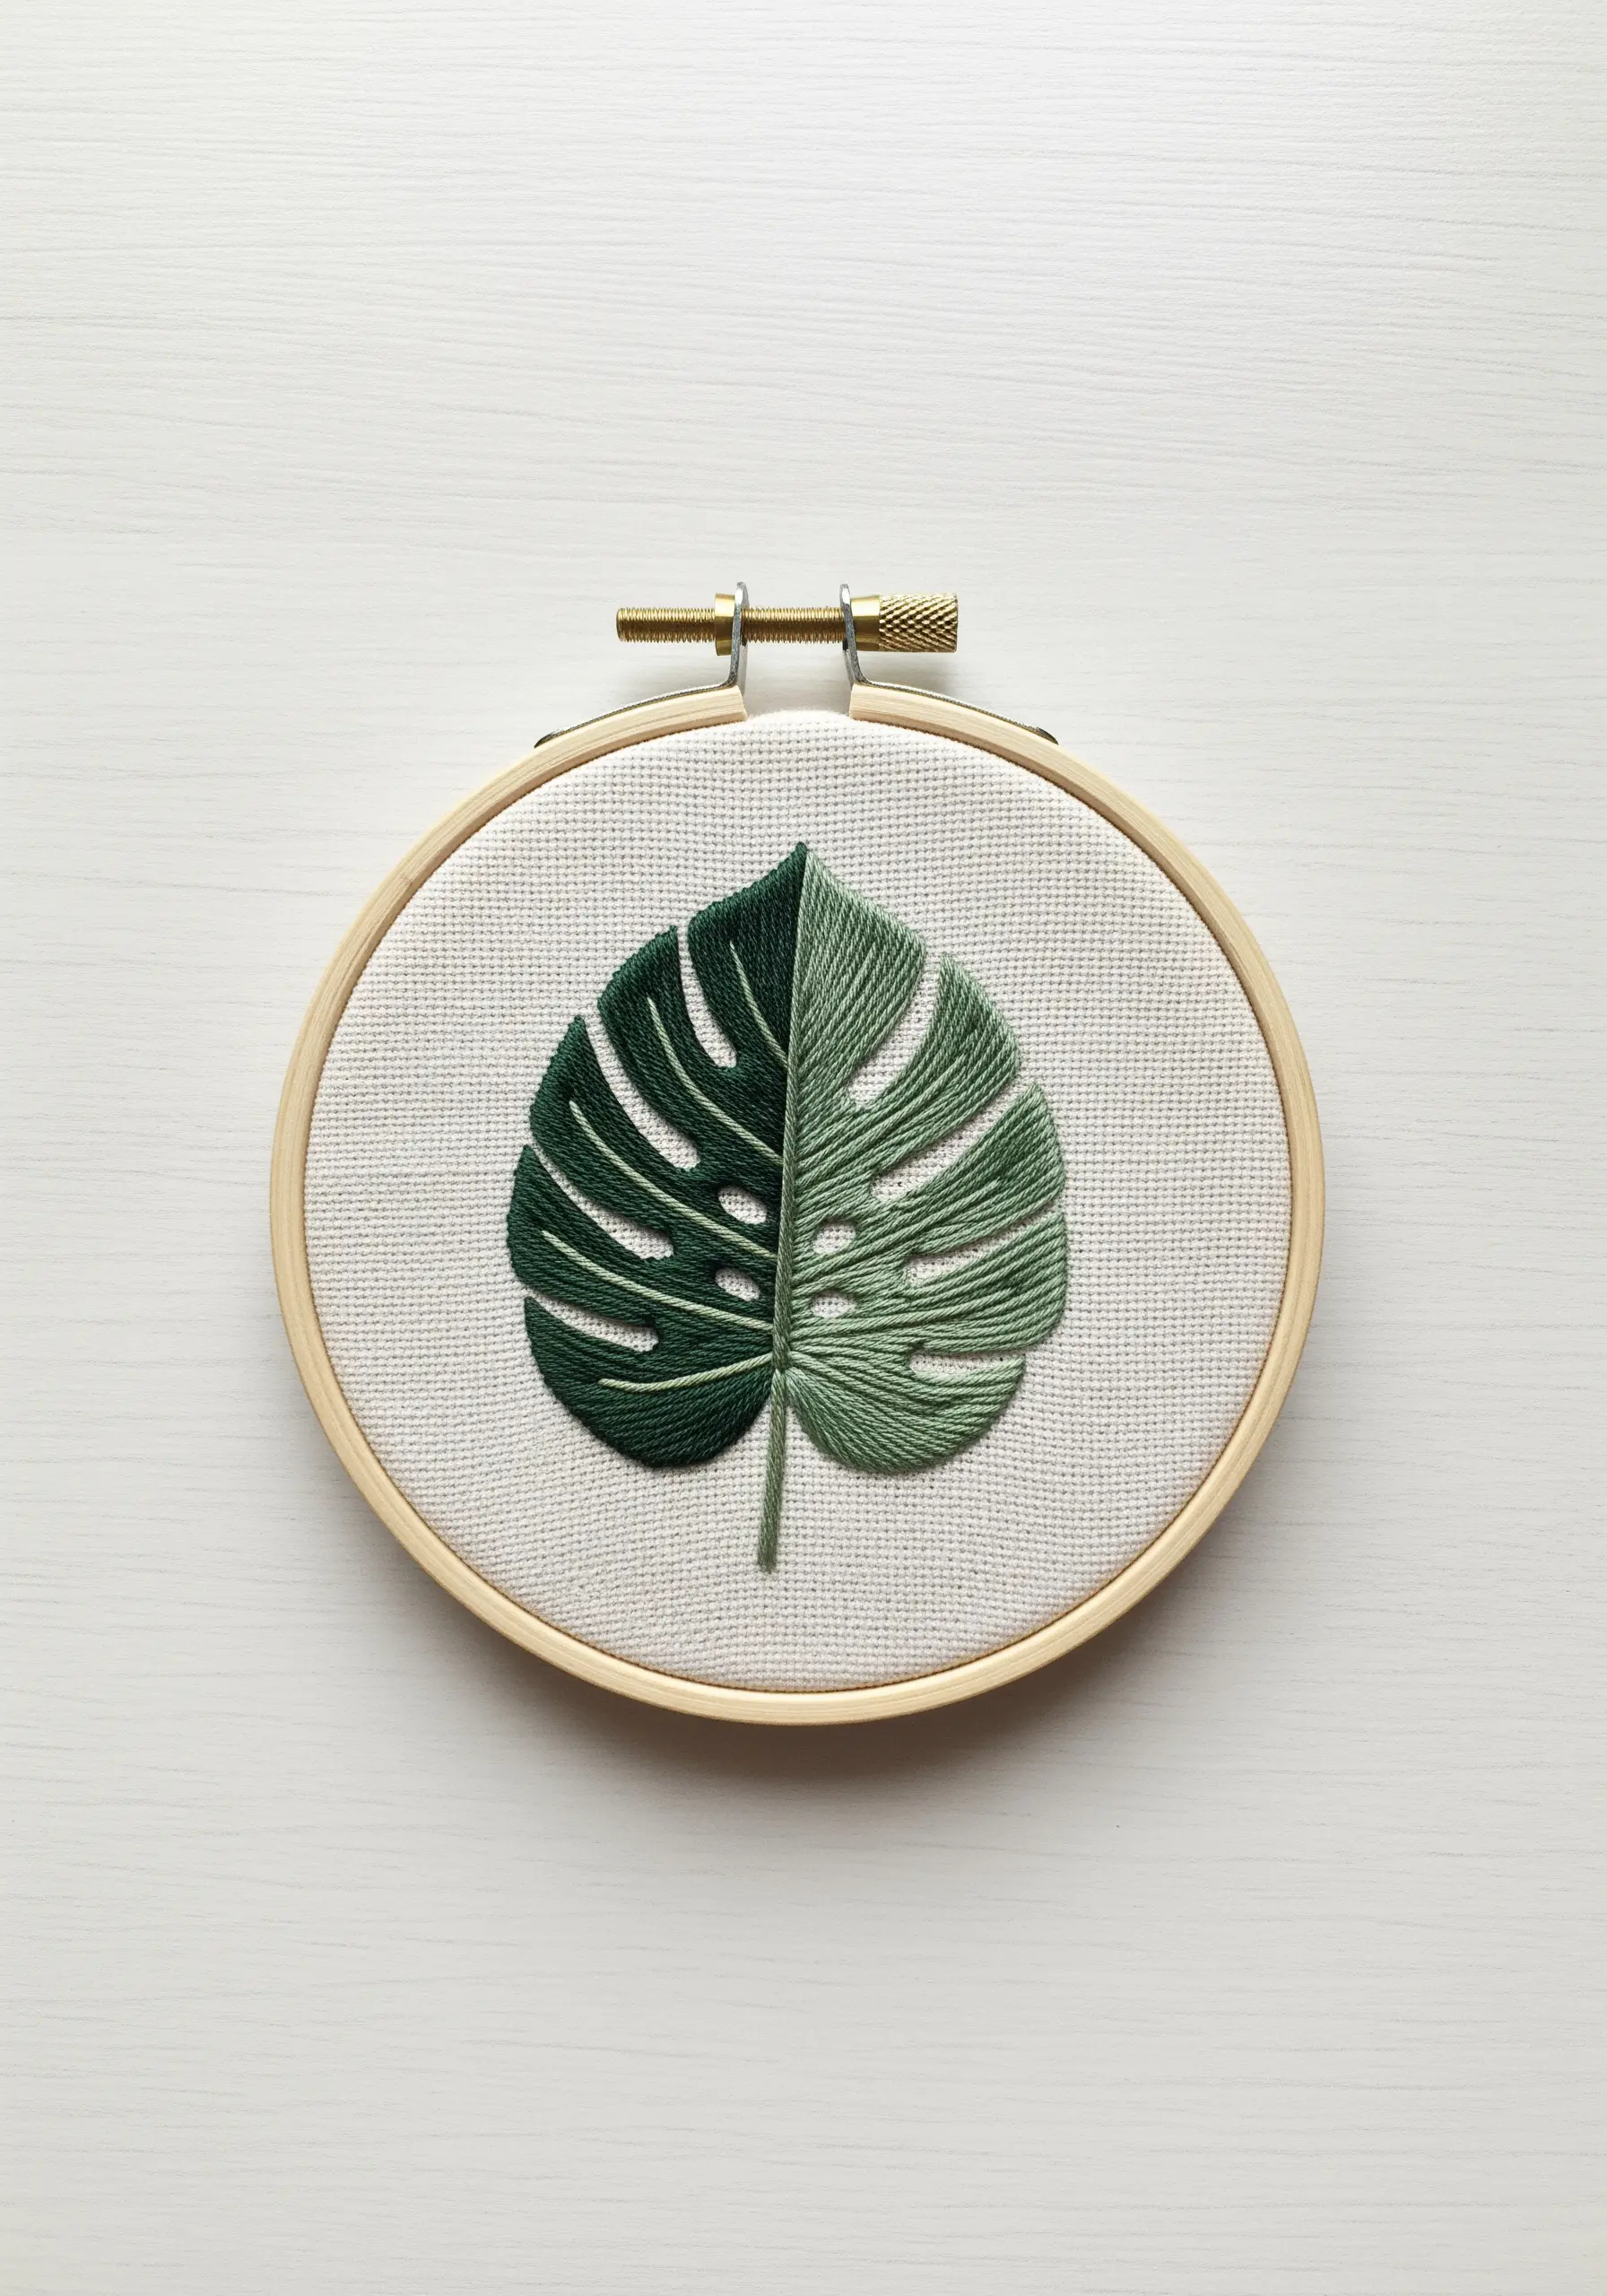
When filling a shape like this monstera leaf, the direction of your satin stitch is everything.
For the most realistic effect, angle your stitches to follow the natural growth of the leaf—outward from the central vein.
By splitting the design into two shades, you can clearly practice keeping your stitch direction consistent on both sides, which creates a subtle play of light and shadow.
Use three strands of floss for dense coverage without creating unnecessary bulk, and define the center with a single, crisp backstitch.
2. The Modern Appeal of Couching

To achieve these perfectly smooth, bold arcs, try couching instead of a wide satin stitch.
First, lay down a bundle of six-strand floss along your design line.
Then, using a single strand of a matching or contrasting color, make tiny, evenly spaced tacking stitches to secure the bundle to the fabric.
This technique gives you flawlessly curved lines with a beautiful, rope-like texture, and it’s much quicker and easier to control than trying to keep long satin stitches perfectly aligned.
3. Achieving Gradients with Long-and-Short Stitch
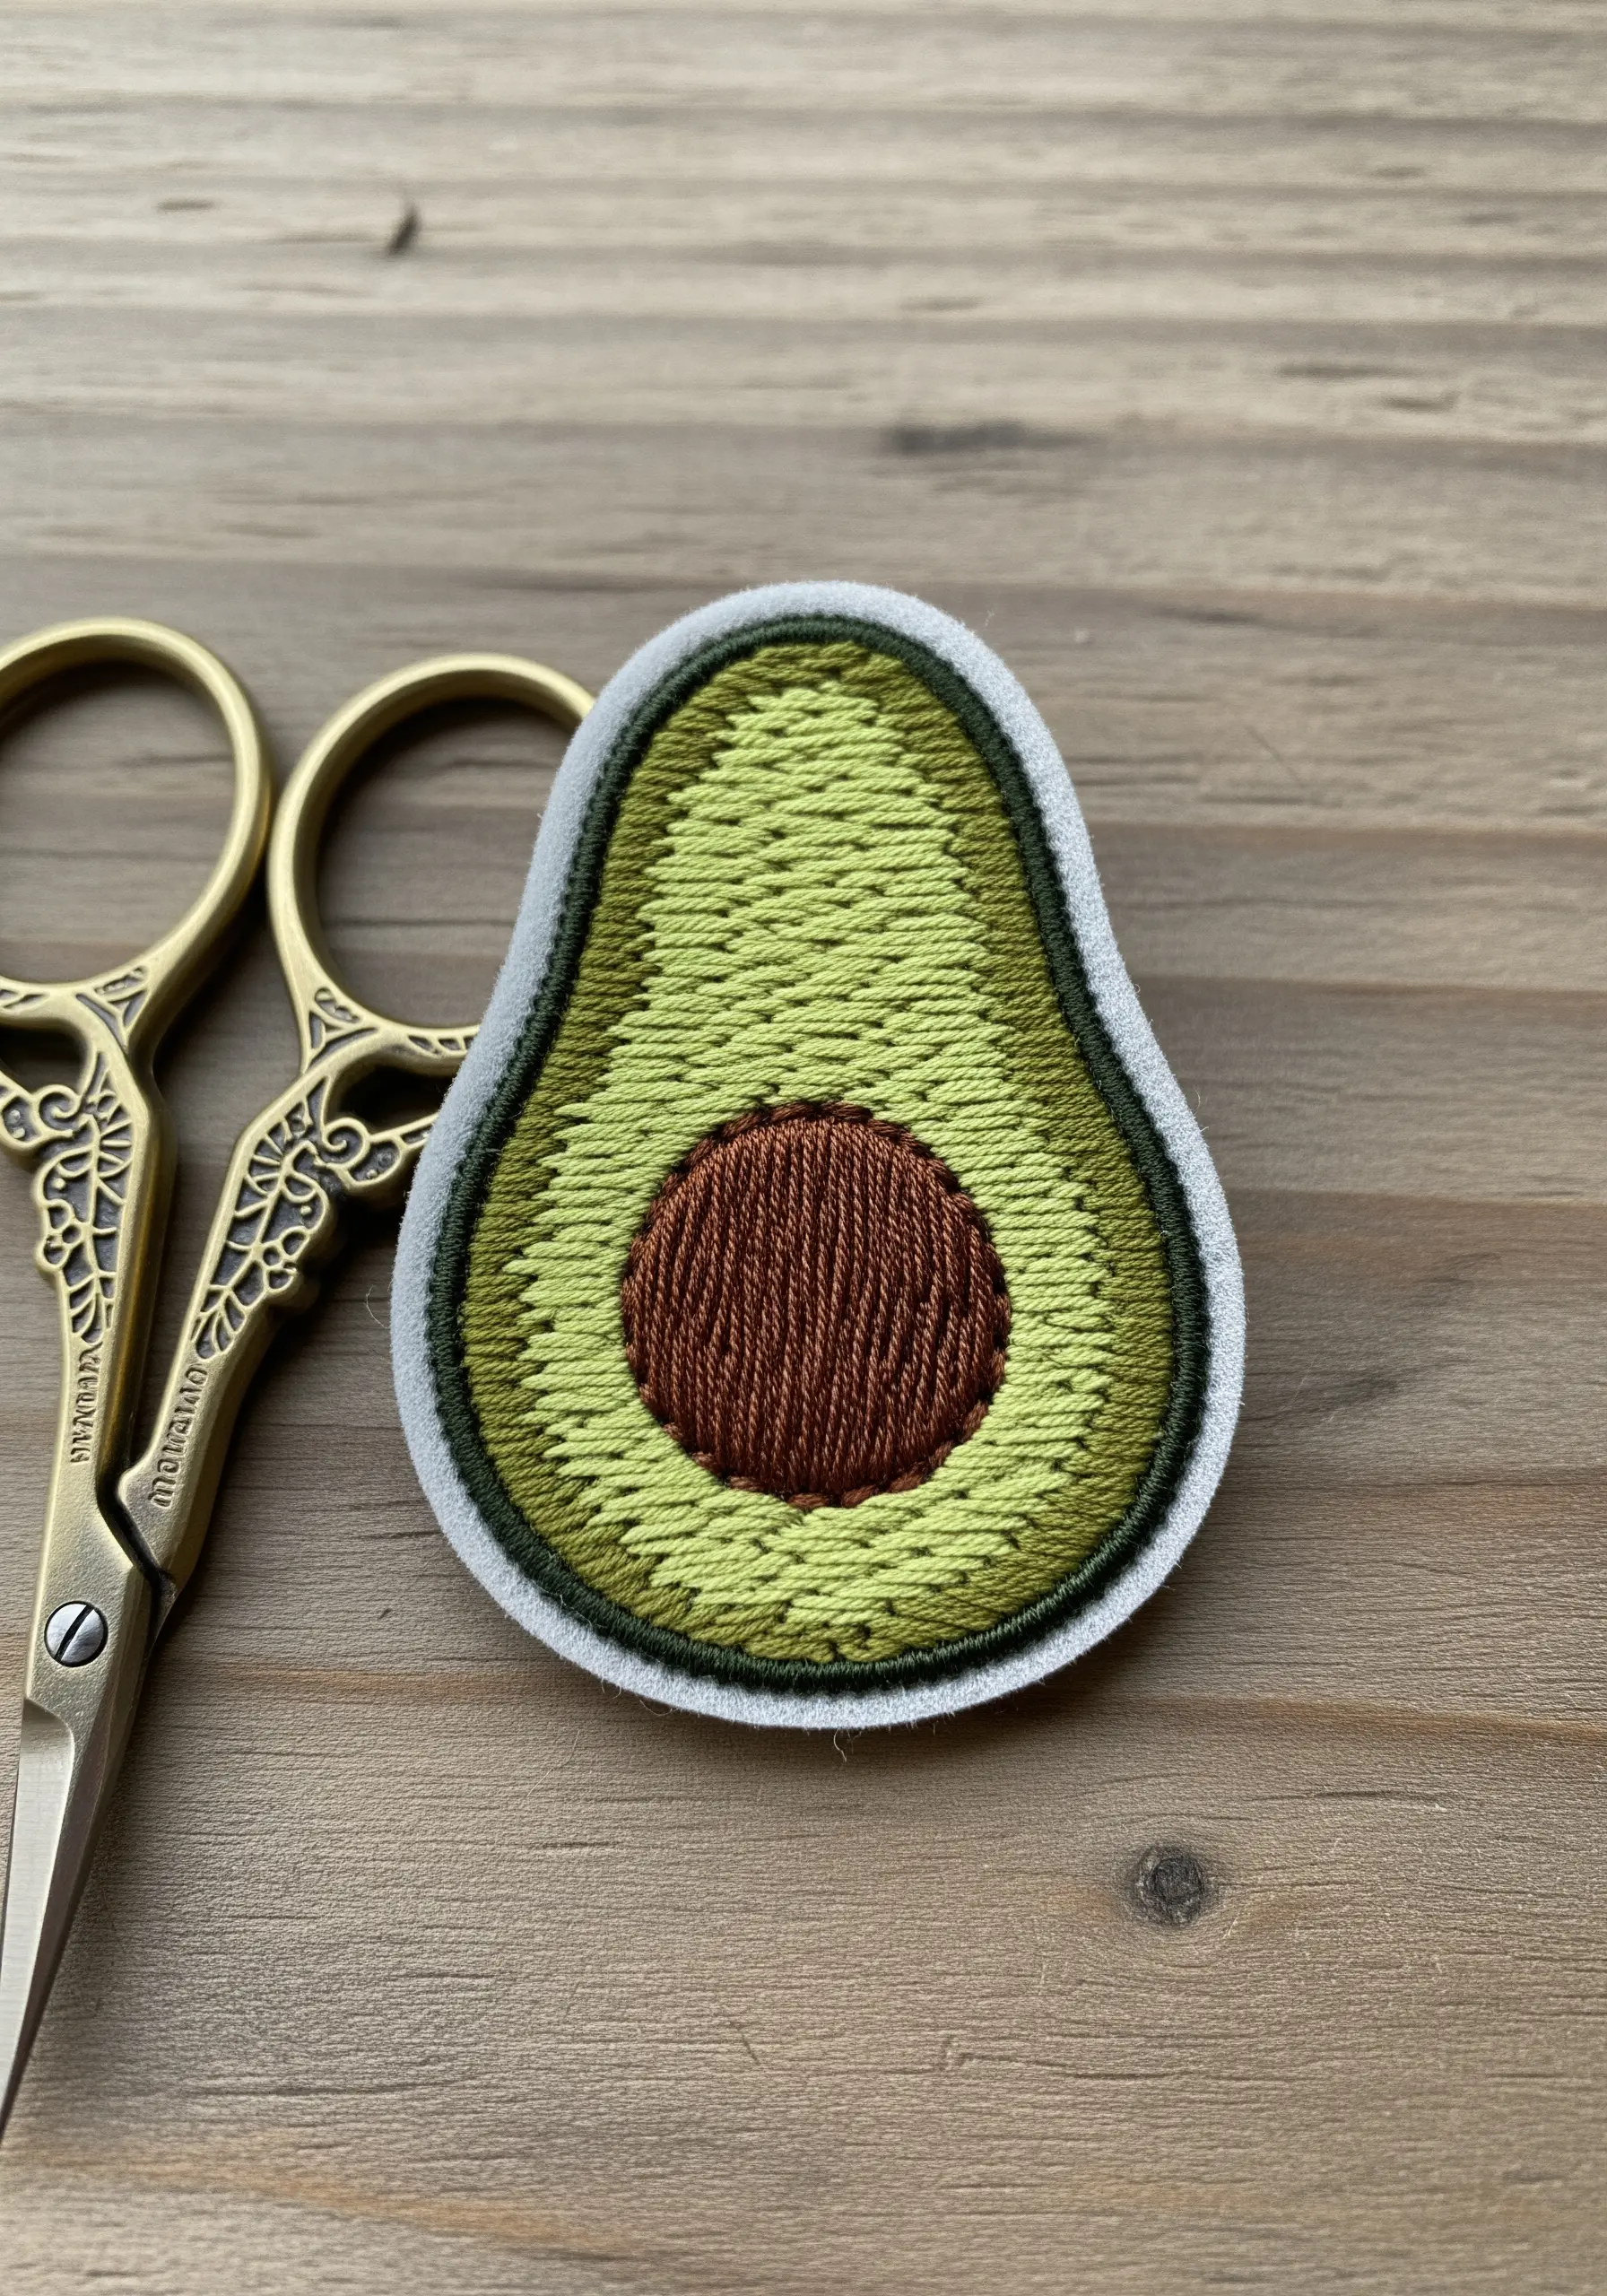
This avocado’s soft, realistic color transition comes from the long-and-short stitch, a cornerstone of thread painting.
Begin with the darkest shade on the outer edge, then work your way inward with progressively lighter greens.
The key is to stagger the length of your stitches and slightly overlap each new row of color with the last.
This method eliminates harsh lines and blends the shades seamlessly, giving even simple shapes a painterly depth.
4. The Power of a Bold, Weighted Outline
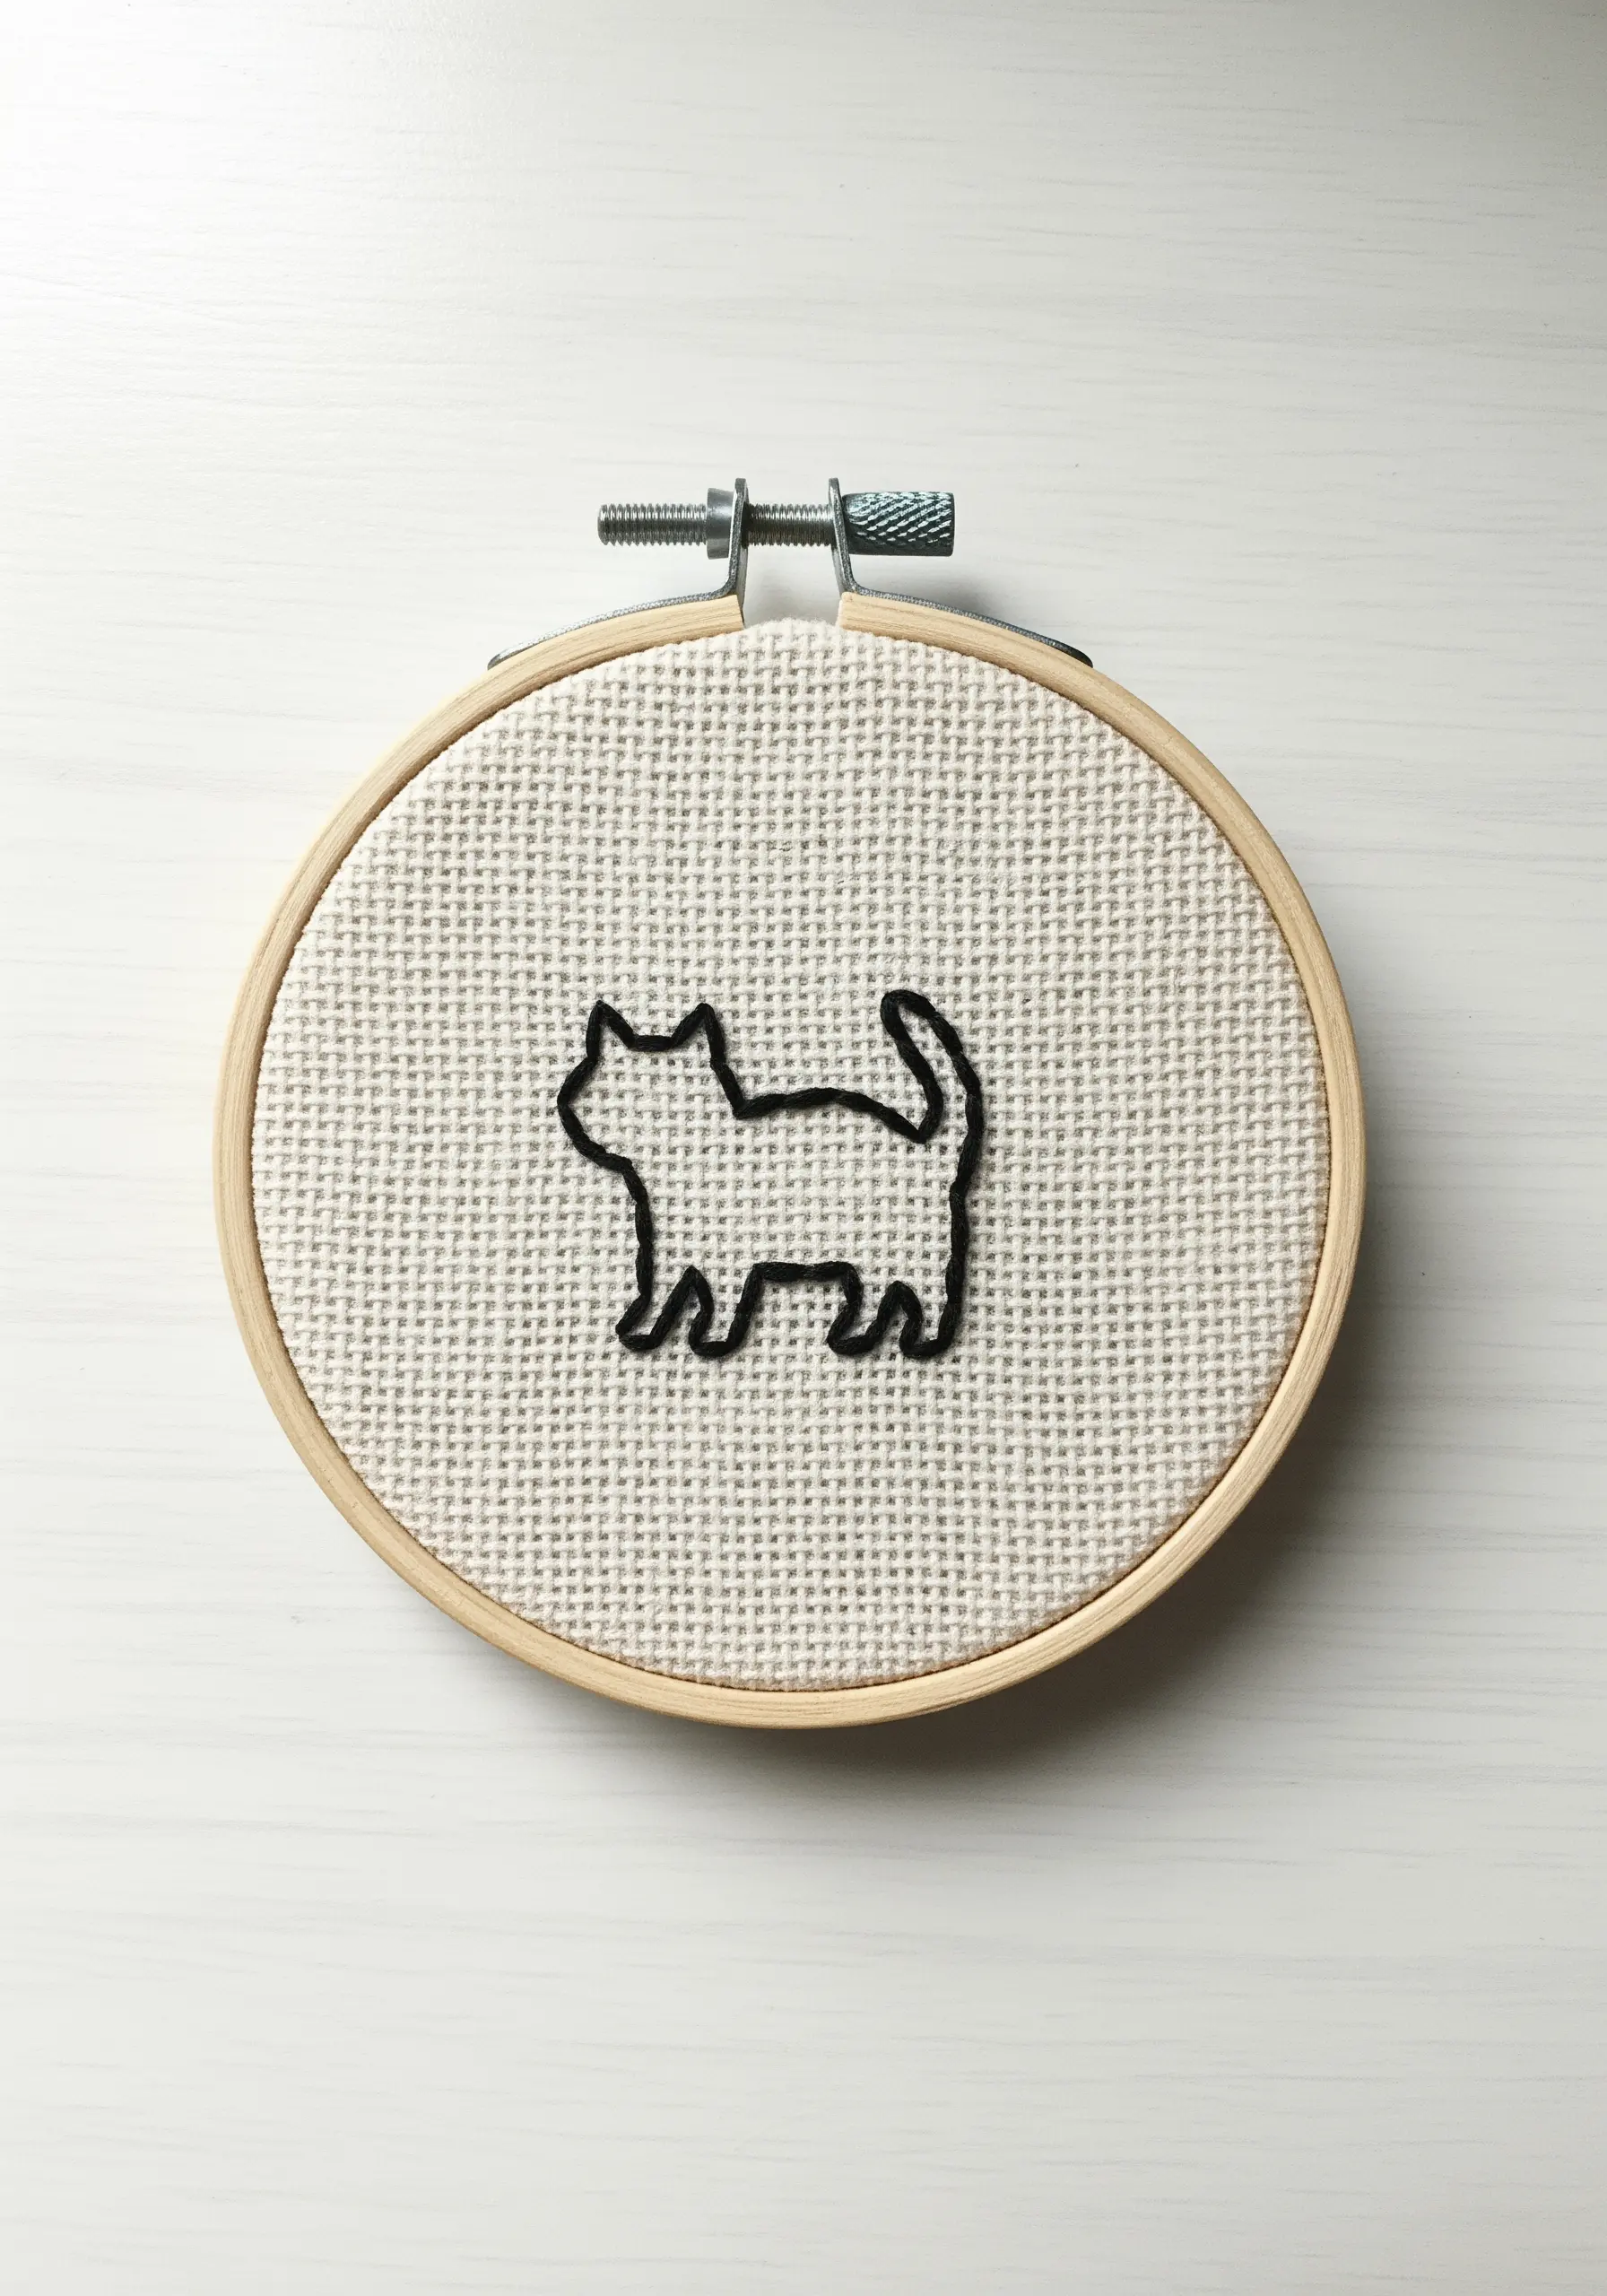
Transform a simple silhouette into a graphic statement by focusing on the weight of your outline.
Use all six strands of floss with a stem stitch or a whipped backstitch to create a thick, substantial line.
A stem stitch offers a slightly twisted, rope-like texture, while whipping your backstitches creates a perfectly smooth, solid line.
The most important factor is maintaining consistent stitch length and tension to ensure the outline remains fluid and even from start to finish.
5. Creating Luster with Metallic Thread
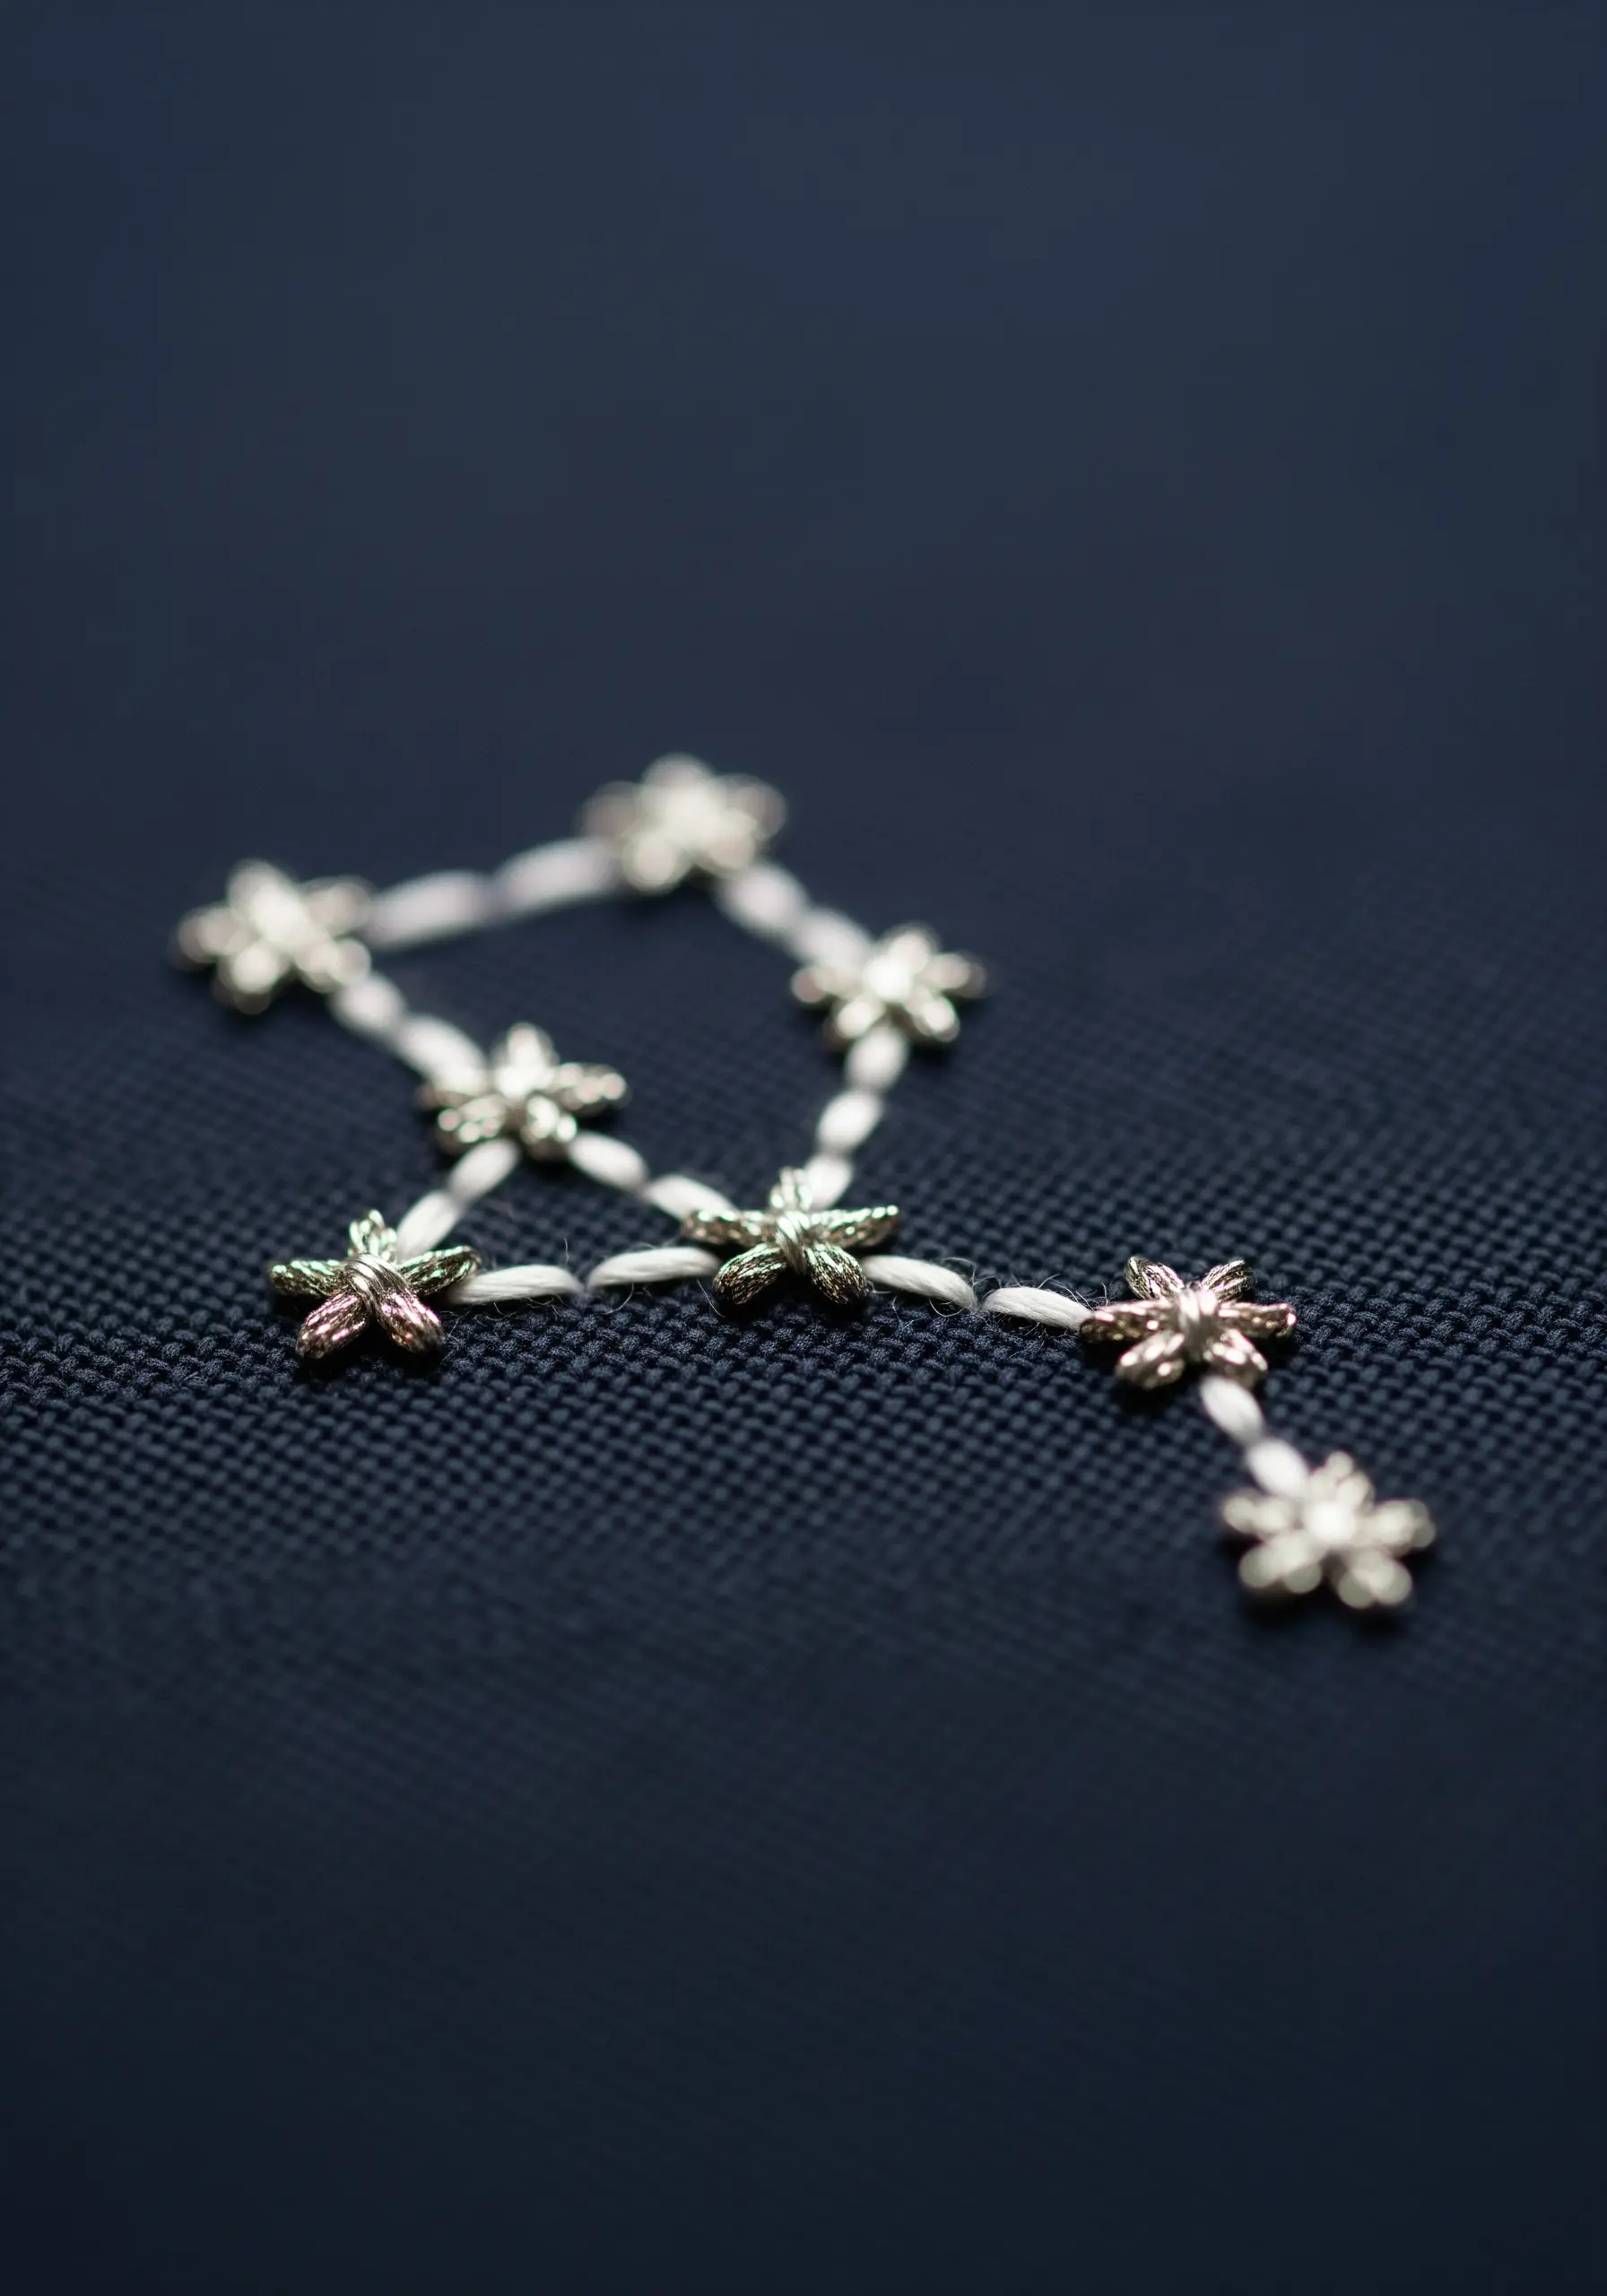
A tiny constellation is the perfect project for mastering metallic thread.
Form each star using lazy daisy stitches (or detached chain stitches), which create a natural starburst effect.
To prevent the notorious fraying and tangling of metallic floss, work with shorter lengths—no more than 12 inches at a time.
Using a thread conditioner can also make the process much smoother, allowing the thread to glide through the fabric.
Stitching on a dark, tightly woven cotton makes the metallic sheen truly sparkle.
6. Elevating Line Art with a Pop of Color

This charming design shows how minimal effort can yield elegant results.
Use a simple backstitch with just two strands of thread for the cup’s outline, focusing on neat, even stitches.
Combine this with a few other basic stitches to add character: straight stitches for the coffee, a tiny satin-stitched heart, and a wavy backstitch for the steam.
Framing these tiny pieces gives them a sense of polish and transforms a quick practice session into a finished piece of art.
7. Building Fluffy Texture with French Knots

To create this pillowy, three-dimensional cloud, cluster French knots tightly together, allowing them to fill the entire shape.
Create a more organic, fluffy texture by varying the size of the knots—use one, two, or three wraps around your needle.
A variegated grey-and-white thread enhances this effect, adding subtle color shifts without needing to switch floss.
For the raindrops, use a metallic silver thread and a smooth satin stitch to provide a beautiful contrast in both texture and sheen.
8. Creating a Focal Point with a Single Stitch
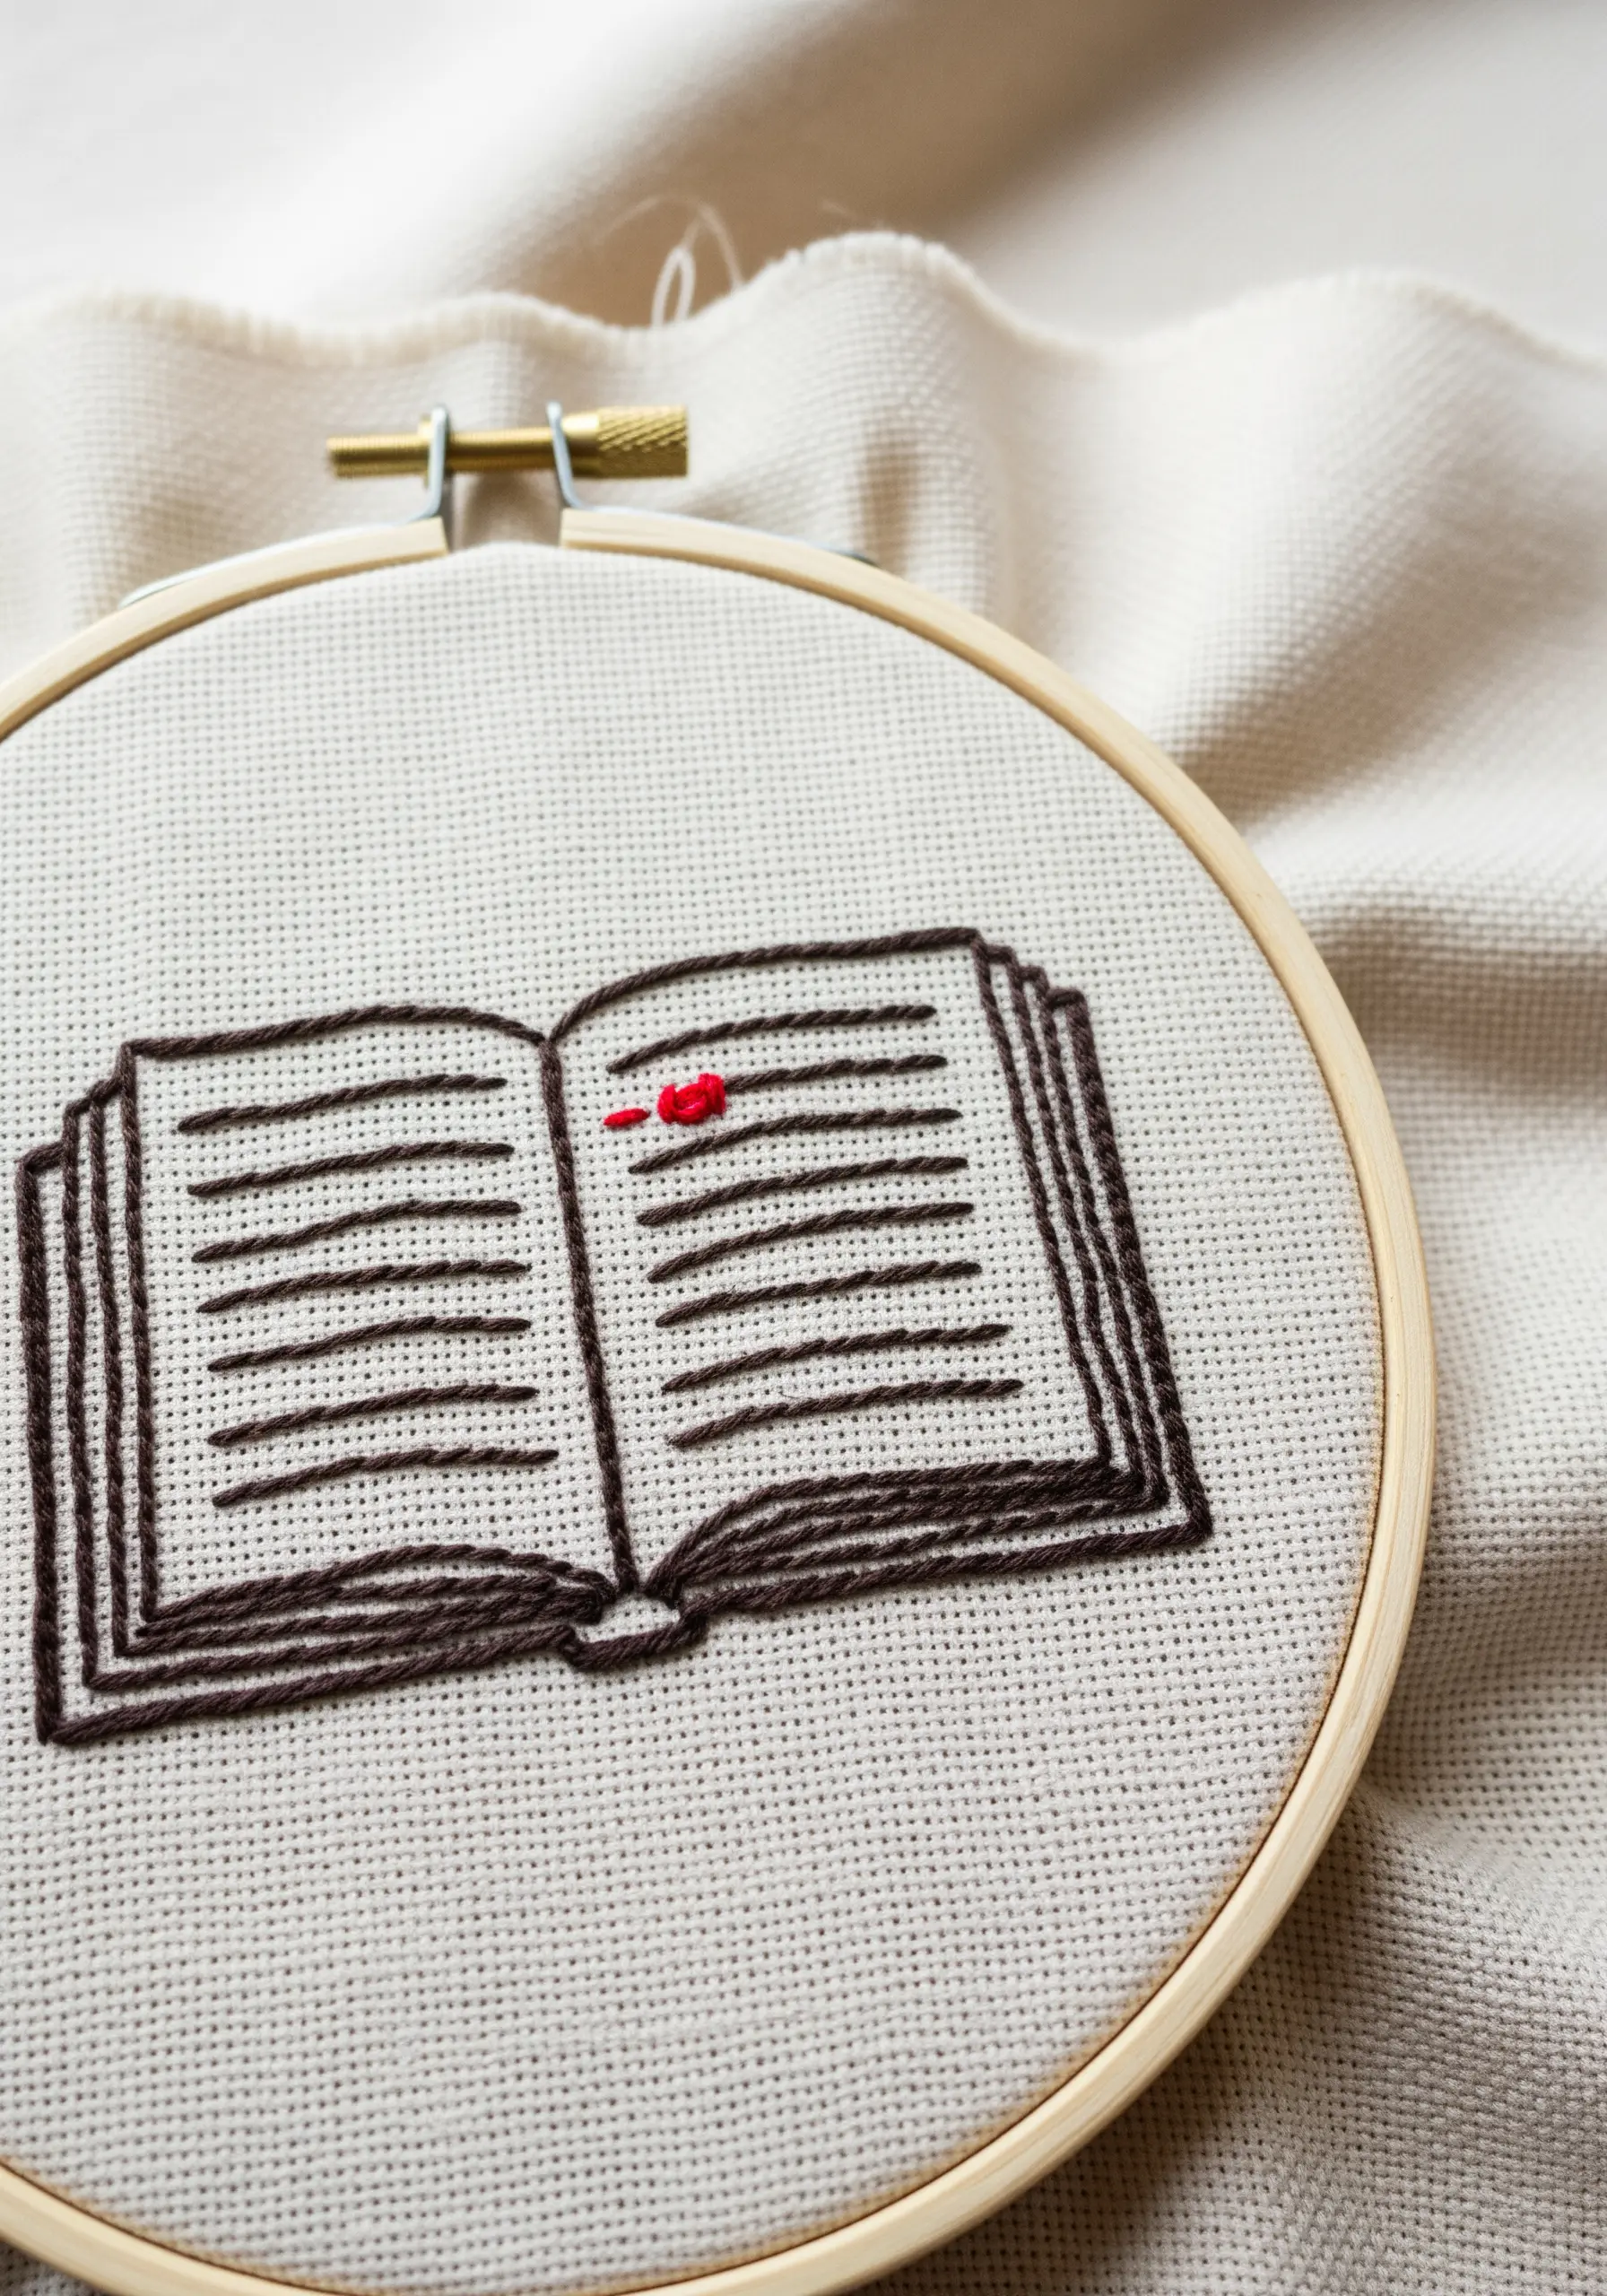
The brilliance of this piece is its restraint.
The book is rendered in clean backstitch outlines and simple straight stitches for the text lines.
By adding just one tiny red French knot, you create an immediate and powerful focal point that draws the eye and suggests a story.
This technique—using a single, isolated pop of vibrant color—is incredibly effective in minimalist compositions, adding meaning without clutter.
9. Embellishing Denim with Delicate Details
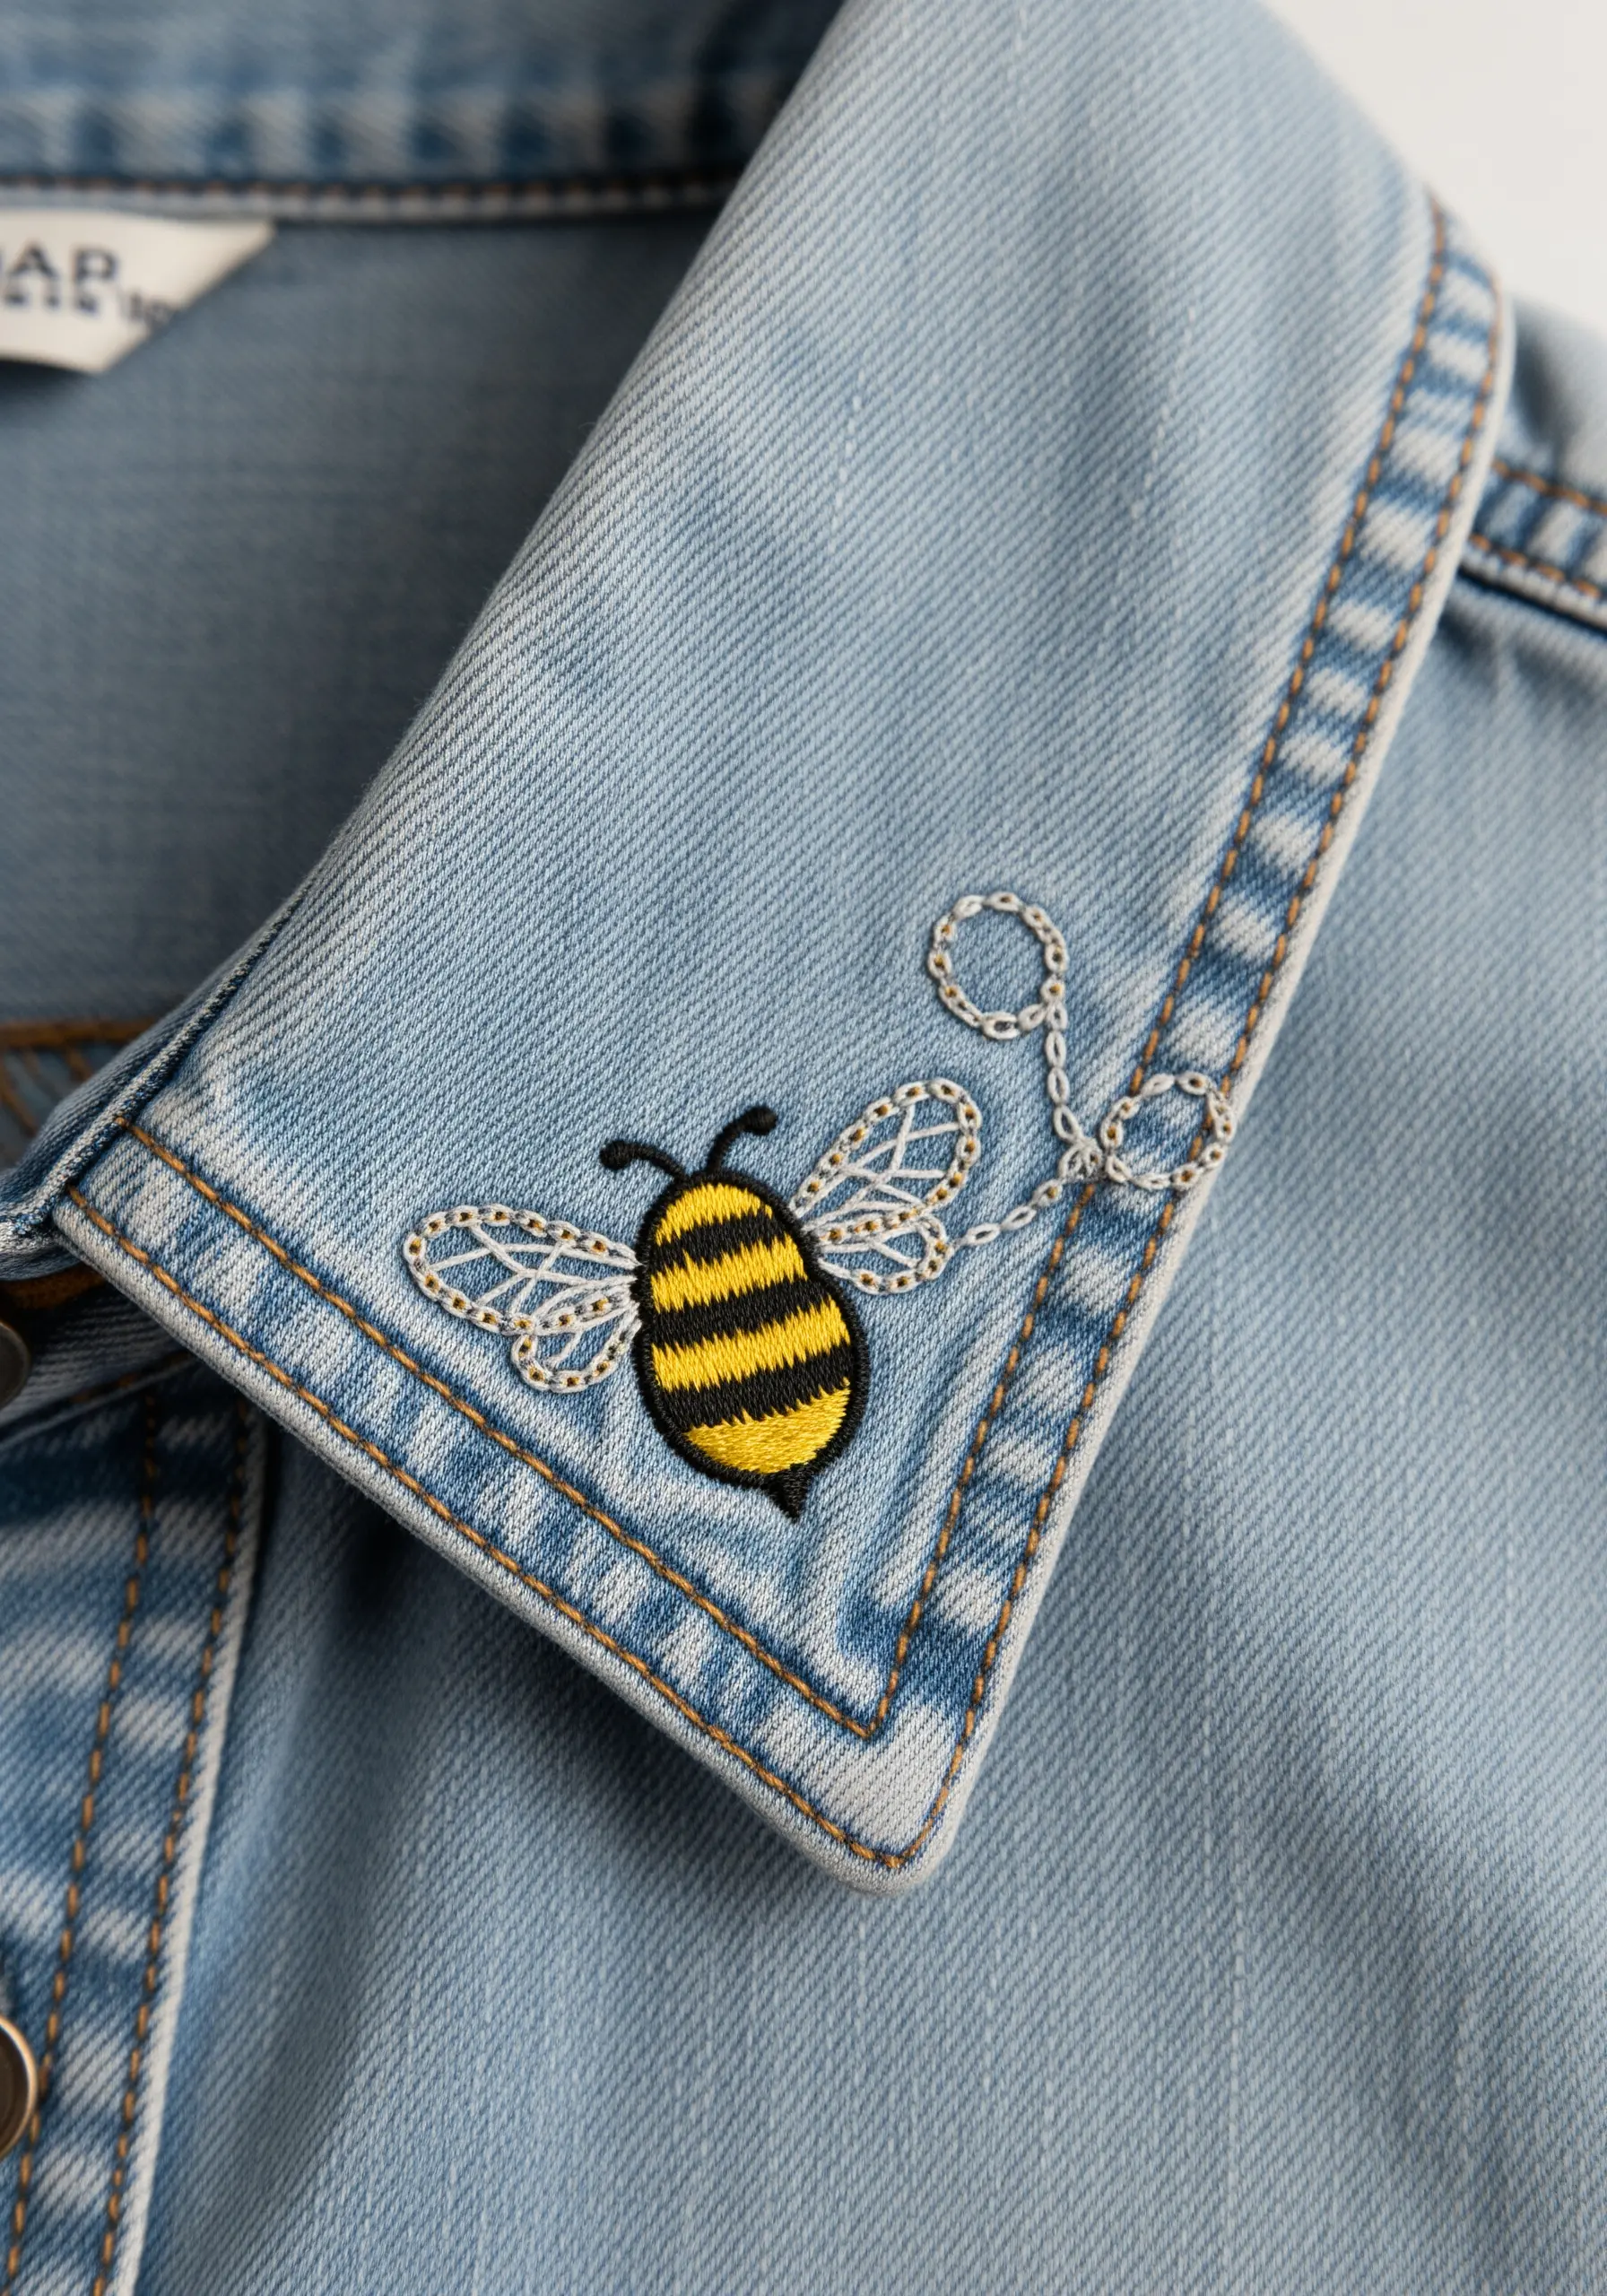
When embroidering on a sturdy fabric like denim, use a sharp, strong needle.
Create the bee’s body with a bold satin stitch, alternating black and yellow for crisp stripes.
The wings require a lighter touch: use a single strand of white or silver thread to outline them, then add delicate veins with a whipped backstitch or tiny straight stitches.
This contrast between the solid body and the sheer wings makes the design feel balanced and refined.
10. Balancing Texture in a Monogram Wreath
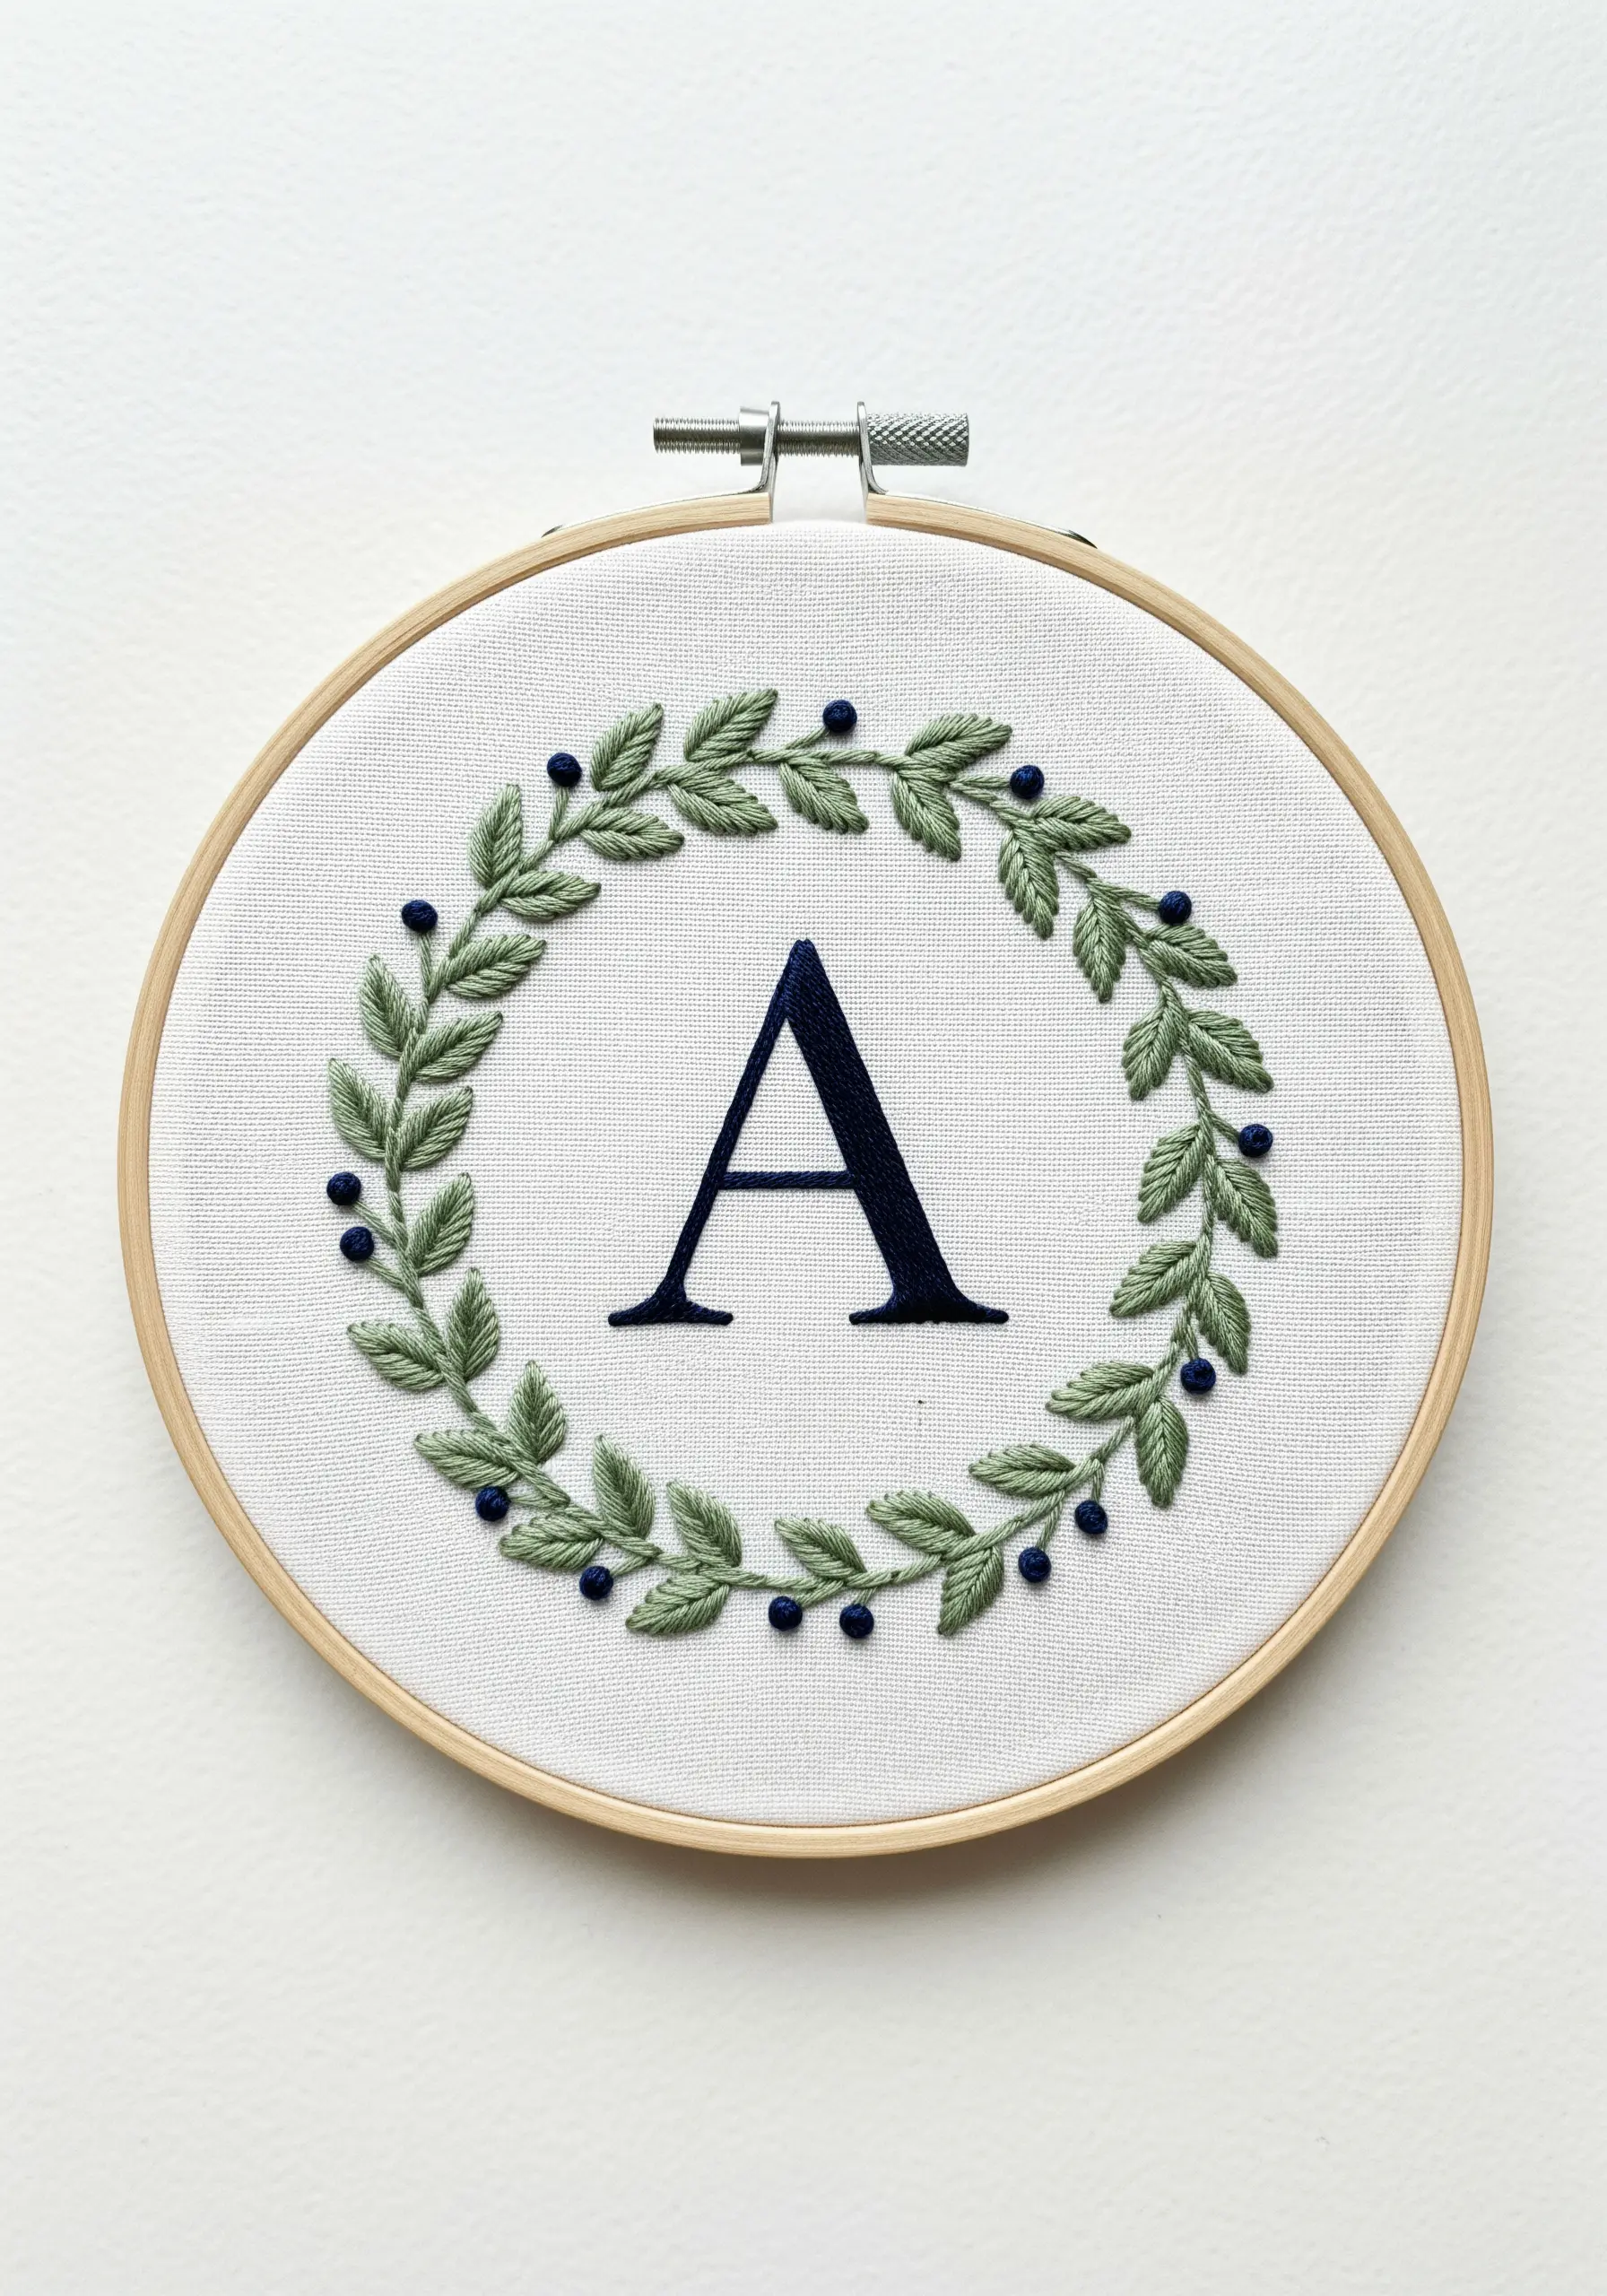
This classic design feels fresh and modern because of its sophisticated balance of textures.
Use a fishbone stitch for the leaves, which creates a raised effect with a beautiful central vein.
For the berries, cluster tiny French knots in small, organic groups.
The monogram itself should be crisp and bold; fill it with a smooth, vertical satin stitch.
Pair a crisp satin stitch monogram with textured botanicals for an elegant design that feels both classic and contemporary.
11. Thread Painting with Variegated Floss
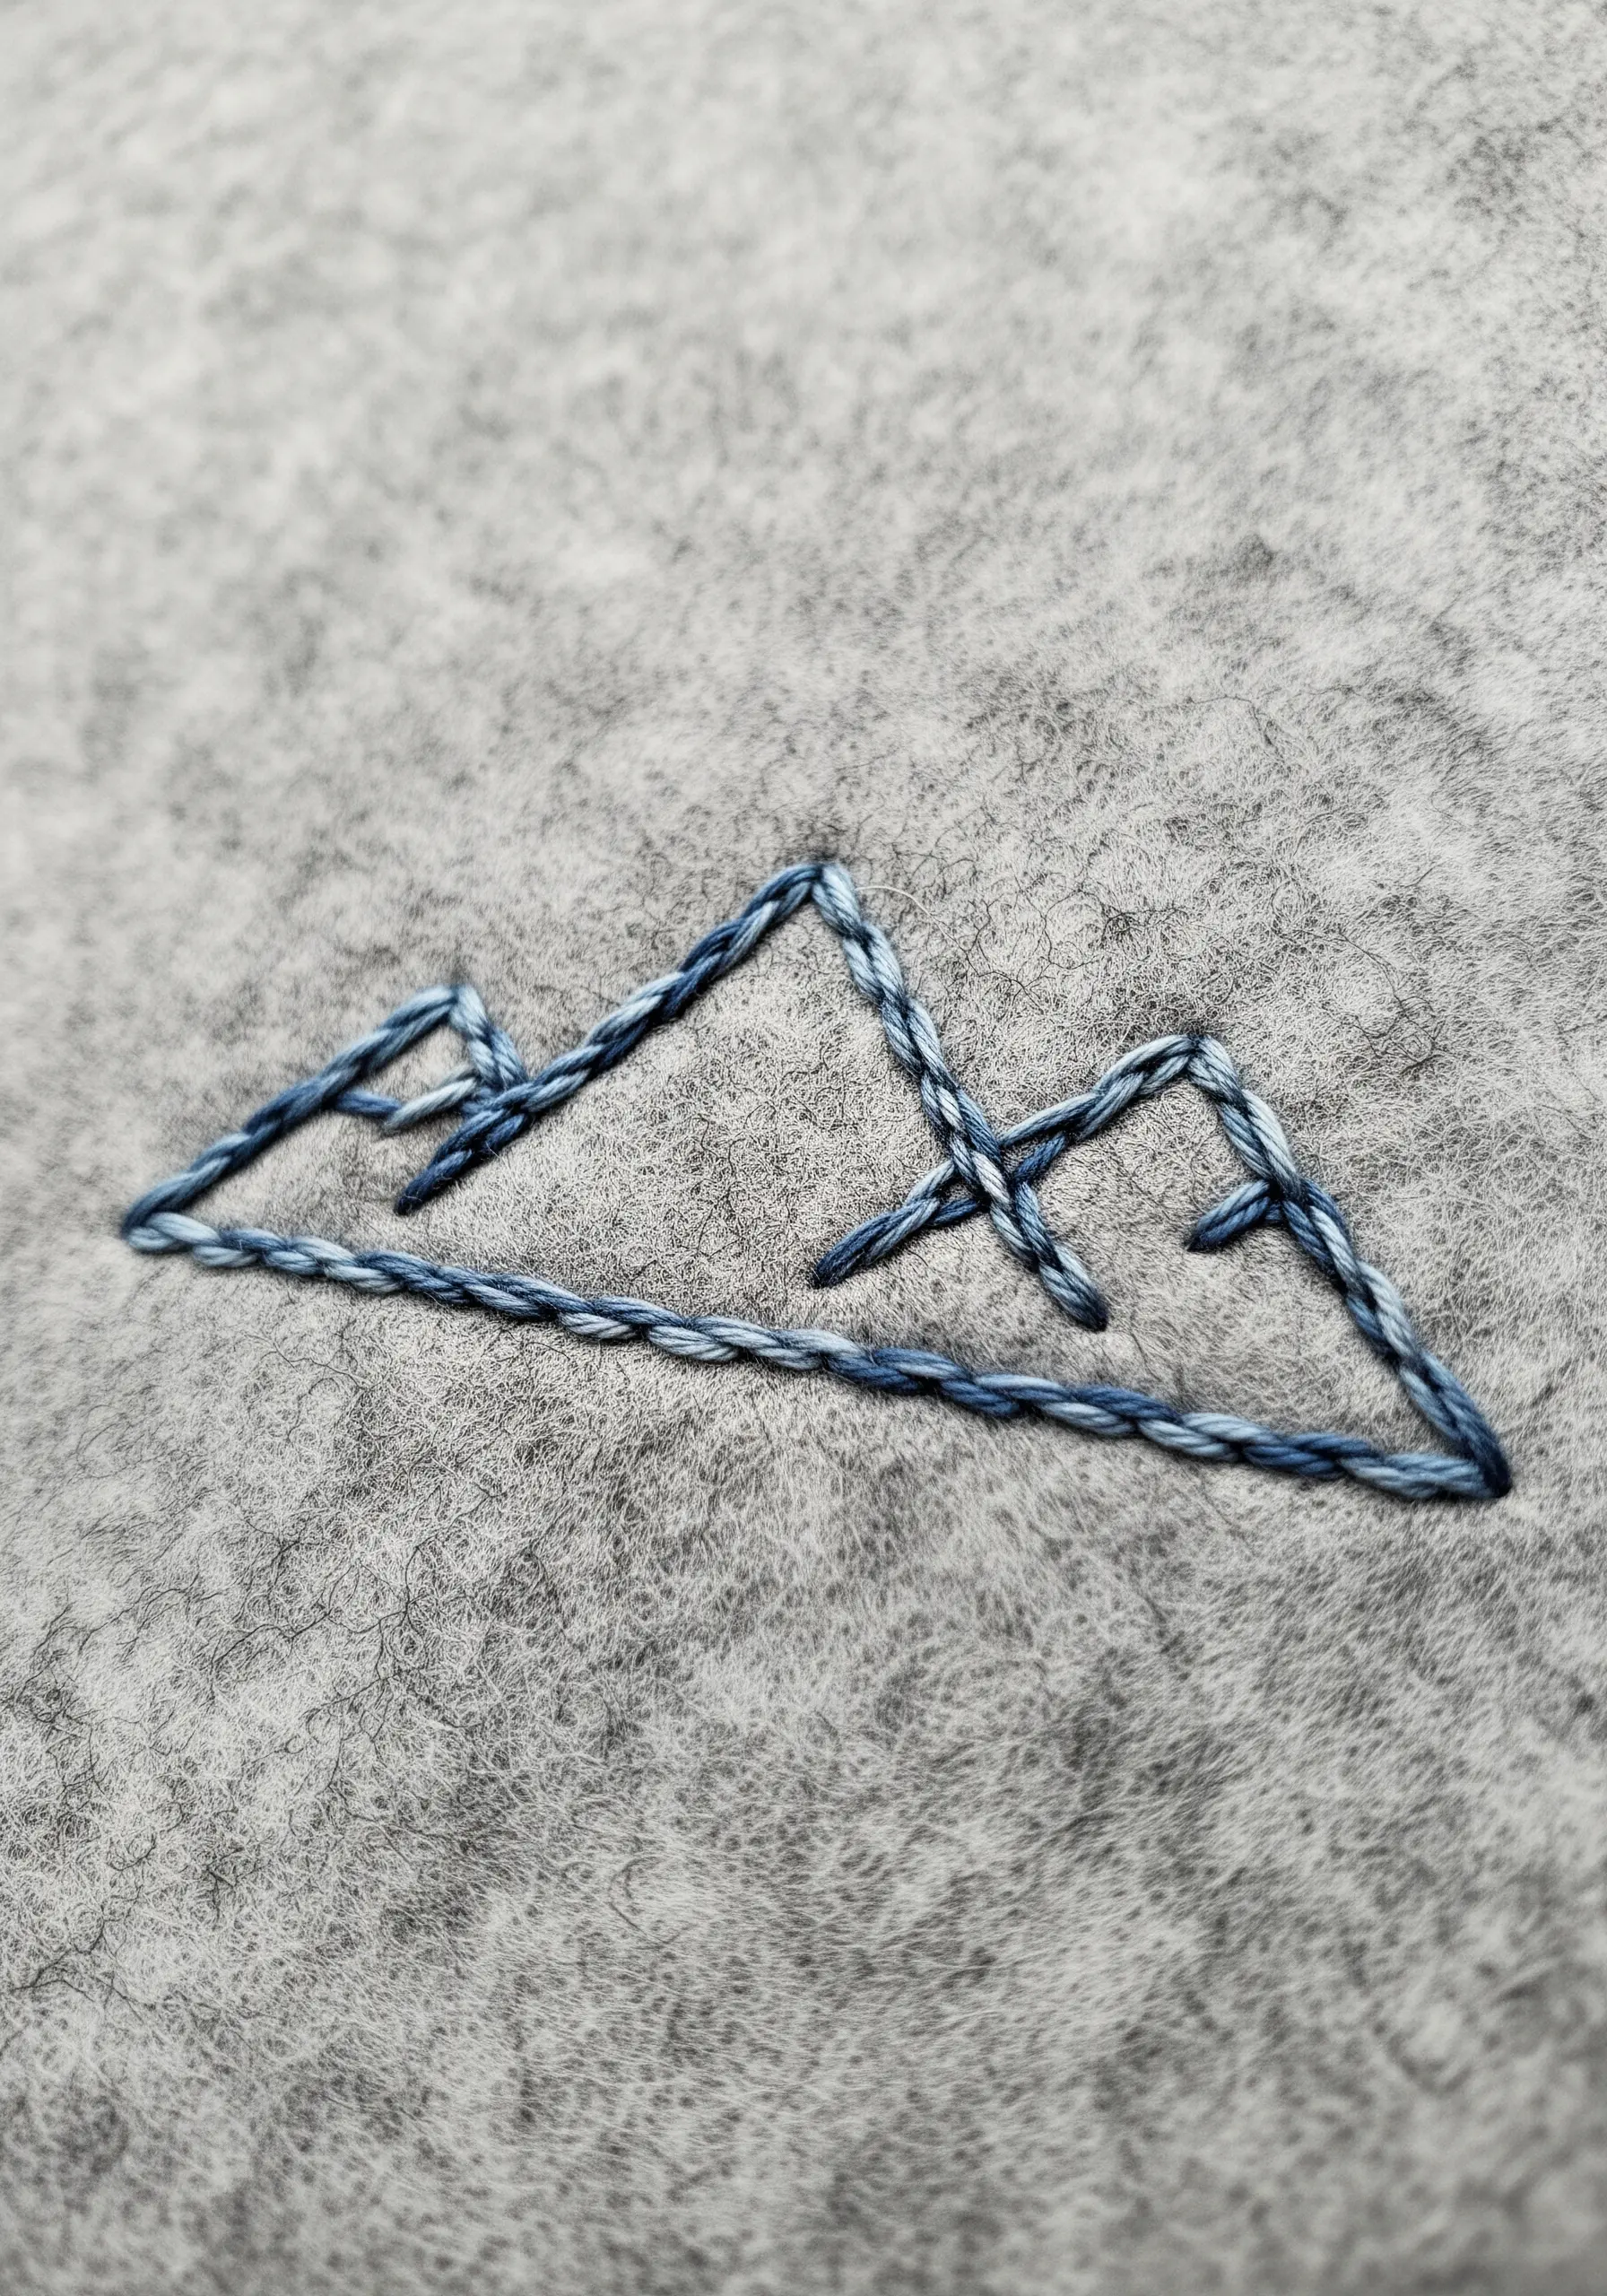
In this minimalist mountain range, the variegated thread does all the complex work for you.
By using a single floss that shifts through shades of blue, you create automatic highlights and shadows along the peaks.
Use a whipped backstitch or a stem stitch to create a solid, rope-like line that fully showcases these subtle color changes.
This technique adds incredible depth and a painterly quality with very little effort, and it works especially well on textured fabrics like wool felt.
12. Mastering Contrast on Dark Fabric
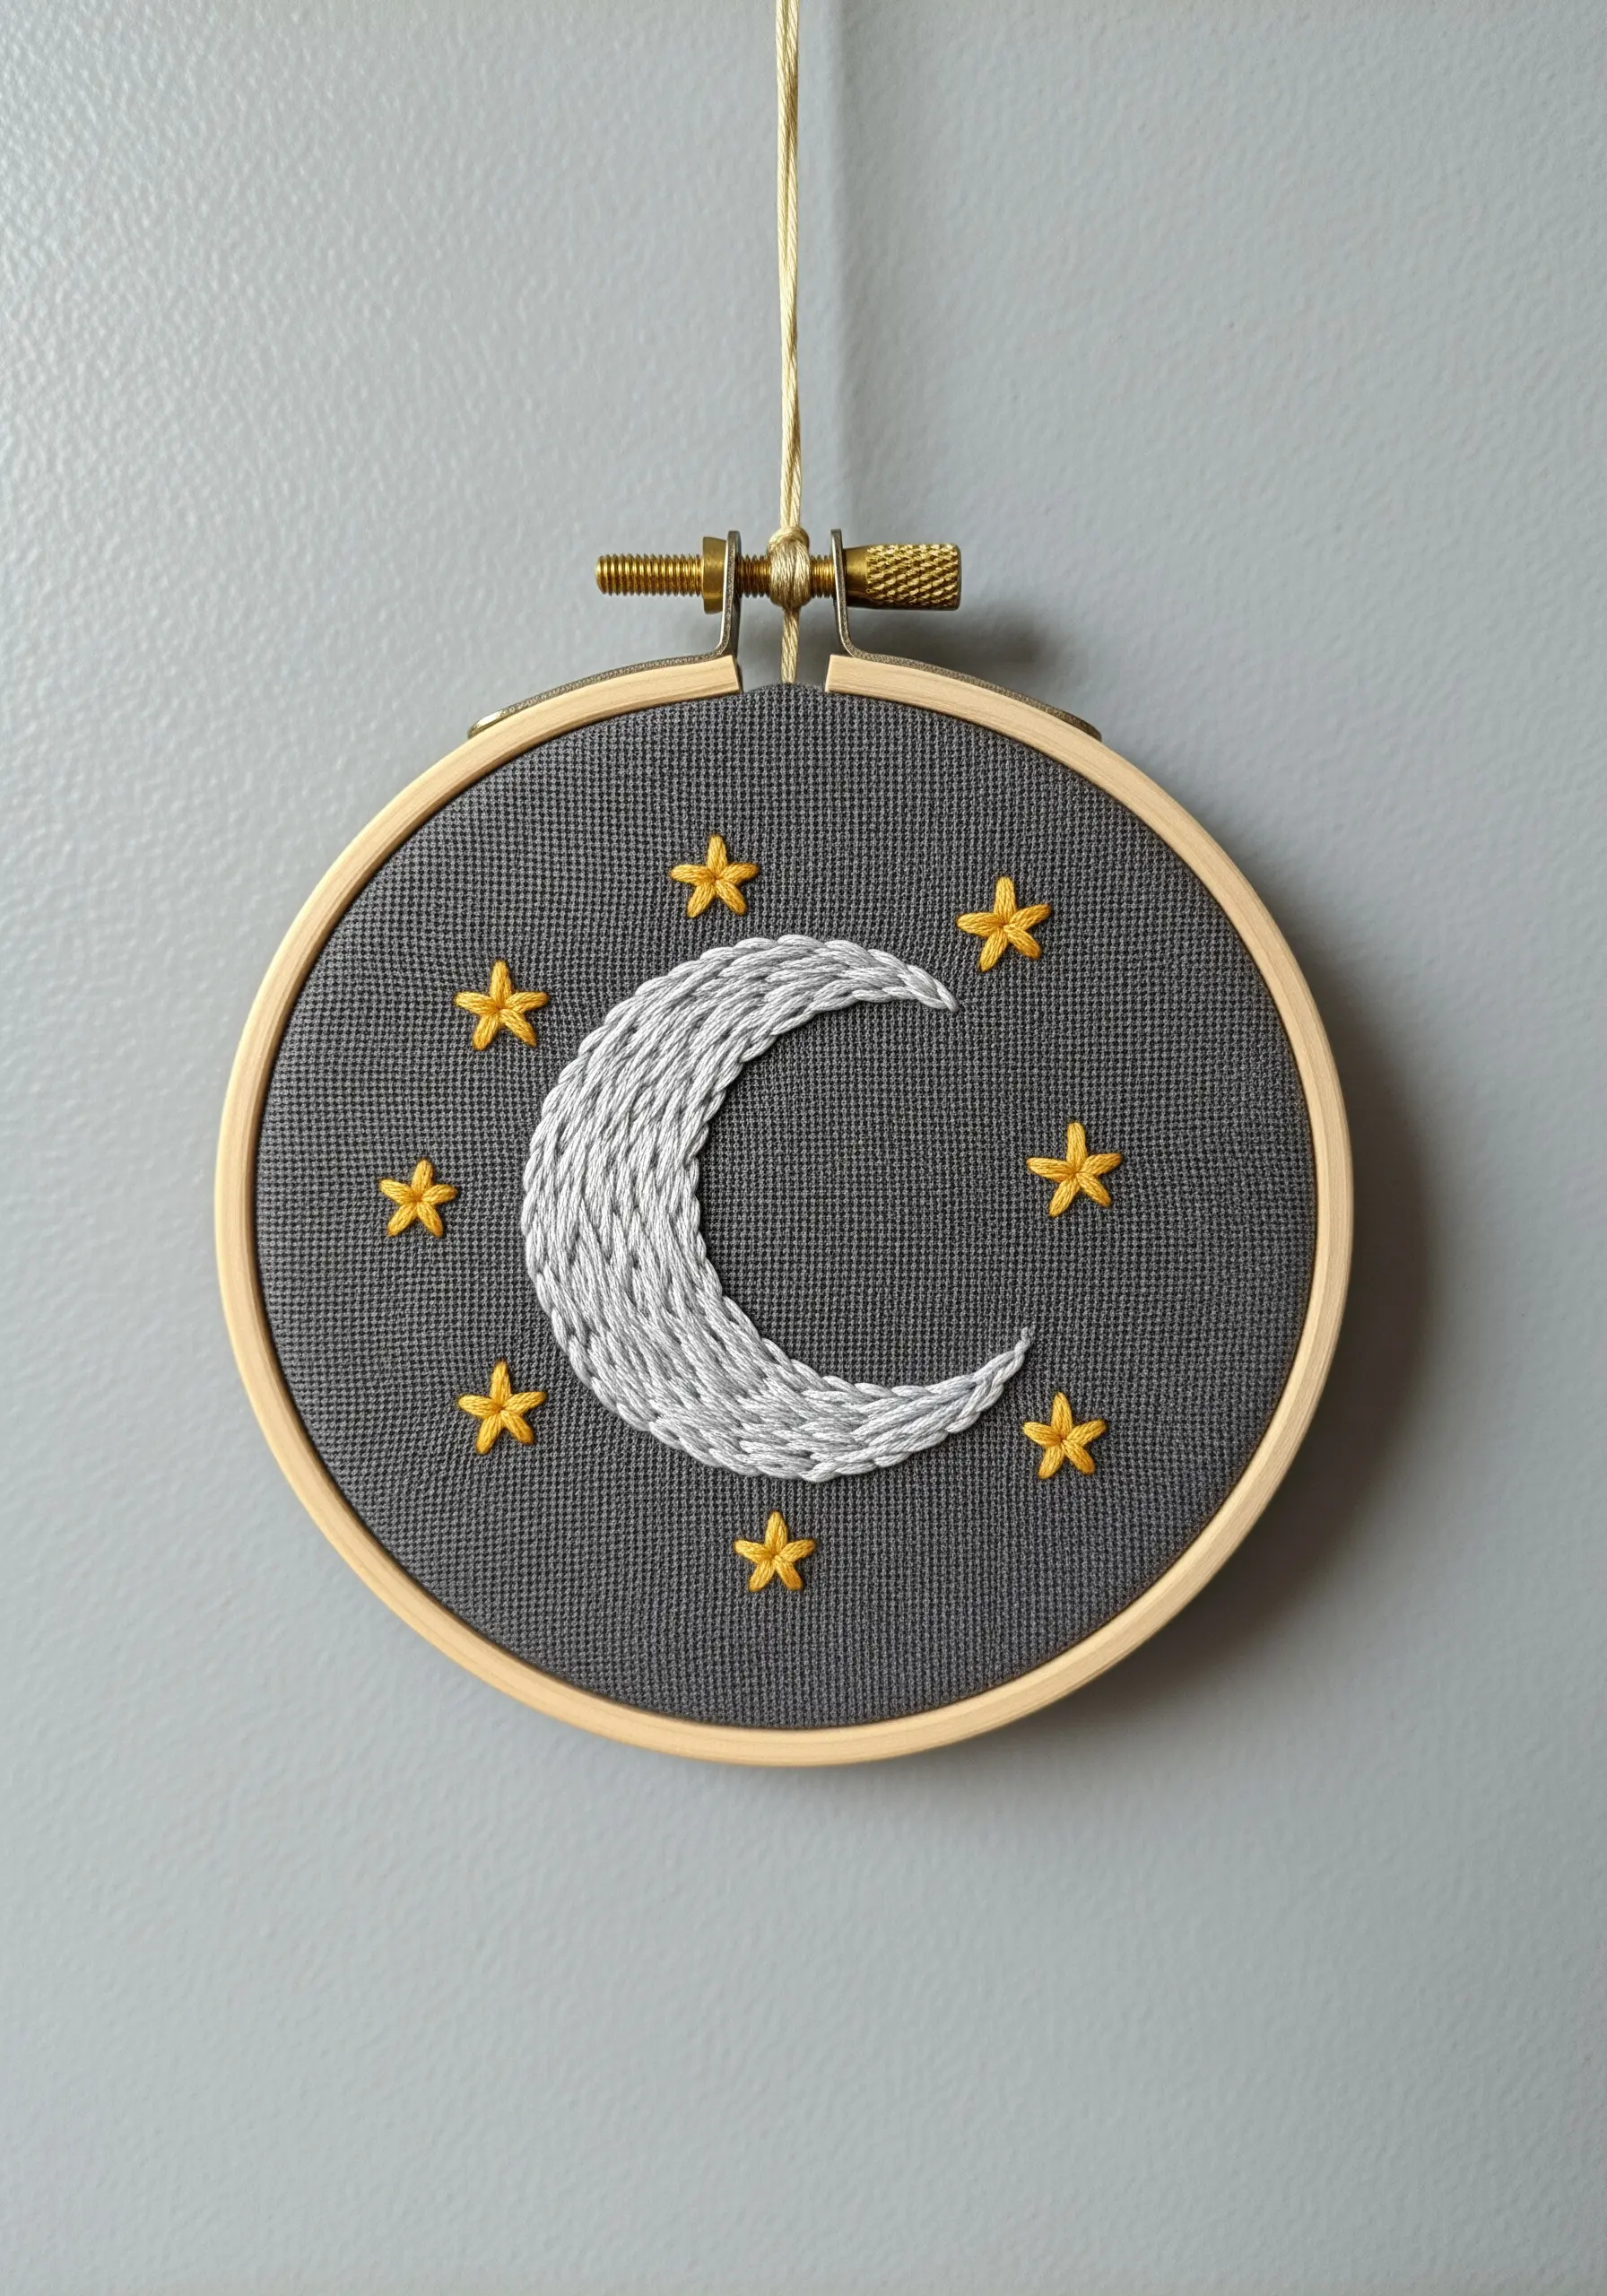
To ensure your design is vibrant and clear on a dark background, choose your thread and stitches with intention.
The crescent moon is filled with a slightly diagonal satin stitch using a light, silvery-grey floss that effectively catches the light.
For the stars, use a bright, high-contrast yellow and a simple star stitch—formed with several intersecting straight stitches.
This stark contrast between the thread colors and the dark fabric base makes the entire celestial scene feel luminous.
13. Achieving Plump Texture with Knots
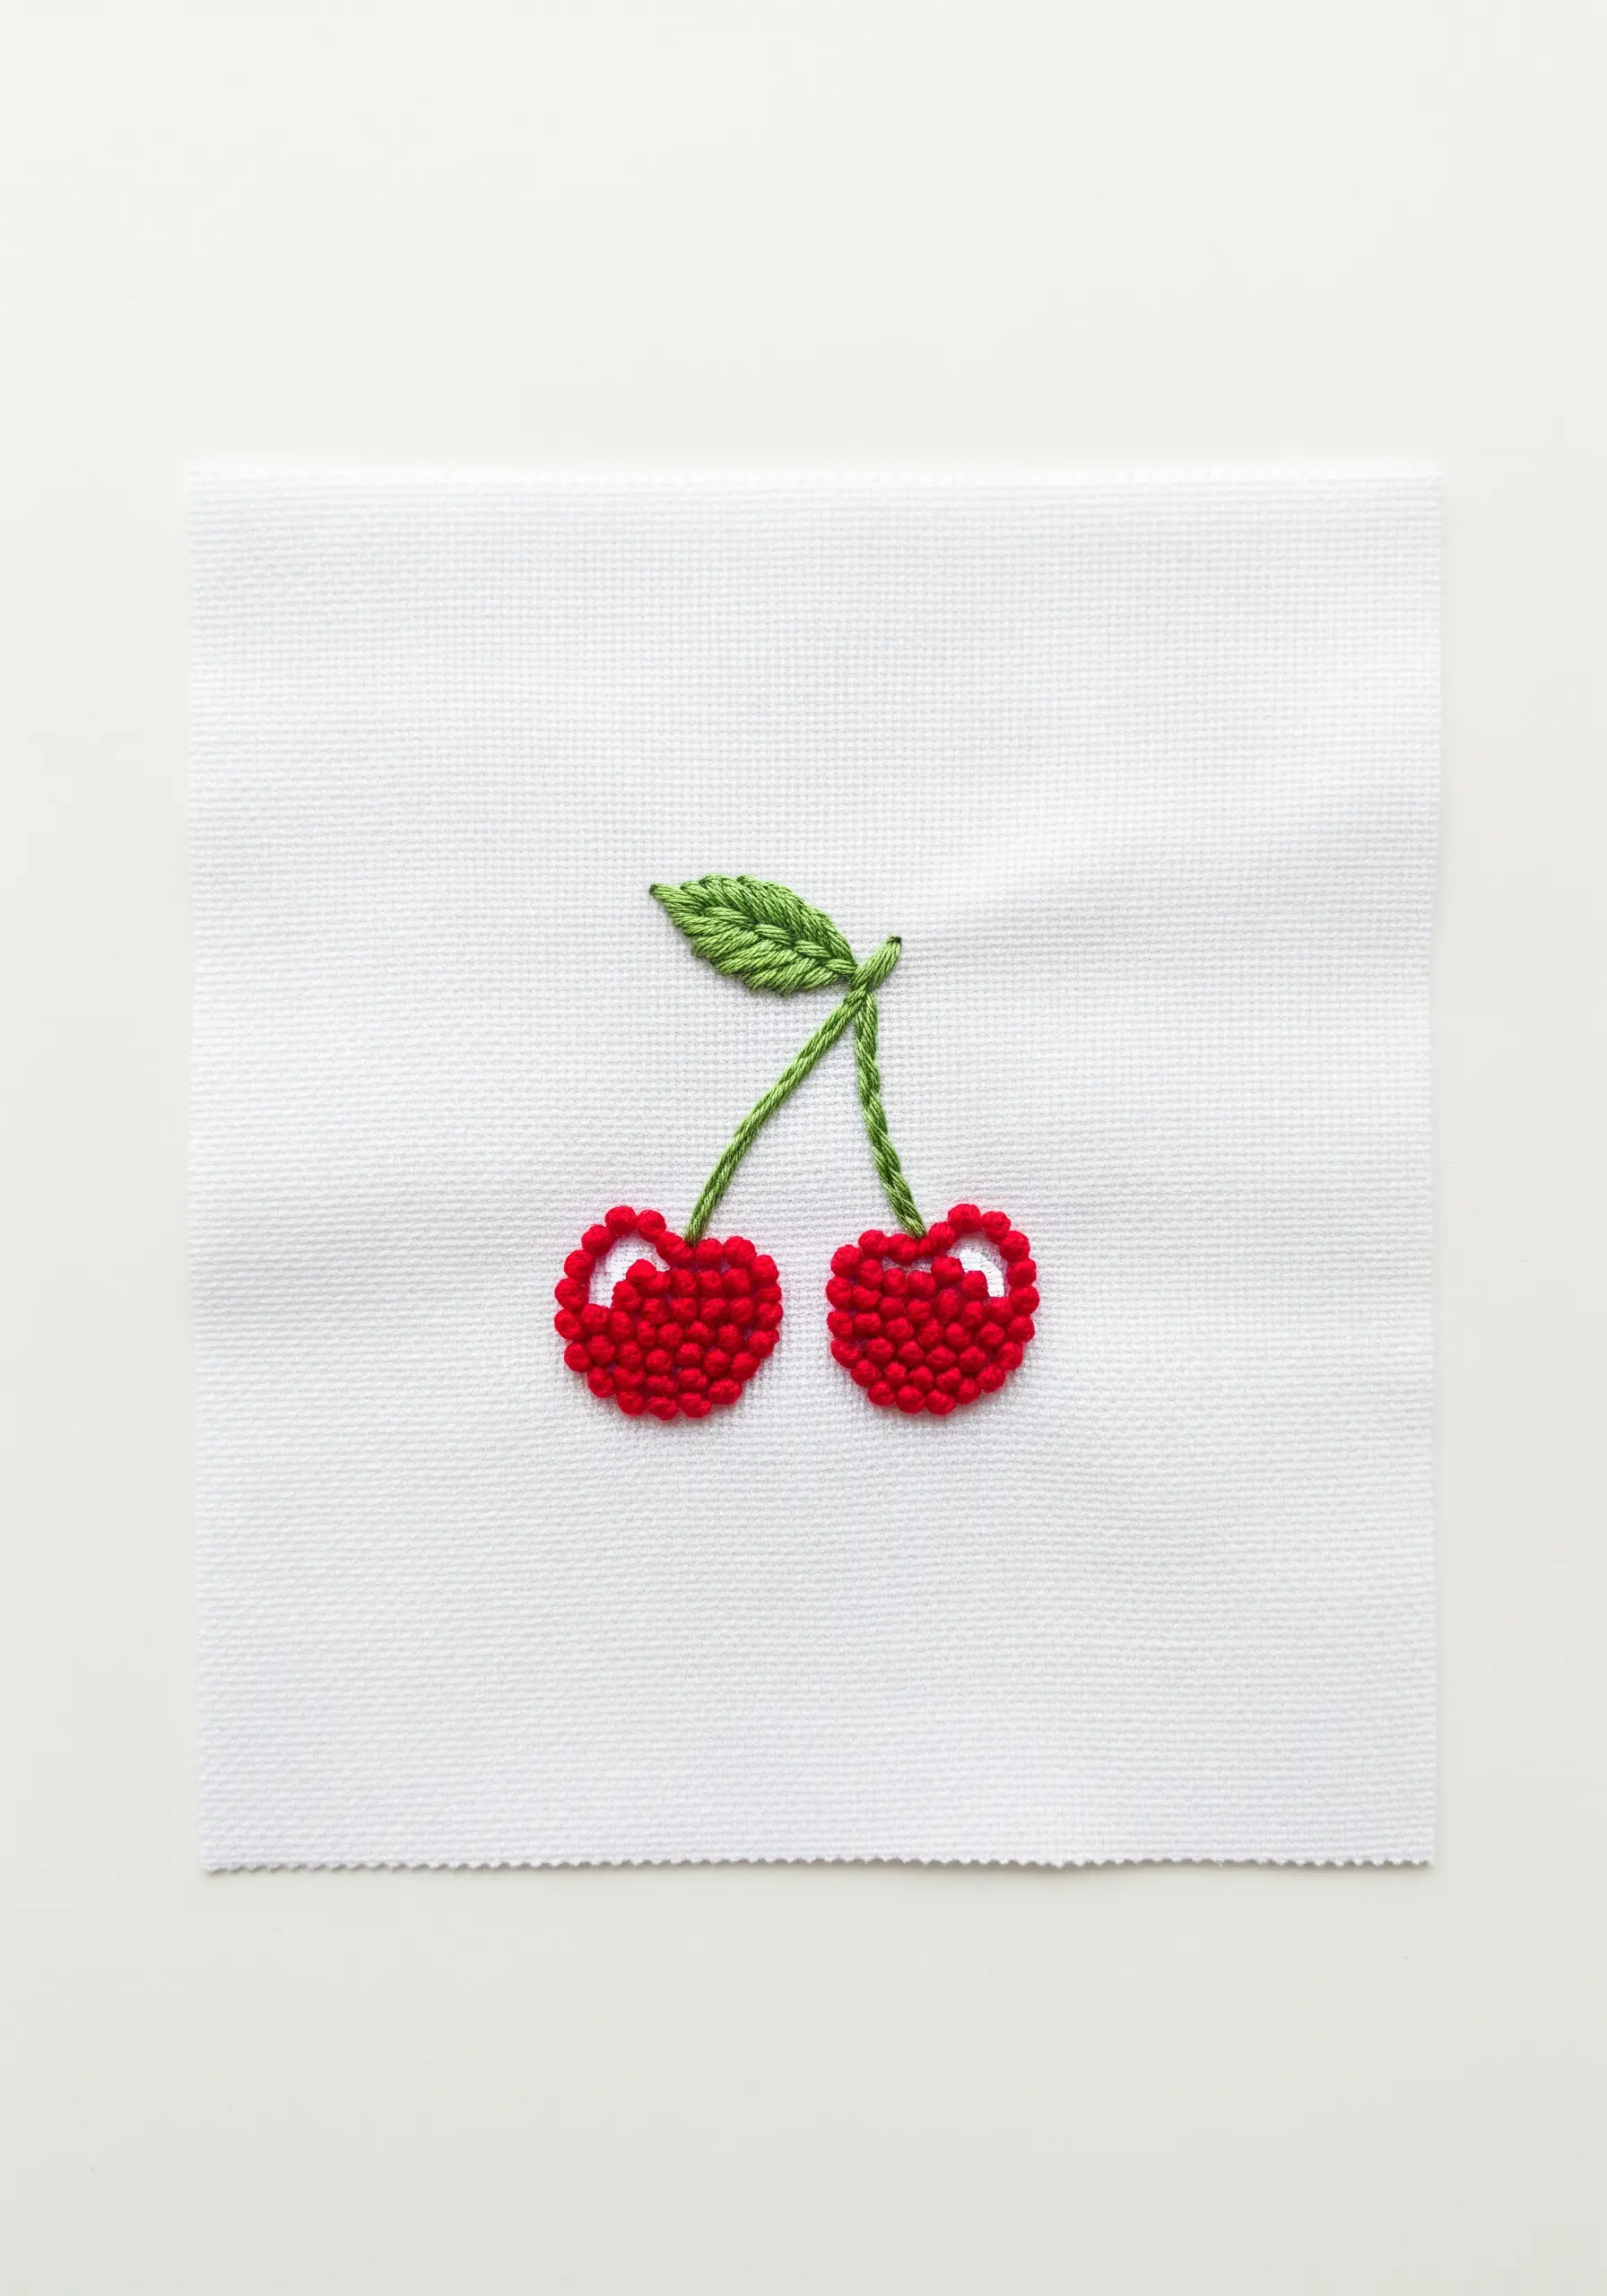
These cherries get their delightful, three-dimensional form from densely packed French knots.
Use a vibrant red thread and wrap it two or three times around the needle for each knot to create a full, round shape.
Work the knots very close together until the entire cherry shape is filled, creating a bumpy, tactile surface.
Adding a single, tiny white straight stitch as a highlight gives the illusion of shine and completes the effect.
14. Building Botanicals with Strategic Stitches

Recreate the delicate structure of a lavender sprig by thoughtfully combining just a few simple stitches.
Use a clean stem stitch for the main stalk, then build the blossoms with a mix of French knots and detached chain stitches (lazy daisies).
Cluster these stitches tightly at the top of the sprig and gradually space them out as you move down the stem to mimic natural growth.
Using two or three shades of purple will add even more depth and realism to your work.
Combine French knots and lazy daisies to build the delicate, organic shape of lavender.
15. Exploring Sculptural Knots and Stitches

Move beyond the familiar French knot and experiment with more sculptural stitches like the bullion knot or cast-on stitch.
This abstract piece is an excellent study in texture, created by clustering these dimensional stitches together.
Bullion knots are formed by wrapping the thread multiple times around the needle before pulling it through, which creates a beautiful, worm-like coil.
Varying the number of wraps, the tension, and the colors will result in a highly tactile, sculptural piece of fiber art.
16. Capturing Movement with Chain Stitch
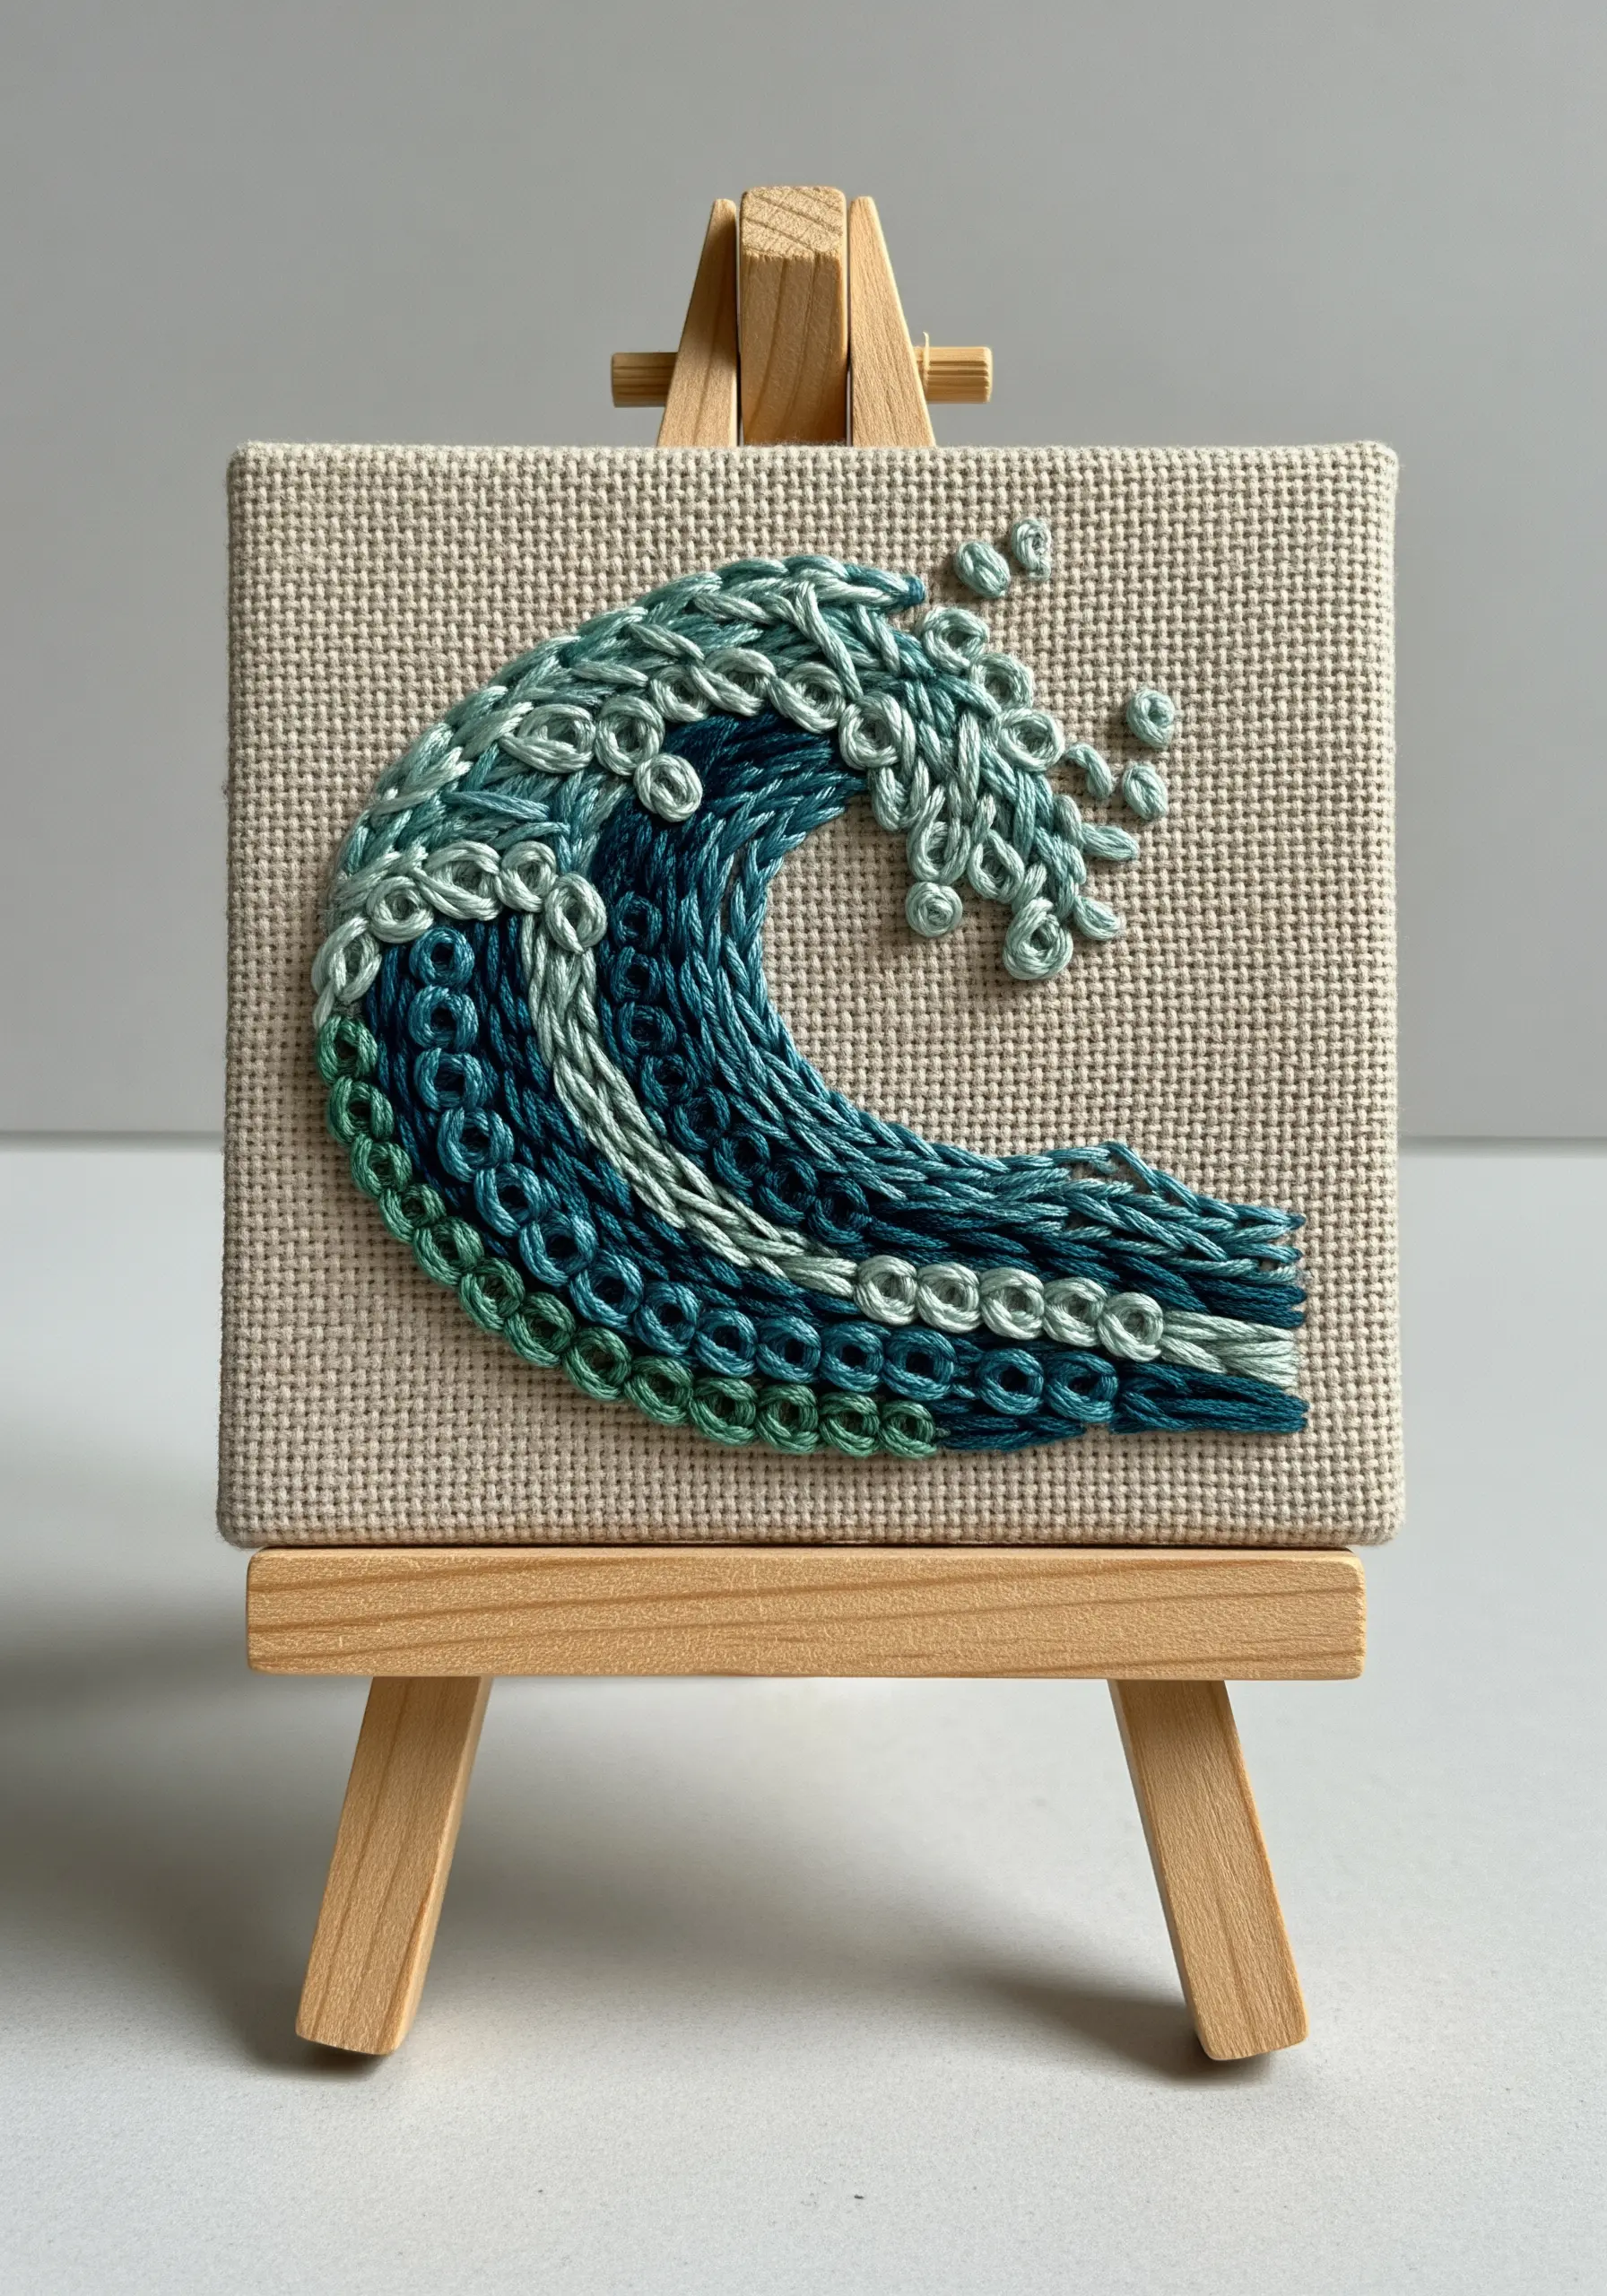
The chain stitch is uniquely suited for creating flowing, textured lines that evoke a sense of movement.
To build this dynamic wave, work in concentric rows of chain stitches, using several shades of blue and green to create a gradient effect.
The interconnected loops of the stitch produce a braided texture that mimics the churn of water.
For an extra touch of realism, leave a few stitches detached at the crest of the wave to suggest sea spray, turning a simple stitch into a tool for capturing natural energy.
17. Balancing Filled and Outline Stitches

Create a strong visual hierarchy in your design by combining filled shapes with simple line work.
The paper airplane is the solid focal point, filled with a smooth satin stitch.
To ensure its edges are perfectly crisp, first outline the shape with a split stitch before you begin filling it in.
The flight path, a simple dashed running stitch in a contrasting color, adds a sense of motion and whimsy without competing for attention.
This balance between solid and linear elements makes the composition feel deliberate and polished.
18. Layering Stitches for Three-Dimensional Form
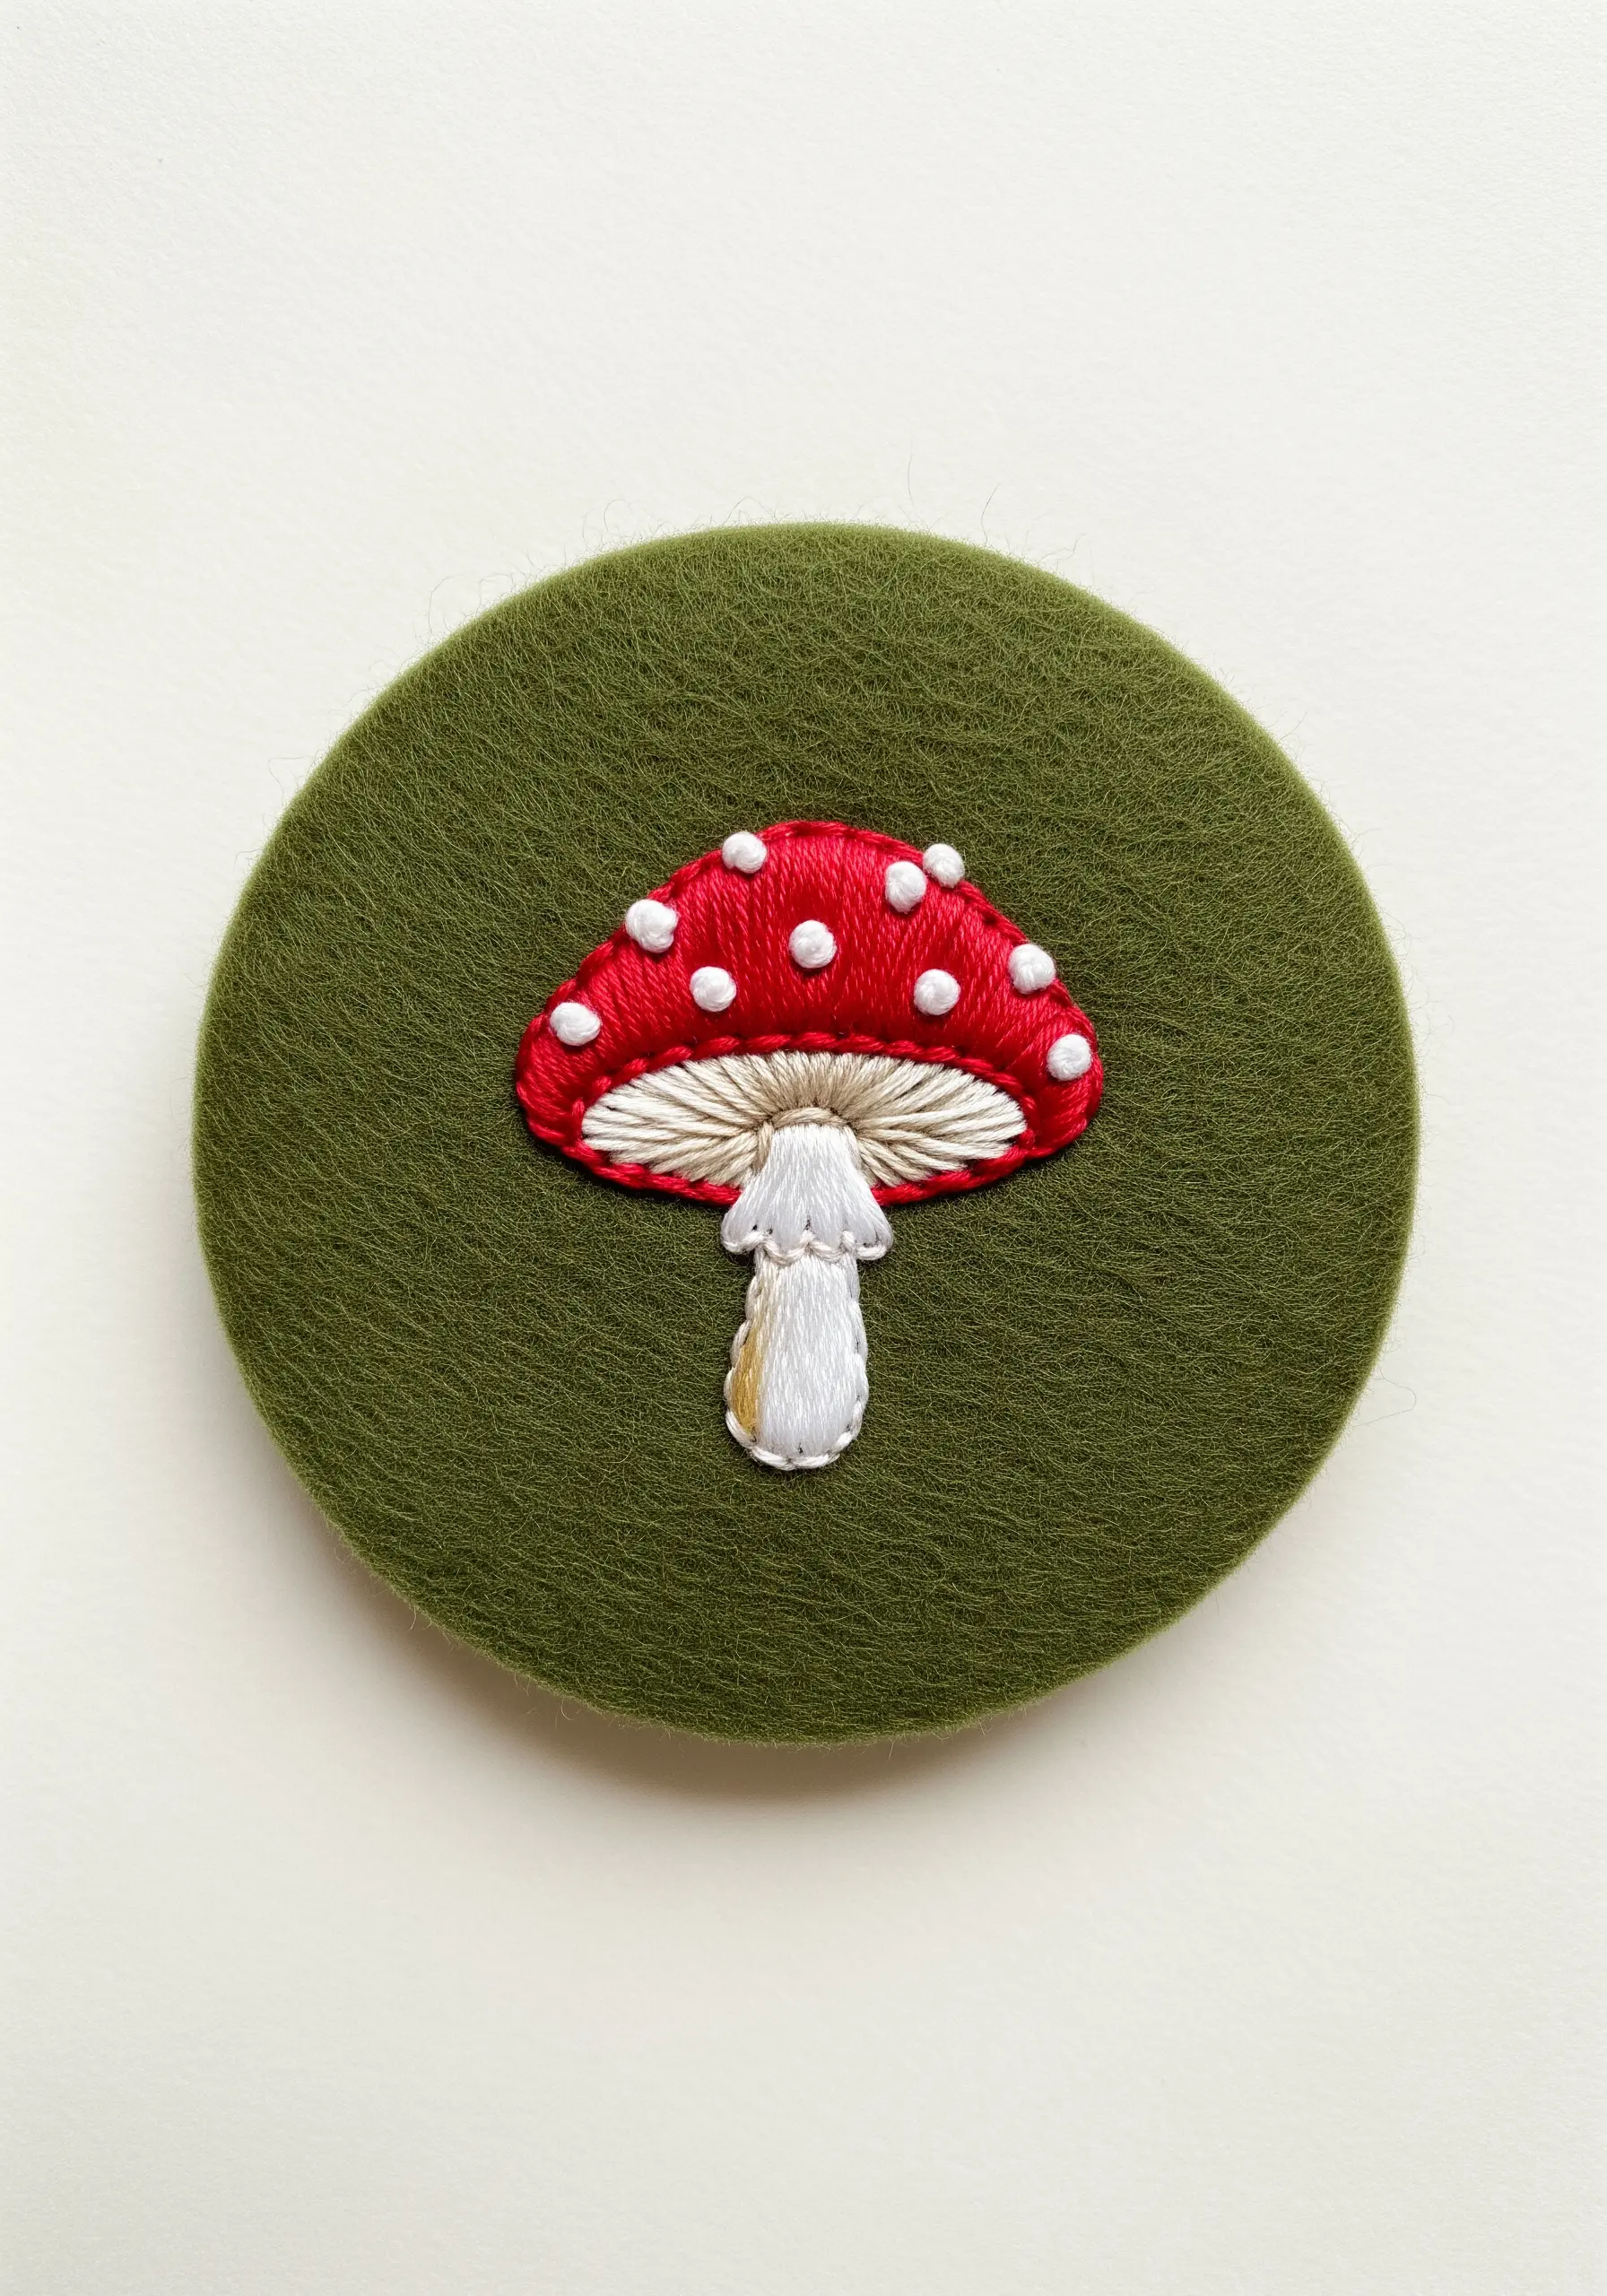
This charming mushroom is a masterclass in layering different stitches to create depth.
The red cap is filled with satin stitch, but the white spots are French knots stitched directly on top of the red base.
Underneath, the gills are suggested with radiating straight stitches in a lighter color.
Finally, the stem uses a vertical long-and-short stitch with two shades of white and tan to create subtle shading and a rounded effect.
This layering technique is what gives the simple motif its realistic, three-dimensional quality.


