
Before you pick up your next needle and thread, I want you to reconsider the fabric in your hoop not just as a canvas, but as a space for intention.
The most breathtaking embroidery isn’t about mastering hundreds of complex stitches. It’s about choosing the right stitch for the right texture, the right thread for the right light, and the right composition to tell a quiet but confident story.
Here, you’ll find more than just inspiration. You’ll find the specific adjustments—a thicker thread, a change in stitch direction, a surprising texture—that elevate a simple idea into a piece of art you’ll be genuinely proud to hang on your wall.
Let’s begin.
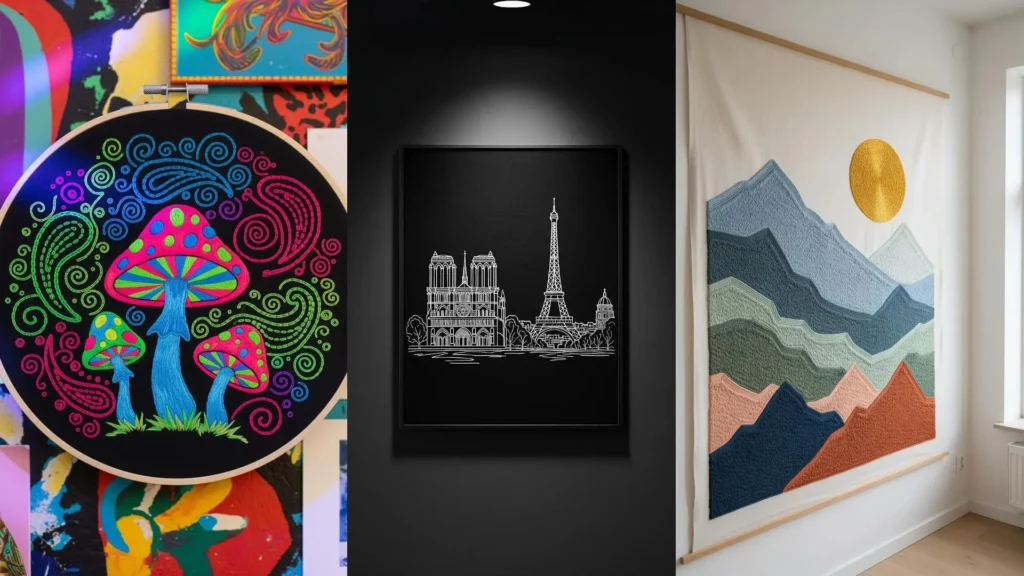
1. Weave a Textured Landscape Tapestry
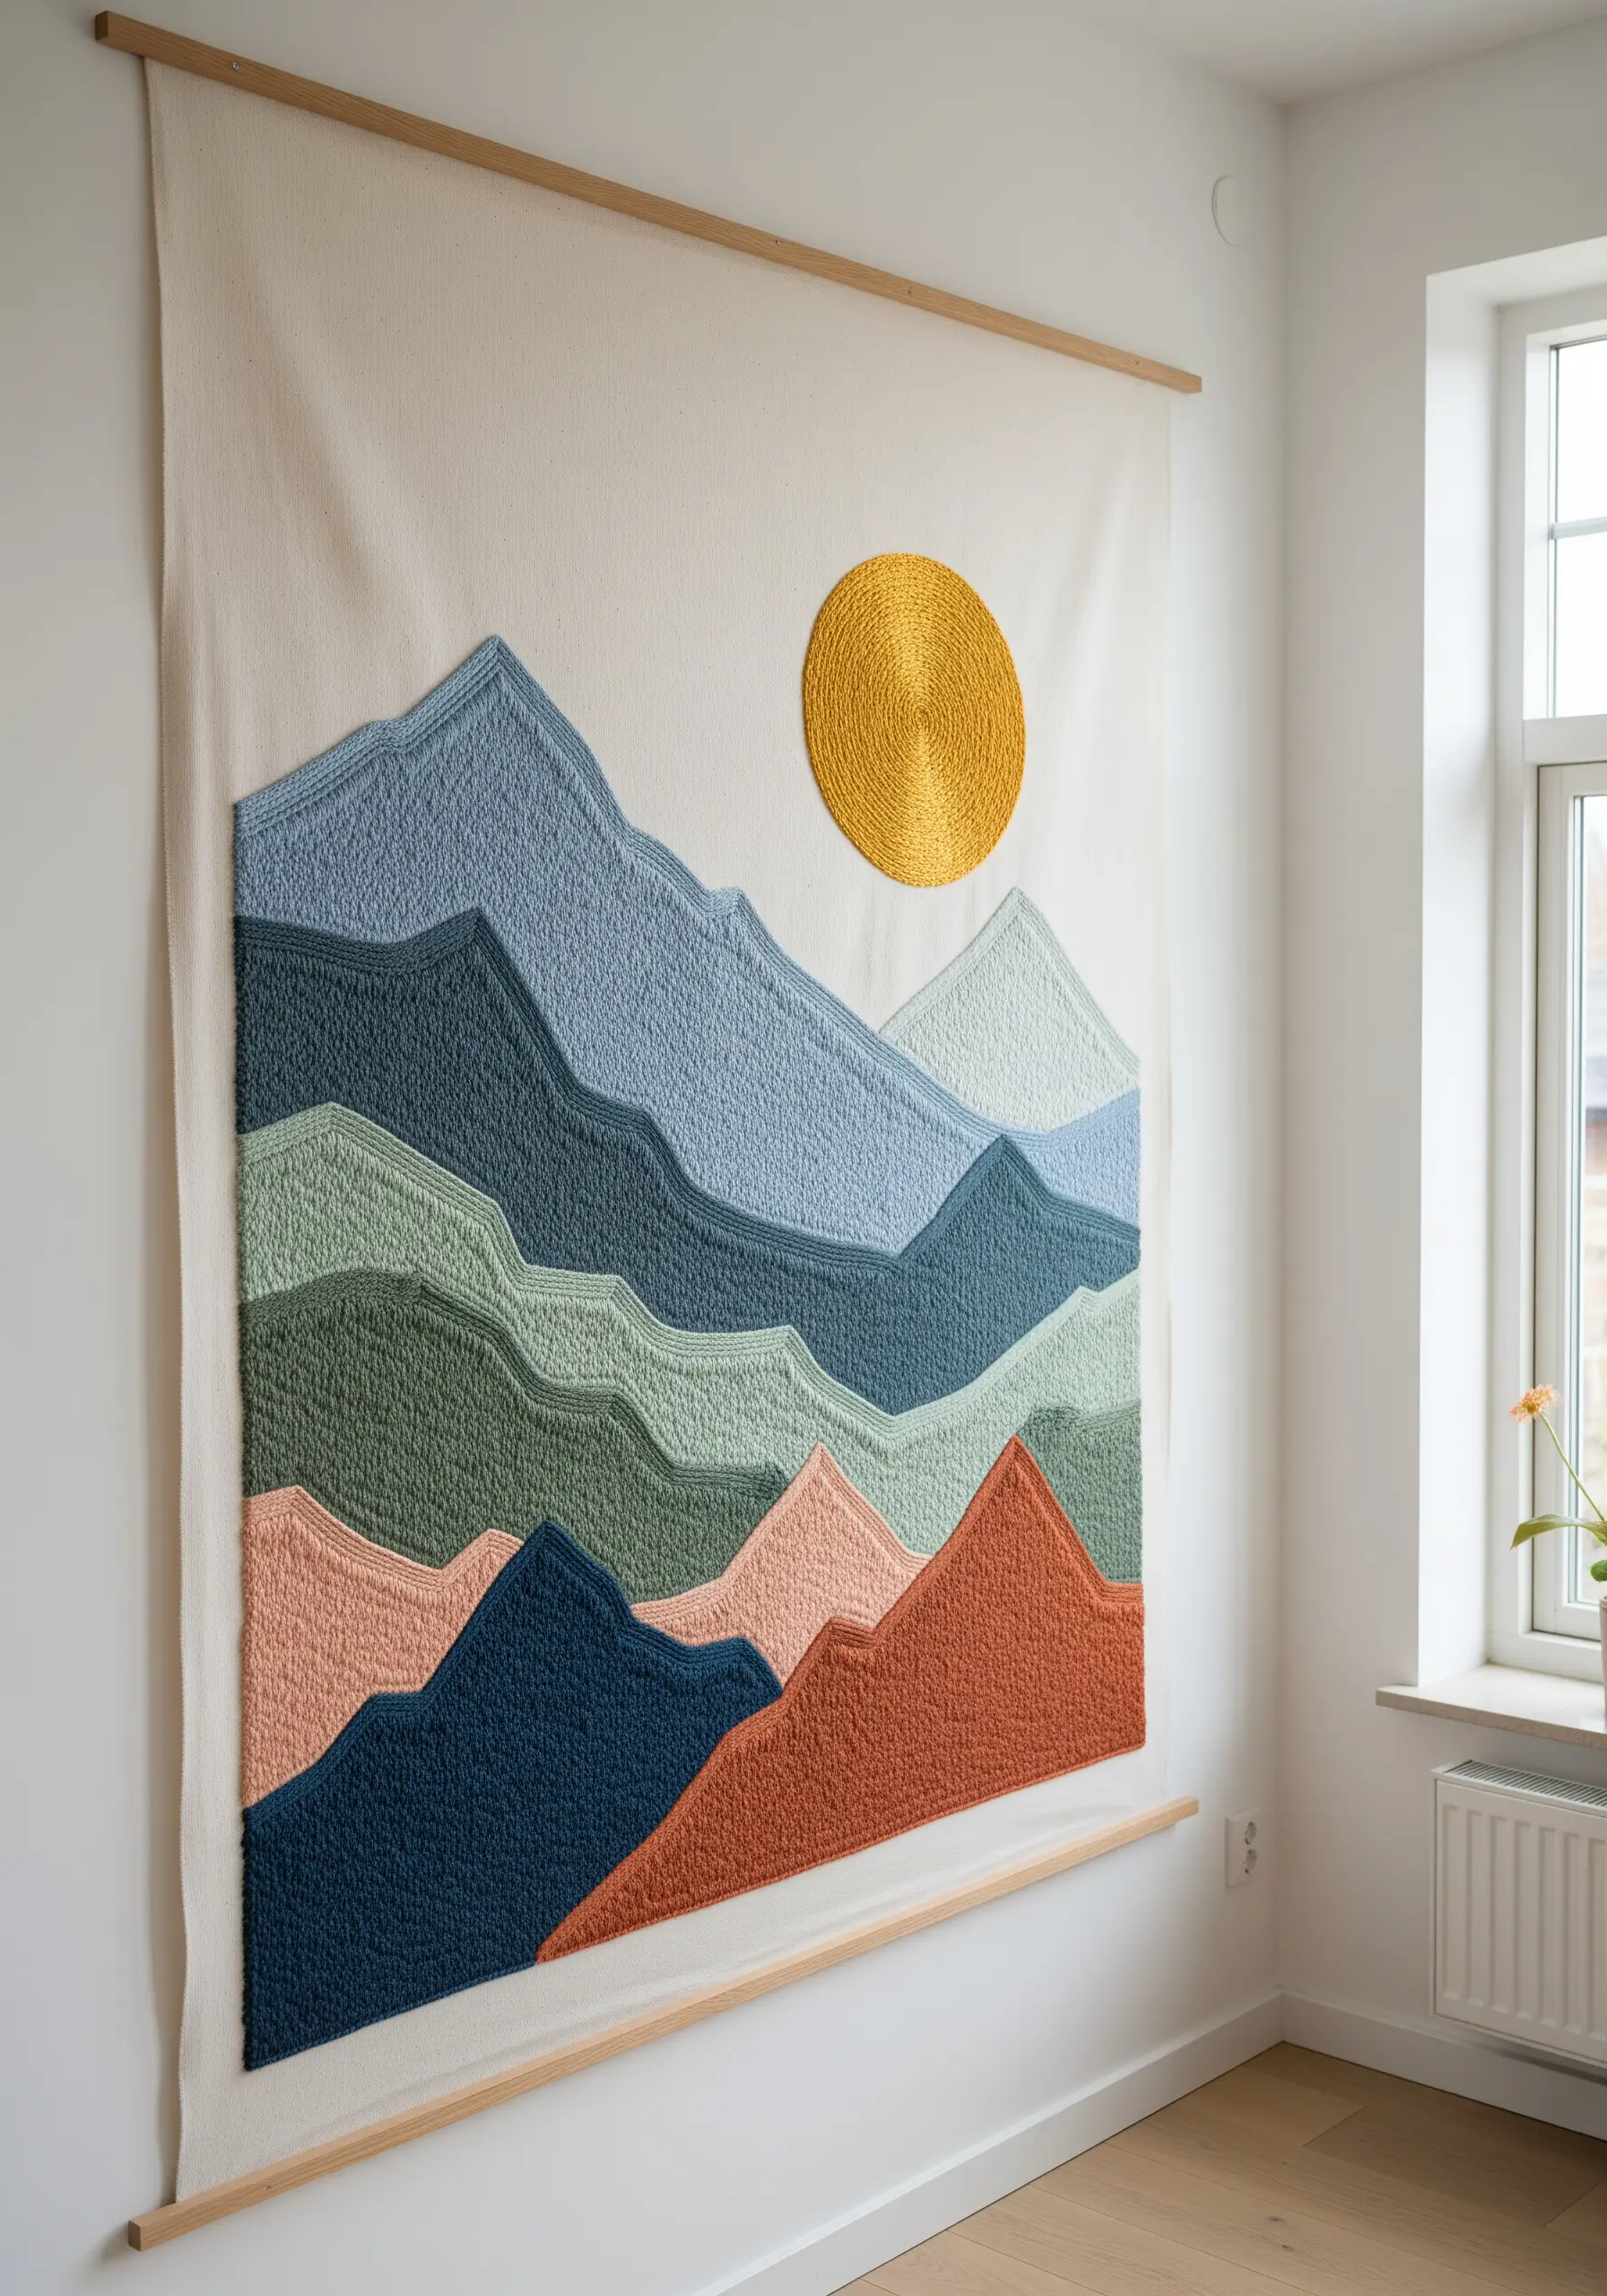
For a large-scale piece, trade traditional stitches for textural fills like the punch needle technique or densely packed French knots.
This method allows you to cover large areas with rich texture, creating a piece that feels more like a woven tapestry than a simple embroidery.
Define each mountain range with a clean, crisp backstitch before filling it in; this creates sharp, graphic divisions between your color-blocked sections.
By varying the height of your loops or the density of your knots, you introduce subtle dimension that mimics natural terrain, making your modern embroidered tapestry designs feel both graphic and organic.
2. Illuminate a Celestial Scene with Silver Thread
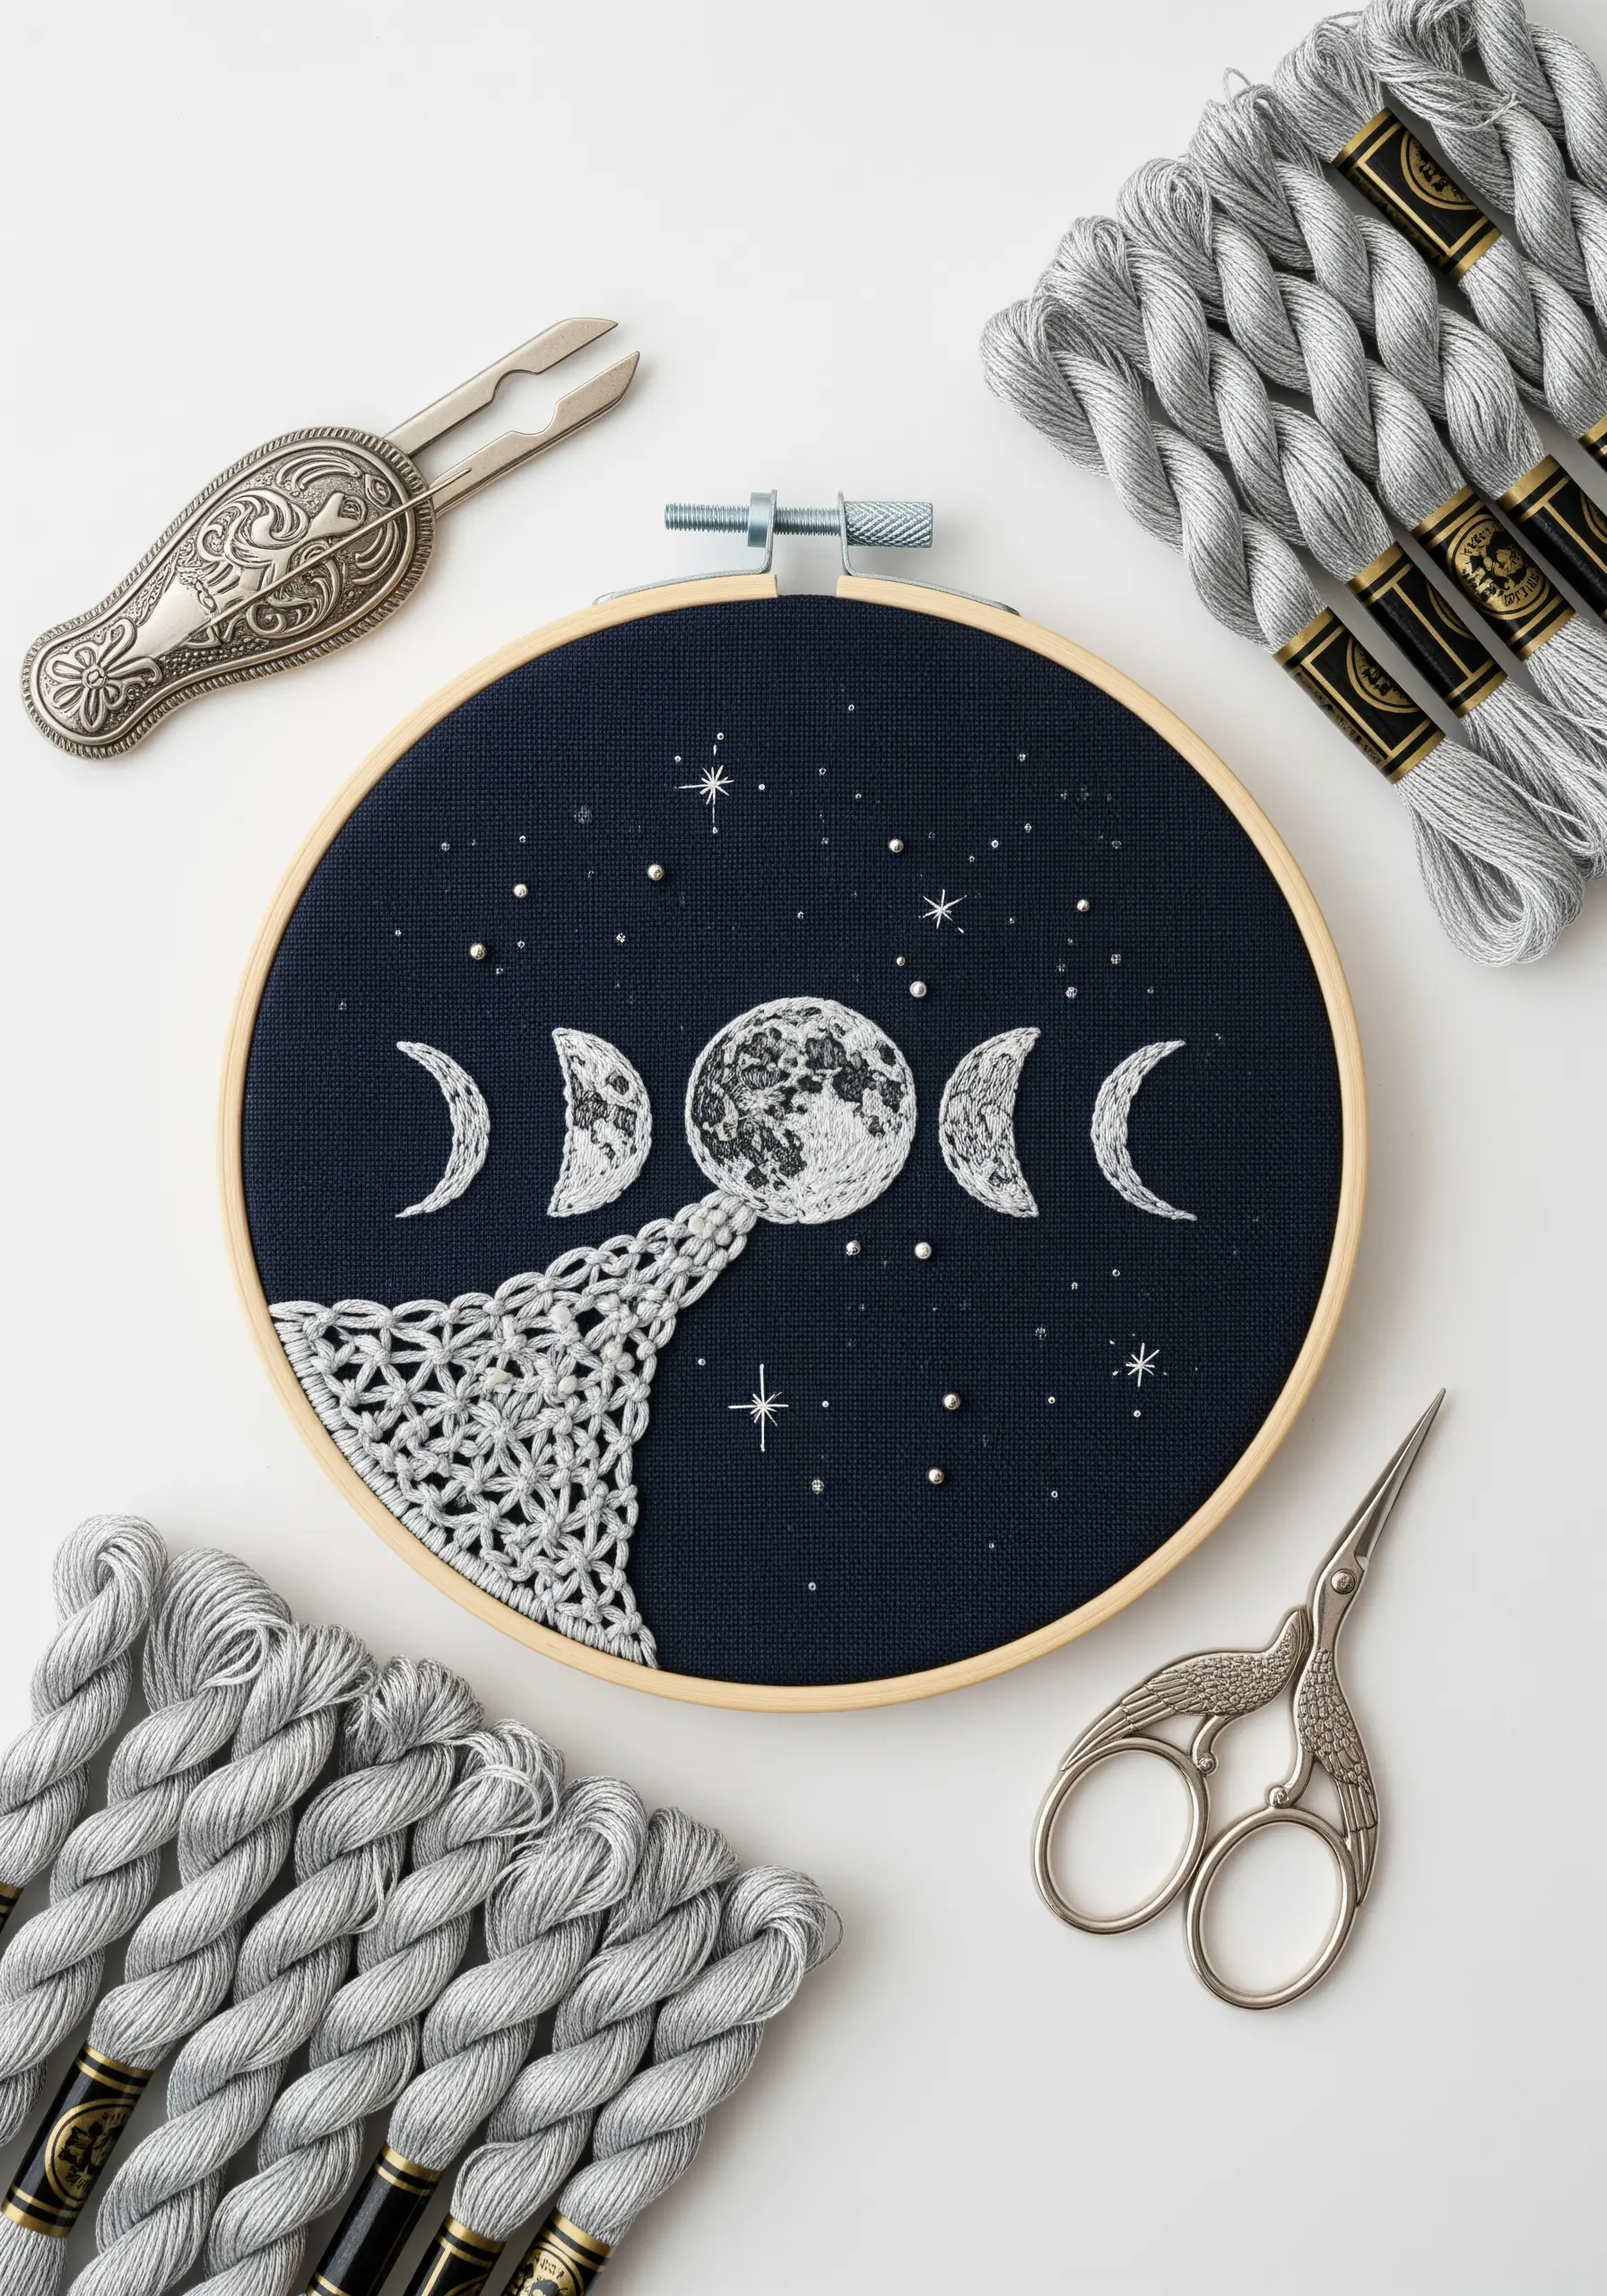
Stitching on dark fabric creates immediate drama, especially when you choose a high-contrast thread like silver, white, or a light metallic.
To make the full moon feel dimensional, use a circular satin stitch, spiraling from the center out.
For the flowing trail, experiment with detached chain stitches or open Cretan stitches to create a lace-like effect that adds movement and elegance.
Working on navy or black linen requires good lighting, so position a task lamp to illuminate your fabric and ensure your stitches are precise.
3. Frame Your Florals with Fiber Art
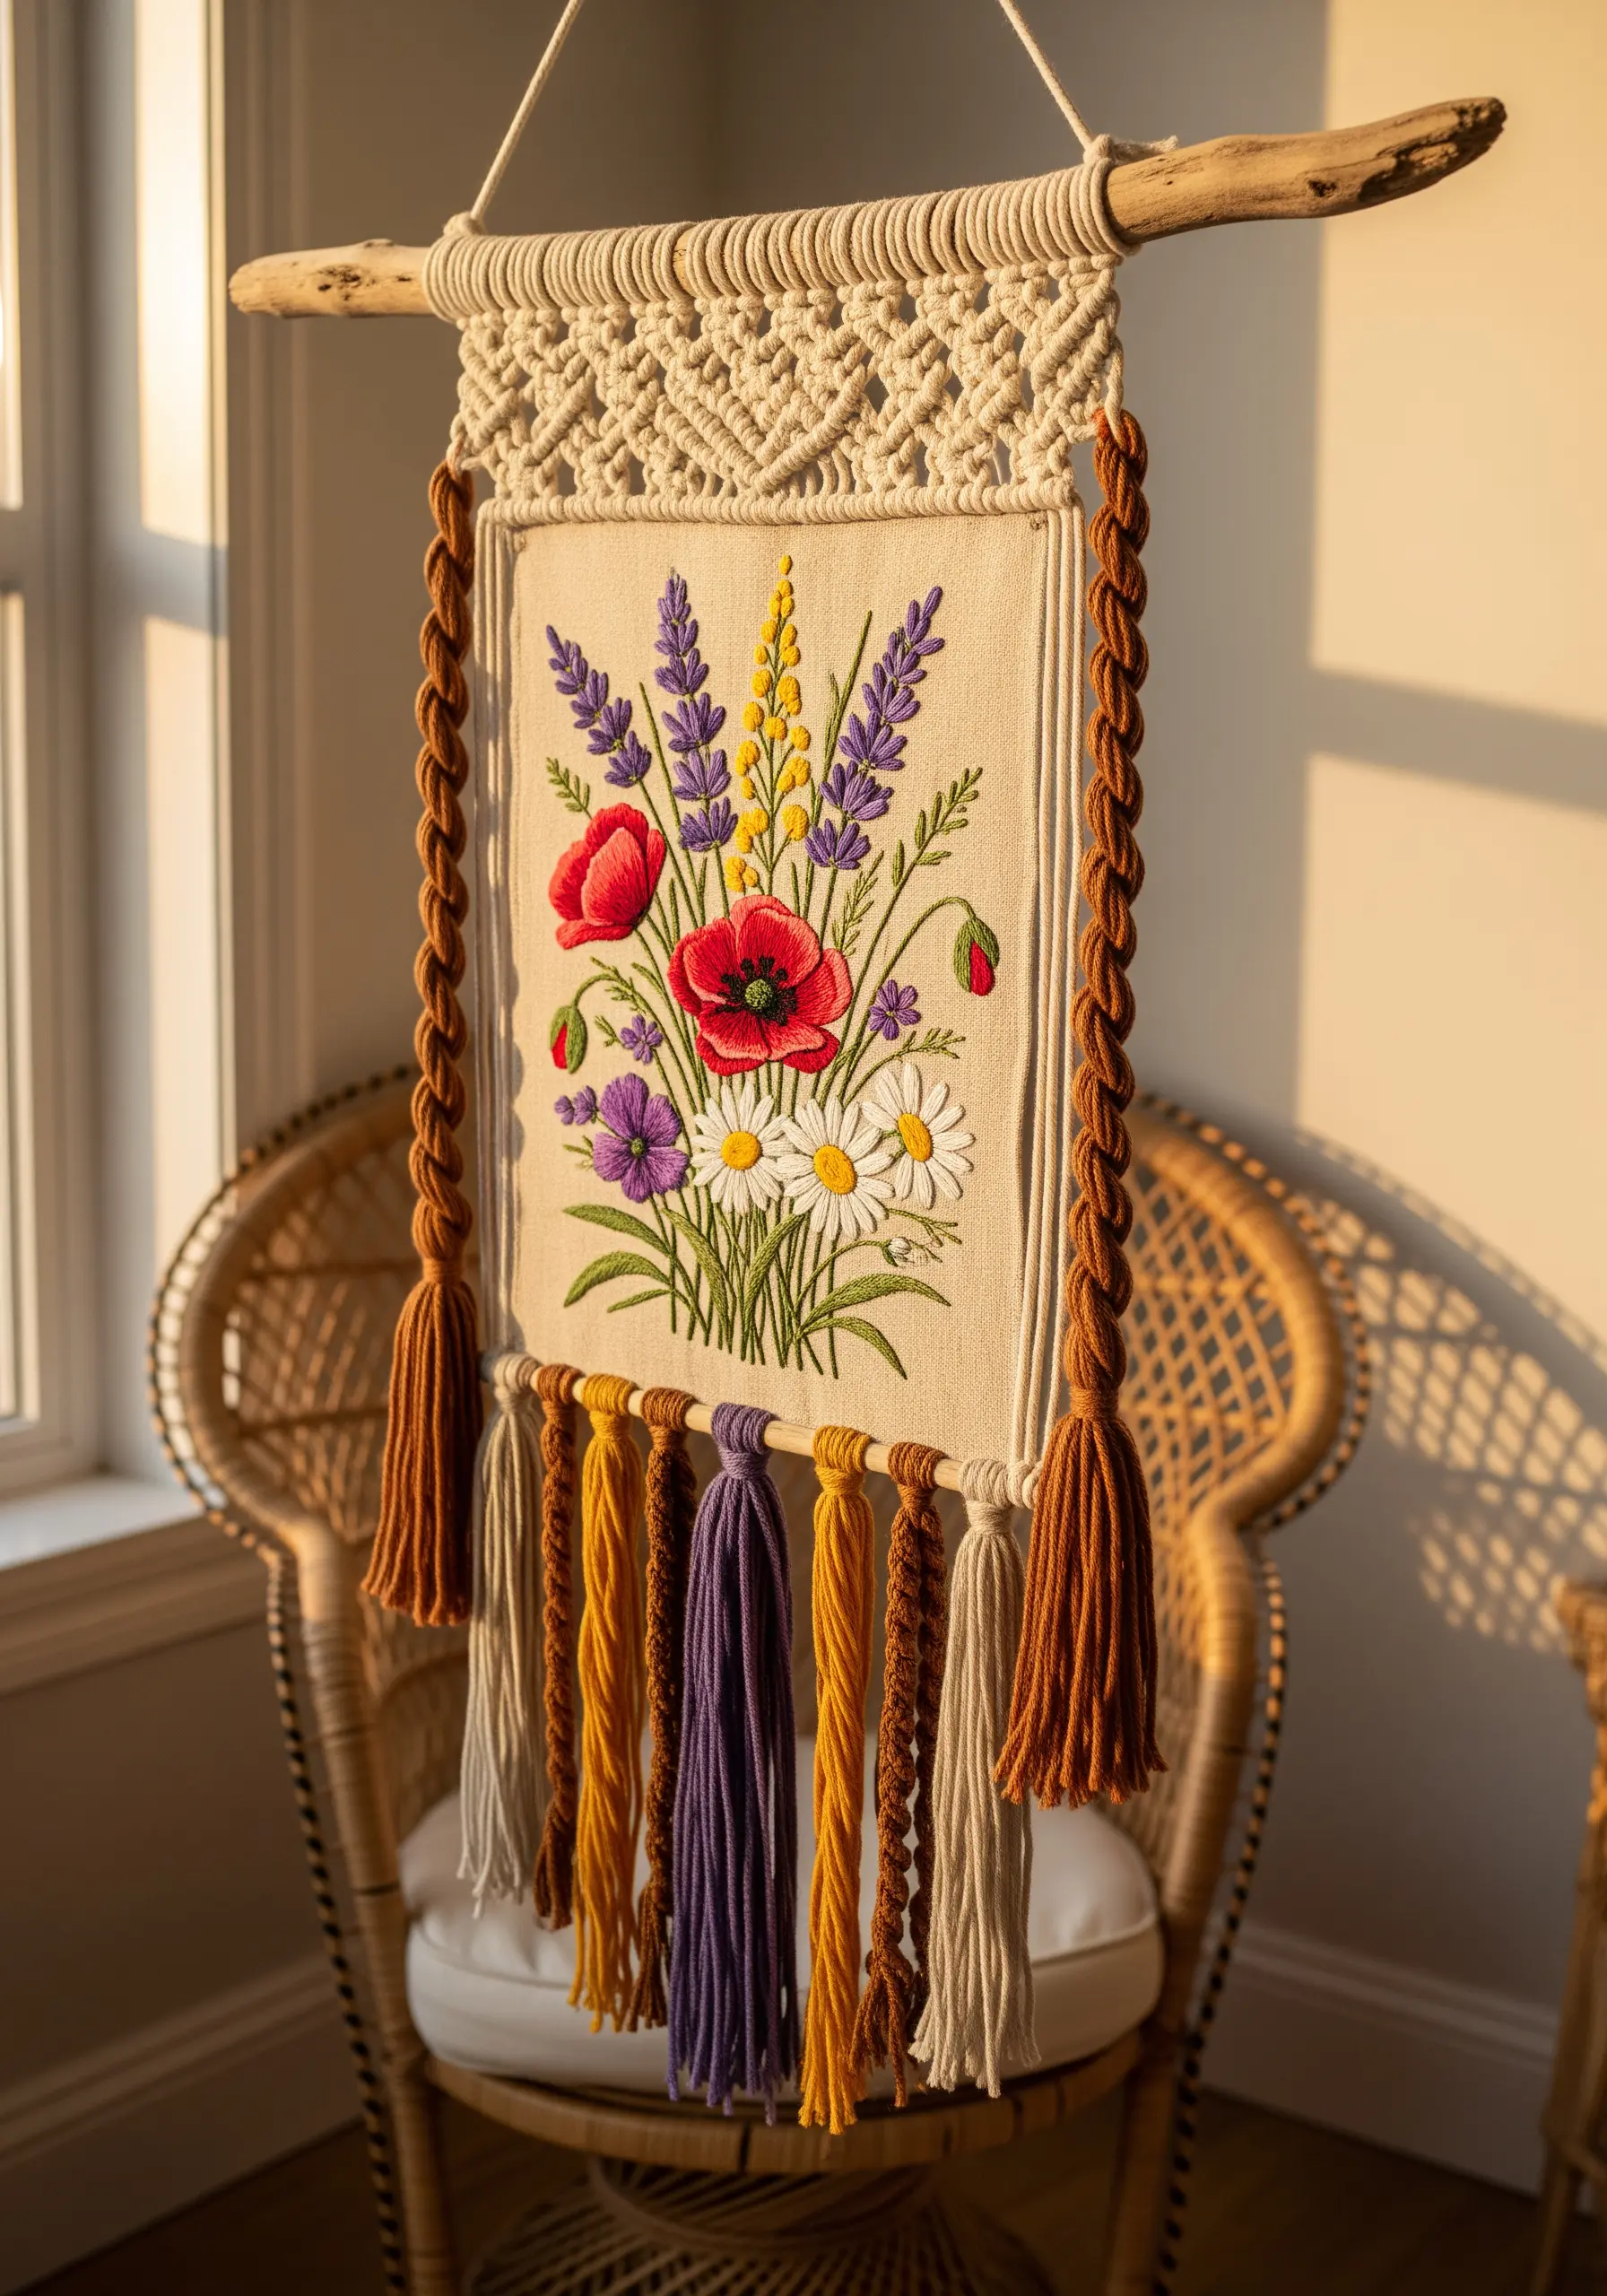
Elevate a simple embroidered panel by integrating it with other fiber crafts like macrame.
A macrame header and tassels add a layer of texture and a bohemian finish that complements the softness of the stitched florals.
When stitching the bouquet, use a variety of stitches to differentiate the flowers: smooth satin stitch for the poppy petals, clusters of French knots for lavender, and lazy daisy stitches for the chamomile.
This combination turns a simple embroidery project into one of the most compelling boho-inspired wall hoop embroidery ideas, giving it presence and weight.
4. Master the Elegance of Minimalist Line Art
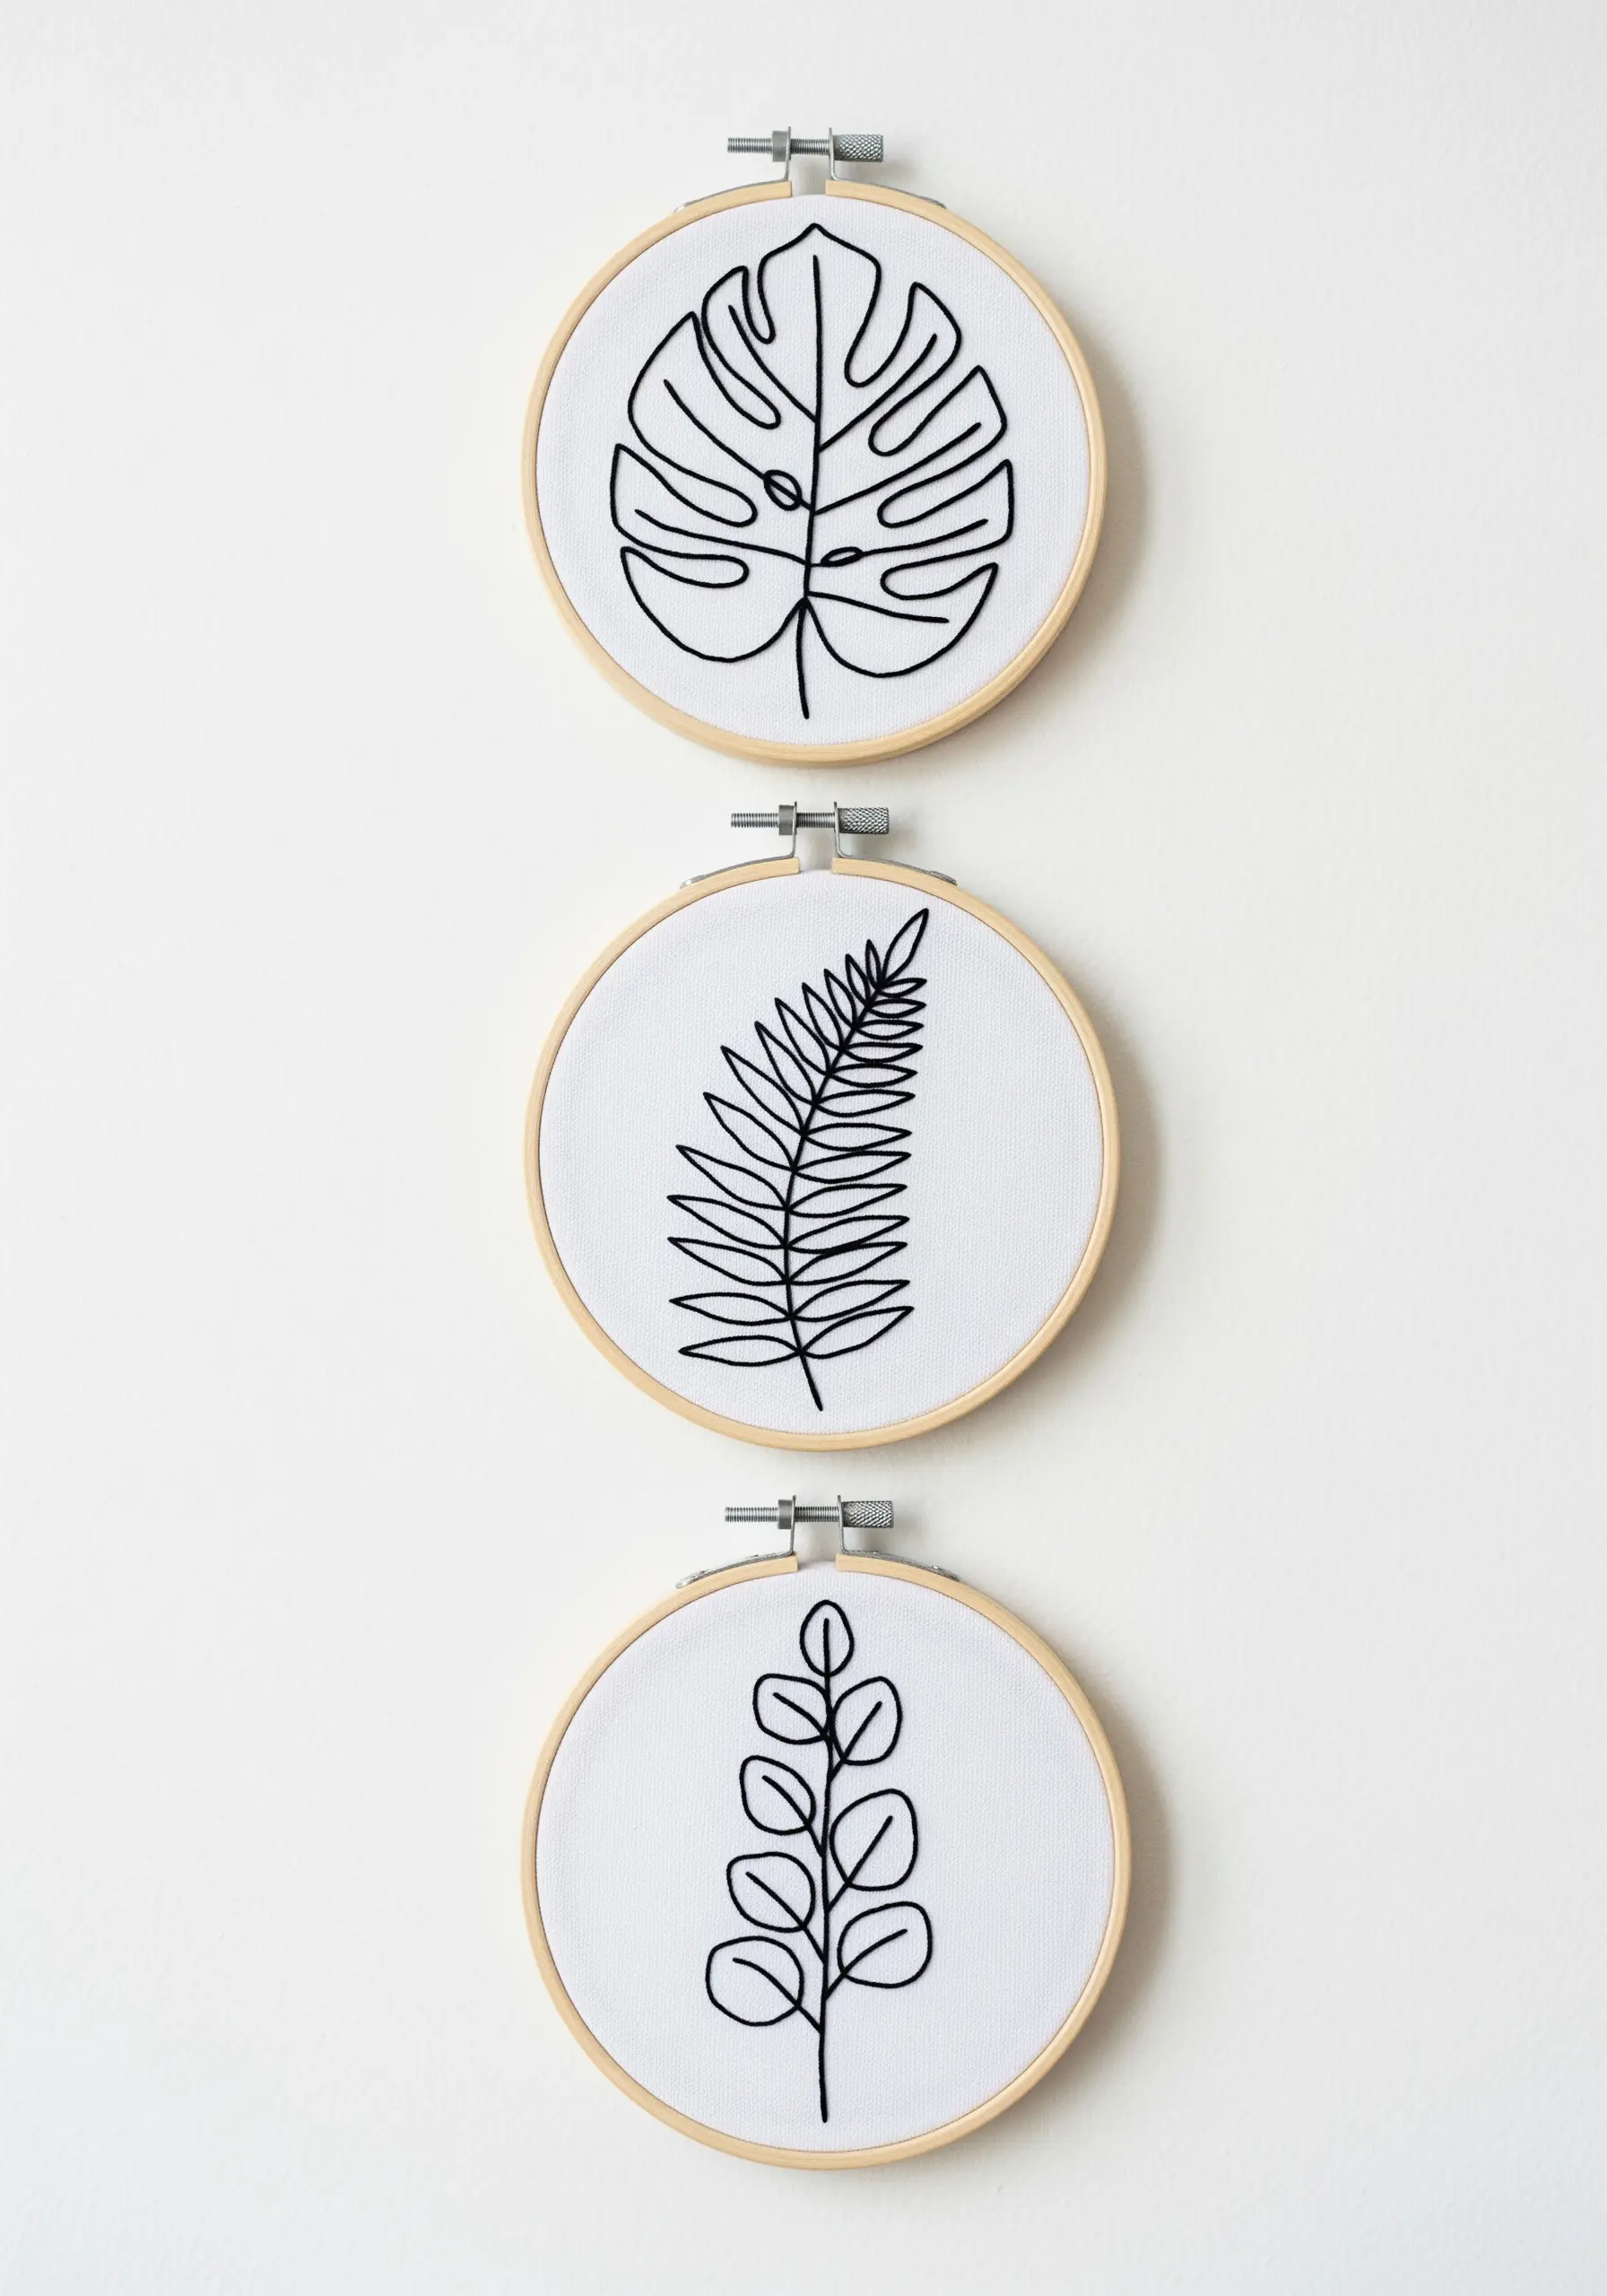
You don’t need complex fills to make a statement; a single, confident line can be just as powerful.
Choose a bold black thread—using all six strands of floss—and a simple backstitch or stem stitch to create clean, graphic botanical silhouettes.
The key is consistency in your stitch length, which ensures the lines flow smoothly without any visual breaks.
Group three small hoops together to form a triptych, turning simple sketches into a sophisticated wall installation, much like these minimalist line art animal designs.
5. Paint with Thread in Geometric Blocks

Achieve a perfectly smooth, fabric-like finish by using the long-and-short stitch to fill large geometric shapes.
This technique, often called thread painting, allows you to blend colors seamlessly and control the direction of your stitches to create a sense of light and shadow.
To keep your edges razor-sharp, outline each section with a split stitch first. This creates a raised border that your fill stitches can tuck into neatly.
This approach transforms your hoop into a canvas for geometric abstract thread patterns with incredible depth and precision.
6. Build a Three-Dimensional Woodland Scene
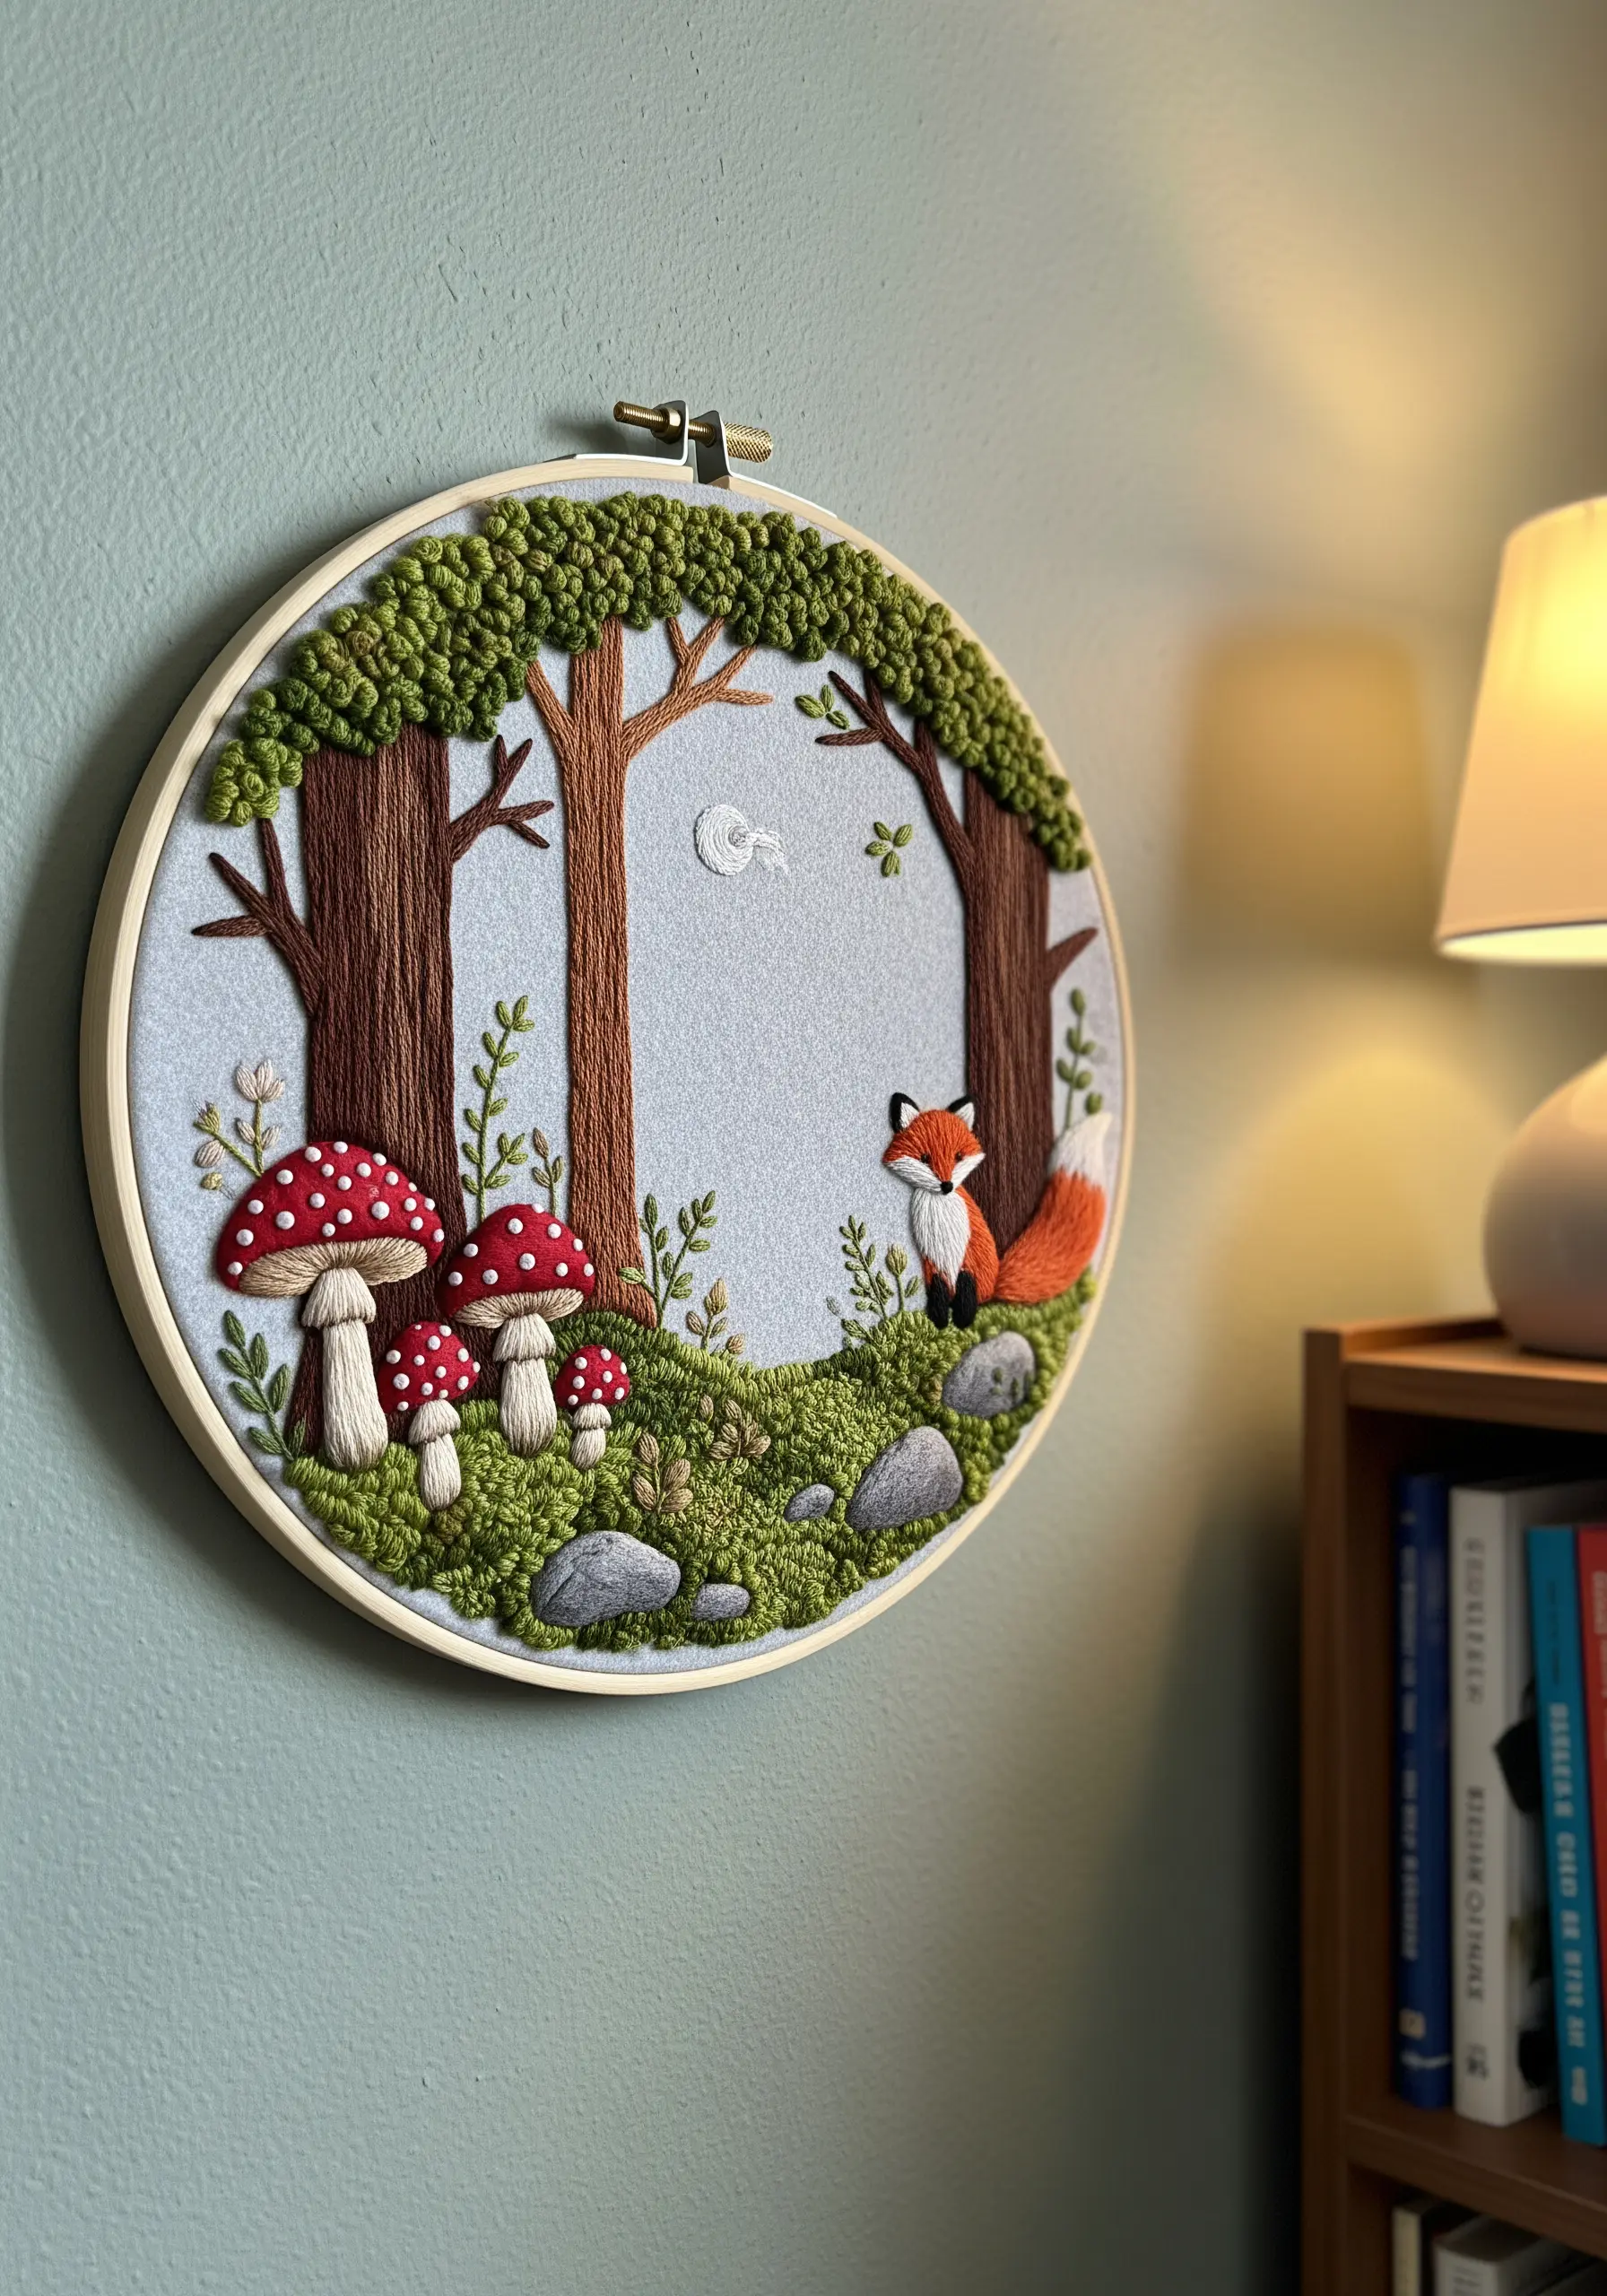
Create a tactile world by assigning different textures to each element in your design.
Use dense French knots for the forest canopy and mossy ground, giving these areas a plush, raised surface you can’t help but touch.
Contrast this with a smooth, vertical satin stitch for the tree trunks and a delicate long-and-short stitch for the fox’s tail.
This layering of textures is what brings the scene to life, transforming a flat image into an immersive slice of the forest floor.
7. Refine Your Lettering with Dimensional Stitches
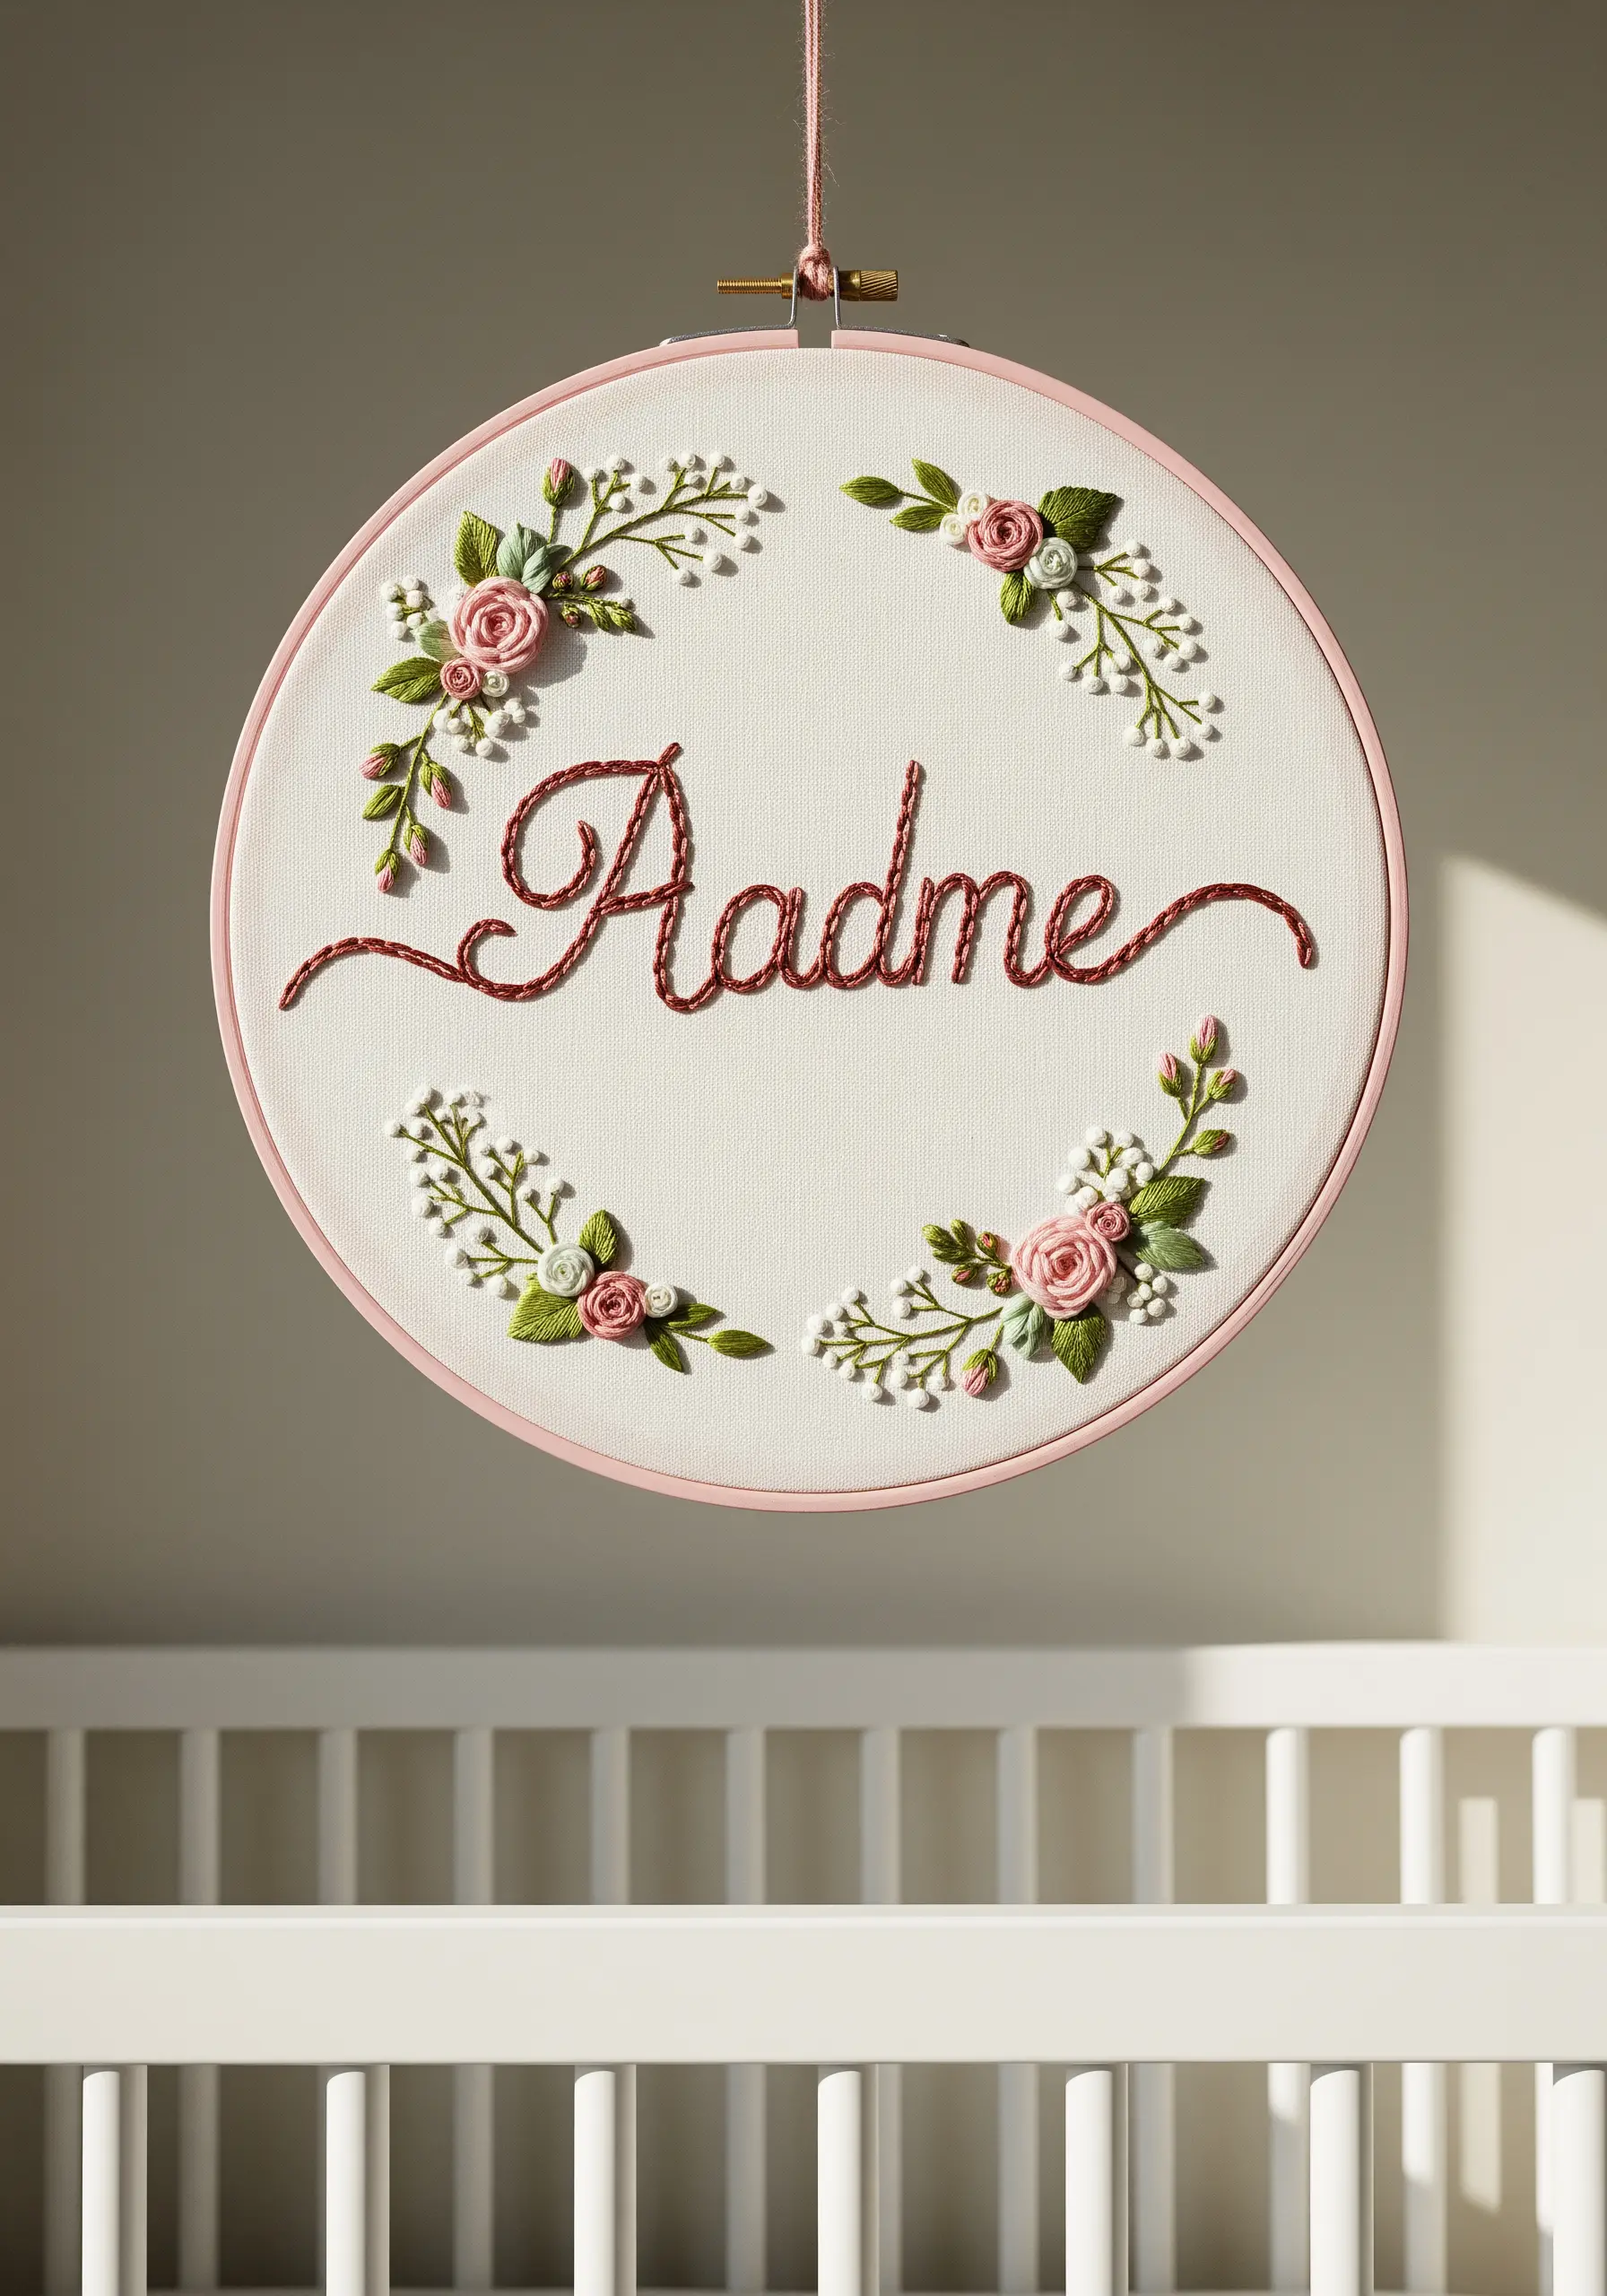
Make a name or quote the centerpiece by giving it dimension and character.
Instead of a simple backstitch, use a heavy chain stitch or a whipped backstitch to create a bold, rope-like line that stands off the fabric.
Surround the text with delicate, dimensional florals like woven wheel roses and tiny French knot buds for a soft, balanced composition.
This technique makes personalized name monogram wall embroidery gifts feel exceptionally thoughtful and handcrafted.
8. Sculpt a Crashing Wave with Loops and Beads

Capture the chaotic energy of the ocean by moving beyond flat stitches and embracing sculptural techniques.
Use turkey work or bullion knots to create the frothy, looping sea foam, trimming the loops to varying lengths for a more organic feel.
Weave in thicker yarns, metallic threads, and tiny seed beads to mimic the glistening, churning water.
These contemporary texture techniques allow you to build a dynamic, multi-layered surface that feels alive with movement.
9. Stitch a Desert Scene with Subtle Texture
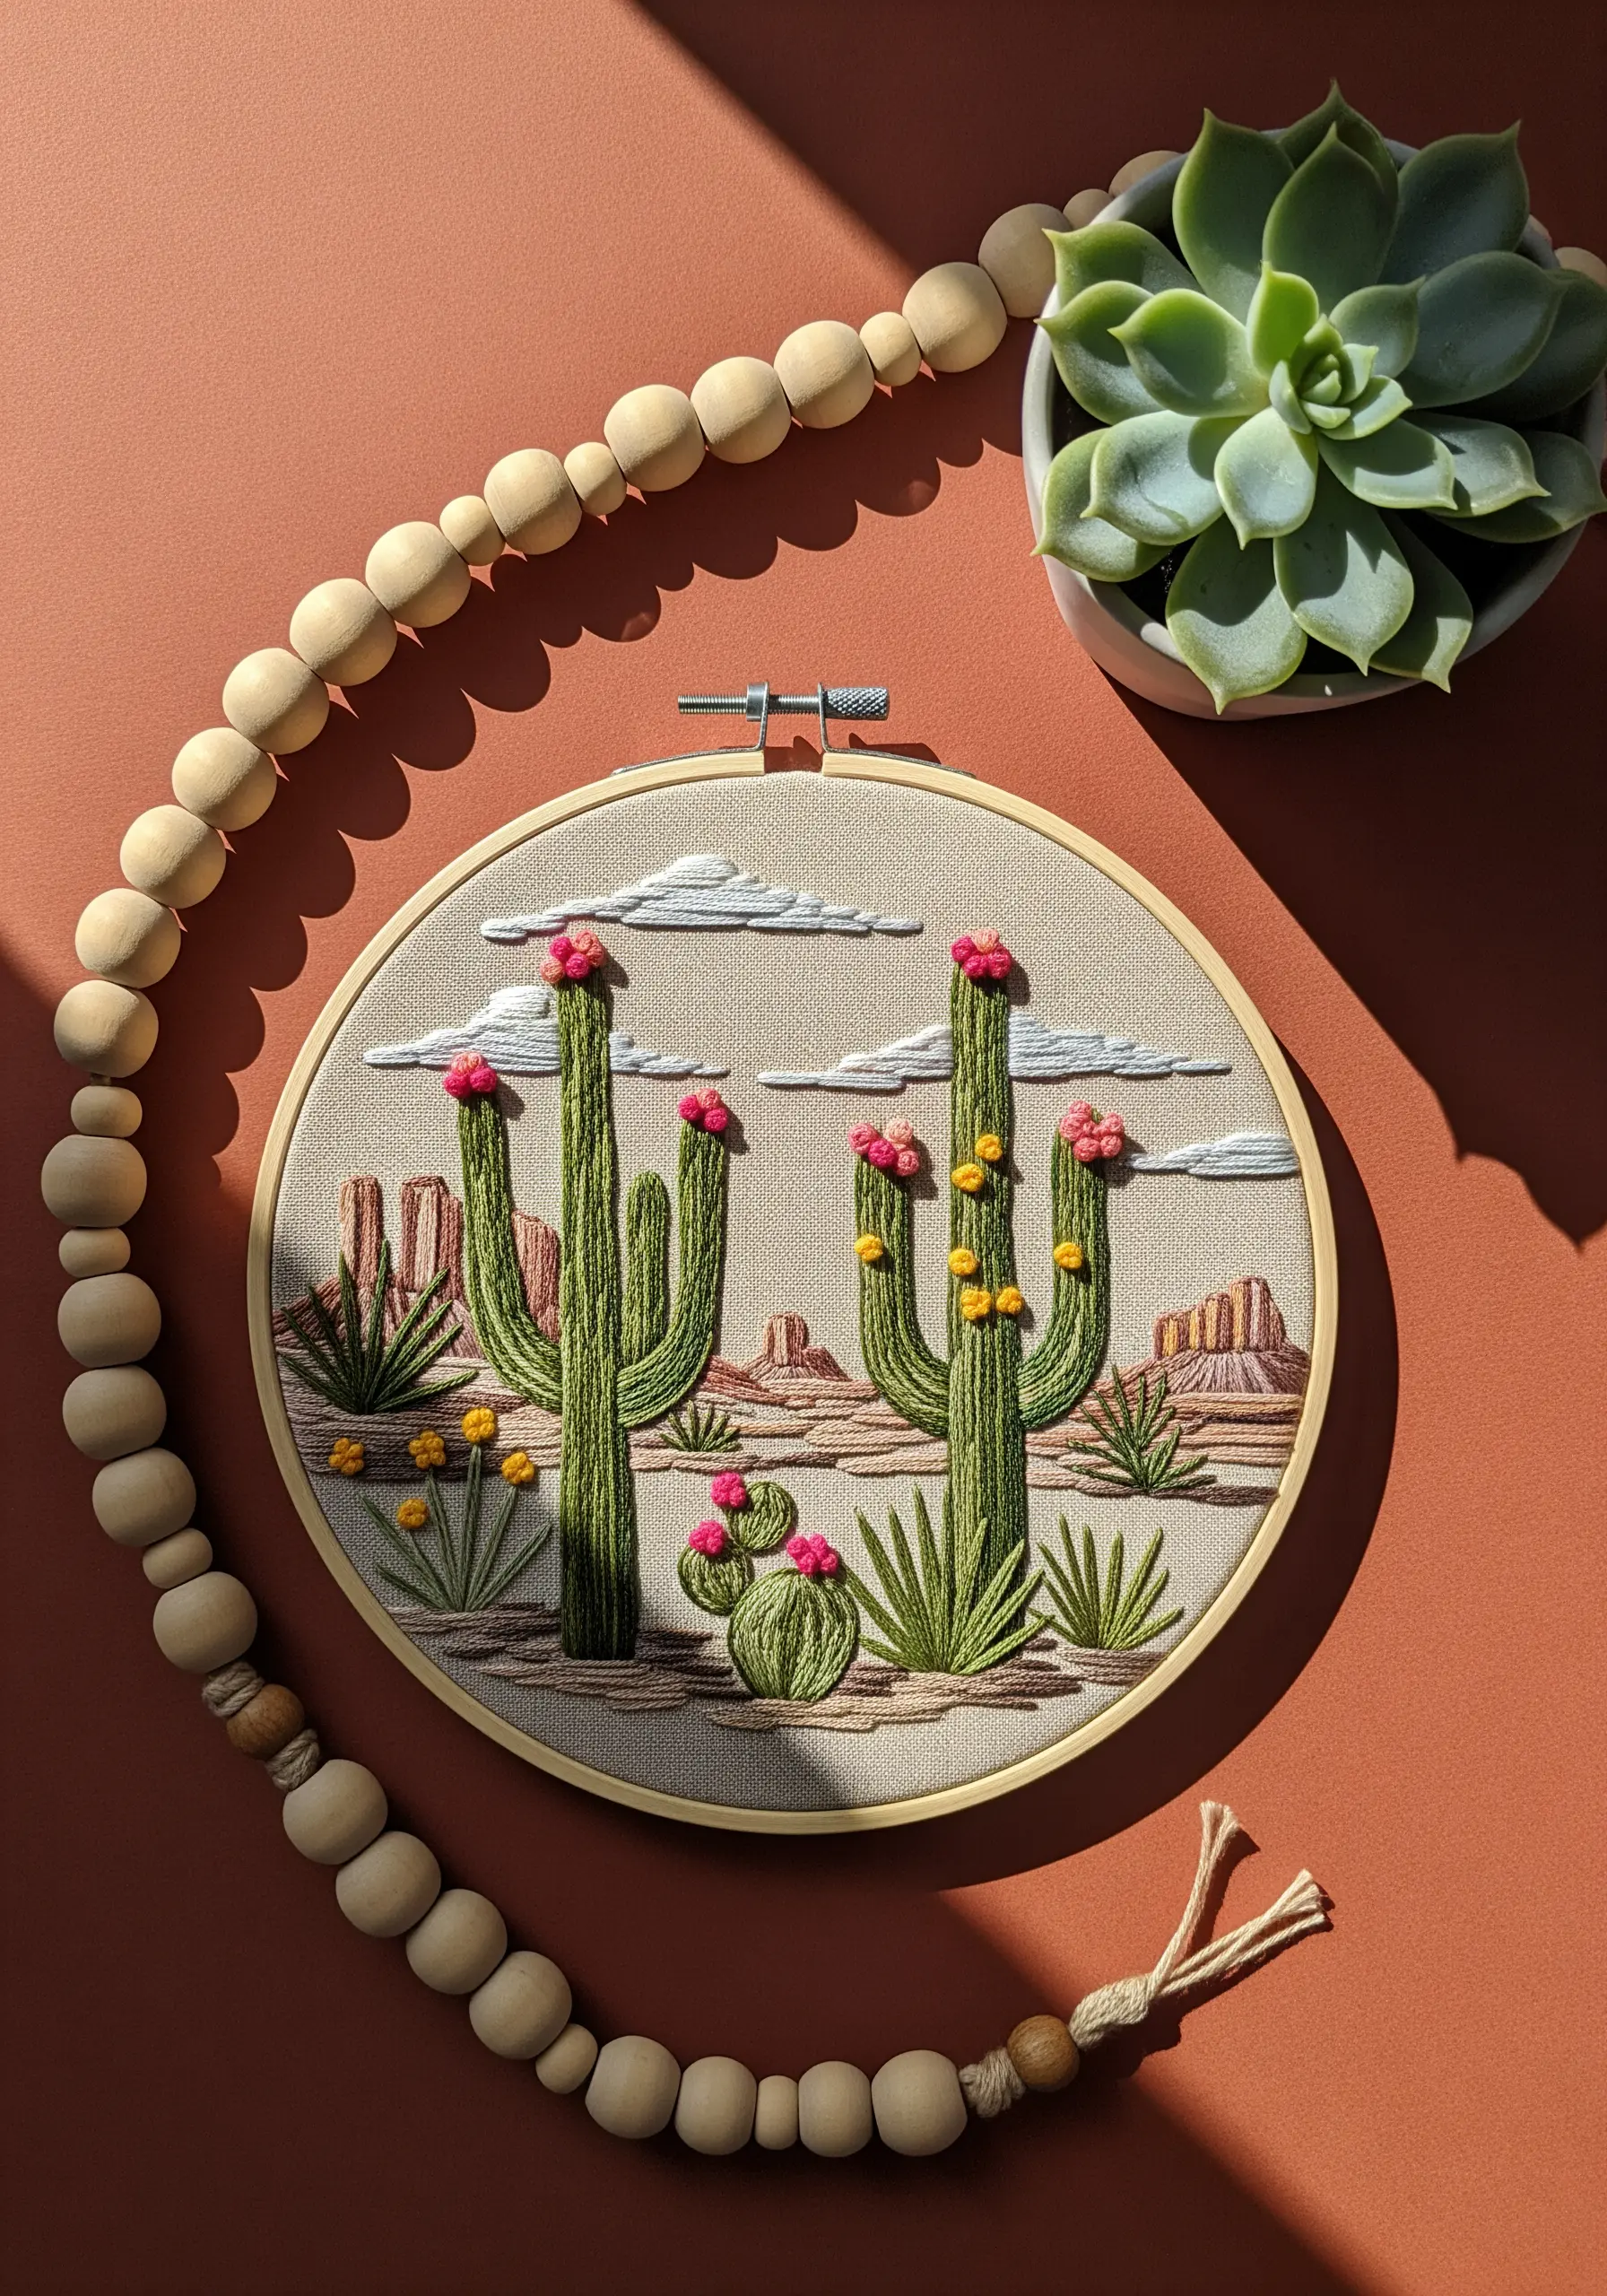
Evoke the serene atmosphere of the desert by focusing on understated textures and a harmonious color palette.
Use a vertical split stitch for the body of the cacti to mimic their ribbed texture, and add tiny French knots or star stitches for the flowers.
Fill the distant mesas with a simple satin stitch, but change the stitch direction to differentiate each landform.
For the sandy ground, scatter random seed stitches to create a subtle, grainy texture that grounds the entire composition.
10. Draft Architectural Art with a Single Thread
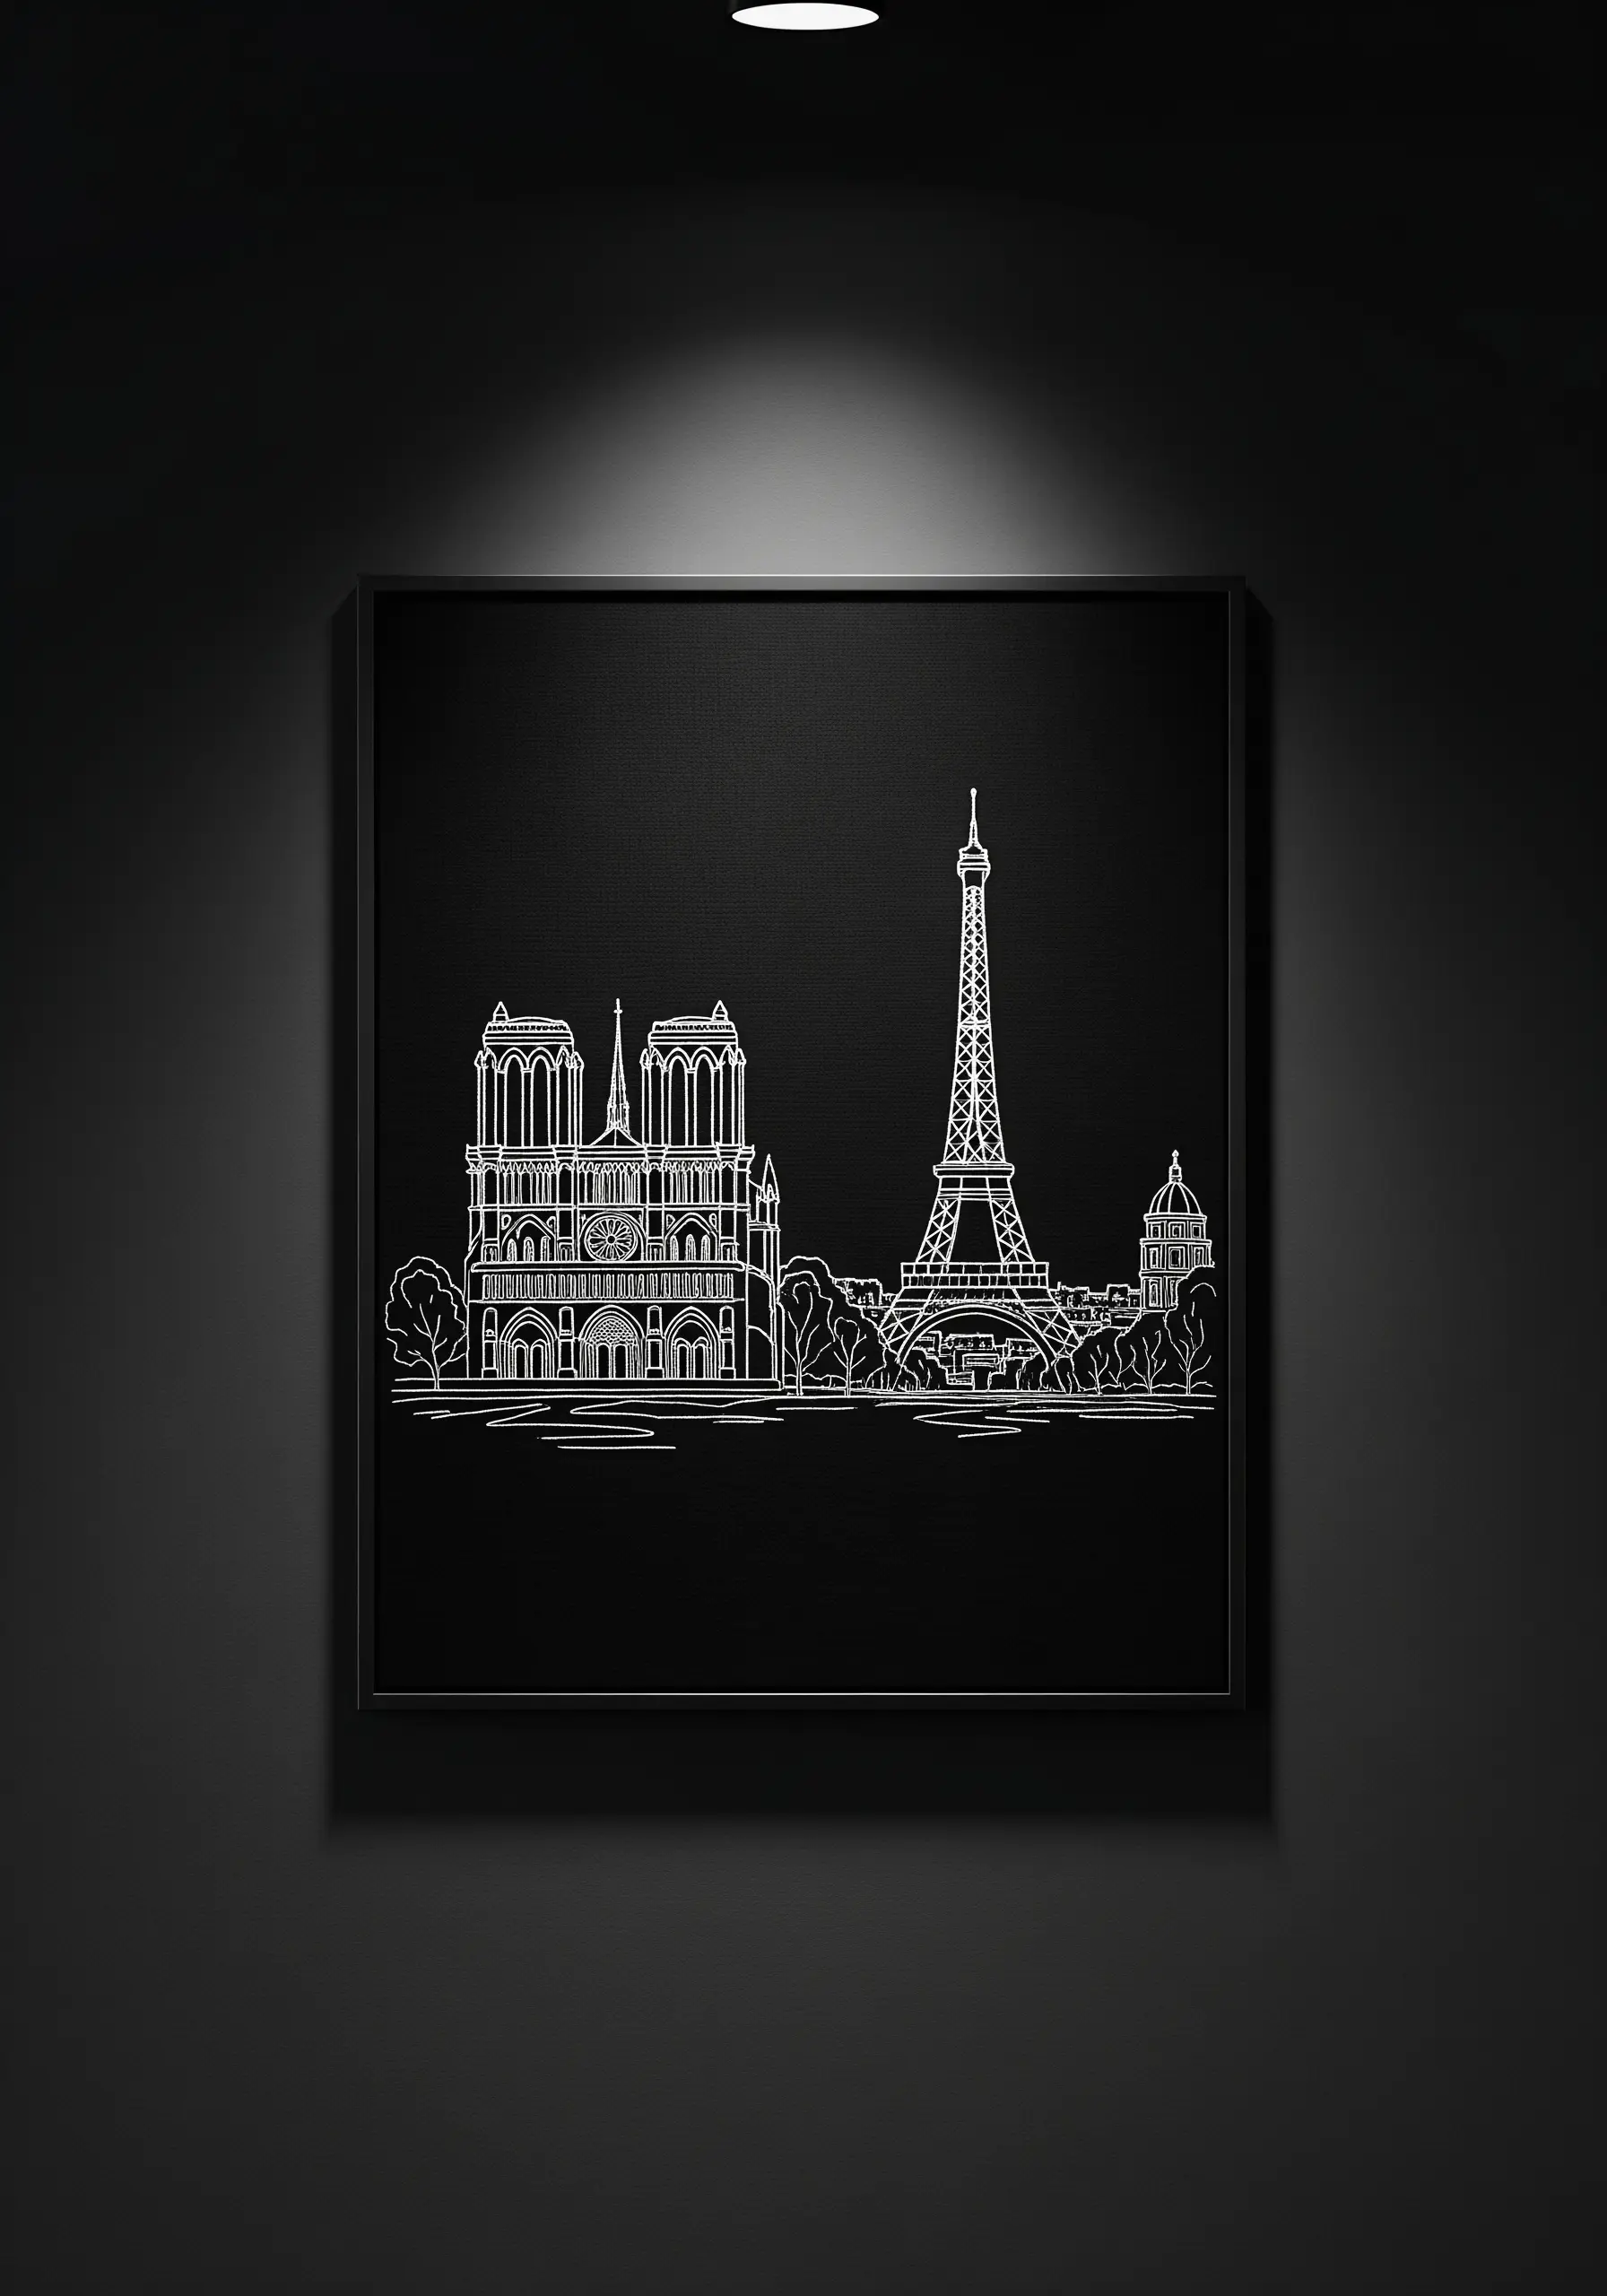
Recreate intricate cityscapes with the clean precision of an architectural drawing.
Using a single strand of white or silver thread on black fabric creates a striking, high-contrast effect that emphasizes form and line.
A meticulous backstitch is all you need, but focus on keeping each stitch small and uniform to handle the sharp corners and delicate details of the buildings.
This minimalist approach turns complex structures into elegant abstract line art silhouettes.
11. Embrace Rustic Charm on Burlap Banners
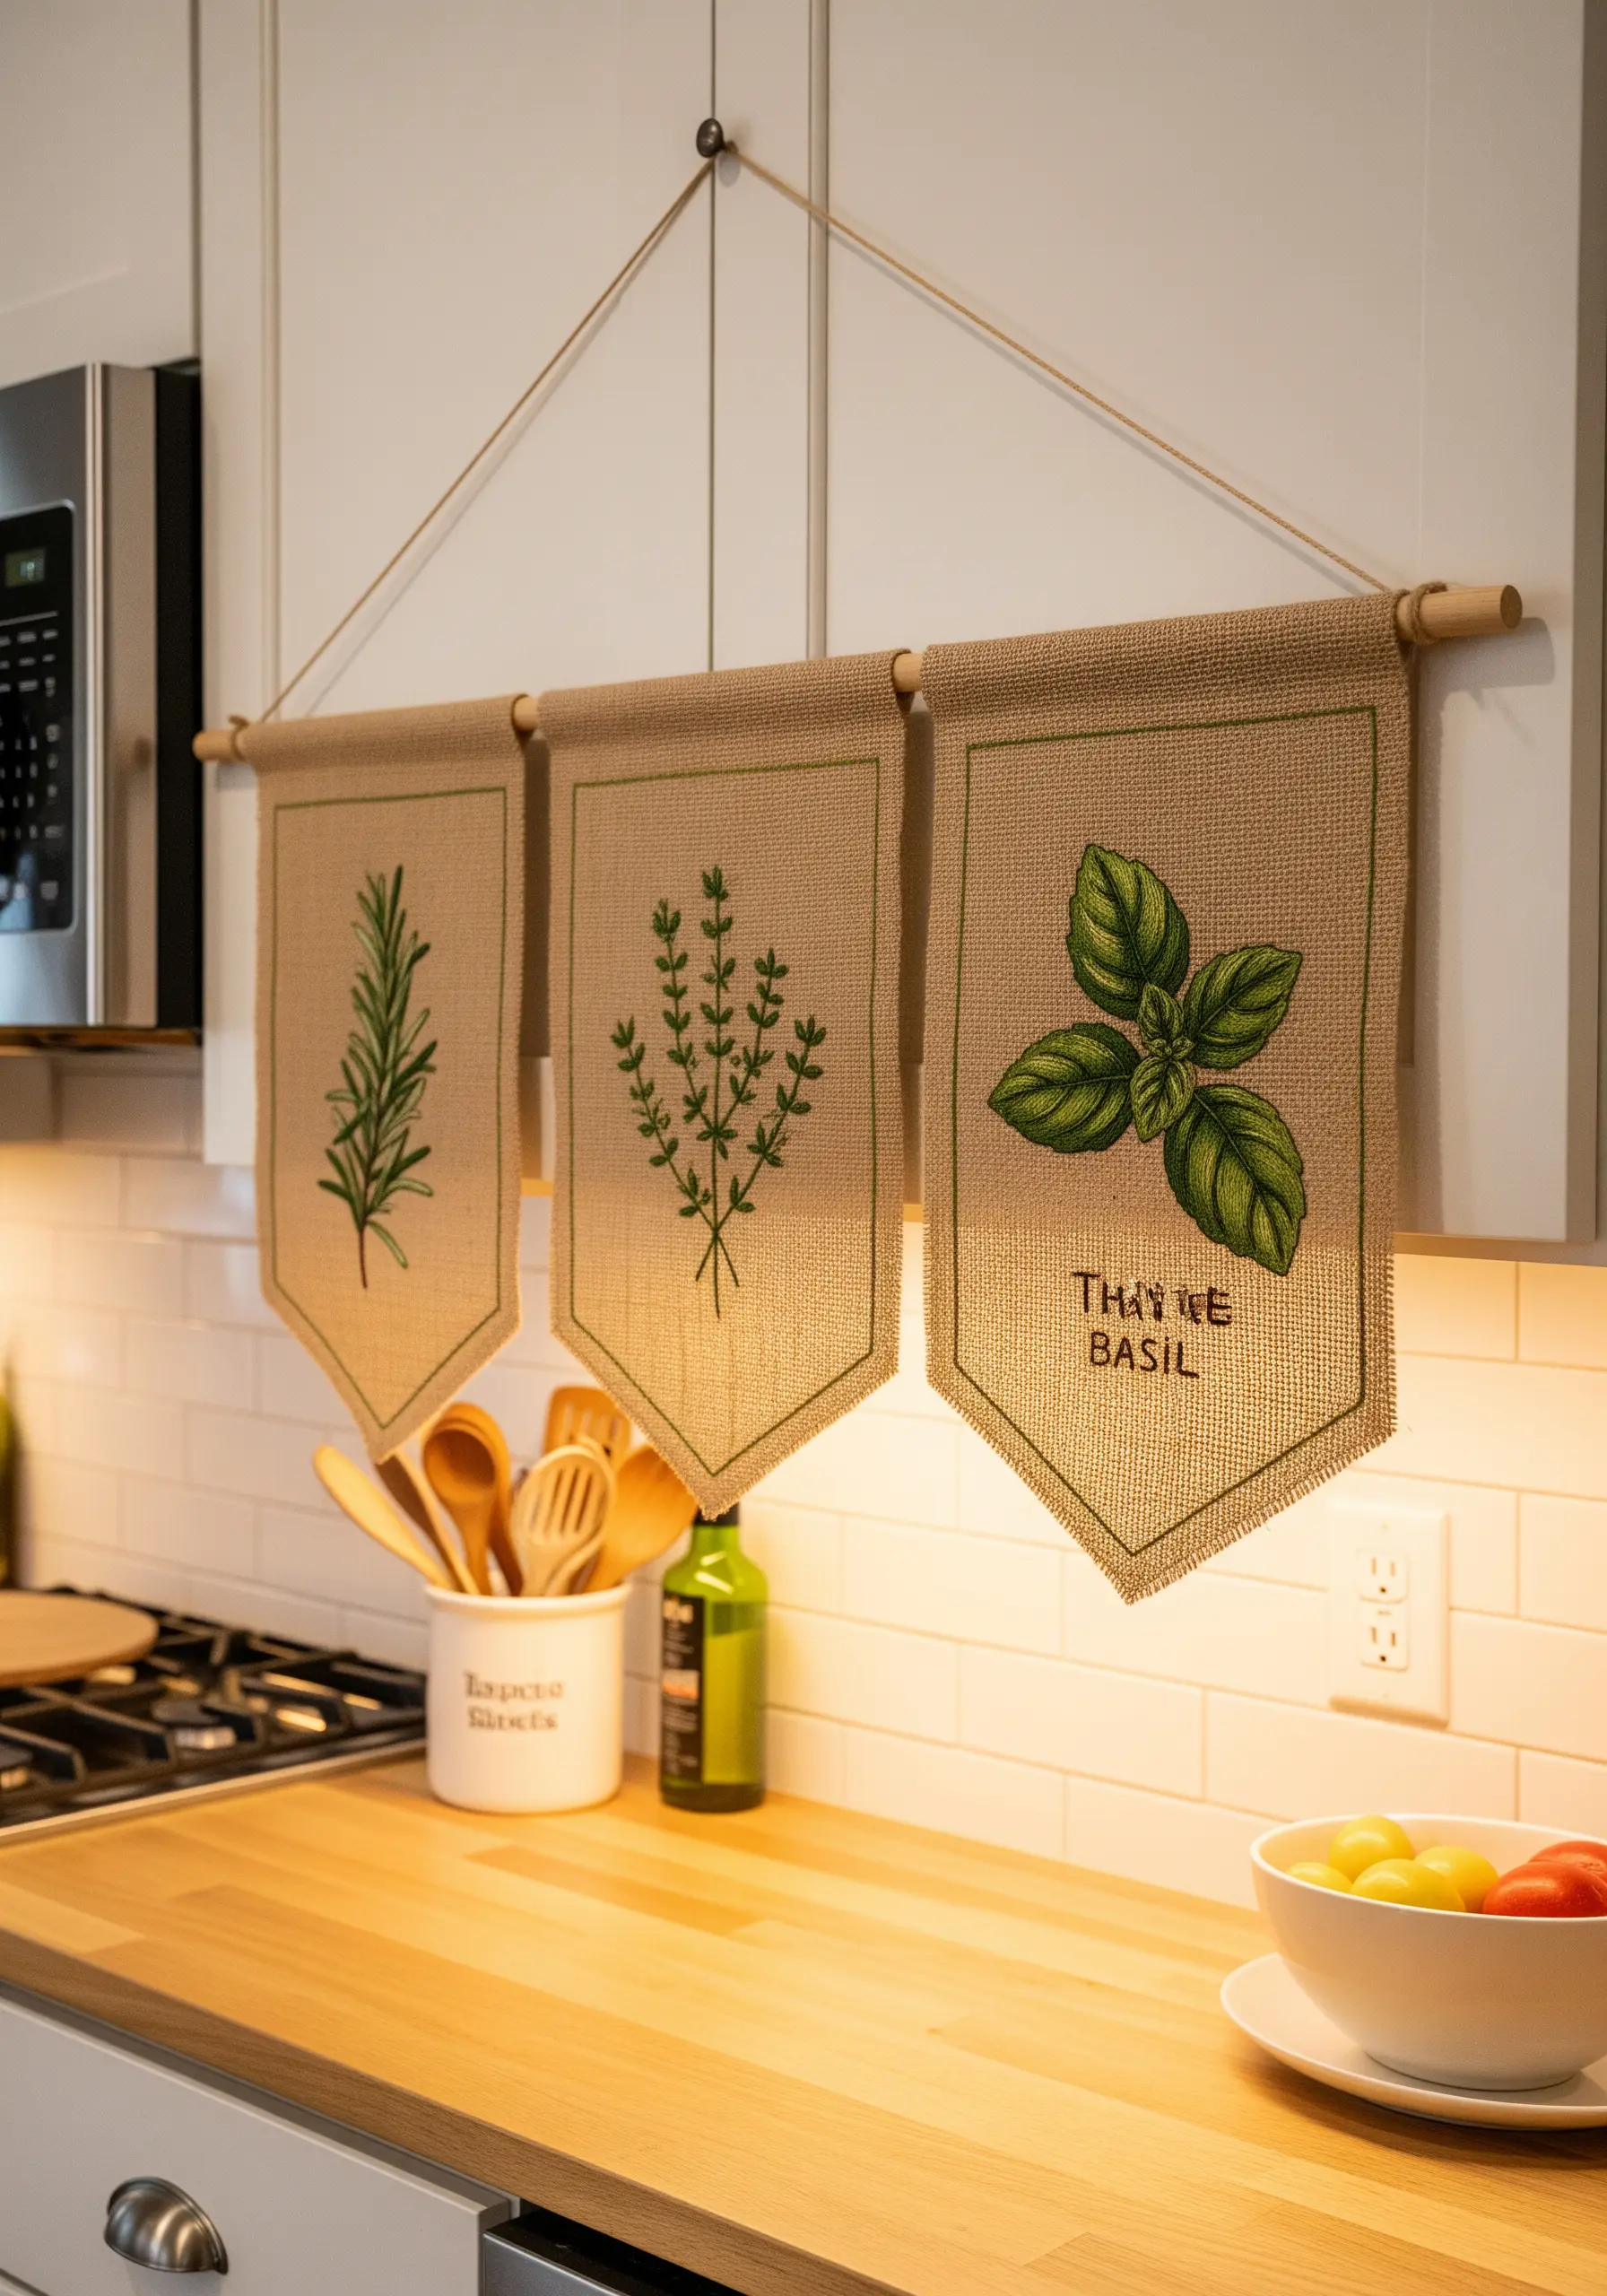
Stitching on a coarse, open-weave fabric like burlap adds instant rustic character to your work.
Because the weave is loose, use a thicker thread, like pearl cotton or all six strands of floss, to ensure your stitches are substantial and visible.
Simple stitches like stem stitch for the stems and lazy daisy for the leaves work beautifully here, as the texture of the fabric itself becomes part of the design.
For finer details or lettering, consider placing a water-soluble stabilizer on top of the burlap to give your needle a smoother surface to work with.
12. Weave an Autumnal Wreath with Blended Hues
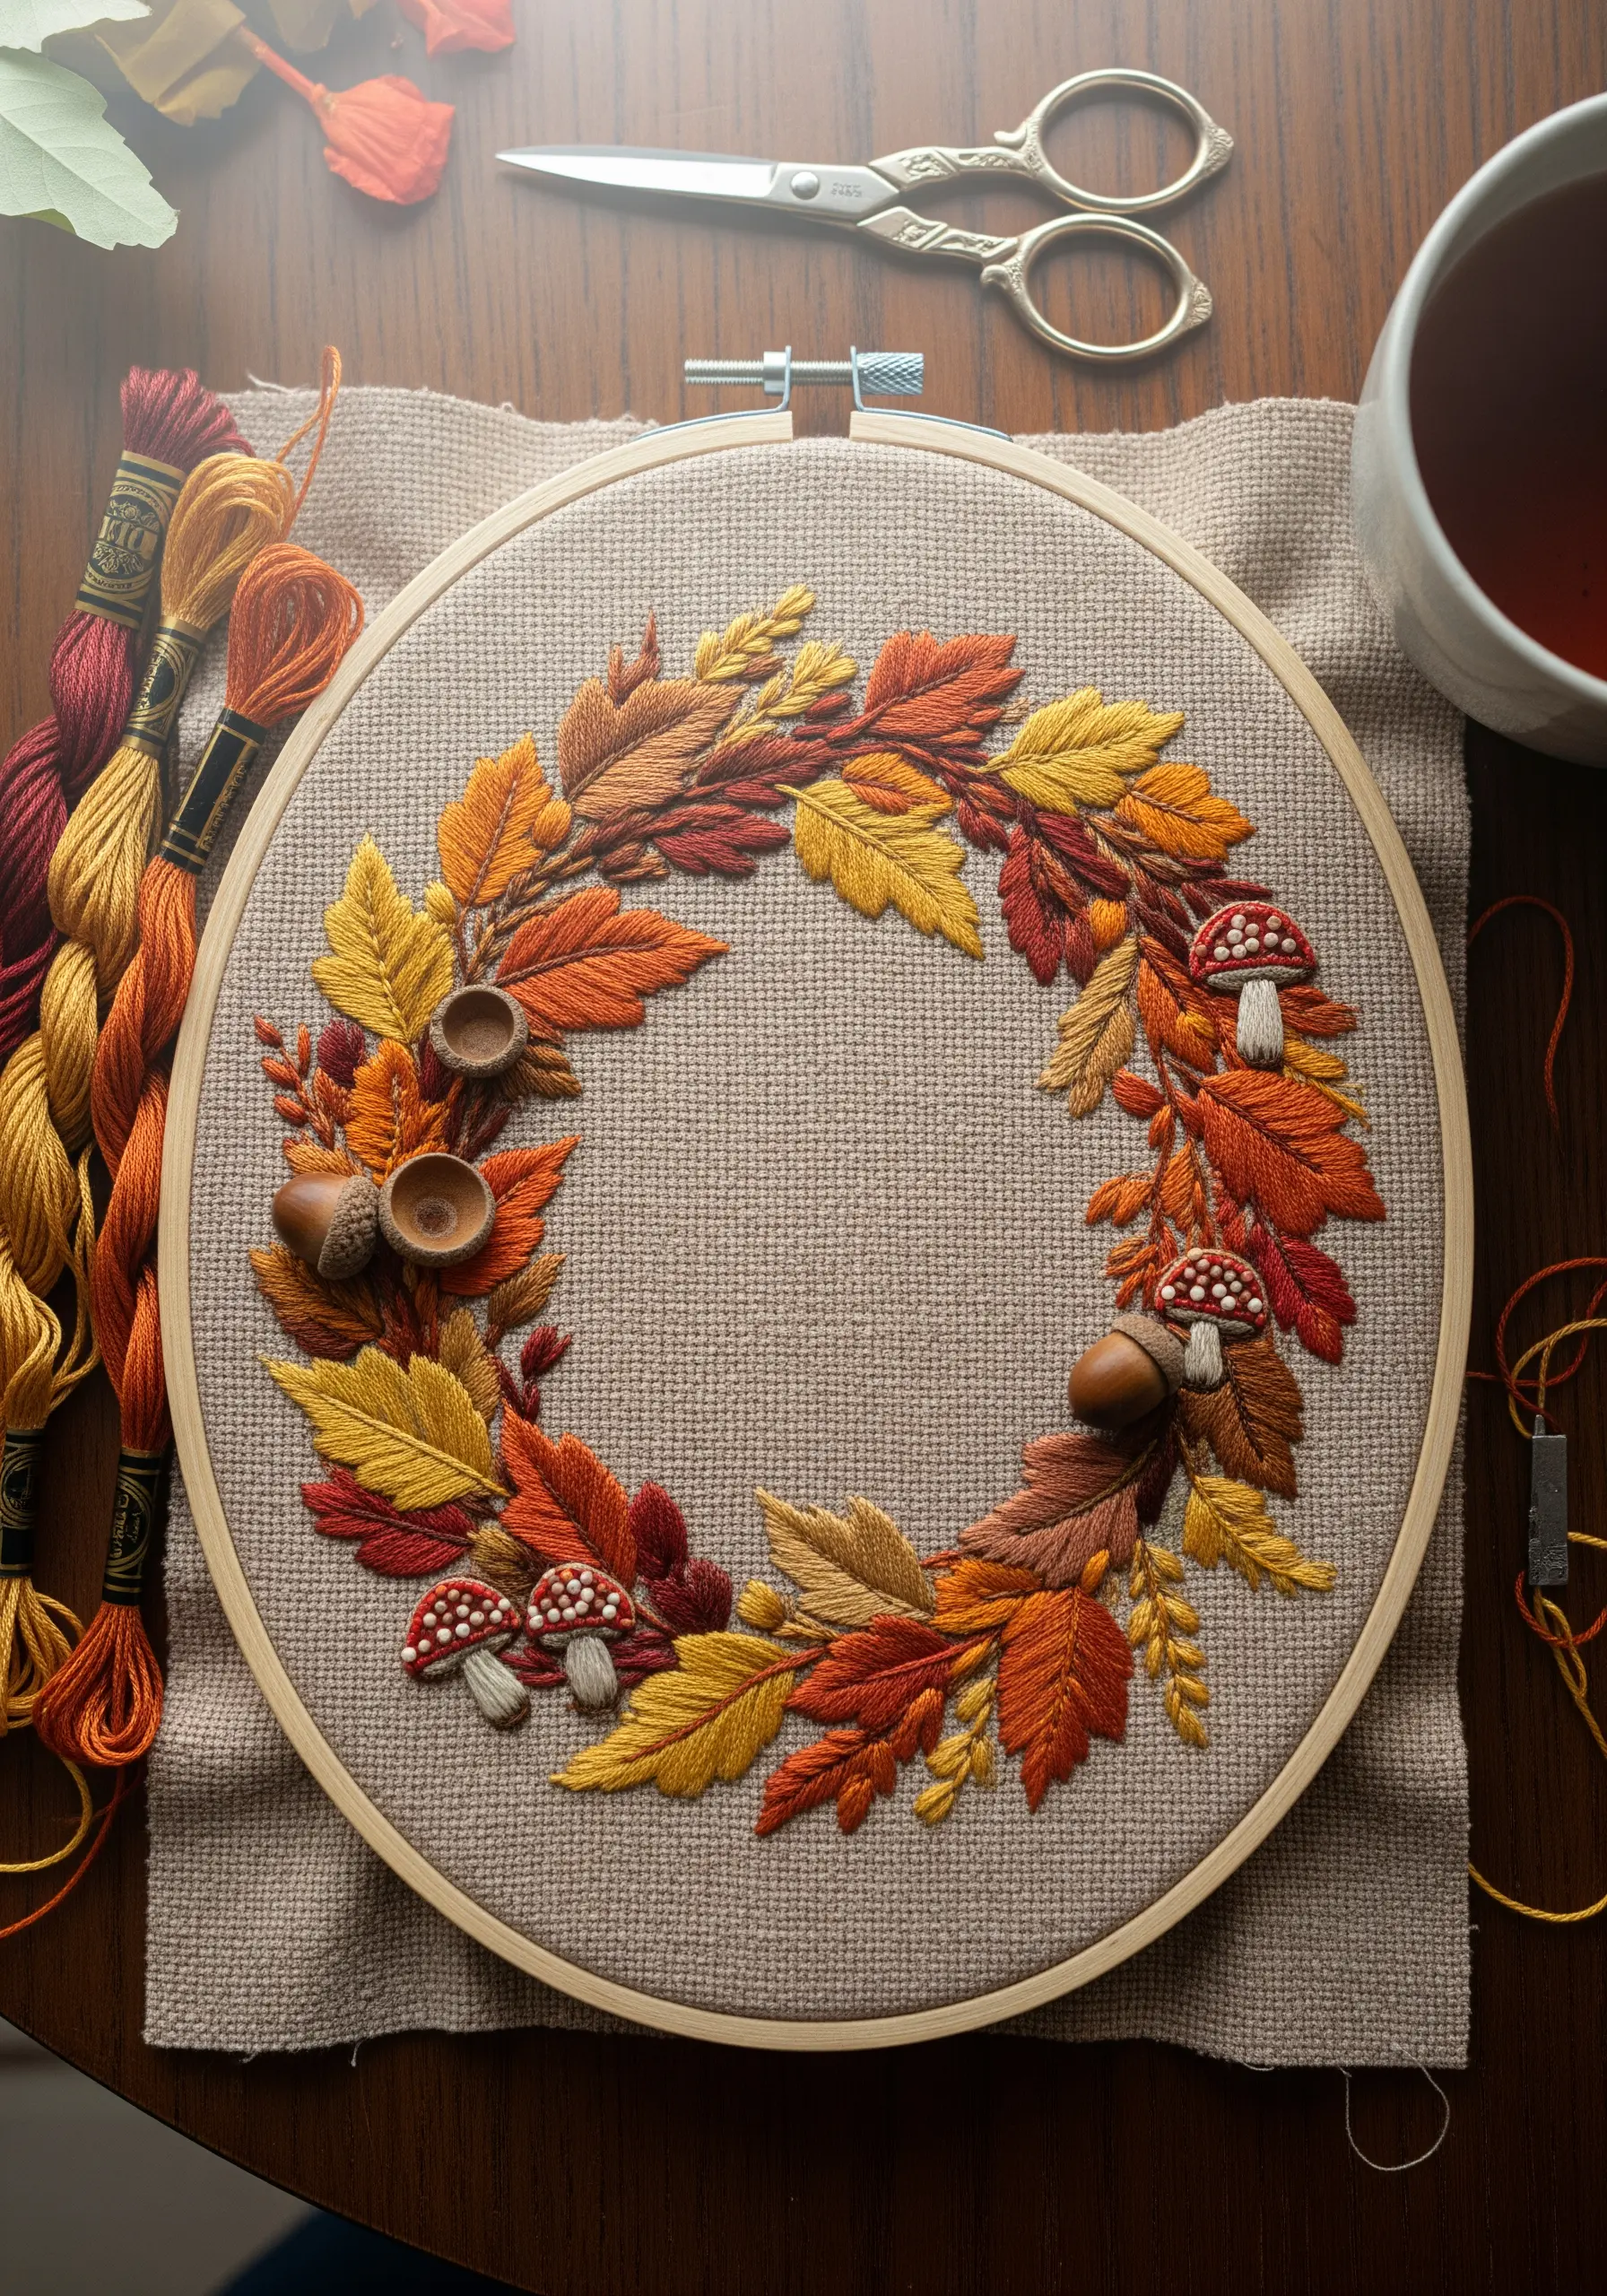
Capture the rich, gradual shift of autumn colors by using the long-and-short stitch to blend threads directly on the fabric.
Instead of stitching one solid-colored leaf, work with two or three needles threaded with adjacent shades—like red, rust, and orange—and alternate them to create a soft gradient.
Contrast the softly blended leaves with the solid, smooth satin stitch of the acorns and the dimensional texture of French knot mushrooms.
This technique turns simple seasonal wall art projects into sophisticated studies of color.
13. Create Graphic Art with Appliqué and Stitch
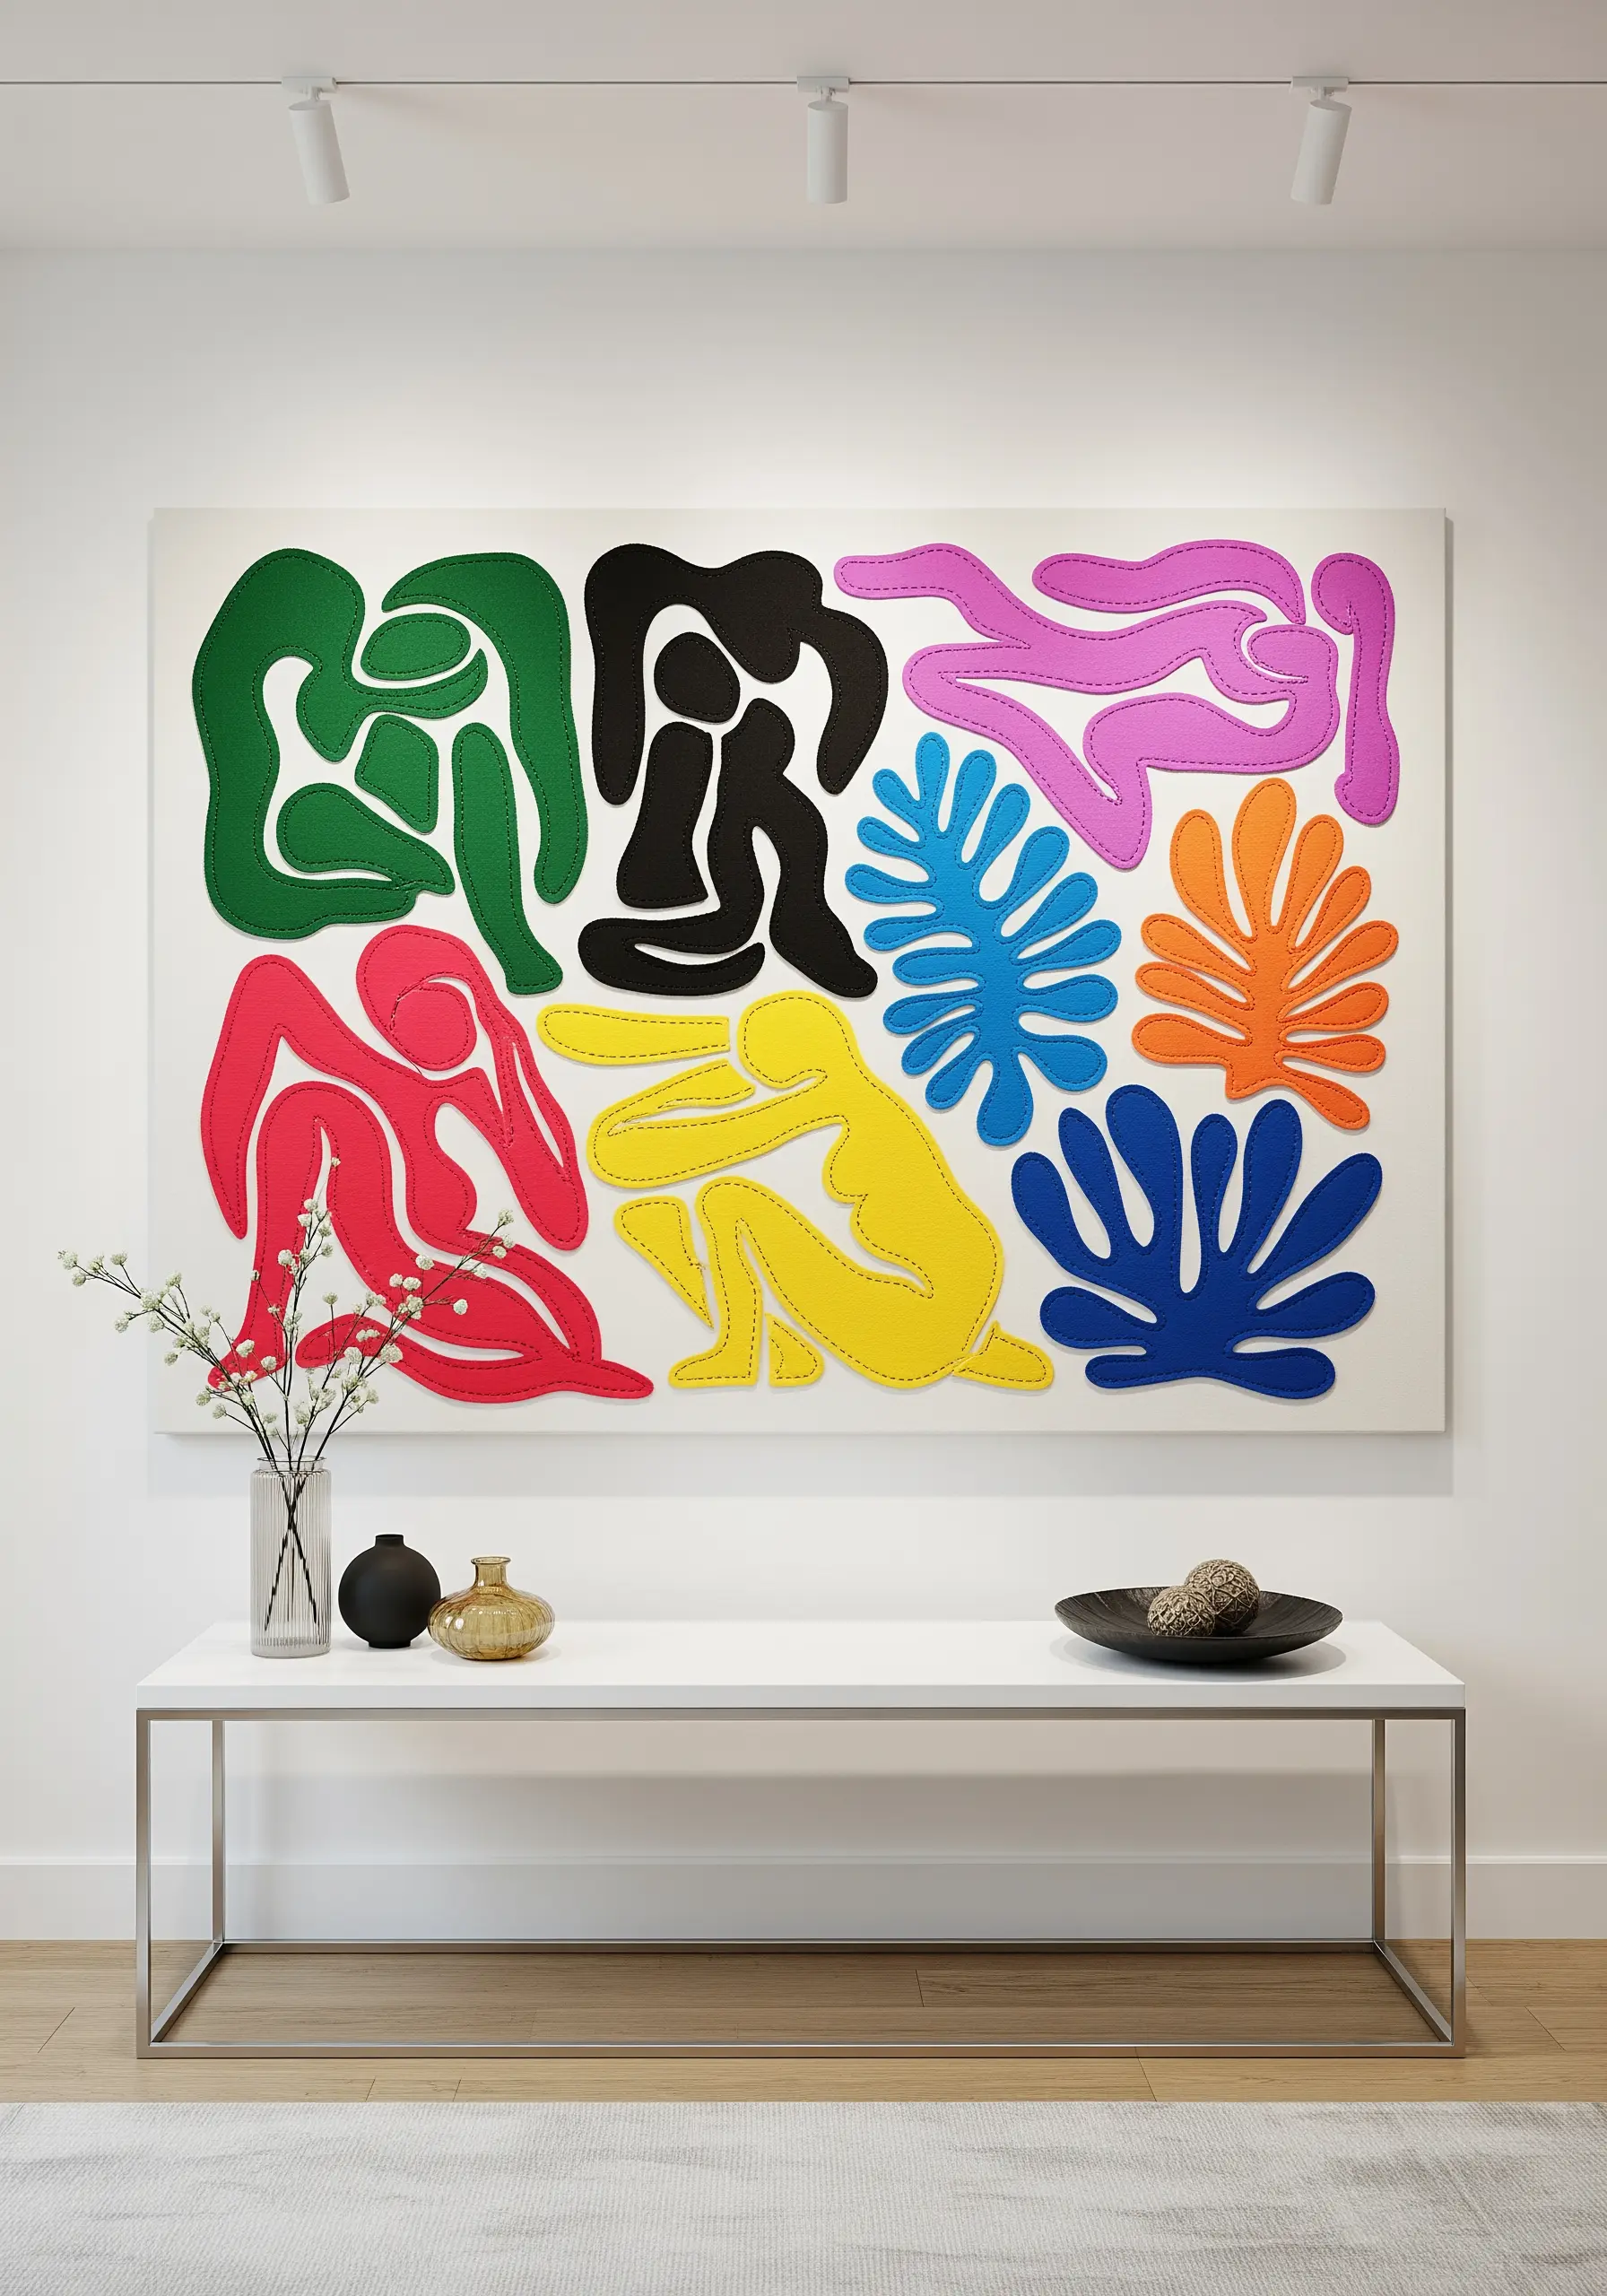
Combine the boldness of paper cut-outs with the tactile quality of thread by using appliqué.
Cut your shapes from felt or non-fraying cotton, arrange them on your base fabric, and secure them with a simple running stitch or a neat blanket stitch around the edges.
The visible stitches become a design element in their own right, adding a handcrafted feel to the graphic, color-blocked shapes.
This is one of the fastest ways to create large-scale, impactful fabric collage embroidery layouts without filling the entire area with thread.
14. Stitch a Symmetrical Folk Art Panel
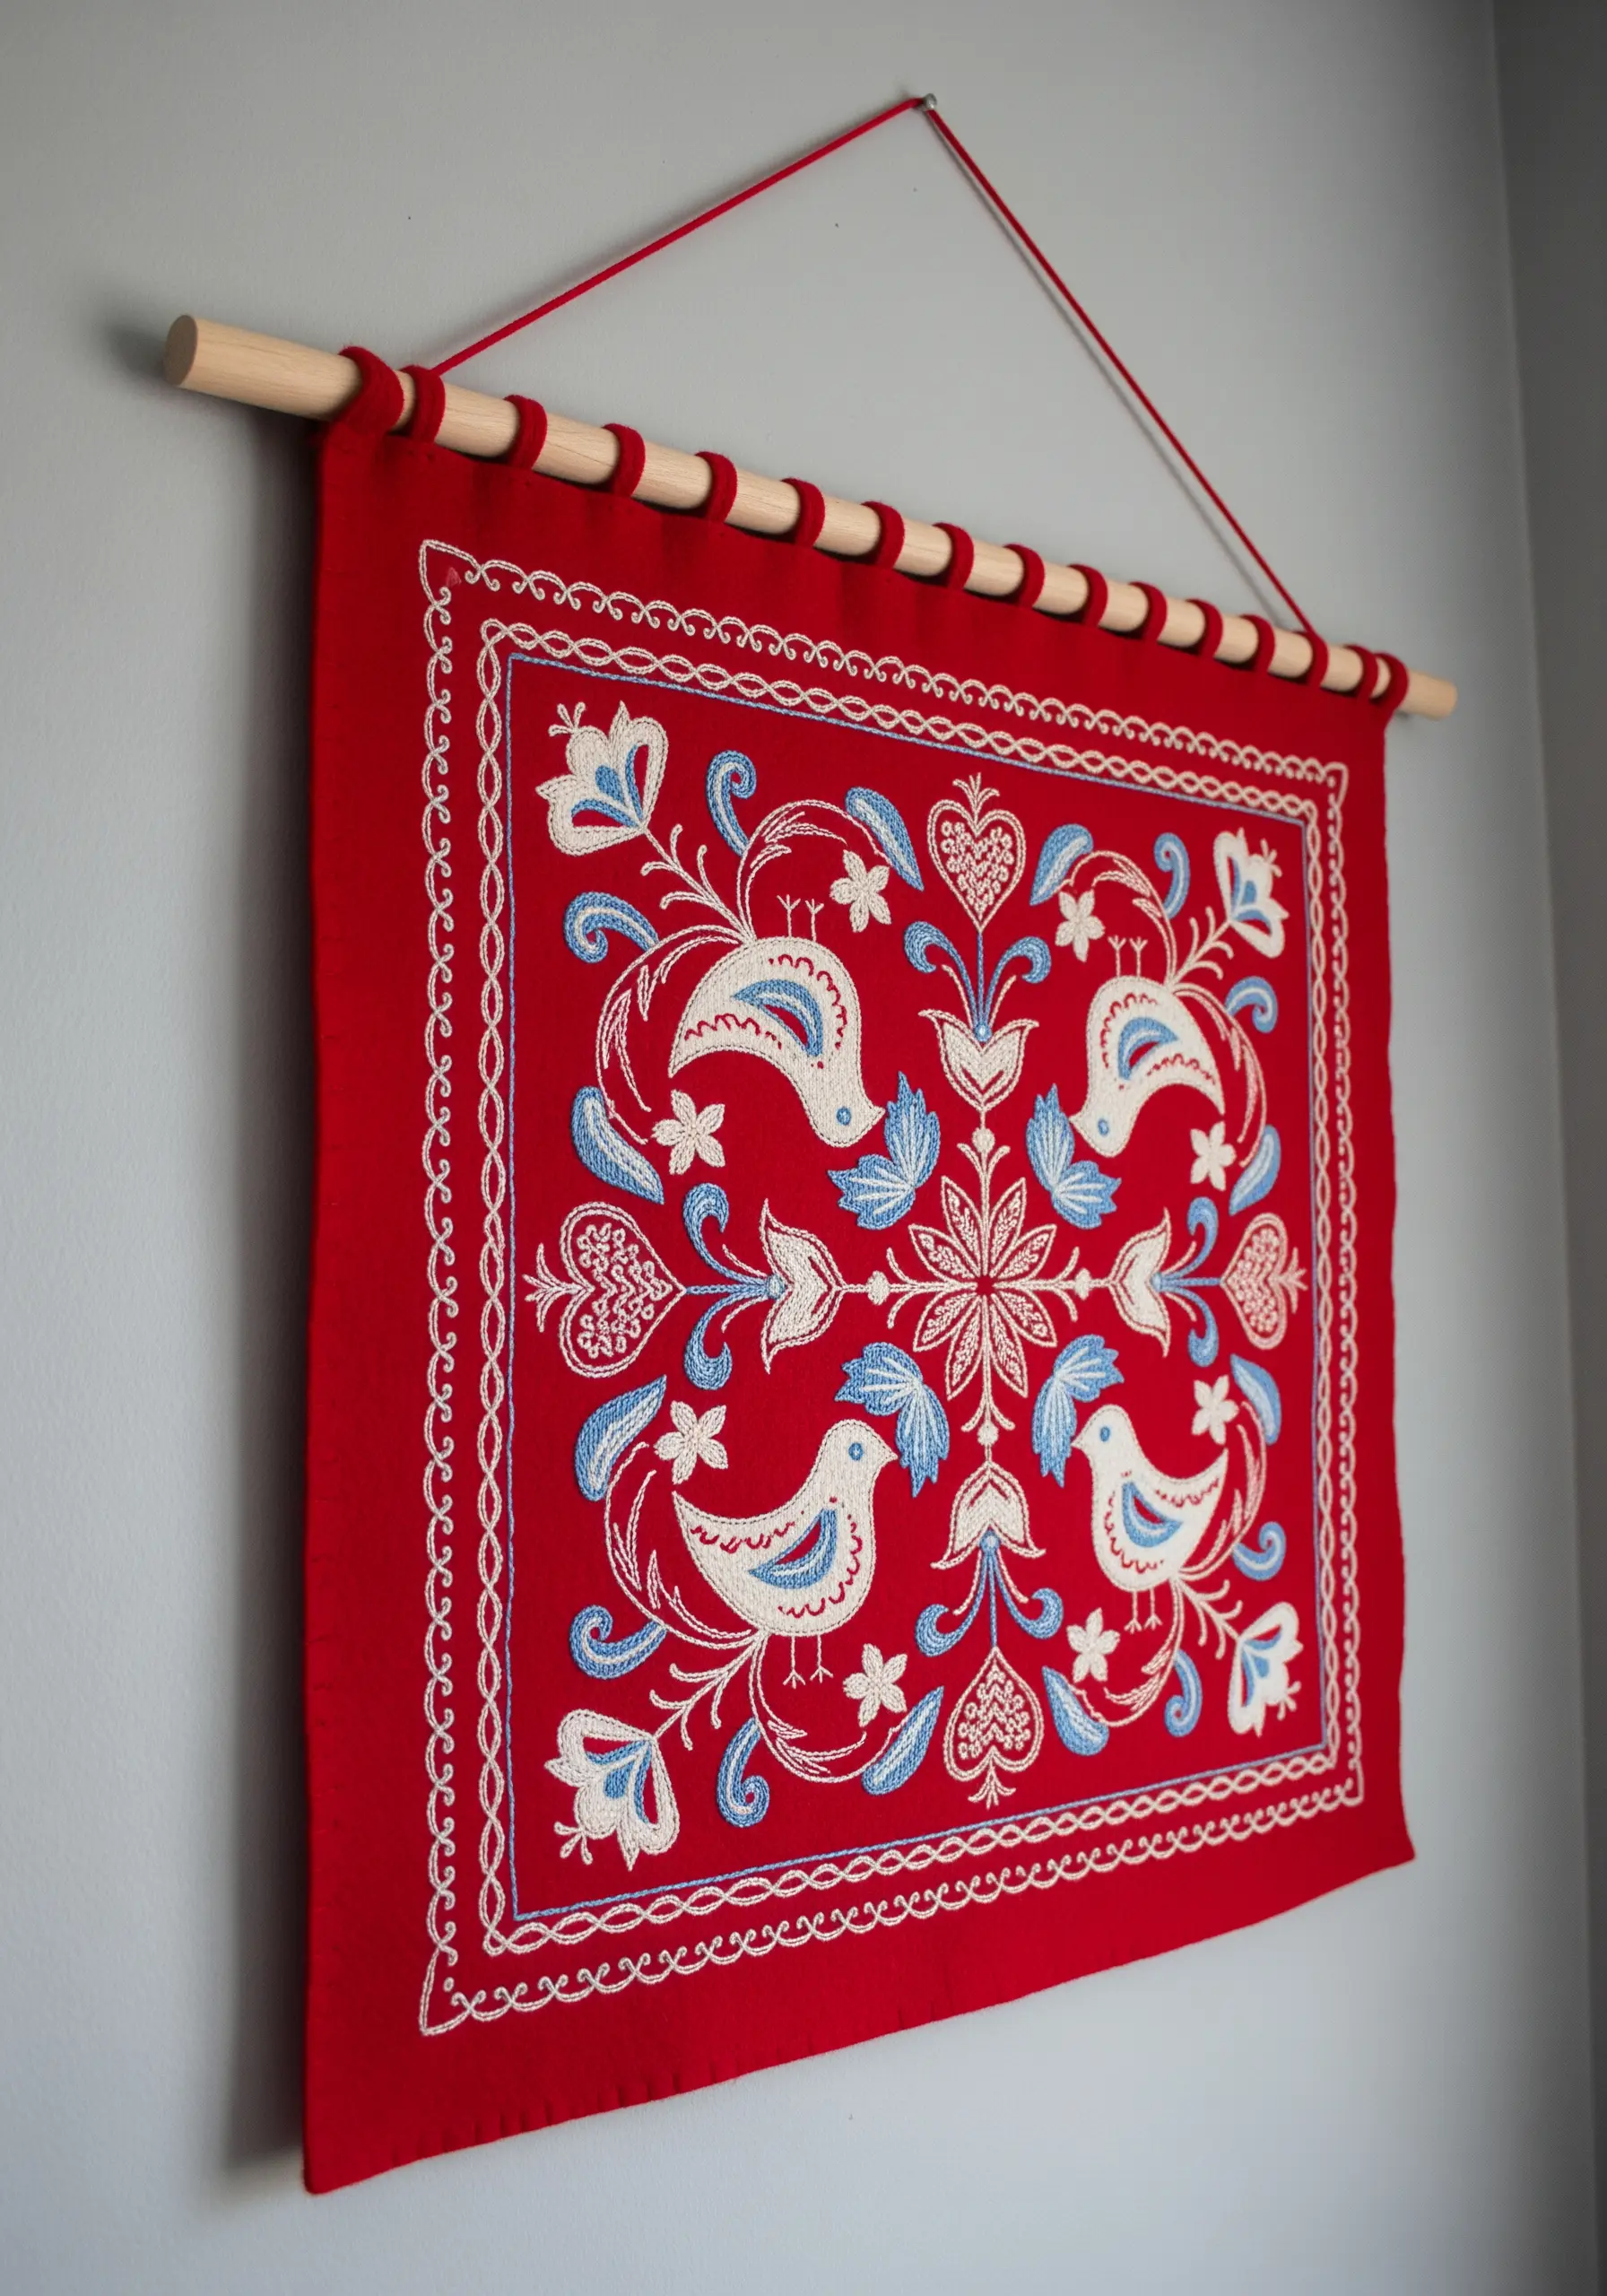
Achieve the balanced, harmonious look of folk art by focusing on symmetry and a limited color palette.
Fold your fabric in quarters and lightly press to create guide-lines, ensuring your mirrored motifs are perfectly aligned.
Use classic, sturdy stitches like chain stitch for outlines and satin stitch for fills, which are hallmarks of traditional folk embroidery.
The combination of bold red fabric with crisp white and blue threads creates a timeless aesthetic that feels both traditional and refreshingly modern.
15. Paint a Pet Portrait with Directional Stitches

The secret to realistic thread-painted fur is stitching in the direction of hair growth.
Use a single strand of floss and a short long-and-short stitch, paying close attention to how the fur flows around the eyes, nose, and ears.
Layer your colors gradually, starting with the darkest shades and adding lighter tones for highlights. This builds depth and dimension, making your work look less like stitches and more like brushstrokes.
This careful layering transforms a simple pet picture into one of those modern thread portraits that capture true personality.
16. Craft Puffy Letters with a Padded Foundation
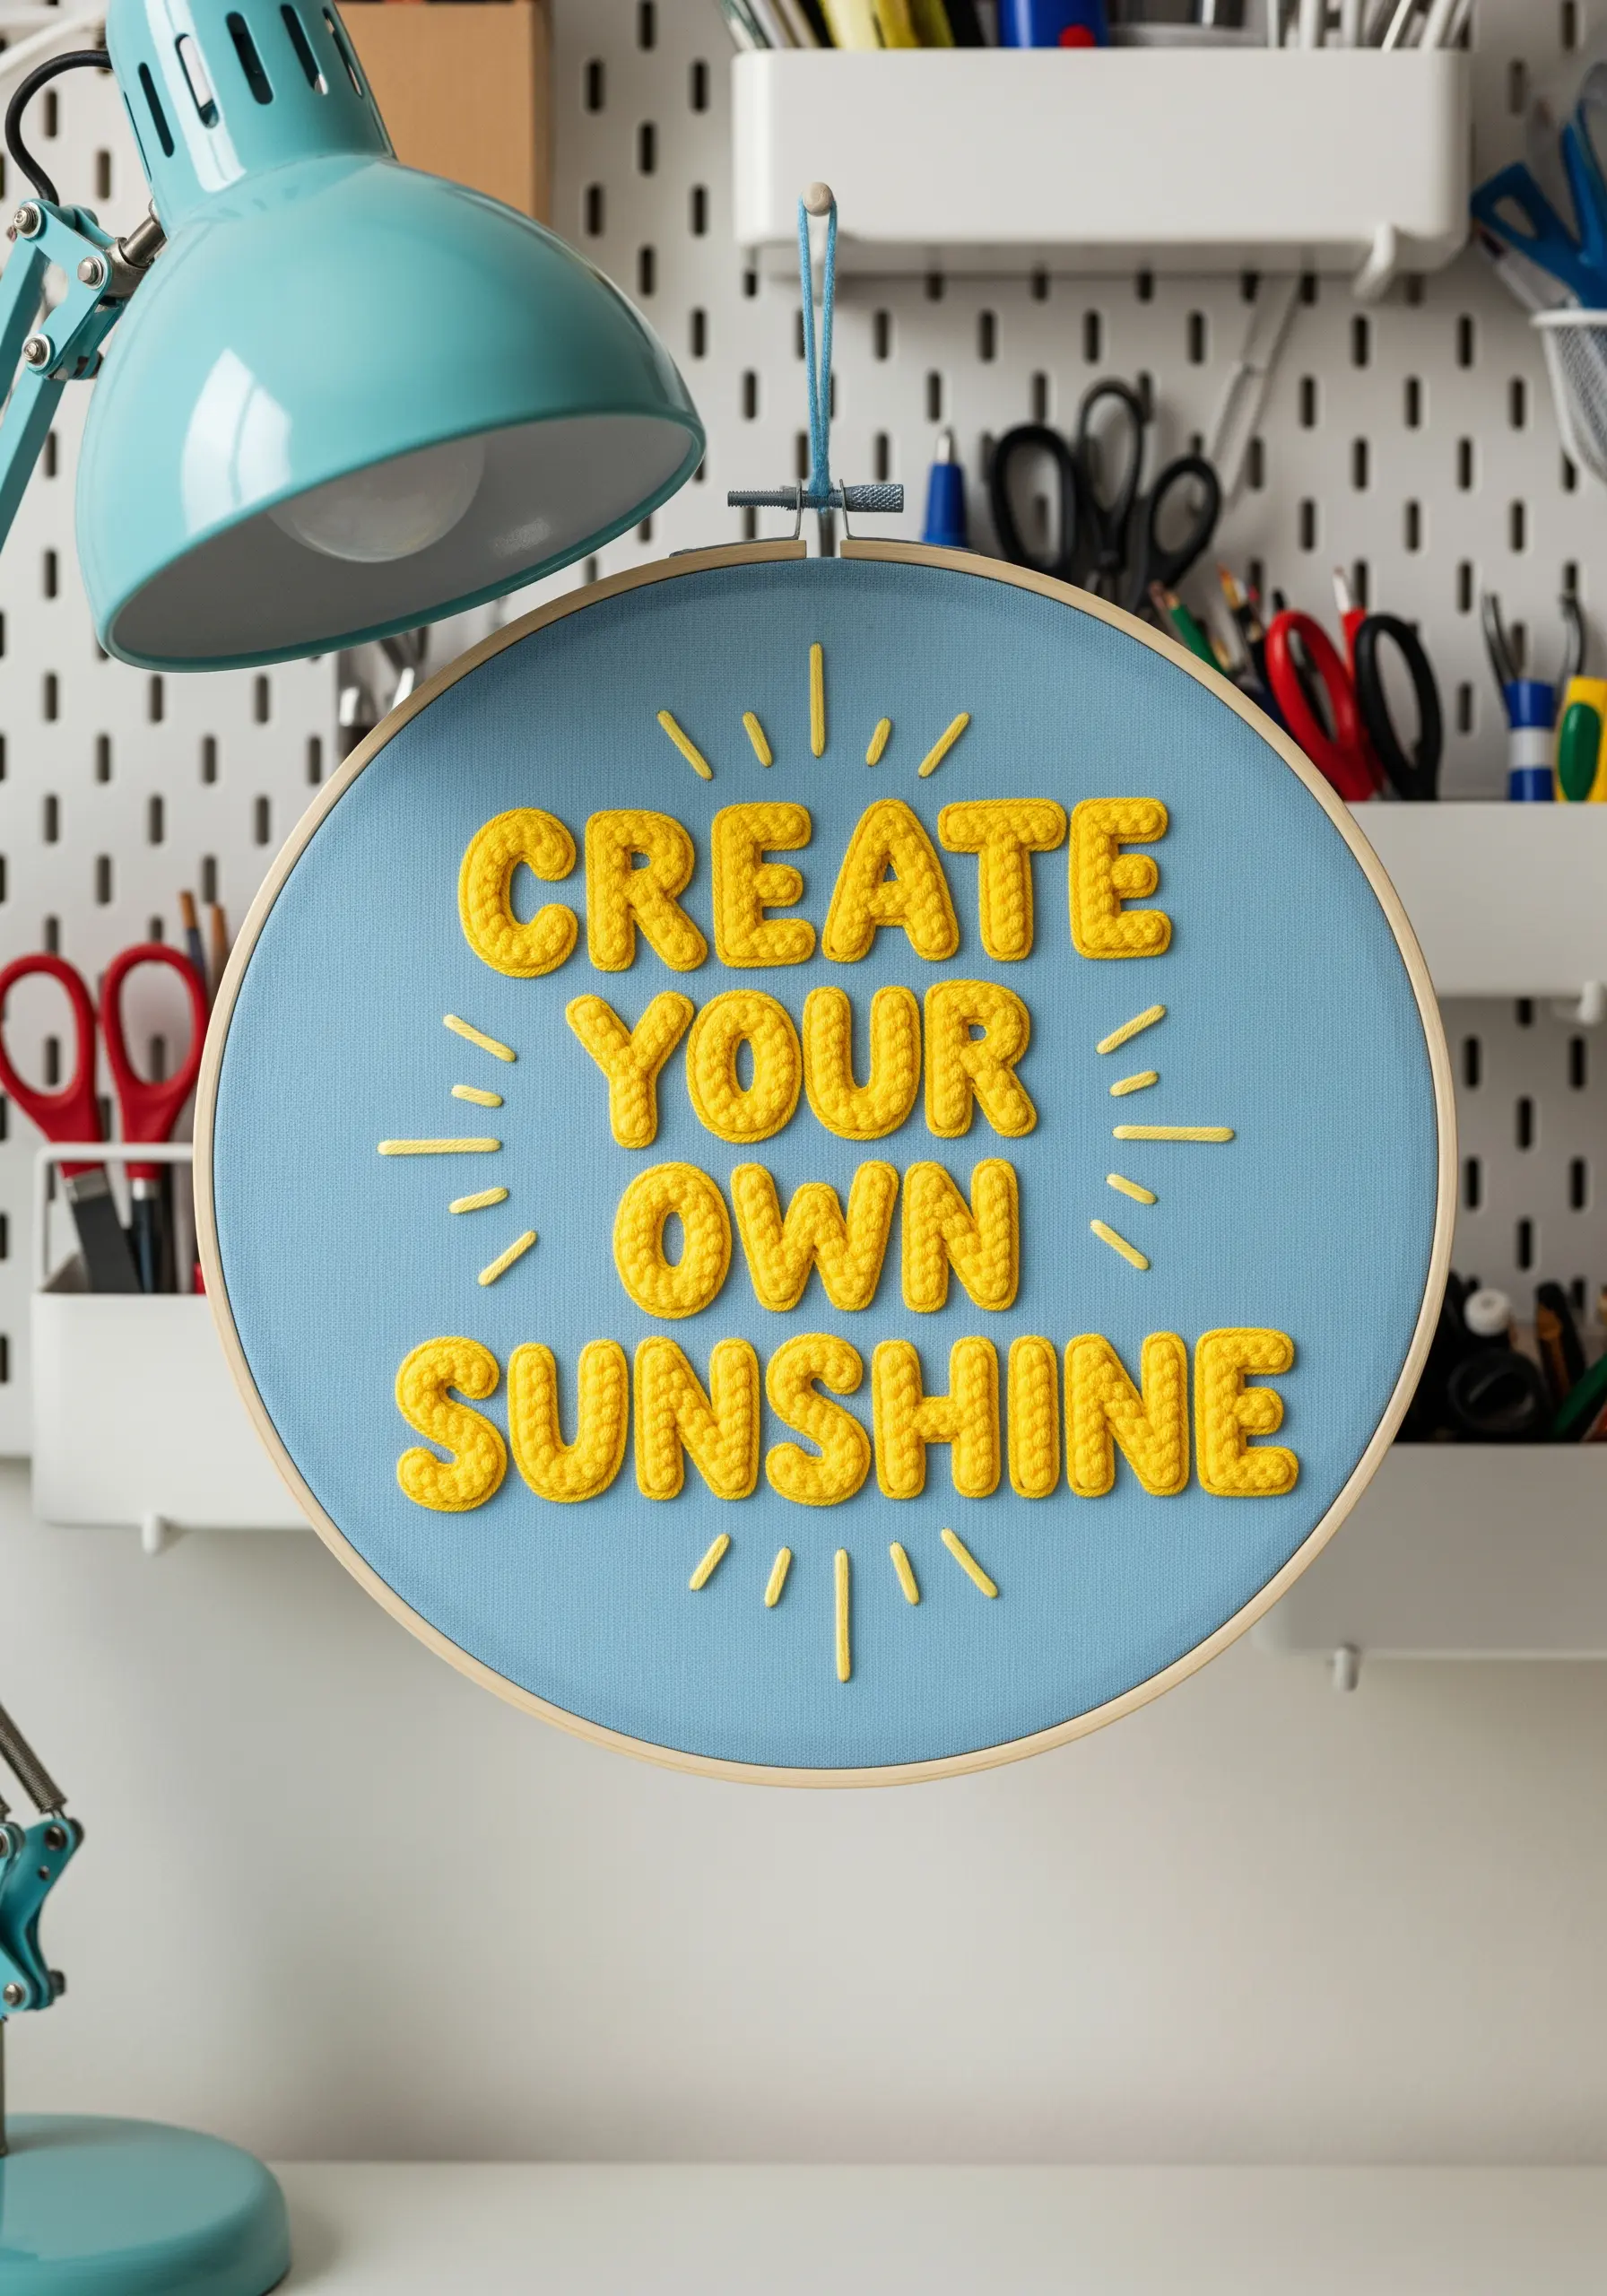
Give your embroidered text a playful, three-dimensional pop with padded satin stitch.
First, fill the inside of your letter shapes with a base of seed stitches, small straight stitches, or even a piece of cut felt tacked down.
Then, cover this padded foundation with a smooth, even layer of satin stitch, ensuring your stitches extend just beyond the padding to create a neat, rounded edge.
This technique makes the text stand off the fabric, creating tactile shadows that add incredible depth and fun to your wall art.
17. Design a Faux Stained Glass Suncatcher
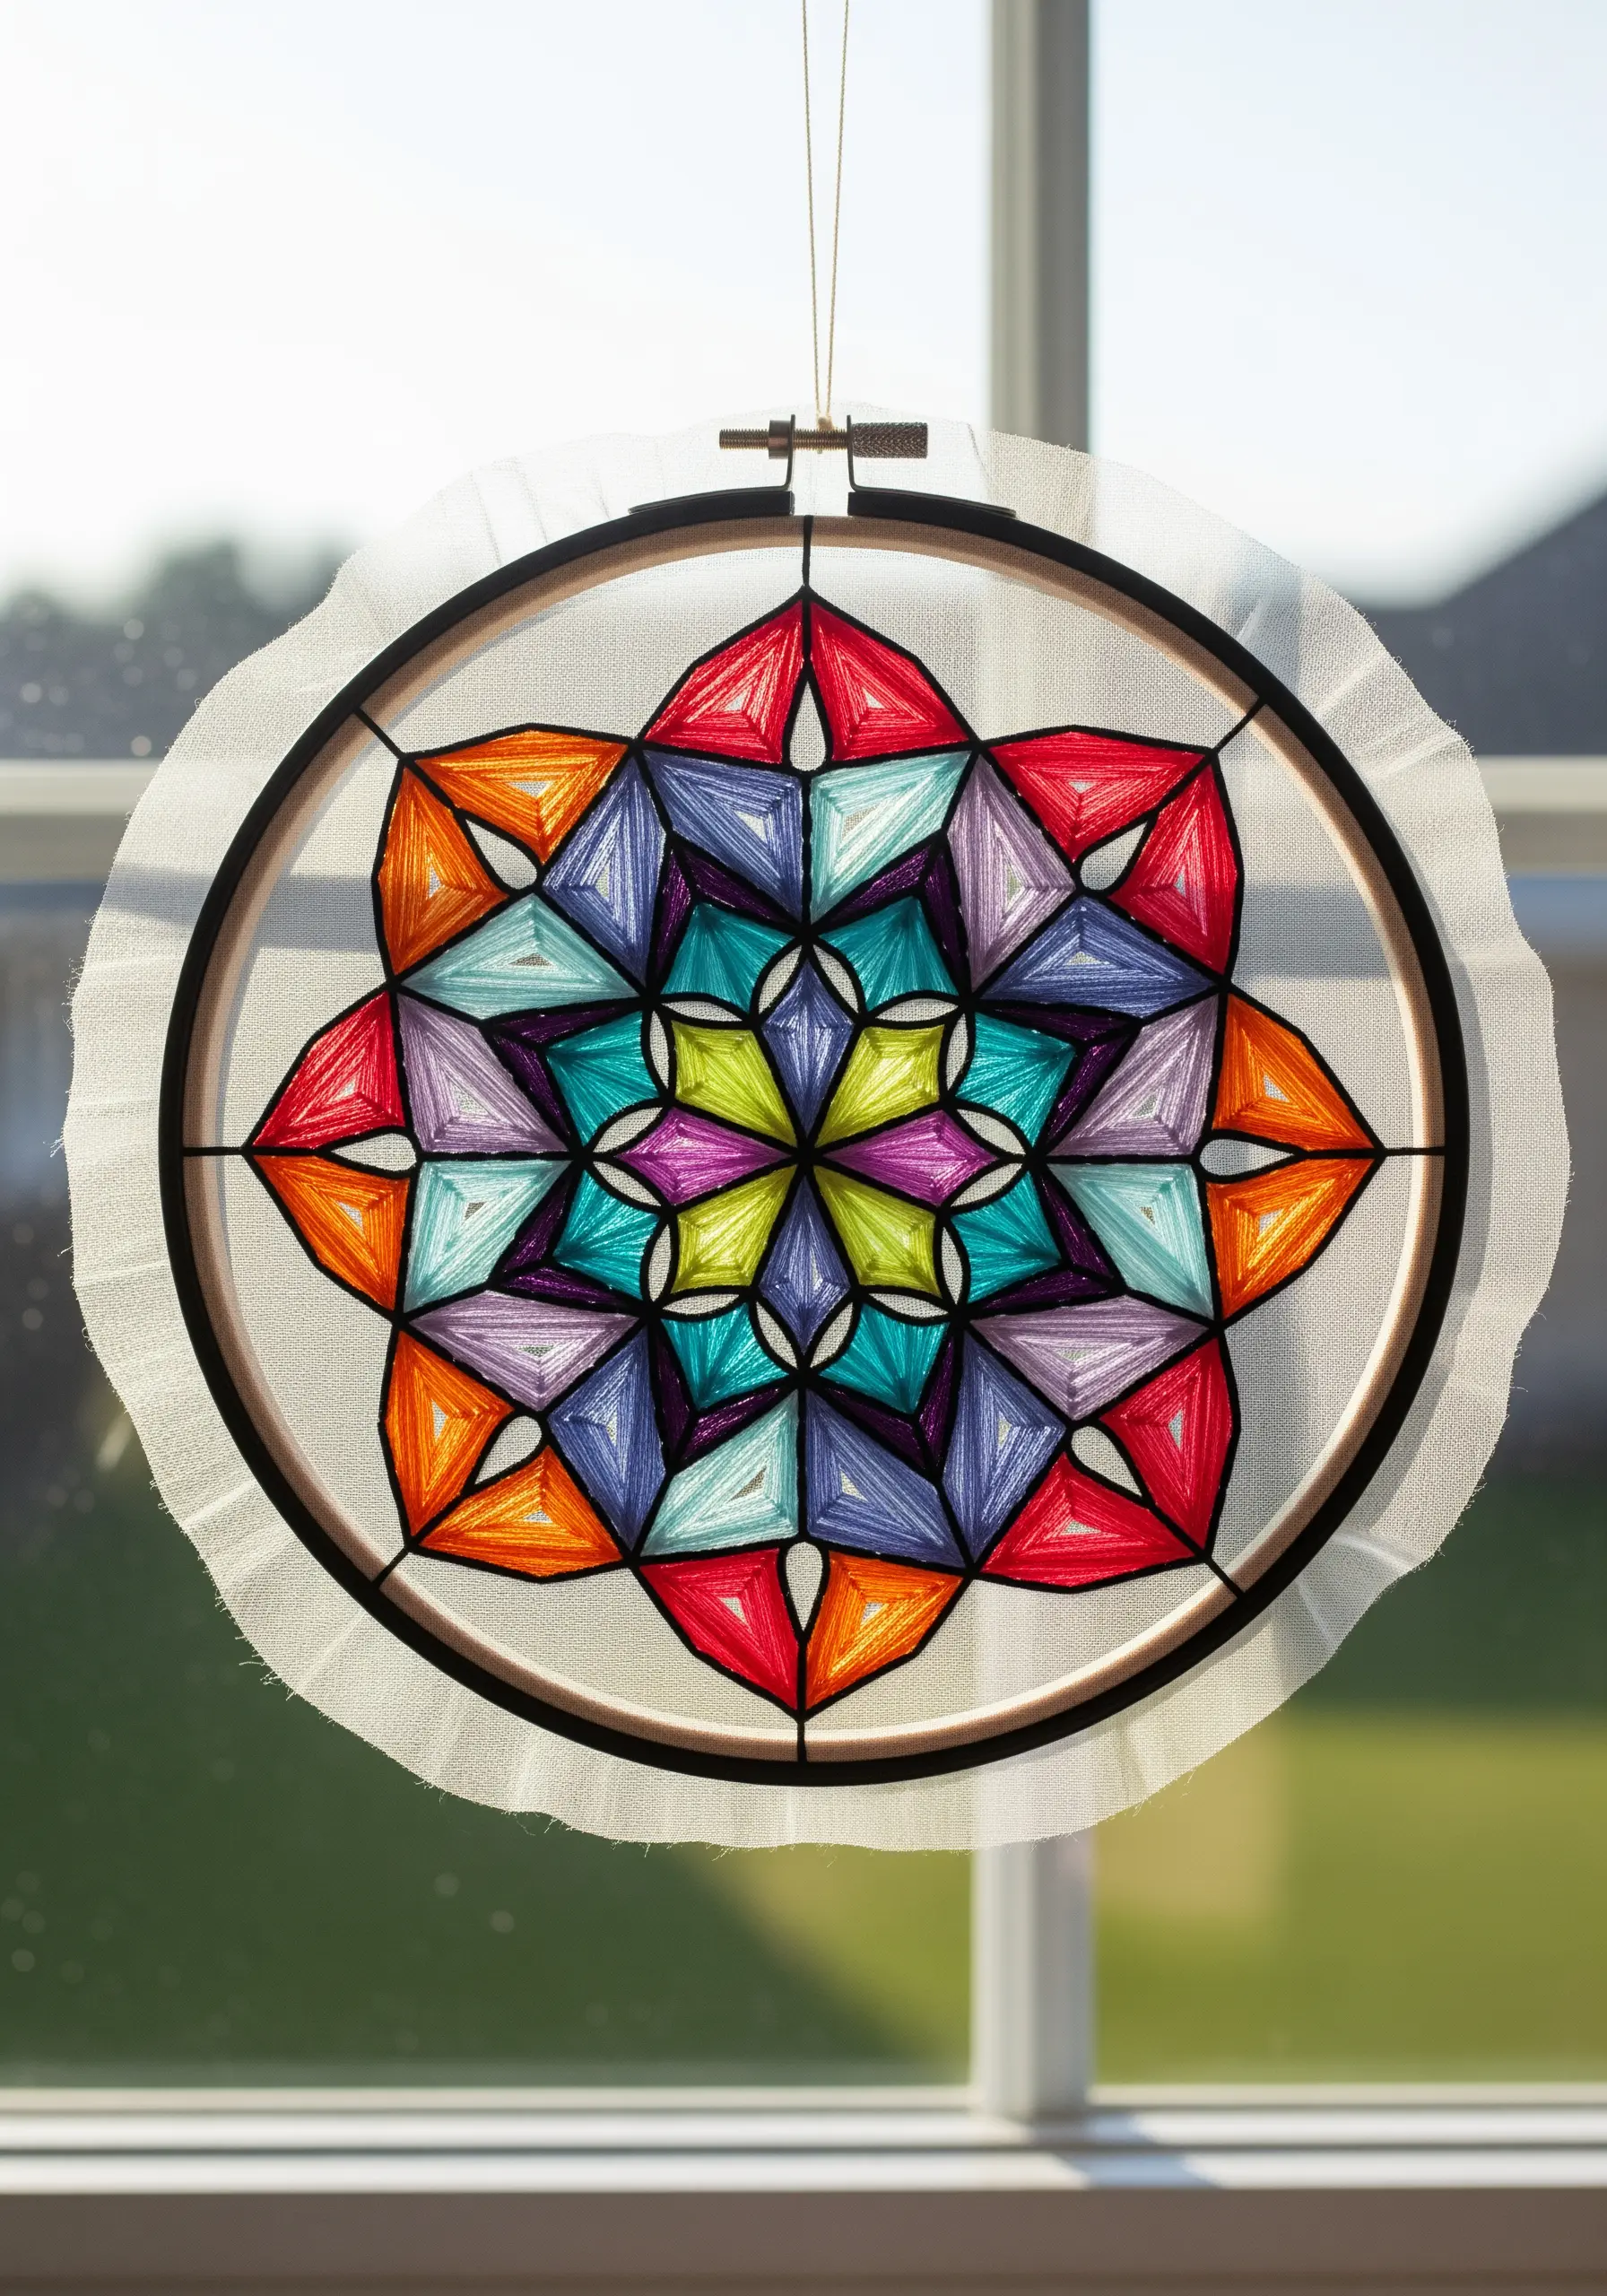
Create a luminous piece of art by embroidering on a sheer fabric like organza or tulle and hanging it in a window.
Use a thick, bold satin stitch or backstitch in a dark color to create the ‘leading’ that outlines your geometric shapes.
Fill the shapes with a lighter, more open stitch like a long-and-short fill, or leave them partially empty to let the light shine through.
The transparent background makes the colors glow, turning your embroidery hoop into a vibrant suncatcher.
18. Achieve Realistic Shading on a Leaf
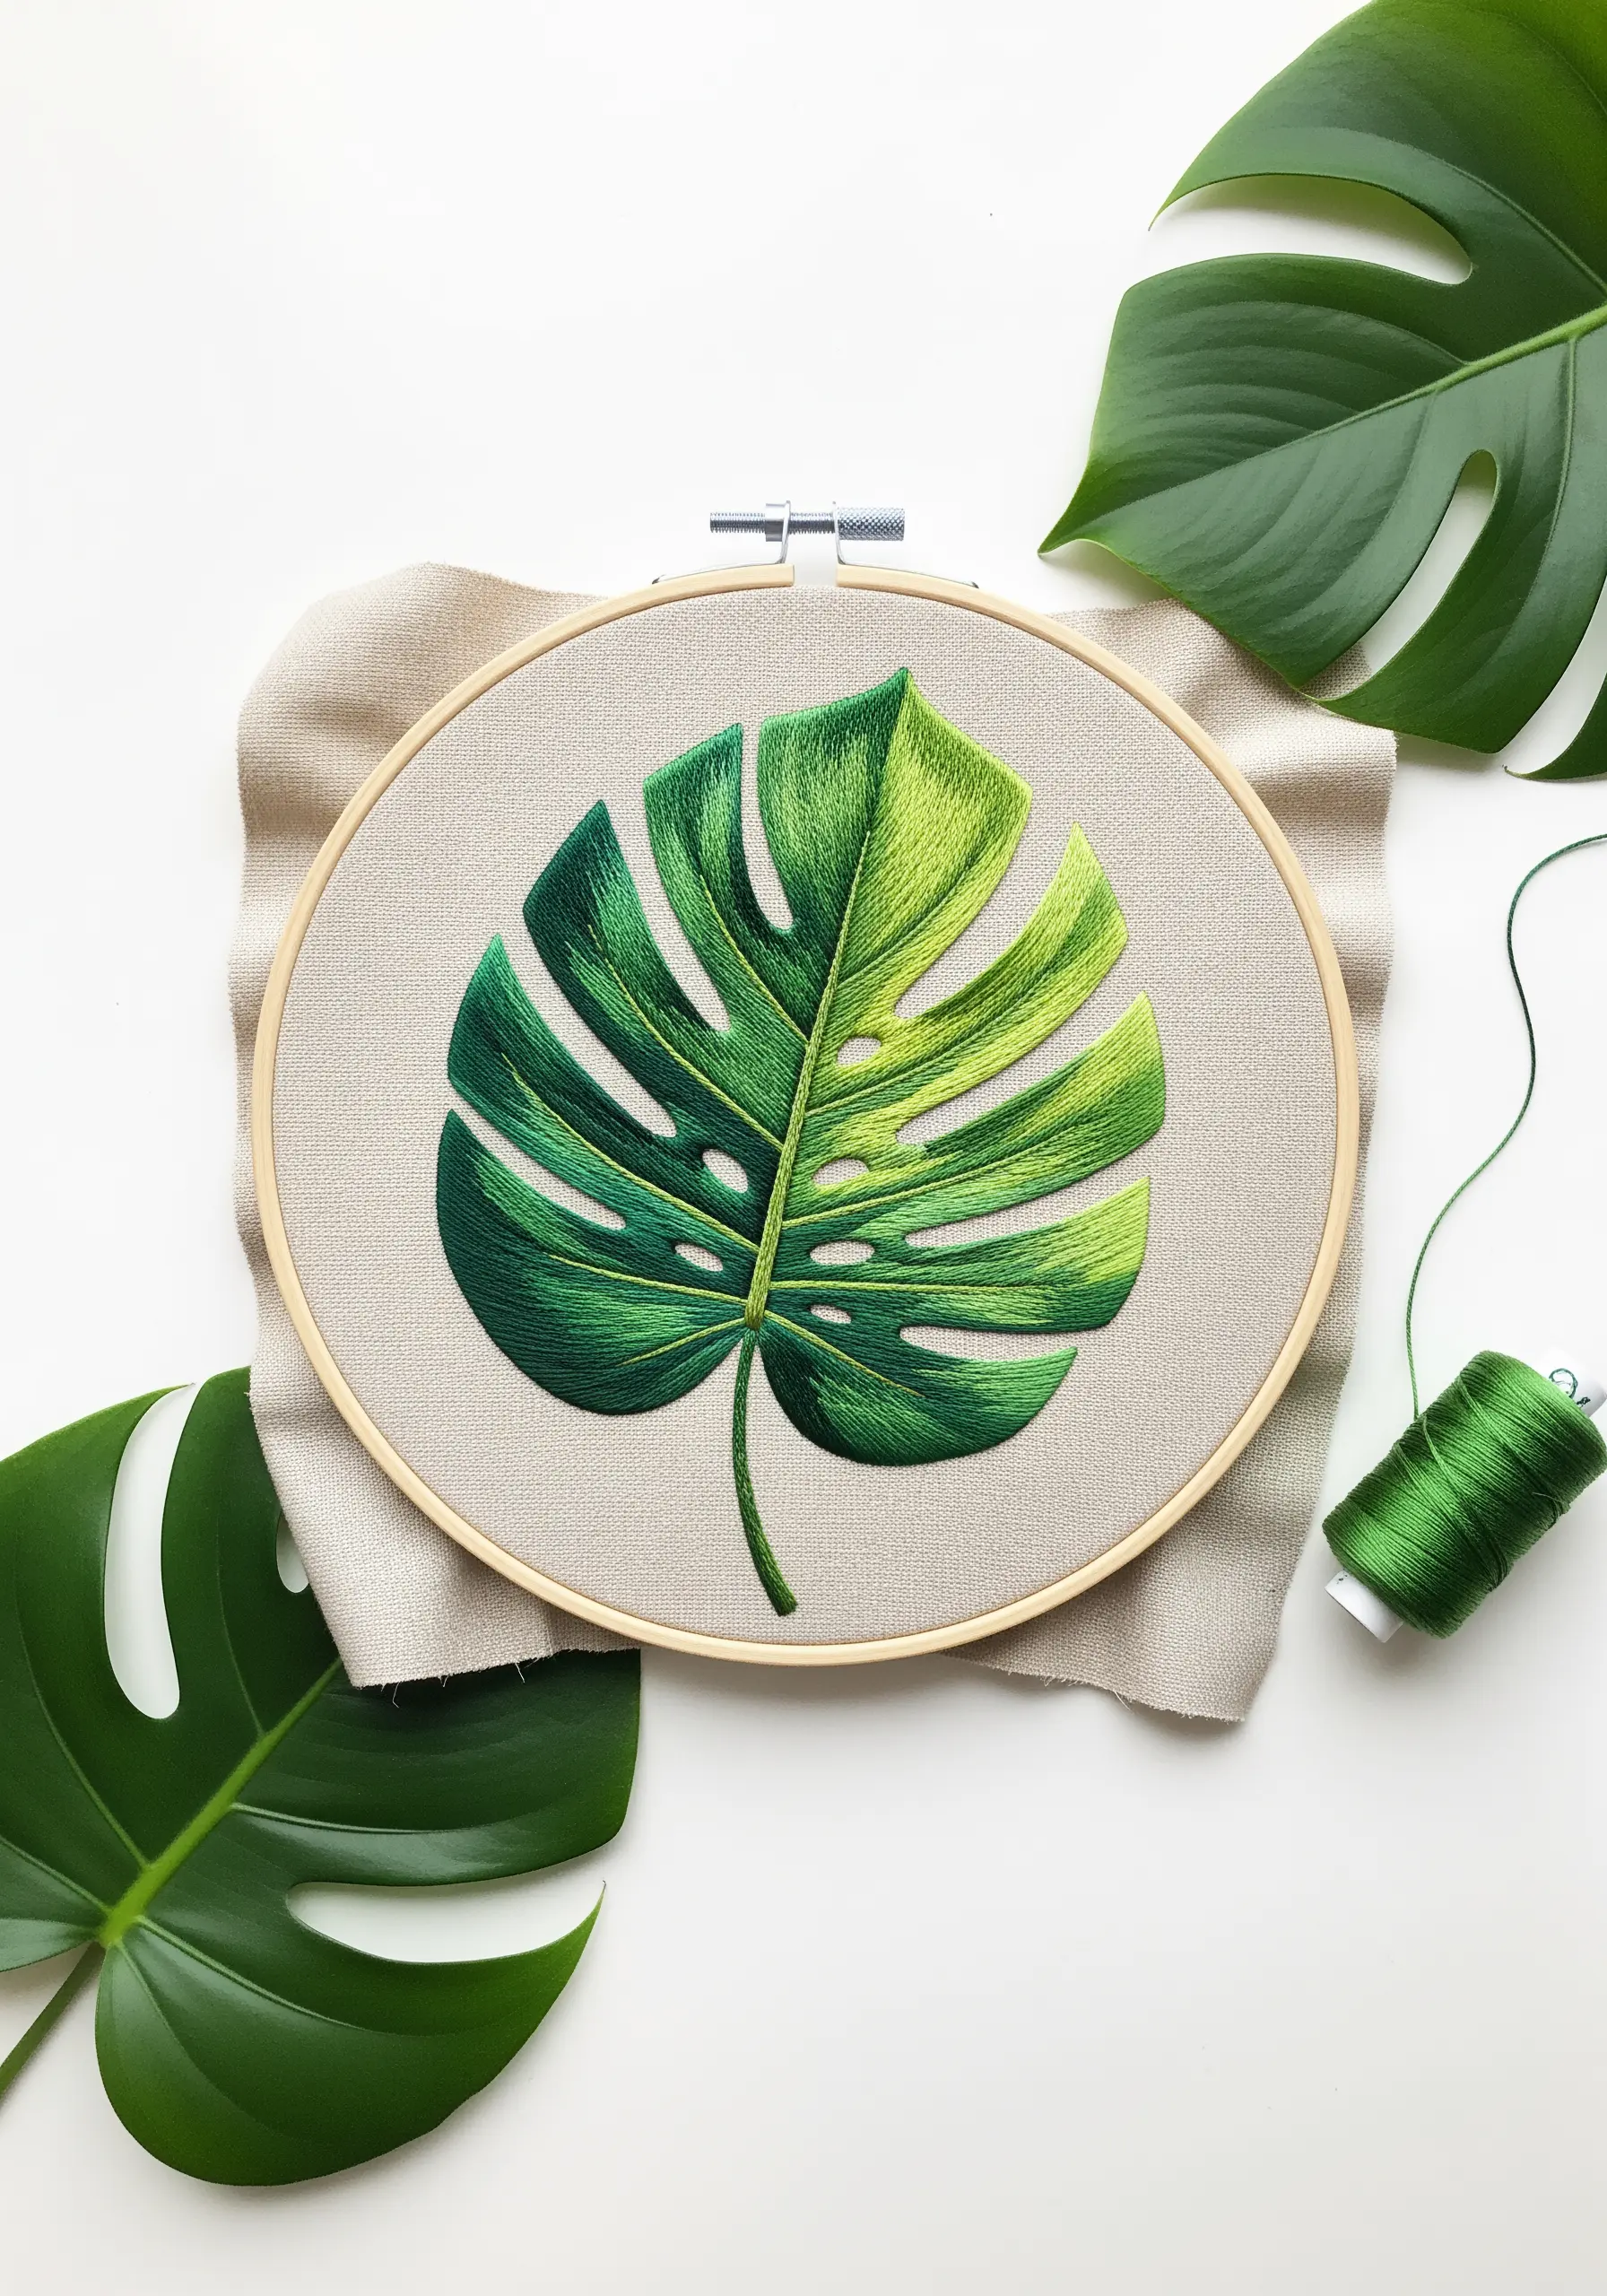
To make a botanical element look truly alive, focus on blending multiple shades to mimic how light hits a surface.
Divide the leaf into sections based on your light source. Use your darkest greens in the shadows and your lightest, most vibrant greens for the highlights.
The long-and-short stitch is your best tool here, allowing you to seamlessly merge one color into the next without harsh lines.
Mastering this technique is fundamental for creating the hyper-realistic botanical embroidery that looks like it could photosynthesize.
19. Tell a Story with Layered, Stitched Collage
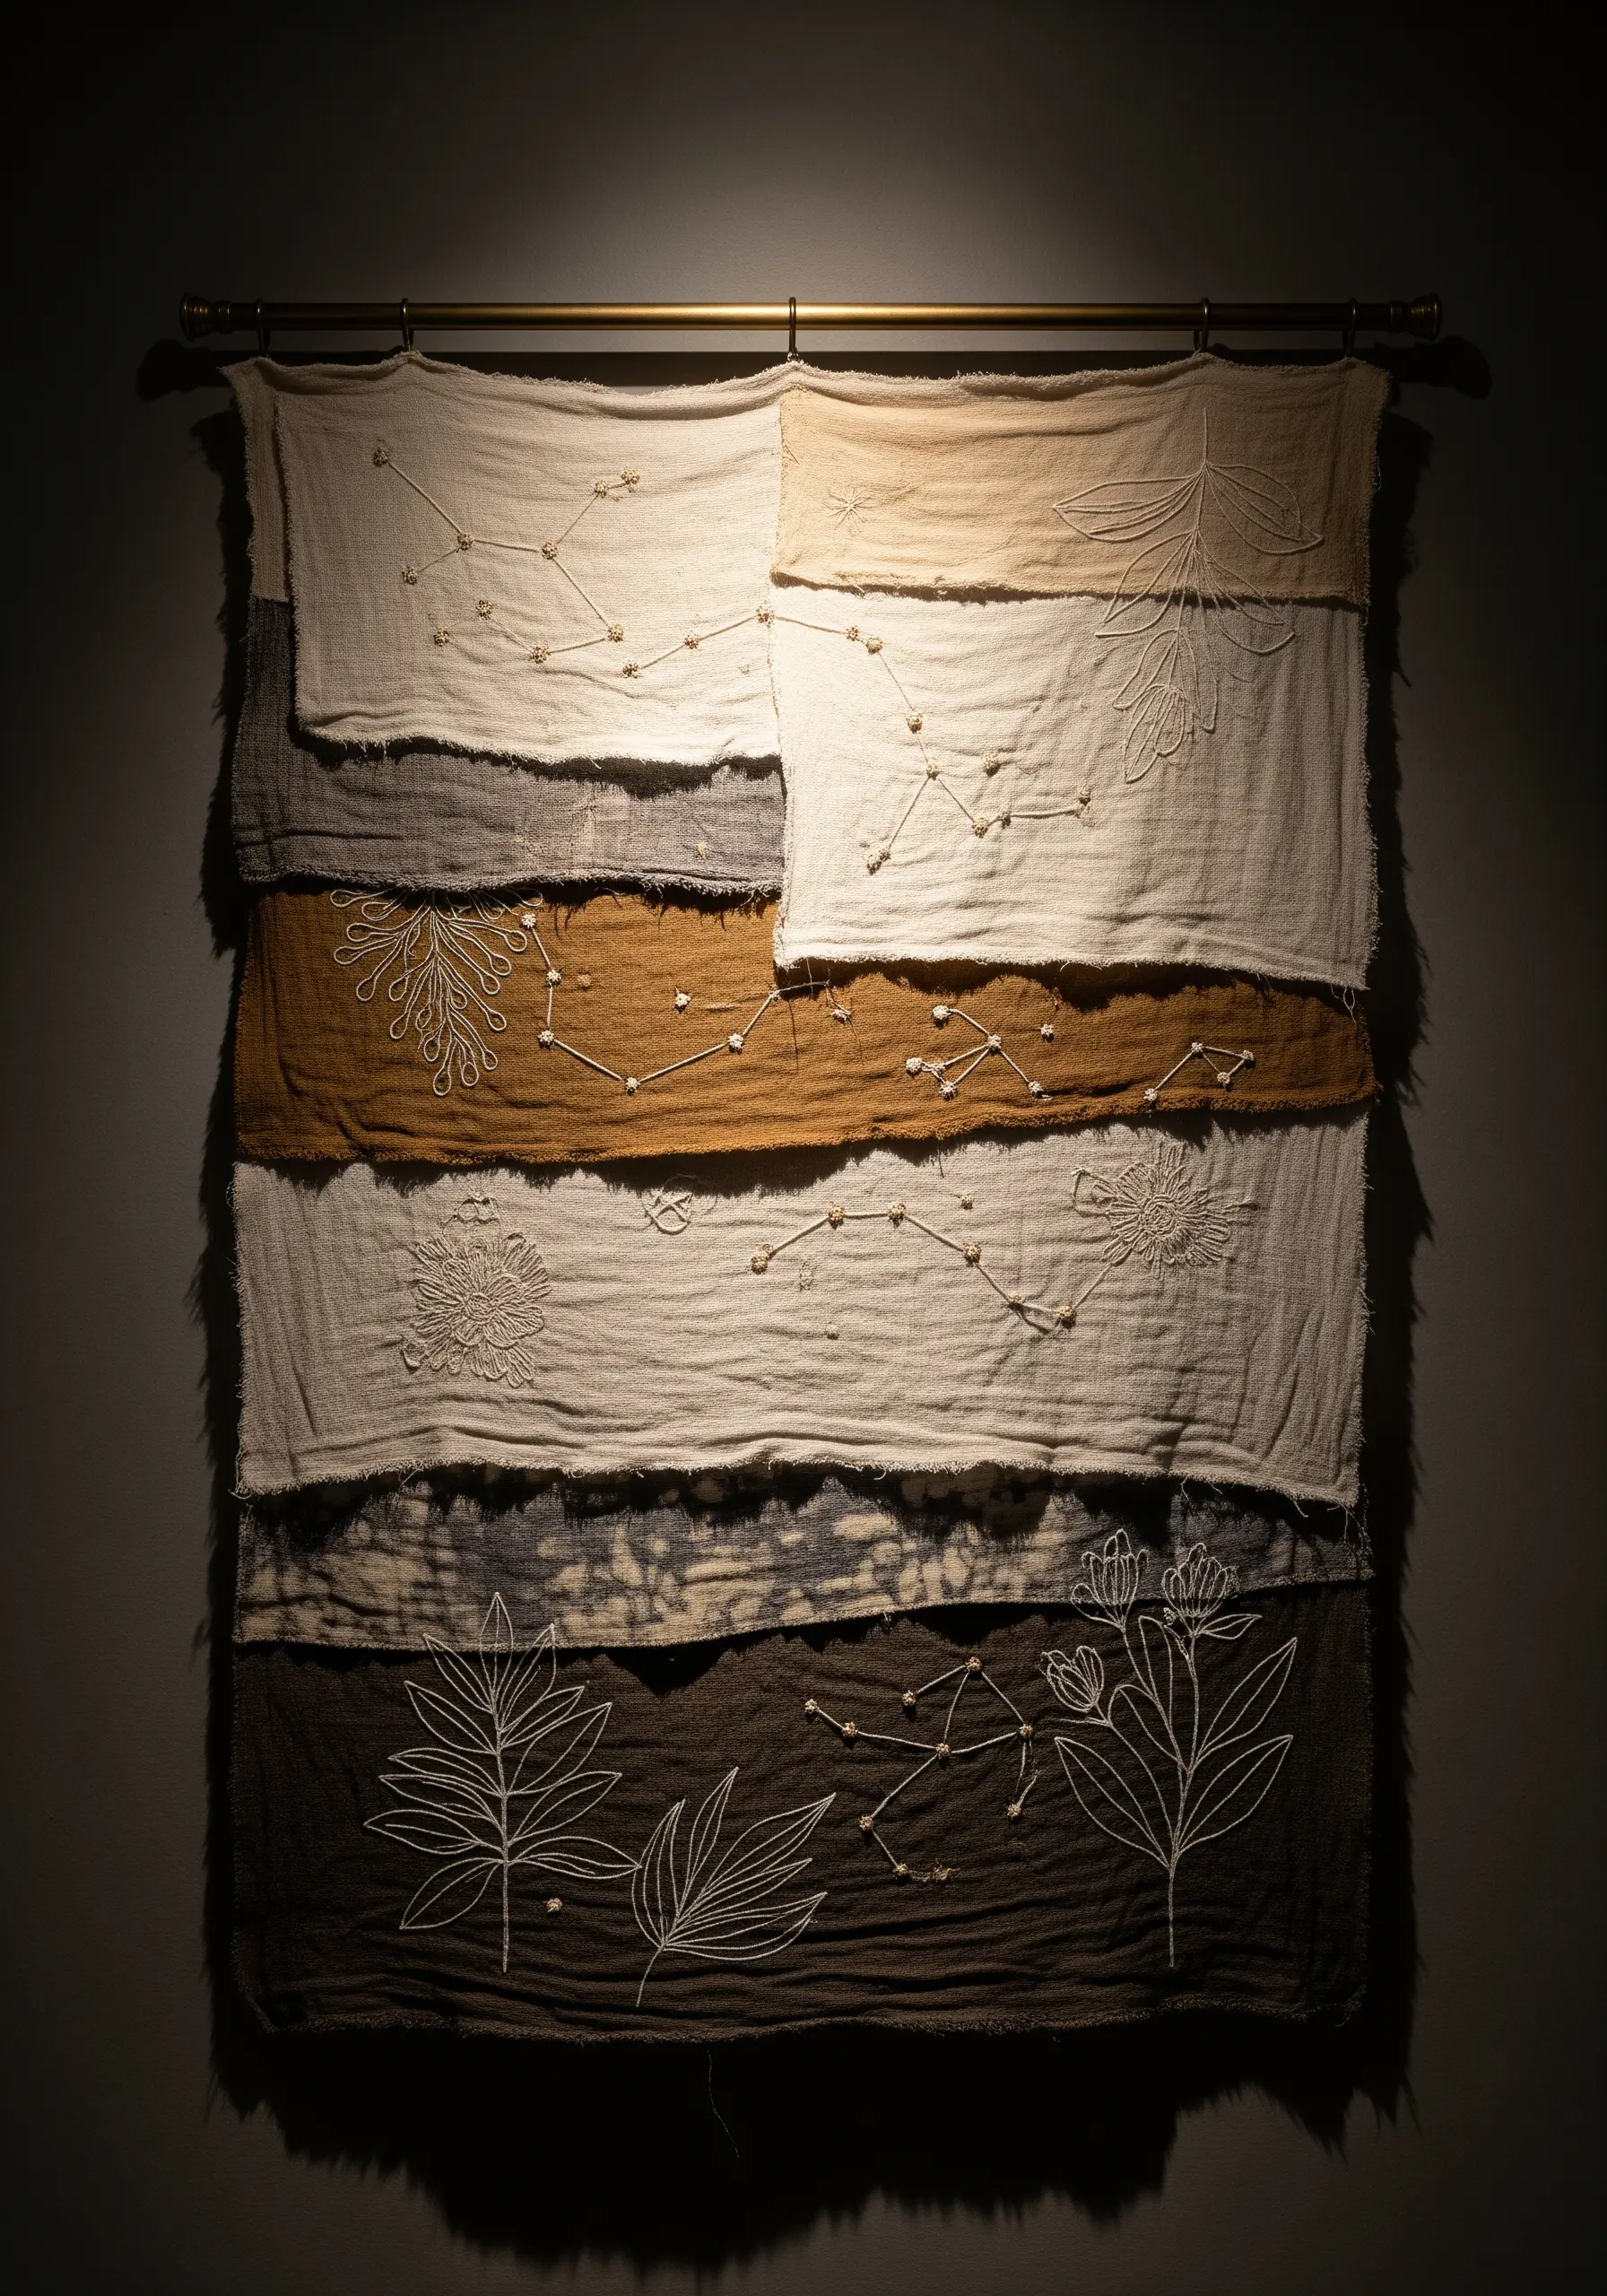
Create a deeply personal and textural wall hanging by collaging scraps of meaningful fabric.
Layer pieces of naturally dyed linen, old cotton shirts, or vintage textiles, leaving the raw edges exposed for an organic, wabi-sabi feel.
Connect the pieces with simple, delicate embroidery—like constellations, botanical outlines, or a meaningful pattern—using a single color of thread to unify the composition.
These textile wall art ideas using scrap fabric are not just beautiful; they are woven with memories.
20. Electrify Your Art with Neon Threads

Make your embroidery vibrate with energy by using fluorescent or neon threads on a dark background.
The stark contrast makes even the simplest stitches—like backstitch, chain stitch, or satin stitch—pop with an almost electric glow.
This is especially effective for psychedelic or pop-art-inspired designs, where the goal is to create maximum visual impact.
To enhance the effect, choose a black or deep indigo fabric that will absorb light and make your neon colors appear even brighter.
21. Cultivate a Wildflower Meadow in a Hoop
To create a dense, natural-looking field of flowers, rely on a variety of simple stitches and a thoughtful color palette.
Use lazy daisy stitches for petals, French knots for flower centers and small buds, and straight stitches for stems and blades of grass.
Vary the height, color, and density of the flowers across the hoop to avoid a uniform look. A looser, more scattered arrangement feels more organic.
The beauty of these wildflower thread palettes is that perfection is not the goal; the charm is in the cheerful chaos.
22. Chart Your Travels on a Stitched World Map
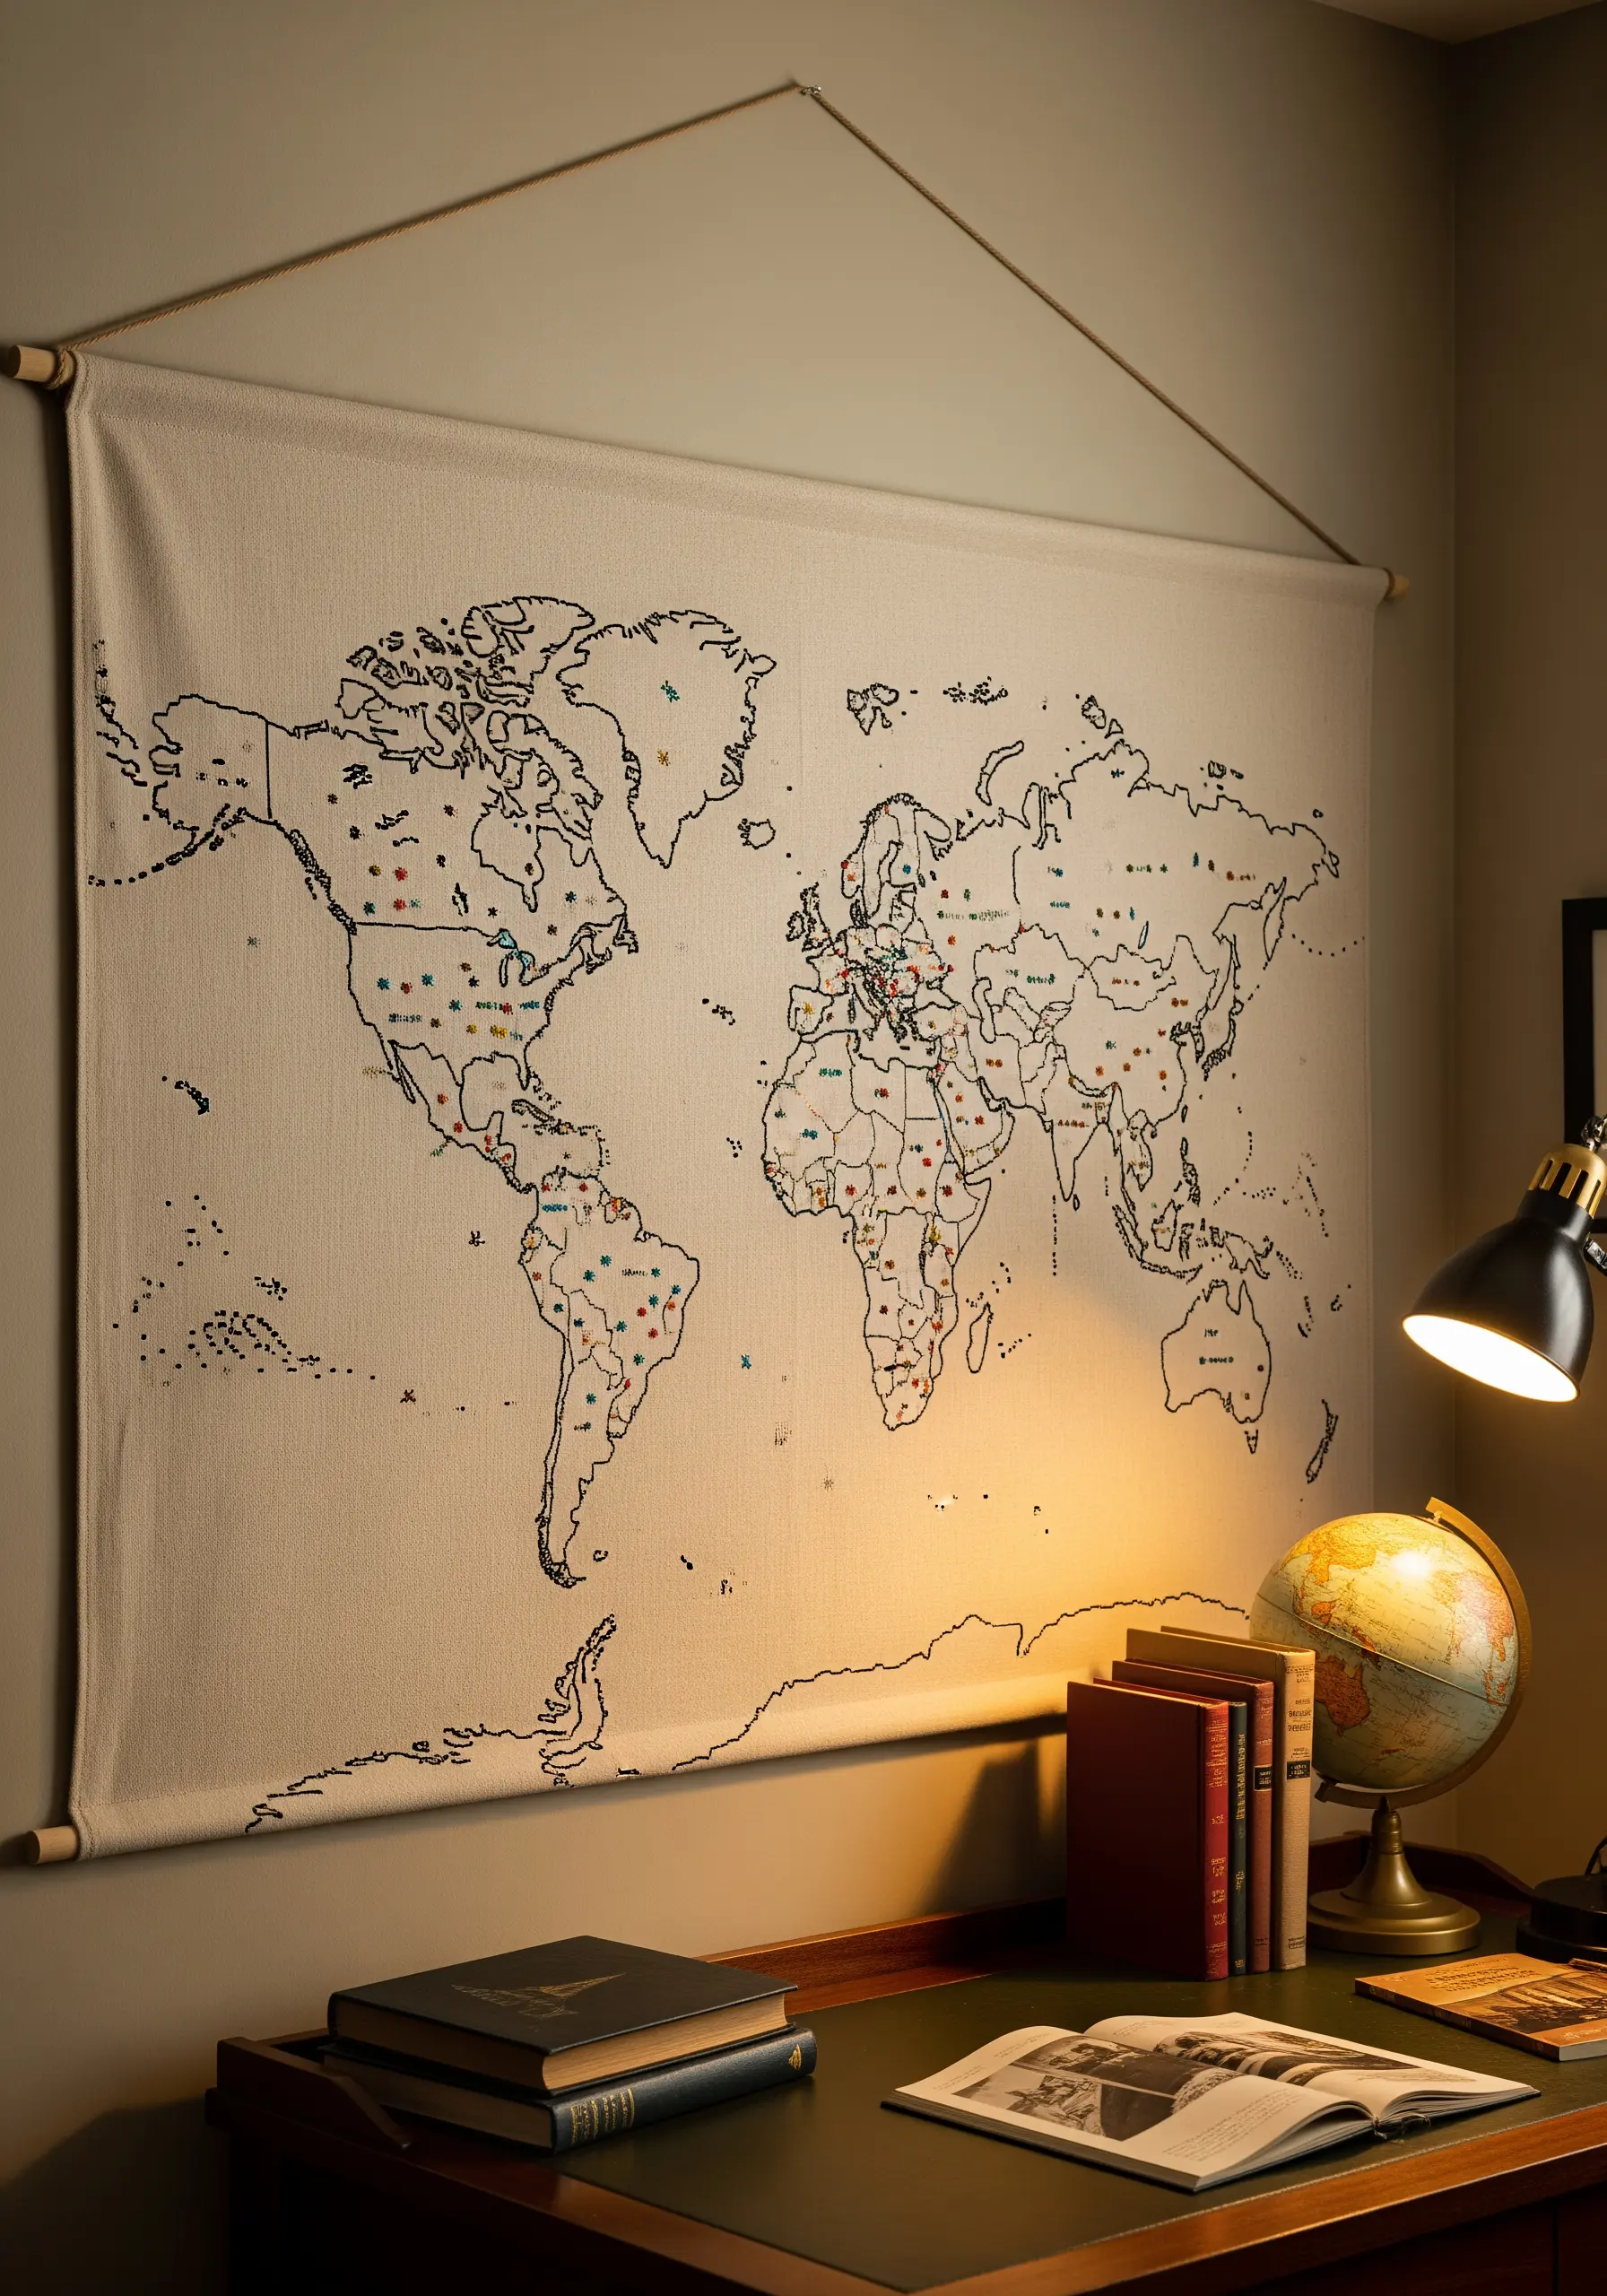
Turn a wall hanging into a living piece of art by creating an interactive, embroidered map.
Stitch the continents using a simple backstitch or stem stitch, keeping the lines clean and clear.
Then, use colorful threads to add French knots, tiny cross-stitches, or star stitches to mark places you’ve been or dream of visiting.
This project becomes a beautiful, evolving record of your life’s adventures, far more personal than a store-bought map.
23. Add a Touch of Whimsy with 3D Stumpwork
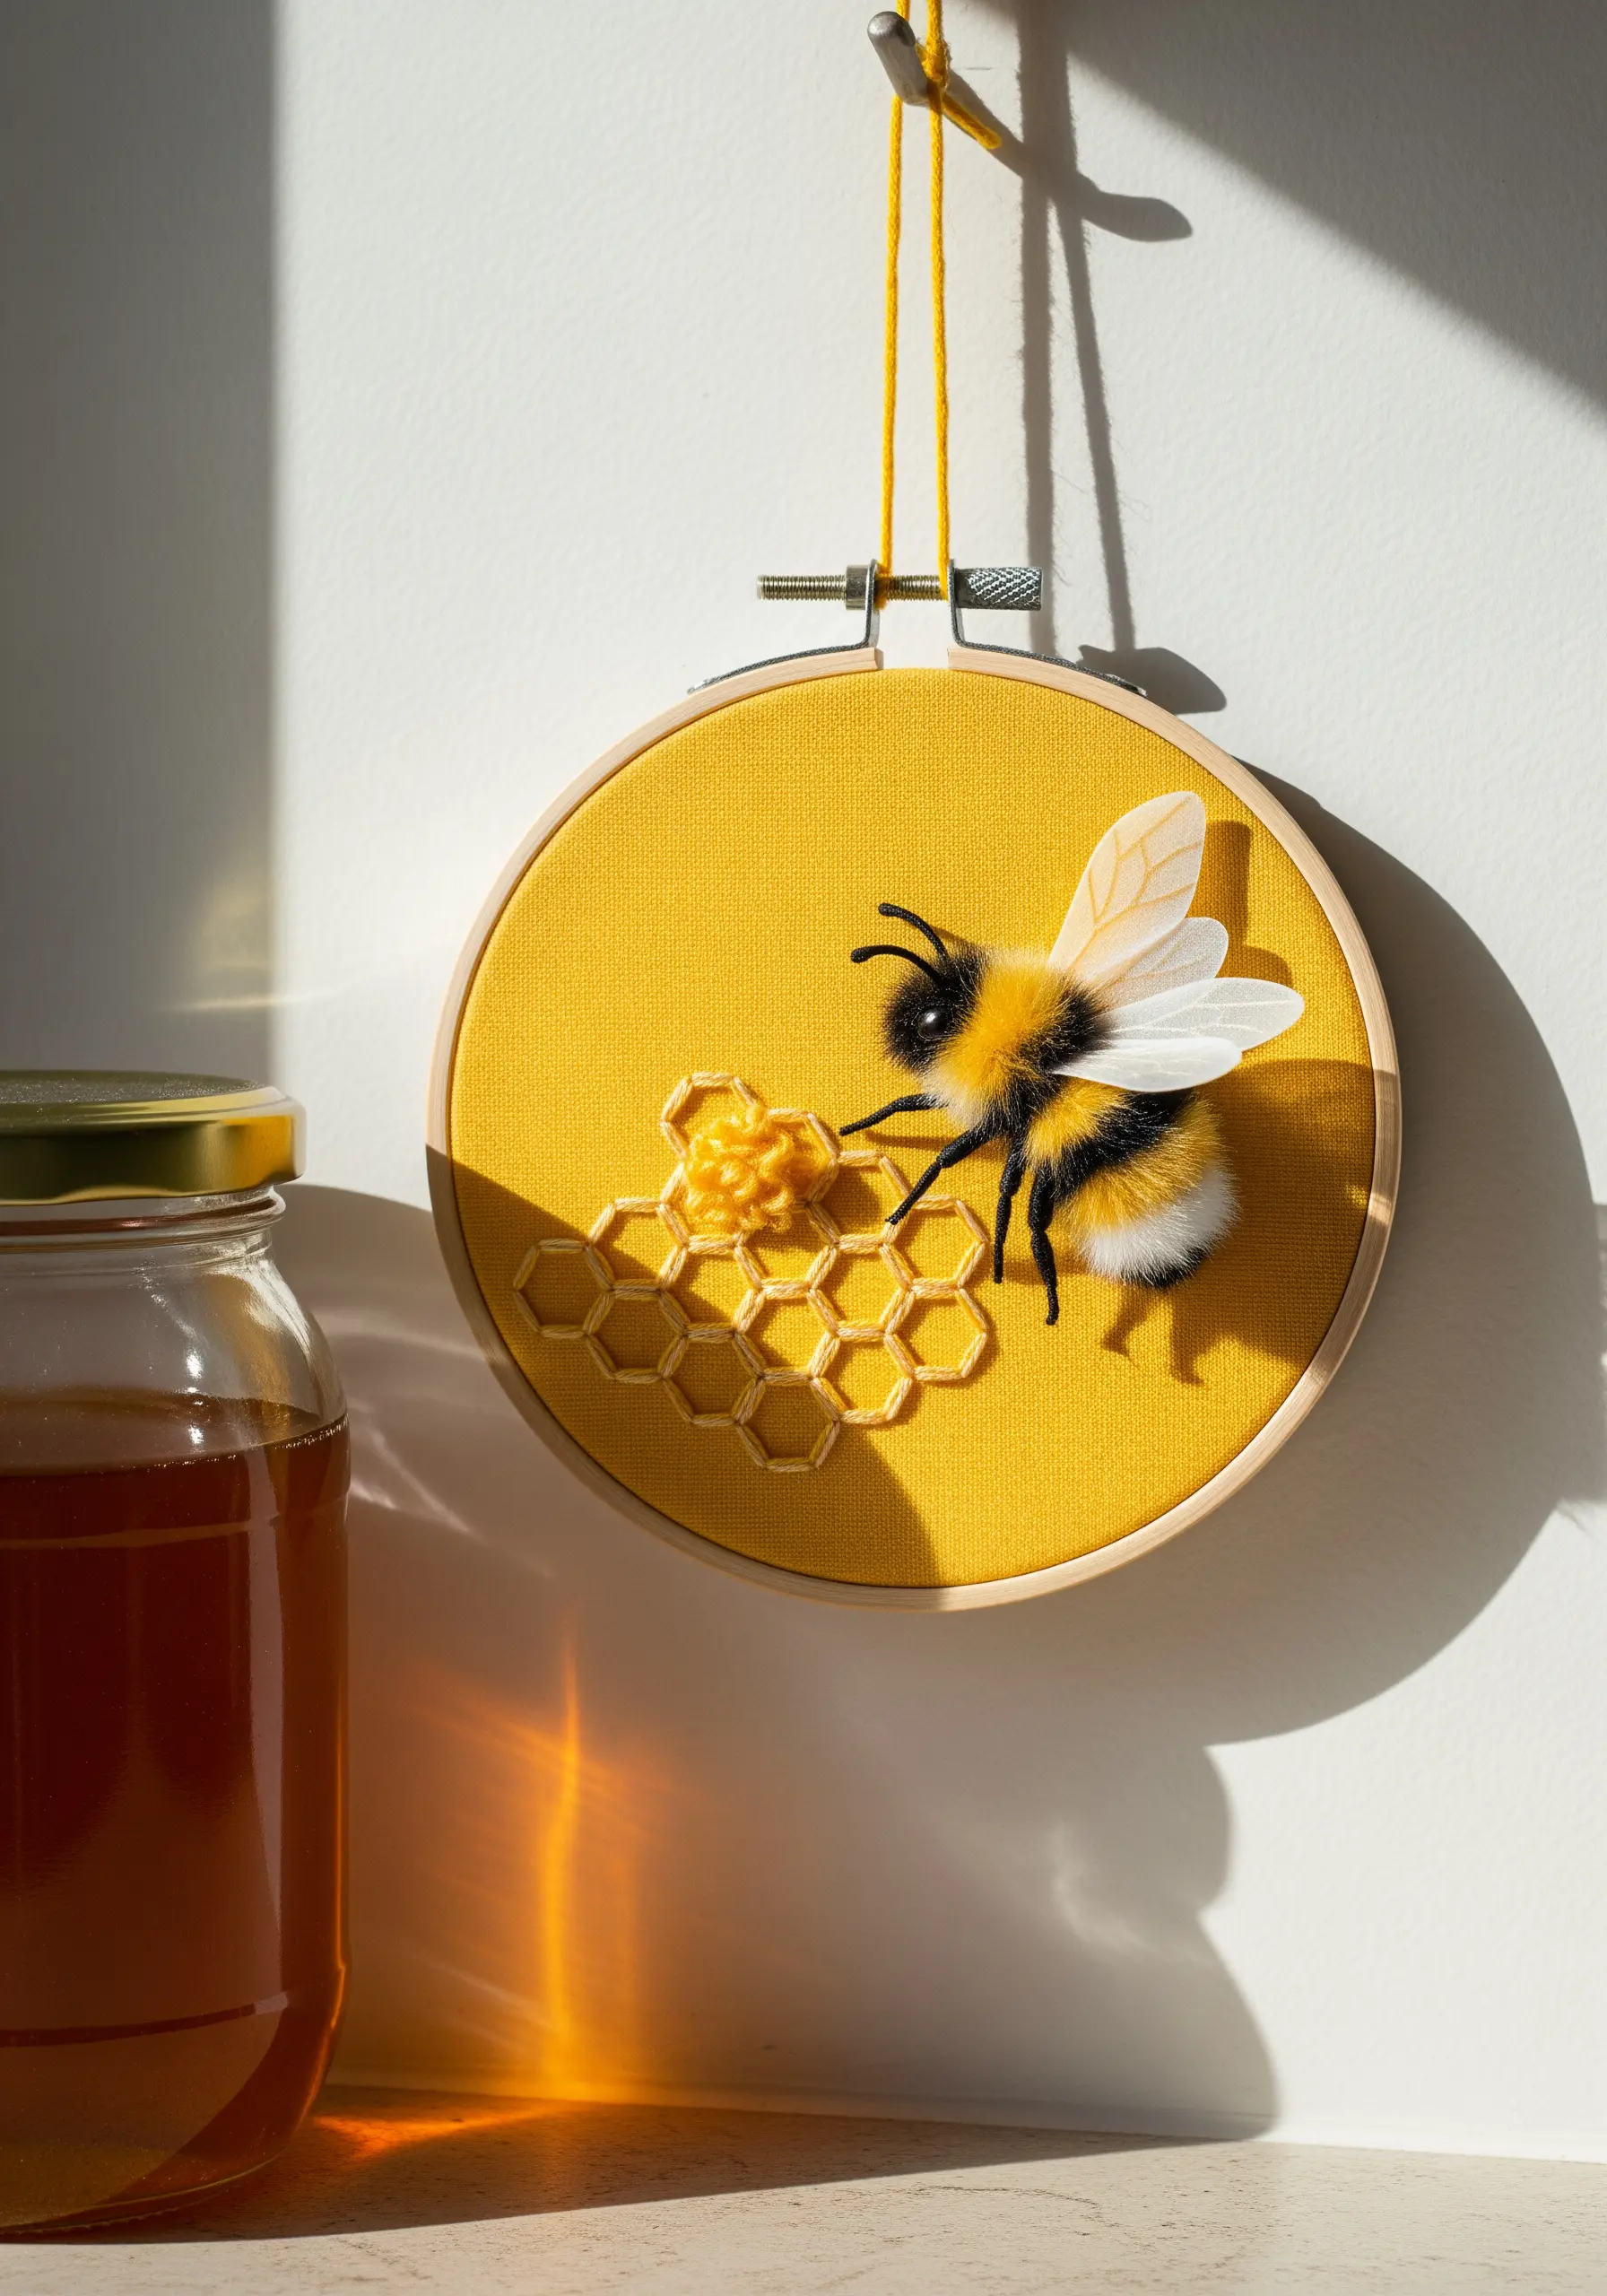
Bring elements of your design into the third dimension with stumpwork, a technique involving wired, raised, and padded embroidery.
Create the bee’s wings separately by working buttonhole stitches over a wire frame, then attach them to the body so they stand away from the fabric.
For the fuzzy body, use turkey work and trim the loops to create a soft, plush texture. The honeycomb can be rendered with a simple, graphic backstitch.
This playful mix of 2D and 3D elements adds a surprising and delightful layer of realism to your work.


