

Sometimes, the desire to create something beautiful feels just out of reach. You have the threads, the fabric, the ideas—but the finished piece doesn’t quite match the vision in your mind.
Let’s close that gap, not with more complexity, but with more intention. What if the secret to elevating your work isn’t learning a hundred new stitches, but mastering the subtle art of texture, depth, and composition? It’s about choosing the right stitch for a leaf’s vein, understanding how a single strand of thread can suggest light, or knowing when a simple line is more powerful than a dense filling.
In these pieces, you’ll find small, thoughtful adjustments you can make right now. Think of this as a quiet conversation about craft—one that helps you trust your hands and transform your love for embroidery into art that feels truly, confidently yours.
1. Creating a Sense of Depth with Layered Stems
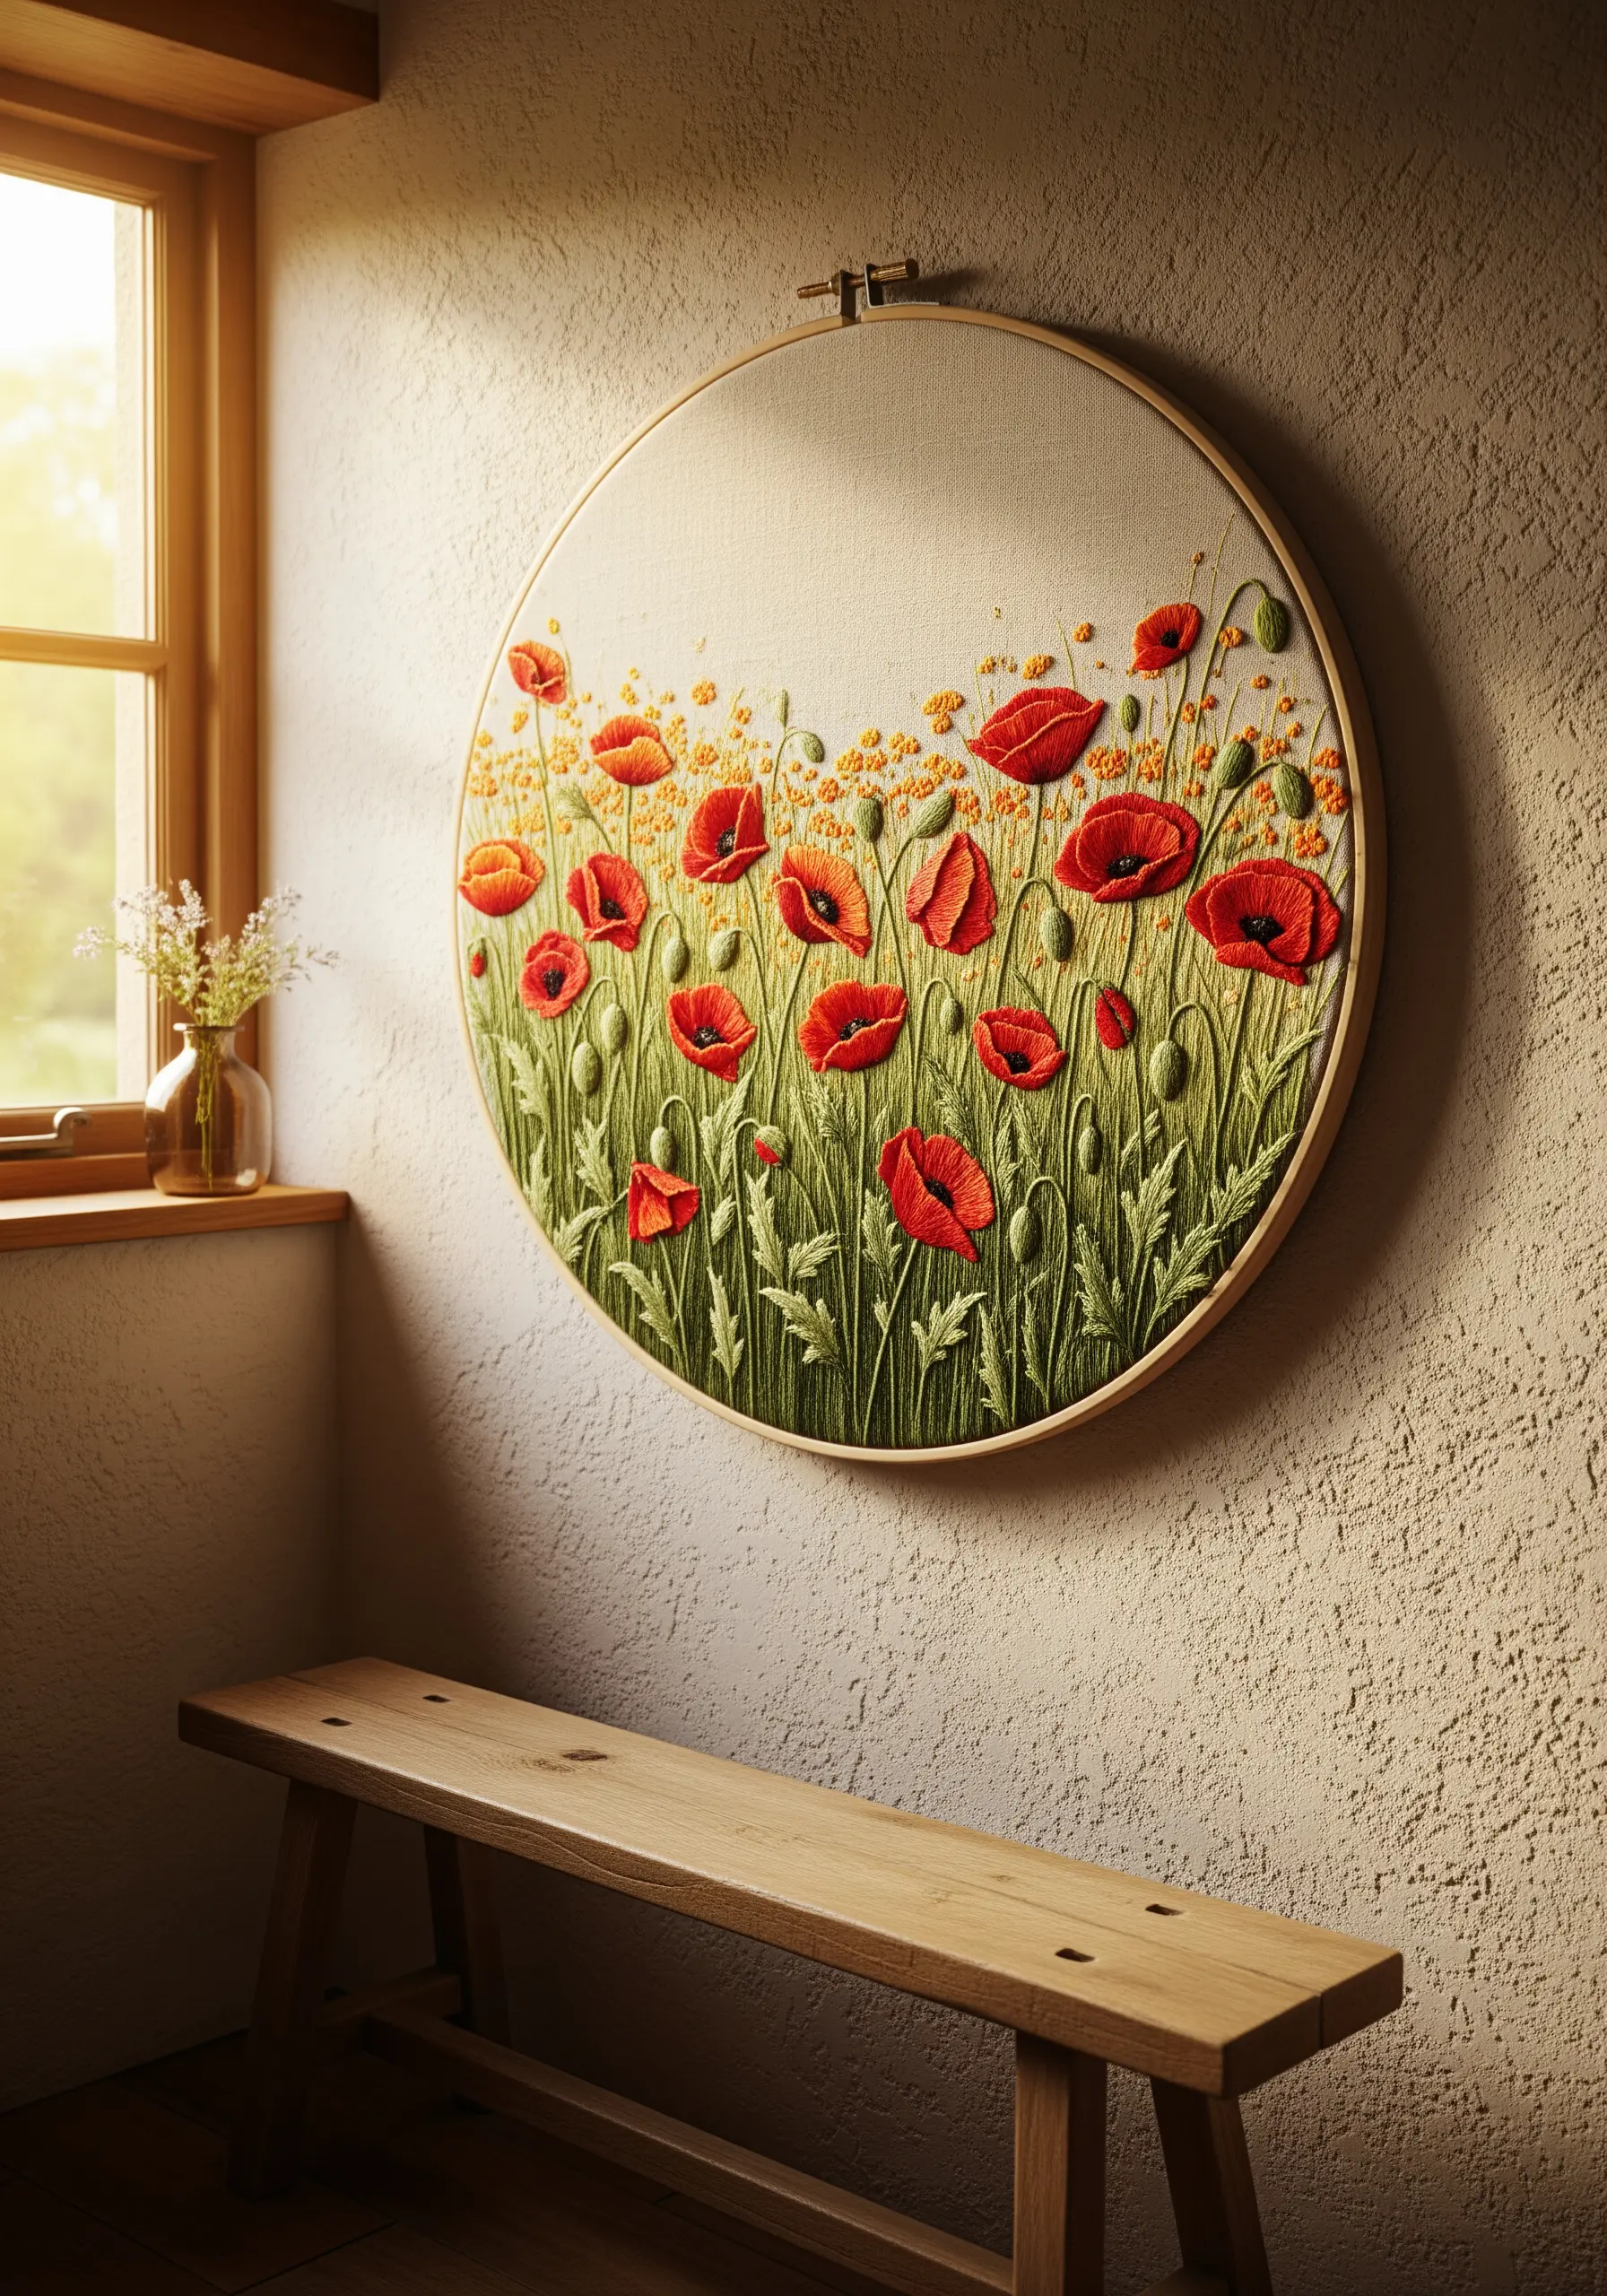
To give a floral scene the feeling of a dense meadow, think in layers.
Use a thicker thread (four to six strands) and more defined stitches like satin or fishbone for the foreground elements to bring them visually forward.
For the middle ground and background, switch to fewer strands and simpler stitches, like single-strand backstitch or tiny French knots.
This subtle shift in thread weight and stitch density creates an illusion of perspective, making your two-dimensional hoop feel like a living landscape. It’s a simple technique that adds professional depth to oversized hoop wall displays.
2. Mastering Natural Texture with Directional Stitching
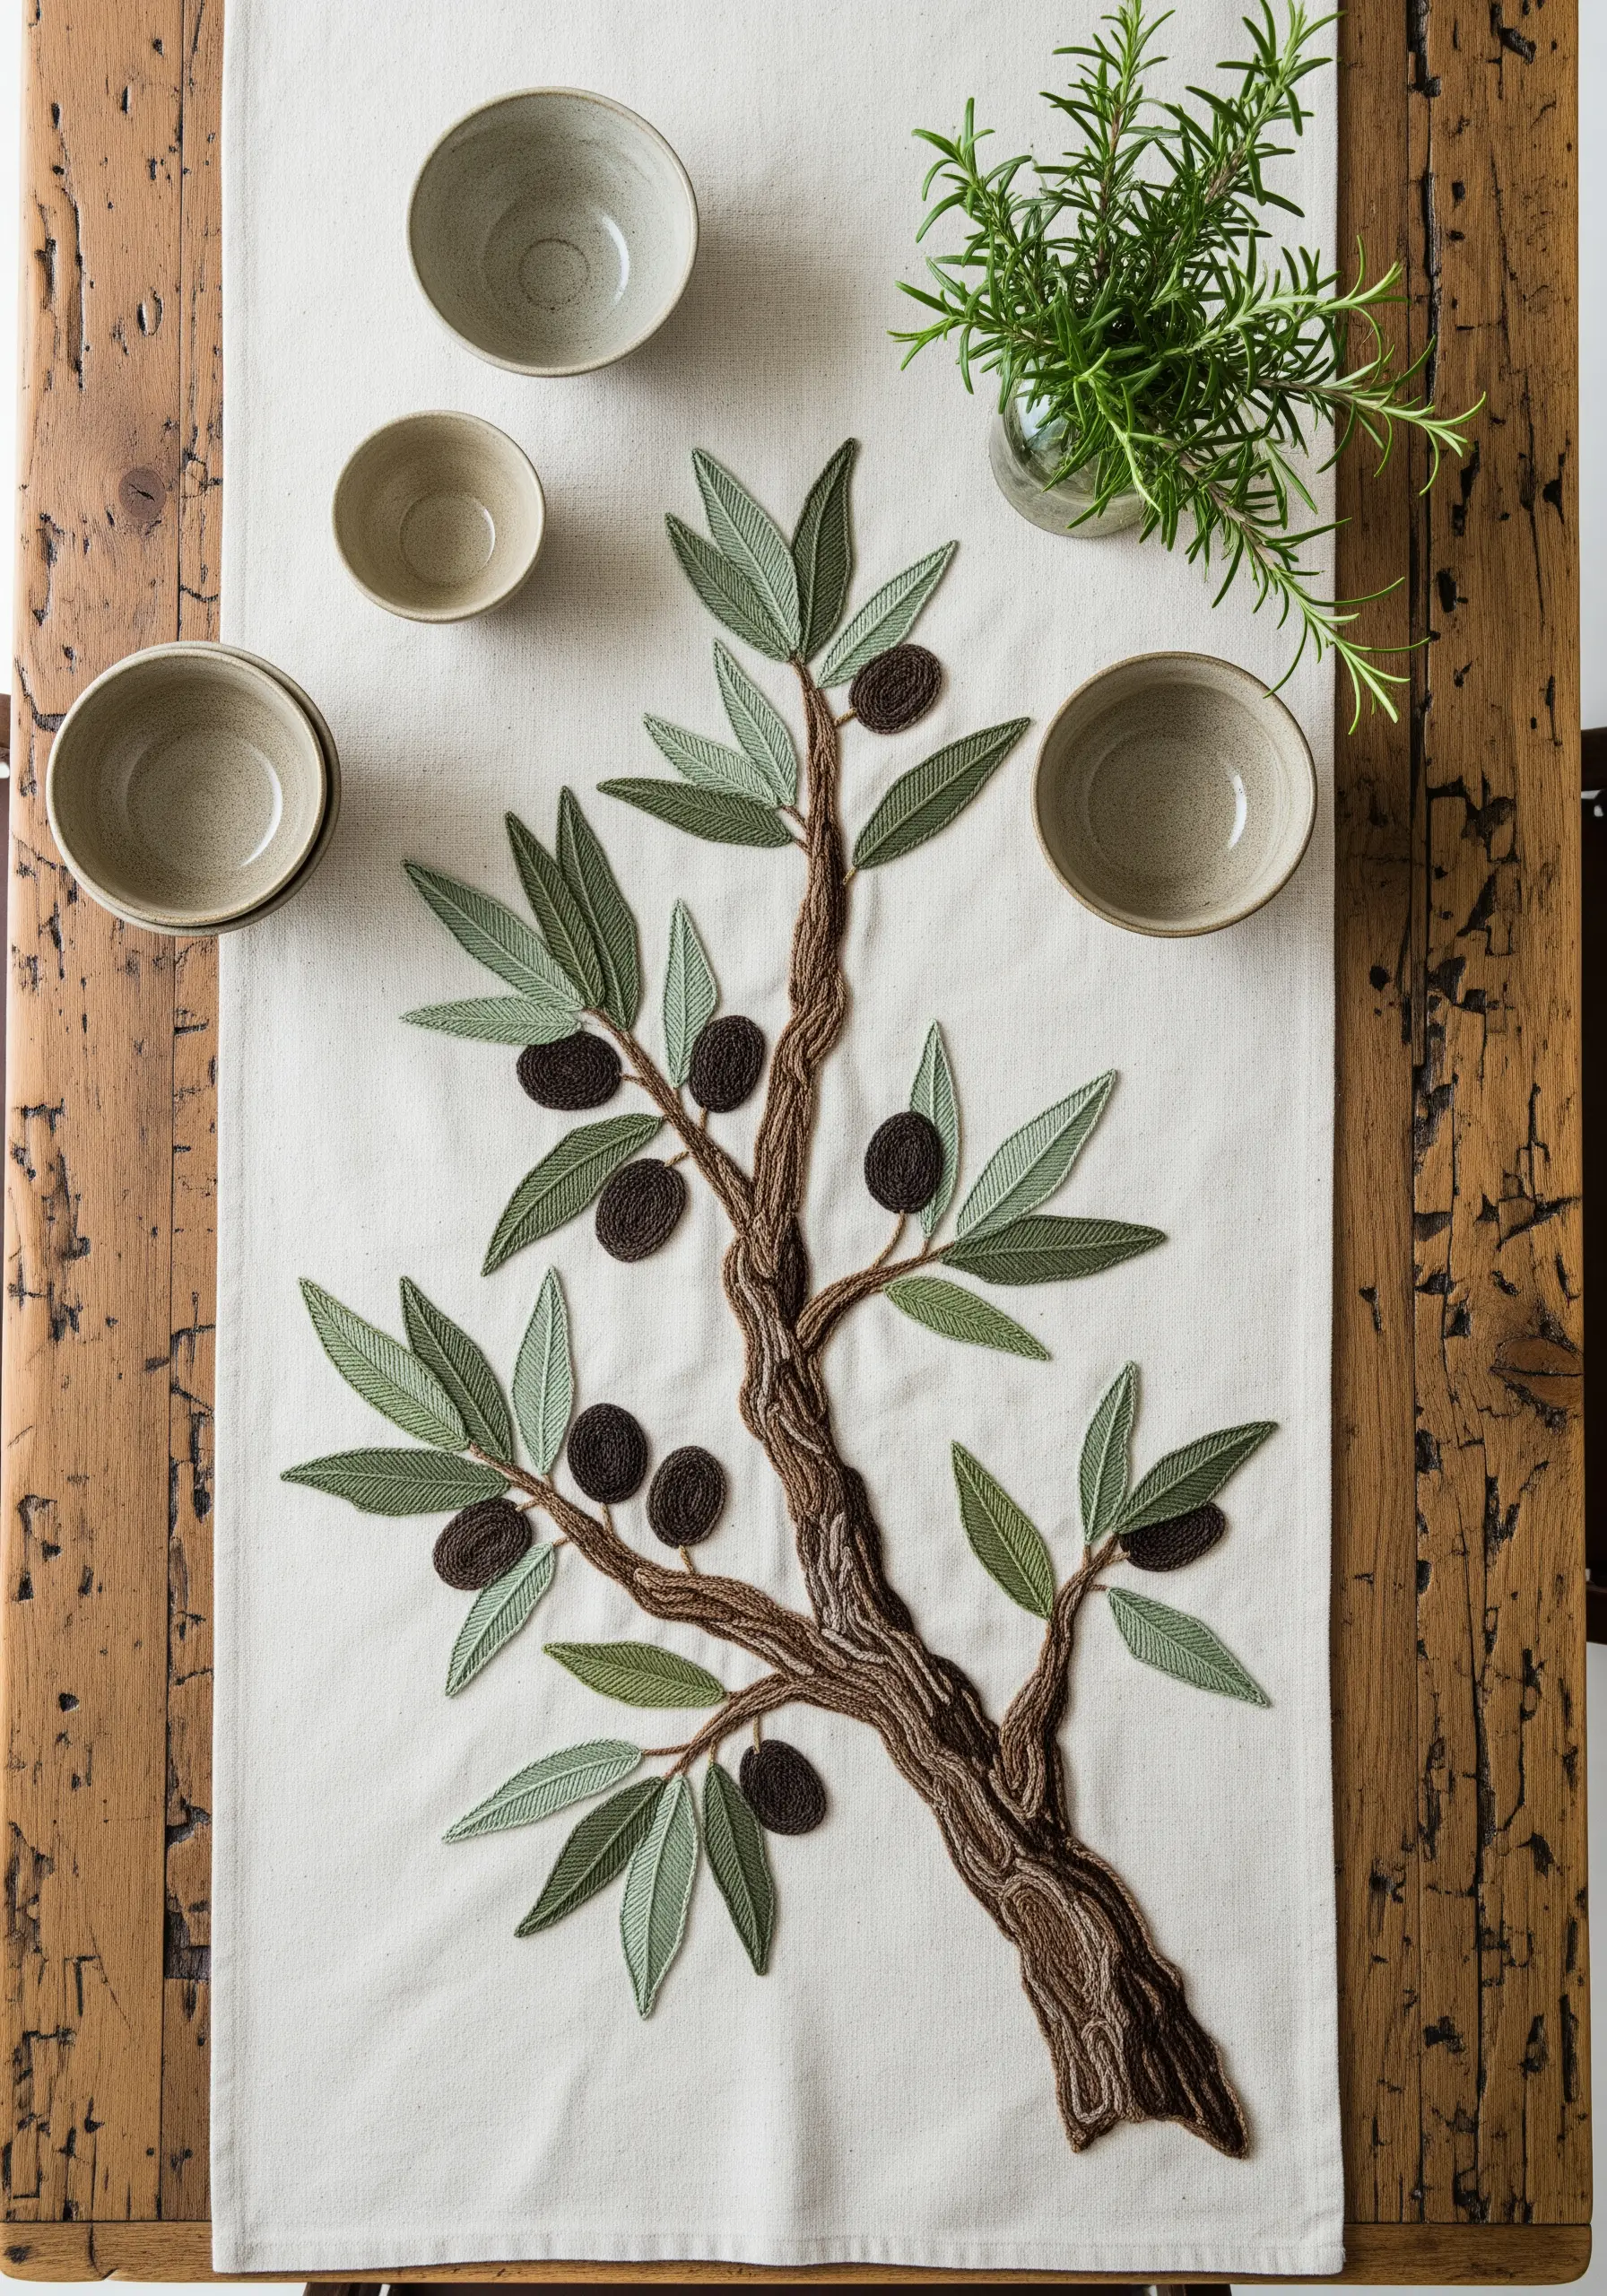
To give a tree trunk or branch a gnarled, realistic texture, avoid filling it in uniformly.
Instead, use a directional satin stitch or long-and-short stitch, letting your stitches follow the organic curves of the bark.
Blend several shades of brown, grey, and even a touch of green, laying the stitches side-by-side to mimic the way wood grain flows.
This method turns a flat shape into a tactile, lifelike element and is perfect for designs that transform table runners into botanical art.
3. Achieving Sculptural Dimension with Raised Stitches
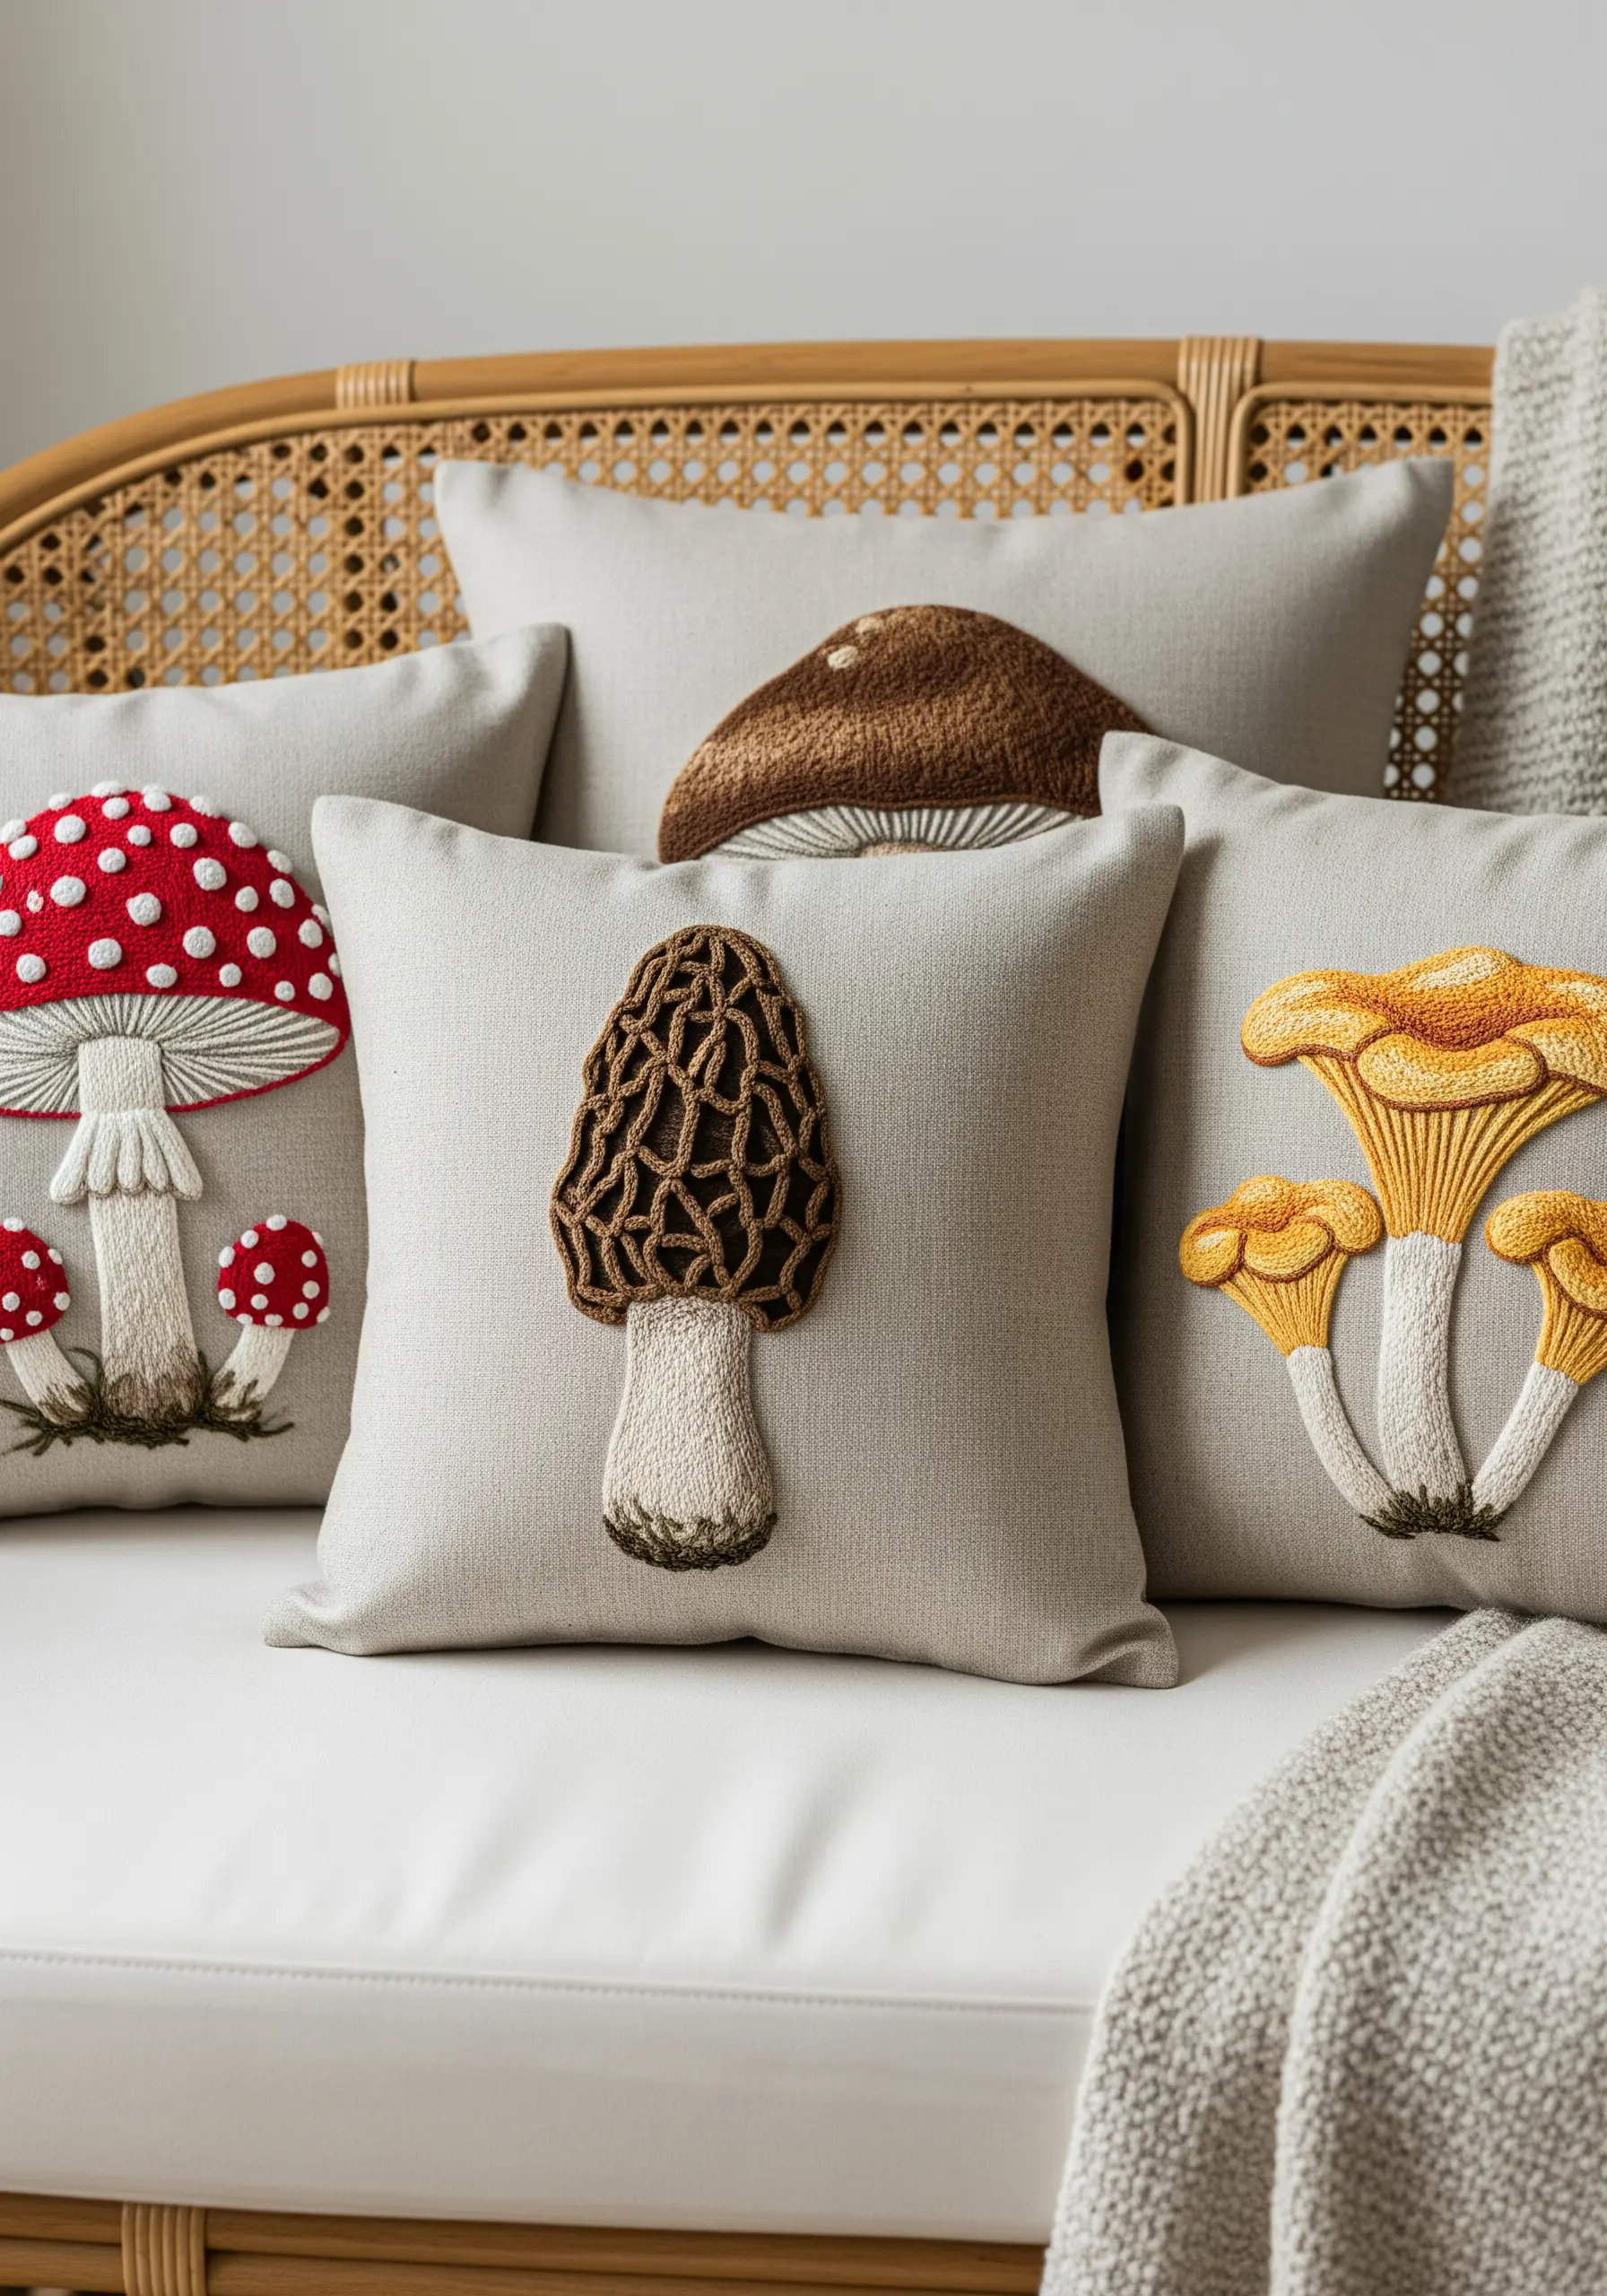
Elevate your embroidery from two dimensions to three by incorporating raised and textural stitches.
For a soft, mossy effect like a mushroom cap, use turkey work (looped stitches) and trim the loops to create a dense, velvety pile.
For a smoother, more rounded form, use padded satin stitch: create a base layer of seed stitches, then cover it with smooth satin stitches.
This technique physically lifts the design from the fabric, turning simple pillows into tactile, sculptural objects. It’s a wonderful way to create realistic mushroom forest floor embroidery projects.
4. Building Landscapes with Fabric Collage and Stitch
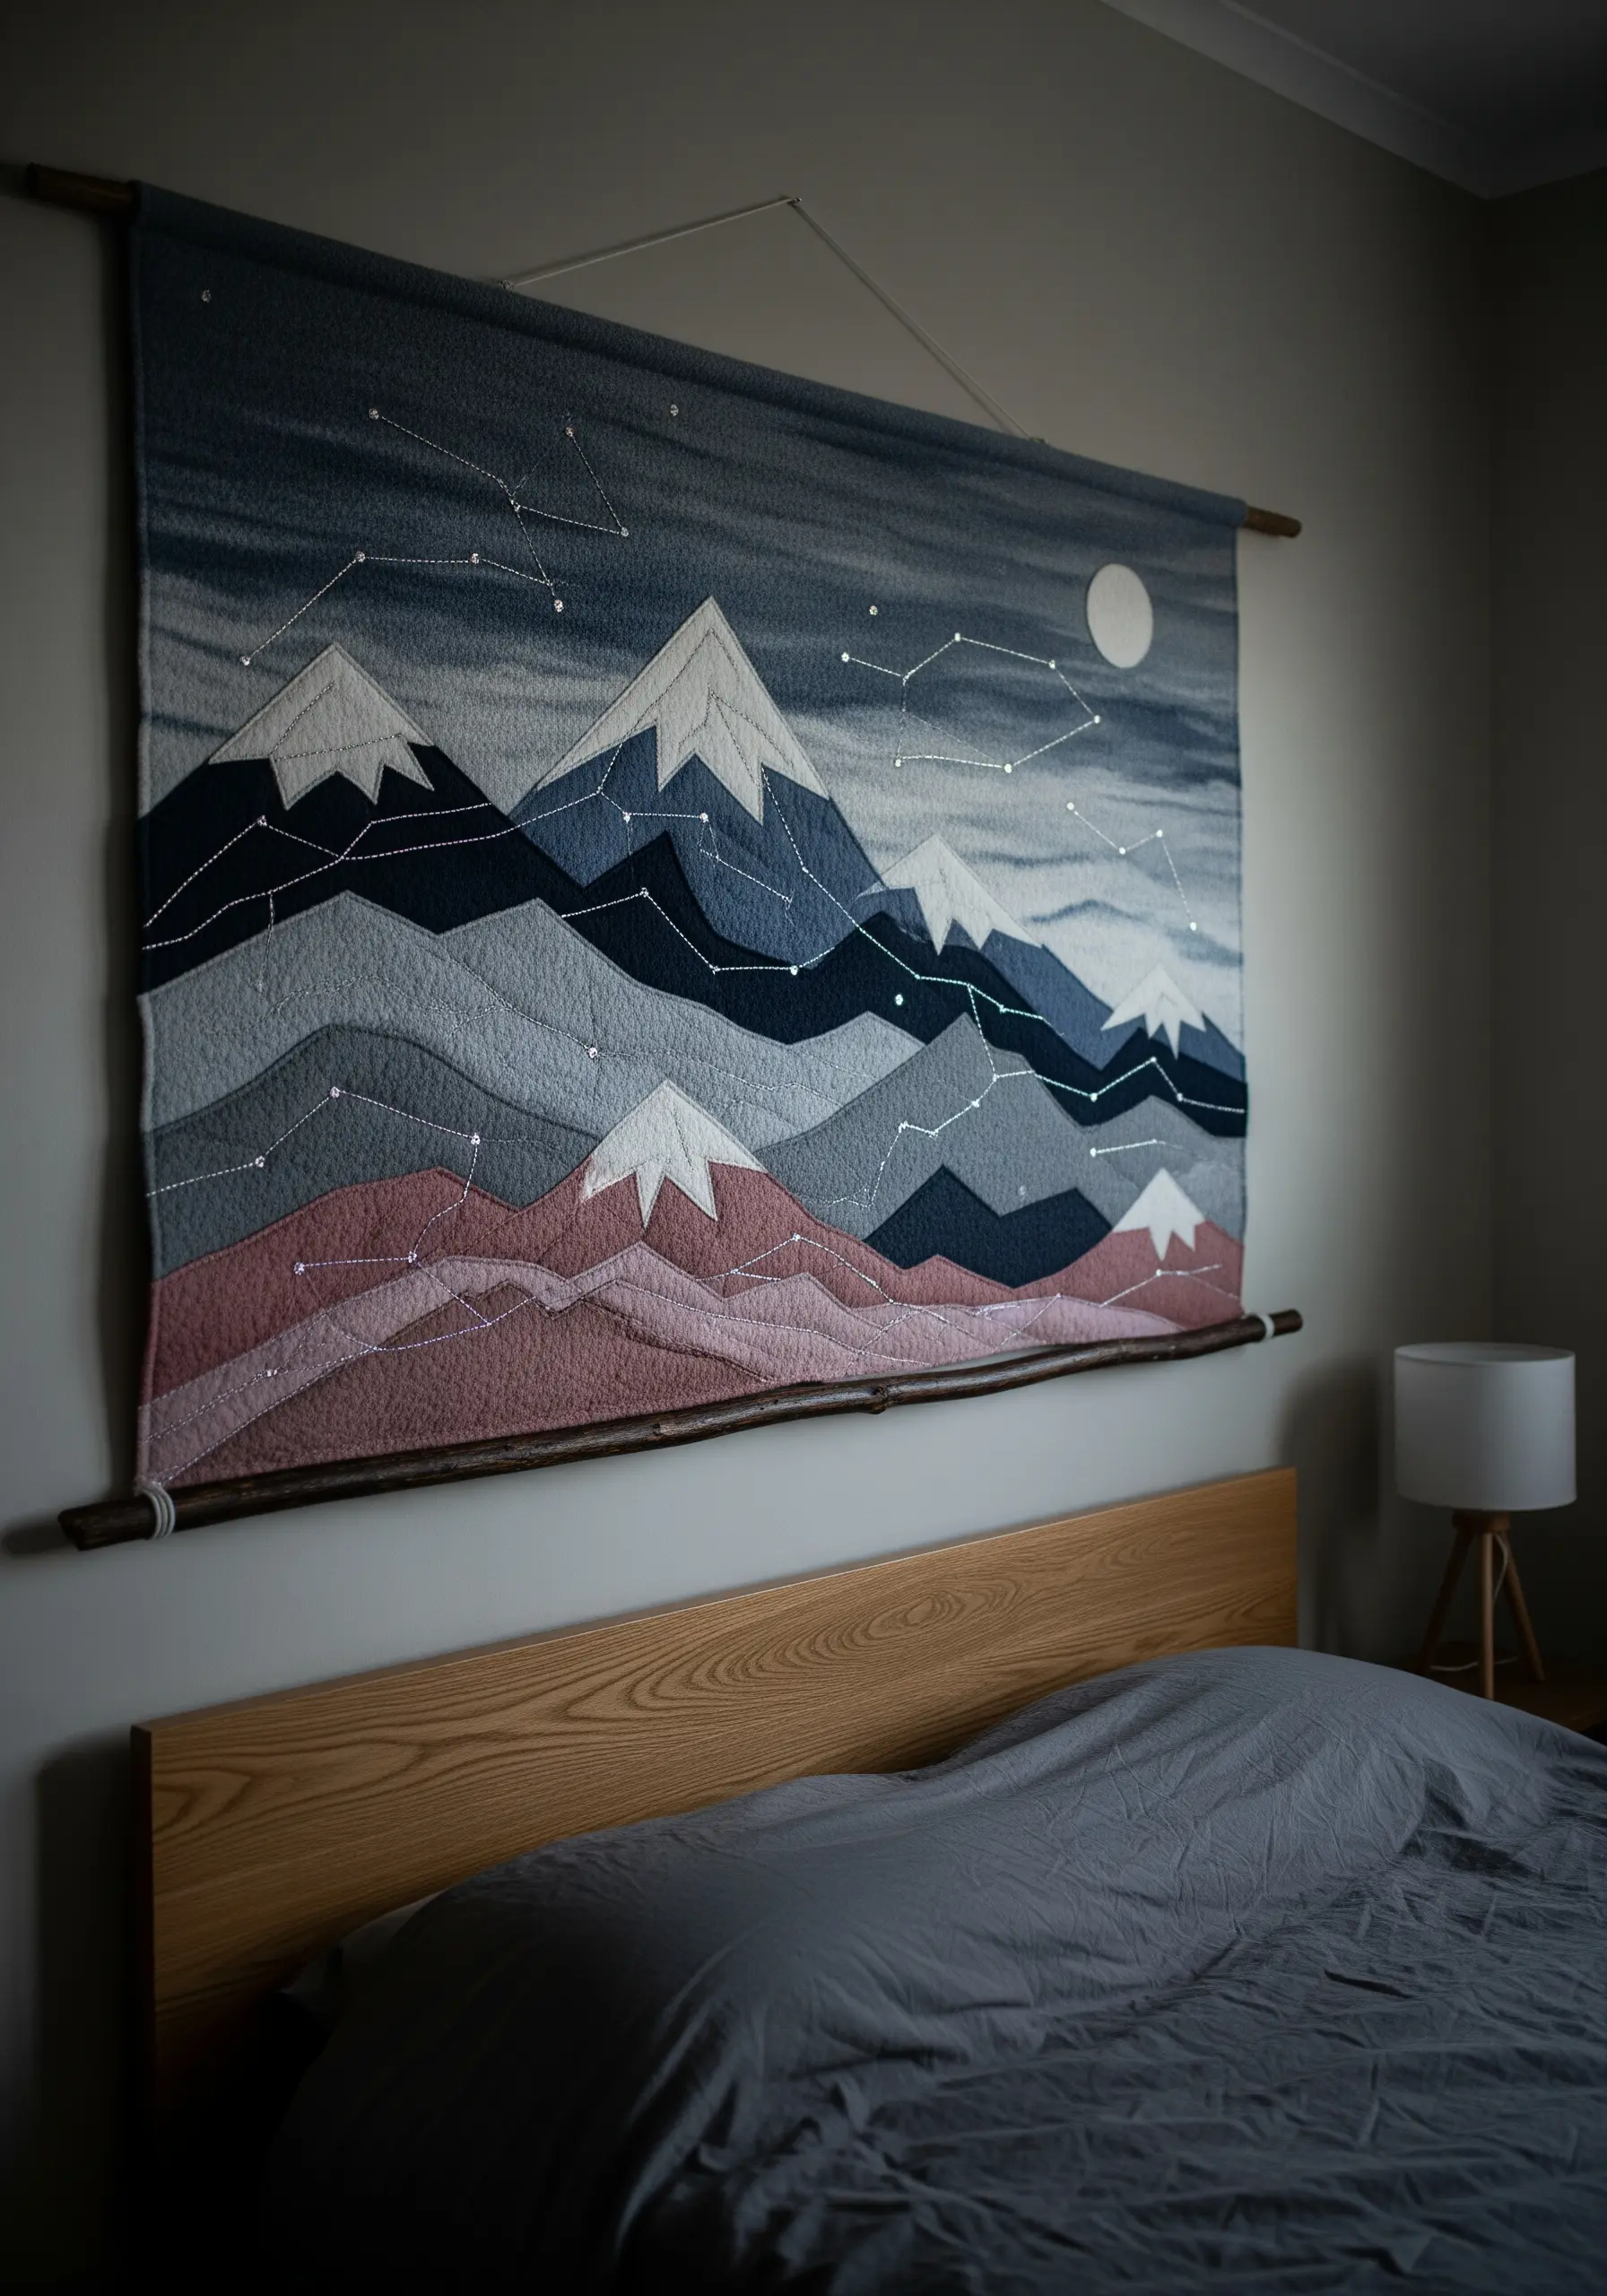
For large-scale pieces, combining fabric appliqué with embroidery is both efficient and visually striking.
Cut shapes from felt, wool, or cotton in various tones to block out the major elements of your landscape, like mountain ranges or fields.
Layer these fabric pieces and secure them with a simple running stitch or backstitch along the edges.
Then, use finer embroidery to add the delicate details—contour lines, stars, or tiny flowers. This method allows you to create impactful embroidered wall hangings with rich texture and depth.
5. Capturing Delicate Realism with Thread Painting
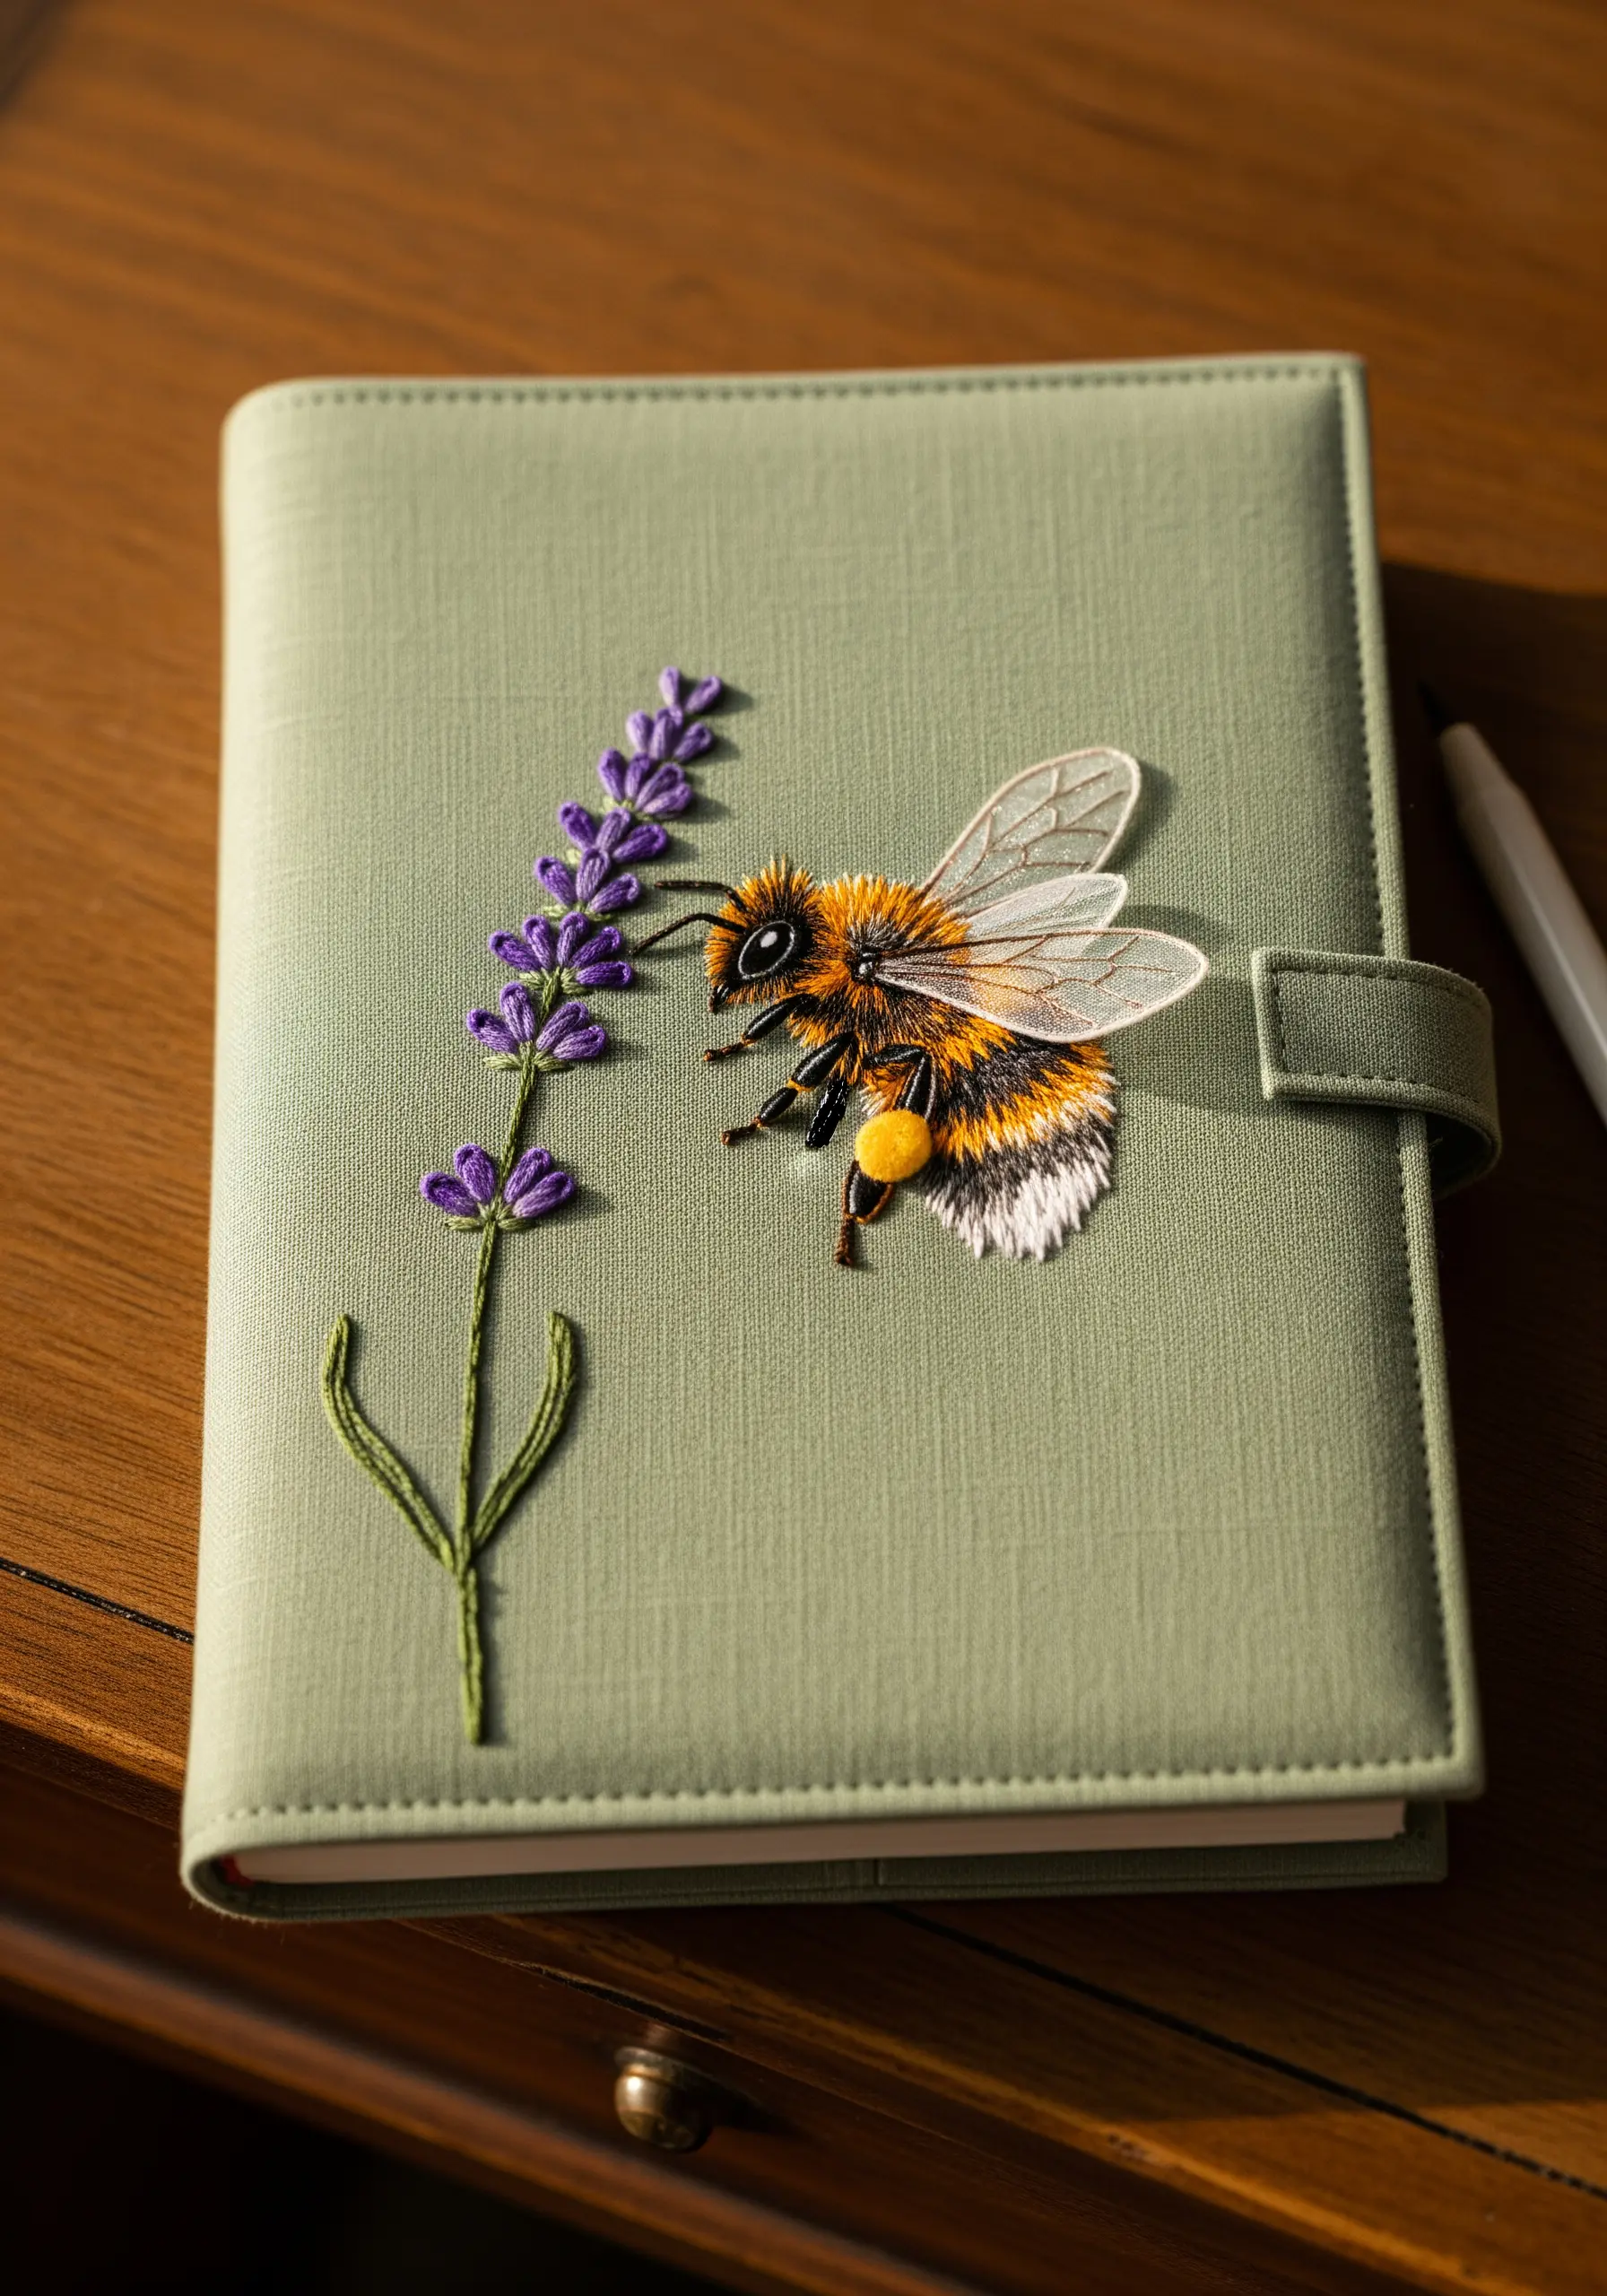
To capture the fuzzy texture of a bumblebee or the soft petals of a flower, thread painting is key.
Use a single strand of floss and the long-and-short stitch to blend colors seamlessly.
For translucent elements like insect wings, use an even lighter touch. Outline the veins with a single strand of off-white or light grey thread, leaving the spaces open.
This restraint is what creates the illusion of transparency, making your motif incredibly lifelike. You can practice these framed embroidery artworks that capture tiny details beautifully.
6. Botanical Accuracy Through Stitch Selection
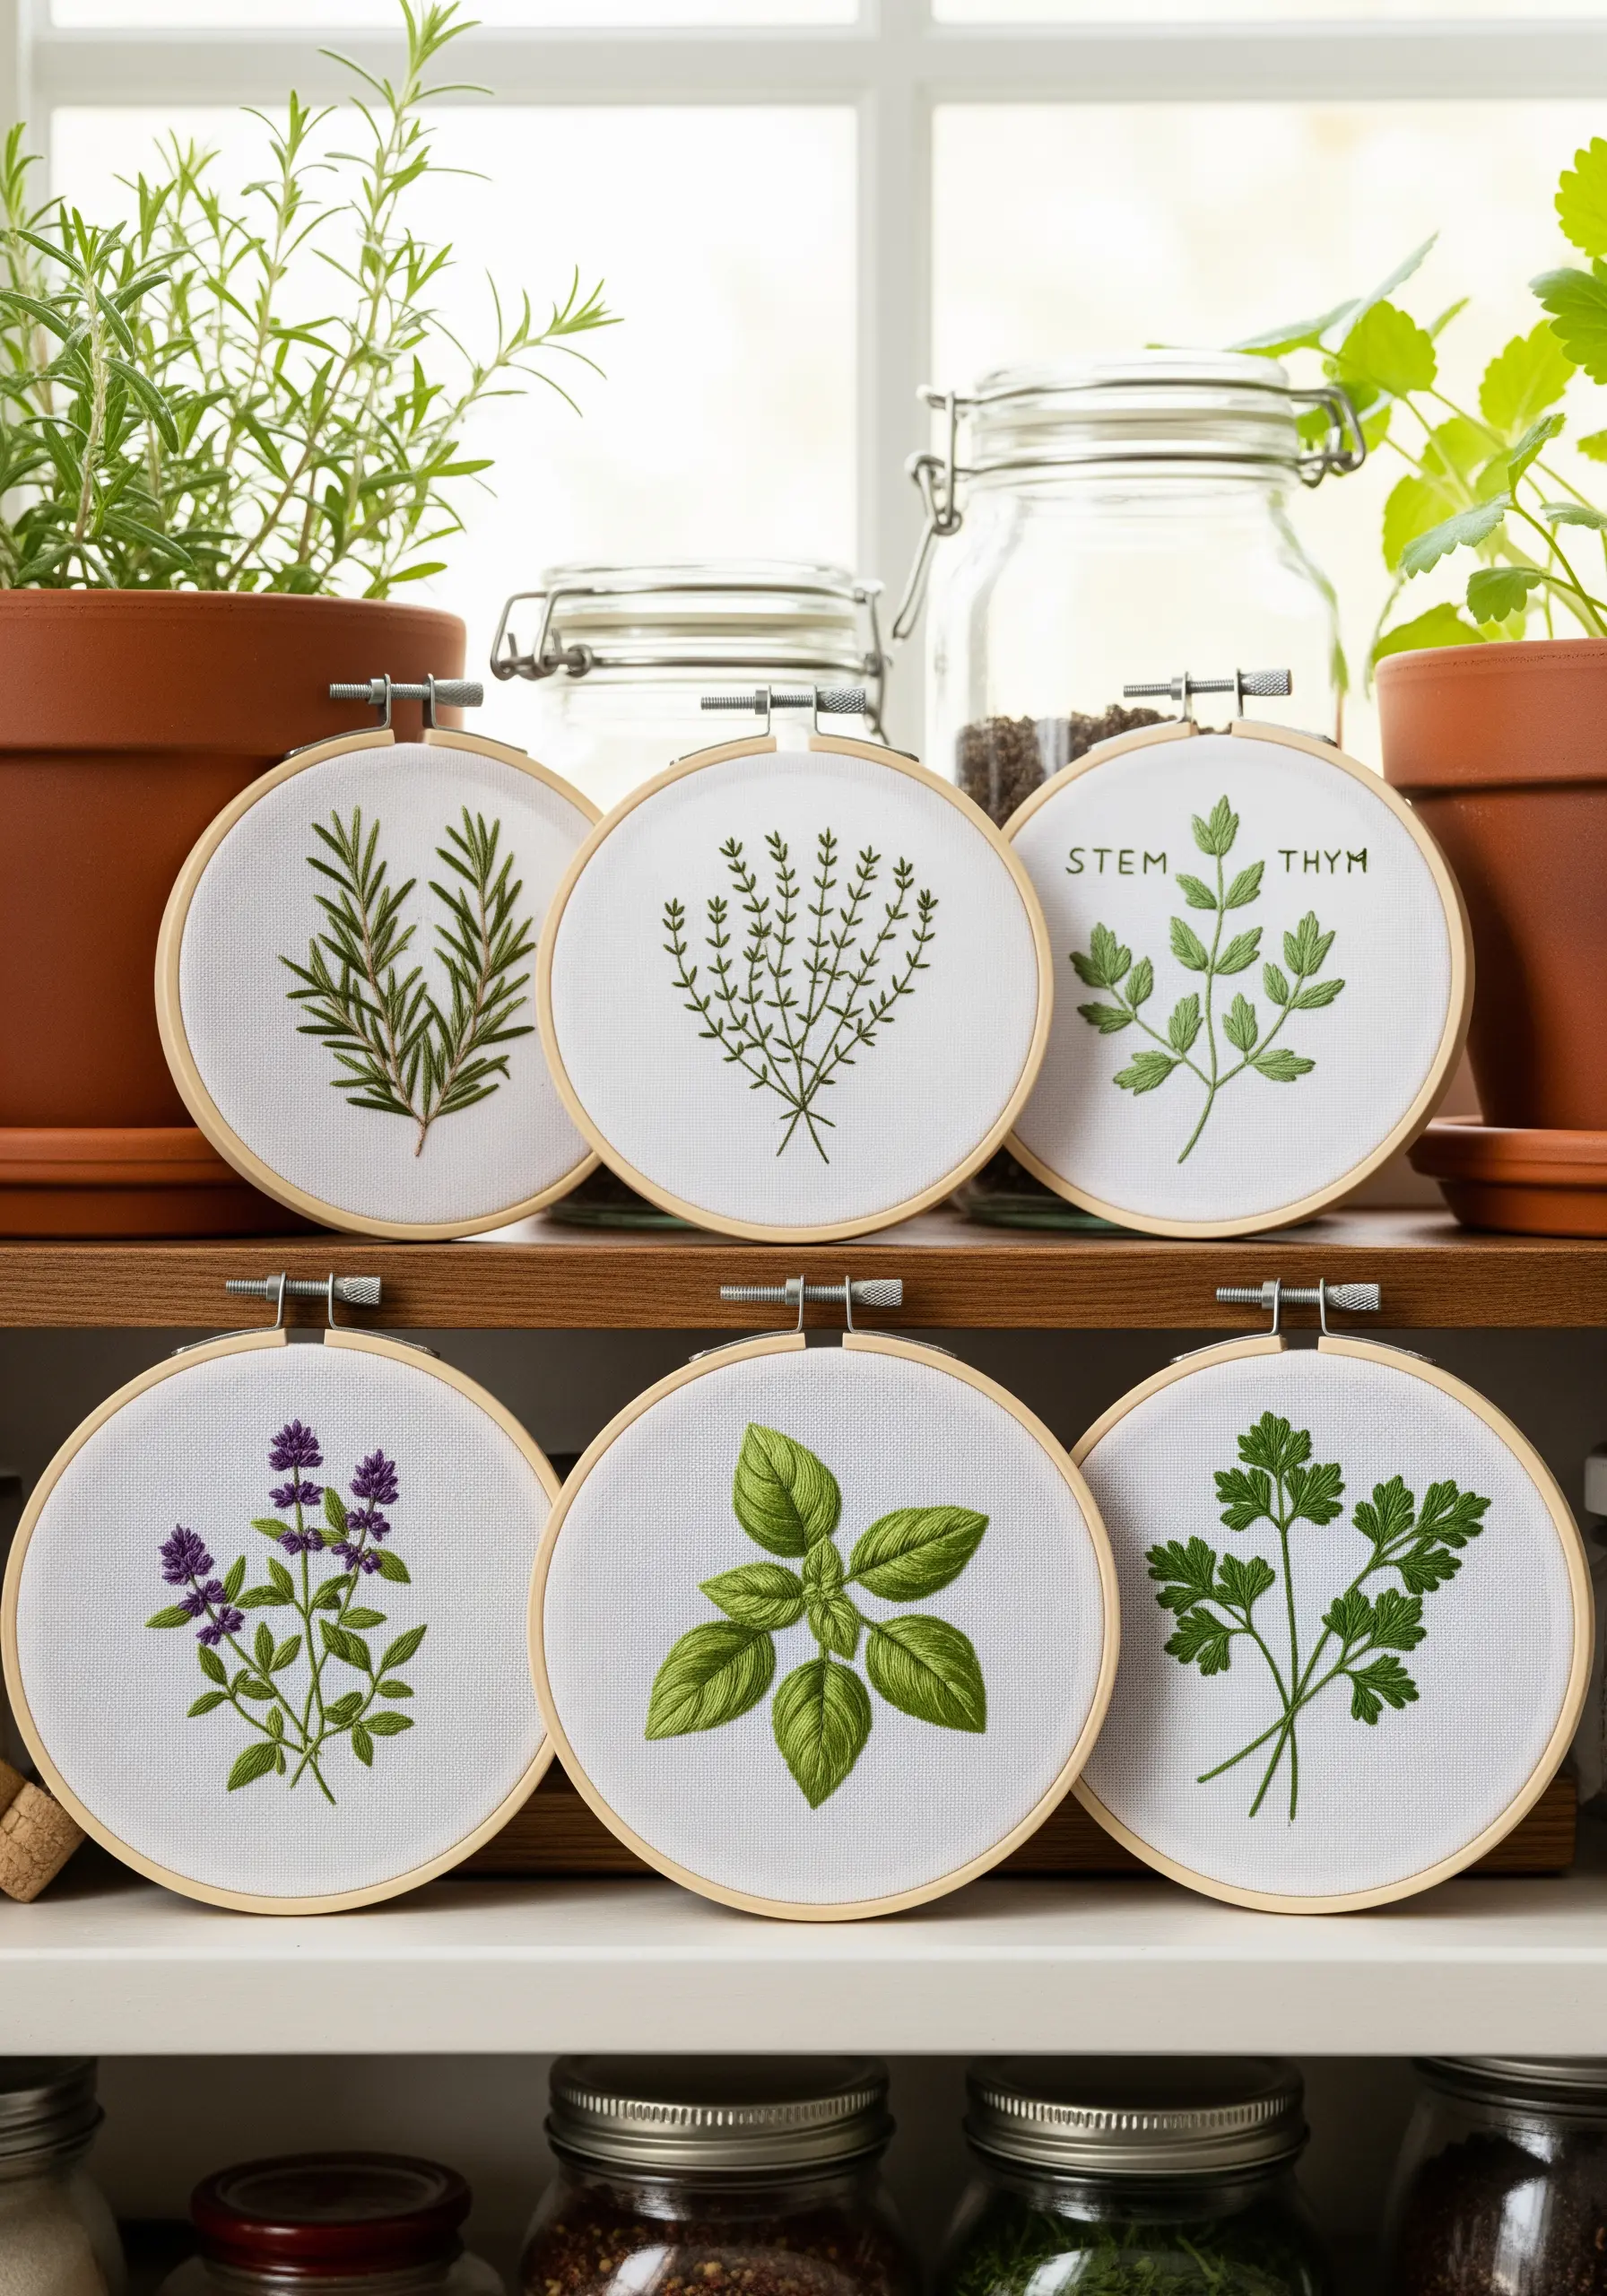
You can create instantly recognizable botanicals by choosing a stitch that mimics the plant’s natural structure.
Use a fern stitch for plants with feathery leaves like rosemary or parsley. For the branching stems of thyme, the fly stitch works perfectly.
A simple fishbone stitch is ideal for creating a defined central vein and leaf shape in one motion, perfect for basil or sage.
This thoughtful approach makes your work more accurate and elegant. It’s an excellent way to create a collection of small hoop embroidery ideas for a kitchen gallery.
7. The Power of Line Art on Solid Color
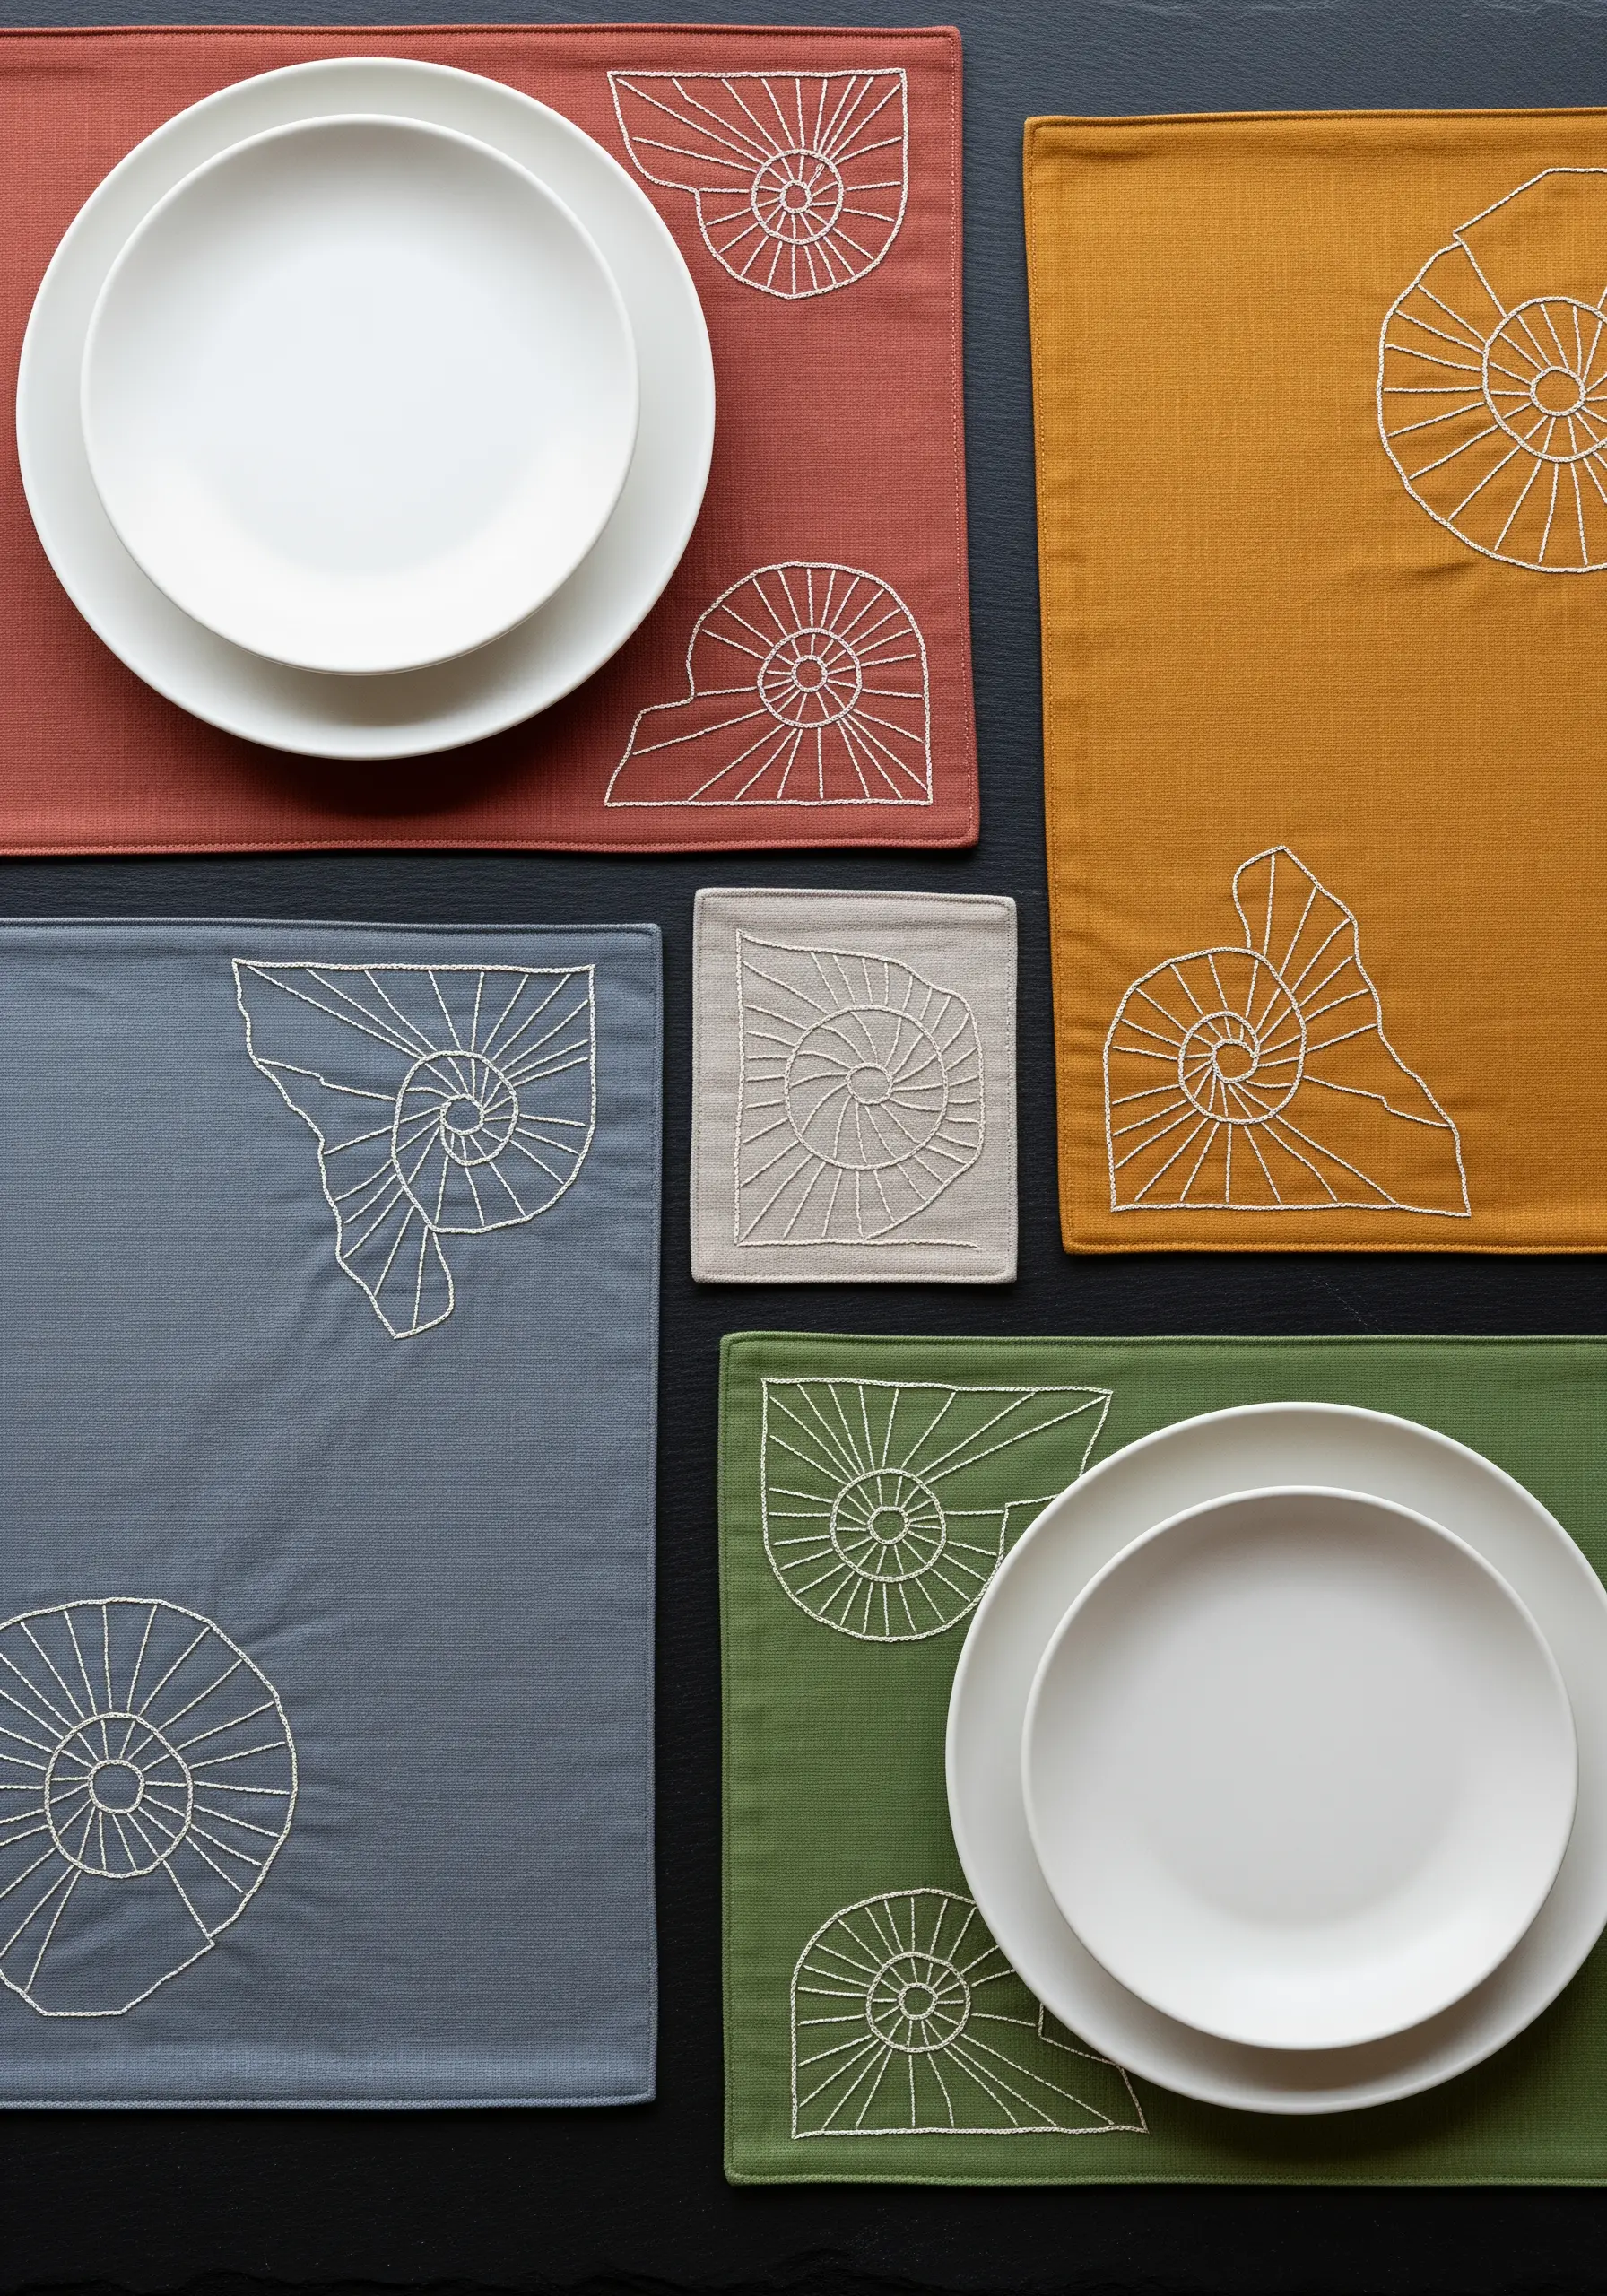
Transform simple table linens by using the striking contrast of a single line.
Choose a thread color that stands out against your fabric—like cream on terracotta or white on slate blue.
Use a precise backstitch or stem stitch to create a clean, continuous line motif. The key to a professional finish is consistency in your stitch length and tension, especially around curves.
This minimalist approach turns everyday items into a coordinated set of modern minimalist table linen.
8. Balancing a Composition with Rhythm and Flow
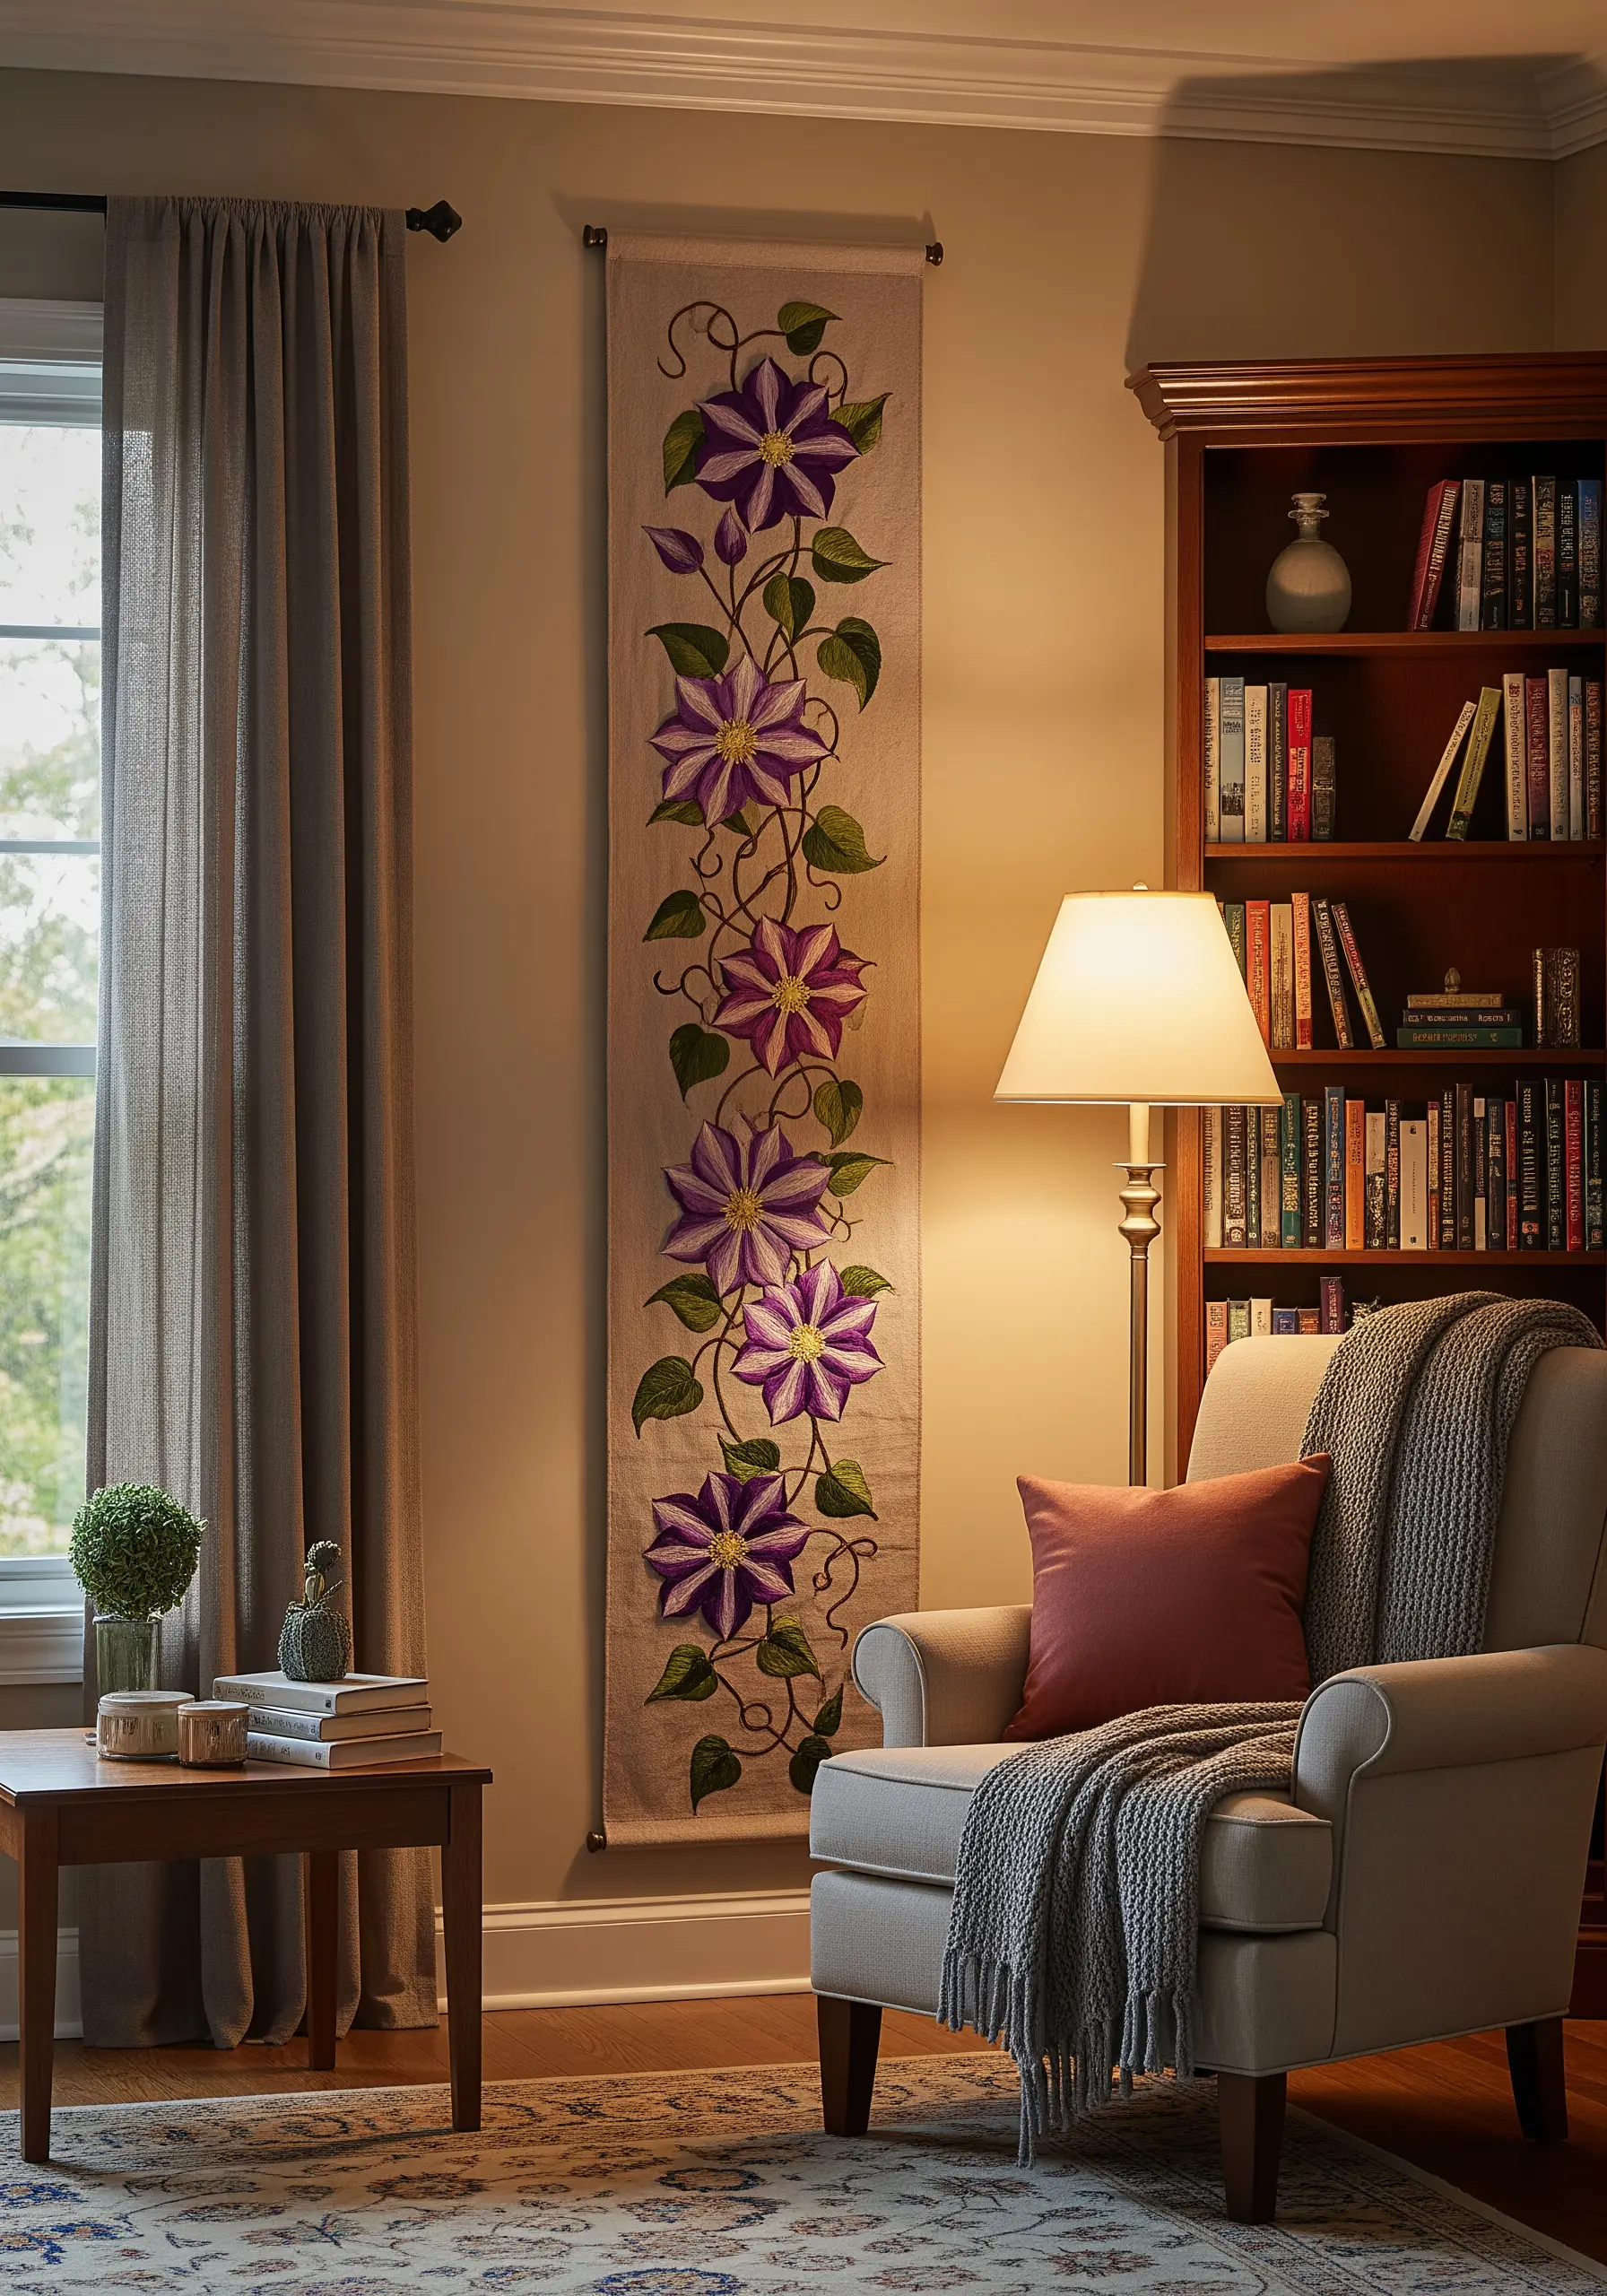
When designing a long, vertical piece, create a visual path for the eye to follow.
Arrange your main floral motifs in a gentle ‘S’ curve rather than a straight line to build a sense of natural, organic movement.
Vary the size and orientation of the flowers to avoid monotony, and connect them with delicate, winding vines stitched in a whipped backstitch.
This creates a balanced and dynamic flow, turning a simple piece into a captivating embroidered textile wall hanging.
9. Blending Threads for an Iridescent Sheen
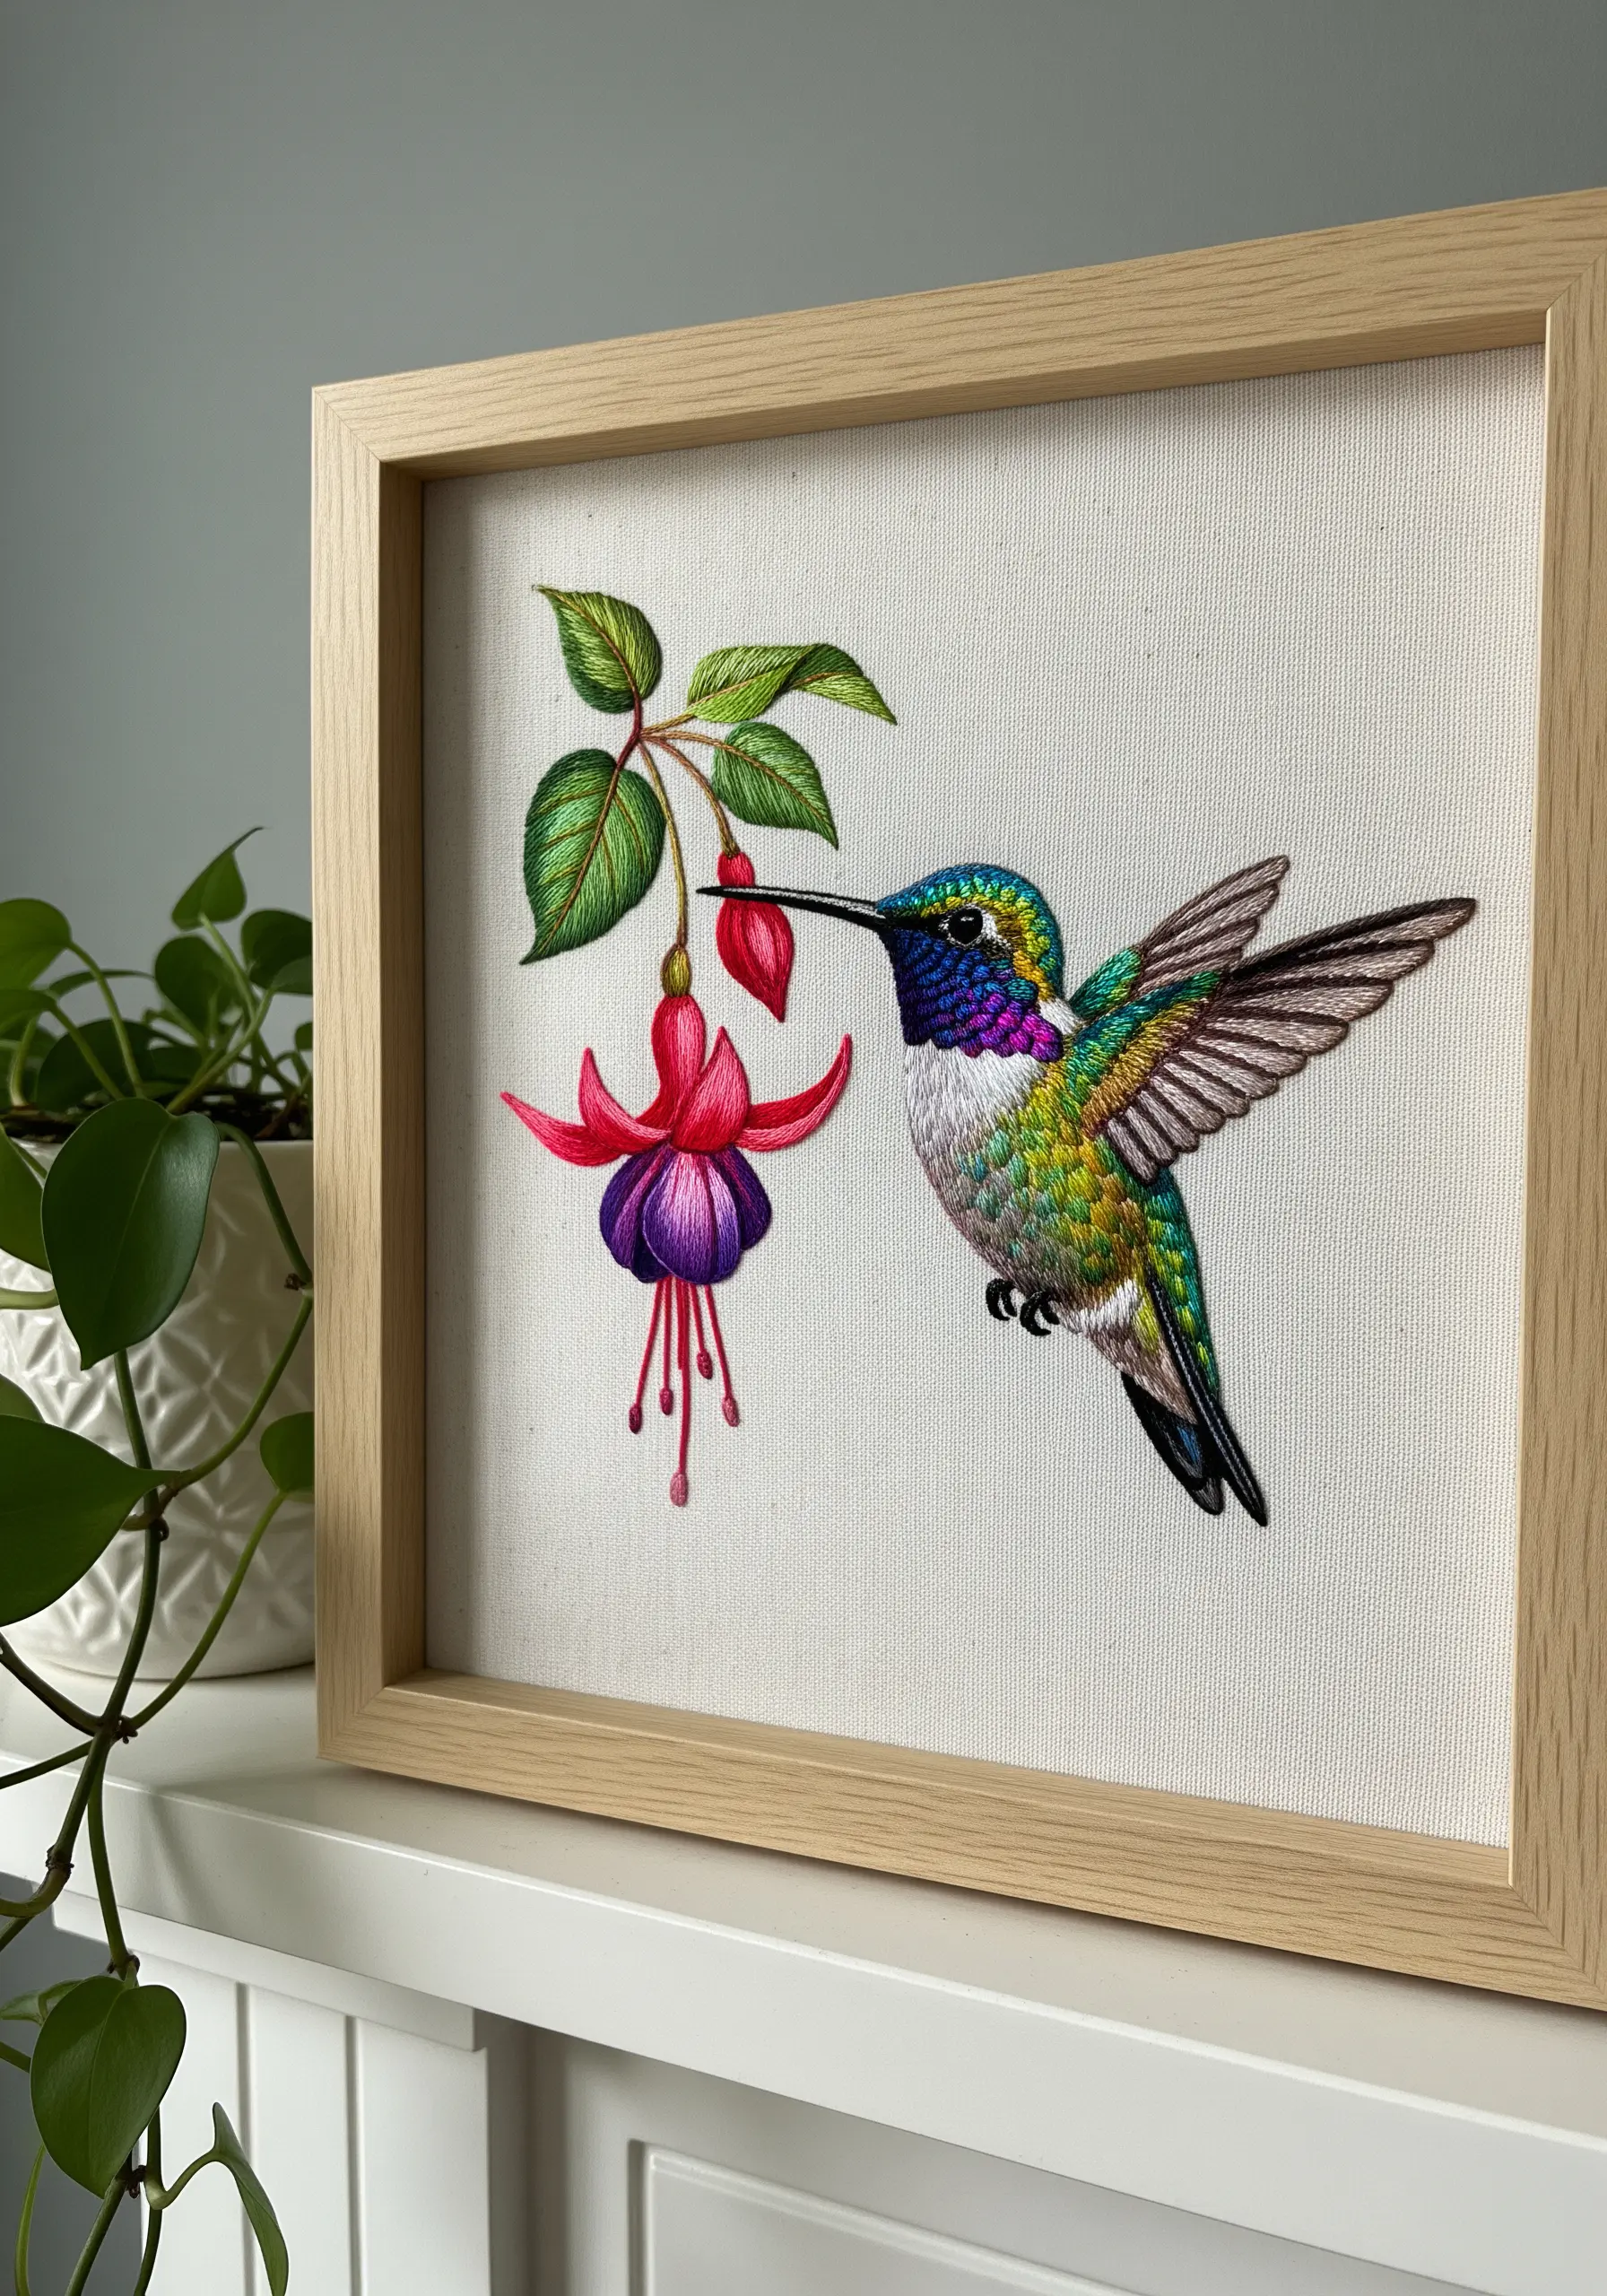
To capture the shimmer of a hummingbird’s feathers without the stiffness of pure metallic thread, create your own custom blend.
Combine one strand of standard cotton floss with one strand of a fine, single-ply metallic or rayon thread in a similar color.
Use this blended thread in your needle for long-and-short stitching. The result is a subtle, elegant shimmer that catches the light beautifully and gives your work a realistic, iridescent quality perfect for tiny hummingbird embroidery ideas.
10. Illuminating Your Stitches on a Lampshade
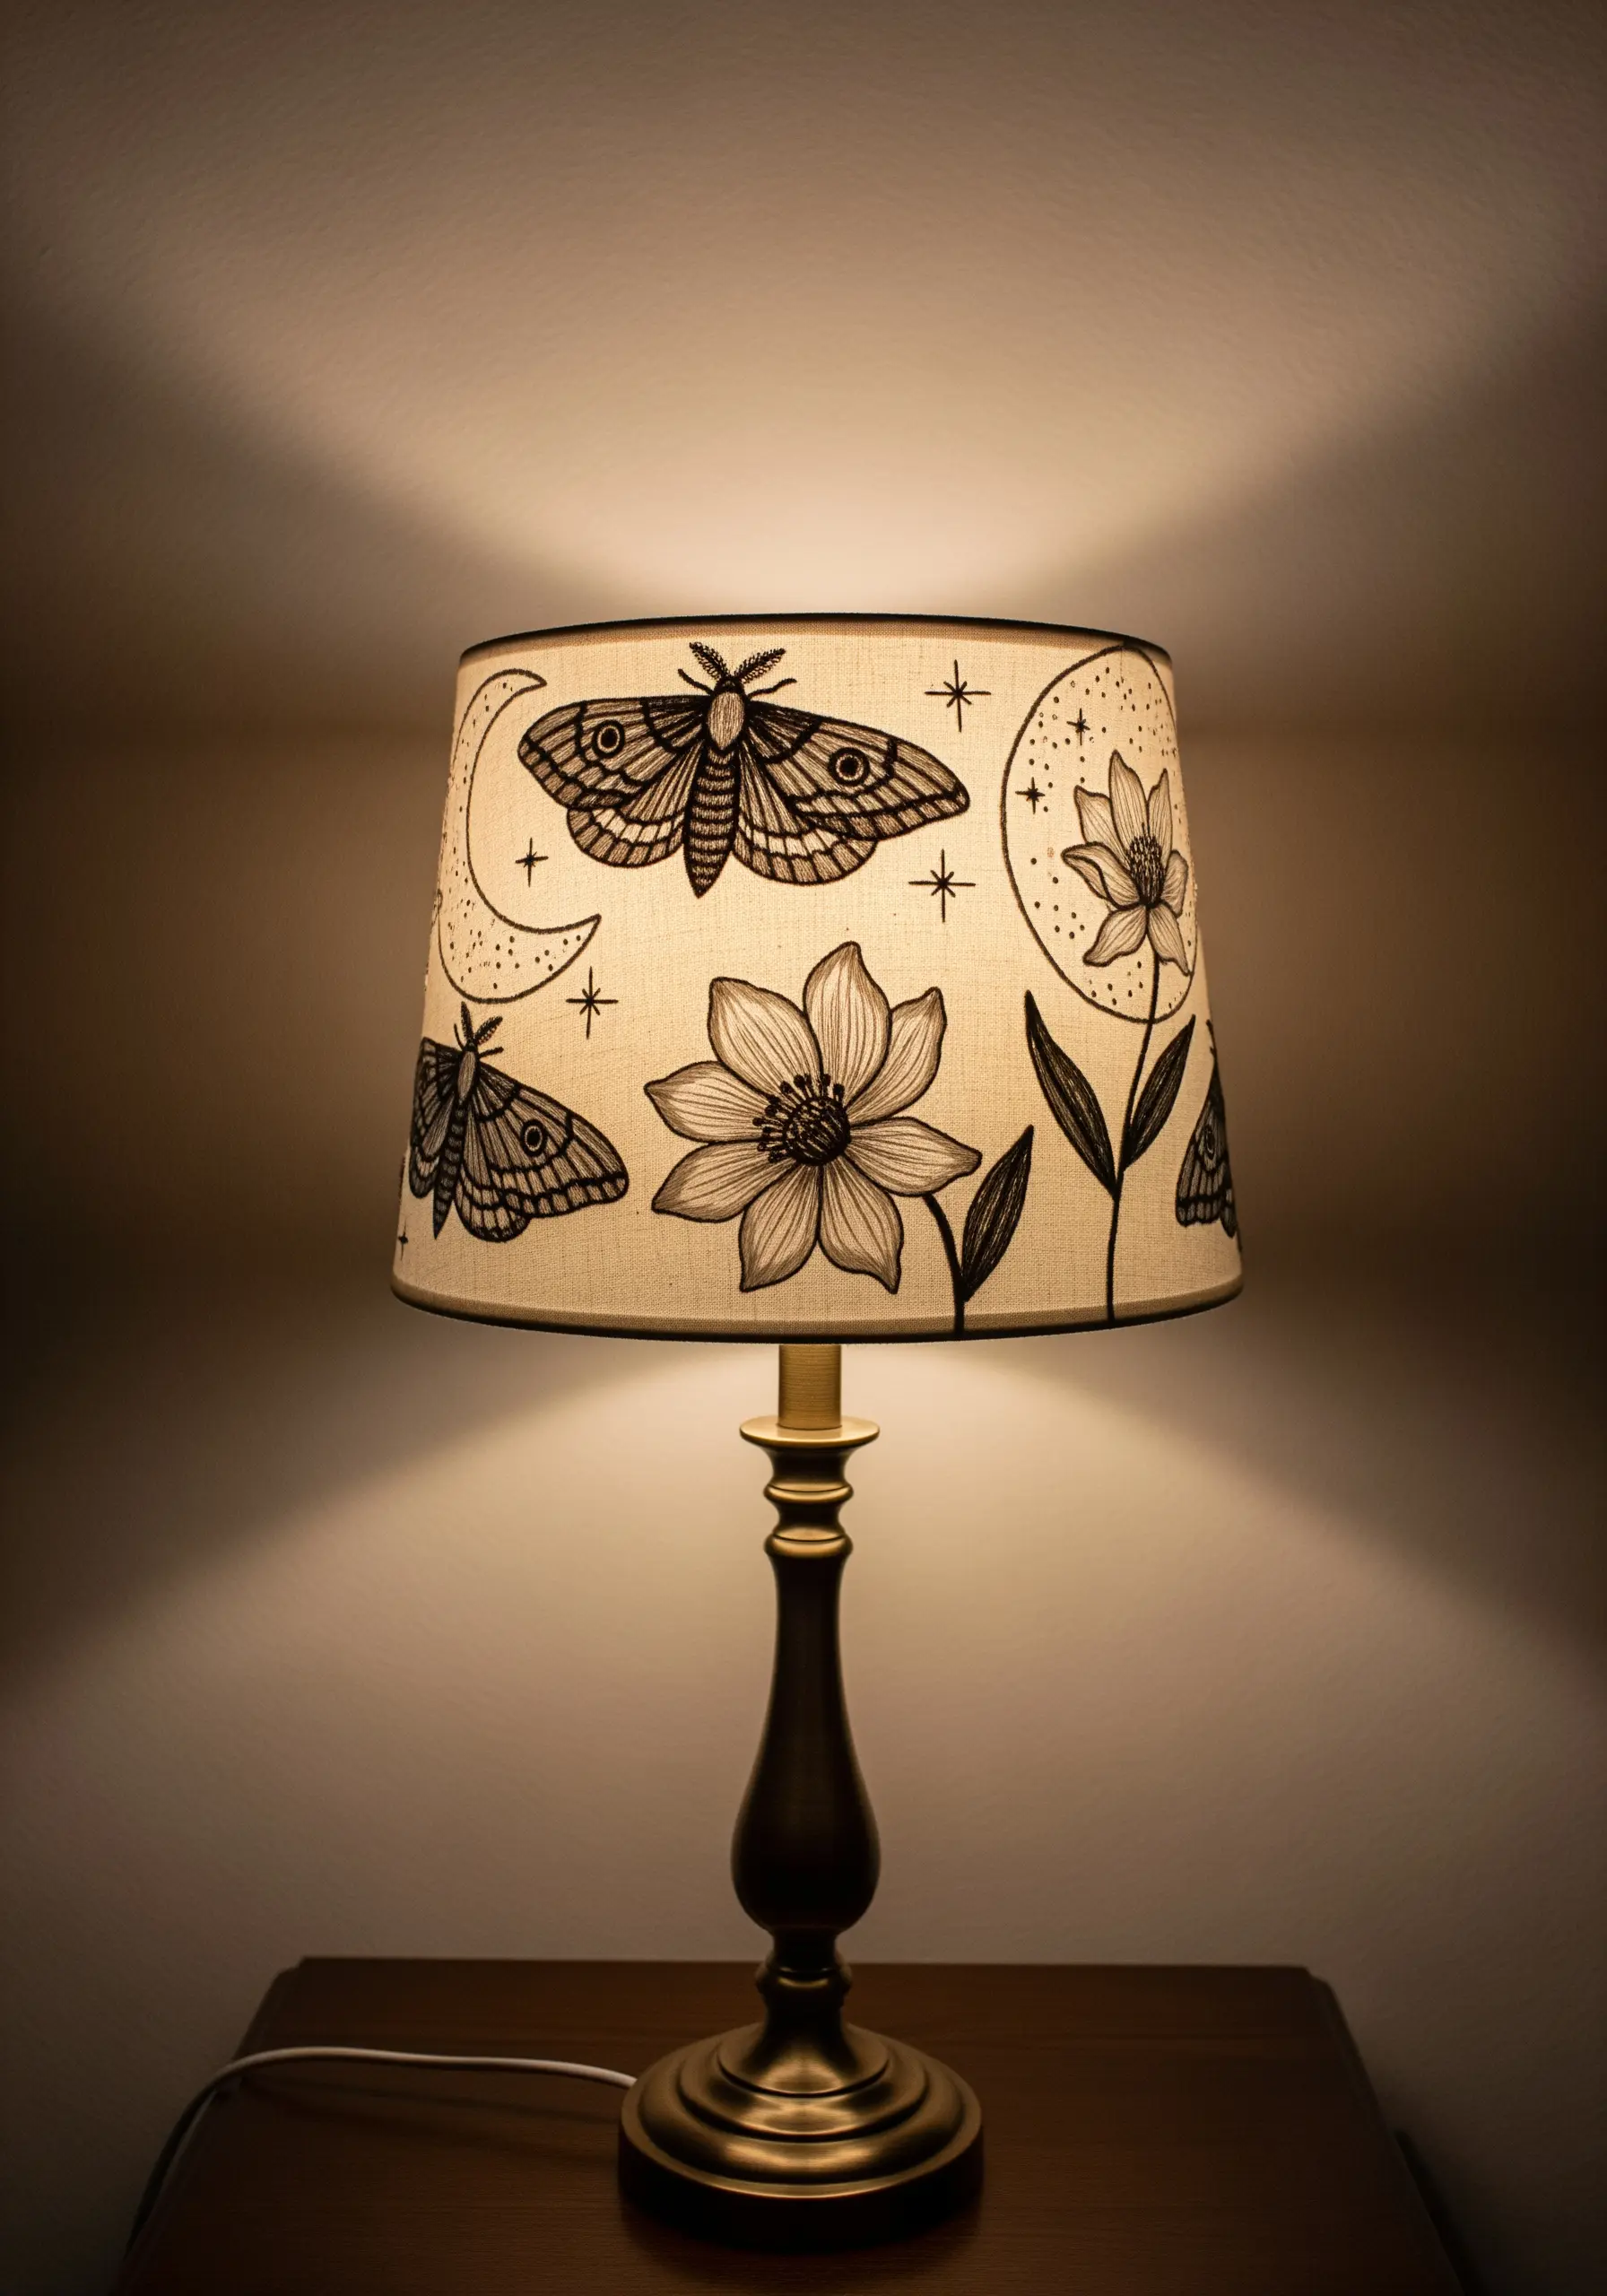
Embroidering on a fabric lampshade turns your work into a functional light source.
For best results, use a simple backstitch for outlines, as it creates a crisp silhouette when lit from behind.
Avoid dense fill stitches like satin stitch, which will block the light. Instead, opt for lighter techniques like seed stitch or cross-hatching to add texture while still allowing light to filter through.
This transforms your embroidery into a luminous piece of art, one of many handmade objects that make your home a mini art gallery.
11. Sculpting with Thread on a Tactile Surface
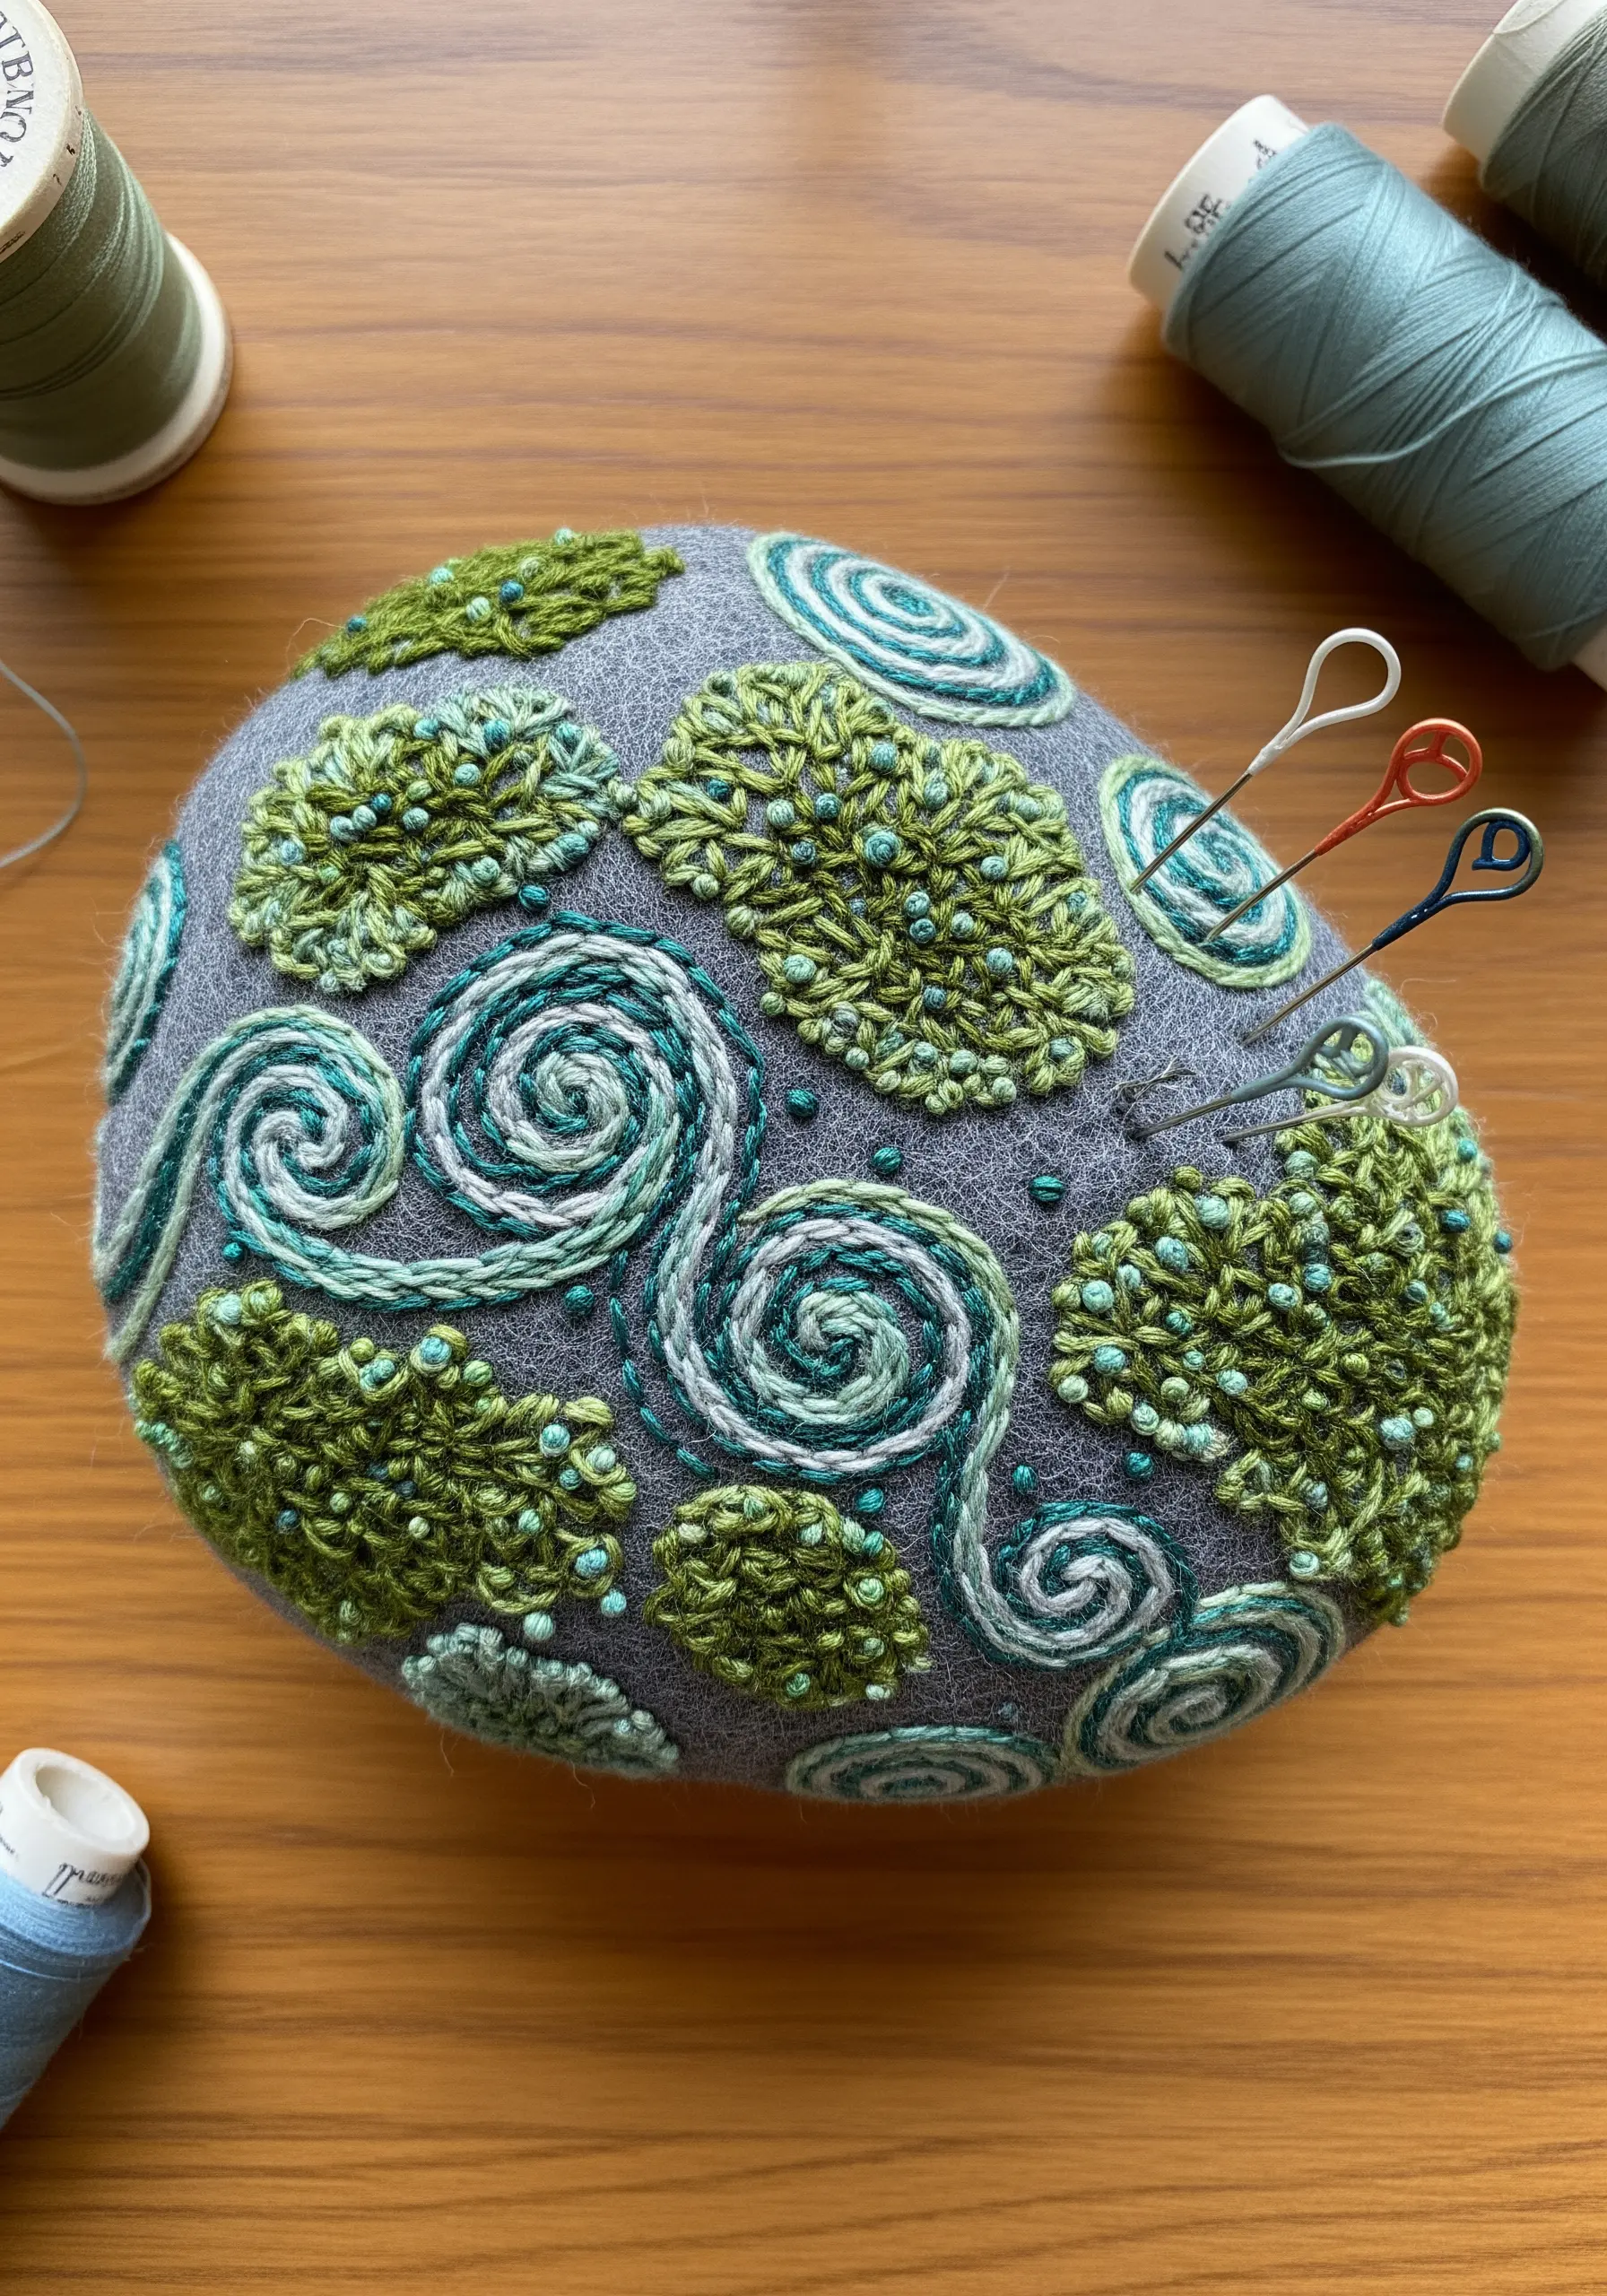
Turn a simple object like a pincushion into a miniature landscape by focusing on texture.
Use dense clusters of French knots or colonial knots to create mossy mounds, varying the shades of green for realism.
Contrast these knotted areas with the smooth, linear flow of a whipped backstitch or chain stitch to represent swirling water or wind.
Working with thicker wool thread on a felt base enhances the plush, three-dimensional quality of your stitches and is one of the best ways to capture nature’s textures in your next embroidery project.
12. Creating an Underwater World with Mixed Media
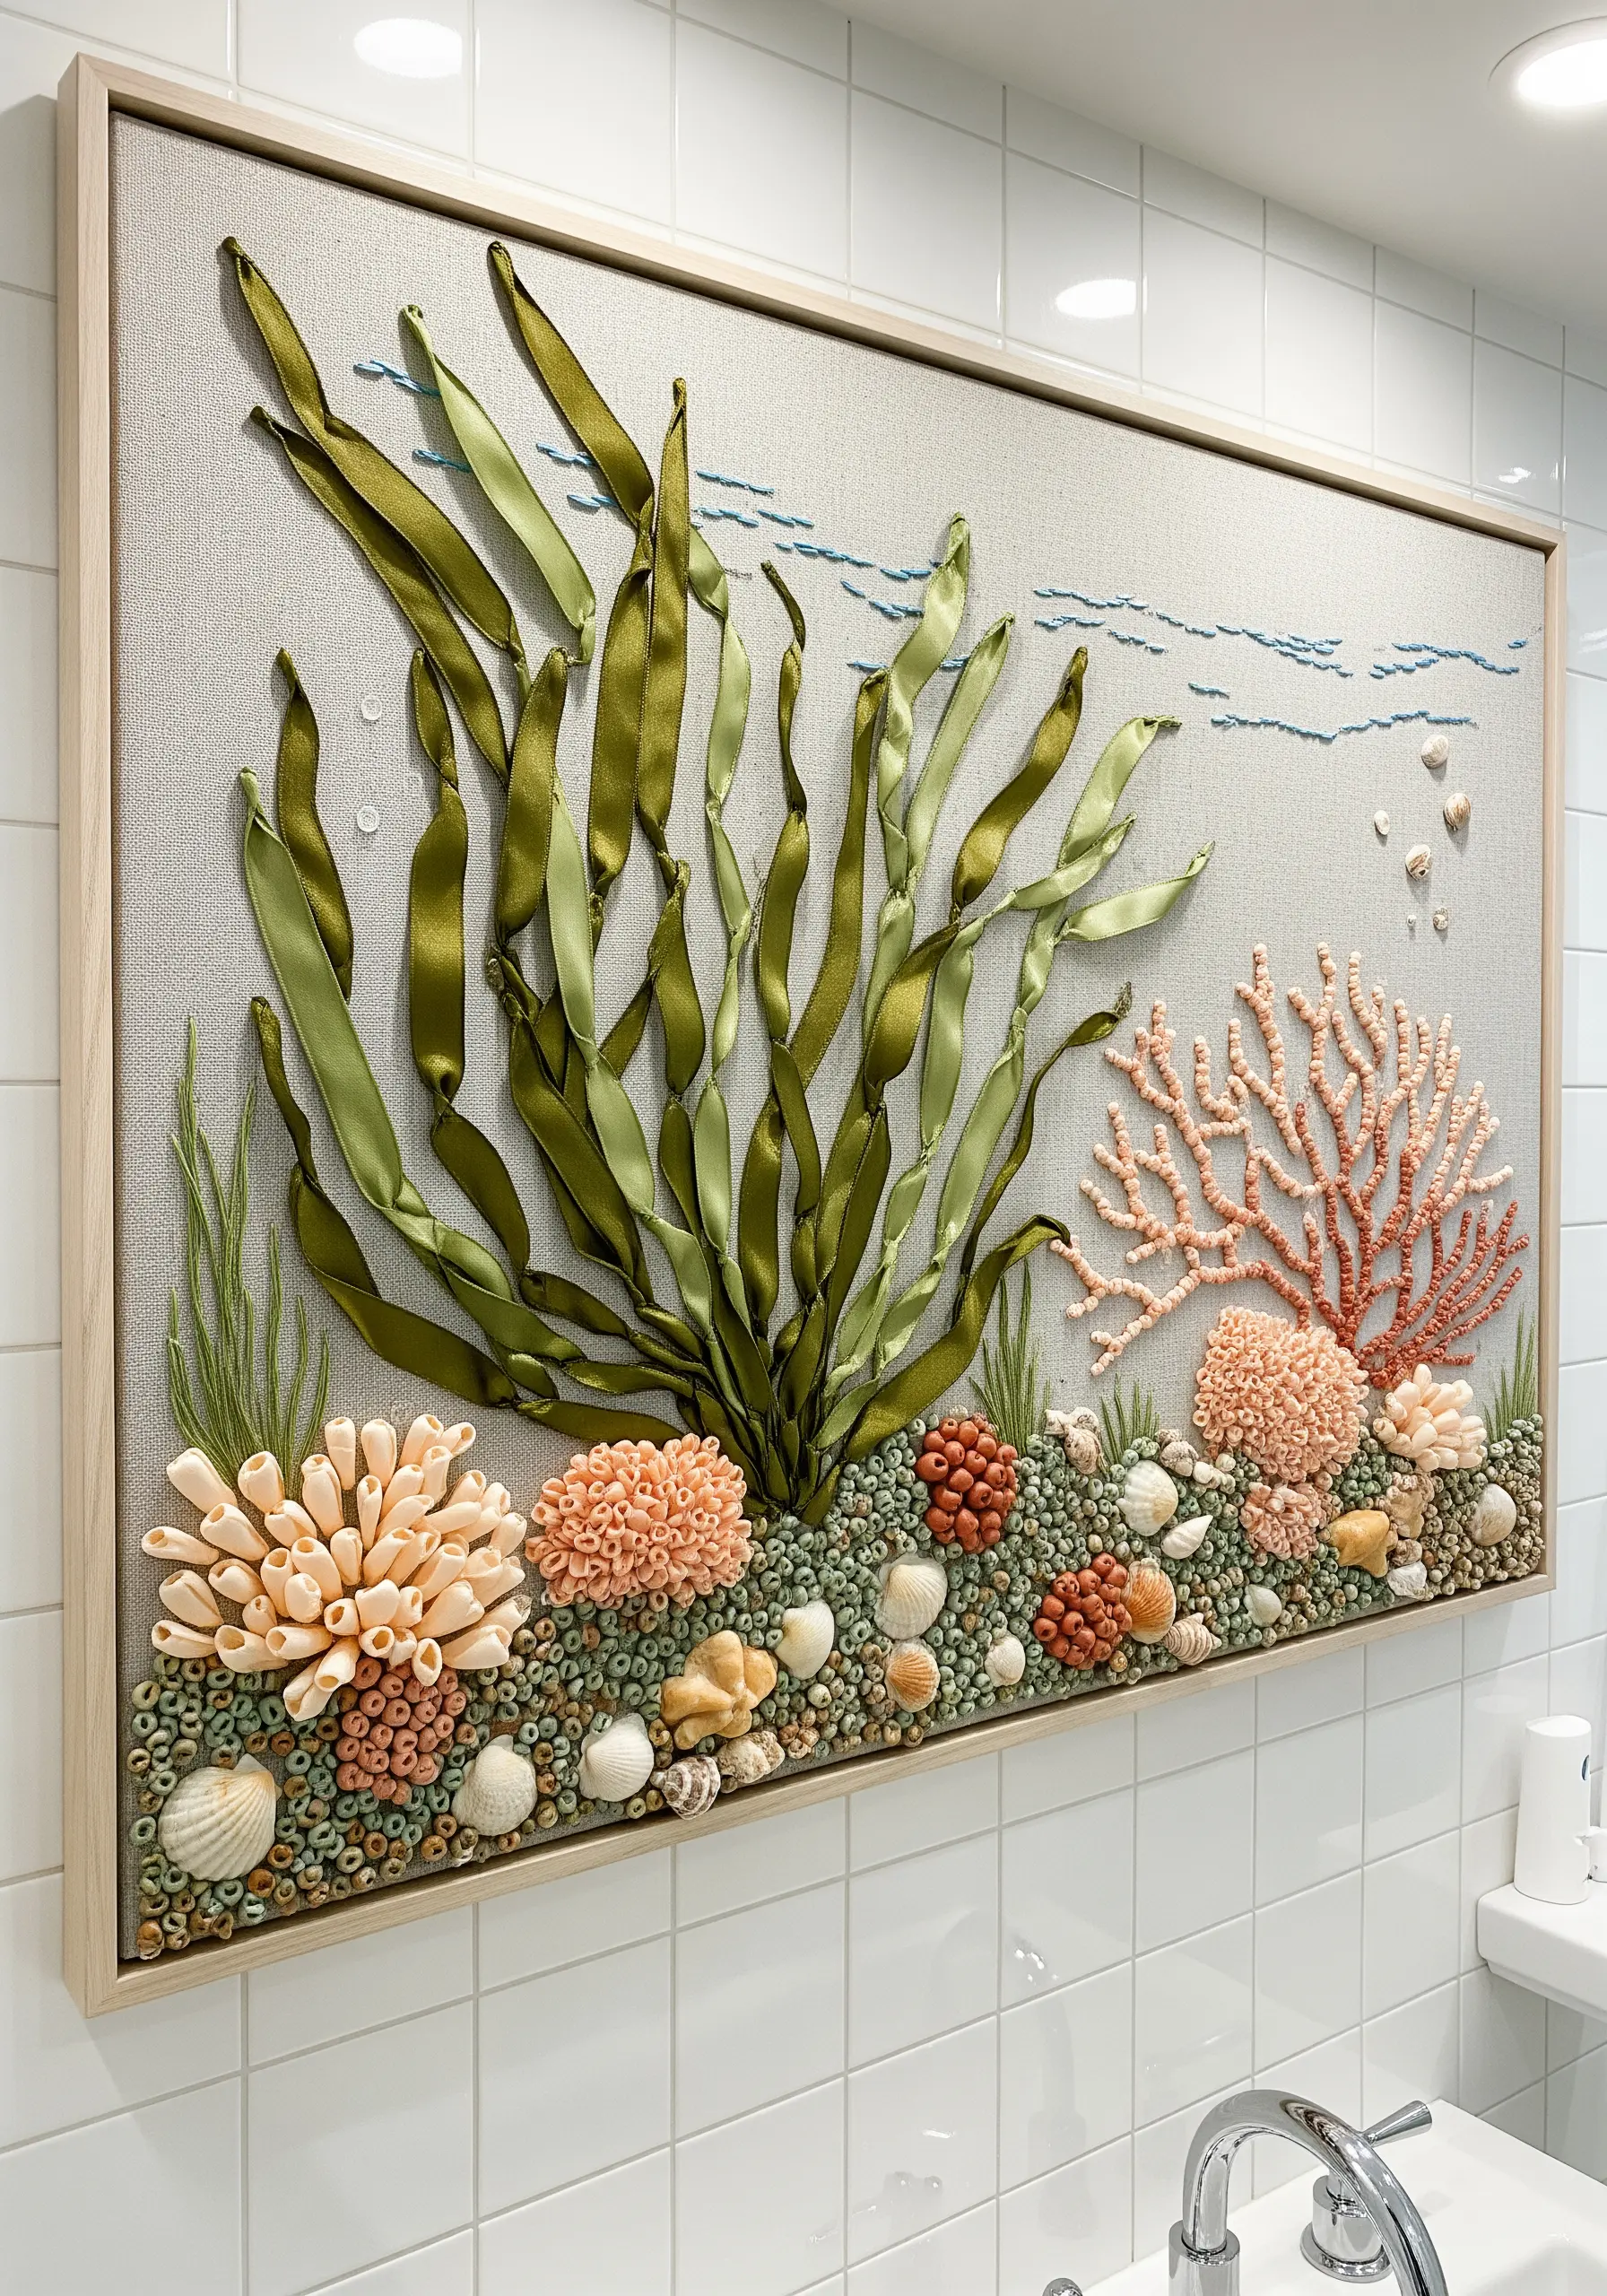
Build a rich, multi-textured seascape by combining different materials.
Use wide silk ribbon and a twisted straight stitch to form the broad, flowing leaves of kelp—the ribbon’s sheen and body create instant dimension.
For coral, use dense clusters of French knots and bullion knots in traditional floss. Finish by adding tiny seed beads, pearls, or even miniature shells to represent pebbles and bubbles.
These gorgeous mixed-fiber textures create a vibrant underwater world.
13. Fusing Embroidery with Macrame Details
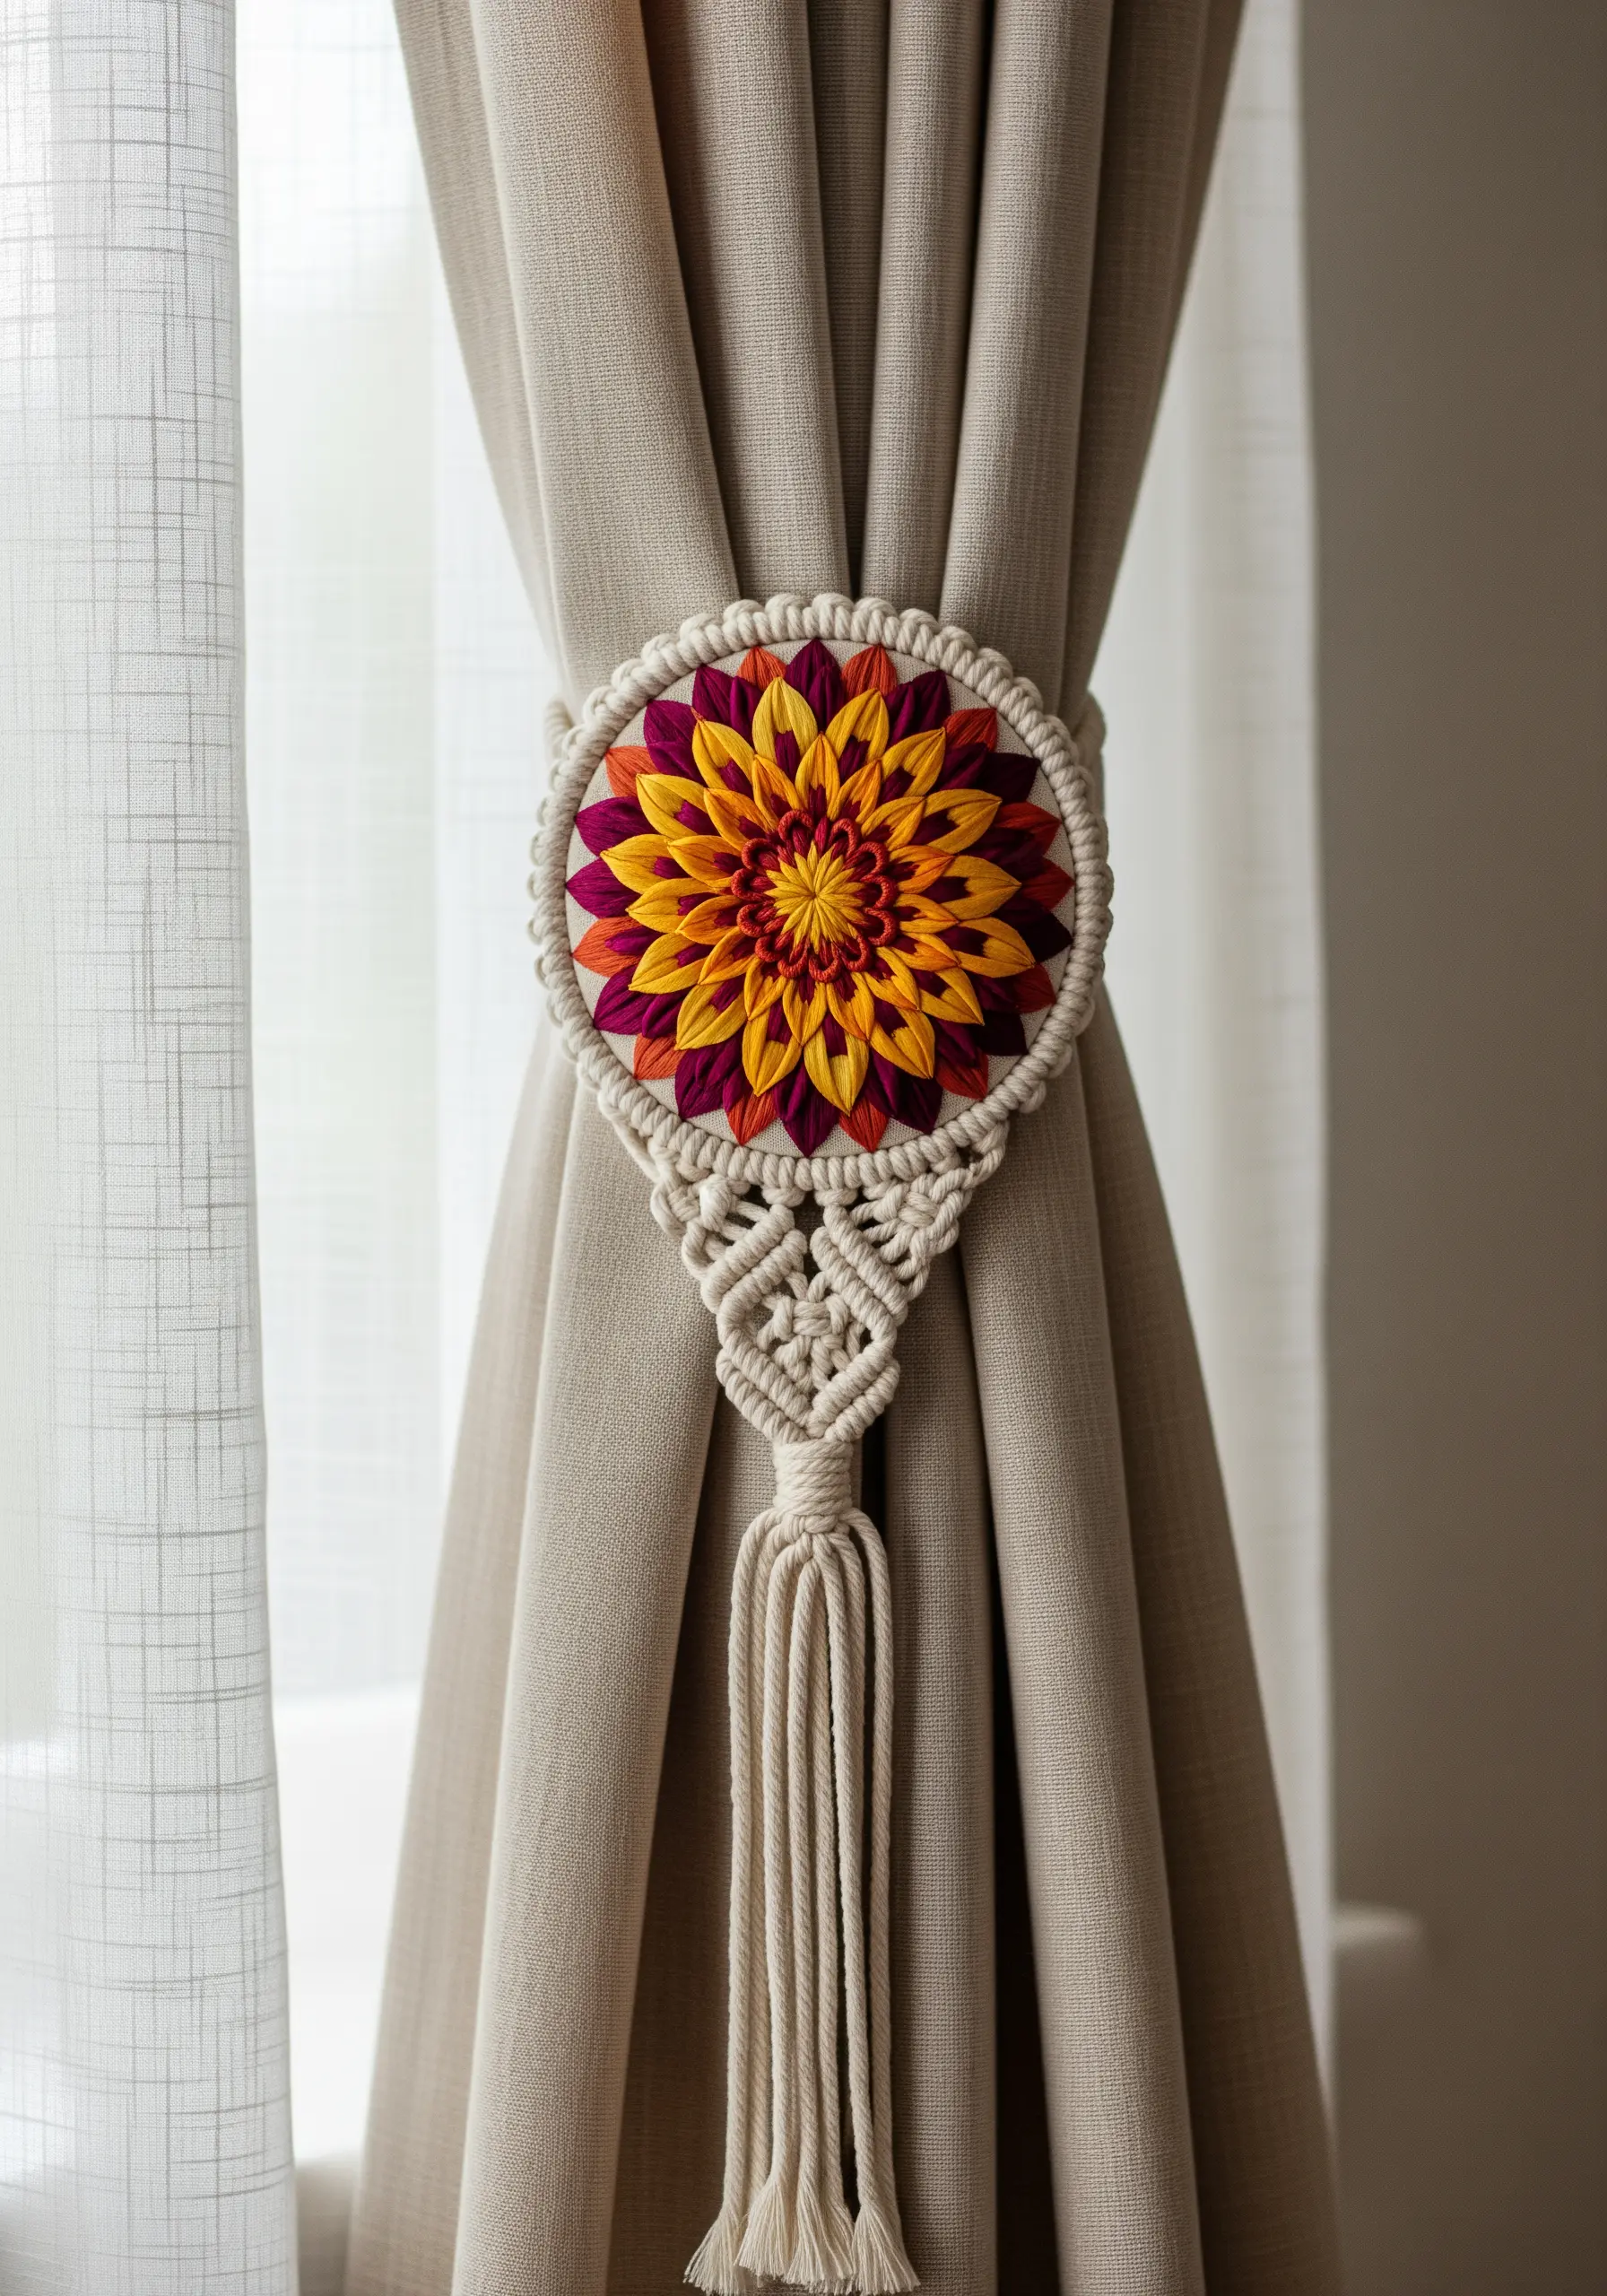
Combine the fine detail of embroidery with the rustic texture of macrame for a unique piece of functional art.
Stitch a colorful medallion on a separate piece of fabric, using dense satin stitches to create a vibrant floral mandala.
Once finished, cut the motif out and securely stitch it onto your macrame curtain tie-back or wall hanging.
This technique adds a polished, unexpected pop of color and craftsmanship, elevating simple knots into a sophisticated decor accent. It’s a modern take on embroidered curtain borders.
14. Enhancing Patchwork with Subtle Stitching
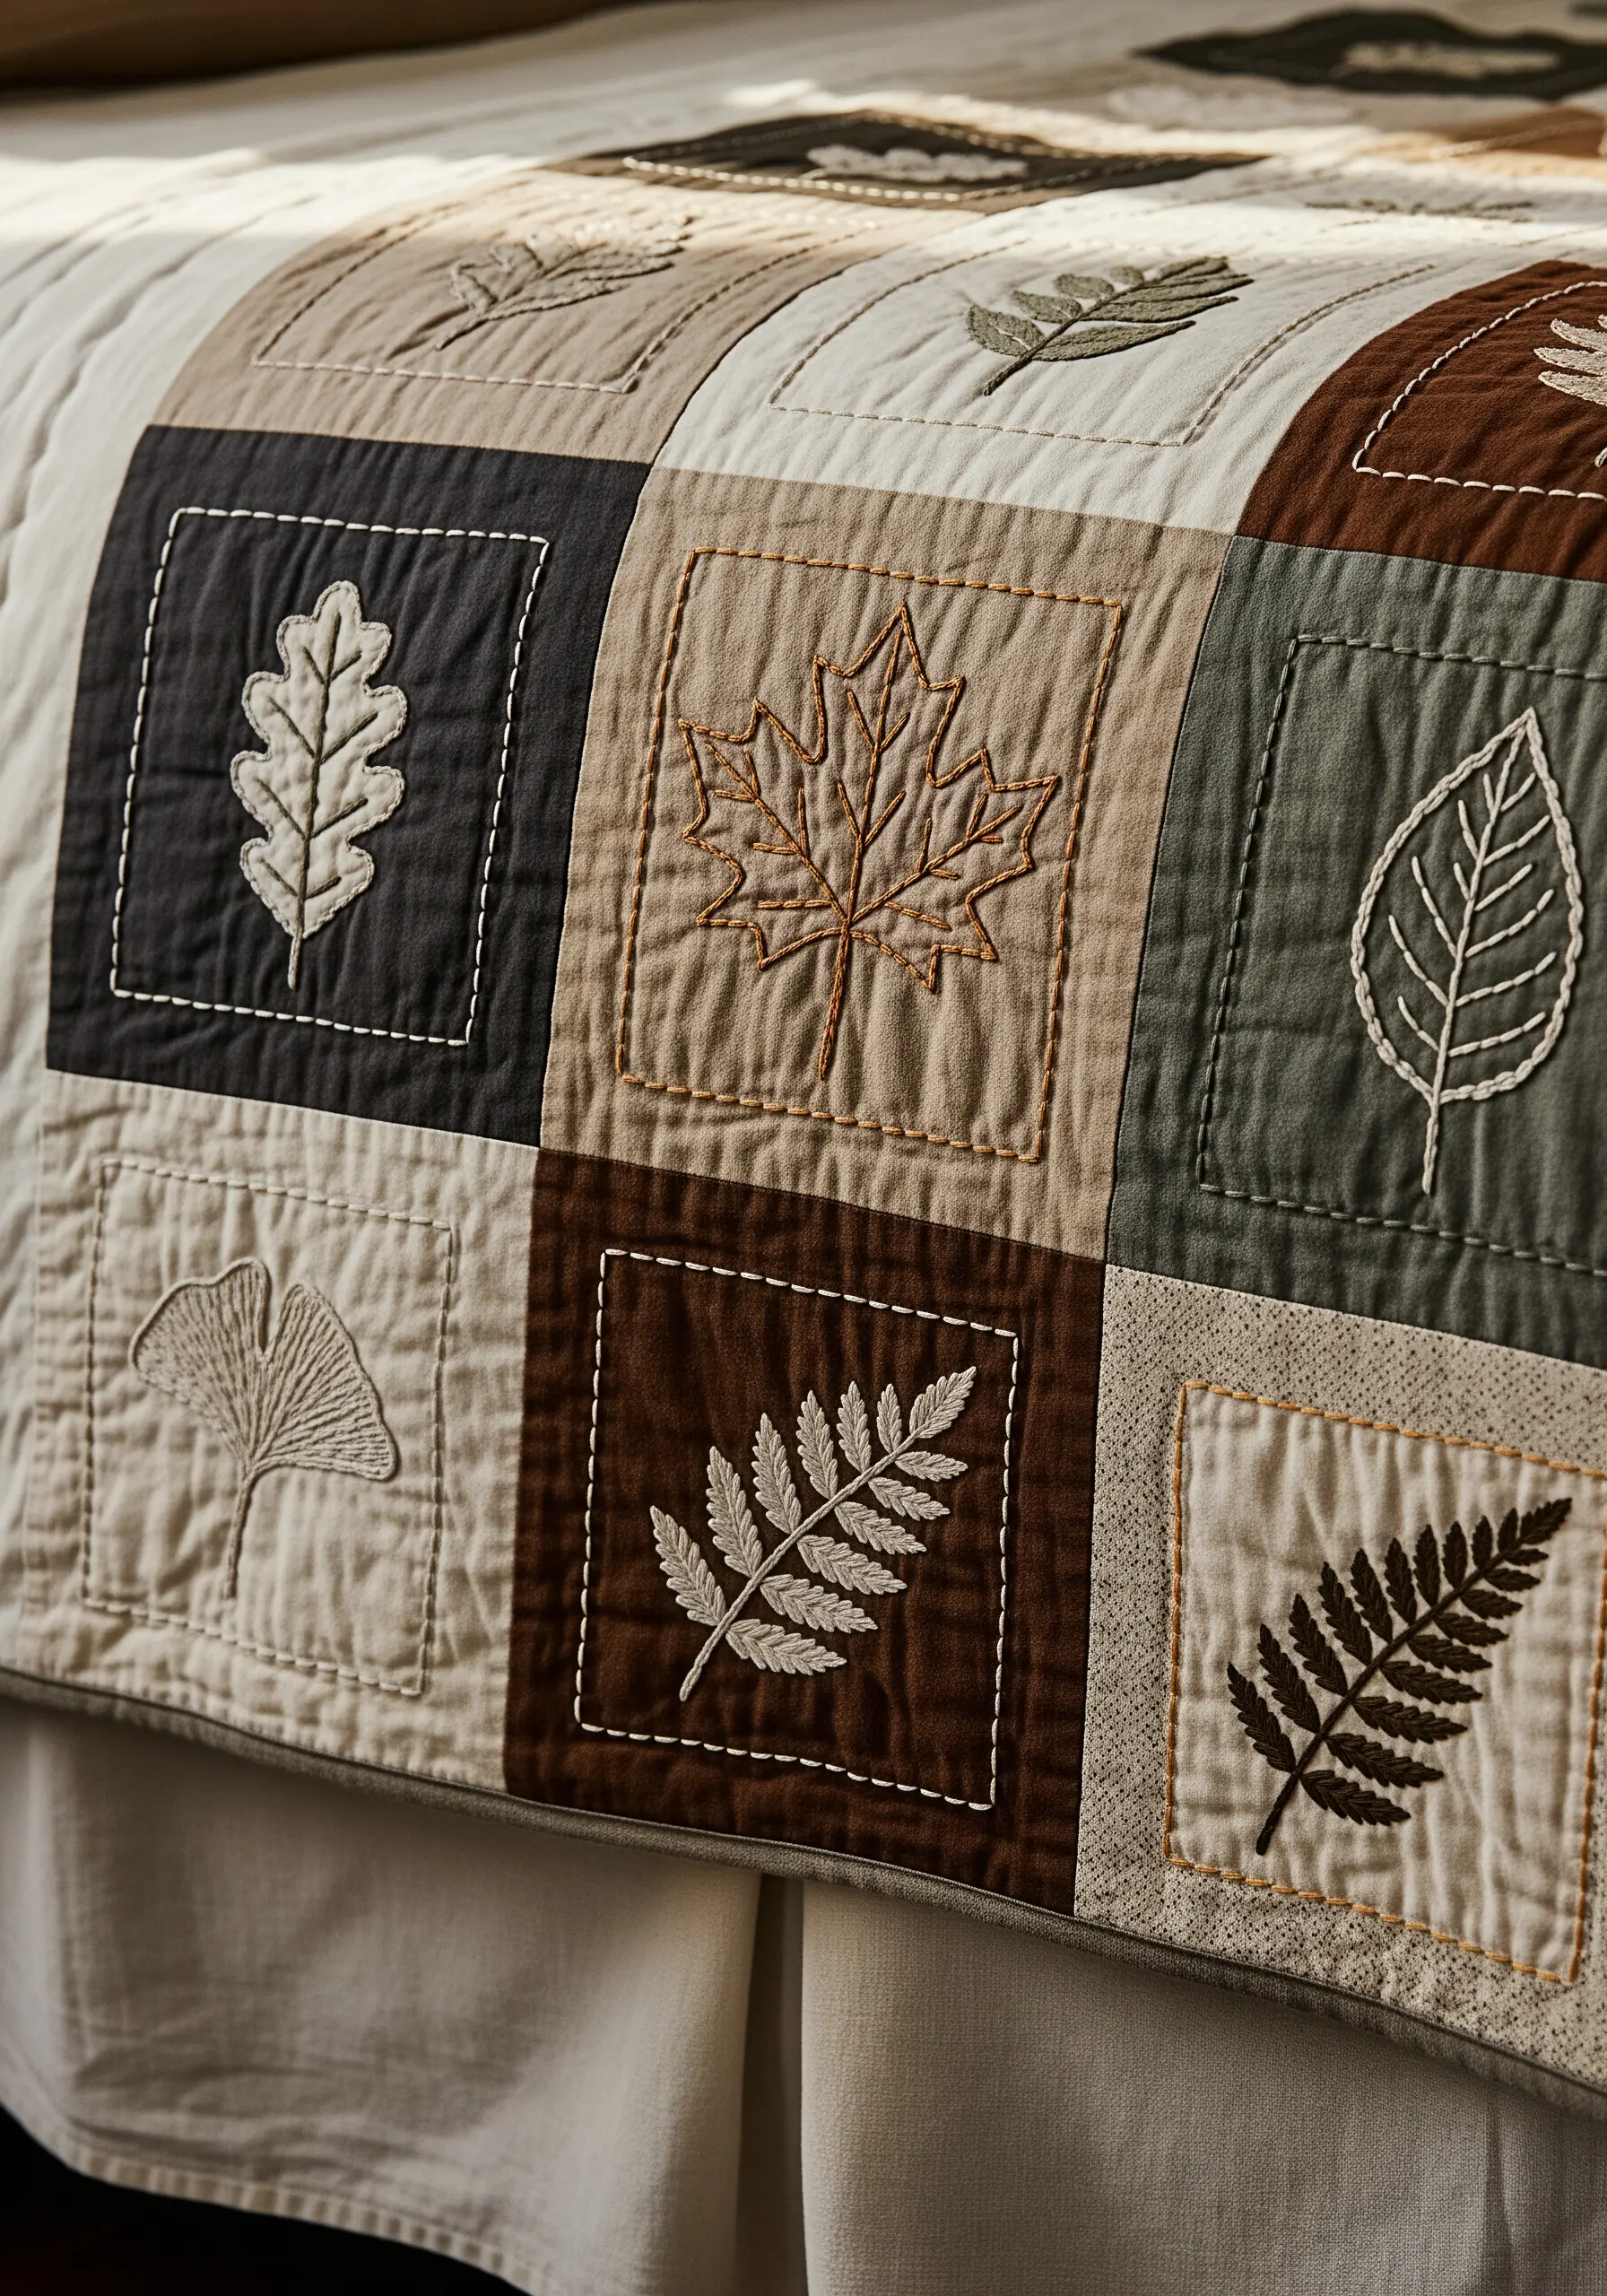
Add a layer of handcrafted elegance to a quilt without overwhelming the patchwork design.
On each square, use a simple backstitch or stem stitch to outline a single botanical motif.
For a sophisticated, tone-on-tone effect, choose a thread that is only a few shades lighter or darker than the fabric.
This subtle detail adds texture and a personal touch while honoring the graphic quality of the quilt itself. You can find many beautiful hand-embroidery leaf patterns suitable for this project.
15. Building Functional Objects with Coiled Rope
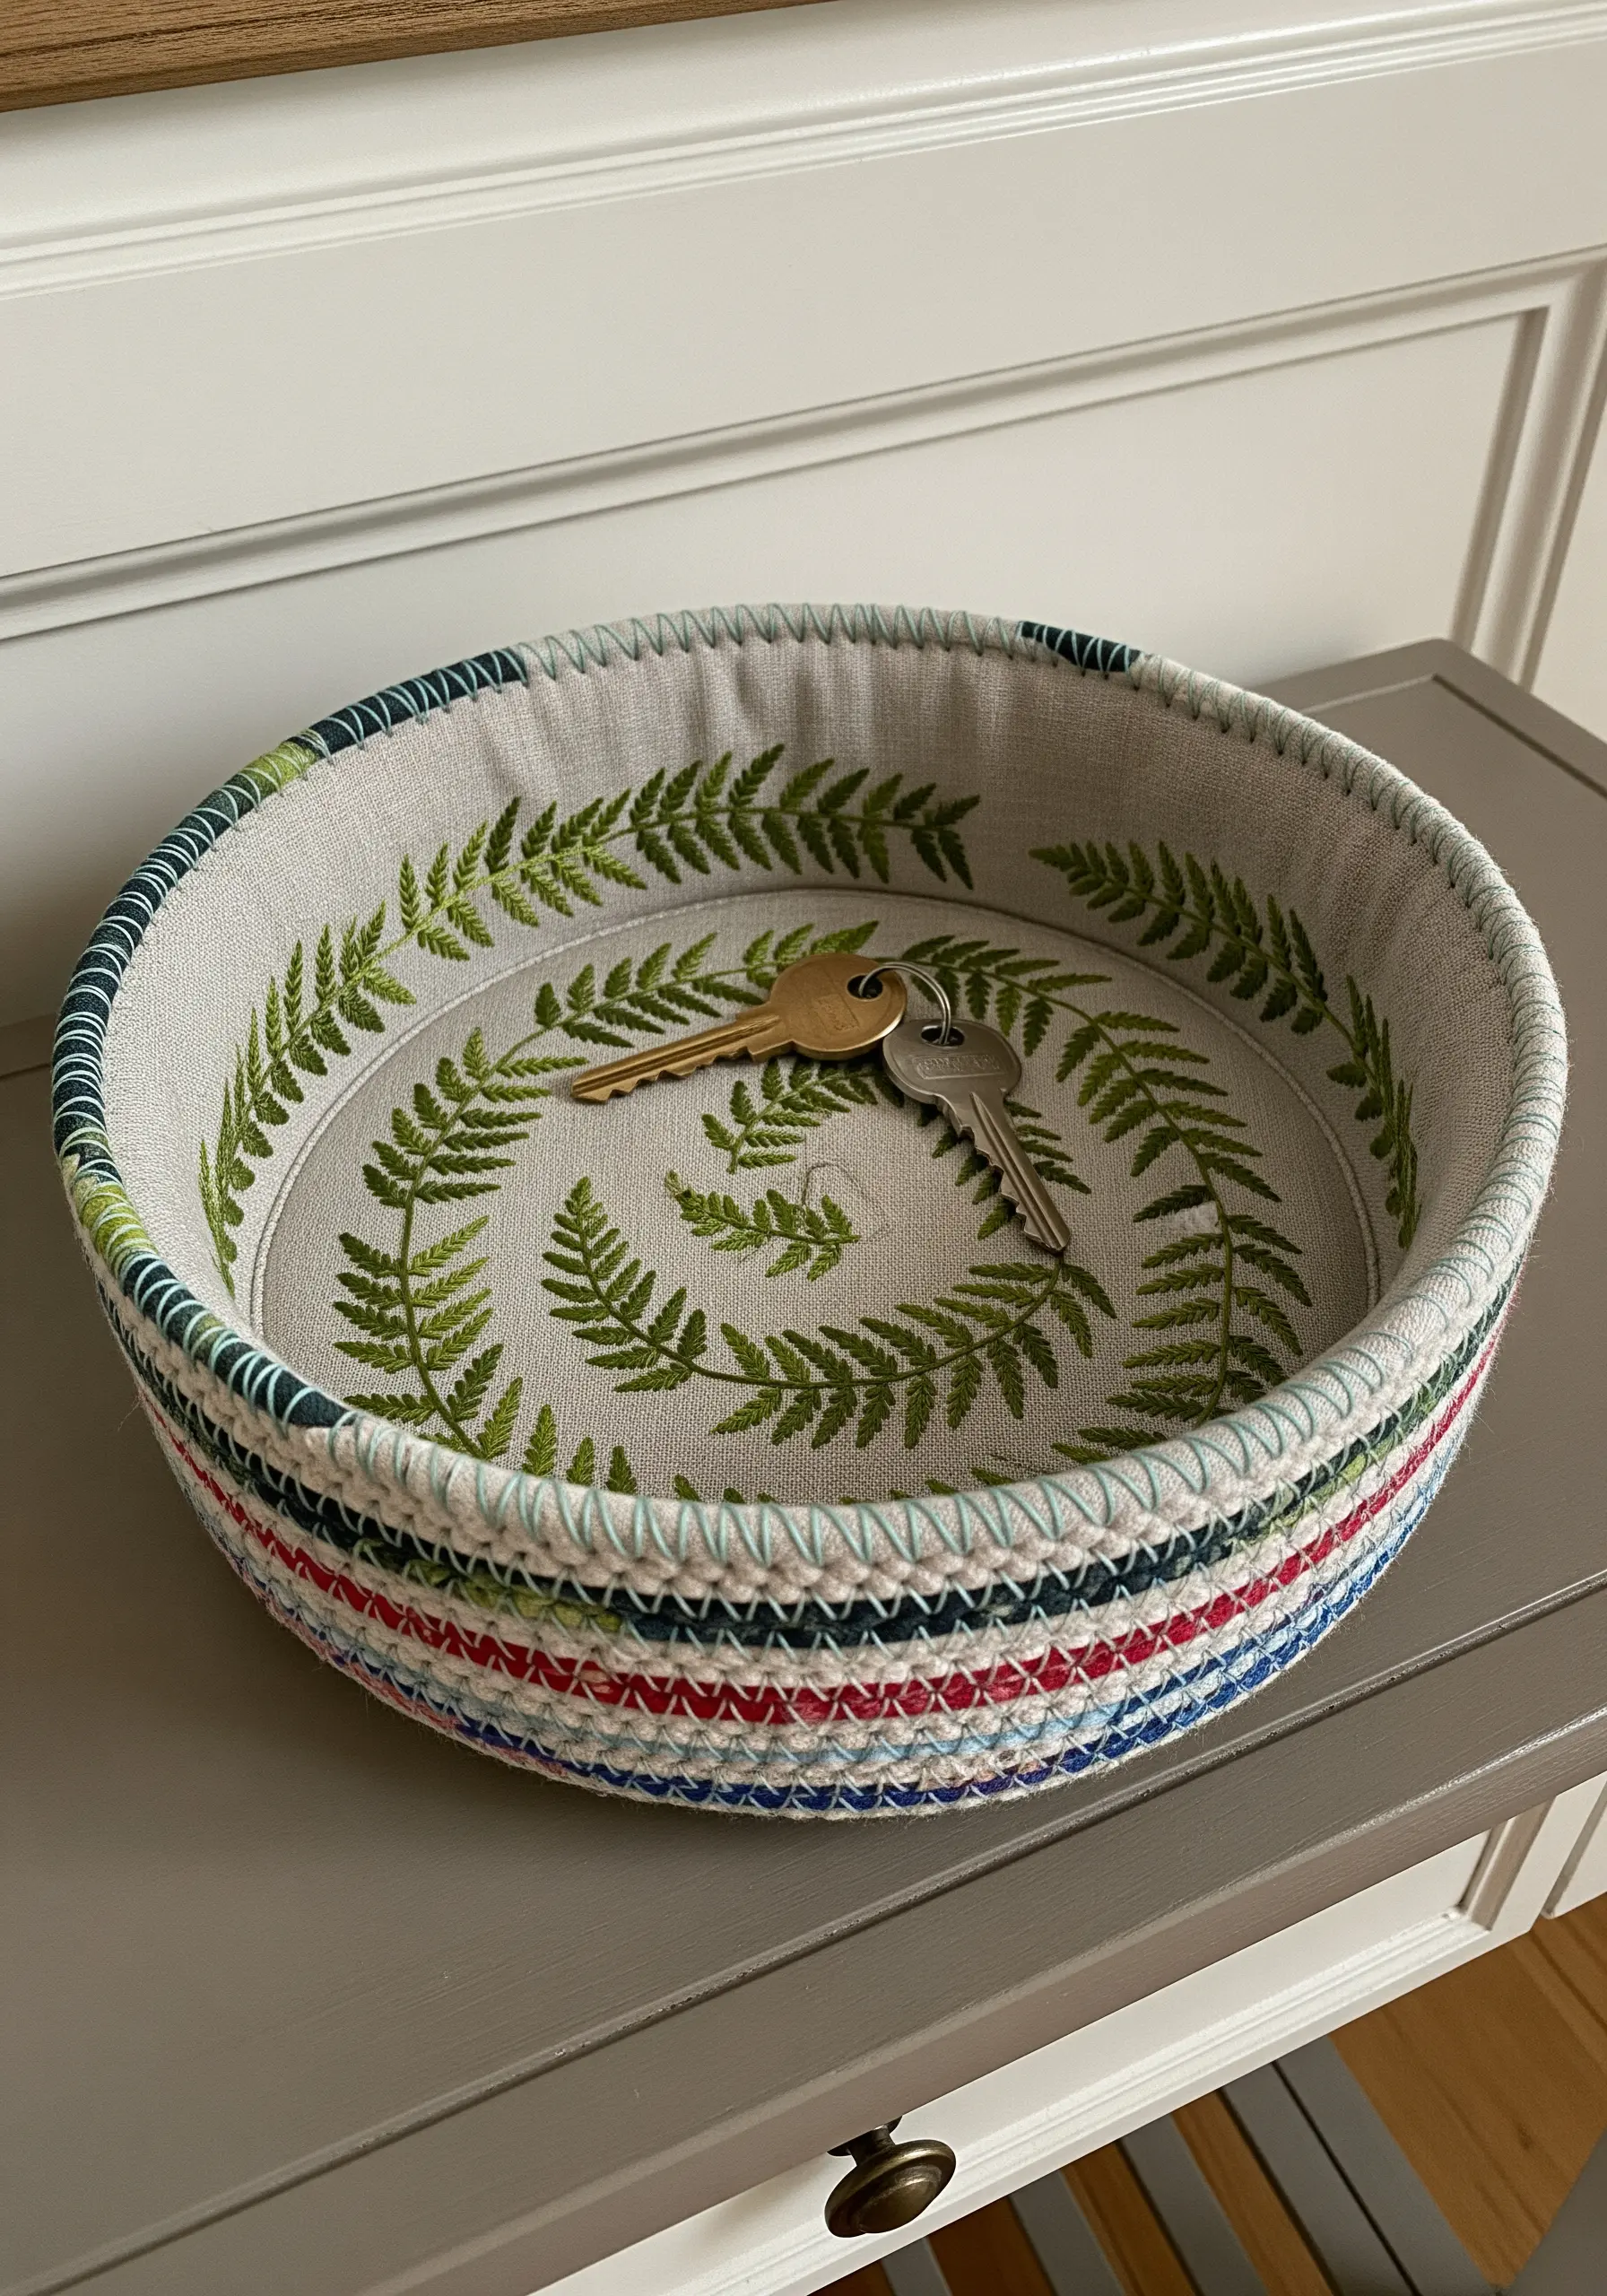
Create a beautiful and useful trinket bowl by starting with a flat, embroidered base.
Stitch your design—like these delicate fern fronds—onto a circle of canvas or heavy linen. Then, use this circle as the starting point for a coiled rope bowl.
Wrap the embroidered base around the end of a cotton rope and begin coiling and stitching the rope to form the walls. The embroidery becomes a piece of hidden art at the bottom of a functional object.
Explore different fern foliage stitch variations to personalize your own.
16. The Art of the Minimalist Motif
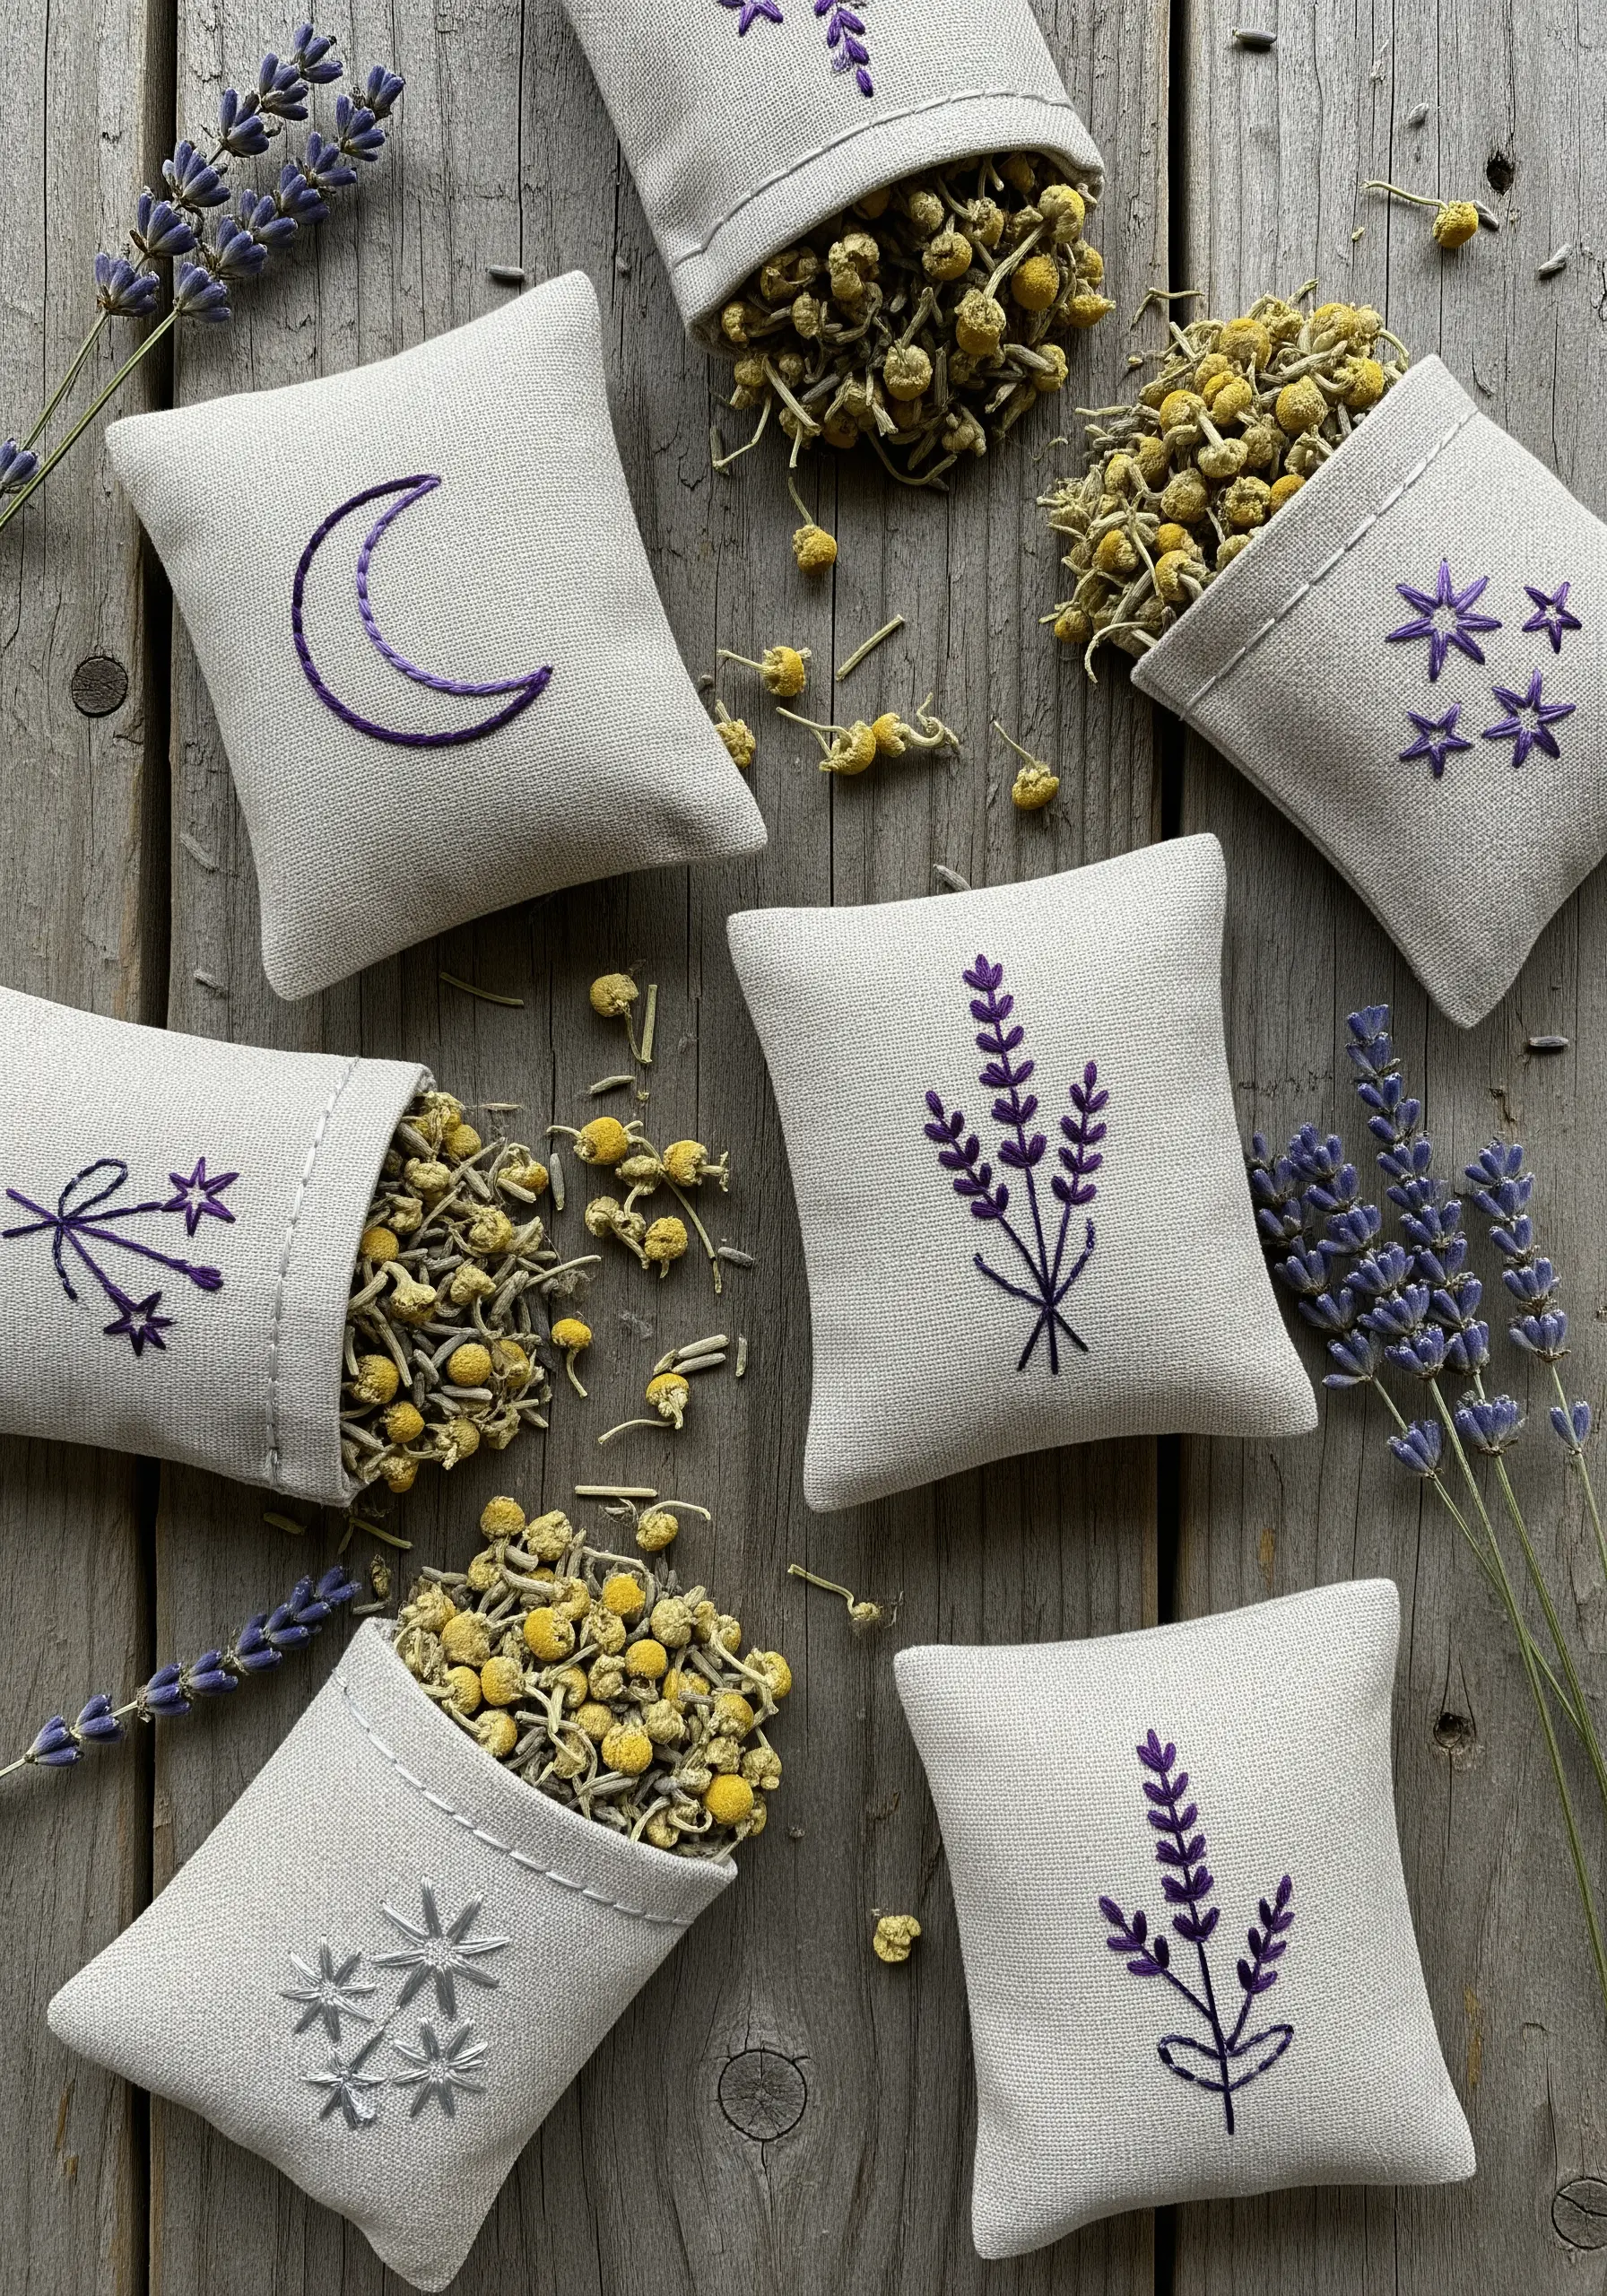
For small, functional items like sachets or gift tags, a simple, well-executed motif speaks volumes.
Limit your design to one or two core elements and a restrained color palette.
Focus on stitch quality: a neat stem stitch for a lavender stalk and tiny, precise detached chain stitches for the blossoms are all that’s needed.
The clean space around the design on a neutral linen background gives it a modern, refined feel. These delicate lavender stitch ideas are perfect for creating thoughtful gifts.
17. Designing an Embroidered Triptych
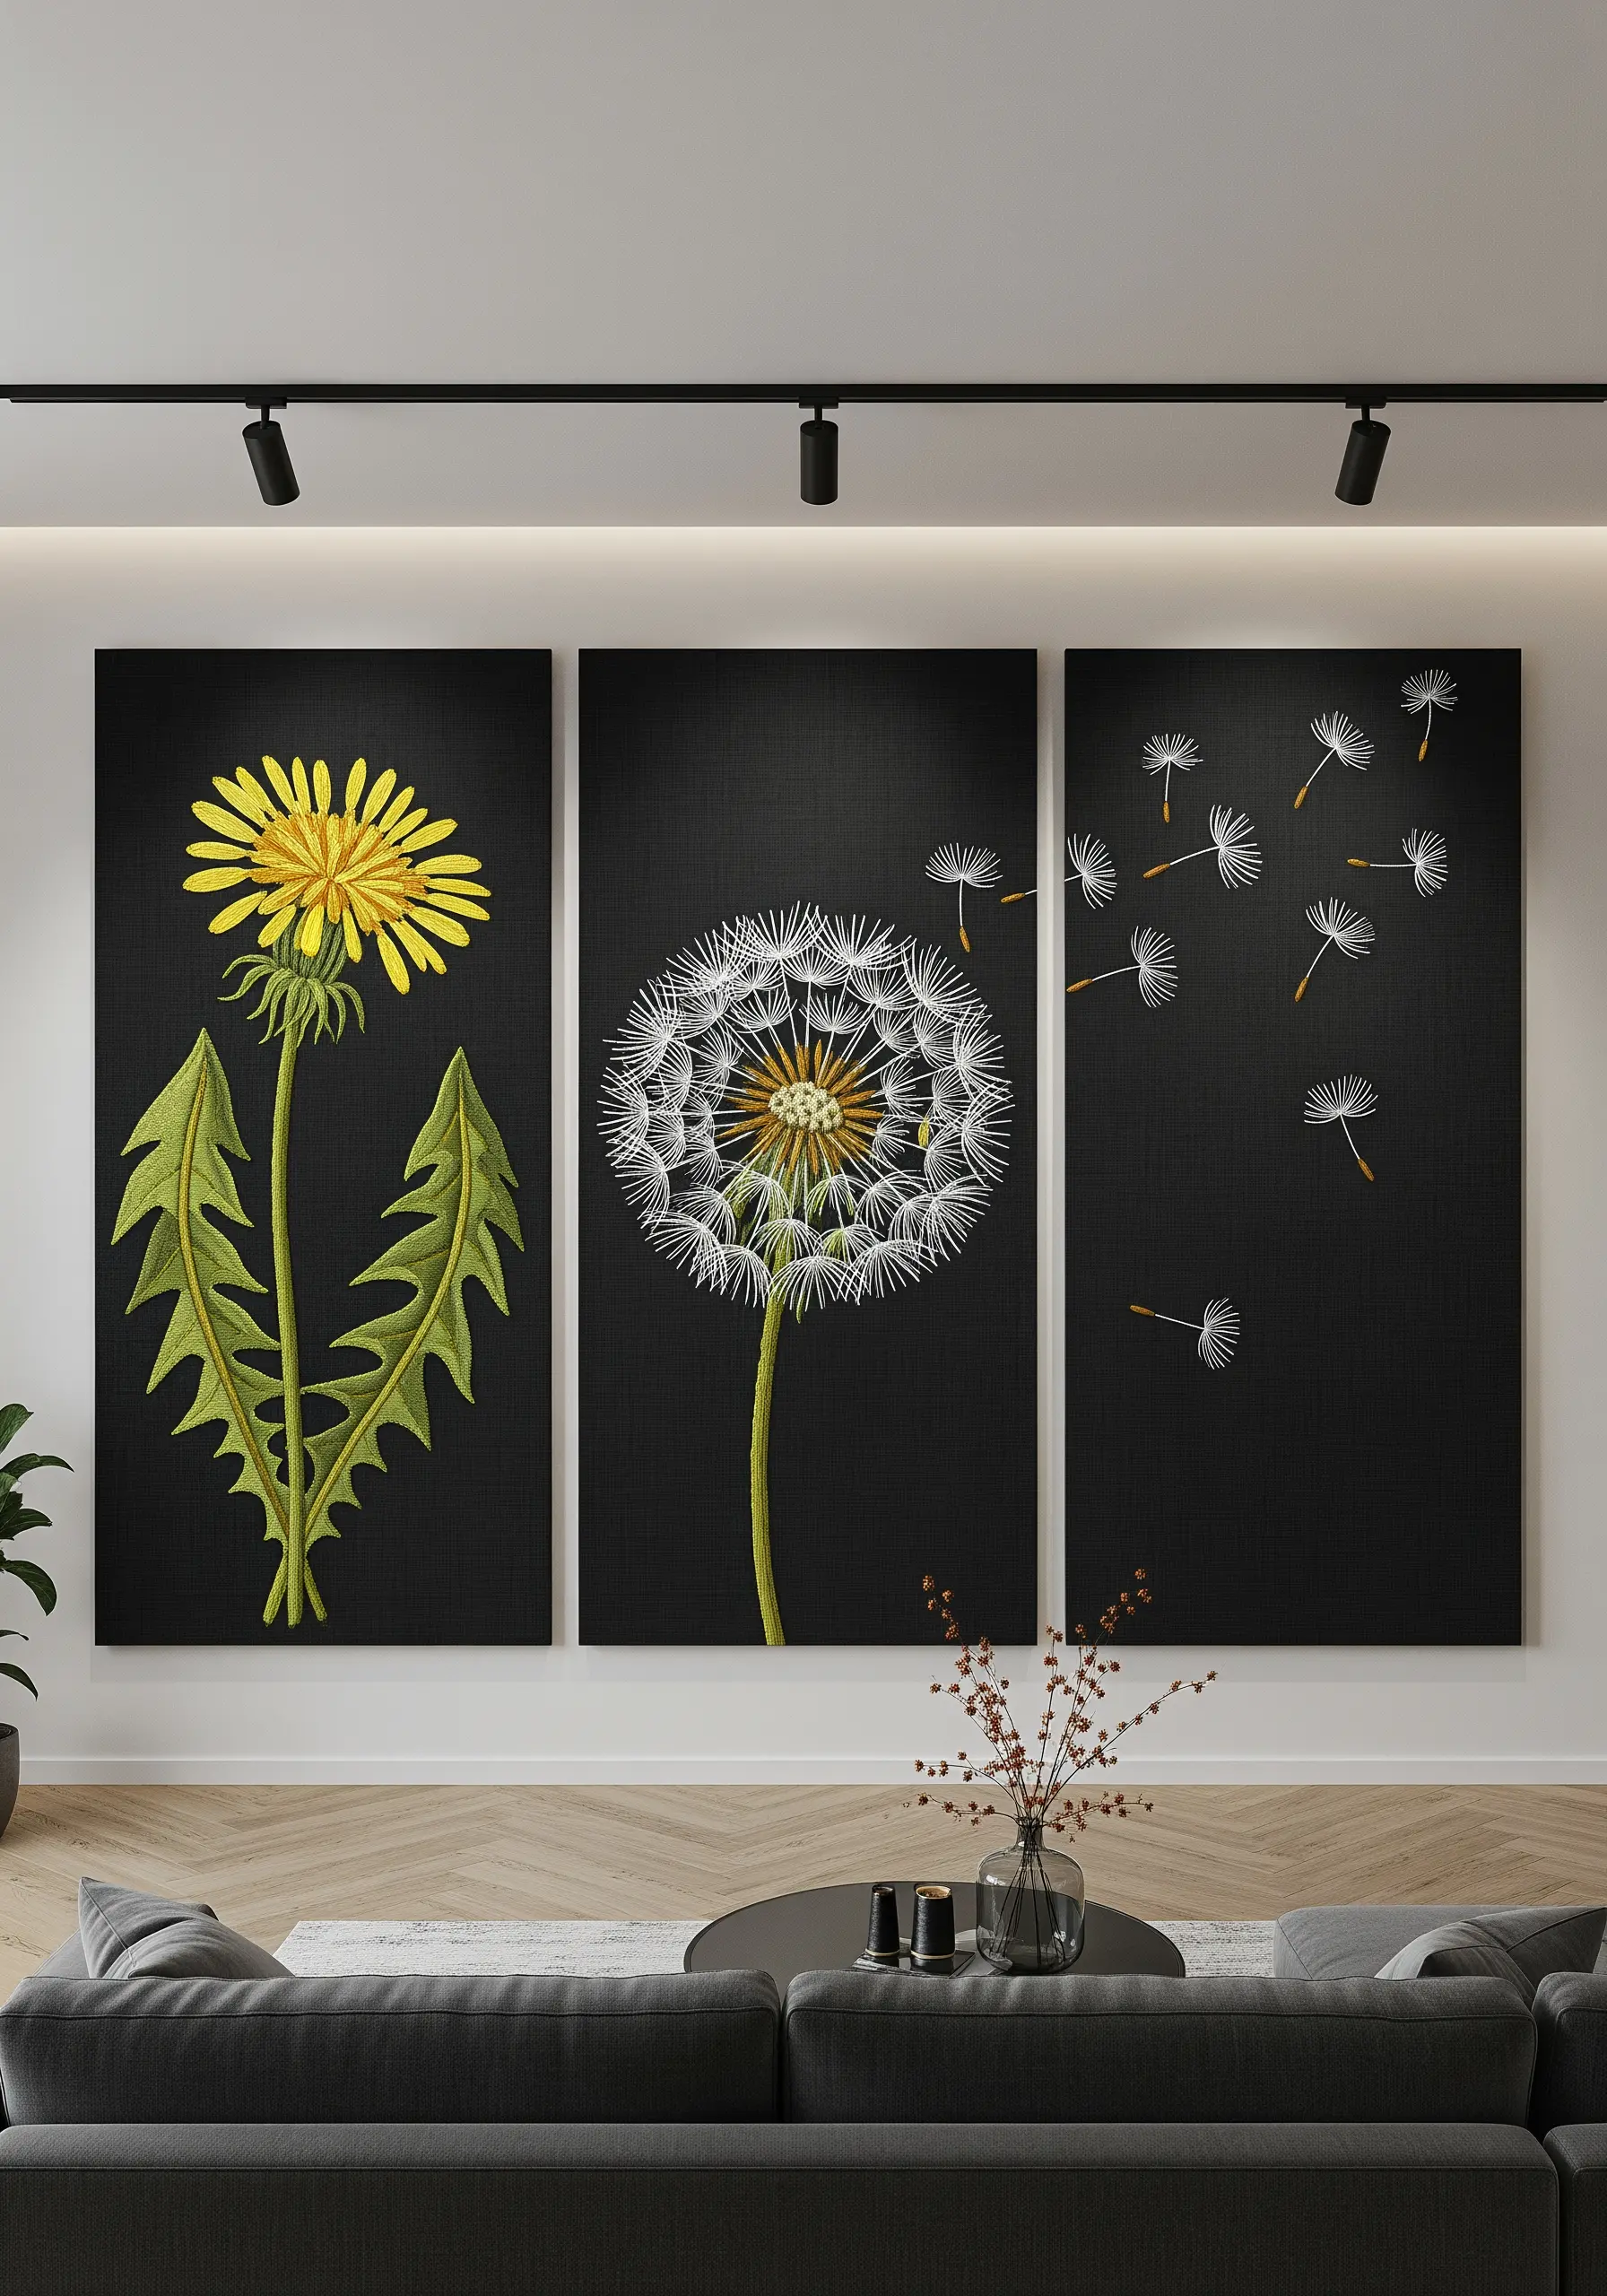
When creating a multi-panel artwork, think of the composition as a single, flowing narrative.
Let elements from one panel drift into the next to create a sense of connection and movement, like these dandelion seeds floating across the canvases.
Stitching on dark fabric with white or light-colored thread creates dramatic contrast and makes every stitch pop.
This approach allows you to work on a manageable scale while creating large-scale embroidery tapestries that tell a complete story.
18. Stitching with Clarity on Textured Fabric
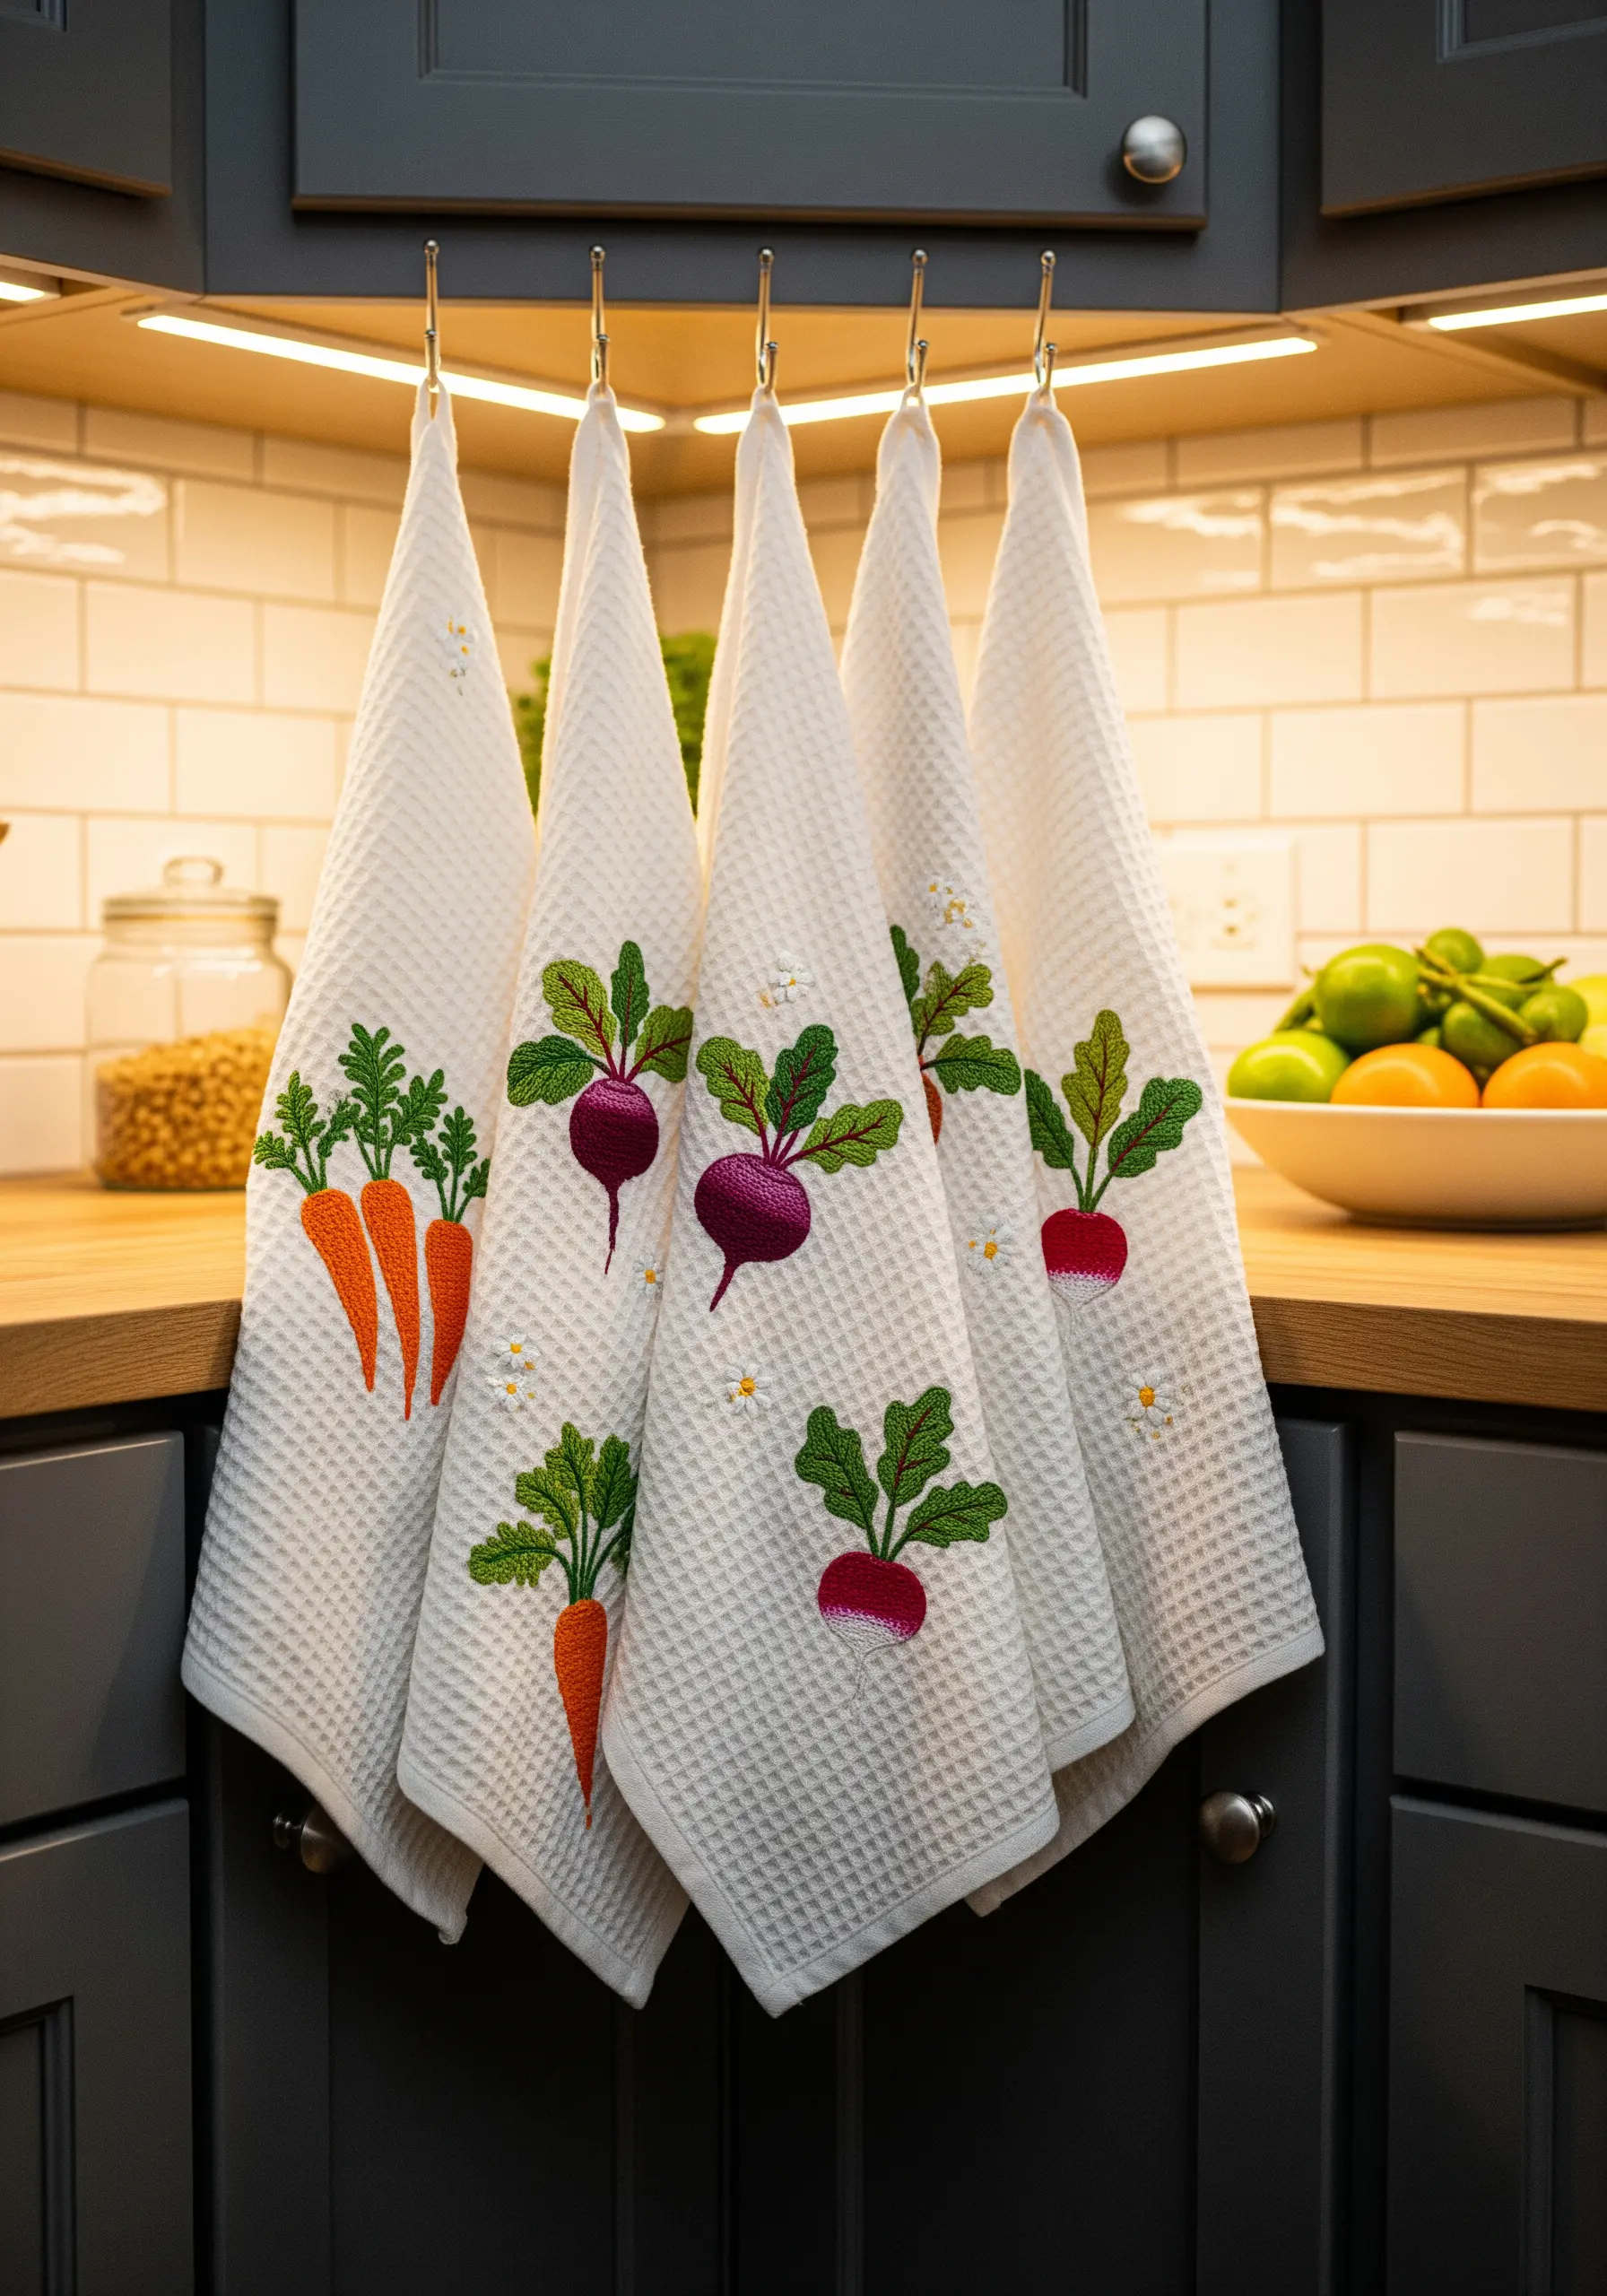
When embroidering on a textured material like waffle-weave or terry cloth, a few adjustments are necessary for a clean finish.
Apply a stabilizer to the back of the fabric; this prevents the stitches from sinking into the weave and distorting.
Use all six strands of your embroidery floss and choose simple, bold shapes. The thickness of the thread will help your design sit proudly on the surface, ensuring your motifs look crisp and vibrant, and make kitchen textiles chic and aesthetic.
19. Integrating Beadwork for Luminous Detail
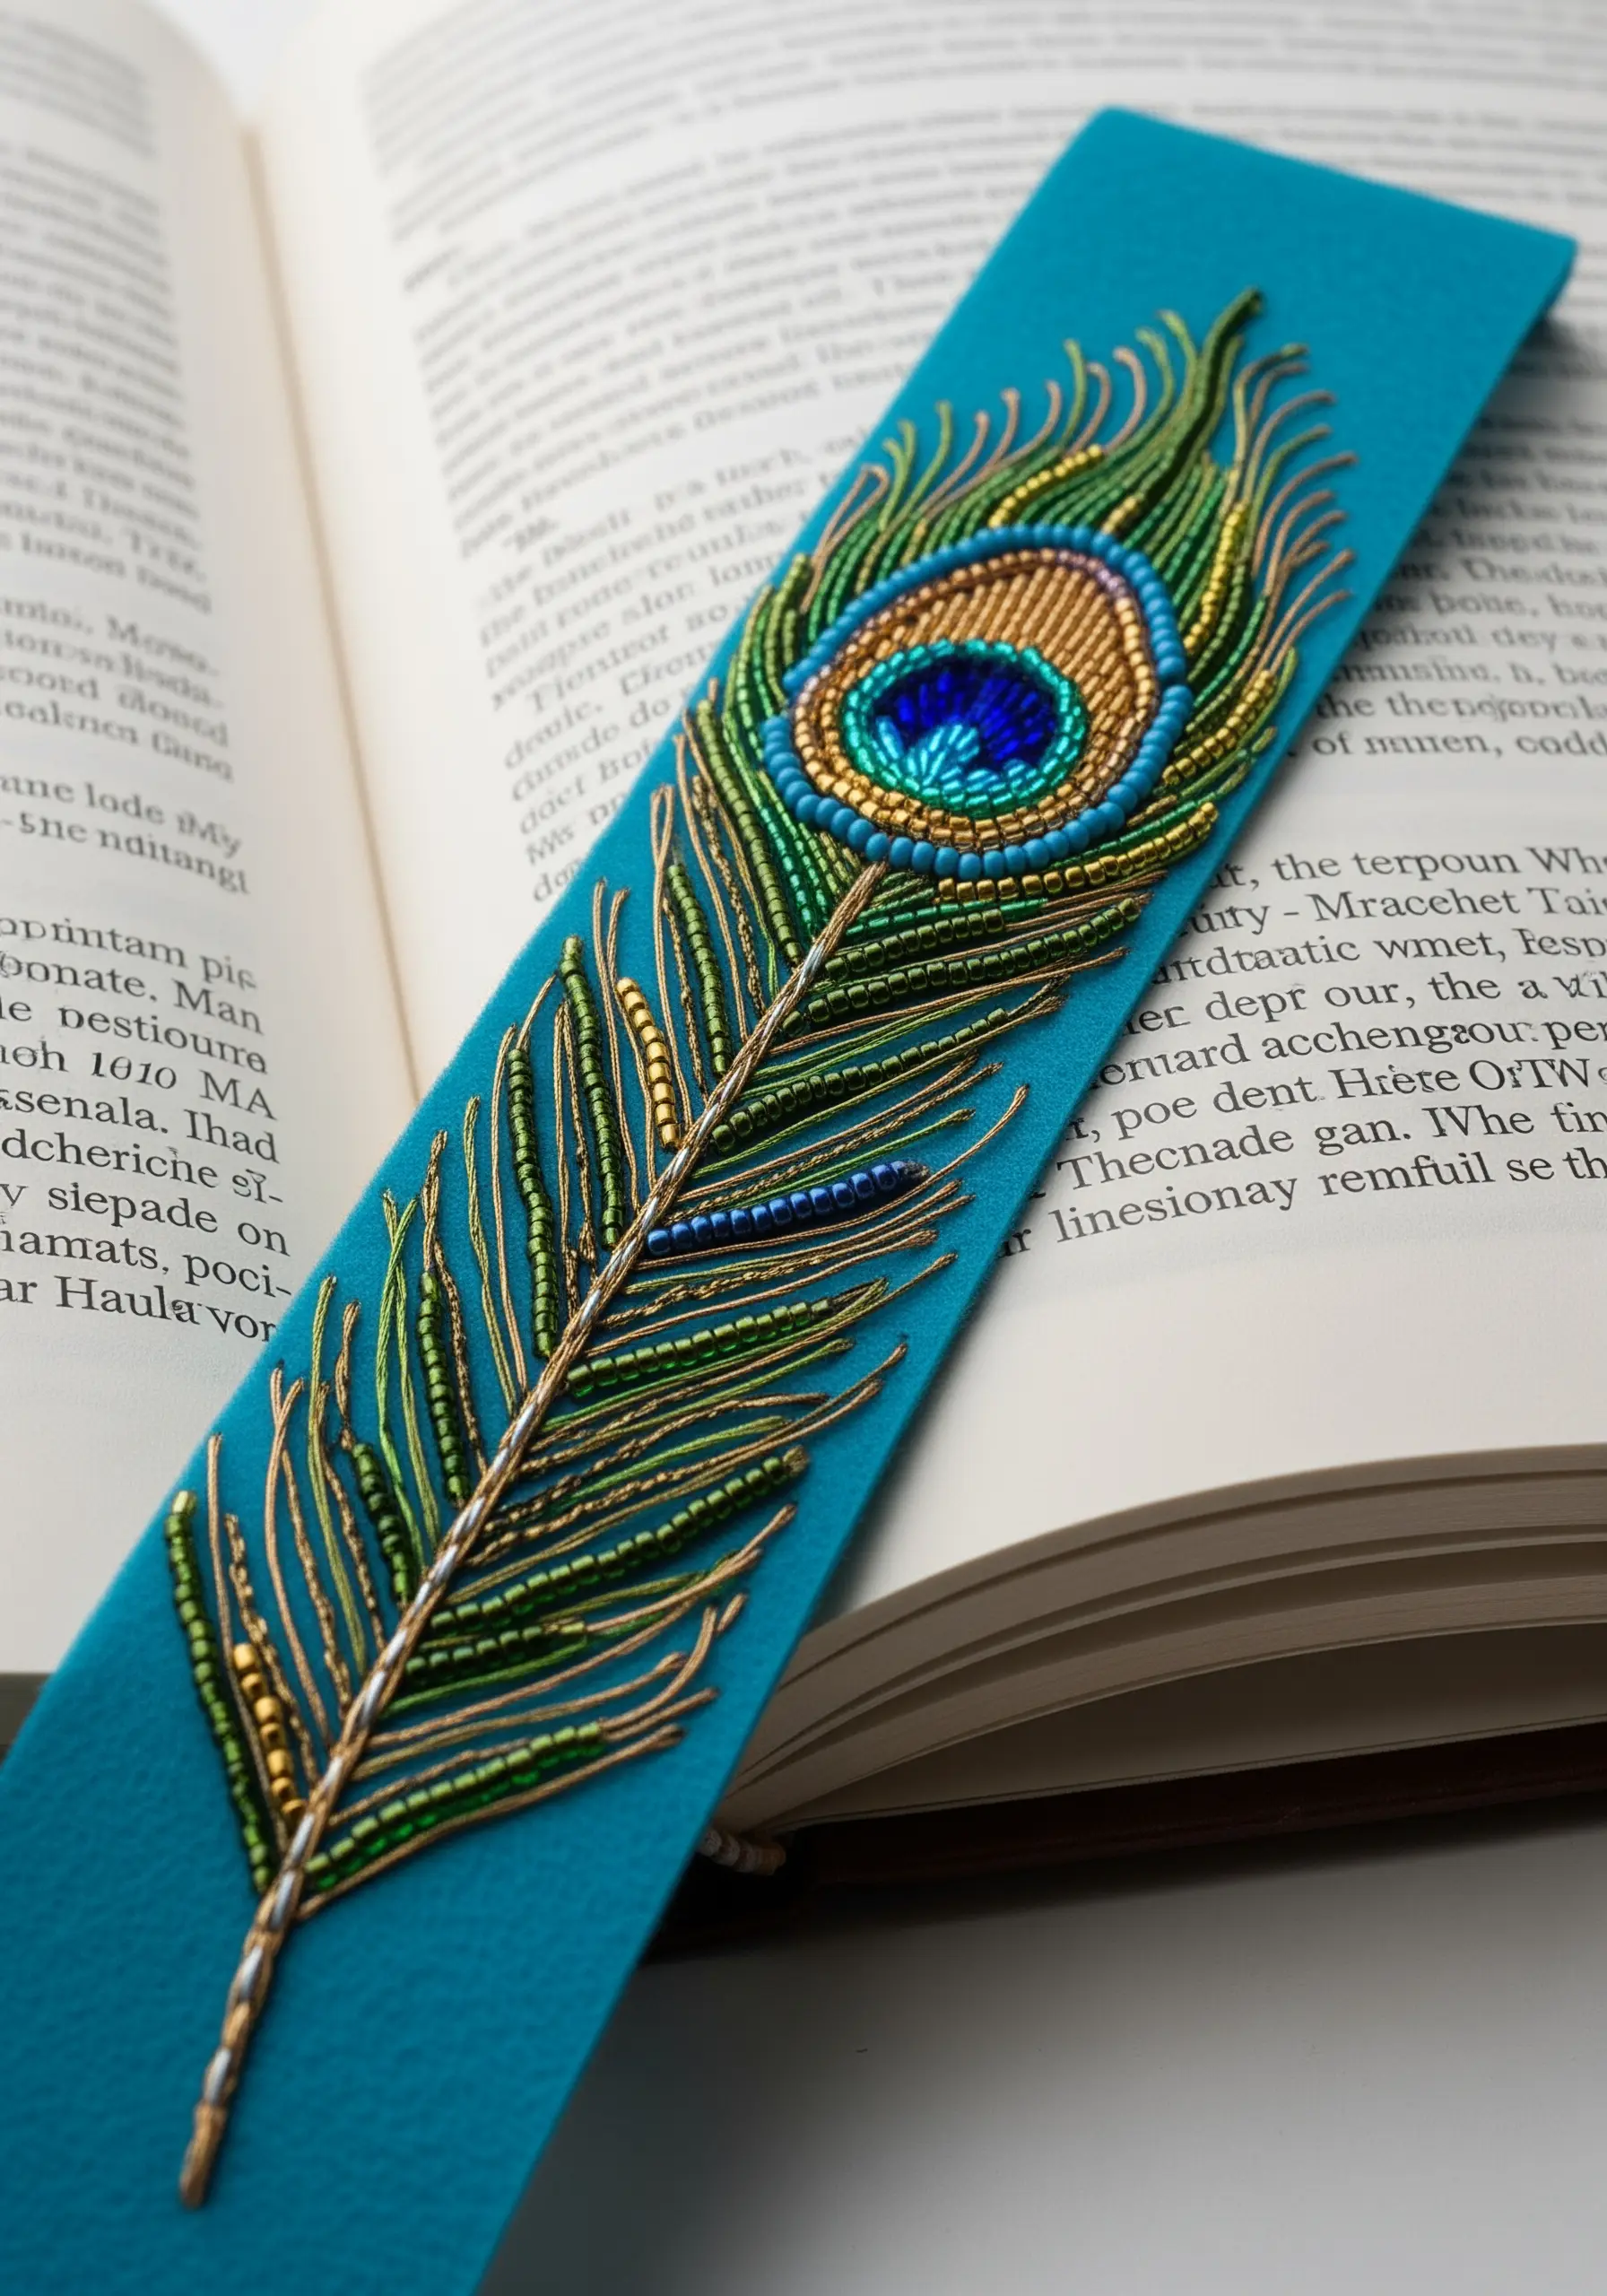
Combine fine beadwork with embroidery to create breathtaking texture and light-play.
First, outline your main shapes with a simple backstitch. Then, fill specific areas, like the eye of this peacock feather, with concentric circles of colorful seed beads.
For the delicate filaments, use single straight stitches in metallic thread, occasionally adding a single long bugle bead to catch the light.
This mix of matte thread, shimmering beads, and metallics creates unparalleled depth and turns a simple item into one of many unique DIY embroidery presents.
20. Creating Three-Dimensional Felt Objects
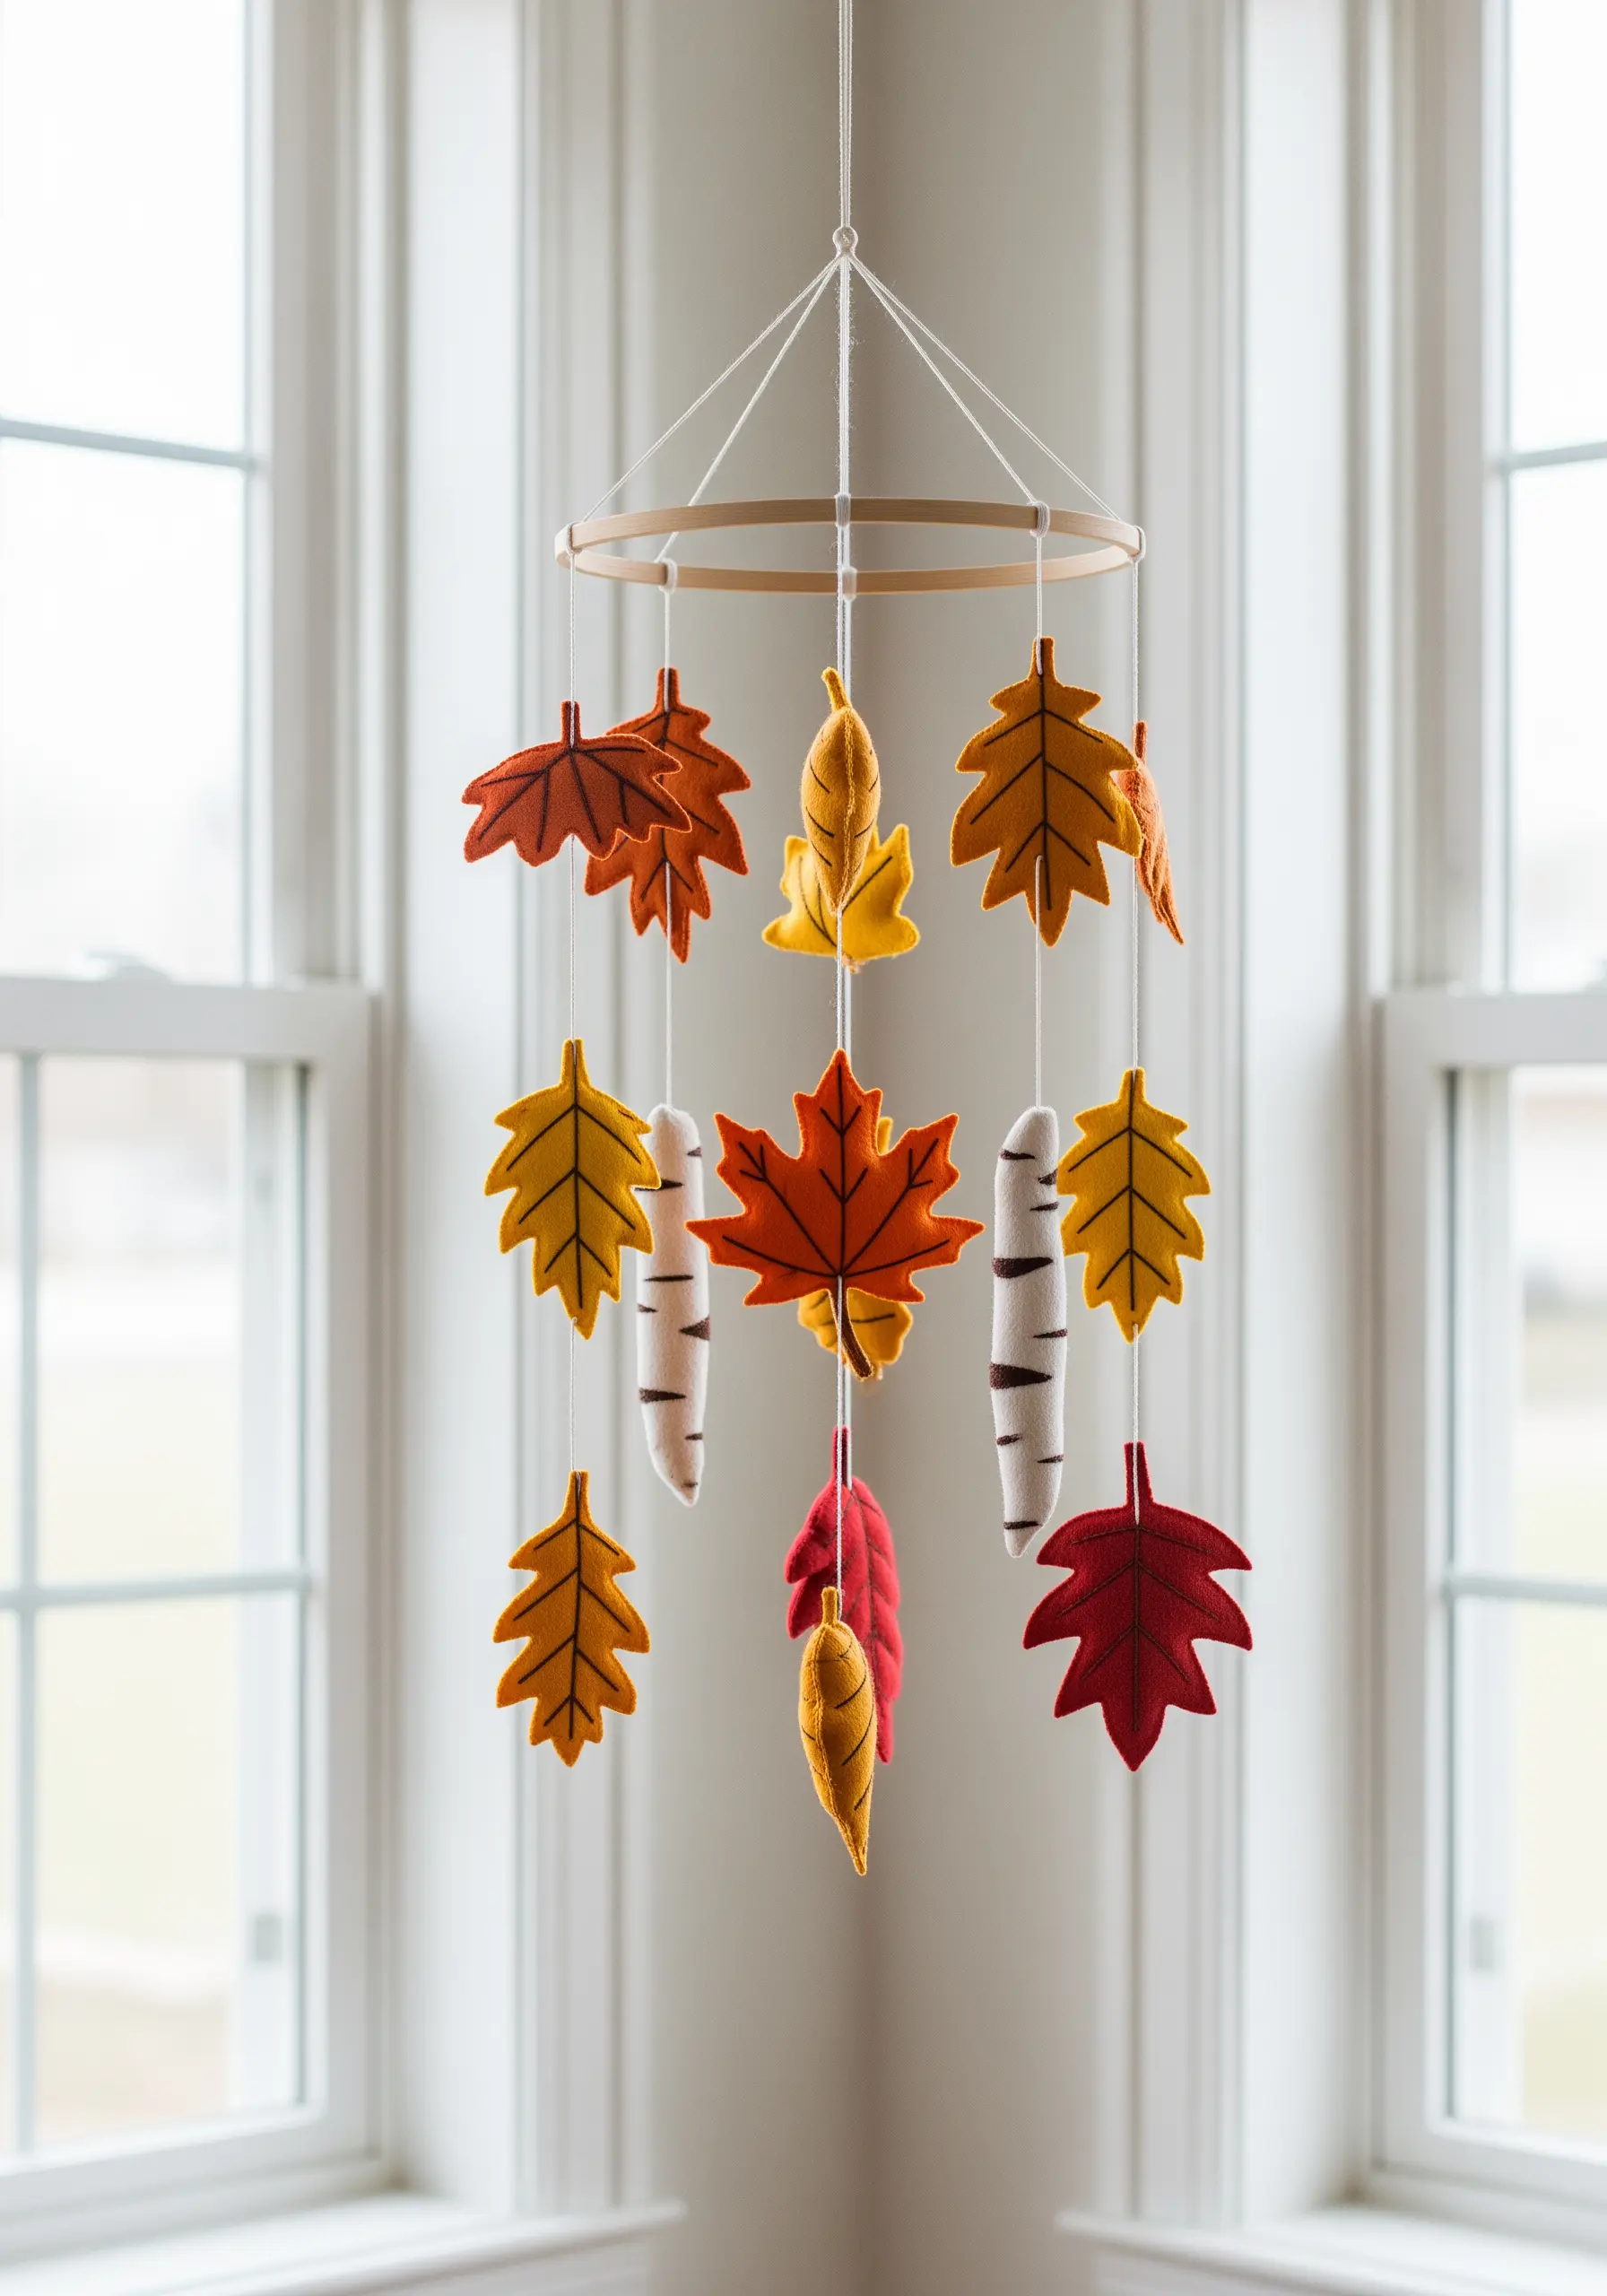
Take your embroidery off the hoop by constructing soft, three-dimensional forms.
For each element, cut two identical shapes from felt. On one layer, add your embroidered details—a simple backstitch for leaf veins is perfect.
Place the second felt shape behind the first and join the edges with a neat blanket stitch, adding a small amount of stuffing before you close the final seam.
This technique creates charming, tactile objects perfect for embroidered nursery decor ideas or seasonal decorations.
21. Achieving Smooth Gradients in Thread Painting
To give fruits or flowers a realistic, rounded look, master the long-and-short stitch.
Work in sections, starting with one shade and then blending in the next. The key is to stagger the length of your stitches, ensuring the needle comes up through the middle of the previous stitches to create a seamless transition.
This painterly technique eliminates harsh lines and creates a soft, natural gradient, which is essential for gradient color floral embroidery ideas.
22. The Art of Illusion on Sheer Fabric
Create breathtakingly delicate designs by stitching on a nearly invisible background like tulle or organza.
The fabric disappears, allowing your stitches to appear as if they are floating in air.
Use a single strand of thread and a simple backstitch to trace fine, detailed patterns like these insect wings.
When hung in a window or placed over a light source, the design comes alive, showcasing one of the most elegant modern thread art techniques.
23. Crafting Large-Scale Abstract Wall Art
For an impactful piece that doubles as functional decor, think beyond the hoop.
Stretch a neutral-colored, heavy-duty fabric like linen over a large corkboard or canvas frame.
Use thicker threads, like wool yarn or multiple strands of floss, to create bold, flowing lines with a simple running stitch or couching stitch.
This technique allows you to create large, abstract patterns that mimic natural forms like agate or wood grain, resulting in statement wall art.
24. Building a Winter Scene with Textural Stitches
Create a tactile winter landscape by combining different yarns and stitches.
Use the couching technique—laying down a thick yarn and tacking it with a thinner thread—to form the raised, rustic tree trunks and branches.
For the soft clumps of snow, use clusters of white French knots, bullion knots, or even small, handmade pom-poms.
The contrast between the linear texture of the branches and the fluffy texture of the snow creates a dynamic and inviting scene, perfect for cozy mixed-fiber projects.
25. Giving Motifs Volume with Padded Satin Stitch
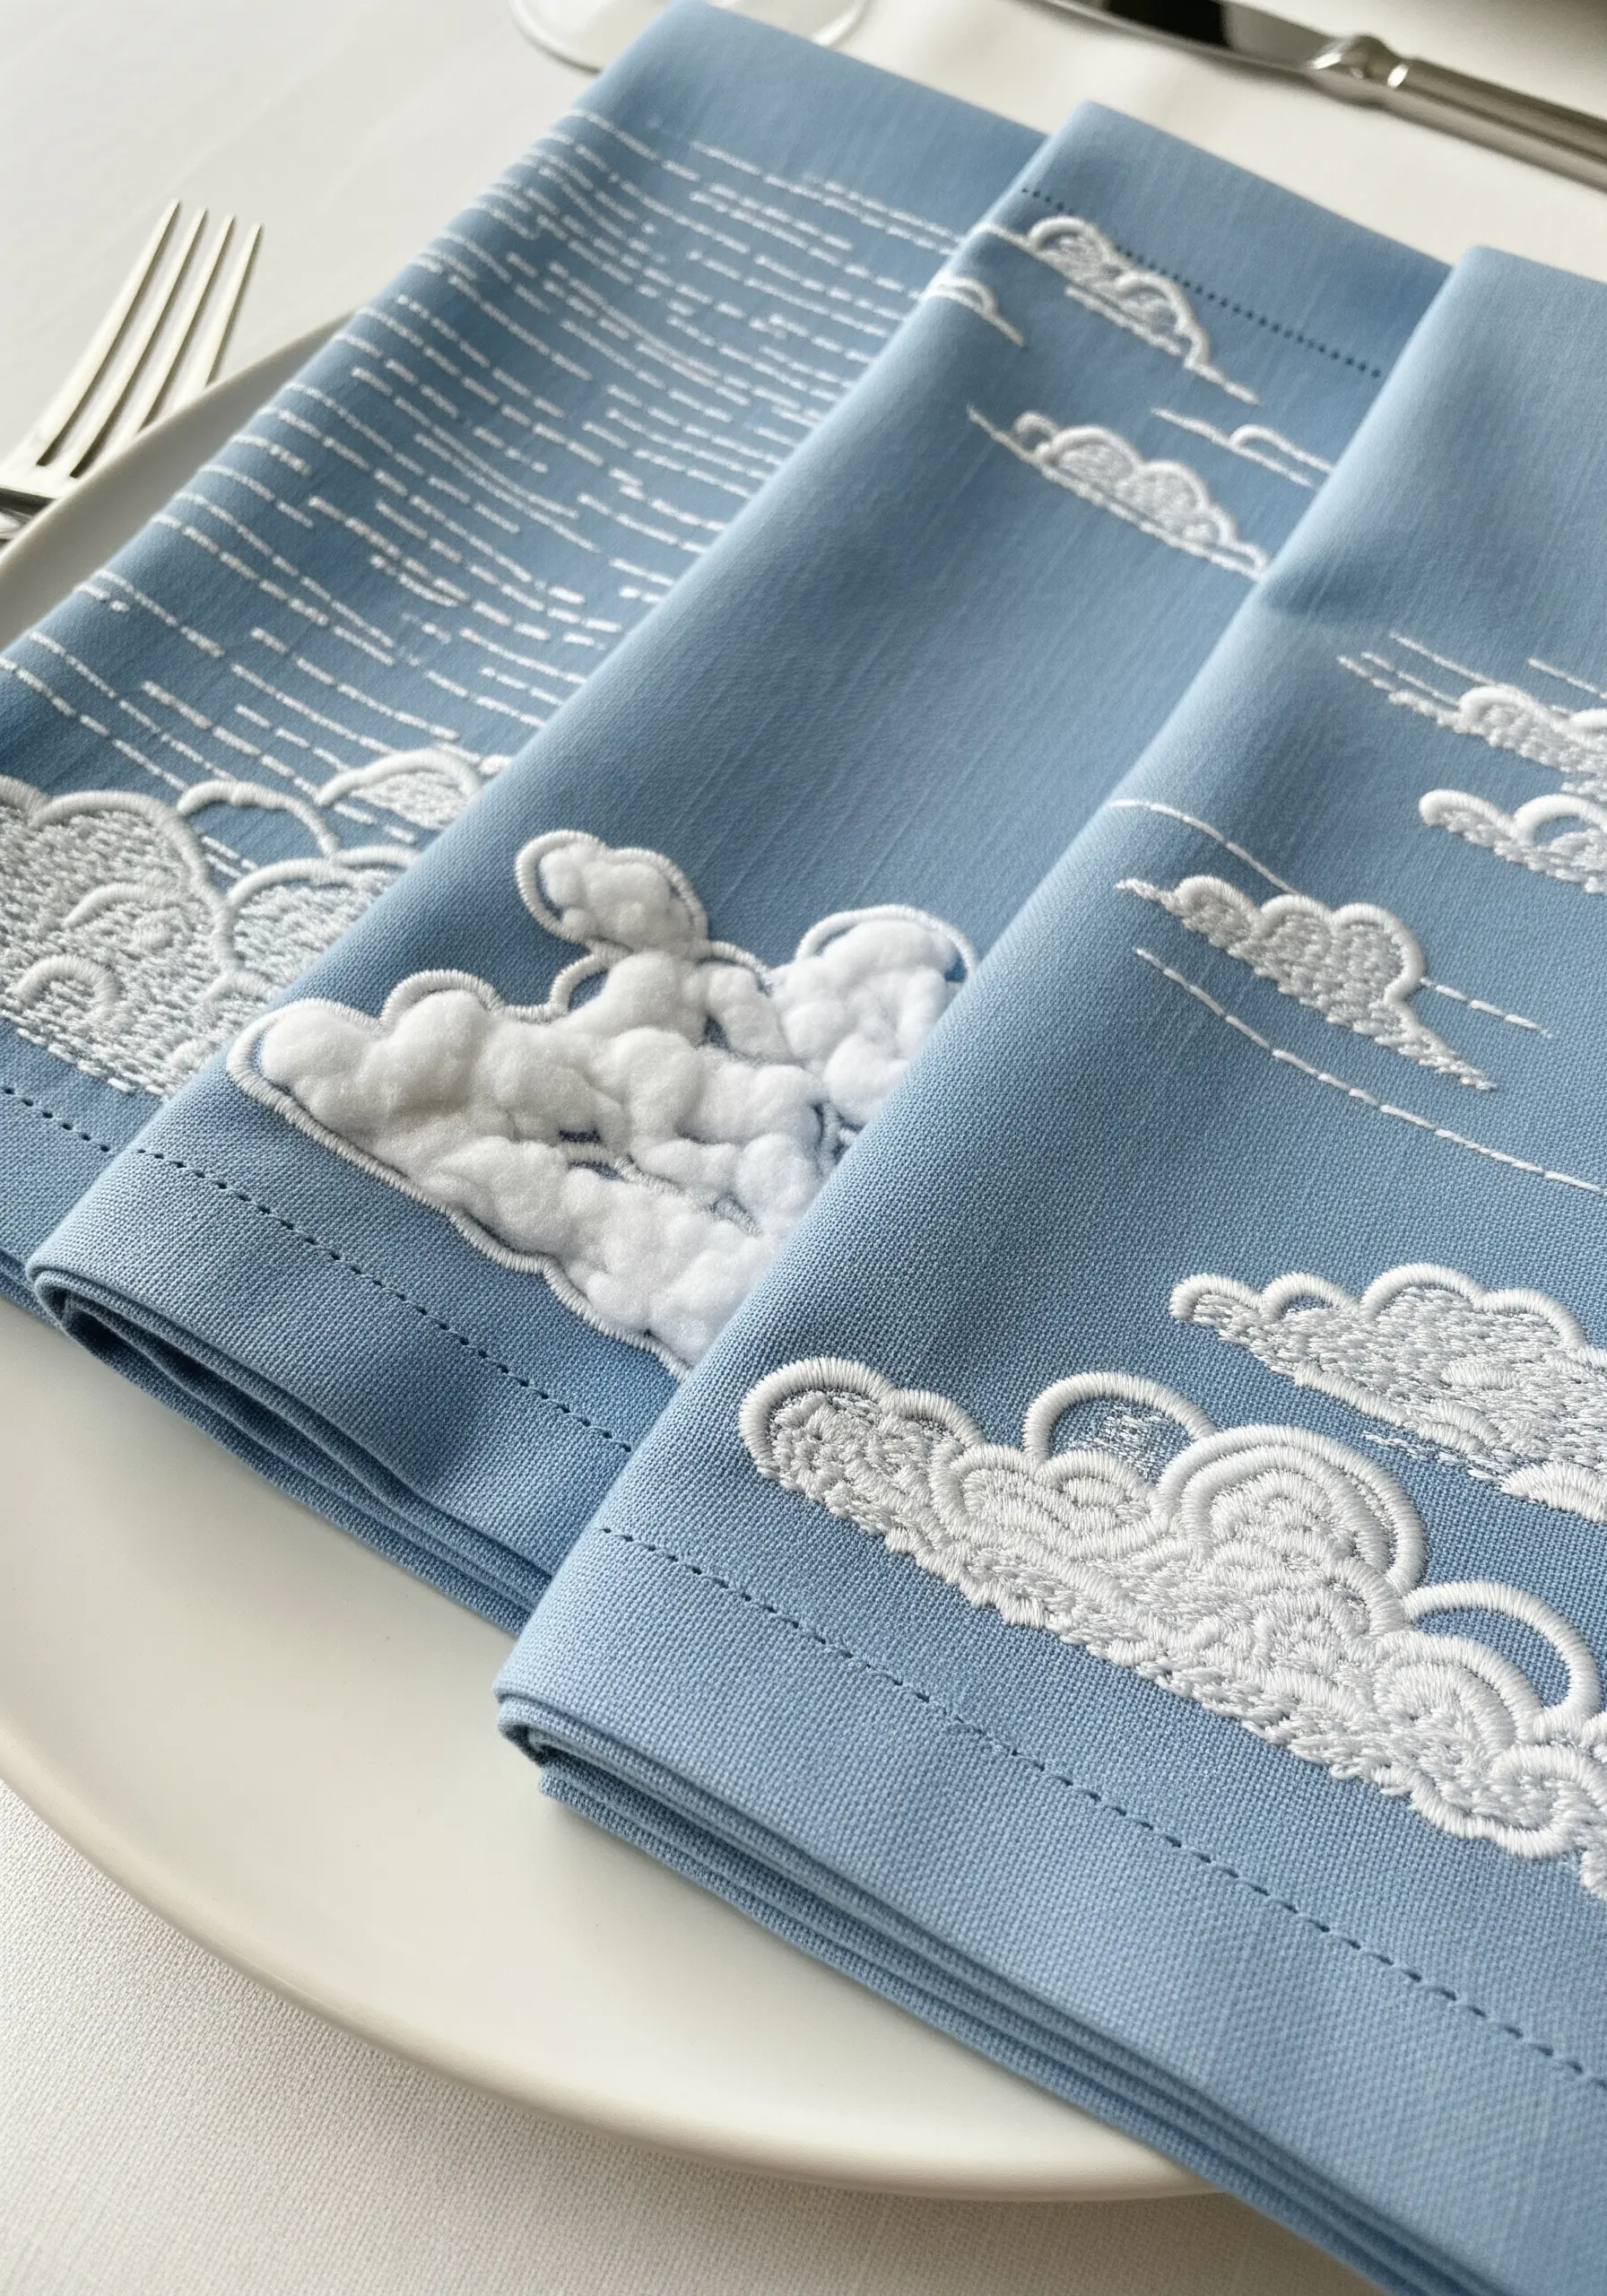
To make elements like these clouds look puffy and three-dimensional, use the padded satin stitch technique.
First, create a foundation by filling the shape with underlying stitches, like seed stitches or a layer of satin stitches worked in the opposite direction of your final layer.
Then, neatly cover this padding with smooth, even satin stitches. This raises the surface of the embroidery, making the clouds physically pop from the fabric for a luxurious, sculptural effect. It’s a wonderful technique for abstract thread embroidery ideas inspired by nature.
26. Combining Line Art with a Pop of Color
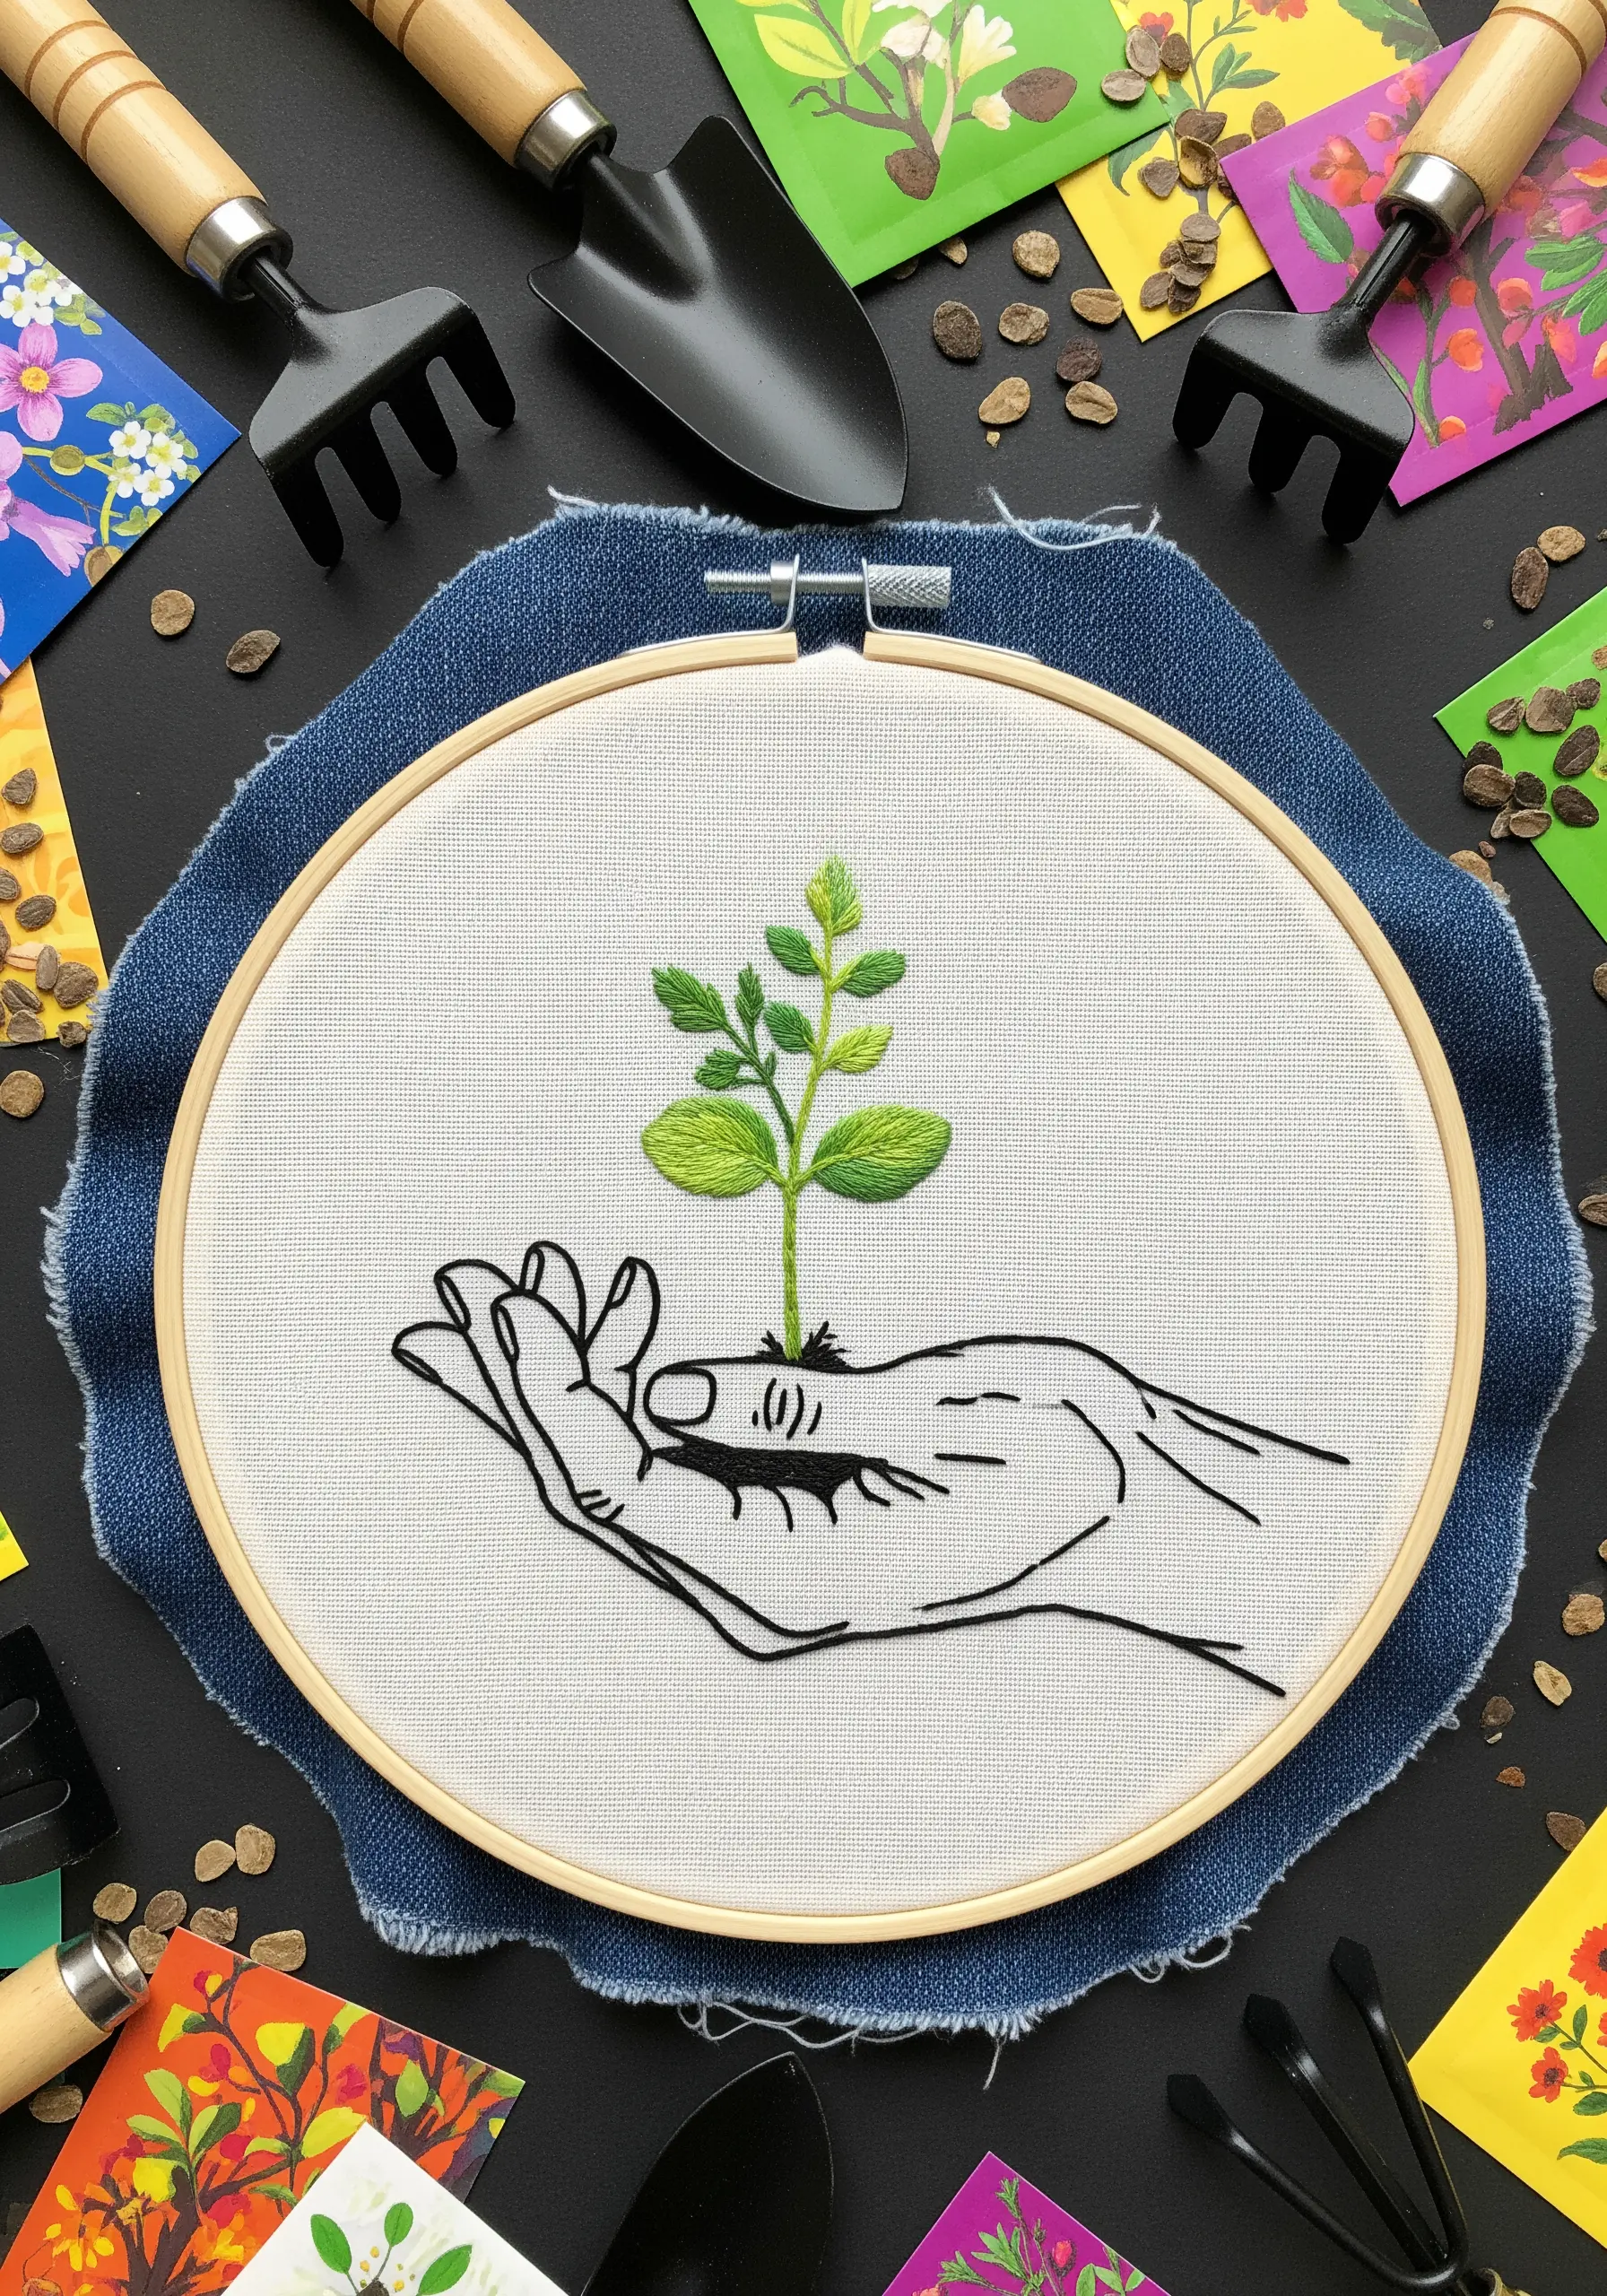
Create a powerful and modern composition by pairing detailed line work with a single, vibrant area of color.
Use a single strand of black thread and a clean backstitch to render the expressive lines of the hand. The precision here is key.
Then, bring the seedling to life with rich, saturated green thread, filling the leaves with a smooth long-and-short stitch.
This dramatic contrast immediately draws the eye, making the small colored element the emotional heart of the piece. It is a wonderful composition for nature-themed embroidery samplers.
27. Embroidering on Unconventional Woven Objects
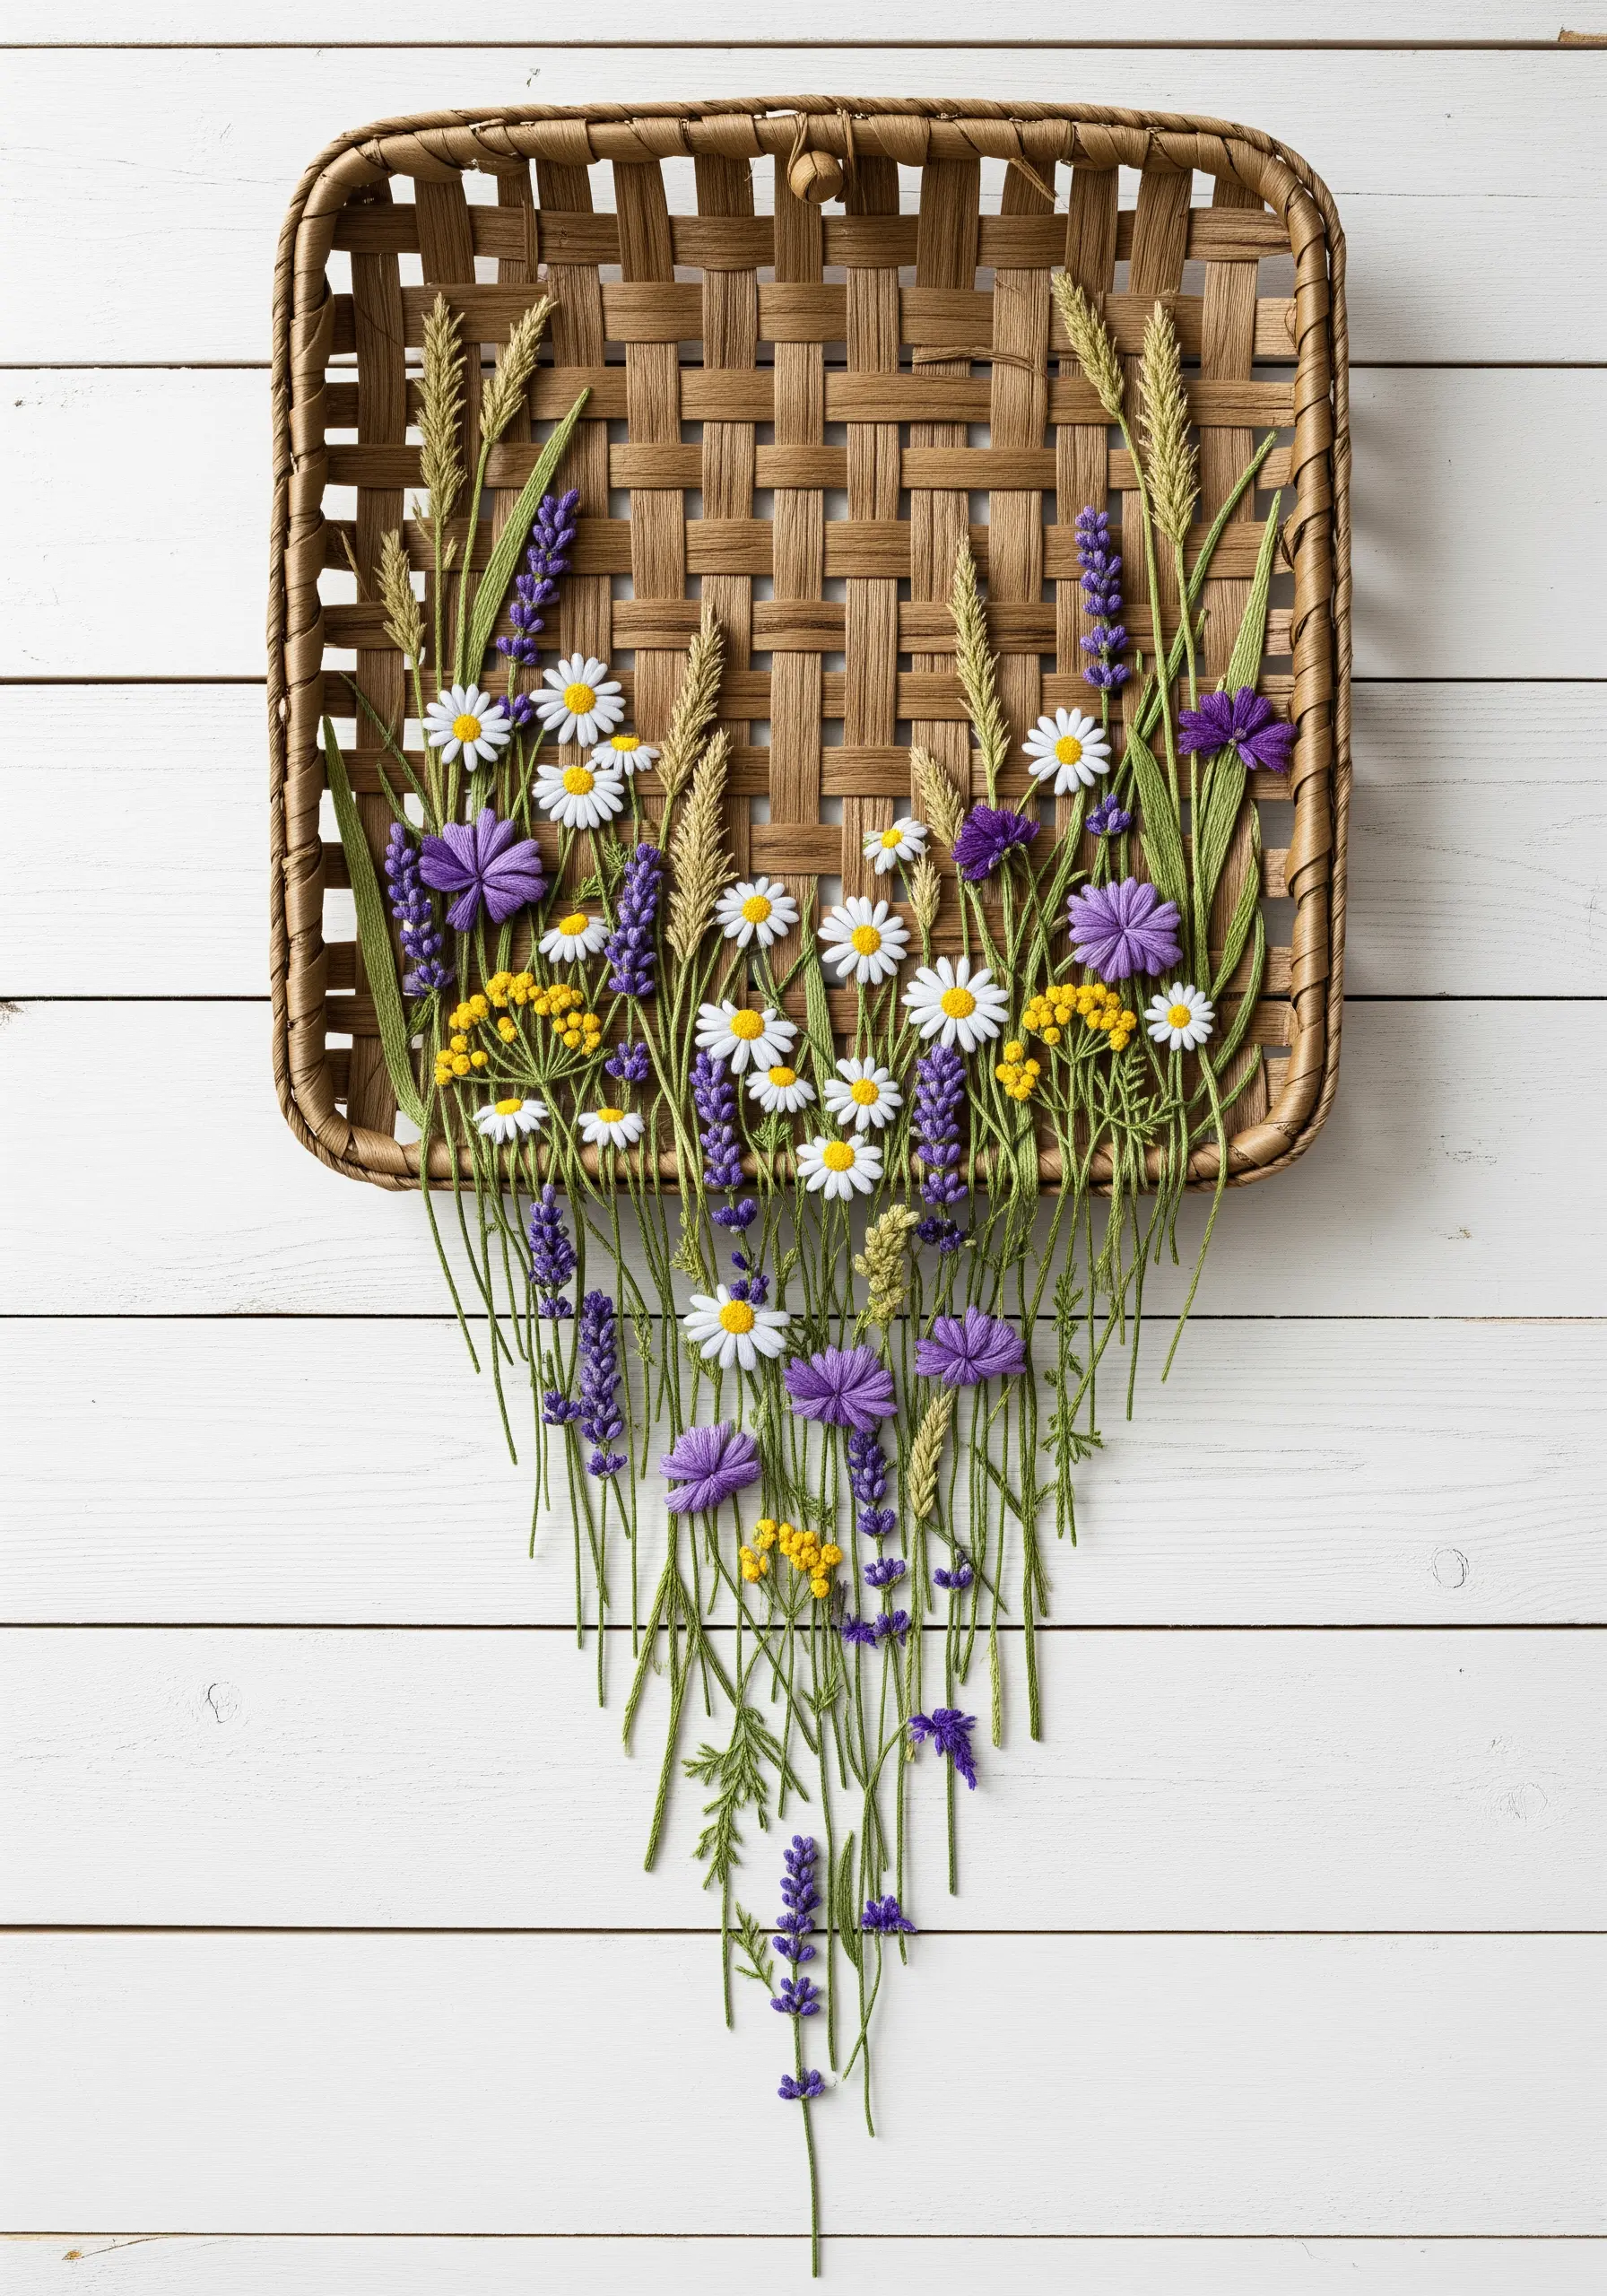
Expand your canvas by stitching directly into woven materials like baskets or placemats.
Use a large-eyed tapestry needle to easily pass thread through the openings in the weave.
Create simple flowers with lazy daisy stitches for petals and French knots for the centers. For stems, simply wrap your thread around the vertical elements of the basket.
This unexpected application adds a splash of rustic, handmade charm to an everyday object. Try it with some wild botanical wreath patterns.
28. Engineering a Professional-Looking Back Patch

For a durable and striking embellishment on a jacket or bag, create your design as a separate patch.
Embroider your motif onto a piece of sturdy fabric, like canvas or felt. This allows you to perfect your stitching without wrestling with heavy denim.
Once complete, trim around the design, leaving a small border, and either stitch it onto the jacket with a tight whip stitch or use an iron-on adhesive for a clean, professional finish. It’s the perfect way to apply vintage-inspired denim jacket embroidery motifs.
29. Building Environments with Felt and Thread
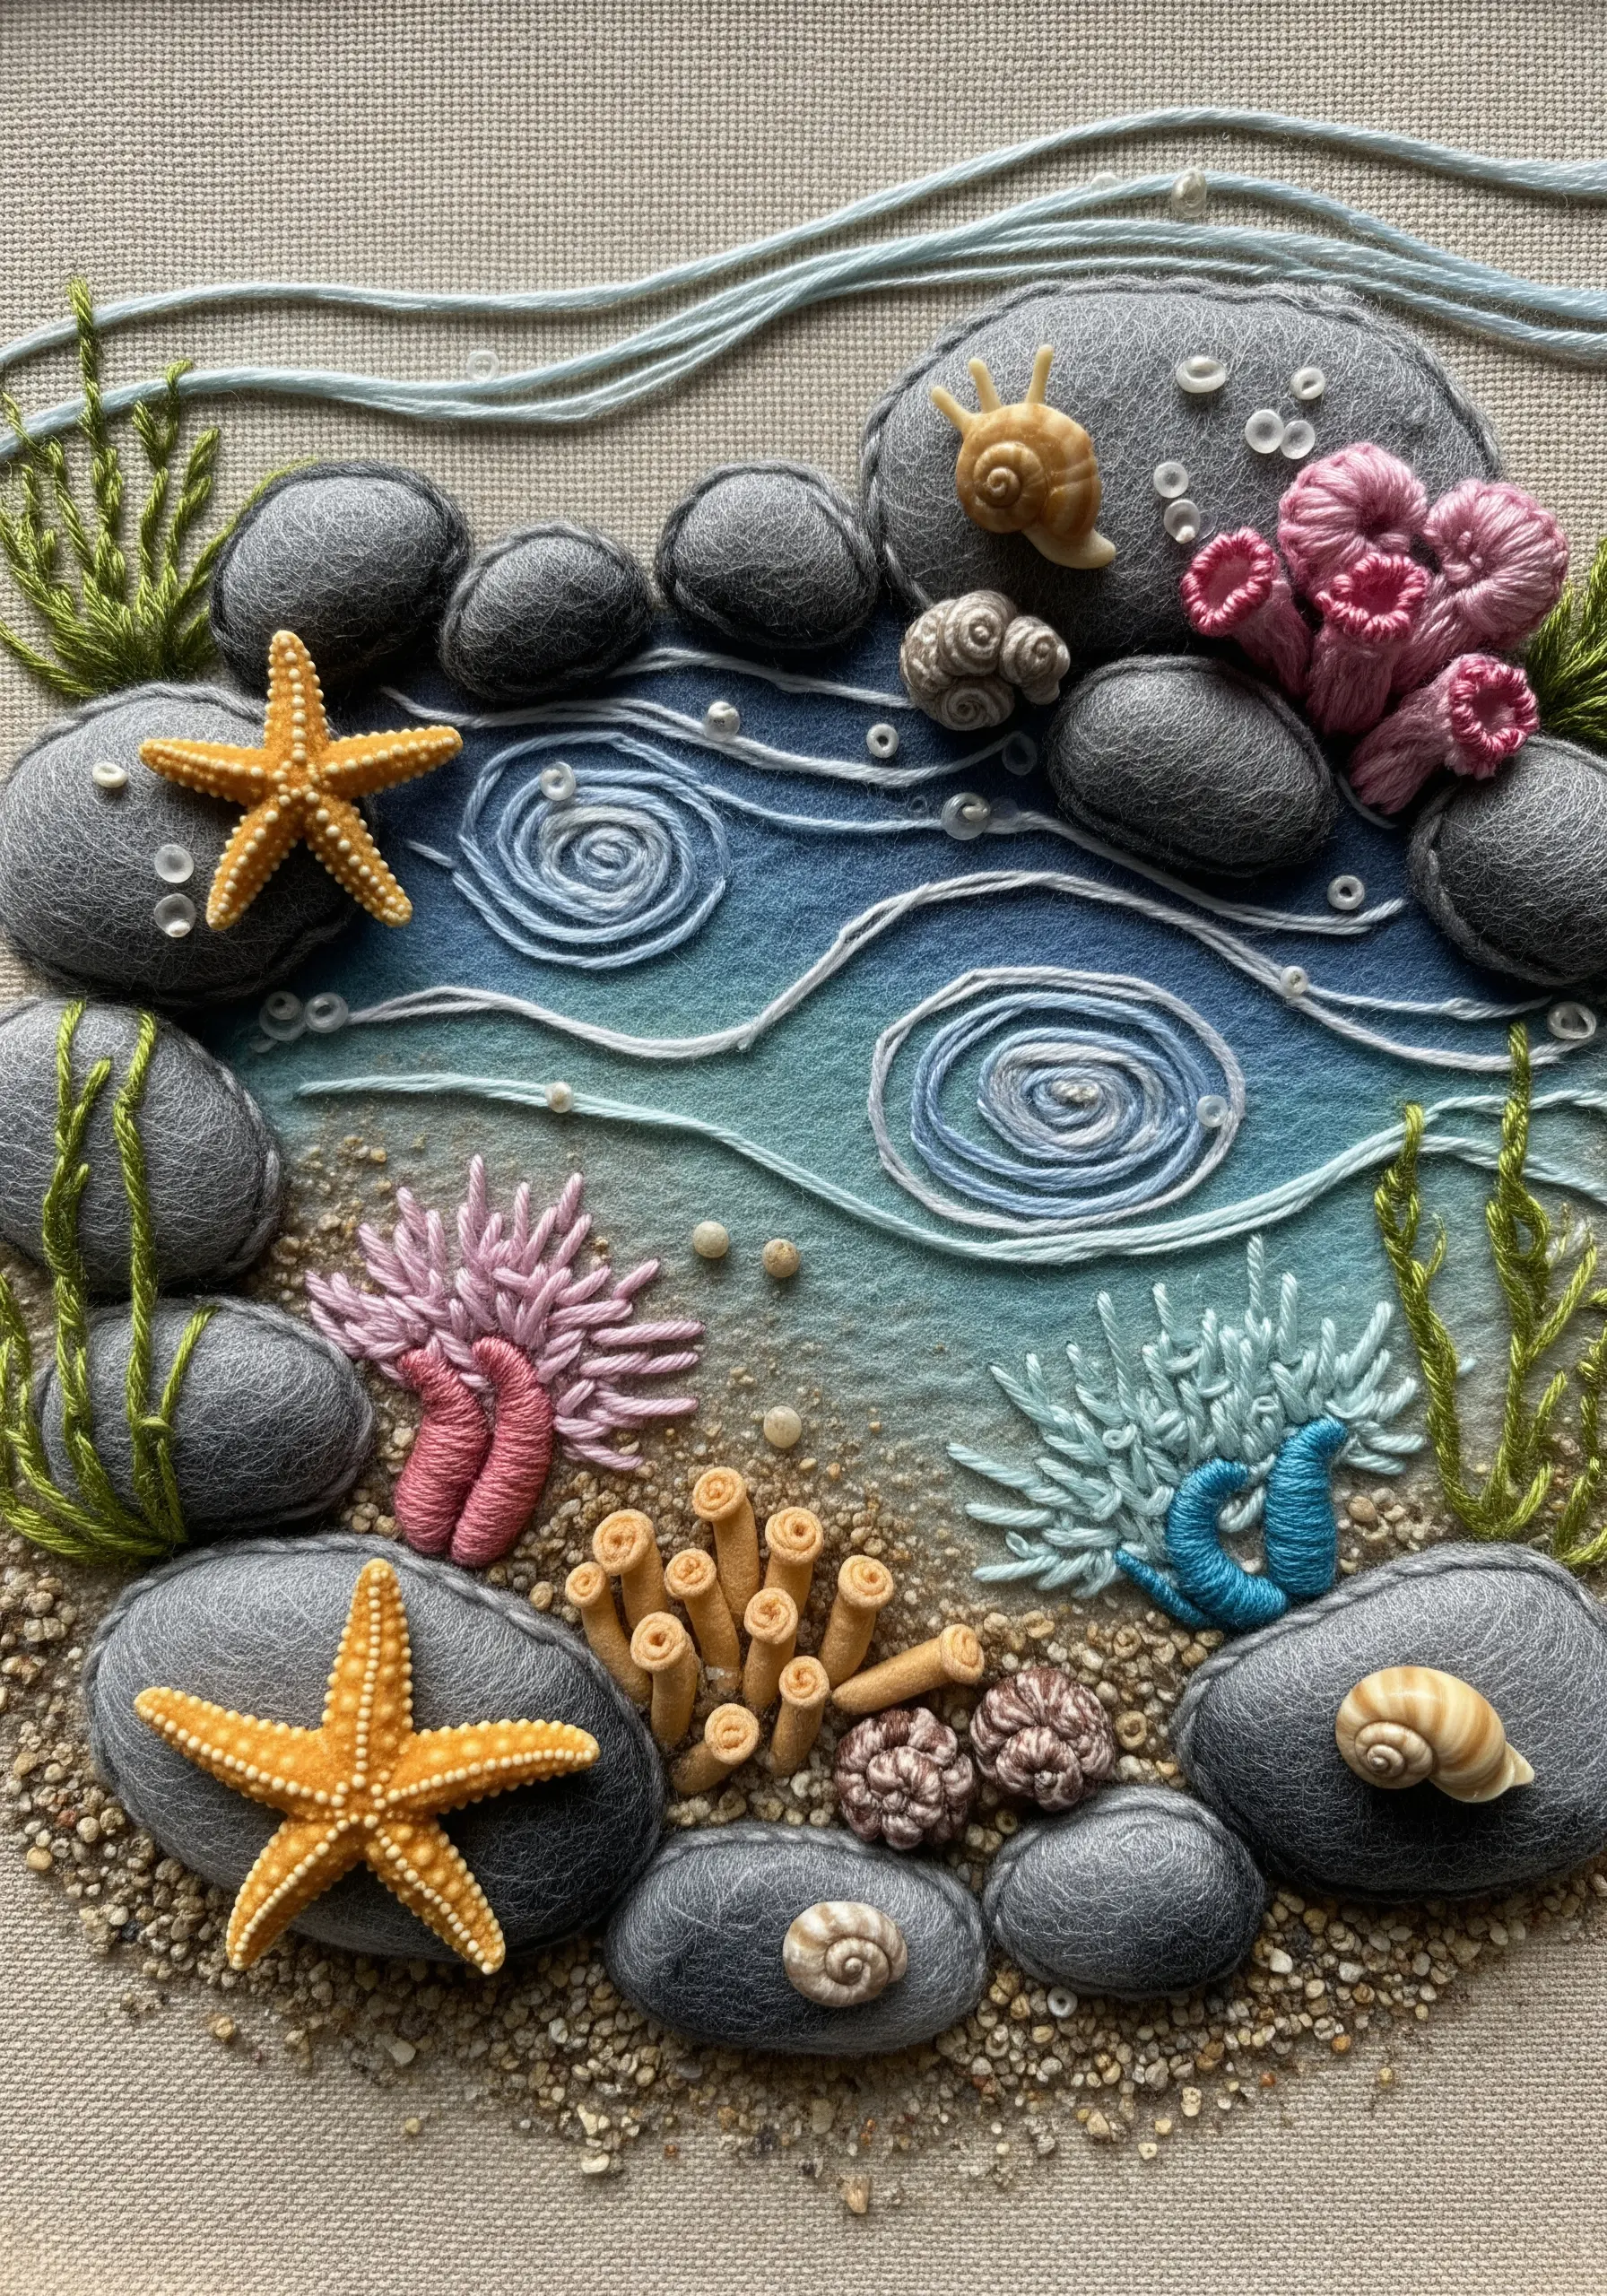
Create a rich, tactile world by combining soft, sculptural felt with fine embroidery.
Use needle-felting techniques to form the larger, softer shapes, like these smooth grey pebbles, and attach them to your fabric base.
Then, use traditional embroidery to add the intricate details: bullion knots for sea anemones, straight stitches for seaweed, and French knots for tiny snail shells.
This mix of soft forms and sharp detail creates wonderfully interactive high-texture fabric collage embroidery projects.
30. Creating Atmosphere with Dye and a Single Stitch
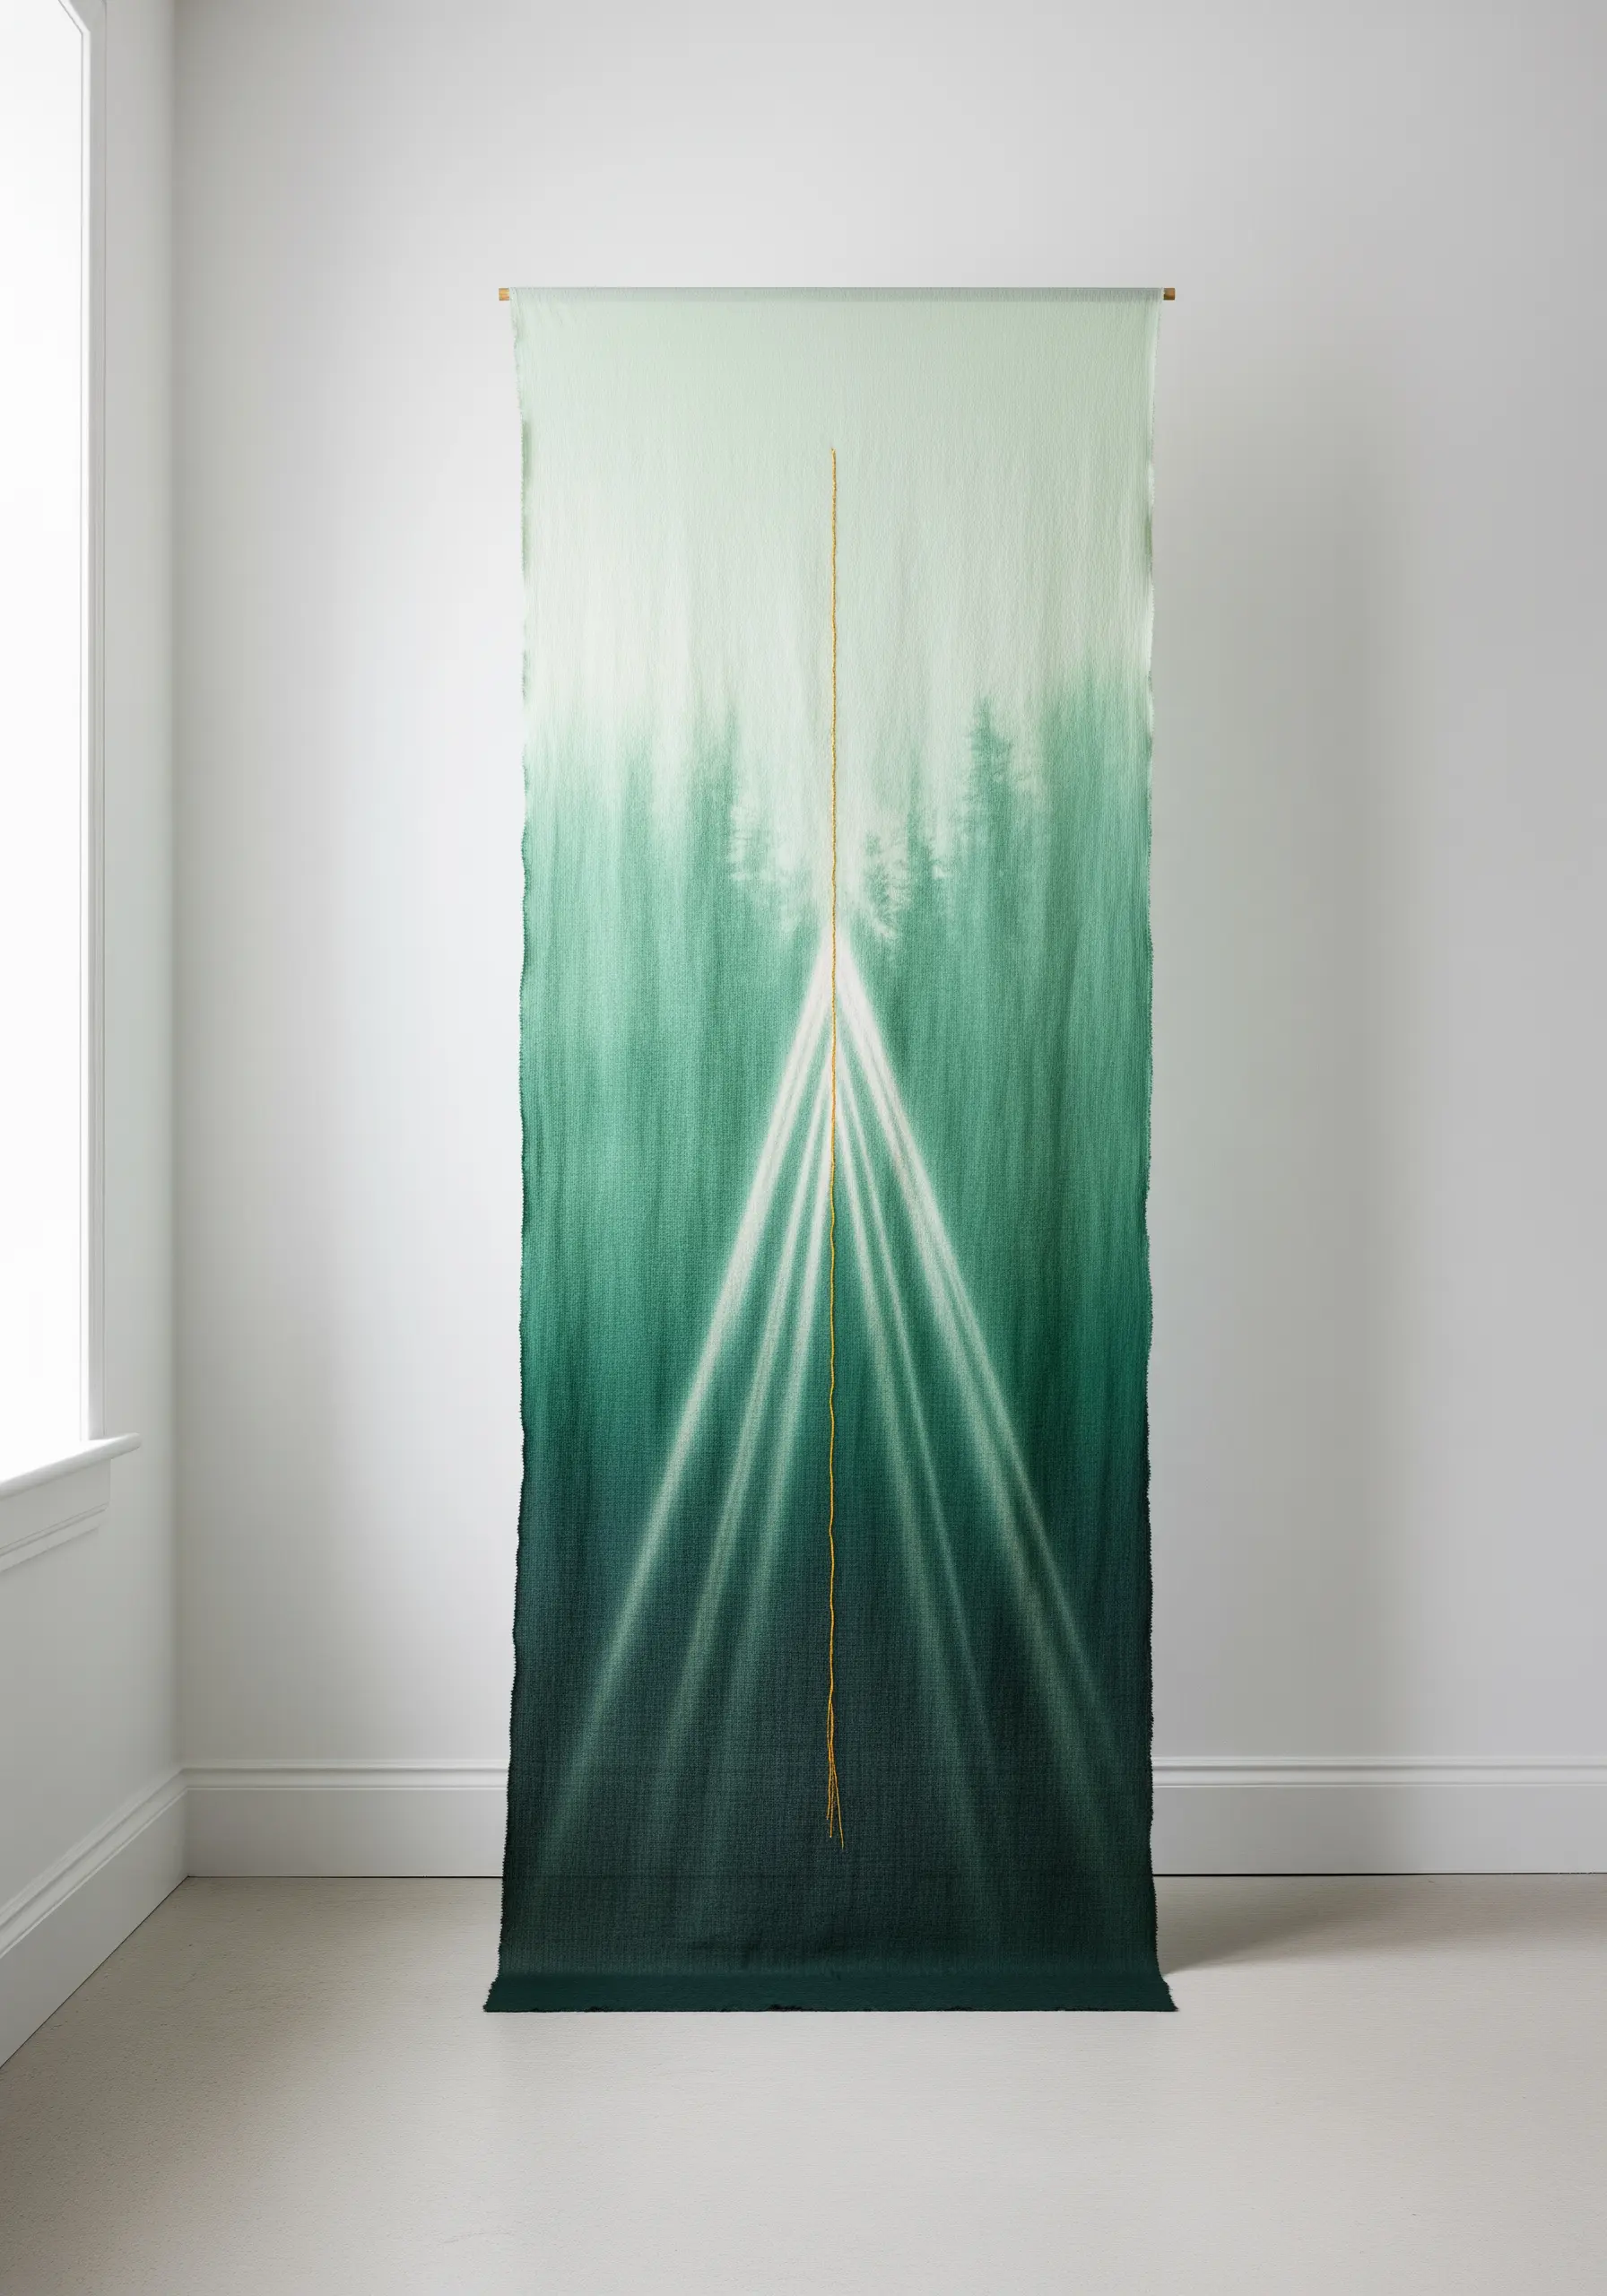
Sometimes the most powerful statement comes from what you don’t stitch.
Create a deeply atmospheric background by first dyeing your fabric. A simple ombré dip-dye in shades of green can evoke a misty forest or a deep sea.
Once the fabric is prepared, add only the most essential embroidered detail—a single, long line of golden thread to represent a ray of light, for example.
This minimalist approach allows the color and fabric to tell most of the story, creating elegant and rent-friendly embroidery wall tapestry ideas.


