
Perhaps you feel your embroidery has hit a plateau, confined to the flat circle of a hoop. You have the skills, the threads, and the desire, but you’re looking for a way to give your work more presence, more dimension—to let it step off the wall and into the room.
This is where we begin to think like sculptors. It’s not about abandoning your needle and thread, but about inviting new materials and new perspectives into your practice. We’ll explore how stitching can construct, connect, and define form, transforming fabric and fiber into objects with weight, texture, and shadows.
These ideas are not about mastering complex new disciplines overnight. They are invitations to use your existing stitching skills as a bridge to the third dimension. You can do this right now, by combining thread with wood, wire with lace, or simply by seeing a padded cushion as a canvas for topographical stitching.
Let’s move your art forward, giving it the physical voice you’ve been searching for.
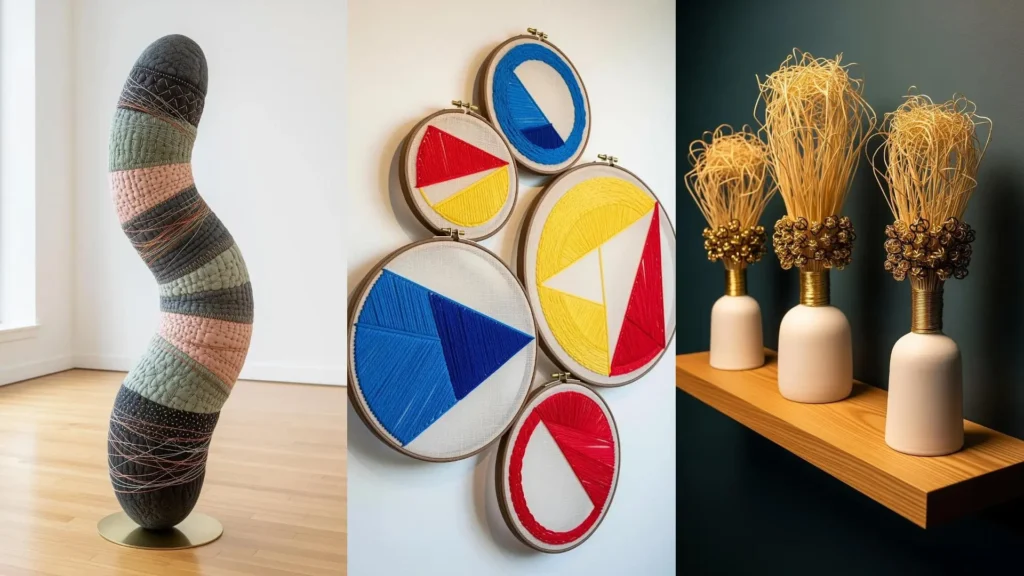
1. Sculptural Quilting with Directional Stitching

Move beyond flat quilts by creating padded, free-standing forms.
First, piece together fabric blocks in a subtle palette, then quilt them with a layer of thick batting for structure.
Use contrasting thread for your quilting stitches—like running stitch or backstitch—to draw lines that emphasize the sculpture’s curves.
Finally, wrap sections with a finer, high-sheen thread to constrict the form, adding tension and a delicate linear pattern over the soft, stitched surface.
2. Geometric Thread Blocking in Hoops
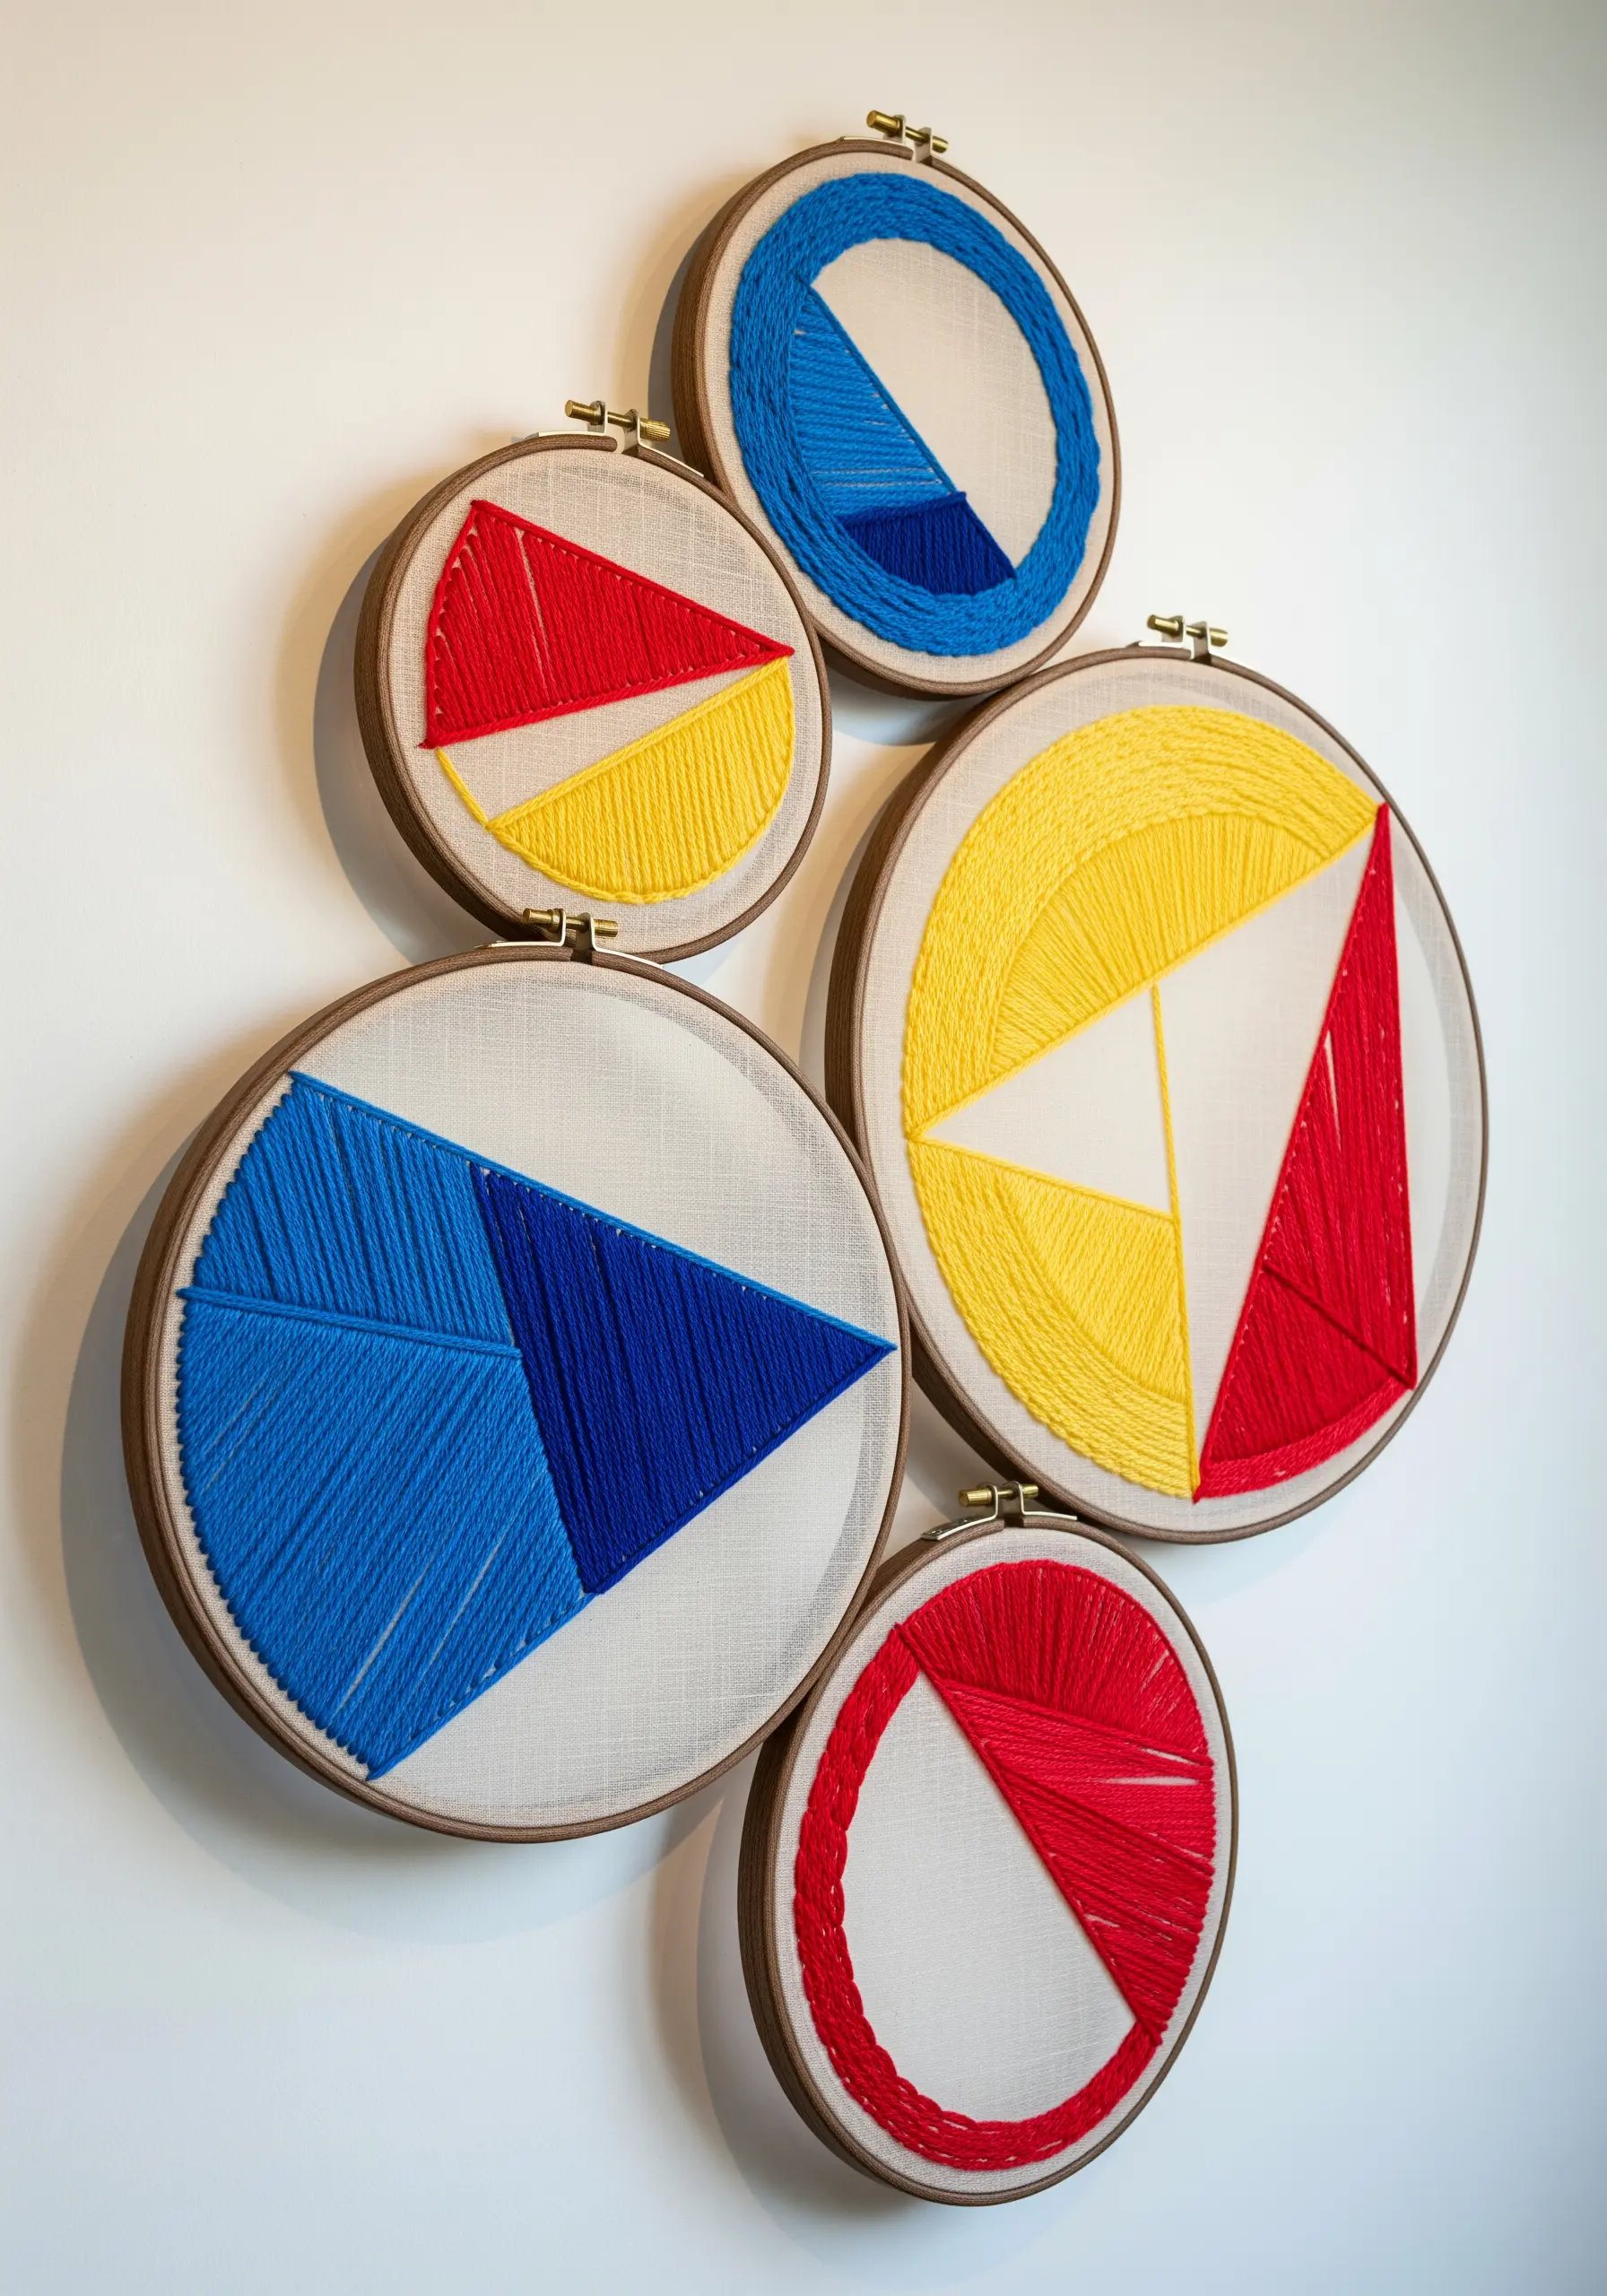
Use the entire hoop as your canvas by stretching thread from edge to edge, creating bold, graphic shapes with color.
Secure your thread or yarn to the screw-tightening hardware of the hoop, then wrap it tightly across the open space to another point on the frame.
Plan your composition by lightly marking points on the hoop’s interior to guide your wrapping.
The key is maintaining high, even tension so the threads don’t sag, creating sharp, clean lines that rely on abstract negative space techniques to define the shapes.
3. Architectural Macrame with Rigid Inserts
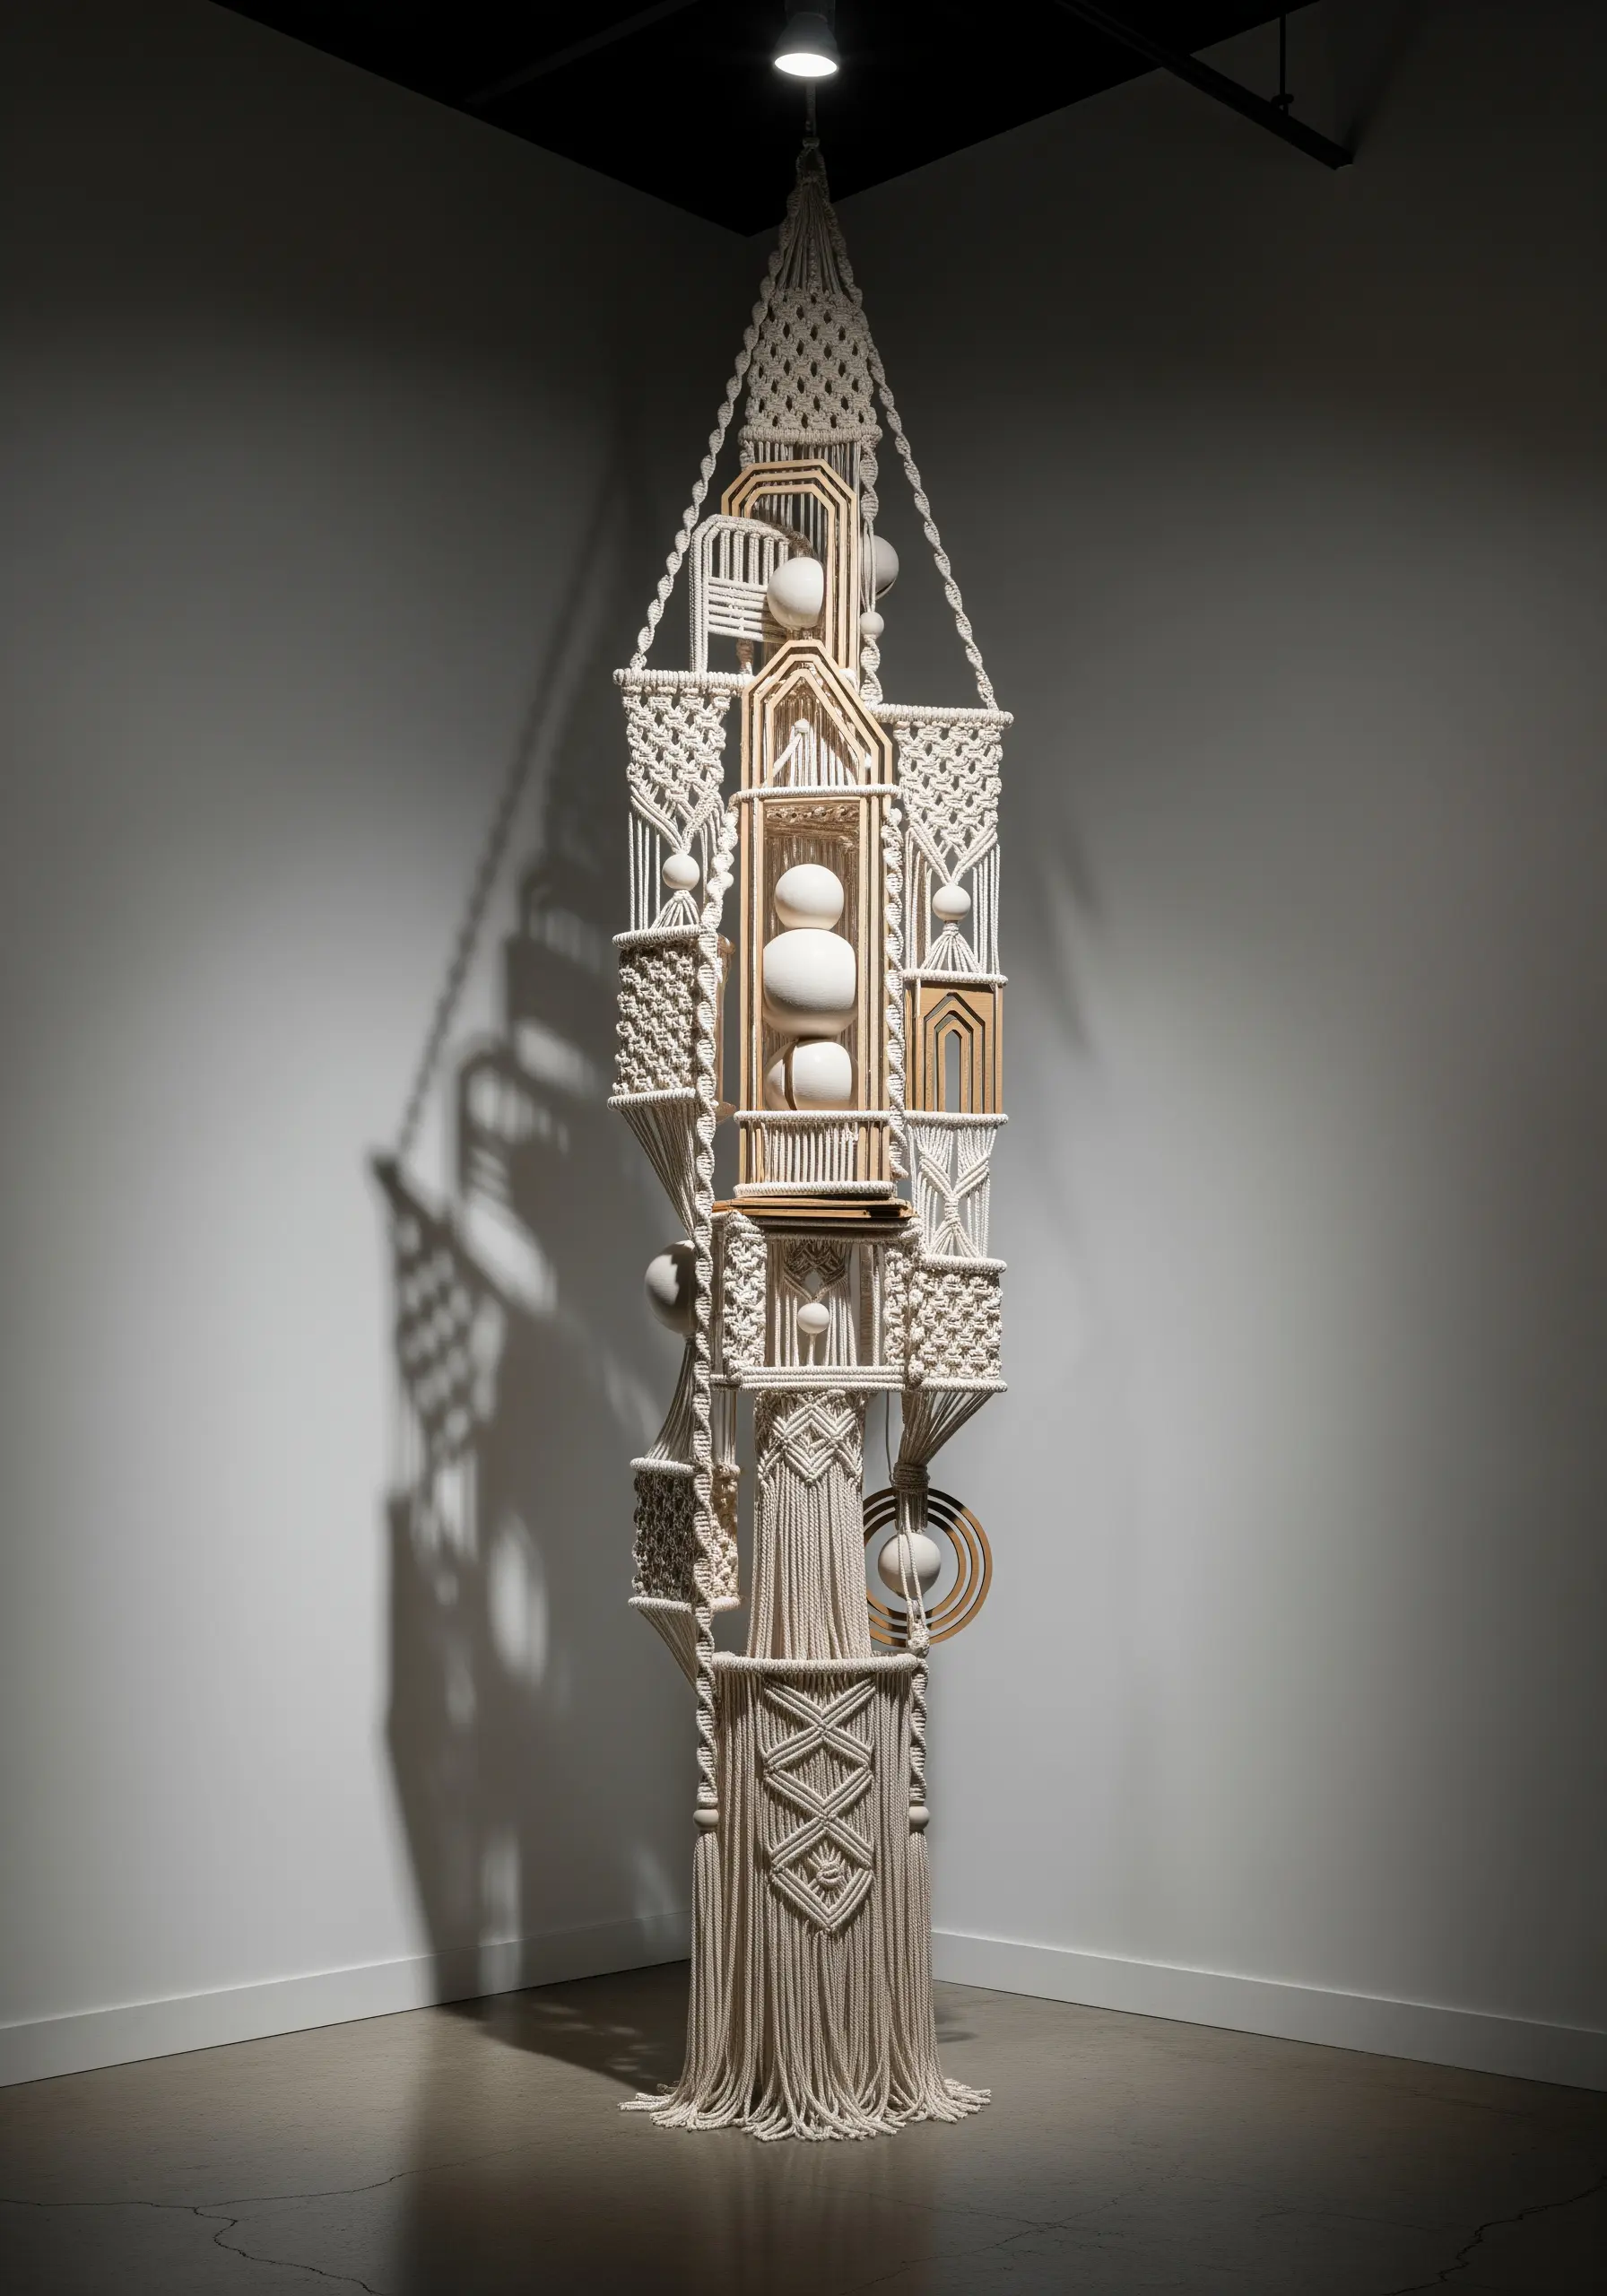
Elevate macrame from wall hangings to structural art by building your knots around a solid framework.
Incorporate laser-cut wood shapes, metal rings, or even custom-built frames into your design.
Use foundational knots like the square knot and double half hitch to build dense, fabric-like panels around these rigid elements.
This contrast between pliable, knotted cord and unyielding geometric shapes creates an architectural presence that feels both handmade and highly designed.
4. Sculptural Thread Coils for Vessels

Create intricate, nest-like sculptures by coiling metallic or waxed thread around a temporary form, like a small balloon or ball.
Apply a fabric stiffener or PVA glue mixture to the thread as you work, allowing it to harden into a self-supporting shape once dry.
For a more controlled approach, wrap fine-gauge wire with metallic floss before shaping it into delicate, tangled forms.
Mount these metallic thread creations atop ceramic vases or wooden bases to create a striking contrast between the chaotic texture of the thread and the smooth surface below.
5. Three-Dimensional Weaving on a Wire Frame
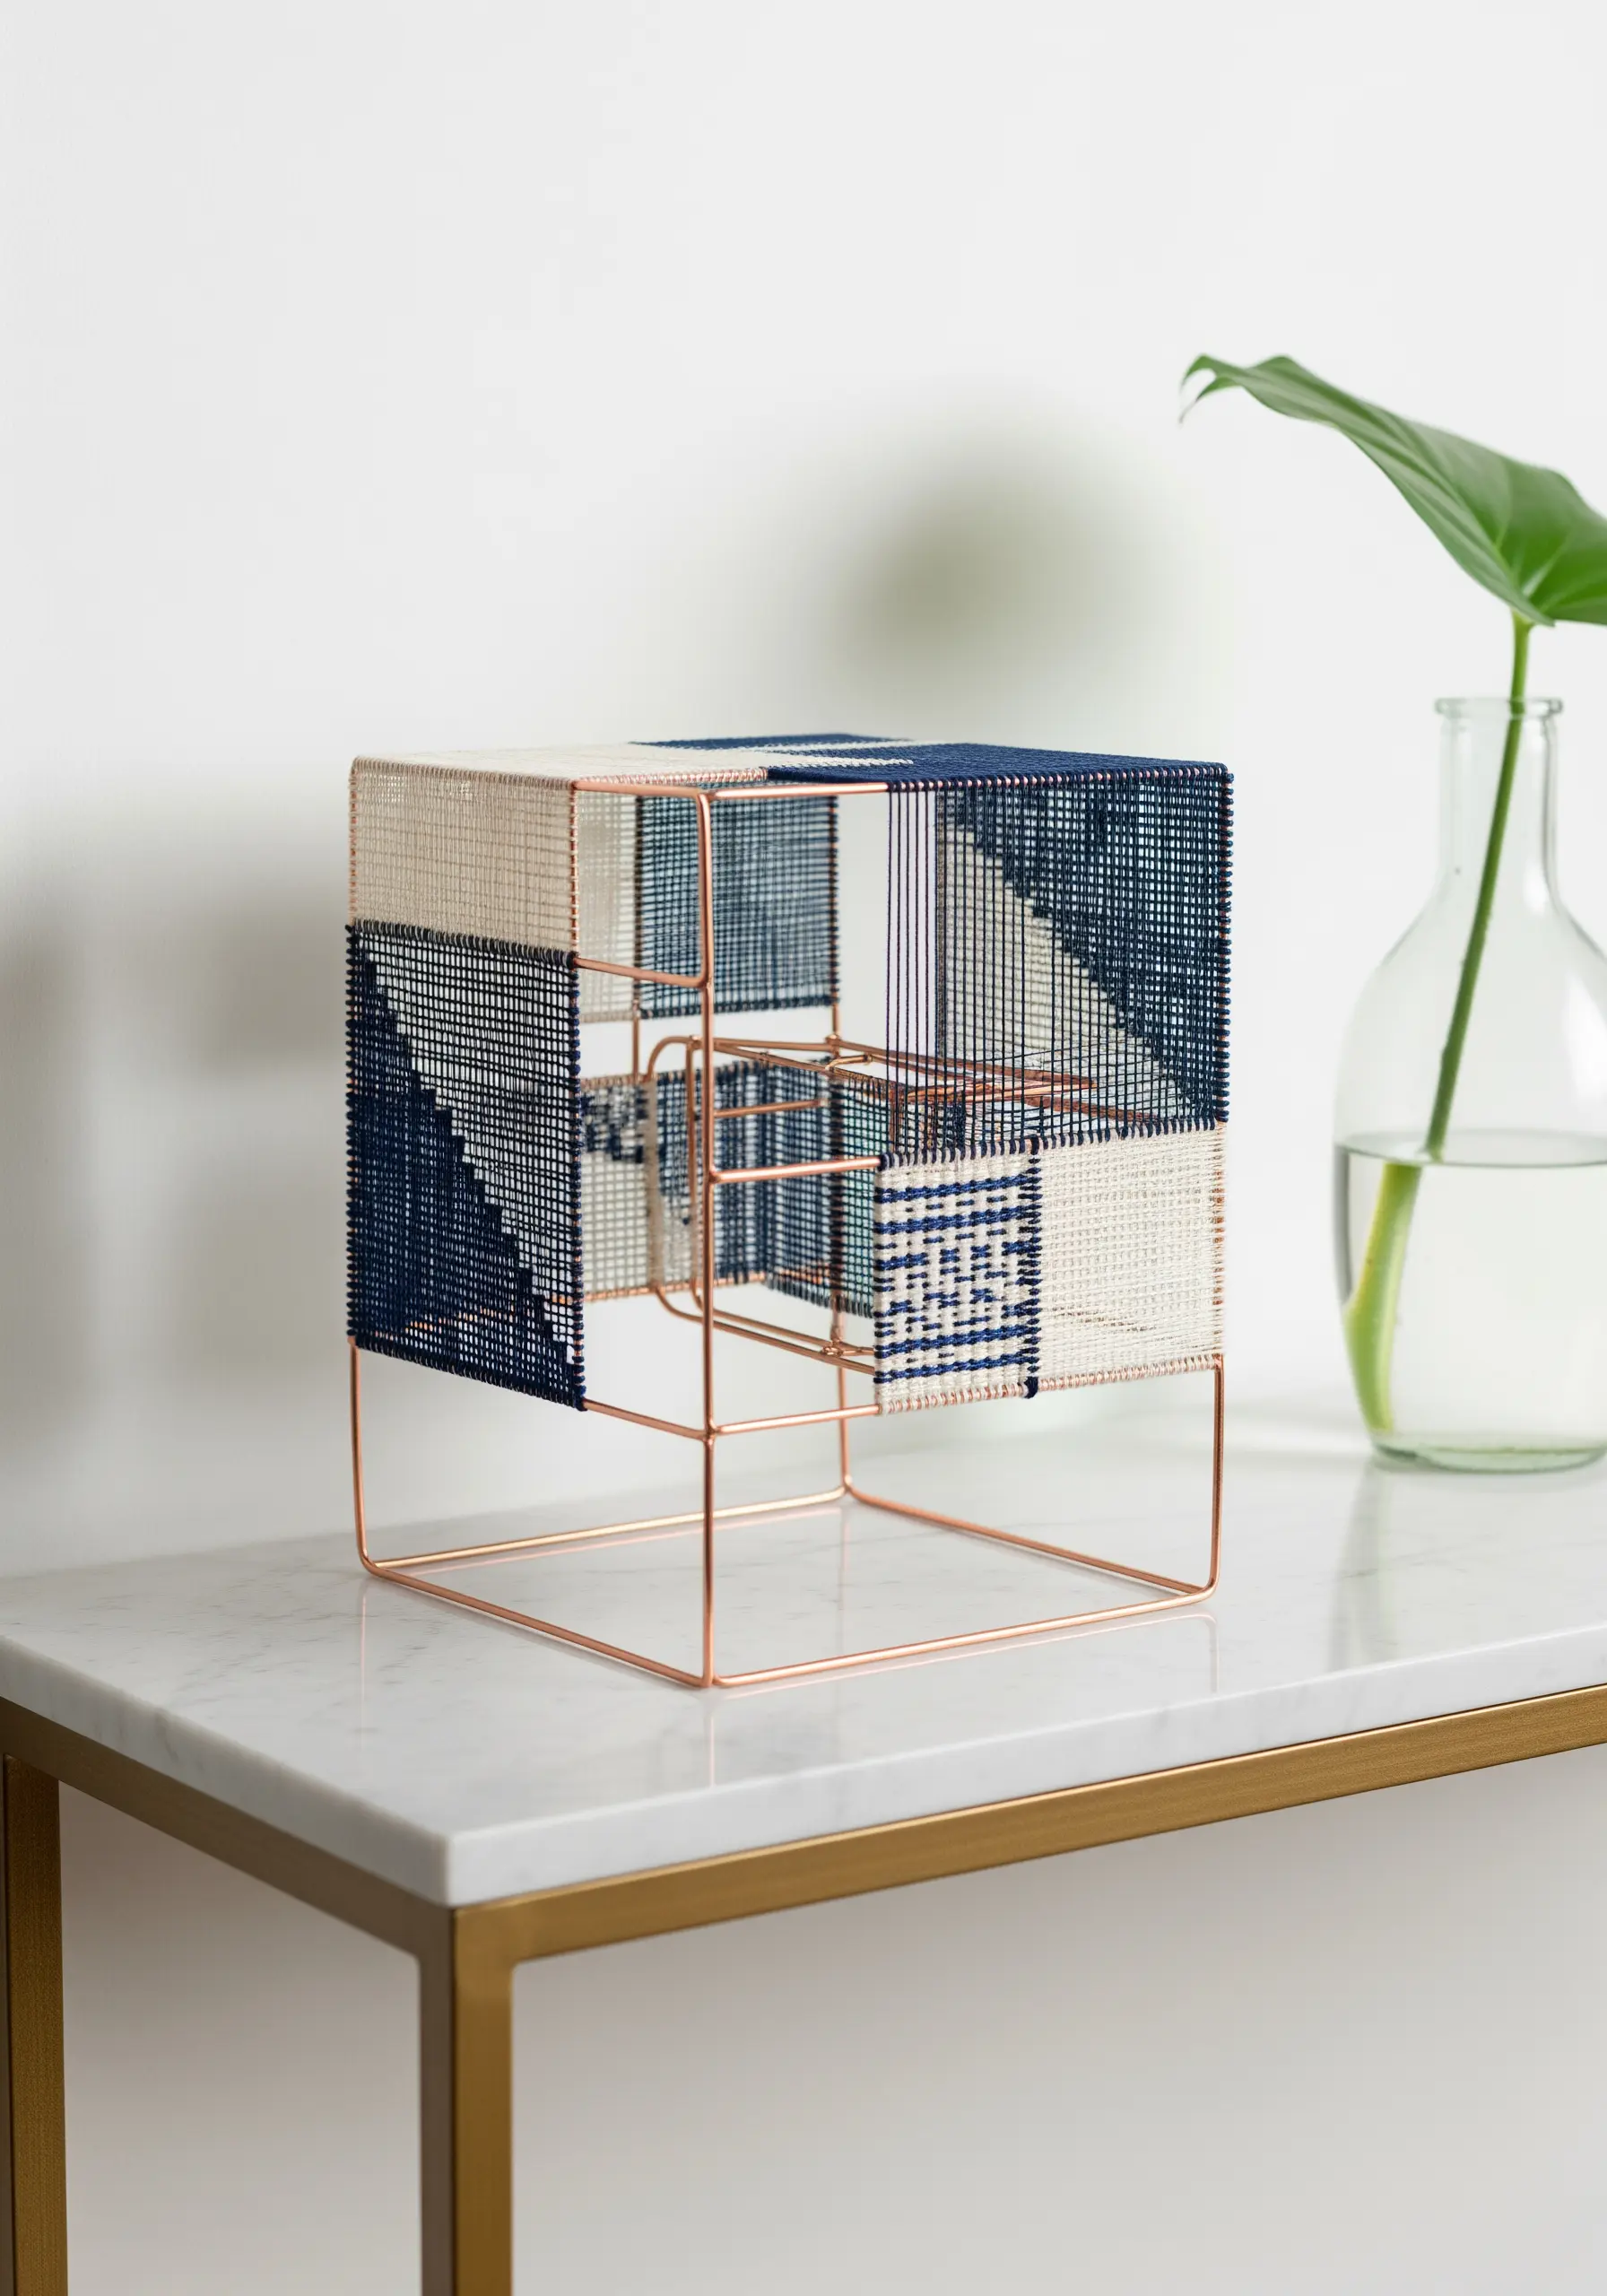
Construct a simple cubic or geometric frame from copper tubing or thick-gauge wire to serve as a three-dimensional loom.
Warp your thread vertically across the frame, then weave your weft threads through, creating solid and semi-transparent panels.
Vary the density of your weave to play with light and shadow, making the interior of the sculpture visible from certain angles.
This technique turns weaving into a sculptural object that you can view from all sides, transforming flat textile art into an interactive piece.
6. Raised Cord Couching for Organic Textures

Add dramatic, topographical lines to fabric surfaces using couching, a technique where you lay a thick cord onto fabric and stitch over it with a thinner thread.
Choose a thick, soft yarn or rope for your main line and a strong, contrasting thread for the securing stitches.
Apply this to a dense fabric like wool felt or bouclé on a three-dimensional object, such as a floor cushion or ottoman.
The raised lines create a powerful tactile quality, inviting touch and transforming a simple surface into an organic landscape of texture.
7. Embroidered Mobiles on Sheer Fabric

Stitch your designs onto sheer organza or tulle, then cut them out to create floating, almost invisible embroidered elements.
Use a stabilizer that can be washed or torn away cleanly, leaving only the stitched threads and the transparent fabric.
Incorporate metallic threads and beads to catch the light, adding subtle weight and sparkle.
Assemble these delicate pieces into a balanced mobile using thin brass rods and clear filament, creating a sculpture that gently moves and interacts with its environment.
8. Modular Cross-Stitch Sculptures
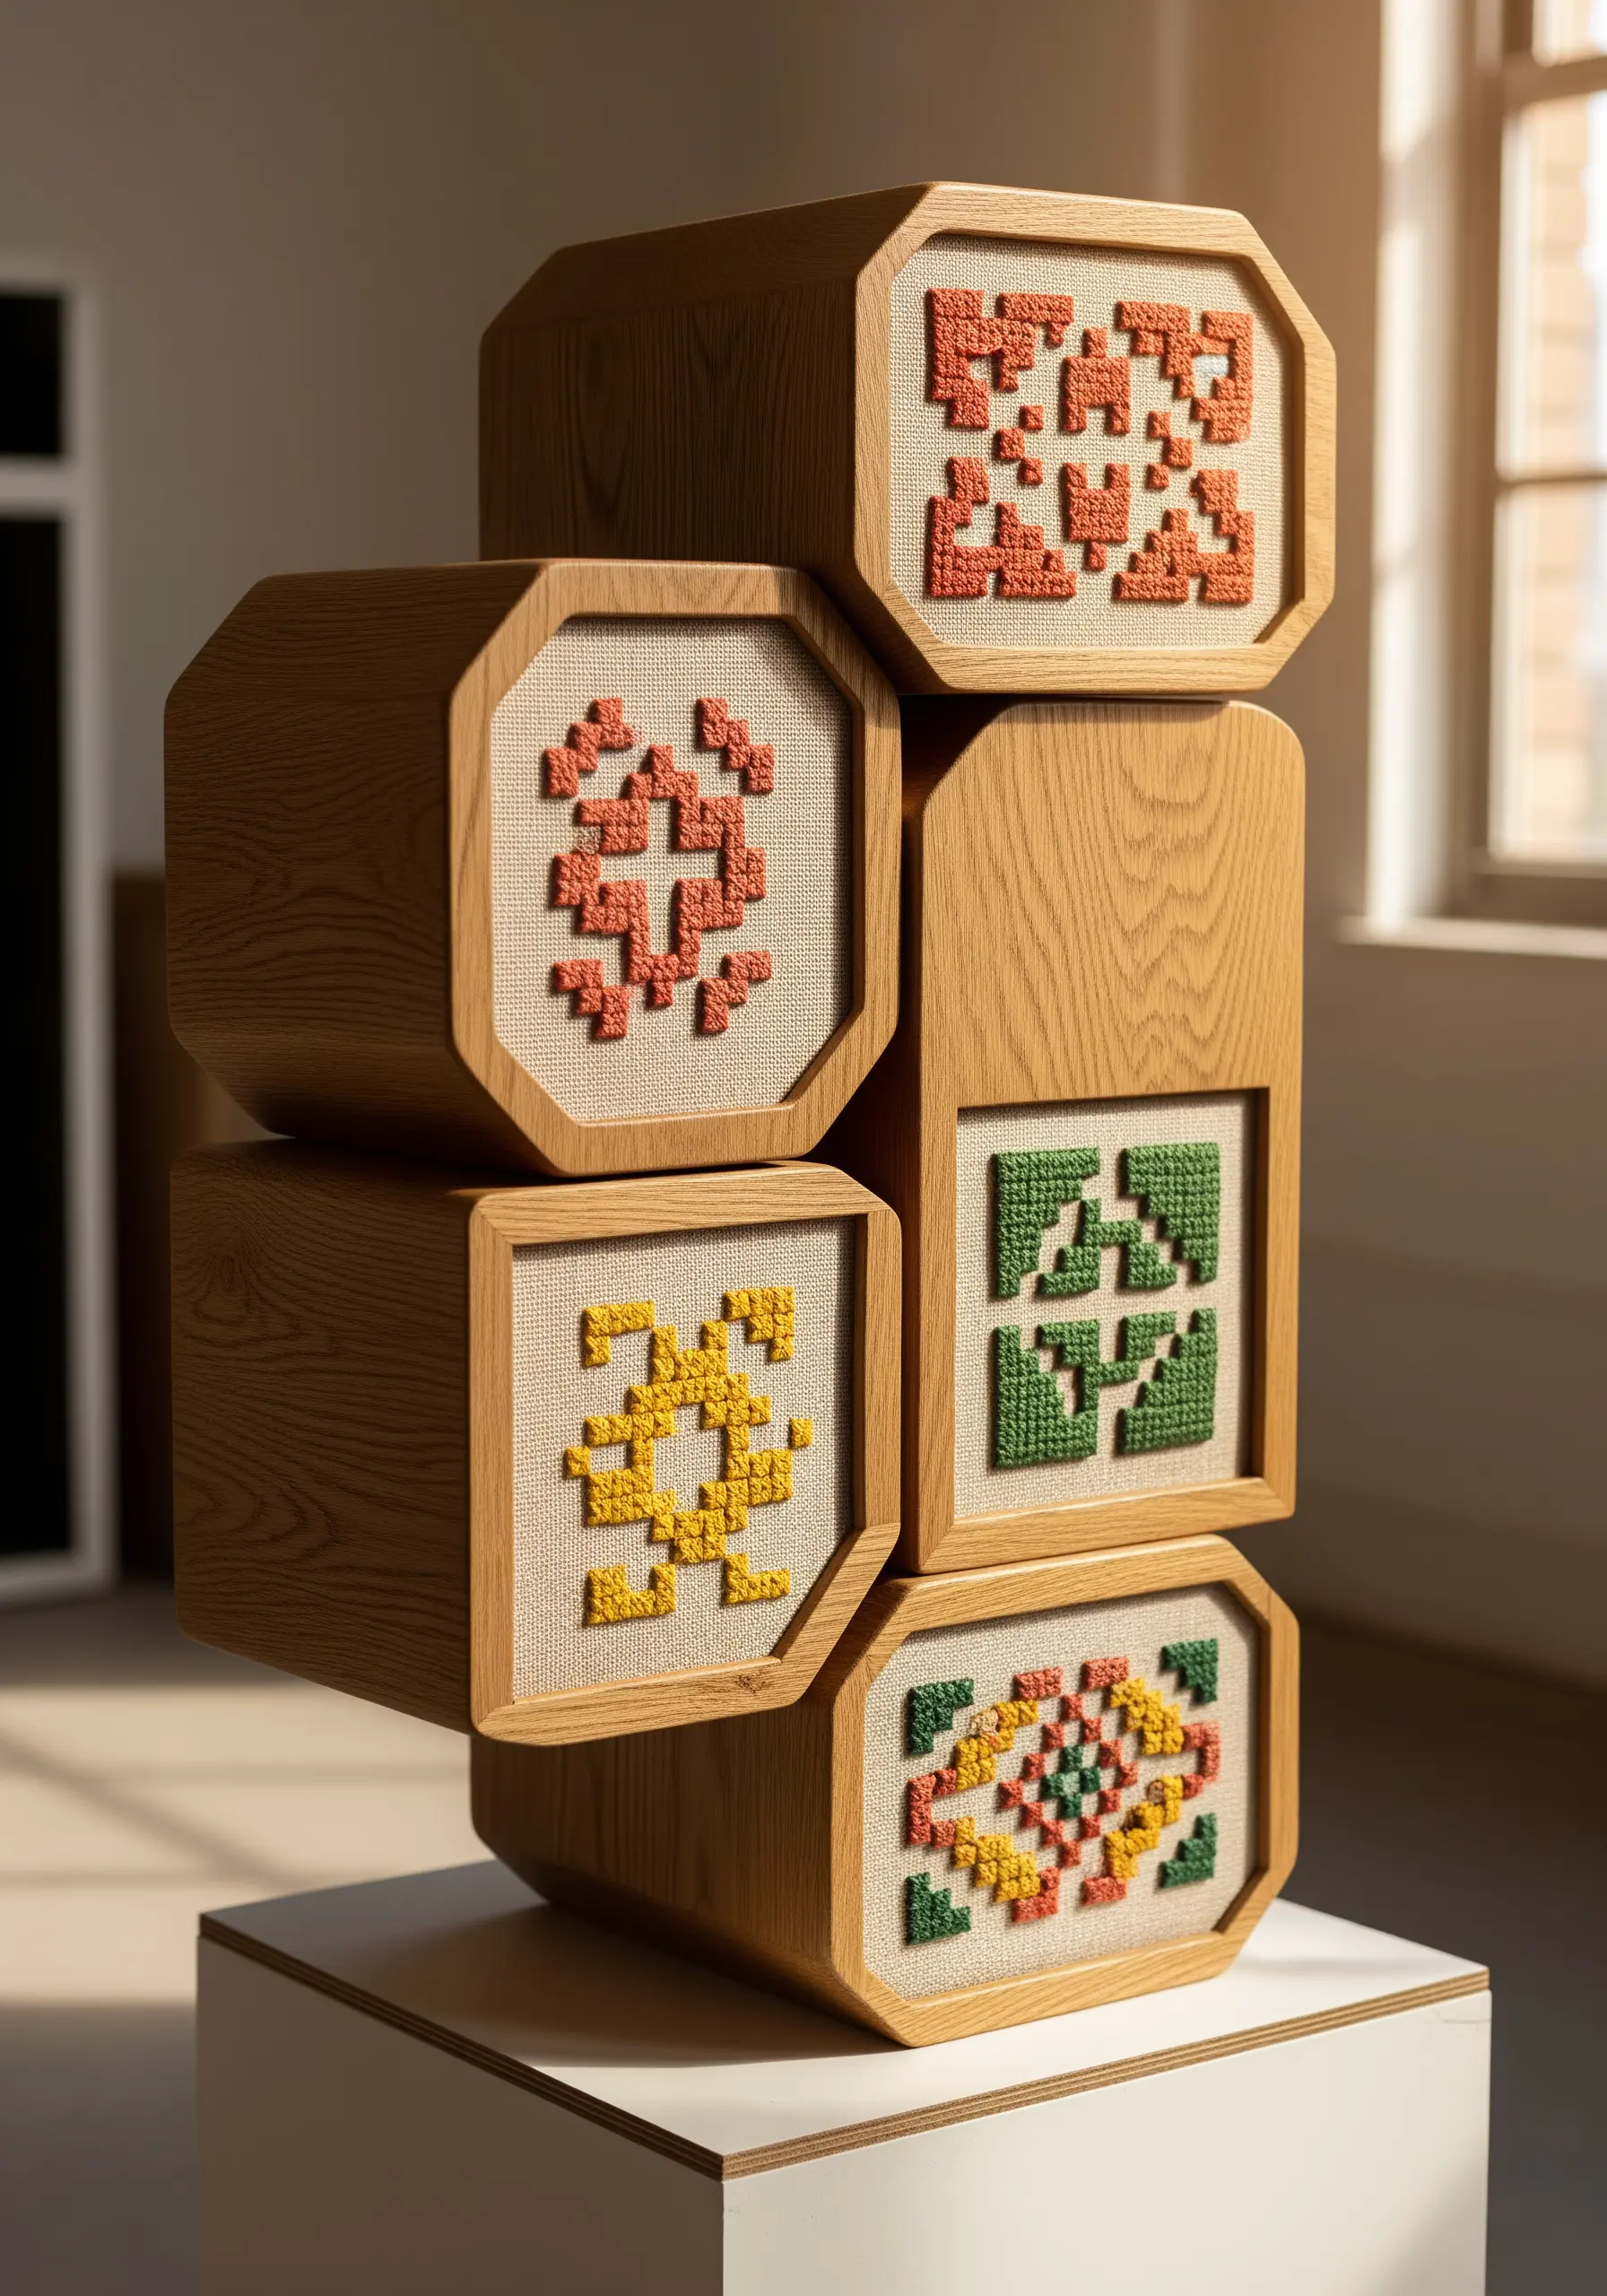
Think beyond a single frame by creating a series of small, related needlepoint or cross-stitch designs on separate canvases.
Use the same fabric count and a cohesive color palette across all pieces to ensure they work together as a unified whole.
Mount each finished piece in a box frame or on a stretched canvas block.
Arrange and stack these modular blocks to build a sculptural totem, allowing you to reconfigure the artwork and create different compositions.
9. Structural Stitching on Rigid Materials
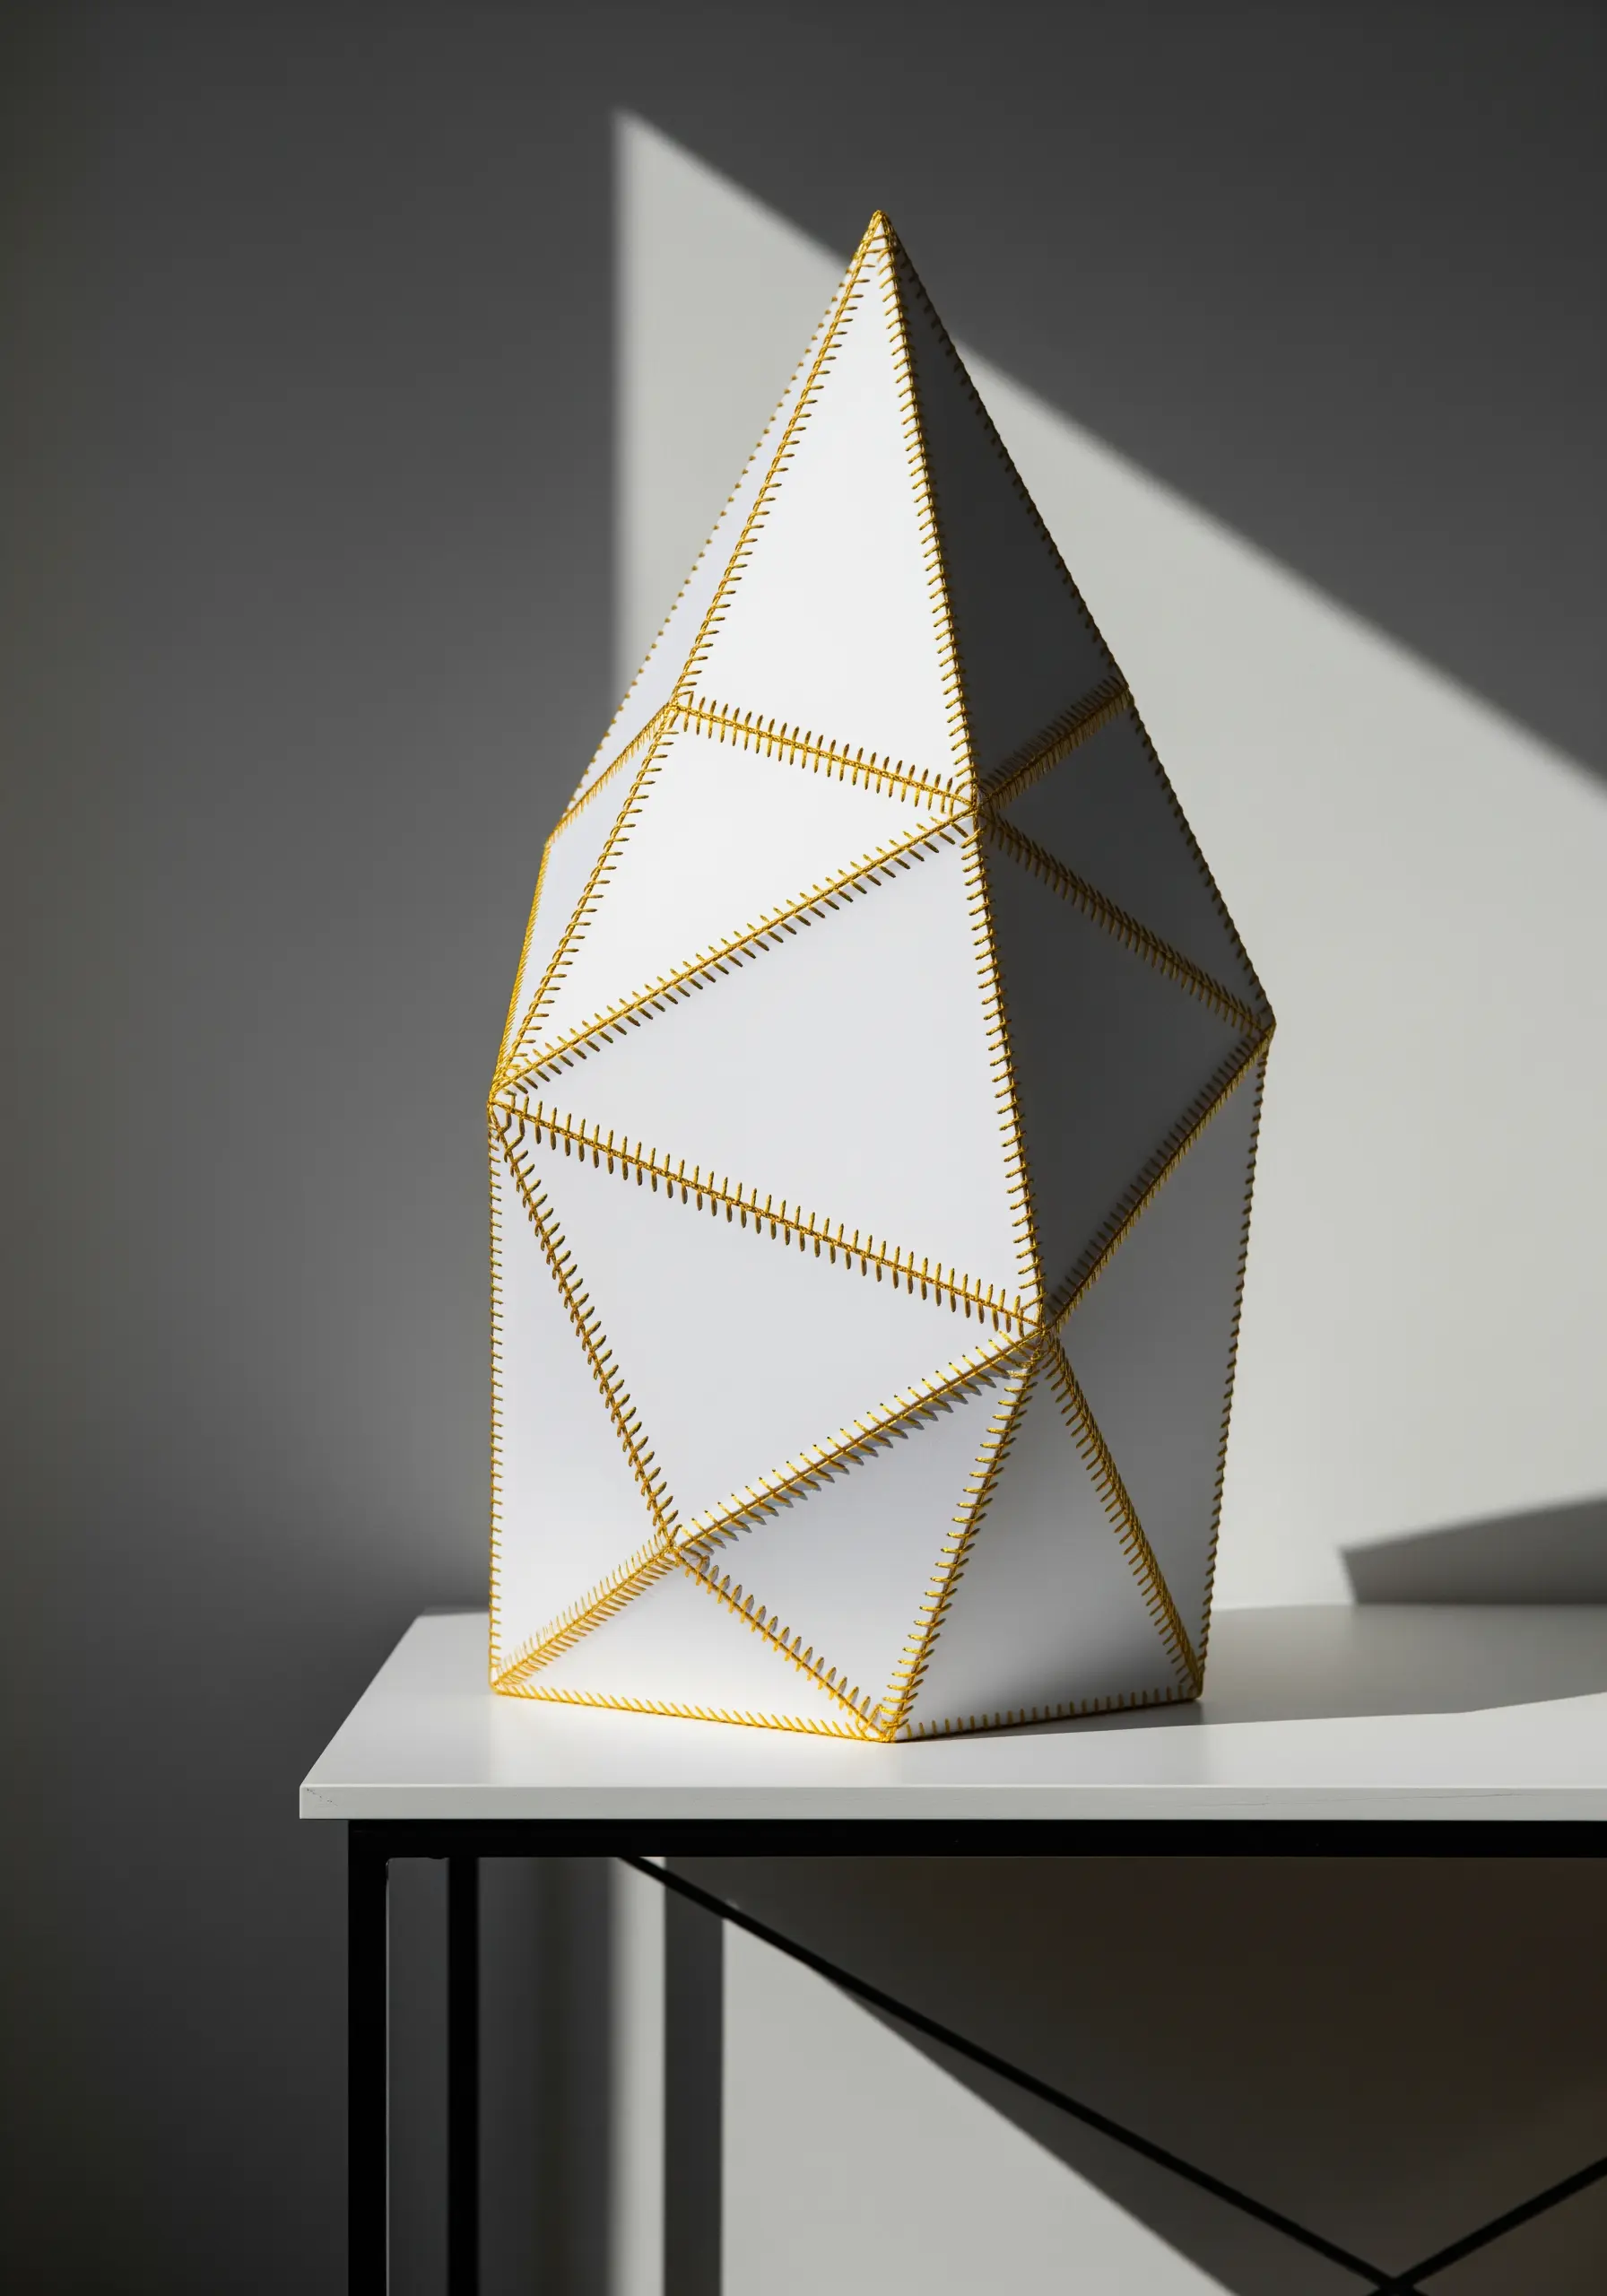
Use thread not just for decoration, but as a functional construction element.
Cut panels from a stiff material like leather, thick felt, or archival cardstock, punching stitching holes along the edges with an awl.
Join the panels using a decorative and strong stitch, such as a blanket stitch or whip stitch, with a thick, contrasting thread like waxed linen or embroidery floss.
This method highlights the construction itself as a key part of the design, celebrating the intersection of craft and form.
10. Interlacing Hard and Soft Materials

Create a striking dialogue between materials by integrating soft yarn with a hard, unyielding object.
Drill a series of holes into a found object like plaster, concrete, or wood.
Use these holes as anchor points to lace, wrap, or weave chunky yarn across the surface, introducing vibrant color and plush texture.
The contrast in material properties—soft versus hard, pliable versus rigid, warm versus cold—is what gives the final piece its compelling energy and visual tension.
11. Decorative Stitching on Coiled Baskets

Construct your own sculptural vessels using the ancient technique of coiling rope.
Wrap thick cotton rope with colorful yarn, stitching each new coil to the one below it to build the walls of your basket.
Once the form is complete, use a simple running stitch or whip stitch as a decorative overlay.
This final stitched line acts as a hand-drawn element, adding a layer of graphic detail and personality to the basket’s organic, woven texture.
12. Sculpting with Gathered Organza and Beads

Create ethereal, cloud-like forms by manipulating large swaths of lightweight, sheer fabric like silk organza or tulle.
Instead of stitching a pattern onto the fabric, use thread to gather and sculpt the fabric itself, pulling sections tightly to create voluminous, organic shapes.
Scatter tiny glass beads or French knots across the surface to catch the light, adding depth and a subtle shimmer.
Suspend the finished form with clear filament inside a box or from the ceiling to enhance its weightless, cloud-like appearance.
13. Topographical Lines on Upholstered Panels

Transform a simple wall into a piece of art by creating large-scale, tactile panels.
Start with padded upholstered panels in a neutral, textured fabric like linen or canvas.
Lay thick rope or cotton cord across the surface in a continuous, flowing line, securing it with a sturdy, invisible couching stitch from behind or a visible stitch from the front.
This technique adds a bold, graphic element that can flow across multiple panels, creating a massive, integrated piece of abstract textile wall art.
14. Macrame Netting on Natural Forms
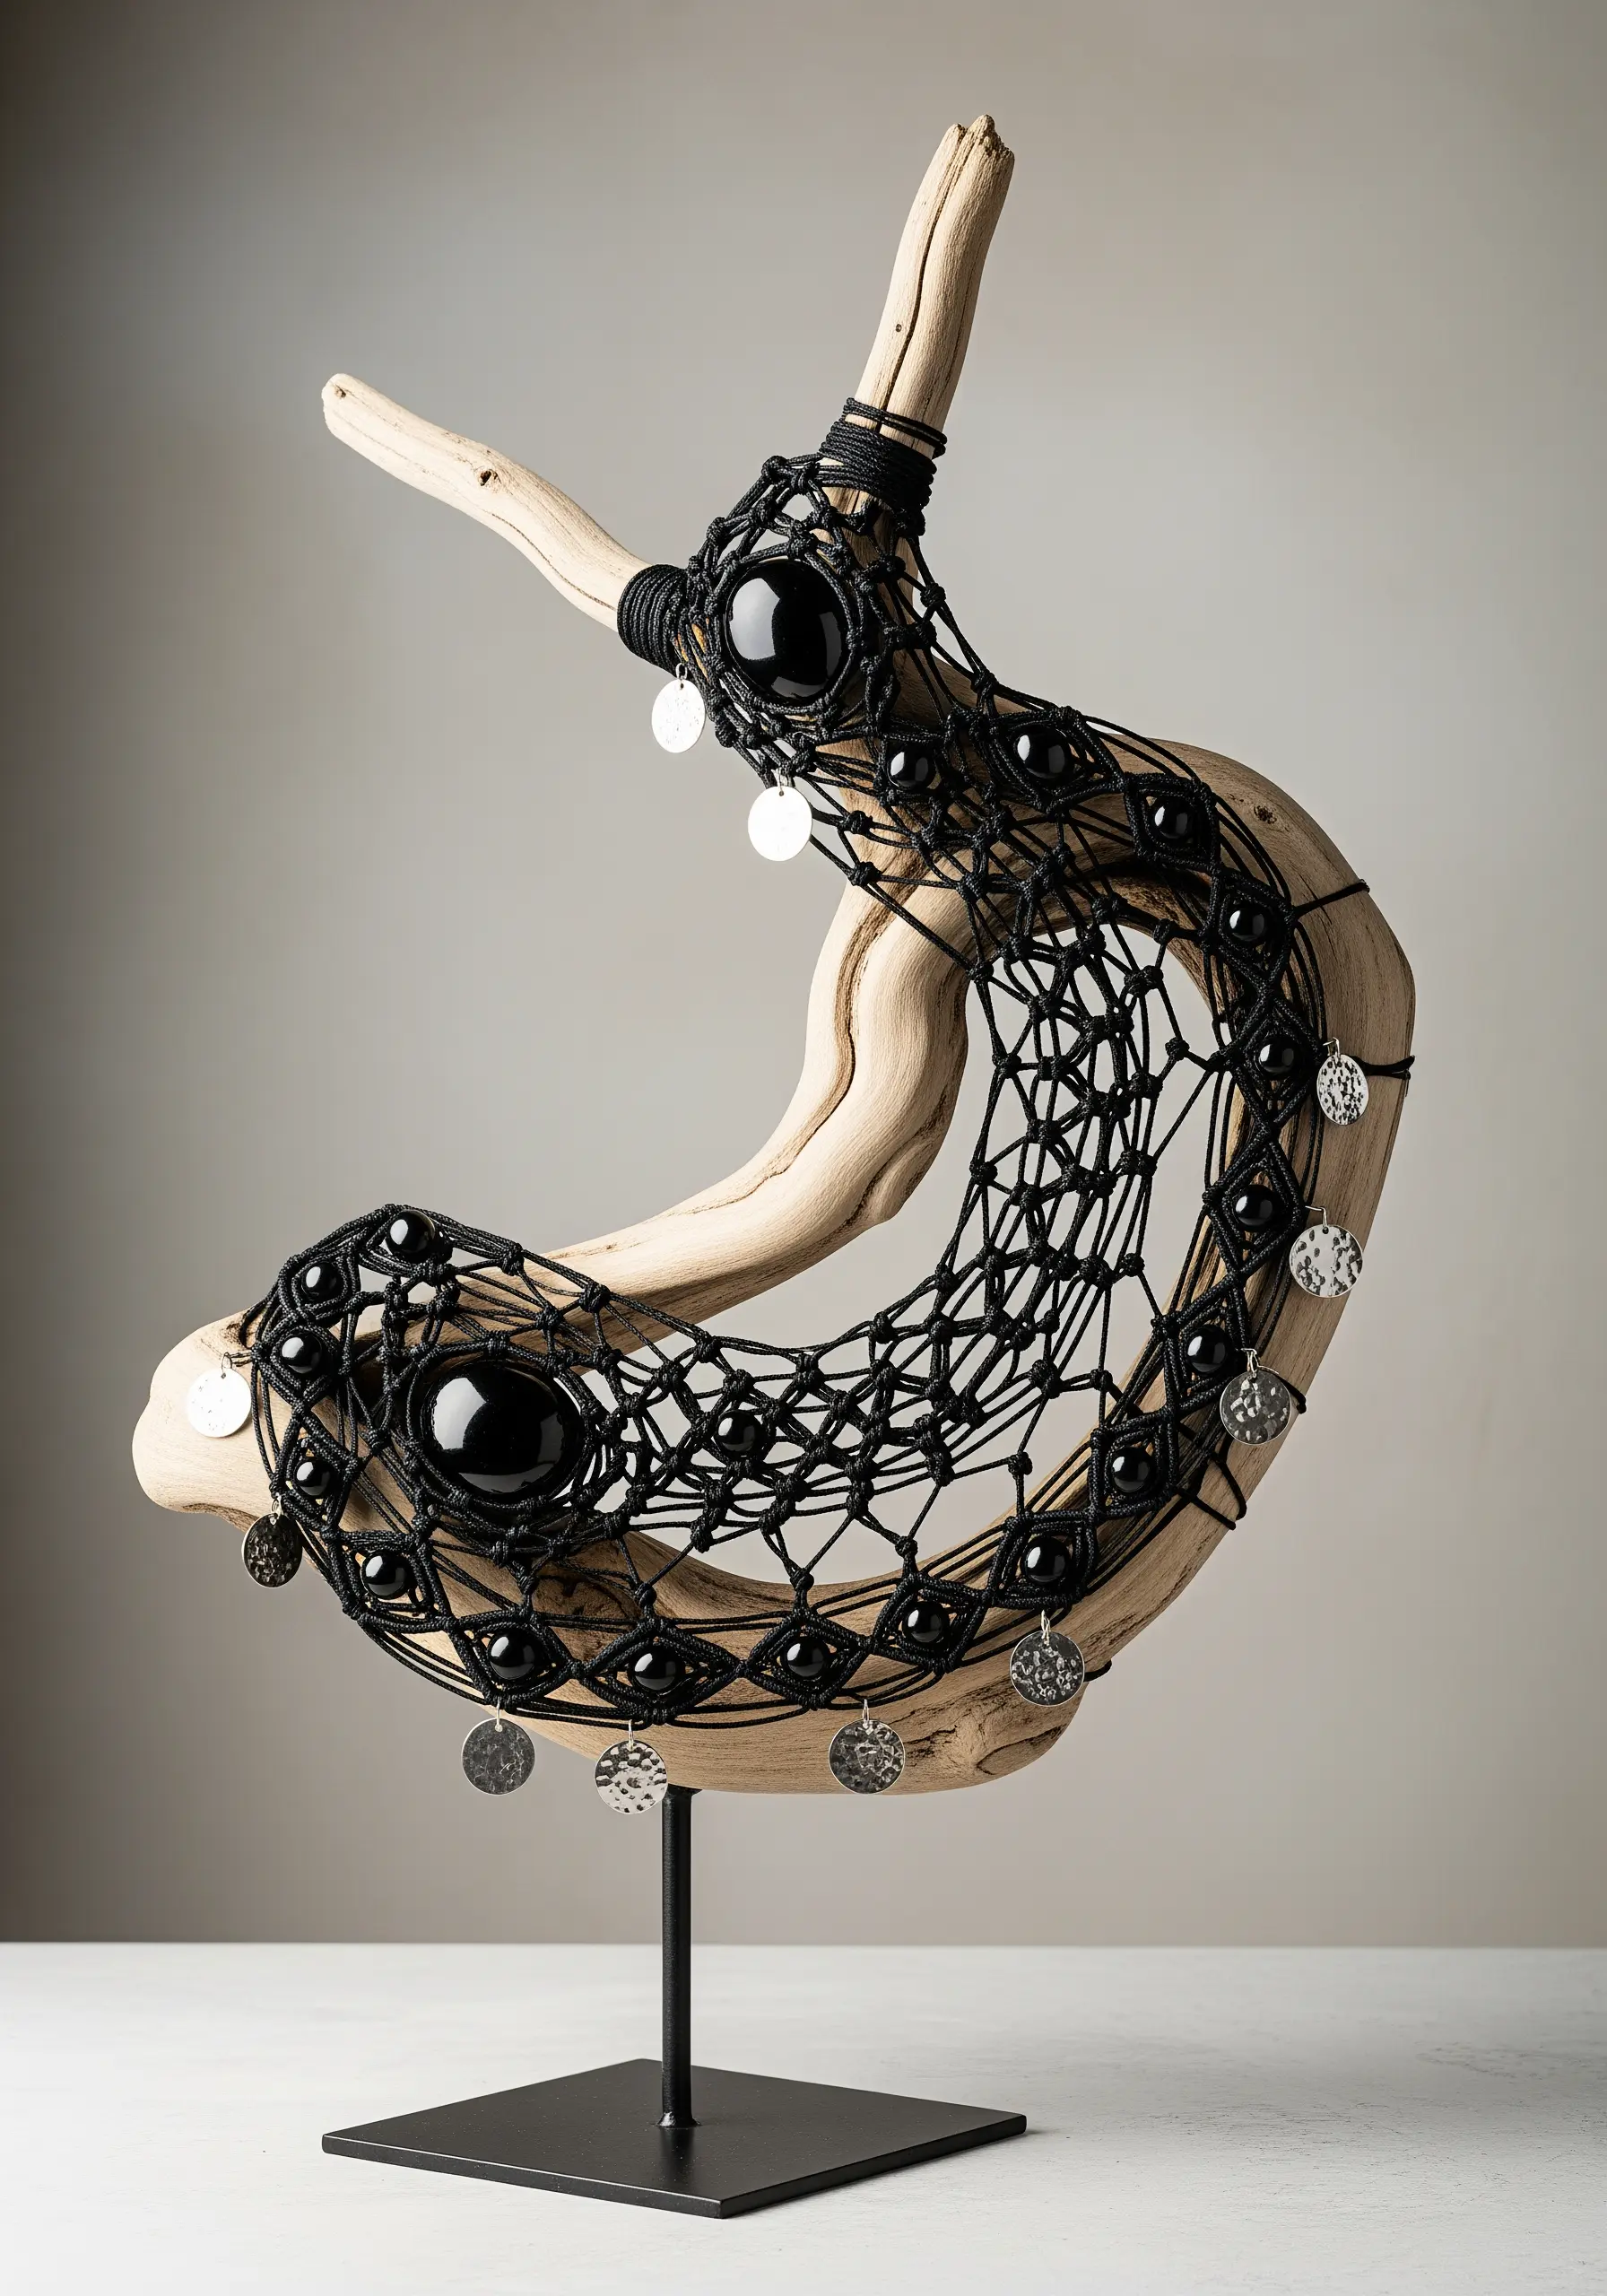
Integrate your fiber work with the natural world by using found objects like driftwood or branches as your loom.
Instead of creating a flat hanging, use macrame netting techniques to wrap and conform to the organic curves of the wood.
Incorporate heavy, smooth elements like polished stones or large wooden beads directly into your knotting.
This approach creates a sculpture that honors the original shape of the natural element, creating a harmonious and balanced composition.
15. Composing with Yarn-Wrapped Rings
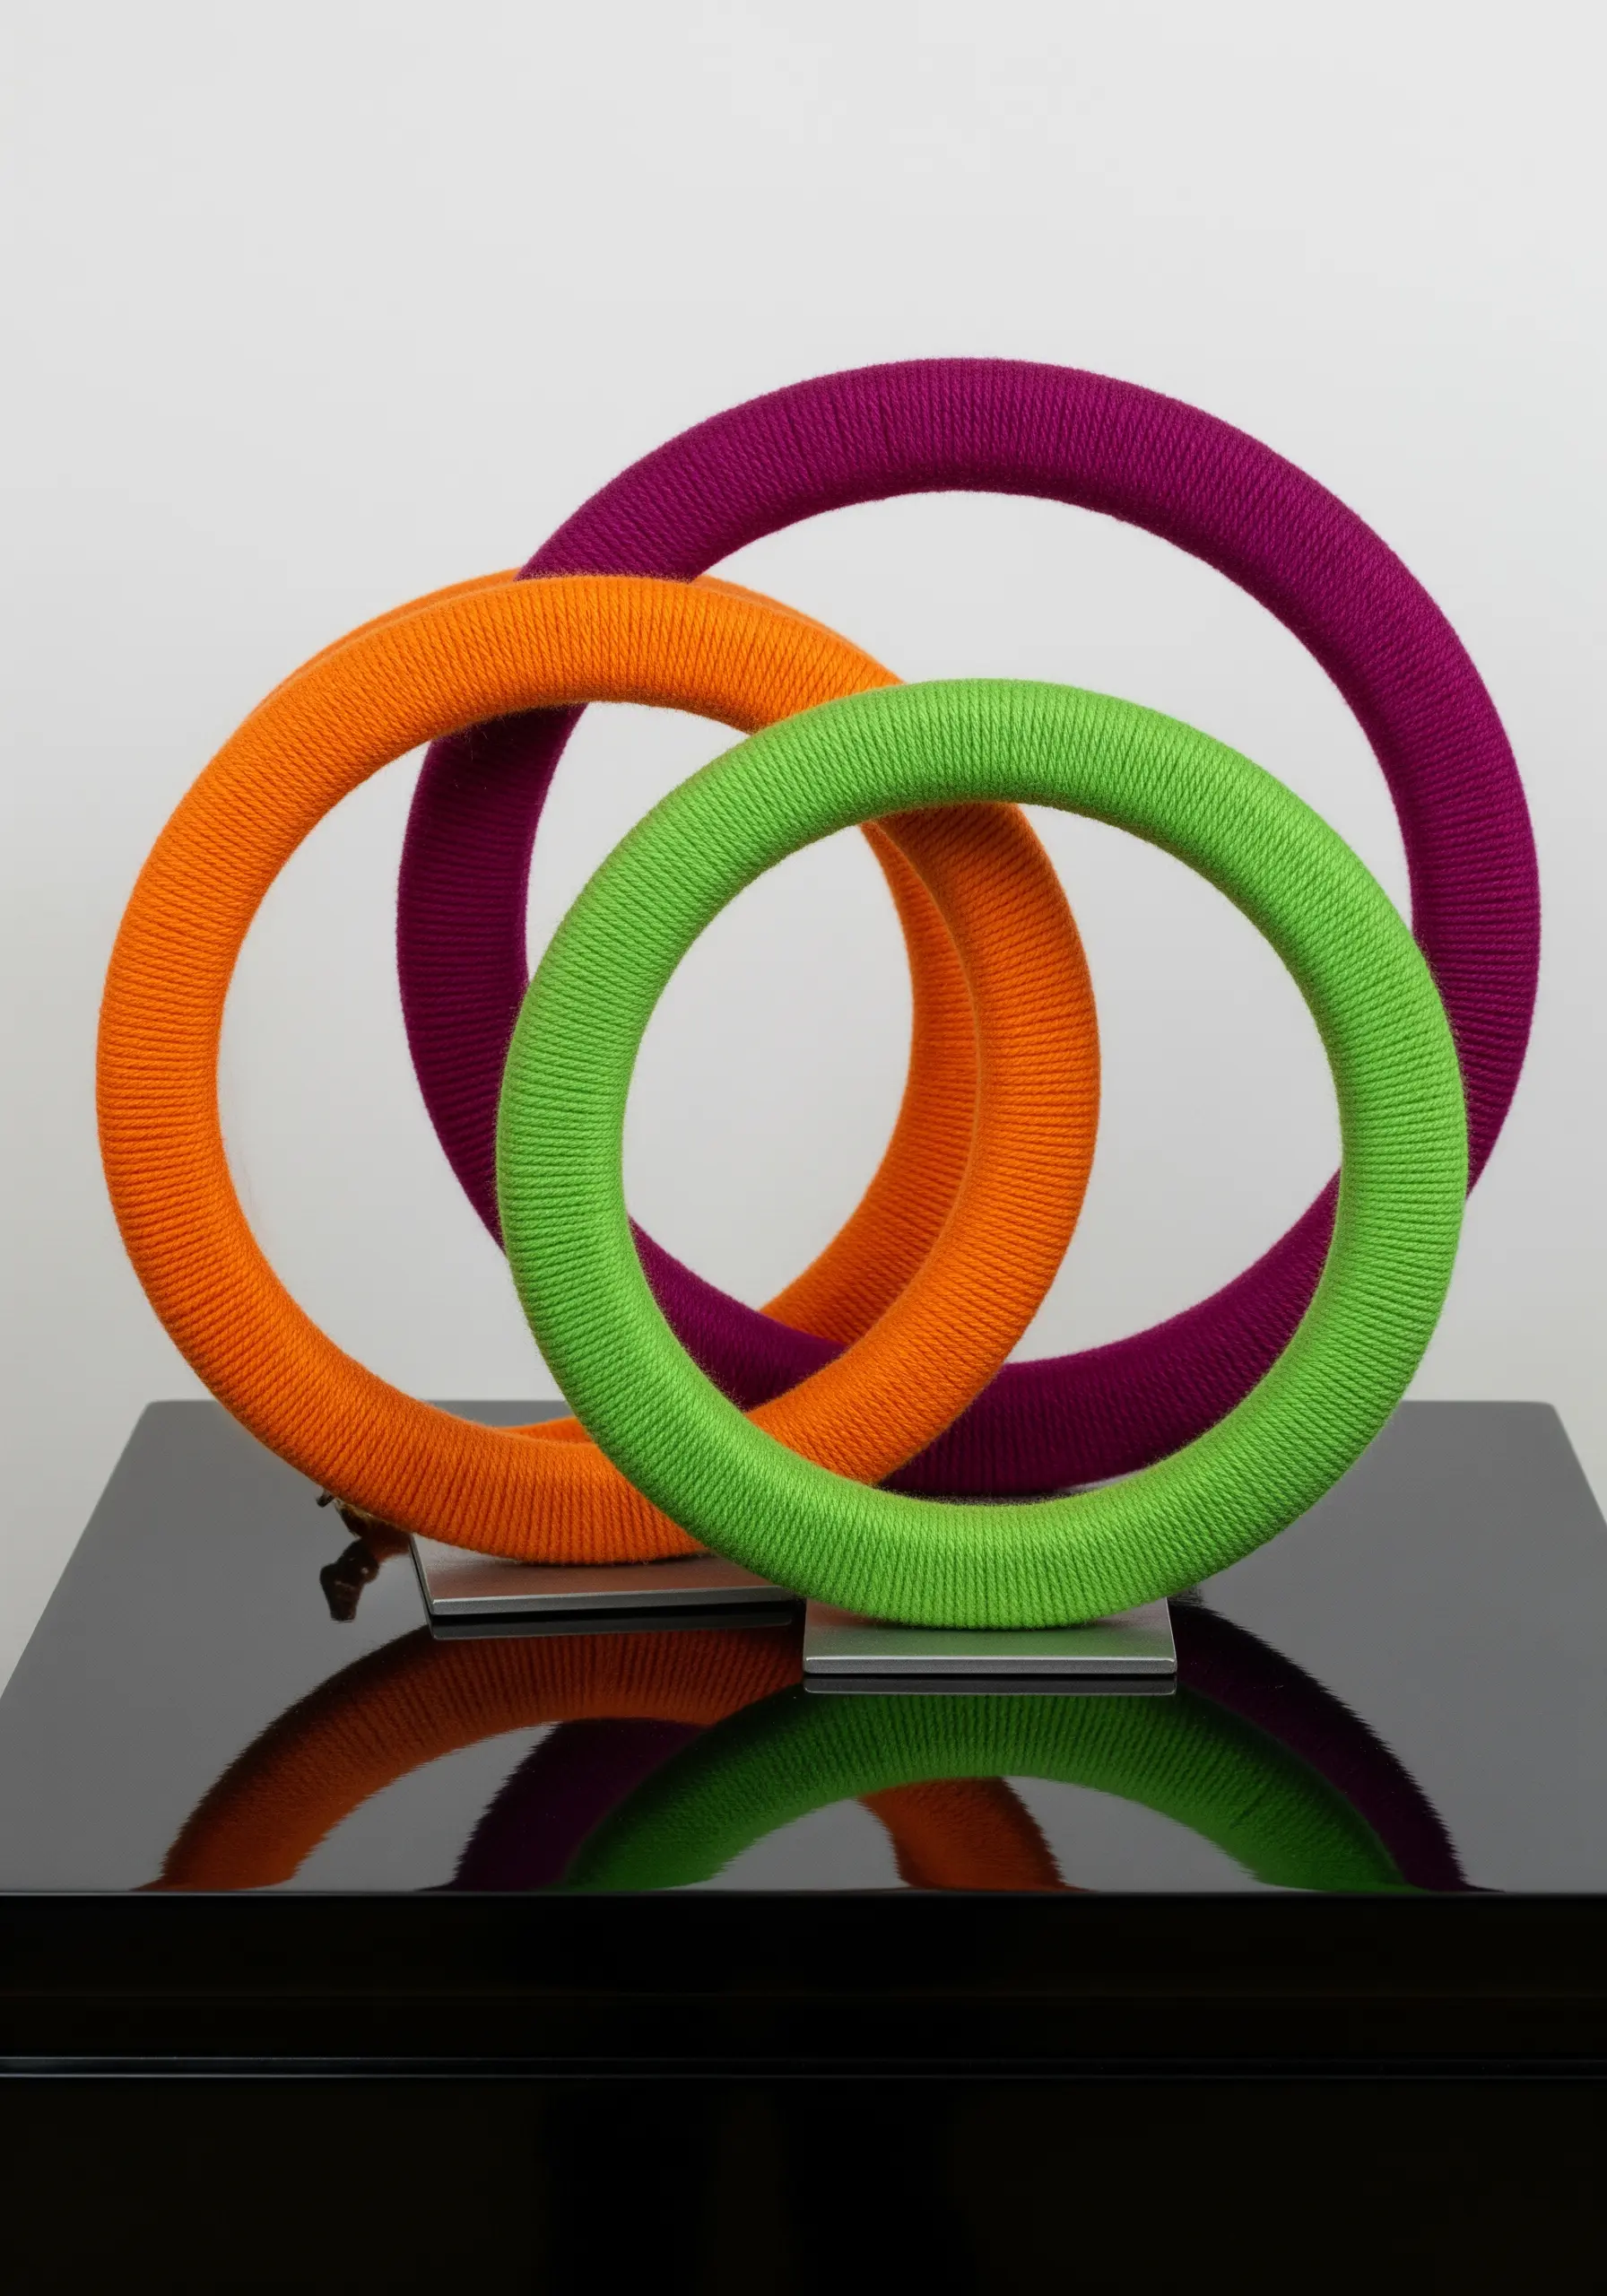
Transform simple craft rings into vibrant sculptural components through the simple act of wrapping.
Choose wooden or metal hoops and wrap them meticulously with yarn, ensuring the tension is tight and even for a perfectly smooth finish.
The artistry lies not in the complexity of the technique but in the composition and color theory.
Interlock, overlap, and arrange the rings in a balanced composition to create a minimalist sculpture where color and form are the heroes.
16. Appliquéing Lace onto Wire Mesh
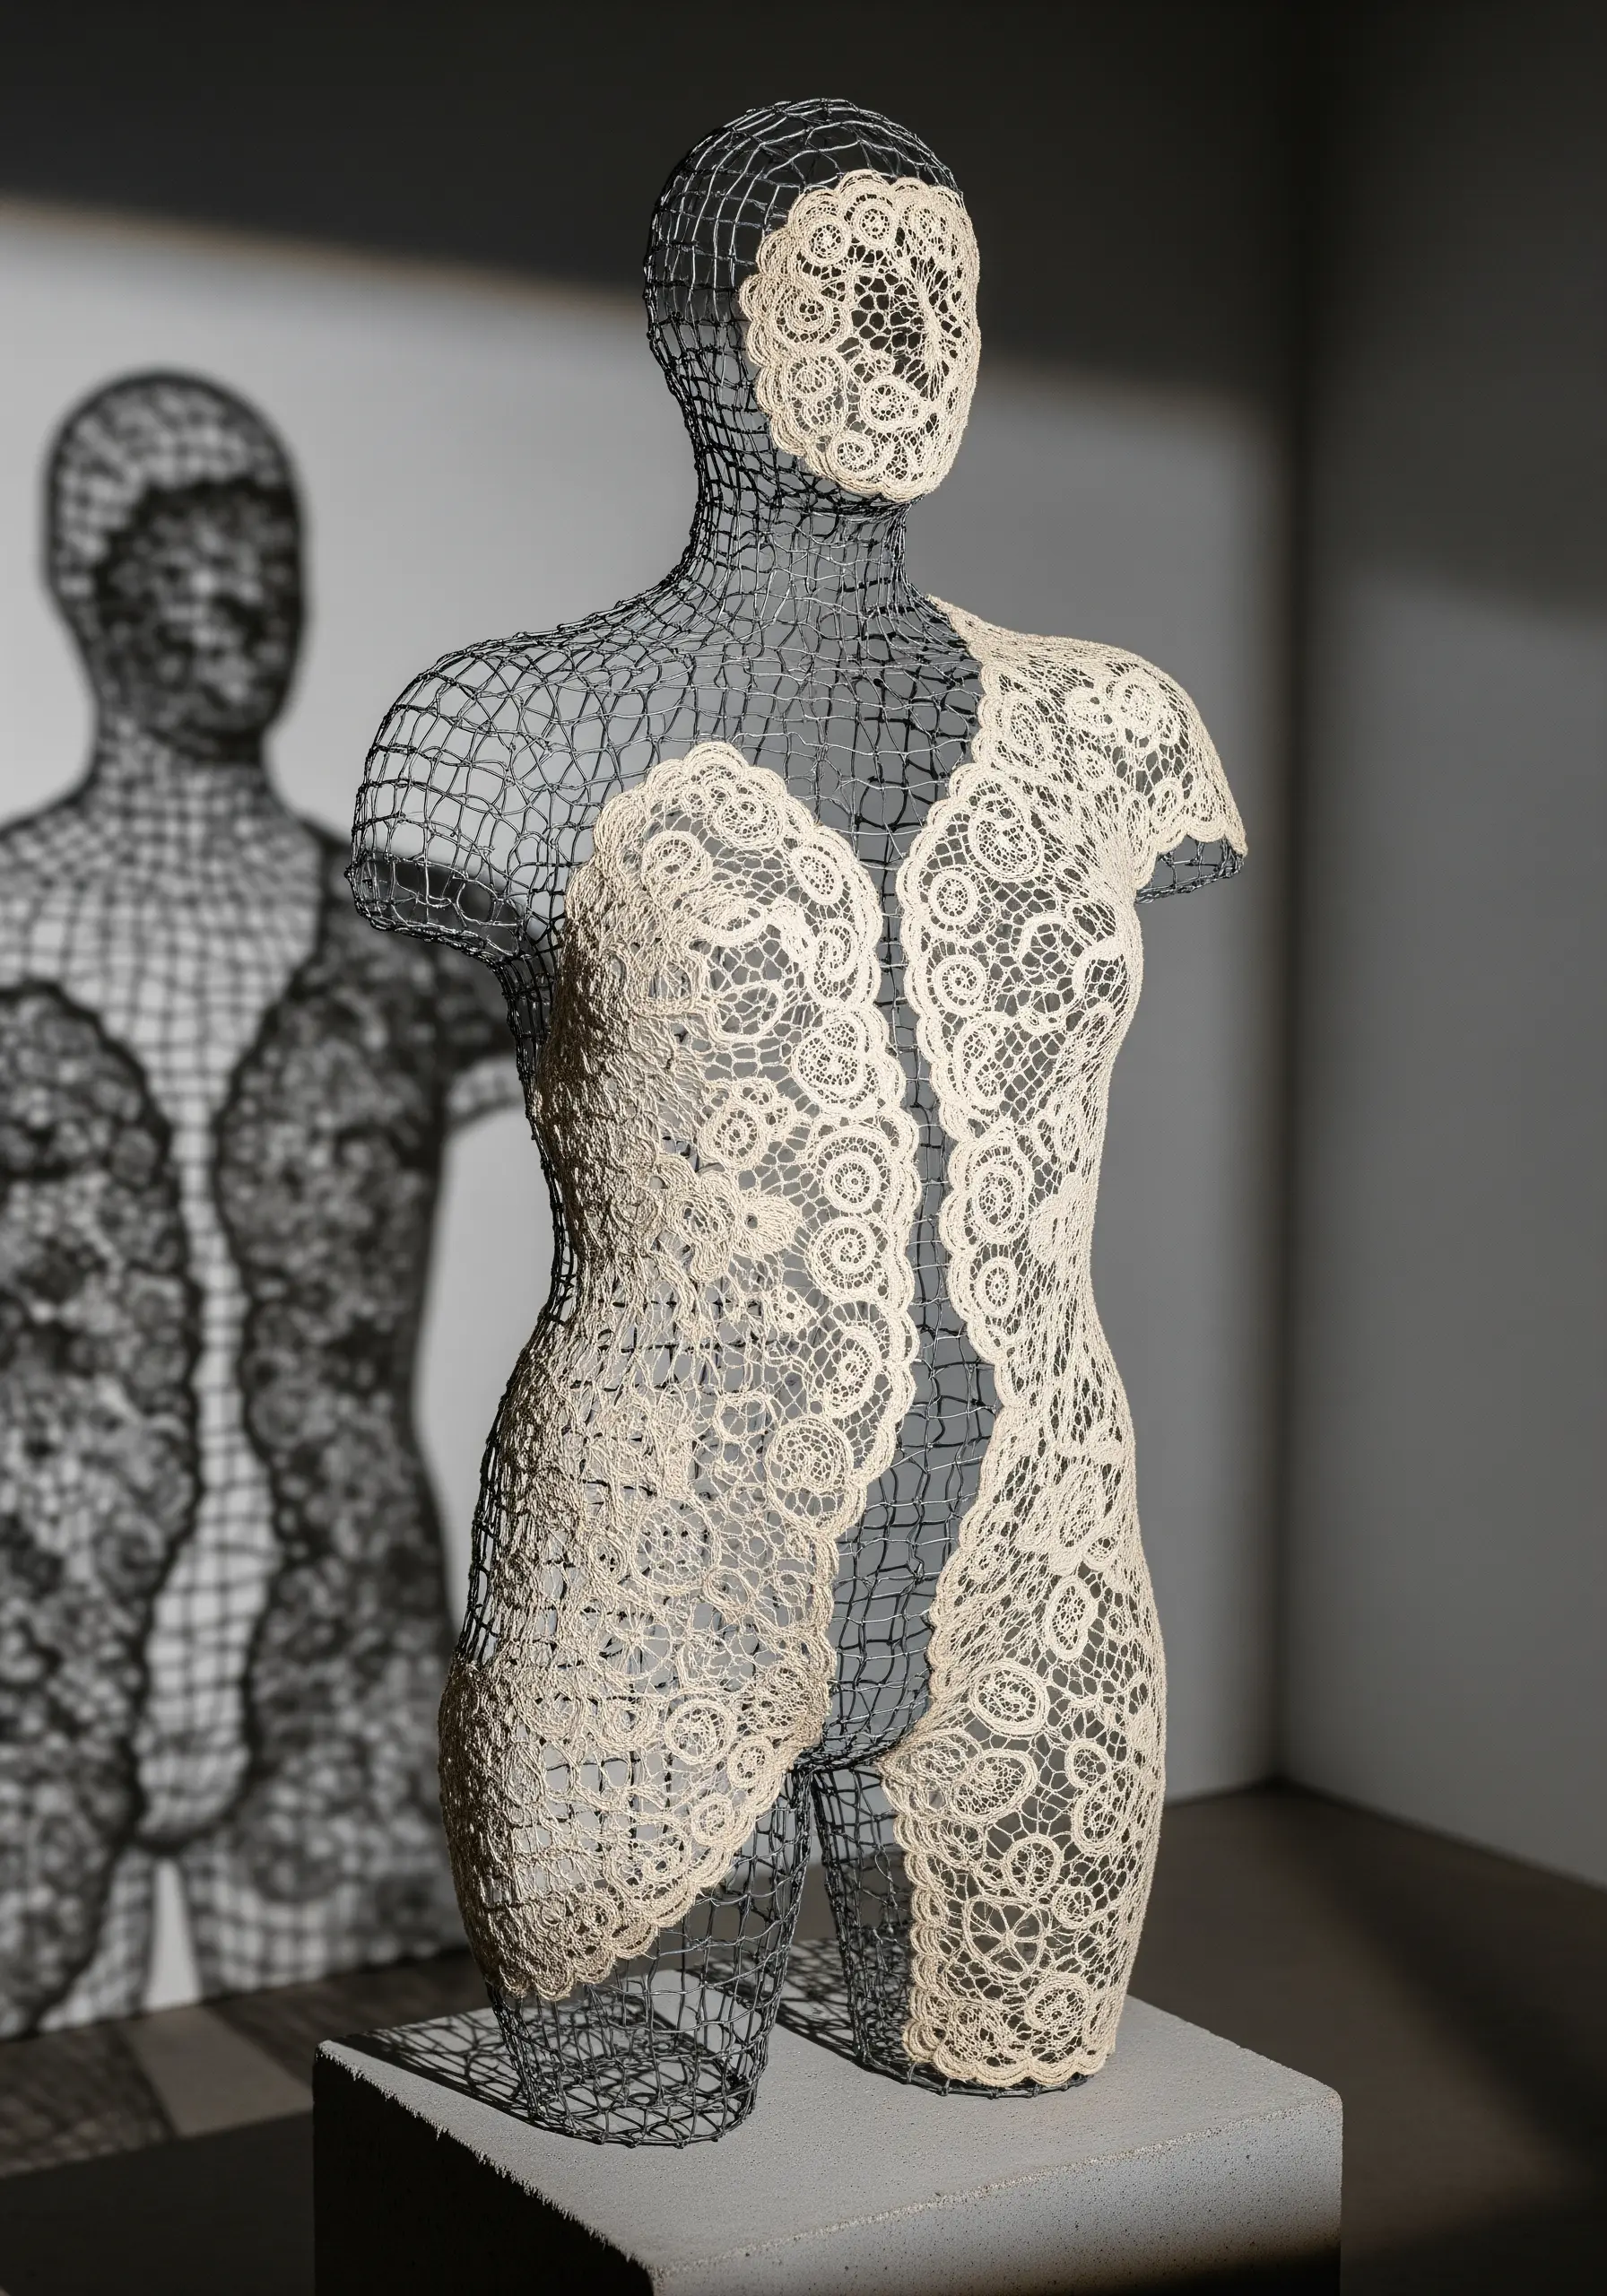
Explore the interplay of structure and delicacy by using wire mesh as a sculptural base for your textile work.
Mold hardware cloth or chicken wire into a three-dimensional form, like a torso or vessel.
Cut motifs from antique lace or embroidered tulle and carefully hand-stitch them onto the wire frame using a fine, strong thread.
The transparency of the mesh allows the lace to appear as if it’s floating, creating a ghostly and beautiful effect that celebrates both materials equally.
17. Stacked Hoop Gradients for Vertical Impact

Take hoop art from the wall to the floor by thinking vertically.
Embroider a series of hoops in graduating sizes and a cohesive color gradient, using simple geometric patterns stitched directly onto the fabric.
The key is to use a consistent design motif, allowing the color and size to be the main focus.
Stack the finished hoops from largest to smallest to create an elegant, tower-like sculpture that commands attention and offers a completely new way to display your stitching.
18. Weaving with Wire on a Natural Frame
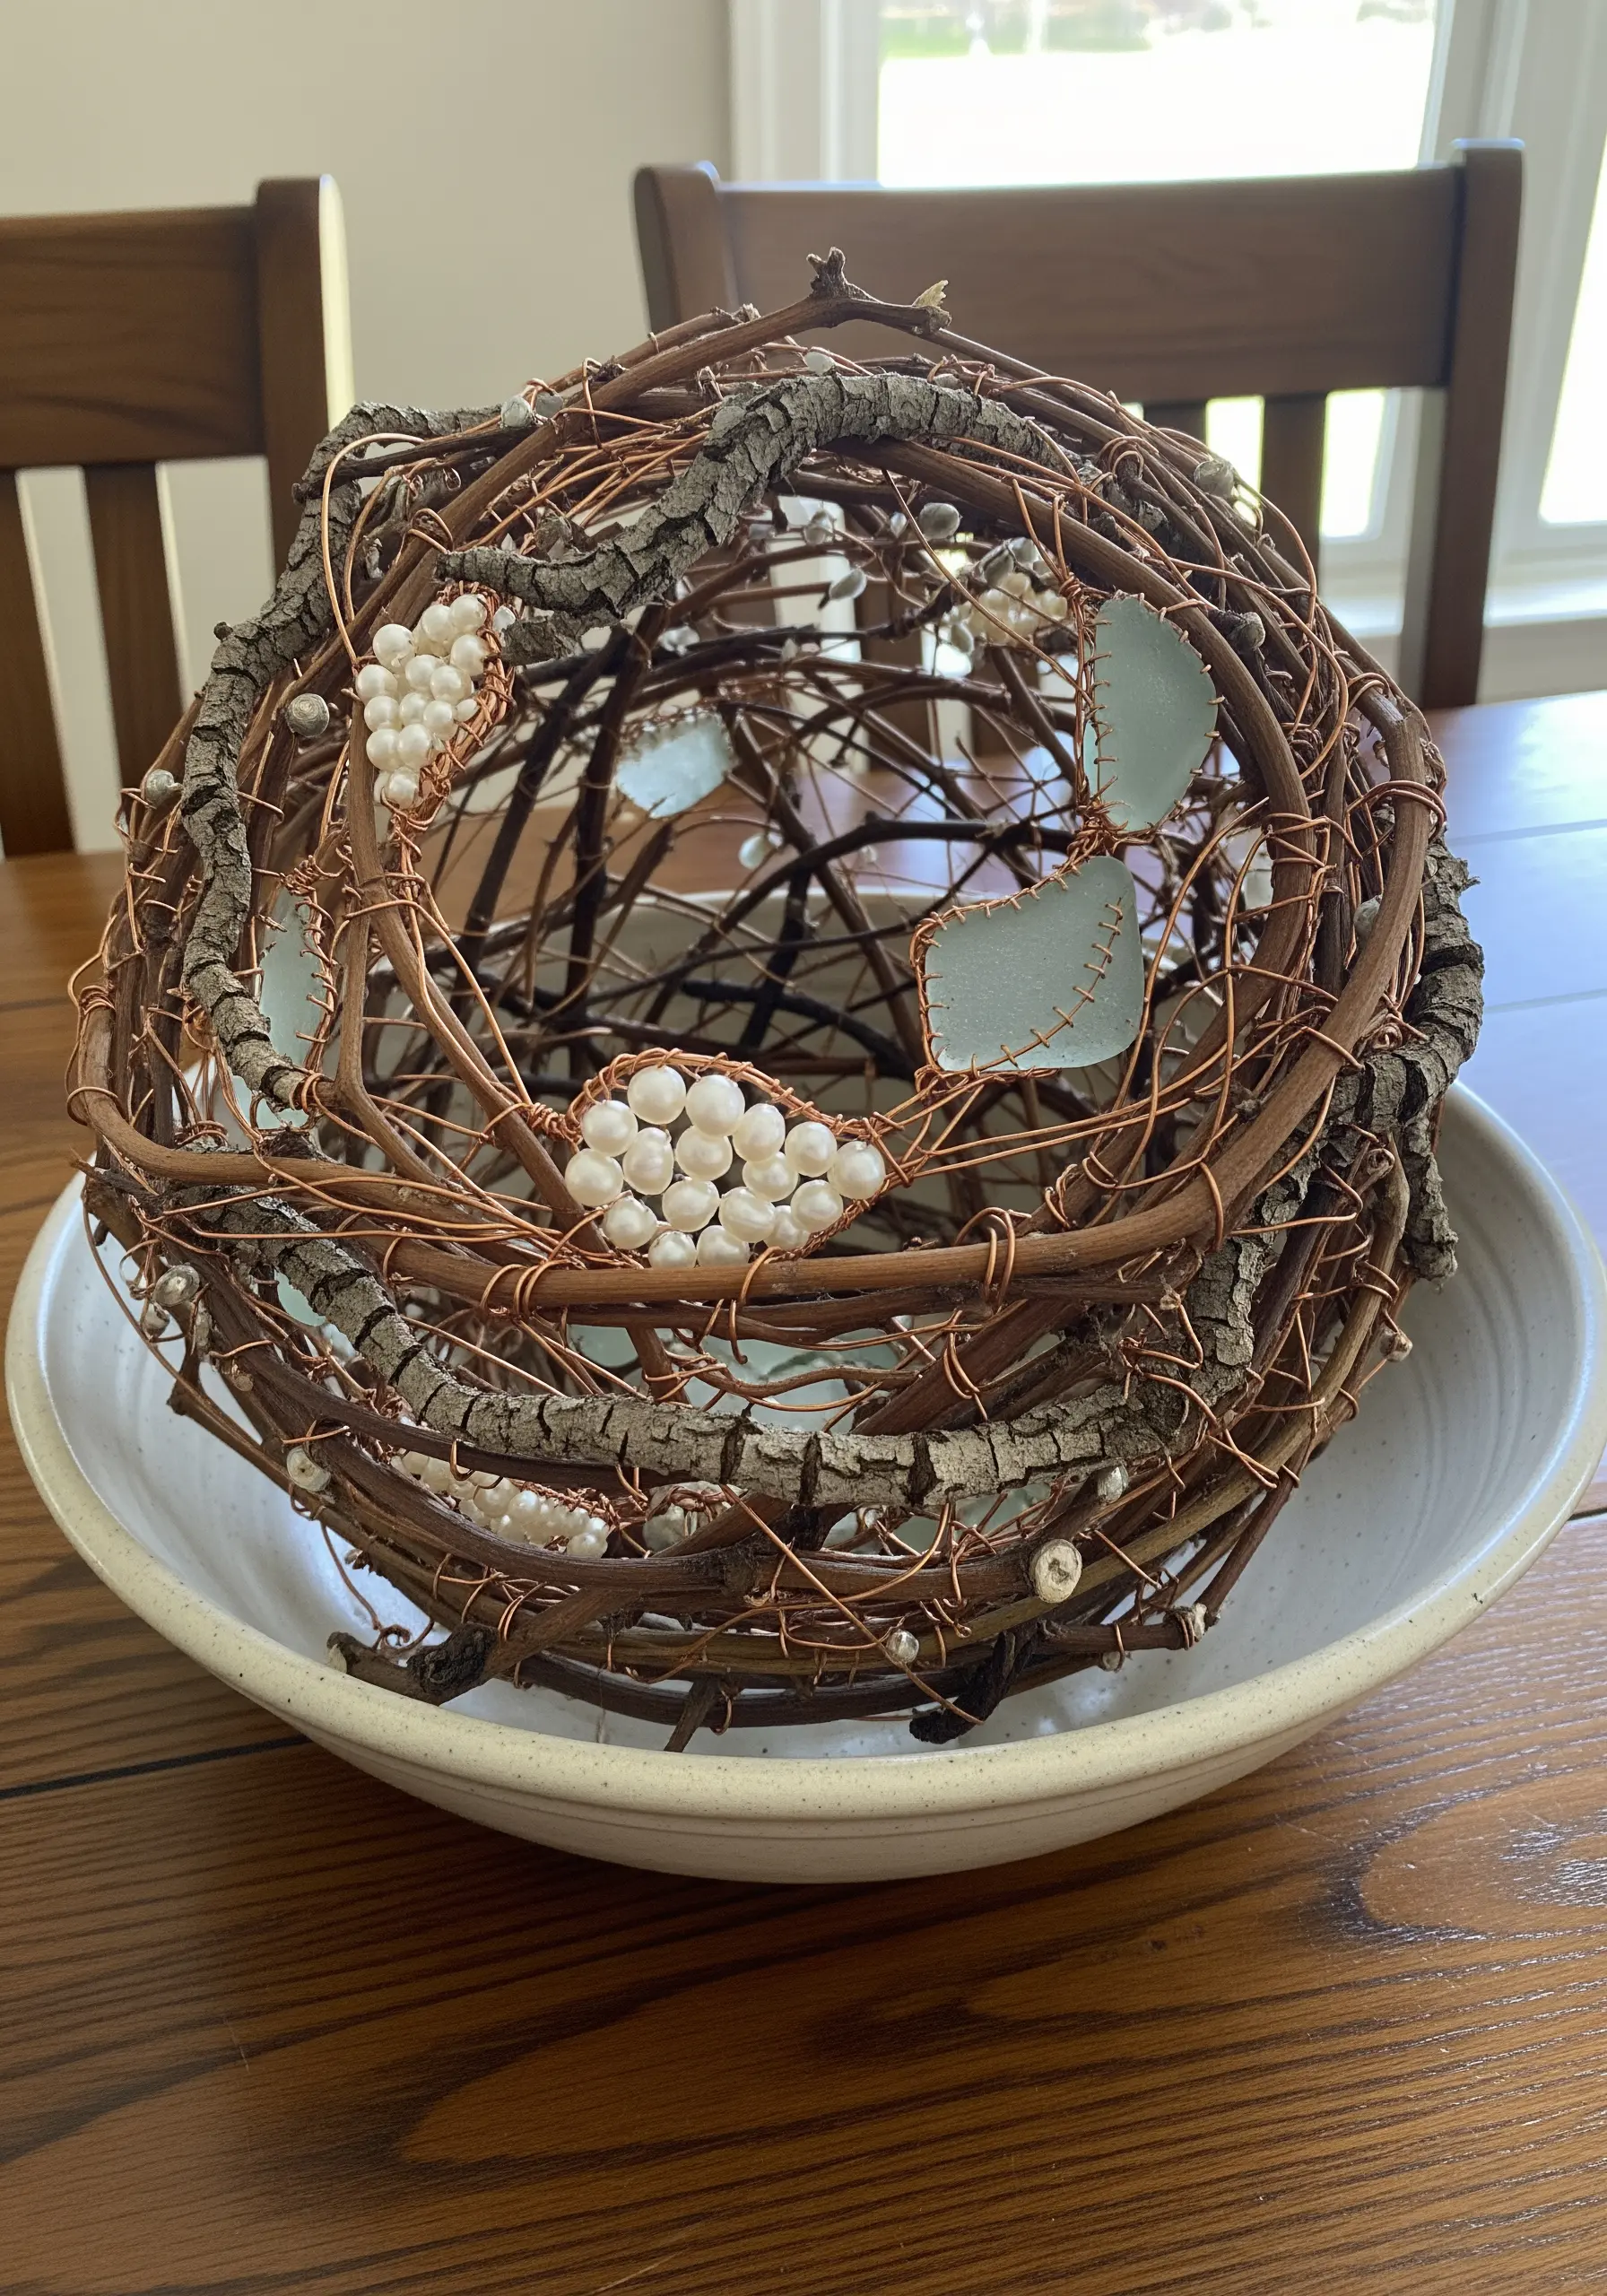
Build an open, airy sculpture using a combination of natural and industrial materials.
Create a spherical armature from flexible grapevine or willow branches, leaving organic gaps in the structure.
Weave a fine-gauge copper or brass wire through the twig frame, using it to secure decorative elements like pearls, sea glass, or pieces of bark.
The wire acts as both a structural reinforcement and a delicate, sparkling web that catches the light and holds your chosen embellishments in place.
19. Sculptural Appliqué on Draped Canvas

Free your work from the stretcher frame by creating large-scale appliqué on unstretched, heavy canvas.
Cut bold, abstract shapes from a contrasting, textured material—like industrial felt or corduroy—and arrange them on a large piece of neutral canvas.
Use a simple, visible stitch like a whip stitch to attach the shapes, making the construction part of the aesthetic.
Instead of hanging it flat, drape the finished textile over a simple wooden stand to give it a relaxed, sculptural form that emphasizes its weight and texture.
20. Laced Panel Construction for Lighting
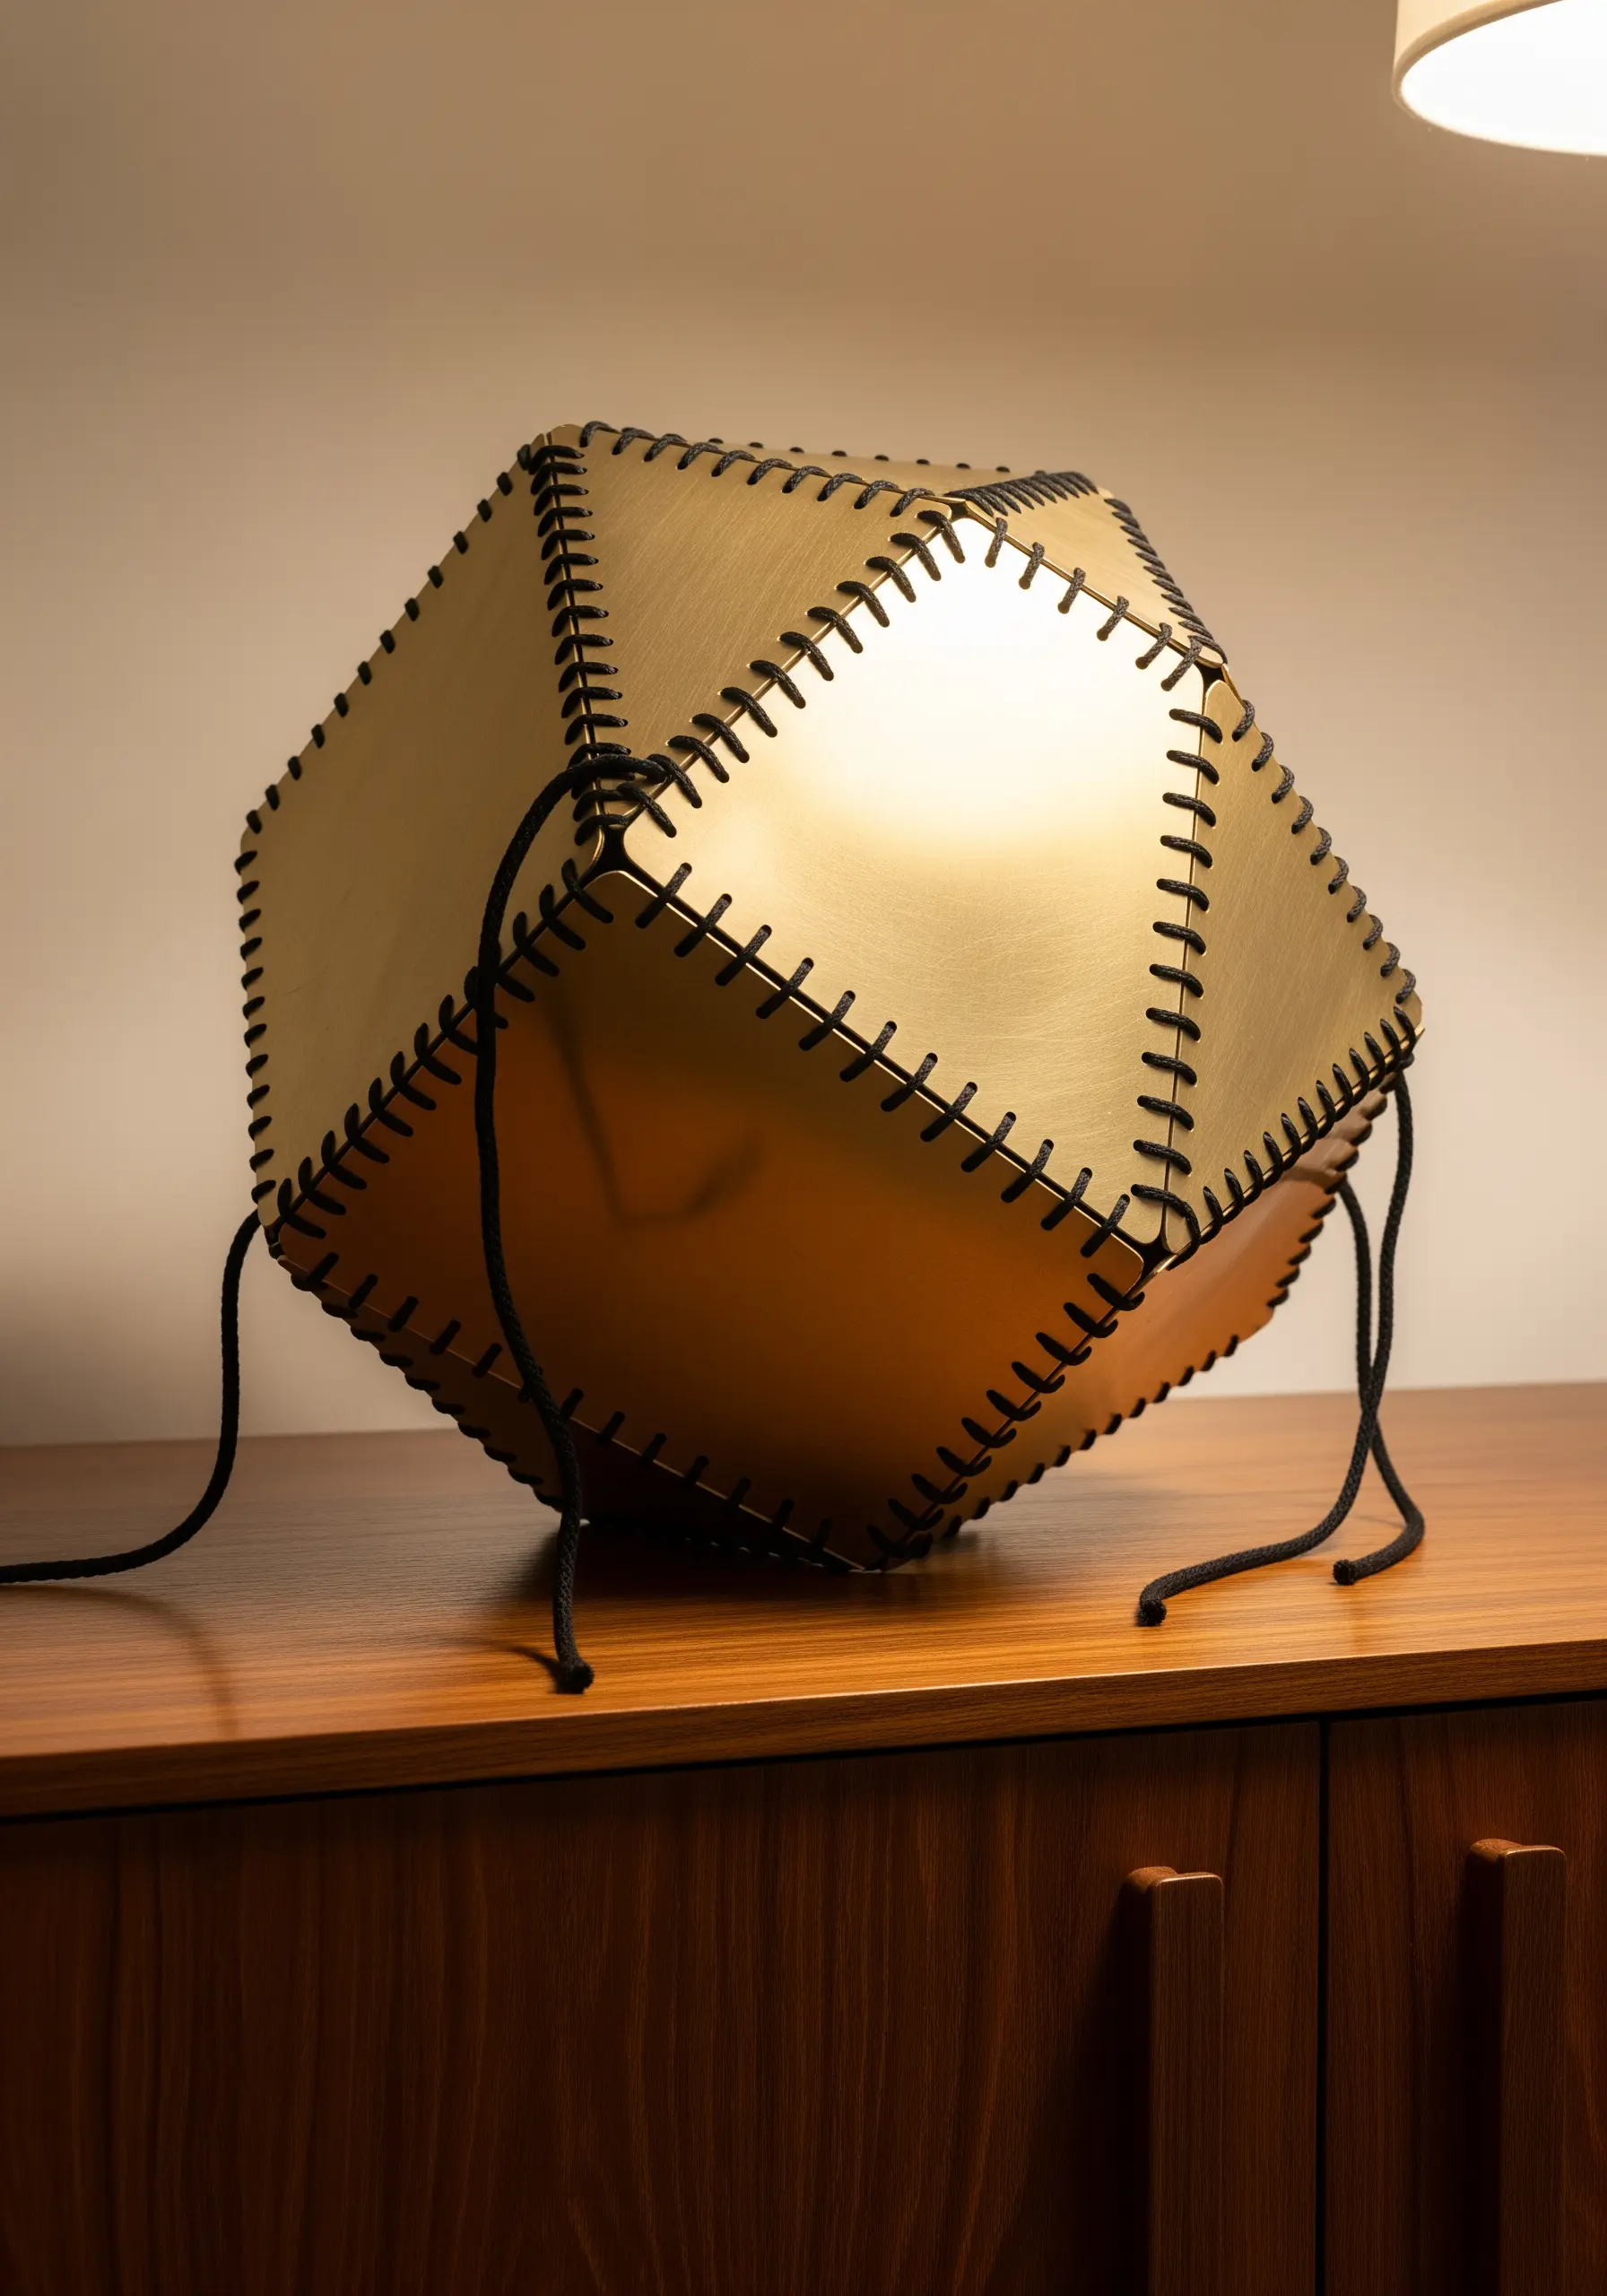
Turn your stitching into functional art by creating a lantern or light shade.
Cut panels from a semi-rigid, translucent material like vellum paper or thin brass sheets, punching holes evenly along the edges.
Lace the panels together using a thick, dark cord and a simple criss-cross stitch, creating a bold, graphic line that defines the form’s edges.
When illuminated from within, the light will not only glow through the panels but also highlight the silhouette of your structural stitching.
21. Faux-Ceramic Stitching on Hard Surfaces

Apply embroidery techniques to unexpected materials to create a surprising textural contrast.
You can achieve a ceramic-like effect using air-dry clay over a spherical form, or by painting wooden objects with a speckled, matte finish.
Carefully drill fine holes in a pattern, then use a sturdy needle and embroidery floss to create simple line-based stitches, like backstitch or cross-hatching.
The result is a piece that blends the fragility of ceramics with the warmth and texture of hand-stitching.
22. Simulating Encapsulation with 3D Stitches

Recreate the look of flowers suspended in resin by building a dense, three-dimensional floral arrangement on fabric.
Use stitches that create high relief, such as bullion knots for petals, woven picot stitch for leaves, and French knots for flower centers.
Choose vibrant, high-sheen threads to mimic the saturated color of objects seen through glass.
Display the finished piece inside a clear acrylic or perspex box to give it that contained, specimen-like quality, preserving its texture while achieving a modern, clean presentation.


