
You have a love for stitching, but perhaps you feel your finished pieces are missing a certain something—a touch of polish, a sense of intention. It’s not about mastering dozens of complex stitches; it’s about learning to see your thread and fabric differently.
Think of each tiny frame not just as a decoration, but as a small study in texture, color, and form. A single change—like switching from three strands of floss to one for delicate details, or choosing a fishbone stitch over a satin stitch to capture the texture of a sage leaf—can elevate your work instantly.
This collection is designed to show you precisely how those small, thoughtful adjustments create embroidery that feels both personal and professionally finished. Let’s explore these techniques together, one stitch at a time.
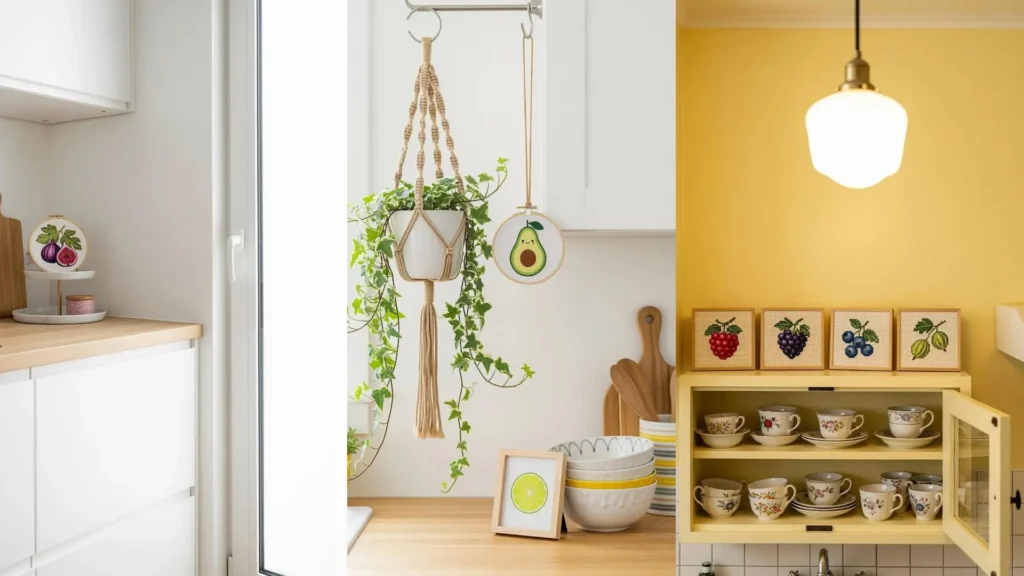
1. Curate a Windowsill Trio with Textural Contrast

Group small hoops to tell a cohesive visual story, even with different motifs like fruits and herbs.
You can unify the collection by using the same neutral oatmeal linen for each piece, creating a consistent canvas that lets the colors pop.
For the lemon, use a directional satin stitch for the glossy rind and tiny seed stitches for the pulp’s texture.
Contrast this with the delicate fly stitches of the rosemary, which gives the needles an airy, three-dimensional quality.
This approach makes each piece interesting on its own while ensuring the set feels intentionally designed.
2. Design a Geometric Herb Garden for Your Wall

Arrange your botanical stitches in hexagonal frames to build a modern, honeycomb-style gallery wall.
The sharp geometric lines of the frames create a beautiful contrast with the soft, organic shapes of the herbs.
For fine details like lavender blossoms or thyme sprigs, use only a single strand of embroidery floss.
This prevents the delicate parts of the design from looking bulky and preserves their graceful structure.
This is one of the best micro-hoop embroidery collections that create gallery walls in tiny spaces, adding a touch of green without taking up counter space.
3. Master the Minimalist Line with Single-Thread Motifs

Elevate simple fruit outlines by treating them as delicate line drawings.
Use a single strand of black or dark gray thread and a precise backstitch to create a clean, continuous line that feels both modern and timeless.
The power of this technique lies in the negative space; by leaving the shapes unfilled, you draw attention to the purity of their form.
This is a perfect way to add minimal embroidery accents that completely upgrade your entryway or kitchen nook with understated elegance.
4. Add Dimension with Textural Stitches

Bring your embroidered fruits to life by moving beyond flat satin stitch.
For the orange slice, use a dense pattern of French knots or colonial knots to mimic the bumpy texture of the rind, creating a tactile surface that invites a closer look.
To make the grapes feel plump and rounded, build them up with a padded satin stitch—simply lay down a base of smaller satin stitches before covering them with your final, smooth layer.
This technique adds subtle, realistic dimension without complicating the design.
5. Embrace Rustic Charm with Cross-Stitch Berries

Switch to cross-stitch for a charming, slightly pixelated effect that perfectly suits a country or retro-inspired kitchen.
To ensure your stitches are perfectly uniform, work on an even-weave fabric like Aida cloth or a high-count linen.
The gridded nature of cross-stitch complements the clean lines of the square frames, creating a tidy and satisfying composition.
Group a series of berries together on a shelf to create a sweet, cohesive collection.
6. Create Jewel-Like Details for Dramatic Impact

For a design like a pomegranate, focus on making the seeds the star of the show.
Stitch each seed with a single strand of high-sheen rayon or silk thread using a satin stitch; the reflective quality of the thread will make them look like tiny, glistening jewels.
Outline the segments with a dark red backstitch to define the sections and add depth, making the vibrant seeds pop even more.
This single, dramatic piece can anchor a whole coffee nook.
7. Capture Creamy Texture with Color Blending

To stitch a realistic avocado, the key is capturing the soft, buttery texture of the flesh.
Achieve this by using a long-and-short stitch with three or four closely related shades of green and yellow-green floss.
Work your stitches in a gentle curve, blending the colors seamlessly from the darker green edge to the lighter center.
This painterly technique creates a sense of depth and softness that a simple satin stitch cannot replicate.
8. Use Directional Stitching for Shape and Movement

Make your embroidered spices and vegetables feel more dynamic by paying attention to the direction of your stitches.
For the chili pepper, angle your satin stitches to follow its natural curve, enhancing its form and suggesting movement.
Similarly, for the garlic, stitch each clove with threads that radiate from the center, emphasizing its bulbous shape.
This subtle adjustment adds a surprising amount of realism and visual interest to simple motifs.
9. Maximize Color Vibrancy on a Dark Canvas

Stitching on black or dark-colored fabric is a powerful way to make your thread colors appear richer and more luminous.
The high contrast makes every stitch stand out, giving your work a dramatic, fine-art quality.
When creating a gallery wall like this, vary the hoop sizes and orientations to create a dynamic layout.
This technique turns a simple coffee corner into a sophisticated display, making it one of those abstract embroidery patterns that turn empty walls into luxury art.
10. Achieve Realistic Gradients with Thread Painting

To create the soft blush of a peach or the dappled skin of an apple, you need to master thread painting.
Using a single strand of floss and the long-and-short stitch, you can blend colors just like a painter.
Start with your lightest color, then slowly introduce mid-tones and shadows, overlapping your stitches to create a smooth, seamless transition.
This technique transforms a flat design into a photorealistic piece of art.
11. Combine Stitch Types for Complex Textures

A fig’s interior is a beautiful and complex texture, making it a perfect subject for stitch experimentation.
Use a smooth, deep purple satin stitch for the outer skin to create a subtle sheen.
For the inner pulp, combine a mix of French knots, colonial knots, and tiny seed stitches in various shades of pink and red.
This combination of smooth and bumpy textures creates a highly realistic and visually captivating result that celebrates the fruit’s unique beauty.
12. Stitch Delicate Wildflowers with Light Threads

When embroidering delicate botanicals like chamomile, the goal is to capture their airy, fragile nature.
Use detached chain stitches (lazy daisies) for the petals and small French knots for the centers, but work with only one or two strands of floss.
A lighter thread weight prevents the flowers from looking clunky and keeps the design feeling light and graceful.
Placing these gentle floral embroidery ideas against a patterned wallpaper adds another layer of charm.
13. Explore Leaf Variations with Specialized Stitches

Give each herb in your collection a distinct personality by choosing a stitch that reflects its unique leaf texture.
For the fuzzy leaves of sage, use a fishbone stitch; its central spine and angled sides perfectly mimic the leaf’s structure and soft appearance.
For the broad, shiny leaves of basil, a wider satin stitch will capture that smooth surface.
This thoughtful approach to stitch selection makes your botanical collection look expertly crafted.
14. Create Visual Interest with Vertical Stacking

Instead of a traditional gallery cluster, try arranging your small frames in a clean vertical line.
This technique draws the eye upward and works beautifully in narrow spaces, like the wall space in a breakfast nook.
For the strawberries, add dimension by stitching the yellow seeds with tiny seed stitches *on top* of the red satin stitch body.
This simple layering trick makes the seeds look embedded in the fruit, adding a subtle touch of realism.
15. Juxtapose Modern Stitching with Ornate Framing

Transform your embroidery from a simple craft into a piece of statement art by choosing an unexpected frame.
The contrast between the clean, modern stitching of the cherries and the ornate, traditional gold frame creates a powerful visual tension that is incredibly sophisticated.
Stitching on black canvas enhances the drama, making the rich reds and greens of the cherries feel deep and luxurious, like an old master’s still-life painting.
16. Adapt Your Designs for Different Surfaces

Don’t limit your kitchen embroidery to wall art; translate your favorite motifs onto functional items like pillows or tea towels.
When stitching on items that will be handled, choose a durable base fabric like cotton canvas or heavy linen that can withstand wear.
For the pineapple’s textured skin, lay down a base of golden yellow satin stitch, then overlay it with a grid of brown backstitches to create that classic diamond pattern.
17. Blend Colors for a Sun-Kissed Gradient Effect

Capture the look of a perfectly ripened pear by blending your thread colors to create a soft, sun-kissed gradient.
Using the long-and-short stitch technique, you can seamlessly transition from green to yellow to a hint of rosy orange.
The key is to use a single strand of floss and slightly overlap your stitches, allowing the colors to mix organically.
These thread color blending tricks for modern abstract art give your simple fruit motif a painterly quality that is both subtle and stunning.


