

Neon thread has a language of its own. It doesn’t just add color; it adds light, energy, and a bold, unapologetic confidence to every stitch.
If you’ve been working with traditional palettes, switching to neons can feel like turning on a blacklight in a familiar room—everything is transformed. On dark fabrics like denim, canvas, or black cotton, these threads don’t just sit on the surface; they pulse with intensity, turning simple lines into glowing statements and filled shapes into vibrant focal points.
Let’s move beyond just adding a pop of color. I’ll show you how to use neon thread with intention—to create depth, define shapes, and tell a story that feels distinctly modern. This is your chance to make your embroidery not just seen, but felt.
1. Layered Neon Geometry for a Statement Back
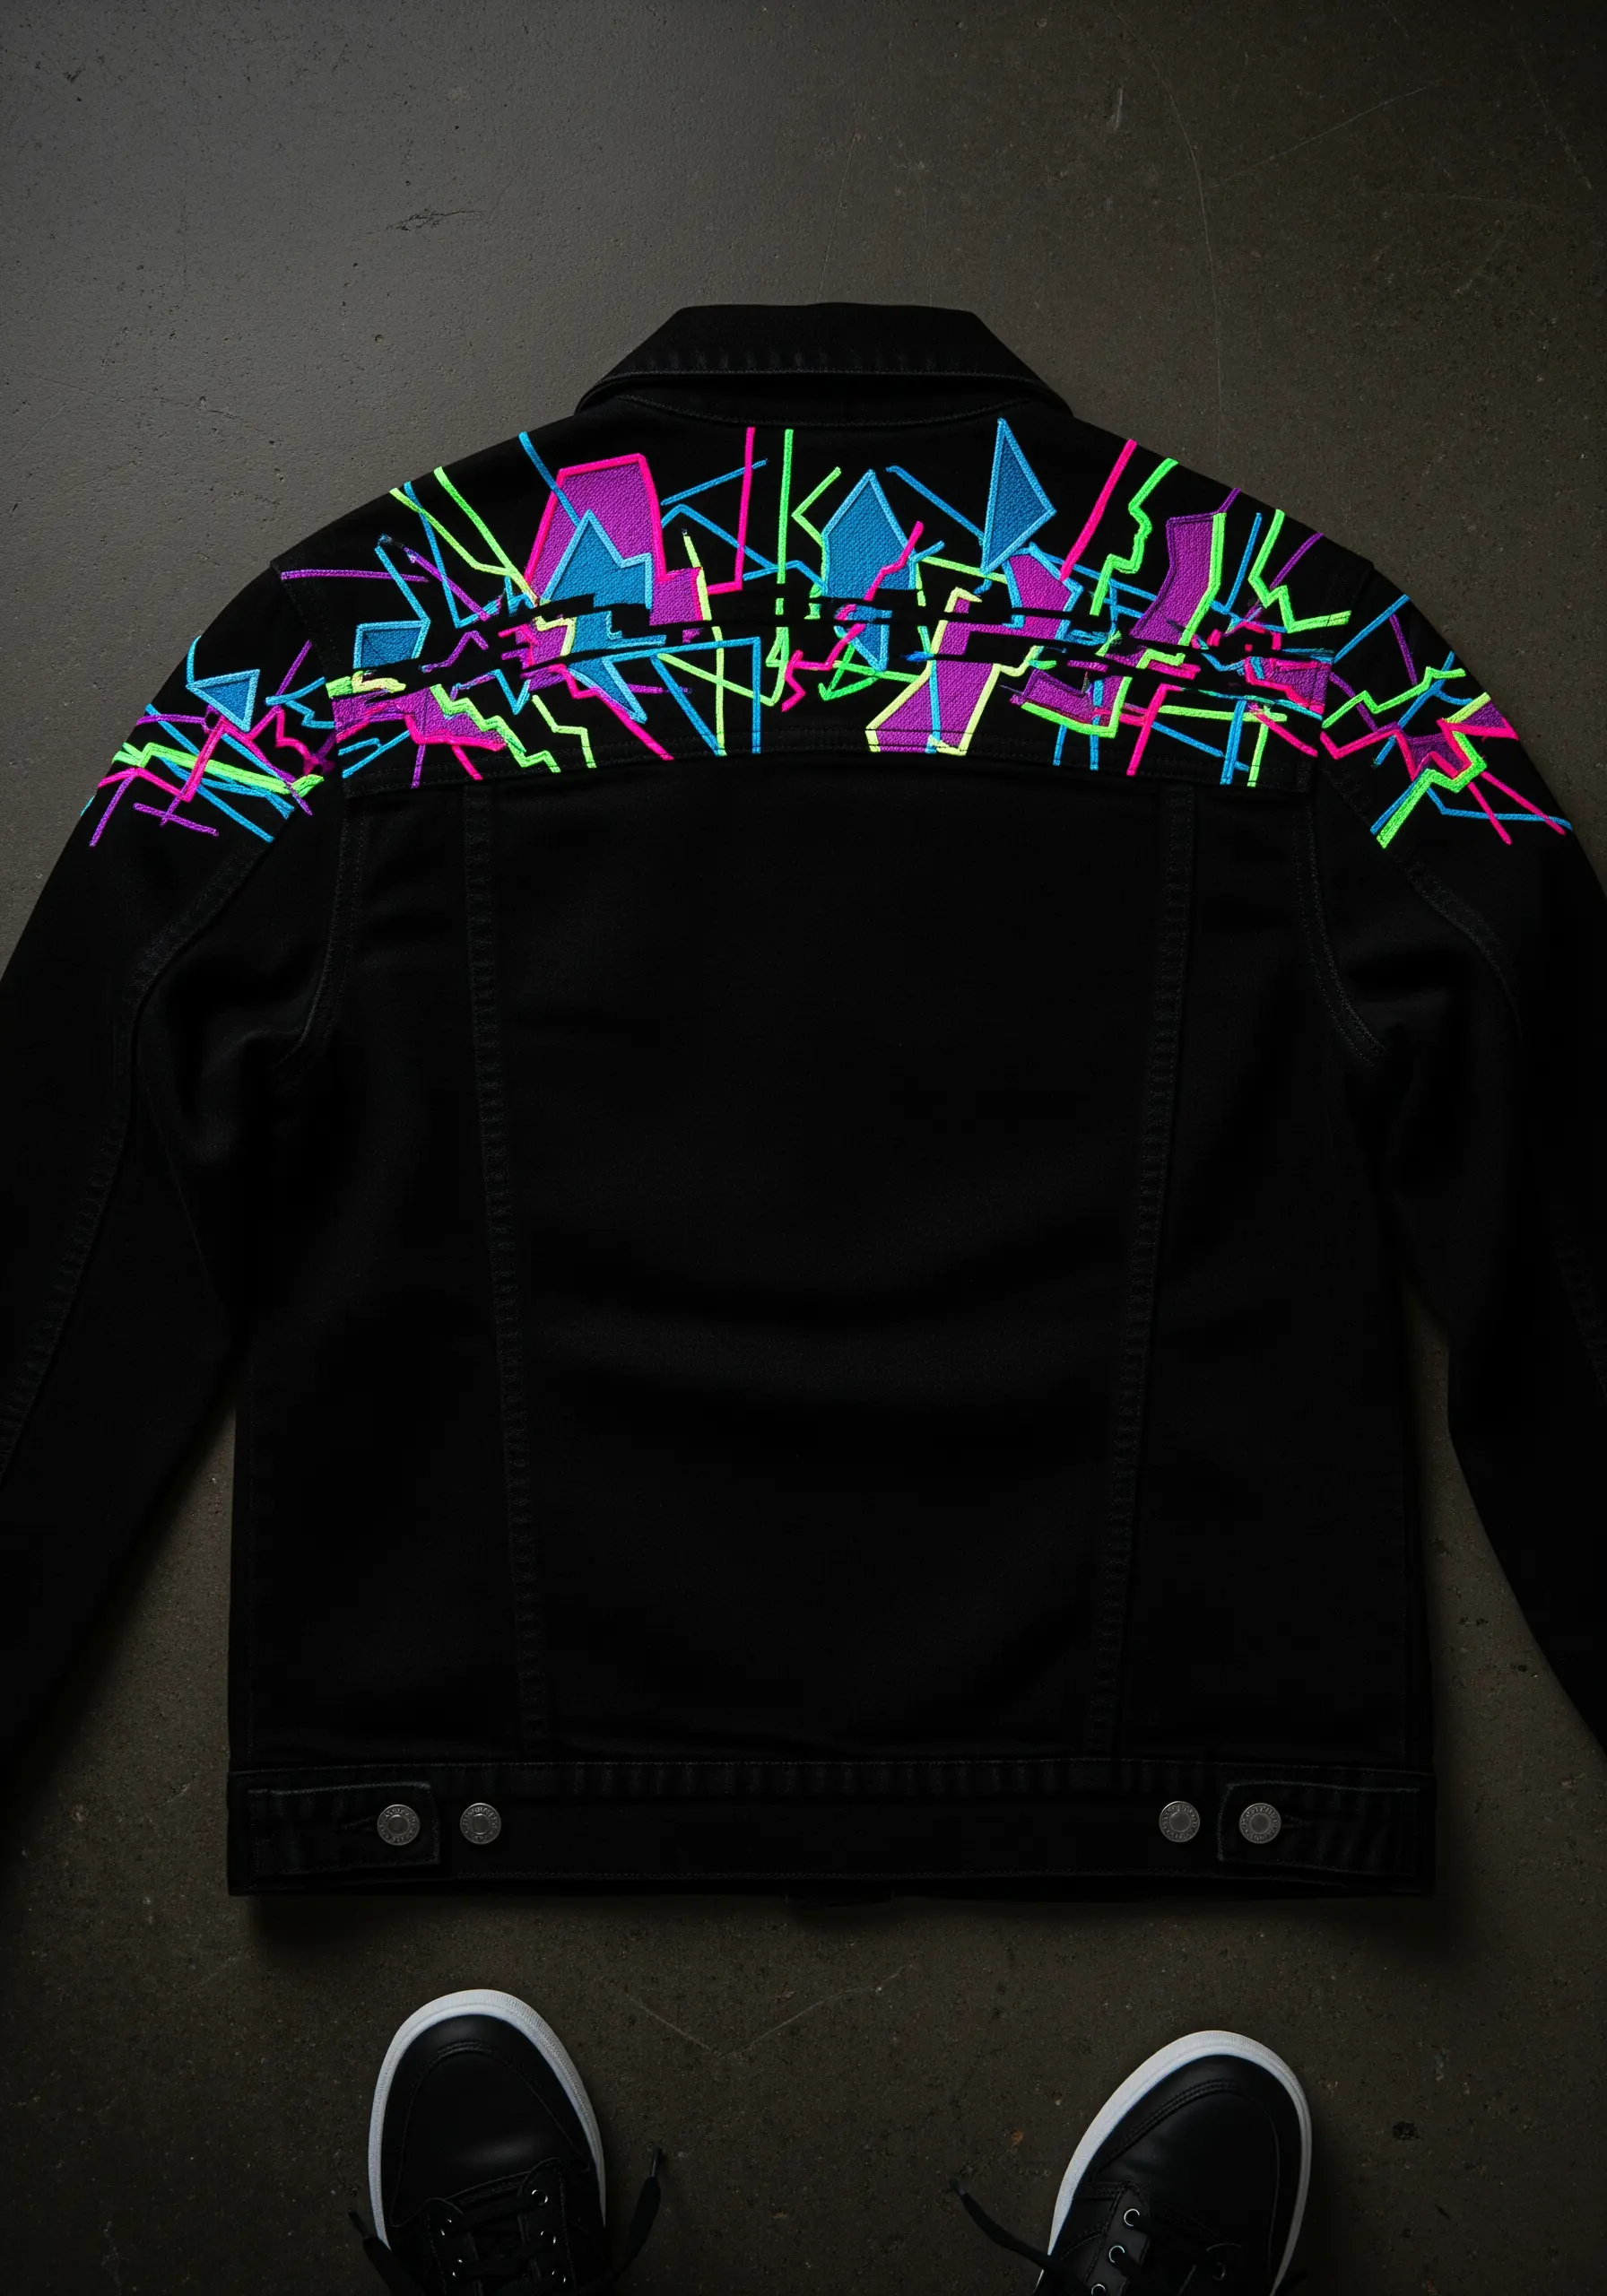
Build your design in layers, starting with the solid-colored shapes stitched in a dense satin stitch.
Use a high-contrast neon palette like magenta, cyan, and lime green to ensure each element stands out against the dark denim.
For the chaotic line work, use a simple backstitch with a single strand of thread to create sharp, graphic lines that overlay the solid blocks.
This technique creates a sense of depth and energy, making the back of a jacket an unmissable canvas.
2. Stitch a Personal Soundwave in High-Contrast Thread

Transform a personal audio clip—a name, a song, a laugh—into a minimalist embroidered waveform.
Use a fine, single-strand backstitch or stem stitch for maximum precision, ensuring each peak and valley is crisp and clear.
Placing a vibrant neon orange thread on a dark charcoal or black hoodie creates a sophisticated, modern look that’s personal yet understated.
The key is consistency in stitch length to maintain the rhythm of the soundwave.
3. Elevate Canvas Sneakers with Bold Floral Outlines

When embroidering on sturdy canvas, use a sharp needle and a tear-away stabilizer on the inside to prevent puckering.
Fill the petals with a smooth satin stitch, blending two shades of blue to create depth without complex thread painting.
The secret to making the colors pop is the vibrant lime-green outline, stitched in a tight backstitch. This acts as a graphic border, defining the shape and electrifying the entire design.
4. Create Crisp Geometric Lines on Headwear
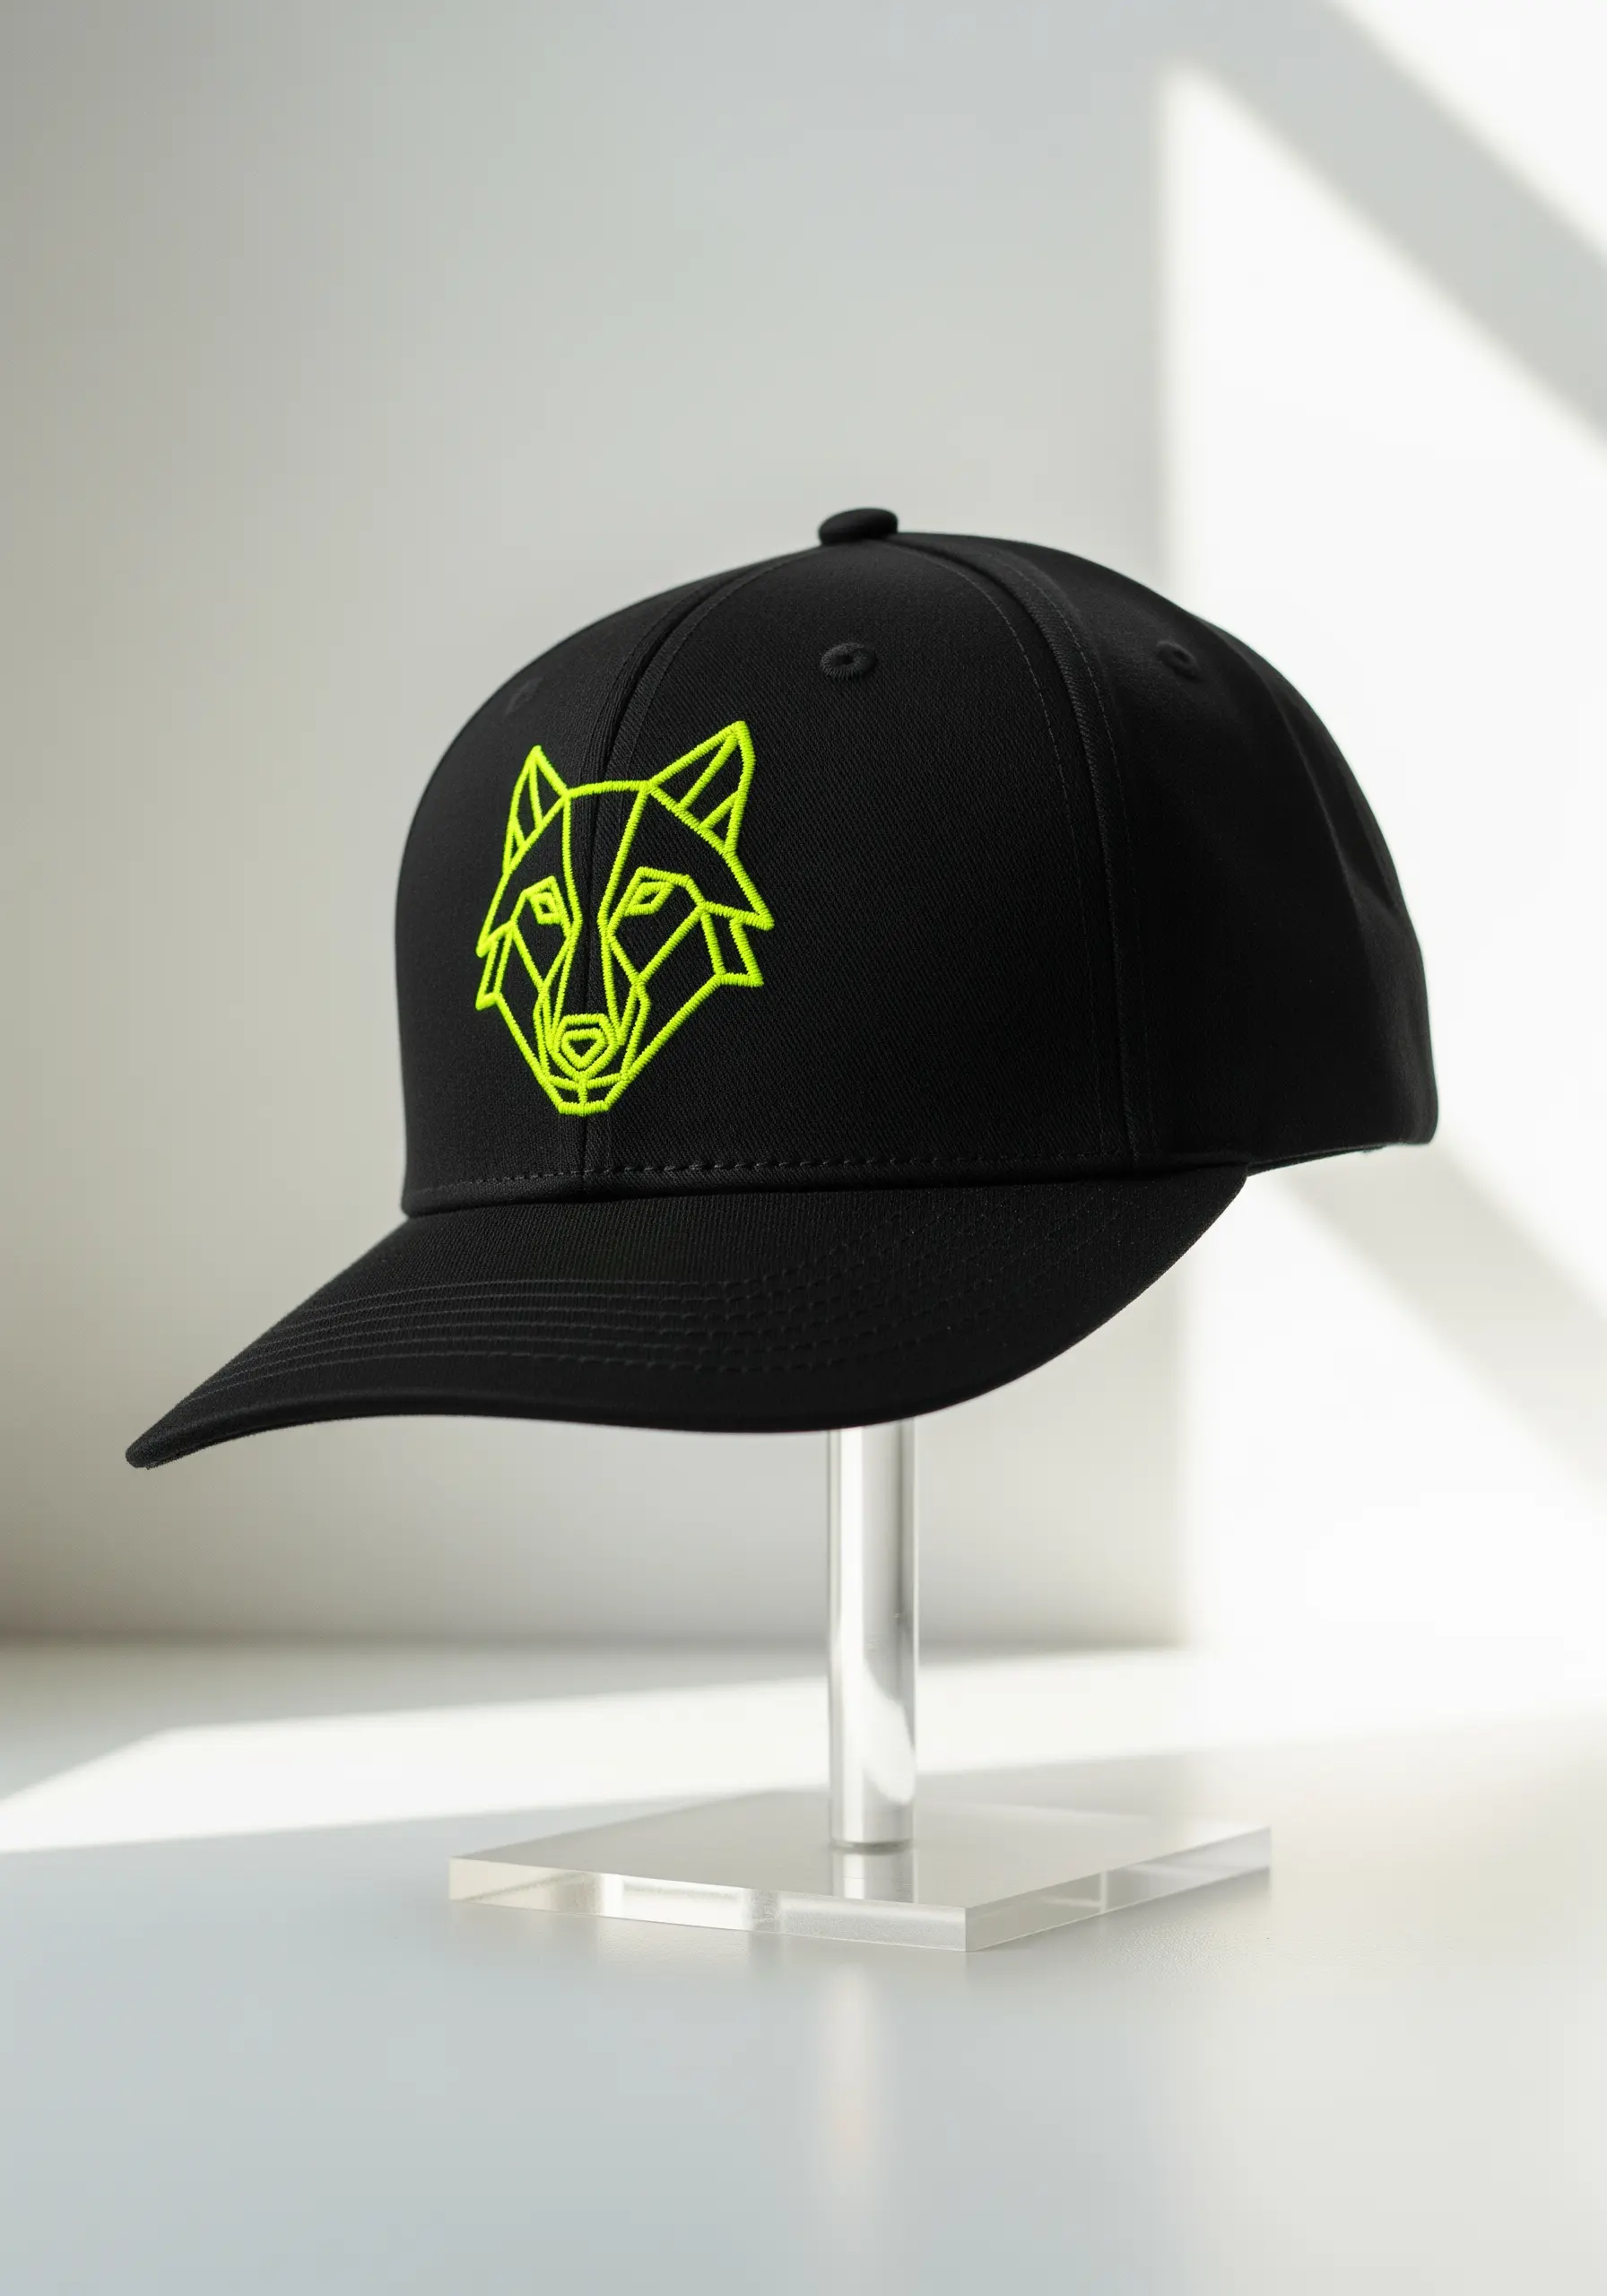
For sharp, continuous lines that mimic neon tubing, use a whipped backstitch.
First, create a standard backstitch outline, then weave a second thread through the stitches without piercing the fabric.
This technique smooths out the segmented look of a regular backstitch, resulting in a bold, raised line that’s perfect for geometric animal portraits or logos on structured caps.
The high-visibility lime green on black offers maximum impact with minimal complexity.
5. Map Out a Circuit Board with Precision Stitching

To create the look of a glowing circuit board, use a simple backstitch for all the pathways.
Choose a vibrant, contrasting palette like cyan, magenta, and yellow to differentiate the circuits and create a futuristic feel.
For the nodes or connection points, place a single, neat French knot. This adds a subtle textural detail that completes the tech-inspired aesthetic on a dark tote bag canvas.
6. Balance Intricate Fills with Bold Neon Outlines

For large-scale back pieces like this moth, break the design into smaller, manageable sections.
Use a long-and-short stitch for the larger filled areas to create a smooth, painterly effect, and a satin stitch for smaller geometric patterns.
The neon green outlines, executed in a crisp backstitch, are essential for containing the vibrant purple and pink fills and ensuring the design remains sharp and readable, even from a distance.
Use a heavy-duty needle and stabilizer to handle the density of the stitches on denim.
7. Design for Movement on Apparel Sleeves

When embroidering on a sleeve, orient your design to wrap and flow with the arm’s natural curve.
A dragon or serpent is the perfect motif for this, as its winding body creates dynamic movement.
Use a combination of satin stitch for the scales and a bold stem stitch for the outlines to add texture and definition.
Neon green on a black bomber jacket provides a classic, high-impact look that feels both timeless and modern.
8. Achieve a 3D Glow with Padded Satin Stitch

To give a simple planetary shape a subtle, three-dimensional feel, use a padded satin stitch.
First, fill the shape with small, underlying straight stitches, then cover it with your final satin stitch. This raises the surface slightly, making it catch the light.
For the rings, couch a bright white or glow-in-the-dark thread around the planet to create a sharp, glowing halo effect against the dark fabric.
9. Integrate Embroidery into Deconstructed Denim
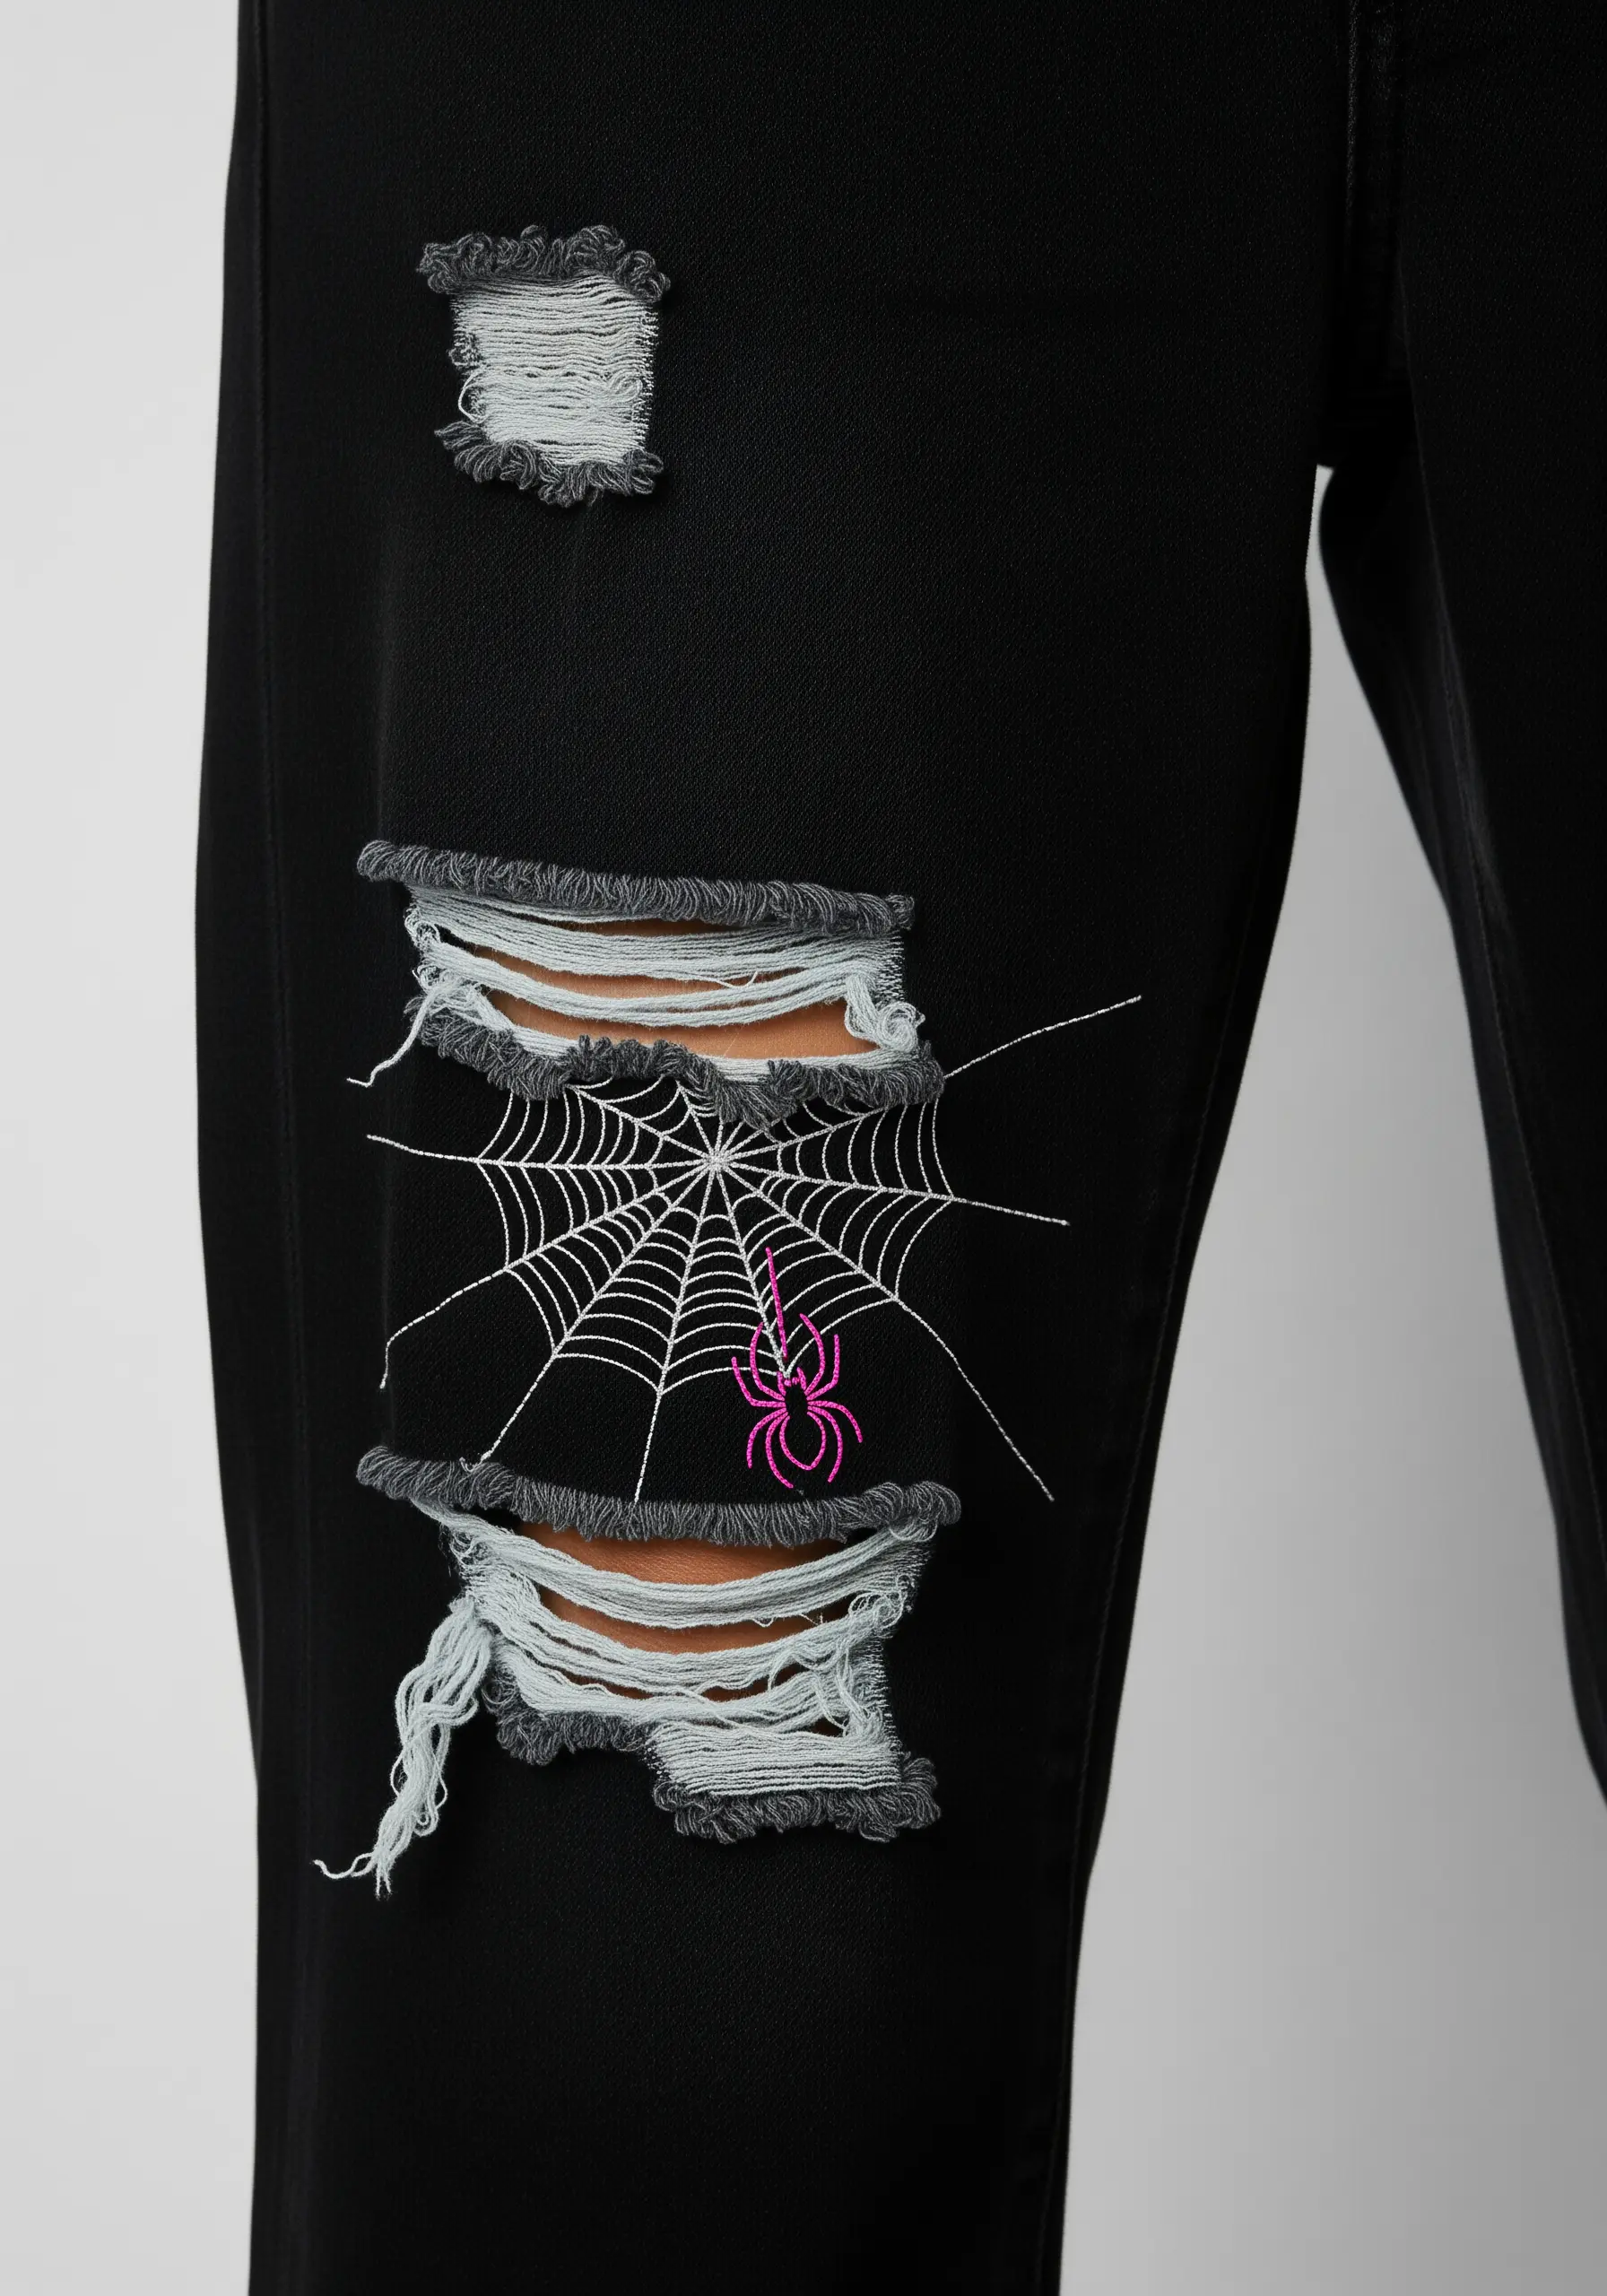
Turn a rip in your jeans into a creative opportunity by stitching a design that interacts with the distressed fabric.
Use a very fine, single strand of white or silver thread to stitch the spiderweb, making it look delicate and almost accidental.
Then, add a tiny, bright neon spider using a satin stitch for a surprising pop of color that draws the eye and adds a playful narrative to the garment.
10. Weave Geometric Shapes for Abstract Texture

Instead of filling shapes with traditional stitches, create texture by wrapping thread across open spaces.
Outline your triangles with a backstitch, then use long straight stitches to wrap the thread from one side to another, creating a woven, almost string-art effect.
This technique works best on a dark, non-stretch fabric in a hoop and allows you to play with density and color layering for a truly unique piece of neon color string art.
11. Stitch Sharp, Graphic Barcodes on Streetwear

The key to a successful barcode design is perfectly uniform vertical lines. Use a dense satin stitch to create solid, opaque bars of color.
To keep your lines perfectly straight, you can draw light guidelines with a removable fabric marker or use masking tape as a visual aid.
The alternating neon green and purple on black cargo pants creates a futuristic, dystopian vibe that feels intentional and sharp.
12. Outline Organic Shapes with a Neon Glow

For designs that blend organic forms with a digital aesthetic, a smooth, clean outline is crucial.
Use a whipped backstitch or a stem stitch in neon cyan and magenta to create lines that look like glowing neon tubes.
This technique elevates a simple line drawing, giving an anatomical heart a futuristic, almost electric feel on a simple black sweatshirt. The focus is entirely on the quality of the line.
13. Imply a Glow with Layered Neon Threads

To create a subtle neon glow effect without special thread, stitch your main outline in a bright color like mint green.
Then, use a single strand of a slightly darker or lighter shade to add a second, very close outline, or use sparse straight stitches radiating outward.
For the moon, a small, bold shape in padded satin stitch provides a focal point that anchors the minimalist design on this dark gray cap.
14. Create 3D Graffiti with Padded Stitching
To achieve that puffy, three-dimensional graffiti look, use a padded satin stitch for the main letters.
First, fill the letter shapes with a base of seed stitches or running stitches, then cover this layer with your final, smooth satin stitch in a bright neon.
Define the shape with a crisp, dark backstitch outline. This contrast between the raised, bright fill and the flat, dark outline is what creates the powerful 3D illusion.
15. Map the Stars with Minimal Stitches

You can create a beautiful, minimalist constellation with just two simple stitches.
Use small star stitches or French knots for the stars themselves, placing them carefully according to your chosen star map.
Connect them with a simple, clean running stitch. The neon yellow thread on a muted gray fabric creates a modern, sophisticated piece of cosmic embroidery art that’s all about precision and negative space.
16. Use Outlines to Suggest Bioluminescence

To make these mushrooms feel like they’re glowing, the magic is in the outline.
Fill the mushroom caps with a solid, vibrant orange satin stitch.
Then, outline the entire mushroom—cap and stem—with a thin backstitch in a contrasting light blue or a white glow-in-the-dark thread. Add small straight stitches radiating from the caps to enhance the glowing effect.
This technique creates a beautiful illusion of light on a dark beanie.
17. Master the High-Impact Pocket Motif

A single, bold motif on a jeans pocket can redefine a simple garment.
For a lightning bolt, the effect depends entirely on a perfect satin stitch. Ensure your stitches are laid down flat, parallel, and with no gaps.
Always use a stabilizer on the inside of the pocket to prevent the dense stitching from warping or puckering the denim. This small step makes the difference between a homemade look and a professional finish.
18. Experiment with Tonal Neon Embroidery

Neon doesn’t always have to be on a black background. Try stitching a vibrant neon onto a colored fabric in the same family.
Here, neon green Monstera leaf outlines are stitched onto an olive green utility jacket. The effect is surprisingly subtle yet incredibly stylish.
A simple backstitch is all you need, allowing the clever color pairing and the clean leaf embroidery to shine.
19. Craft a Symmetrical Neon Mandala
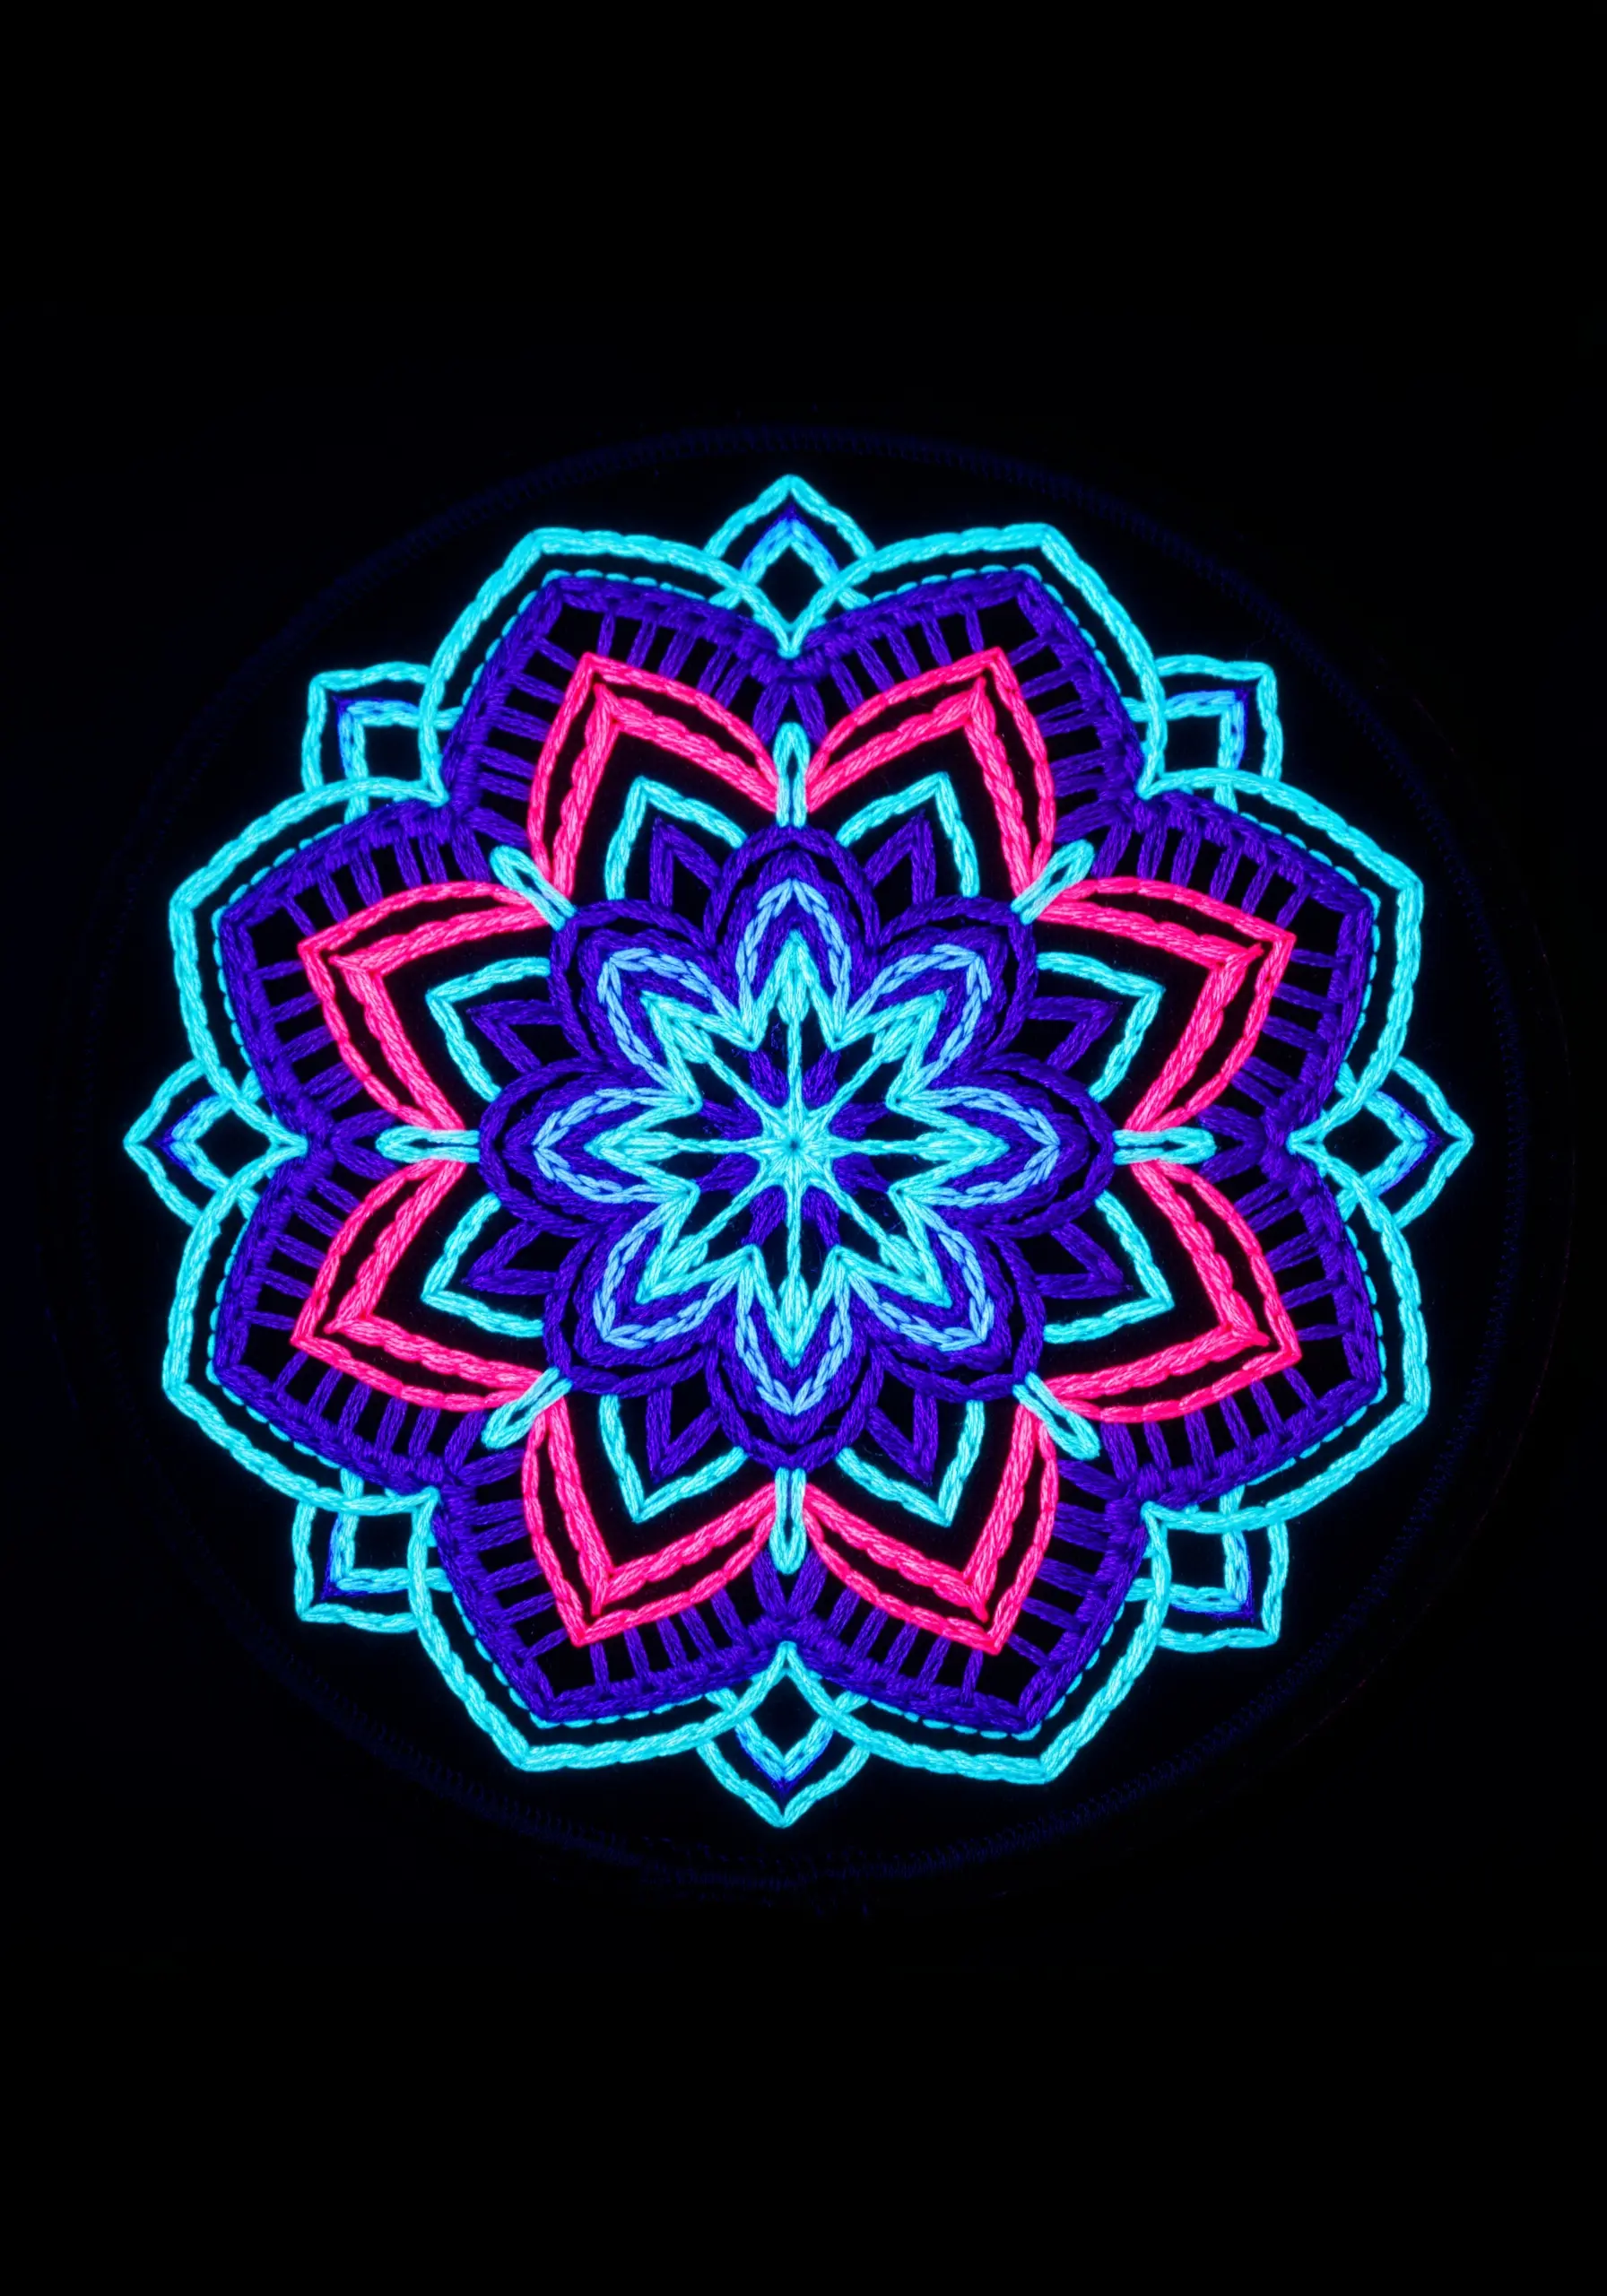
The beauty of a mandala is in its symmetry. To ensure a perfect result, transfer your pattern precisely onto a dark fabric and work from the center outwards.
Use a chain stitch or a split stitch for the outlines instead of a backstitch. These stitches create a thicker, more textured line that resembles braided cord, adding richness and definition to the intricate design.
This technique helps each colored section of the mandala stitch patterns stand out.
20. Create a Digital Rain Effect with Straight Stitches
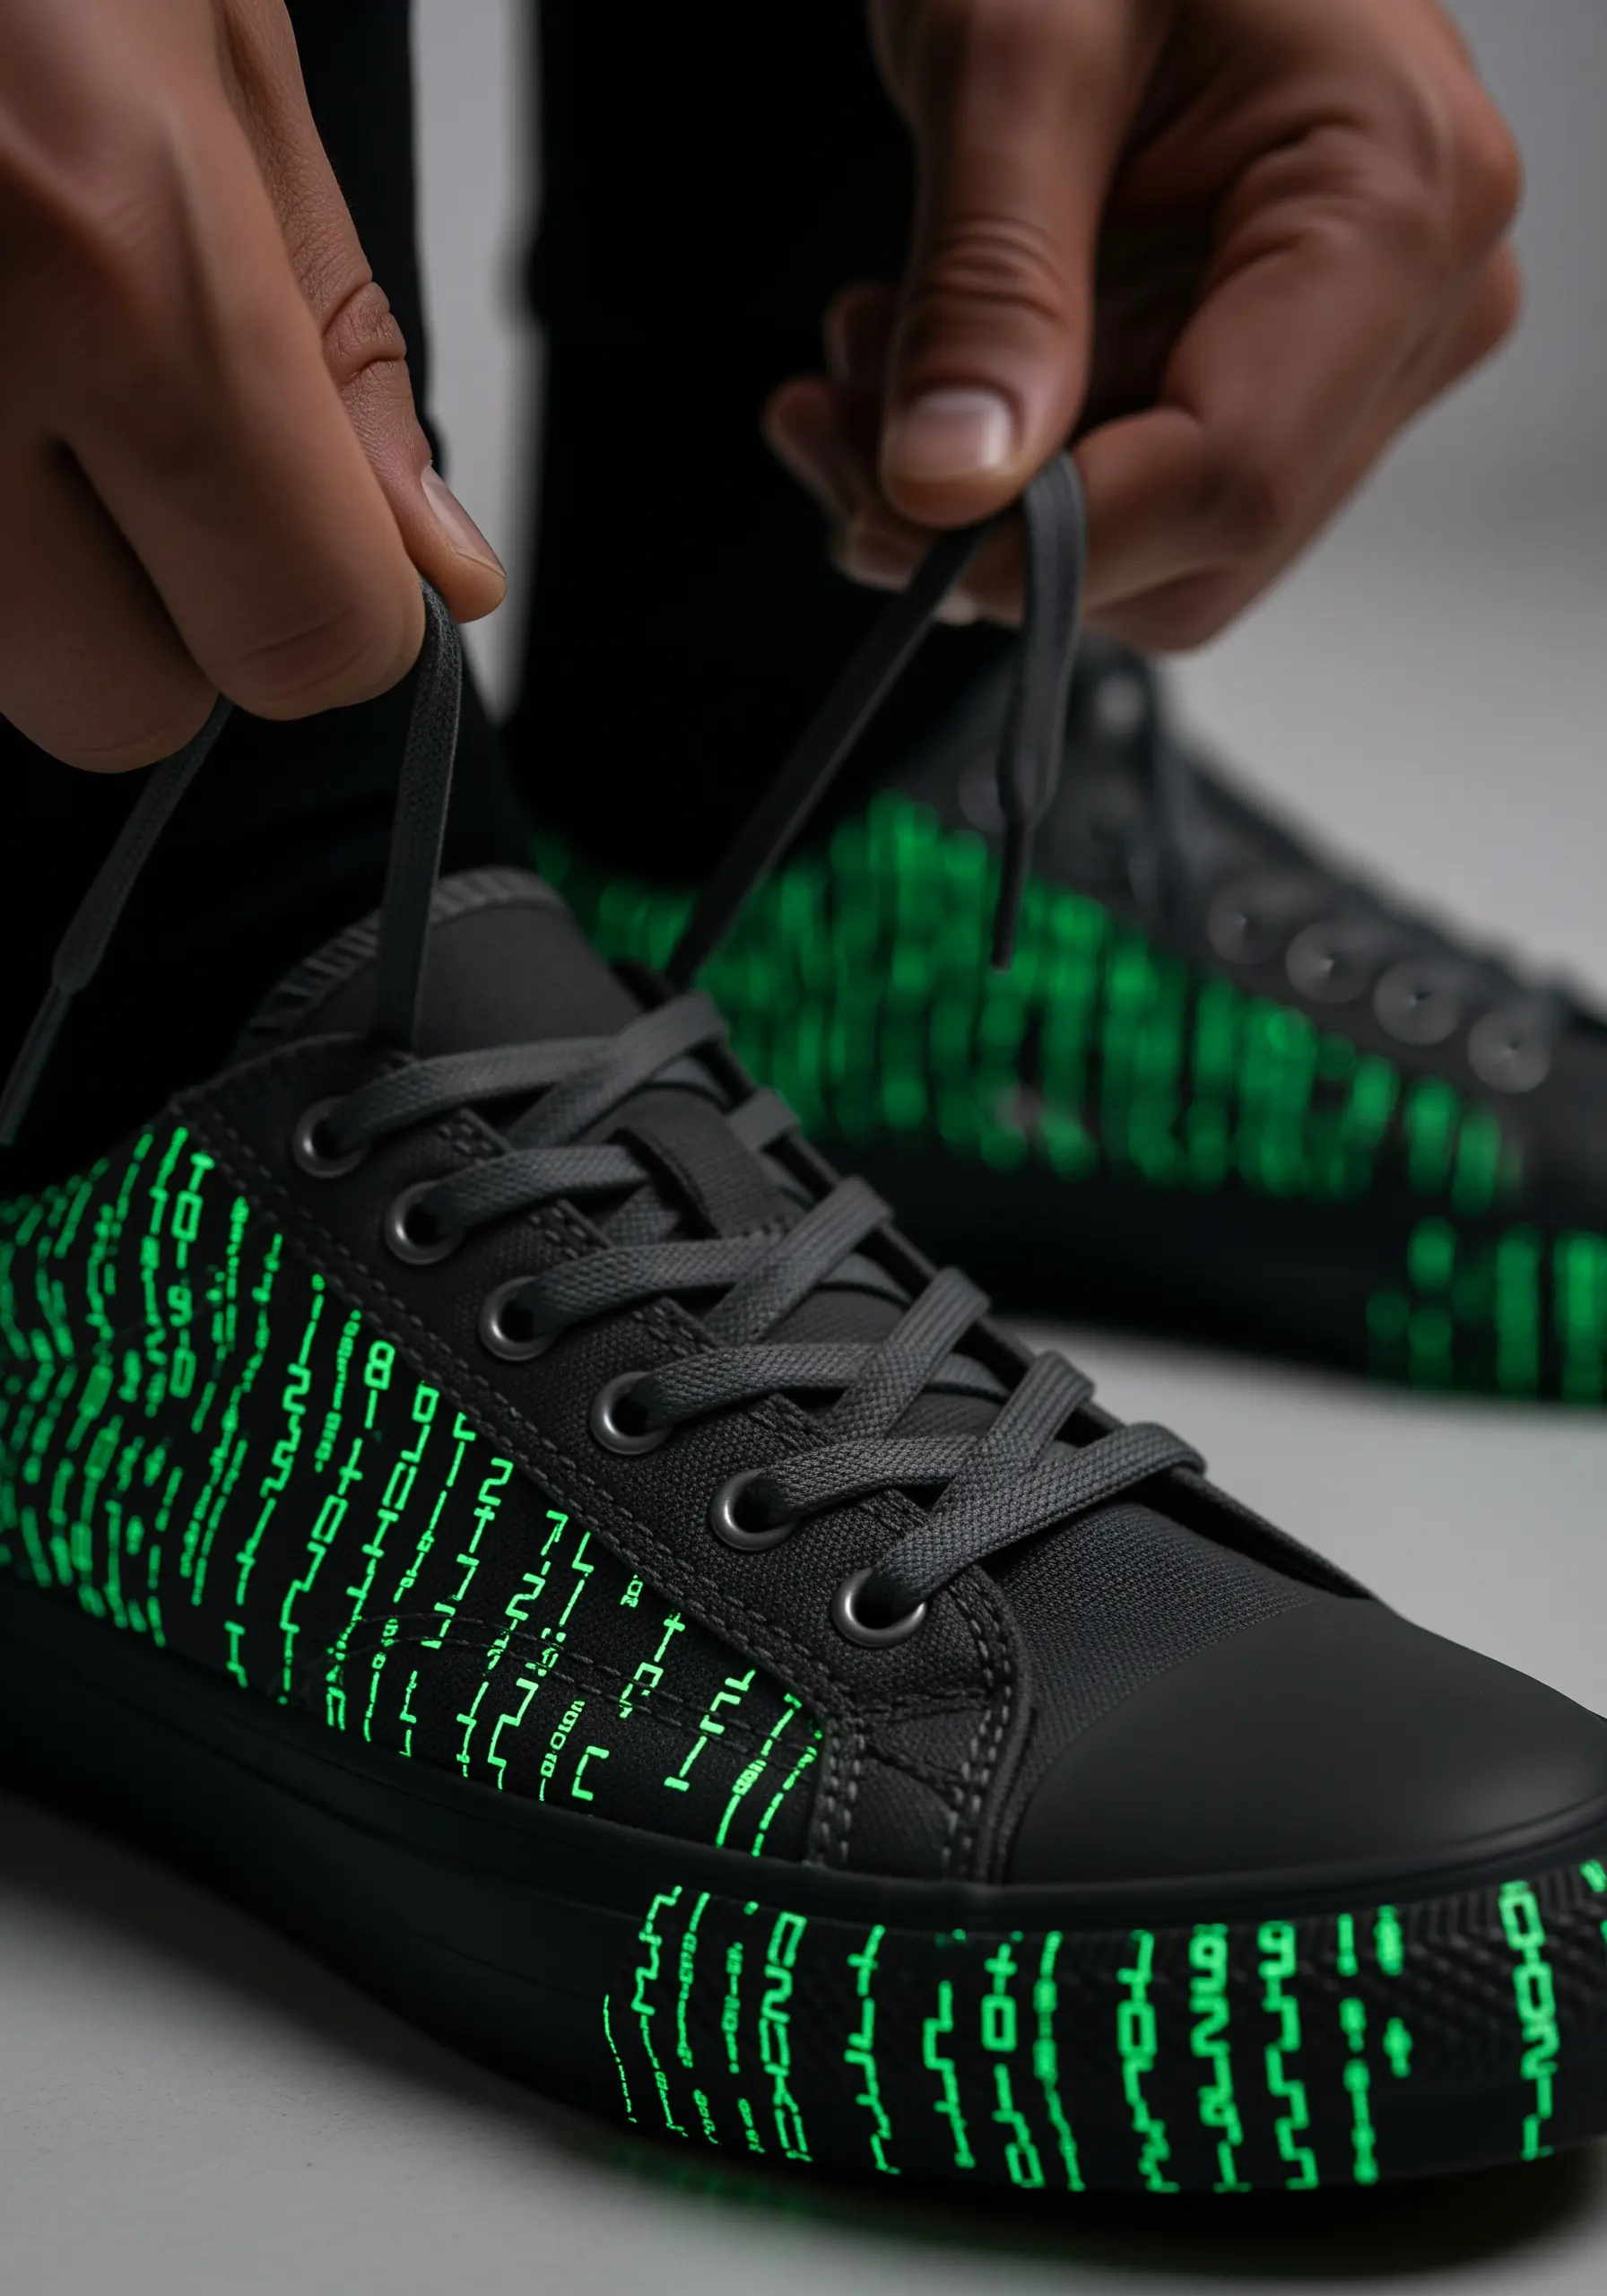
You can achieve the iconic ‘digital rain’ effect with nothing more than simple straight stitches.
Use a glow-in-the-dark green thread and vary the length and placement of your vertical stitches to create a sense of movement and randomness.
This technique is less about precision and more about creating an overall texture and pattern that wraps around the surface of the shoe, making it perfect for customizing streetwear.
21. Tell a Minimalist Story with Line and Dash

Sometimes, the simplest stitches are the most effective. Combine different types of lines to create a narrative.
Use a clean, continuous backstitch in white for the paper airplane to give it a solid form.
For its flight path, switch to a dashed running stitch in a vibrant neon pink. This contrast in both color and line style creates a sense of motion and adds a playful, imaginative touch to a classic denim shirt.
22. Accentuate Designs with Glow-in-the-Dark Details

Elevate a bold design by selectively using glow-in-the-dark thread for key accents.
Stitch the main body of the Oni mask in a rich, vibrant red using a long-and-short stitch to navigate the curves smoothly.
Then, use a bright, glow-in-the-dark green or aqua thread for the eyes, teeth, and horns. This targeted approach creates a dramatic reveal in low-light conditions and gives the design a powerful, otherworldly presence.
23. Achieve Perfect Stripes with Satin Stitch

For clean, graphic stripes on a sleeve, precision is everything. Use painter’s tape to mark off perfectly straight and evenly spaced lines.
Fill each section with a very dense satin stitch, ensuring your needle enters and exits exactly on the edge of the tape.
Once you’ve filled a stripe, carefully remove the tape and move to the next. This method guarantees crisp edges and a professional, high-impact finish for your color-blocked designs.
24. Stitch Intricate Neural Networks with Simple Lines

Create the illusion of a complex neural network or root system using just two basic stitches.
Use a fine backstitch for the delicate, branching pathways. This keeps the lines clean and defined.
At each intersection or endpoint, place a single, small French knot to represent a node. Using a glow-in-the-dark thread for this design makes it incredibly effective, transforming simple gloves into a piece of wearable tech art.
25. Frame a Universe in a Simple Outline

Create a stunning contrast by filling a clean, simple outline with a chaotic, colorful texture.
Stitch the astronaut helmet outline in a bold, white whipped backstitch to make it solid and smooth.
For the ‘universe’ reflected in the visor, fill the space with a dense galaxy of French knots, seed stitches, and star stitches using a variety of neon and metallic threads. This technique creates a captivating design on a jacket pocket.
26. Paint a Nightscape with Thread

Recreate the energy of a city at night using thread painting techniques adapted for a neon aesthetic.
Use single-strand straight stitches in yellow and blue to represent the scattered lights in skyscraper windows. This creates a pointillist effect.
For the motion-blurred headlights on the road, lay down several strands of neon thread together and secure them with tiny, invisible couching stitches. This creates smooth, unbroken lines of light.
27. Practice Basic Stitches in a Graphic Composition
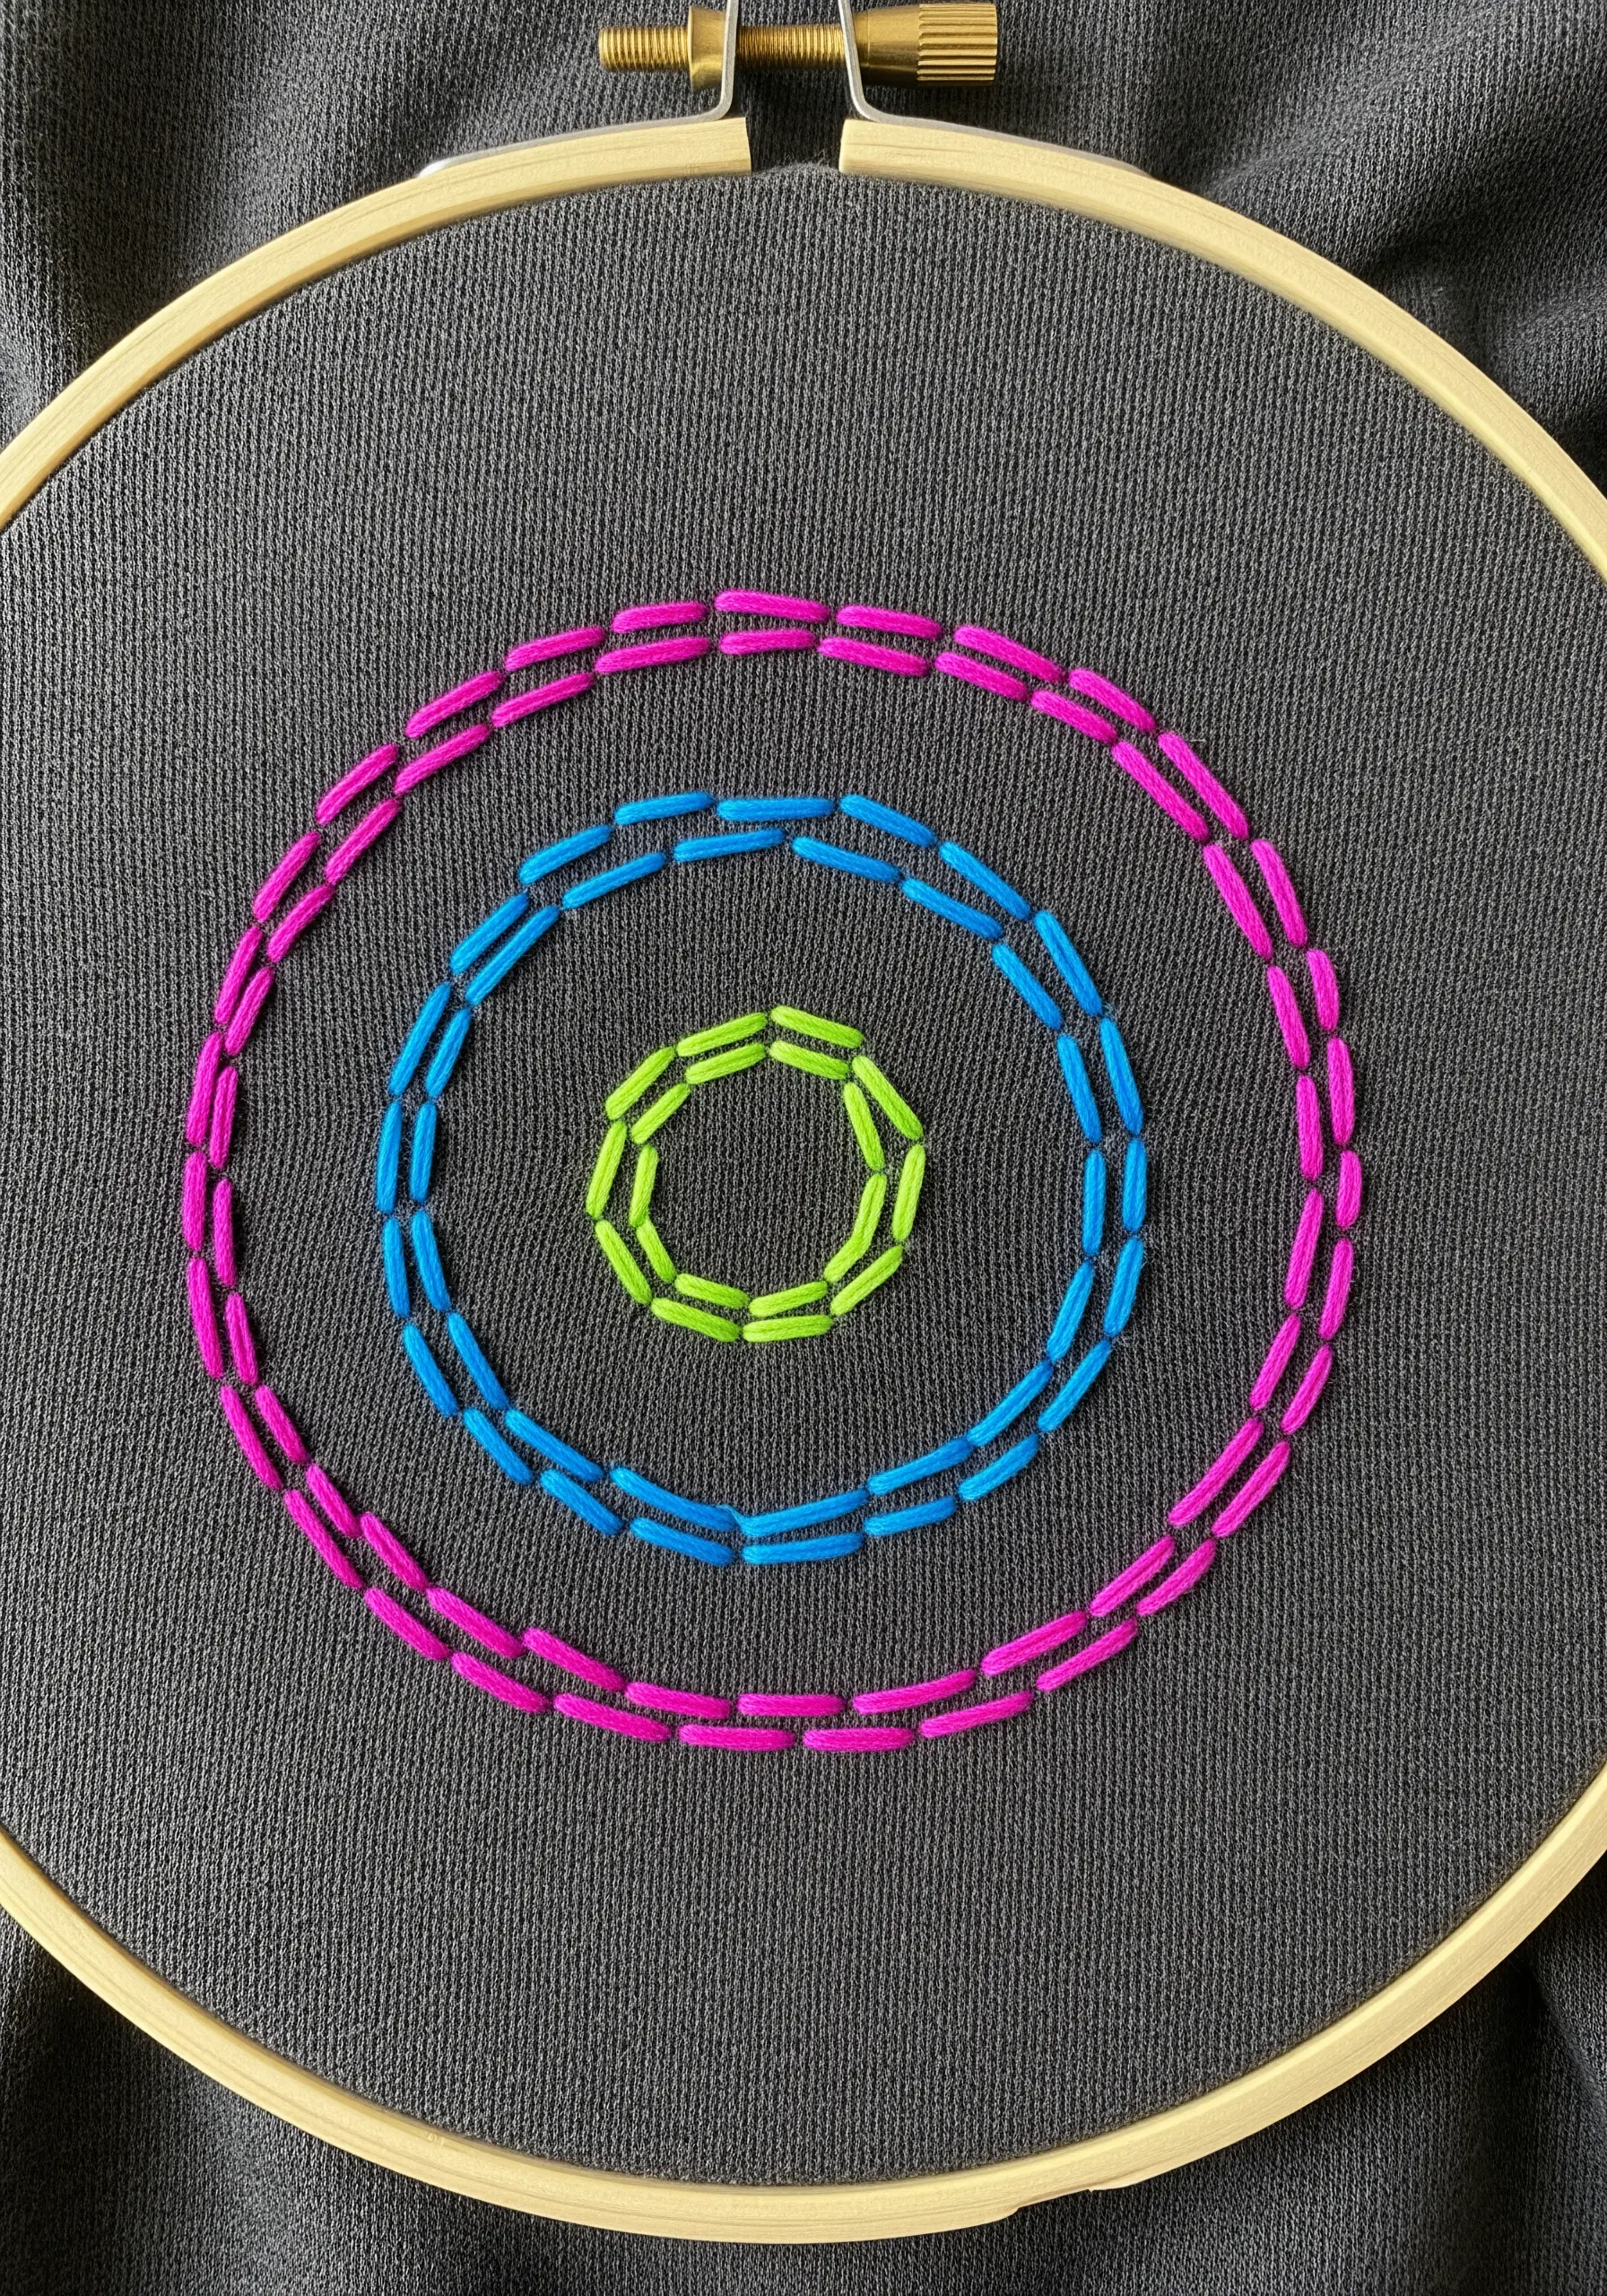
Turn a simple geometric design into a stitch sampler. Assign a different stitch to each concentric circle to practice your technique.
Use a backstitch for one ring, a running stitch for another, and a chain stitch for the third. This not only builds your skills but also creates subtle textural variations within the design.
The vibrant neon colors on a dark, textured fabric make even the most basic stitches look modern and intentional.
28. Add Definition with Contrasting Outlines
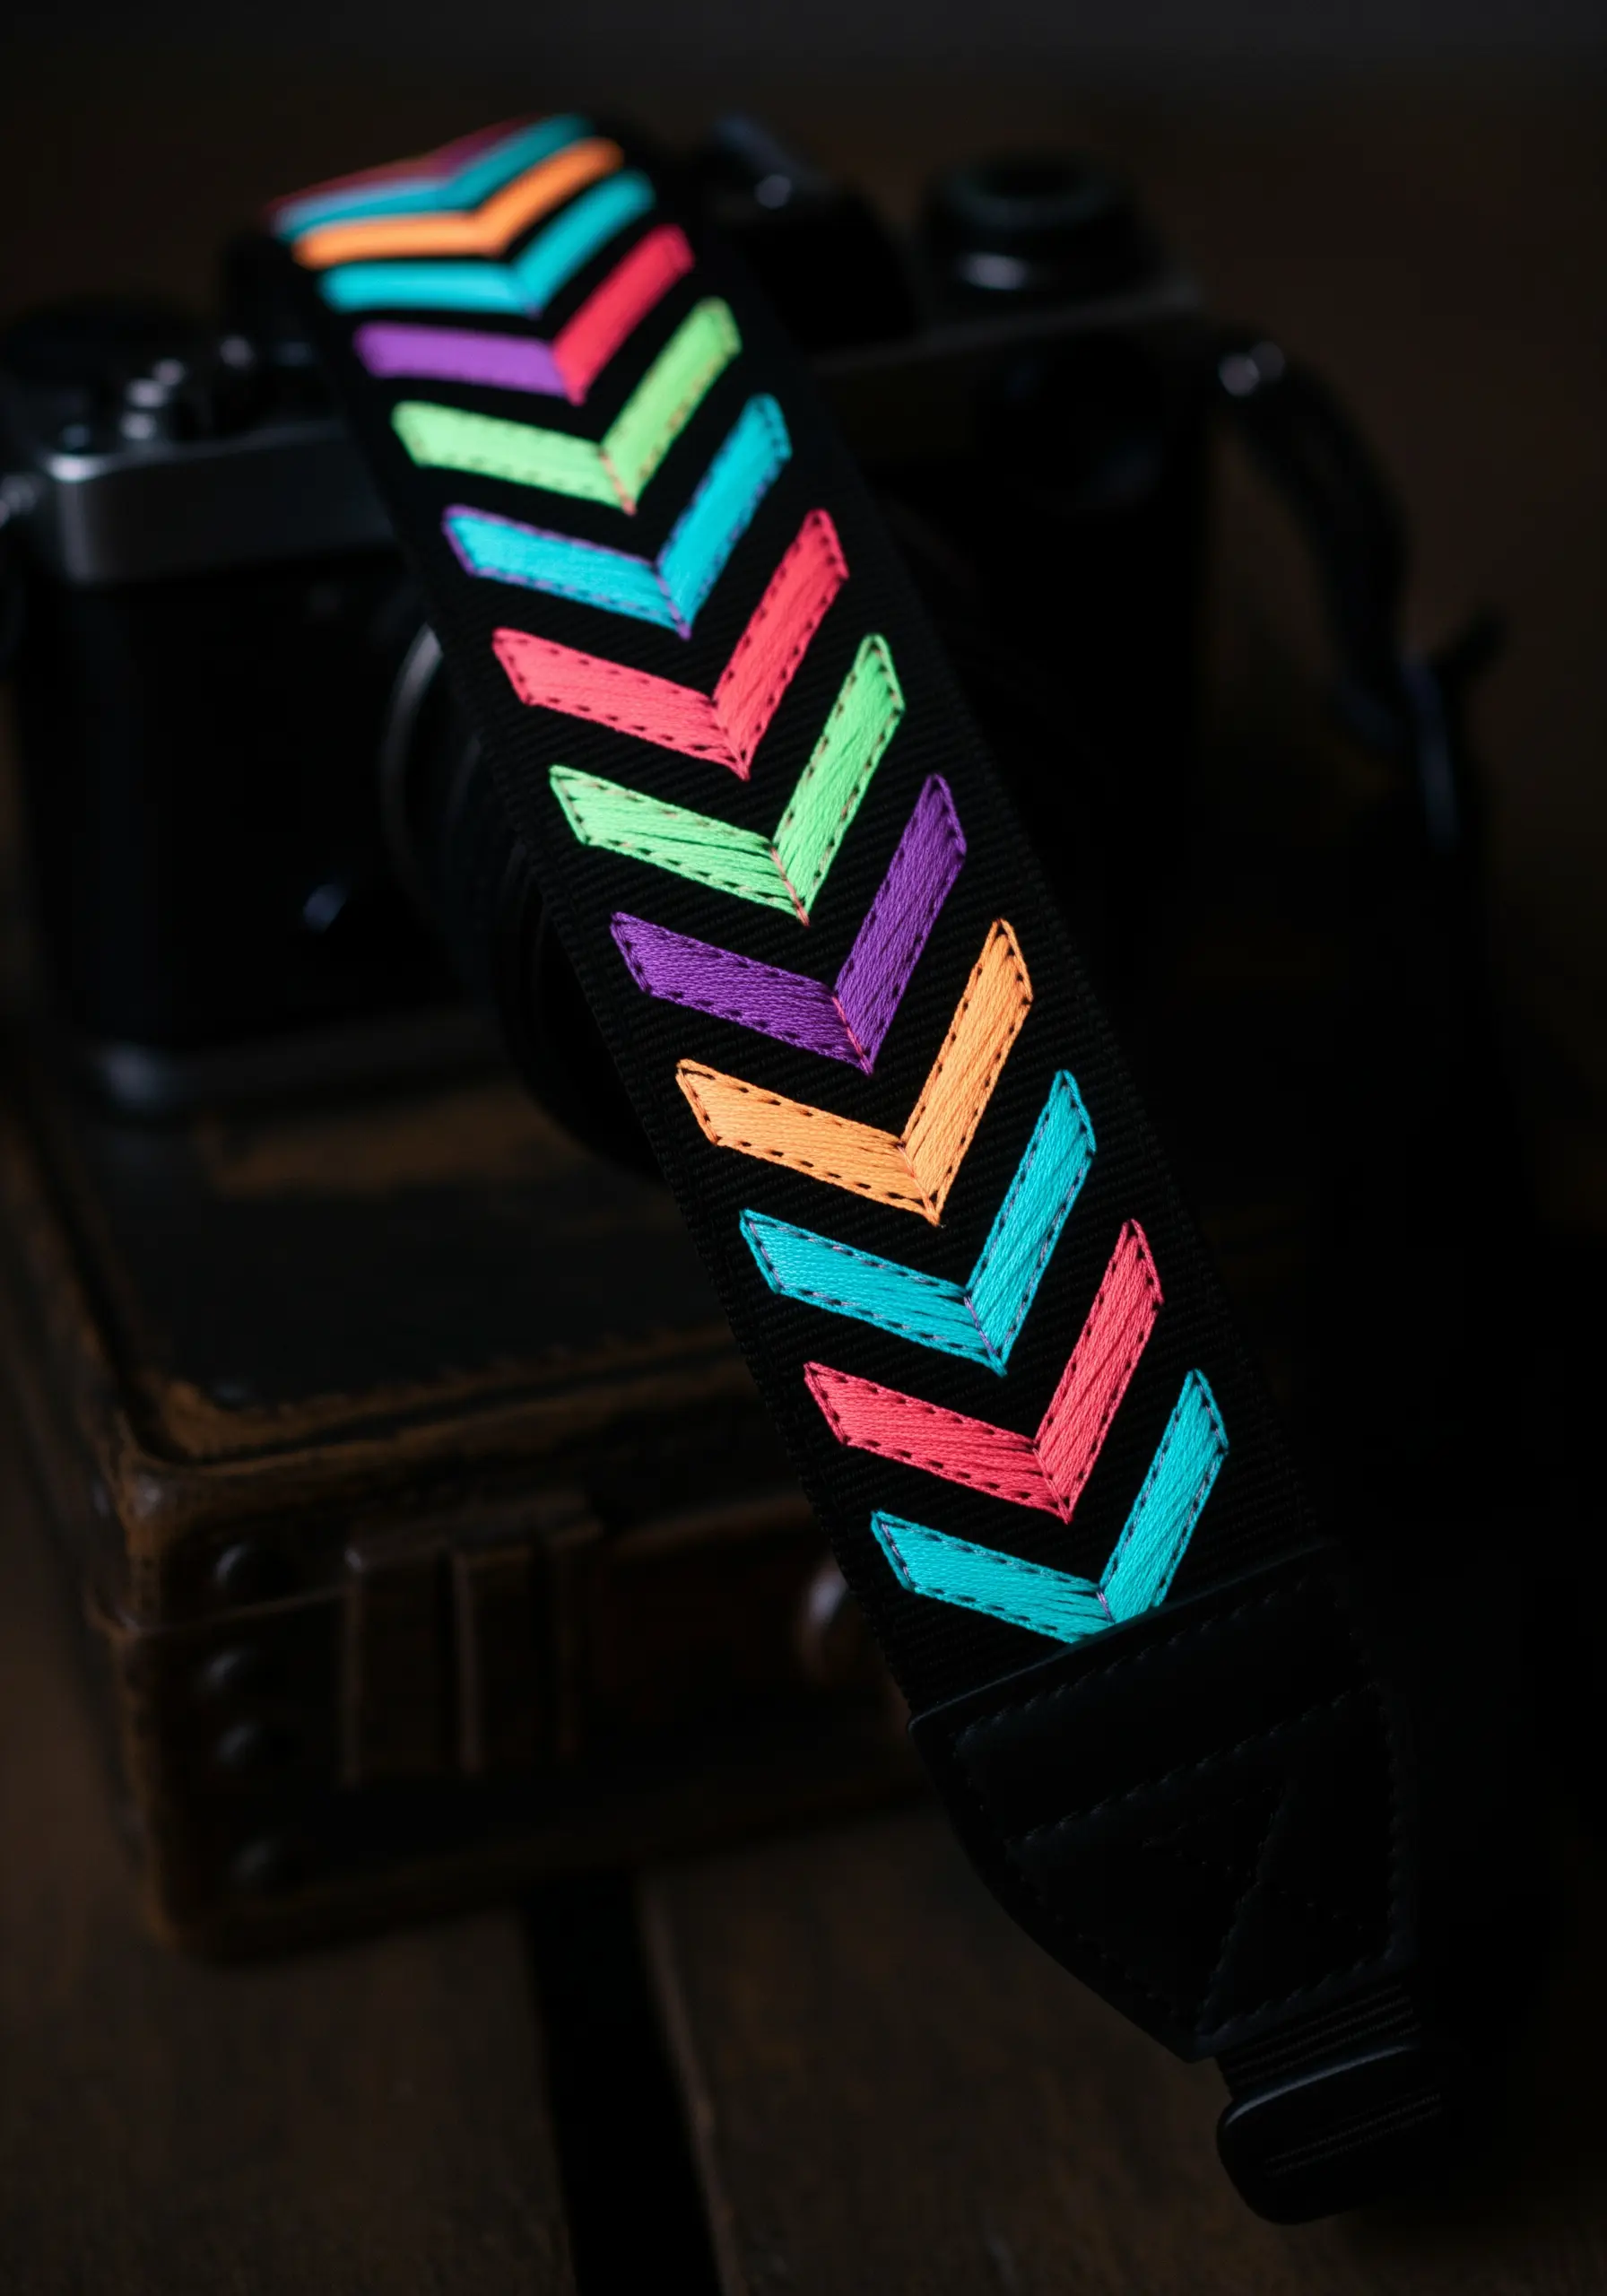
When stitching a pattern with many adjacent blocks of color, the design can sometimes look flat.
To solve this, add a thin outline between each color block using a simple running stitch in a contrasting color, like black or white.
This small detail acts as a border, making each neon chevron on this camera strap pop individually. It adds a level of polish and definition that elevates the entire piece.
29. Master the Single-Line Portrait
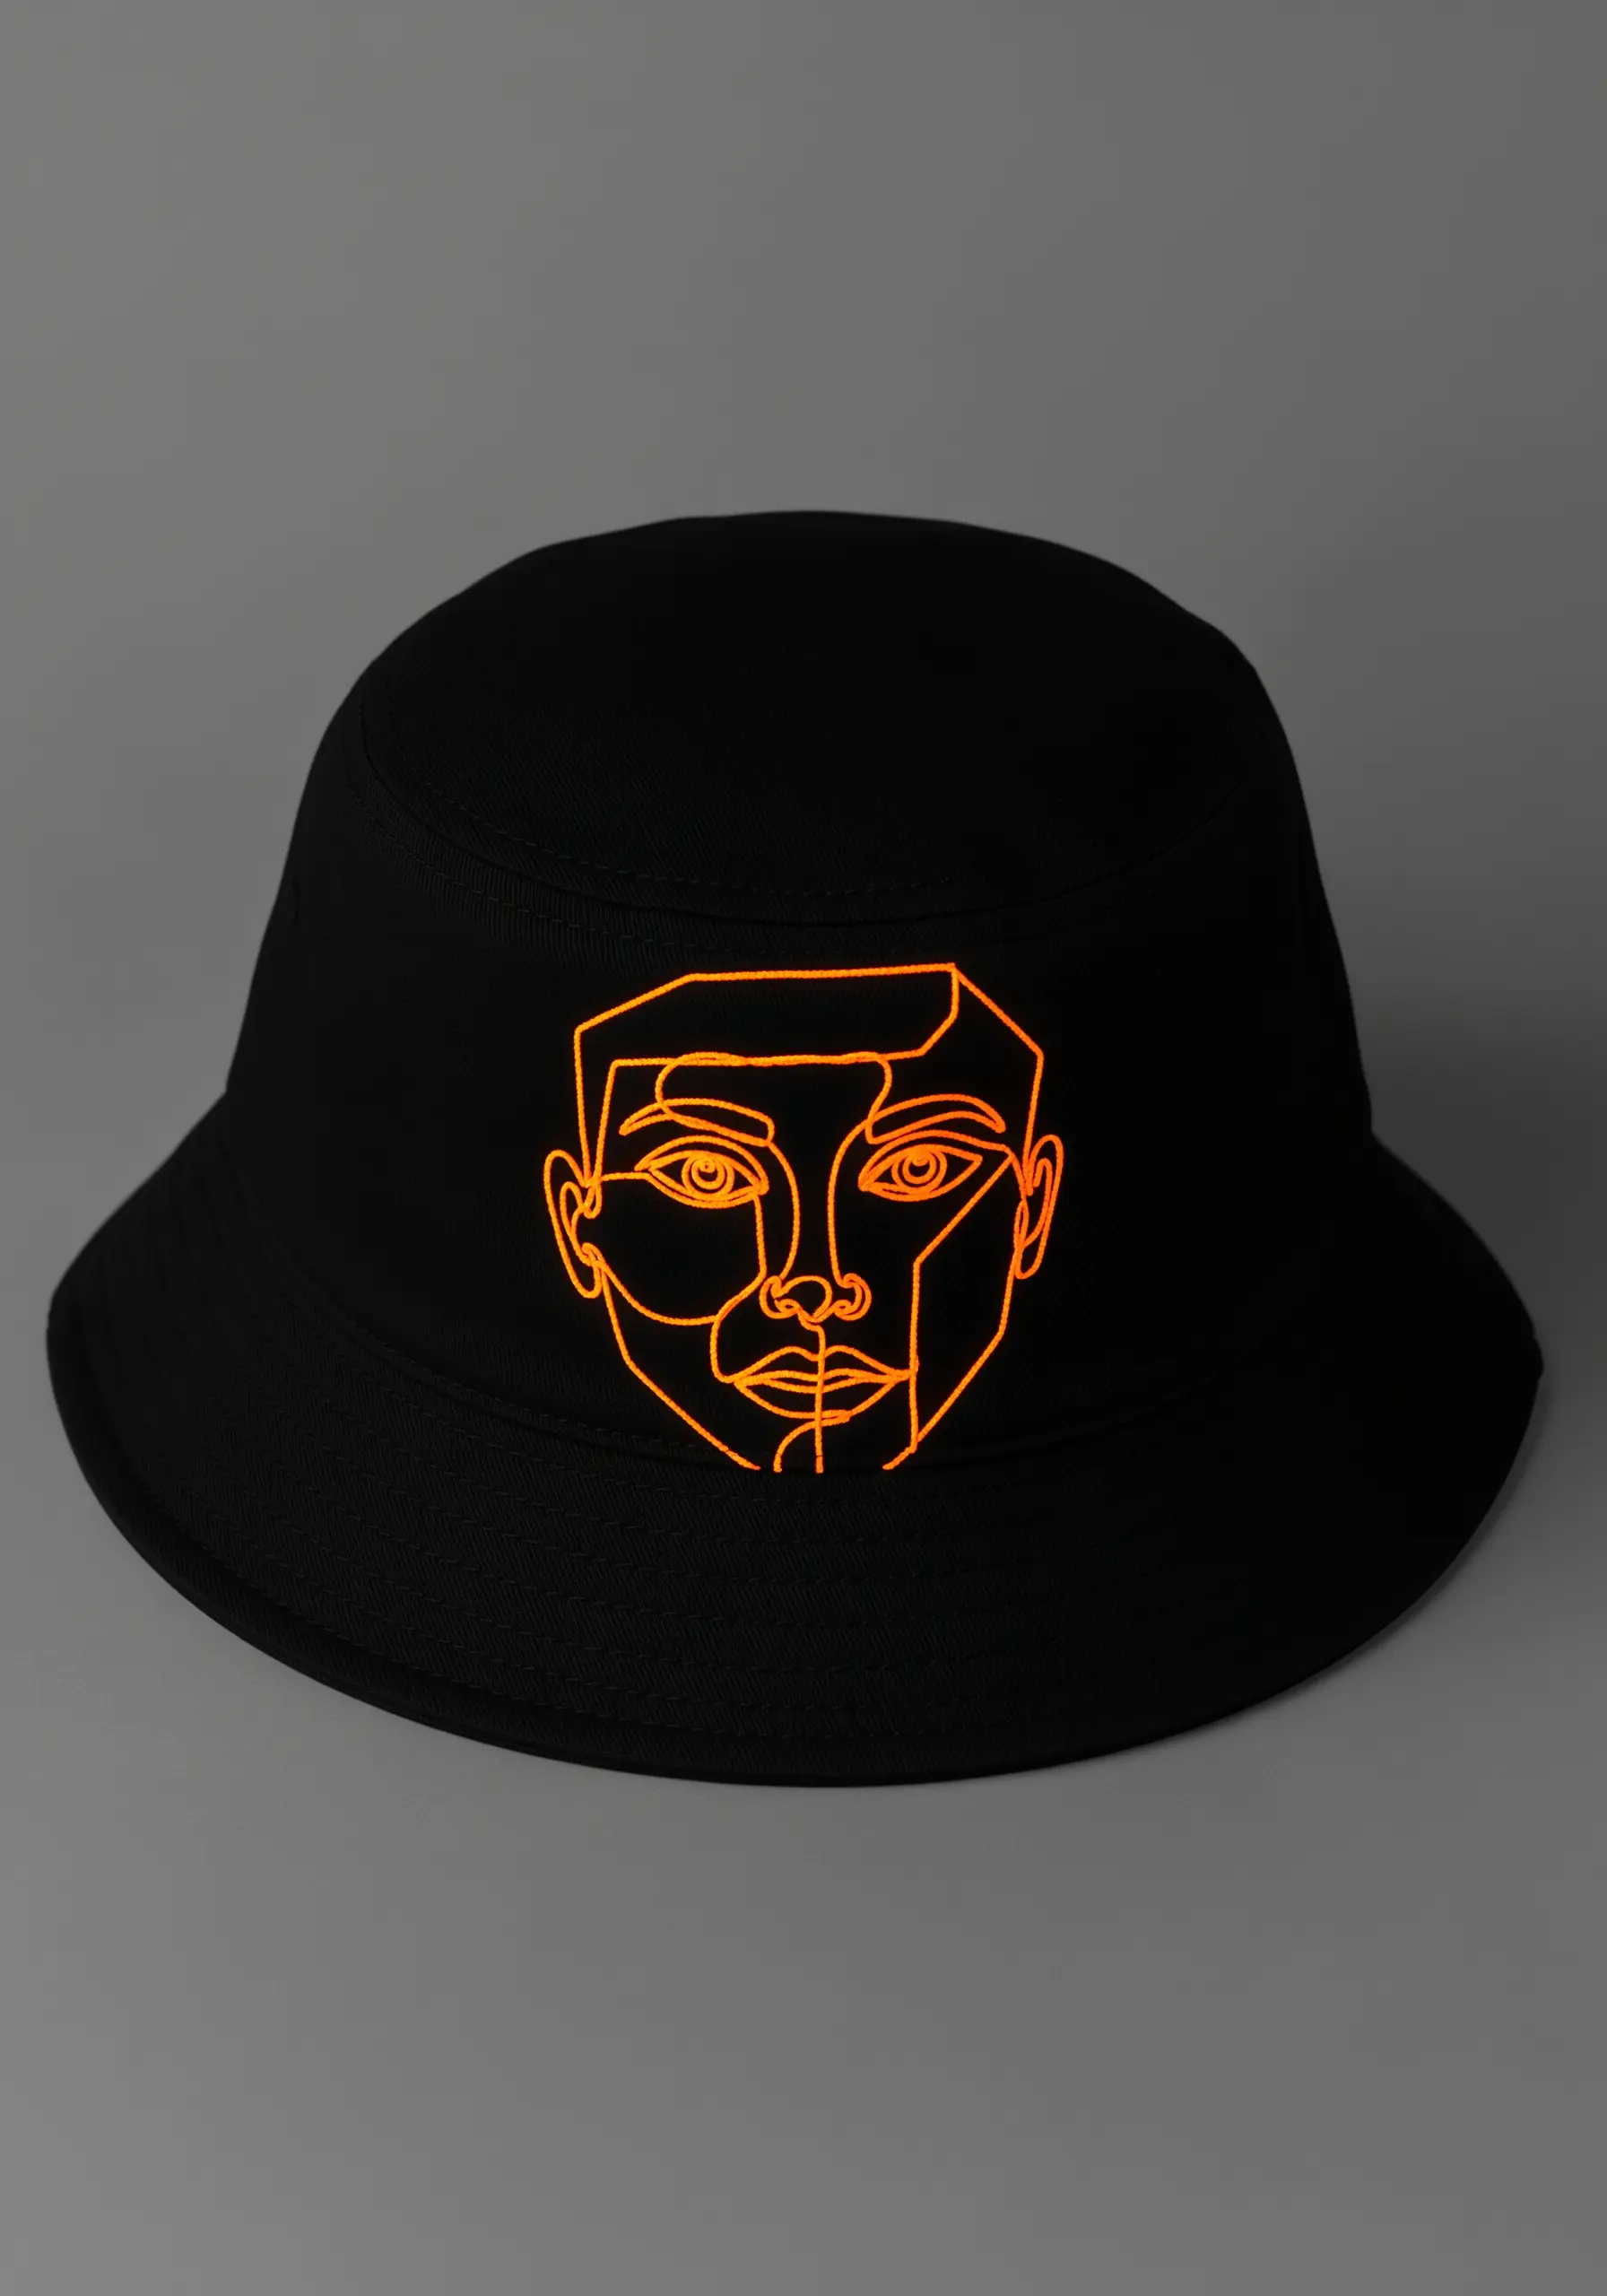
The power of a one-line drawing is its continuous, unbroken flow. To replicate this in embroidery, choose a stitch that creates a smooth line.
A stem stitch or a whipped backstitch is ideal, as they minimize the segmented look of individual stitches.
Use a single strand of a bright neon thread on a dark bucket hat to ensure the focus remains entirely on the elegant, fluid form of the modern line art faces.
30. Frame a Garment with Geometric Collar Details
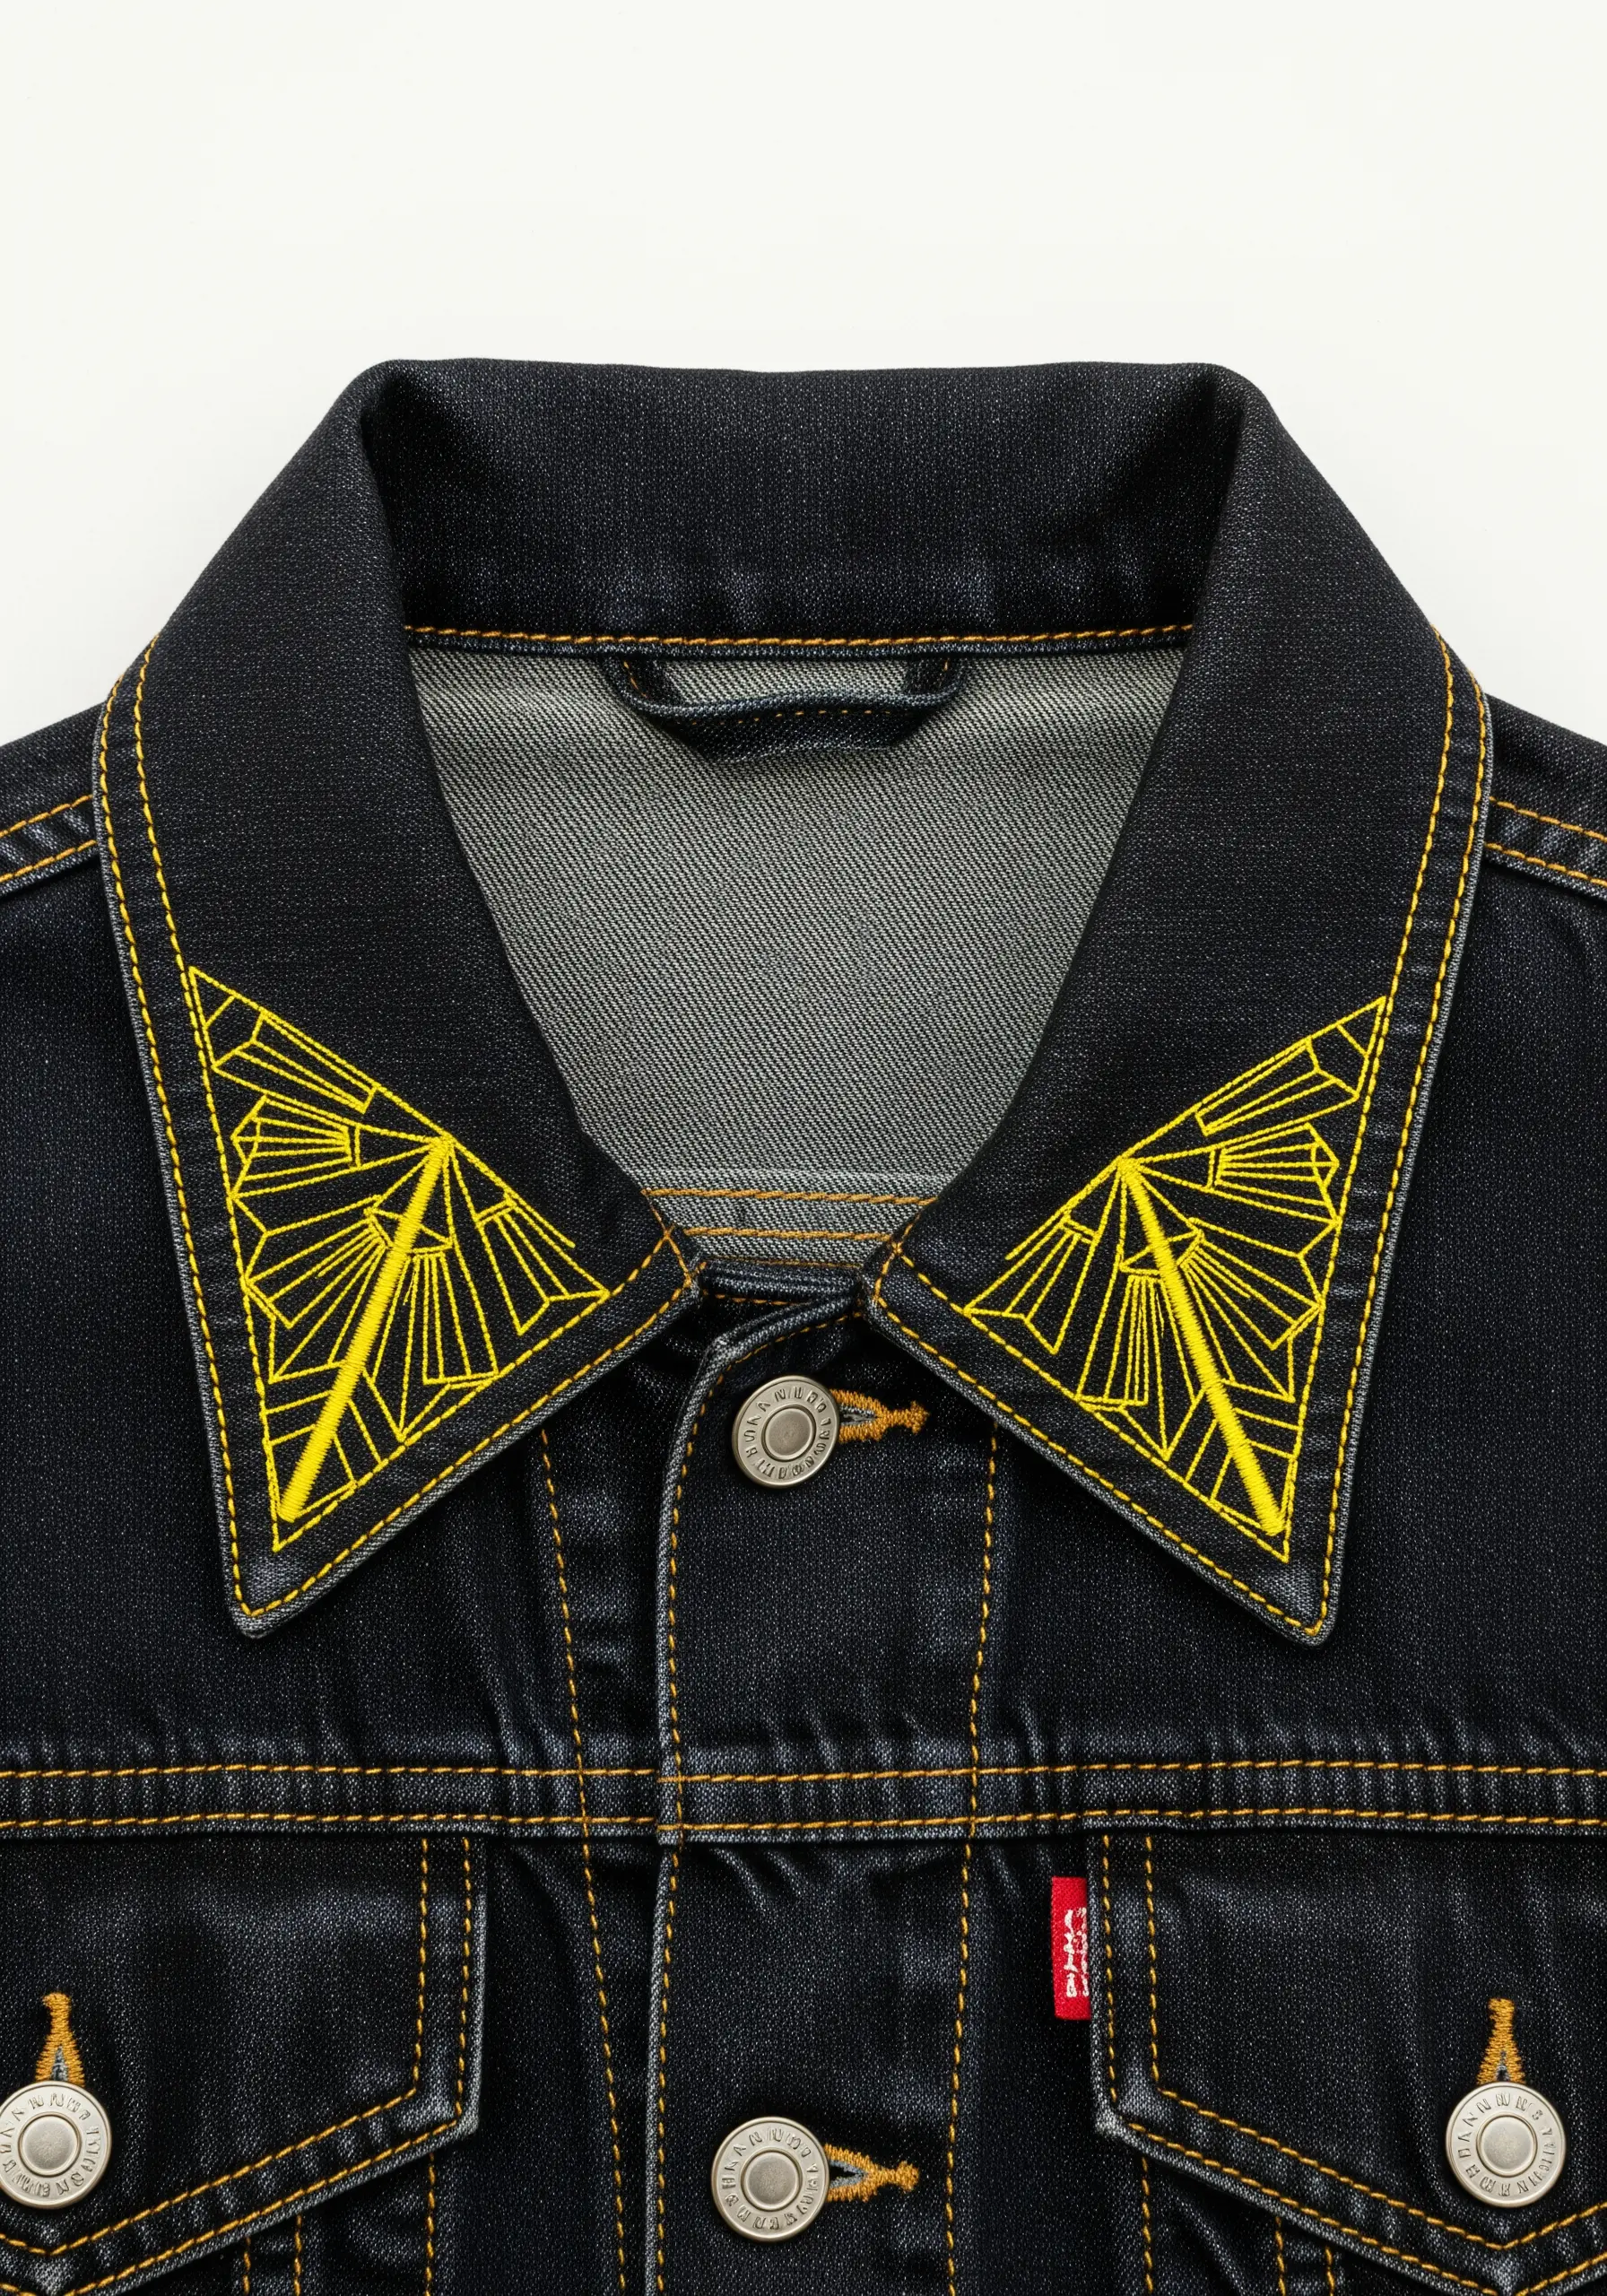
Use embroidery to accentuate the existing architecture of a garment. The sharp angles of a jacket collar are the perfect canvas for a geometric design.
An Art Deco-inspired fan pattern, stitched in a clean backstitch, complements the collar’s shape and adds a touch of unexpected elegance.
The bright neon yellow on dark denim creates a stunning contrast, turning a structural element of the jacket into its main focal point.
31. Customize Accessories with a Simple Scatter Pattern
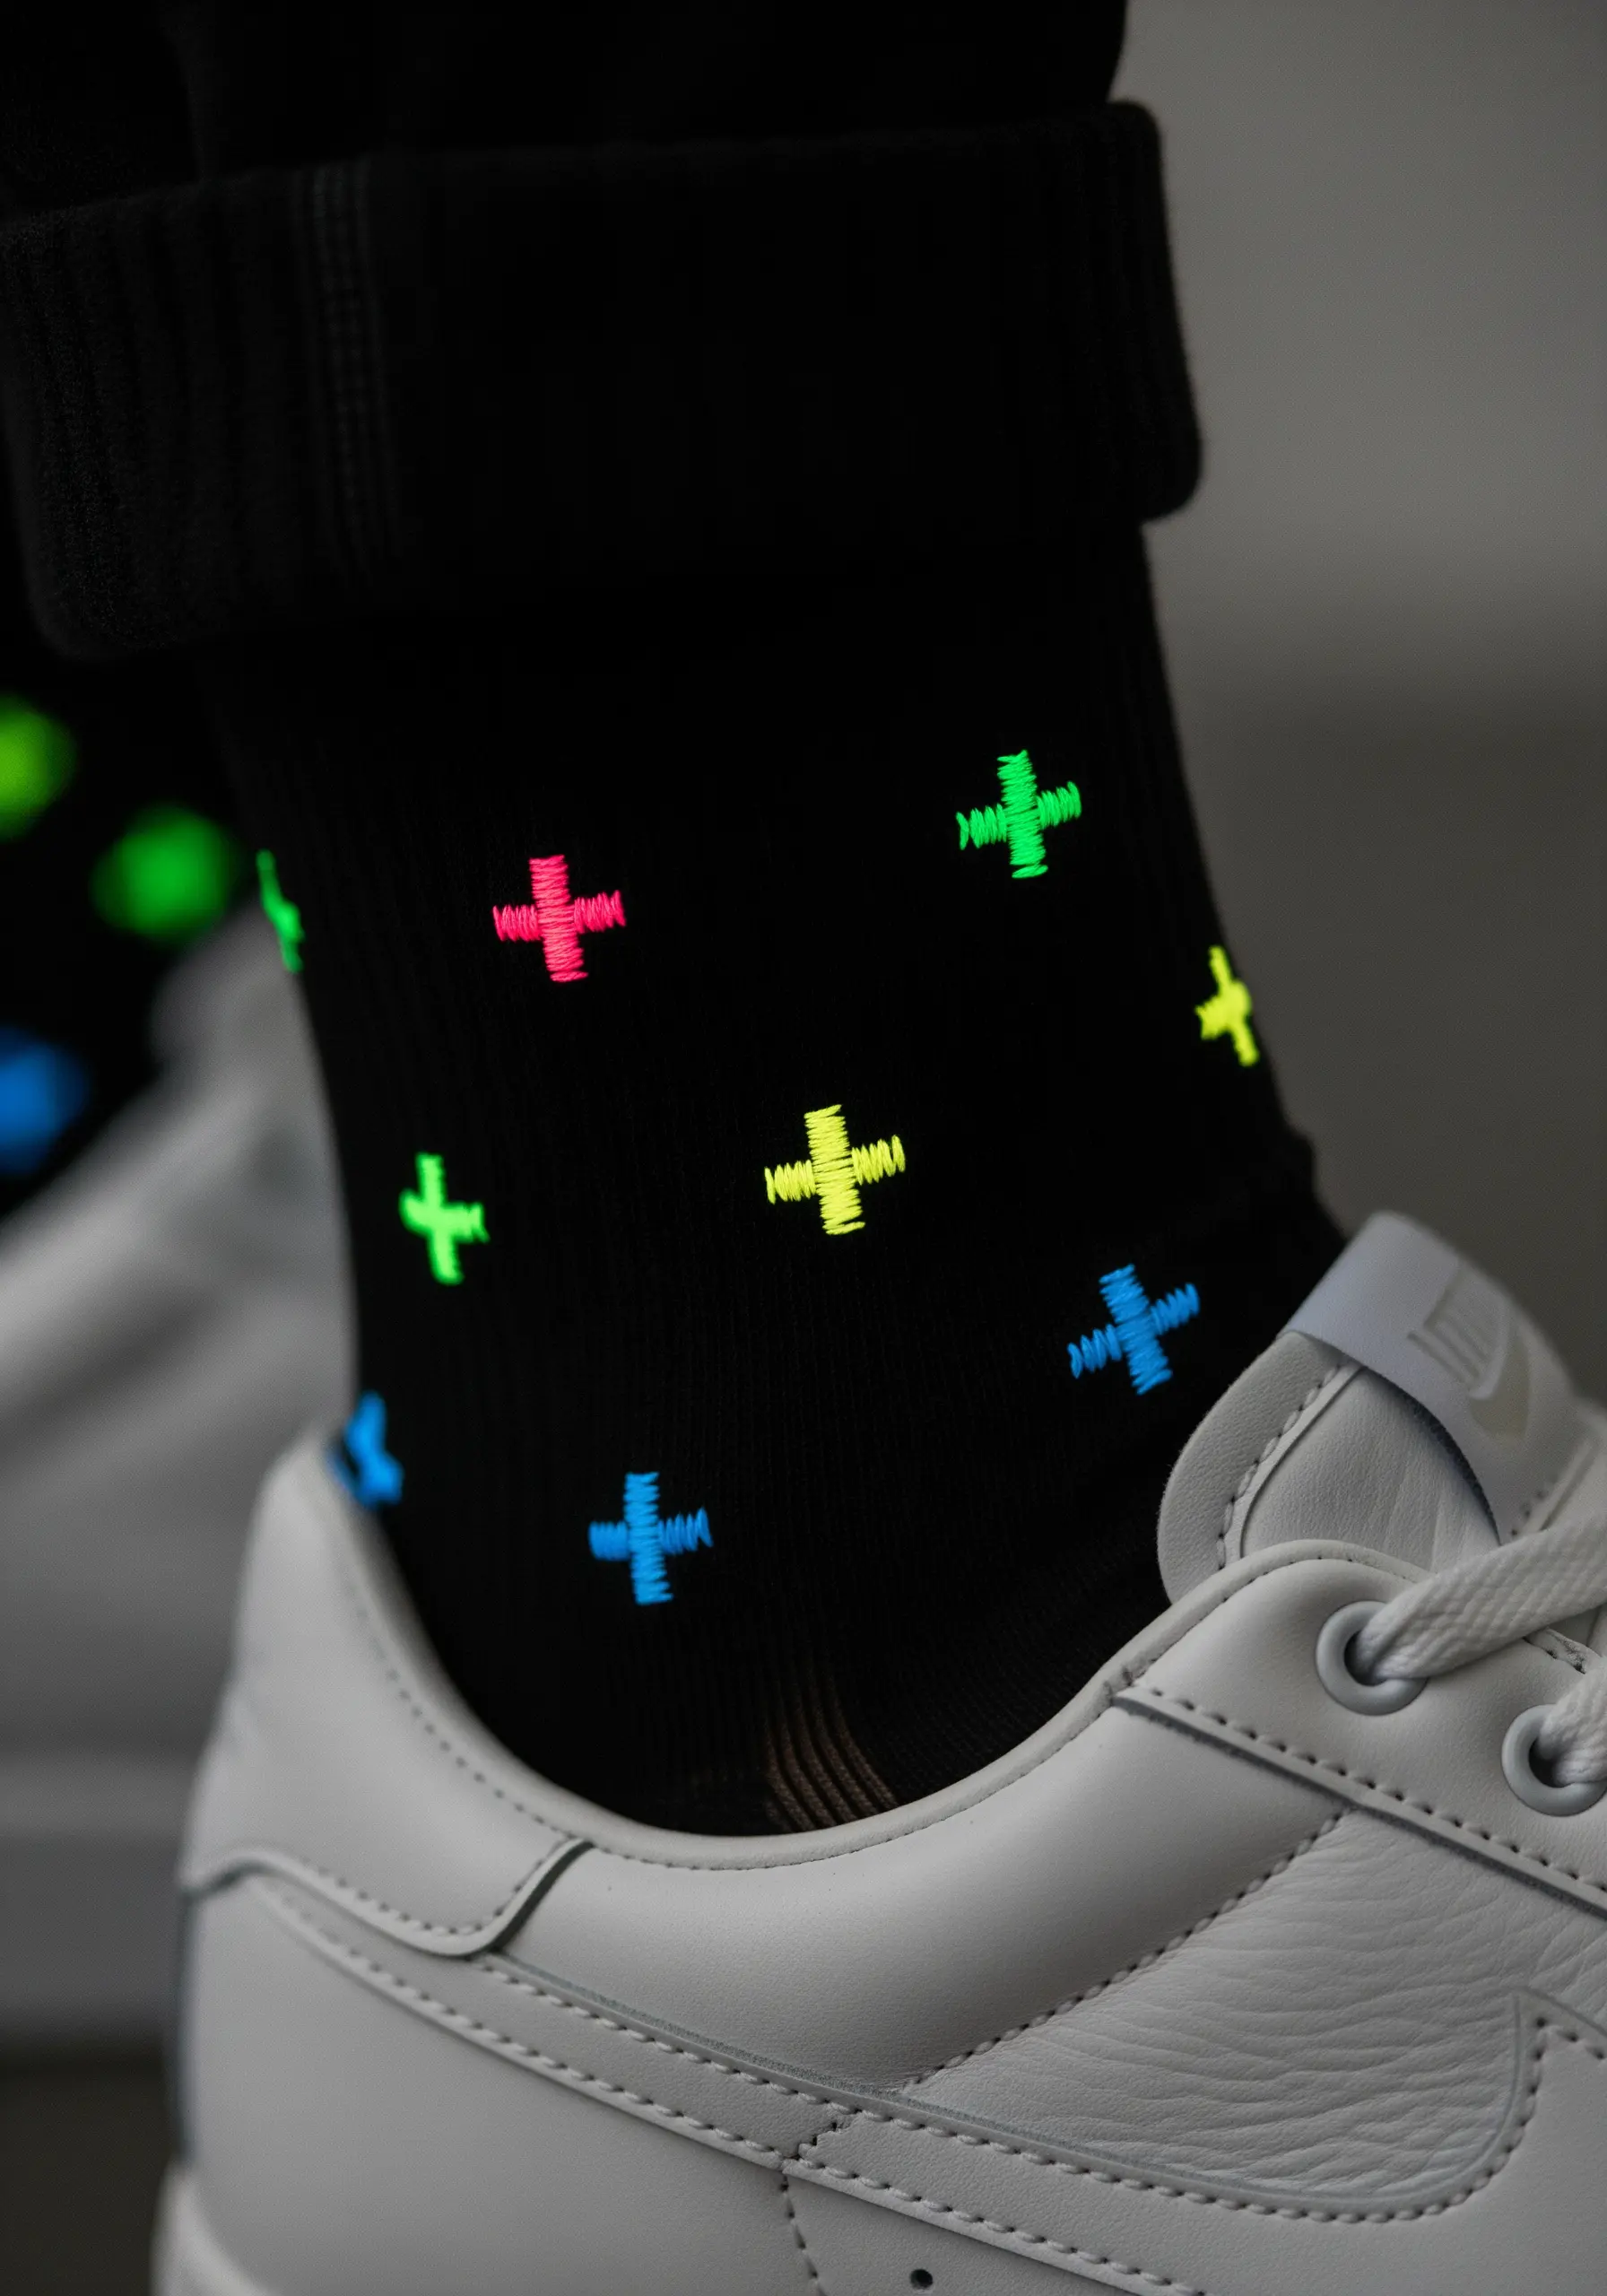
You don’t need a complex design to make a big impact. A simple, scattered pattern of a single motif can completely transform a basic item.
Create these plus signs with just two small, intersecting straight stitches. The key is to use a variety of bright neon colors and to vary the angle and spacing of each cross.
This is a quick, fun, and highly effective way to add a playful, personalized touch to socks, t-shirts, or tote bags.
32. Stitch a Bold, Graphic Heartbeat Line

For a design that relies on a sharp, angular line, a stem stitch is your best friend.
This stitch creates a slightly raised, rope-like line that is perfect for navigating the sharp peaks and valleys of an EKG or heartbeat graphic.
The consistent texture of the stitch gives the design a clean, polished look. When stitched in a vibrant neon green on a black woven belt, the effect is graphic, energetic, and instantly eye-catching.


