

You’ve gathered the threads, chosen your fabric, and are ready to create something meaningful. But how do you move beyond simple outlines to craft embroidery that feels truly sophisticated and intentional? The secret isn’t in more complex stitches, but in a more thoughtful approach to design.
Negative space—the untouched fabric around your motif—is your most powerful tool. By letting the fabric breathe, you give each stitch more impact, turning a simple floral into a piece of modern art. It’s about what you choose *not* to stitch that creates elegance, balance, and a quiet confidence in your work.
In these patterns, we’ll explore how to use clean lines, subtle textures, and thoughtful composition to create breathtaking decor. You’ll learn to transform a simple wedding backdrop, a seating chart, or a gallery wall into a testament to refined, personal craftsmanship. This is where your needle and thread become a tool for creating atmosphere and memory.
1. The Calla Lily: A Study in Minimalist Line Work

Create a monumental statement with a single, delicate outline.
Use a simple running stitch with three strands of floss to define the shape, but vary the stitch length slightly to give the line a hand-drawn, organic quality.
For the dotted texture, use seed stitches placed irregularly within the leaves and along the stem.
This technique allows the unstitched fabric to become part of the art, creating a design that feels both grand and weightless—perfect for catching the light on a semi-sheer fabric panel.
2. The Peony Triptych: Deconstructing a Single Bloom
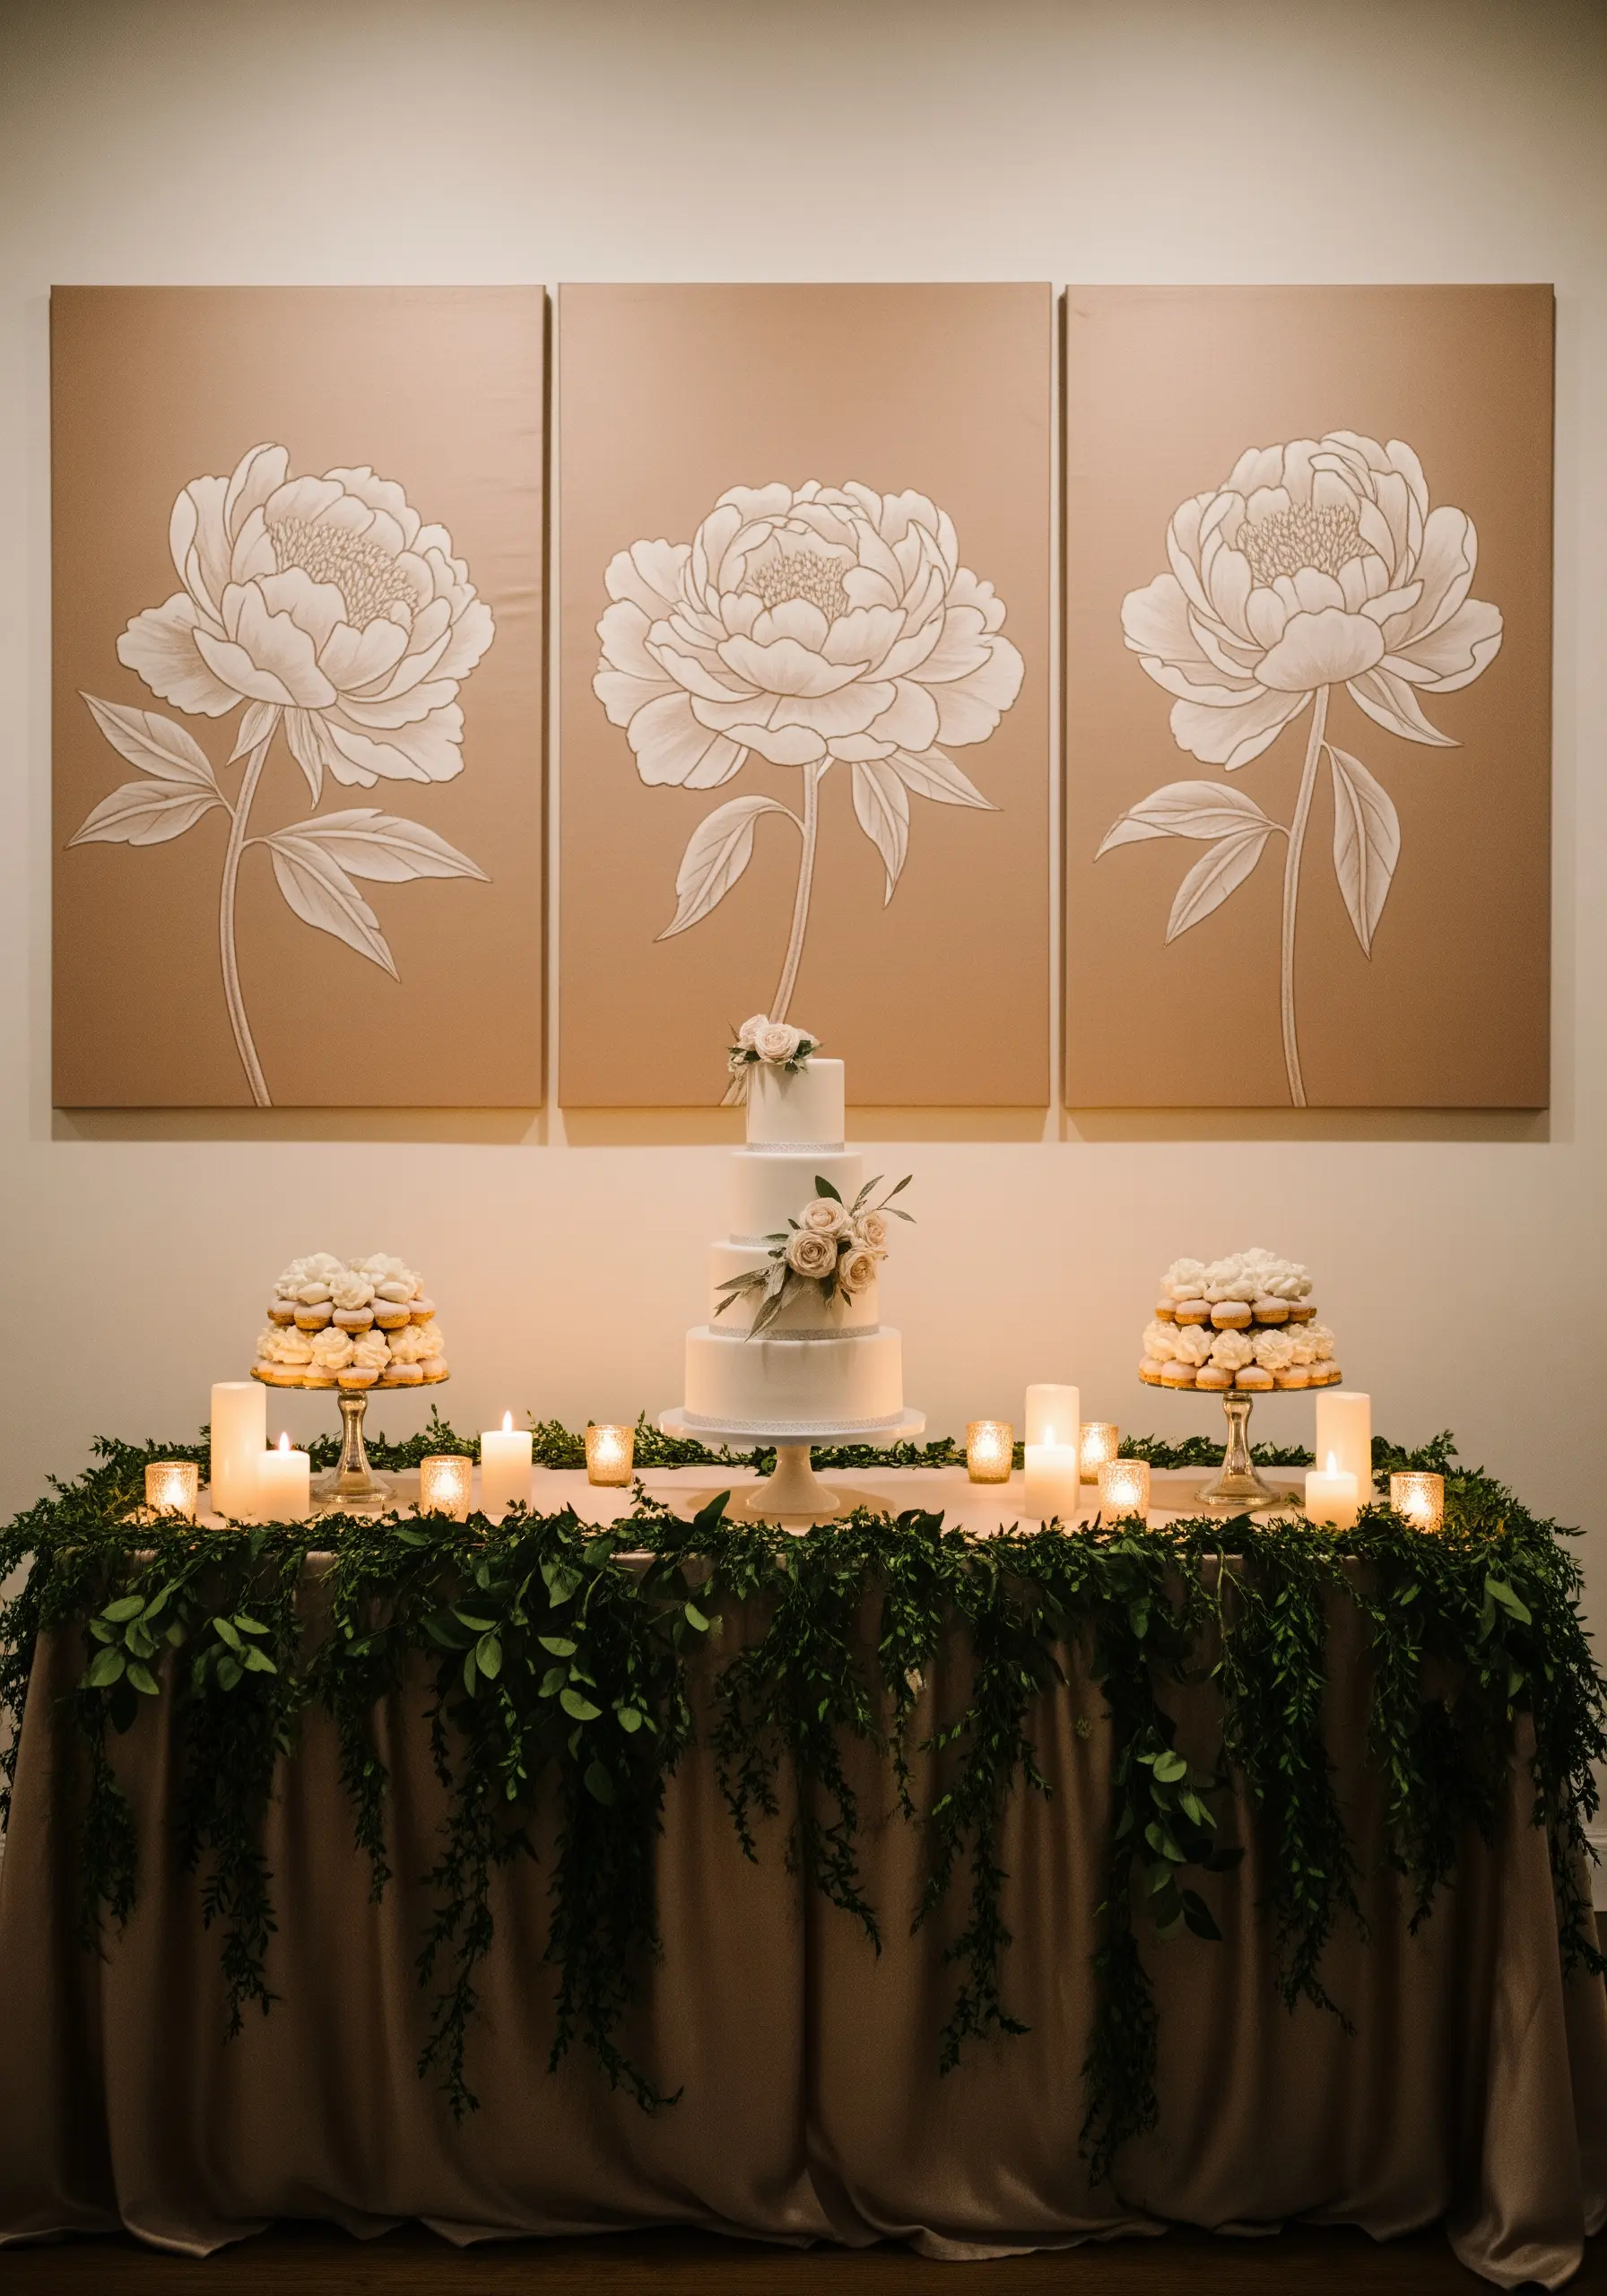
Elevate a classic floral by breaking it across three separate canvases.
This gallery-style presentation turns a single motif into a modern art installation.
Use a consistent three-strand backstitch for all outlines to ensure the lines look bold and cohesive when viewed together.
Choose a warm, neutral fabric like a heavyweight linen in taupe or sand; it adds a soft, organic feel that prevents the stark outlines from feeling cold.
3. Cascading Greenery: Stitching Asymmetrical Flow
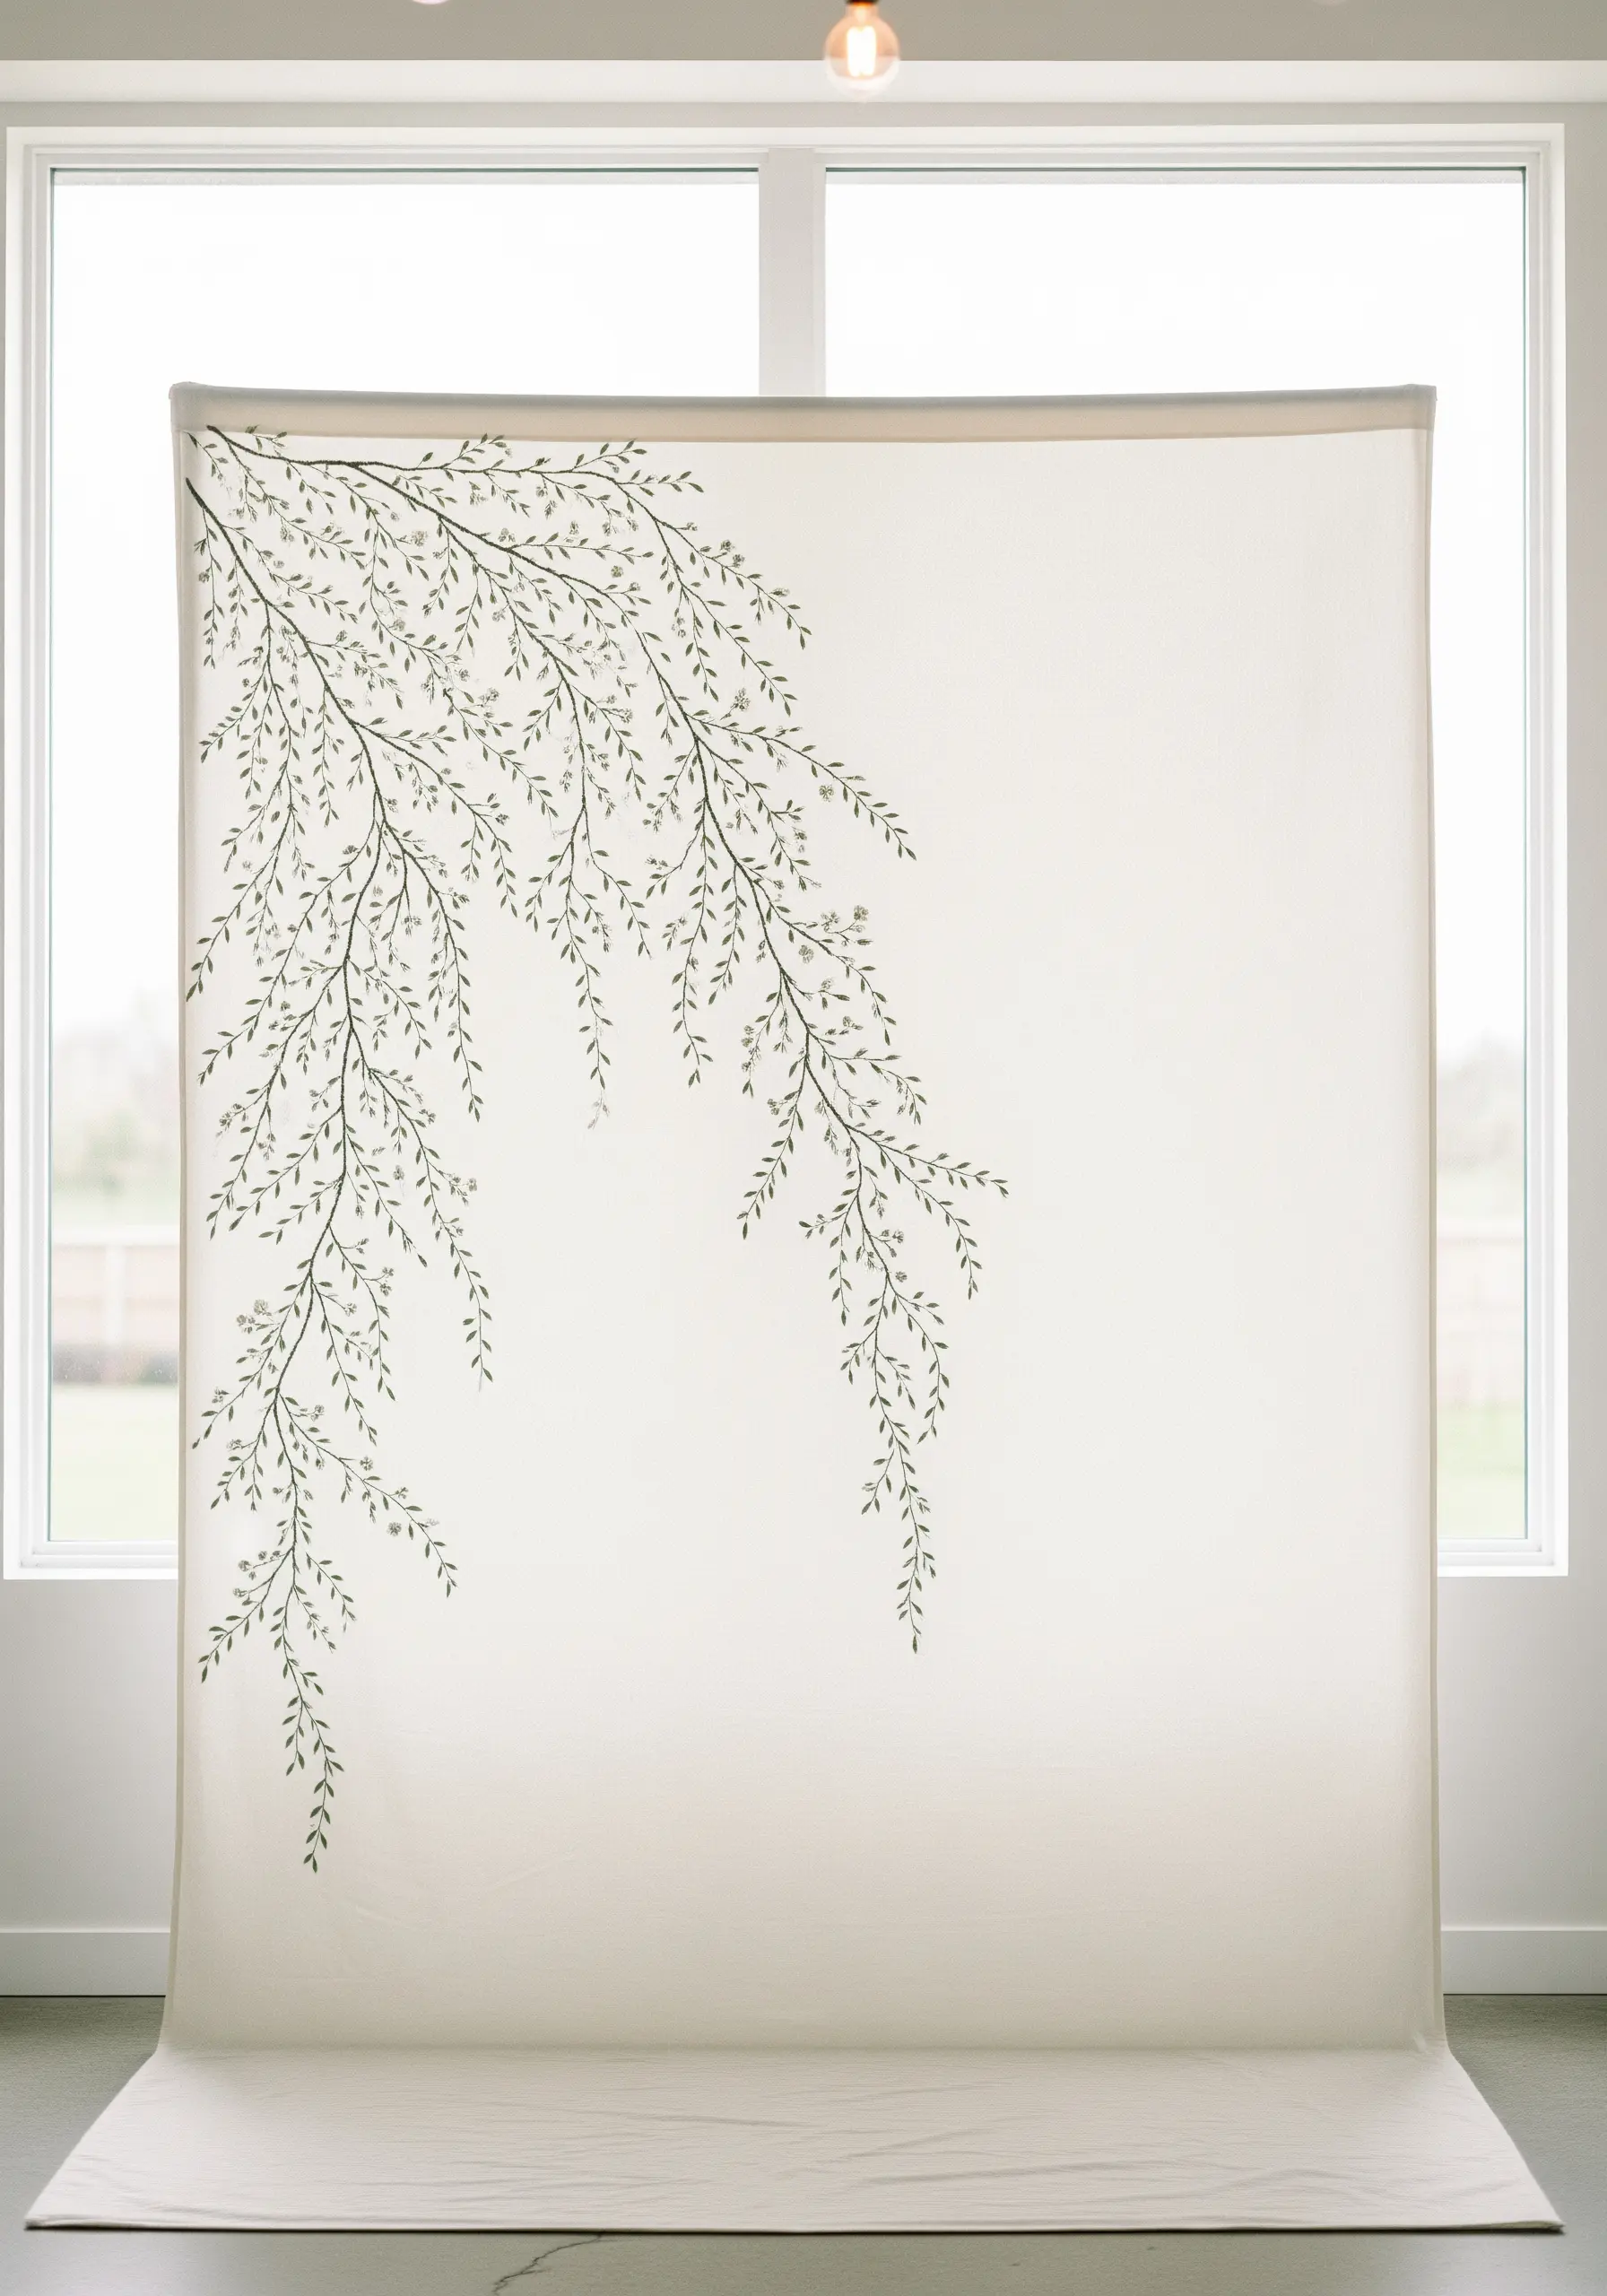
Guide the eye and create natural movement by stitching an asymmetrical cascade of delicate branches.
Use a stem stitch for the main branches to give them a smooth, rope-like definition.
For the tiny leaves, a single detached chain stitch (lazy daisy) is all you need—it’s quick and effective, adding just enough shape without overwhelming the design.
Place a few tiny French knots at the tips of some branches to suggest new buds, adding a subtle layer of texture that catches the light.
This composition works beautifully on photo backdrops, as it frames the subject without competing for attention.
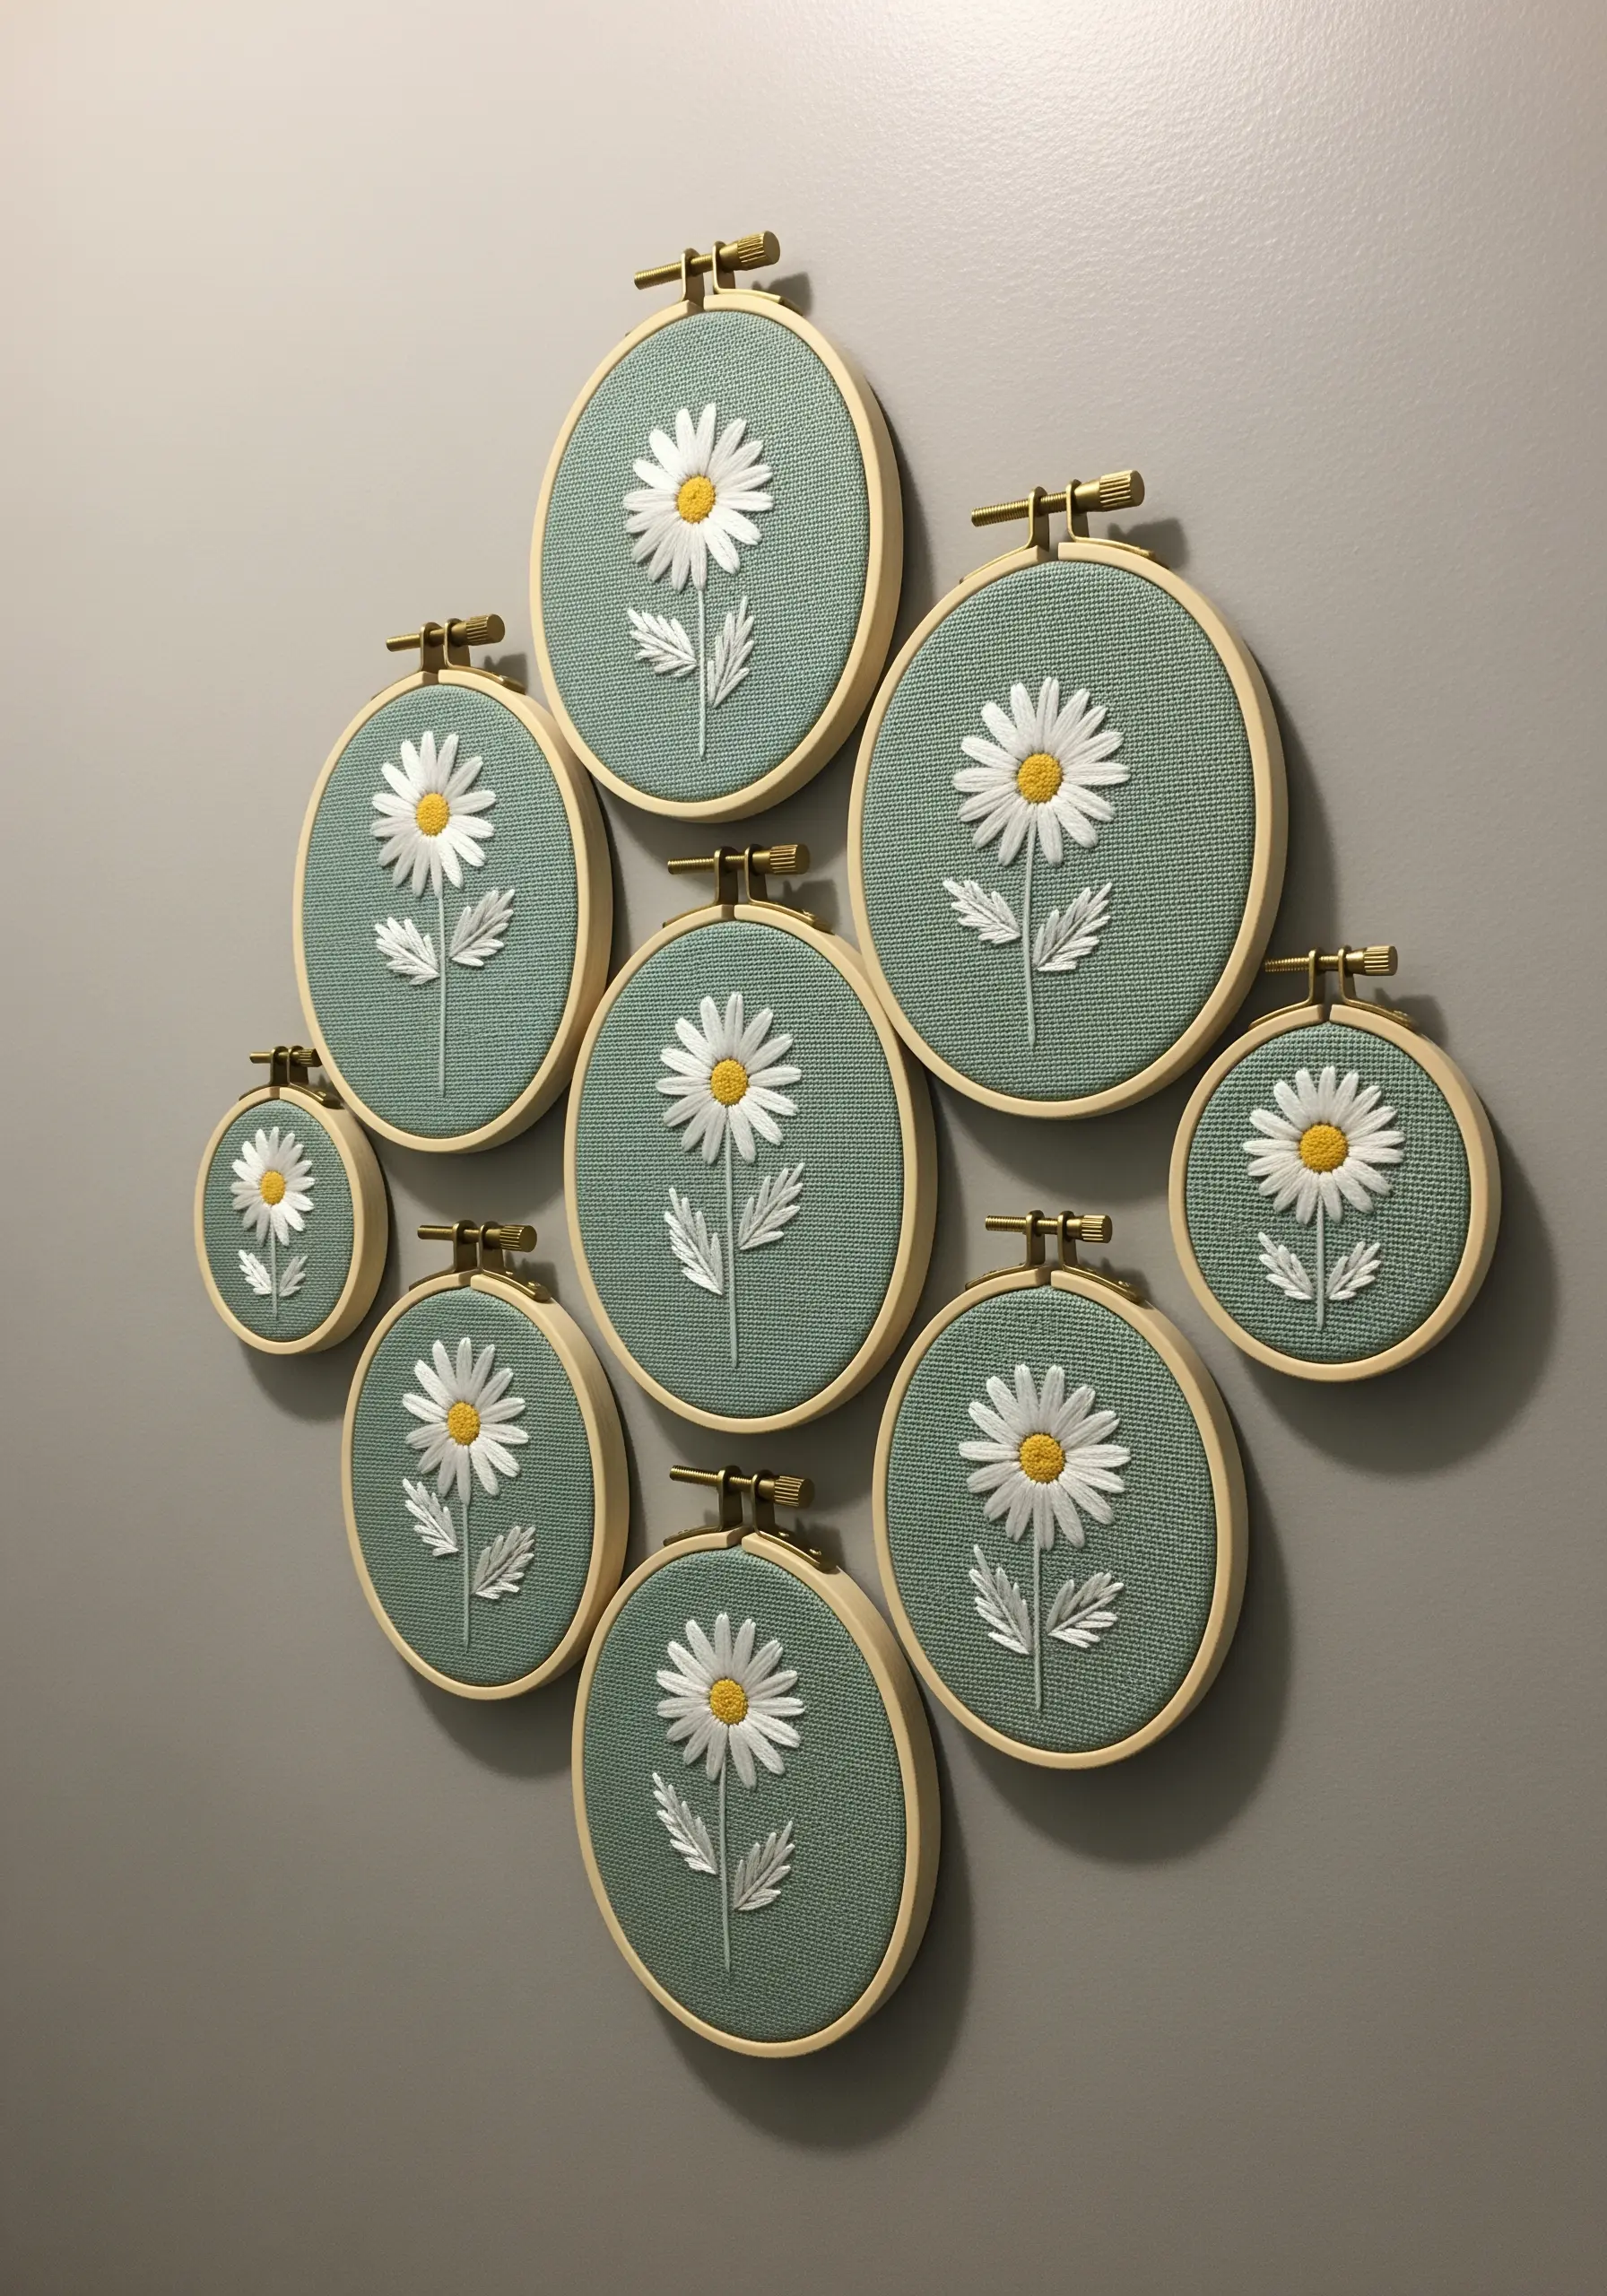
4. The Botanical Collection: Unity Through Repetition

Design a stunning gallery wall by repeating a single concept across multiple hoops.
The key to a cohesive collection is consistency: use the same single-strand black thread, the same off-white cotton fabric, and the same simple backstitch for every flower.
While the floral motifs vary, the uniform materials and technique tie them all together, making the collection feel intentional and curated.
Arrange the hoops in a structured grid to enhance the clean, minimalist aesthetic for truly inspiring hoop art projects.
5. Geometric Roses: Blending Structure and Nature

Juxtapose the soft curves of florals with the clean precision of geometric lines.
To emphasize the contrast, use a heavier thread like a #8 pearl cotton for the straight lines of the background pattern.
For the roses and leaves, switch to a finer, standard six-strand floss, using only two strands for a more delicate appearance.
This contrast in thread weight creates a subtle hierarchy, allowing the organic flowers to feel like they are gently resting on a structured framework.
6. The Seating Chart Garland: Integrating Text and Texture
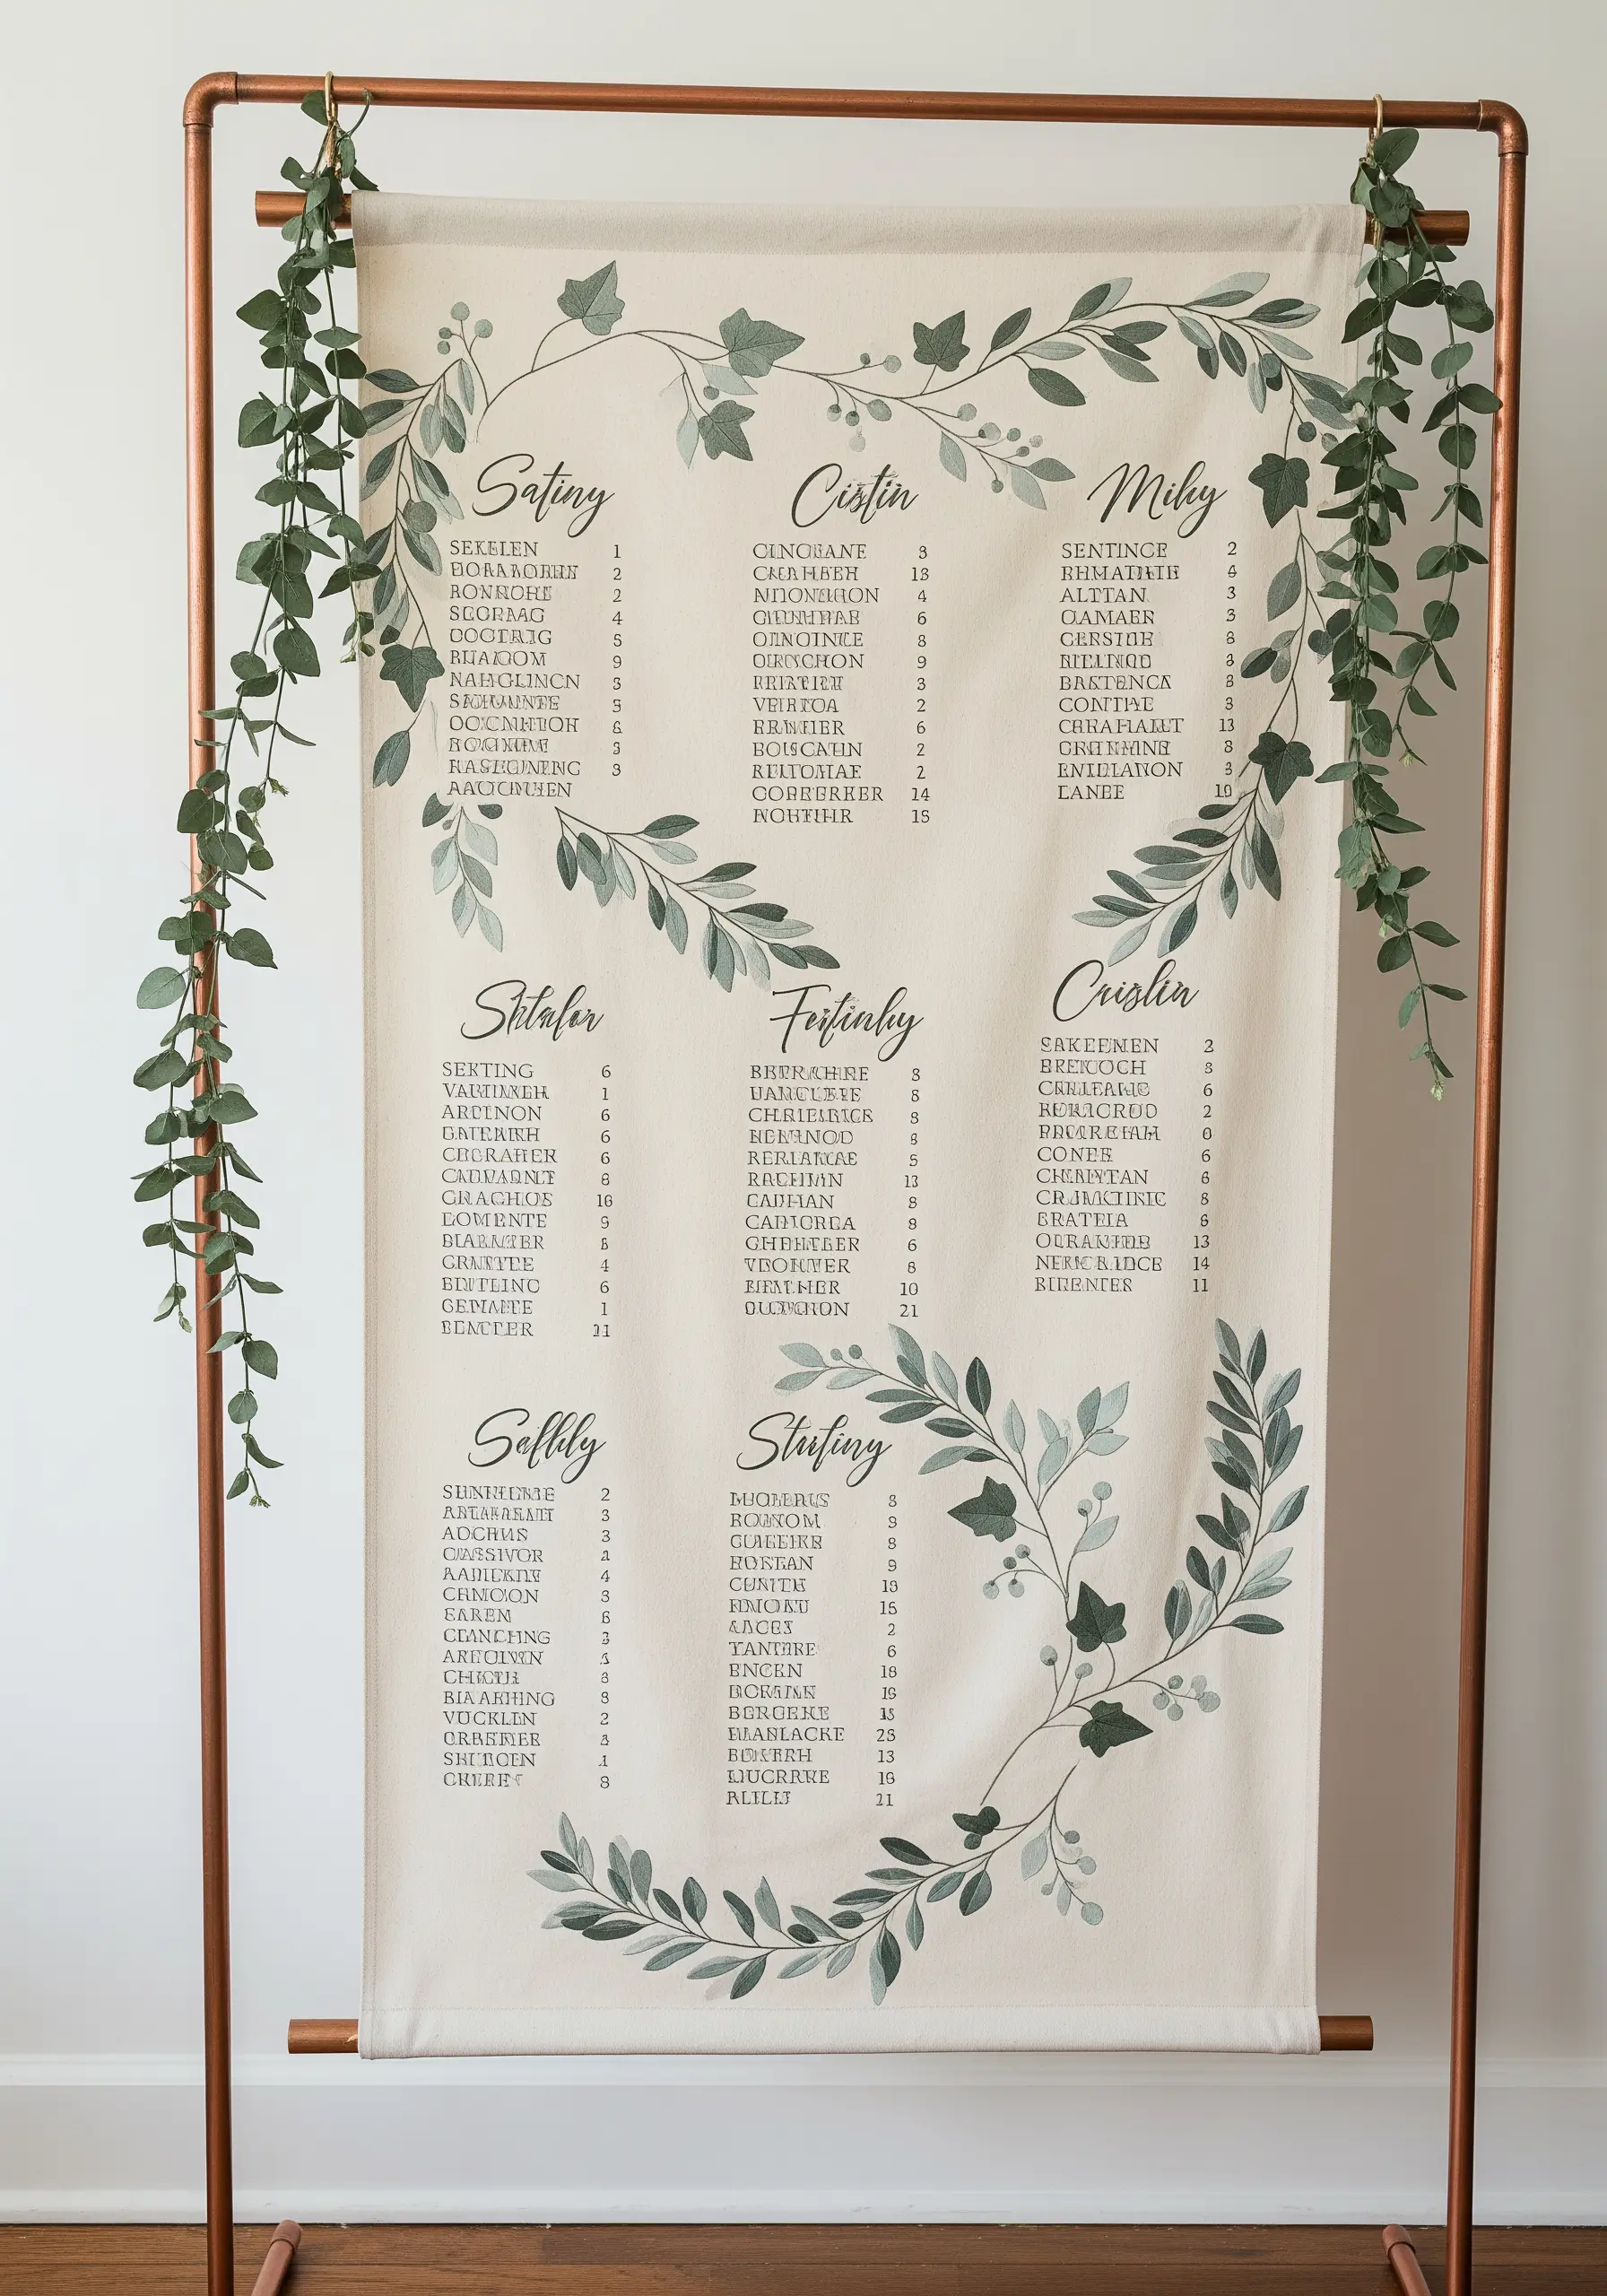
Transform a practical item like a seating chart into a beautiful keepsake.
Frame the text with a delicate botanical garland, using a simple backstitch for the vines and a satin stitch for the leaves.
Use a muted, harmonious color palette—like sage green and dusty gray—to ensure the botanicals complement the text without overpowering it.
The texture of the embroidery adds a tactile, handmade warmth that digital printing alone cannot achieve, making your wedding details feel more personal, like personalized monogram table linen.
7. Lavender Field Backdrop: Creating Depth with Color
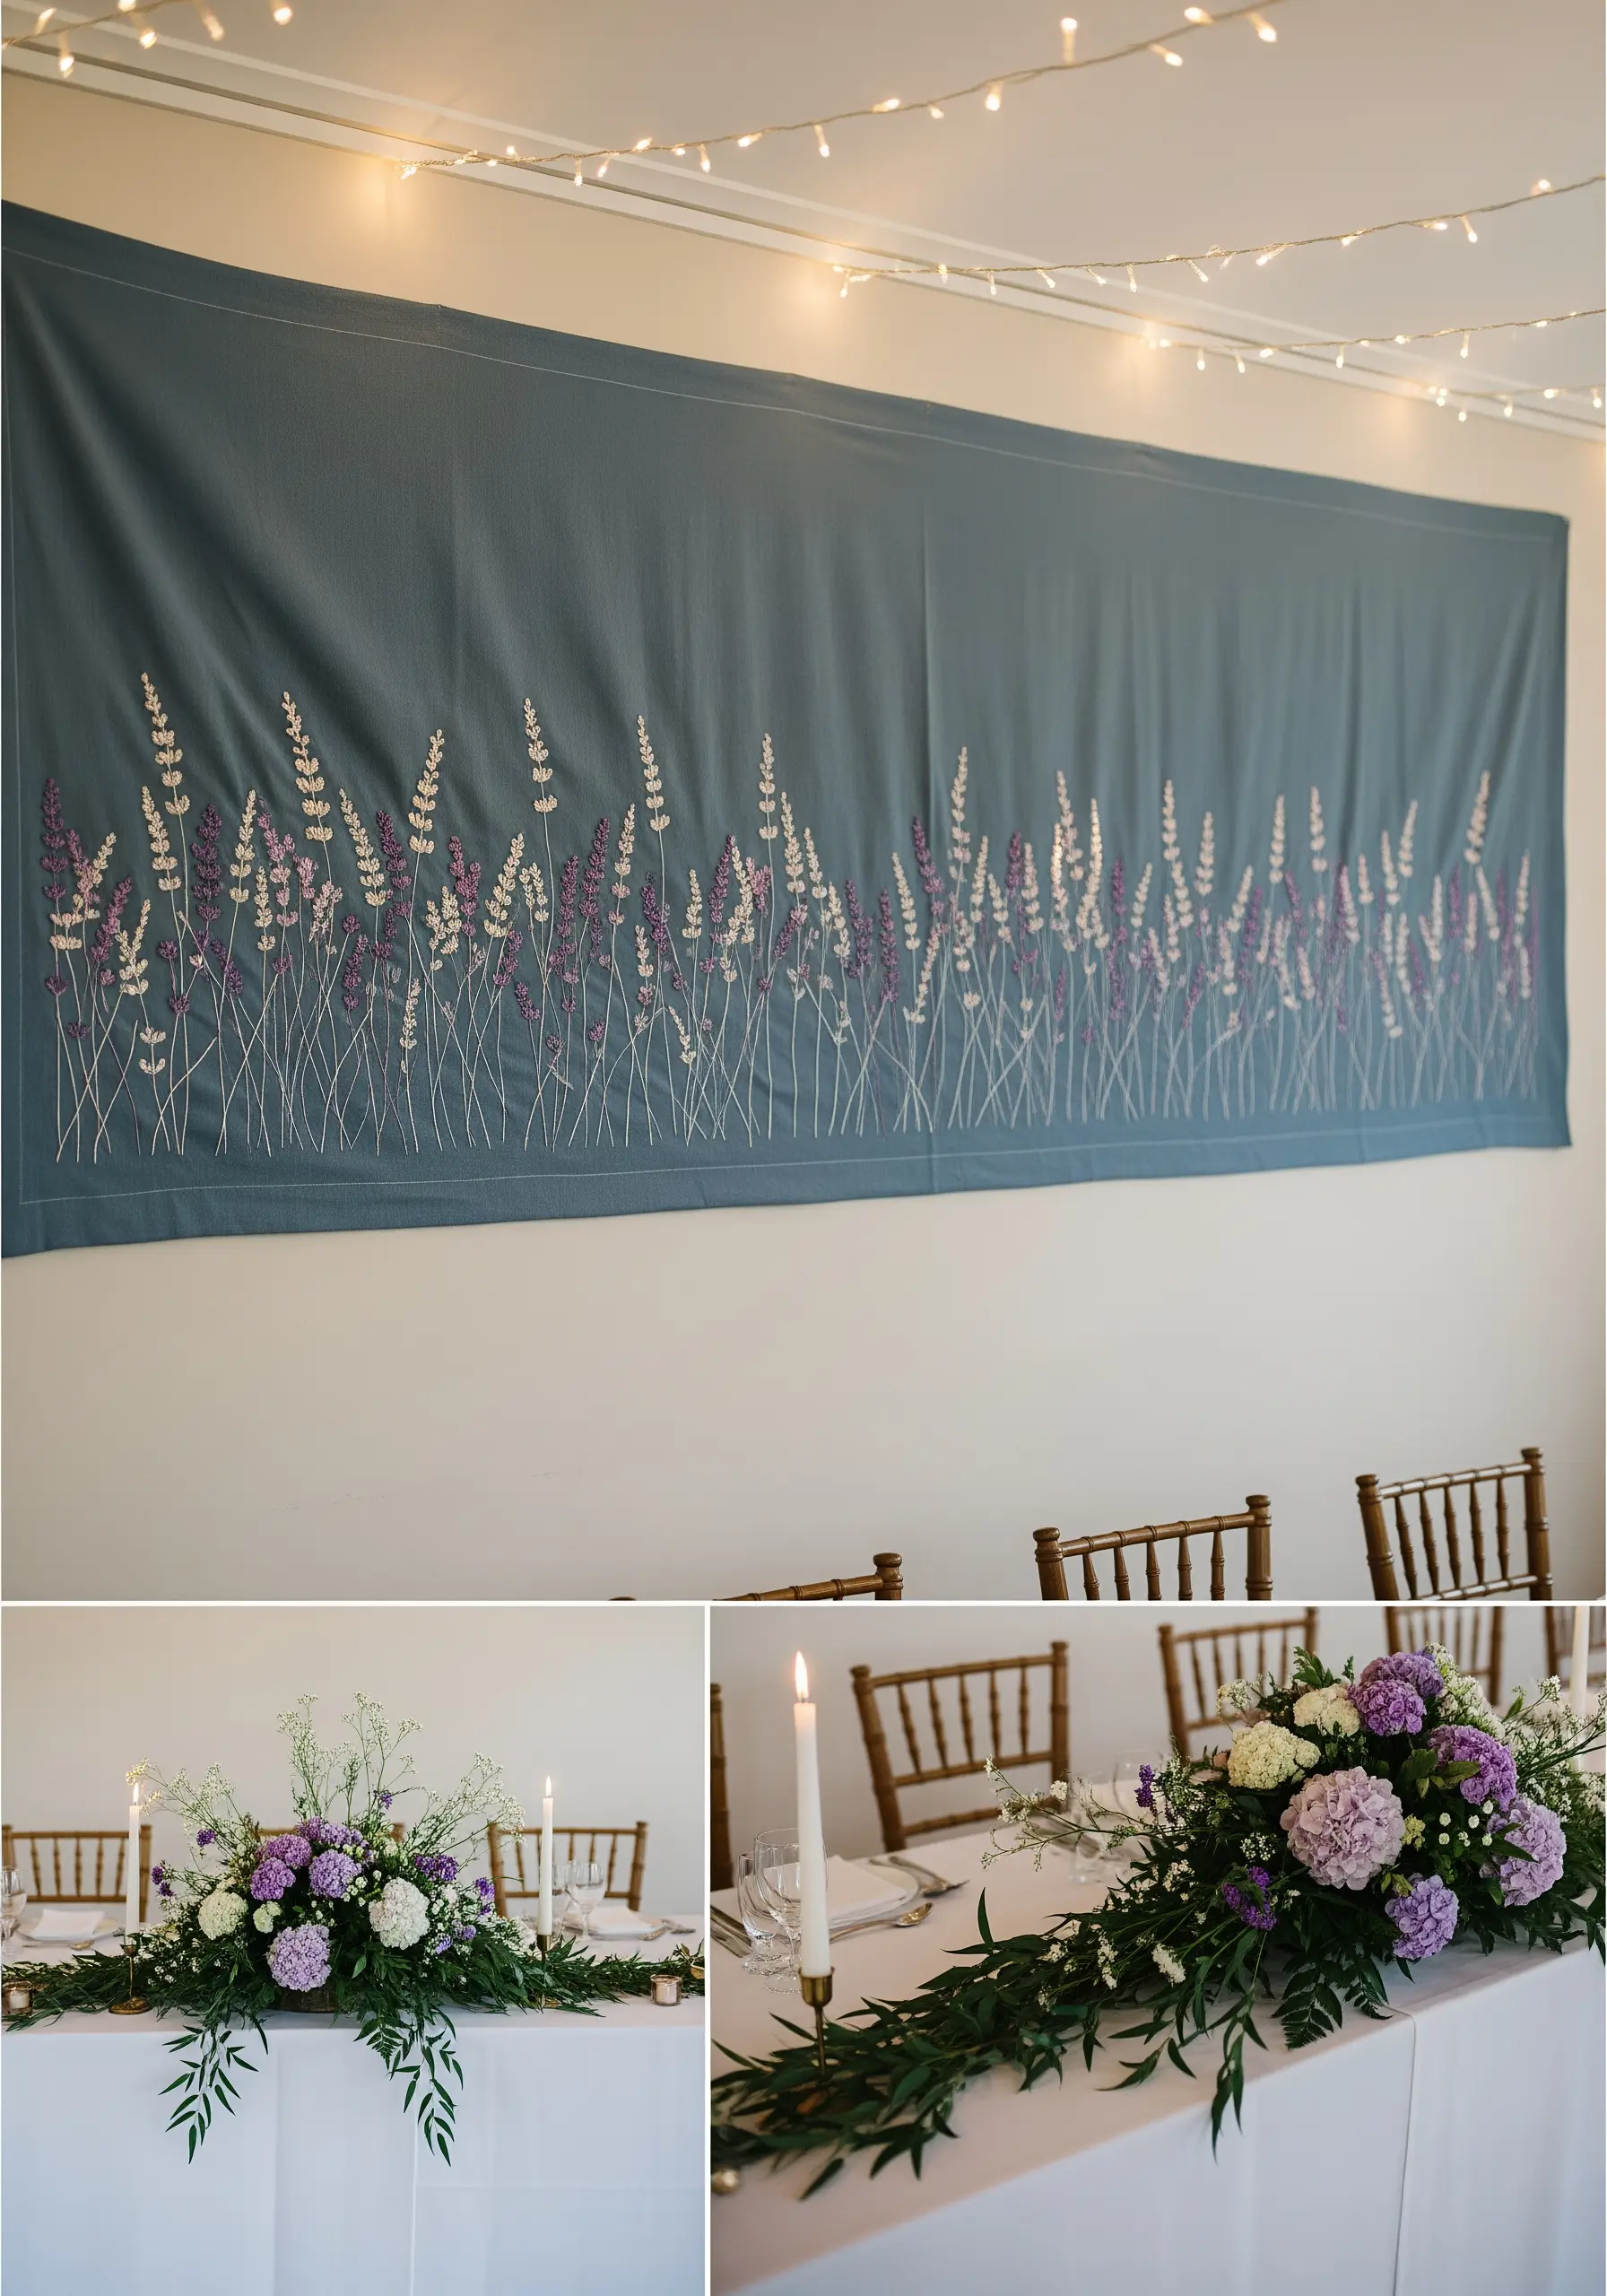
Stitch a simple landscape that feels lush and expansive.
Instead of one shade of purple, use three or four—from dusty lilac to deep violet—to give the lavender field dimension.
Vary the height of your vertical stitches and cluster them in irregular groups to mimic how flowers grow in nature.
A few stalks stitched in an off-white or pale cream thread will add highlights, making the entire composition feel more dynamic and sun-kissed.
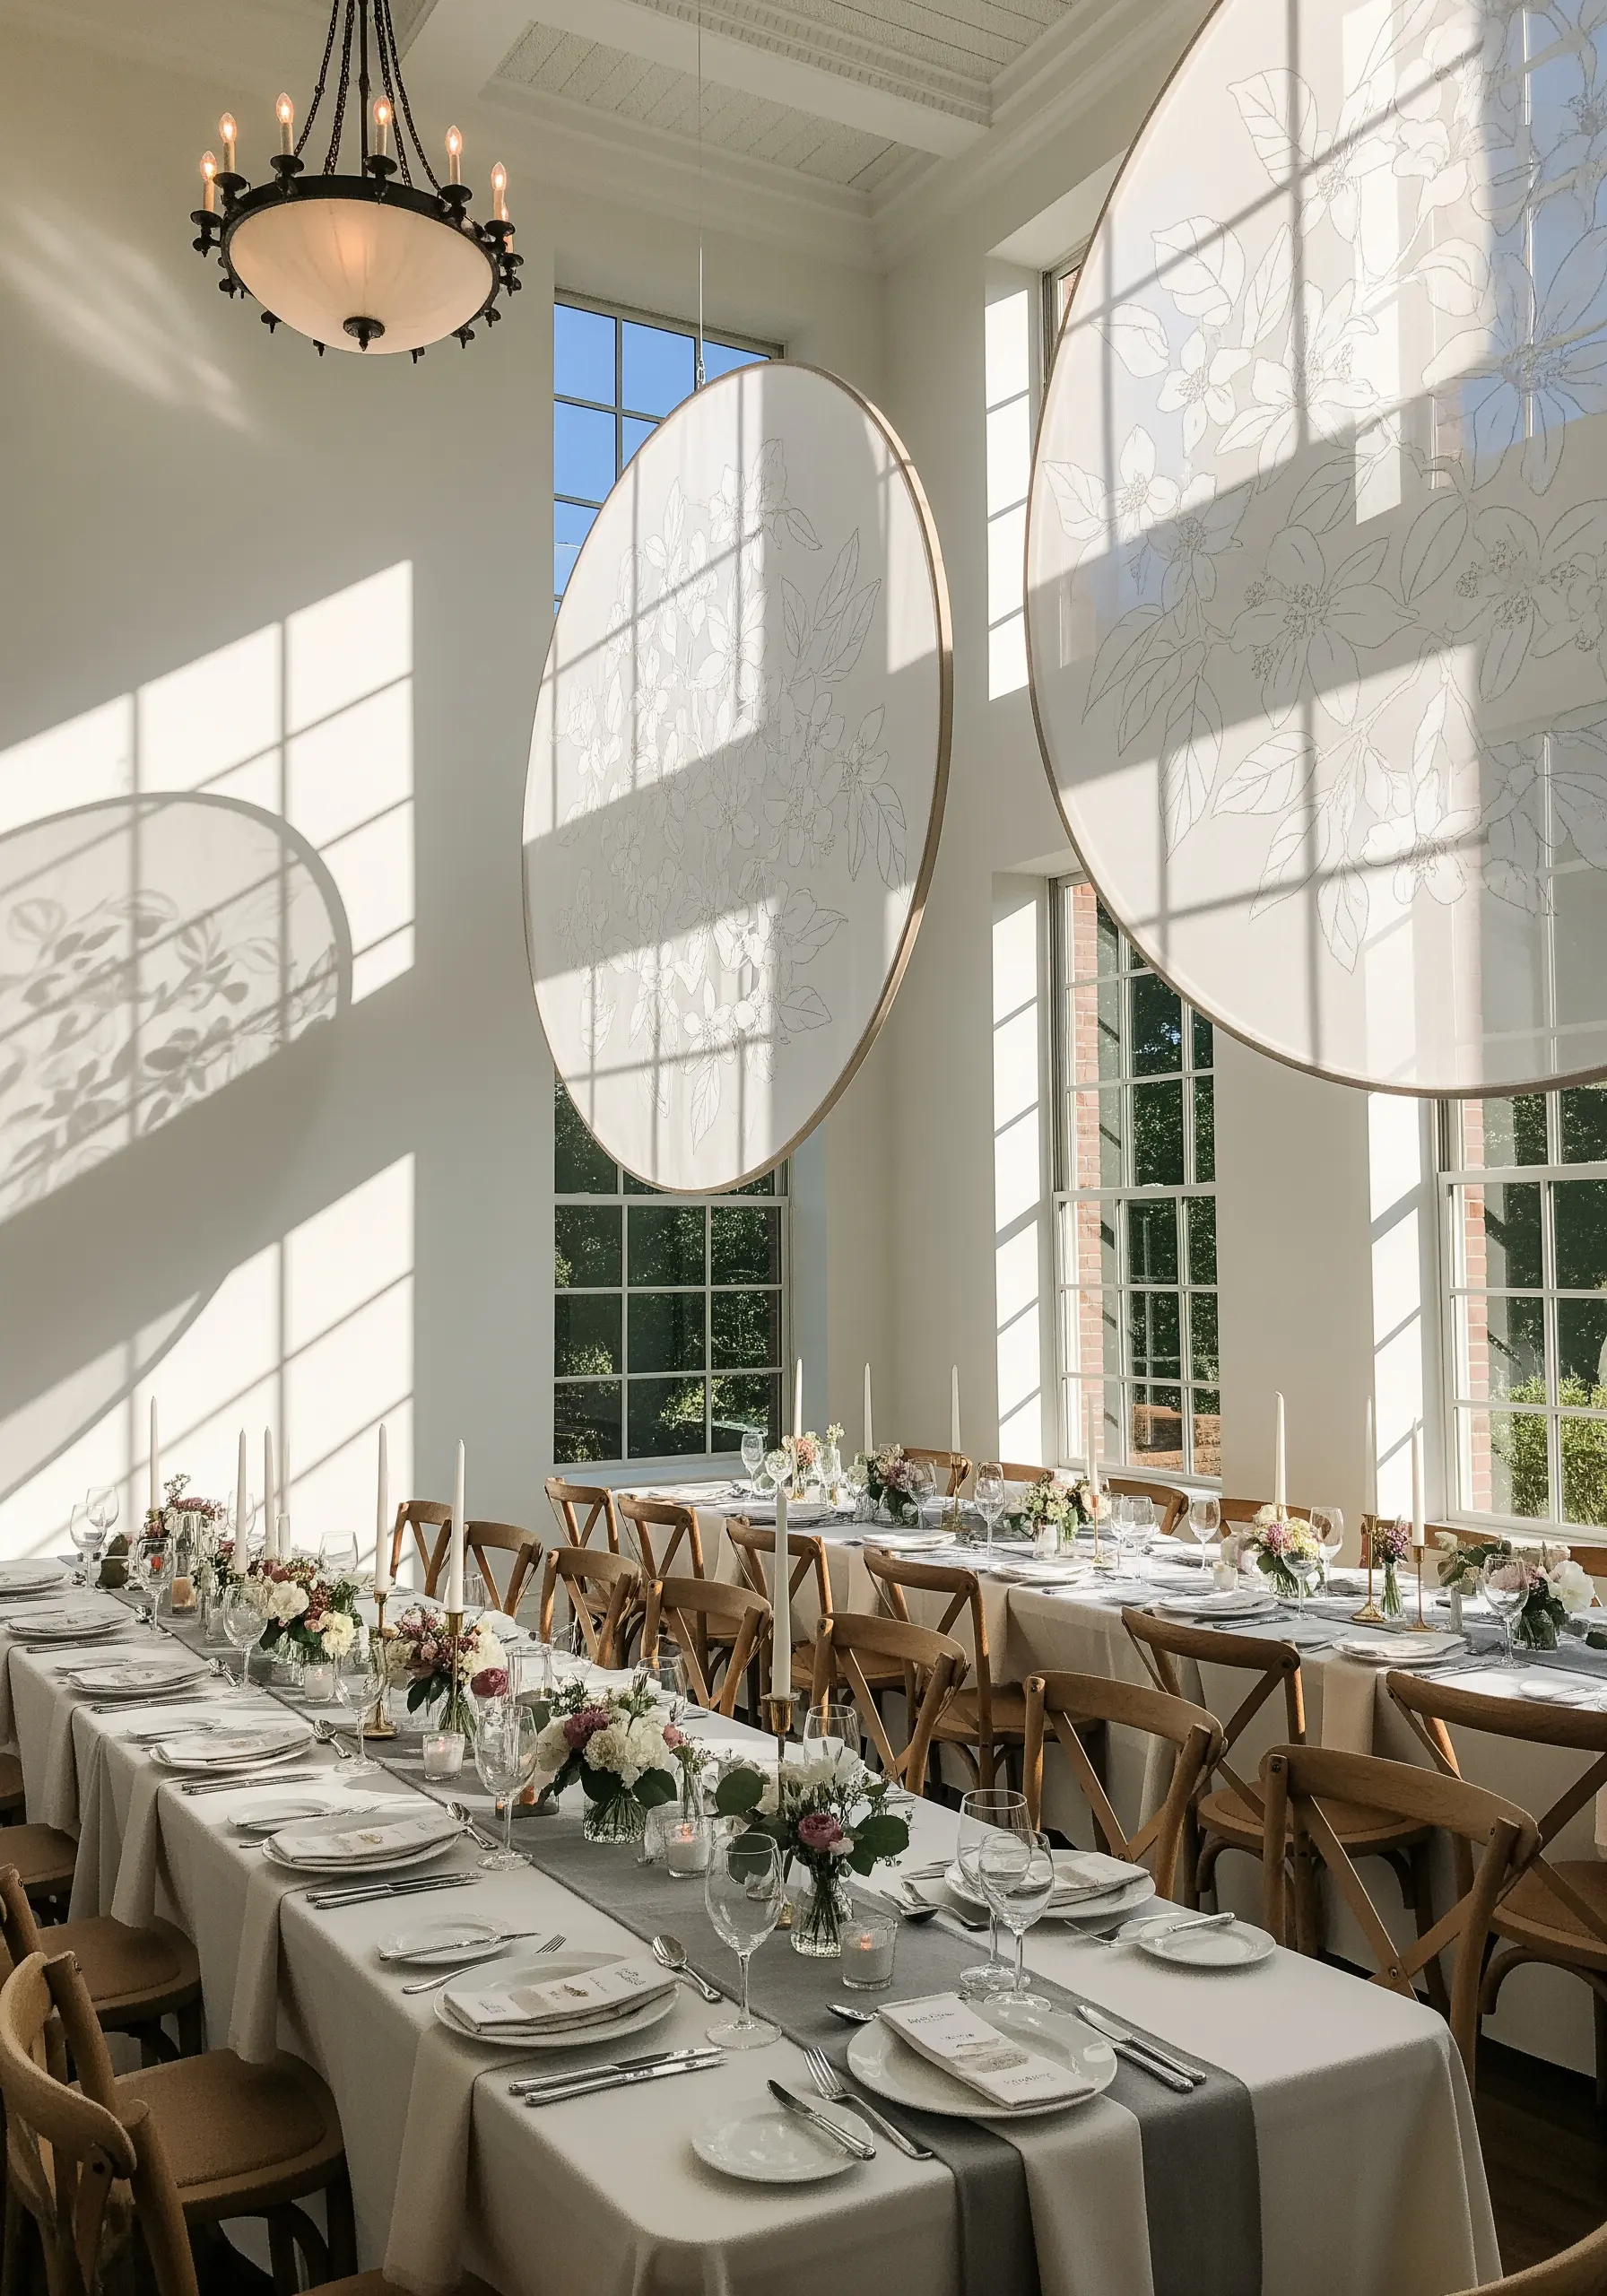
8. Ethereal Magnolia: Mastering Sheer Fabric
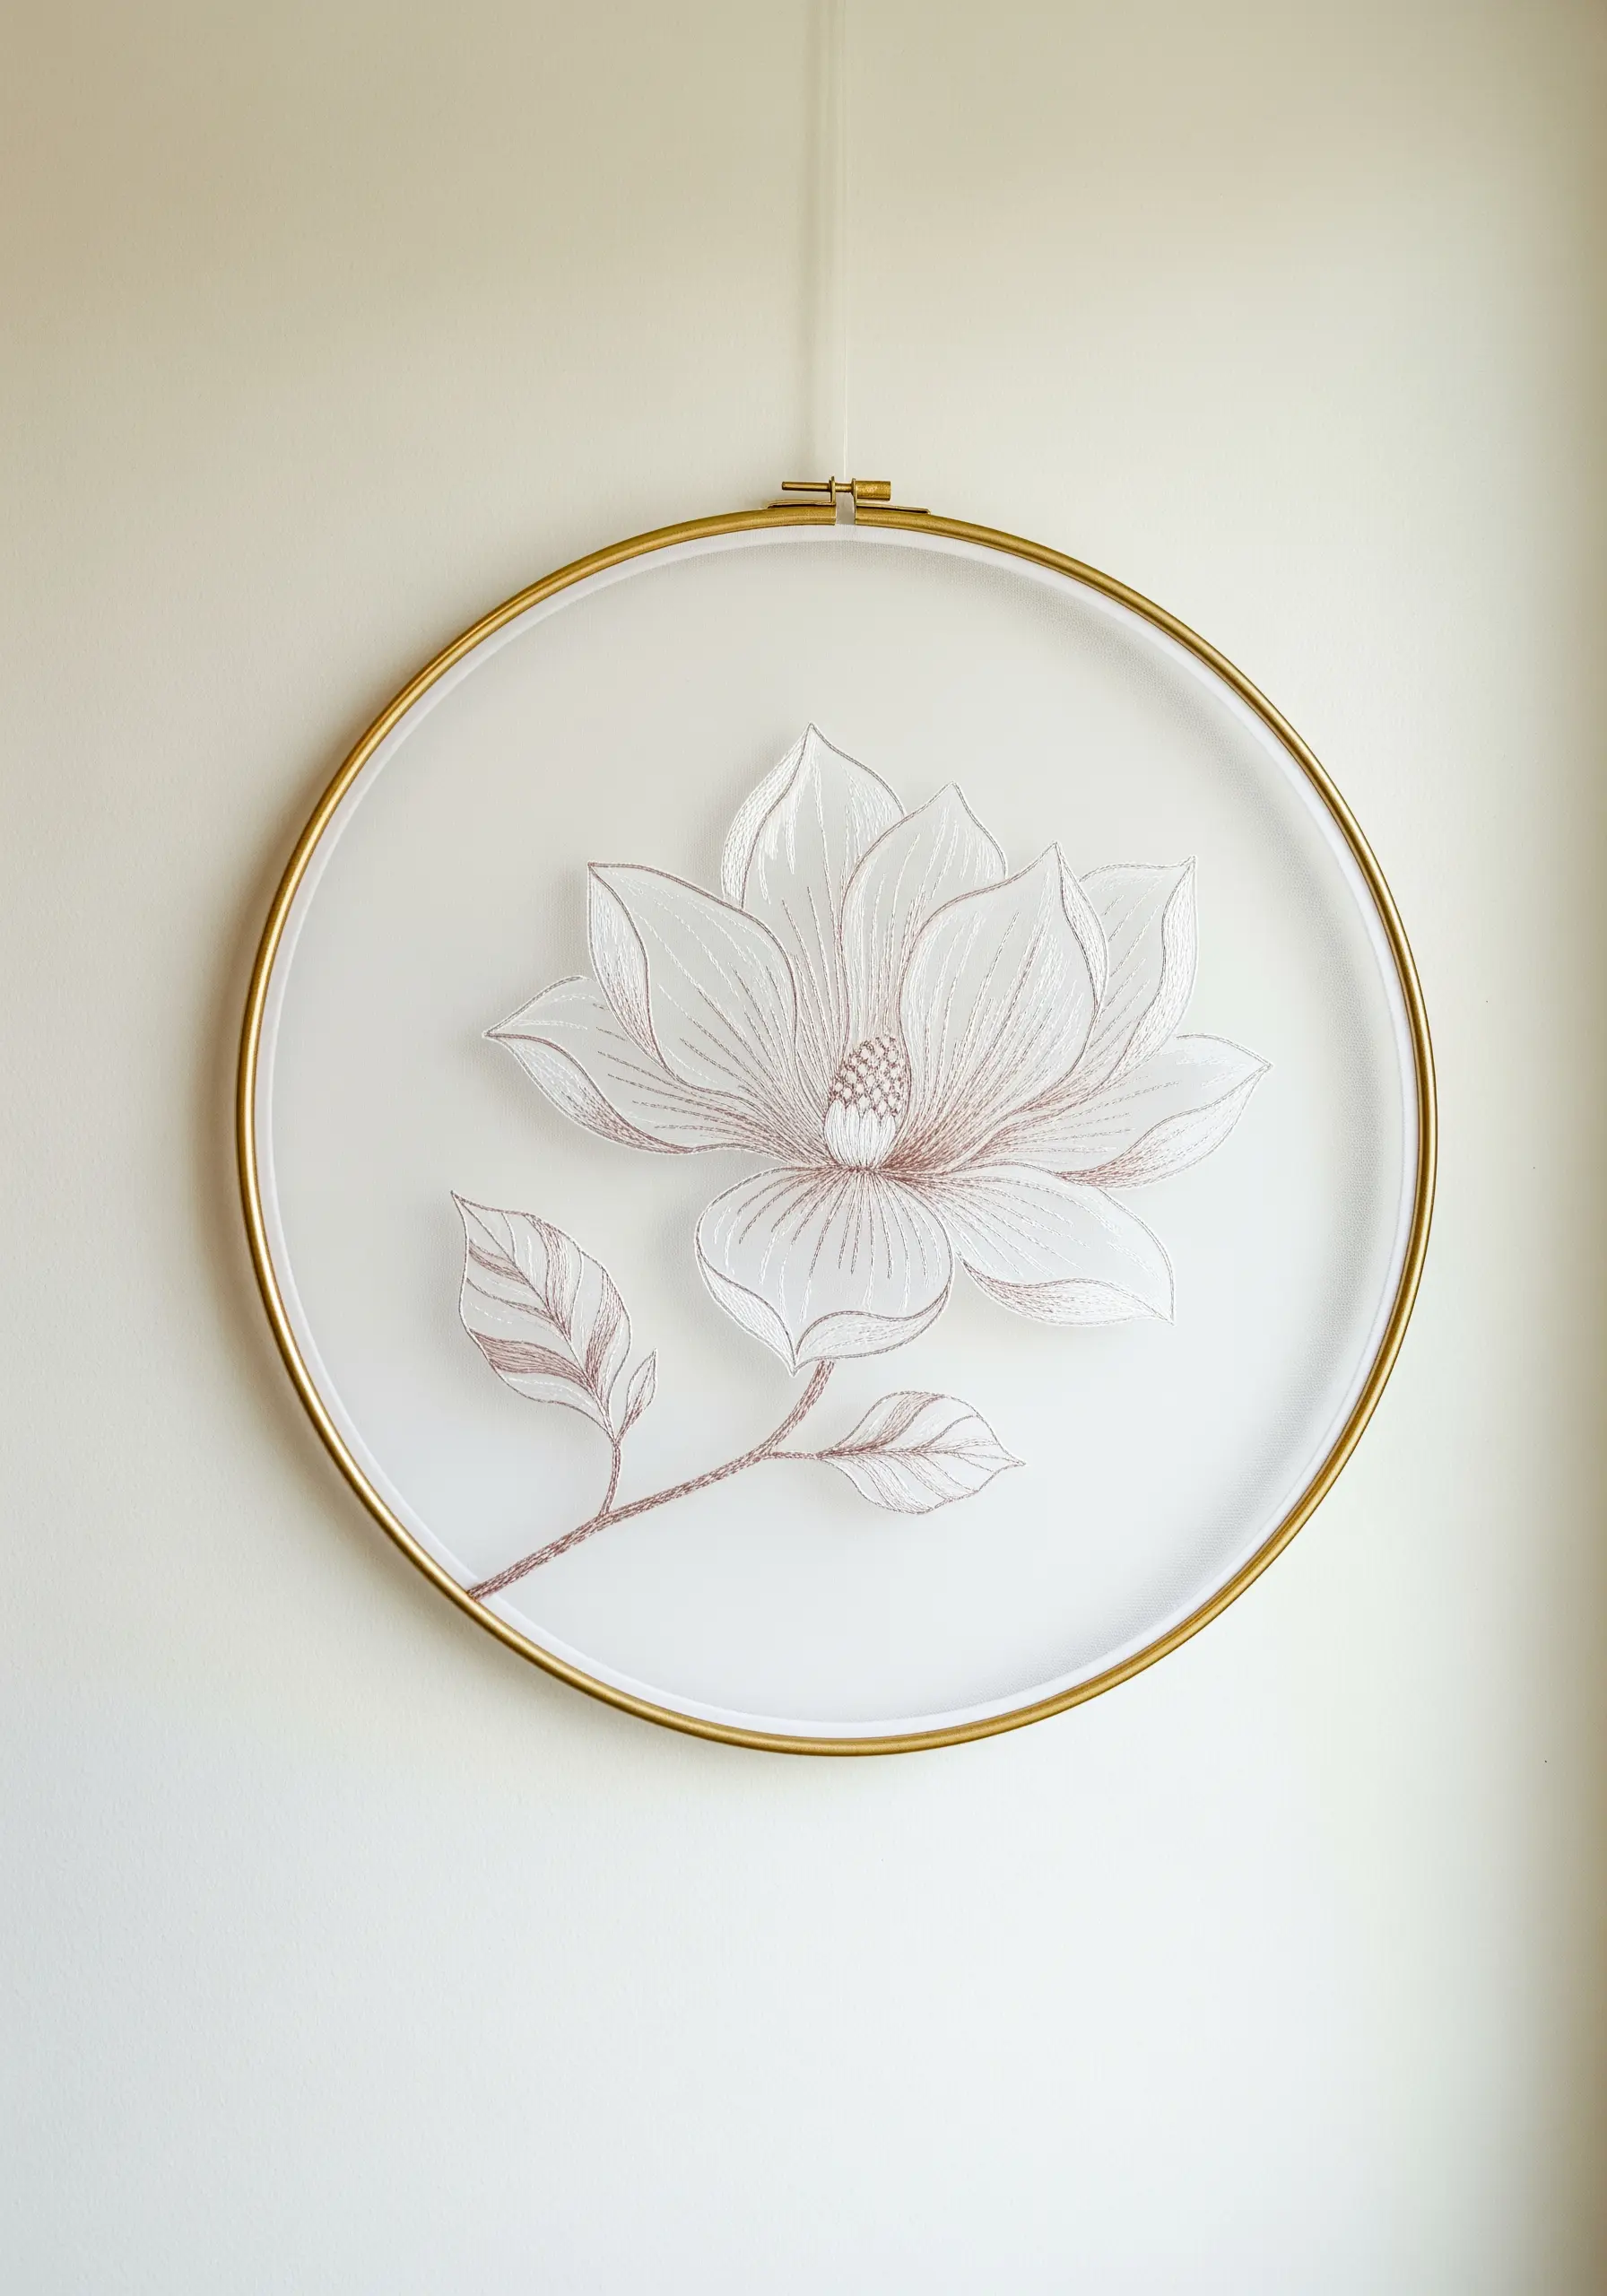
Create a floating, dreamlike effect by stitching on sheer organza or tulle.
To prevent puckering, use a lightweight, wash-away stabilizer on the back of your fabric while you stitch, then dissolve it gently in water once you’re finished.
Use only one or two strands of floss to keep the lines light and delicate, preserving the transparency of the fabric.
The result is a design that seems suspended in air, turning the negative space into a glassy, ethereal window.
9. The Herbarium Series: Illustrative Botanical Banners
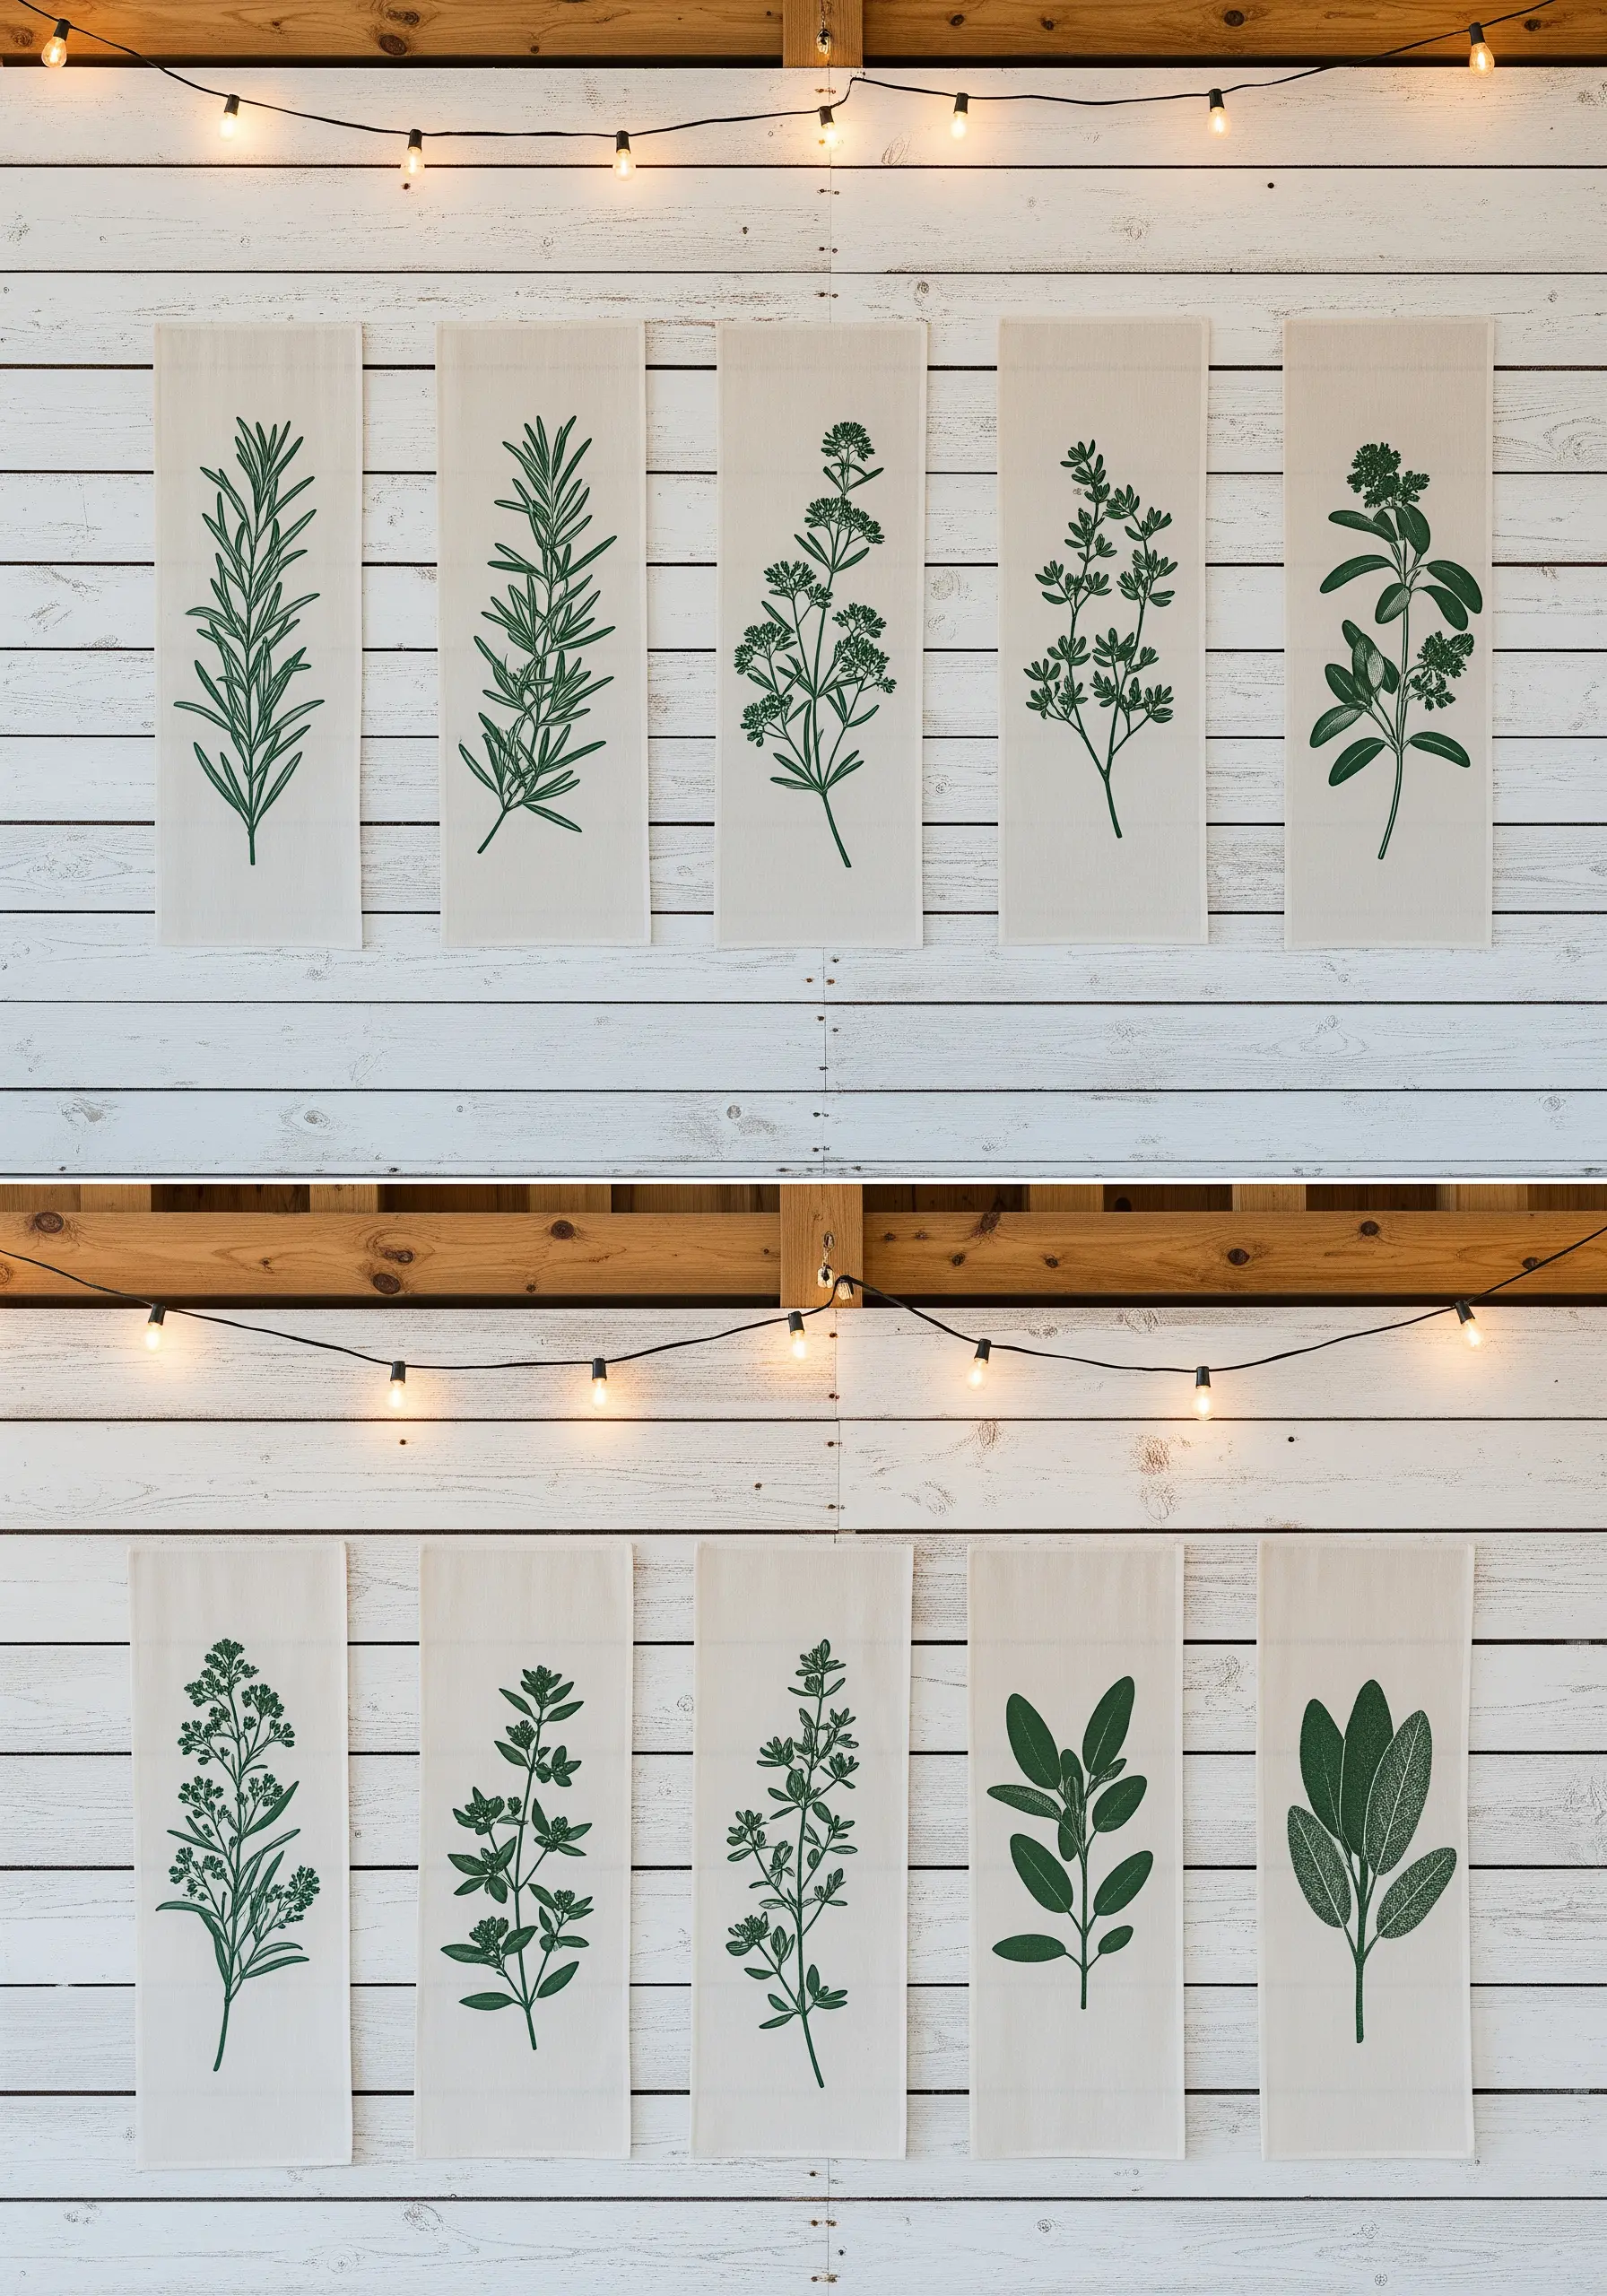
Create a series of botanical banners for a rustic, charming display.
To give your herbs a clean, illustrative quality, use a split stitch for the outlines. This stitch creates a solid, sharp line that resembles ink drawing.
For fuller leaves, like sage, fill them with long and short stitch in a slightly lighter shade of green to create subtle dimension.
Displaying them as a series of narrow banners adds a touch of farmhouse elegance, perfect for a kitchen-themed bridal shower or rustic wedding, just like minimal fruit botanical embroidery patterns.
10. Cosmic Bloom: Mixed-Media Constellations

Combine painting and embroidery for a celestial backdrop that’s out of this world.
First, create a textured moon-like surface on a large canvas by dabbing on fabric paint in shades of black, gray, and white with a sea sponge.
Once it’s dry, use a bright white or silver metallic thread to stitch constellation patterns directly onto the painted surface.
Use small French knots for stars and backstitch for the connecting lines to create a design that has both painted depth and stitched texture.
11. The Photographic Statement Rose: Large-Scale Line Art

Use embroidery as the star of a photo shoot or a minimalist ceremony backdrop.
To transfer such a large design onto fabric, use a digital projector to trace the lines directly onto your tightly stretched material with a water-soluble marker.
Use a heavier thread, like a full six strands of floss or even a fine yarn, to ensure the lines are visible and impactful from a distance.
The simplicity of a single motif on a vast expanse of fabric is a powerful statement in minimalism.
12. The Asymmetrical Cluster: Curating a Hoop Wall

Arrange hoops of varying shapes and sizes into a dynamic, asymmetrical cluster.
To create harmony in a mixed-format display, choose a single, unifying color palette. Here, shades of deep magenta and dusty rose tie the fern, poppy, and tulip together.
Introduce a different shape, like a square frame, to break up the rhythm of the round hoops and add a point of visual interest.
This approach allows you to combine different botanical subjects into a single, cohesive art piece.
13. High-Contrast Orchids: The Power of Black and White
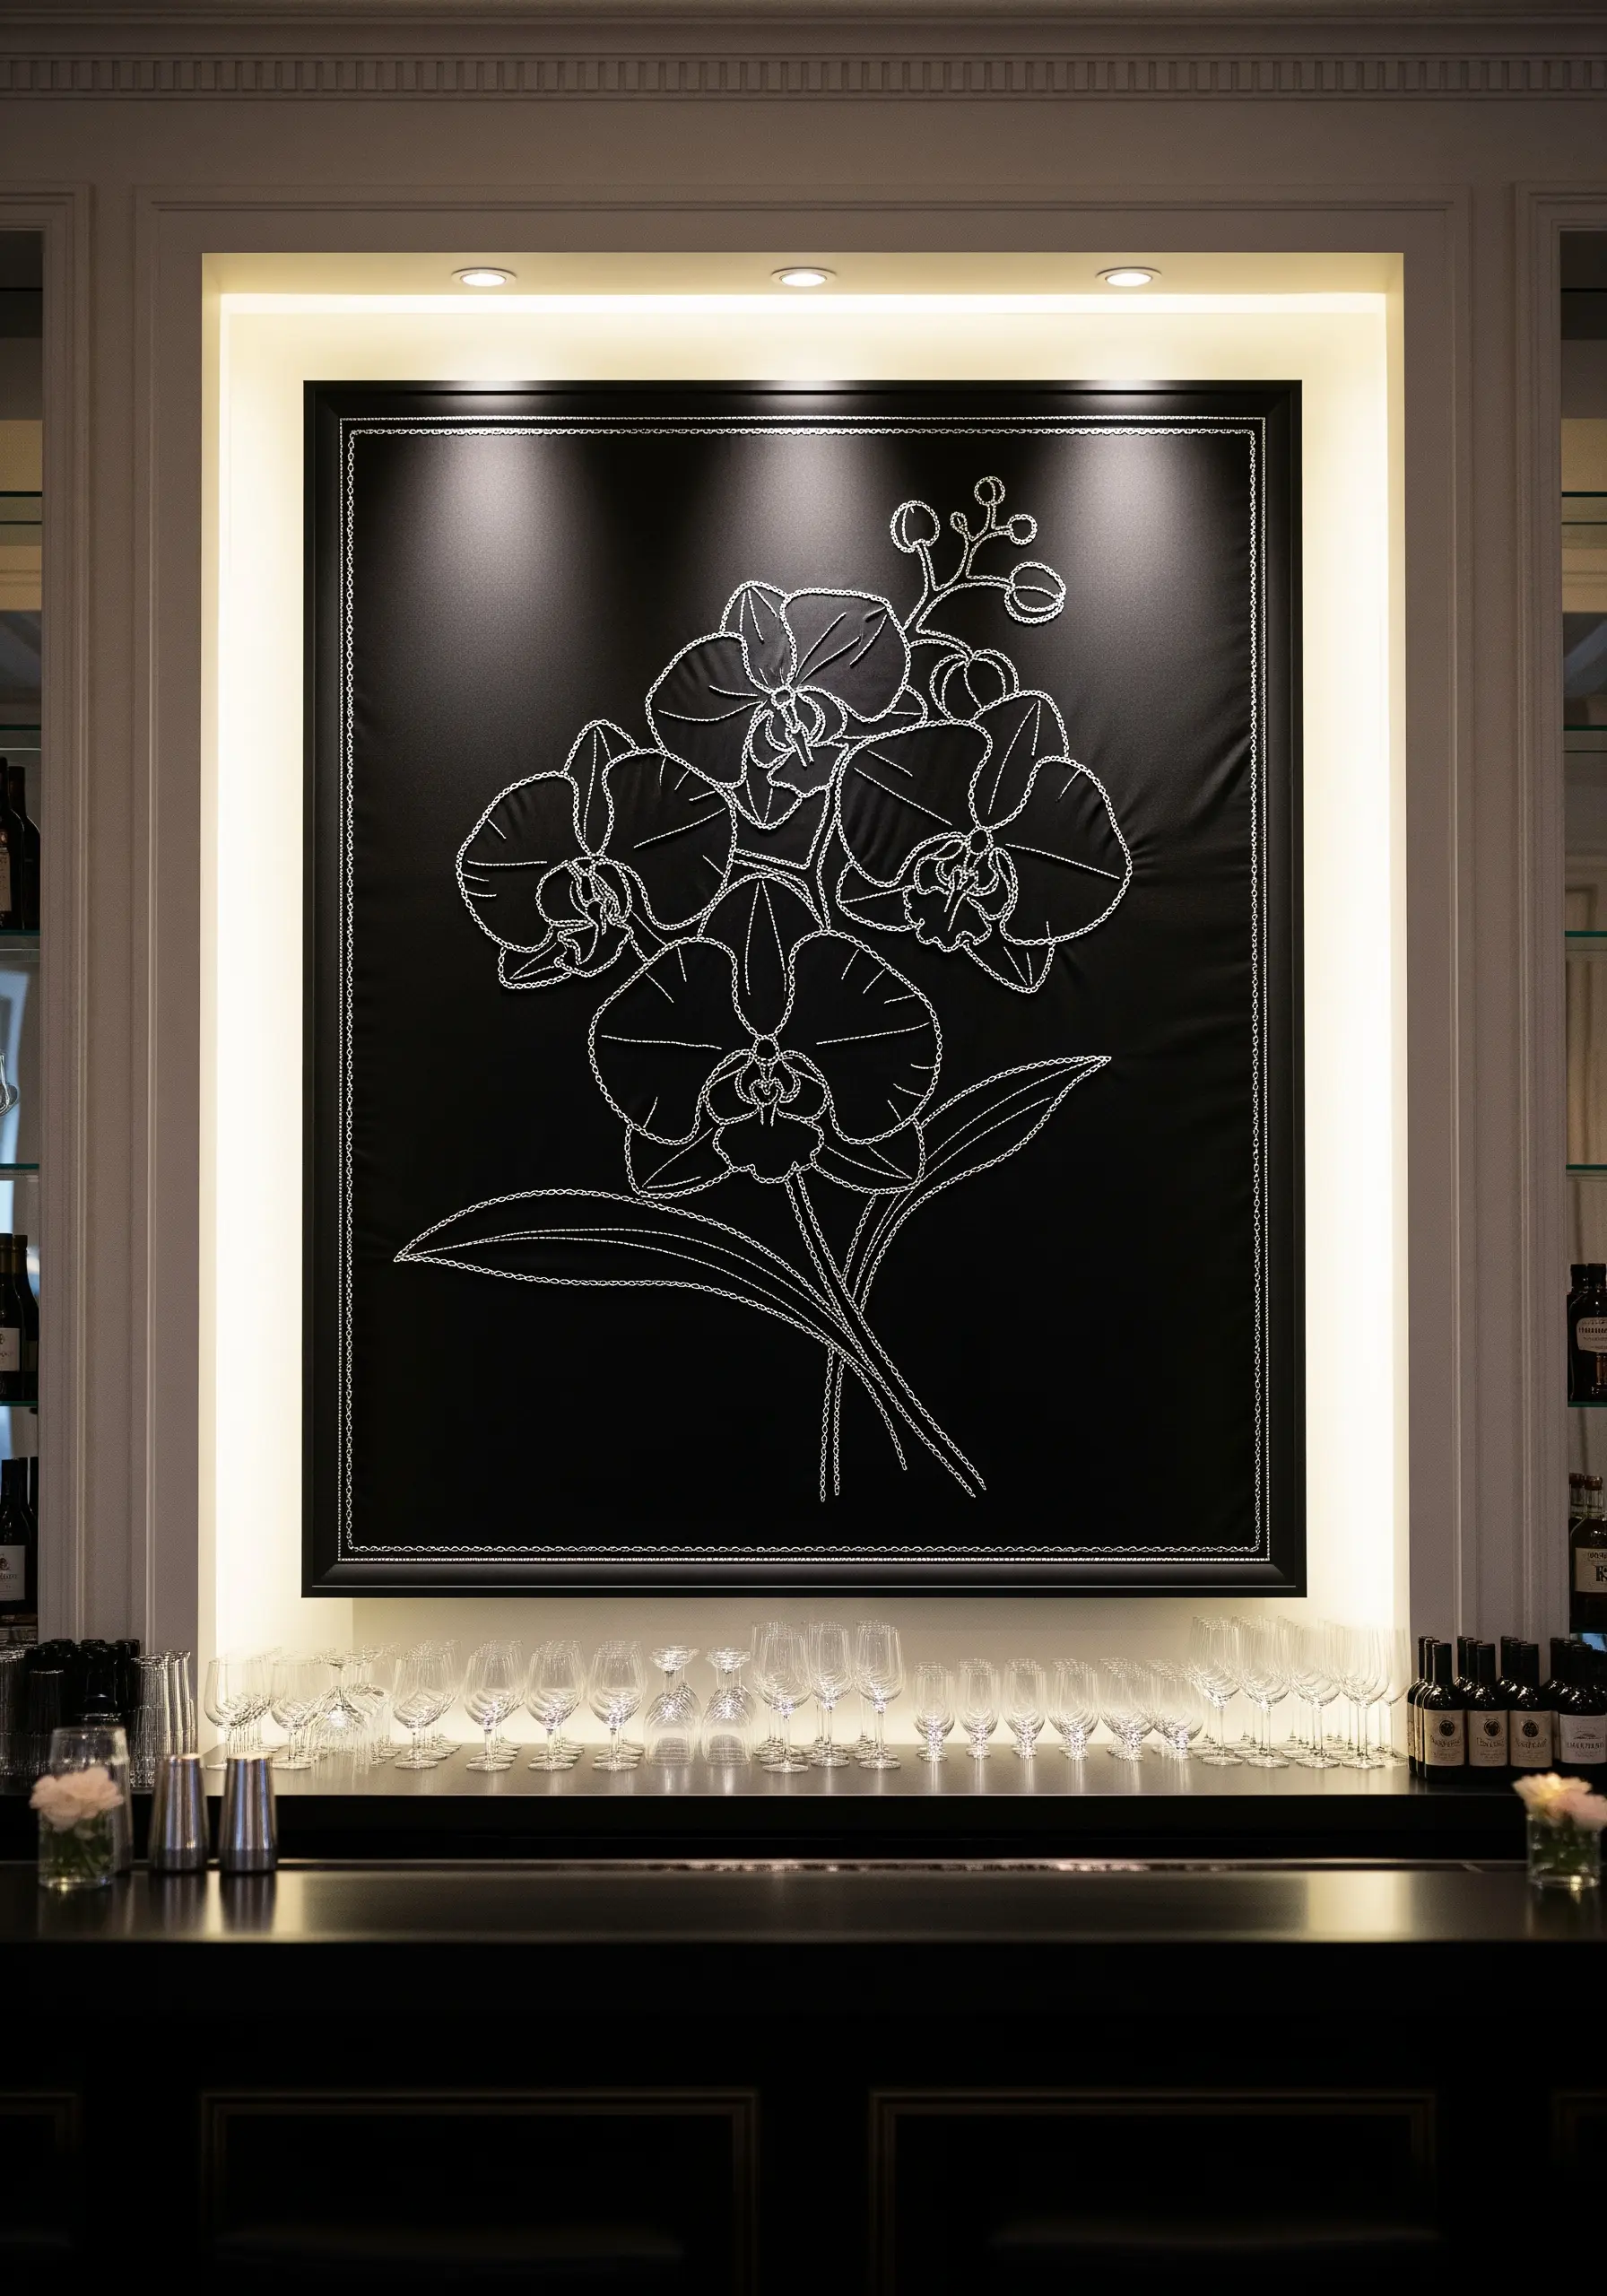
Make your stitches pop with the timeless drama of high-contrast design.
Stitch with a bright white, high-sheen thread, like rayon or silk floss, on a deep black, matte fabric such as cotton twill or linen.
The contrast between the lustrous thread and the light-absorbing fabric creates an incredible visual vibration, making the lines appear almost electric.
Use a whipped backstitch for the outlines to create a perfectly smooth, uninterrupted line that enhances the graphic quality of the design.
14. Integrating Memories: Embroidery in a Photo Wall

Weave your handmade art directly into your family’s story by integrating embroidery hoops into a photo gallery wall.
Choose a simple, repeatable motif and stitch it in a color that complements the tones in your photographs.
By using the same fabric and thread color for each hoop, you create a visual anchor that ties the textile art to the surrounding frames.
This thoughtful integration makes your wall feel more personal, textured, and curated.
15. The Morning Glory Stair Runner: Elegant Repetition
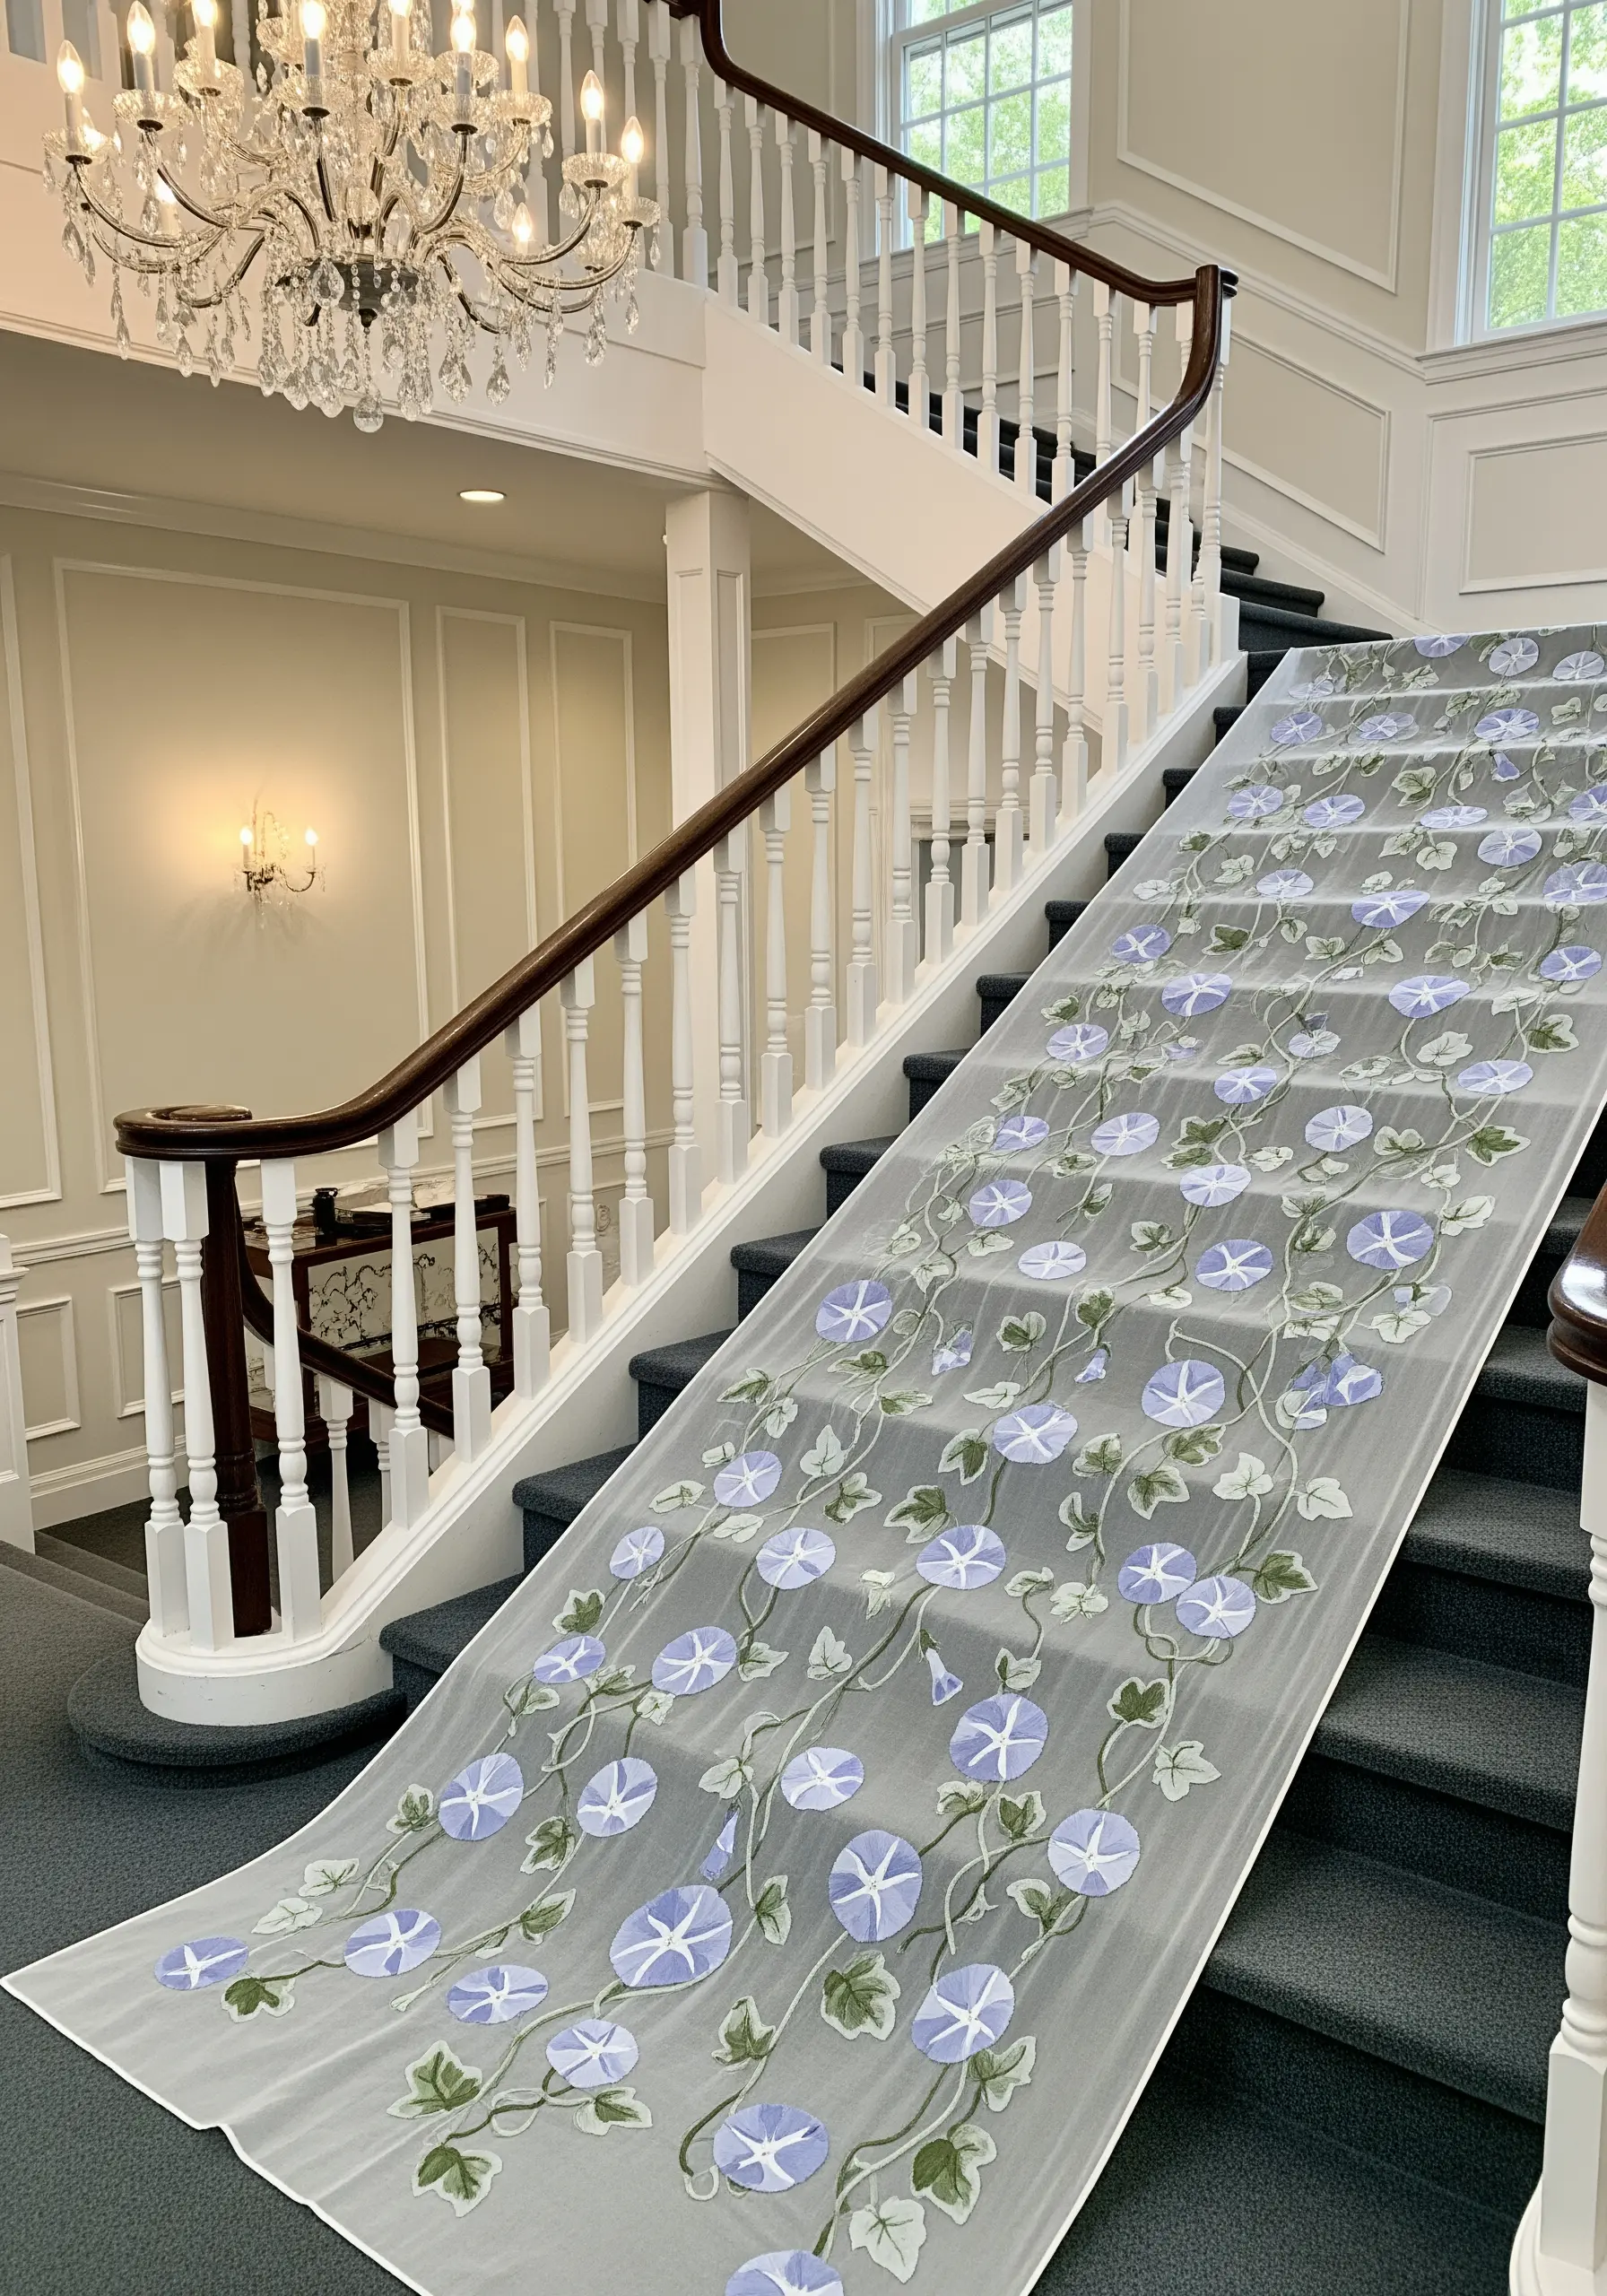
Create a breathtaking installation with a single, repeating botanical motif.
For a project of this scale, create a reusable stencil or pattern template to ensure each morning glory vine is consistent in size and shape.
Use a simple satin stitch for the flower petals to create a solid block of color that stands out against the sheer fabric.
The final piece becomes an architectural element, guiding guests with a trail of handmade beauty.
16. Bold Sunflower: Embracing Heavy Texture
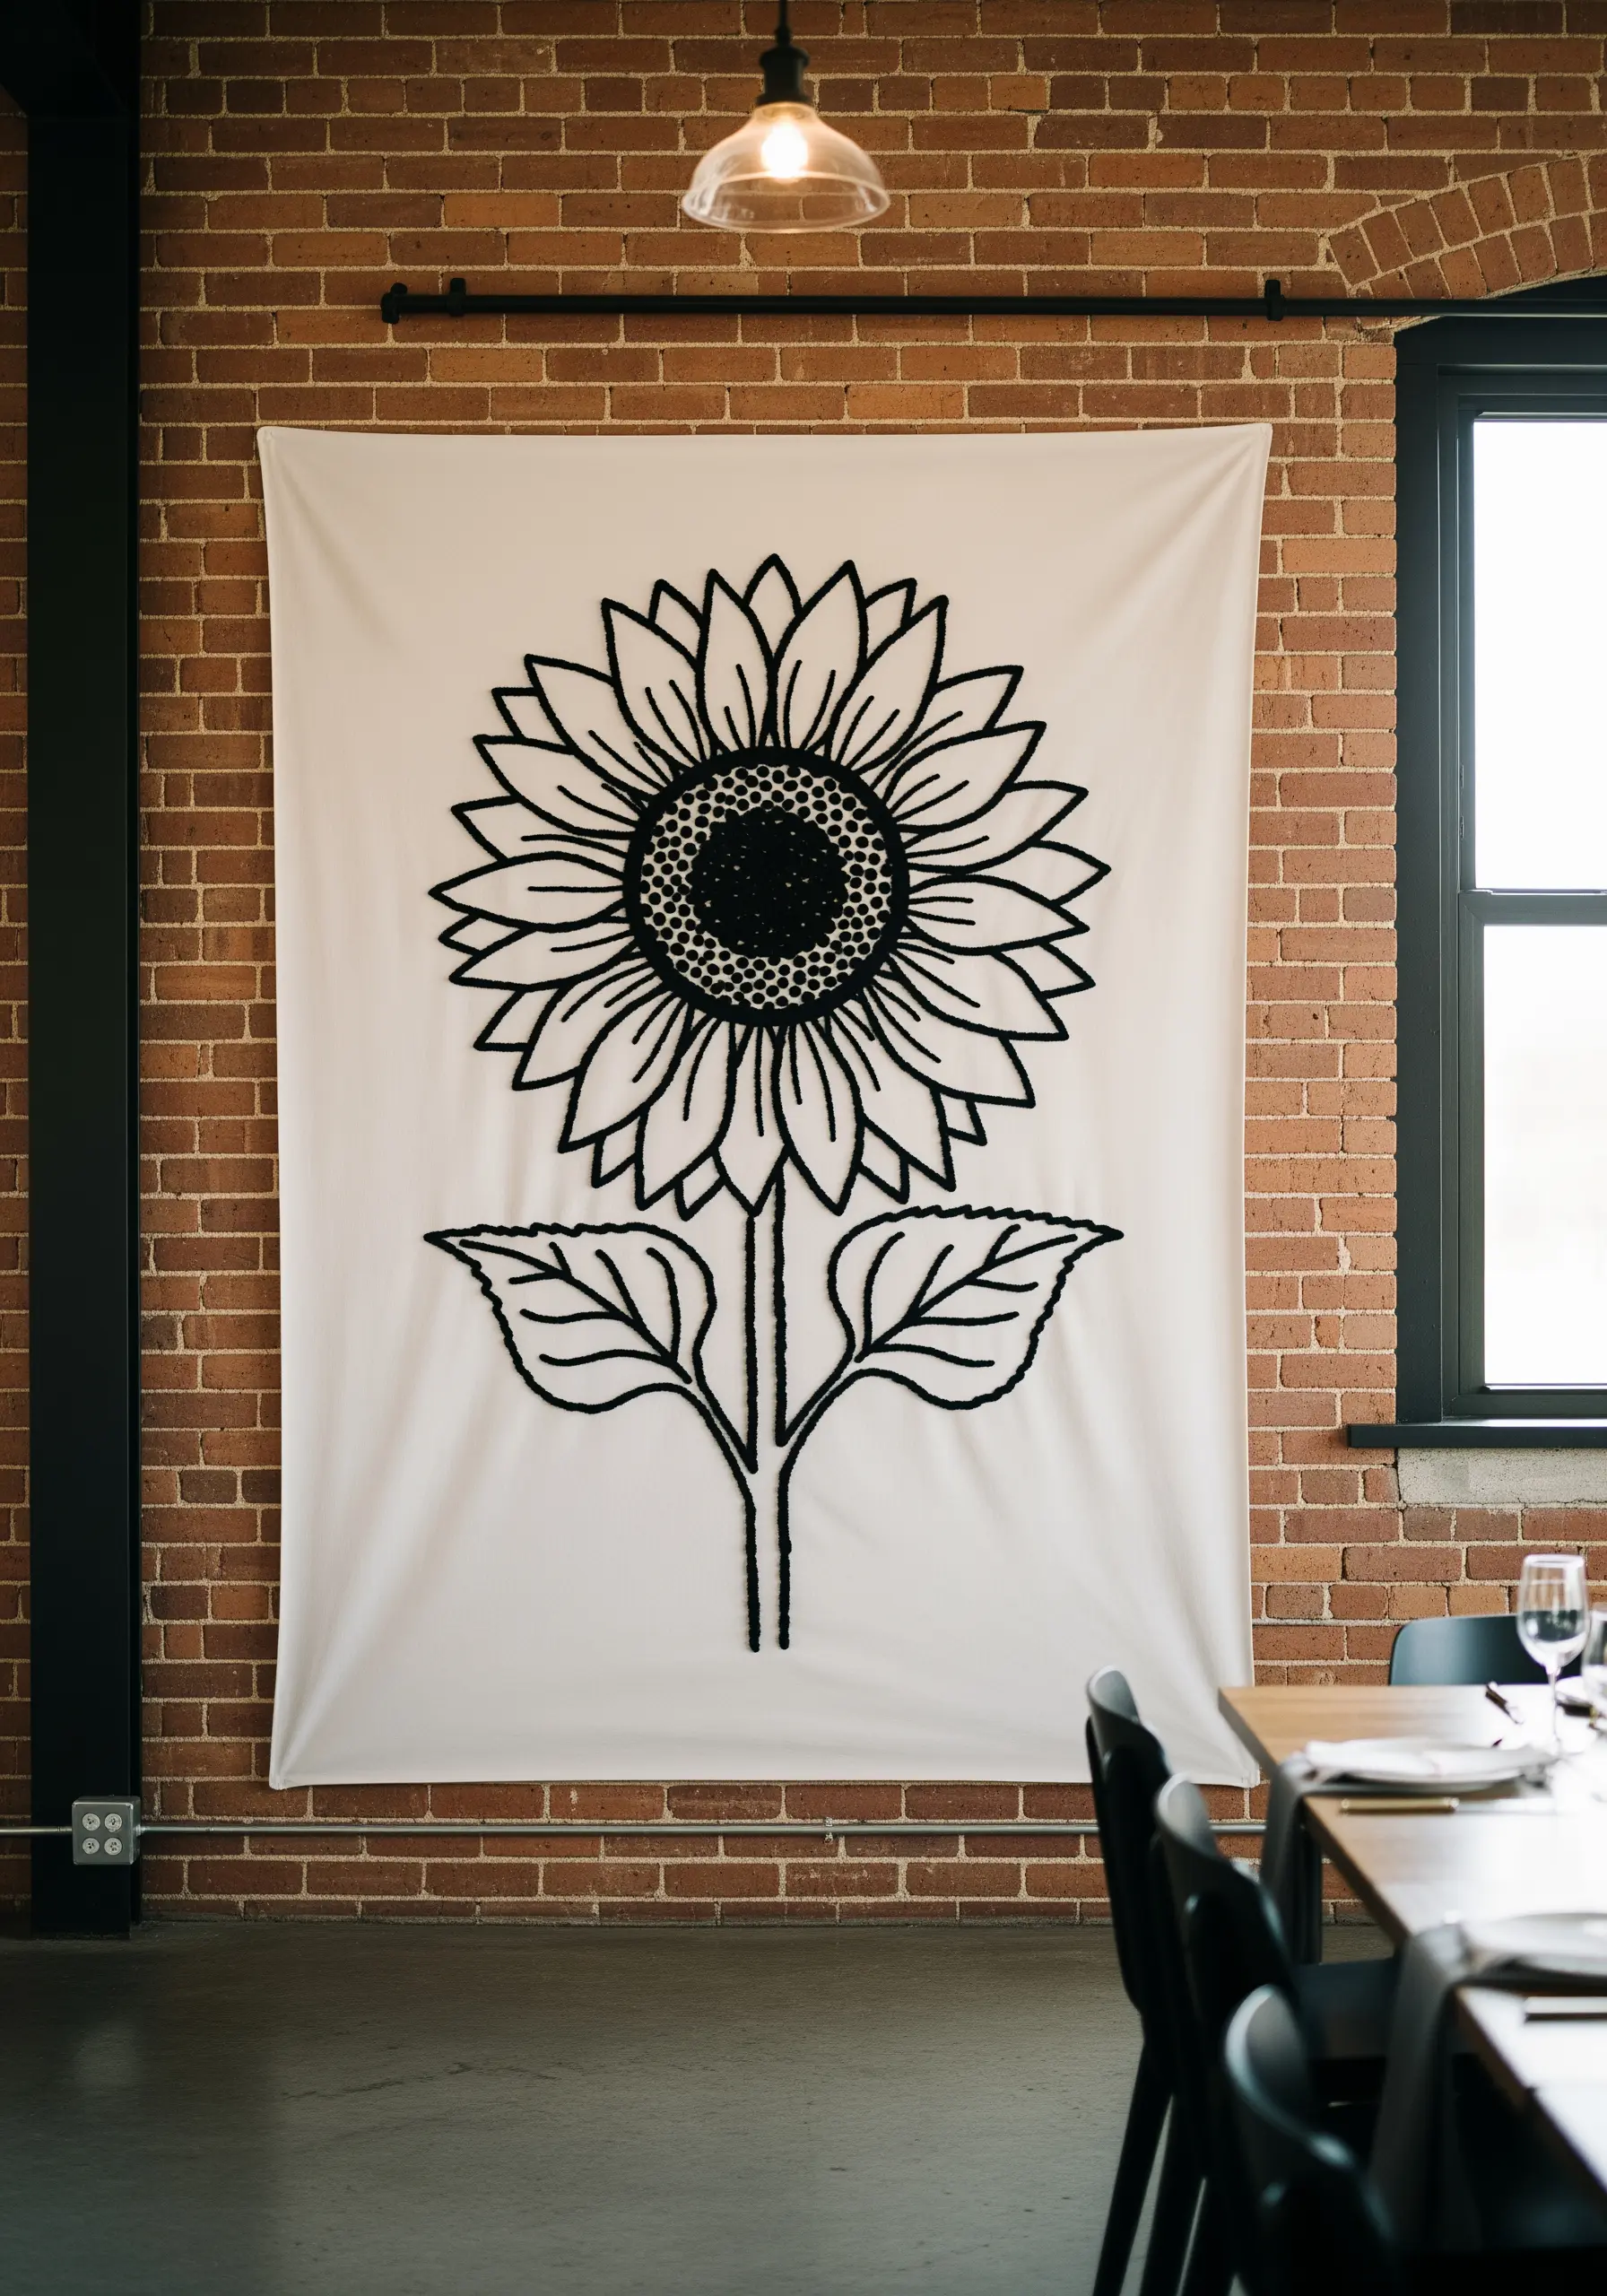
Go bold by using thick yarns and textured stitches to create a design that demands attention.
For the sunflower’s center, use a punch needle with chunky black yarn to create a dense, looped texture that mimics a seed head.
Outline the petals and leaves with a heavy chain stitch using the same chunky yarn. This creates a bold, graphic line that has a satisfying three-dimensional quality.
These dramatic yarn wall art ideas work best on a durable fabric like cotton duck canvas.
17. Painterly Cherry Blossoms: Scattered Stitches

Capture the delicate, fleeting beauty of cherry blossoms with a light, scattered stitch technique.
Use a simple backstitch for the branches, varying your stitch length to create a gnarled, natural look.
For the blossoms, scatter hundreds of tiny French knots and single detached chain stitches across the branches and the surrounding space.
Work with three to four shades of white, cream, and pale pink to give the blossoms a realistic, painterly depth, as if petals are gently falling.
18. Tropical Leaf Panels: Bold Botanical Graphics

Create a lush, modern backdrop with a series of bold, graphic tropical leaves.
Fill in each leaf using long and short stitch. This technique allows you to blend shades of green seamlessly, creating highlights and shadows that give the flat shapes a sense of form and life.
To ensure crisp edges, outline each leaf with a single line of split stitch before you begin filling it in.
Hanging them as separate panels adds a contemporary, modular feel to the display.
19. Gilded Lotus on Velvet: A Touch of Luxury
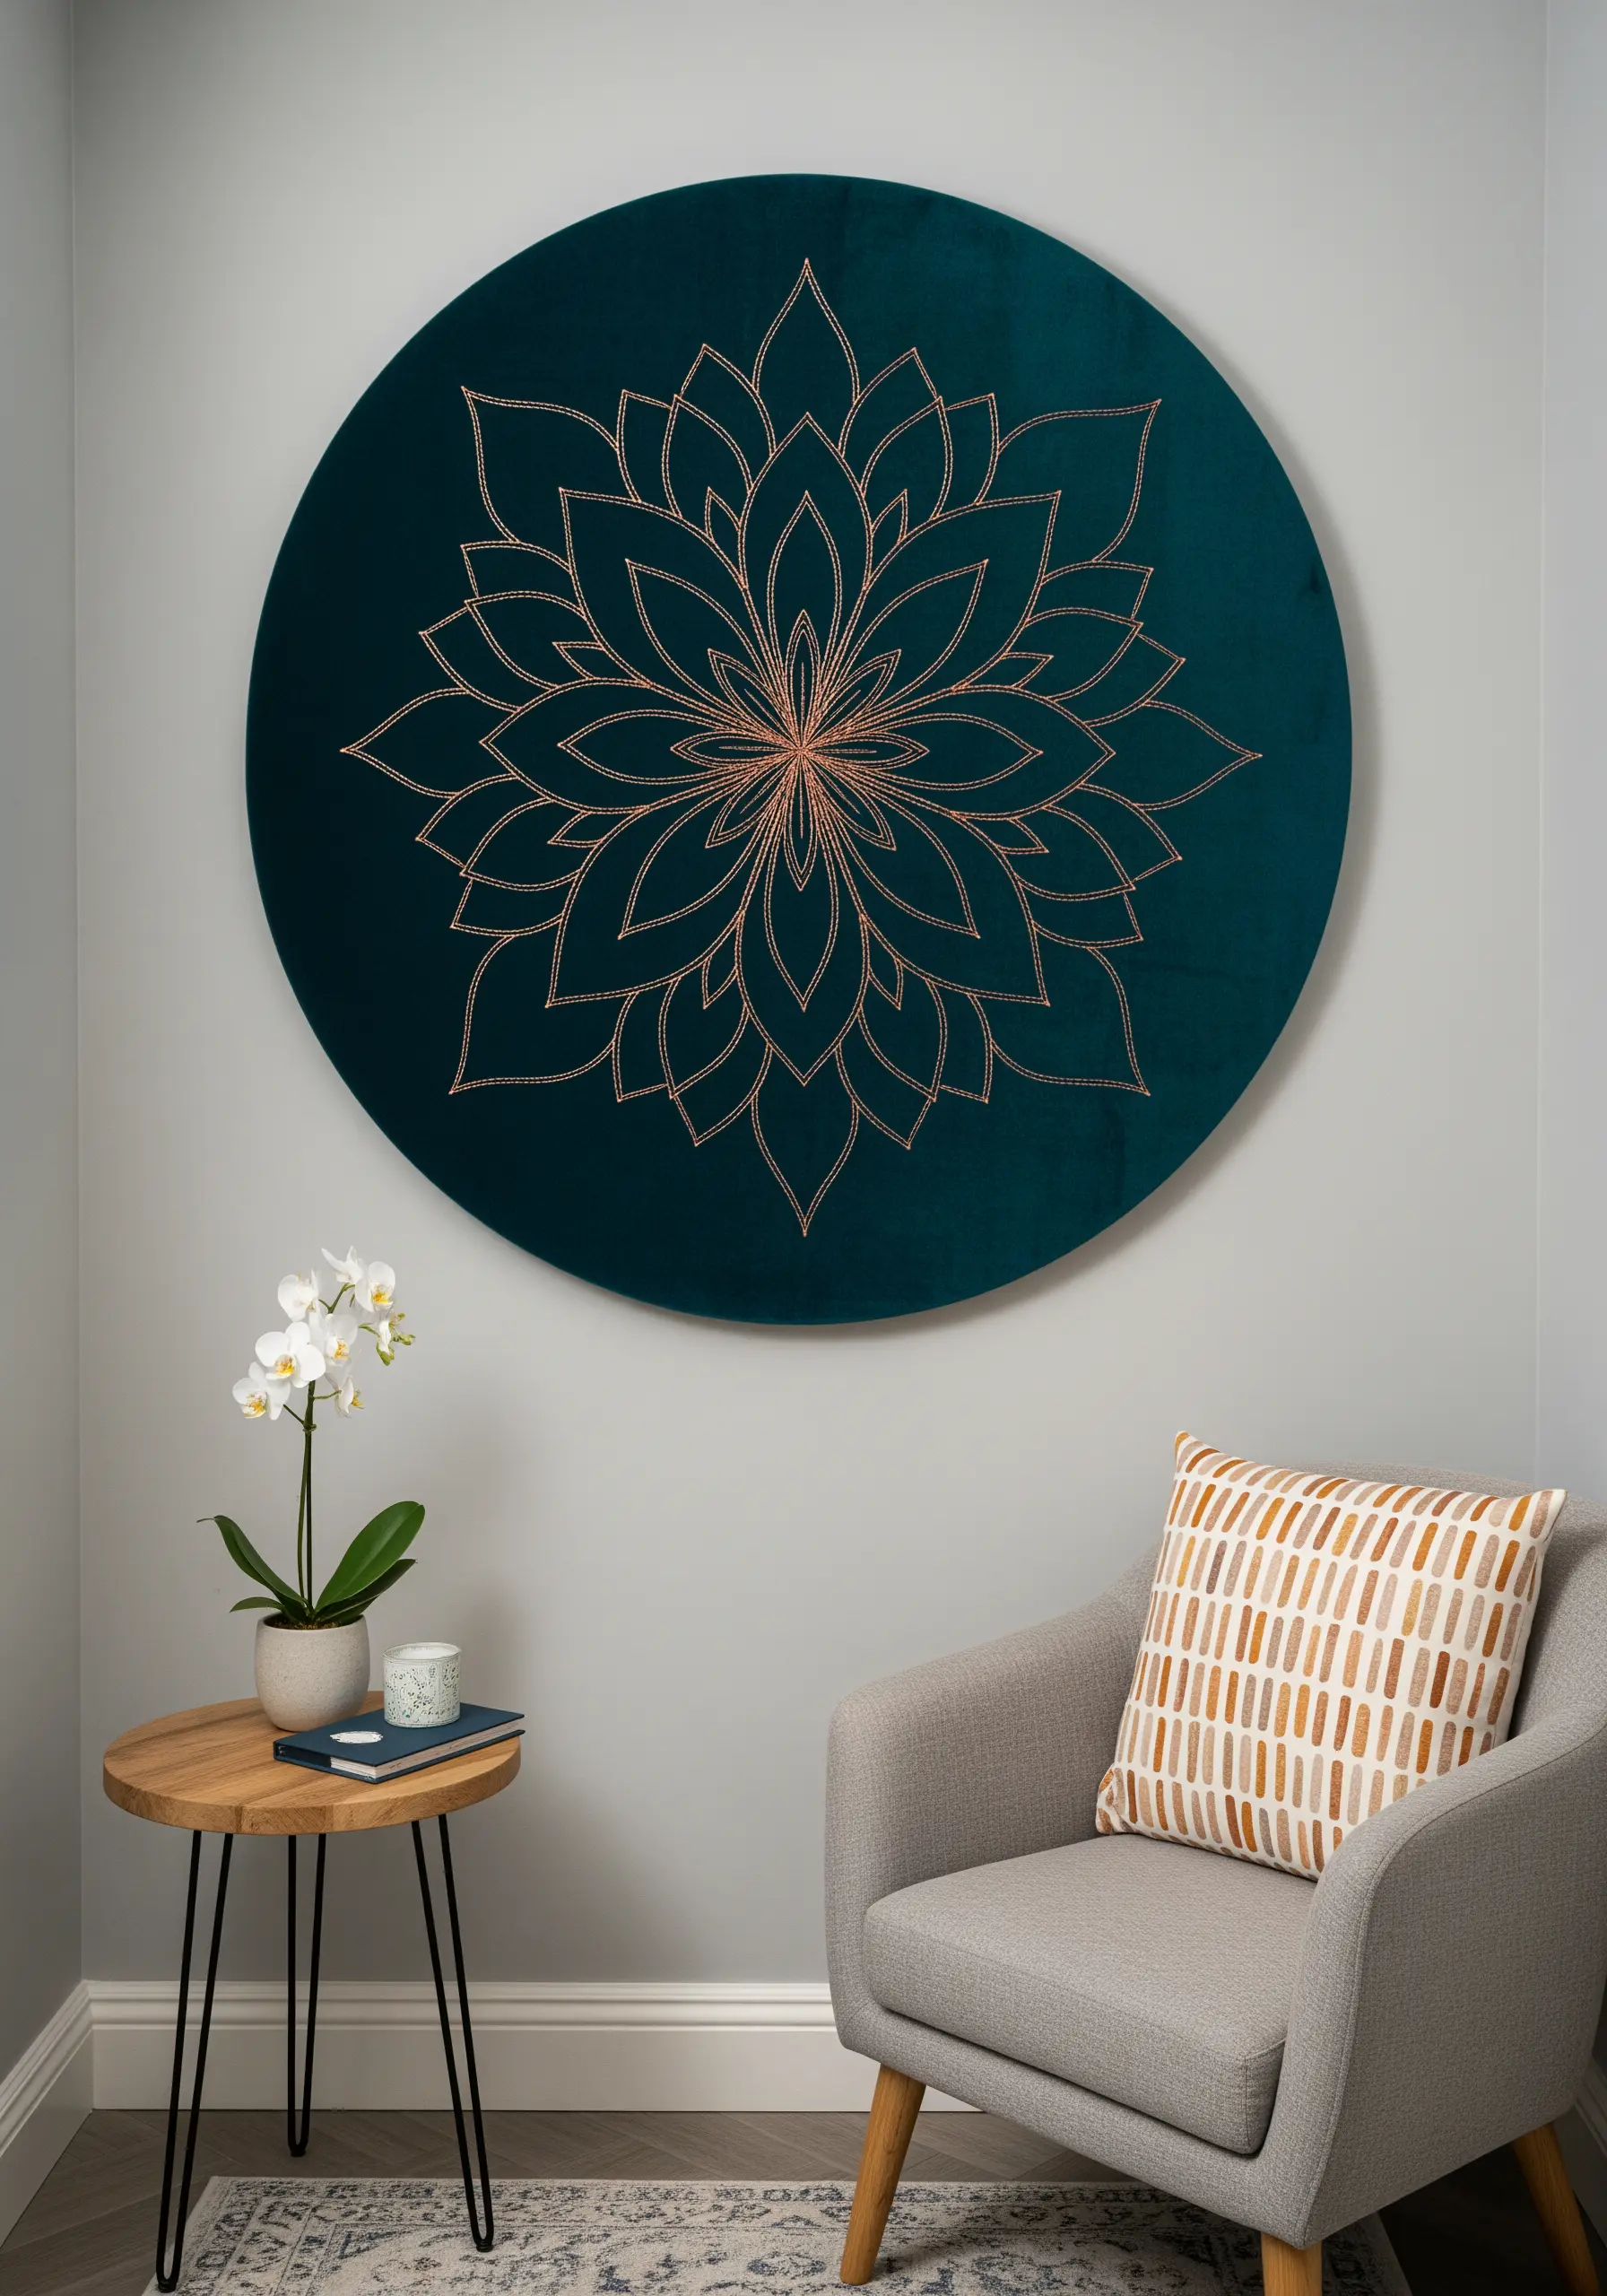
Combine reflective metallic thread with plush velvet for an unbelievably luxurious finish.
When stitching on velvet, always work in the direction of the pile to keep your stitches smooth.
Use a fine, sharp needle (like a size 10) to part the fibers rather than breaking them. This prevents snagging and ensures clean stitch holes.
The deep, light-absorbing pile of the velvet makes the metallic thread shine even more brilliantly, creating a piece that feels both opulent and serene.
20. Harvest Wheat Menu: Rustic and Refined Details
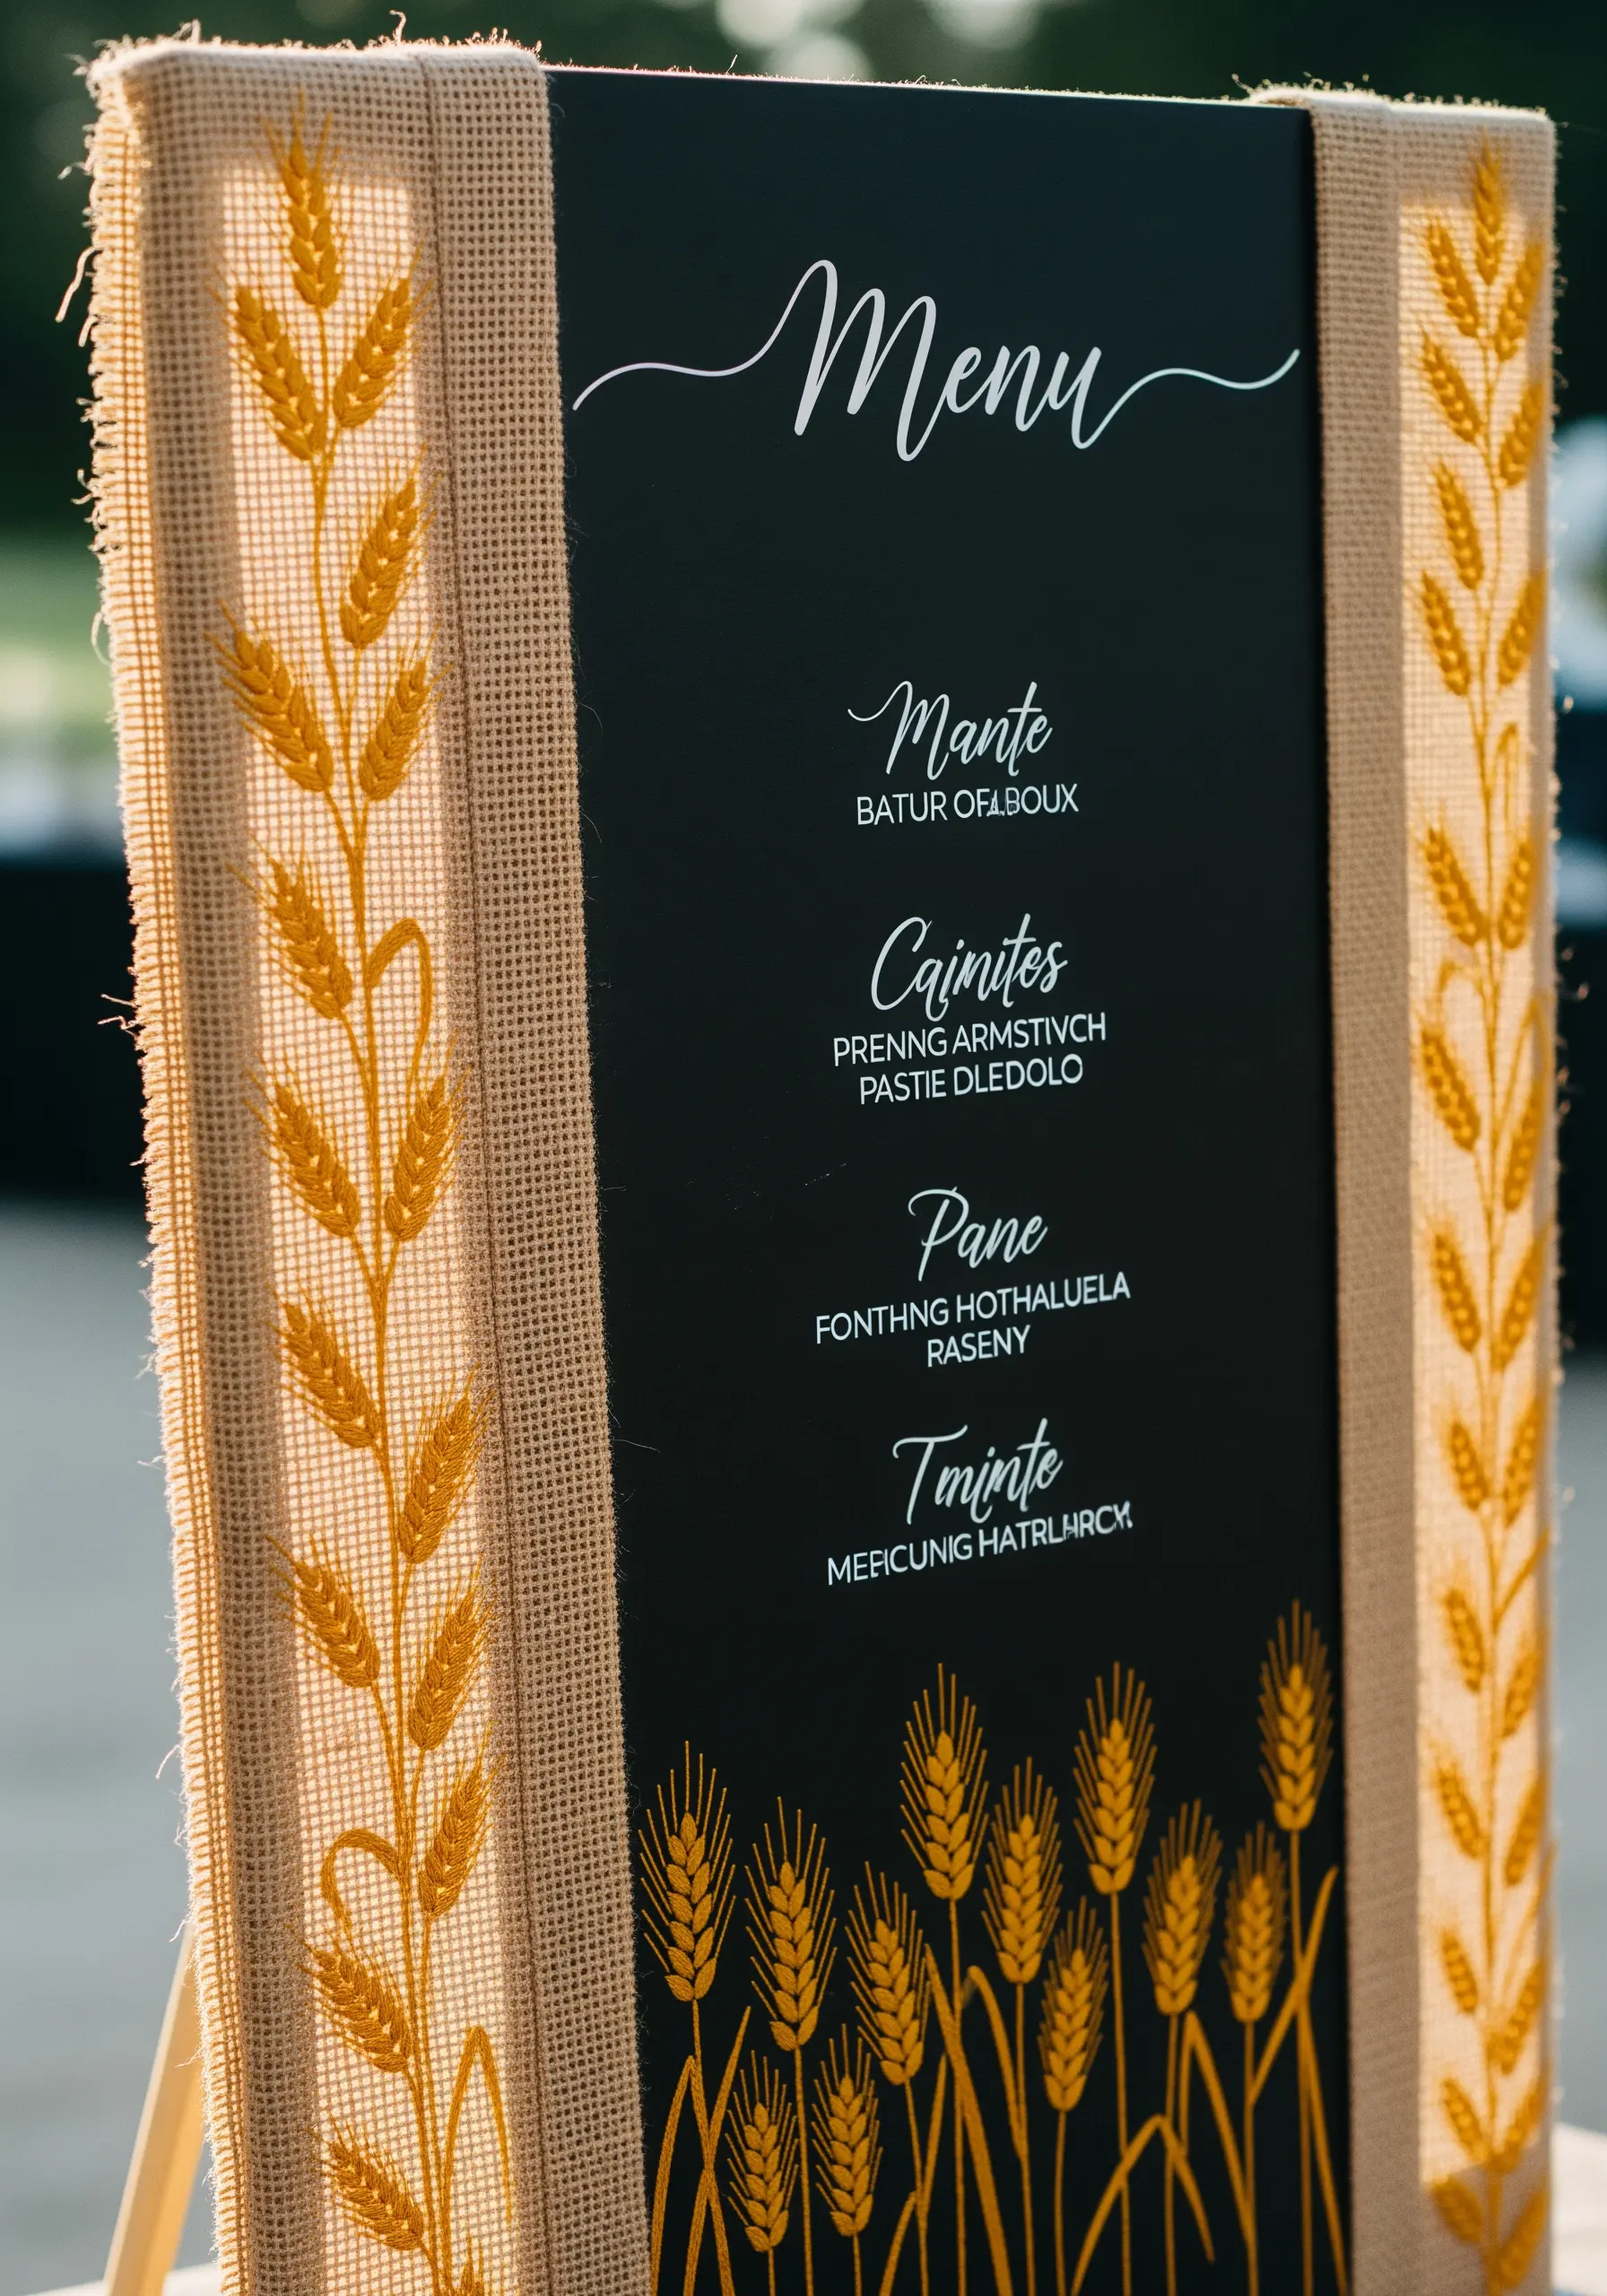
Add a touch of rustic elegance to your event stationery with natural fabrics and simple stitches.
Embroidering on an open-weave fabric like burlap or hessian adds instant texture.
Use a simple satin stitch for the wheat kernels and a straight stitch for the stems, using a full six strands of golden-yellow floss to make the design stand out against the neutral fabric.
This tactile detail transforms a simple menu board into a memorable piece of decor.
21. Clematis on Sheer Curtains: Functional Floral Art
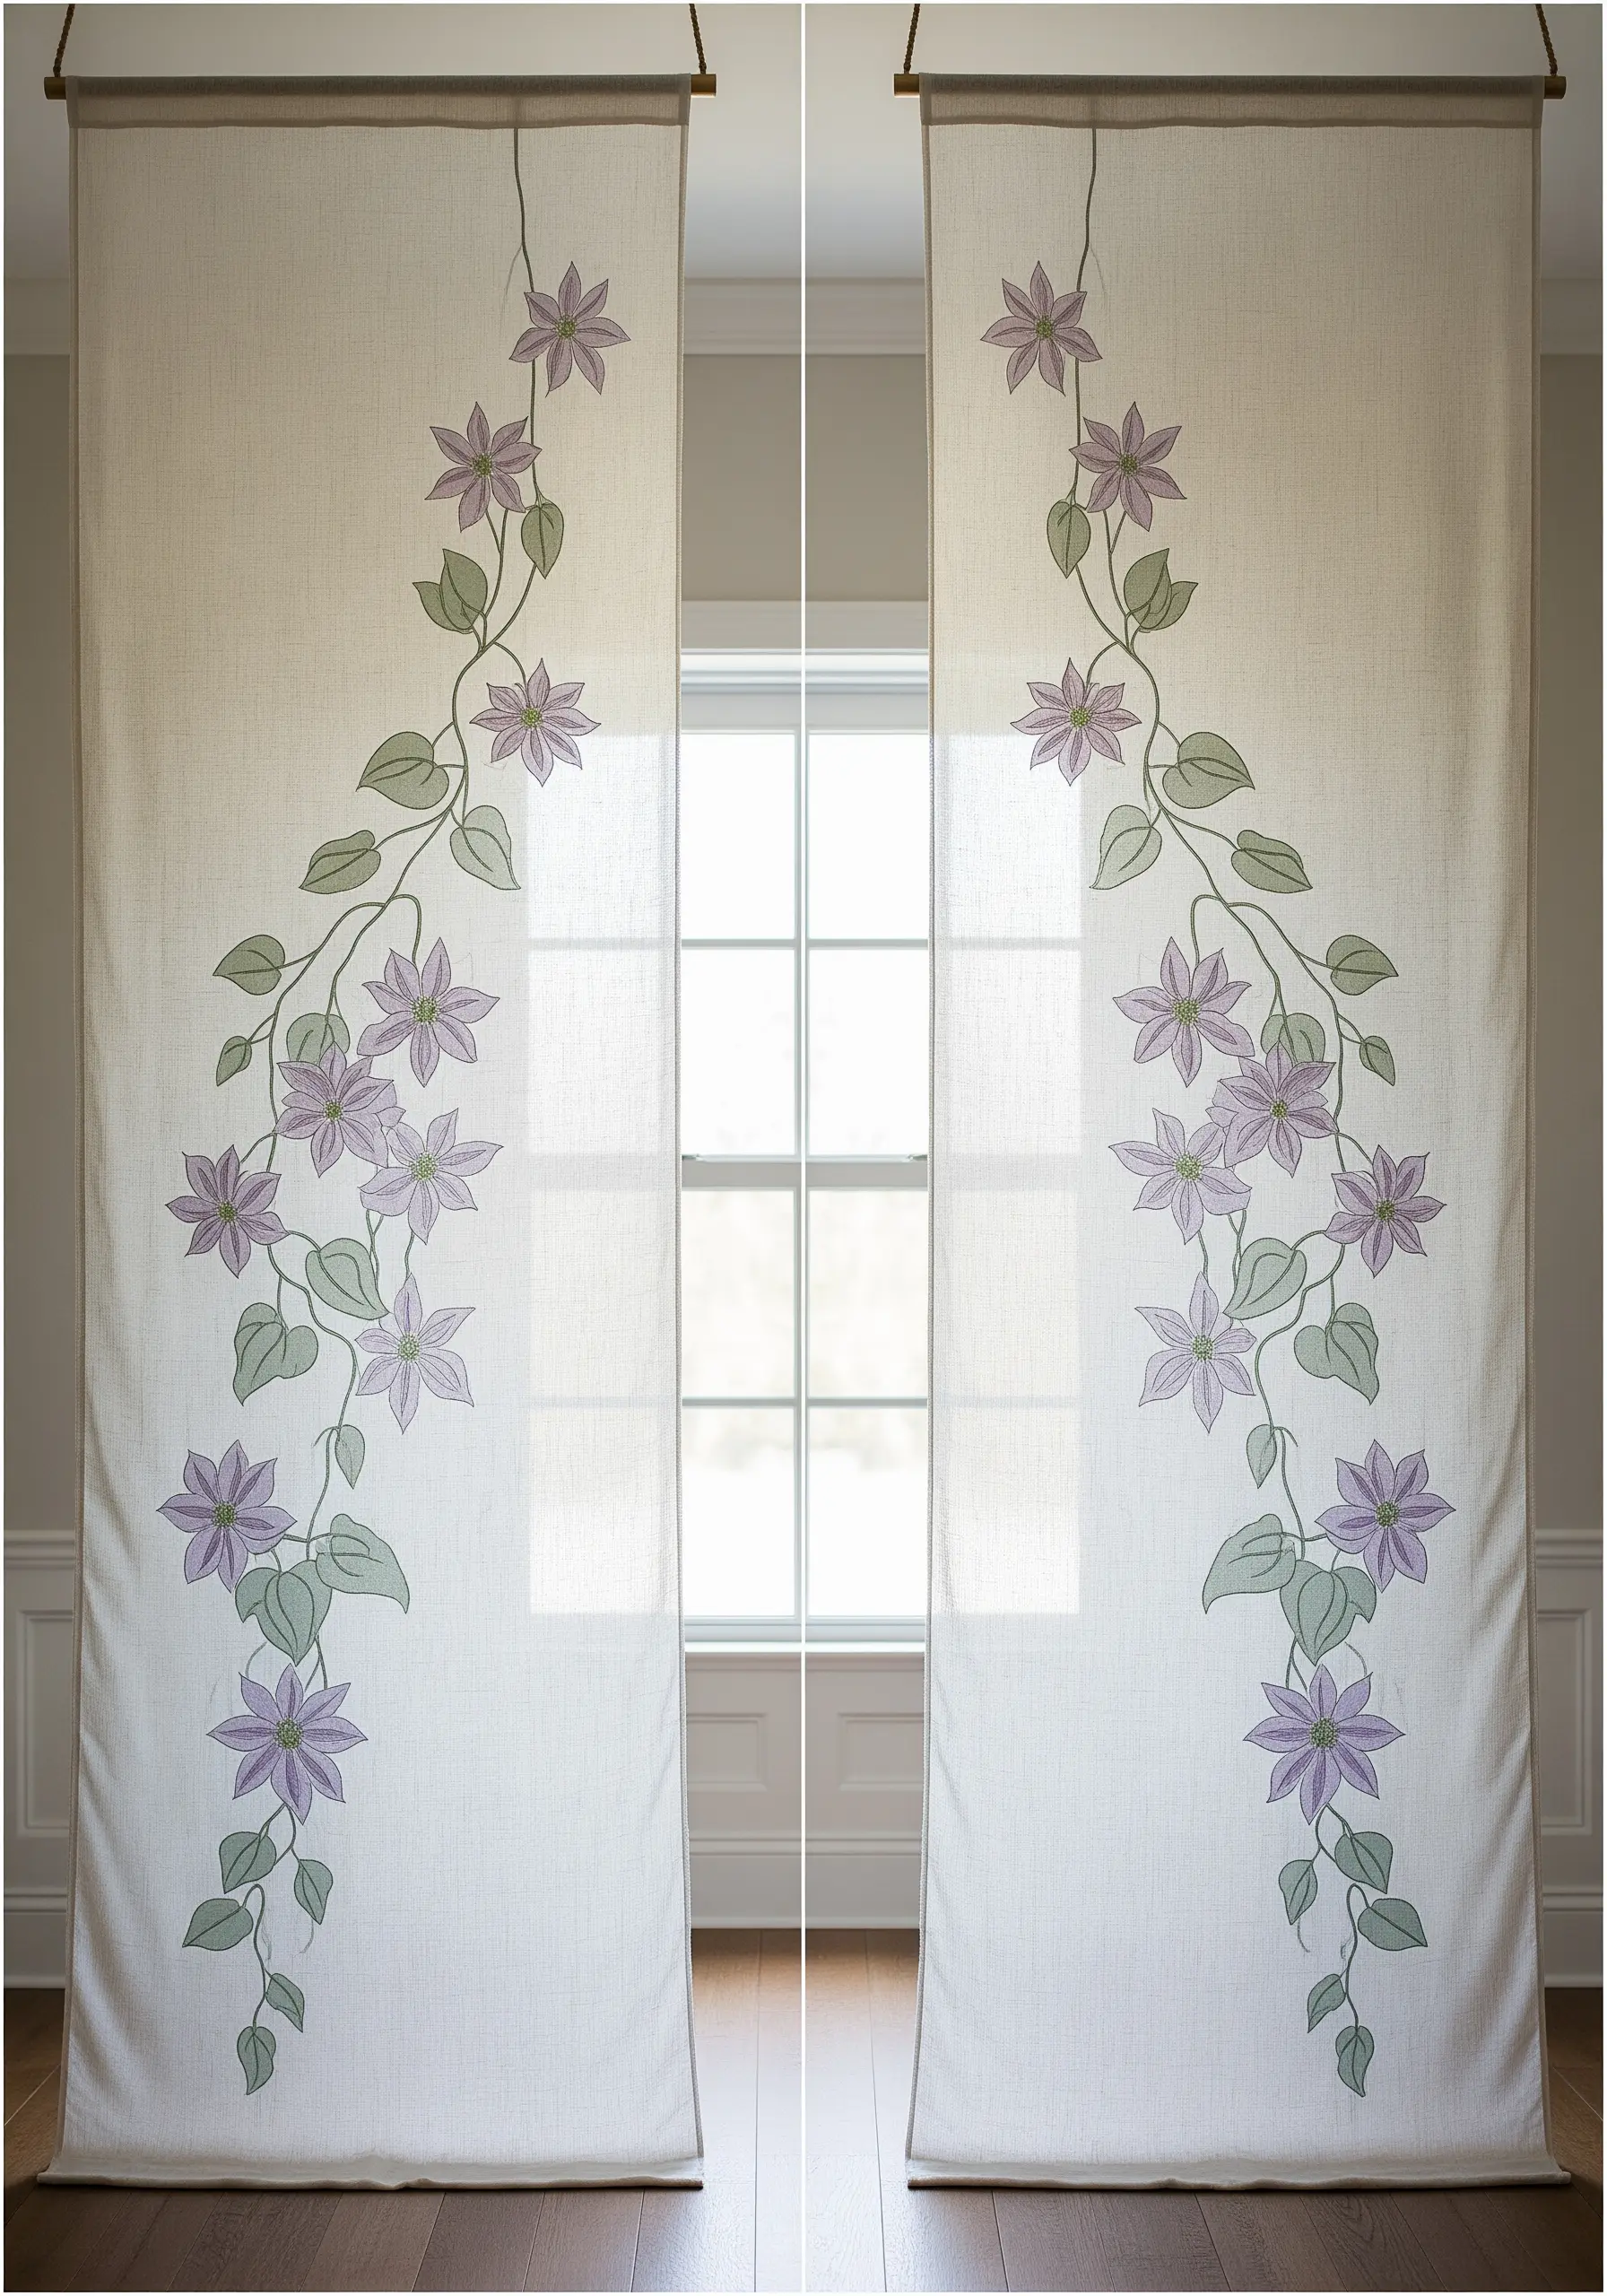
Turn everyday items like curtains into works of art that play with natural light.
When you stitch on sheer fabric, the design becomes two-sided. The light filtering through will illuminate your stitches and cast beautiful, colored shadows into the room.
Always use a lightweight tear-away stabilizer to support your stitches and prevent puckering. Once removed, the design will feel perfectly integrated with the delicate fabric of these embroidered curtain & blind ideas.
22. Golden Ginkgo Leaves: Capturing Delicate Veins
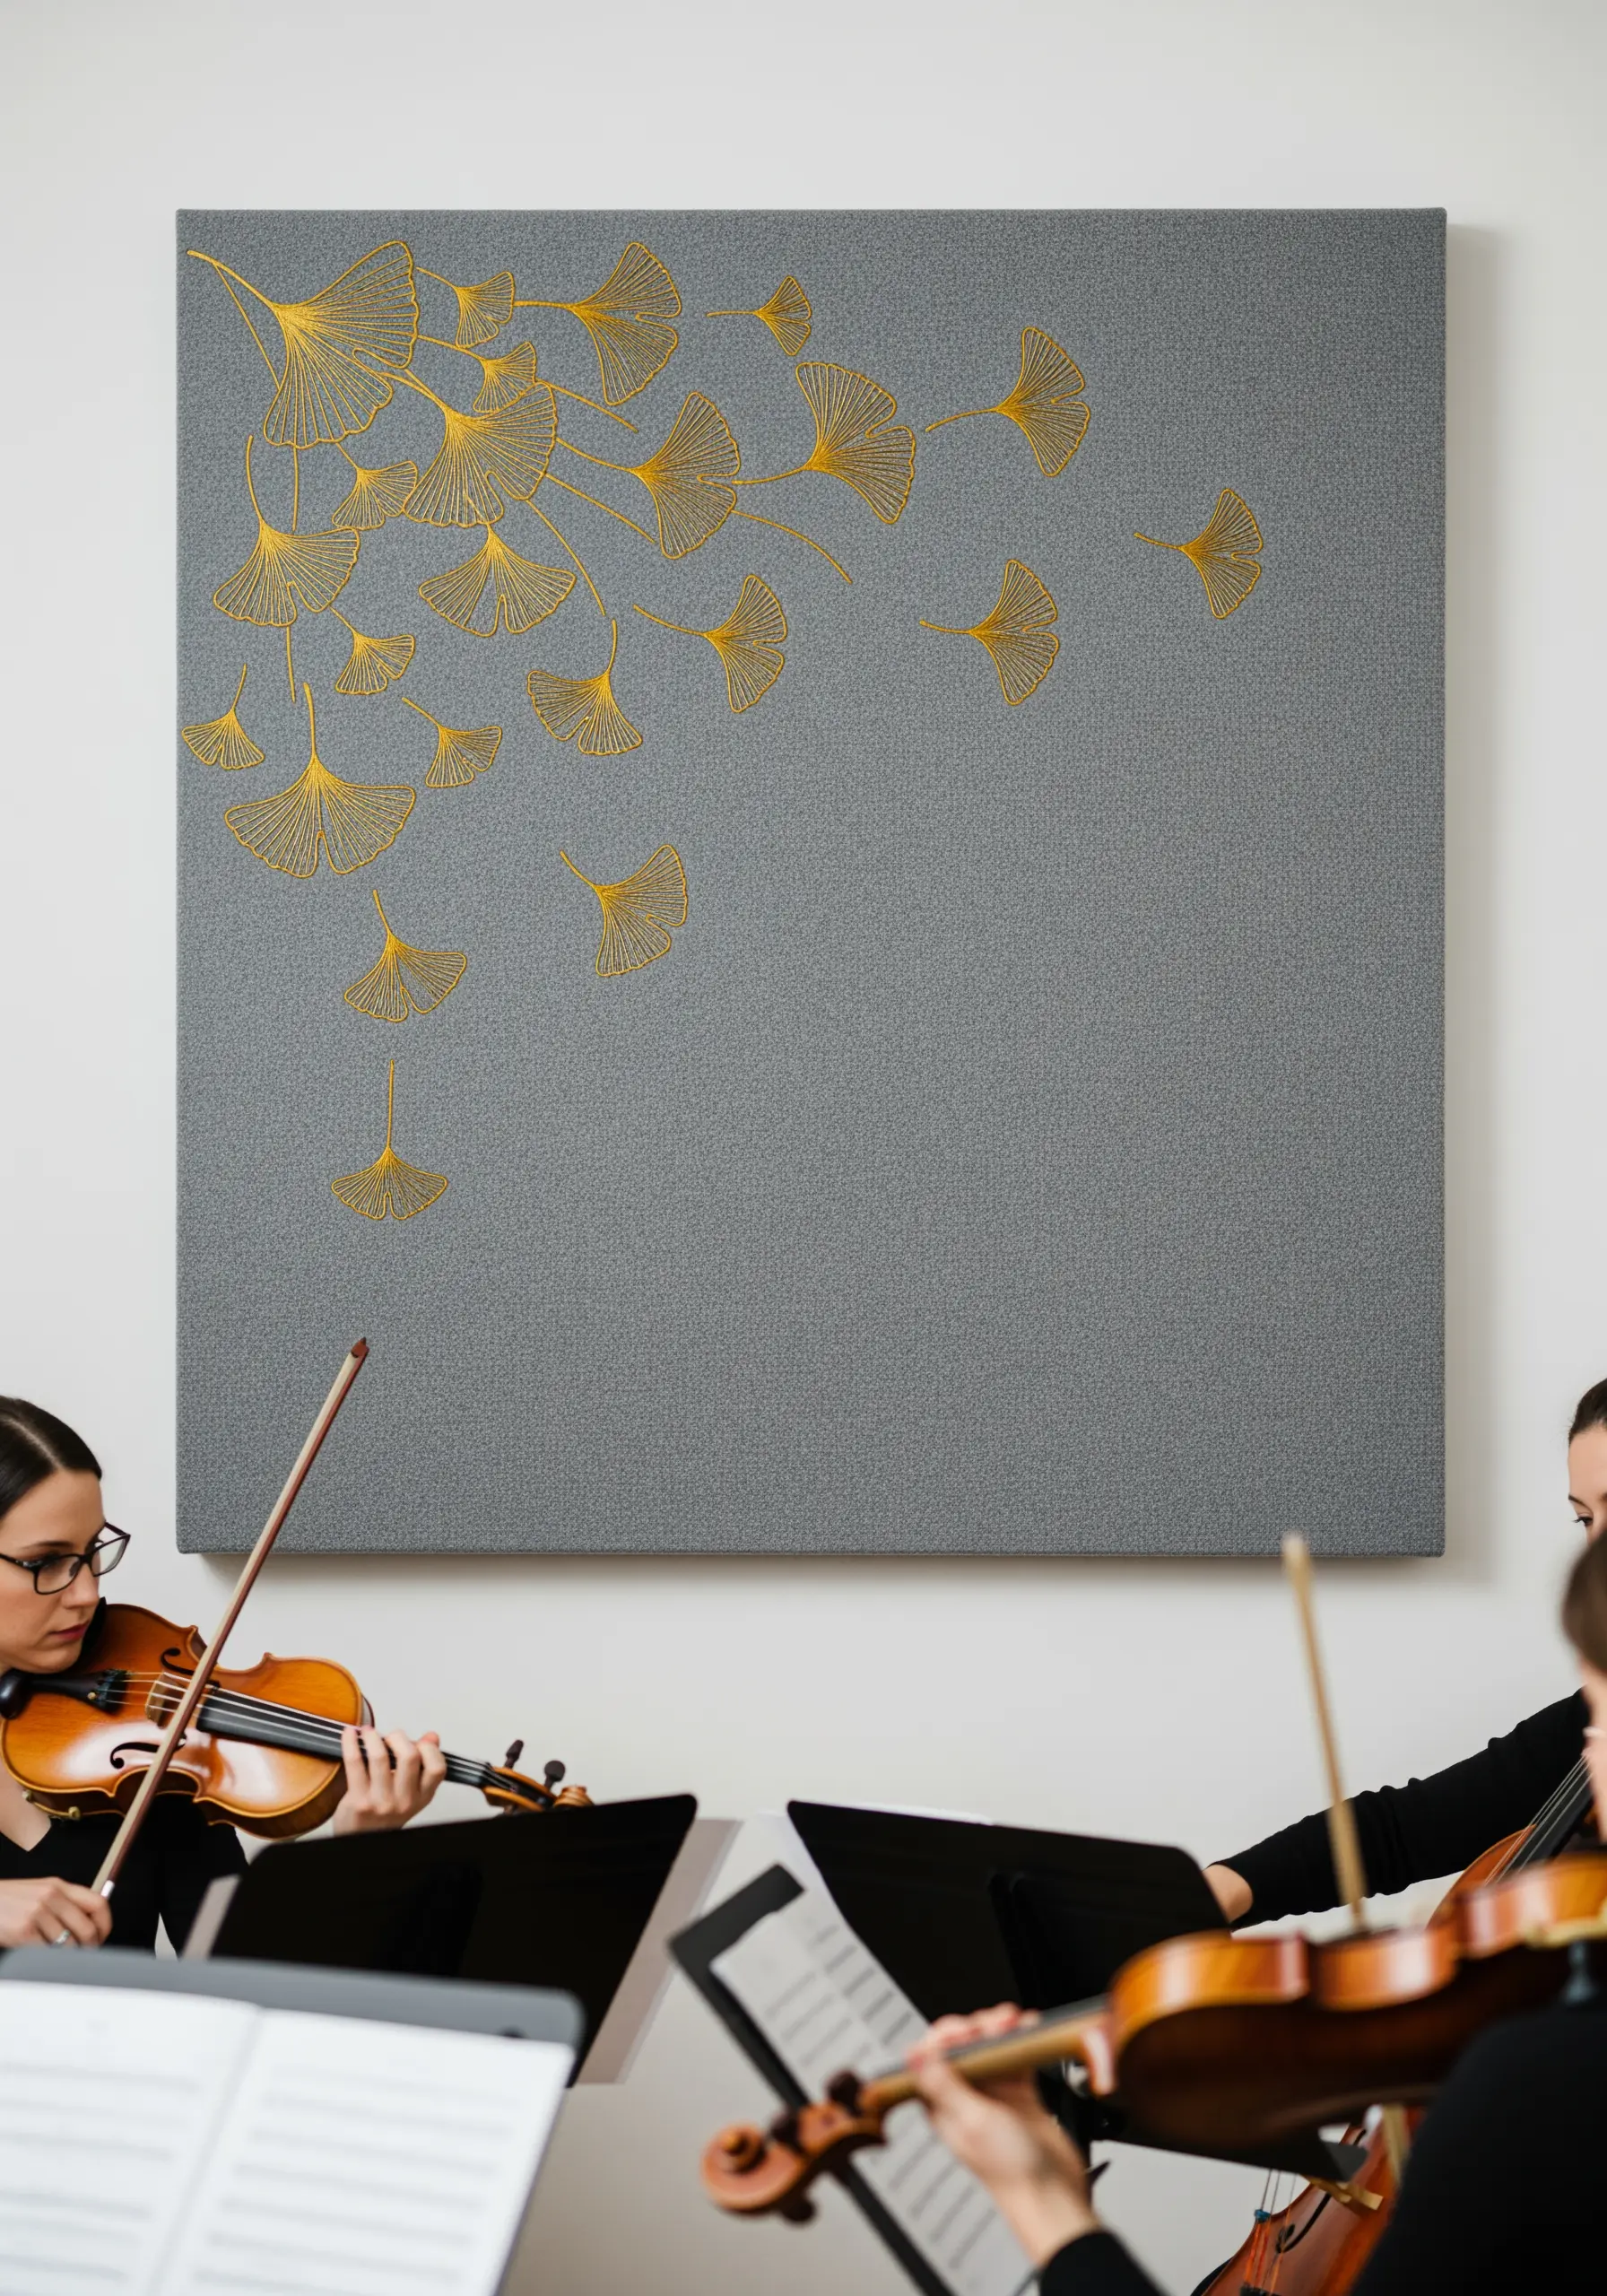
Emulate the delicate, fan-like structure of ginkgo leaves with precise stitching.
Use a gold metallic thread to trace the organic shape, and then add the iconic veins with single straight stitches radiating from the base.
To make your metallic outlines extra smooth and reflective, use a whipped backstitch. The extra wrapping pass covers the individual stitches, creating a seamless, glistening line.
The asymmetrical, falling composition adds a sense of grace and movement.
23. The Appliqué Thistle: Layering Fabric and Thread
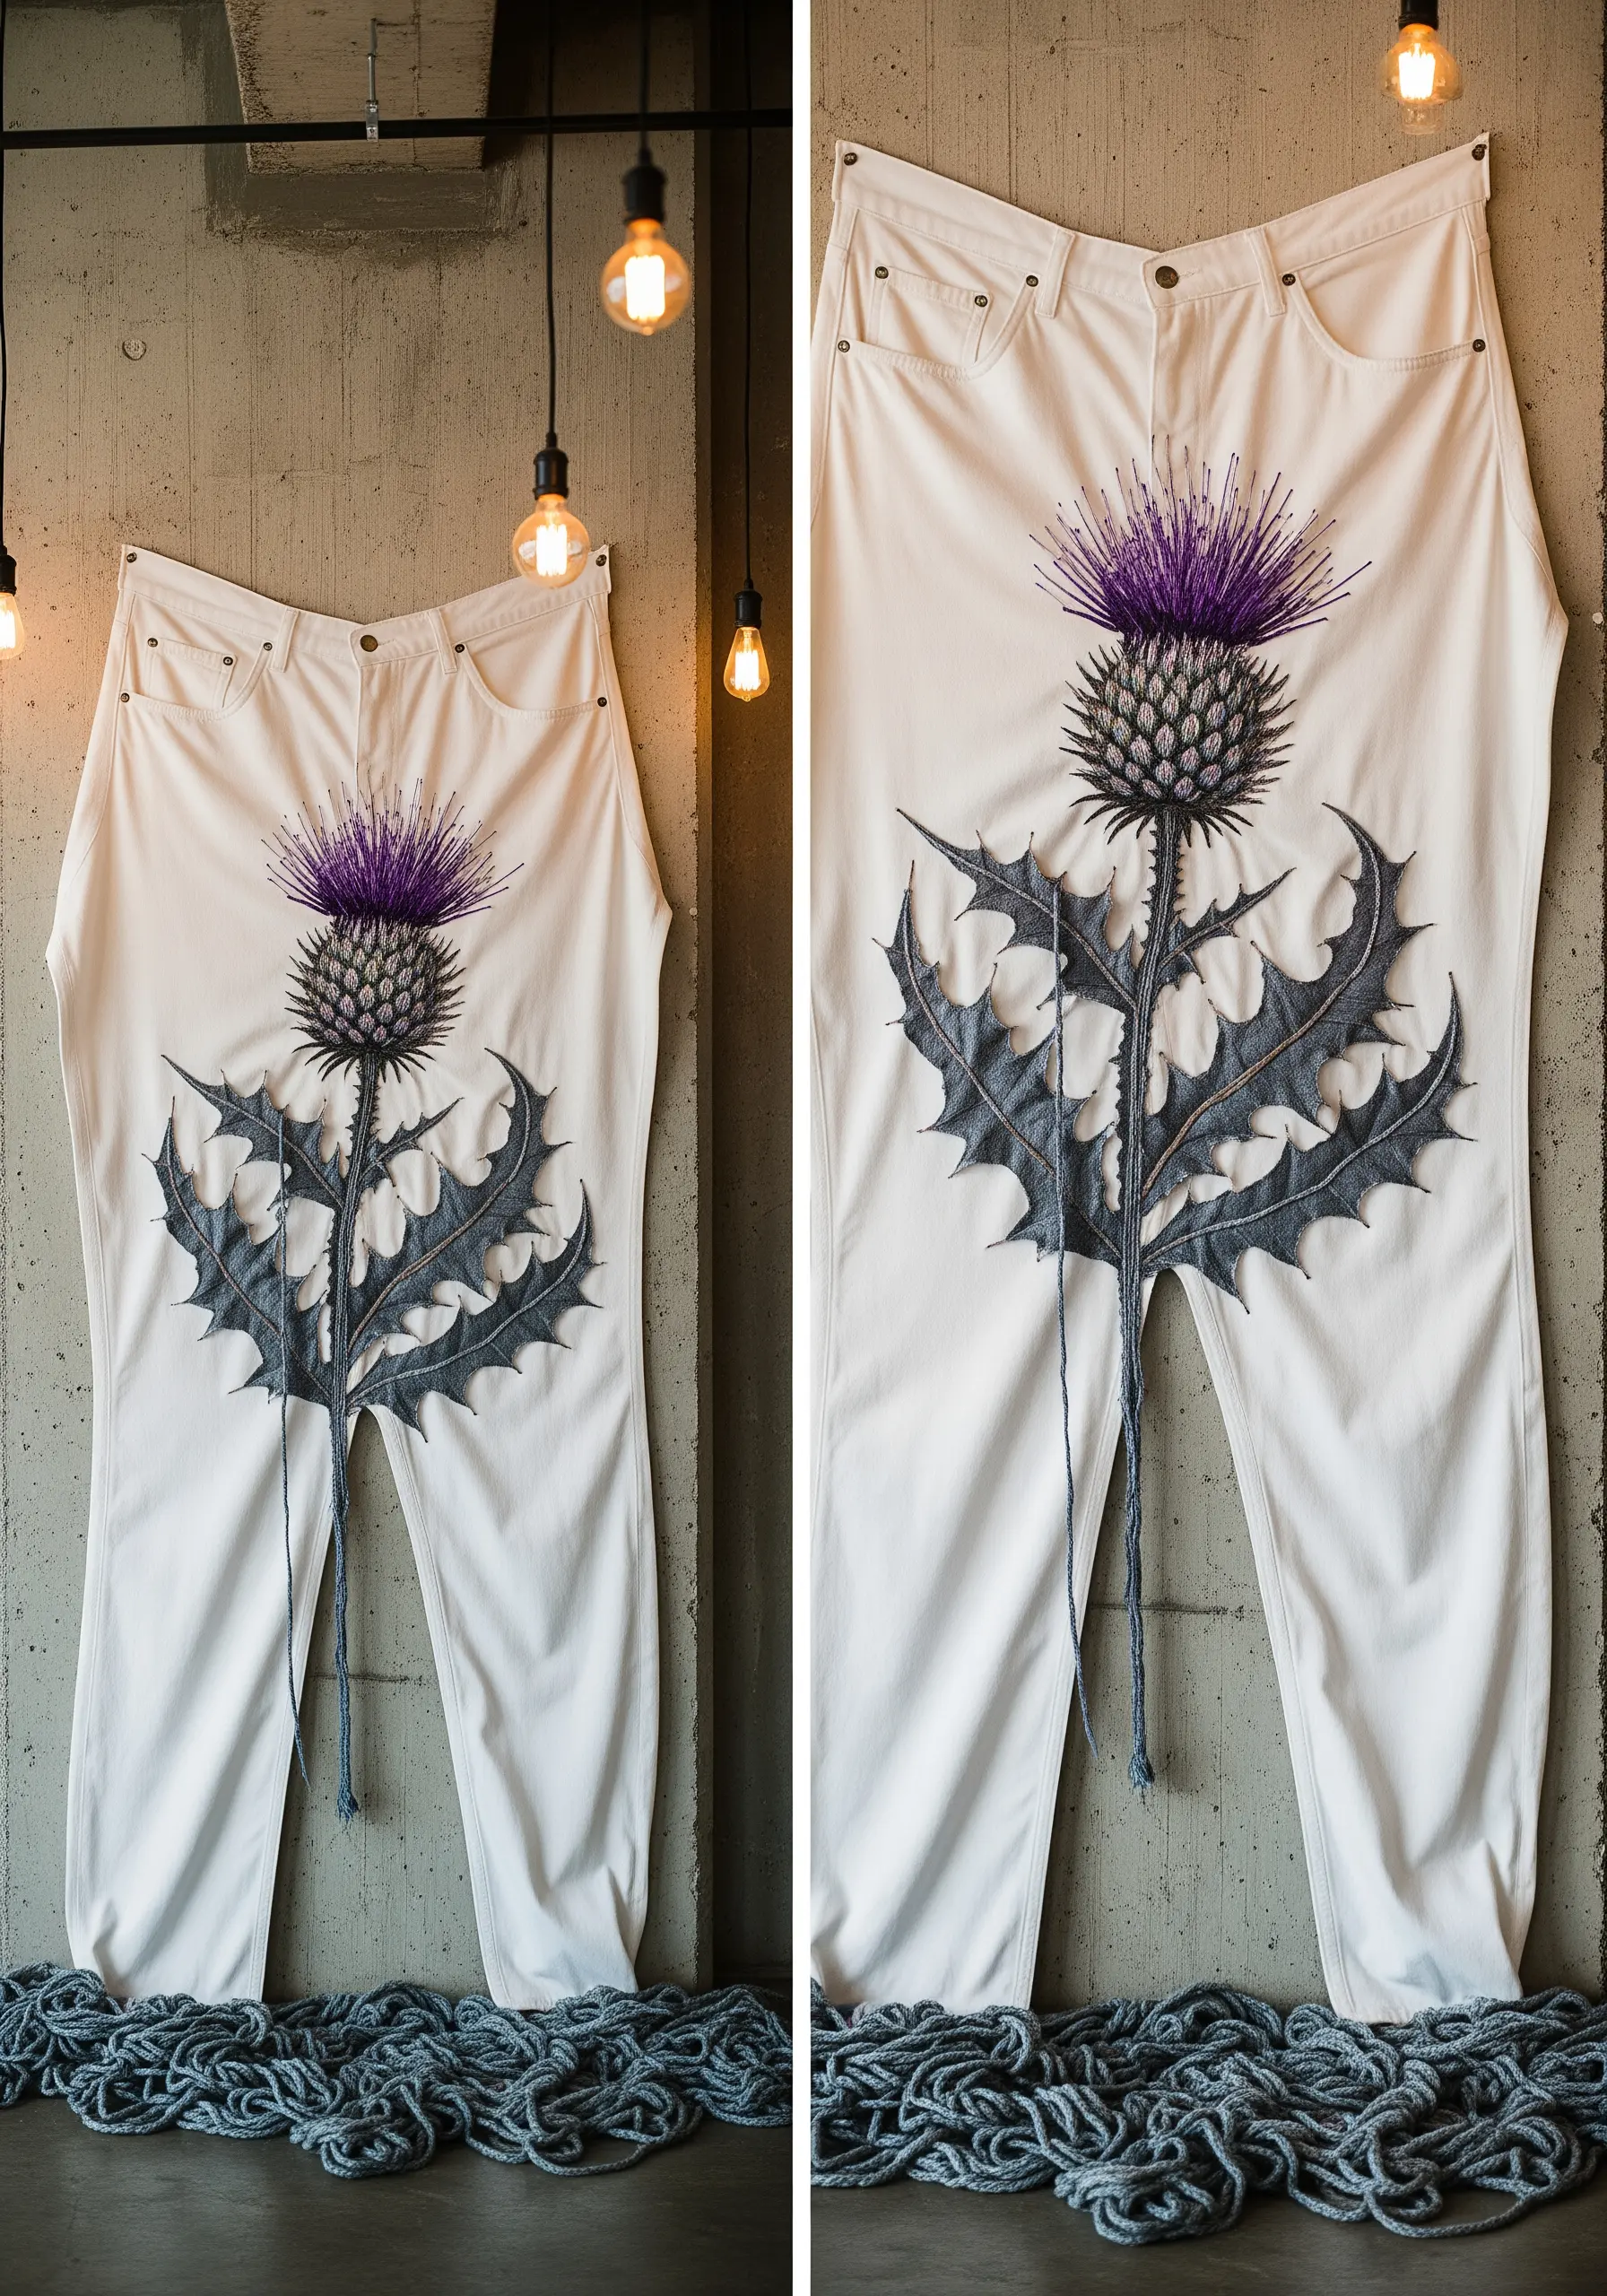
Create stunning, dimensional designs by combining fabric appliqué with embroidery.
Cut the thistle’s sharp leaves from a contrasting fabric, like denim, and secure them with a simple running stitch around the edges.
For the blooming top, use the turkey stitch (also known as the Ghiordes knot) with a soft purple yarn. Once you stitch the loops, you can trim them to create a fluffy, three-dimensional effect that perfectly mimics a real thistle.
This mixed-media approach adds incredible depth and texture to your work.
24. Classic Lily of the Valley: Timeless Elegance

Achieve a classic, almost antique look with a simple motif on a dark, rich background.
On a navy or midnight blue linen, use a fine, bright white thread (like a single strand of DMC Blanc) to ensure every stitch stands out.
Form the delicate, bell-shaped flowers with tiny satin stitches or even single seed stitches. The contrast creates a crisp, elegant design that feels both traditional and timeless.
Pairing it with an ornate gold frame completes the sophisticated aesthetic.
25. Tone-on-Tone Architectural Panels: The Beauty of Subtlety
Explore the sophisticated power of tone-on-tone embroidery for large-scale decor.
Choose a thread that is just one or two shades lighter or darker than your fabric. This creates a subtle, textural effect that reveals itself as the light changes.
The design is defined by the shadows cast by the raised stitches, not by color contrast. This technique is perfect for creating an atmosphere of quiet luxury and refinement.
It works especially well for large, architectural pieces that need to feel integrated with the space.
26. The Continuous Line: Fluidity in Thread
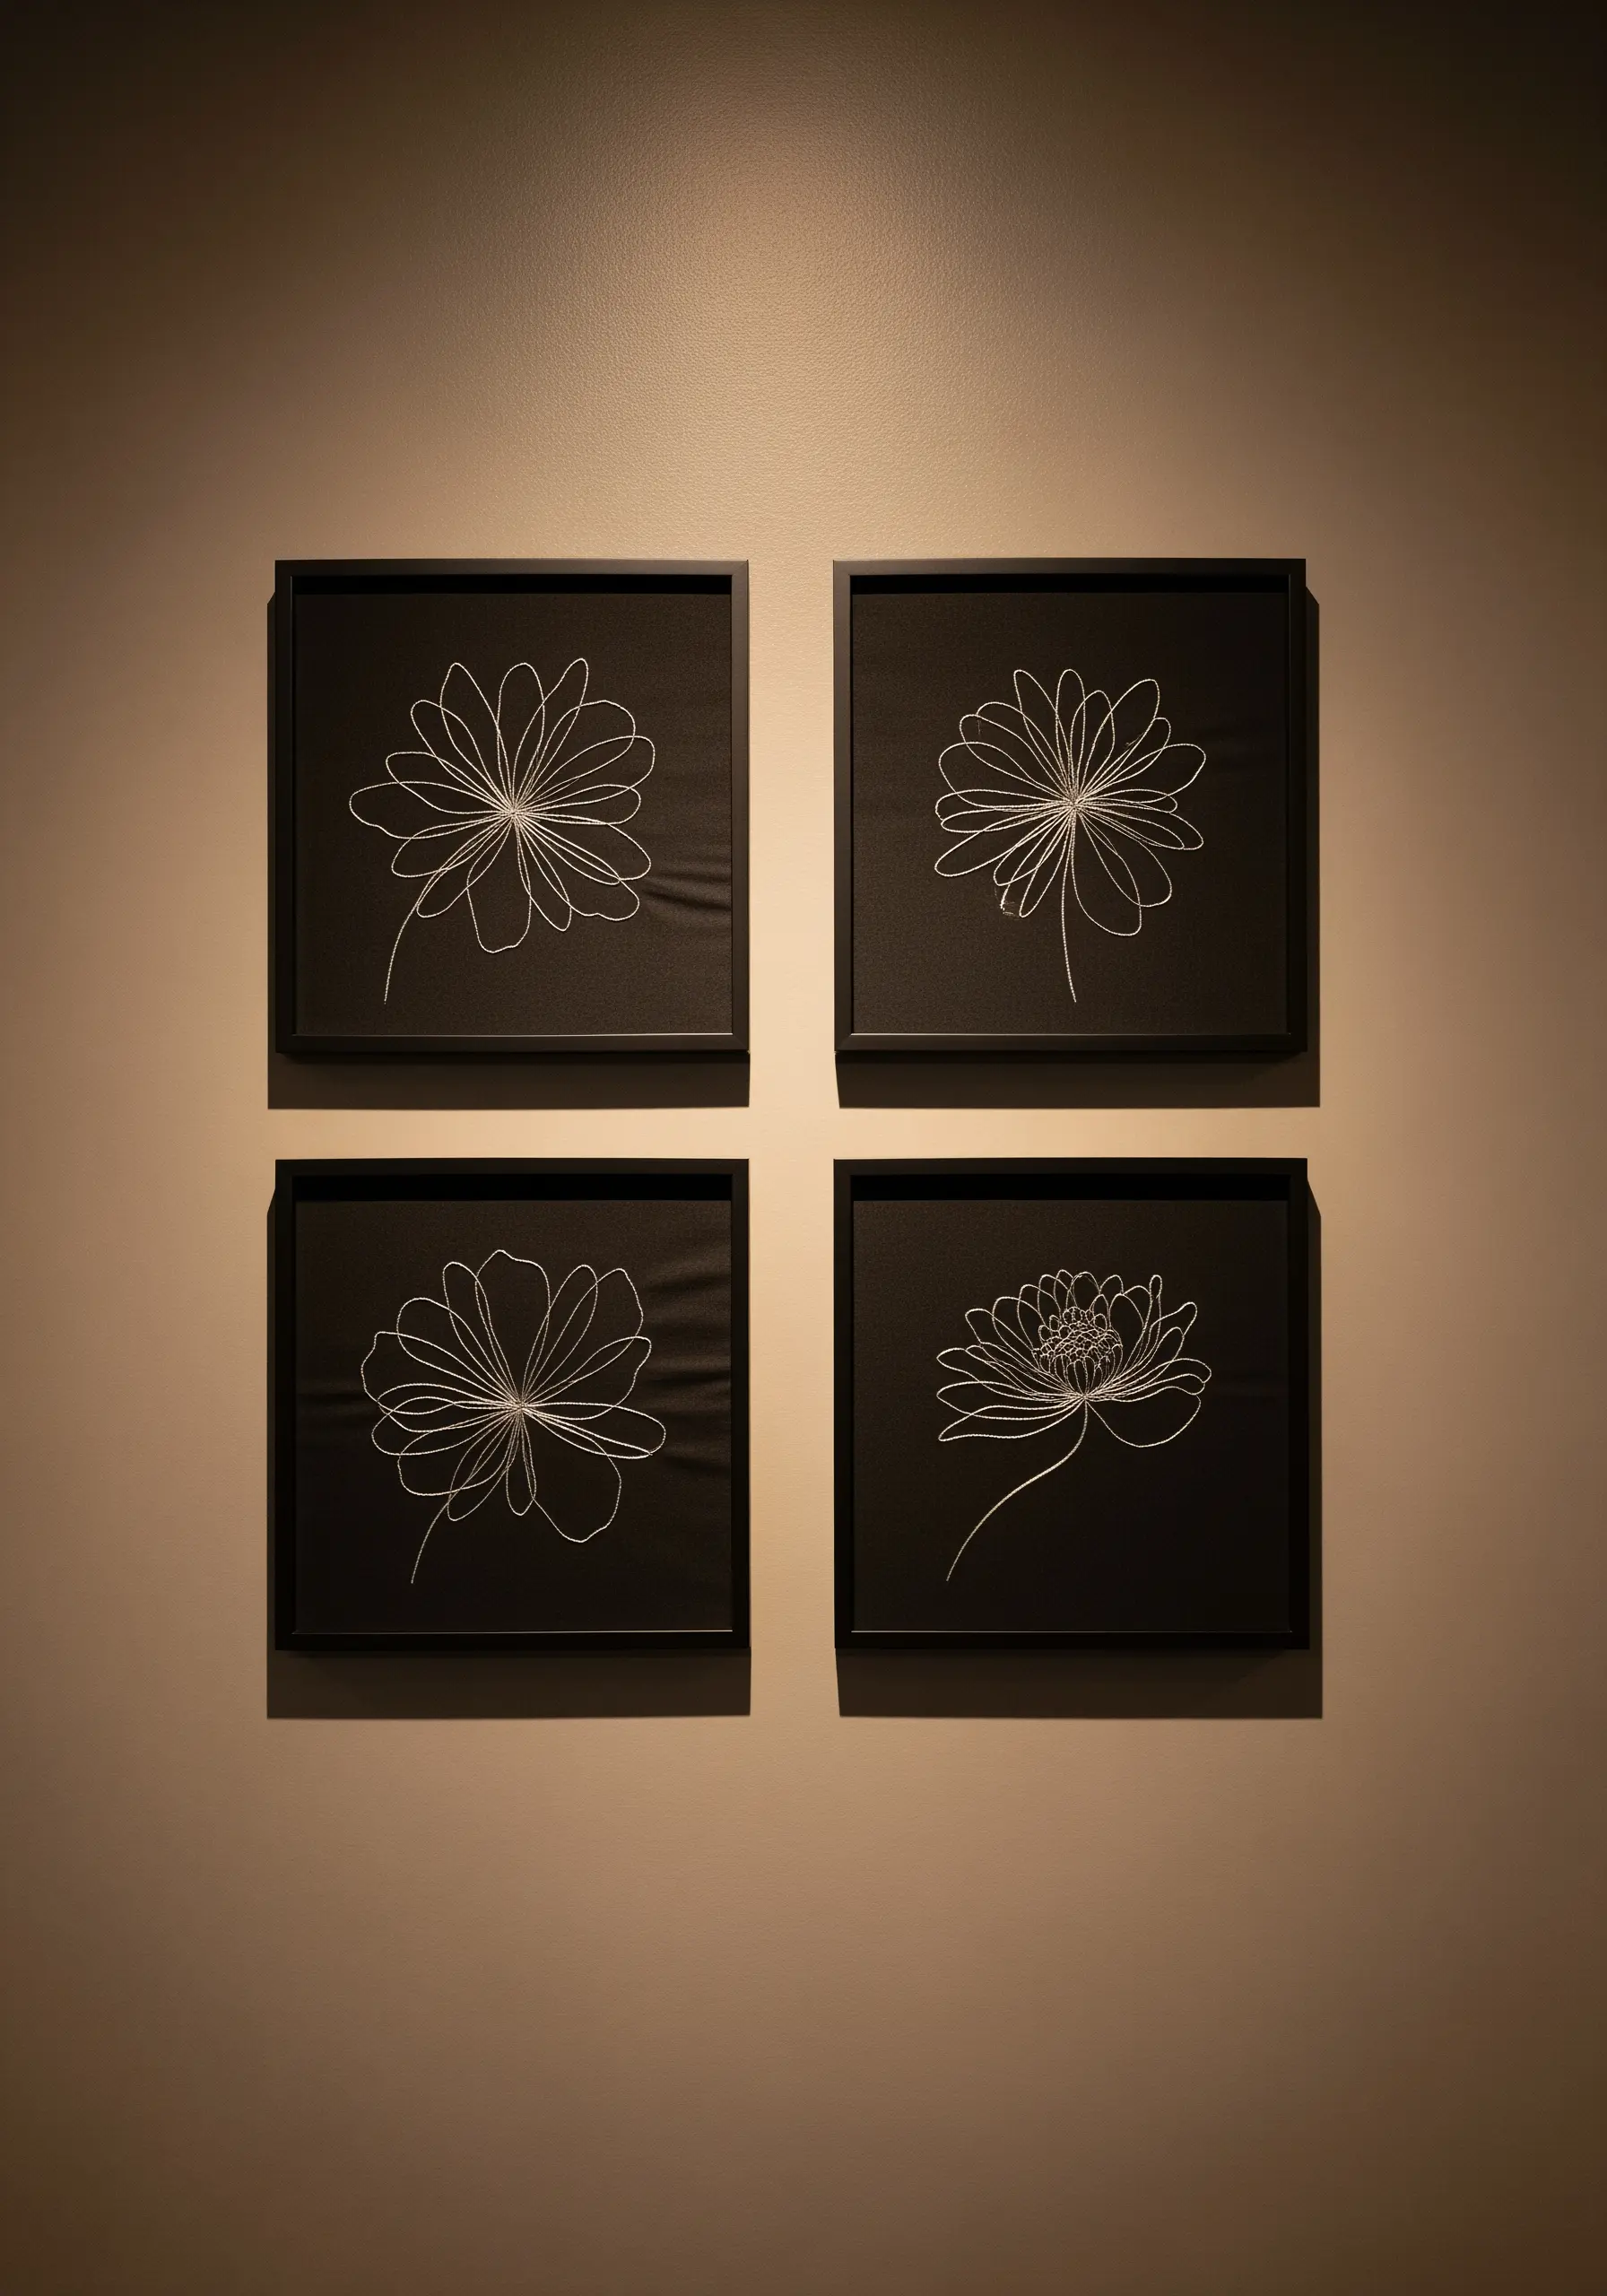
Capture the essence of a sketch by using a single, unbroken line.
The stem stitch is your best friend for this technique, as it creates a smooth, continuous line that can easily handle tight curves.
Plan your stitching path carefully to minimize jumps on the back of the fabric. The goal is to make the thread flow as if it were drawn with a single stroke of a pen.
Framing these pieces as a simple grid of abstract line art silhouettes amplifies their modern, graphic appeal.
27. Dimensional Daisies: The Padded Satin Stitch
Give your flowers a raised, sculptural quality using a padded satin stitch.
Before you lay down your final satin stitches, create a base of small, underlying straight stitches within the shape of each petal.
When you stitch your satin stitch over this padding, the petals will be slightly raised from the fabric surface, creating soft shadows and a beautiful 3D effect.
This simple trick adds a professional, tactile finish to even the most classic floral motifs.
28. The Monogram Wreath: A Personalized Banner

Create a meaningful family crest or wedding monogram with a lush, embroidered wreath.
Use the fishbone stitch for the leaves; its central spine and angled stitches perfectly mimic the structure of a real leaf.
Add clusters of French knots in a contrasting color for berries, varying the number of wraps to create knots of different sizes for a more organic feel.
For the initials, a whipped backstitch provides a clean, elegant line that stands out beautifully in the center.
29. Candlelit Grapevines: Shimmer on a Table Runner
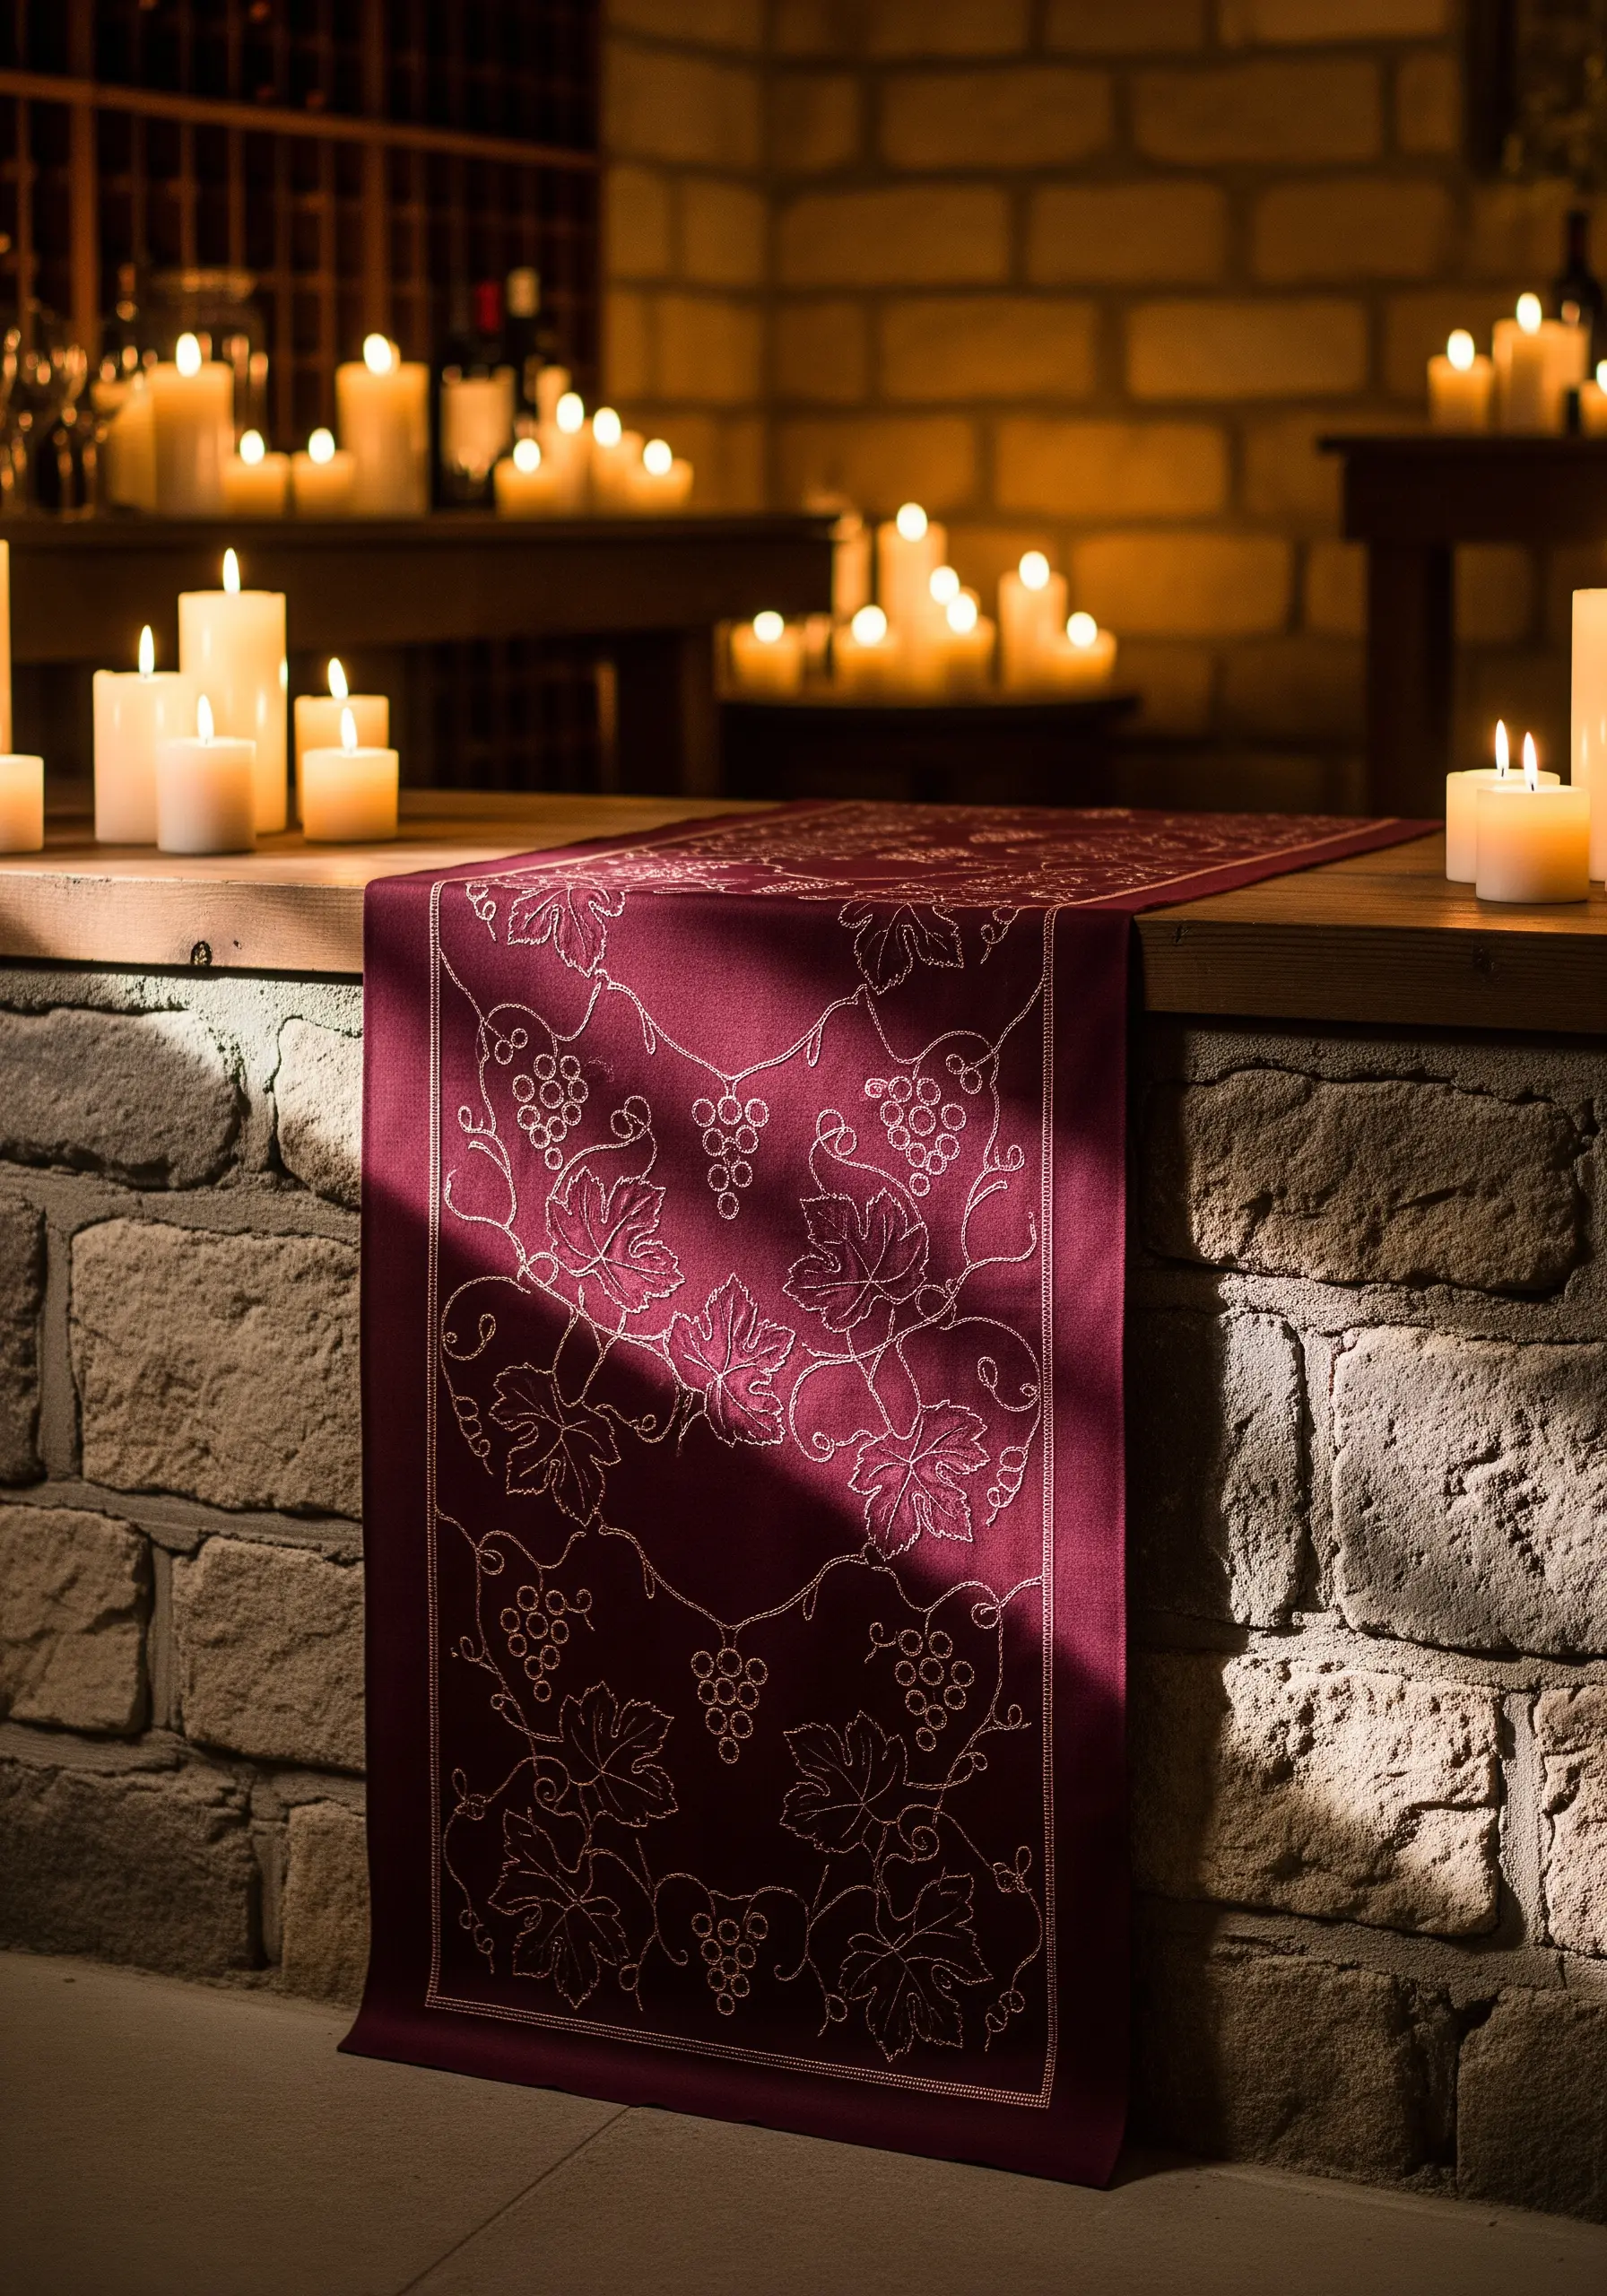
Design table linens that come alive in romantic, low-light settings.
Use a pale gold or silver metallic thread to outline a delicate grapevine pattern on a dark, rich fabric like burgundy or forest green.
The metallic thread will catch and reflect the warm glow of candlelight, making the design shimmer and dance as guests move around the table.
Keep the stitches simple—a running stitch or backstitch is all you need to let the thread’s sparkle be the main feature.
30. Queen Anne’s Lace on Paper: Delicate Card Stitching

Elevate your thank you cards or wedding stationery by stitching directly onto paper.
Choose a heavy, high-quality cardstock (at least 200 gsm) to prevent tearing.
Gently pre-pierce your stitch holes with a needle or awl before you begin stitching. This ensures clean entry points and prevents the paper from buckling.
Use a dense cluster of tiny French knots in an off-white floss to perfectly replicate the delicate, airy flower heads of Queen Anne’s Lace.


