

Before you begin your next project, take a moment. The most captivating embroidery doesn’t come from complex stitches or expensive threads, but from intention—the thoughtful choice of a texture that tells a story.
You don’t need to master hundreds of stitches to elevate your work. Instead, focus on mastering a few versatile techniques—like varying the density of your French knots or the direction of your satin stitch. These small adjustments are what transform a flat design into something with depth, movement, and emotion.
This collection is designed to show you how accessible that transformation can be. Each idea is rooted in a simple, achievable technique that delivers a rich, organic texture. Let this be your guide to creating work that not only looks beautiful but feels alive in your hands.
1. Cultivate a Mossy Landscape with Dimensional Knots
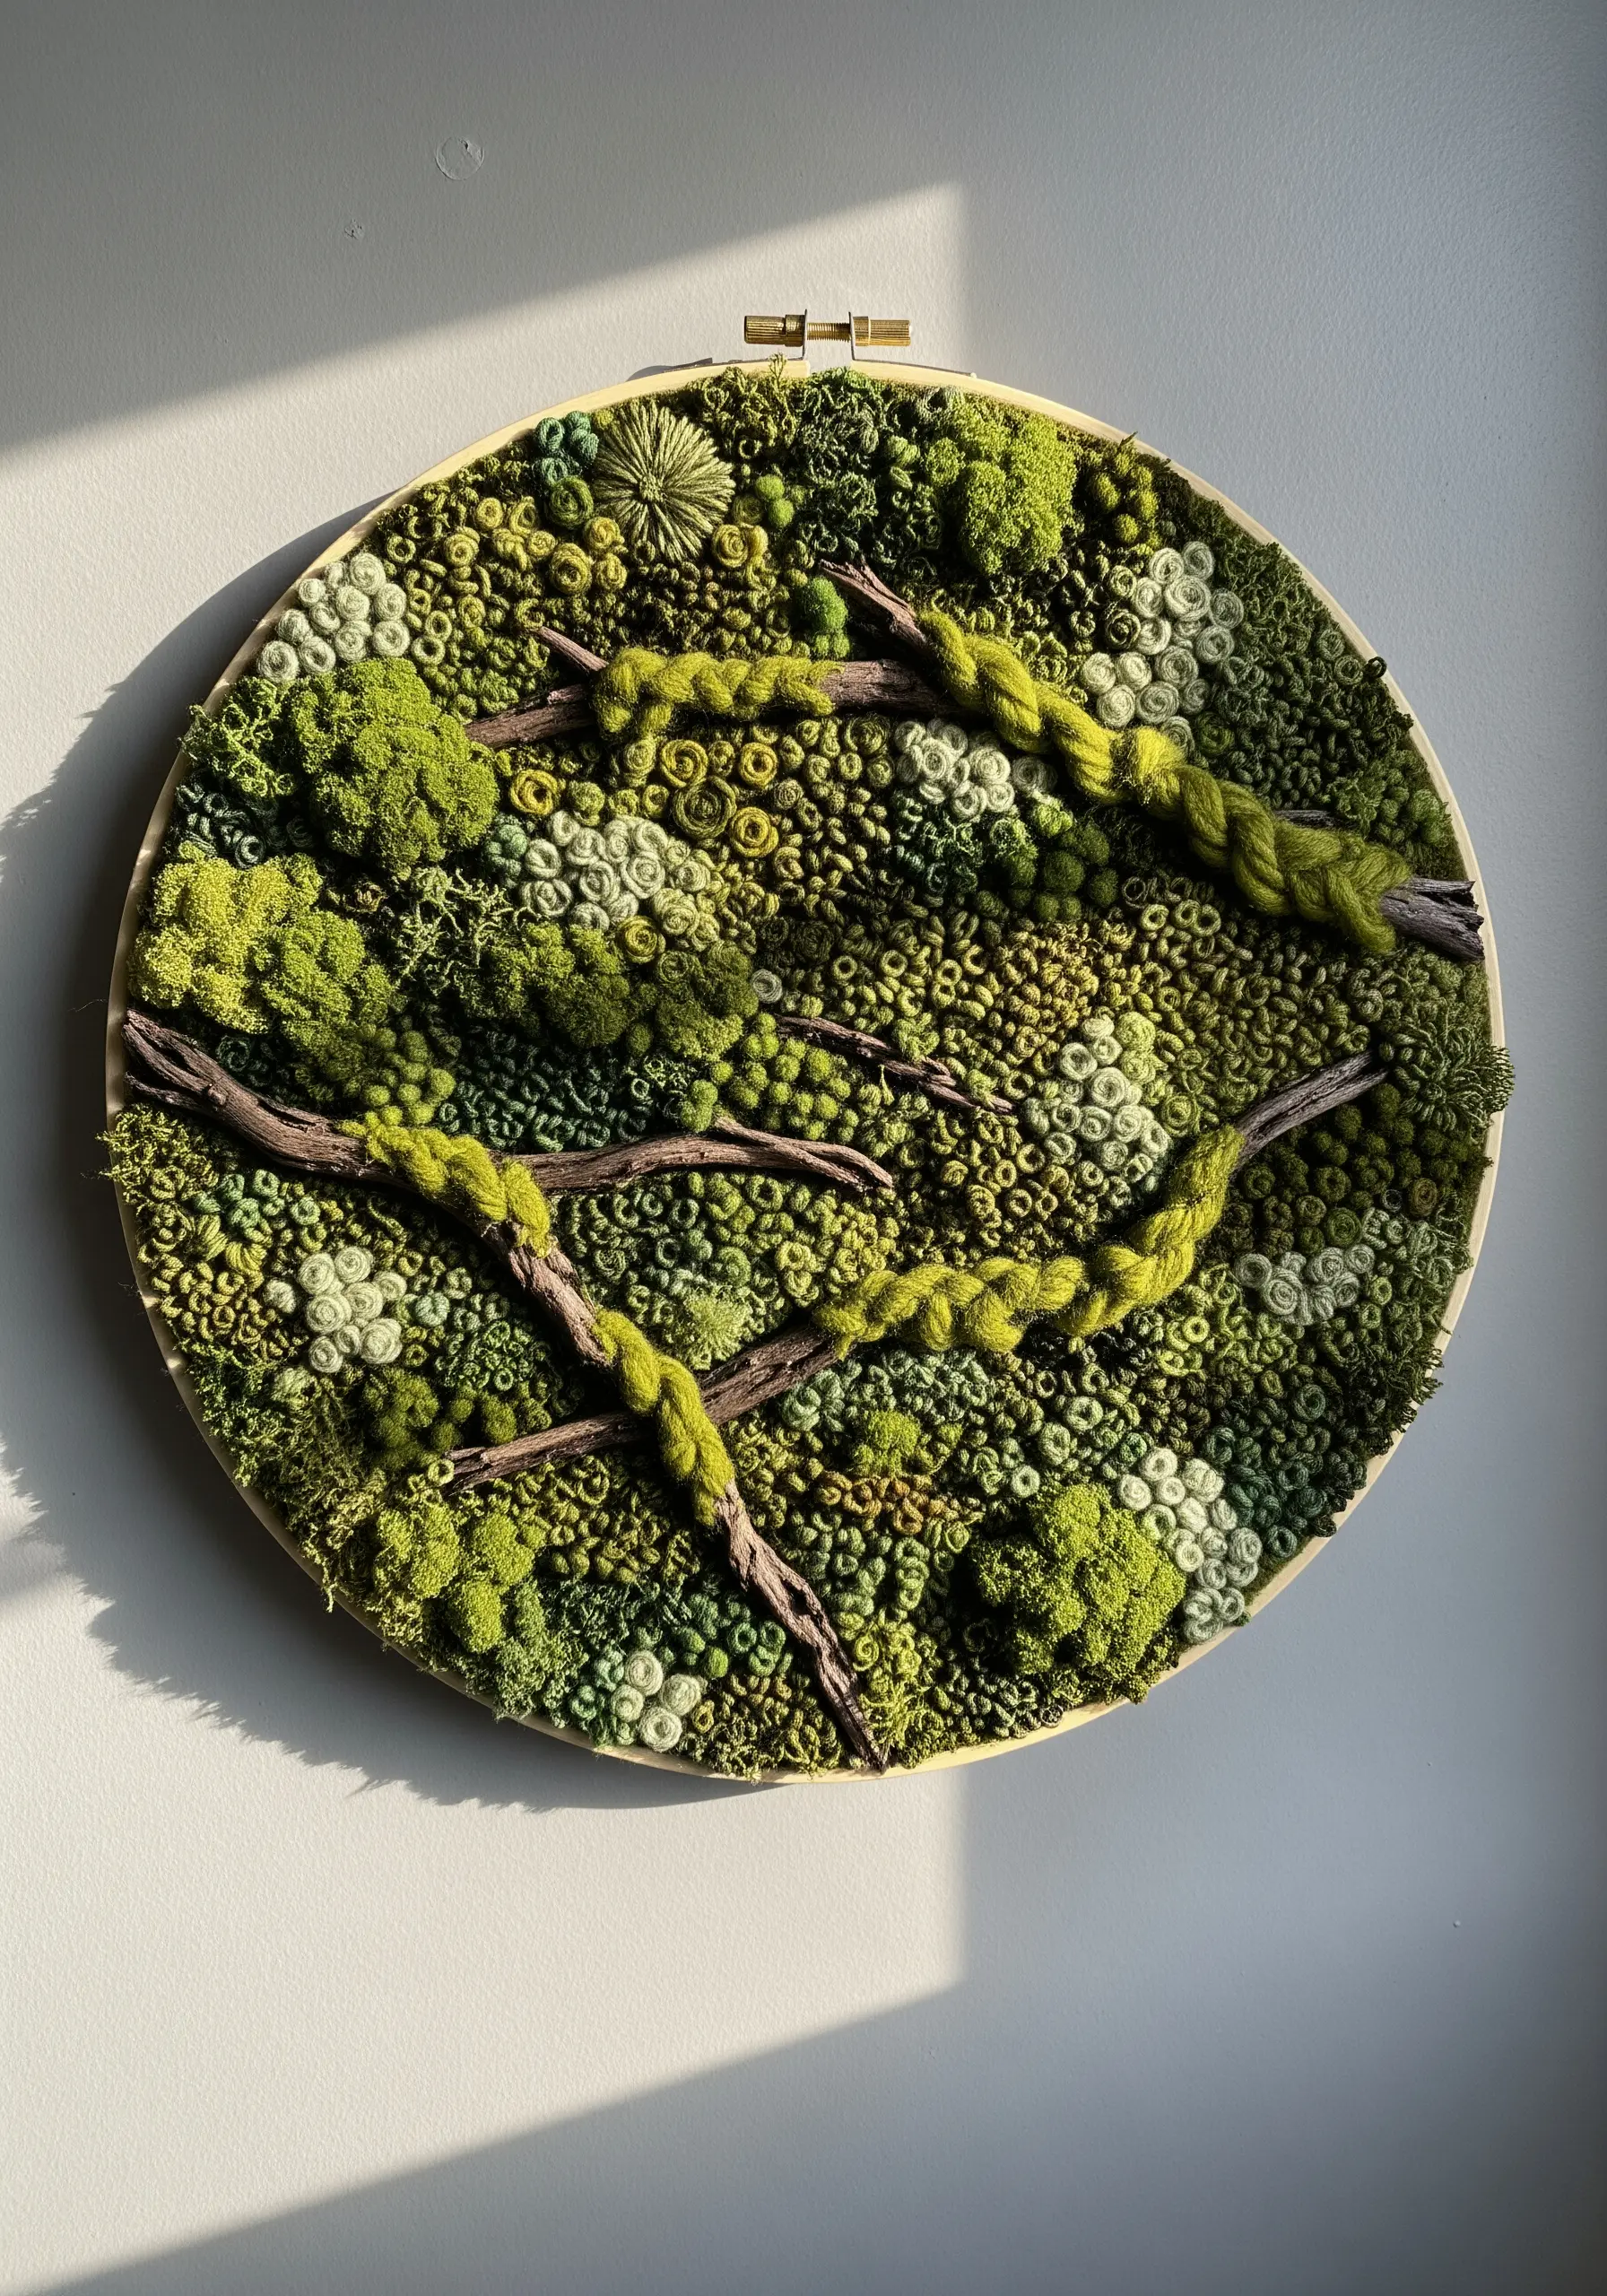
Create a lush, tactile forest floor by densely clustering French and colonial knots.
Use a mix of variegated green and earthy brown threads to mimic natural moss, varying the number of wraps around your needle (from one to three) to create different knot sizes.
This variation is what builds realistic depth and prevents the texture from looking flat or repetitive.
For a true mixed-media piece, try couching—stitching down—small, authentic twigs to serve as fallen branches, instantly elevating your hoop into a sculptural nature texture wall hanging.
2. Recreate Birch Bark with Contrasting Stitches
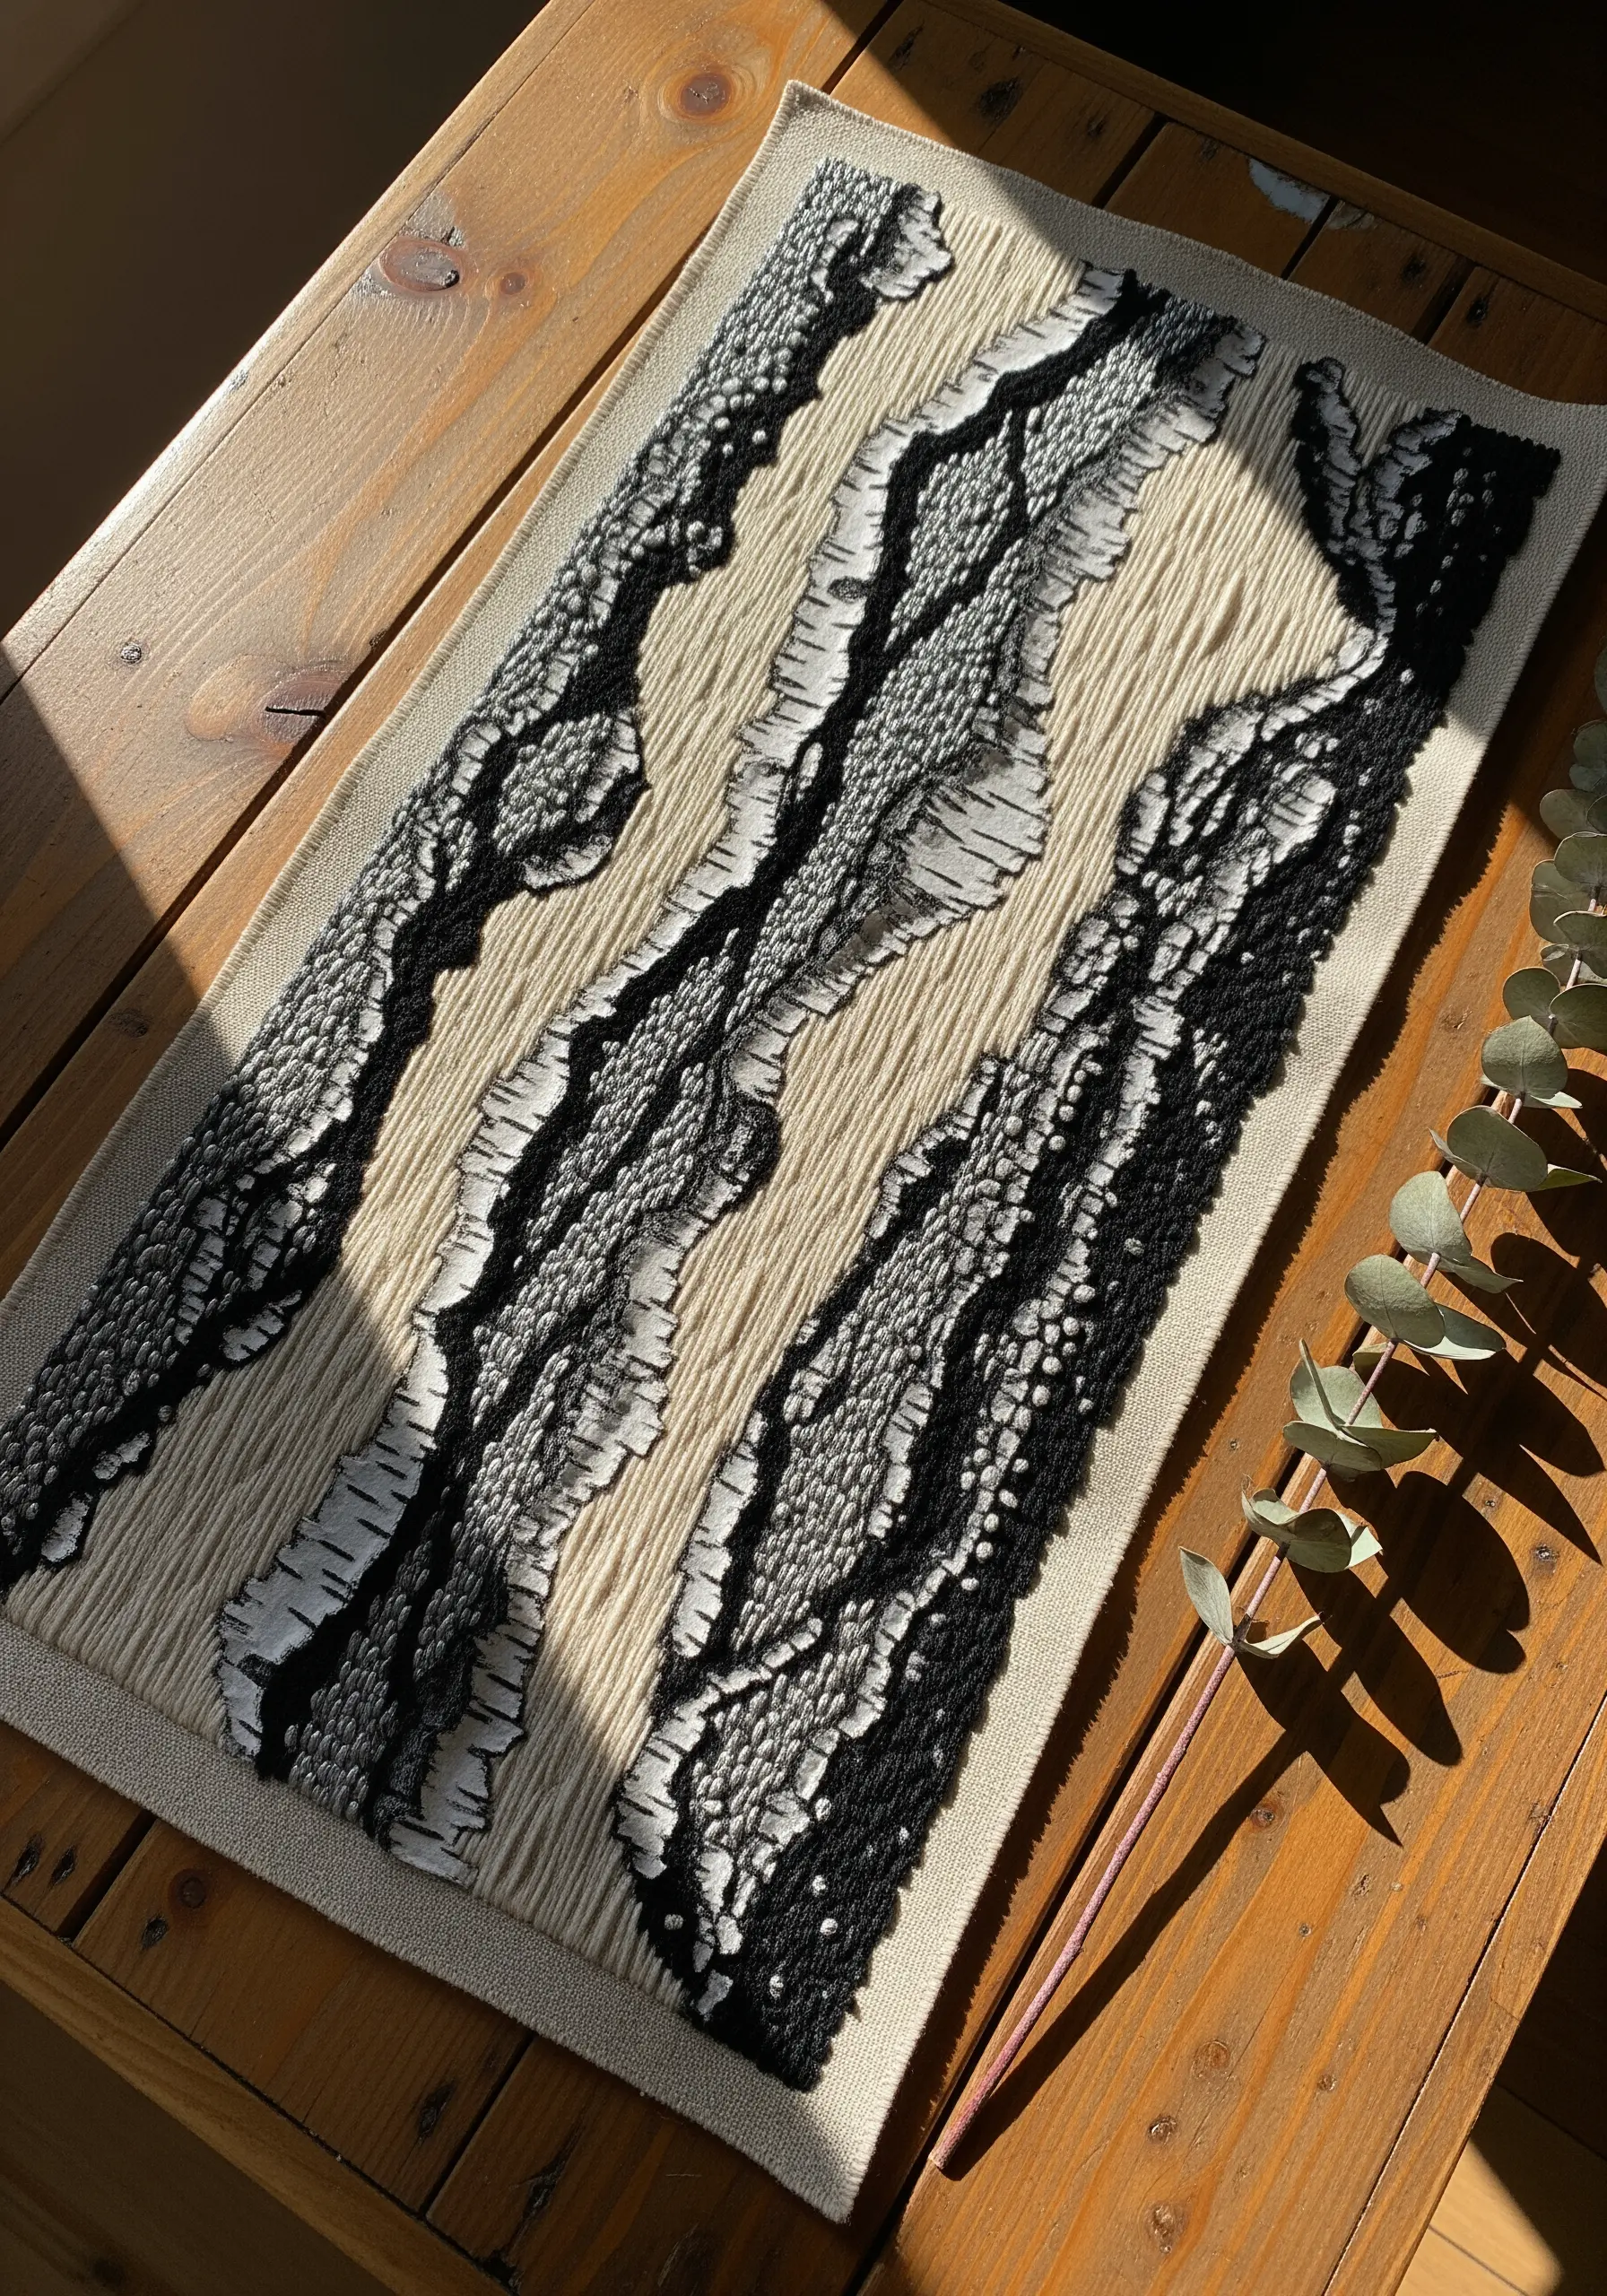
Capture the delicate, peeling texture of birch bark by juxtaposing two distinct stitching styles.
Use long, vertical satin stitches with an off-white or cream thread to form the smooth base of the bark.
Then, interrupt these clean lines with chaotic clusters of short, dense stitches in black and grey, mimicking the rough, dark markings on the tree.
This high-contrast approach makes the piece dynamic; the texture isn’t just felt, it’s seen. It’s an effective way to make monochrome thread look multi-dimensional.
3. Sculpt Realistic Fungi with Layered Satin Stitch

Build three-dimensional shelf mushrooms using a simple padding technique that requires no special tools.
Start by creating a base shape with layers of felt or scrap fabric, then cover it with directional satin stitches to mimic the gills on the underside of the mushroom cap.
Stitch from the outer edge toward the center, slightly overlapping your colors—from dark brown to tan to cream—to create a natural gradient.
Arranging them in a trio of hoops turns a simple study into a compelling piece of forest floor botanical stitch art.
4. Paint with Knots to Grow a Lichen Garden

Achieve a complex, organic look using nothing more than the humble French knot.
The key is to work in dense, irregular clusters, varying your thread colors subtly—from chartreuse to mint green to pale yellow—to replicate the way lichen grows in nature.
Using a dark, high-contrast fabric like black canvas makes the colors appear more vibrant and the texture more pronounced.
This method is meditative and forgiving, making it one of the most satisfying organic-inspired embroidery textures perfect for beginner crafters.
5. Blend Satin Stitch and Seed Pod Textures

Create a composition with captivating contrast by pairing smooth thread painting with dimensional details.
For the poppy, use long-and-short stitch with a single strand of thread to blend reds and pinks seamlessly, achieving a delicate, petal-soft finish.
For the lotus pods, use a padded satin stitch for the base, then add dark brown seed beads or tight French knots inside each compartment for a gritty, realistic texture.
This balance of smooth and rough textures gives your work a professional, polished feel and results in poppy-inspired stitches that add bold, emotional beauty.
6. Couch Thick Yarn for Polished Stone Effects
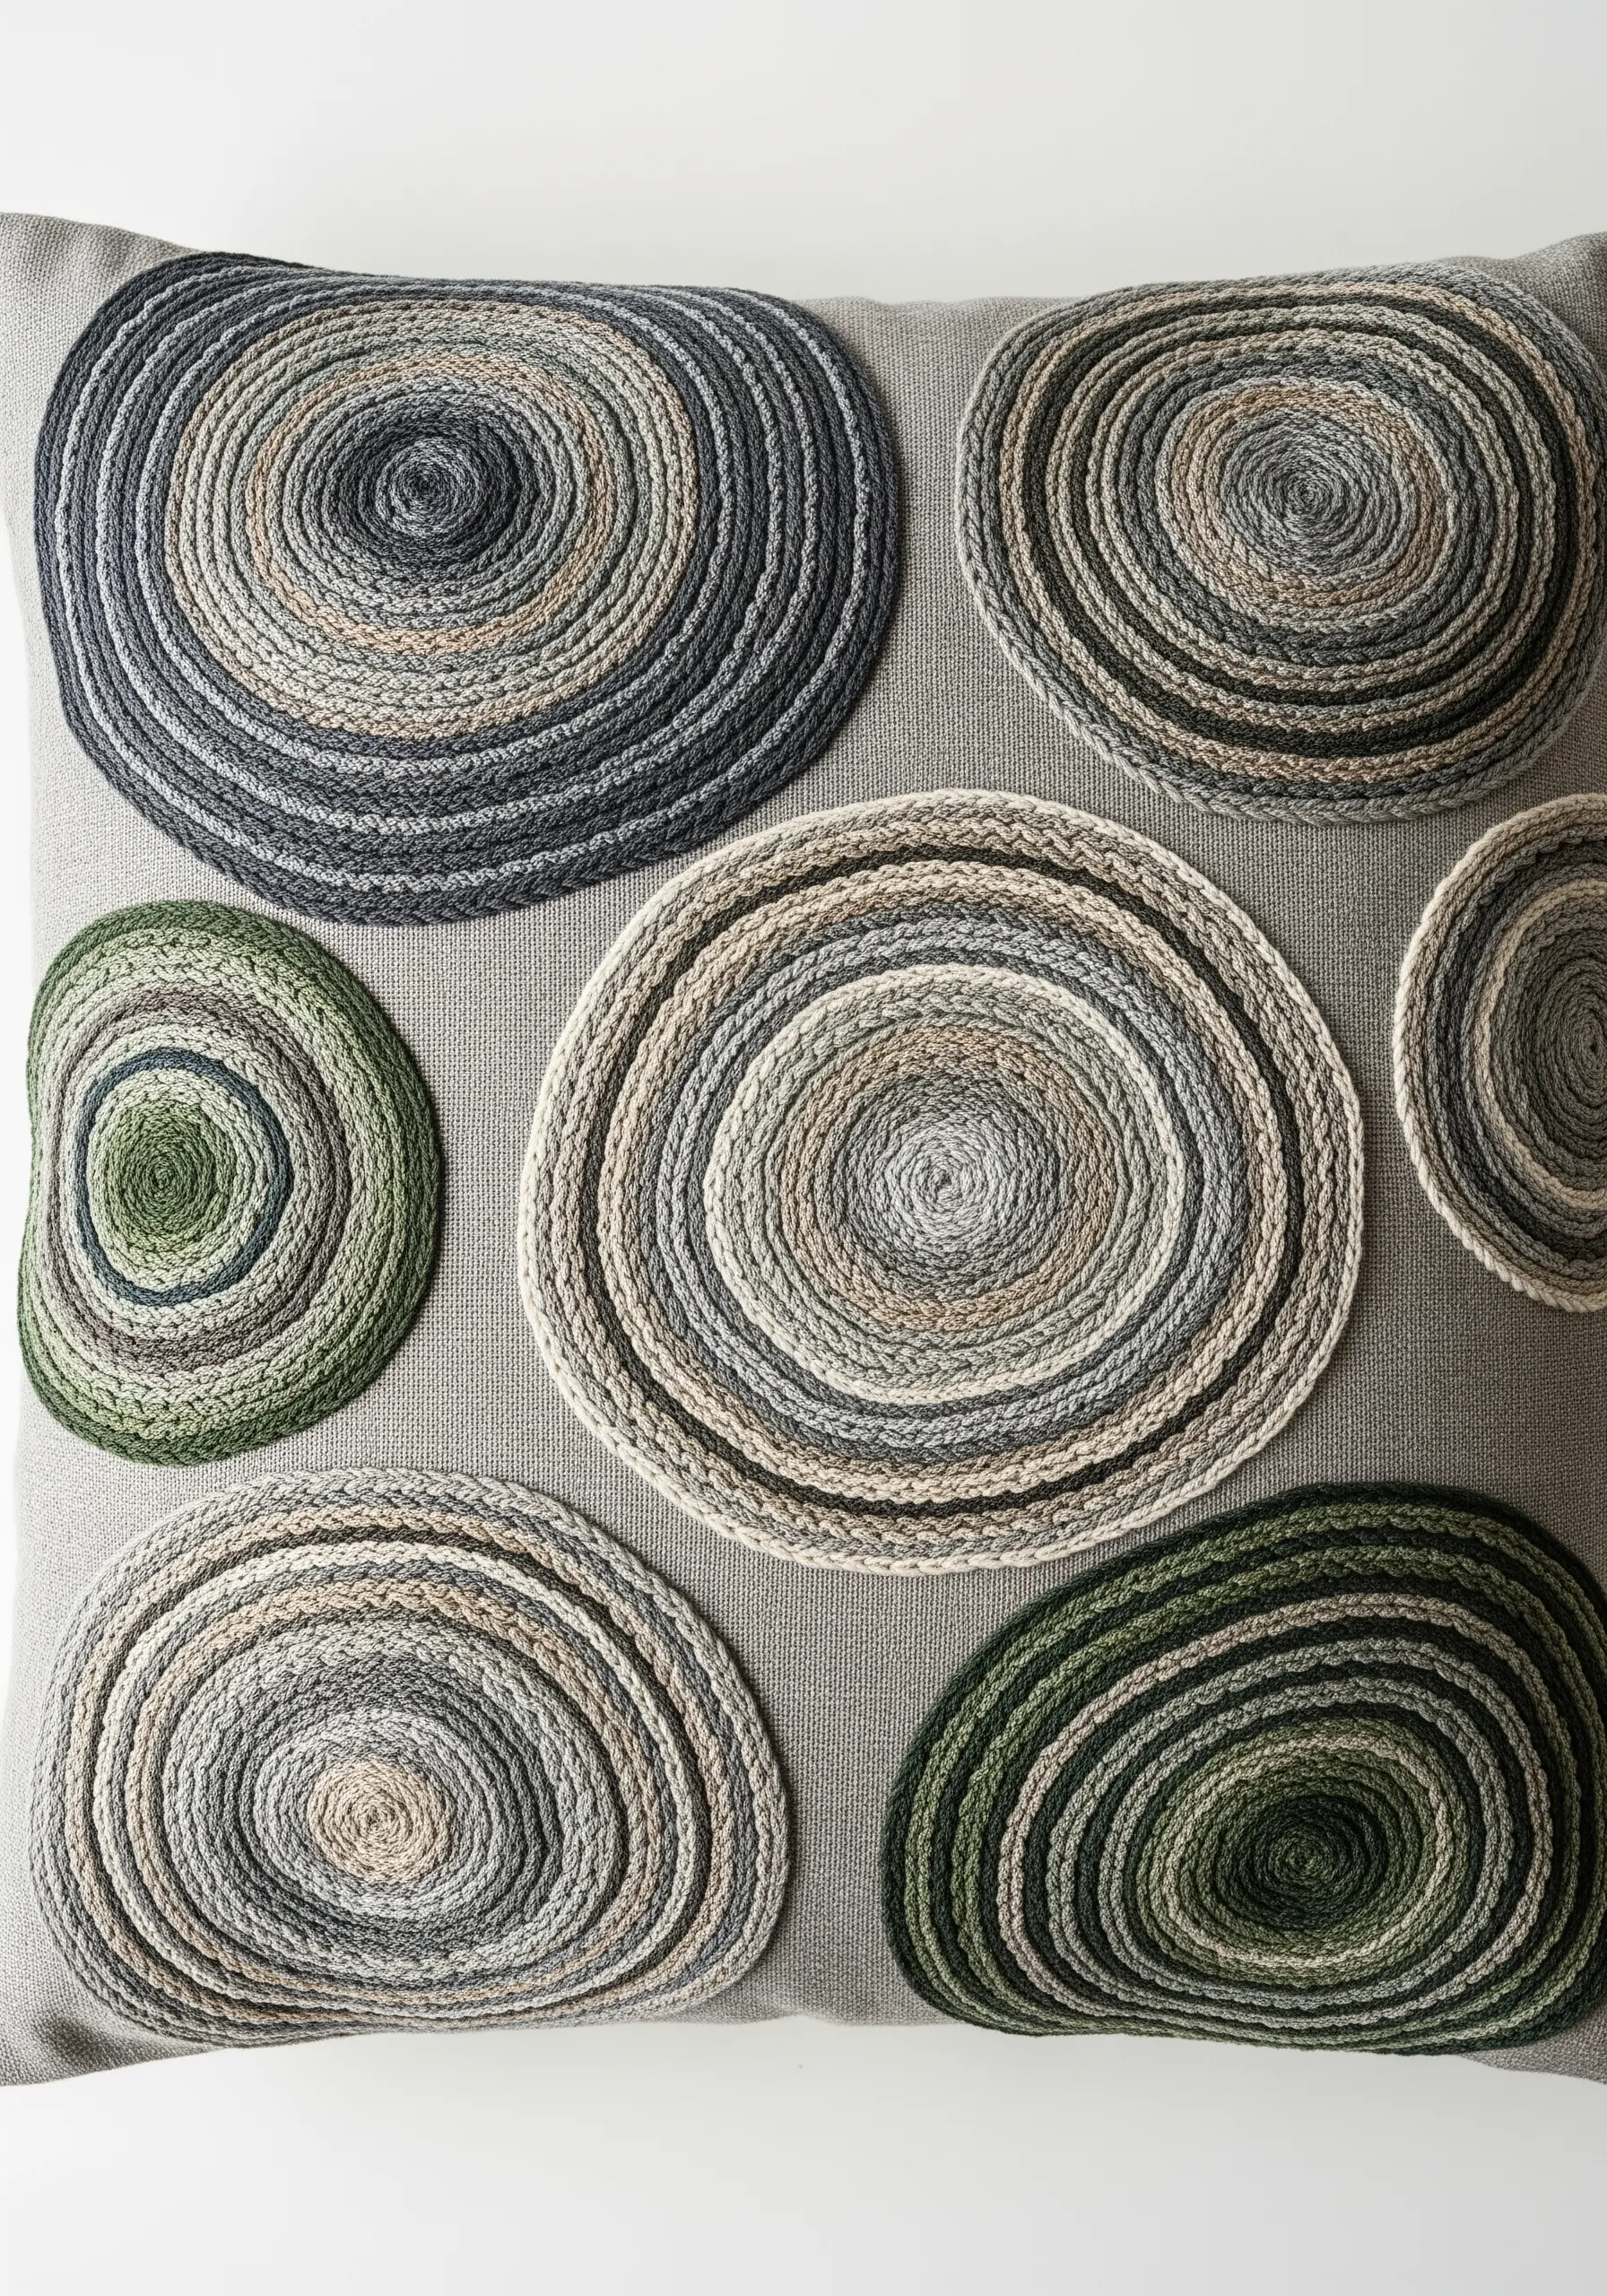
Create the smooth, rounded look of river stones without complex filling stitches.
This technique, called couching, simply involves laying thick yarn or cord onto the fabric and tacking it down with a thinner, matching thread.
Work in a continuous spiral from the center outwards to form each pebble shape.
By using variegated yarn or switching colors every few rows, you can replicate the natural bands and striations found in real stones, perfect for embroidery ideas inspired by stones, sand, and soil.
7. Chart a Tree’s History with Coiled Yarn

Translate the organic rings of a cut log into a stunning piece of fiber art using coiled yarn.
Begin coiling a thick yarn from the center of your hoop, securing it to the fabric with small, discreet stitches as you go.
Introduce new colors—creams, tans, rusts, and deep browns—to build a rich gradient that tells a story of growth.
Allow the outer edges to be irregular and uneven, breaking the perfect circle to mimic the natural shape of bark. It’s one of the most effective earth-inspired embroidery designs you can make.
8. Sculpt Desert Dunes with Thread Painting

Evoke the sweeping lines of a desert landscape using directional long-and-short stitch.
Focus on stitching along the natural curves of the dunes, allowing your stitches to define their shape and flow.
Use a cohesive palette of sand, taupe, and terracotta, blending the shades smoothly to create shadows and highlights that suggest depth and sunlight.
A sparse scattering of tiny French knots adds a delicate, textural counterpoint, like grains of sand catching the light. This technique is perfect for abstract thread landscapes.
9. Weave a Sculptural Nest with Mixed Fibers

Move beyond the hoop and create a three-dimensional object that celebrates organic chaos.
Instead of stitching onto fabric, build this nest by weaving and wrapping threads, fine wires, and dried grasses around a bowl-shaped form.
There’s no pattern here; the beauty comes from layering different textures and letting the materials dictate the final shape.
Once it holds its form, you can remove it from the mold and display it as one of your handmade art objects that bring a touch of whimsy to your life.
10. Craft a Honeycomb with Folded Ribbon

Achieve a stunning, geometric 3D effect with ribbon embroidery.
To create each honeycomb cell, bring a wide satin ribbon up through the fabric, fold it neatly into a hexagon, and tack down the corners with small stitches.
The slight puffiness of the folded ribbon creates instant dimension.
For added texture, fill alternating cells with dense clusters of French knots using a contrasting embroidery floss. It’s one of the most creative ways to stitch natural textures like a pro.
11. Define Bold Lines with Whipped Stitches
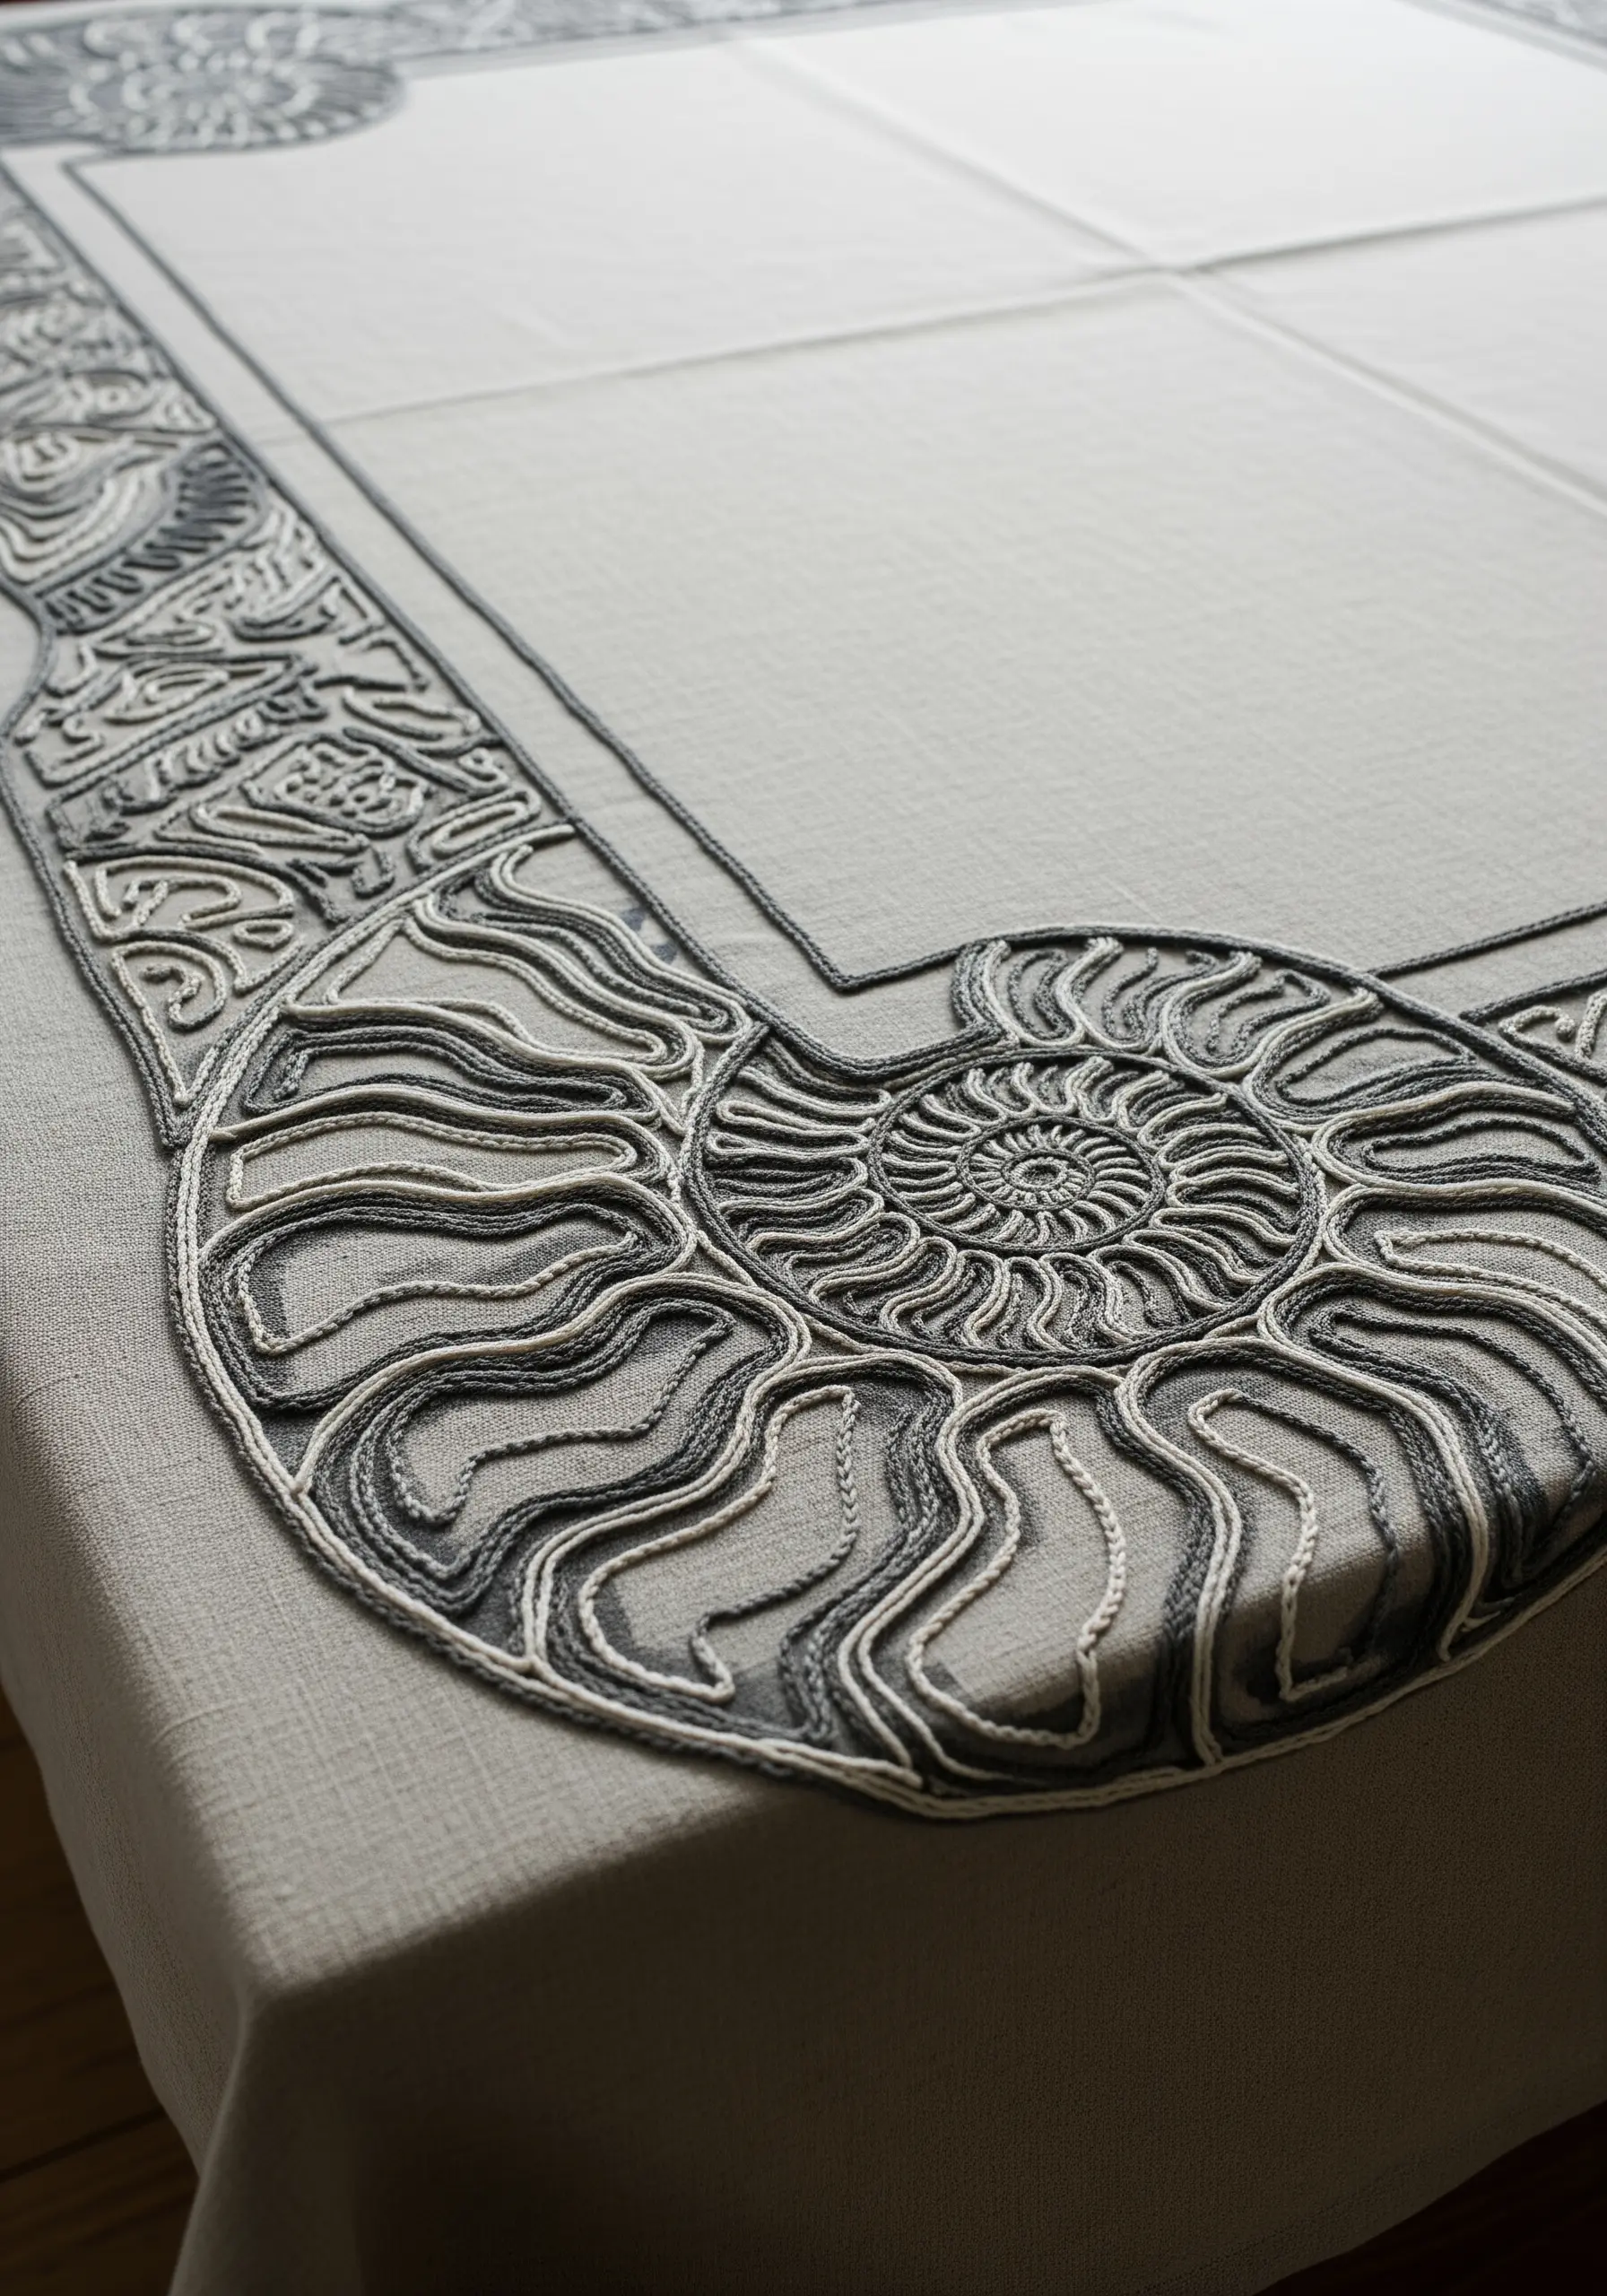
Create the elegant, spiraling lines of a nautilus shell with a simple but powerful stitch combination.
First, lay down your primary design lines using a basic backstitch. Then, using a contrasting color and a blunt tapestry needle, whip the thread around each backstitch without piercing the fabric.
This technique creates a raised, cord-like line that is both graphic and graceful, making it ideal for large-scale table linen embroidery motifs that need to make an impact.
12. Illustrate Water Ripples with Varied Line Stitches

Capture the movement of water by combining different line stitches in concentric circles.
Use a simple backstitch for smooth, clean rings, and then introduce a whipped chain stitch or a Pekinese stitch for a textured, wavy line.
Alternating between these smooth and textured stitches creates a visual vibration that mimics the way light plays on disturbed water.
Stitching on a dark navy fabric enhances the effect, making this a perfect technique for minimal ocean-inspired embroidery pieces.
13. Mimic Cracked Earth with Couching and Seed Stitch
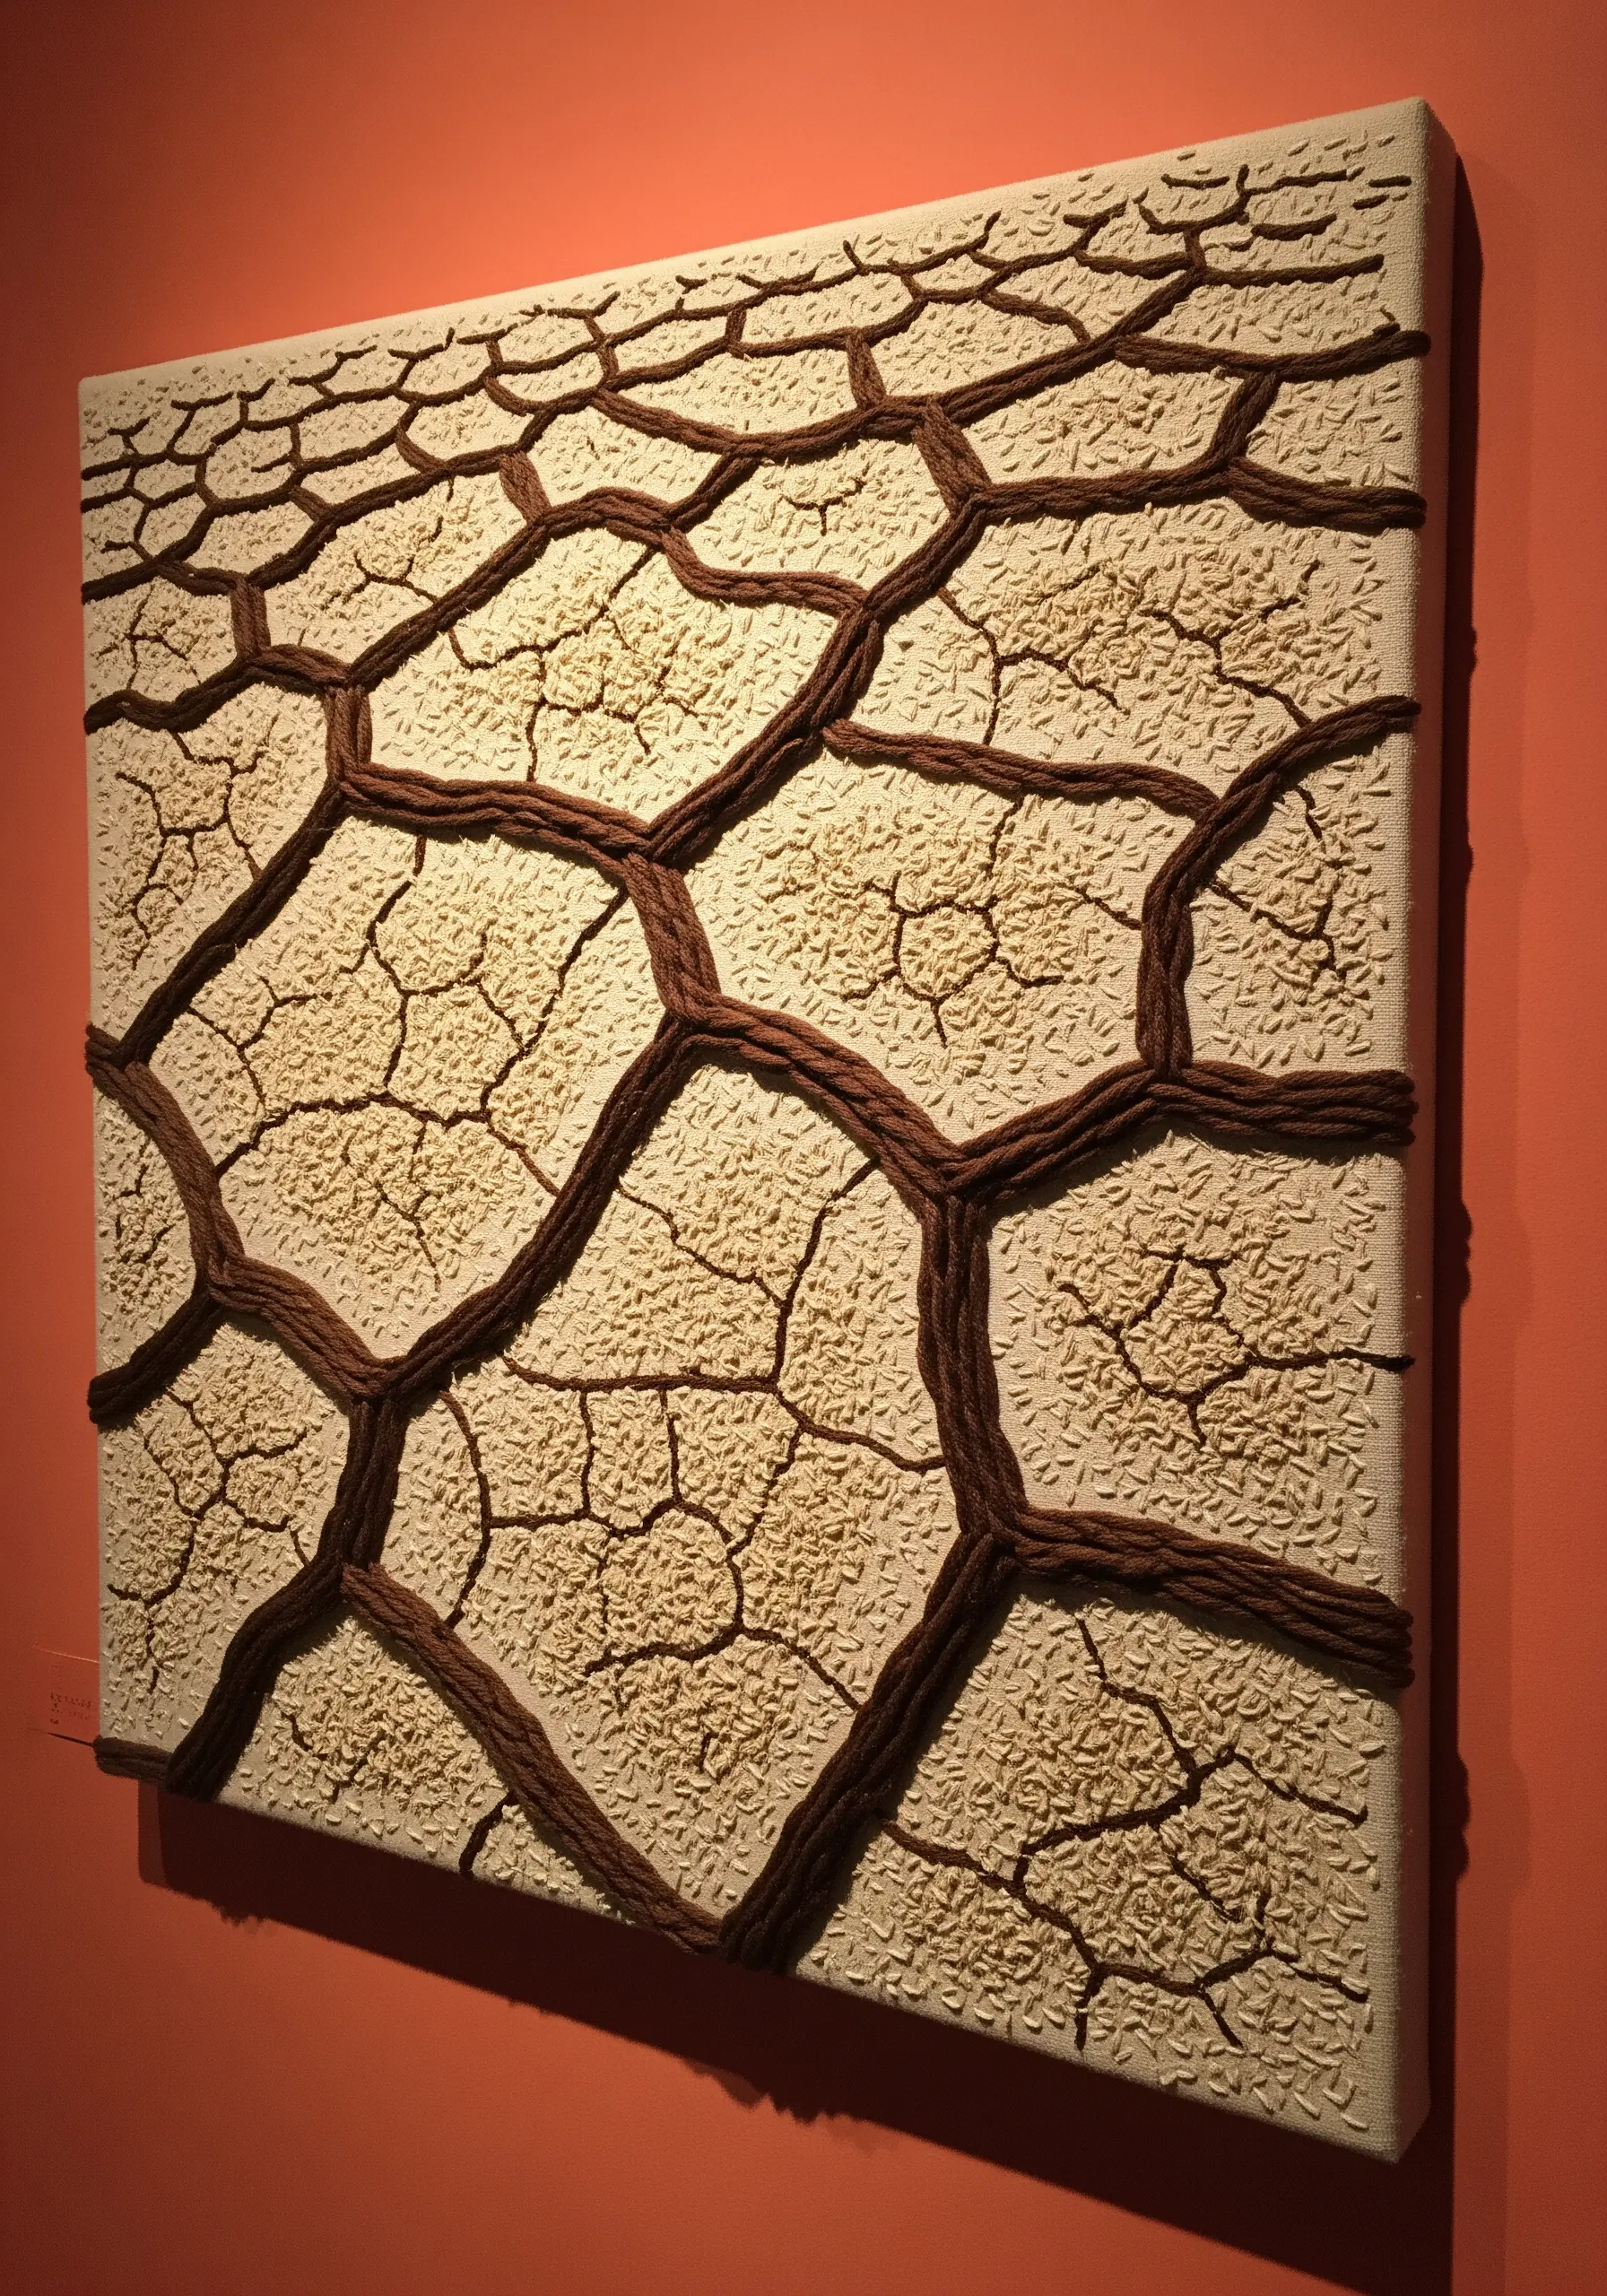
Replicate the parched texture of a dry lakebed with a smart combination of two simple techniques.
Outline the large, cracked shapes with a thick, couched cord in a dark brown to create raised, defining borders.
Then, fill the inside of each shape with a dense, random scattering of tiny seed stitches (single, short straight stitches) in a sand or bone color.
The contrast between the bold, smooth lines and the delicate, granular fill is what makes this earthy texture embroidery pattern so compelling and realistic.
14. Achieve Coral Textures with Raised Stitches

Emulate the organic, brain-like texture of coral using a raised stem stitch or Turkey work with thick, soft yarn.
Instead of stitching in straight lines, work in meandering, curved paths that fold back on themselves, filling the entire area.
Using an ombre yarn or blending several shades from coral to pink creates a gorgeous gradient that enhances the sculptural quality of the stitches.
This method allows you to create dense, plush, and highly contemporary texture techniques to create raised, sculptural embroidery effects on pillows and wall art.
15. Construct a Delicate Dandelion with Fly Stitches

Build the airy, fragile structure of a dandelion seed head using strategically placed straight and fly stitches.
For each individual seed, stitch a long straight line for the stem, topped with a fan of three to five tiny detached chain or fly stitches to create the pappus (the fluffy parachute).
Work in a radial pattern from a central point filled with French knots and satin stitch.
Using a dark background fabric makes the white threads pop, highlighting the delicate structure of these minimalist embroidery designs inspired by nature.
16. Create Layered Scales with Shaded Satin Stitch

Build a rich, repeating pattern like fish scales, feathers, or pinecones by layering curved satin stitches.
Stitch one row of scalloped shapes, then begin the next row so that the tops of the new scallops cover the bottoms of the previous row.
Within each individual scallop, use thread painting techniques—blending light and dark shades of the same color—to give it a curved, three-dimensional appearance.
This technique shows how ways to layer leaf stitching for three-dimensional botanical texture can be adapted for non-botanical patterns.
17. Blend Weaving and Embroidery for a Tactile Statement
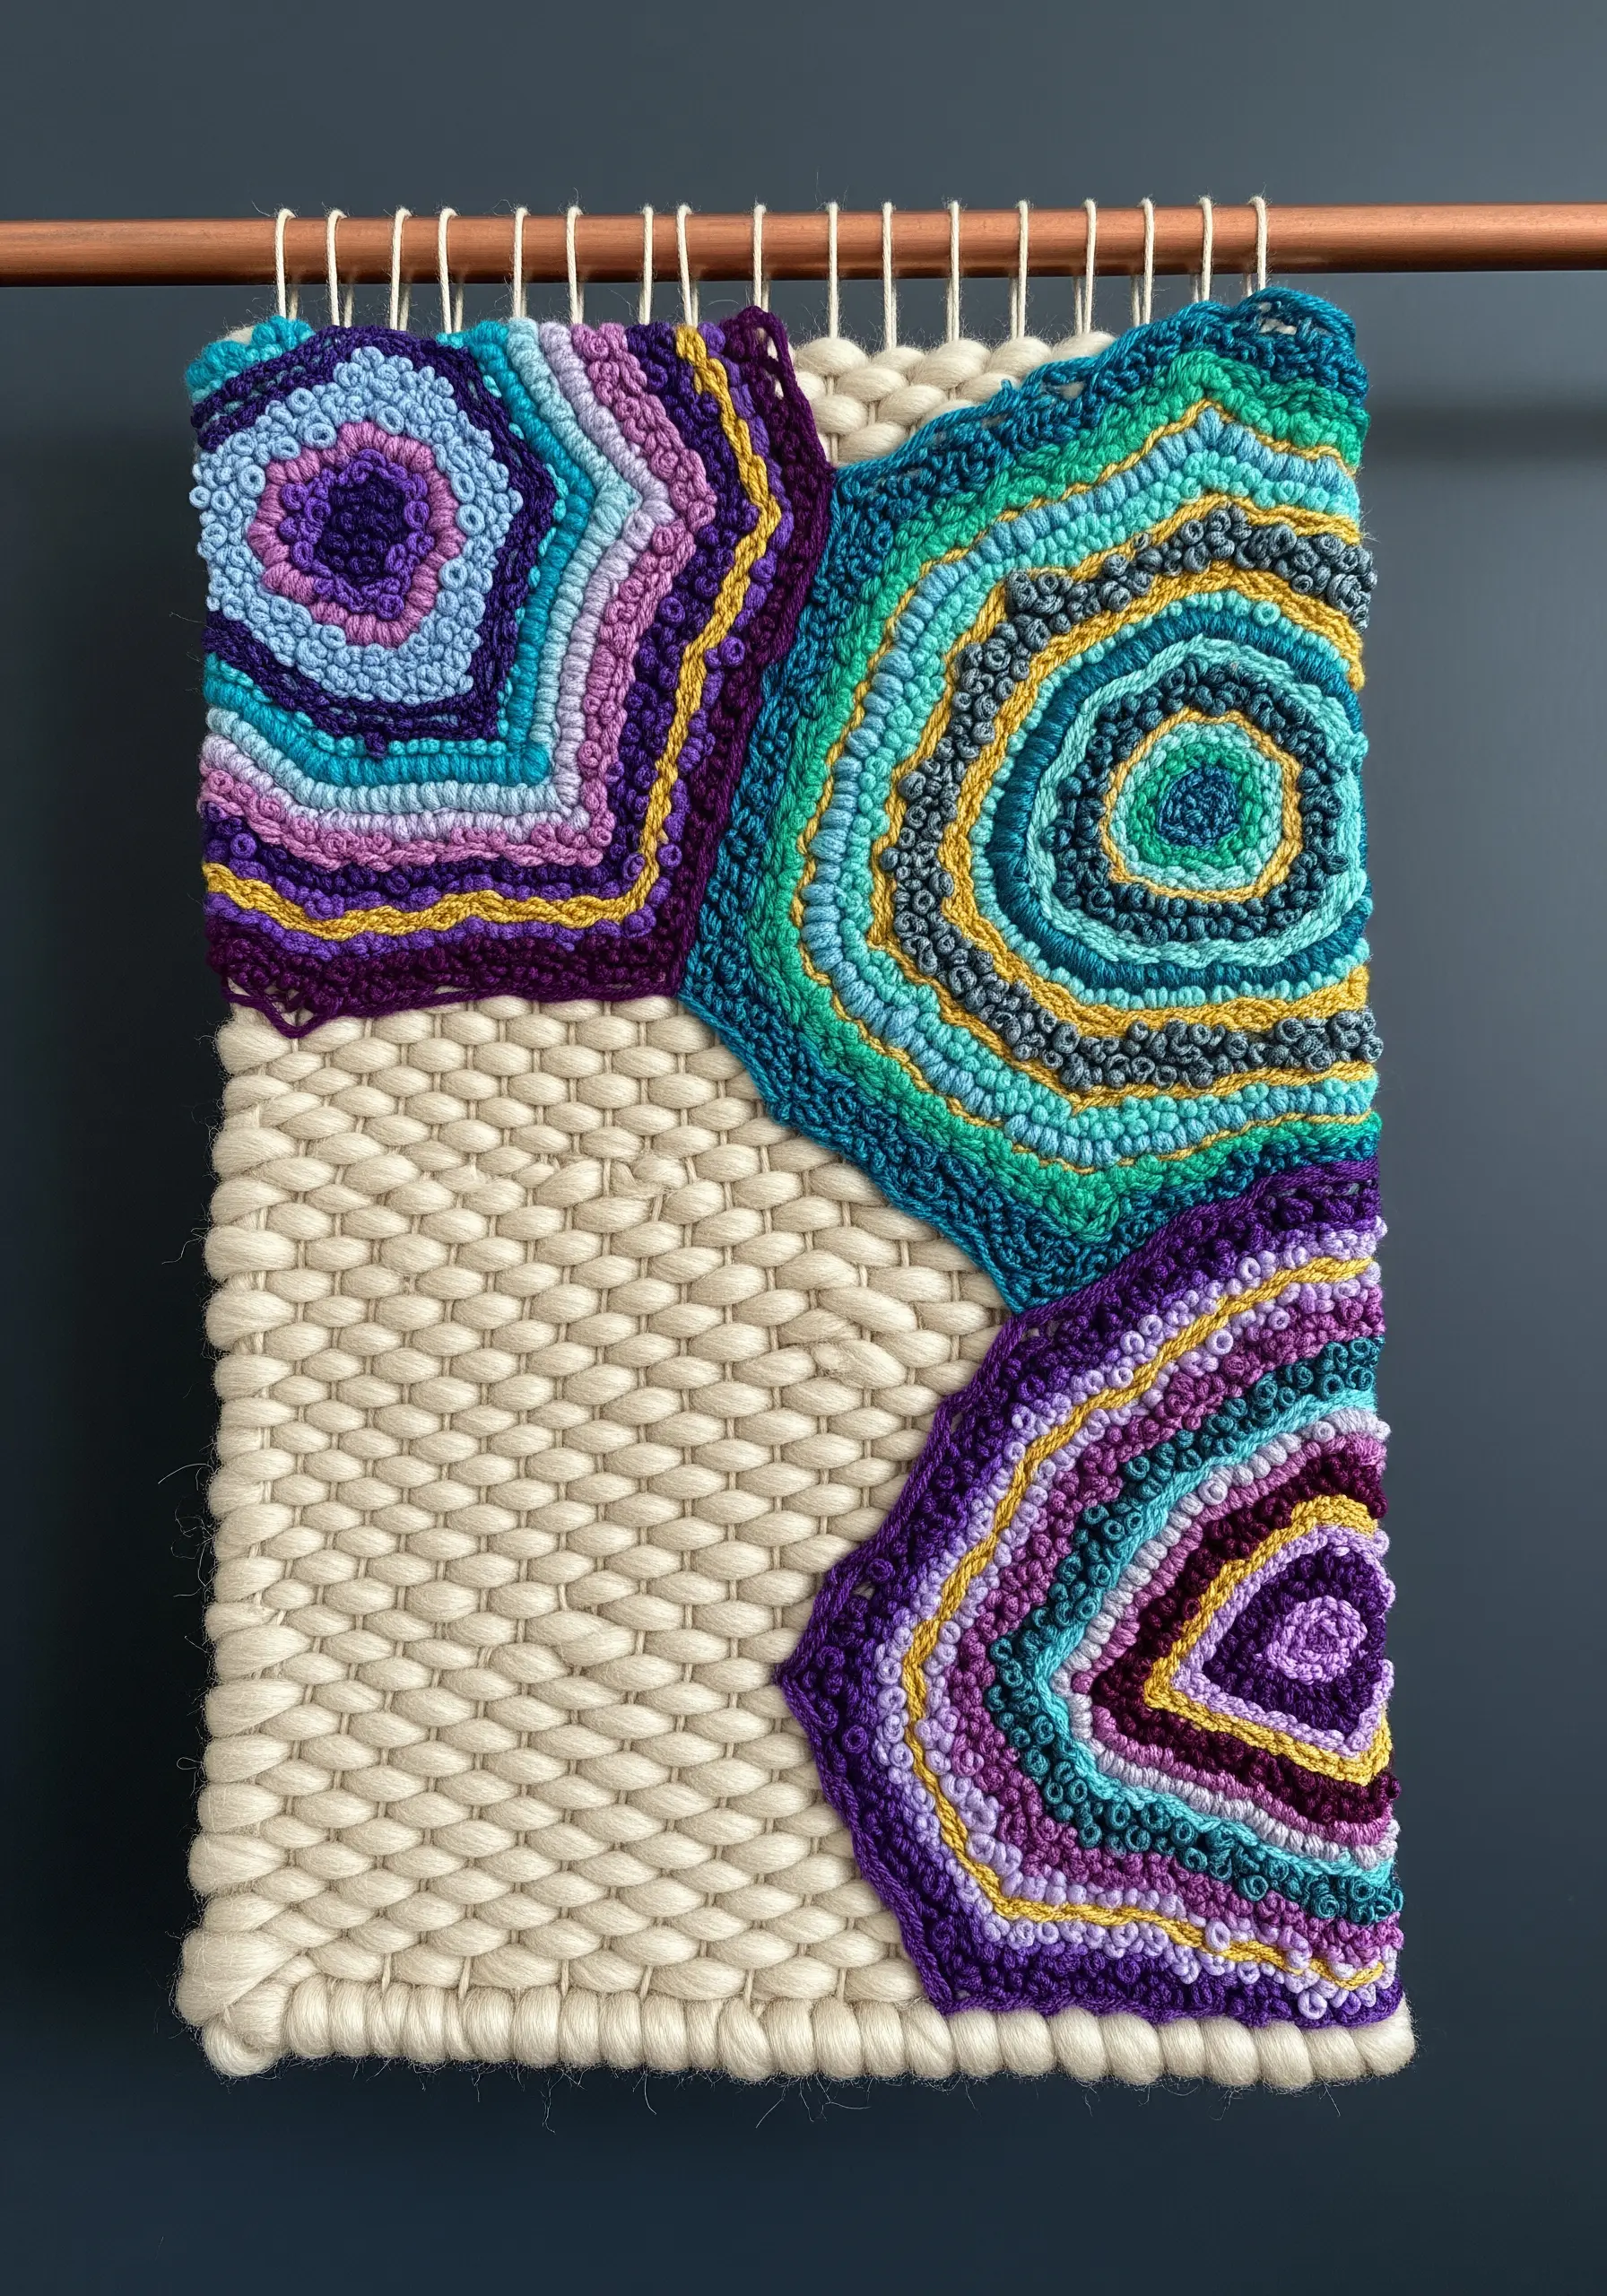
Create a truly unique piece by combining the structured grid of weaving with the freeform nature of embroidery.
Start with a simple base of plain-weave using a thick, neutral-colored roving. This creates your canvas.
Then, use a tapestry needle to add embroidered sections directly onto the weaving, filling organic shapes with concentric rings of chain stitch or backstitch.
This contrast between the soft, chunky weave and the finer, colorful embroidery makes for stunning mixed-fiber wall hangings that will totally transform your room.
18. Shade a Nautilus Shell with Long and Short Stitch

Give a simple line drawing depth and realism with careful shading.
After outlining the segments of the nautilus shell with a dark backstitch or couched thread, fill each section using the long-and-short stitch technique.
Focus on blending shades of brown and tan to create a gentle gradient that suggests the shell’s curve.
A few strategically placed French knots can mimic pearls or water droplets, turning a simple tote into one of your favorite bold tote bag embroidery designs.
19. Etch Delicate Leaf Veins onto Felt
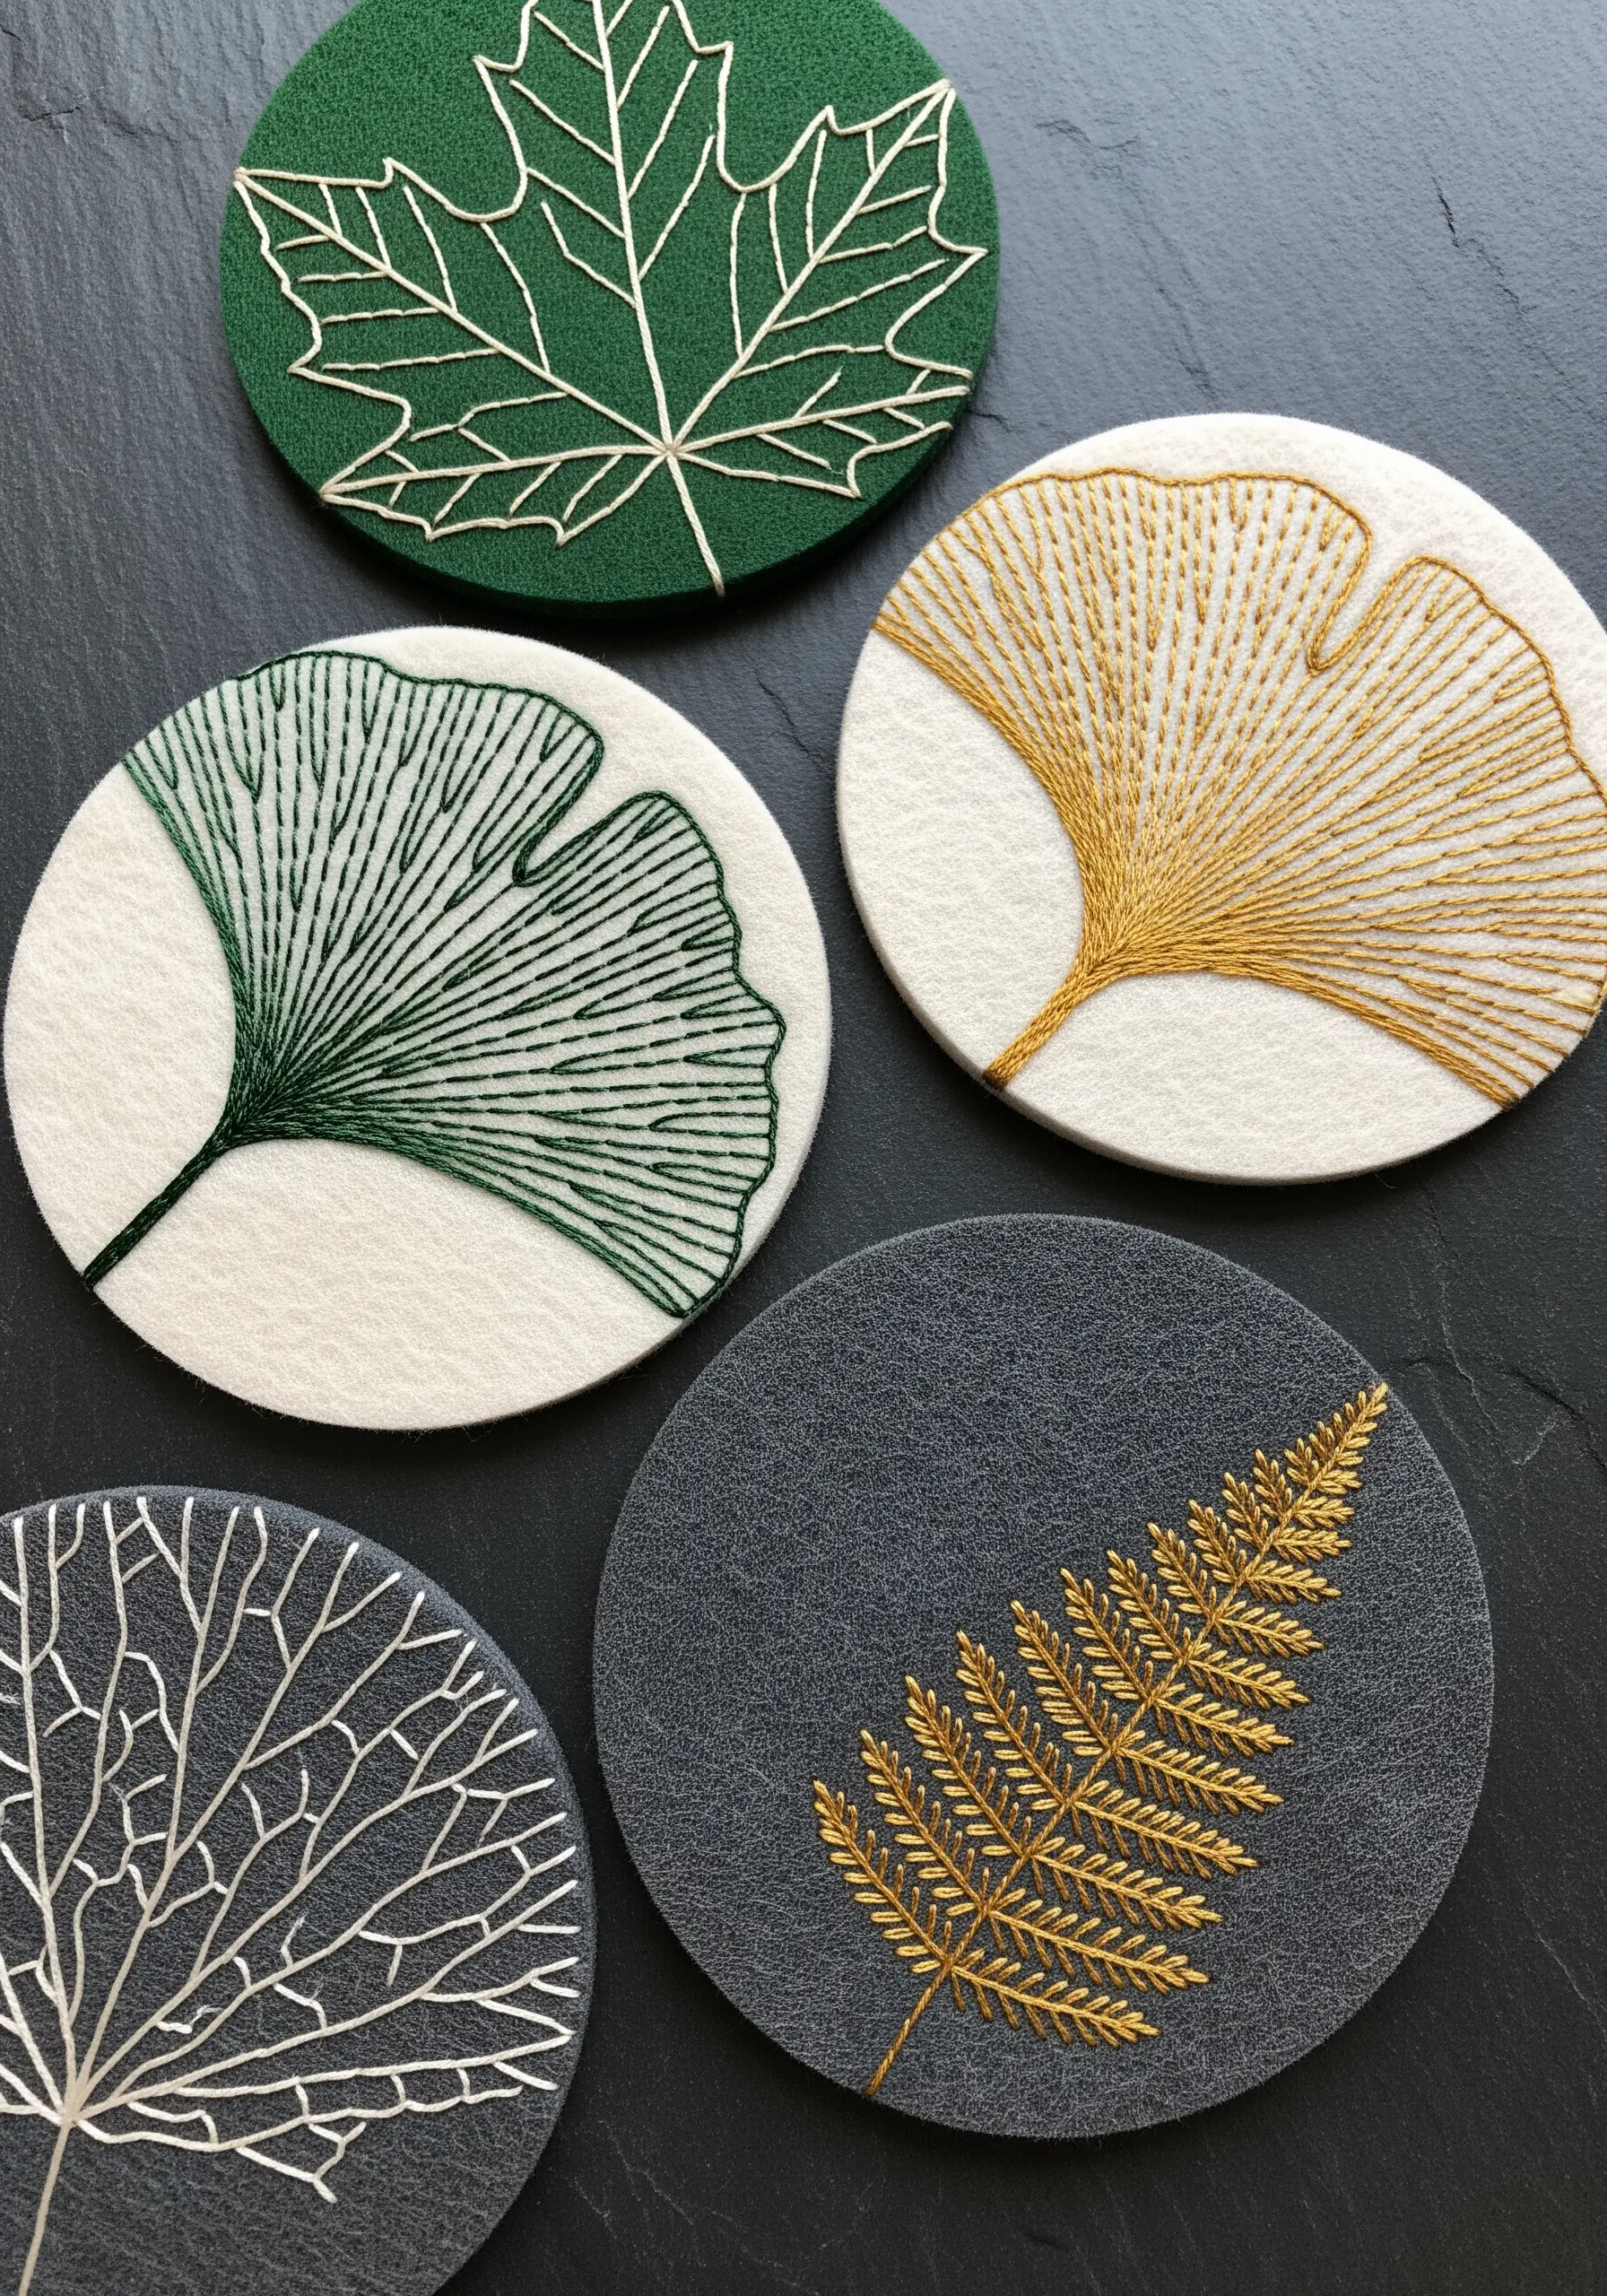
Create elegant, minimalist botanical art by stitching fine lines onto thick wool felt.
The sturdy, non-fraying nature of felt makes it the perfect canvas for precise linework, as it provides stability and won’t pucker.
Use a simple backstitch or stem stitch with a contrasting metallic or single-color thread to trace the intricate vein patterns of leaves like ginkgo, fern, or maple.
This project proves that the most impactful delicate leaf stitch techniques for realistic botanical embroidery shading can also be the simplest.
20. Stitch Plump Lavender Sprigs with Bullion Knots

Create perfectly shaped, dimensional lavender buds with the bullion knot.
This stitch, which involves wrapping the thread multiple times around the needle before pulling it through, creates a small, caterpillar-like shape that is ideal for lavender blossoms.
Stack them in tapering clusters along a simple green stem stitch, varying the shades of purple and violet for a more natural, sun-kissed look.
This technique transforms a simple cushion into one of the most beautiful lavender-inspired embroidery designs for bedrooms meant for relaxation.
21. Create Ethereal Frost Patterns on Tulle

Capture the delicate beauty of frost on a windowpane by stitching on a sheer fabric like tulle or organza.
The transparency of the fabric allows the stitches to appear as if they are floating in mid-air.
Use feather stitch and fly stitch with fine, single strands of white, silver, and pale grey thread, branching out in organic, fern-like patterns.
This method is a stunning example of how to transform plain linen into luxury decor—or in this case, sheer tulle into winter magic.
22. Block Out Abstract Shapes with Vertical Stitches
Create a bold, modern wall hanging using only one stitch: the straight stitch.
The artistry here lies not in complex techniques but in the composition and color blocking. Sketch out large, organic, curved shapes on your fabric.
Fill each shape completely with tightly packed, vertical straight stitches, using a different neutral color for each block.
The result is a highly textured, rhythmic piece that proves how simple stitched patterns that pair perfectly with modern furniture can make a big statement.
23. Let Thread Roots Grow Beyond the Fabric
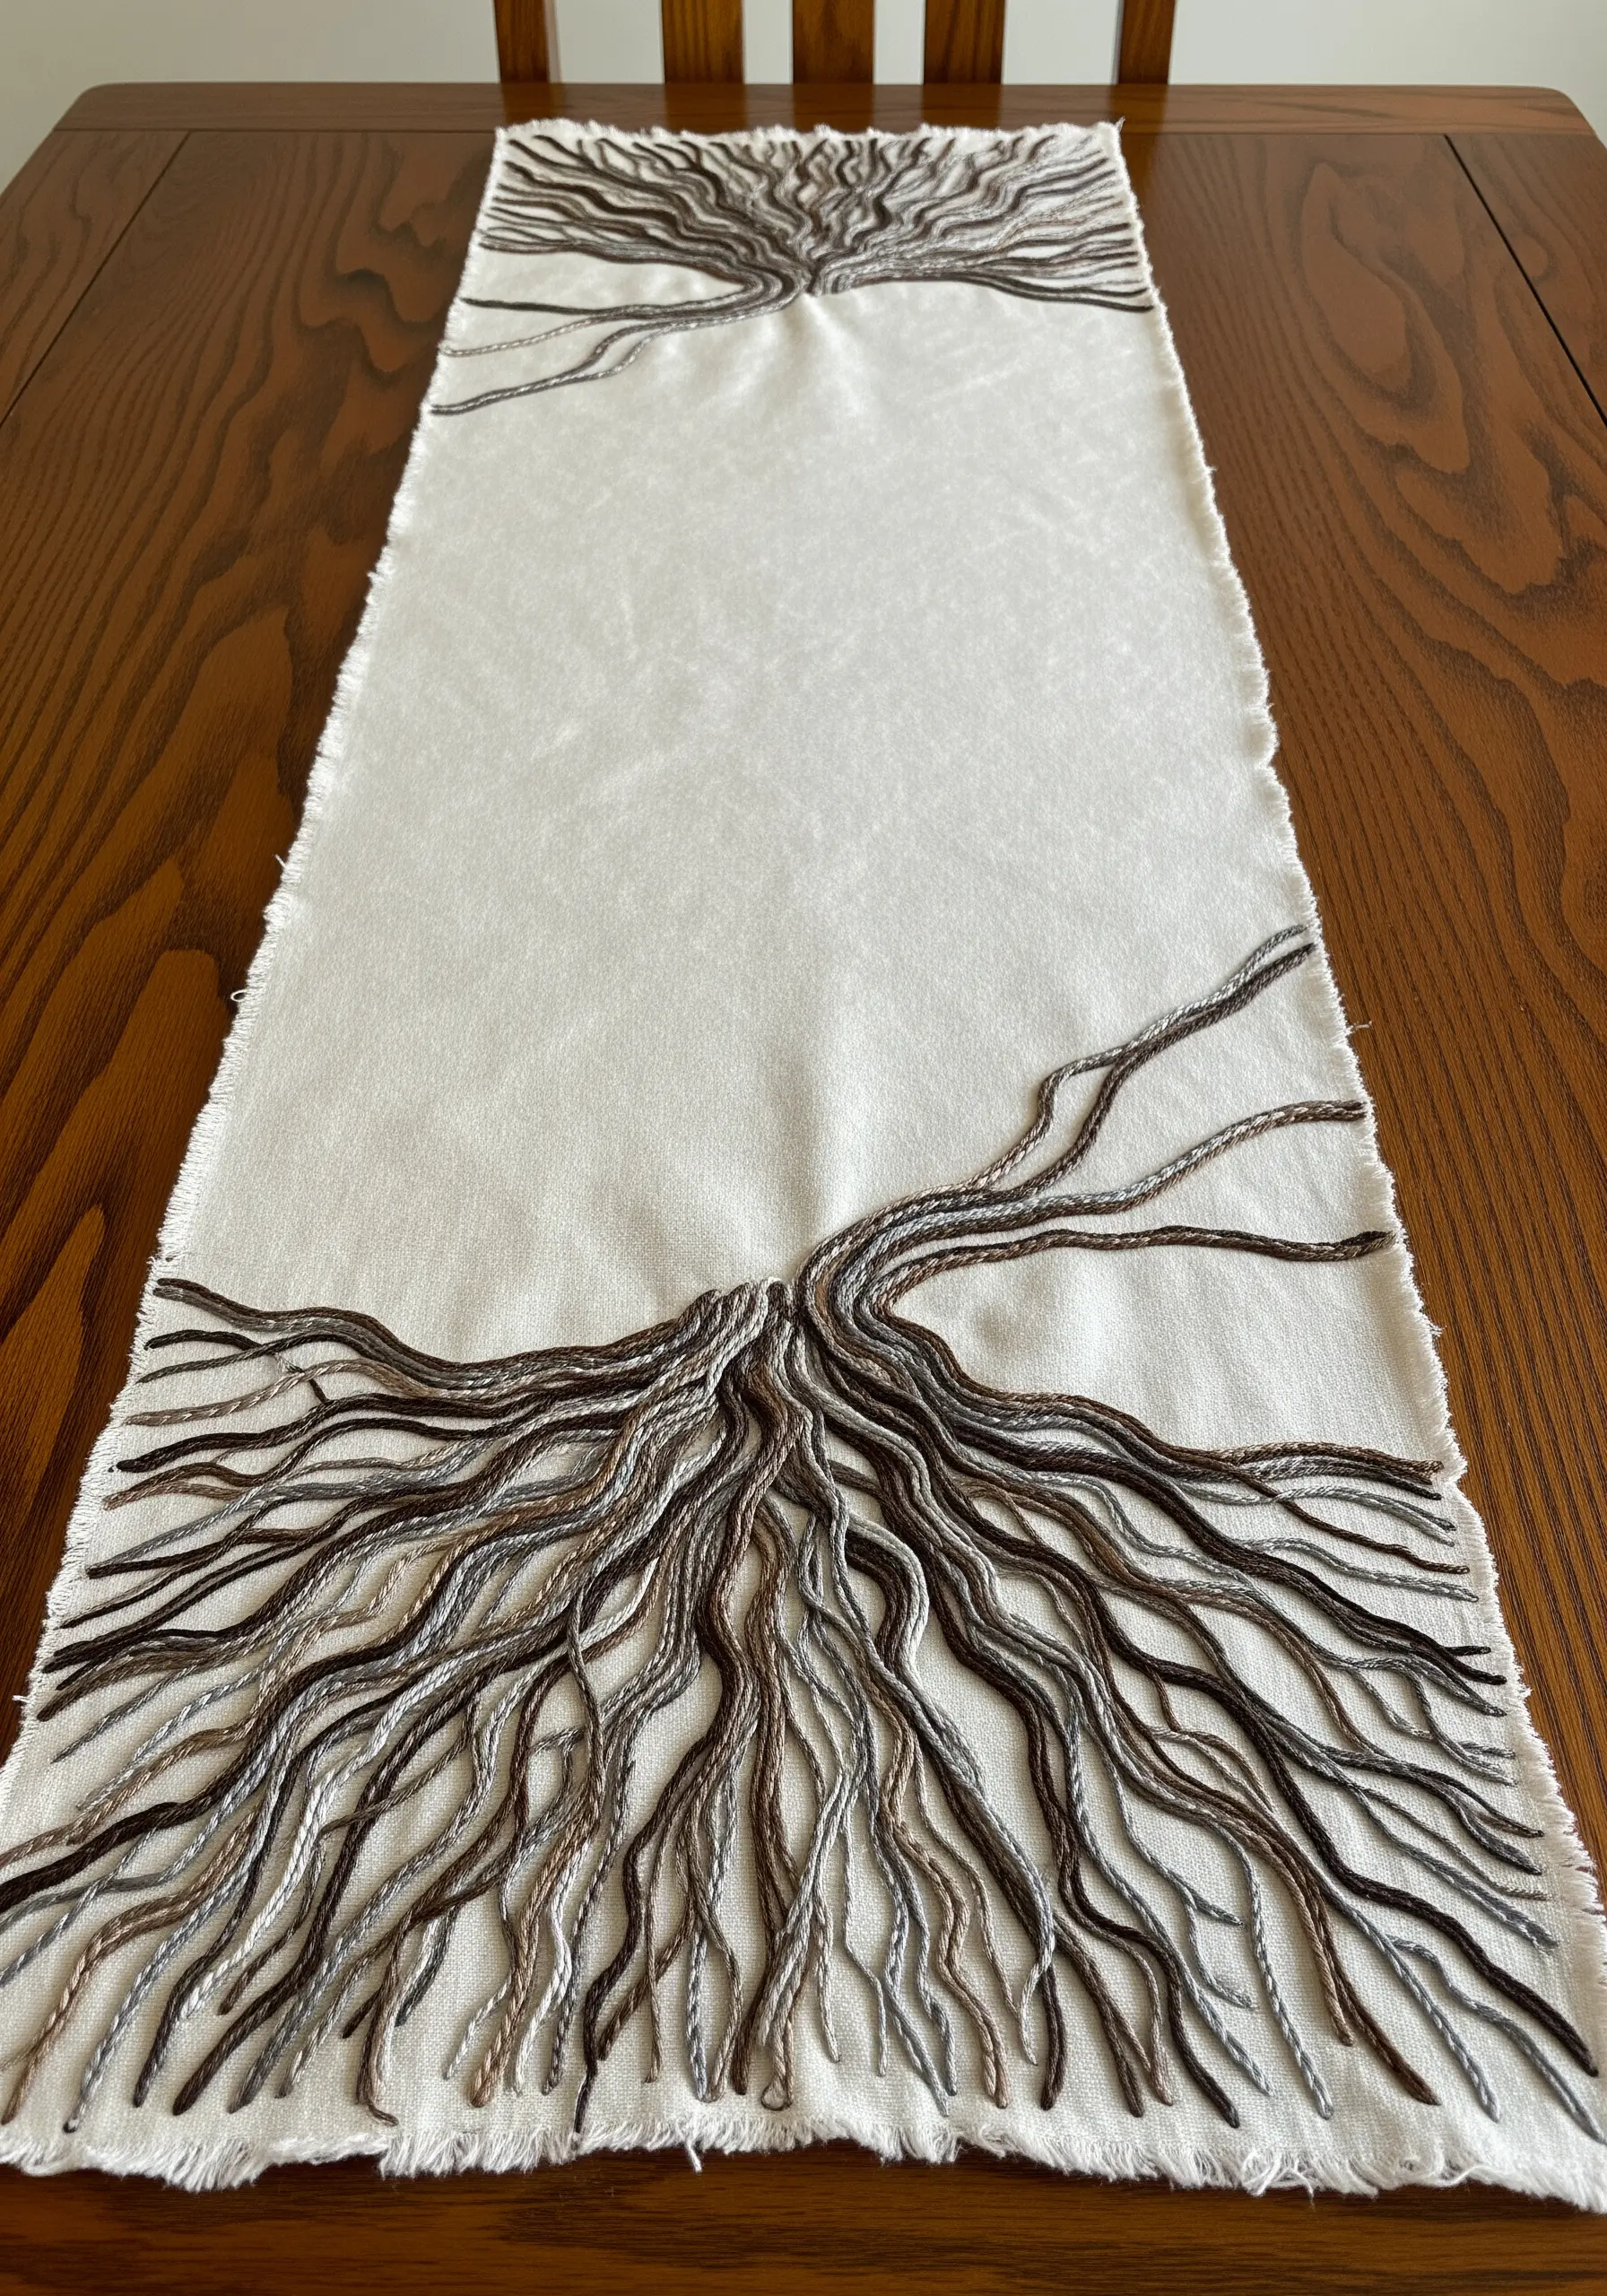
Add an element of organic deconstruction to your work by allowing your stitches to escape the confines of the fabric.
At the ends of a table runner, use various shades of brown and grey yarn to couch down a network of tangled roots.
As you near the edge, stop stitching the yarn to the fabric, letting the loose ends hang freely and fray.
This technique beautifully plays with abstract thread designs using negative space and texture, creating a piece that feels alive and untamed.
24. Paint a Hyper-Realistic Feather with a Single Thread
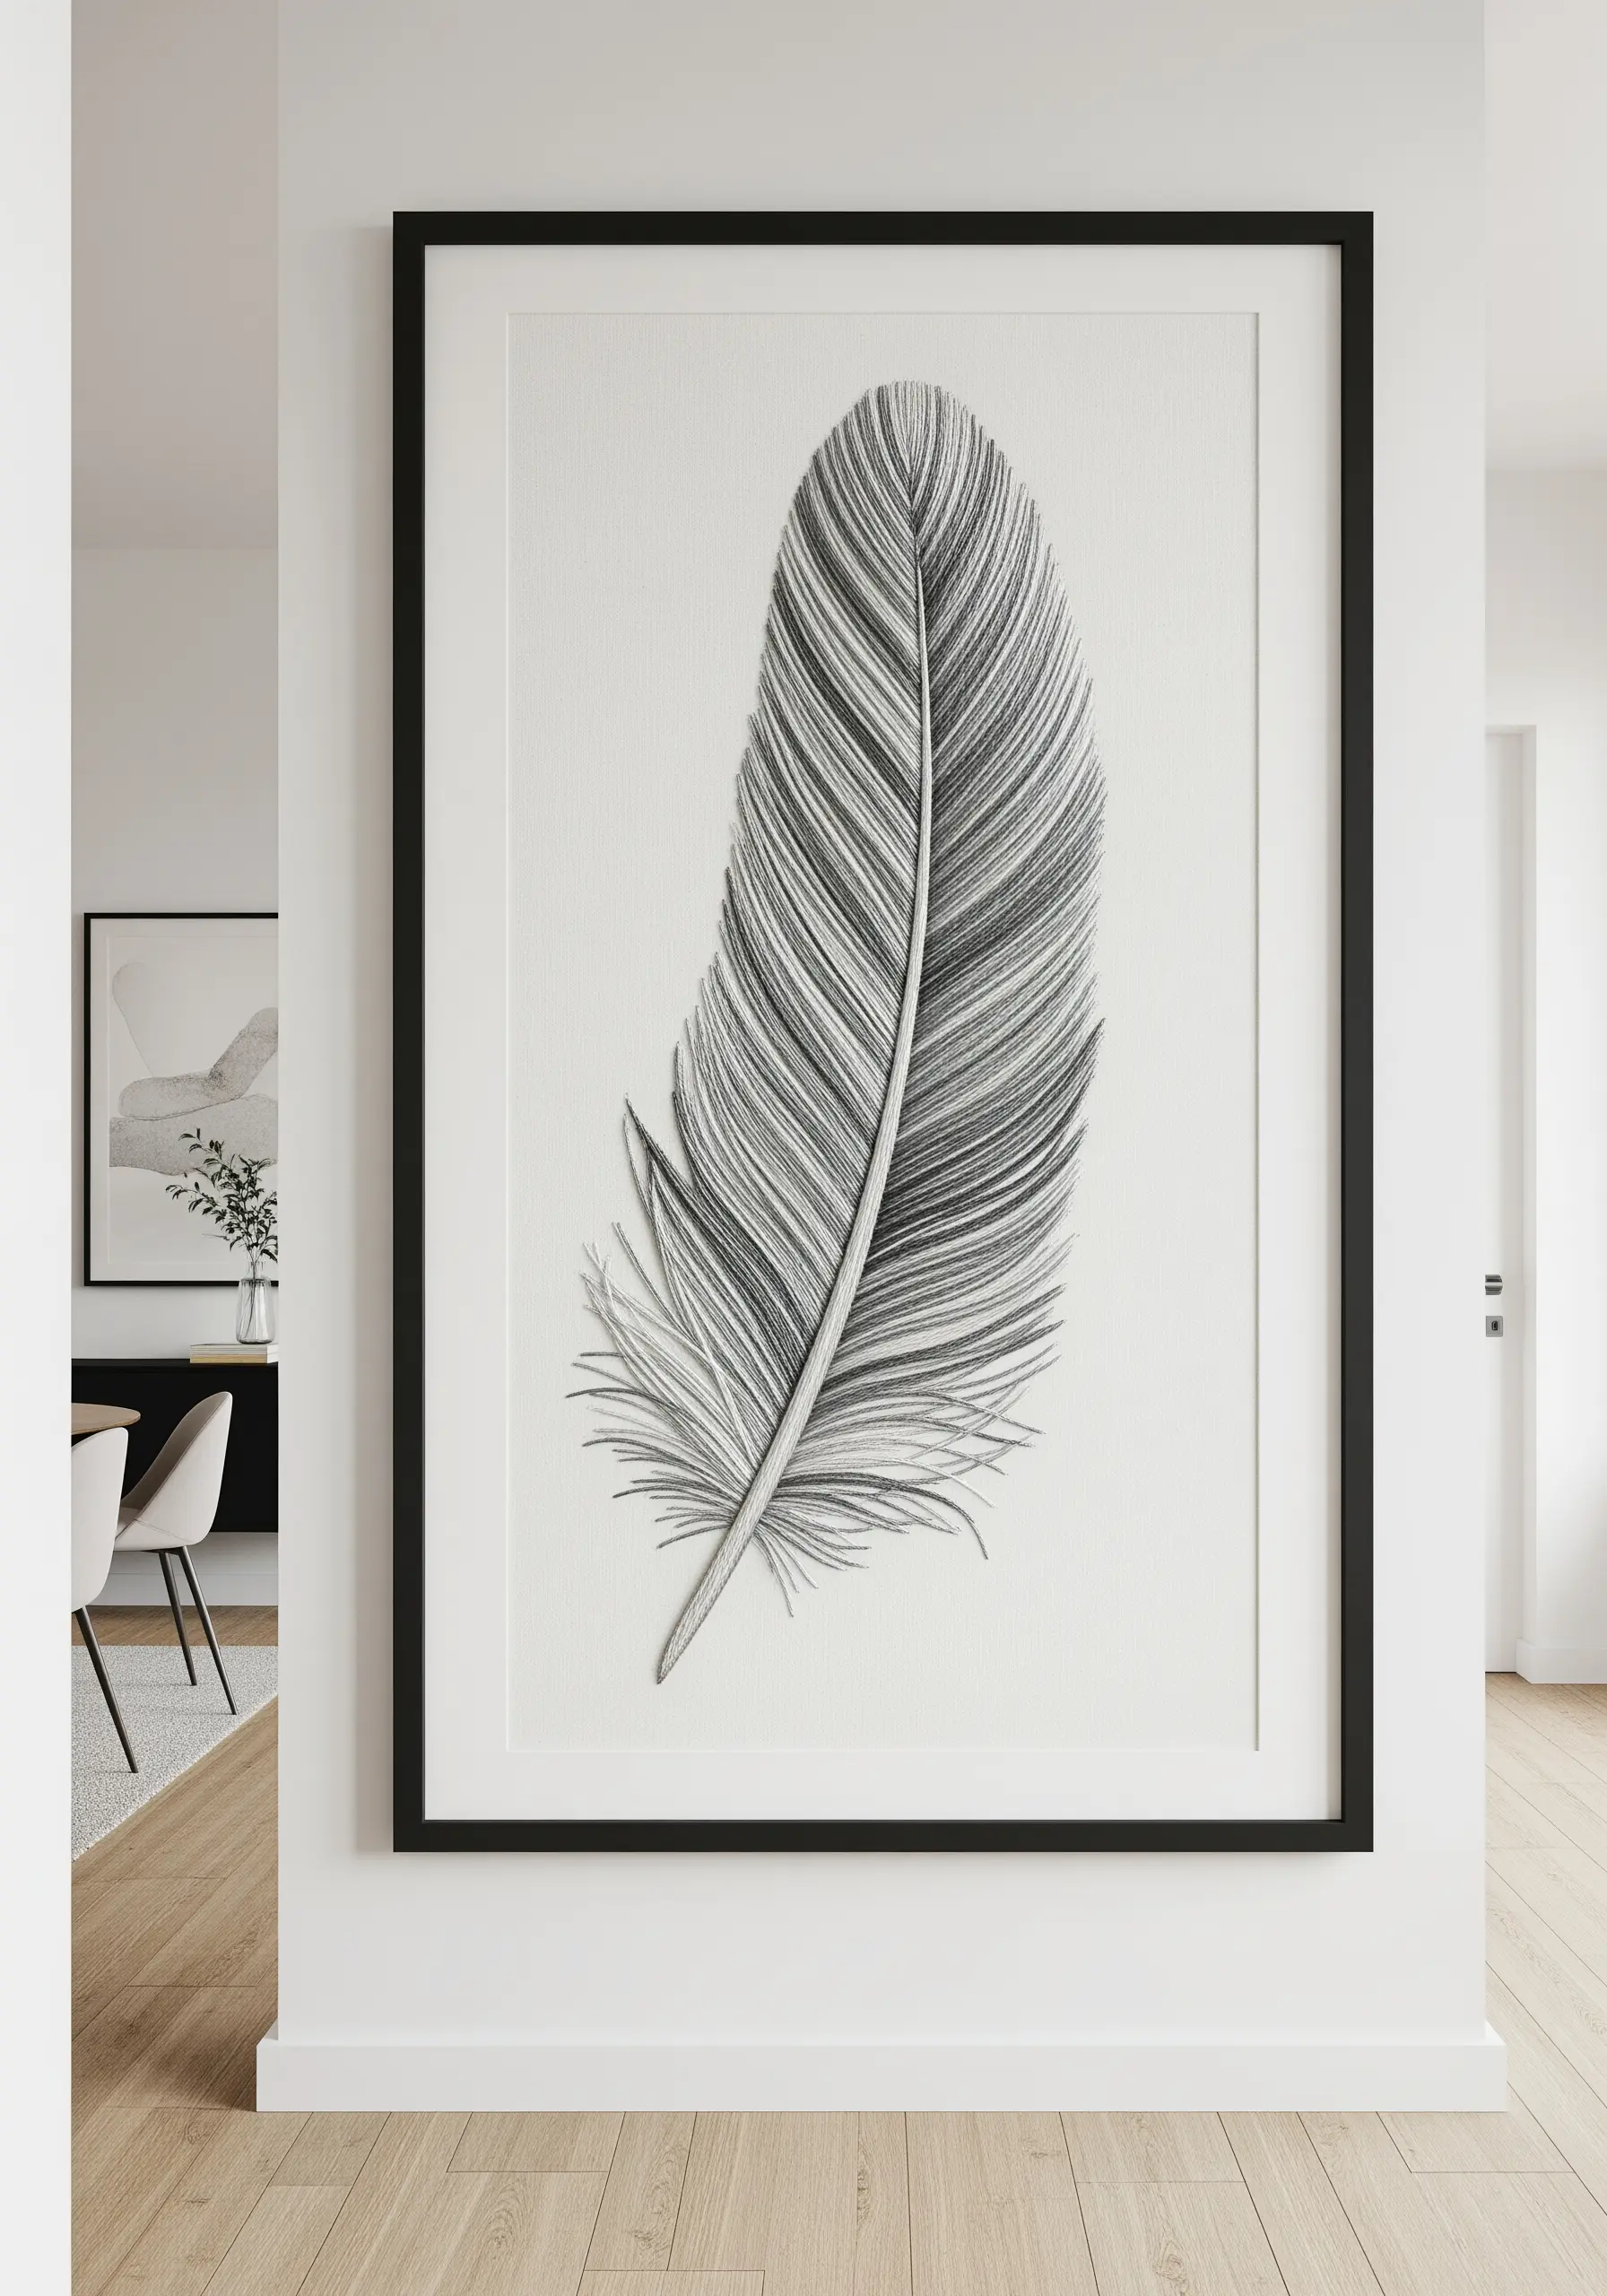
Achieve astonishing realism by using just a single strand of embroidery floss and the long-and-short stitch.
The key to this technique is meticulous color blending and paying close attention to the direction of your stitches to mimic the feather’s barbs.
Work with many similar shades of grey, black, and white, laying your stitches side-by-side to create a flawlessly smooth gradient.
This is the essence of thread painting, turning simple floss into modern thread portraits that look shockingly realistic.
25. Sculpt a Lunar Surface with Padded Stitching

Recreate the cratered, textured surface of the moon with dimensional stitching techniques.
For the raised rims of the craters, use padded satin stitch—working over a foundation of smaller stitches or felt—to give them height.
Fill the surrounding areas with a dense field of French knots or seed stitches to create a rough, dusty texture.
Working in a monochrome grey palette keeps the focus entirely on the dramatic interplay of light and shadow across your abstract thread sculpt designs.
26. Weave a Bold Braid Directly onto Fabric
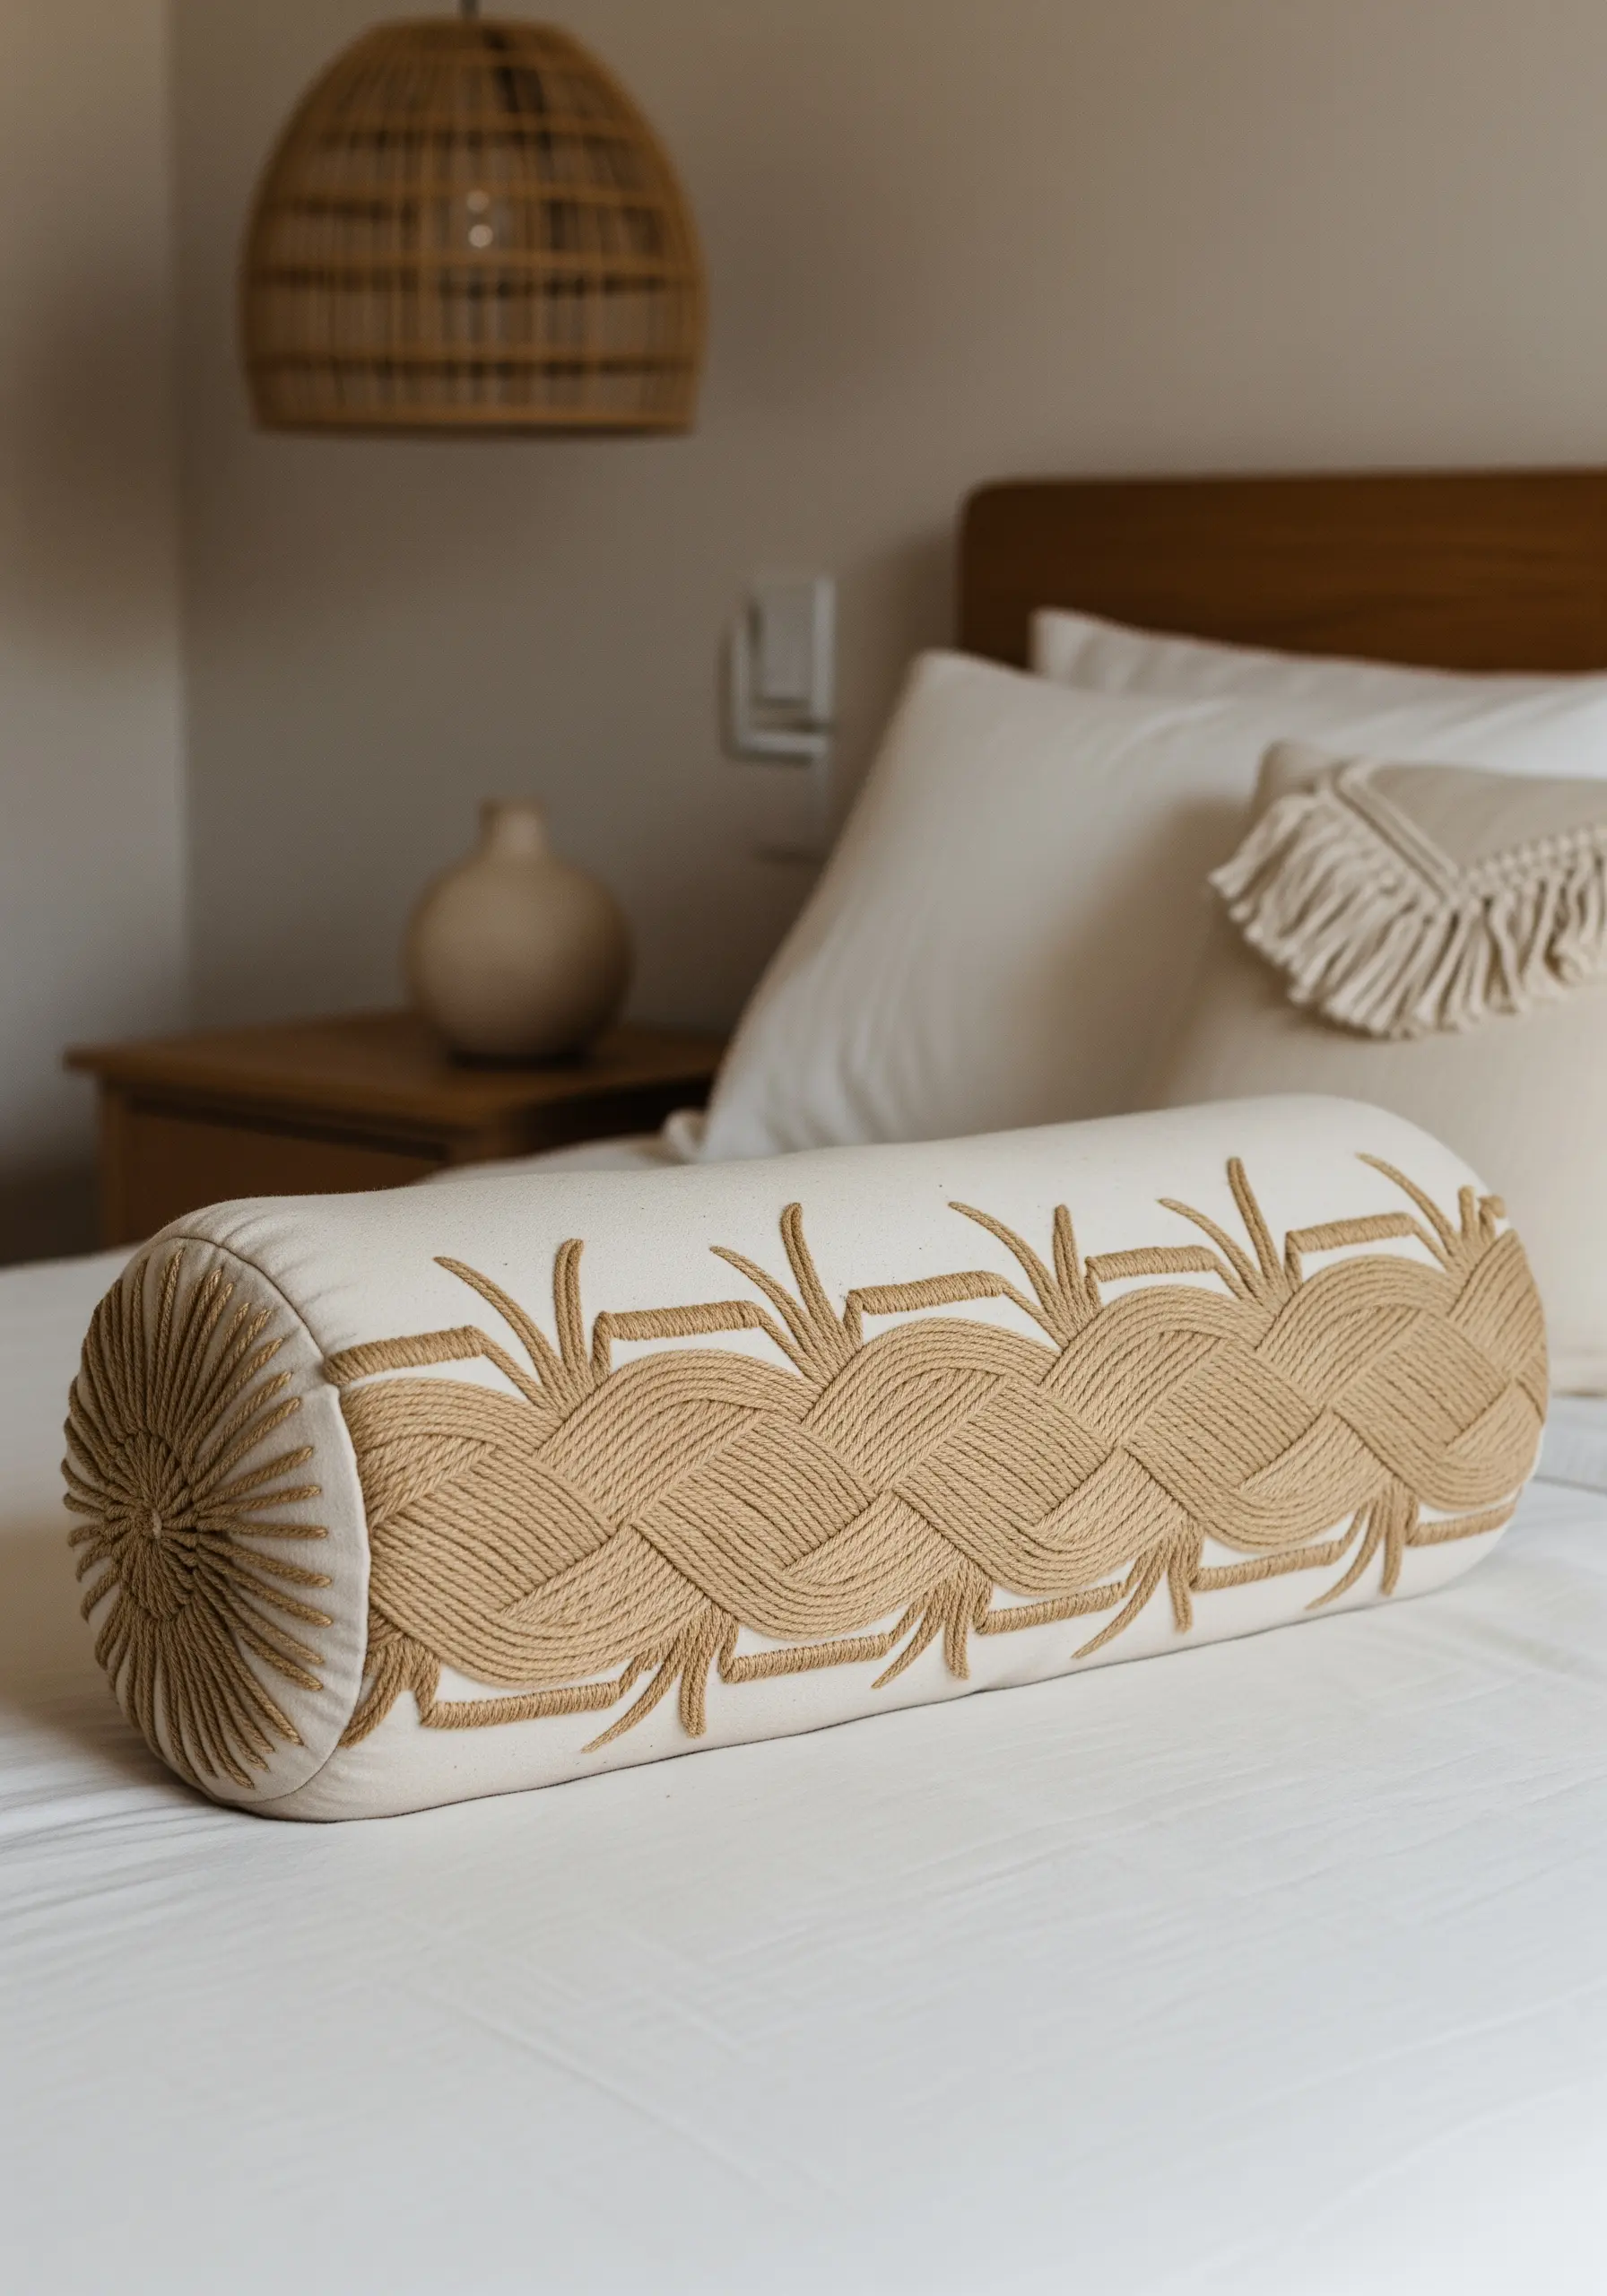
Create a chunky, woven texture on a bolster pillow using a surface weaving technique.
This is achieved by laying down long, parallel anchor stitches and then weaving a thick yarn over and under them, directly onto the cushion’s fabric.
You can create intricate patterns like braids or basketweaves without ever leaving the surface.
This is a fast and impactful way to make handmade pillow and cushion embroidery patterns for total comfort and style.
27. Layer Fabric Petals for a 3D Blossom

Construct a magnificent, full-bloom flower by layering individual fabric petals.
Cut out dozens of petal shapes from a fabric like cotton or organza. To add detail and prevent fraying, stitch a fine line of backstitch around the edge of each petal.
Then, arrange the petals in overlapping, concentric circles on your base fabric (like an ottoman cover) and stitch them down at their base.
This appliqué method is perfect for large-scale gorgeous floral embroidery ideas for a dreamy bedroom aesthetic.


