

You have a deep appreciation for the way thread can transform fabric. But what happens when you swap your linen for paper? The needle, the floss, the familiar motion of the stitch—they all find a new voice, a new kind of expression that is crisp, graphic, and wonderfully modern.
Paper offers a structural firmness that fabric cannot. It invites you to think not just about surface decoration, but about form, dimension, and light. Your stitches are no longer just coloring a surface; they are piercing, joining, and sculpting it. This shift in material doesn’t require you to abandon your skills—it asks you to elevate them.
Consider this your invitation to explore. Each project is a starting point, a way to see how the techniques you already know can be thoughtfully adapted to create something entirely new. Trust your hands, prepare to be surprised, and let’s make something beautiful.
1. Stitch a Celestial Map on Watercolor Paper
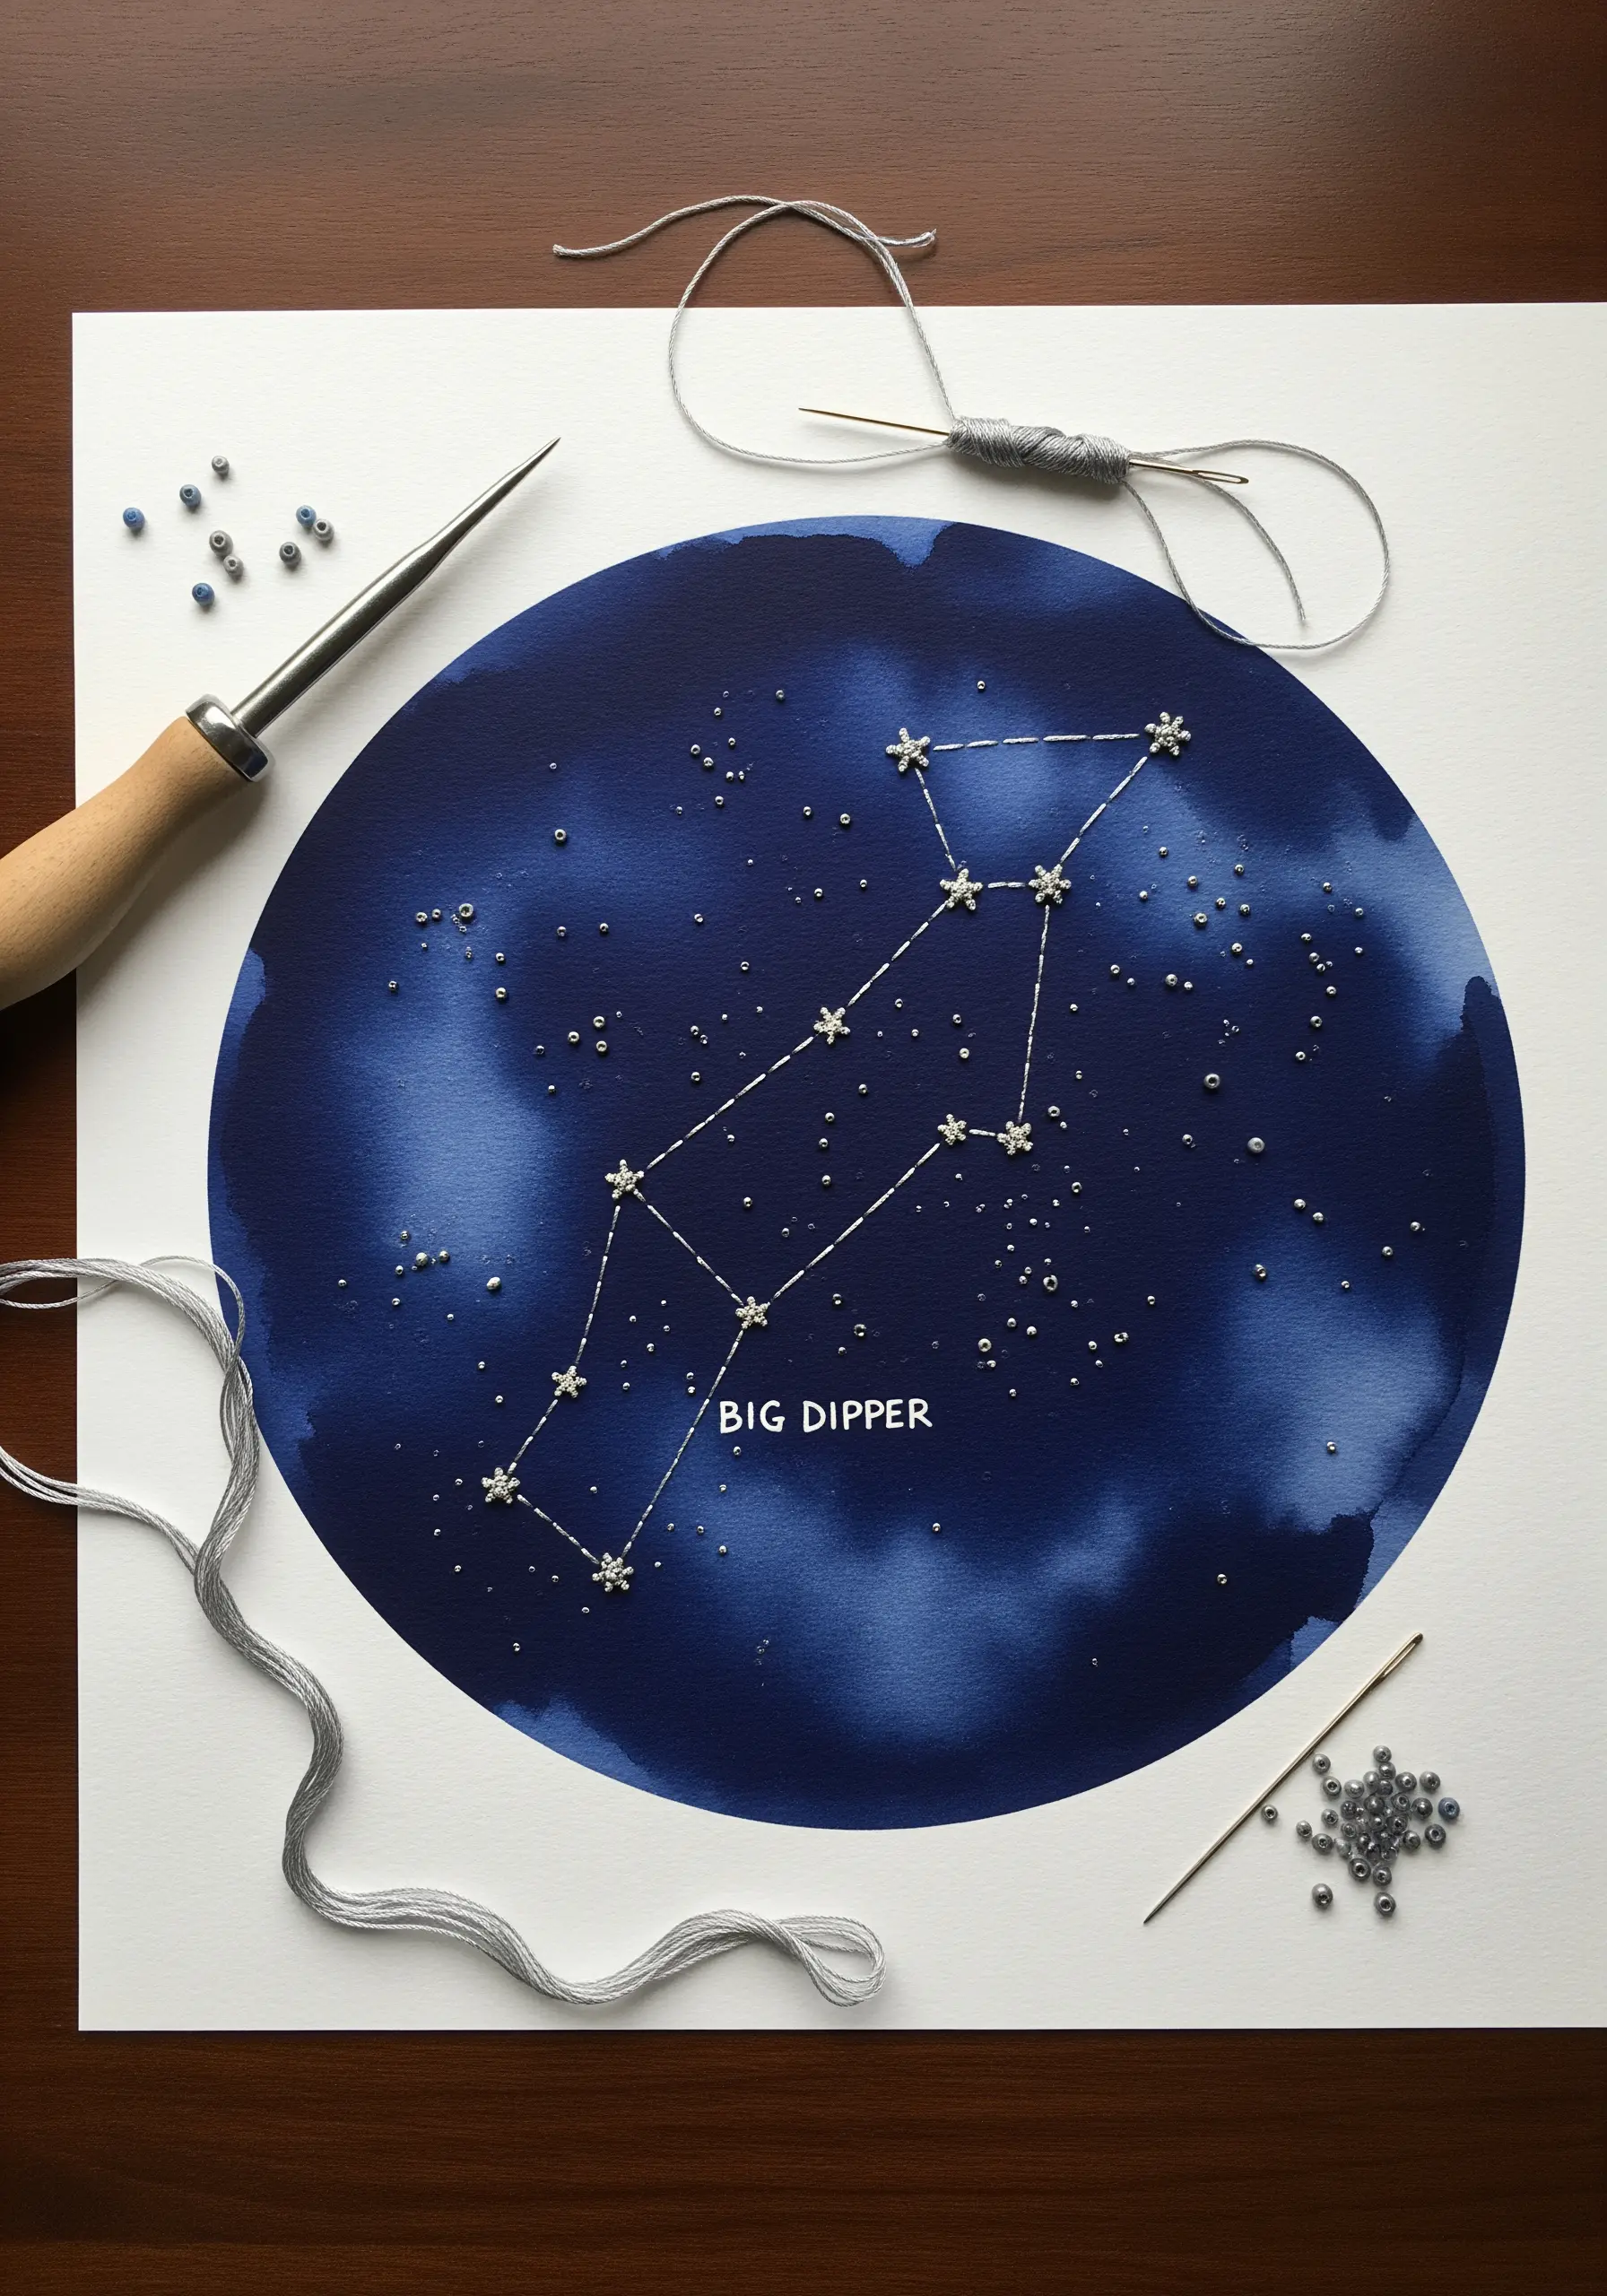
Create a rich, indigo background using a watercolor wash before you even thread your needle.
Once dry, use a bookbinding awl to gently pre-pierce holes for your stitches, preventing any tearing and ensuring clean entry points for your thread.
Select a silvery metallic floss to define the constellation lines—use a thread conditioner to prevent fraying and make each stitch glide through the paper smoothly.
Anchor tiny seed beads or star-shaped sequins at key points with a single, secure stitch to represent the stars, adding a delicate, light-catching dimension.
2. Create a Modern Botanical Triptych with Machine Stitching
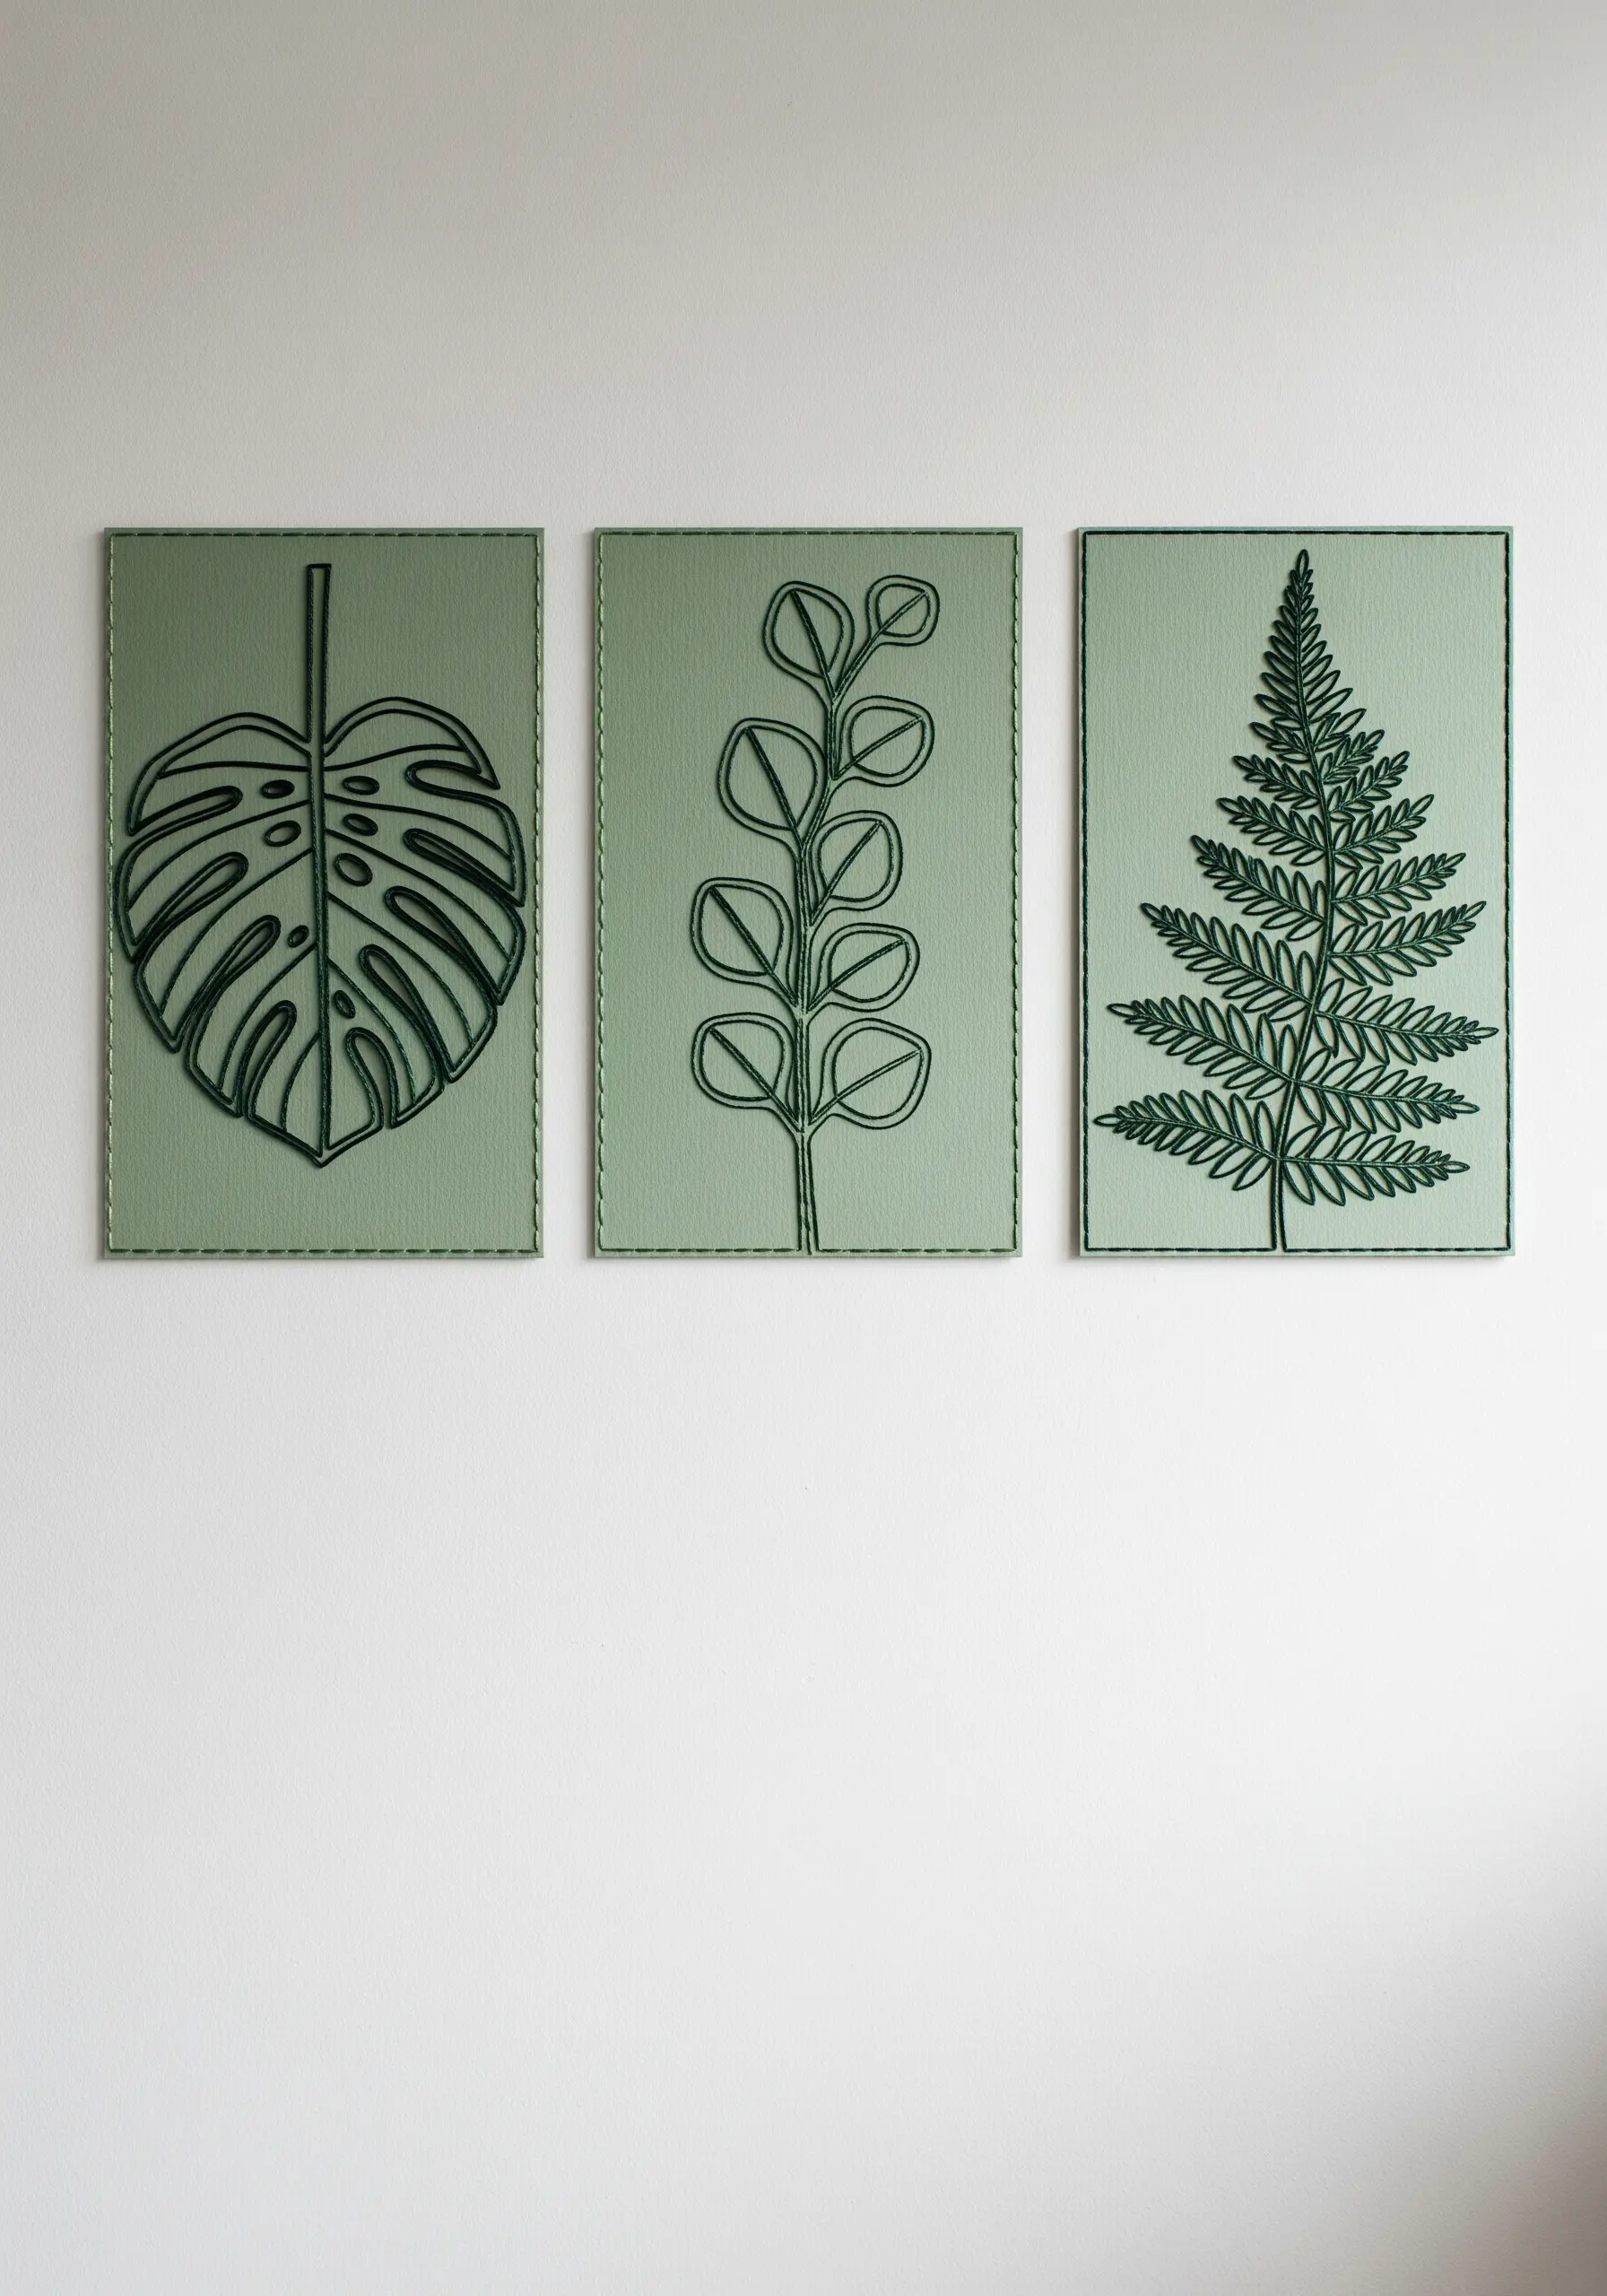
Transform heavy cardstock into minimalist wall art using your sewing machine.
Choose a simple, graphic leaf design like a monstera or fern—the key is clean lines, not complex shading.
Set your machine to a longer stitch length (around 3.0-3.5mm) to avoid perforating the paper too intensely, which maintains its structural integrity.
Use a topstitch needle for its sharp, strong point, and select a high-contrast thread to make the botanical outlines pop against the colored paper.
Arrange three panels together to create a cohesive, modern statement piece for your wall.
3. Layer Torn Paper Landscapes with Structural Stitches
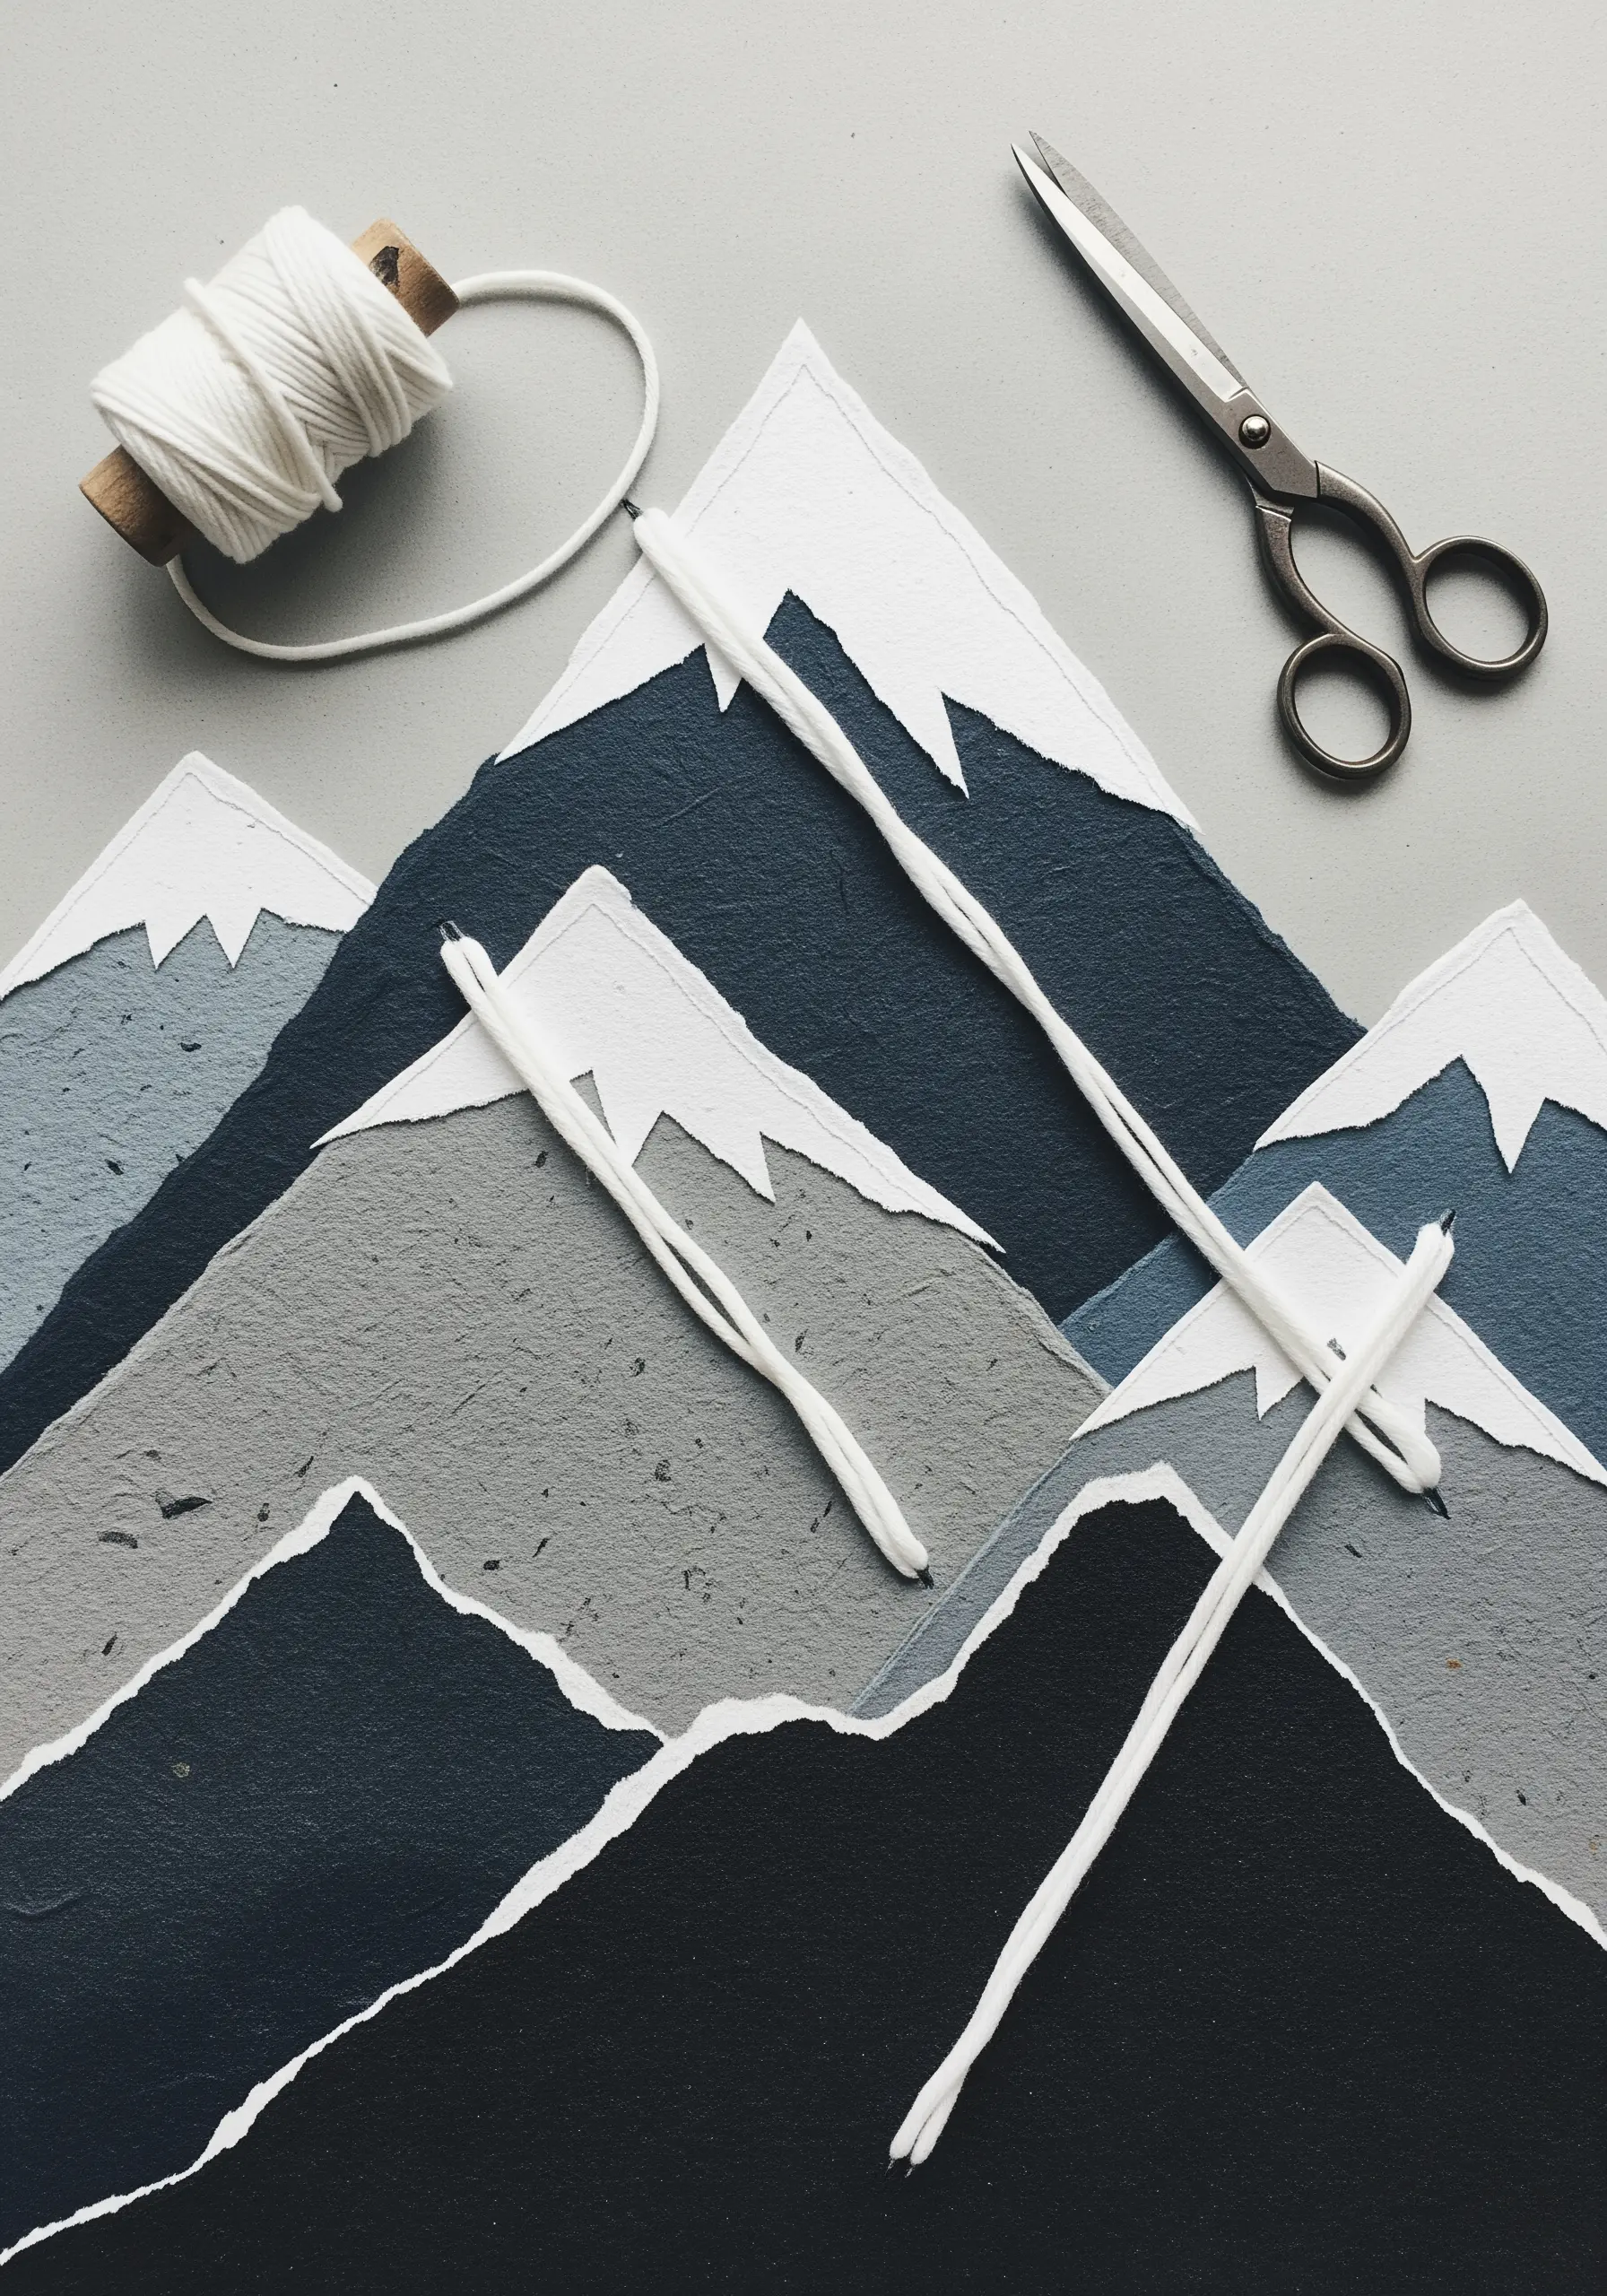
Build a mountain range not with a pen, but with layers of textured, handmade paper.
Tear the edges of each sheet to create soft, organic ridgelines that mimic natural formations—this adds depth and a tactile quality that cut edges lack.
Overlap the papers to build your composition, then use a thick, soft cotton twine and a simple running stitch to bind the layers together.
This stitch is not just decorative; it becomes a graphic element that adds a rustic, handmade signature to your piece.
These are beautiful examples of DIY collage art pieces that feel both grounded and artistic.
4. Sculpt 3D Florals with Crepe Paper
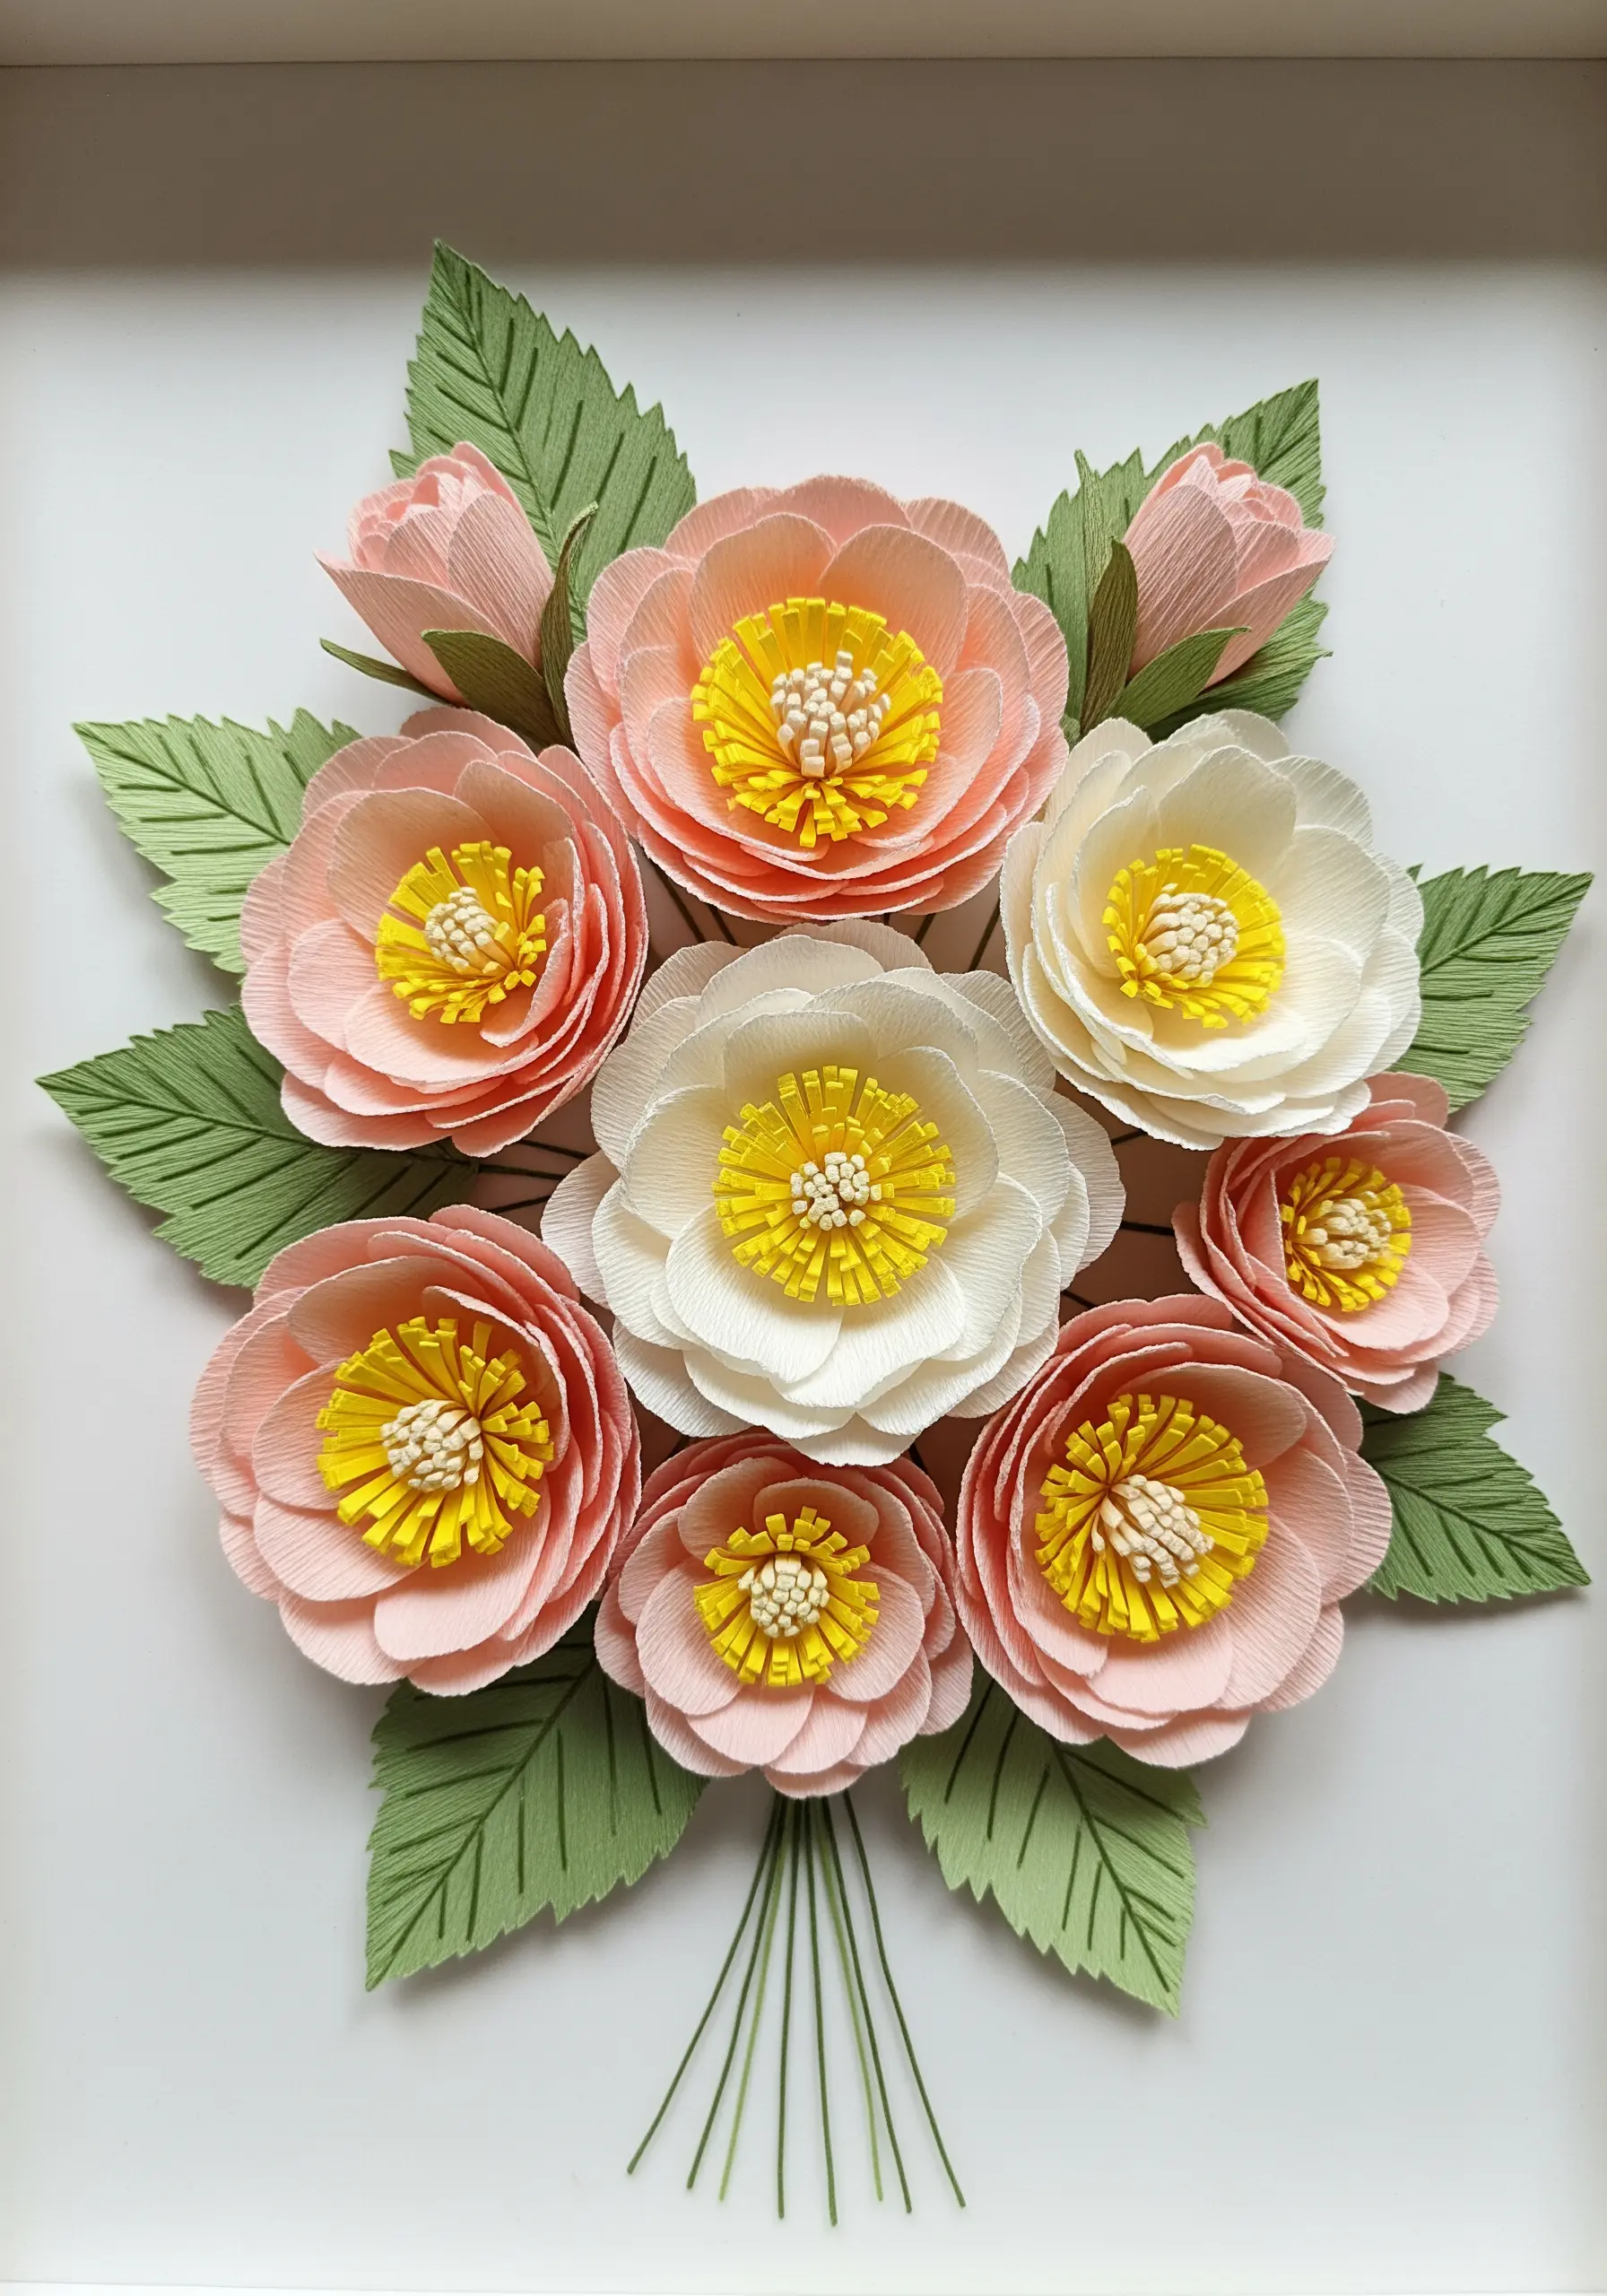
Explore dimension by treating paper like fabric, creating forms that parallel advanced embroidery techniques like stumpwork.
Use crepe paper for its unique stretch and texture, which allows you to shape petals with natural-looking curves and ruffles.
Form the flower’s center by creating tiny French-knot-like bundles from fringed paper strips, adding a realistic, pollen-dusted texture.
Layer each petal carefully, building outward to create lush, full blooms that have a tangible presence and shadow play that thread alone cannot achieve.
5. Design a Paper Quilt with Meditative Running Stitches
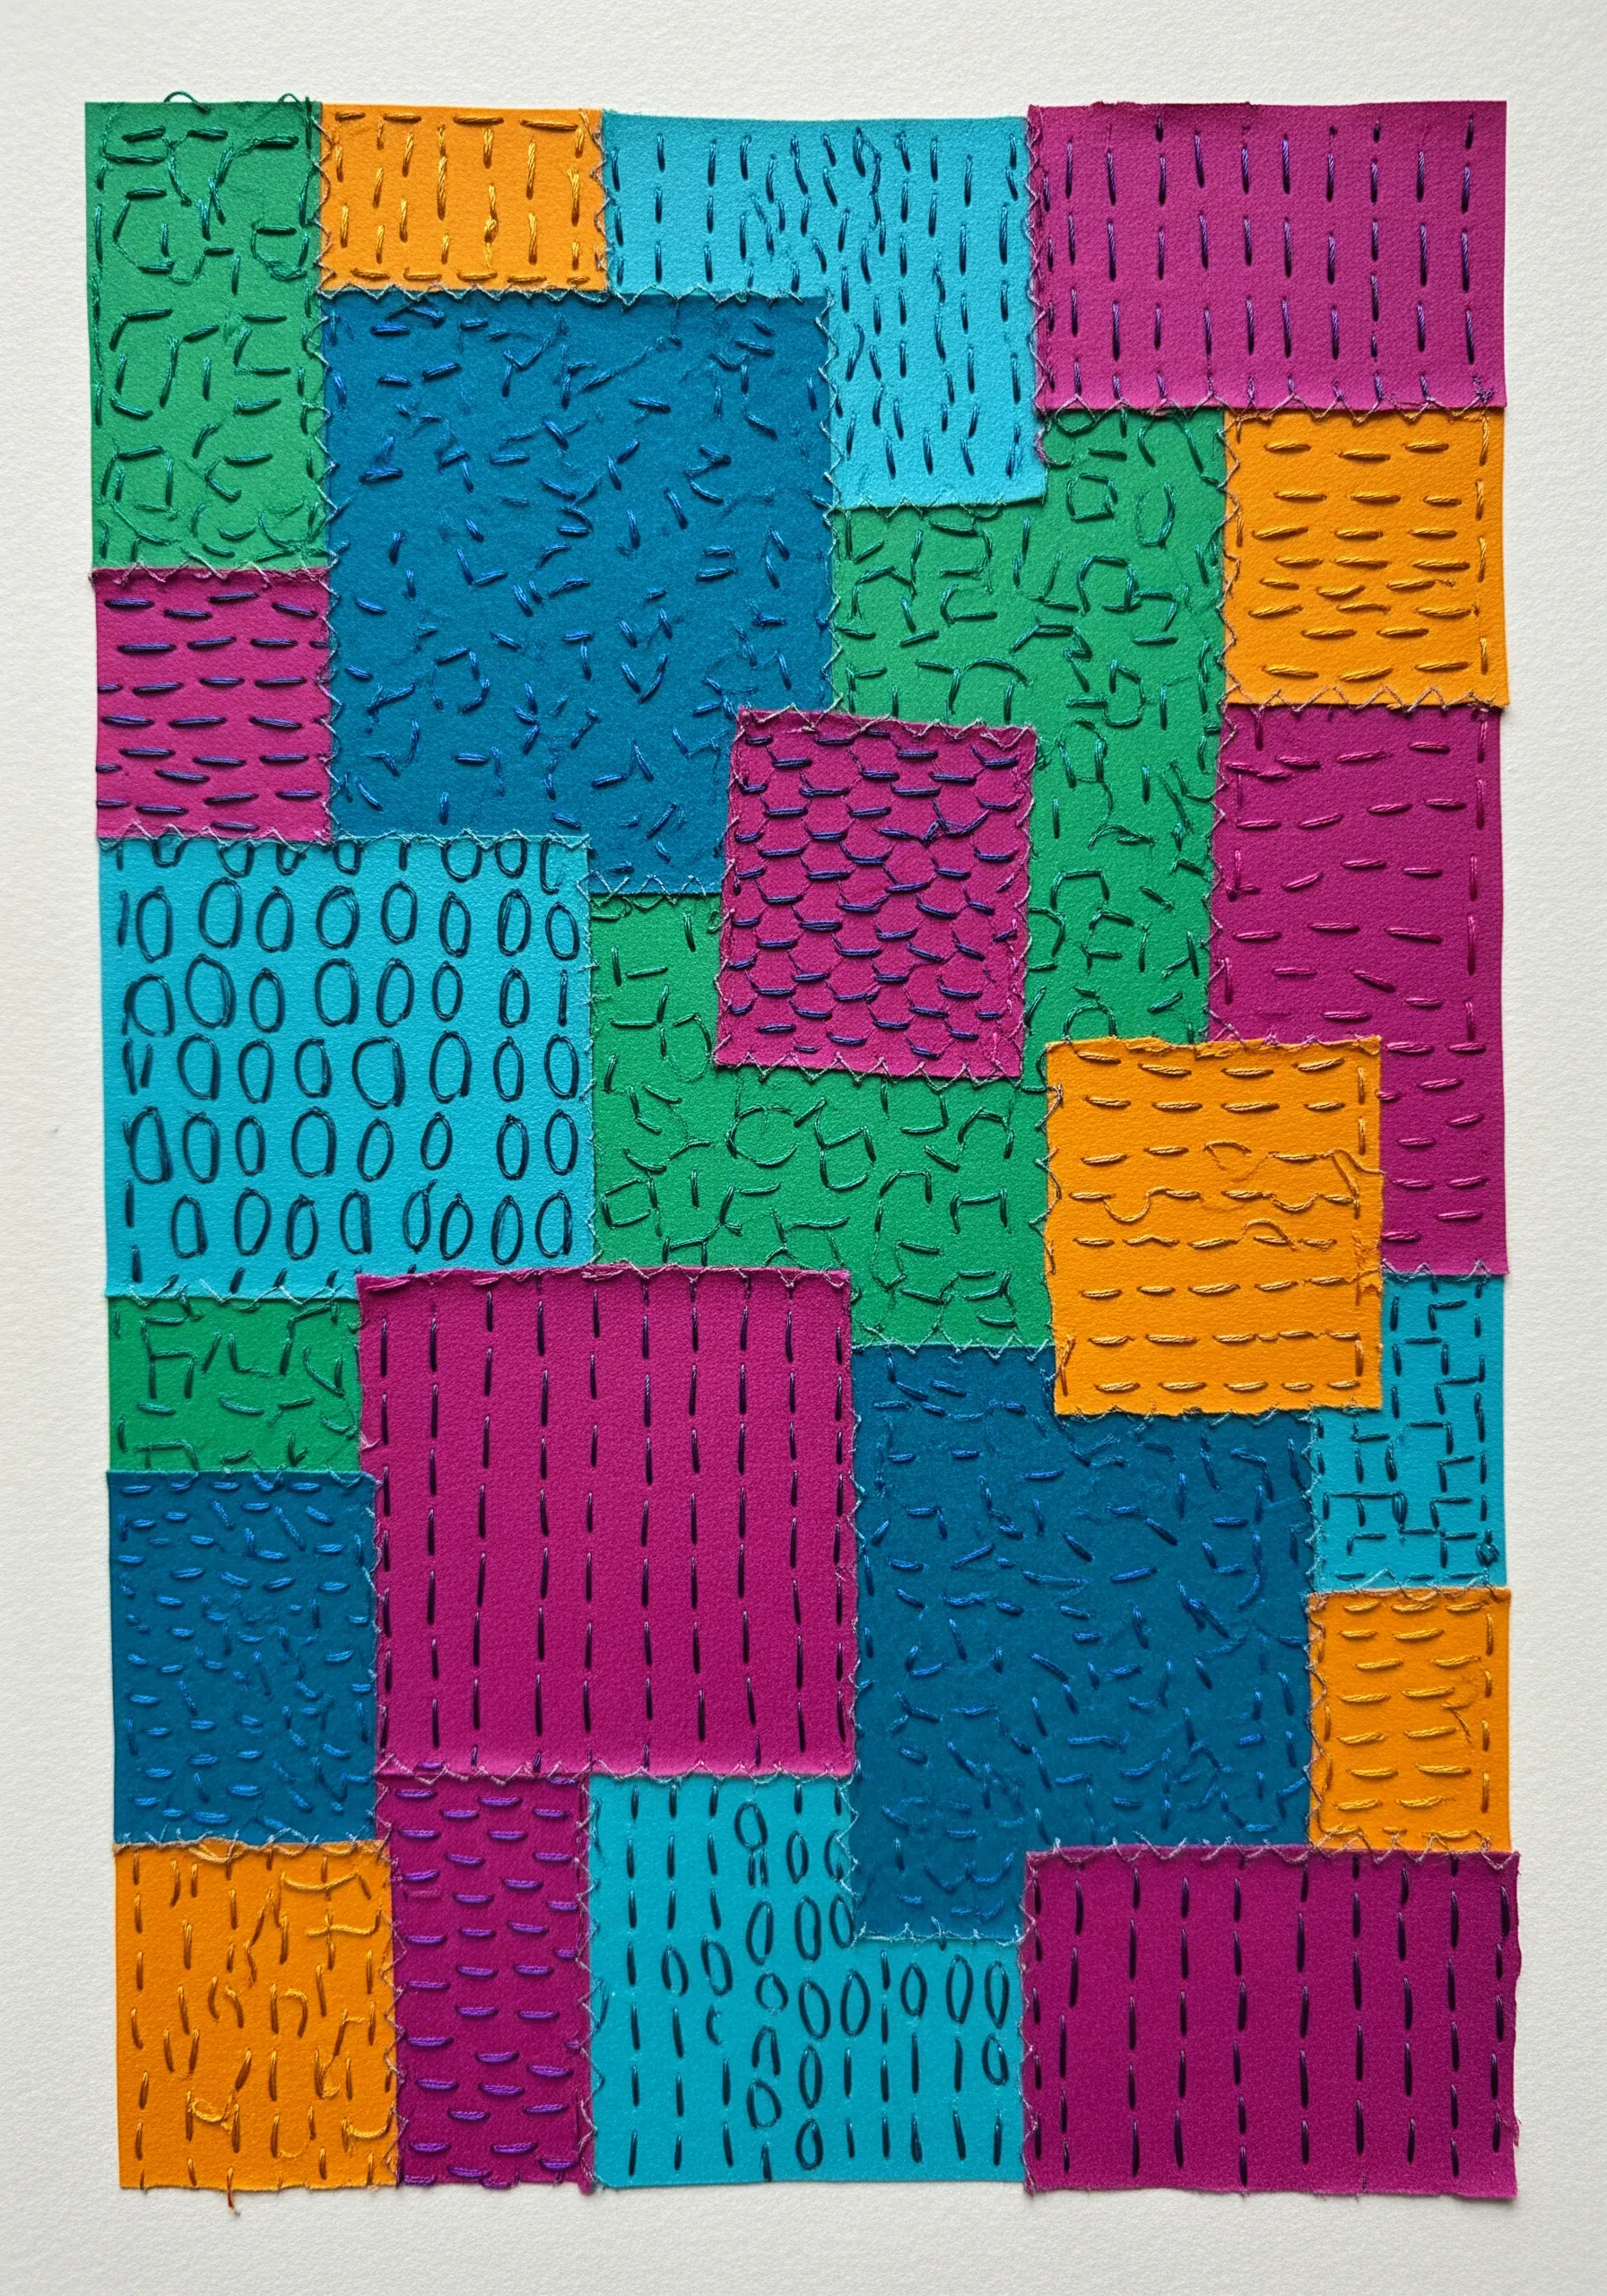
Embrace the principles of sashiko by using simple running stitches to create intricate patterns on paper squares.
Cut colored cardstock into geometric patches and arrange them in a visually pleasing quilt-like composition on a backing sheet.
Use a contrasting, thicker thread (like a pearl cotton size 5) so your stitches stand out as deliberate design elements.
Vary the stitch patterns on each patch—lines, circles, waves—to create a sampler of textures that draws the eye across the entire piece.
This is a wonderful way to create abstract fabric collage embroidery ideas with the crispness of paper.
6. Illuminate a Cityscape with Golden Satin Stitch
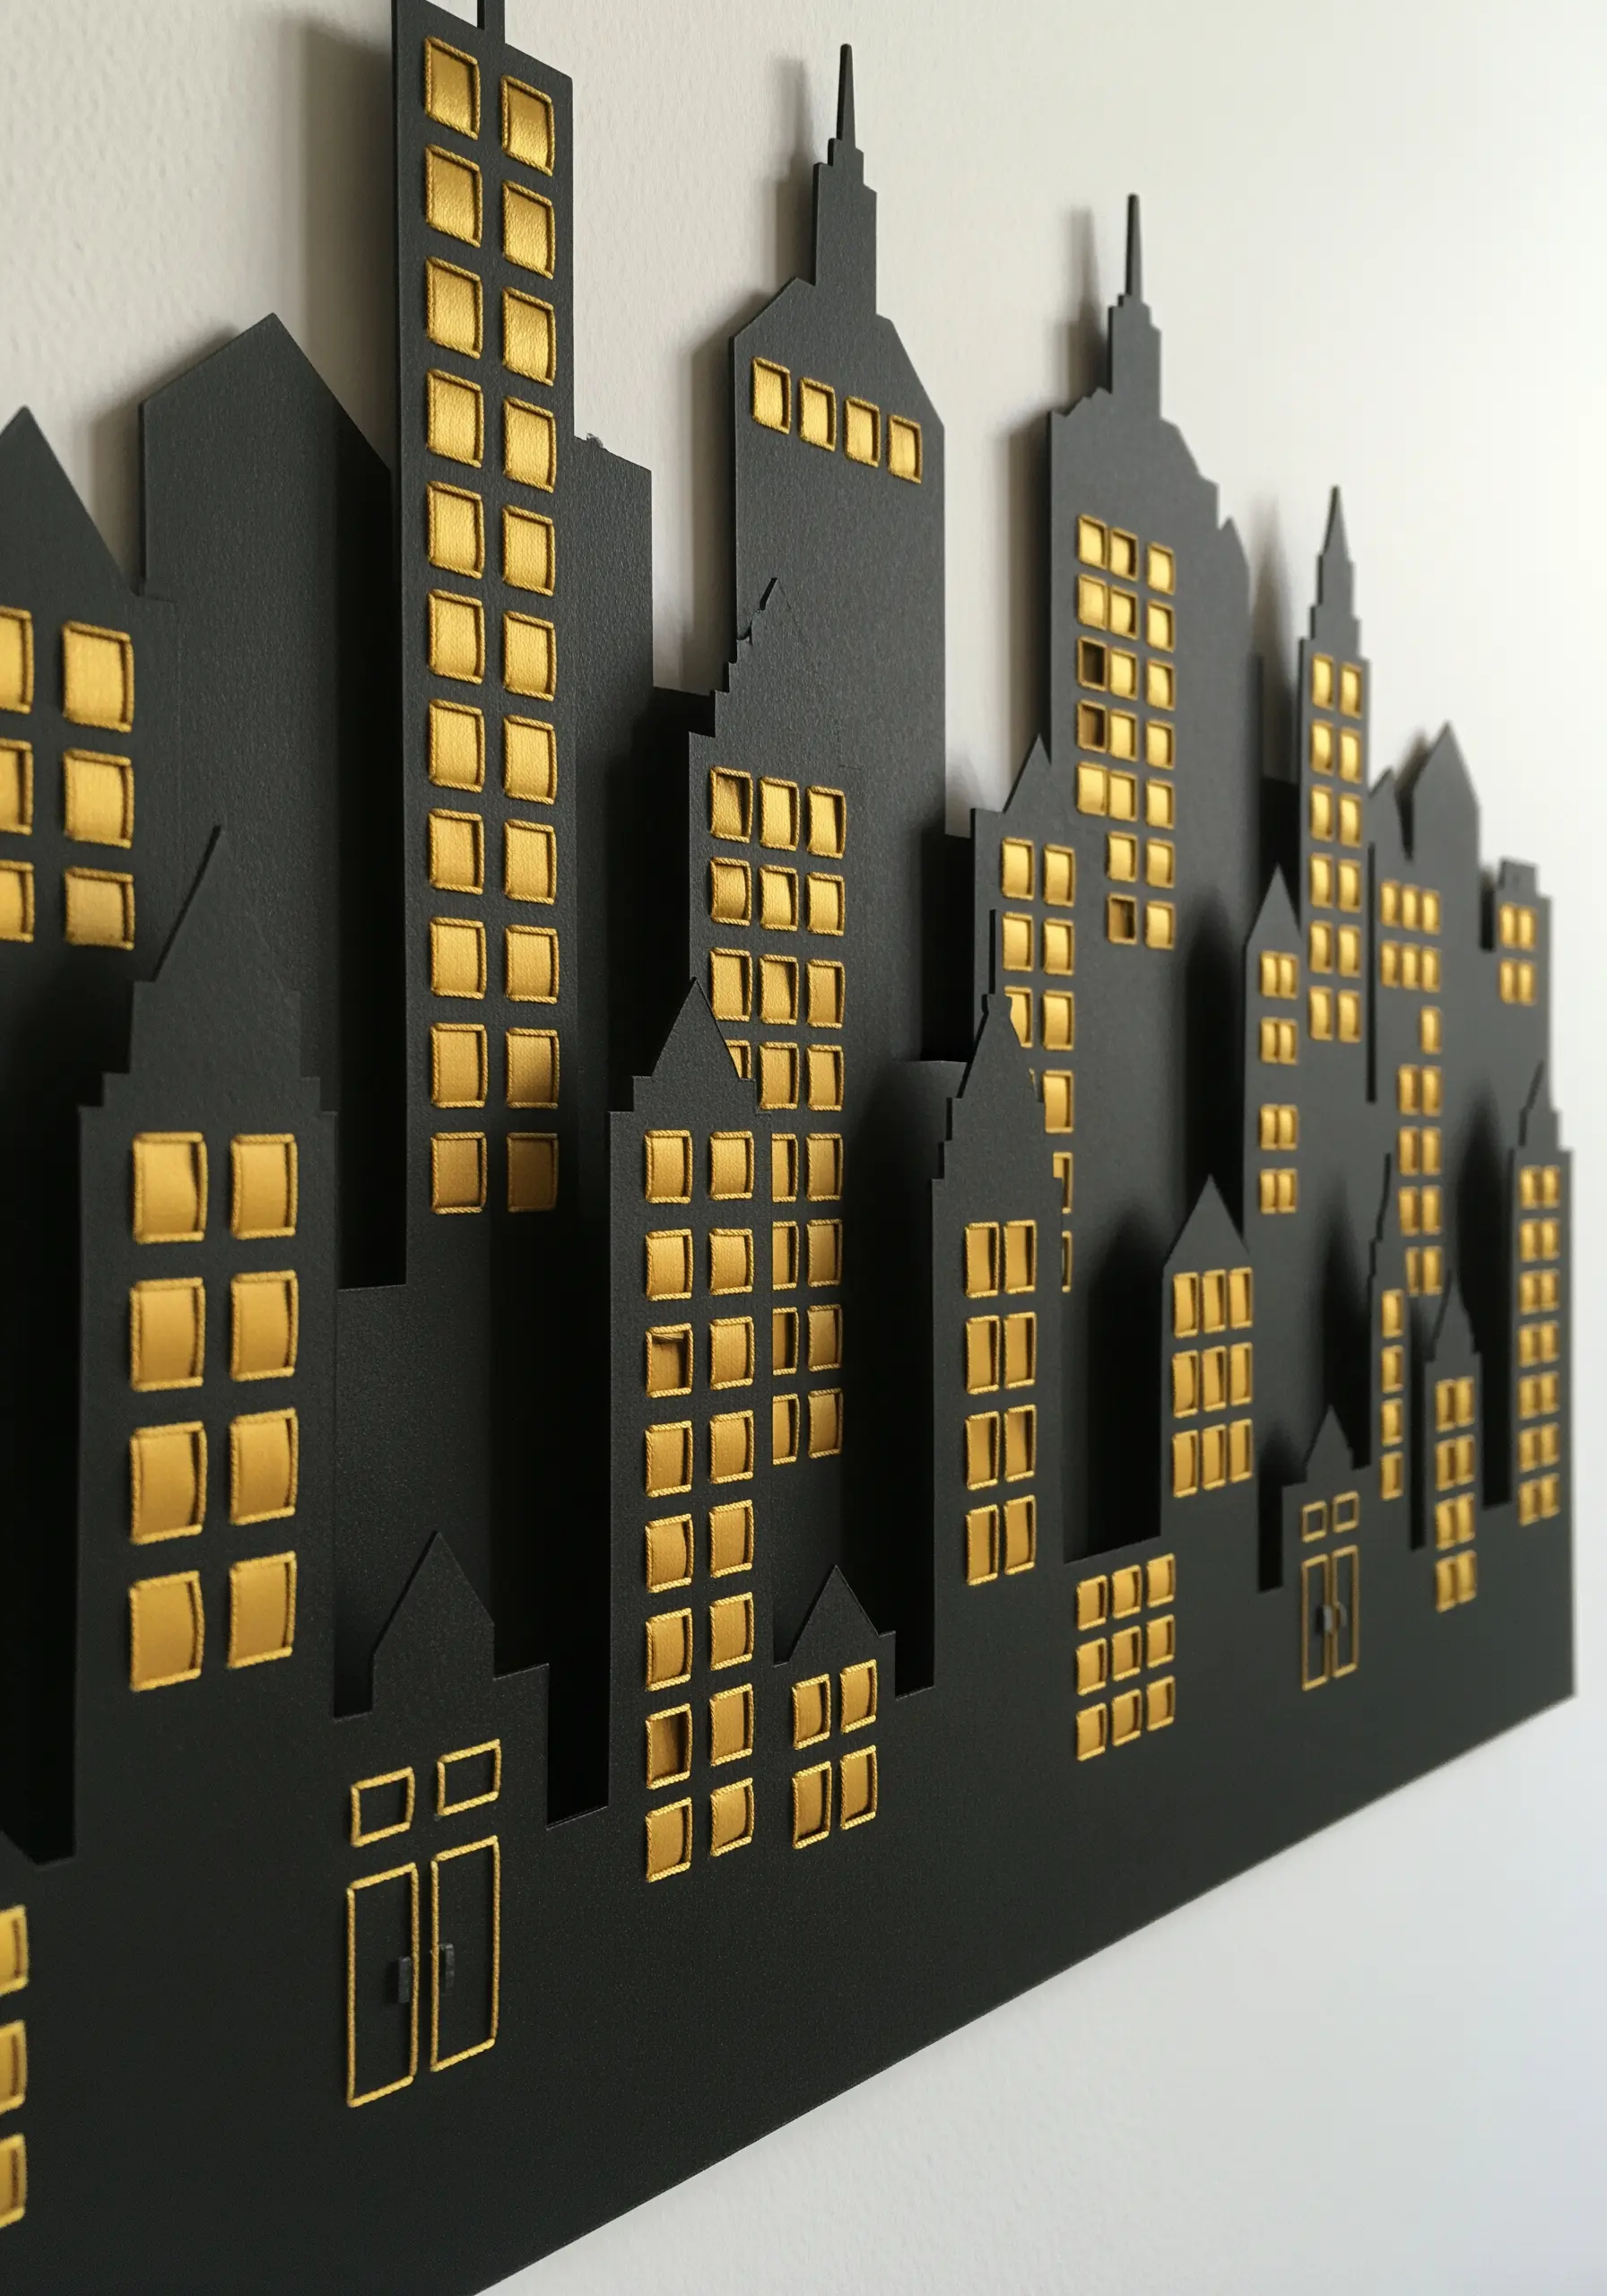
Use thread to create the illusion of light in a stark, monochrome paper cutout.
First, design and cut a city skyline from heavy black cardstock for a dramatic silhouette.
Pre-punch neat, evenly spaced holes for each window. This is the most critical step for a clean finish.
Fill in the windows with a lustrous gold metallic or bright yellow rayon thread using satin stitch, ensuring your stitches lay flat and parallel to create a solid block of reflective color.
The contrast between the matte black paper and the gleaming thread creates a powerful sense of glowing windows at night.
7. Weave a Gradient Mandala with Geometric String Art
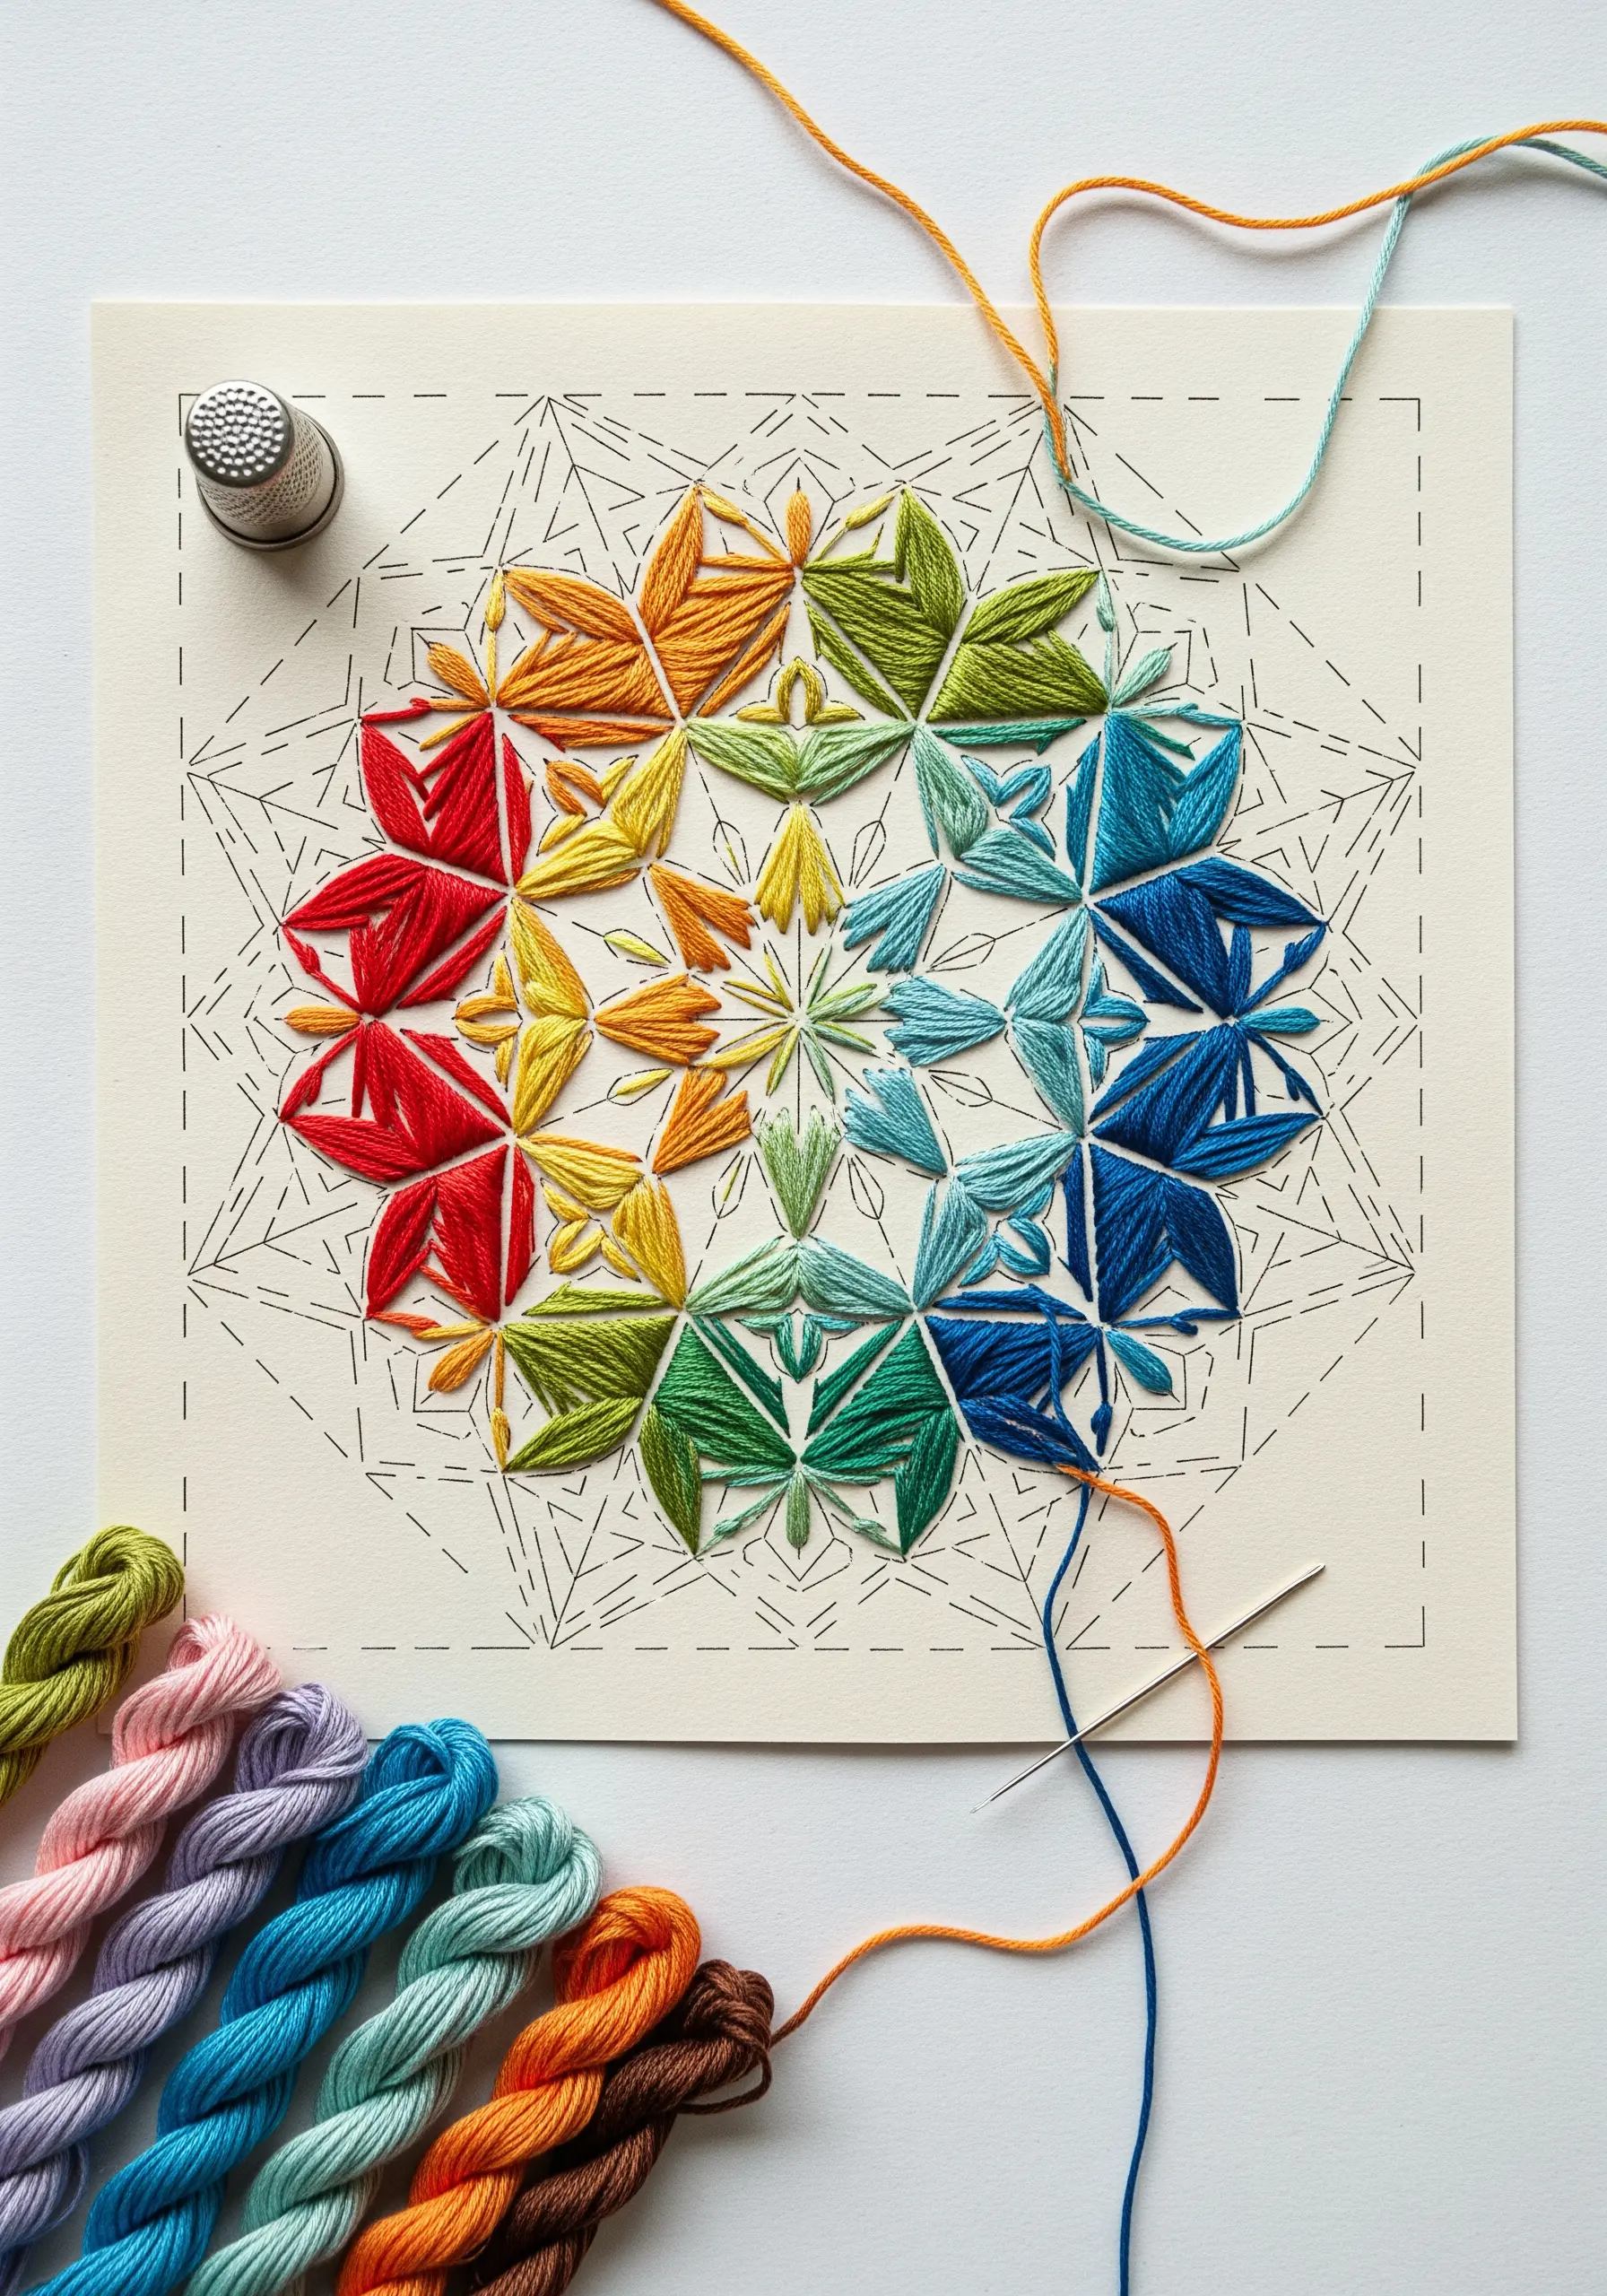
Turn a paper canvas into a vibrant, geometric mandala using thread as your medium.
Print a geometric template onto cardstock and use a pin to pierce holes at every vertex—this precision is the foundation for a sharp design.
Choose an analogous color palette of 6-8 shades to create a smooth, satisfying gradient effect as you weave the thread from point to point.
By layering threads across different anchor points, you create new shapes and an illusion of depth, turning straight lines into elegant curves.
This technique results in stunning mandala embroidery wall art with mathematical beauty.
8. Add Selective Color to Photographs with Thread
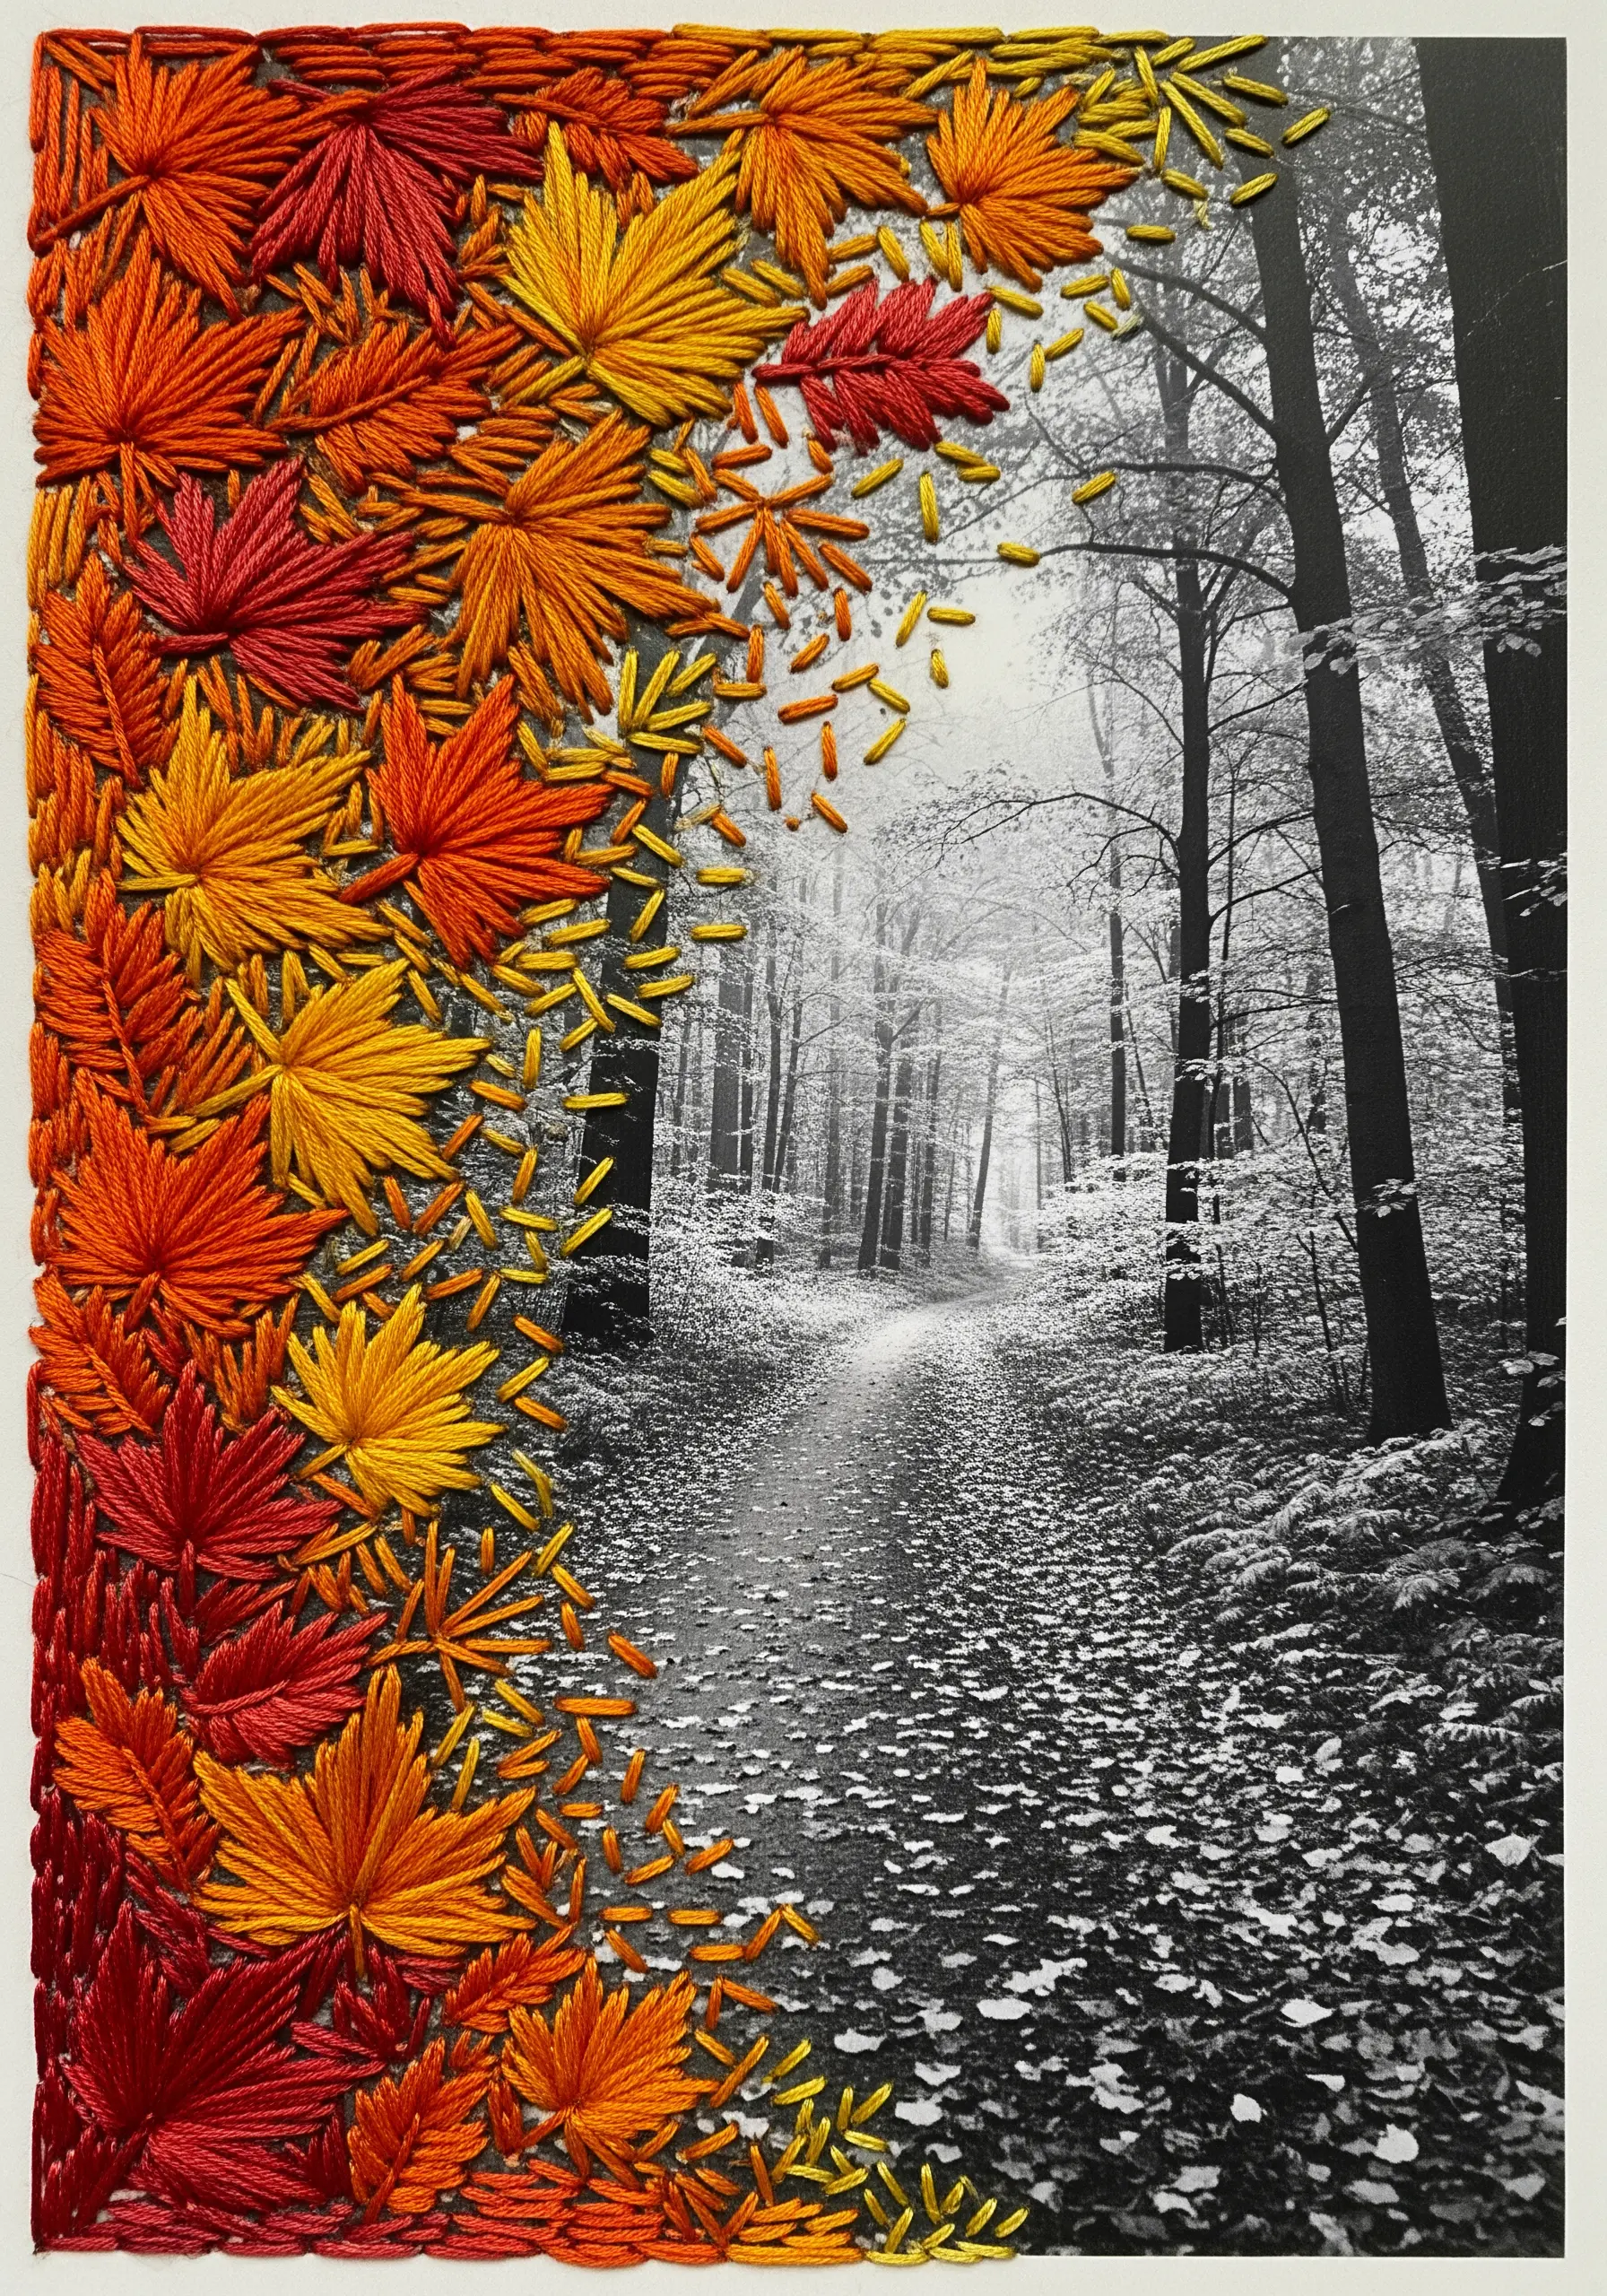
Transform a black-and-white photograph into a mixed-media artwork by adding targeted pops of embroidered color.
Choose a photo printed on matte paper, as its surface is more forgiving to piercing and won’t crack like glossy prints can.
Identify an area where you want to draw focus—like autumn leaves—and use vibrant satin stitches to bring them to life against the monochrome background.
Add scattered seed stitches to create a sense of movement, as if the embroidered leaves are falling and blending into the scene.
These embroidered mixed media ideas create a powerful narrative contrast.
9. Elevate a Monogram with Padded Satin Stitch
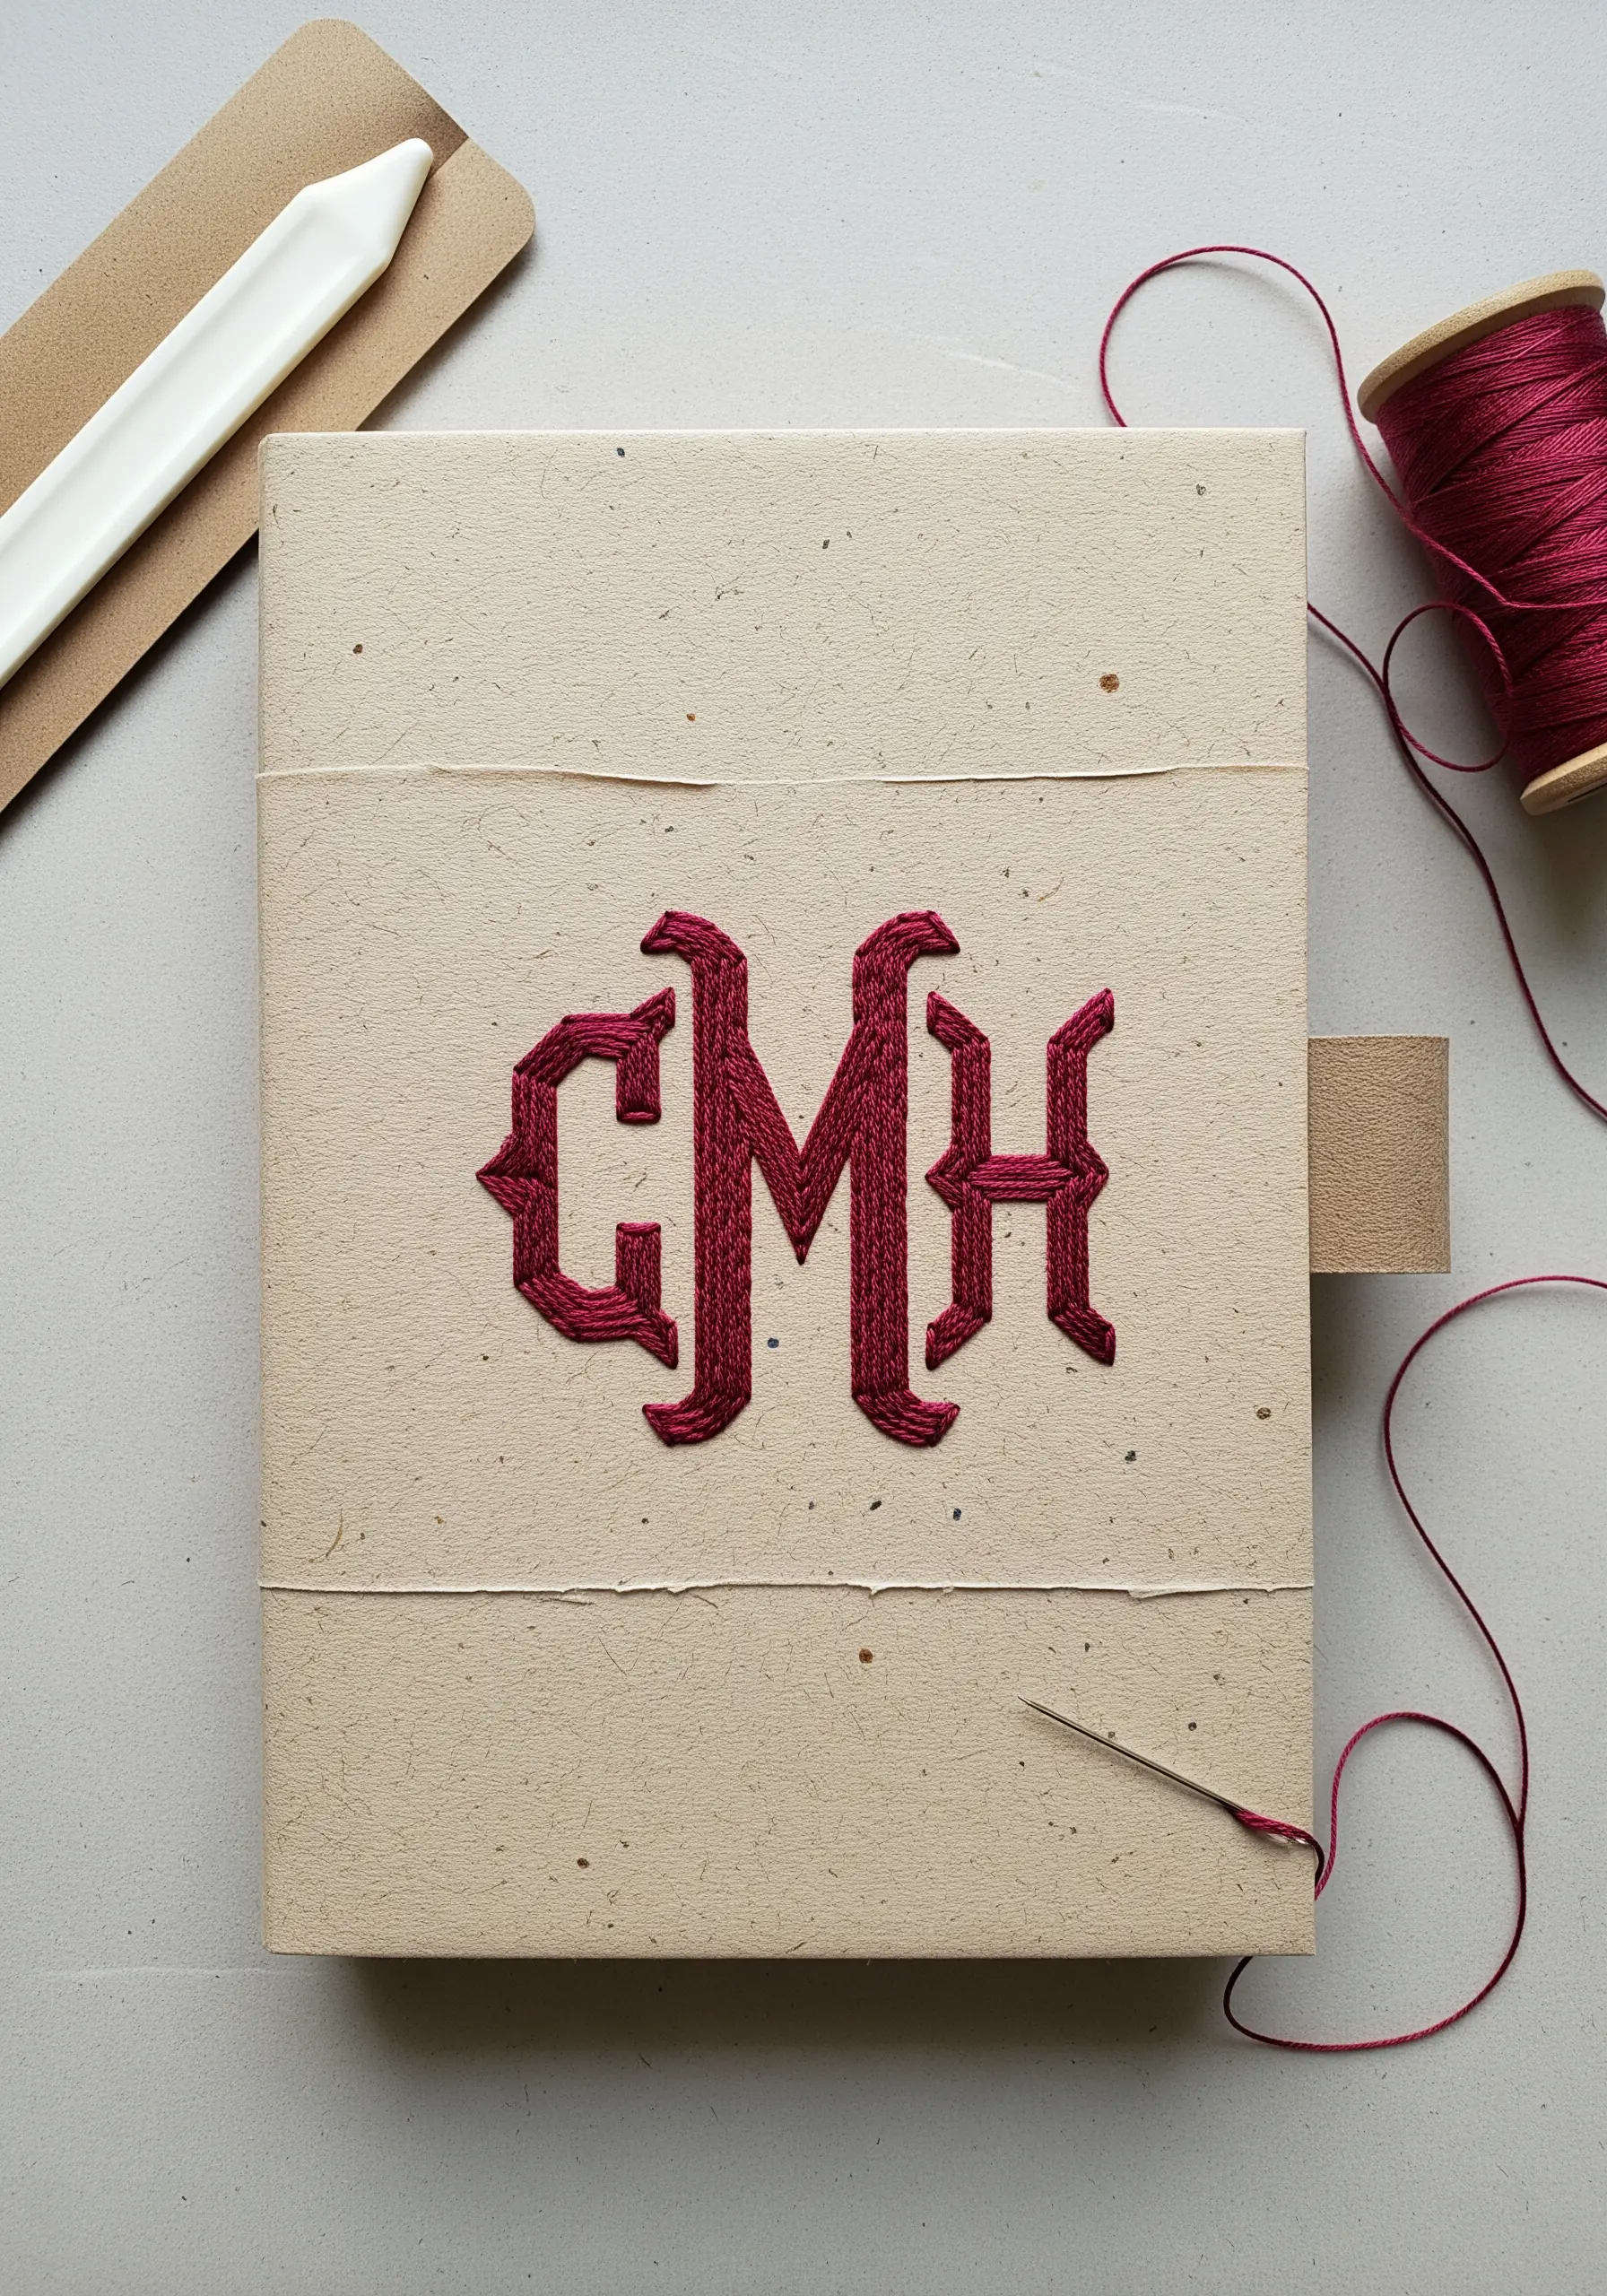
Give a paper-stitched monogram a raised, dimensional quality that feels luxurious and professional.
Before you begin your main satin stitches, create an underlayer of small seed stitches or a split stitch outline within your letter shapes.
This ‘padding’ raises the surface slightly, so when you stitch over it, your final satin stitches will be fuller and more defined.
Use a thread with a slight sheen, like pearl cotton, and stitch over the padding at a slight angle for the best coverage and a smooth, elegant finish.
10. Build a 3D Coral Reef with Paper Quilling
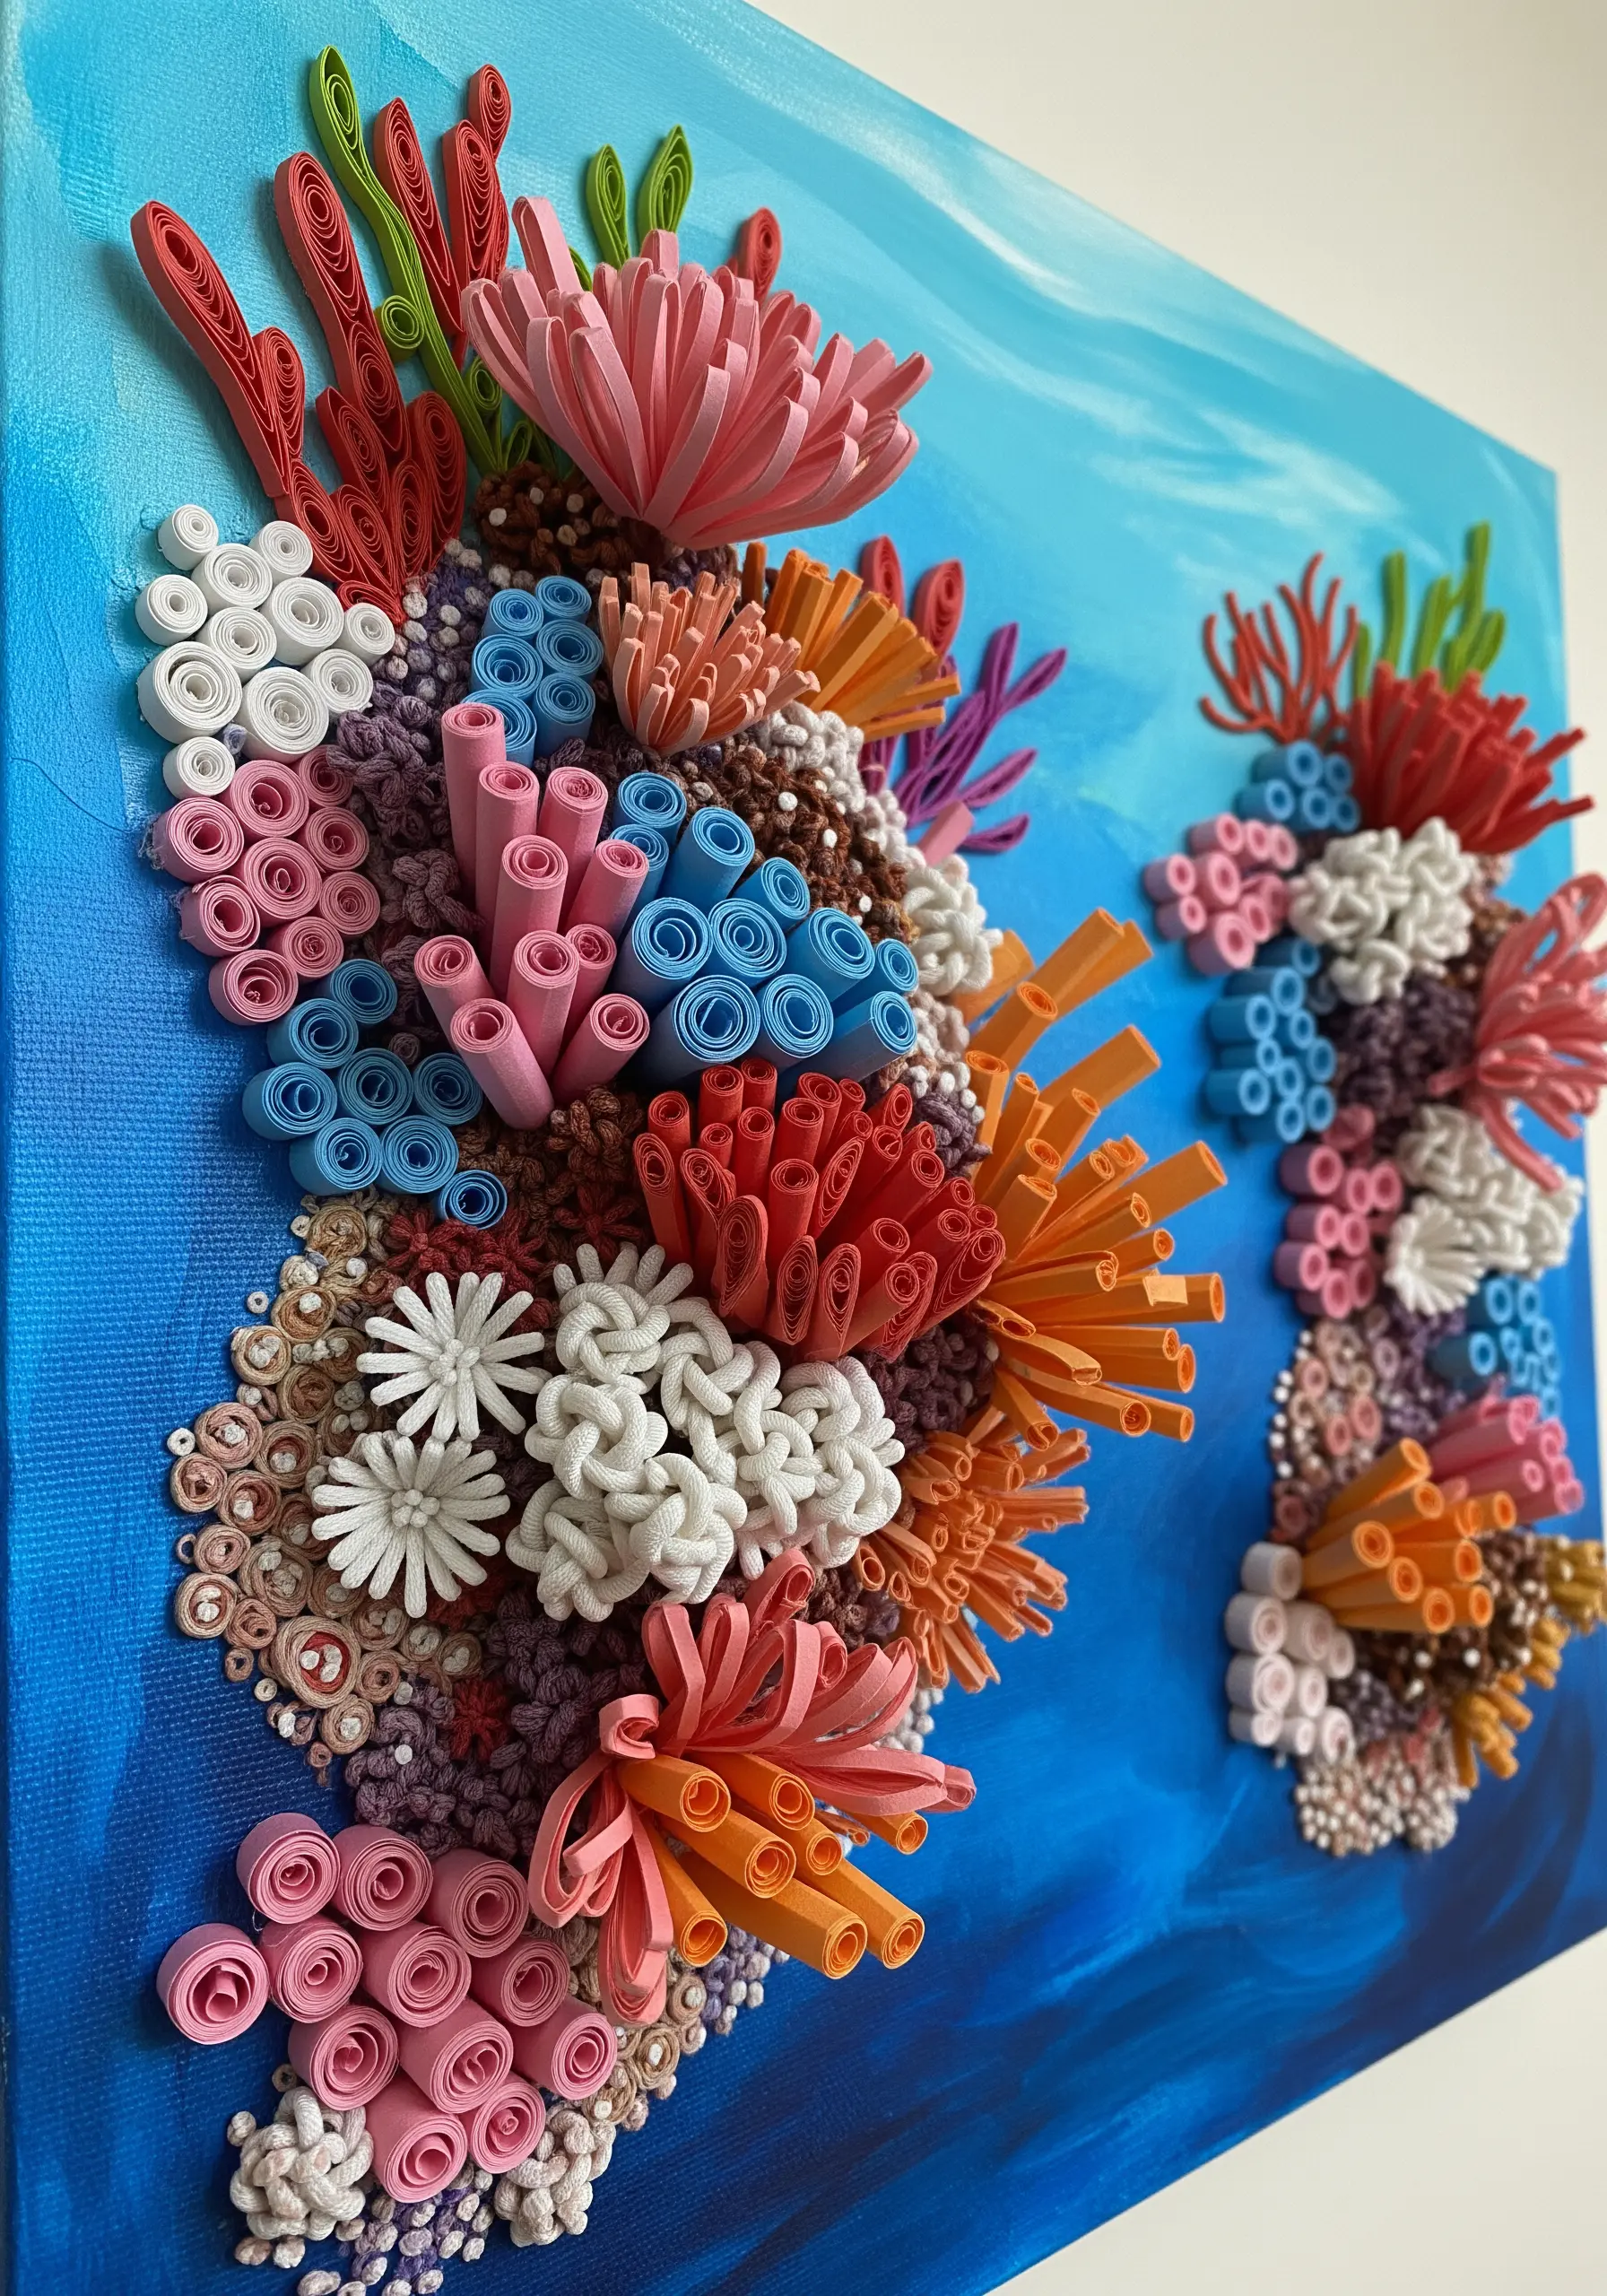
Create an underwater world by rolling, shaping, and gluing thin strips of paper to a painted canvas.
This technique, known as quilling, allows you to build textures that are impossible with thread alone, mimicking the complex structures of coral.
Vary the tightness of your coils—tight circles for dense coral, open loops for flowing anemones—to create visual and textural diversity.
Arrange your quilled shapes in dense, overlapping clusters on a painted background to build a vibrant, dimensional reef that invites touch.
11. Craft Elegant Cards with Minimalist Motifs

Embrace the power of negative space by stitching a single, perfectly executed motif on high-quality textured cardstock.
Choose simple, iconic symbols—a crescent moon, a sunburst, a single leaf—that communicate a clear message without clutter.
Use only two or three strands of embroidery floss to keep your lines delicate and your satin stitches smooth and refined.
The texture of the watercolor paper provides a subtle, tactile background that enhances the clean elegance of the embroidery, perfect for creating cards or minimal monogram styles.
12. Weave a Wall Hanging from Paper and Yarn
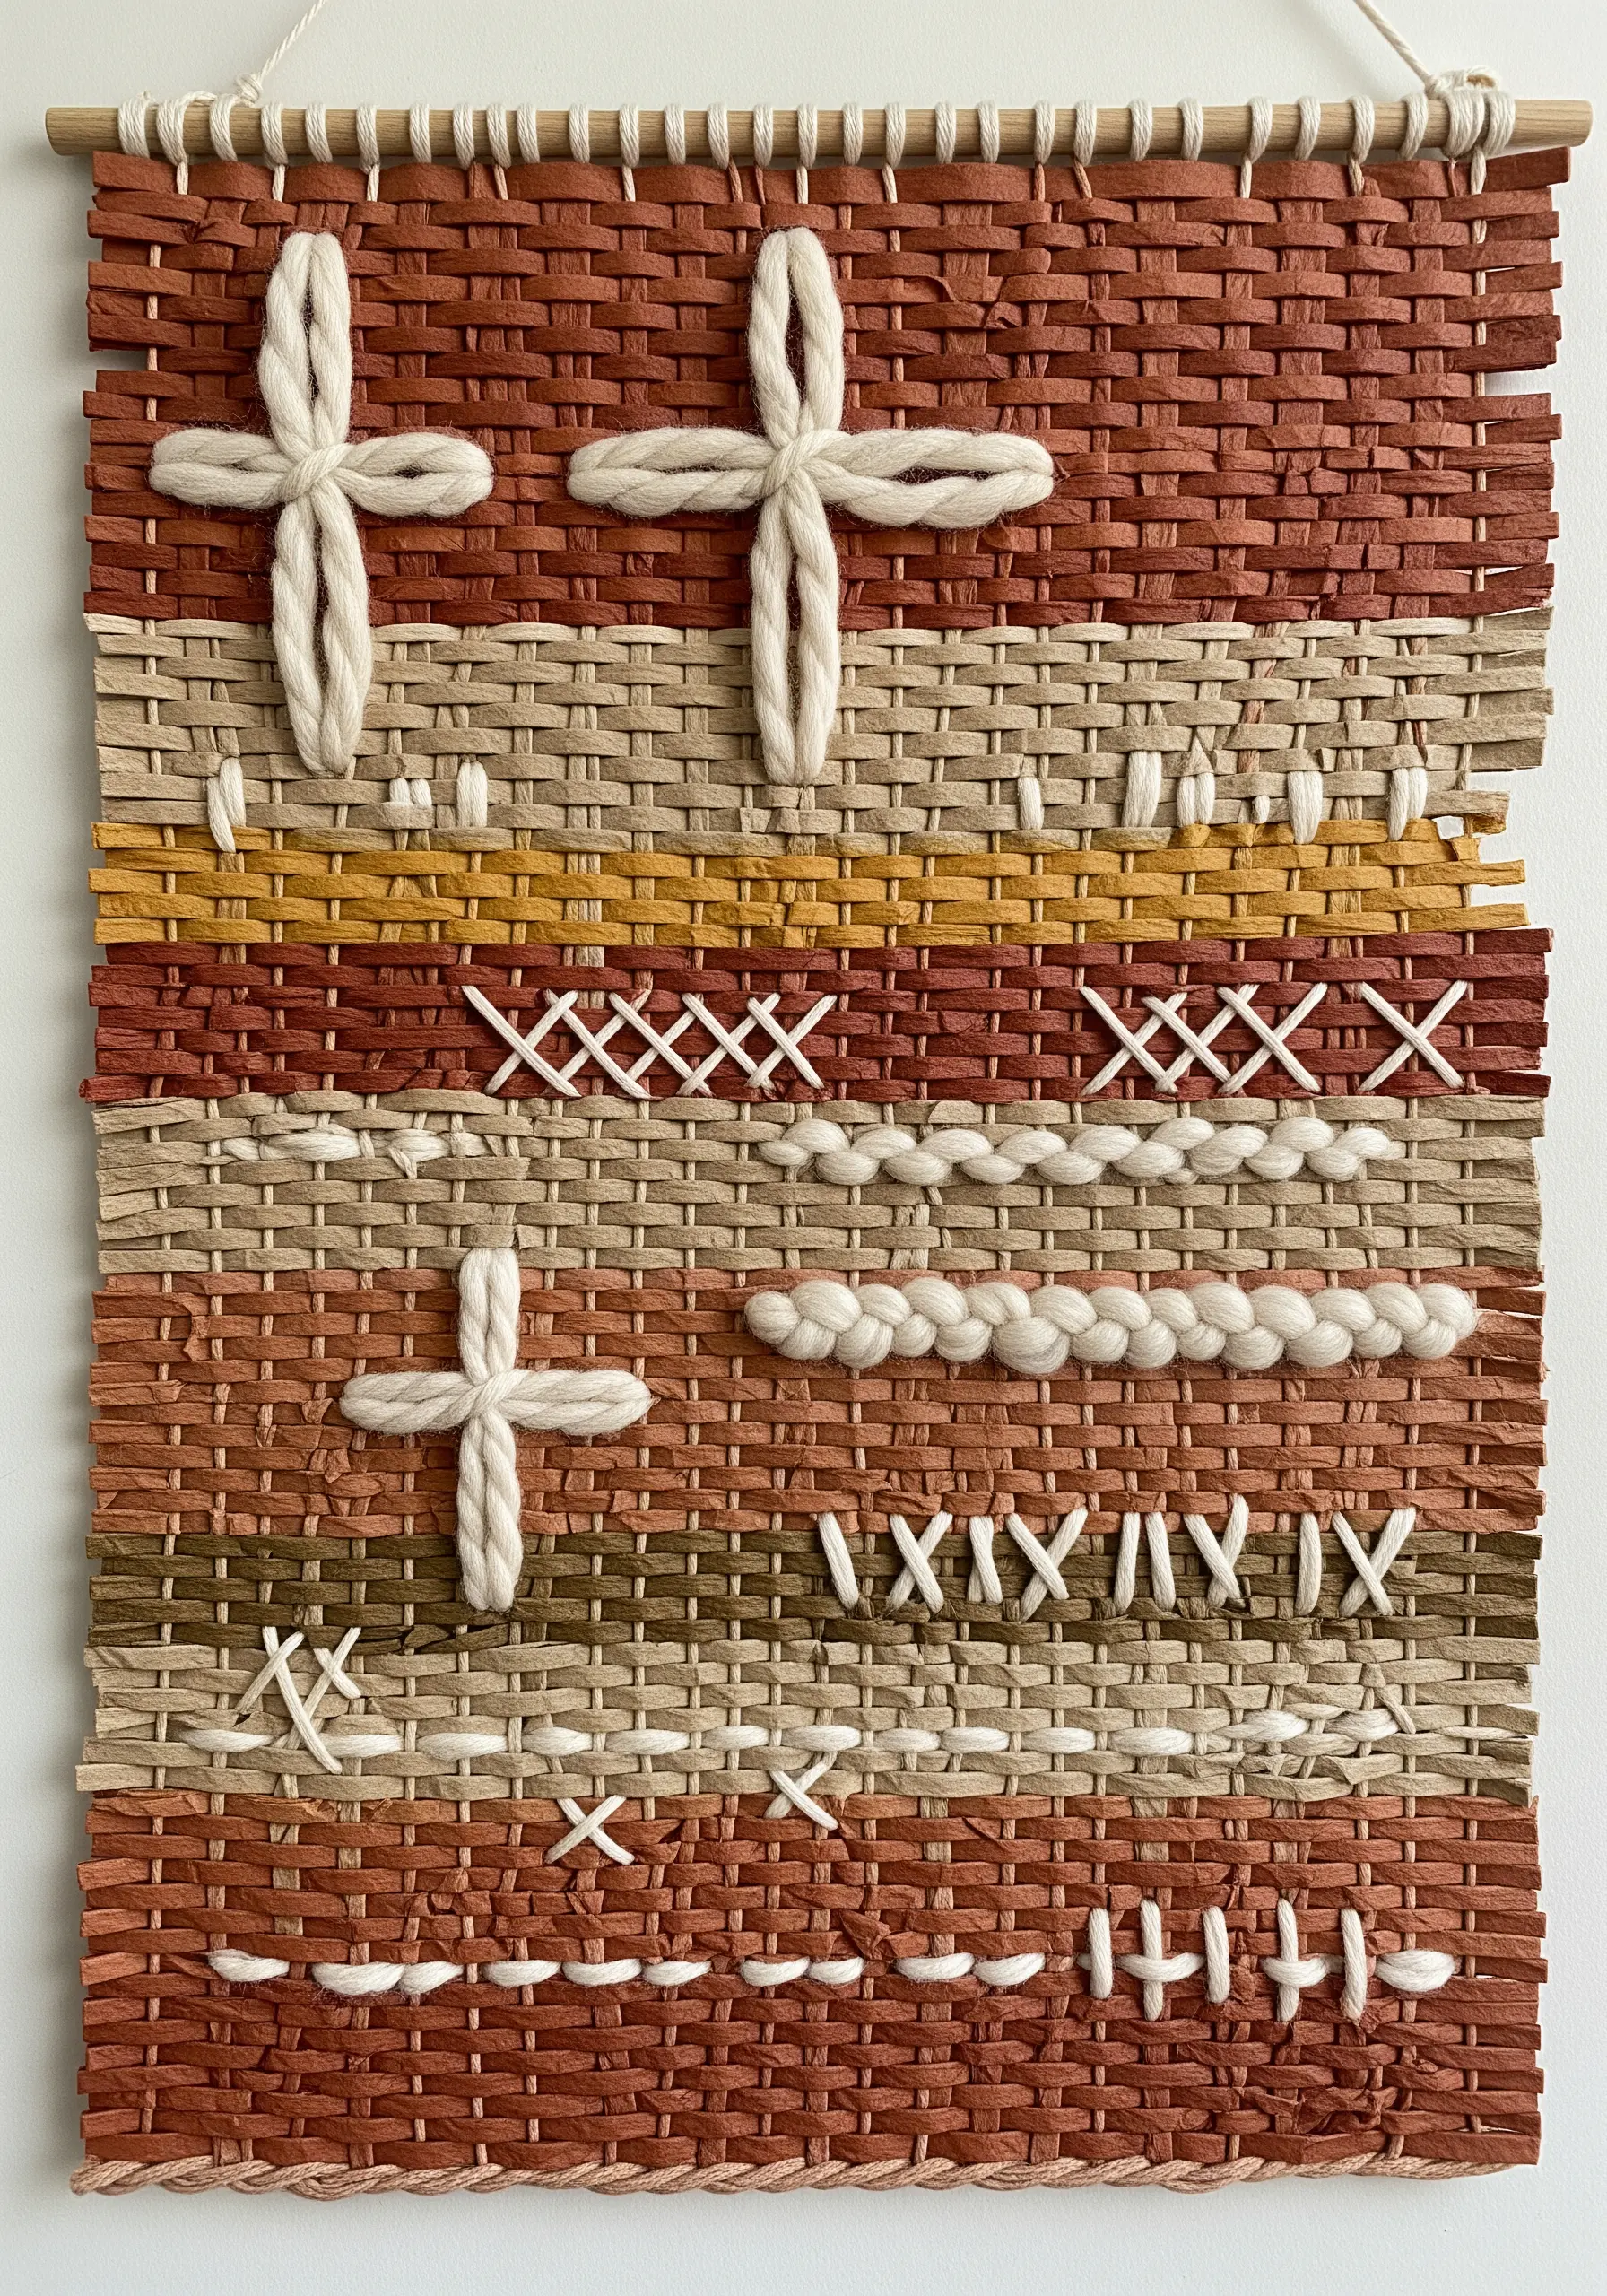
Create a loom from woven paper strips to serve as an unconventional canvas for textural yarn stitches.
Begin by weaving strips of colored paper or raffia together to form a sturdy, flexible base with a built-in grid.
Introduce texture and a soft counterpoint to the crisp paper by adding stitches with chunky, soft yarn.
Experiment with couching, cross stitches, or even weaving the yarn through the paper strips to create a mixed-media piece that celebrates diverse fiber textures.
13. Define Layered Paper Art with Clean Backstitching

Use precise paper cutting and minimal stitching to create a graphic, multi-layered illustration.
Cut each colored layer of the butterfly’s wings with a craft knife for sharp, clean edges that fit together perfectly.
Instead of filling the shapes with color, use a simple backstitch in a high-contrast thread to ‘draw’ the delicate veins and body details.
This technique uses thread as a tool for linework, adding definition and a subtle handmade touch to the crisp paper form.
14. Construct a Geometric Mobile with Stitched Edges
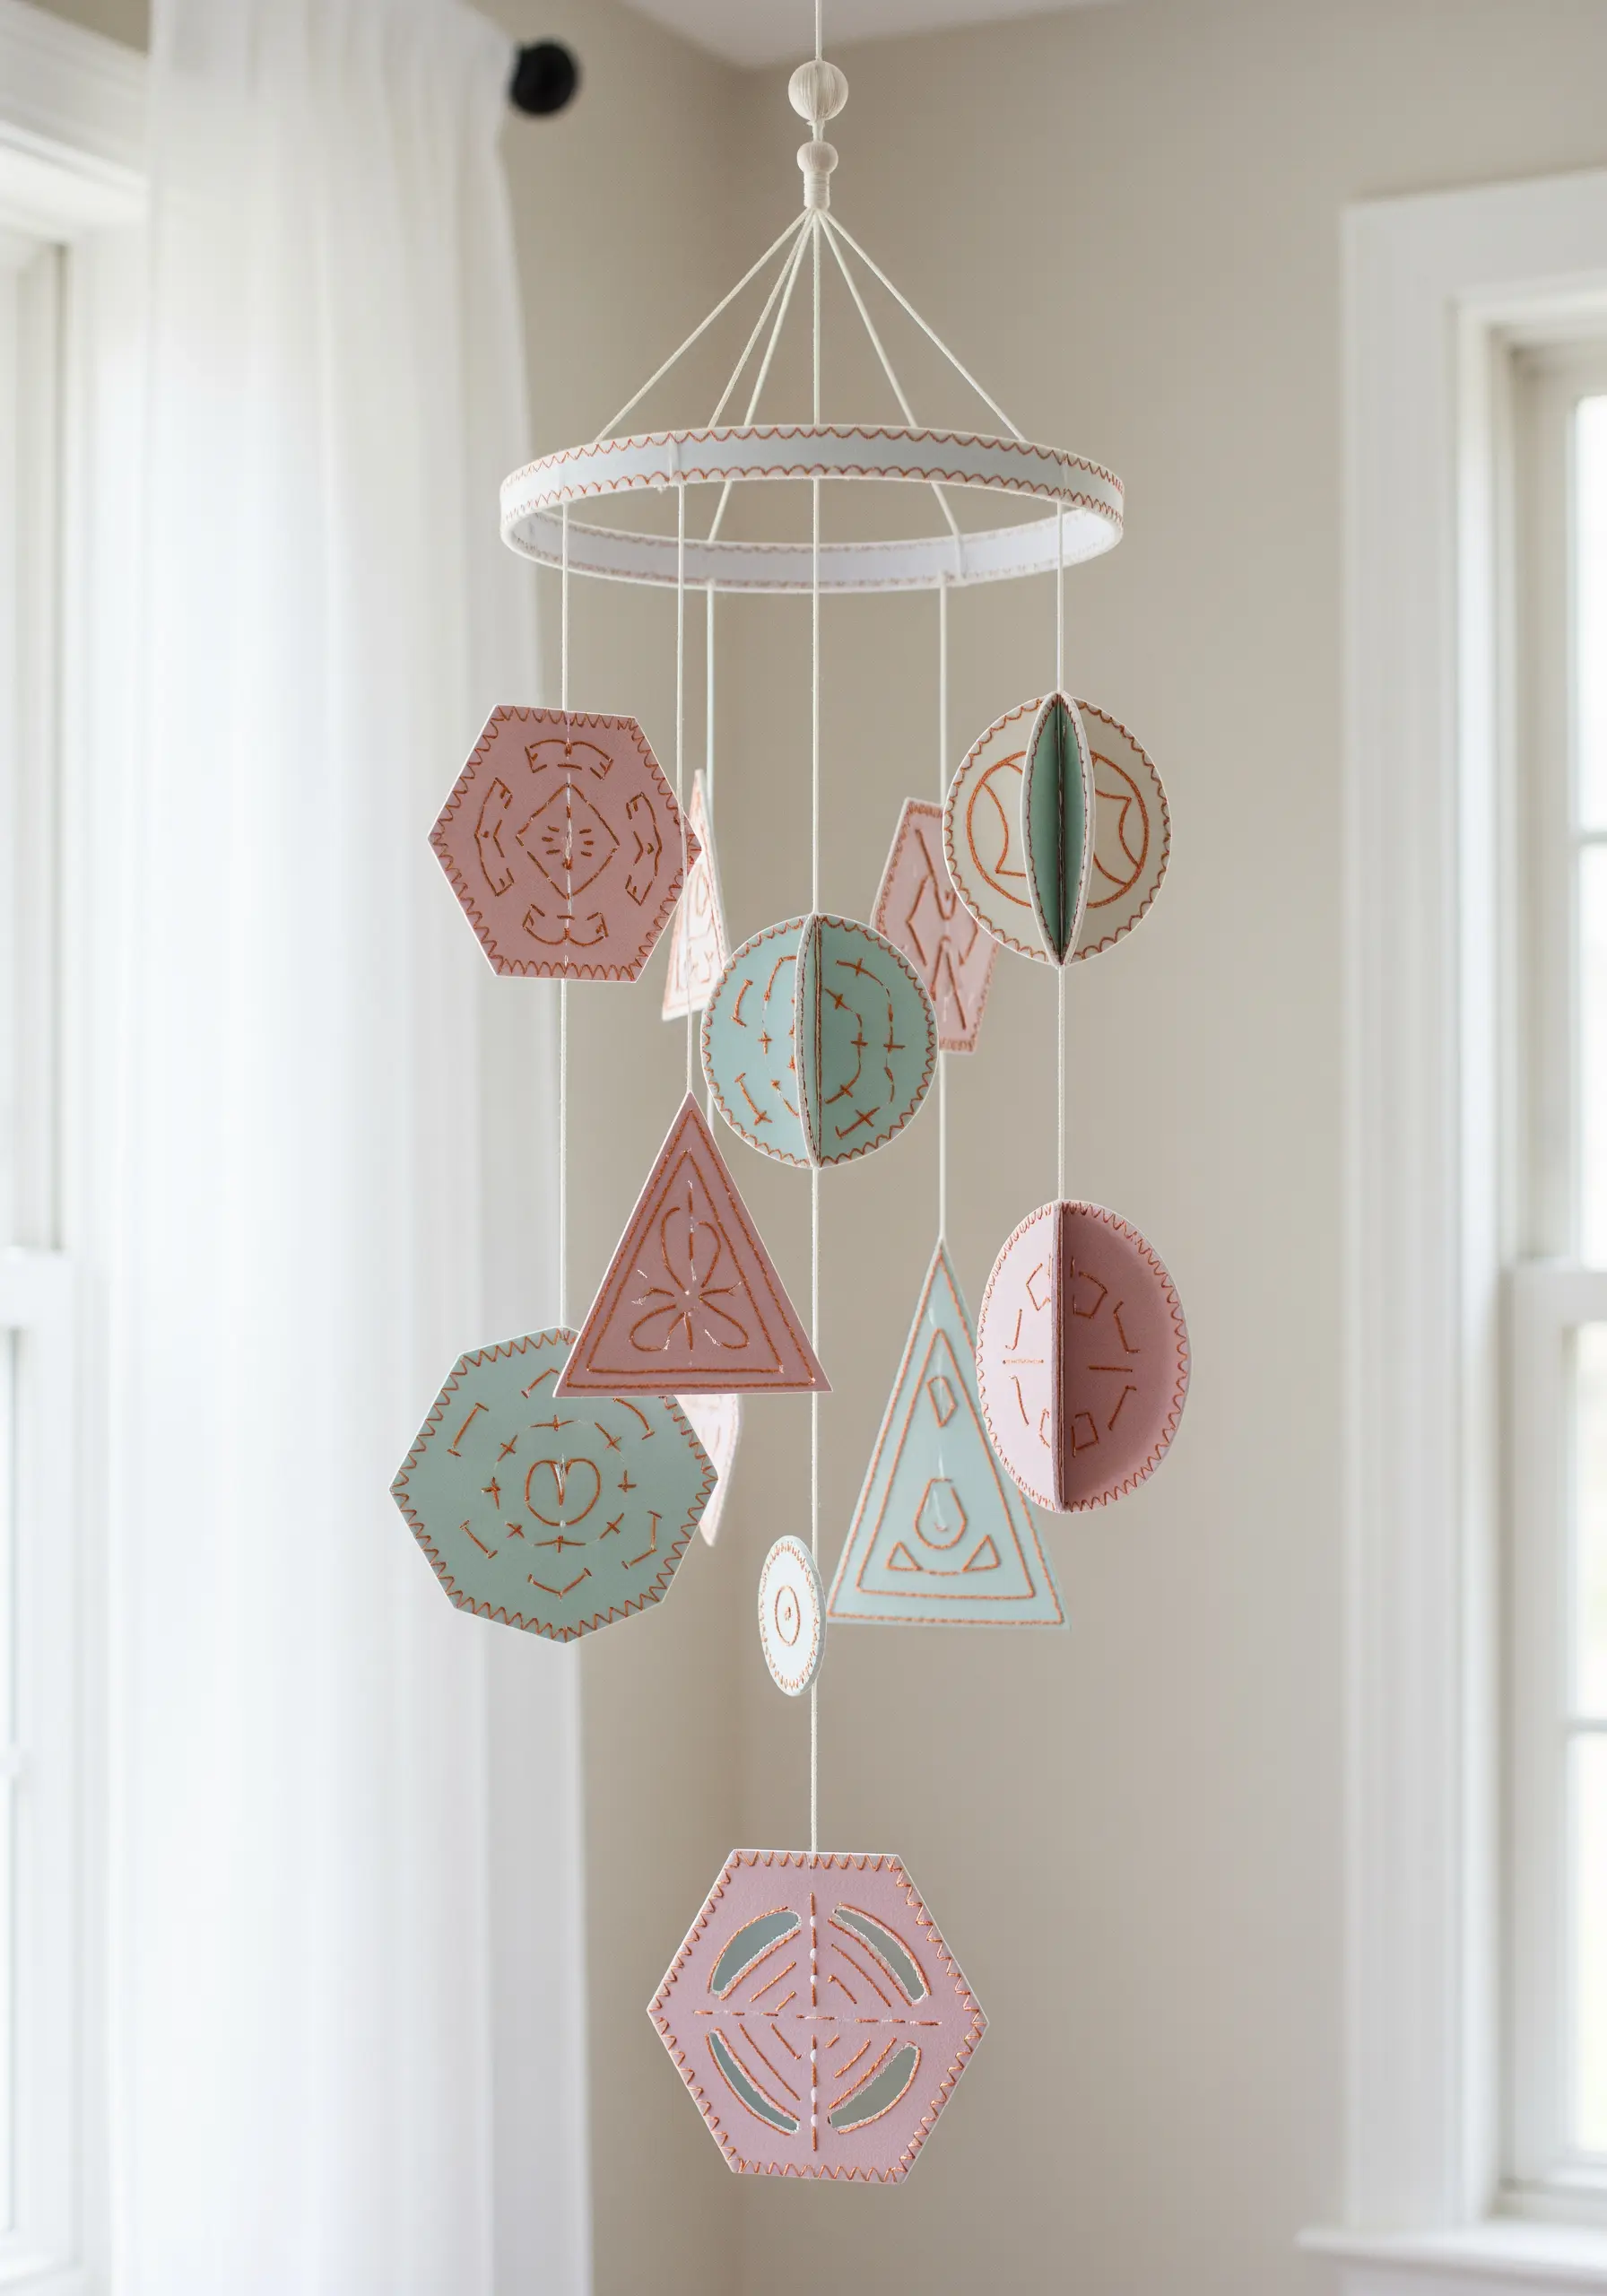
Give paper shapes the structure and finish they need to become a beautiful, balanced mobile.
For each element, cut two identical shapes from cardstock. You can lightly stitch a design on one or both before assembly.
Place the two shapes back-to-back and join them with a blanket stitch around the entire perimeter. This hides the reverse side of your stitches and creates a sturdy, finished edge.
Combine flat and 3D-folded shapes to add visual interest to your nursery-friendly design, ensuring it captivates from every angle.
15. Create Wave Crests with Knotted Stitches
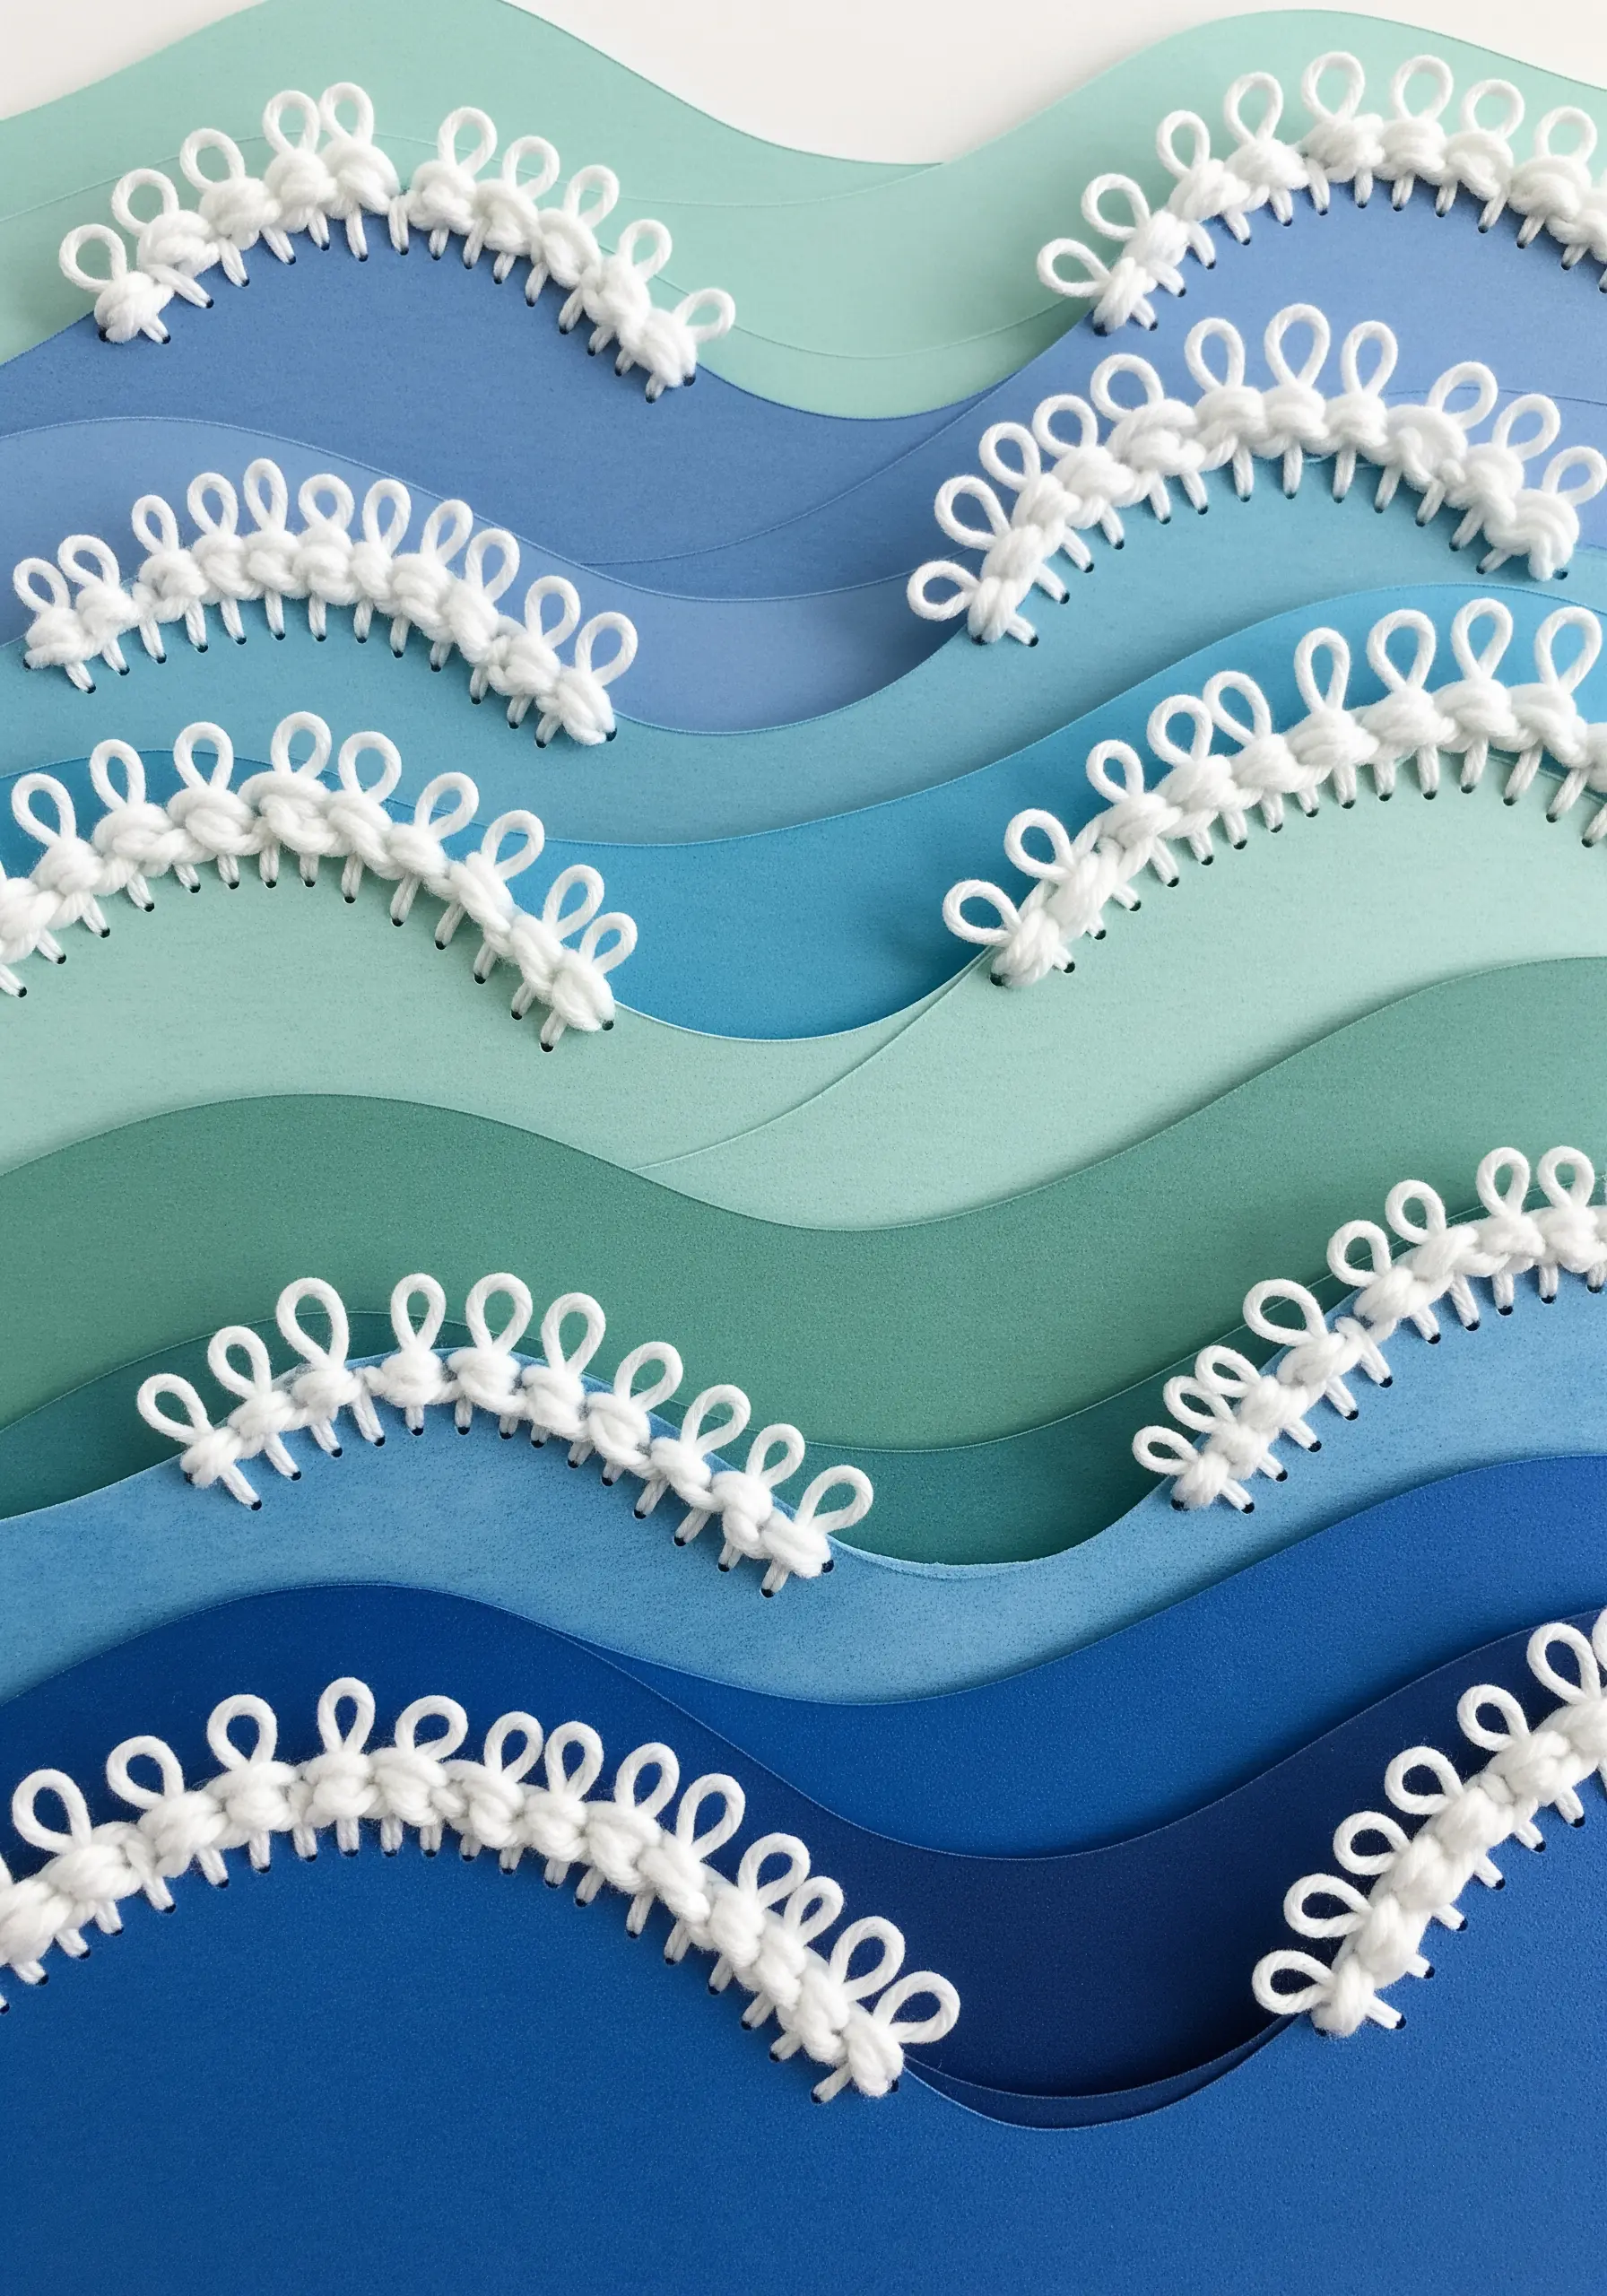
Evoke the texture of sea foam by adding dimensional knots to a layered paper seascape.
Cut sweeping, curved shapes from different shades of blue cardstock and layer them to create the gentle roll of ocean waves.
Use a thick, white pearl cotton or soft yarn to stitch a series of linked bullion knots or detached chain stitches along the top edge of each wave.
This creates a frothy, looped texture that sits on top of the paper, perfectly capturing the look of cresting waves in a stylized, tactile way.
16. Fill a Silhouette with Paper Filigree
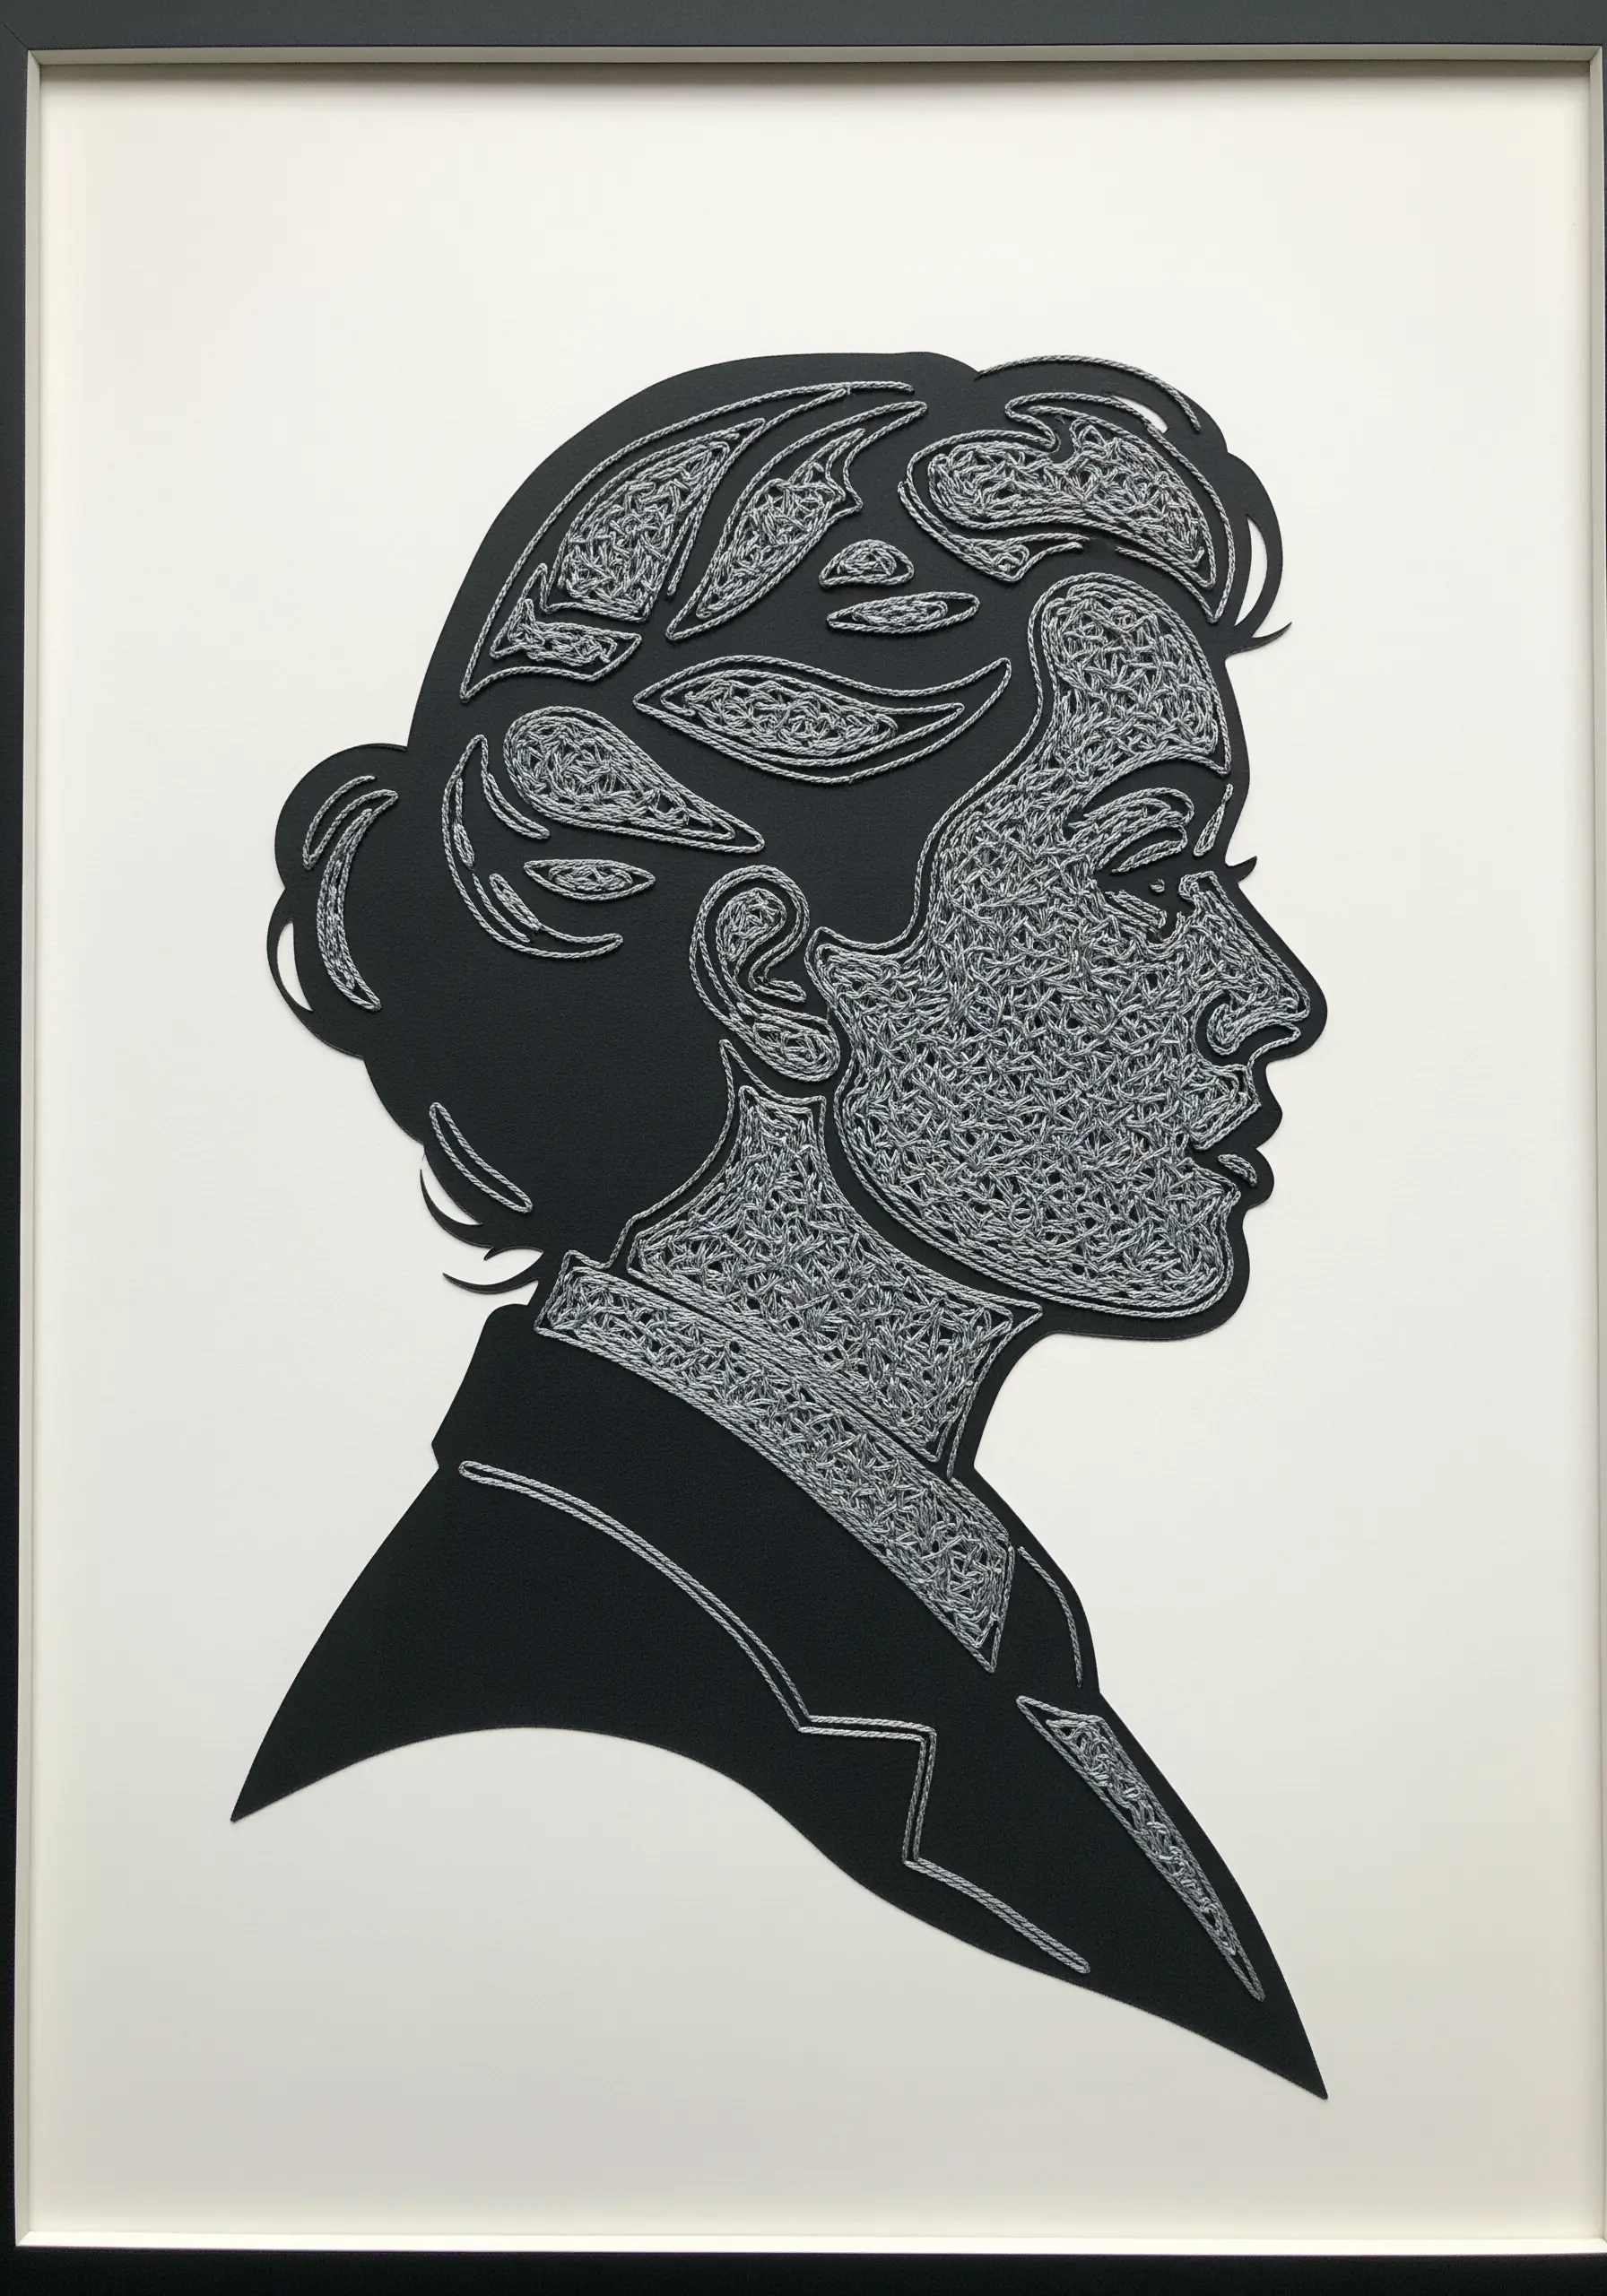
Use the quilling technique not just for decorative shapes, but as a fill to create intricate, lace-like patterns within a solid outline.
Start with a strong, clean-cut silhouette from black cardstock, which will serve as the frame for your work.
Instead of thread, fill the interior space with tightly curled and shaped strips of paper, arranging them to create flow and density.
This method allows you to ‘paint’ with paper texture, creating a stunning contrast between the solid frame and the delicate, swirling filigree inside.
17. Make a Garland with Stitched Watercolor Leaves
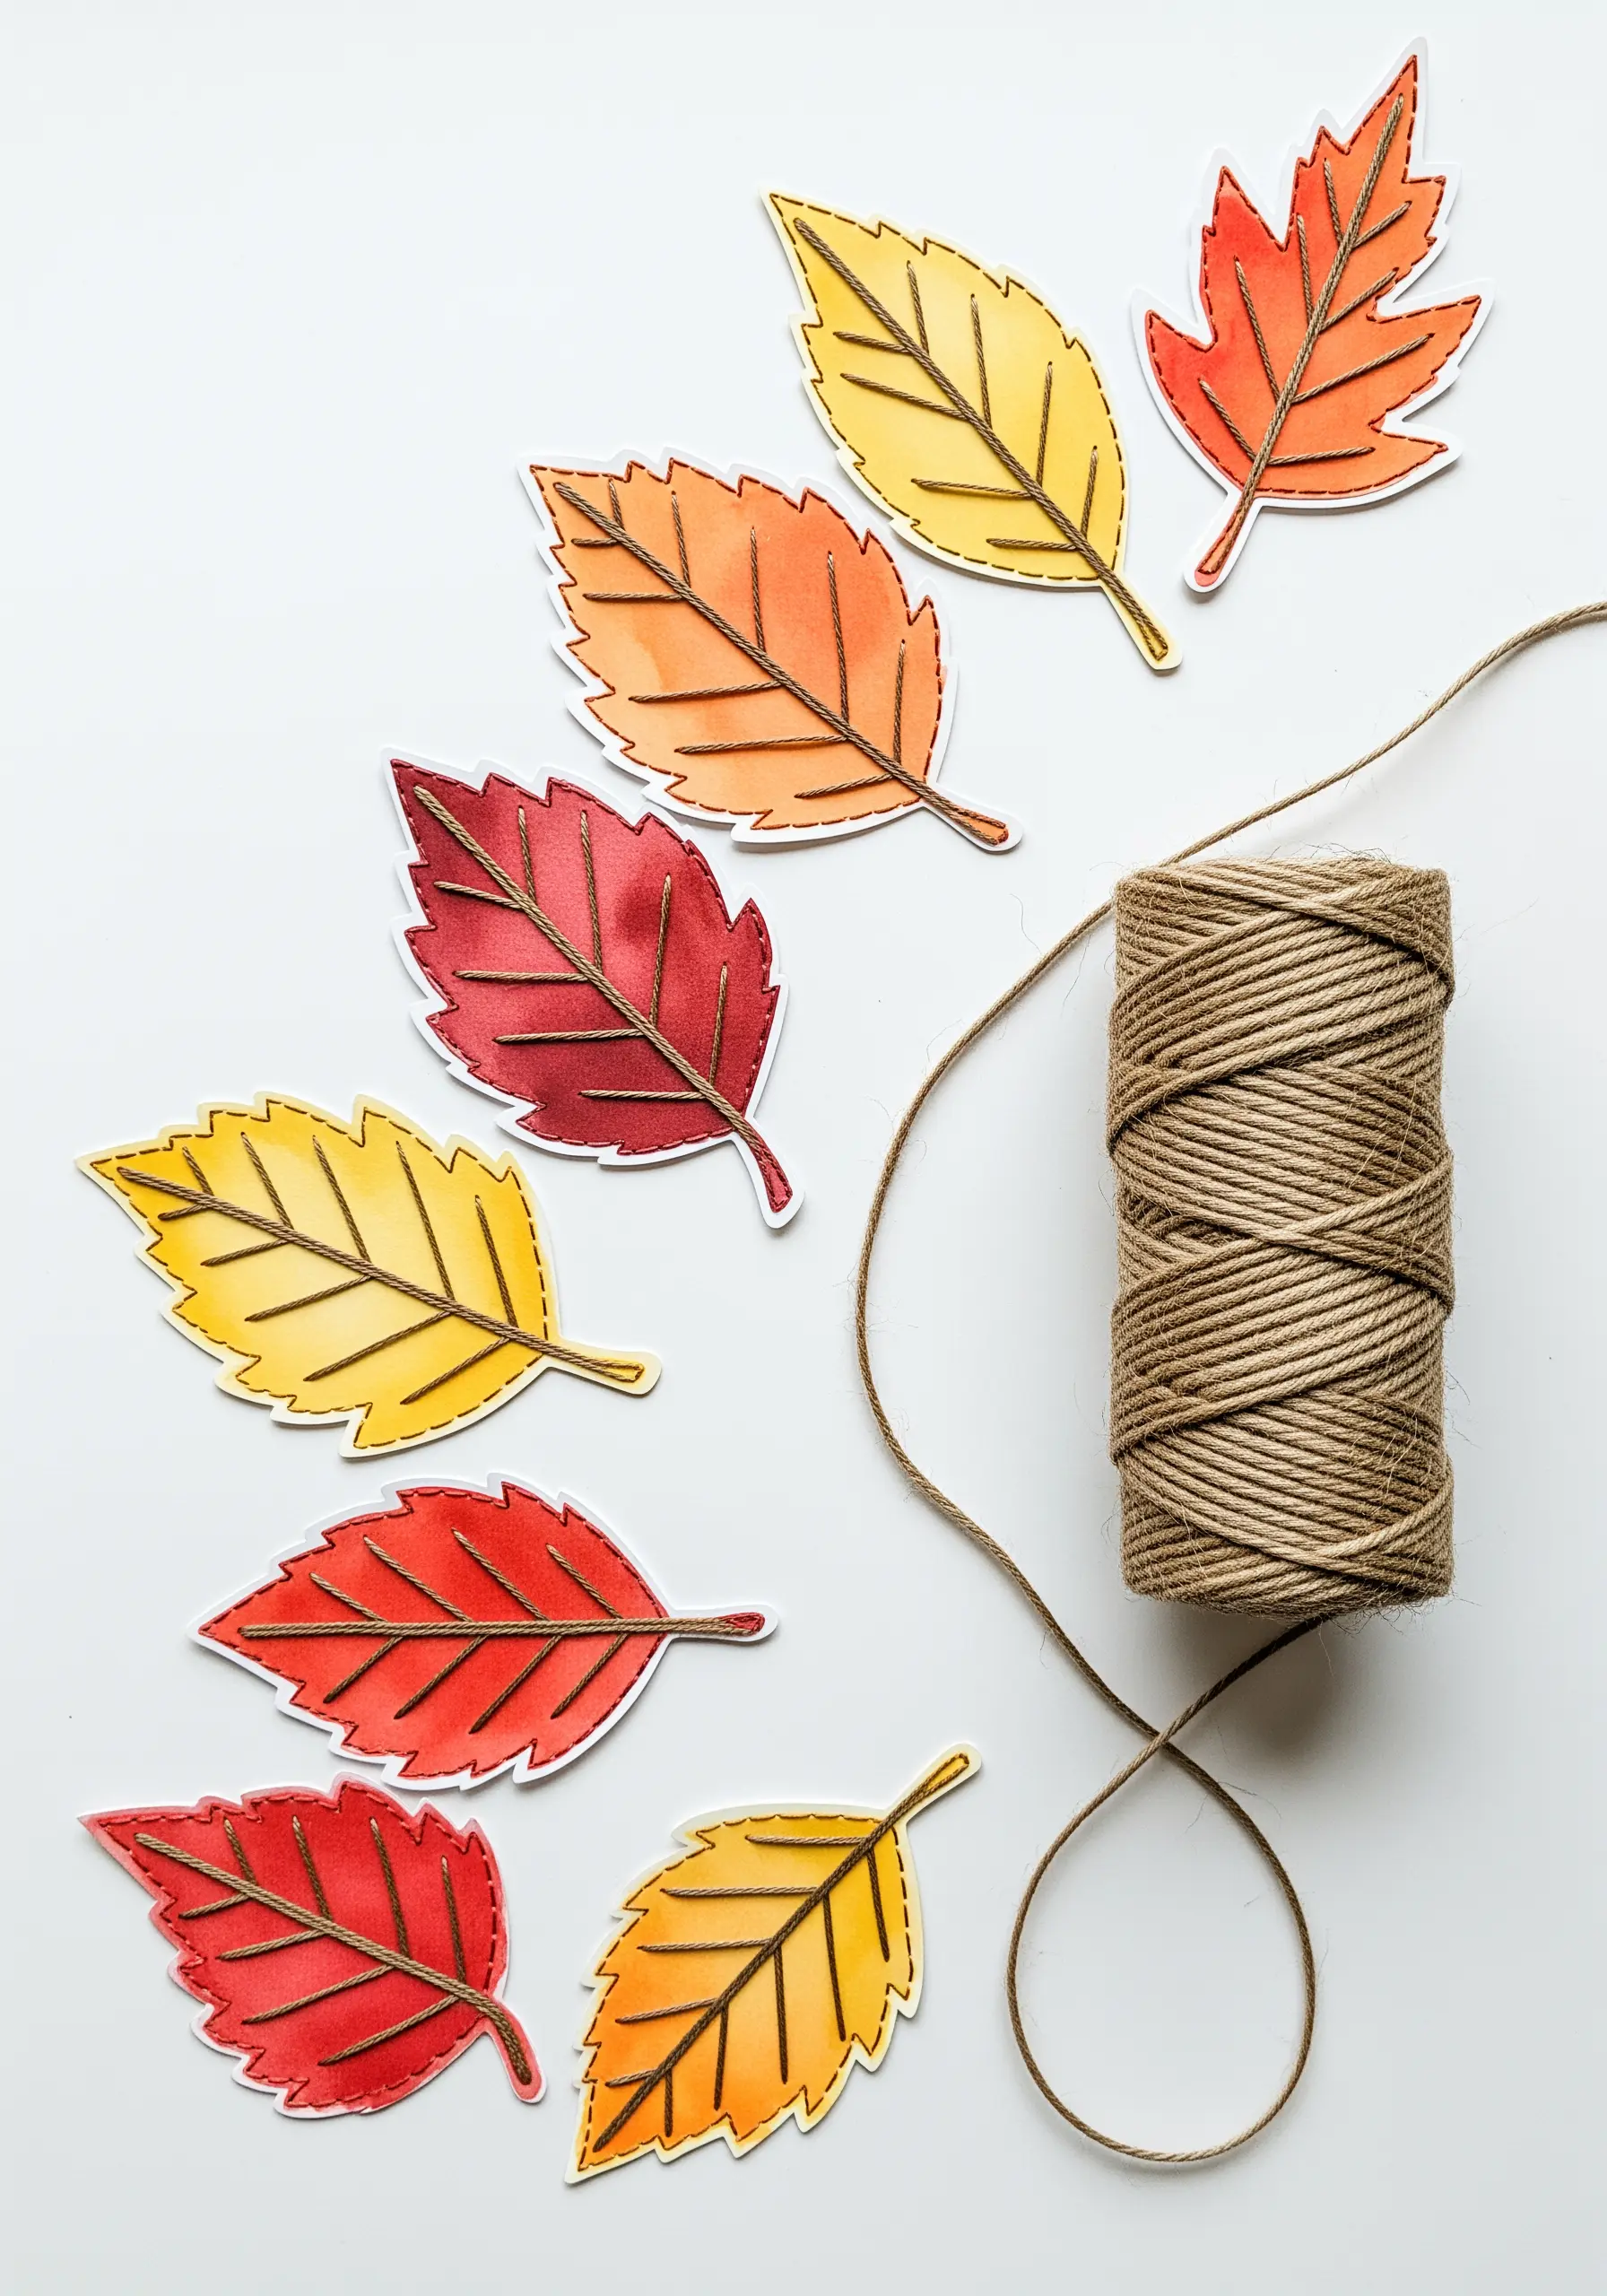
Combine the soft gradients of watercolor with the sharp definition of machine stitching for beautiful, reusable decor.
Paint a sheet of watercolor paper with autumnal shades, allowing the colors to blend naturally for an organic effect.
Once completely dry, cut out simple leaf shapes. The color variations will make each leaf unique.
Using your sewing machine, stitch the central vein and smaller radiating veins onto each leaf with a contrasting thread, then string them together on twine.
18. Assemble a 3D Sculpture with Structural Lacing
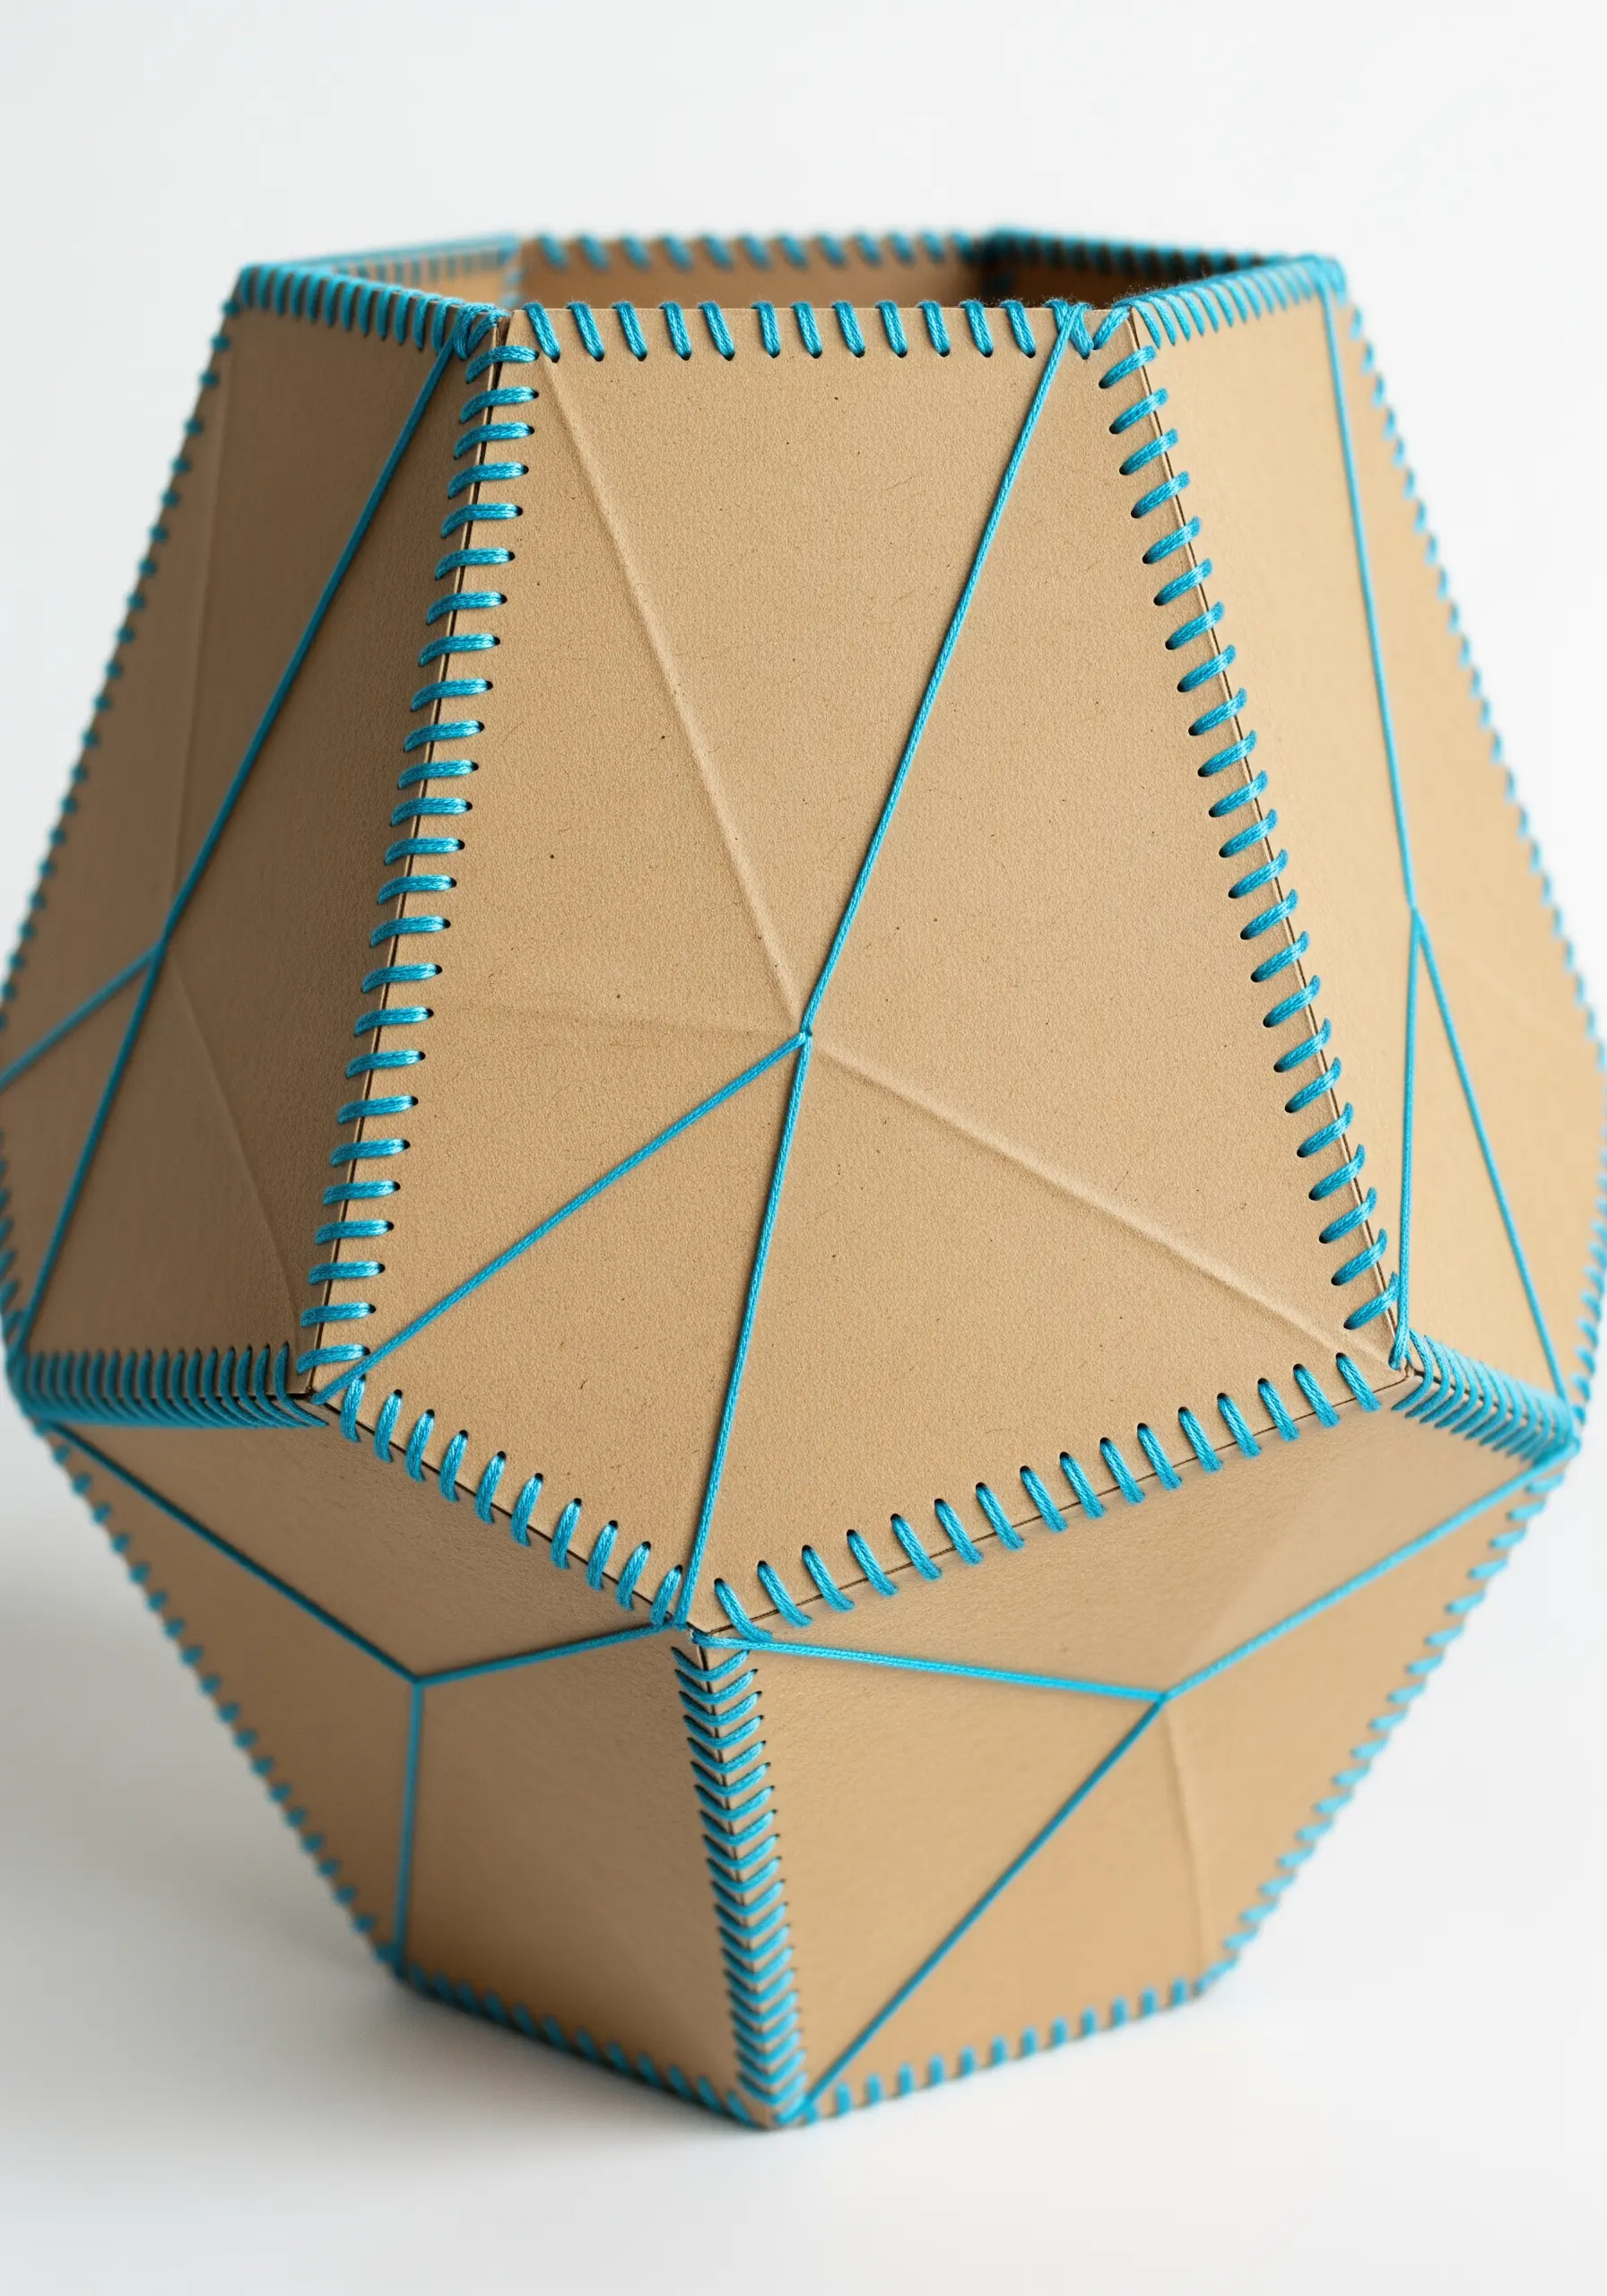
Move beyond flat surfaces and use stitching as a construction method to build geometric paper forms.
Cut your polygonal shapes from sturdy cardboard or thick cardstock, and pre-punch holes evenly along all edges that will be joined.
Use a strong, smooth cord or yarn and a blanket stitch or whip stitch to lace the panels together, turning 2D shapes into a 3D object.
The contrasting color of the lacing cord highlights the geometry of the form, celebrating the stitch as both a functional and aesthetic element.
19. Visualize Sound with Dimensional Thread Art
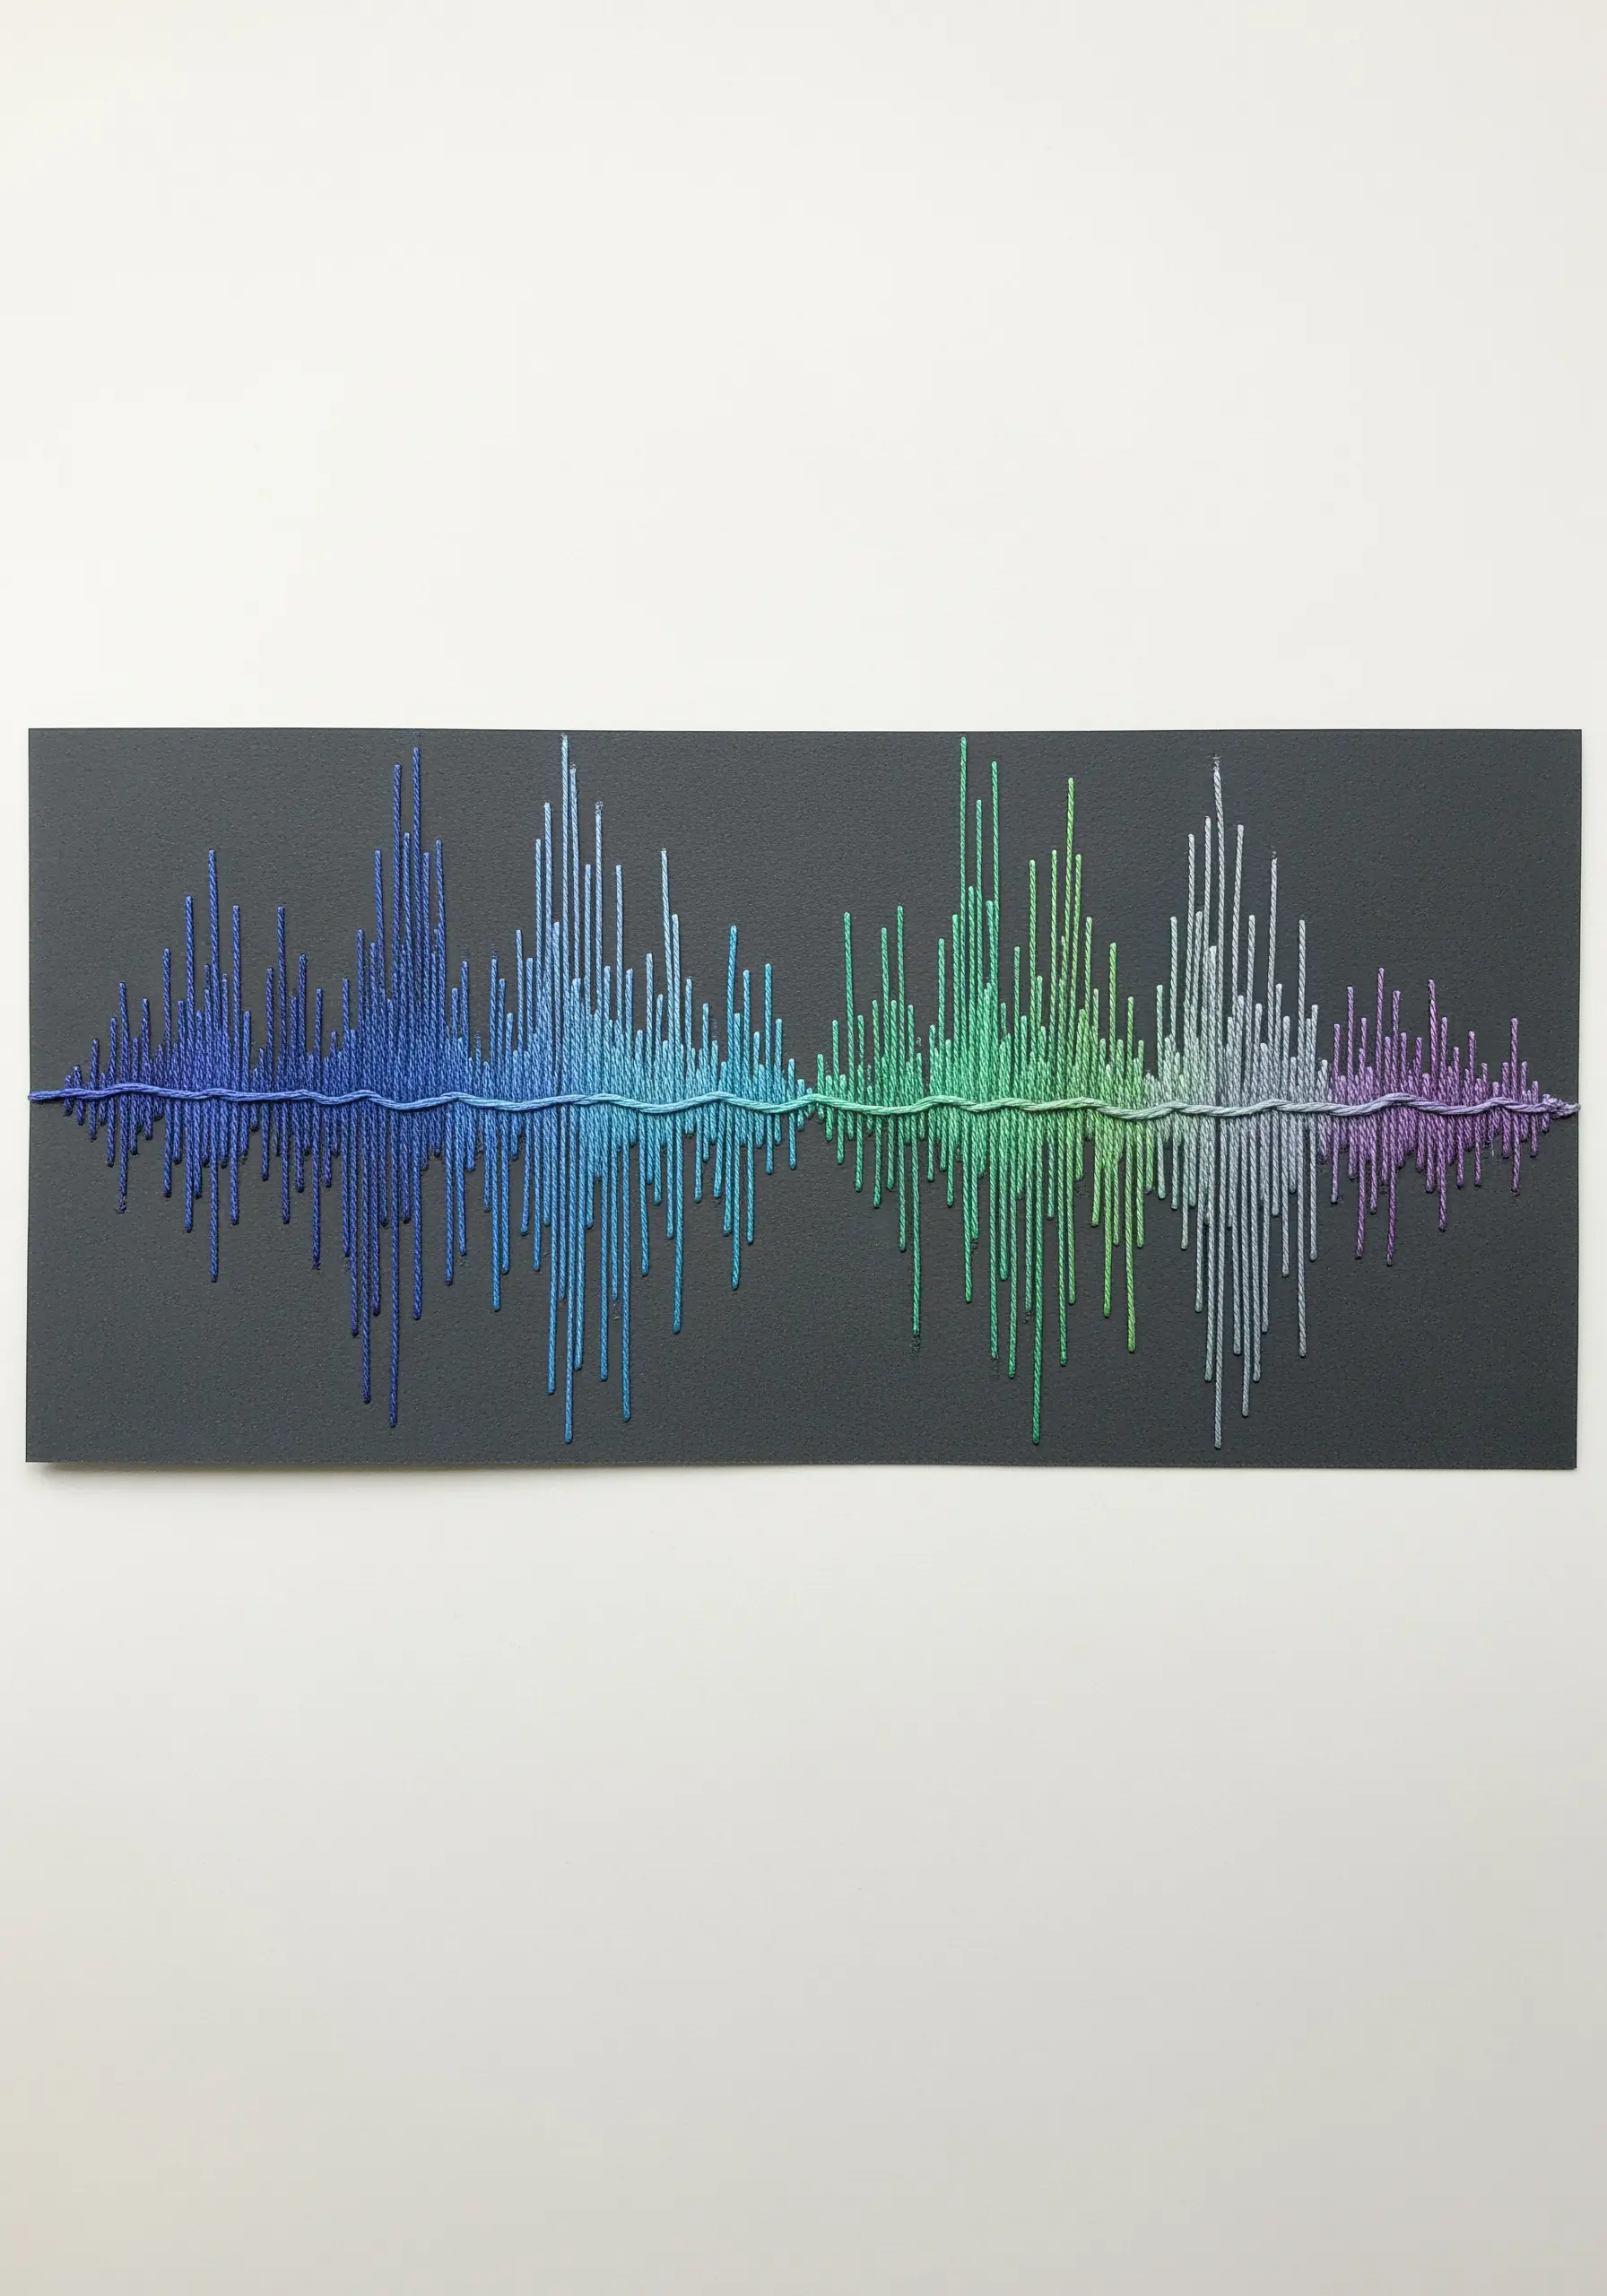
Translate an audio waveform into a tactile piece of art by varying the length and density of your stitches.
Use a personal voice recording or a favorite line of music as your source, and trace its waveform onto dark cardstock.
Stitch vertically from a central axis line, using hundreds of straight stitches that precisely match the peaks and valleys of the soundwave.
Employ a gradient of thread colors to add another layer of visual information, creating a piece that is both deeply personal and technically striking.
20. Emulate Art Deco Radiance with Folded Paper
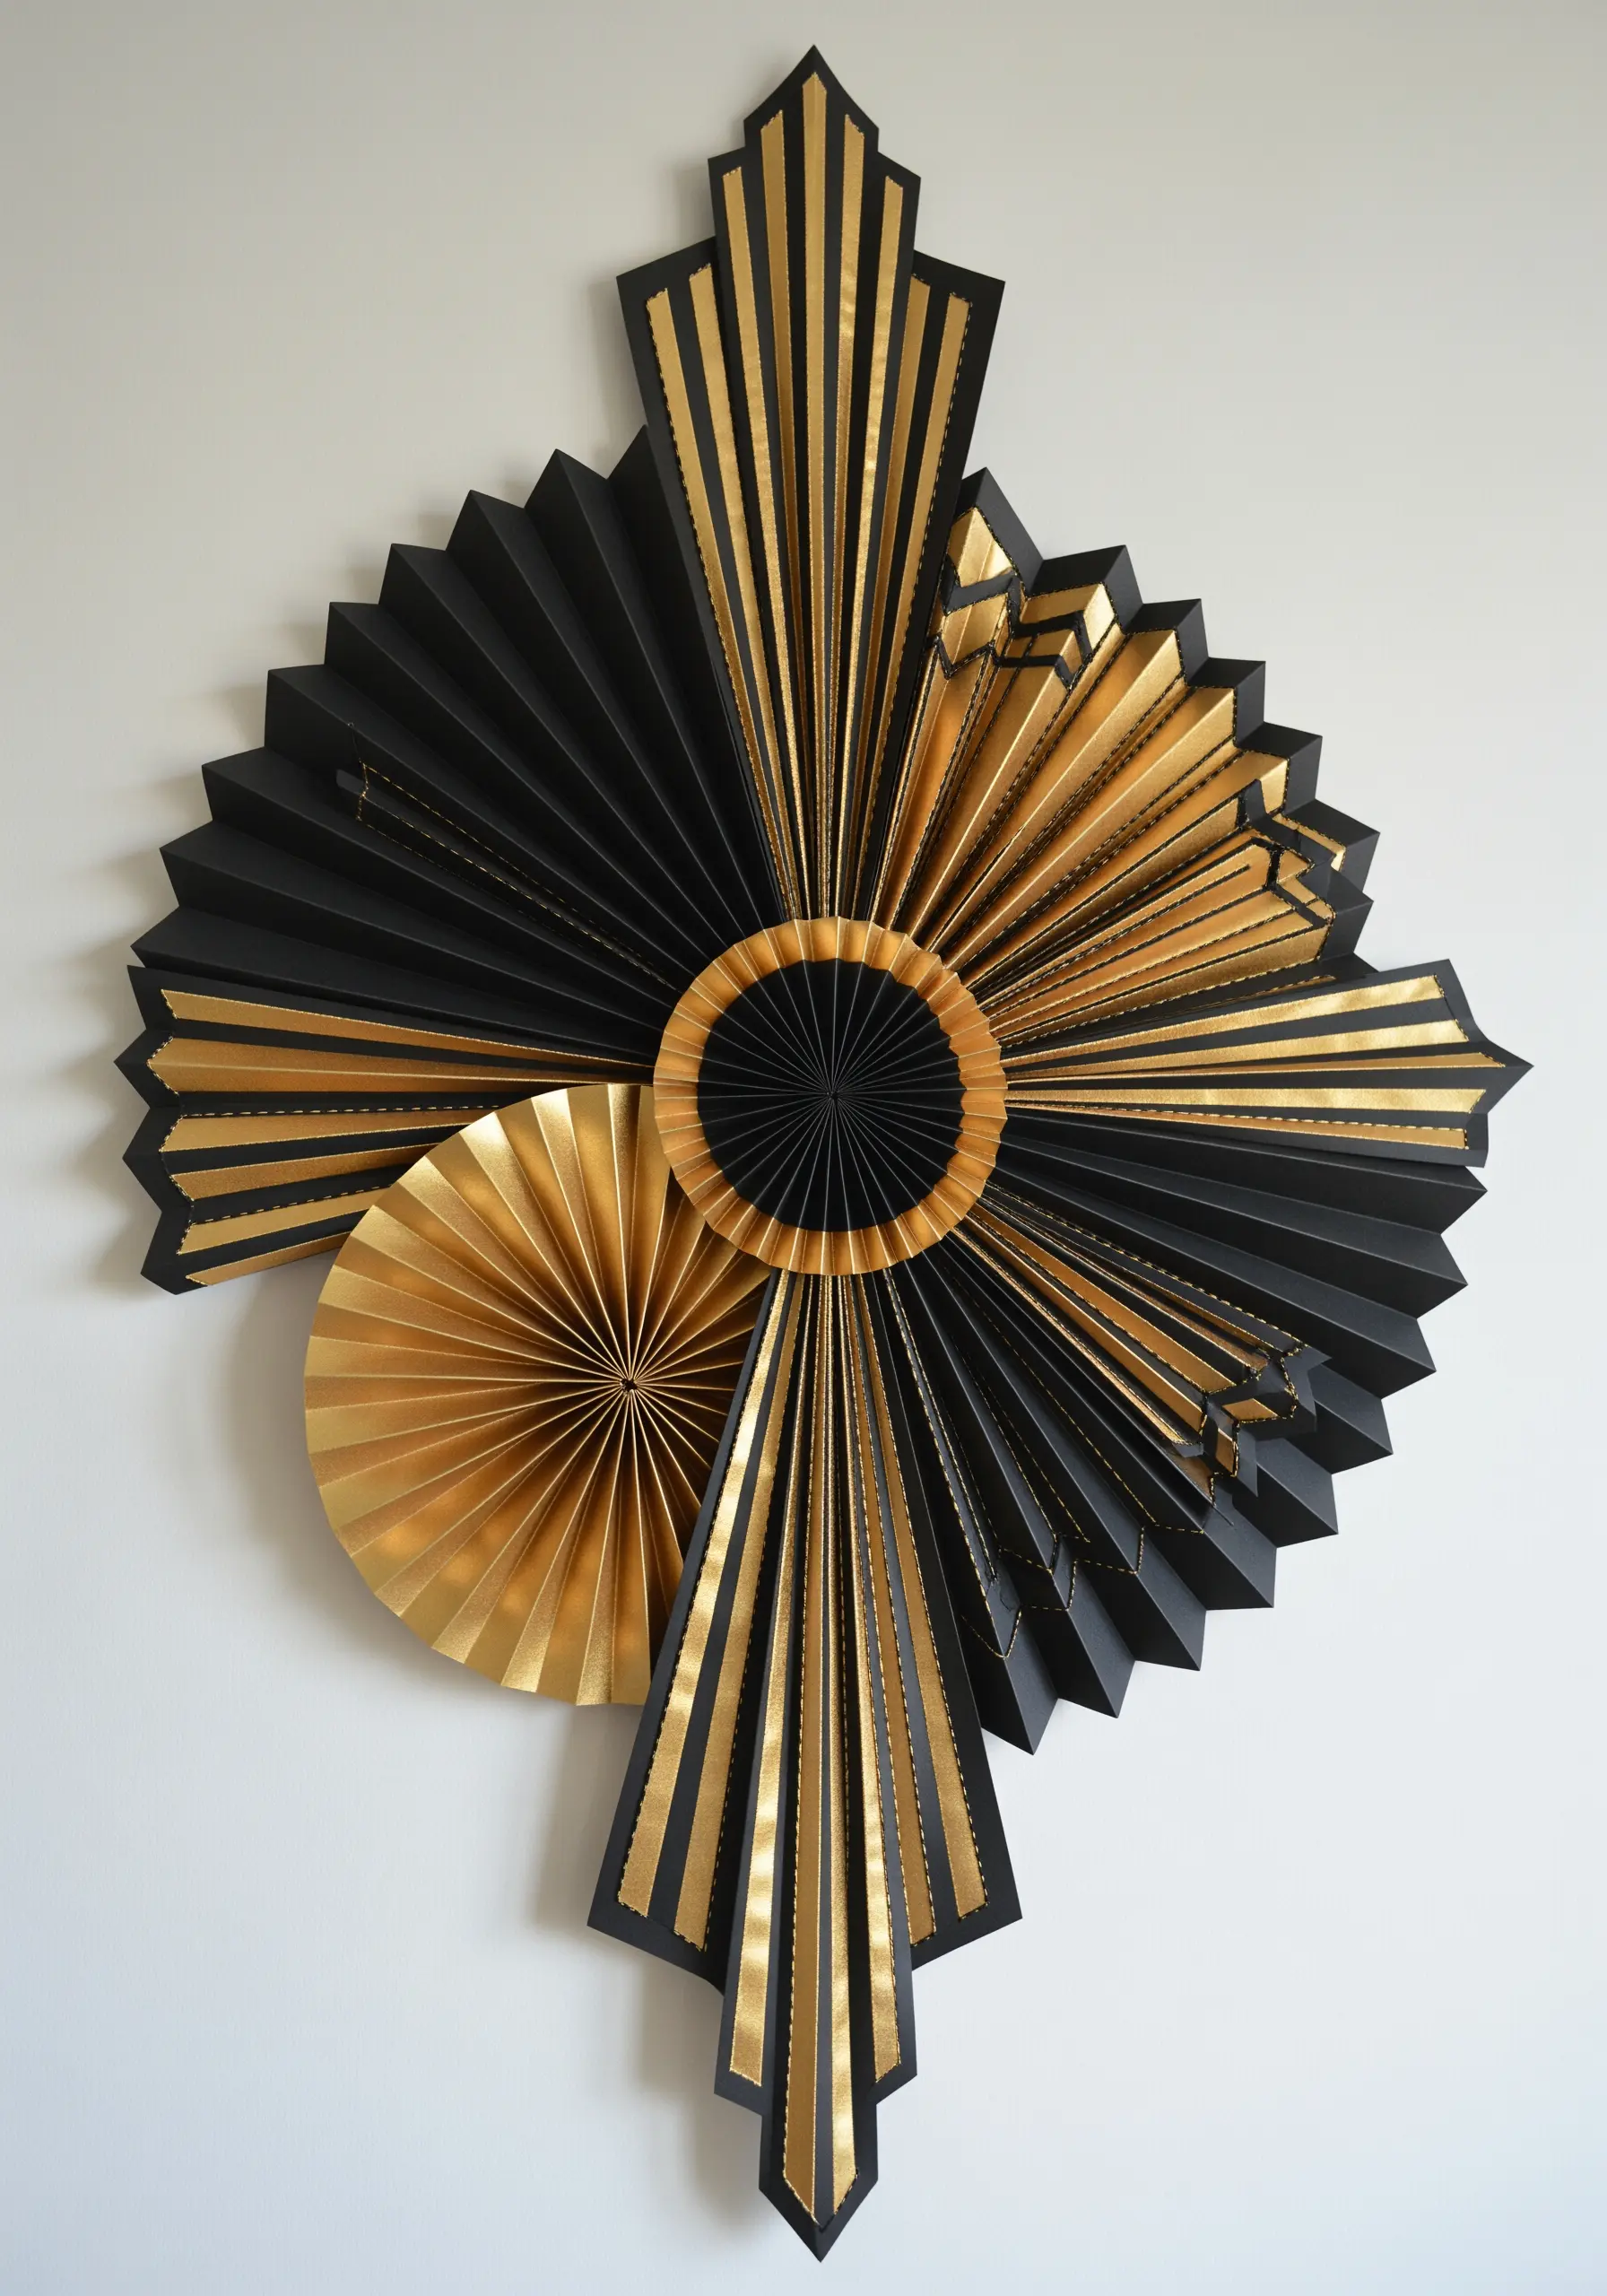
Study the principles of folded paper art to inform your embroidery compositions, especially for geometric and Art Deco designs.
Notice how the crisp, radiating folds create a dynamic play of light and shadow—a quality you can replicate with precisely angled satin stitches.
Use metallic thread to stitch radiating lines or fill fan shapes, mimicking the way light catches the edges of the folded gold paper.
This project reminds us that inspiration for stitch direction and composition can come from the structural beauty of other art forms.
21. Carve a Landscape and Inlay a Thread River
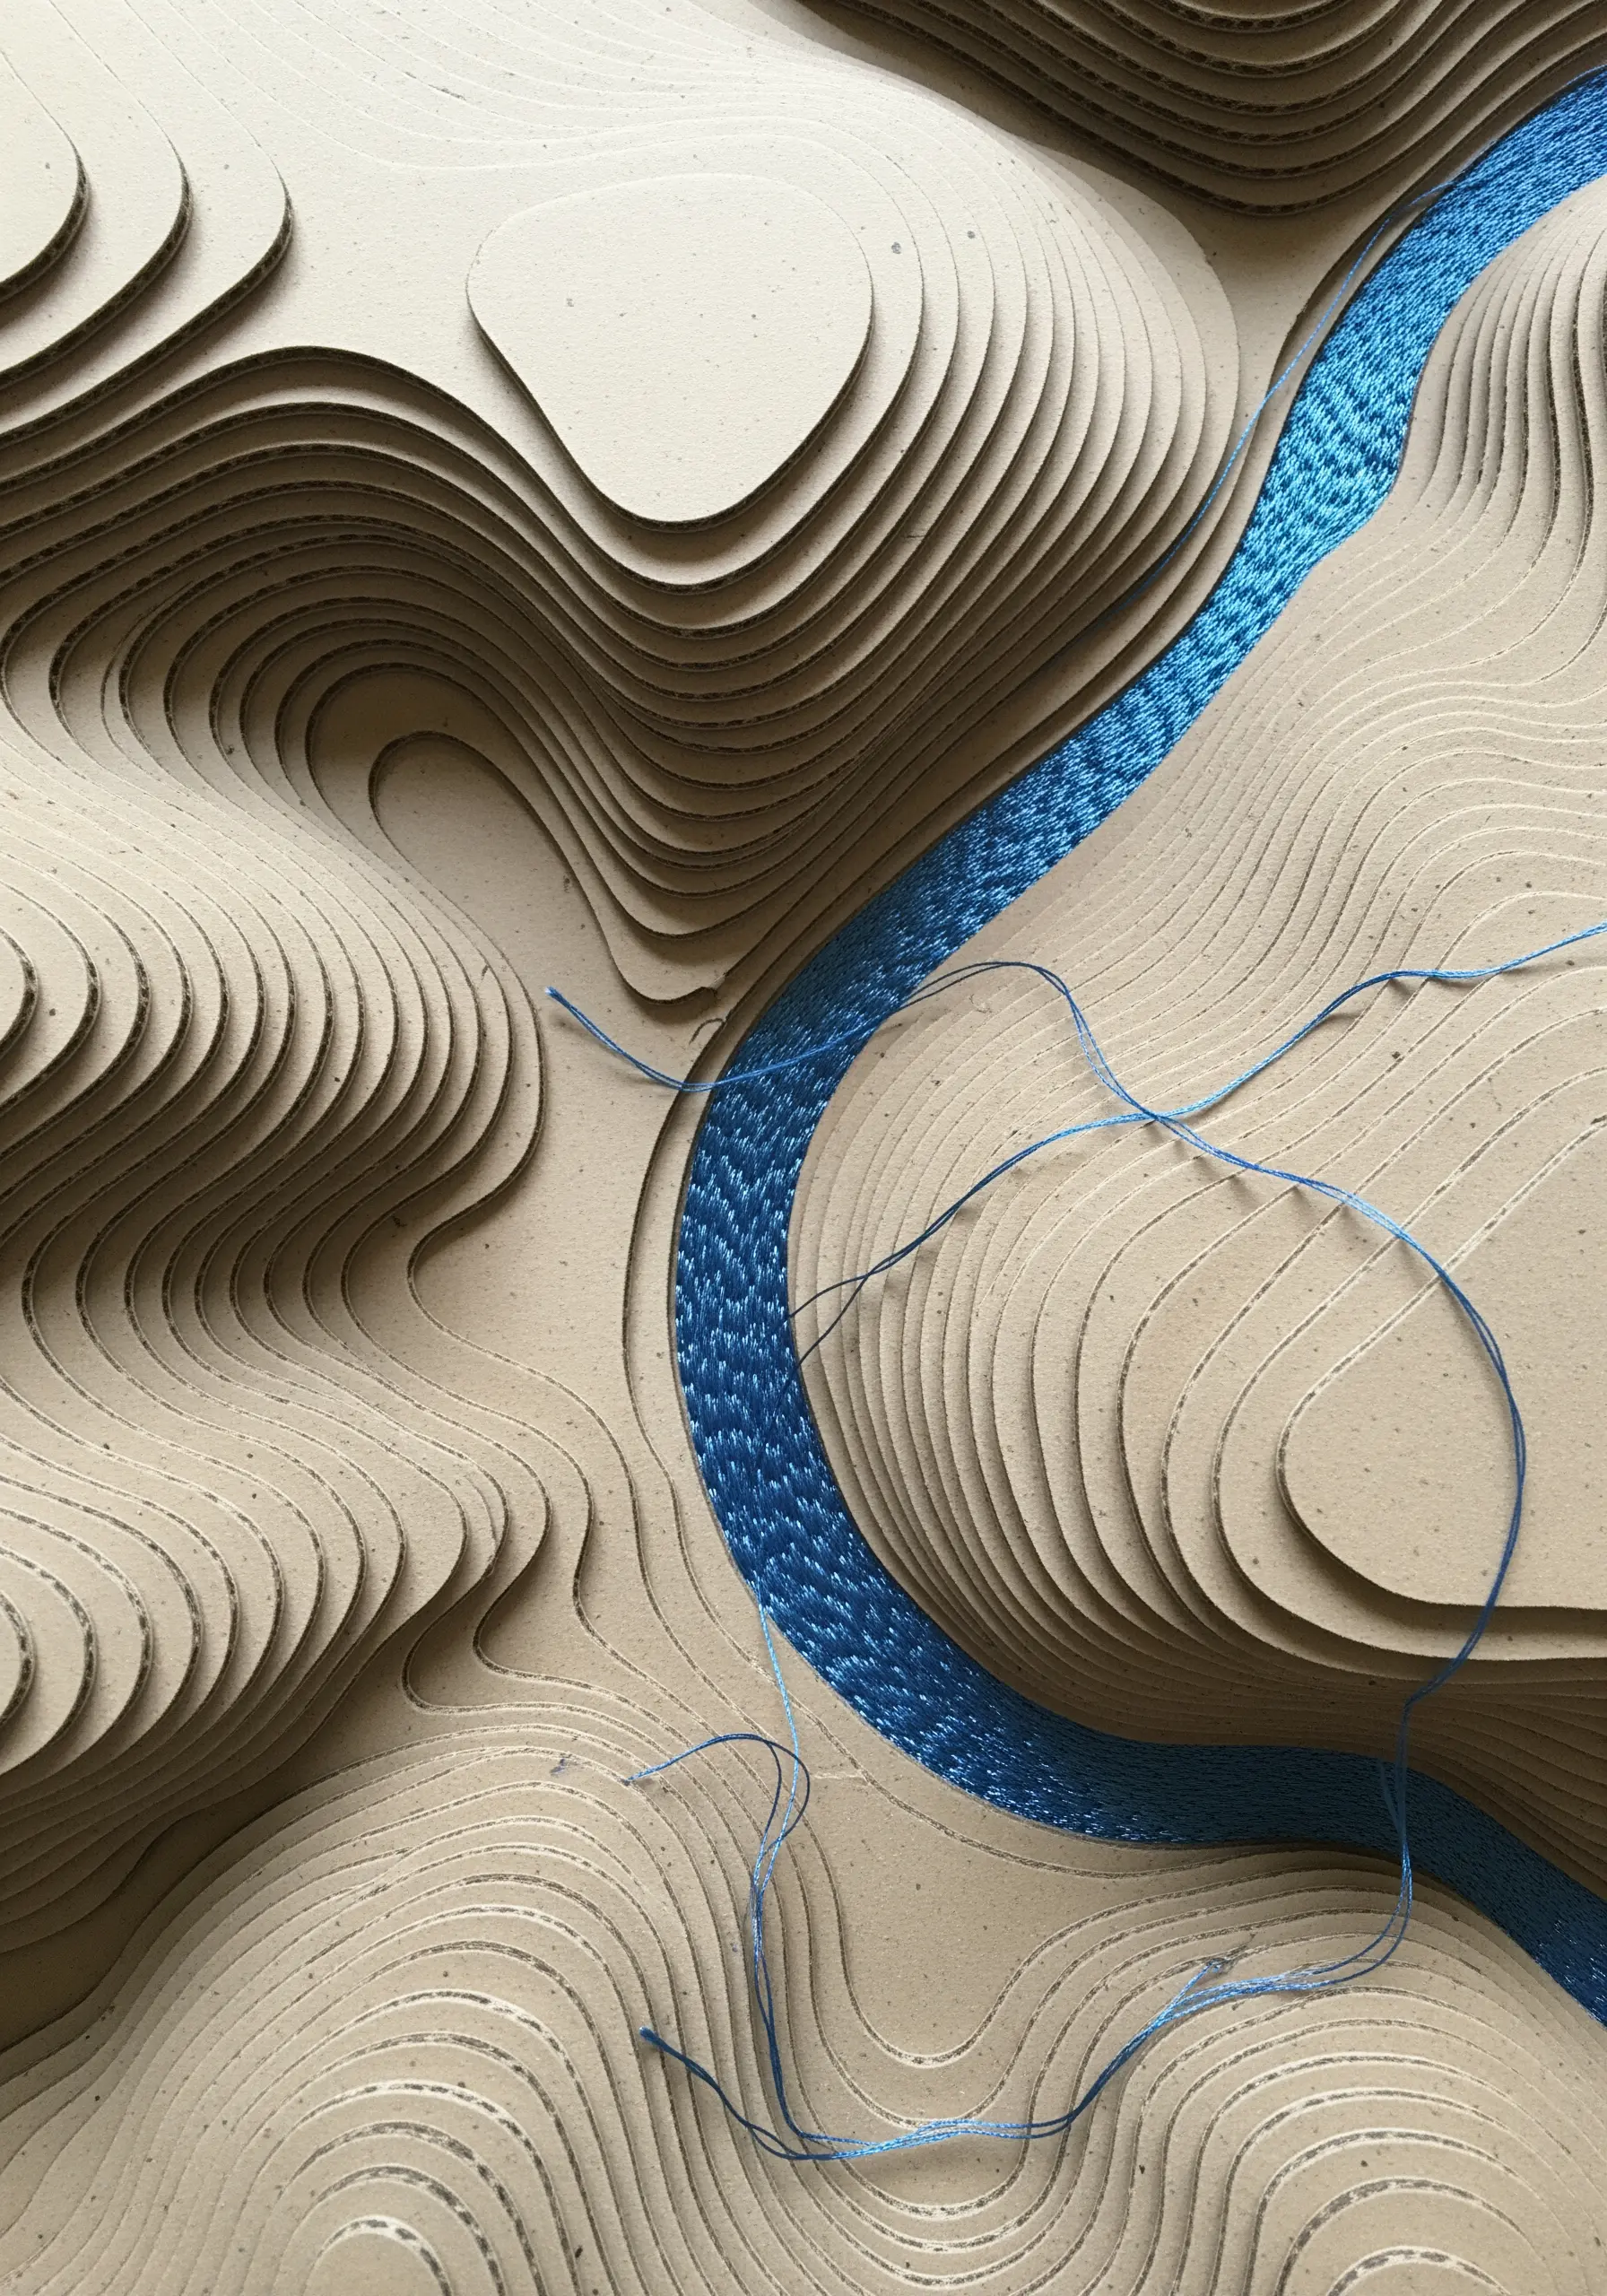
Create a topographical map by layering precisely cut pieces of cardstock, then inlaying thread for a pop of color and texture.
Stack and glue layers of cardboard, each cut slightly differently, to build up the contours of a landscape, leaving a channel for a river.
Fill this channel by couching a vibrant blue or metallic thread. This technique involves laying the thread on the surface and tacking it down with small, perpendicular stitches.
The smooth, shimmering thread provides a beautiful textural contrast to the matte, stepped edges of the paper canyon walls.
22. Craft a 3D Entomological Collection with Stumpwork
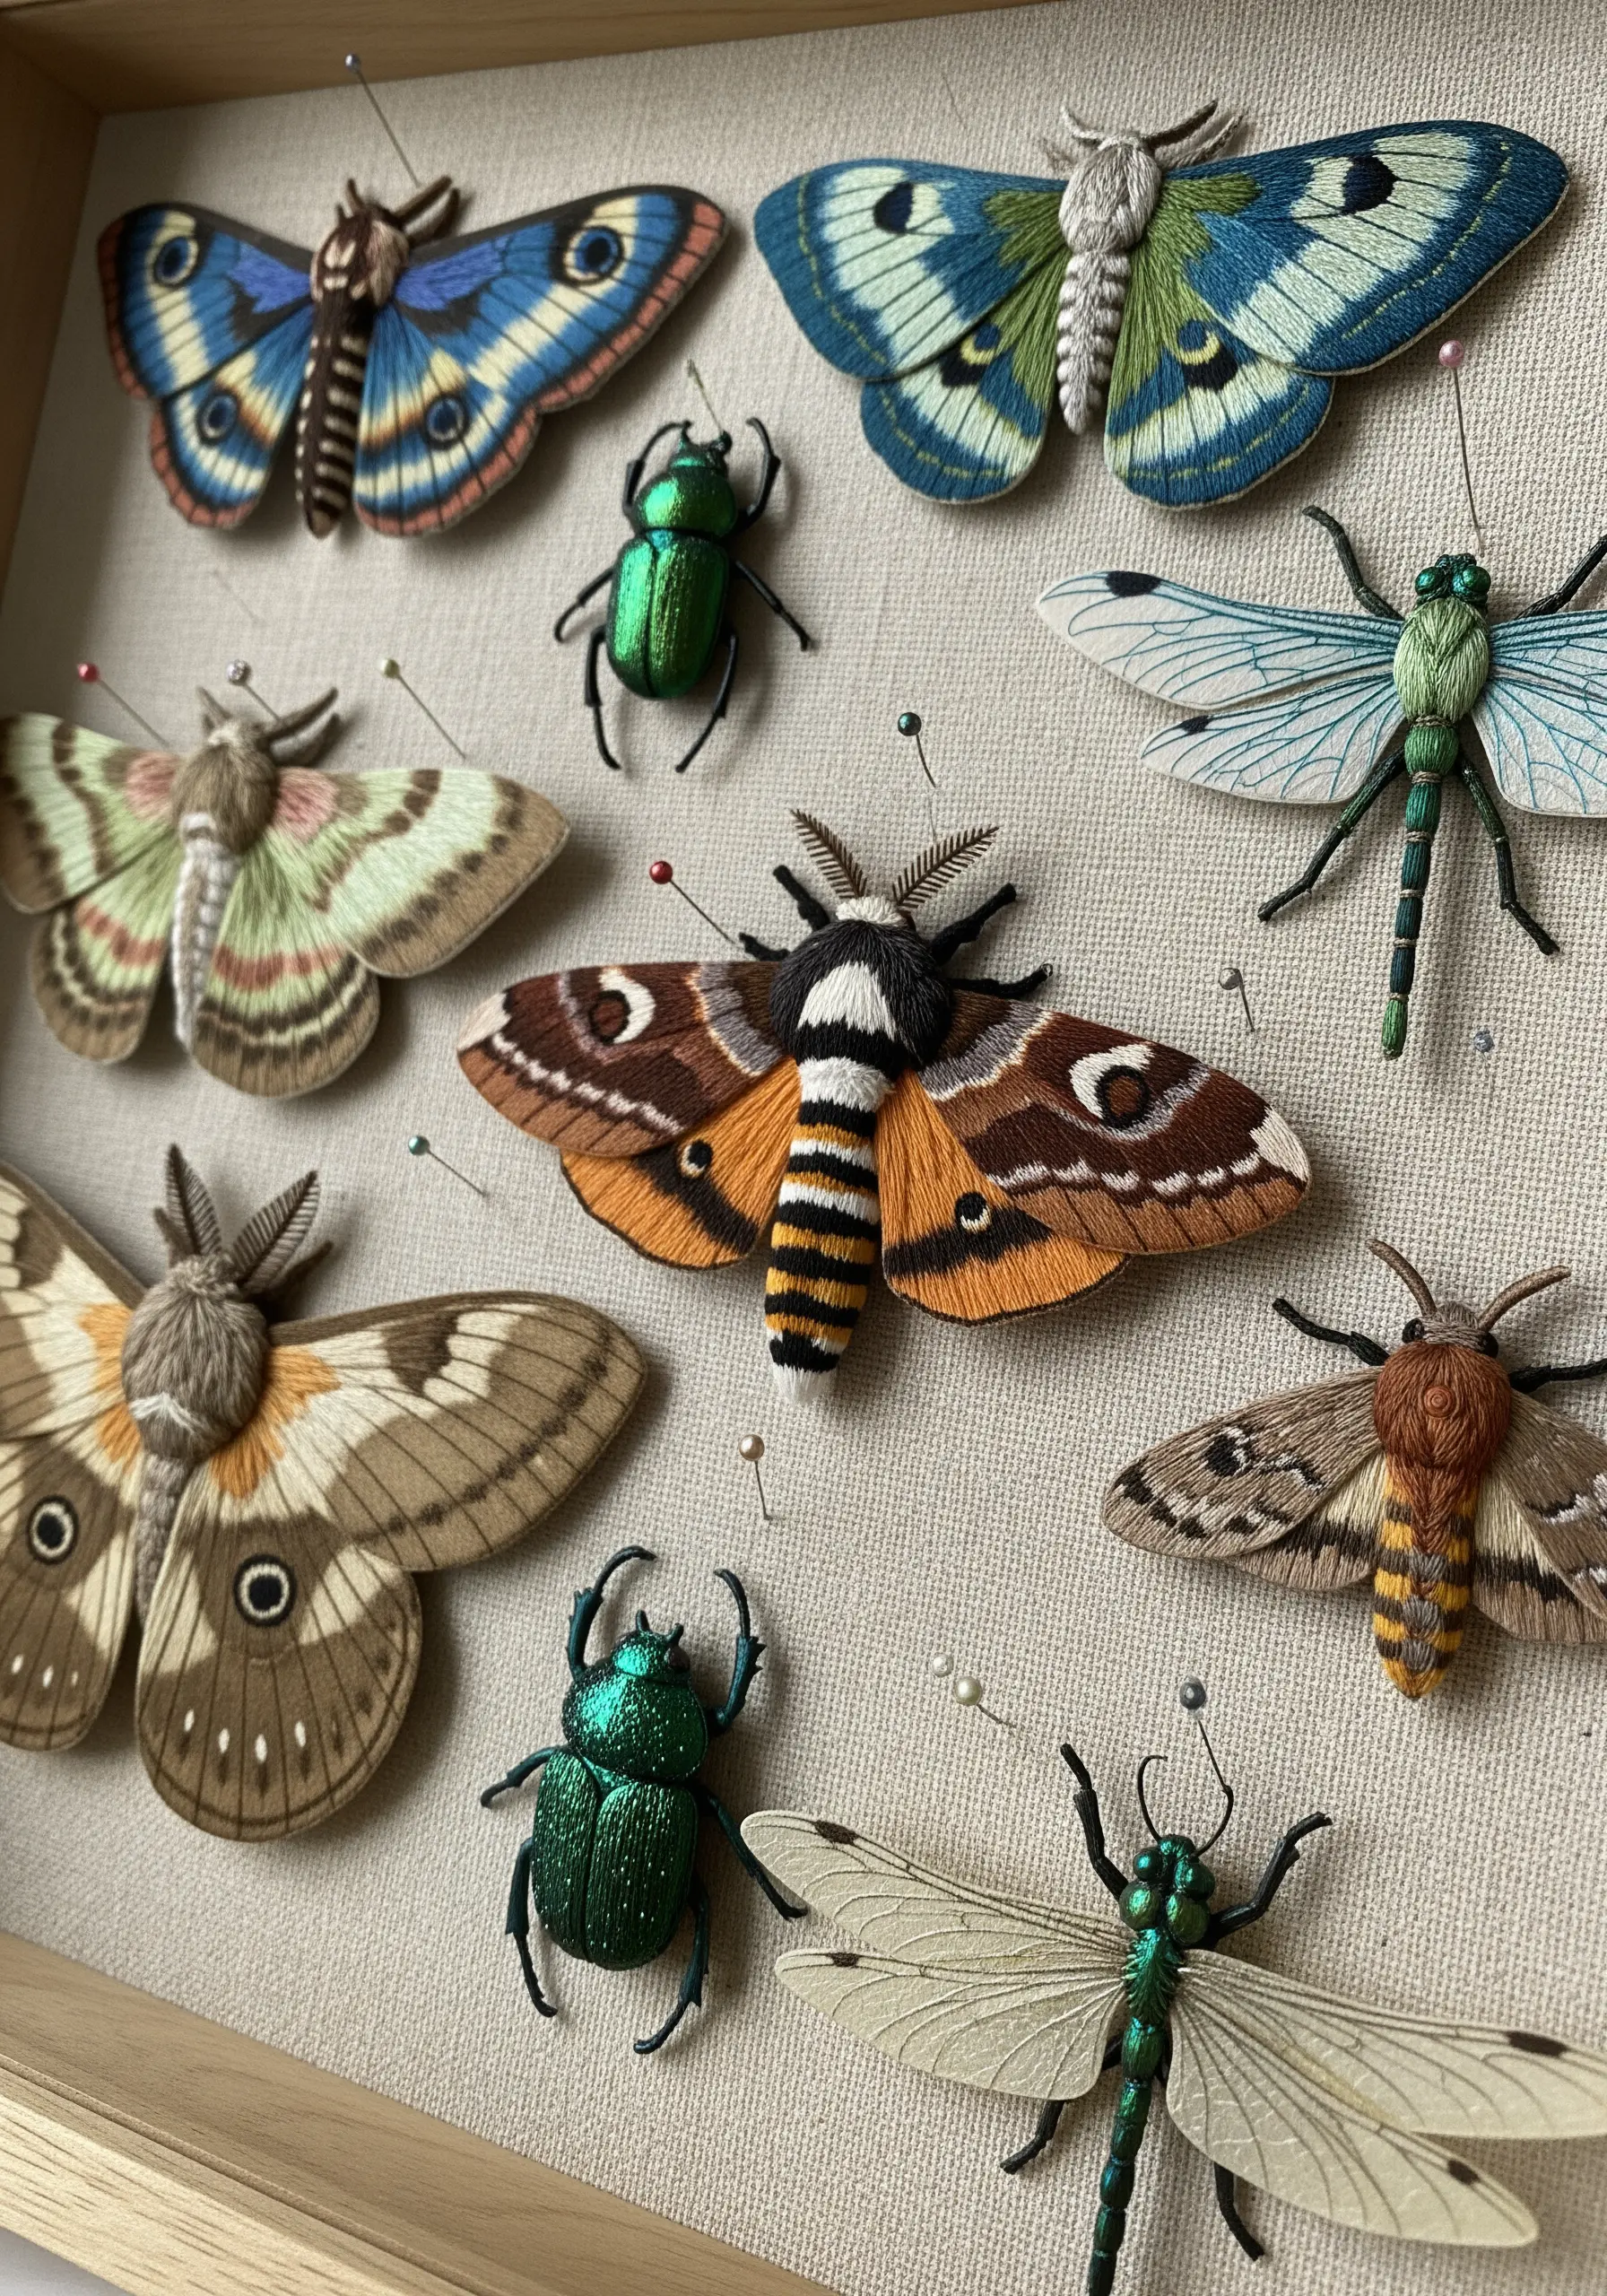
Elevate your embroidery into the third dimension by using stumpwork techniques to create realistic, sculptural insects.
Create wings separately by embroidering onto a piece of organza with a thin wire outline, then cut them out and attach them to the body.
Build up the insects’ bodies with padded satin stitch or French knots to give them a realistic, rounded form.
Mount your finished creations in a shadow box with pins, just like a real entomological display, for a piece of art that truly stands out.
23. Add Subtle Texture to Paper Fruit Slices
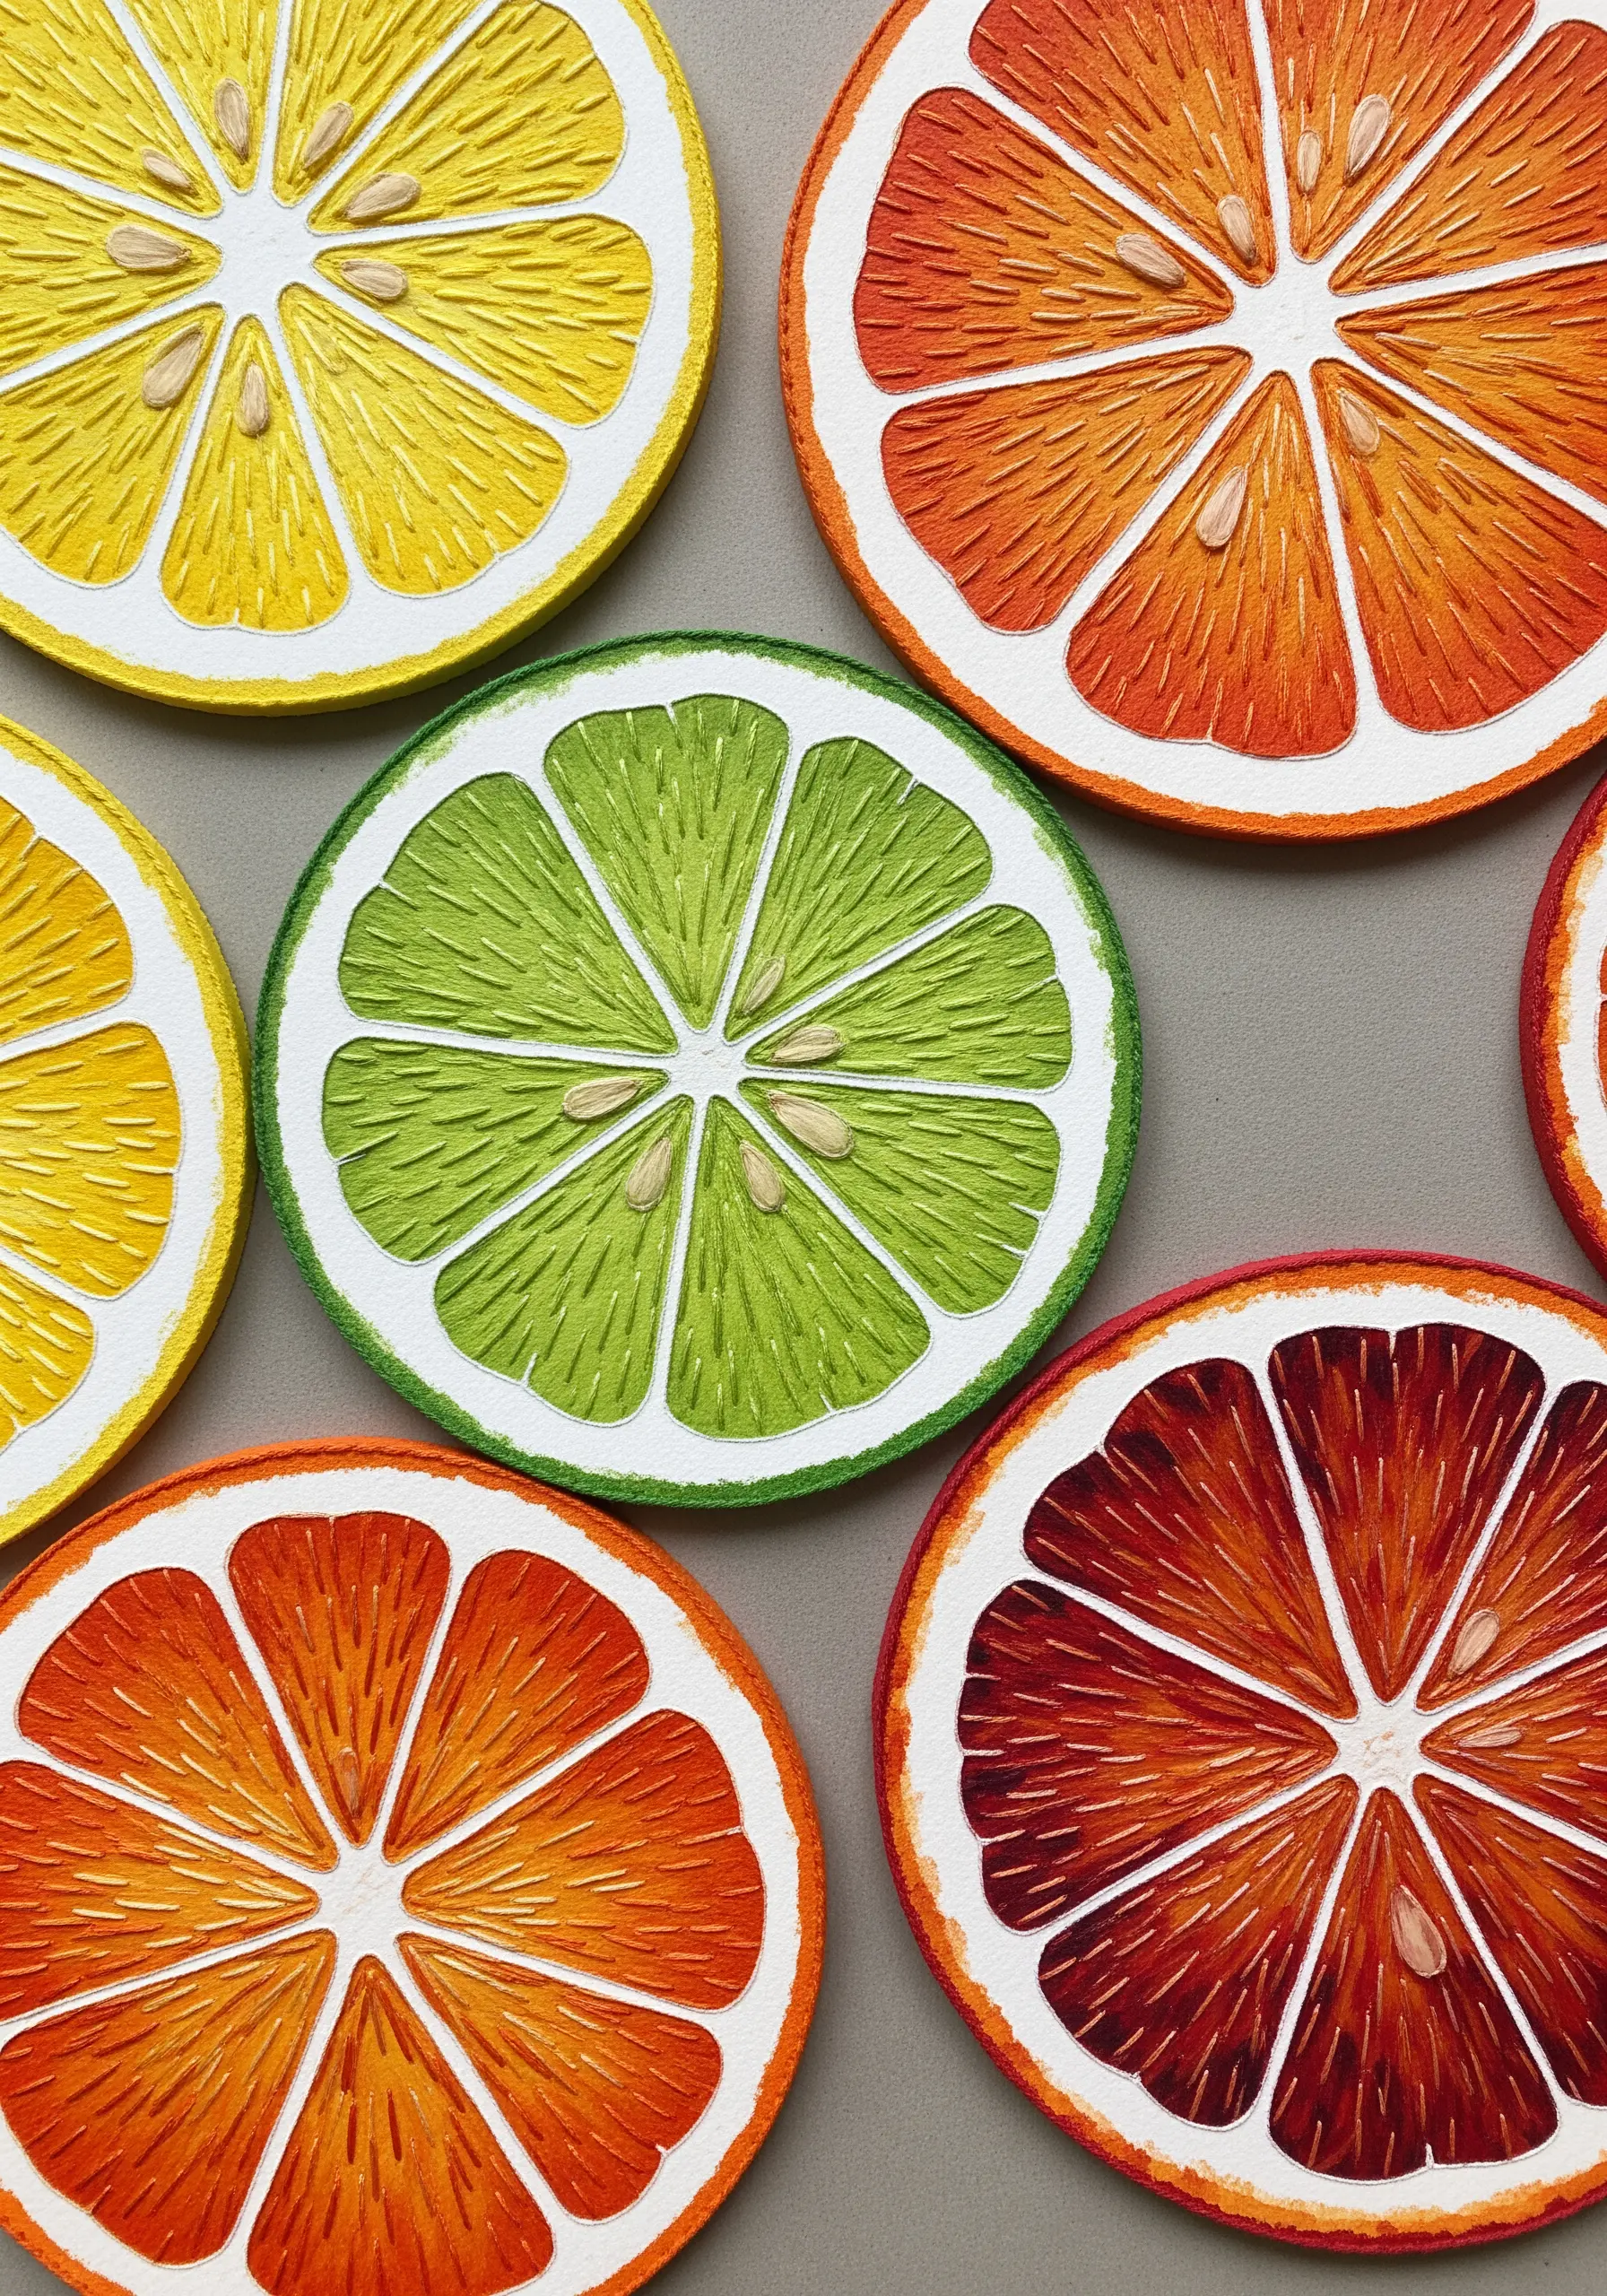
Use minimal stitches to add a touch of realism and tactile interest to simple paper cutouts.
After cutting your citrus shapes from colored paper, use a few strategically placed seed stitches in a contrasting color to represent the seeds.
Use a long-and-short stitch to fill the segments, giving the fruit pulp a fibrous texture that plain paper lacks.
This approach shows how just a few well-placed stitches can elevate a simple paper craft into a more sophisticated mixed-media piece with minimal fruit motifs.
24. Construct a Lantern with Embroidered Vellum Panels
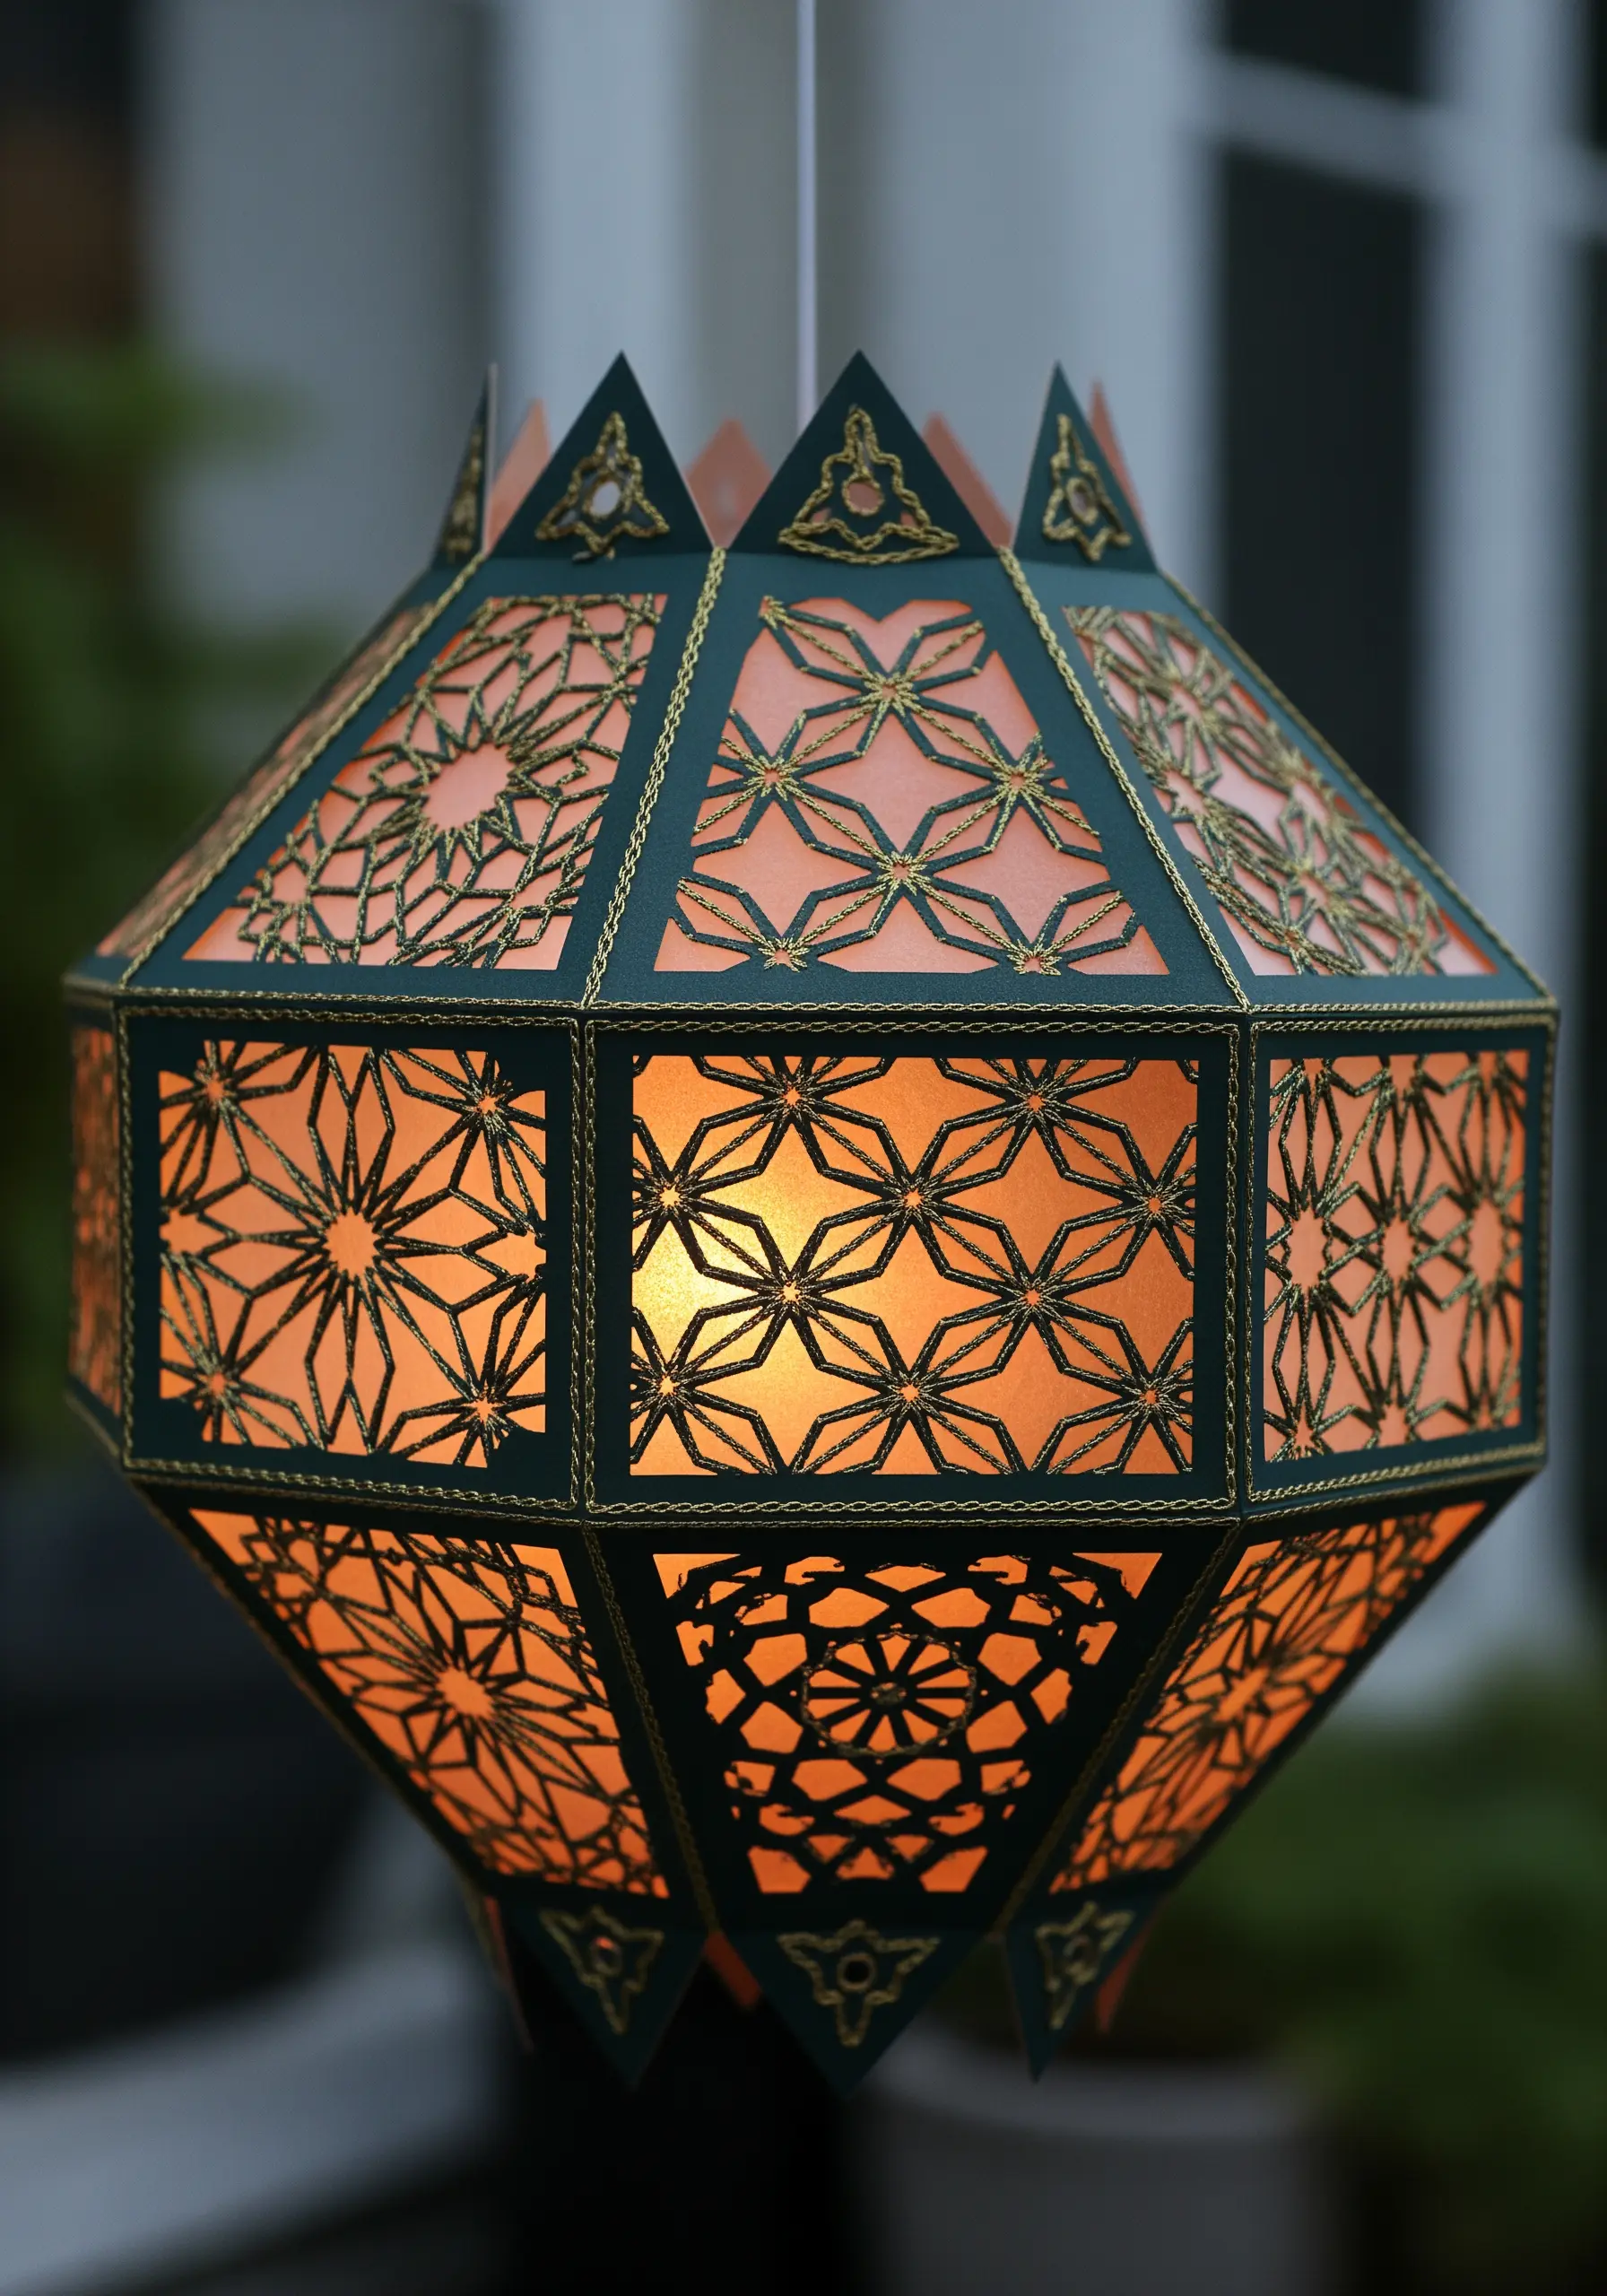
Combine paper engineering with delicate embroidery to create a functional piece of art that glows from within.
Embroider your geometric or floral designs onto panels of vellum or another translucent paper, which will diffuse light beautifully.
Use a metallic thread that will catch and reflect the light, enhancing the pattern when the lantern is lit.
Keep your stitch tension slightly looser than you would on fabric to prevent tearing the delicate paper, then carefully assemble the lantern structure around your finished panels.
25. Weave Concentric Color with Yarn on a Hoop
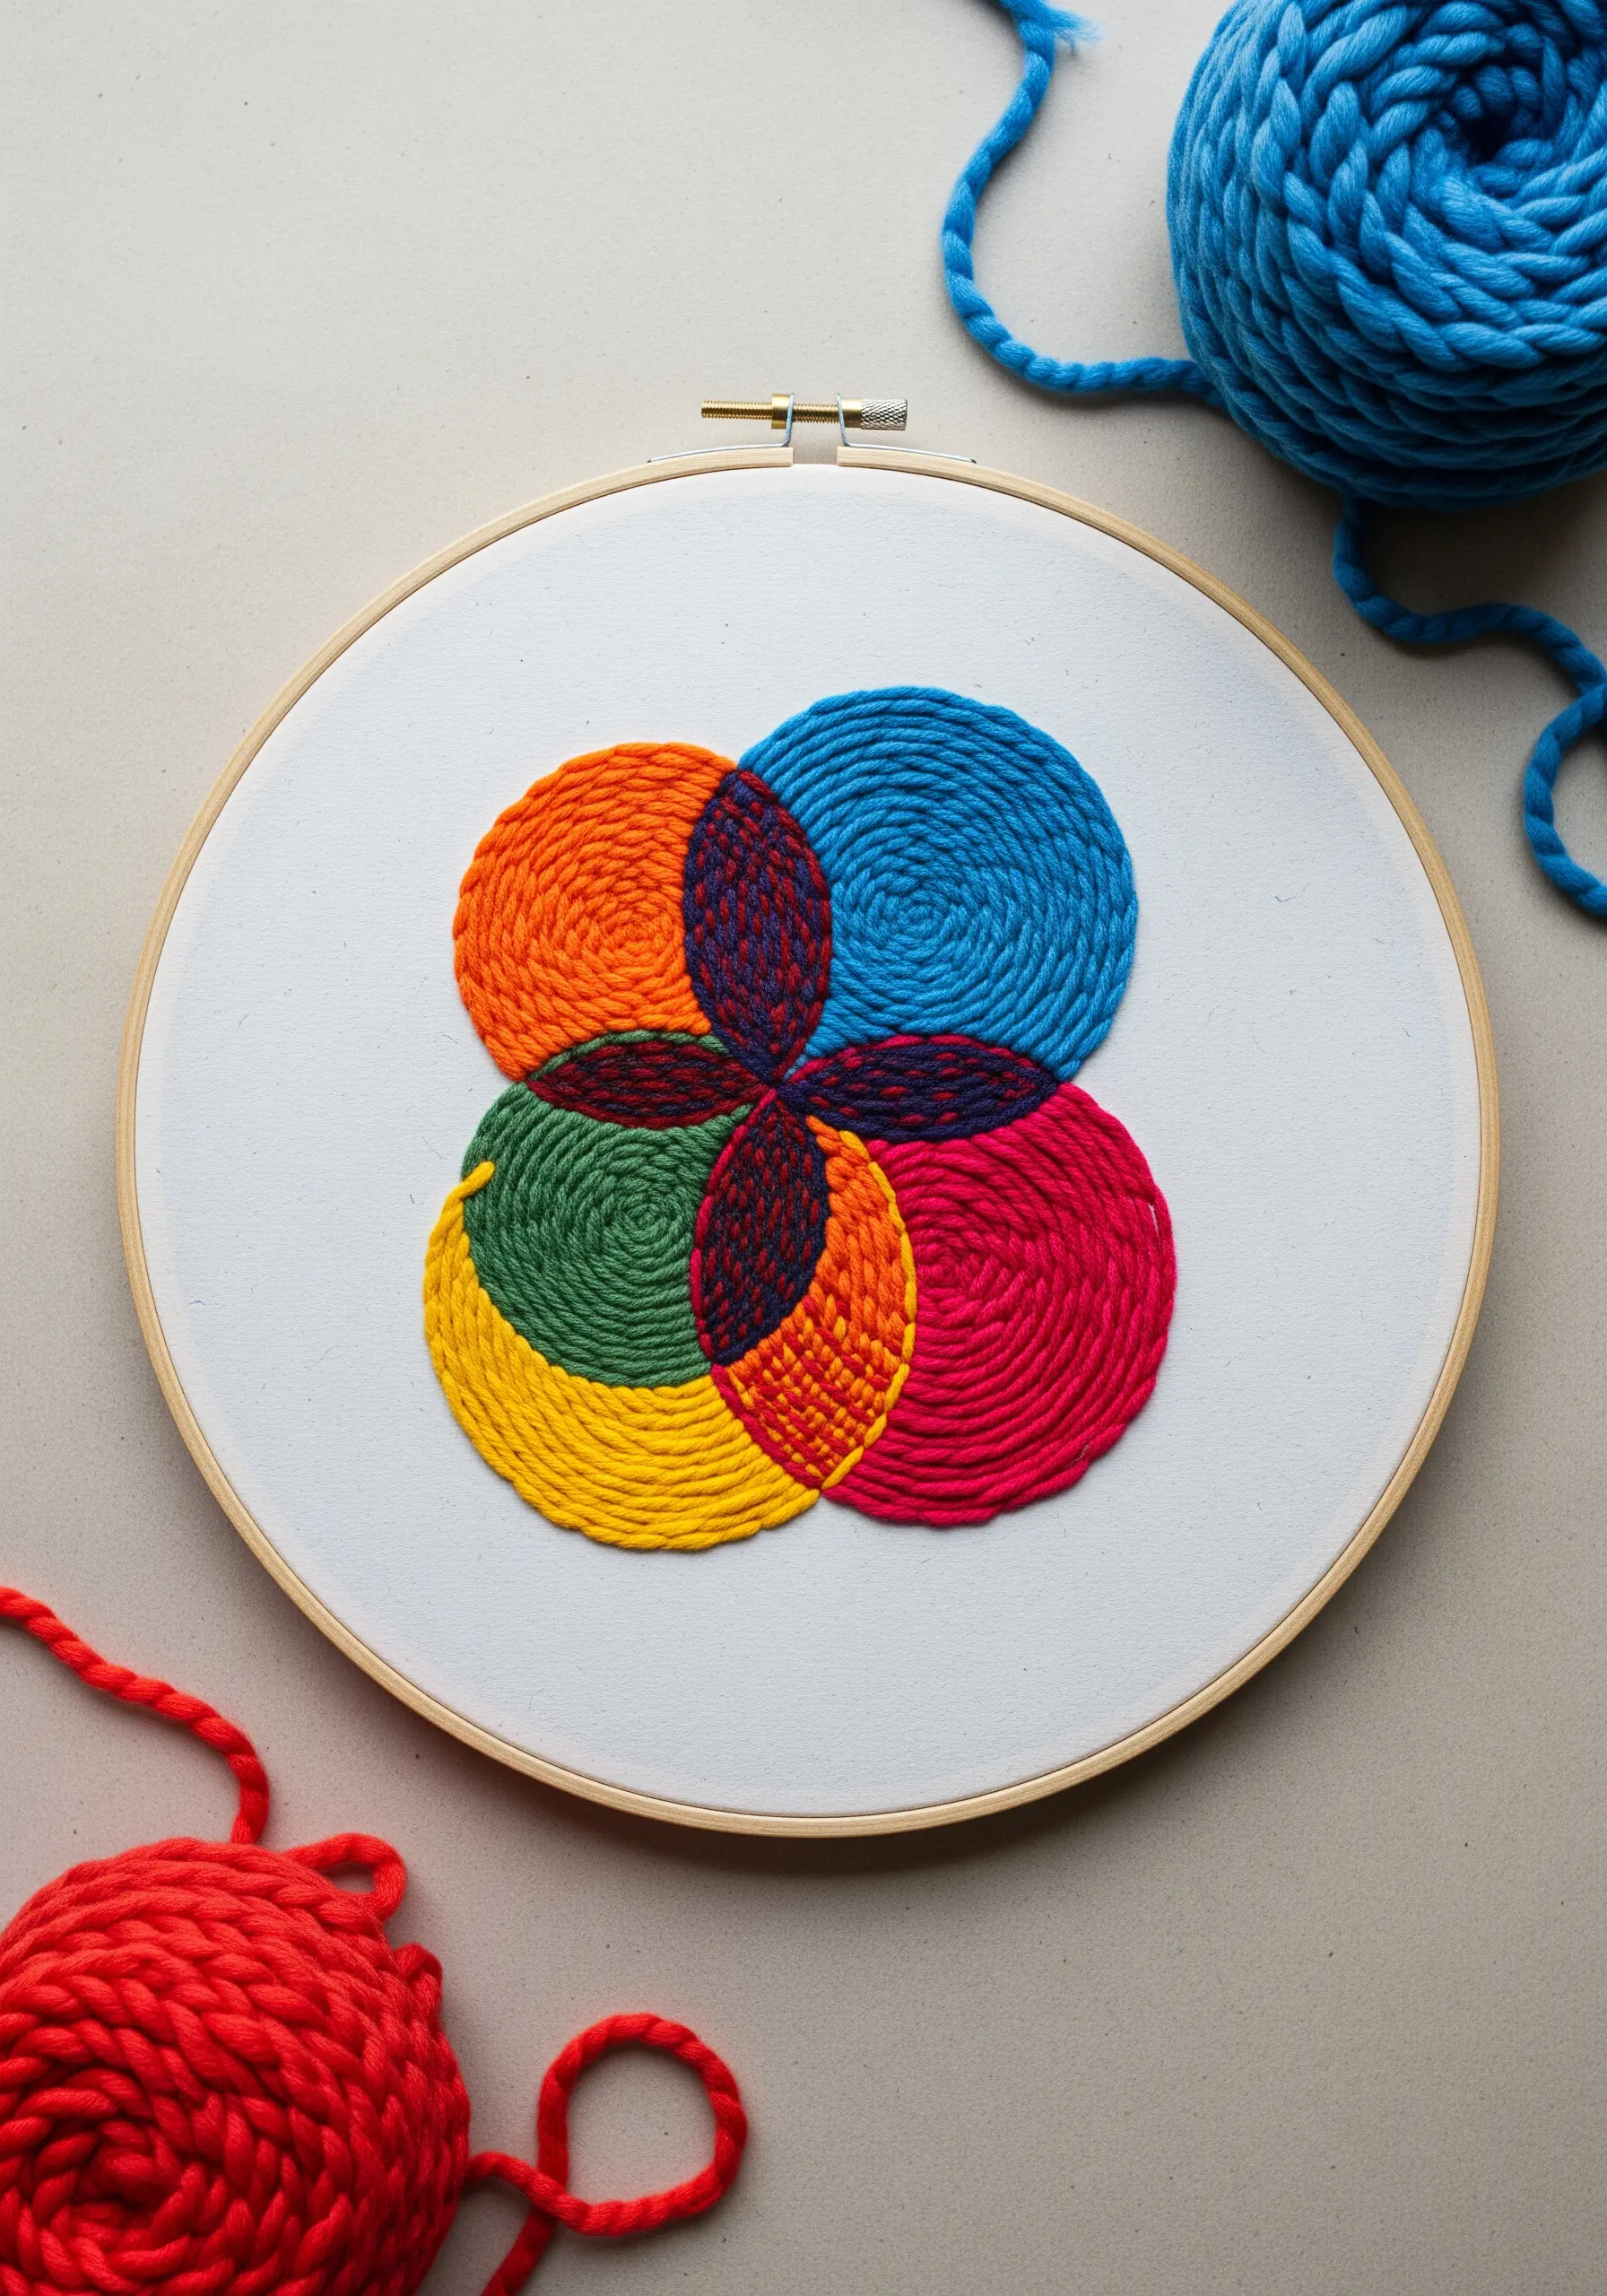
Adapt weaving techniques to an embroidery hoop to create bold, graphic art with satisfying texture.
Instead of stitching through the fabric, you’ll use the fabric-covered hoop as a frame for circular weaving.
Begin by creating spokes with a strong thread, like a star, then weave your yarn over and under these spokes, spiraling out from the center.
Change yarn colors to create concentric rings or interlocking shapes, exploring color theory and texture in a way that is both meditative and visually impactful.
This method is perfect for creating abstract hoop art concepts with rich, dimensional surfaces.


