

Sometimes, the greatest challenge in embroidery isn’t mastering a complex new stitch, but learning how to use the simple ones you already know with more intention. You have the thread, the fabric, and the desire to create something beautiful—but you want it to feel less like a hobby and more like art.
This is where that transformation begins. Forget the idea that ‘simple’ means ‘basic’ or ‘unrefined.’ Simplicity, when applied with thoughtful technique, becomes elegance. It’s about understanding how the direction of a single stitch can create movement, how a change in thread count can define a detail, or how negative space can make a design breathe.
Think of these projects not just as patterns to follow, but as focused lessons. Each one is designed to teach you a specific principle—creating texture, achieving a clean line, balancing a composition, or blending color. Master these fundamentals, and you will carry that confidence and skill into every piece you create from now on.
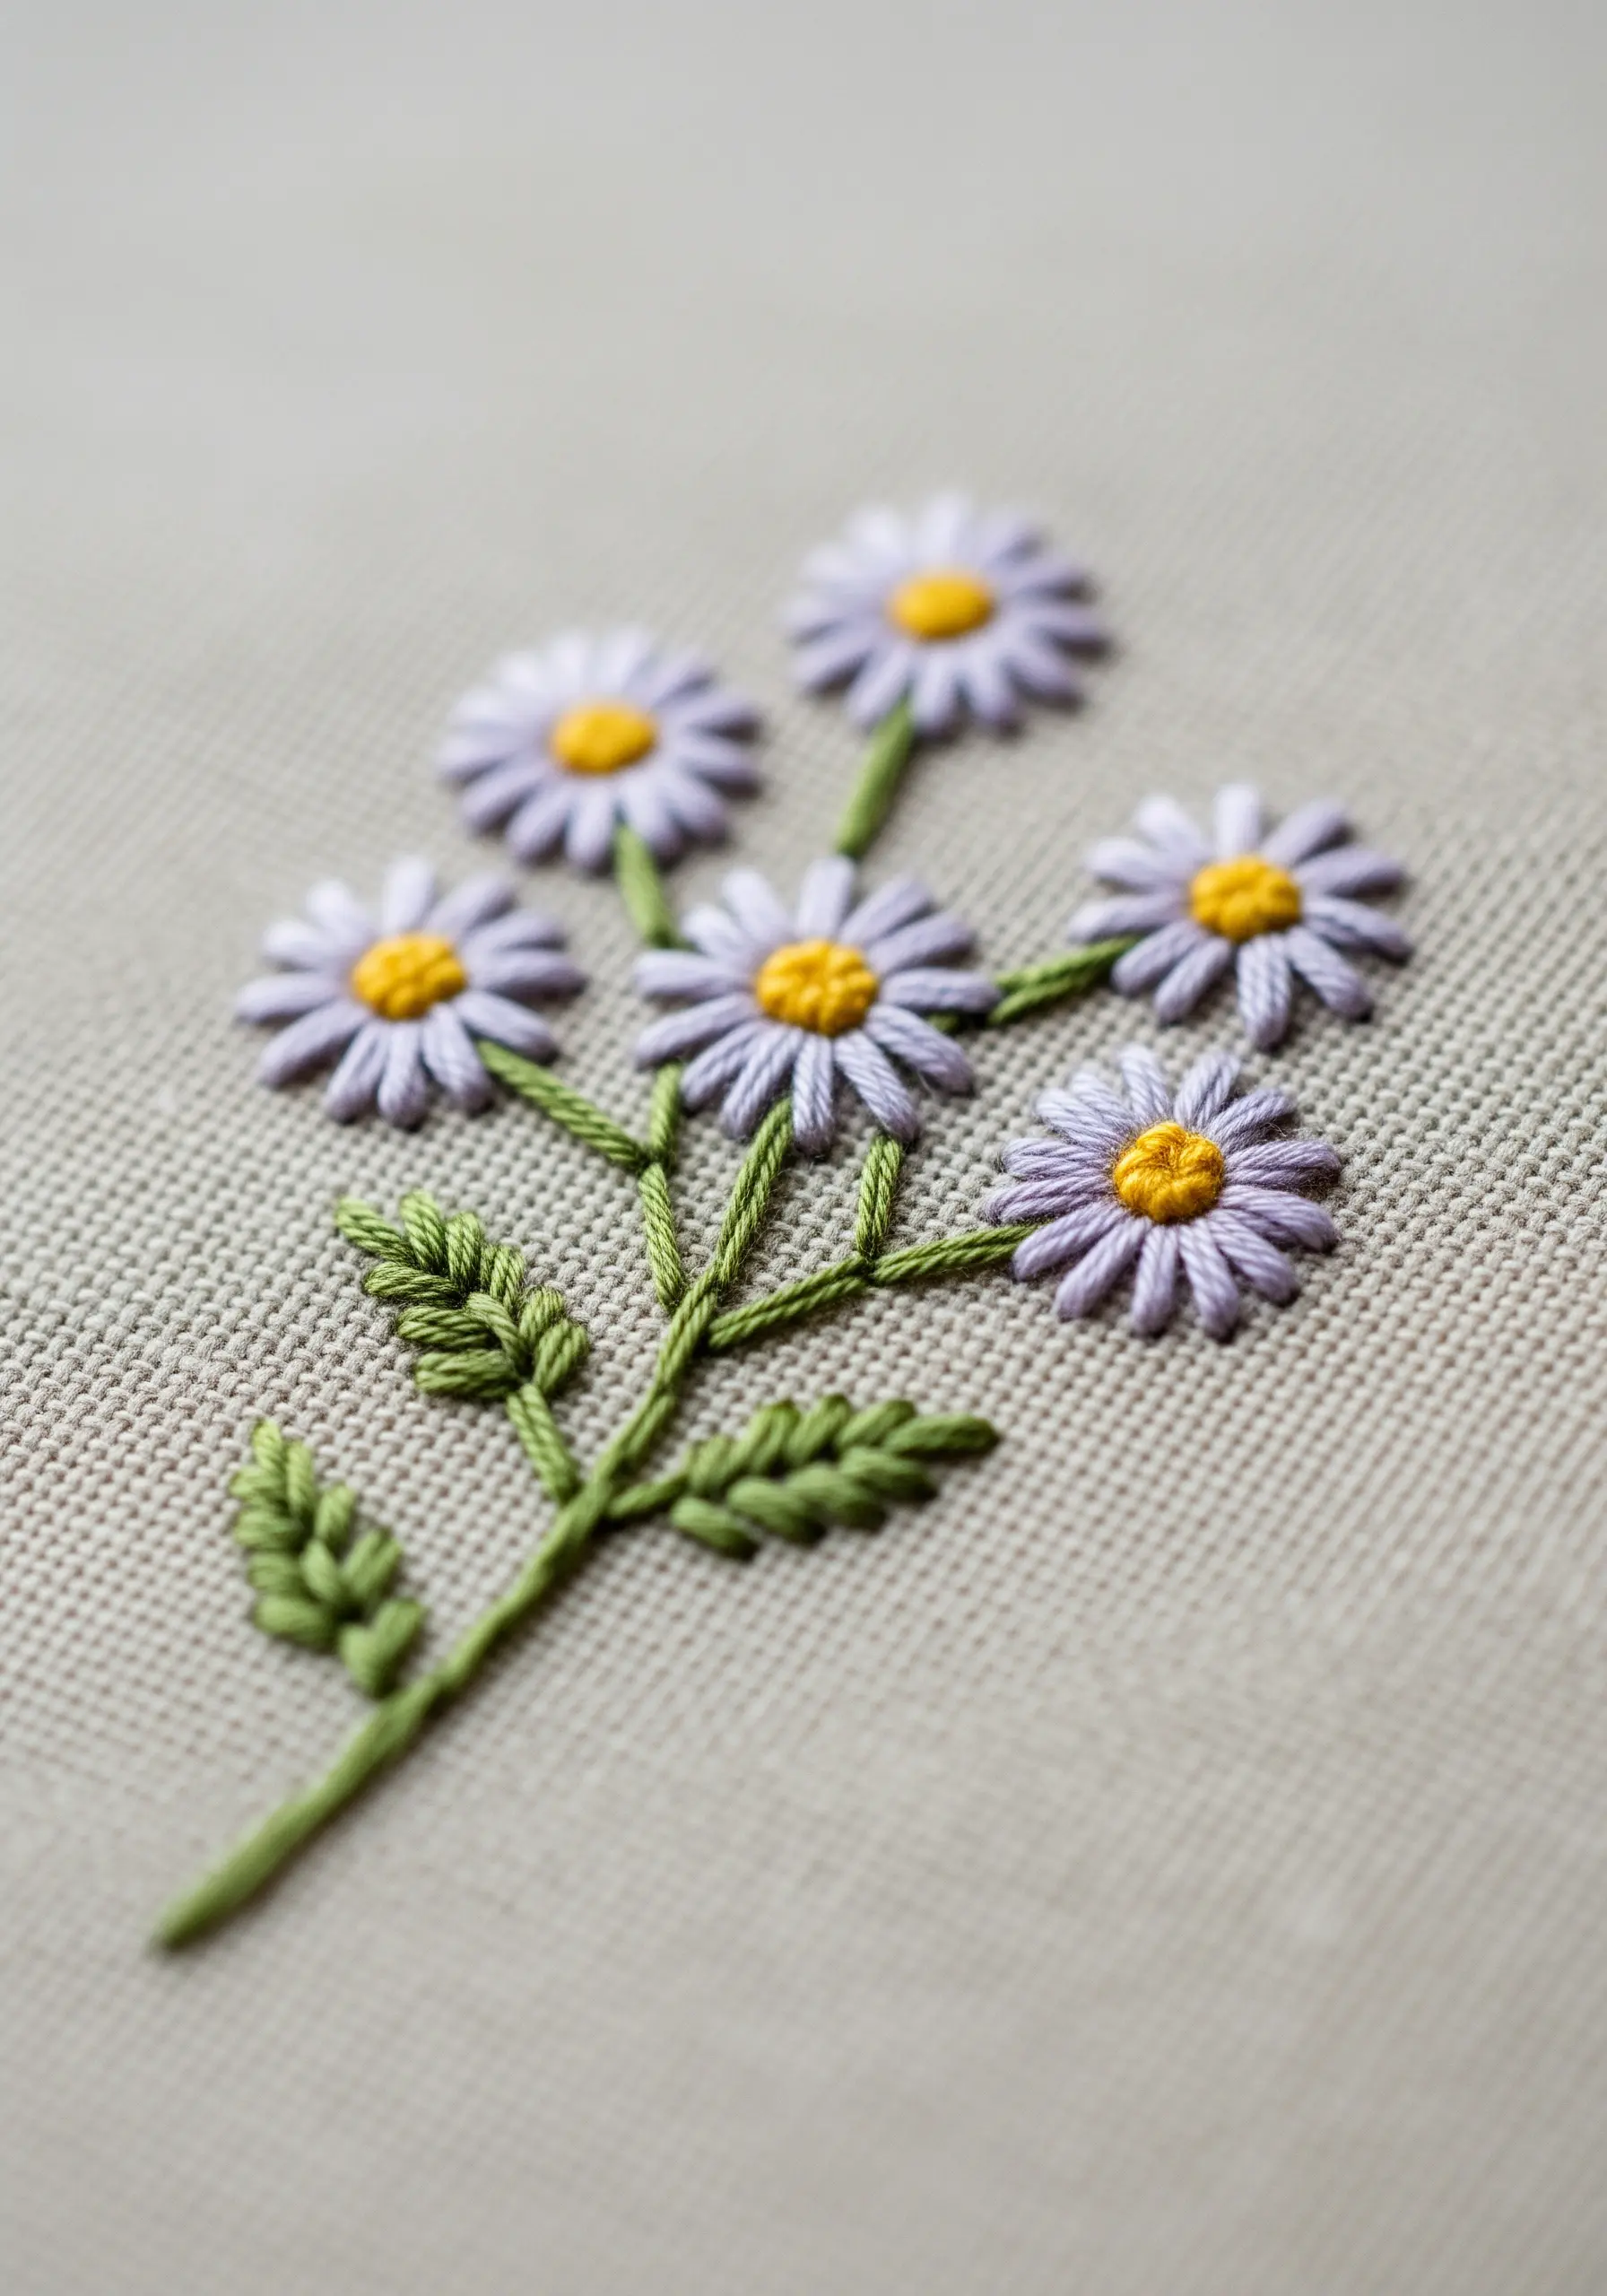
1. The Balanced Botanical Sprig

This classic design is the perfect way to practice combining different stitches for a rich, textured result—even with a limited color palette.
Use a lazy daisy stitch for the flower petals; its open-loop shape feels more delicate than a solid satin stitch.
For the center, a single French knot provides a tight, raised dot of color. To keep it from pulling through the fabric, ensure your fabric is taut in the hoop and don’t insert the needle back into the exact same hole it came from.
Give the leaves a natural-looking central vein by using fishbone stitch instead of basic satin stitch. This one change instantly adds dimension and realism.
Finish with a simple split stitch for the stem, which creates a substantial, rope-like line that grounds the delicate blooms.
2. Minimalist Lines on Denim

Embroidering on a sturdy fabric like denim offers a fantastic opportunity to play with contrast—a delicate line on a rugged surface.
Always use a strong, sharp needle designed for denim to pierce the thick weave without snagging or breaking.
To prevent the design from puckering, apply a stick-on, wash-away stabilizer to the back of the pocket. This provides a smooth surface for stitching and ensures your lines remain crisp after washing.
A simple backstitch using three strands of floss is perfect for creating a bold, graphic outline. Focus on keeping your stitch length consistent, especially around sharp corners, for a clean, professional finish.
The sun is filled with satin stitch; pack the stitches tightly together to create a solid, opaque circle of color that pops against the blue denim.
3. The Power of Negative Space
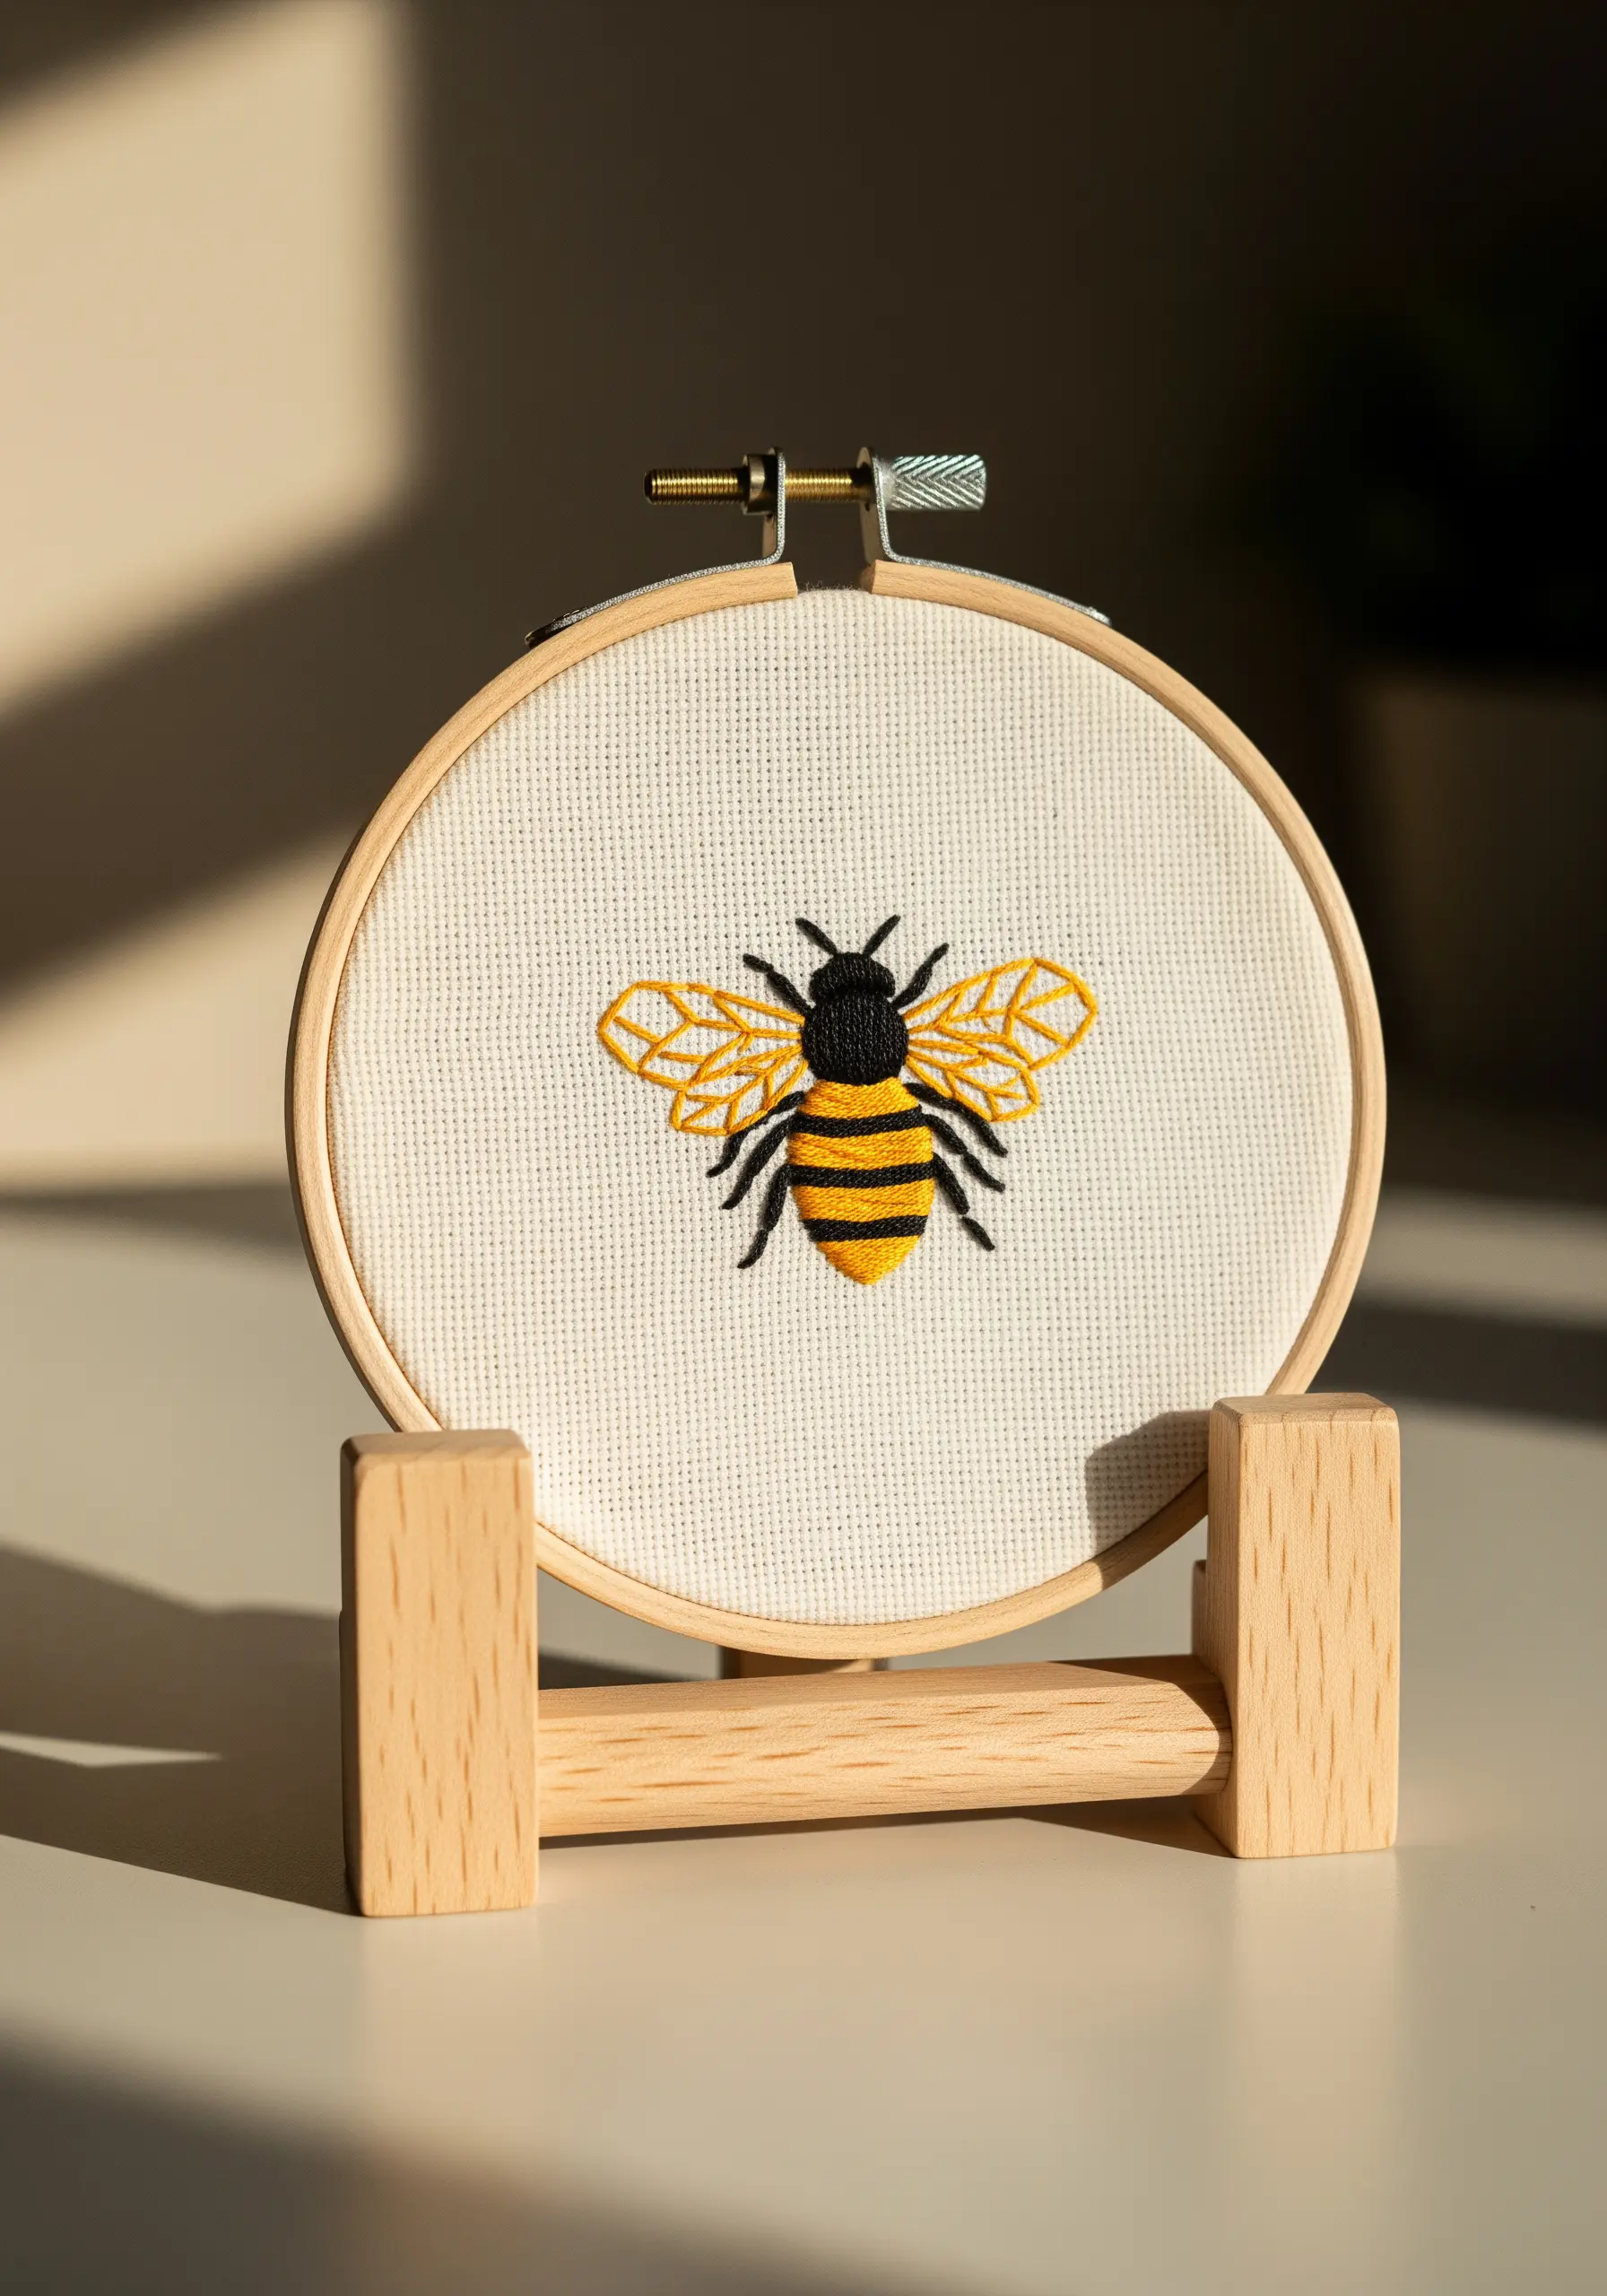
This bee design shows you how to use empty space to your advantage, making your embroidery feel lighter and more dynamic.
Instead of filling the wings completely, use an open fill like a simple grid or lattice of straight stitches. This technique suggests transparency and delicacy without adding complexity.
For the body, alternate bands of black and yellow satin stitch. To keep the stripes clean, outline each section with a split stitch first, then fill inwards. This creates a slightly raised edge that prevents colors from blending.
Use a fine backstitch for the legs and antennae, using only one or two strands of floss to maintain a delicate, insect-like appearance. Handmade embroidery hoop designs often rely on this balance between filled and open areas.
4. Sculpting with Directional Stitches

Create the illusion of a curved, three-dimensional surface on this crescent moon by carefully directing your satin stitches.
Instead of stitching straight across, angle your stitches to follow the curve of the moon. Think of them as tiny brushstrokes that hug the shape, which creates a subtle sense of light and shadow.
Using a variegated or metallic thread enhances this effect, as the shifting tones and shimmer will catch the light differently depending on the stitch angle.
For the tiny star accents, use a simple star stitch (made of several straight stitches crossing at a central point) or a single detached chain stitch paired with a French knot. This adds sparkle without cluttering the design.
5. Mastering Micro-Embroidery

A tiny motif like this carrot is an excellent project for learning how to control fine details and add a touch of personality to everyday items like napkins or handkerchiefs.
The key to micro-embroidery is using fewer strands of floss. For this scale, work with only one or two strands to keep the stitches from looking bulky.
Fill the carrot body with a tight satin stitch, ensuring each stitch lies flat against the last for a smooth, glossy finish.
For the leafy top, use a few detached chain stitches (lazy daisies) and straight stitches. This mix adds texture and a more organic, leafy feel than a simple satin fill would.
This is one of those minimalist stitches that instantly upgrade plain cotton handkerchiefs and other simple linens.
6. Expressive Lettering with Chain Stitch

When you want your embroidered text to have presence and texture, the chain stitch is your best friend.
Its linked-loop structure creates a line that is naturally thick and dimensional, almost like a tiny rope, making it perfect for cursive lettering.
To achieve smooth, elegant curves, slightly shorten your stitch length as you navigate the tight loops of letters like ‘a’ or ‘m’. This gives you more control and prevents sharp, angular corners.
Using a variegated thread adds a subtle color-shifting effect automatically, giving the word depth and visual interest without you needing to change your floss.
Stitching on a piece of felt is very forgiving for beginners, as the fabric has no discernible weave and hides small imperfections well.
7. High-Contrast Celestial Designs
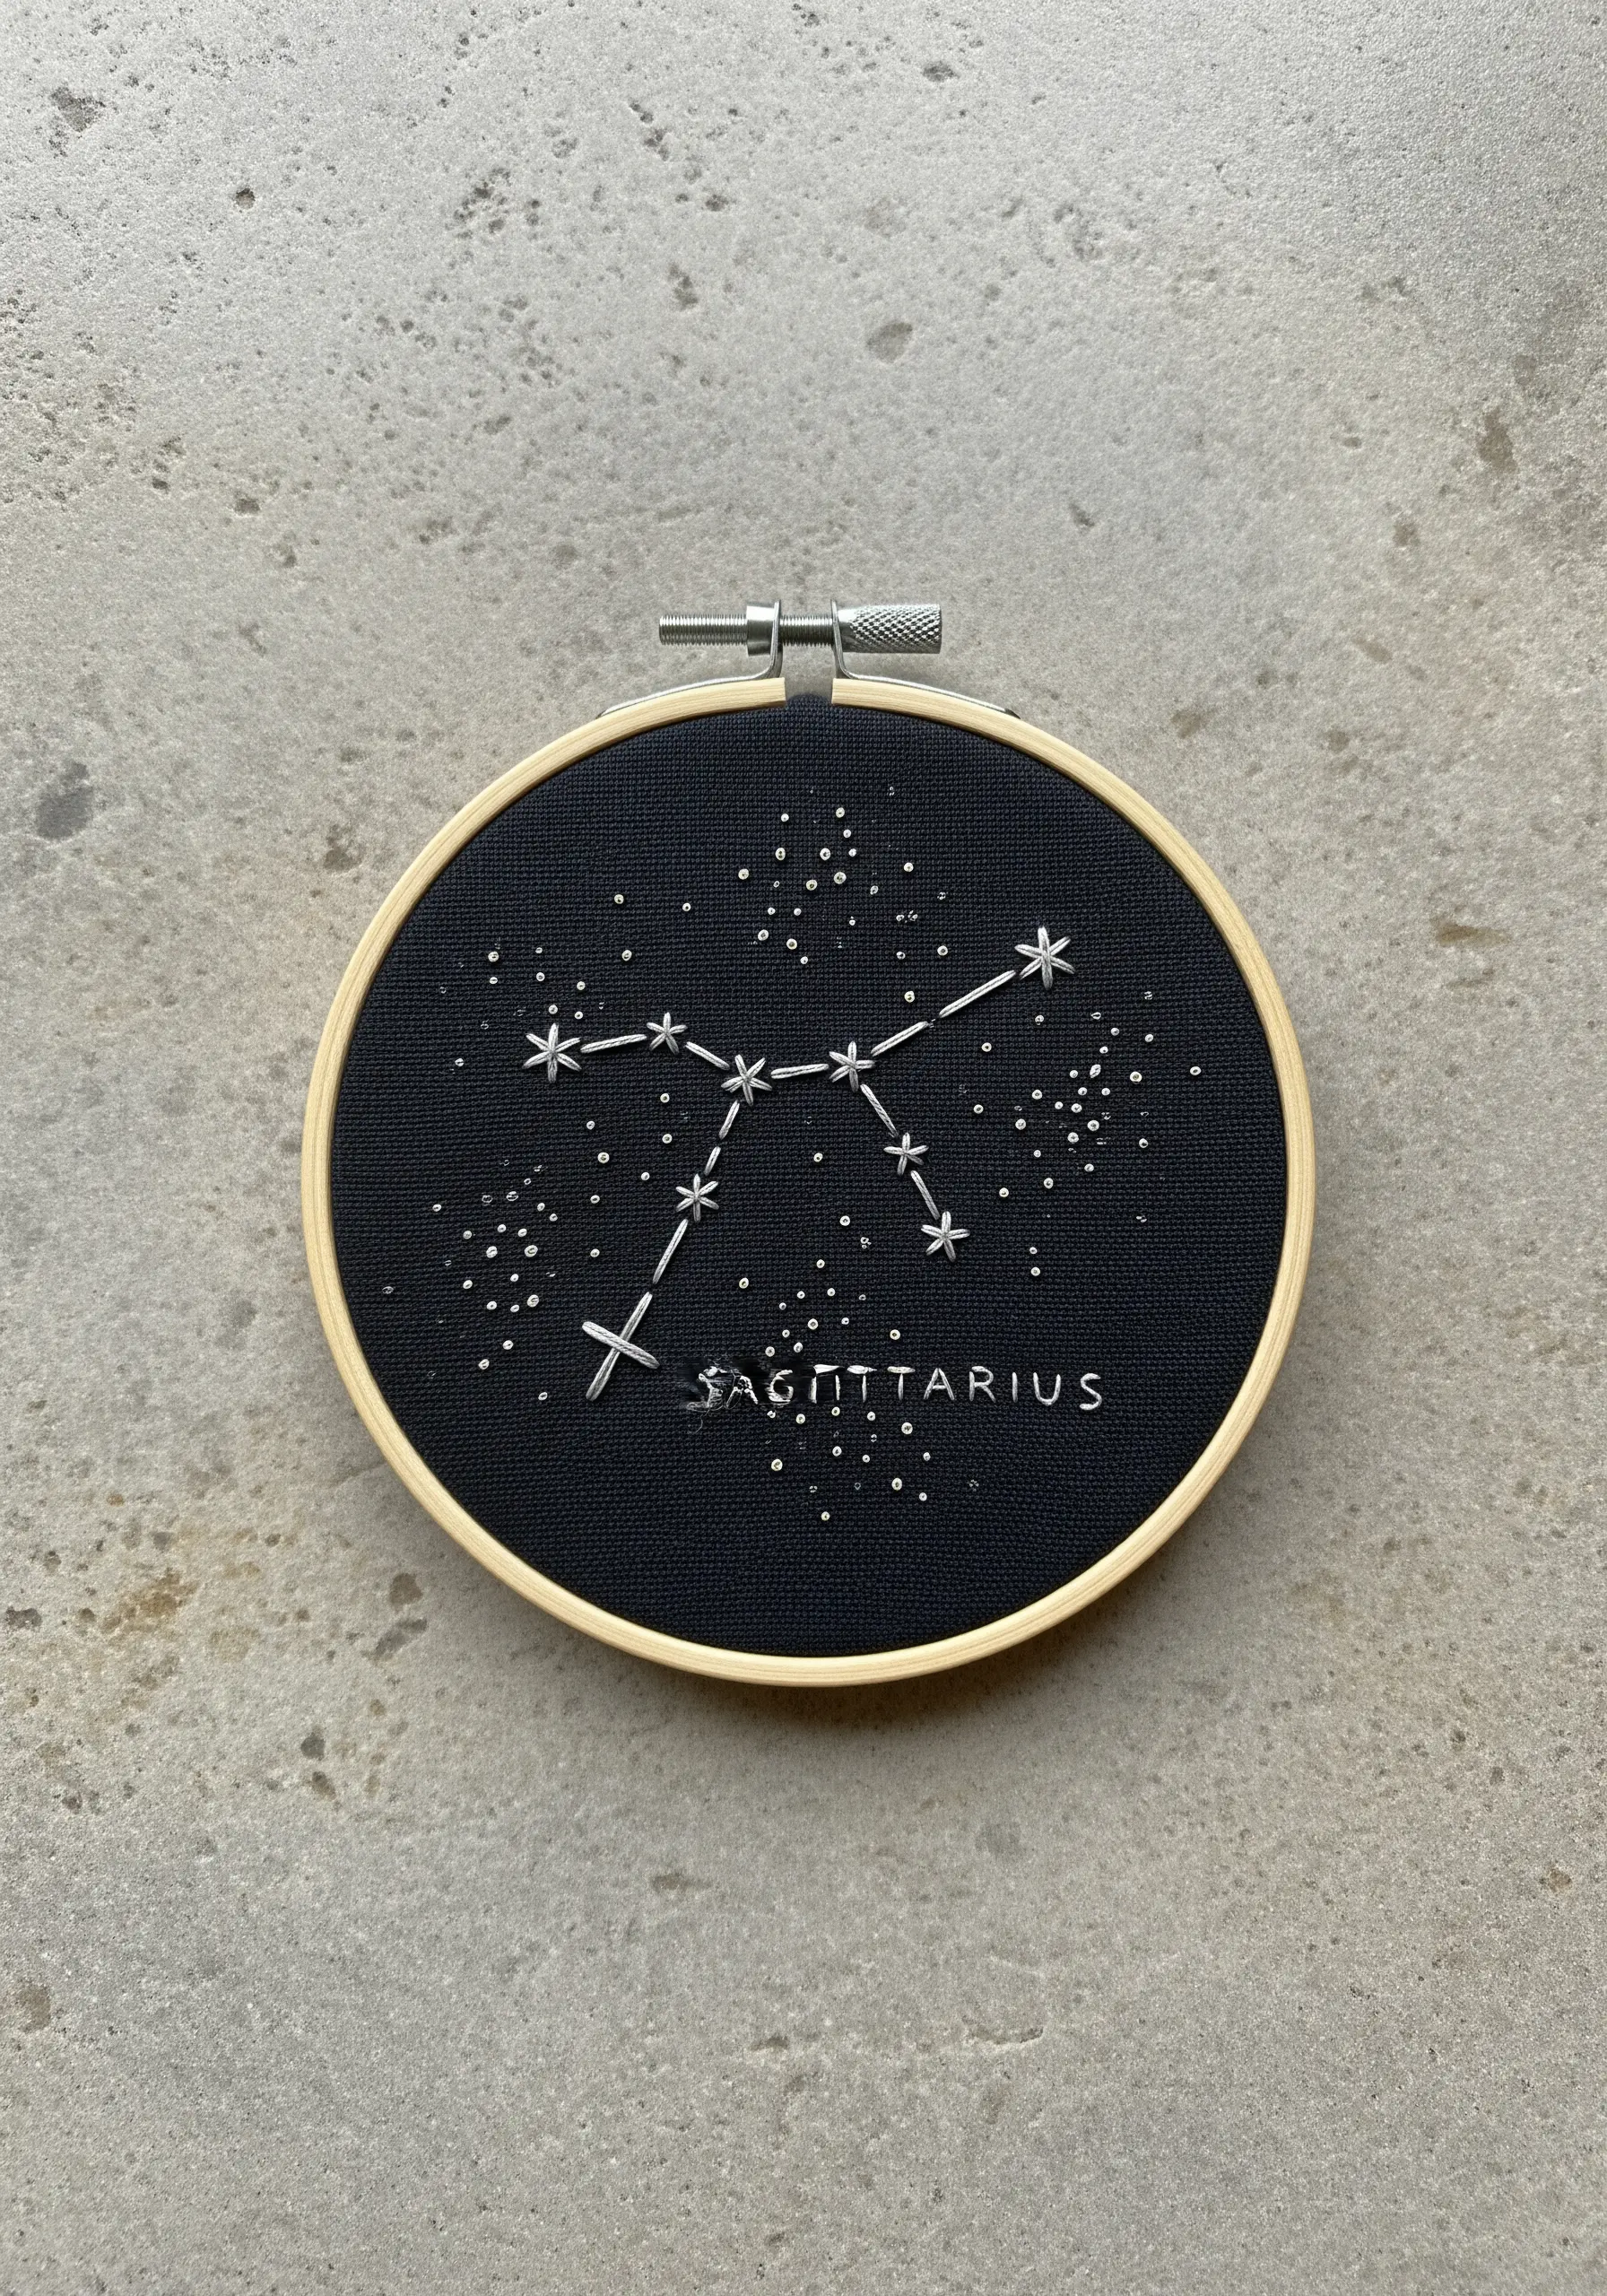
Stitching with light thread on dark fabric creates immediate visual drama, making simple lines and dots feel impactful and sophisticated.
To make the stars of the constellation, use a combination of French knots for smaller stars and star stitches (multiple intersecting straight stitches) for the larger, brighter ones.
Connect them with a simple backstitch. Keep the lines crisp and straight to accurately represent the constellation’s form.
For a touch of shimmer, consider using a silver metallic thread. Pro tip: work with shorter lengths of metallic floss (no more than 12 inches) and a thread conditioner to prevent it from tangling and fraying.
The contrast is what makes these dramatic dark thread embroidery designs so effective.
8. The Elegance of a Continuous Line

A single-line drawing translates beautifully into embroidery, teaching you the importance of creating smooth, uninterrupted curves.
For a line this bold and consistent, a whipped backstitch is the ideal choice. First, you create a standard backstitch outline, and then you whip a second thread around those stitches without piercing the fabric.
This technique completely smooths over the segmented look of a regular backstitch, resulting in a fluid, raised line that looks polished and professional.
Use at least three or four strands of floss to give the line enough weight to stand out, especially on a heavy canvas fabric like a tote bag.
9. Layering Elements for Visual Depth
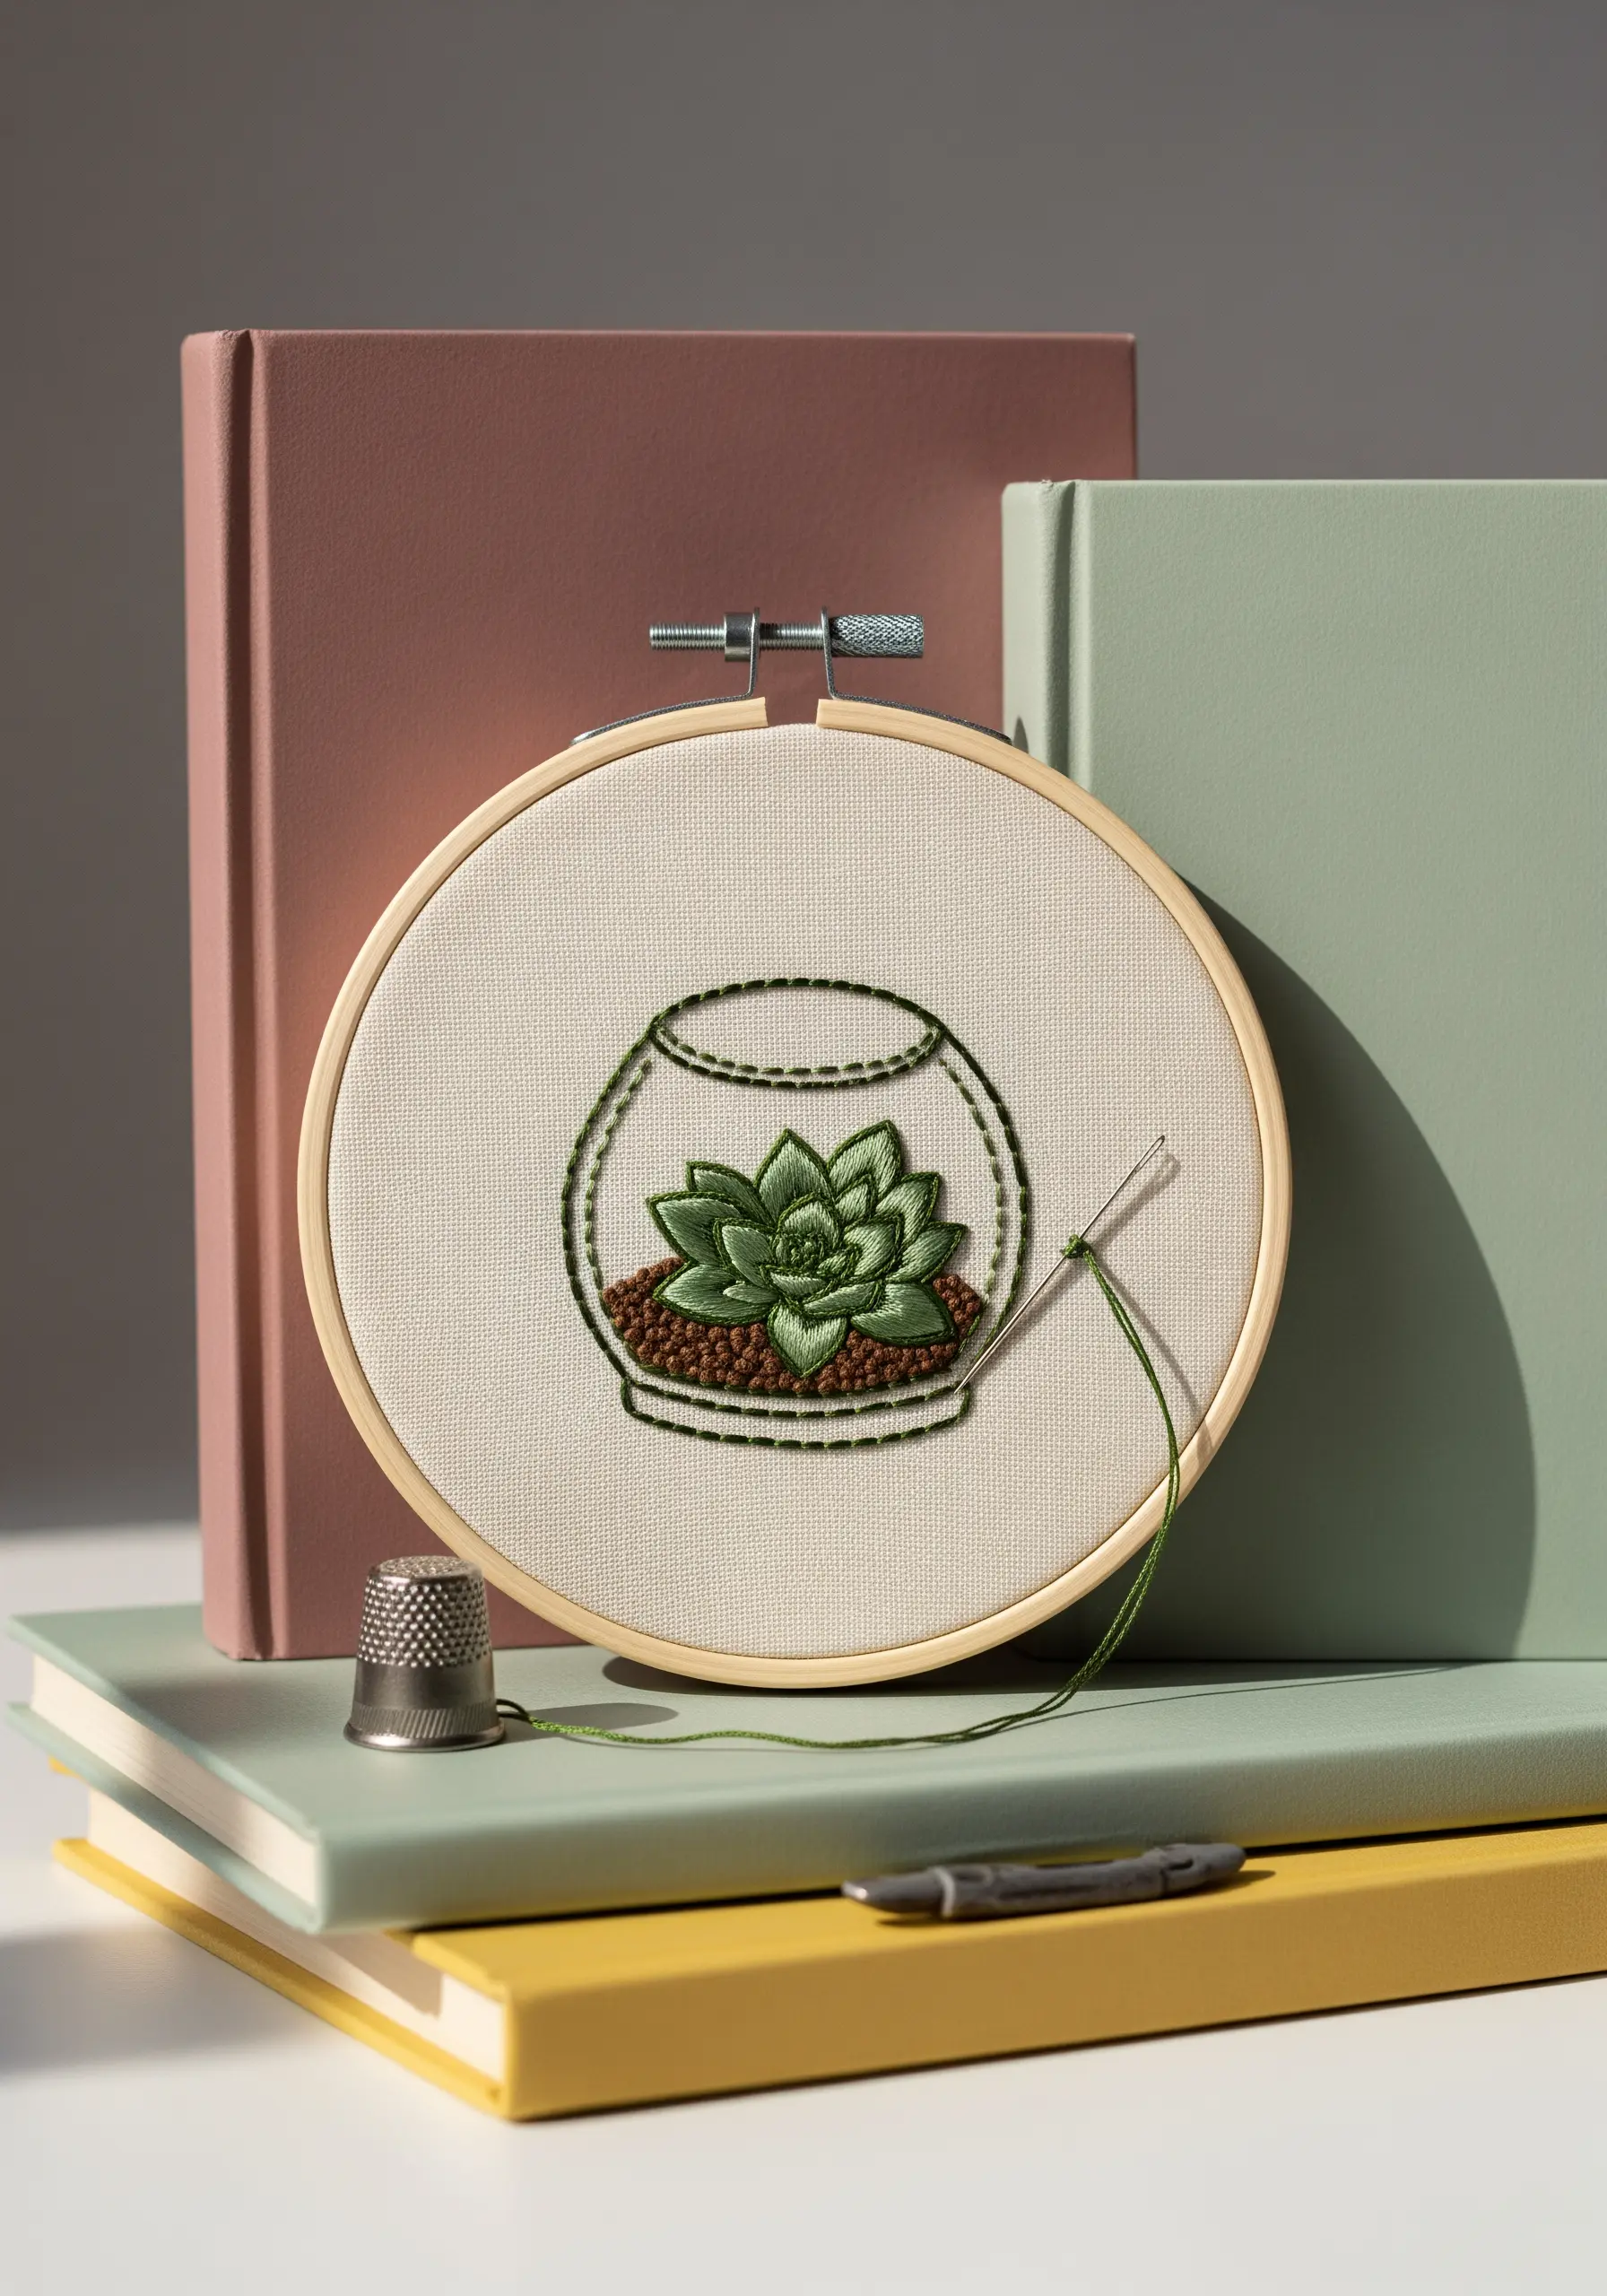
This terrarium project is a fantastic exercise in layering, using different stitches and colors to create the illusion of depth in a flat medium.
Stitch the element that is furthest ‘away’ first—in this case, the soil. Use small, scattered seed stitches or French knots in a dark brown to suggest a granular texture.
Next, stitch the succulent petals using a fishbone stitch or a series of detached chain stitches, layering them slightly to build up the plant’s form.
Finally, add the ‘glass’ terrarium outline using a simple backstitch. Stitching this last makes it appear as though it’s in front, containing the elements inside. This simple order of operations creates a convincing sense of foreground and background.
10. Painting with Thick Threads

Explore a bolder, more textural style by swapping standard six-strand floss for a thicker material like tapestry wool or pearl cotton.
This abstract rainbow is created using a couching stitch. You lay down the thick yarn on the surface of your fabric and then use a thinner, regular embroidery floss to tack it down with small, evenly spaced stitches.
This technique allows you to create sweeping curves and solid blocks of color quickly, focusing on form and texture rather than intricate detail.
The aesthetic is modern and graphic, and it’s a wonderful way to experiment with the textured yarn wall art techniques that will elevate your space.
11. Adding a Narrative Detail

A tiny, thoughtfully placed motif on a piece of clothing can tell a story and add a delightful element of surprise.
The paper airplane outline is formed with a clean backstitch. To create the dotted flight path, use a simple running stitch—the gaps between stitches create the perfect sense of movement and direction.
When stitching on clothing, especially near a cuff or collar, use a small hoop to keep the area taut and secure the rest of the garment out of the way with clips.
This kind of subtle embellishment is one of the easiest ways to turn a plain shirt into a meaningful, personalized embroidered gift.
12. Functional Beauty: The Embroidered Bookmark
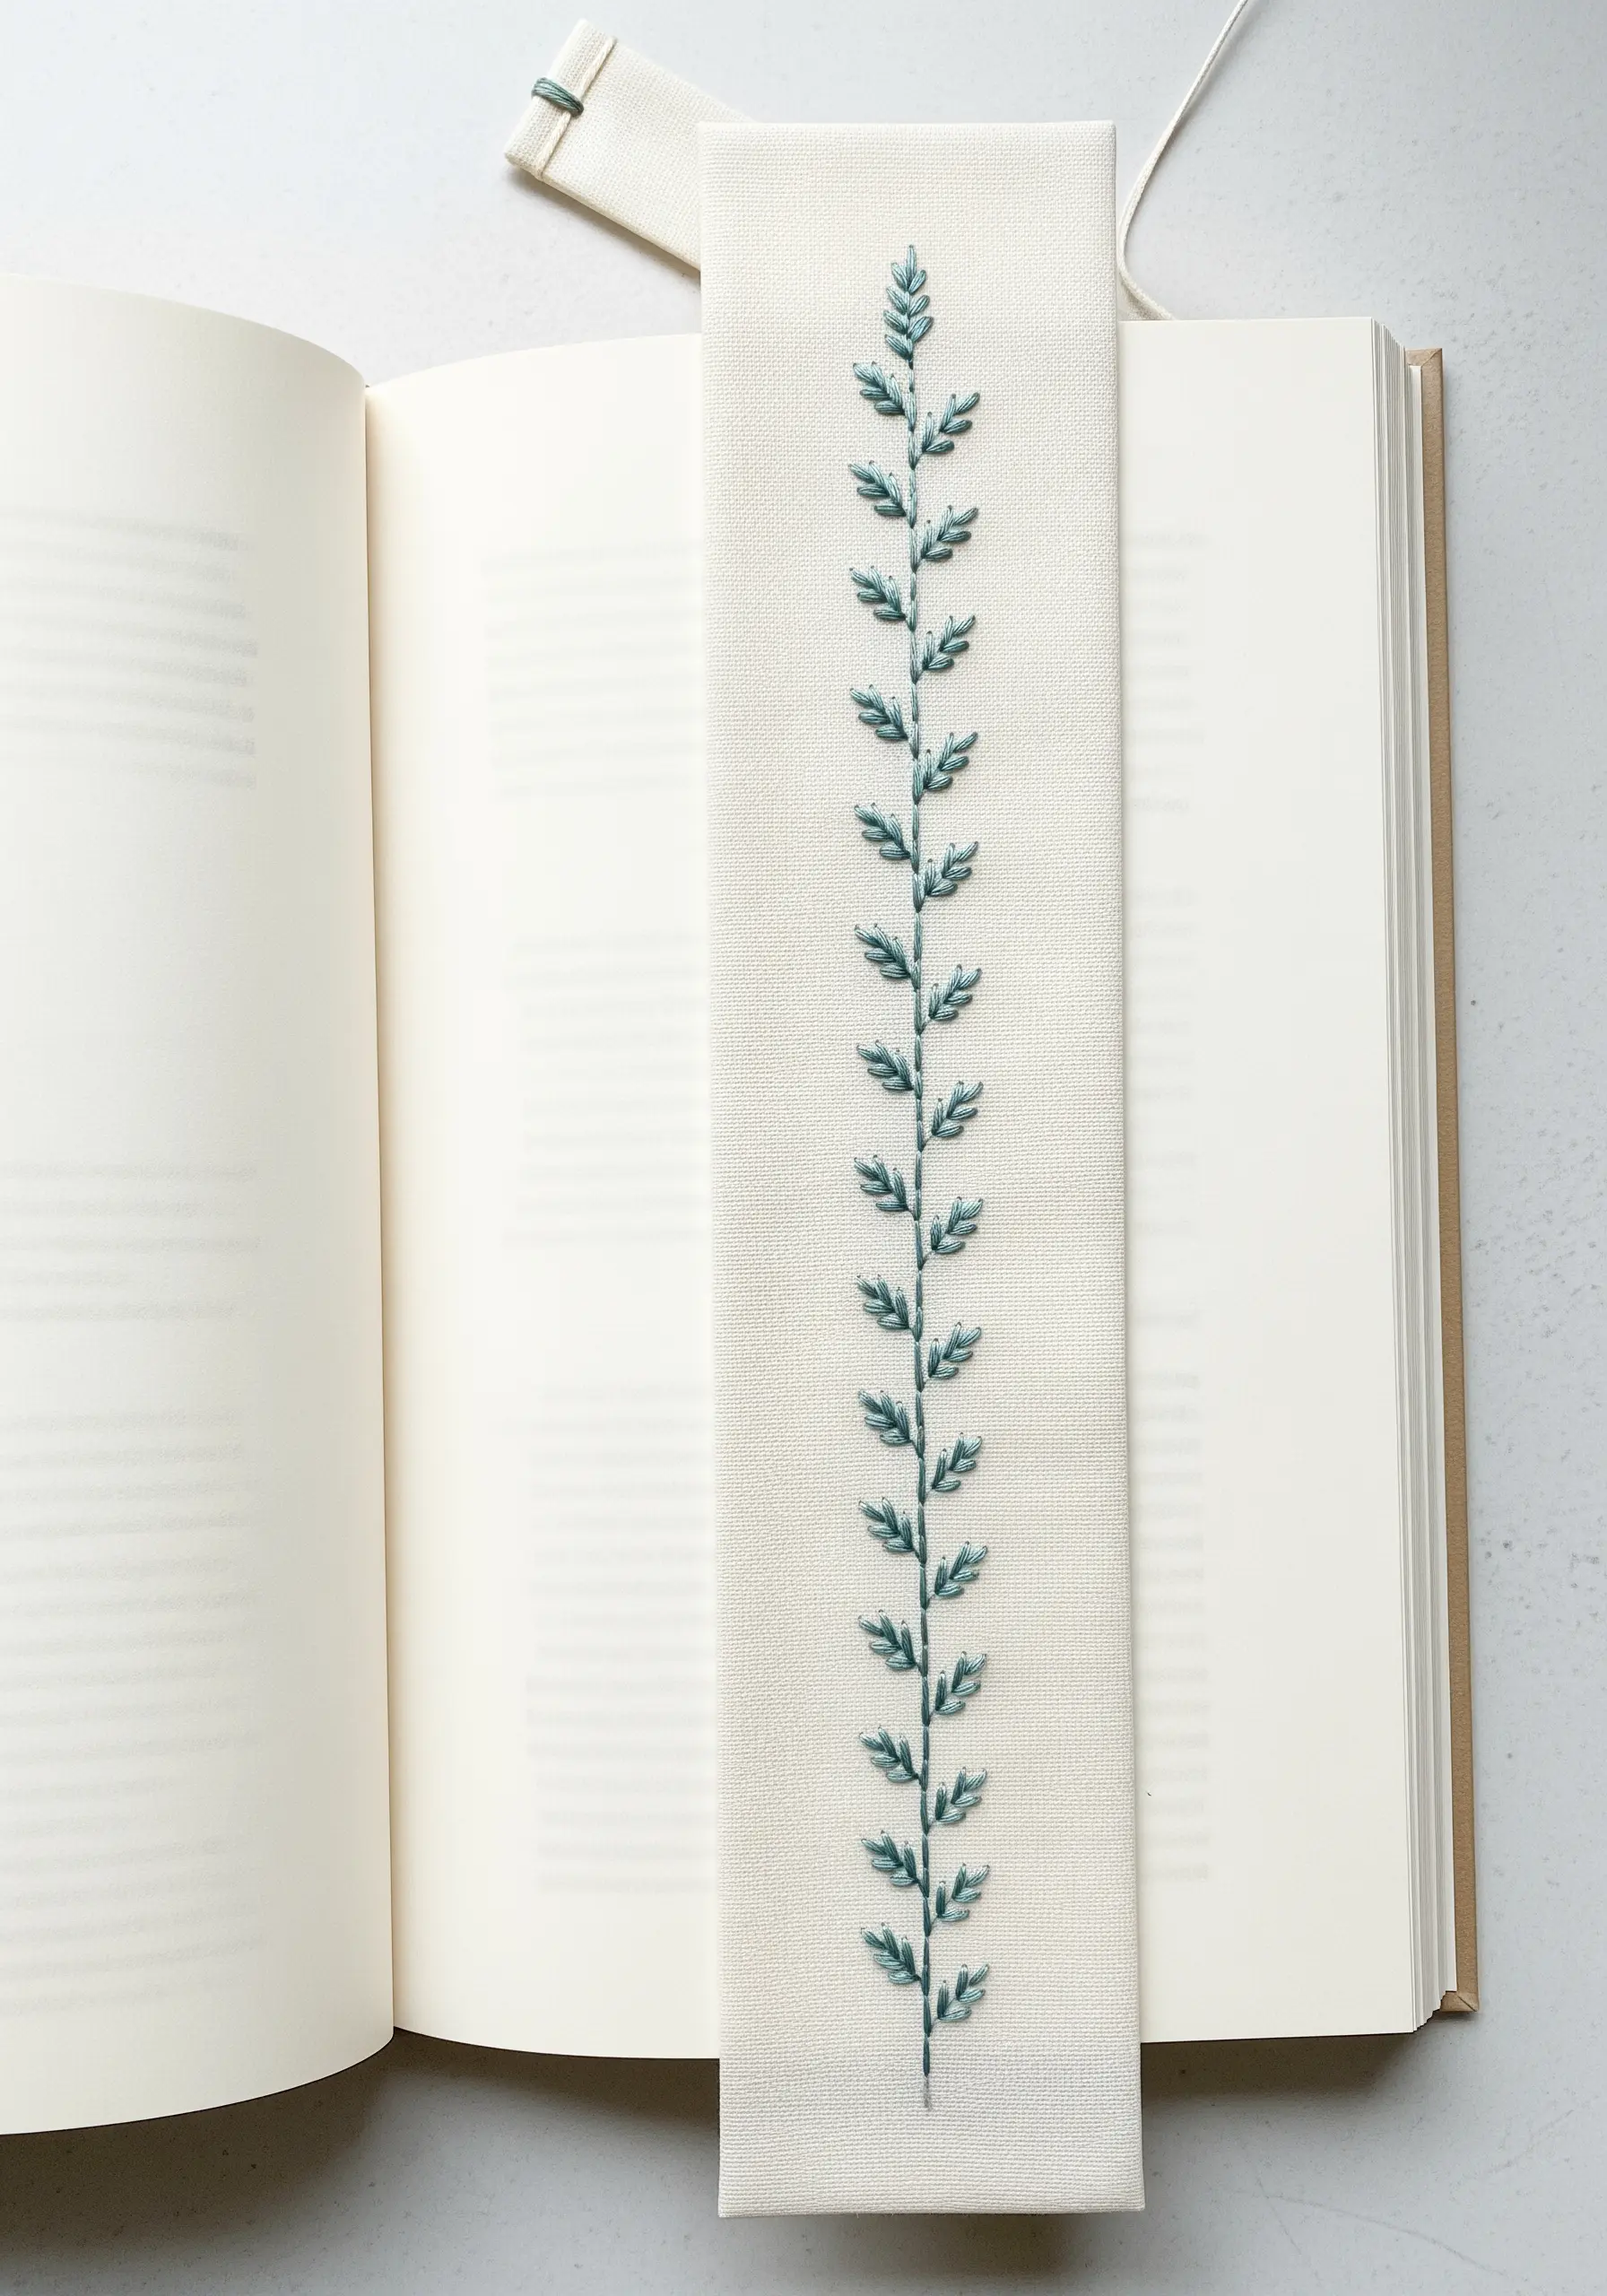
Translate your embroidery skills into a beautiful and practical object that you or a loved one can use every day.
The repeating leaf pattern on this bookmark is created with the fly stitch. This stitch naturally forms a ‘V’ shape with a tail, making it ideal for individual leaves or delicate greenery.
By working the fly stitches in a symmetrical pattern down a central stem (made with a stem stitch), you can create an elegant, vine-like border.
Using a variegated thread adds subtle shifts in color, giving the foliage a more natural and less uniform appearance without any extra effort.
13. The Art of Directional Fill

Mastering the satin stitch is less about just filling a shape and more about using the direction of your stitches to create movement and life.
For this ginkgo leaf, the satin stitches all radiate outward from the base, fanning out to follow the leaf’s natural growth pattern.
This directional approach is what gives the piece its dynamic, elegant feel. If the stitches were simply laid horizontally, the leaf would look flat and static.
To keep your edges perfectly clean, first outline the entire shape with a tiny split stitch. Then, work your satin stitches just over this outline, which acts as a raised guide and ensures a crisp, professional border.
14. Capturing Delicacy with Line Work
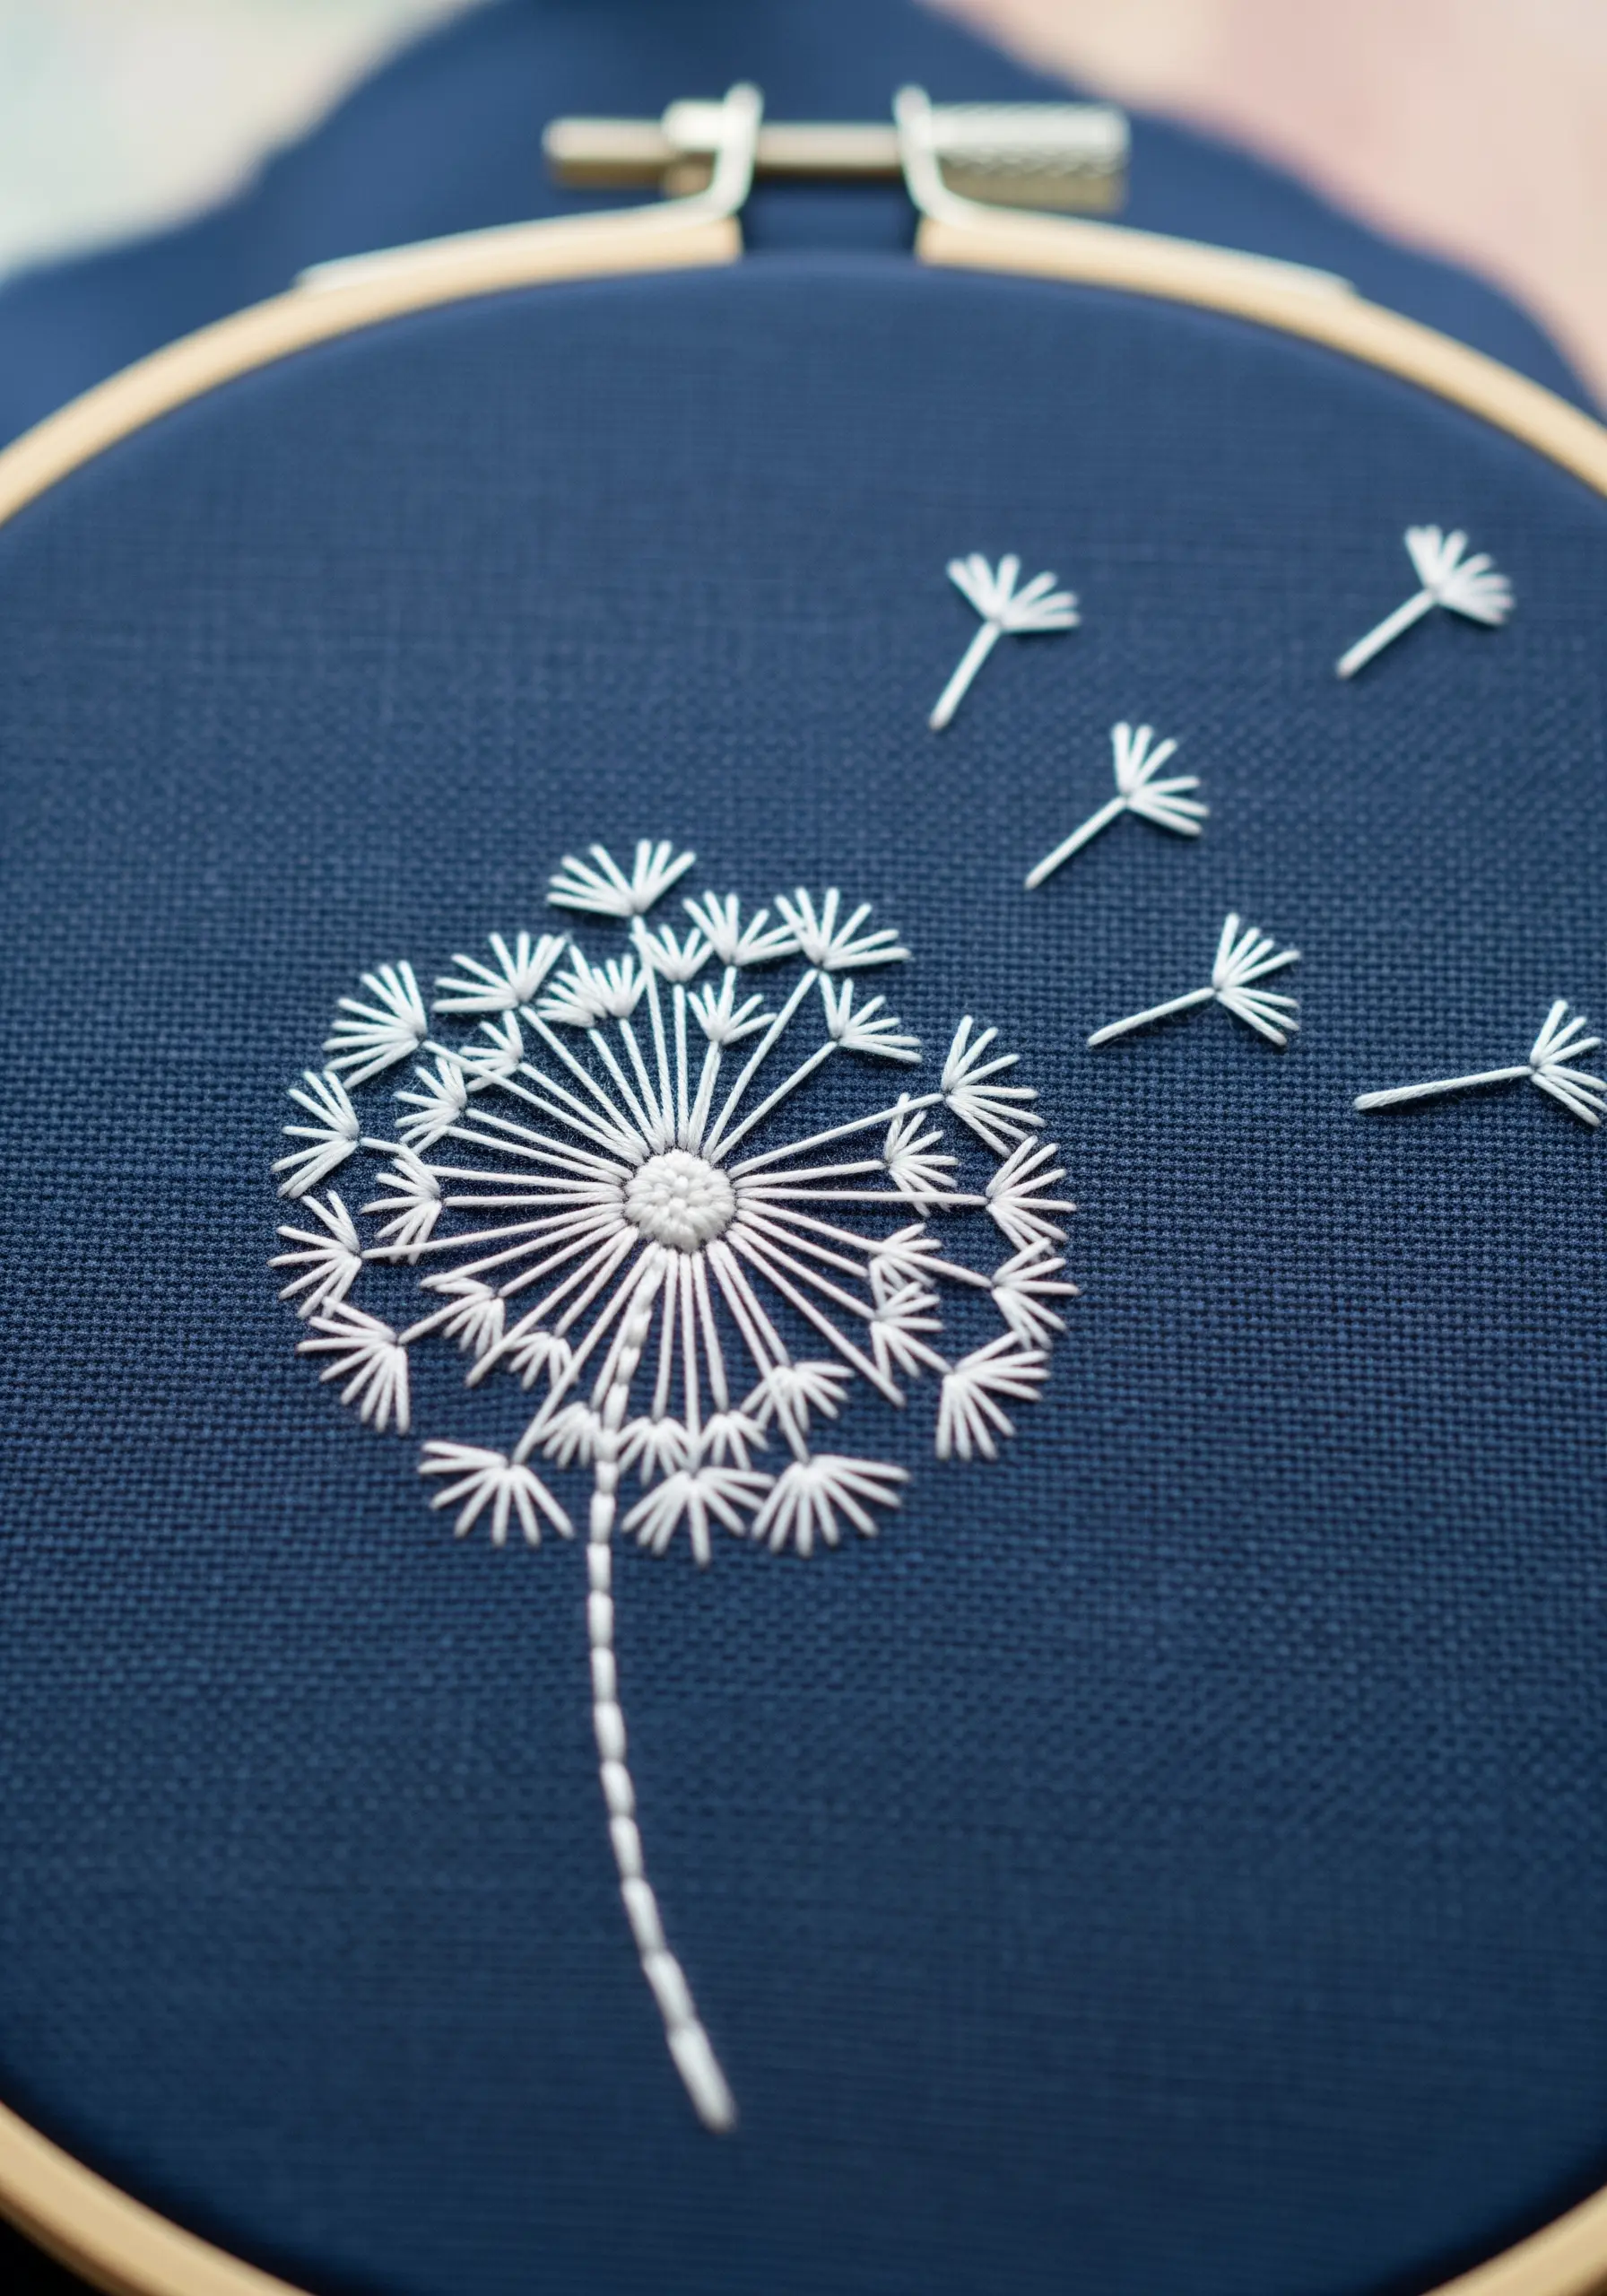
This dandelion design is a beautiful study in how to use simple straight stitches to create a sense of lightness and motion.
The central seed head is built from straight stitches radiating from a tightly packed cluster of French knots. Varying the length of these stitches makes it look more organic.
Each individual floating seed is a combination of two small, V-shaped straight stitches and a longer straight stitch for the stem. That’s it.
The magic comes from the high contrast between the fine white thread and the dark navy fabric, which makes the delicate lines pop. Using only one or two strands of floss is essential to maintain that airy, weightless feel.
15. Geometric Simplicity on Aida Cloth
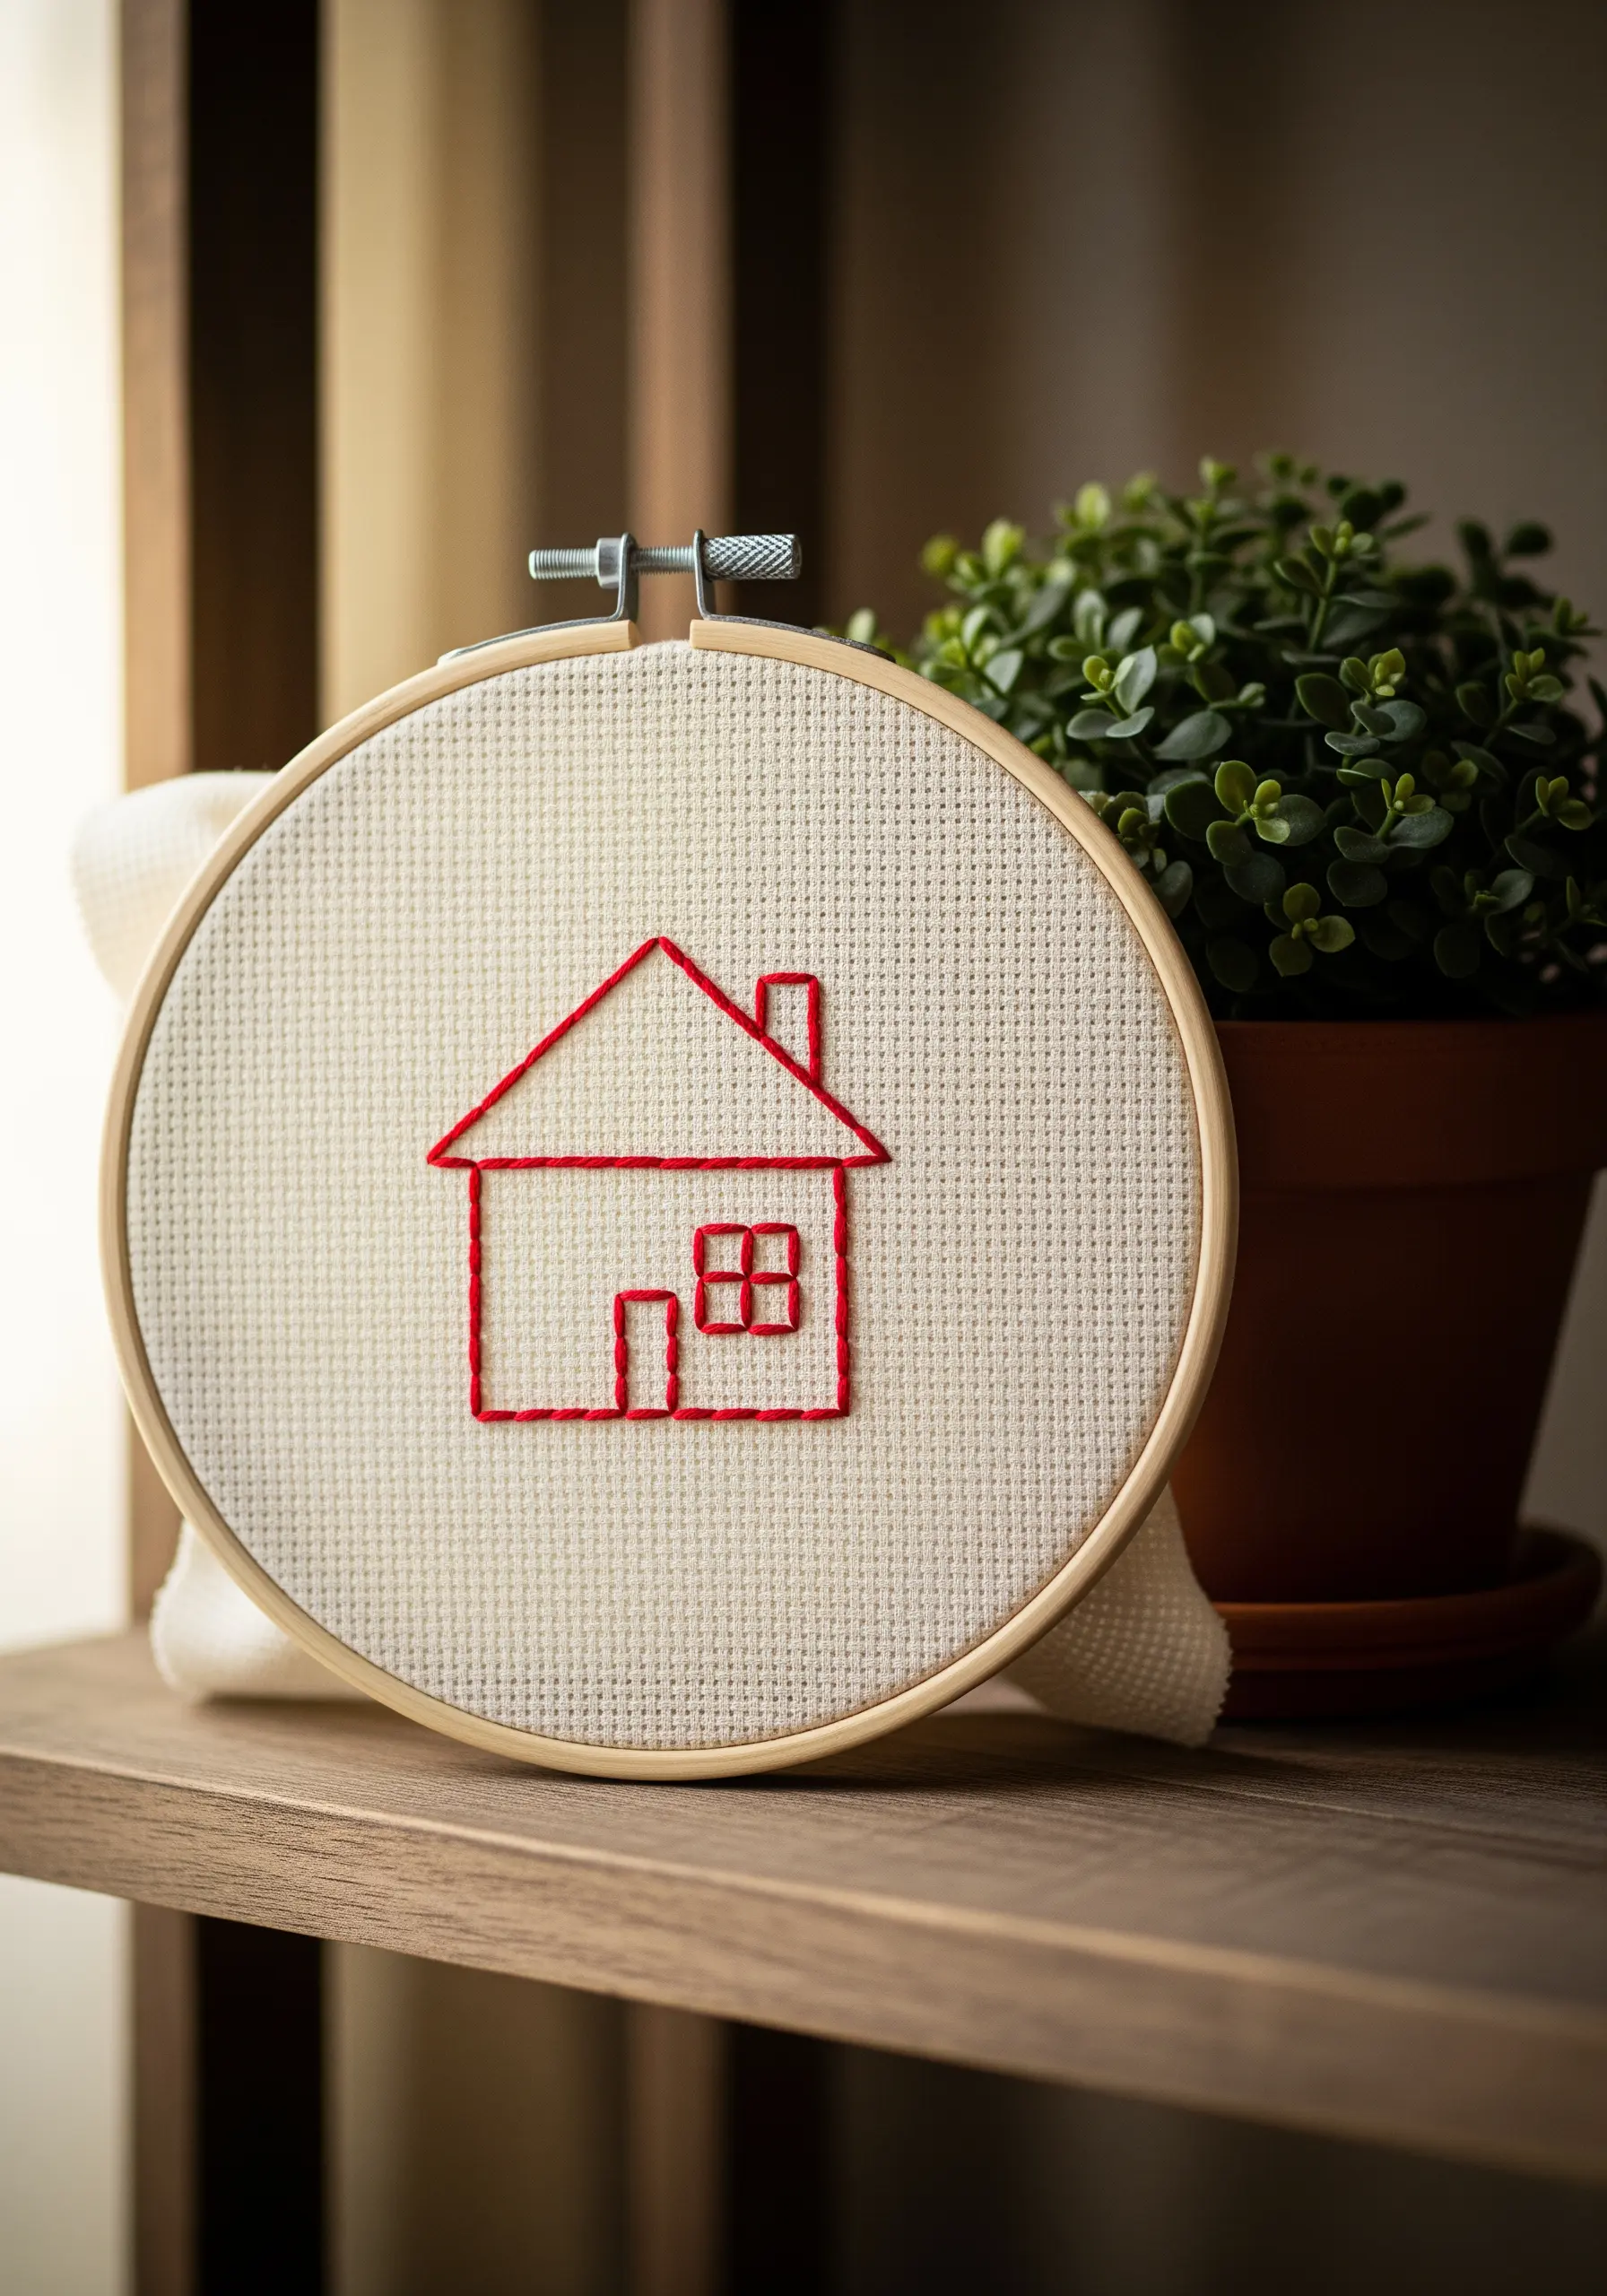
You don’t have to do cross-stitch just because you’re using Aida cloth. Its grid-like weave is perfect for creating precise, geometric line art with other stitches.
This simple house outline uses a basic backstitch, with the holes of the Aida cloth acting as a perfect guide for keeping your stitches uniform in length and perfectly straight.
This is a fantastic way for a complete beginner to gain confidence, as the fabric’s structure removes the guesswork of stitch placement.
The bold red thread on the off-white fabric creates a classic, charming aesthetic that feels both modern and nostalgic, making it a perfect piece of DIY embroidery to display.
16. Exploring with a Stitch Sampler
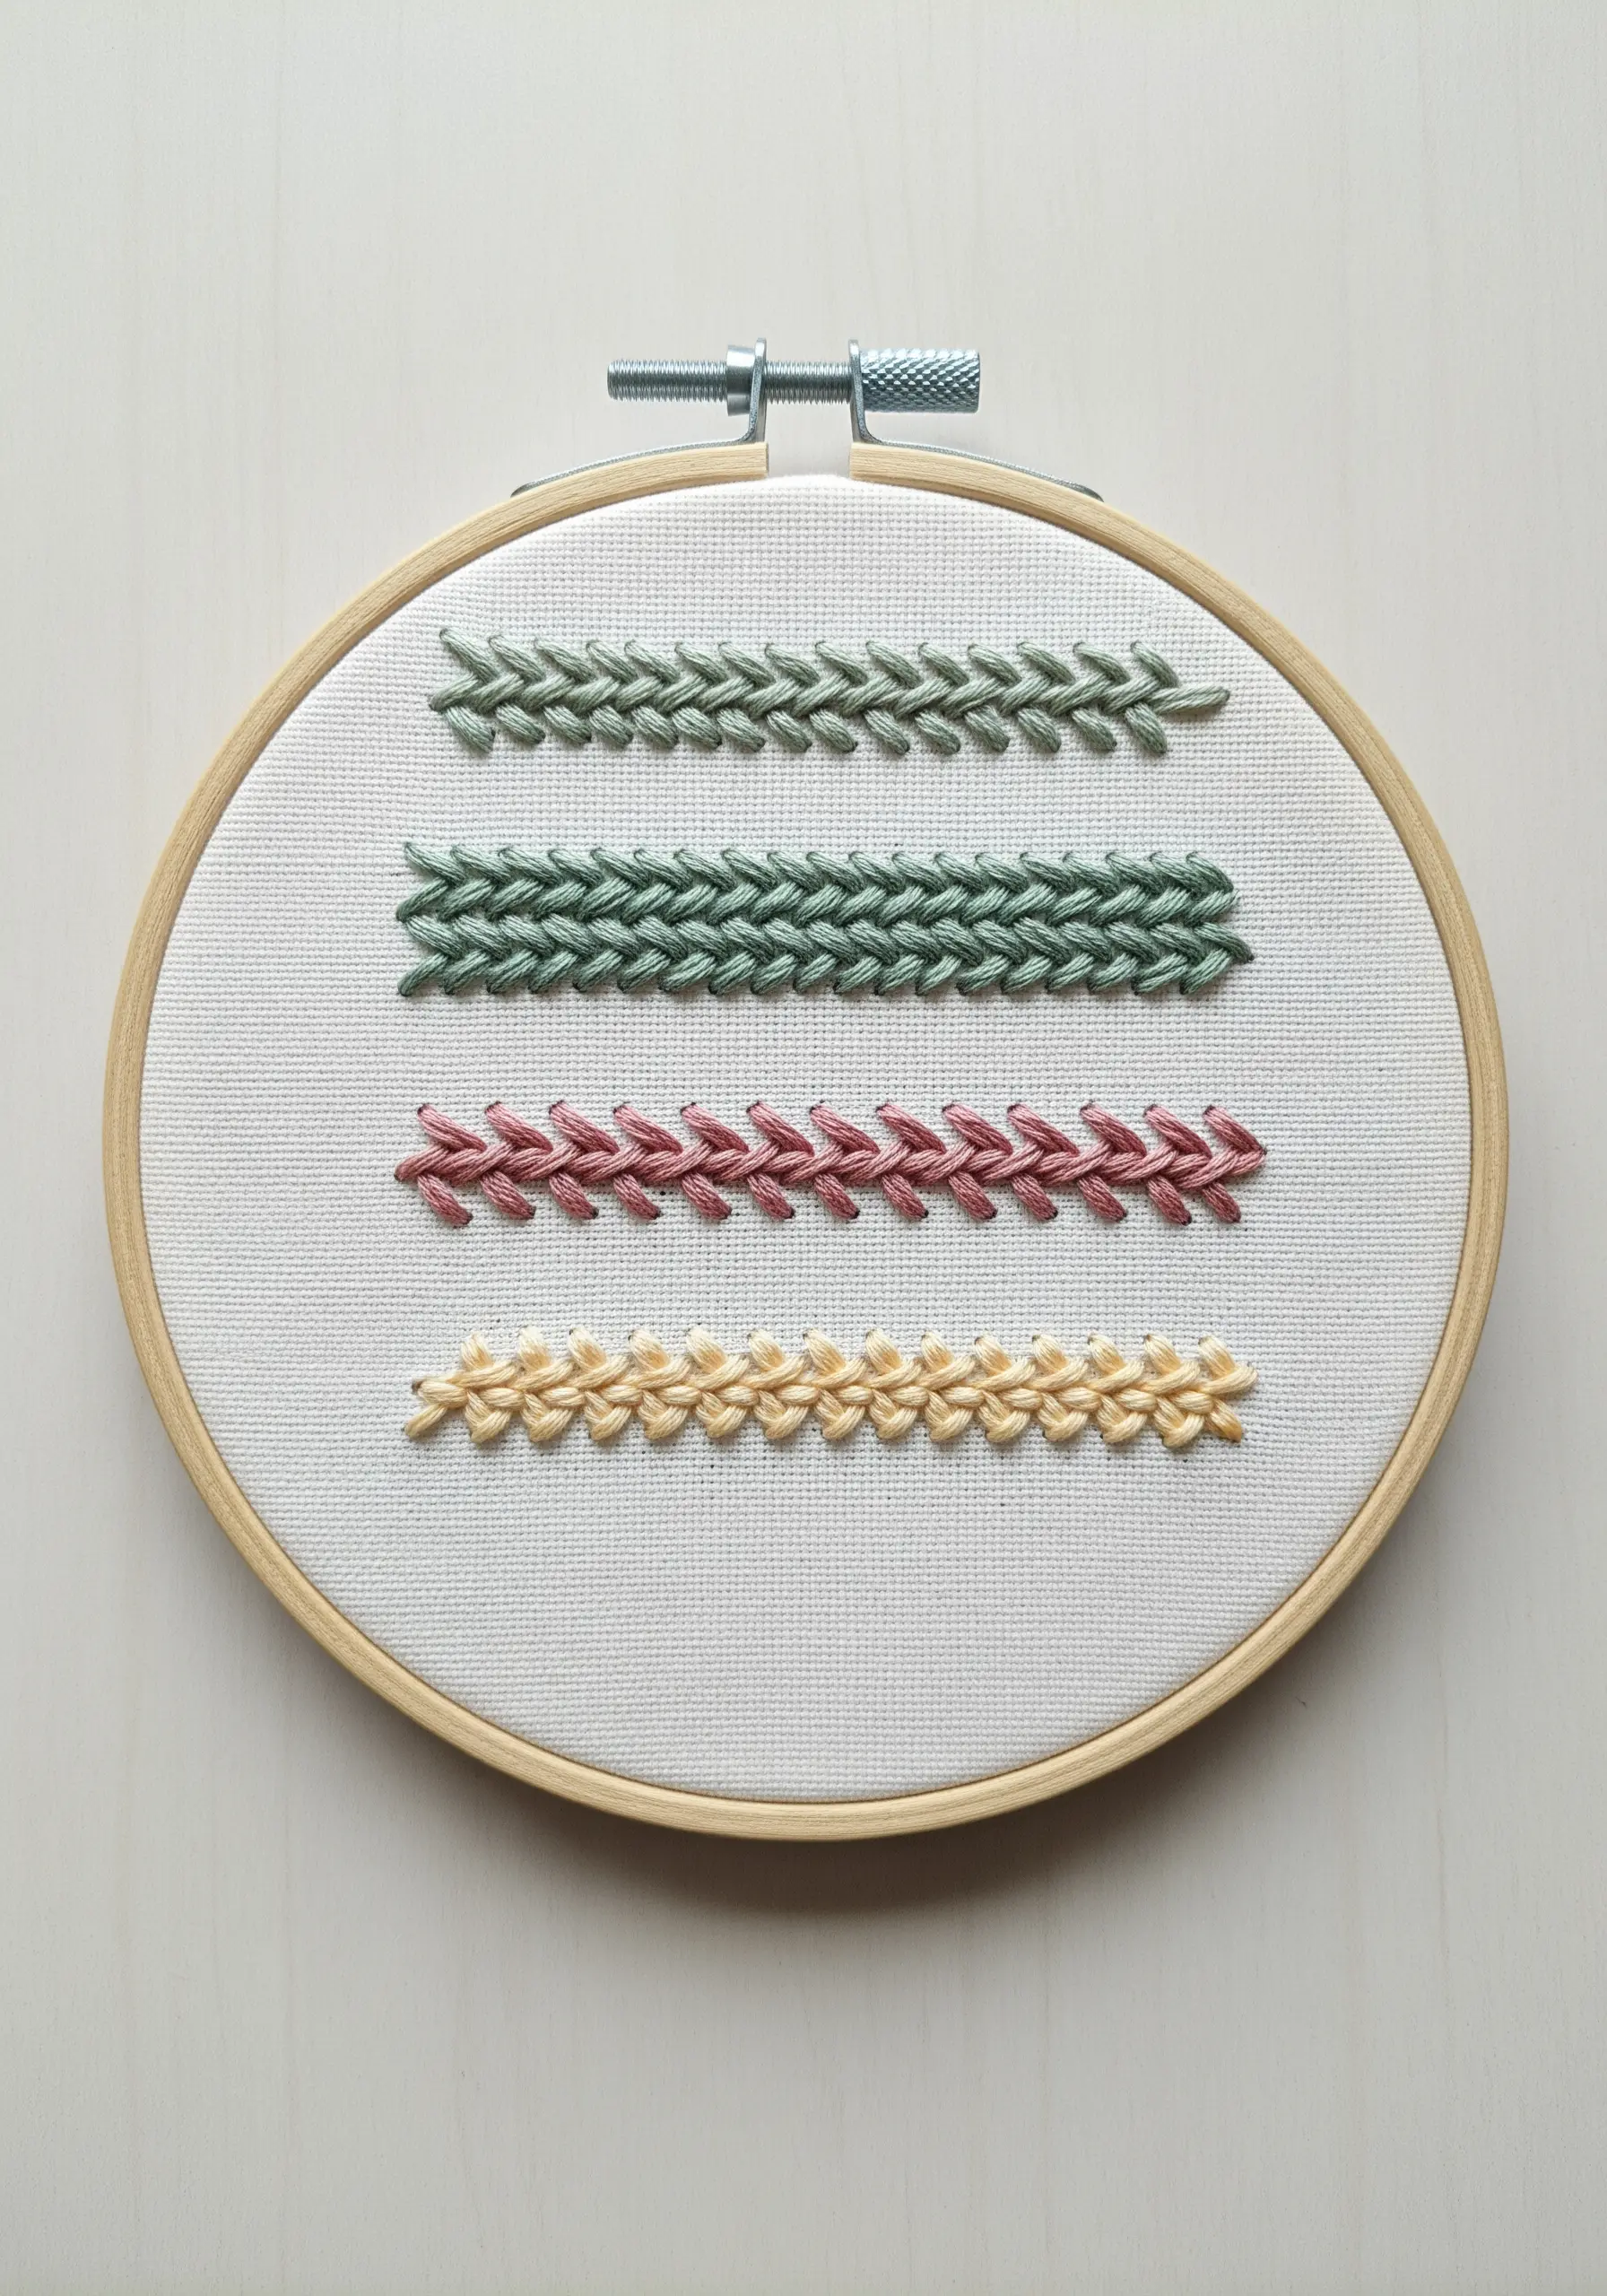
A stitch sampler is one of the best ways to build your skills and confidence without the pressure of creating a finished pictorial piece.
This hoop showcases variations of the herringbone stitch and the braided chain stitch, allowing you to focus purely on technique, tension, and consistency.
Try working a stitch with different numbers of floss strands (e.g., six strands vs. three strands) to see how it changes the texture and thickness of the line.
Experiment with spacing—packing the stitches tightly together versus leaving more room between them—to discover the different decorative effects you can achieve with a single stitch.
17. The Sketched Embroidery Style
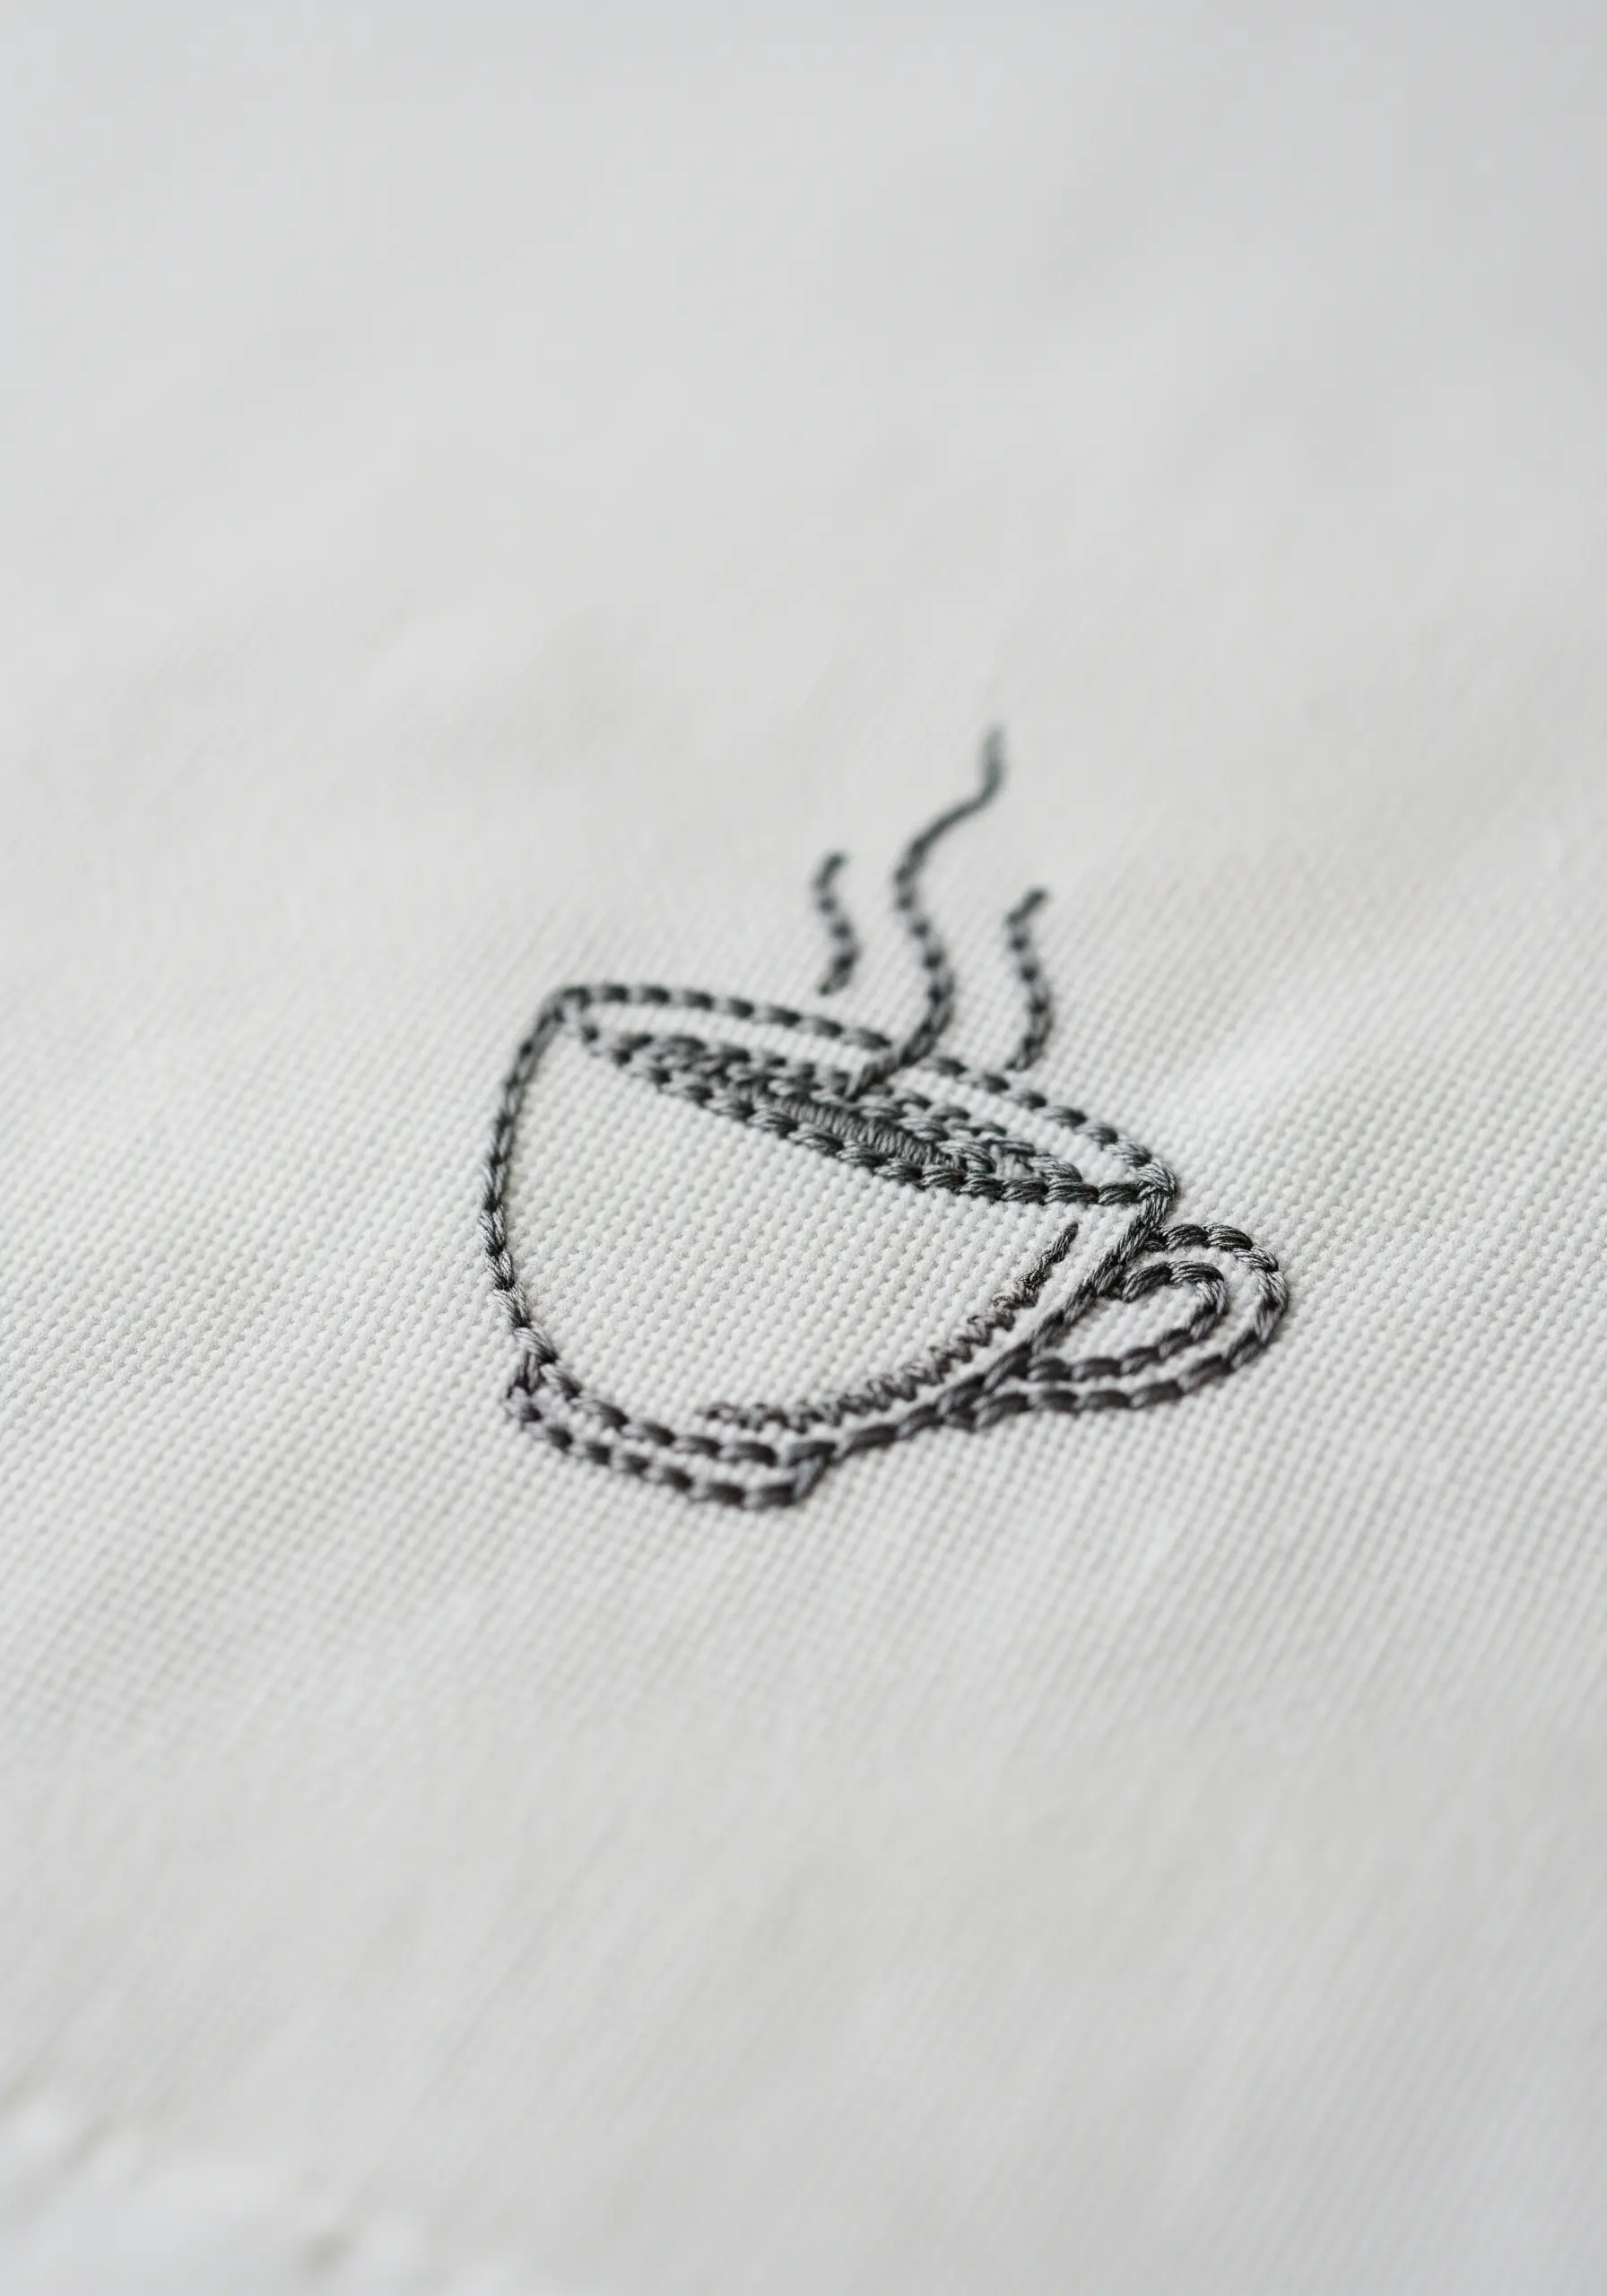
You can create a charming, hand-drawn look in your embroidery by using a simple stitch and embracing slight imperfections.
This coffee cup uses a whipped backstitch with a variegated grey and black thread, which mimics the varied tones of a pencil sketch.
The slightly uneven lines and open spaces are intentional; they contribute to the loose, illustrative quality of the piece.
For the steam, use a delicate stem stitch with just one or two strands of floss, making the lines wavy and light to suggest vapor rising from the cup.
18. Creating Wearable Art
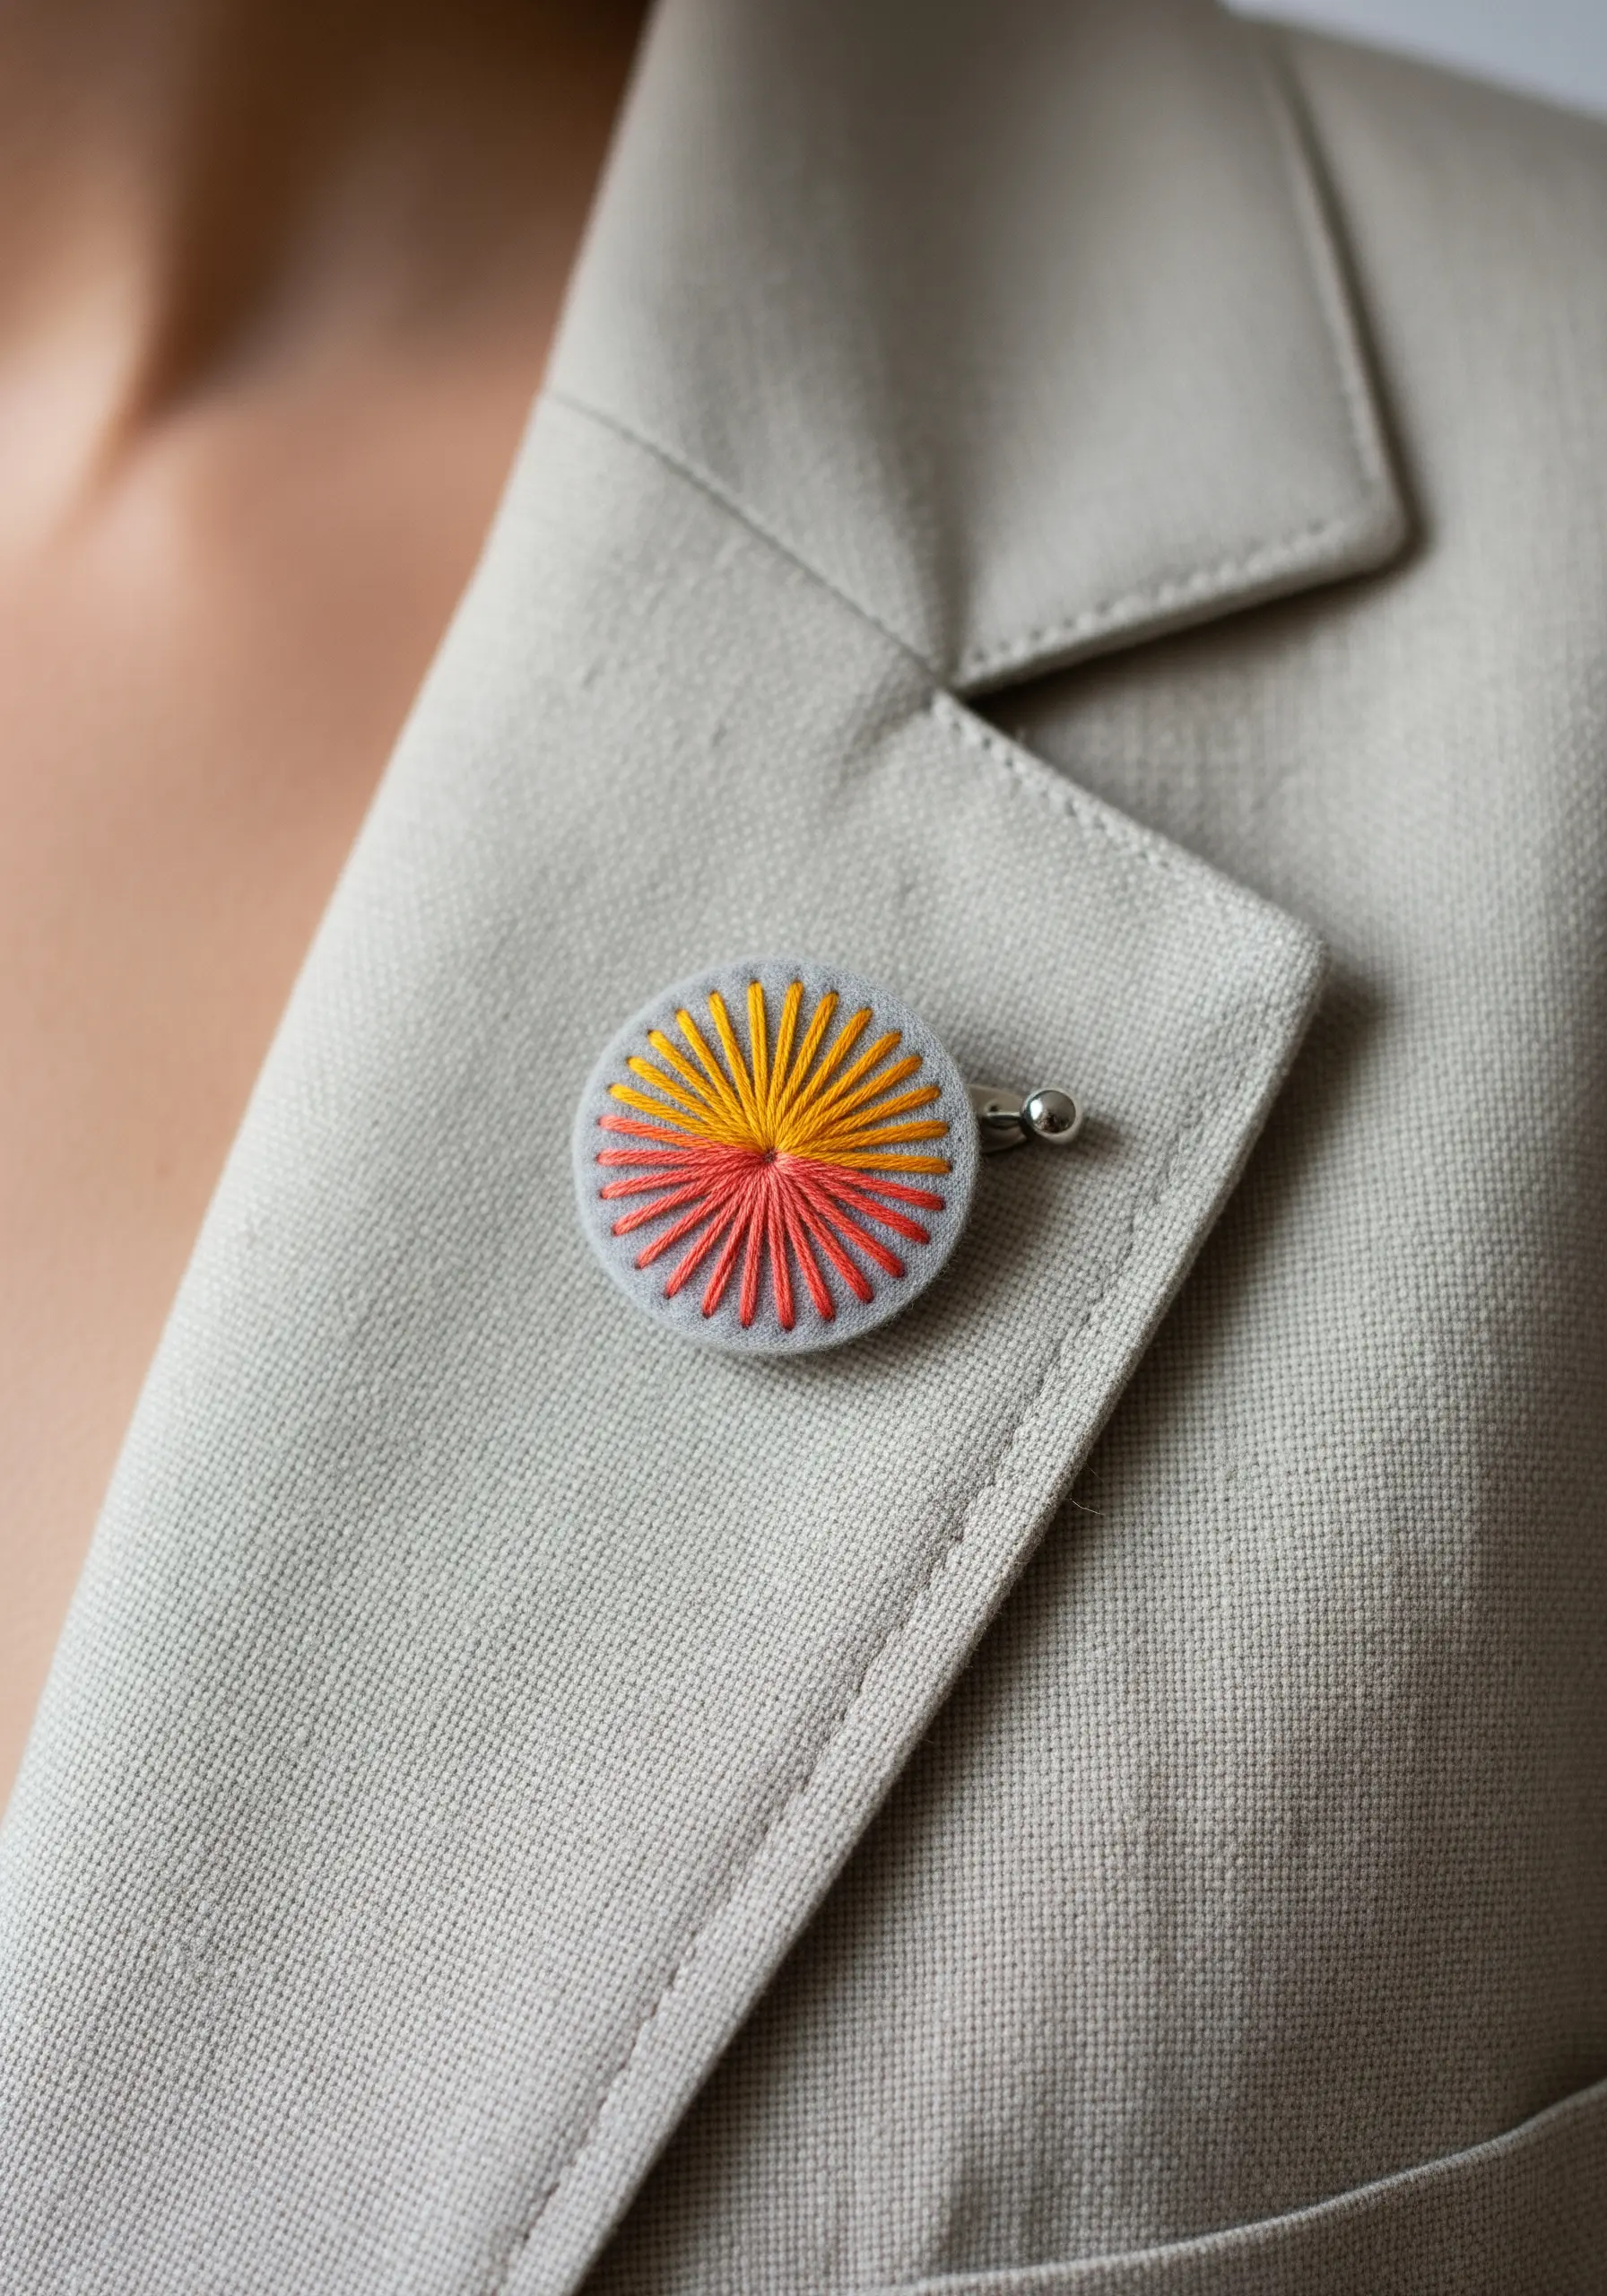
Turn a small piece of embroidery into a stylish accessory, like this lapel pin, by mastering a few simple finishing techniques.
This sunburst design is made entirely of straight stitches radiating from a central point, with two contrasting colors layered to create depth. It’s a quick and impactful design perfect for a small surface.
After stitching, you can mount the finished piece on a button cover blank. Simply cut the fabric in a circle larger than the blank, place the embroidery on top, and snap the back piece into place.
Then, just glue a pin back onto the button, and you have one of those small embroidery designs to transform your accessories.
19. Minimalist Gradients with Parallel Lines
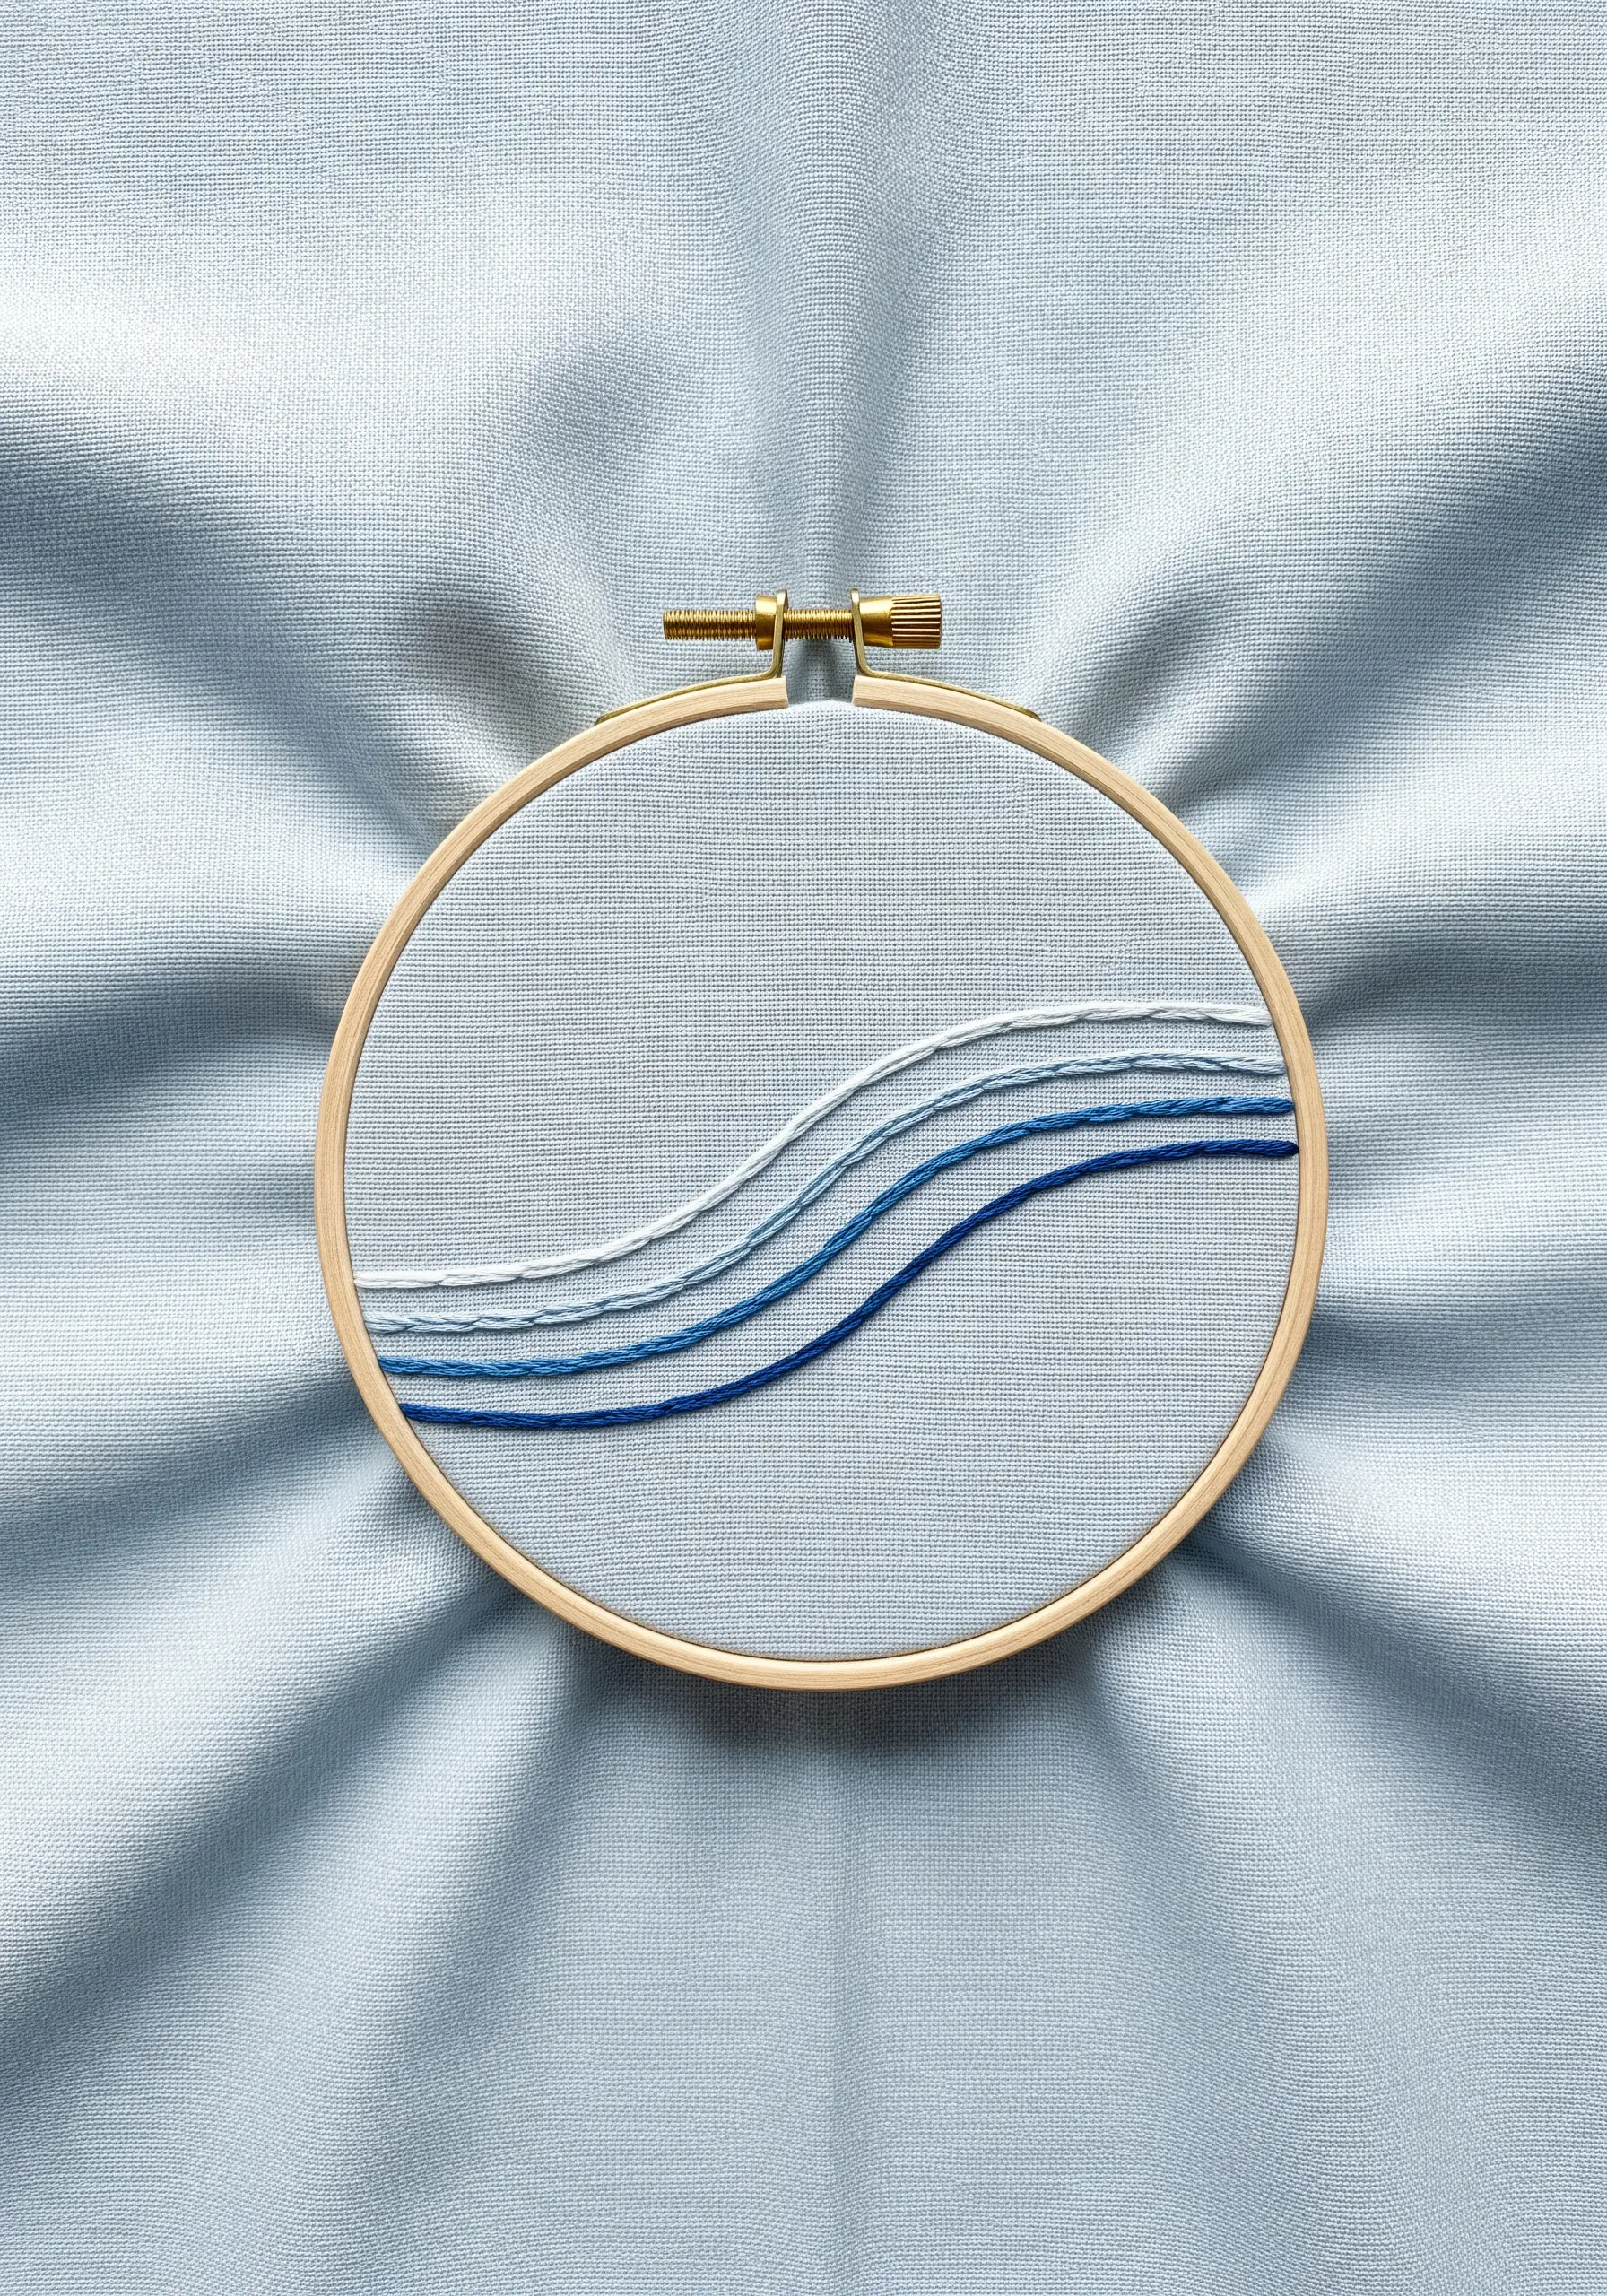
This abstract wave design demonstrates that you don’t need complex stitches to create a sophisticated and modern piece of art.
The entire design is composed of just five parallel lines worked in a simple stem stitch or backstitch. The effect comes entirely from the color selection.
Choose four or five shades of the same color, from very light to very dark, to create a smooth and pleasing ombré gradient.
The key to success here is careful spacing. Use a water-soluble marker and a ruler to draw your guidelines on the fabric before you start stitching to ensure your waves are perfectly parallel.
20. Embroidering on Chunky Knitwear
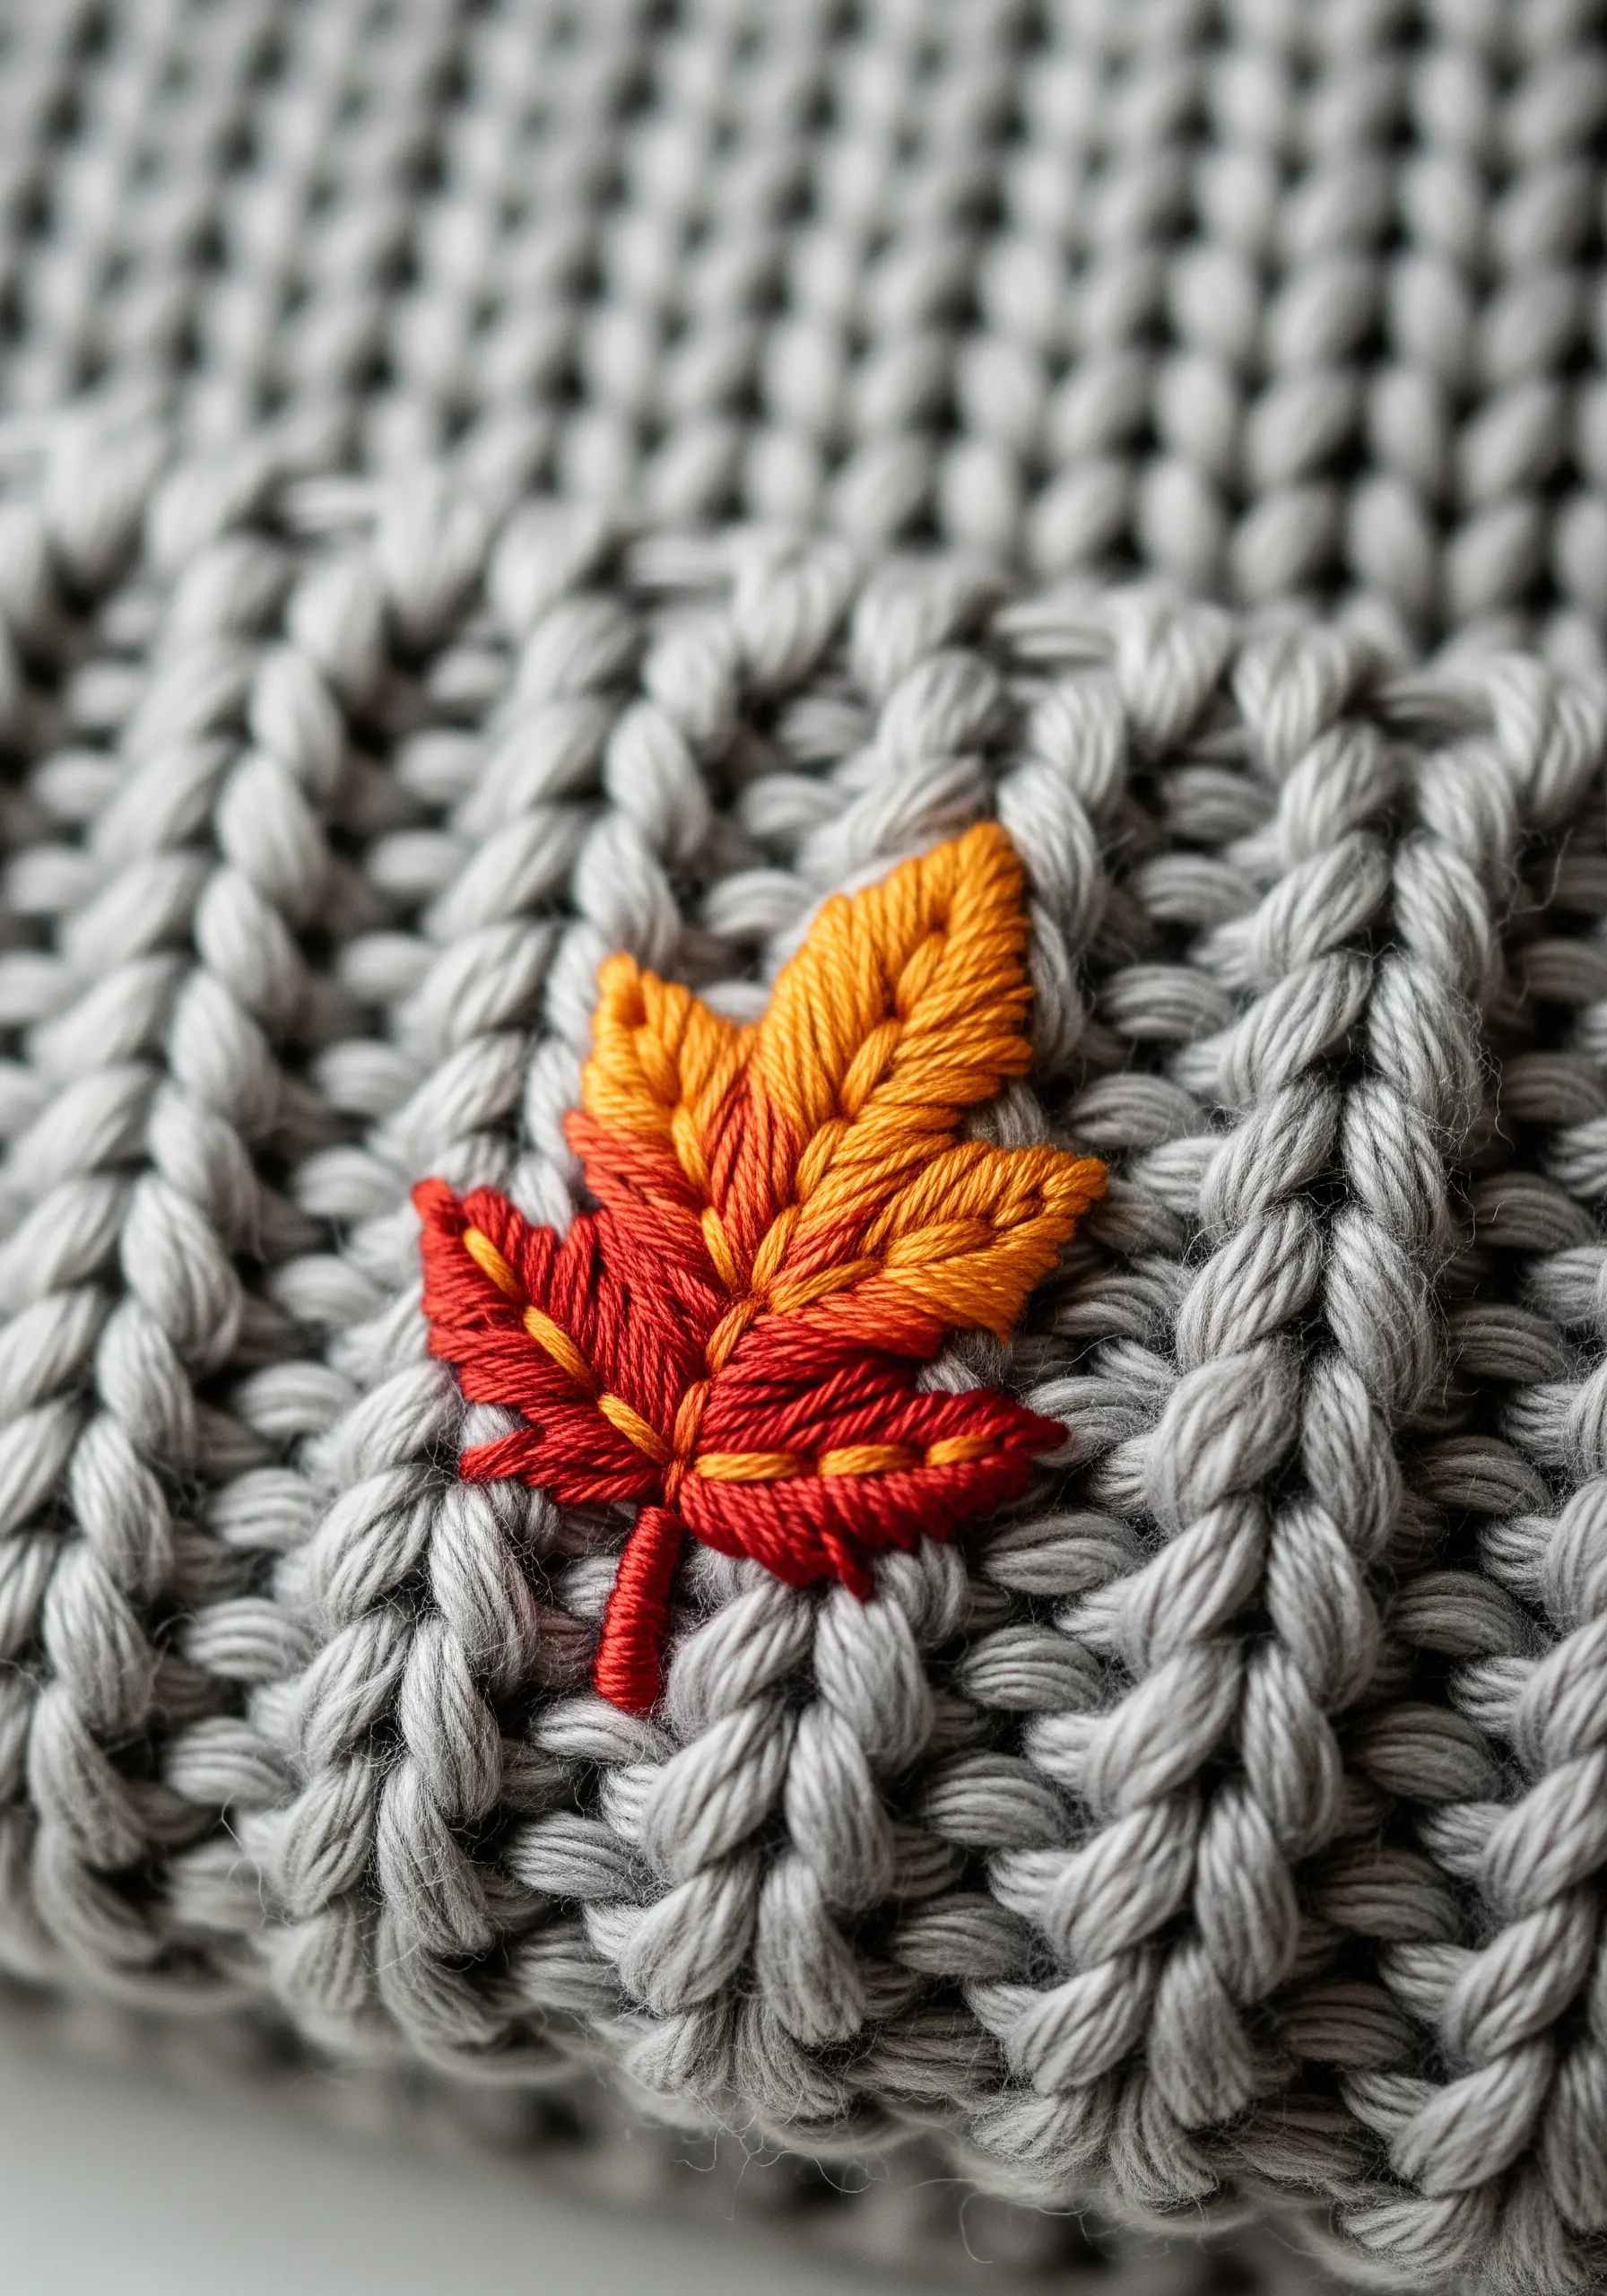
Adding embroidery to a textured, stretchy fabric like a knit hat requires a few specific adjustments to ensure your stitches look great and don’t distort the garment.
The most important step is to use a stabilizer on the inside of the hat. An iron-on or stick-on stabilizer will prevent the knit from stretching as you stitch and keep your design from warping.
Use a fishbone stitch for the leaf; its structure is well-suited to creating a solid, stable shape on the uneven surface.
A ballpoint needle is the best choice for knit fabrics, as it’s designed to slip between the knit loops rather than piercing and potentially damaging them.
21. Playful Textures for Simple Motifs
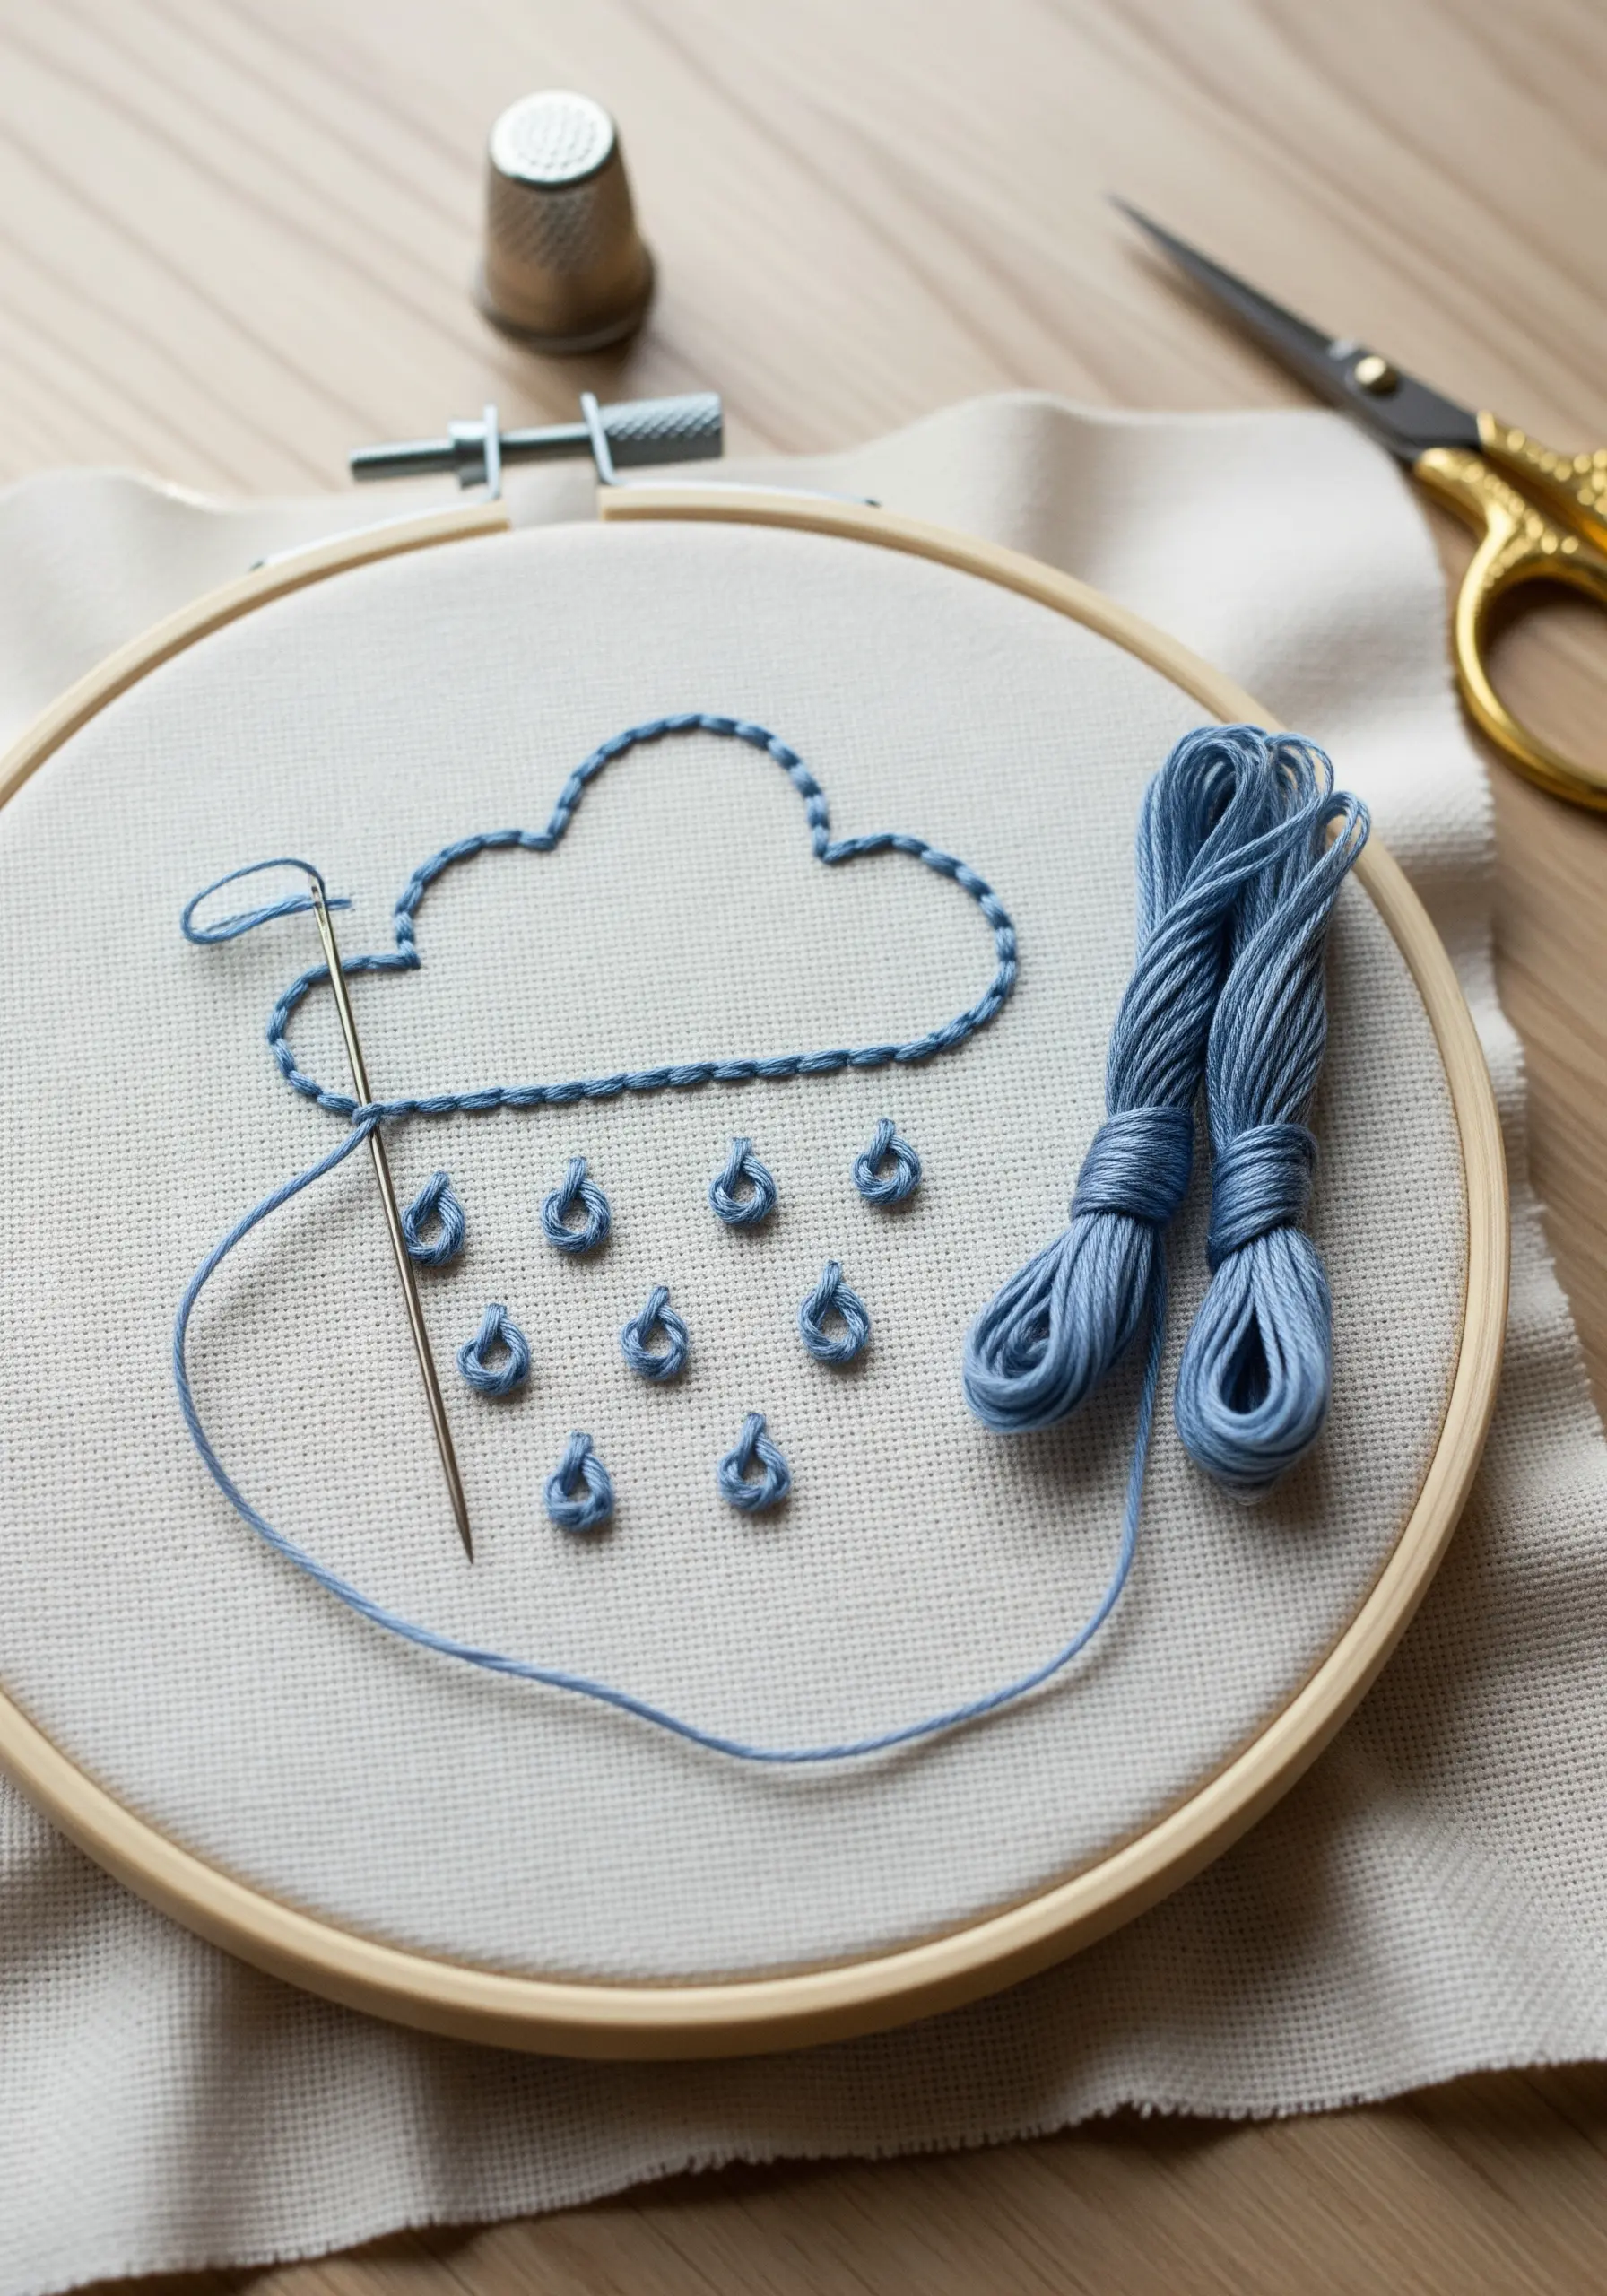
Elevate a simple line drawing by incorporating a stitch that adds a pop of three-dimensional texture.
The outline of the cloud is a simple, clean backstitch, which provides a solid frame for the design.
The raindrops, however, are made with lazy daisy stitches (also known as detached chain stitches). This stitch creates a small, anchored loop that naturally forms a teardrop shape and sits raised on the fabric’s surface.
This combination of flat line work and dimensional details makes the piece more engaging and tactile, adding a playful quality that is perfect for nursery decor or children’s items.
22. Geometric Fills and Monochrome Palettes

This design is a masterclass in precision and control, using only satin stitch and a monochromatic color scheme to create a striking geometric pattern.
To achieve those razor-sharp edges between sections, outline each small triangle with a split stitch before you begin filling. This creates a tiny ‘wall’ for your satin stitches to press up against.
For a perfectly smooth, glass-like finish, ensure your satin stitches are laid perfectly parallel to one another without overlapping or leaving gaps.
Working with a limited palette of black, white, and greys forces you to focus on the technical execution of the stitch, making this an excellent practice piece for anyone looking to master their satin stitch.
23. Soft Petals with Lazy Daisy Stitch
The lazy daisy stitch is arguably one of the fastest and most satisfying ways to create simple, charming flowers, making it a perfect starting point for any beginner.
Each petal is just a single detached chain stitch. You can create a full, round flower by arranging five or six of these stitches in a circle around a central point.
Anchor the center of the flower with a few French knots in a contrasting color. This not only completes the floral look but also neatly covers the point where all your petal stitches converge.
This stitch combination is incredibly versatile and can be used to create wildflower hoop art projects, borders, or scattered motifs on clothing.
24. Achieving a Professional Monogram
A satin-stitched monogram is a timeless way to personalize anything from a pouch to a pillowcase, and there’s a simple trick to making it look impeccably polished.
First, trace your letter onto the fabric. Then, go over that outline with a split stitch. This creates a slightly raised foundation for your fill stitches.
Now, work your satin stitches over that split-stitch border, going from one side of the letter to the other. The foundation underneath will give your final monogram a padded, 3D effect with a perfectly defined edge.
This technique, known as a padded satin stitch, is what gives professional monograms their distinctive, high-quality appearance.
25. The Essence of Minimalist Composition
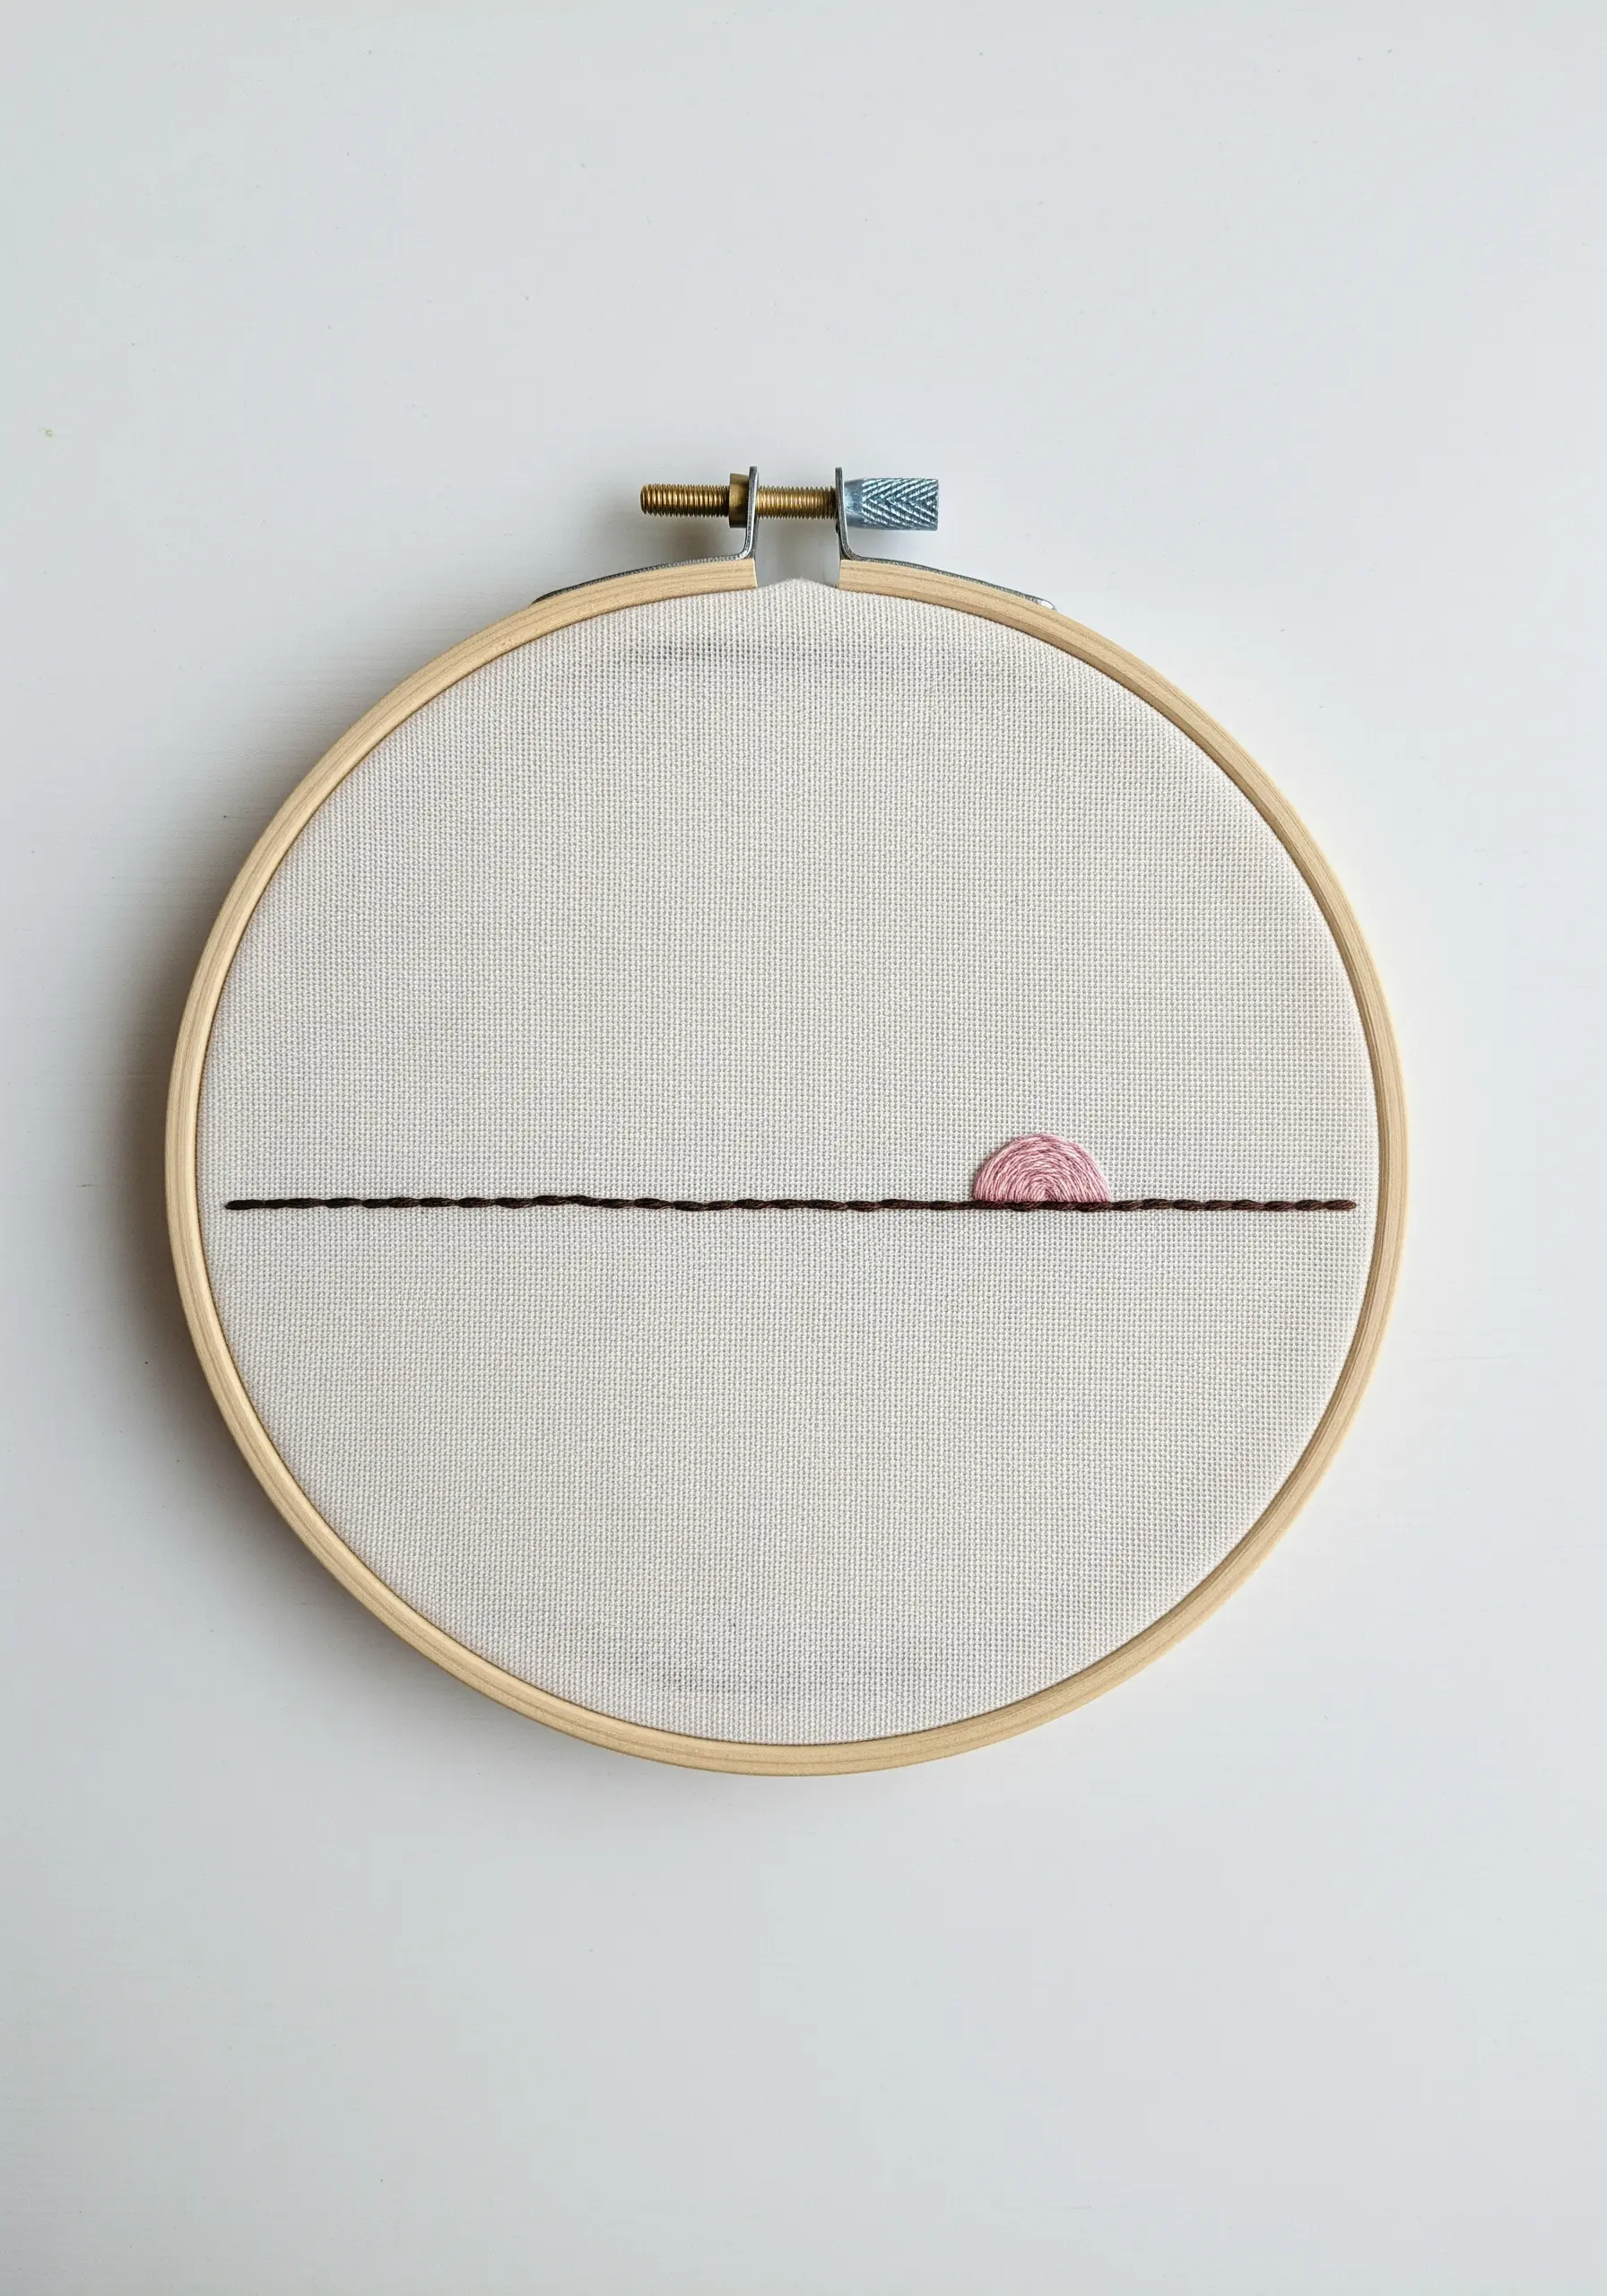
This design proves that you only need two simple elements and a thoughtful composition to create a piece of art that feels calm and complete.
A single, taut line of split stitch creates the horizon. A split stitch is better than a backstitch here because it forms a smoother, more solid line with no visible gaps.
The setting sun is a small semi-circle filled with satin stitch. By using a variegated pink thread, you introduce multiple tones and a sense of gentle movement without any extra effort.
The power of this piece comes from its use of negative space. The vast emptiness of the fabric gives the simple stitched elements room to breathe, creating a serene and contemplative mood.
26. Blending Colors with Long and Short Stitch

Ready to move beyond solid blocks of color? The long and short stitch is the key to creating soft, painterly gradients and realistic shading.
To create the gills of this mushroom, start at the outer edge with your lightest color, making a row of staggered long and short stitches pointing toward the stem.
Then, bring your next shade up through the fabric, splitting the stitches of the previous row to seamlessly blend the two colors together. Repeat this process until the area is filled.
The cap is a solid satin stitch, while the white spots are raised French knots, creating a satisfying mix of textures. This is a perfect project for practicing organic texture embroidery designs.
27. Feather-Light String Art Effects
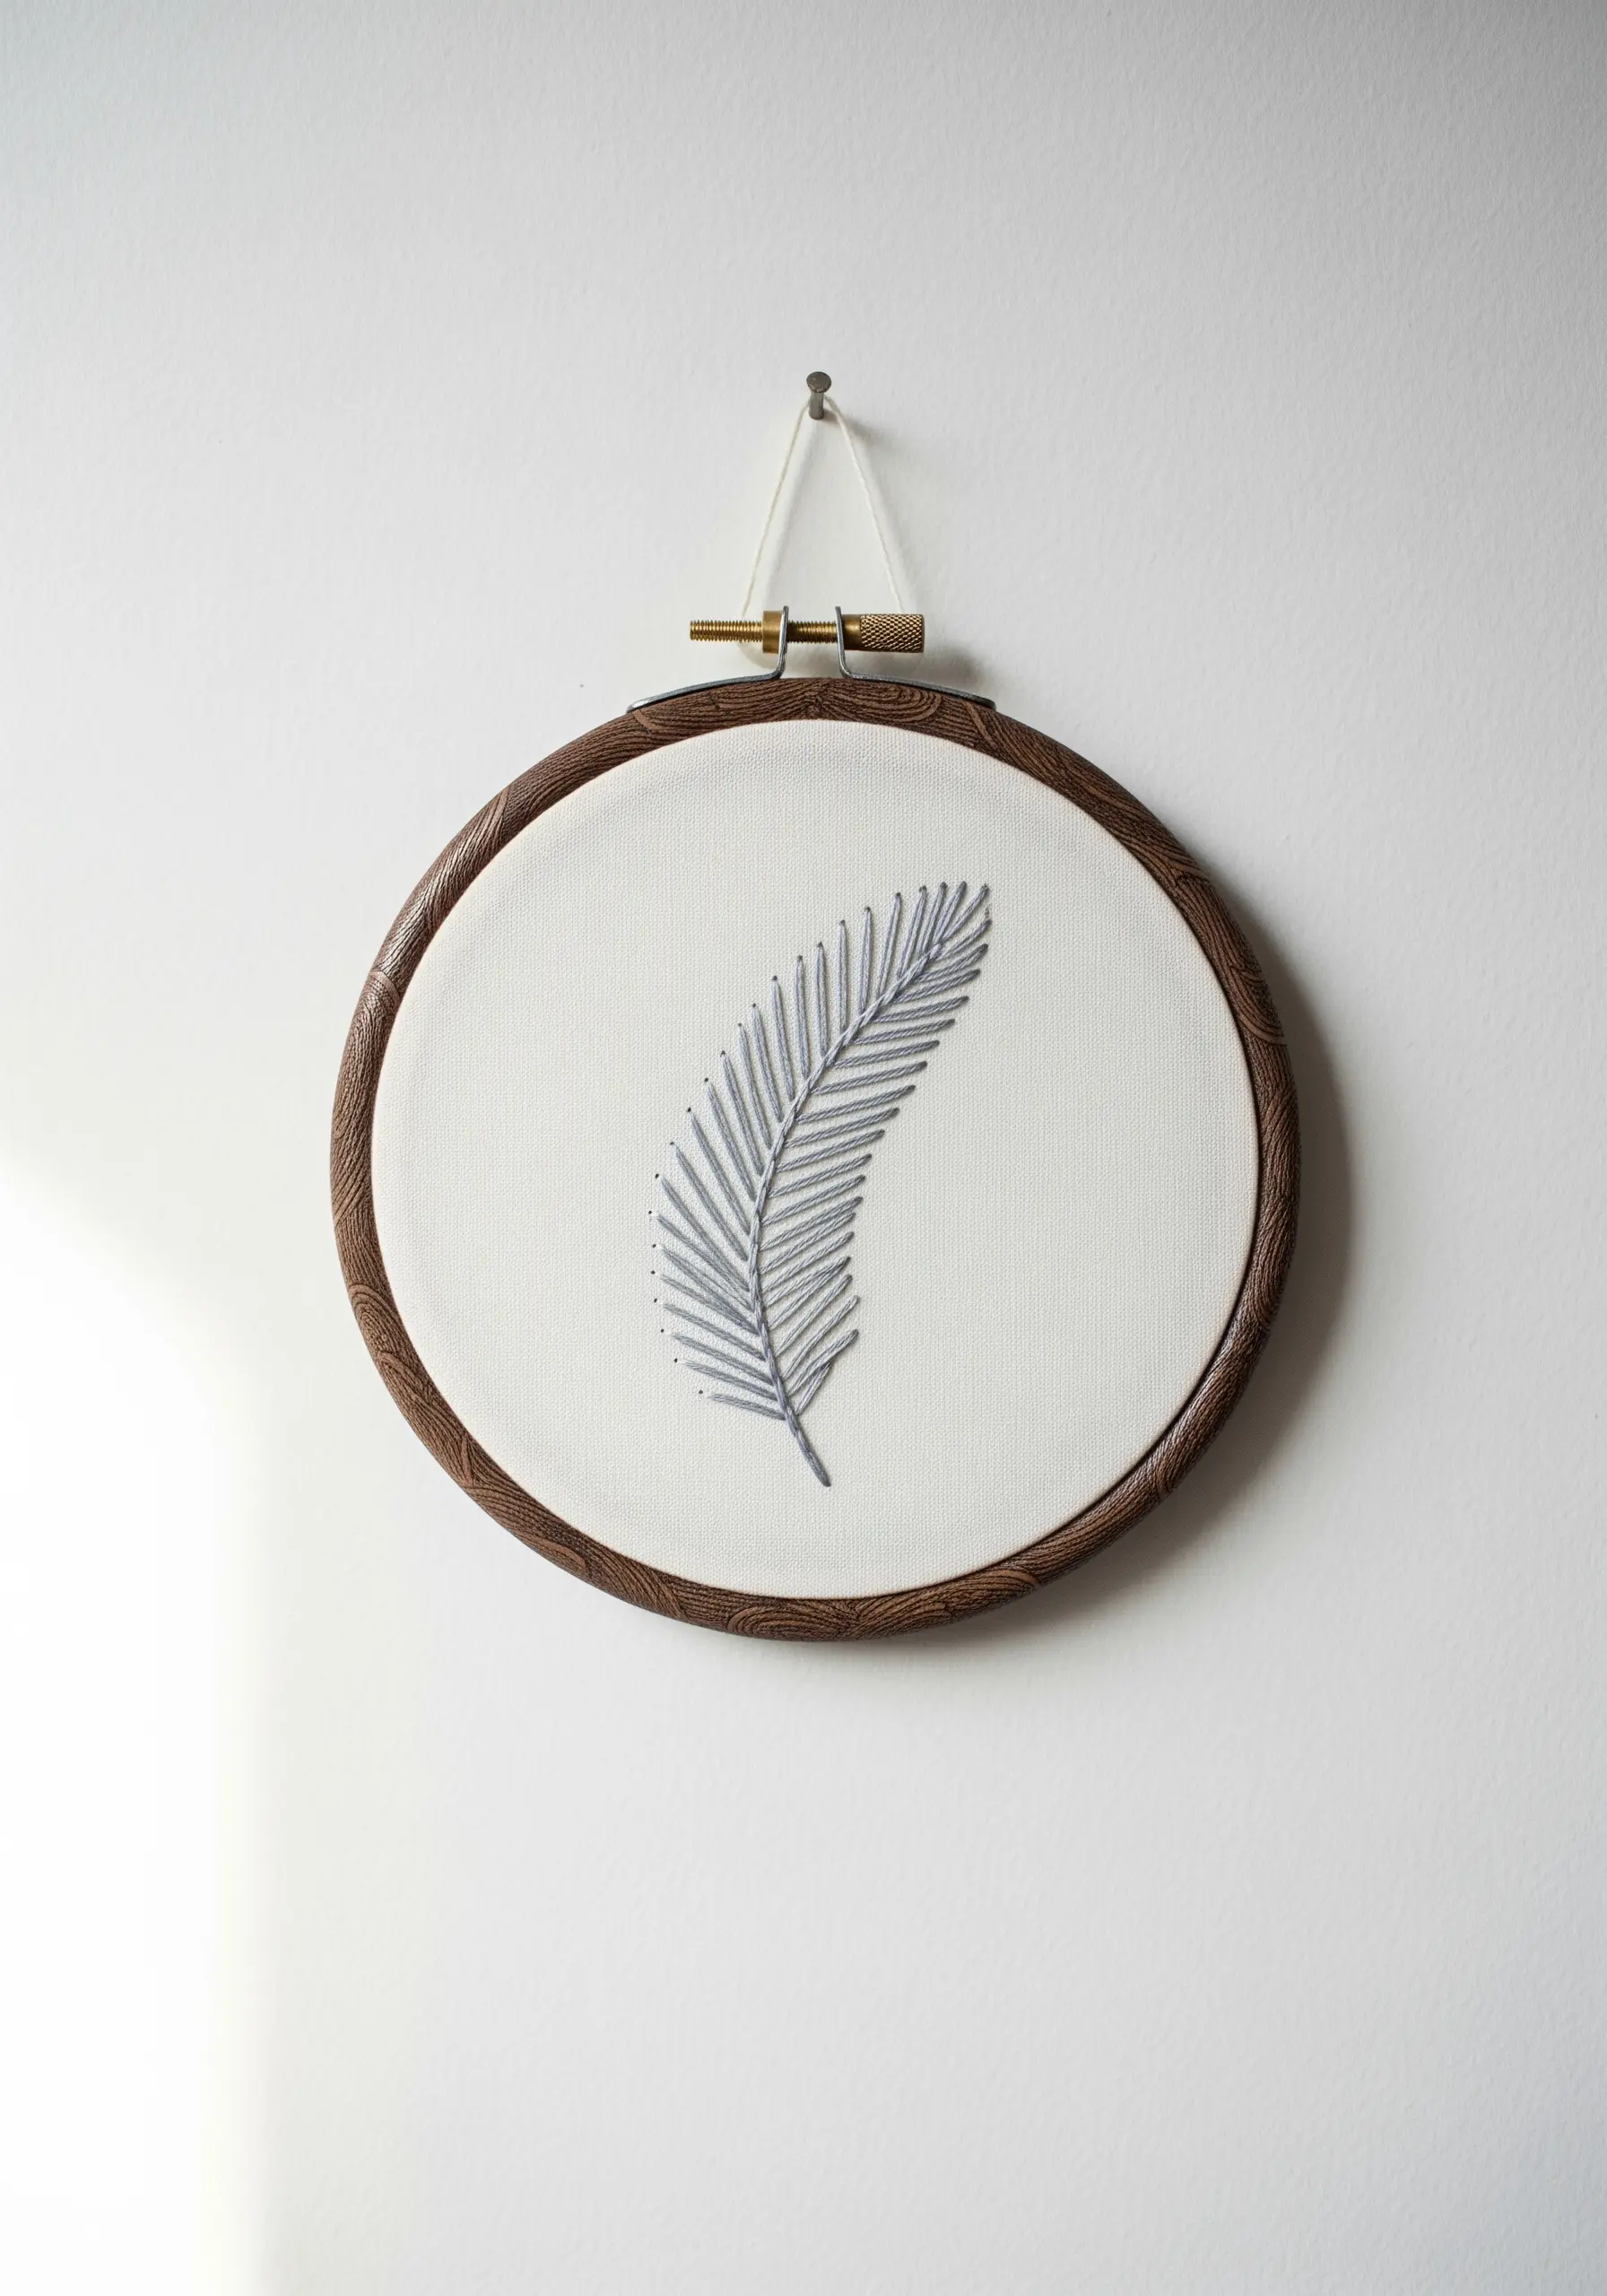
Combine embroidery with the principles of string art to create motifs that feel exceptionally light and airy.
First, create the central shaft of the feather using a stem stitch or a bold line of backstitches.
Next, use a water-soluble marker to draw a faint outline of the feather’s shape. Use this line as a guide for tiny anchor stitches (seed stitches) placed evenly along the perimeter.
Finally, create the feather’s barbs by making long, straight stitches that stretch from the central shaft out to the tiny anchor stitches along the edge. This open-fill technique gives the feather a delicate, almost transparent quality that a solid fill could never achieve.


