

Your embroidery hoop is more than just a tool—it’s a frame for a story, a canvas for texture, and a portal to a more intentional creative practice. If you feel your work is missing that final touch of polish, the answer isn’t in more complex stitches, but in more thoughtful design choices.
Forget the pressure to be perfect. Instead, let’s focus on techniques that build confidence and create visible impact. We’ll explore how to balance color, play with texture, and arrange your finished pieces in a way that transforms them from simple projects into personal masterpieces.
These ideas are designed to help you see the potential in every thread and every inch of fabric. You have the skill; now it’s time to give your art the presentation it deserves and turn those empty walls into a reflection of your unique creative voice.
1. Curate a Desert Vista Triptych
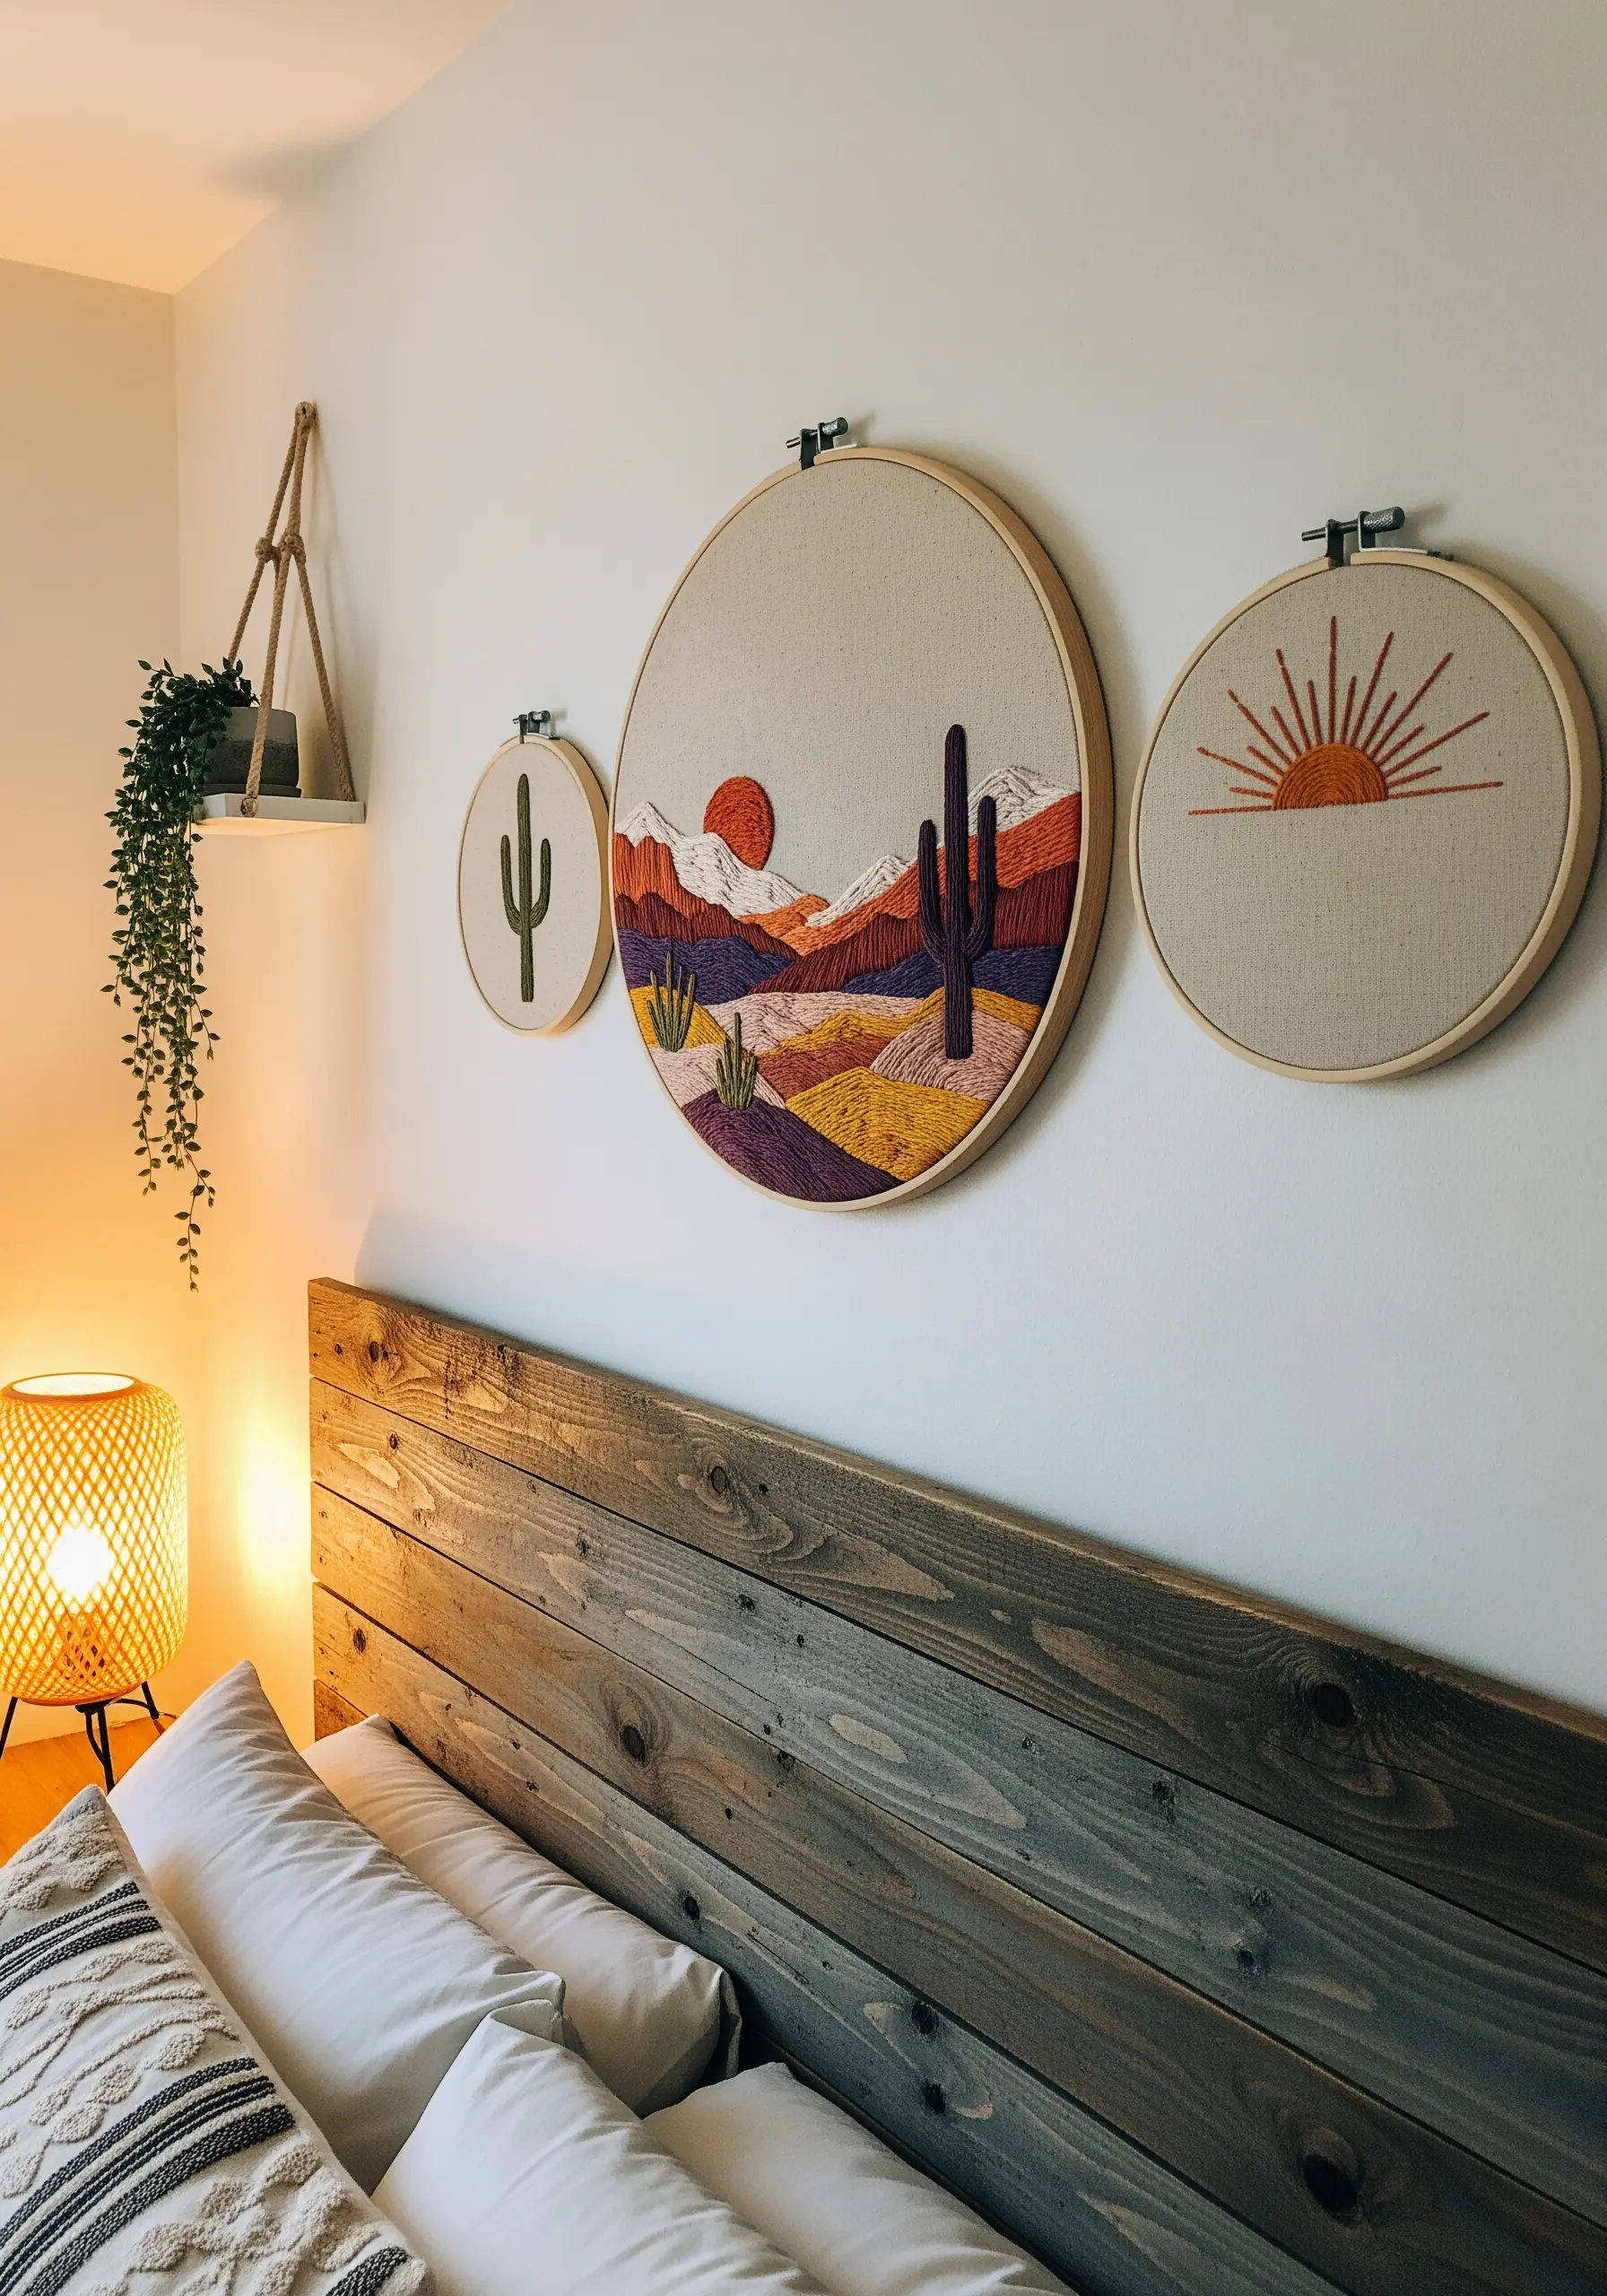
Create a narrative by splitting one cohesive scene across multiple hoop sizes.
Use satin stitch to block in colors for the landscape, creating a clean, graphic look that feels modern and bold.
Limit your palette to warm, earthy tones—terracotta, mustard, and deep purple—to unify the collection and evoke a specific mood.
This method transforms simple stitches into a sophisticated, storytelling wall installation.
2. Build a Living Botanical Gallery Wall
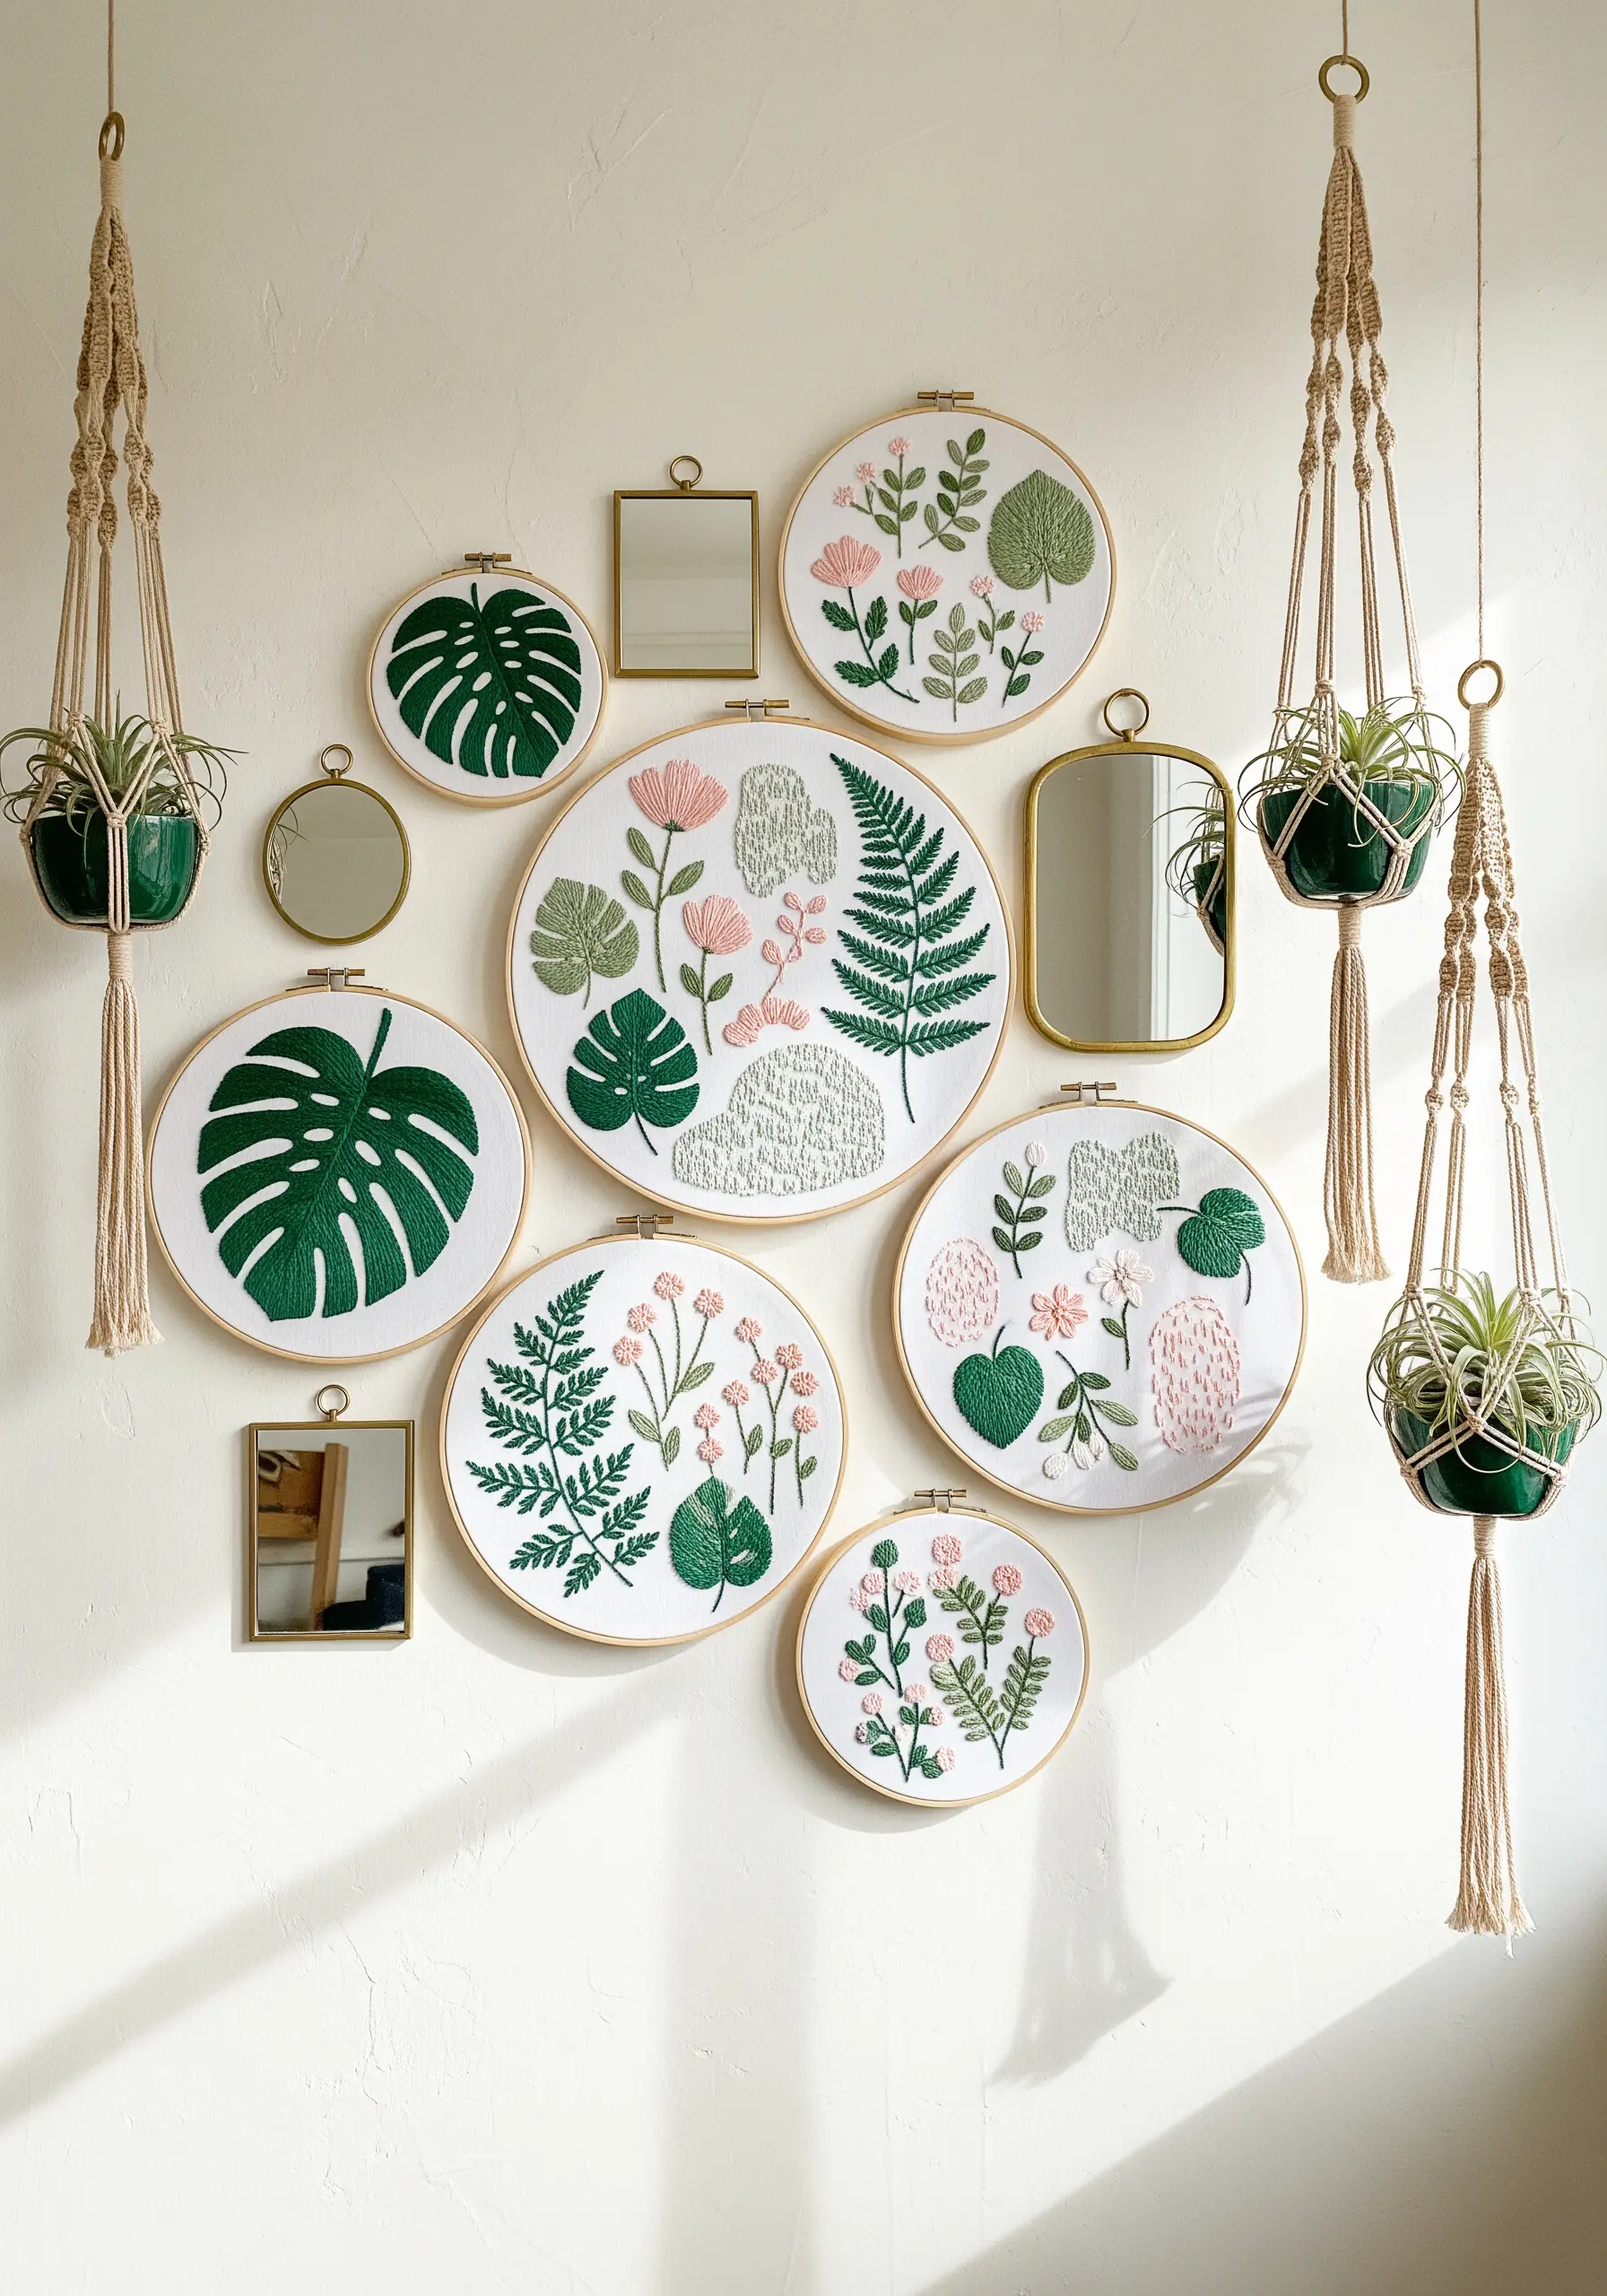
Go beyond a single hoop by creating a dynamic, asymmetrical gallery wall.
Mix embroidered hoops with complementary elements like small mirrors and hanging plants to add depth and break up the texture.
Keep your embroidery motifs focused—like monstera leaves, ferns, and simple florals—and use a consistent color palette of greens and soft pinks to ensure the entire collection feels intentional and cohesive.
This approach makes your wall feel like a curated botanical exhibit, not just a collection of crafts.
3. Sculpt a Luminous Moon with Textured Stitches
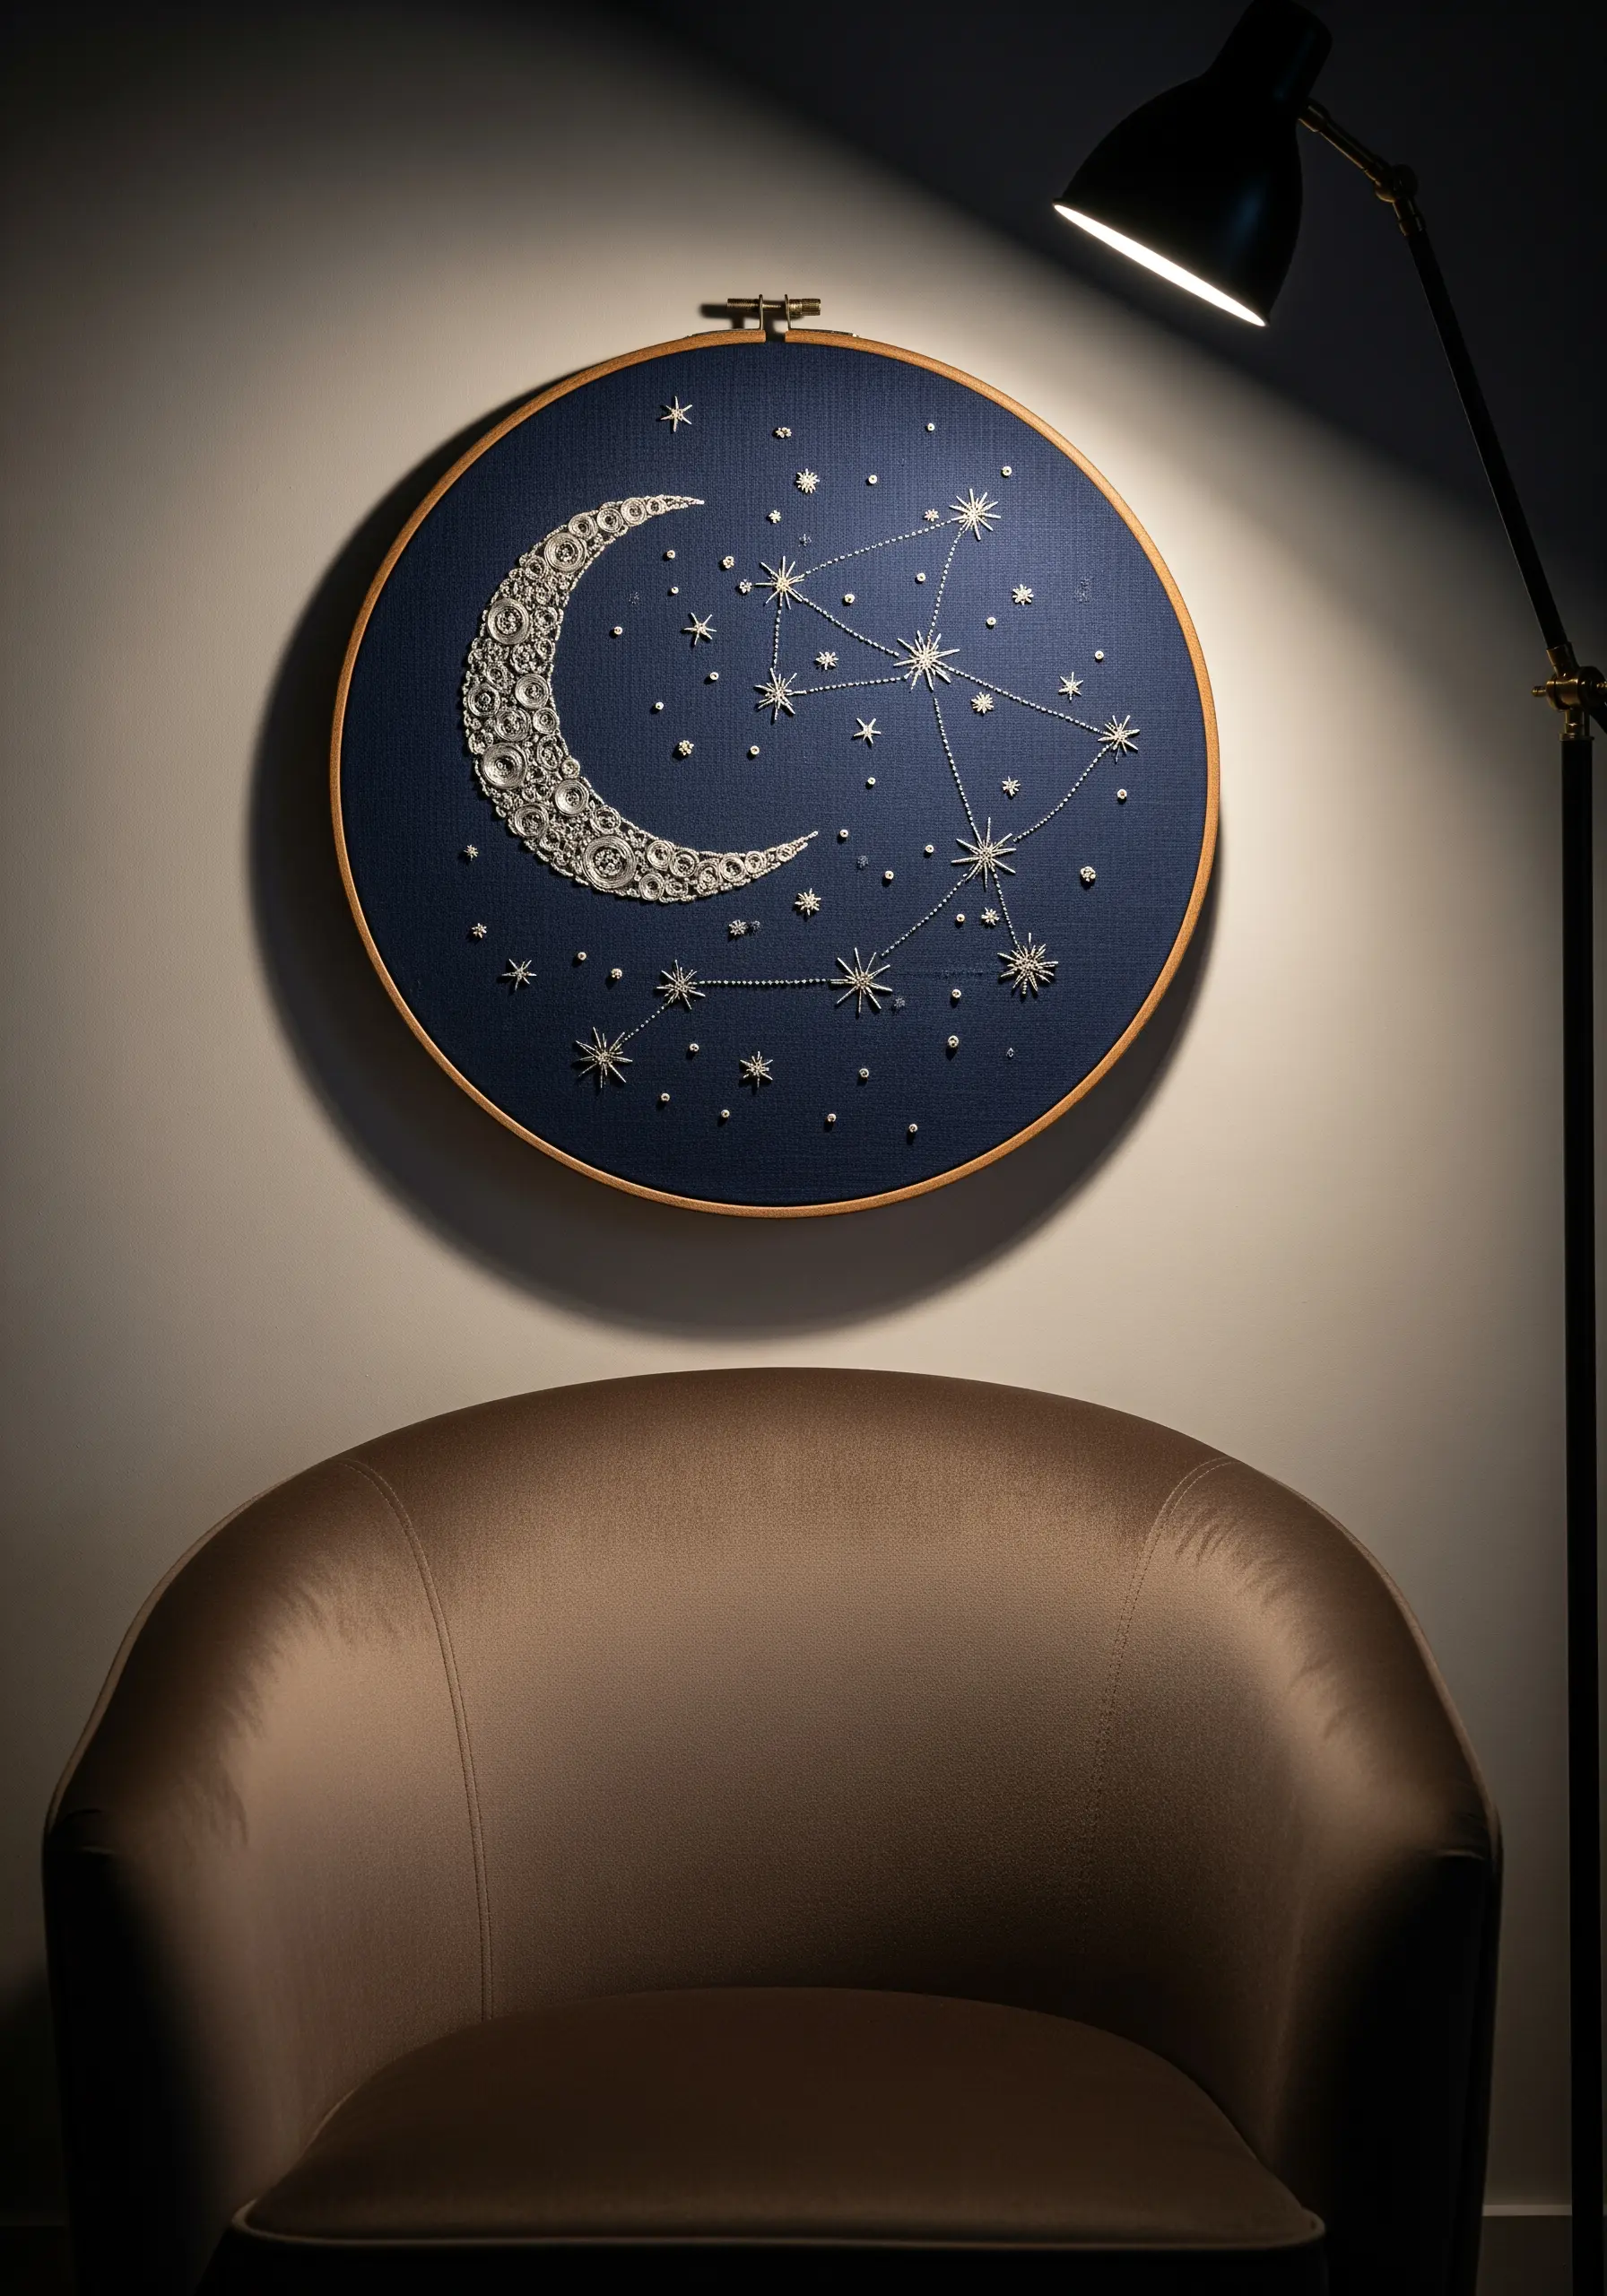
Create dramatic contrast by stitching on dark navy or black linen.
Instead of flat satin stitch, build up the moon’s surface with a dense texture of French knots, bullion knots, or couched threads in white and silver.
This technique makes the moon feel sculptural and tactile, catching the light in a way flat stitches can’t.
Use a single strand of metallic thread for the stars and constellation lines to add a subtle, elegant sparkle.
4. Weave Bold Textures with Monochrome Punch Needle
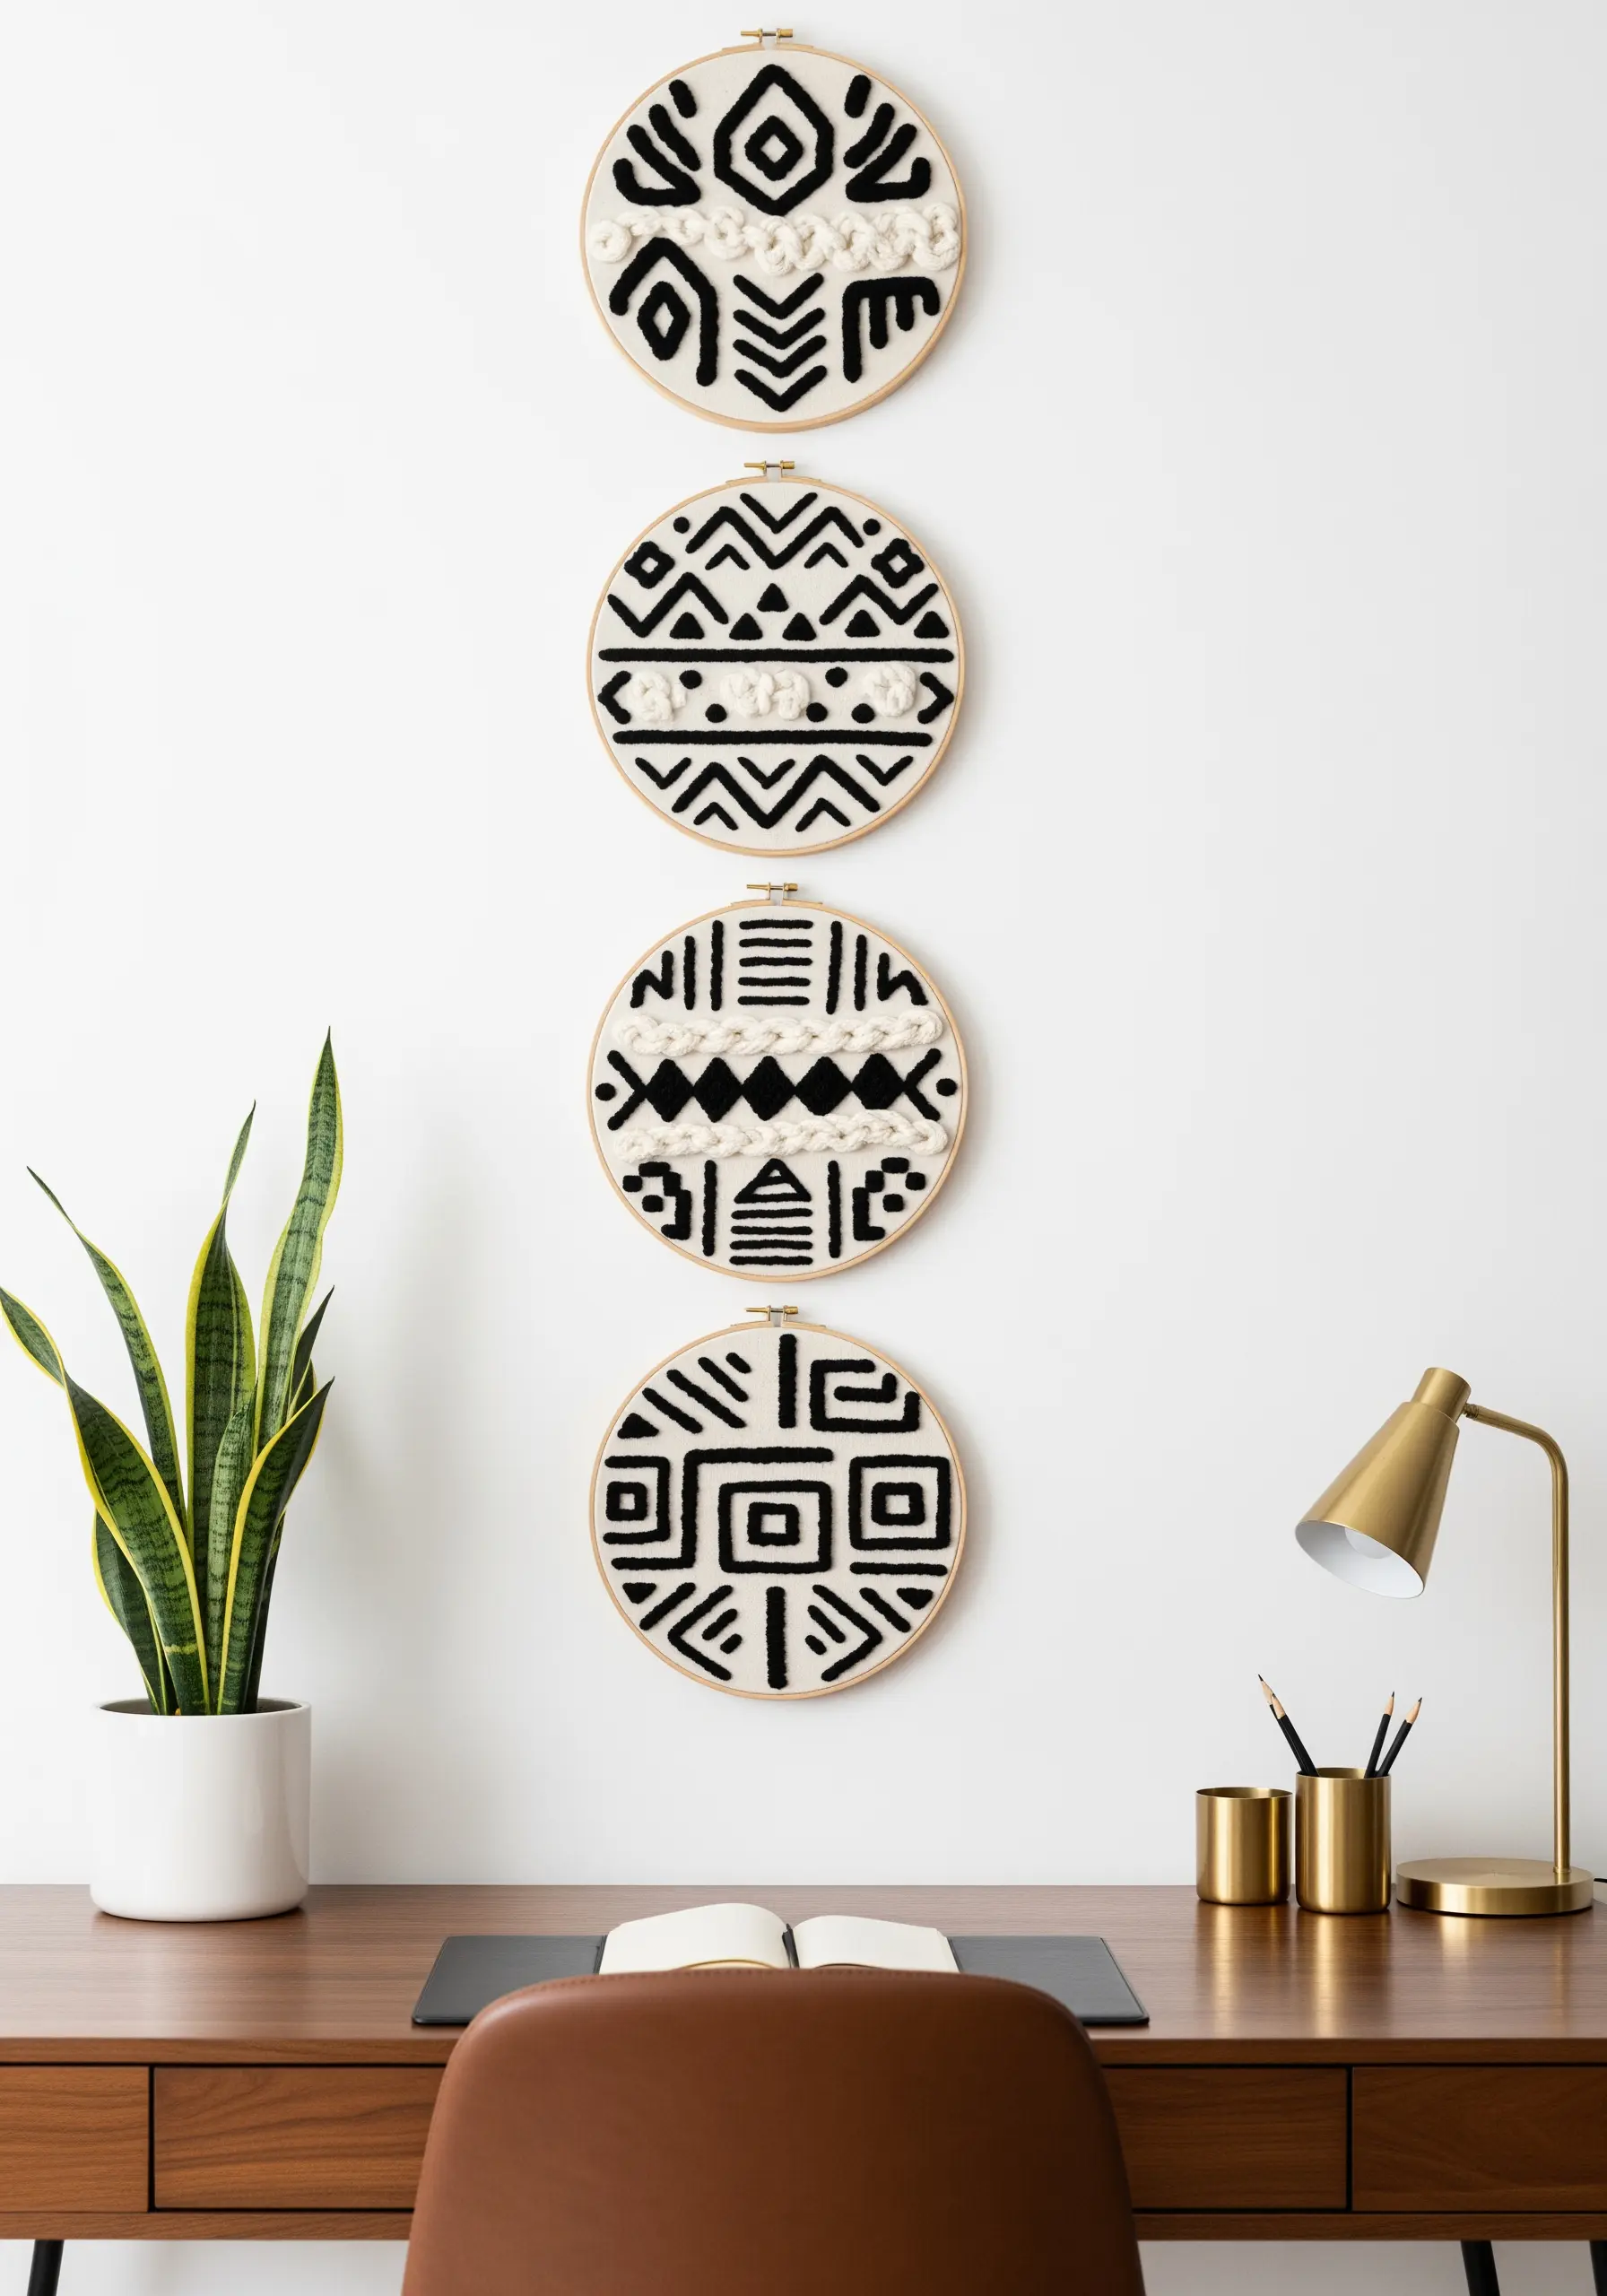
Combine flat embroidery with the high-relief texture of punch needle or couched yarn for a dynamic, tactile design.
Stick to a simple black-and-ivory color scheme to let the textures—loops, lines, and fills—become the main focus.
Arrange the hoops vertically to create a strong graphic statement that draws the eye upward, making it perfect for a narrow wall or workspace.
This mix of high and low-profile stitches gives abstract monochrome thread designs a sculptural, boutique feel.
5. Animate Woodland Motifs with Dimensional Stitches
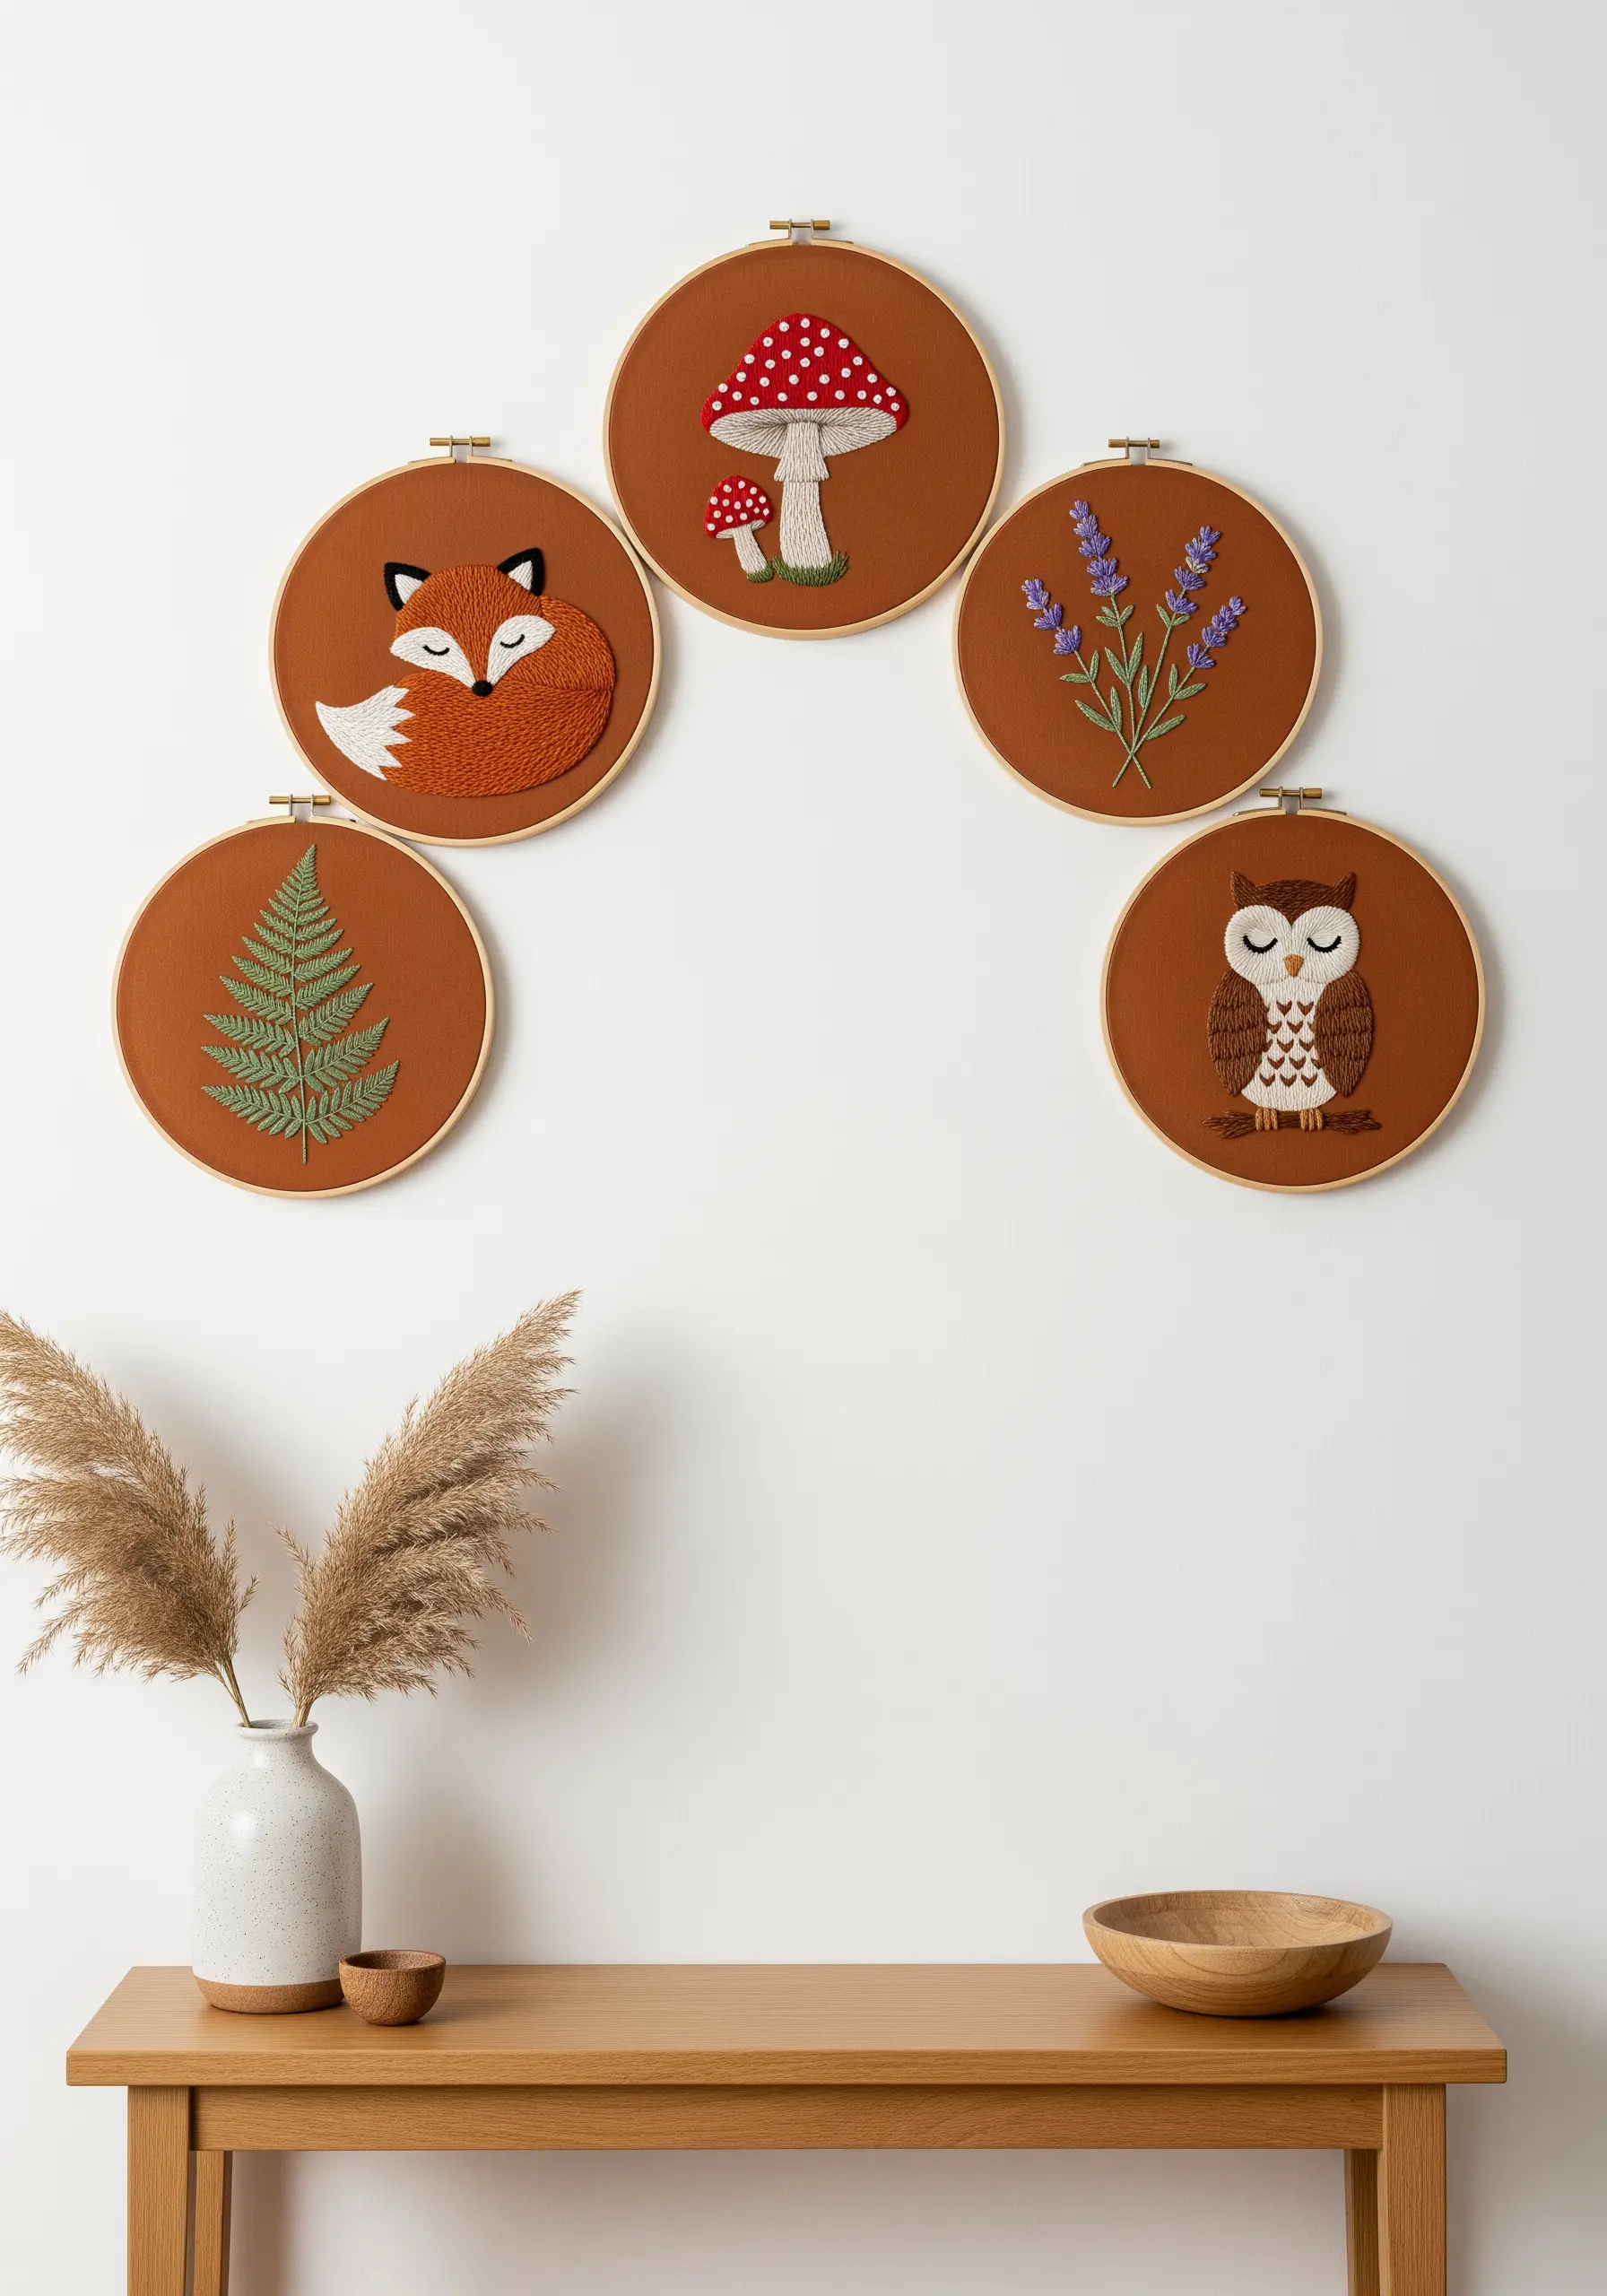
Bring charming woodland creatures to life by choosing stitches that mimic natural textures.
Use turkey work for the fox’s fluffy tail and French knots for the mushroom’s spots to add a playful, 3D quality.
Stitching on a warm, rust-colored cotton or linen fabric provides a cohesive, earthy backdrop that makes each motif pop while unifying the collection.
The result is a whimsical yet polished set that feels both modern and cozy.
6. Design a Fresh and Fragrant Kitchen Collection
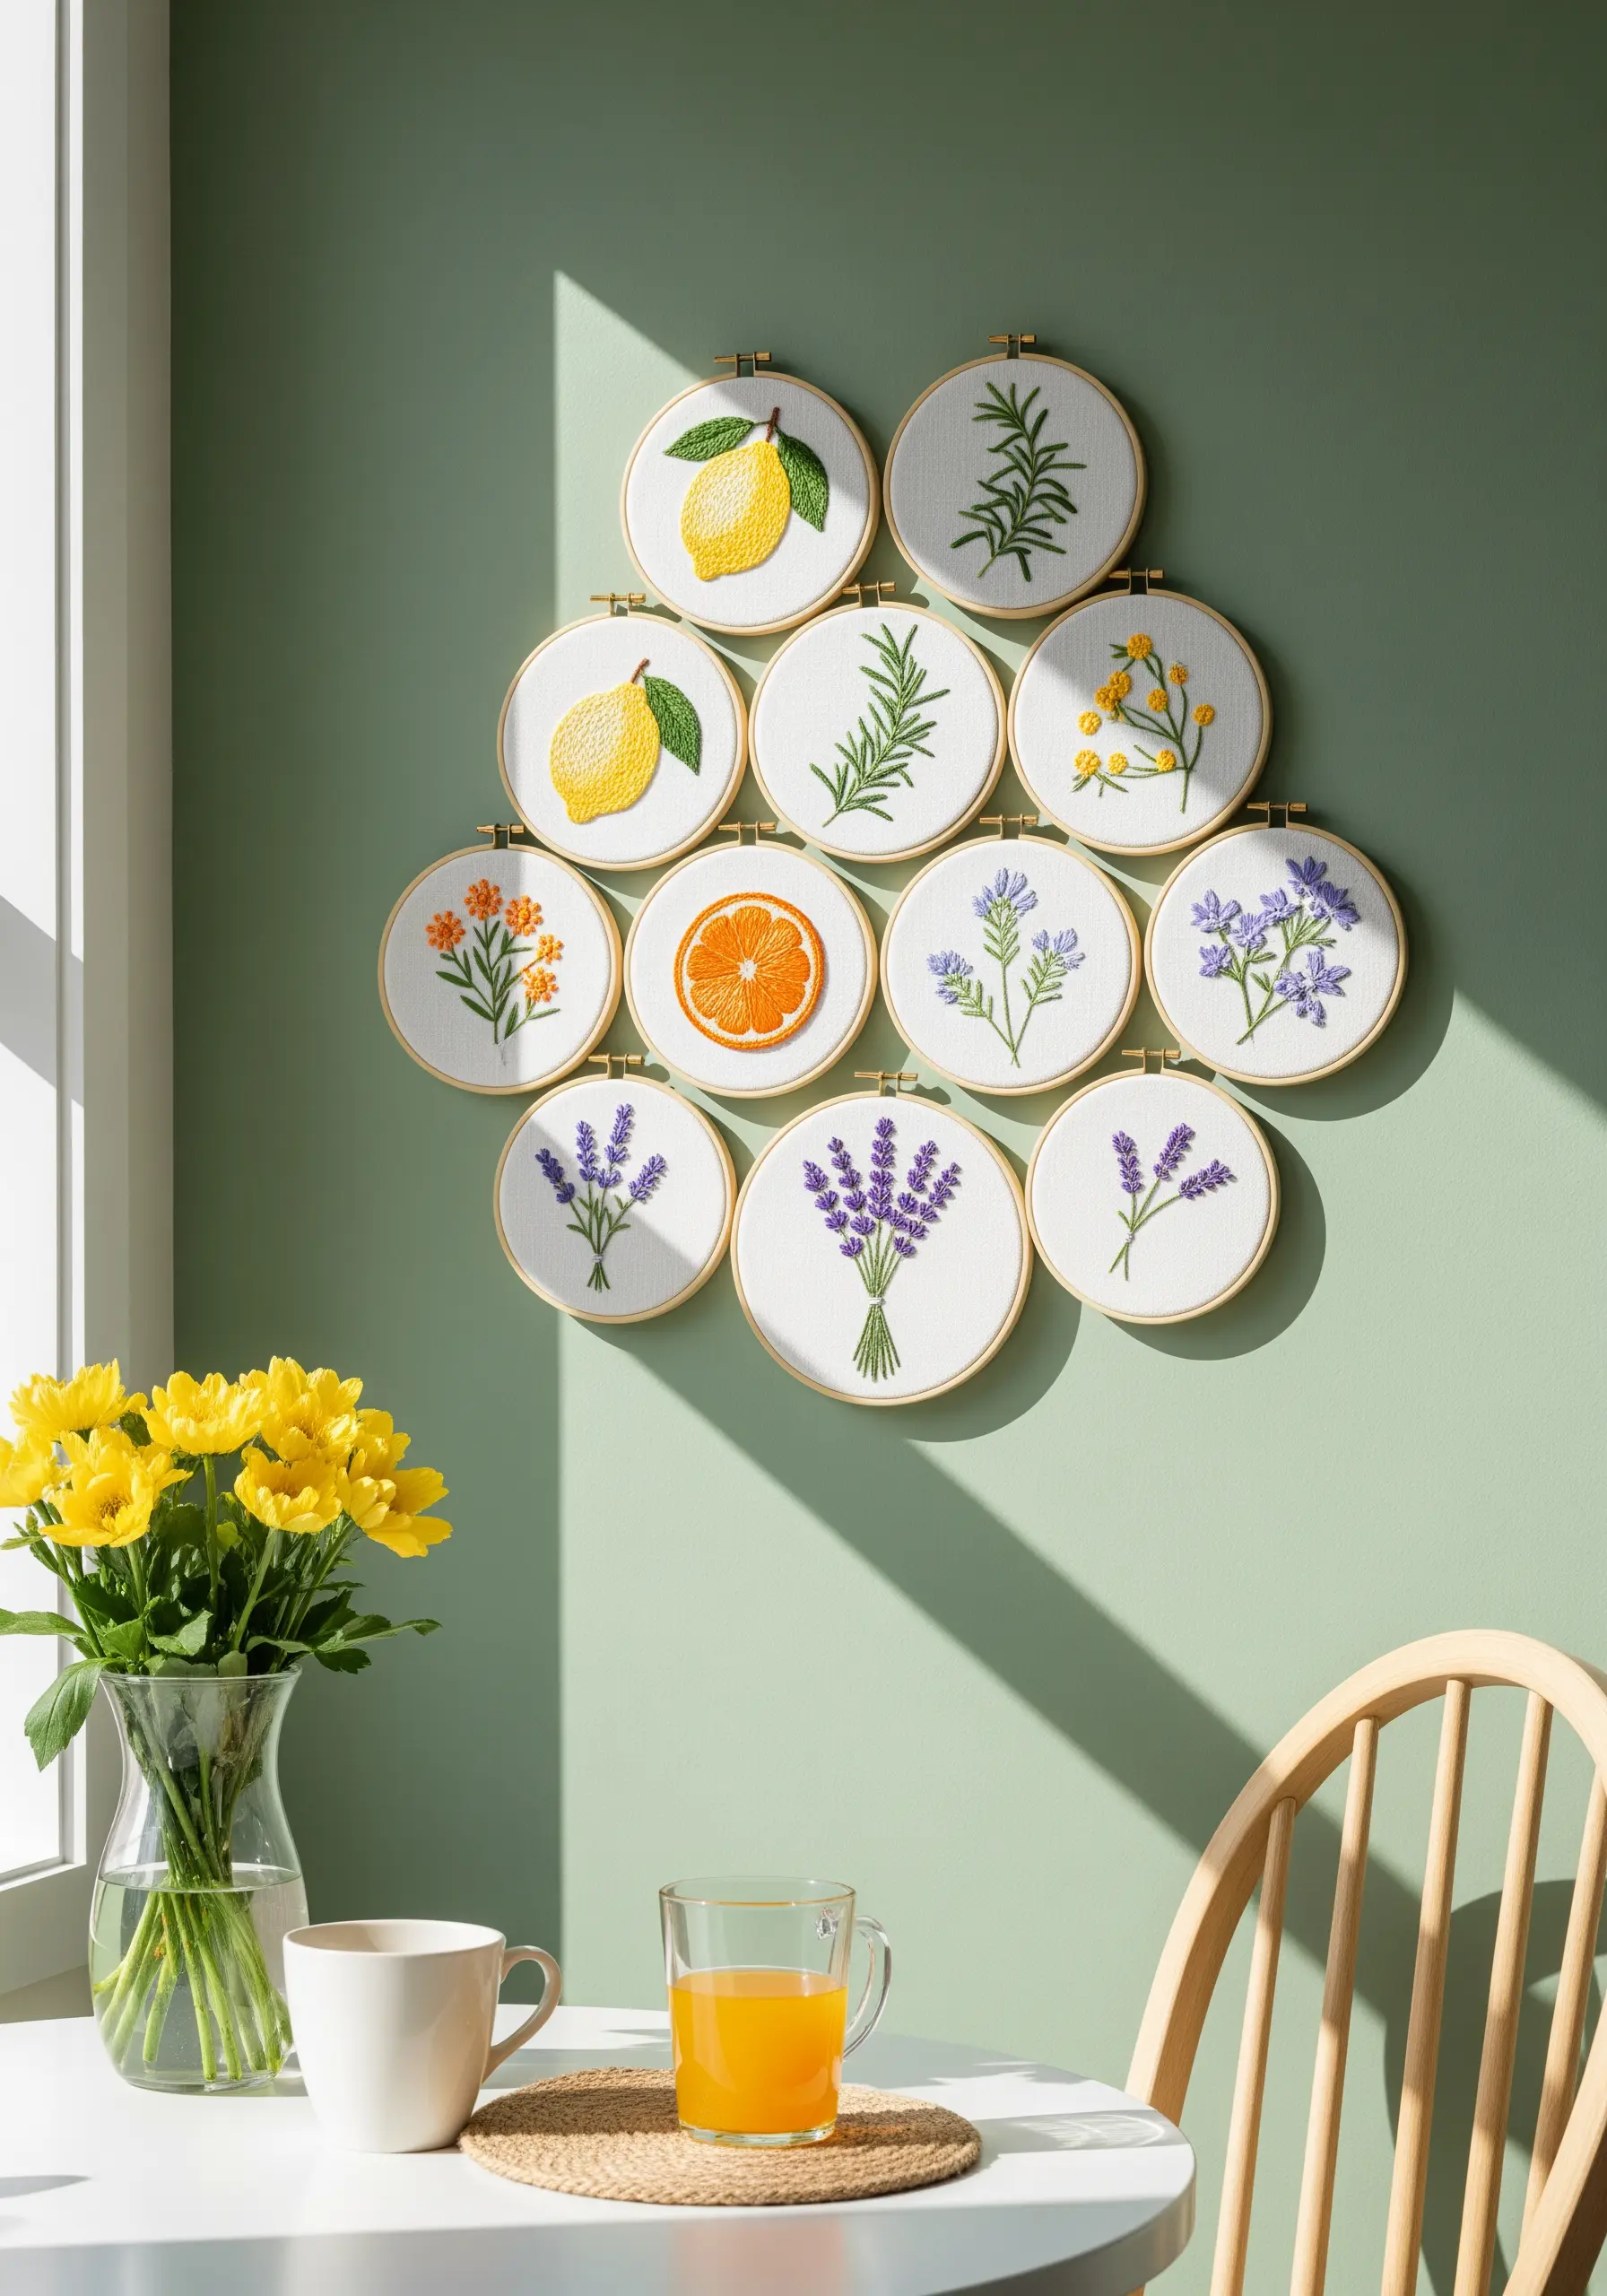
Elevate your kitchen decor by creating a grid of small, coordinated hoops featuring herbs and citrus fruits.
Focus on clean outlines using stem stitch and delicate fills with satin or seed stitch to keep the designs light and airy.
By limiting each hoop to a single motif, you create a collection that feels organized and intentional, like botanical illustrations.
Grouped together, these mini fruit & herb embroidery frames add a touch of handmade elegance to a sunny kitchen wall.
7. Achieve Meditative Calm with Intricate Mandala Art
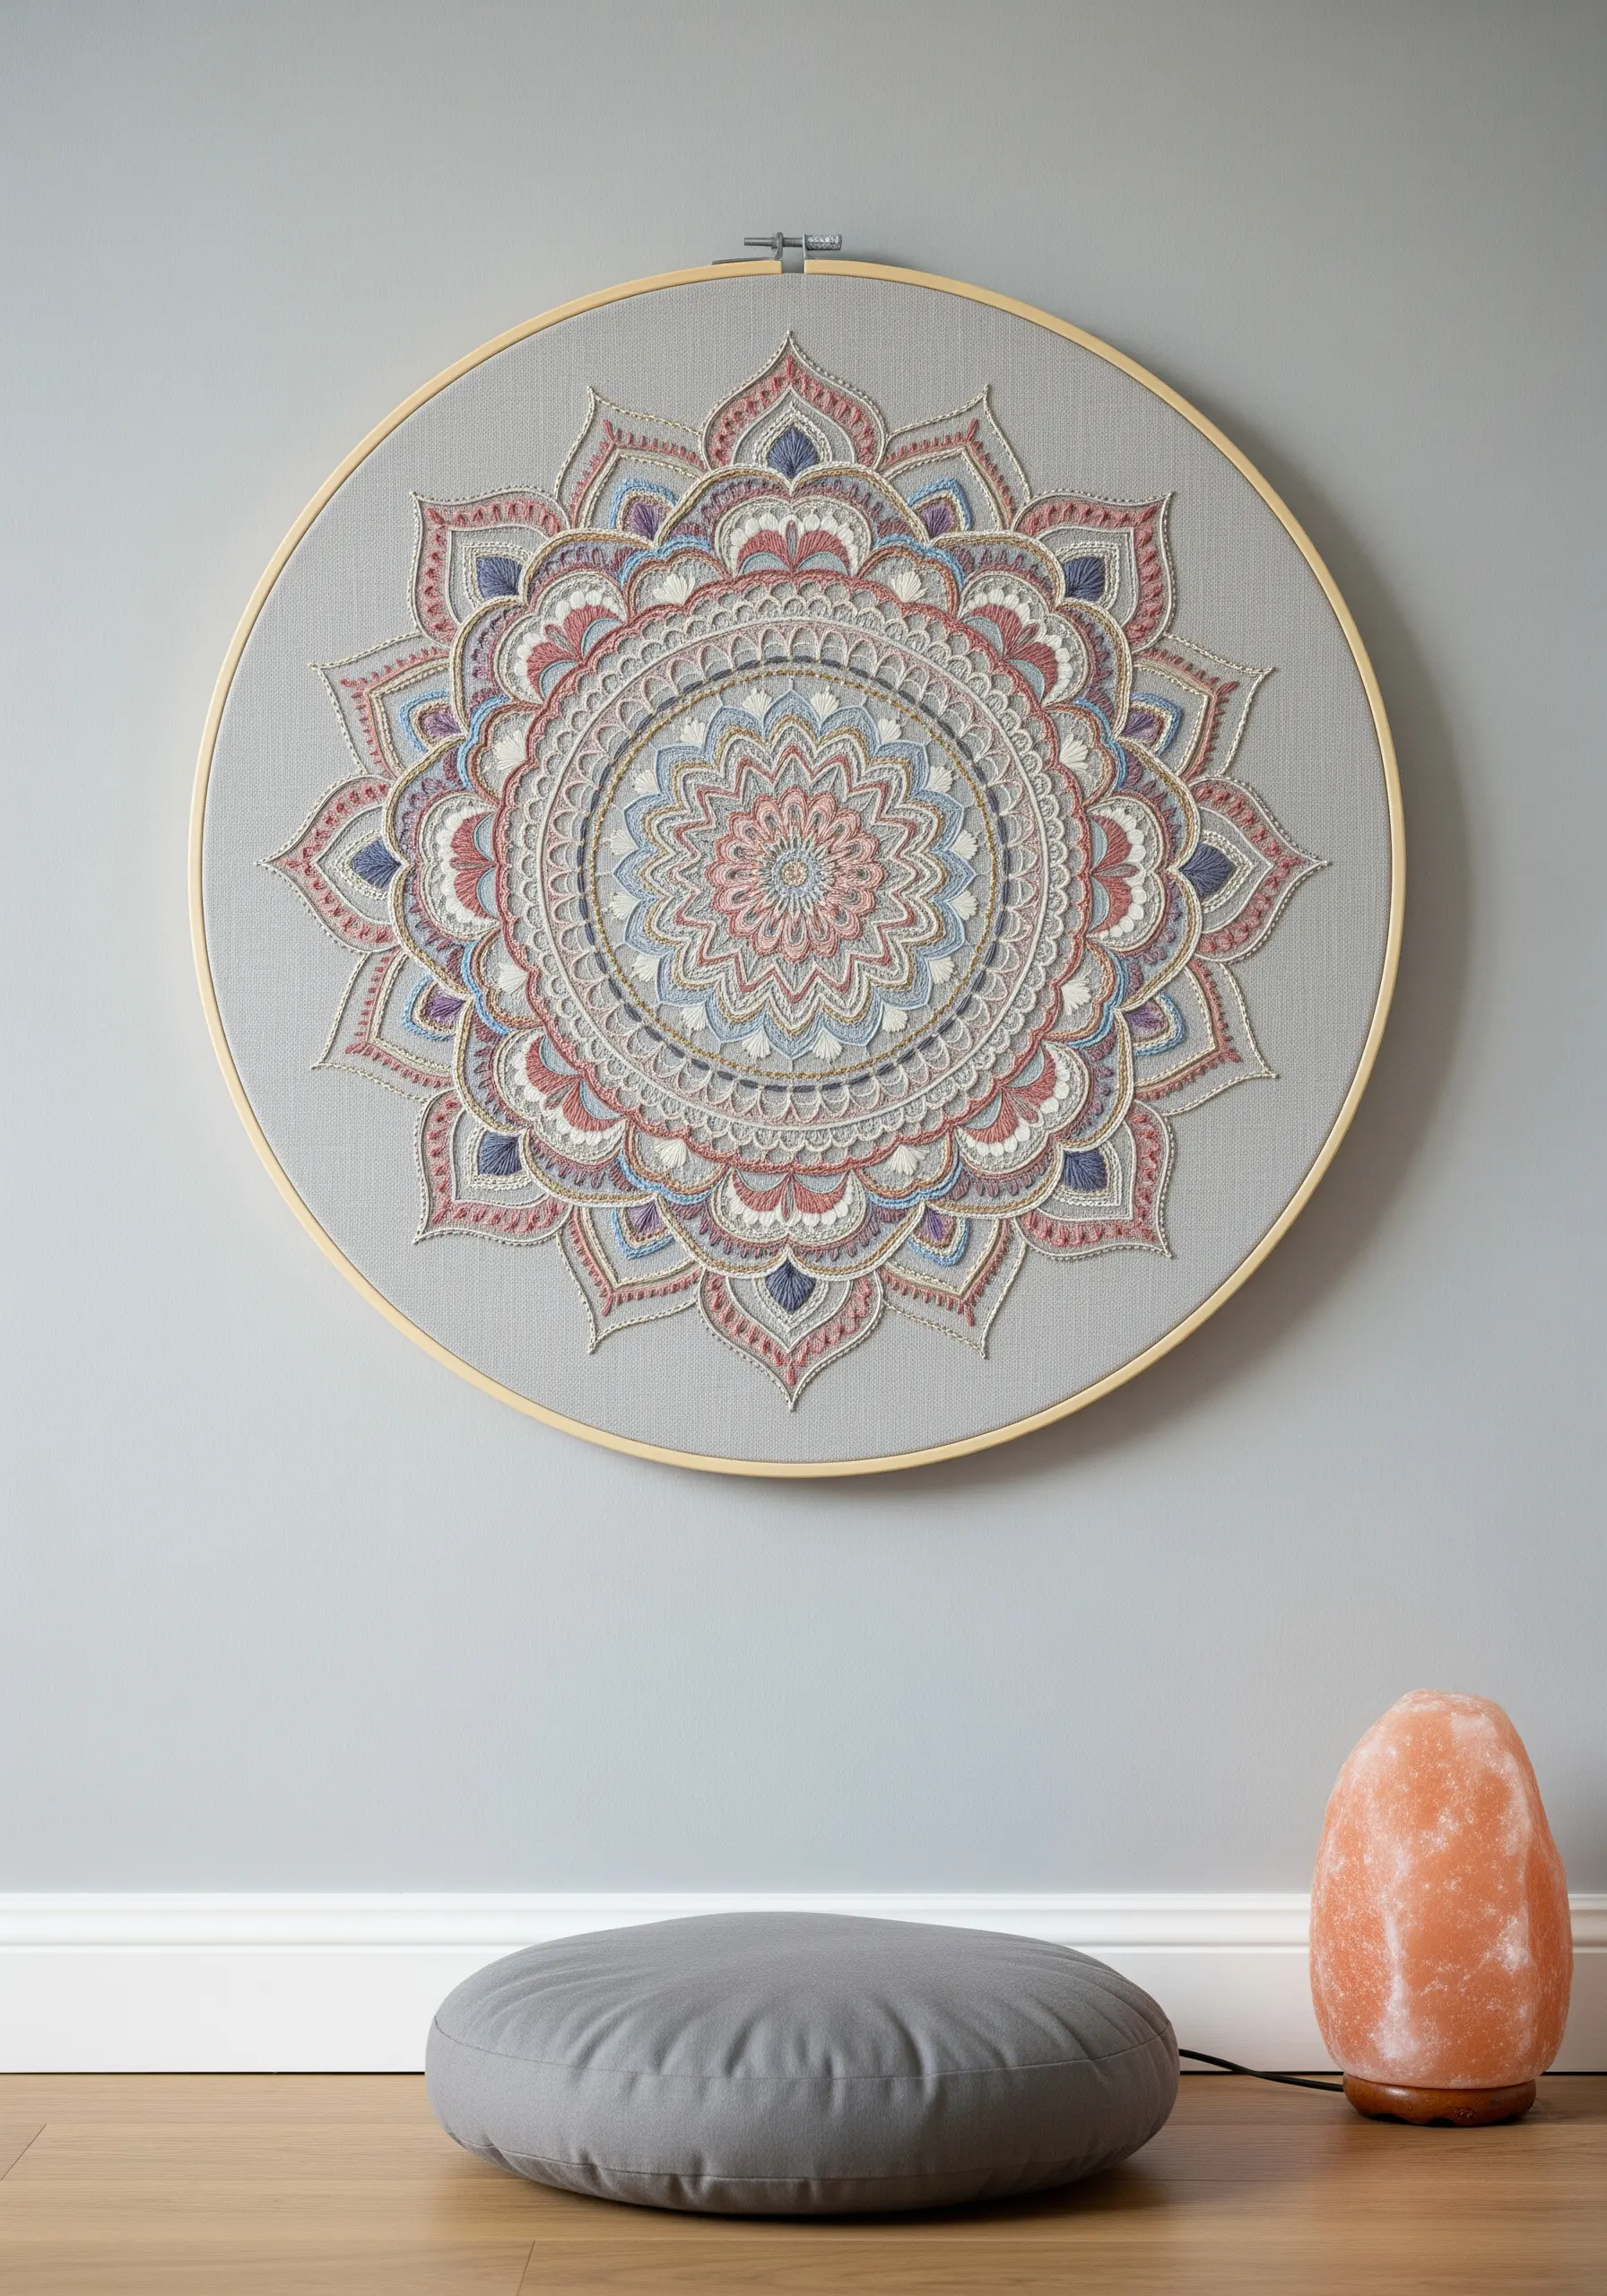
For a design this complex, precision is everything.
Use a single, consistent stitch—like a two-stranded backstitch or split stitch—to maintain clean lines and visual harmony throughout the intricate pattern.
Choose a muted, analogous color palette—like dusty rose, slate blue, and soft gray—to create a soothing, hypnotic effect rather than overwhelming the eye.
Stitching on a neutral gray linen allows the subtle color shifts to stand out beautifully.
8. Master Contrast with Celestial Thread Painting
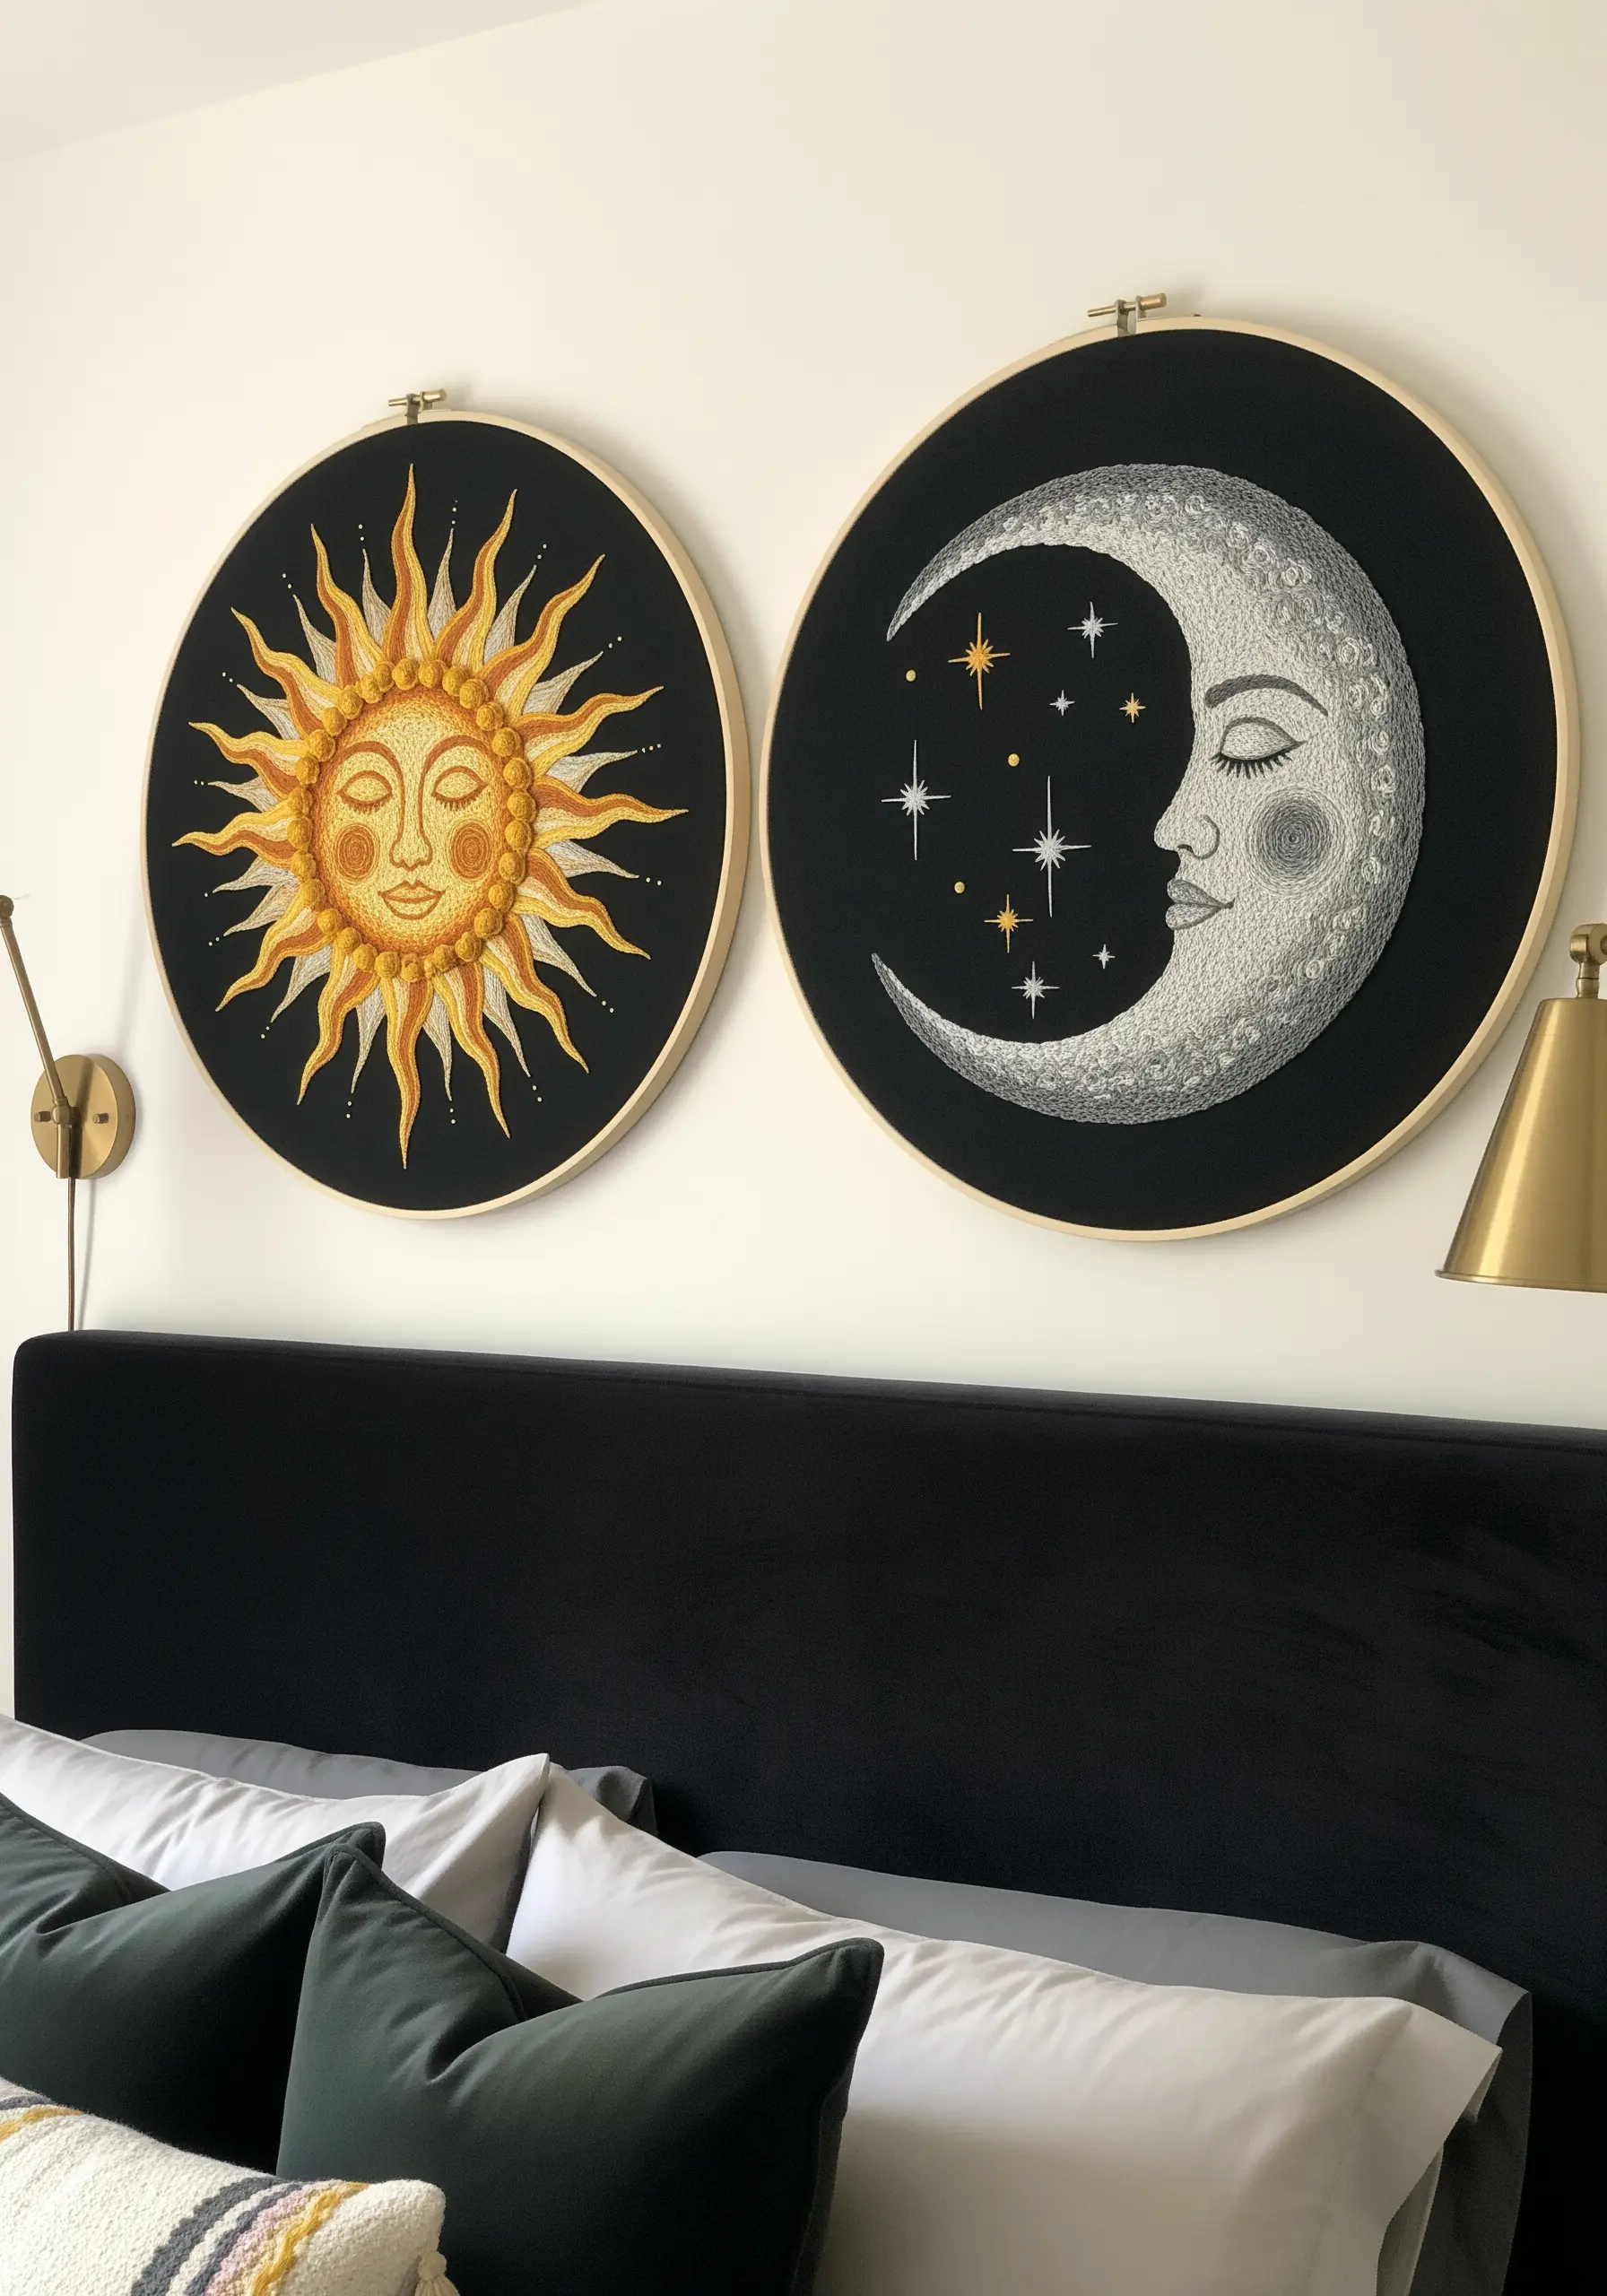
Create a powerful focal point by pairing two complementary celestial designs.
Use the long-and-short stitch technique to blend shades of yellow, gold, and white, achieving a smooth, painterly gradient for the sun and moon’s features.
Black fabric is non-negotiable here; it creates the deep contrast needed to make the metallic and bright threads radiate with light.
This high-drama pairing is perfect for creating a statement above a headboard.
9. Layer Soft Textures for a Gentle Nursery Wall
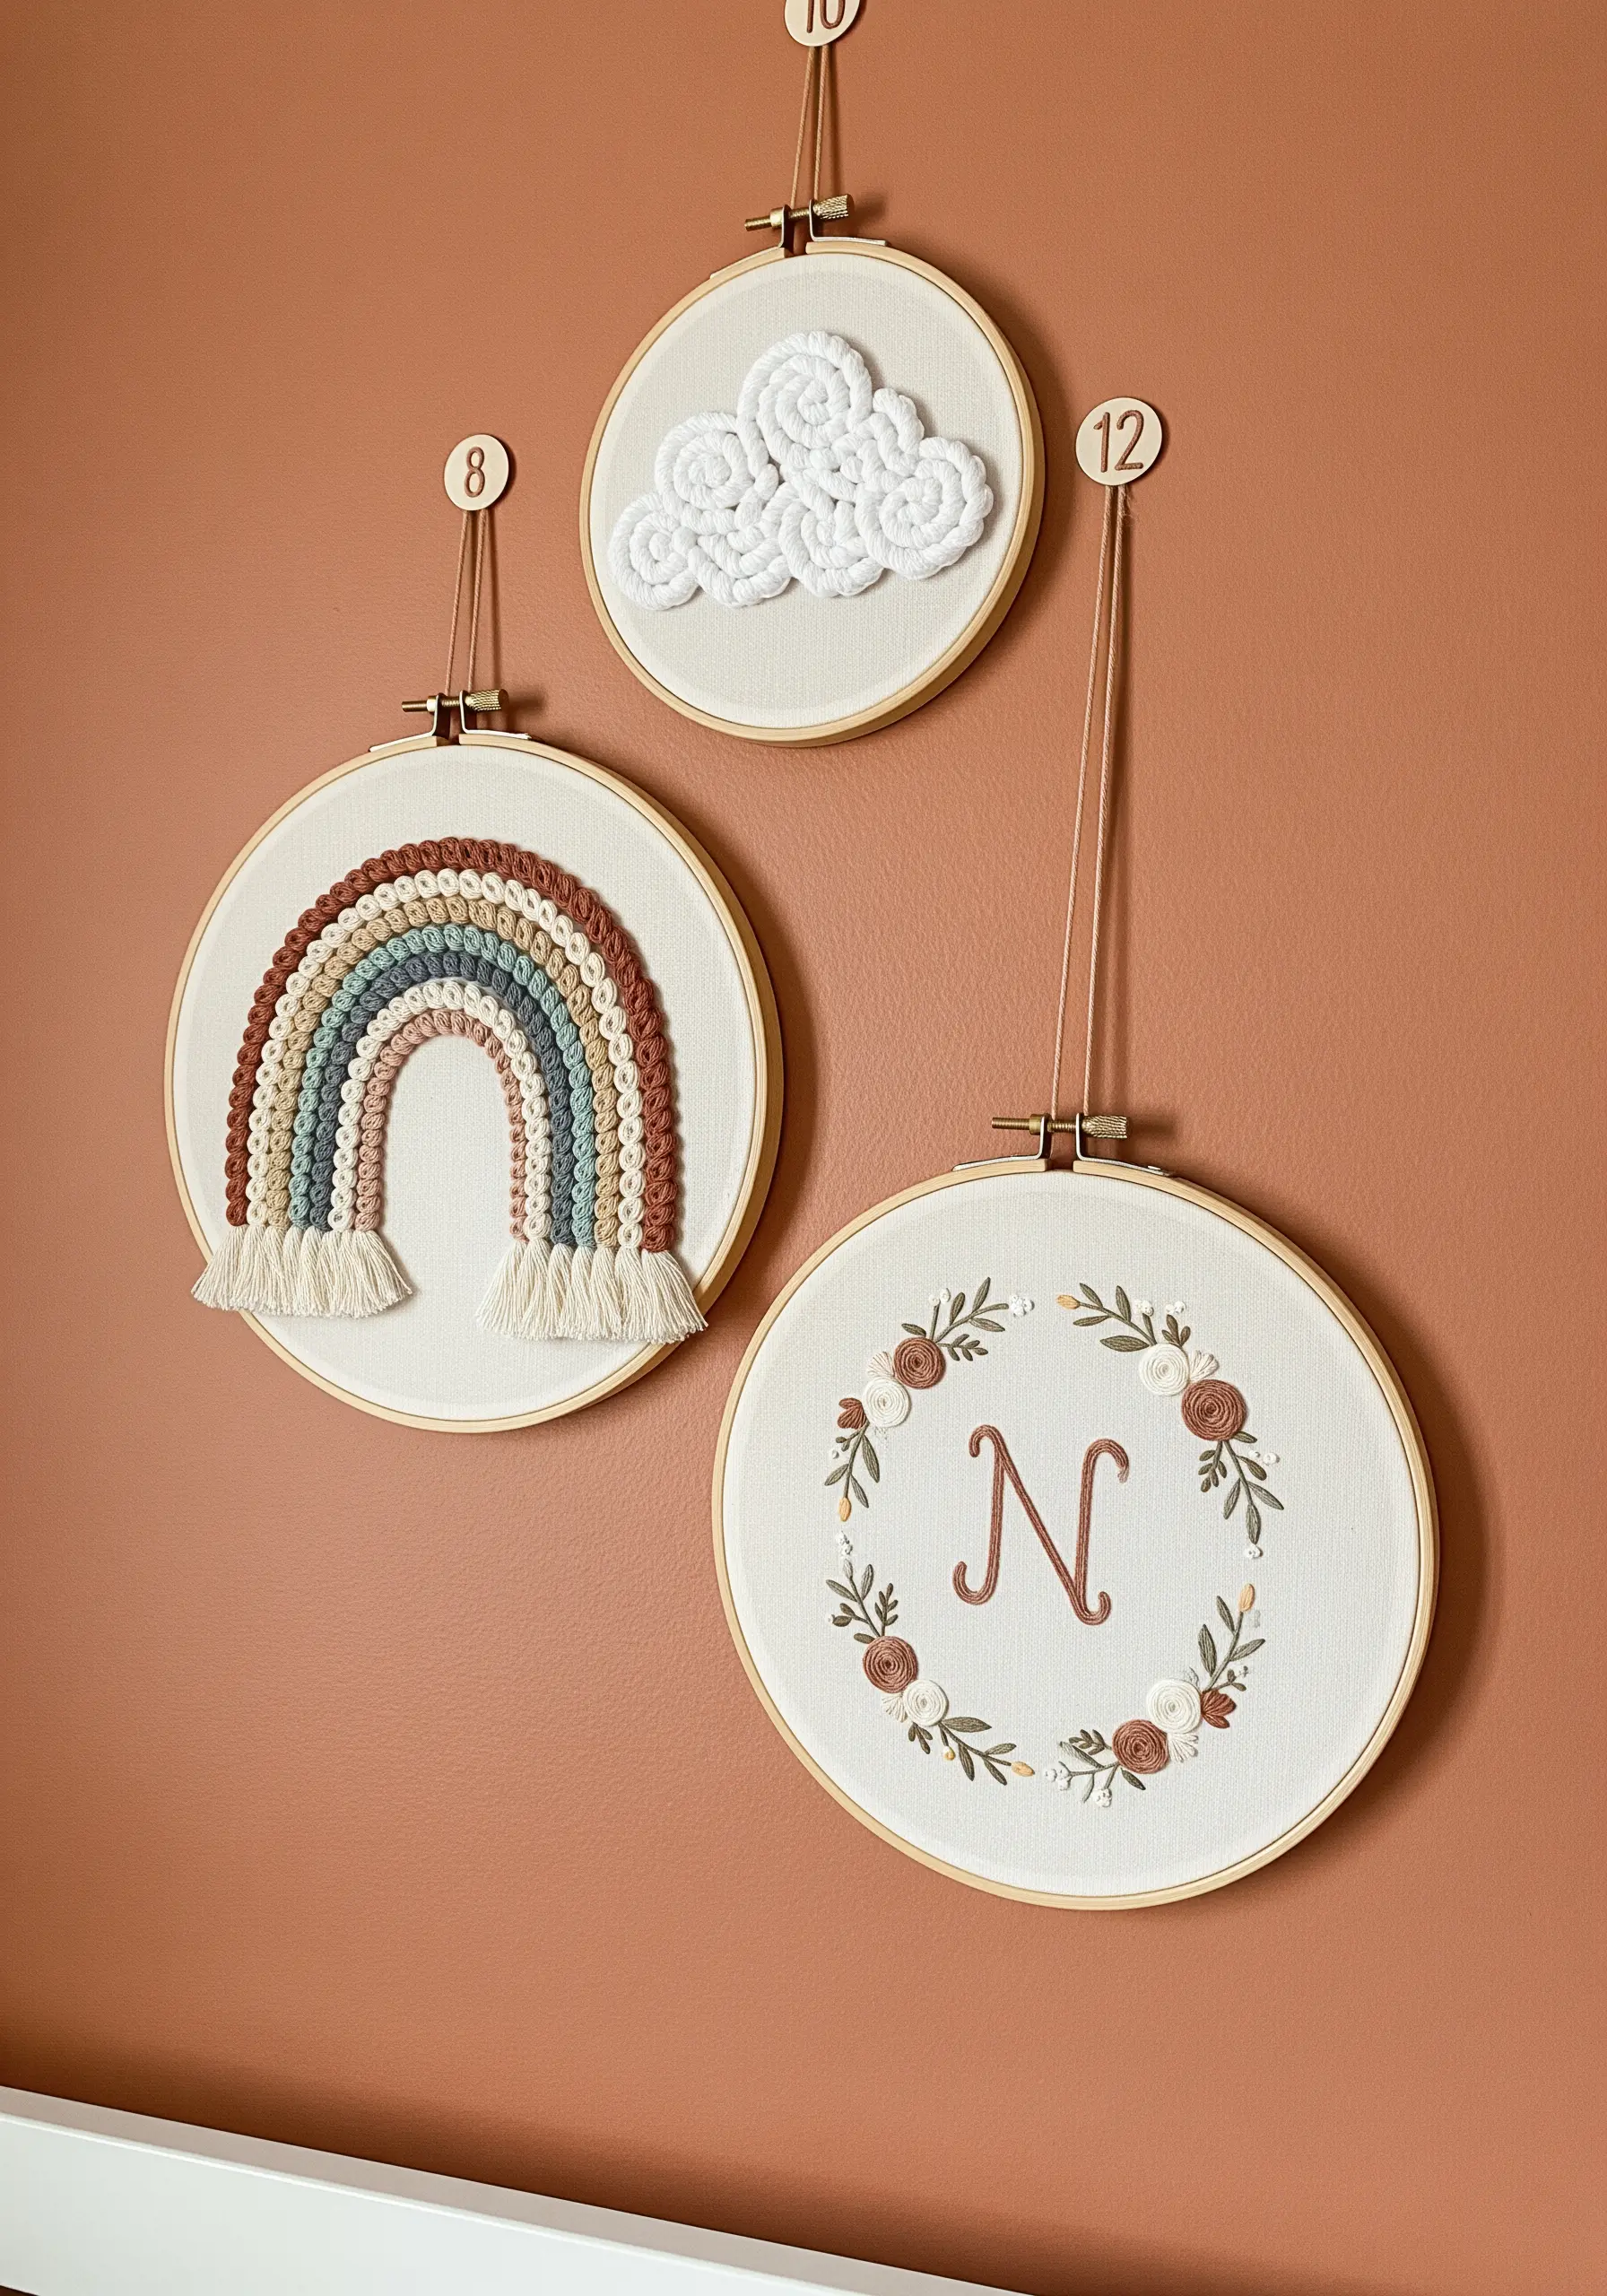
Create a soft, tactile wall arrangement perfect for a nursery by mixing different fiber arts.
Combine traditional embroidery, like a satin-stitched monogram, with macrame rainbows and fluffy yarn-wrapped clouds.
A cohesive, earthy color palette of terracotta, beige, and muted blues ensures the different textures work together harmoniously.
This multi-sensory approach results in a calming, personalized, and visually engaging display.
10. Break the Frame with Expressive Line Art
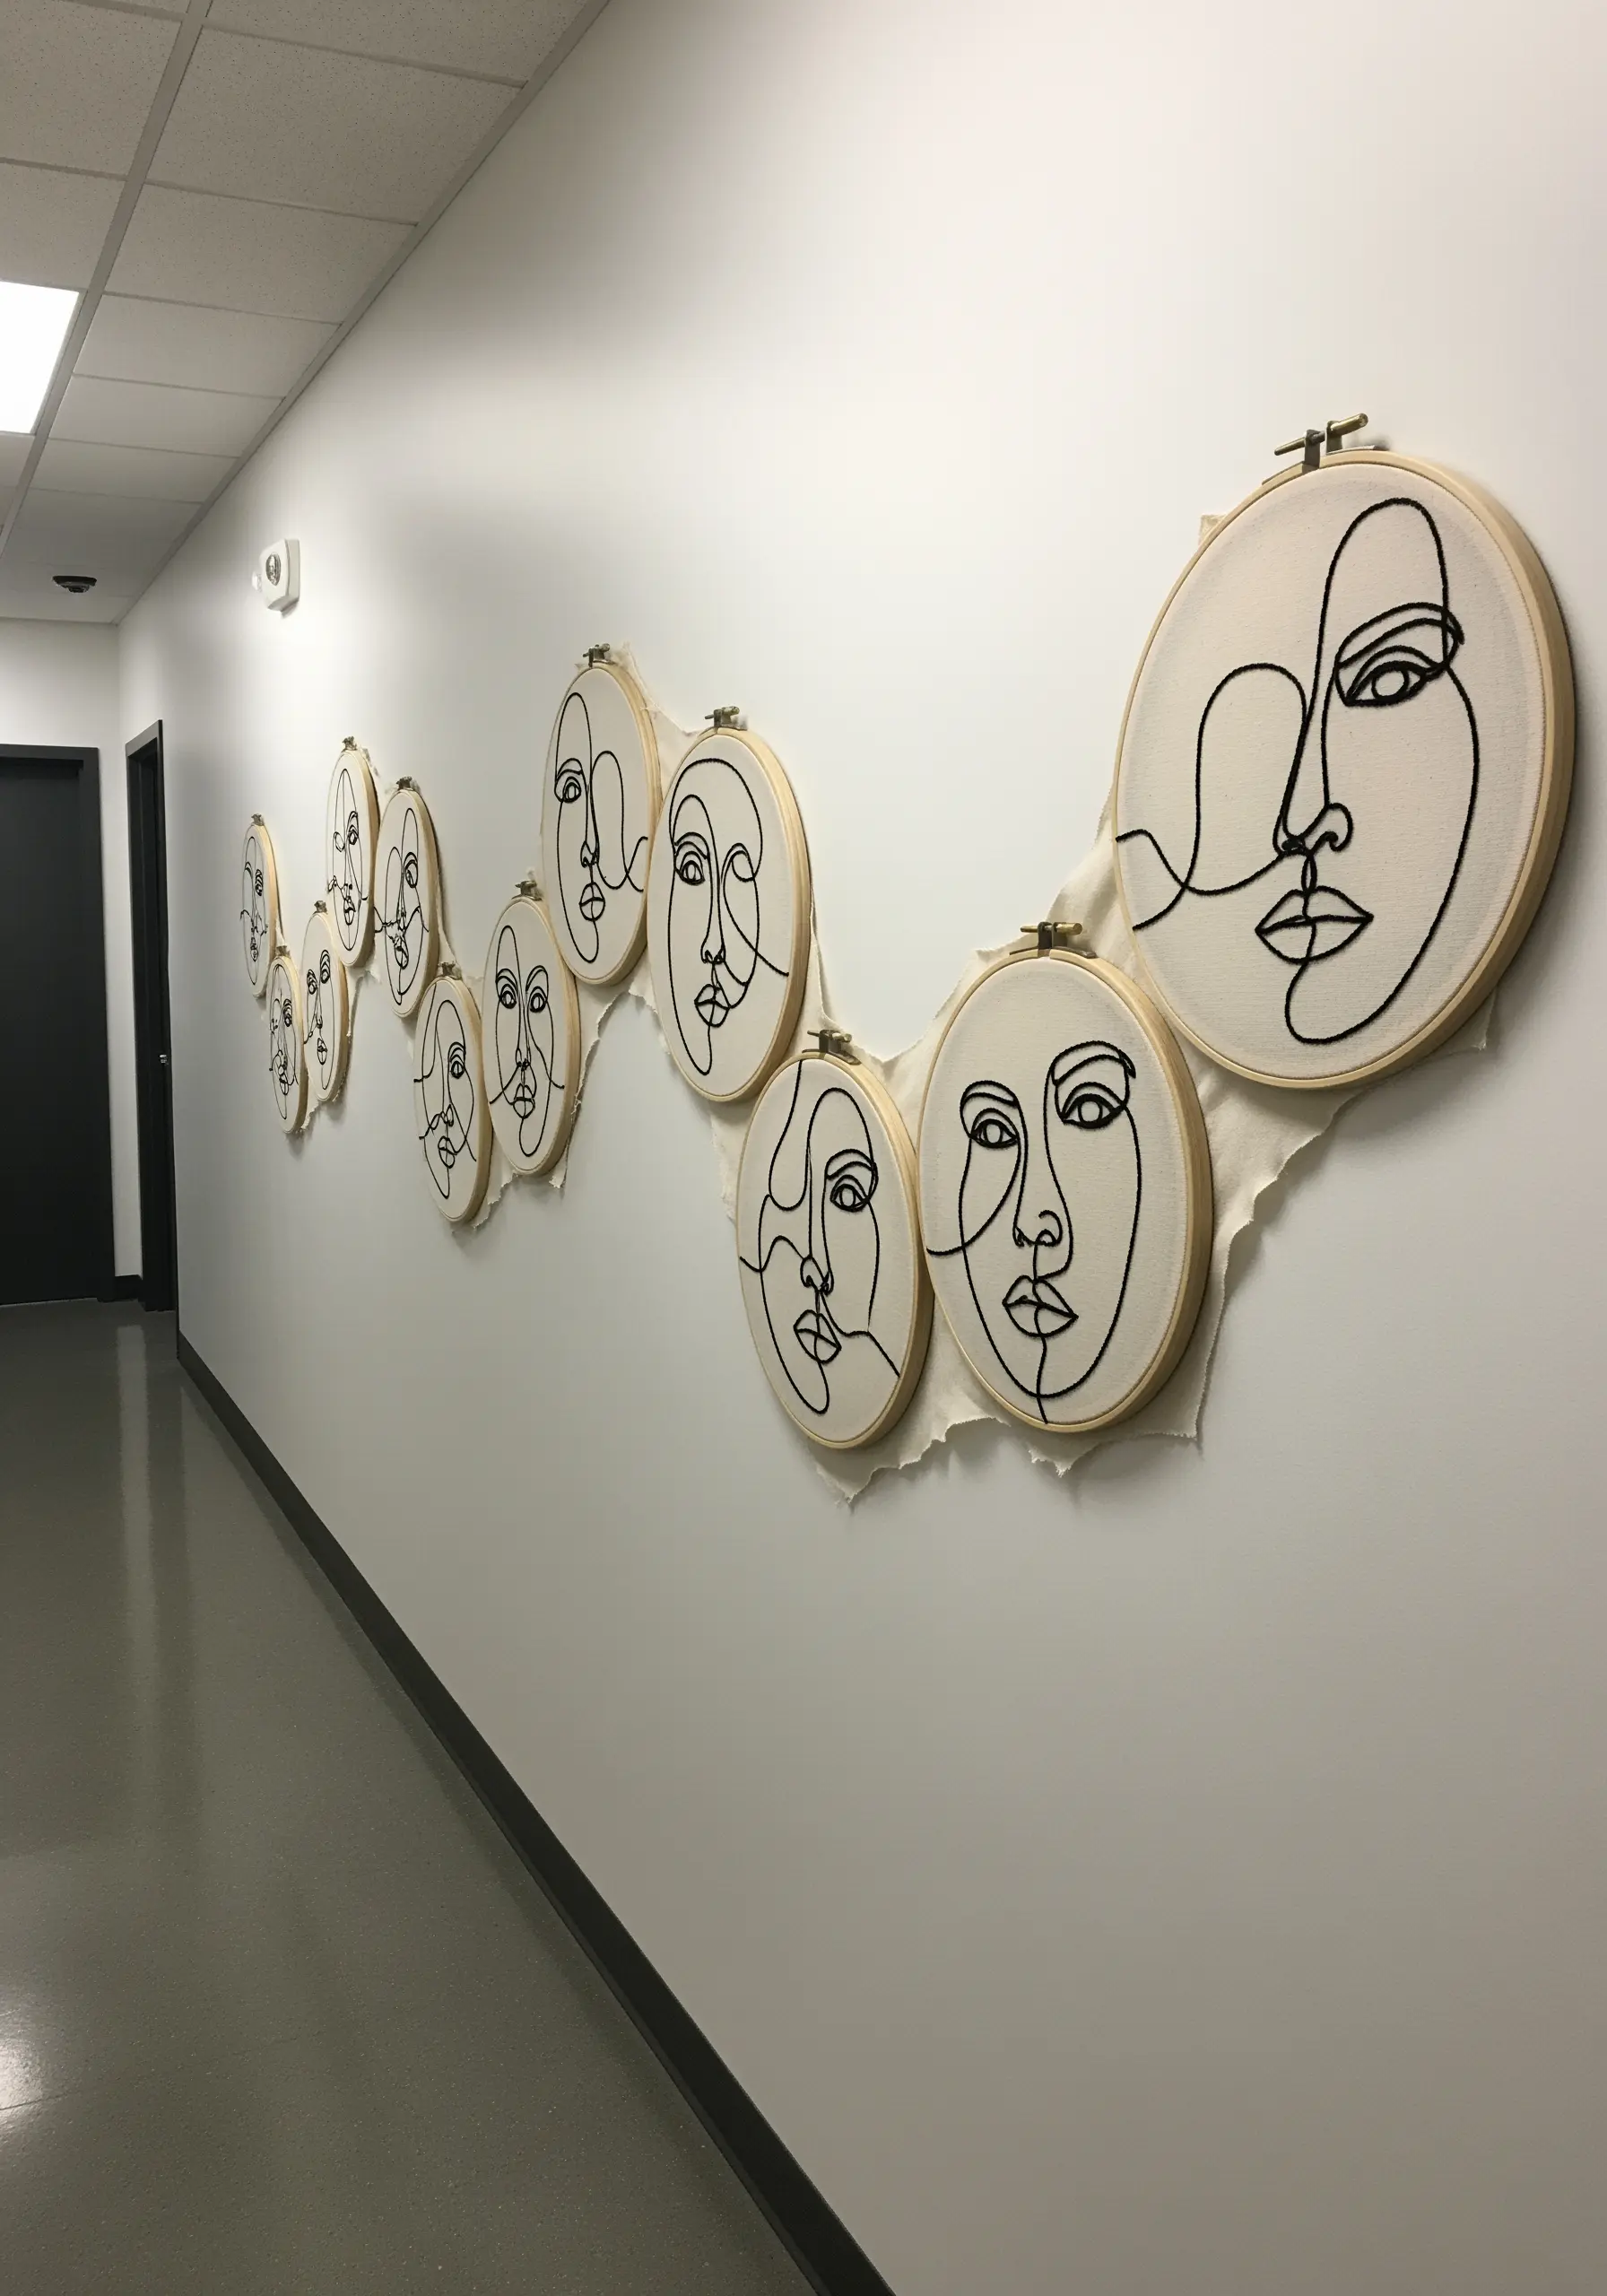
Challenge the confines of the hoop by creating a flowing installation of single-line portraits.
Use a thick, bold thread like Perle cotton or all six strands of floss, and lay it down with a couching stitch for a clean, uninterrupted line.
Allow the fabric to drape and tear between the hoops, connecting the individual pieces into one continuous, fluid work of art.
This technique turns simple modern line art faces into a stunning, large-scale installation.
11. Cultivate an Elegant Embroidered Herbarium
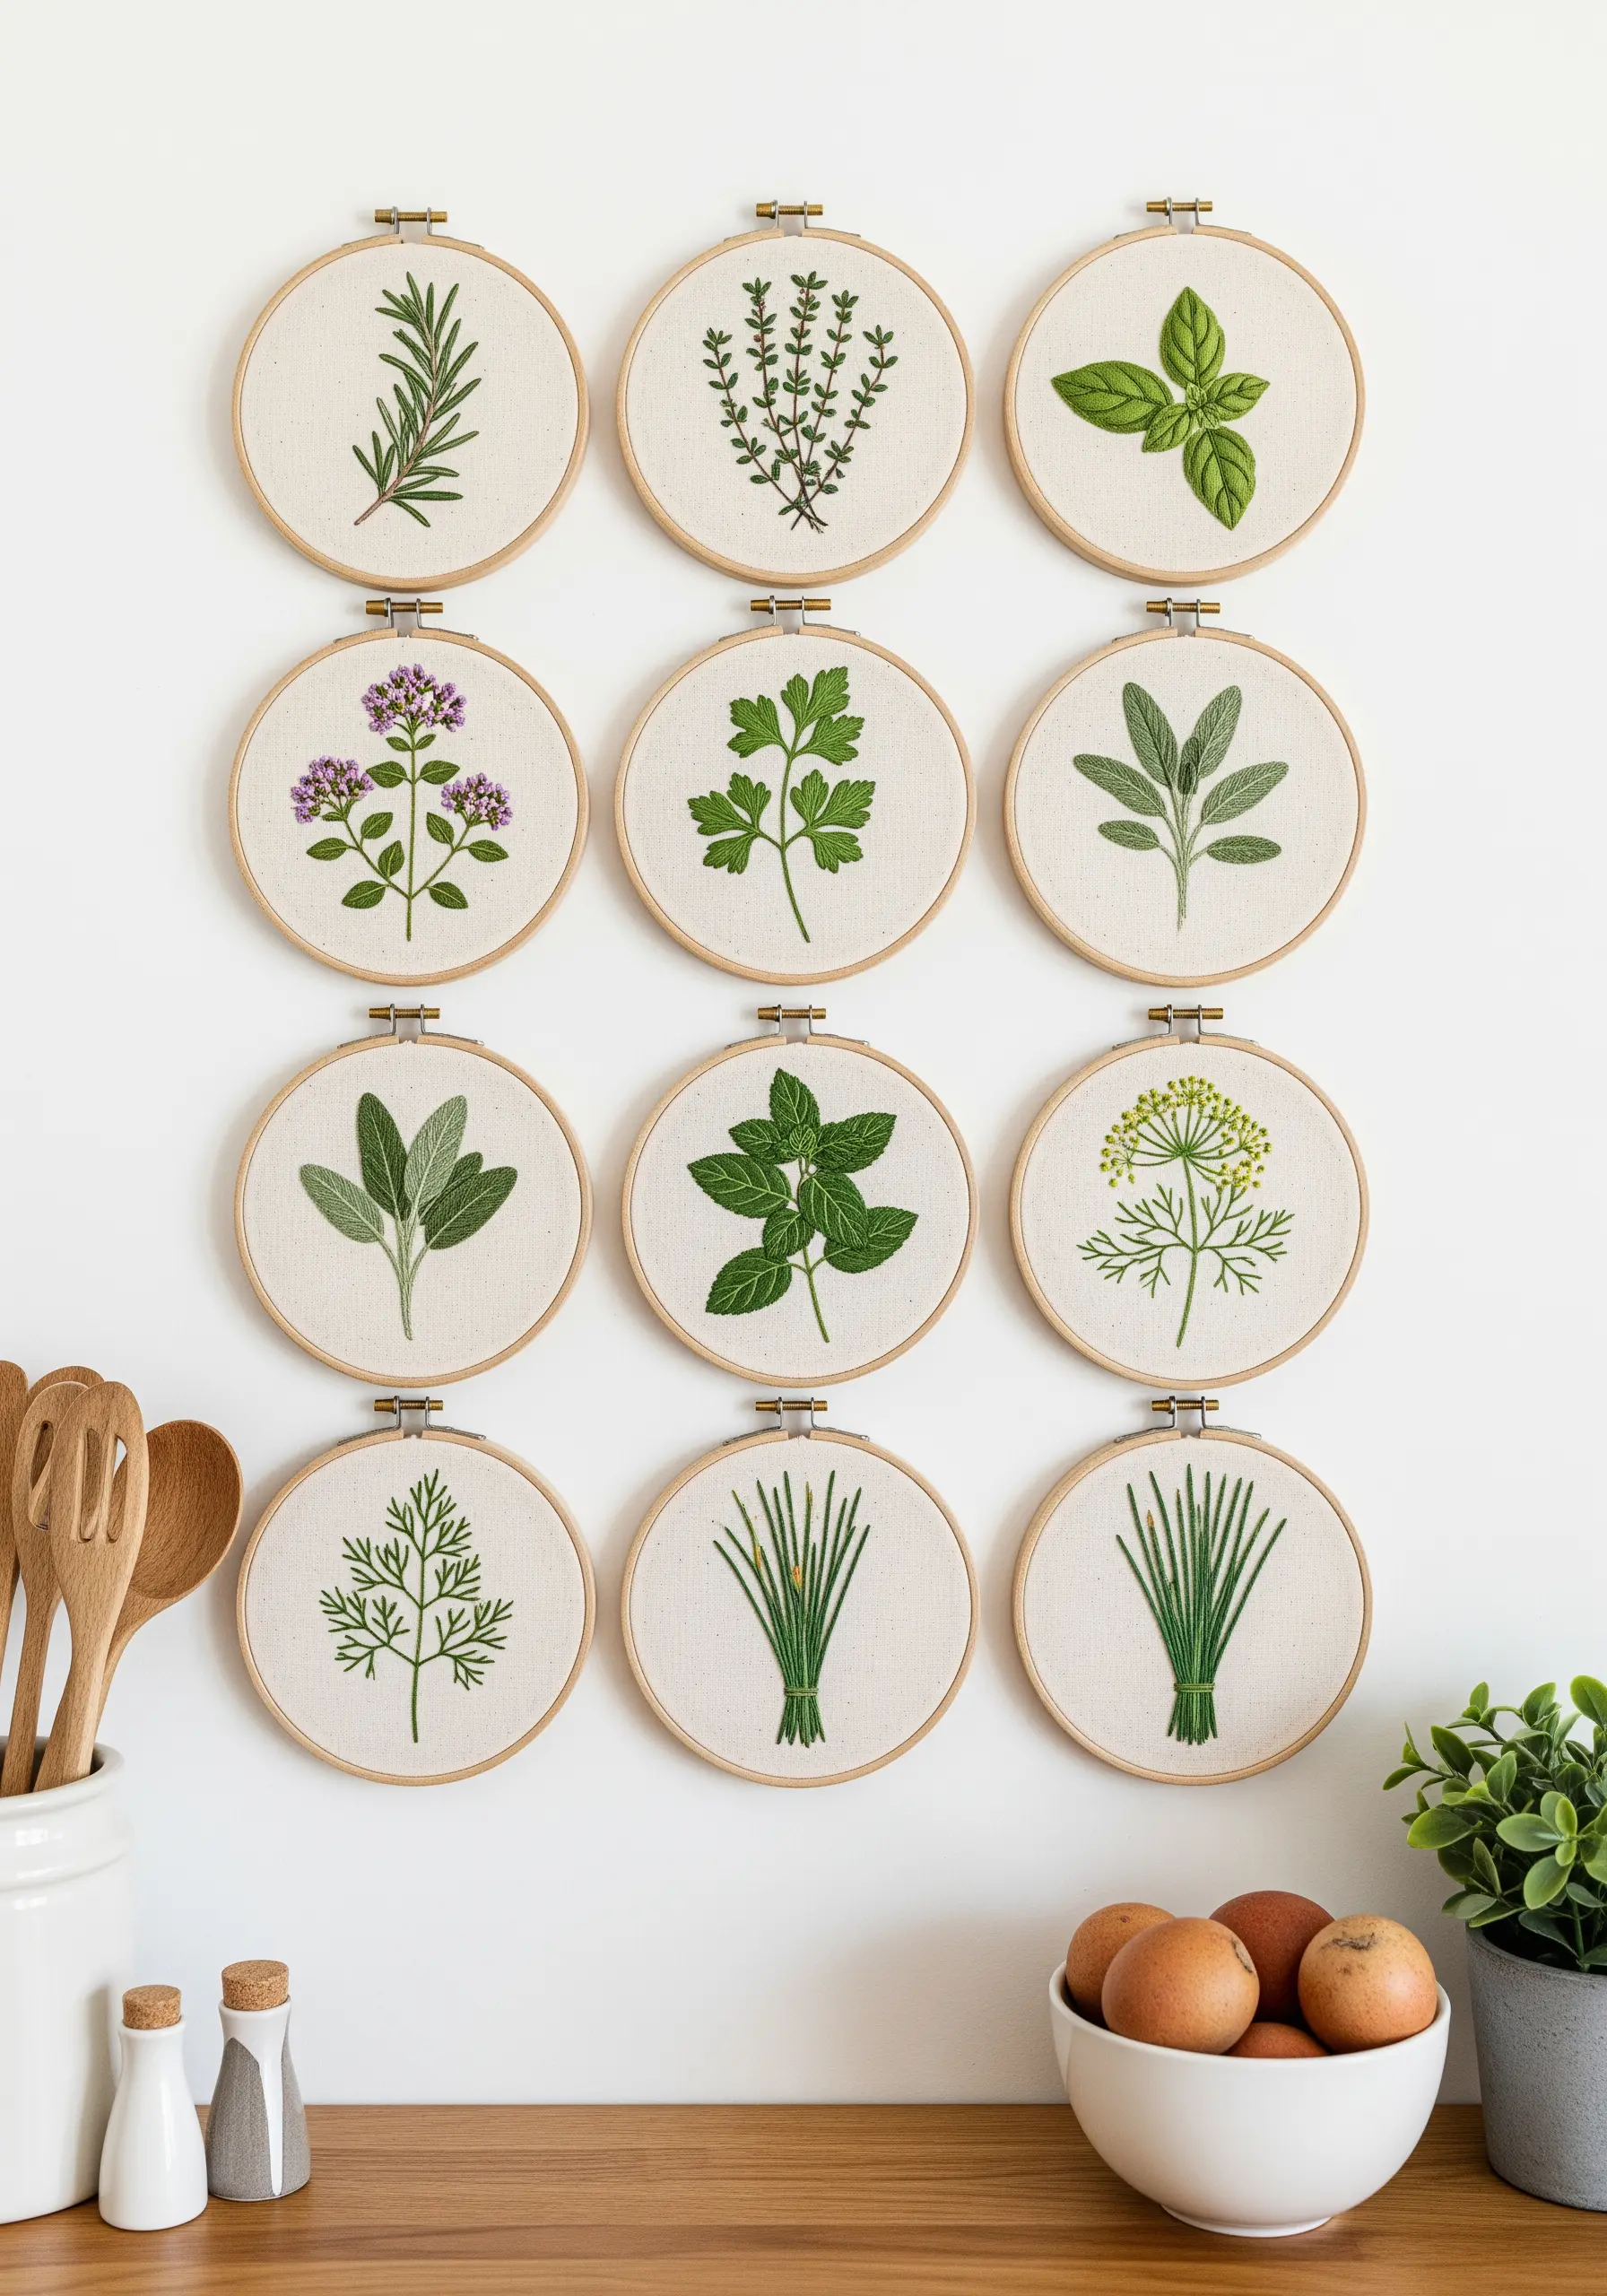
Create the clean, organized look of a botanical chart with a perfectly aligned grid of stitched herbs.
For a refined aesthetic, use just two or three shades of green per plant, focusing on crisp outlines and minimalist details rather than photorealism.
Fishbone stitch for leaves and stem stitch for stalks will give you beautiful, consistent results across every hoop.
This disciplined approach transforms simple subjects into a sophisticated piece of wall art.
12. Compose a Vibrant Southwestern Gallery
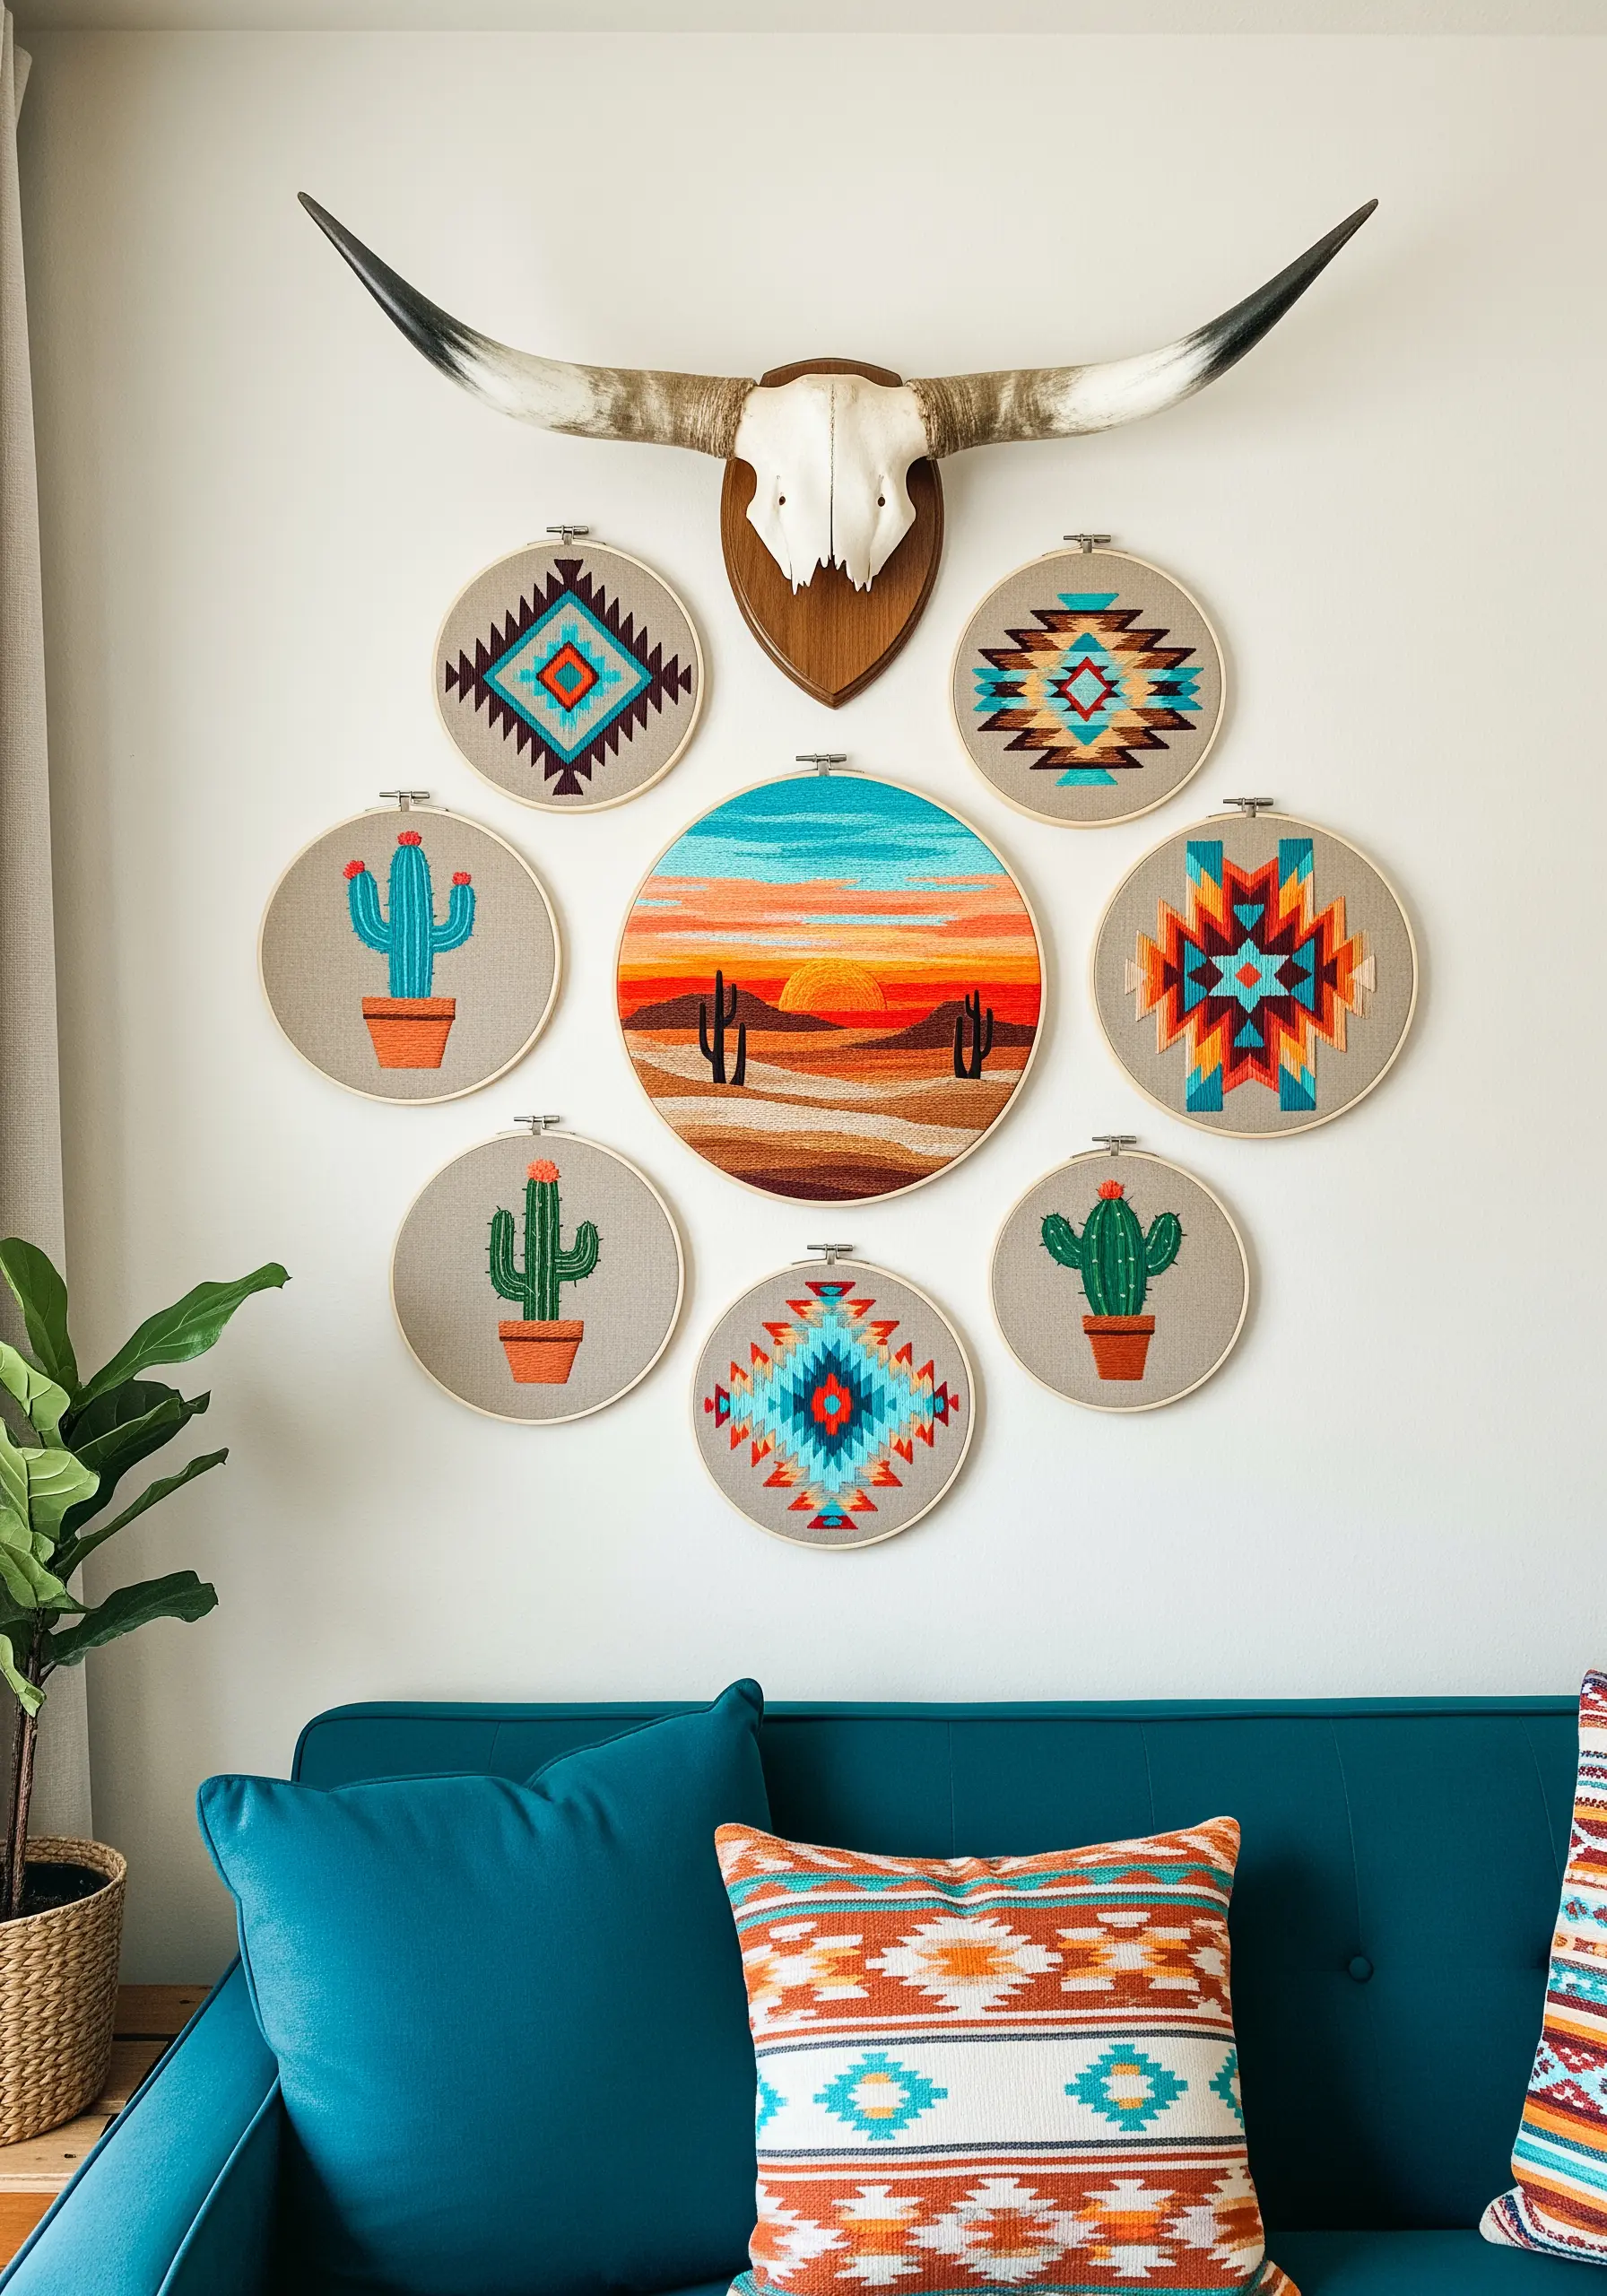
Build a wall display around a central, statement-making piece, like a detailed landscape.
Surround it with smaller hoops featuring complementary motifs—geometric patterns and stylized cacti—to create a balanced composition.
Use dense, full-coverage satin stitch in bold, high-contrast colors like turquoise, coral, and sand to capture the vibrant energy of the theme.
This intentional grouping feels more like a curated collection than a random assortment of hoops.
13. Fuse Embroidery and Weaving for Ultimate Depth
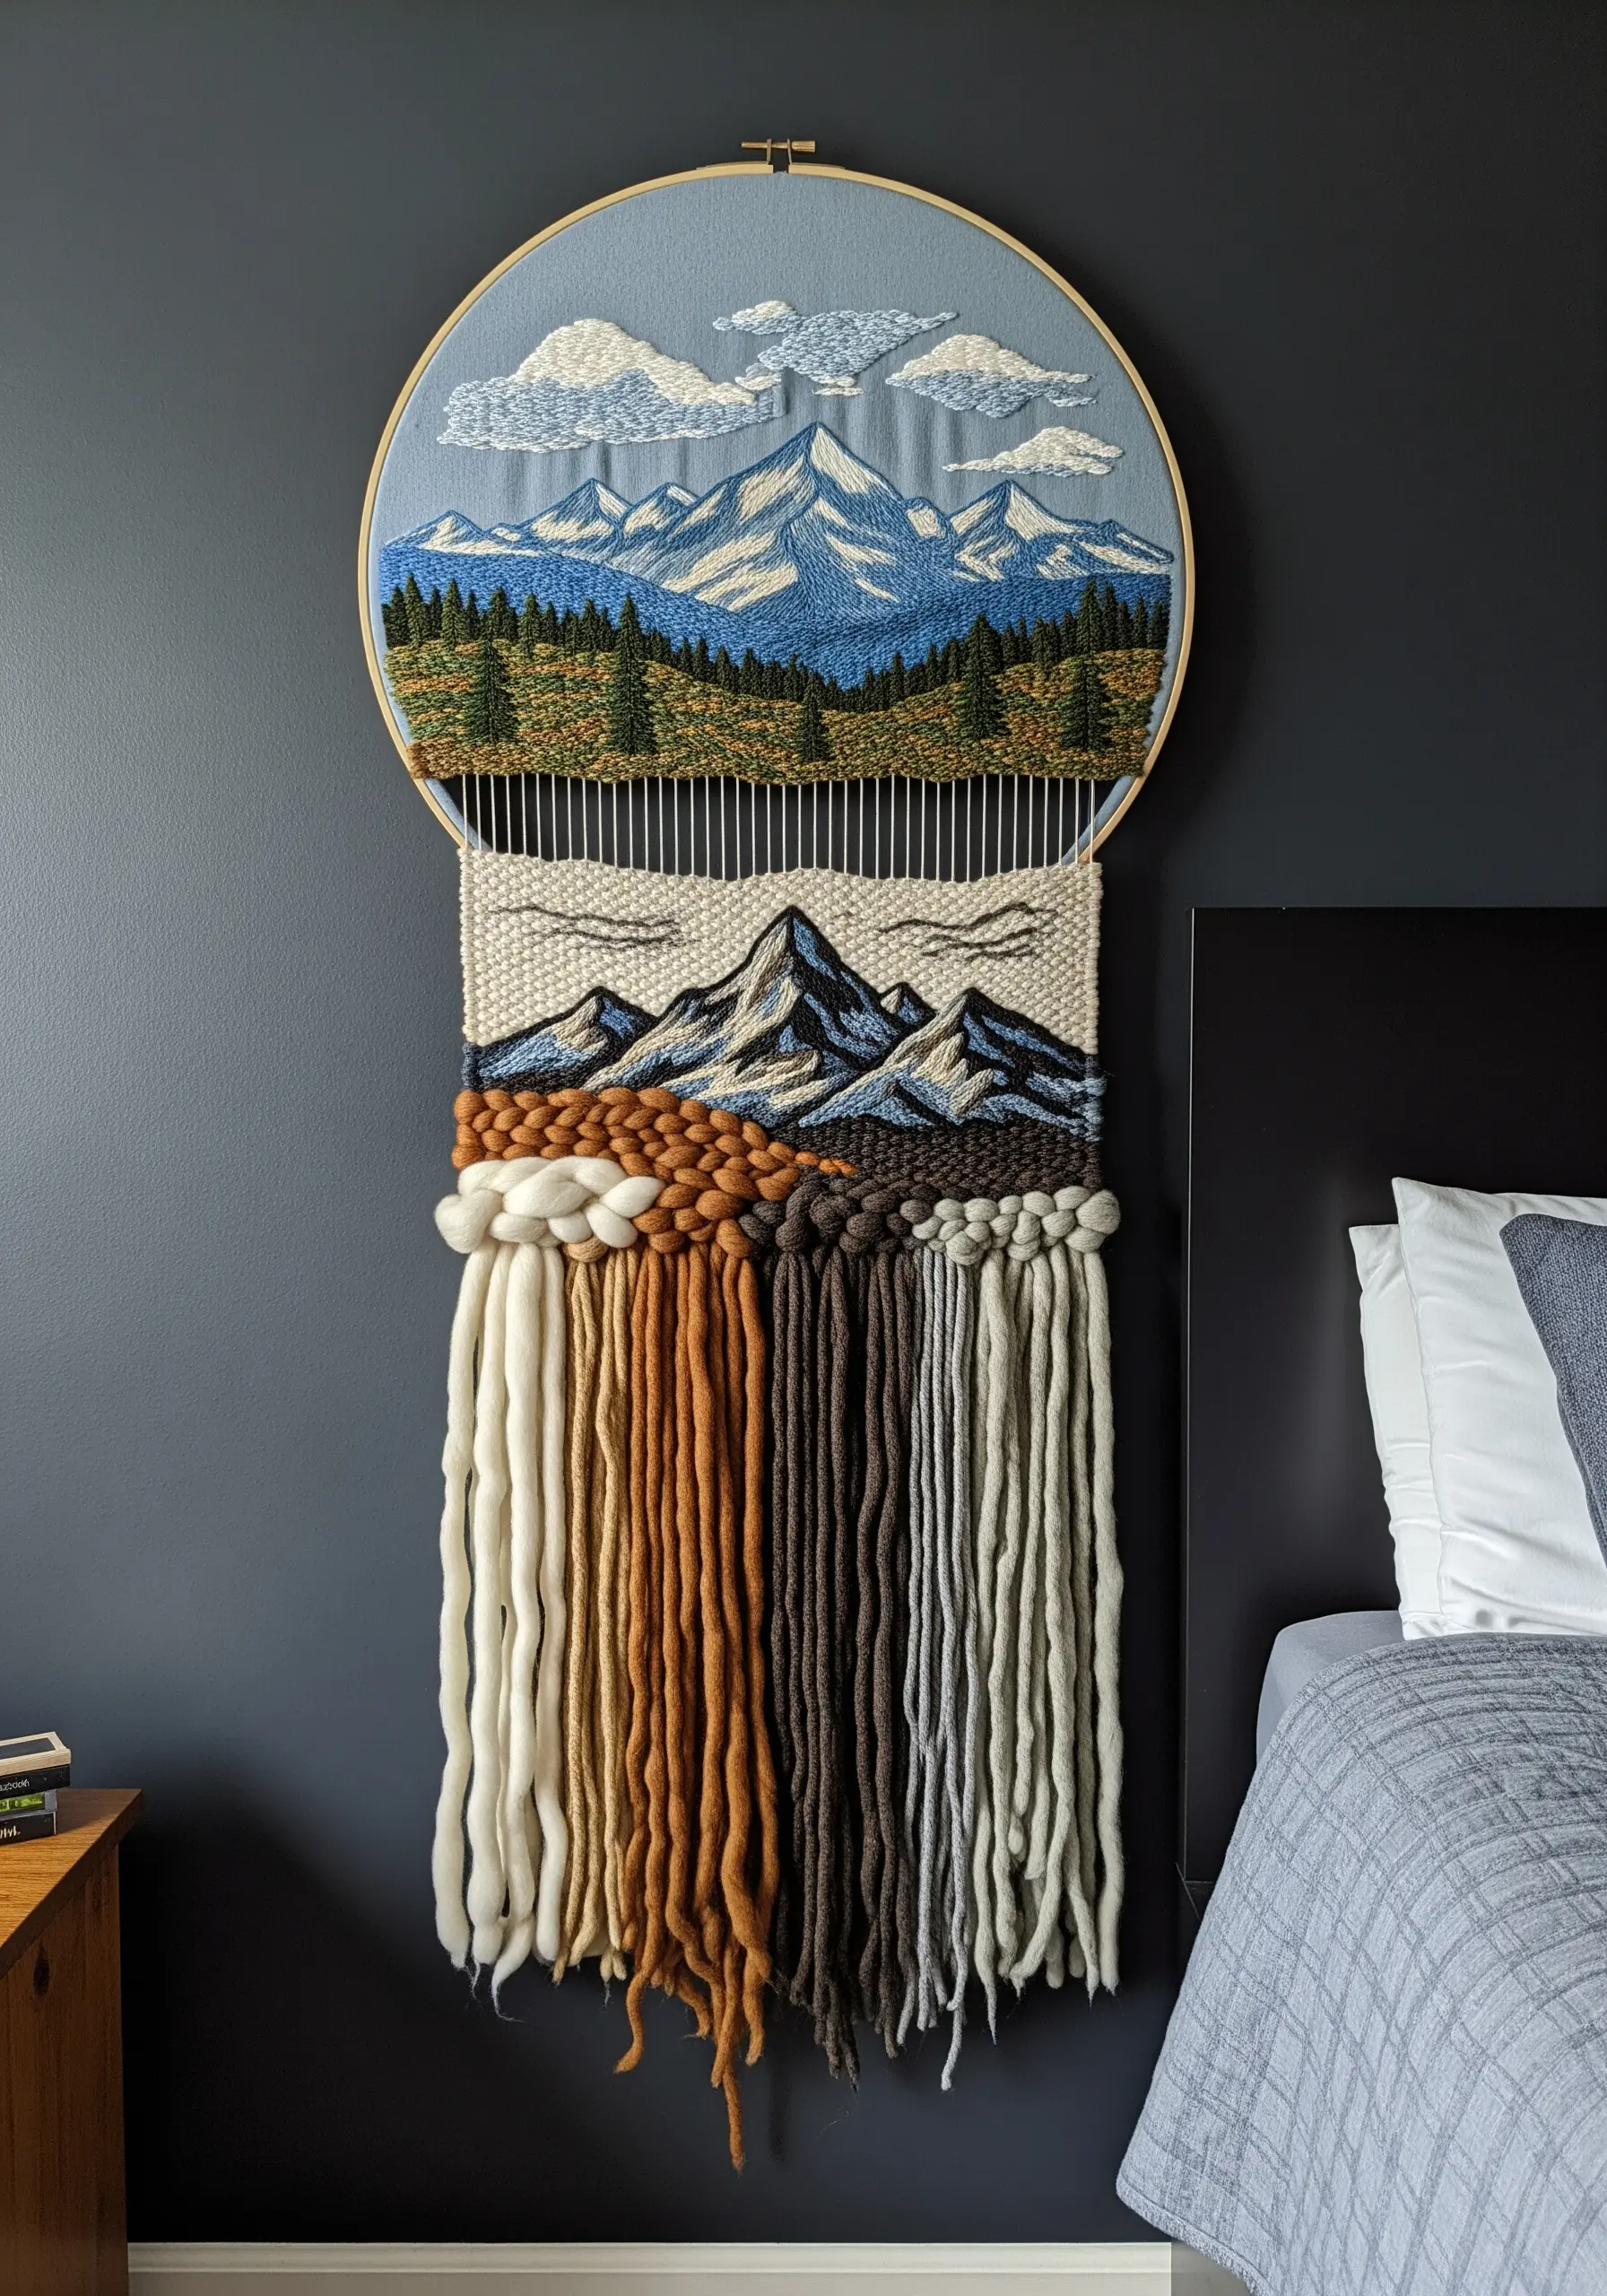
Create breathtaking dimension by combining two fiber arts in a single piece.
Embroider the detailed background, like mountains and sky, in the top portion of the hoop.
Then, warp the bottom half and weave with chunky yarn, roving, and textured fibers to build a foreground that physically comes off the fabric.
This fusion of flat detail and sculptural texture creates a truly immersive landscape.
14. Stitch the Motion of Ocean Waves

Capture the movement of water by layering different linear stitches.
Use whipped backstitch, chain stitch, and stem stitch in varying shades of blue, teal, and white to create the illusion of flowing waves.
Couching a metallic or textured thread along the crest of the waves adds a hint of sparkle, mimicking sea foam catching the light.
This layering of lines is far more dynamic than a simple satin stitch fill for ocean-inspired hoop embroidery ideas.
15. Elevate Typography with Padded Satin Stitch
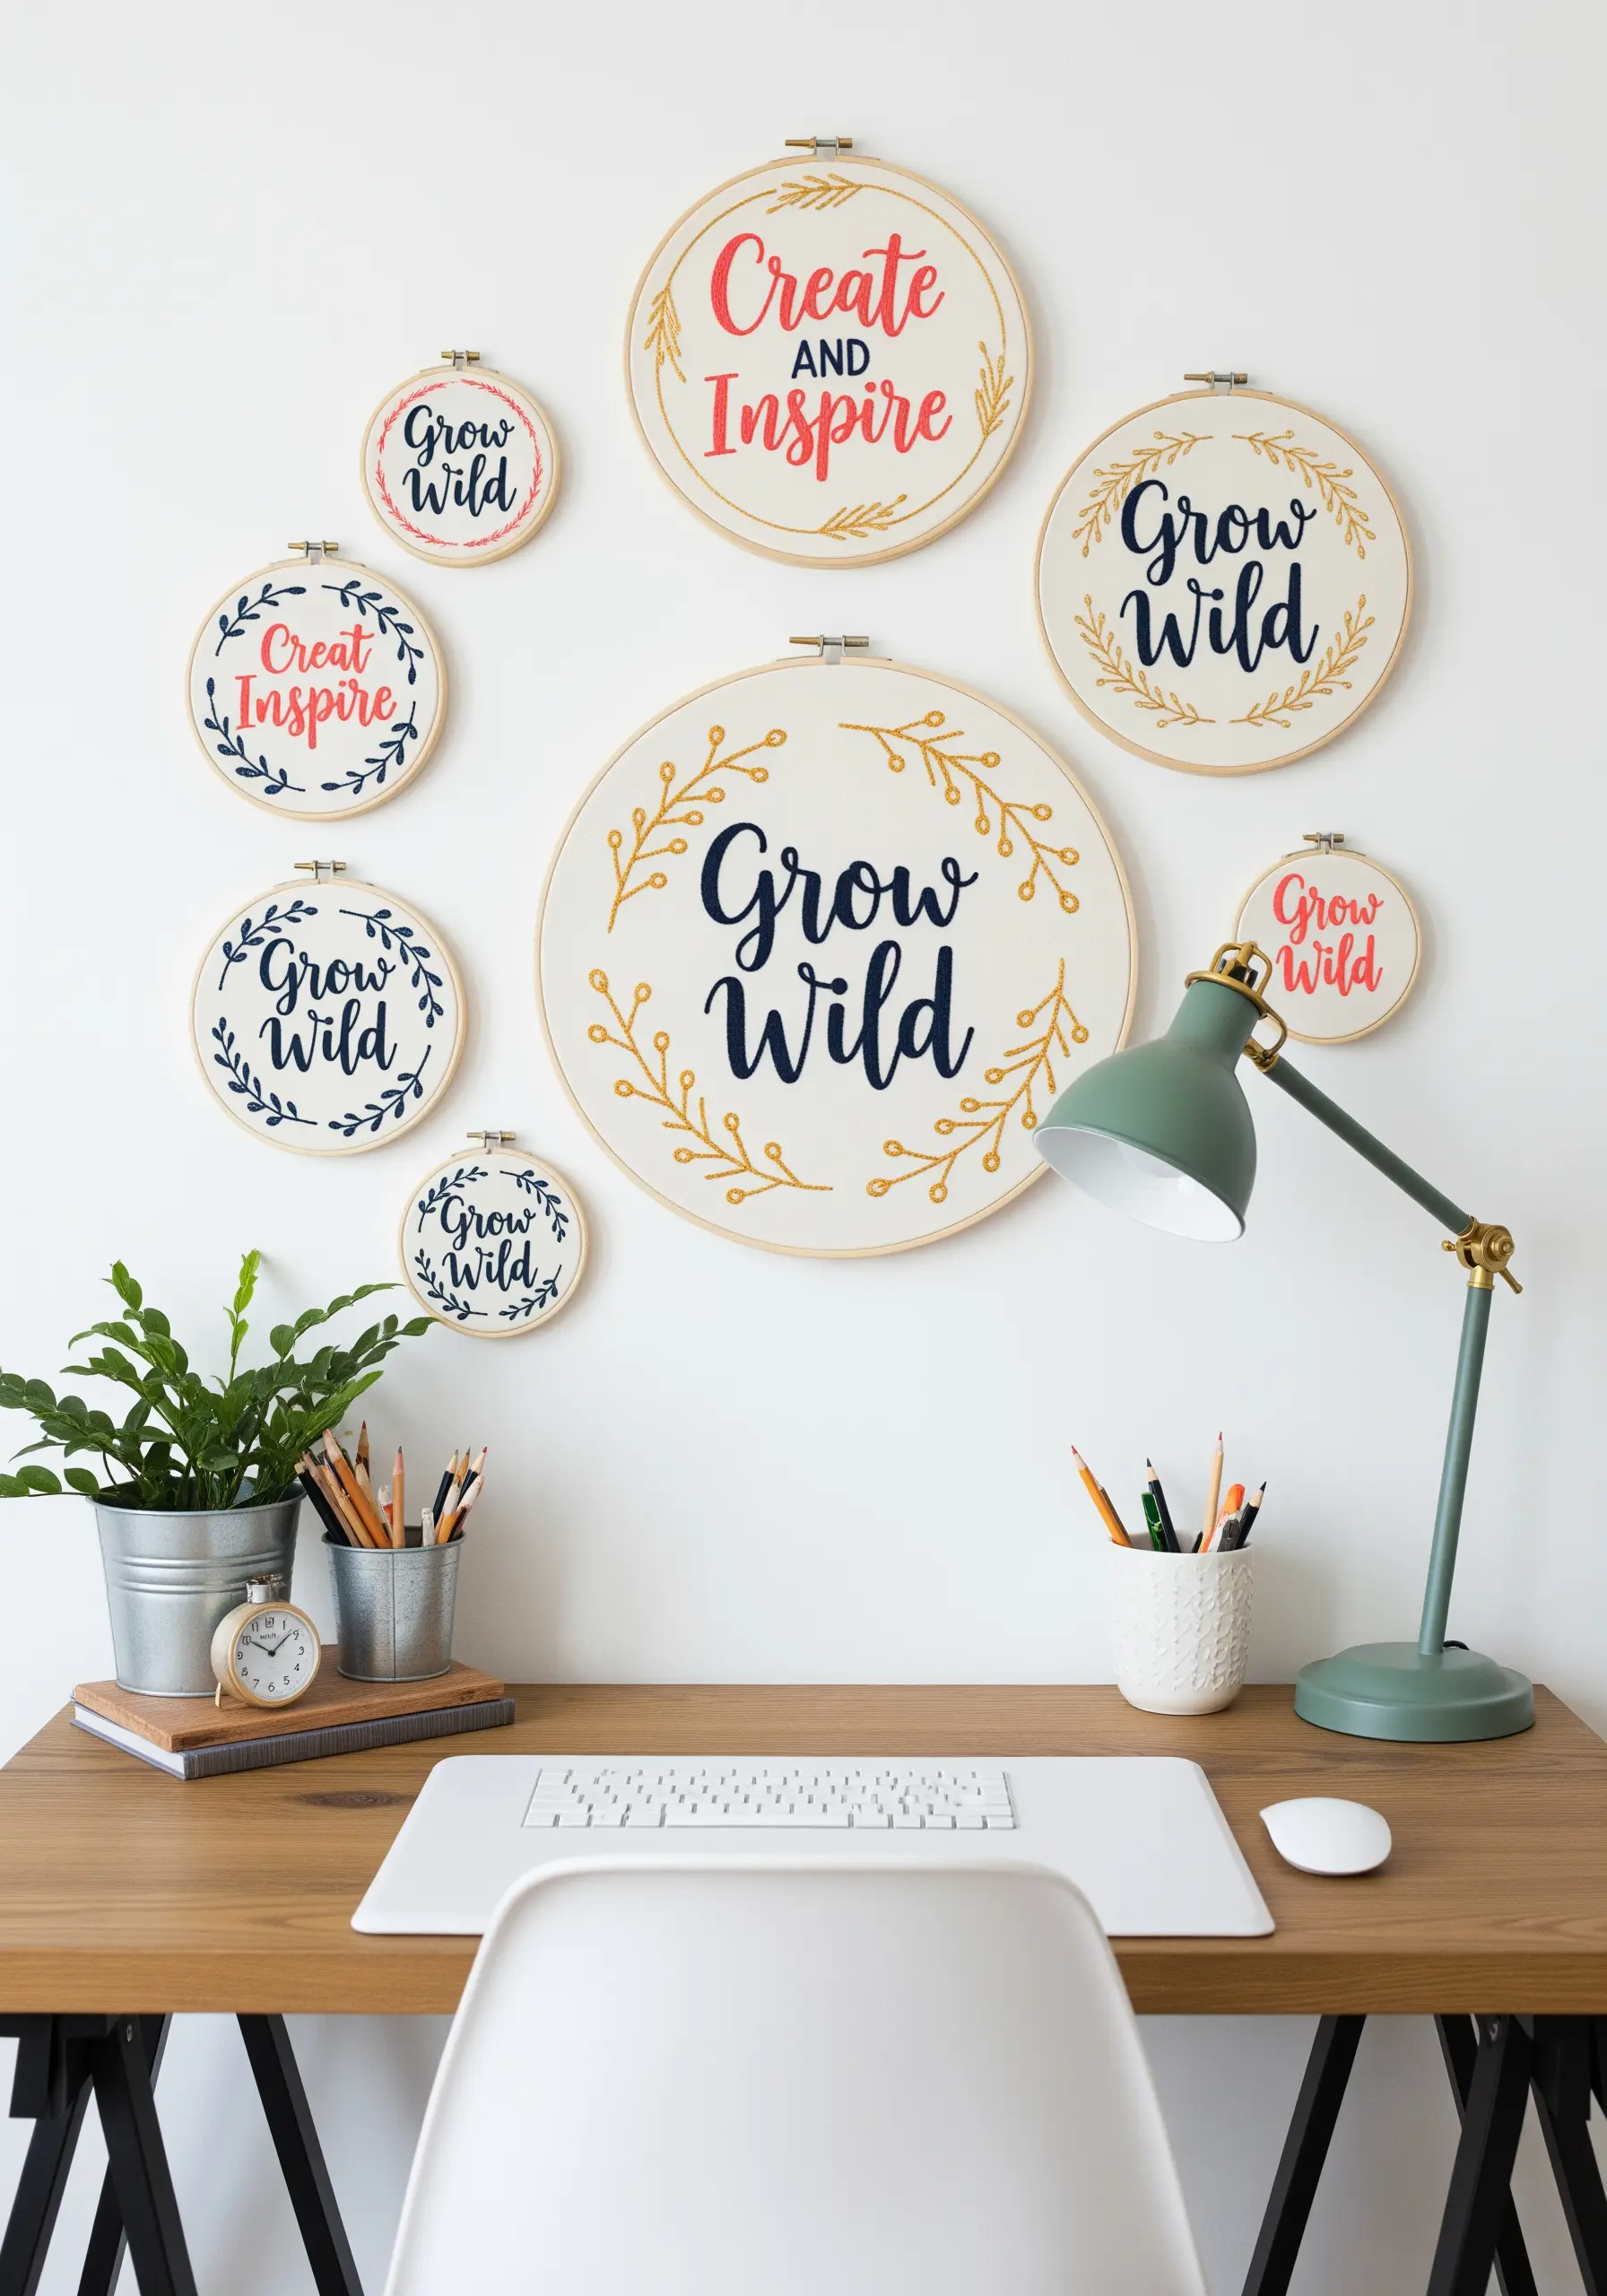
Make your lettering stand out—literally—by giving it dimension.
Before you begin your satin stitch, lay down a foundation of small straight stitches or a split stitch outline within the shape of each letter.
Stitching your final satin stitch over this padding raises the letters from the fabric, creating subtle shadows and a professional, high-end finish.
Frame the typography with simple botanical sprigs to soften the look.
16. Paint a Sprawling Meadow with Knots and Daisies
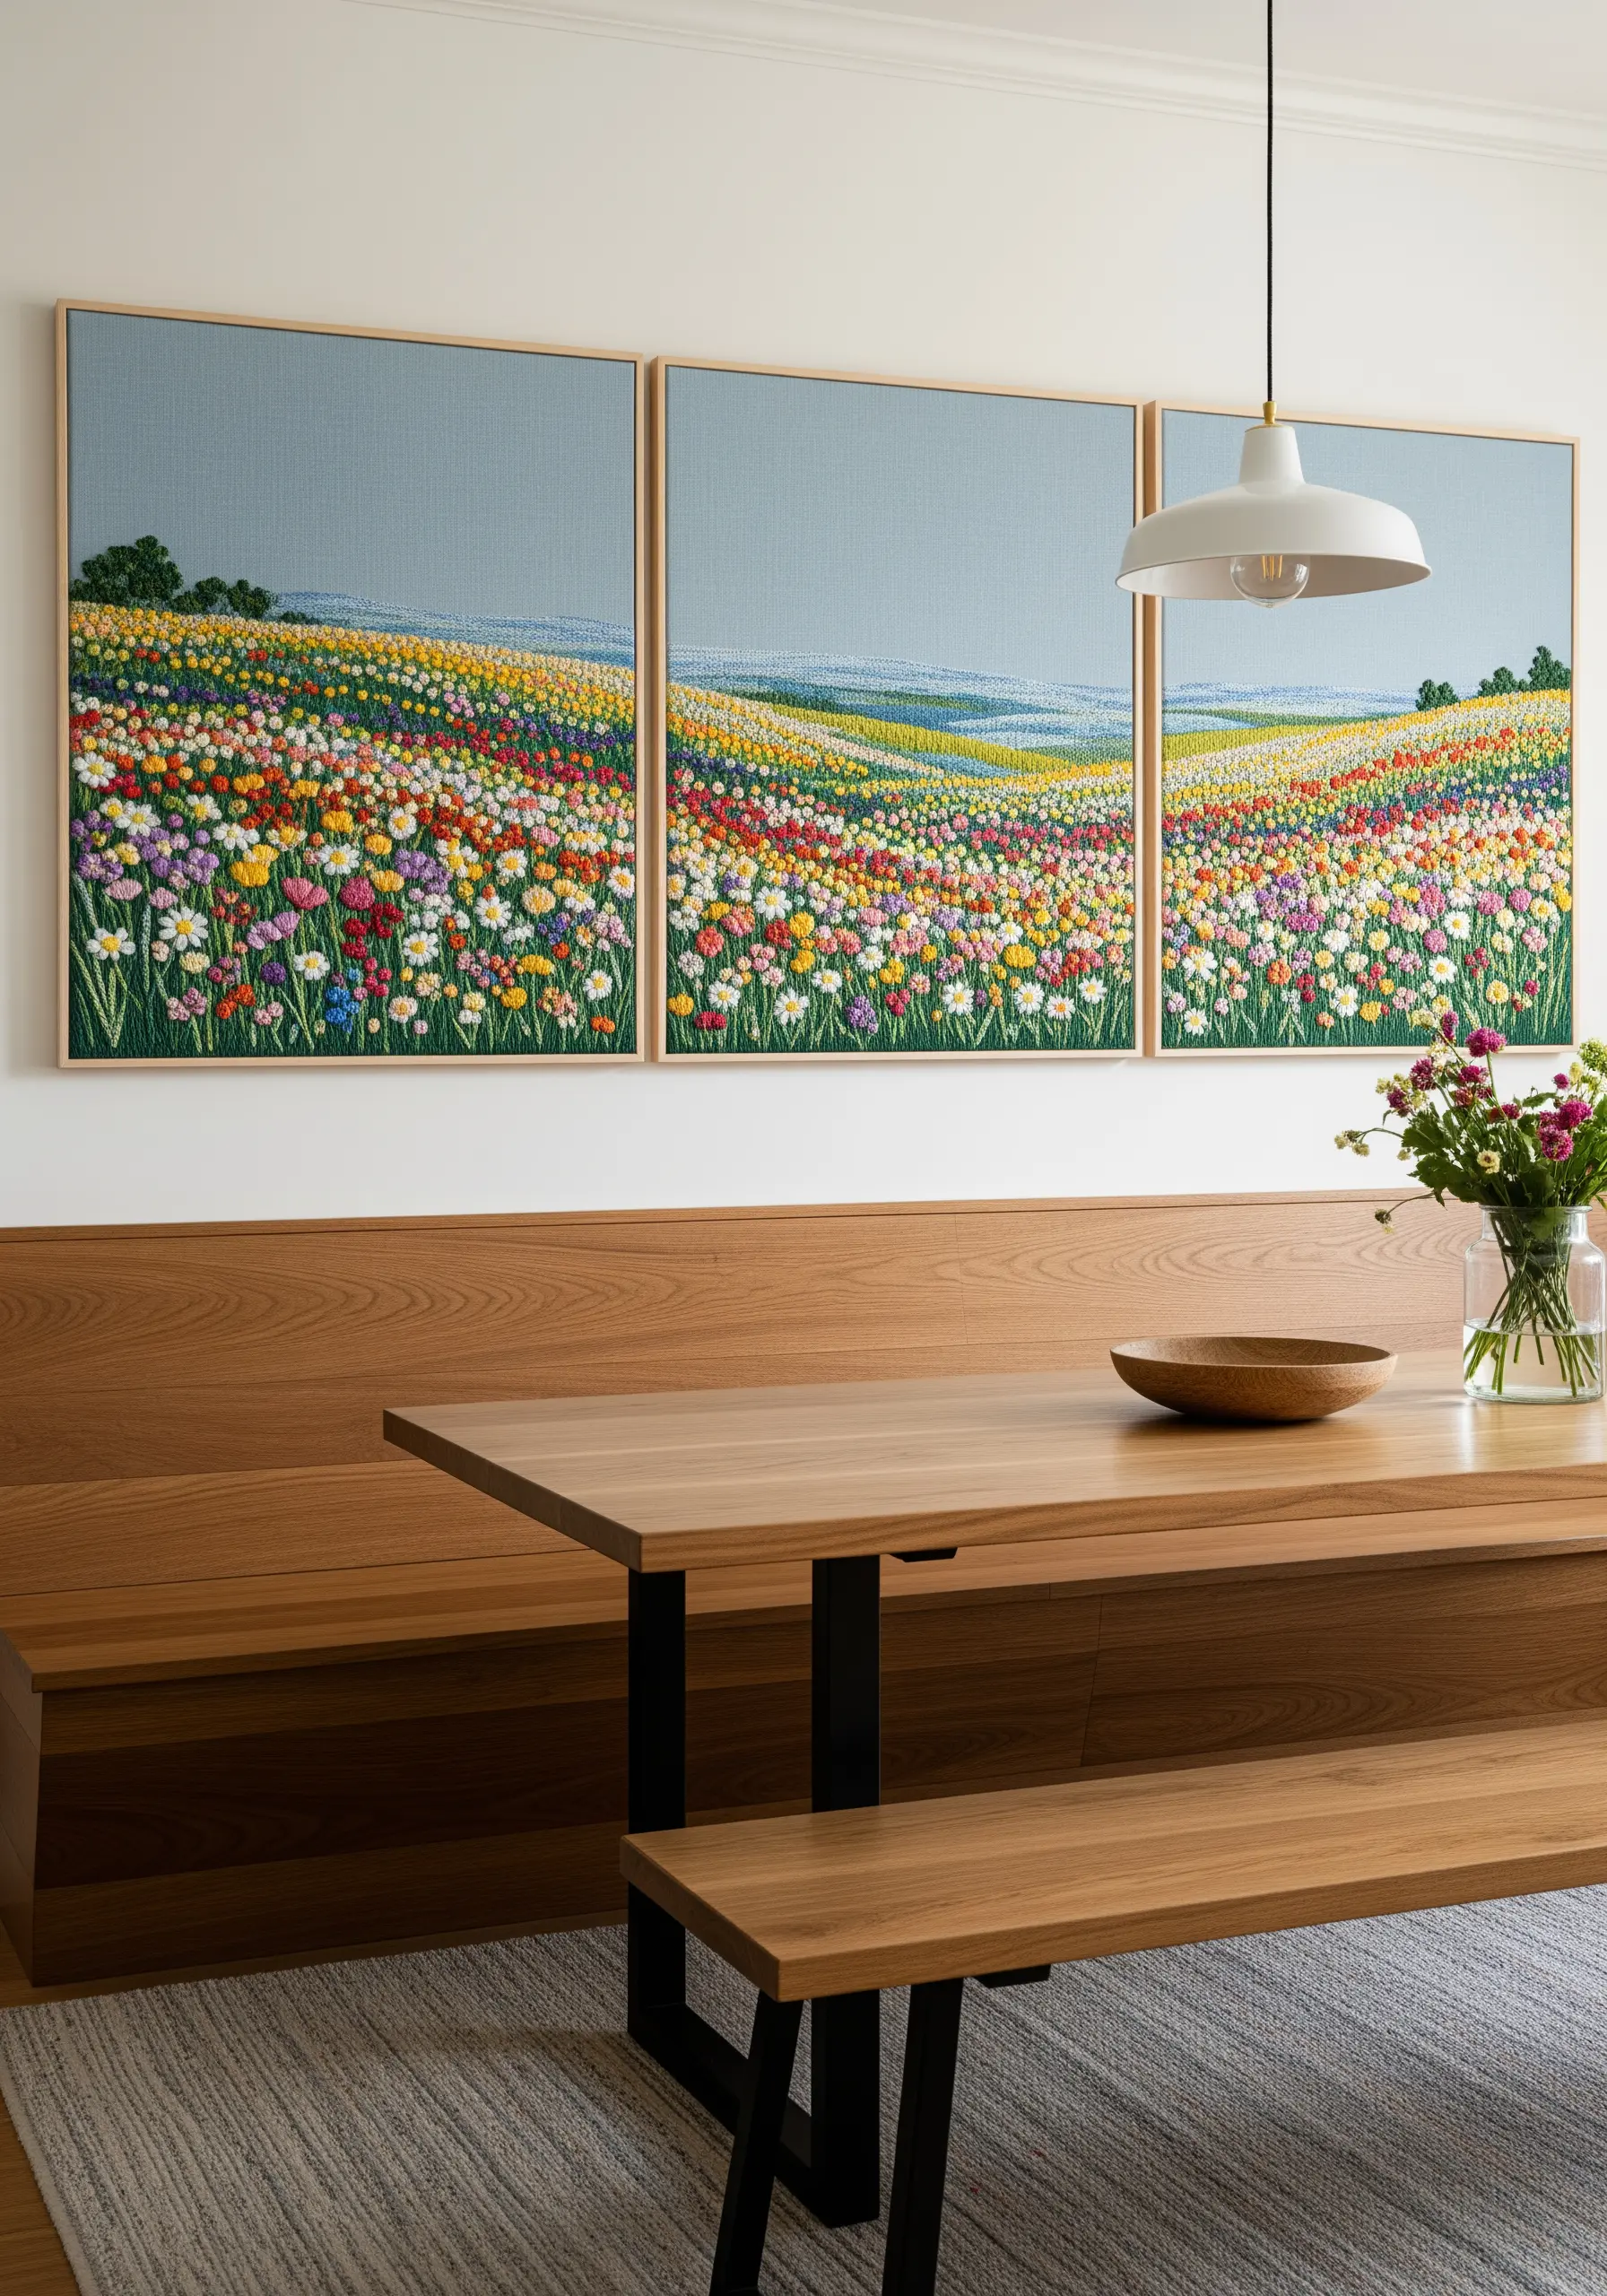
To create the impression of a vast field of flowers, work with texture, not tiny details.
Fill the space with a dense combination of French knots, lazy daisy stitches, and short straight stitches in a wide array of colors.
Arrange the colors in soft, horizontal bands to suggest rows of flowers disappearing into the distance.
Spanning this design across three large, framed panels transforms it into an immersive, statement-making art piece.
17. Capture Iridescence on a Dramatic Black Canvas
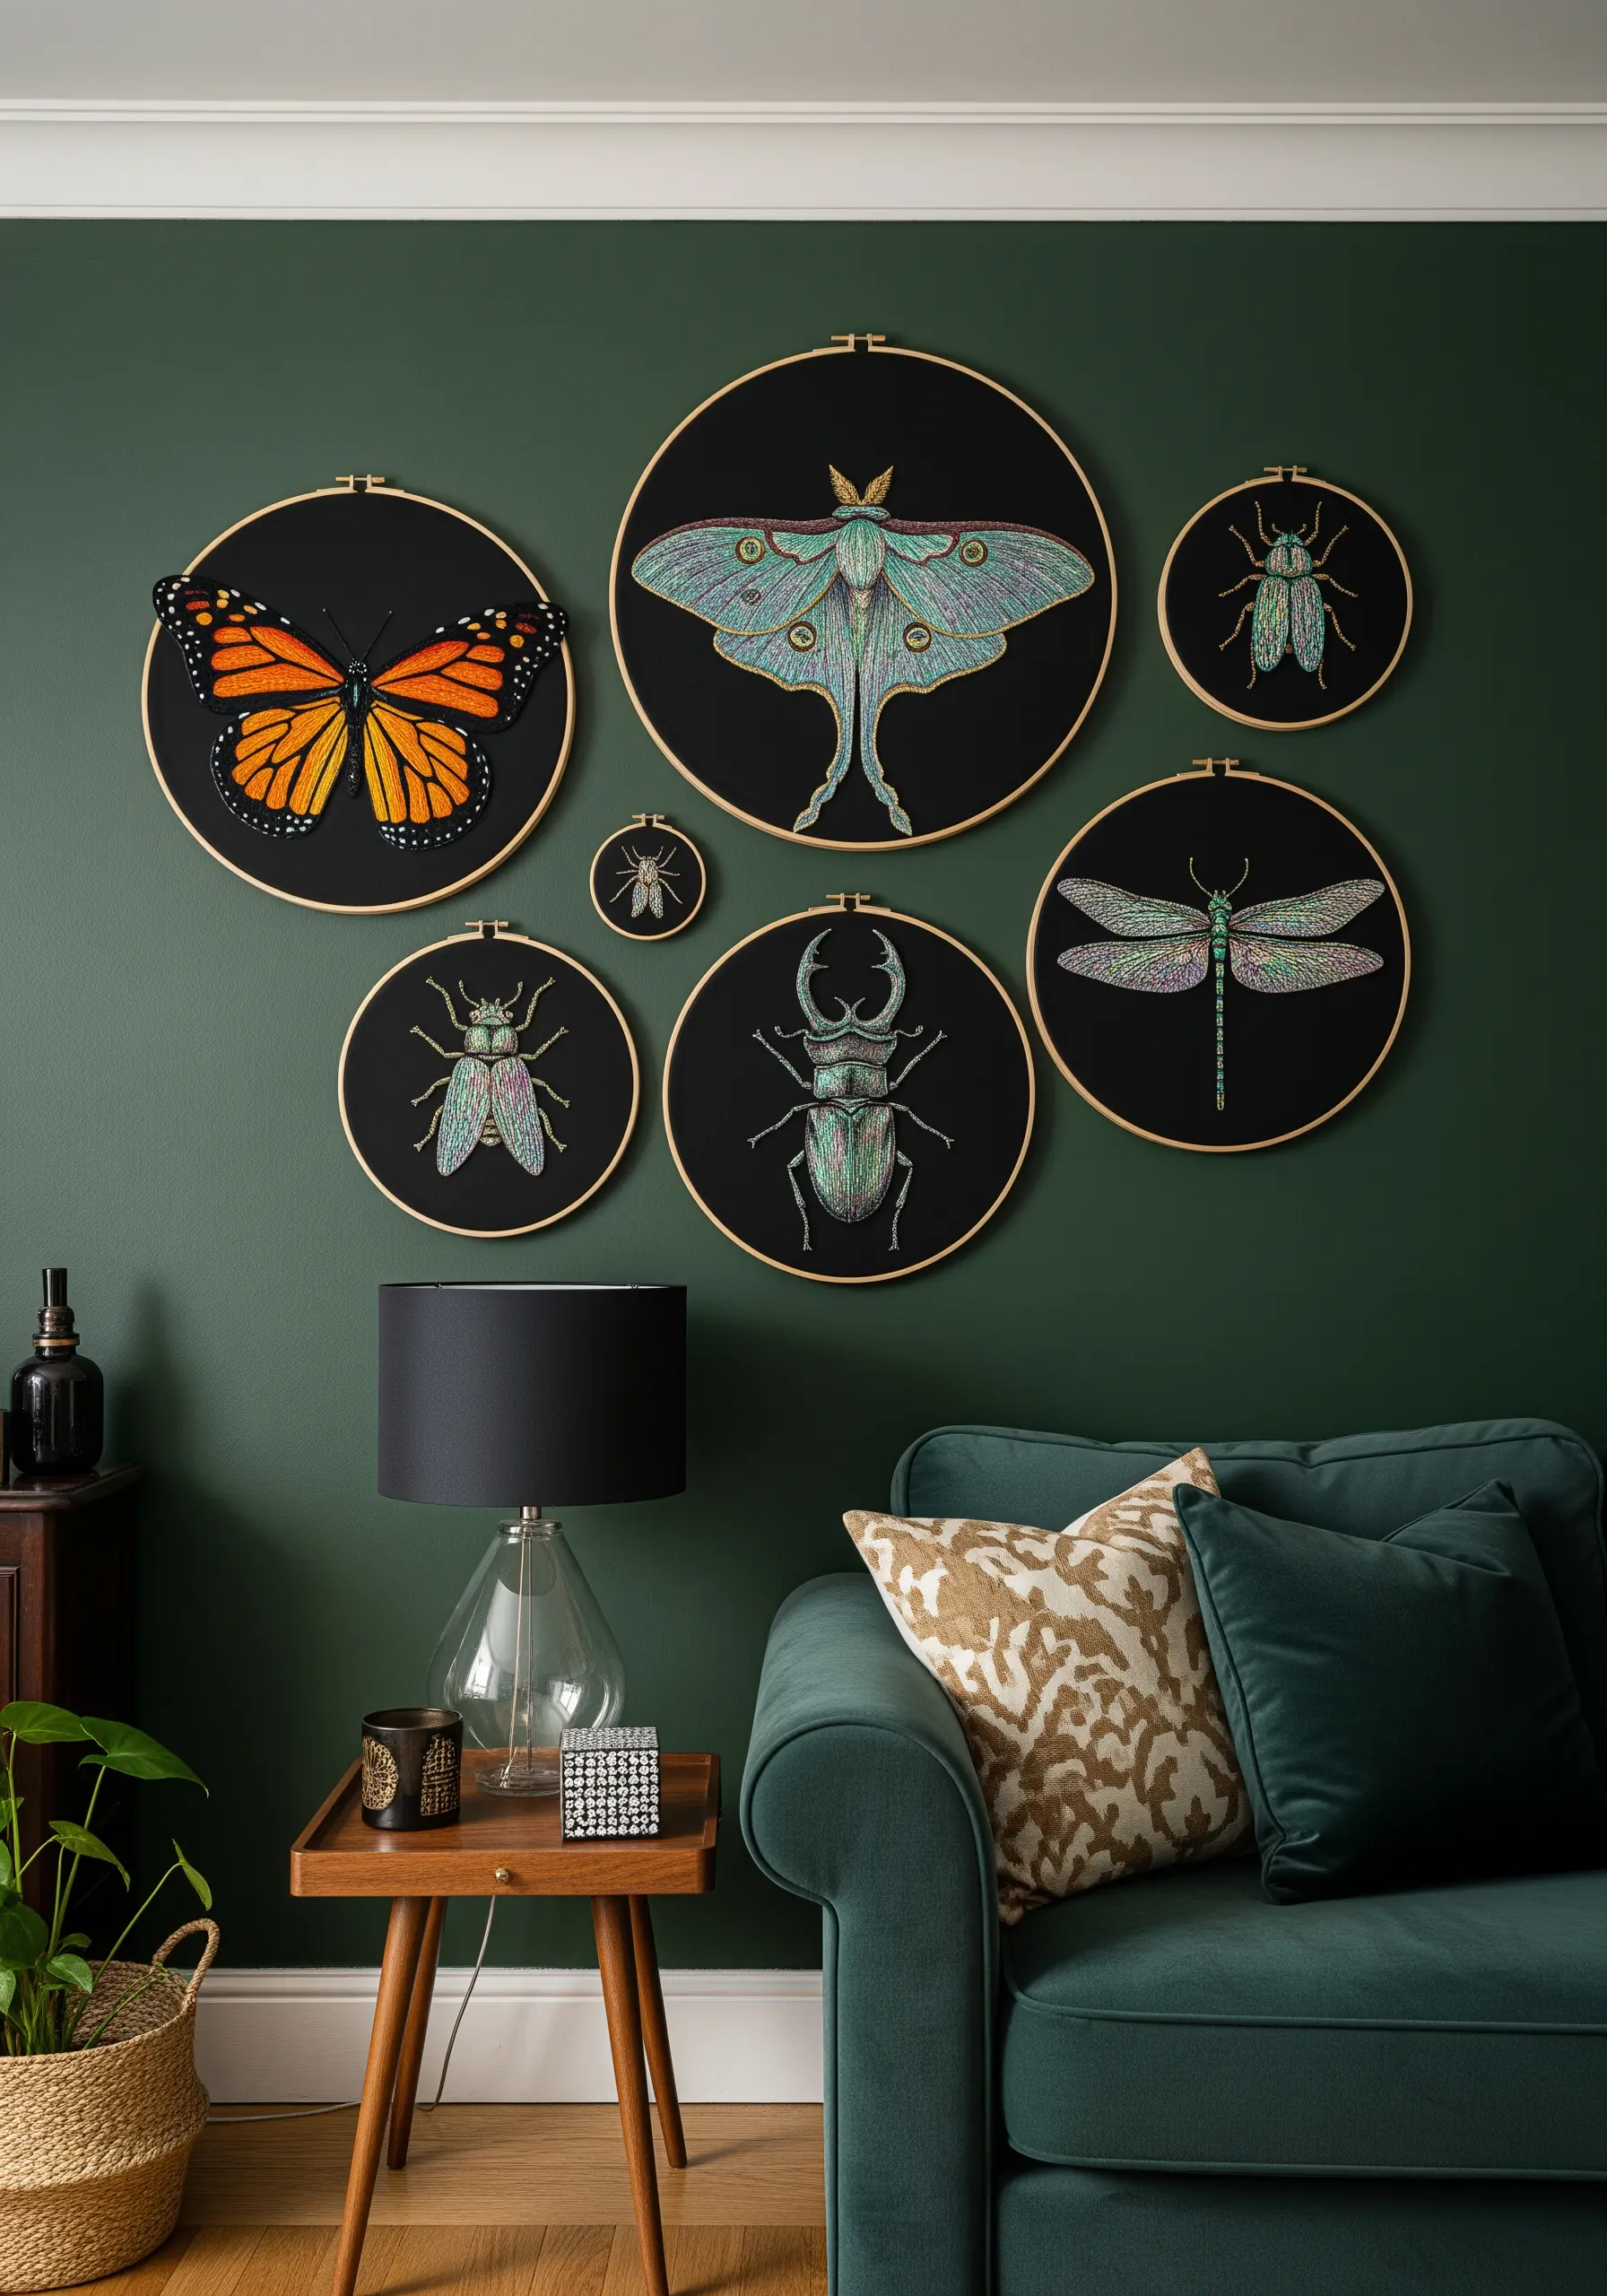
To mimic the natural shimmer of insect wings, your thread choice is key.
Use variegated, metallic, and satin flosses with the long-and-short stitch to create smooth, shimmering color blends.
Stitching on black fabric provides the ultimate dark background, making these jewel-toned threads appear to glow with an inner light.
This high-contrast approach gives your bird & butterfly embroidery patterns a stunning, museum-quality presence.
18. Craft a Living Family Tree with Appliqué
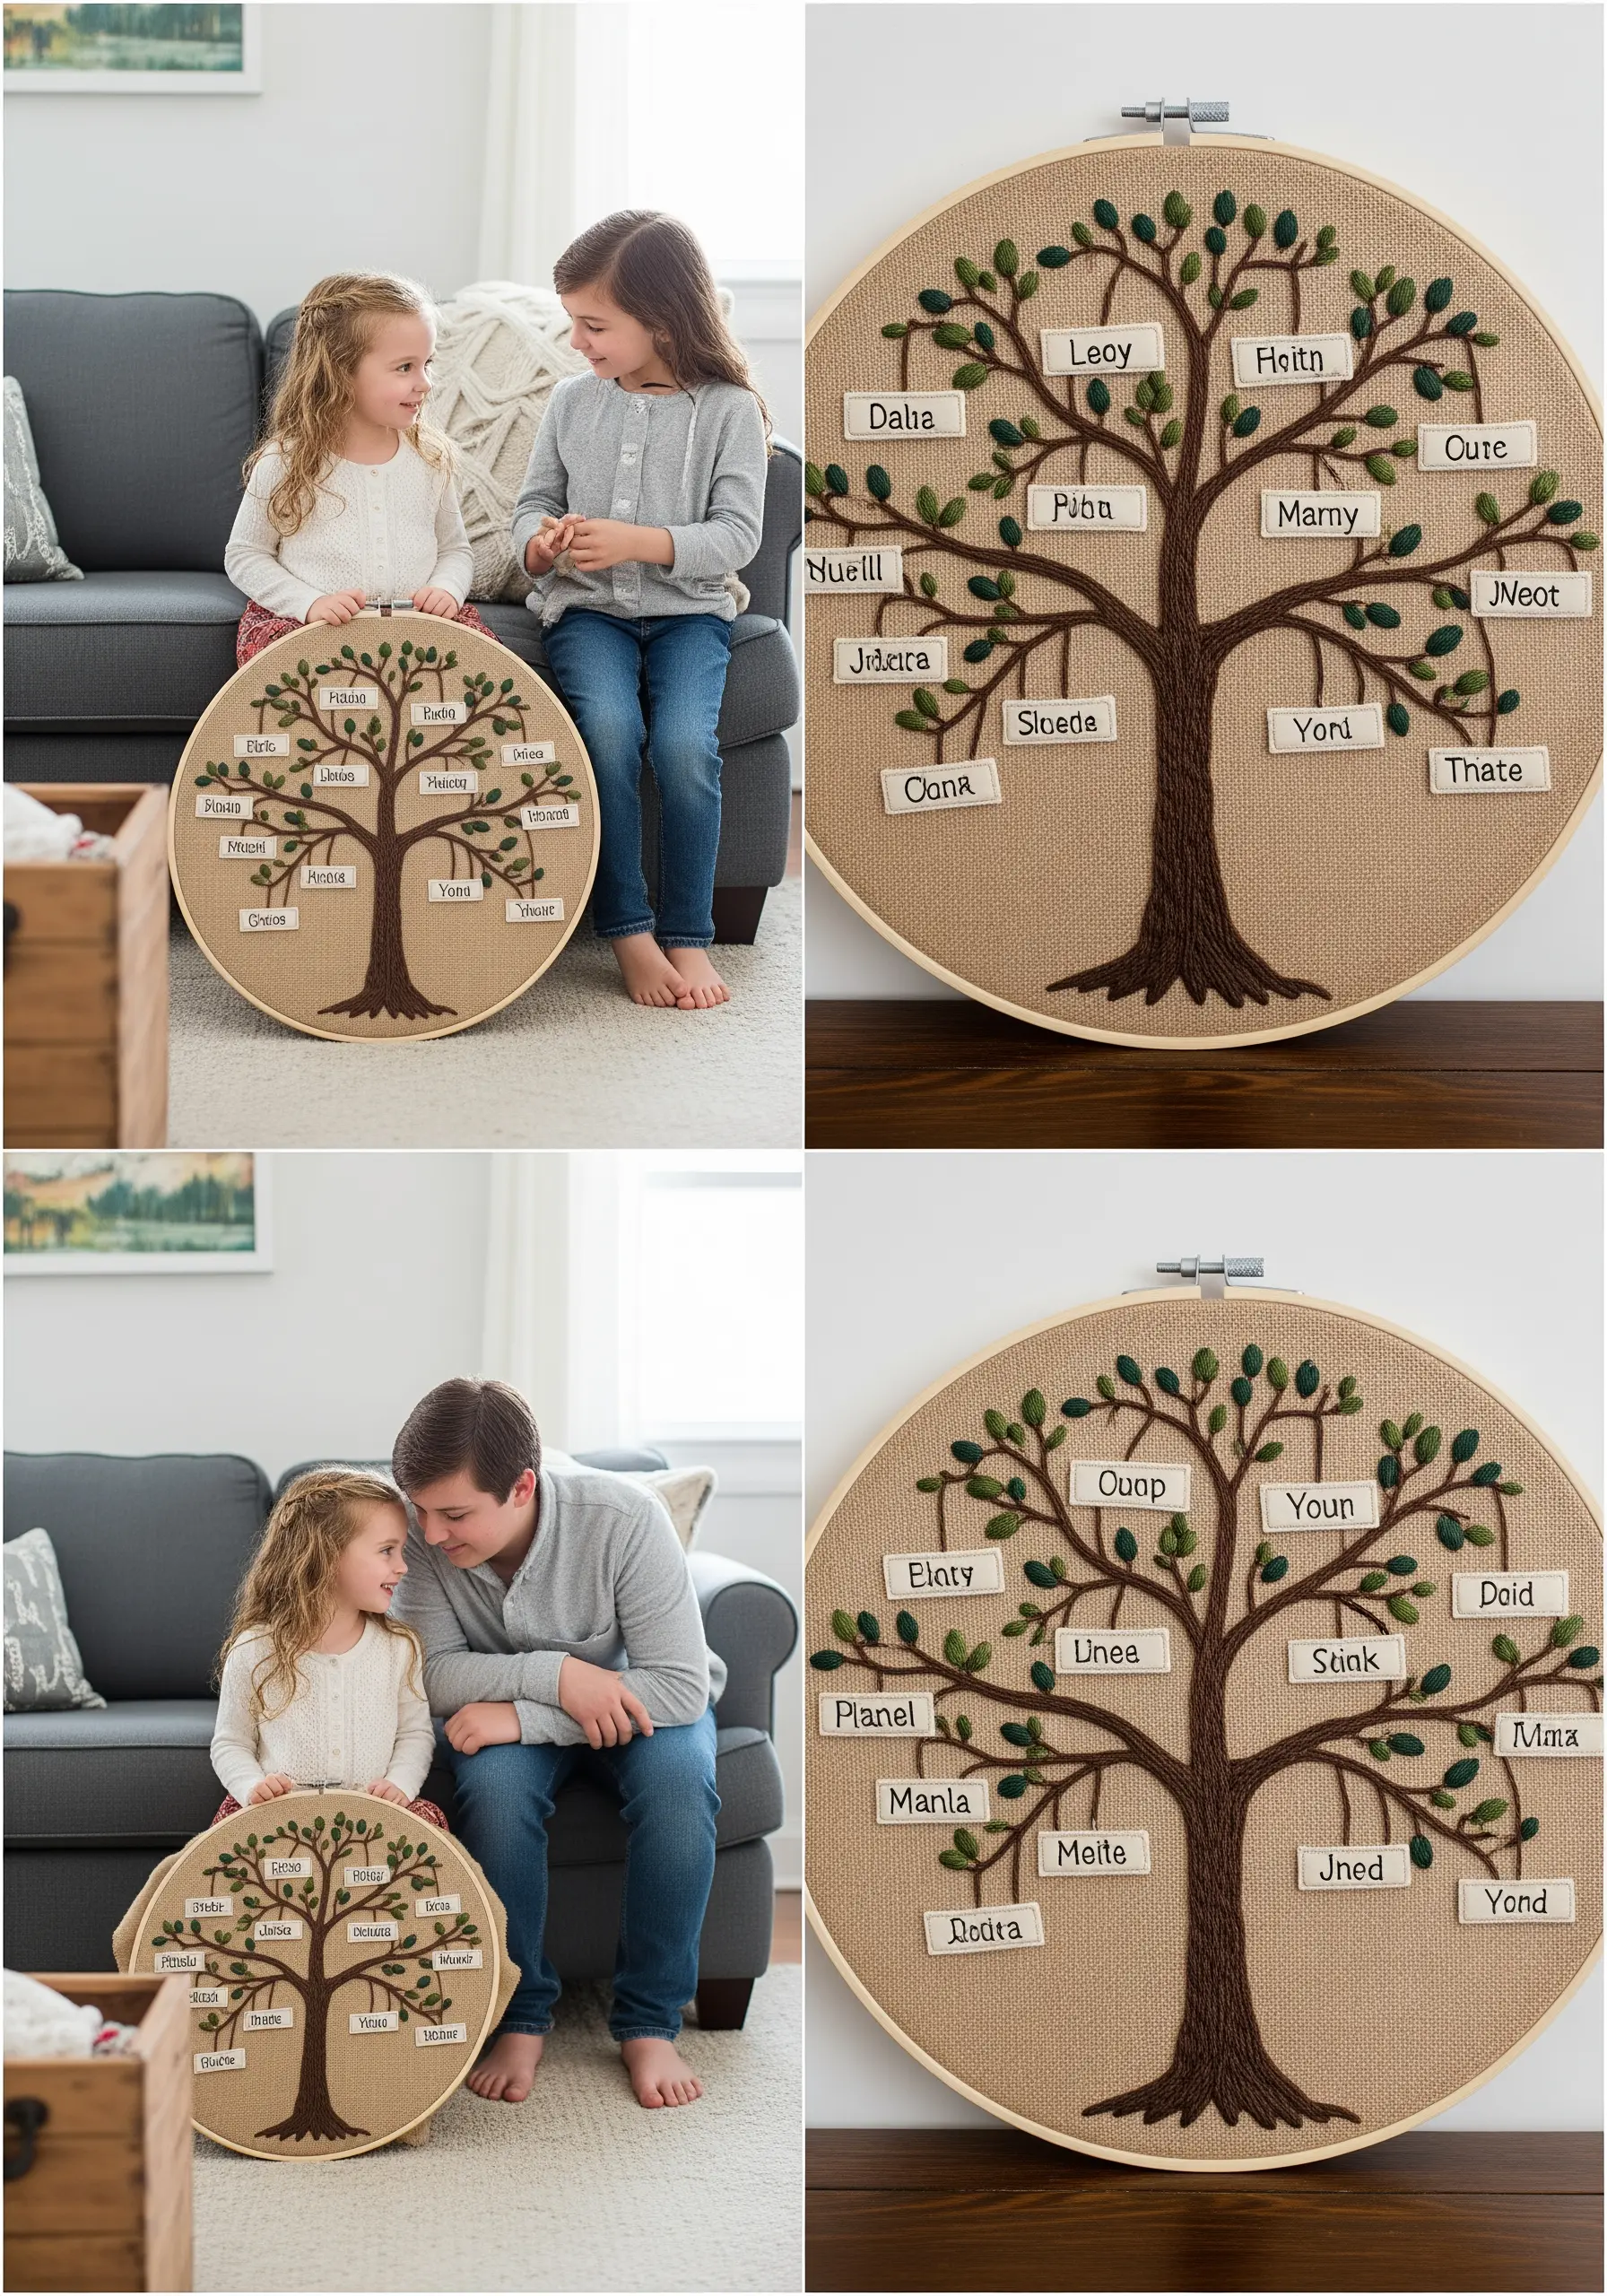
Add a clean, modern touch to a traditional family tree by using appliqué for the names.
Print the names onto a fabric stabilizer, iron it onto a contrasting linen or felt, and cut out small rectangular labels.
Attach each label to the tree with a neat running stitch for a crisp, three-dimensional look that’s easier to read than embroidered text.
Use a chunky chain stitch fill for the tree trunk to give it a sturdy, grounded presence.
19. Create Ethereal Art on Sheer Organza
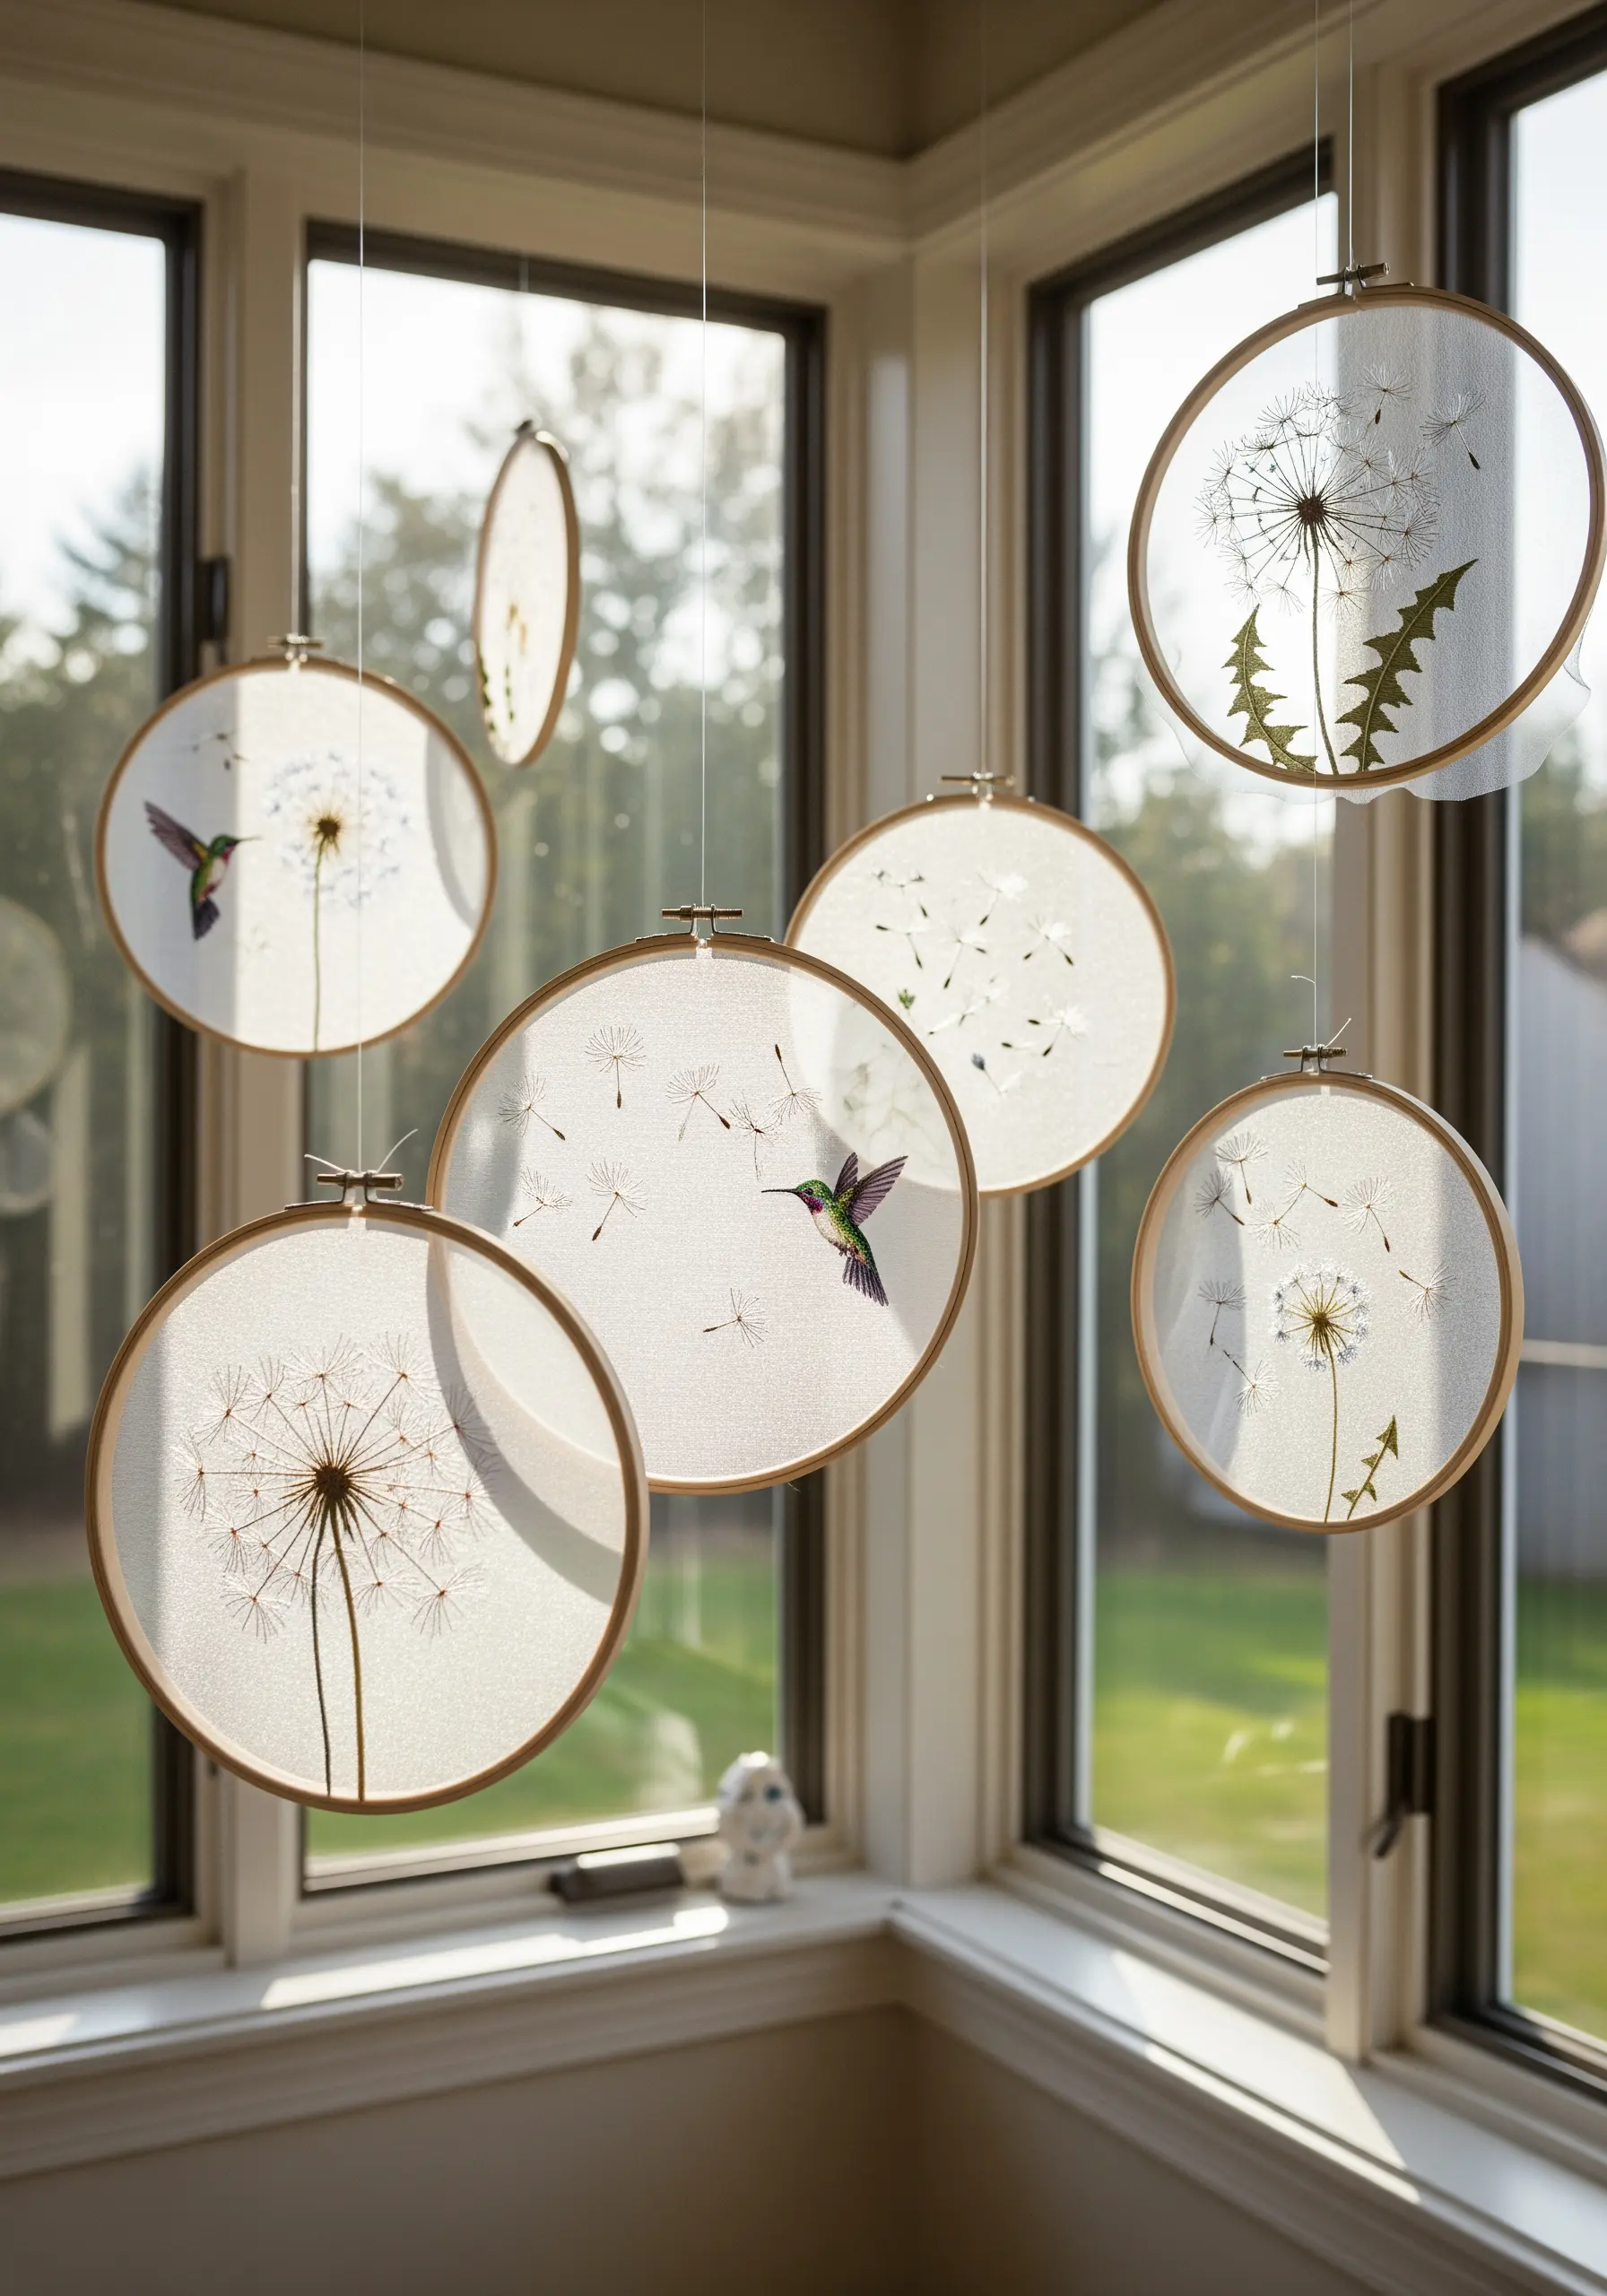
Stitching on a sheer fabric like tulle or organza creates a magical, floating effect perfect for delicate subjects like dandelions.
Use a water-soluble stabilizer to transfer your design, as traditional methods won’t work here.
Keep your stitches minimal and light: a few straight stitches for the seeds and a delicate backstitch for the stem are all you need.
Hang these in a window to let the light shine through, casting beautiful shadows and highlighting the illusion.
20. Mix Opulent Stitches with Abstract Metallics
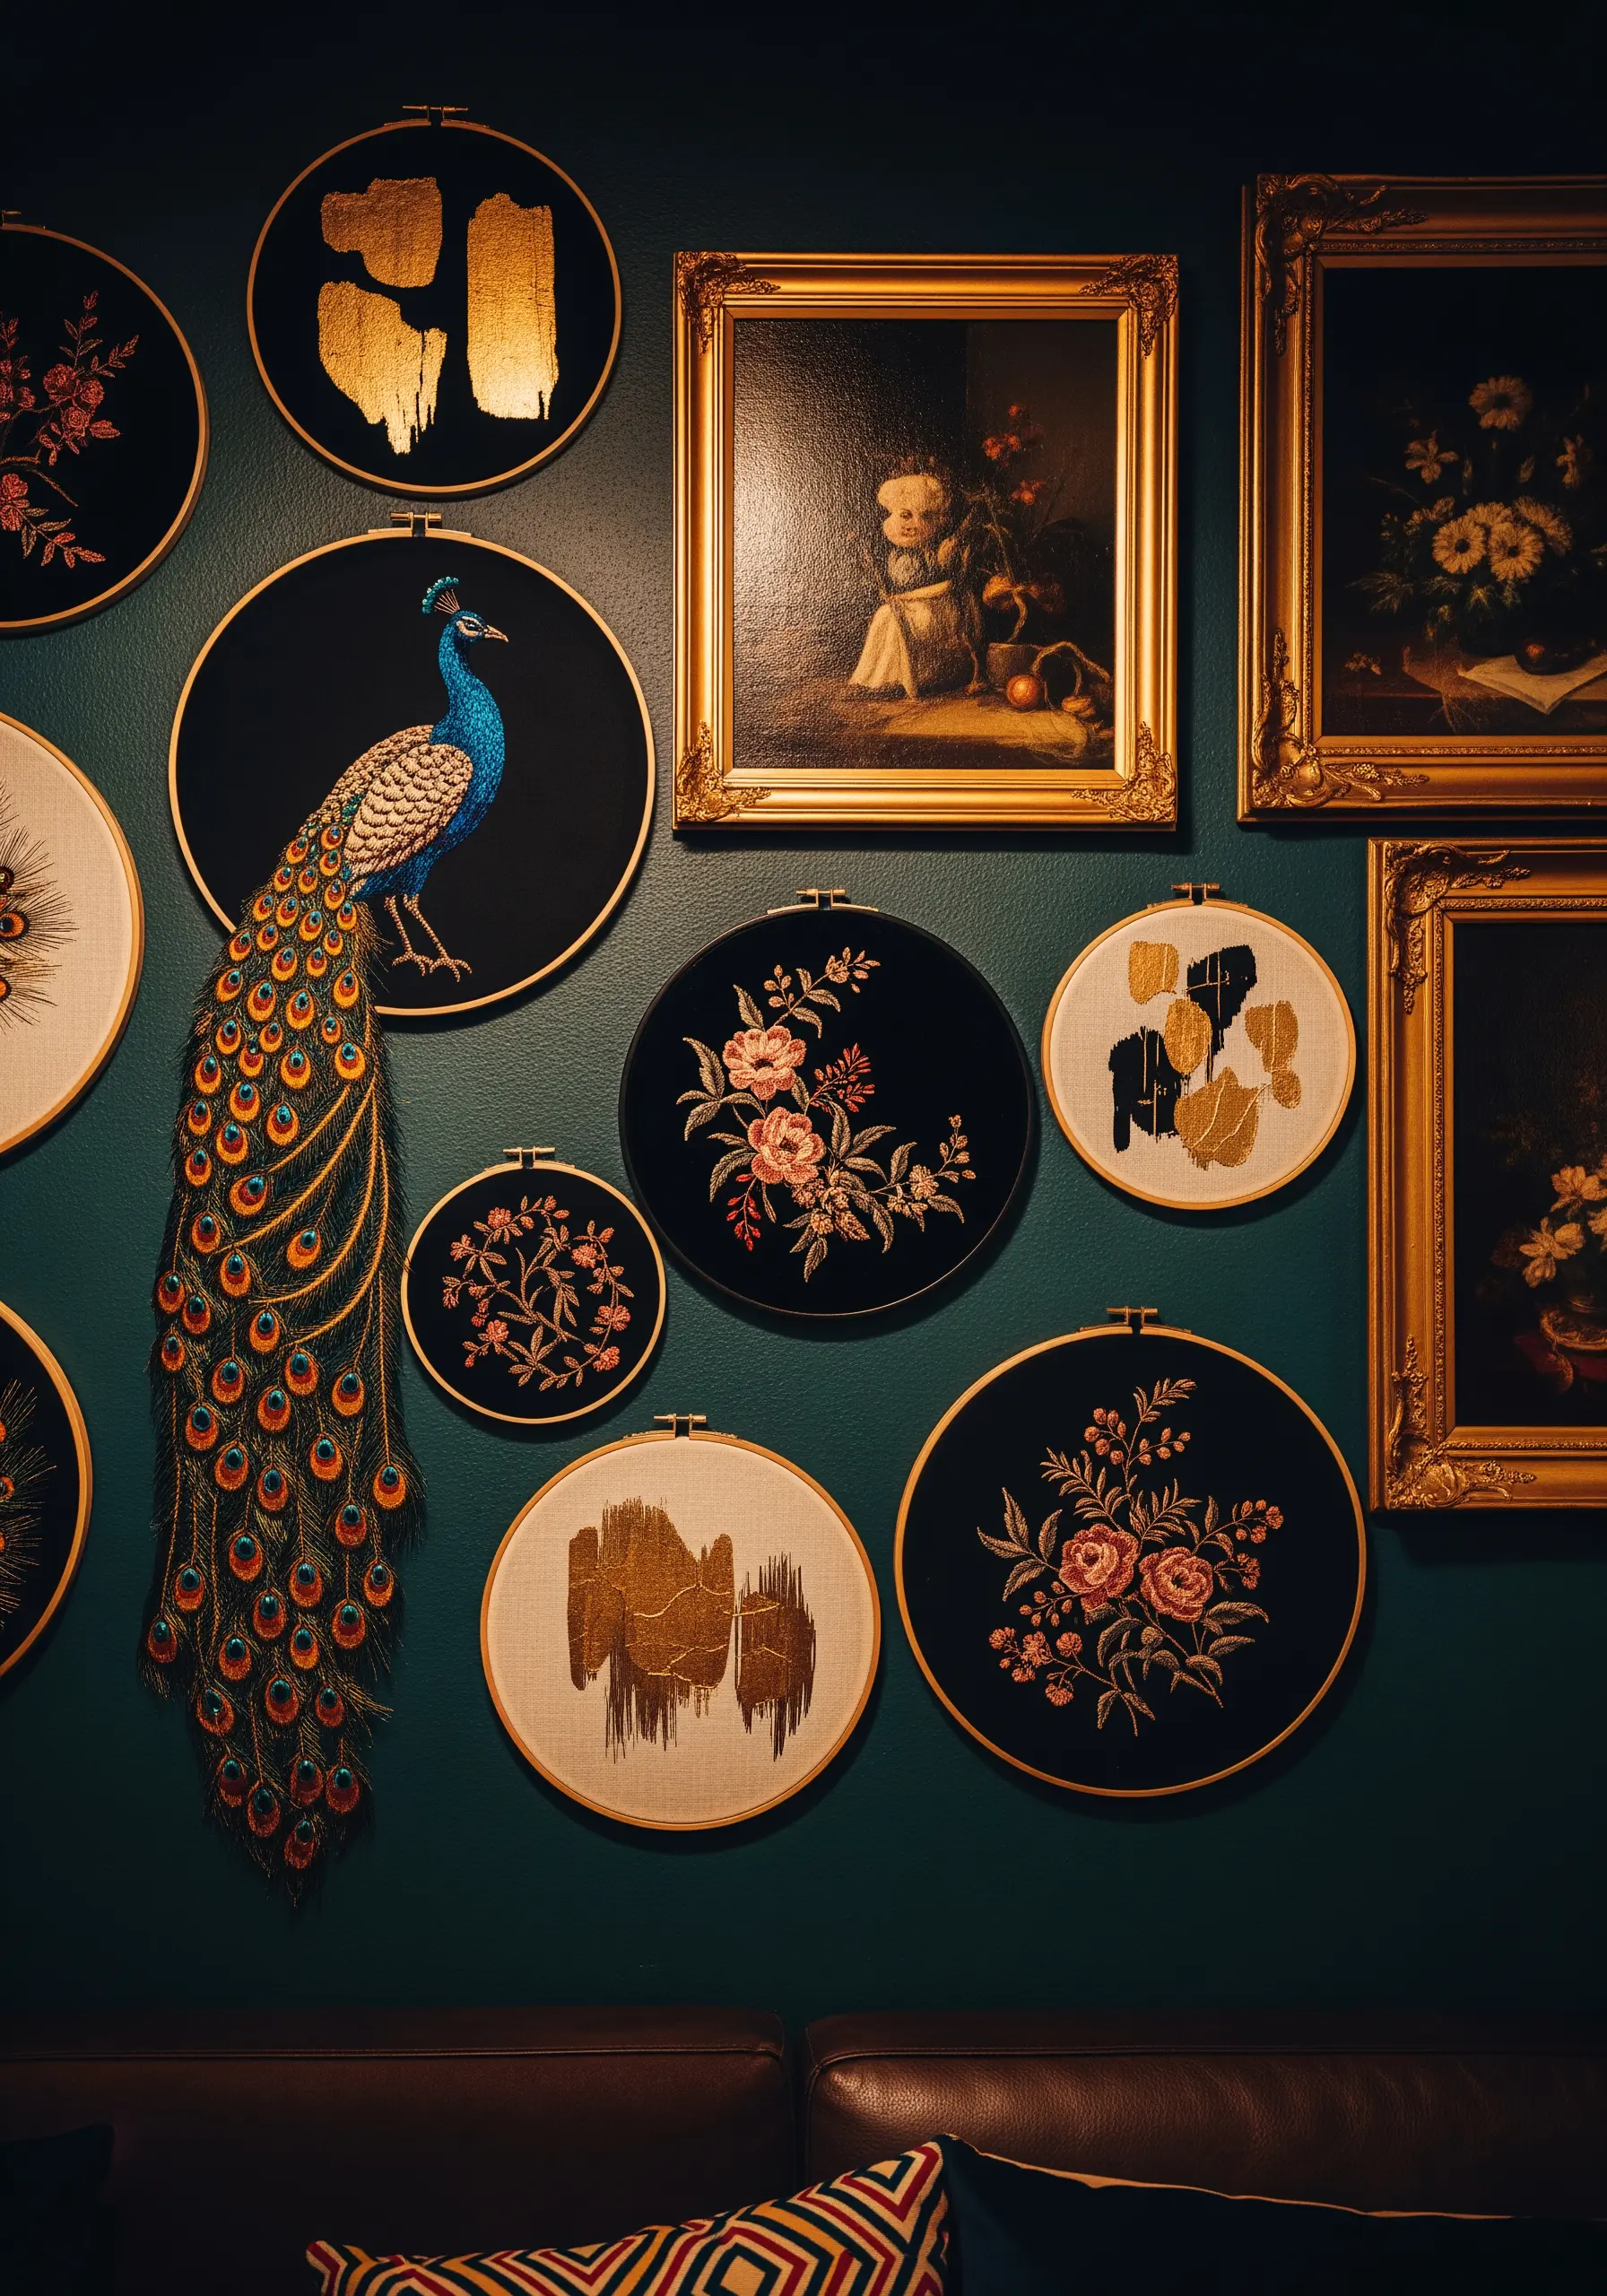
Create a truly maximalist gallery wall by blending classic motifs with modern, abstract elements.
Pair intricately thread-painted florals and a majestic peacock with hoops featuring bold, abstract brushstrokes made with gold leaf or metallic paint.
For the peacock’s tail, let long strands of thread hang loose or couch down metallic yarns to create a stunning, textural cascade that breaks the hoop’s boundary.
This daring combination feels luxurious, artistic, and completely unique.
21. Curate a Thematic Vanity Display
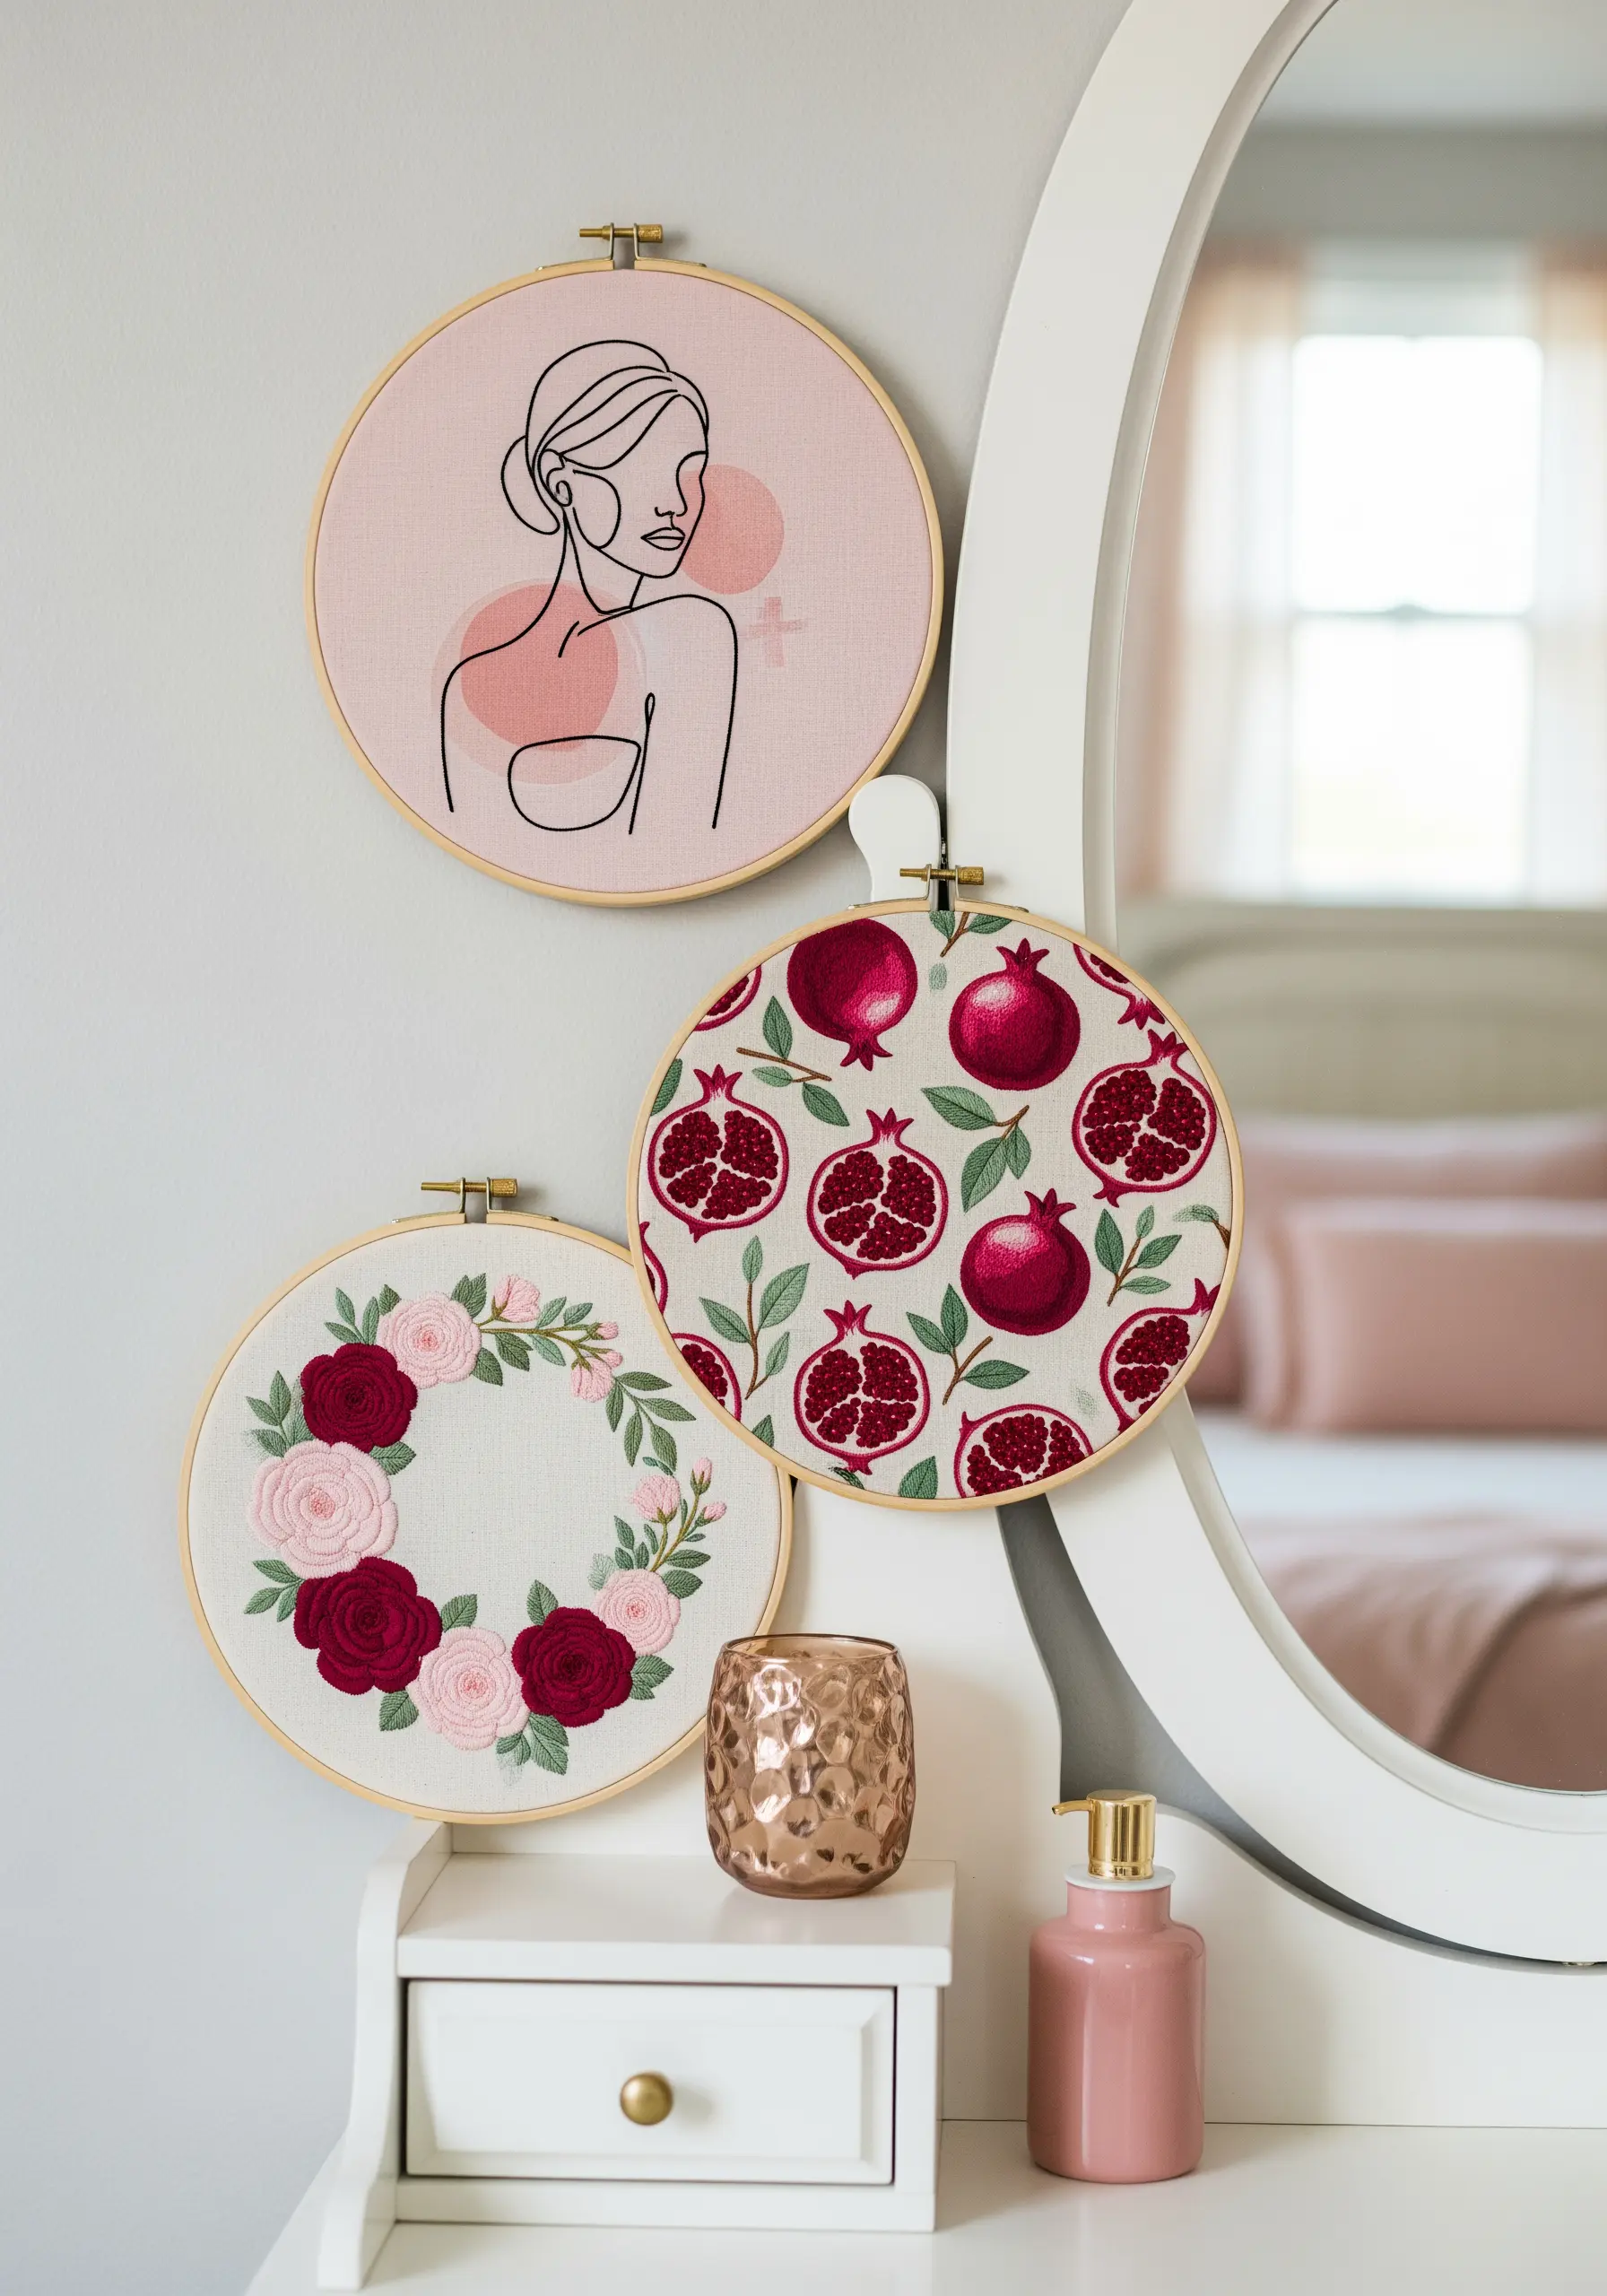
Design a small, cohesive collection that tells a story and complements your space.
Combine different textile techniques: a simple backstitch line art portrait, a densely stitched floral wreath, and a hoop wrapped in a complementary patterned fabric.
Using a consistent color palette—here, soft pinks and deep reds—ties the varied styles together into a single, harmonious vignette perfect for a dressing table.
22. Compose an Installation with Color and Repetition
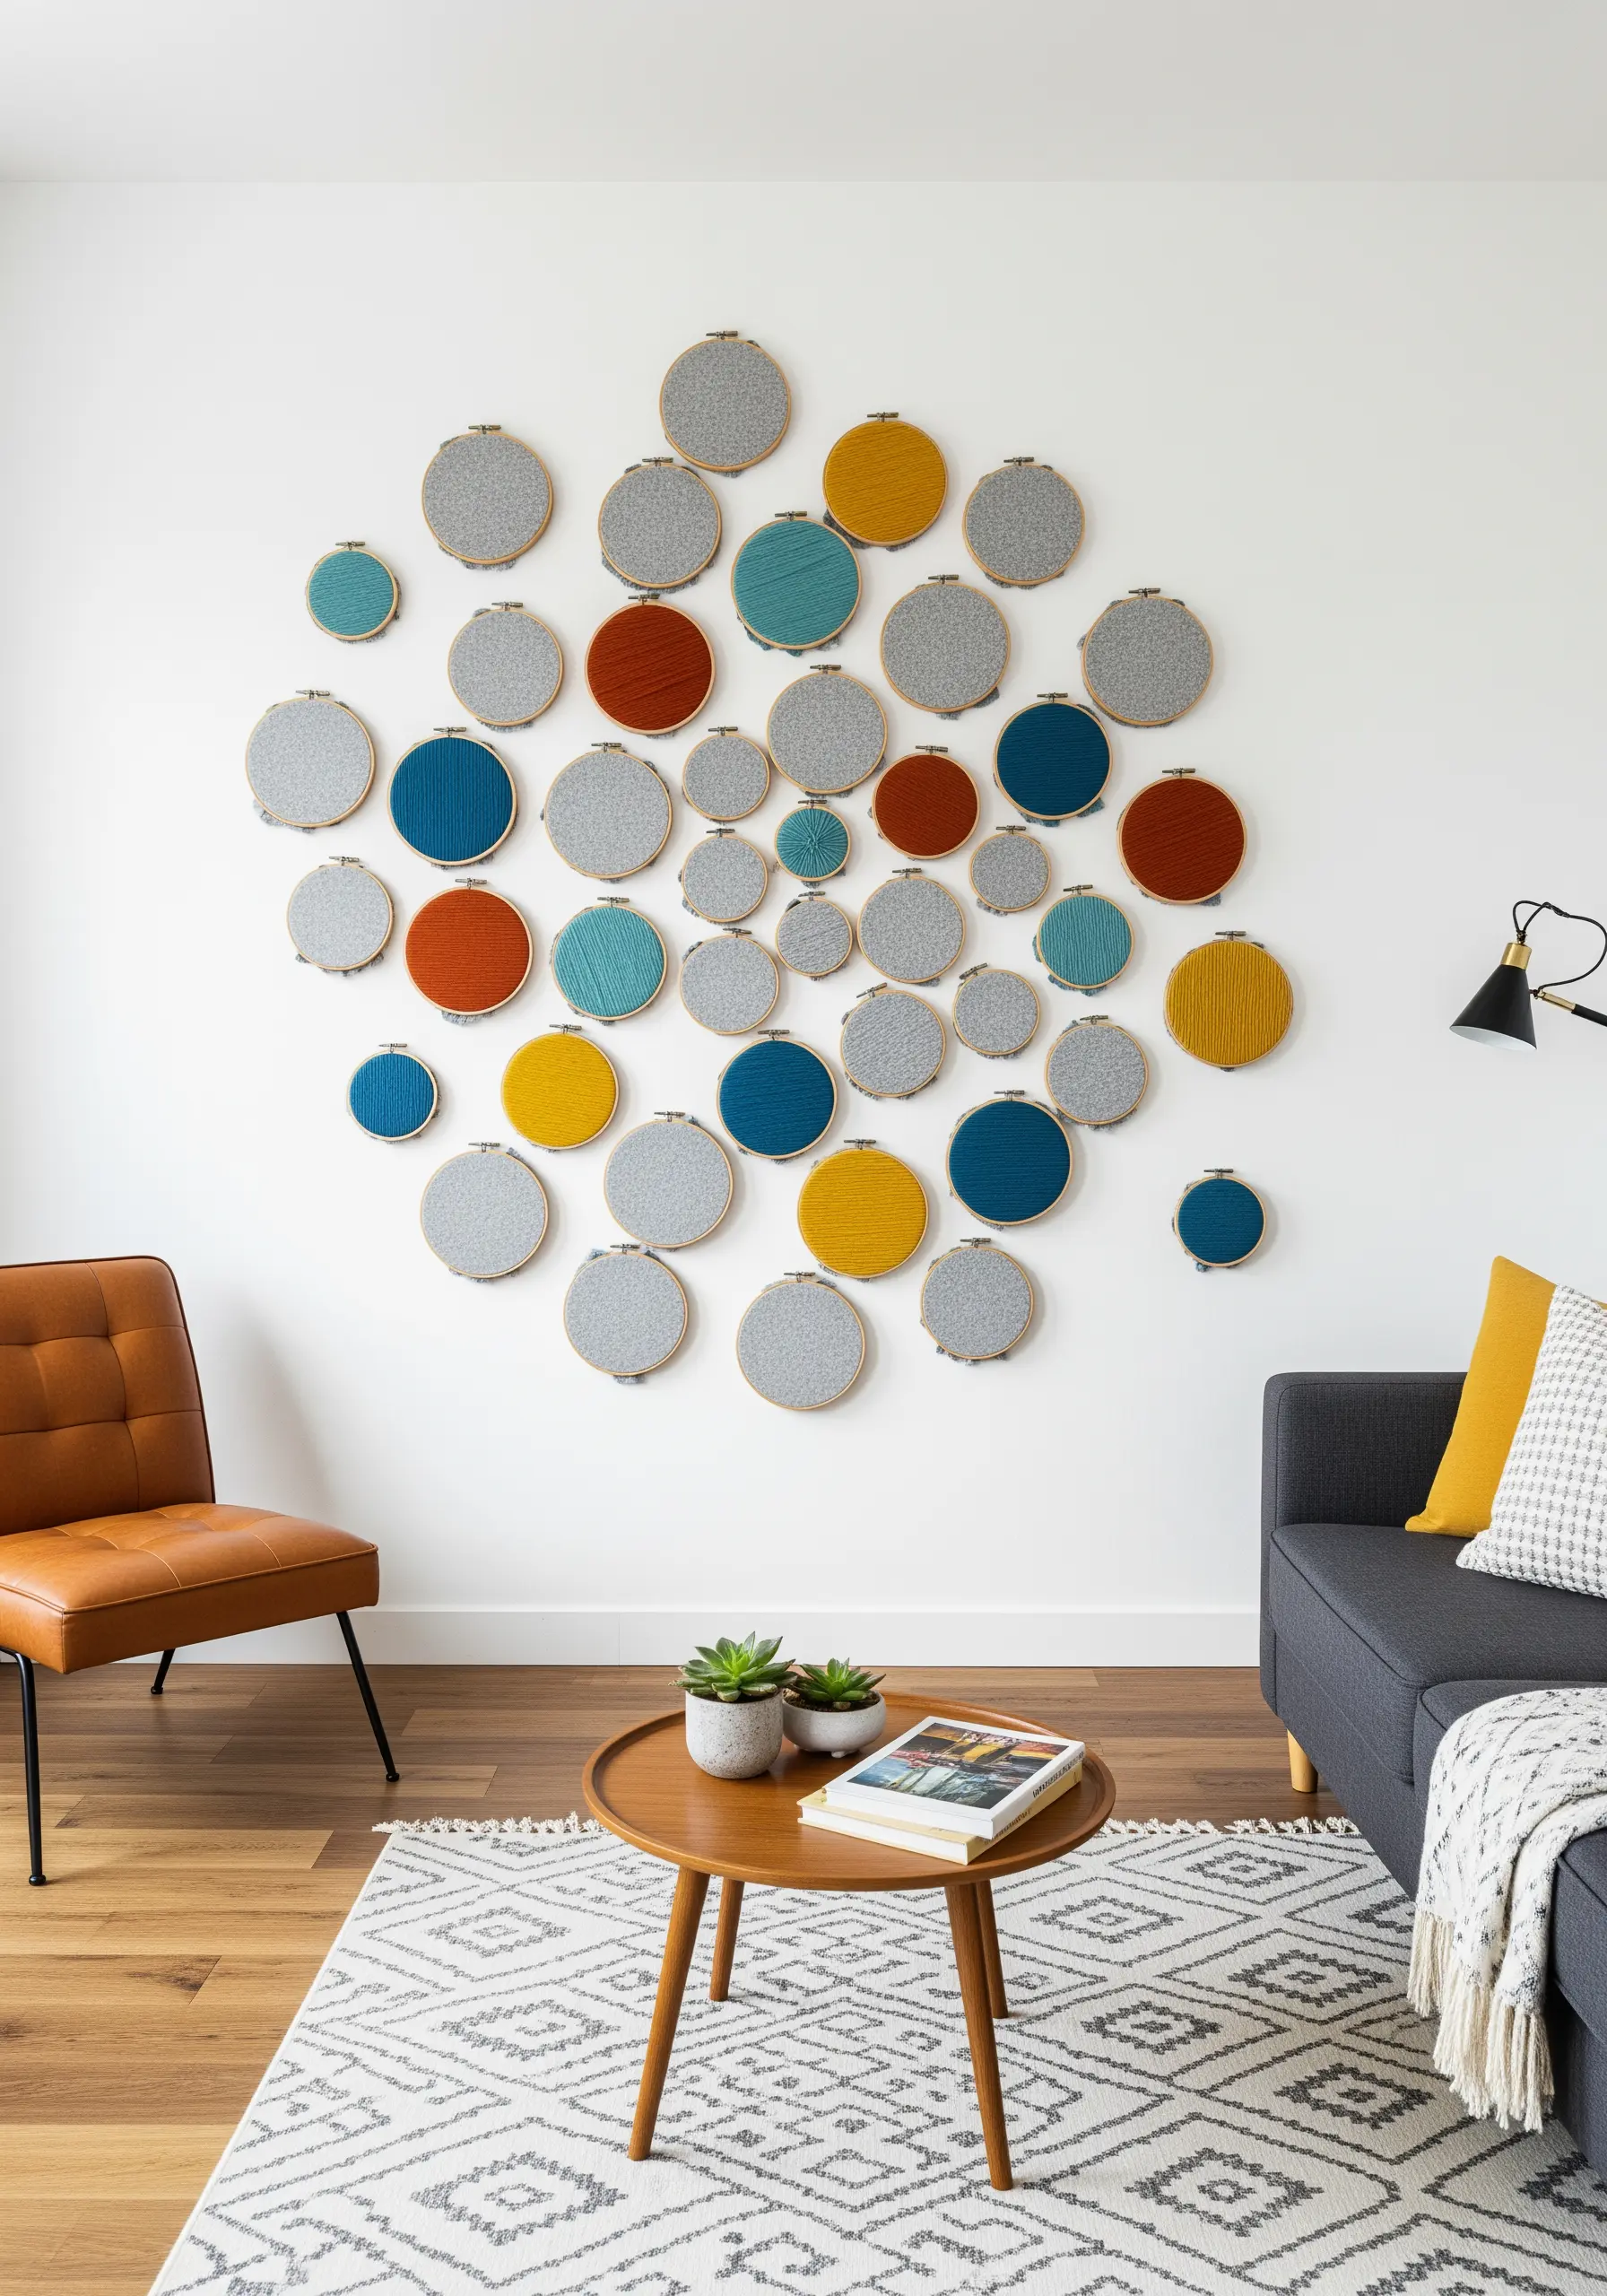
Make a massive impact with the simplest technique: a single stitch, repeated.
Fill dozens of hoops of varying sizes with a dense seed stitch, using a tightly controlled color palette of gray, blue, and ochre.
The power of this installation comes from the sheer volume and the abstract, cloud-like arrangement on the wall.
It proves that you don’t need complex patterns to create breathtaking, large-scale textile art.
23. Chart Your Journeys with an Interactive Map
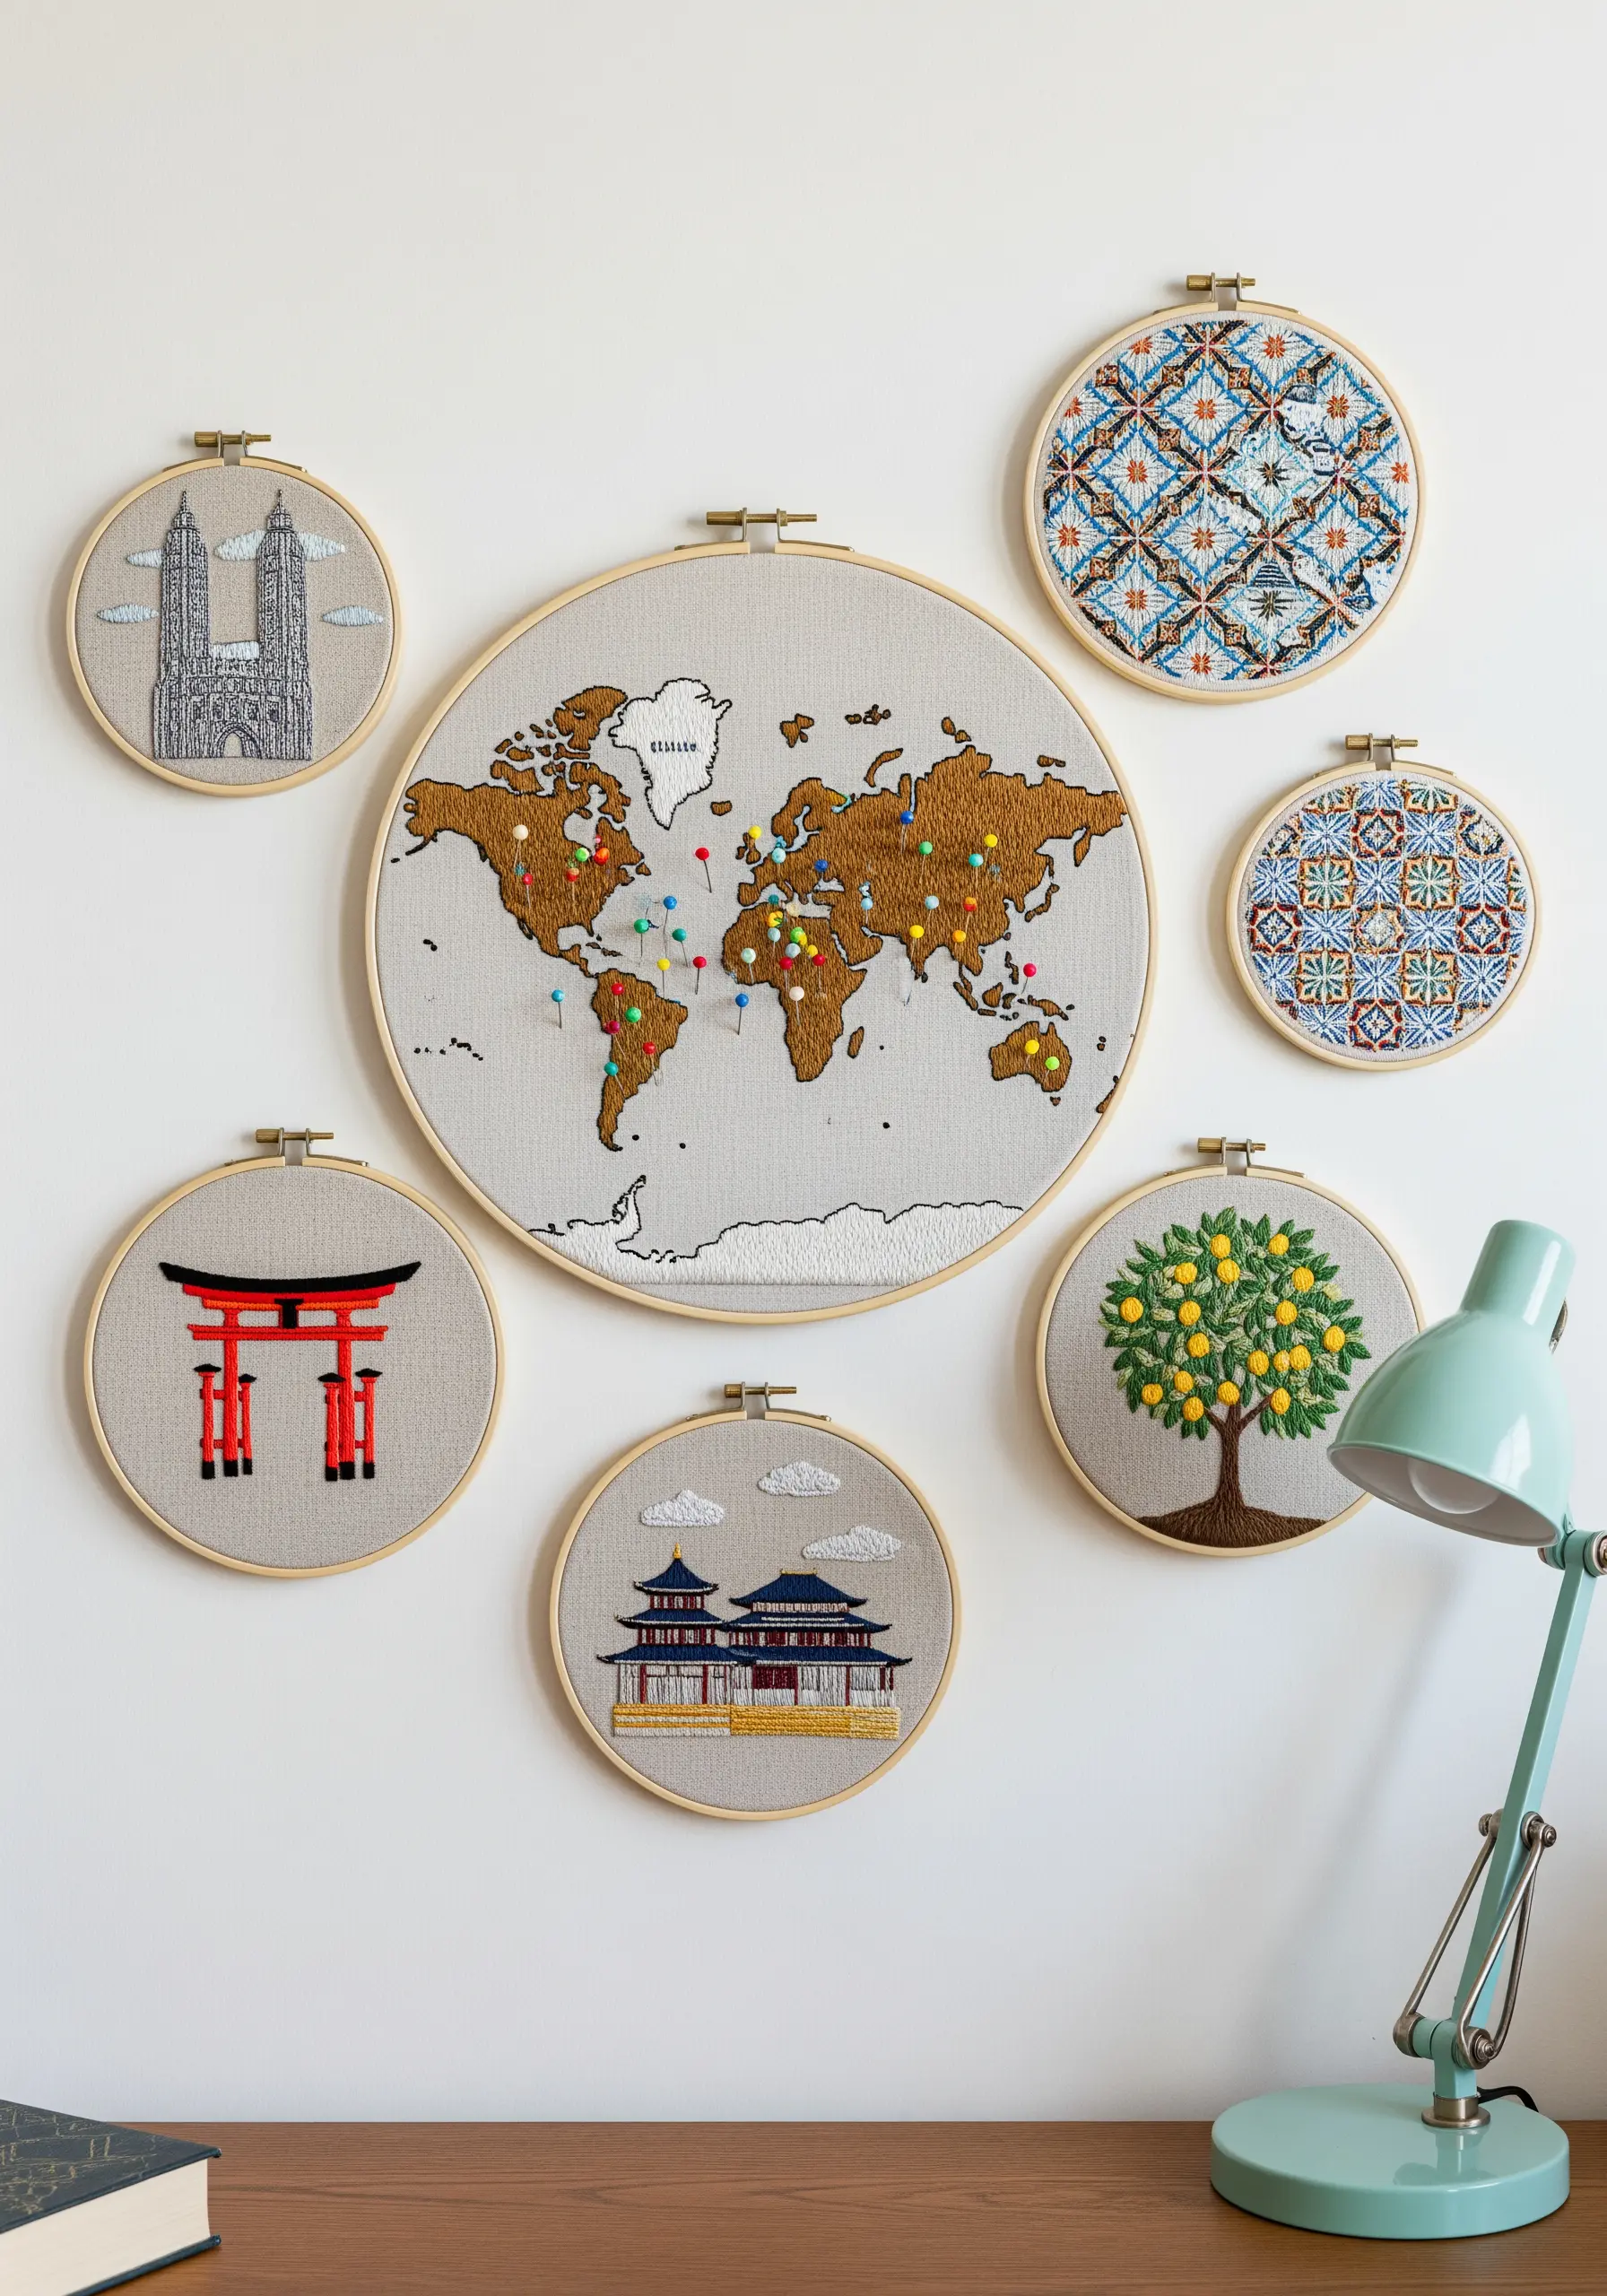
Turn your wall art into a living document of your adventures.
Embroider the continents using a simple outline stitch or a solid satin stitch fill, then use colorful map pins to mark places you’ve been or dream of visiting.
Surround the central map with smaller hoops showcasing stitched landmarks from your travels, creating a beautiful and deeply personal gallery.
This is a wonderful way to make your art interactive and ever-evolving.
24. Visualize Sound with Thread
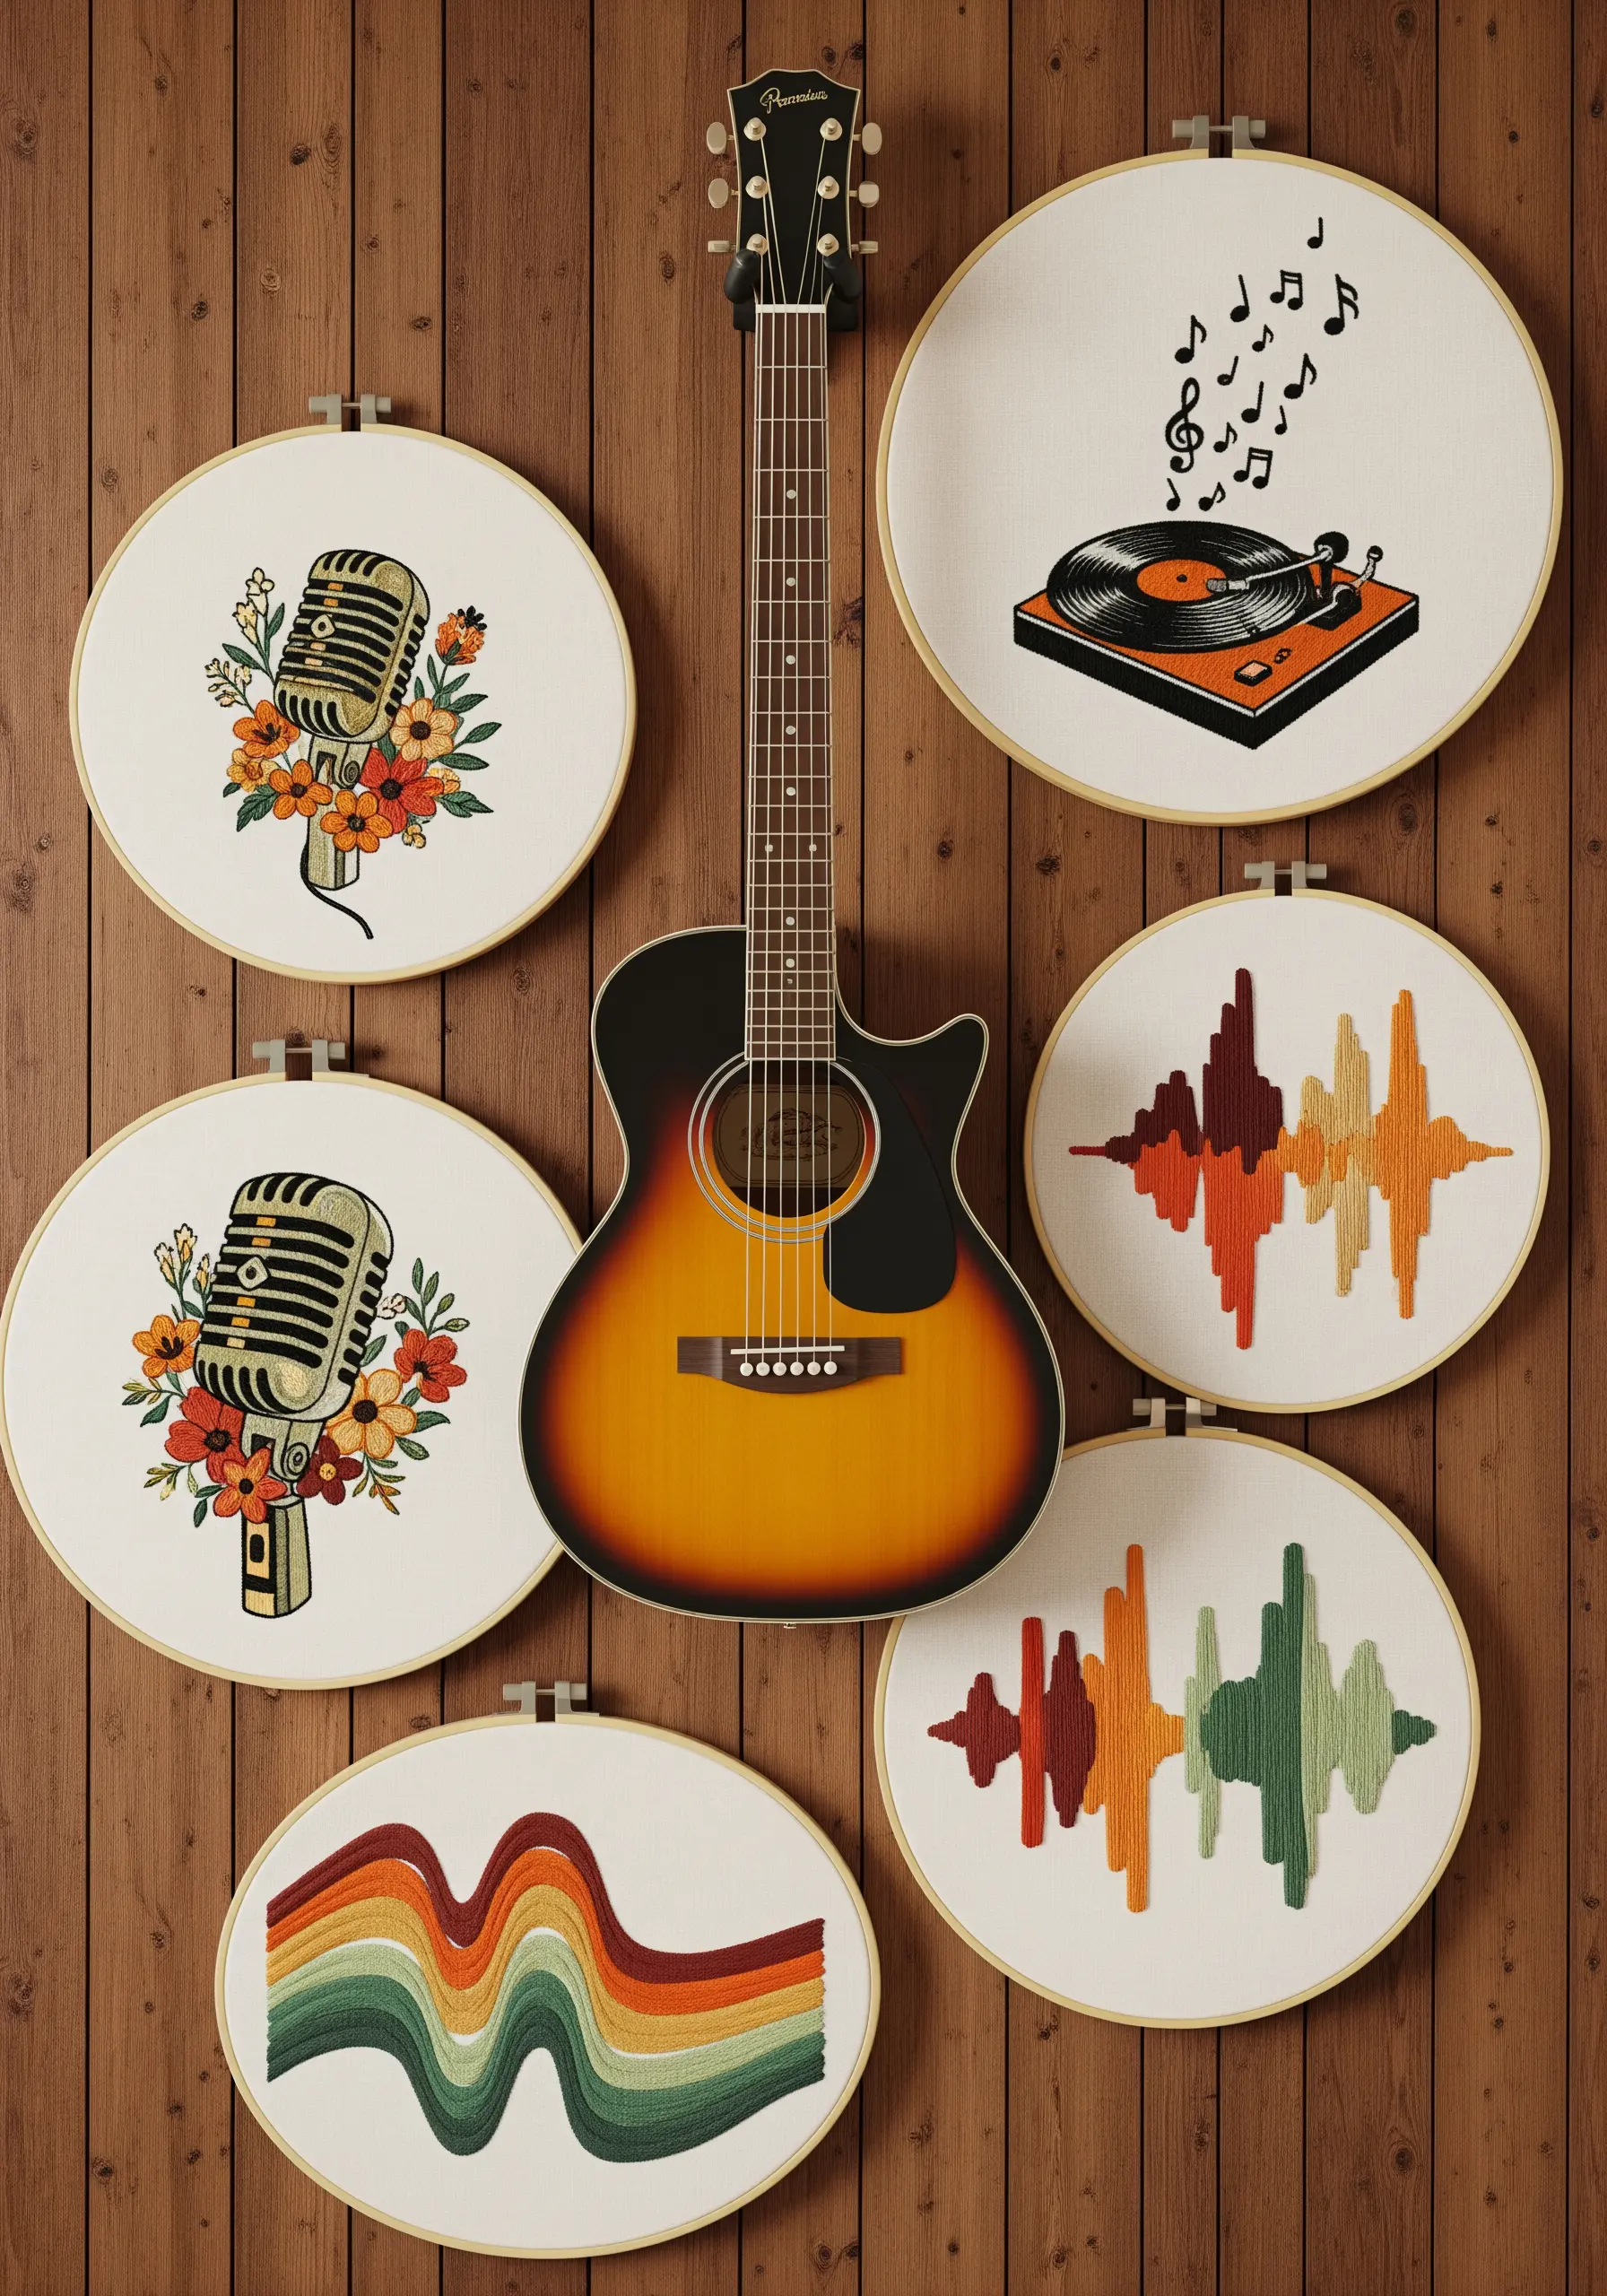
Translate your love of music into a visual medium.
Stitch retro motifs like microphones and record players using bold satin stitch fills for a graphic, poster-like quality.
For a modern, abstract twist, stitch soundwave patterns using simple straight stitches in a gradient of colors.
This combination of literal and abstract representations creates a dynamic collection that celebrates sound in a silent, beautiful form.
25. Craft a Tactile Menagerie for a Nursery
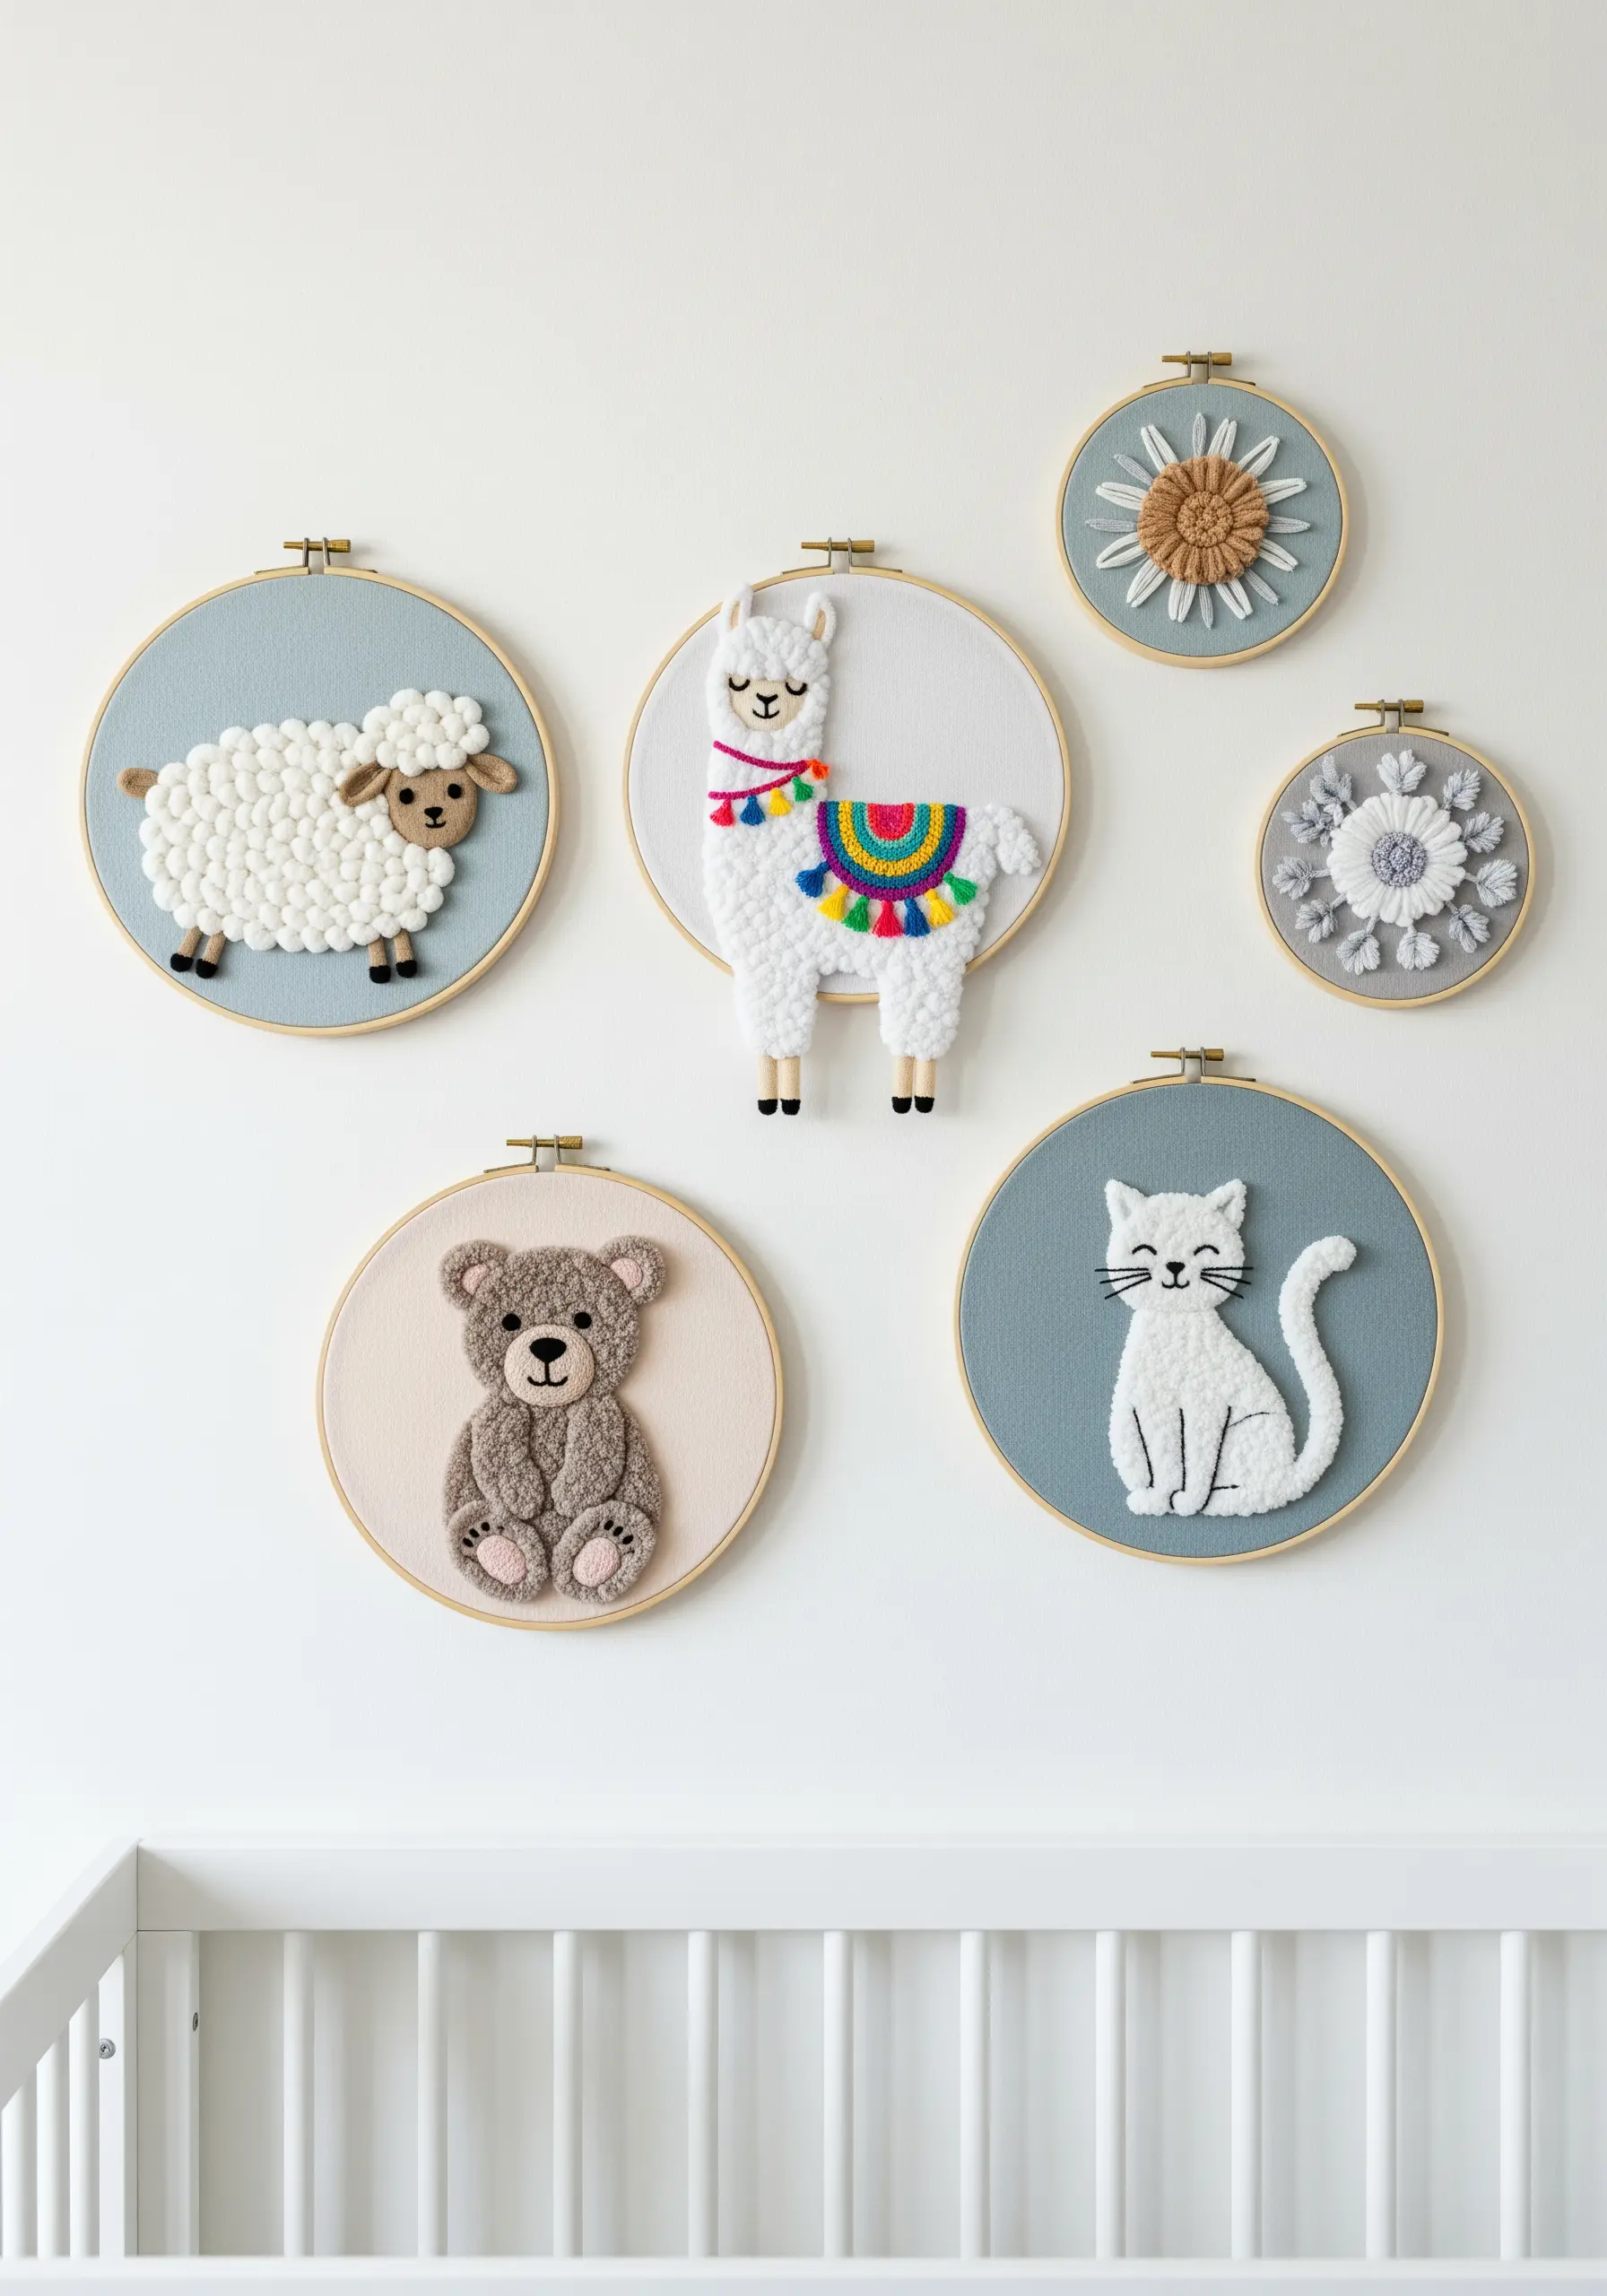
Create irresistibly touchable art for a child’s room by focusing on dimensional, plush stitches.
Use tightly packed French knots or the loop stitch for the sheep’s woolly coat and soft chenille thread or turkey work for the bear’s fluffy fur.
These high-texture stitches create a soft, 3D effect that is visually gentle and engaging, making them perfect for cloud-soft embroidery hoops for nursery walls.
26. Embrace Elegance with Minimalist Line Work
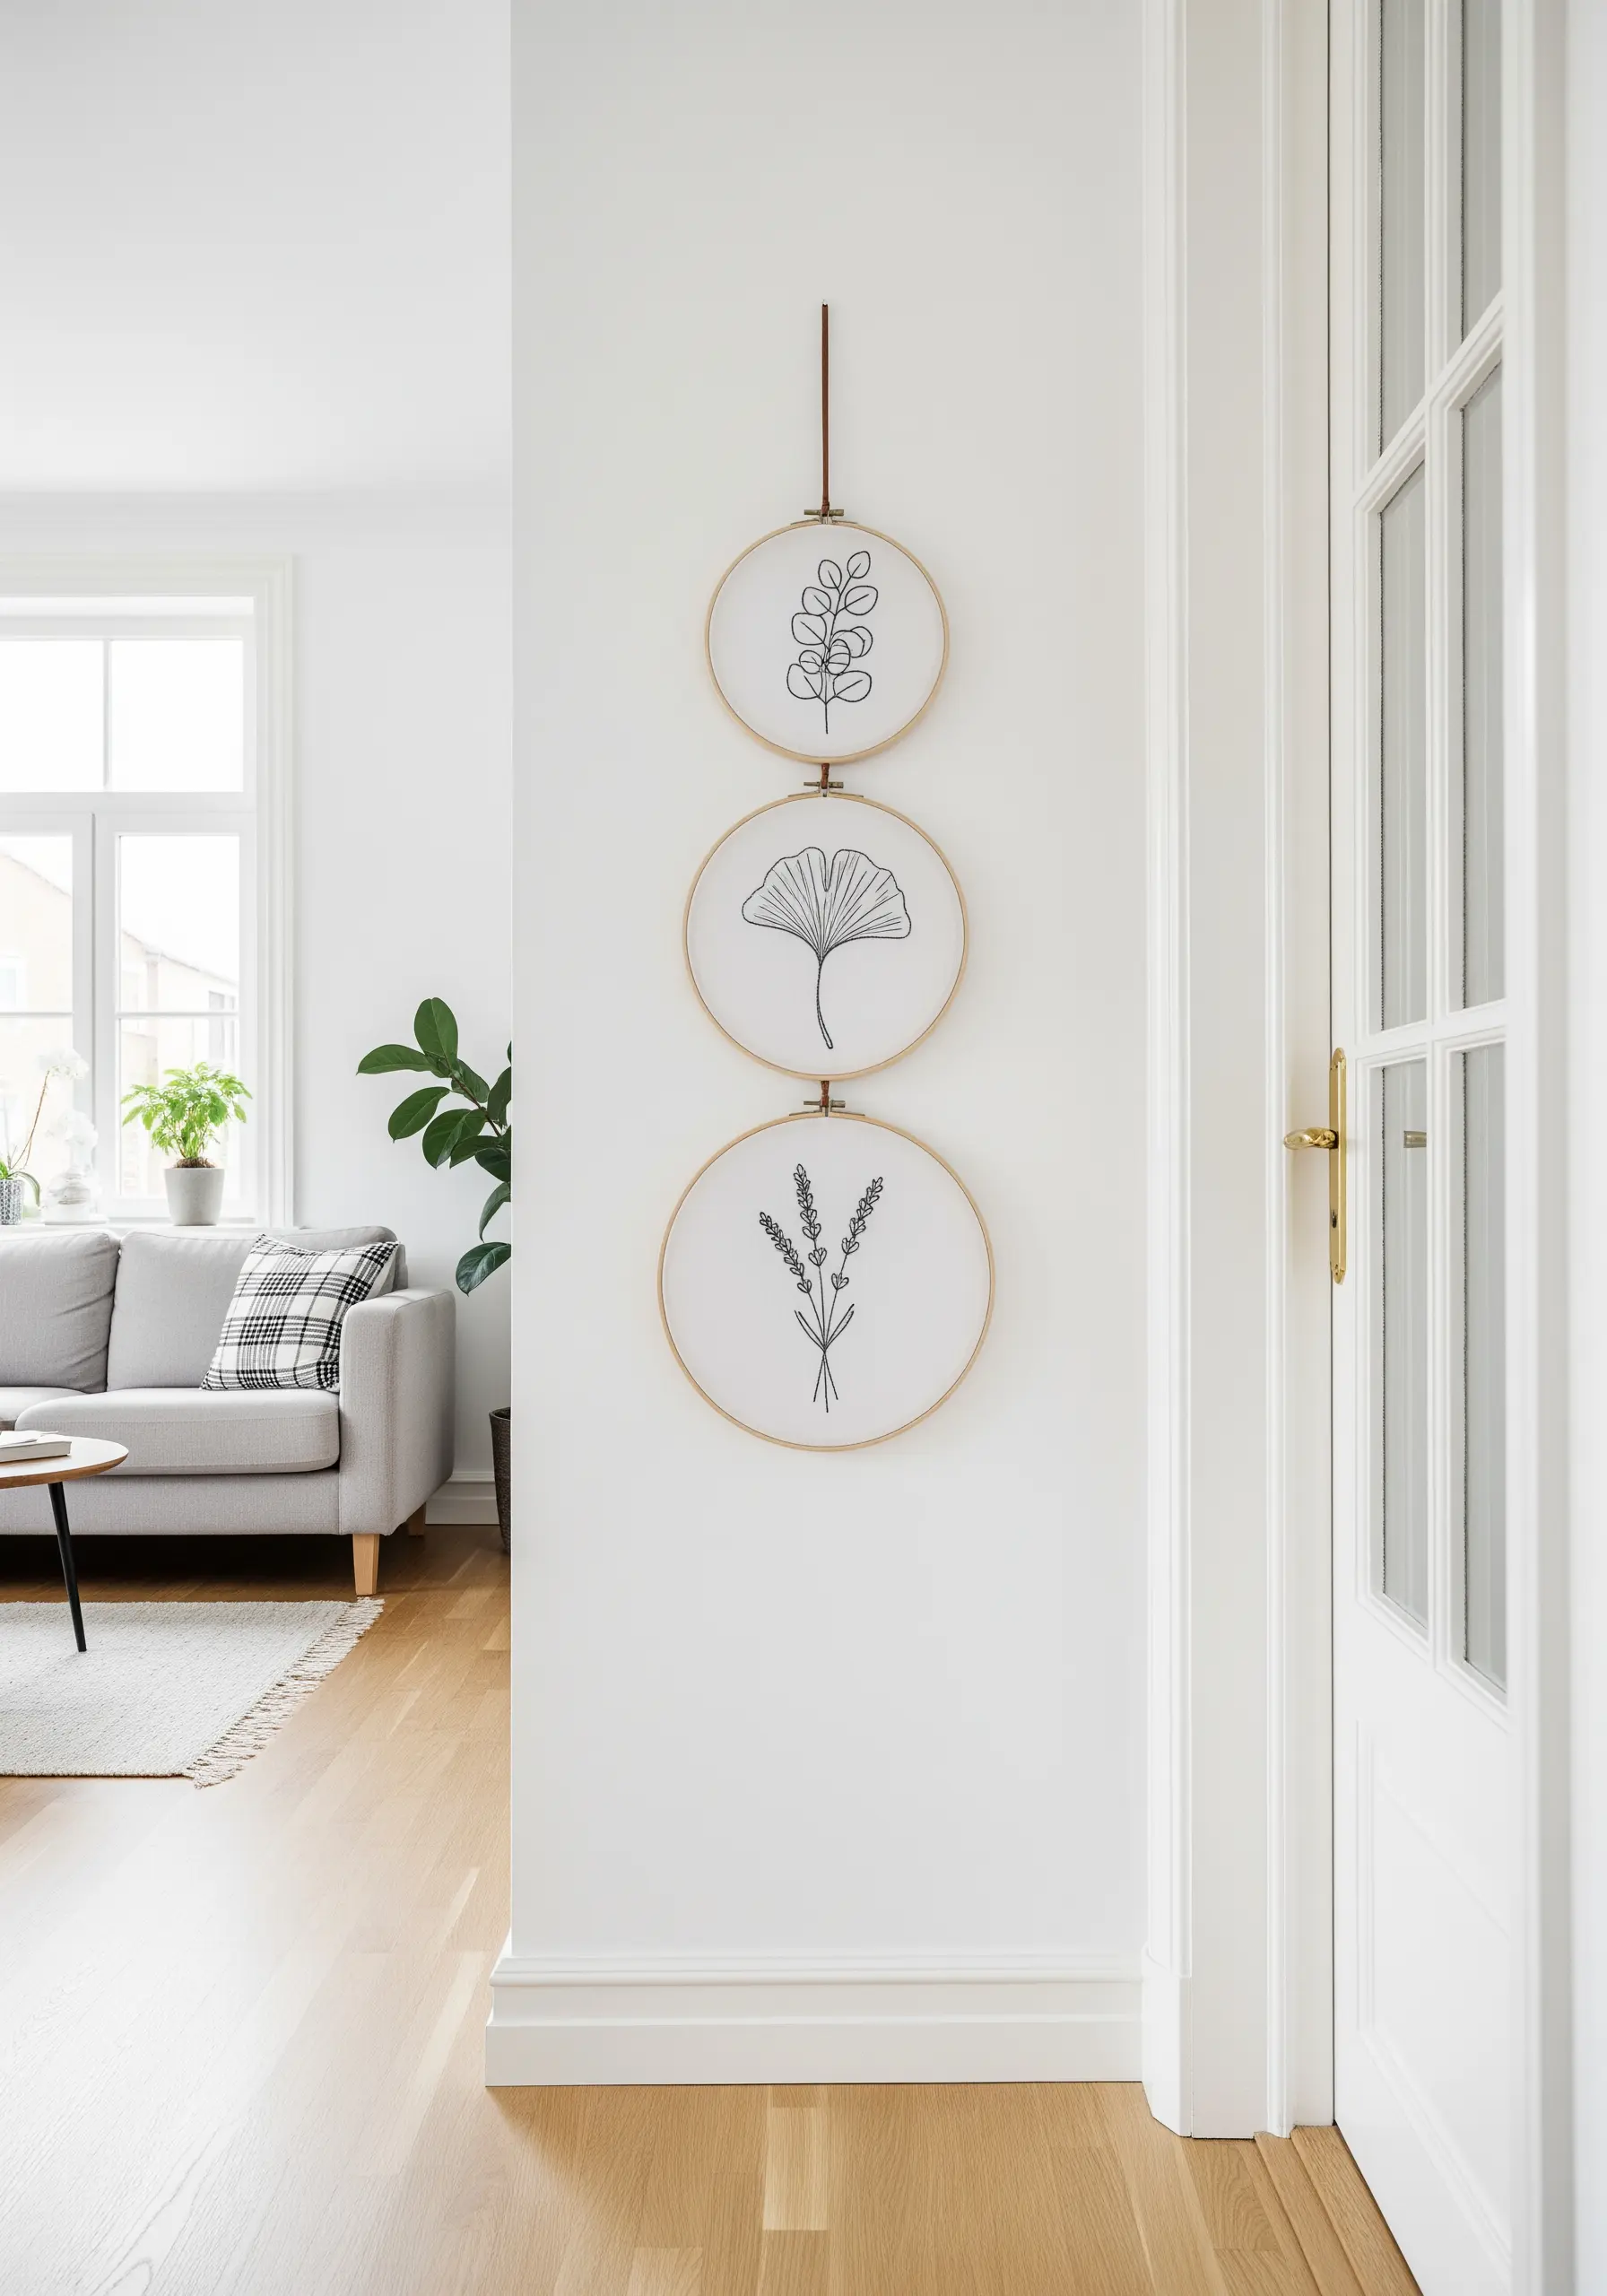
Achieve a sophisticated, Scandinavian-inspired look by celebrating the beauty of a single line.
Use a single strand of black or dark gray thread on a crisp white or natural linen background.
A precise split stitch or backstitch is all you need to render delicate botanical forms.
The negative space is just as important as the stitched line, creating a design that feels calm, clean, and effortlessly elegant. This is the essence of minimalist embroidery projects.
27. Transform a Stitch Sampler into Framed Art

Don’t hide your practice work—celebrate it.
Organize your stitch experiments into a structured grid, arranged by color to create a stunning gradient effect.
This transforms a functional sampler into a comprehensive piece of fiber art that showcases both your skill and your understanding of color theory.
Mounting the finished piece in a large, clean-lined frame elevates it to the status of intentional, high-impact artwork.
28. Unleash Creativity with Abstract Fiber Collage
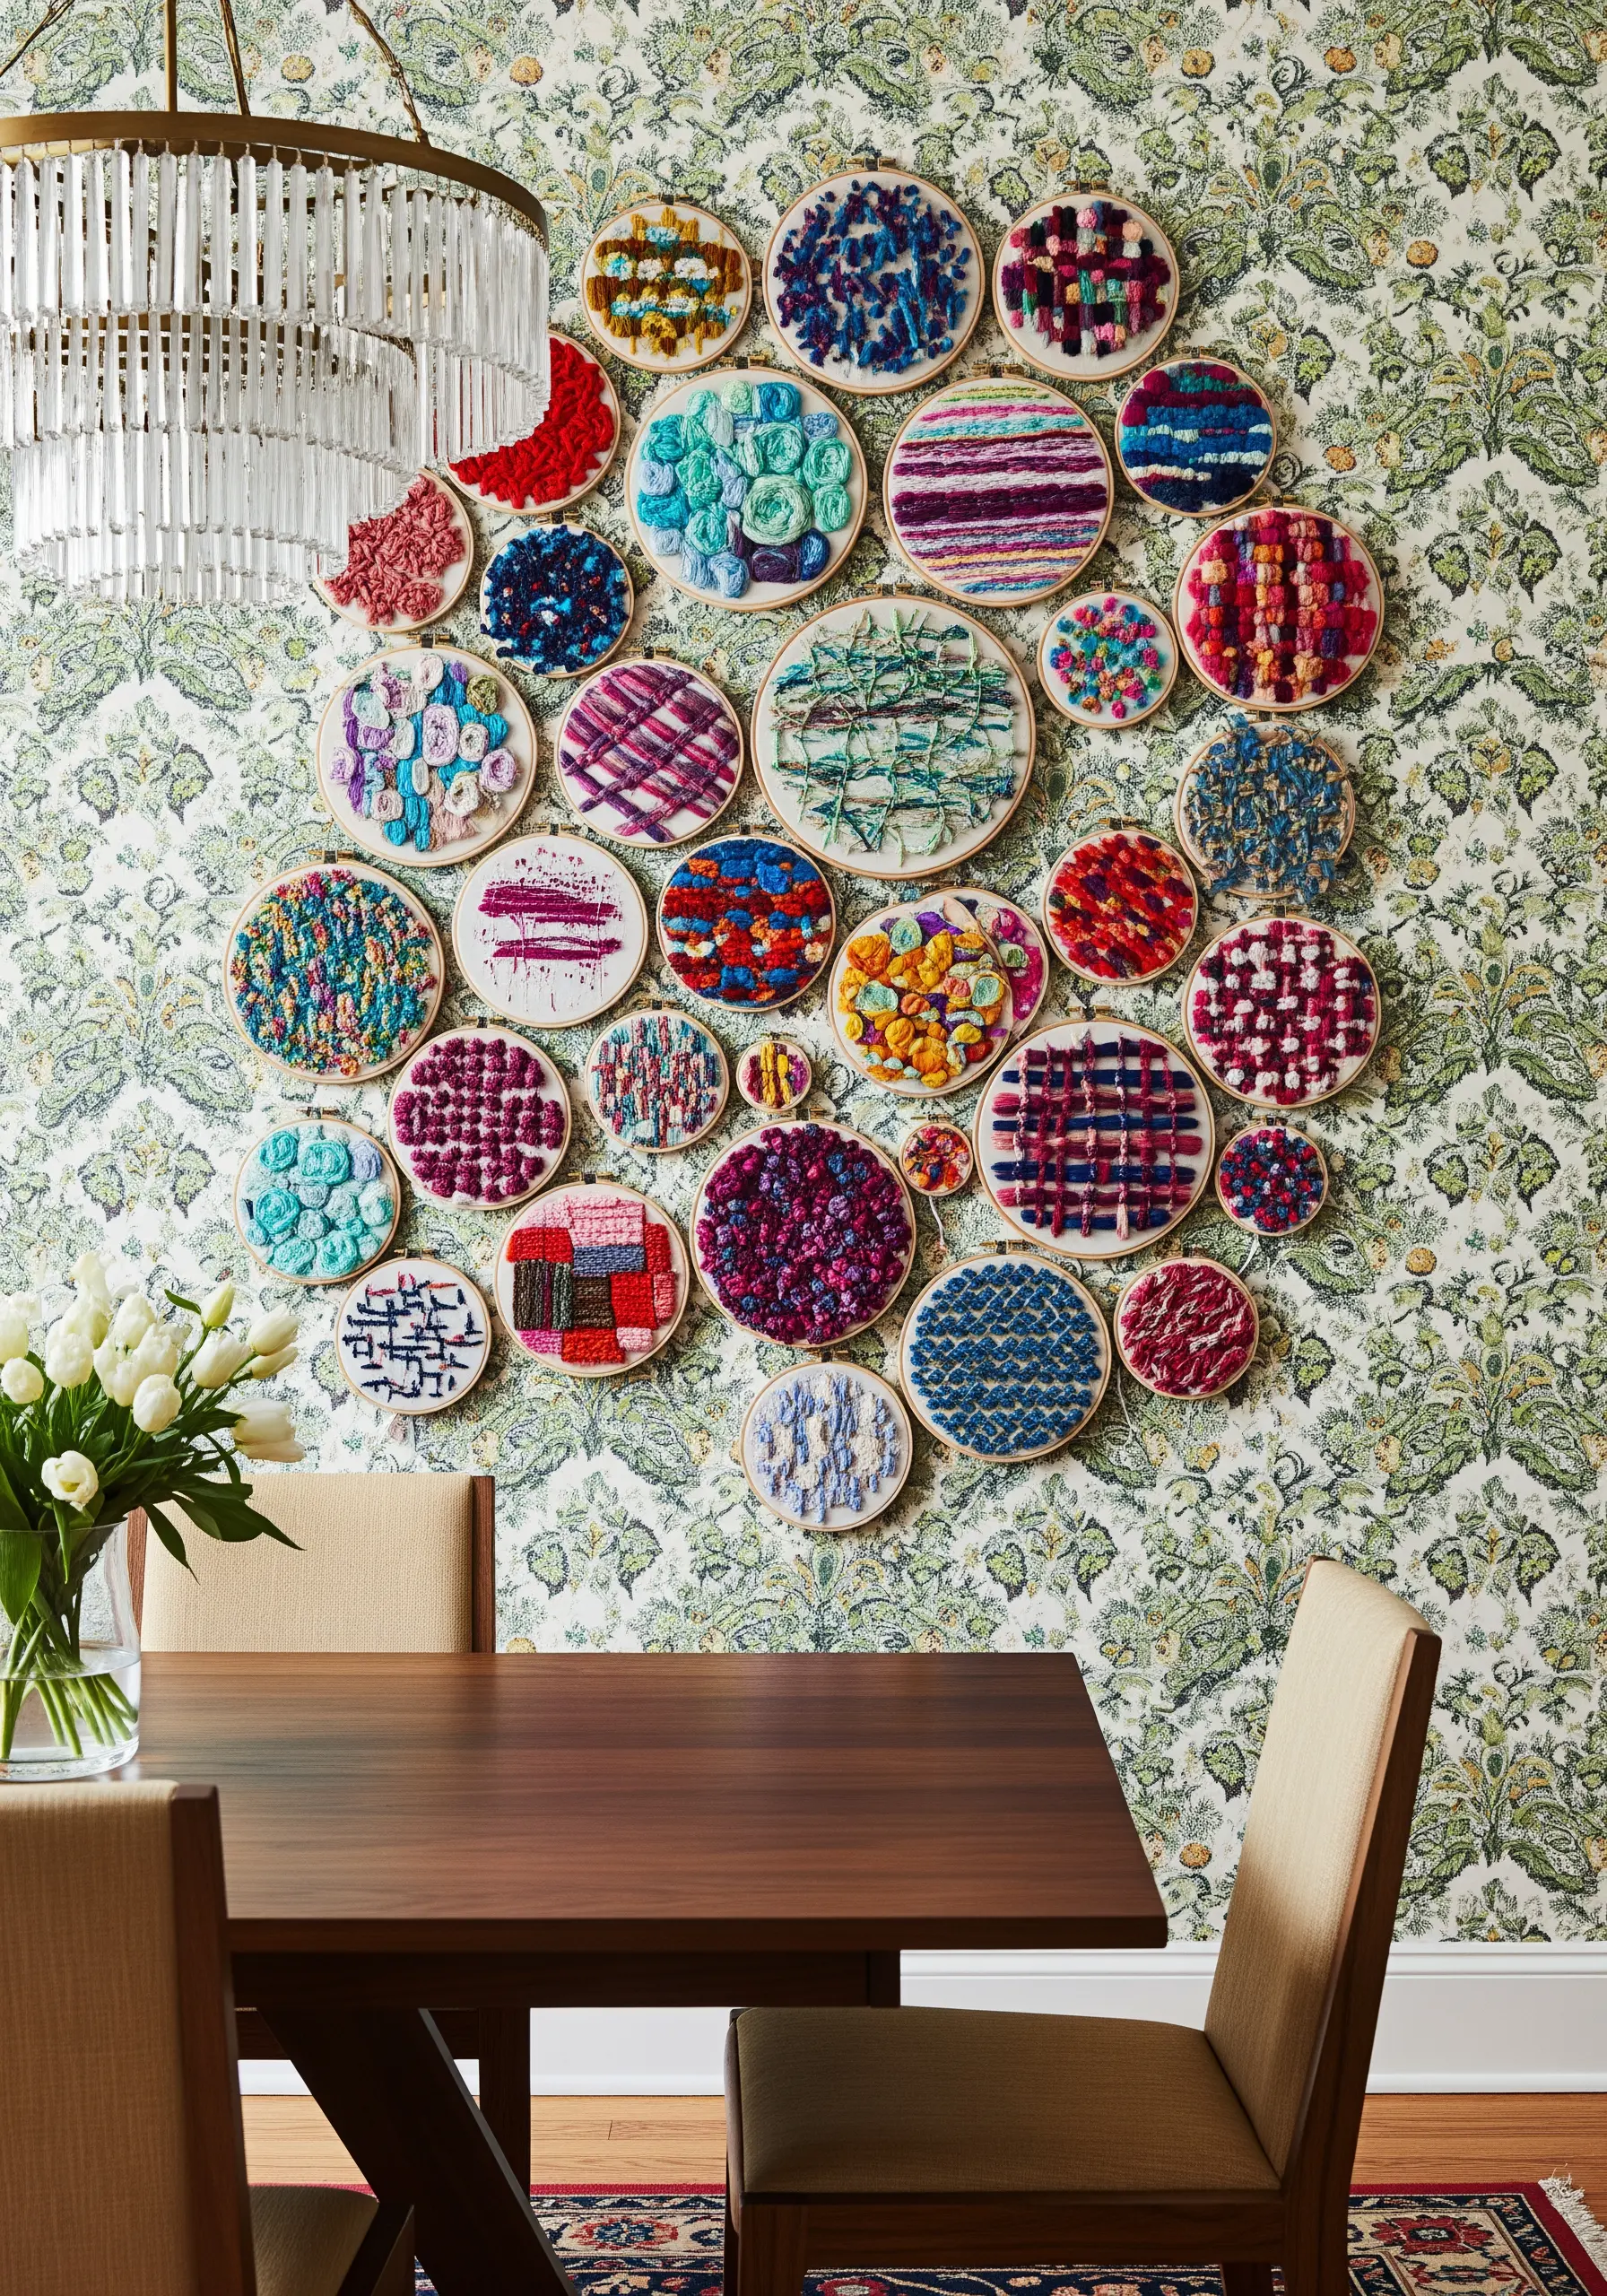
Move beyond traditional stitches and embrace pure, joyful experimentation.
Fill your hoops with a chaotic, beautiful mix of textures: woven yarn, couched roving, tangled threads, and French knot clusters.
There are no patterns or rules; this is about playing with color and material to create a vibrant, expressive collage.
Grouping these improvisational hoops together against a patterned wallpaper creates a maximalist explosion of creativity.
29. Create a Rustic Lodge Aesthetic
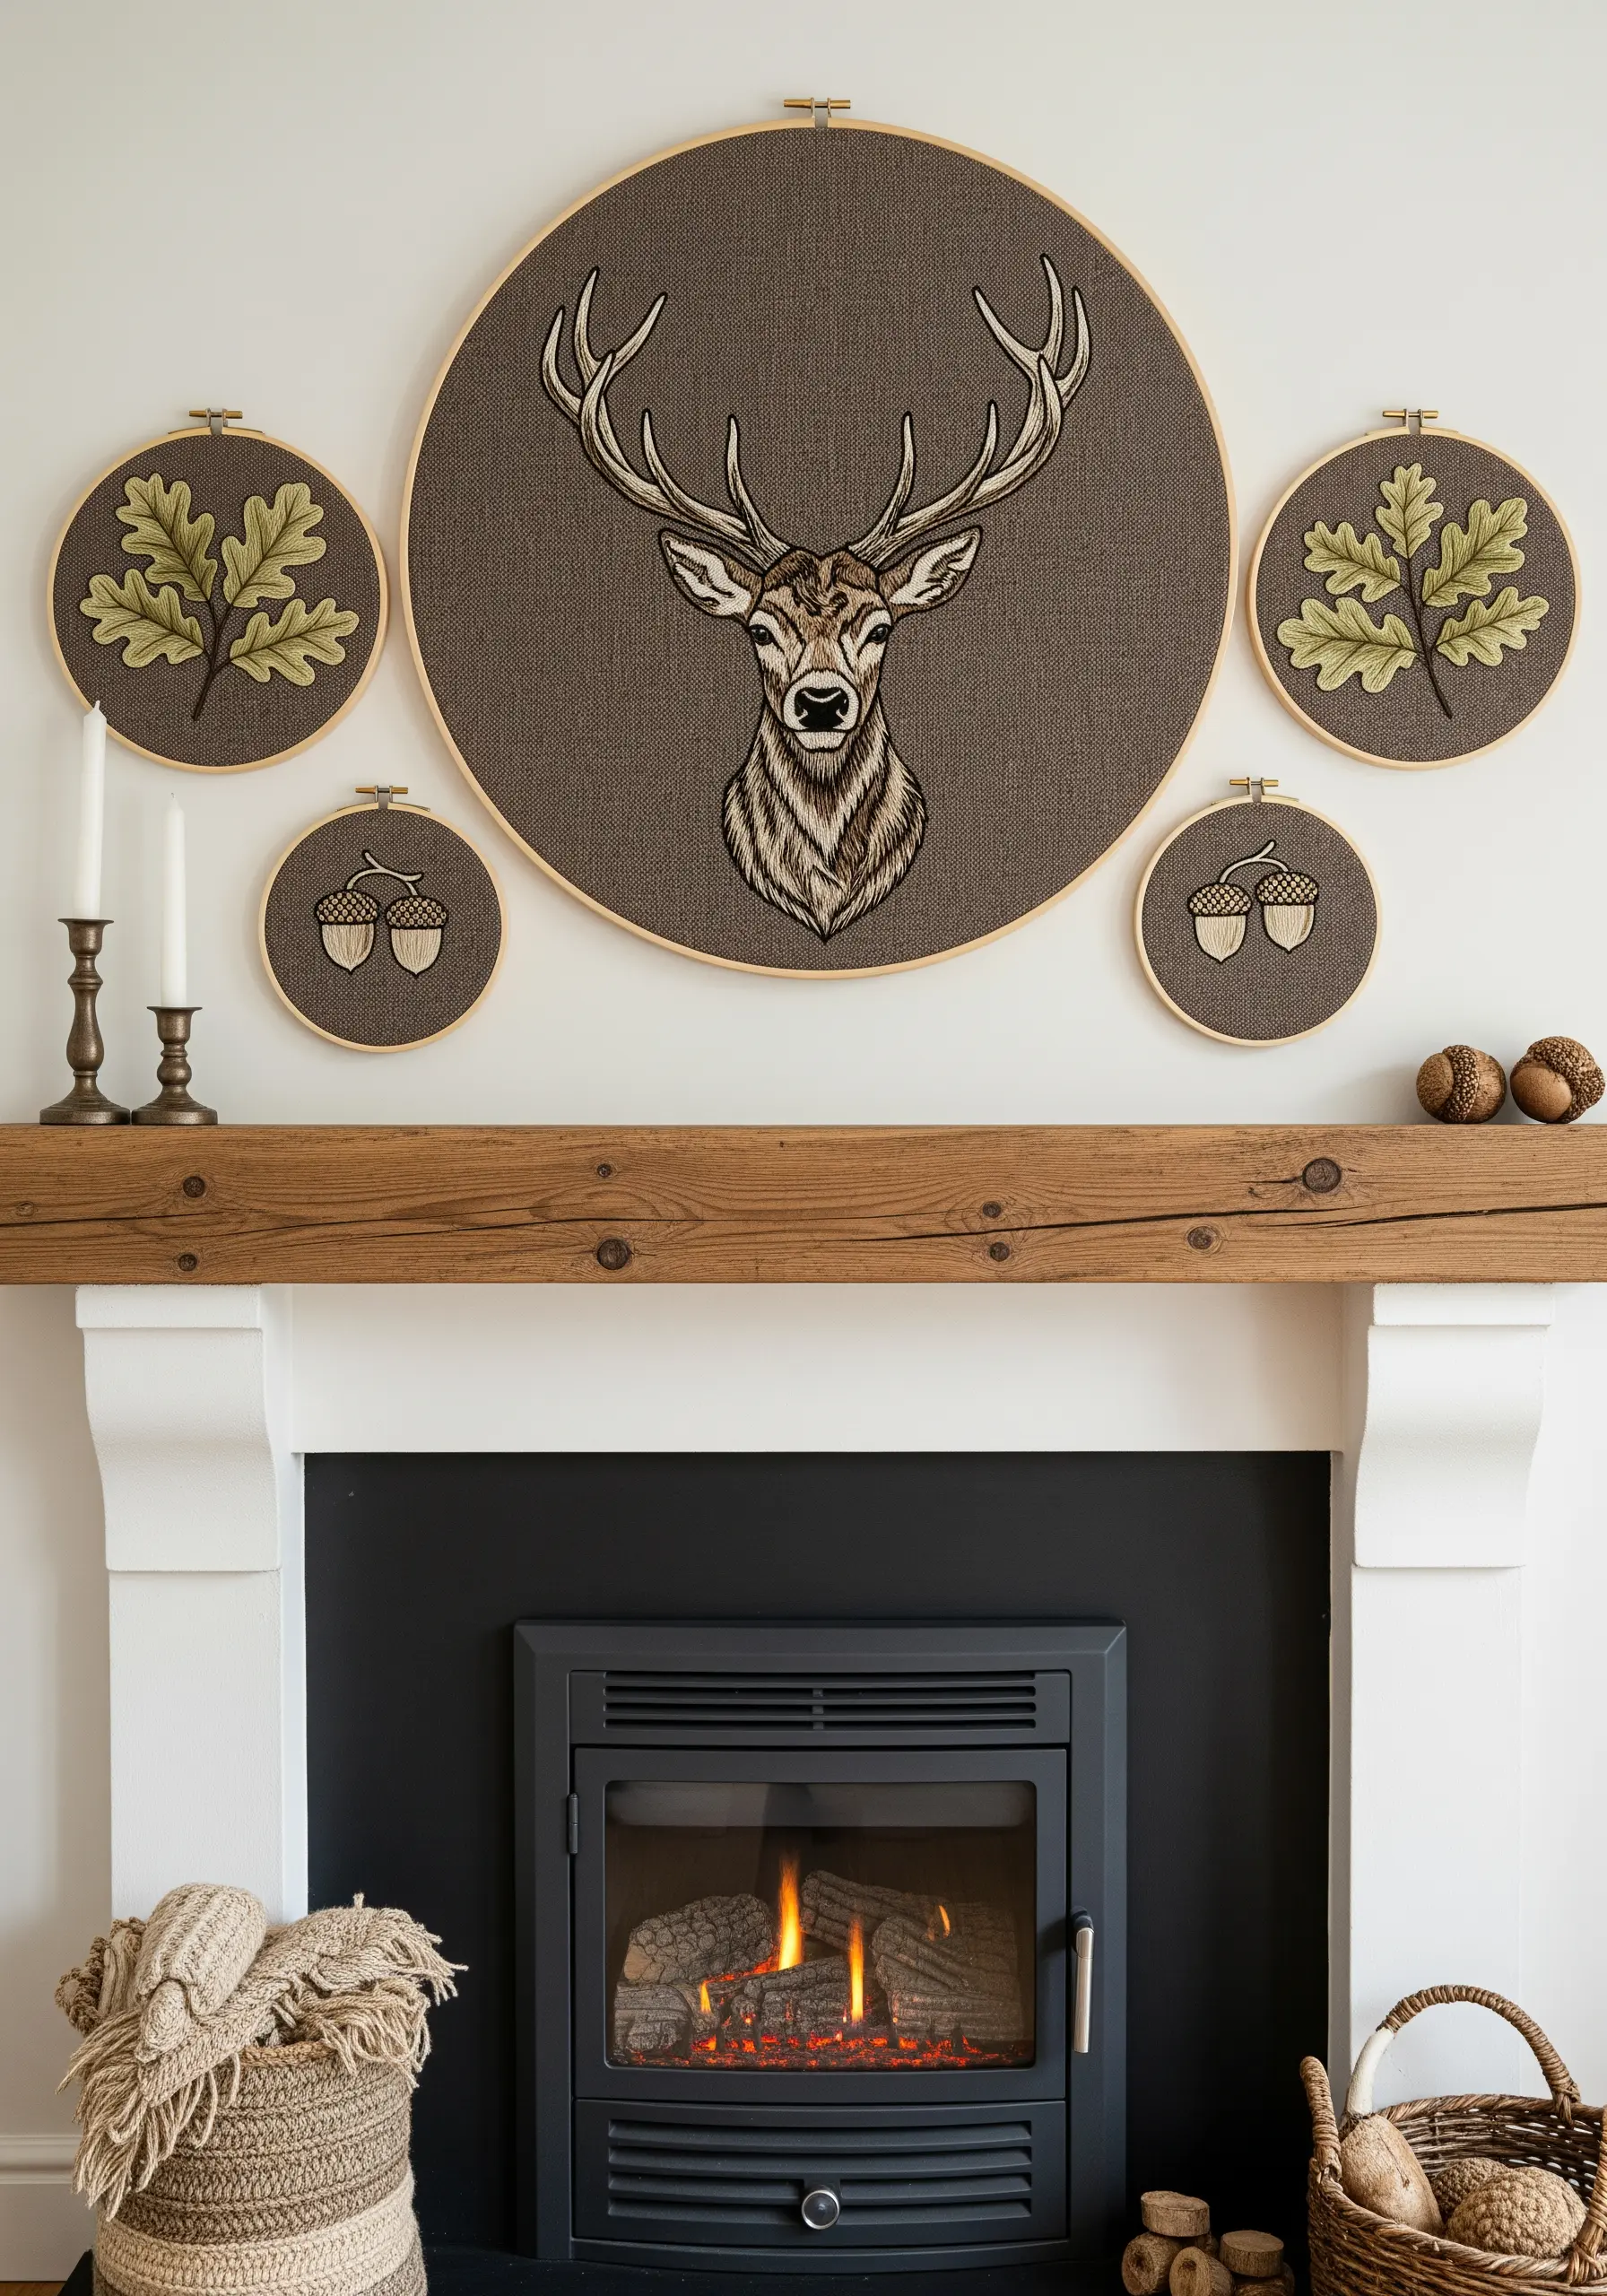
Evoke a sense of rustic elegance by carefully selecting your materials and motifs.
Stitch a stately subject, like a stag, on a coarsely woven, neutral fabric like a tweed or heavy linen to enhance the natural feel.
Use thread painting—blending several shades of brown, tan, and cream—to give the animal’s fur realistic depth and dimension.
Surrounding the main piece with smaller hoops of oak leaves and acorns completes the sophisticated, woodland narrative.
30. Construct a Floating Aviary Mobile
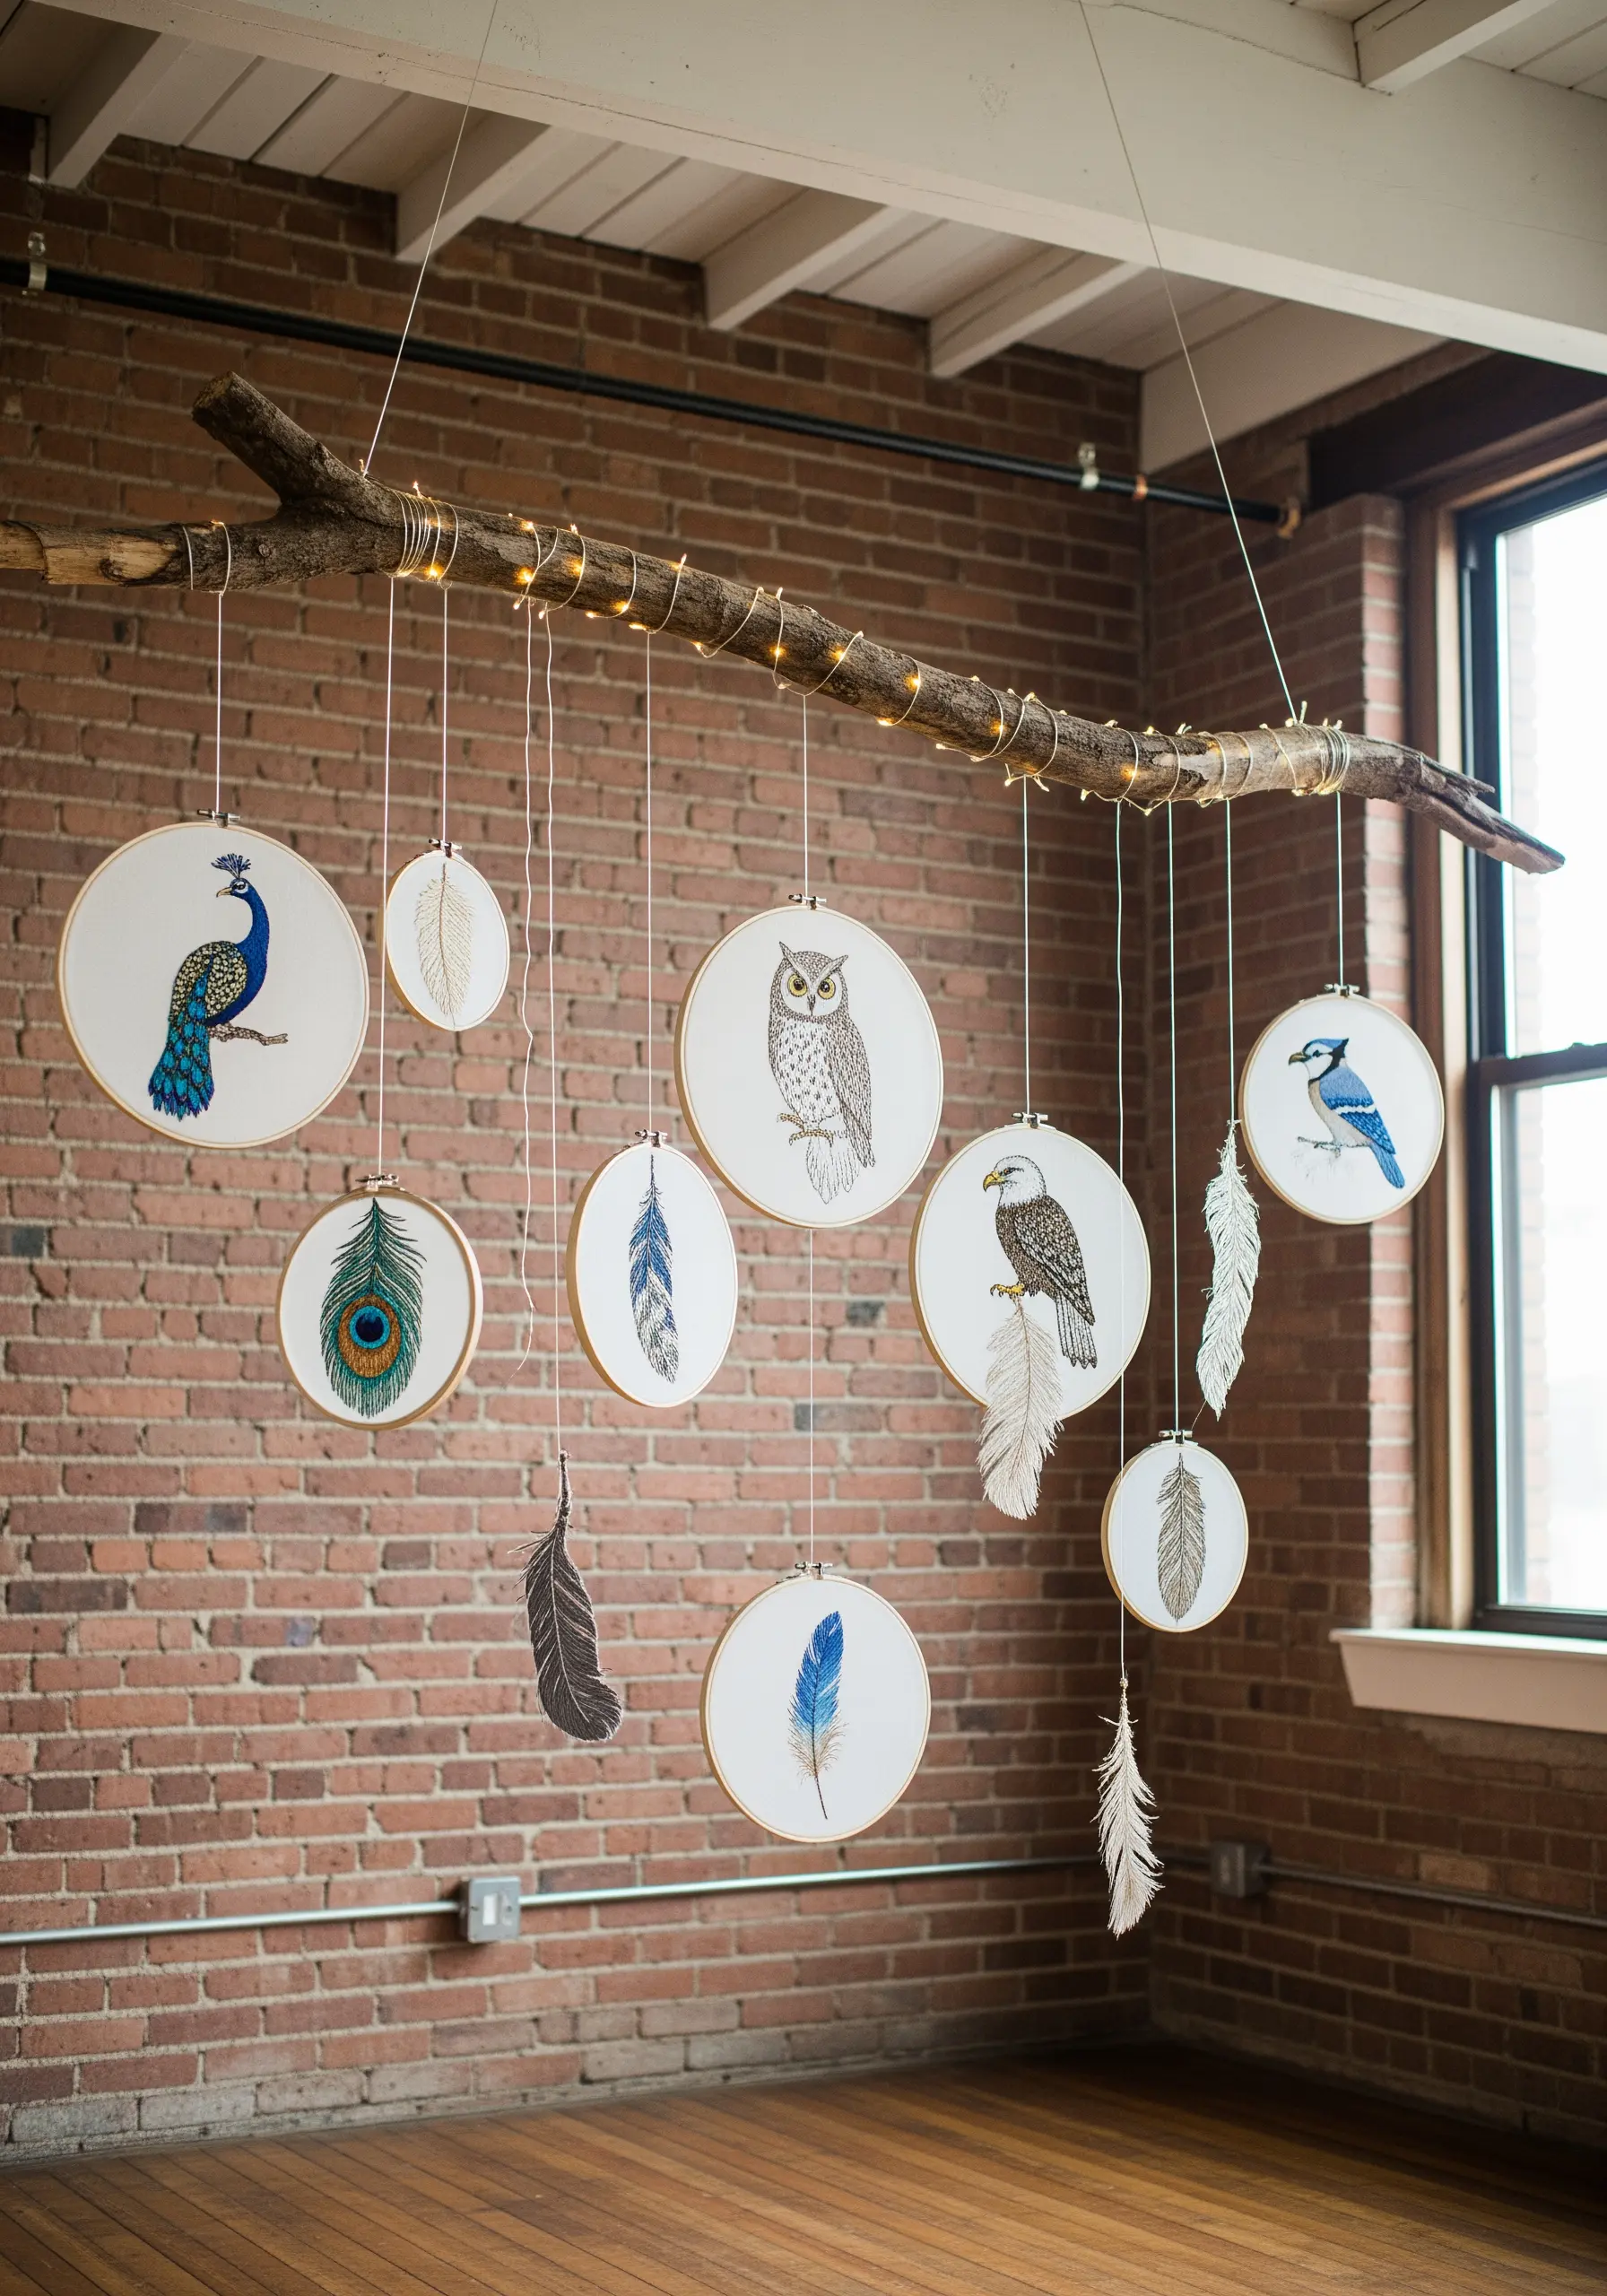
Give your embroidery movement and life by transforming it into a hanging mobile.
Suspend hoops of varying sizes from a natural element, like a piece of driftwood or a sturdy branch.
Alternate between detailed, embroidered birds and simpler stitched feathers to create visual rhythm and balance.
Adding a string of fairy lights to the branch introduces a warm, magical glow, turning the entire piece into an enchanting installation.
31. Build Whimsical 3D Hot Air Balloons

Incorporate three-dimensional elements to make your embroidery literally pop off the fabric.
Use padded satin stitch for the balloon panels to create a puffy, rounded shape.
Craft tiny baskets using weaving techniques or by wrapping thread around a small form, and add handmade tassels for a playful finishing touch.
Soft, fluffy clouds made from wool roving or felt complete this charming, multi-layered scene.
32. Paint with Thread for Serene Water Lilies
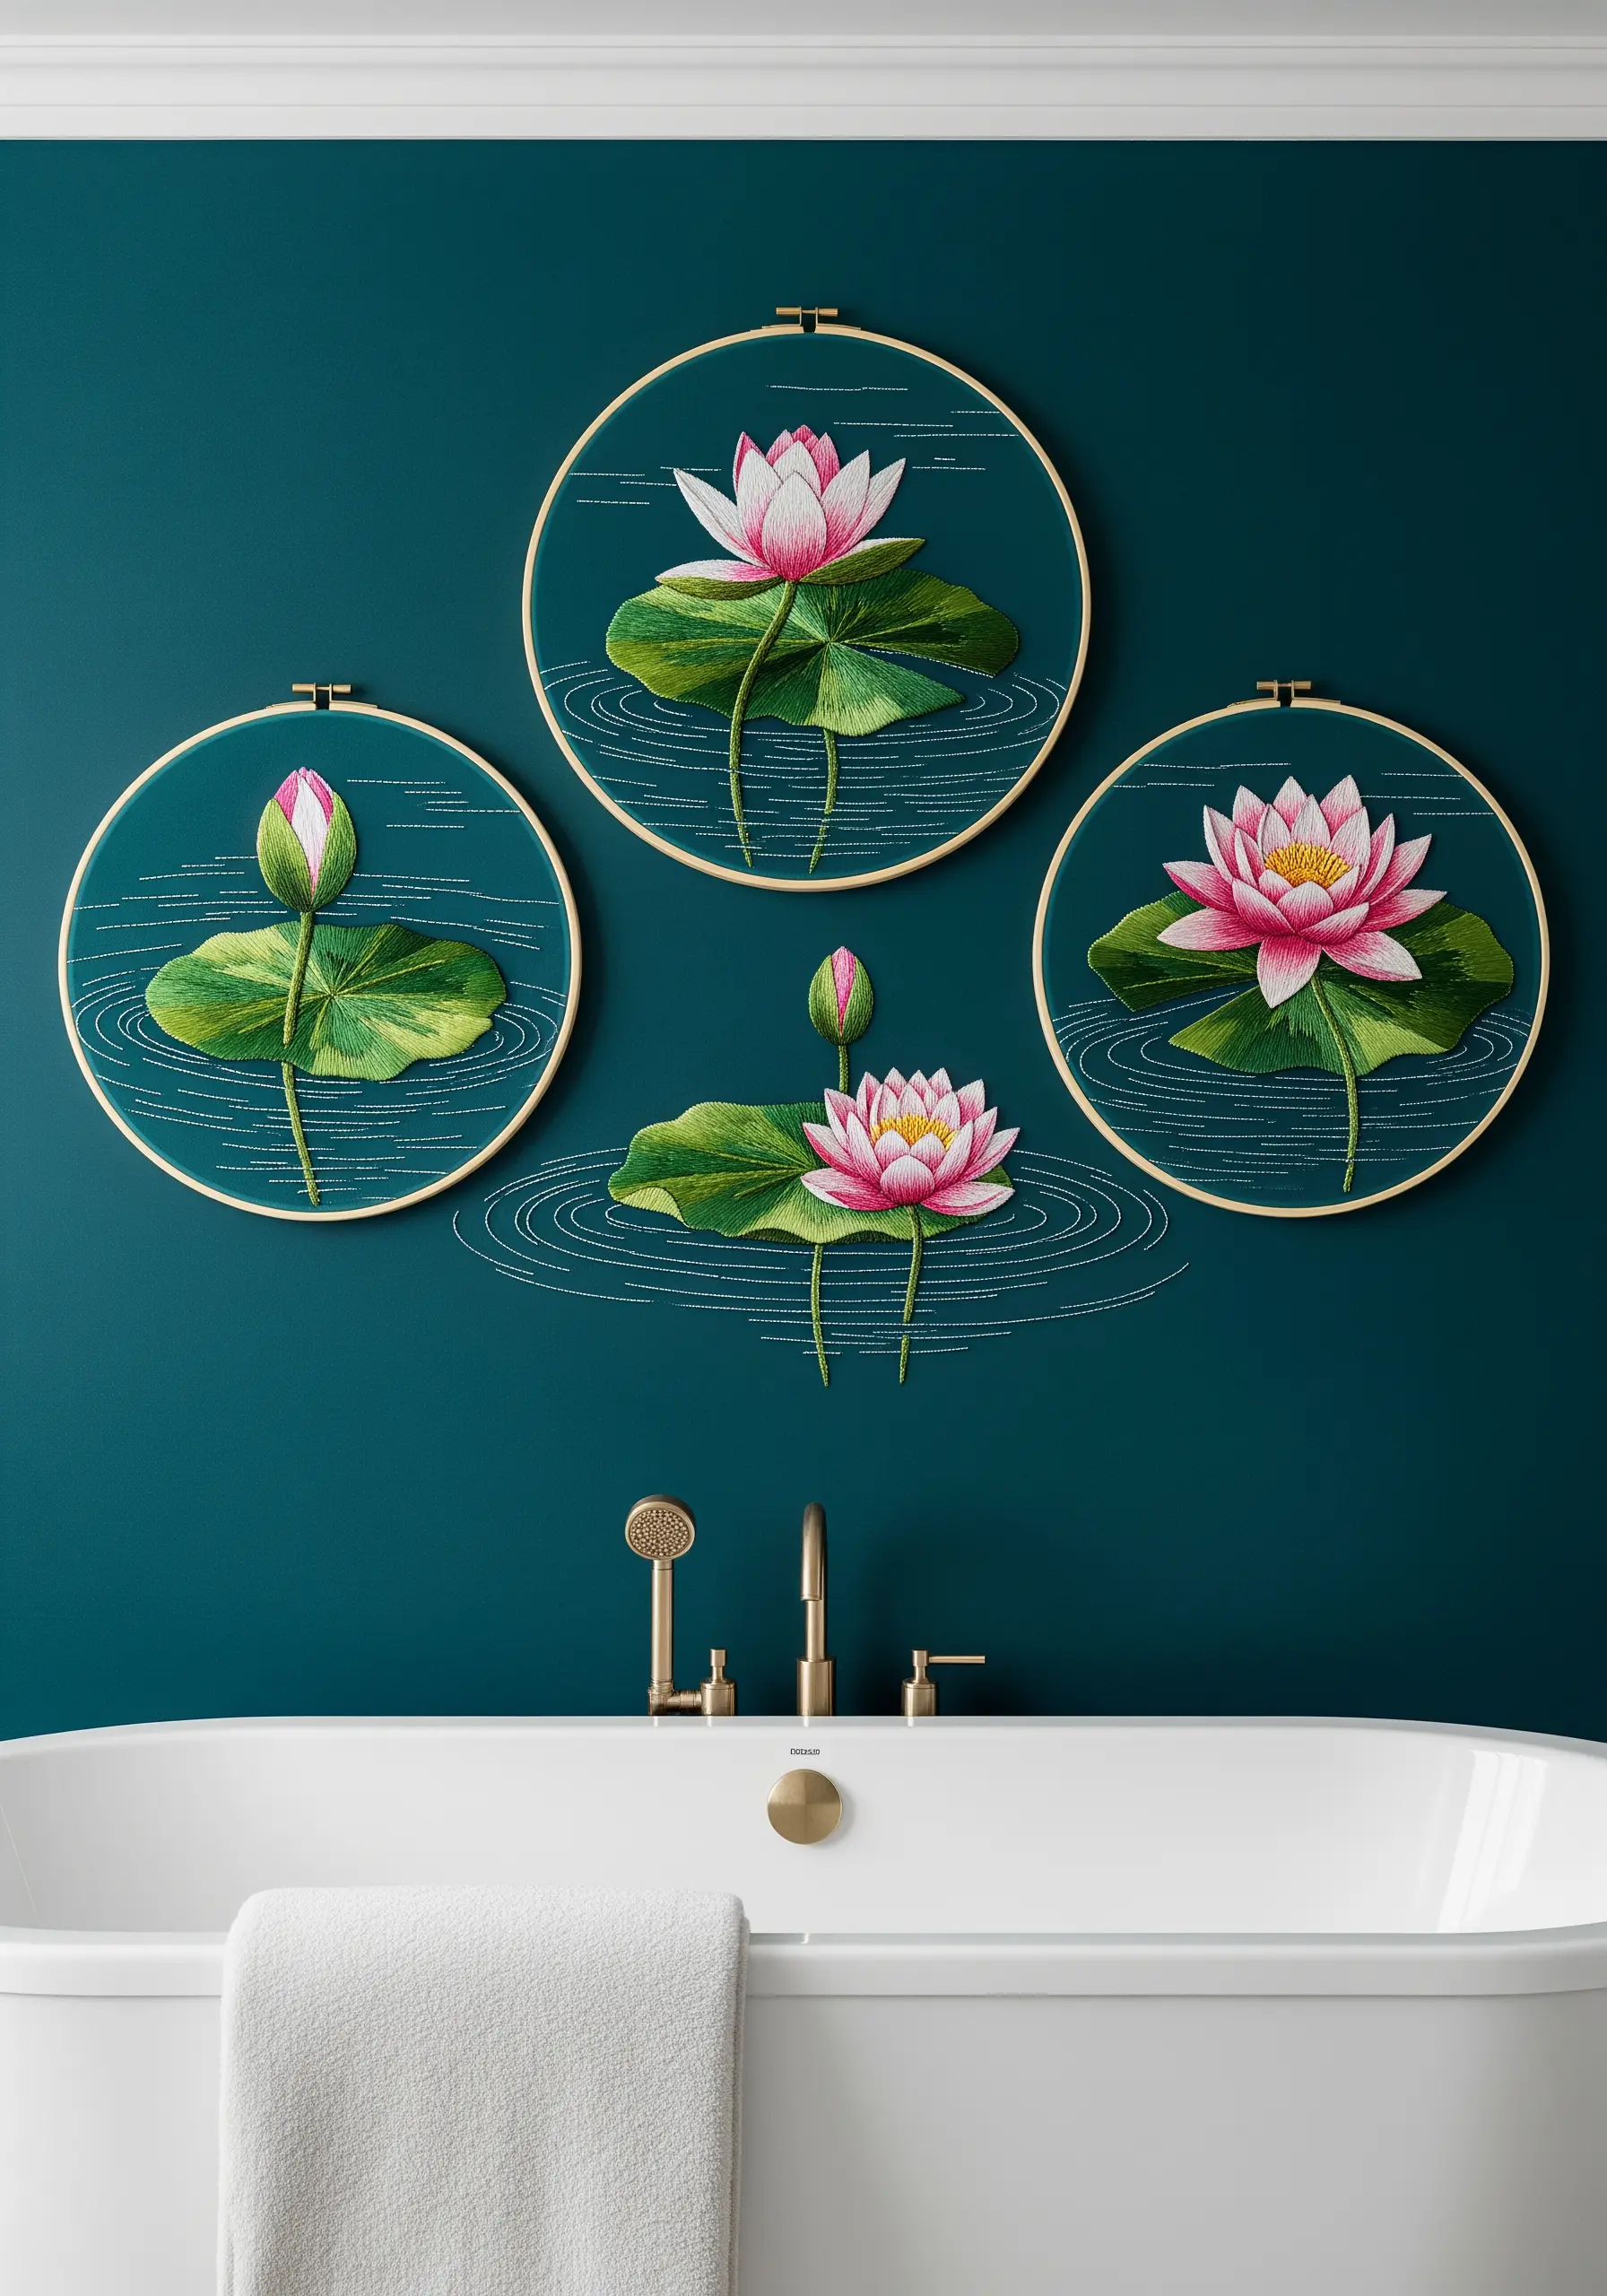
Capture the delicate, painterly quality of water lilies by using the long-and-short stitch.
Blend multiple shades of pink and white within each petal to create soft gradients and a realistic, luminous effect.
To suggest the water’s surface without overwhelming the composition, use a single strand of silver or light blue thread to stitch fine, concentric ripples around the lily pads.
This technique creates a sense of tranquility, making it perfect for gentle botanical embroidery stitches in a calm space.


