
You know that feeling—the specific tilt of a head, the way an ear flops just so. Capturing the spirit of your dog in a portrait feels like a monumental task, but the truth is, you don’t need complex stitches or a full palette of colors. The secret lies in the power and elegance of a single line.
Think of your needle as a pen and the thread as your ink. With just one continuous stroke or a series of thoughtful outlines, you can convey form, emotion, and personality. It’s an exercise in seeing what’s truly essential, and translating that observation into a clean, modern piece of art that feels both personal and polished.
Here, you’ll discover how to use simple stitches to create texture, imply motion, and add just enough detail to make your portrait come alive. Forget perfection; focus on the character in each curve. You have the ability to create a timeless tribute that will look stunning on your wall, and I’m here to show you how.
1. Add a Single, Potent Color Accent
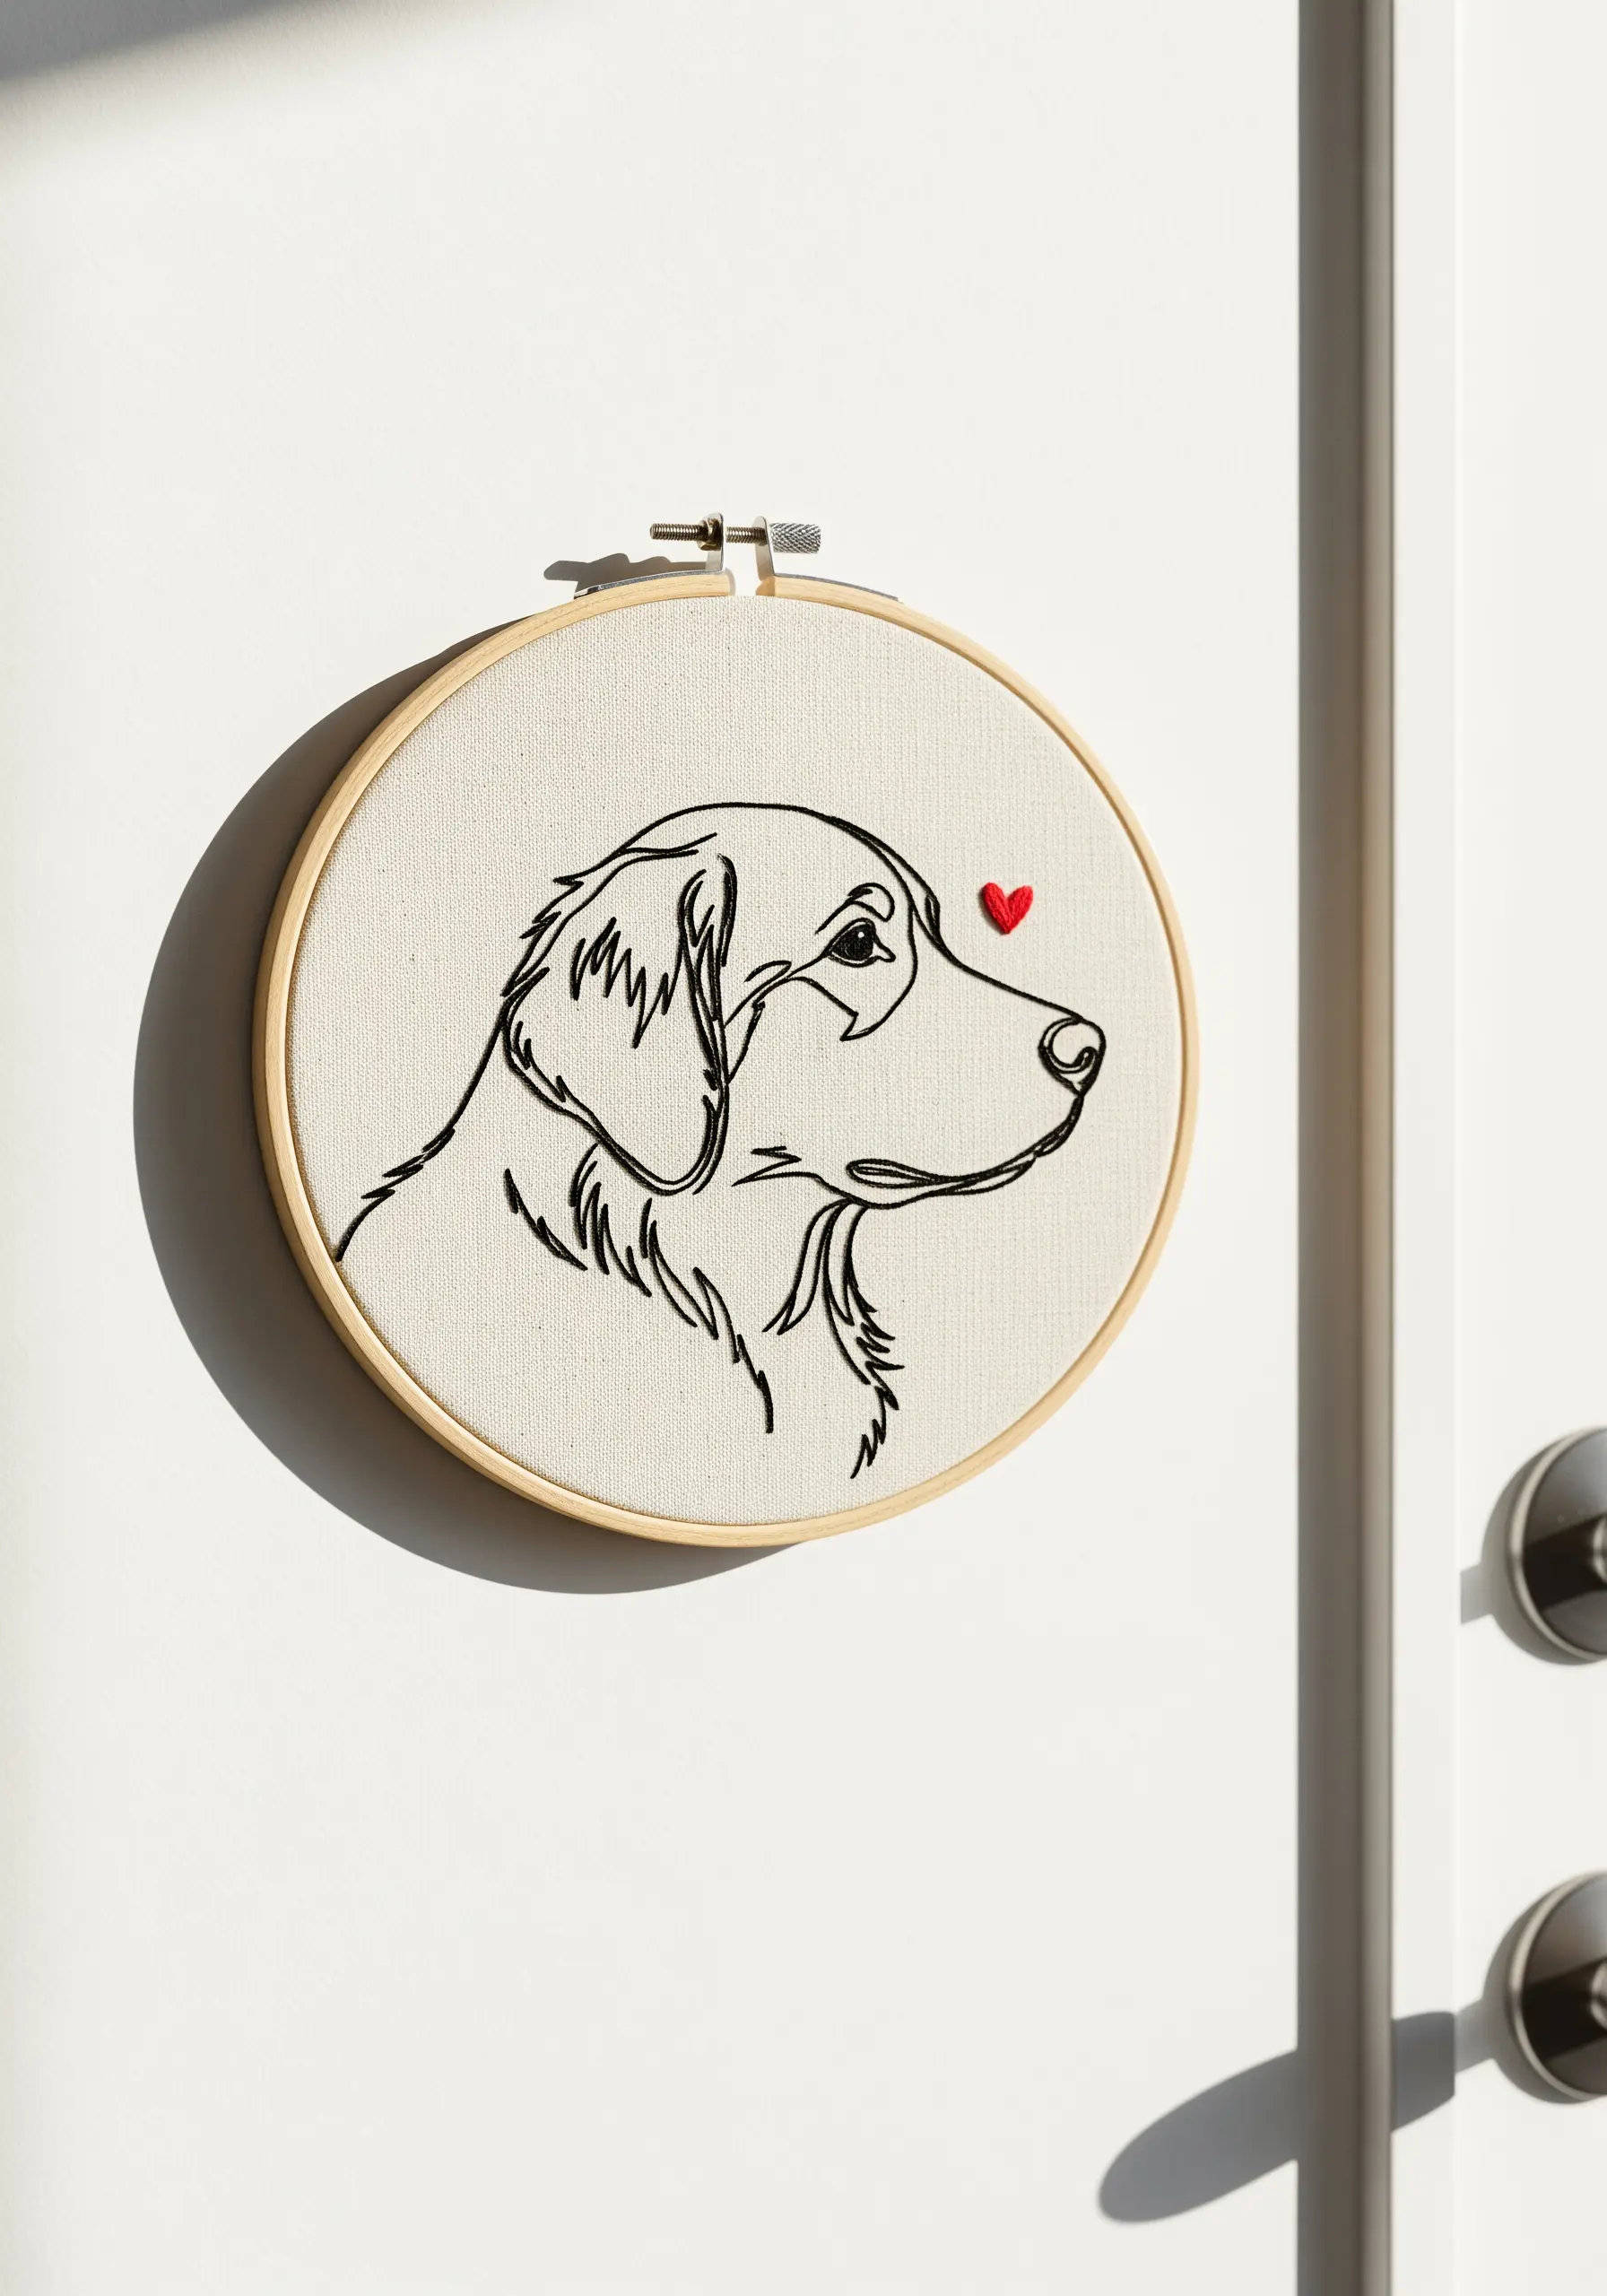
A simple backstitched outline in black feels classic and clean, but the addition of a single, bright accent transforms it into a thoughtful piece of art.
Instead of scattering color, place one tiny, satin-stitched heart where it draws the eye—on the nose, over the heart, or as a collar tag.
This technique works because it creates an immediate focal point and adds a layer of emotional storytelling without complicating the design.
Use three strands of floss for the heart to give it a subtle, raised dimension against the finer, two-strand outline of the portrait.
2. Frame Your Stitching on a Flat Canvas
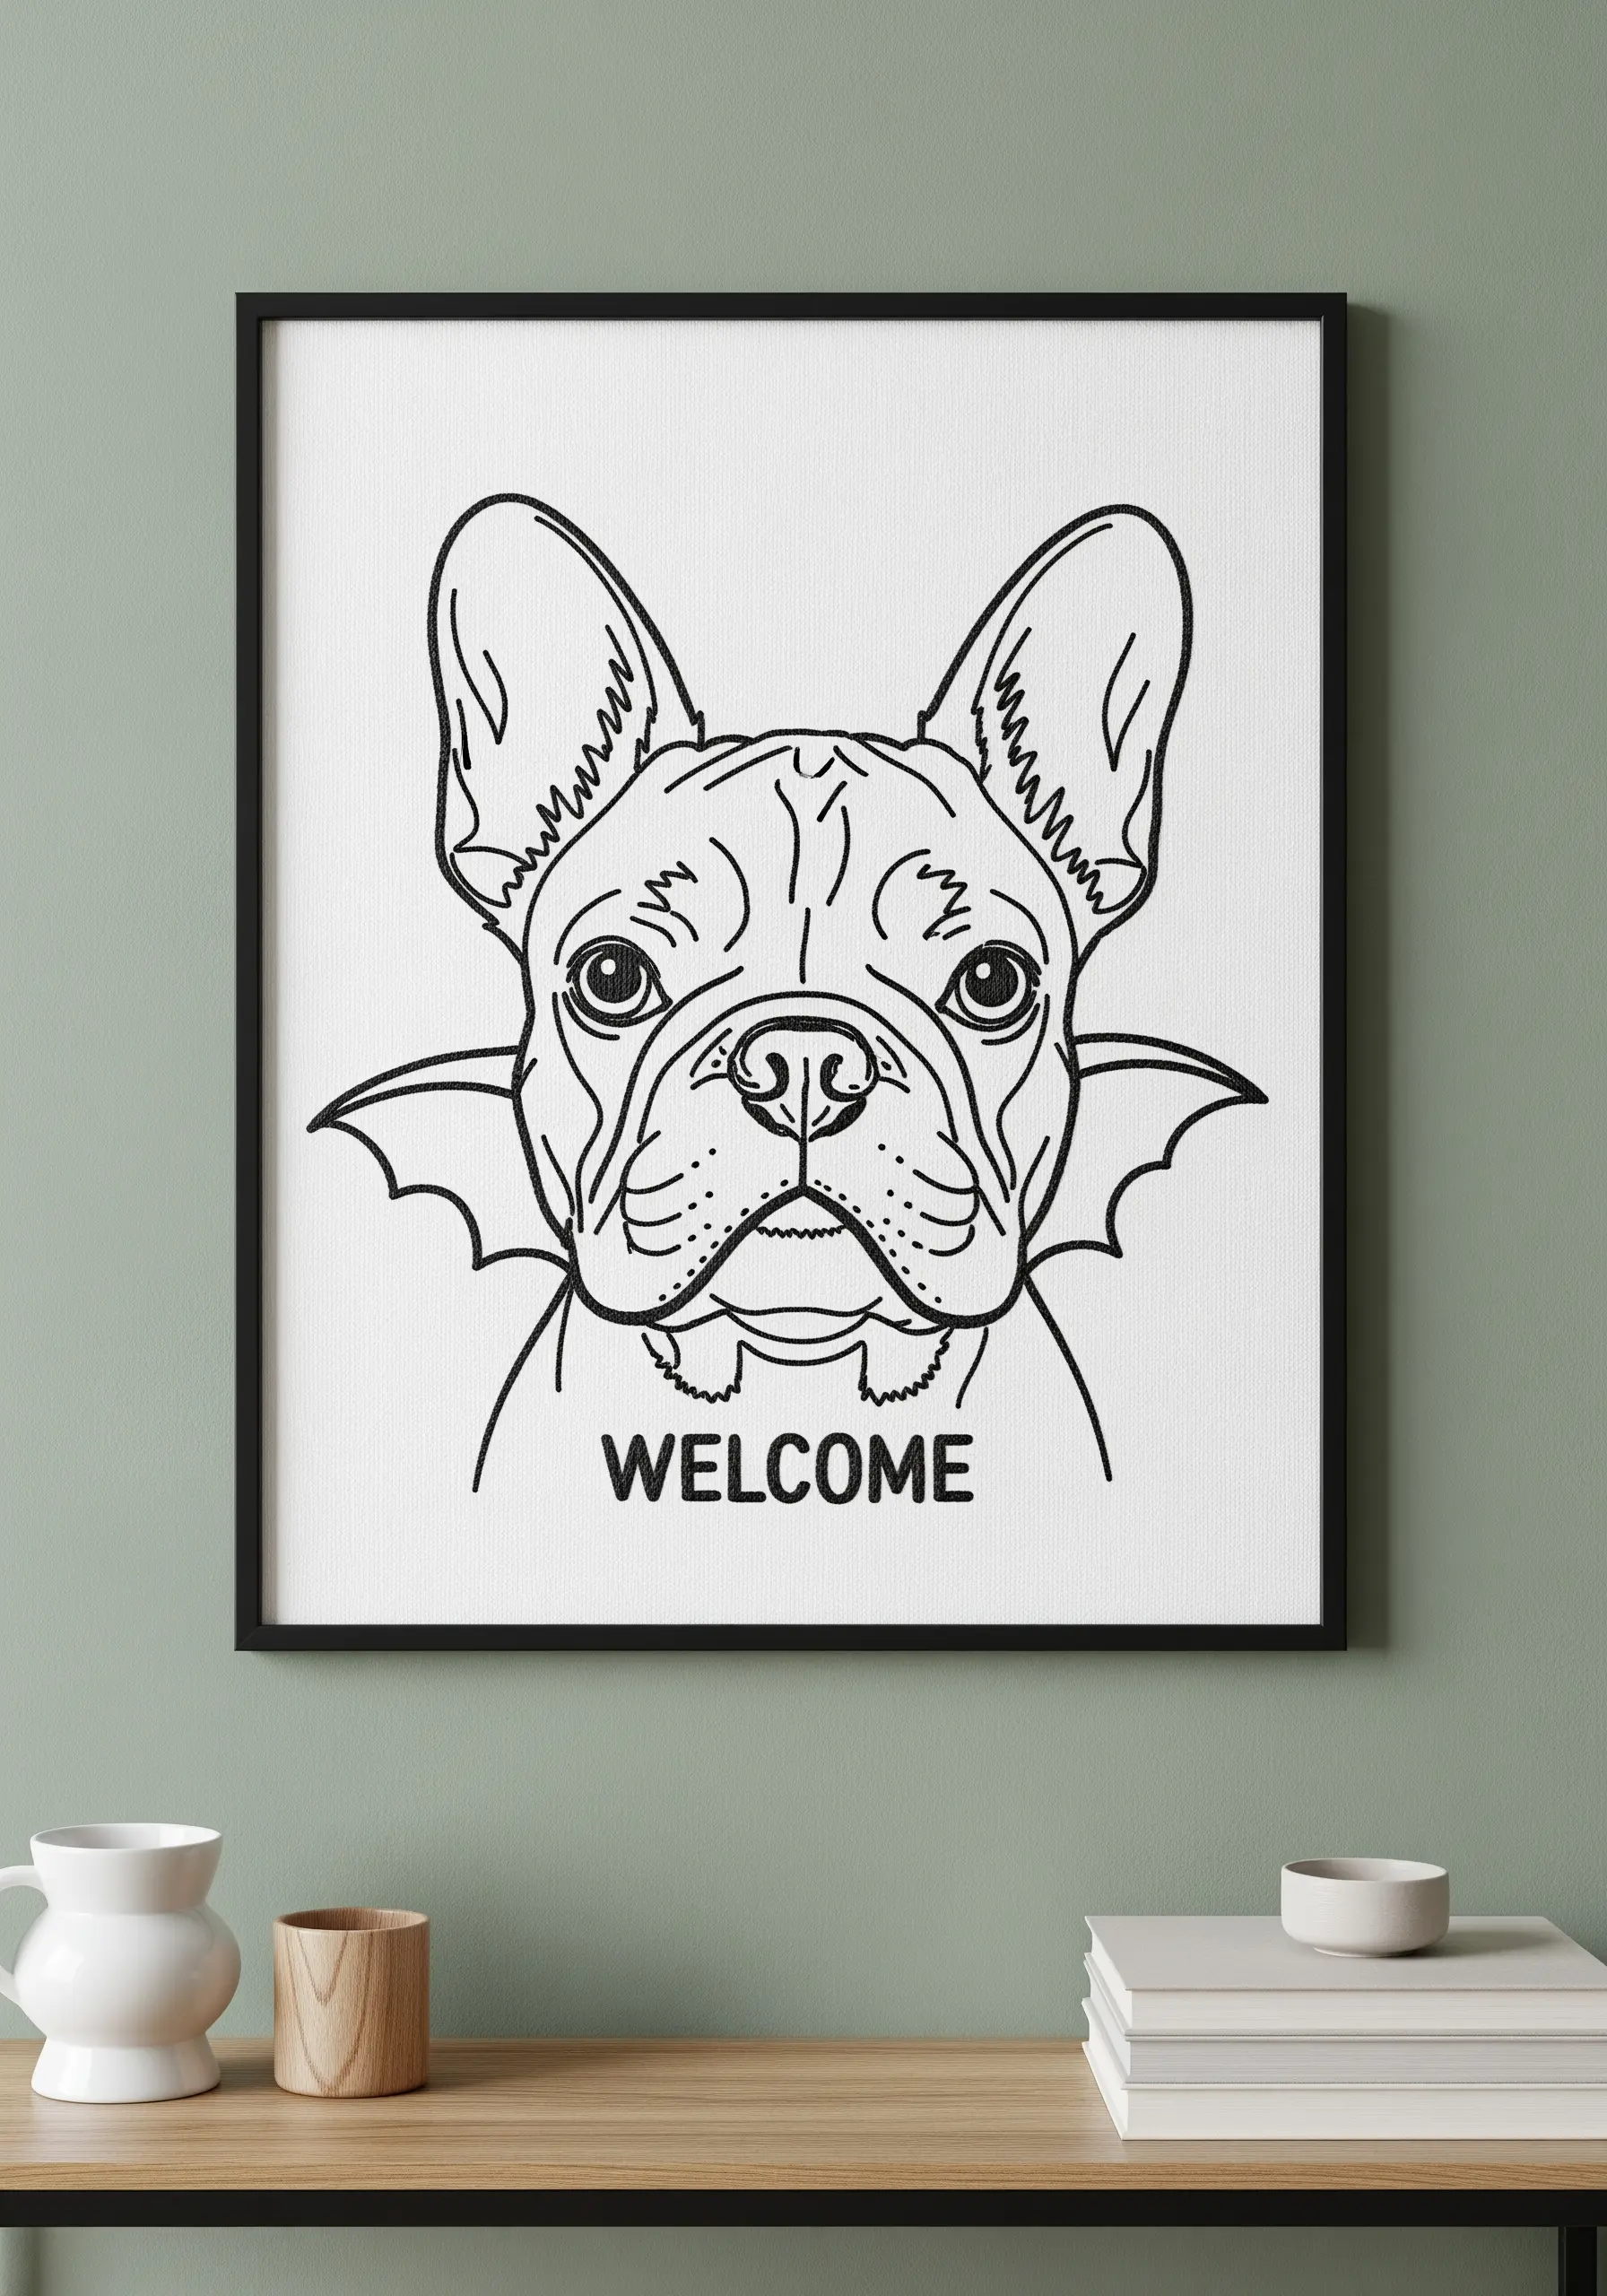
Move beyond the hoop and give your line art a gallery finish by stretching the embroidered fabric over a canvas board.
This method removes the casual, crafty feel of a hoop and presents your work as a formal art piece, perfect for an entryway or bookshelf.
To ensure your lines are crisp, use a whipped backstitch, which wraps the initial stitches to create a smoother, more solid line ideal for graphic designs.
Consider adding sans-serif text using a tiny backstitch; it complements the modern aesthetic of hand-stitched framed embroidery pieces.
3. Use Textured Fabric for Visual Depth
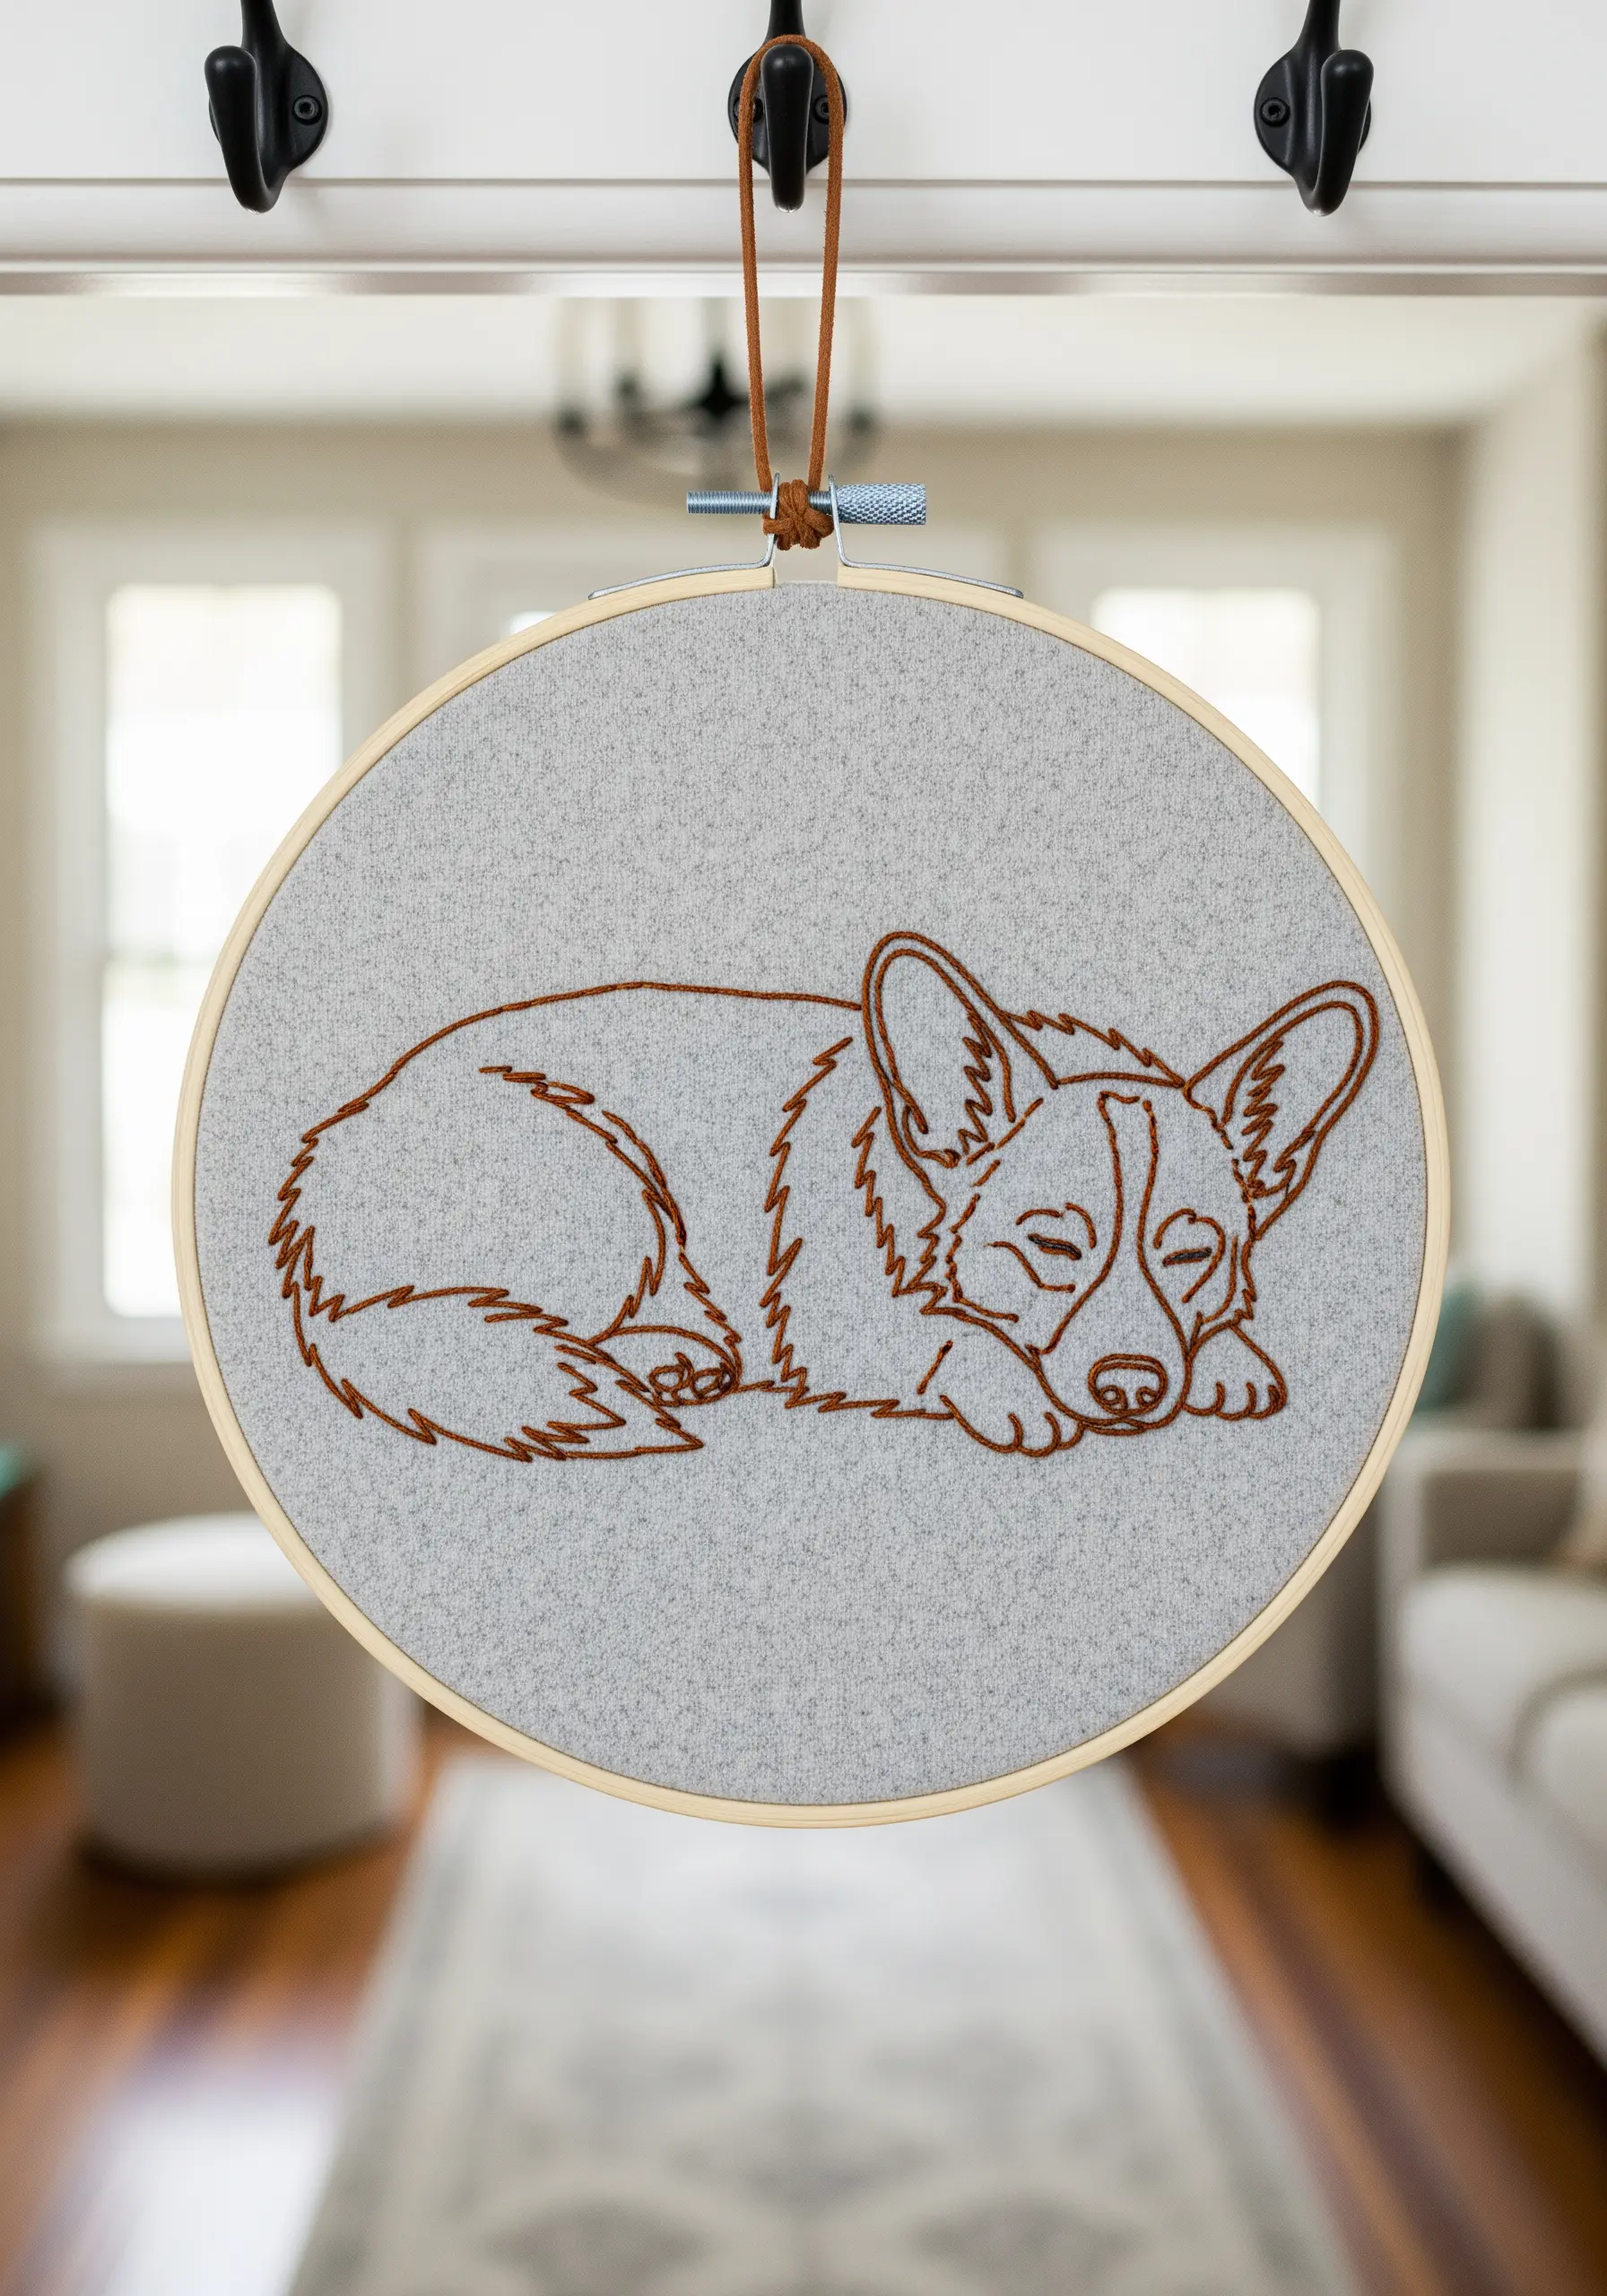
Stitching on a plain white or cream fabric is classic, but choosing a subtly textured or heathered material adds instant depth and softness.
A grey mottled cotton or linen-blend background makes a warm thread color, like this rich brown, feel more integrated and gentle.
The fabric’s texture does some of the aesthetic work for you, creating a cozy, lived-in feel that perfectly suits a portrait of a sleeping pet.
Use a simple backstitch, but allow the lines to be slightly imperfect to mimic the look of a pencil sketch.
4. Master the Single Continuous Line
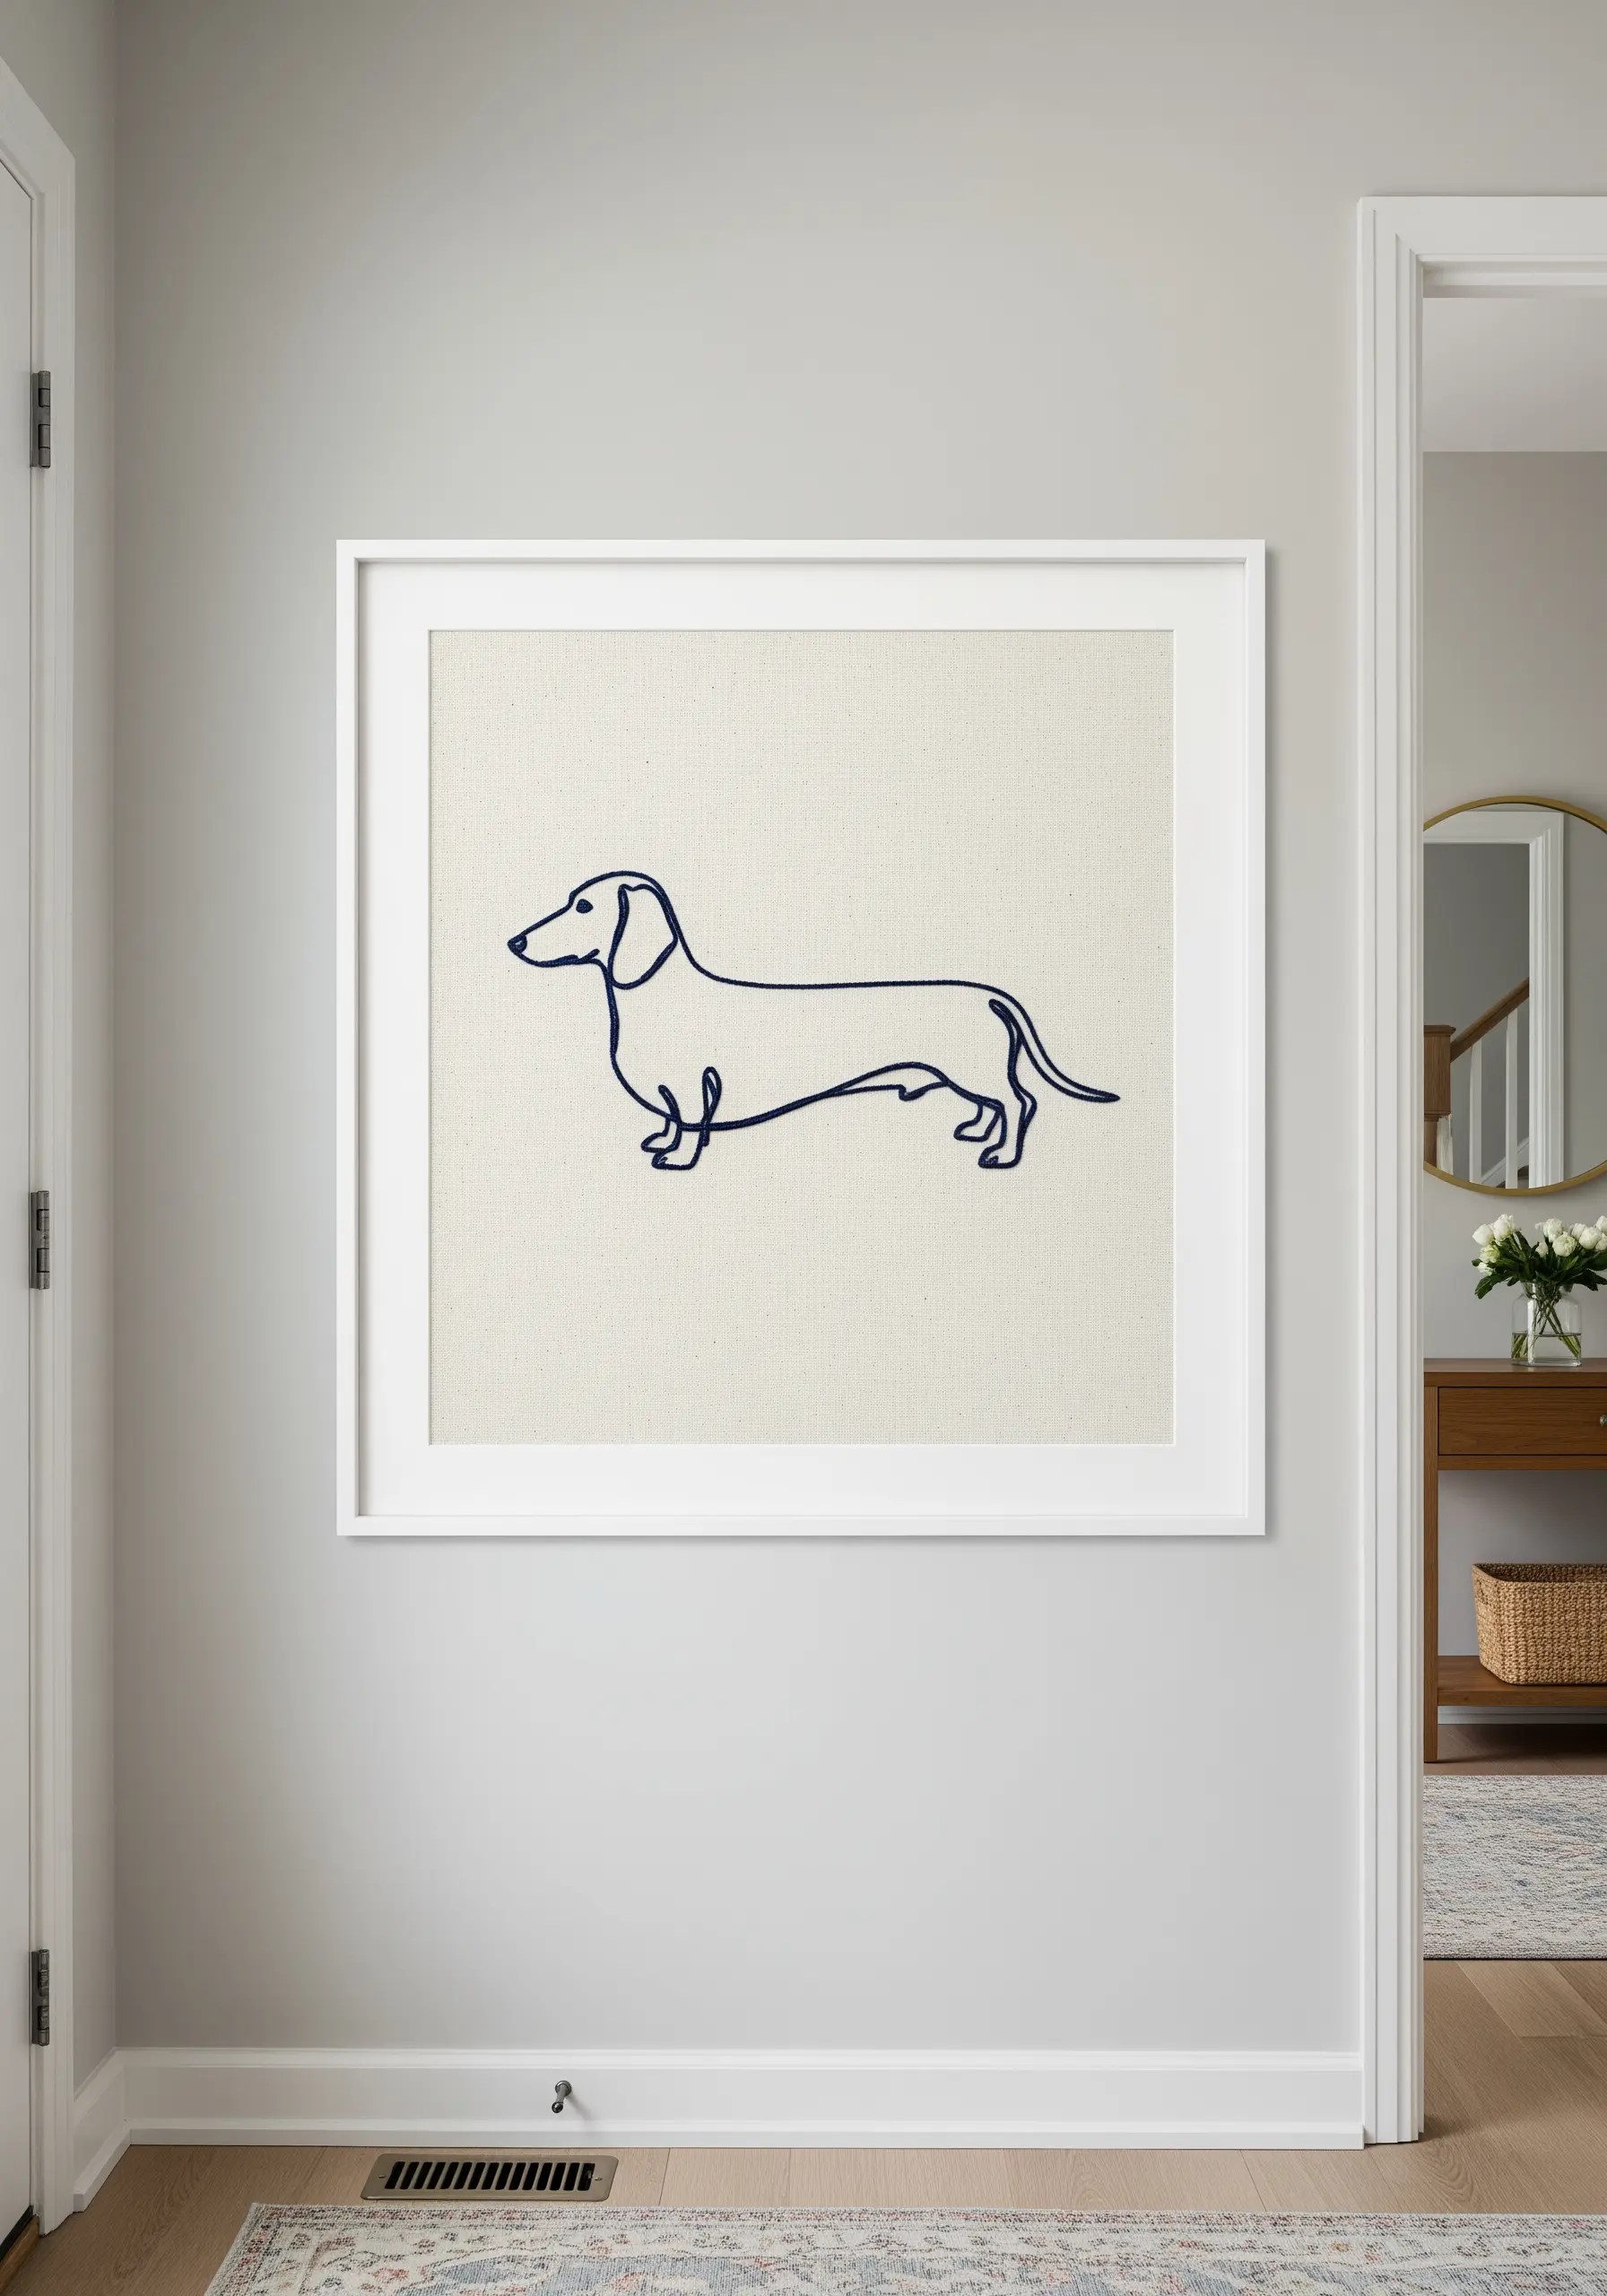
Challenge yourself to create a portrait using one unbroken thread, a technique that forces you to simplify shapes and focus on pure form.
Before you begin, trace the entire path with your finger to plan your route, ensuring you don’t trap yourself in a corner.
This method produces a fluid, elegant result that feels both modern and minimalist.
Use a thicker floss, like pearl cotton, or all six strands of embroidery floss to give the single line the weight it needs to stand on its own.
5. Combine Line Work with Textural Stitches
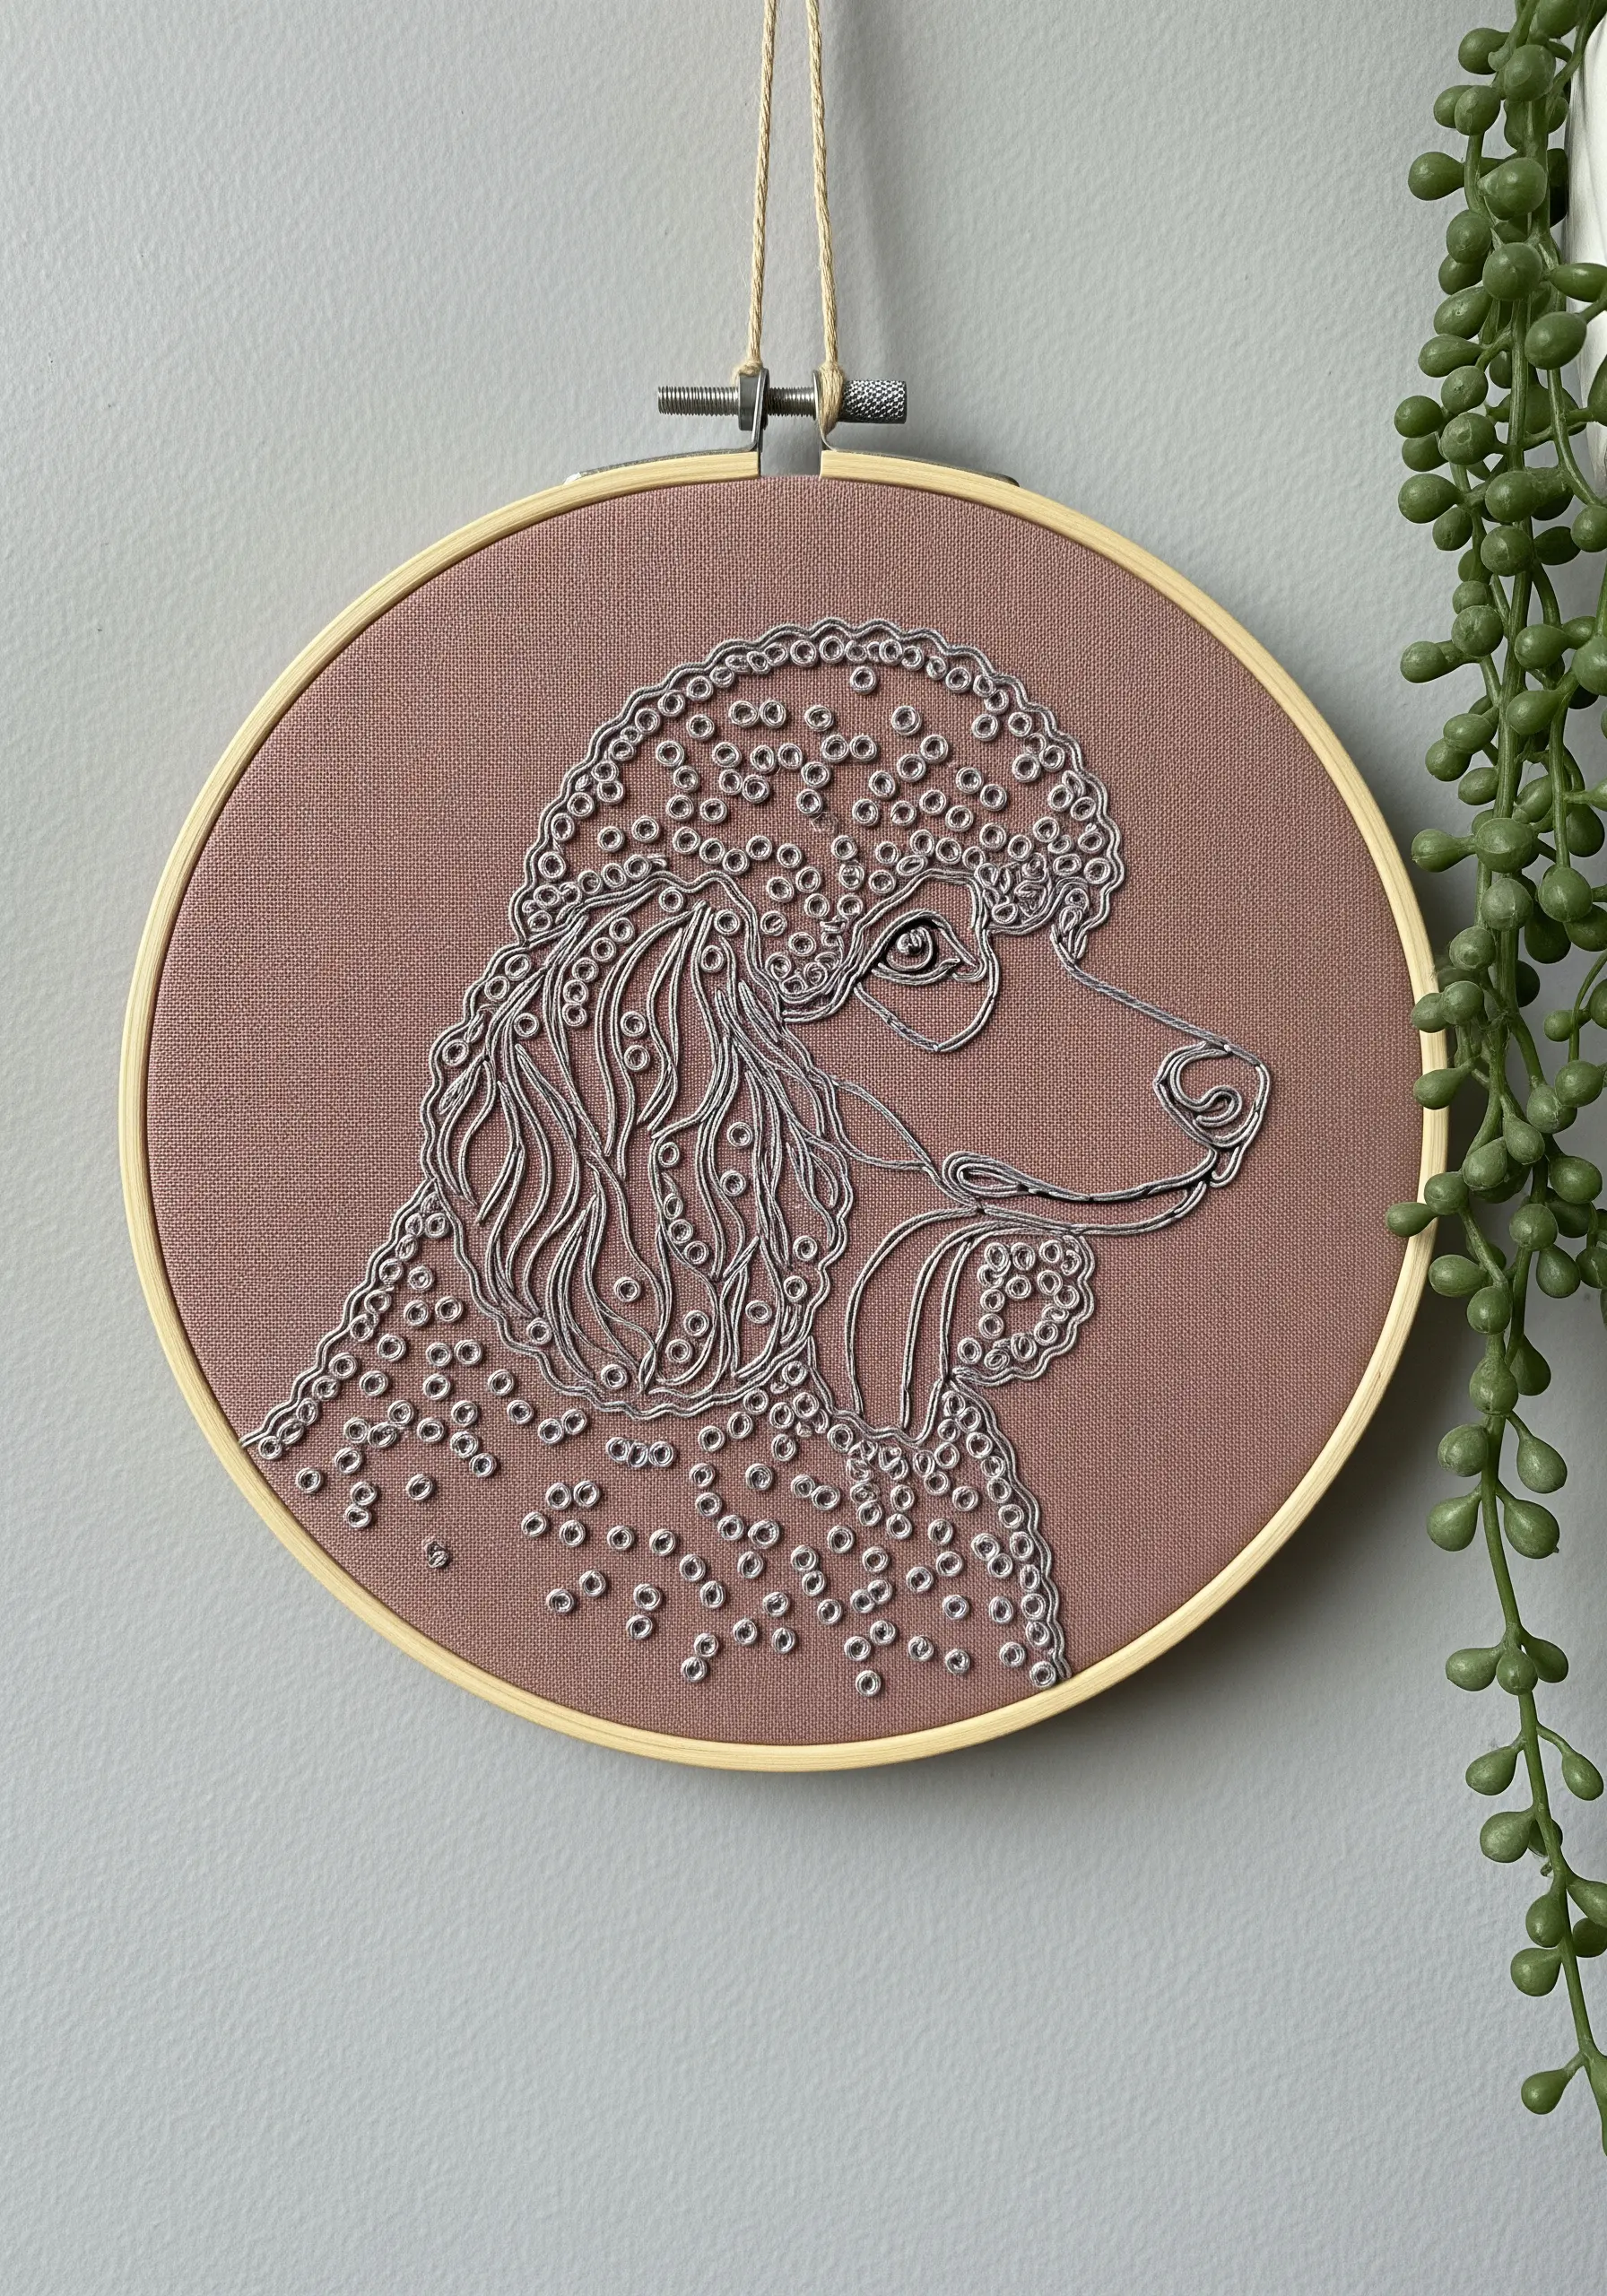
Create a sophisticated tactile contrast by pairing smooth outlines with dense, textured fill stitches.
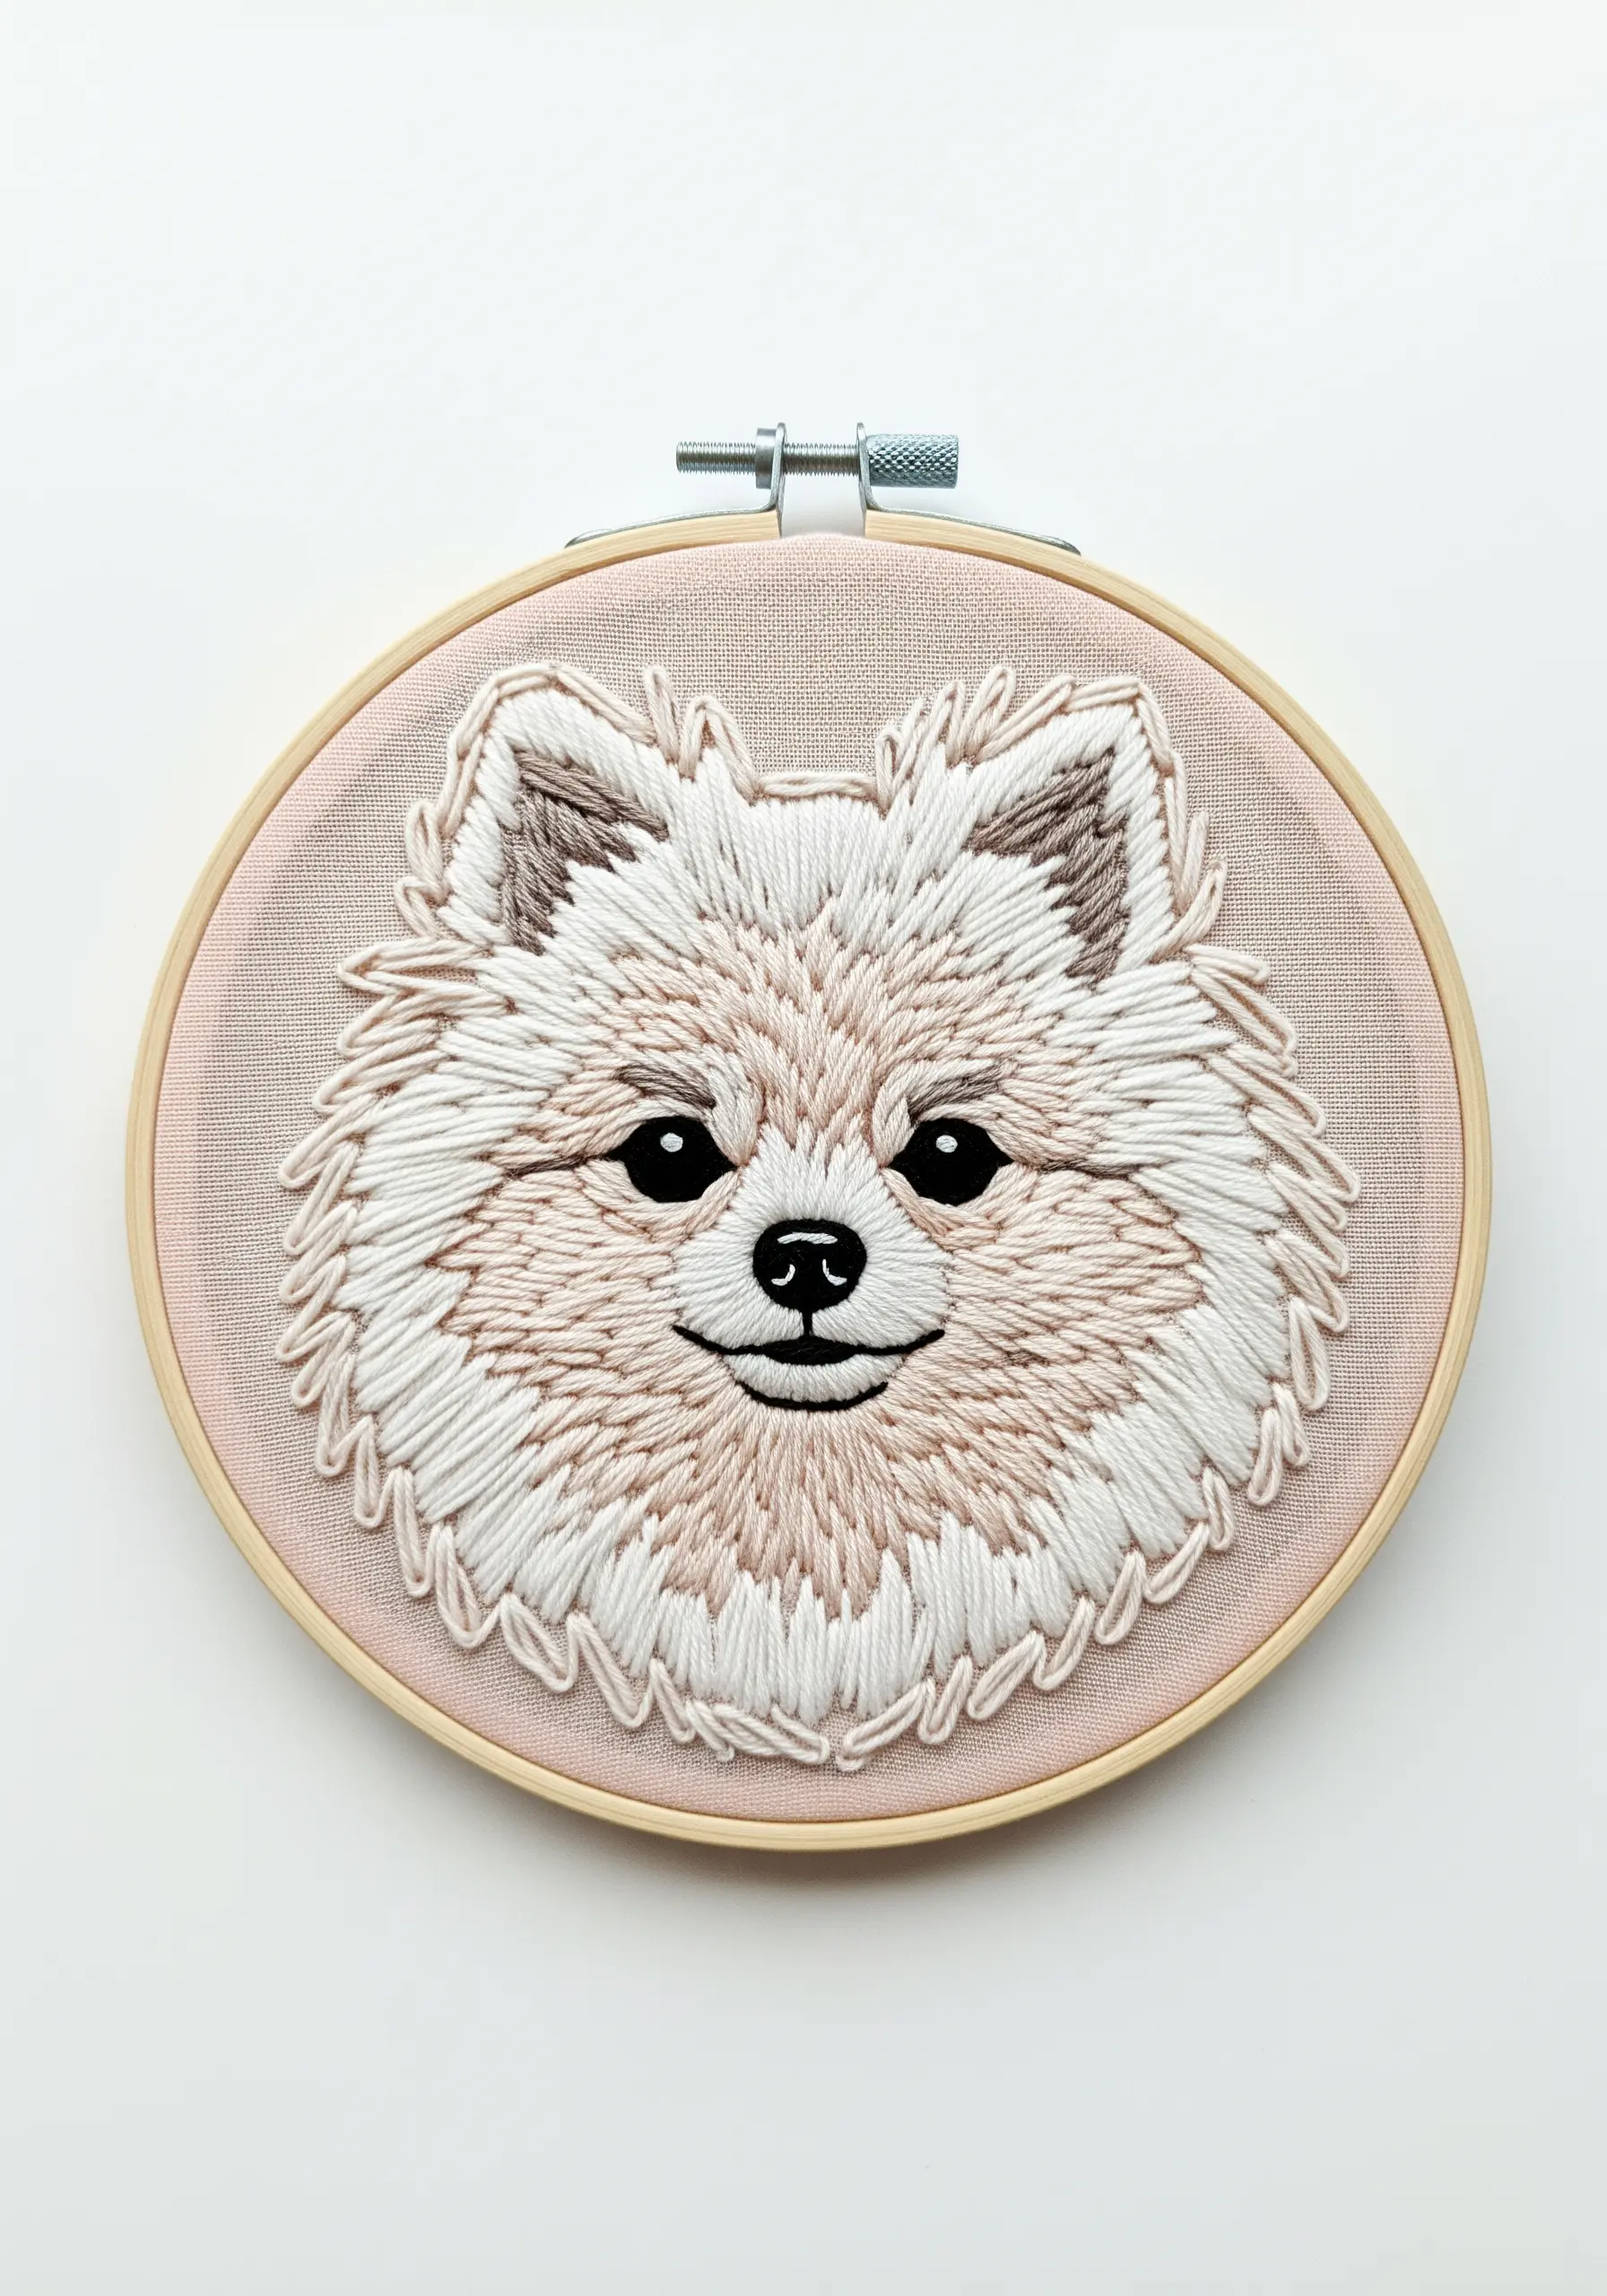
Use a fine split stitch for the defining lines of the face and ears, then fill the curly fur areas with a sea of French knots.
Vary the tightness and size of your French knots to mimic the natural clumping of a poodle’s coat, making it look more realistic.
This technique is perfect for breeds with distinctive fur, turning a flat portrait into a dimensional, touchable piece of art.
6. Add Depth with Selective Highlights
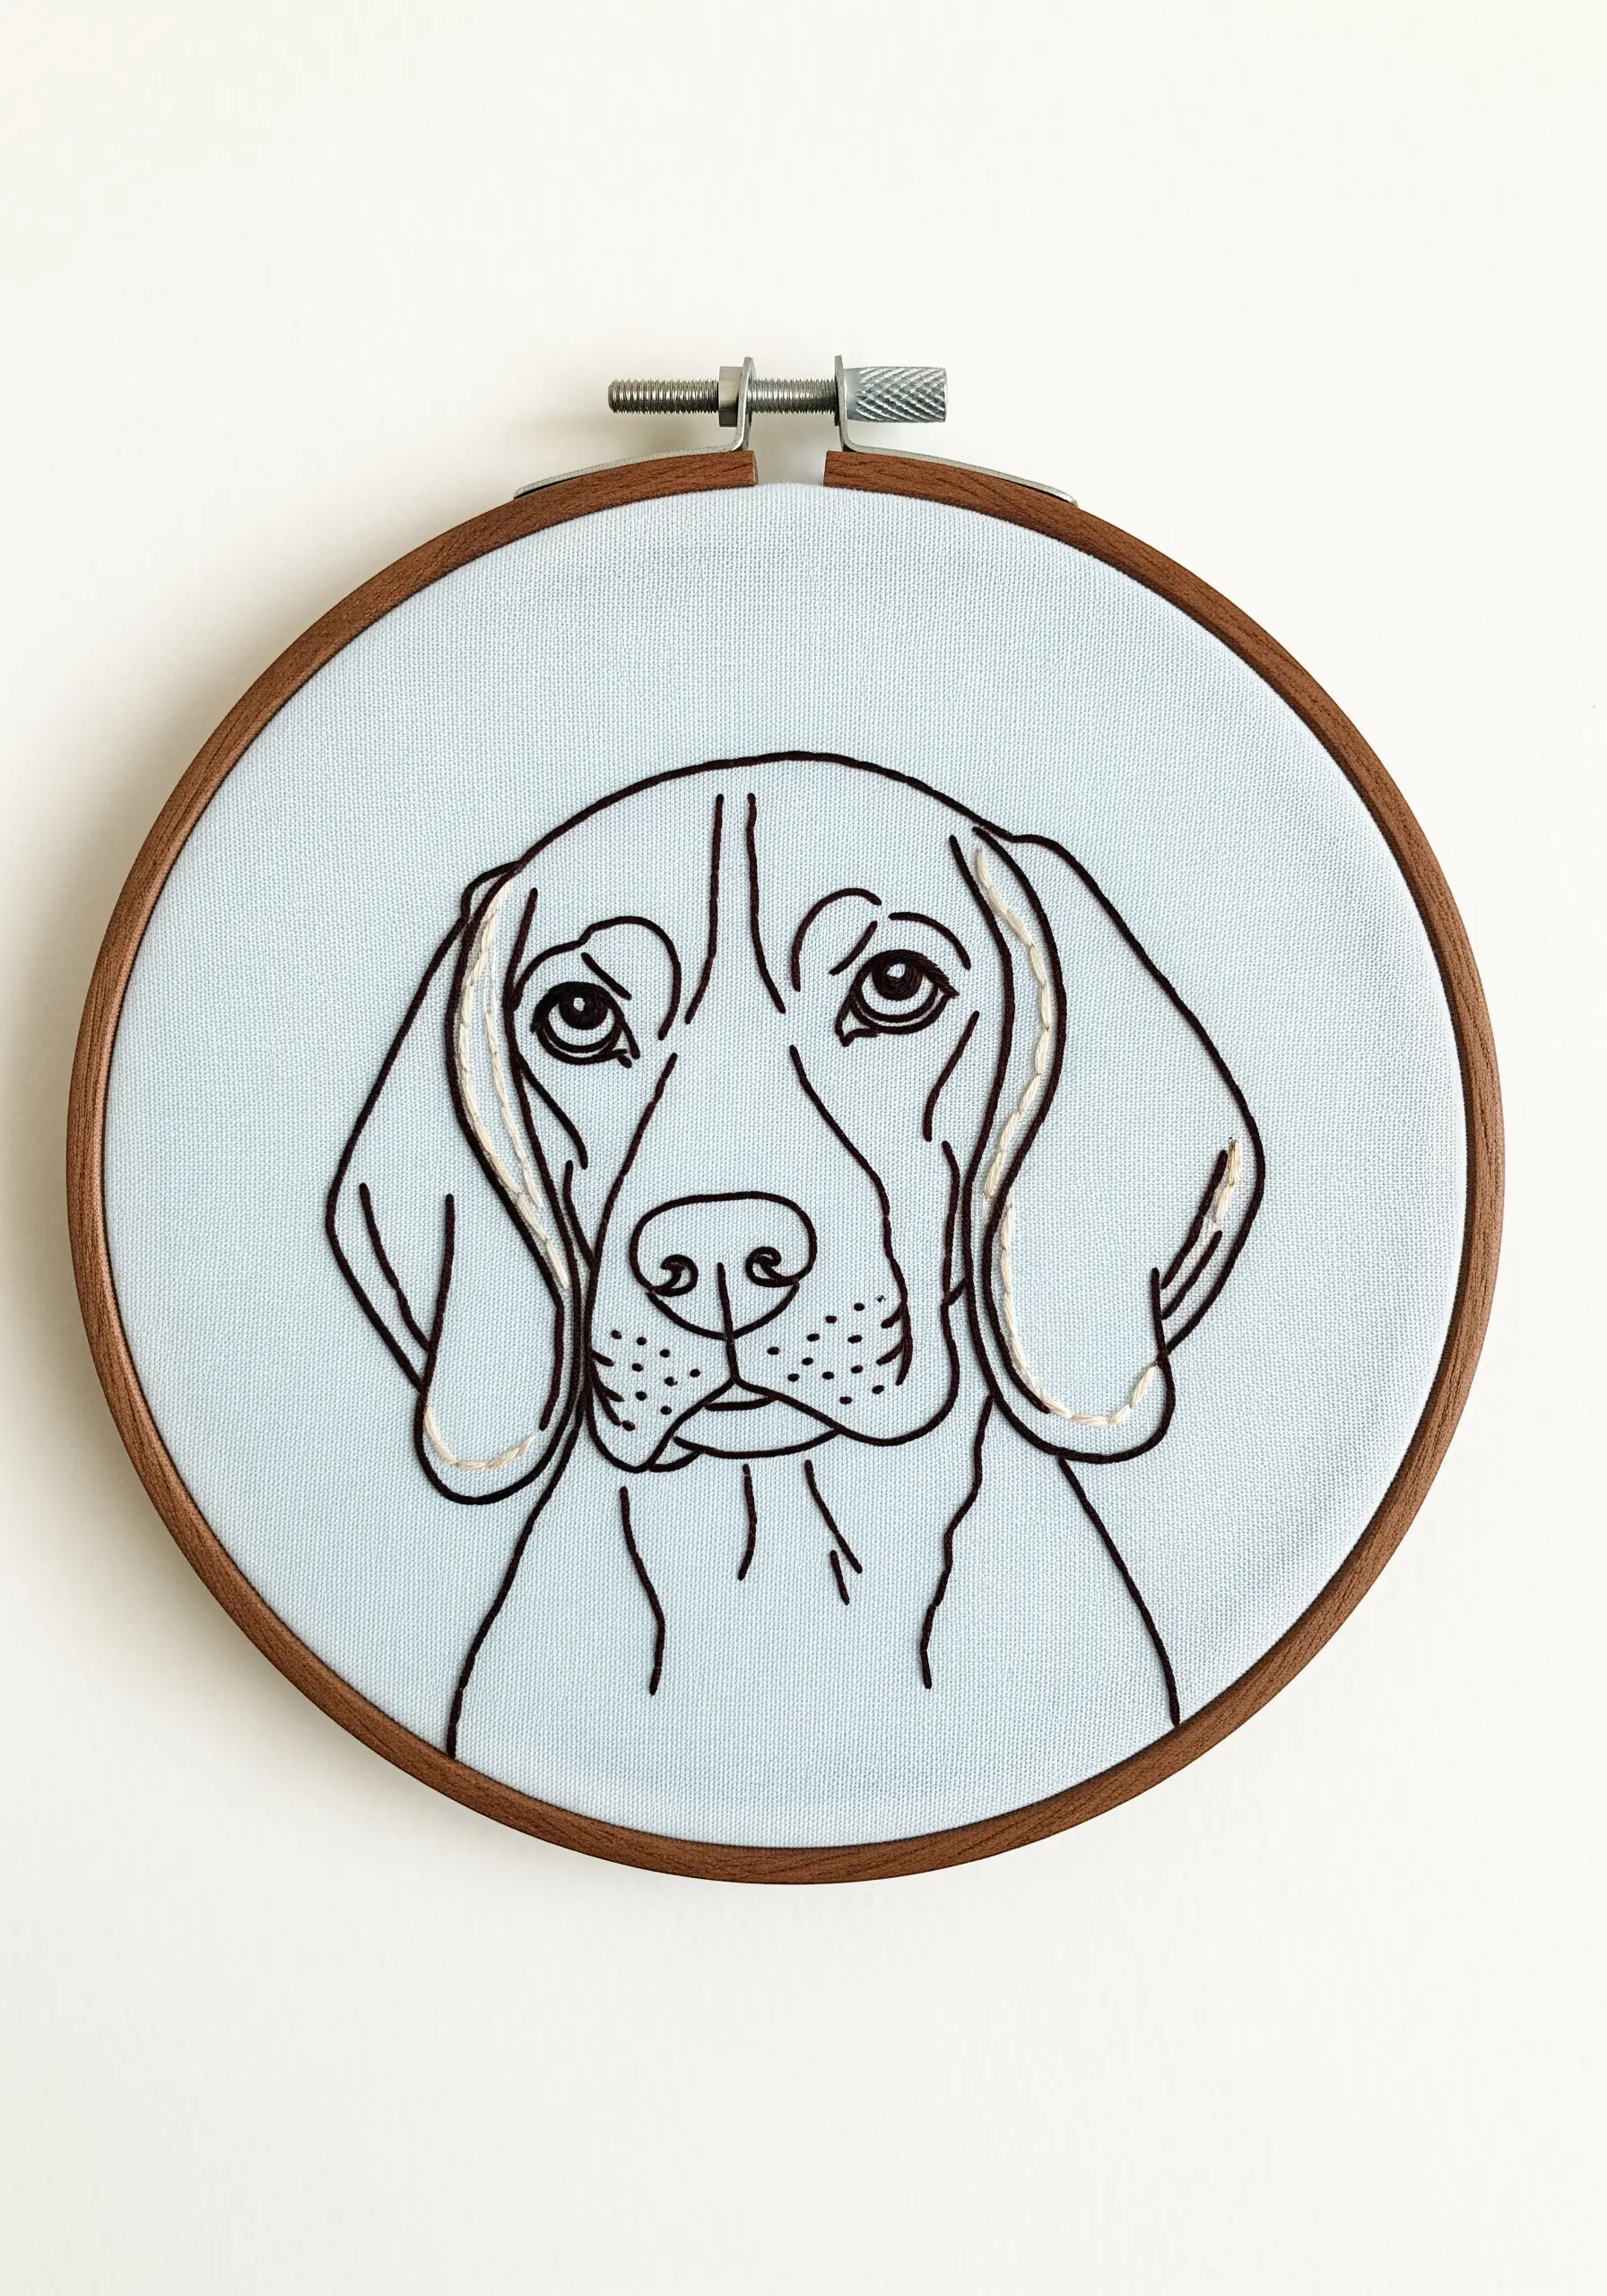
You don’t need full color to create dimension; a few thoughtfully placed highlights can make your line art pop.
After stitching the main portrait in a dark thread, use a single strand of a lighter, contrasting color—like cream or white—to add subtle accents.
Place these highlight stitches along the curves of the ears or the bridge of the nose, exactly where light would naturally hit.
This simple addition tricks the eye into seeing depth and form, elevating a simple outline into a more dynamic portrait.
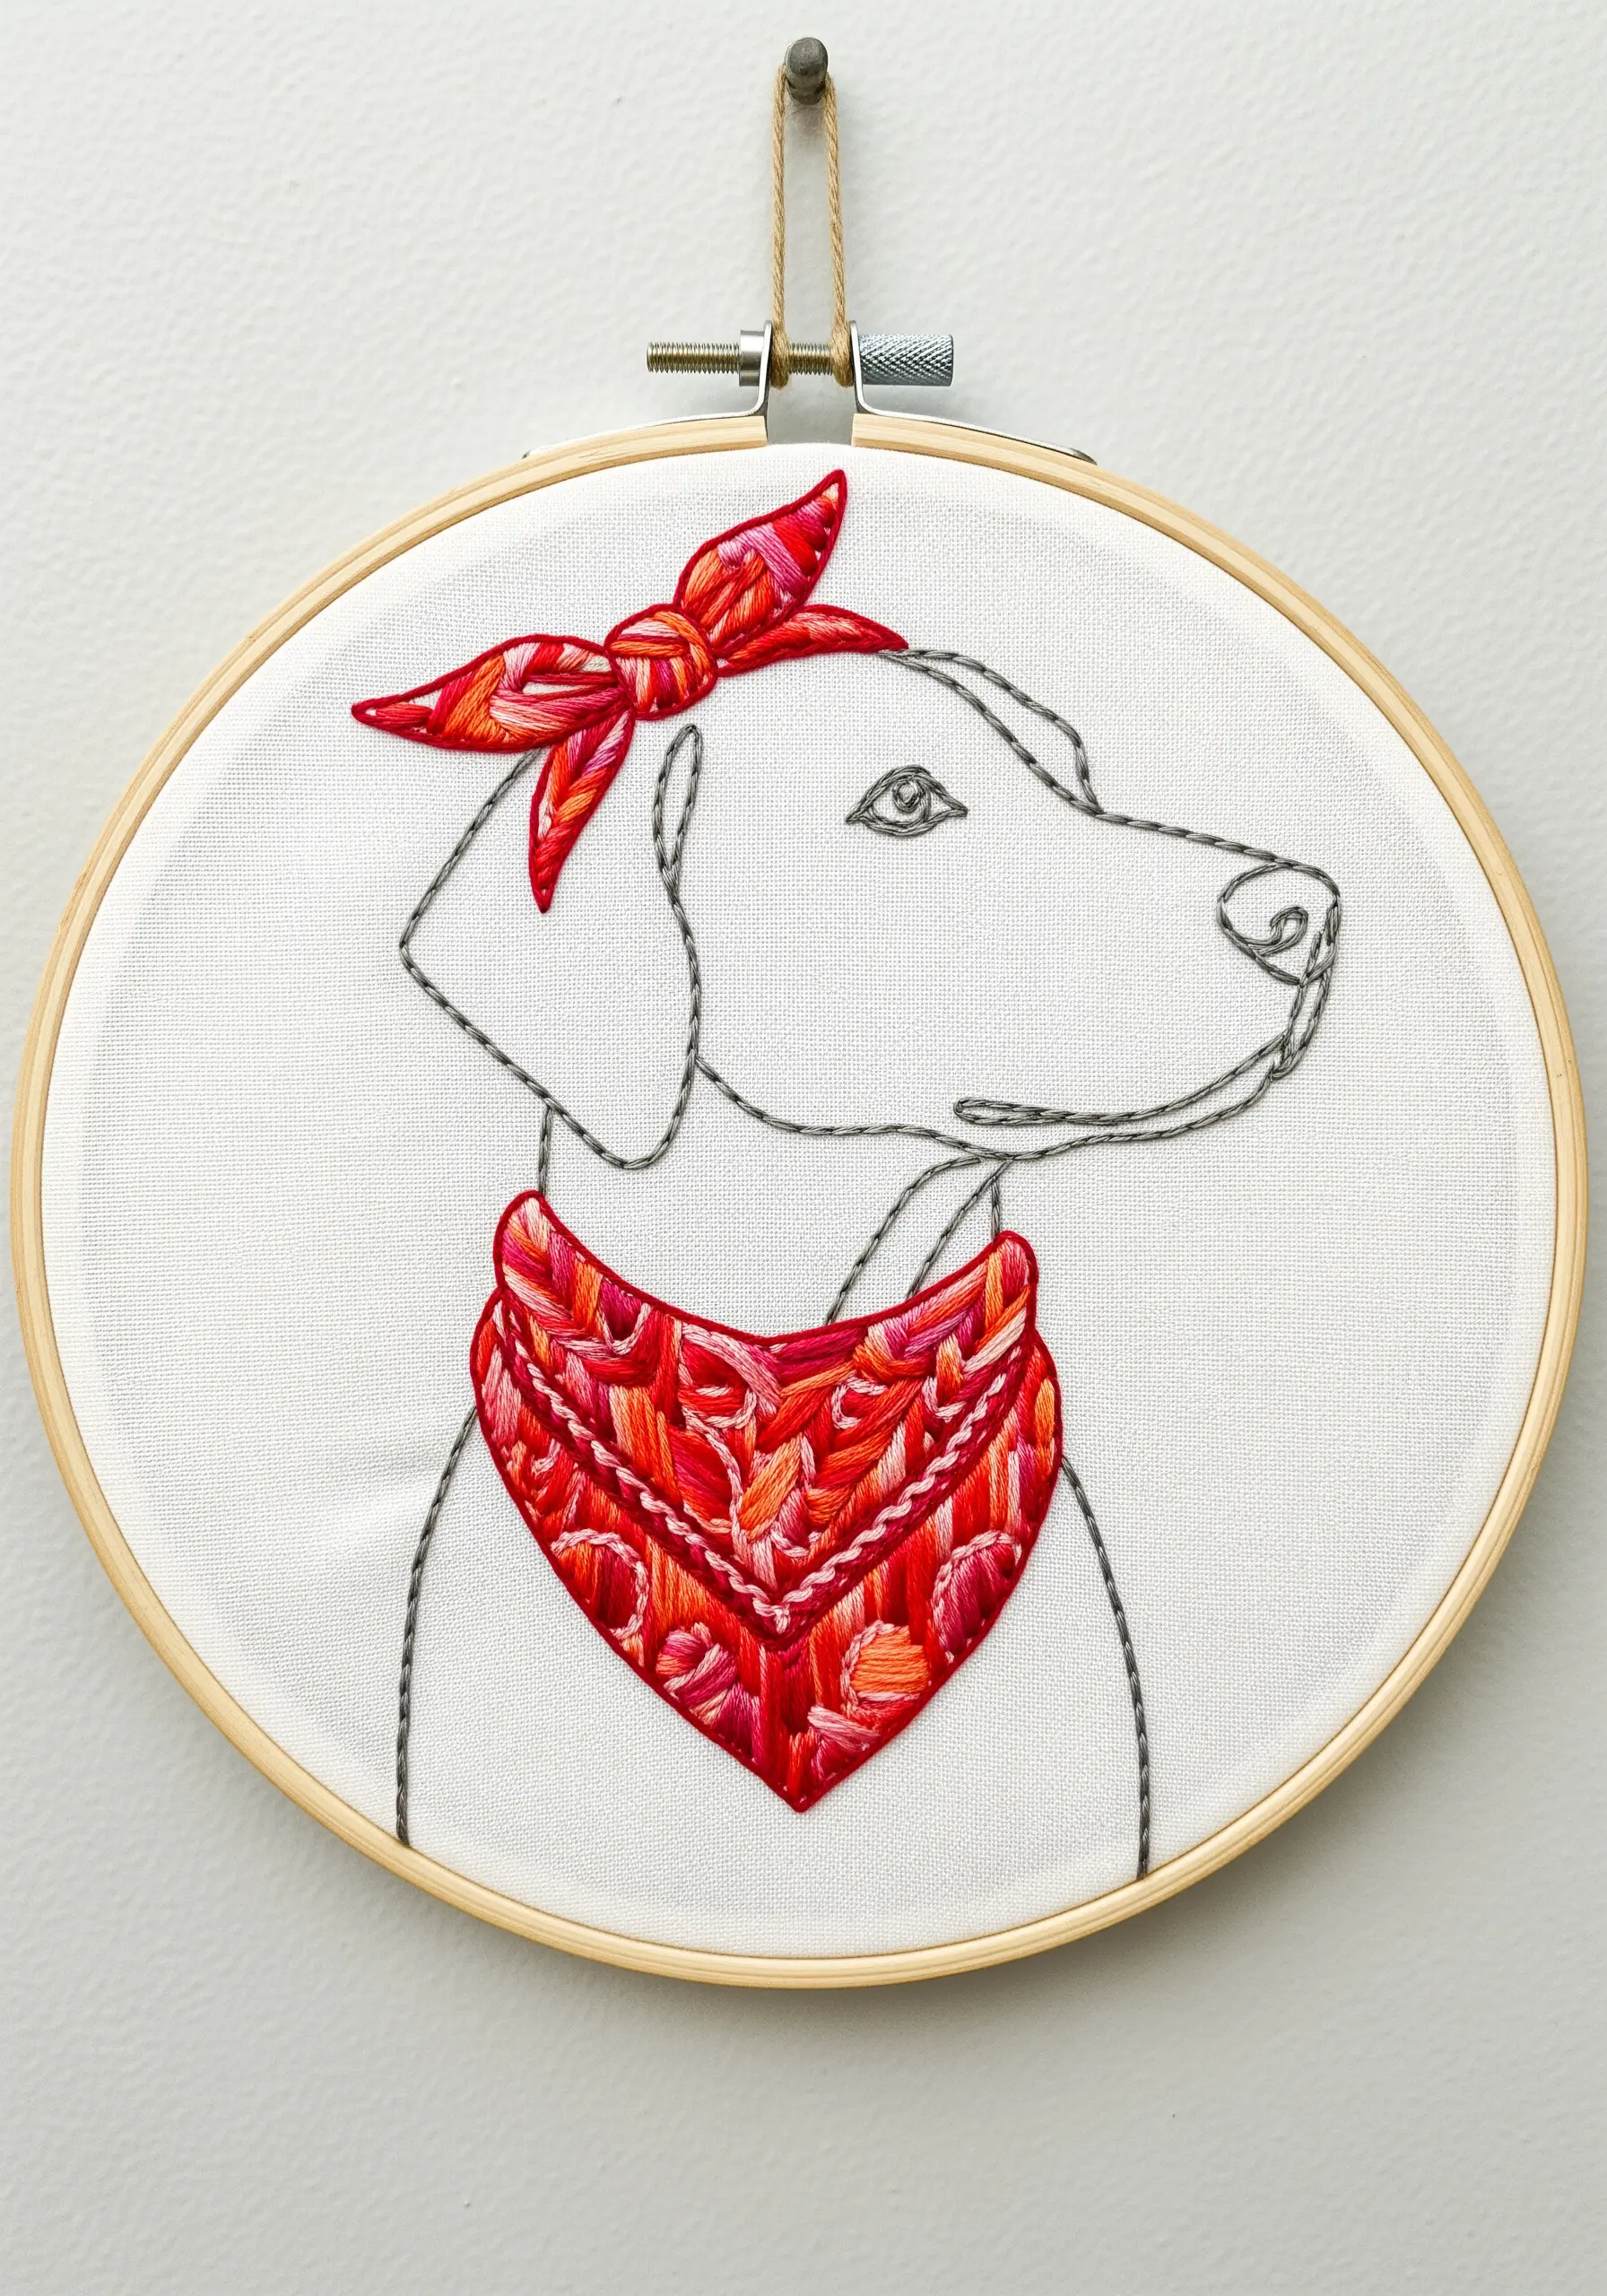
7. Integrate a Bold, Personalized Element
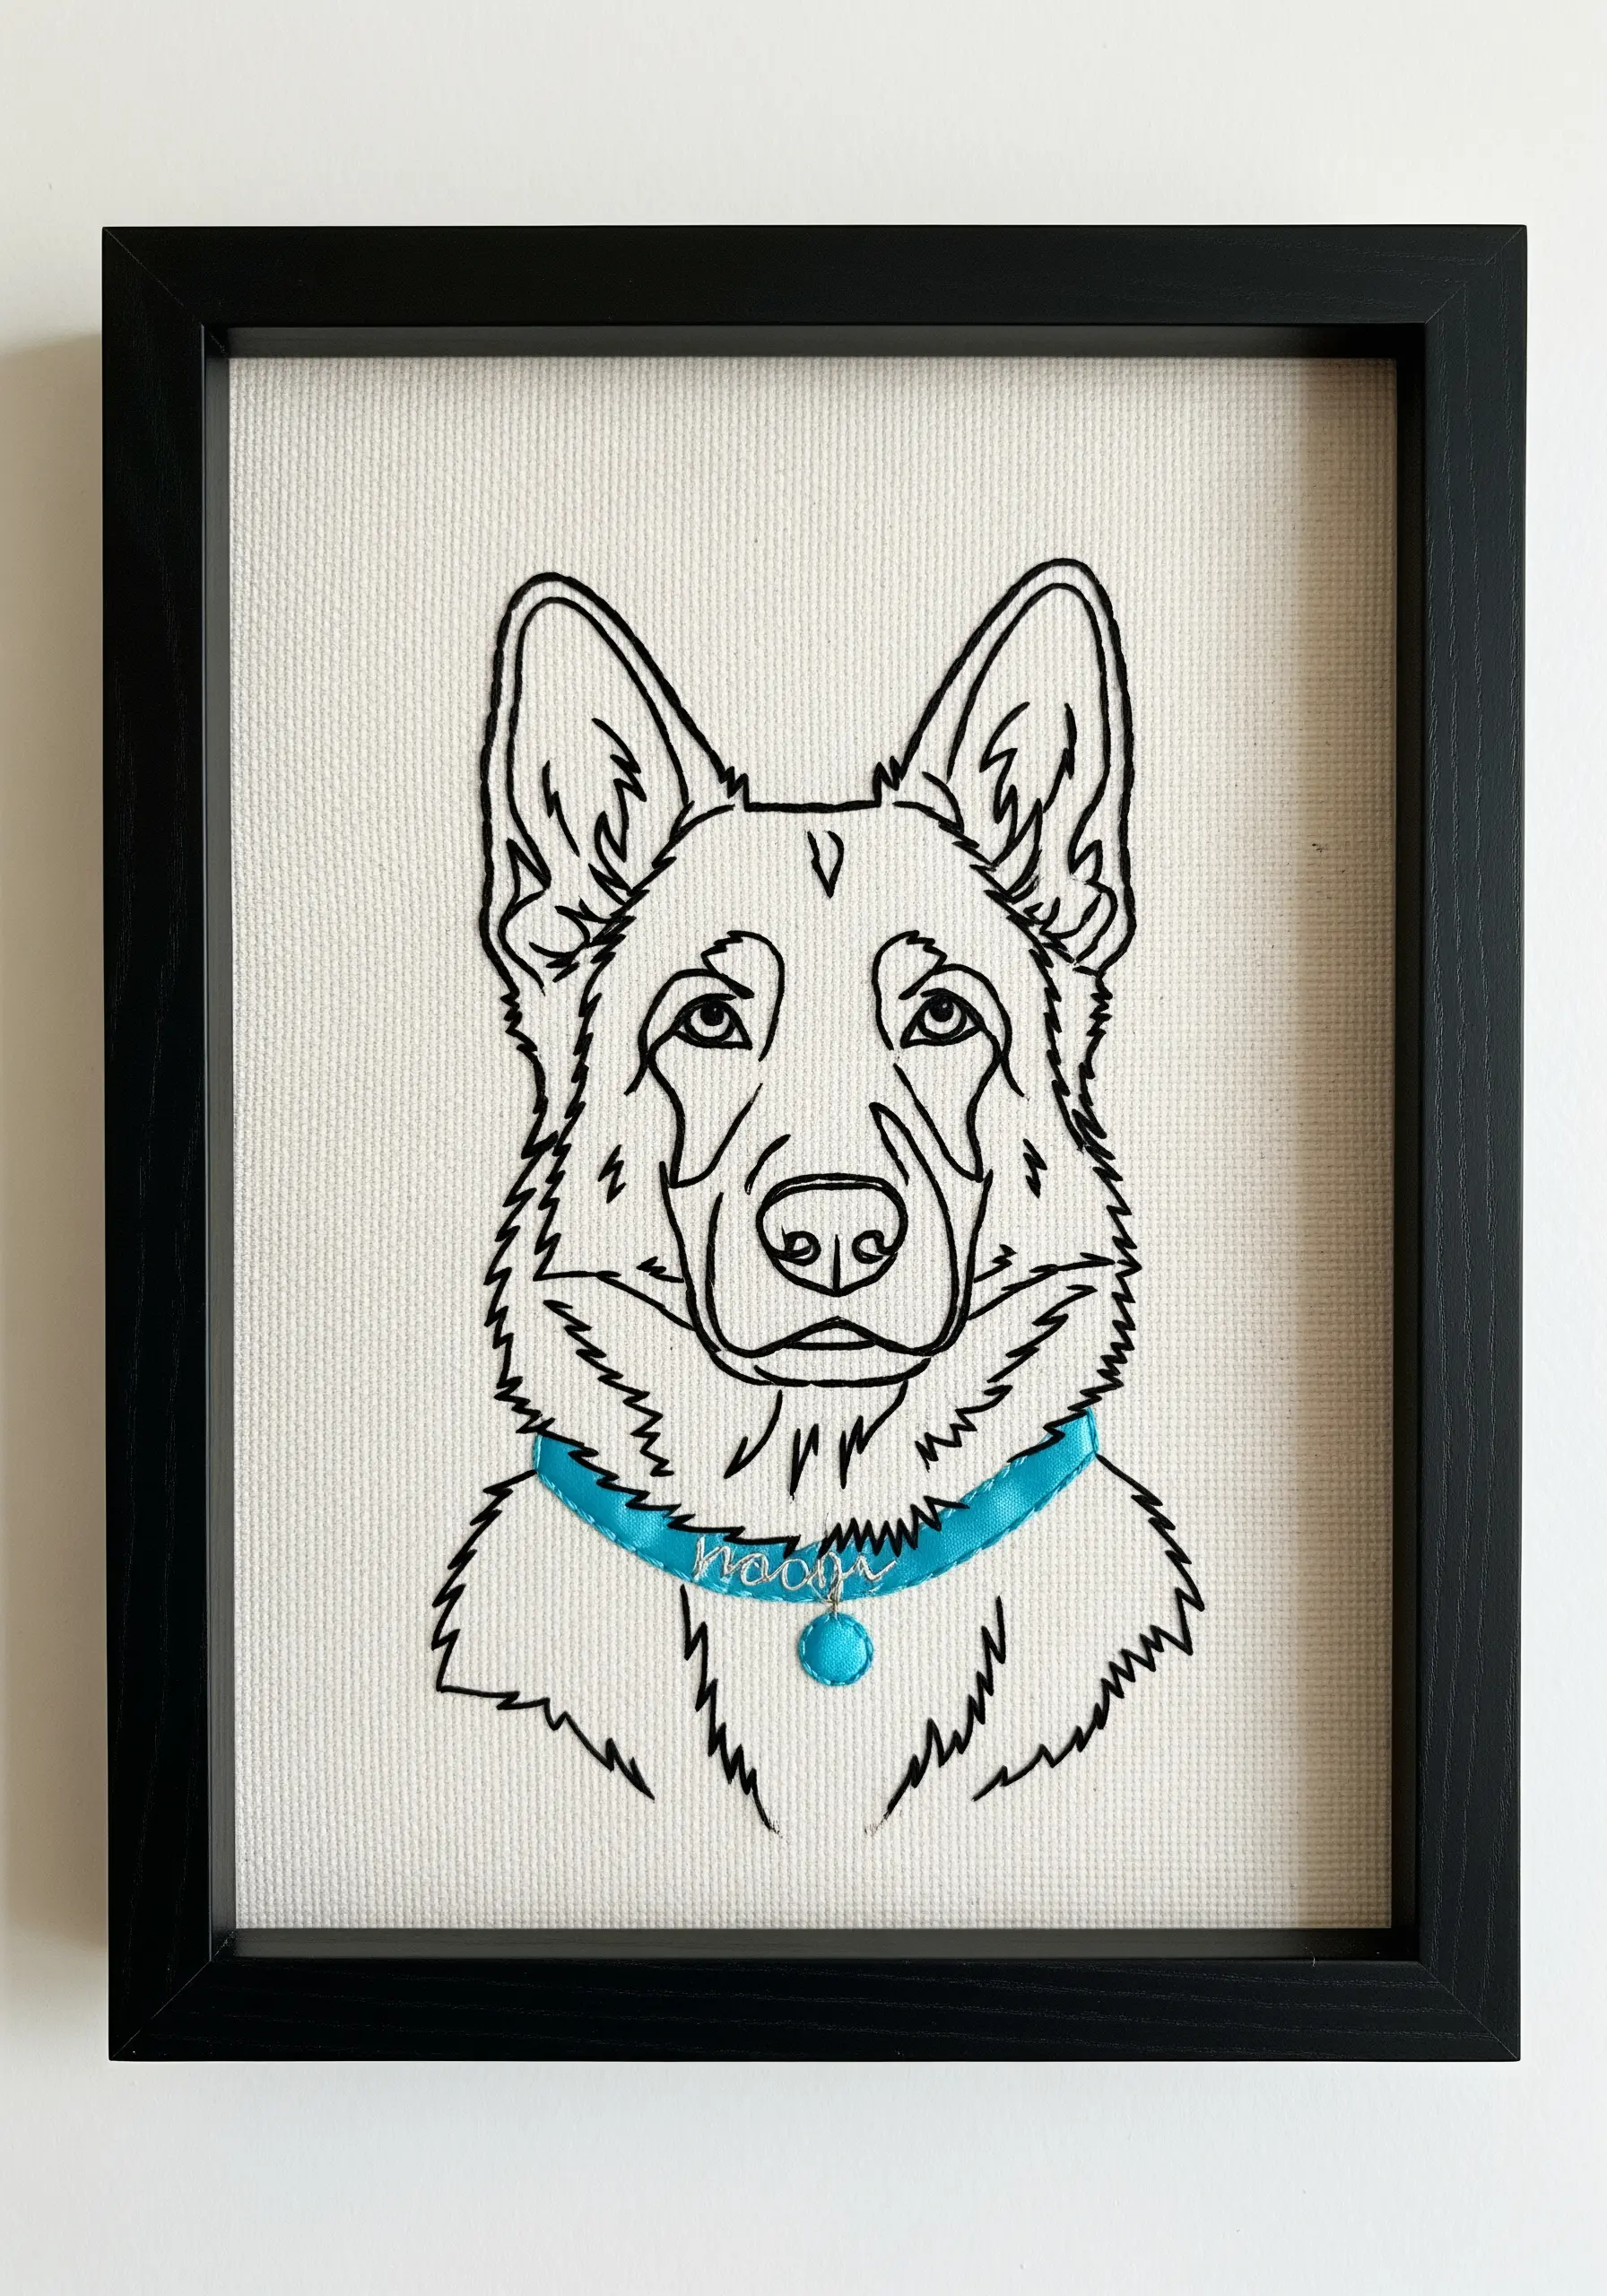
Make your portrait uniquely personal by adding a key accessory in a solid block of color and texture.
Stitch the dog’s outline in a clean backstitch, then fill in the collar using a dense satin stitch for a smooth, raised effect that contrasts with the delicate lines.
Use a contrasting, vibrant color for the collar to make it the centerpiece of the design.
Finish by stitching your pet’s name onto the collar with a single strand of thread, creating a truly custom and heartfelt tribute.
8. Capture Dynamic Motion in Your Lines
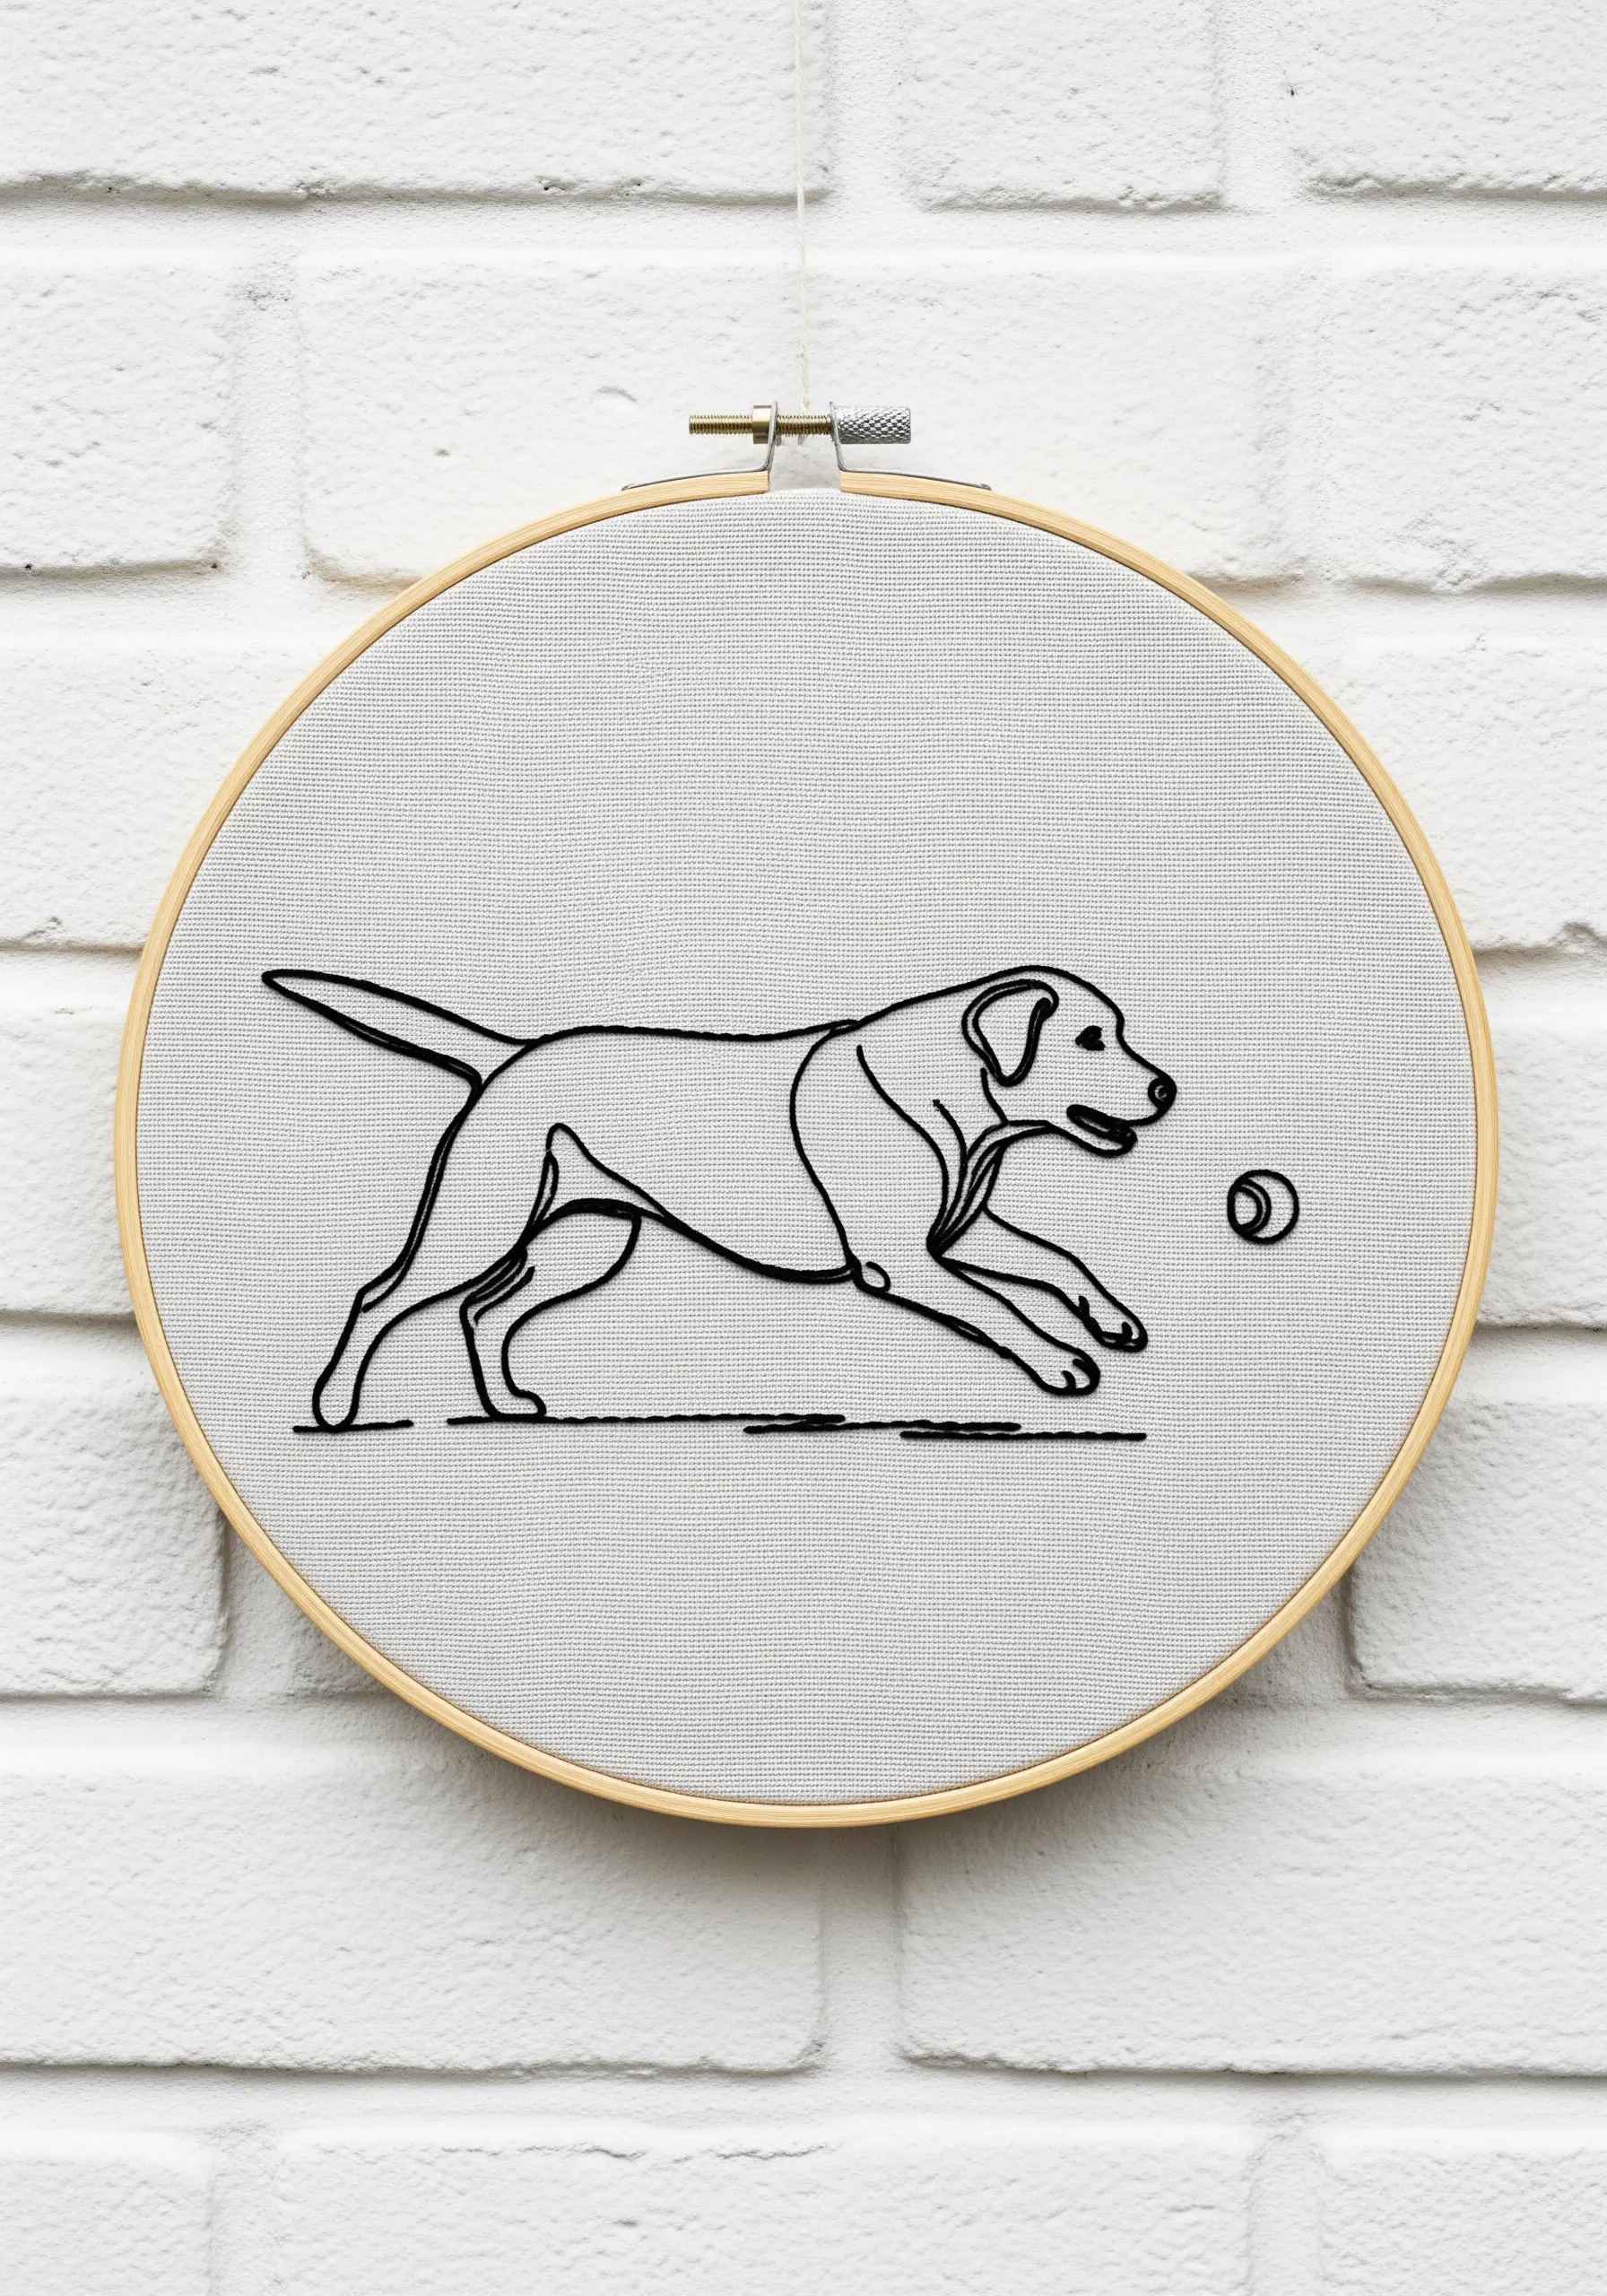
Animate your pet portrait by choosing a pose full of energy and using your stitches to emphasize that movement.
Trace the lines of motion—the curve of the back, the stretch of the legs—with a confident split stitch or stem stitch, which naturally creates fluid, directional lines.
Vary your stitch length to convey speed: use shorter, tighter stitches on the stationary parts and slightly longer ones along the stretched-out body.
The key is to stitch with the flow of the animal’s body, making the final piece feel alive and energetic, not static.
9. Embellish with Three-Dimensional Florals
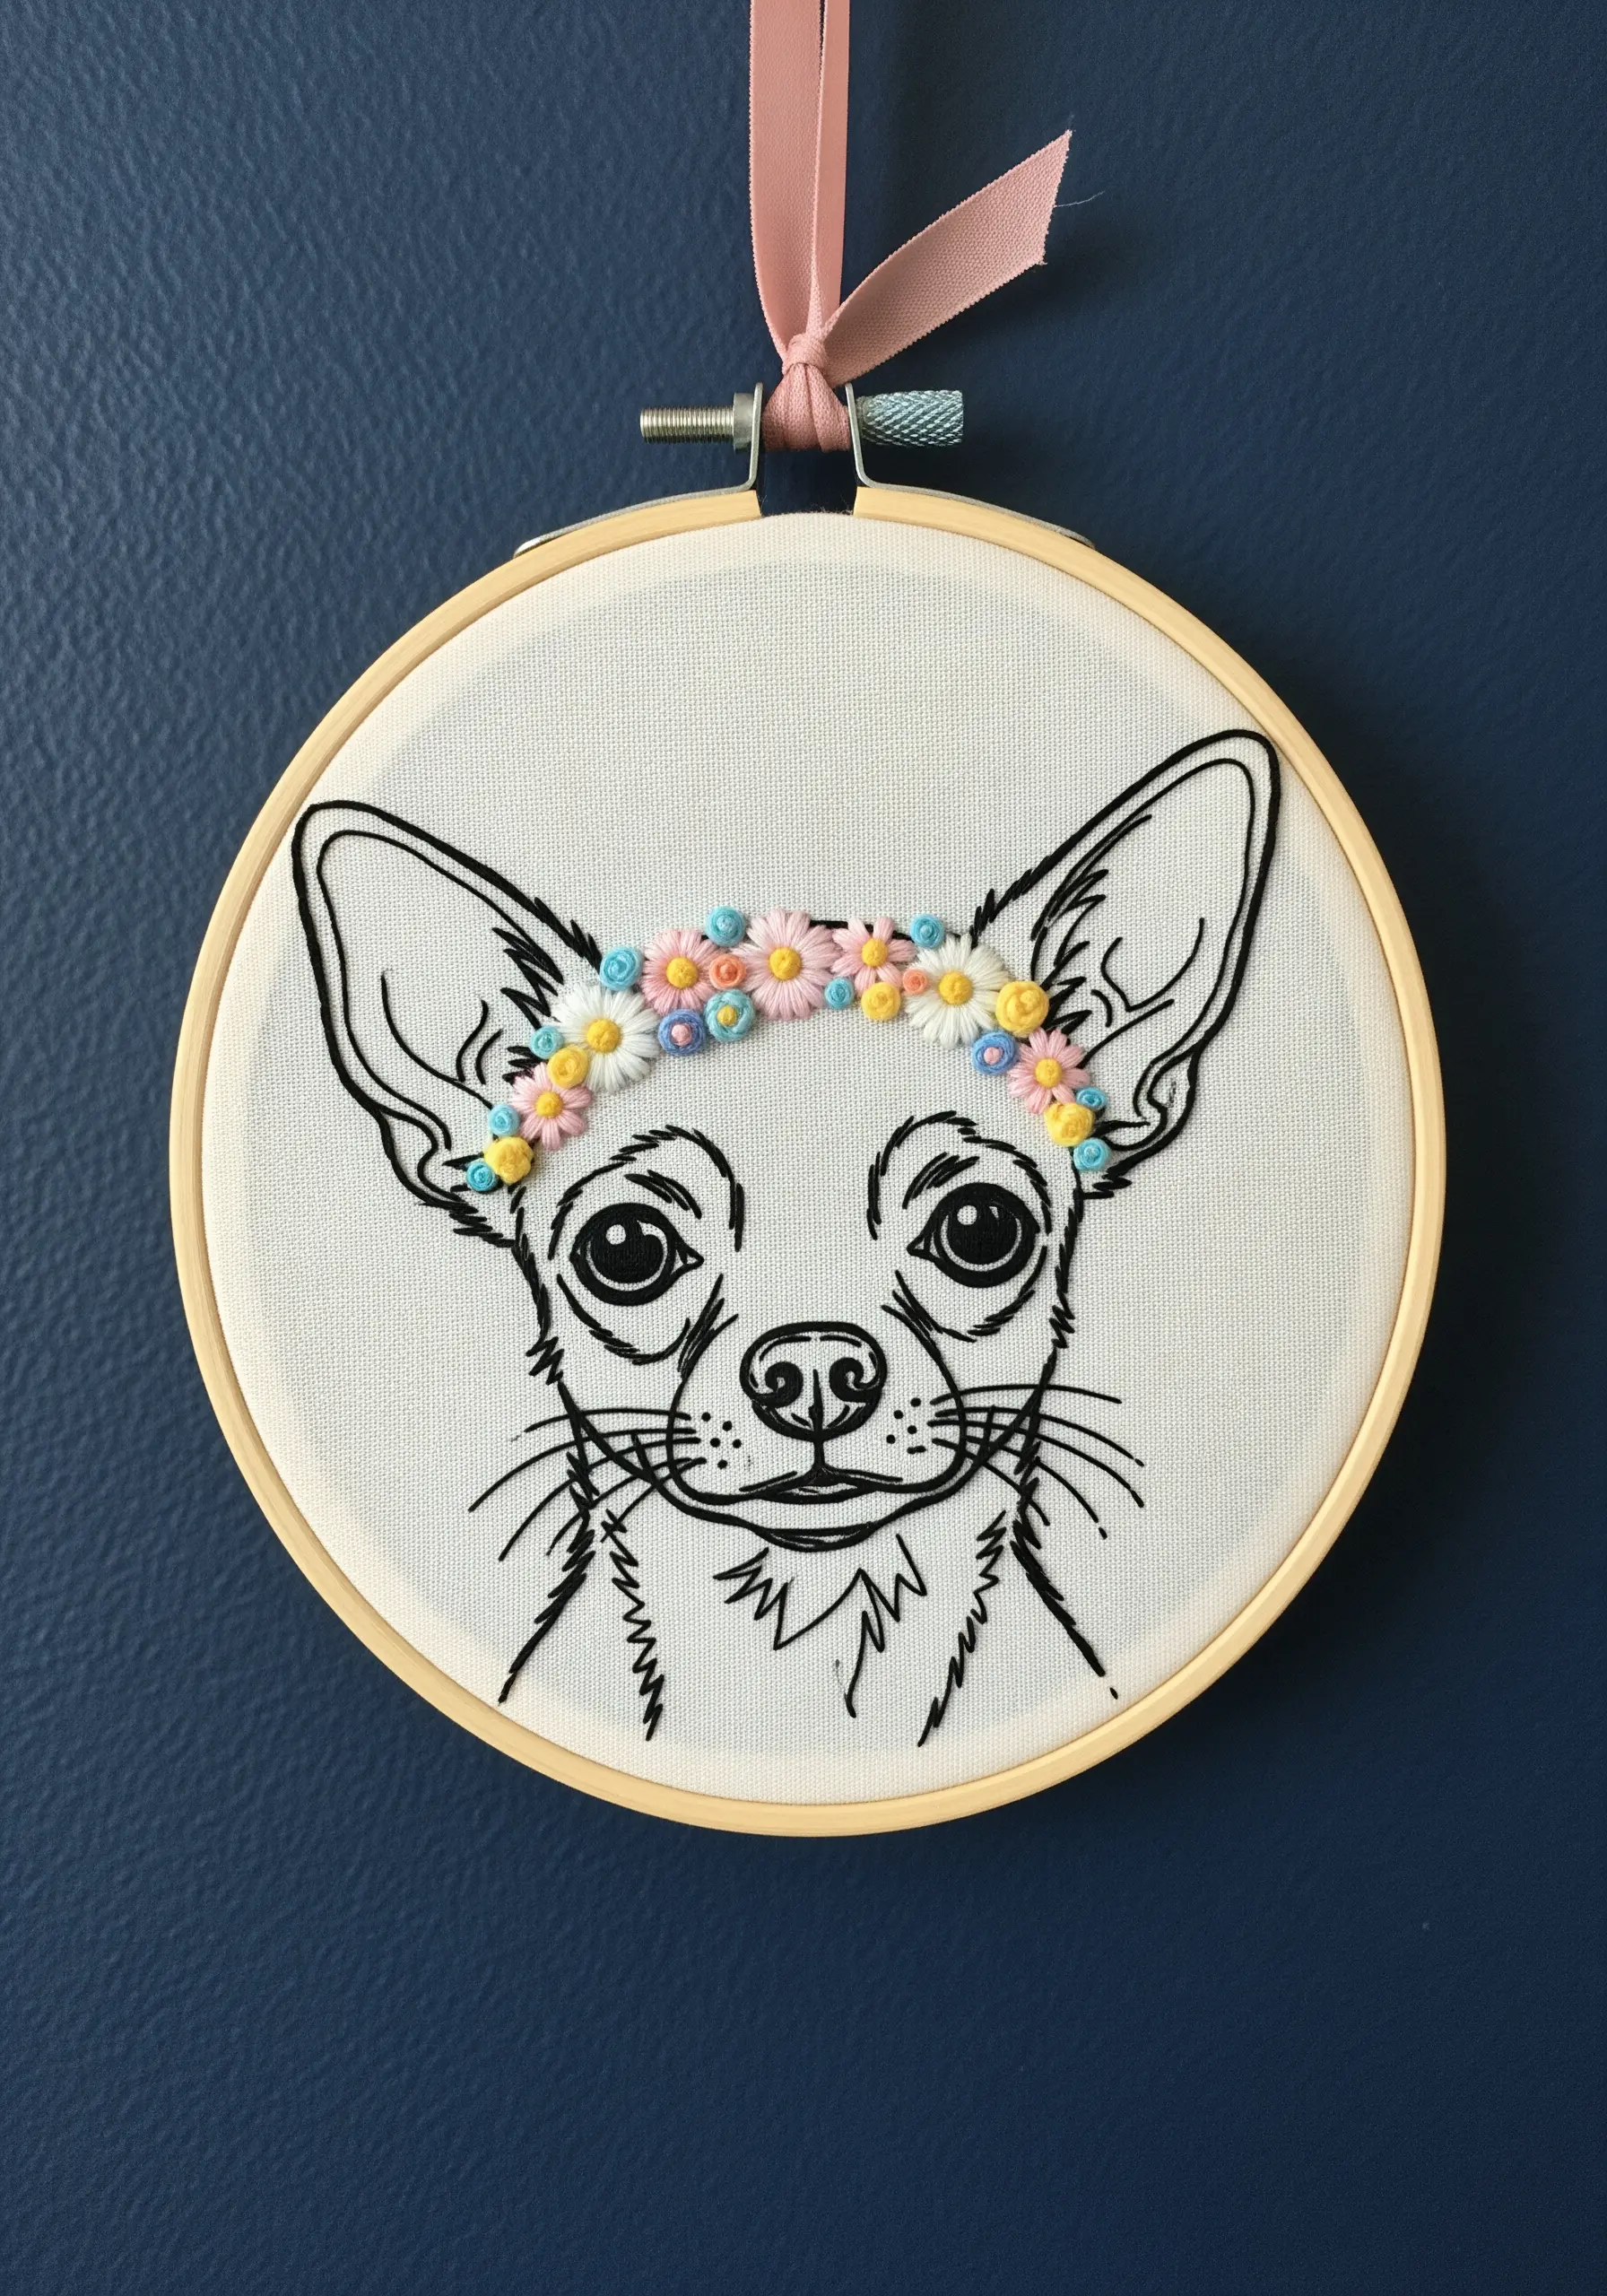
Elevate a simple line portrait by adding a crown of dimensional flowers, transforming it into a piece of whimsical art.
Use woven wheel stitches (or spider web roses) for the larger blooms and French knots for the smaller buds and filler flowers.
Choose a soft, harmonious color palette—like pastels—to keep the floral crown feeling delicate and sweet rather than overwhelming.
This technique is perfect for adding personality and charm, especially for a pet with a gentle or playful nature.
10. Create Intensity with Monochromatic Focus
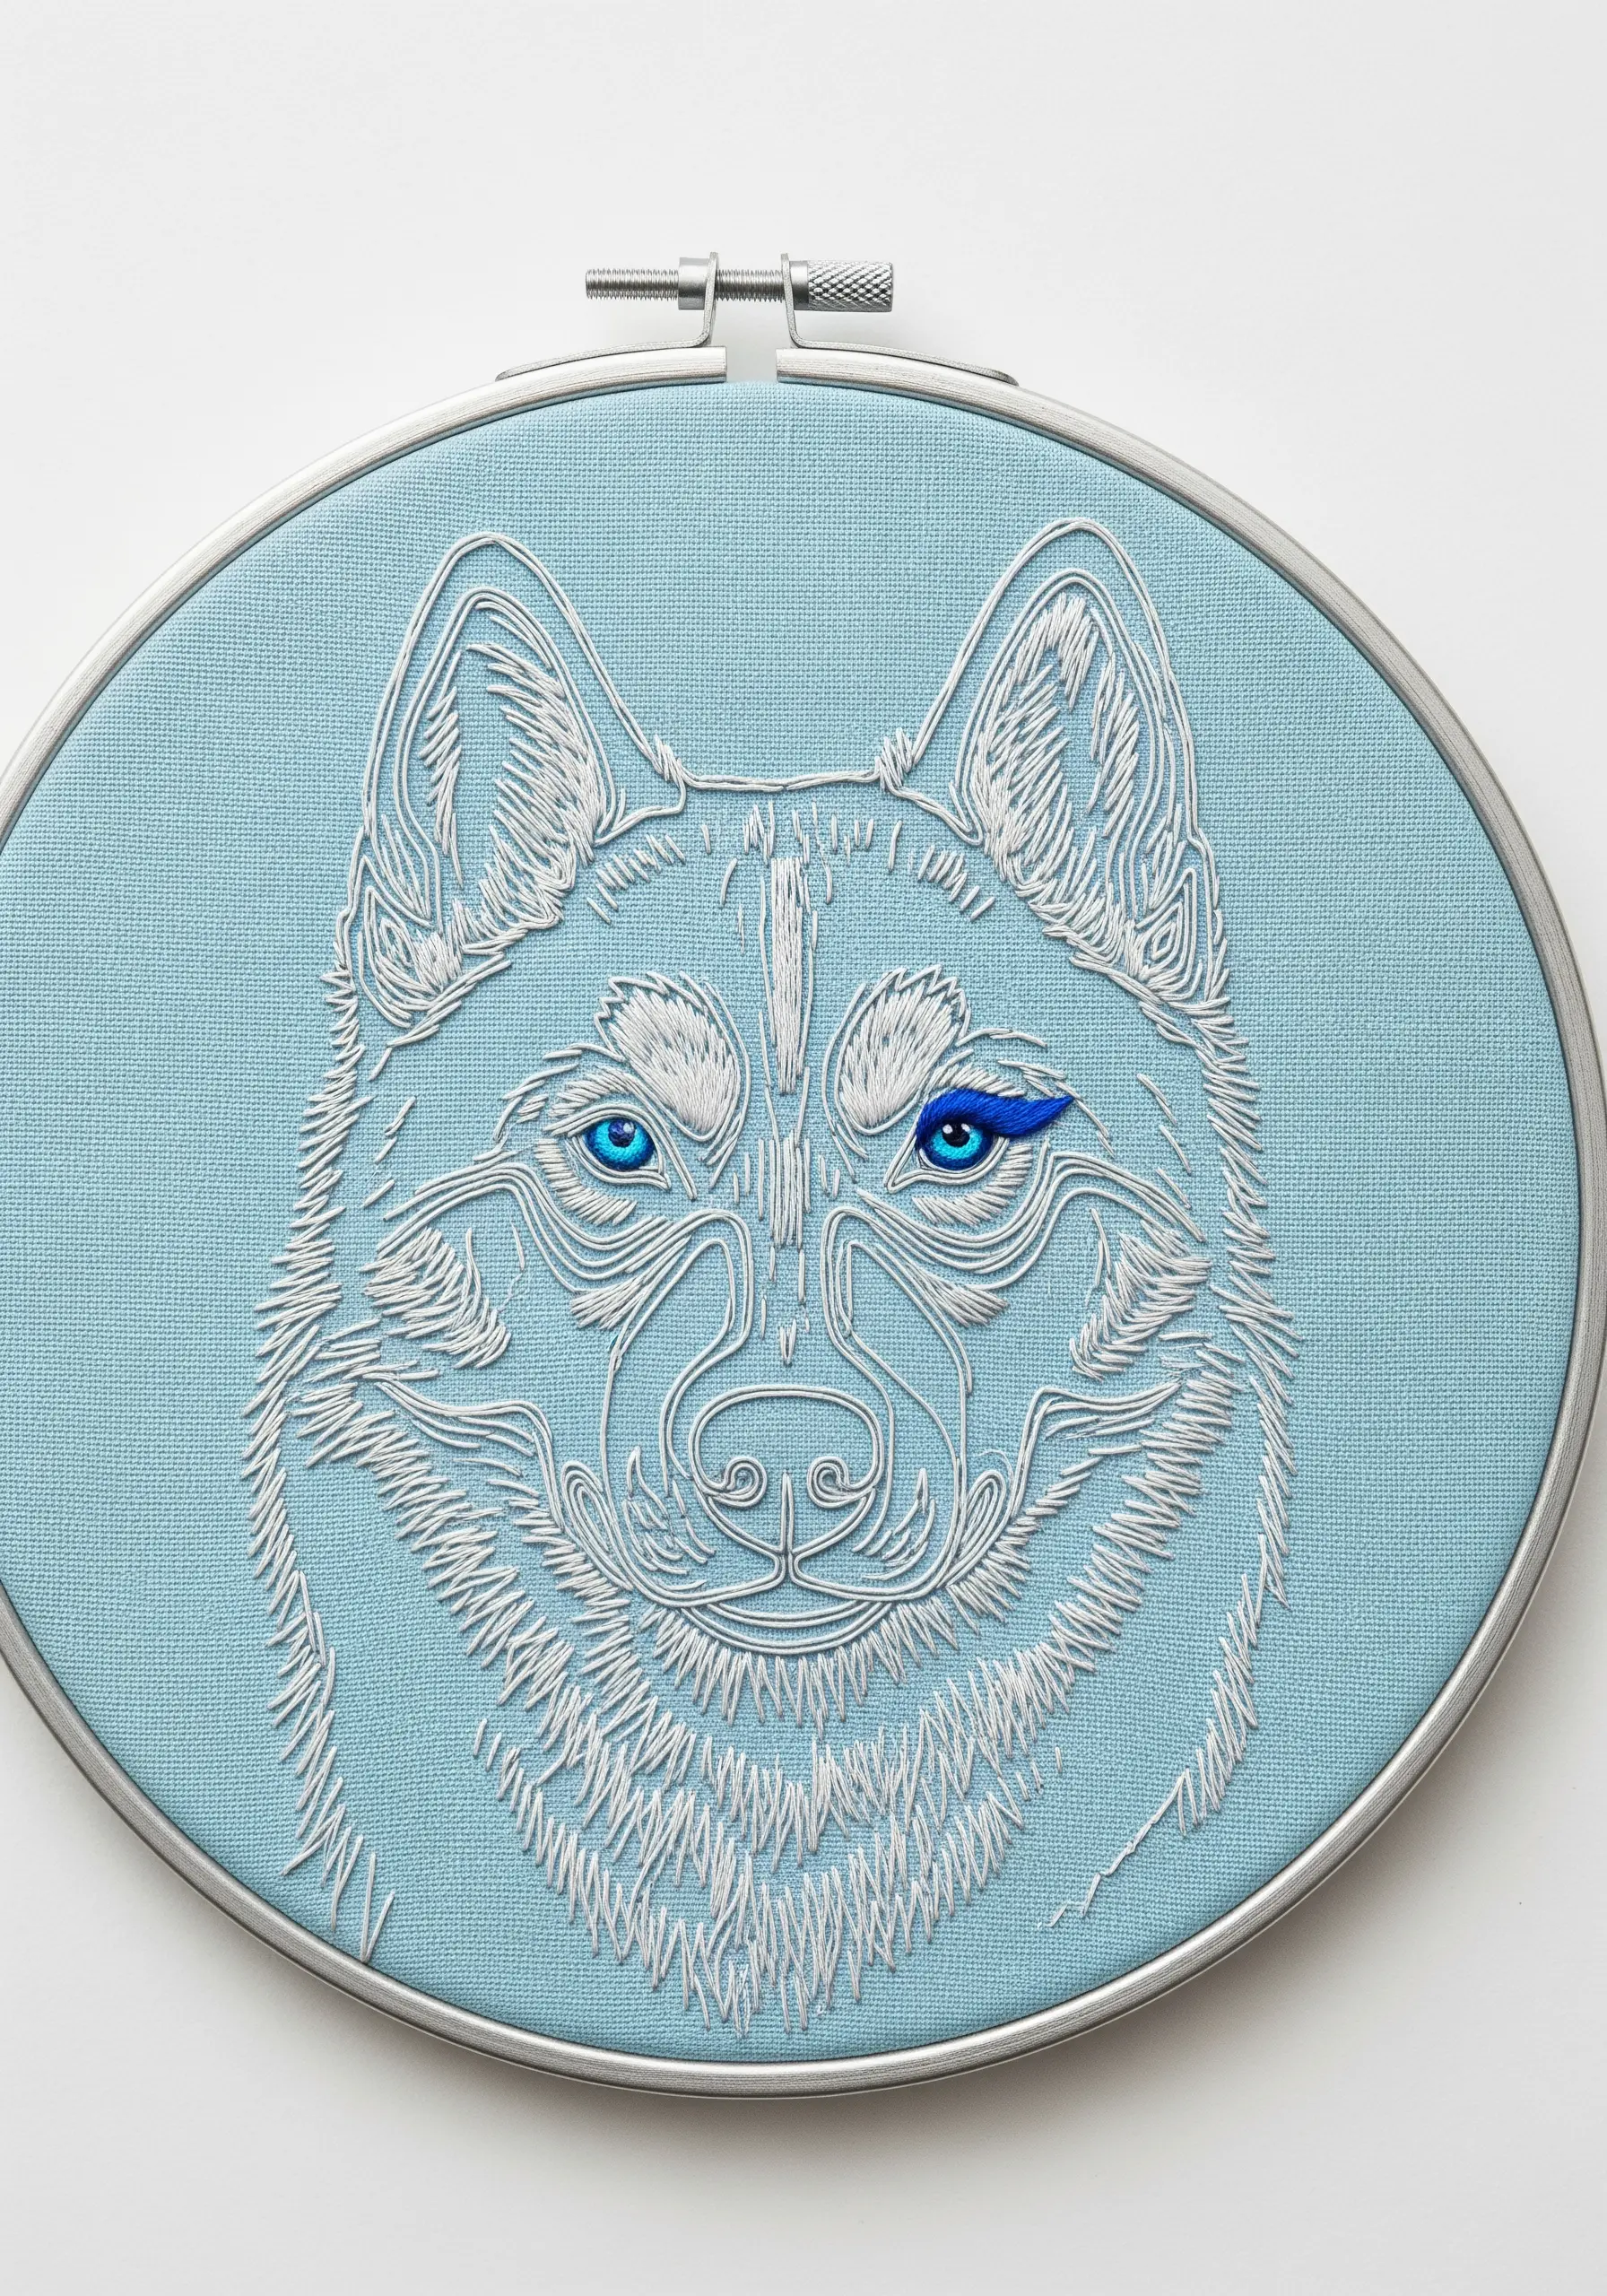
Stitch an entire portrait in a single color, like white on blue, but reserve a vibrant, contrasting hue exclusively for the eyes.
This technique instantly makes the eyes the most powerful feature of the piece, drawing the viewer in and conveying a sense of soulfulness.
Use a satin stitch to fill the eyes, ensuring the stitches lie smoothly in the same direction to create a glossy, reflective look.
The surrounding fur can be rendered with short, feathered straight stitches to build texture that directs attention back to the piercing gaze.
11. Tell a Story of Connection Between Two Pets
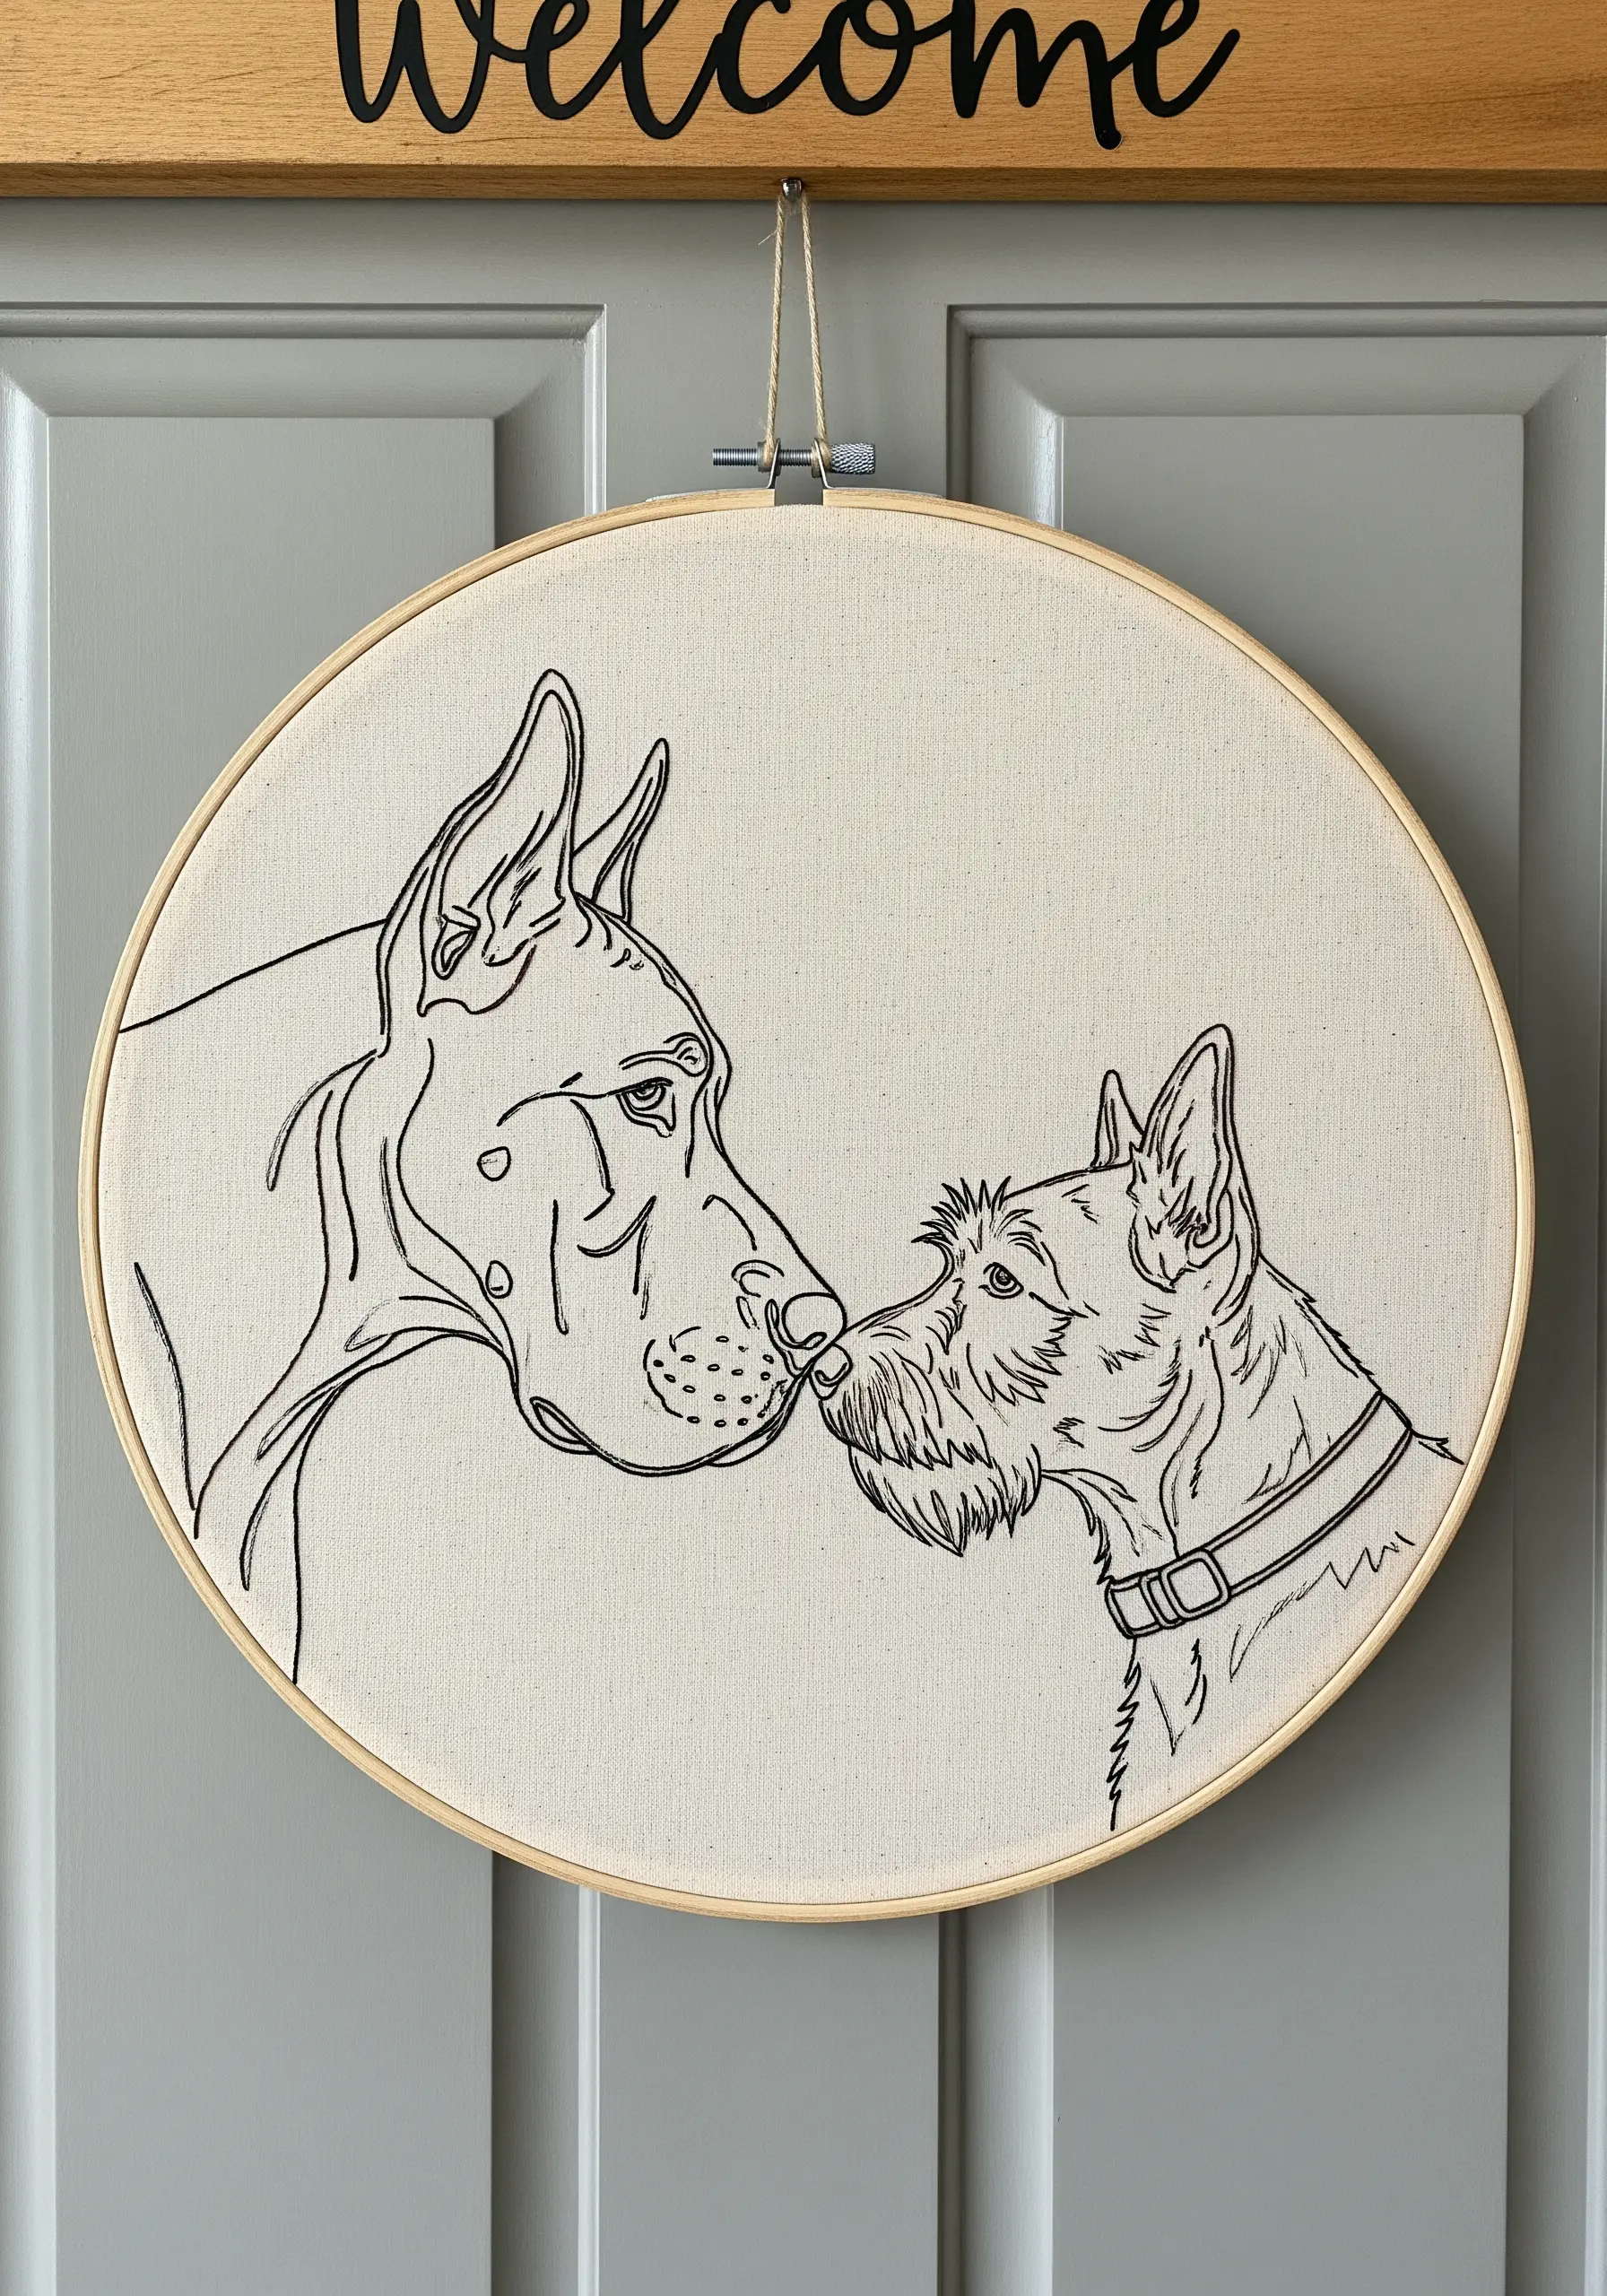
When stitching two animals, focus on the point of interaction to create a narrative of friendship or affection.
Let the lines of their noses gently touch or overlap, using a consistent backstitch to unify them into a single composition.
Pay attention to the scale and detail; the larger dog can have slightly thicker lines, while the smaller one has finer details, adding realism.
These modern thread designs that turn simple outlines into emotional love story portraits capture a shared moment, making the piece feel deeply personal.
12. Embrace Simplicity with a Bold Paw Print
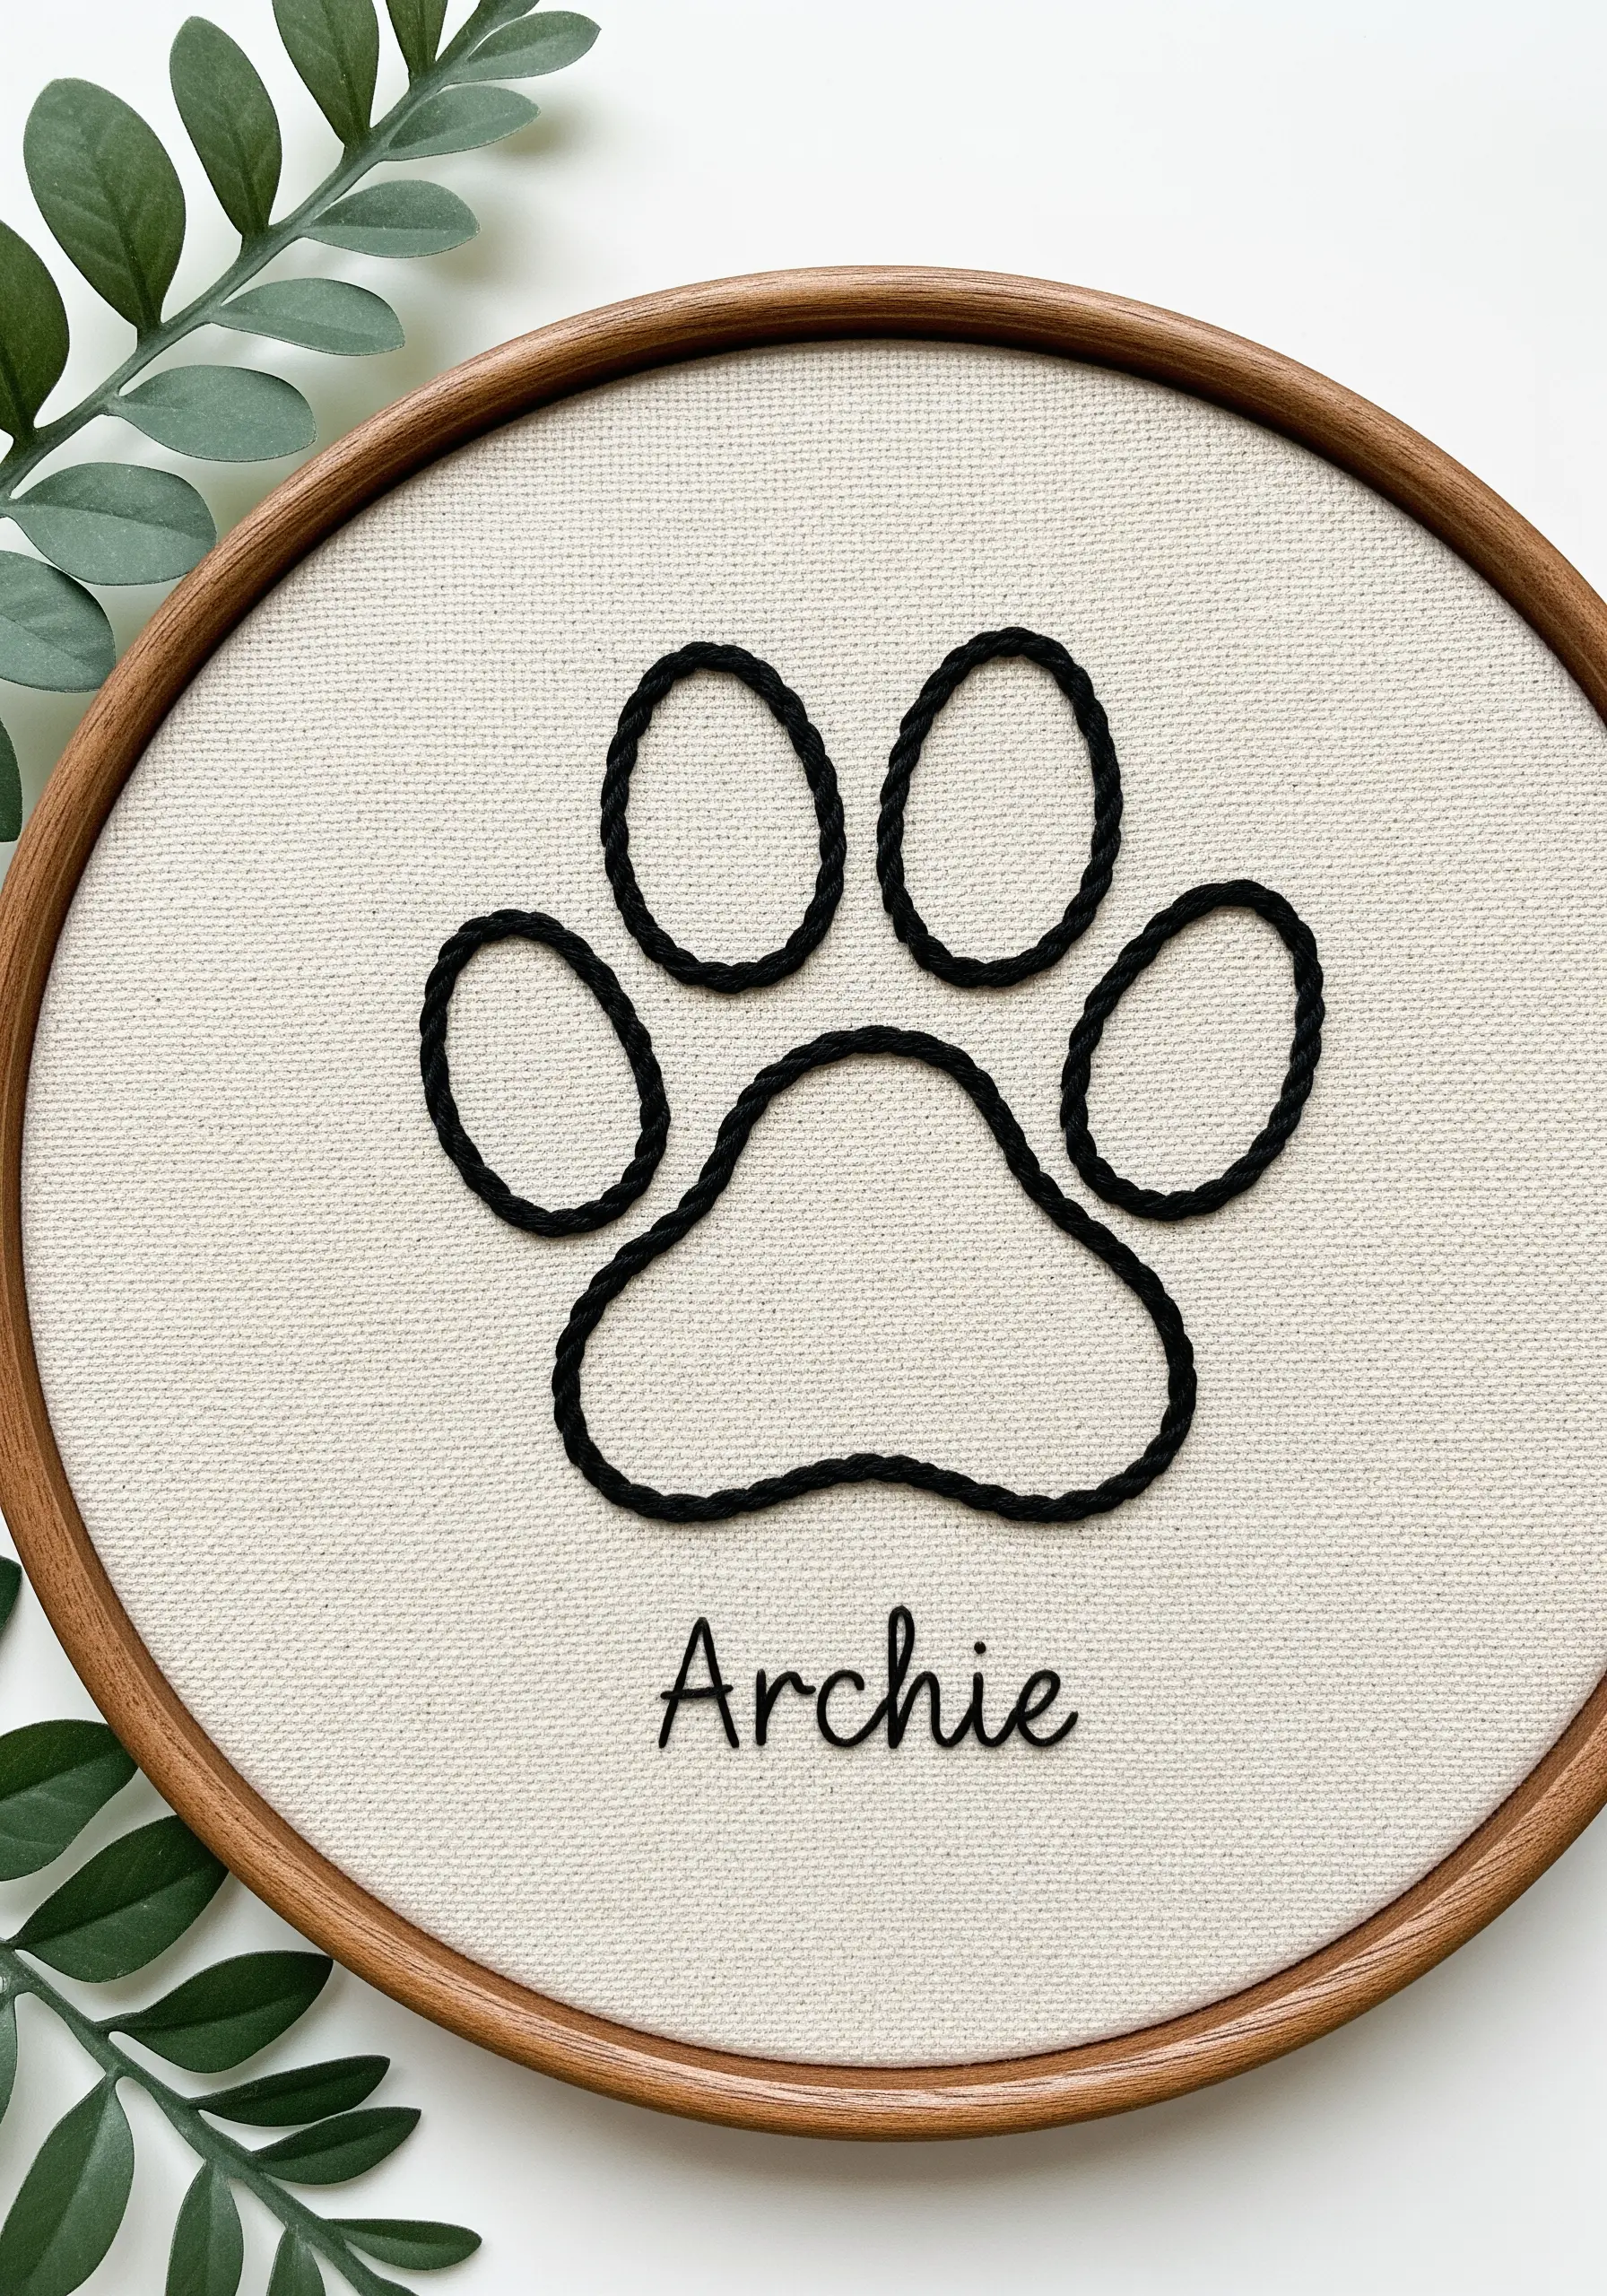
Sometimes the most iconic symbol is the most powerful. A single, bold paw print is a timeless and elegant tribute.
Instead of a thin backstitch, use a stem stitch or a double-threaded backstitch to create a thick, rope-like outline that gives the simple shape substance.
Personalize it with your pet’s name stitched below in a clean, simple script.
These small pet portrait embroidery ideas are perfect for a quick yet meaningful project that looks stunning on a gallery wall.
13. Pair Earthy Tones for a Grounded Aesthetic
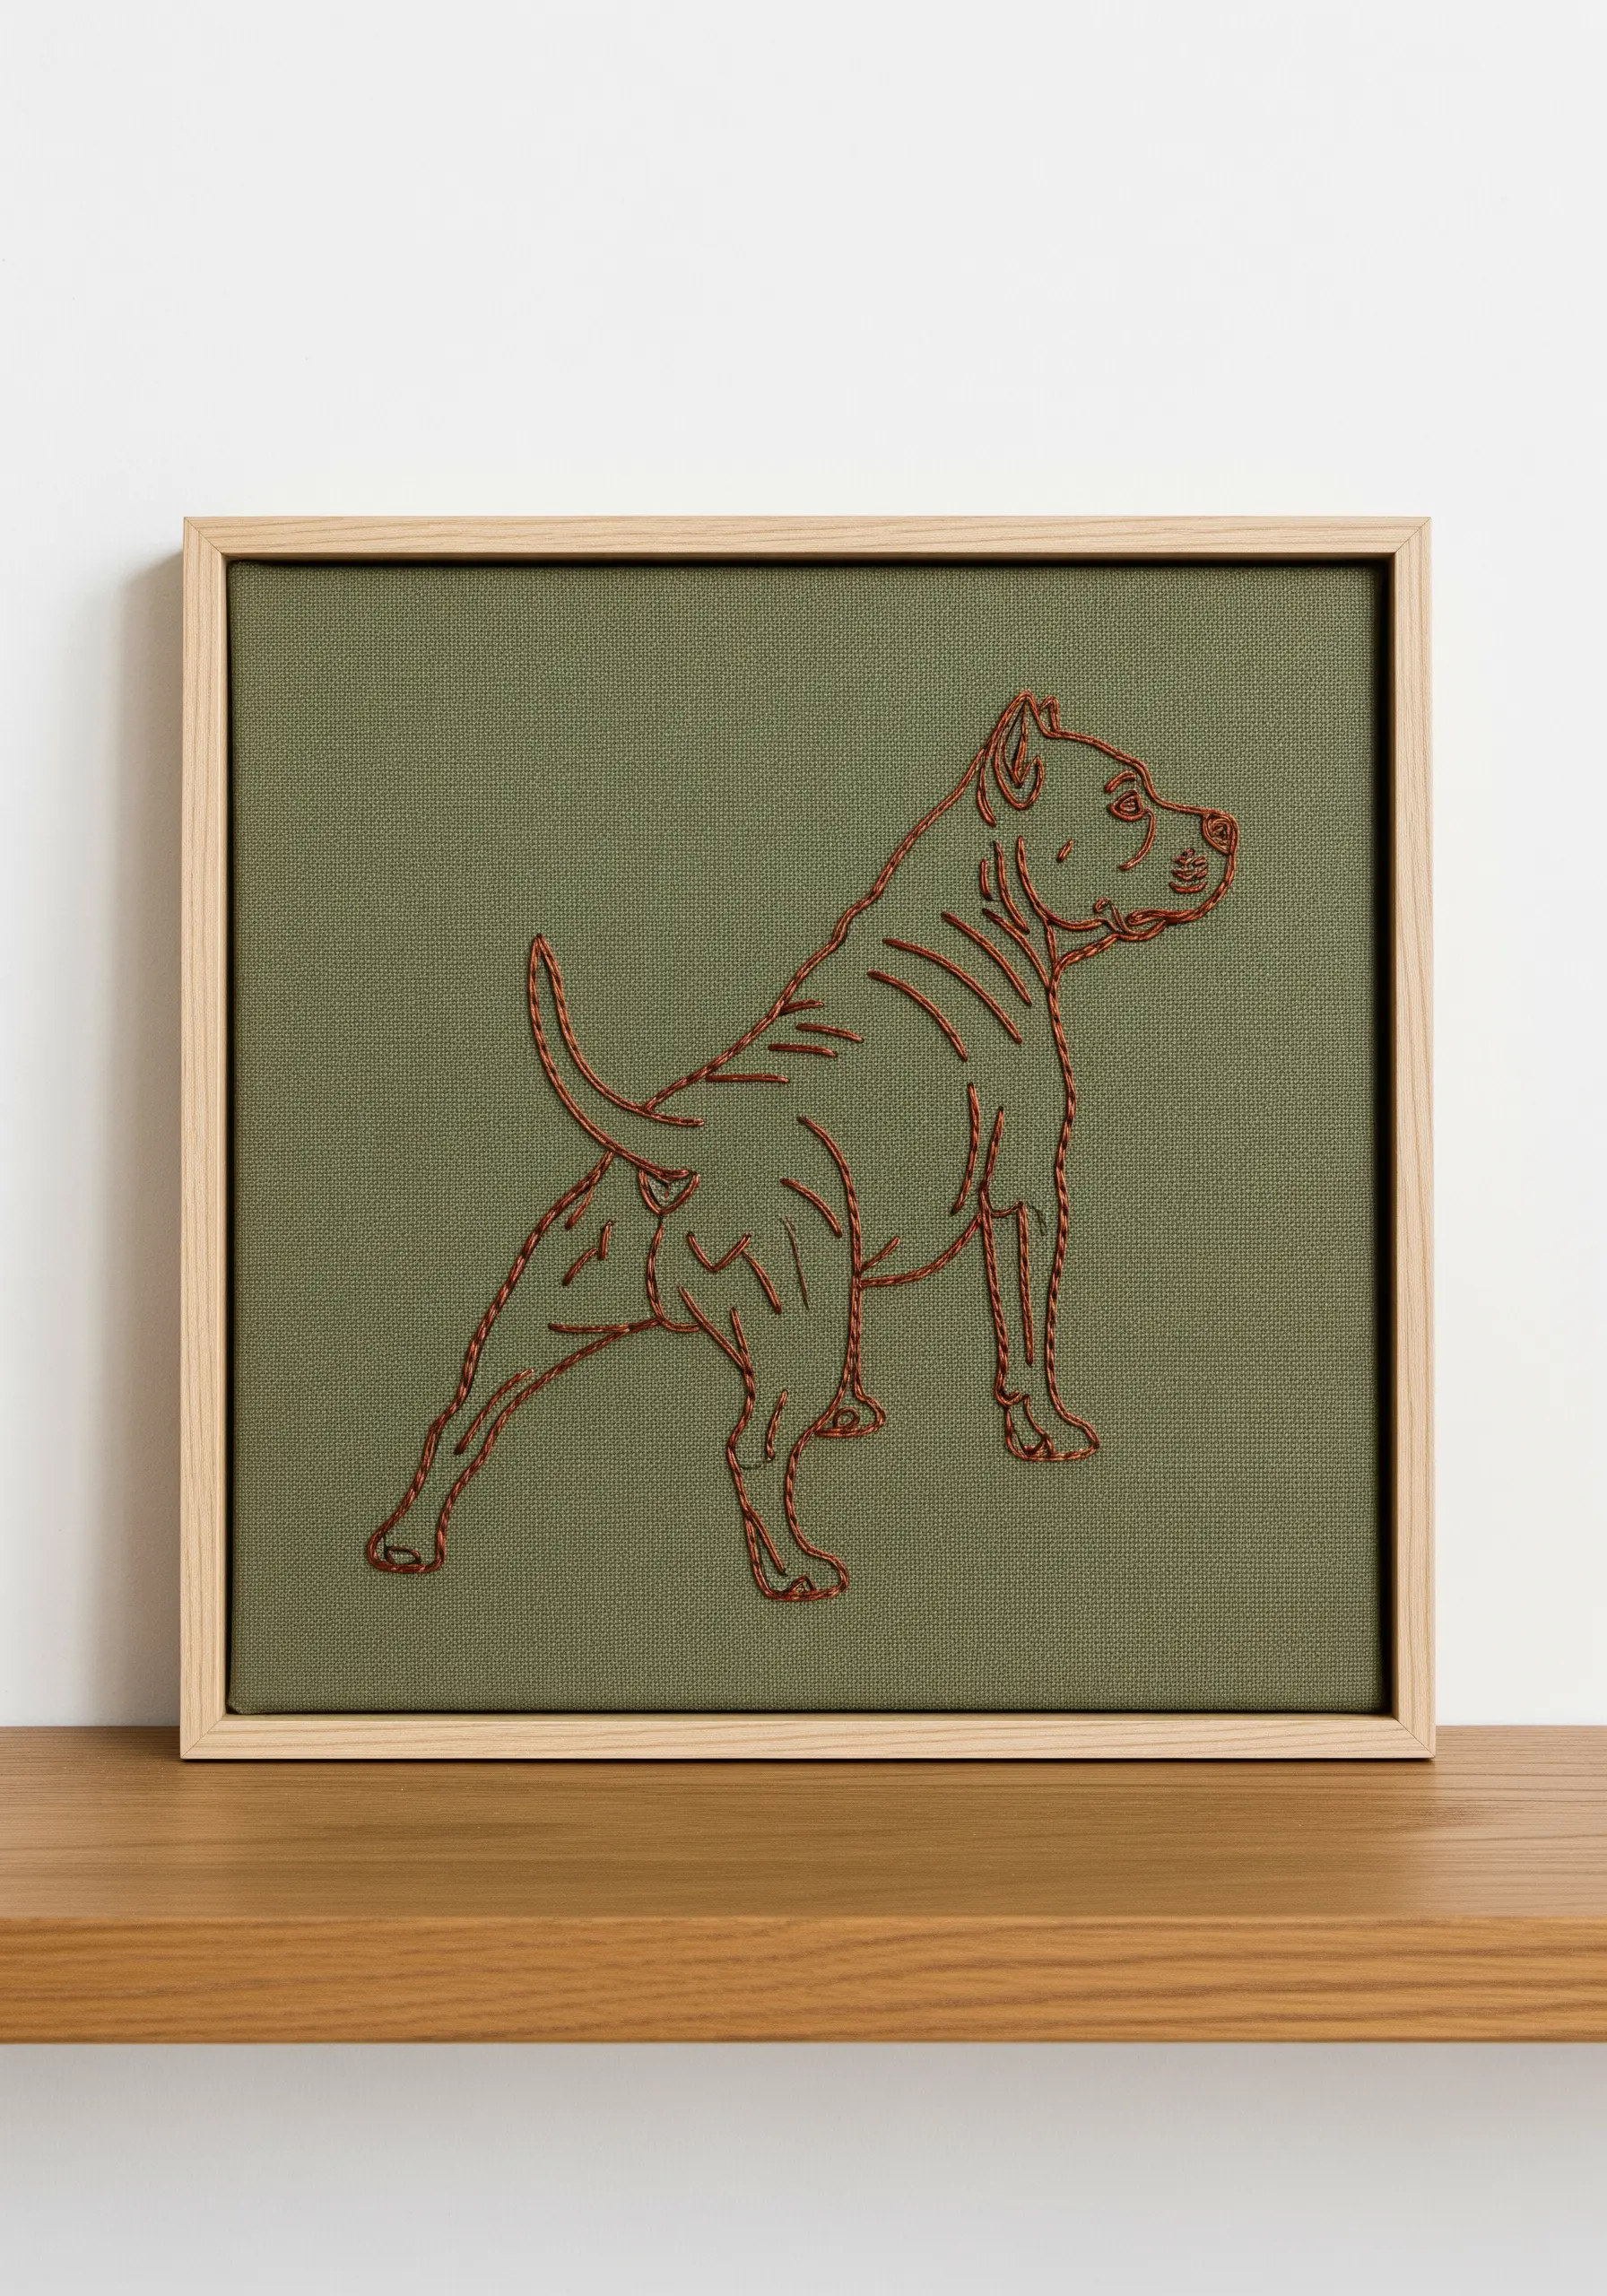
Create a sophisticated, organic feel by choosing a refined color palette drawn from nature.
Pairing a rust-colored thread with an olive green linen or cotton canvas creates a warm, harmonious combination that feels both modern and timeless.
This approach works especially well for strong, muscular breeds, as the earthy colors complement their powerful physique.
When framing, choose a light, natural wood to complete the grounded and cohesive aesthetic.
14. Suggest Fluff with Directional Thread Painting
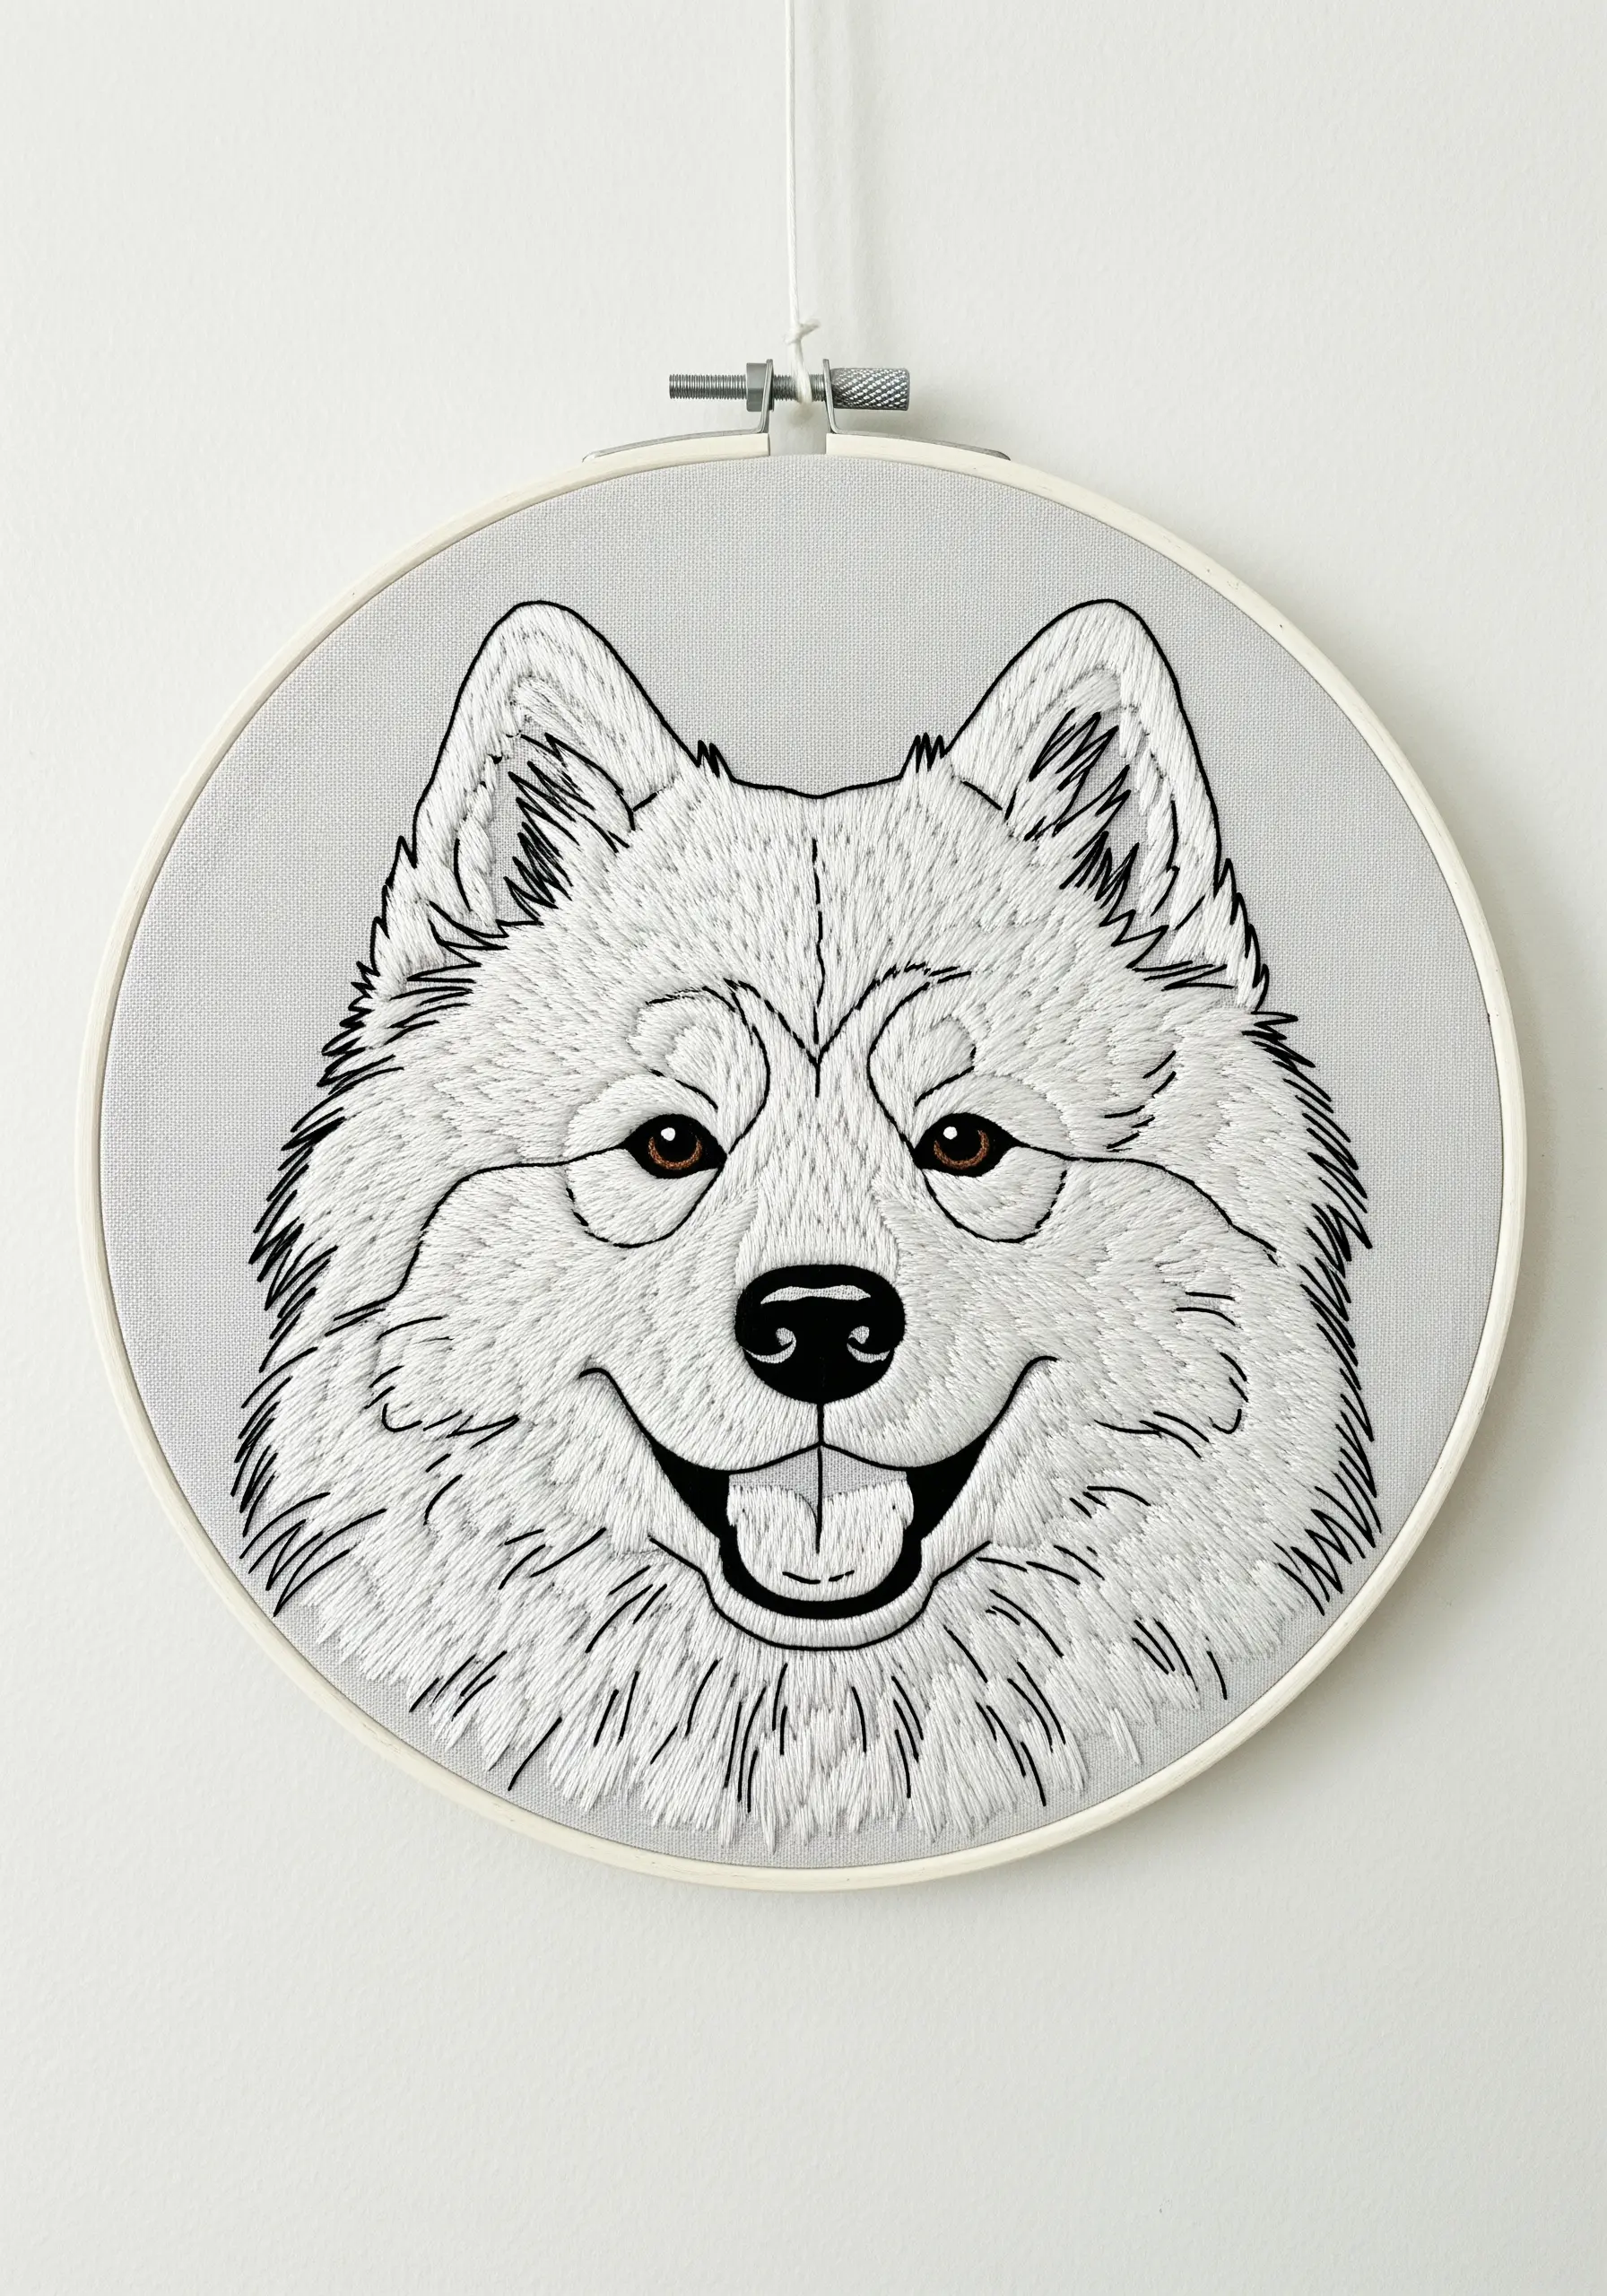
For long-haired or fluffy breeds, transition from simple lines to basic thread painting to capture that signature texture.
Use long-and-short stitches that follow the natural direction of fur growth—outward from the nose, down the ears, and around the face.
Incorporate a few shades of the same color (e.g., white, cream, and light grey) to create highlights and shadows, giving the fur realistic volume.
This approach to pet portrait embroidery ideas that help beginners capture fur texture like pros adds incredible life and personality.
15. Scale Up Your Design for High-Impact Art

Don’t be afraid to go big. A large-scale embroidered portrait can become the stunning centerpiece of a room.
When working on a large canvas, you must increase your thread weight to match the scale; otherwise, the lines will look thin and lost.
Use all six strands of embroidery floss, or even switch to a thicker material like tapestry wool or cotton pearl No. 5.
This technique transforms a simple line drawing into a bold, graphic statement with undeniable presence.
16. Use a Decorative Stitch for a Signature Feature
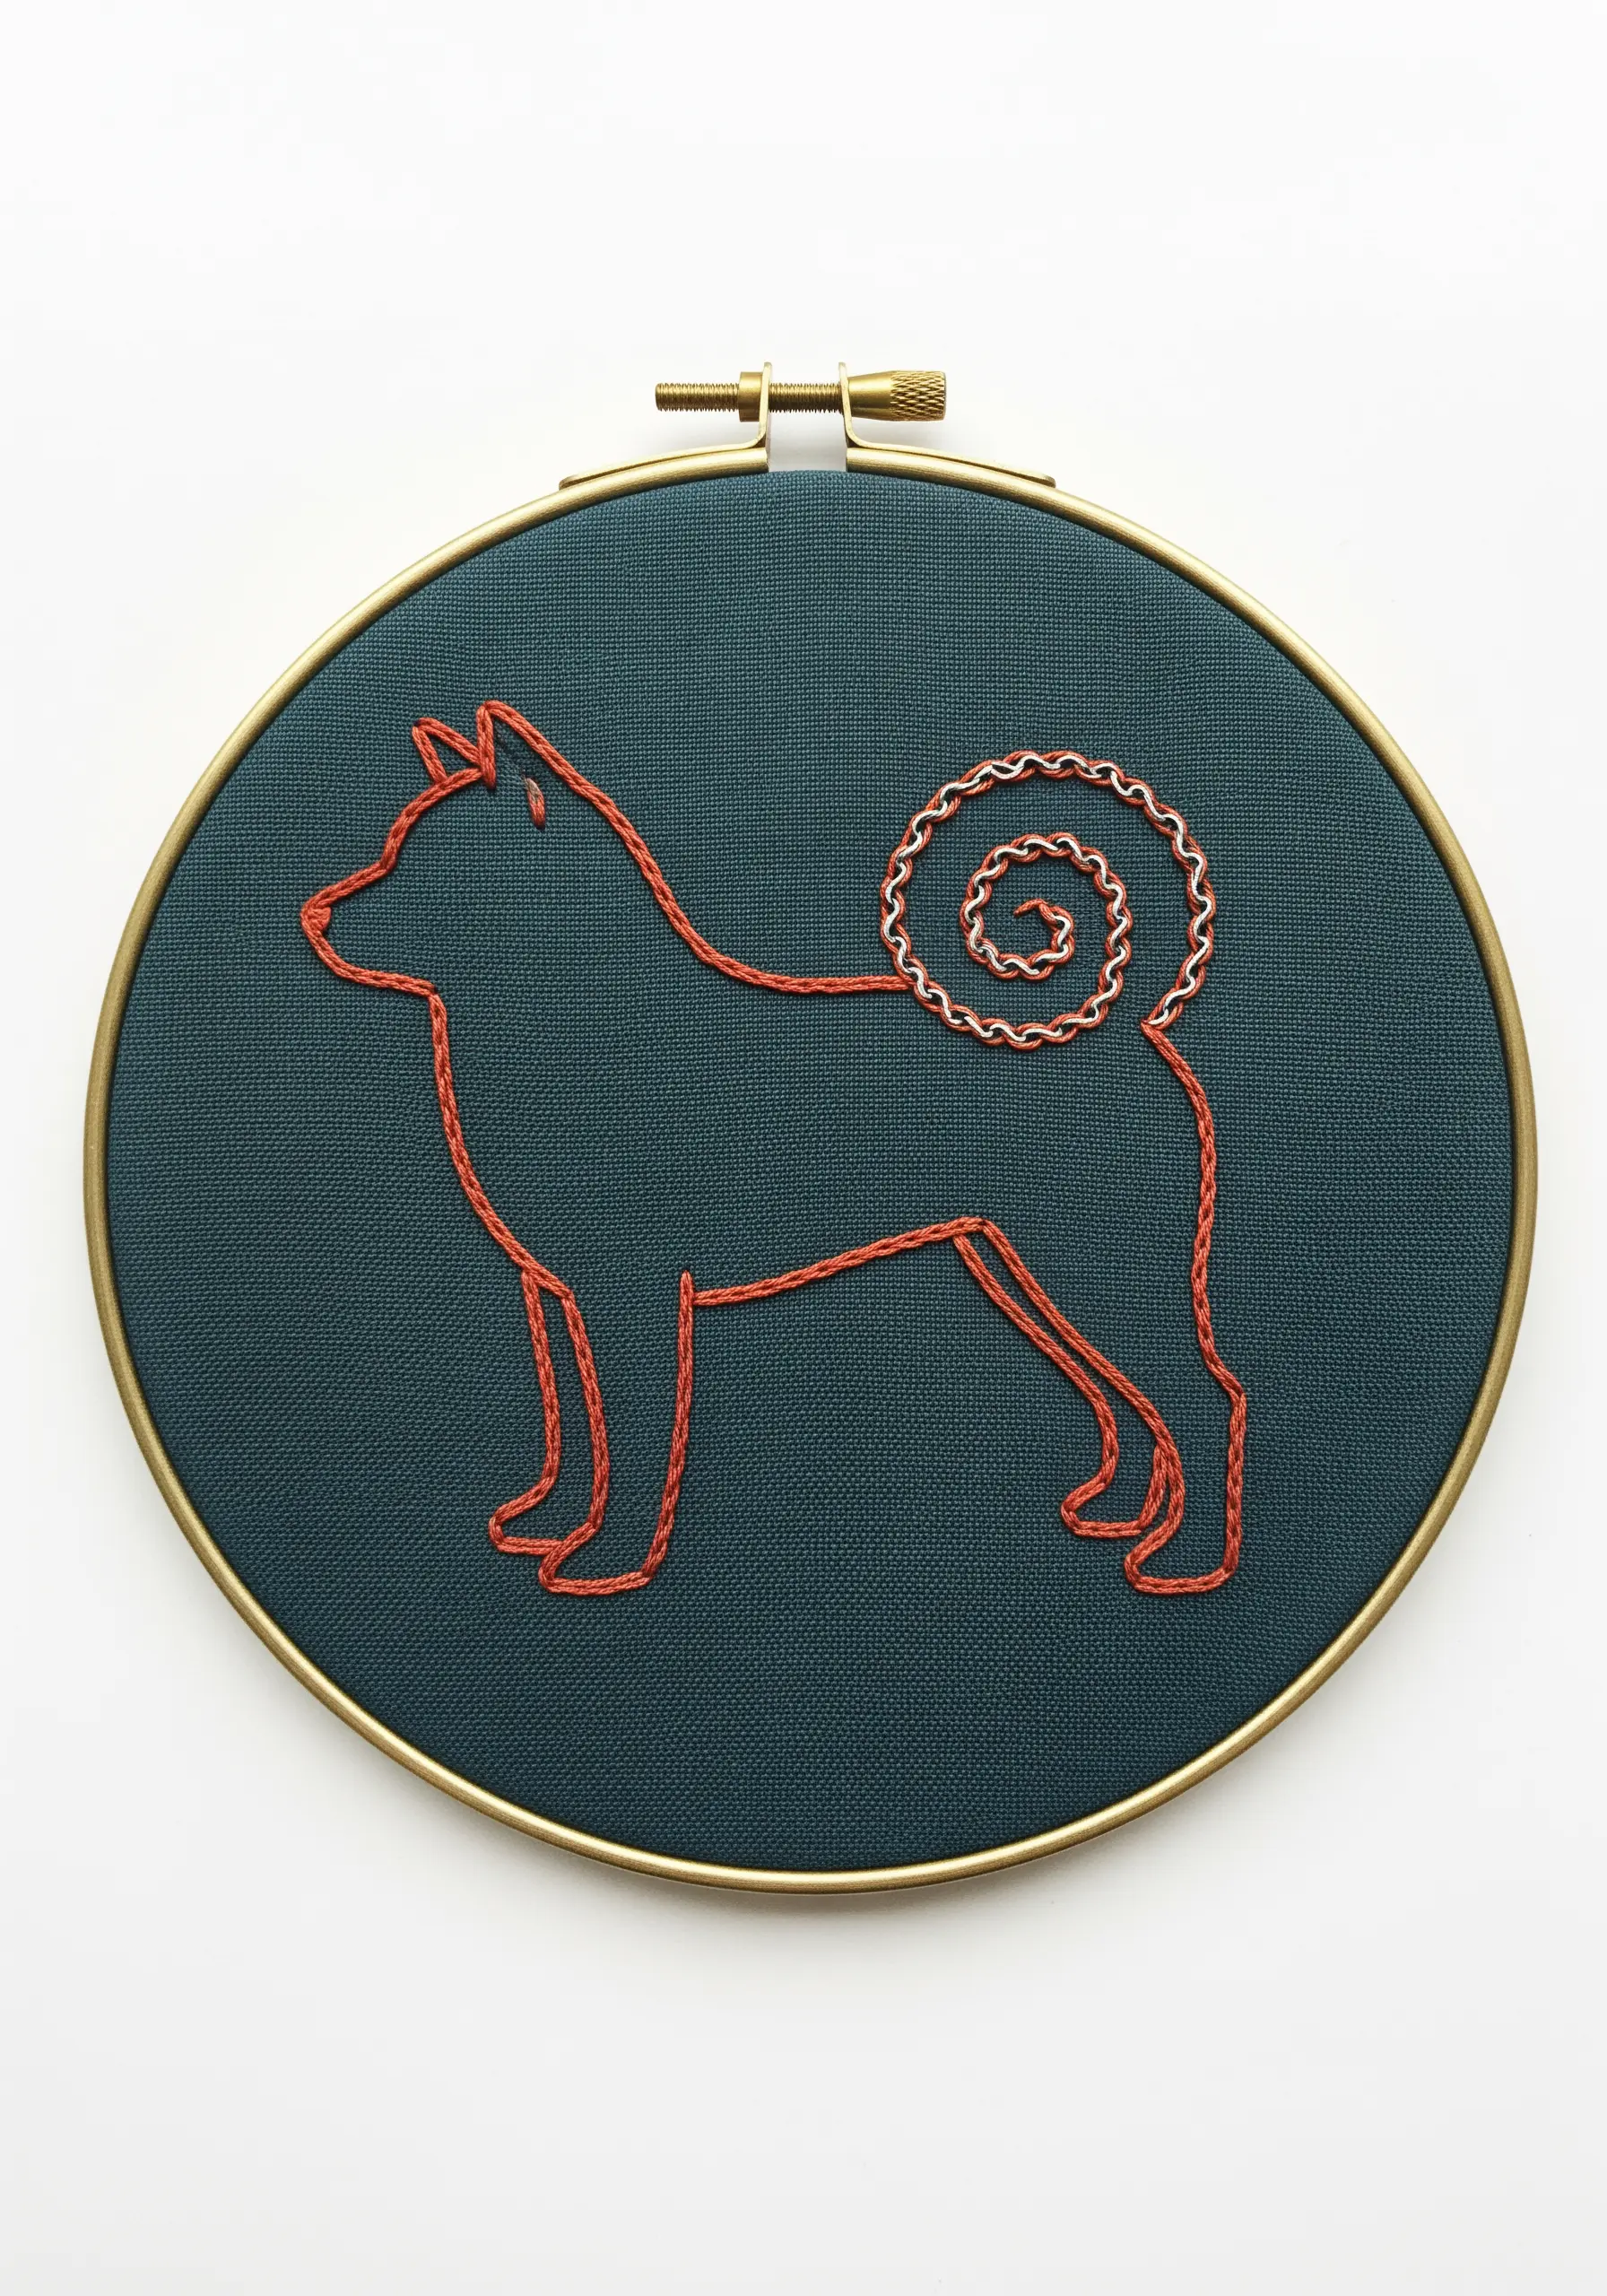
Identify your pet’s most unique feature and highlight it with a special stitch that sets it apart from the rest of the outline.
Here, a simple backstitch outlines the body, but a Pekinese stitch (or a whipped backstitch) creates the distinctive, springy texture of the curled tail.
This draws attention to a key characteristic of the breed and adds a delightful touch of complexity to an otherwise minimalist design.
Using a slightly different shade for the special feature can enhance the effect even further.
17. Convey Tenderness on Textured Aida Cloth
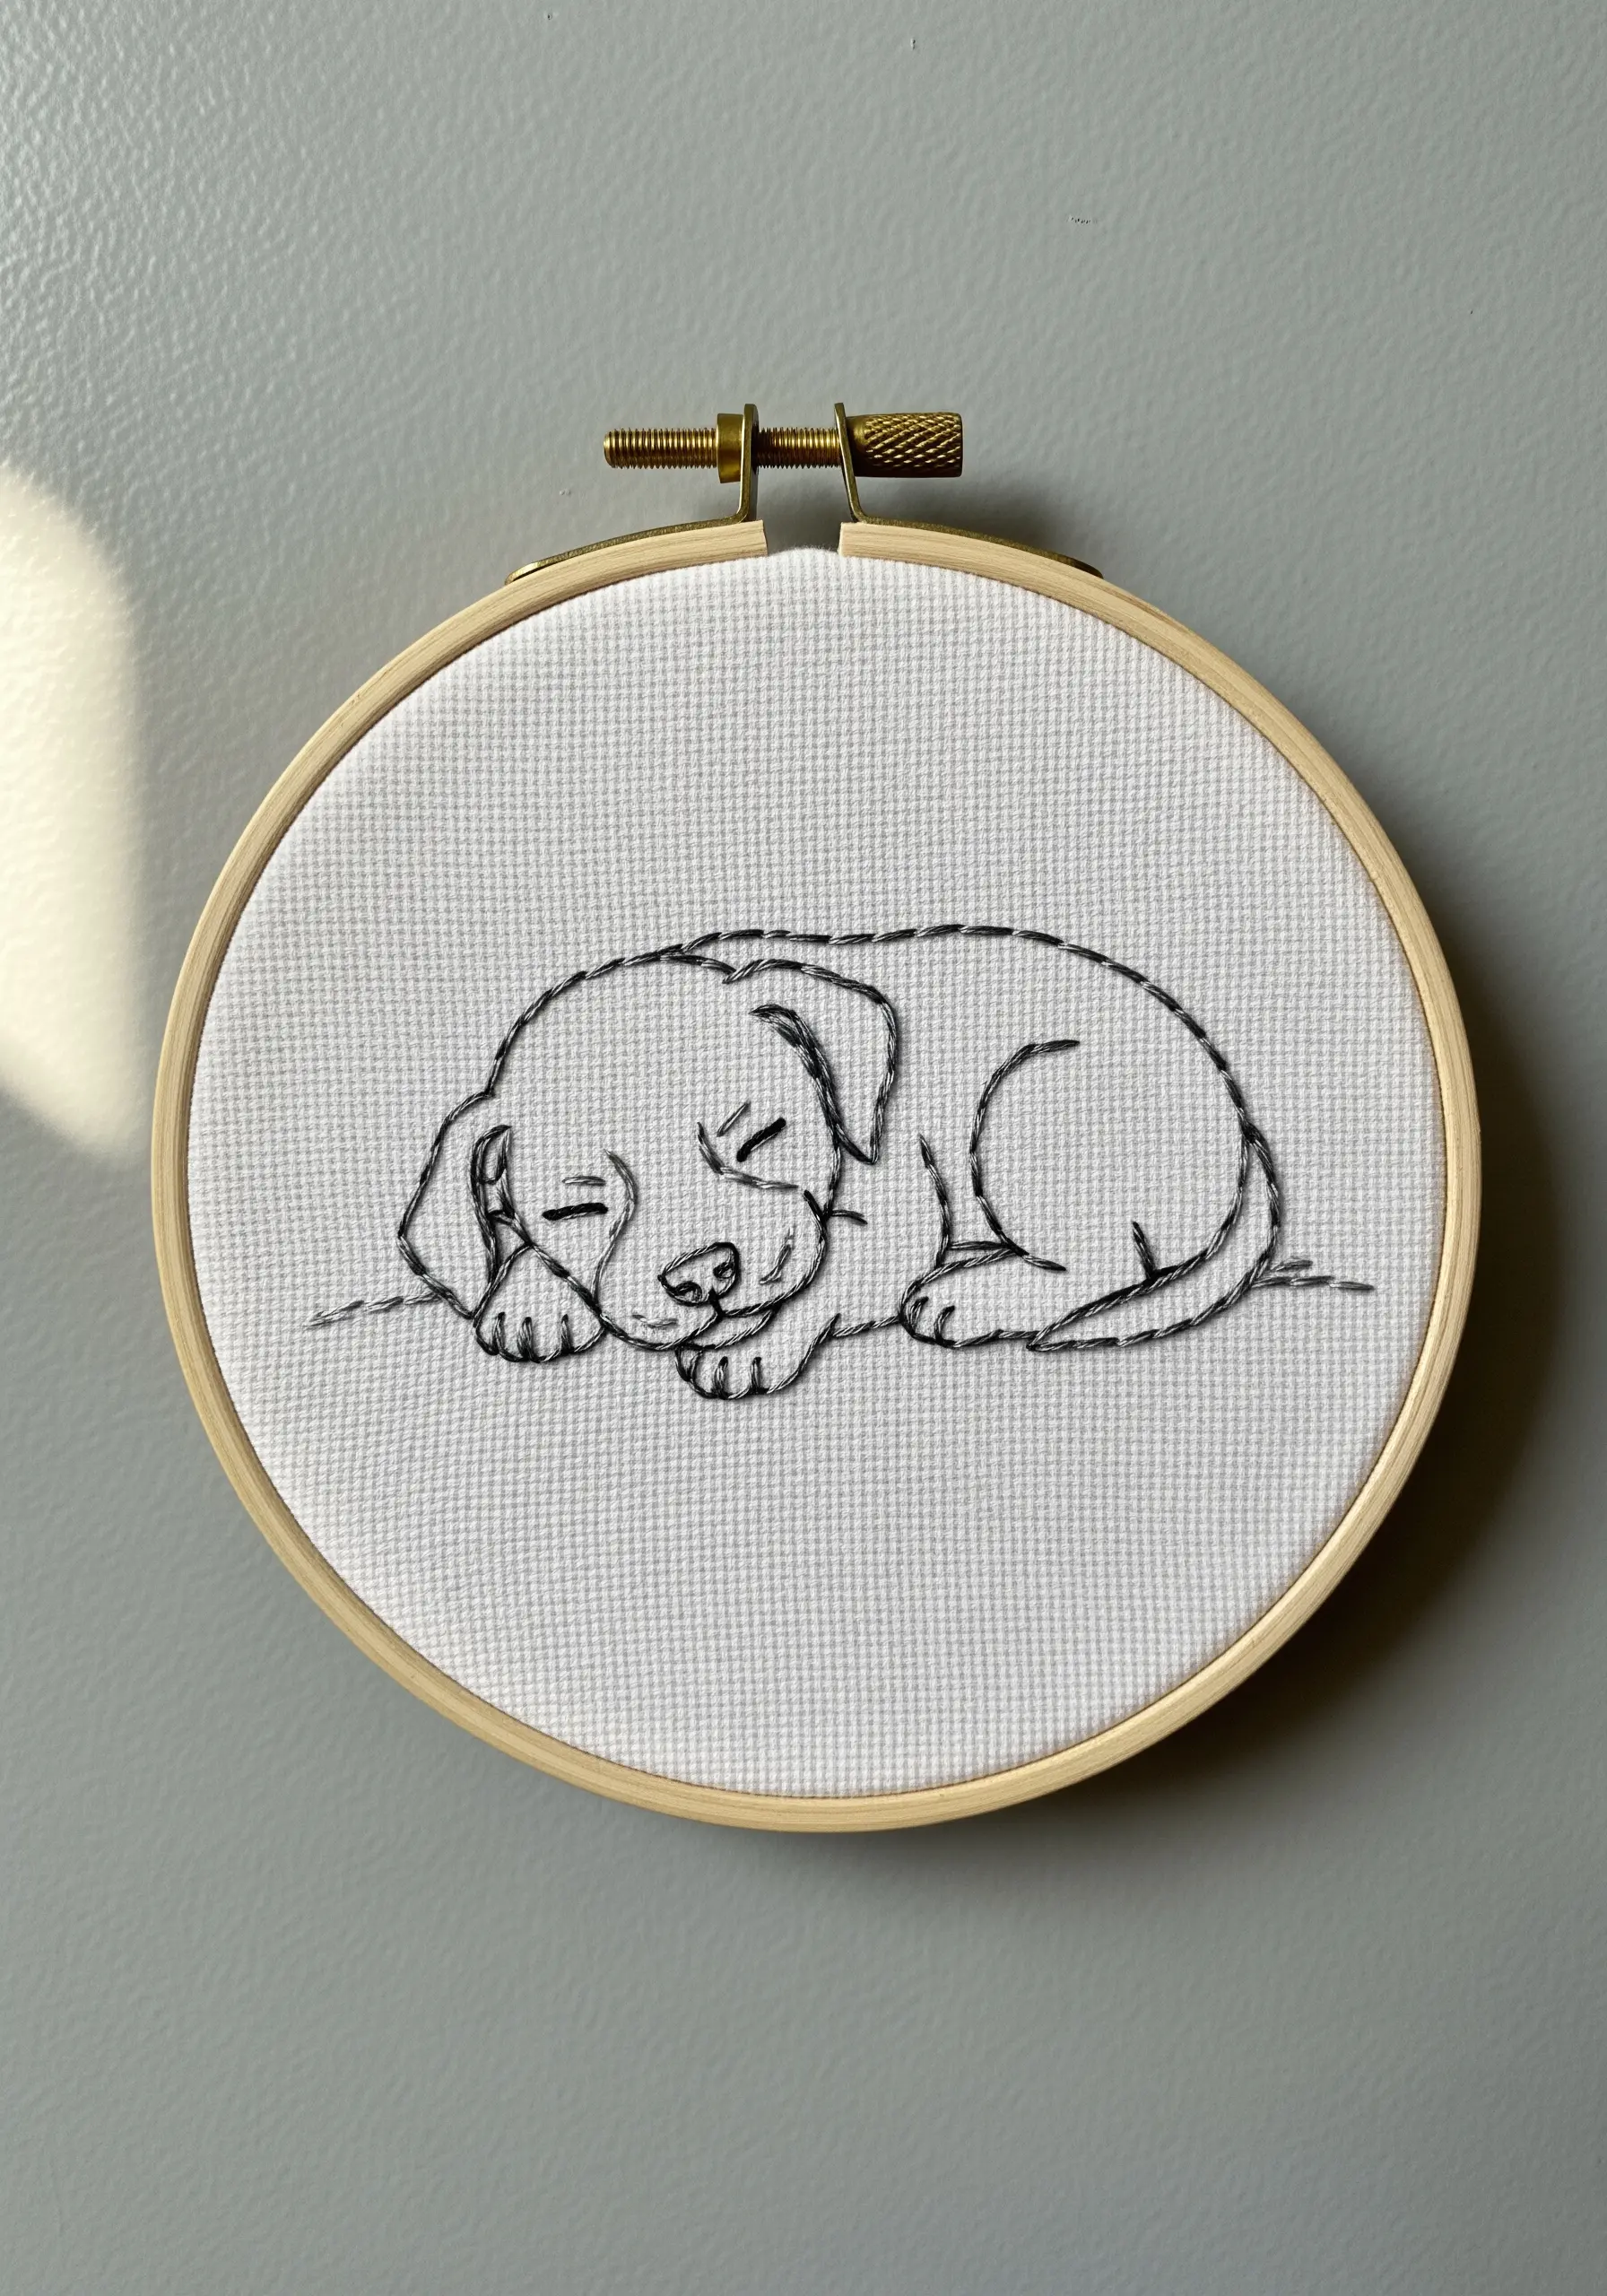
Capture the softness of a sleeping puppy by stitching on a fabric with a visible, gentle texture, like Aida cloth.
The grid-like weave of Aida naturally softens the edges of your stitches, giving the finished piece a gentle, almost pixelated quality that enhances its charm.
Use a simple backstitch with just two or three strands of floss to keep the lines delicate and light.
This combination of soft fabric and fine lines is perfect for conveying a sense of quiet, peaceful slumber.
18. Focus on a Close-Up for an Abstract Feel
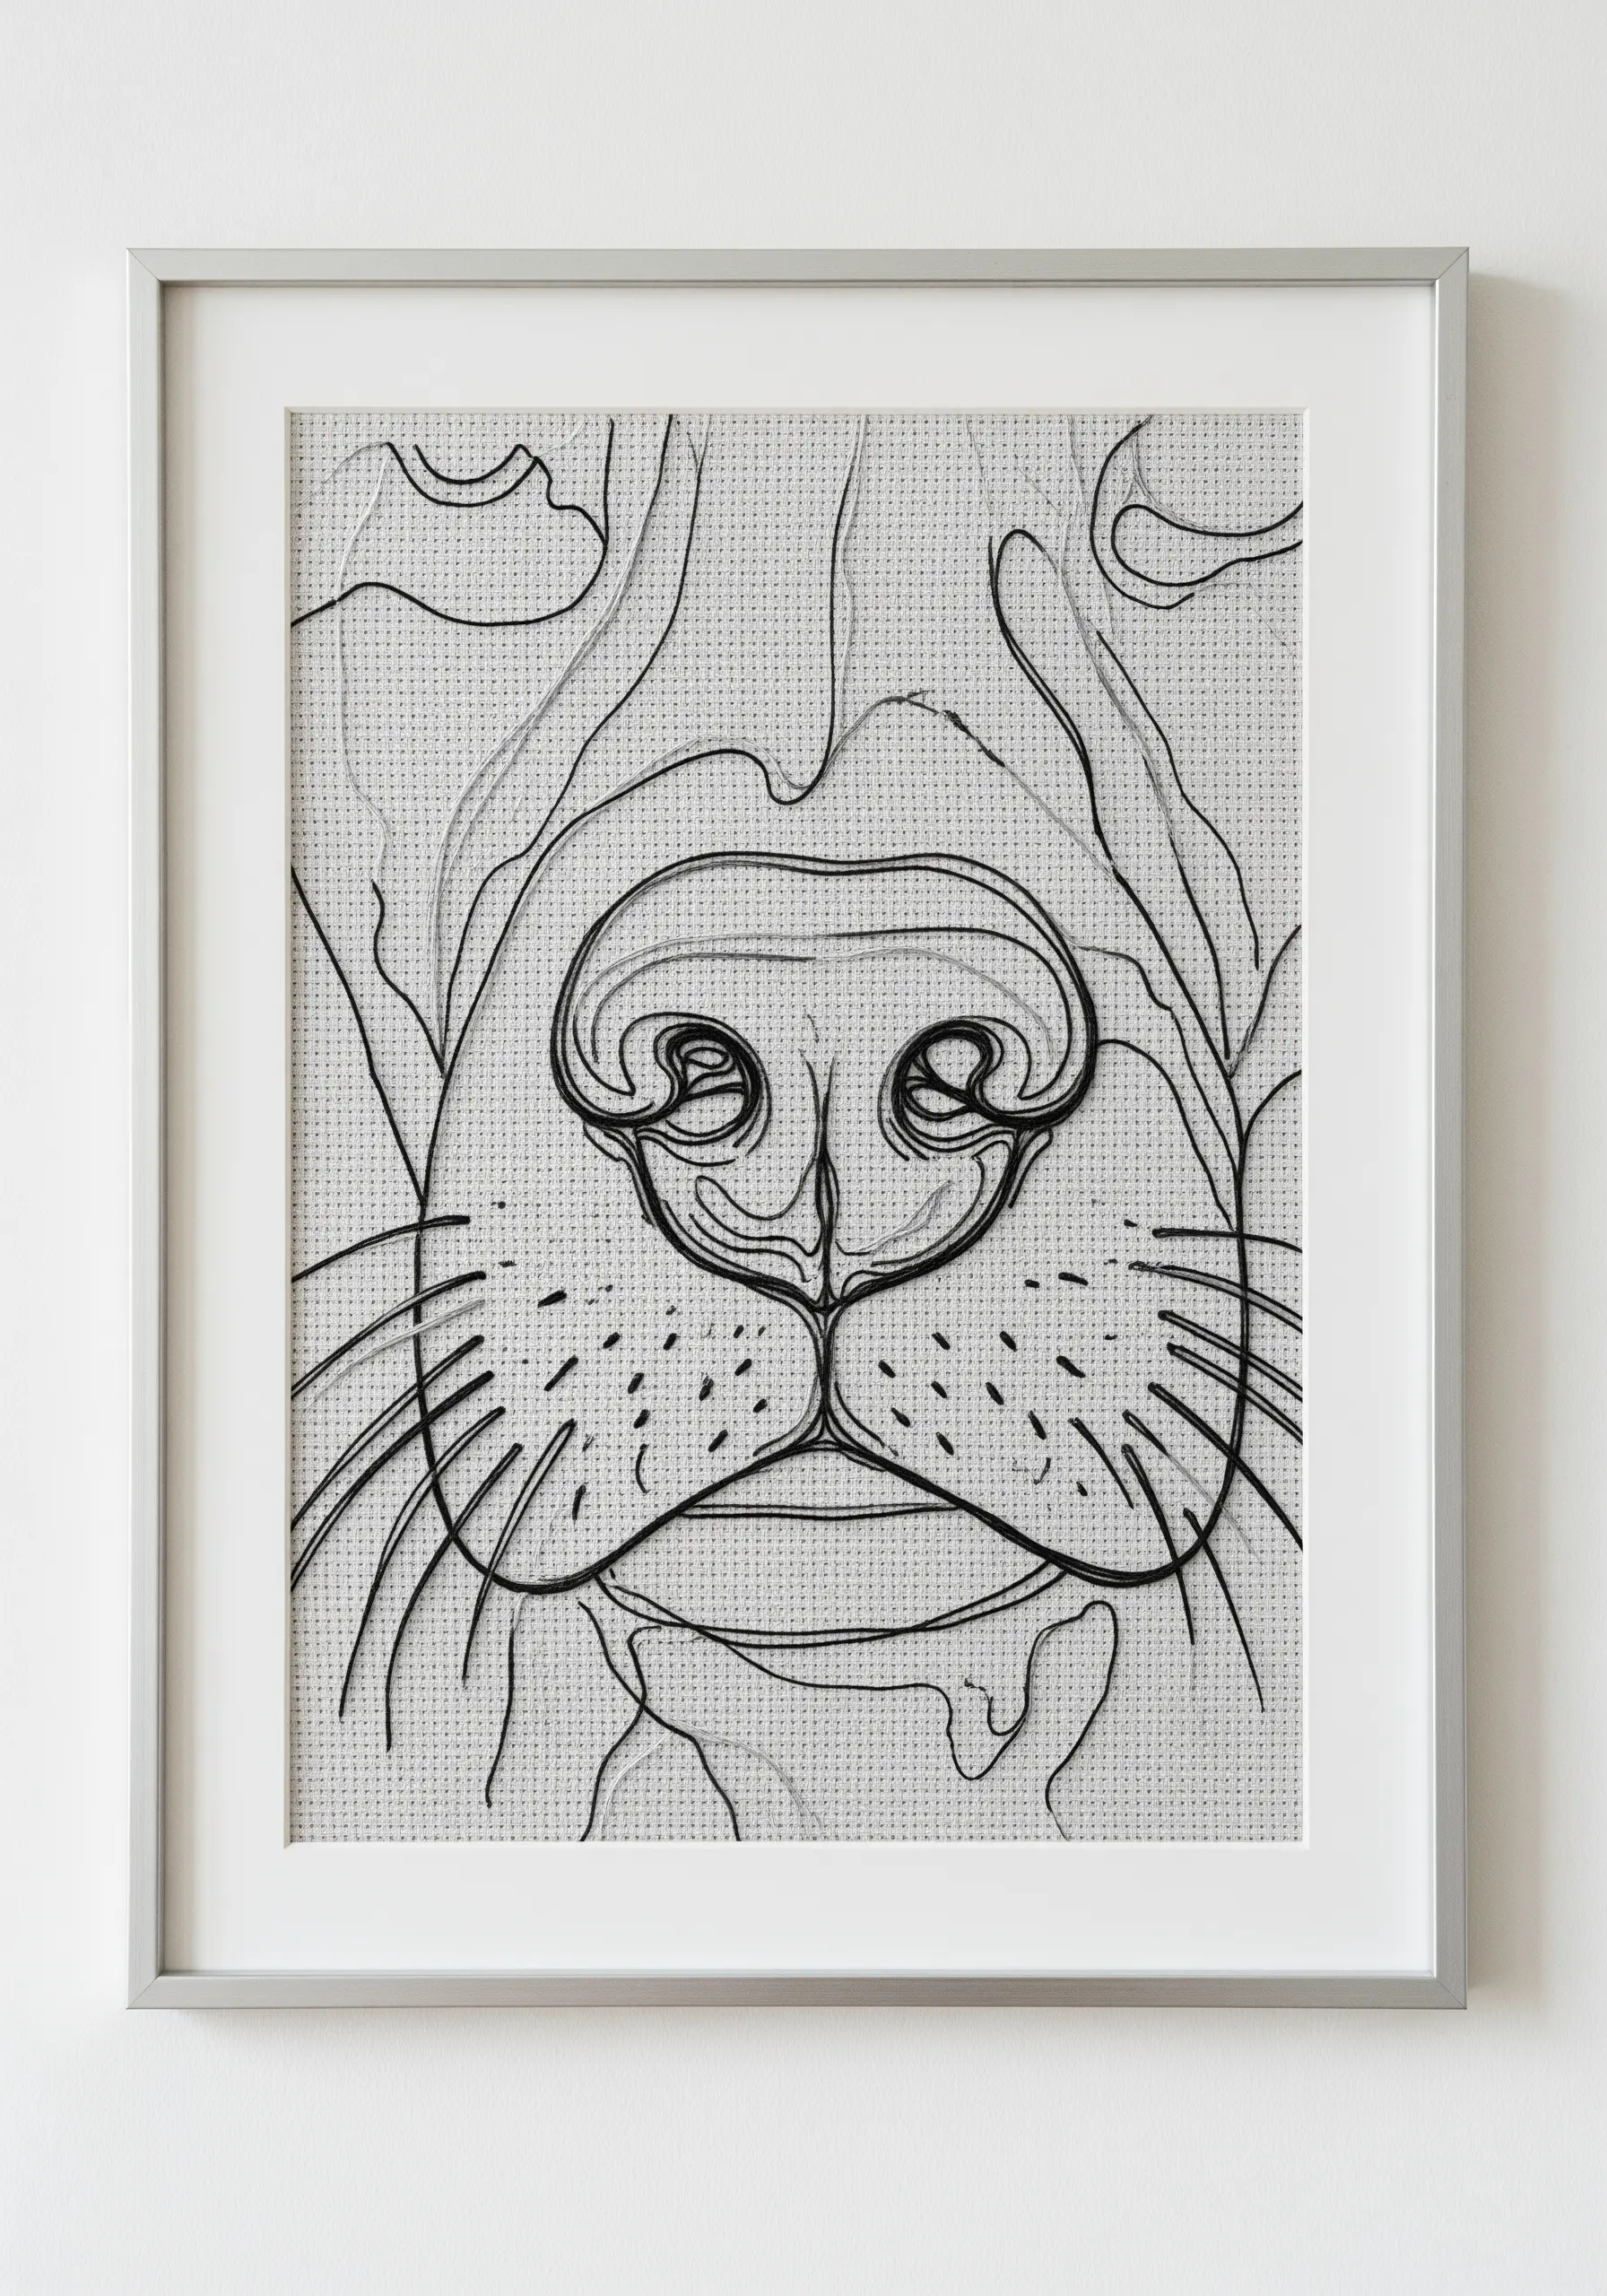
Create an intimate and artistic portrait by zooming in on a specific feature, like the nose and whiskers.
This approach abstracts the subject, turning familiar shapes into a compelling composition of lines and curves.
Use varied line weights to create depth: a thicker thread for the bold outline of the nose and a single, fine strand for the delicate whiskers.
A few scattered French knots or seed stitches can add texture to the nose, making it feel more realistic and tactile.
19. Make a Statement with High-Contrast Color
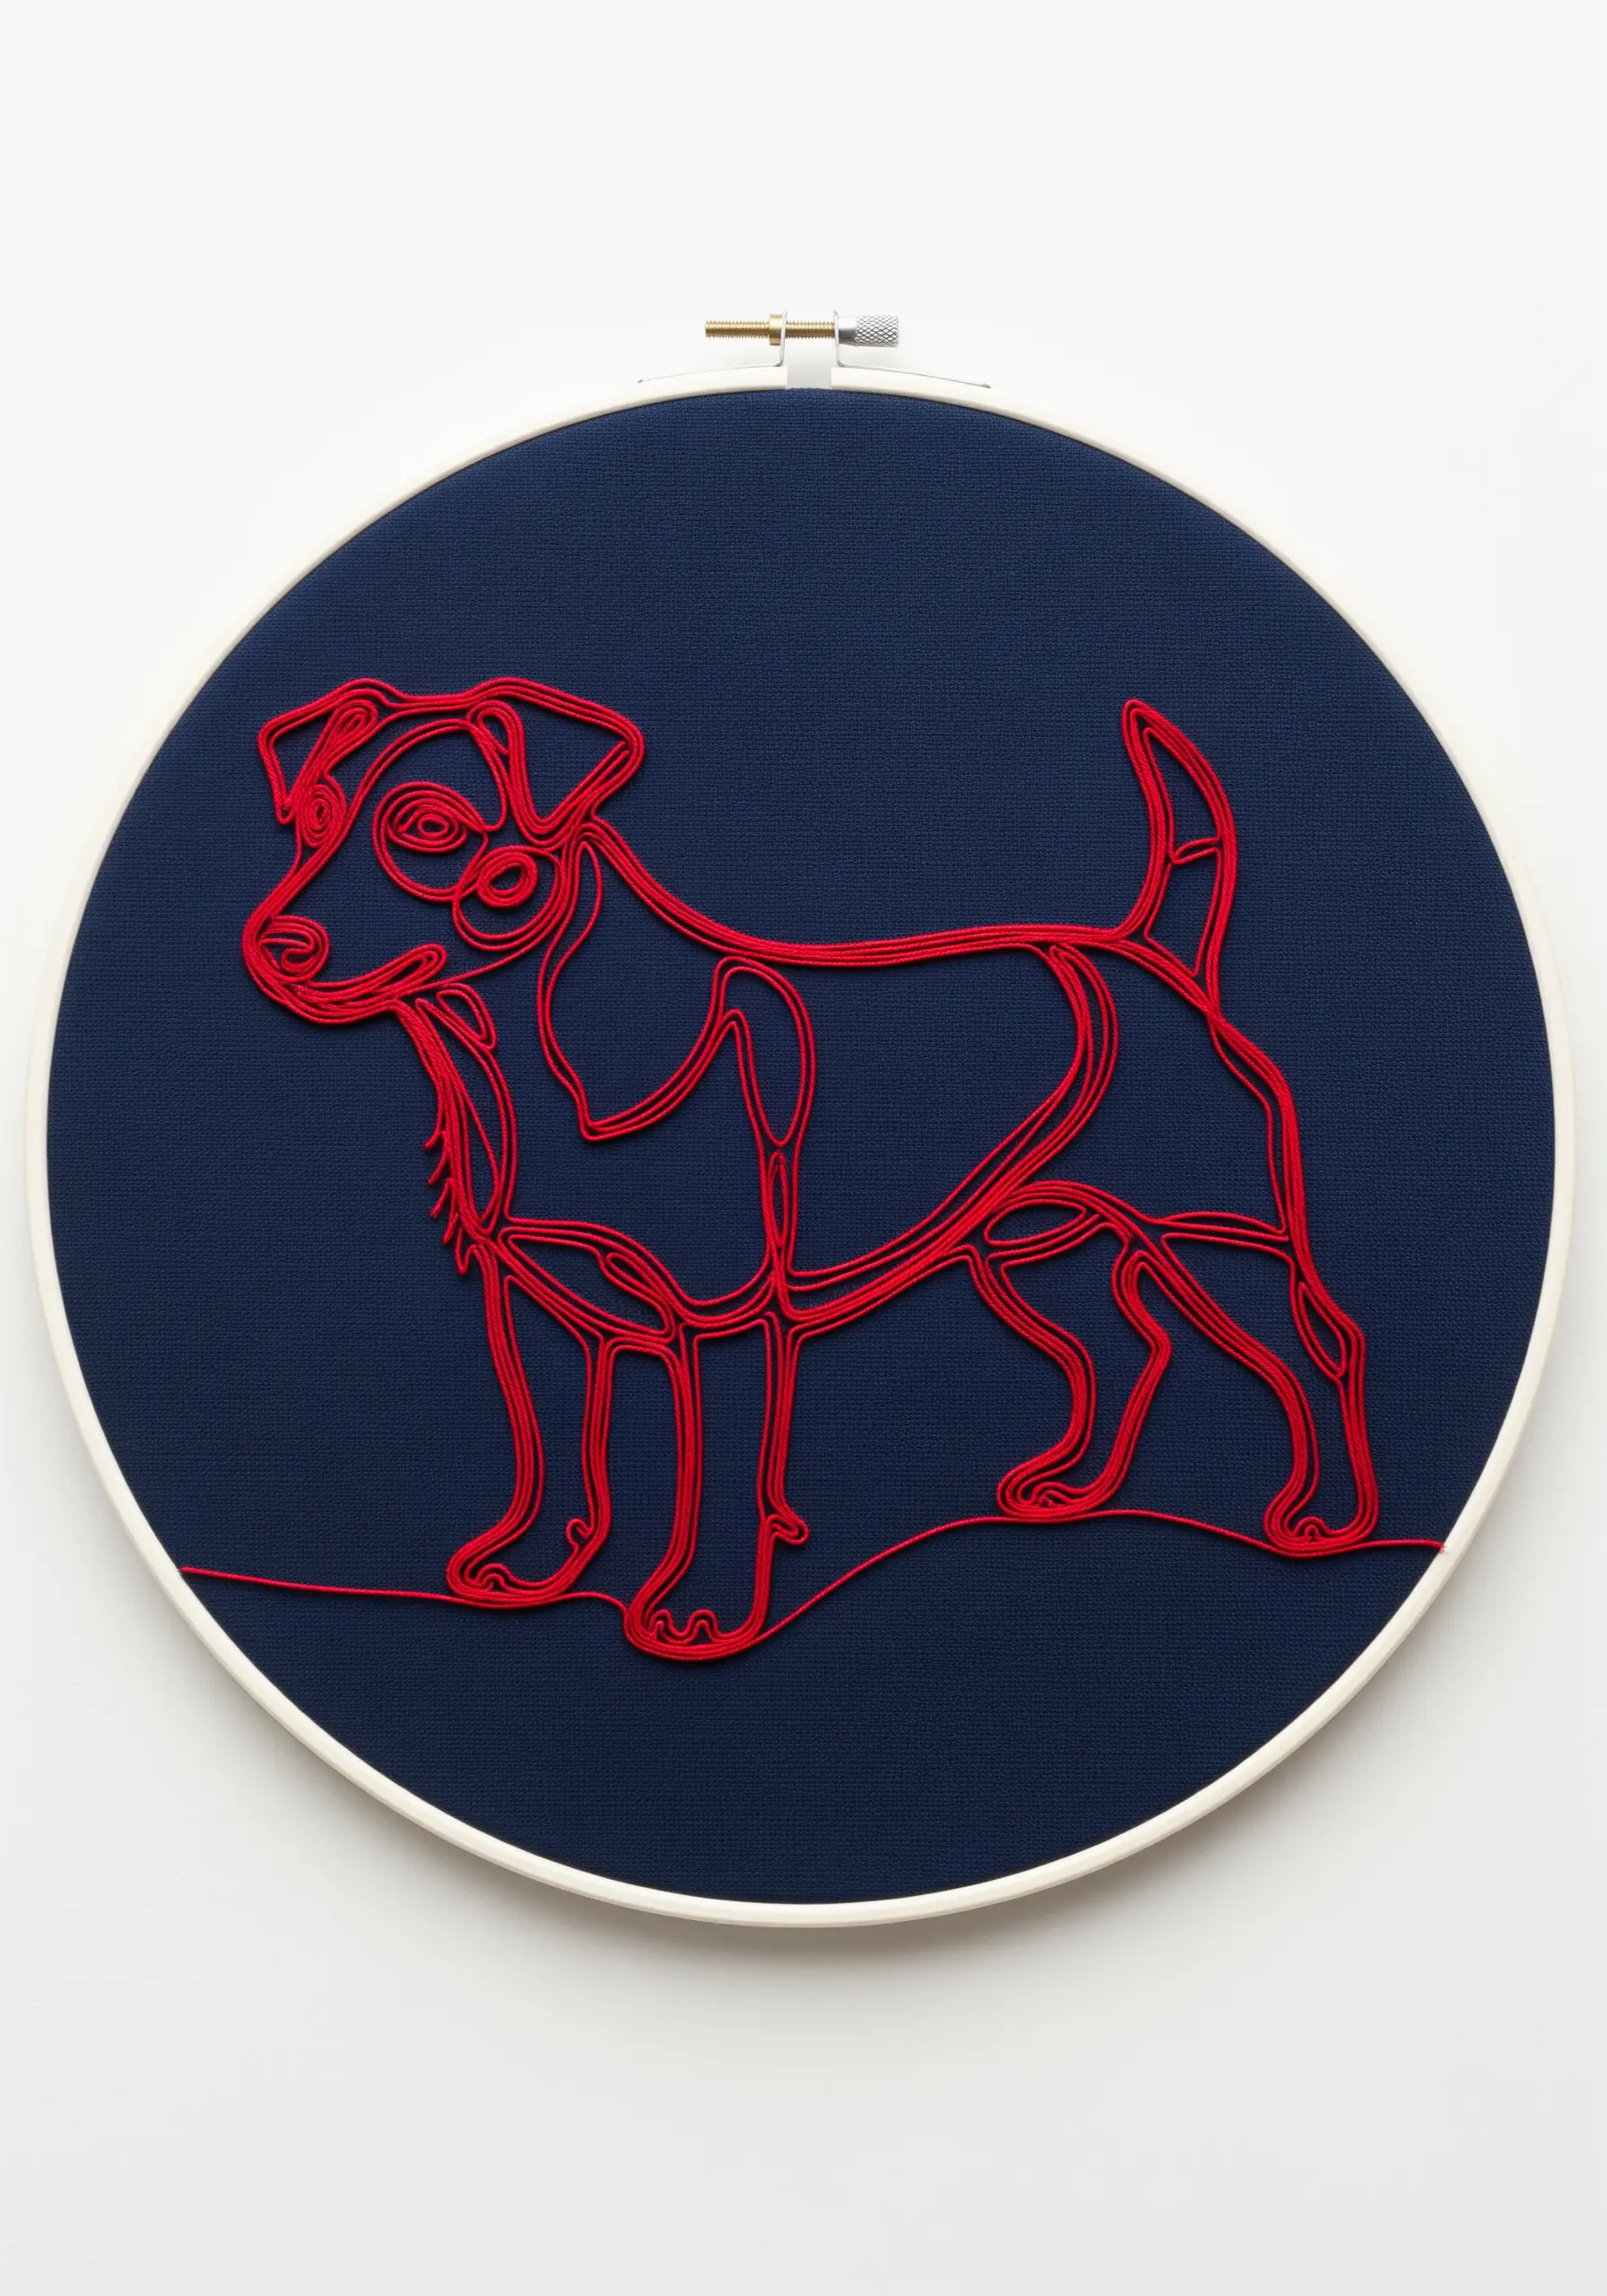
Create a visually striking piece by pairing a single, vibrant thread color with a dark, moody background fabric.
The contrast between the bright red thread and the deep navy blue canvas is electric, making the simple lines feel bold and graphic.
To ensure the red truly pops, use a stitch that sits on top of the fabric, like a stem stitch, which gives the line a slightly raised, solid appearance.
This color strategy turns a simple outline into a powerful piece of modern art.
20. Balance Line Work with Blocks of Color
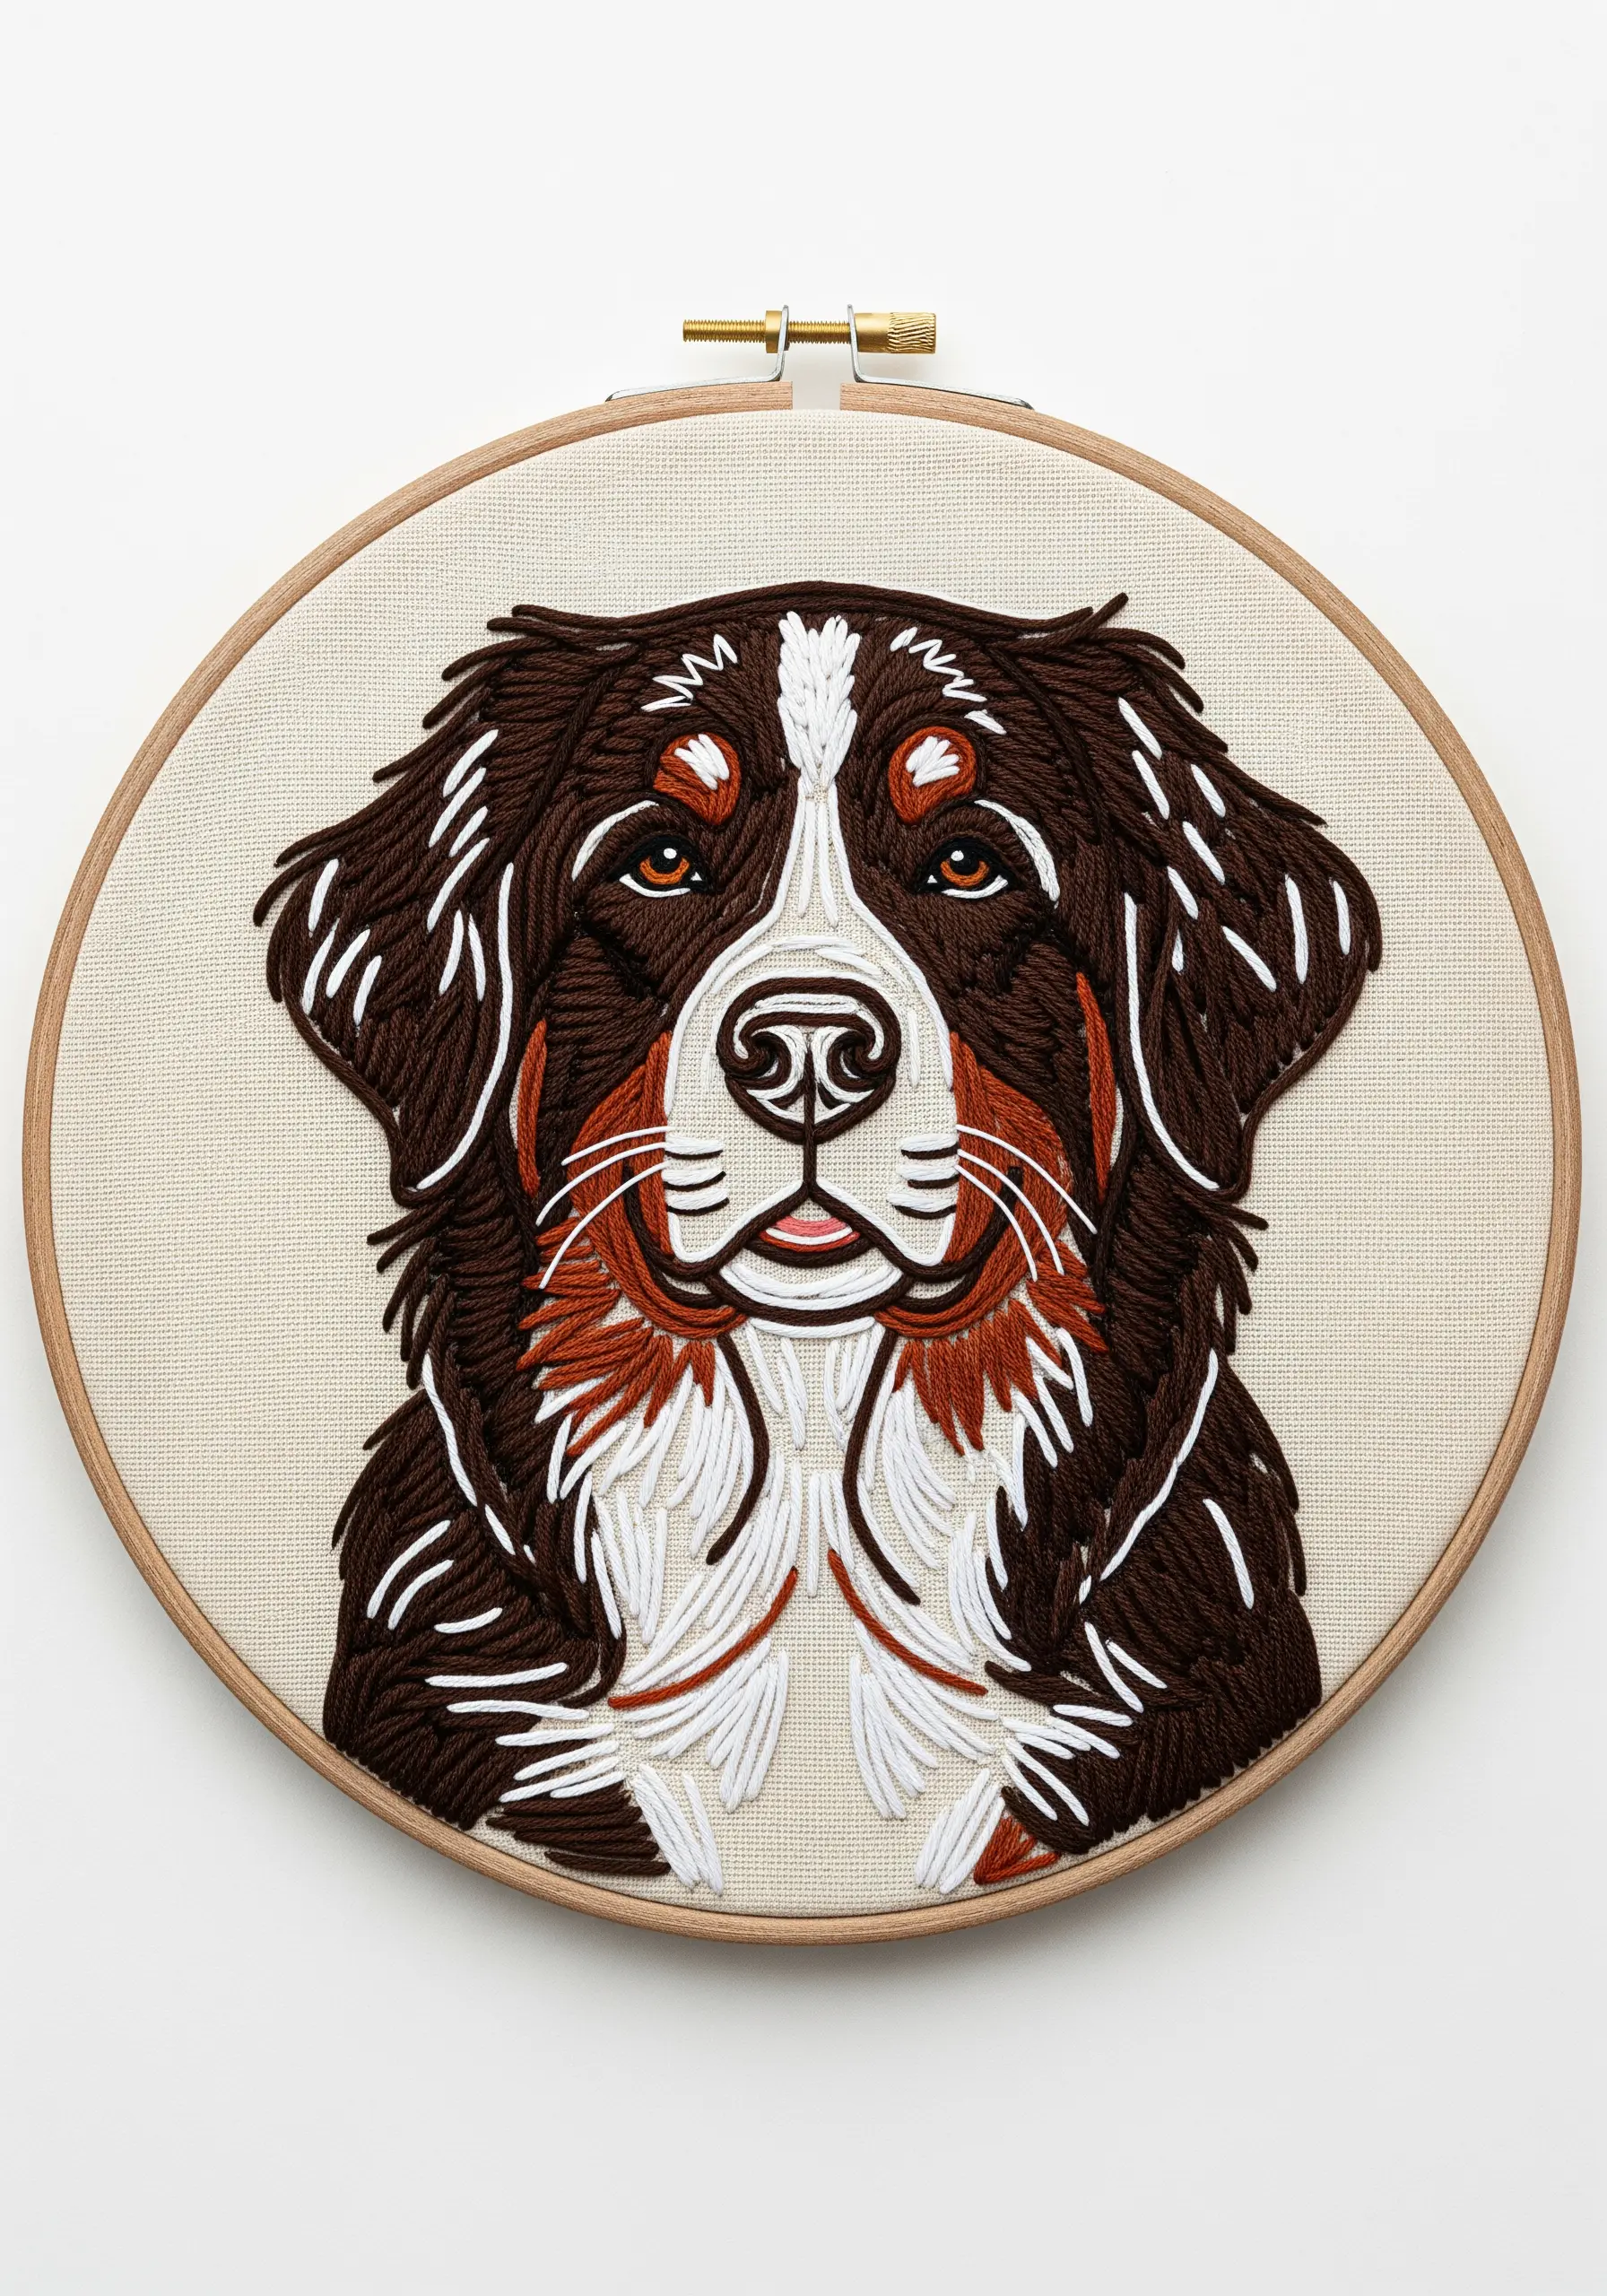
For multi-colored breeds, you can achieve a realistic portrait without full thread painting by blocking in key color areas.
Use directional satin stitch or long-and-short stitch to fill in the patches of color—the brown, the white, the copper—while leaving the rest of the design as simple line work.
This hybrid technique captures the essence of the breed’s markings without requiring the time-intensive detail of a fully rendered piece.
Outline the filled sections with a single backstitch in a darker shade to give them a clean, defined edge.
21. Express Elegance with a Single, Flowing Line
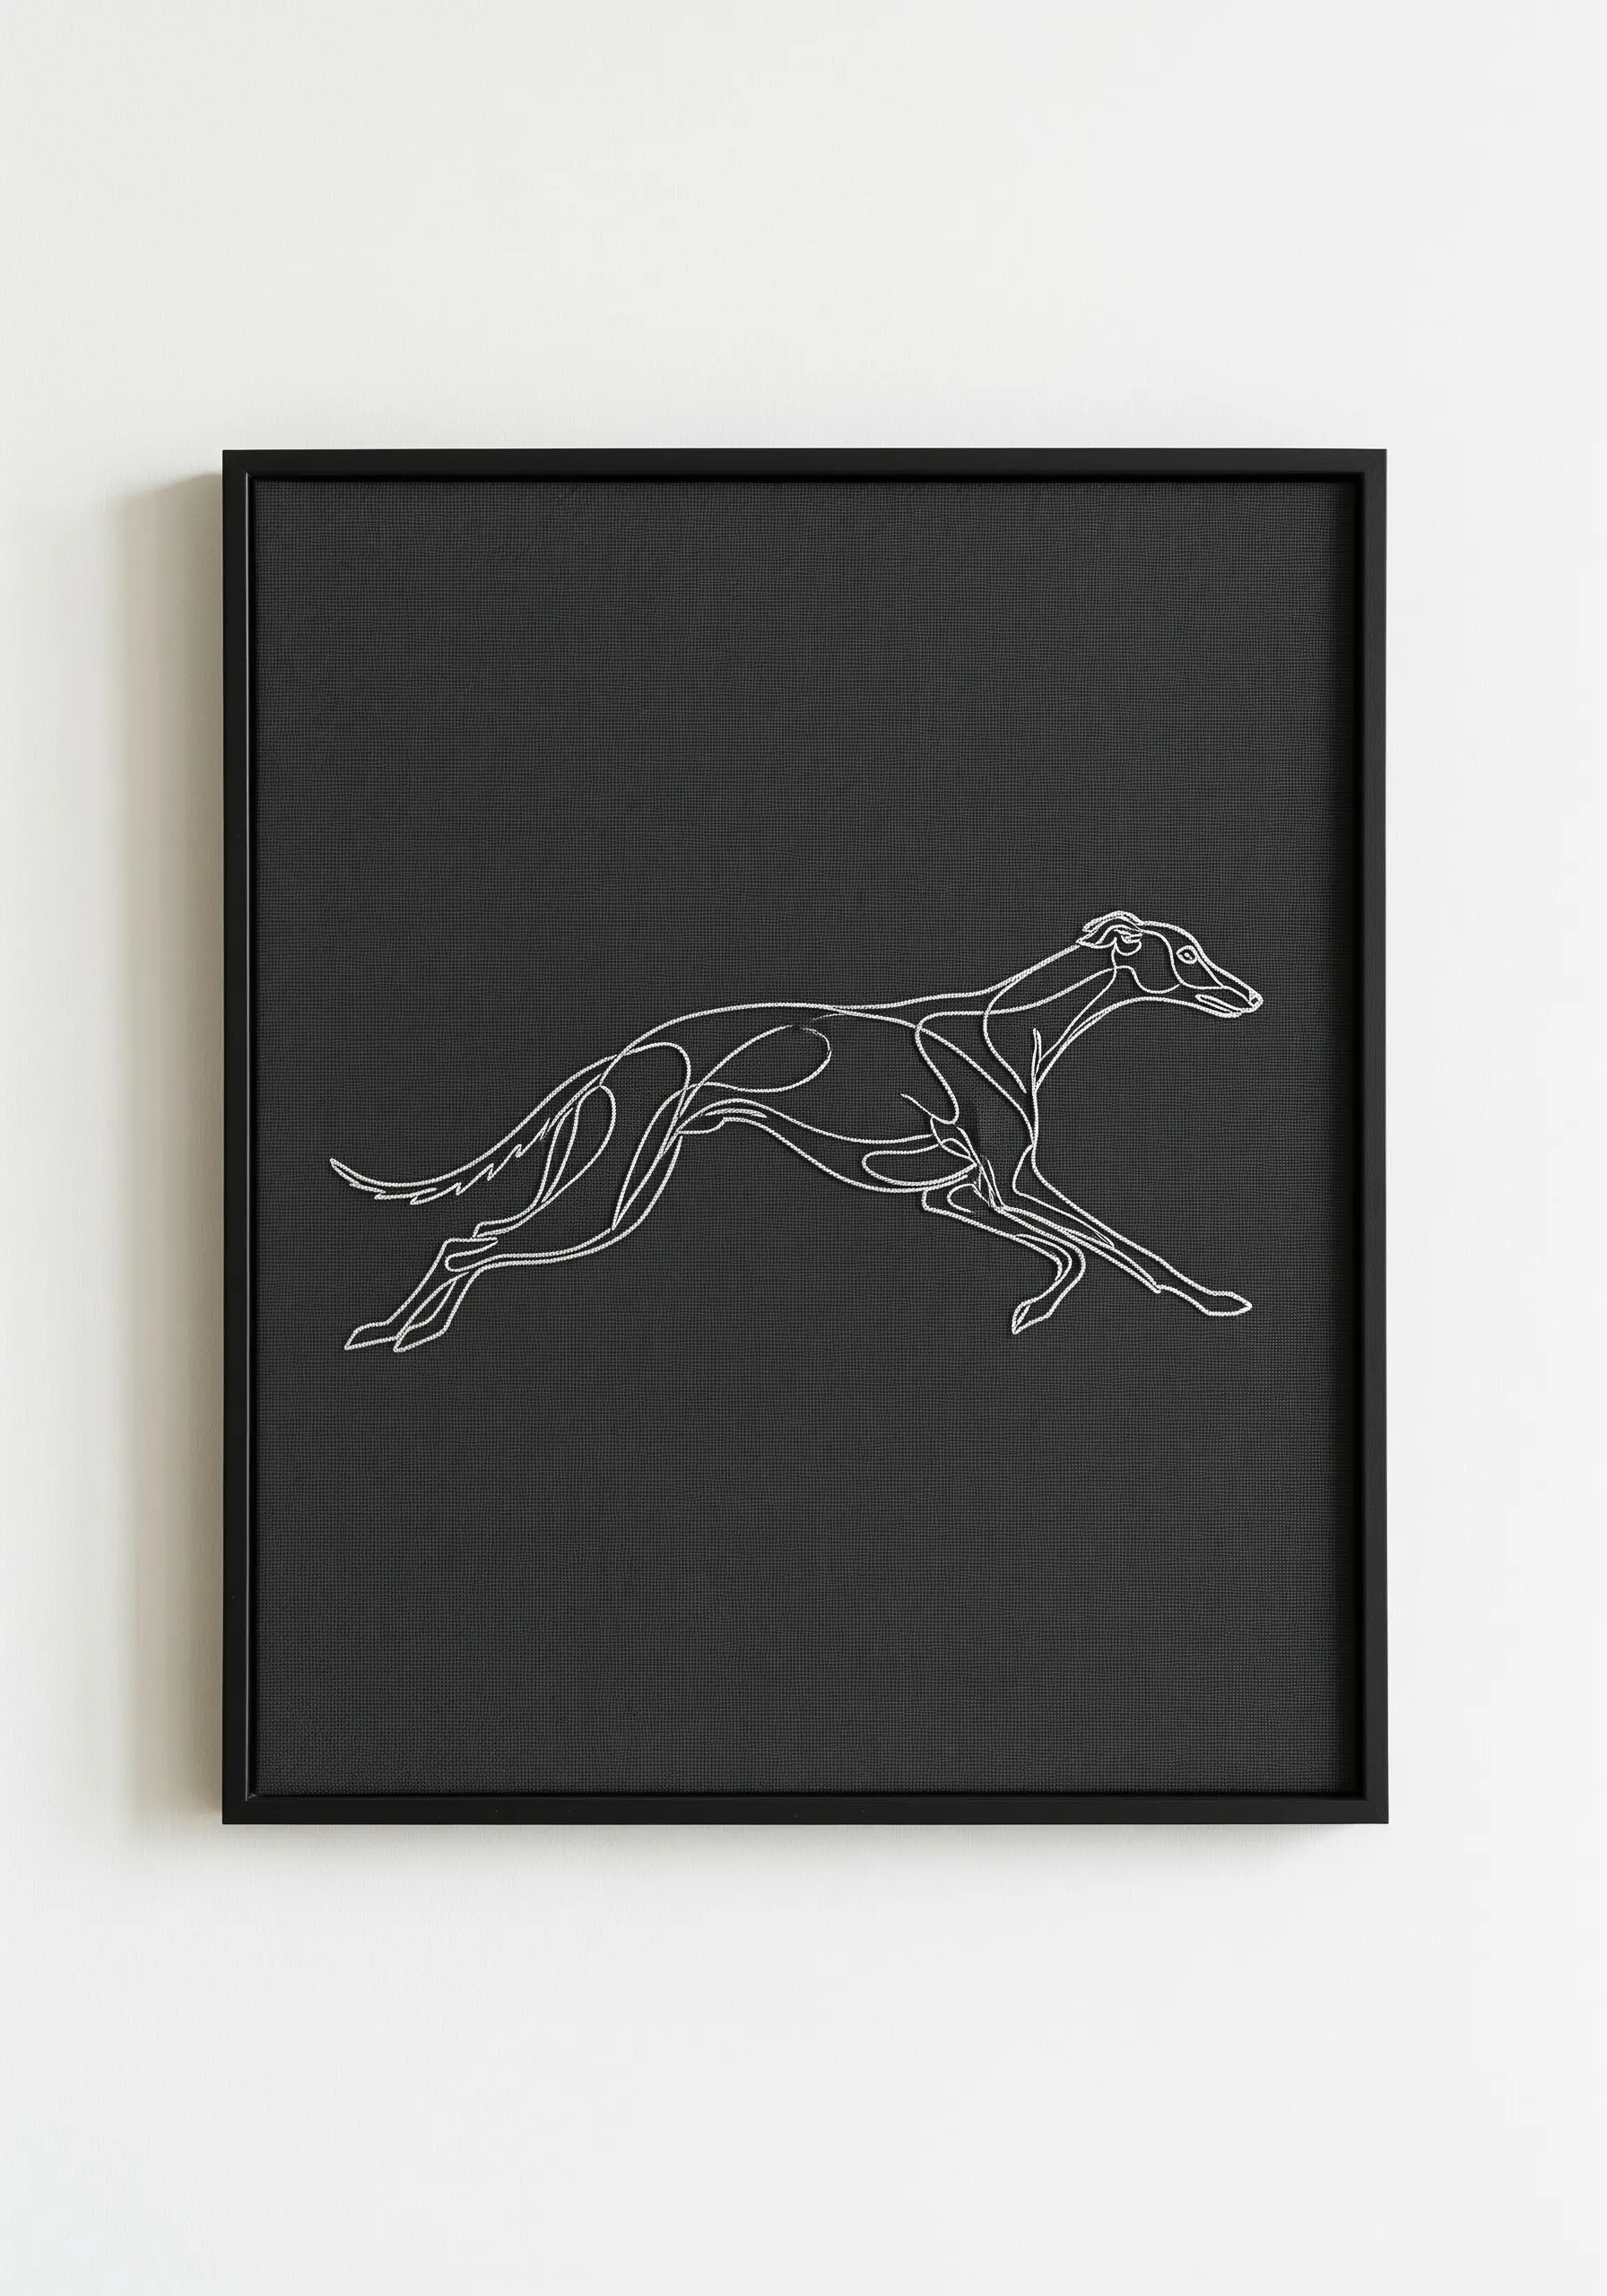
Capture the grace of breeds known for their speed and agility, like greyhounds, with a design that emphasizes fluidity.
Use a single, continuous line to trace the animal’s form, focusing on the long, elegant curves of its spine and legs.
A split stitch is ideal for this, as it creates a perfectly smooth and sharp line that can handle tight curves without breaking.
This style of simple line art embroidery patterns to create Scandinavian-style minimal walls on a budget feels effortlessly sophisticated.
22. Imply Shading with Varied Stitch Density
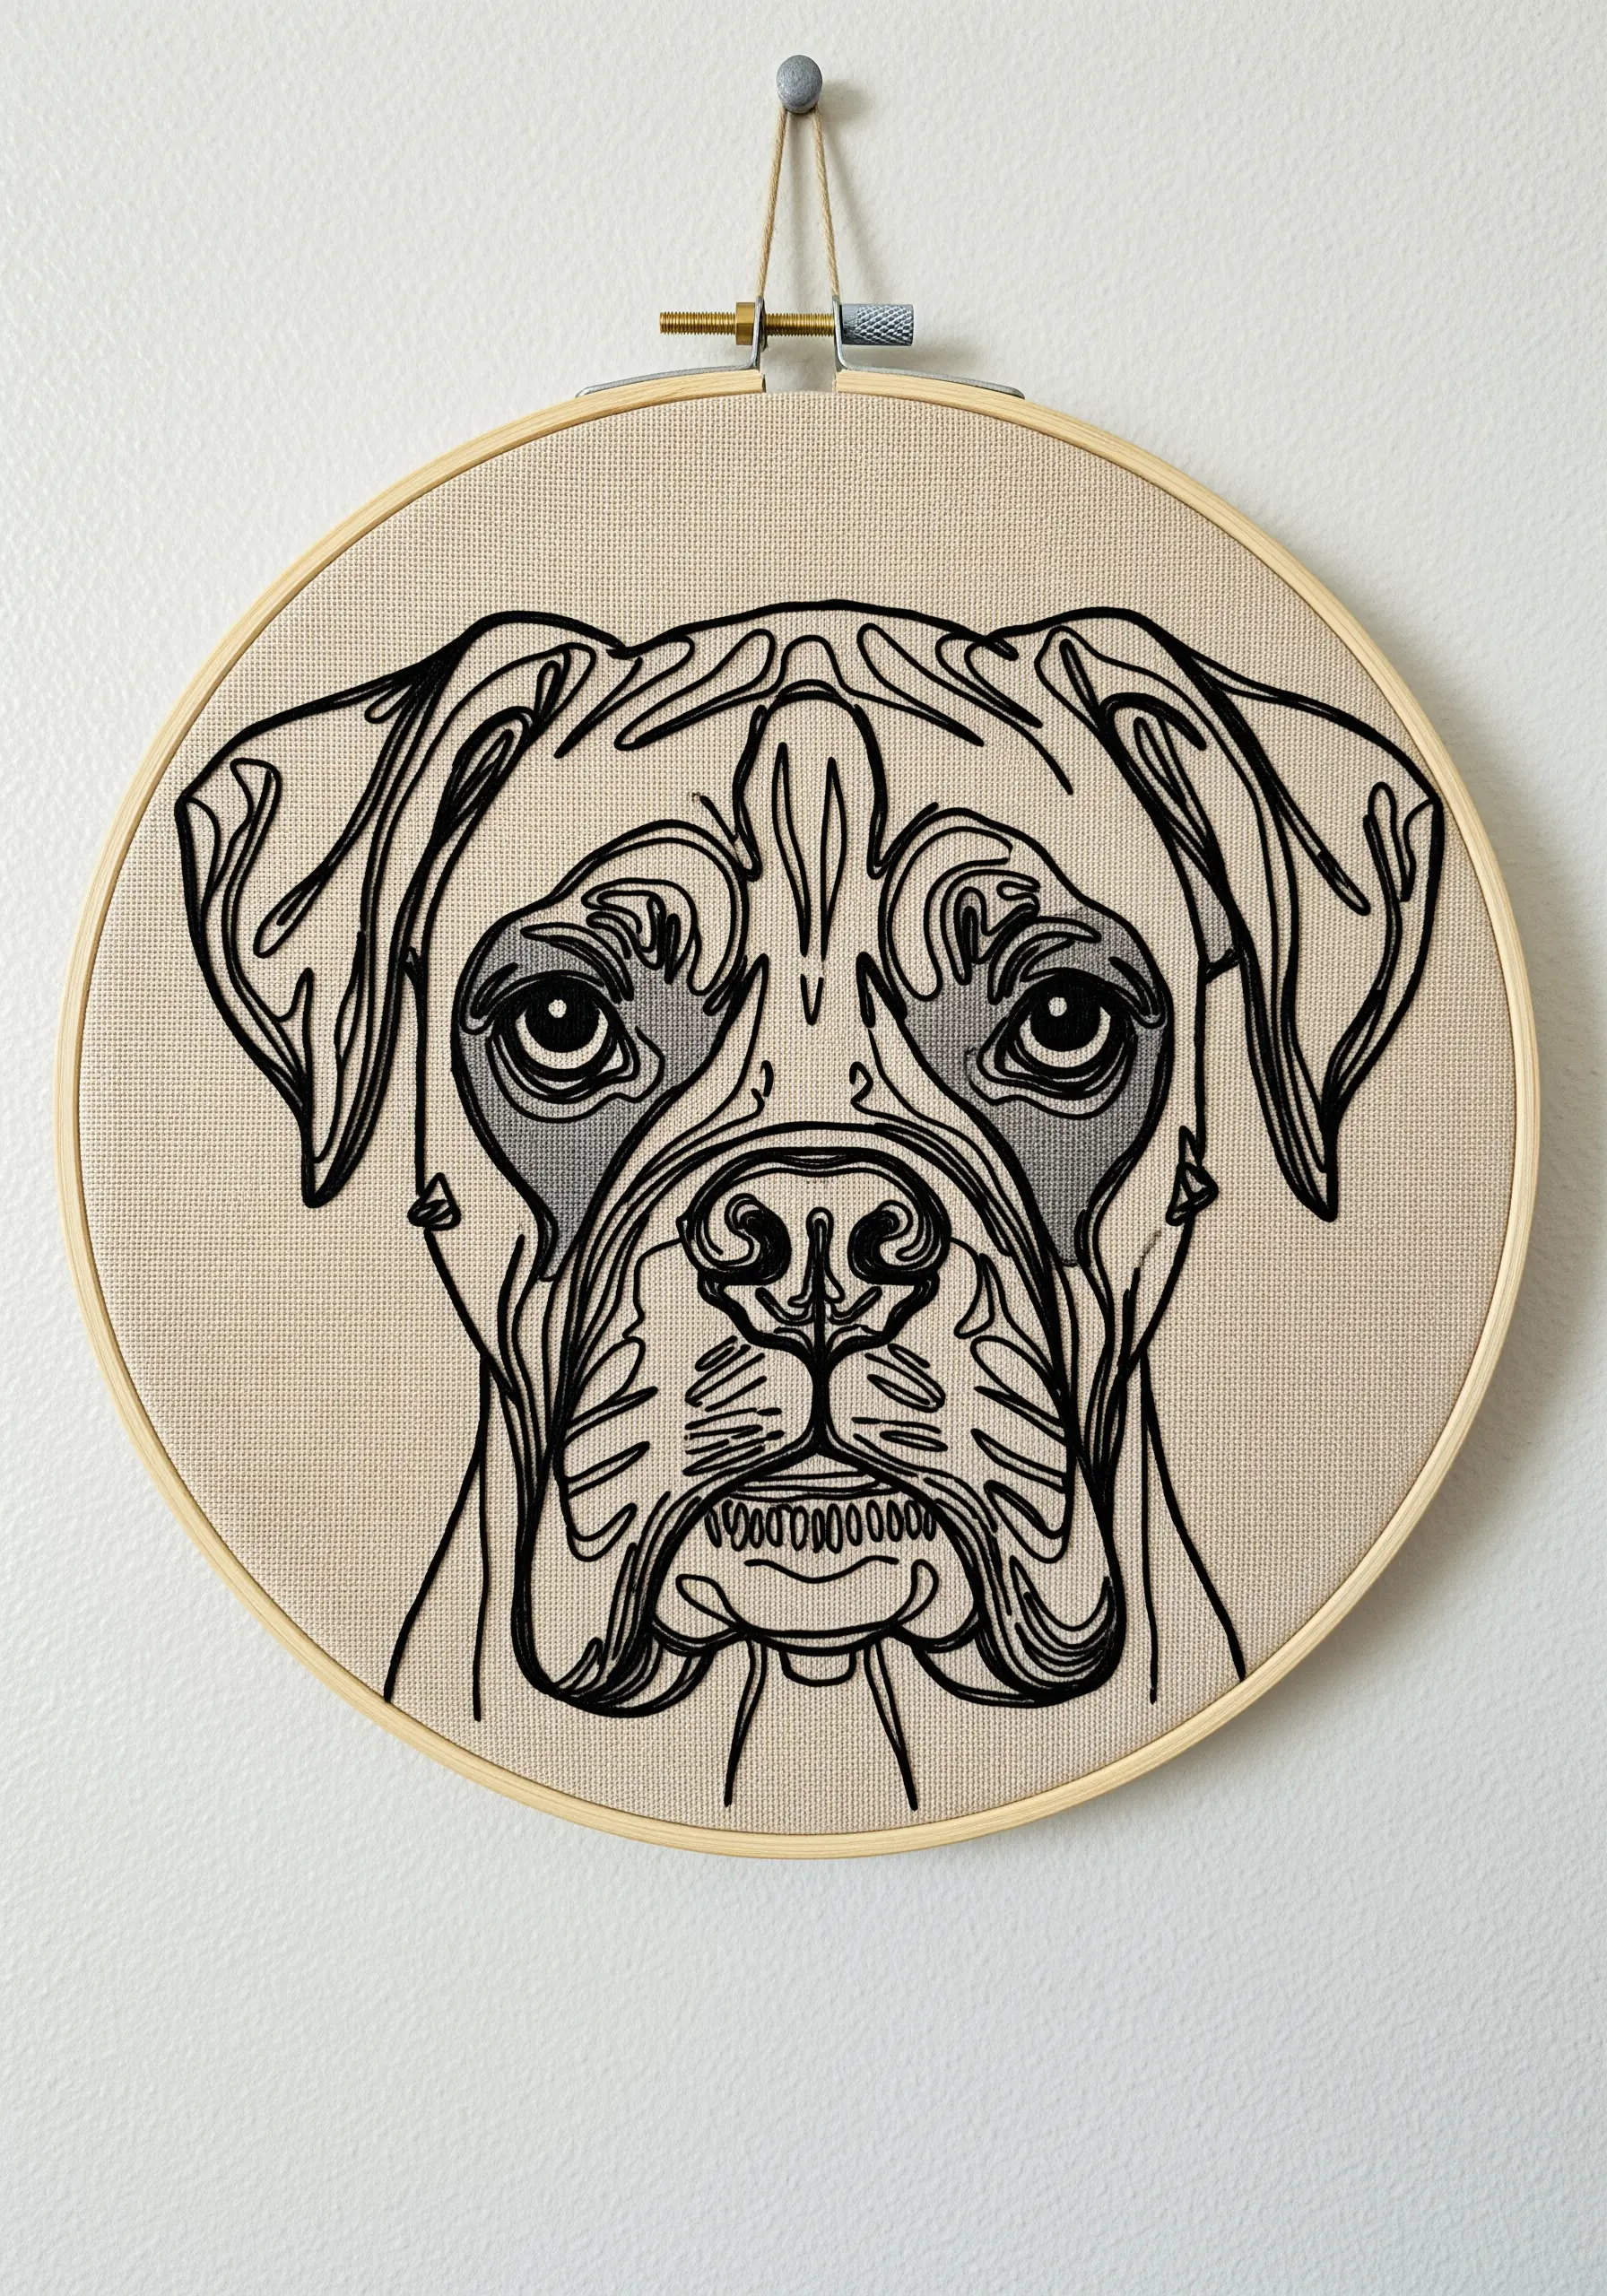
You can create the illusion of shadows and highlights in a monochrome piece by strategically filling small areas with parallel lines.
Use satin stitch or tightly packed straight stitches to fill in the areas that would naturally be in shadow, like under the brows or inside the ears.
The density of these filled sections contrasts with the open line work, tricking the eye into seeing depth and dimension.
This technique adds a layer of graphic sophistication that feels intentional and artistic.
23. Create a Playful, Deconstructed Pattern
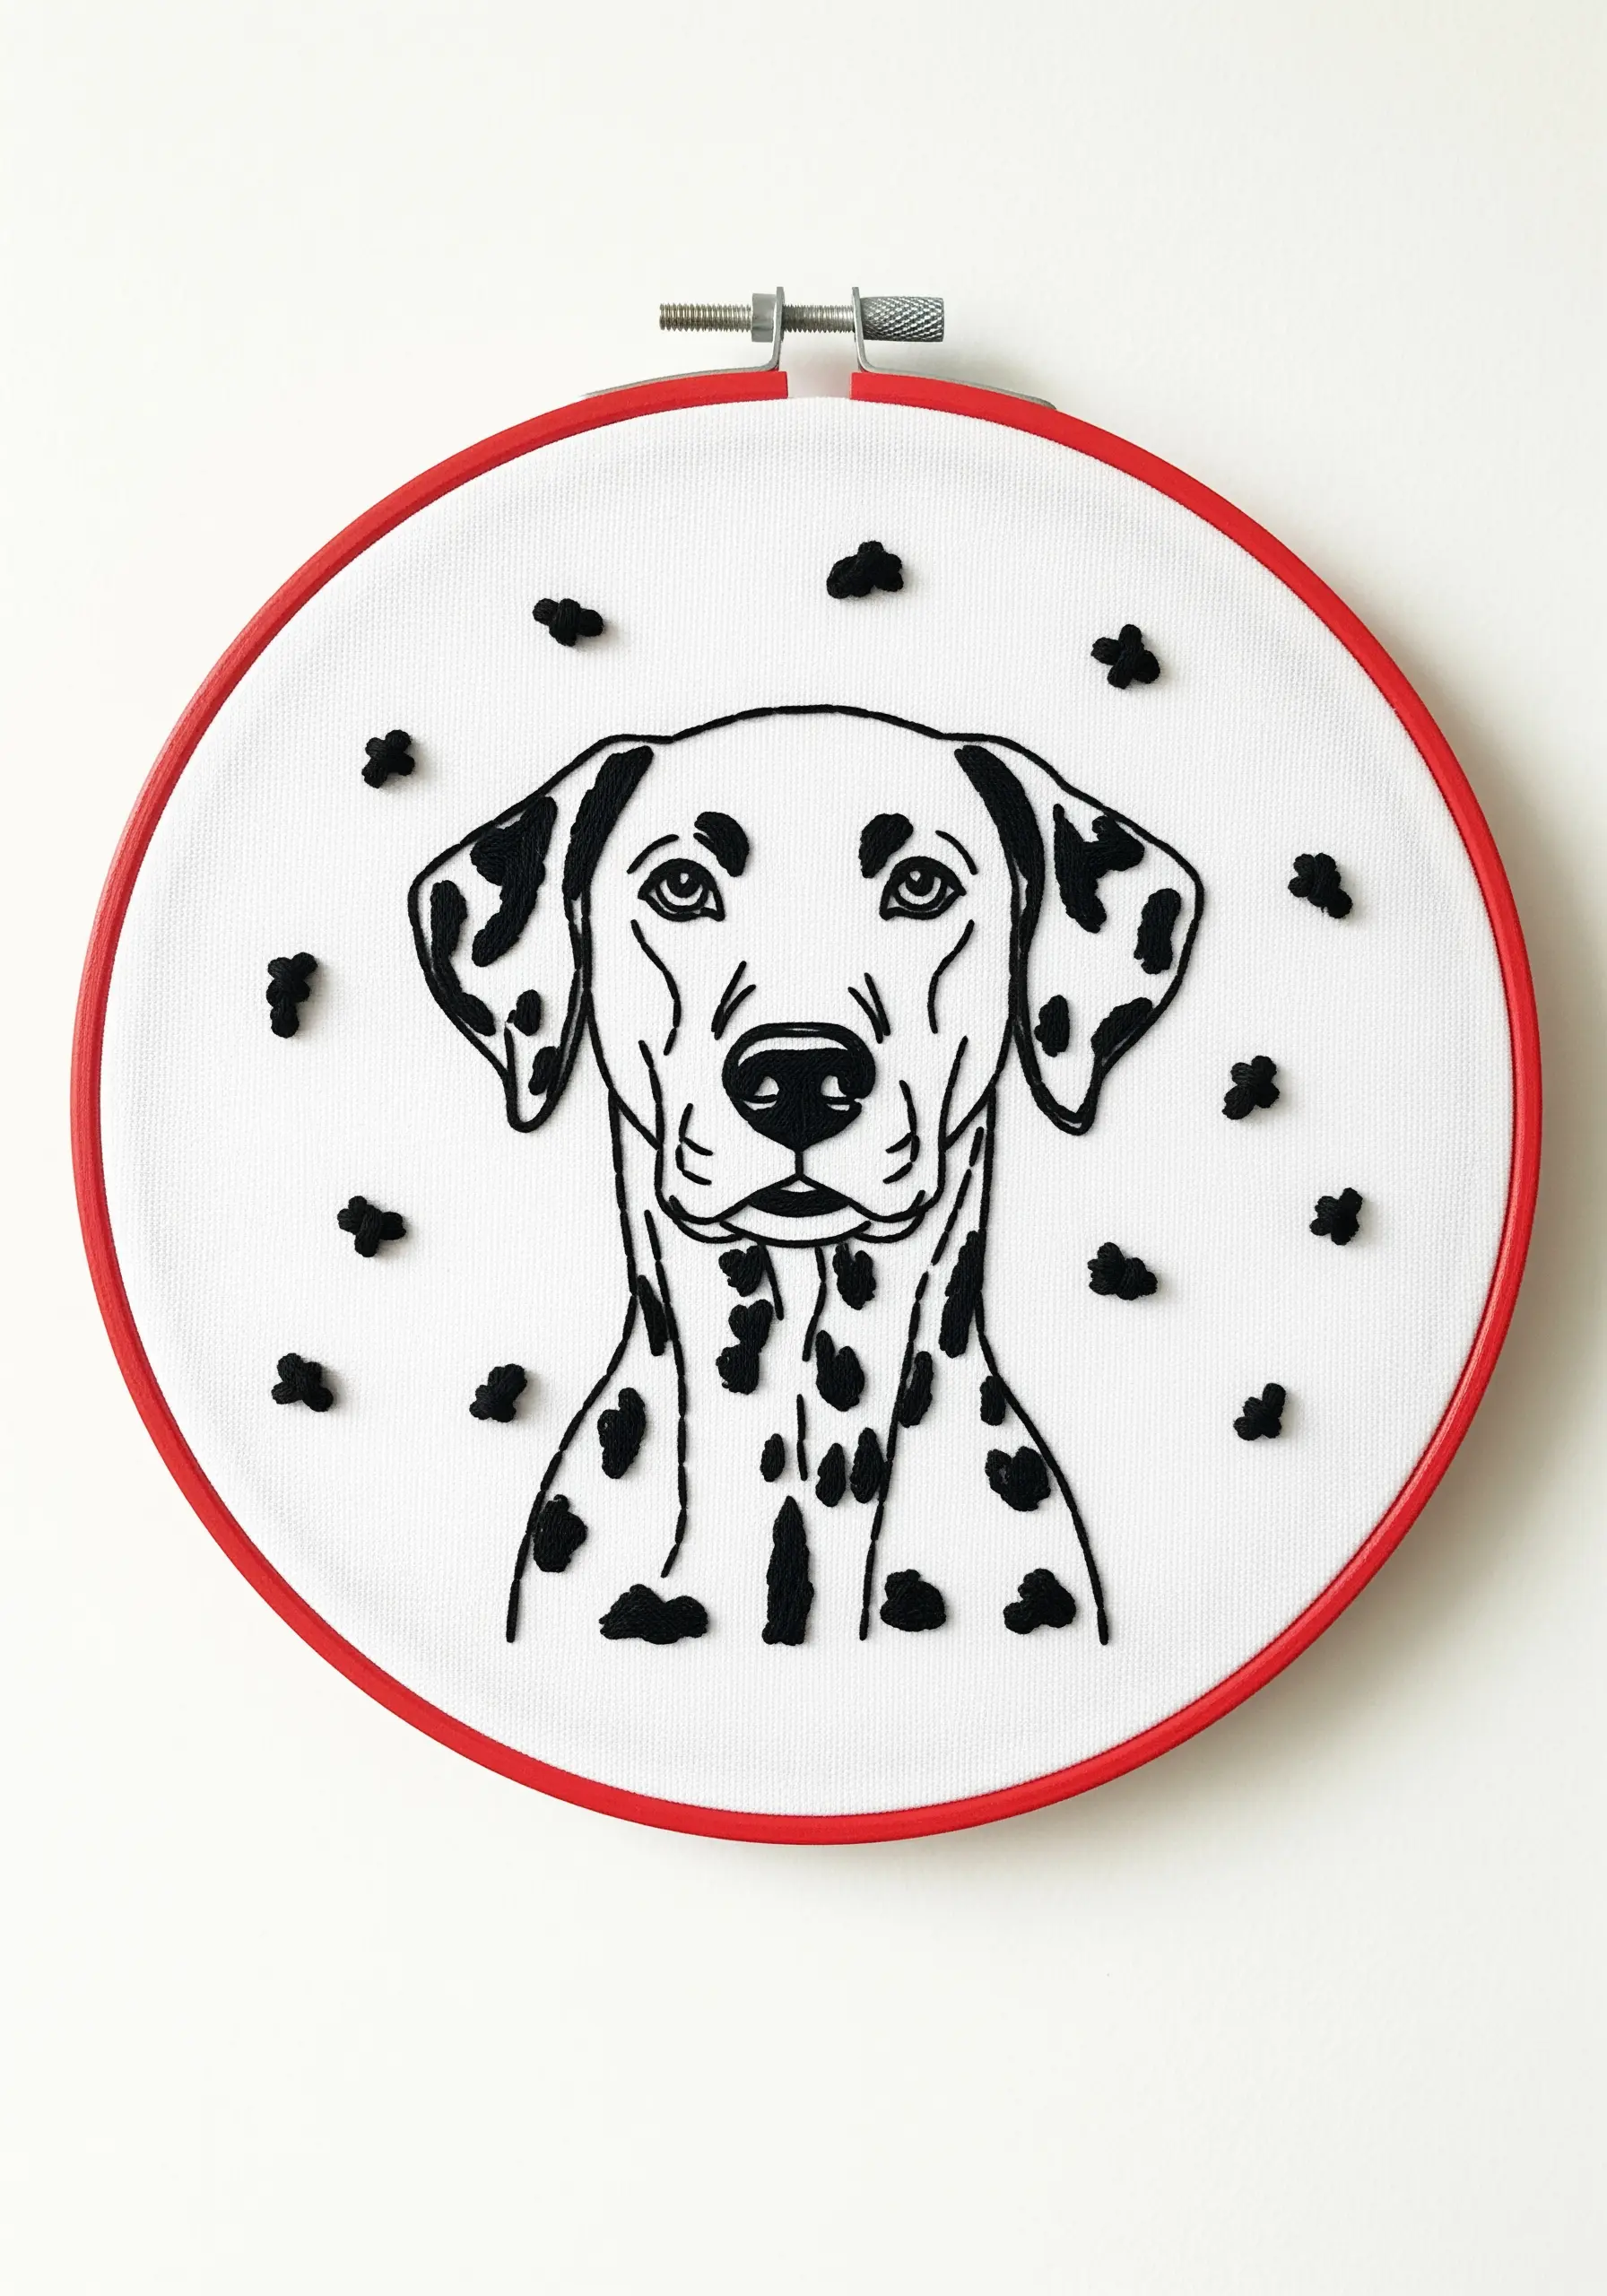
Capture the iconic look of a Dalmatian with a fun, artistic twist by separating the spots from the body.
Stitch the outline of the dog, then scatter French knots or small, irregular satin-stitched blobs around it to represent the spots.
This deconstructed approach feels modern and playful, focusing on the *idea* of the spots rather than their literal placement.
Using a brightly colored hoop, like this vibrant red, enhances the cheerful and graphic quality of the design.
24. Use Layered Outlines for a Celestial Scene
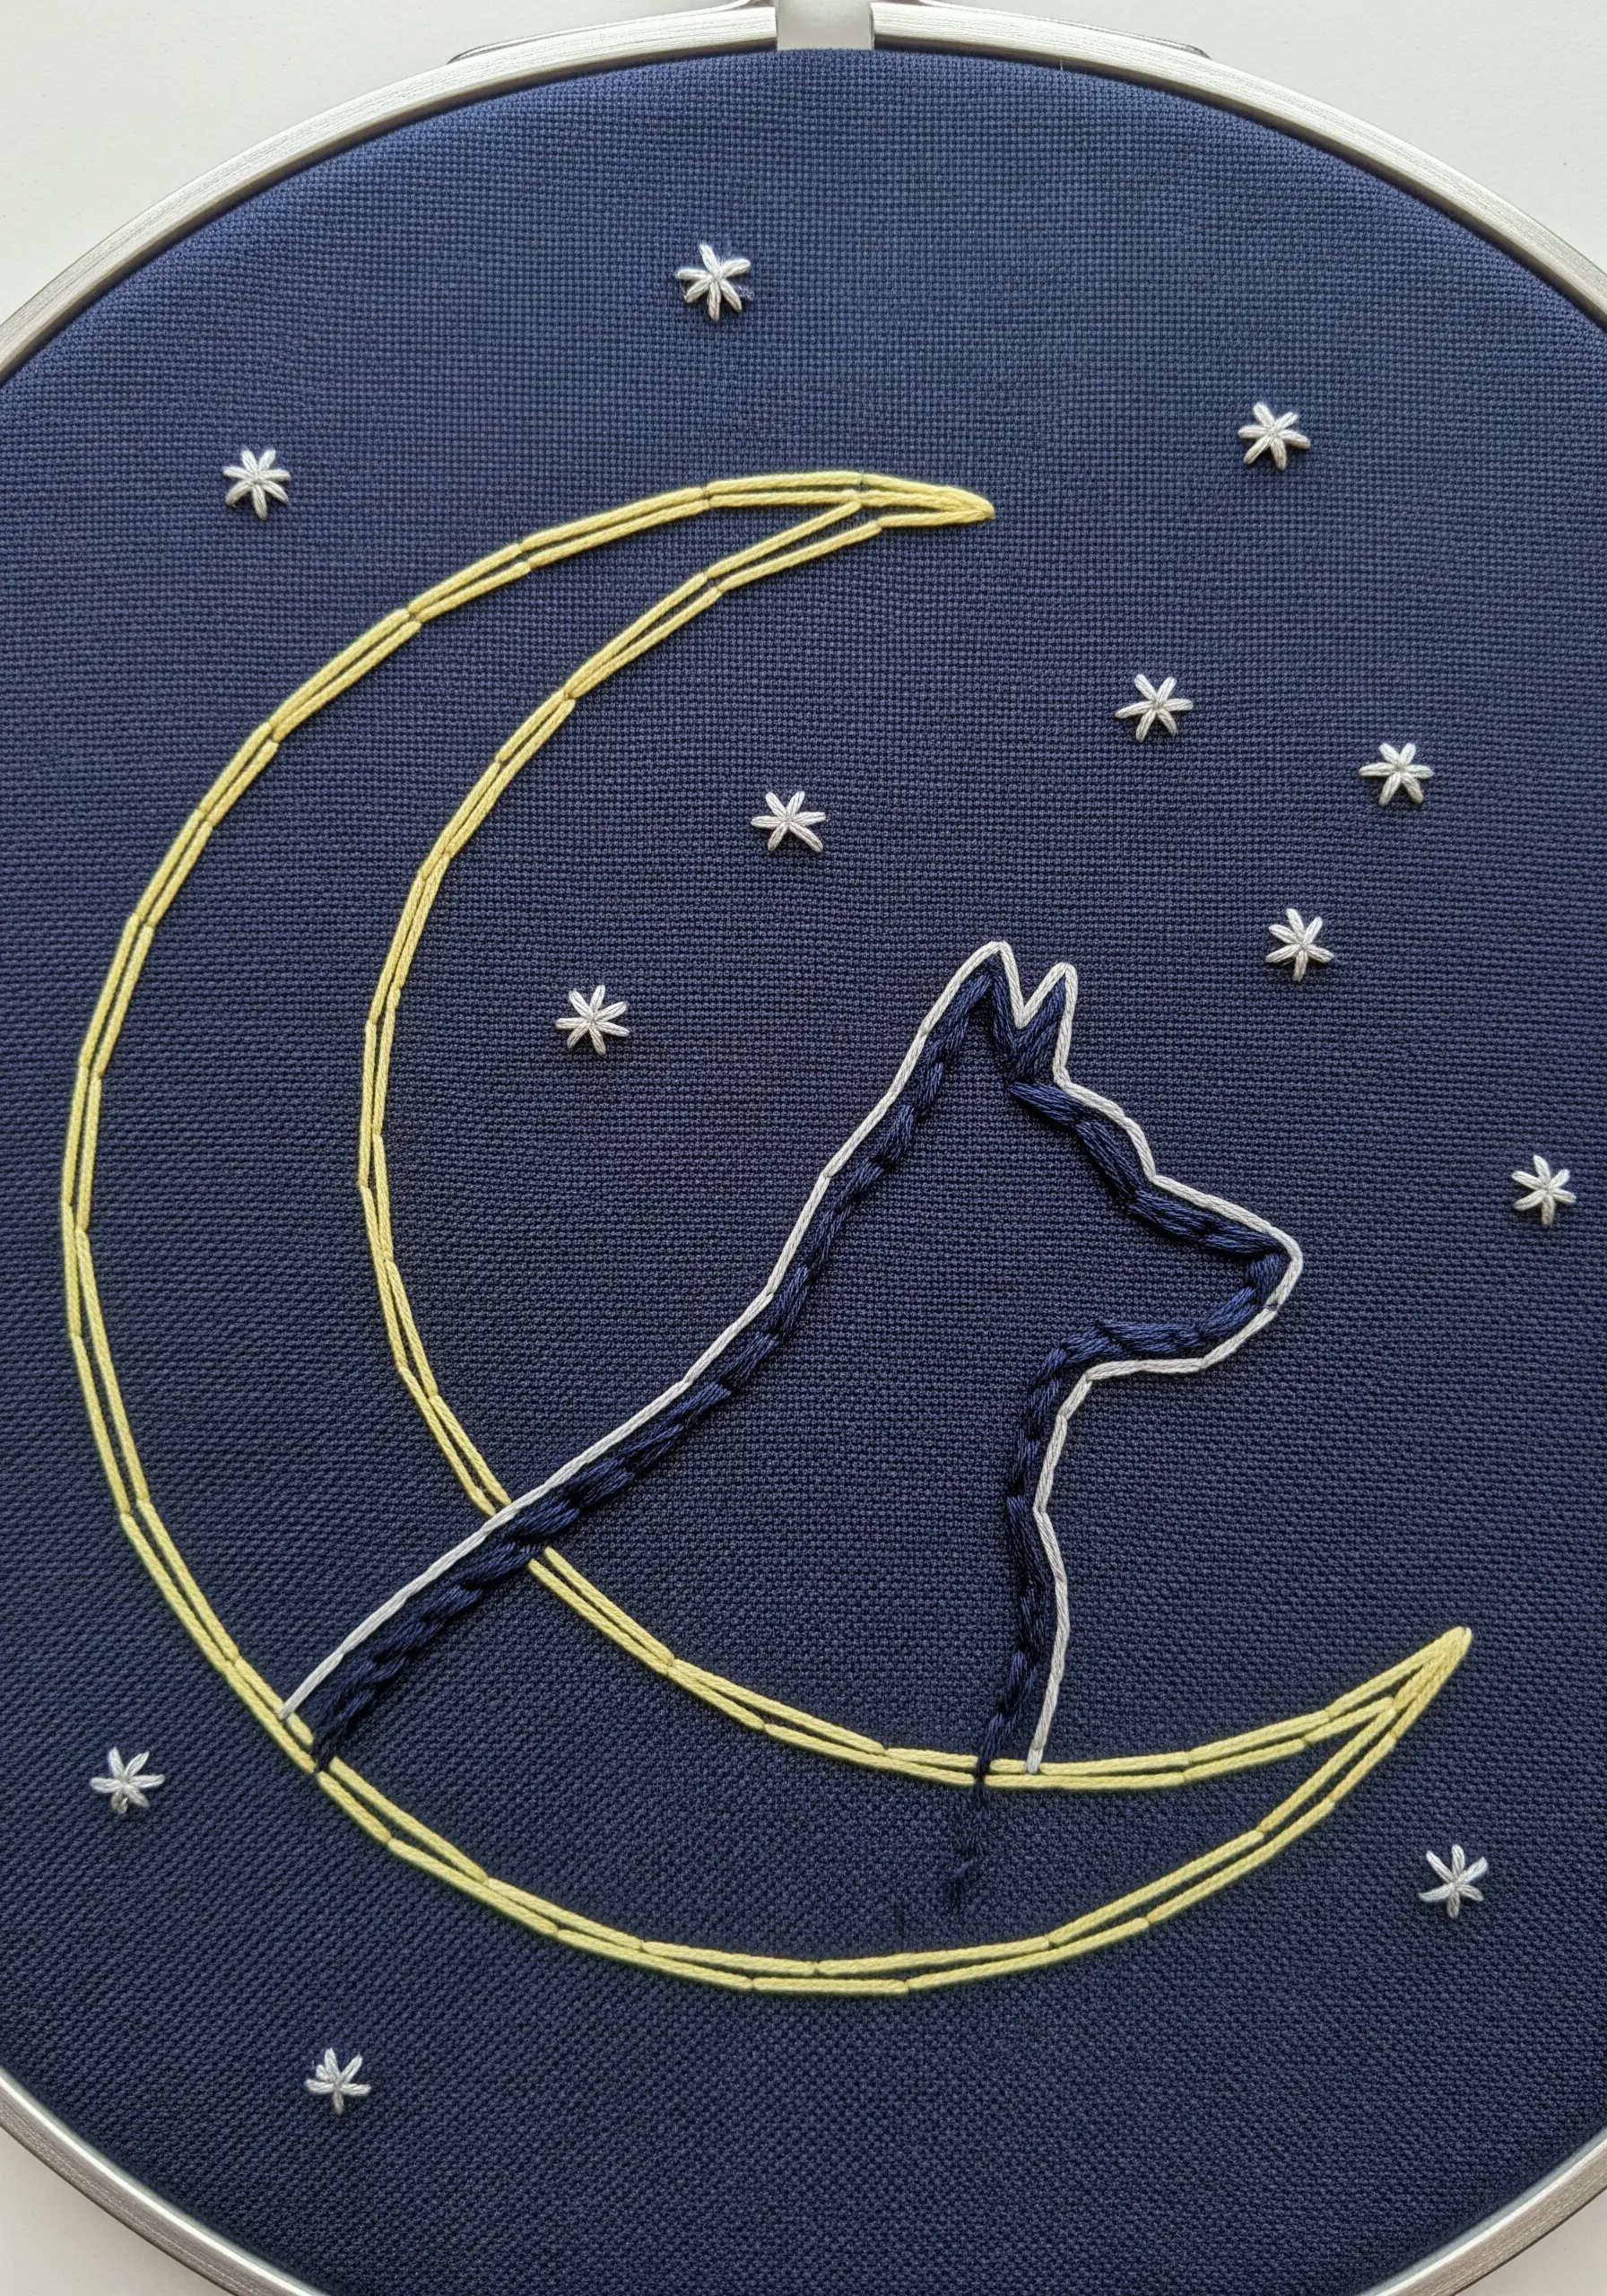
Create a magical, celestial portrait by layering two simple outlines—one for your pet and one for a celestial body like the moon.
To create a clear visual hierarchy, use different stitches or threads for each element. Here, the dog’s silhouette is a simple backstitch, while the moon’s outline uses a thicker, more textured braided chain stitch.
Stitching the inner outline in a contrasting color (white against the dark blue) adds a beautiful, subtle highlight.
Scatter tiny star stitches or French knots to complete the dreamy night-sky atmosphere.
25. Build Up Fluffy Texture with Layered Stitches
To achieve the ultimate fluffy look for breeds like Pomeranians, think like a painter and build up layers of color and texture.
Start with a base layer of long-and-short stitches in your main color, then add shorter, finer stitches in lighter and darker shades on top.
Always stitch in the direction of the fur growth, using short, flicking motions to create a soft, feathery effect.
This meticulous layering is the key to creating realistic volume and a coat that looks irresistibly soft.
26. Break the Mold with an Unconventional Frame
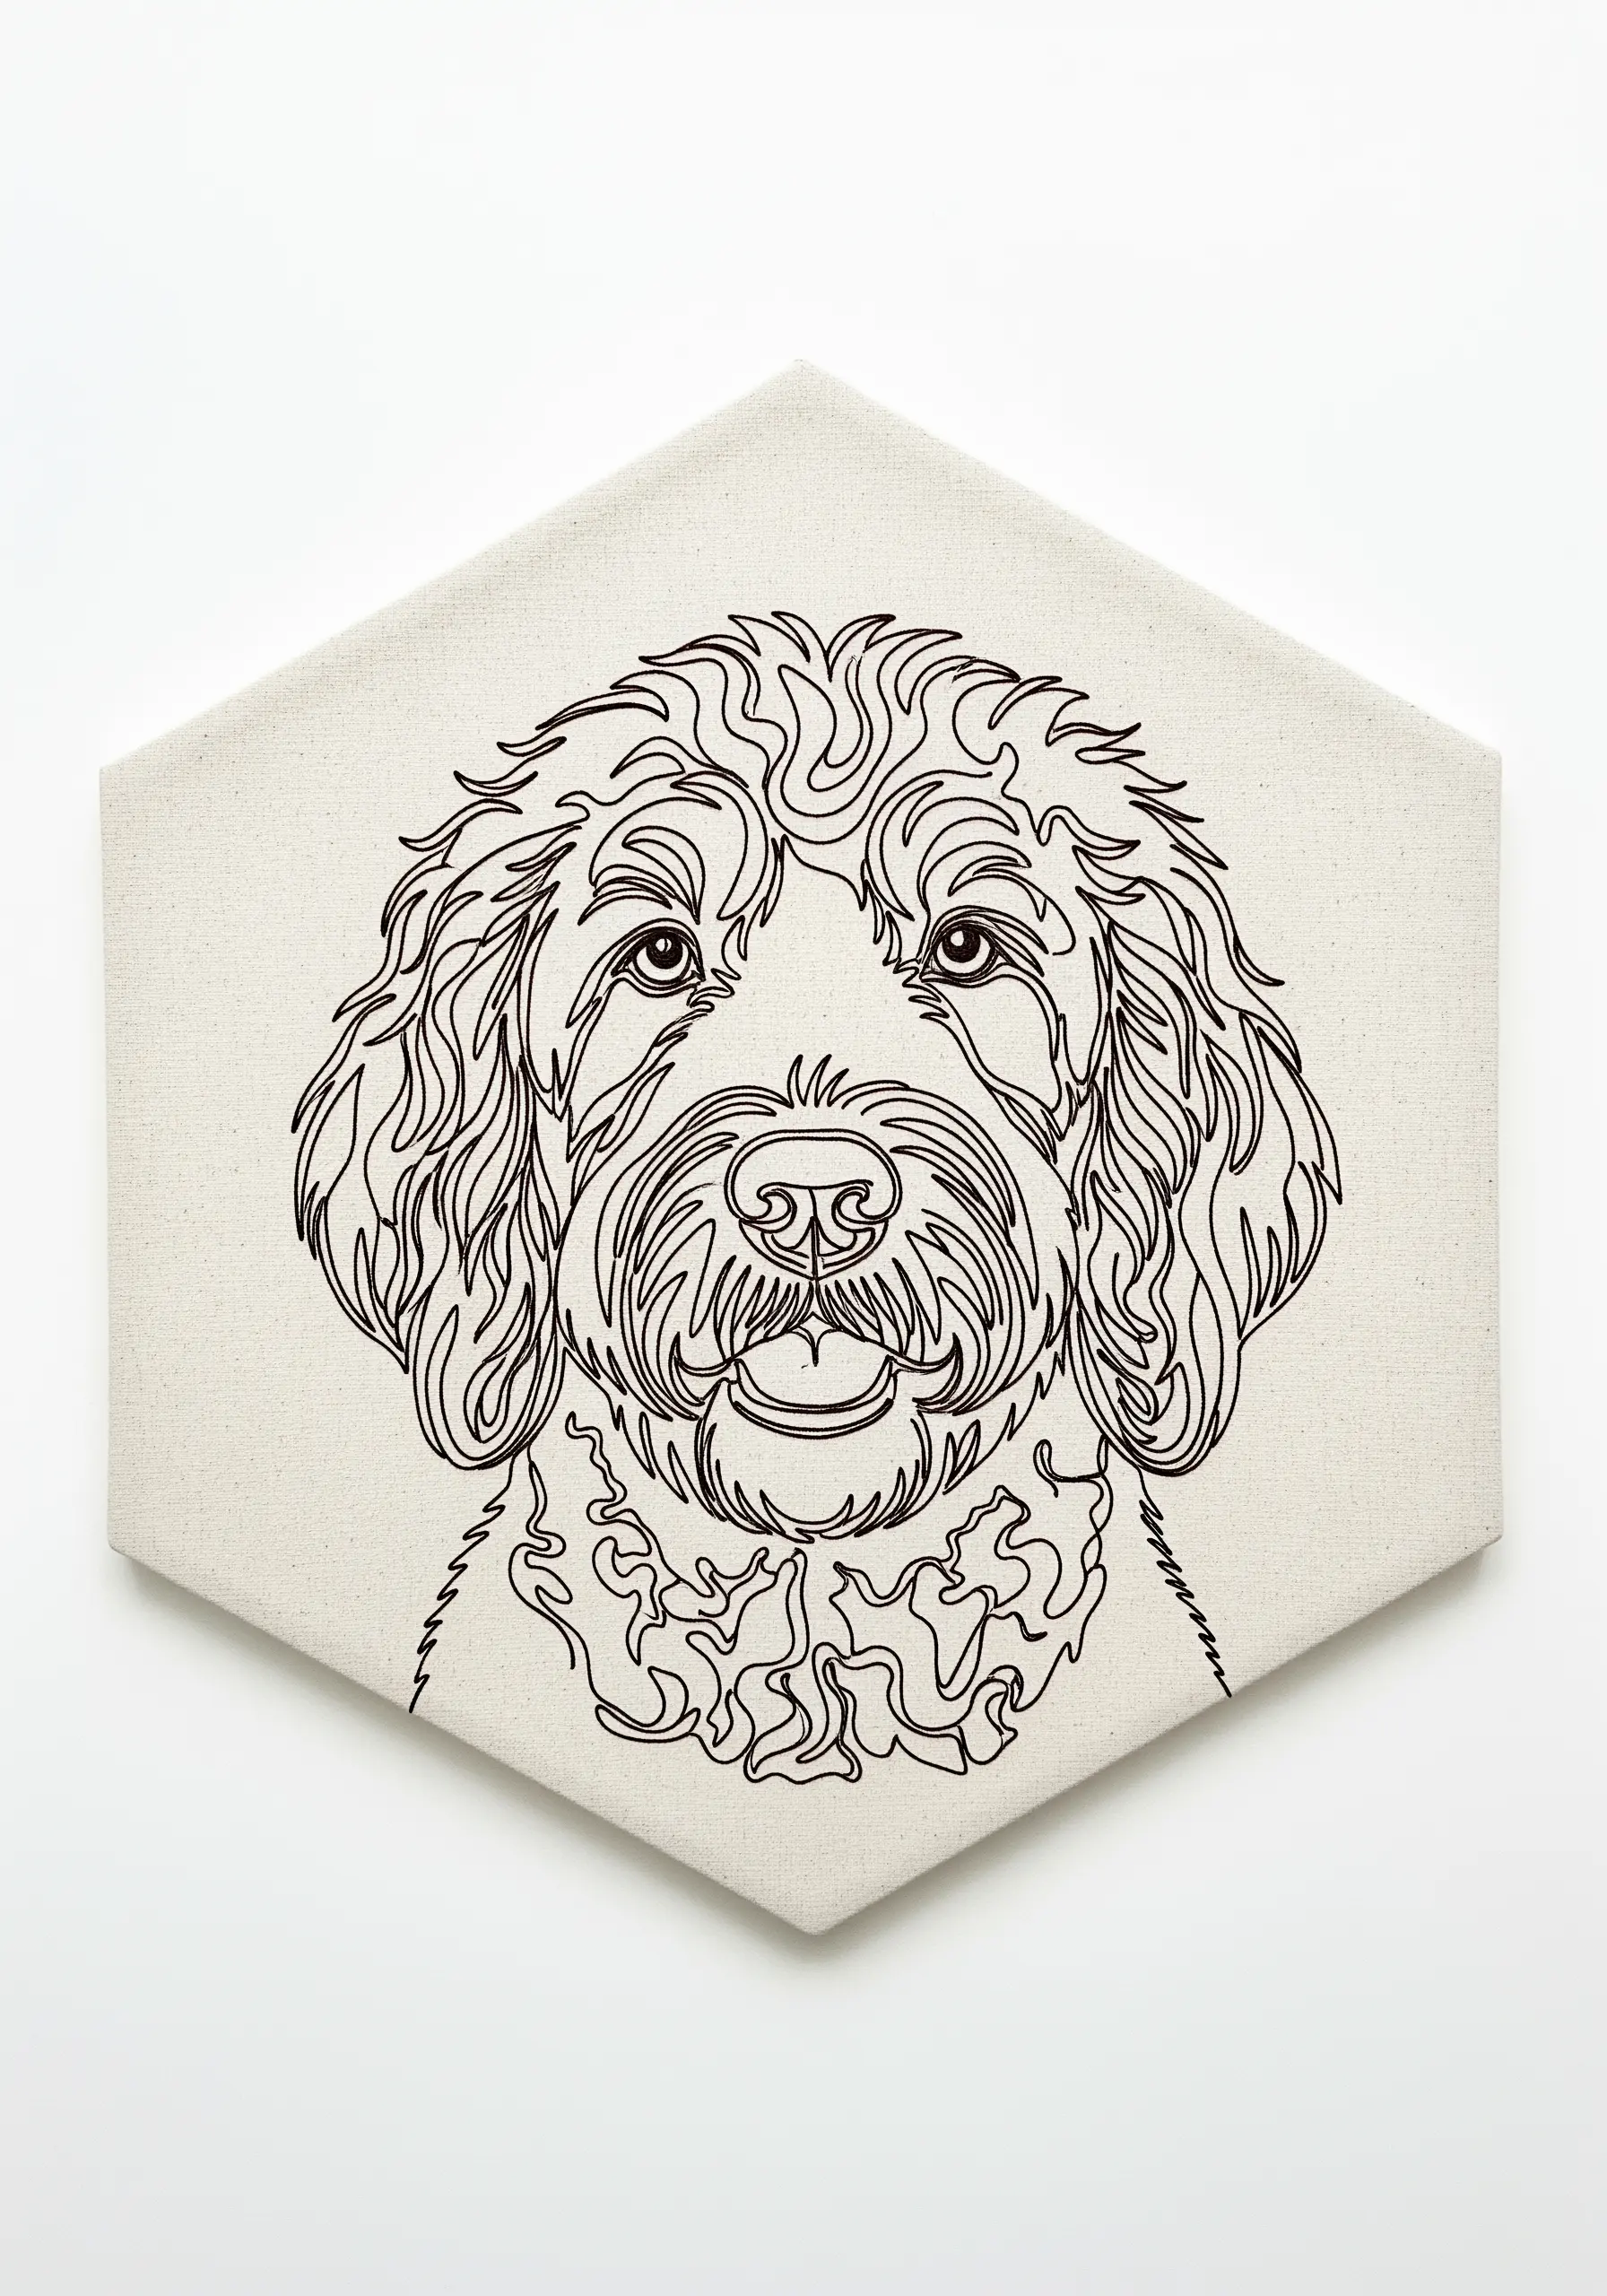
Give your modern line art a contemporary edge by displaying it on an unconventional shape, like a hexagonal stretched canvas.
The geometric frame contrasts beautifully with the organic, flowing lines of the portrait, creating a dynamic visual tension.
This display method feels intentional and design-forward, instantly elevating your embroidery into a piece of unique home decor.
It works particularly well for intricate, single-line designs that fill the entire space.
27. Inject Personality with a Variegated Thread
Add instant color, shading, and pattern to an accessory like a bandana by using a single variegated thread.
The thread does all the work for you, creating a beautiful blend of tones as you stitch. Use a fishbone stitch or long-and-short stitch to allow the color changes to flow naturally.
This is a wonderfully efficient way to make a small area of your design incredibly vibrant and detailed without constantly switching floss.
Keep the main portrait in a simple, neutral color to ensure the colorful accessory remains the star of the show.
28. Capture an Identity with Abstracted Shapes
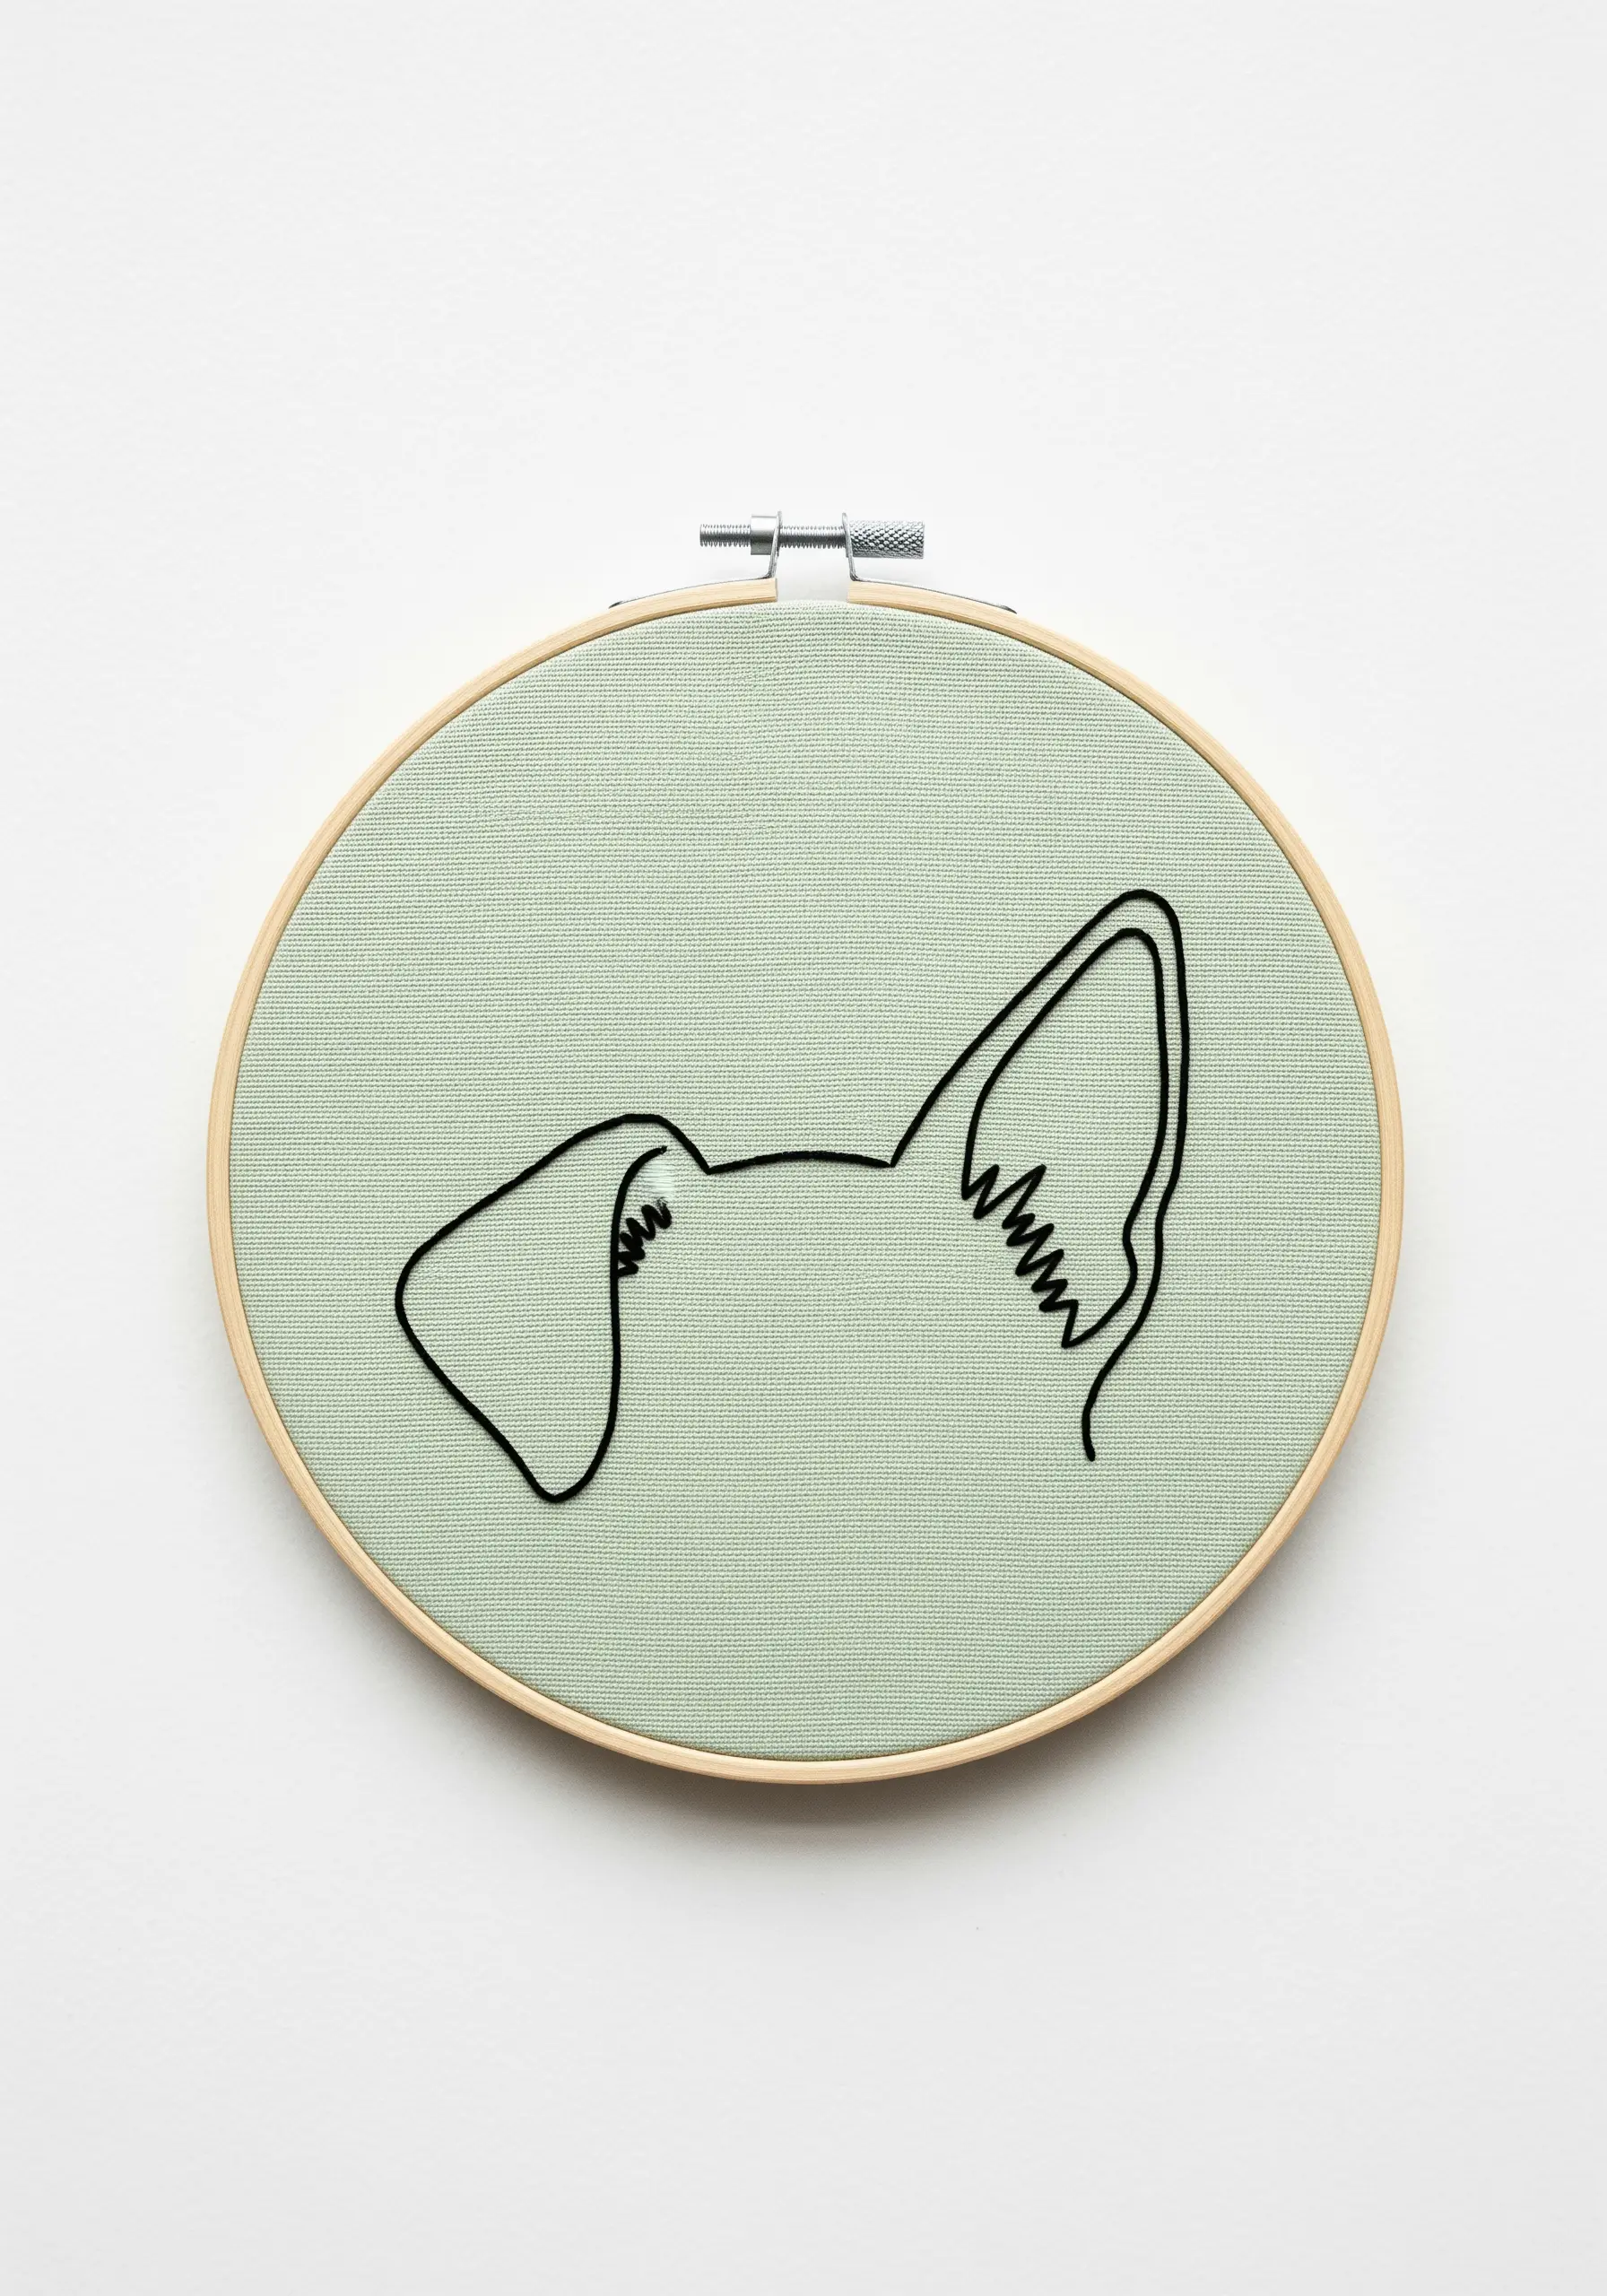
Showcase the defining features of your dog—or multiple dogs—through extreme minimalism.
Instead of a full portrait, stitch only the most recognizable shapes, like the distinct silhouettes of their ears.
This abstract approach is a sophisticated nod to their identity, creating a quiet, thoughtful piece of art that invites curiosity.
These minimal pet silhouette embroidery wall designs prove that less can be profoundly more when it comes to capturing personality.
29. Anchor Your Portrait with a Solid Heart

Ground a delicate line drawing by adding a small but solid element of filled color.
While the portrait uses a fine backstitch to feel light and airy, the heart is filled with a dense satin stitch, giving it visual weight and importance.
This contrast between line and solid form creates a beautiful balance in the composition.
Placing the heart at the base of the chest anchors the entire design and reinforces the theme of love and companionship.


