

Sometimes the most beautiful statements are made in the quietest details. You don’t need sprawling, complex patterns to fill your bedroom with a sense of softness and romance—all you need is a small hoop, a few carefully chosen threads, and the intention to create something personal.
These small floral motifs are more than just patterns; they are exercises in technique and texture. This is your chance to see how a simple switch from a satin stitch to a long-and-short stitch can make a petal look real enough to touch, or how the placement of a few French knots can transform a simple sprig of lavender into a tiny, fragrant field.
Let these ideas guide you toward embroidery that feels less like following instructions and more like painting with thread. Notice the way color choices and stitch direction can create light, shadow, and emotion. This is where your true artistry begins.
1. Render Lavender with Tactile French Knots
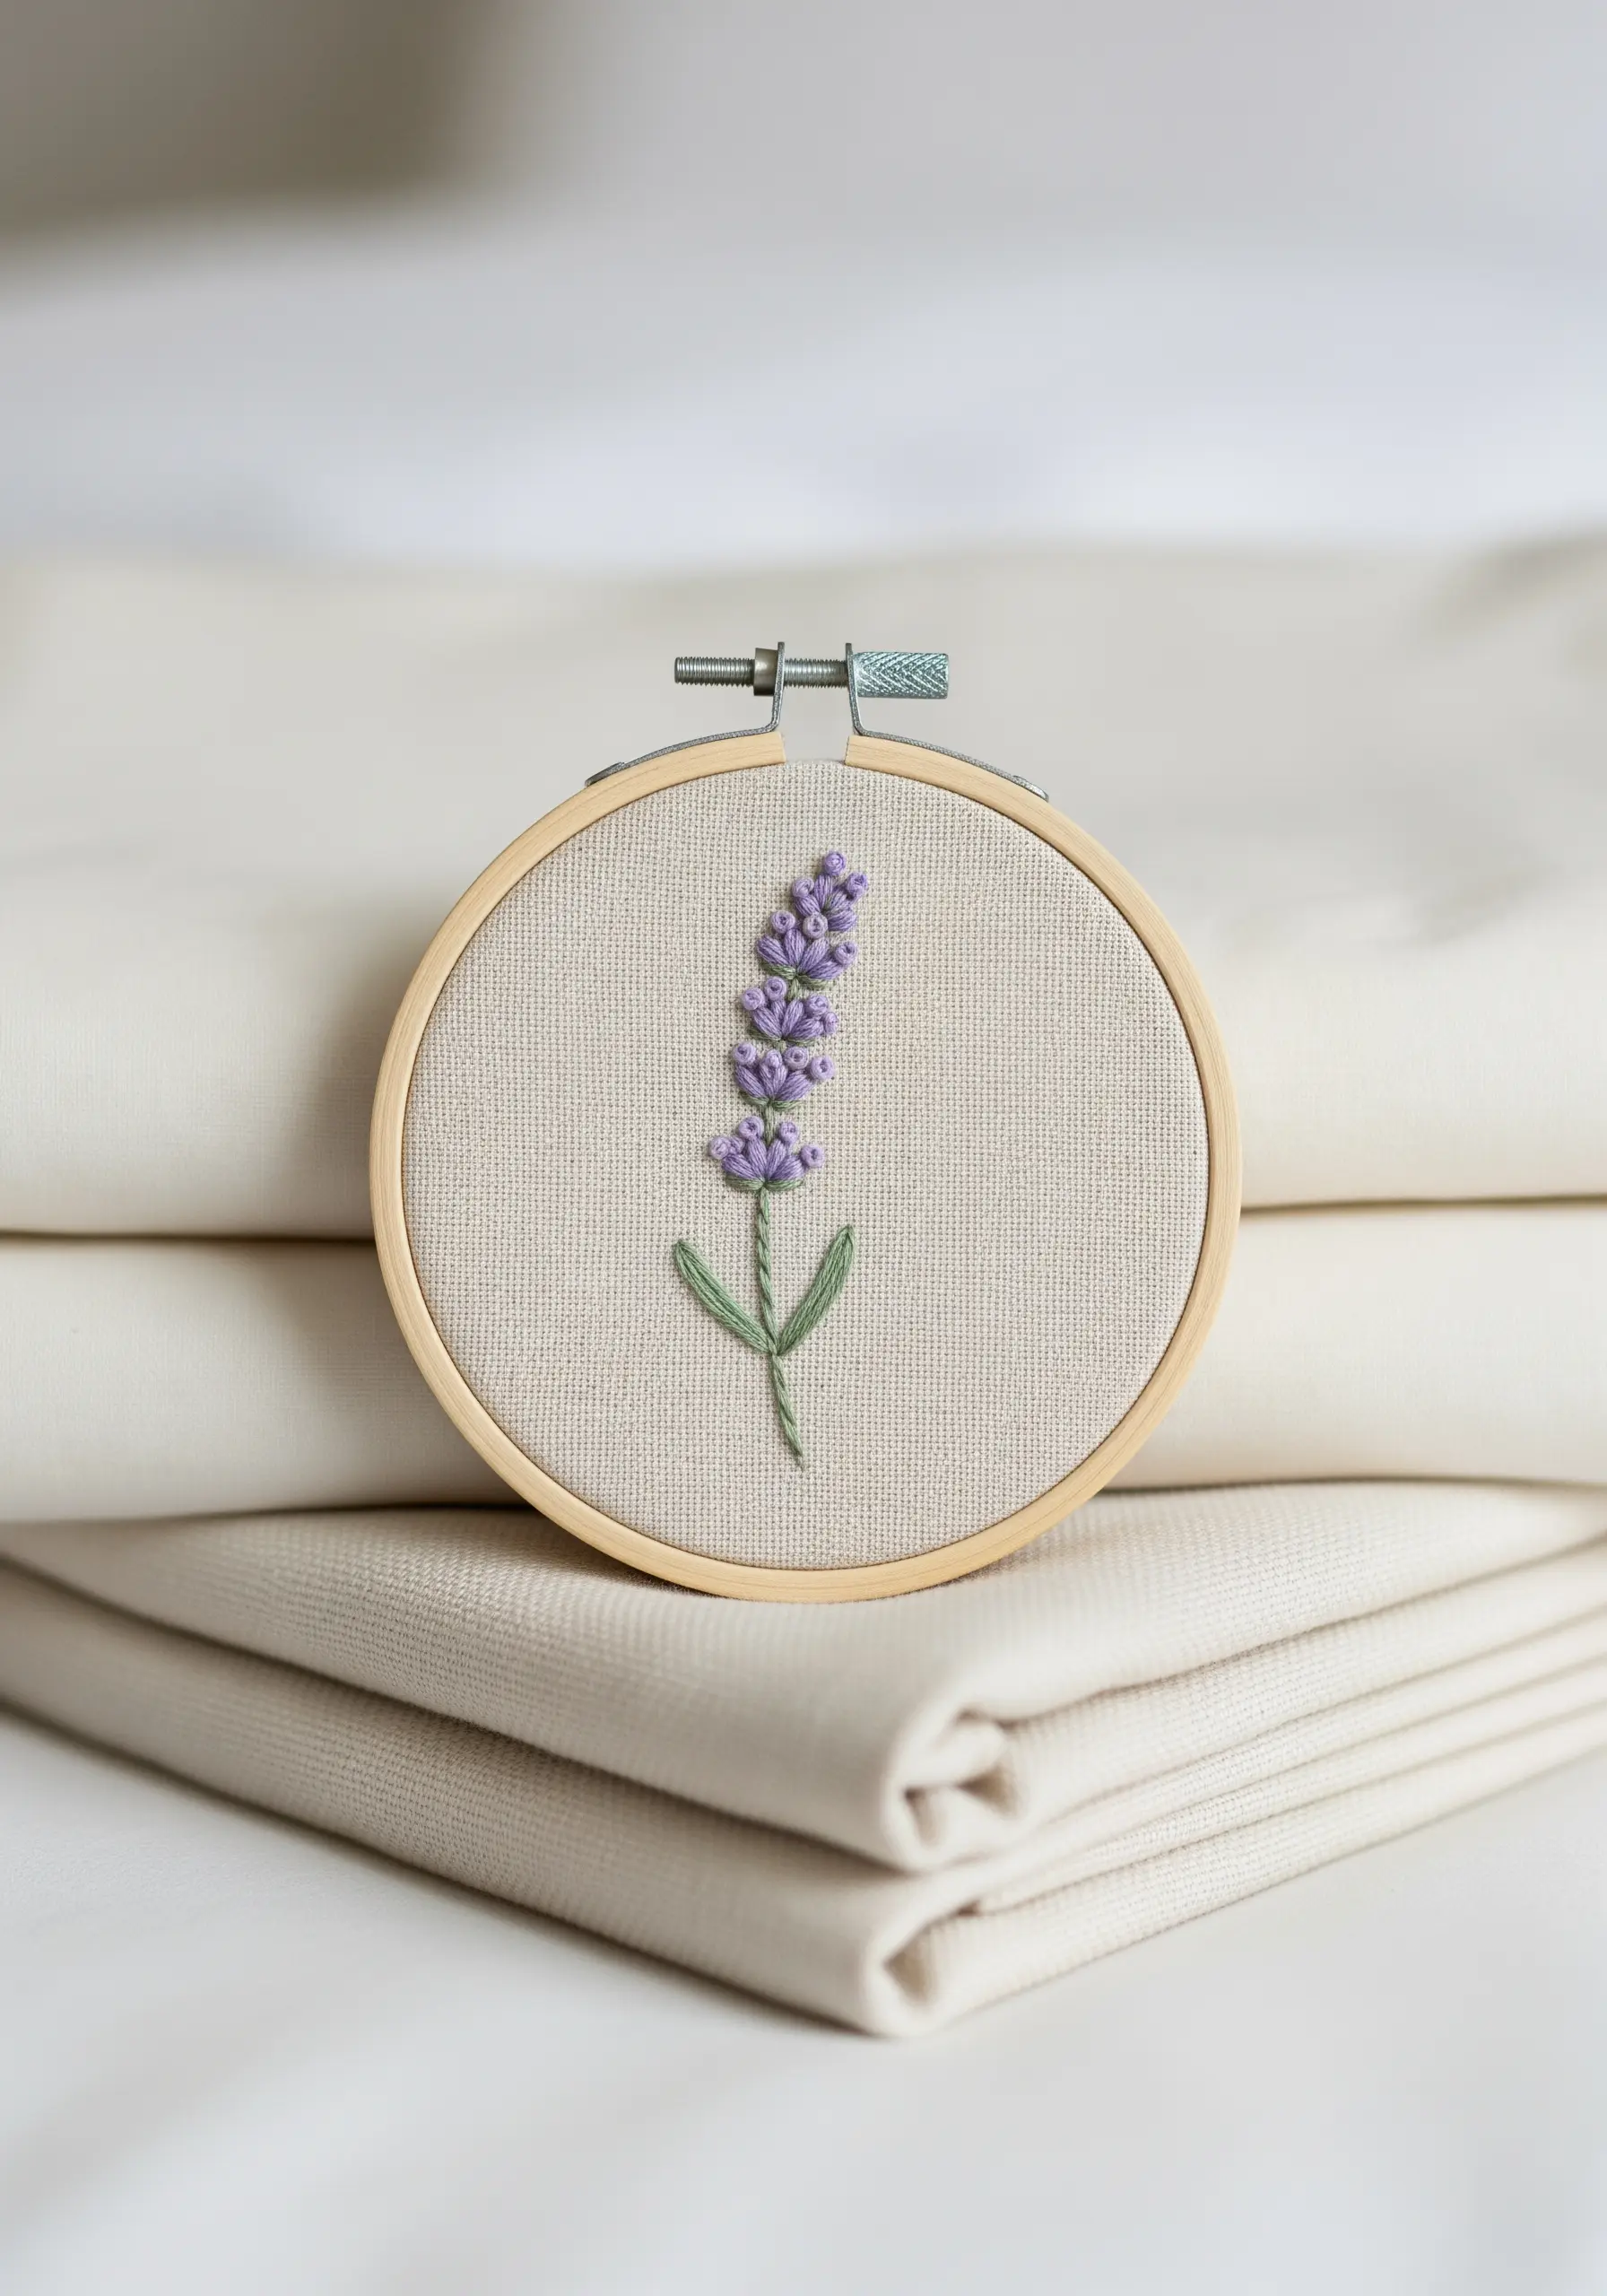
Create the iconic lavender texture by clustering French knots tightly at the top of the stalk, tapering down toward the stem.
Use two or three shades of violet and lavender thread, stitching the knots randomly to create natural-looking depth and dimension.
For the stem, a simple stem stitch using just two strands of green floss keeps the design delicate and balanced.
This technique turns a flat drawing into a tactile, sensory piece, making it one of the most effective minimal embroidery designs that use only three colors for creating visual interest.
2. Master Uniformity with Lazy Daisy Stitches
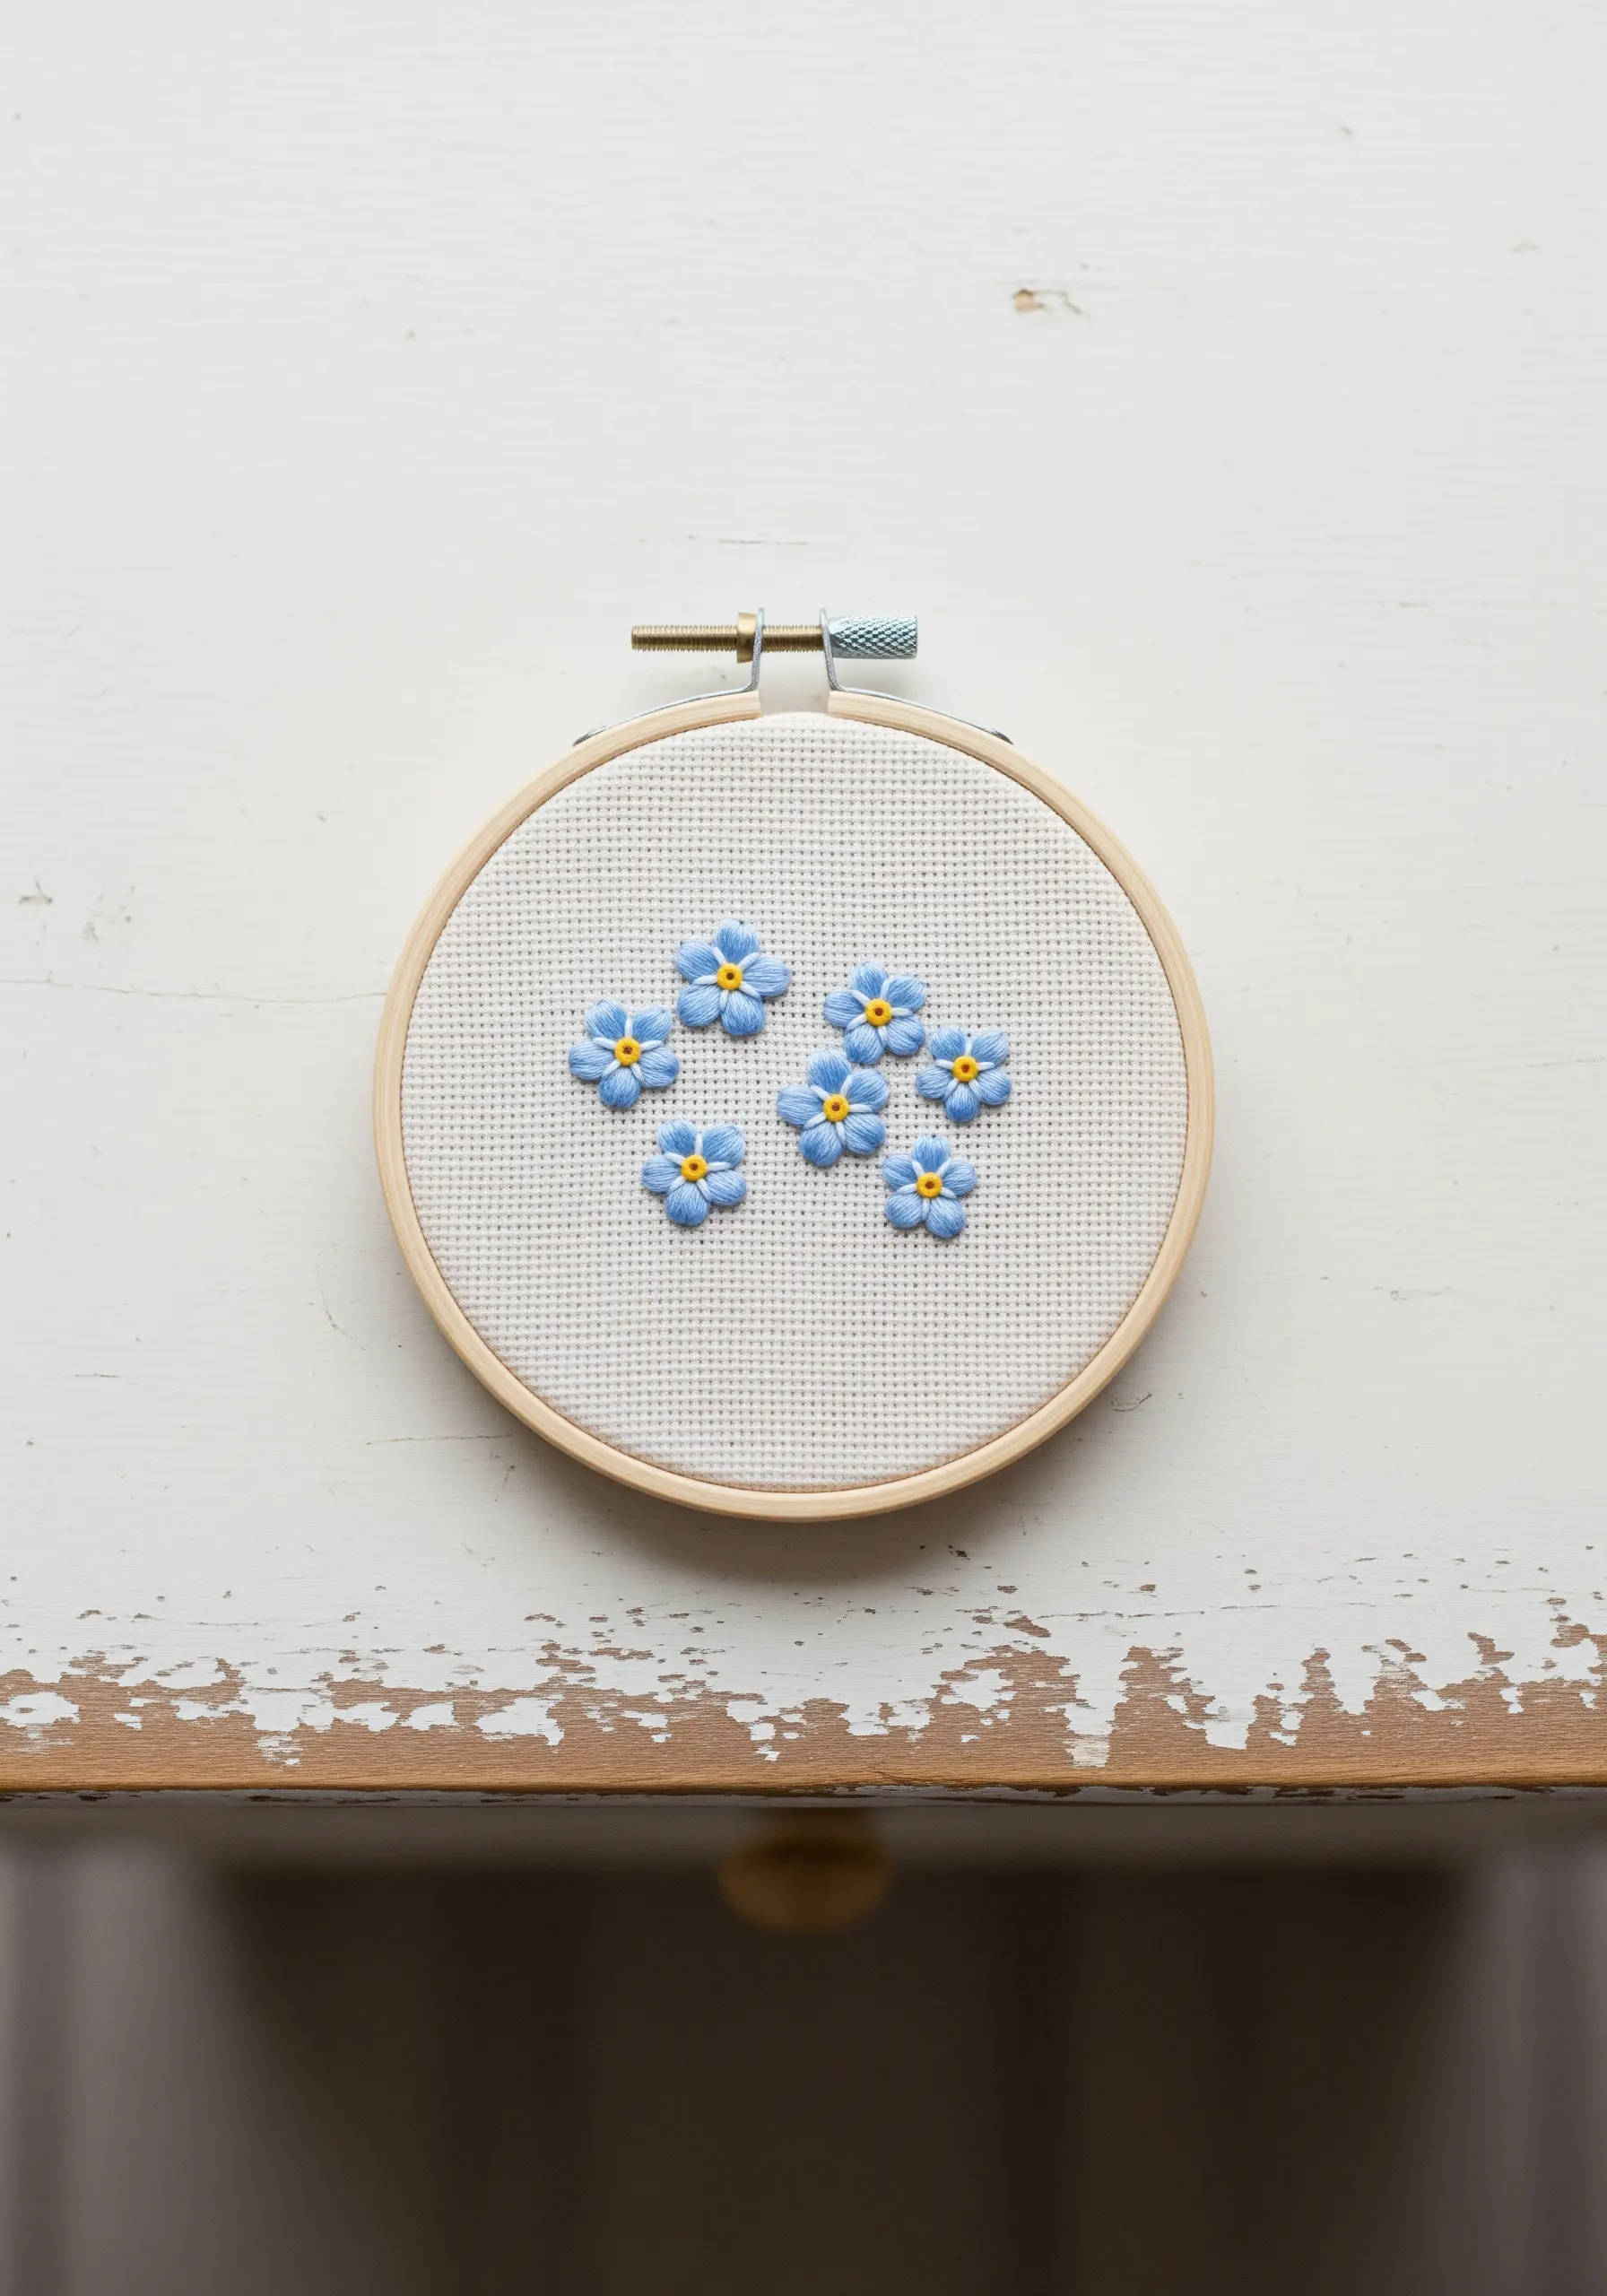
For these delicate forget-me-nots, the lazy daisy stitch is your essential tool.
Focus on keeping the tension of each loop identical to ensure every petal has the same rounded shape, creating a clean and cohesive flower head.
Anchor the composition with a single, bright yellow French knot in the center of each bloom—this contrast is what makes the blue pop.
By scattering the flowers asymmetrically, you give the piece a gentle, organic movement that feels more natural than a rigid pattern.
These are perfect tiny hoop embroidery projects for practicing stitch consistency.
3. Create Weightless Motion with Straight Stitches
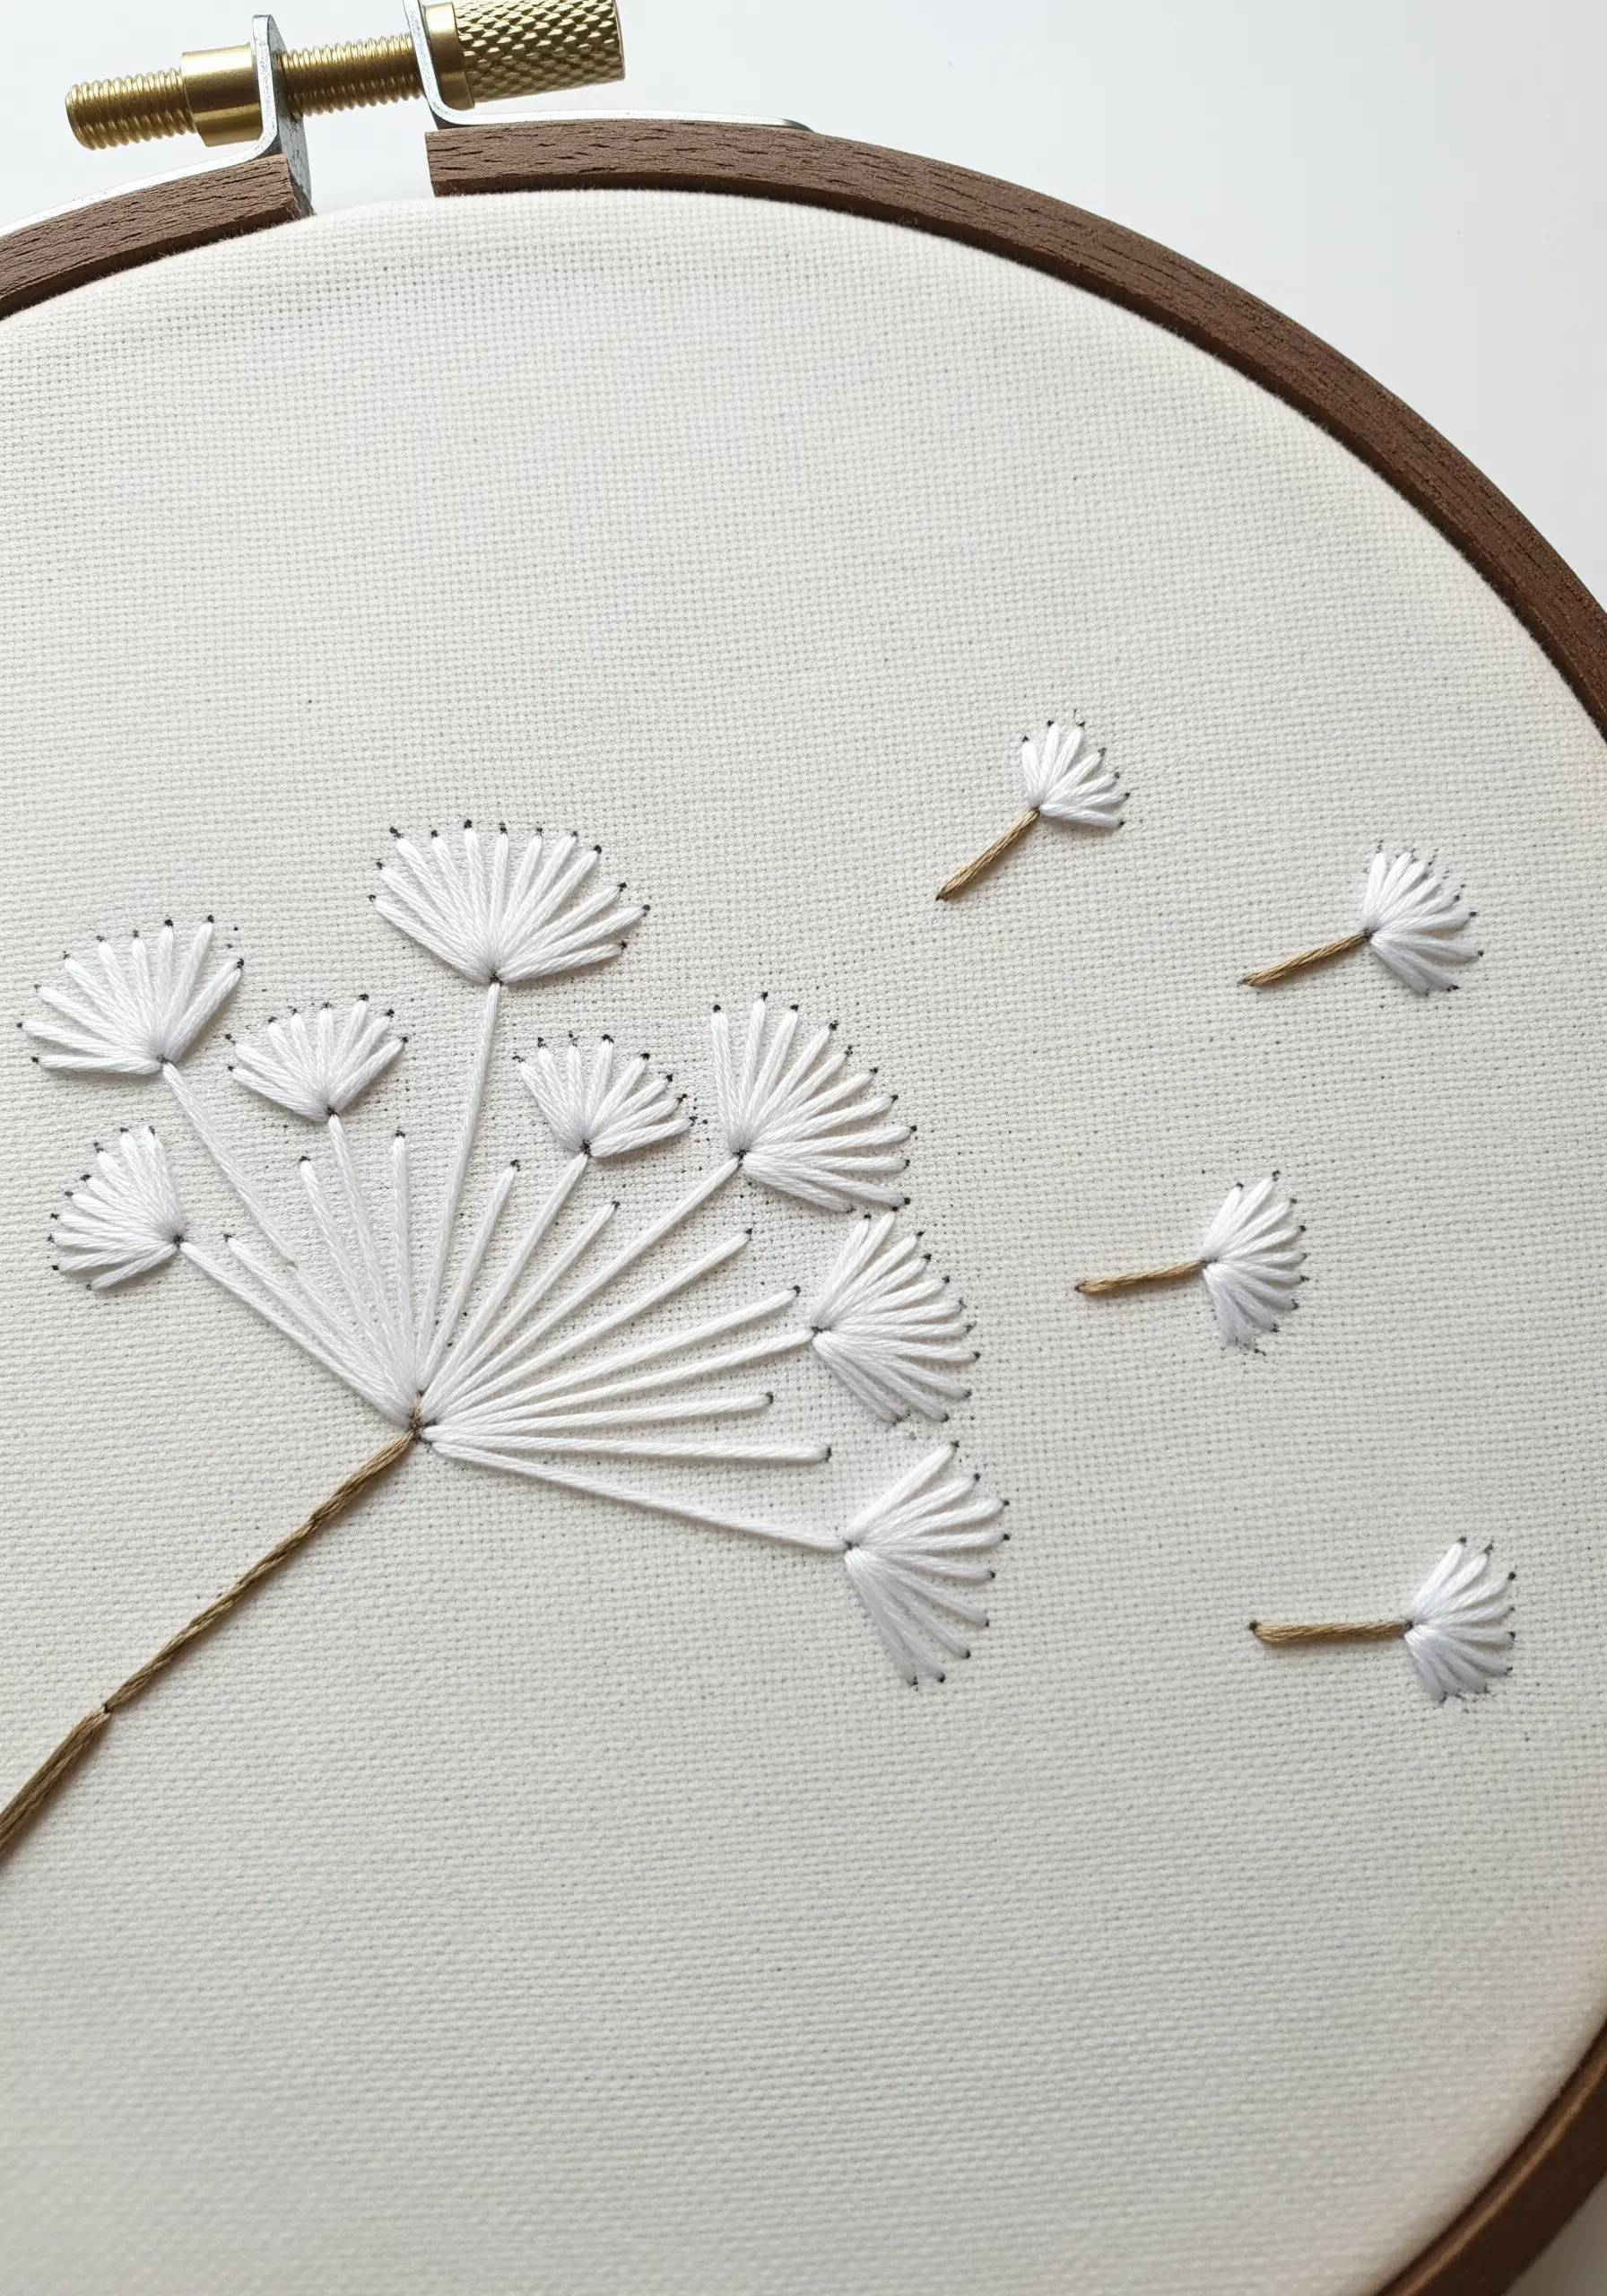
Capture the ethereal quality of a dandelion by mastering the straight stitch.
Use a fan-like arrangement of single stitches for each parachute, converging at a single point to create the delicate floret.
For the seeds floating away, use only a single strand of floss to achieve a barely-there, weightless effect.
The contrast between the fine white threads and the slightly thicker, earthy brown stem is what gives this design its visual poetry, perfect for minimalist embroidery wall art.
4. Elevate Petals with a Satin Stitch Foundation
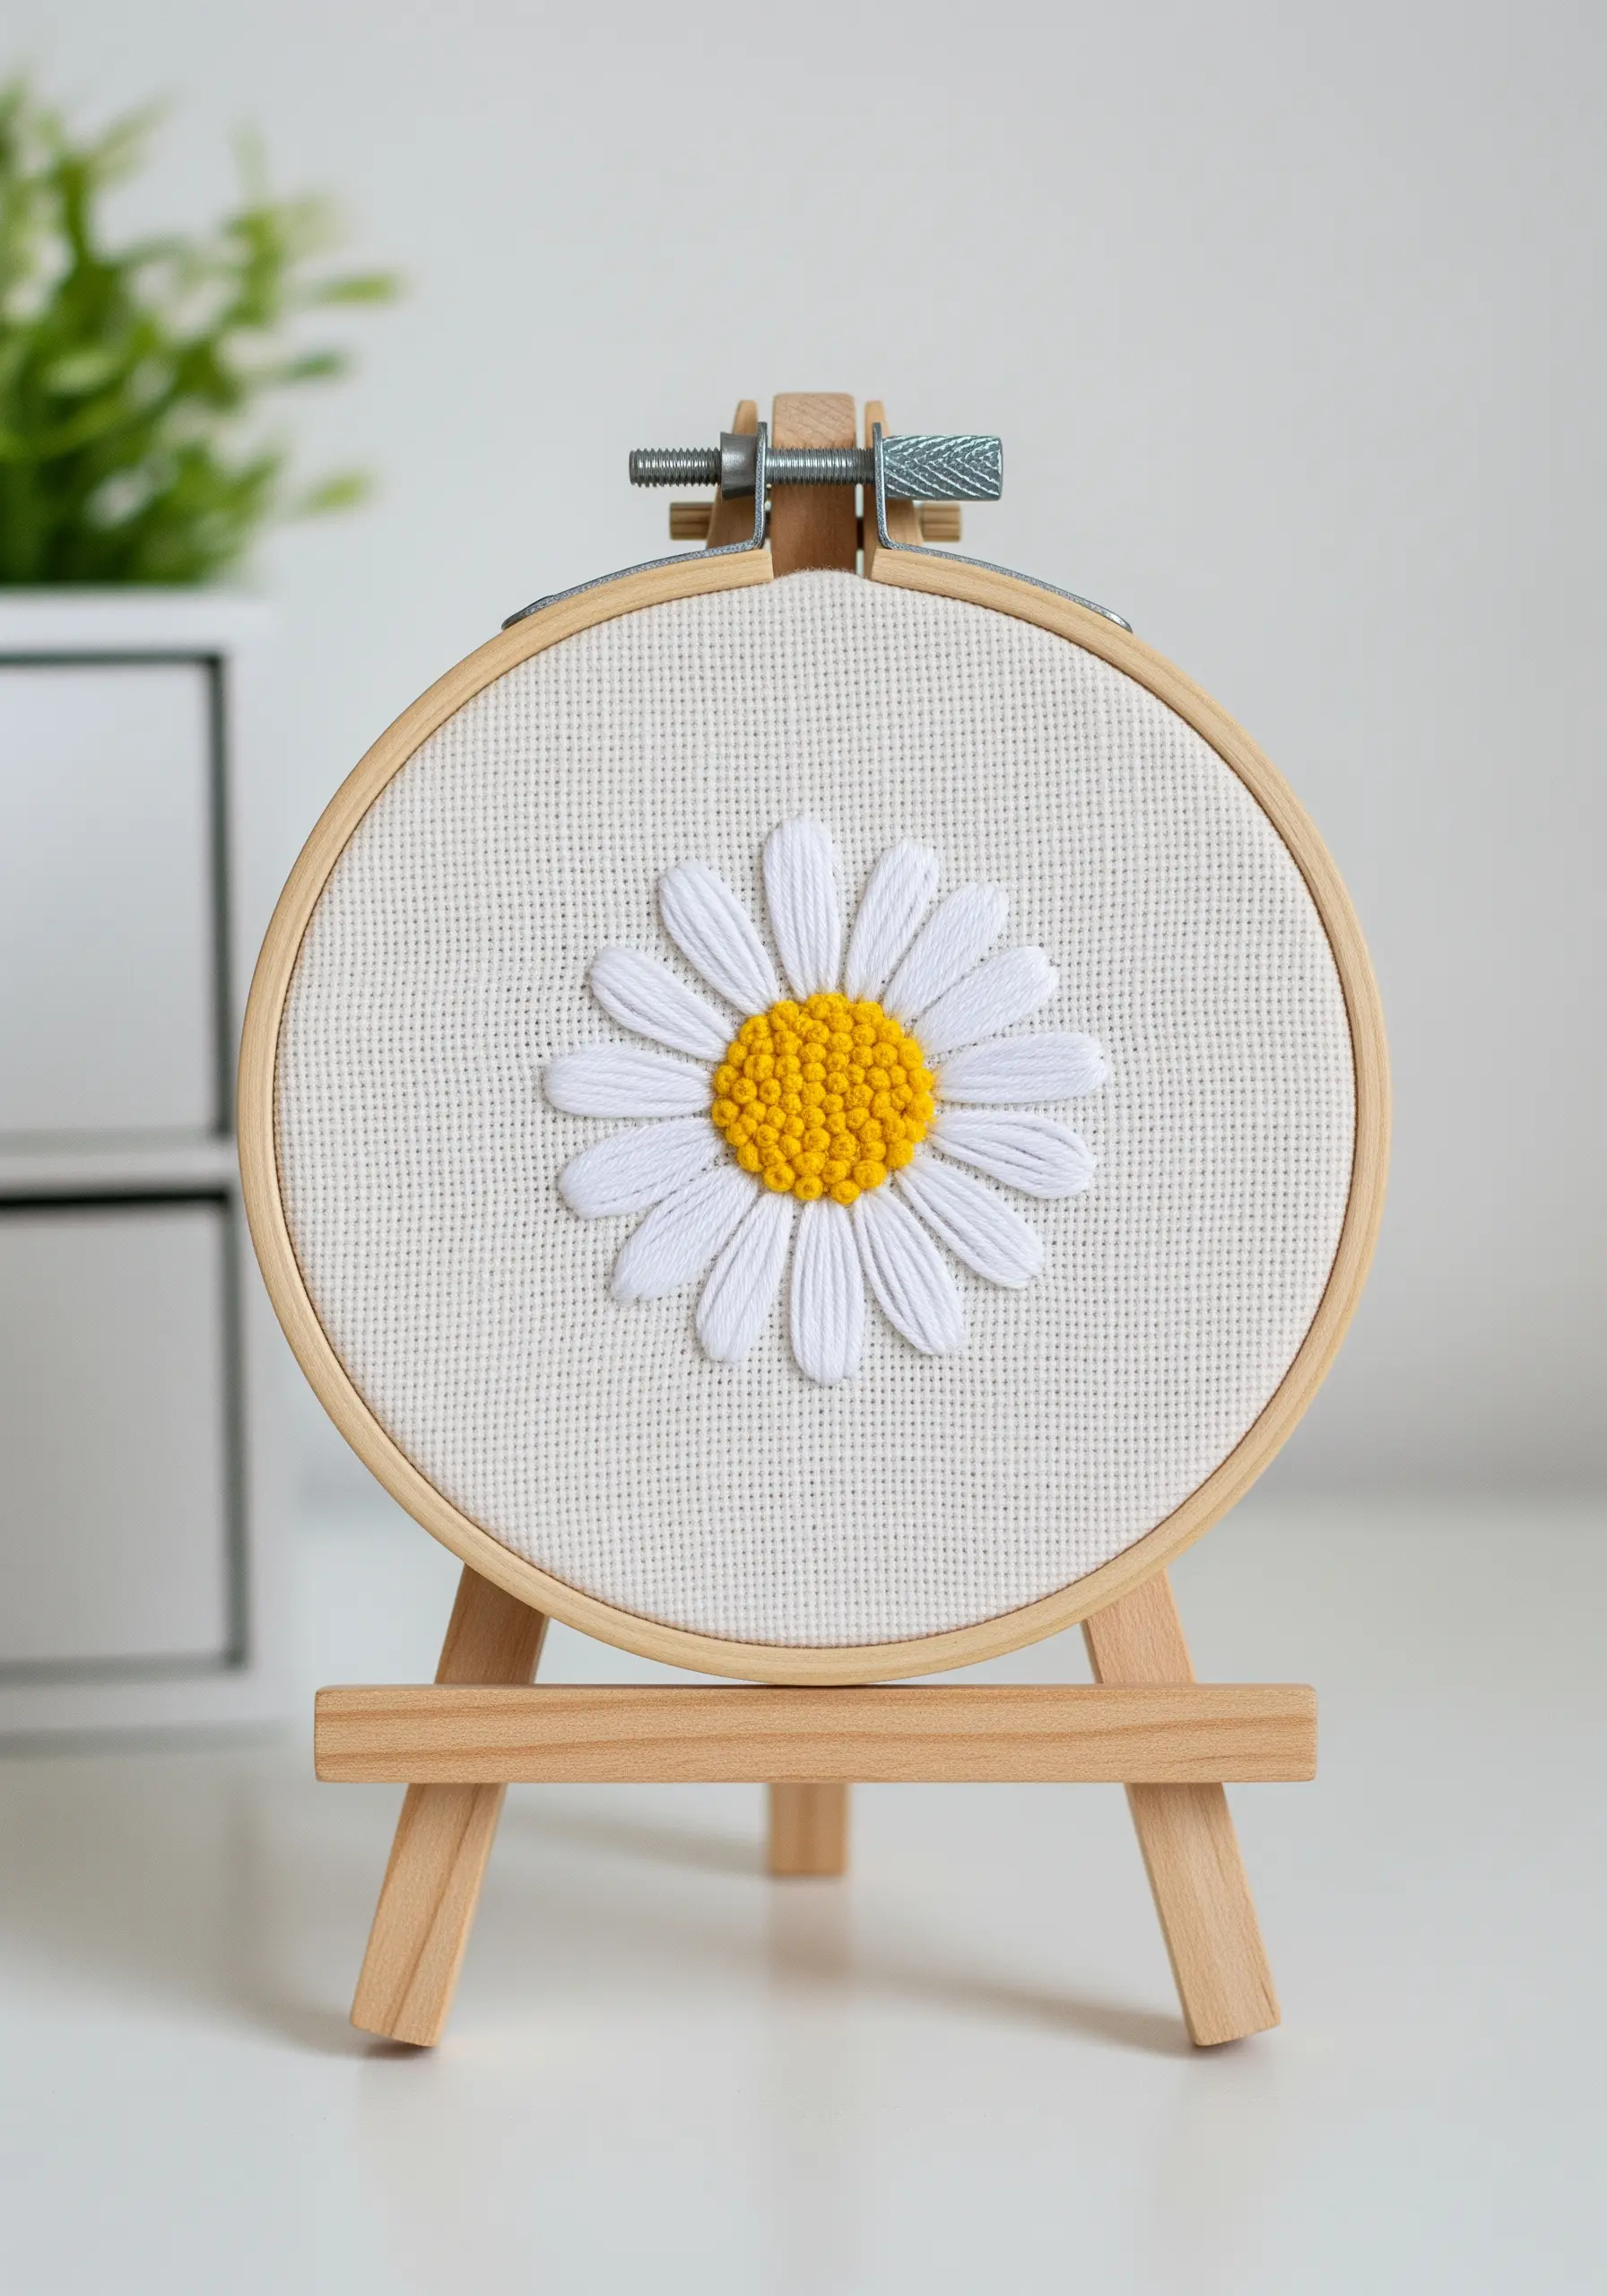
To achieve perfectly smooth, opaque daisy petals, first outline each one with a split stitch using the same color thread.
Fill in the shape with a satin stitch, using the outline as a raised guide. This simple preparation prevents gaps and creates a clean, defined edge.
For the center, fill the circle with tightly packed French knots in a vibrant yellow, which adds a beautiful textural contrast to the flat petals.
This technique ensures your satin stitches look professional and intentional, giving the flower a satisfying, almost three-dimensional quality.
5. Blend Color Gradients for a Realistic Rose
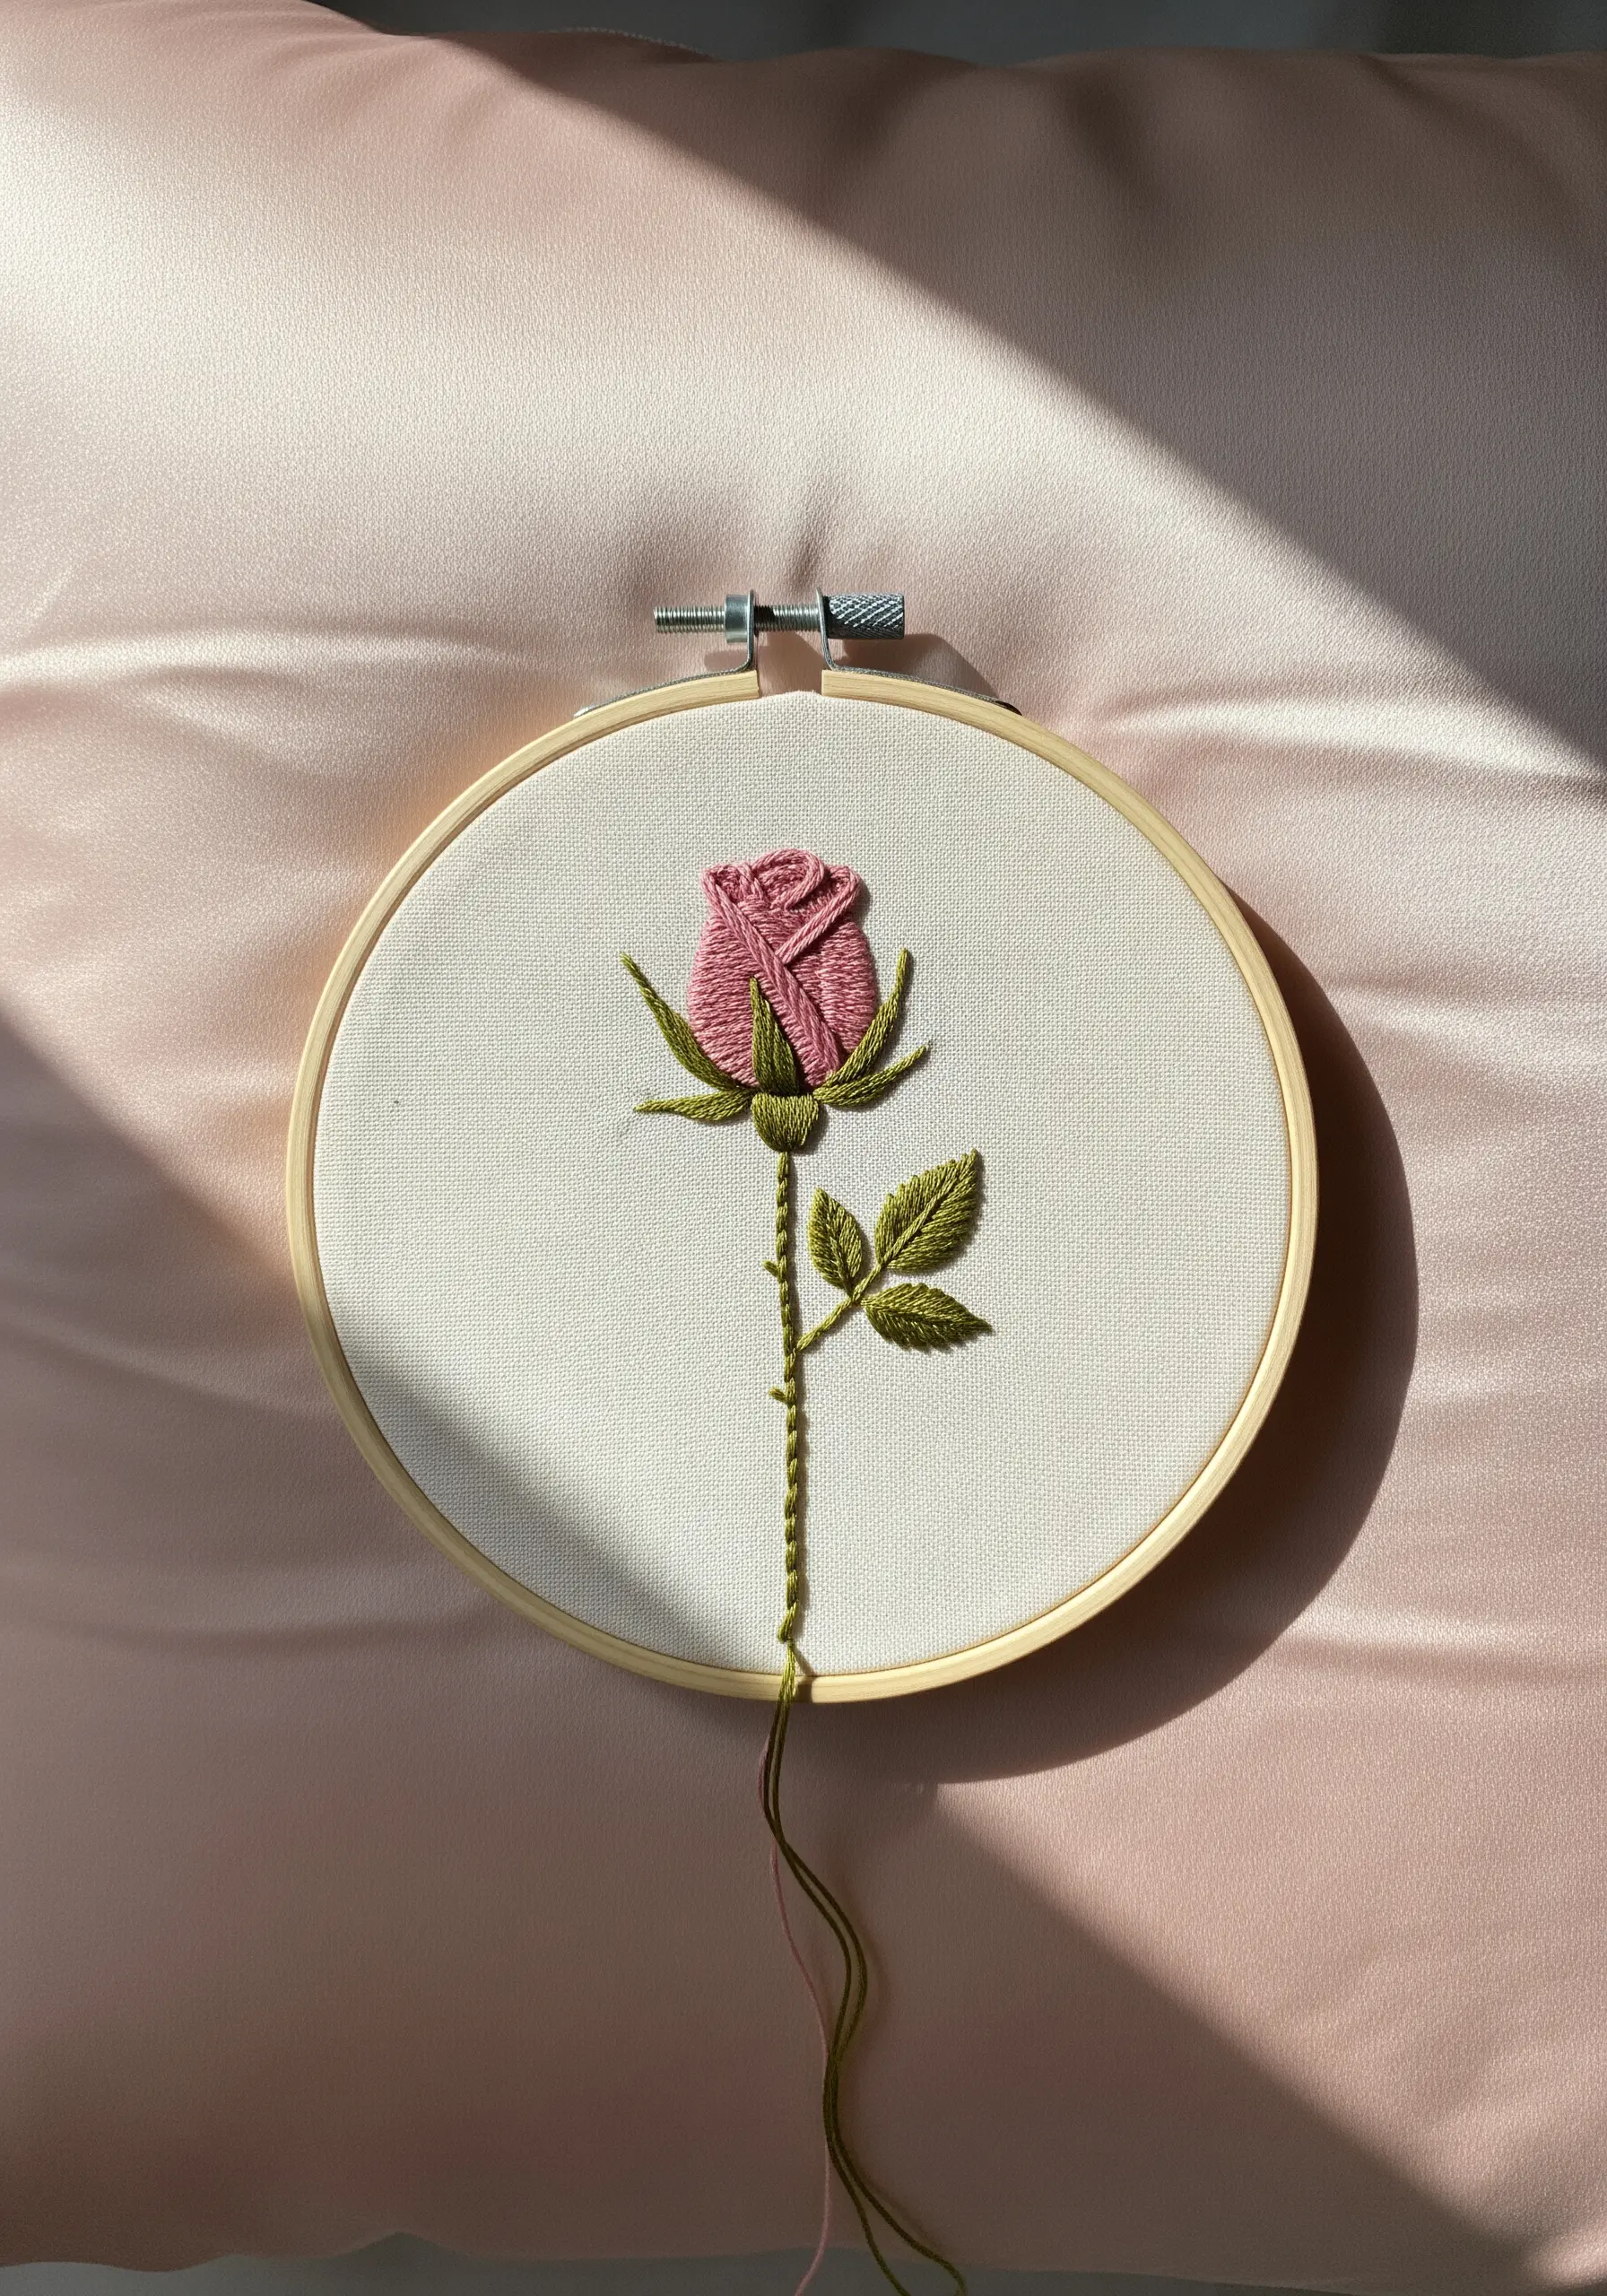
Bring a single rose to life using the long-and-short stitch to blend three or more shades of pink.
Start with the darkest shade at the base of each petal and in the deepest folds, then gradually introduce lighter threads as you stitch outwards.
Ensure your stitches follow the natural curve and direction of the petals—this is the key to creating realistic form and shadow.
This is one of the foundational floral thread painting techniques that transforms simple florals into works of art.
6. Use Radiating Stitches for Symmetrical Daisies
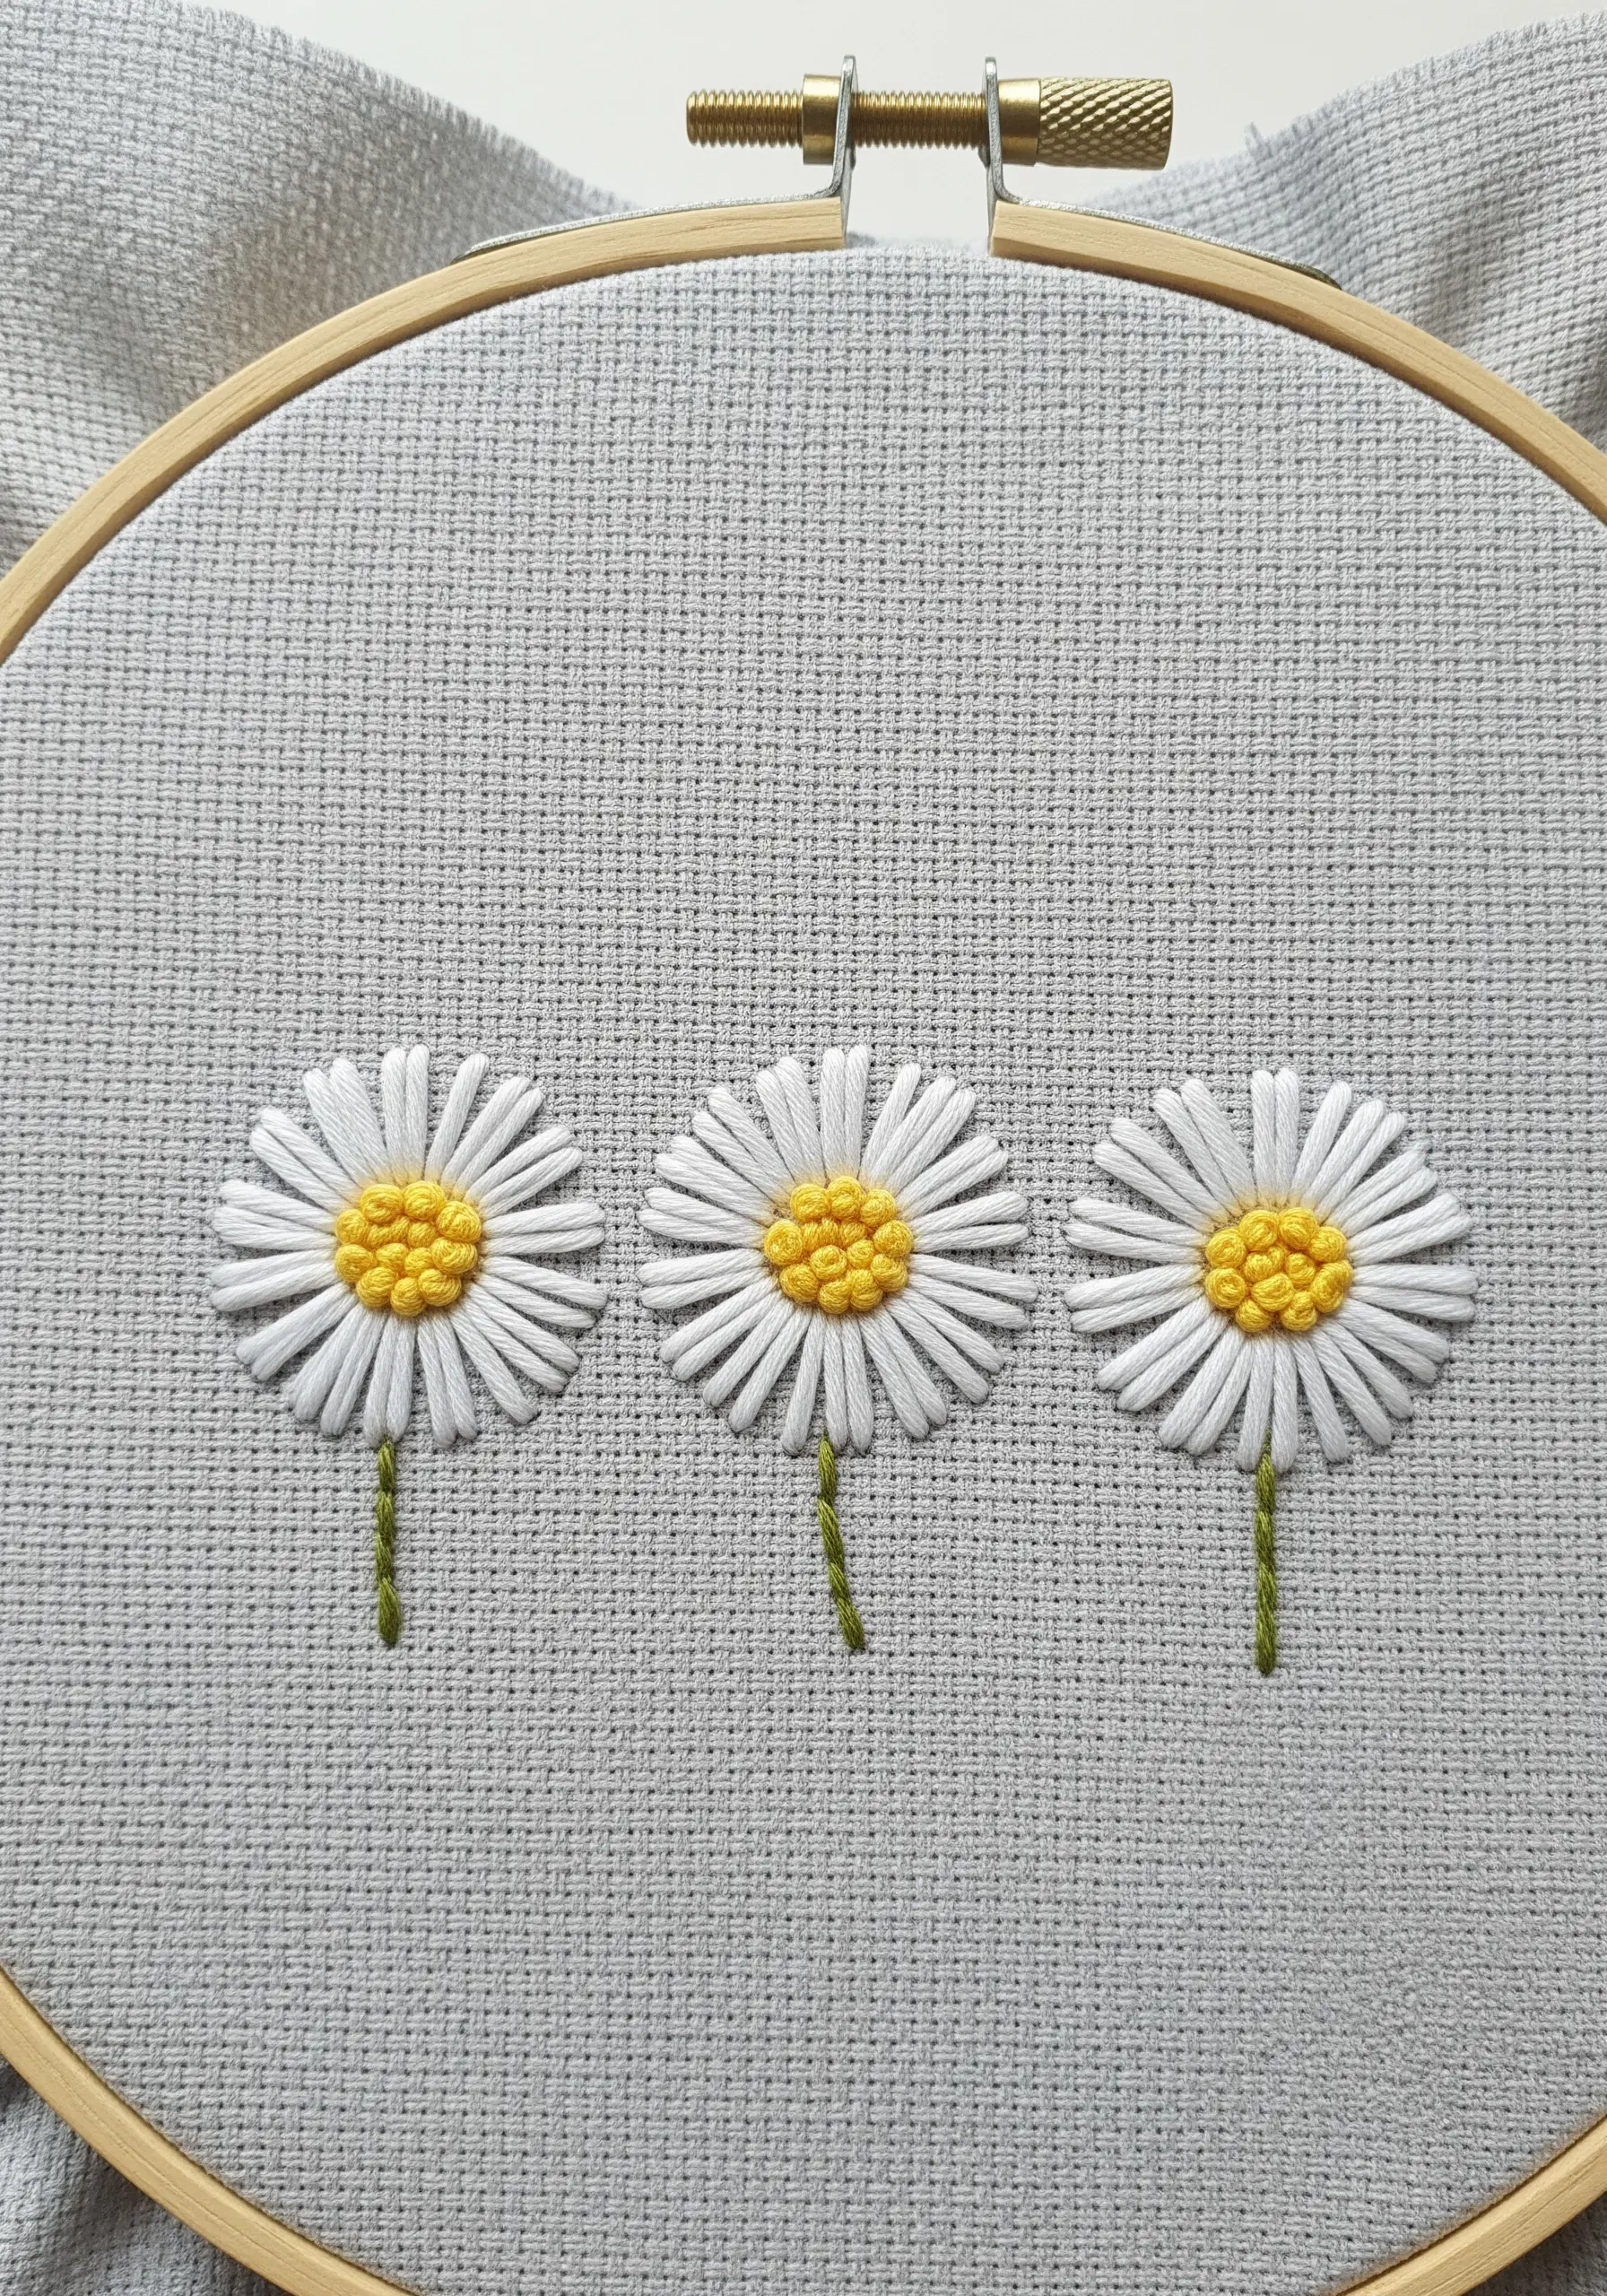
For a clean, graphic daisy, use a detached chain stitch (or lazy daisy) for each petal, pulling them taut to create a straighter, more pointed shape than usual.
Work from an imaginary central point to ensure all petals radiate evenly, giving the flower a satisfying symmetry.
A cluster of French knots in the center not only adds texture but also cleverly hides the convergence point of all your stitches.
Stitching on Aida cloth, as shown here, provides a natural grid to help guide your petal placement for perfect alignment.
The cheerful look is similar to that of sunflower-inspired embroidery crafts.
7. Outline and Fill for Soft Eucalyptus Leaves
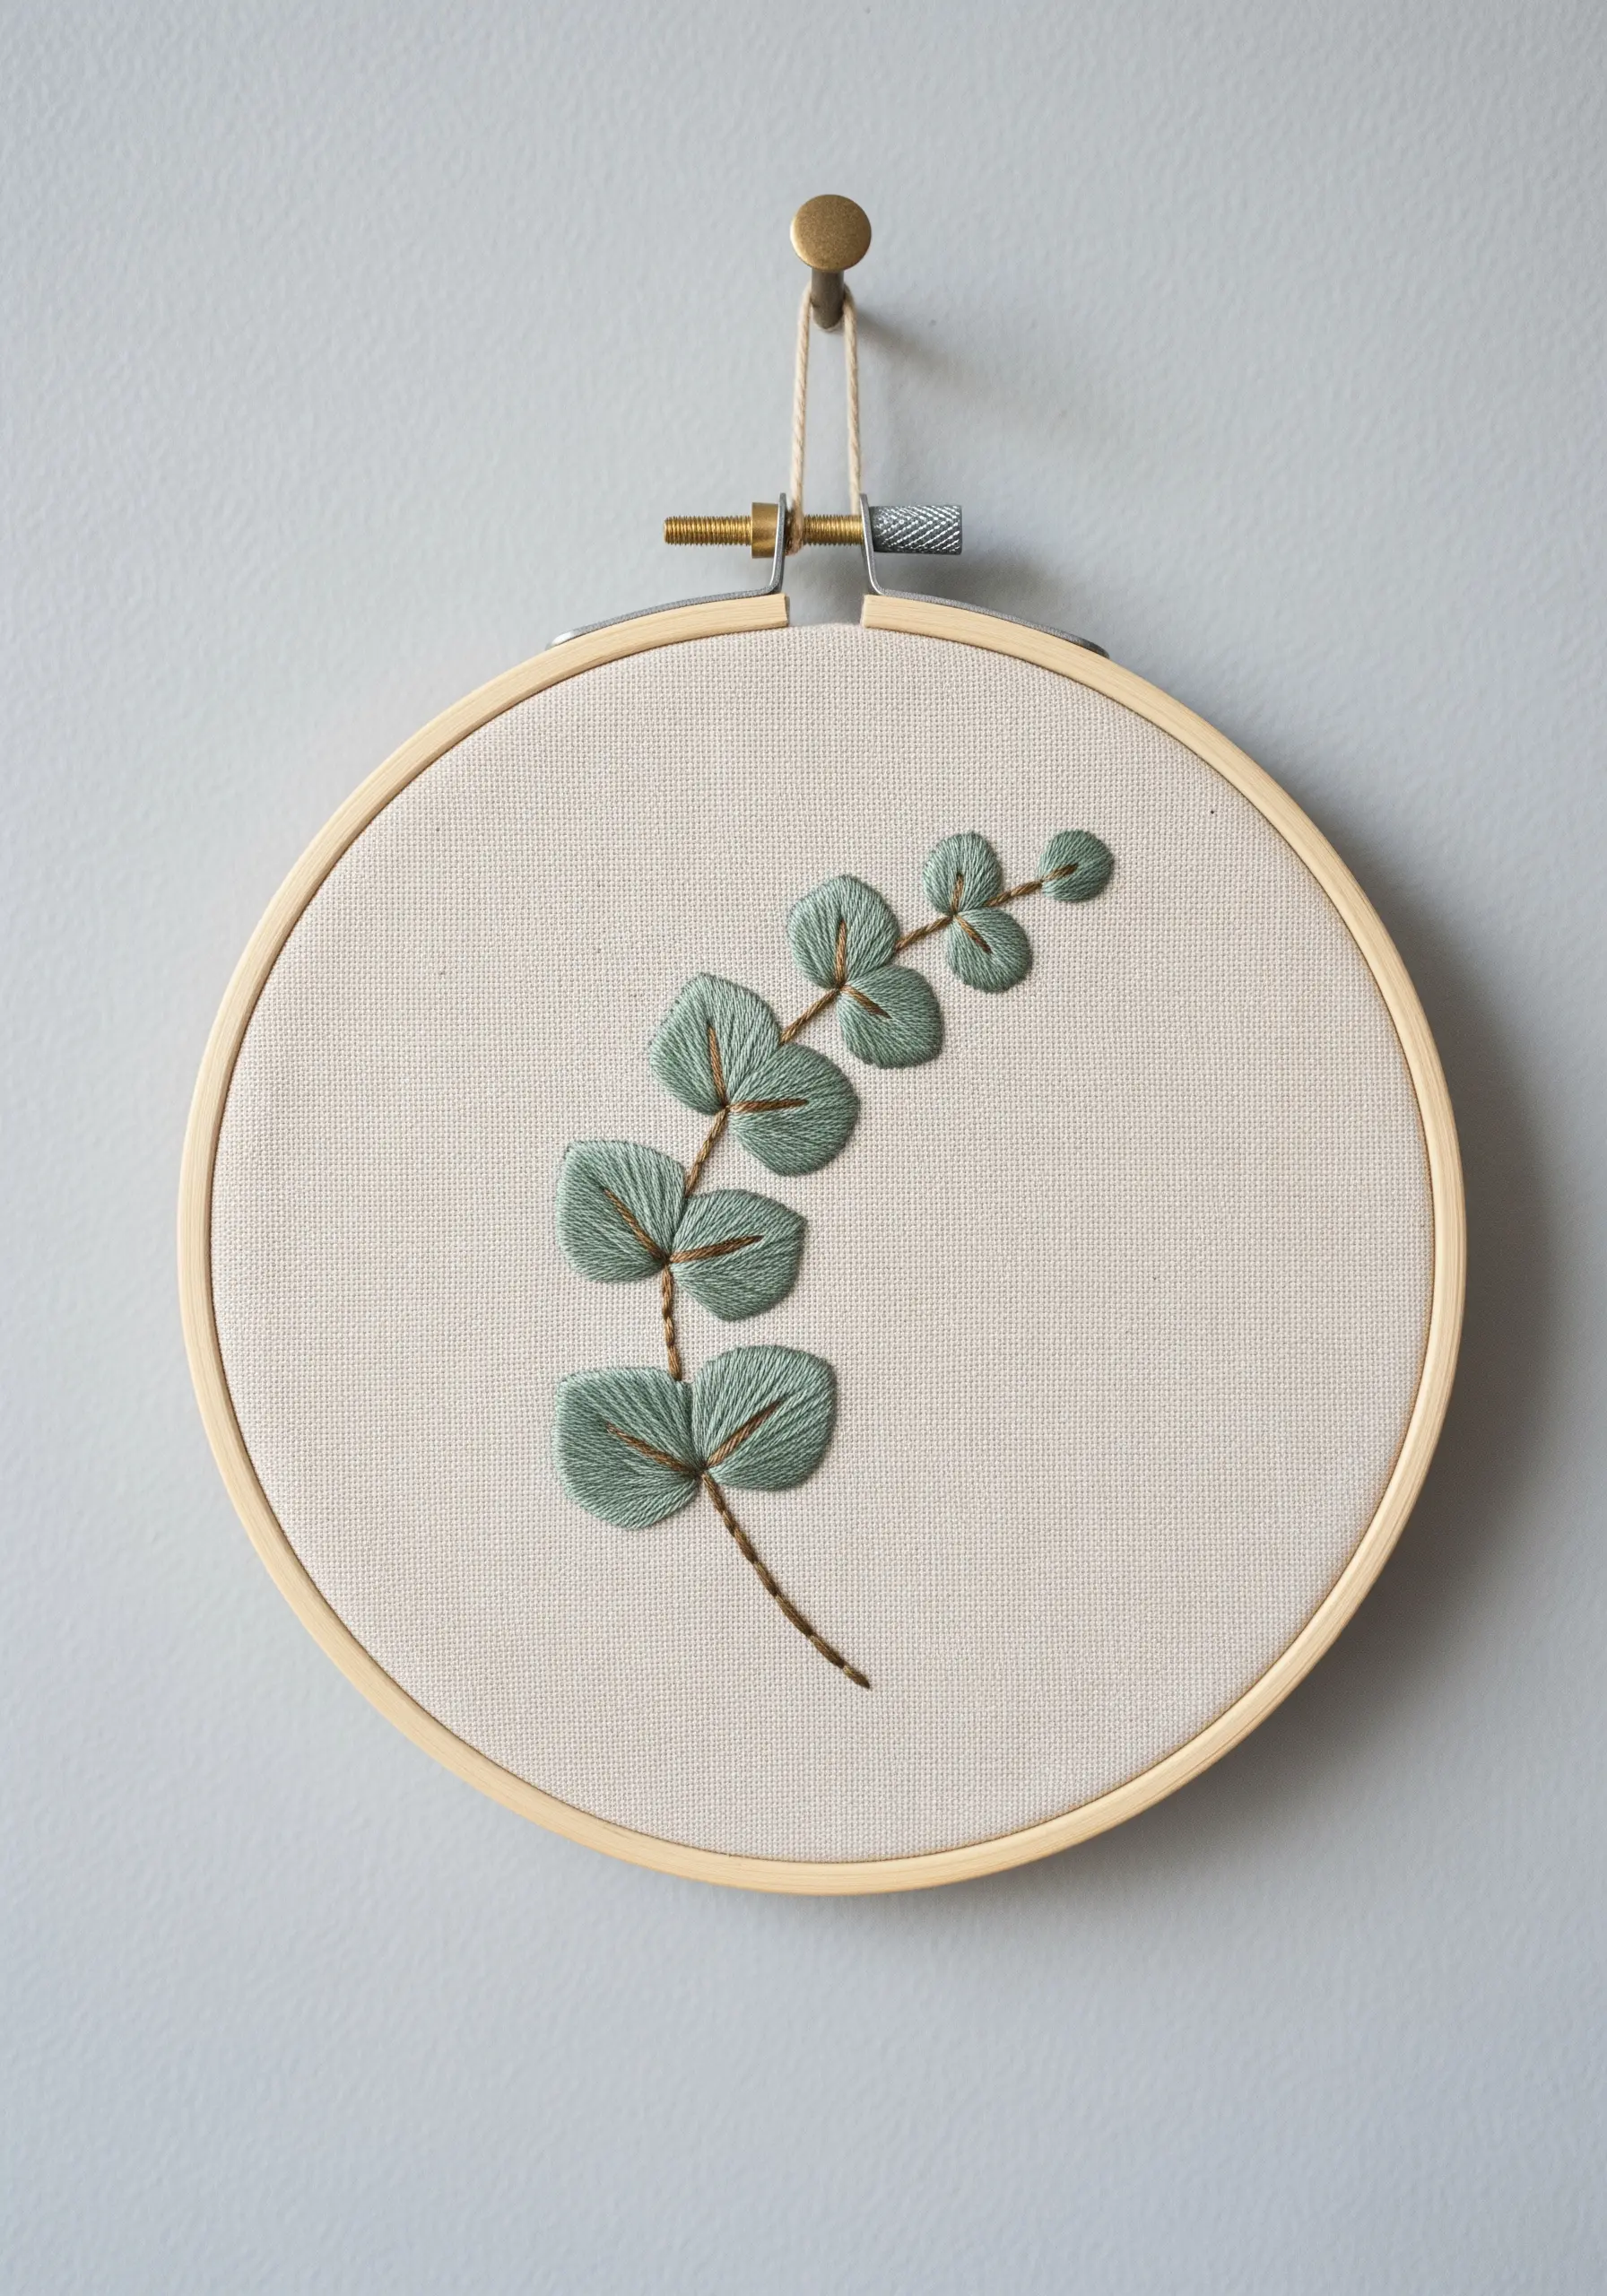
Create the soft, matte look of eucalyptus by first outlining each leaf with a backstitch or stem stitch in a slightly darker green.
Fill the shape with a satin stitch using a lighter, sage-colored thread, keeping your stitches parallel and angled slightly for a natural look.
This two-step process defines the shape clearly while adding a subtle, sophisticated dimension.
It’s one of the most effective leaf embroidery stitches for capturing botanical forms with elegance.
8. Build Dimension with Layered Blossoms

Give a cherry blossom branch a sense of depth by layering your stitches and colors.
Use lazy daisy stitches for the petals, but vary the shades of pink—from near-white to a soft rose—to suggest flowers at different stages of bloom.
Place some French knots partially behind the petals to hint at buds or stamens, creating a fuller, more complex composition.
Stitching on a soft pink fabric enhances the romantic mood and makes the white and deep pink threads stand out beautifully, making it one of the loveliest soft pastel embroidery ideas.
9. Capture Organic Growth with Variegated Greens
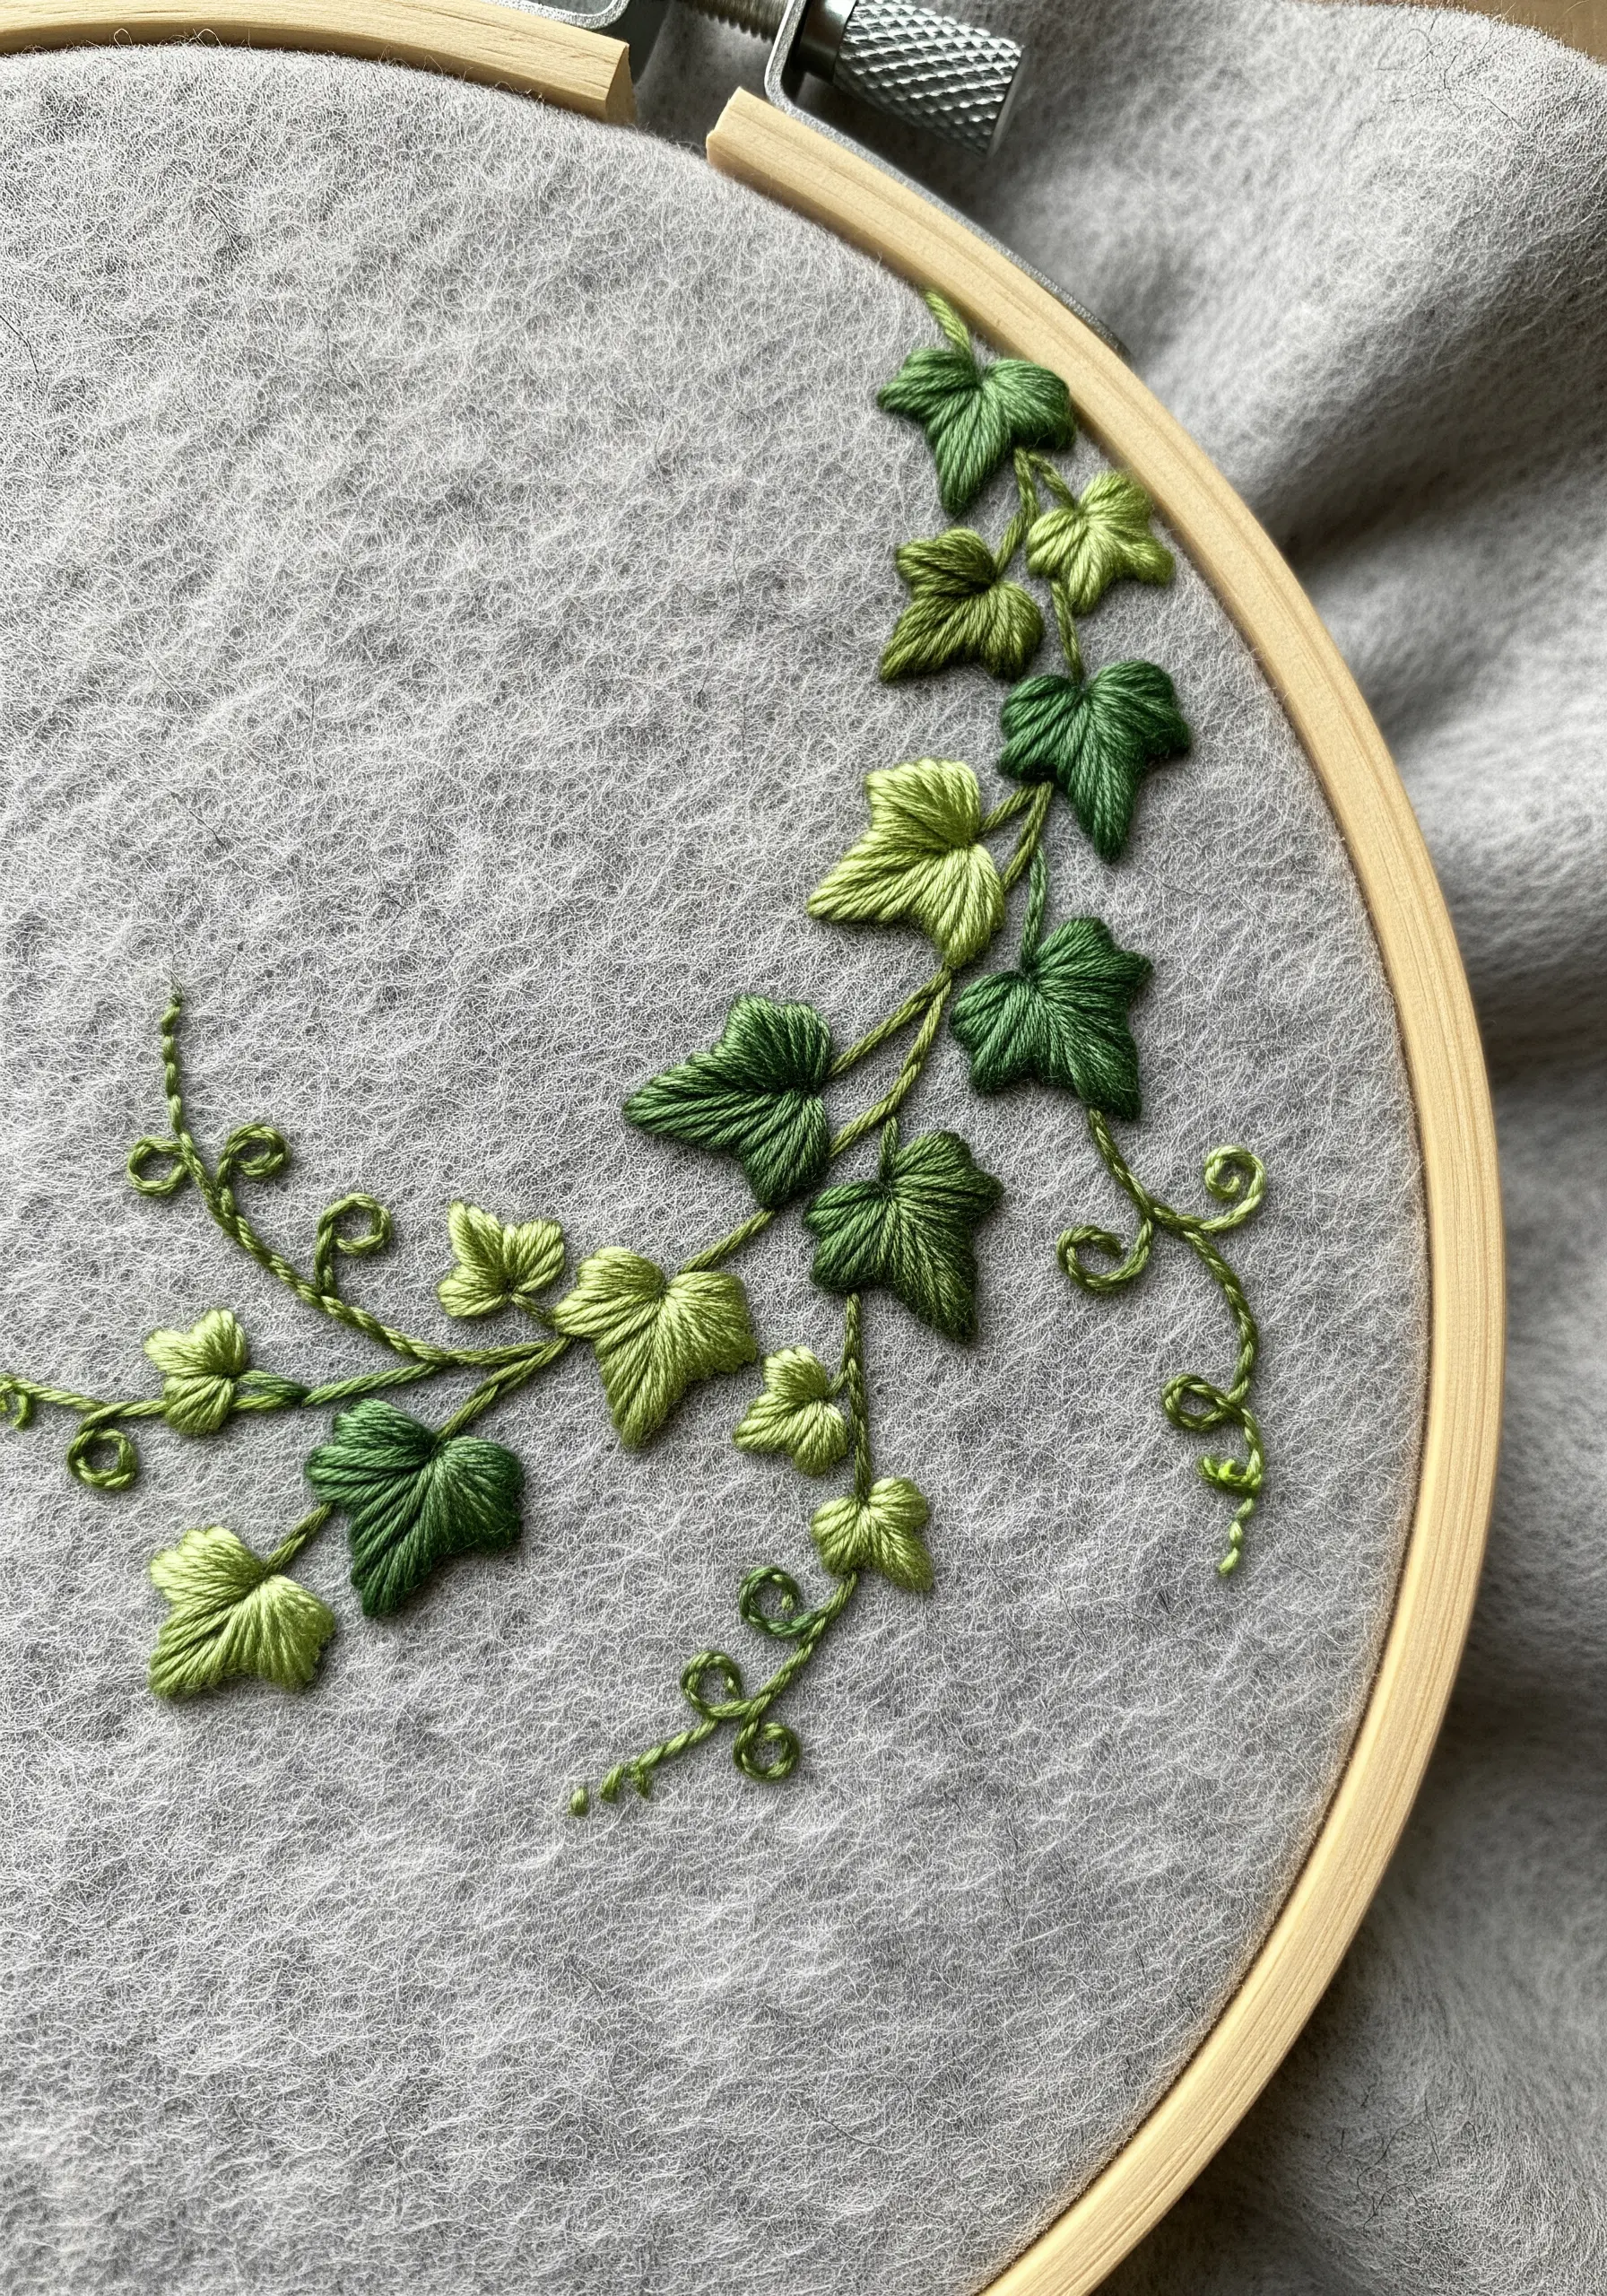
To embroider realistic ivy, use at least three distinct shades of green to represent new and mature leaves.
Use a fishbone stitch for the larger leaves to create a defined central vein and natural texture.
For the smaller, newer leaves, a simple satin stitch in a brighter, lime green suggests fresh growth.
Incorporate delicate, curling tendrils using a whipped backstitch to give them a rounded, dimensional quality that makes the vine feel alive.
This is how you master ways to embroider realistic shadows under leaves for depth.
10. Craft Delicate Bell Flowers with French Knots
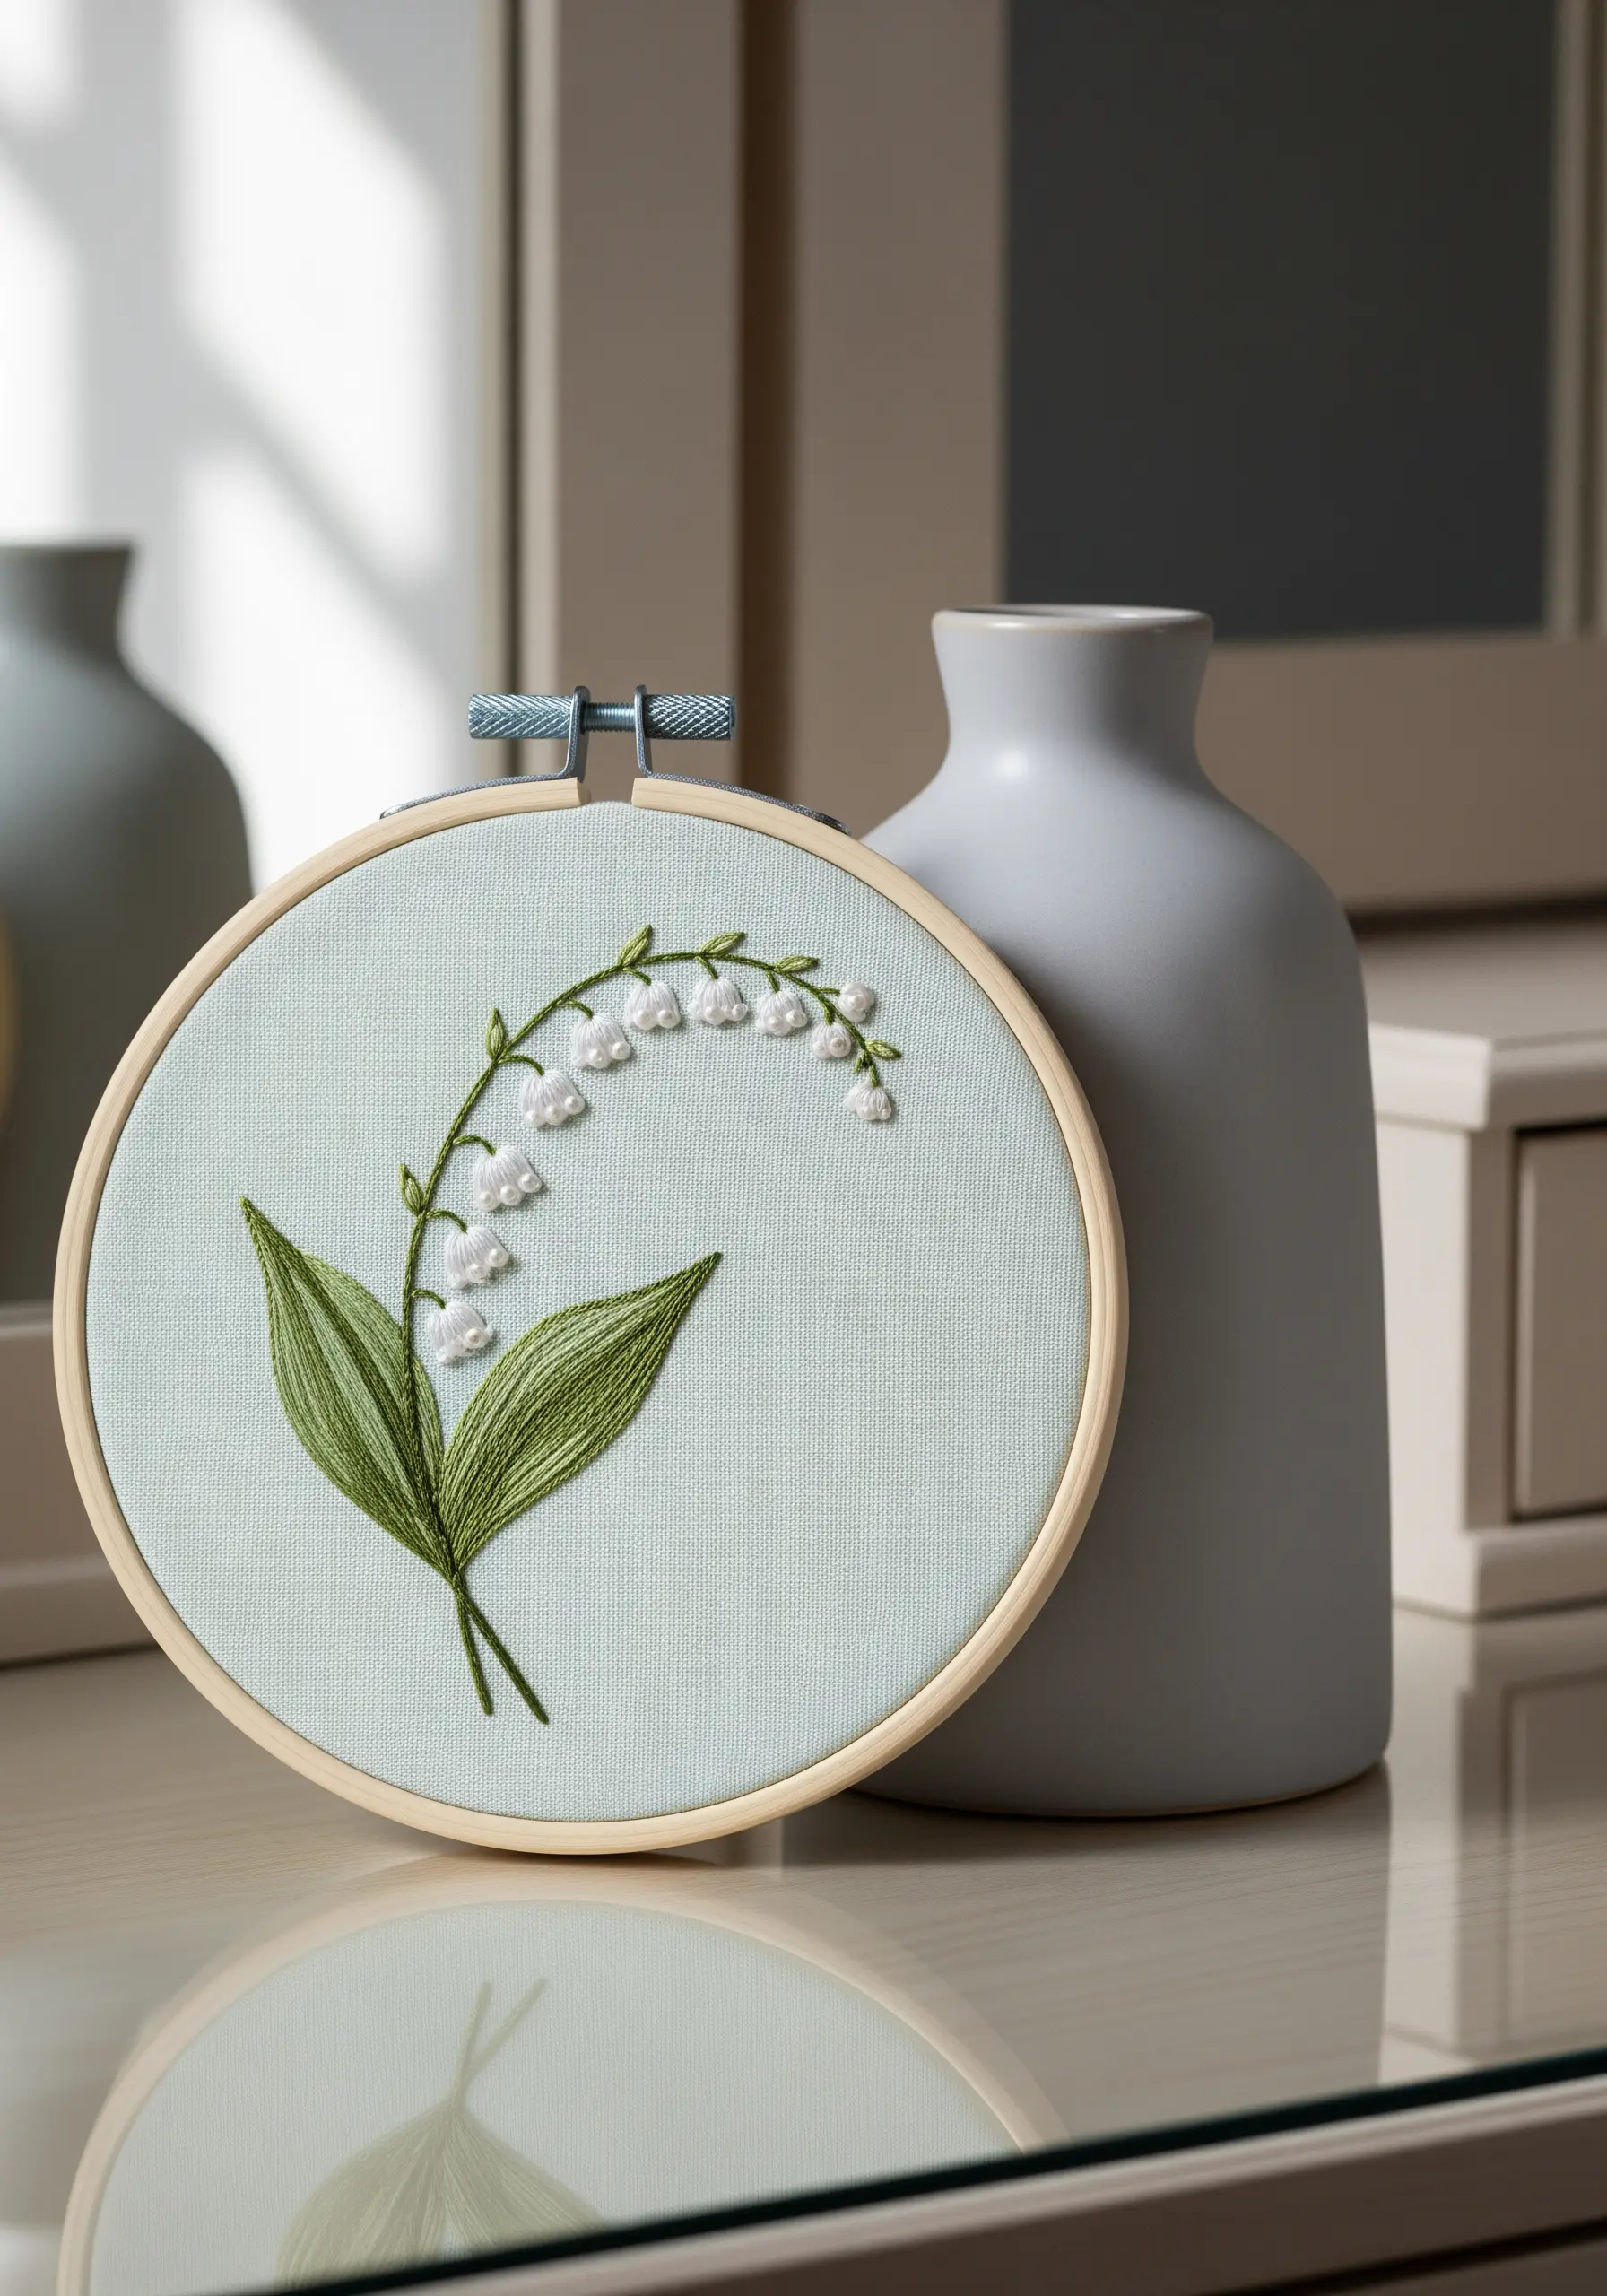
For the tiny, bell-shaped flowers of Lily of the Valley, a single, slightly loose French knot is all you need for each bloom.
Stitch them in a gentle arch, connecting them to the main stem with a tiny straight stitch in green, suggesting their delicate connection.
Contrast the textured knots with smooth, wide satin stitches for the leaves, making sure the stitch direction follows the leaves’ natural veins.
This play on texture—bumpy knots against sleek satin—is what gives the piece its refined elegance.
11. Achieve High Contrast with a Monochromatic Wreath
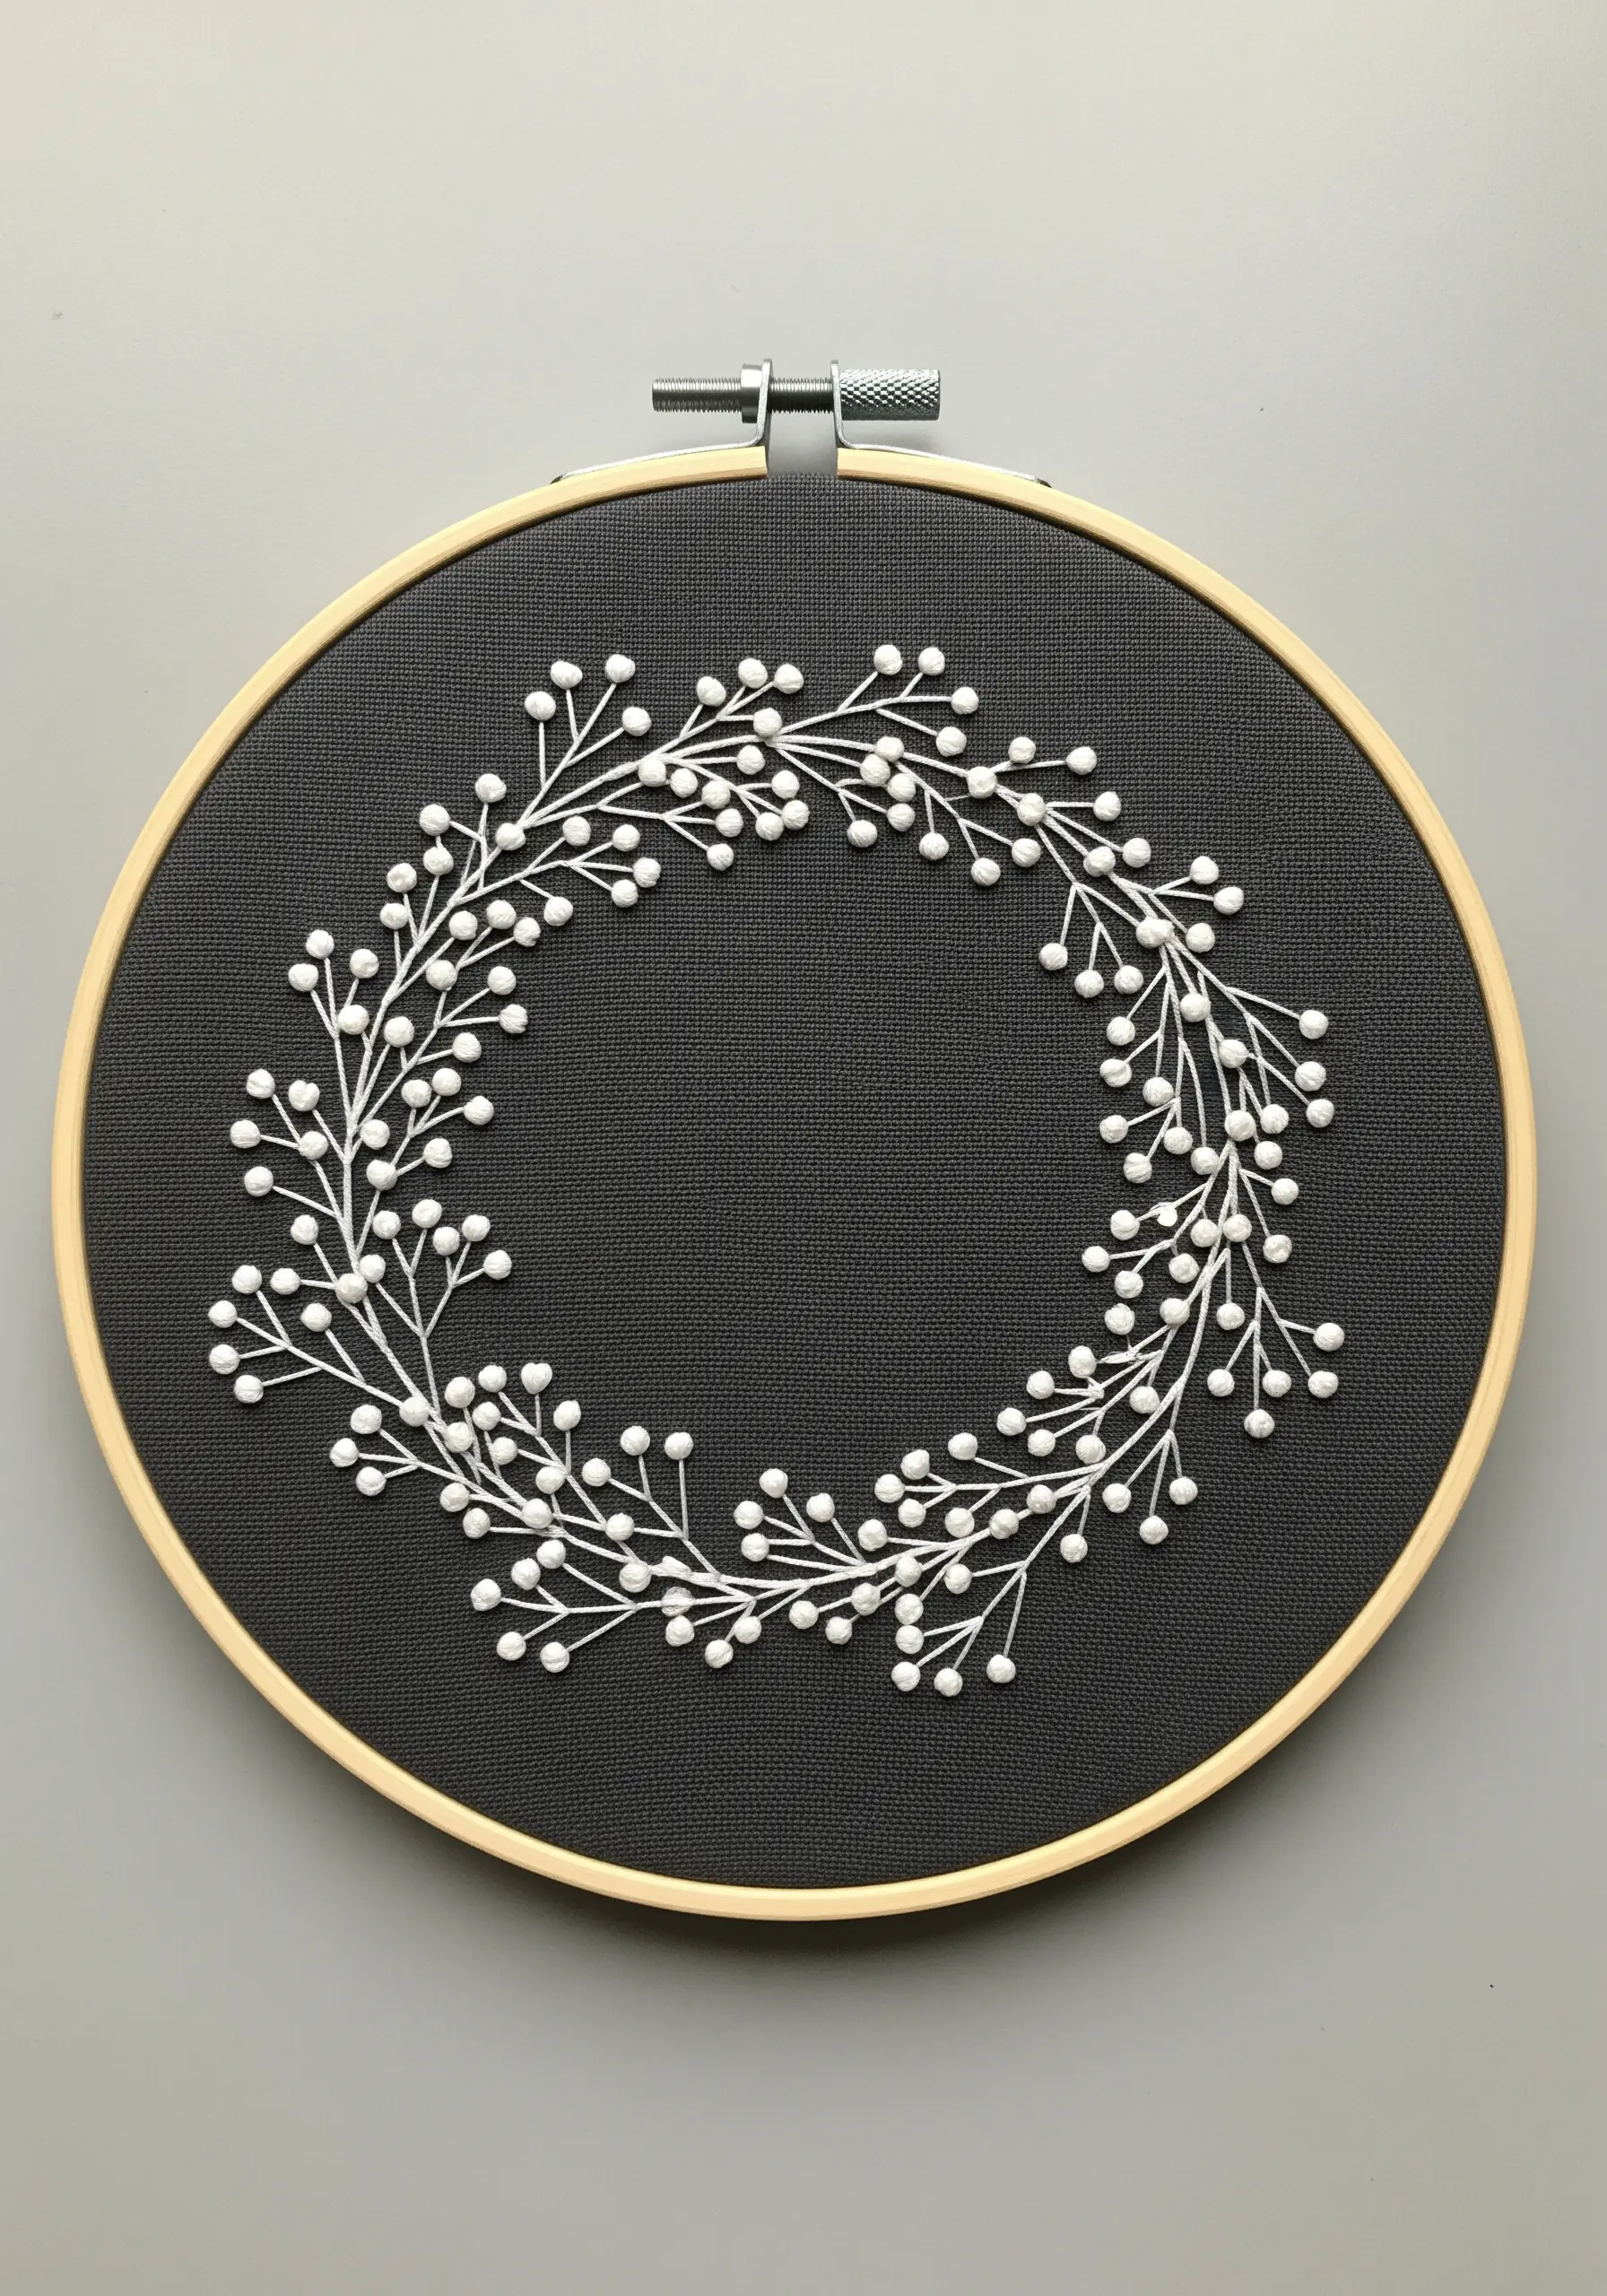
Create a striking baby’s breath wreath by using bright white thread on a dark, matte fabric like black or charcoal linen.
The entire design is built from two simple elements: straight stitches for the delicate branches and French knots for the blossoms.
Vary the size of your French knots slightly to avoid a repetitive, unnatural look.
This high-contrast approach turns a simple stitch combination into a dramatic and sophisticated piece, ideal for wild botanical wreath patterns.
12. Master Petal Blending with Thread Painting
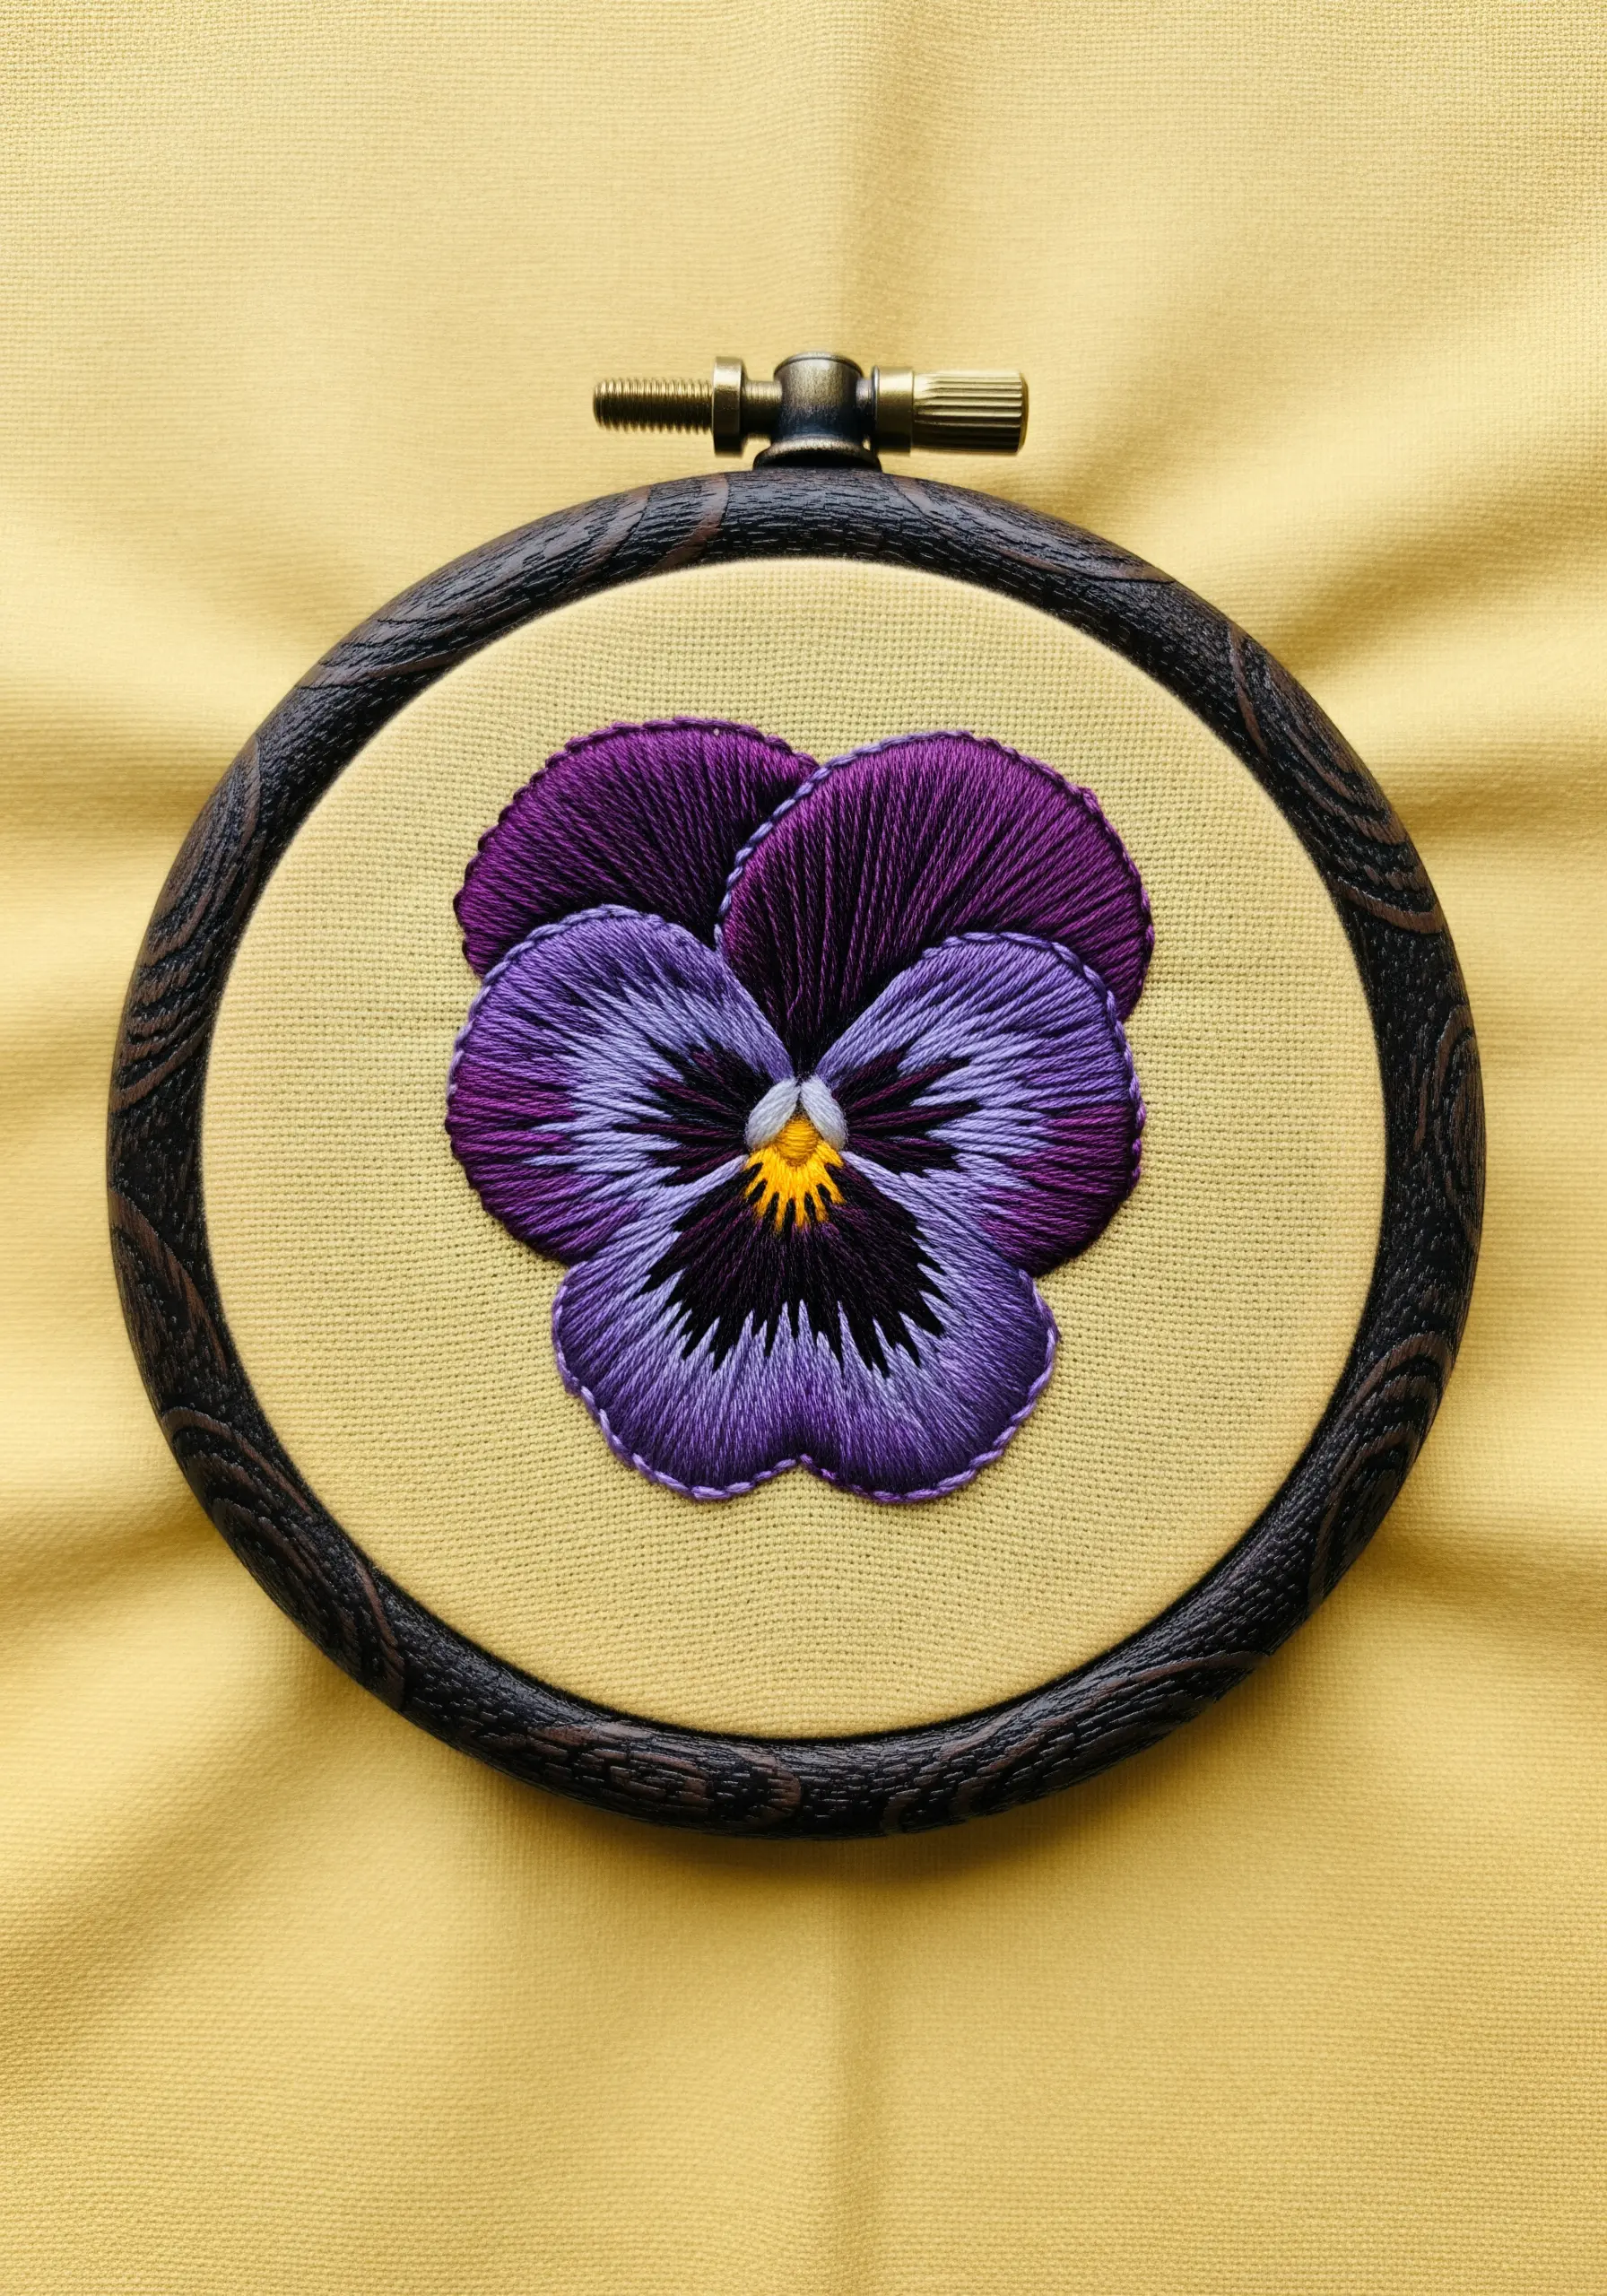
Capture the velvety, multi-toned petals of a pansy by using the long-and-short stitch technique with single strands of floss.
Choose a gradient of at least three purples and a deep blue to create the dark, saturated center, blending them with long, directional stitches.
The key is to make your stitches radiate from the flower’s center, just as they appear in nature.
This meticulous blending is what elevates the motif from a simple flower to a small piece of textile art, showcasing gradient color floral embroidery ideas beautifully.
13. Replicate Heather with Clustered Colonial Knots
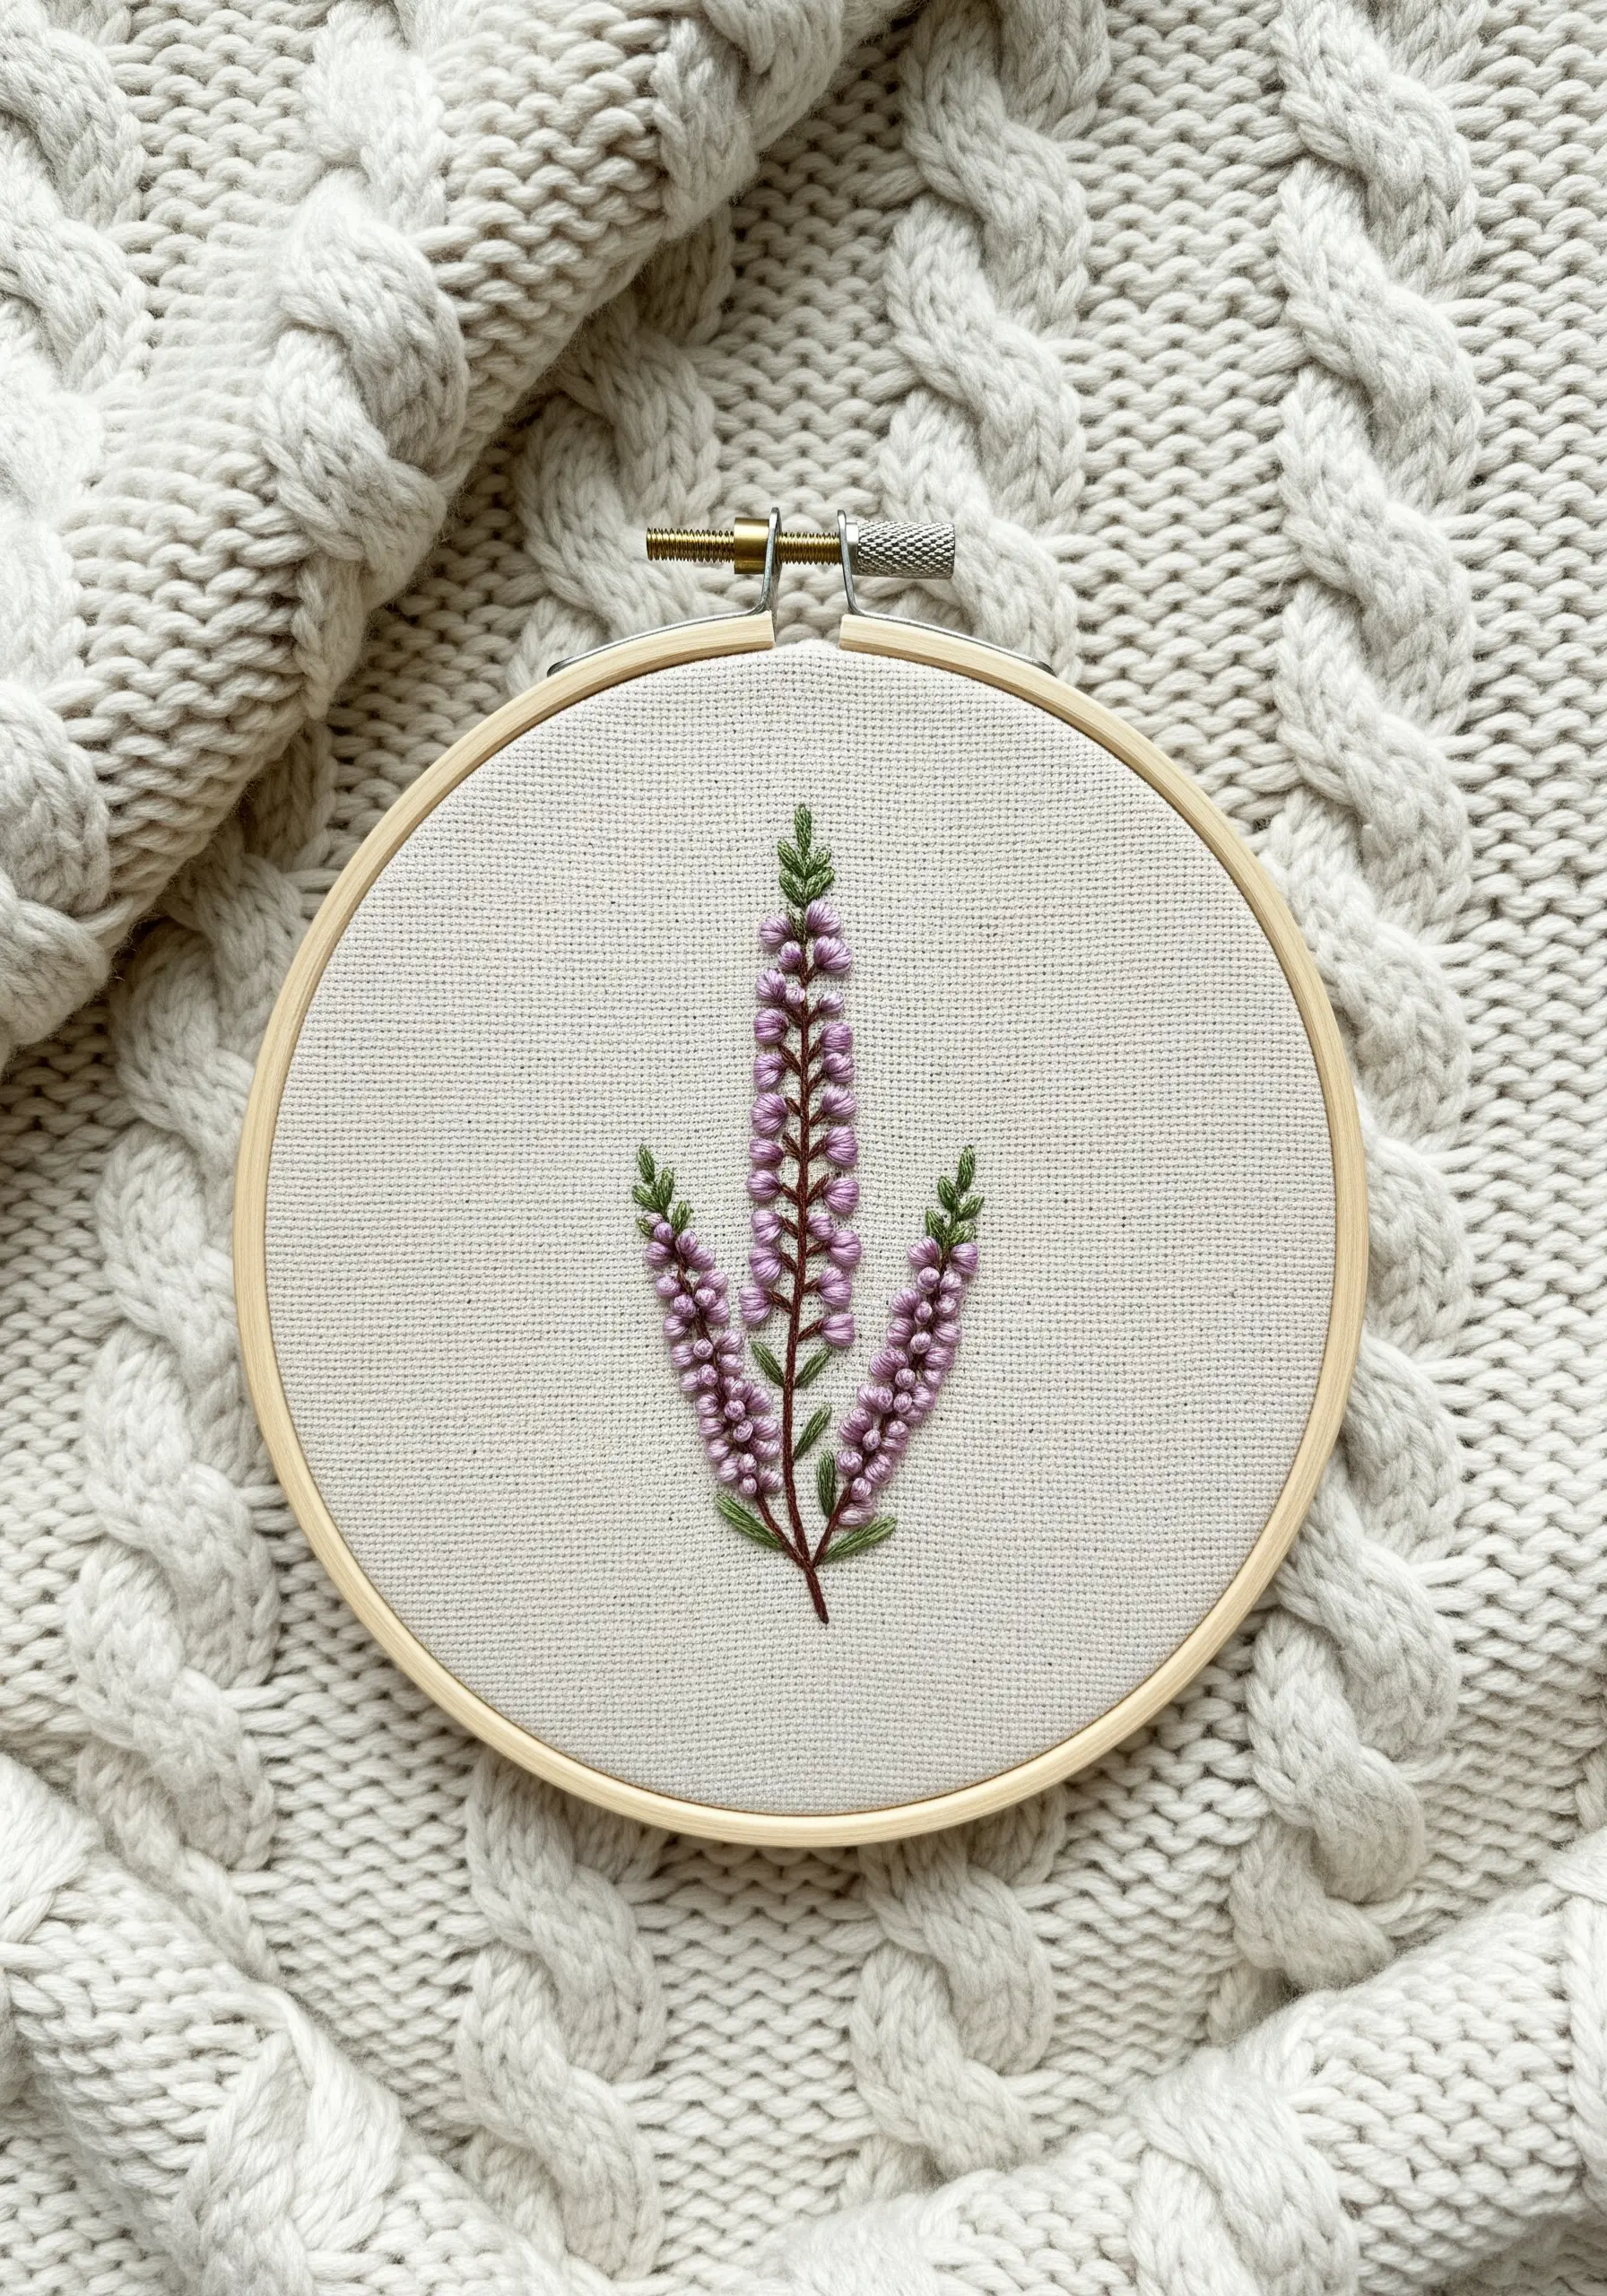
For the dense floral spikes of heather, use colonial knots instead of French knots.
Colonial knots are rounder and stand up slightly higher, creating a wonderfully bumpy texture that perfectly mimics the real flower.
Cluster them tightly along a central stem, using a mix of mauve and lilac threads to give the blossoms a soft, varied appearance.
Frame the floral clusters with small, sharp leaves made with a single detached chain stitch to complete the iconic silhouette.
14. Define Form with Minimalist Line Art
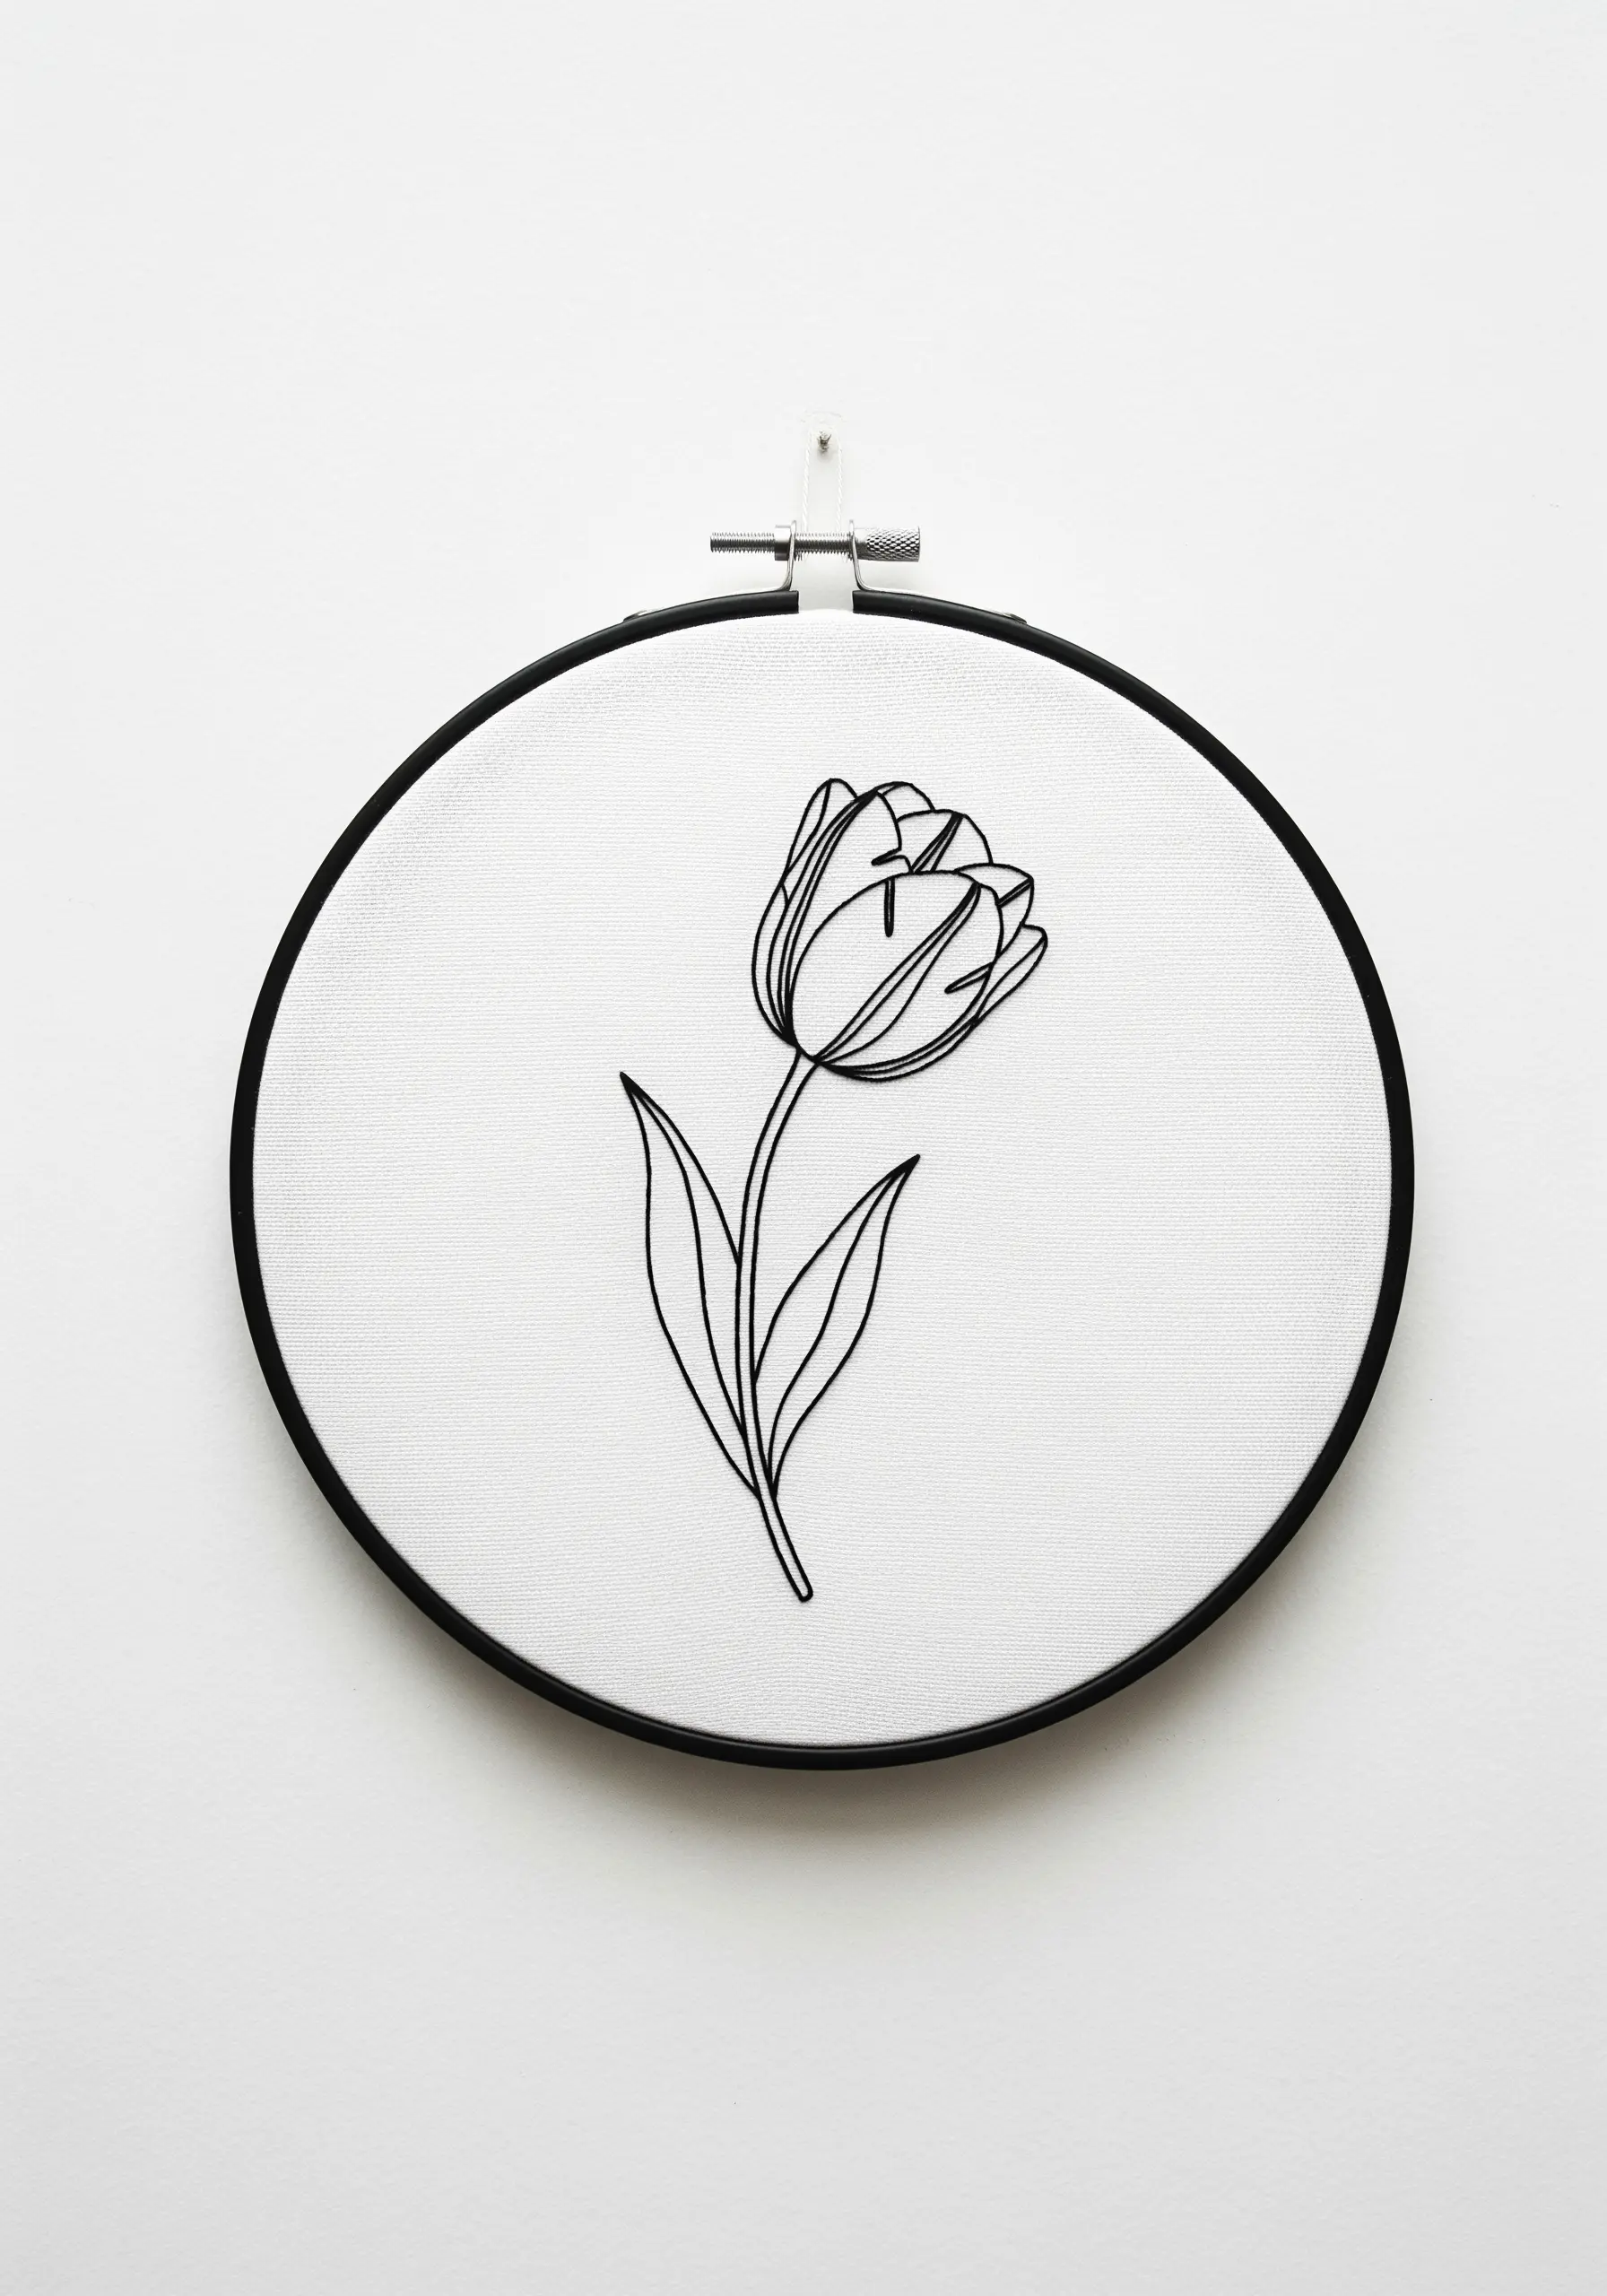
Embrace minimalism by focusing on the pure outline of a flower, like this elegant tulip.
Use a consistent backstitch or stem stitch with two or three strands of black floss for a clean, graphic line.
Pay close attention to your stitch length, keeping it short on tight curves to maintain a smooth, unbroken contour.
This style proves that you don’t need color or complex stitches to create a sophisticated and romantic piece; the beauty is in the simplicity of the form. It’s a perfect example of delicate line art embroidery.
15. Layer Satin Stitches for Cascading Wisteria
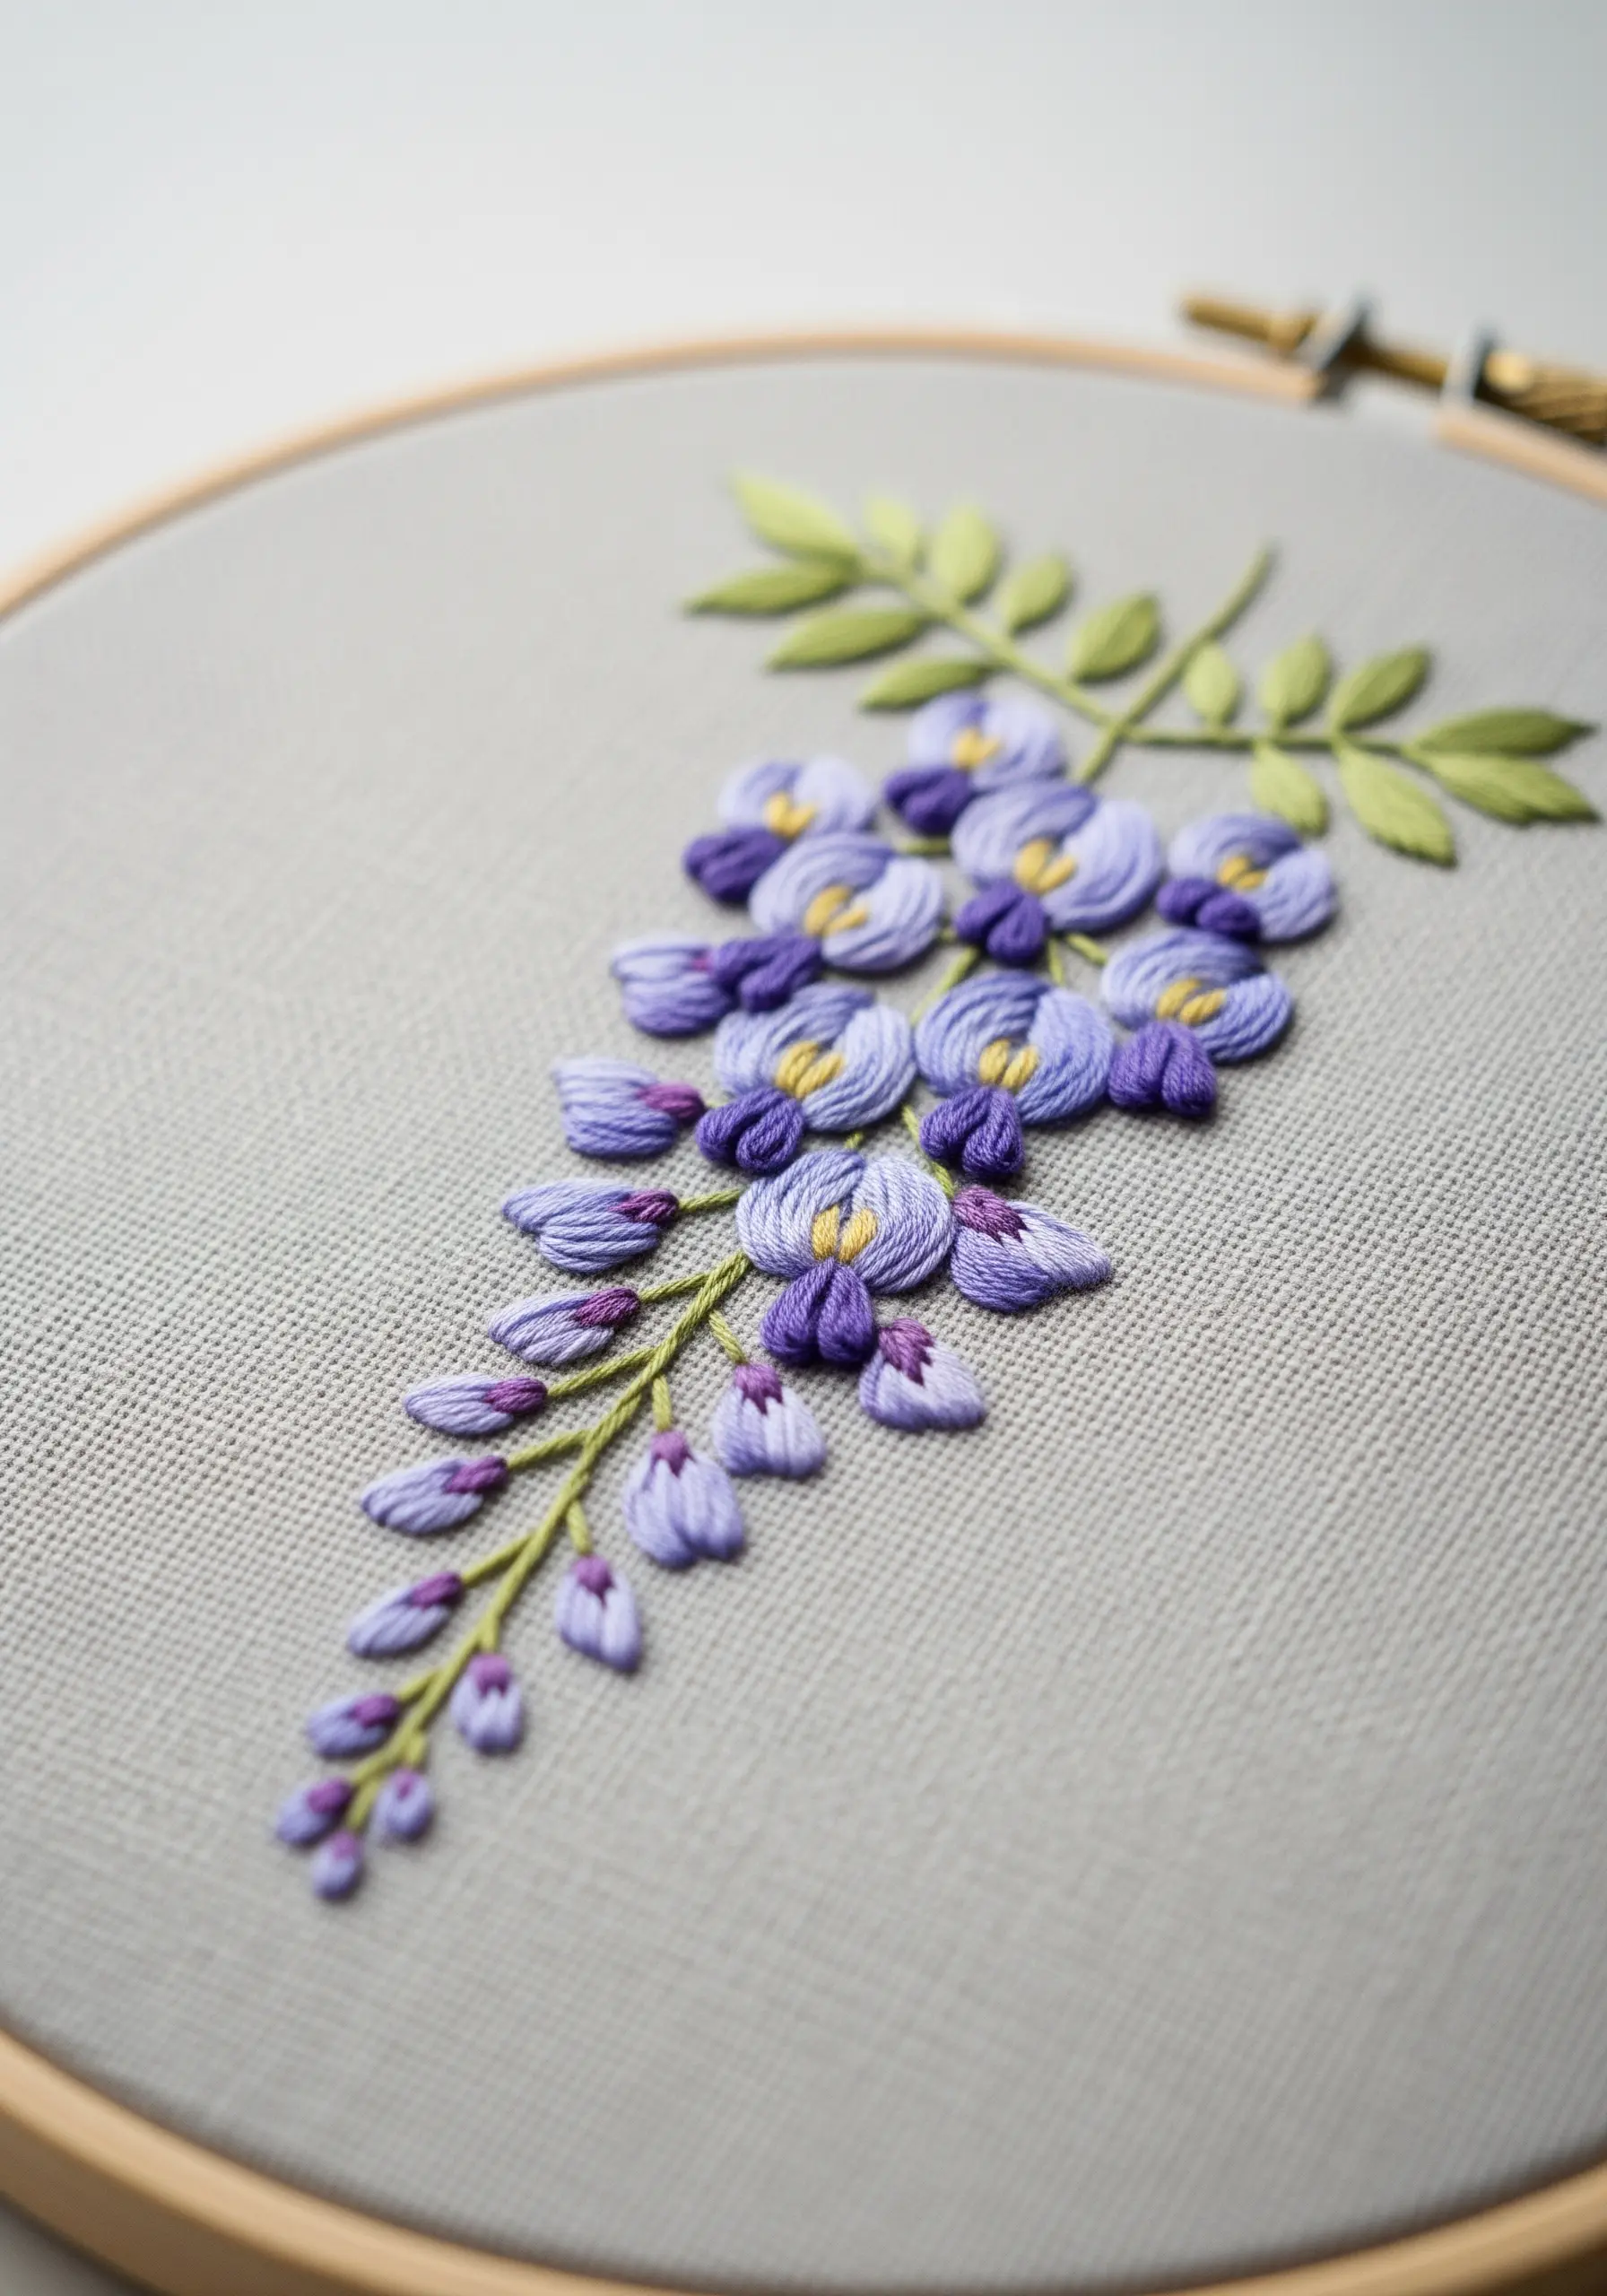
To capture the draped, cascading form of wisteria, think in layers.
Stitch the blossoms that are furthest away first, using a slightly muted lavender. Then, work forward, stitching the closer blossoms on top in brighter shades of periwinkle and purple.
Use a simple satin stitch for each floret, but angle your stitches differently for each one to create a sense of movement and volume.
A few pops of yellow with a single straight stitch in the center of the foreground flowers draw the eye and add a final touch of realism.
16. Build Up Texture in a Sunflower Center
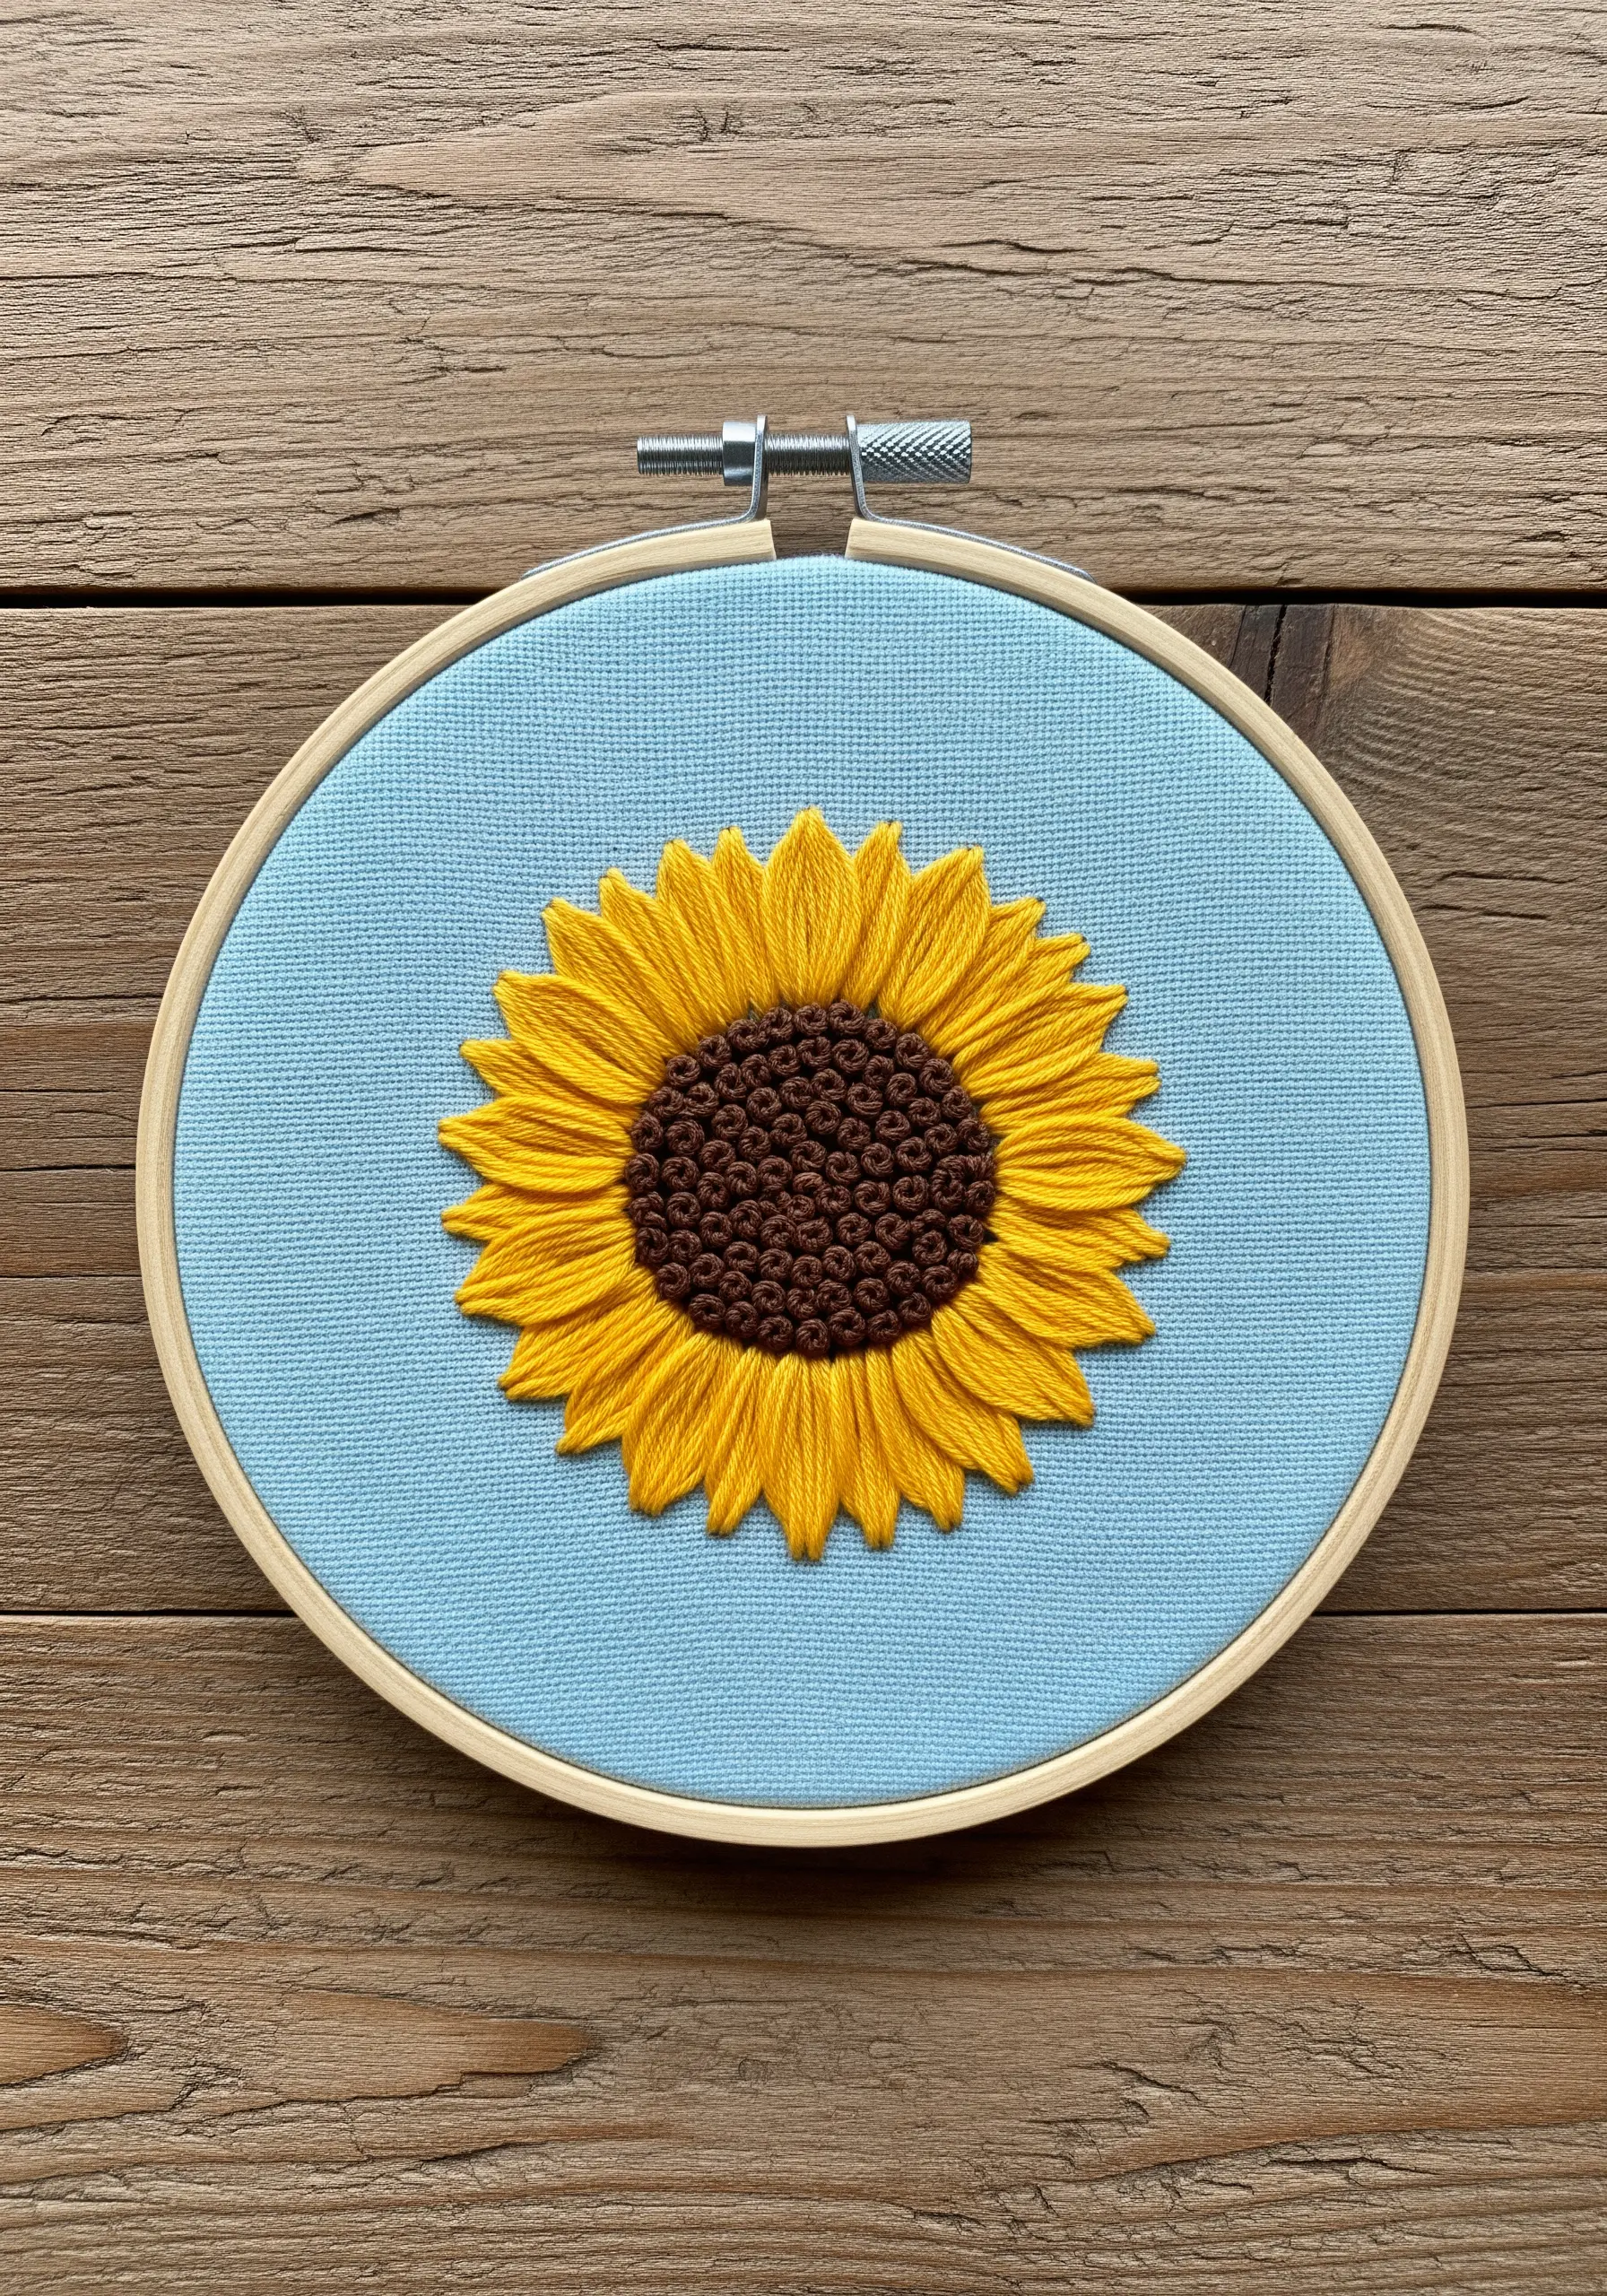
The magic of an embroidered sunflower is in its textural center.
Fill the central disc with a dense layer of French or colonial knots using dark brown thread, packing them so tightly that no fabric shows through.
For the petals, use a fishbone stitch. This creates a subtle central line and allows the stitches to angle outwards, perfectly mimicking the structure of a real sunflower petal.
The contrast between the highly textured center and the smooth, radiating petals makes the flower feel dynamic and lifelike. You can create many abstract floral embroidery hoops with this textural play.
17. Add Subtle Color Tipping to Petals
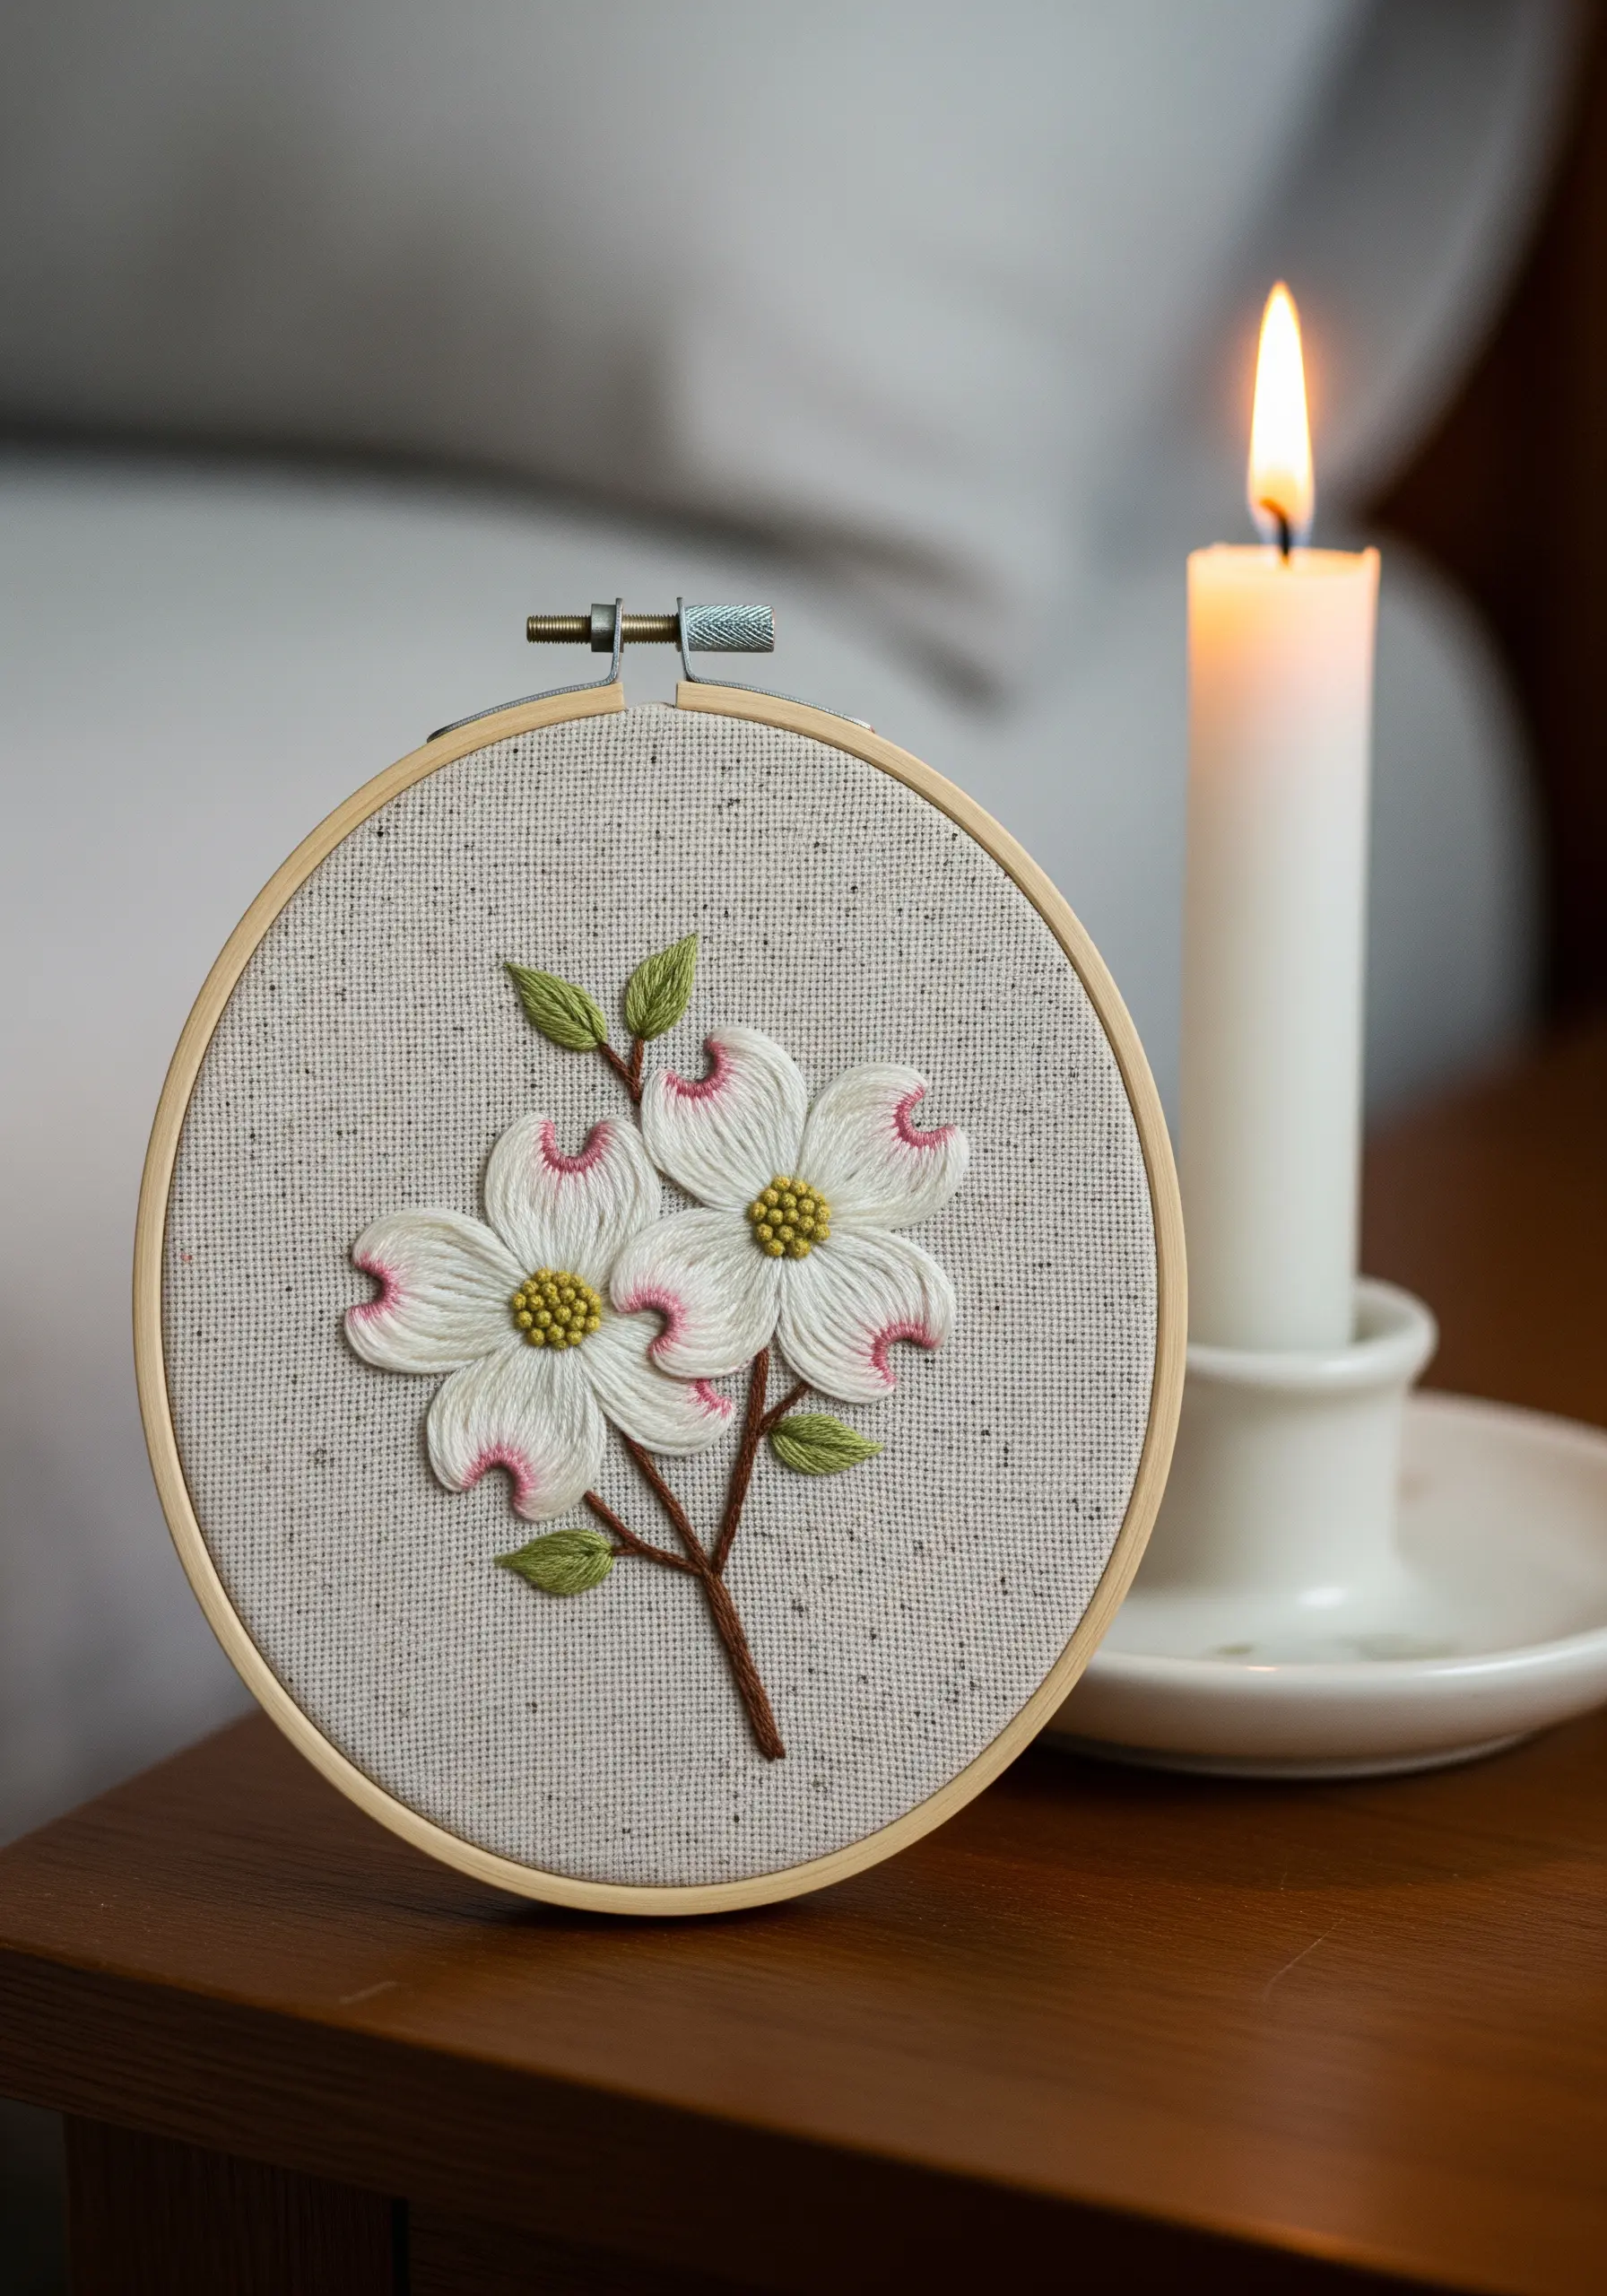
To give dogwood blossoms their characteristic blush, don’t switch threads—simply add a hint of color afterward.
First, complete the white petals using a satin stitch. Then, using a single strand of soft pink, add a few tiny straight stitches right at the notched tip of each petal.
This subtle addition is far more delicate and realistic than trying to blend two colors within the satin stitch itself.
The center’s texture is achieved with a cluster of green-yellow French knots, providing a focal point for the soft blooms.
18. Create Layered Petals with Directional Stitches
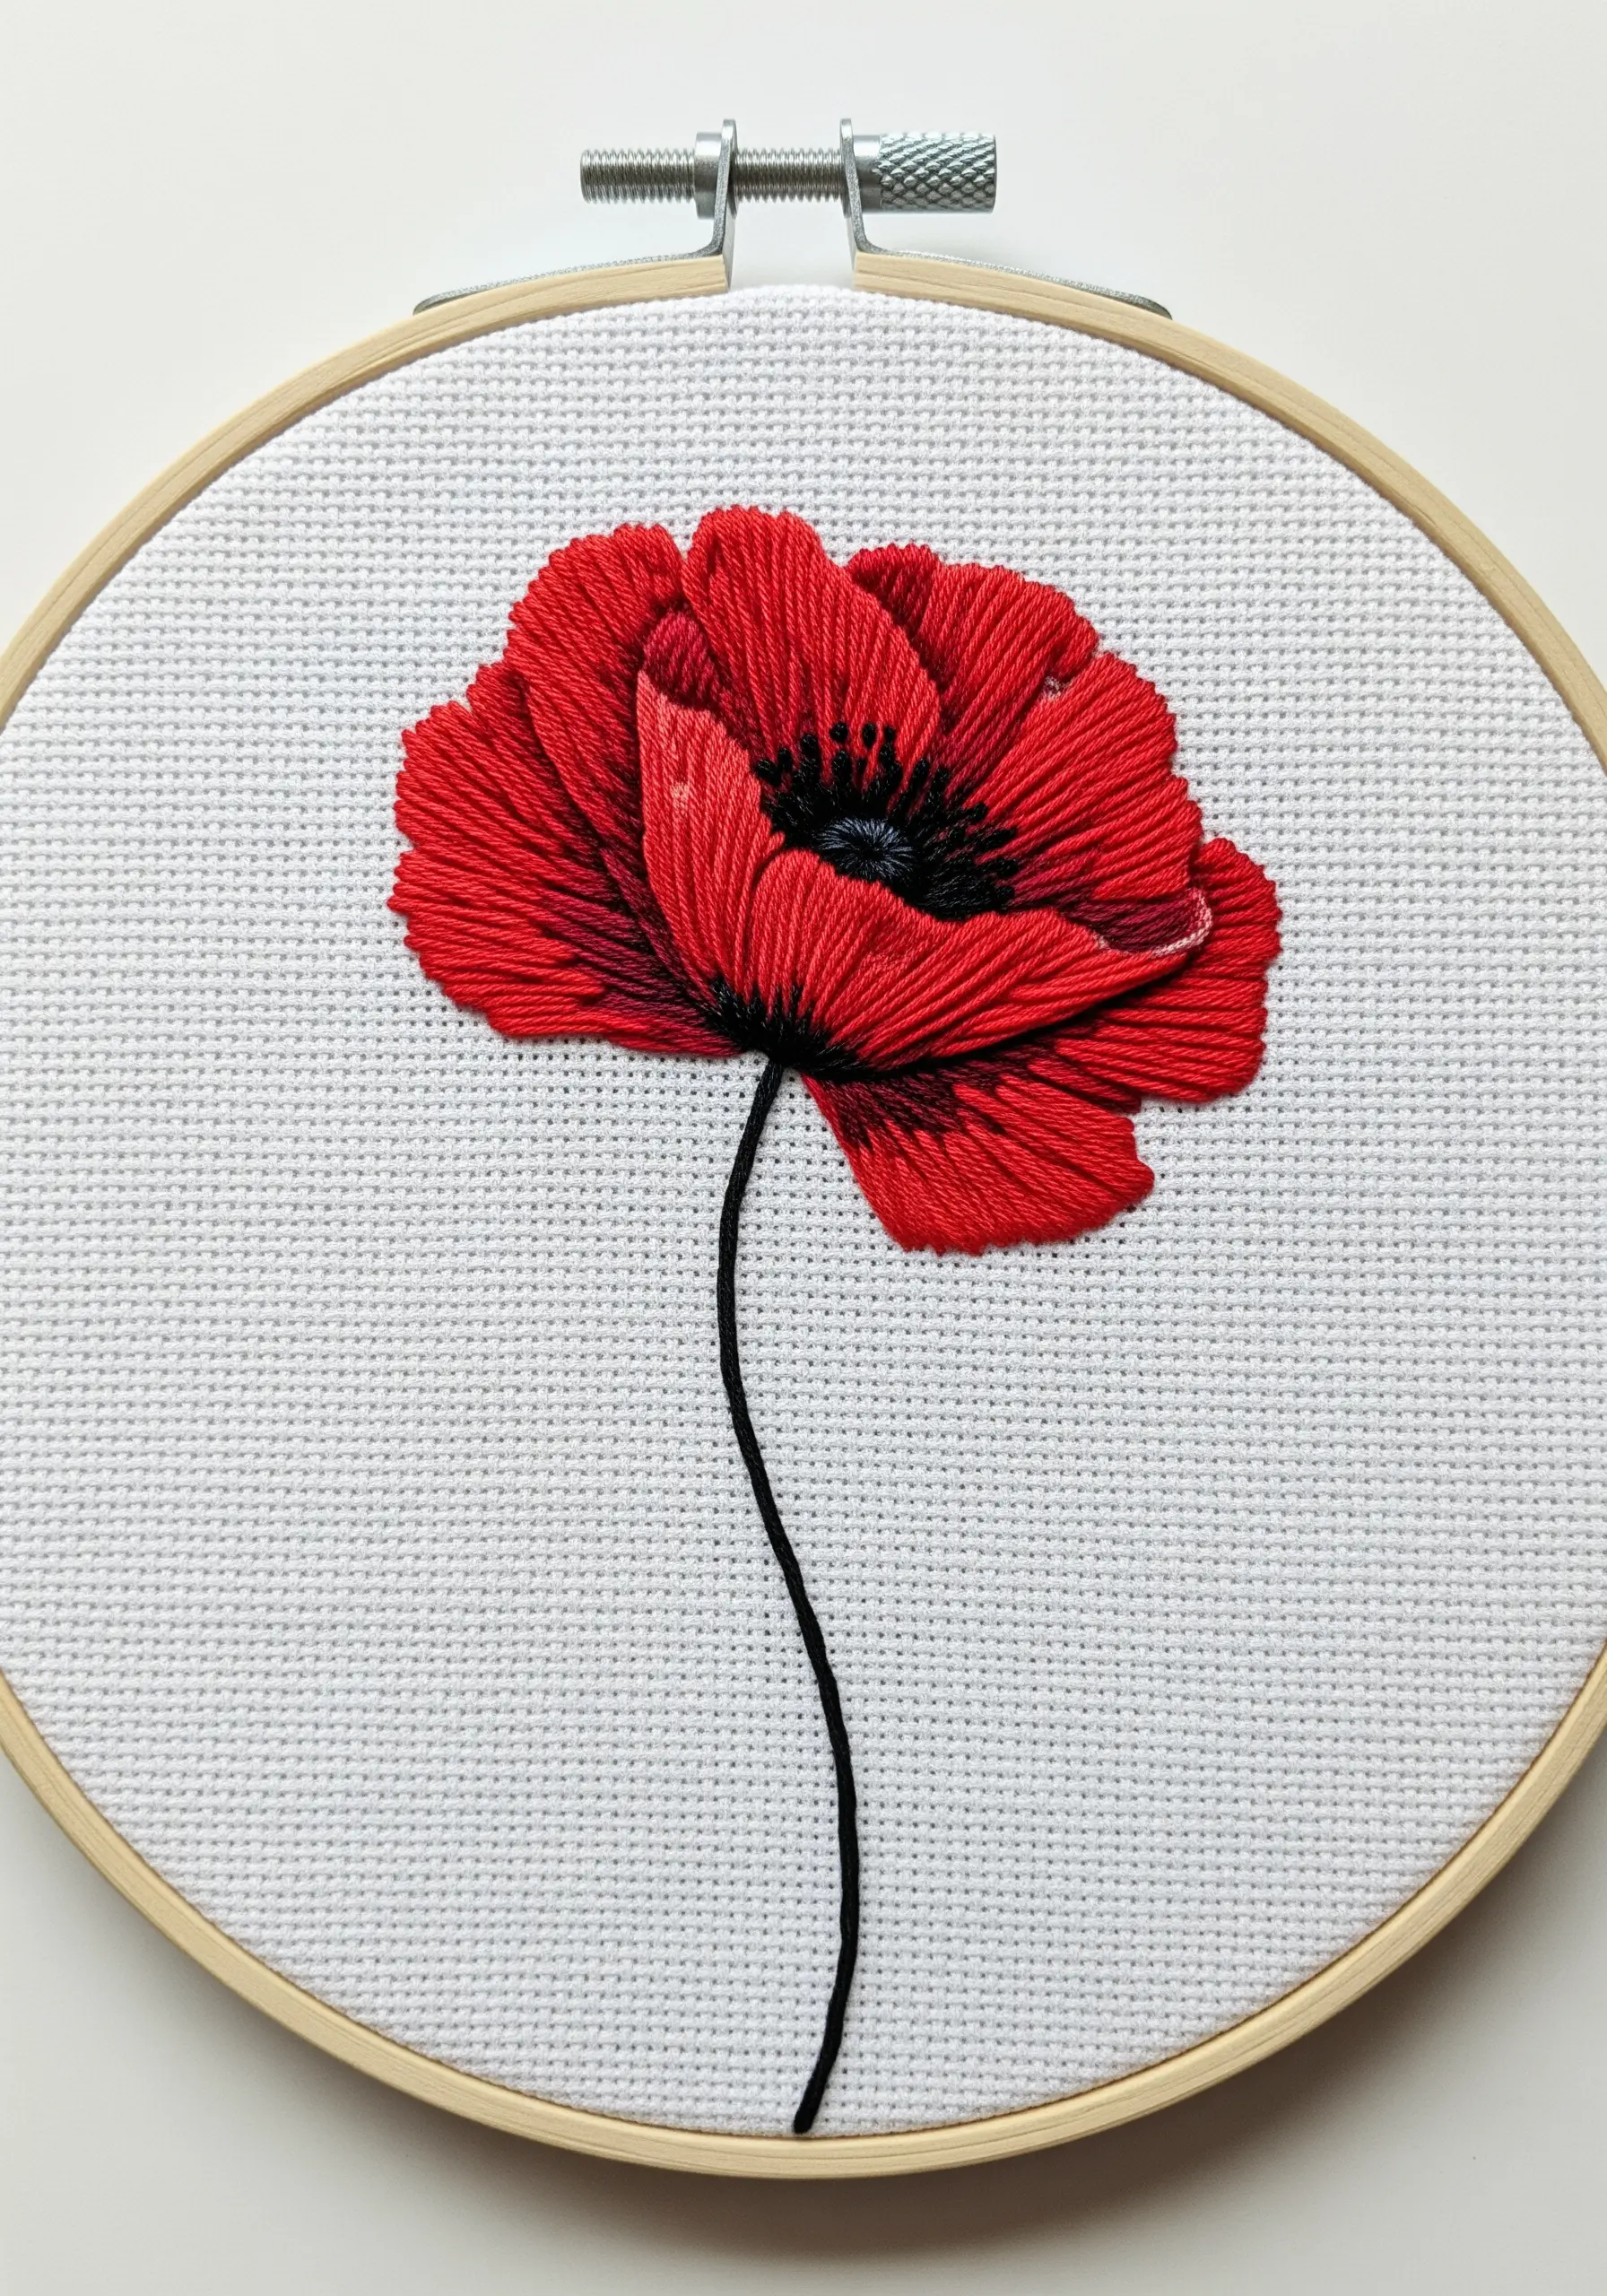
To prevent a large flower like this poppy from looking flat, you must create the illusion of overlapping petals.
Stitch the back petals first using a long-and-short stitch. Then, stitch the front petals directly over them, making sure the stitch direction of the top layer is distinct from the one beneath.
Use a darker red or black for the shadowed areas where petals overlap to create depth.
This layering technique is what gives the flower its delicate, paper-thin appearance, making it one of the most beautiful minimalist stitch designs that still carries incredible depth.


