
You have likely stared at a blank hoop, wondering how to bridge the gap between a simple outline and a piece of art that feels finished and professional. The secret often isn’t in learning a dozen new complex stitches, but in applying the right texture and thread weight to the simplest motifs. In the kitchen, where we crave warmth and nostalgia, vintage-inspired embroidery offers the perfect playground for these techniques.
These twenty-one ideas are not just patterns; they are lessons in texture and composition. You will see how a simple change in stitch direction can turn a flat yellow shape into a zesty lemon, or how swapping a backstitch for a whipped variation instantly adds durability and dimension to wire utensils. We are moving away from flat, coloring-book style stitching and toward deliberate, tactile art.
Grab your hoop and your thread stash. Whether you have five minutes to stitch a single sprig of rosemary or an afternoon to thread-paint a rustic rolling pin, these projects will help you refine your hand and style your space with intention.
1. Minimalist wire whisk line work

This design proves that you do not need complex shading to create a recognizable object; the beauty lies in the fluidity of the curve.
To achieve those smooth, continuous loops, I recommend using a whipped backstitch rather than a standard backstitch.
This technique wraps the base thread, creating a seamless, rope-like effect that mimics the sturdy wire of kitchen tools beautifully.
Using a dark charcoal thread on oatmeal linen provides simple line art embroidery ideas for a modern, rustic finish.
2. Textured lemon wedge on blue
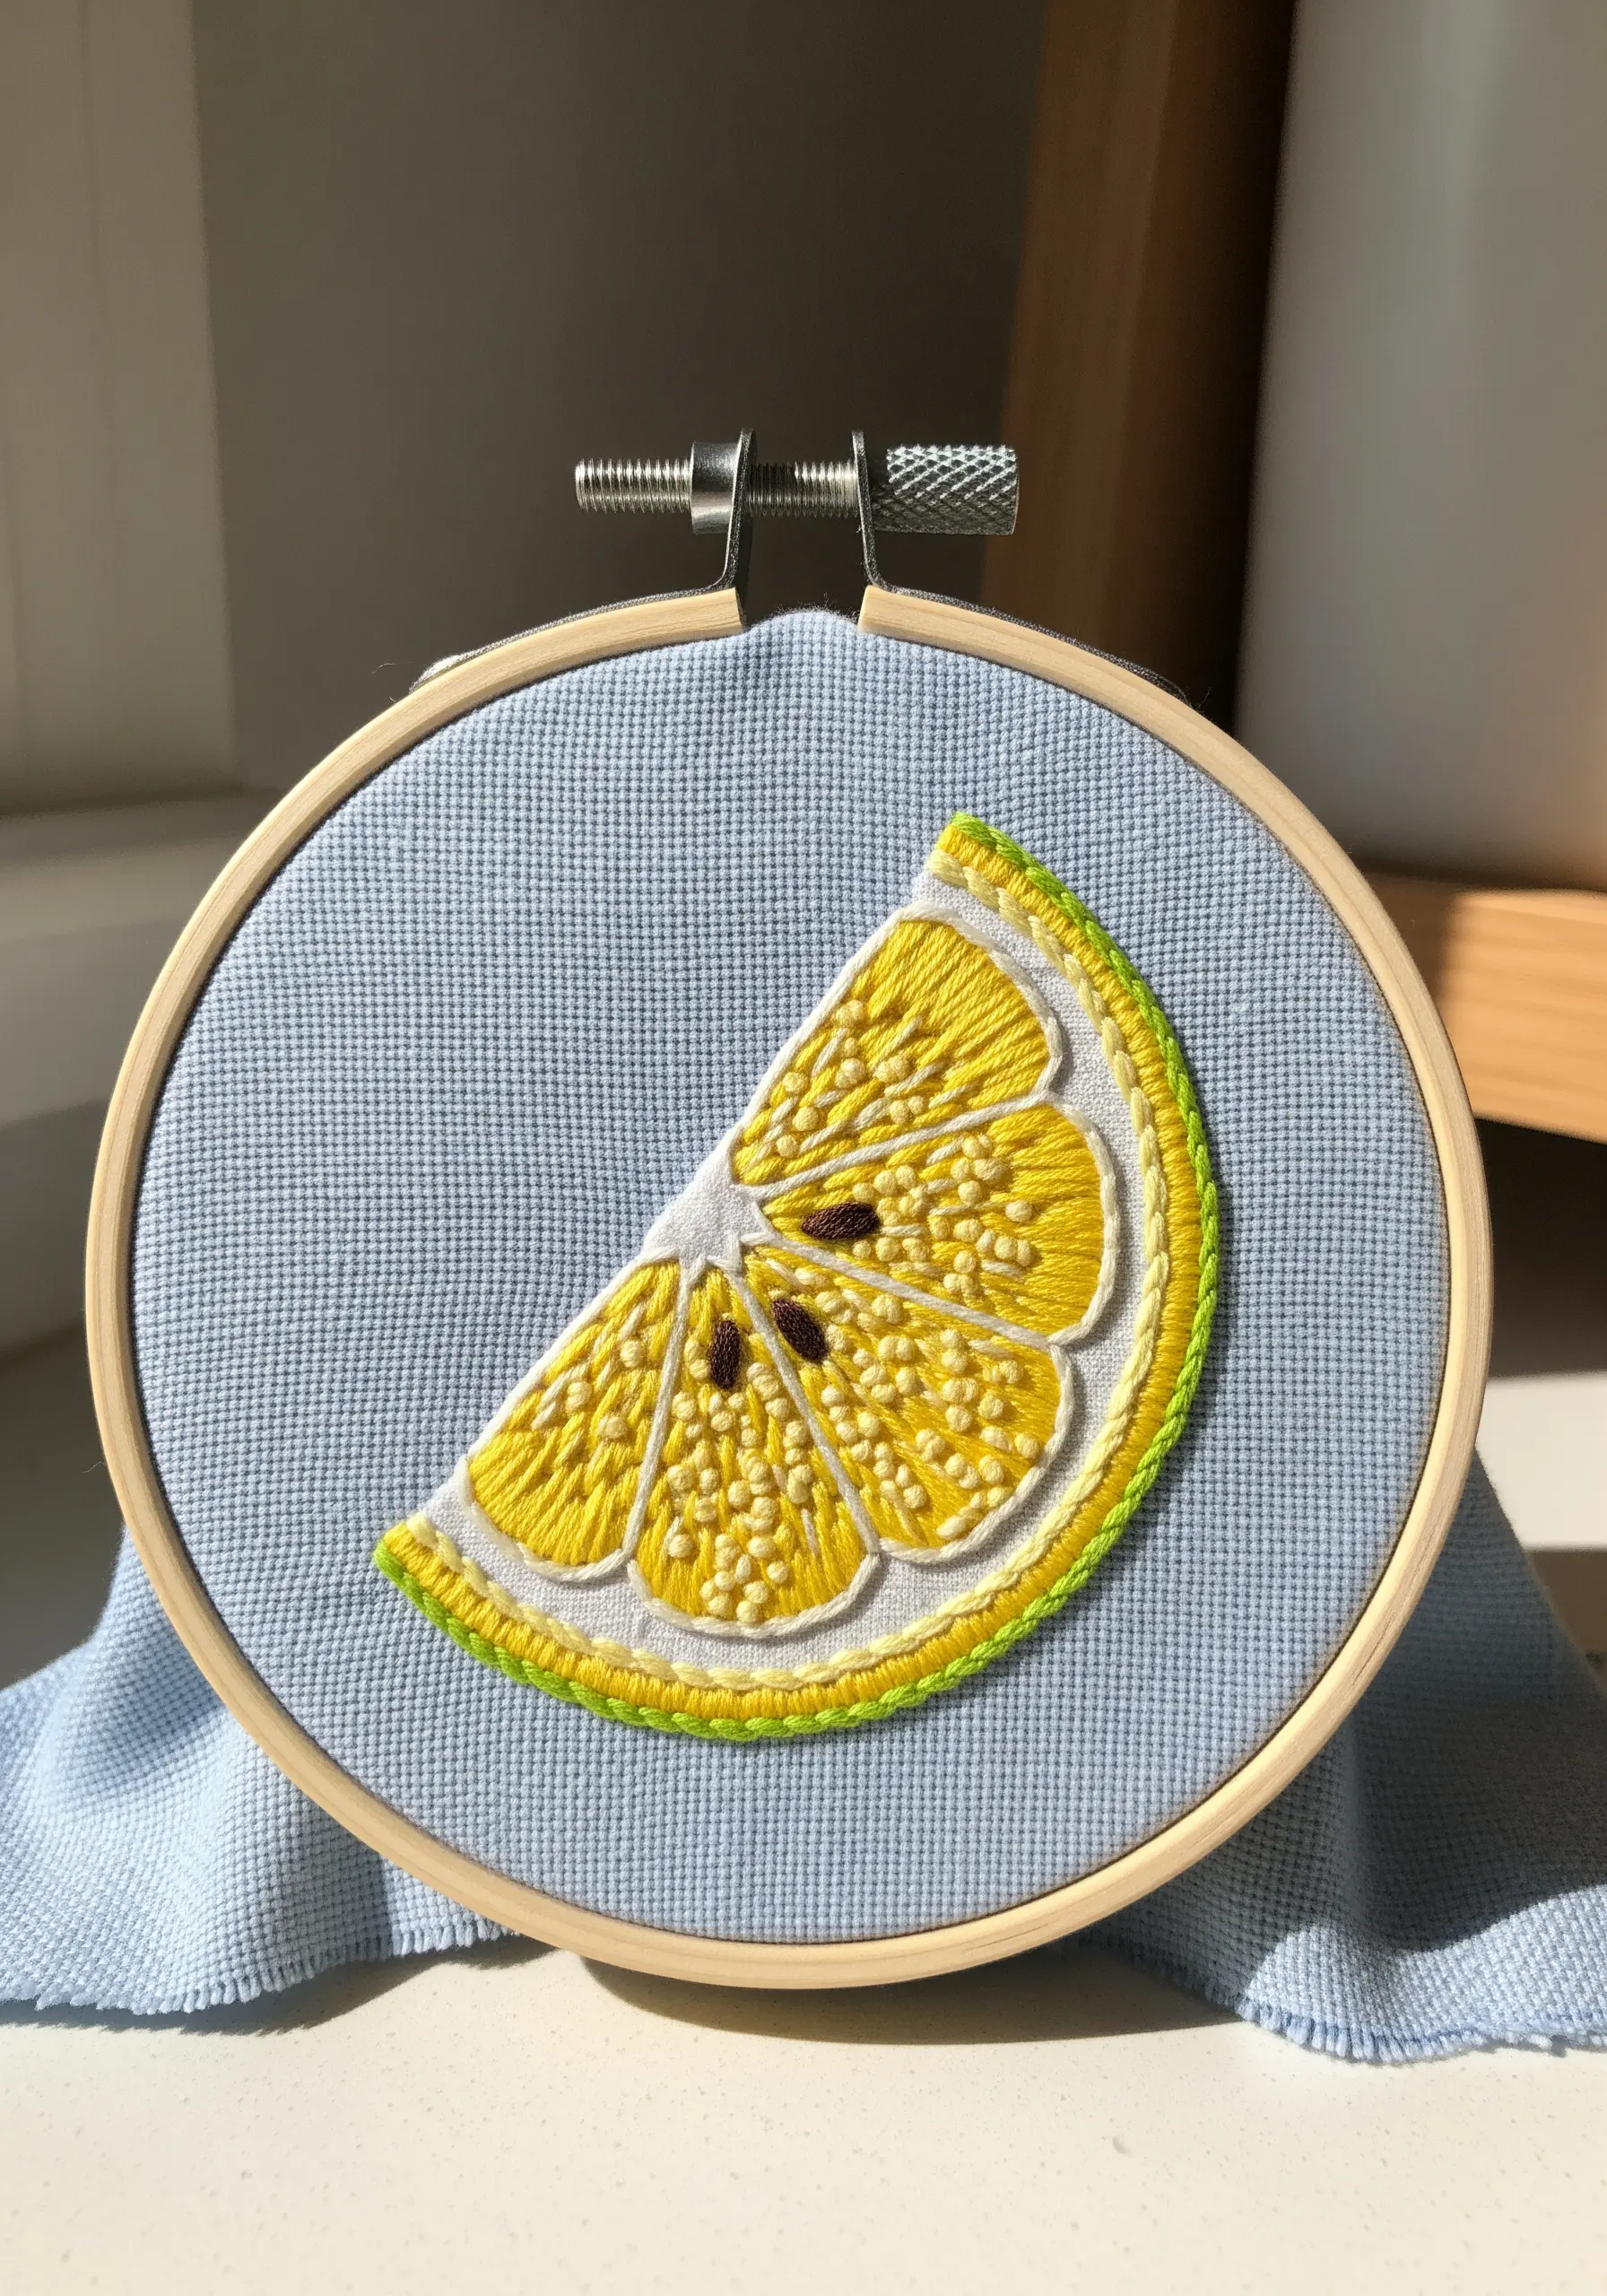
Texture is the secret ingredient here; the pith of the lemon is not just outlined, but filled with dense French knots to mimic the porous nature of citrus rind.
Contrast is created by placing the vibrant yellow against a soft cornflower blue fabric, which makes the fruit pop instantly.
For the segments, keep your satin stitches directional, radiating from the center outward to capture the natural grain of the fruit pulp.
3. Geometric moka pot blueprint

There is an architectural elegance to a Moka pot that begs for sharp, geometric stitching.
Use a single strand of cotton floss to maintain crisp, engineering-style lines, focusing on sharp corners rather than soft curves.
This style works best on high-count white fabric to ensure your lines remain straight and do not get lost in the weave.
4. Realistic rosemary sprig study
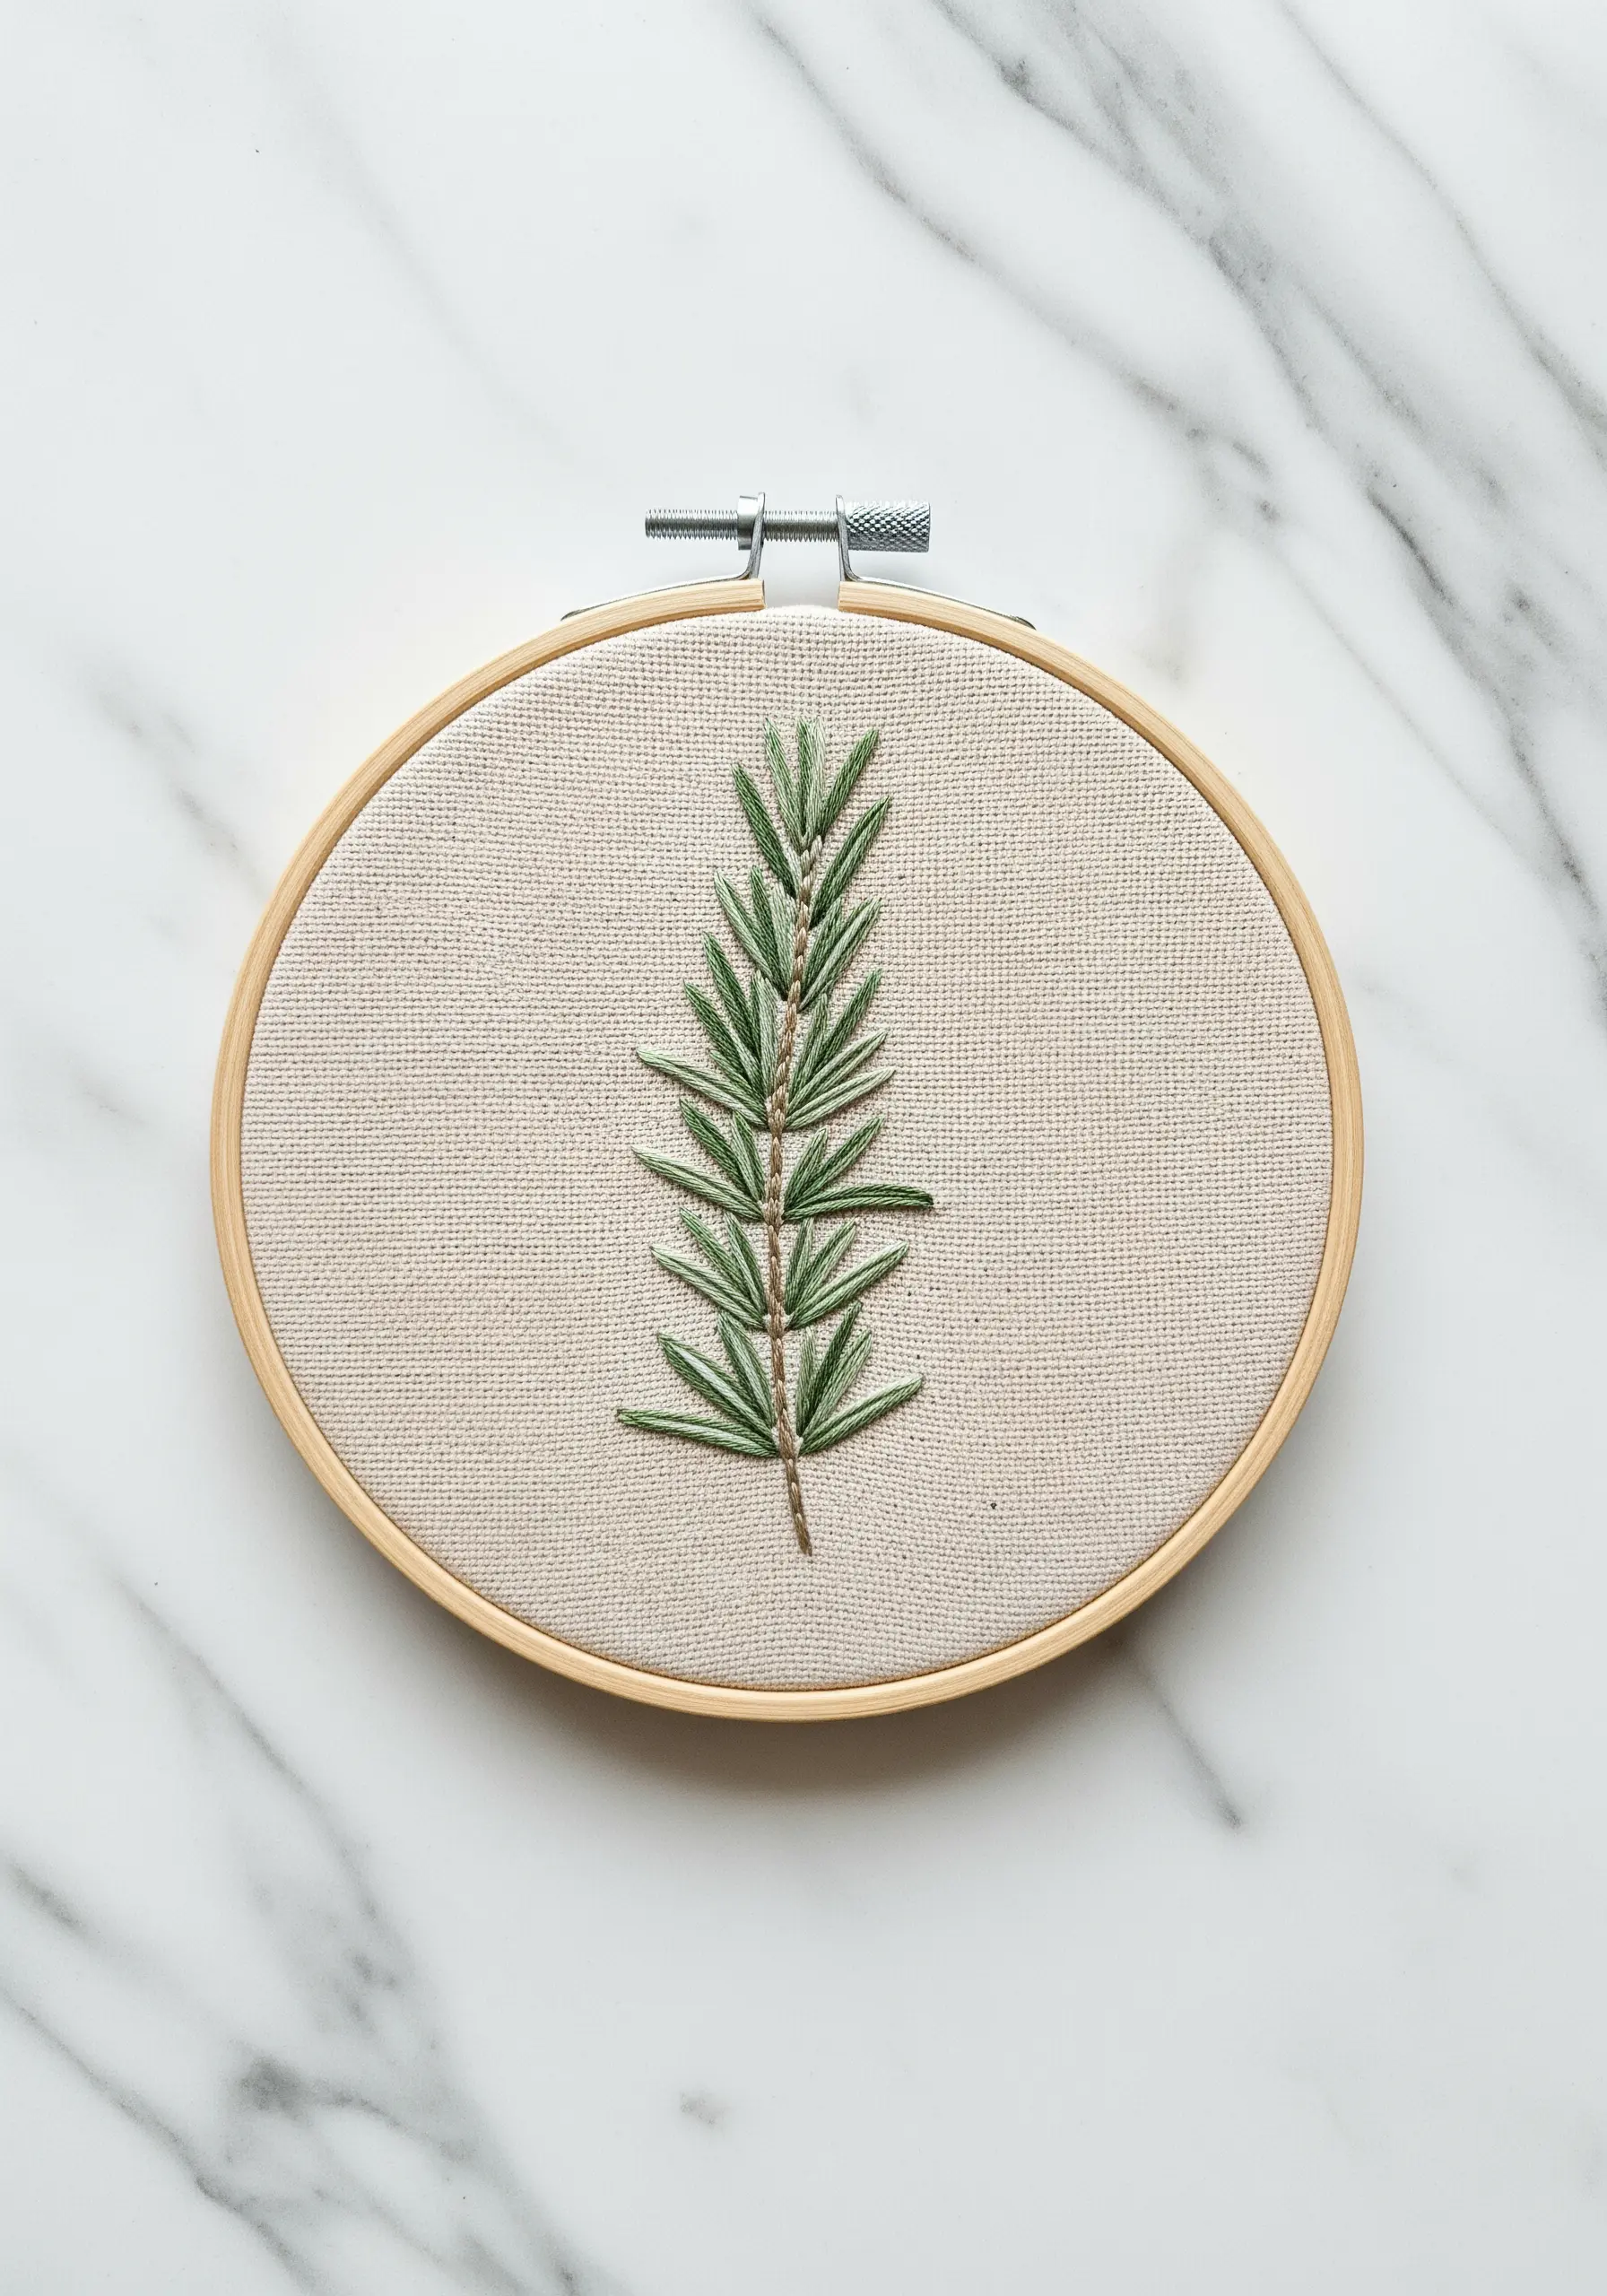
Botanicals require organic movement; avoid stiff straight lines for the central stem and instead curve it slightly.
The leaves are best executed with a fly stitch or a detached chain stitch that has been elongated to mimic the needle-like quality of rosemary.
For herbal plant embroidery motifs, blending two shades of green in the needle simultaneously adds instant depth and realism.
5. Vintage red mixing bowl

You can create volume without solid filling by using hatching techniques often found in ink illustrations.
Notice how the horizontal lines on the rim are dense, while the body uses open space; this negative space implies the curvature of the ceramic.
A split stitch is ideal here for the outline, offering a solid, braided look that stands up to the bold red color choice.
6. Metallic grey measuring spoons
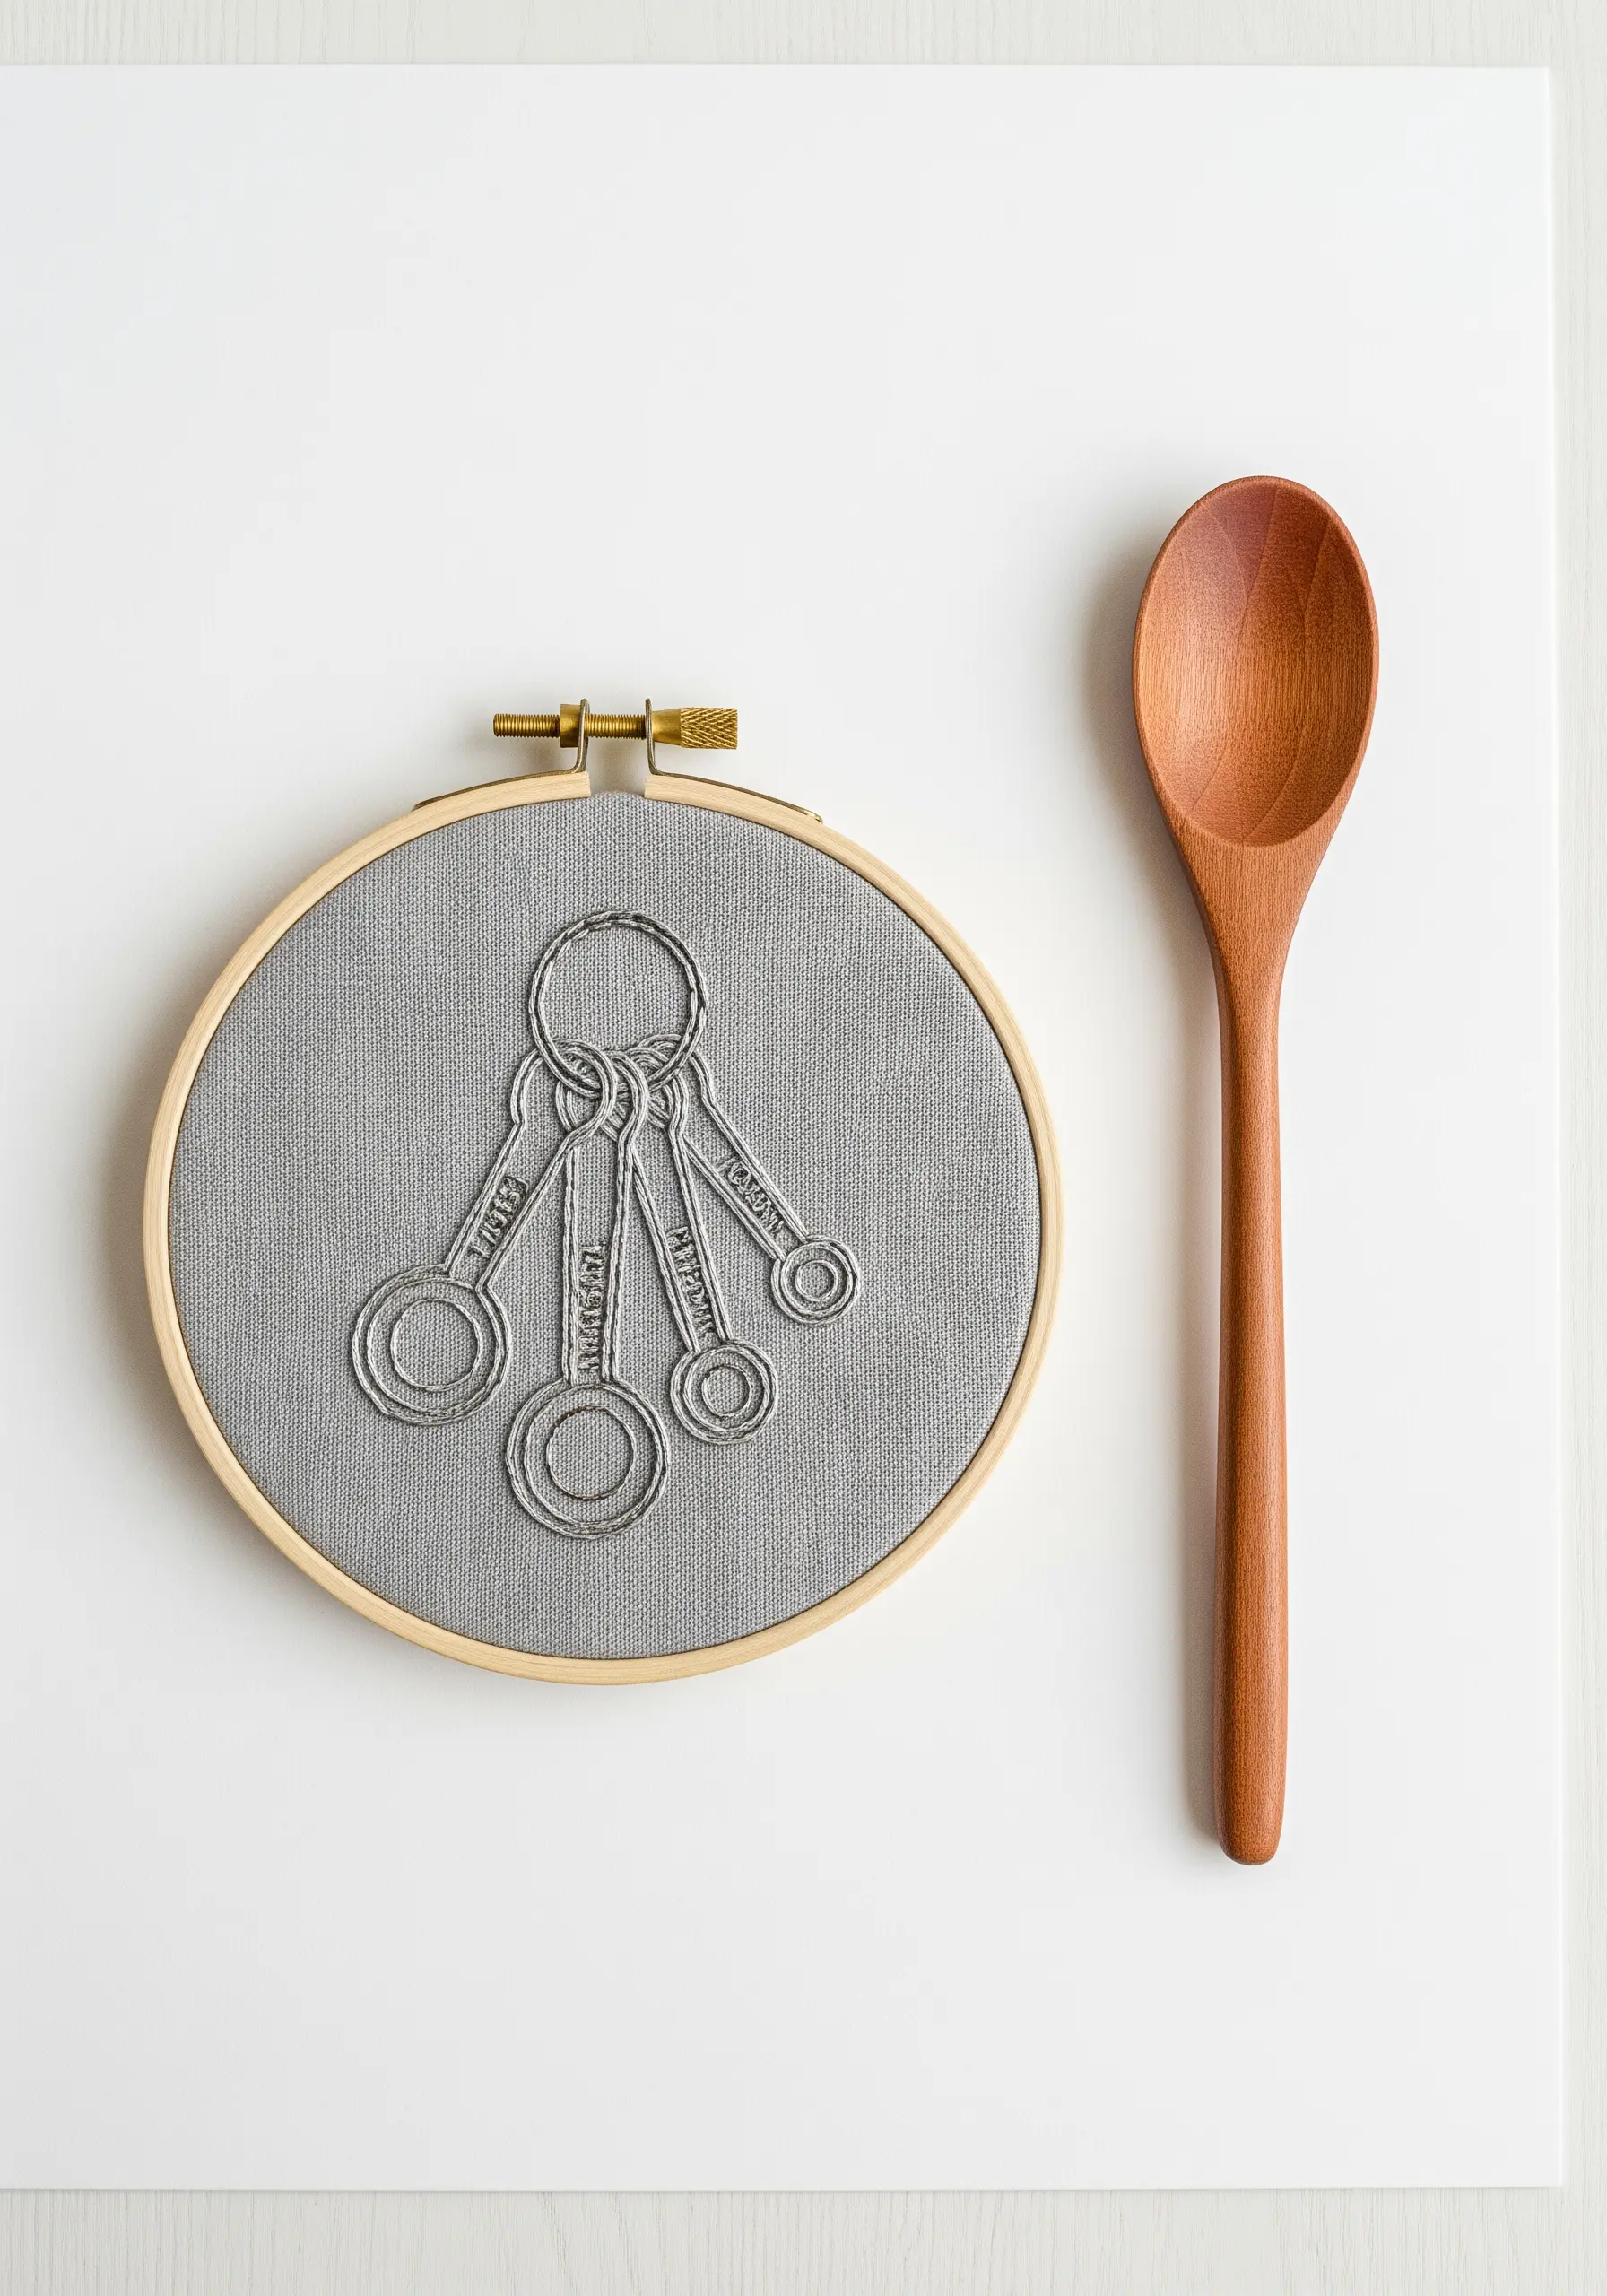
When embroidering metal objects, you have two choices: metallic thread or clever grey shading.
If metallic thread feels too difficult to manage, use a mercerized grey cotton which naturally catches the light.
Focus on the concentric circles of the spoons; keeping these perfectly round using a stem stitch is crucial for a polished look.
7. Cherry pie with woven crust

This piece elevates a simple food motif by using a woven stitch for the lattice crust, physically layering the thread over itself.
For the filling, switch to bullion knots in deep burgundy to simulate cooked cherries, creating a rich, bumpy texture.
These embroidered kitchen towel designs rely on tactile contrast to look appetizing and handmade.
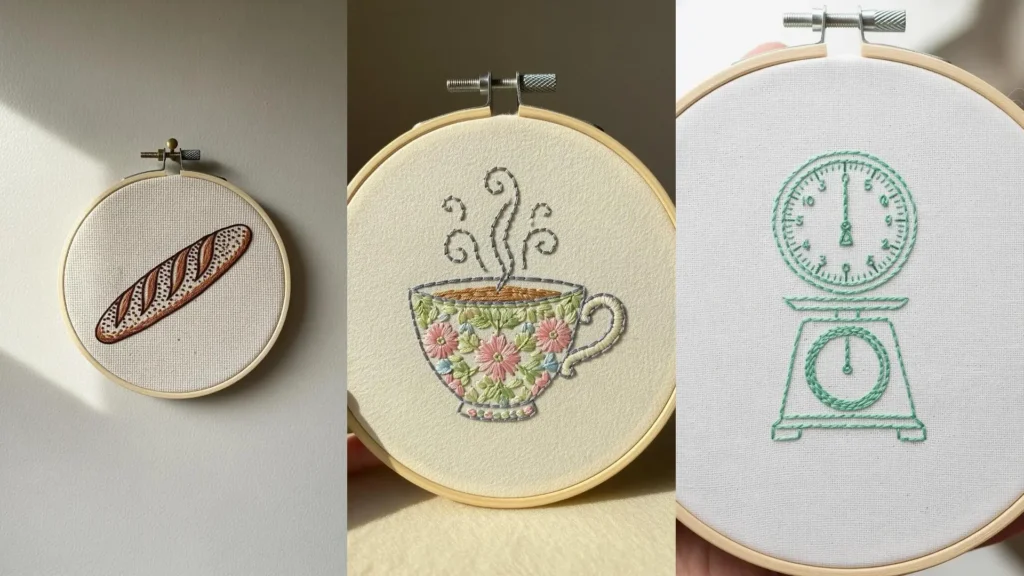
8. Precision mint green scale
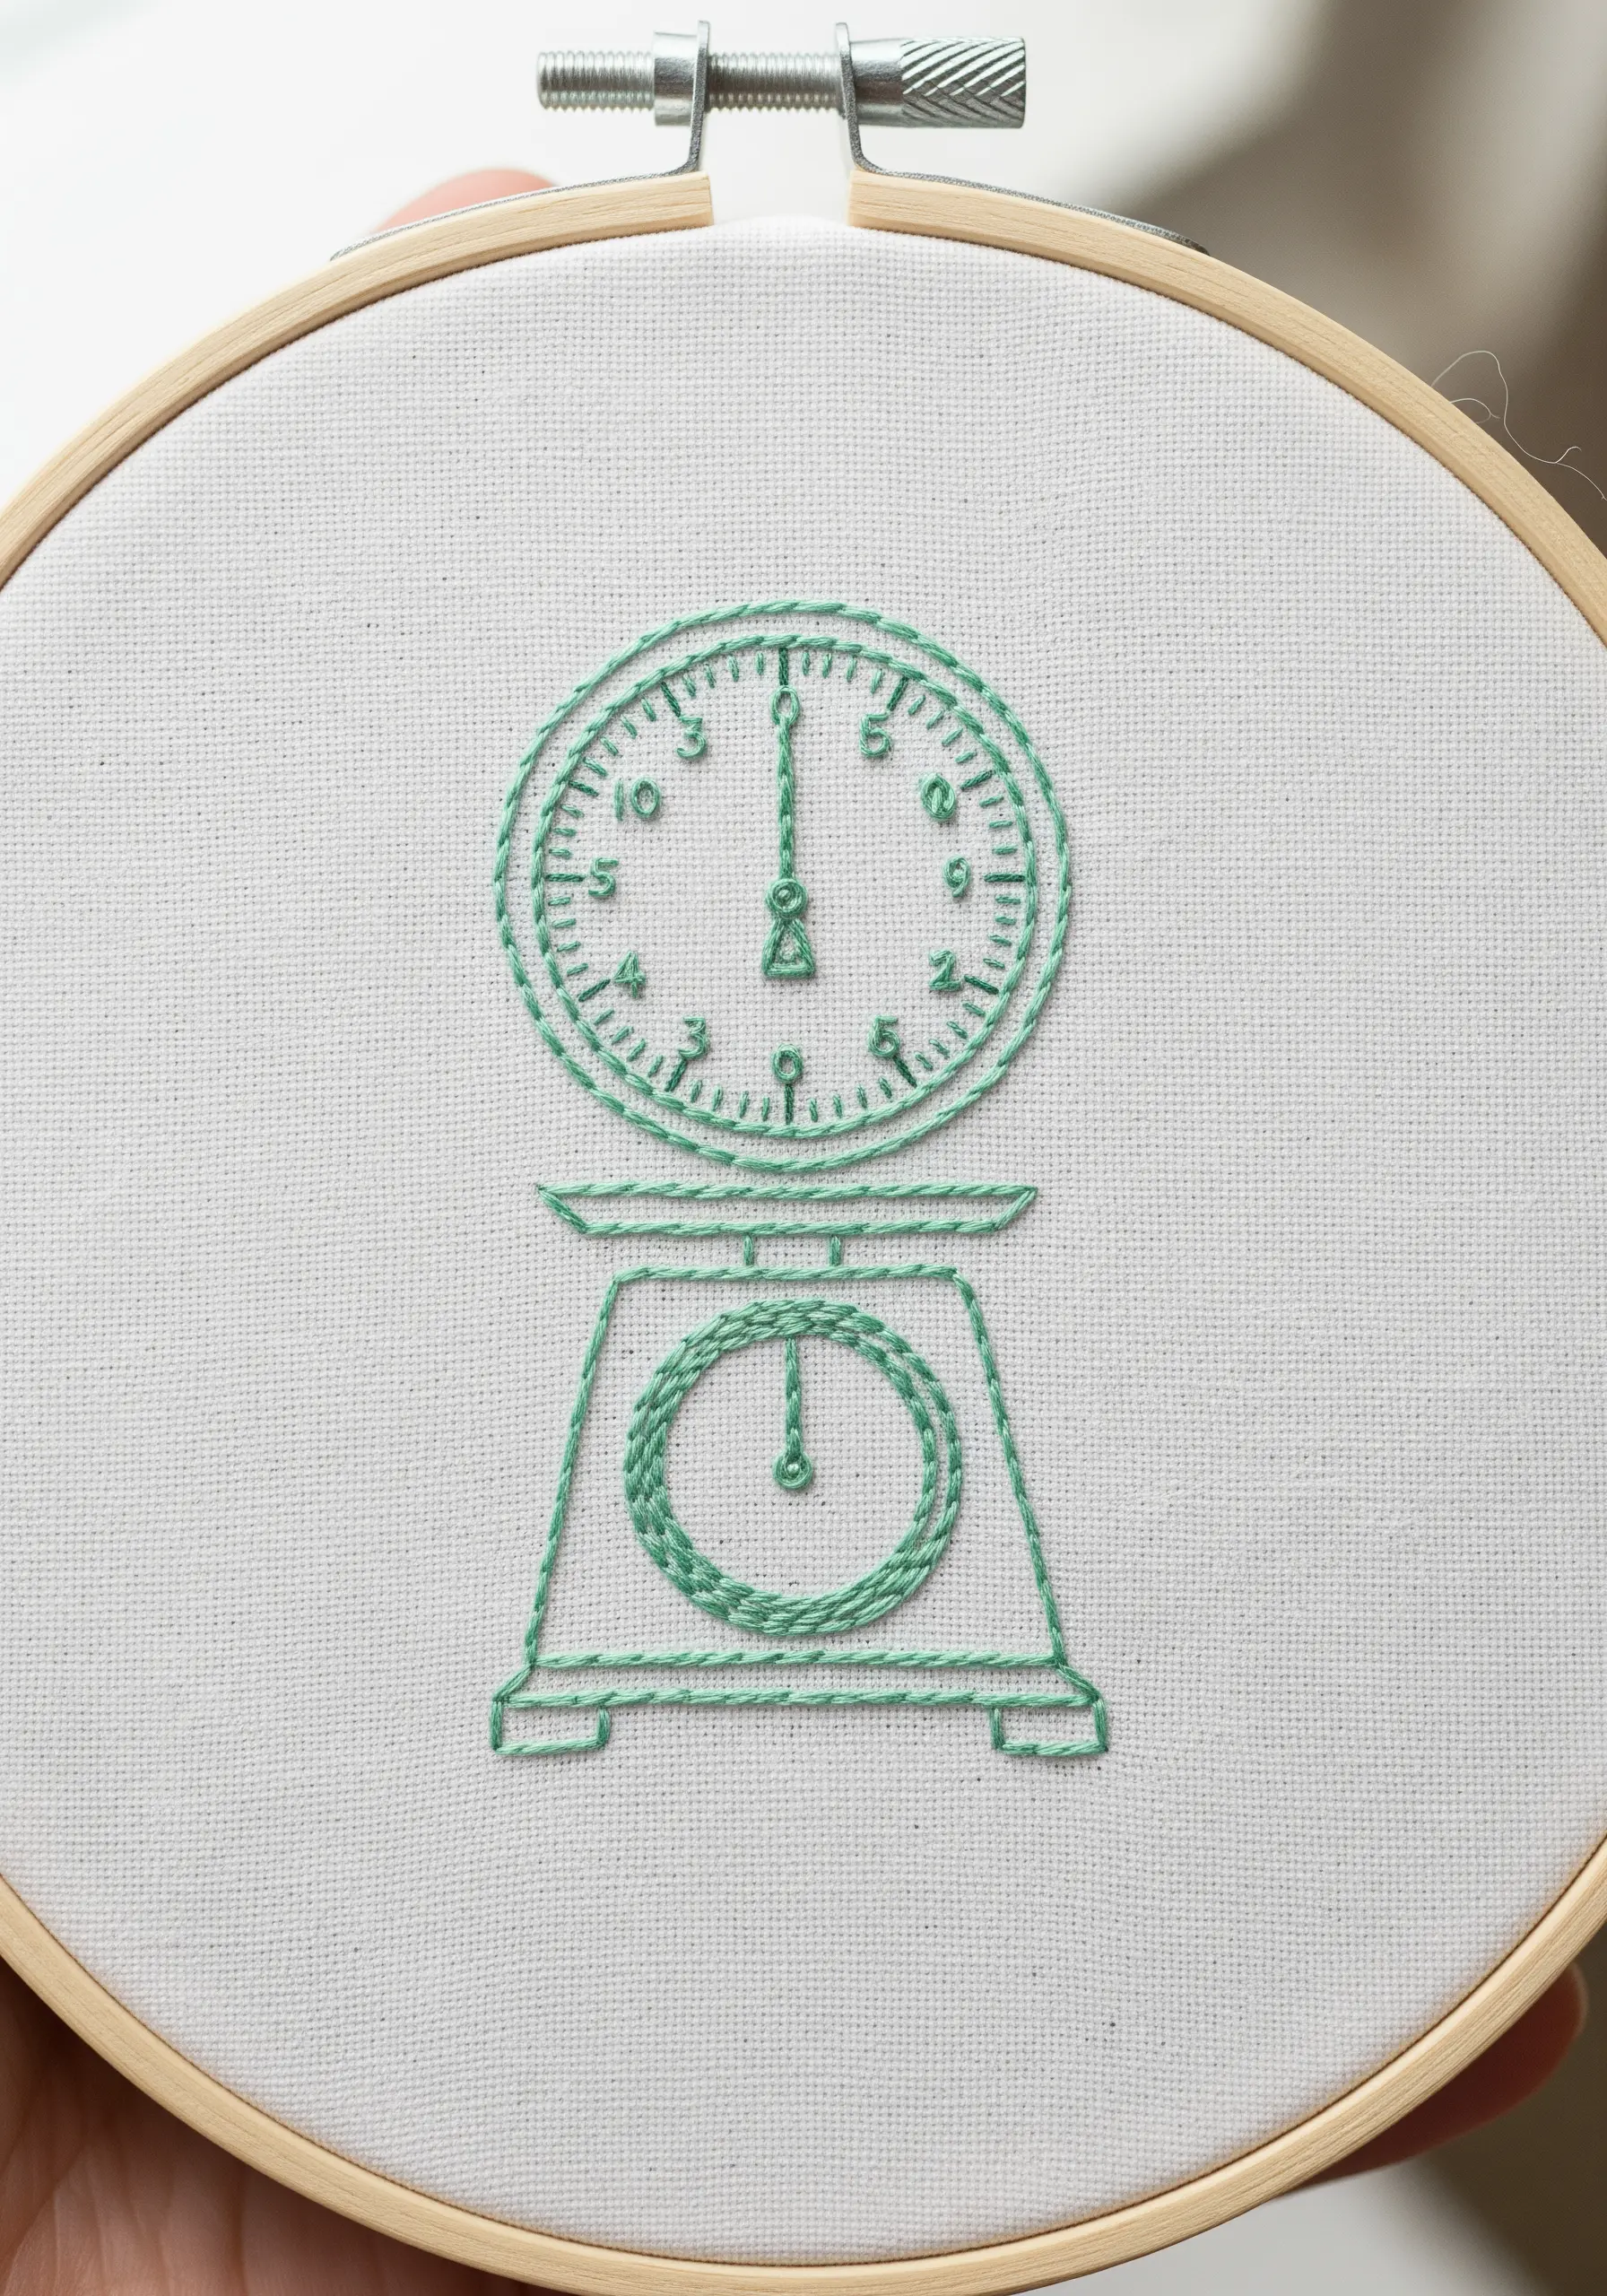
Symmetry is your challenge here; use a compass or a circle template to transfer your pattern, as even a slight wobble will be visible.
The backstitch must be incredibly short to navigate the tight curves of the dial without becoming angular.
Using a soft mint green on white creates a retro 1950s kitchen aesthetic that feels clean and nostalgic.
9. Wood grain rolling pin

The success of this piece lies in the thread painting technique used to mimic the grain of the wood.
Layer different shades of ochre, tan, and brown using long-and-short stitches to create the striated look of turned timber.
This approach transforms simple shapes into tree bark wood texture stitch ideas that feel warm and tactile against the dark fabric background.
10. Preserved peaches jar

This design utilizes a cross-stitch or pixel-art style, which adds a charming, vintage farmhouse feel.
The transparency of the glass jar is suggested by the light blue outline, while the peaches are solid blocks of warm color.
Ensure your crosses are all stitched in the same direction to maintain a uniform light reflection across the fruit.
11. Floral fill tea cup

Instead of shading the cup with solid thread, fill the silhouette with a delicate floral pattern.
This ‘tattoo’ style embroidery allows the background fabric to serve as the ‘china’ of the cup, while the flowers provide definition and character.
Use small floral embroidery patterns like lazy daisies and French knots to keep the details legible within the small outline.
12. Gradient root vegetables
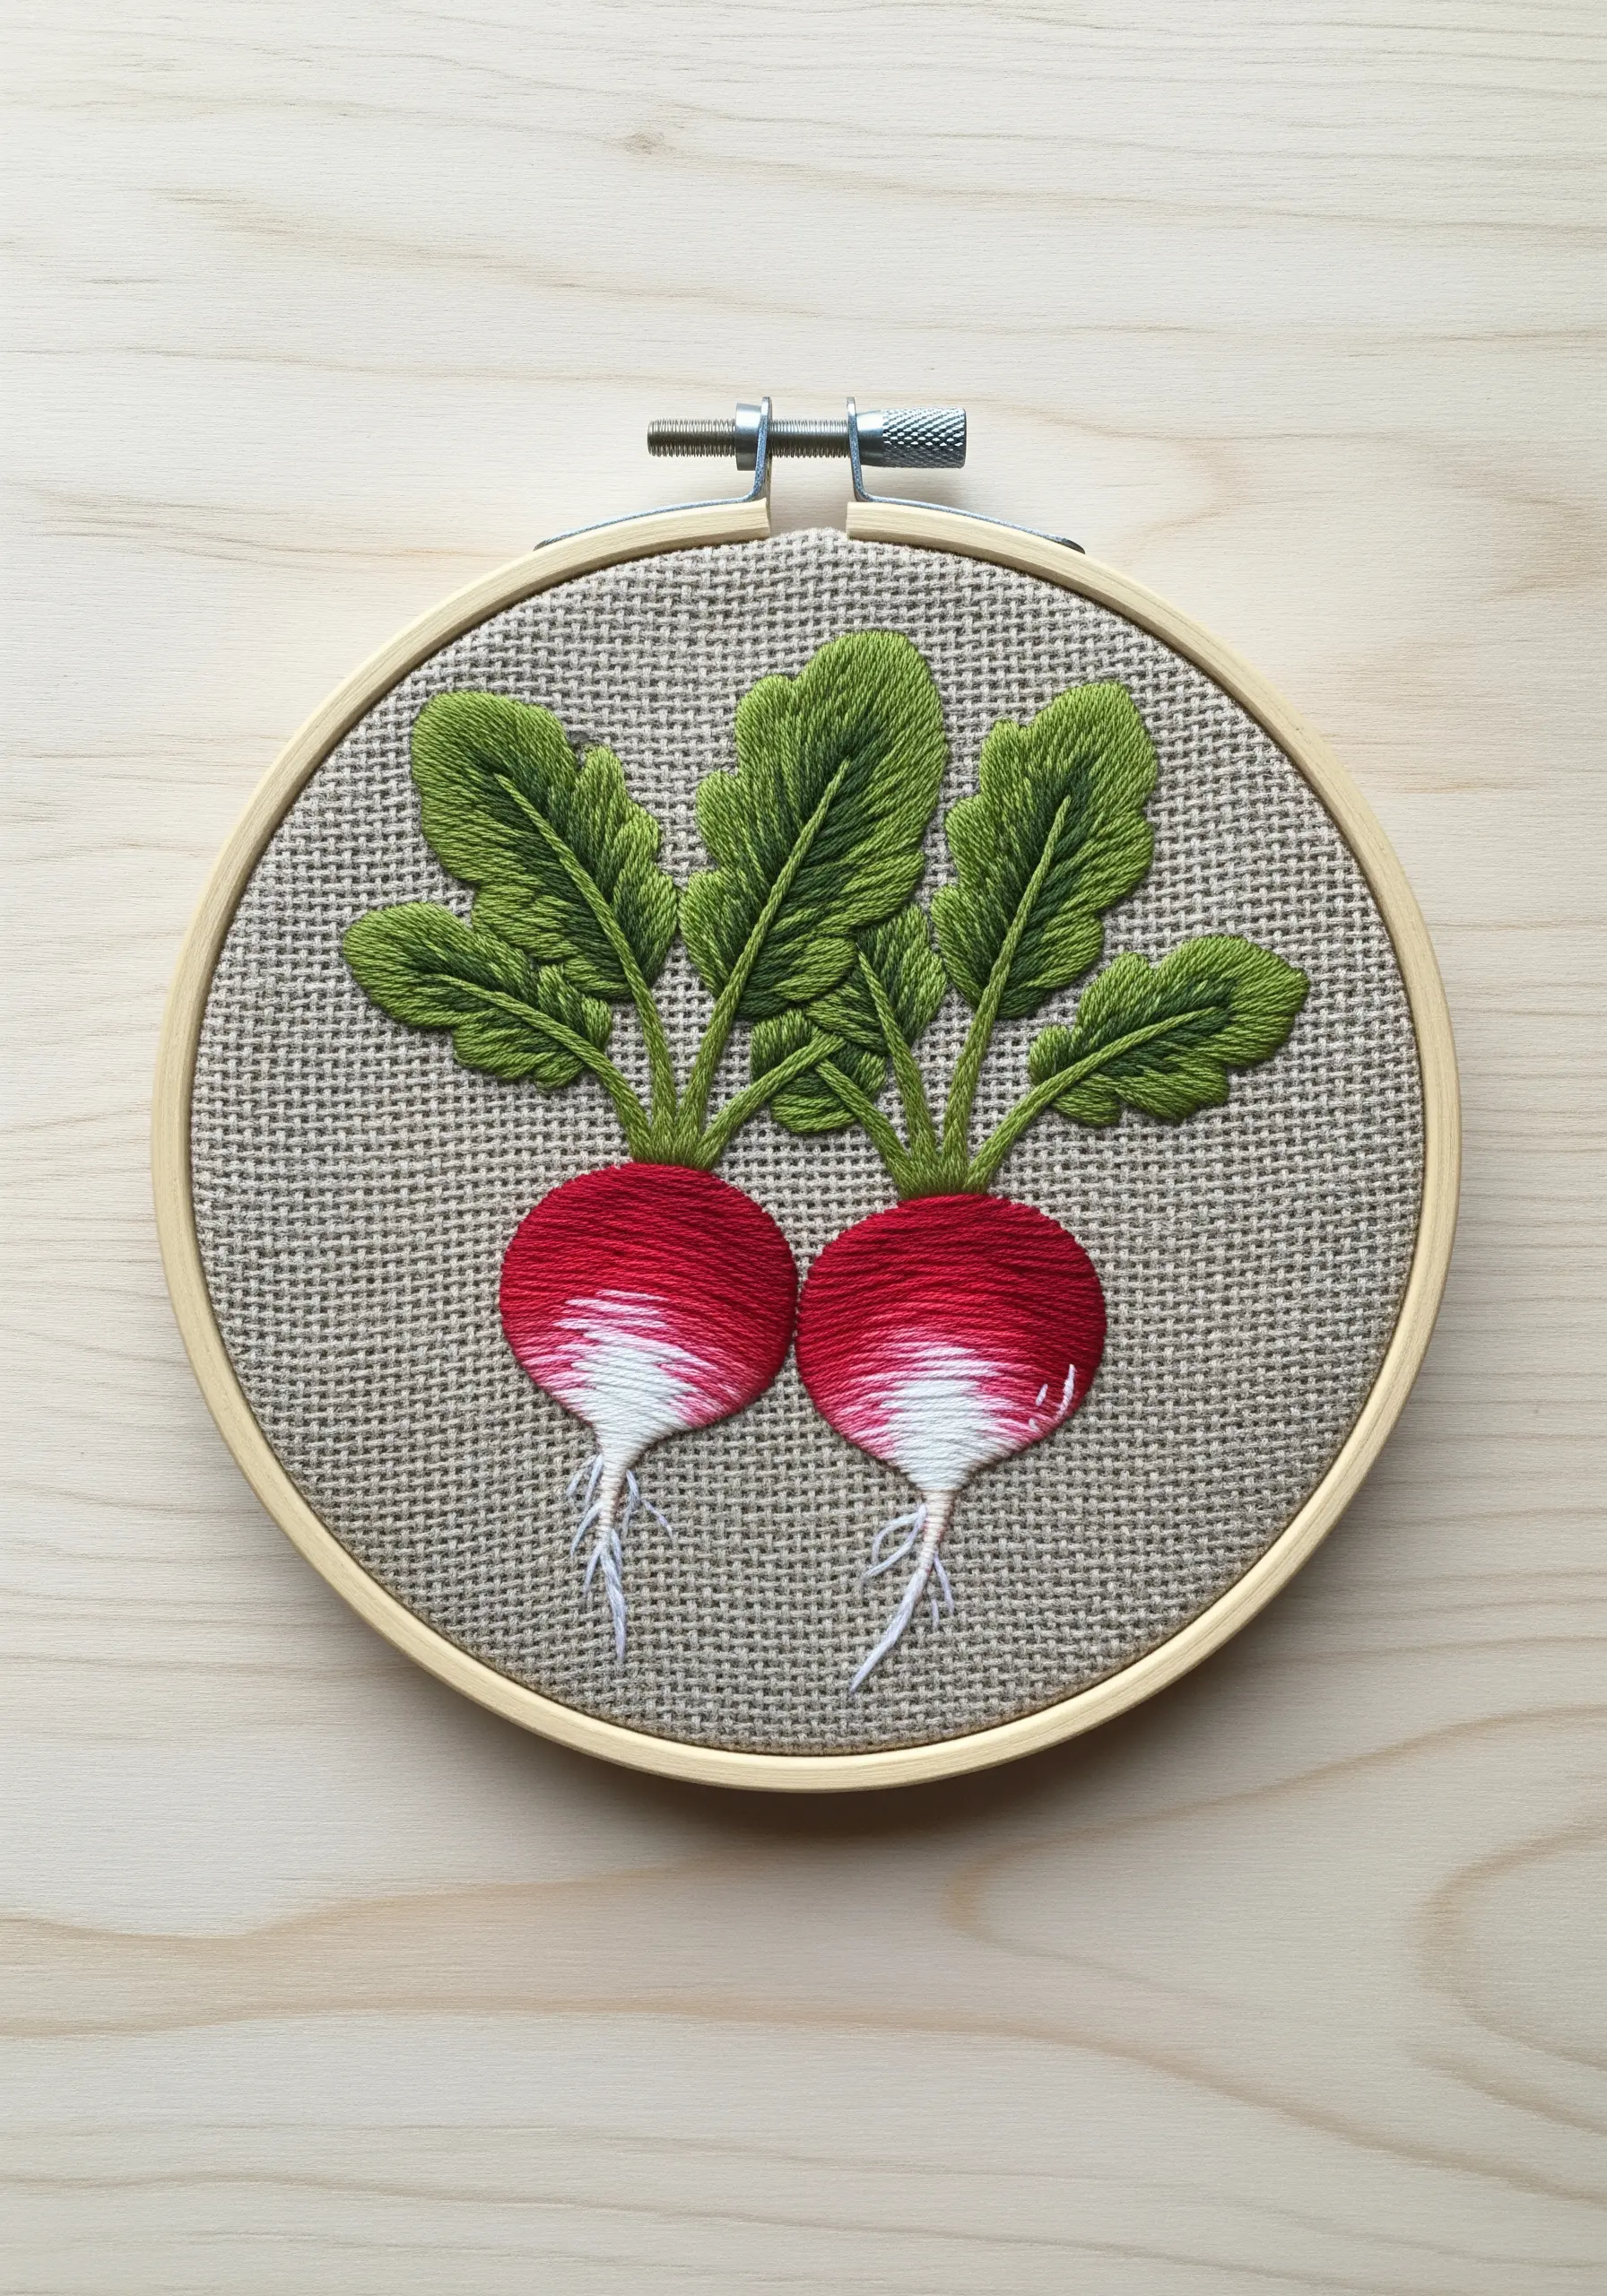
Capturing the transition from the deep red of a radish to its white root requires careful thread blending.
Use a split stitch or long-and-short stitch to merge the colors gradually, avoiding harsh stripes.
The leafy greens should be stitched with a looser tension to give them volume and a slightly ruffled appearance.
13. Iconic red stand mixer
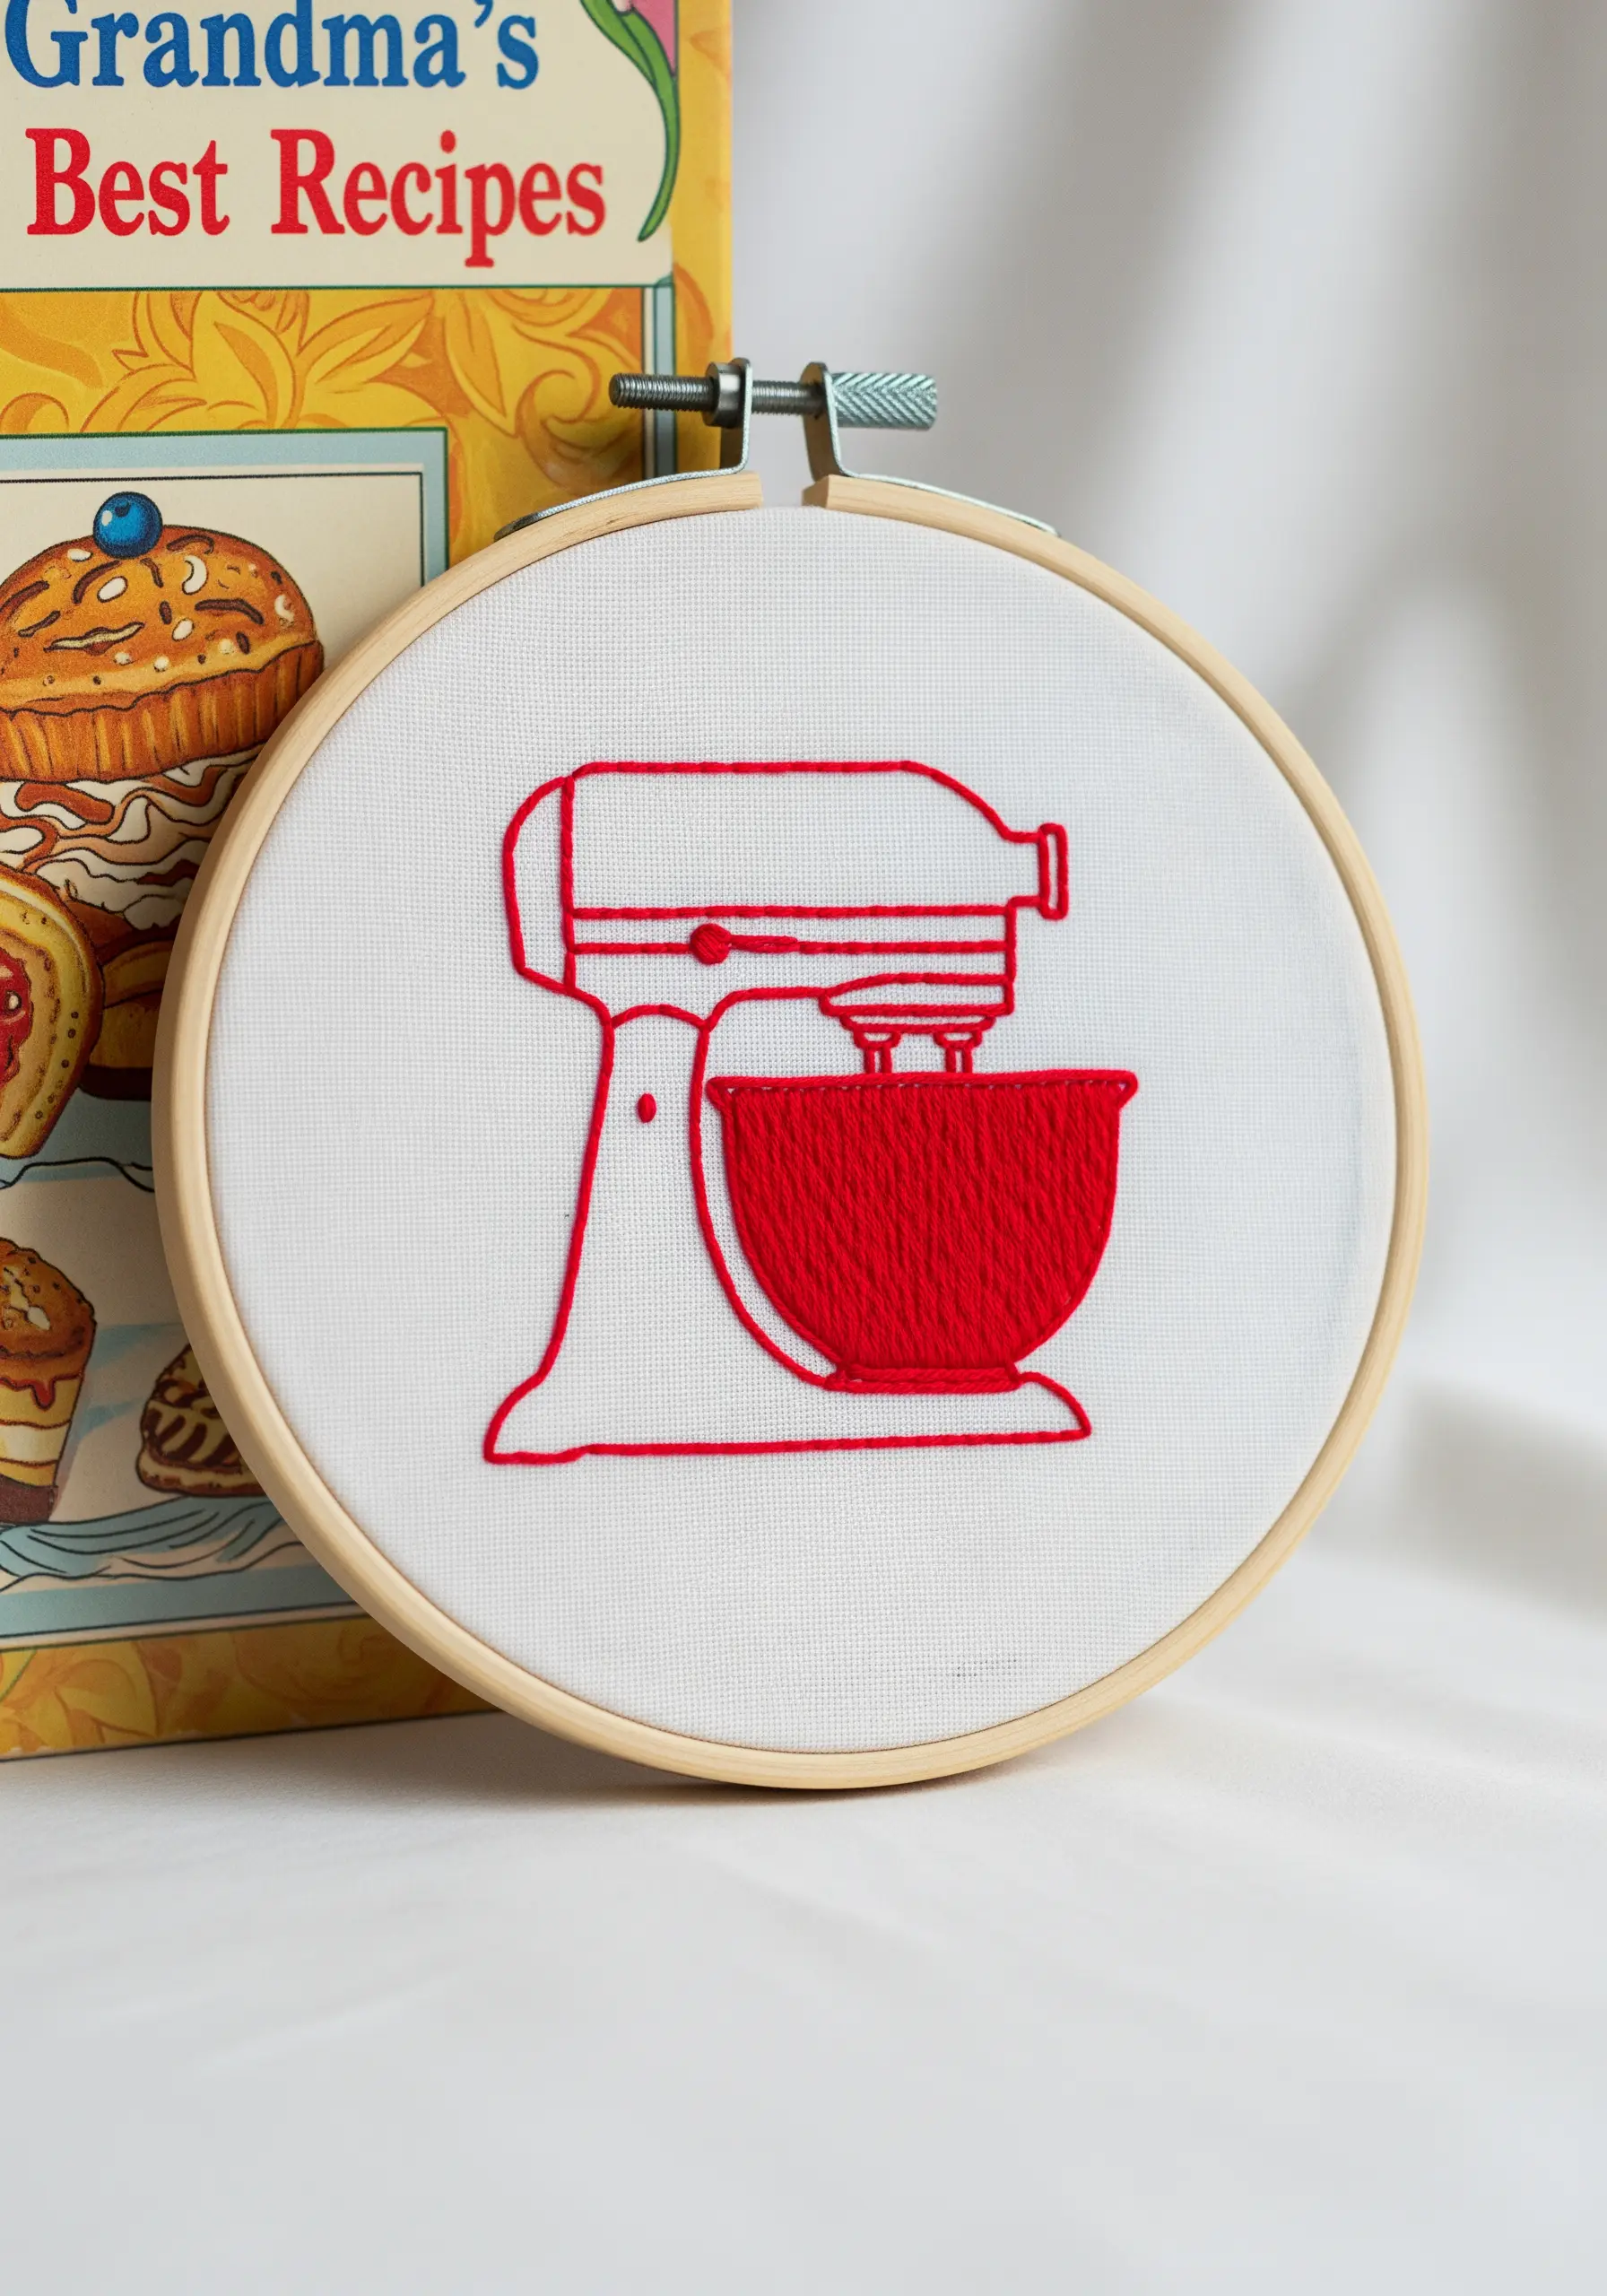
A bold, single-color outline makes a strong graphic statement, perfect for modern kitchen decor.
The key here is line weight consistency; use two or three strands of floss to ensure the line is thick enough to stand out against the white canvas.
Pay attention to the negative space—the areas you don’t stitch define the appliance’s curves just as much as the thread does.
14. Stumpwork fried egg

To make the yolk pop, you need to build height using a technique called stumpwork or padding.
Stitch a small felt circle underneath the yolk area before covering it with satin stitch; this creates a physical dome.
The white outline can be a simple chain stitch, keeping the focus entirely on the dimensional, golden center.
15. Etched salt shaker
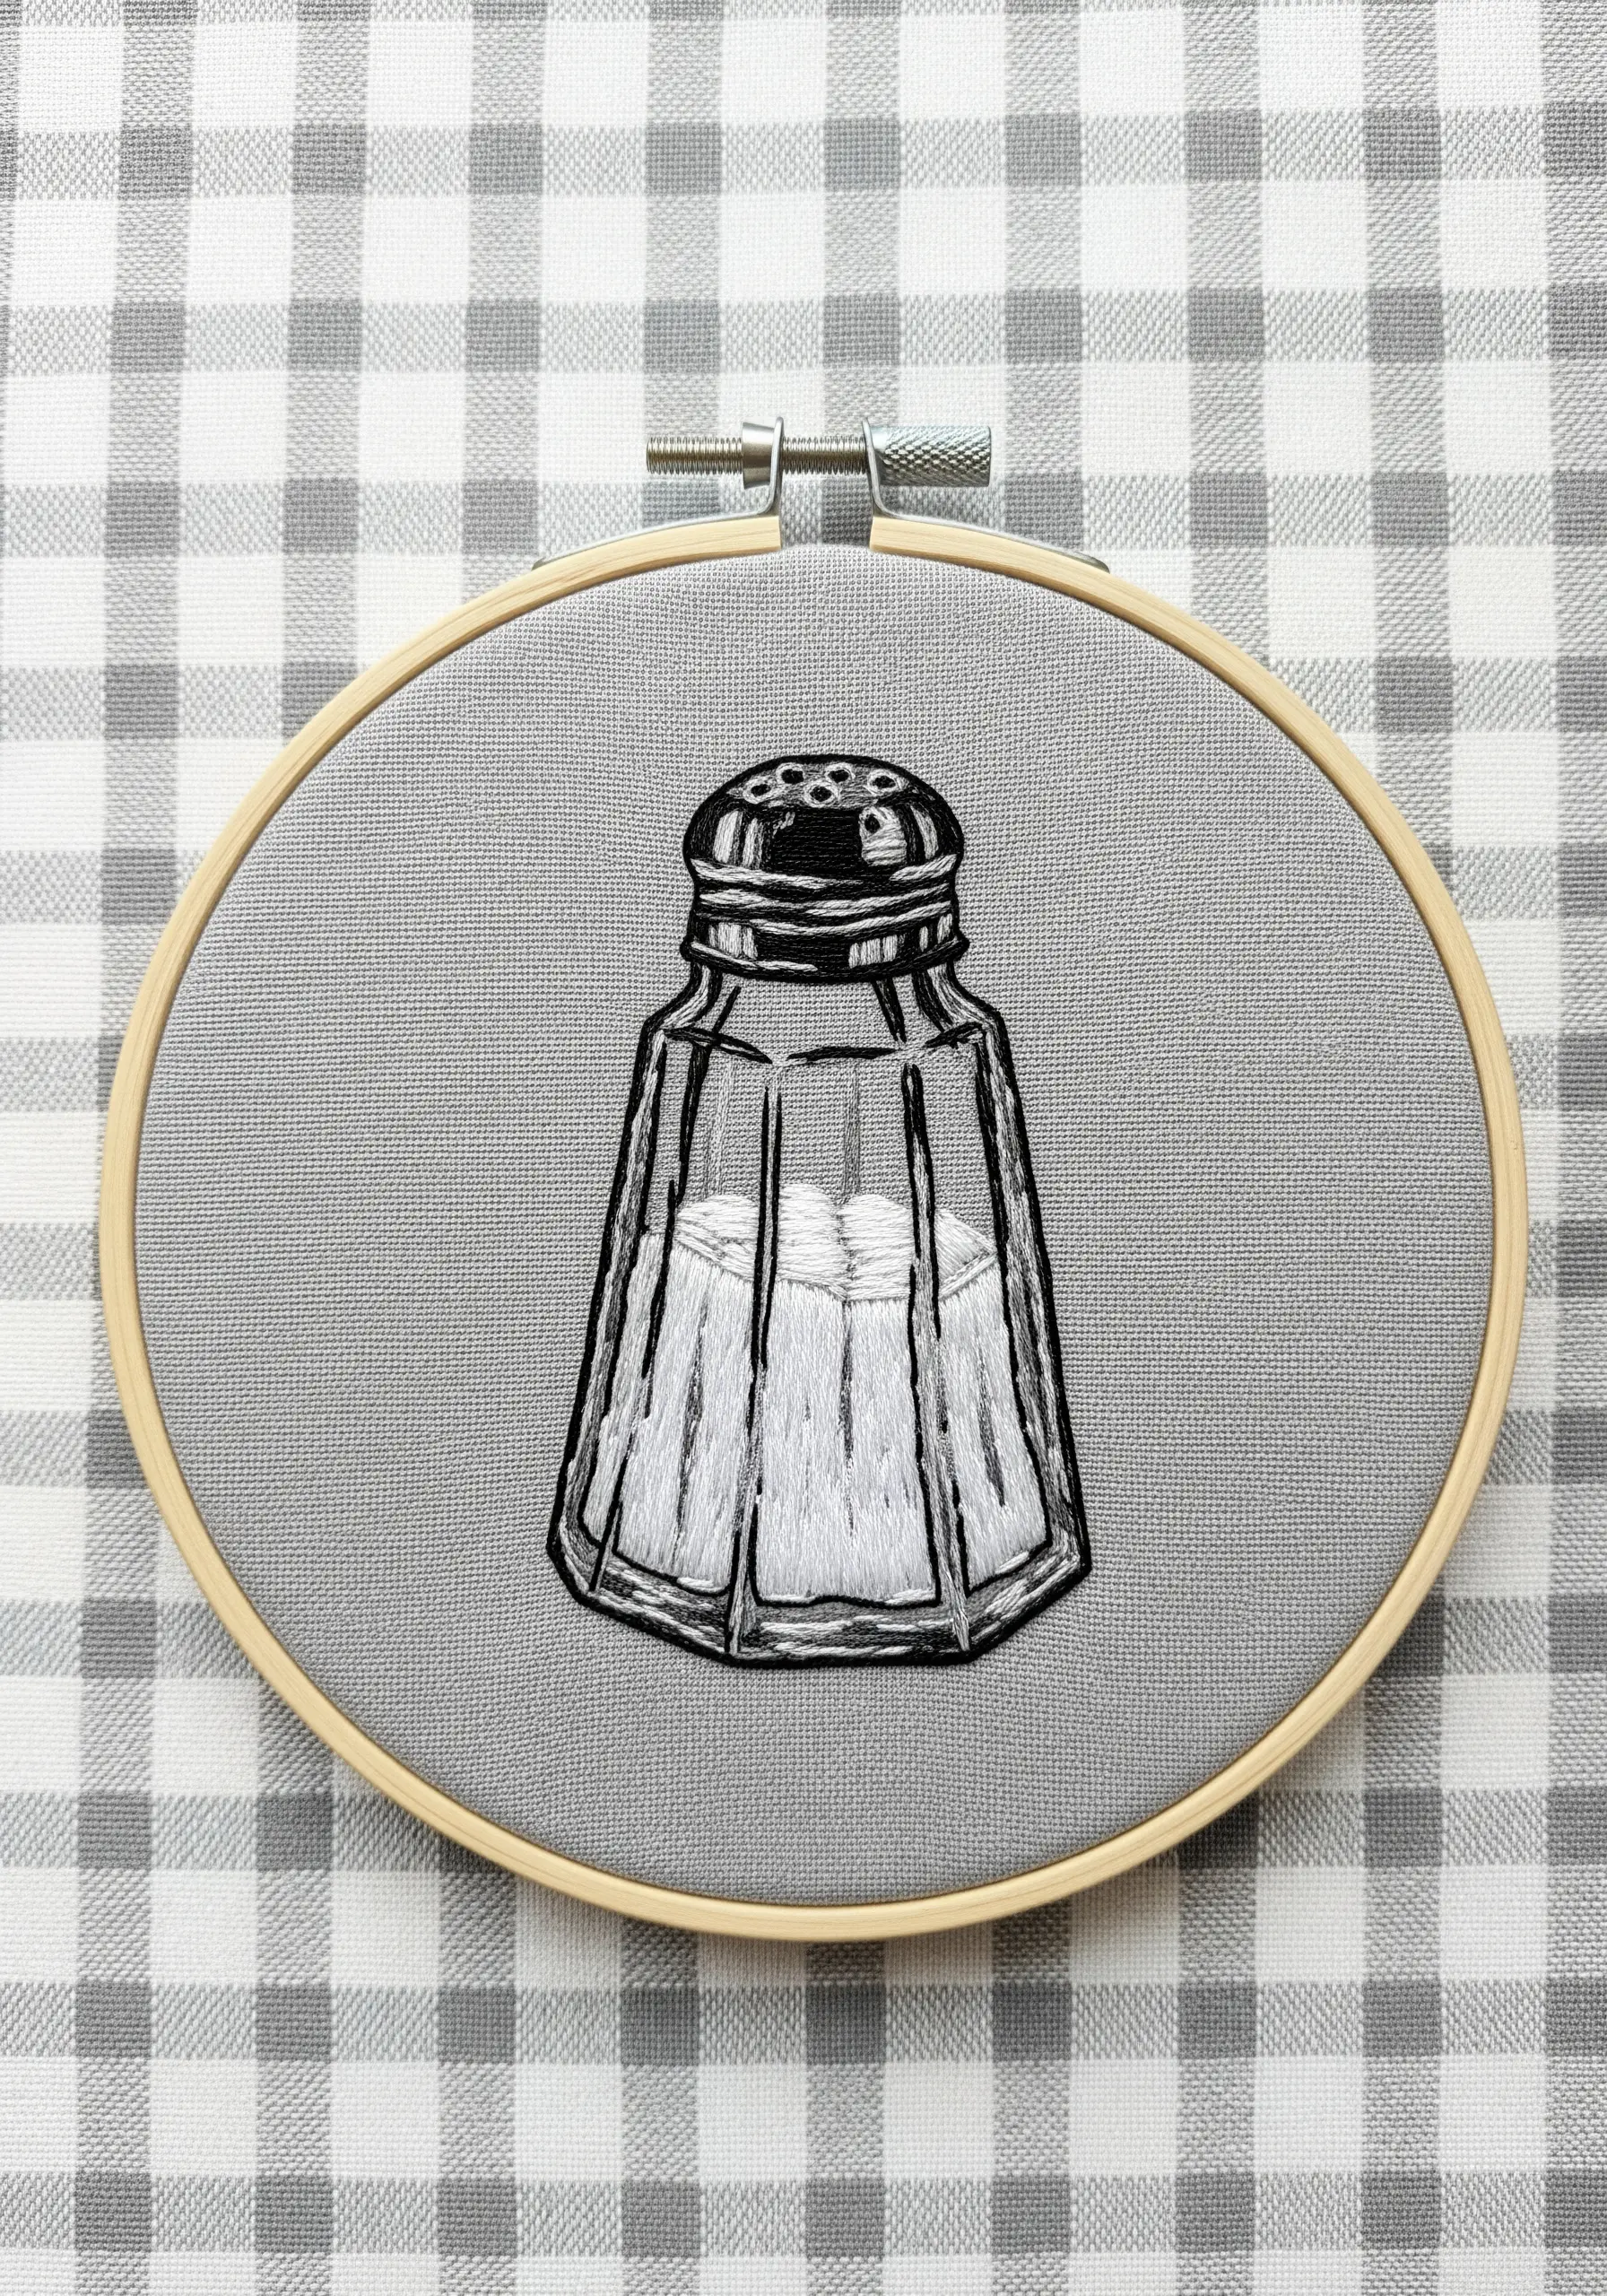
This style mimics the cross-hatching found in vintage engravings and newspaper illustrations.
Use a single strand of black thread to create the shading; closer lines create shadows, while wider spacing creates highlights.
This technique is perfect for rendering glass, as it allows you to depict transparency and reflection without complex color blending.
16. Seed stitch baguette

Bread crust has a unique, stippled texture that is perfectly replicated by the seed stitch.
Scatter tiny, random stitches in shades of tan, beige, and brown to build up the surface of the baguette.
Reserve your satin stitch for the deep ‘scores’ in the bread, using a darker brown to show the depth of the cuts.
17. Lush potted herbs

When stitching a cluster of leaves, vary the direction of your stitches to separate the foliage visually.
Use the fishbone stitch for the larger leaves to create a central spine, giving the plant structure and flow.
For the terracotta pot, vertical satin stitches provide a smooth, solid contrast to the organic, textured greenery above.
18. High contrast kettle
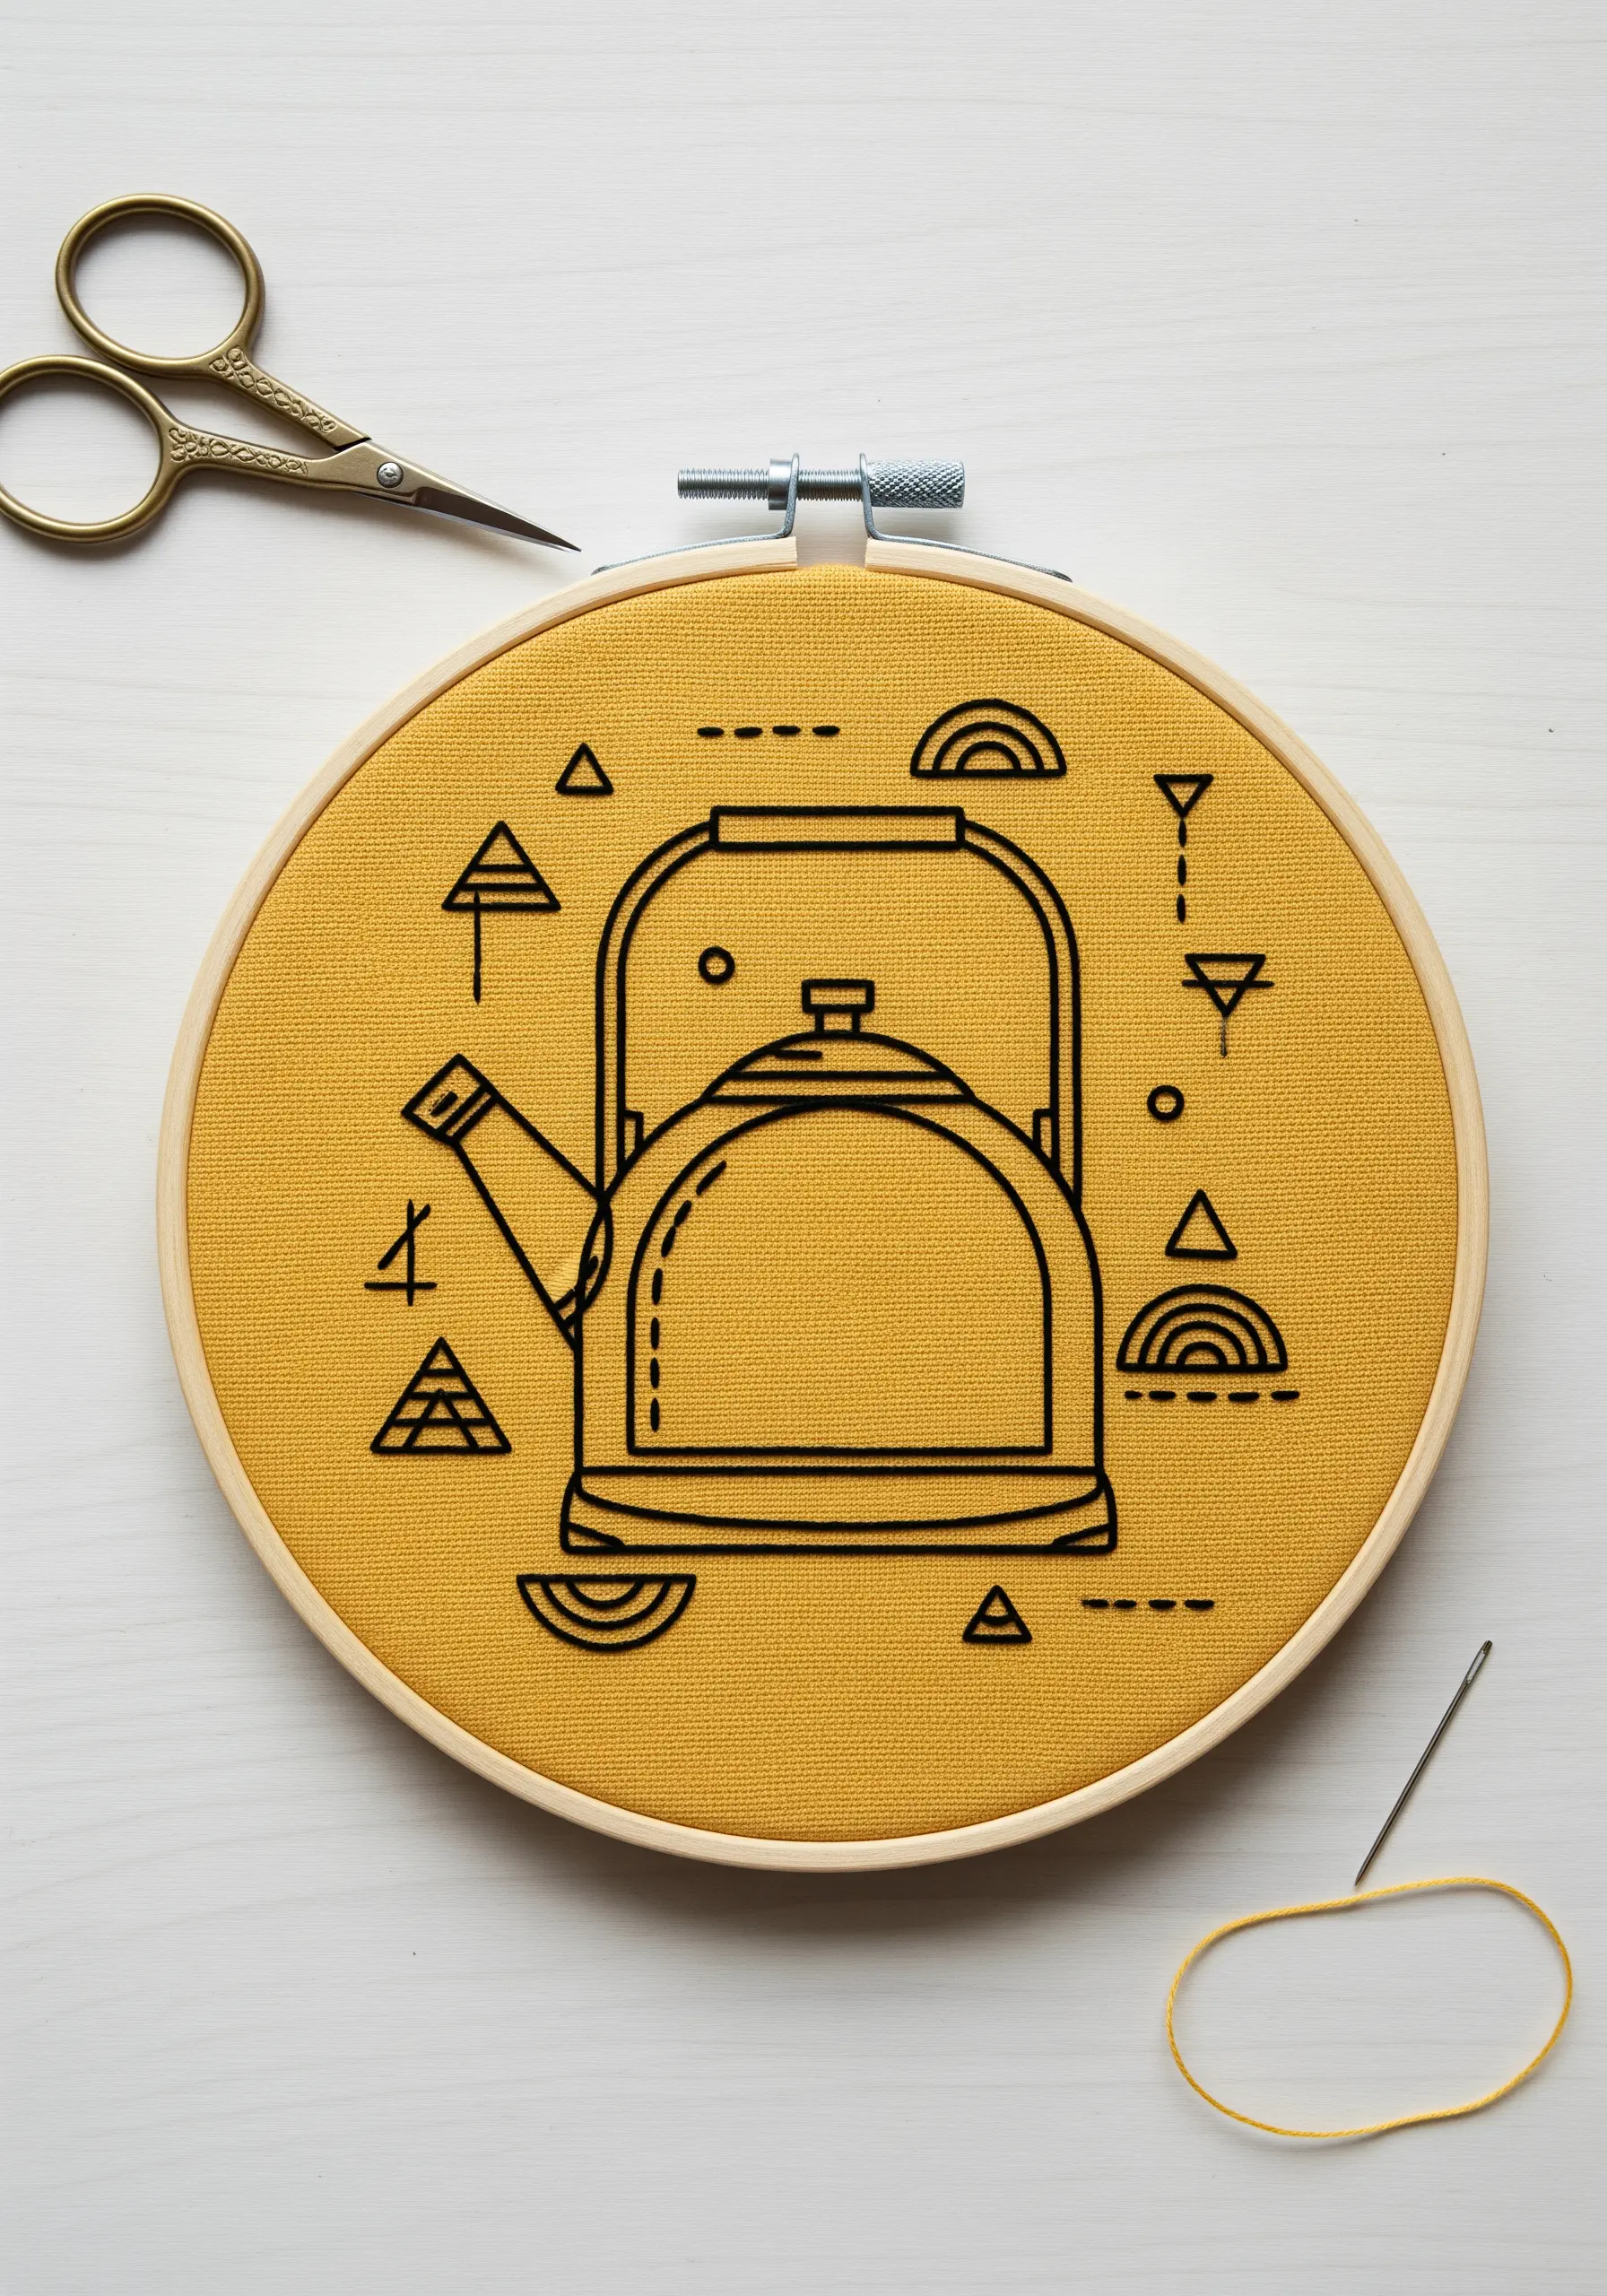
Sometimes the fabric choice does the heavy lifting; here, a mustard yellow fabric acts as the kettle’s body color.
Your job is to act as the illustrator, adding the black outlines and details to define the shape.
This is effectively ‘reverse coloring’—you are stitching the shadows and edges, letting the fabric provide the fill.
19. Textured beehive and honey
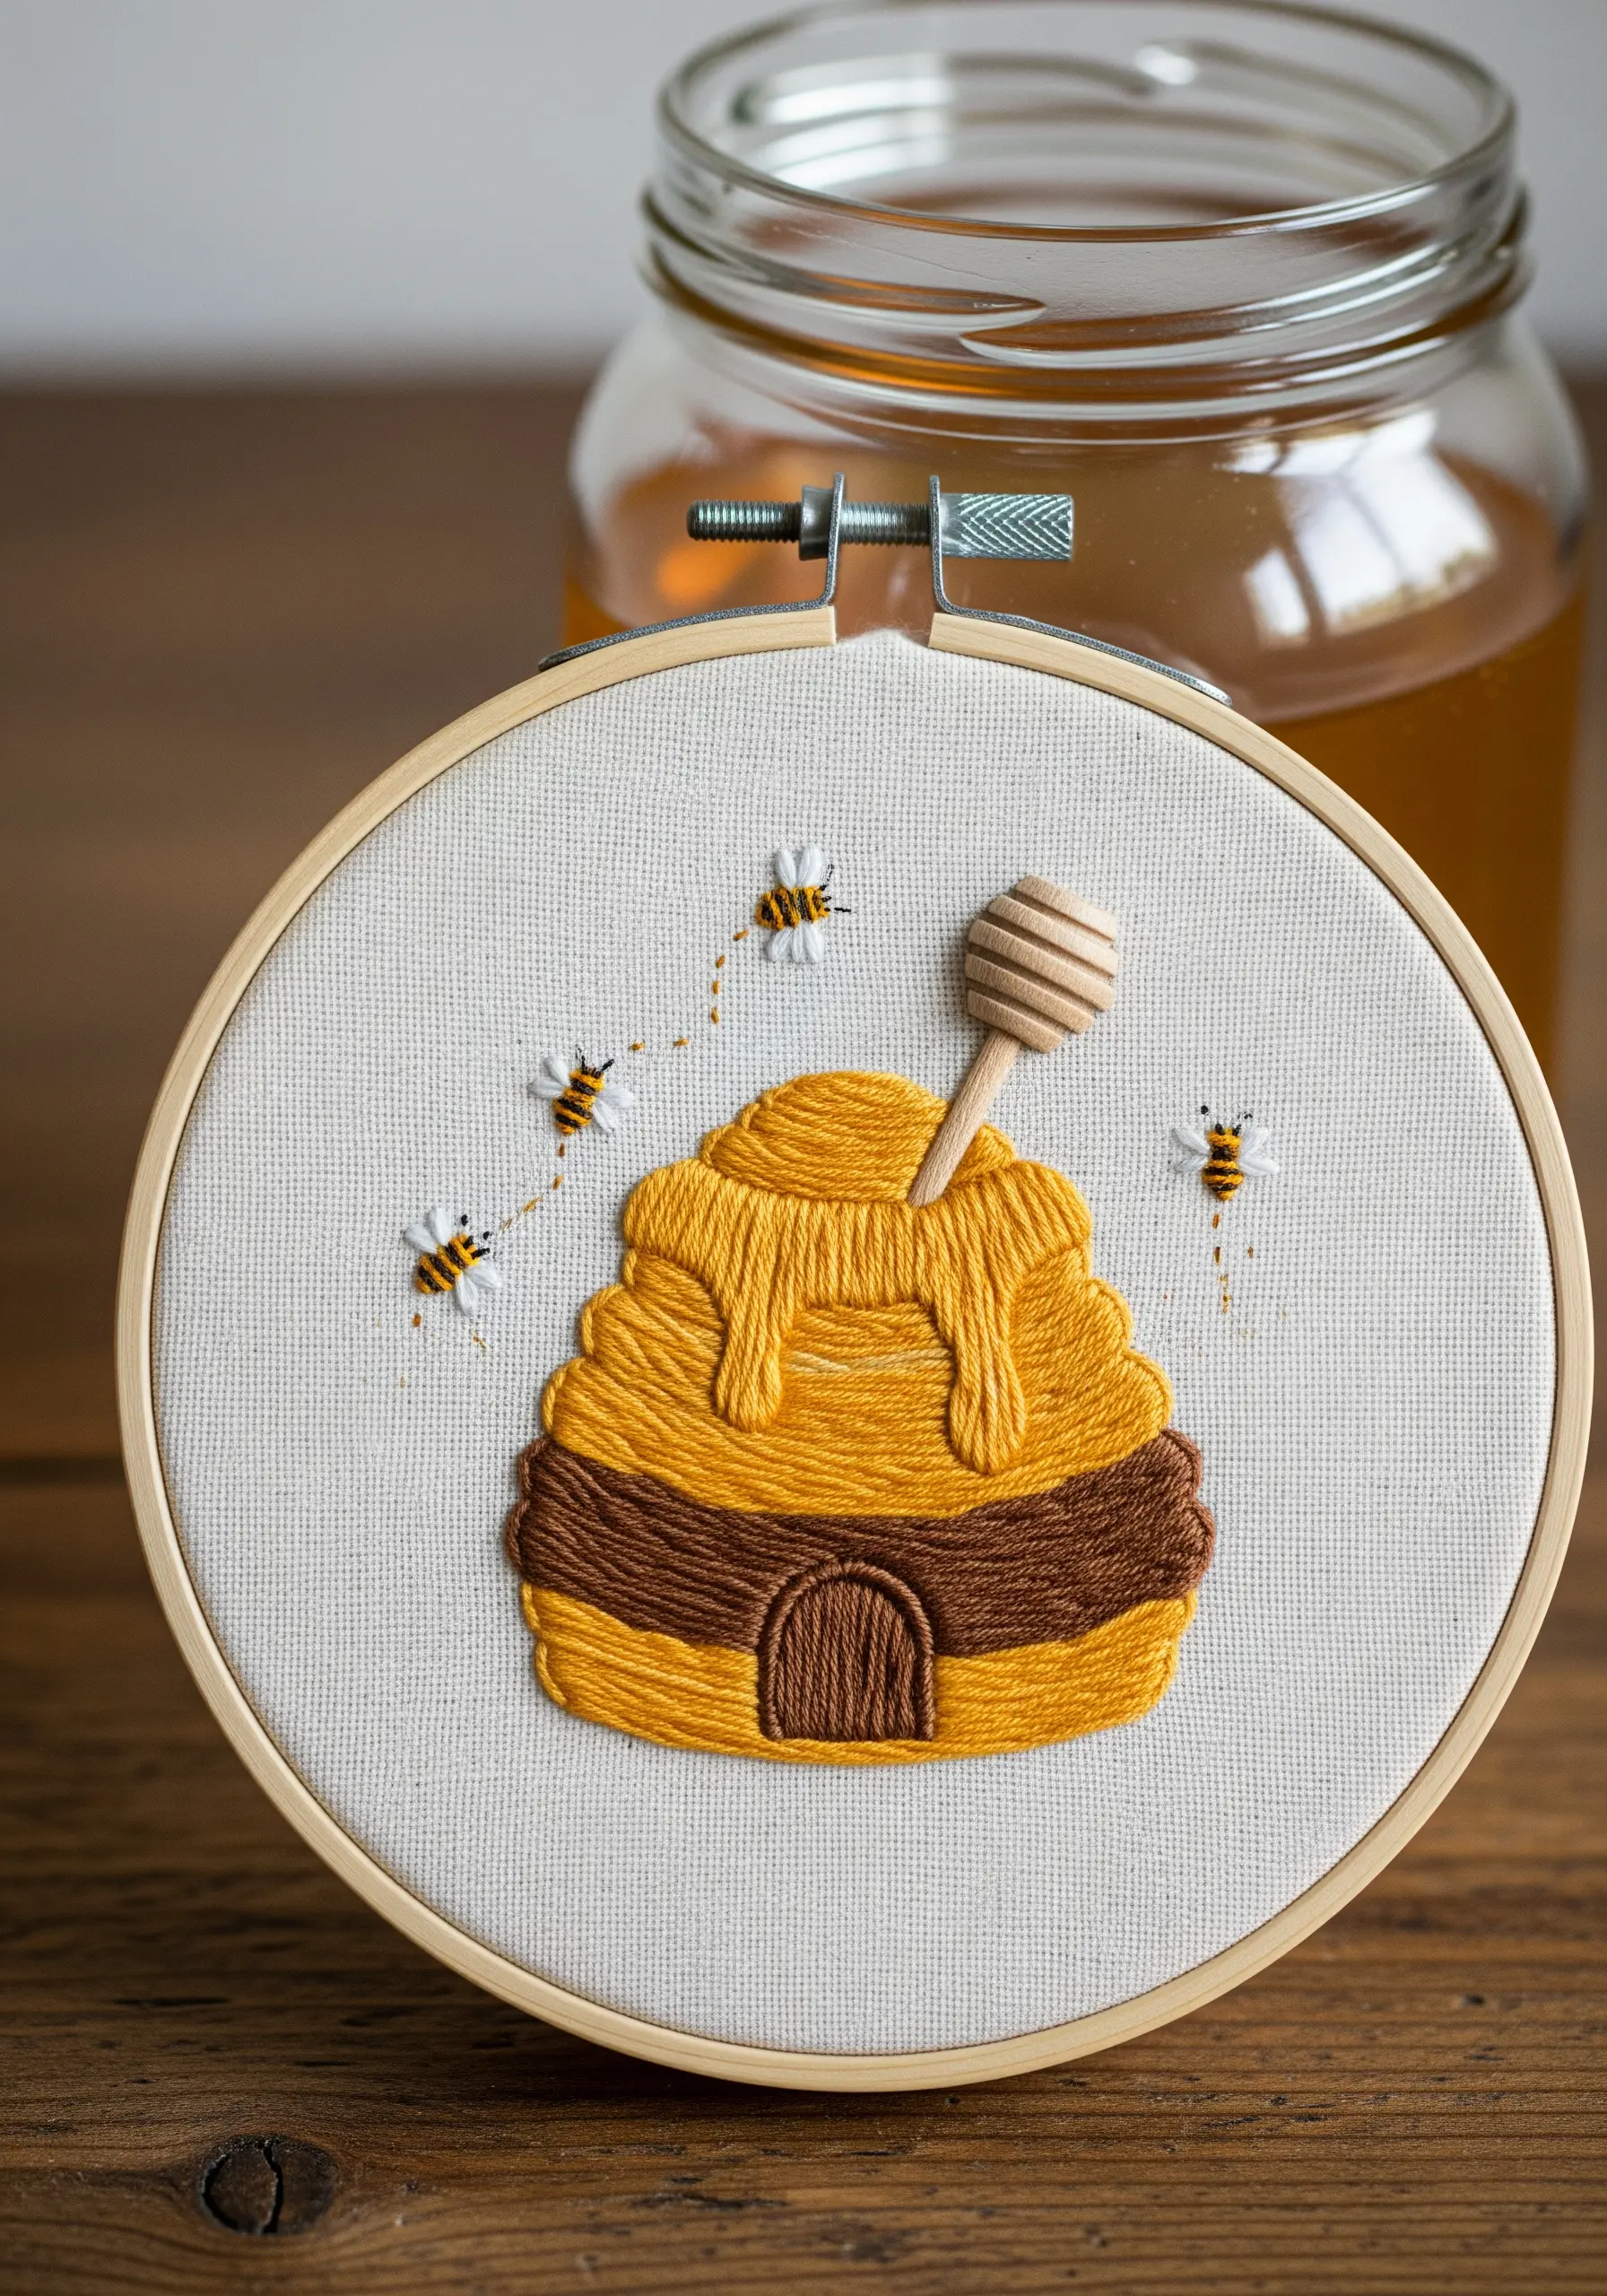
This design is all about tactile sensation; use bullion knots or heavy chain stitches to build the ridges of the beehive.
For the honey dipper, a smooth satin stitch in a lighter wood tone creates a nice contrast against the textured hive.
Add tiny detached fly stitches for the bees’ wings to give them a sense of flutter and movement.
20. Earthy mushroom duo

Mushrooms offer a wonderful opportunity to practice radial shading on the caps.
Work your stitches from the center of the cap outwards, blending rust and cream tones to show the curvature.
Using a dark green fabric ground grounds the design, making it feel like a snapshot of a forest floor.
21. Typography and wheat

Lettering requires patience; use a split stitch for the curves of the serif font to keep the edges smooth.
The wheat ears framing the text can be created with lazy daisy stitches, elongated and stacked to mimic the grain head.
This design combines thread-based typography ideas with simple botanical borders for a classic label look.


