

There’s a quiet connection between the ritual of making tea and the patient rhythm of embroidery. Both ask you to slow down, to focus on the details, and to create something warm and restorative with your own hands.
This collection is about translating that connection into thread. But instead of just showing you pretty pictures of herbal plants, I want to guide you to look closer. We’ll explore the specific stitches, color choices, and textural techniques that make these designs feel alive and authentic.
You’ll learn how to make a petal look soft, a leaf look realistic, and a berry look plump enough to pick. These are not just patterns; they are lessons in seeing, translating the quiet beauty of your favorite tea ingredients into art that feels personal, polished, and full of intention.
1. Capturing Chamomile’s Calm with Radial Satin Stitch
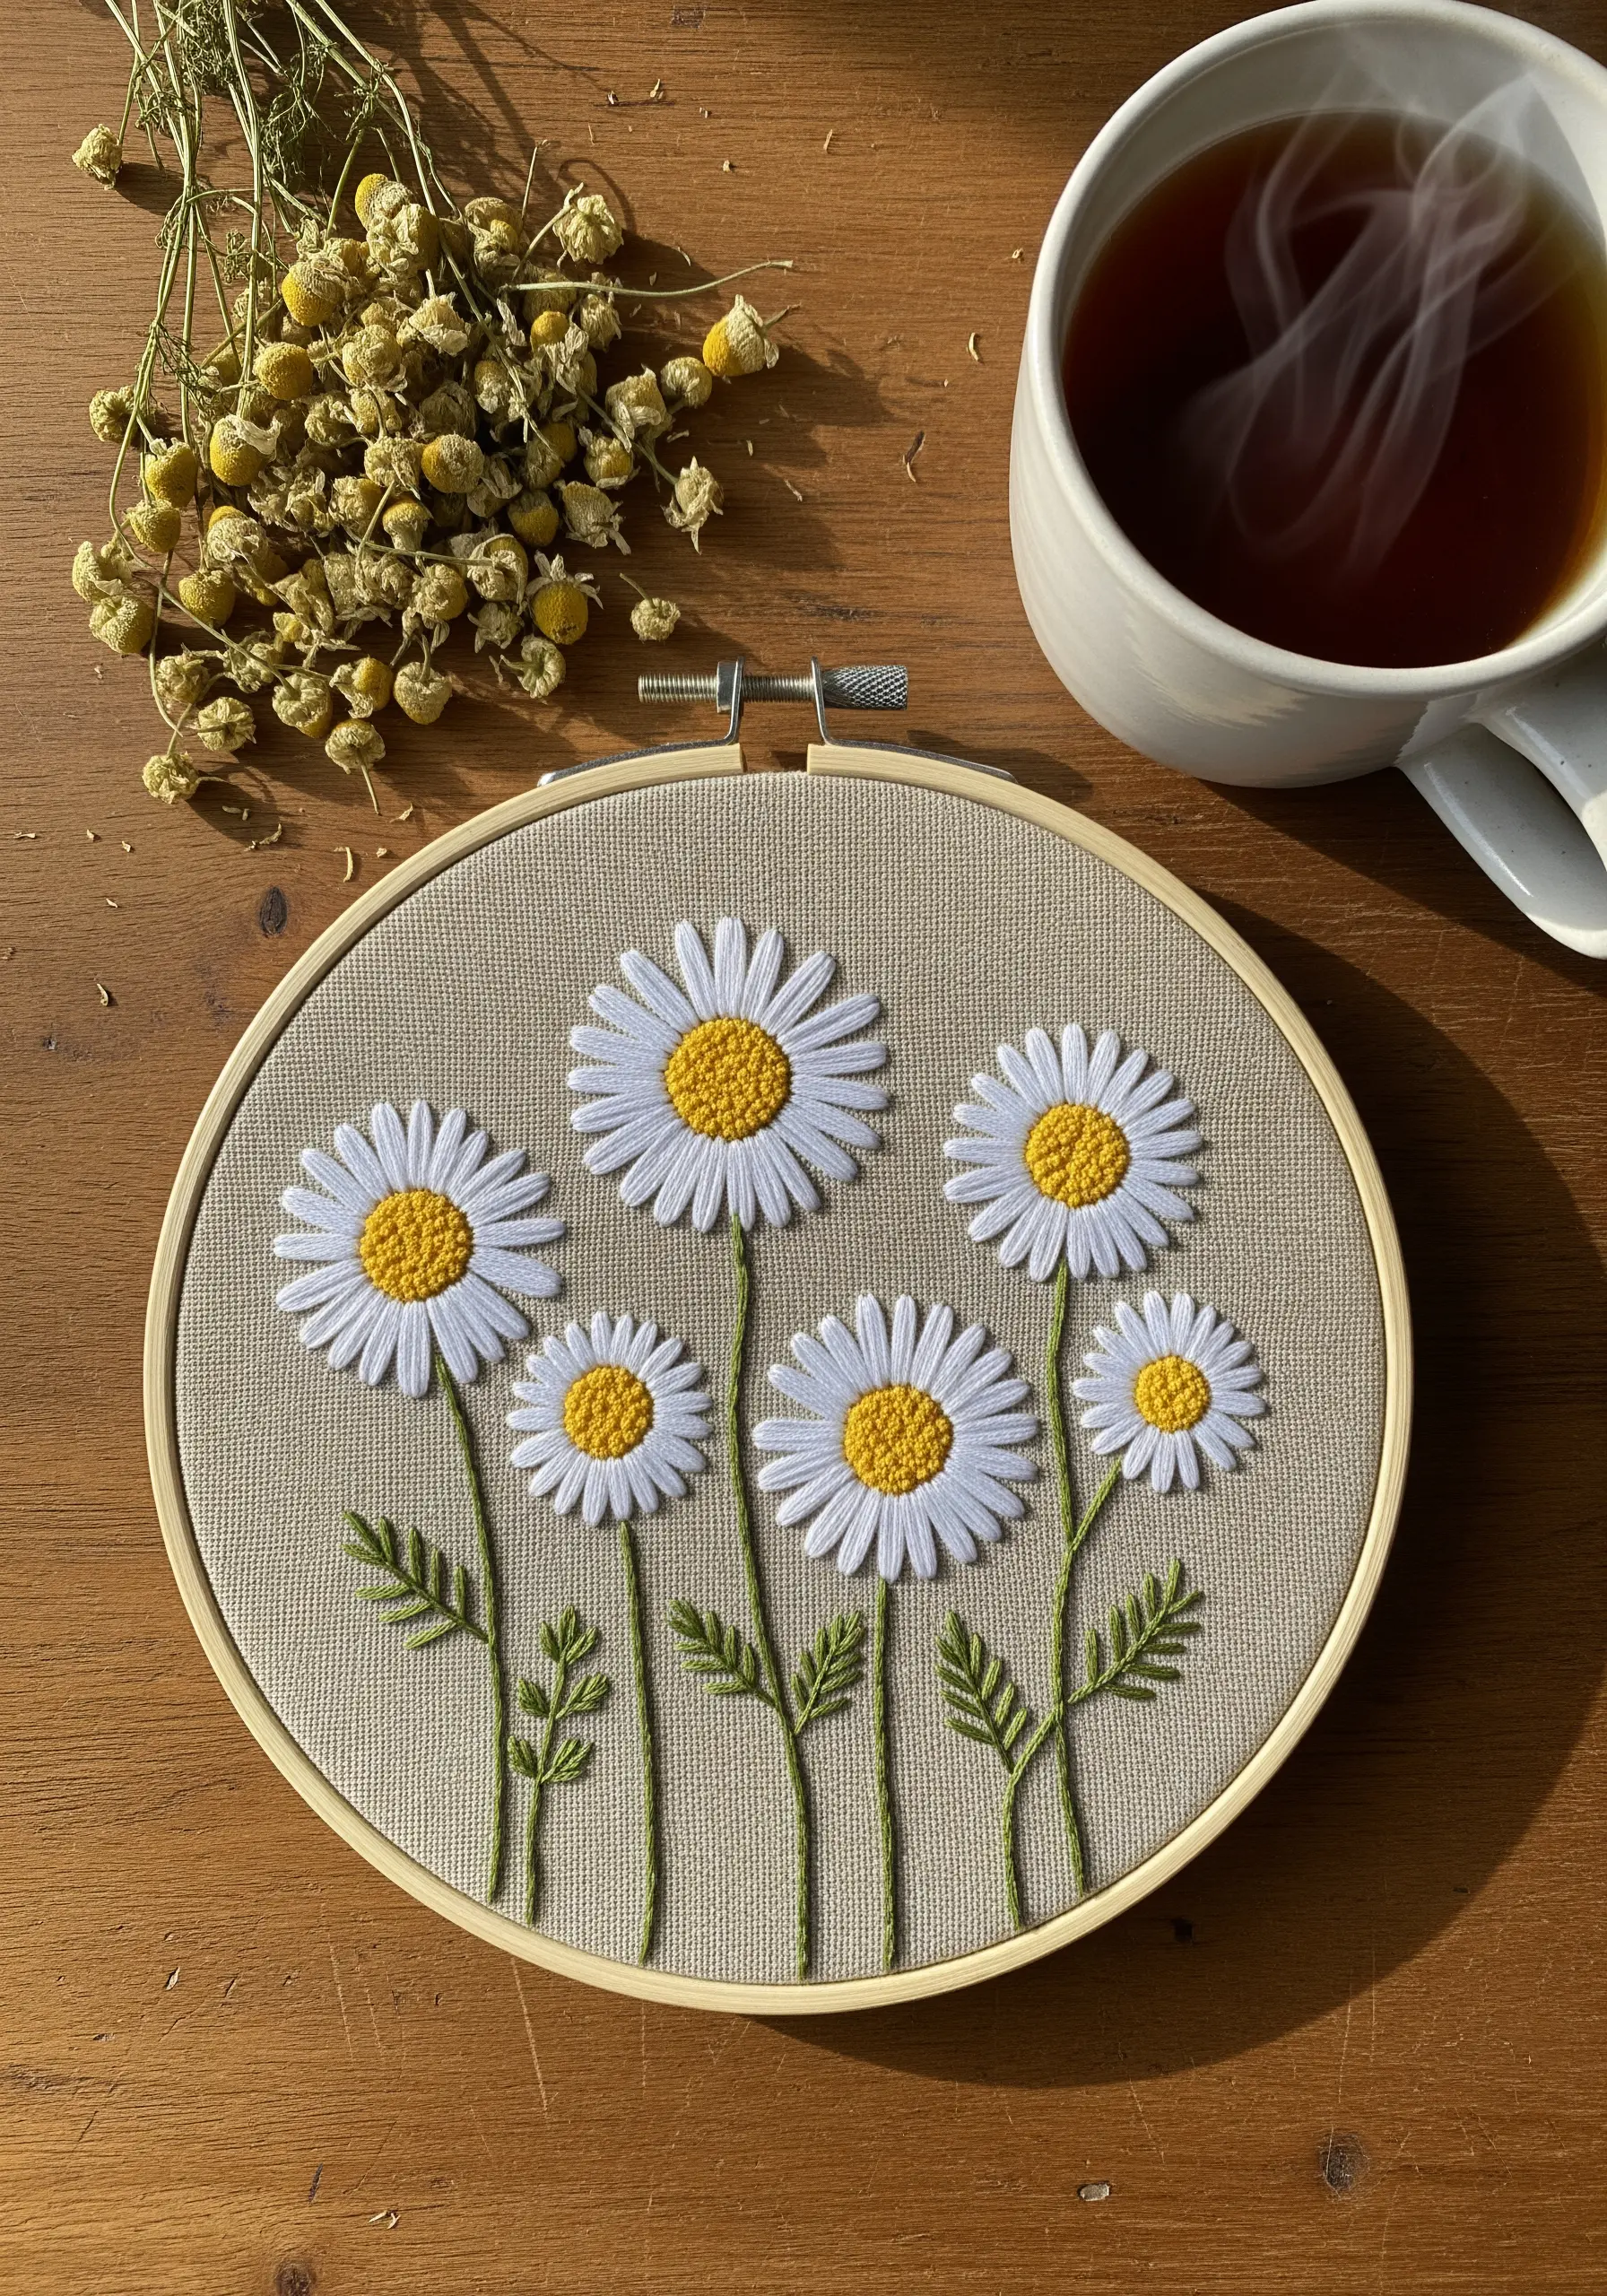
To give your chamomile petals that smooth, placid quality, work your satin stitches from the outer edge toward the center.
This radial direction ensures the threads lay flat and catch the light uniformly, creating a gentle sheen that contrasts beautifully with a textured center.
For the center, build up layers of French knots using two or three strands of a golden-yellow floss to mimic the dense pollen head.
Stitching on a neutral, textured fabric like linen or Osnaburg cotton enhances the design’s organic, rustic feel, making the white petals appear brighter.
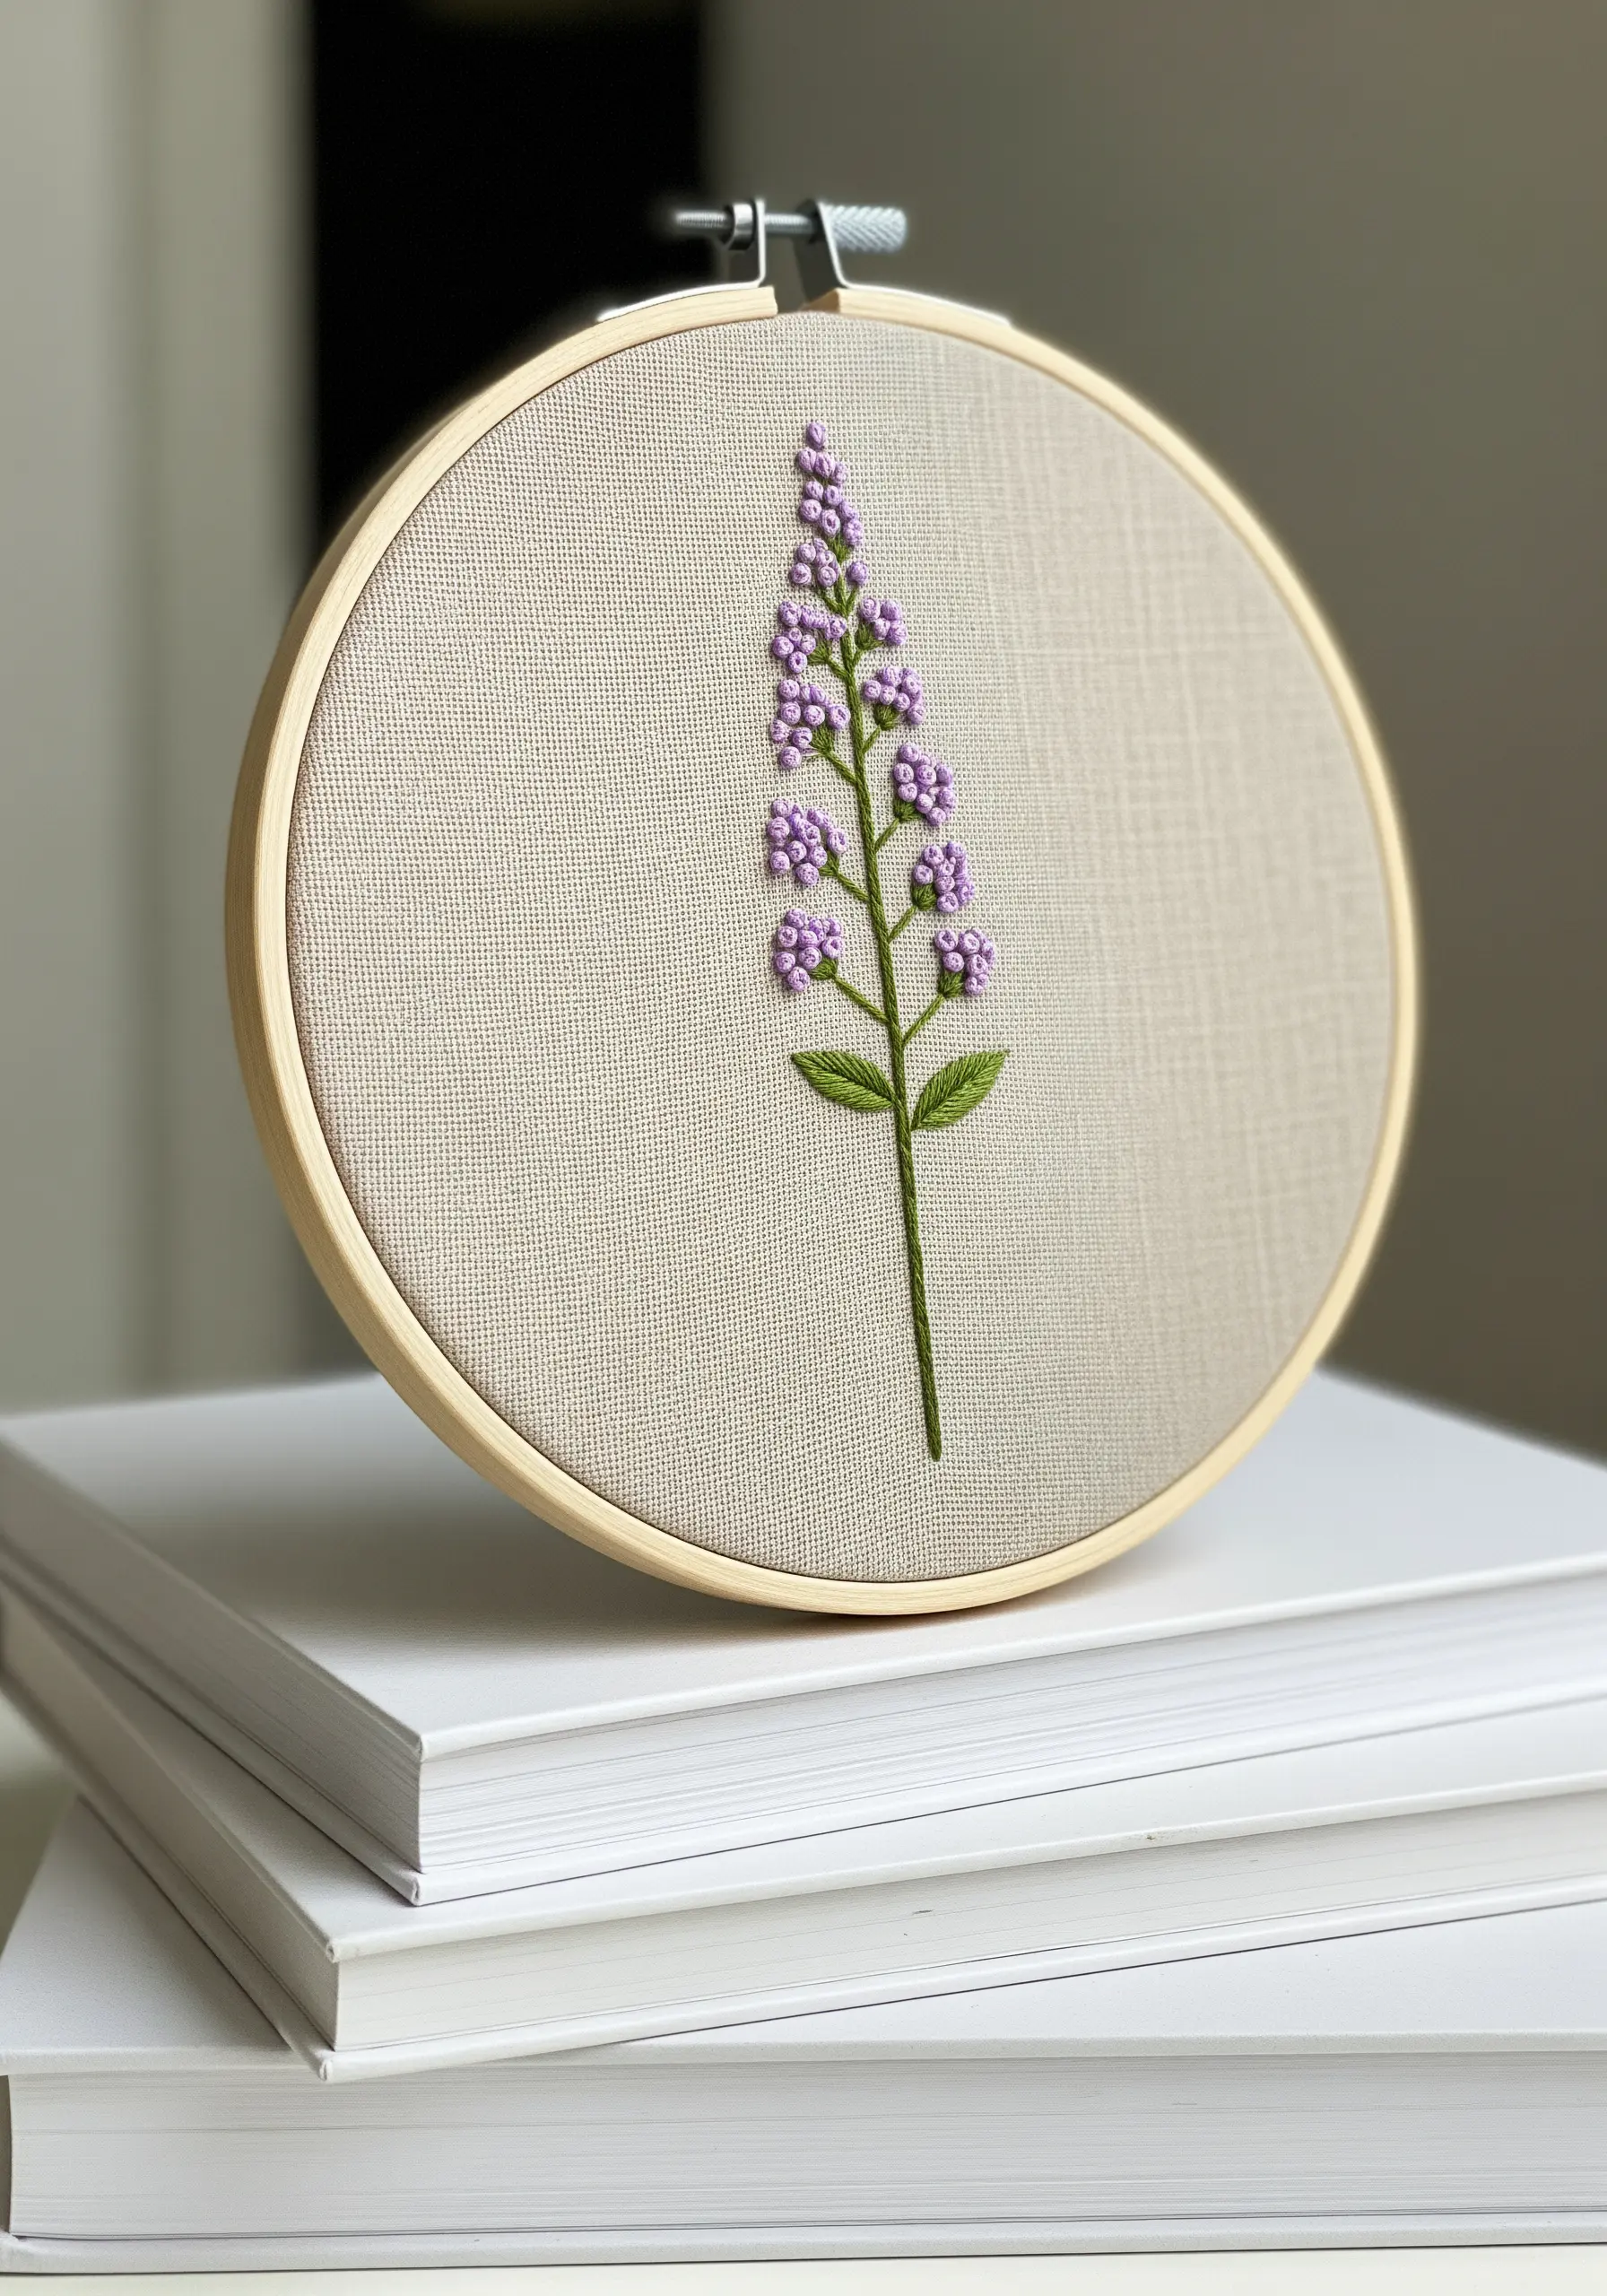
2. Building Lavender’s Texture with Bullion Knots

The key to realistic lavender sprigs is creating their signature bumpy texture without overwhelming the delicate stem.
Use bullion knots or stacked detached chain stitches for the individual florets, varying their angle slightly as you work up the stalk.
If bullion knots feel intimidating, you can achieve a similar effect by clustering tiny French knots together using two strands of floss.
The real elegance here comes from the composition—leaving ample negative space around each stalk allows the simple forms to feel graceful and intentional, perfect for lavender-field embroidery ideas.
3. Achieving Realistic Mint with Thread Painting
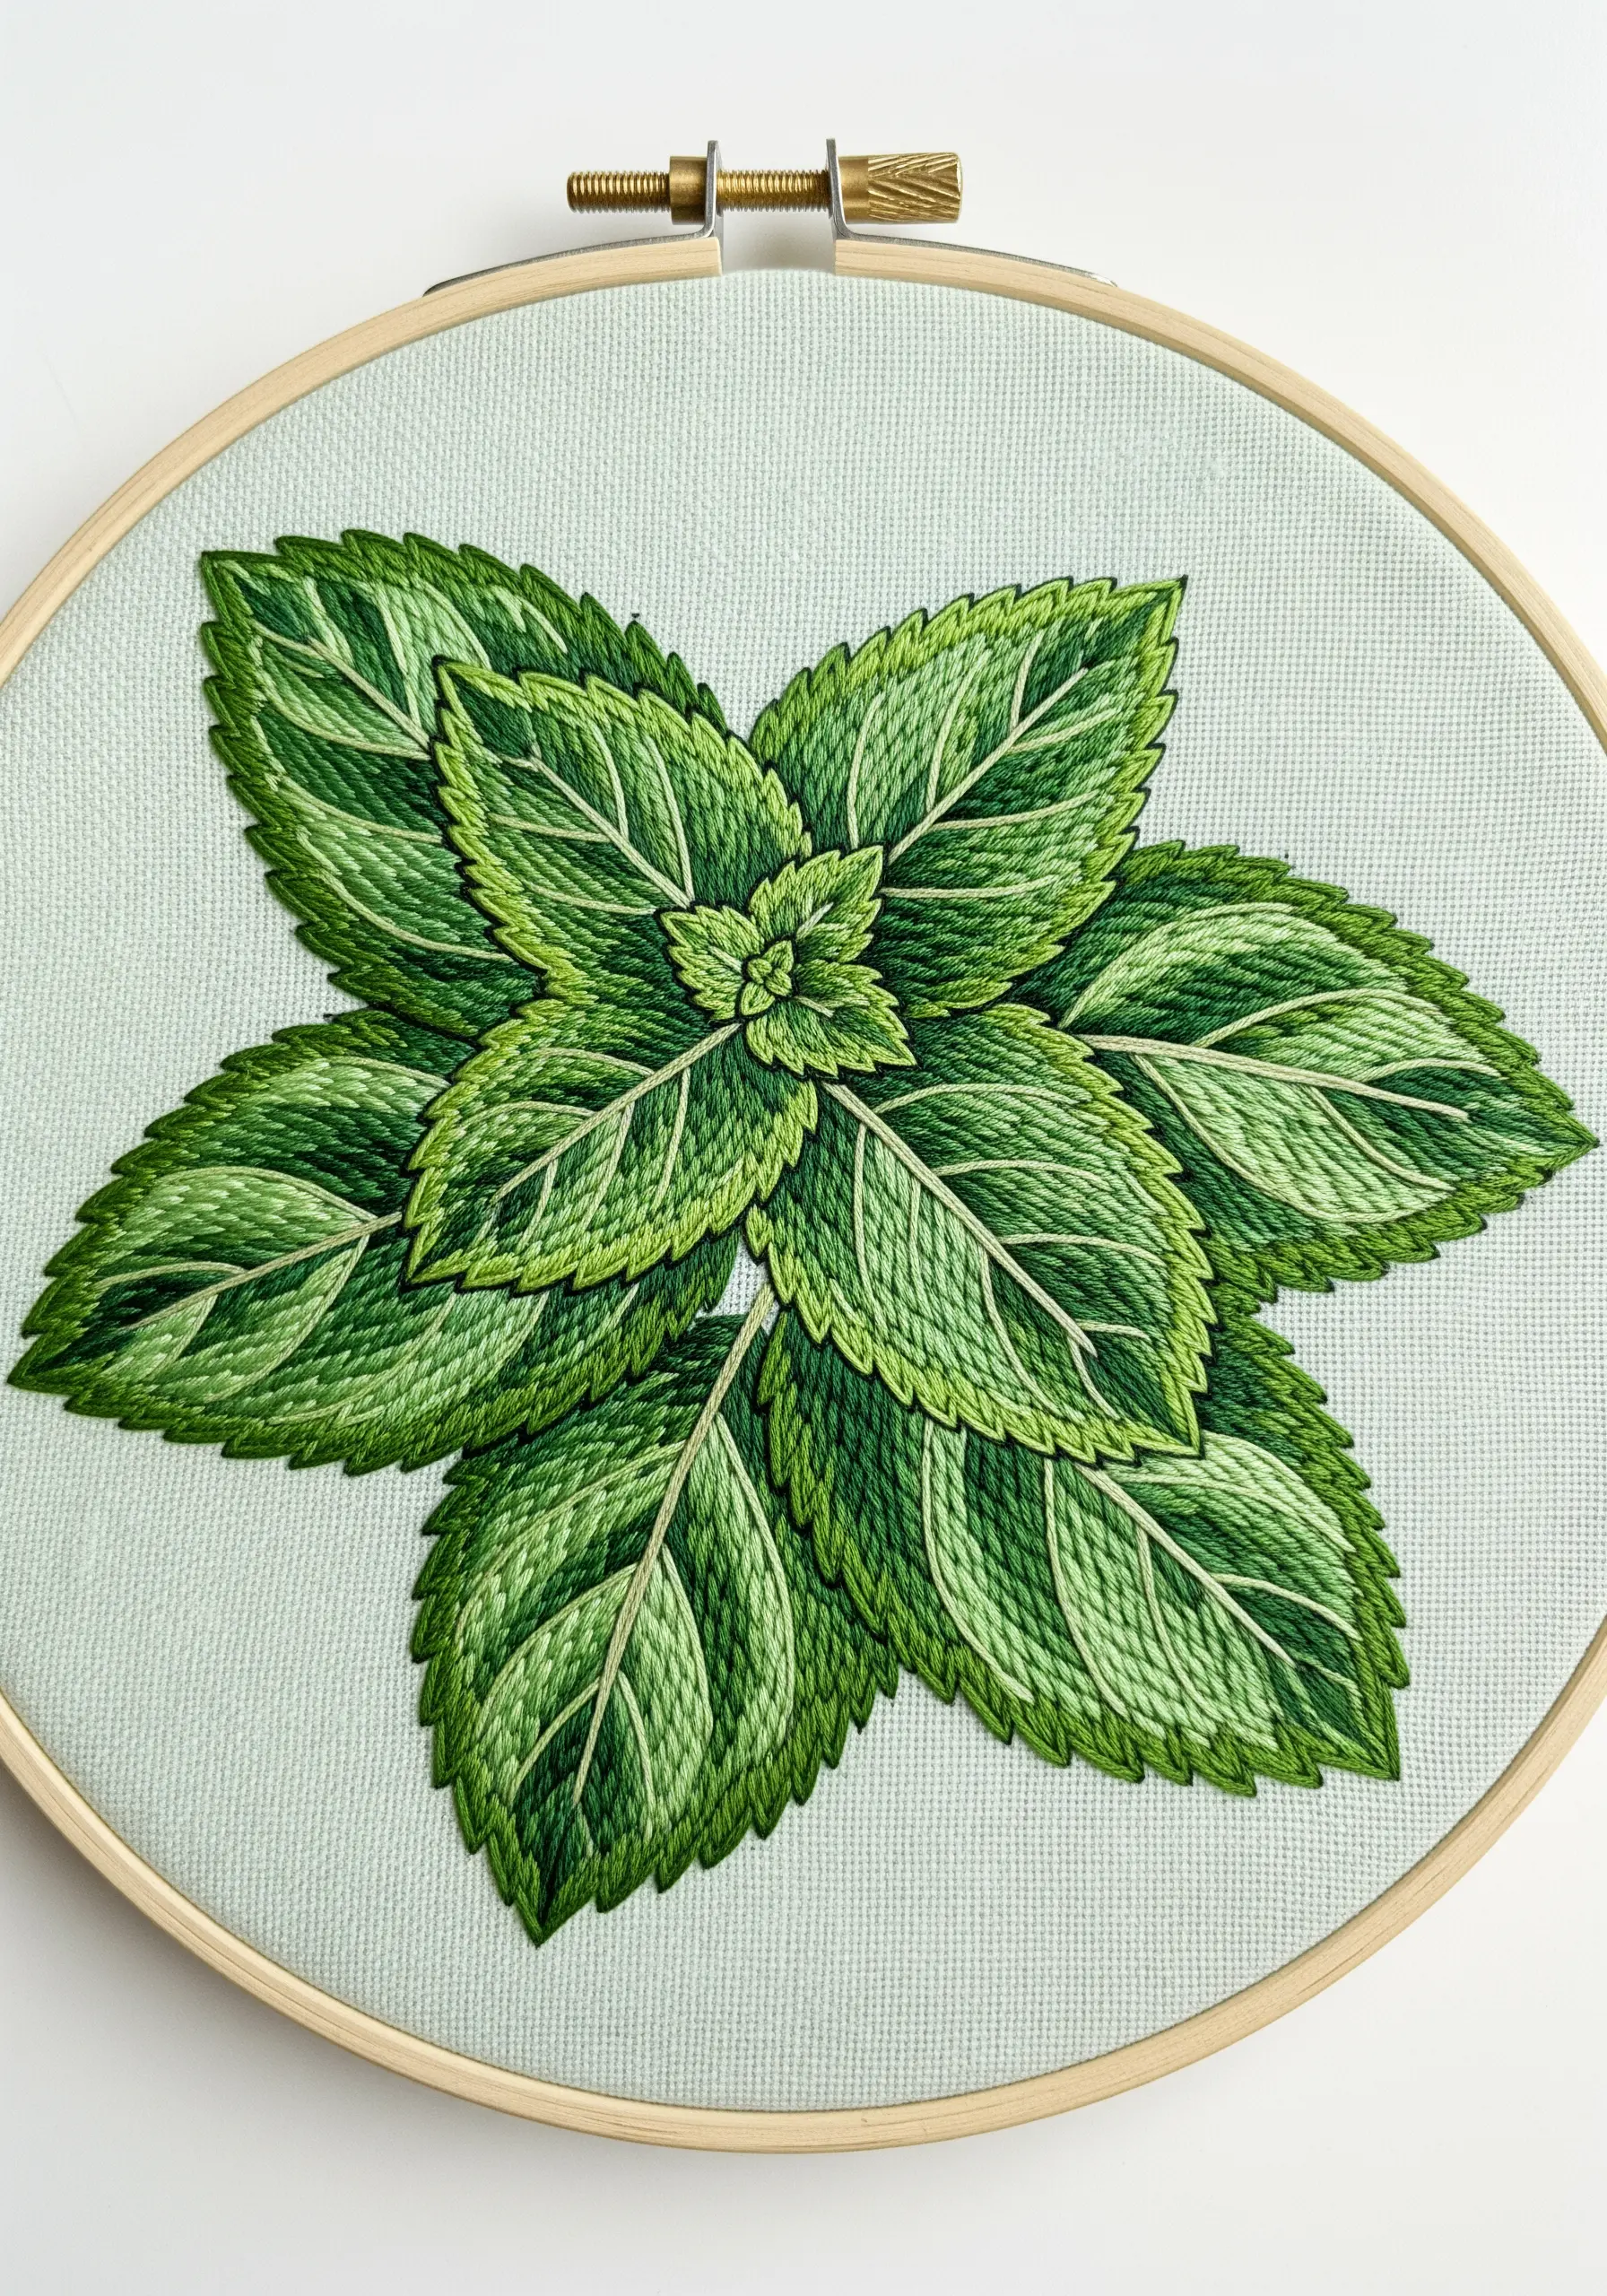
To capture the vibrant complexity of a mint leaf, you’ll need to think like a painter, blending threads instead of pigments.
Use the long-and-short stitch with at least three or four shades of green to create soft gradients, mimicking how light hits the leaf’s surface.
Keep your stitches directional, following the natural lines of the veins for maximum realism. A single strand of a pale green or off-white can then be used for the central veins, stitched right over your fill.
Outlining the entire motif with a darker split stitch gives it a crisp, defined edge that makes the internal shading pop.
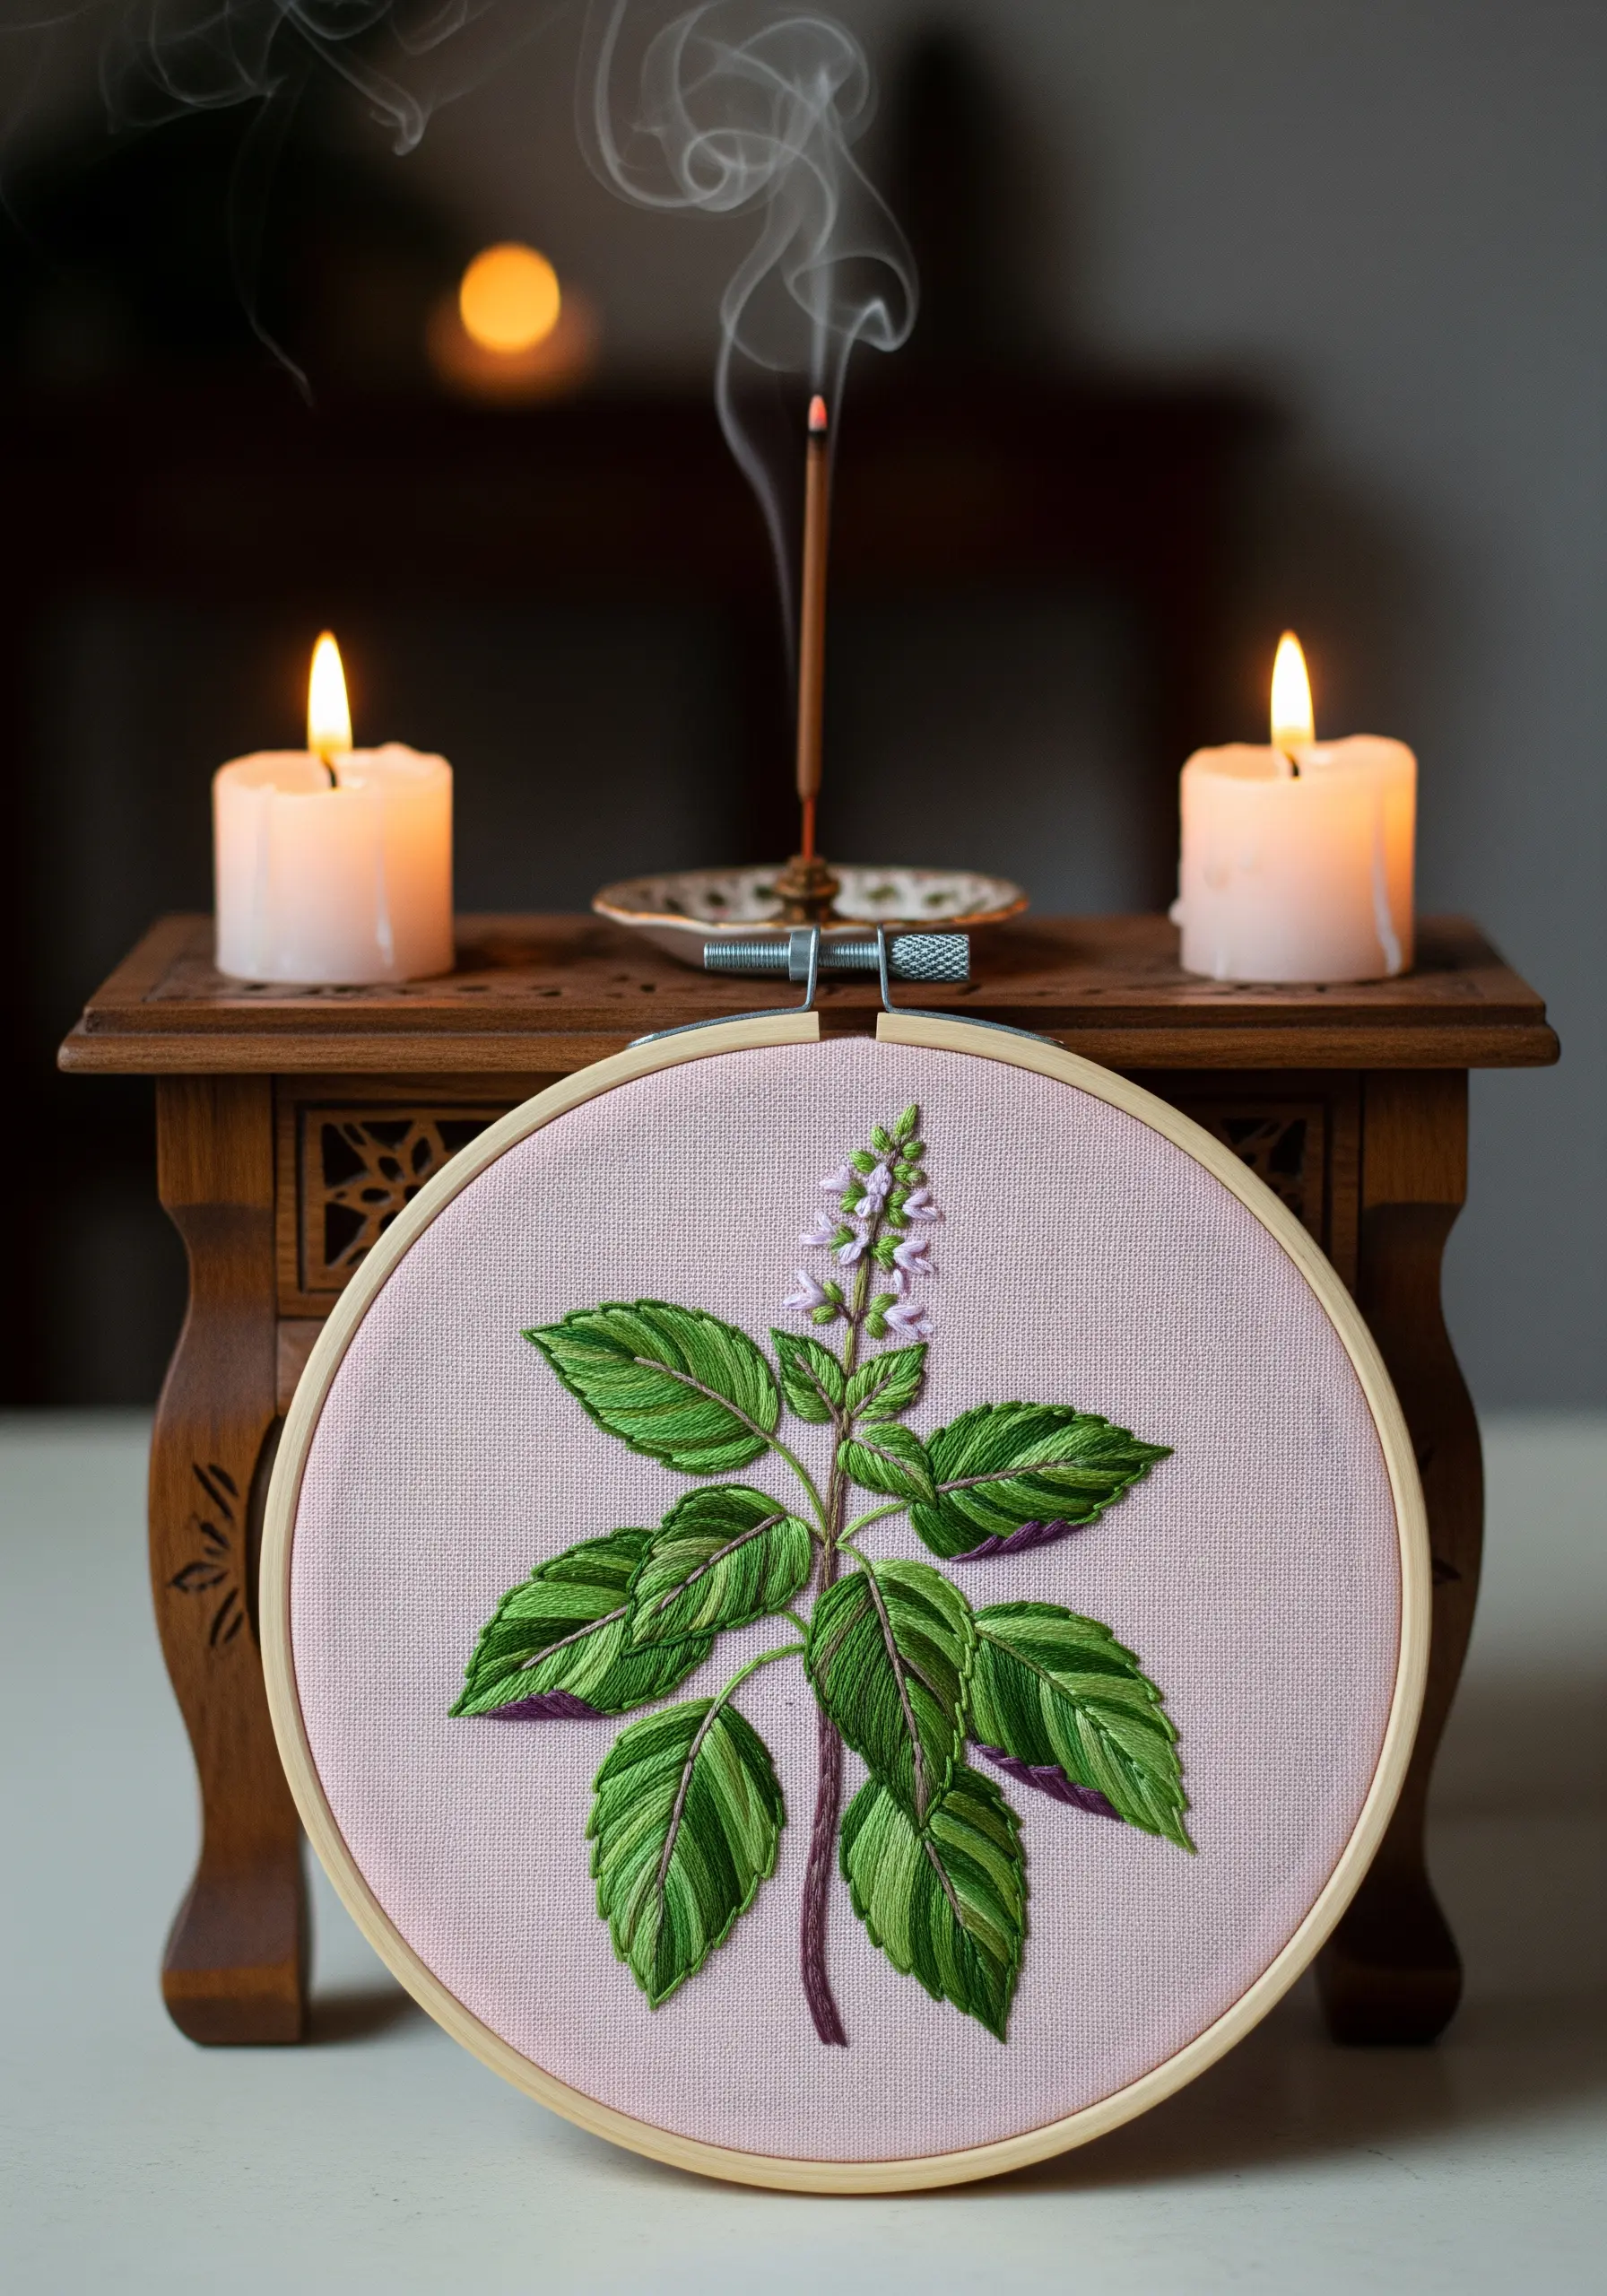
4. The Minimalist Elegance of a Lemon Balm Outline
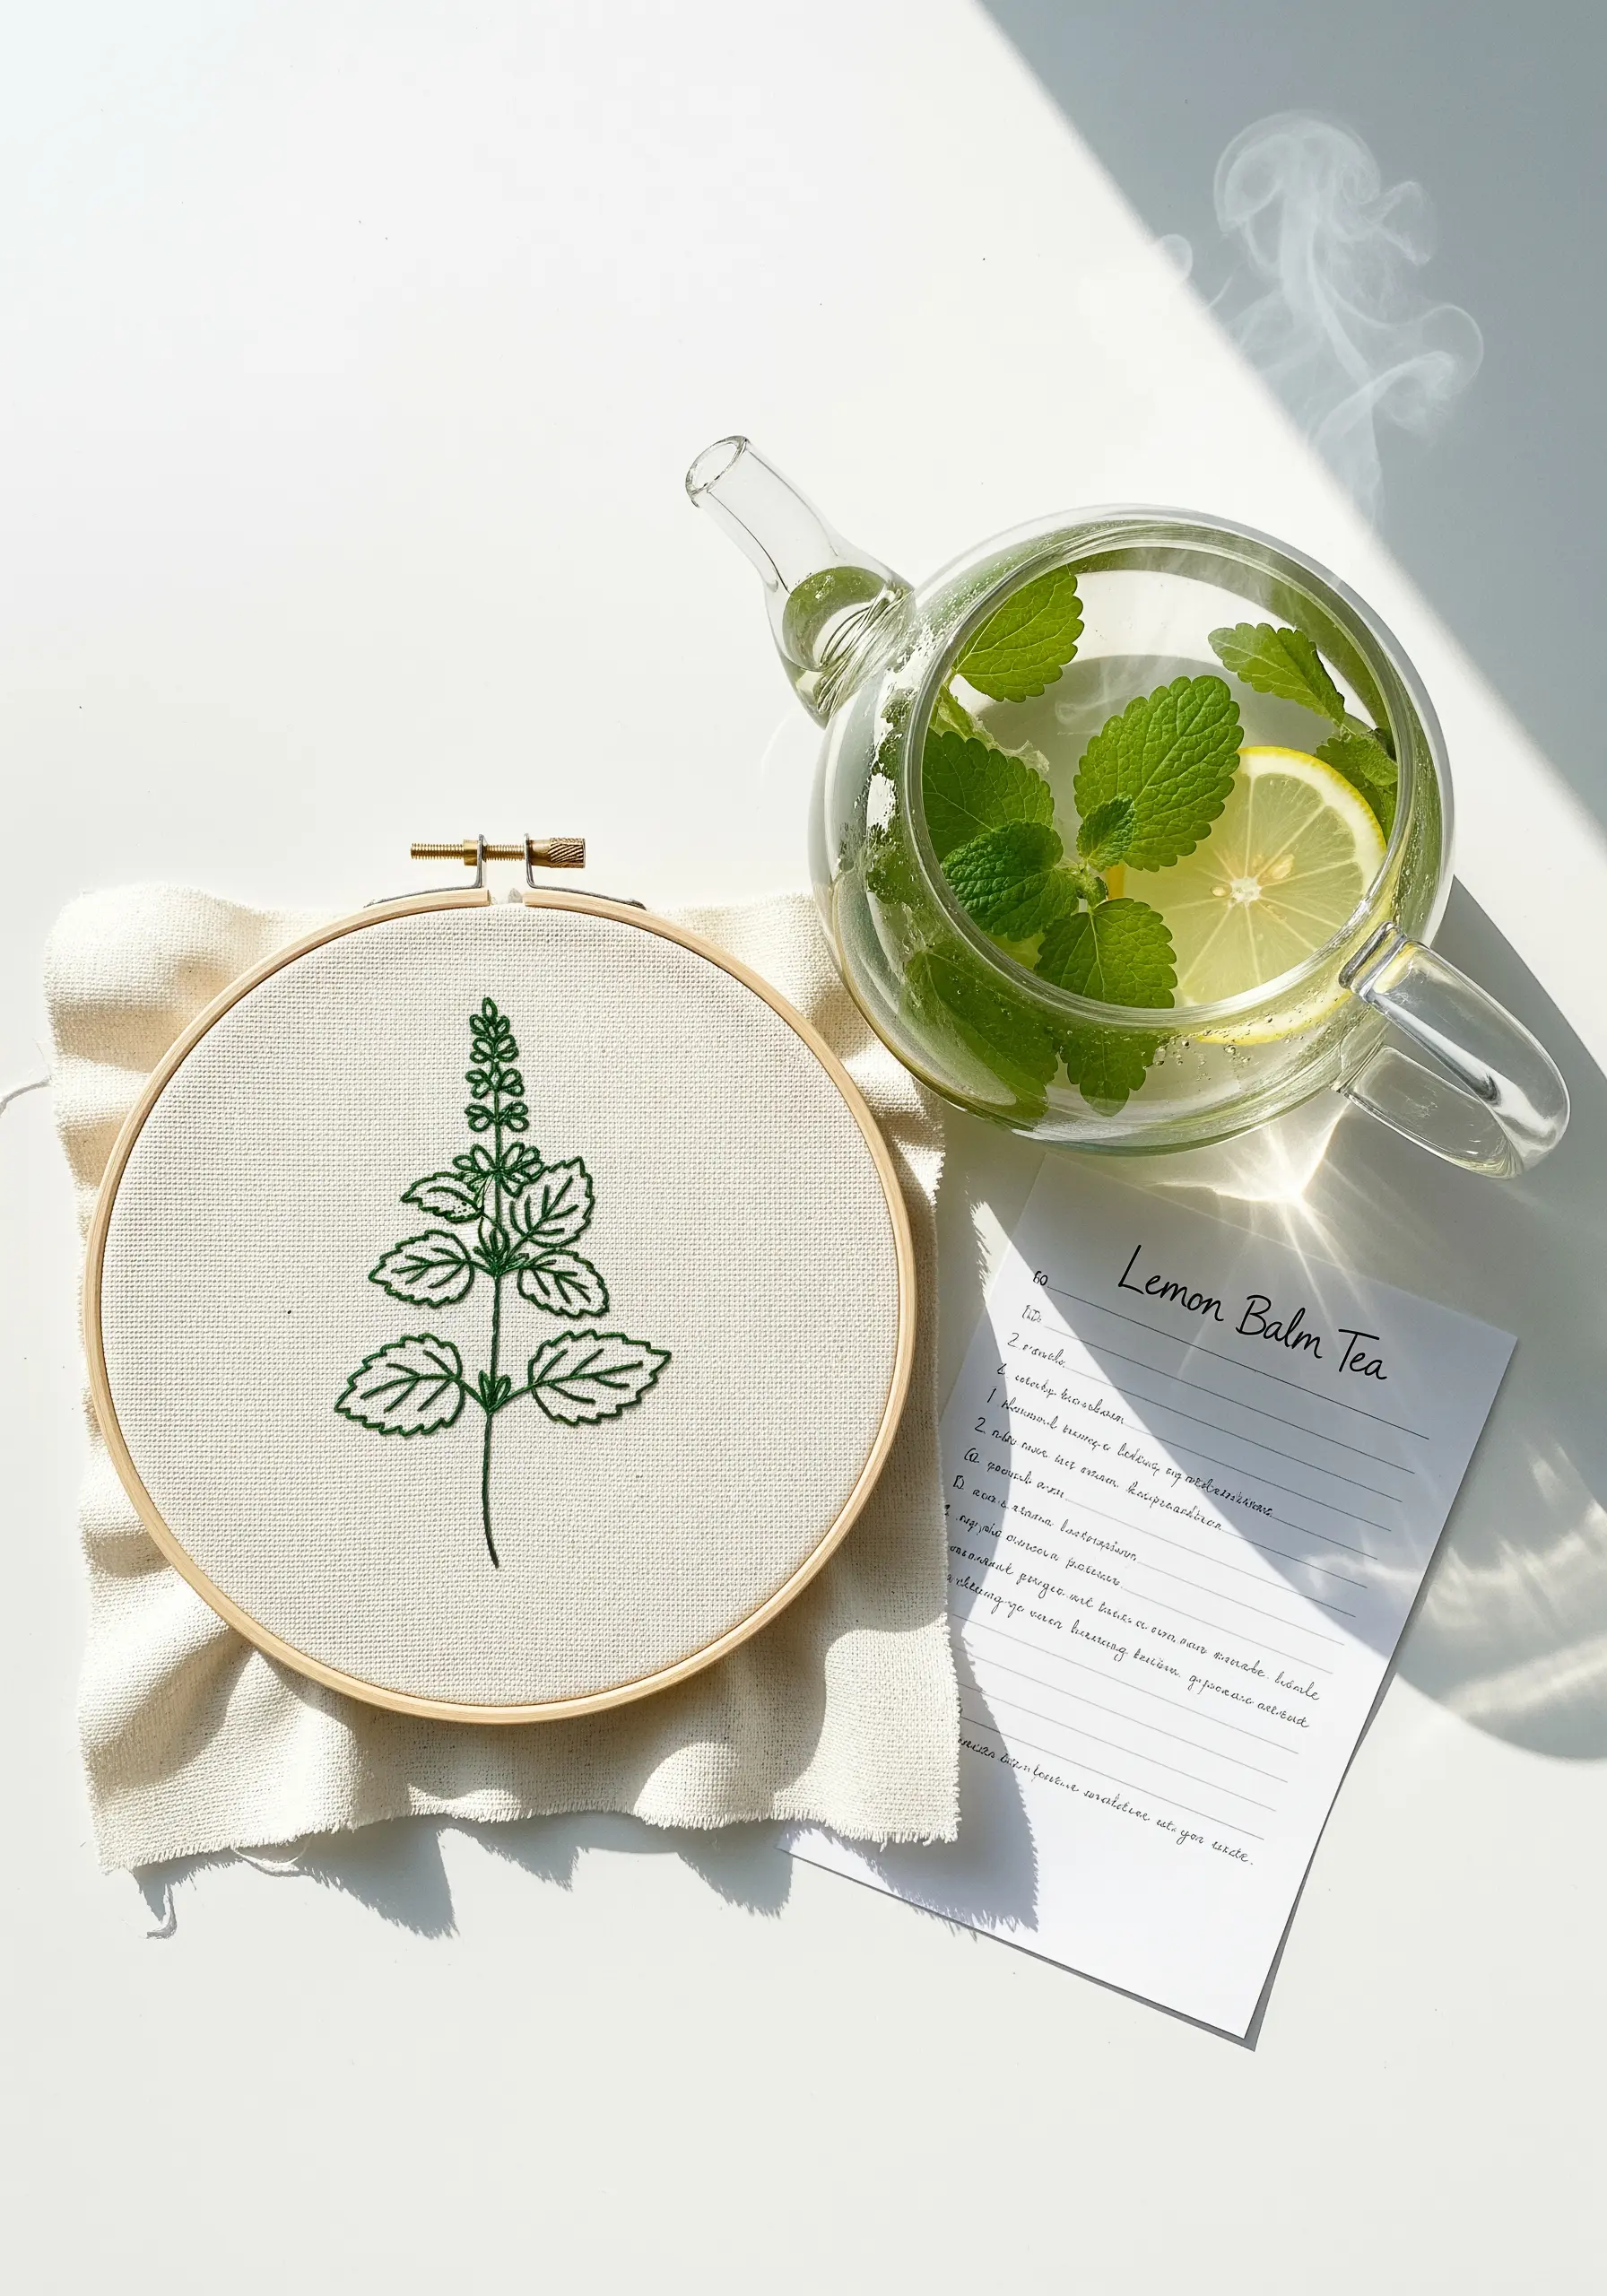
Sometimes, a simple line drawing in thread is more impactful than a fully filled design.
For a clean lemon balm motif, choose a single, high-contrast color and use a consistent backstitch or stem stitch for the entire piece.
The key to making this style look polished is stitch uniformity—ensure every stitch is the same length and tension to create a smooth, unbroken line.
This technique is perfect for embellishing functional items like tea towels or napkins, as it’s quick to execute and durable enough for daily use.
5. Crafting Echinacea’s Dimension with Layered Stitches
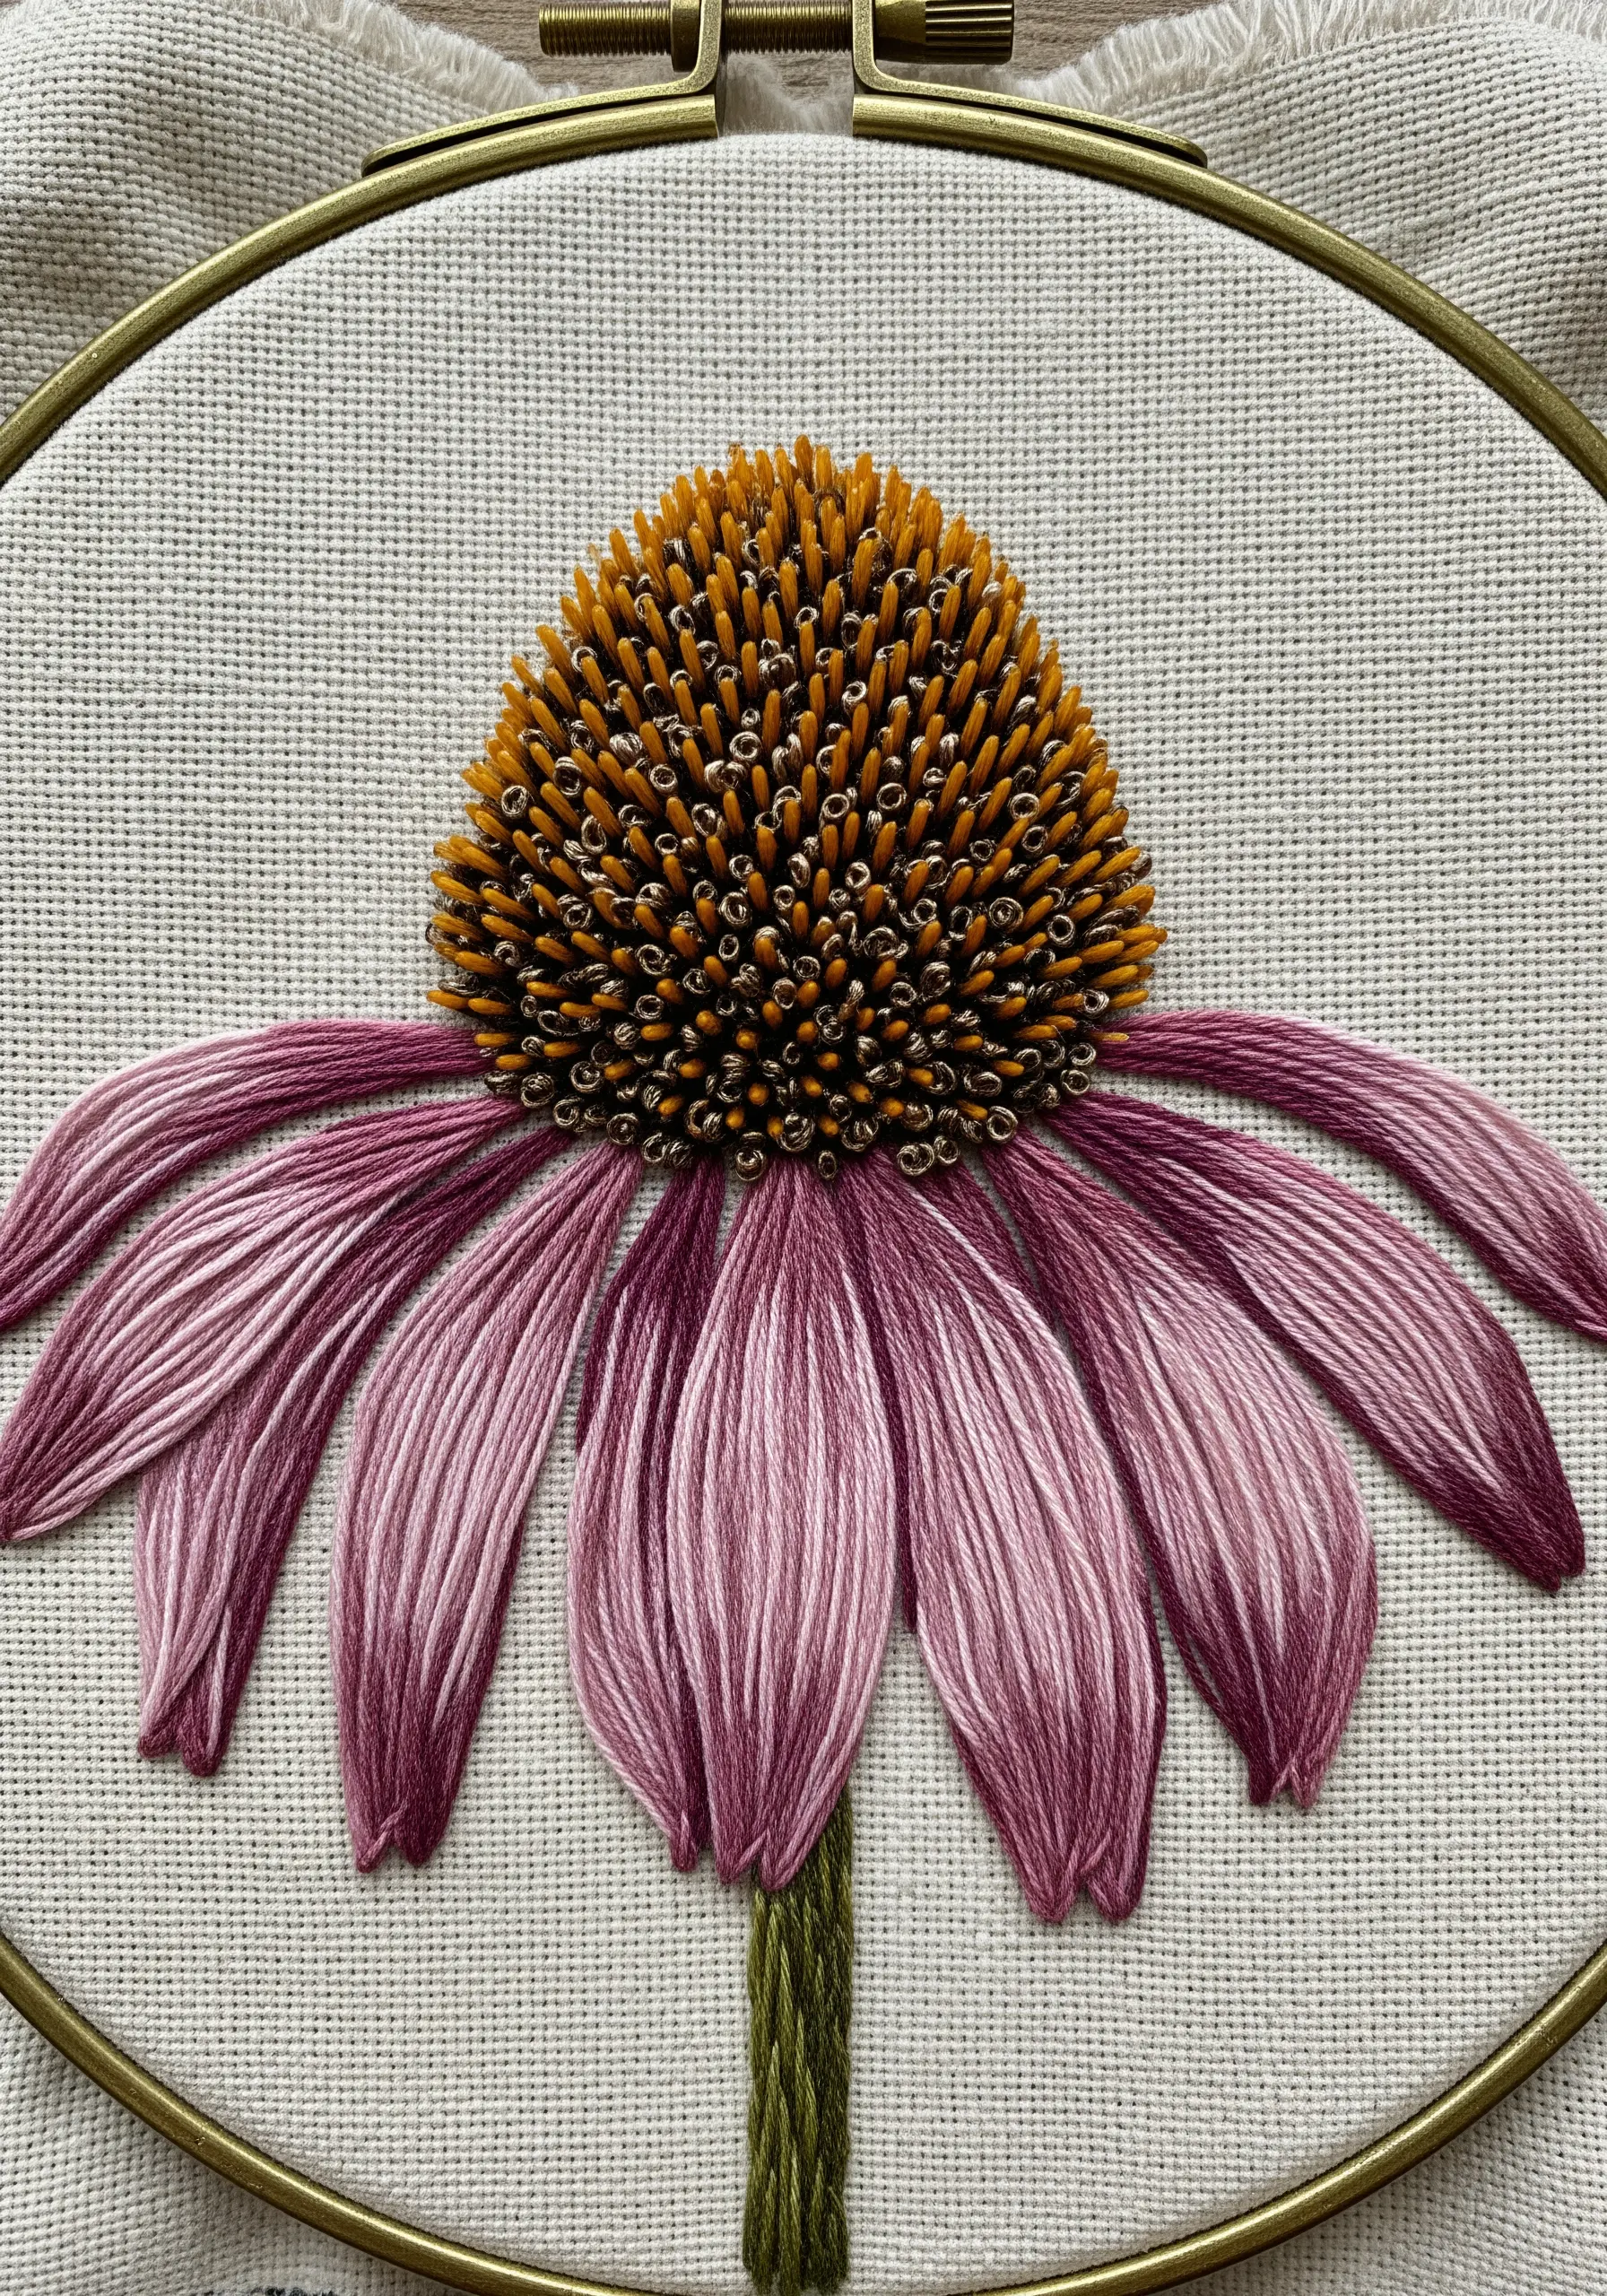
The beauty of an echinacea embroidery lies in its contrasting textures: the spiky, raised center and the soft, drooping petals.
Create the cone-like center by packing the area with French knots, using a darker brown at the base and a brighter orange on top to create depth.
For the petals, use long, straight stitches or a gentle long-and-short stitch, blending two or three shades of mauve and pink within the needle to achieve a natural, variegated look.
Don’t pull these petal stitches too tight; allowing a little slack helps convey their signature droop.
6. Making Hibiscus Pop with Bold Thread Painting

Stitching on black fabric instantly adds drama and makes vibrant colors appear even richer, which is perfect for a tropical hibiscus.
When thread painting, lay down your lightest colors first and then blend the darker shades into them—this helps create a seamless gradient that looks almost painted on.
Use a single strand of floss for the finest details, like the delicate stamen, and finish with tiny yellow French knots at the tip for a touch of realism.
Remember to use a light-colored transfer paper or a chalk pencil for your pattern so you can see your lines clearly on the dark background.
7. Adding Plumpness to Rosehips with Padding
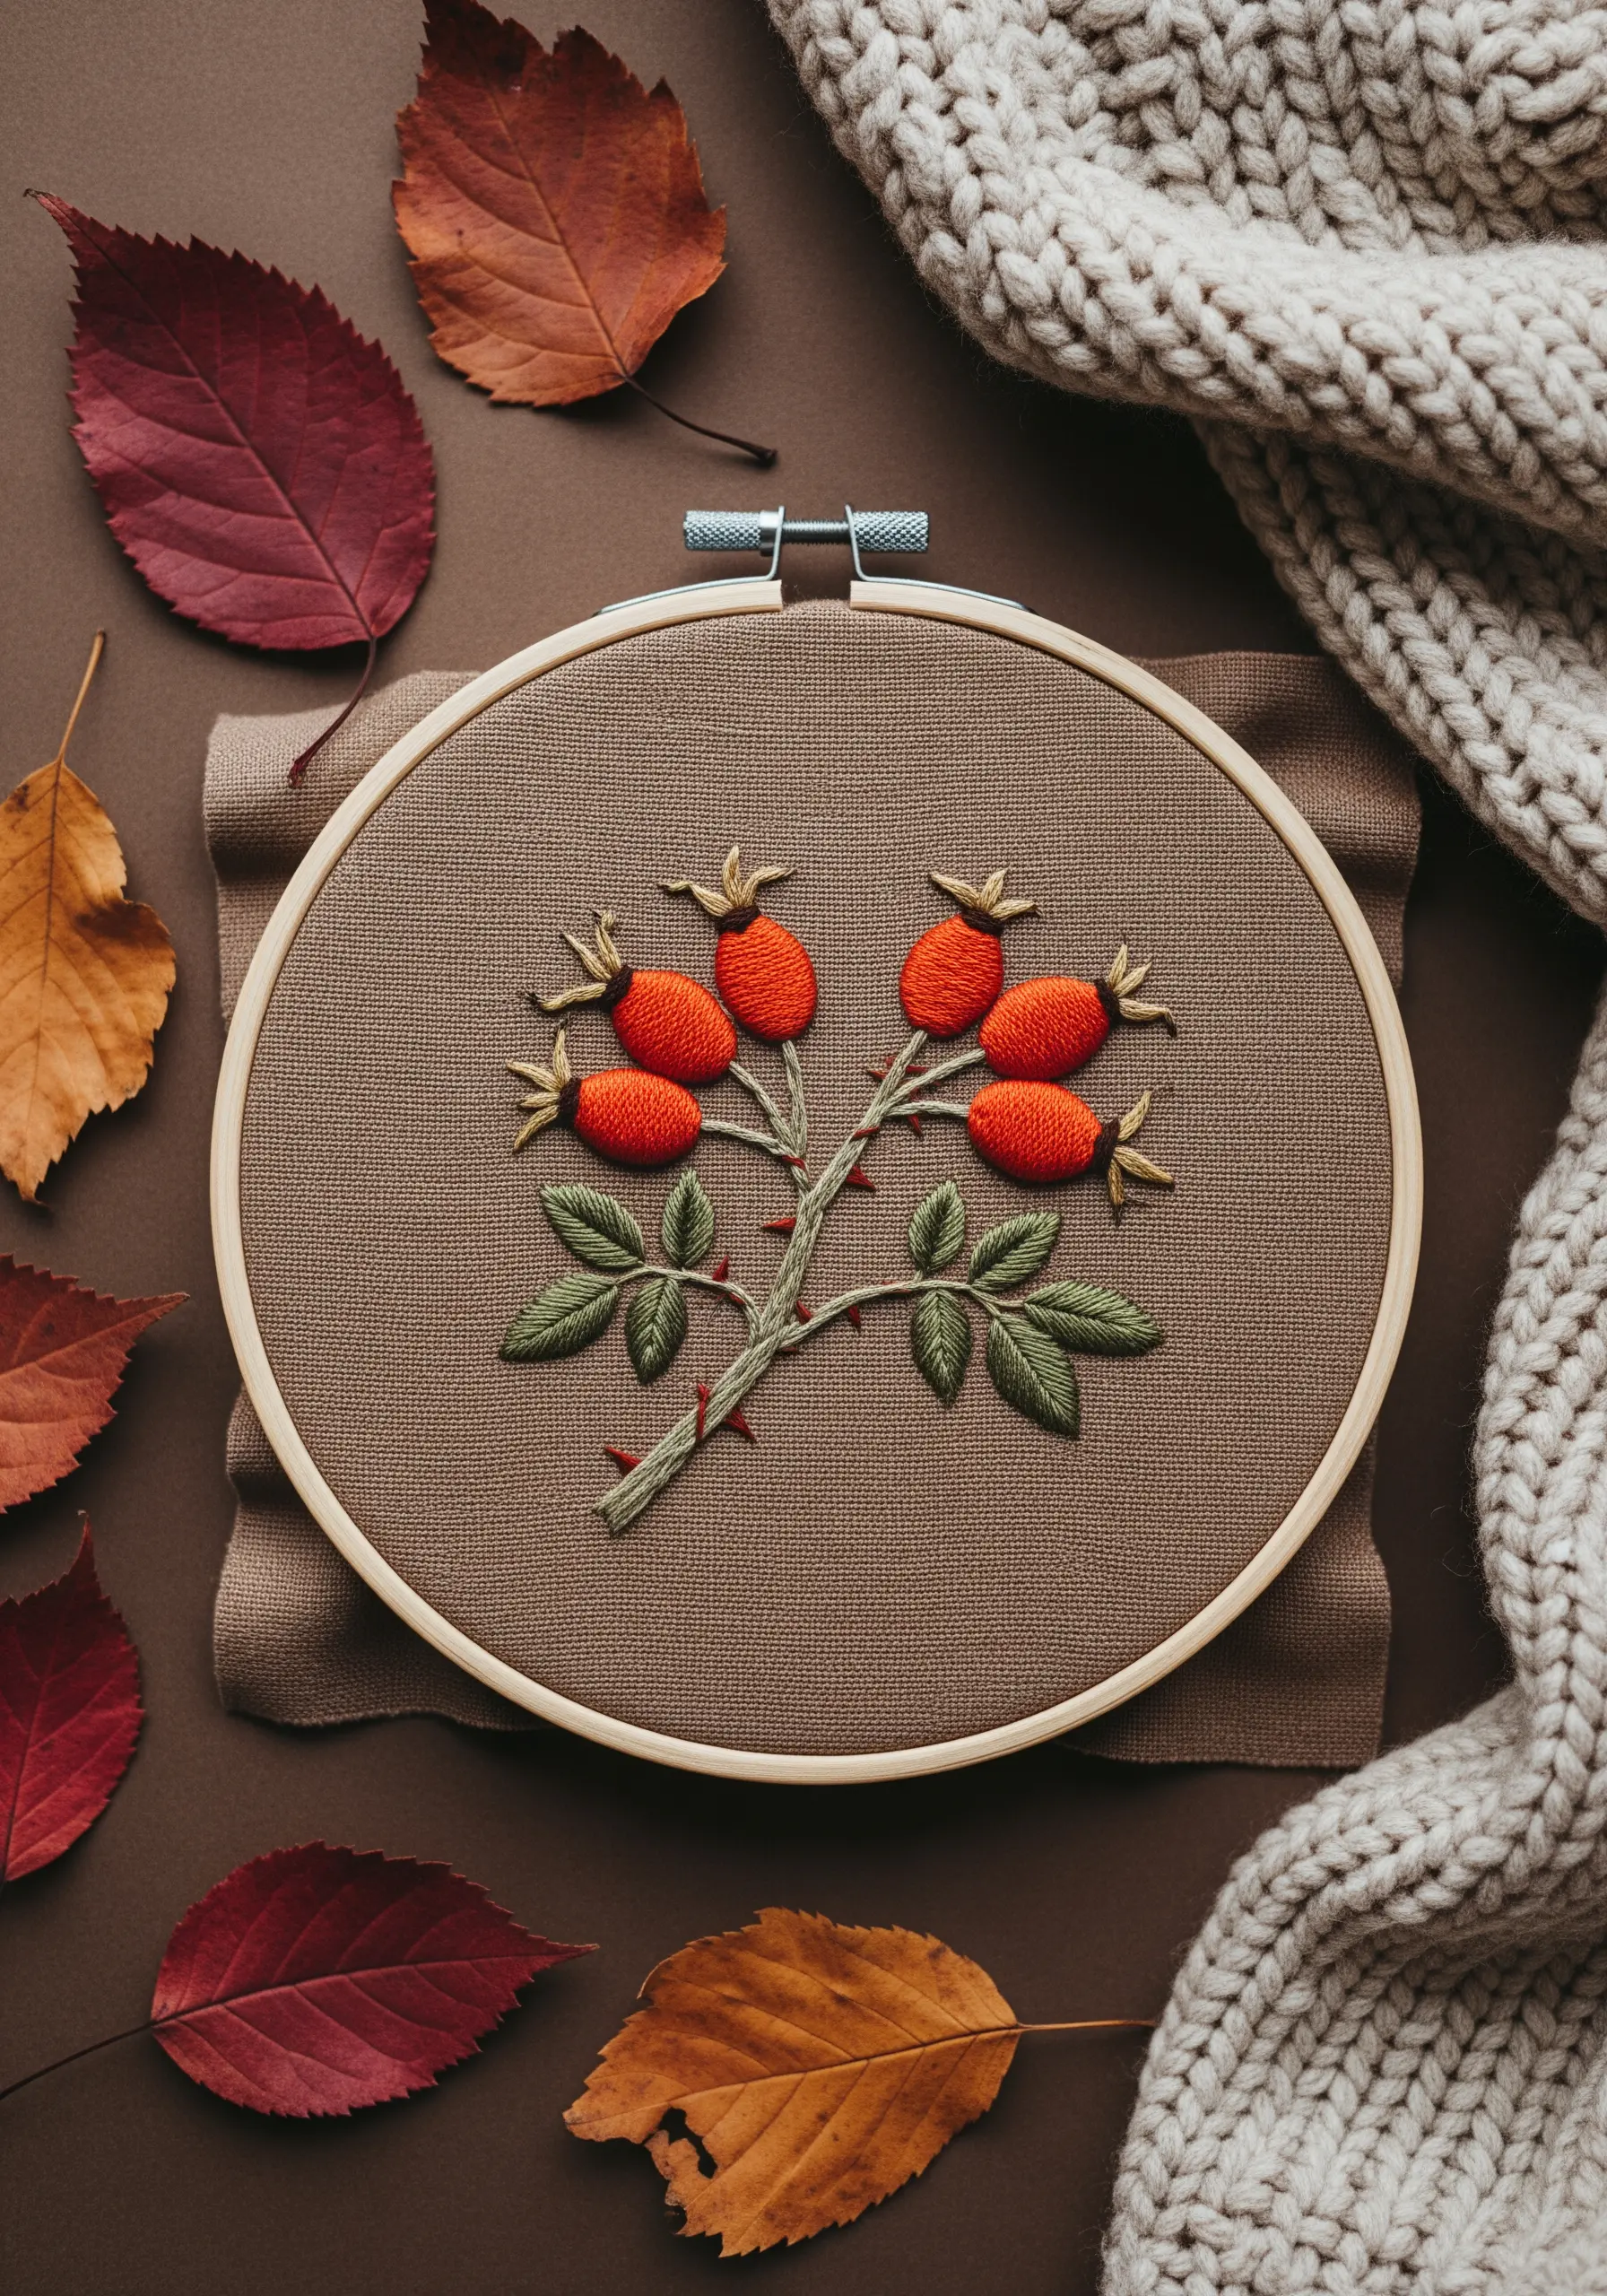
To make your rosehips look full and round, use a technique called padded satin stitch.
First, fill the shape of the berry with a base of small seed stitches or a few layers of satin stitch running perpendicular to your final layer.
Then, cover this padding with your final satin stitches, using a vibrant red-orange floss. The underlying stitches will raise the surface, creating a subtle 3D effect.
Combine this with thorny, textured stems (use a whipped backstitch) and simple fishbone leaves on an earthy fabric for a rustic, autumnal feel.
8. Sculpting Ginger Root with Textured Wrapping
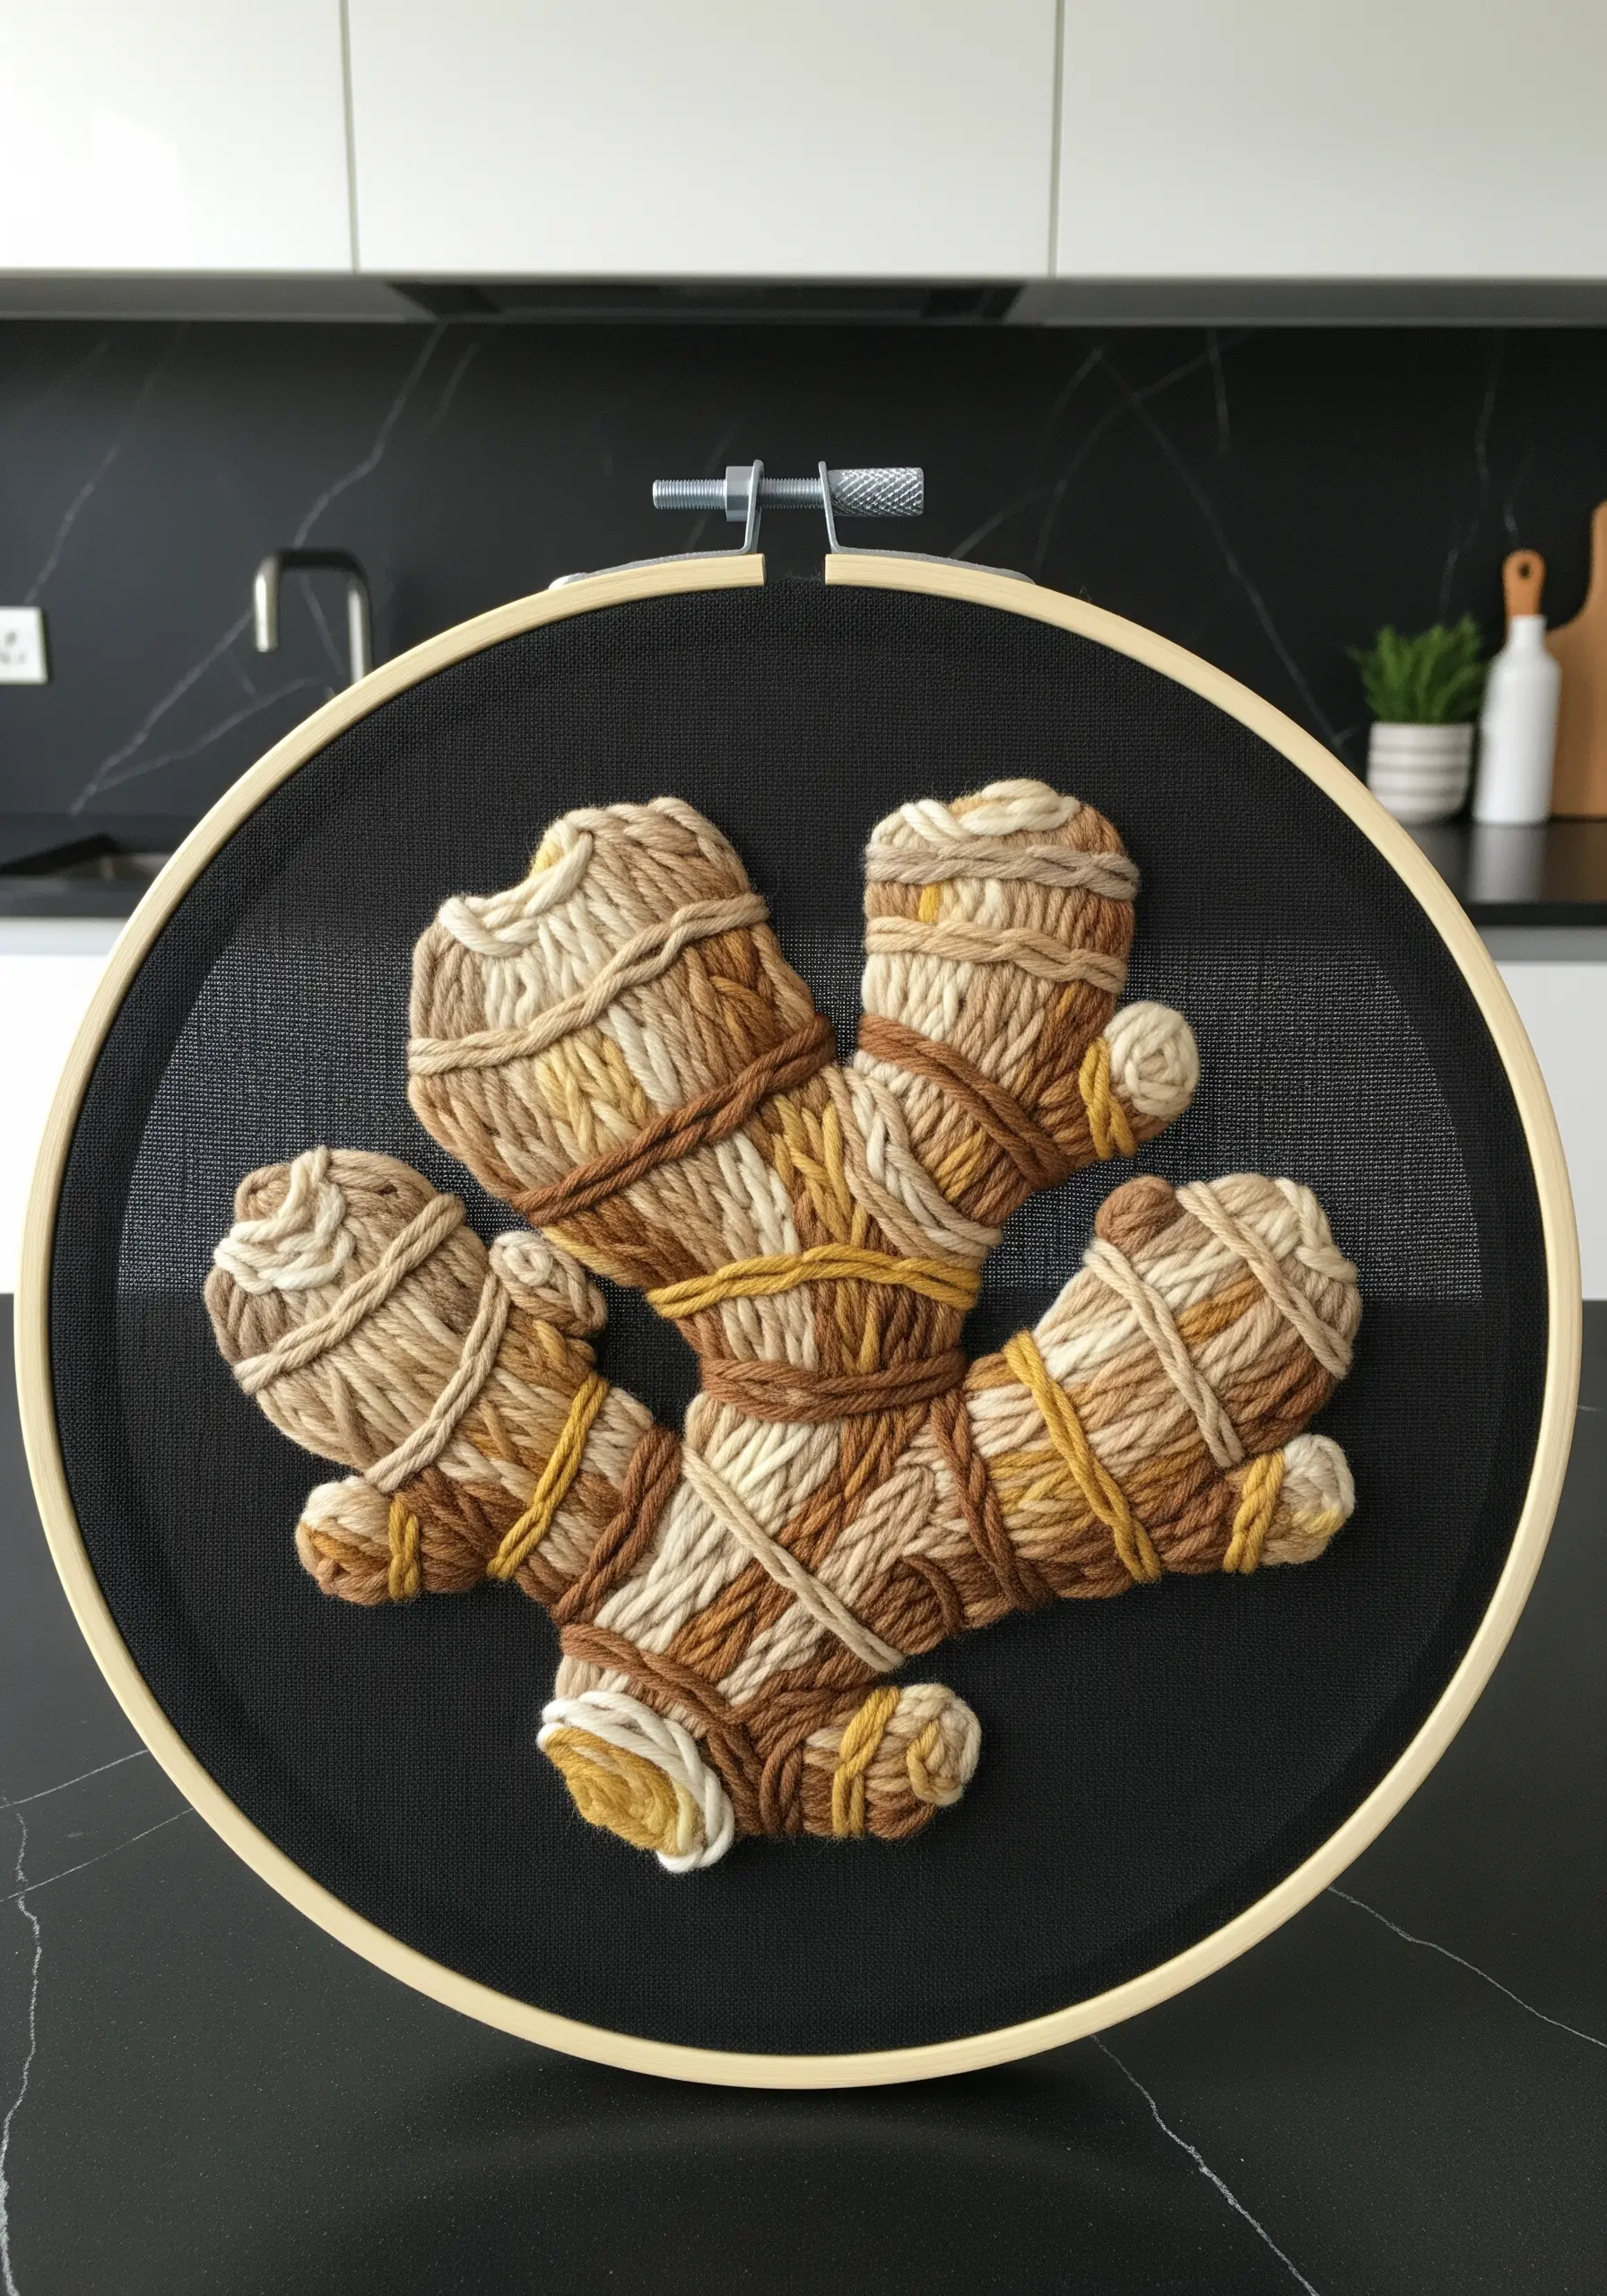
Move beyond flat stitches and explore sculptural techniques to capture the gnarled texture of ginger root.
This design uses thick bundles of thread or yarn, which are laid on the surface and then ‘couched’ or wrapped with a thinner thread to hold them in place.
By varying the colors of both the core bundle and the wrapping thread, you create incredible depth and realism.
This is a fantastic exploration of mixed fiber embroidery techniques, perfect for creating art that invites touch.
9. Capturing the Essence of Lemongrass with Varied Stitches
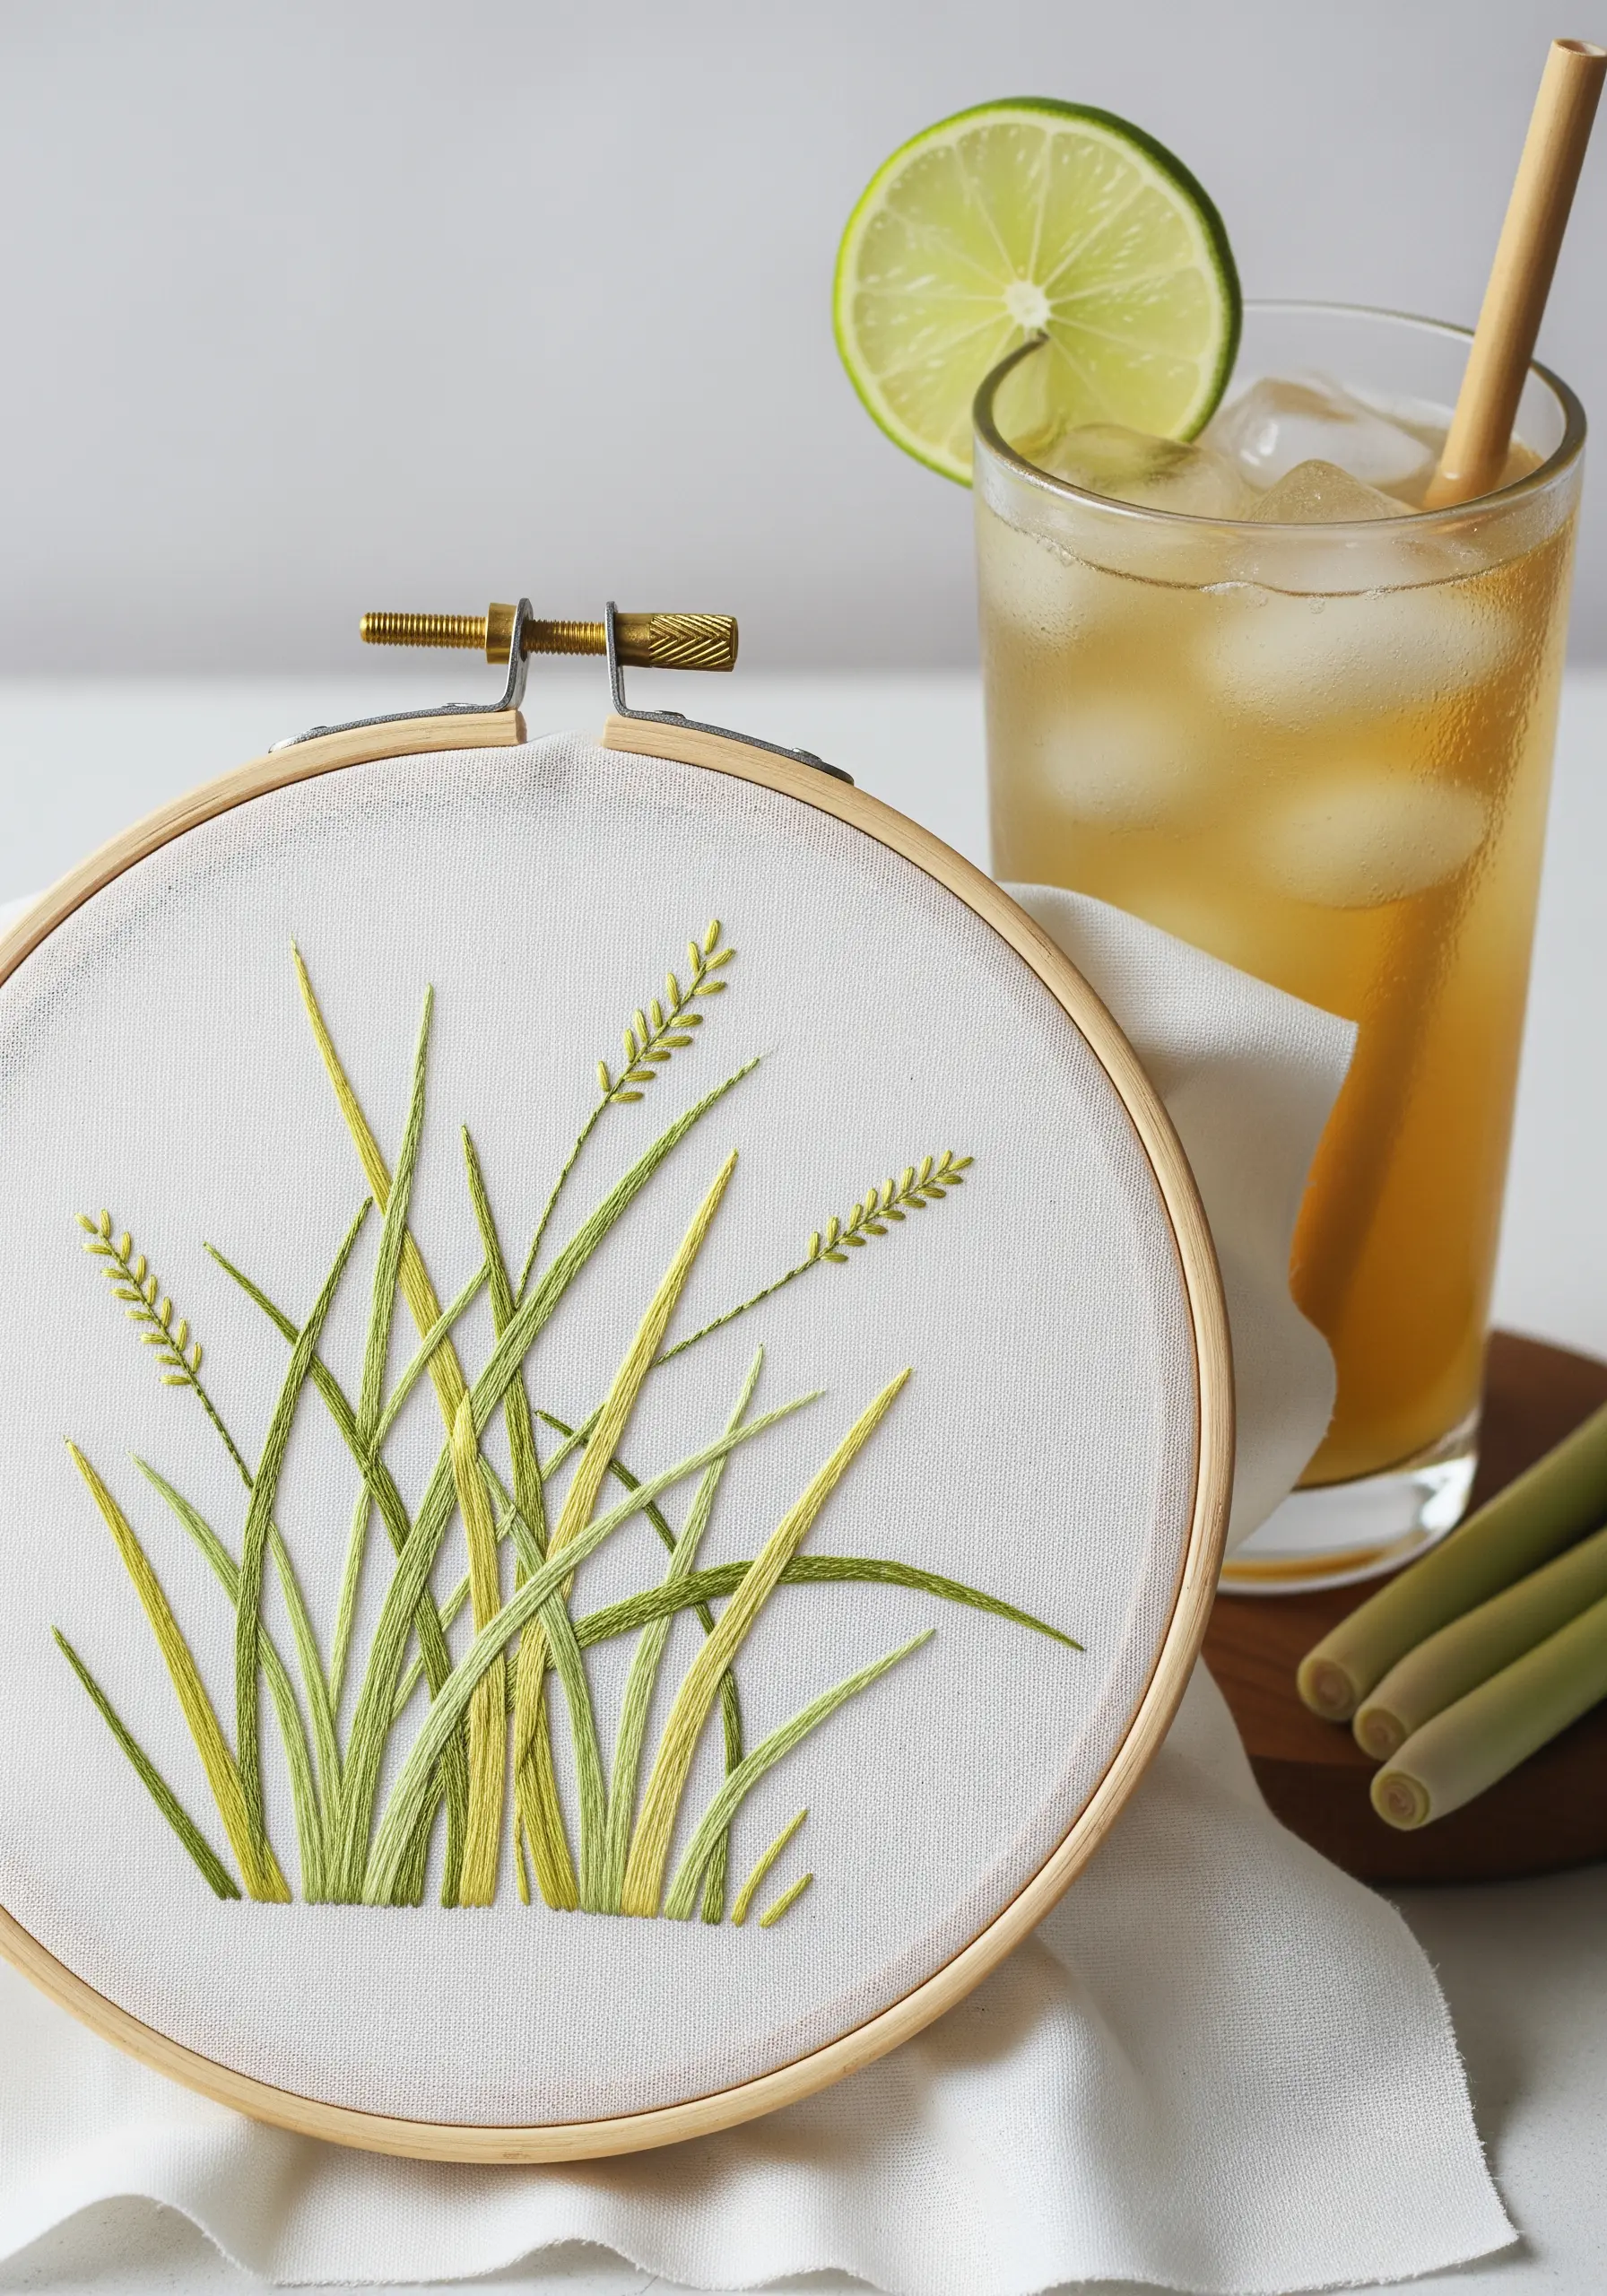
To avoid a flat, uniform look when stitching grasses, think about movement and light.
Use a mix of long straight stitches, split stitches, and single-strand highlights in several shades of green and chartreuse.
Angle your stitches slightly differently for each blade of grass to create a sense of natural, breezy movement.
Adding a few stitches in a pale yellow or cream color can suggest sunlight hitting the leaves, giving your composition instant life and dimension.
10. Stitching Rooibos with a Light, Airy Touch
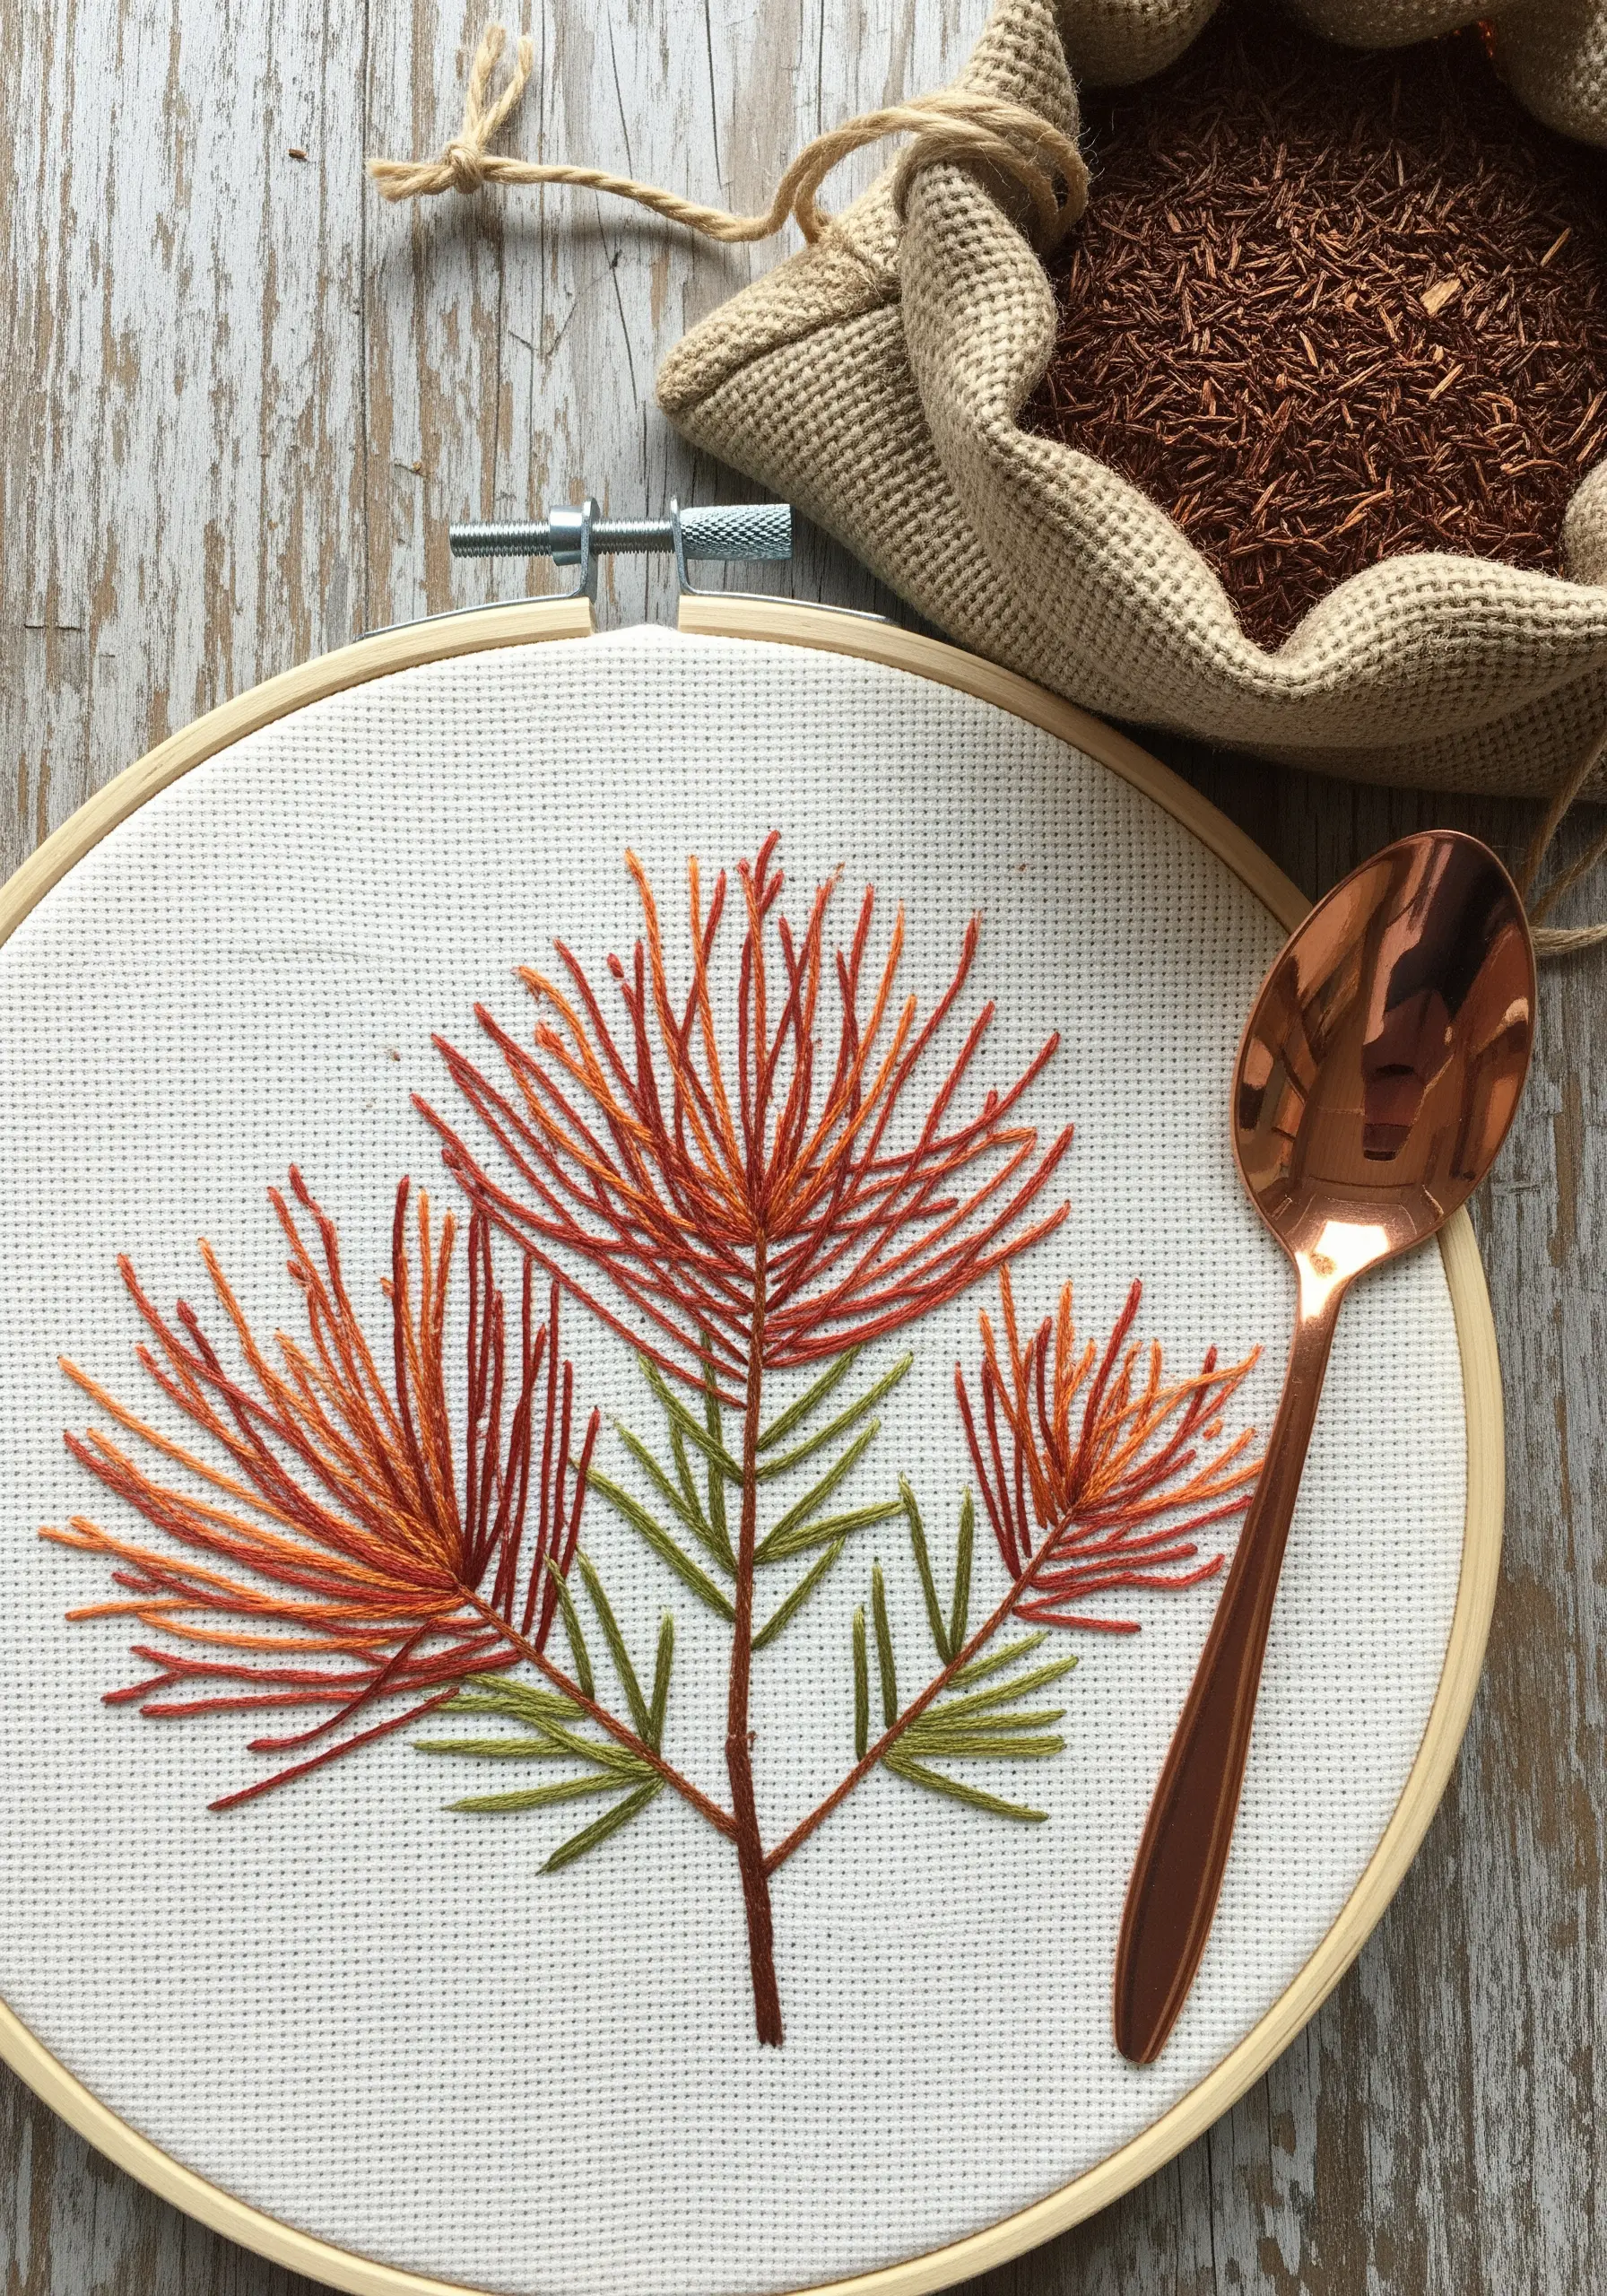
The key to stitching a plant like rooibos is to capture its fine, needle-like quality without making the design look heavy.
Use long, delicate straight stitches with just two or three strands of floss, radiating them out from the central stem.
Blend multiple autumnal colors—russet, orange, and deep red—in your needle at the same time to create a natural, variegated effect with each stitch.
This technique is all about restraint and letting the negative space play a role in the final design.
11. Creating a Dreamy Dandelion on Sheer Fabric
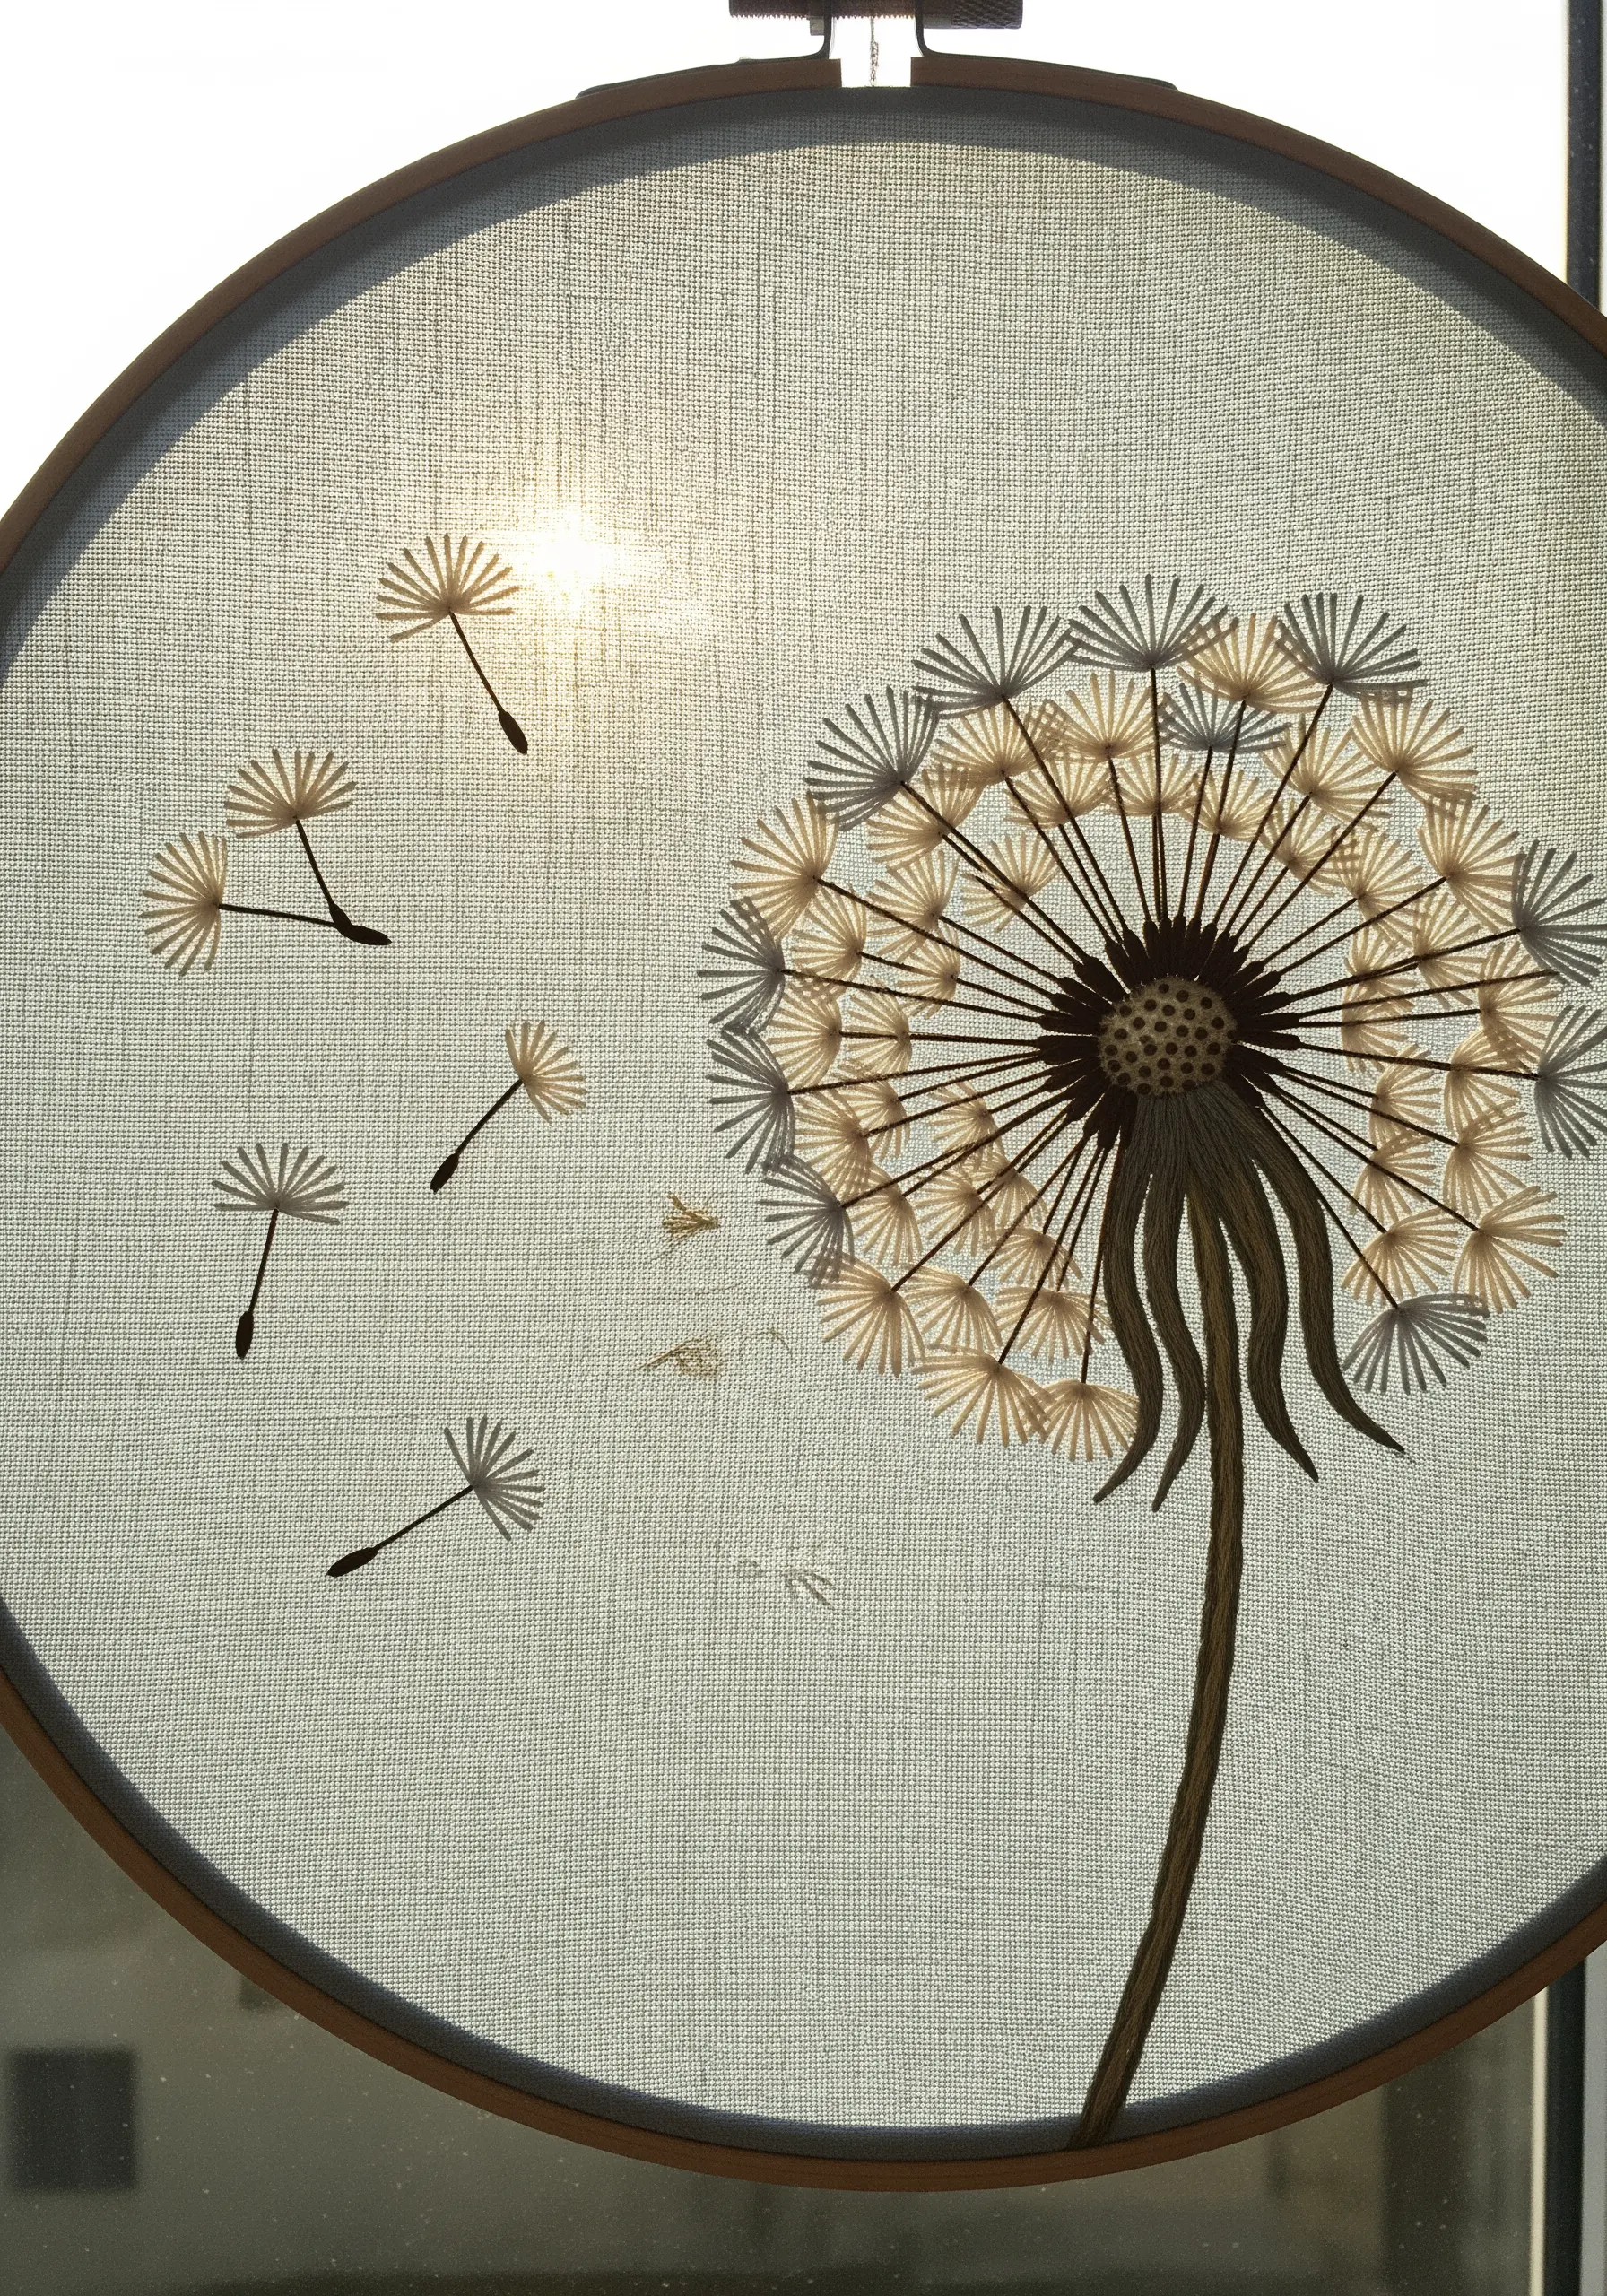
Take your embroidery off the wall and into the light by stitching on a sheer fabric like organza or voile.
A dandelion seed head is the perfect subject, as the transparent background enhances the feeling of lightness and air.
Use simple straight stitches for the seeds, radiating from a dark, densely stitched center. Be gentle with your tension to avoid puckering the delicate fabric.
When hung in a window, the light shines through, transforming your stitching into a magical, ethereal piece of art.
12. Defining Nettle Leaves with Precise Outlines
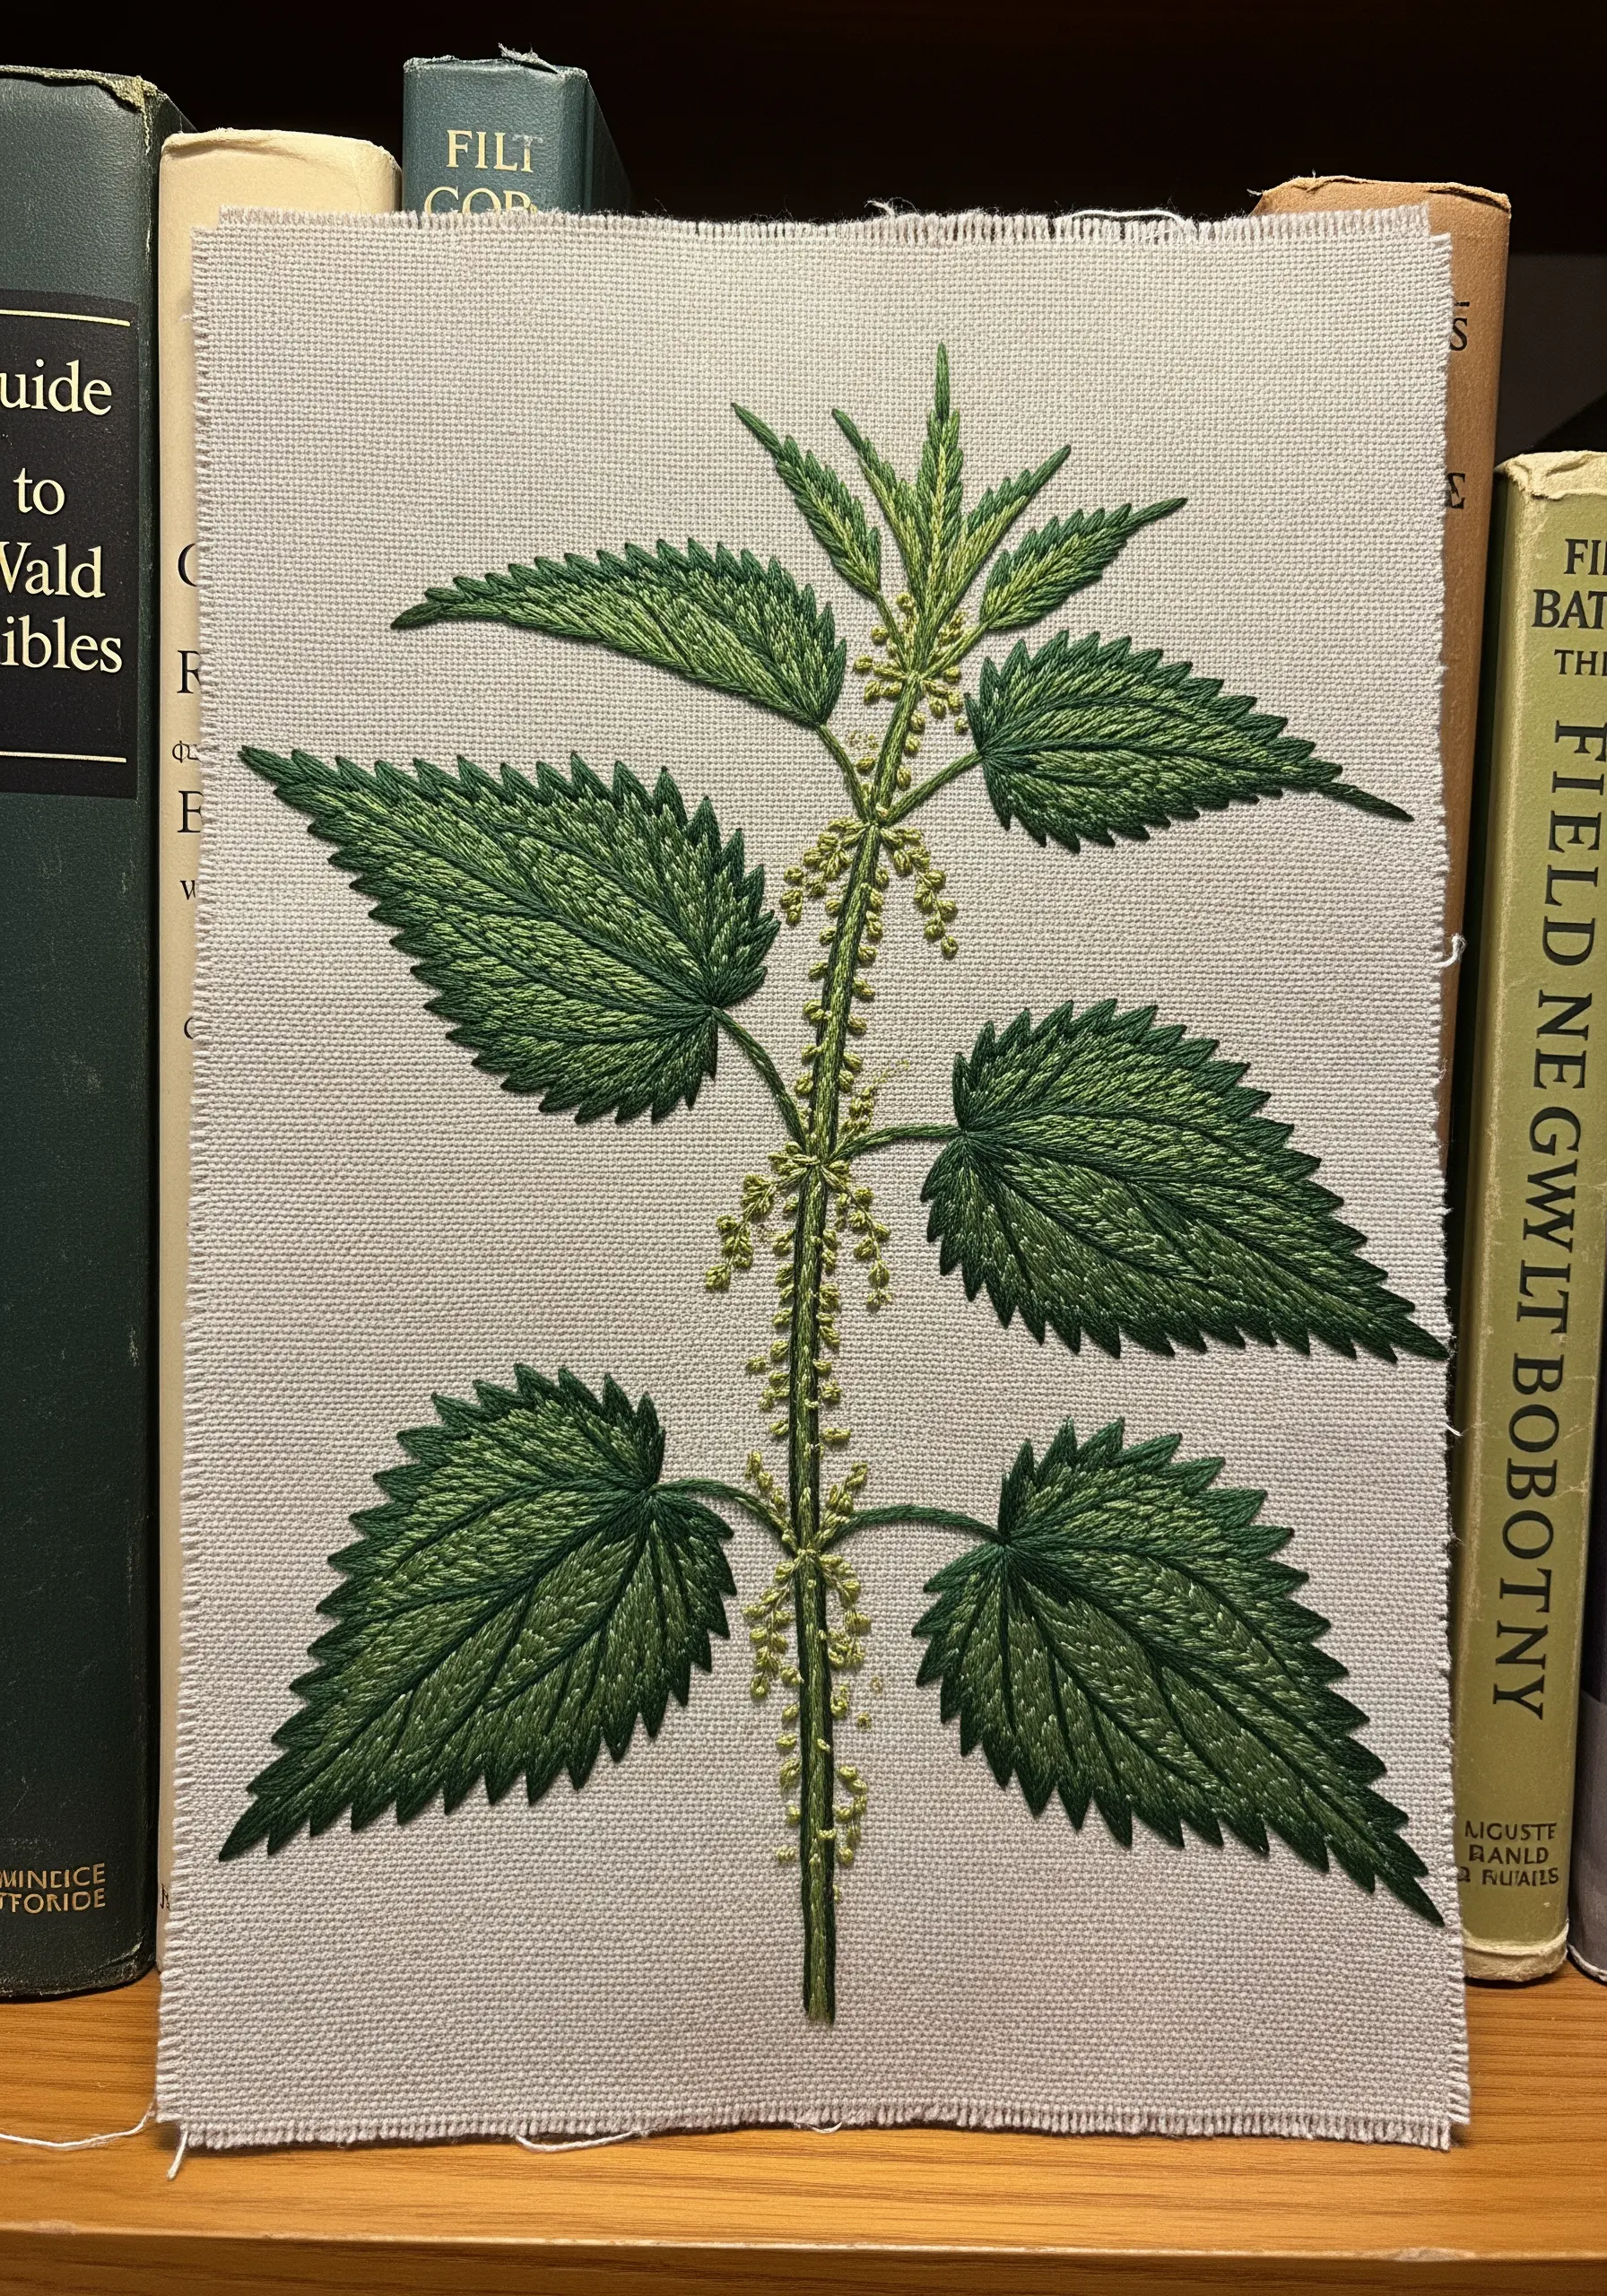
For a botanically accurate piece like this stinging nettle, precision is everything.
Fill the leaves with a directional satin stitch or long-and-short stitch, ensuring your stitches follow the natural angle of the leaf’s growth.
To create the sharp, serrated edges, go back over the perimeter with a perfectly executed split stitch using a single strand of a slightly darker green thread.
This final outline is what transforms the motif from a simple shape into a realistic representation, giving it a crisp, illustrative quality.
13. Clustering French Knots for Delicate Valerian Flowers
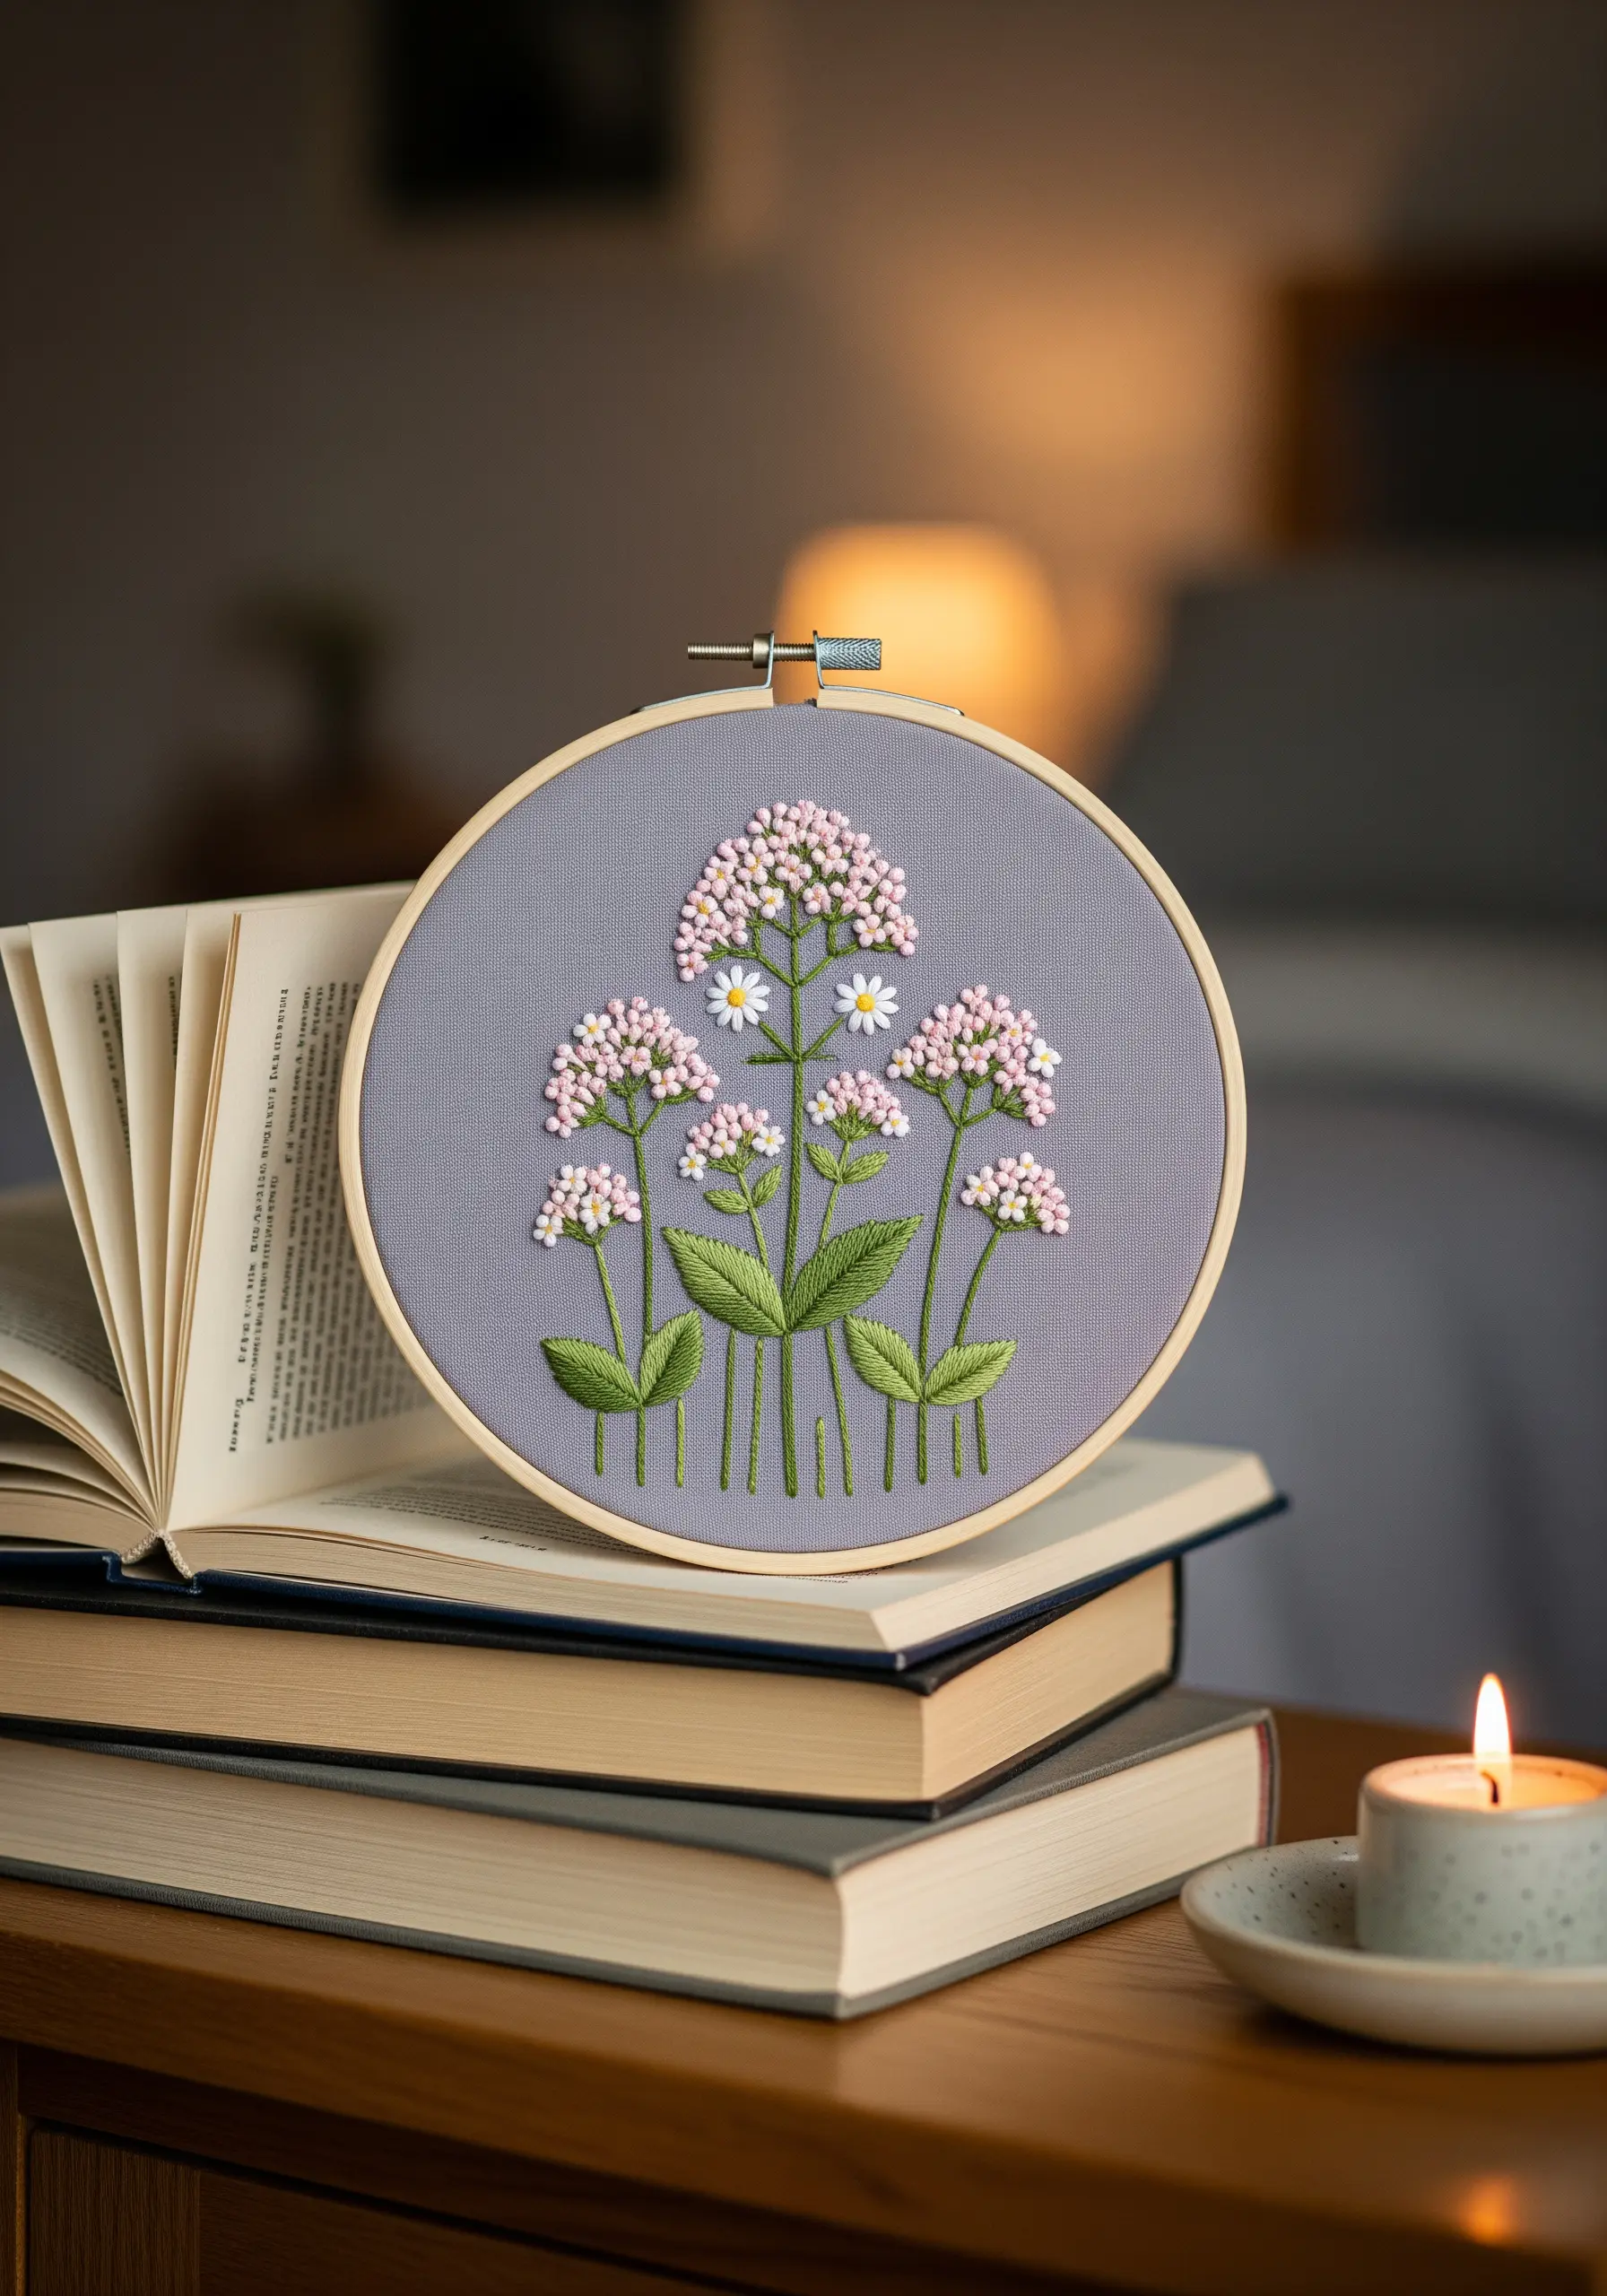
To create the soft, clustered flower heads of the valerian plant, rely on the simple but effective French knot.
Use a soft pink and off-white floss, varying the number of wraps around your needle (one or two times) to create knots of slightly different sizes.
This variation is what gives the clusters a natural, fluffy appearance rather than a uniform, rigid one.
Placing them on a muted, cool-toned fabric like this dusty blue makes the delicate pinks and whites feel even softer and more serene.
14. The High-Contrast Drama of Elderflower
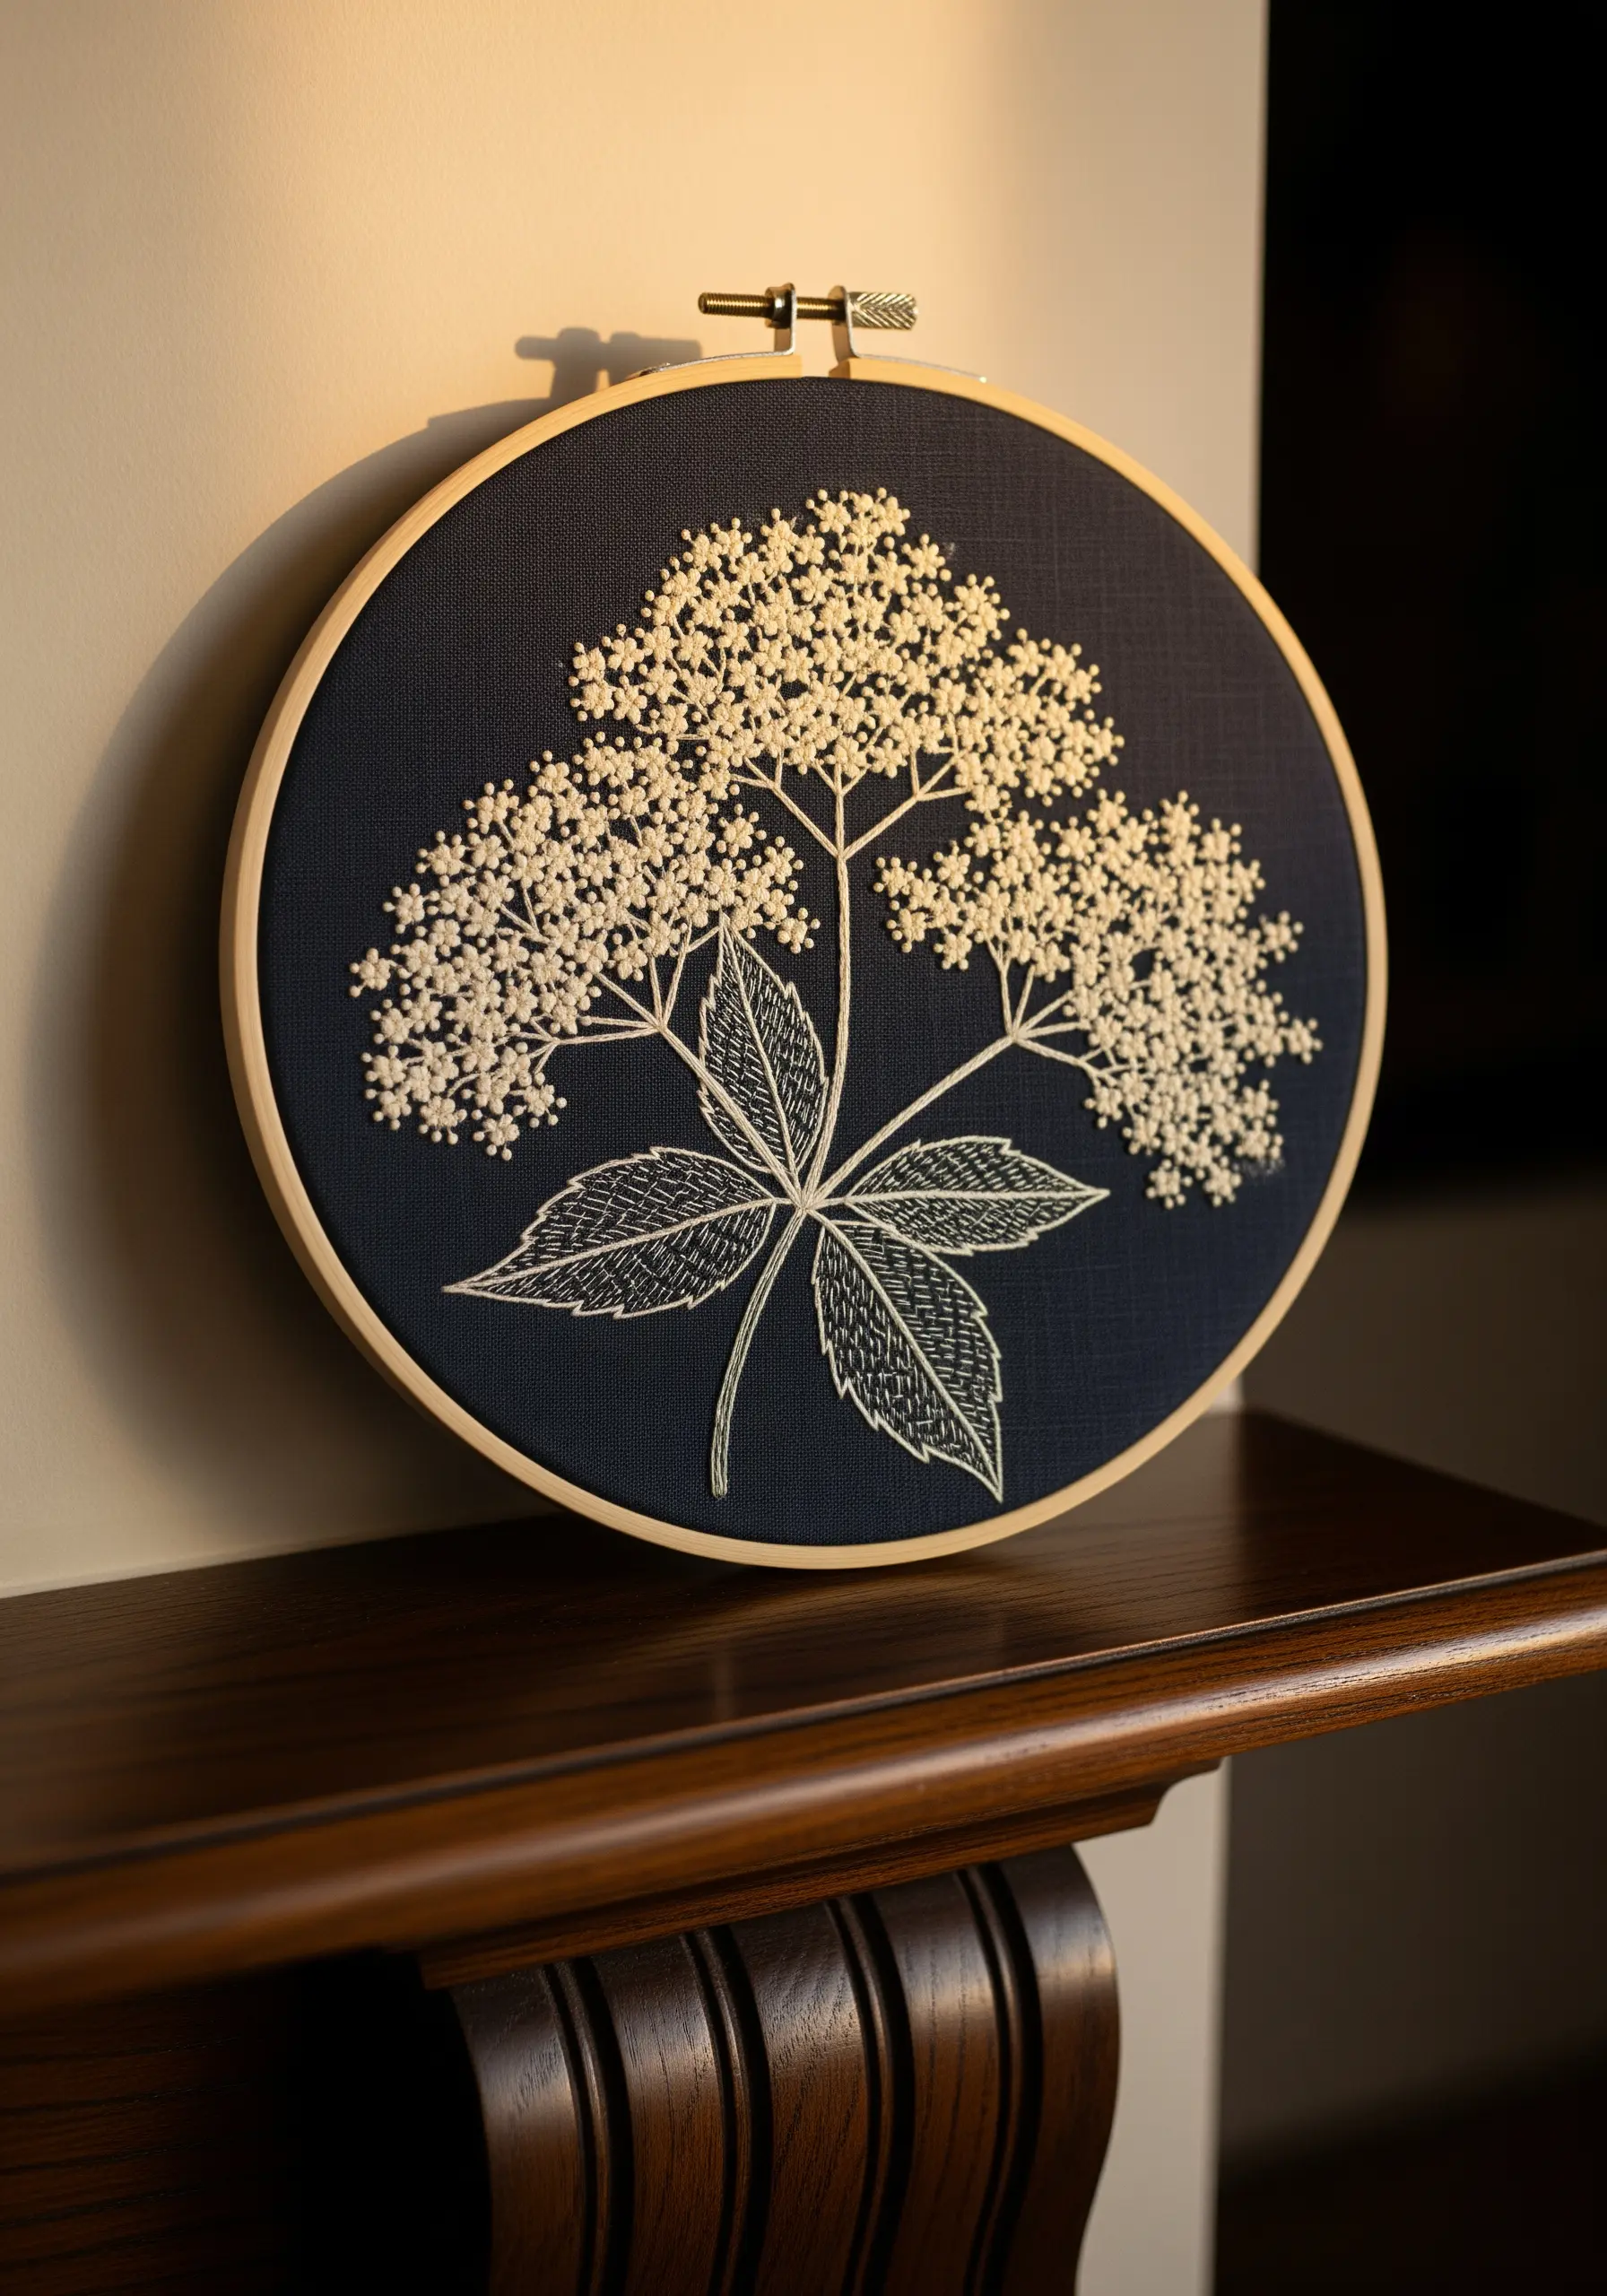
Achieve a stunning, graphic look by working in a single light color on a dark, matte fabric.
The intricate sprays of elderflower are rendered here entirely with white French knots, creating a texture that is both visual and tactile.
For the leaves, a simple backstitch outline filled with spaced-out seed stitches provides a contrasting texture that doesn’t compete with the dense flowers.
This monochrome approach is a powerful lesson in how texture and contrast can be just as impactful as a full-color palette.
15. Modern Sage with Color-Blocked Satin Stitch
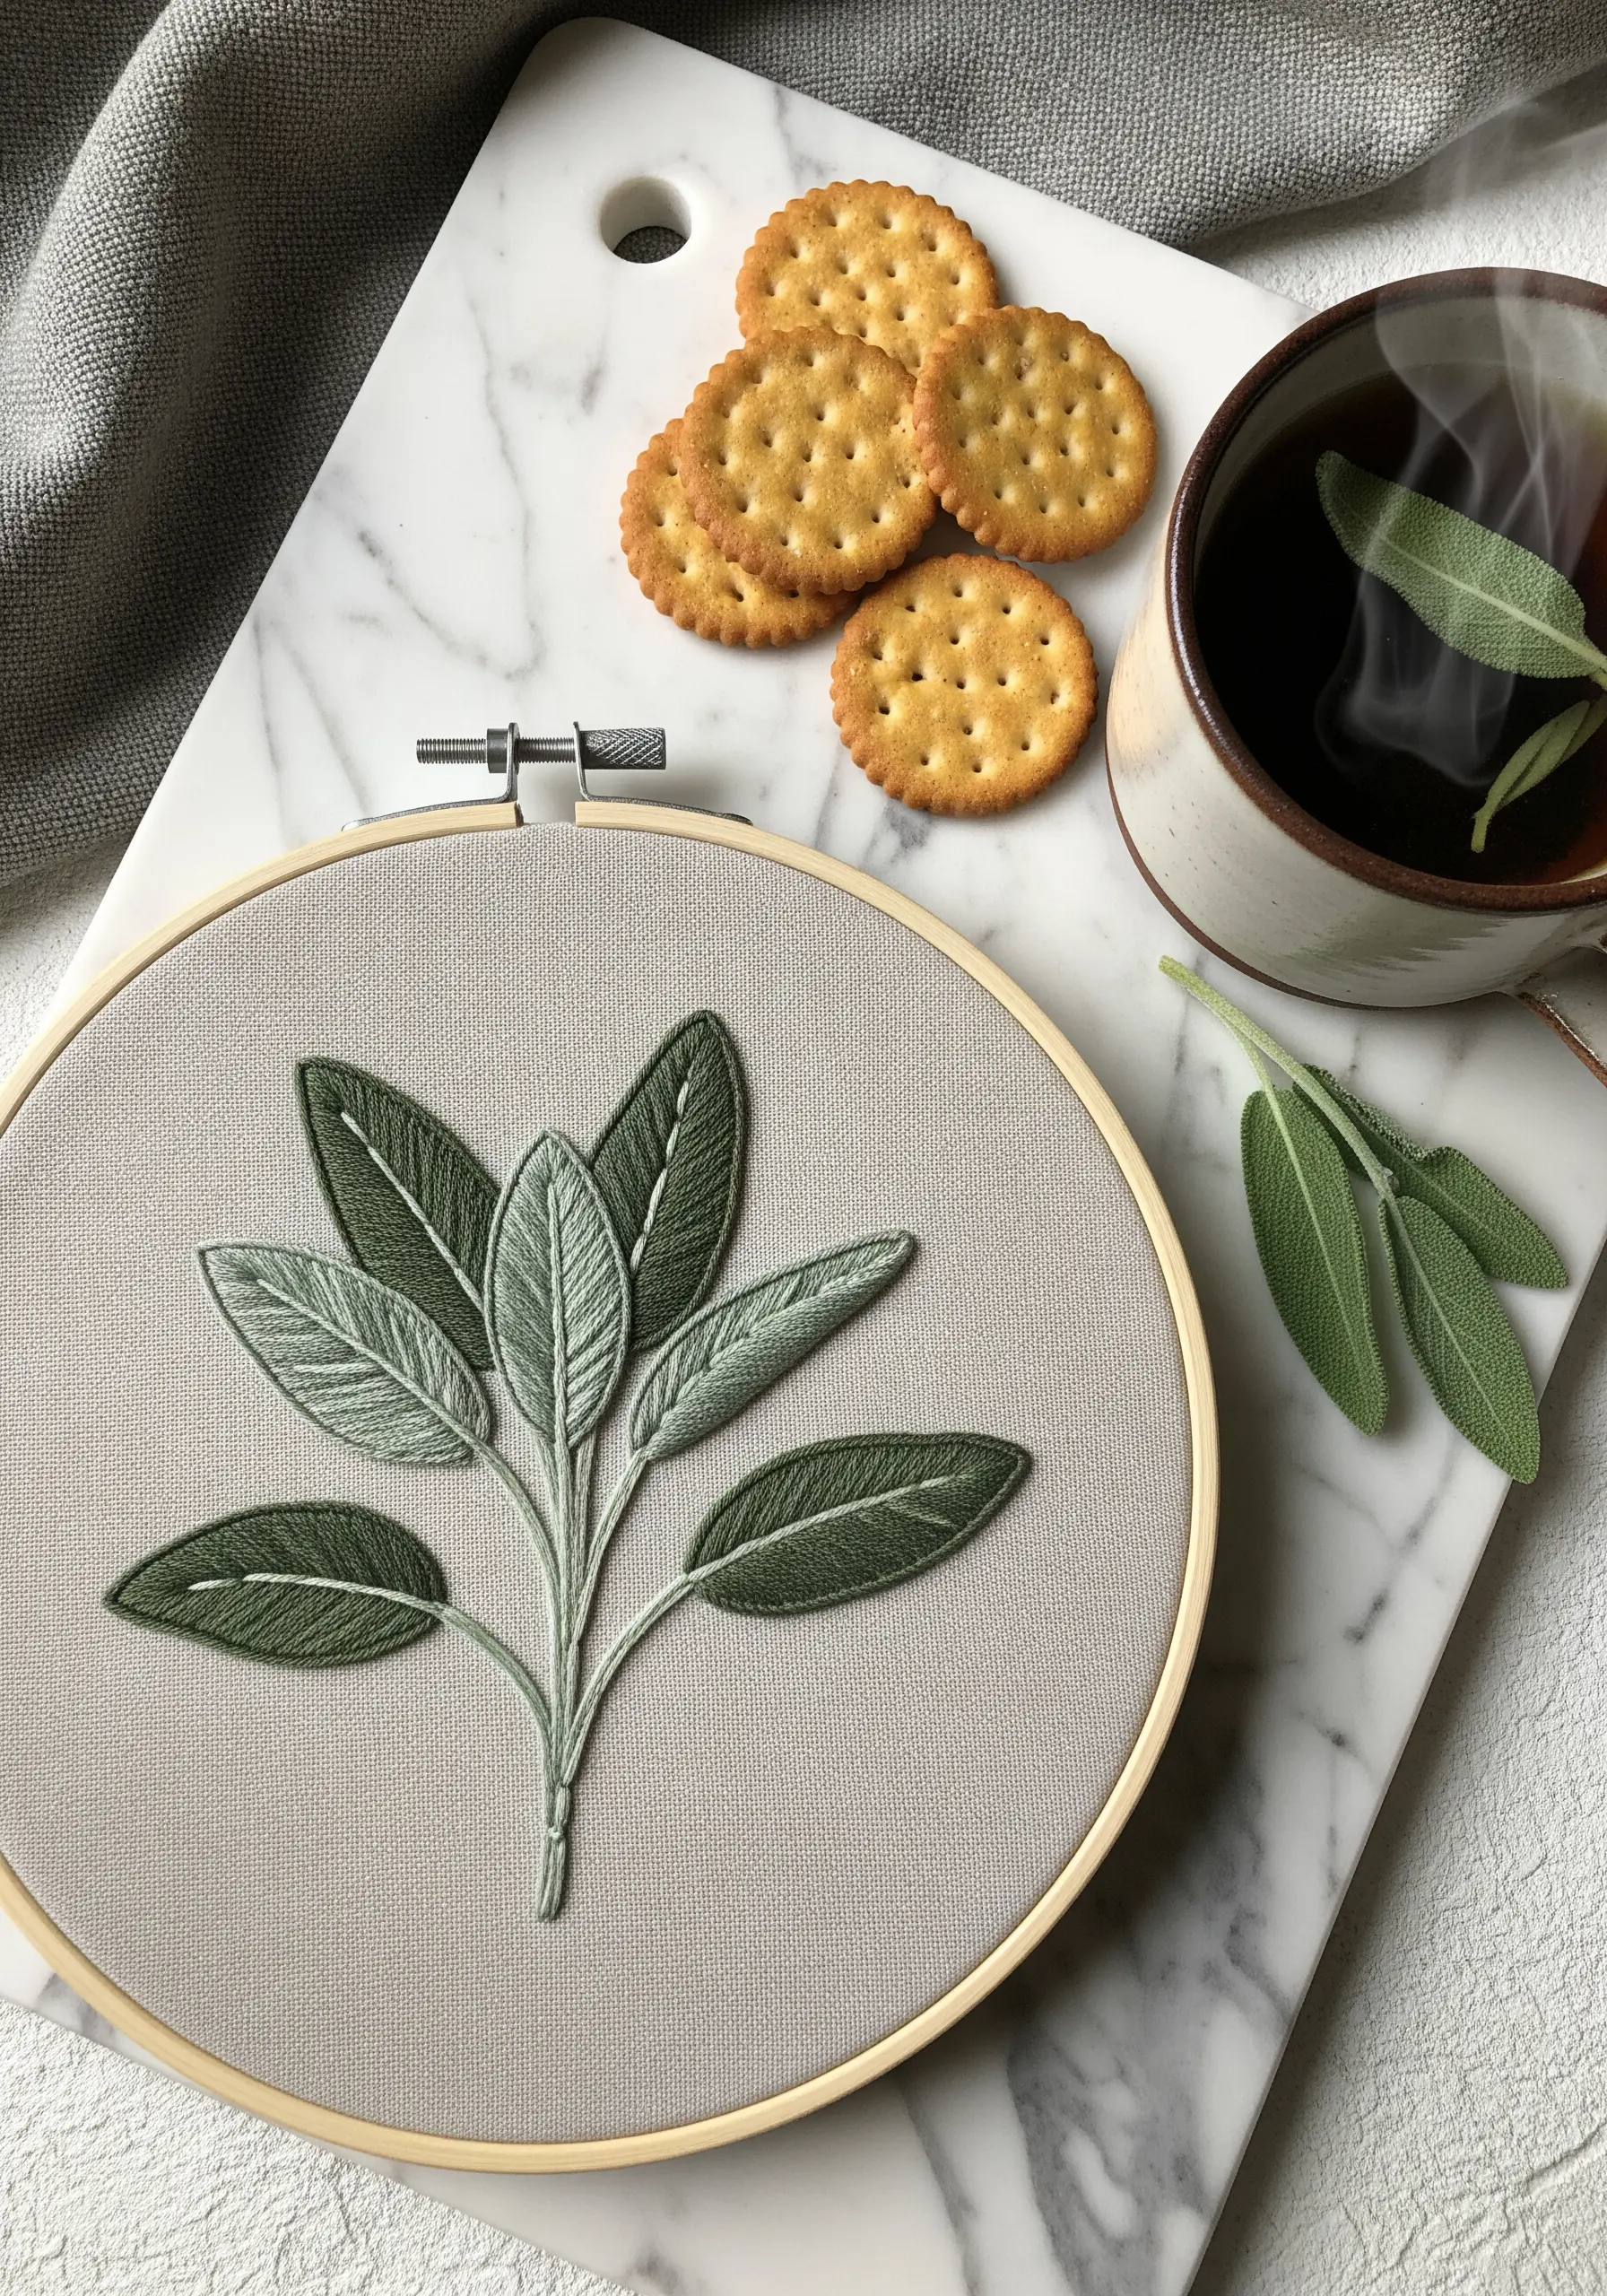
Give your botanical embroidery a modern, graphic twist by using color-blocking instead of subtle shading.
Divide each sage leaf into distinct sections and fill them with smooth, clean satin stitch in complementary shades of dusty green and silver.
To ensure your edges are razor-sharp, outline each color block with a single-strand split stitch after you’ve filled it in.
This technique elevates a simple plant into a piece of minimalist stitched art, focusing on shape and color over photorealism.
16. Detailing Tiny Thyme with Padded Leaf Stitch
When working on a small scale, creating dimension can be a challenge. For tiny leaves like thyme, a padded leaf stitch is the solution.
Create a single straight stitch to act as the central vein. Then, work tiny satin stitches over it from side to side, covering the center stitch completely.
This builds a small, raised leaf shape that has a lovely plumpness, even at a miniature size.
These are perfect for tiny embroidery ideas to personalize your denim jacket or the collar of a shirt.
17. Creating Vibrant Calendula with Silk Ribbon
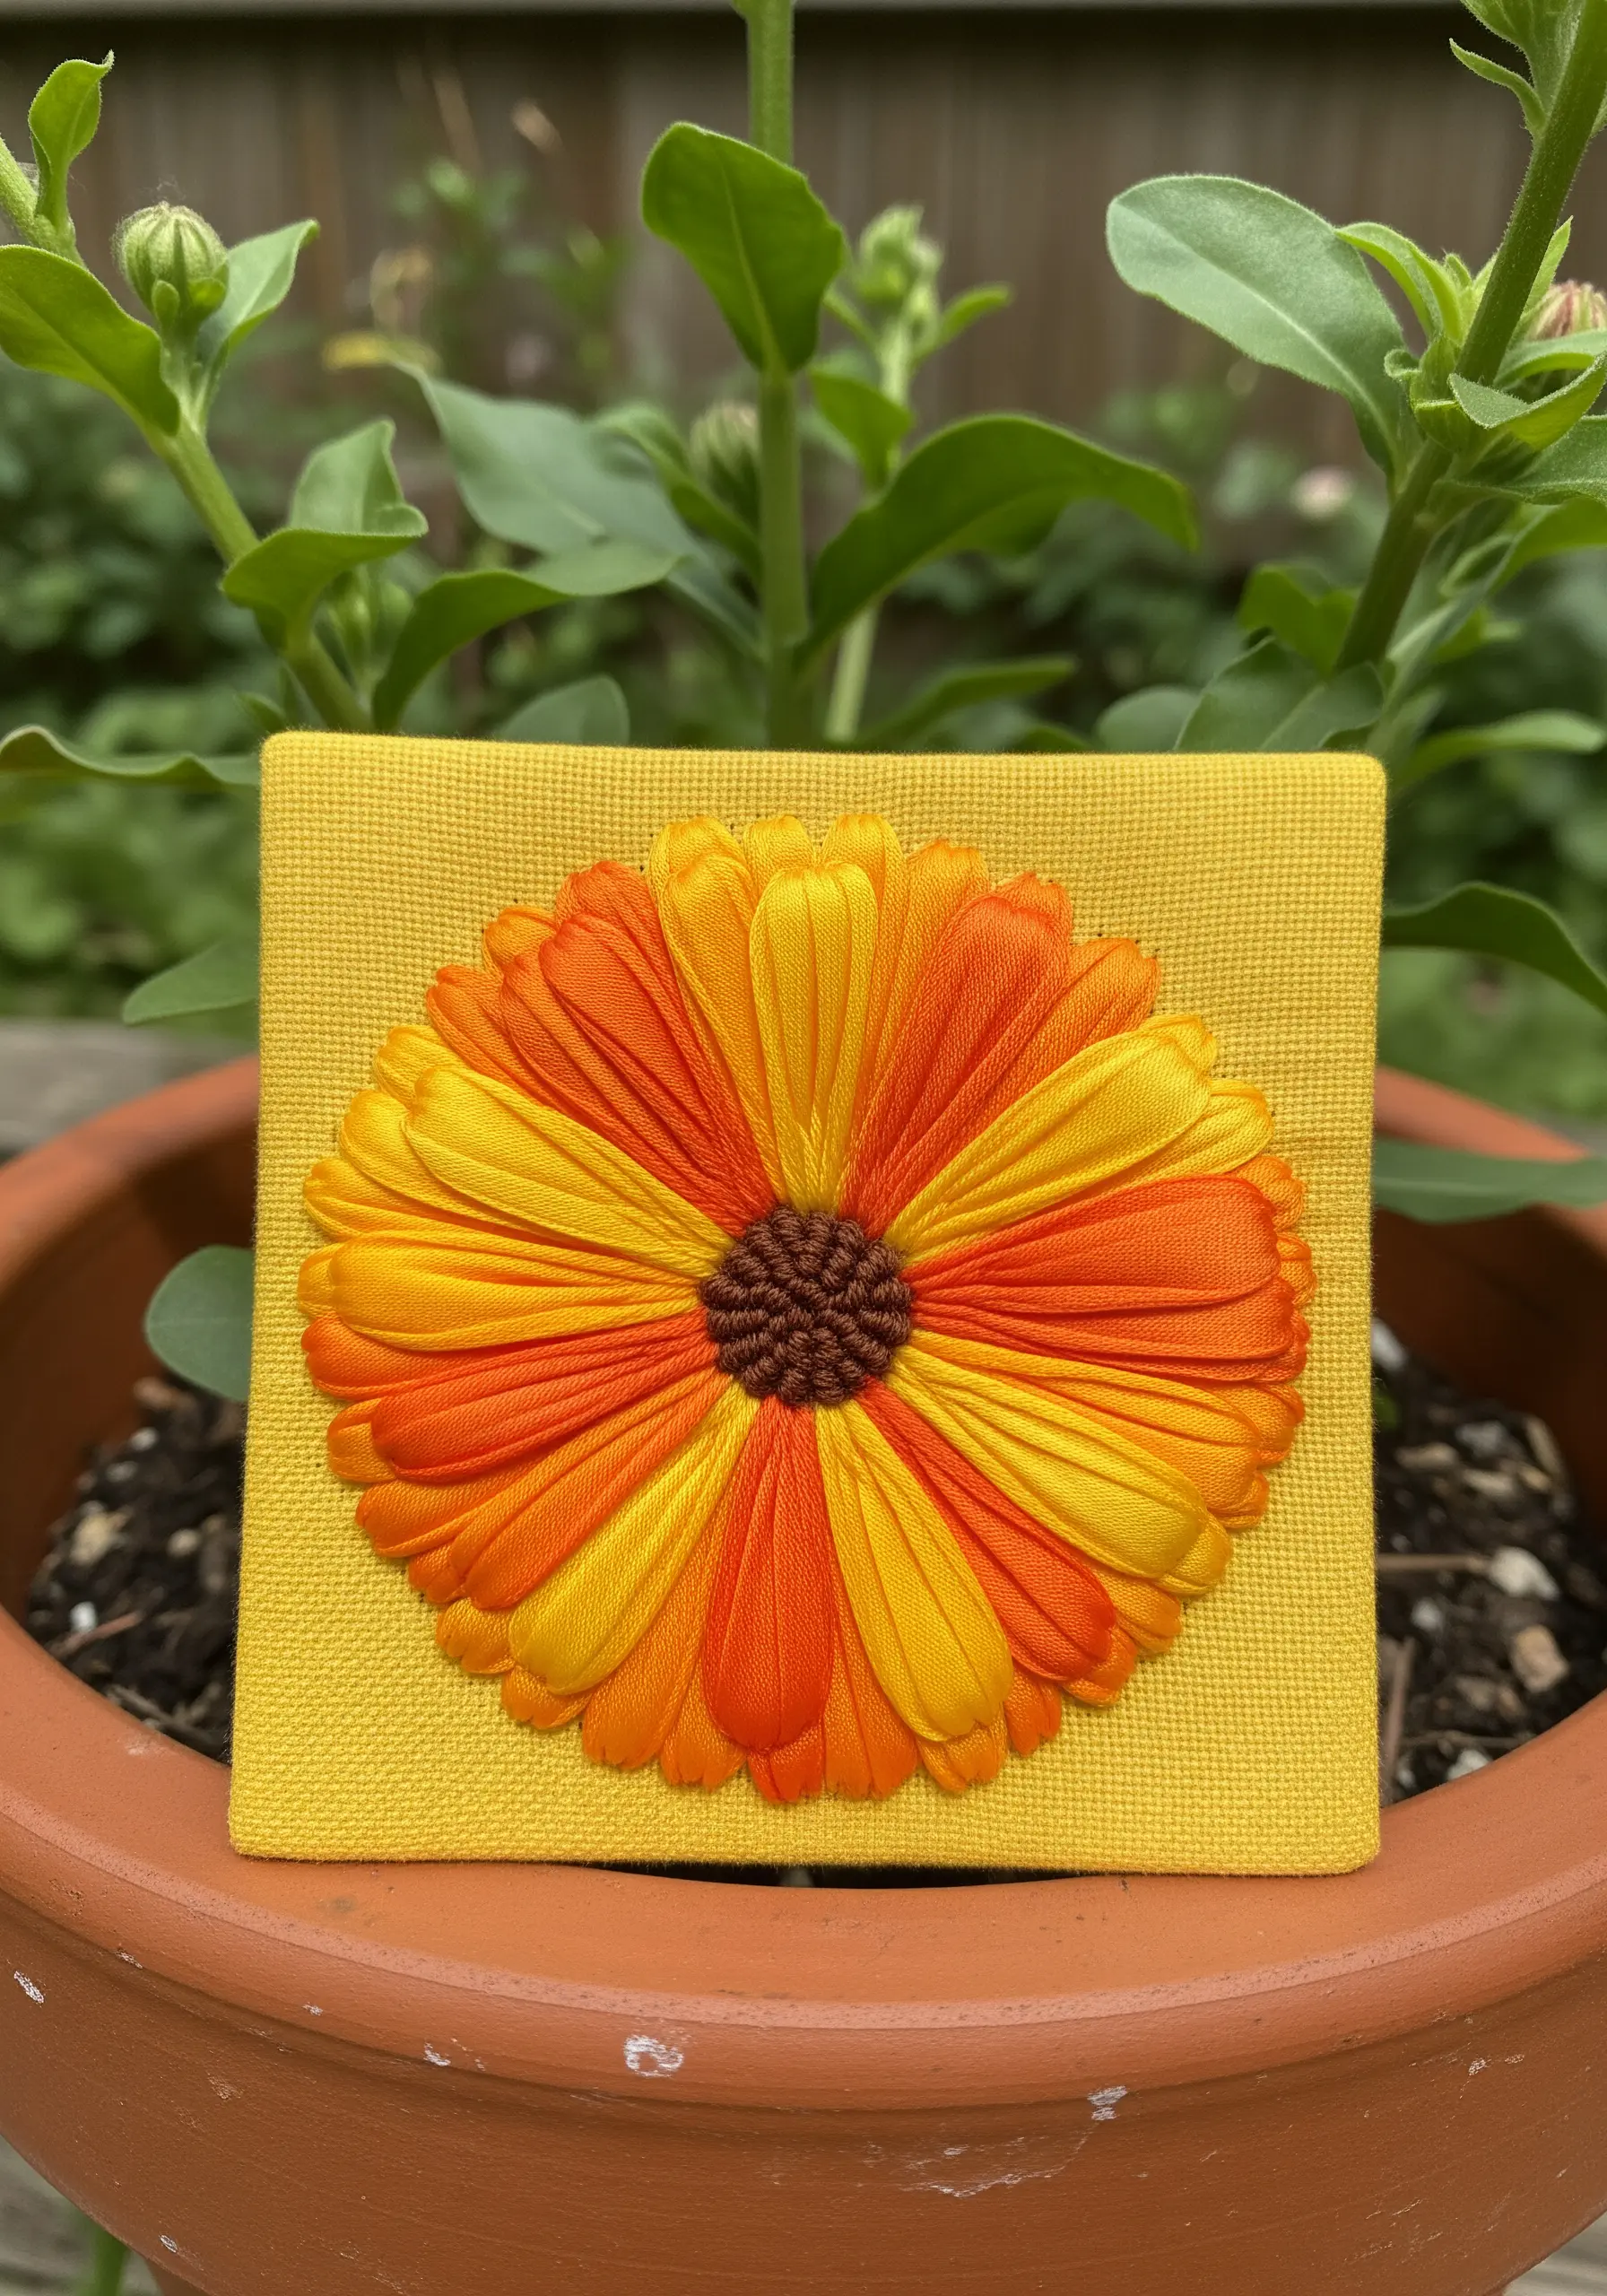
To capture the bold, satiny petals of a calendula, switch from floss to silk ribbon.
Ribbon embroidery creates dimension and a light-reflecting sheen that thread simply can’t replicate. Use a simple straight stitch, but twist the ribbon slightly as you pull it through the fabric to create natural-looking folds in the petals.
By using a variegated orange and yellow ribbon, you can achieve beautiful color gradients with minimal effort.
Finish the center with dense brown French knots for a perfect textural contrast.
18. Mimicking Raspberry Leaf Texture with Stitch Direction
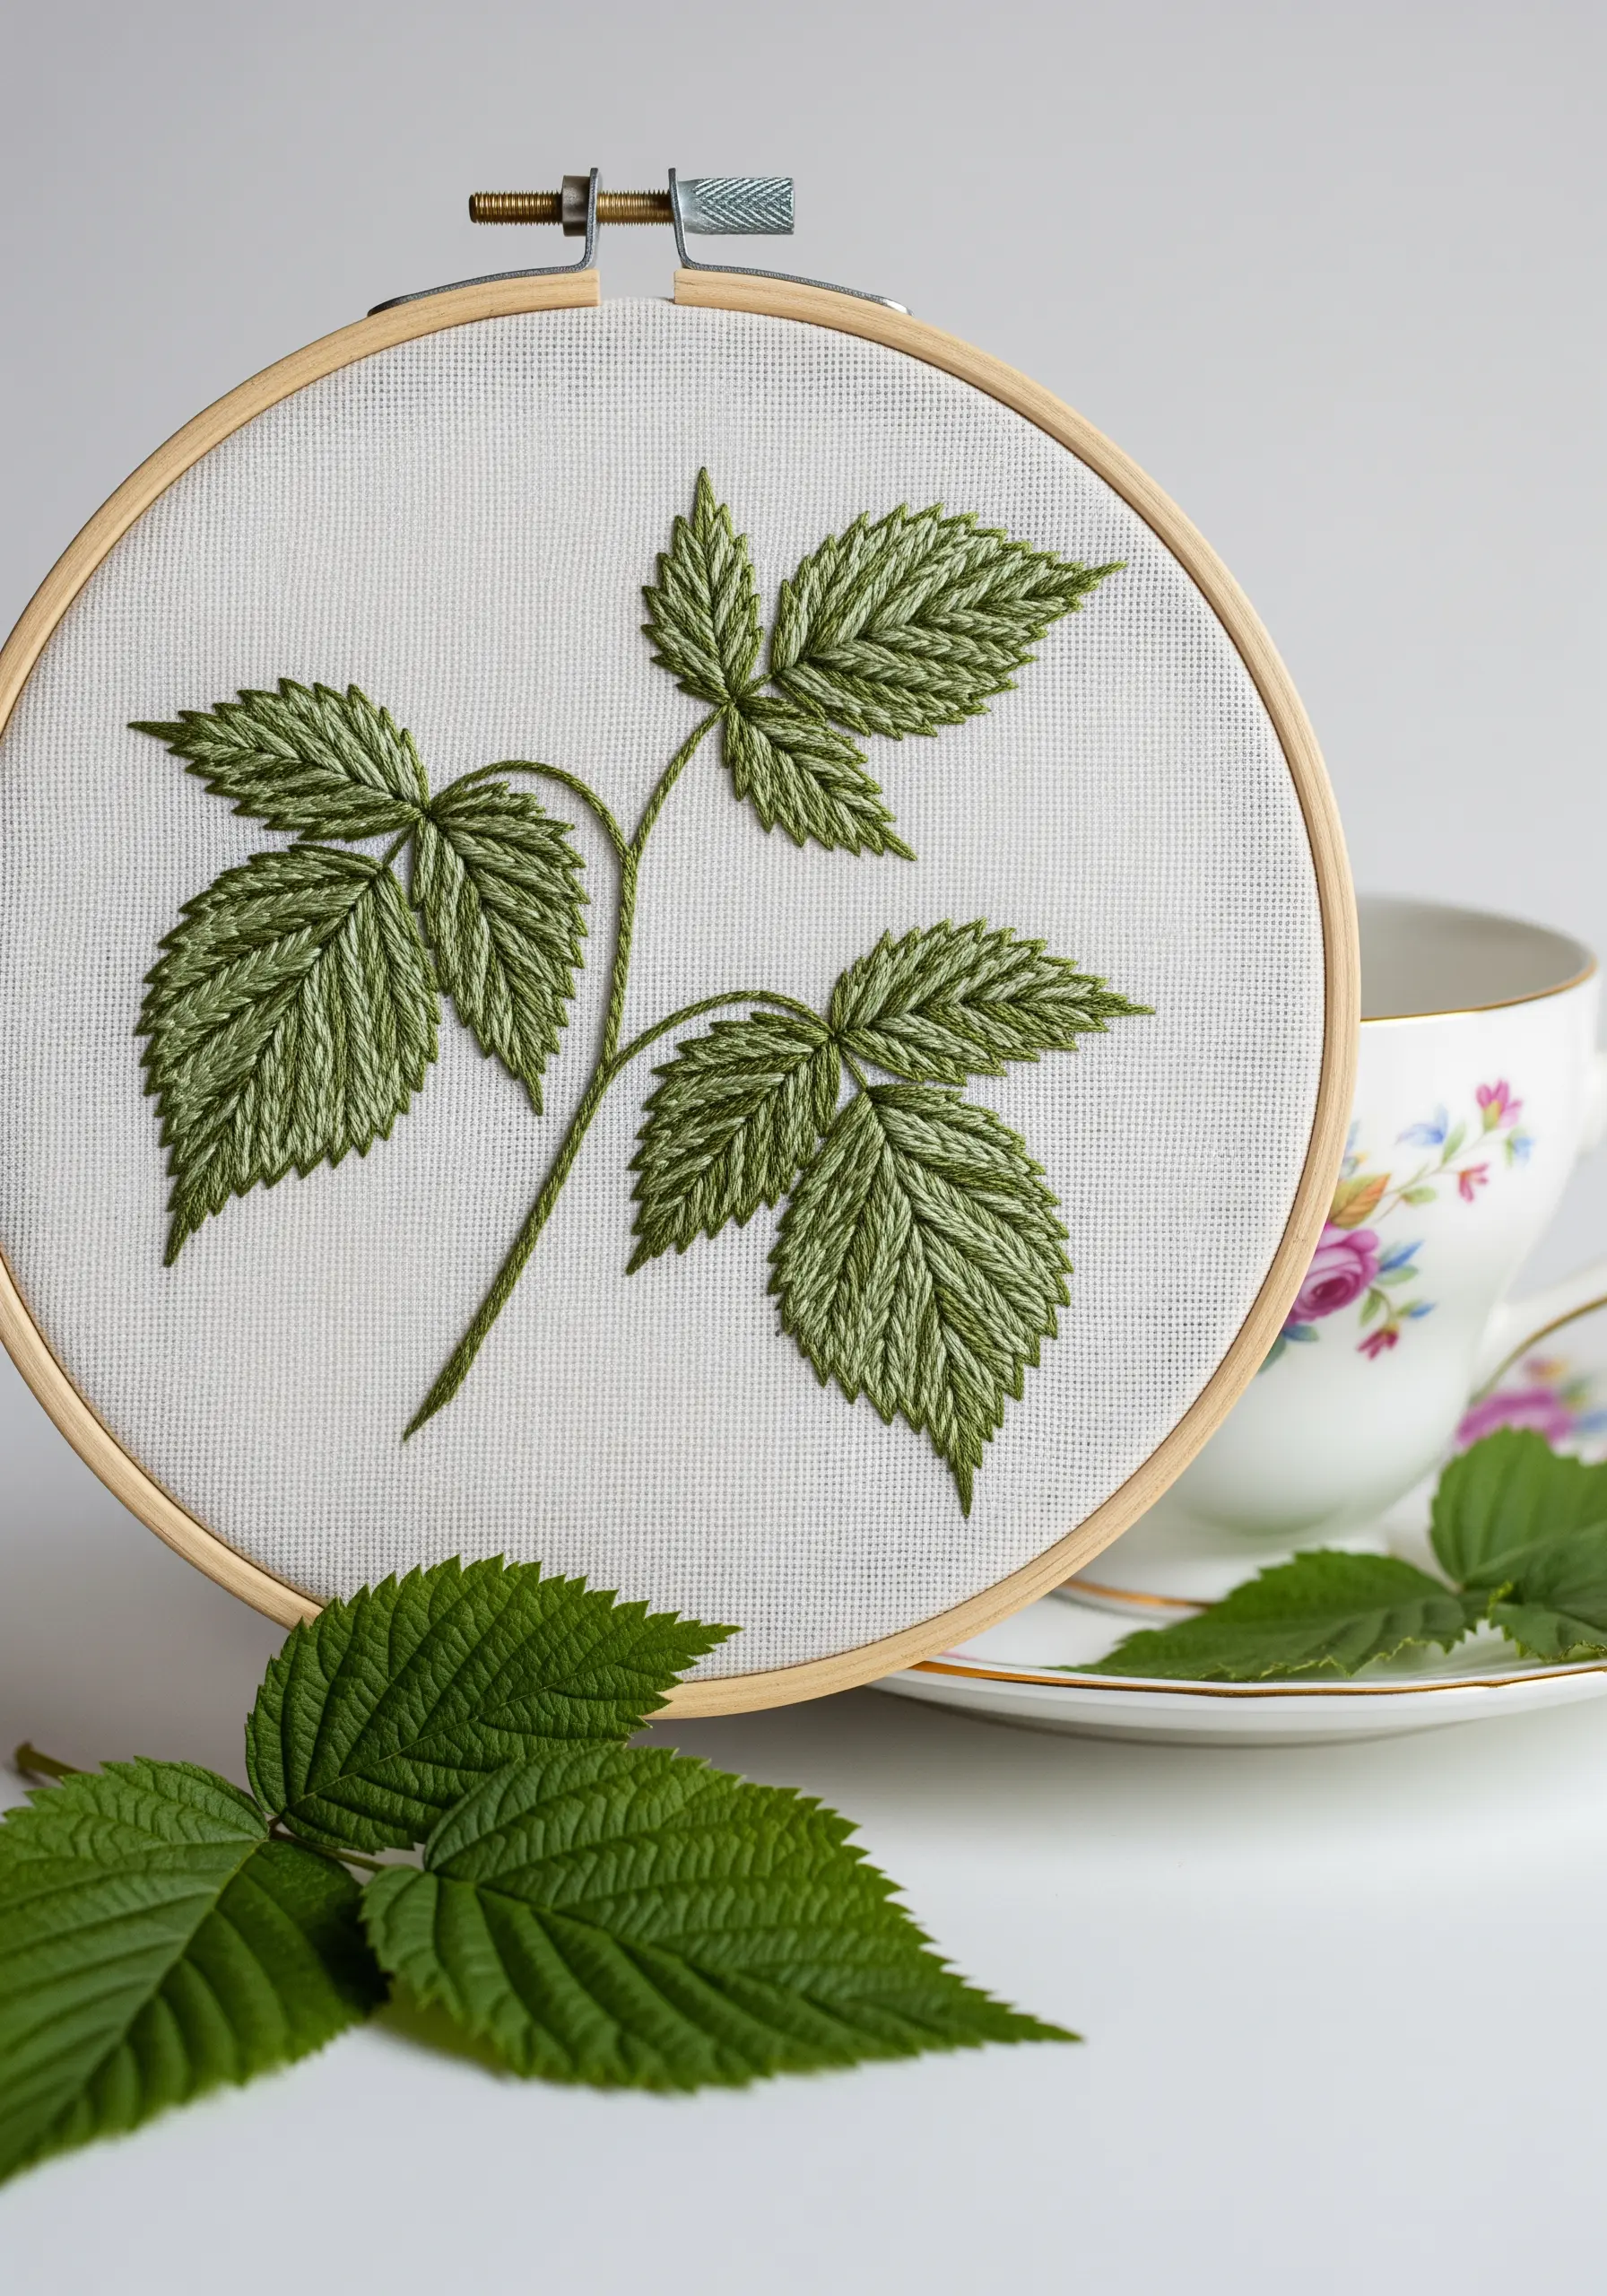
The realism in these raspberry leaves comes entirely from careful, directional stitching.
Using a long-and-short stitch, angle the stitches to follow the direction of the veins, radiating out from the center to the edges.
Where the leaf naturally crinkles or folds, change the angle of your stitches abruptly. This simple shift in direction tricks the eye into seeing depth and texture.
Using two or three similar shades of green will enhance this effect, creating subtle highlights and shadows.
19. Enhancing Holy Basil with a Complementary Background
Your choice of fabric color can dramatically change the feel of your embroidery. Here, a soft mauve-pink background makes the greens and purples of the Holy Basil (Tulsi) look richer and more vibrant.
The pink is a complementary color to green, so it intensifies the leaf color without being distracting.
This is a powerful tool in your design arsenal; always consider how your fabric choice will interact with your thread palette.
For the tiny flowers, use a mix of white and pale lavender French knots to create a delicate, airy feel.
20. Sculpting Borage Stars with 3D Embroidery
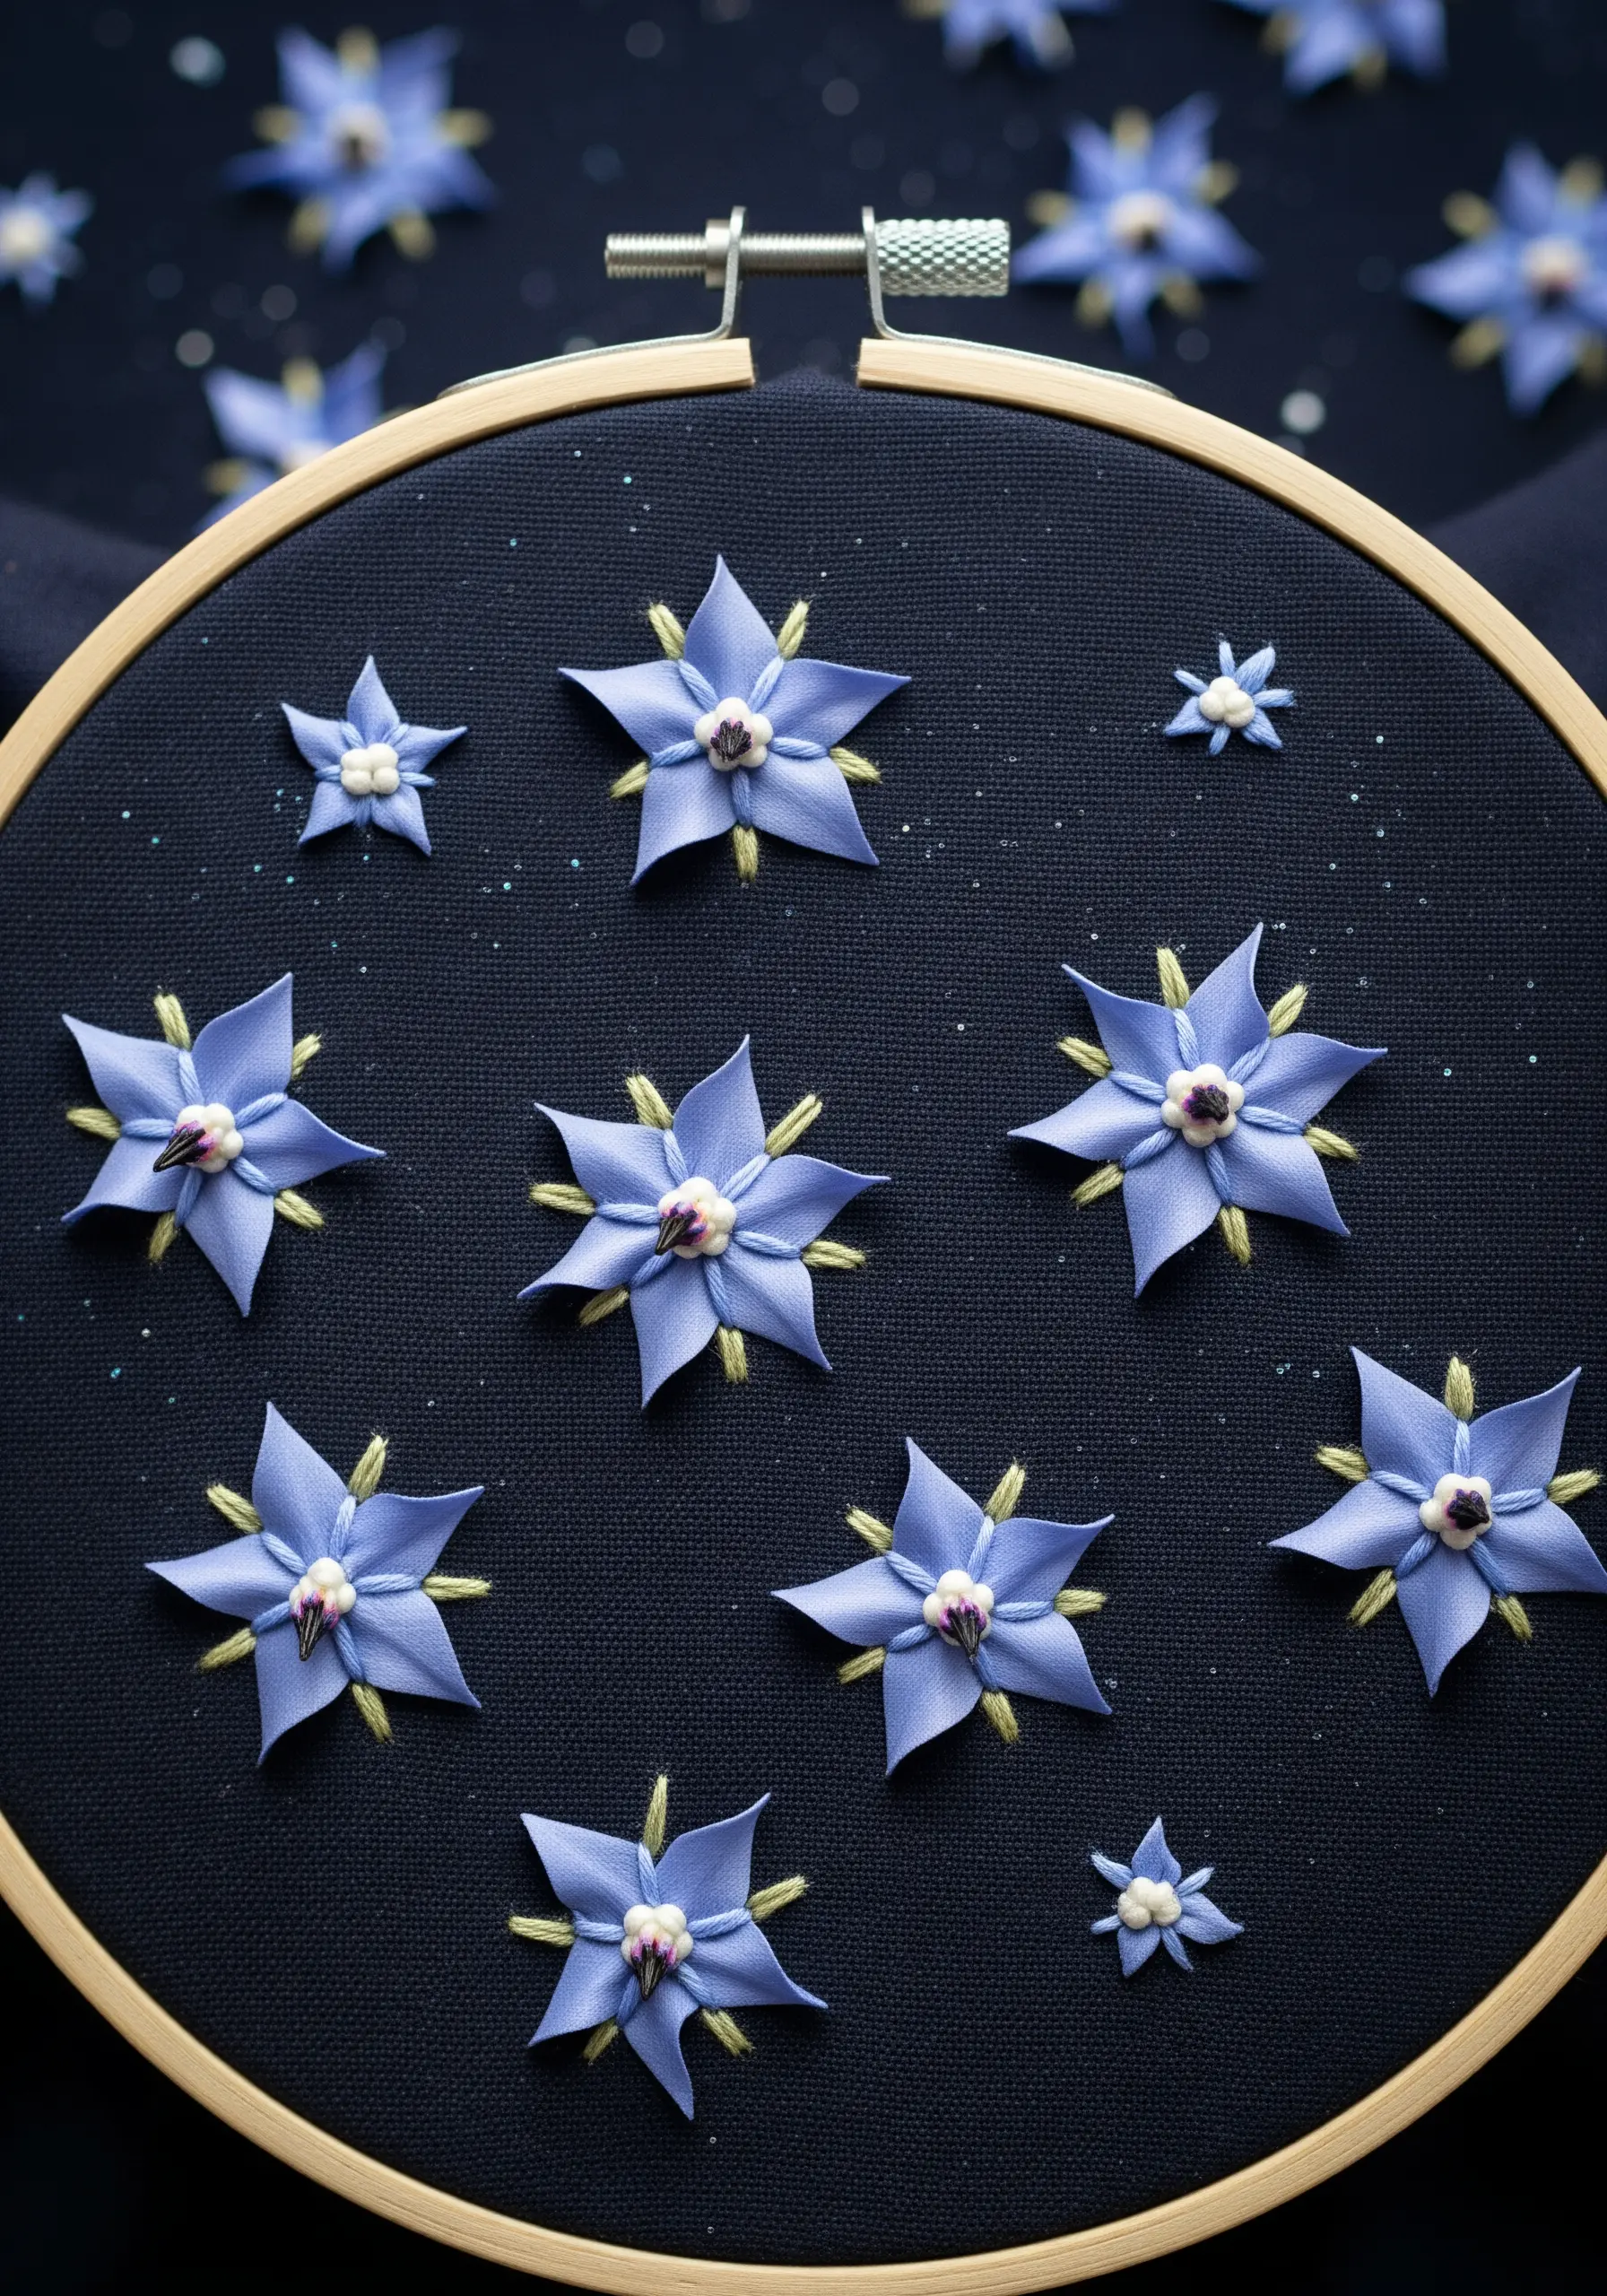
Elevate your embroidery from two dimensions to three with stumpwork techniques for these borage flowers.
Each petal is a detached buttonhole stitch, worked around a temporary guide thread to create a small, stiff loop that stands away from the fabric.
Arranging five of these loops in a star shape creates the iconic borage flower. This method allows you to build layers and create incredible depth.
The result is a tactile piece of art that looks incredibly complex but is built from a single, versatile stitch.
21. Achieving Fennel’s Feathery Form with Fine Stitches
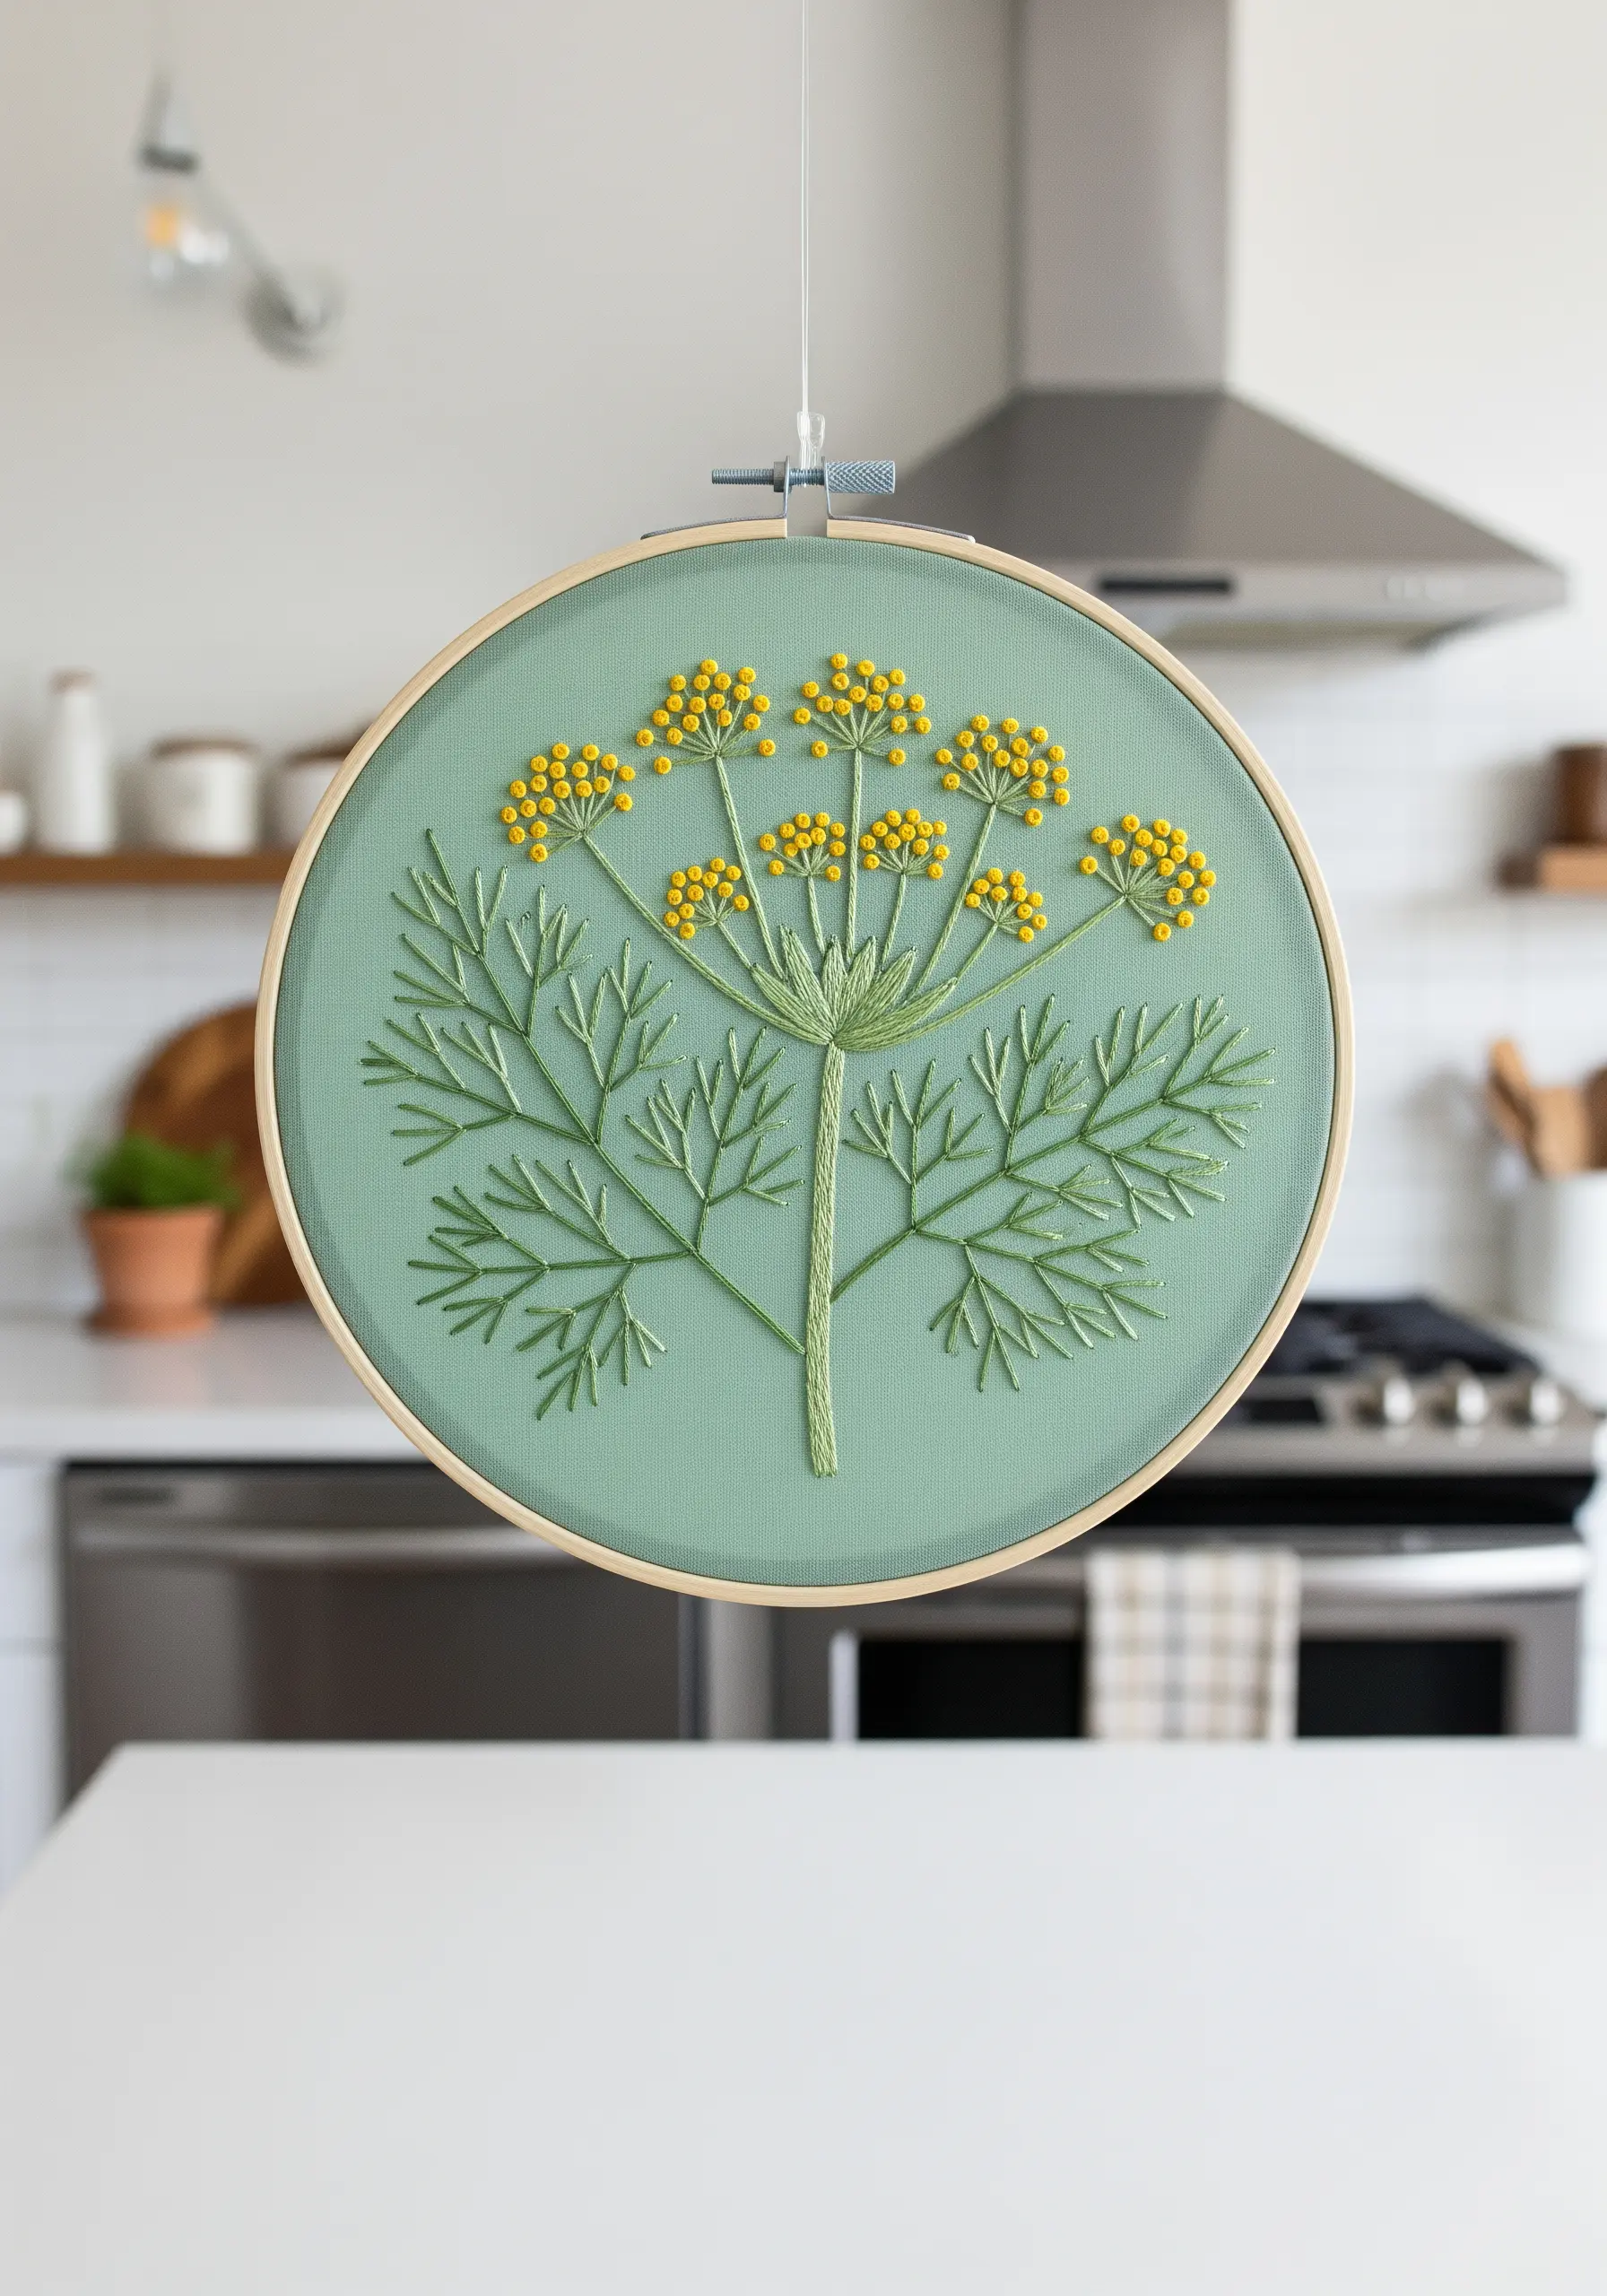
To capture the delicate, airy quality of fennel, you must use a light hand and fine threads.
Use only a single strand of floss for the feathery fronds, working them in a simple backstitch or split stitch.
The flower umbels are created with clusters of bright yellow French knots, which provide a pop of texture and color against the delicate green foliage.
The success of this design lies in its simplicity and the contrast between the linear fronds and the dotted flower heads.
22. Layering Simple Stitches for Anise Hyssop

You don’t need complex stitches to create intricate-looking flowers. These Anise Hyssop blossoms are a masterful combination of the basics.
Each tiny flower is made of just five detached chain stitches (lazy daisies) arranged in a star shape, with a single yellow French knot in the center.
By carefully layering these simple flower motifs up the stalk, you build a complex and beautifully textured floral spike.
The leaves, worked in a contrasting fishbone stitch, provide a solid base for the airy flowers.
23. Creating 3D Linden Leaves with Stumpwork
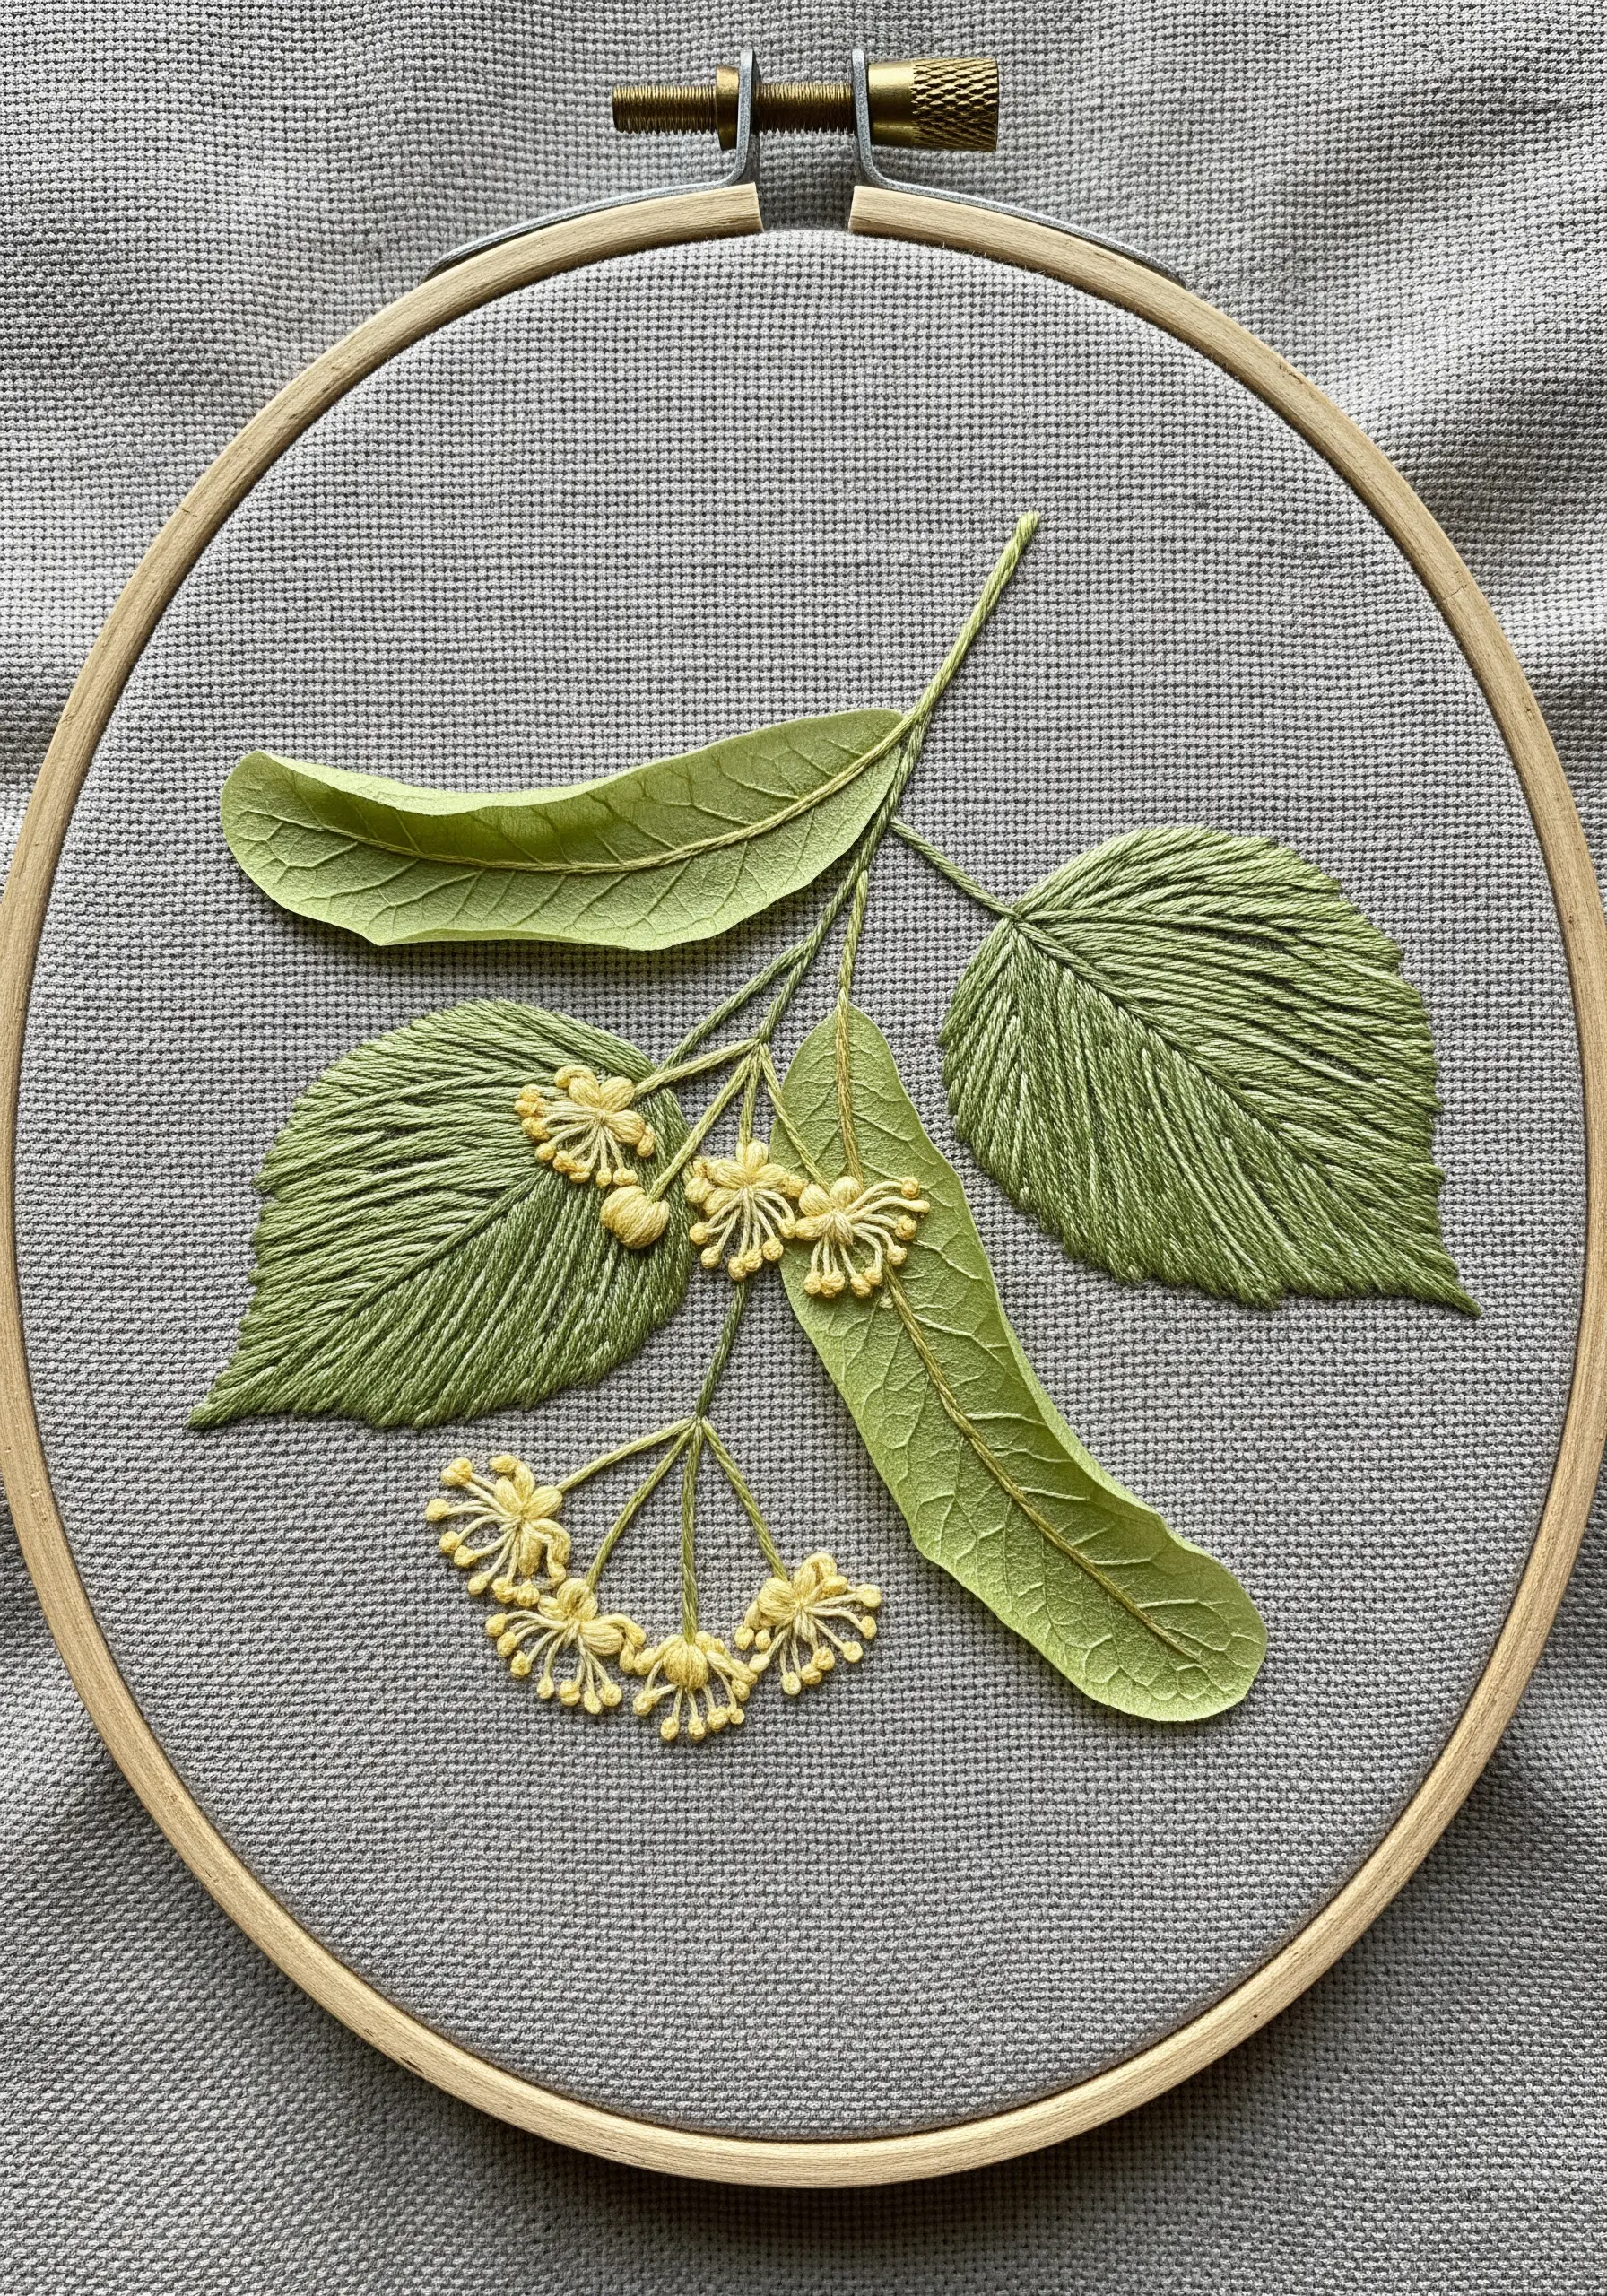
For ultimate realism, bring elements of your embroidery completely off the fabric with stumpwork.
These linden leaves are created separately by embroidering over a wire frame with buttonhole stitches. Once complete, they are cut out and stitched onto the background fabric, allowing you to bend and shape them.
The delicate flowers can be stitched directly onto the background using tiny straight stitches and French knots.
This technique creates breathtaking depth and turns your hoop into a miniature botanical sculpture.
24. Capturing Mullein’s Fuzzy Texture with Yarn

To replicate the soft, fuzzy leaves of the mullein plant, think beyond standard embroidery floss and reach for a thicker fiber like tapestry wool or single-ply yarn.
Use a long-and-short stitch or a simple satin stitch, allowing the natural fuzziness of the yarn to create that signature soft texture.
By blending a grey-green yarn with an off-white one, you can mimic the plant’s silvery sheen.
This is one of the most effective organic texture embroidery designs you can try, where the material does most of the work for you.
25. Stitching Feathery Yarrow with Fern Stitch
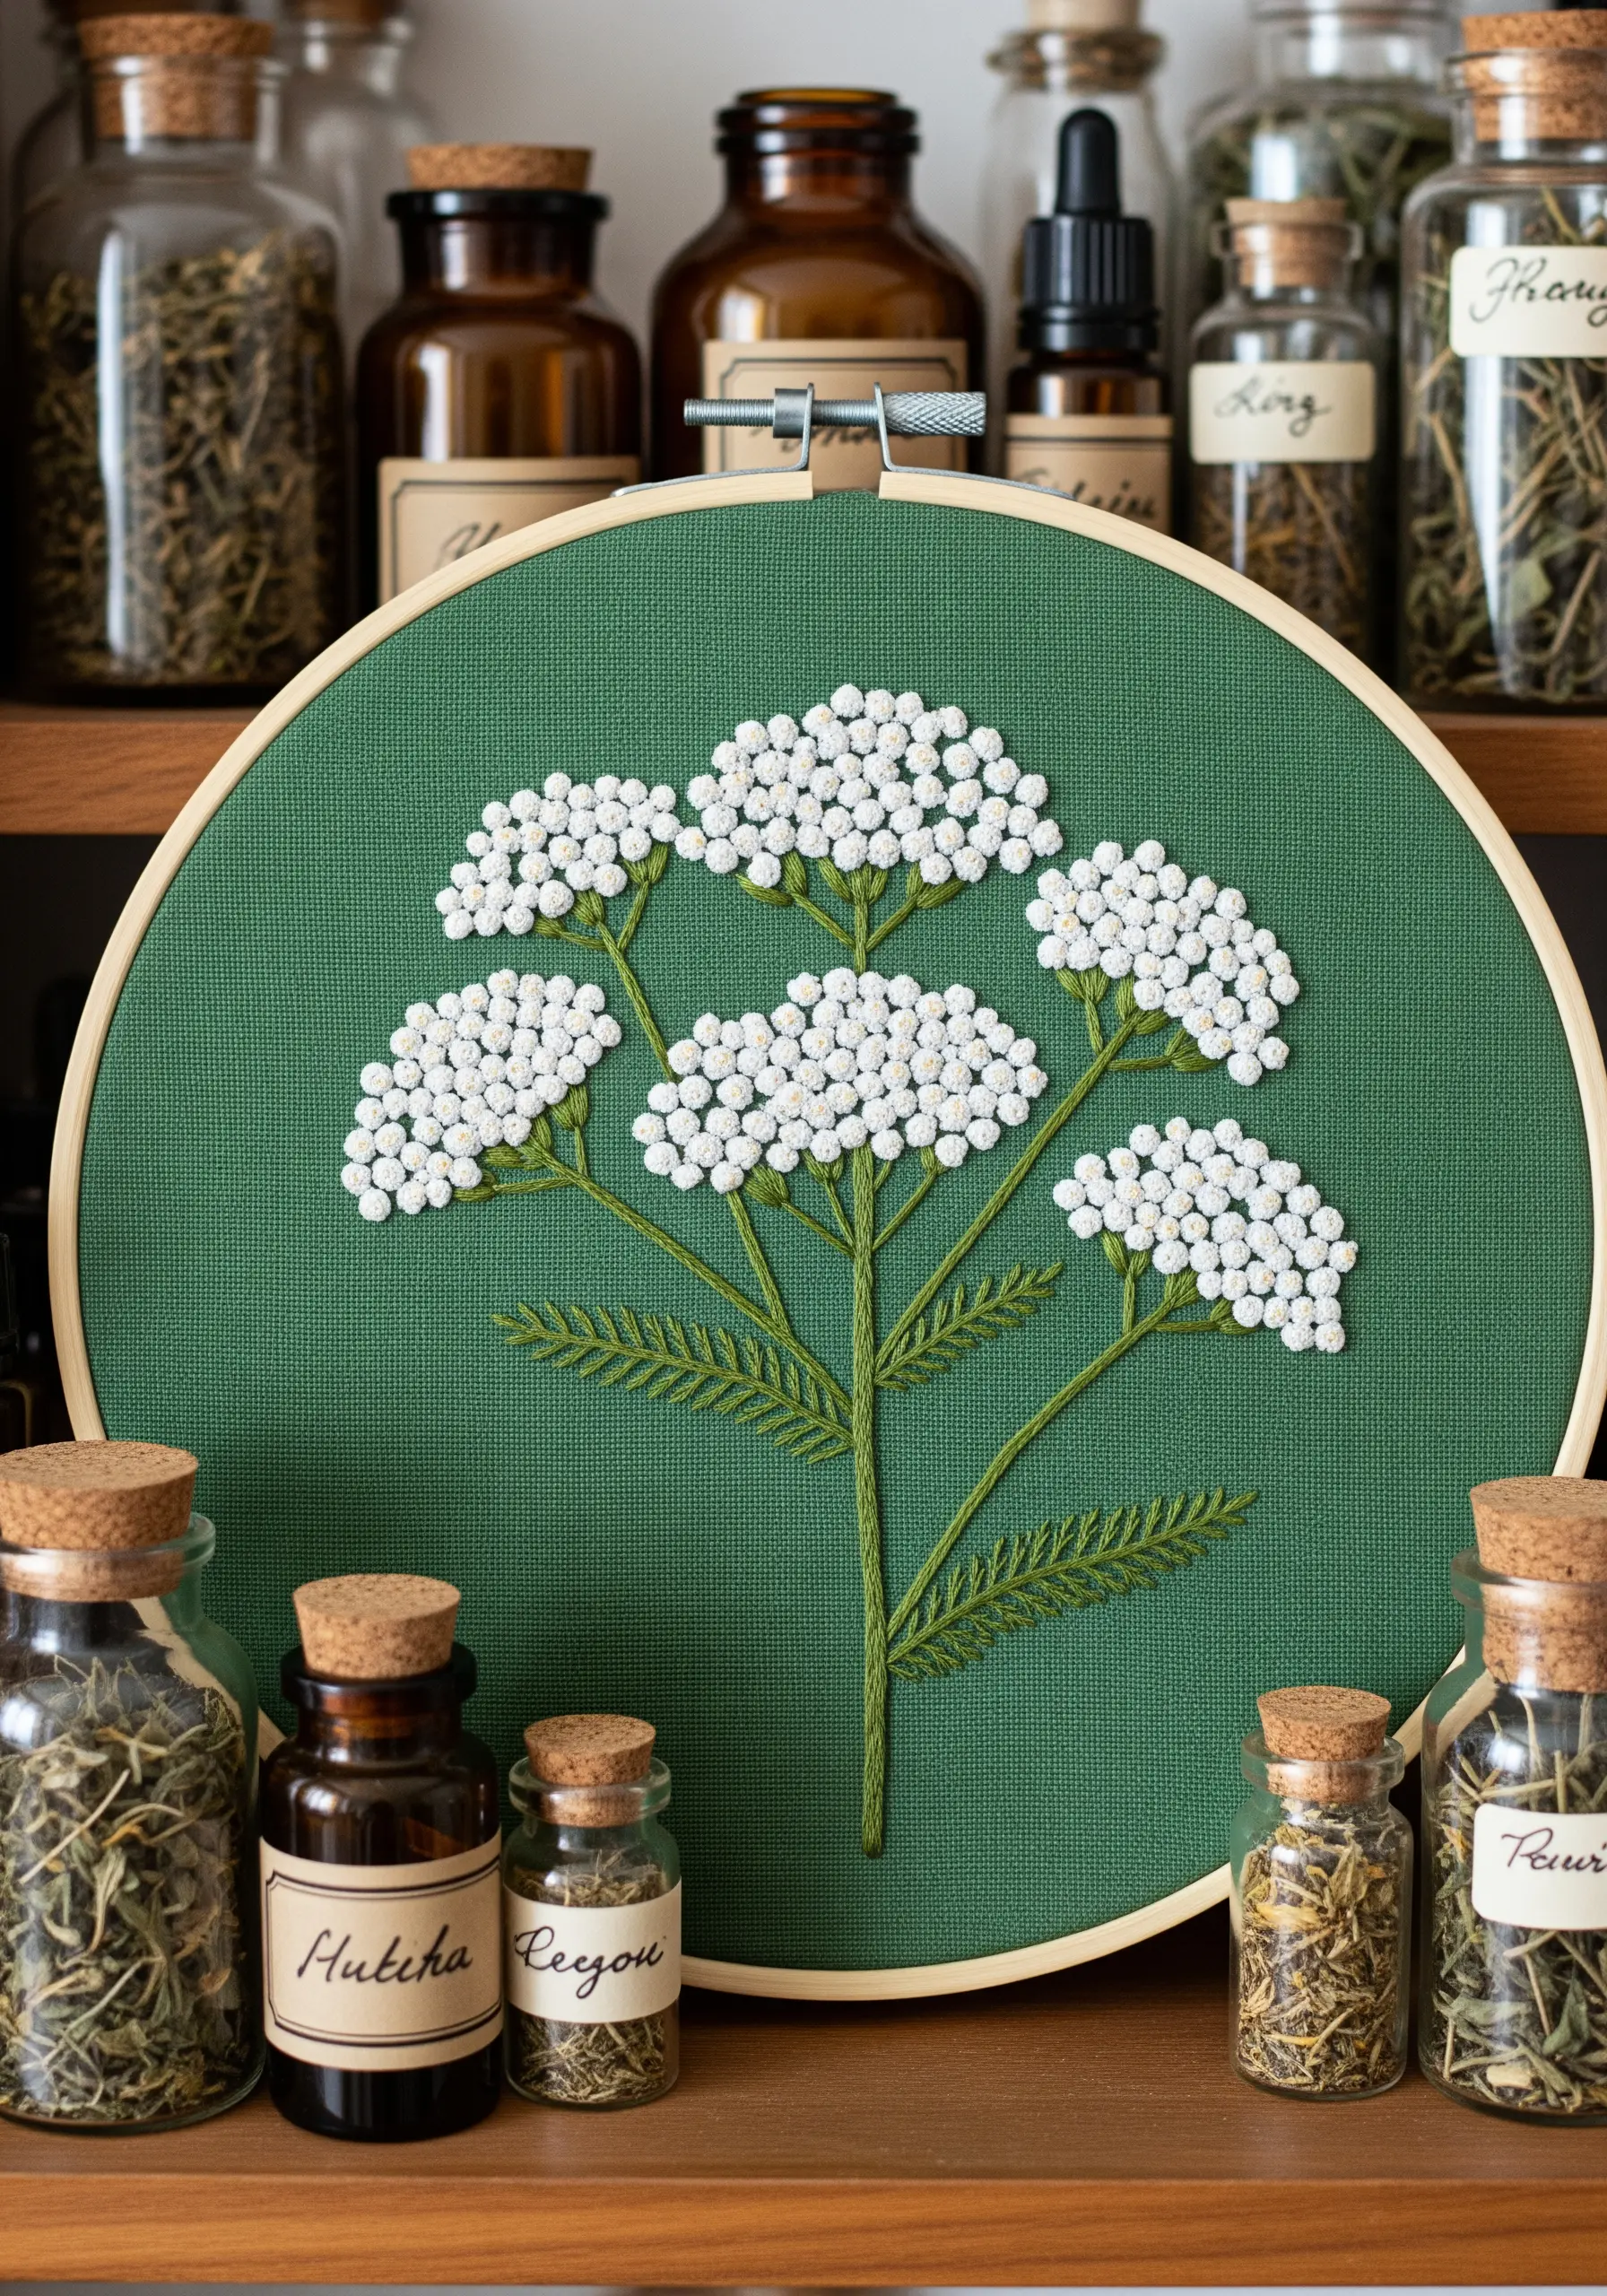
The fern stitch is the perfect choice for creating the delicate, feathery leaves of the yarrow plant.
This stitch creates a central stem and angled side stitches all in one fluid motion, perfectly mimicking the structure of a fern-like leaf.
For the dense flower heads, pack the area with tiny white French knots, using just one or two strands of floss to keep them delicate.
The contrast between the airy fern stitch leaves and the dense knotted flowers creates a balanced and visually interesting composition.
26. Thread Painting a Dimensional Red Clover
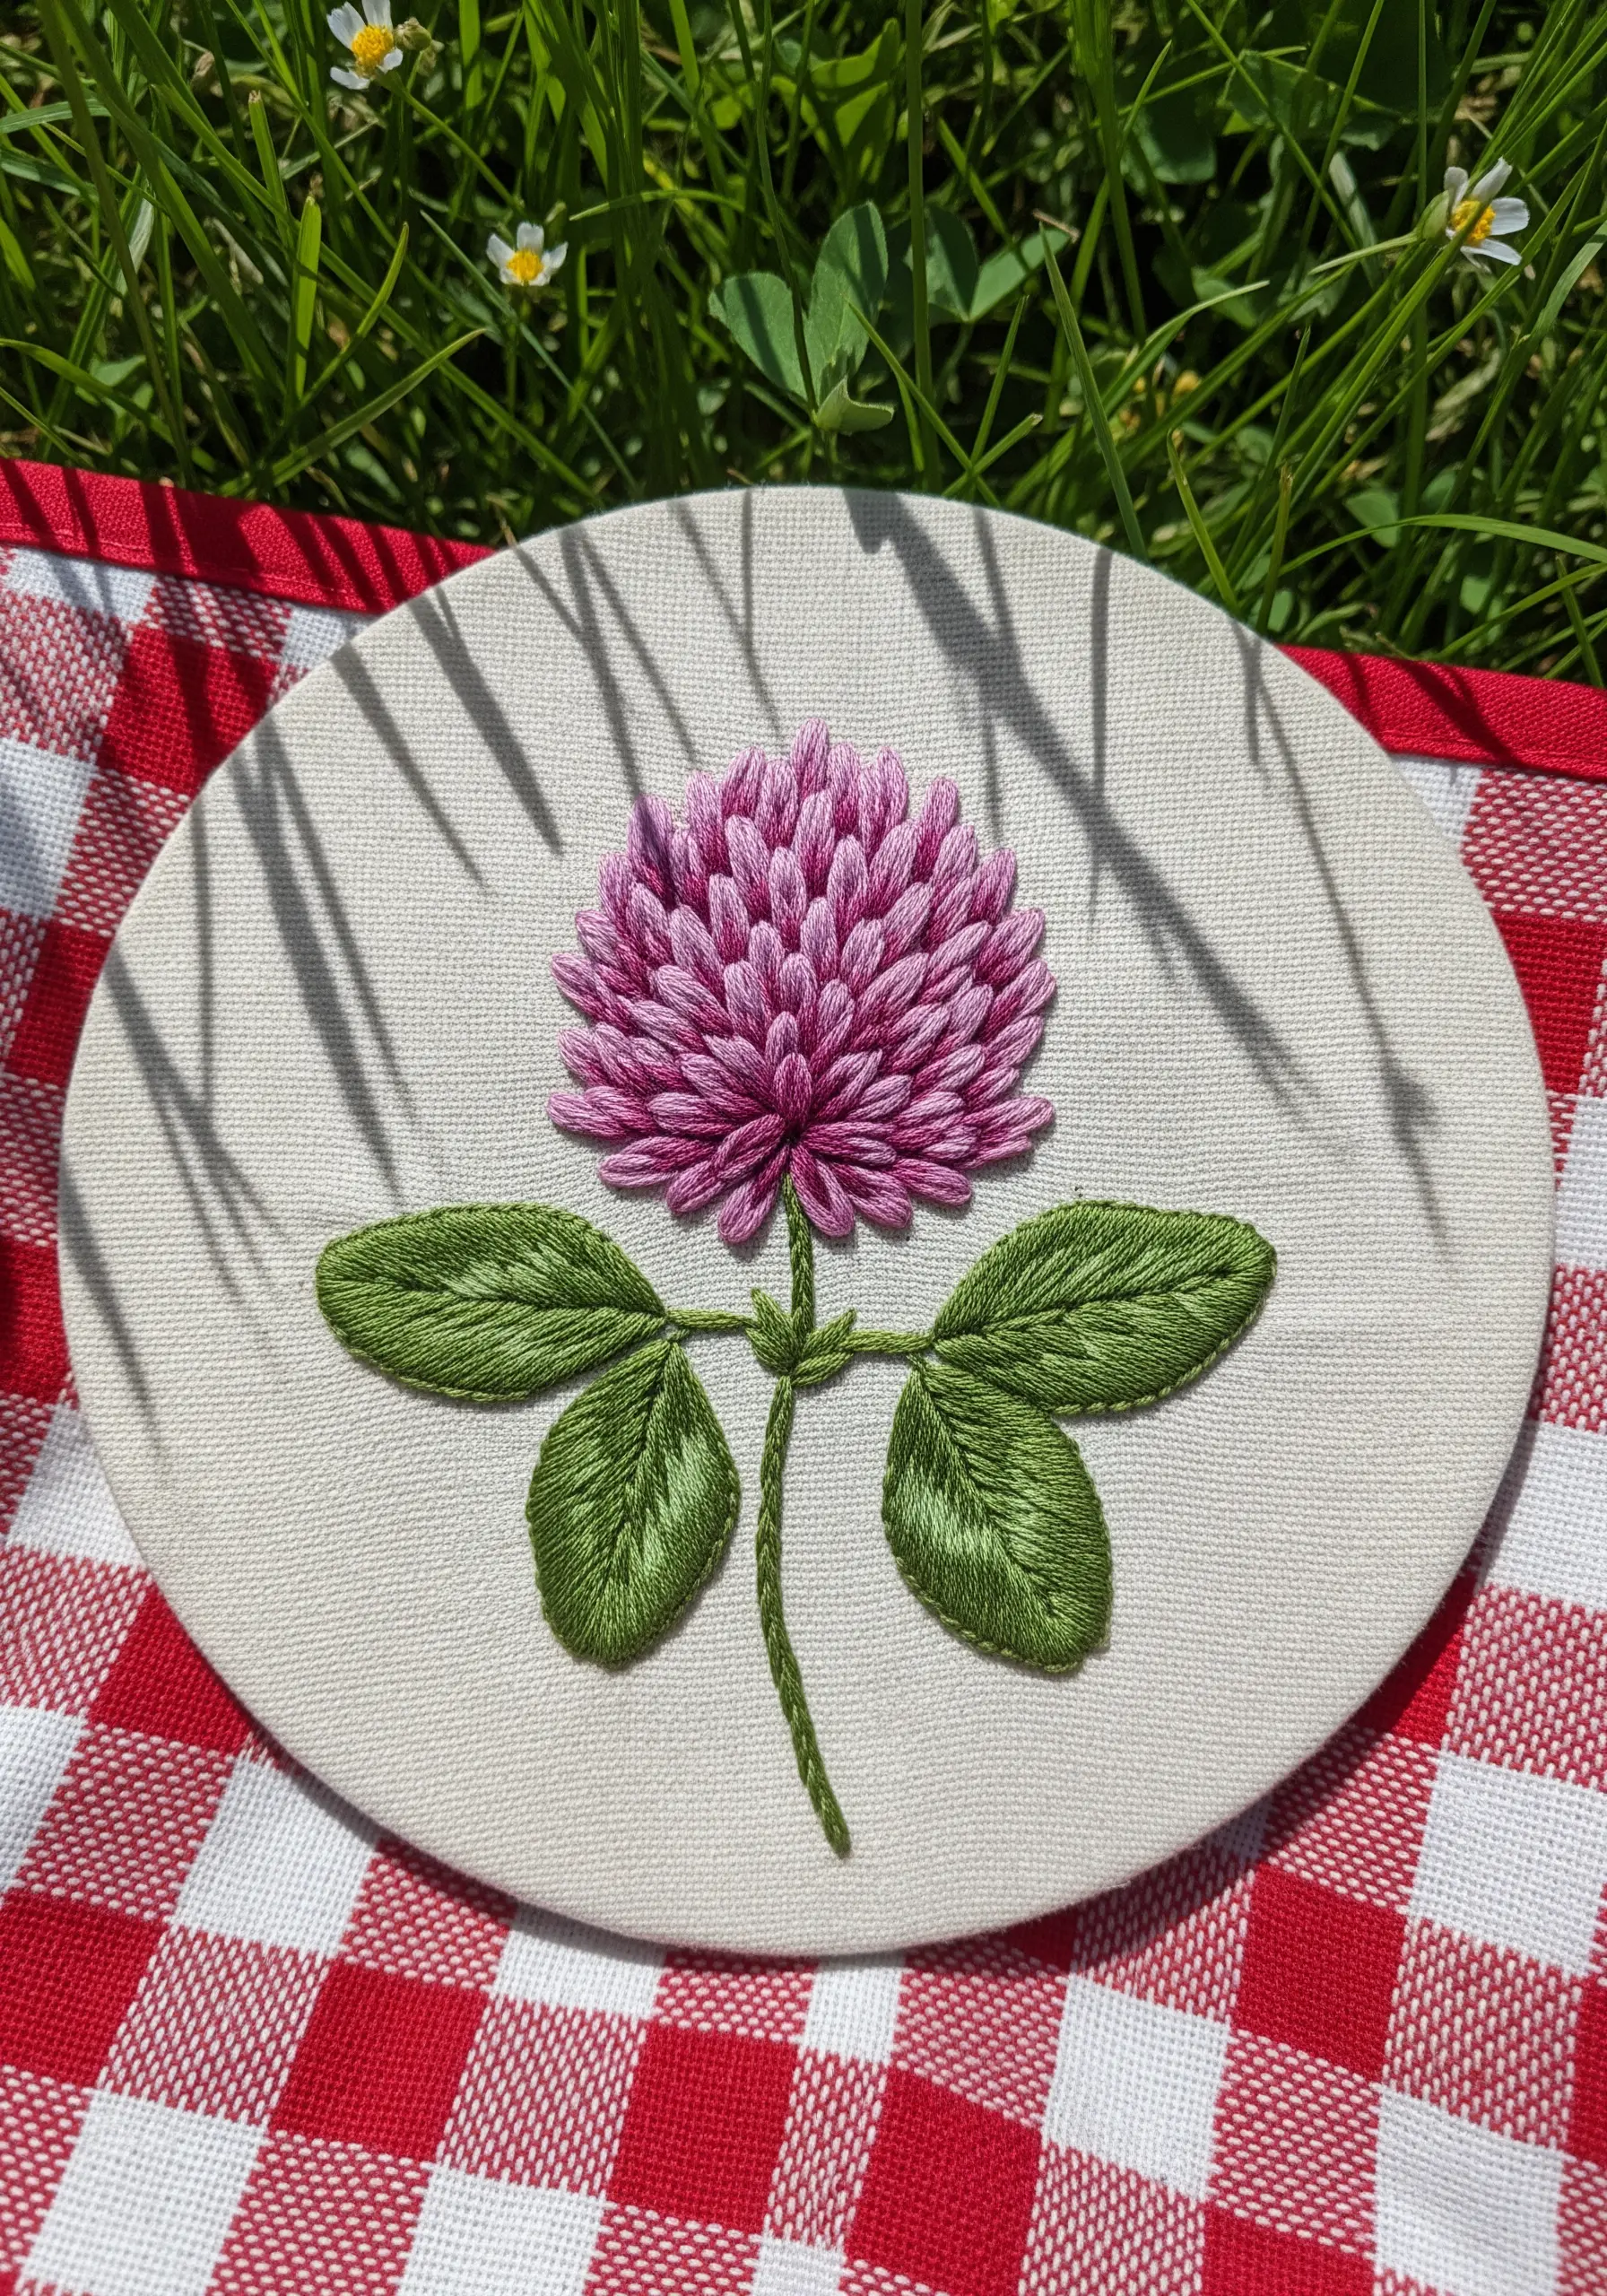
To make a spherical flower like red clover look round and not flat, you need to master shading with thread.
Use at least three shades of a color, from light to dark. Start with the lightest shade to fill the area that would be hit by light, then use your mid-tone and darkest tone to create a curved shadow.
Your long-and-short stitches should follow the curve of the flower head, which helps enhance the illusion of a three-dimensional shape.
This is the fundamental principle of thread painting: using color and stitch direction to create form.
27. Deconstructing Passionflower with Graphic Precision
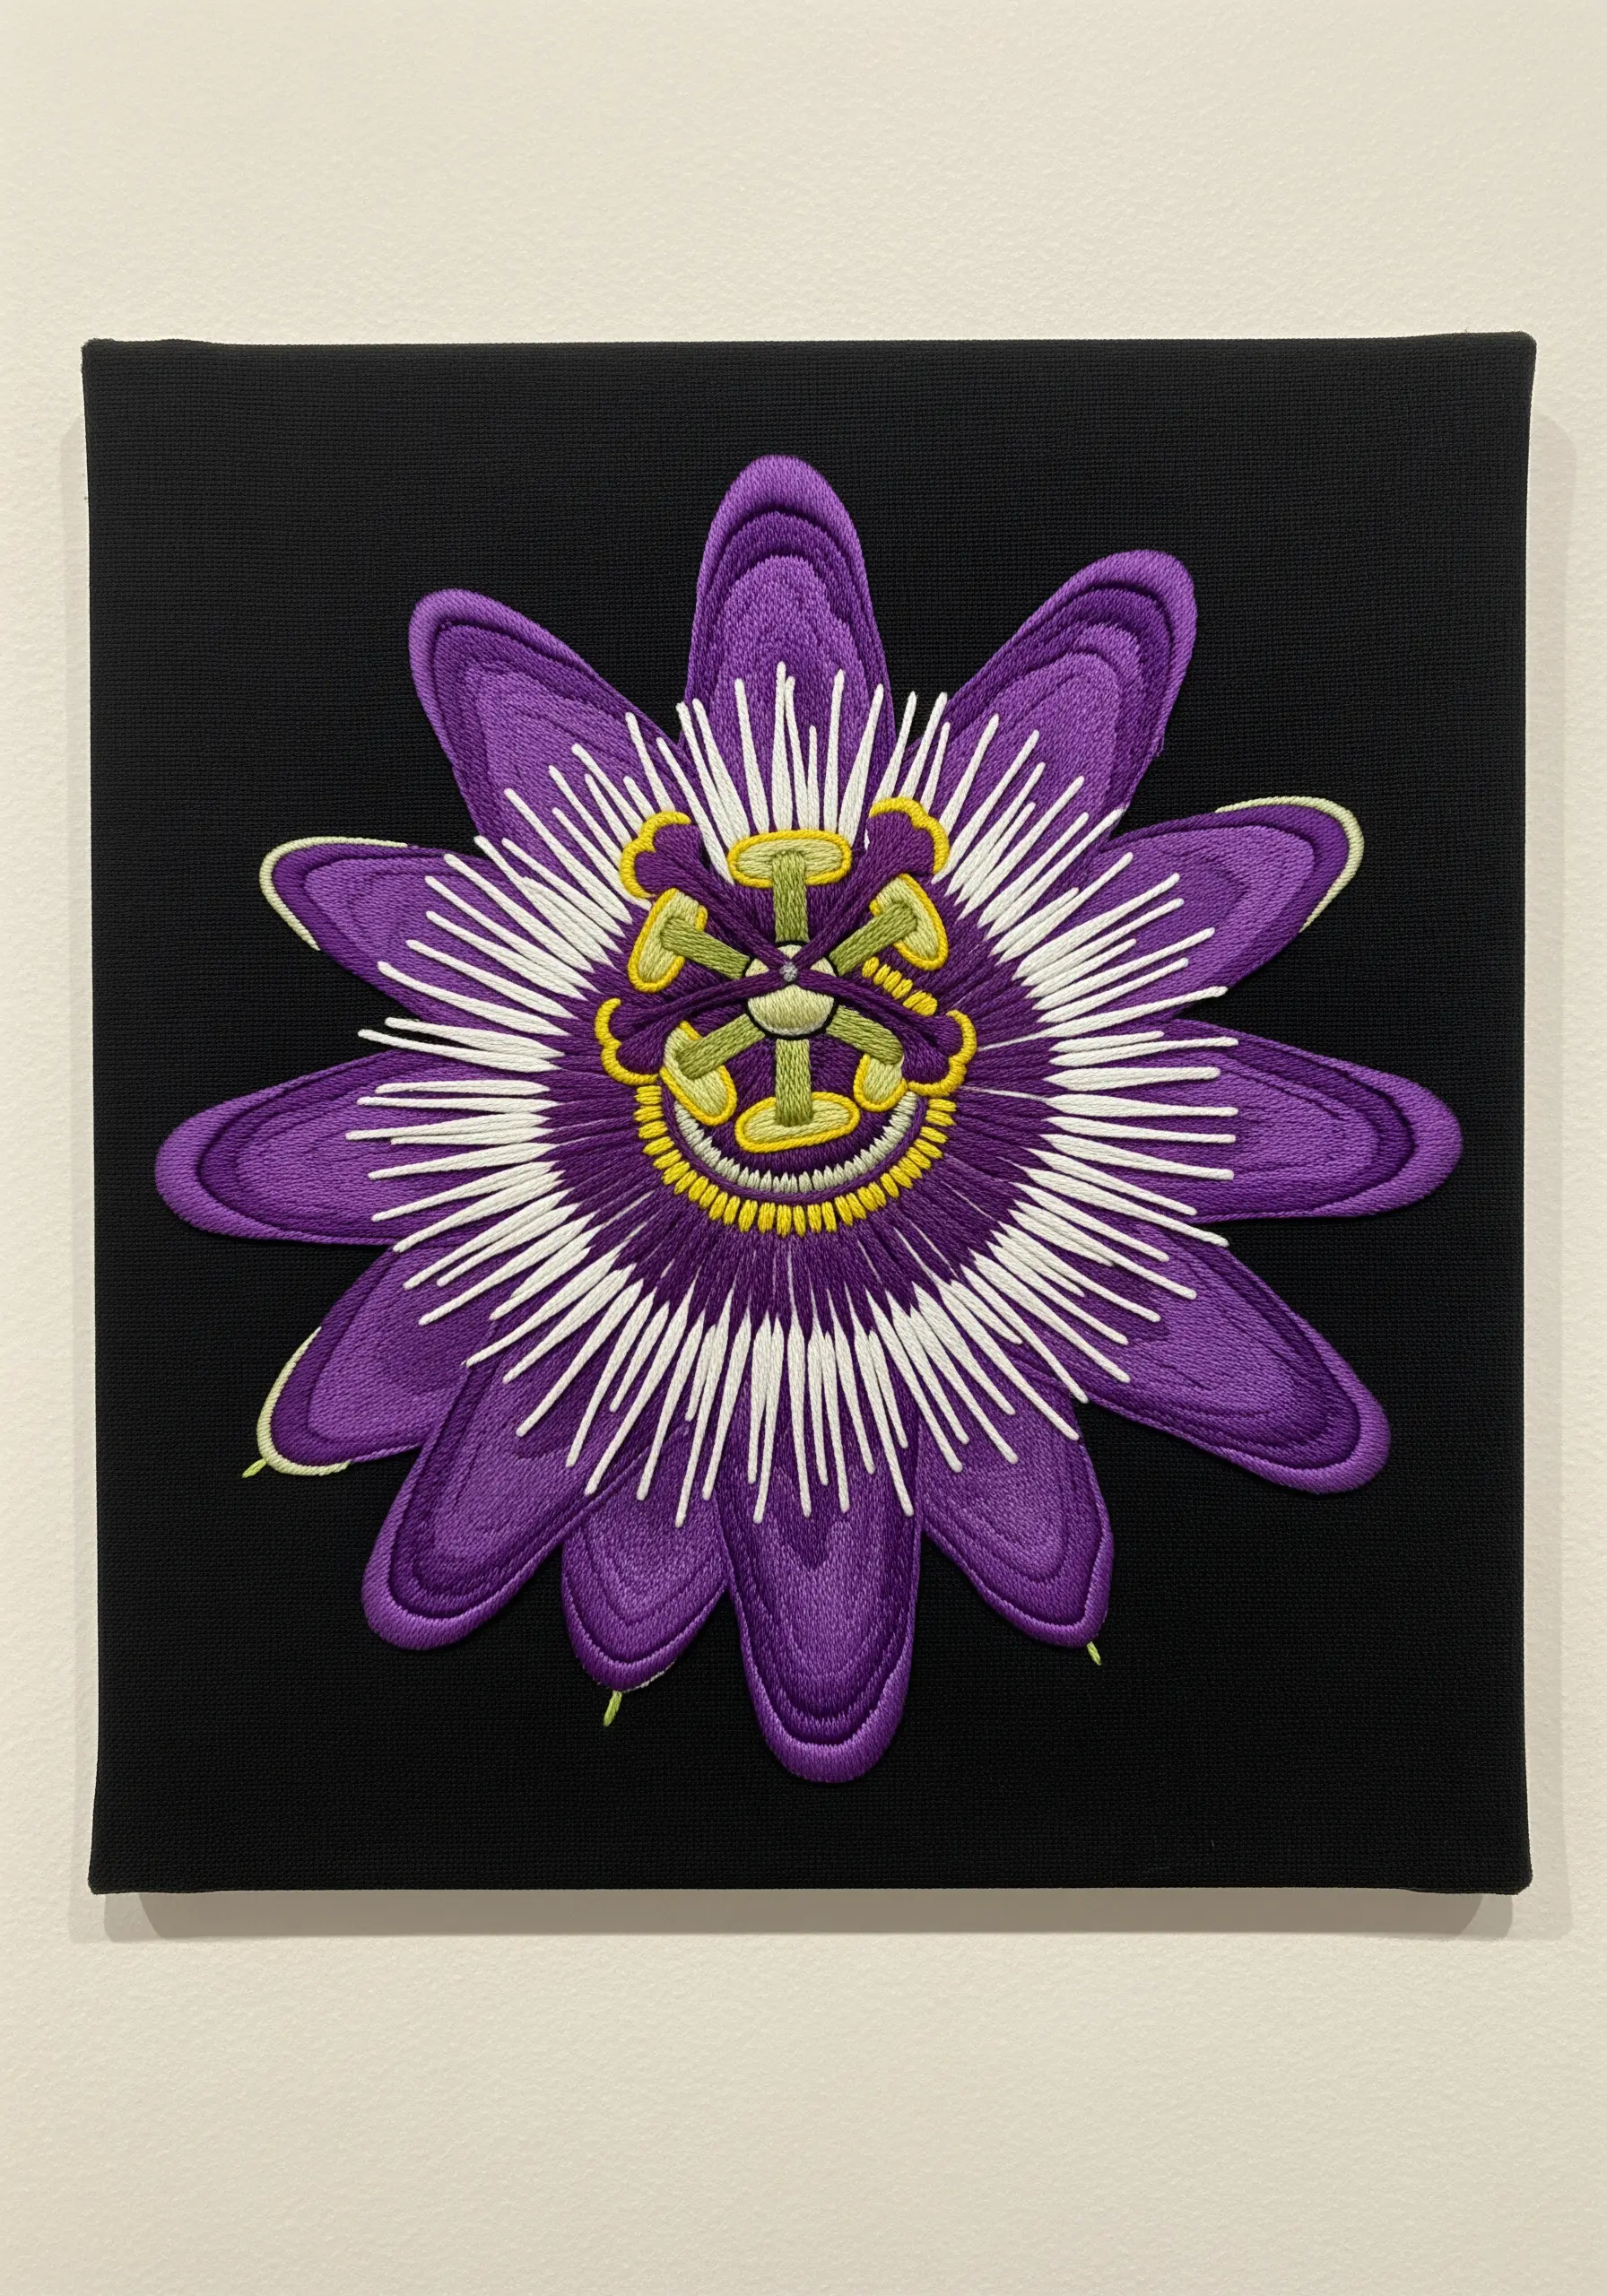
When faced with a flower as complex as the passionflower, break it down into simple, manageable geometric shapes.
Stitch one layer at a time, starting with the back petals (satin stitch), then the ring of white filaments (straight stitch), and finally the intricate central structure.
Using a strong outline for each element in a contrasting color helps to define the layers and gives the piece a bold, graphic quality.
Working on black fabric makes the intricate details and vibrant colors stand out even more.
28. Adding a Personal Touch with a Catnip Heart
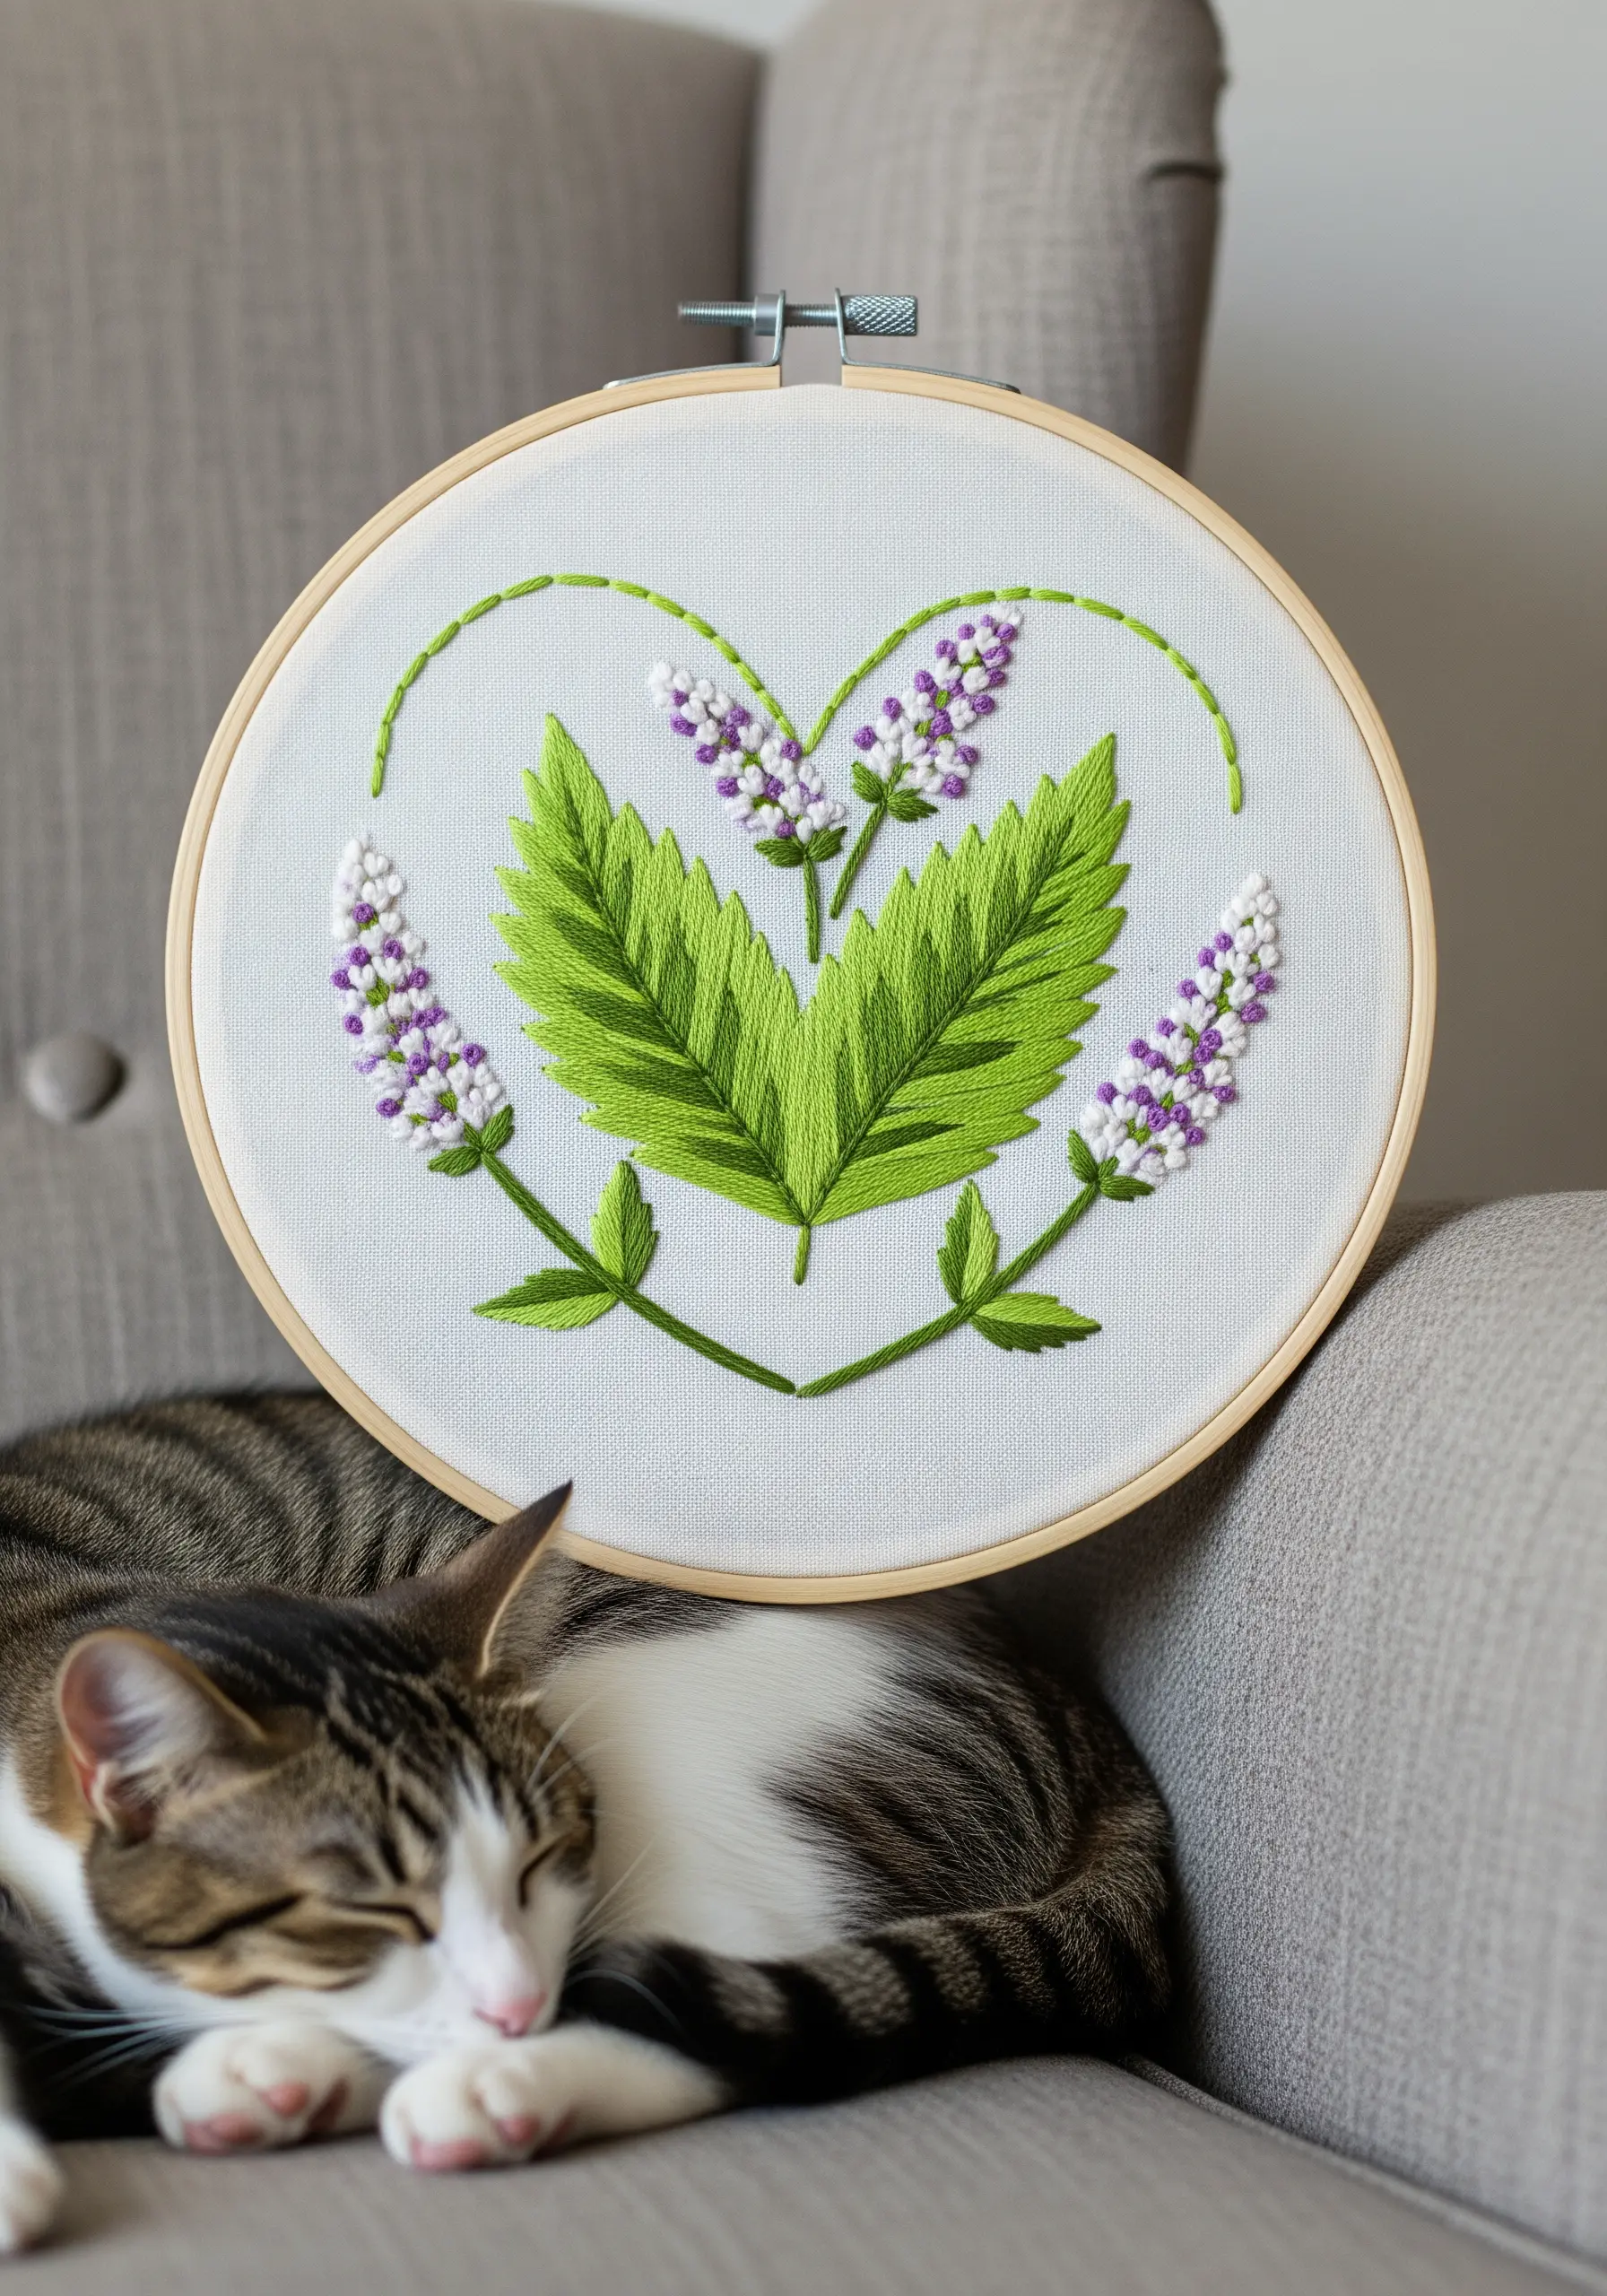
Go beyond a simple botanical study by arranging your elements into a meaningful shape.
Here, two catnip stems are curved to form the outline of a heart, instantly turning a plant portrait into a piece with personal significance.
The leaves are rendered with beautiful detail using long-and-short stitch, while the flower spikes are a combination of French knots and tiny straight stitches.
This is a wonderful way to infuse your work with emotion, making it a perfect idea for DIY embroidery gift ideas.
29. Creating Schisandra Berries with Textured Knots
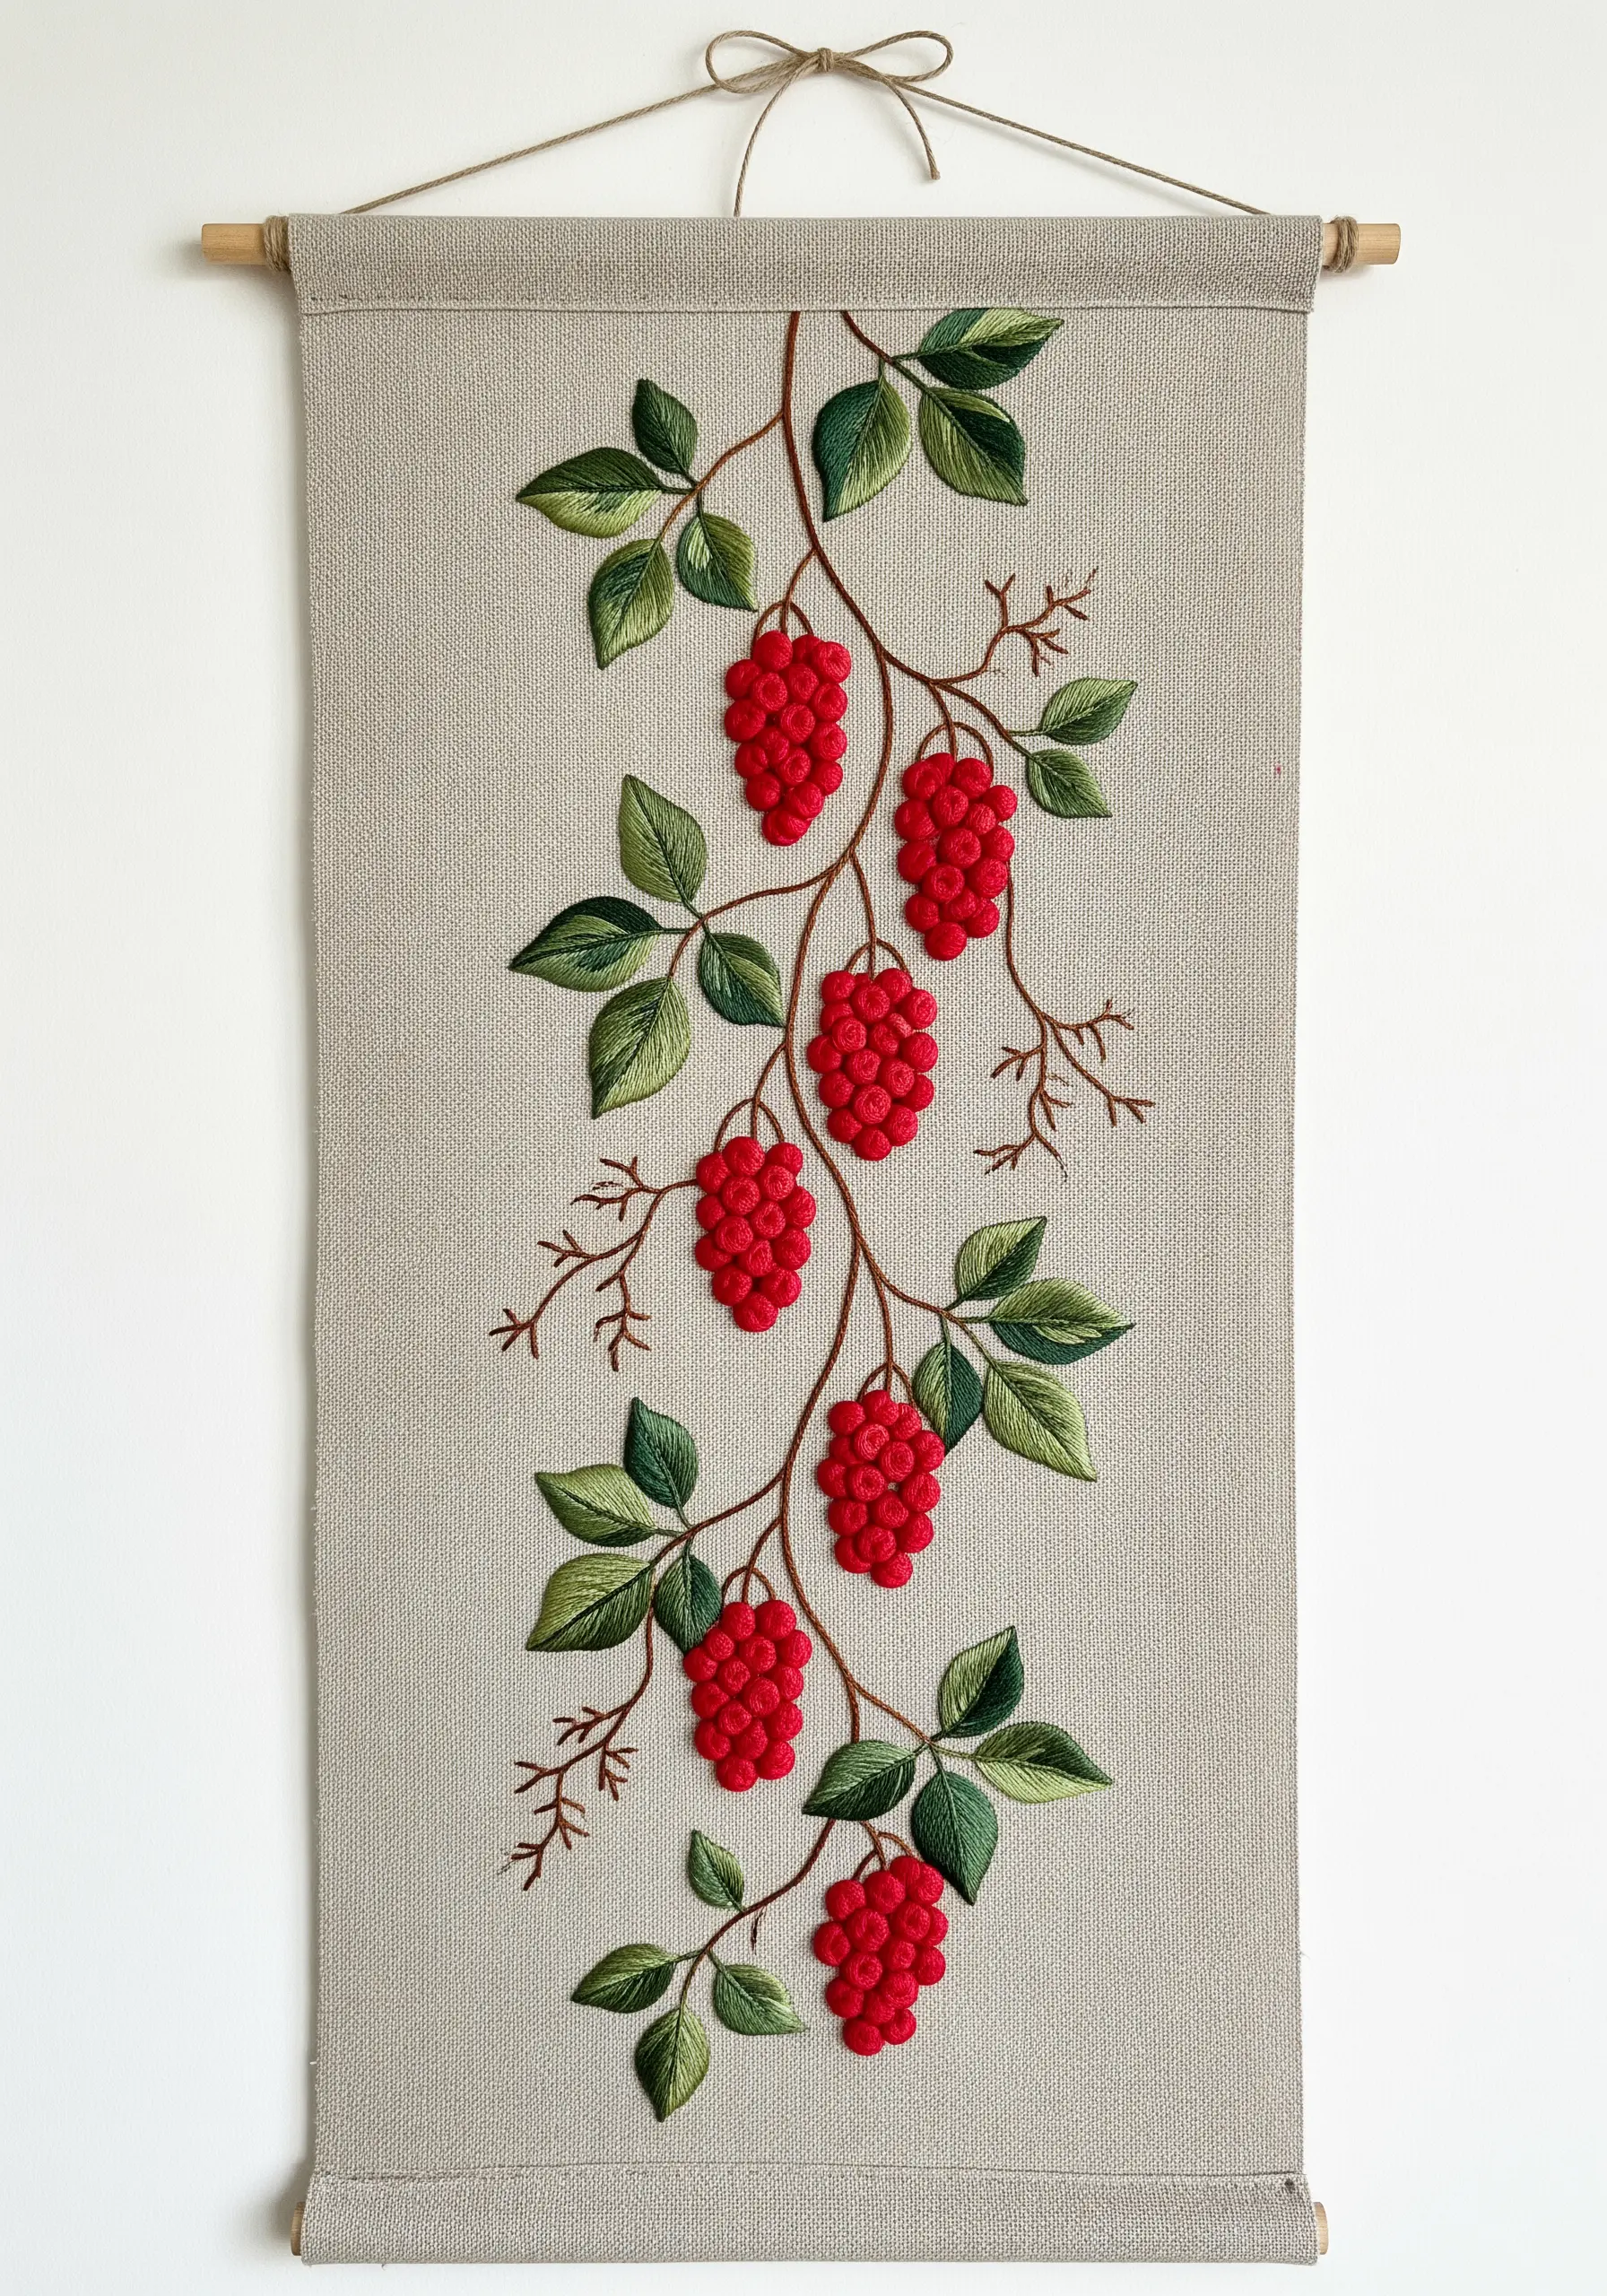
For plump, dimensional berries that stand out from the fabric, the cast-on stitch or a well-made bullion knot is your best friend.
Both stitches create a raised, caterpillar-like shape that is perfect for berries, buds, or textured flower petals.
By clustering these red stitches together on a dangling stem, you create a realistic bunch of Schisandra berries that have weight and volume.
A vertical composition like this works beautifully for a statement size embroidered textile hanging or banner.
30. The Graphic Beauty of Angelica in Monochrome
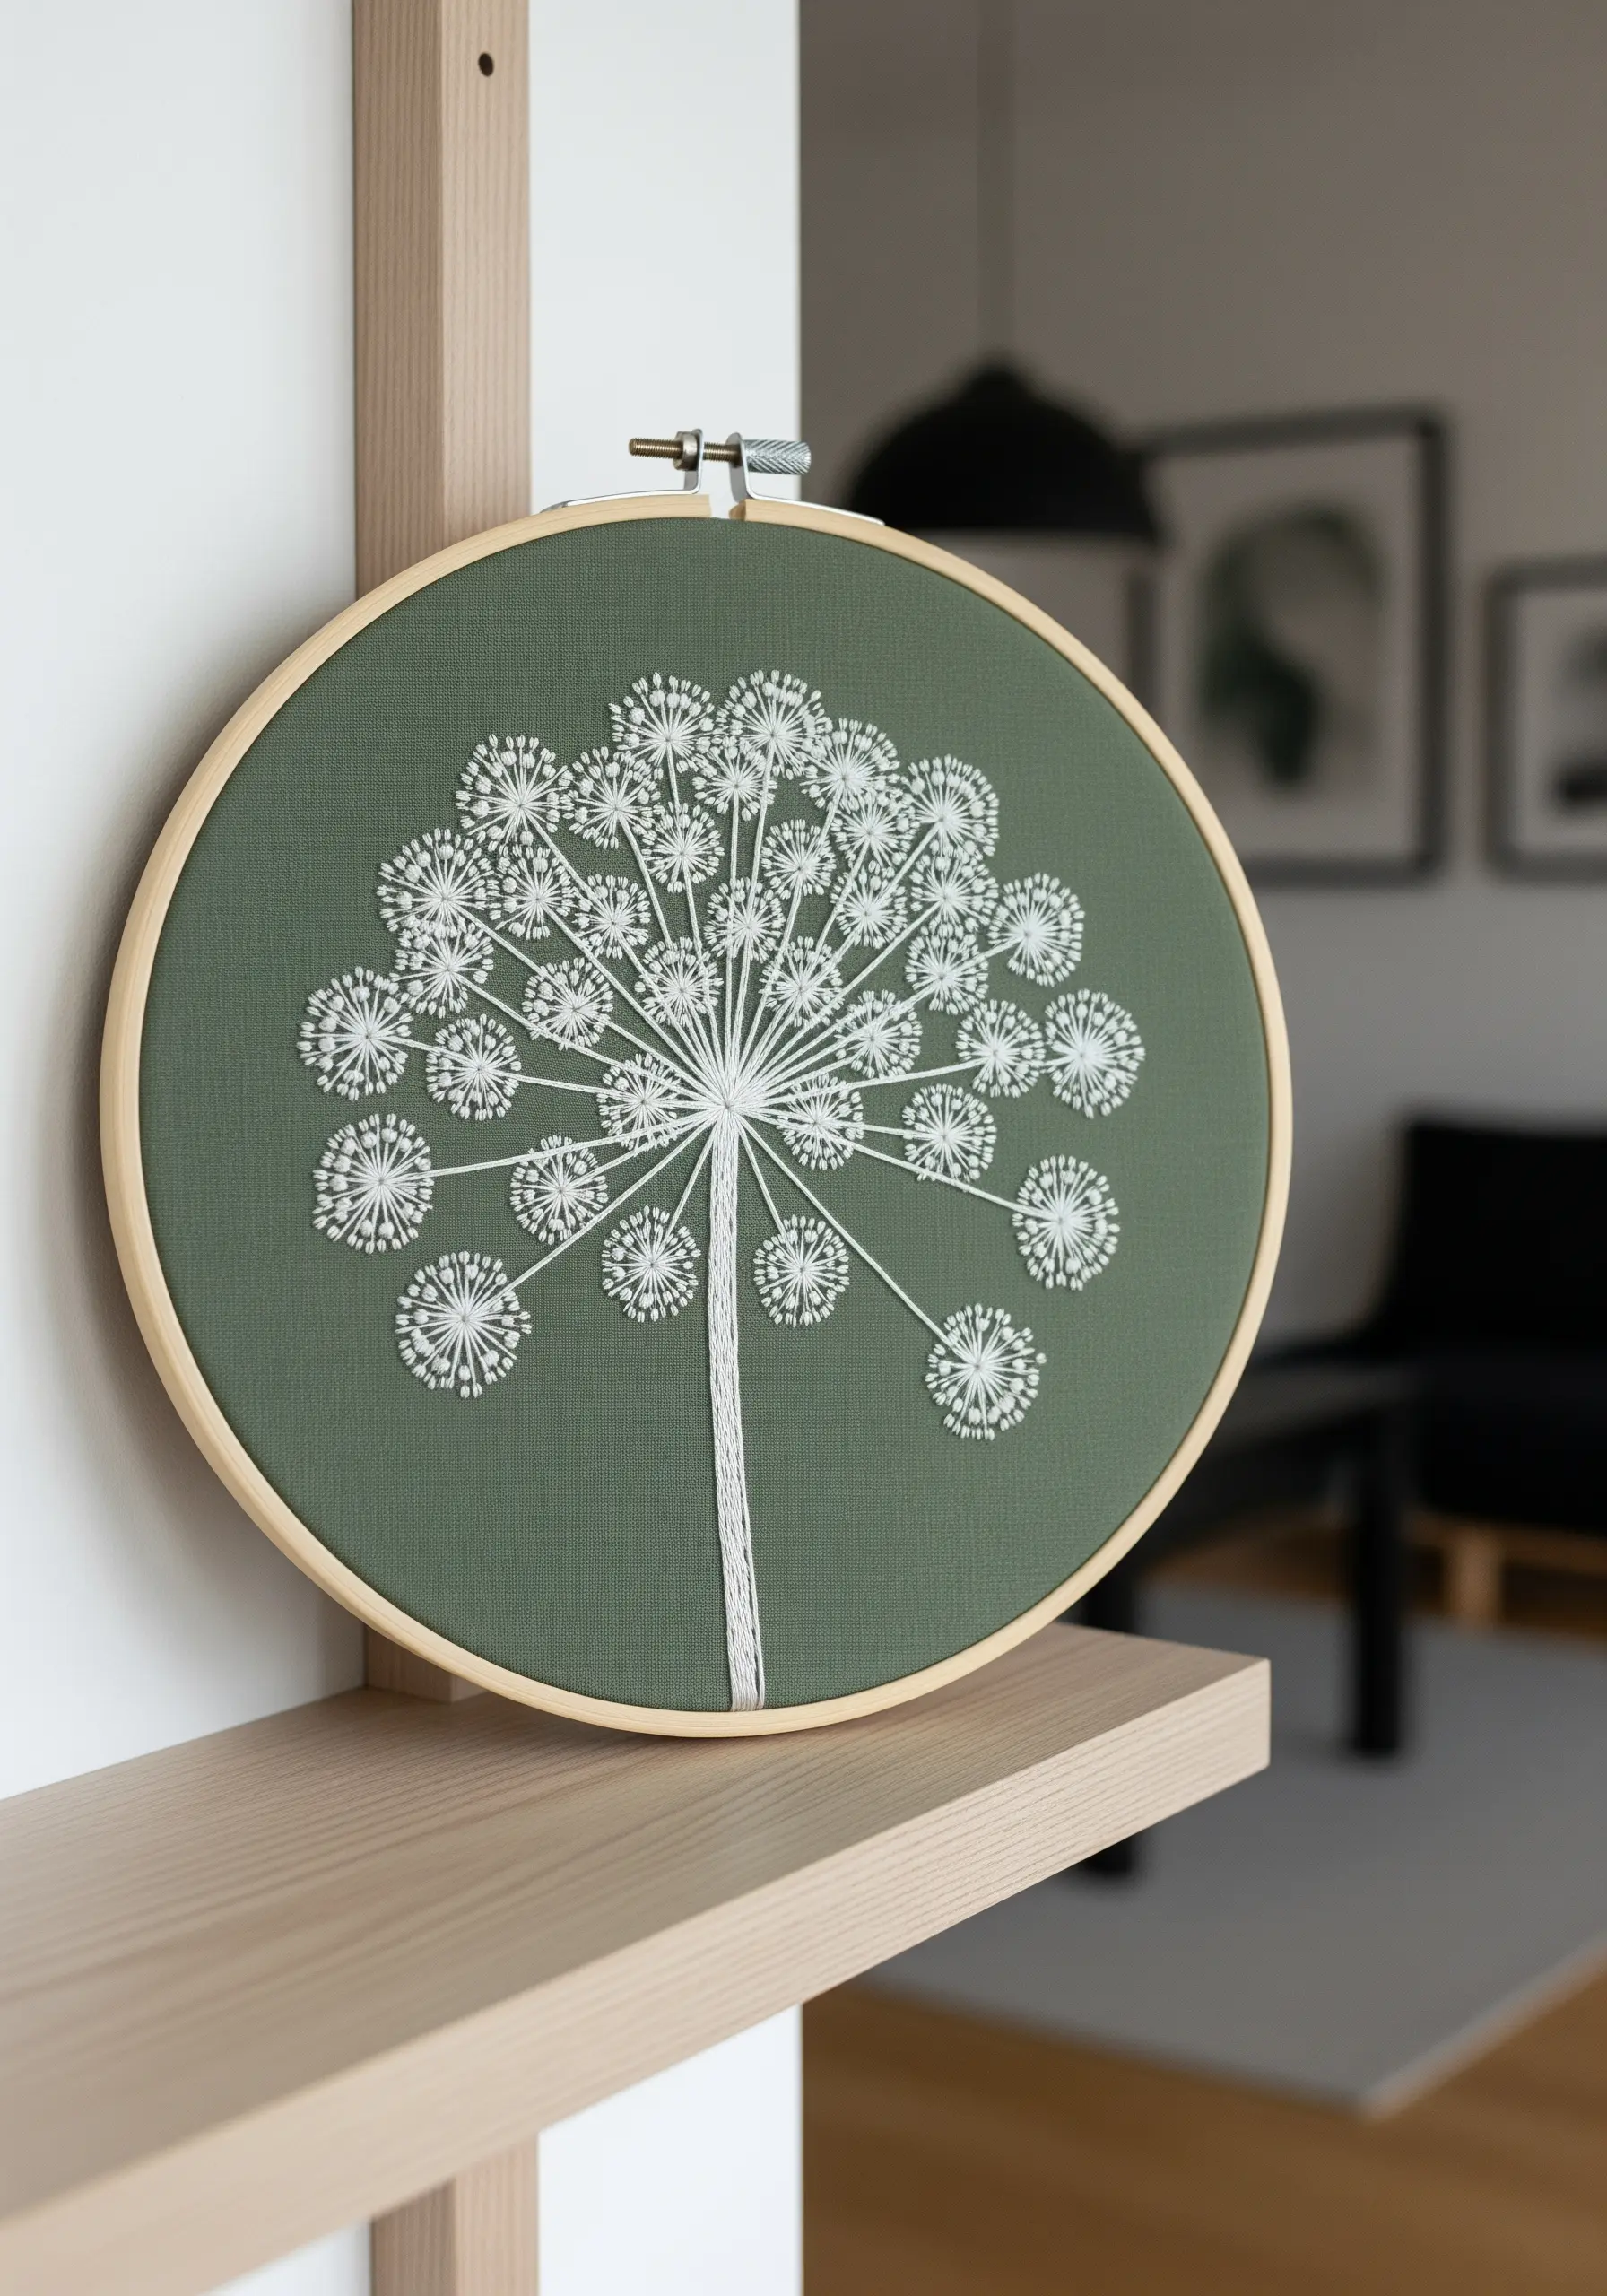
This Angelica design proves that you can create a huge impact with the most basic stitches.
The entire piece is constructed from straight stitches and detached chain stitches (lazy daisies), cleverly arranged to form the flower’s complex umbels.
The power comes from the repetition and the radial composition. Using a single color of thread on a contrasting fabric emphasizes the plant’s beautiful geometric structure.
It’s a perfect example of how minimal embroidery ideas using texture instead of color can create a stunning visual effect.
31. Composing a Cohesive Herbal Tea Wreath
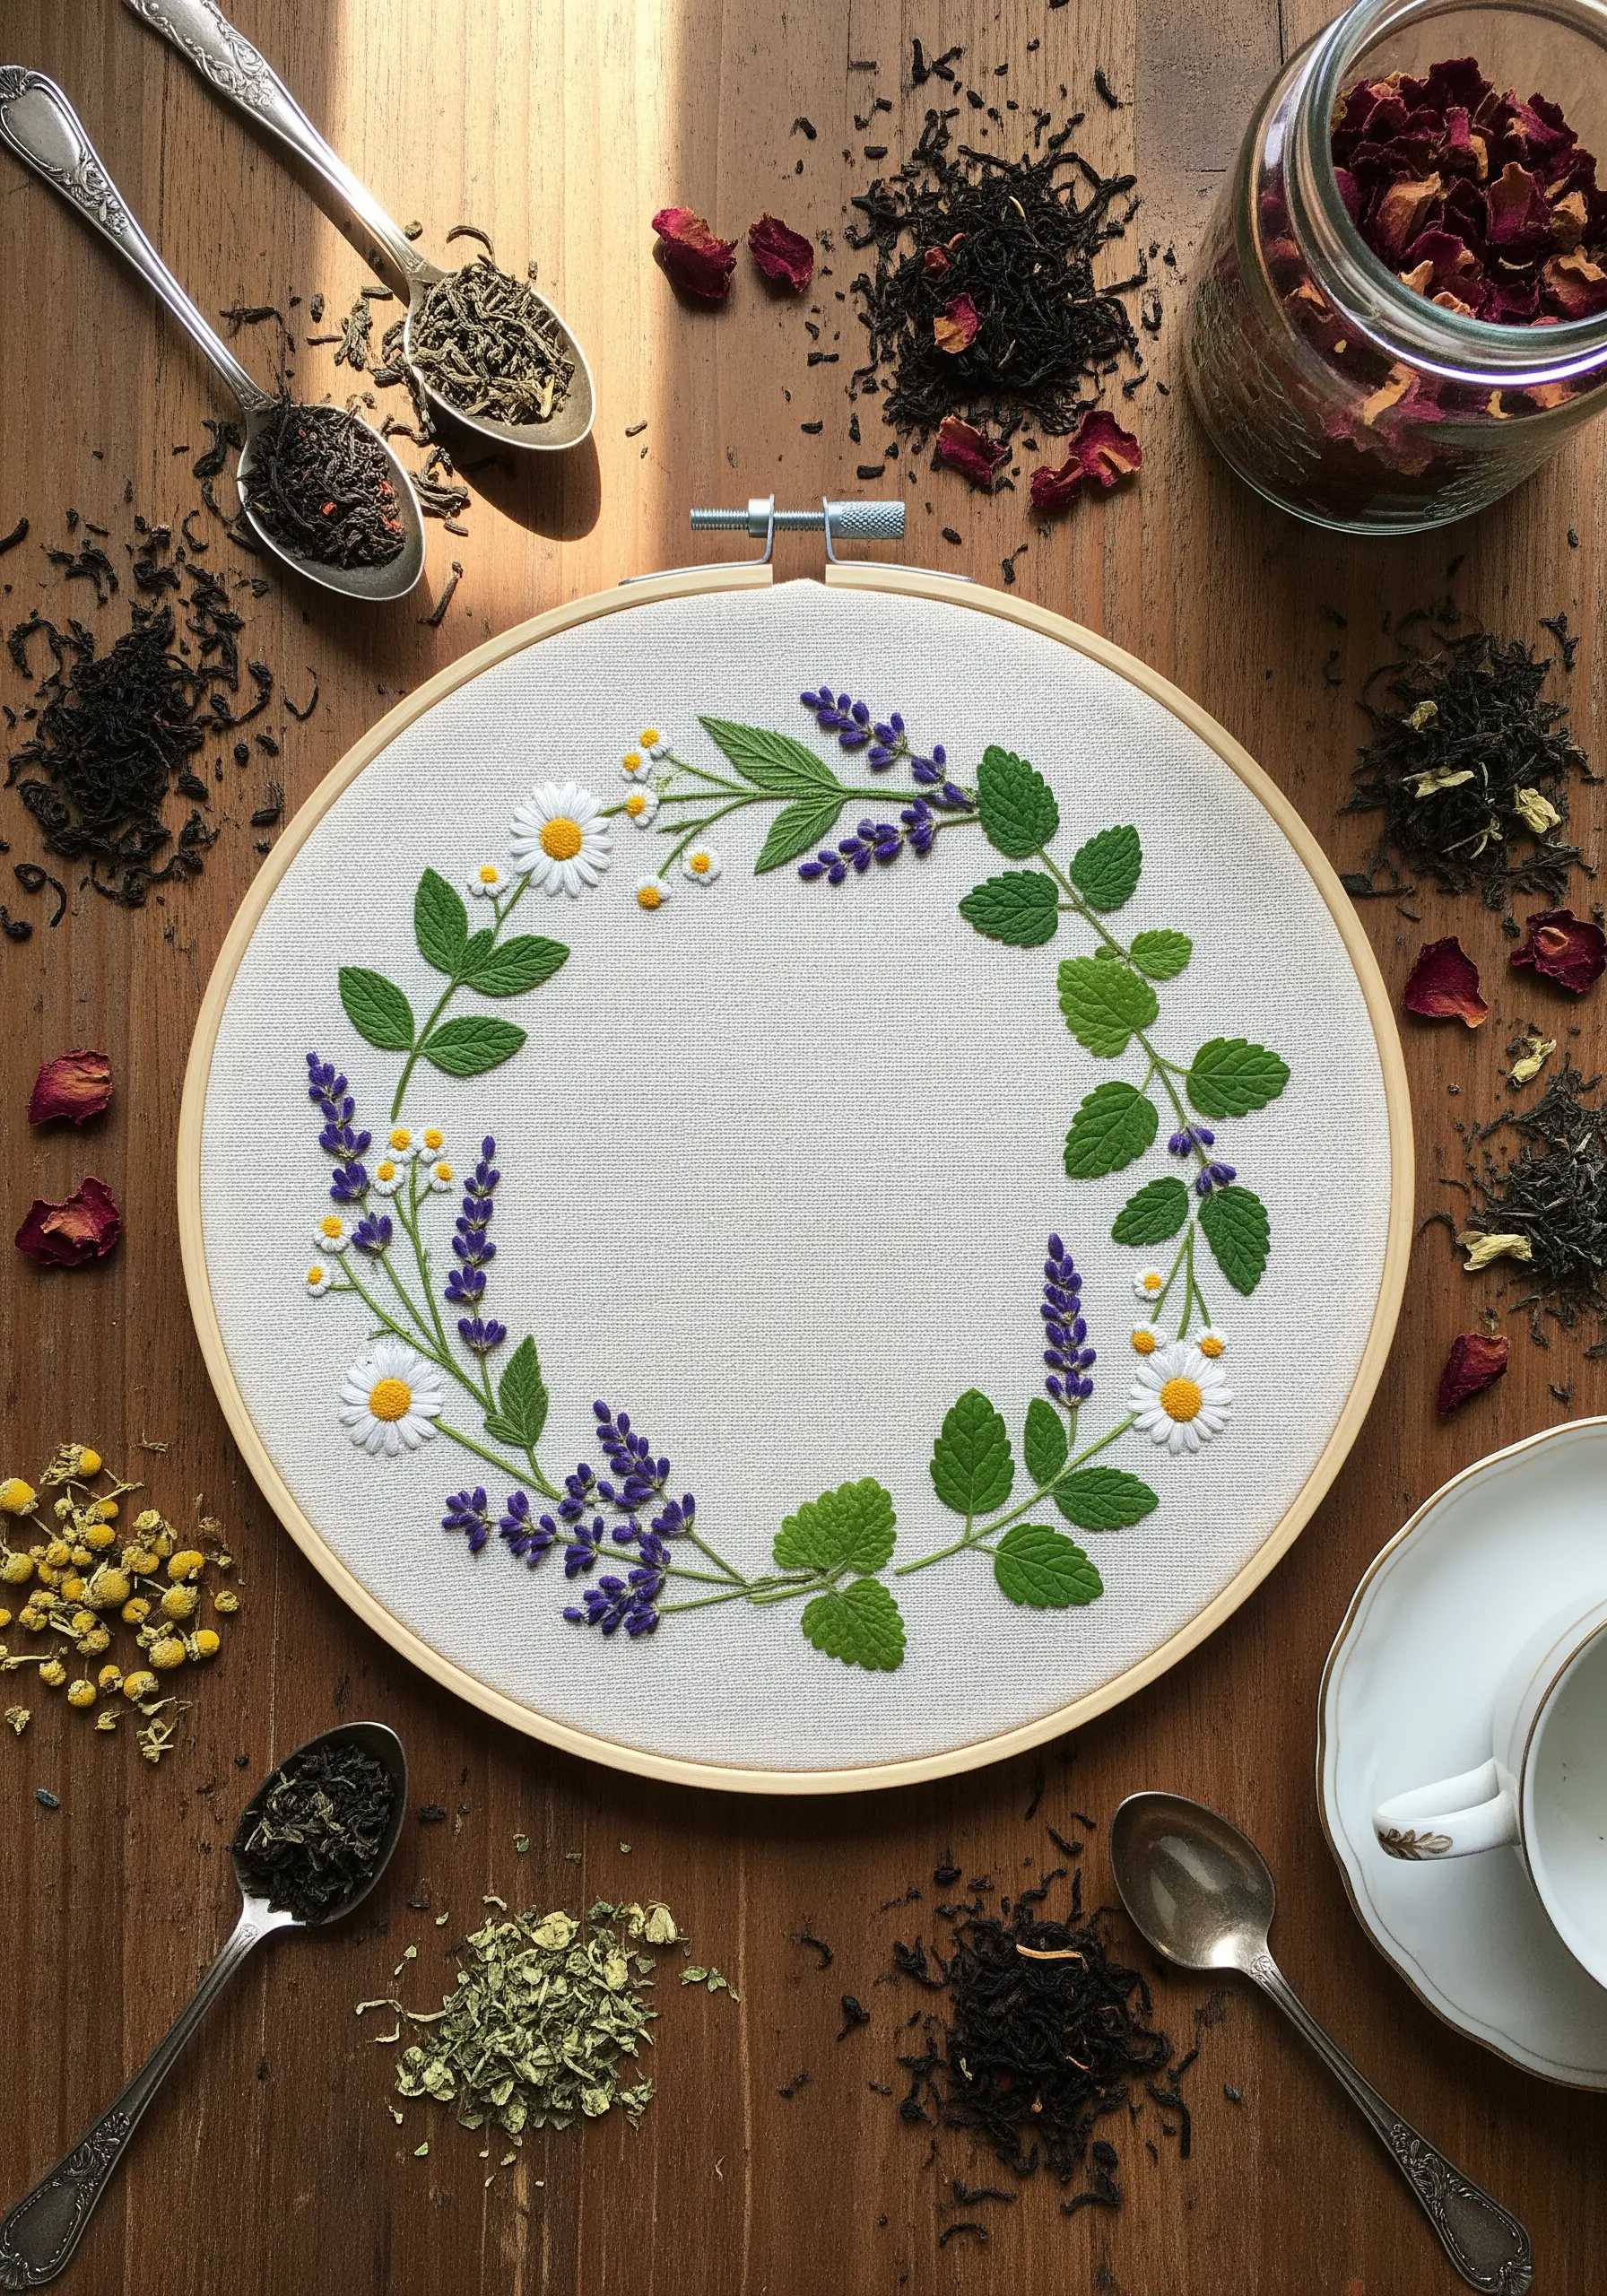
When combining multiple plants into one design, the goal is to create harmony, not chaos.
A wreath composition is perfect for this, providing a natural structure. Alternate between different textures—the soft dots of chamomile, the spiky forms of lavender, and the flat shapes of mint leaves.
Maintain a consistent color palette and scale to ensure all the elements feel like they belong together.
A project like this is an excellent way to practice a variety of stitches while creating a beautiful, unified piece of art.
32. Sculpting Ginseng Root with Padding and Couching

To create a truly sculptural effect, you need to build your embroidery up from the surface of the fabric.
For this ginseng root, a base shape was likely cut from felt or built up with layers of thread. Then, bundles of off-white floss were laid over this base and couched—or stitched down—with a finer, matching thread.
This technique creates a smooth, raised form that has real dimension and shadow.
The delicate, branching roots are then added with a simple stem stitch, providing a perfect contrast to the thick central form.
33. The Delicate Simplicity of a Single Vervain Stem
There is immense beauty in simplicity, and this single stem of vervain is a testament to that.
The entire design relies on just two basic stitches: a stem stitch for the stalk and tiny detached chain stitches for the florets.
When working this minimally, your stitch quality is paramount. Focus on creating even, consistent stitches.
This quiet, meditative style is one of the hallmarks of minimalist botanical stitch designs and is perfect for creating a moment of calm in any space.
34. Embellishing Linens with a Jiaogulan Vine
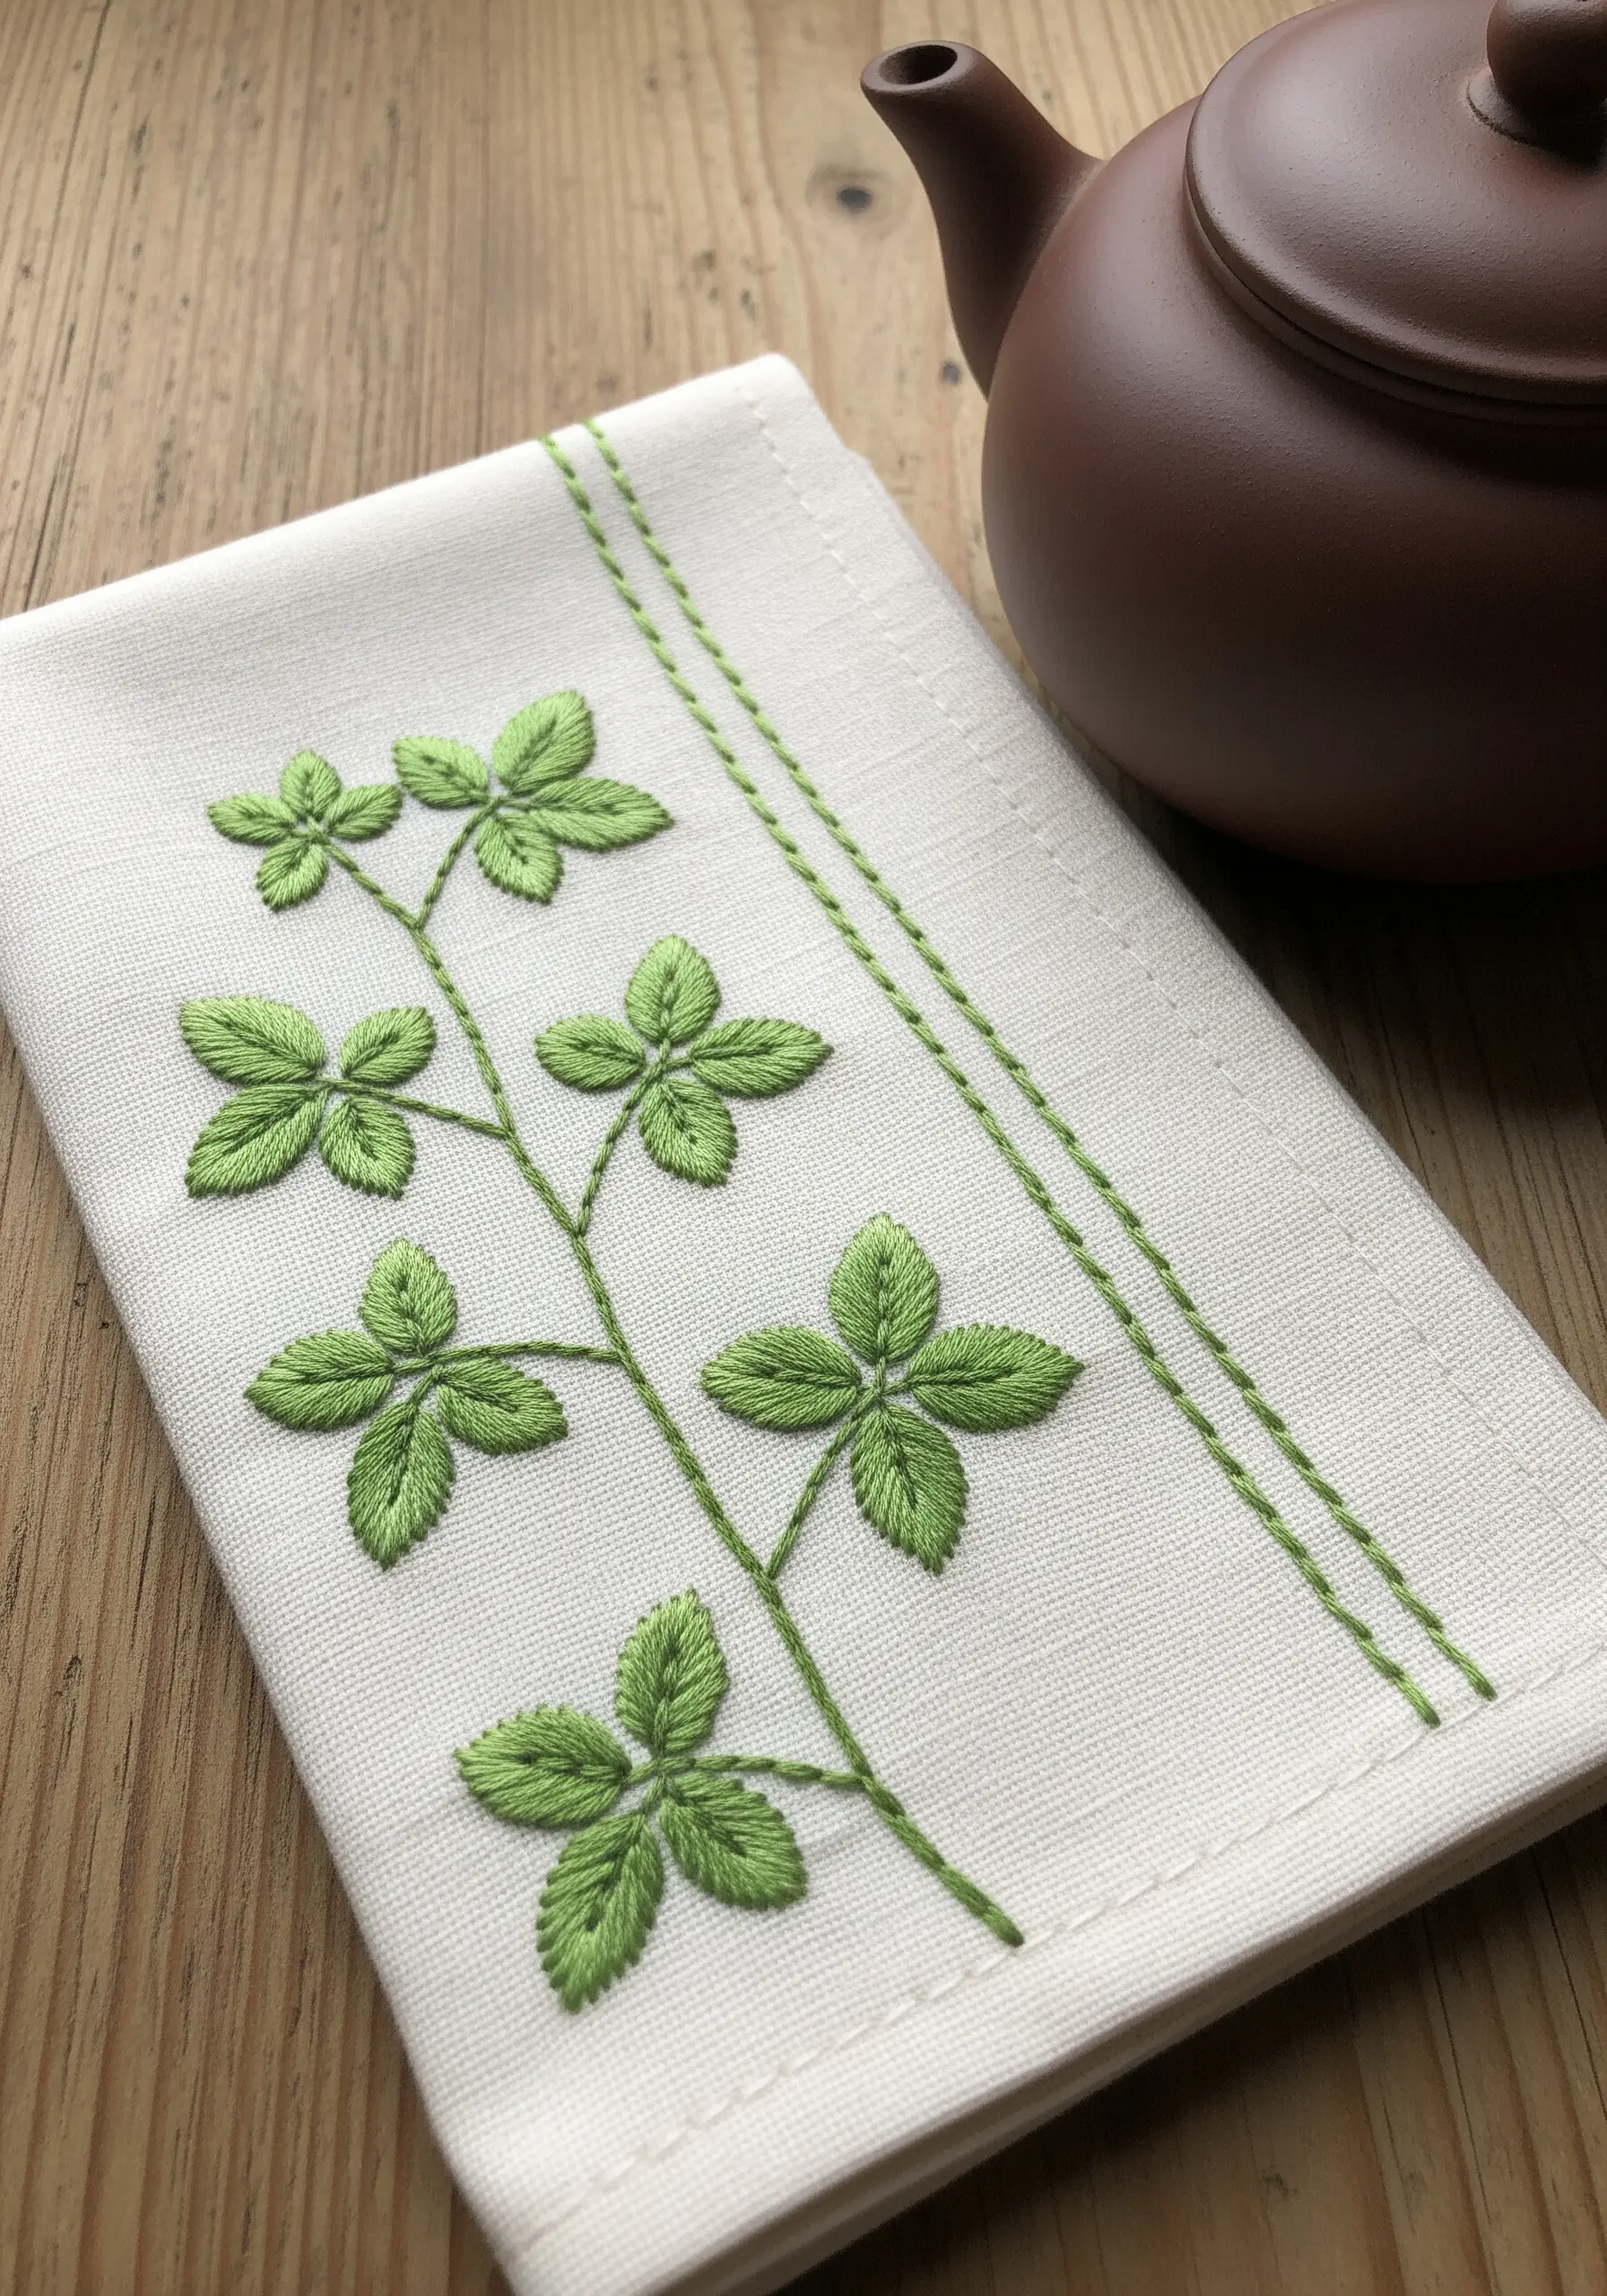
Take your embroidery off the wall and onto your table by embellishing functional items like this cloth napkin.
When stitching on linens that will be used and washed, choose simple, durable stitches like the satin stitch and stem stitch used here for the Jiaogulan vine.
Always use a good quality stabilizer on the back of your fabric to prevent puckering, and choose colorfast threads.
The parallel decorative lines, stitched with a simple running stitch, add a professional finishing touch that frames the botanical motif beautifully.
35. Designing a Botanical Quadrant Sampler
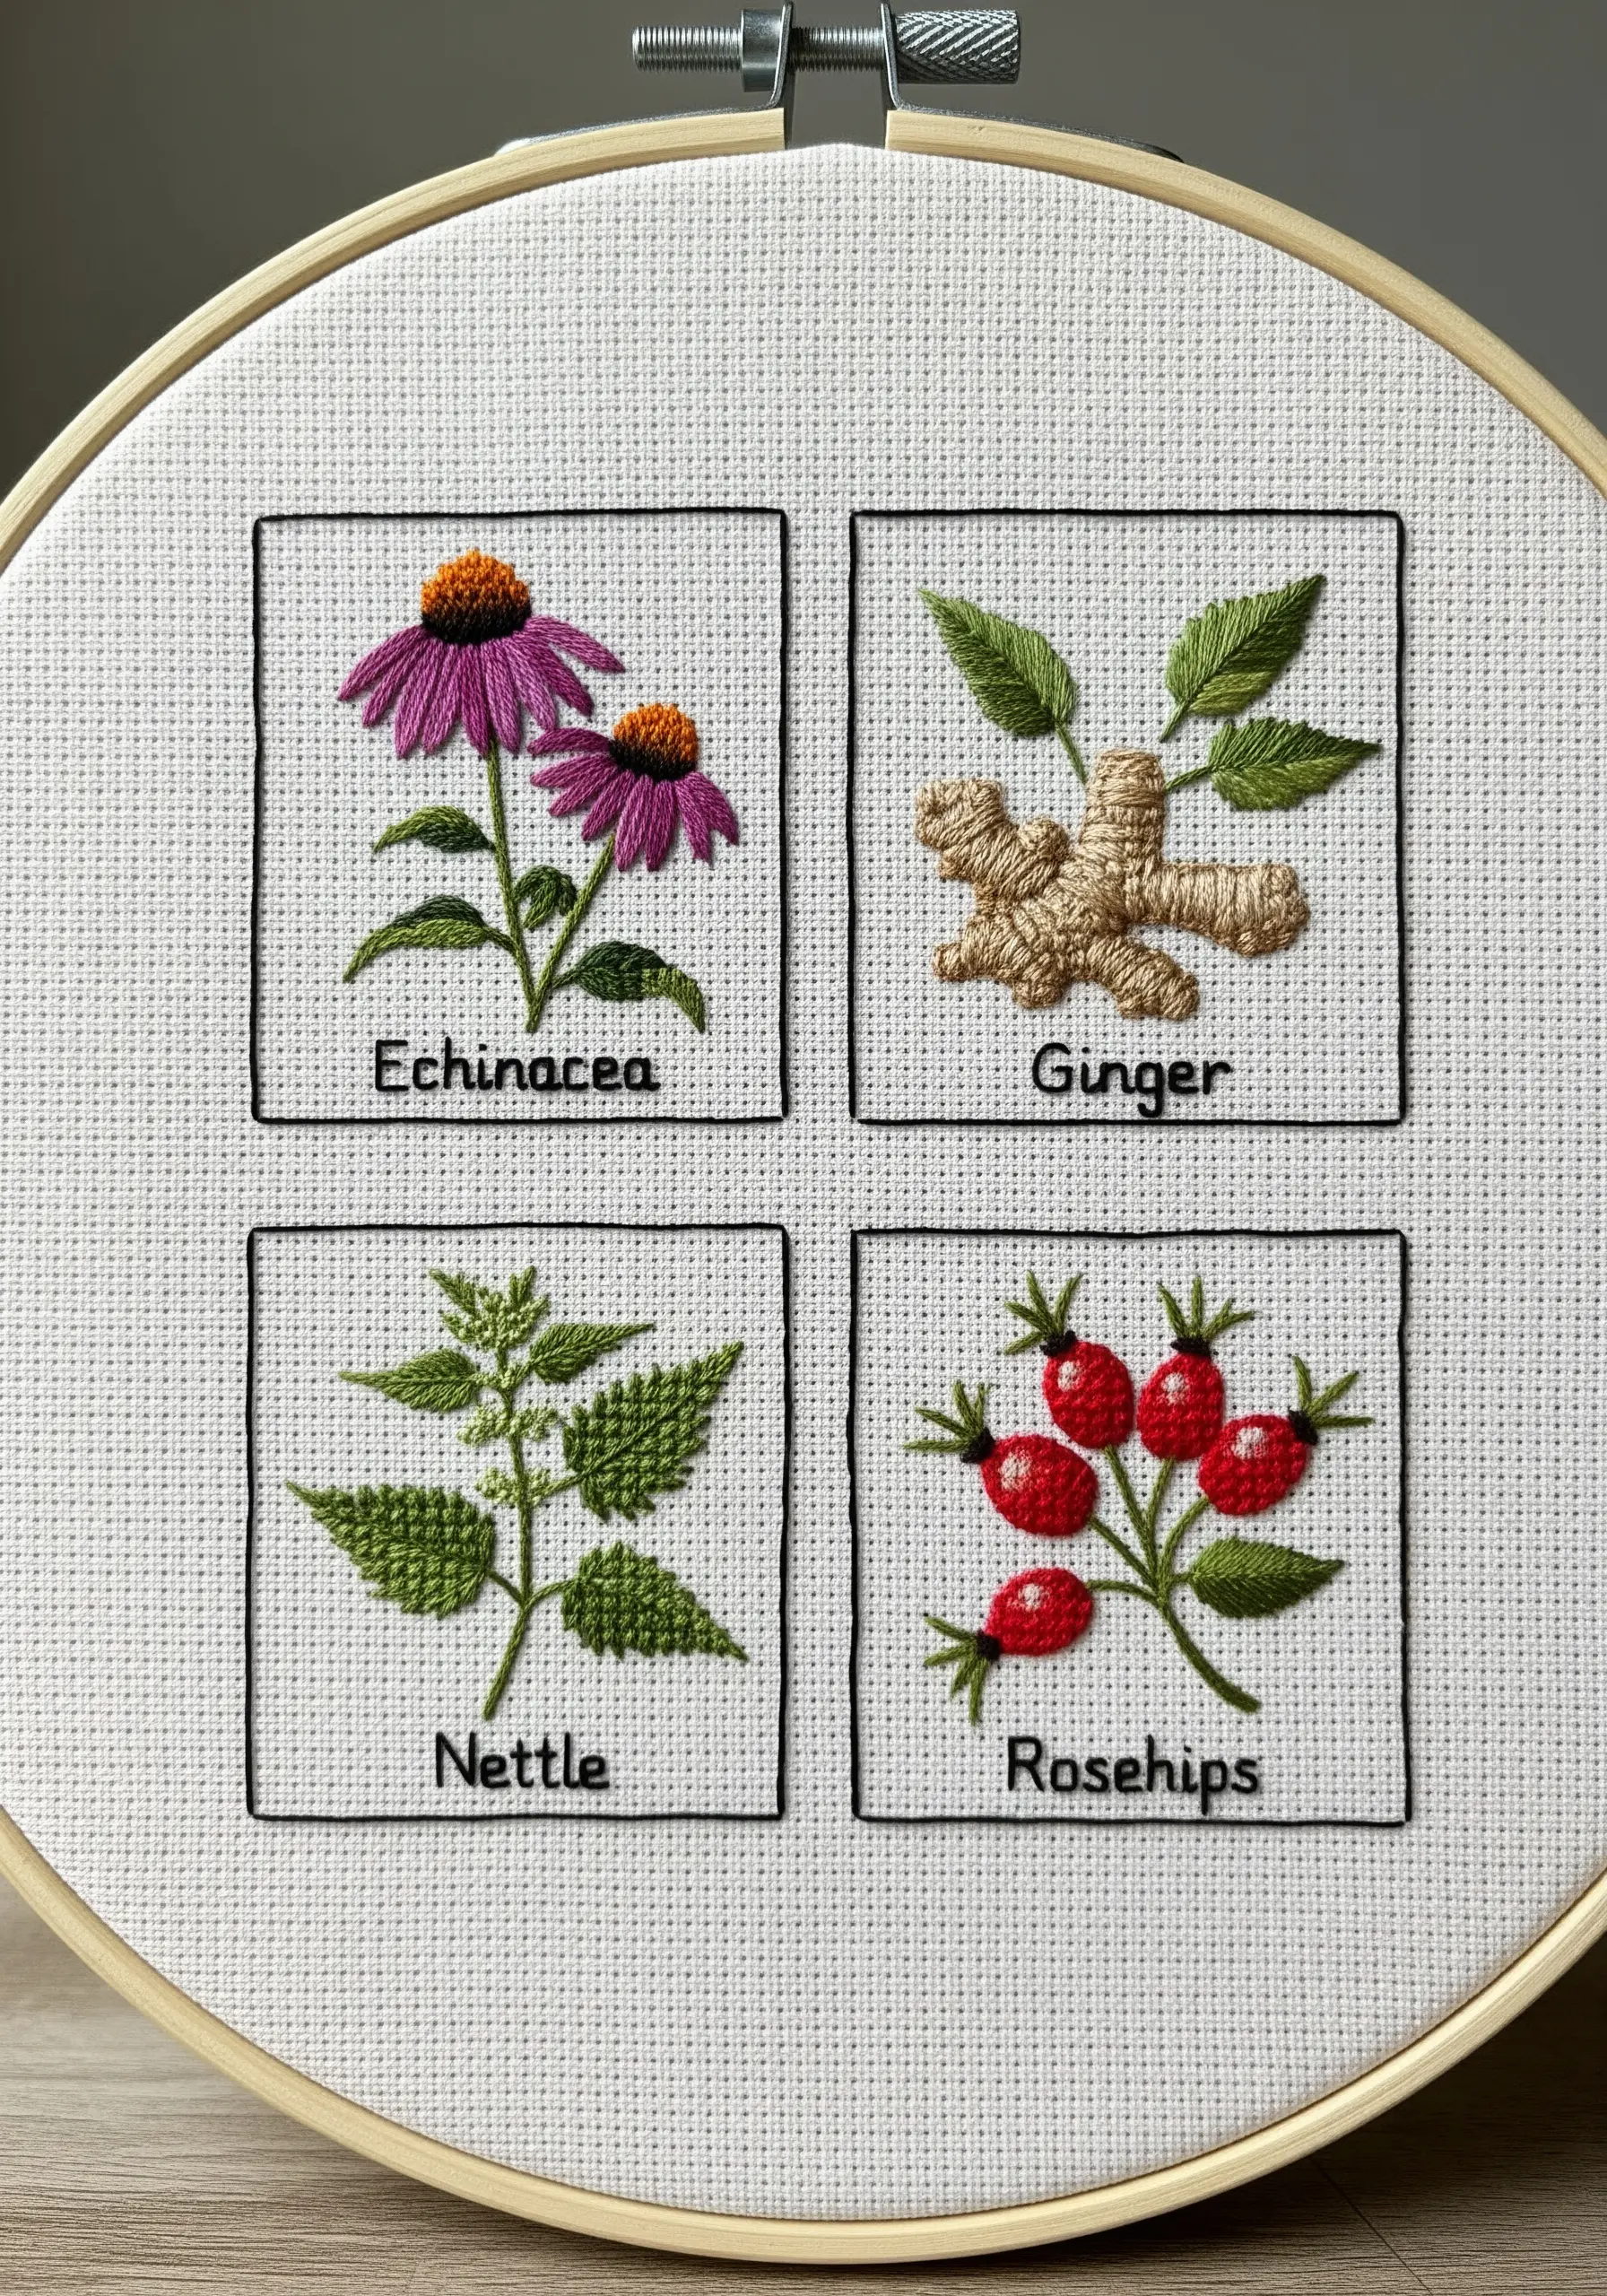
A sampler is a fantastic way to practice new techniques and build your skills, and a quadrant design offers a clean, organized layout.
Choose four of your favorite herbs and dedicate one square to each, focusing on capturing their unique textures.
Unify the design with a consistent element, such as the simple black backstitch borders and matching handwritten labels used here.
This approach allows you to create a beautiful, cohesive art piece while experimenting with diverse botanical patch ideas.


