

Have you ever finished a piece and felt that something was missing, even though your stitches were perfect? You’ve mastered the technical skills, but now you’re ready to move from simply executing a pattern to creating a piece of art that feels truly expressive and complete.
The secret often lies not in learning a more complex stitch, but in expanding your definition of what embroidery can be. It’s about inviting new textures and materials to the conversation—paper, felt, paint, even a few thoughtfully placed beads. This isn’t about making things complicated; it’s about making them more intentional.
Think of this collection as an invitation to play. See how the crisp edge of paper can highlight the softness of your thread, or how a simple painted background can make your stitches radiate with color. These ideas are here to help you build layers of story and texture, transforming a flat surface into a stunning piece of art for your walls.
1. Combine Appliqué and Beading for a Celestial Finish

For a detailed focal point without hours of stitching, begin by appliquéing a printed fabric moon onto a dark, tightly woven cotton or linen.
Use a single strand of silver metallic thread to connect the constellations with a simple backstitch—its subtle shimmer will mimic starlight against the navy fabric.
Instead of French knots for stars, secure tiny sequins and seed beads at key points. This adds dimension and catches the light in a way thread cannot.
The contrast between the flat print, the linear thread, and the raised beading creates a sophisticated piece with layers of texture.
2. Build Botanical Depth with Layered Felt
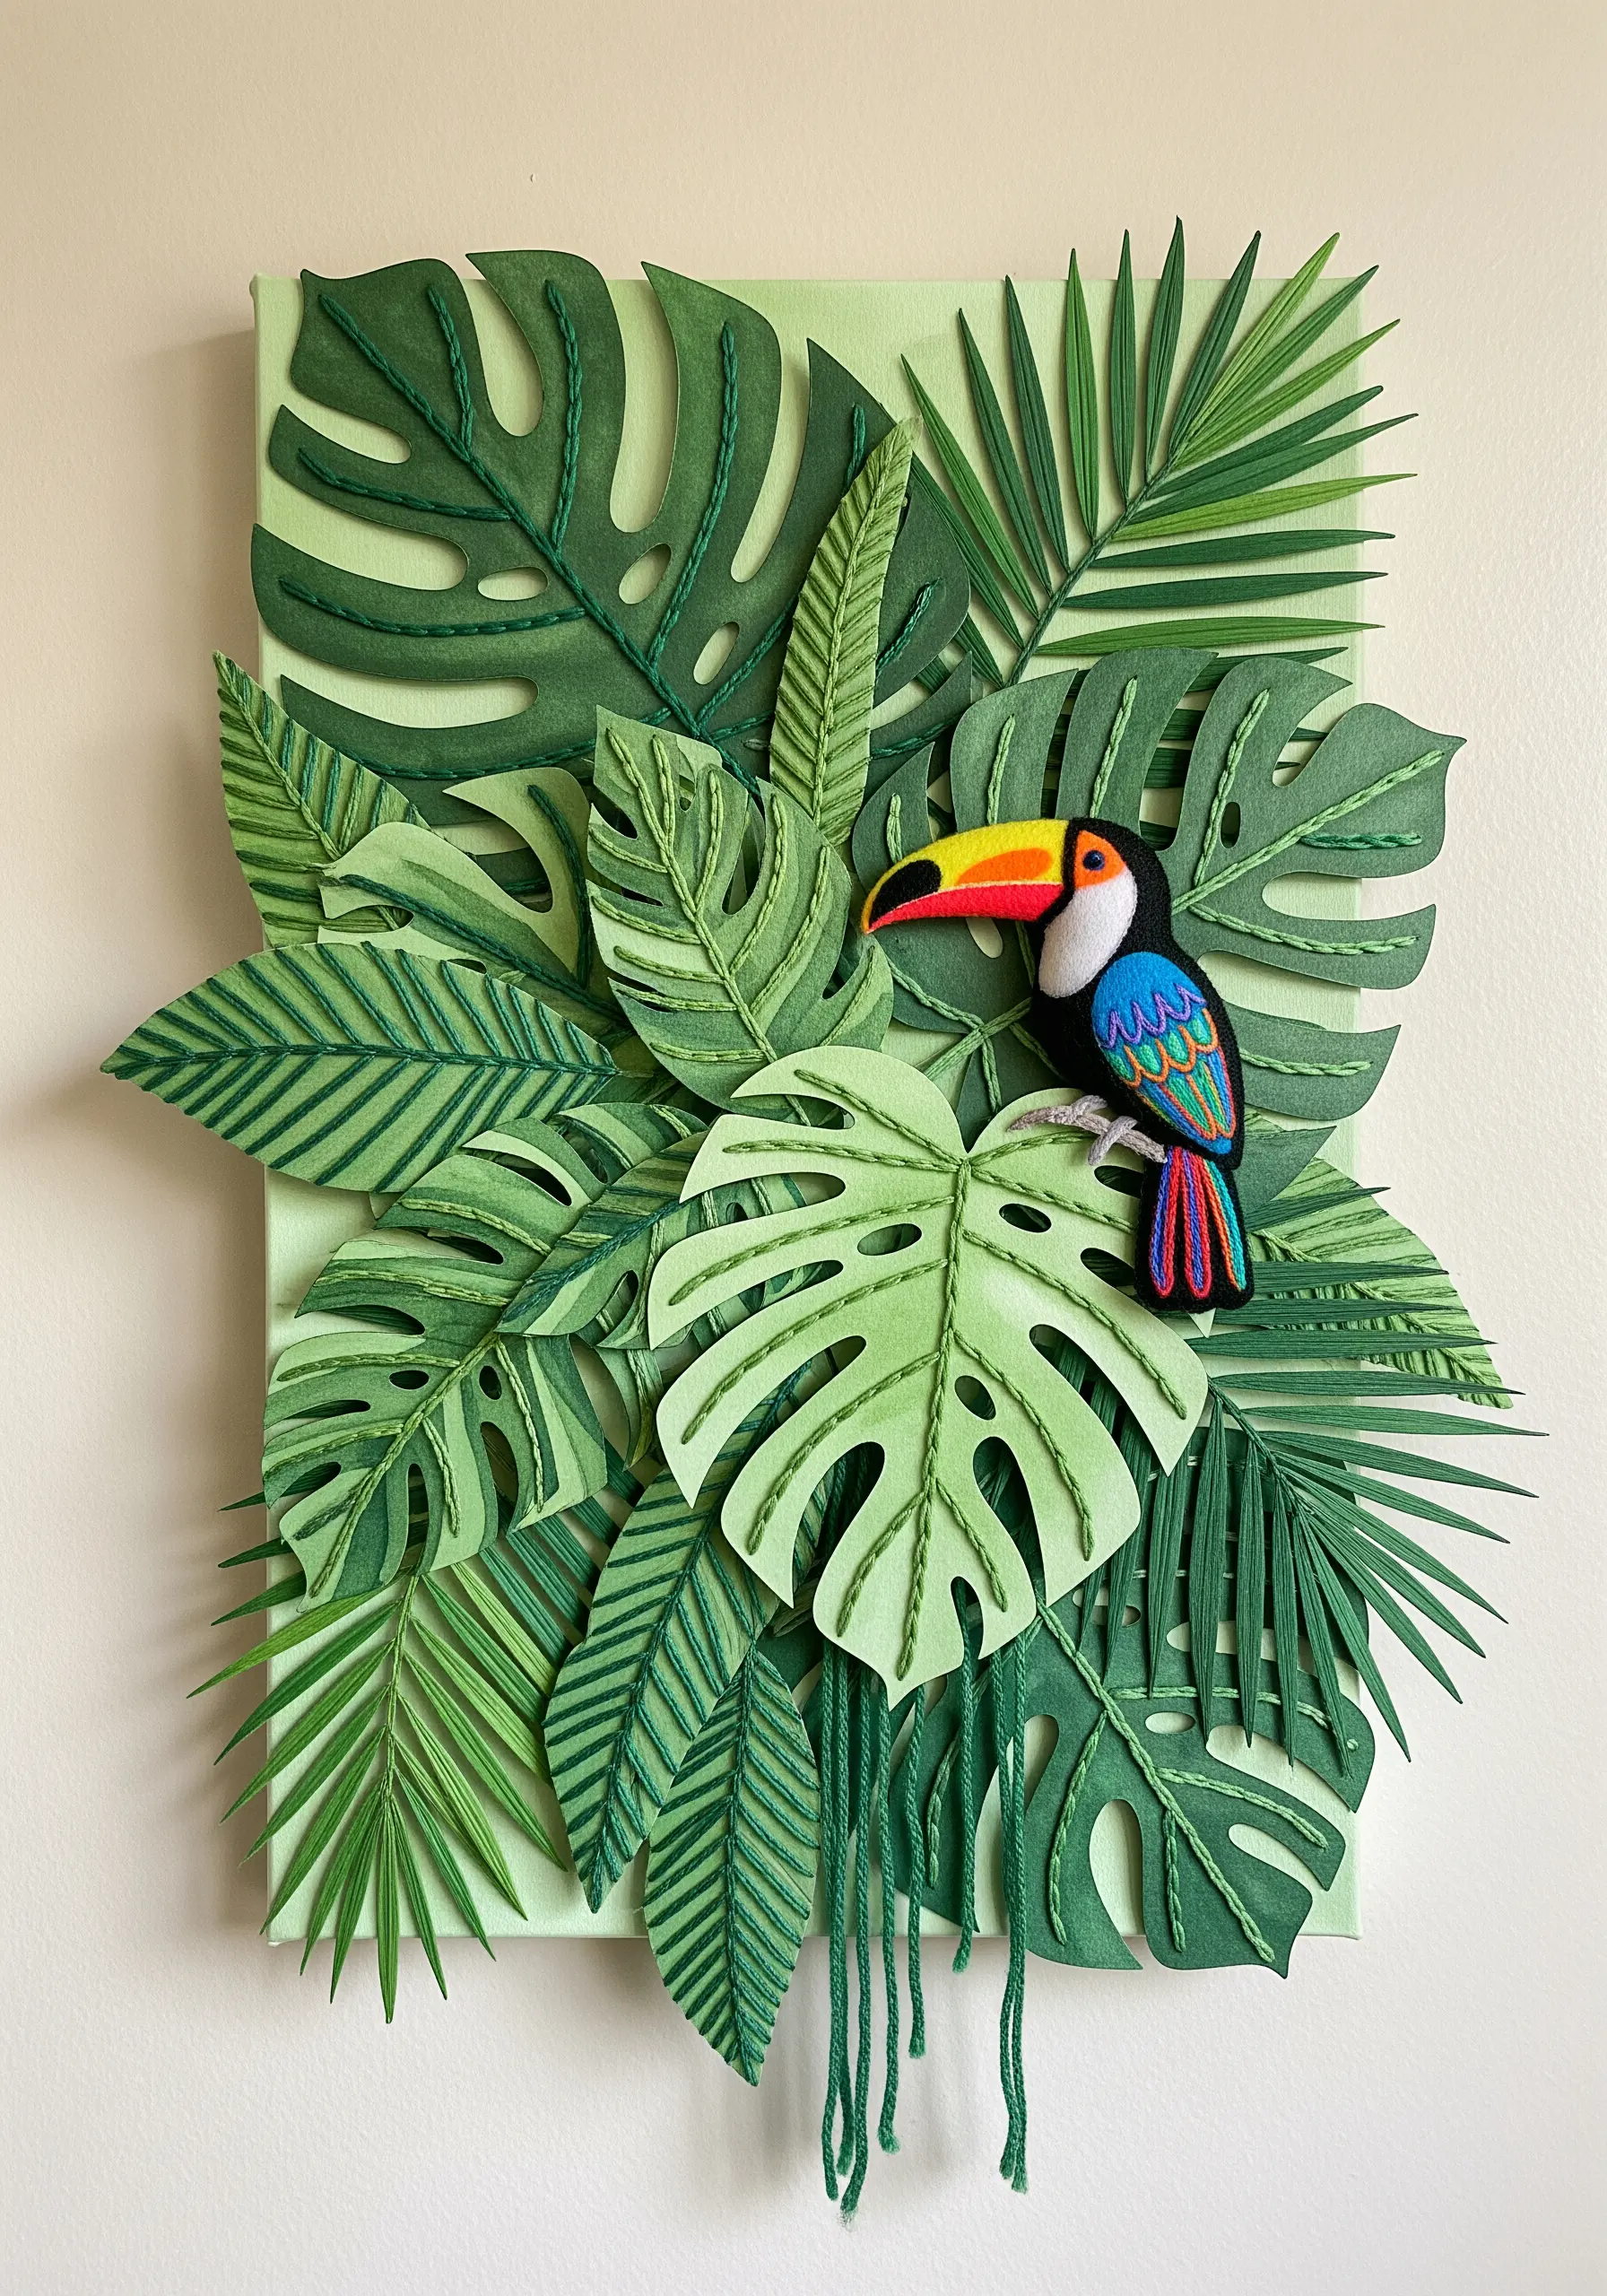
Create a lush, three-dimensional jungle by cutting tropical leaf shapes from stiffened felt in various shades of green.
Use a simple running stitch in a slightly darker thread to define the veins on each leaf—this adds texture and a touch of realism without complex stitching.
Arrange the leaves on a stretched canvas, tucking darker shades behind lighter ones to create natural-looking shadows and depth.
By treating the felt like structural elements, you can build a vibrant, sculptural scene far more quickly than with thread painting alone.
3. Create Abstract Landscapes with Stitched Paper
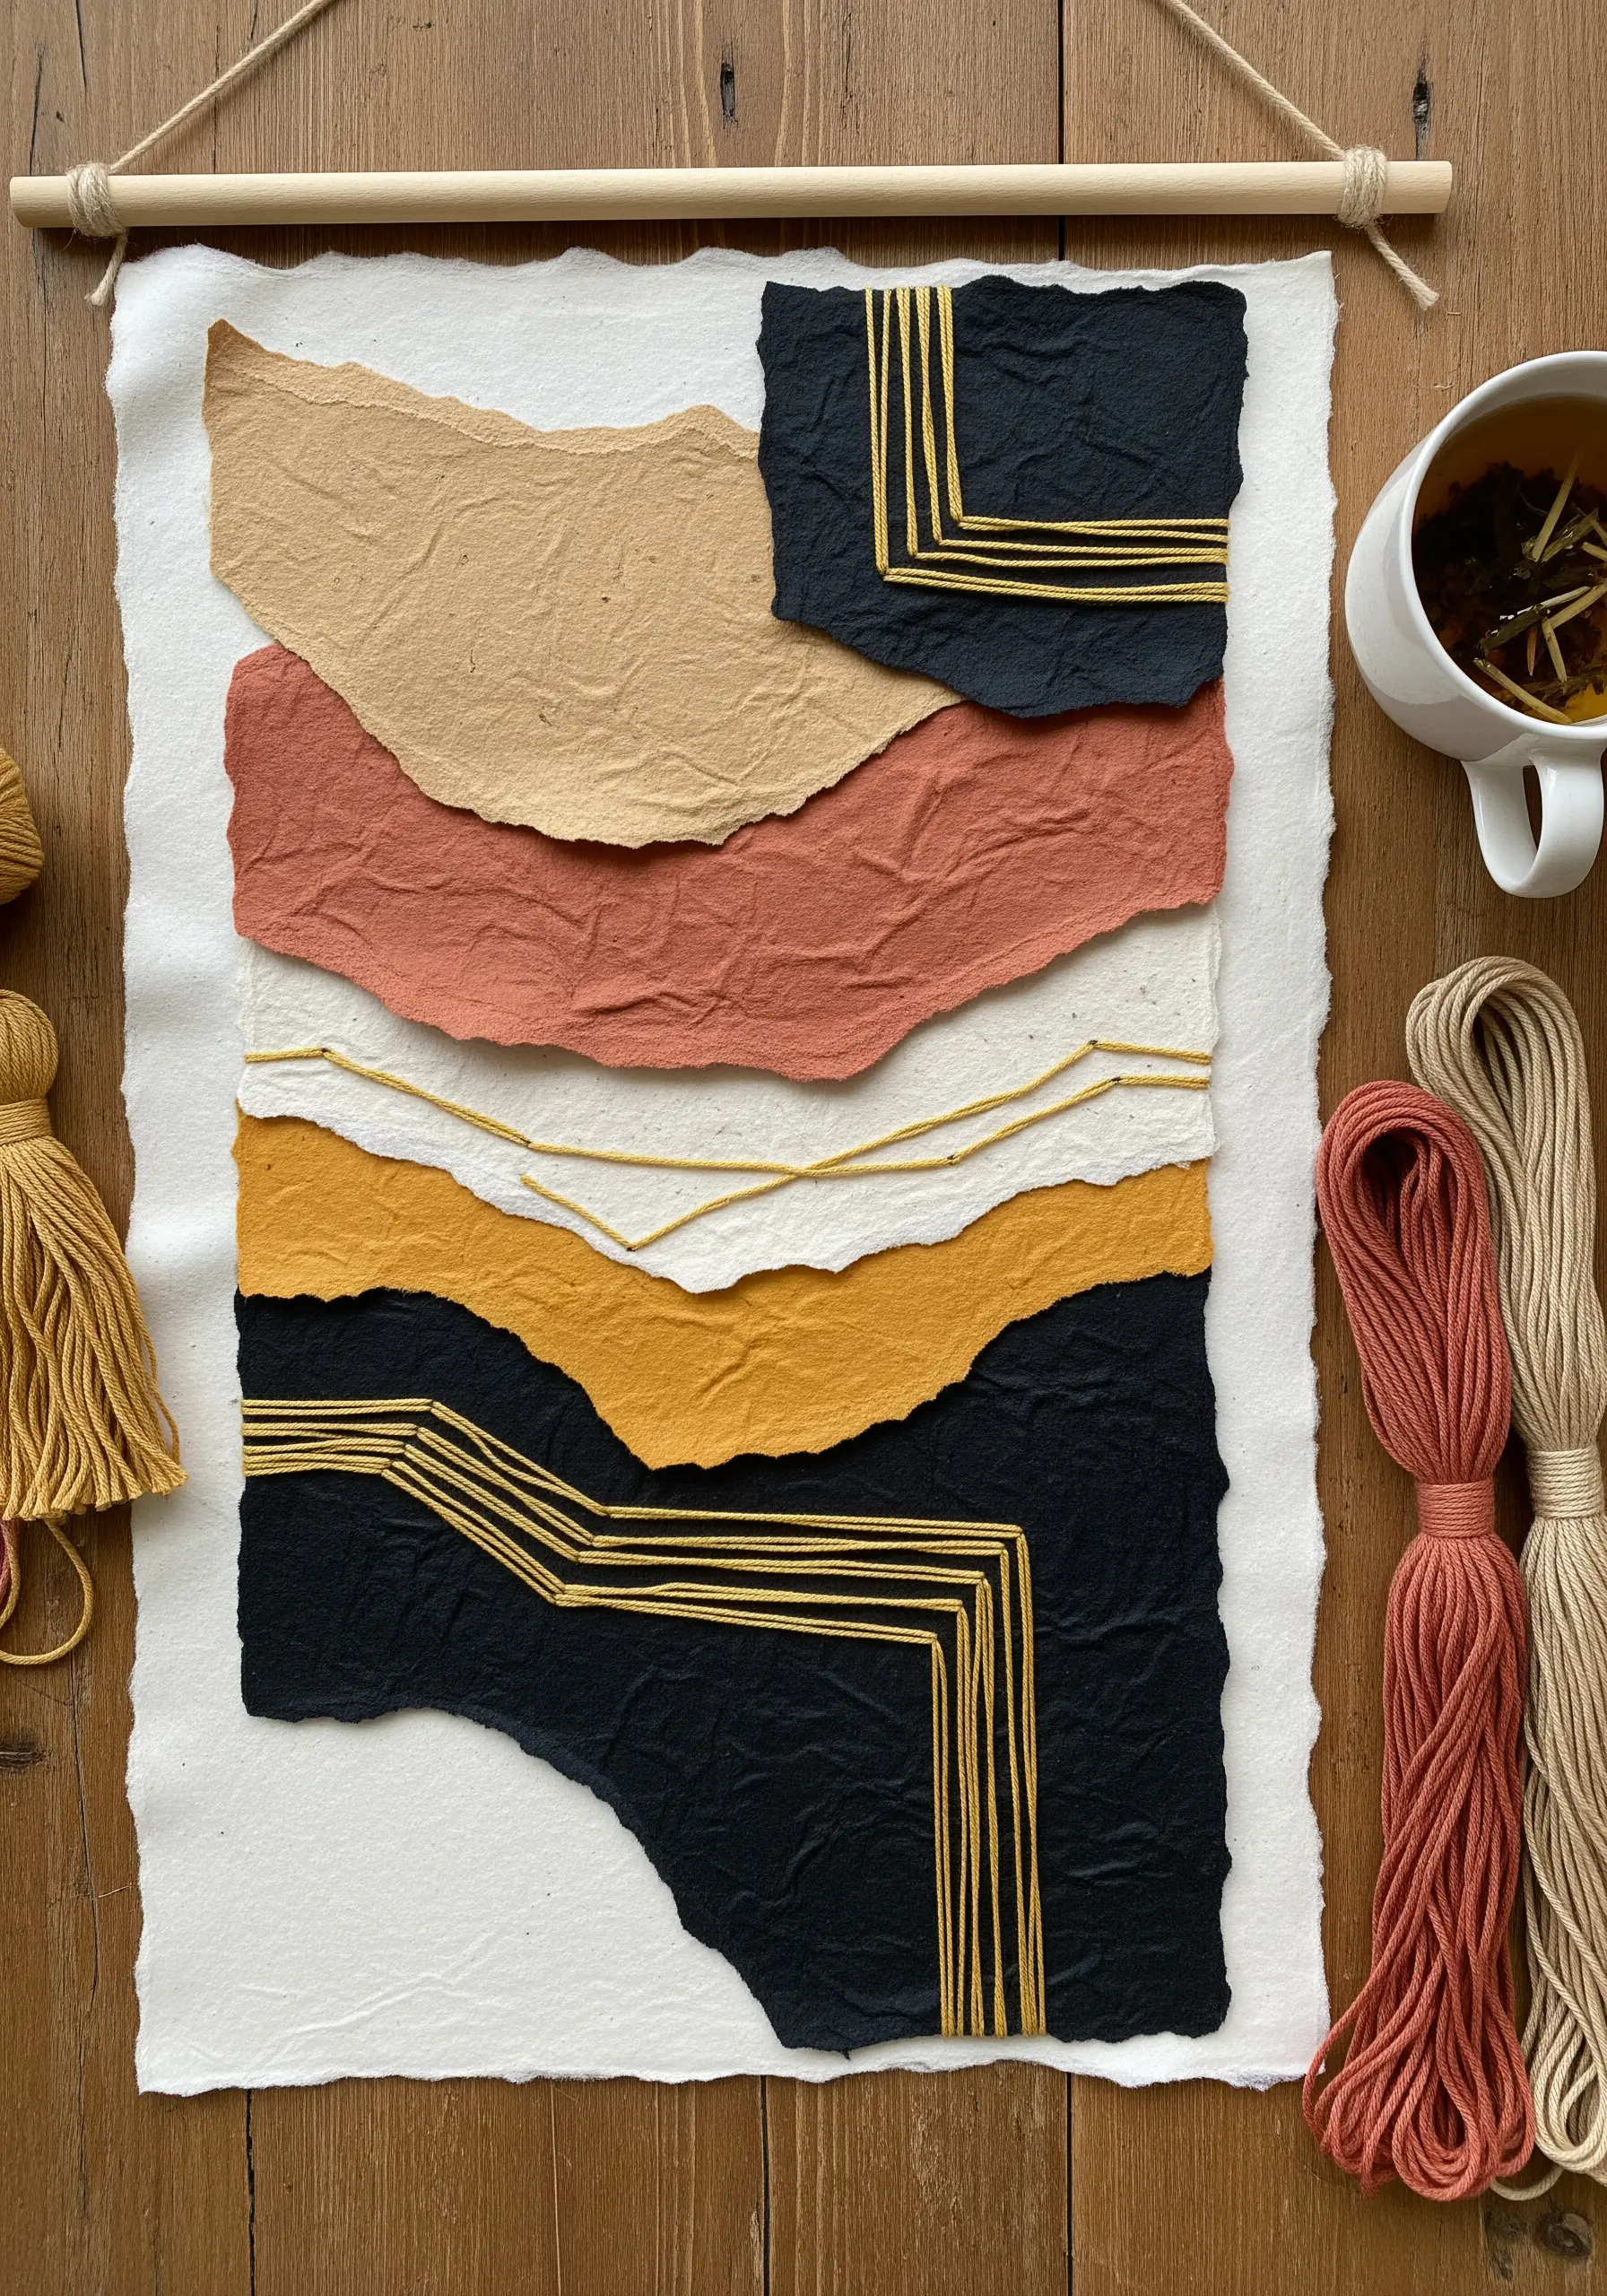
Let the texture of handmade paper become a key element in your design. Tear, rather than cut, the edges to create soft, organic lines.
Arrange the paper in an overlapping collage on a heavier backing paper, creating an abstract composition that suggests hills or horizons.
Introduce structure by adding clean, geometric lines with a strong thread like pearl cotton. Use long straight stitches to contrast with the soft paper edges.
The tension between the raw, fibrous paper and the sharp, precise stitches is what gives this type of mixed-media art its modern, graphic appeal.
4. Weave a Narrative with Pressed Botanicals

Use a vintage book page or sheet music as your canvas to immediately add a layer of history and texture to your piece.
Arrange pressed flowers like lavender or forget-me-nots to frame a central space. Secure them with tiny, nearly invisible couching stitches or a clear, acid-free adhesive.
Embroider a single, meaningful word using a padded satin stitch to give it dimension and presence. Choose a thread color that echoes the floral tones.
This technique allows you to create a deeply personal piece that merges the tangible memory of a place (the flowers) with the quiet story of the text.
5. Sculpt Ocean Waves with Fabric and Beads

Begin by painting a simple color-wash background on a canvas; this creates depth and saves you from having to stitch the entire surface.
Form breaking waves by ruching, folding, and stitching down pieces of sheer organza or tulle. The fabric’s transparency mimics the look of seafoam and water.
Define the crests of the waves with couched white textured yarn or lines of pearlescent seed beads to suggest sparkling water.
Anchor the scene by adding a shoreline of real sand and miniature shells, adhered with a strong gel medium. This introduces an authentic, organic texture that completes the sensory experience.
6. Construct a Diorama with Felt and Stitches
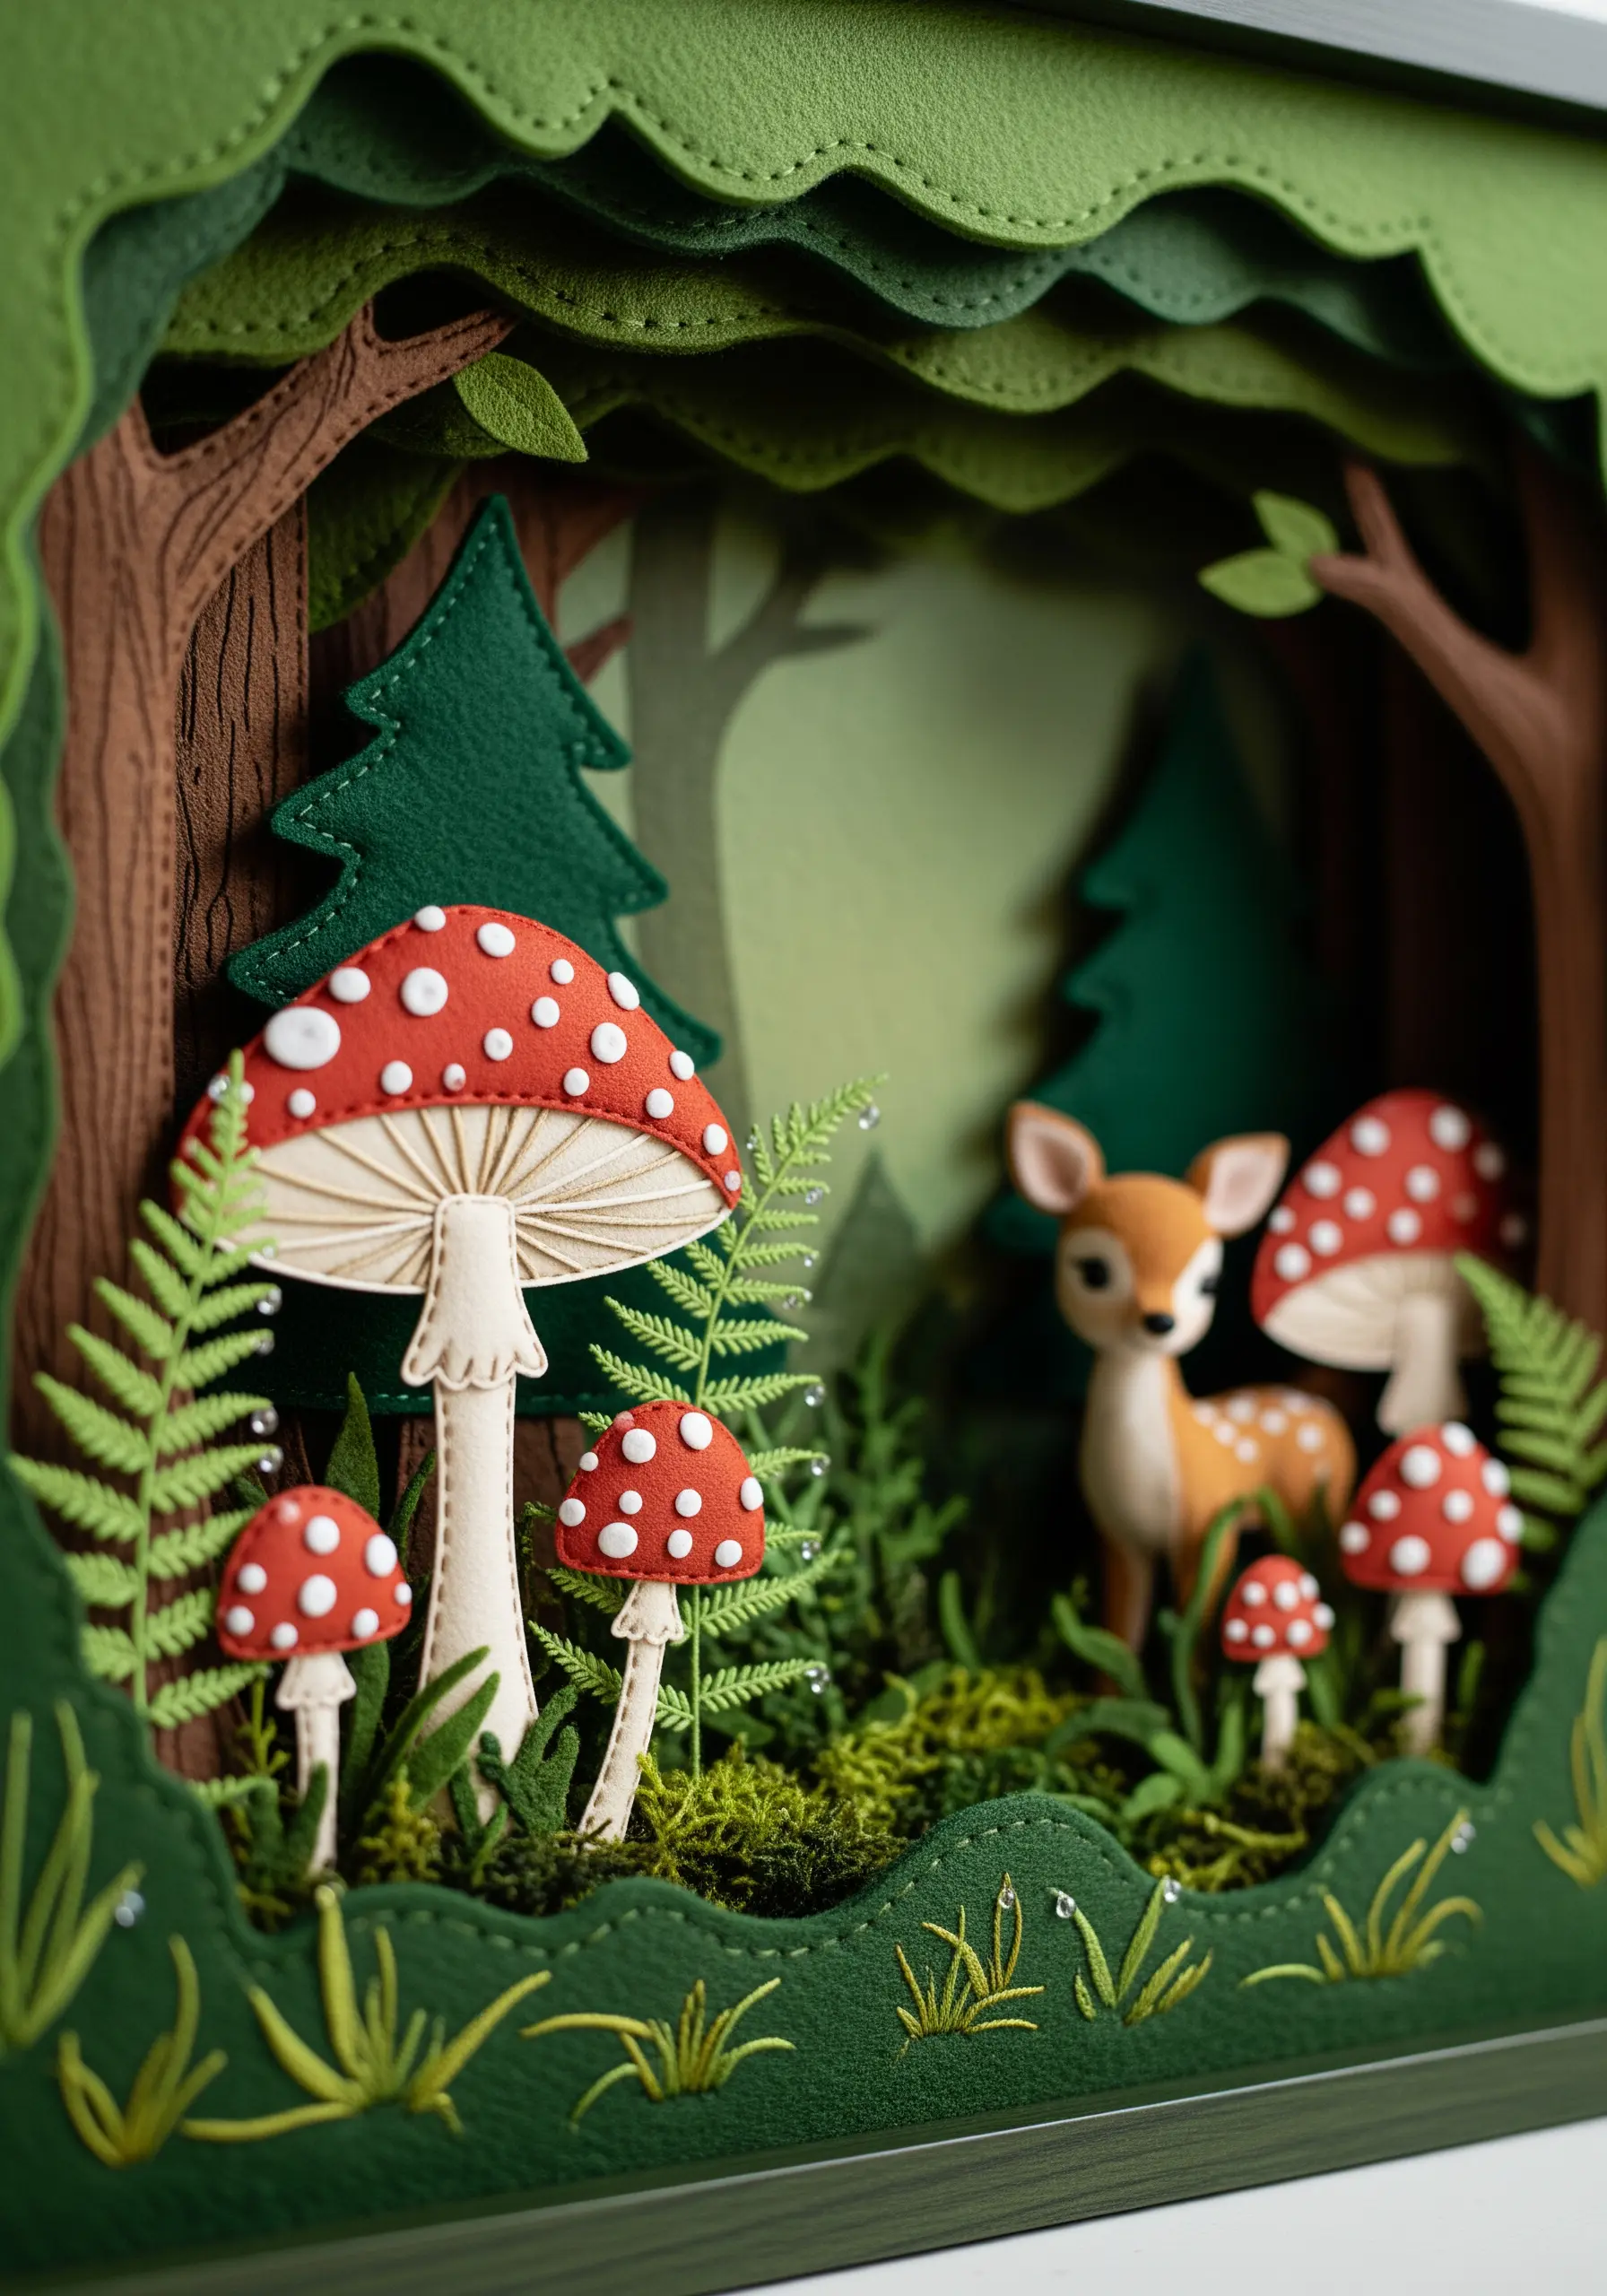
Create a charming woodland scene with immediate depth by building it inside a shadow box frame.
Cut layers of felt to form the foreground, mid-ground, and background, using darker colors for the deepest layers to enhance the illusion of perspective.
Use embroidery sparingly for high-impact details: French knots for mushroom spots, straight stitches for blades of grass, or a few seed stitches on a leaf.
This method lets the felt do the structural work, allowing your embroidery to be the delicate, refining touch that brings the storybook scene to life.
7. Juxtapose Soft and Sharp Textures in a Mountainscape
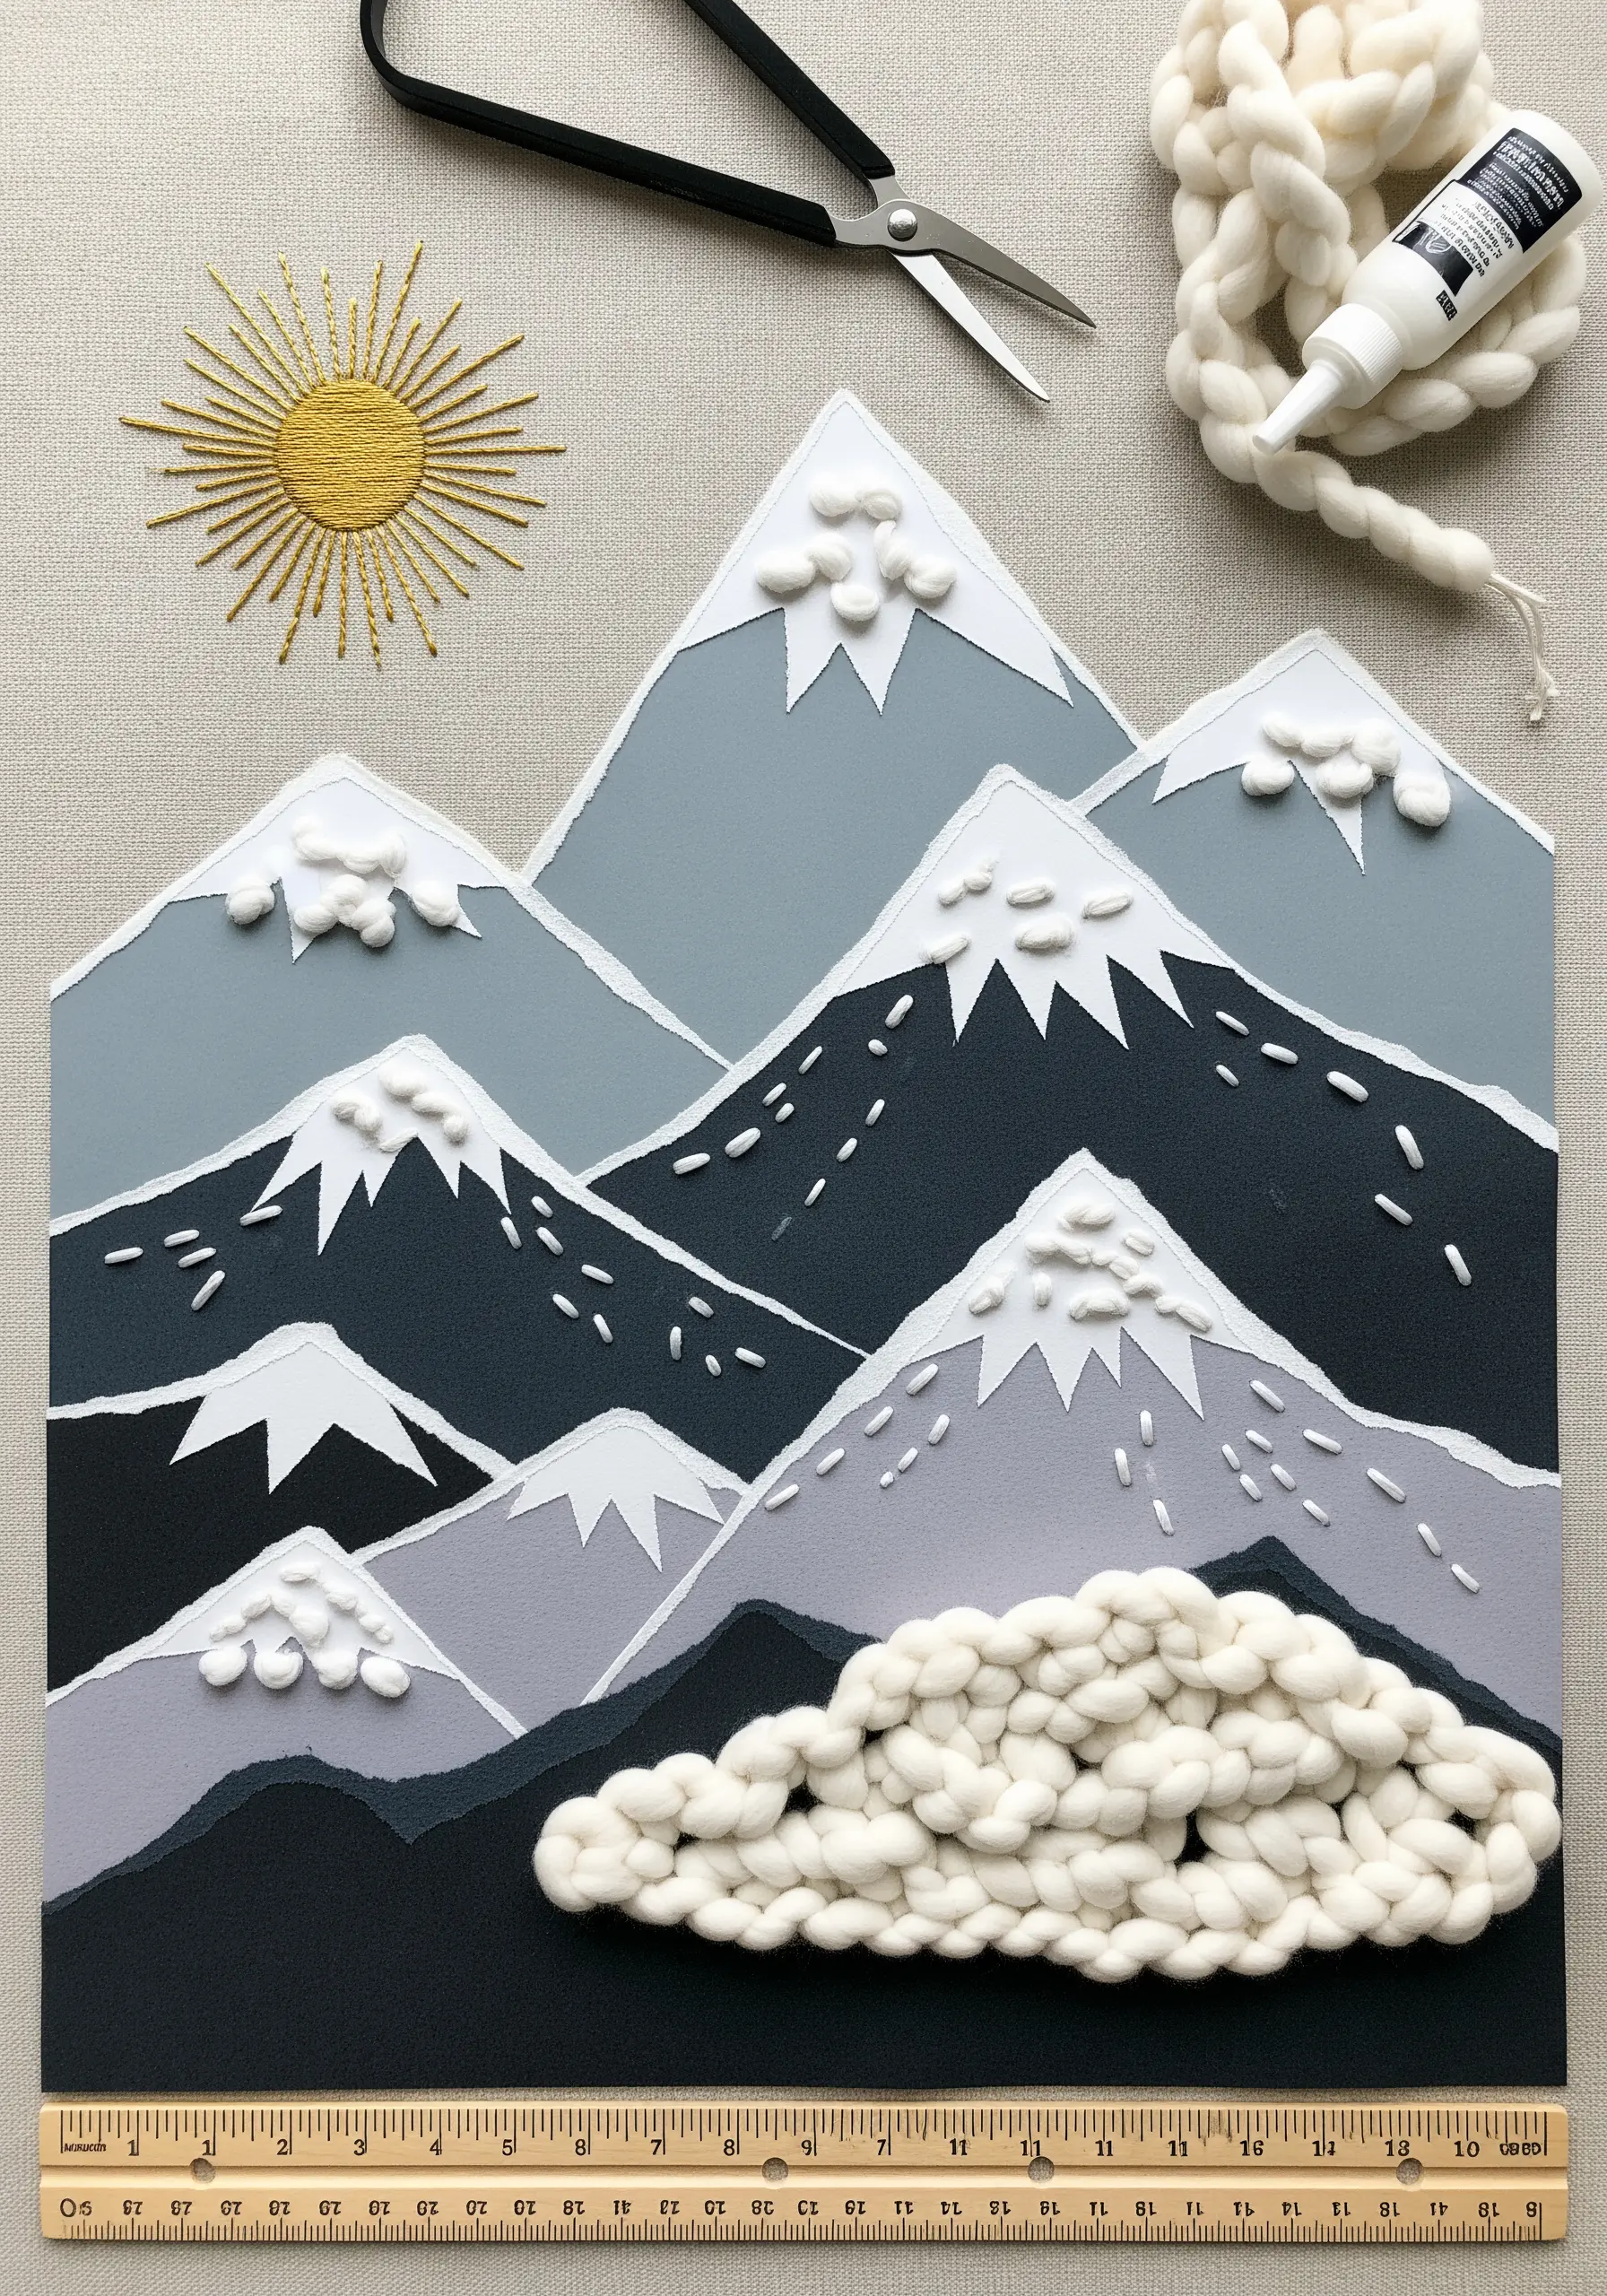
Layer torn art paper in shades of grey and black to form a mountain range. The raw, torn edges create a much more natural, rugged effect than cut lines.
Introduce a dramatic textural contrast by using soft, unspun wool roving for clouds and snow. Couch it down with a matching thin thread to secure it.
For the sun, use a fine metallic thread to stitch a tight, radiant satin stitch. Its sharp lines and reflective sheen provide a perfect counterbalance to the soft, matte textures of the paper and wool.
This intelligent use of contrasting materials is what gives a minimalist mountainscape its powerful visual interest.
8. Achieve Bold Line Art Using Couched Yarn
To create a modern, gallery-style backdrop, paint abstract color blocks directly onto your canvas fabric using acrylics thinned with a textile medium.
For the primary design, use thick yarn instead of embroidery floss. Lay the yarn along your drawn lines and tack it down with a thin, matching thread every few millimeters.
This technique, called couching, creates a bold, sculptural line that has far more presence than a standard backstitch.
It’s a faster way to achieve a graphic look, perfect for minimalist portraits and abstract designs where the quality of the line is everything.
9. Play with Geometric Appliqué and 3D Accents

Use felt as your primary medium for a clean, graphic design. Cut precise hexagons and arrange them in a honeycomb pattern on a neutral linen background.
Secure each felt piece with a simple running stitch around the edge. This adds a charming, handmade detail while keeping the look tidy.
Add a layer of whimsy by crafting tiny, three-dimensional bees from felt or wool roving and stitching them onto the surface.
Finally, connect your composition with a simple dotted backstitch to suggest a flight path, adding movement and a lighthearted narrative.
10. Design a Cascading Wall Hanging with Stitched Paper

Instead of fabric, use heavy cardstock or watercolor paper as your base for each element. Paint it with an autumnal color wash for a variegated, natural effect.
Add a single line of machine or hand stitching down the center of each paper leaf to act as the vein. This provides both visual detail and subtle rigidity.
String the finished leaves onto multiple lengths of fine cord, securing each one with a small knot on the underside to keep the spacing consistent.
Suspend the strands from a piece of driftwood or a copper pipe for a modern-meets-natural wall hanging with beautiful movement.
11. Elevate Watercolor with Metallic Thread and Gems

Start by painting a soft, diffused mandala design onto heavy watercolor paper using a limited color palette. This creates a gentle, ethereal base.
Once completely dry, use a fine metallic thread to trace over key geometric lines. A simple backstitch is all you need; the goal is to add definition and a touch of light, not to cover the paint.
This technique allows the watercolor’s transparency to shine through while the metallic thread provides structure and a hint of luxury.
For a final, refined touch, add tiny flat-backed crystals or beads at the intersections of your stitched lines to elevate the piece.
12. Capture a Cityscape with Architectural Appliqué
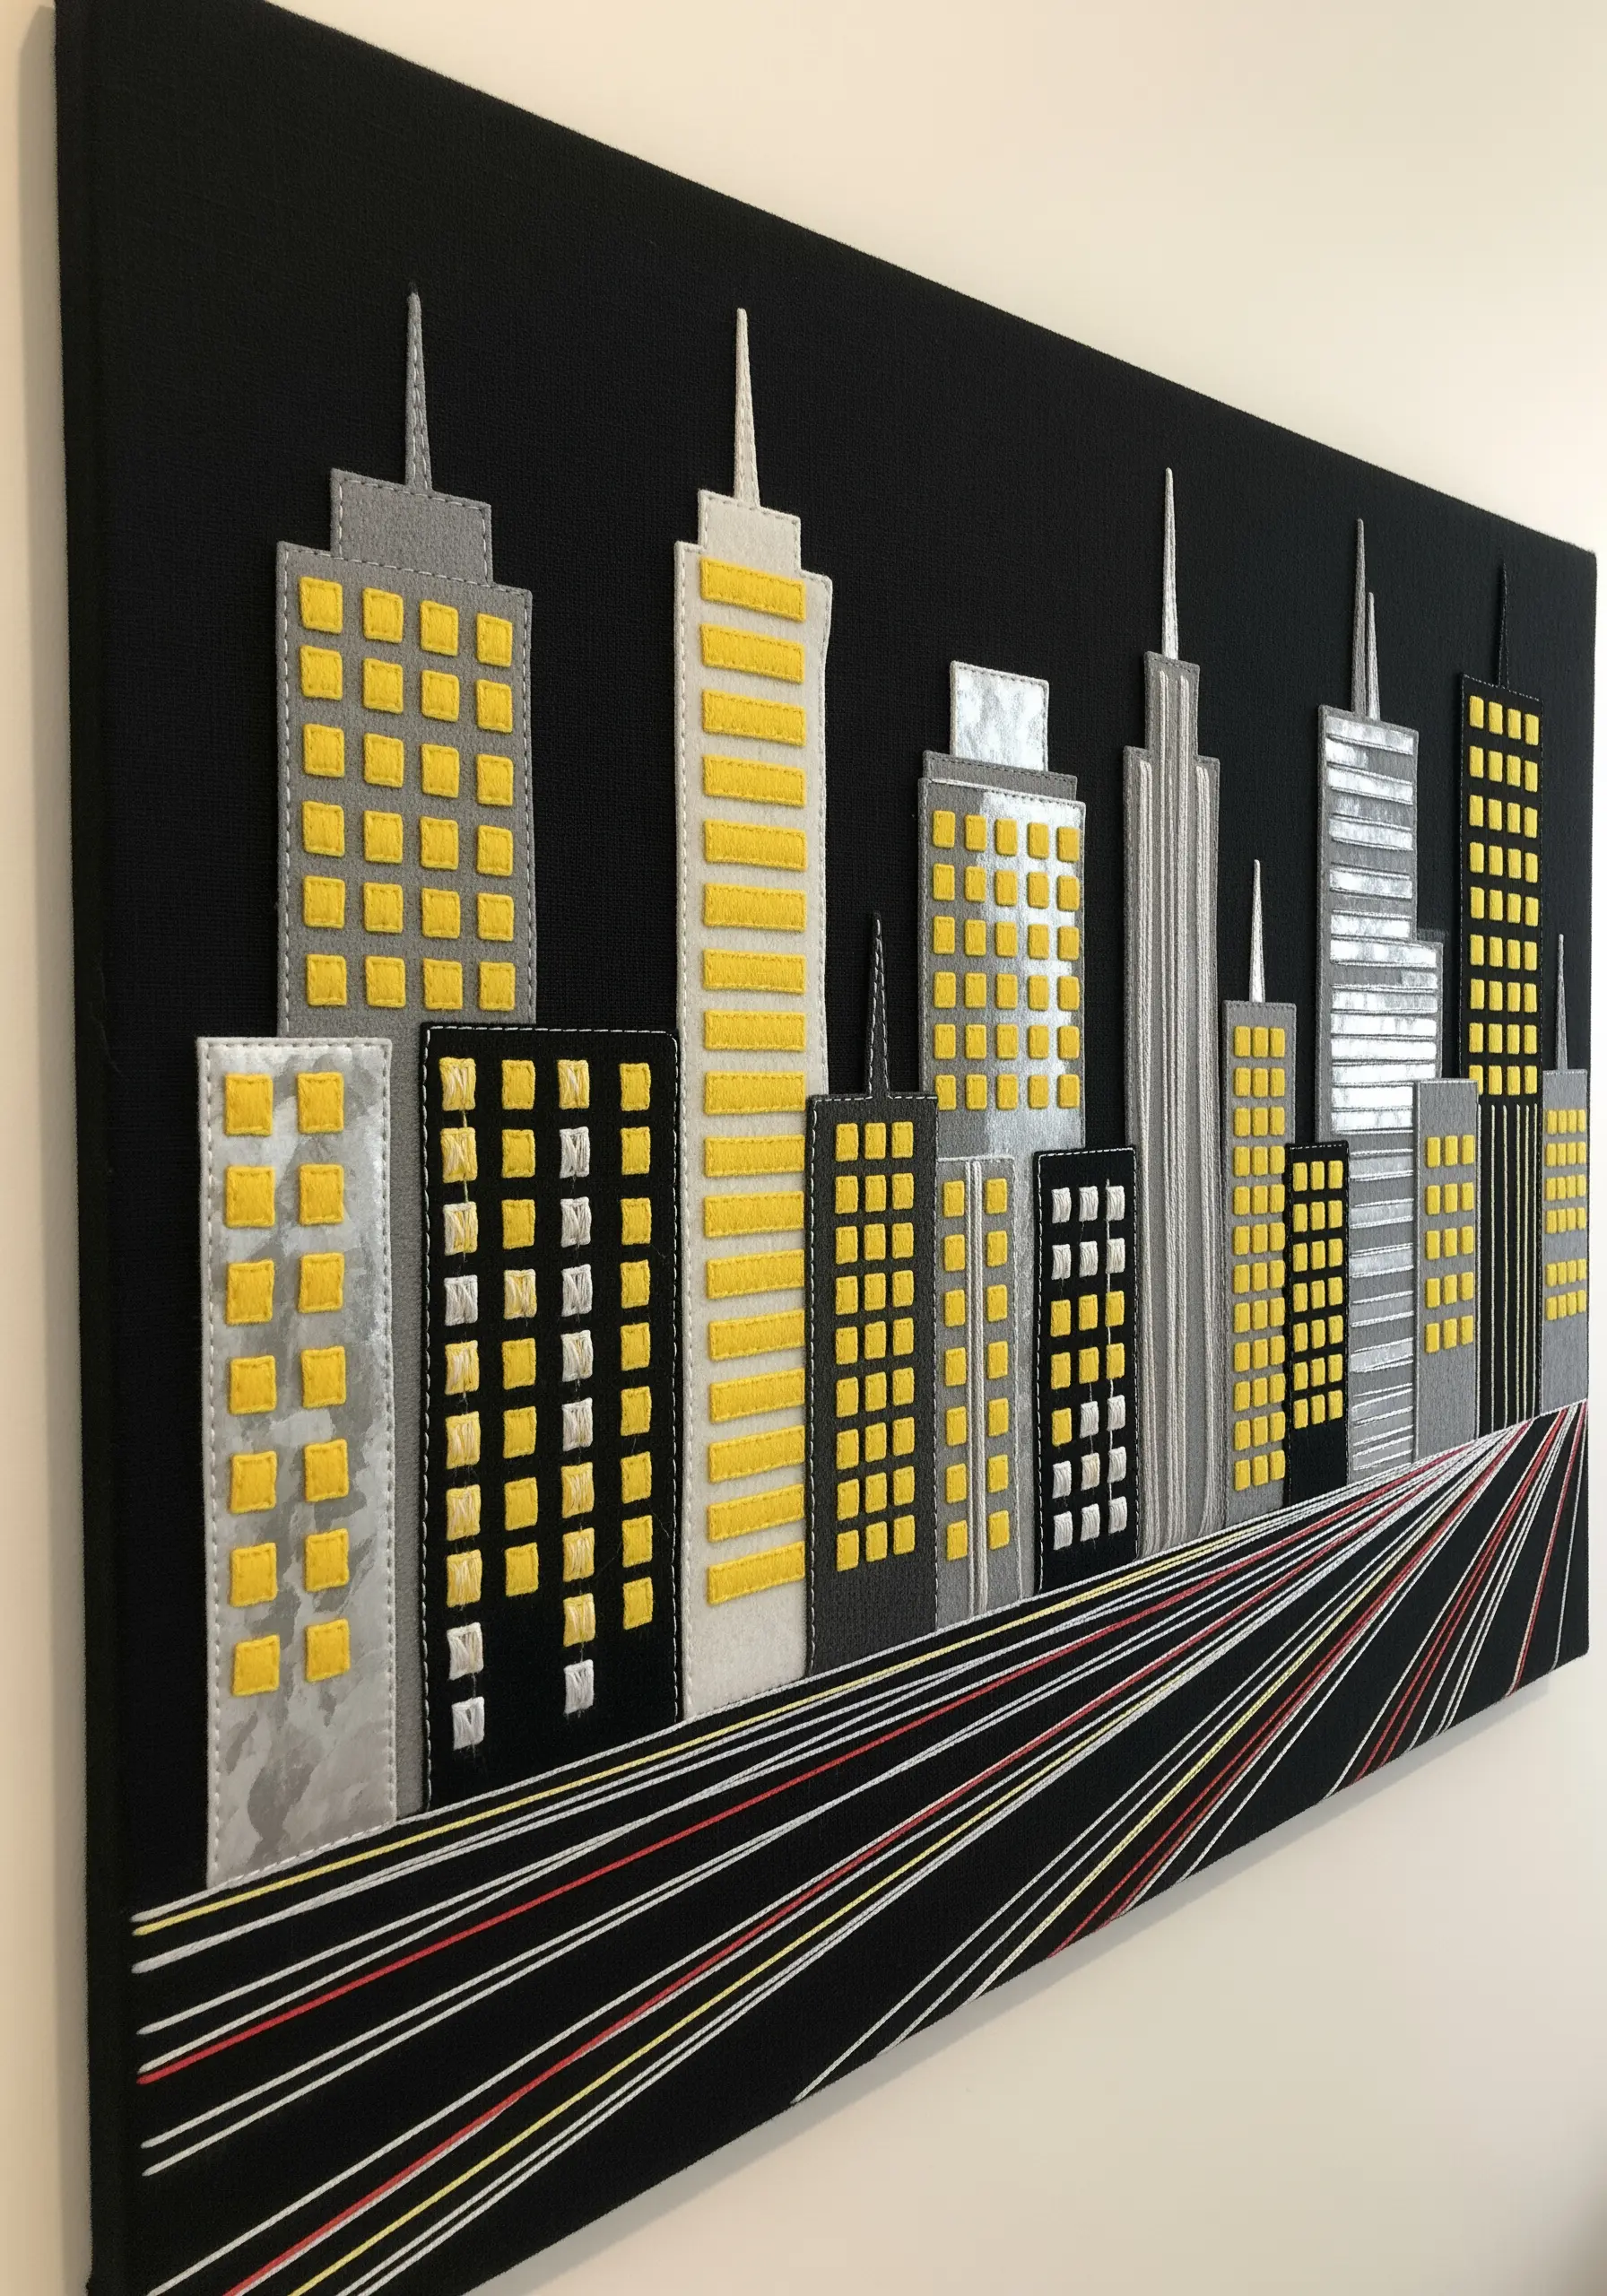
Create your skyline using fabric appliqué. Choose materials with different sheens, like matte black cotton and silvery faux leather, to differentiate the buildings.
Instead of drawing windows, stitch them. A grid of small satin stitches in a bright yellow or white instantly reads as lit-up rooms and adds beautiful, raised texture.
For streaks of light in the foreground, use long, parallel straight stitches in multiple strands of floss. This creates a sense of motion and draws the viewer’s eye.
This project is an excellent exercise in using texture to create perspective and atmosphere.
13. Craft Delicate Feathers with Thread-Wrapped Paper

Cut precise feather shapes from sturdy cardstock; this provides the structure for your thread work.
Tightly wrap fine embroidery floss around the paper base, changing colors to create variegated, natural-looking patterns. This process creates the dense texture of a feather’s barbs.
Define the central quill by gluing a piece of thicker twine or cord down the middle. This adds another layer of texture and realism.
These elements are incredibly versatile; you can group them in a frame, create a mobile, or use them as unique gift embellishments. It’s a perfect example of how paper and thread can work together.
14. Tell a Story with Nostalgic Fabric Appliqué

Give cherished fabric scraps a new purpose by using them for appliqué. Iron on a lightweight fusible stabilizer before cutting your shapes for crisp, fray-free edges.
Attach your fabric teacups and pots to the background with a neat blanket stitch. This adds a classic, handmade charm and secures the pieces beautifully.
Use simple embroidery to add the finishing touches that bring the scene to life: a whipped backstitch for curls of steam, or tiny seed stitches for a decorative border.
This technique transforms remnants into a delightful narrative piece filled with pattern and personality.
15. Create a Cosmic Wall Hanging with Appliquéd Planets

To achieve intricate detail, create each planet separately on a small piece of fabric before assembling your final piece.
Use the long-and-short stitch to blend colors seamlessly, capturing the gaseous swirls of Jupiter or the continents of Earth.
For Saturn’s rings, couch multiple rows of fine metallic thread around the planet. The sharp, shimmering lines provide a perfect textural contrast.
Once all planets are complete, carefully cut them out and appliqué them onto a long panel of dark velvet. The plush, non-reflective fabric makes the vibrant, thread-painted planets appear to float in space.
16. Build a Tactile Coral Reef with 3D Fiber Stitches

Begin with a painted canvas that transitions from deep sea to shallow water. This creates an atmospheric base for your fiber art.
Use dimensional stitches to build coral textures. The Turkey stitch creates dense, loopy structures, while clusters of French knots are perfect for bumpy coral formations.
Incorporate other fibers for variety. Create brain coral by couching down thick, chunky yarn in swirling patterns, or make sea anemones from rolled strips of felt.
This project is a celebration of texture, inviting you to create a vibrant, multi-layered underwater world with a variety of mixed-fiber creations.
17. Design a Modern Desertscape with Felt and Satin Stitch

Embrace a minimalist aesthetic by using clean, simple shapes. Cut cacti from matte felt in several shades of green for subtle variation.
Add minimal embroidered details—a few straight stitches for spines or tiny pink French knots for blossoms—to give the felt shapes definition.
Create the sun with a dense, perfectly executed satin stitch. The smooth, high-sheen surface of the floss will stand in beautiful contrast to the flat, soft texture of the felt.
This composition relies on the interplay of texture and clean lines to create a serene and modern feel.
18. Sculpt a Whimsical Mushroom Harvest

Move beyond the hoop by creating three-dimensional, stuffed objects from felt. Hand-sew mushroom caps and stems, leaving a small opening for polyester fiberfill.
Embroider the details before you stuff and close the pieces. Use French knots or tiny seed beads for the iconic spots on toadstools, and parallel straight stitches for the gills underneath.
Arrange your finished sculptural mushrooms in a shallow, woven basket and hang it on the wall for a unique, fairytale-inspired art piece.
This project fully merges fiber art with sculptural techniques for a truly standout display.
19. Map the Stars with Geometric String Art

For a crisp, modern take on celestial art, work on a painted corkboard or foam core panel instead of fabric.
Mark the positions of your stars and press in small, decorative pins. You can glue star-shaped sequins at the base of each pin for extra sparkle.
Use a single, continuous strand of thread—neon or metallic works beautifully—and wrap it around the pins to form the constellation lines.
This embroidery-adjacent technique results in perfectly straight lines and a sharp, graphic aesthetic that is both stunning and simple to create.
20. Explore Tonal Texture on a Modern Rainbow
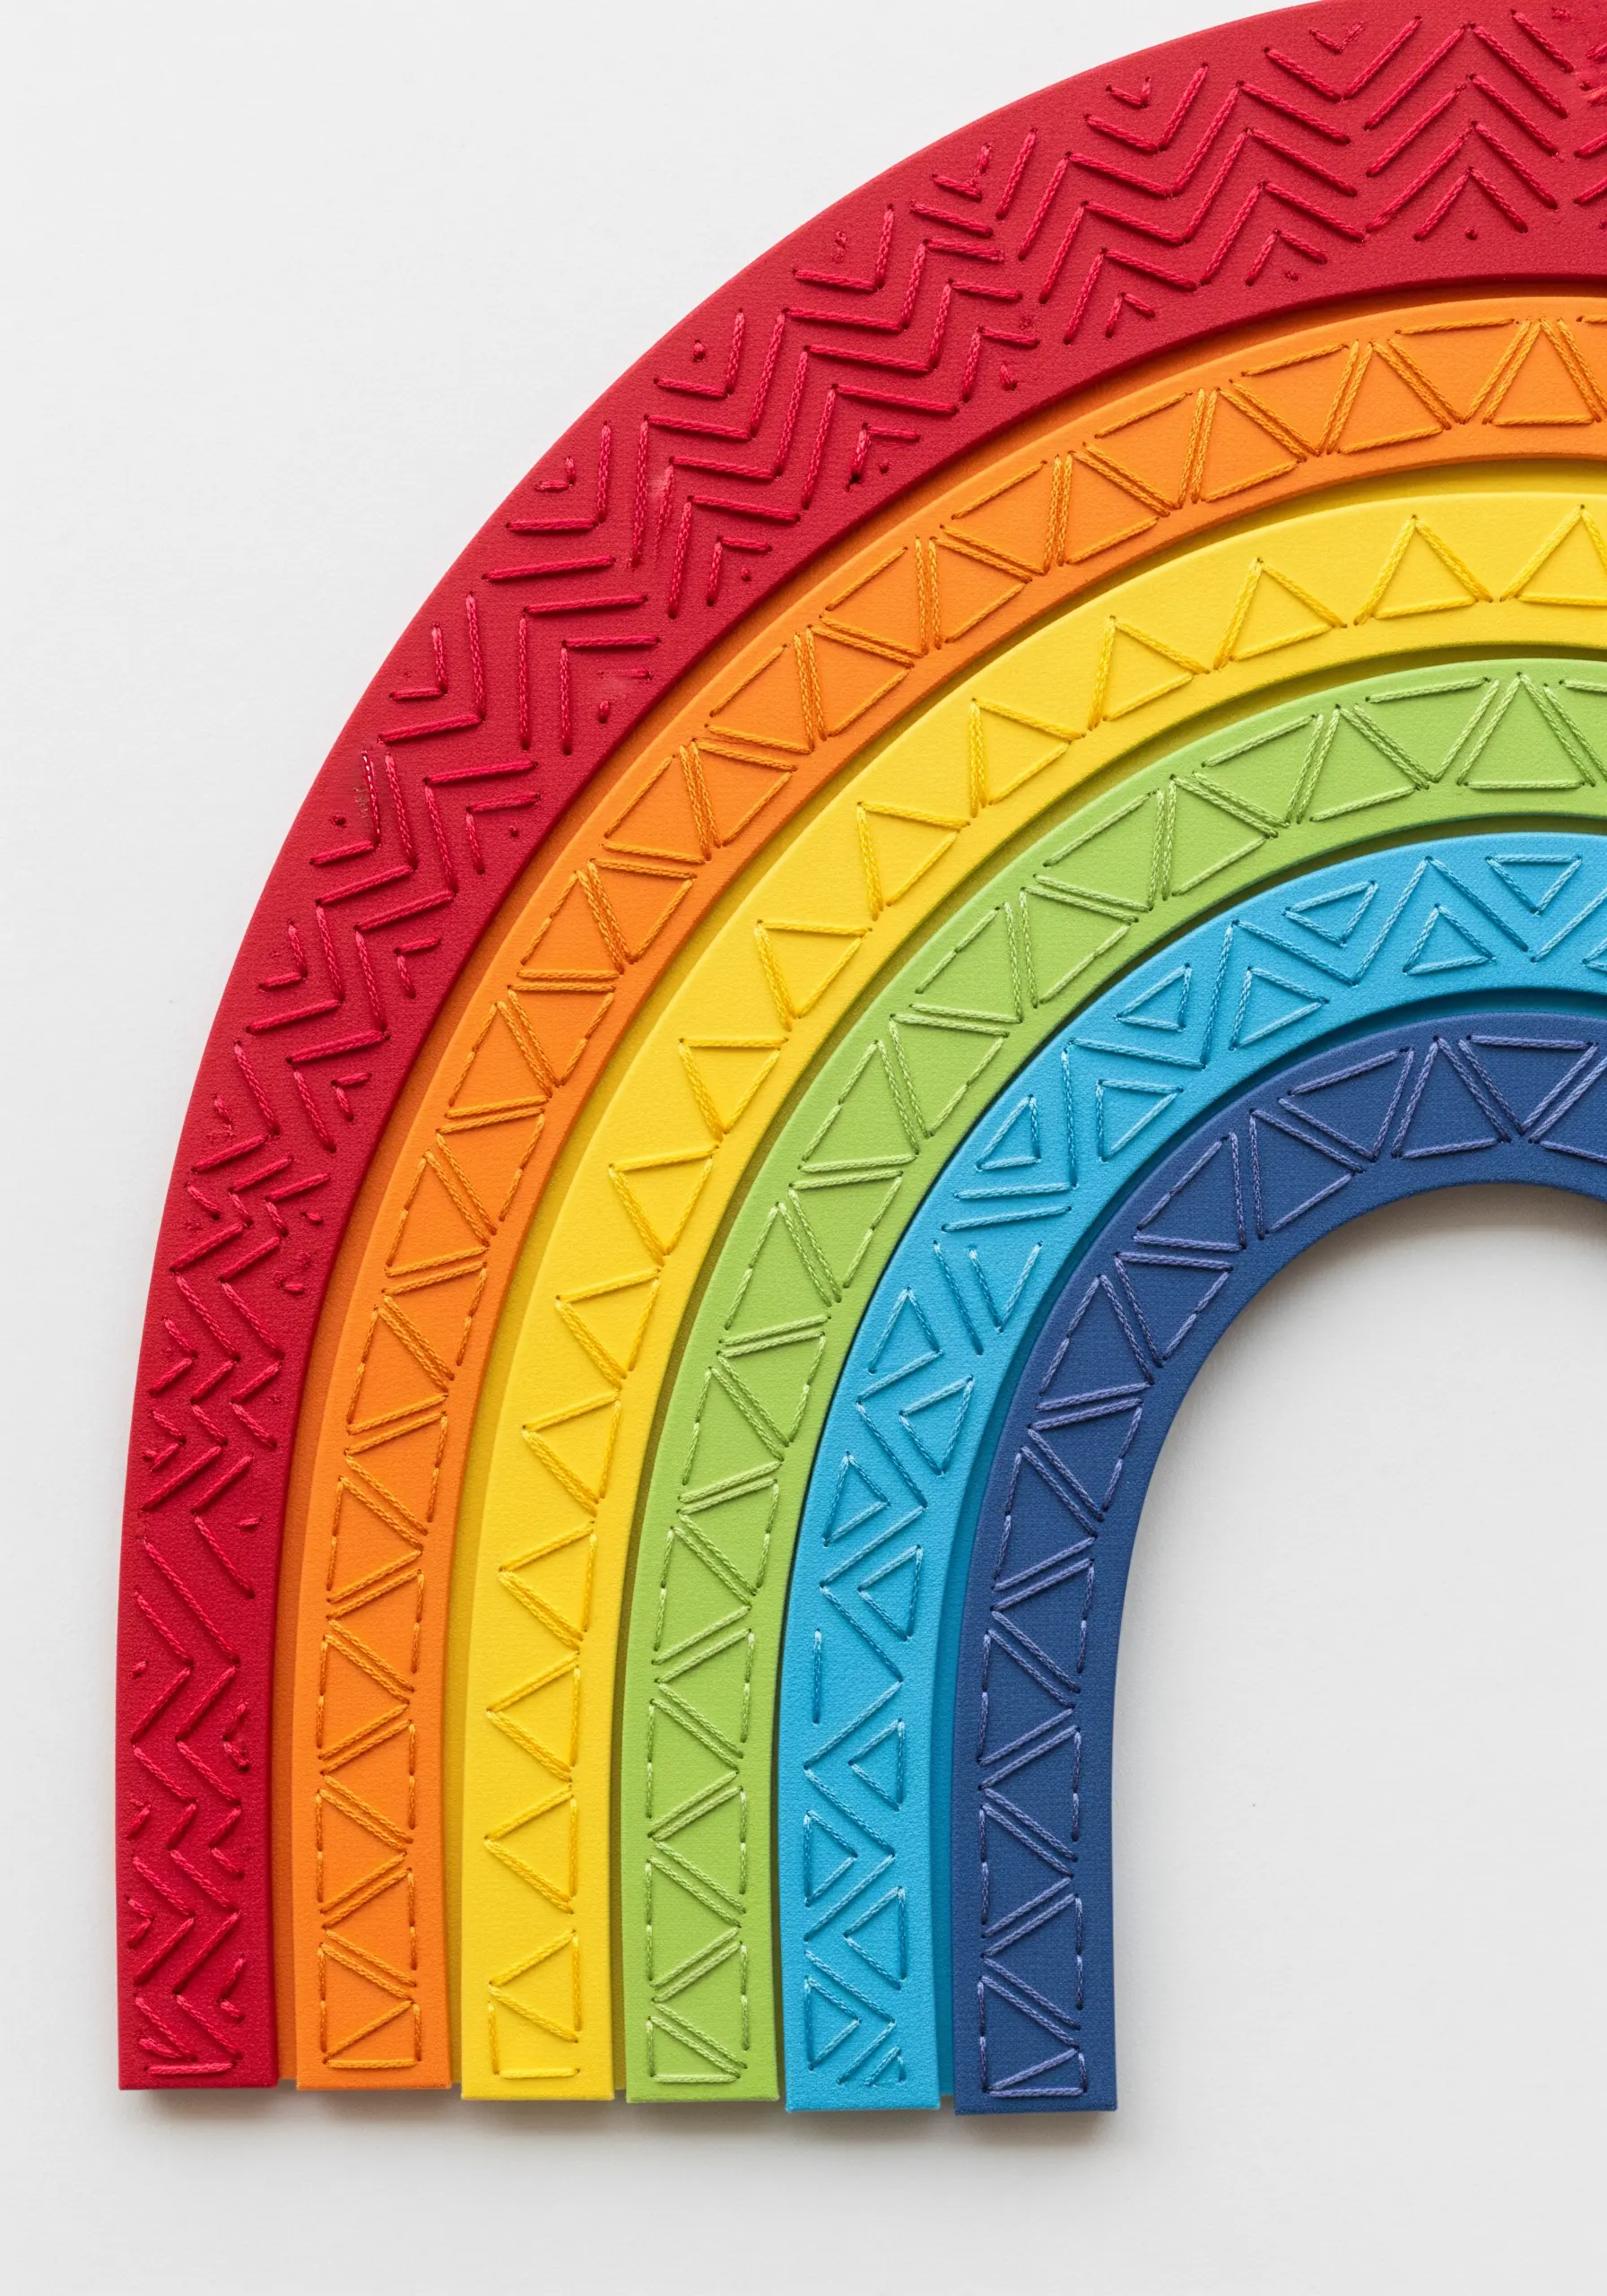
Elevate the classic rainbow motif by focusing on texture rather than just color. Cut your rainbow arches from thick cardstock or craft foam.
For each colored arch, use a perfectly matching embroidery floss to create a unique, repeating pattern. Try a field of seed stitches on one, a chevron pattern on another, and tight backstitching on a third.
The goal is to create a subtle, tactile dimension that draws the viewer in for a closer look.
This tonal approach adds a layer of sophistication, transforming a simple shape into a refined piece of textile art.
21. Frame a Miniature World in a Hoop

Transform your embroidery hoop into a three-dimensional diorama. Start with a patterned fabric background to set the scene for your secret garden.
Build forward by layering different materials. Use craft sticks for a tiny gate, cut paper for leaves, and use knotted thread or yarn for flower buds like roses.
Incorporate small found objects or embellishments, like paper butterflies or tiny metal hinges for the gate, to add realistic details.
This technique allows you to create a complete, narrative world within the small, focused space of a hoop.
22. Infuse Your Art with Place and Memory

Use non-traditional materials that hold personal meaning. Vintage maps are perfect for this, adding layers of history and geography to your work.
To make the paper sturdy enough for stitching, back it with a lightweight, iron-on fusible interfacing before cutting your shapes.
Appliqué your map-paper birds onto a neutral linen banner with a simple, clean running stitch around the edges.
The result is a piece that is not just decorative but deeply narrative, with each element telling a story of a meaningful place.
23. Create a Sculptural Lunar Hanging with Clay

Explore materials beyond fiber by incorporating air-dry or polymer clay into your work. Form flat discs and press textures into them with beads or tools to create cratered moon surfaces.
Once hardened, paint the clay pieces with shades of grey, white, and metallic silver to capture the lunar glow.
Assemble your wall hanging by stringing the finished moon phases onto fine, strong threads, interspersed with silver beads and star-shaped charms.
This mixed-media approach results in a substantial, sculptural piece that combines the earthy quality of clay with the delicate nature of thread.


