

You have the threads, the fabric, and the desire to create something beautiful. But perhaps you feel a small gap between the work you’re making and the polished, intentional art you aspire to create. It’s not about needing more skill; it’s about making small, thoughtful adjustments that transform your work.
This is where tiny projects become your greatest teachers. They invite you to focus on a single technique—the smooth curve of a stem stitch, the plump texture of a French knot, the perfect tension of a satin stitch. They are not lesser projects; they are concentrated acts of creativity that build confidence and refine your artistic voice, one stitch at a time.
Each of these small designs is an opportunity to make something meaningful, quickly. They are perfect for gifting, not just because they are handmade, but because they carry the quiet intention of your time and attention. Let’s begin.
1. The Lavender Sprig: Texture Through French Knots
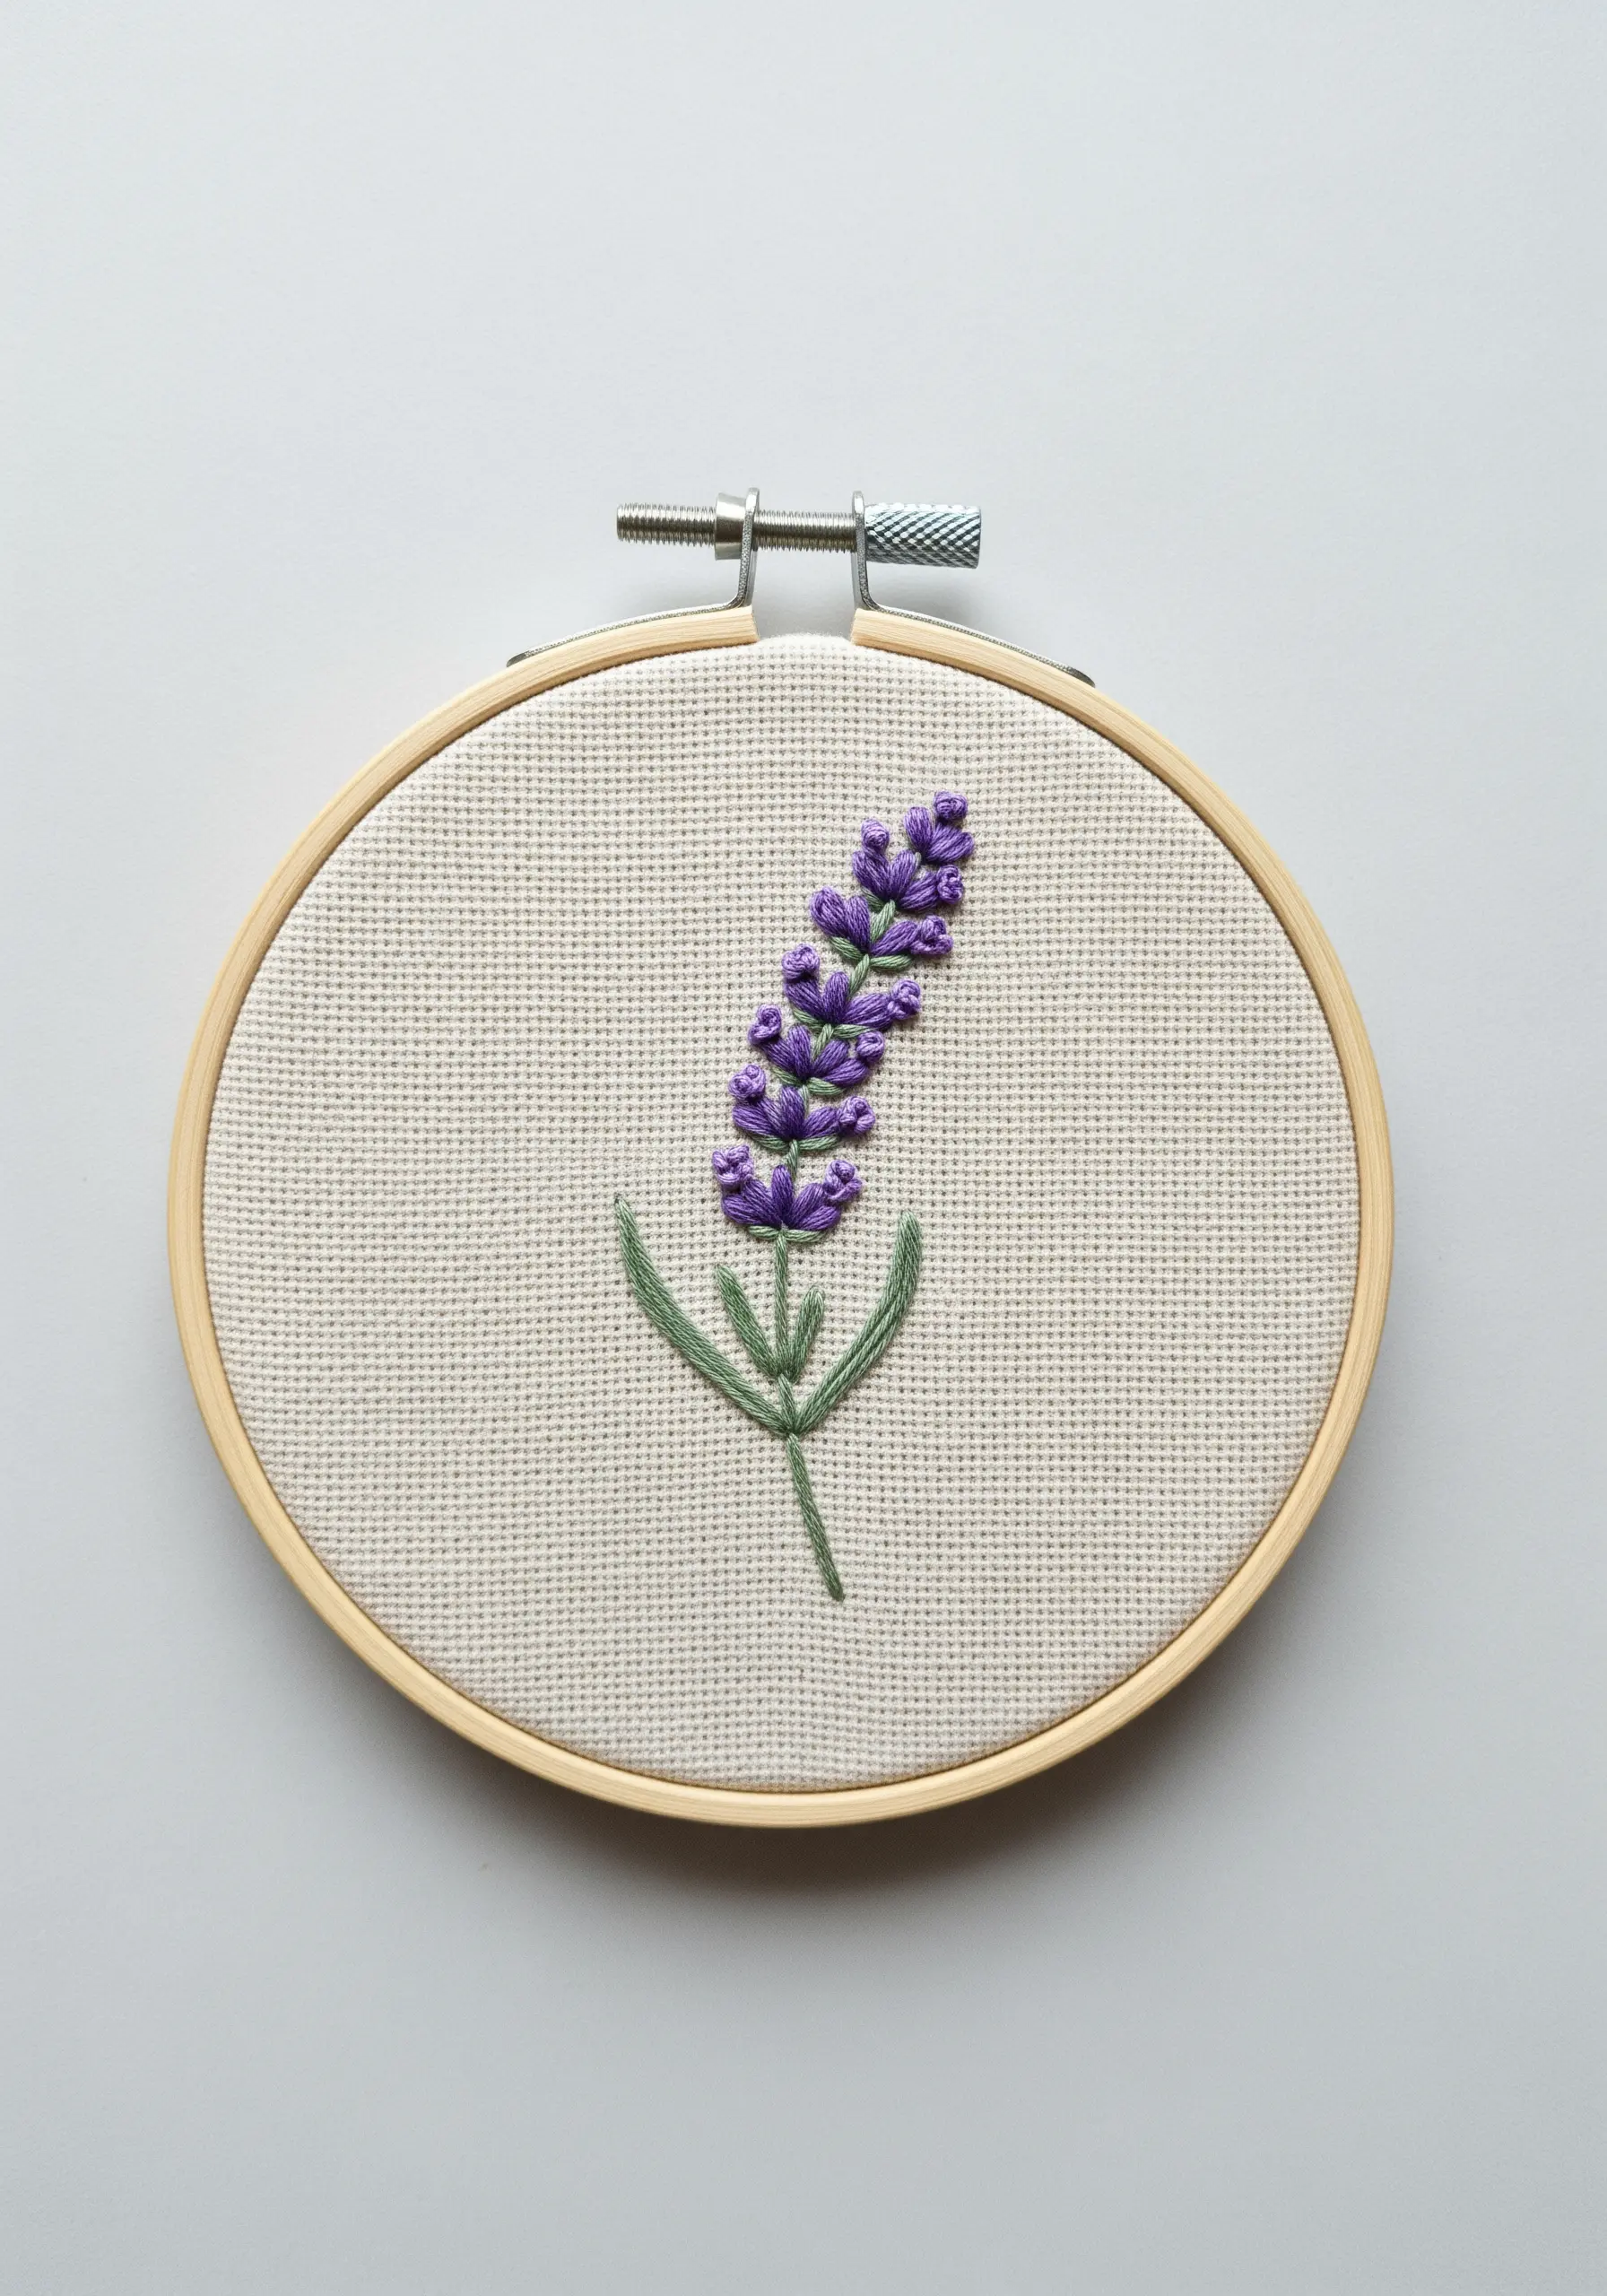
Create the lavender buds using French knots instead of satin stitch for a plush, three-dimensional texture that invites touch.
Vary the tension and size of your knots—tighter ones for the unopened buds at the top, slightly looser ones at the base—to mimic a natural bloom.
Use two shades of purple, clustering the lighter shade near the top of the sprig to create a subtle, sun-kissed highlight.
The stem, worked in a simple stem stitch, provides a smooth, linear contrast to the wonderfully bumpy texture of the flowers, making the entire design feel balanced and complete.
This is a perfect beginner-friendly way to explore lavender-inspired embroidery designs.
2. The Minimalist Sunburst: Precision in Spacing
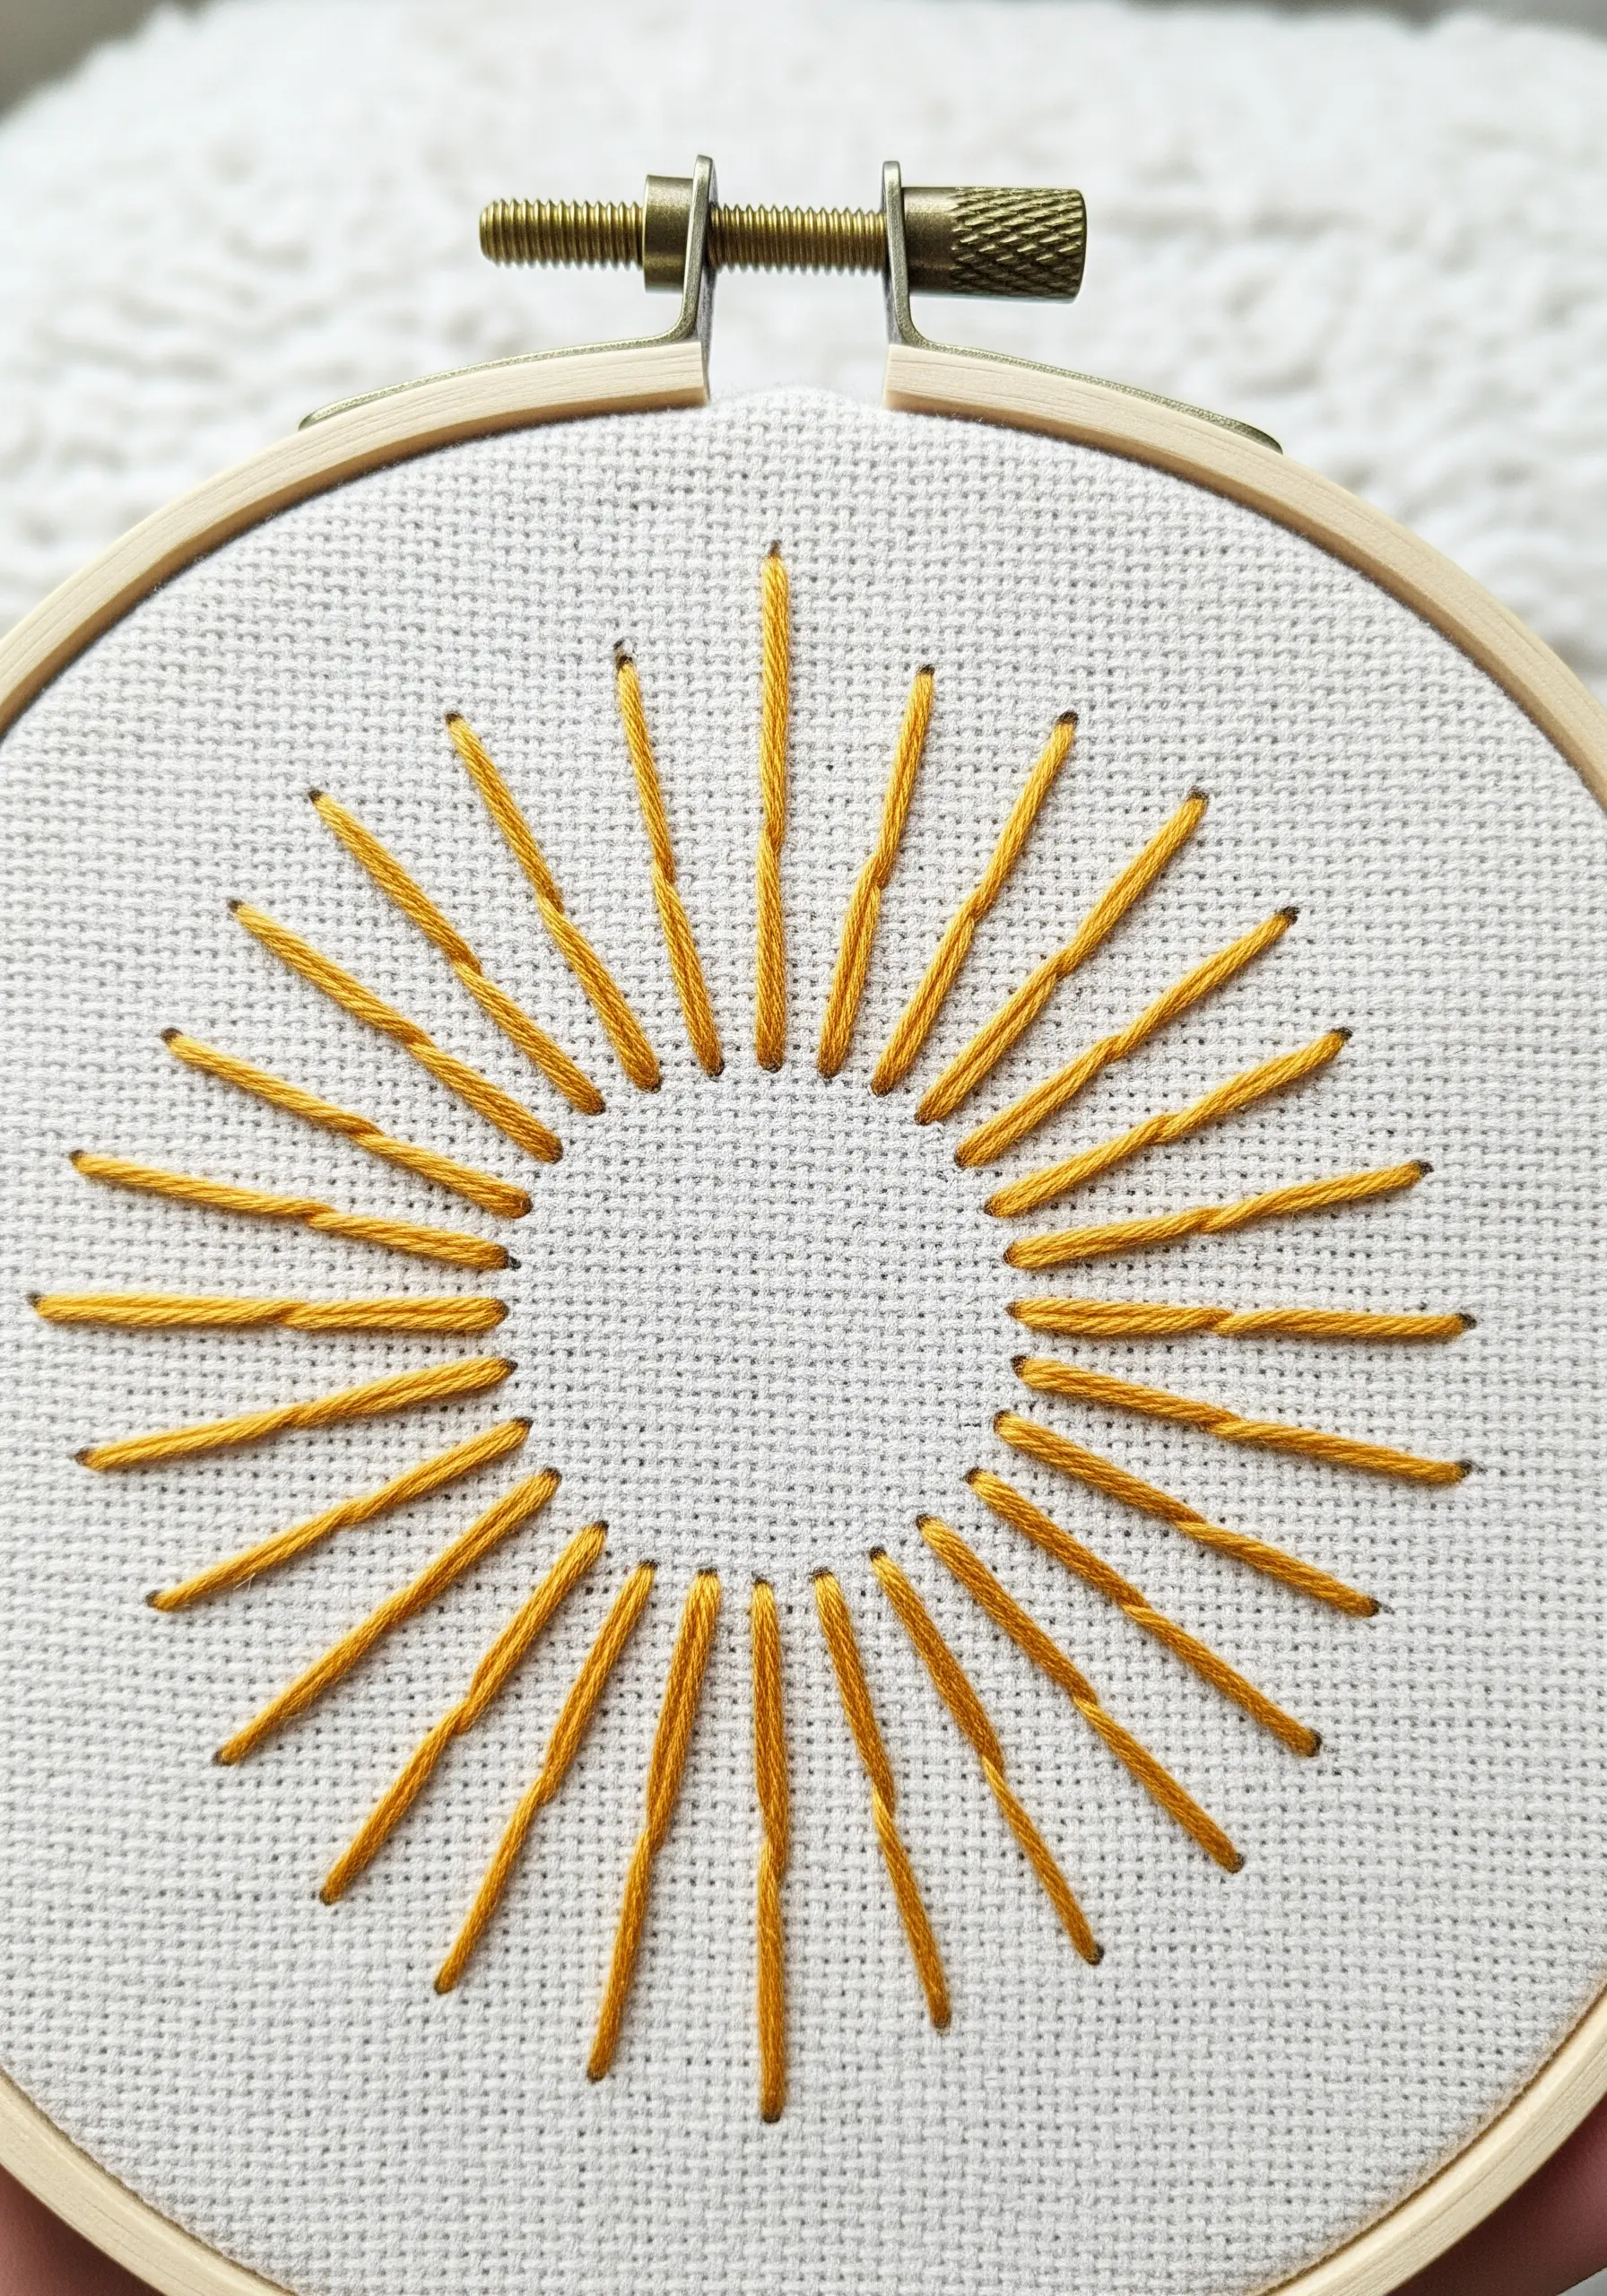
This design’s power comes from perfectly spaced straight stitches, proving that simplicity can have a major visual impact.
To ensure perfect symmetry, use a water-soluble pen and a circular guide to mark your stitch endpoints before you begin.
Use all six strands of your embroidery floss to give each ray a bold, defined presence that stands out against the fabric weave.
The negative space in the center is as crucial as the stitches themselves; it acts as a quiet focal point, allowing the radiating lines to feel energetic and uncluttered.
3. The Celestial Night: Metallic Thread on Dark Fabric
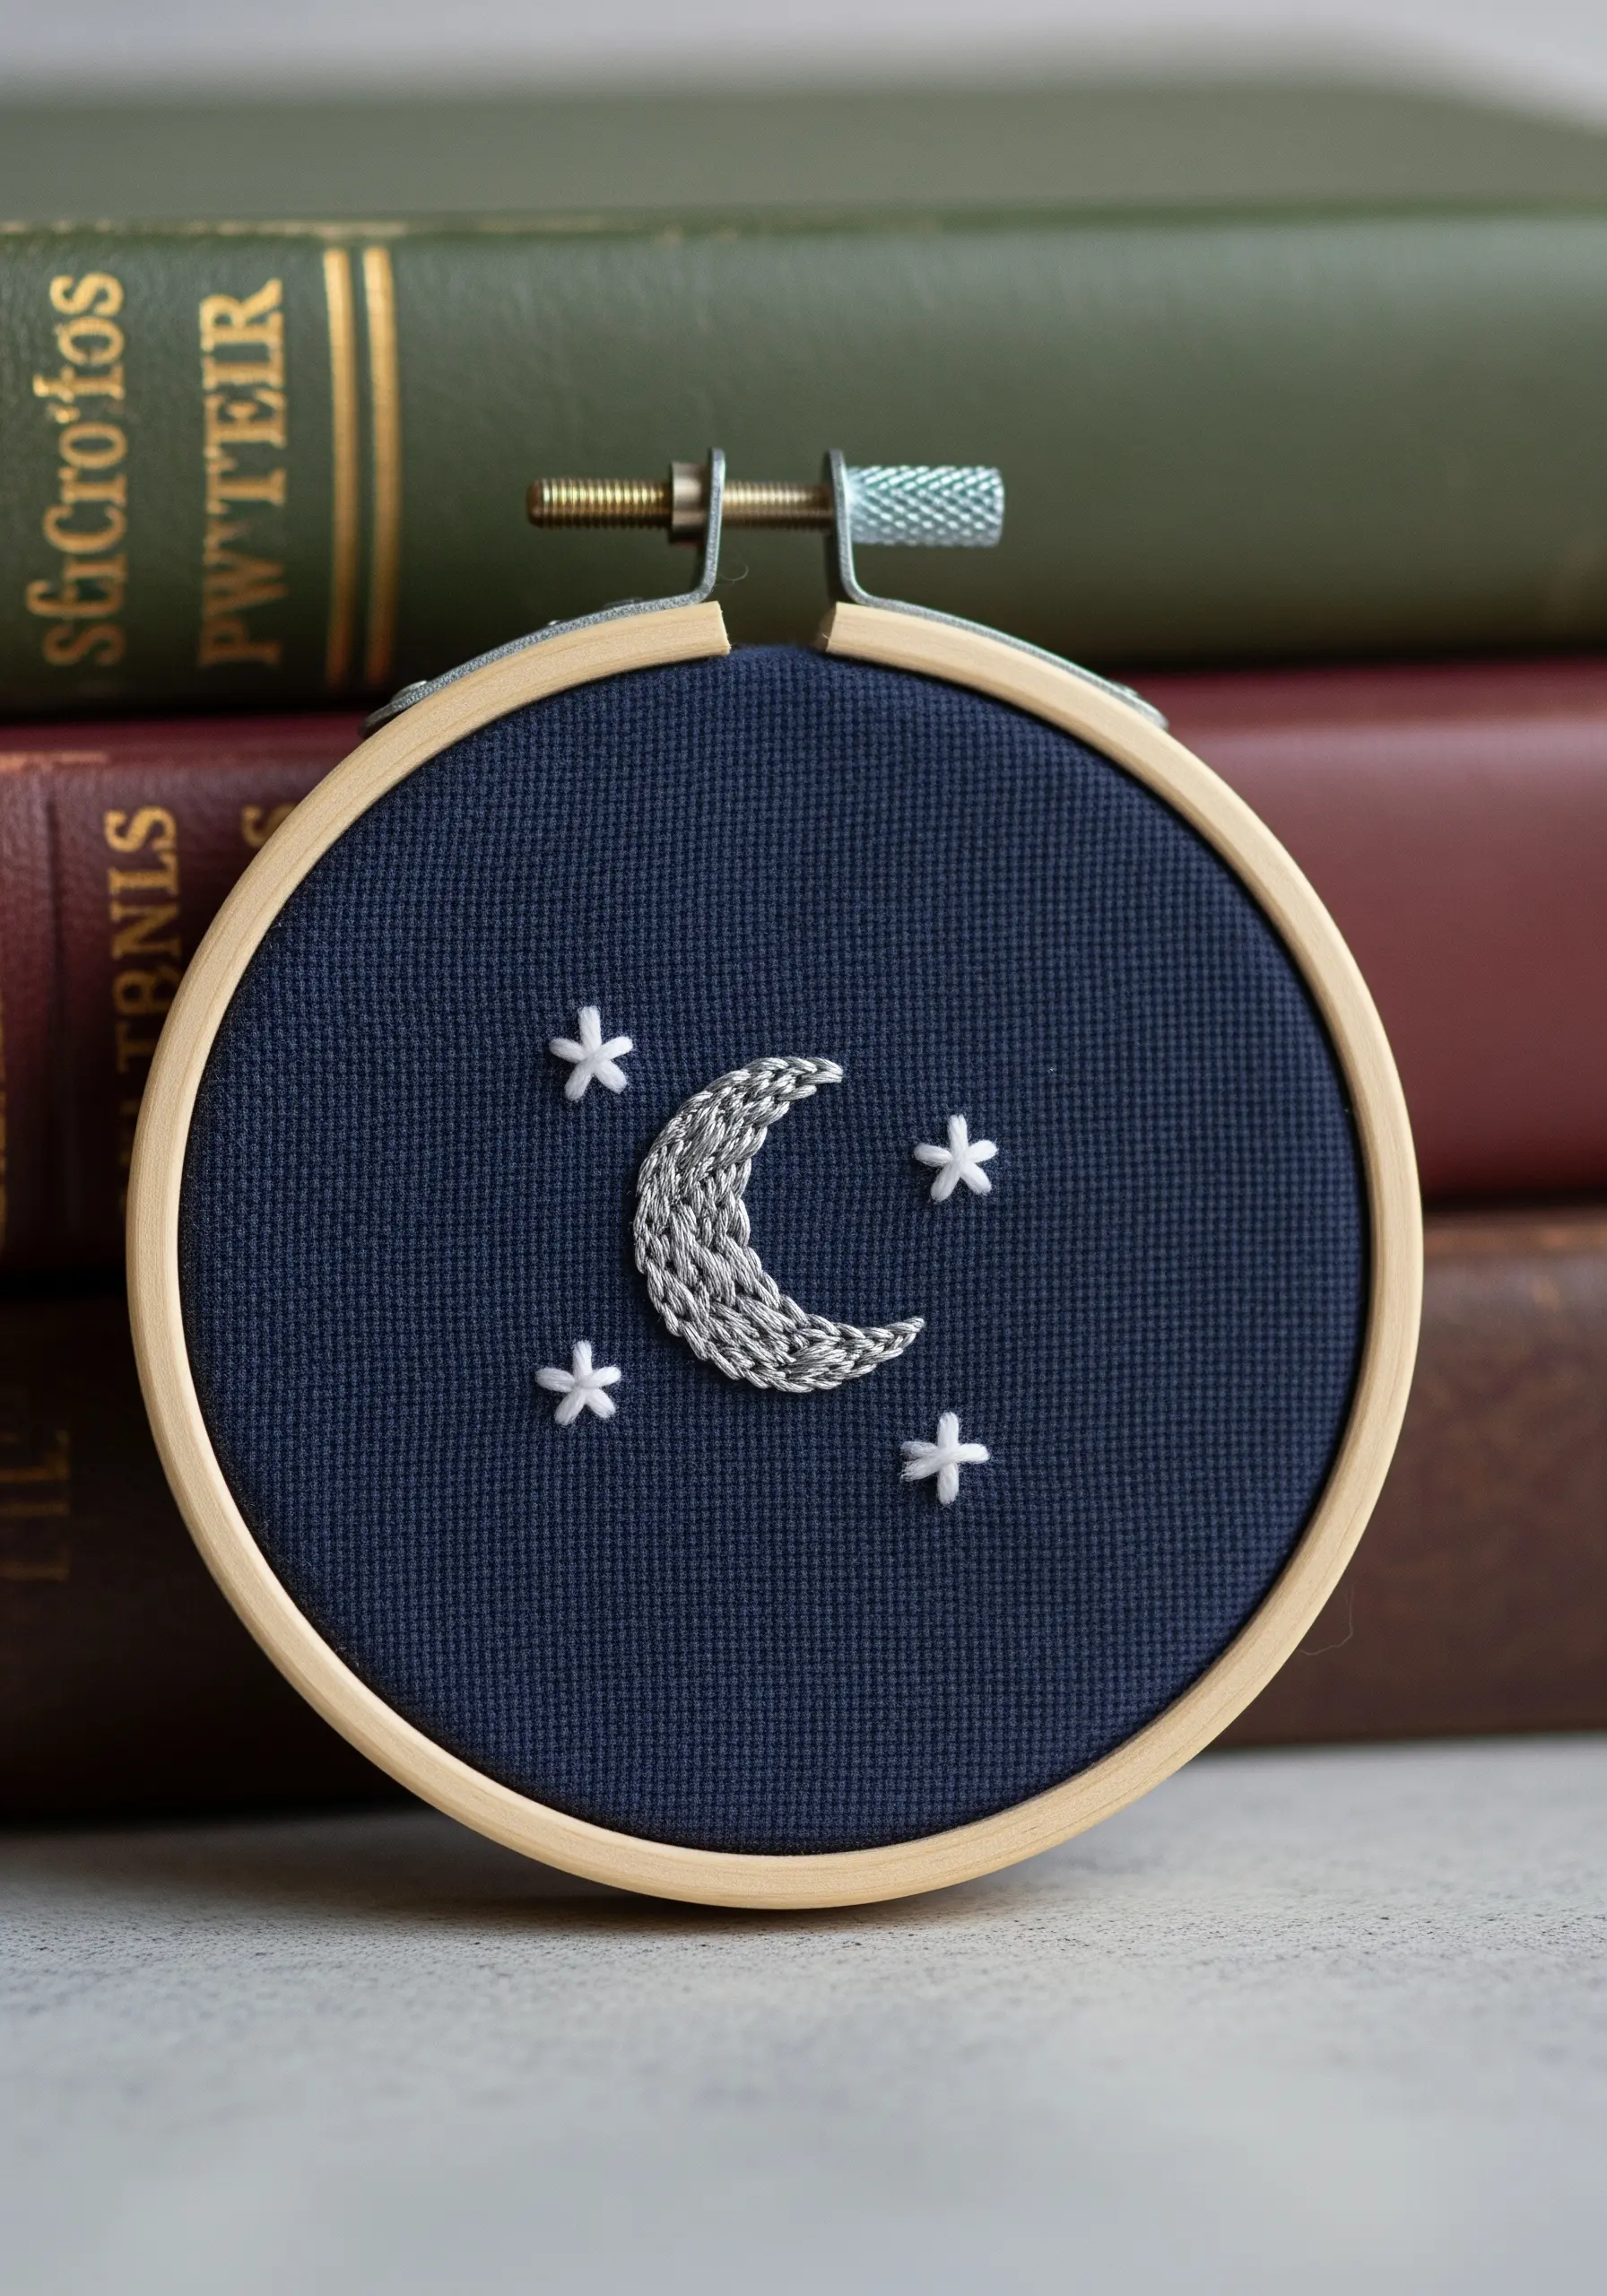
Achieve an instant touch of magic by using a metallic silver thread against a deep navy cotton or linen fabric.
To fill the crescent moon, use a laid filling stitch: lay long parallel stitches across the shape, then tack them down with tiny perpendicular stitches. This method prevents the metallic thread from snagging and ensures a smooth, even sheen.
For the stars, a simple star stitch made of three intersecting straight stitches is all you need for a crisp, celestial sparkle.
This high-contrast combination creates a tiny, dramatic scene that feels both elegant and timeless, a perfect motif for moon and stars embroidery ideas.
4. The Eucalyptus Study: Blending with Thread Painting
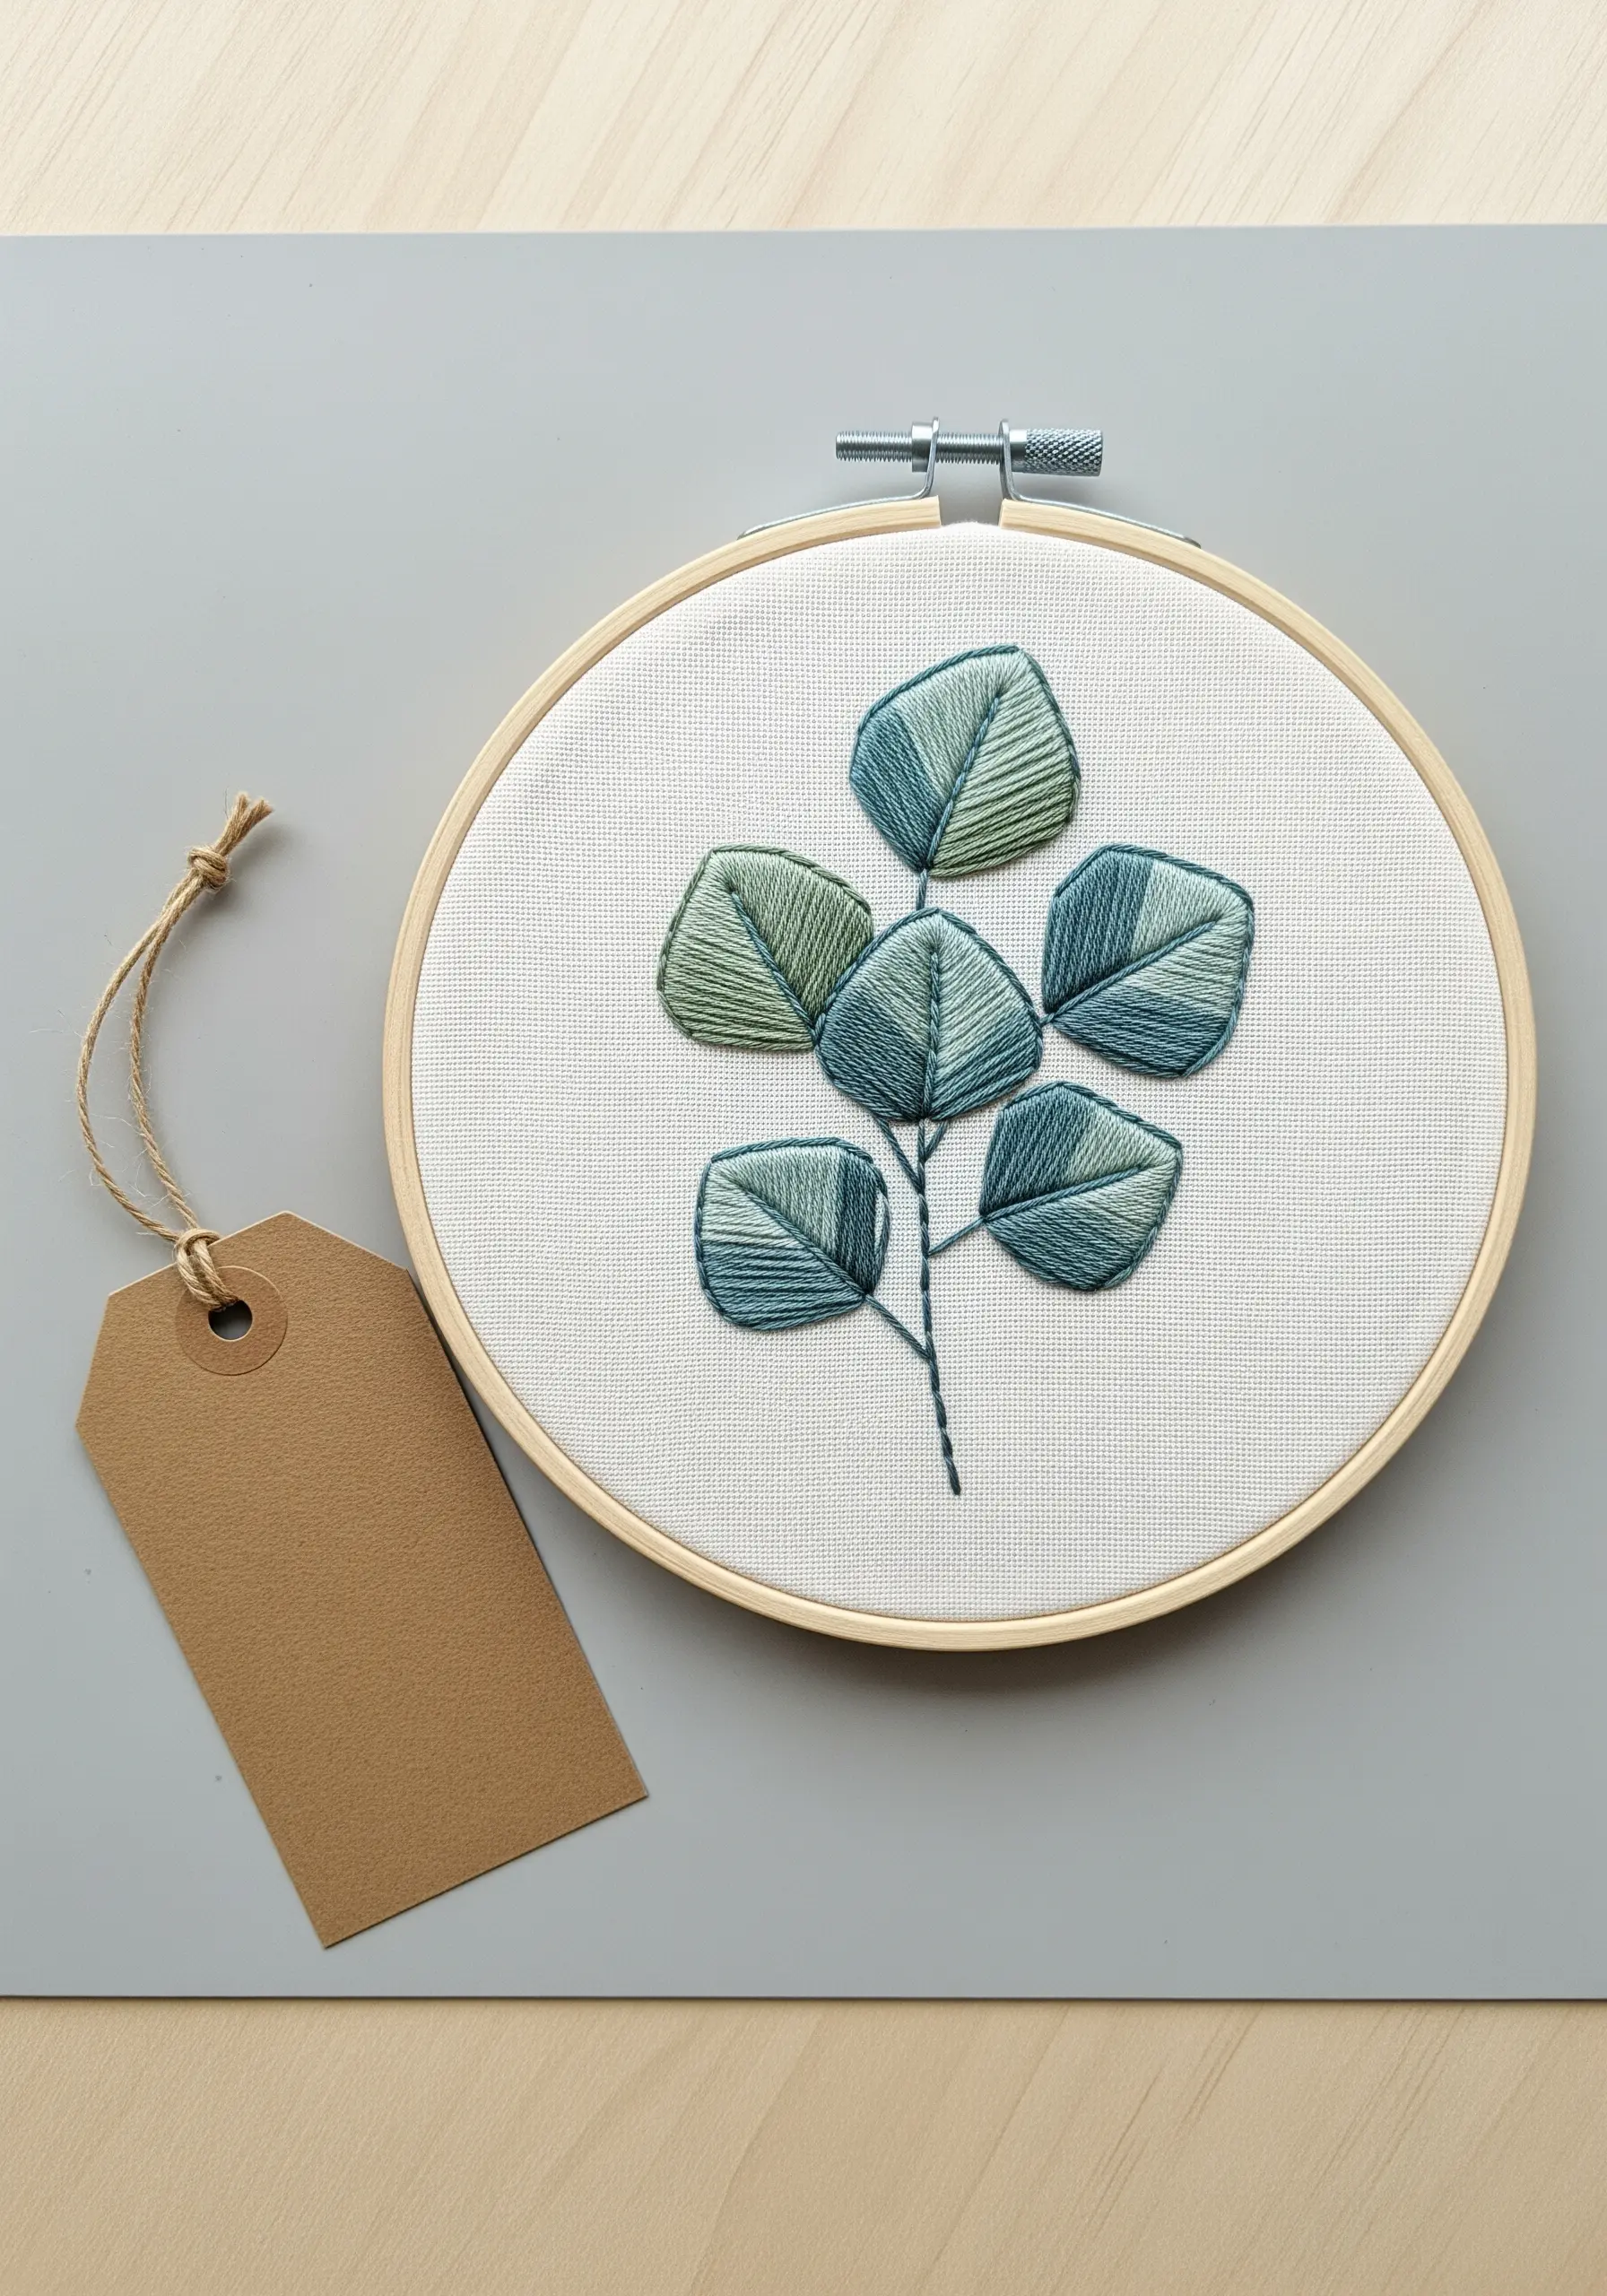
Create that soft, painterly effect by using the long-and-short stitch to blend two or three shades of green within each leaf.
Angle your stitches toward the central vein to create naturalistic movement and the illusion of light hitting the foliage.
For the smoothest color transitions, use only one or two strands of floss. This allows the colors to merge seamlessly rather than creating harsh lines.
Finish by outlining each leaf with a single backstitch in your darkest shade to define its shape without losing the soft, blended interior.
5. The Continuous Line Portrait: Mastering the Whipped Backstitch
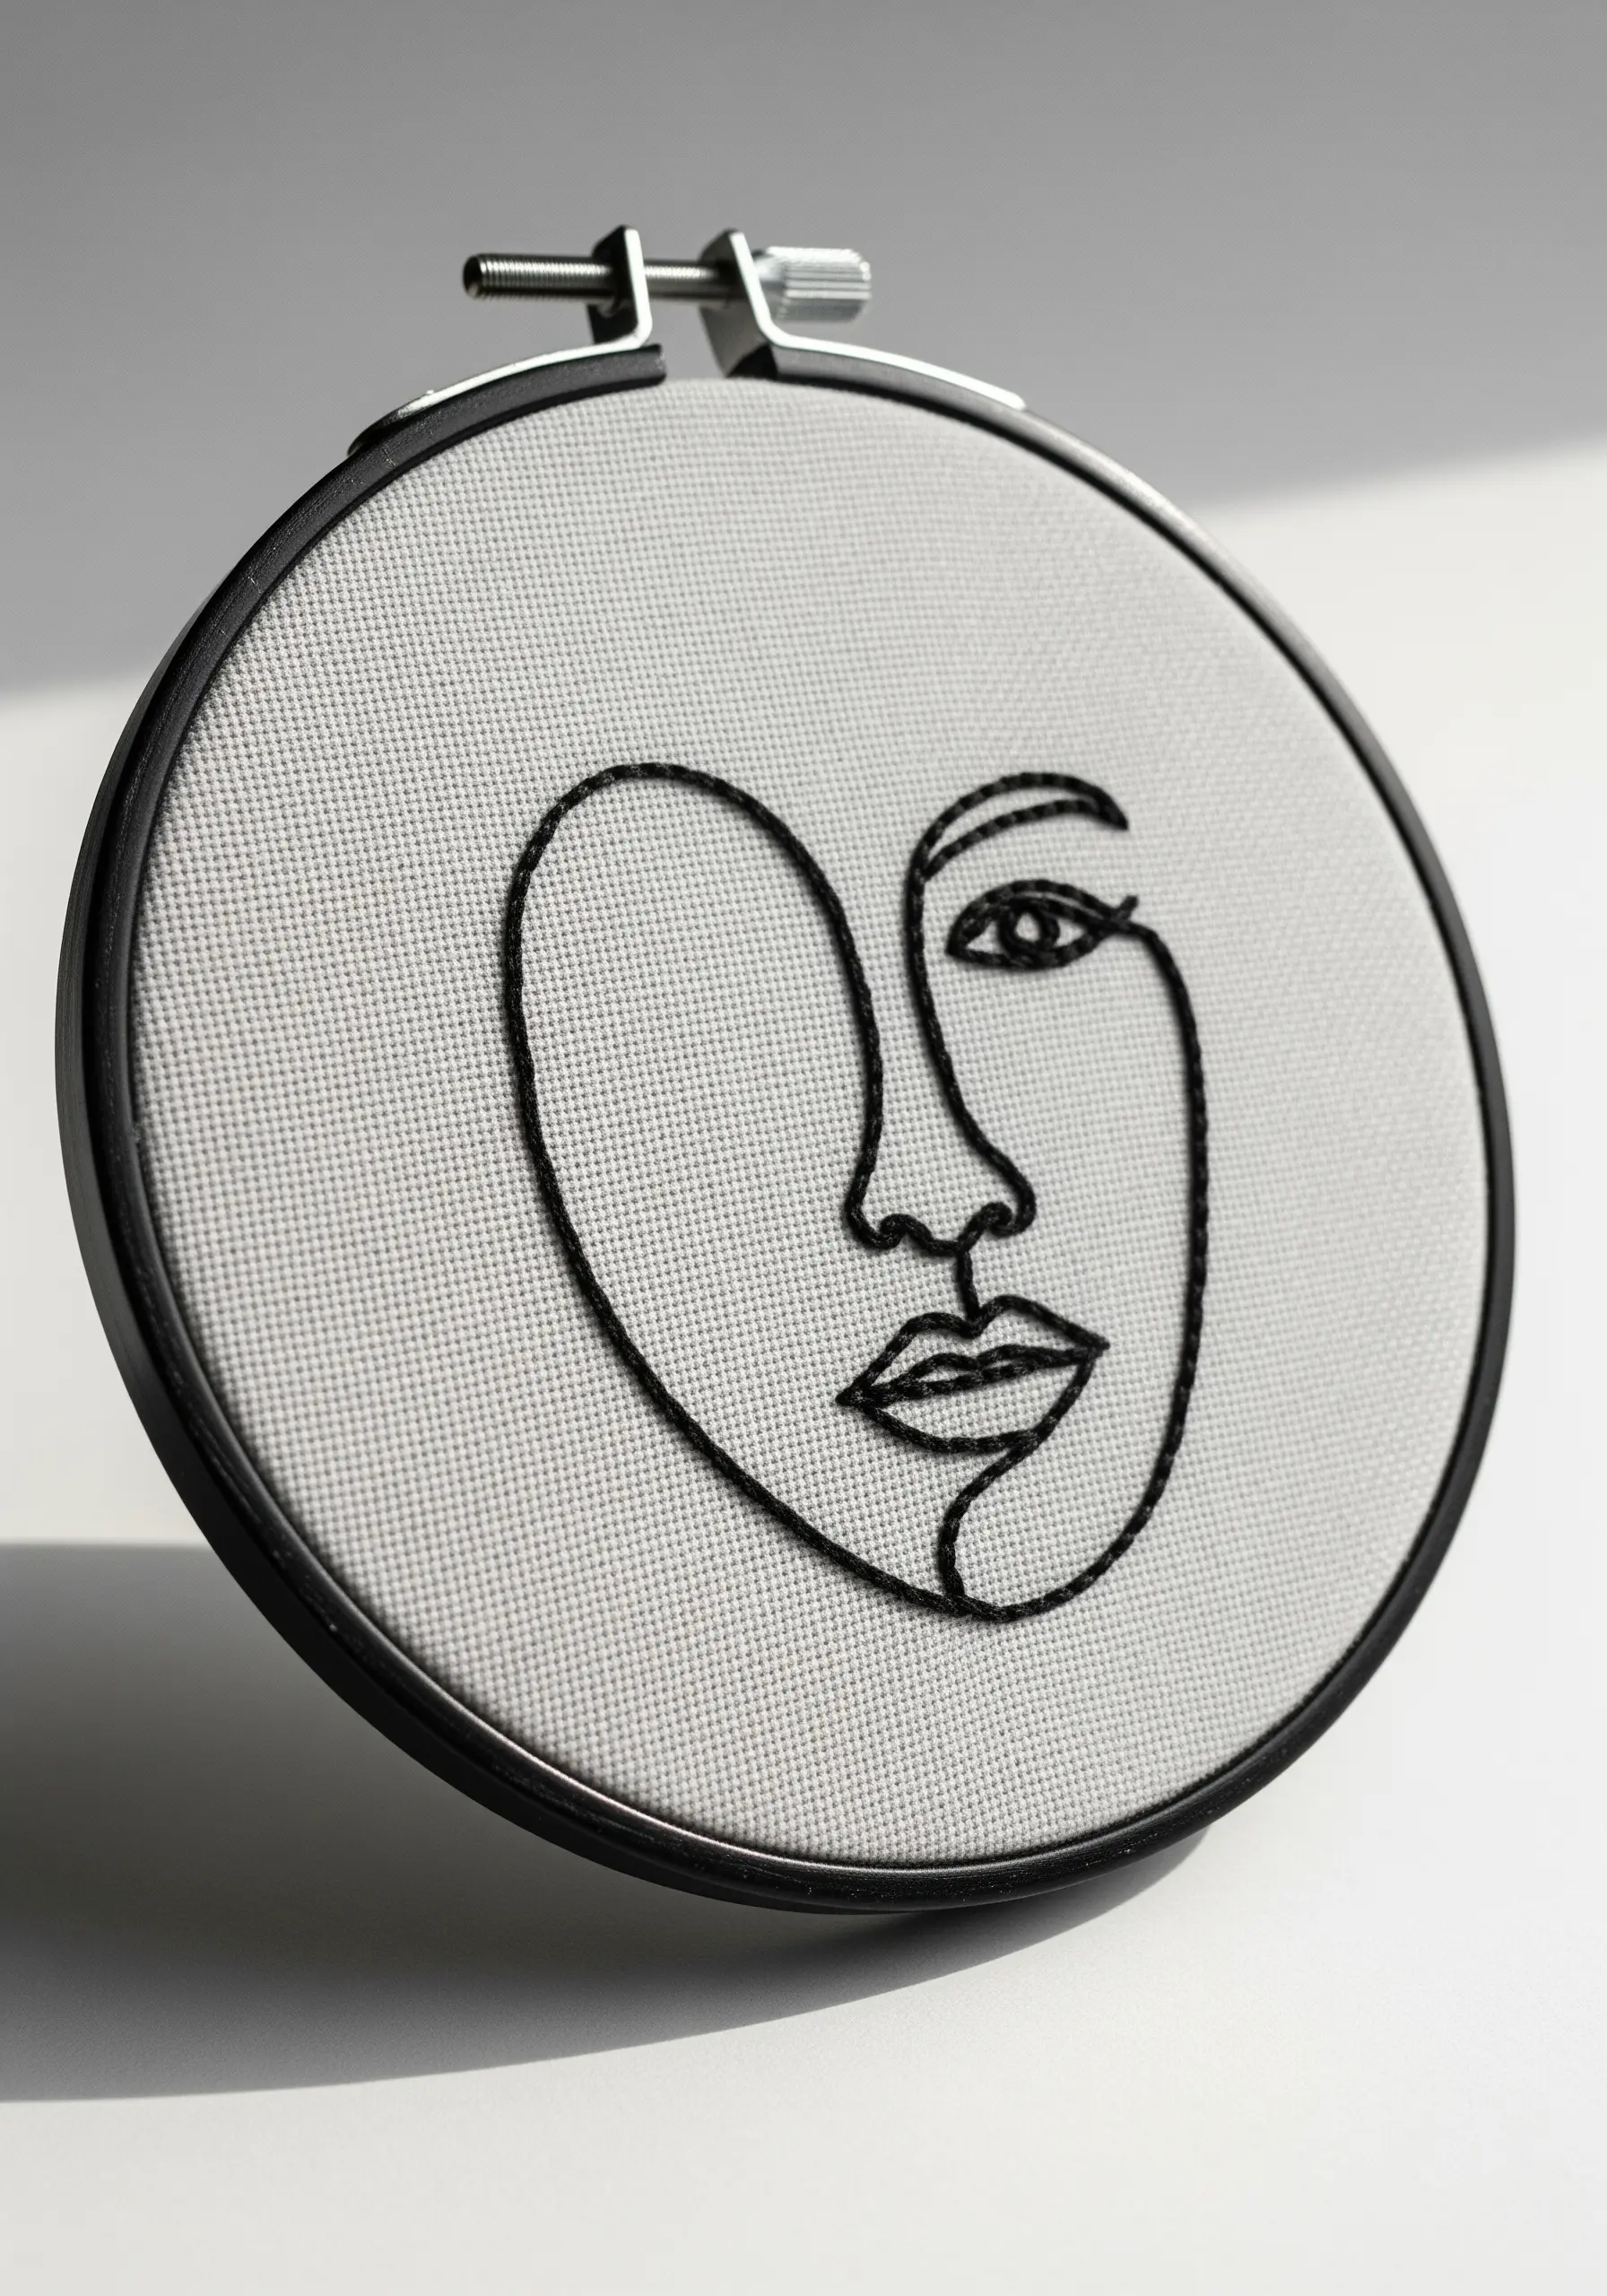
This design’s minimalist power comes from its single, unbroken line. To achieve this fluid look, use a whipped backstitch.
First, lay down a standard backstitch foundation along your design line. Then, using the same thread, pass the needle under each backstitch without piercing the fabric, effectively “whipping” or wrapping the foundation.
This technique transforms the segmented look of a regular backstitch into a smooth, rope-like curve that feels intentional and artistic.
High-contrast thread, like black on light grey fabric, ensures that the elegant form of these modern line art faces becomes the undeniable focal point.
6. The Mixed-Media Bee: Incorporating Sheer Organza
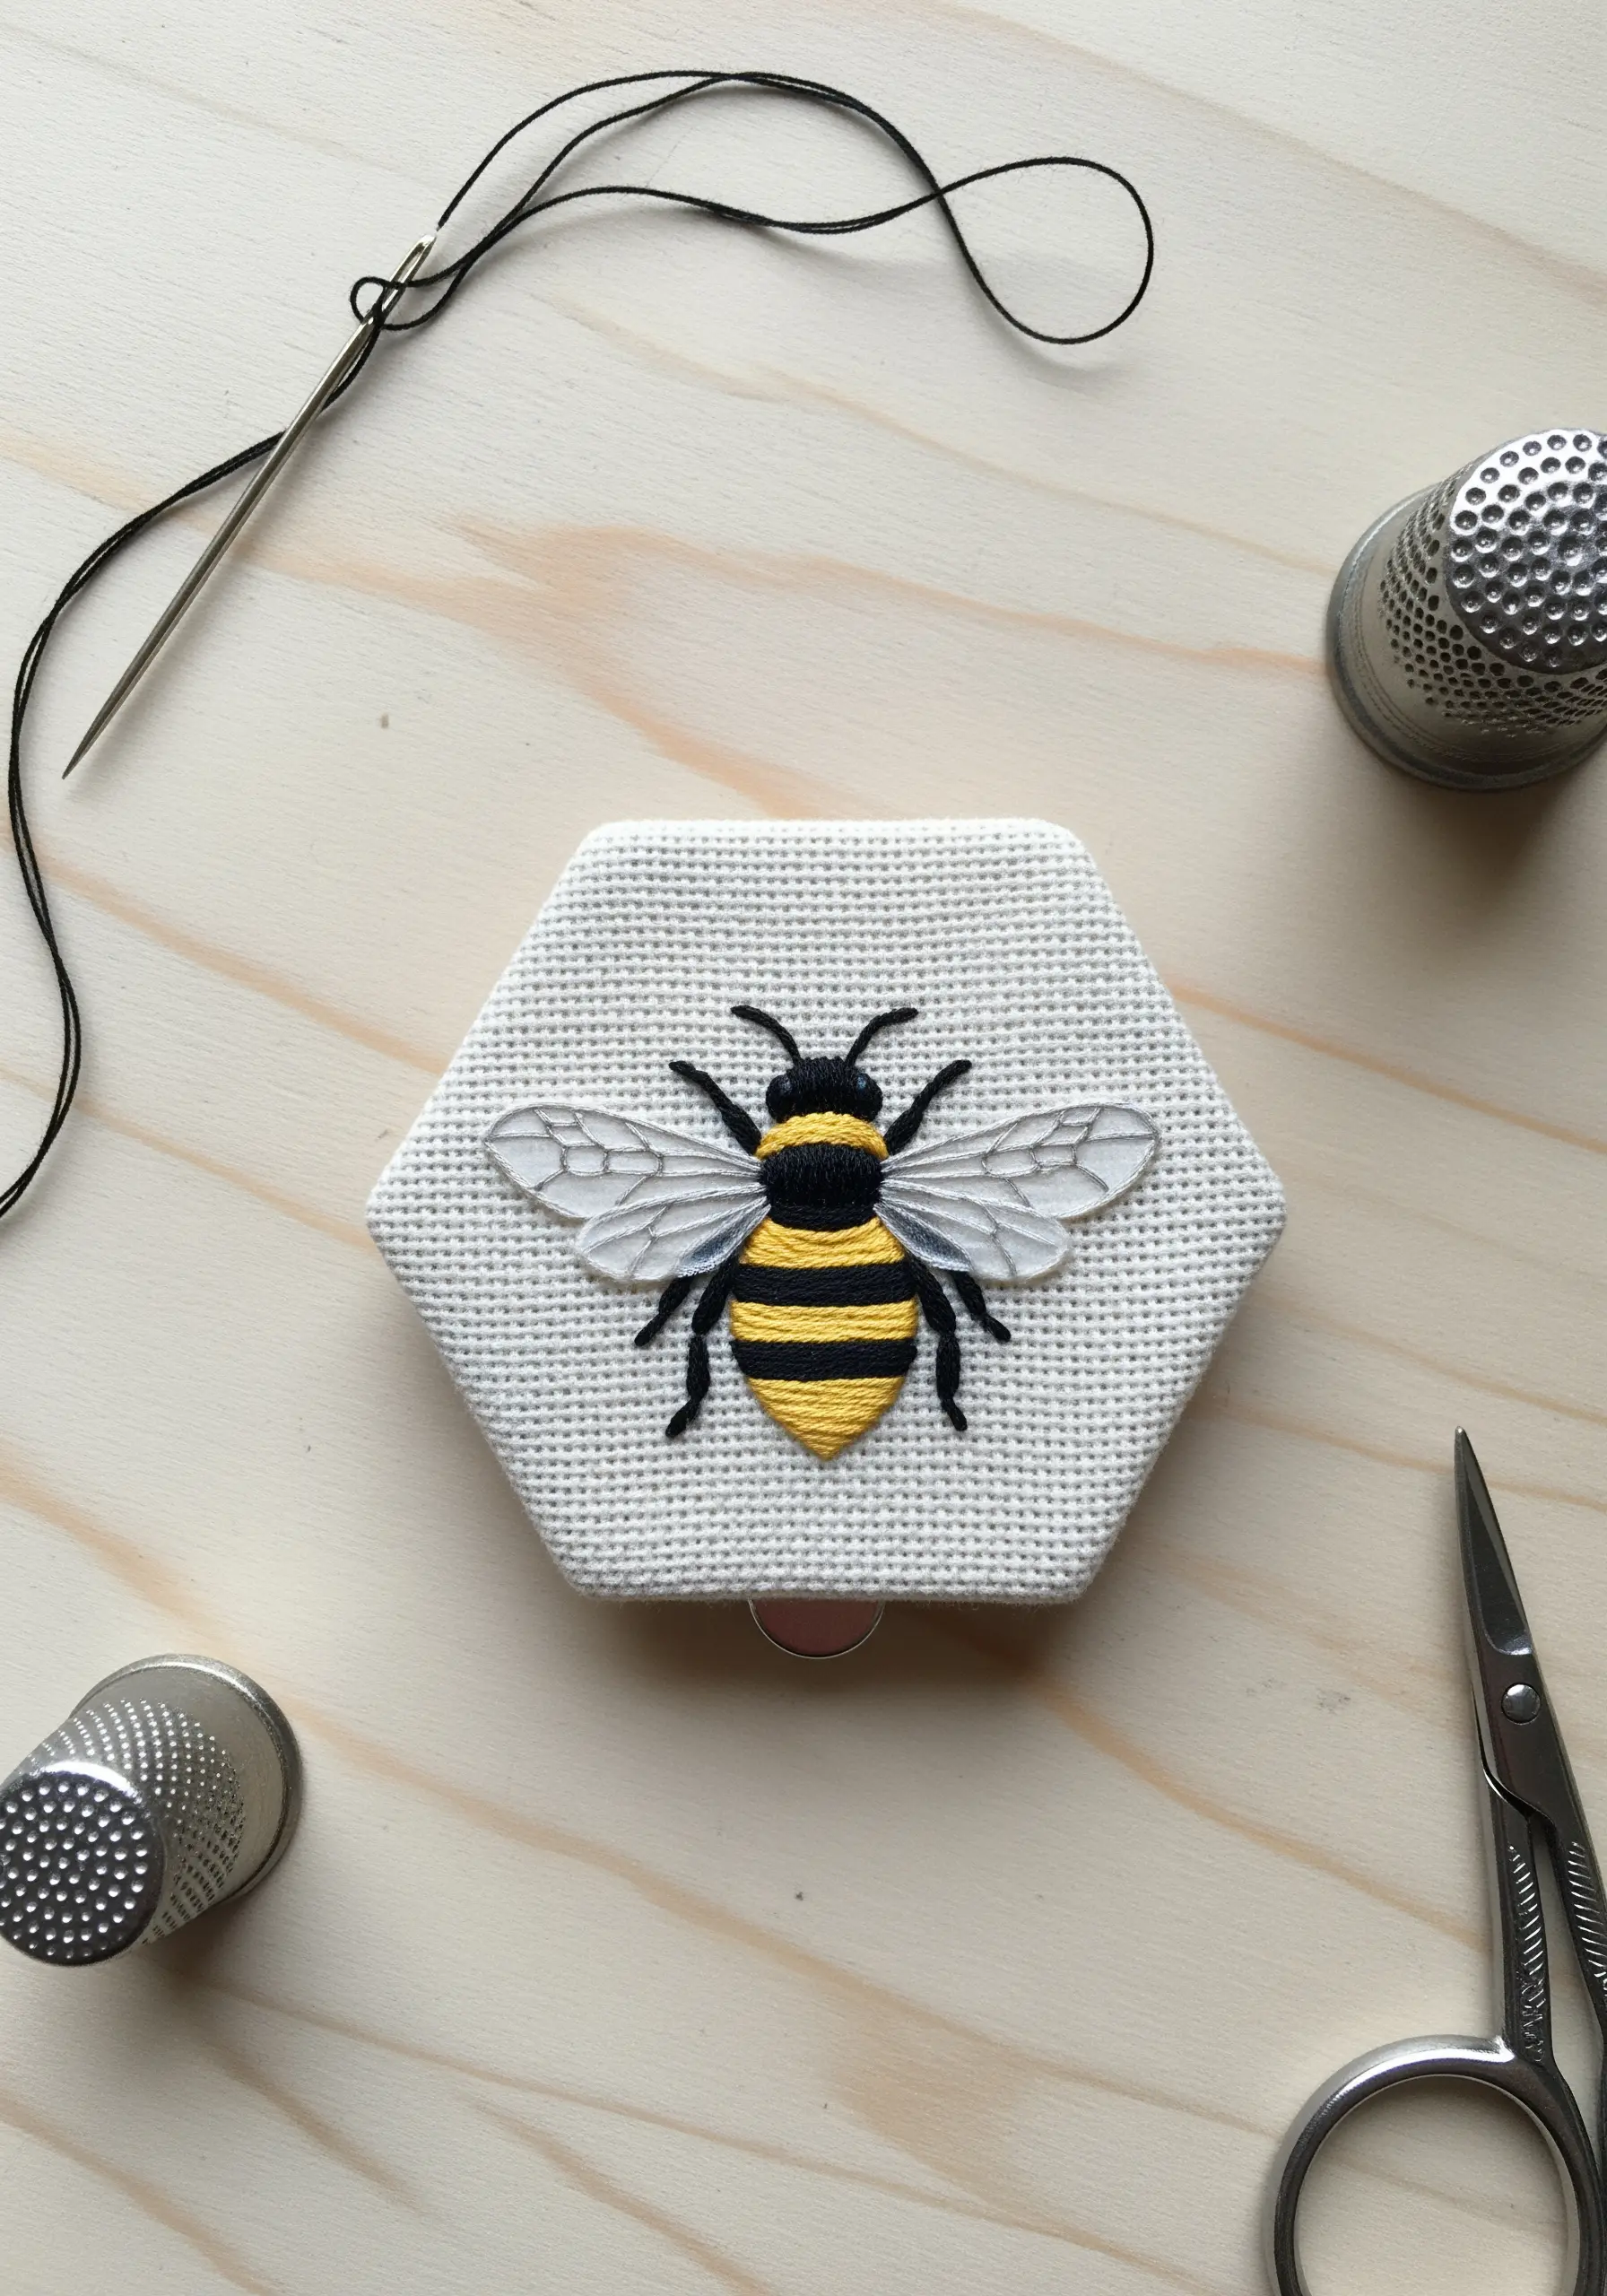
Elevate your embroidery by introducing a mixed-media element for the bee’s wings. A small piece of sheer organza creates a stunning, translucent effect.
First, stitch the bee’s body directly onto your base fabric using a dense satin stitch for the stripes.
Next, lay a scrap of organza over the wing area and stitch the vein details, which secures the sheer fabric in place.
Finally, use a pair of sharp, fine-tipped scissors to carefully trim the excess organza around the stitched outline. This reveals delicate, lifelike wings that add a layer of unexpected sophistication.
7. The Refined Monogram: The Power of Padded Satin Stitch
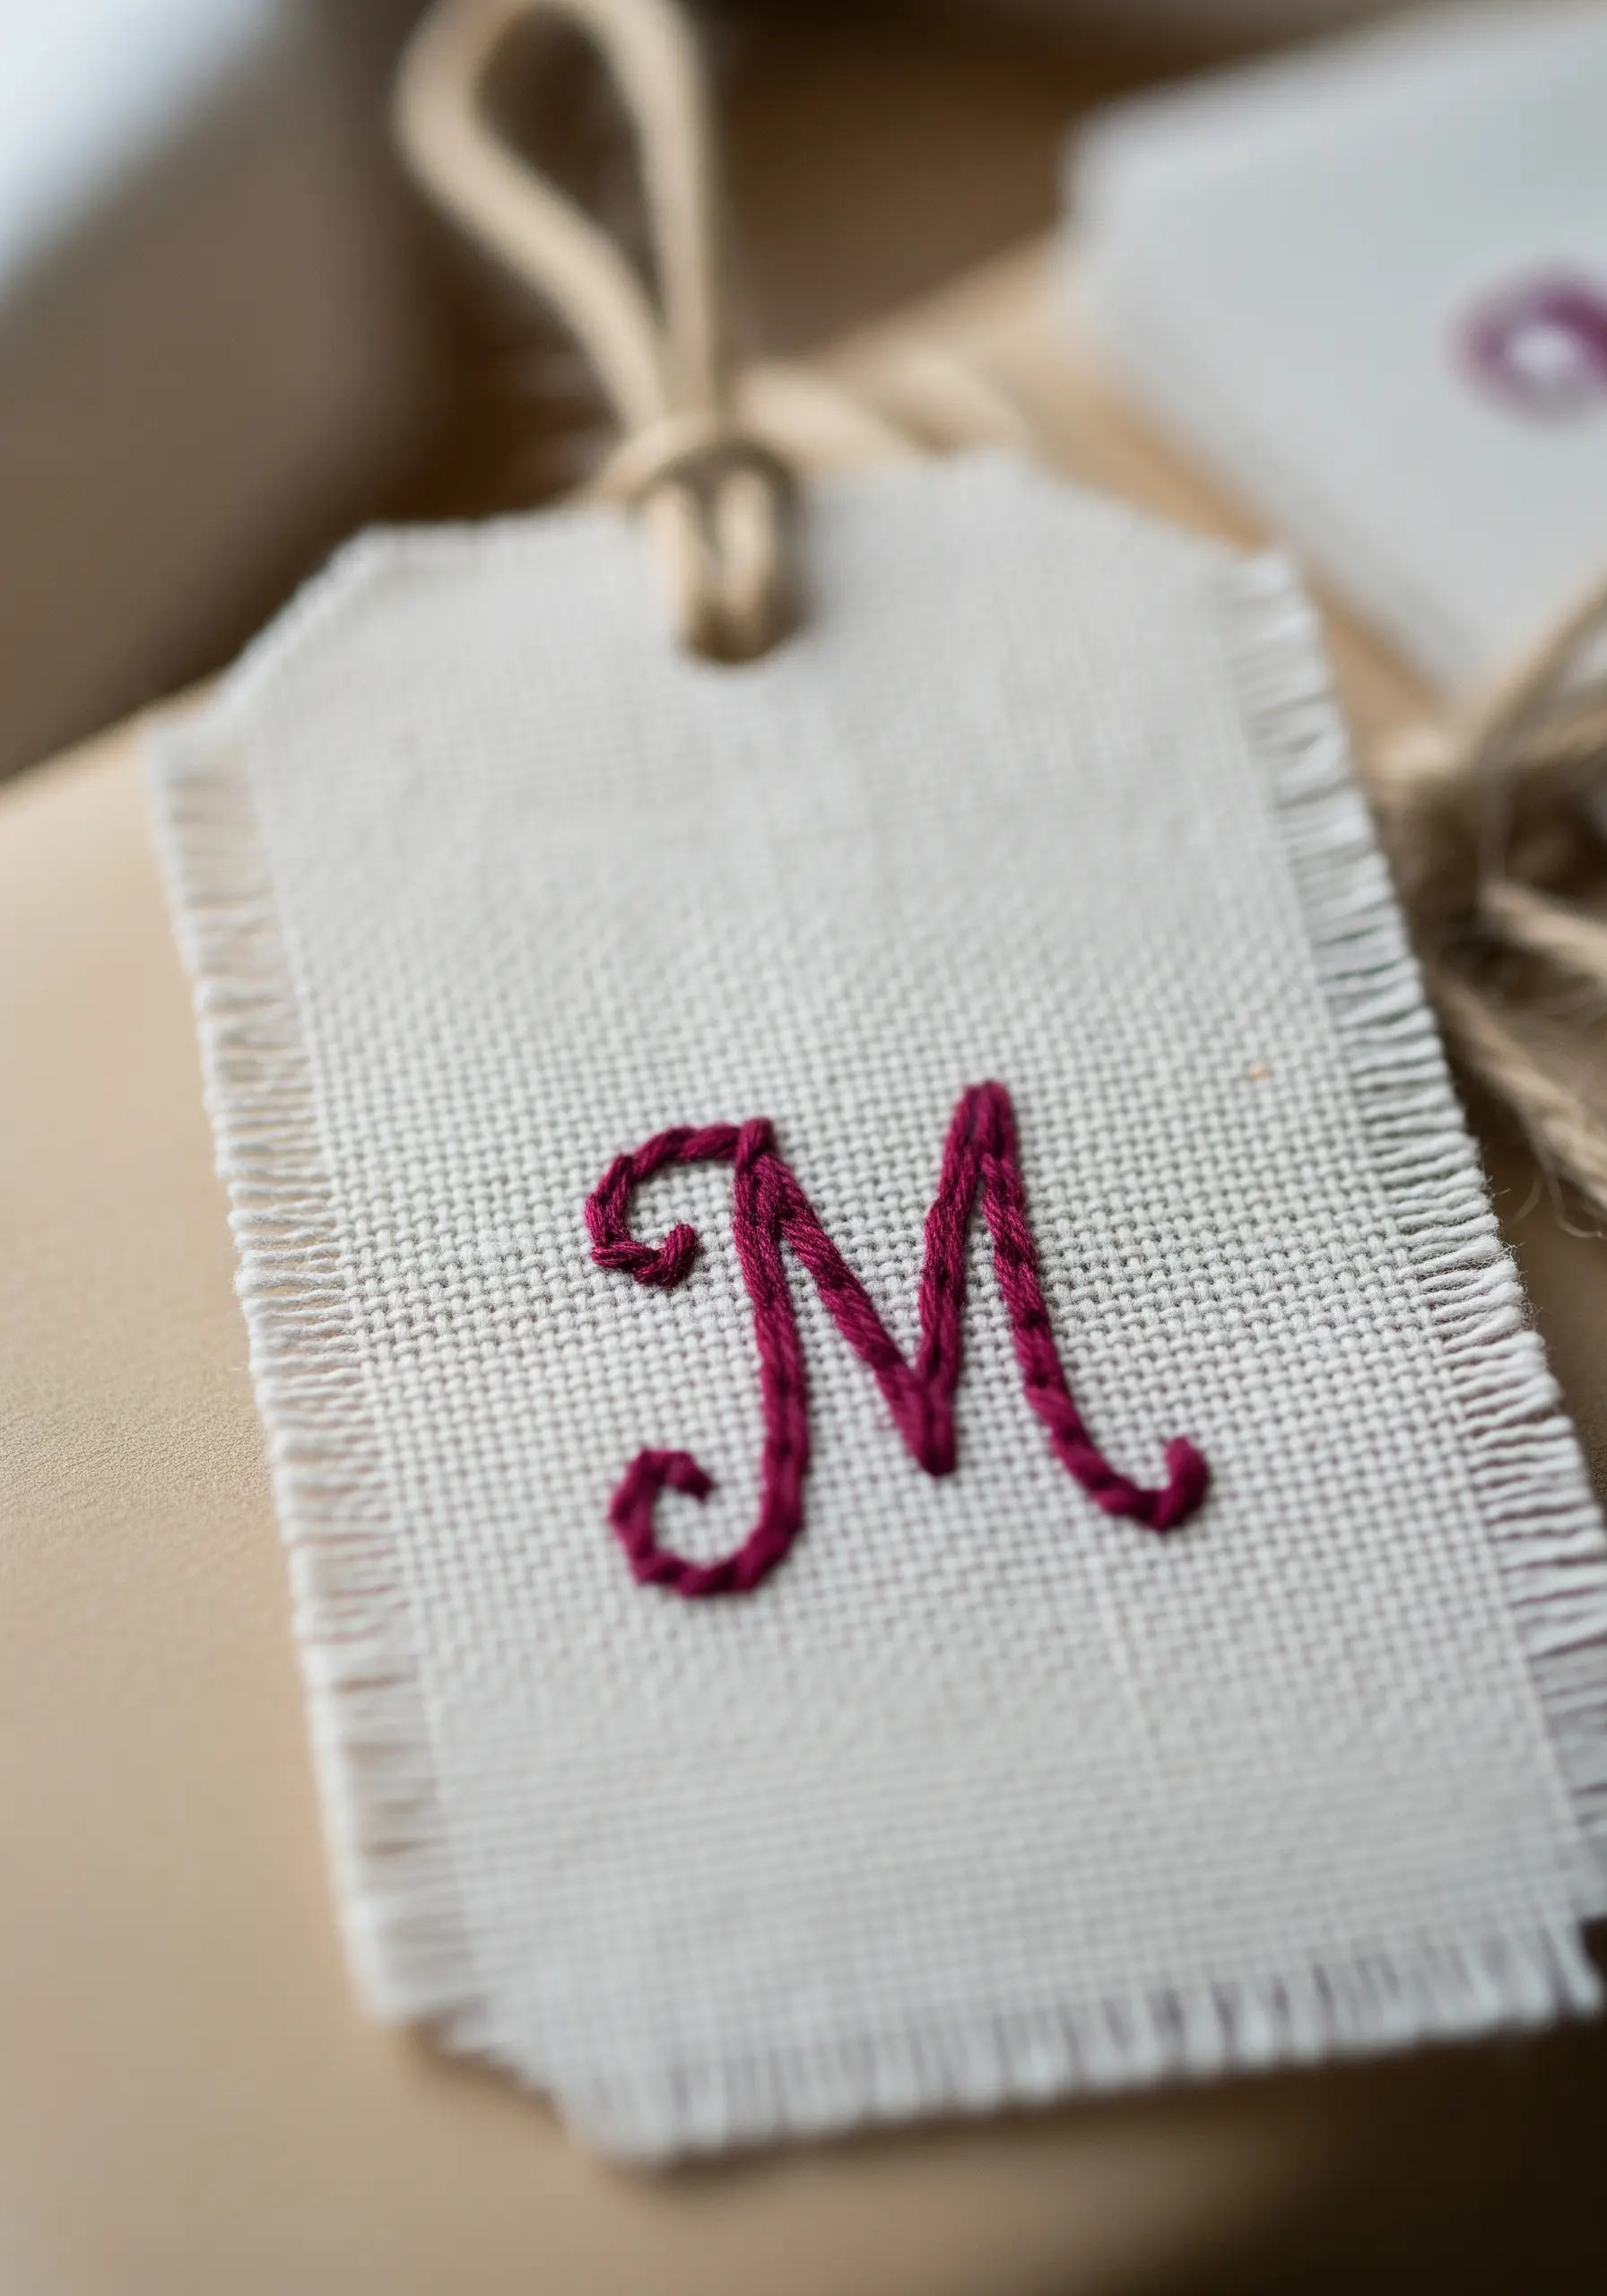
Give a simple initial a luxurious, three-dimensional feel with padded satin stitch. This technique makes the letter physically rise from the fabric surface.
Begin by filling the letter’s shape with small underlying seed stitches or outlining it with a split stitch to create a raised foundation.
Work your final satin stitches over this padding, keeping your tension smooth and even to create a plump, polished surface.
Using a fabric with a visible weave, like linen, provides a rustic contrast to the elegant monogram, making it perfect for personalized monogram table linen.
8. The Forget-Me-Not Bookmark: Lazy Daisy on Felt
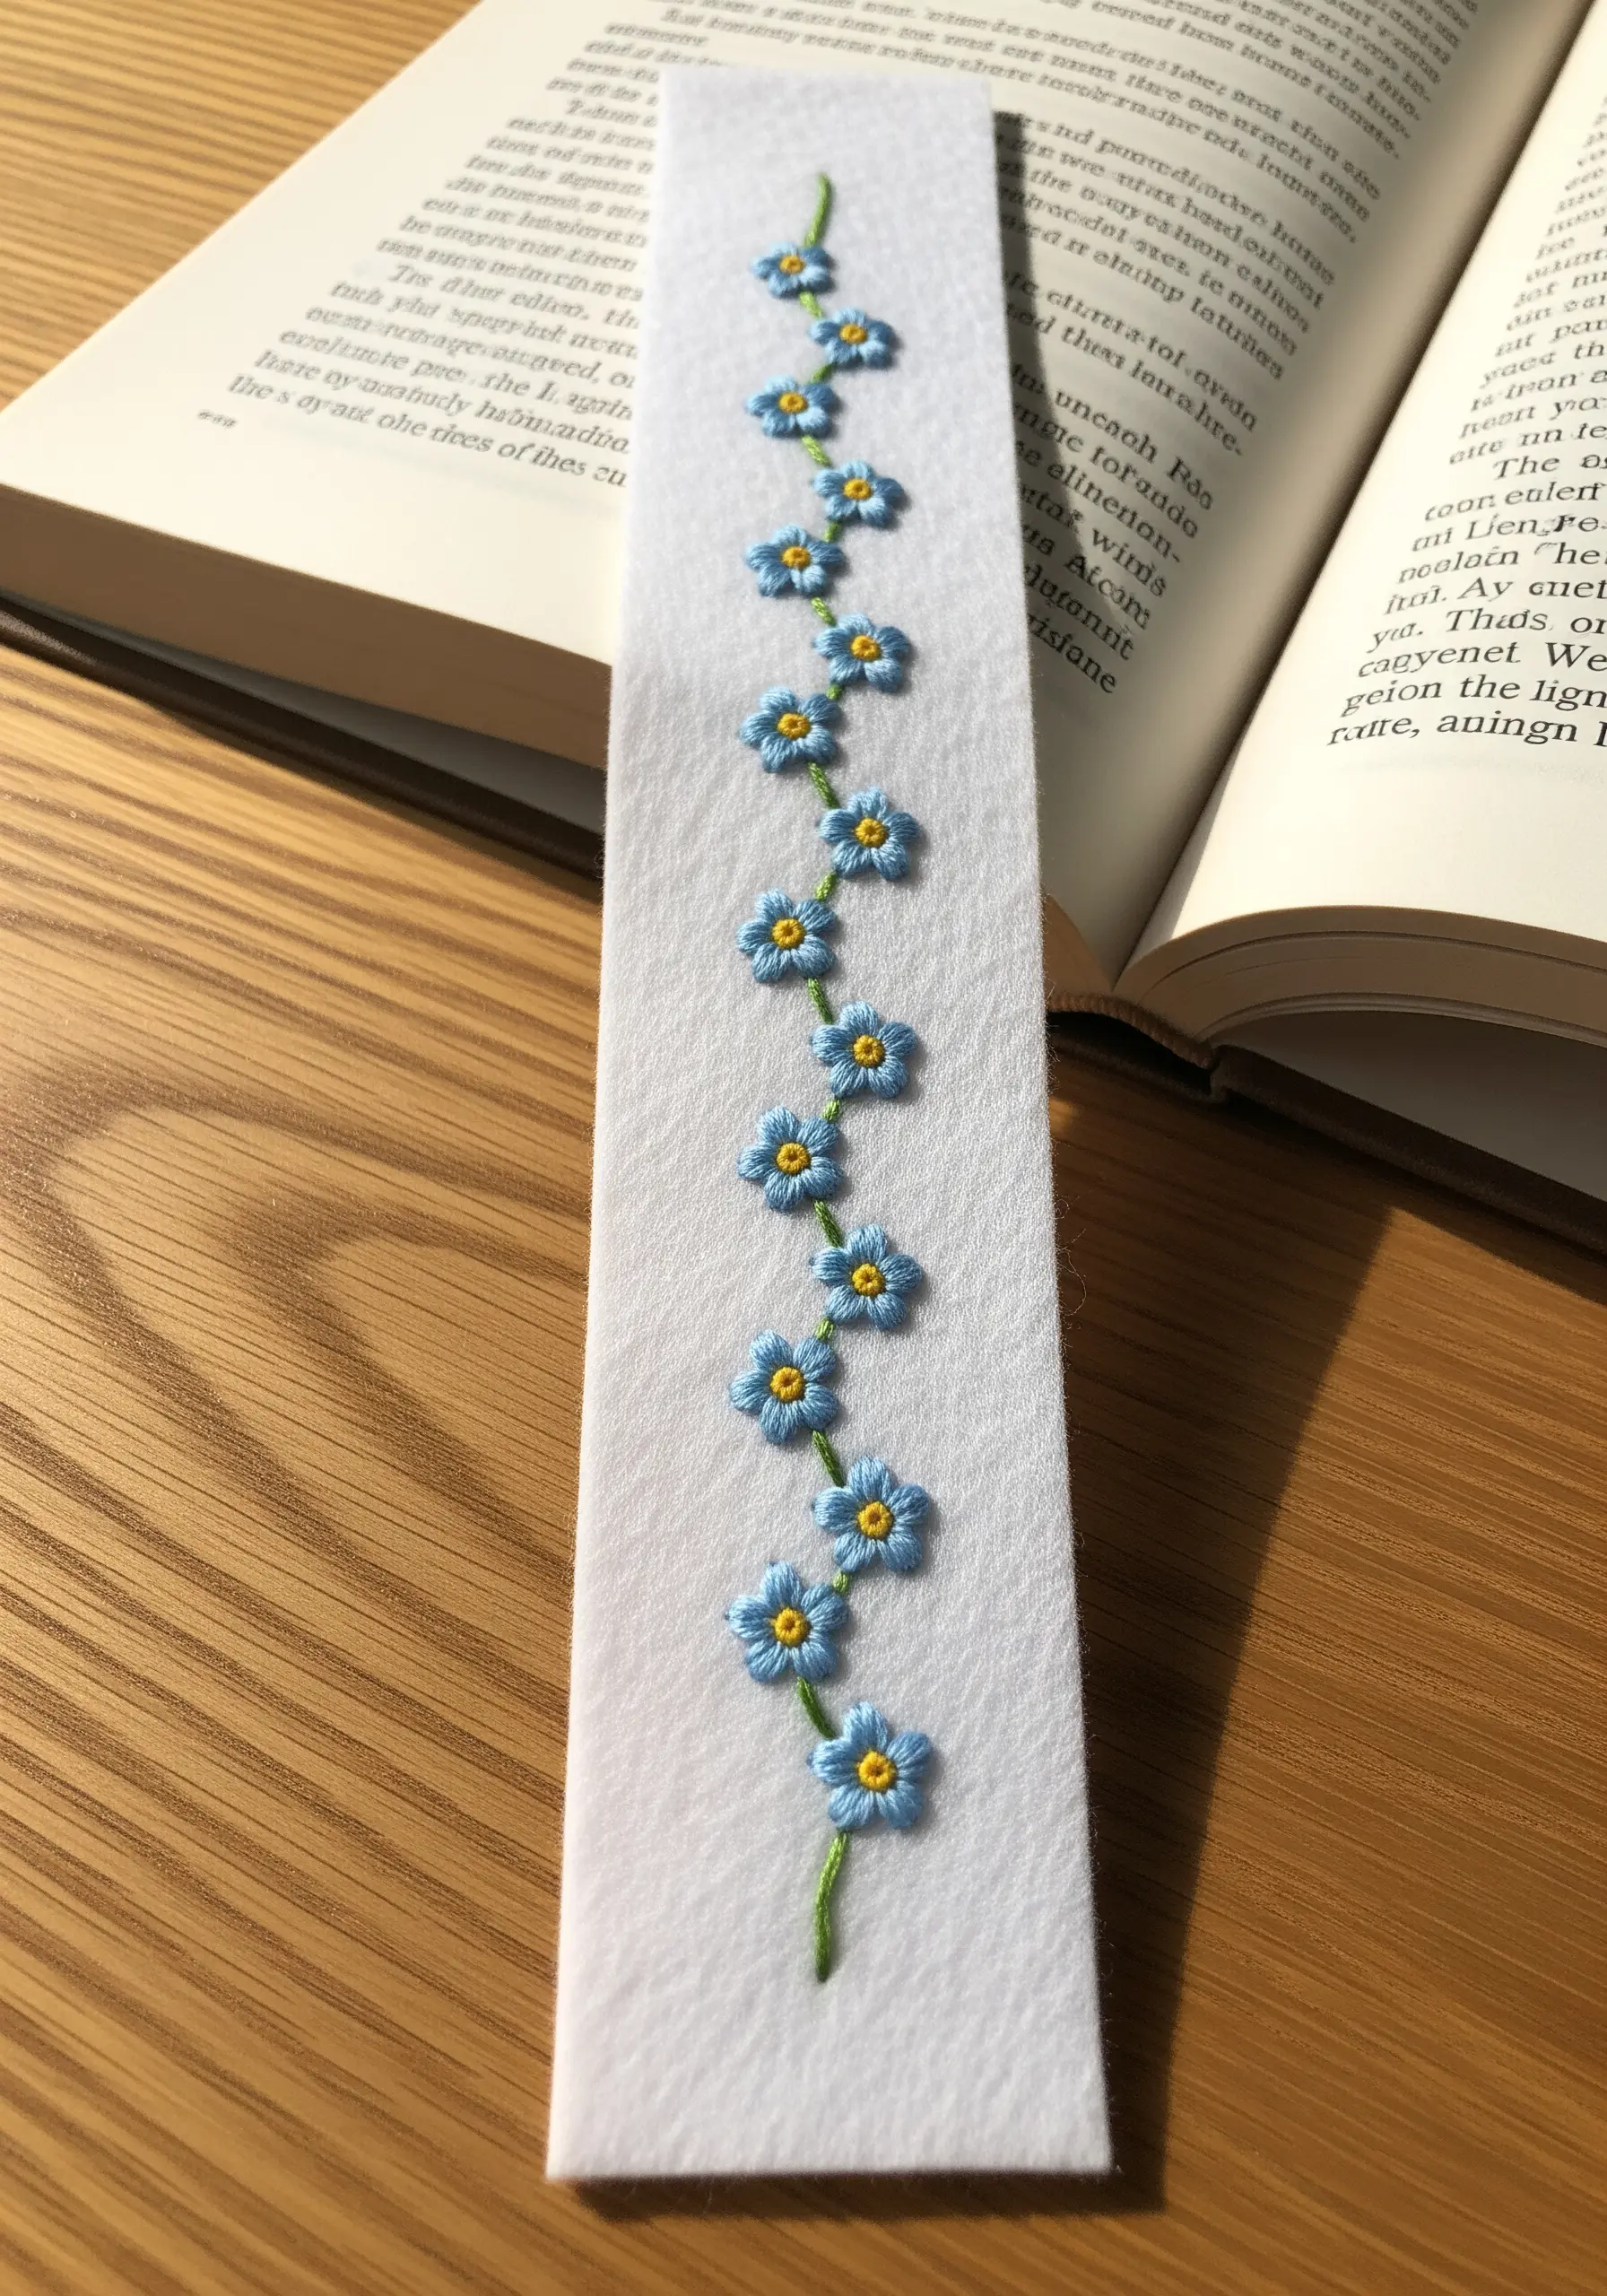
Felt is an ideal base for a bookmark; it’s sturdy, easy to stitch through, and doesn’t fray, so there’s no need to hem the edges.
Form the delicate petals using detached chain stitches, also known as lazy daisy stitches. Arrange five in a circle for each iconic blossom.
A single French knot in a bright, contrasting color like yellow creates the perfect flower center and adds a tiny pop of detail.
Connect the blossoms with a delicate, meandering stem stitch to give the impression of a wild, trailing vine.
9. The Mountain Silhouette: Clean Lines with Backstitch
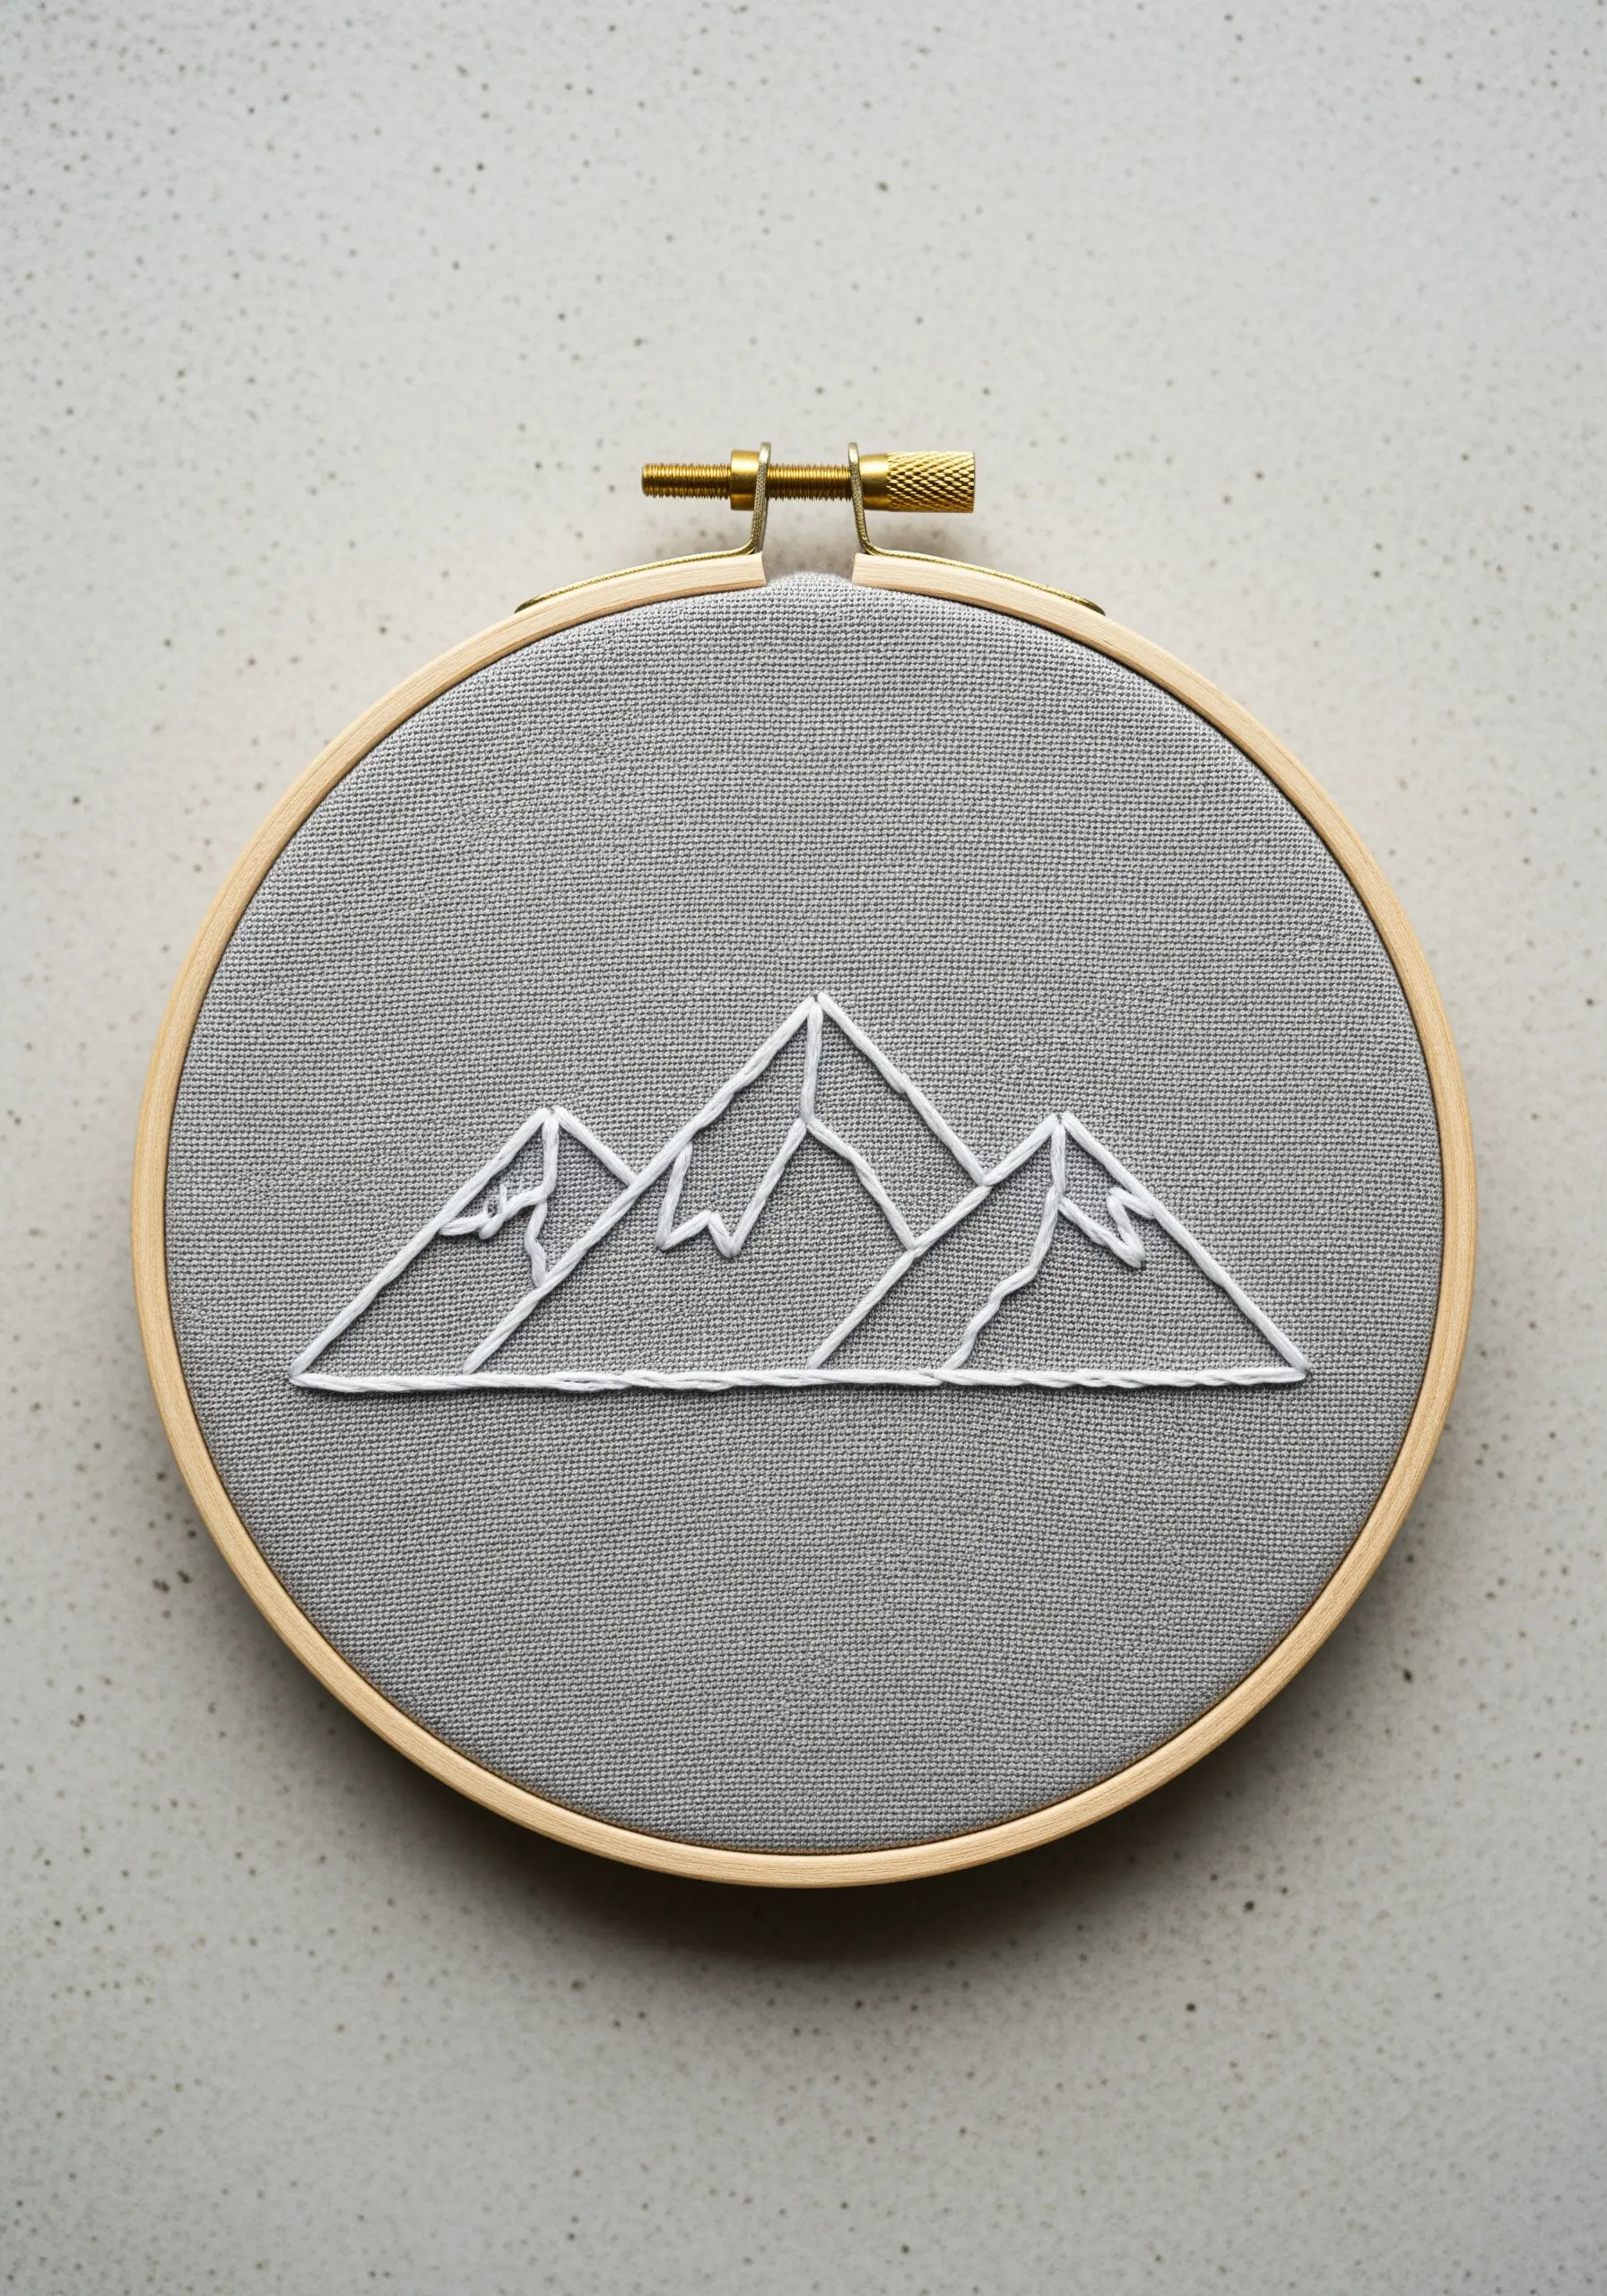
For a crisp, graphic landscape, the backstitch is your most reliable tool. The key to a professional finish is maintaining a consistent stitch length throughout the design.
To create sharp peaks and angles, ensure your needle exits and enters the fabric at the exact same point where lines intersect.
Using a thicker thread, like all six strands of floss or even a fine pearl cotton, gives the outline a satisfying weight and presence against the textured fabric.
This is a fast yet striking project that celebrates the beauty of minimalist embroidery designs inspired by nature.
10. The Textured Succulent: A Sampler of Stitches
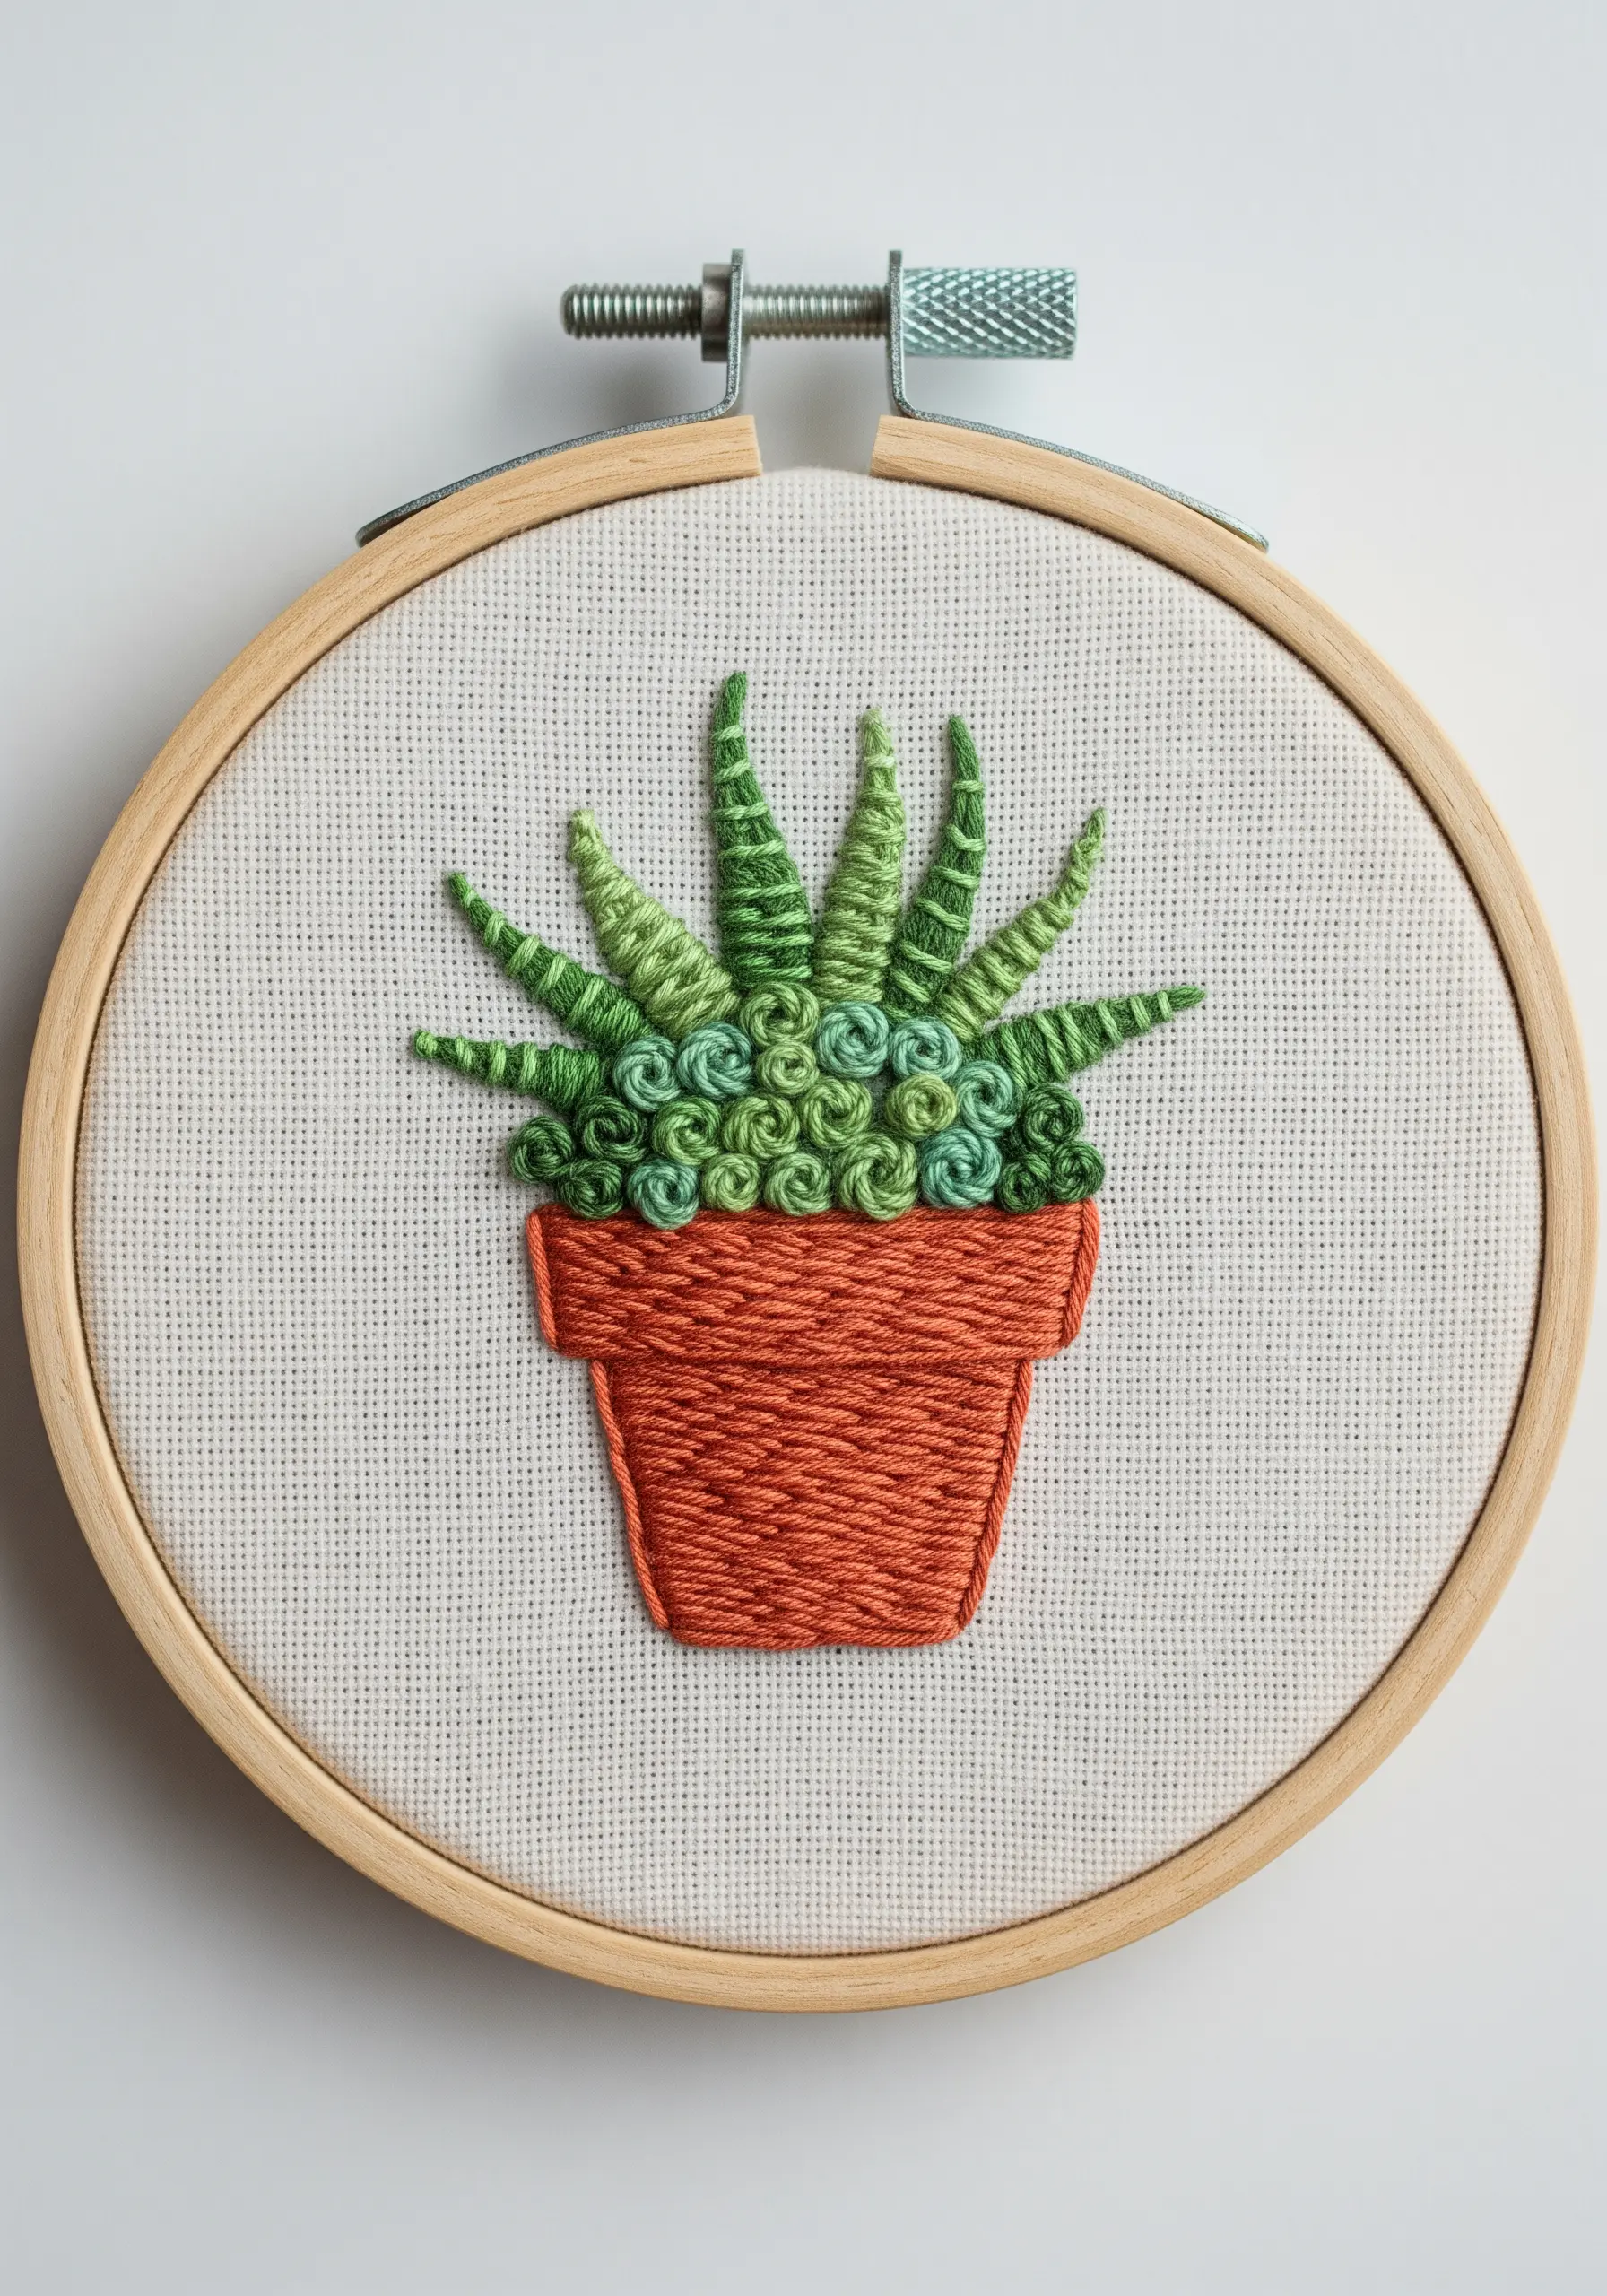
This tiny plant is a perfect canvas for playing with texture. Use bullion knots or woven wheel stitches to create the dense, rosette-style succulents.
For the spikier, upright leaves, use detached chain stitches or straight stitches layered in varying shades of green to build up dimension.
Fill the terracotta pot with a simple satin stitch, keeping the stitches perfectly parallel to create a smooth, solid surface that contrasts with the detailed plant.
This delightful combination of textures makes the small design feel dynamic, tactile, and full of life.
11. The Cozy Cup: Delicate Whipped Running Stitch
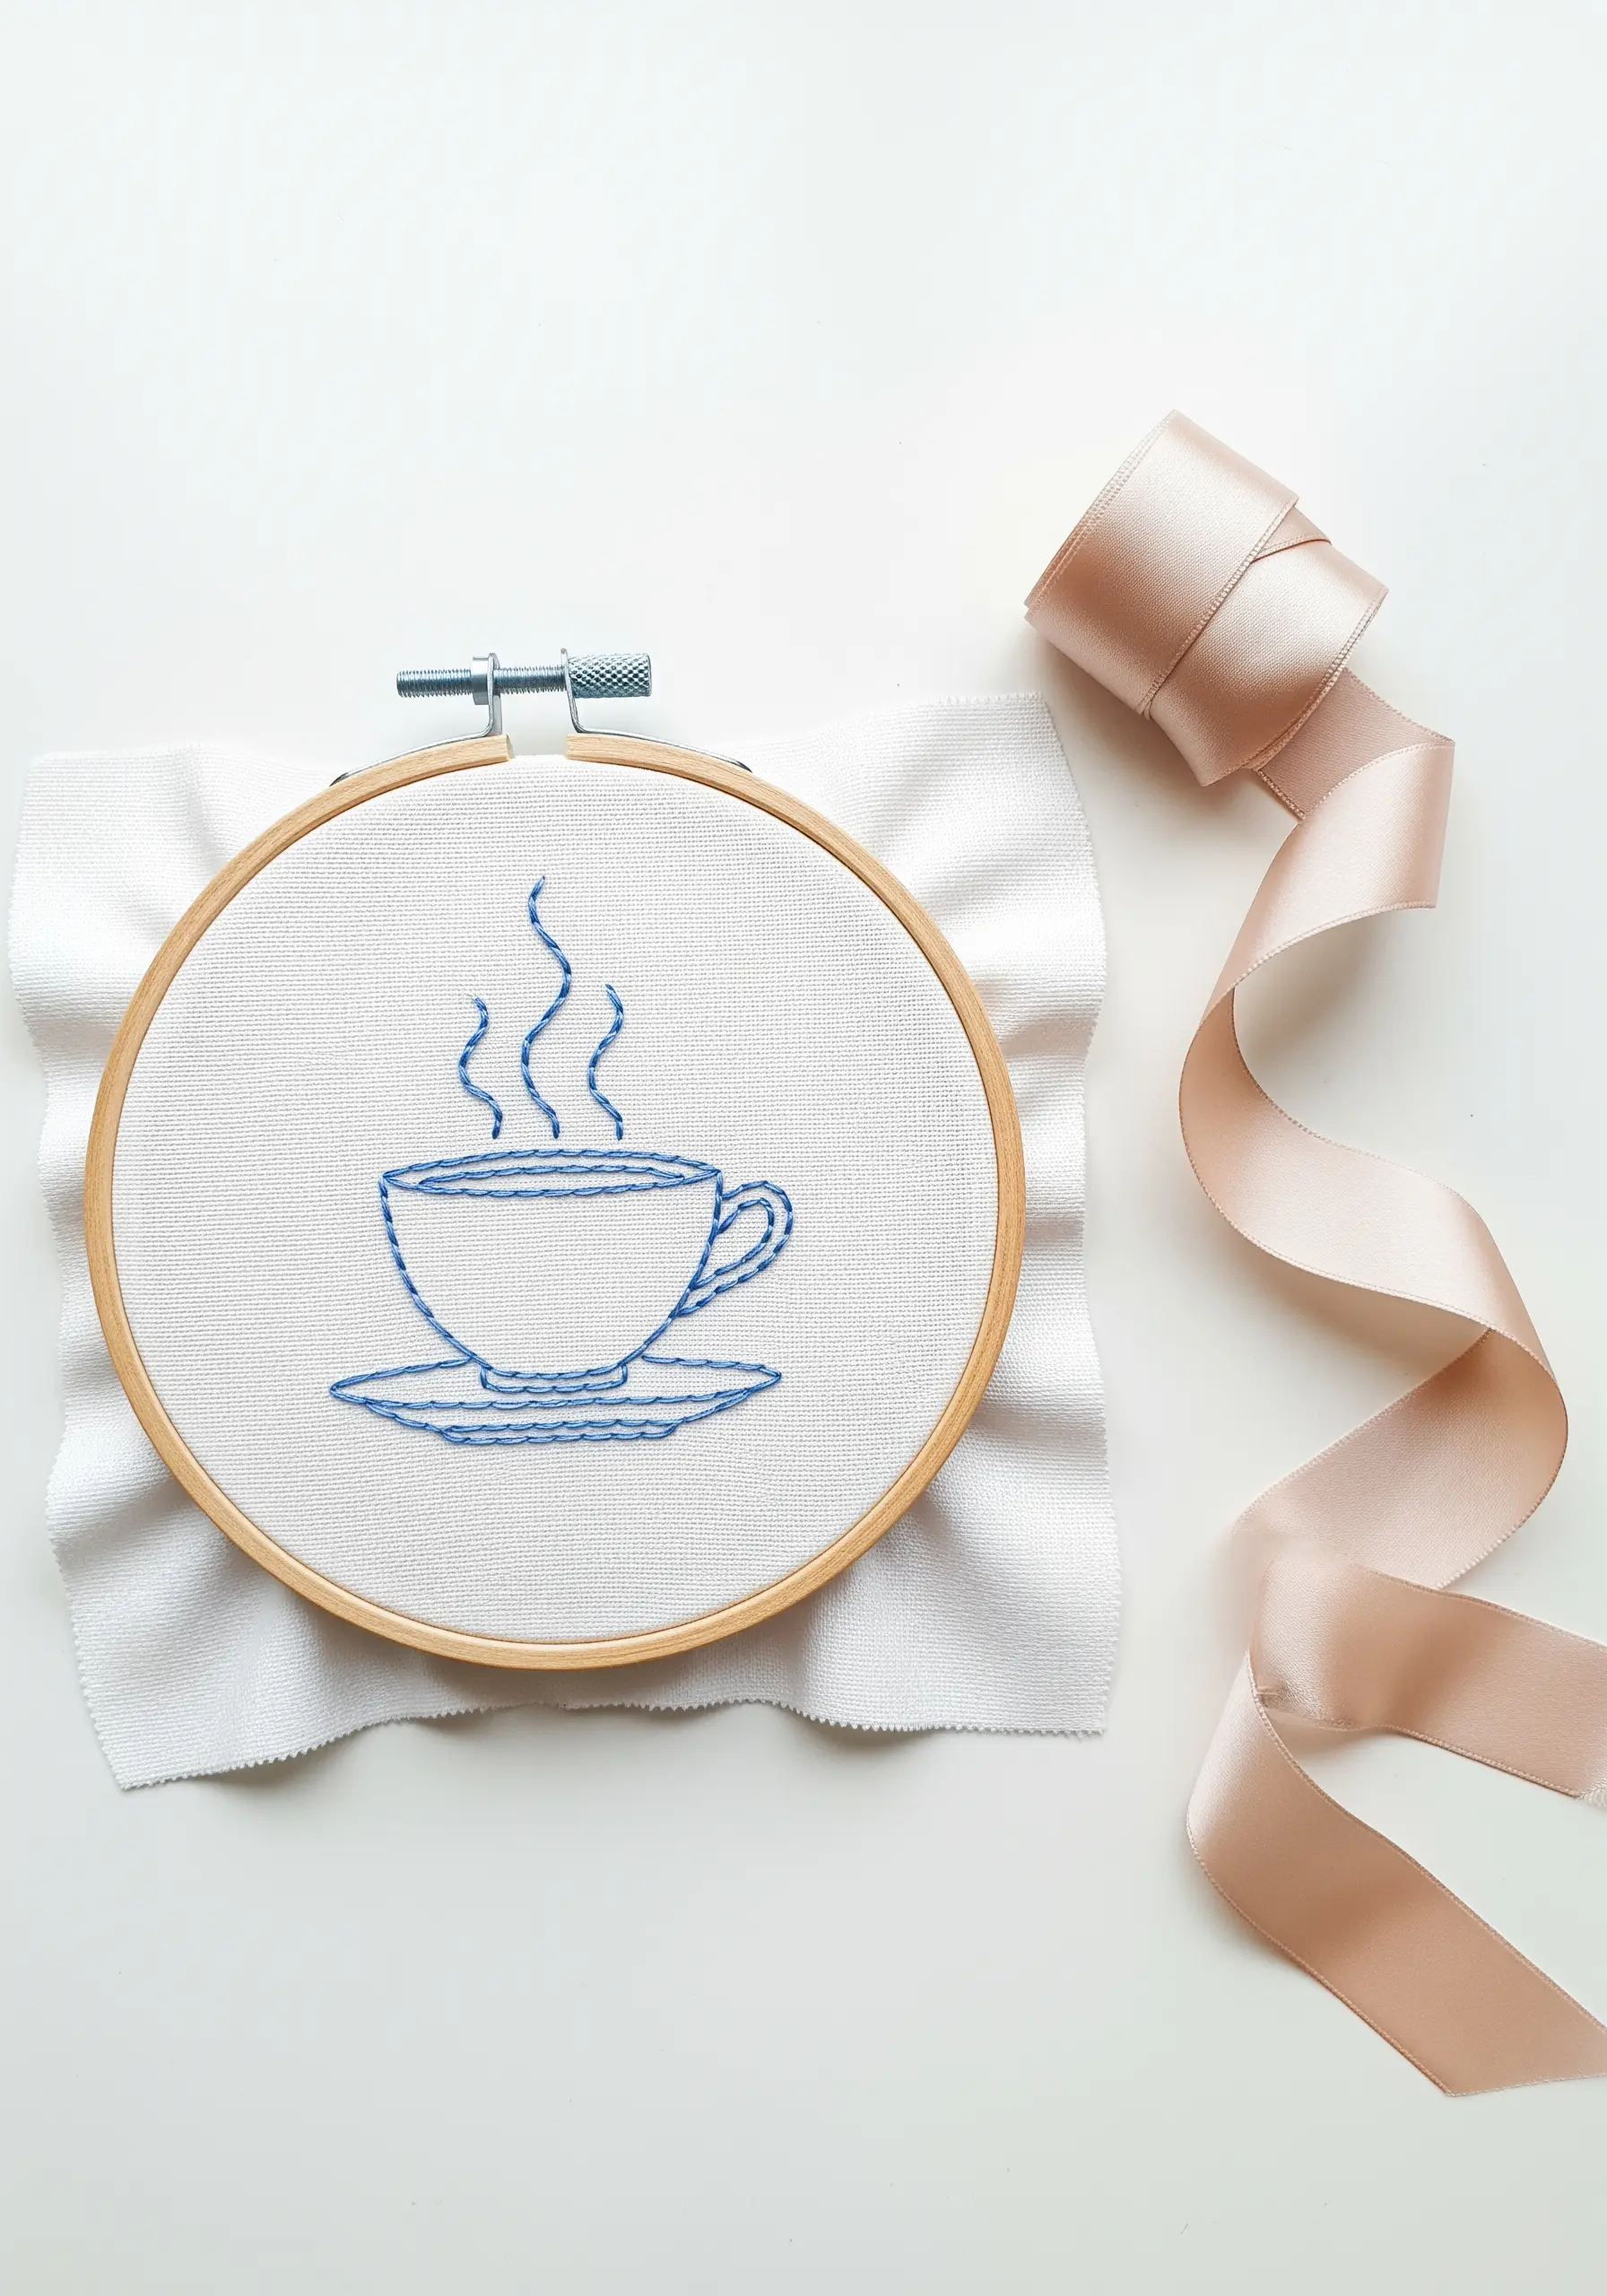
For a soft, rounded outline, first lay down a simple running stitch. Then, whip a second thread around those stitches to create a solid, corded line without piercing the fabric again.
This whipped running stitch is faster than a backstitch and gives a more delicate, less rigid edge, which is perfect for this cozy motif.
Create the steam with a loose, organic stem stitch. Varying the curves makes the steam look as if it’s naturally rising.
The beauty of this project lies in its absolute simplicity—it’s a thoughtful gift you can stitch in under an hour.
12. The Starry Constellation: Combining Stitch Types
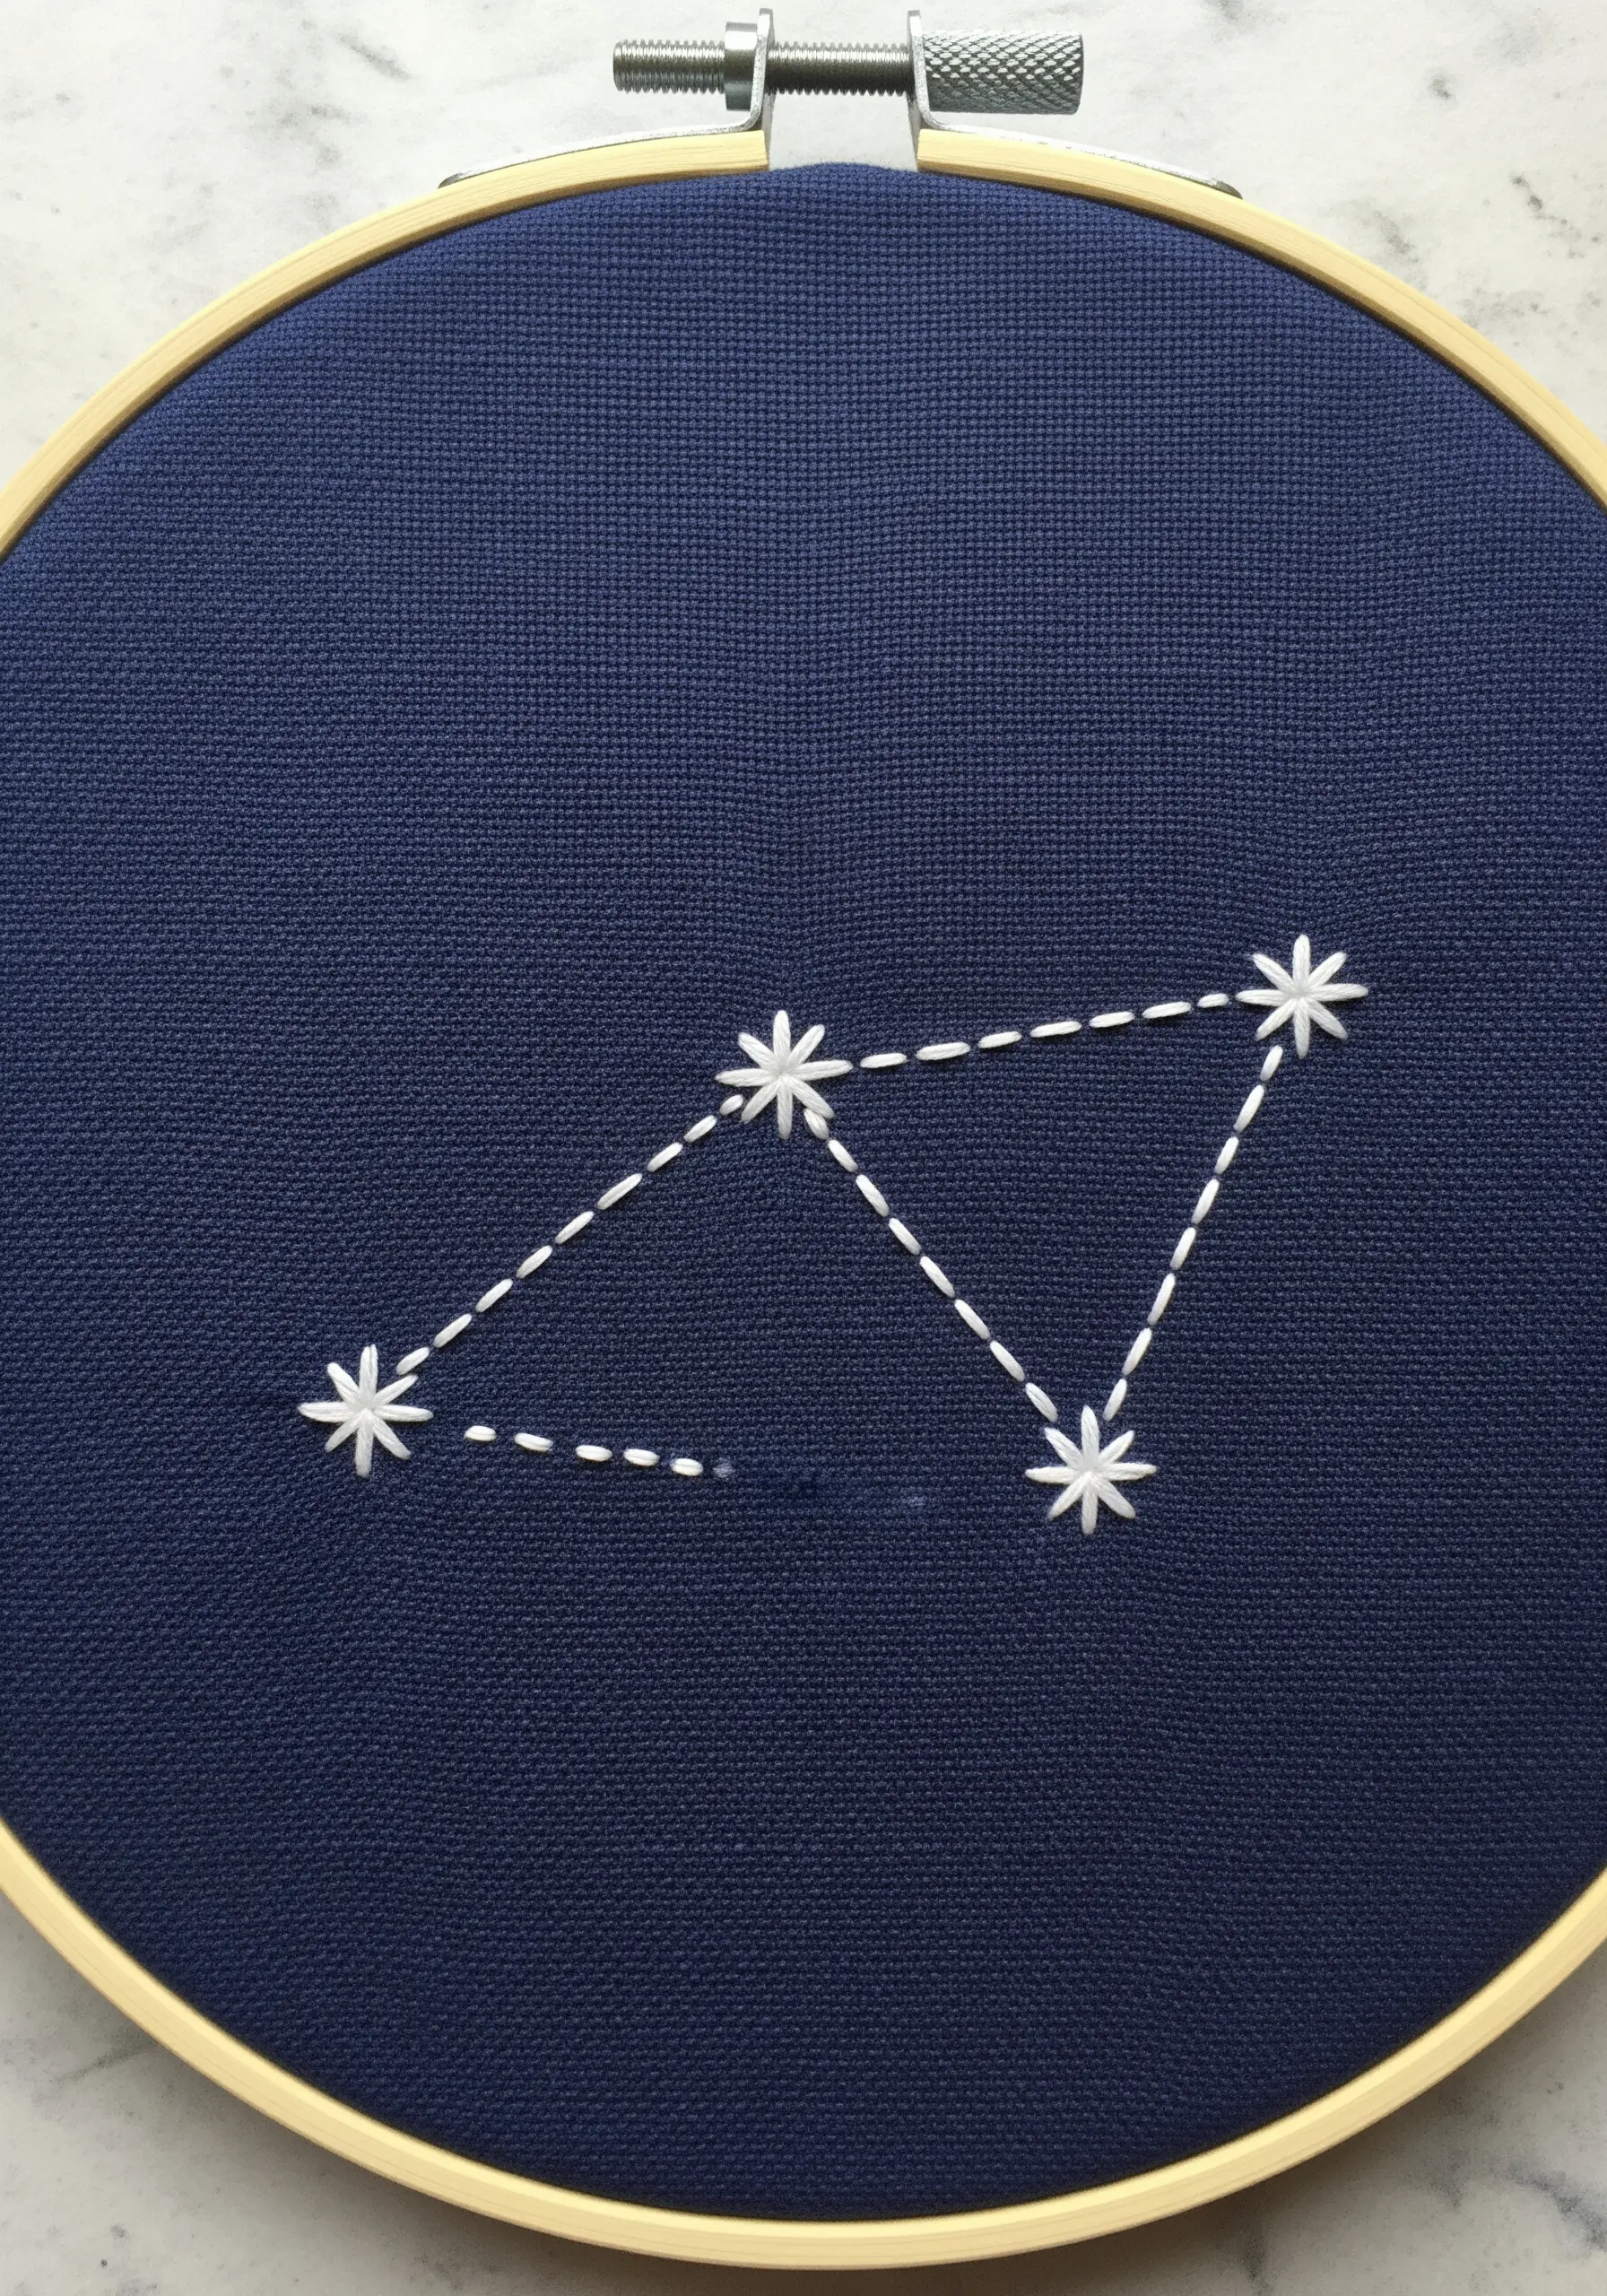
To give your stars a brilliant twinkle, use a star stitch (three intersecting straight stitches) instead of a simple cross-stitch. It adds more dimension and catches the light beautifully.
Connect the stars with a delicate, dashed running stitch. Use a single strand of floss to keep these connecting lines subtle and secondary to the stars themselves.
The dramatic contrast between bright white thread and dark navy fabric is essential for creating that deep, night-sky effect.
This is a wonderful way to personalize a gift with a zodiac sign or a meaningful constellation.
13. The Delicate Fern: Precision with Fishbone Stitch

The fishbone stitch is the ideal choice for creating realistic leaves with a defined central vein. It works by alternating angled stitches from the center line to the outer edge.
Start at the very tip of a leaflet and work your way down, allowing the angled stitches to create that classic, tapered shape.
For the main stem, a simple but sturdy stem stitch provides a solid spine for the delicate leaflets, giving the design structure.
Using a single shade of green on a natural linen fabric gives this fern a timeless, organic, and beautifully understated feel.
14. The Geometric Honeycomb: The Elegance of Negative Space
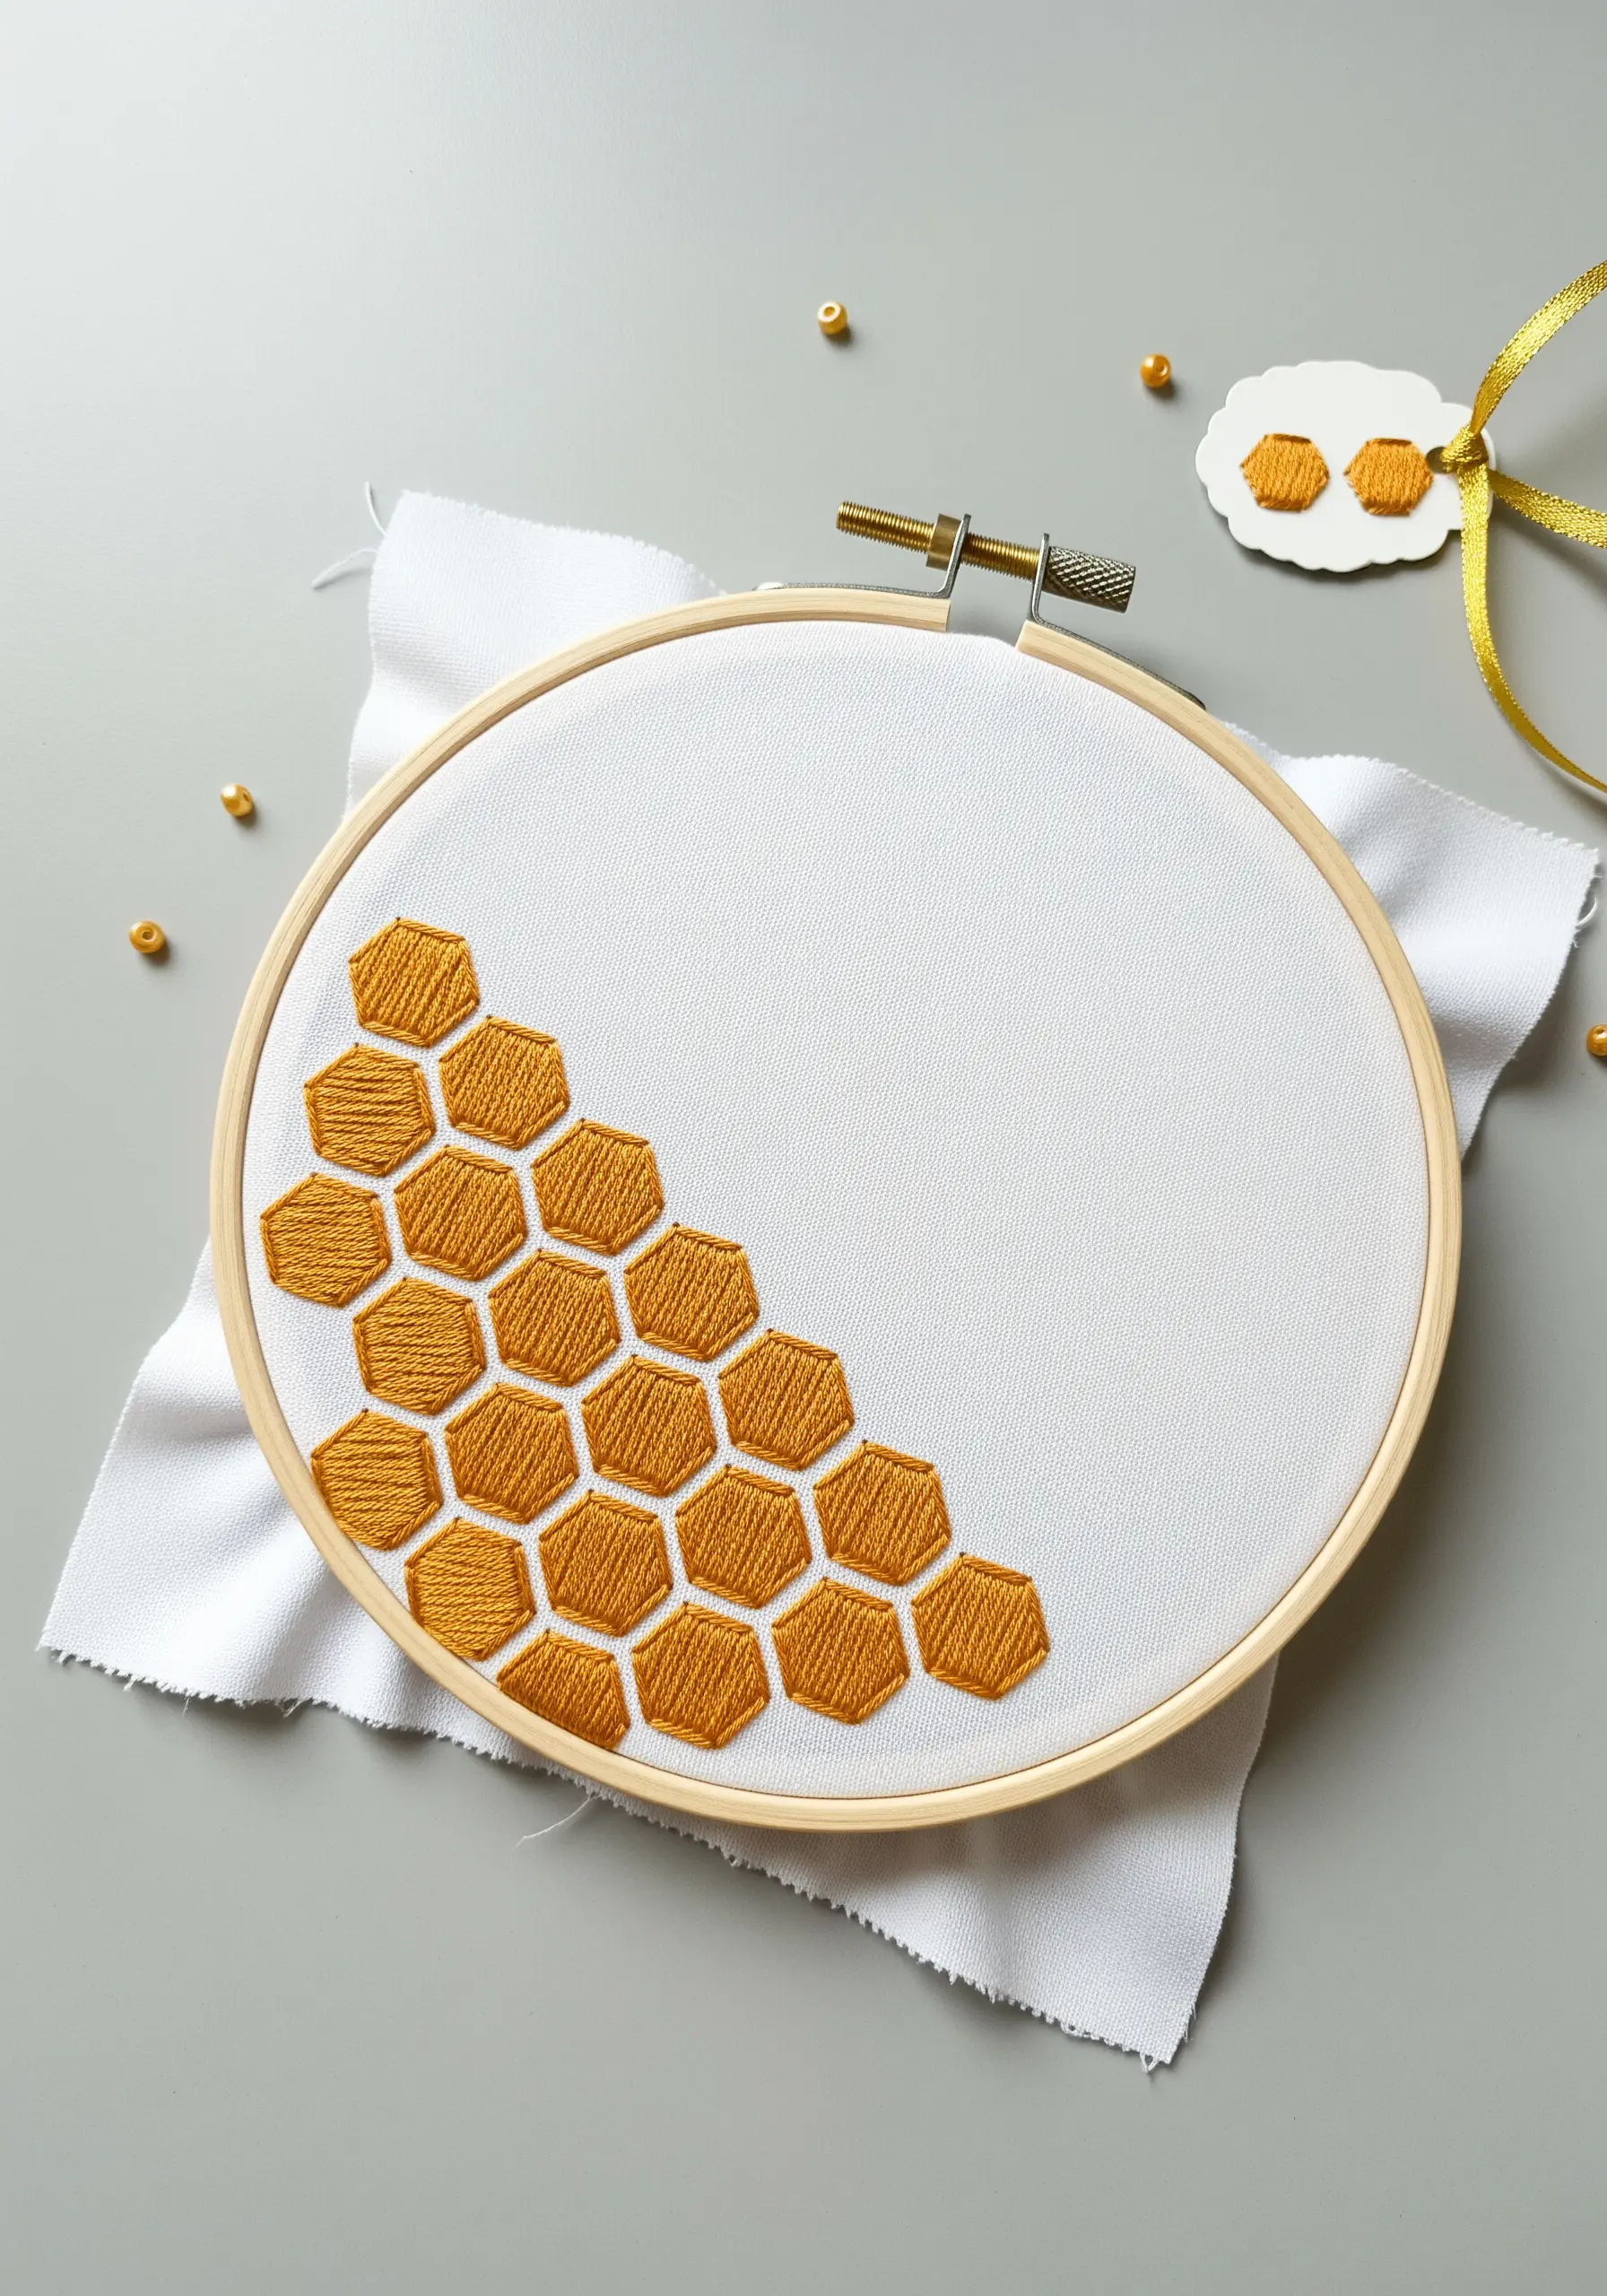
This modern design is a masterclass in precision. For perfectly uniform shapes, use a water-soluble marker and a ruler to draw a honeycomb grid first.
Outline each hexagon with a simple, neat backstitch. The visual impact comes from the clean repetition, not from complex stitches.
By leaving the centers empty, you allow the fabric color to become an integral part of the design, creating a light and airy feel.
Grouping the pattern in an organic, asymmetrical cluster feels more dynamic and artistic than filling the entire hoop.
15. The Zesty Lemon Slice: Directional Satin Stitch
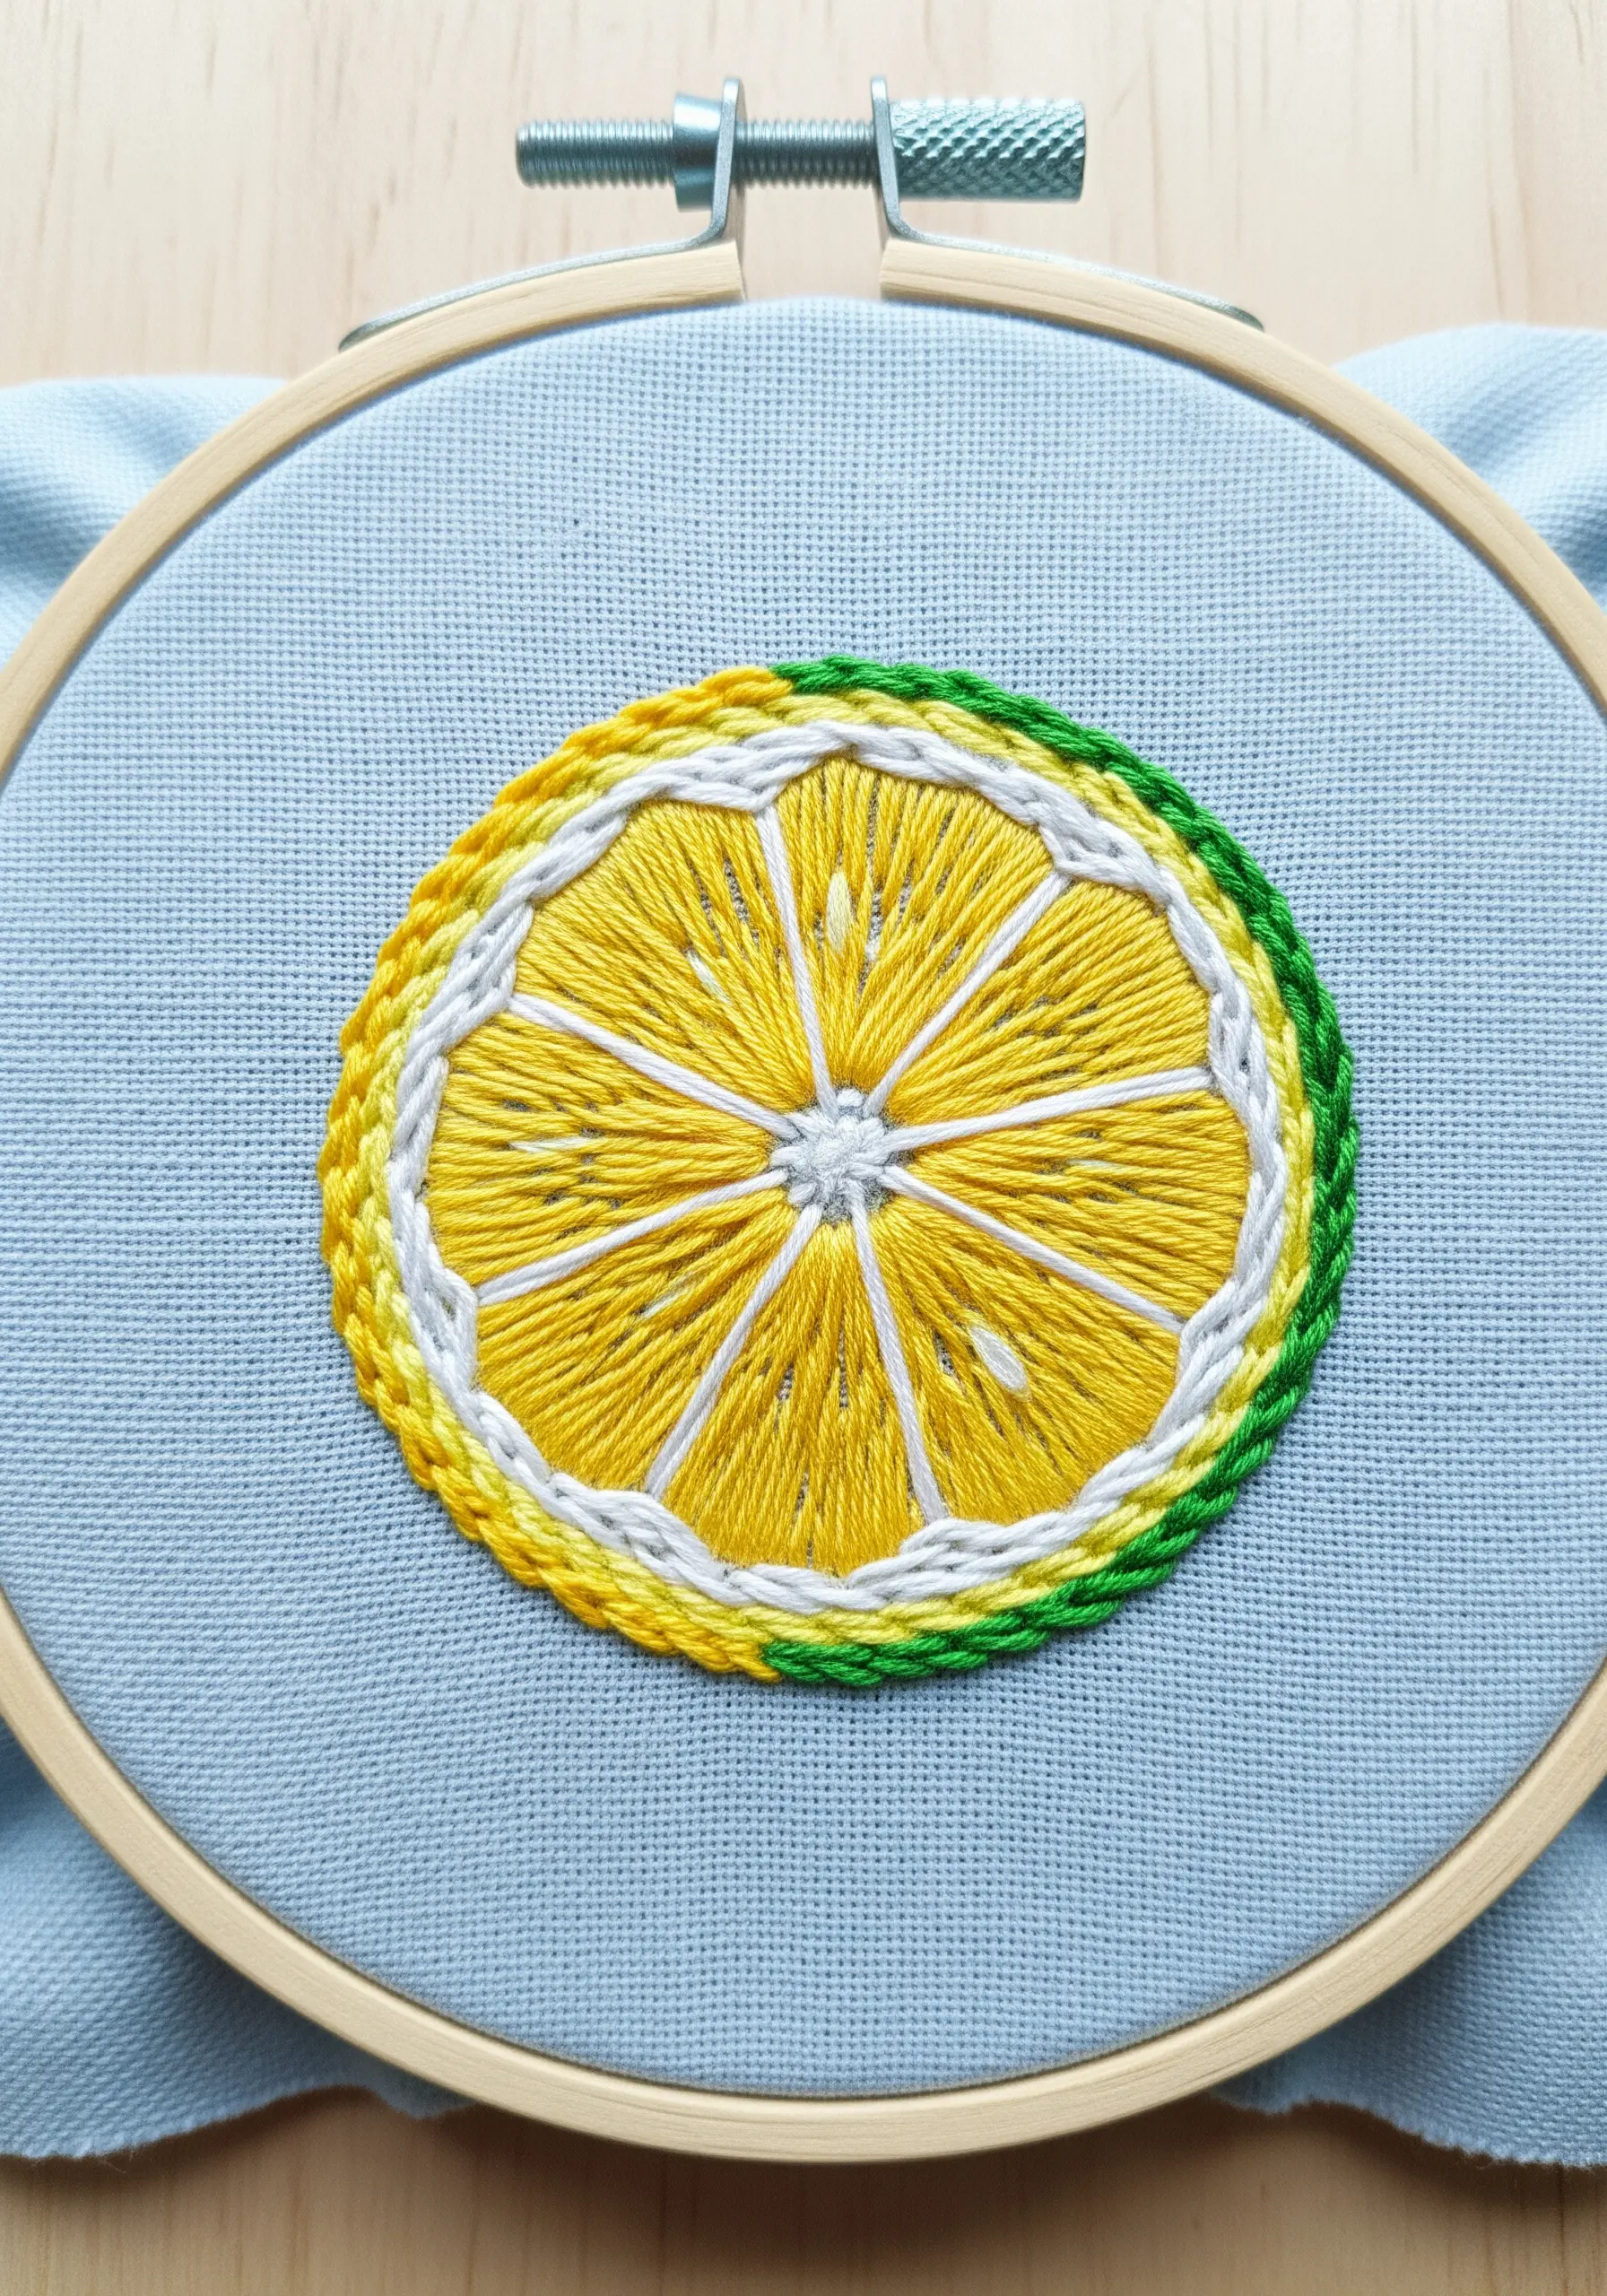
The secret to a realistic citrus slice is directional satin stitch. For the segments, angle your stitches toward a central point to create that distinctive fan-like effect of citrus pulp.
Outline each segment with a split stitch before filling. This simple step creates a raised, defined edge that makes your satin stitch look incredibly neat and professional.
Use a slightly lighter yellow for the segments than for the rind to create a subtle contrast and the illusion of juicy flesh.
The layered outlines in white, yellow, and green add a wonderful depth and a final pop of vibrant color.
16. The Earth-Toned Rainbow: Textured Satin Stitch Blocks
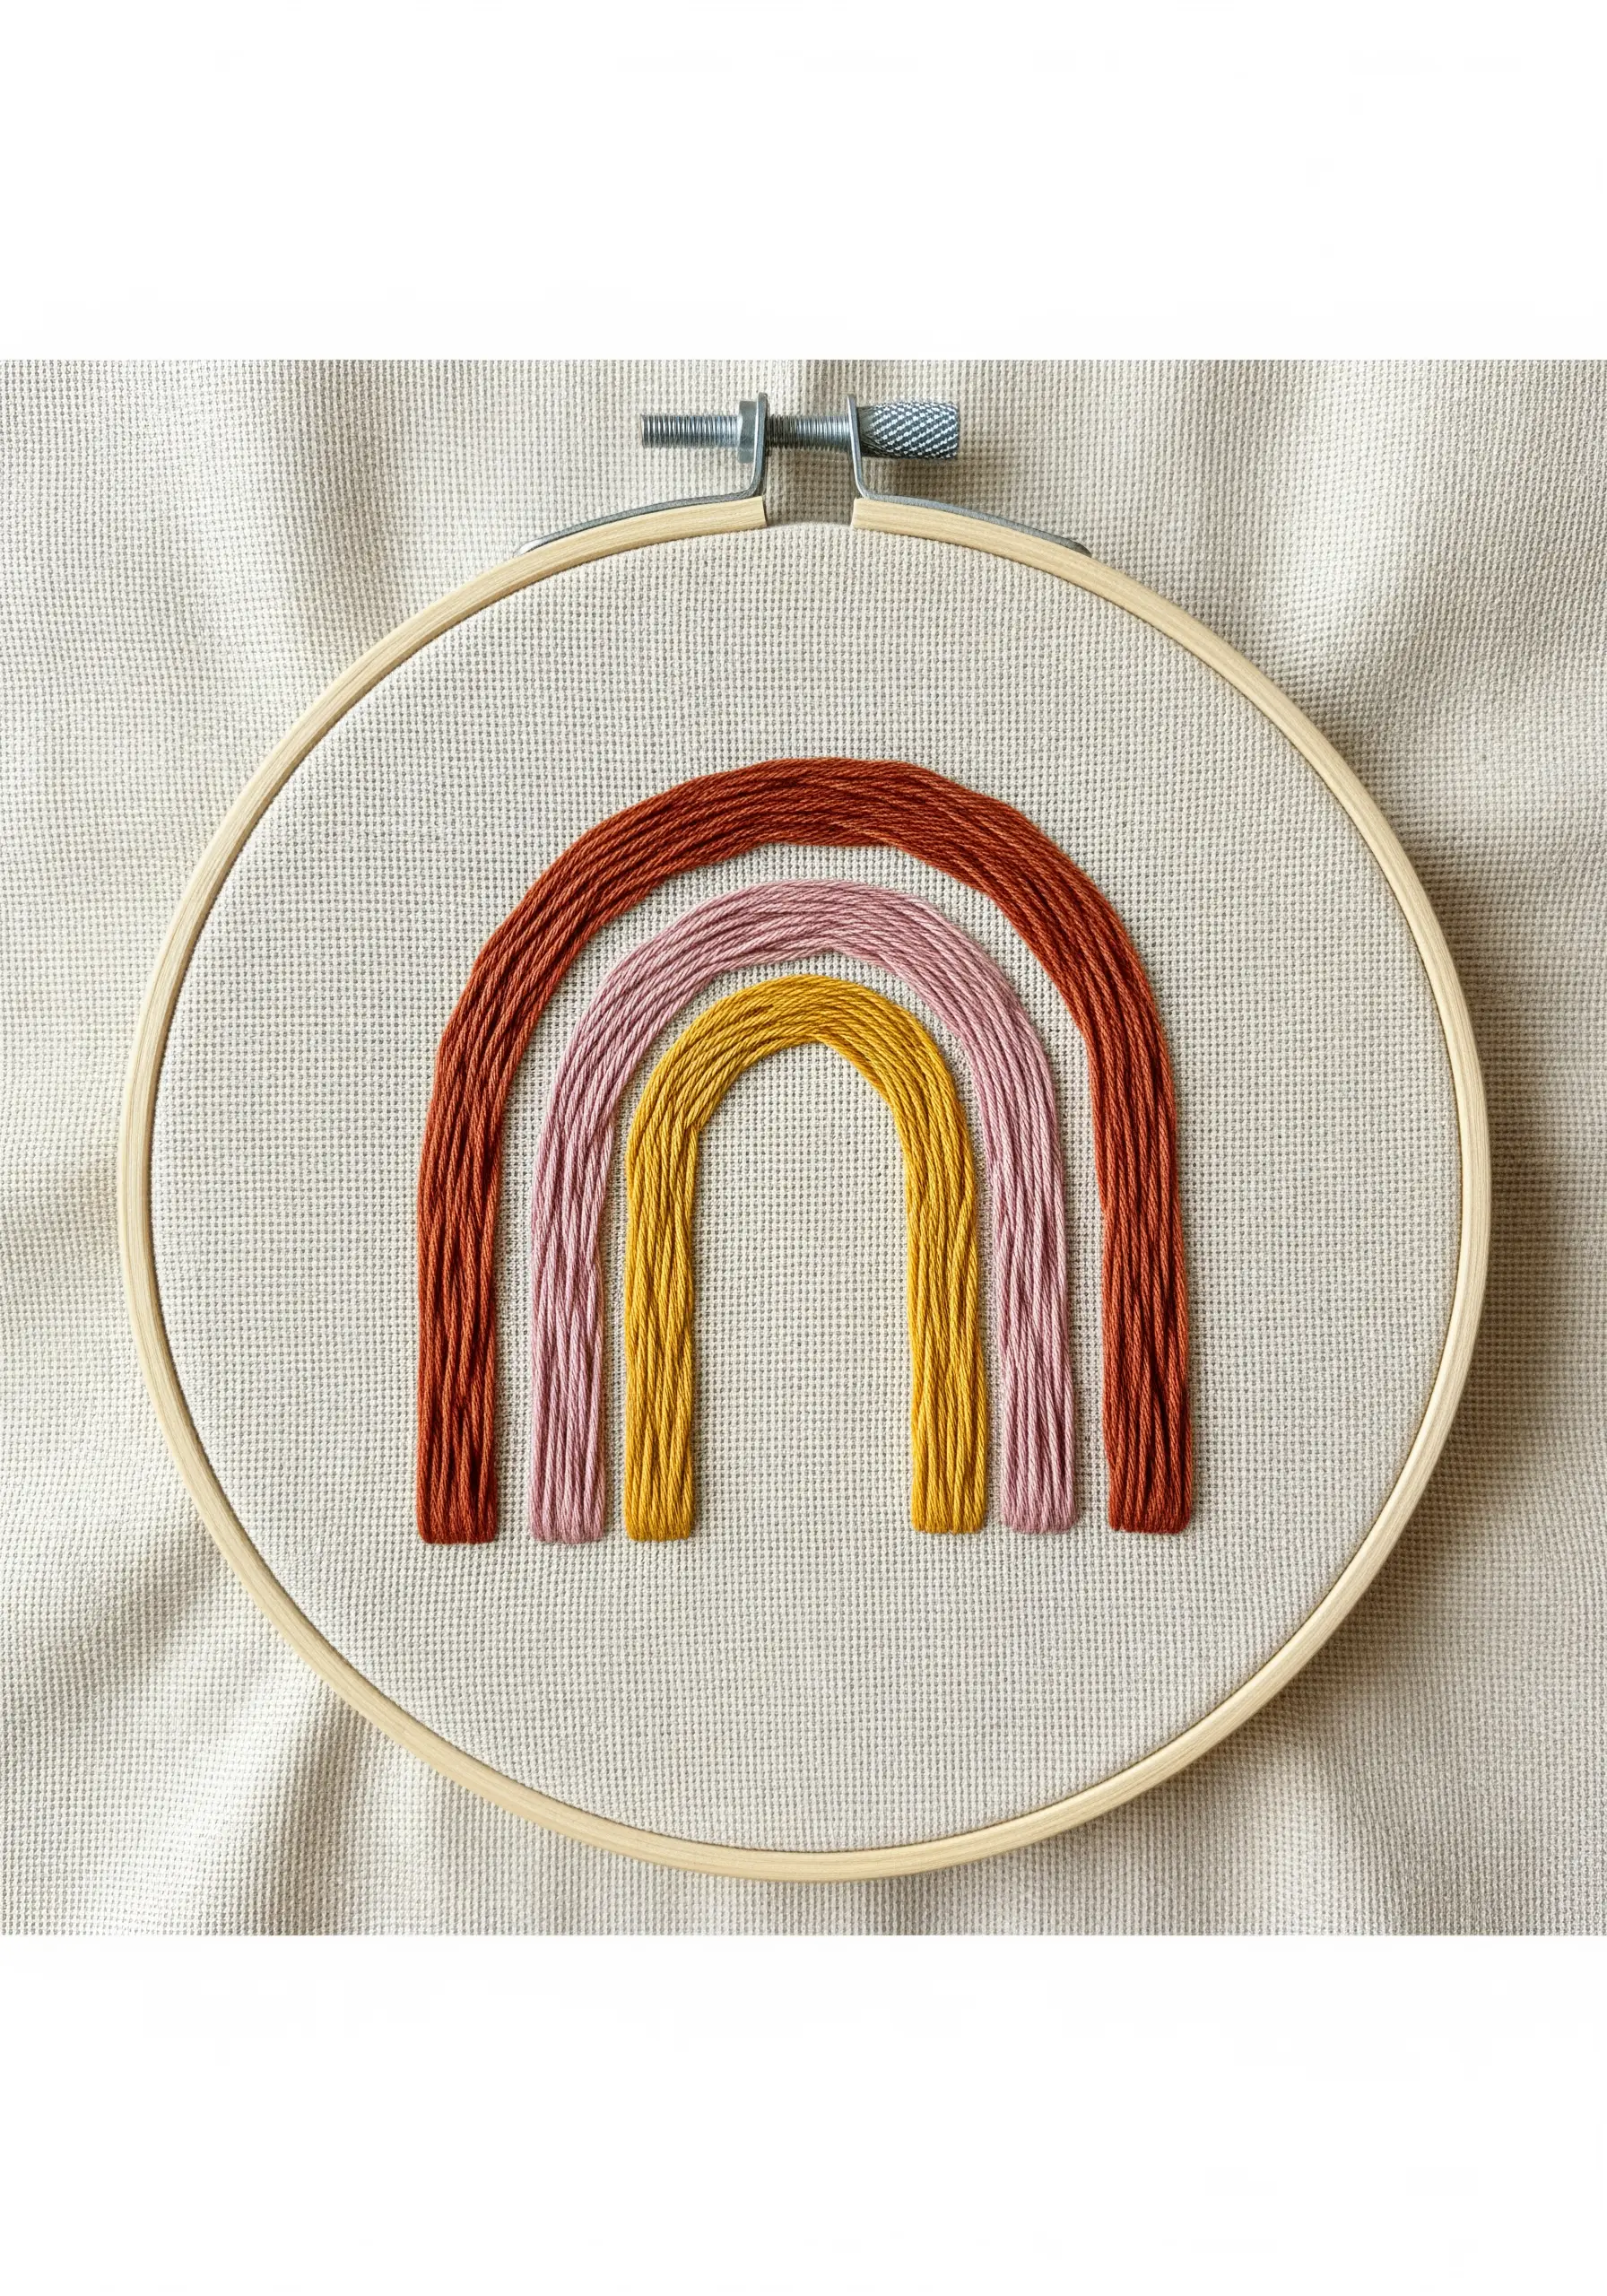
Create a modern, textural rainbow using thick blocks of satin stitch. Use all six strands of embroidery floss to achieve a chunky, almost woven appearance.
Swap a traditional bright palette for an earthy, muted color scheme. This simple change gives the classic rainbow motif a more sophisticated and contemporary feel.
To keep the edges of each arc perfectly clean, outline them with a split stitch first. This acts as a reliable guide and prevents your satin stitches from becoming uneven.
The slight space left between each color band helps define the individual shapes and keeps the design feeling crisp and clear.
17. The Airy Dandelion: Combining Straight and Fly Stitches
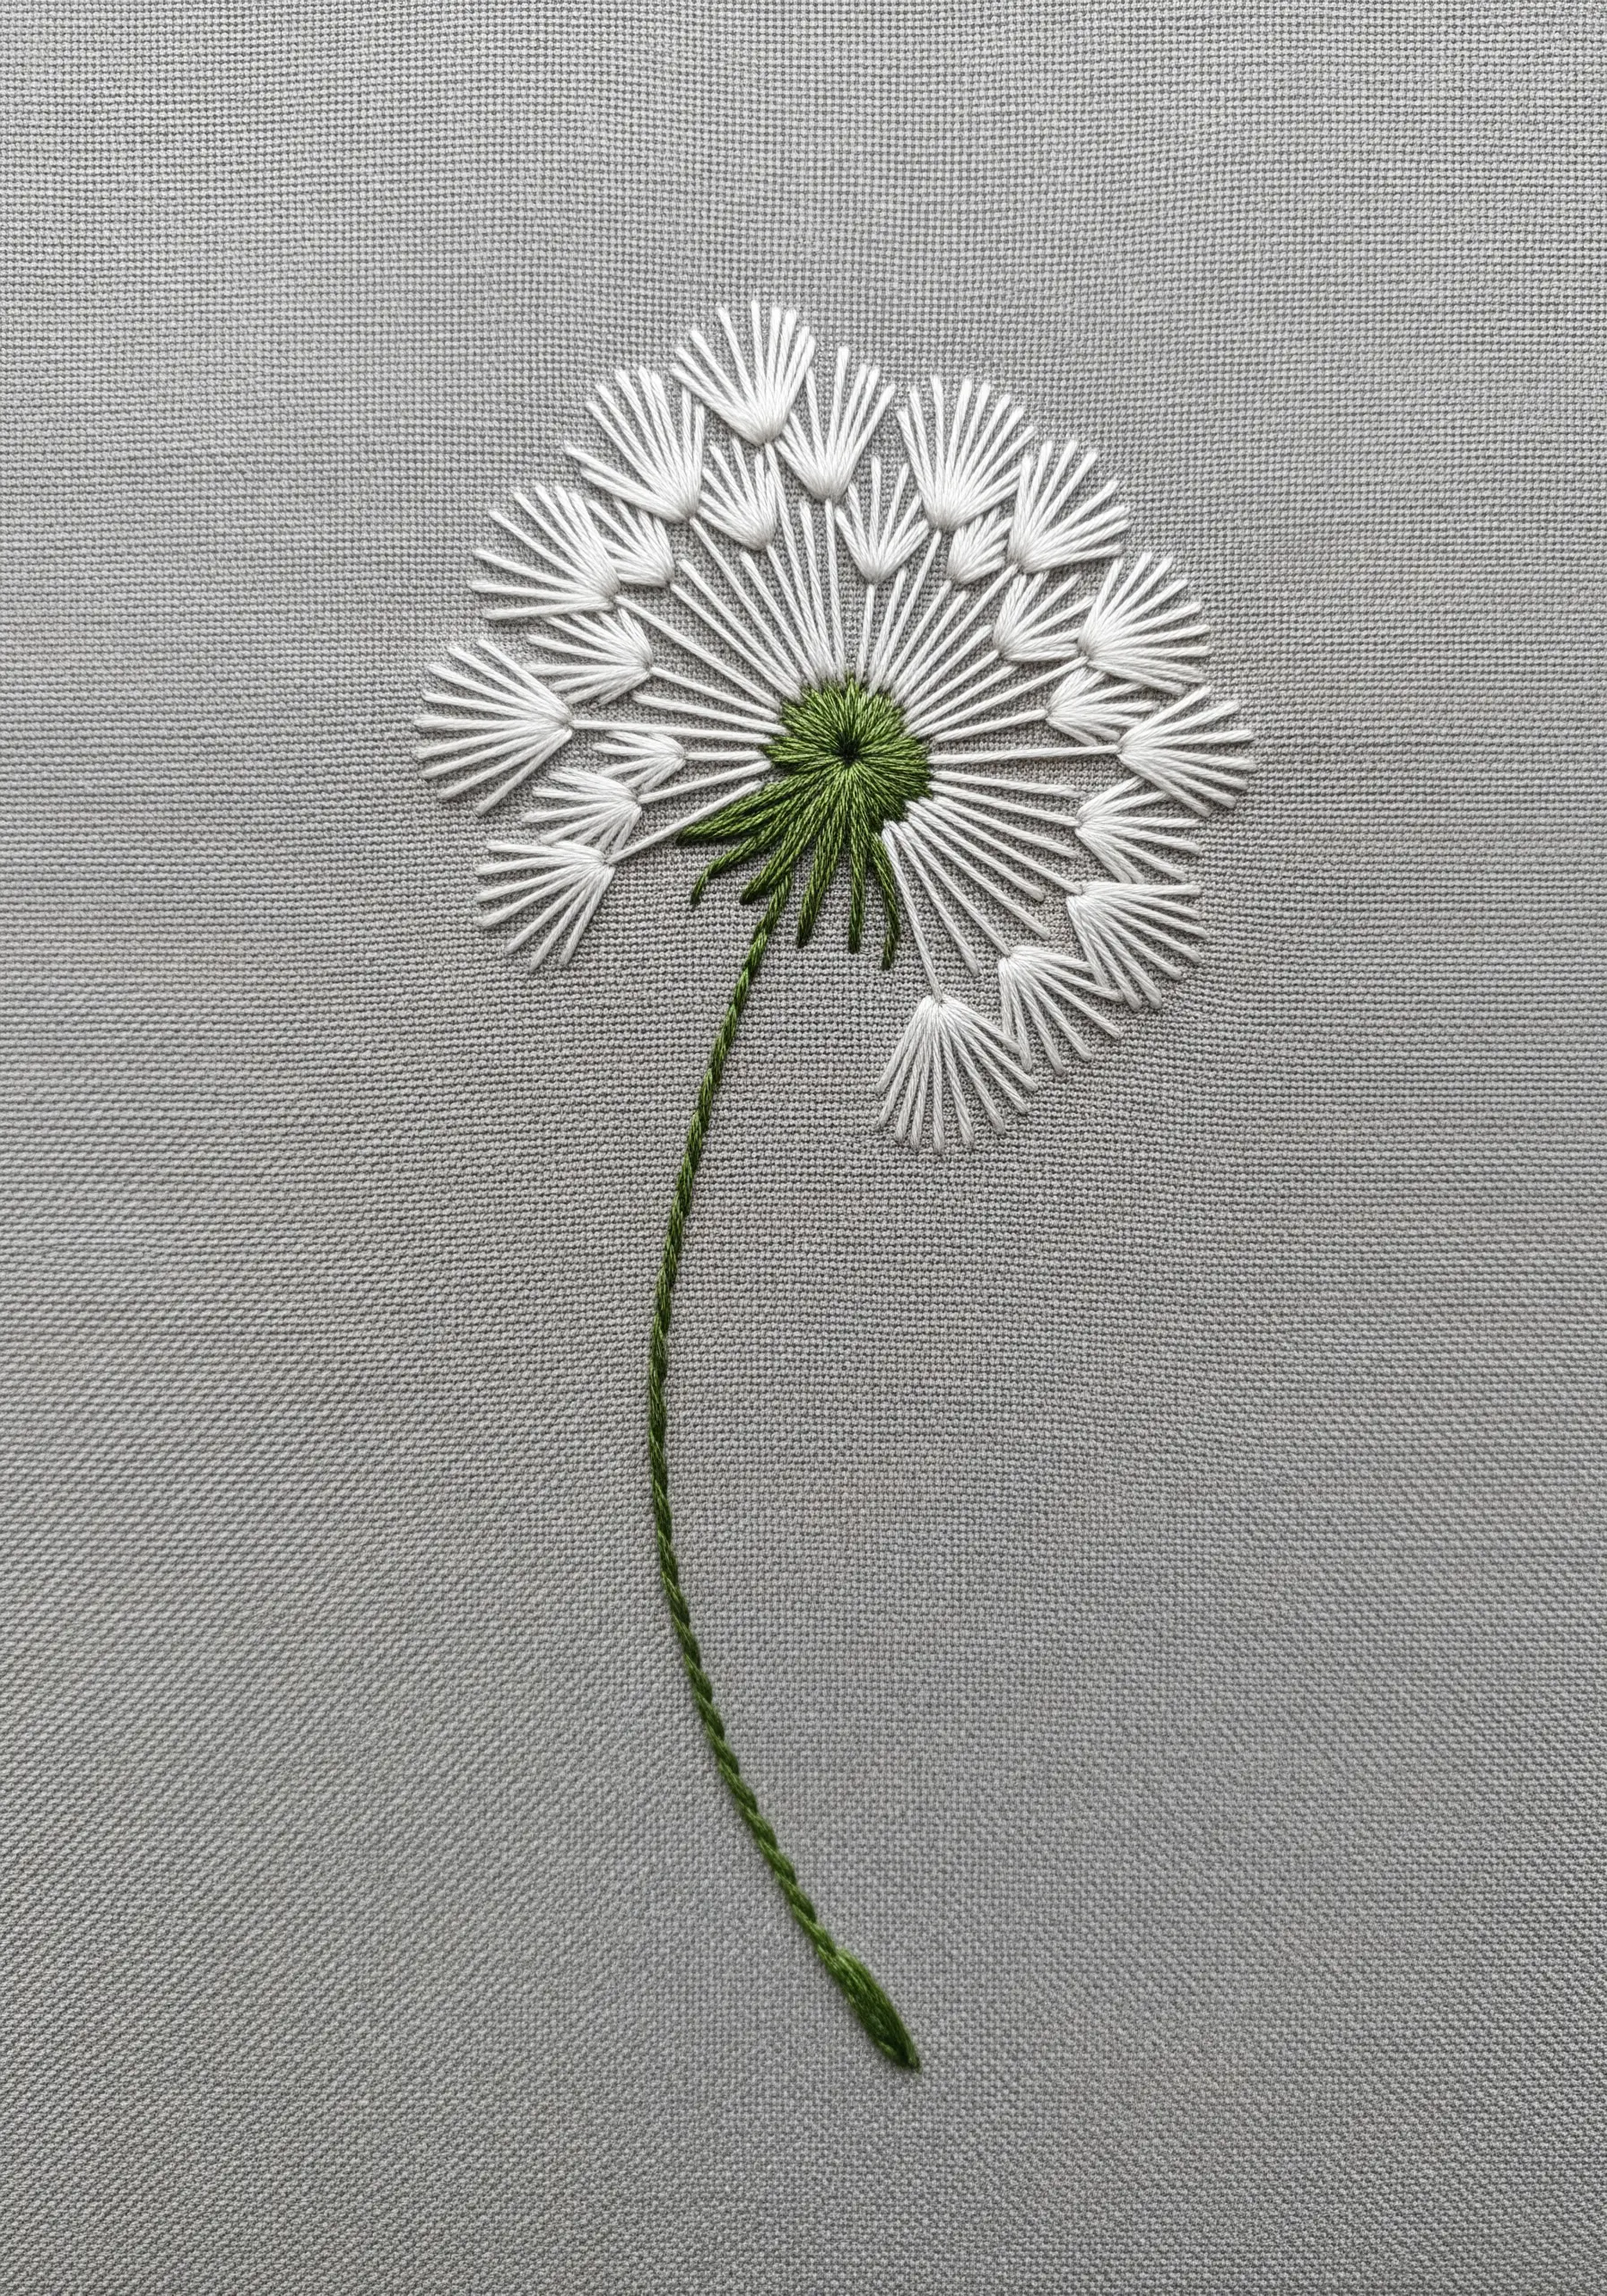
Capture the delicate fluff of a dandelion seed head by combining two elementary stitches for a sophisticated result.
First, create the core structure with long straight stitches radiating out from a central point.
At the end of each of these straight stitches, add a single, tiny fly stitch (a V-shape anchored with a small tail) to represent the individual seeds.
Work the stem in a whipped backstitch to give it a smooth, solid curve that provides a lovely contrast to the sharp, airy lines of the seed head.
18. The Home Icon: The Power of a Single Line
This universally recognized symbol of home is a perfect project for mastering sharp corners with a backstitch or stem stitch.
To achieve crisp, 90-degree angles, end one stitch precisely in the corner, then bring your needle up through the very same hole to start the new line in a different direction.
Using a bold, primary color like red on a neutral fabric makes this simple design instantly pop and feel both modern and heartfelt.
This is an ideal housewarming gift that is full of meaning and can be completed in well under an hour, making it one of the most adorable mini embroidery ideas perfect for gifts and keepsakes.
19. The Scripted Word: Smooth Curves with Stem Stitch
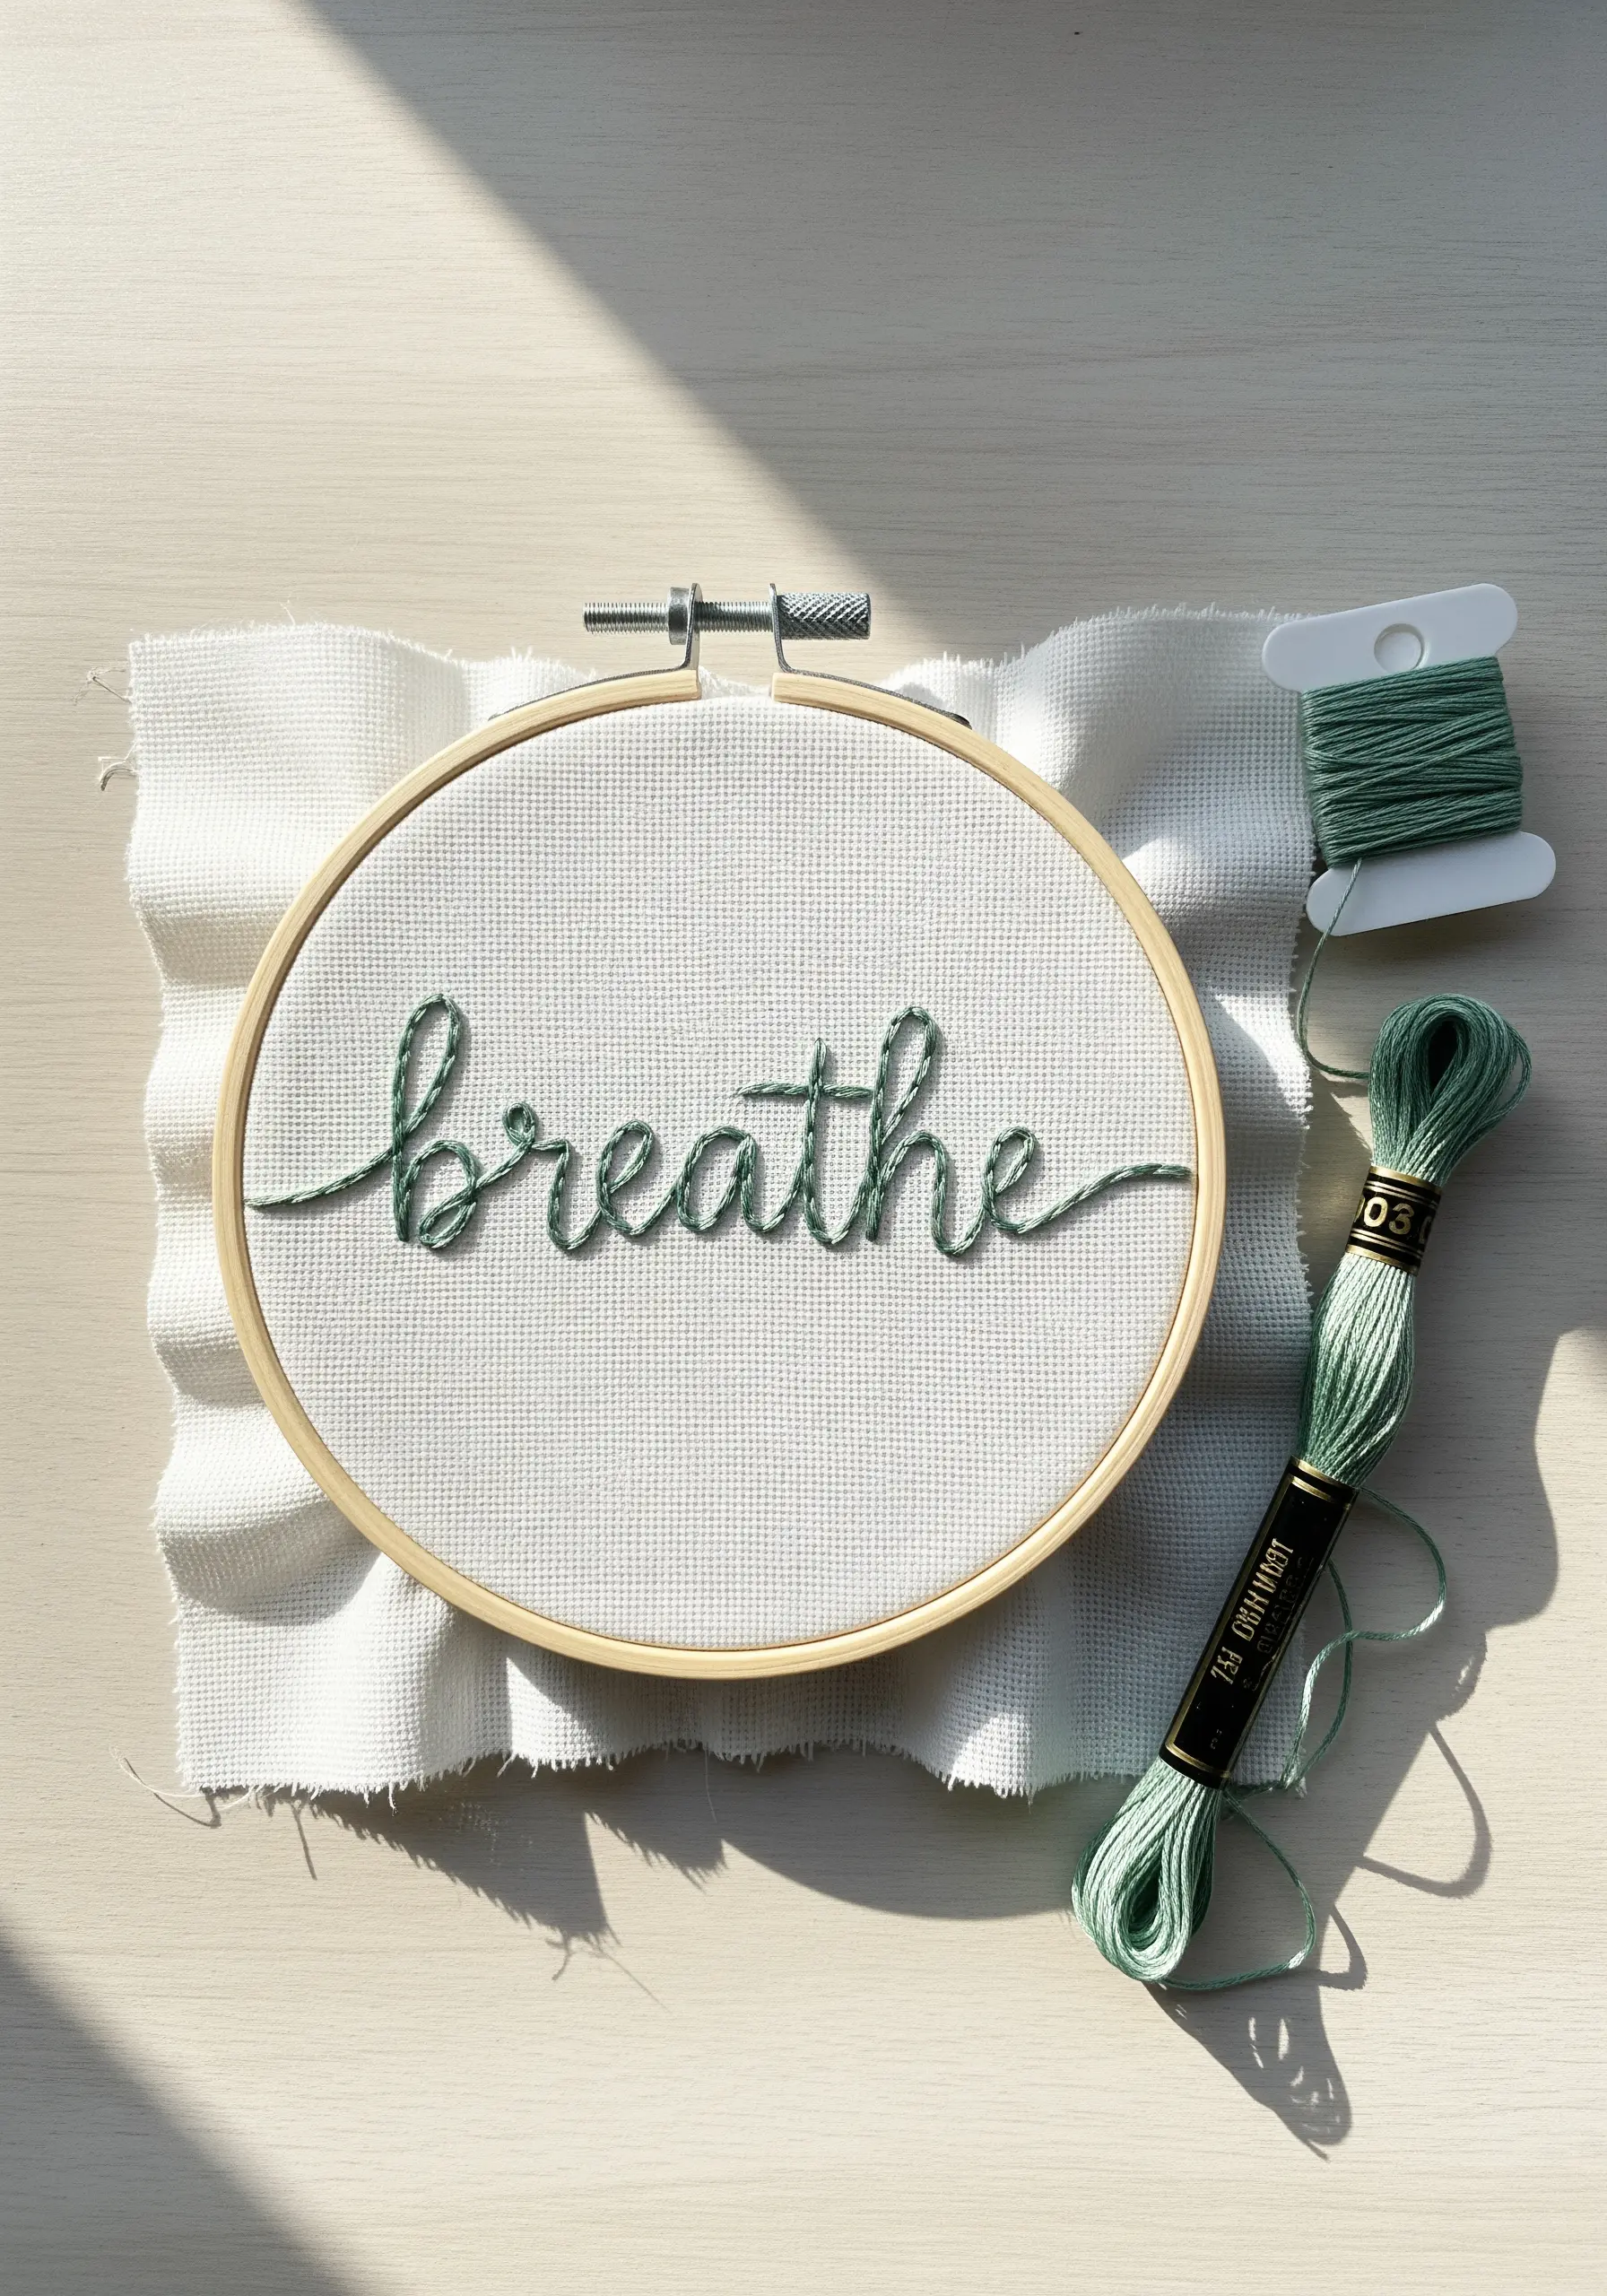
The stem stitch is unparalleled for creating elegant, flowing cursive lettering. Its naturally rope-like texture follows curves with grace.
The key to consistency is to always keep the working thread on the same side of your needle as you take each stitch. This ensures the twist of the stitch remains uniform.
For more calligraphic flair, you can slightly shorten your stitches on tight curves and lengthen them on straighter sections.
Choosing a calming word and a serene color palette creates a piece that is not just a gift, but also a gentle, mindful reminder.
20. The Woodland Mushroom: Padded Satin Stitch & French Knots
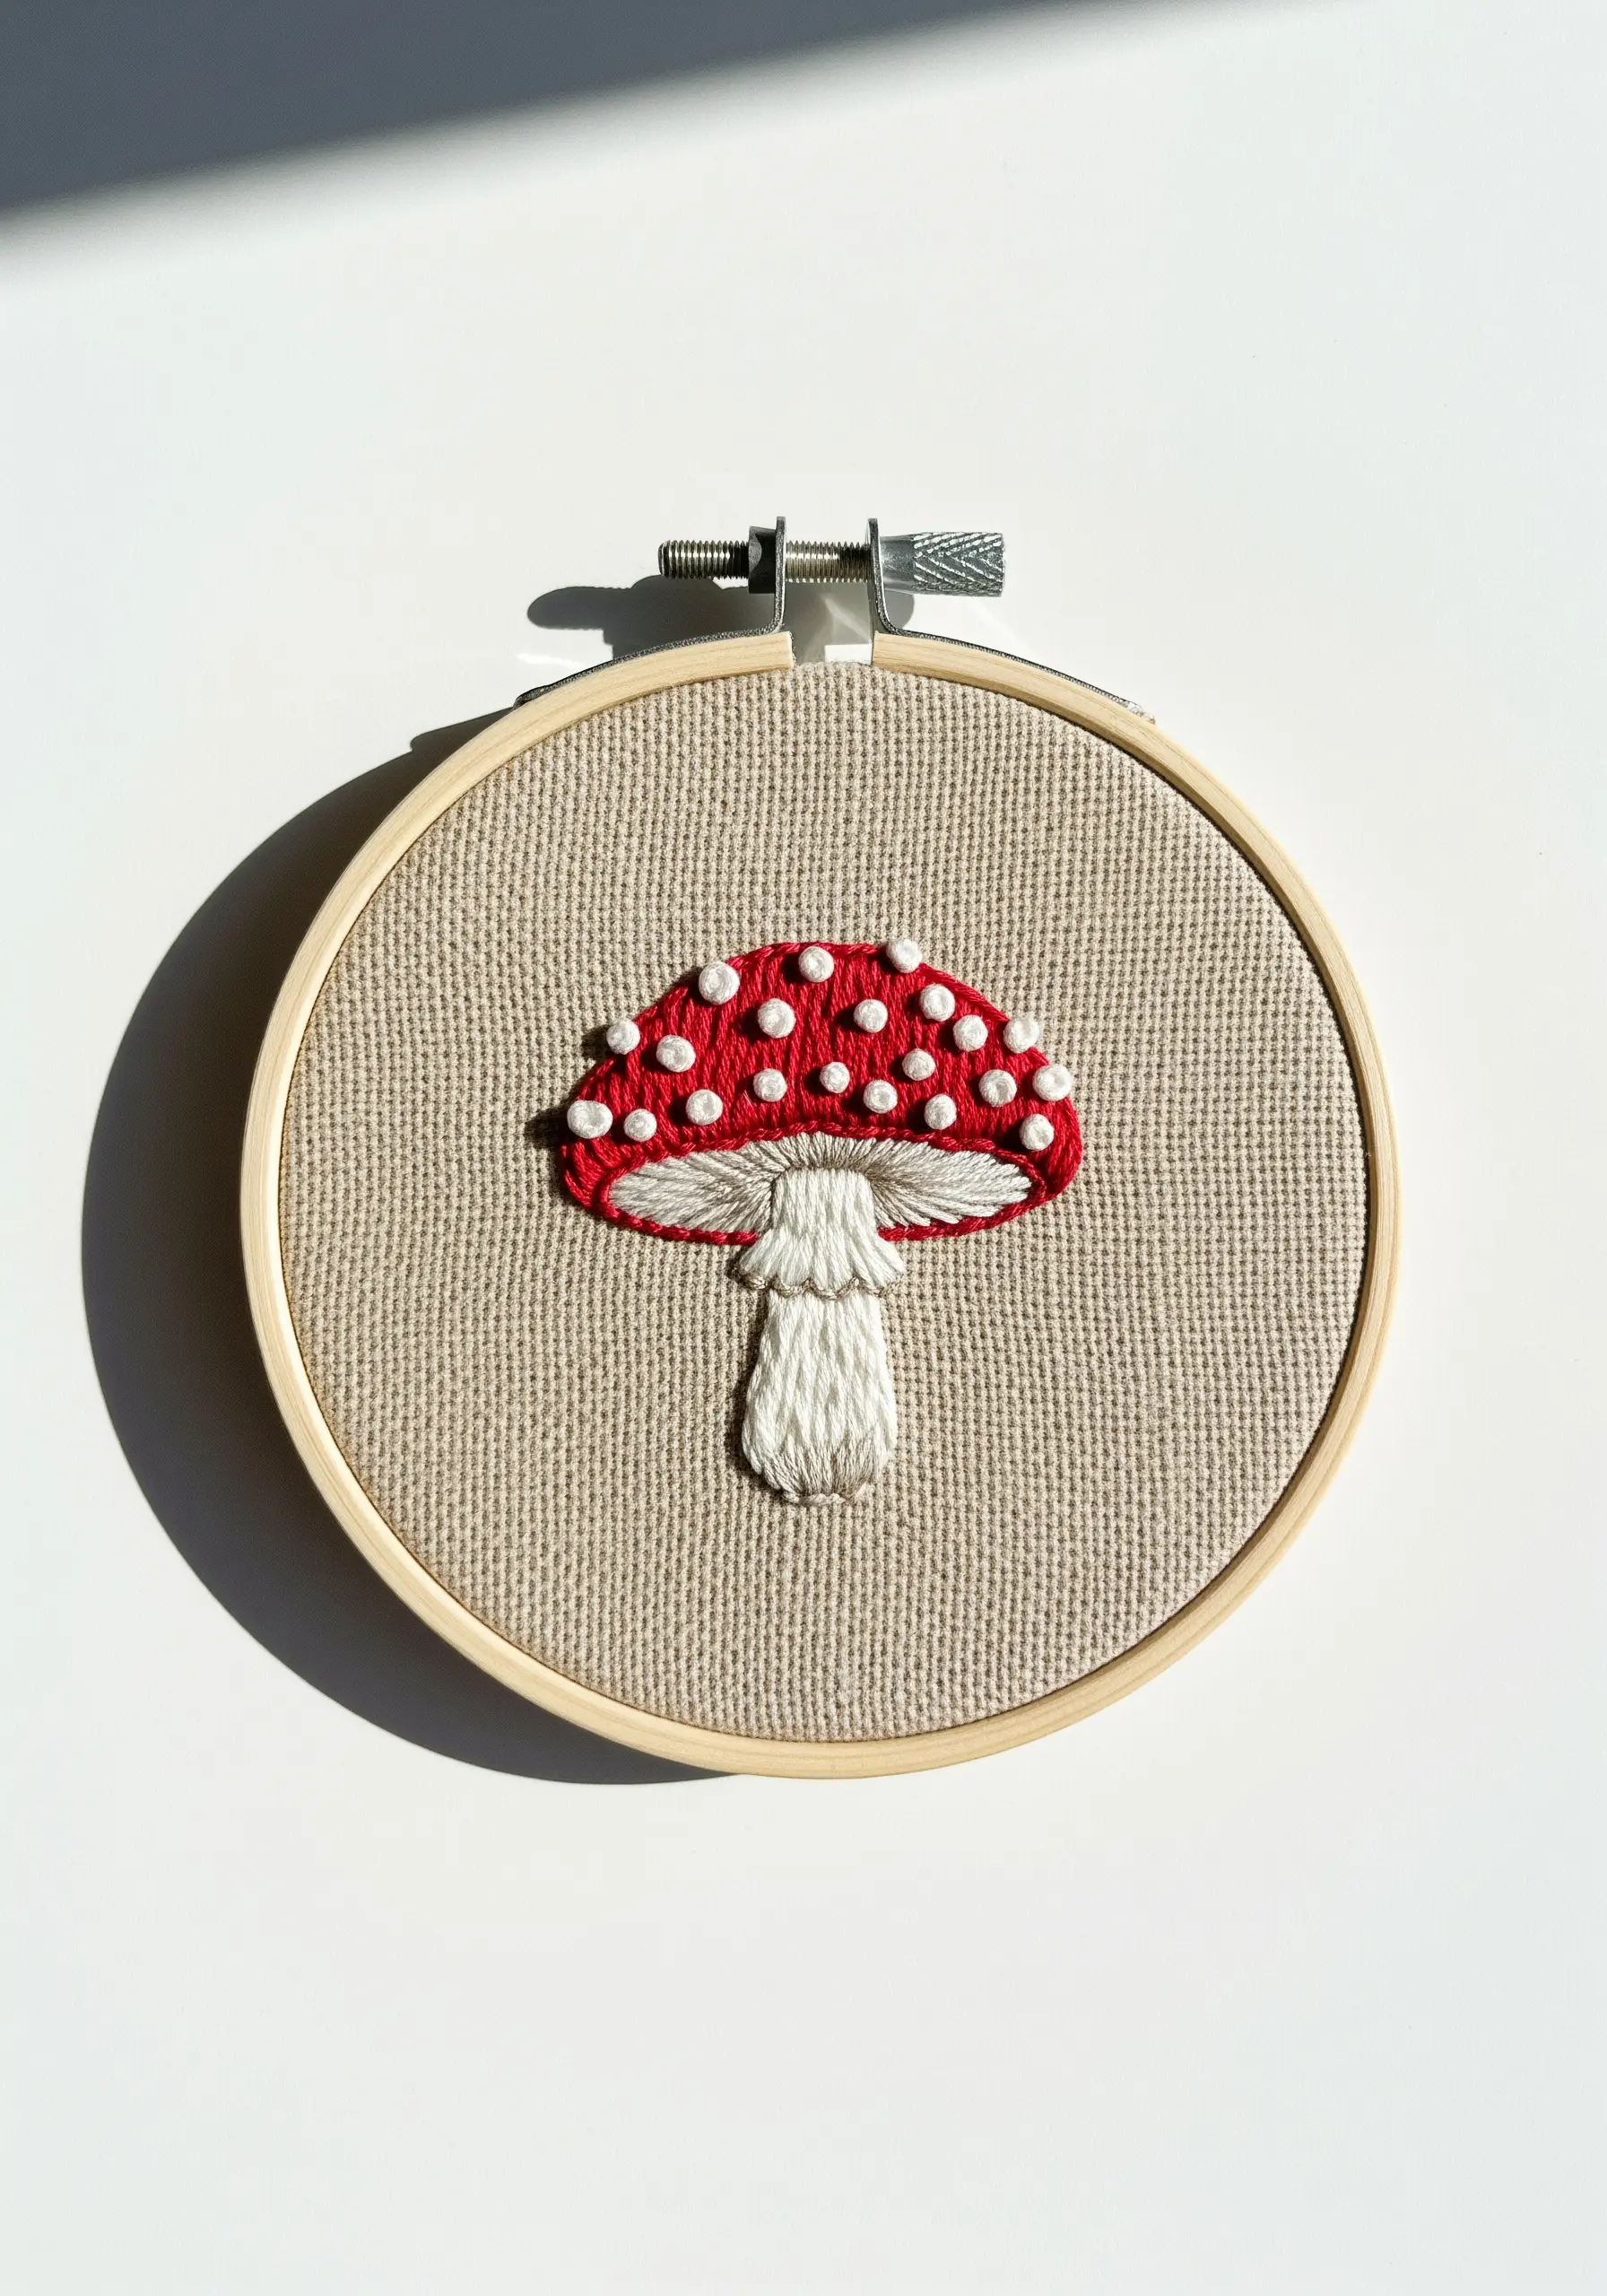
To give the mushroom cap its classic rounded shape, use padded satin stitch. First, create a foundation of small seed stitches, then cover them completely with vertical satin stitches.
Add the white spots using French knots *after* the red cap is finished. This technique makes them sit on top of the satin stitch, enhancing the three-dimensional effect.
For the stem, use vertical satin stitches in off-white, adding a few strands of light grey along one side to create a simple but effective shadow.
This thoughtful combination of techniques creates a charming, storybook-style mushroom with delightful texture and depth.
21. The Woven Color Gradient: Exploring Abstract Texture
This abstract piece uses rows of simple chain stitch to create a surprisingly complex woven, fabric-like texture.
To achieve the smooth gradient, stitch several rows in one color, then switch to the next shade in your sequence. Using five or more analogous shades creates the most beautiful effect.
The trick is to pack the rows of chain stitch tightly together so no background fabric shows through, which strengthens the woven illusion.
This is a perfect example of how to use abstract thread texture hacks to create something dynamic and modern.
22. The Antique Key: Shading with Two Tones
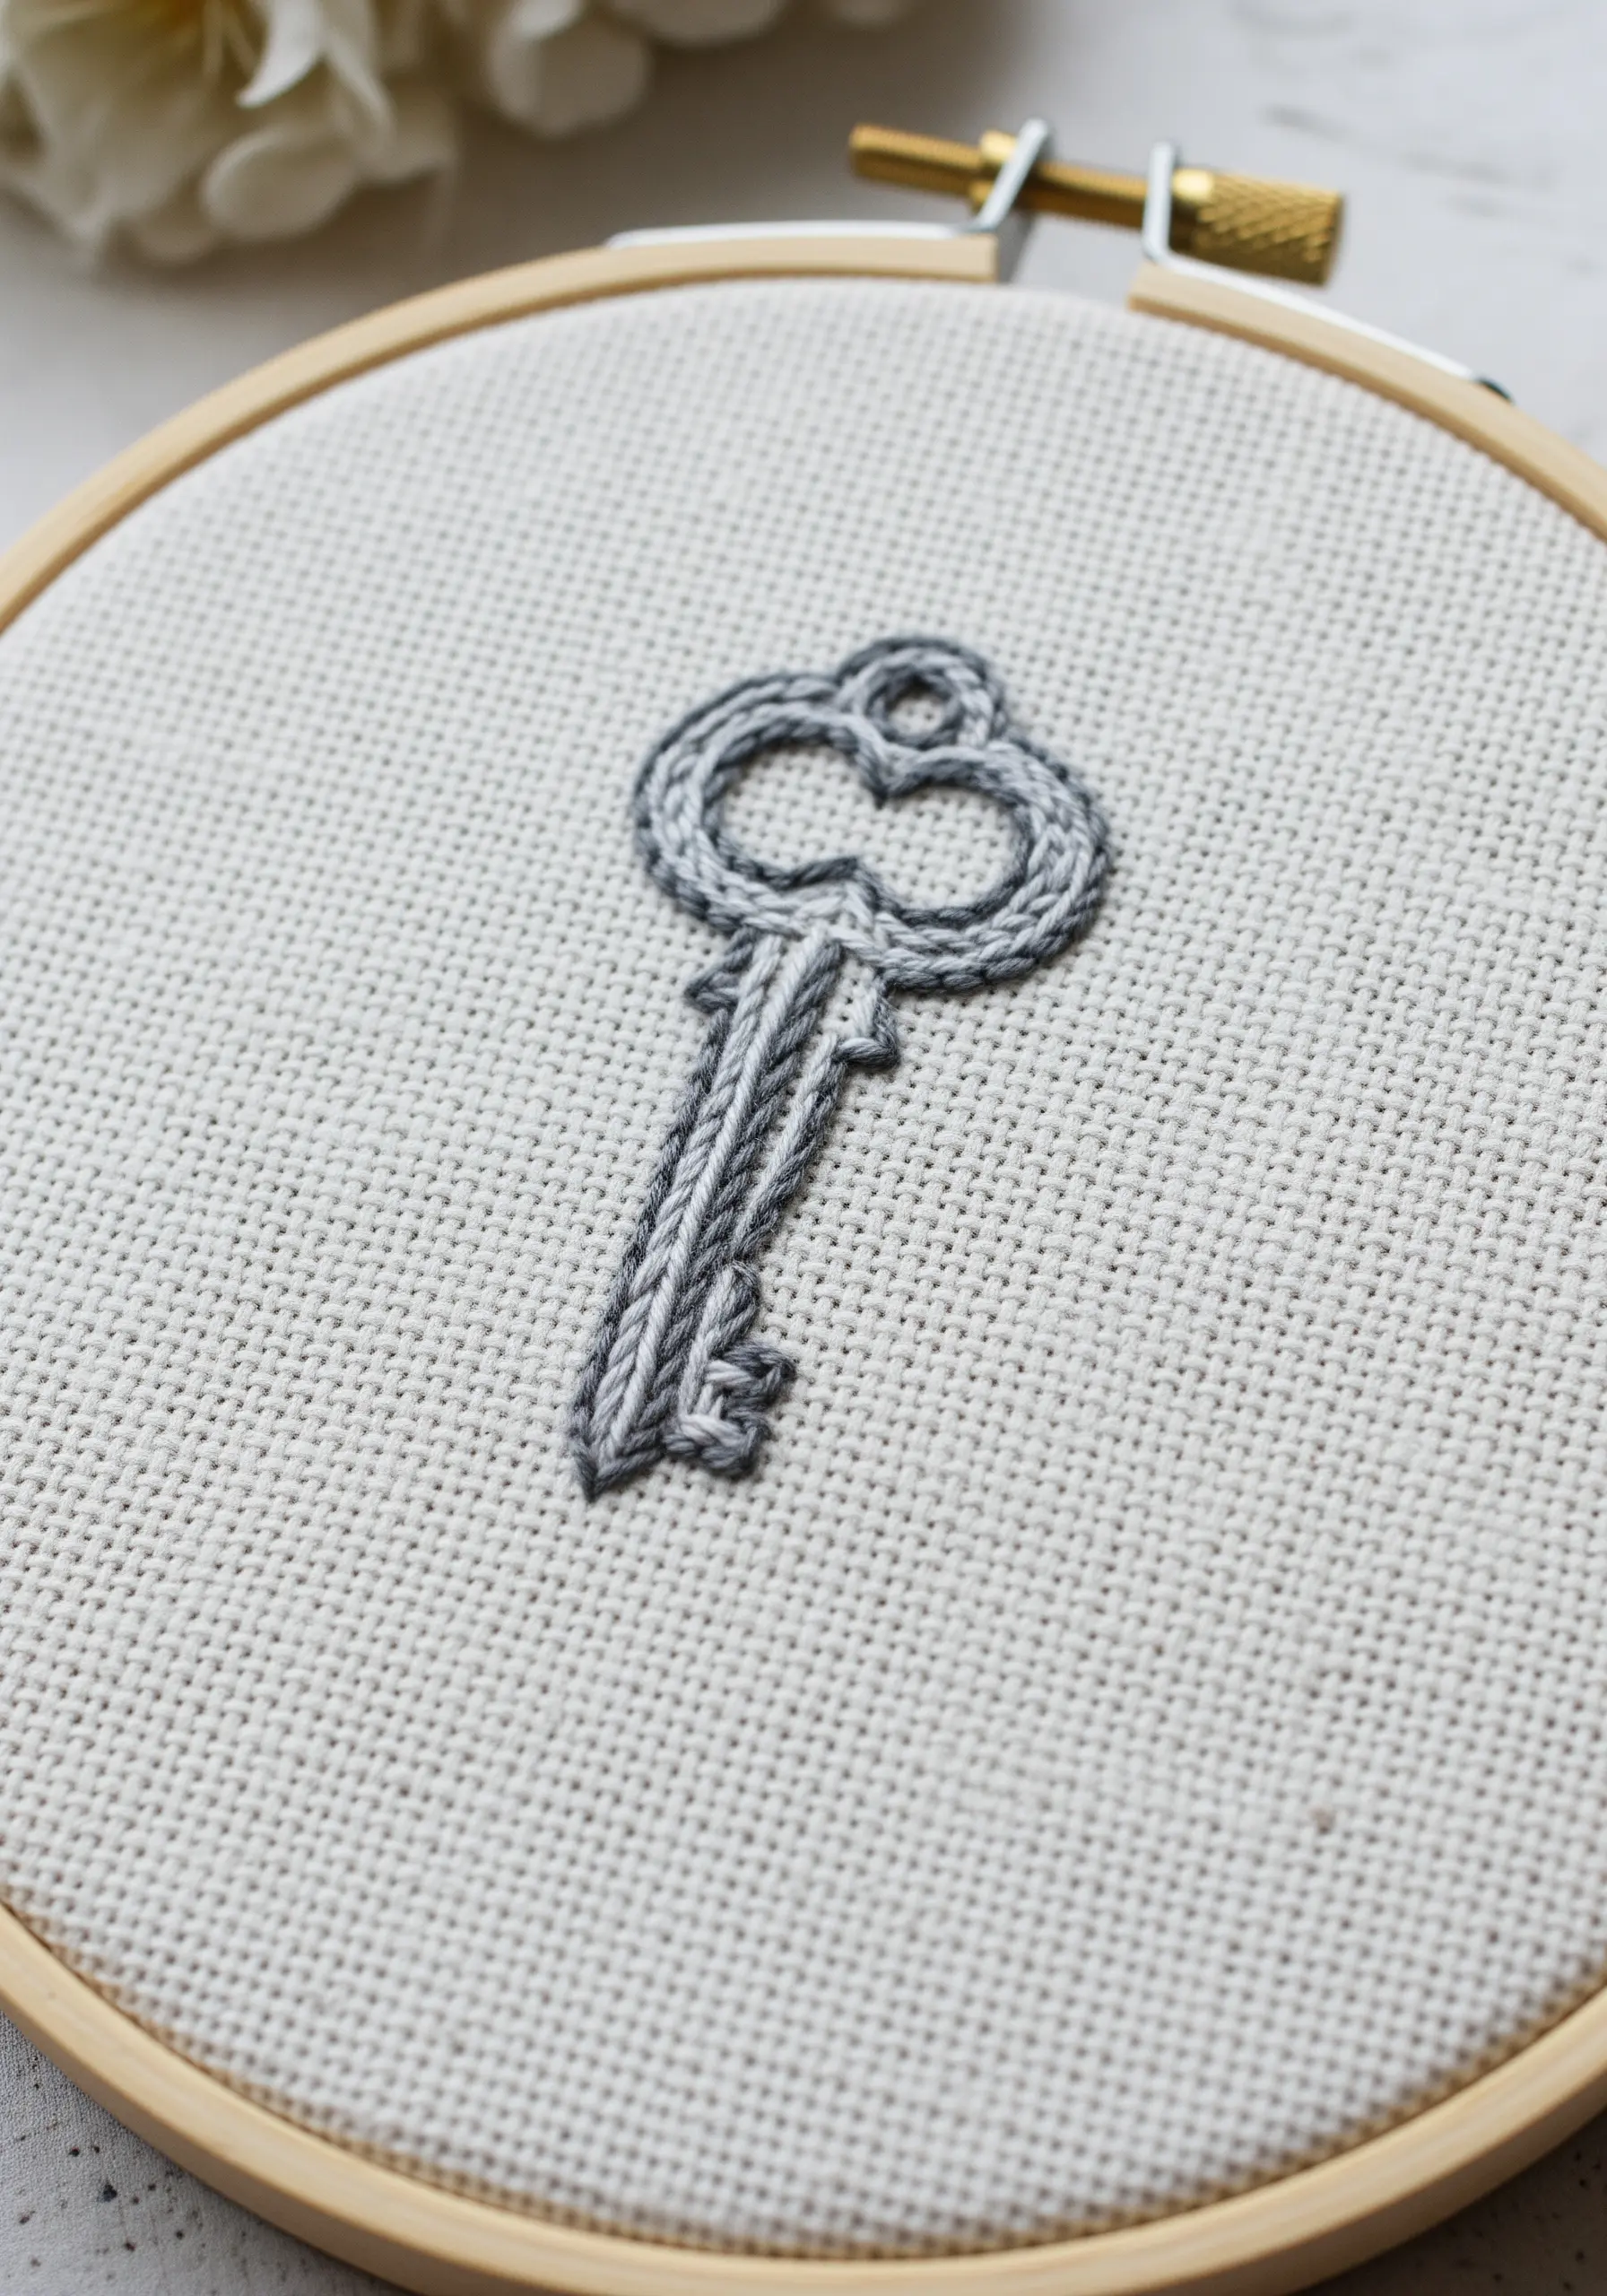
You can create the illusion of aged metal and subtle shadows using just two shades of grey thread.
First, outline the entire key with a split stitch using the darker grey. This clearly defines the shape and provides a crisp edge.
To fill the key, use a satin stitch, but thread your needle with one strand of the light grey and one strand of the dark grey at the same time.
As you stitch, the threads will twist naturally, creating a random, variegated effect that mimics the highlights and lowlights on a real antique key.
23. The Cherry Blossom Branch: Lazy Daisy Blossoms
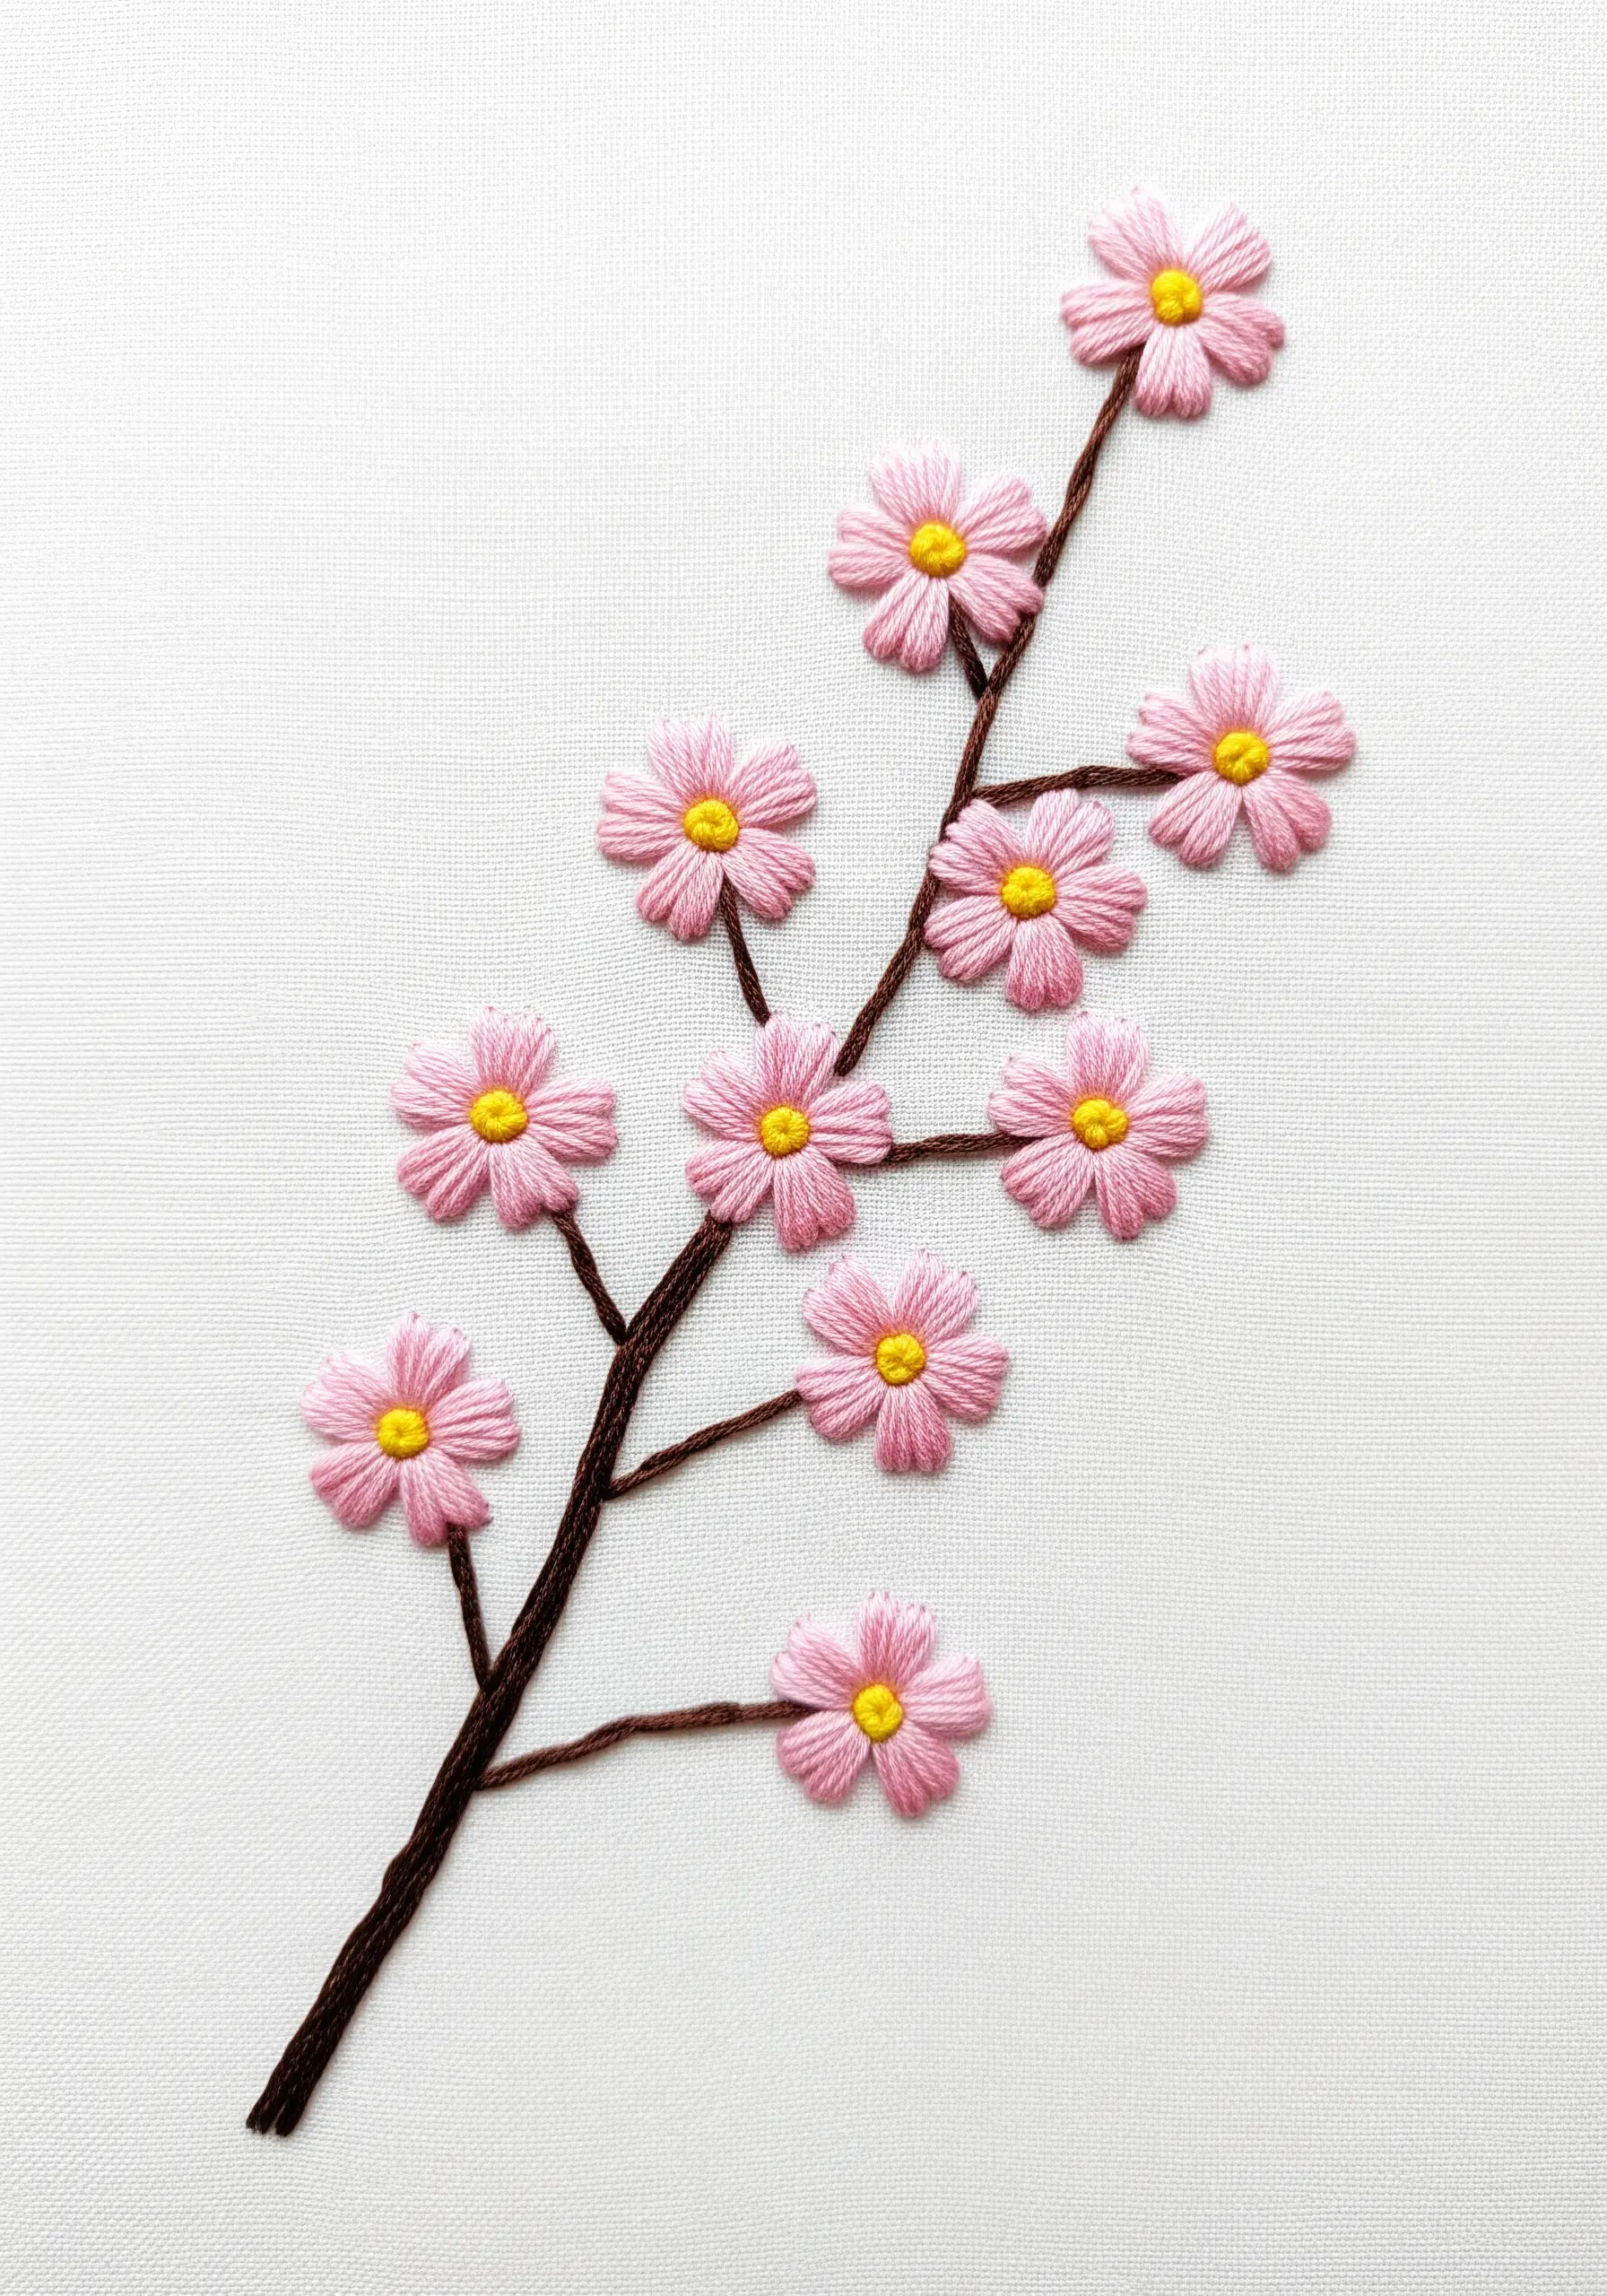
This design is a beautiful reminder that the simplest stitches can create the most stunning results. Each pink blossom is made from five detached chain stitches (lazy daisies) arranged in a circle.
A single French knot in a contrasting yellow at the center of each blossom adds a perfect pop of color and detail.
For the branches, use a thicker thread or more strands to create a robust, textured line. A heavy stem stitch or a whipped backstitch works beautifully.
The scattered, natural placement of the flowers along the dark branches makes the entire composition feel organic and alive.
24. The Abstract Triangle Scatter: Satin Stitch as a Graphic Element
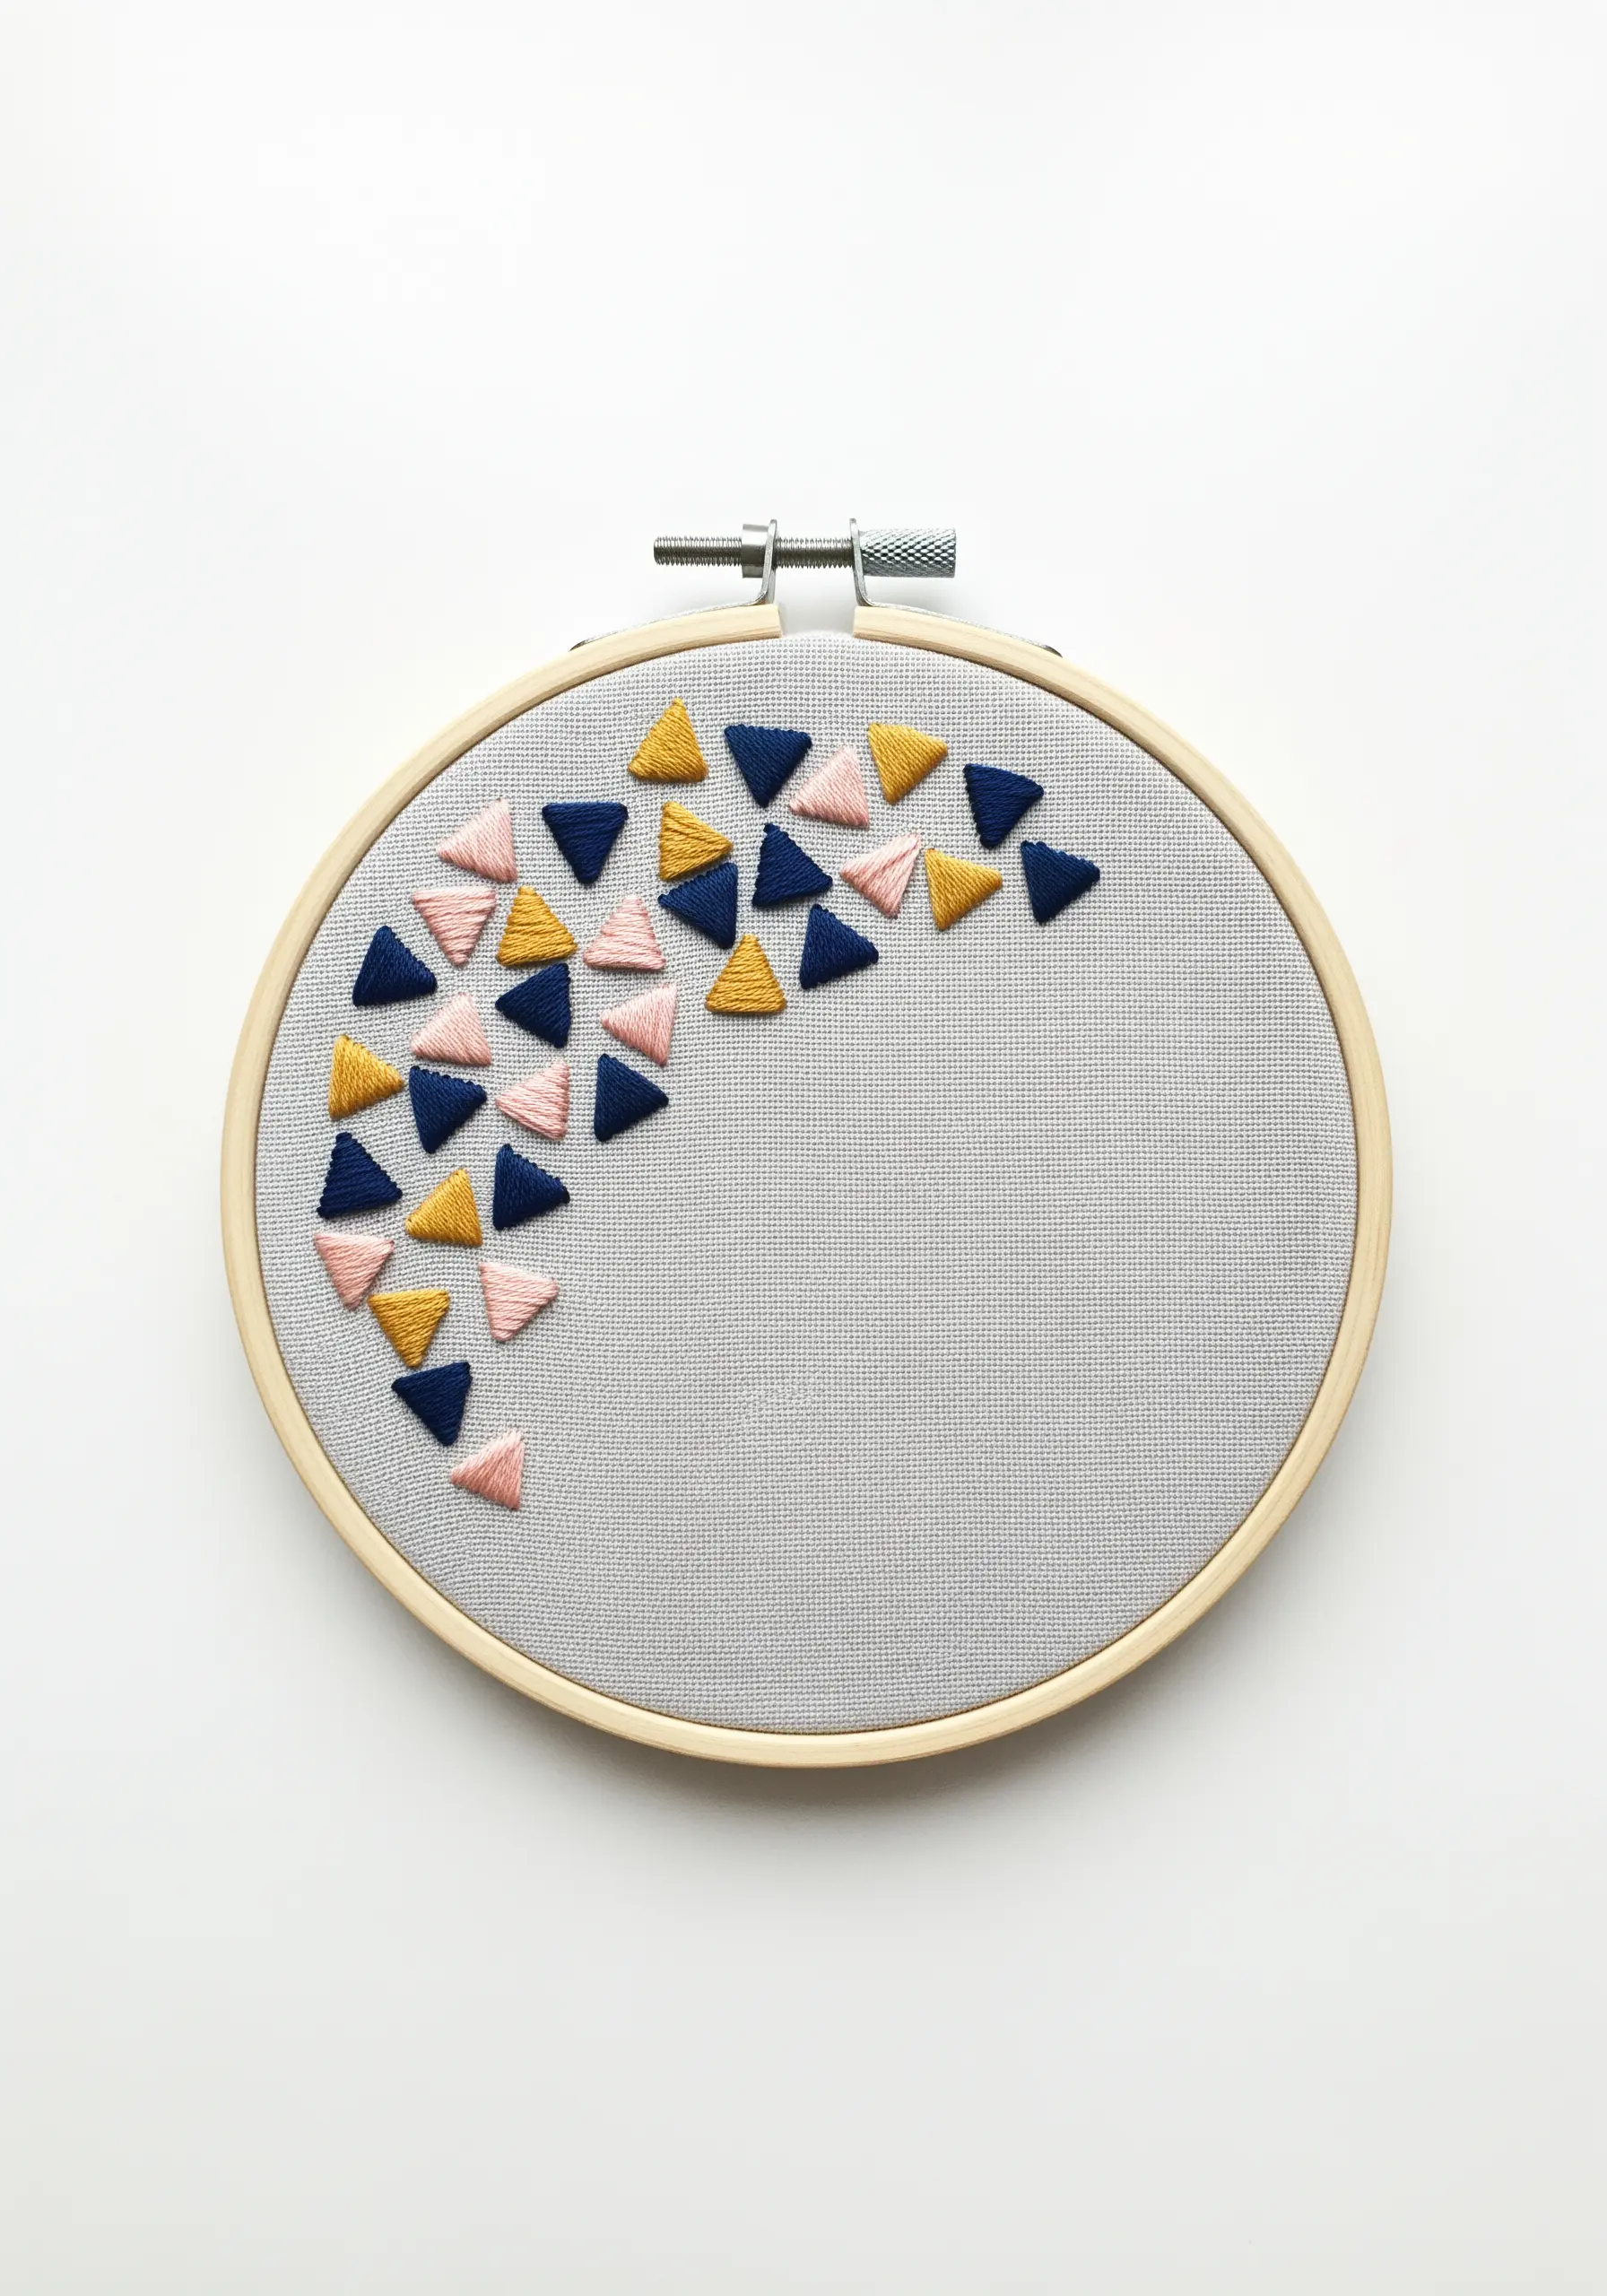
Use satin stitch to fill small geometric shapes for a clean, bold, and modern effect. The triangles become solid blocks of pure color.
To keep the edges perfectly crisp, outline each triangle with a single backstitch before you begin filling it in. This acts as a ‘wall’ for your satin stitches.
Arrange the triangles in an organic, cascading pattern rather than a rigid grid. This clever composition creates a sense of movement and spontaneity.
A limited color palette of three complementary colors—like navy, pink, and ochre—keeps this abstract design feeling cohesive and intentional.
25. The Woven Heart Pincushion: Exploring Basket Weave Stitch
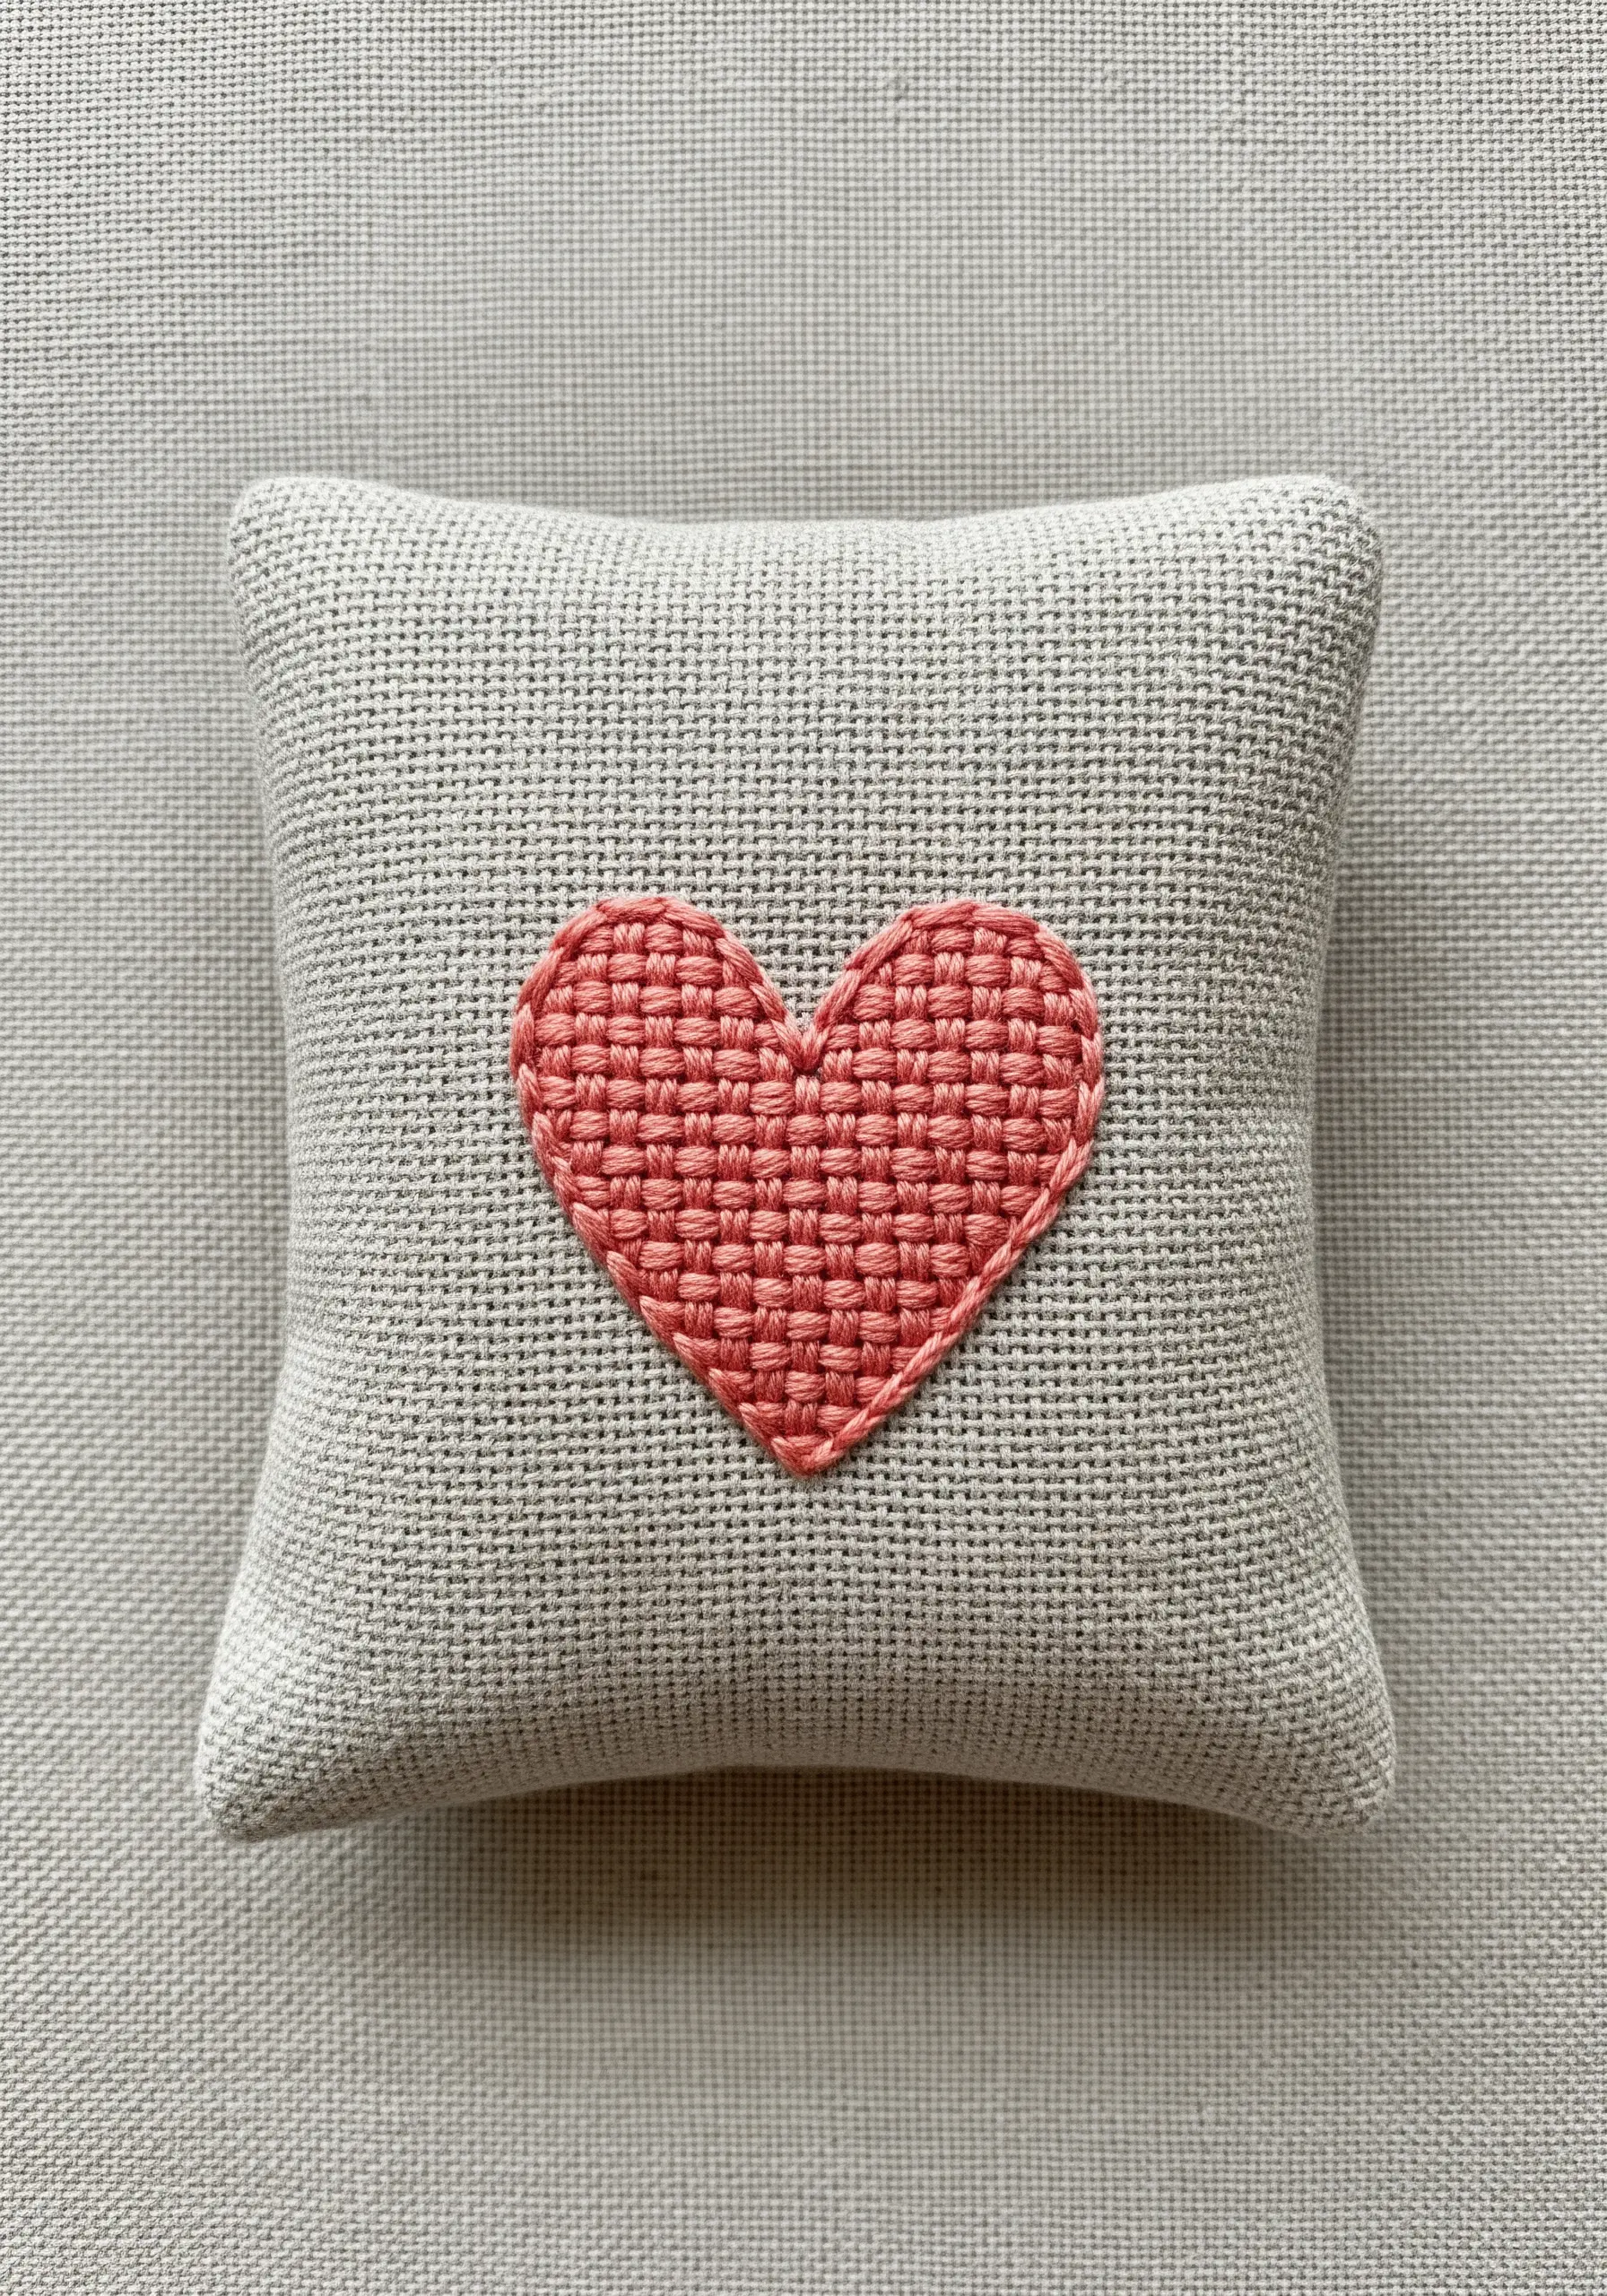
This beautiful, raised texture is created with a basket weave stitch, a surface embroidery technique that looks just like woven fabric.
First, lay down a grid of long, parallel vertical stitches to form the ‘warp’. Then, using a second thread, weave horizontally over and under these vertical stitches to create the ‘weft’.
To form the heart shape, simply adjust the length of your initial vertical stitches to match your transferred outline.
This stitch is perfect for filling larger areas and creates a wonderfully tactile finish, making it ideal for a pincushion, patch, or one of your warm and cozy pillow embroidery designs.


