

If you’ve ever felt that your embroidery could be… more, this is for you. More polished, more intentional, more expressive. It’s not about mastering a hundred complex stitches or buying expensive threads. It’s about understanding how small, thoughtful choices can transform your work from a simple craft into a piece of art.
Think of each hoop as a canvas and your needle as a paintbrush. The direction of a single stitch can create movement. The thickness of a thread can create depth. The space you leave empty can be just as powerful as the space you fill.
This weekend, I invite you to try one of these ideas. Not just to follow a pattern, but to see how a specific technique feels in your hands. Notice how a whipped backstitch smooths a line, or how layering felt creates instant texture. These are the details that build confidence and, more importantly, help you develop a style that is uniquely yours.
1. Radiate with Minimalist Sunbursts
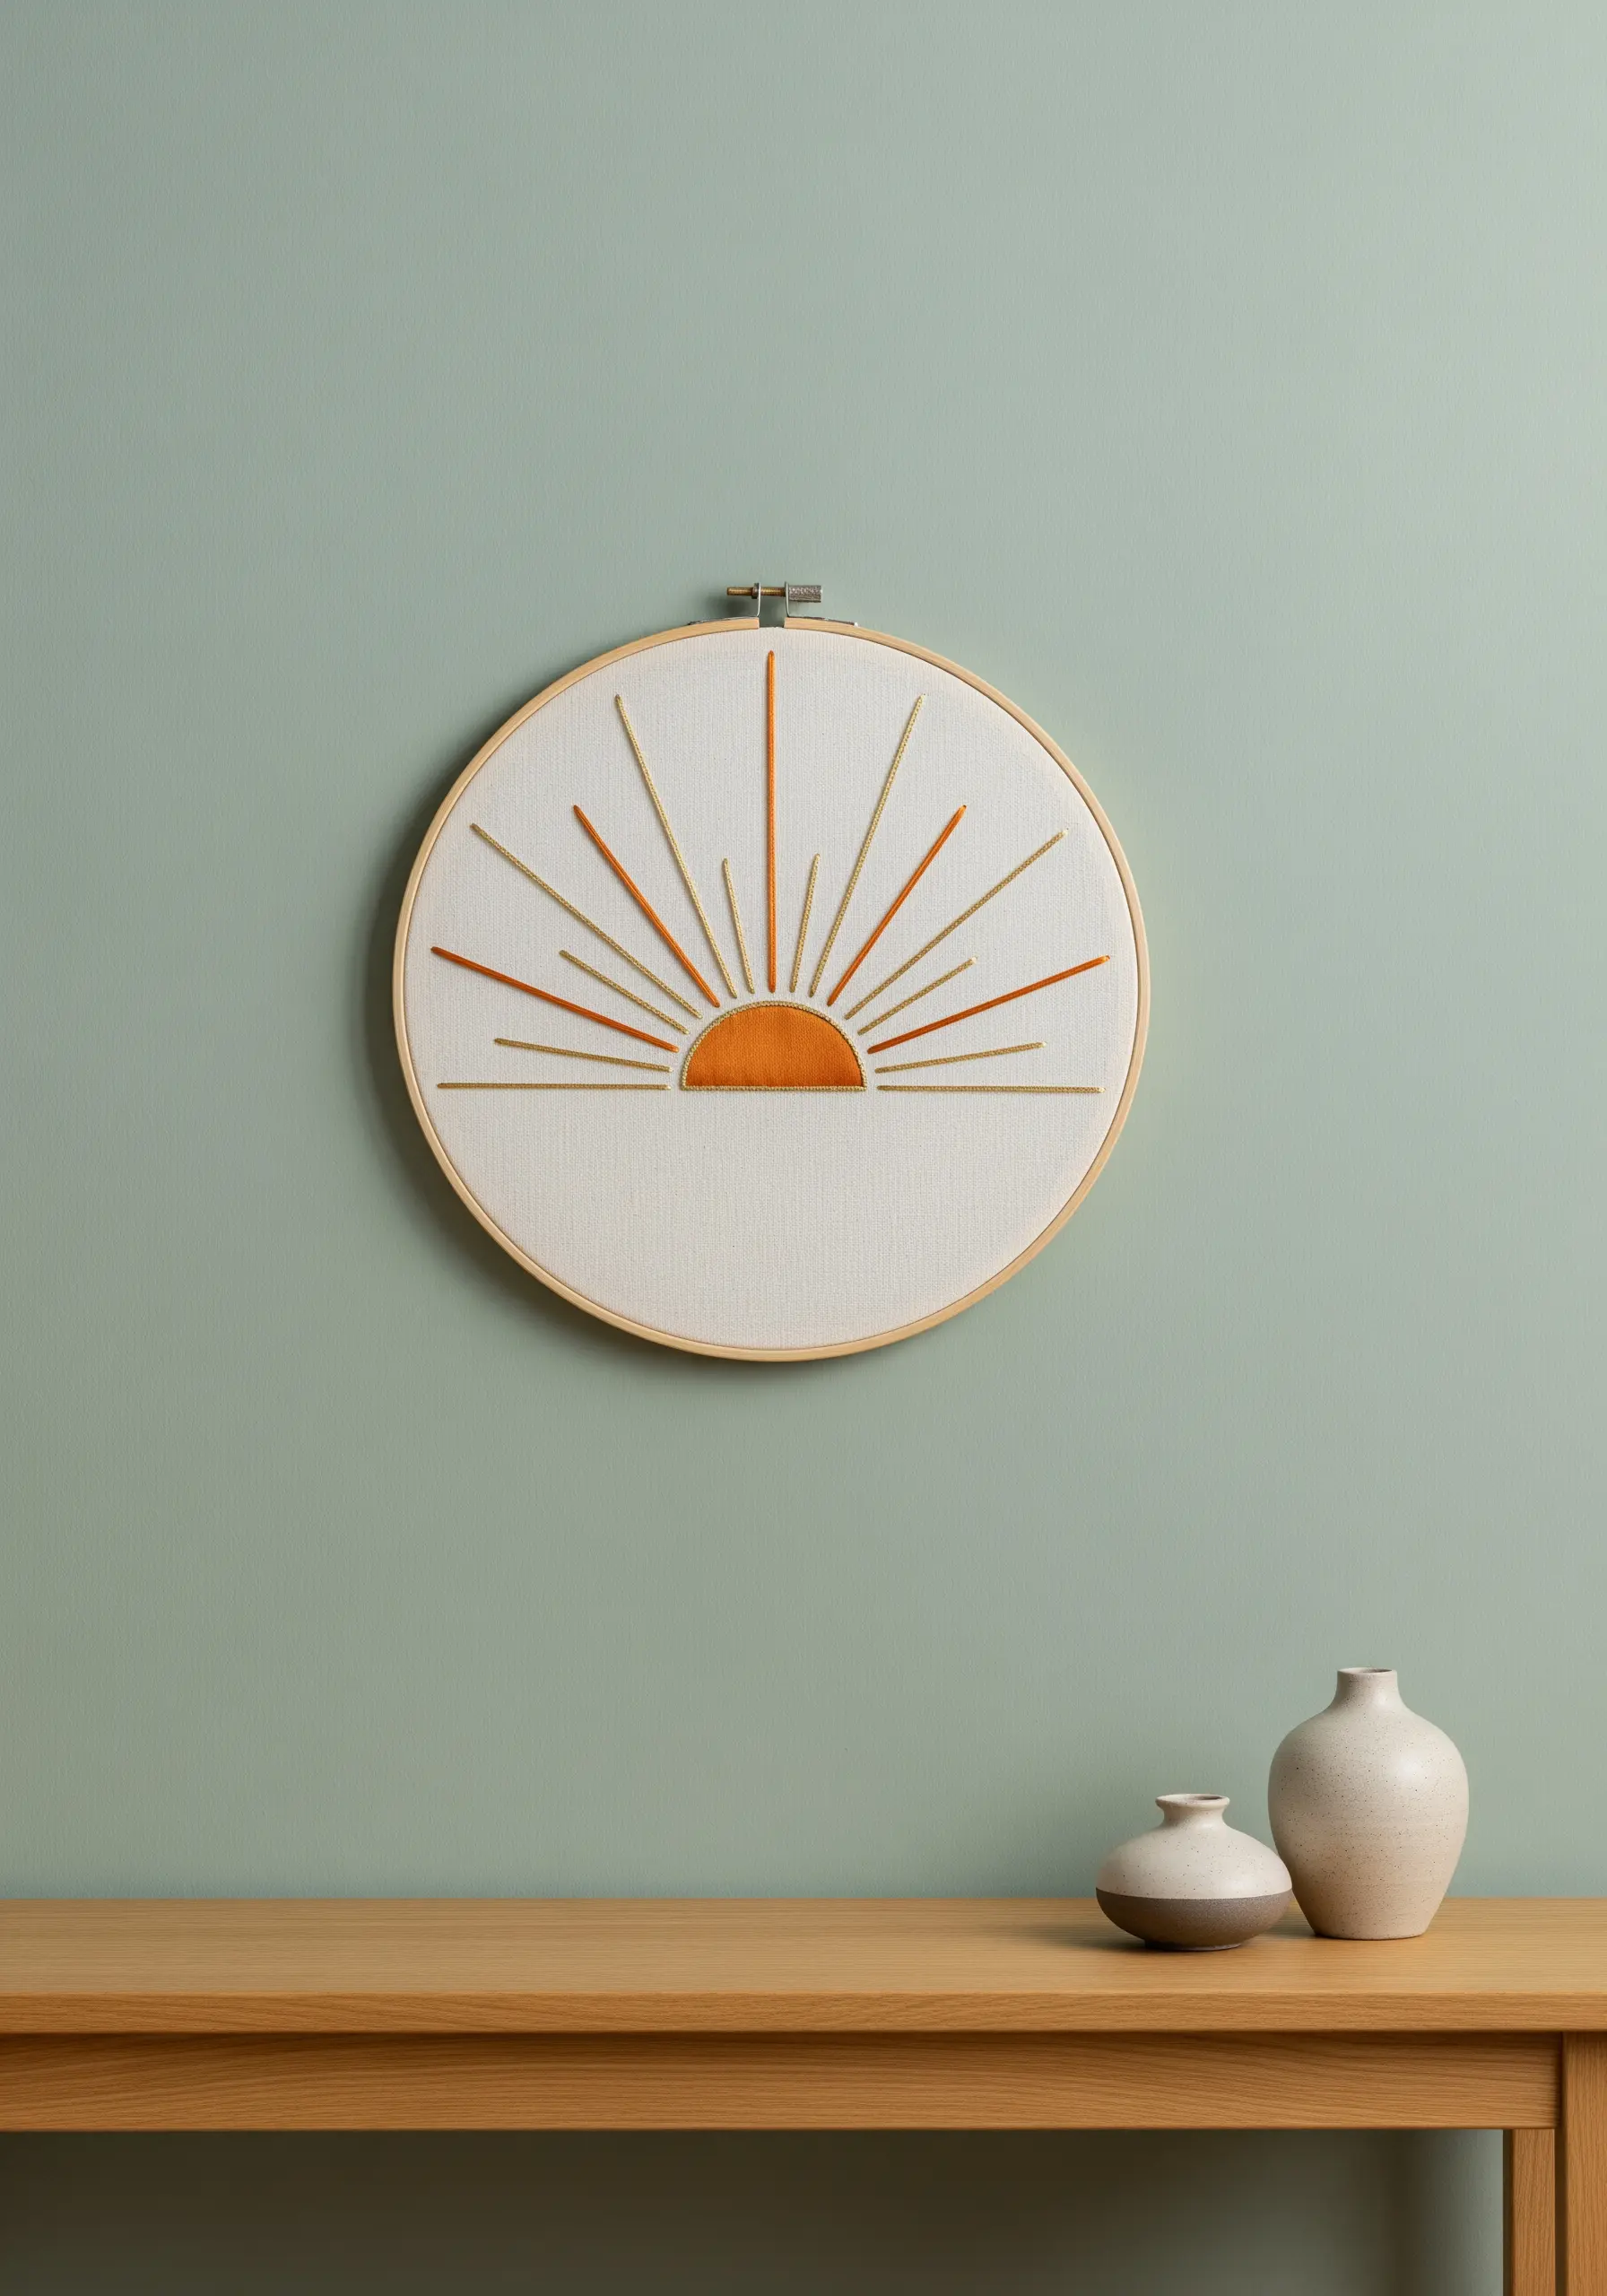
Create a striking sunburst using just two stitches: a padded satin stitch for the semi-circle and a whipped backstitch for the rays.
First, outline the sun’s base with small backstitches, then fill it with horizontal straight stitches to create padding.
Cover this padding with a vertical satin stitch using a warm orange to give it a subtle, raised dimension.
For the rays, use a whipped backstitch to ensure each line is perfectly smooth and uninterrupted, which is critical for achieving this clean, graphic look.
Alternating a matte thread with a single strand of metallic floss in the rays adds a gentle shimmer that catches the light without overpowering the design.
2. Cultivate a Cohesive Botanical Trio

Groupings of hoops create a powerful statement, but the key to a polished look is cohesion through variety.
Choose three distinct leaf shapes—like monstera, fern, and eucalyptus—but stitch them using a unified color palette of greens.
Use fishbone stitch for the monstera to create its distinct central vein organically.
For the delicate fern, use fly stitches branching off a central stem stitch line; this technique is faster than individual straight stitches and gives a more natural flow.
The eucalyptus leaves are perfect for a simple satin stitch, which gives them a smooth, solid appearance that contrasts beautifully with the other textures.
Displaying them in hoops of slightly different sizes adds dynamic balance to your wall.
3. Illuminate a Night Sky with Mixed Textures

Move beyond thread alone to create a captivating focal point, like this shimmering crescent moon.
Instead of filling the moon with satin stitch, cut the shape from a piece of glittery or metallic fabric and appliqué it onto your dark background.
Secure the appliqué with tiny, almost invisible couching stitches around the edge using a single strand of matching metallic thread for a crisp outline.
For the stars, use a combination of simple straight stitches and French knots in white, yellow, and silver metallic thread to create varied points of light and depth.
This material contrast on a dark navy linen is what makes the design feel so magical and professional.
4. Master Abstract Color Blocking with Thread

Achieve a bold, graphic look by treating thread like paint in this abstract design.
The secret to perfectly sharp edges between the color blocks is to first outline each shape with a split stitch.
Then, fill each shape with a dense satin stitch, working your needle just inside that split-stitch border.
This technique creates a clean, defined boundary and prevents the colors from looking messy where they meet.
Vary the direction of your satin stitches in adjacent blocks (e.g., horizontal next to vertical) to enhance the geometric feel and create a subtle play of light across the threads.
5. Build a Rainbow of Raised Stitches

Elevate a simple rainbow motif by assigning a different textural stitch to each color band.
This approach turns a flat design into a tactile piece you can’t help but touch.
Try a bold chain stitch for the outer red band, a knotted Palestrina stitch for the orange, and a whipped backstitch for the yellow to create rope-like textures.
For the delicate inner band, use spaced-out French knots or even small seed beads to introduce a different kind of dimension.
Using a thicker thread, like #5 pearl cotton, will make these textural stitches even more pronounced and satisfying to create.
6. Stitch a Wildflower Meadow with Depth

Create the illusion of a layered, natural meadow by varying your stitches and thread weights.
Start by stitching the elements furthest in the background—like thin grasses—using single-strand straight stitches.
Next, add mid-ground flowers like lavender using stacked lazy daisy stitches along a stem.
Finally, stitch the foreground flowers, like the poppies, using a fuller satin stitch with three or four strands of floss to make them pop.
This simple layering technique, combined with varying the height of each stem, creates a beautiful sense of depth and realism without complicating the design.
7. Perfect Your Satin Stitch with a Lemon Slice
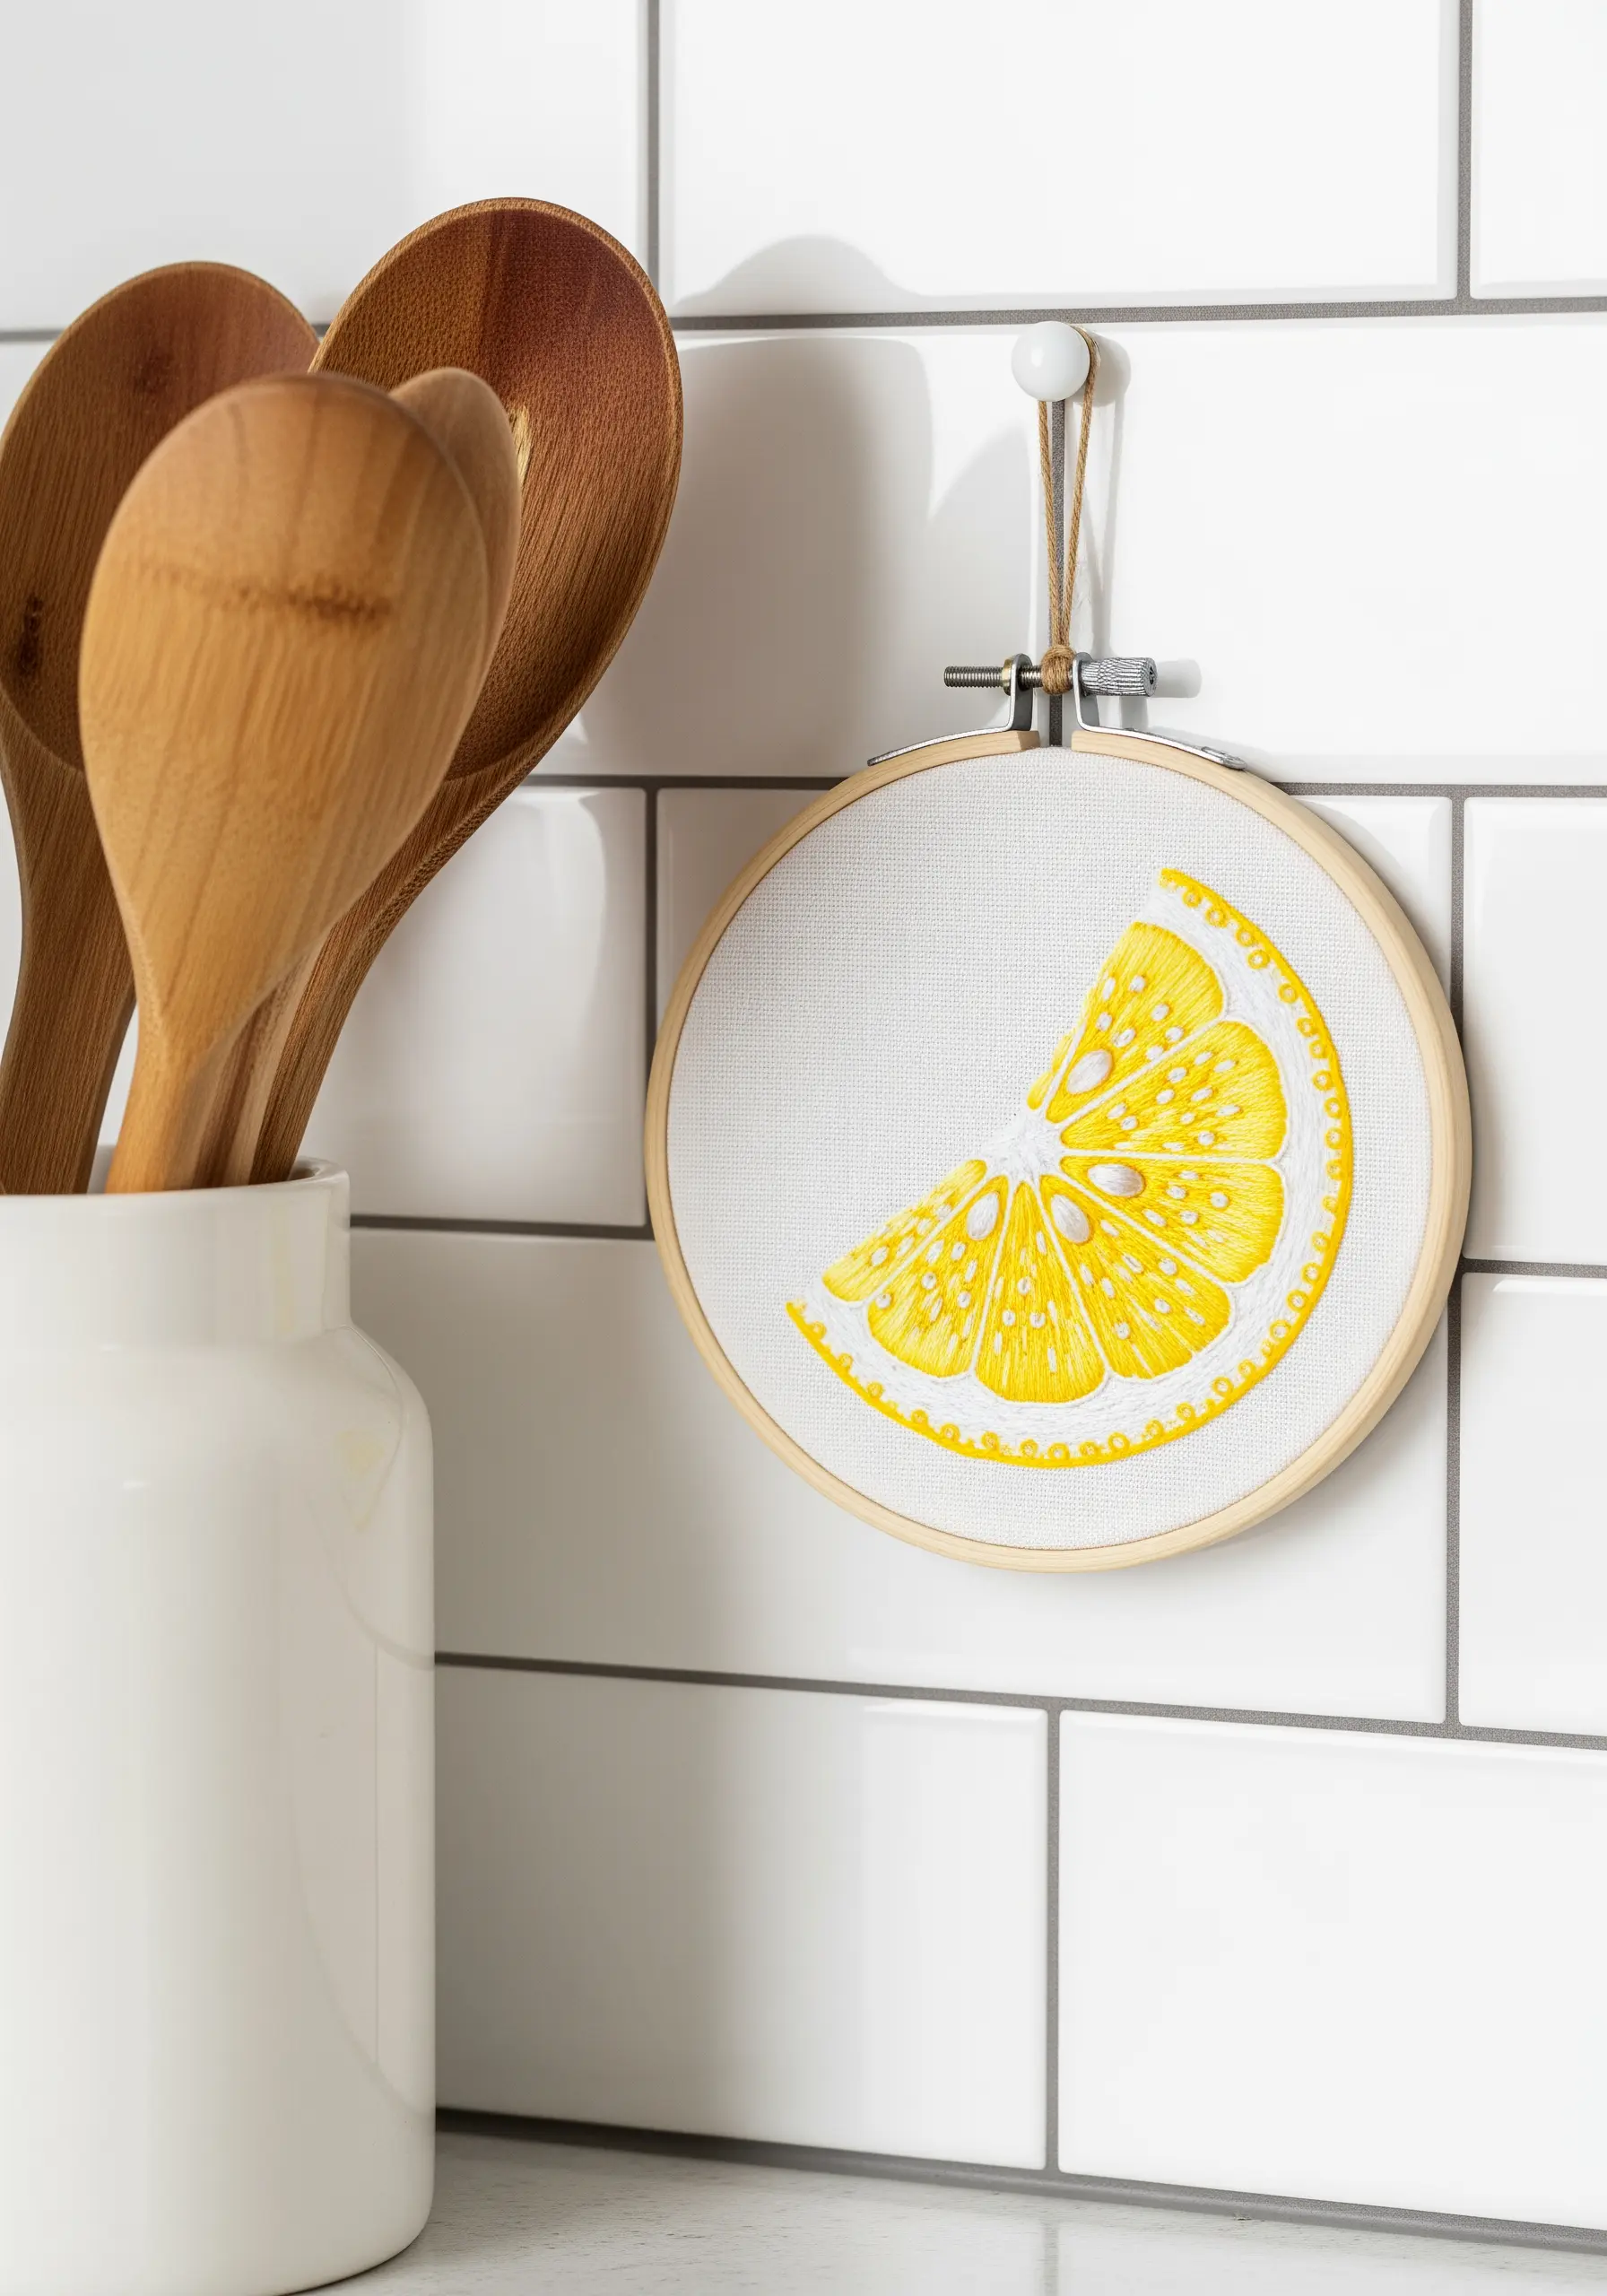
A simple lemon slice is the perfect project for mastering satin stitch direction, which is the key to realism.
For each segment, angle your satin stitches so they converge toward the center of the fruit. This slight change in direction mimics the natural texture of citrus pulp.
Use a clean backstitch with white thread to define the membranes between each segment, giving your work structure and contrast.
For the rind, use short, vertical satin stitches in a slightly darker yellow to differentiate its texture from the flesh.
This thoughtful control over stitch direction is what elevates a simple shape into something lifelike and delicious-looking.
8. Combine Geometric Lines with Organic Textures

This design creates harmony between the strict geometry of a honeycomb and the soft, fuzzy texture of a bee.
Use a crisp backstitch with a dark or metallic thread for the honeycomb outlines to ensure they are sharp and defined.
Fill a few cells with a woven pattern using a seed stitch or long-and-short stitch to add visual interest.
For the bee, create a raised effect by using a padded satin stitch for the body and the turkey stitch for the fuzzy thorax. This stitch creates small loops that you can snip for a soft, fluffy texture that begs to be touched.
9. Paint a Landscape with Ribbon and Thread

Cover large areas of color quickly and beautifully by incorporating silk ribbon or fabric scraps into your landscape.
Instead of filling the mountains with thousands of stitches, cut pieces of ribbon in shades of pink and purple to fit your design.
Lay the ribbon on your background fabric and secure it with small, color-matched couching stitches along the edges. This creates a smooth, luminous surface with a gentle sheen.
You can then embroider smaller details like the cactus and sun directly on top, making this a stunning and efficient mixed media art project.
10. Achieve Flawless Lettering with One Simple Trick

For elegant, flowing script that looks like a single, continuous line, the whipped backstitch is your best friend.
First, stitch your word using a standard backstitch, keeping your stitches small and even, especially around curves.
Then, take a new length of the same thread and, using a tapestry needle, ‘whip’ it around each backstitch without piercing the fabric.
This simple second step completely conceals the individual stitches, creating a smooth, raised line that looks incredibly professional and is perfect for minimalist quote art.
11. Capture the Motion of Water
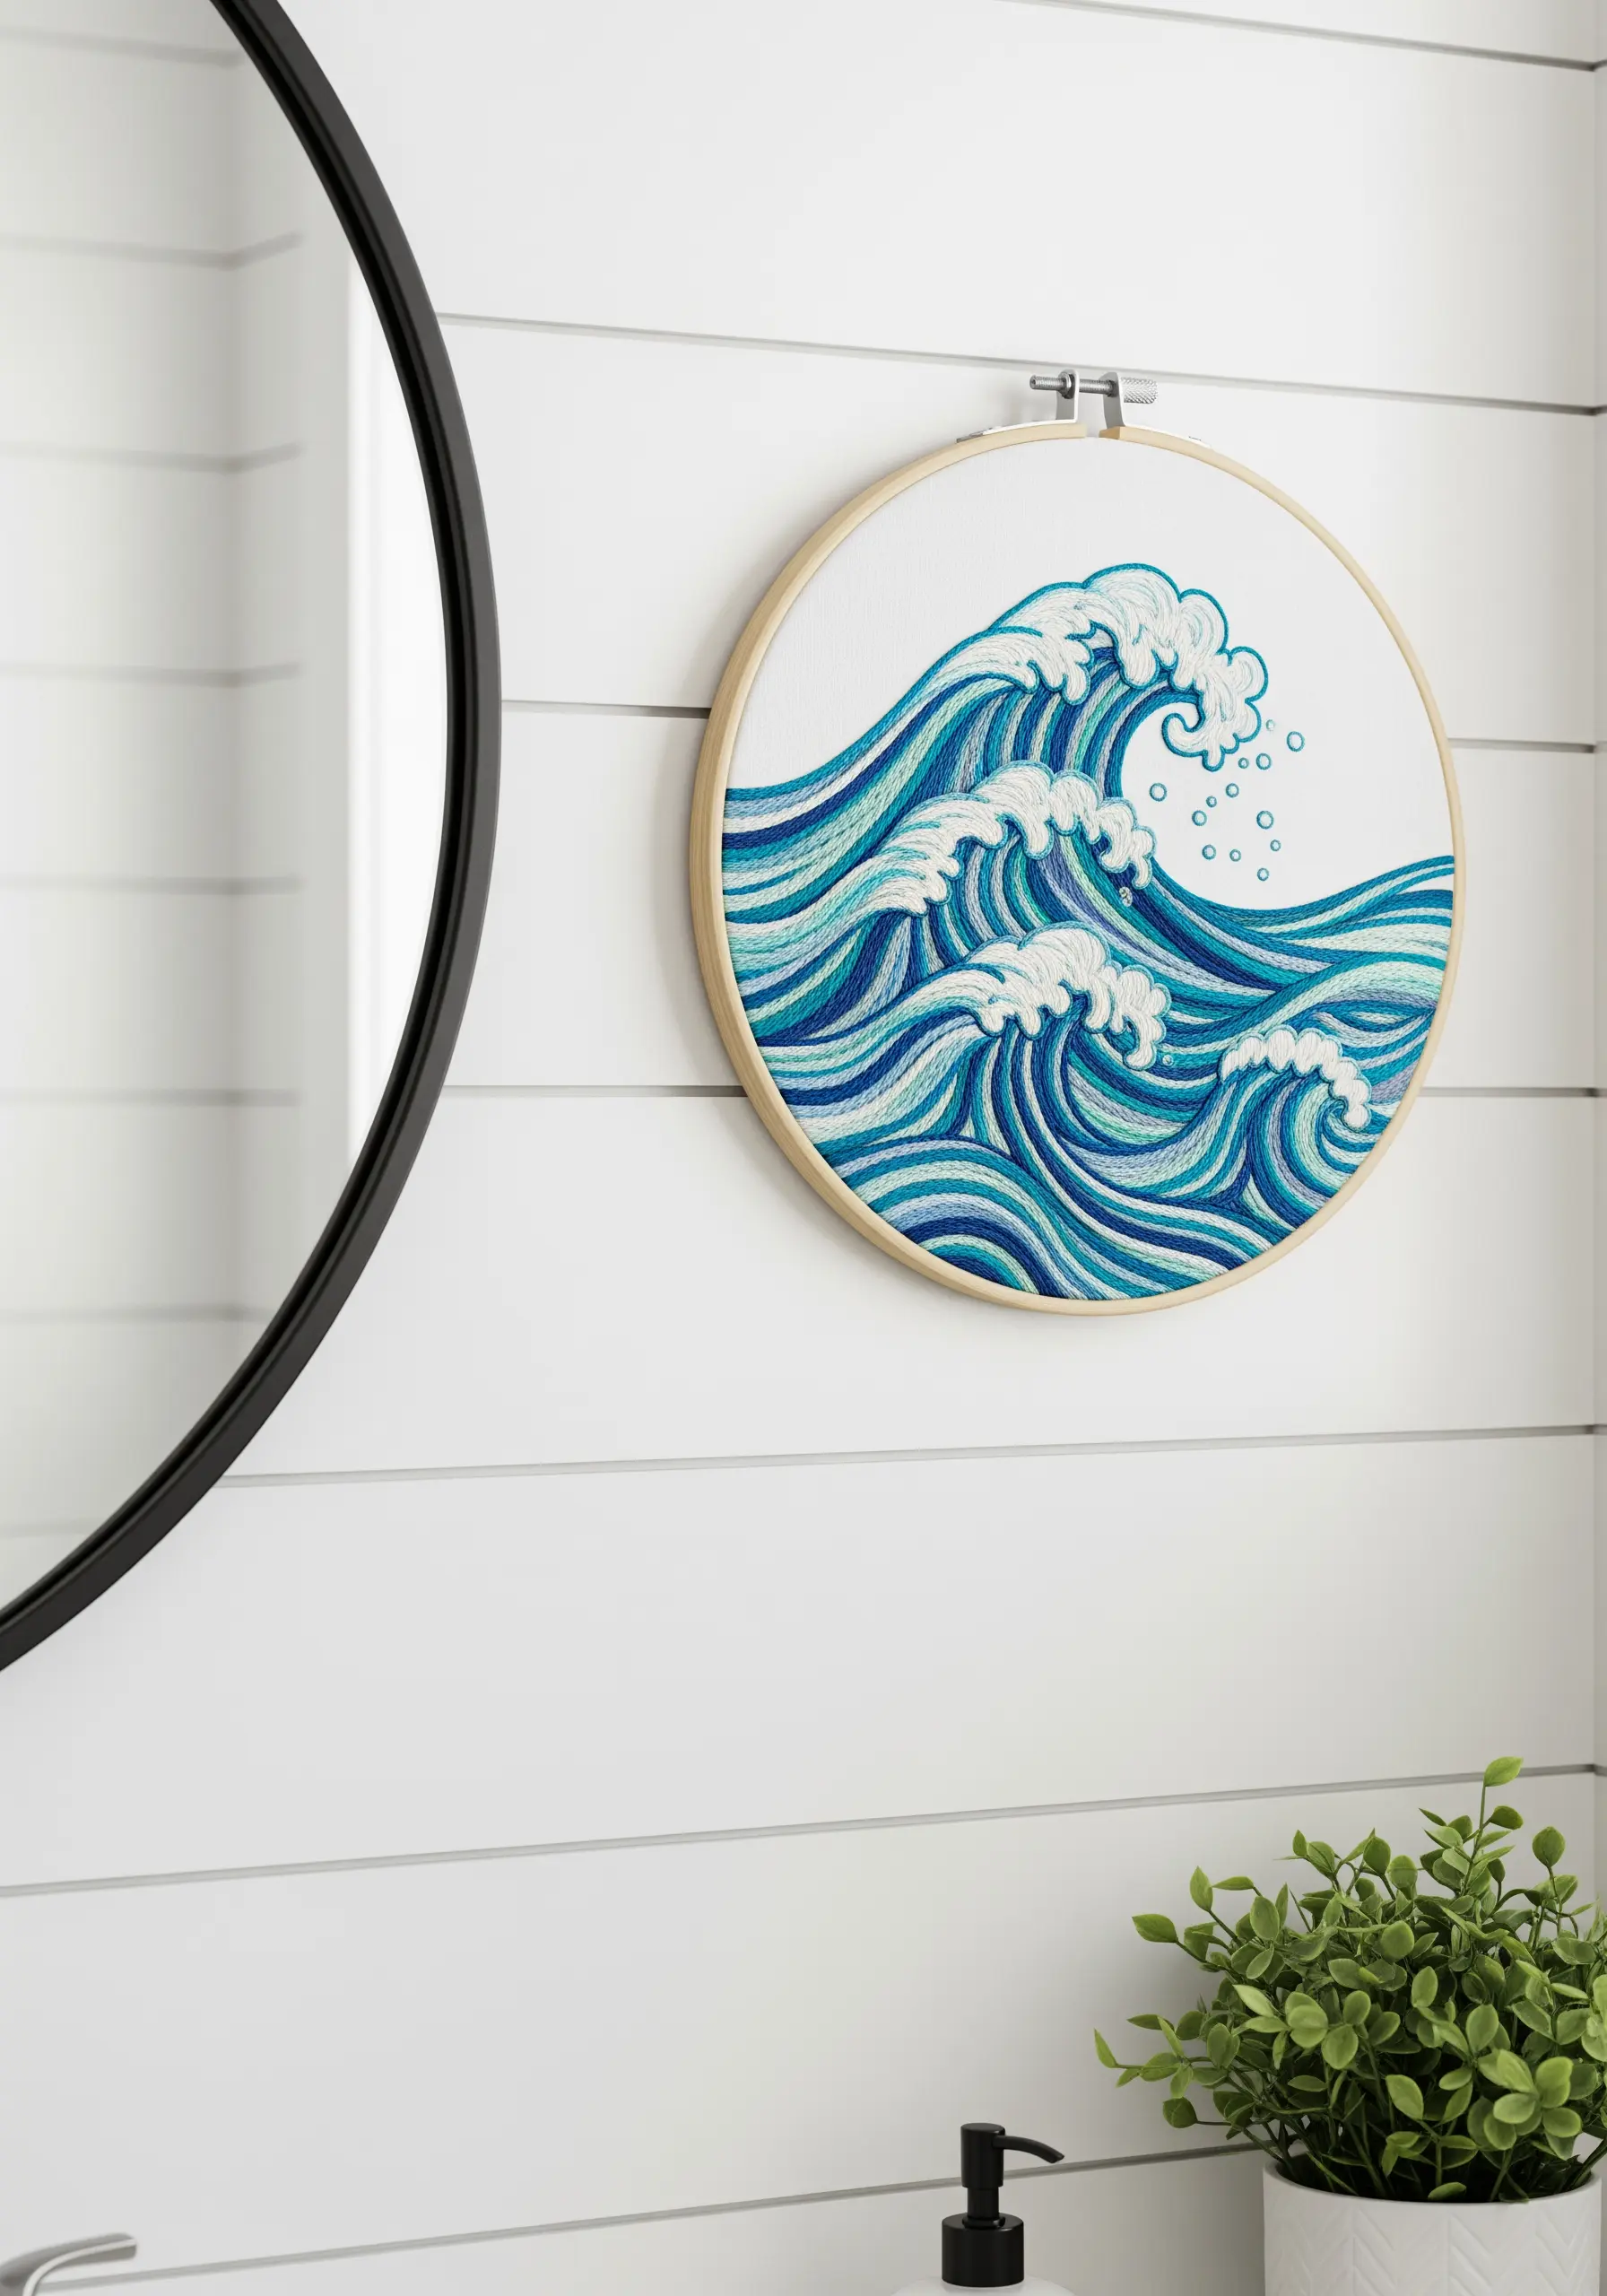
Create the illusion of moving waves by carefully directing your stitches and blending colors.
Use at least three or four shades of blue, from deep navy to light aqua, plus white for the foam.
Fill the sections of the waves using a long and short stitch, ensuring your stitches follow the curve and flow of the water. This directional stitching is what creates the sense of movement.
For the seafoam and spray, use a dense cluster of French knots in white and pale blue. The textural contrast between the smooth waves and the bubbly knots makes the whole piece come alive.
12. Create a Graphic Mountain Scene with Felt Appliqué

For a quick yet impactful piece, step away from the floss and embrace felt.
This project relies on layering cut pieces of felt in different shades of grey and white to build a graphic mountain range.
Use a craft glue stick to temporarily place your felt pieces before securing them with a simple, decorative running stitch.
Choosing a thick, contrasting thread like white pearl cotton for the running stitch adds a charming, handcrafted detail that defines the snowcaps and layers.
This is a perfect weekend project that delivers a modern, textural result with minimal stitching.
13. Master the Elegance of Continuous Line Art

The power of this design lies in its unbroken line, which requires a steady hand and the right stitch.
To create a smooth, continuous line for a portrait, use a stem stitch. Its overlapping nature creates a slightly rounded, rope-like effect that is more fluid than a standard backstitch.
On tight curves, like around the nose and lips, shorten your stitch length significantly. This gives you more control and prevents the line from looking jagged or angular.
Using a single, high-contrast color—like white thread on black fabric—makes this piece of modern line art feel both minimalist and incredibly dramatic.
14. Add Whimsy with a Trio of Mushrooms
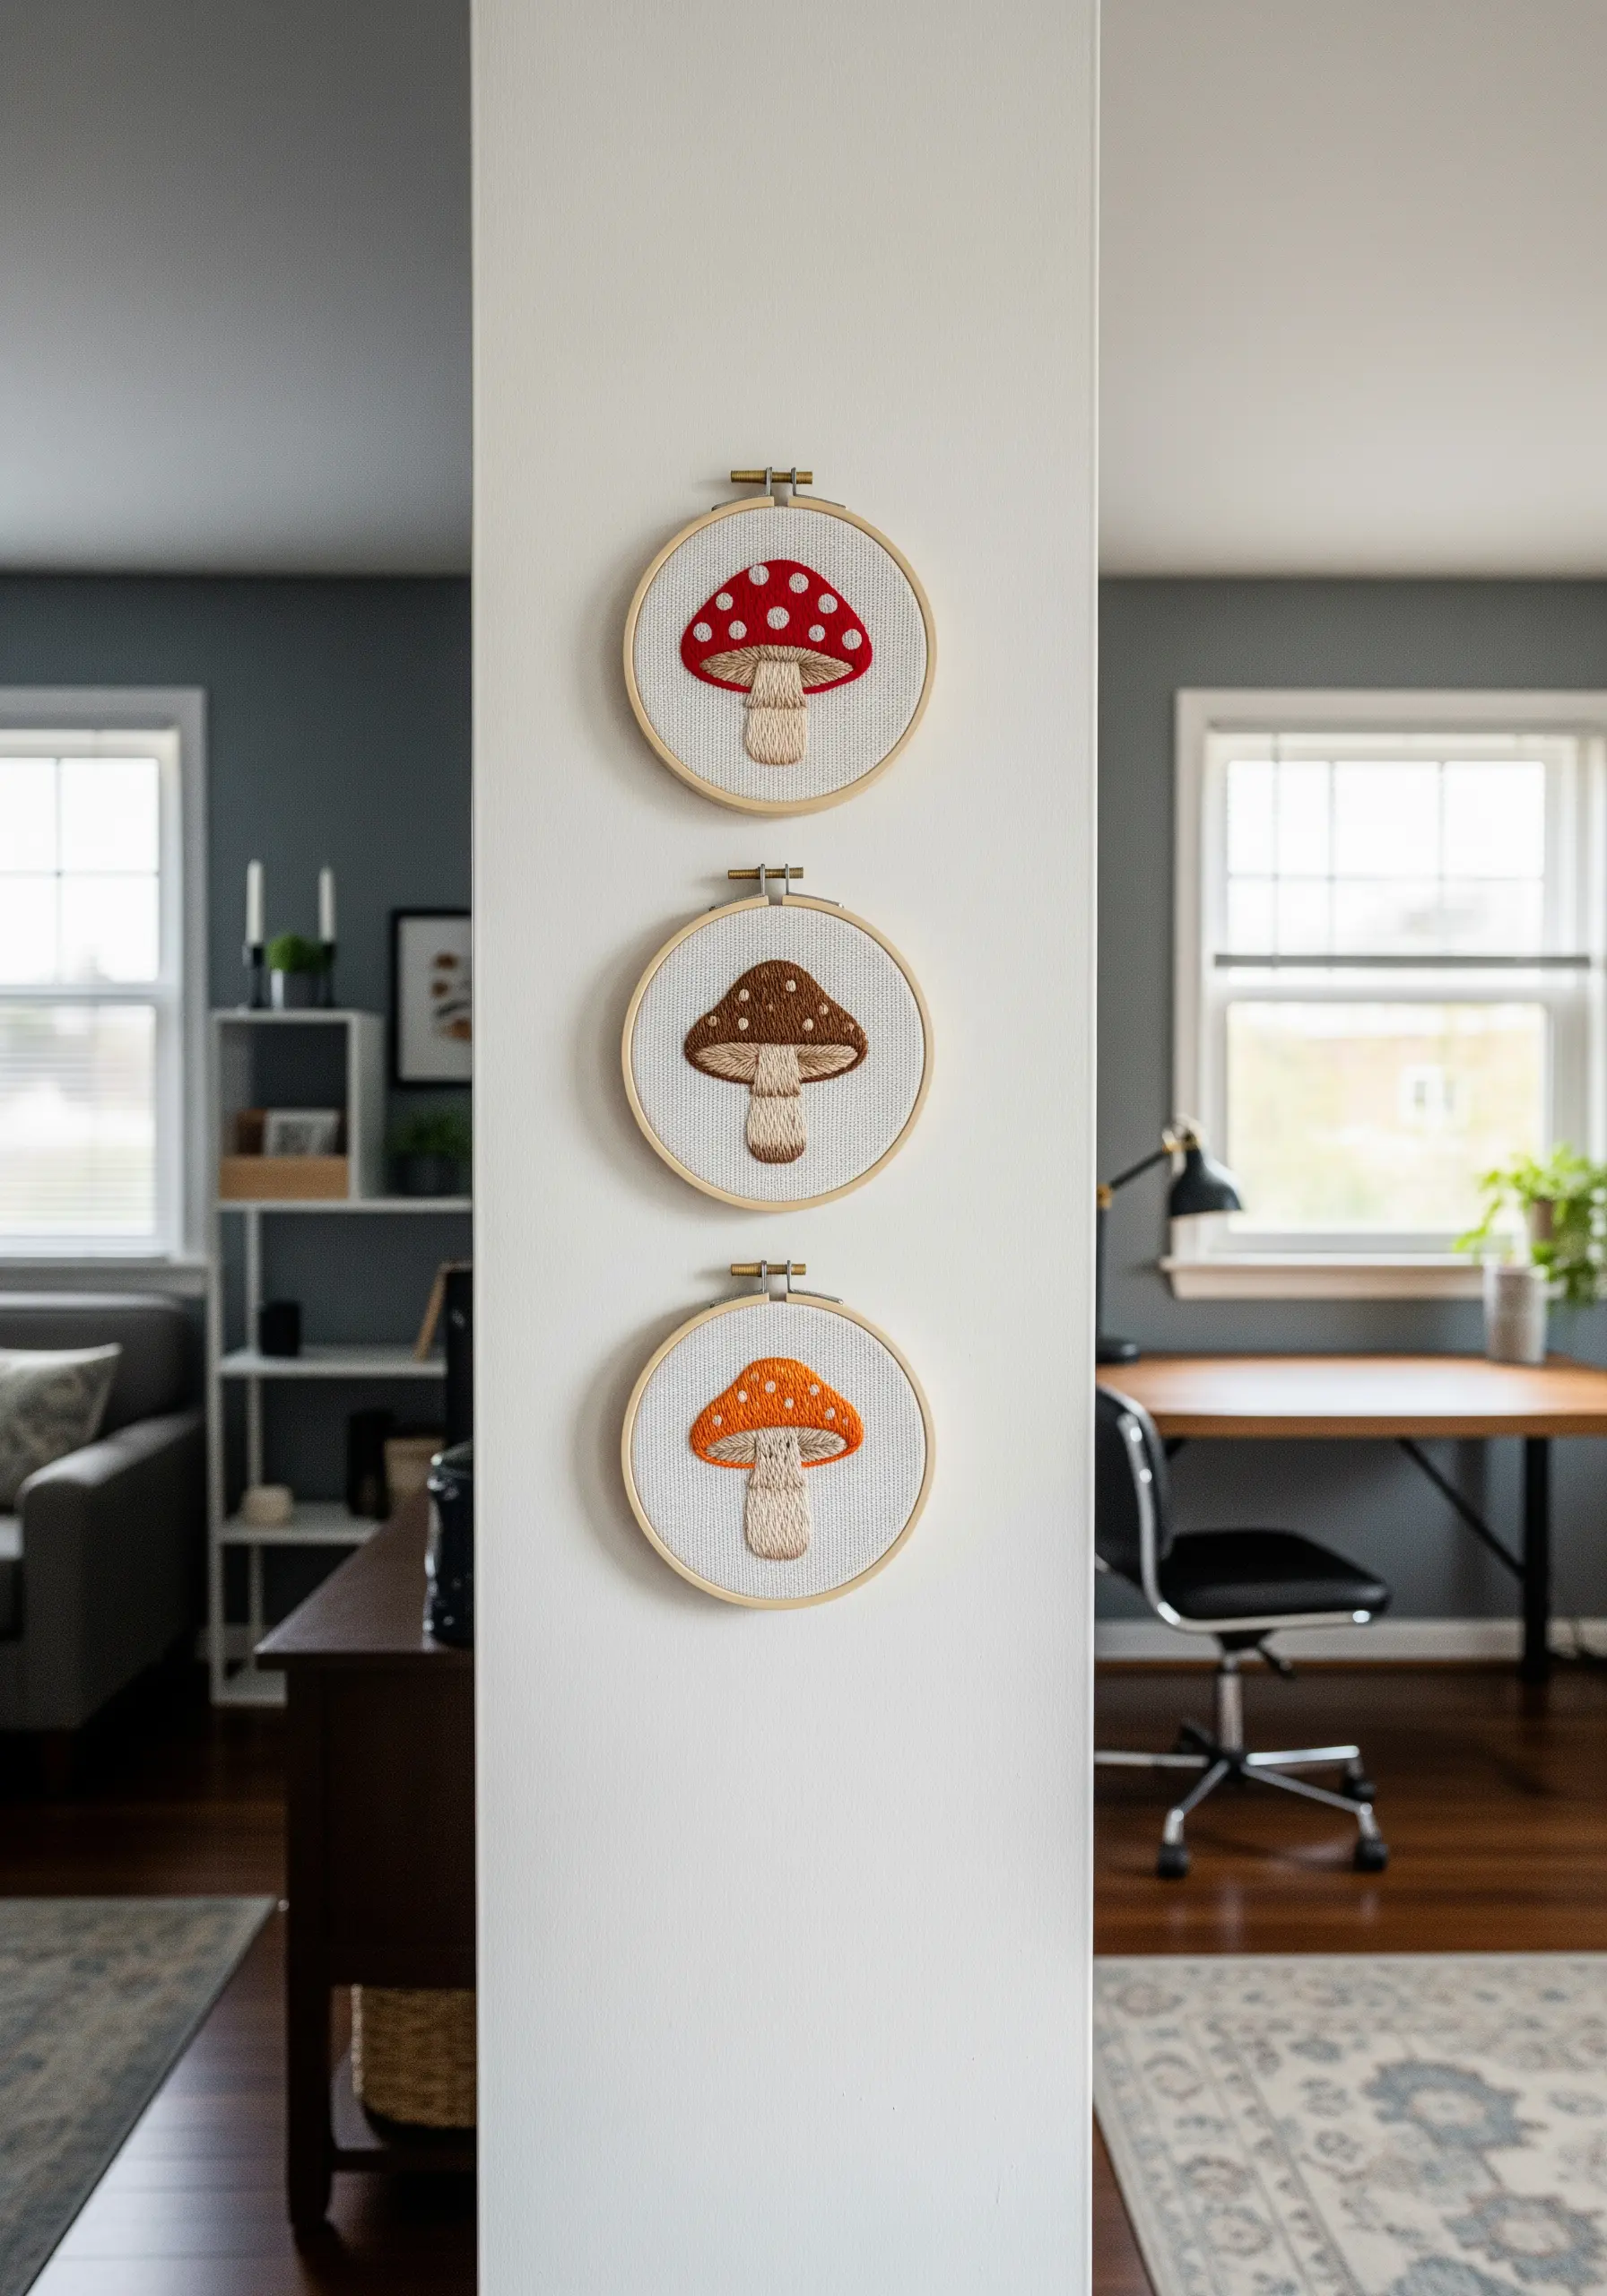
Create a charming woodland vignette by focusing on simple shapes and clean fill stitches.
For the mushroom caps, use a satin stitch, ensuring your stitches all lie in the same vertical direction for a smooth, uniform finish.
Add the iconic spots on top using small French knots or tiny, detached satin stitches in white.
Suggest the gills underneath with a few straight stitches in a darker, contrasting color.
Grouping three mushrooms together with different colors and slightly different shapes creates a more dynamic and interesting composition than a single motif.
15. Chart a Constellation with Metallic Thread

Capture the night sky with a design that is both minimalist and luxurious.
Use a high-contrast background like black or navy blue felt or cotton for maximum impact.
For the stars, use colonial knots instead of French knots. They are sturdier, rounder, and less likely to pull through your fabric.
Connect the stars with a simple backstitch, using a fine silver or gold metallic thread.
To make working with metallic thread easier, use a shorter length than you normally would (about 12 inches) and a thread conditioner like beeswax to prevent tangling and fraying.
16. Evoke Autumn with a Cascade of Leaves

Create the feeling of gentle movement by carefully planning the placement and direction of your motifs.
Arrange the leaves in a graceful, S-shaped curve down the hoop to mimic the look of them falling through the air.
Use a fishbone stitch for each leaf, as this stitch creates a beautiful central vein and naturally angled sides.
Work with a rich, autumnal palette of reds, oranges, and golds, and vary the shade and orientation of each leaf to give the composition a more organic, less uniform appearance.
This thoughtful composition is what turns a simple collection of leaves into a dynamic piece of art.
17. Brew a Perfect Cup of Graphic Stitching

This clean, illustrative style relies on bold outlines and understated details.
Use a backstitch or stem stitch with three or four strands of black floss to create a strong, graphic outline for the coffee cup.
For the delicate steam rising from the cup, switch to a single strand of the same floss.
This simple change in thread weight is a professional technique that creates visual hierarchy, making the steam appear lighter and more ethereal than the solid cup itself.
It’s a quick stitch that looks sharp and modern, perfect for a kitchen or breakfast nook.
18. Capture a Pet’s Essence with Minimal Lines

You don’t need complex thread painting to create a heartfelt pet portrait. A simple line drawing can be just as effective.
Choose a clear photo of the pet and trace only the most defining features—the curve of the ears, the shape of the eyes, and a few key markings.
Use a simple backstitch with two or three strands of floss to create a clean, consistent line.
Stitching on a neutral, textured fabric like grey or oatmeal linen adds a touch of warmth and sophistication to your line art portrait embroidery, making it feel like a timeless sketch.
19. Find Your Zen with a Symmetrical Mandala

The meditative quality of stitching a mandala comes from its repetitive, symmetrical nature.
To ensure perfect symmetry, transfer your pattern onto the fabric using a water-soluble stabilizer. It provides a clear guide that you can rinse away completely when finished.
Use a combination of simple stitches to build texture: a backstitch for the main outlines, tiny satin stitches to fill small petal shapes, and French knots for decorative dots.
Working in a single color, or a tight palette of two analogous colors, keeps the focus on the intricate linework and texture, resulting in a calming and sophisticated piece.
20. Merge Watercolor Painting with Geometric Stitching
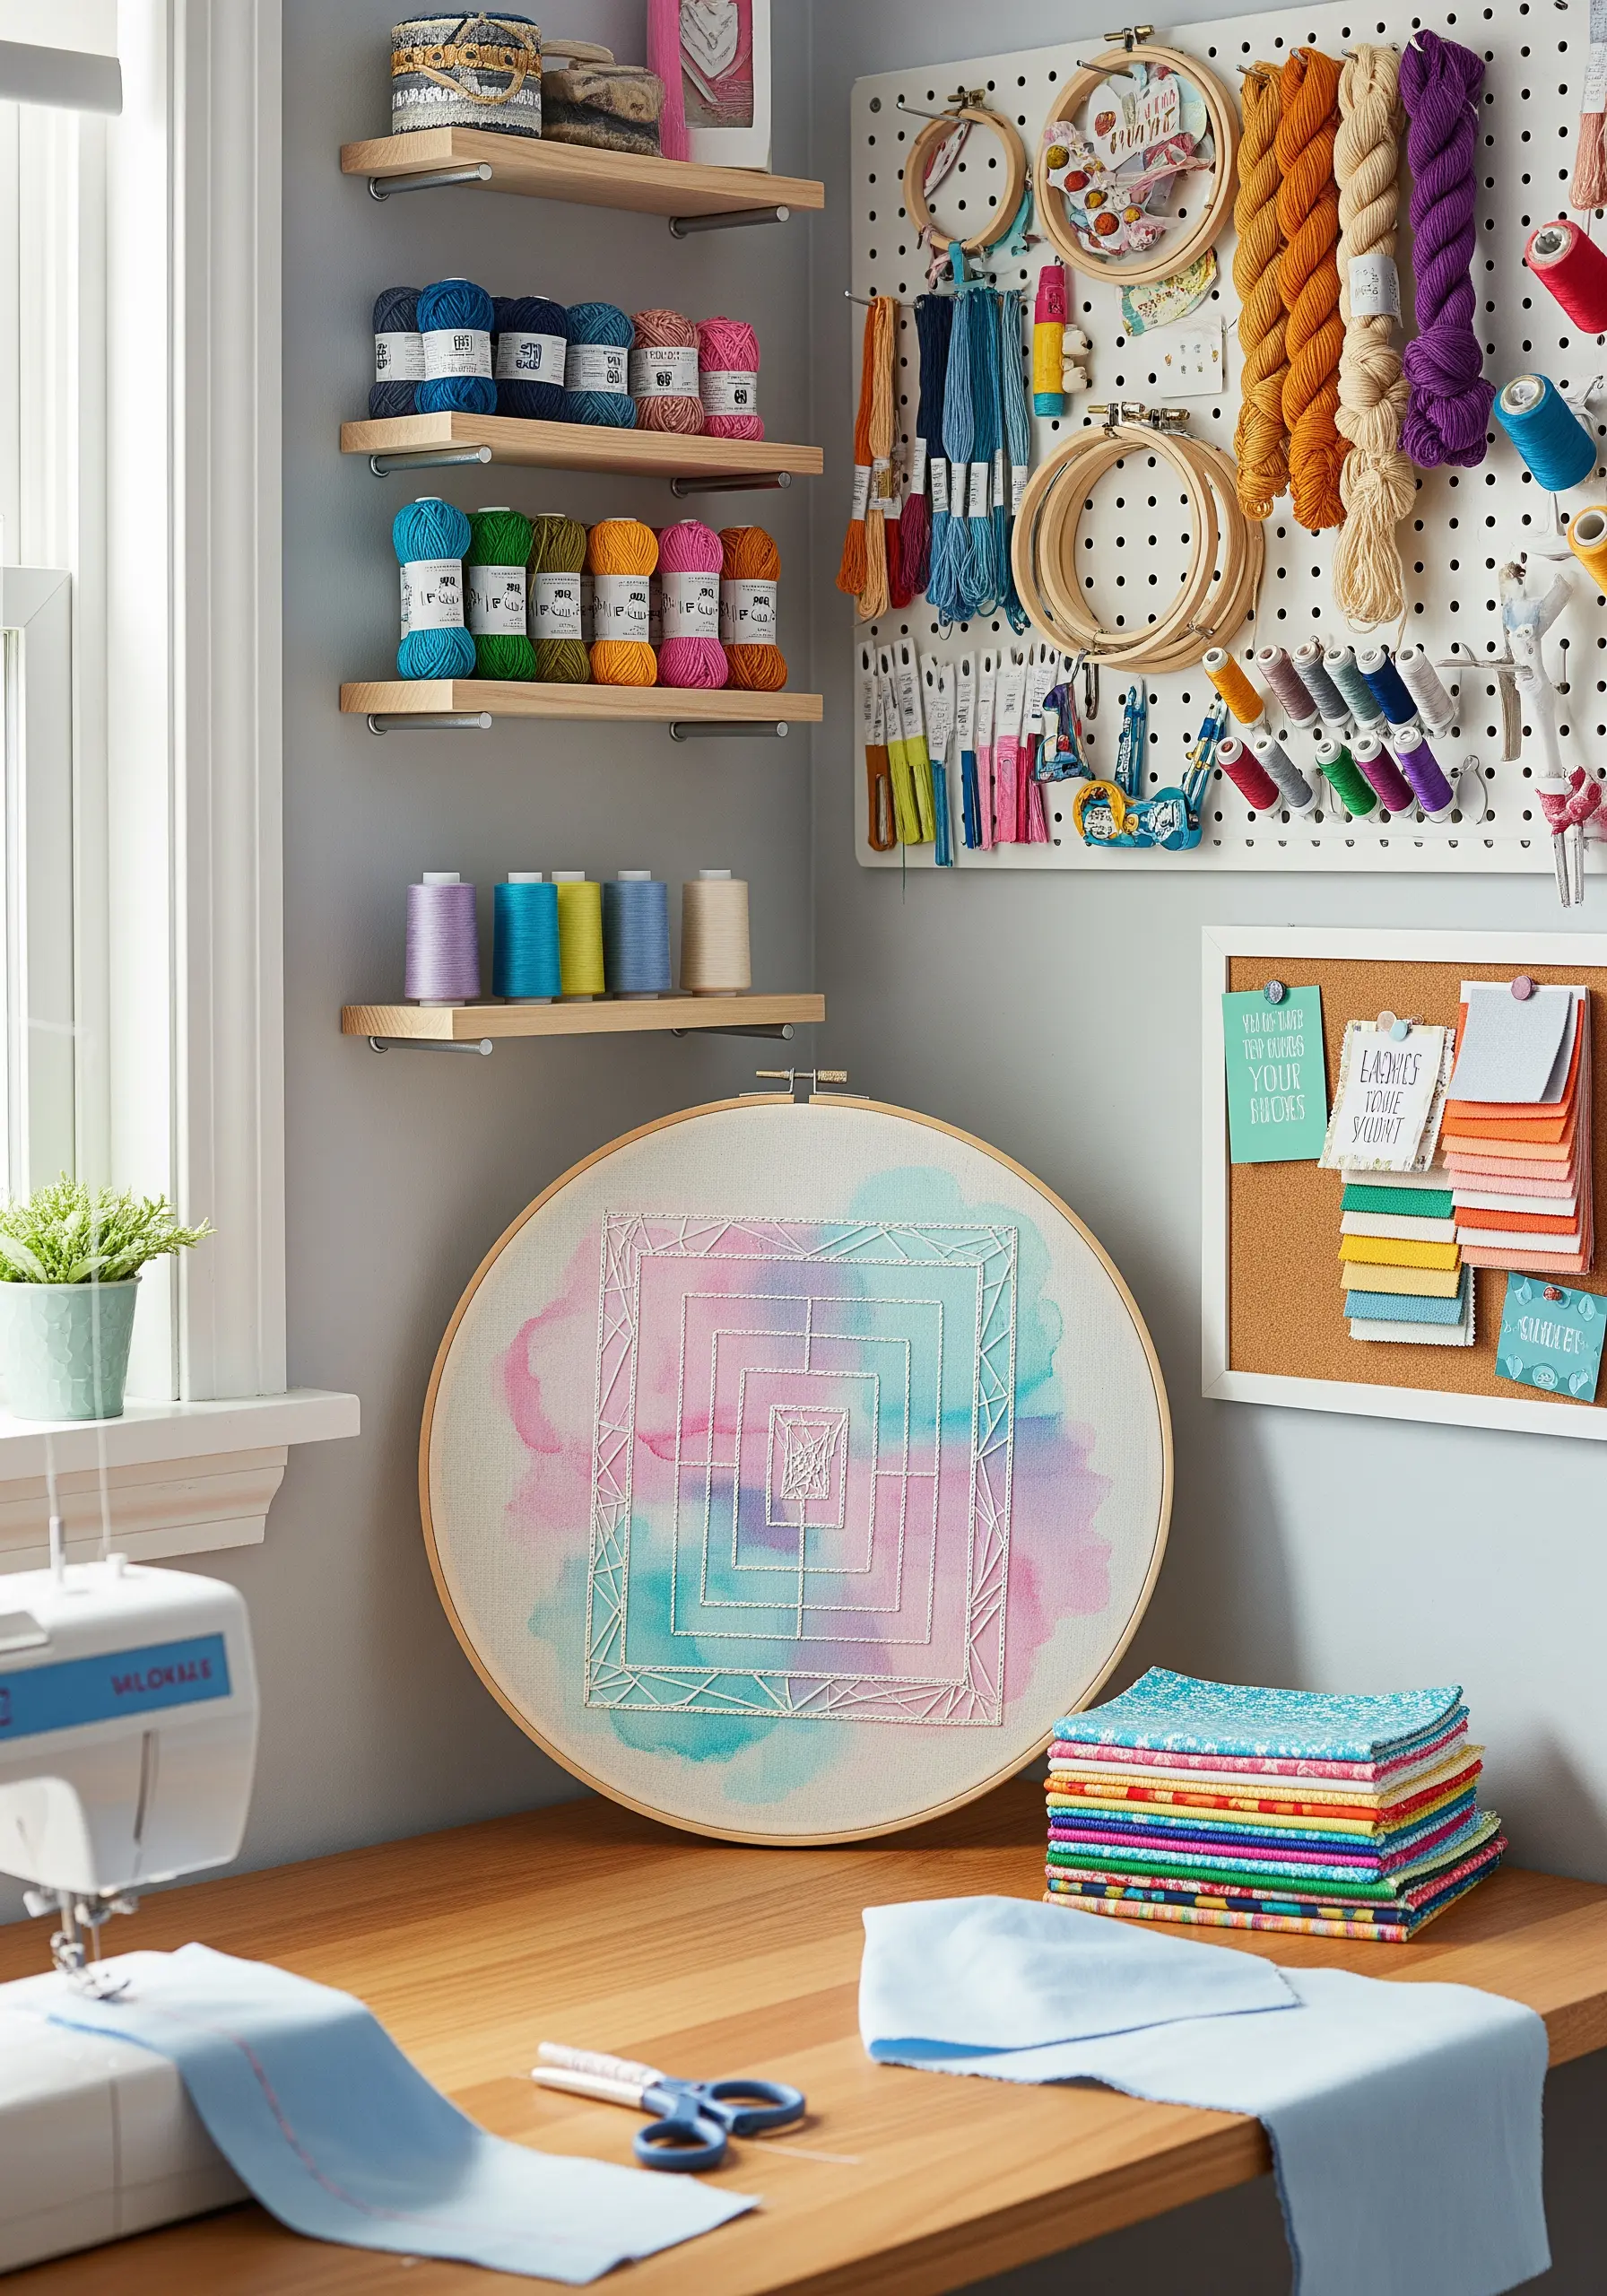
Create a stunning mixed-media piece by using watercolor paint as your canvas.
Before hooping your fabric, apply a light wash of watercolors, allowing the colors to bleed together organically. Let it dry completely.
Once dry, stretch the painted fabric in your hoop and embroider a crisp, geometric pattern over the top using a simple backstitch.
The contrast between the soft, fluid background and the sharp, structured lines of the stitching is visually striking.
Use a simple white or off-white thread for the embroidery to create a clean silhouette against the colorful wash.
21. Fill a Monogram with Dimensional Woven Roses

Create a lush, floral letter with a surprisingly simple and fast technique: the woven wheel stitch.
First, create a star-shaped foundation with five or seven straight stitches. Then, weave your thread over and under these spokes until the entire shape is filled, forming a beautiful, dimensional rose.
Pack these woven roses tightly together to form the shape of your chosen letter.
Tuck in a few green lazy daisy stitches between the roses to serve as leaves, which helps to define the shape and add a pop of contrasting color.
This method creates a stunning 3D effect that looks far more intricate than it actually is.


