

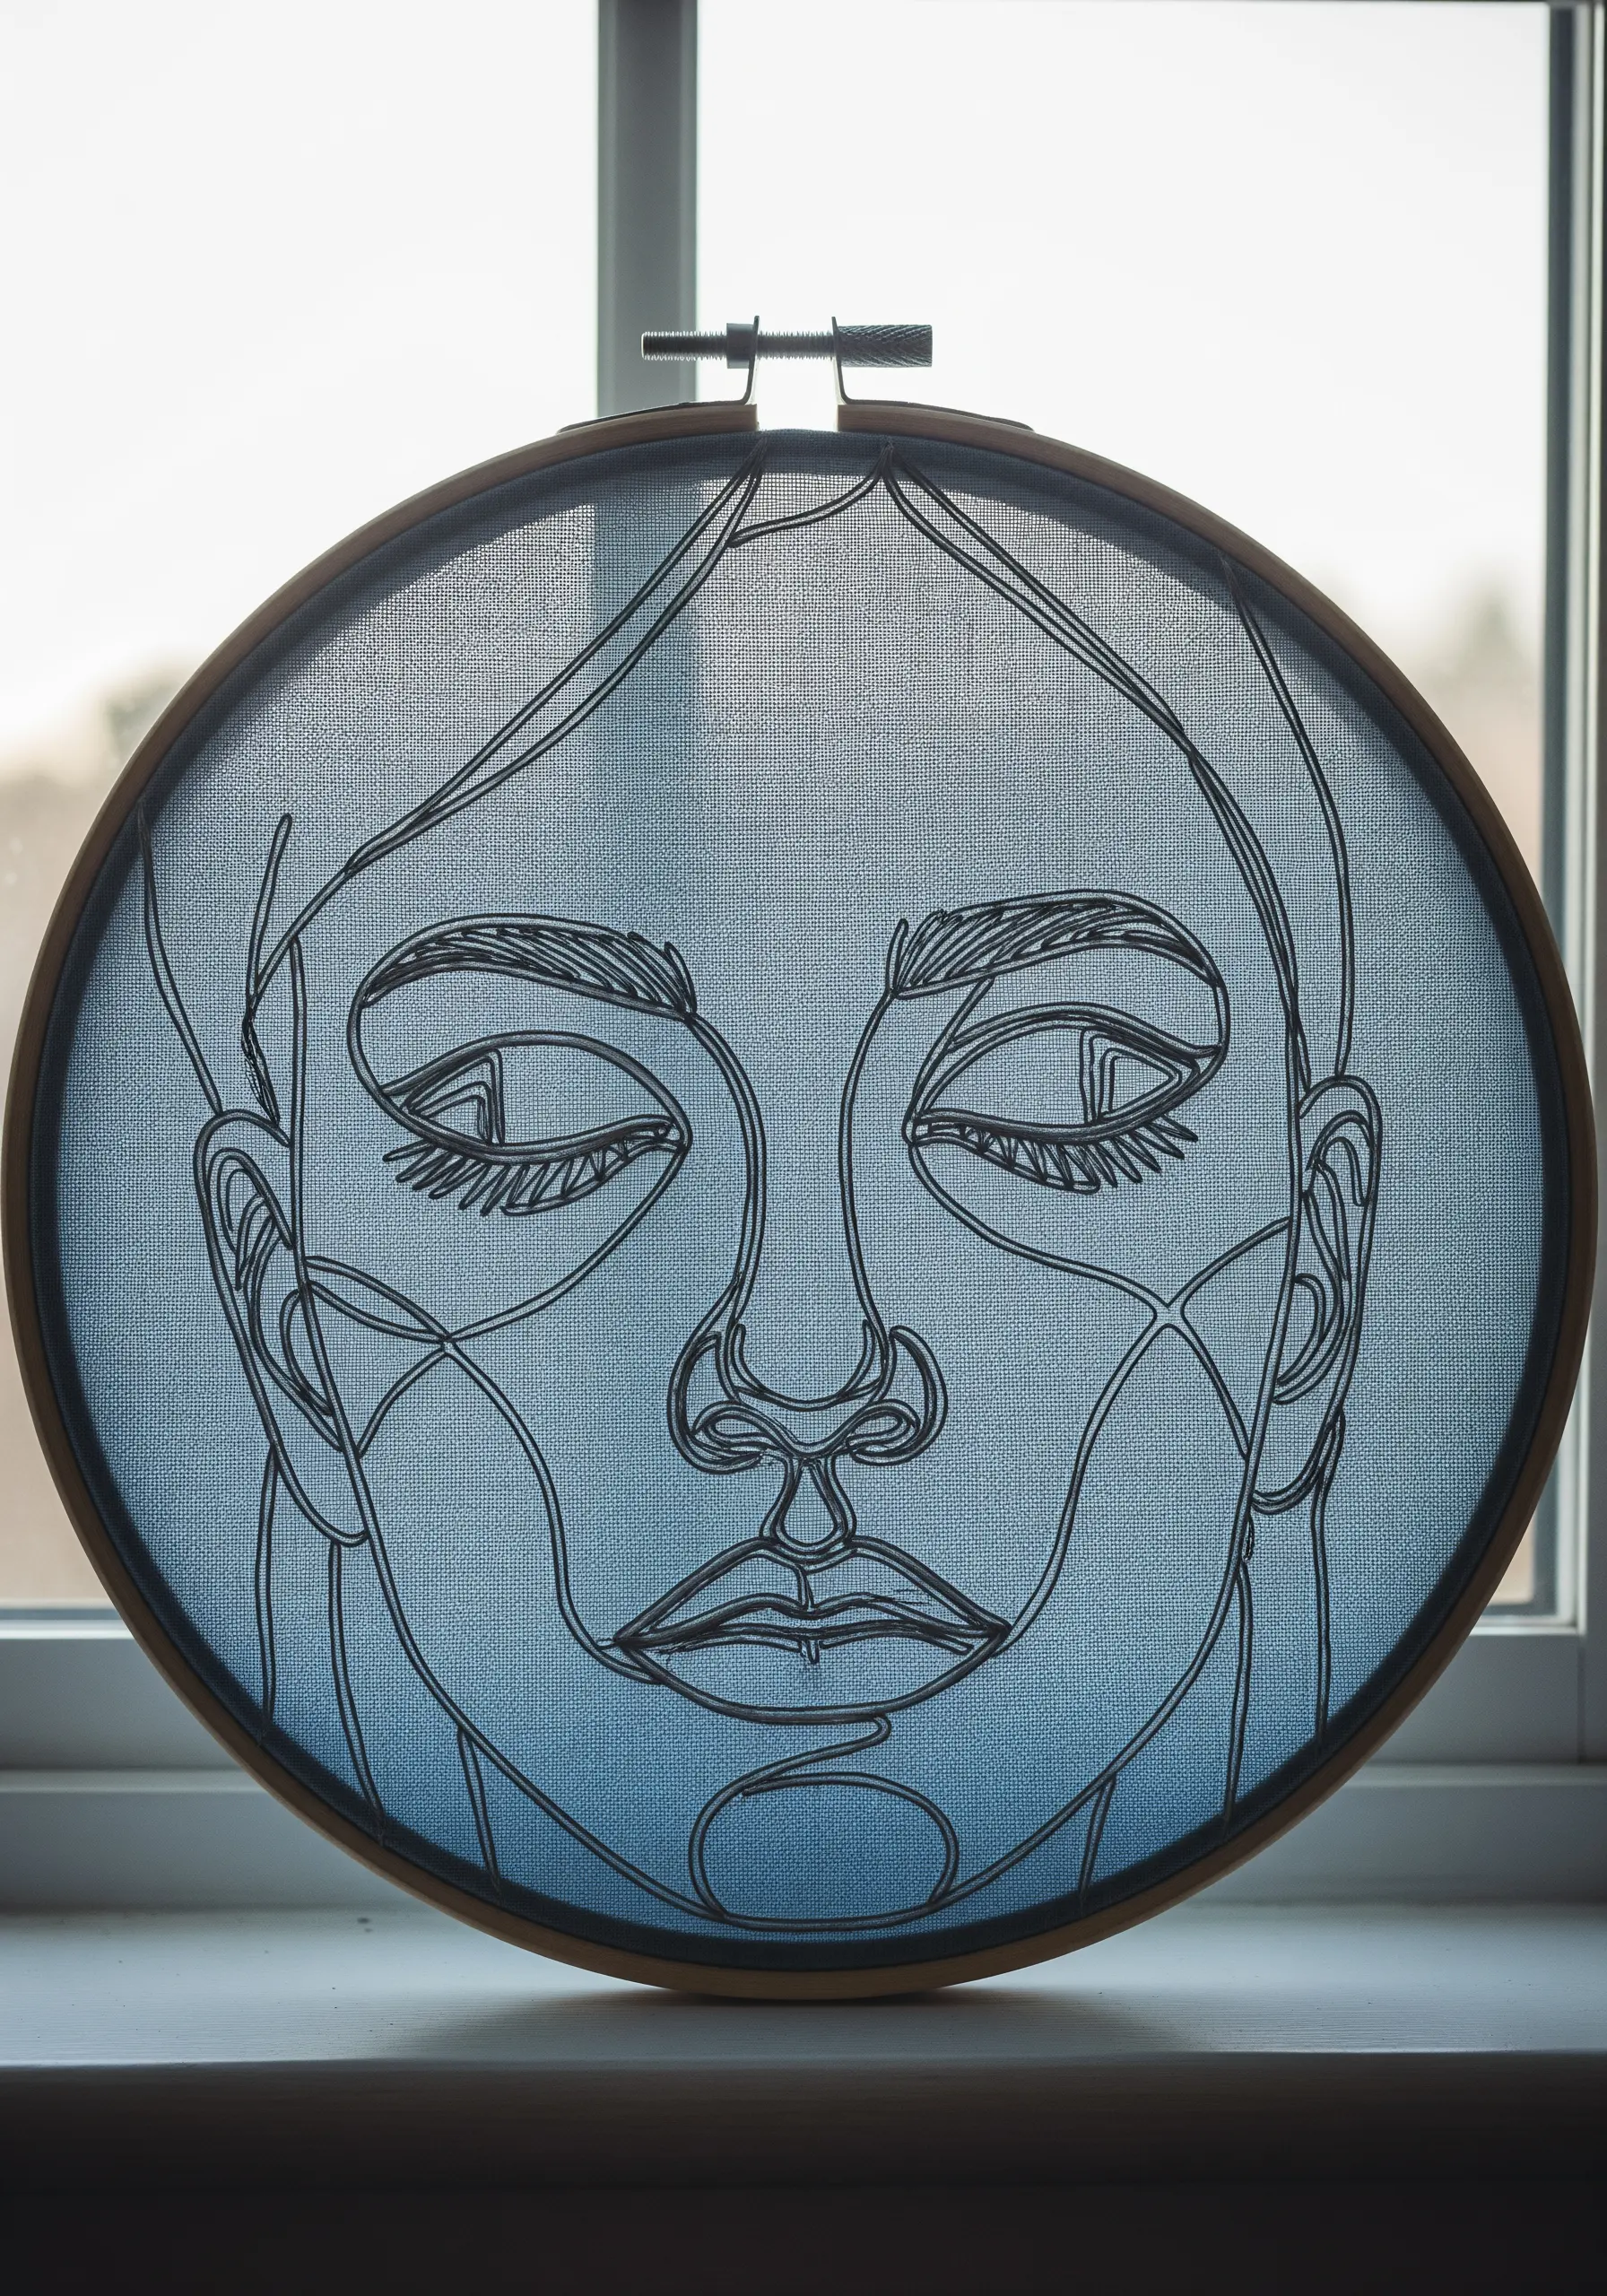
There comes a moment in every creative practice when you want to move beyond simply following a pattern. You want your work to feel less like a hobby and more like an expression—intentional, polished, and uniquely yours. If you’ve been searching for that next step, you’ve found it here, in the elegant simplicity of the single line.
Minimalism isn’t about emptiness; it’s about precision. Every stitch, every curve, and every choice of thread carries more weight. In line-art portraiture, you’ll discover how to communicate emotion, texture, and personality with surprising economy, turning a few well-placed stitches into a piece of modern art.
The ideas that follow are more than just inspiration. They are focused techniques designed to elevate your skill and confidence right now. These small adjustments—from varying your thread weight to incorporating a single pop of color—are what separate good embroidery from breathtaking embroidery. Let’s begin.
1. The Foundation of Minimalist Line Art
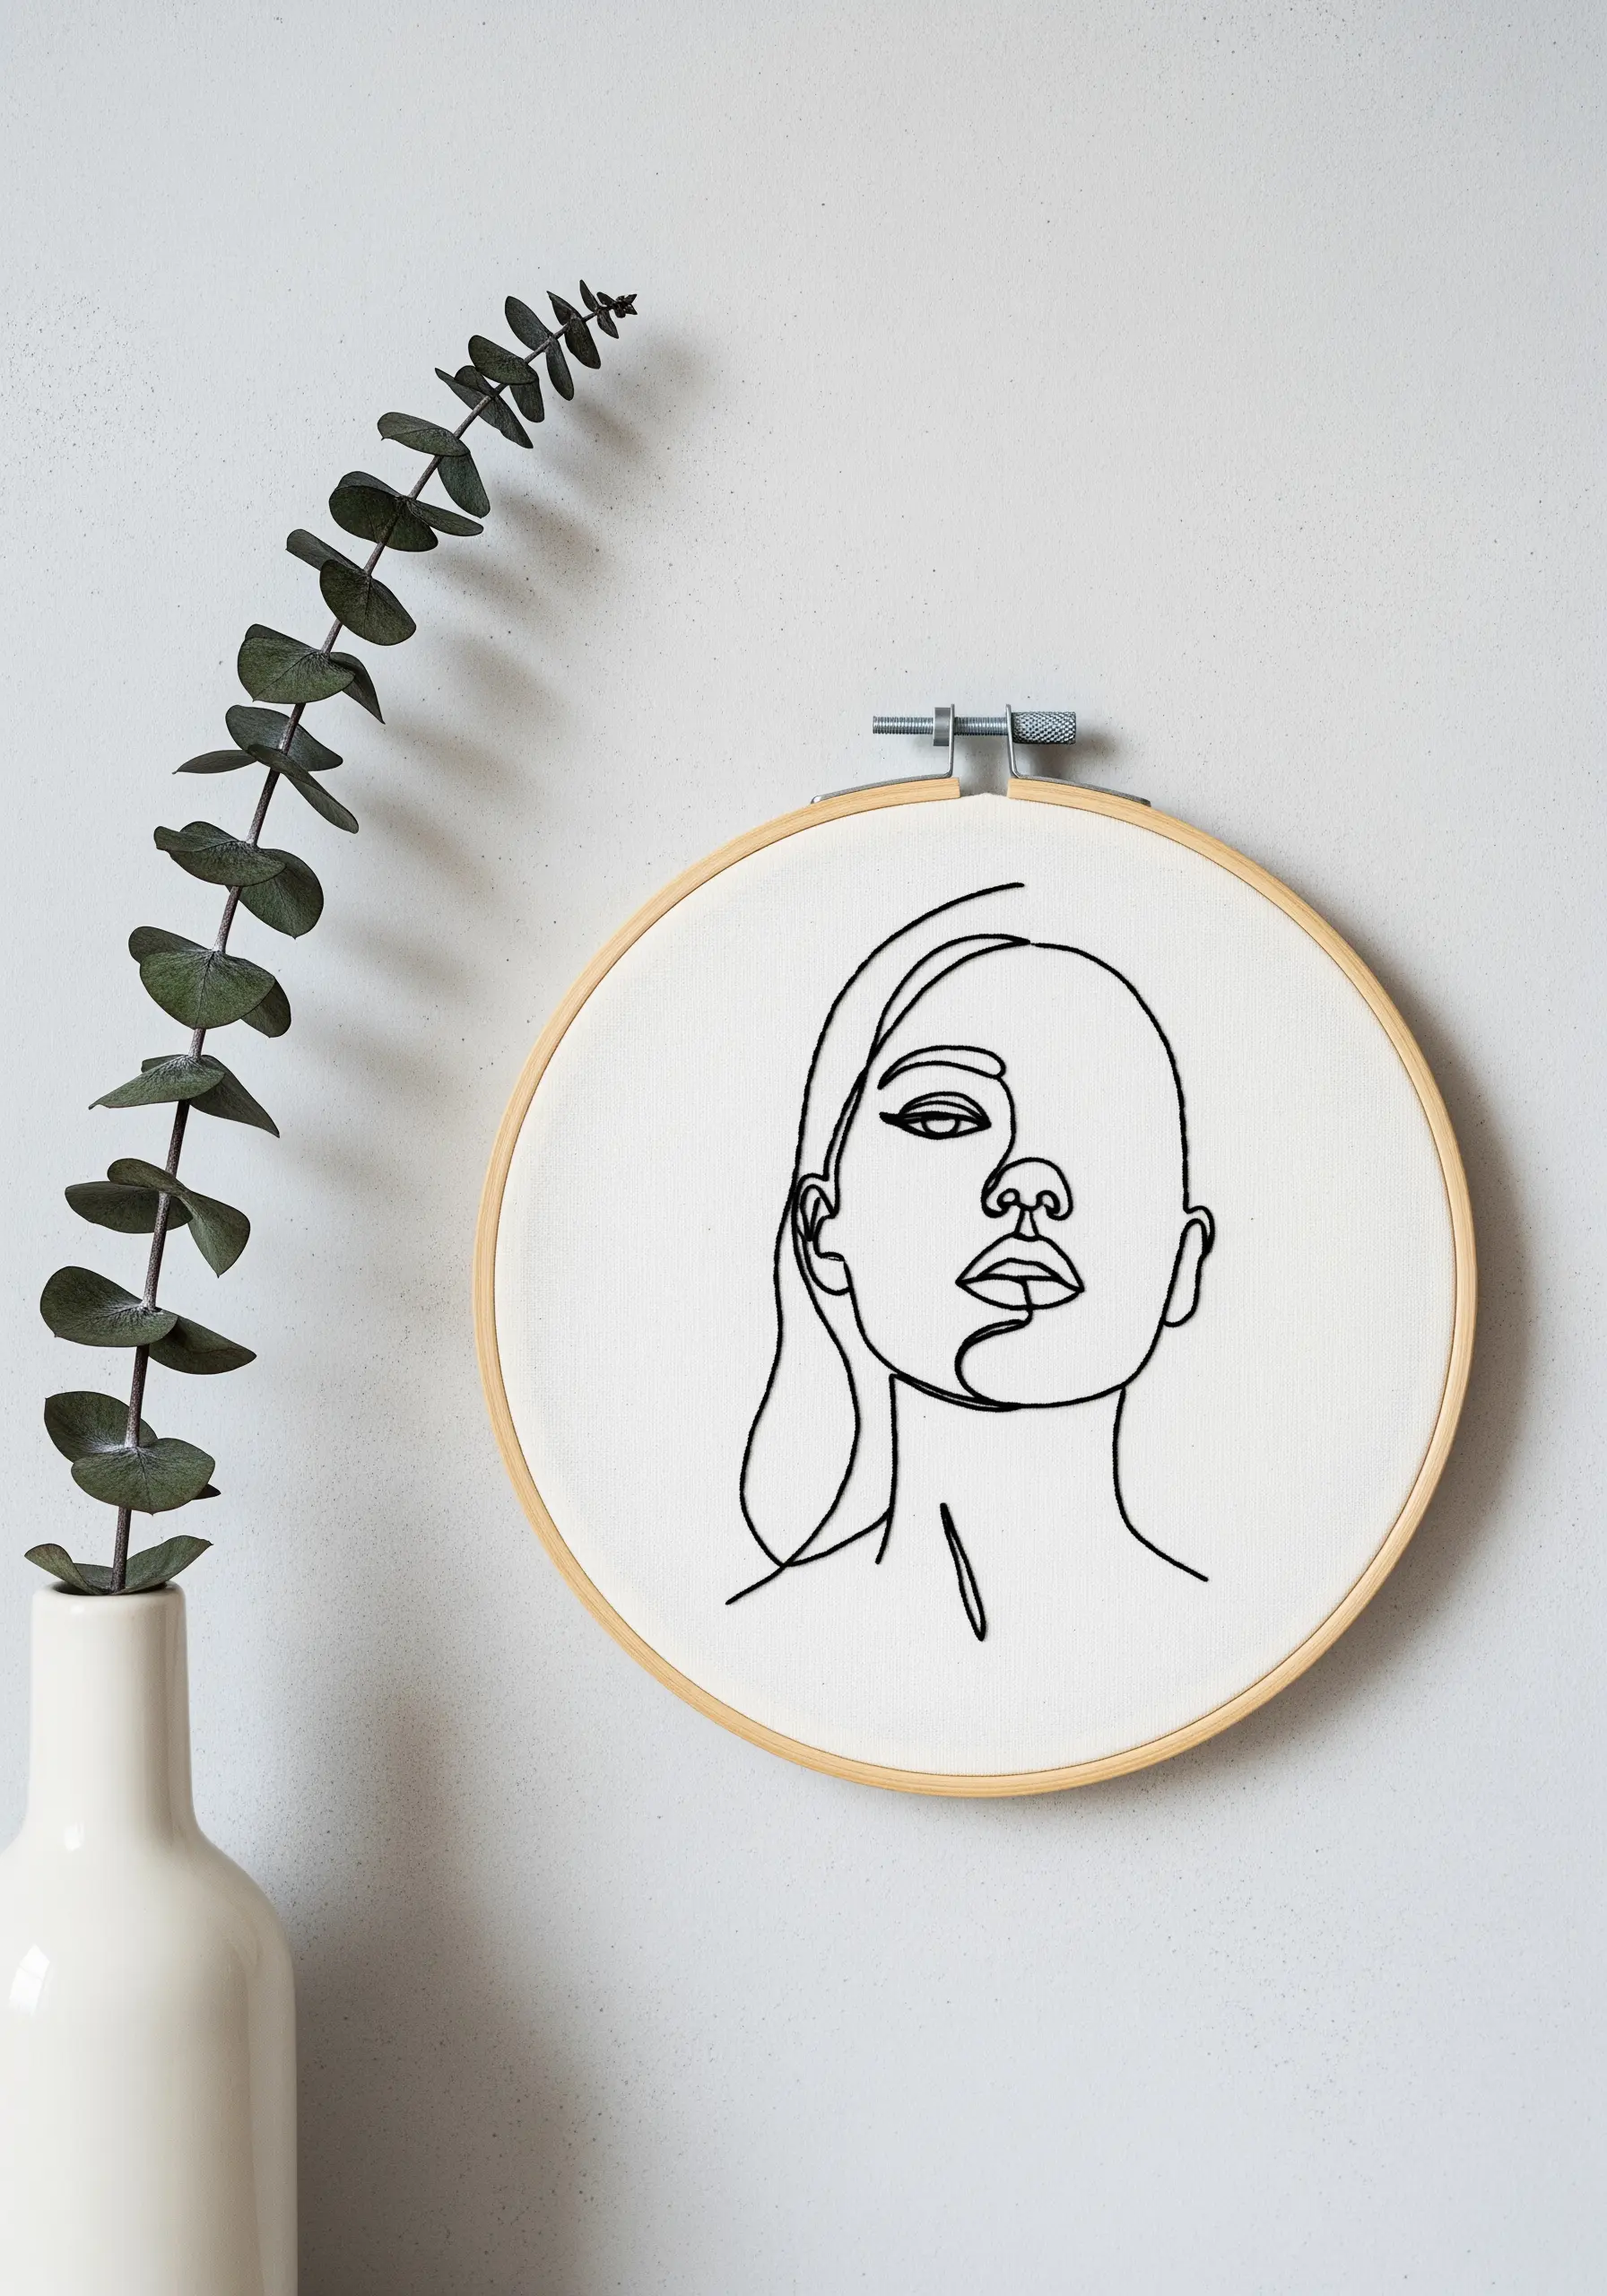
Begin with a simple backstitch to achieve clean, continuous lines that mimic an artist’s pen stroke.
Use two strands of six-strand cotton floss; this gives the line presence without making it appear heavy or bulky.
The secret to smooth curves is maintaining a consistent, short stitch length of about 2-3mm.
This precision prevents sharp, awkward angles and ensures the final piece honors the fluid grace of modern line-art faces.
2. Elevate Line Art with Sculptural Couching
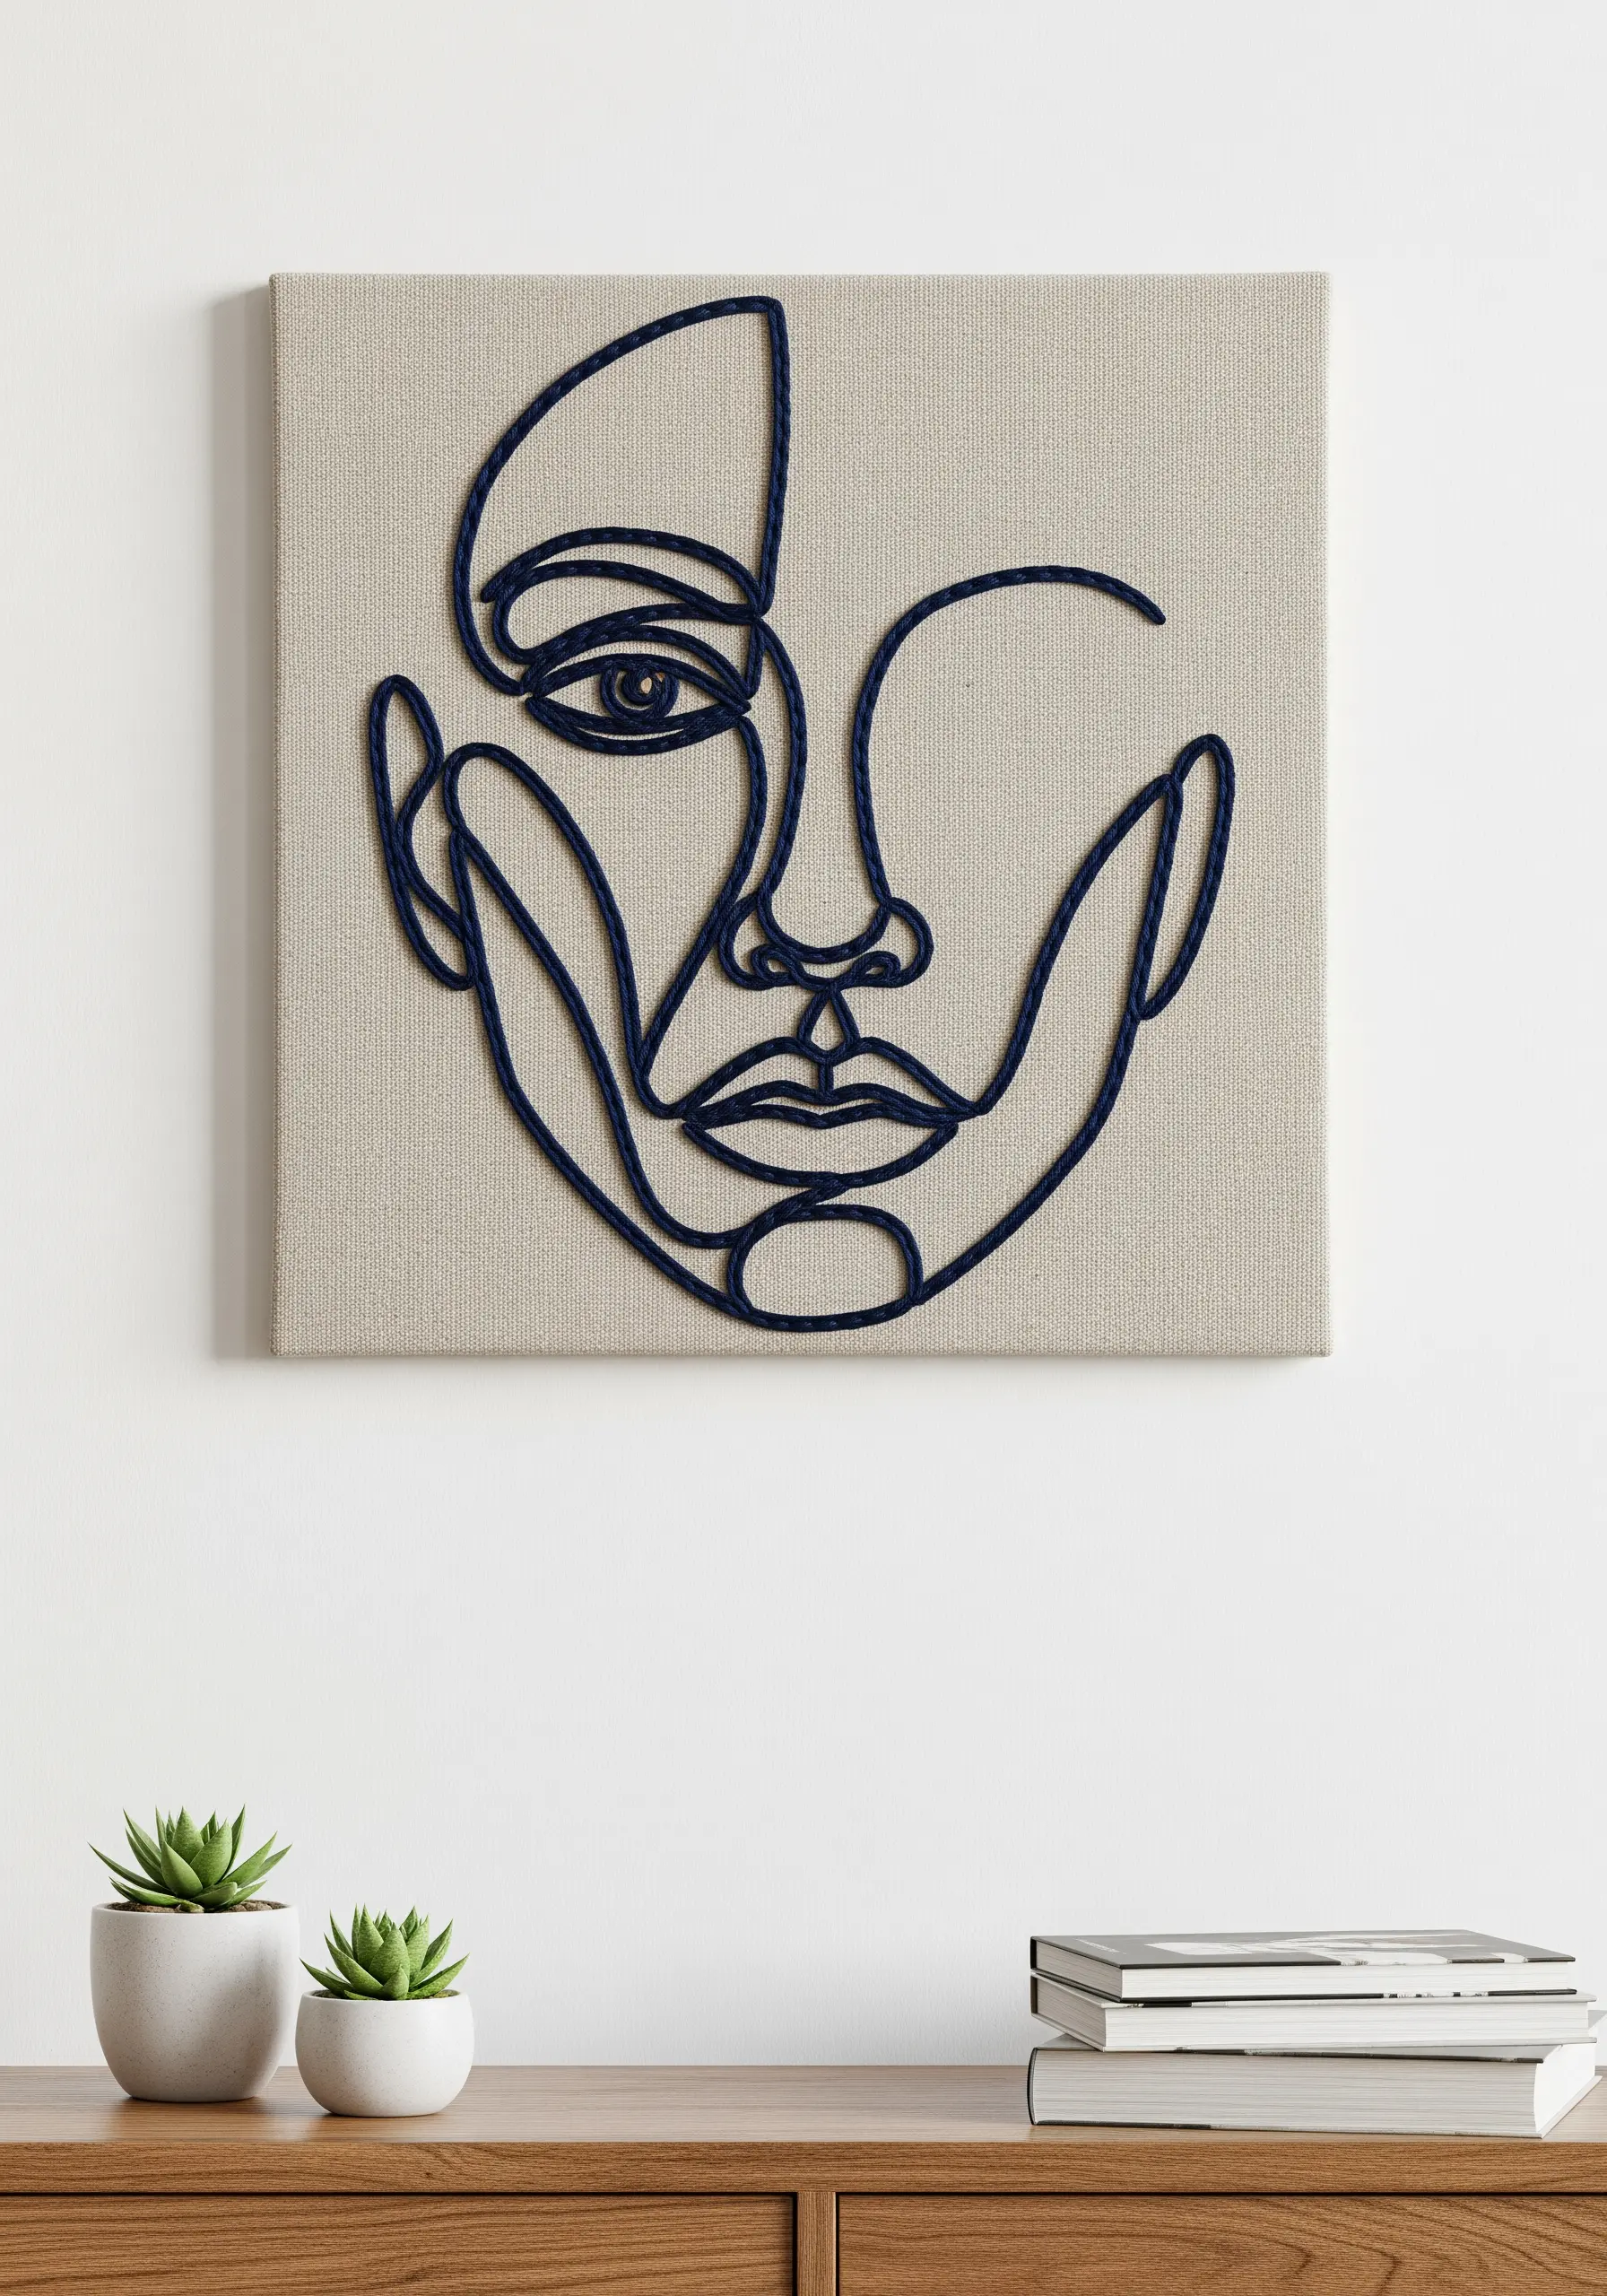
Instead of stitching through the fabric, lay a thick yarn or cord on the surface and secure it with small, discreet stitches of a matching fine thread.
This technique, called couching, adds immediate dimension and a powerful, tactile quality to your work.
The bold, raised line creates a stunning contrast against the flat canvas, transforming a simple portrait into a piece of touchable art.
It’s one of the foundational yarn wall art techniques that bridges the gap between embroidery and sculpture.
3. Integrate Botanical Elements for Whimsical Detail

Combine the clean structure of a line-art portrait with soft, organic motifs to add personality and narrative.
Here, lavender sprigs replace the hair, stitched using a detached chain stitch for petals and a simple straight stitch for stems.
This juxtaposition adds a layer of surreal charm and is a perfect way to customize tote bag embroidery designs.
Use a contrasting thread color for the botanicals to ensure they stand out as a beautiful, decorative feature.
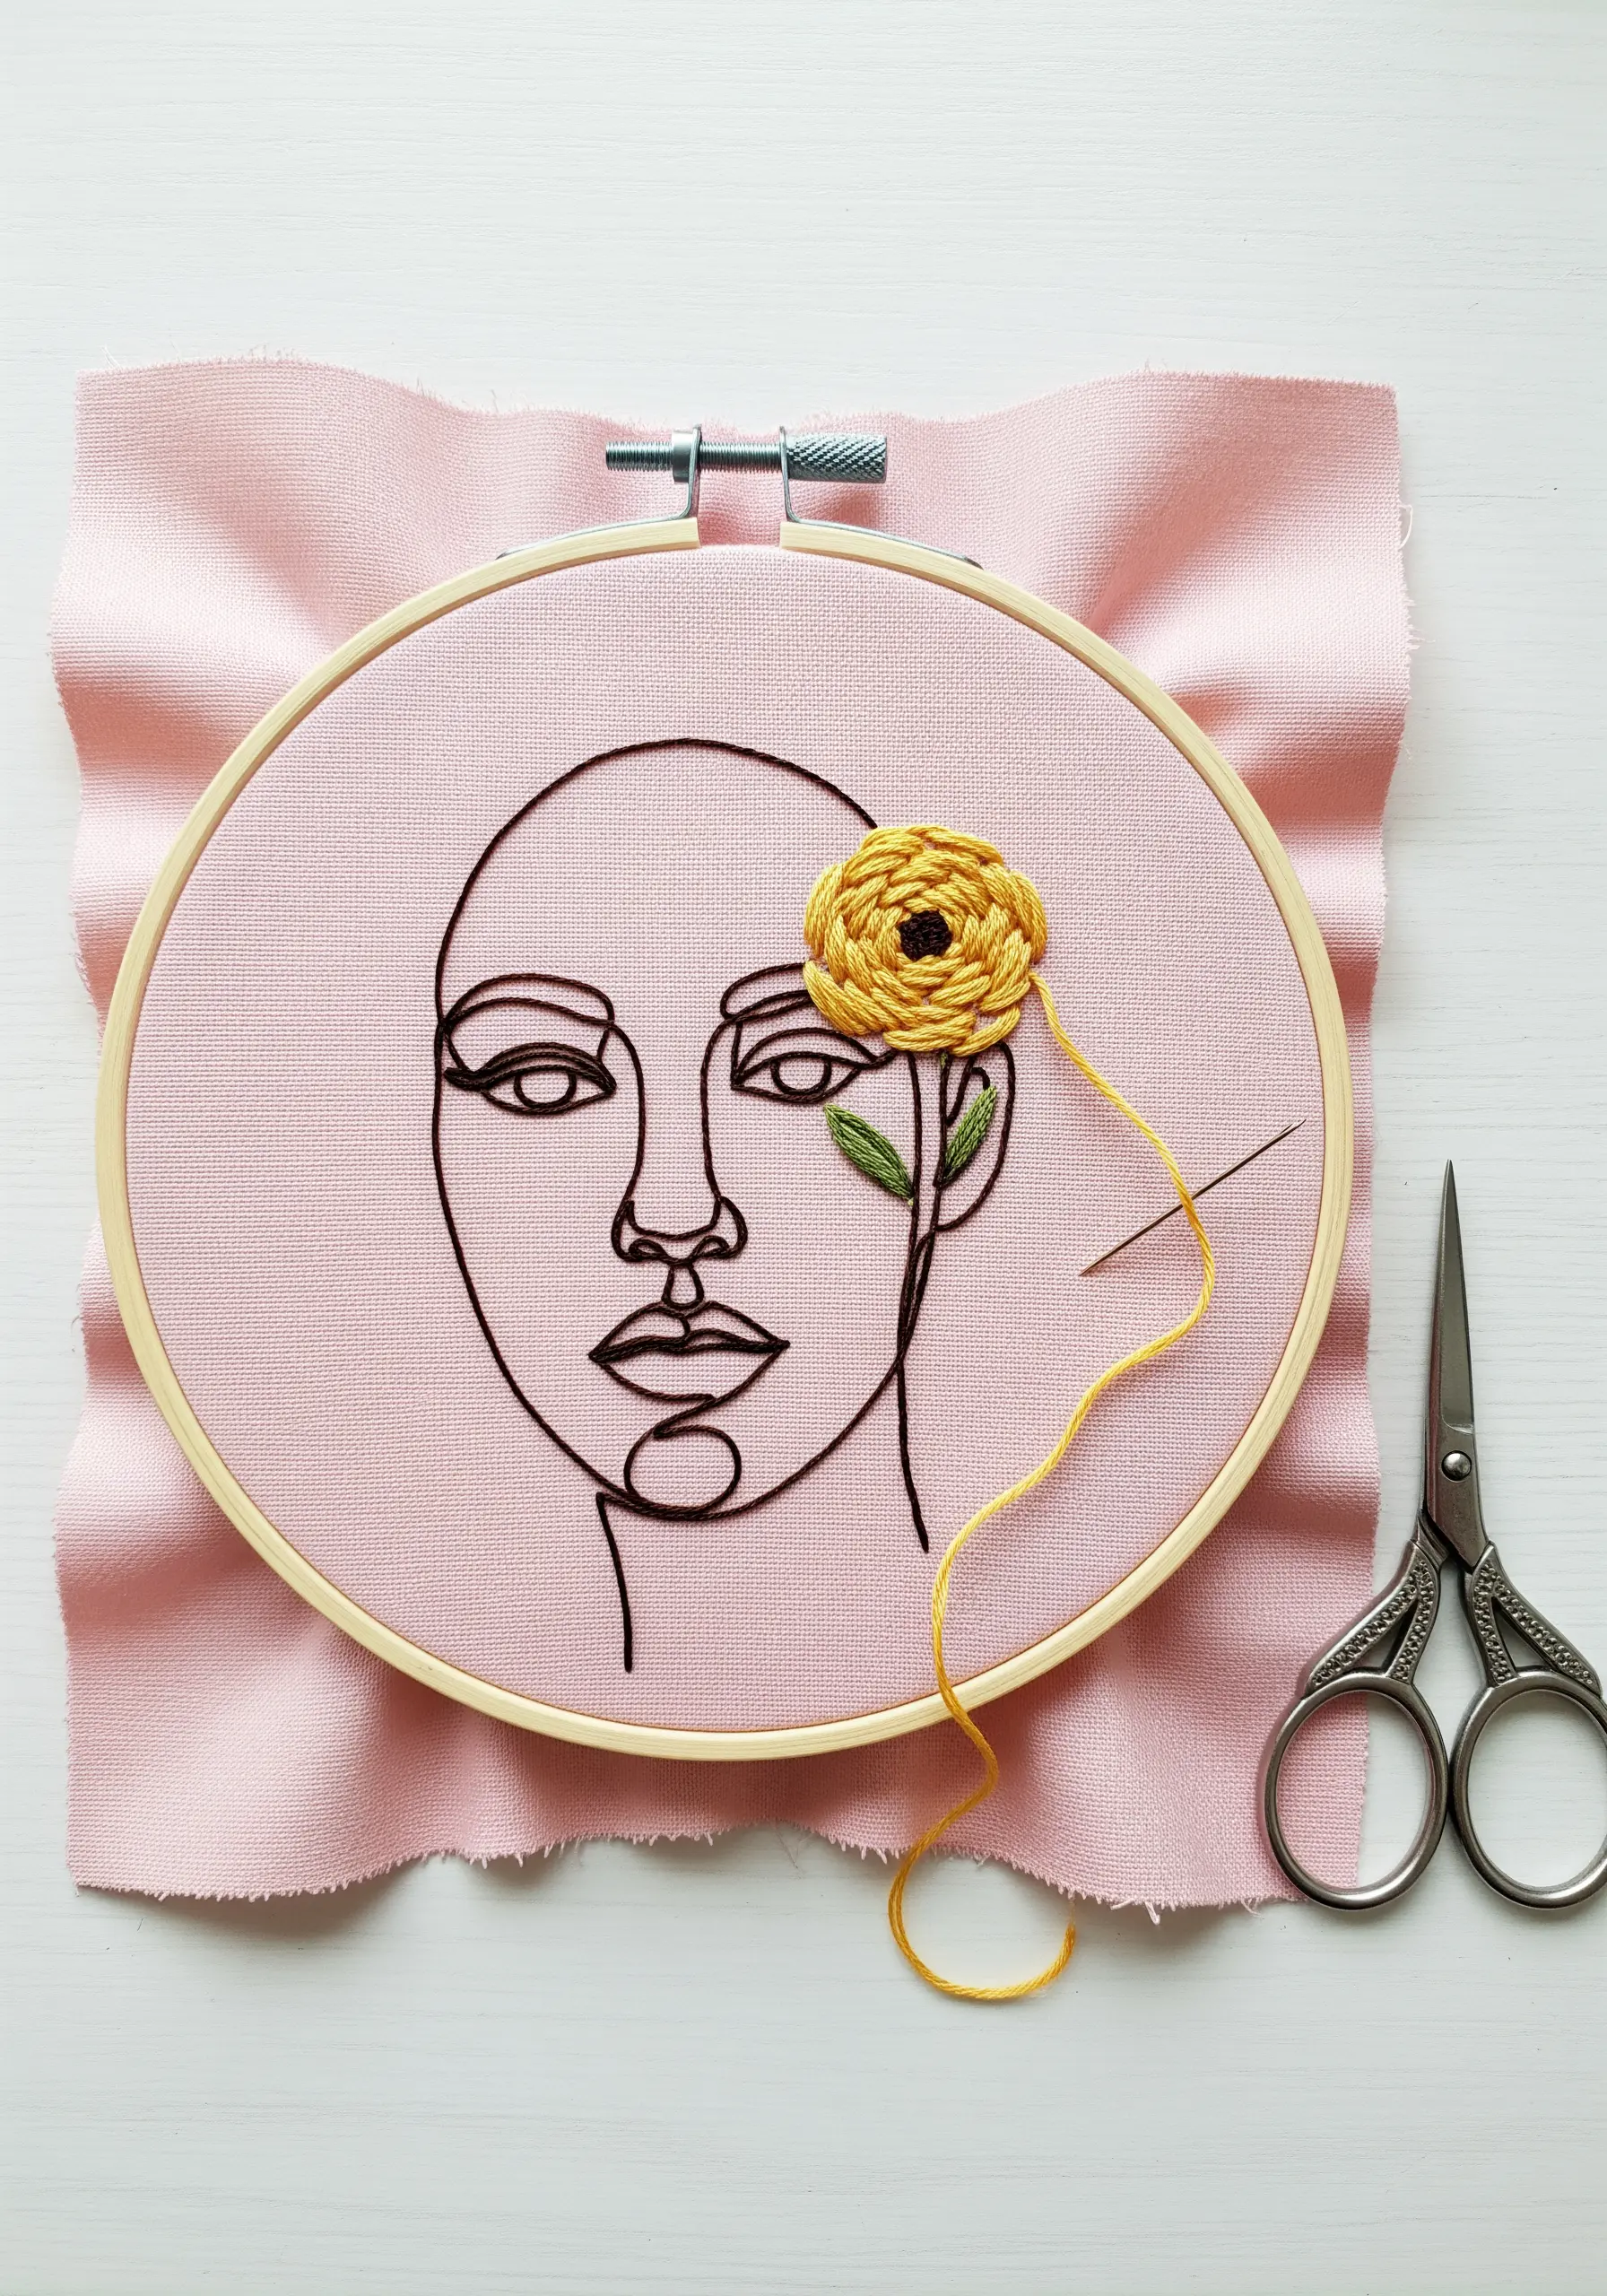
4. Create a Focal Point with a Single Pop of Color
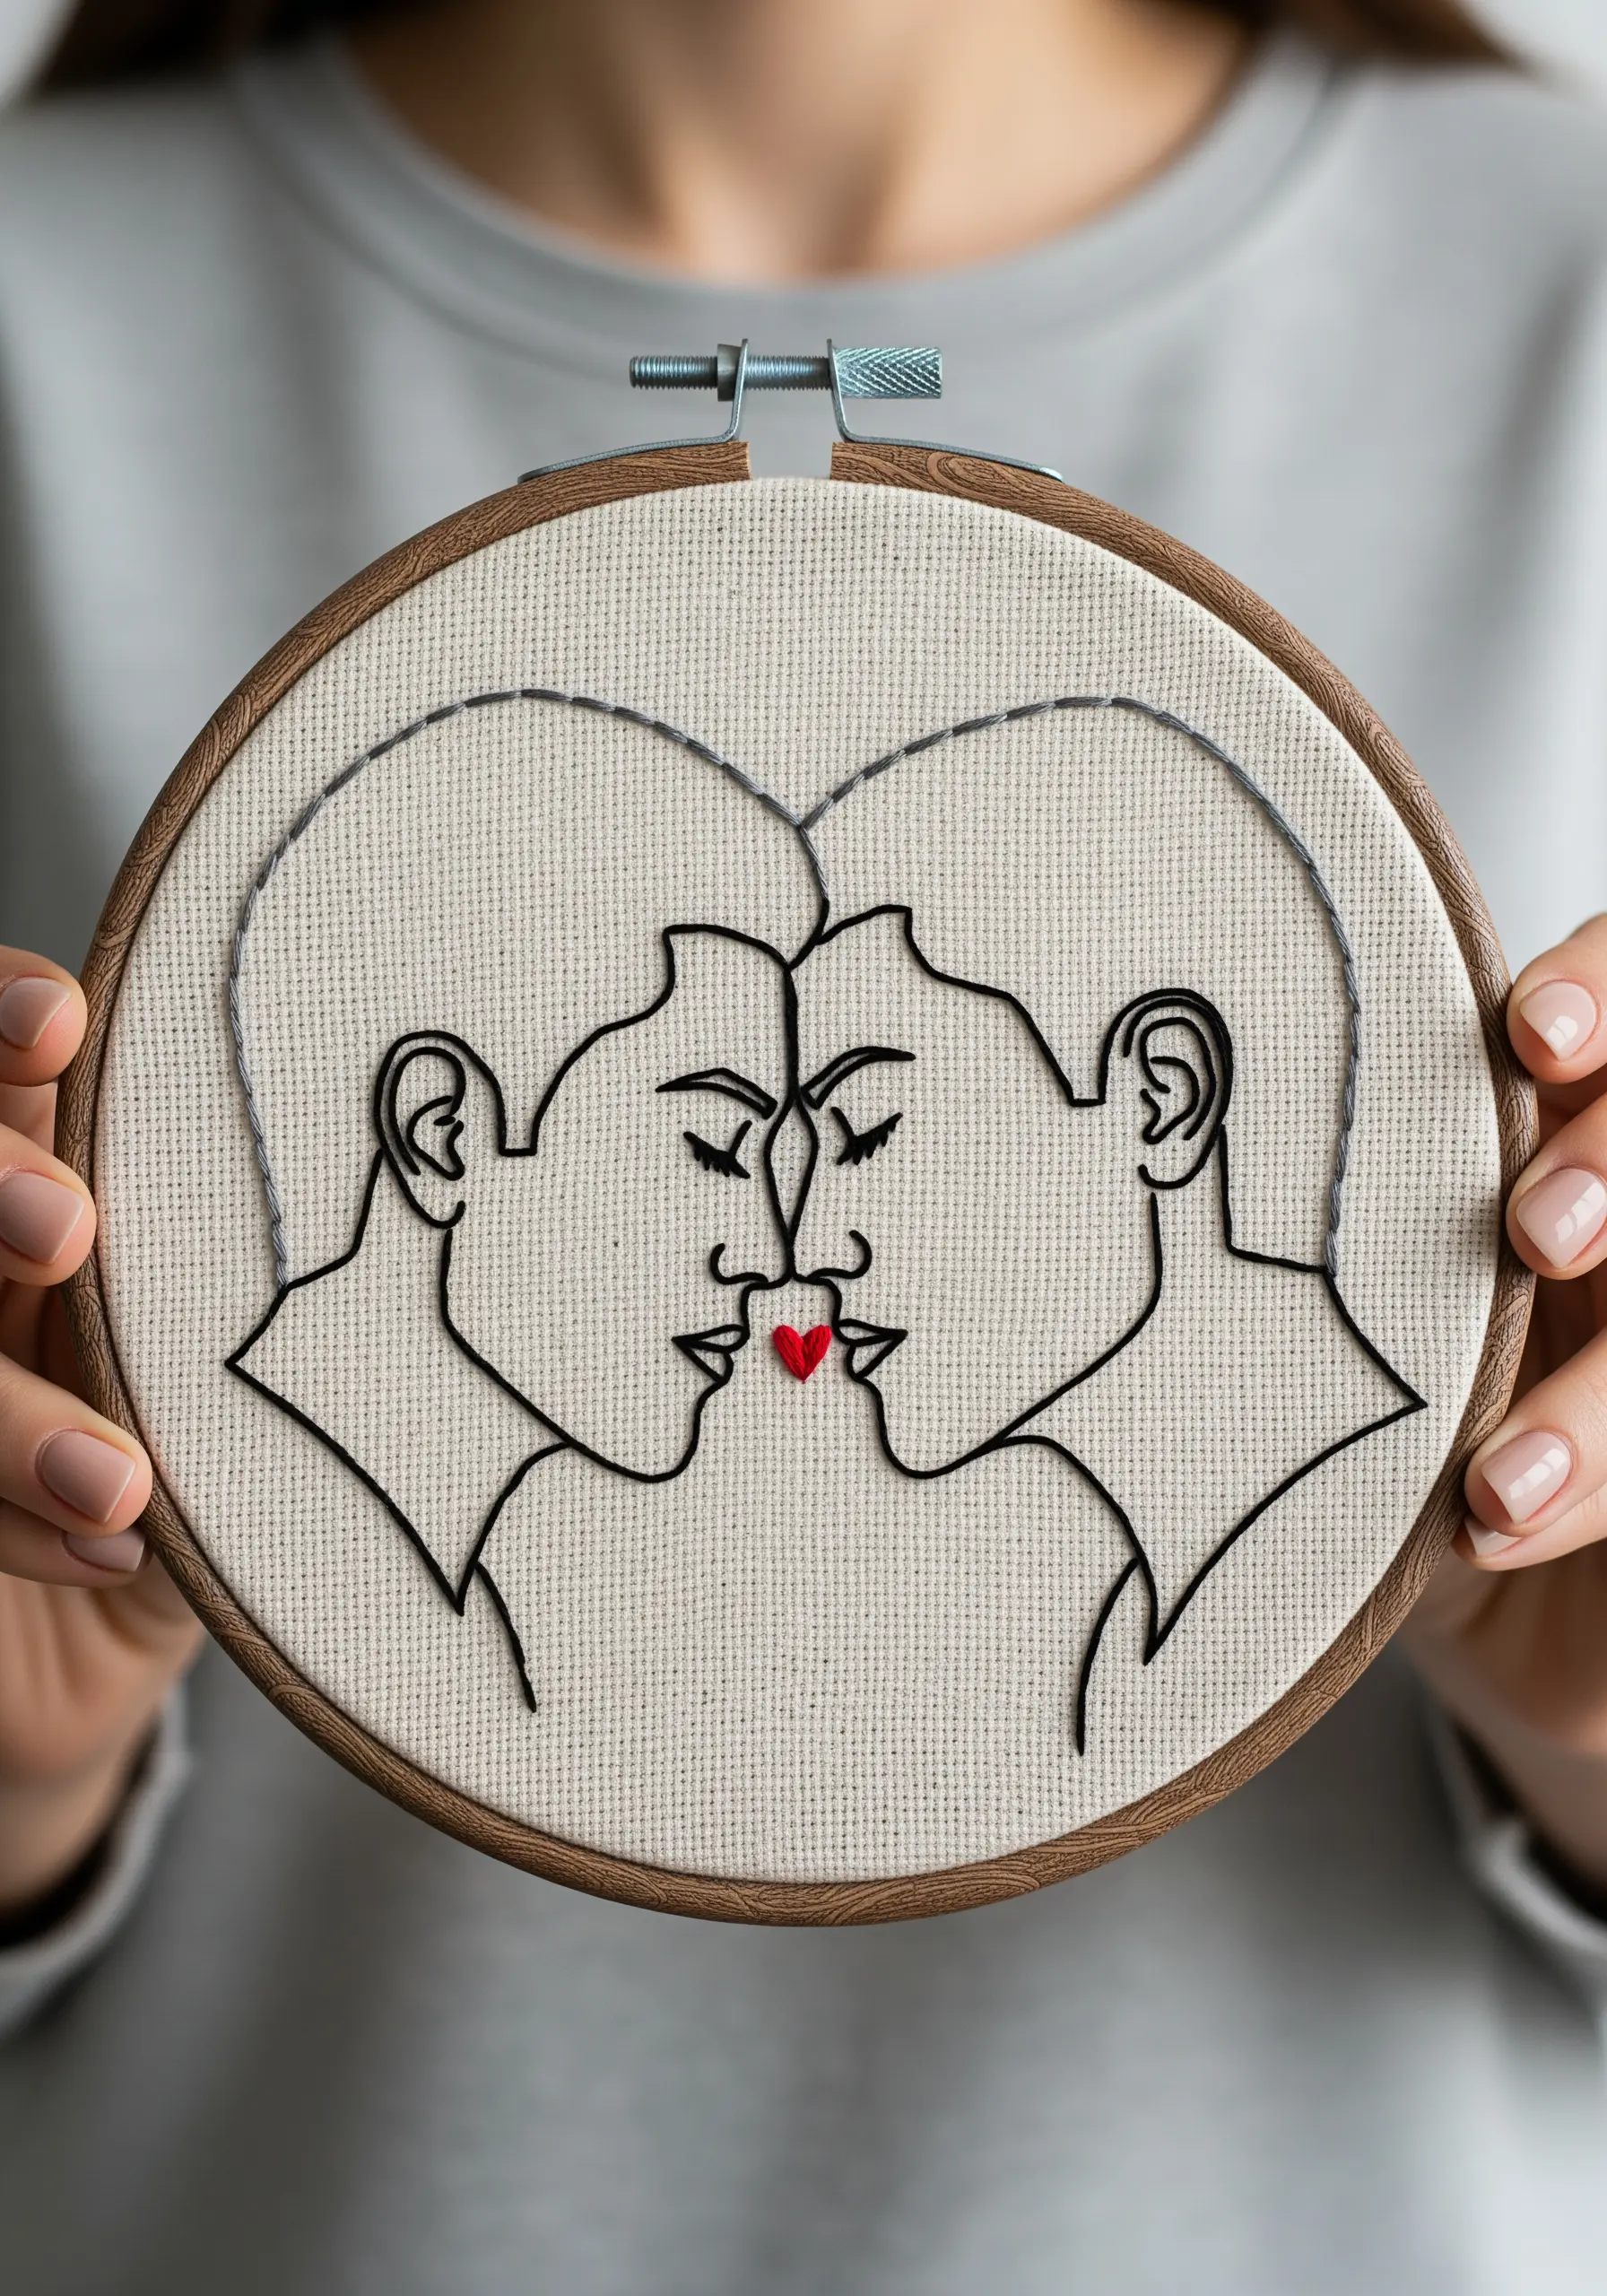
Guide the viewer’s eye and amplify the emotional core of your design with a single, concentrated use of color.
A tiny satin-stitched heart transforms this piece from a simple sketch into a story of connection.
When the rest of the design is monochrome, even the smallest color accent becomes incredibly powerful and intentional.
This technique is perfect for creating romantic couple line-art embroidery patterns that feel both intimate and profound.
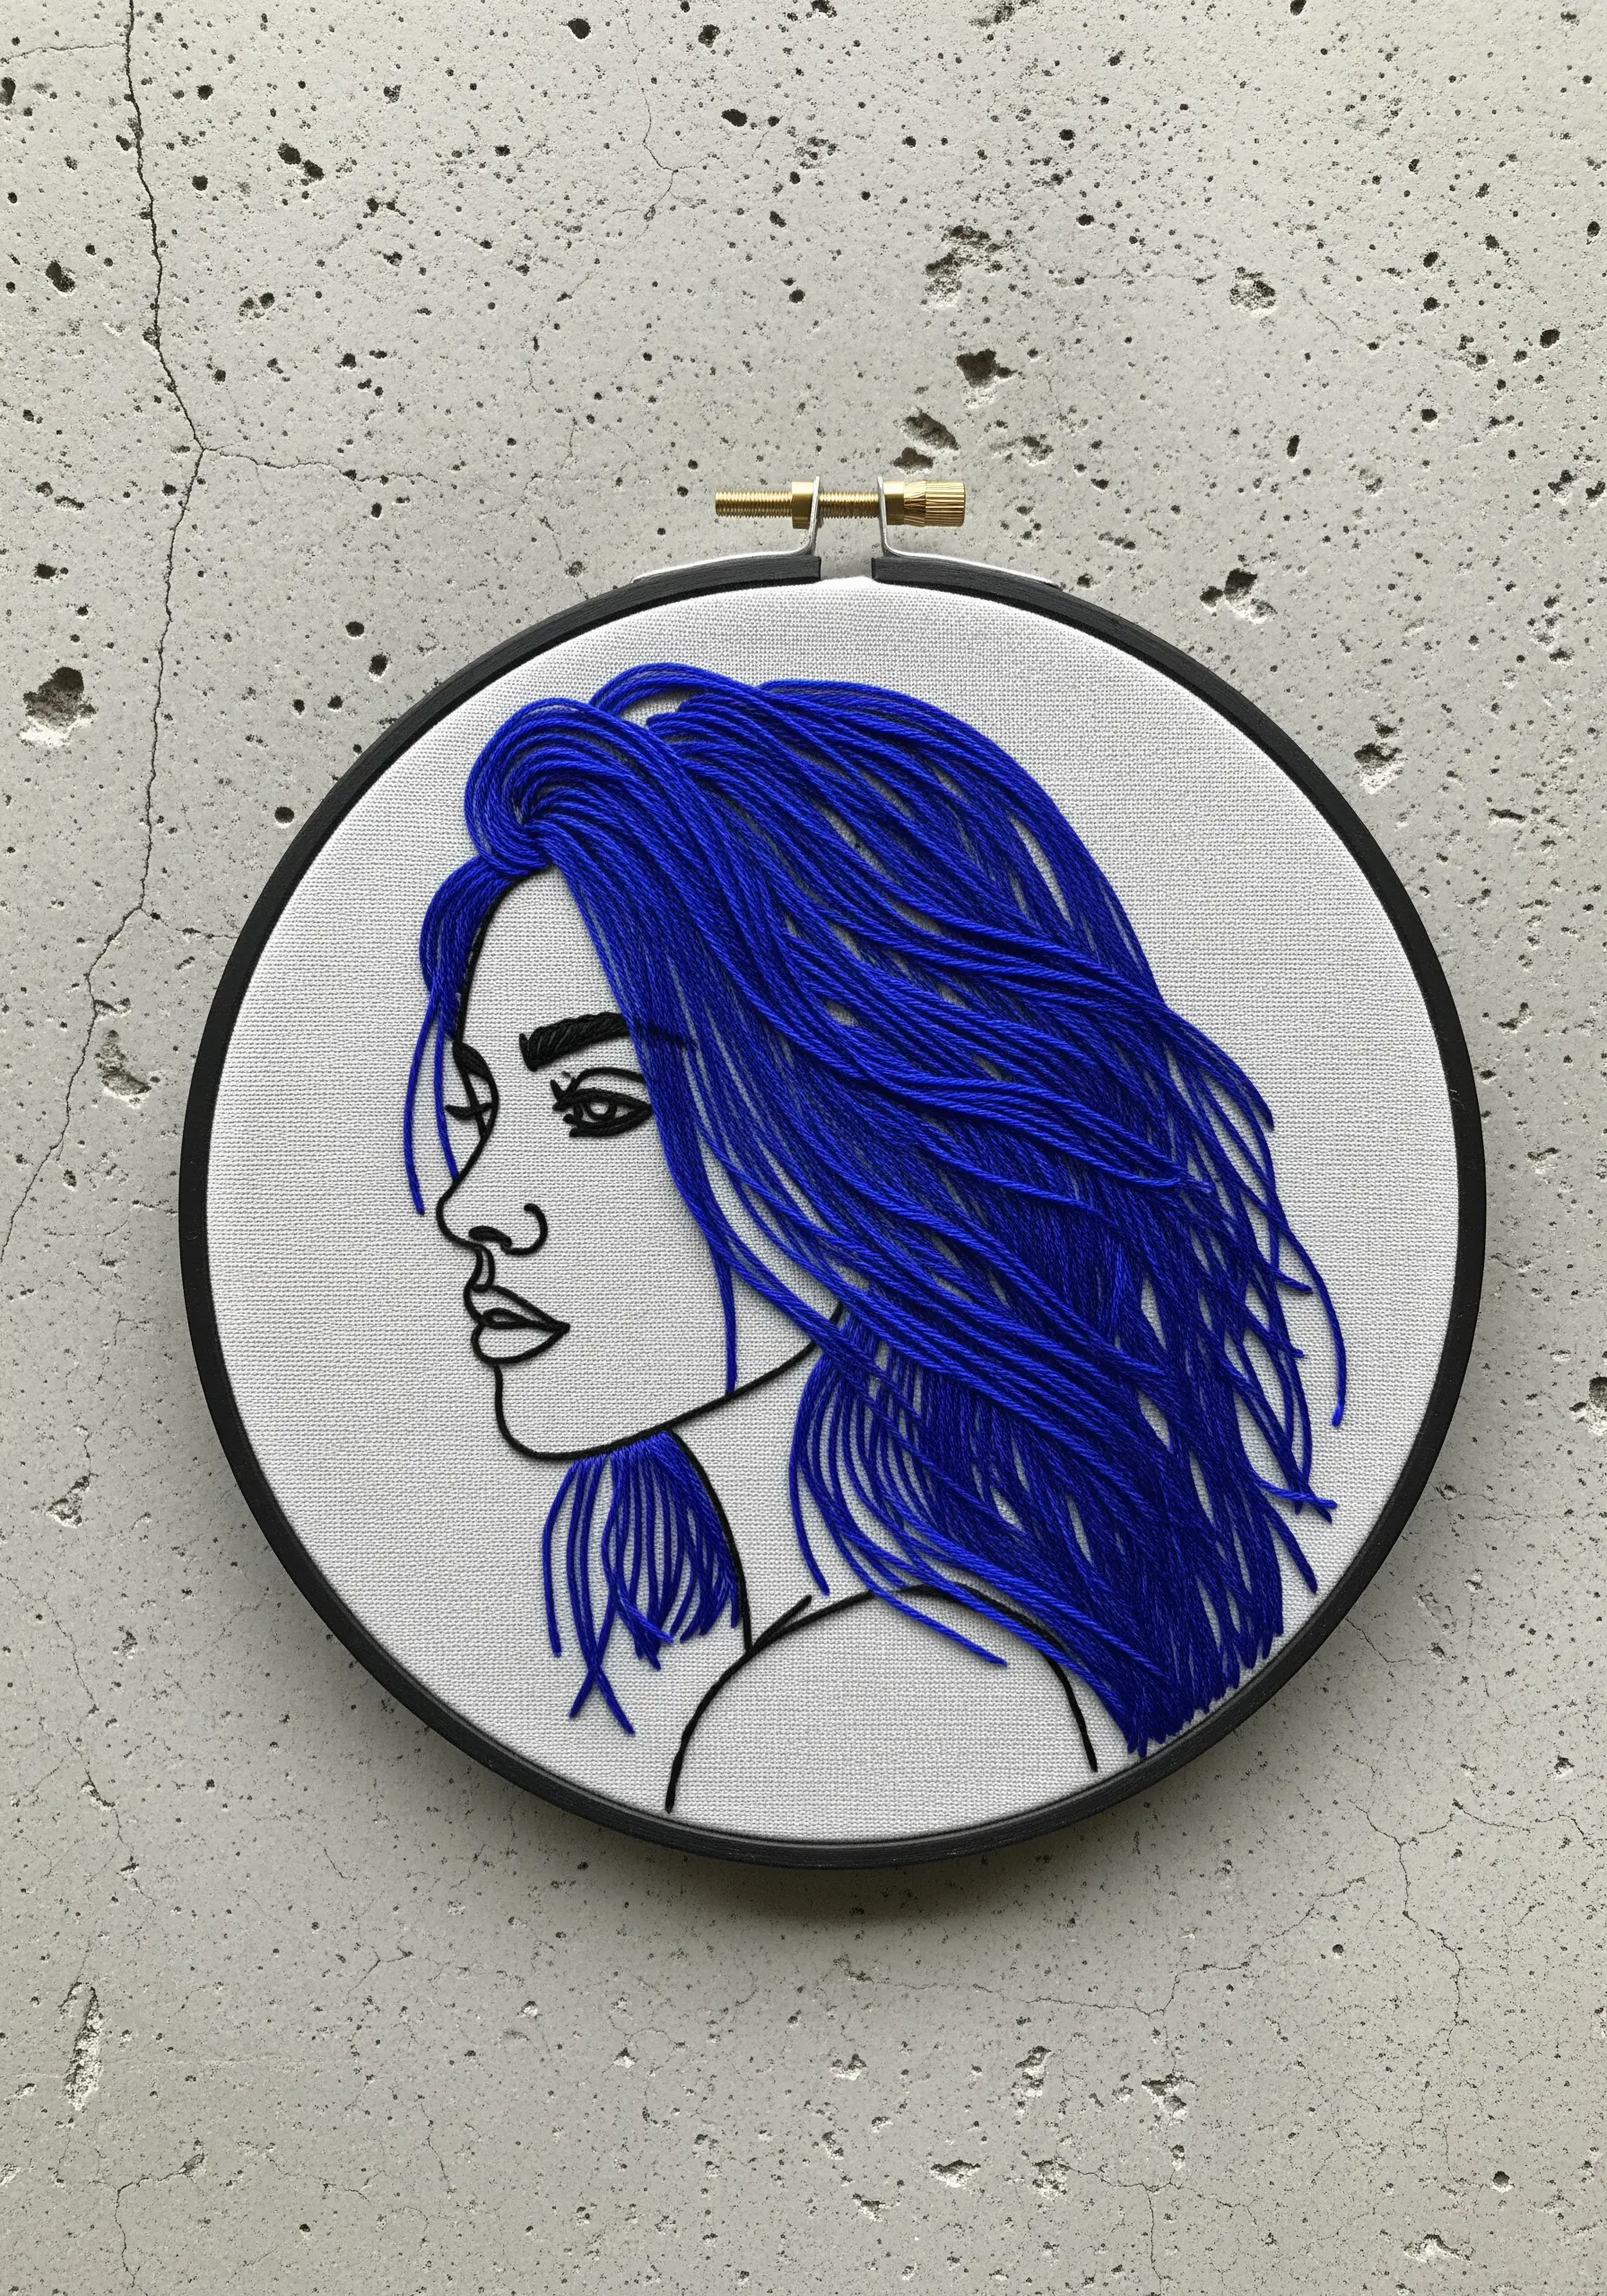
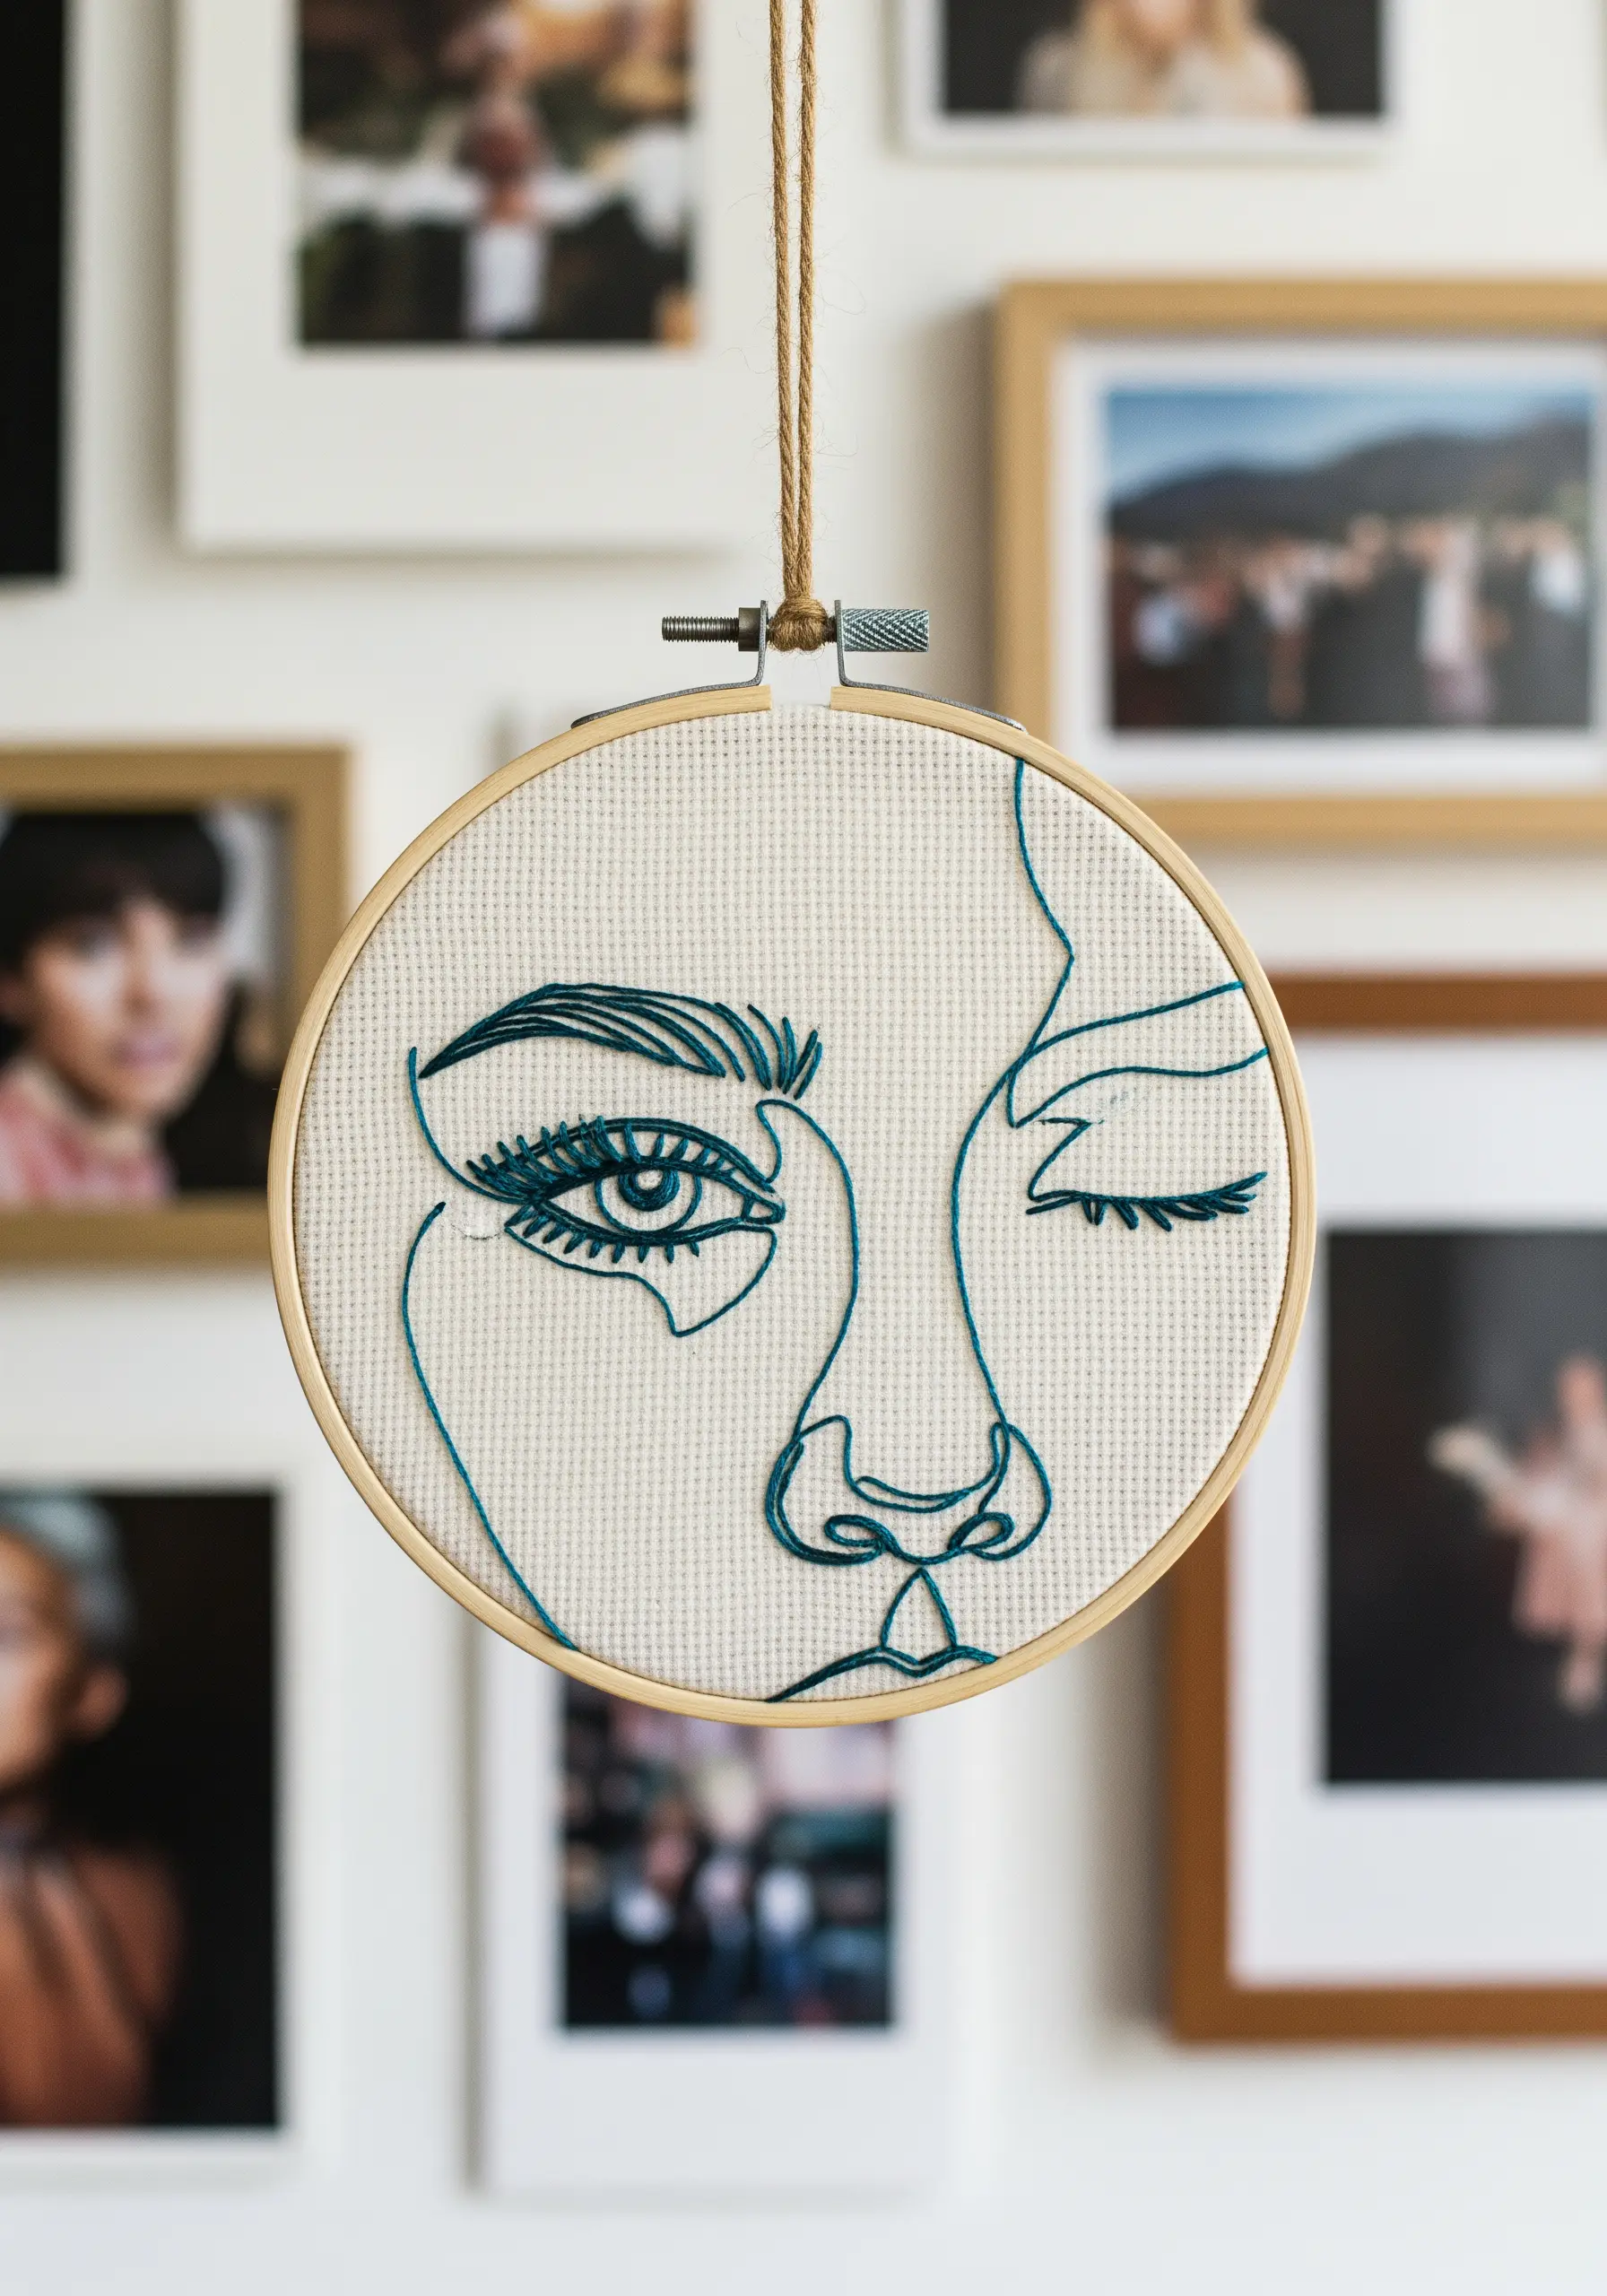
5. Use Thread Weight to Define Light and Shadow
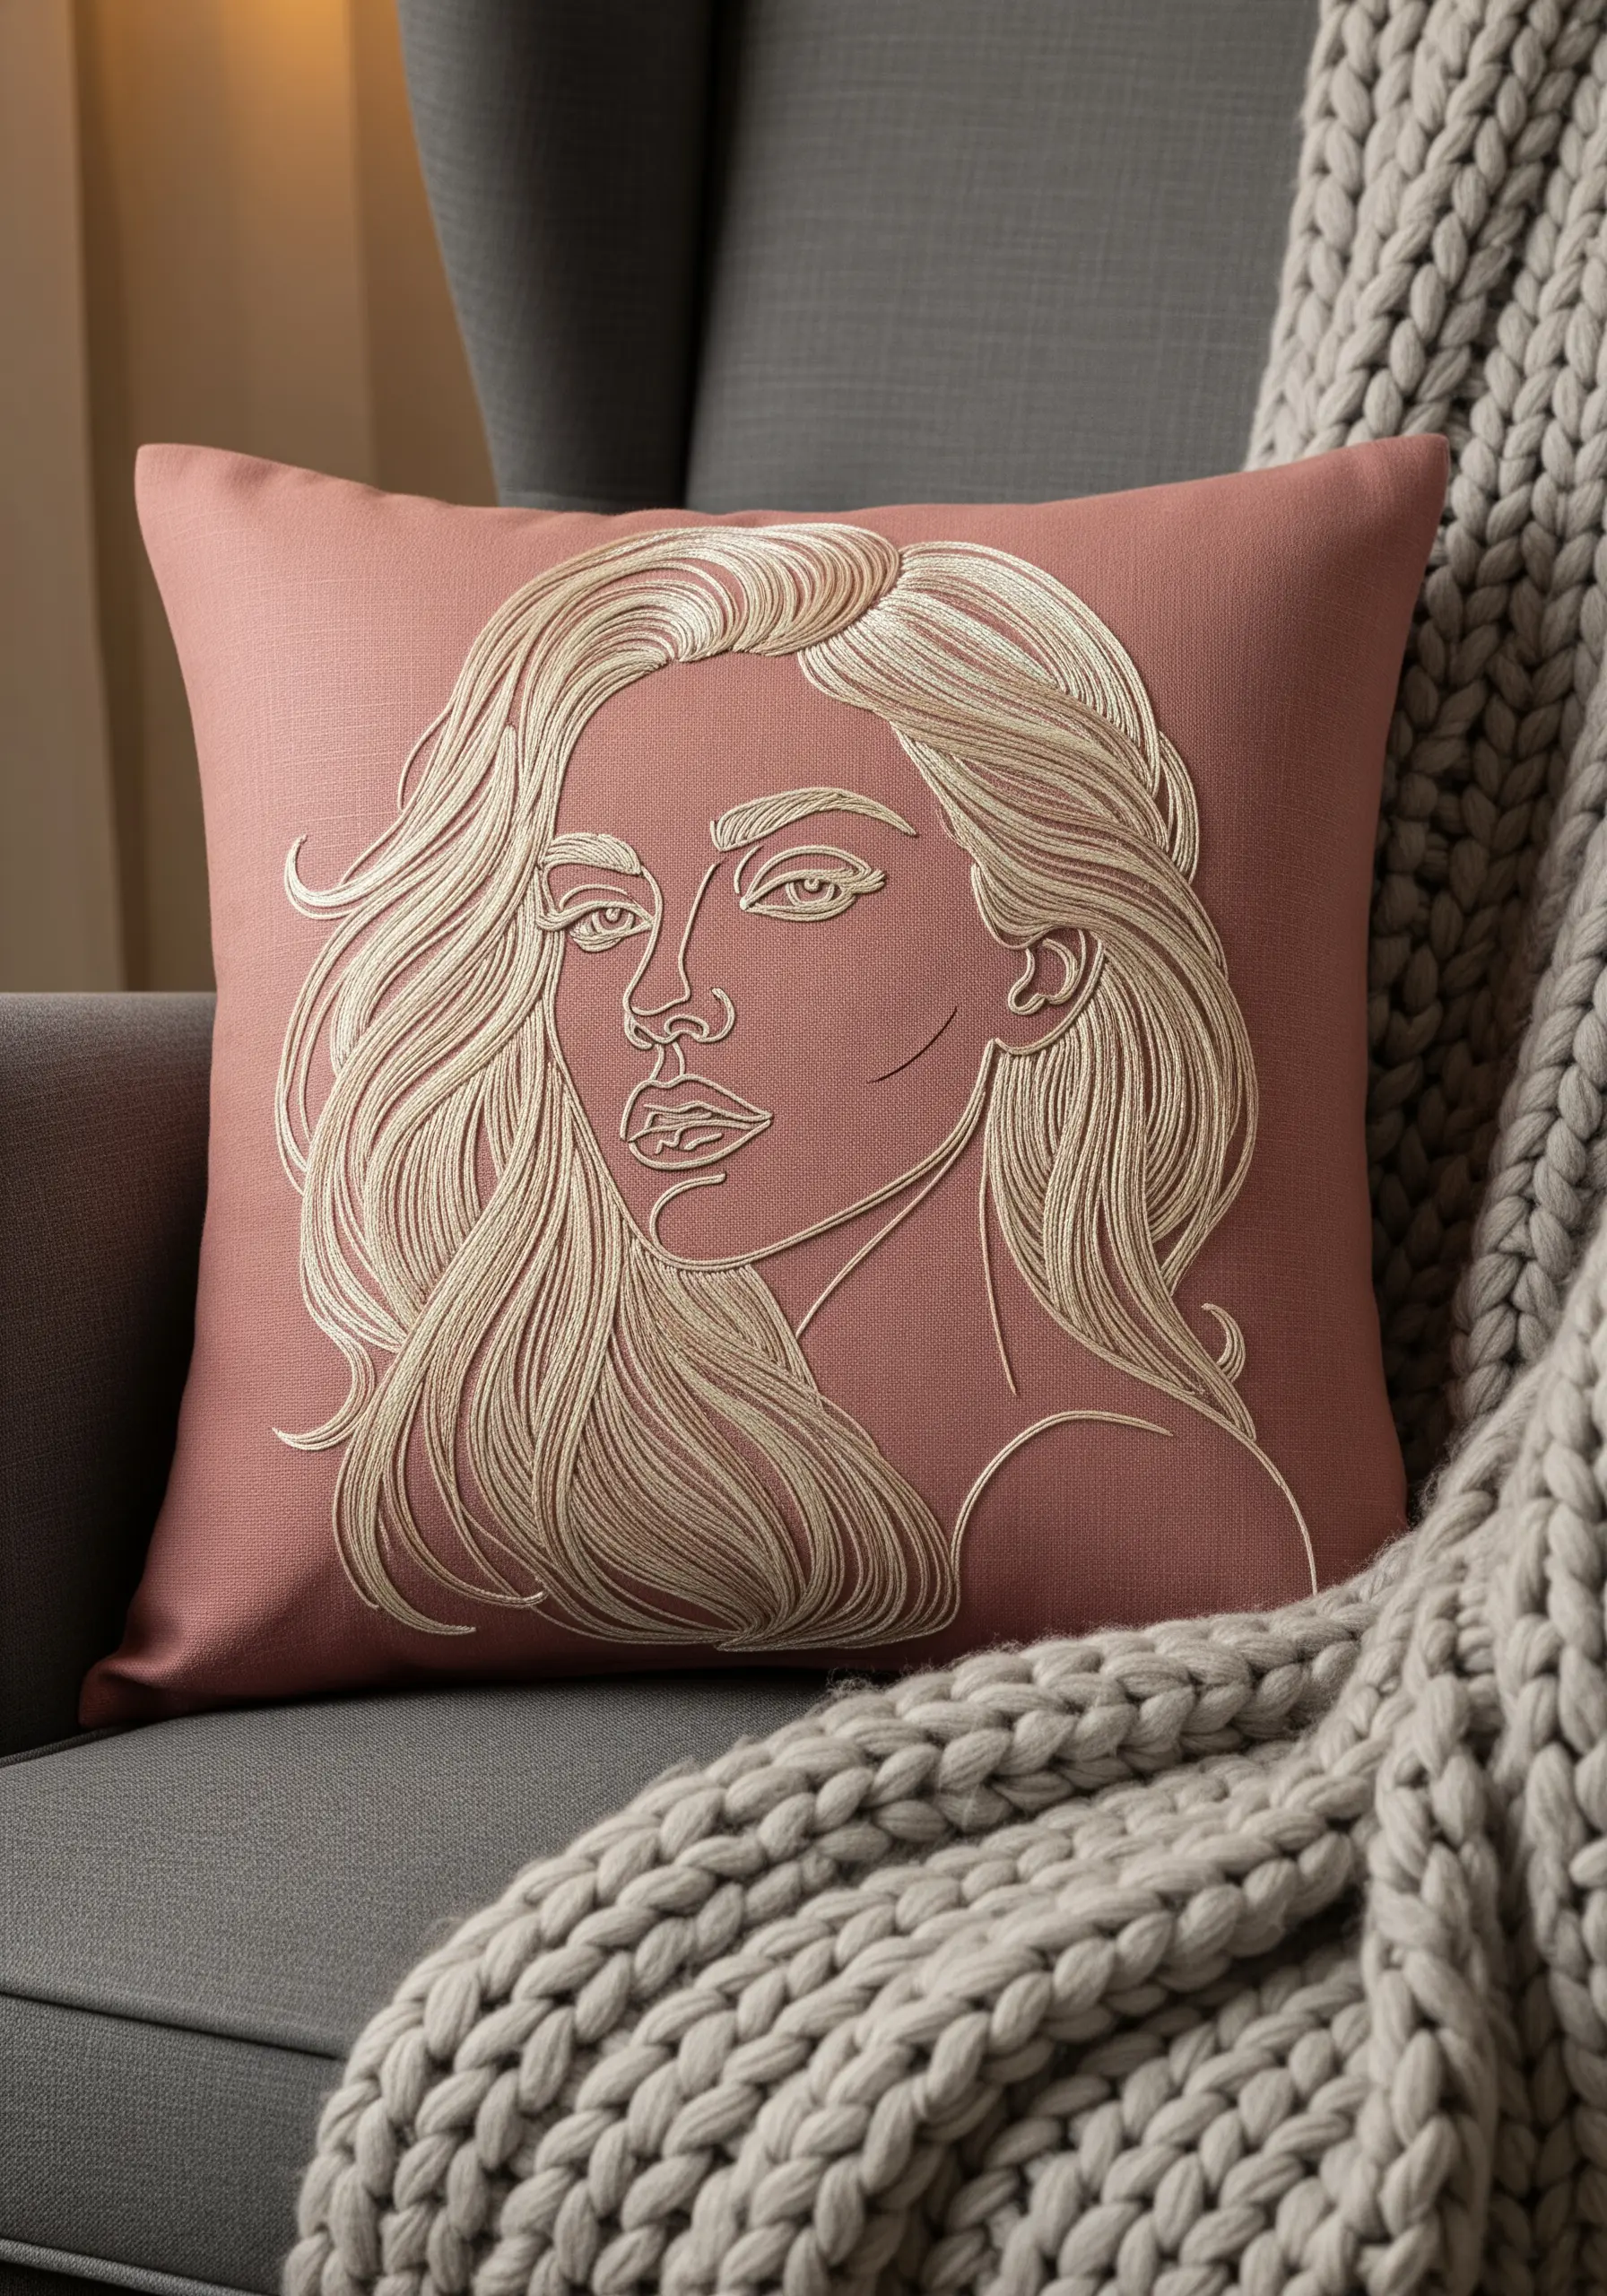
Instead of relying on outlines for everything, vary the number of strands you use to create sophisticated depth.
For the hair, use all six strands of floss with long, flowing straight stitches to create bold, light-catching highlights.
For the more delicate facial features, switch to a single strand for a finer, more subtle line.
This contrast mimics how light falls on a subject, adding dimension without complex shading, making it perfect for embroidered cushion covers where texture is key.
6. Introduce Texture with Geometric Fills

Contrast your smooth, clean backstitched lines with a dense field of tactile texture.
Filling a geometric shape—like this sun-like circle—with hundreds of tiny French knots creates a stunning visual and physical focal point.
Keep your knots tight and uniform for a clean, modern finish that doesn’t look messy.
This technique allows you to play with color blocking and texture, turning a simple outline into a more abstract thread painting.
7. Master the Pet Portrait with Minimal Lines
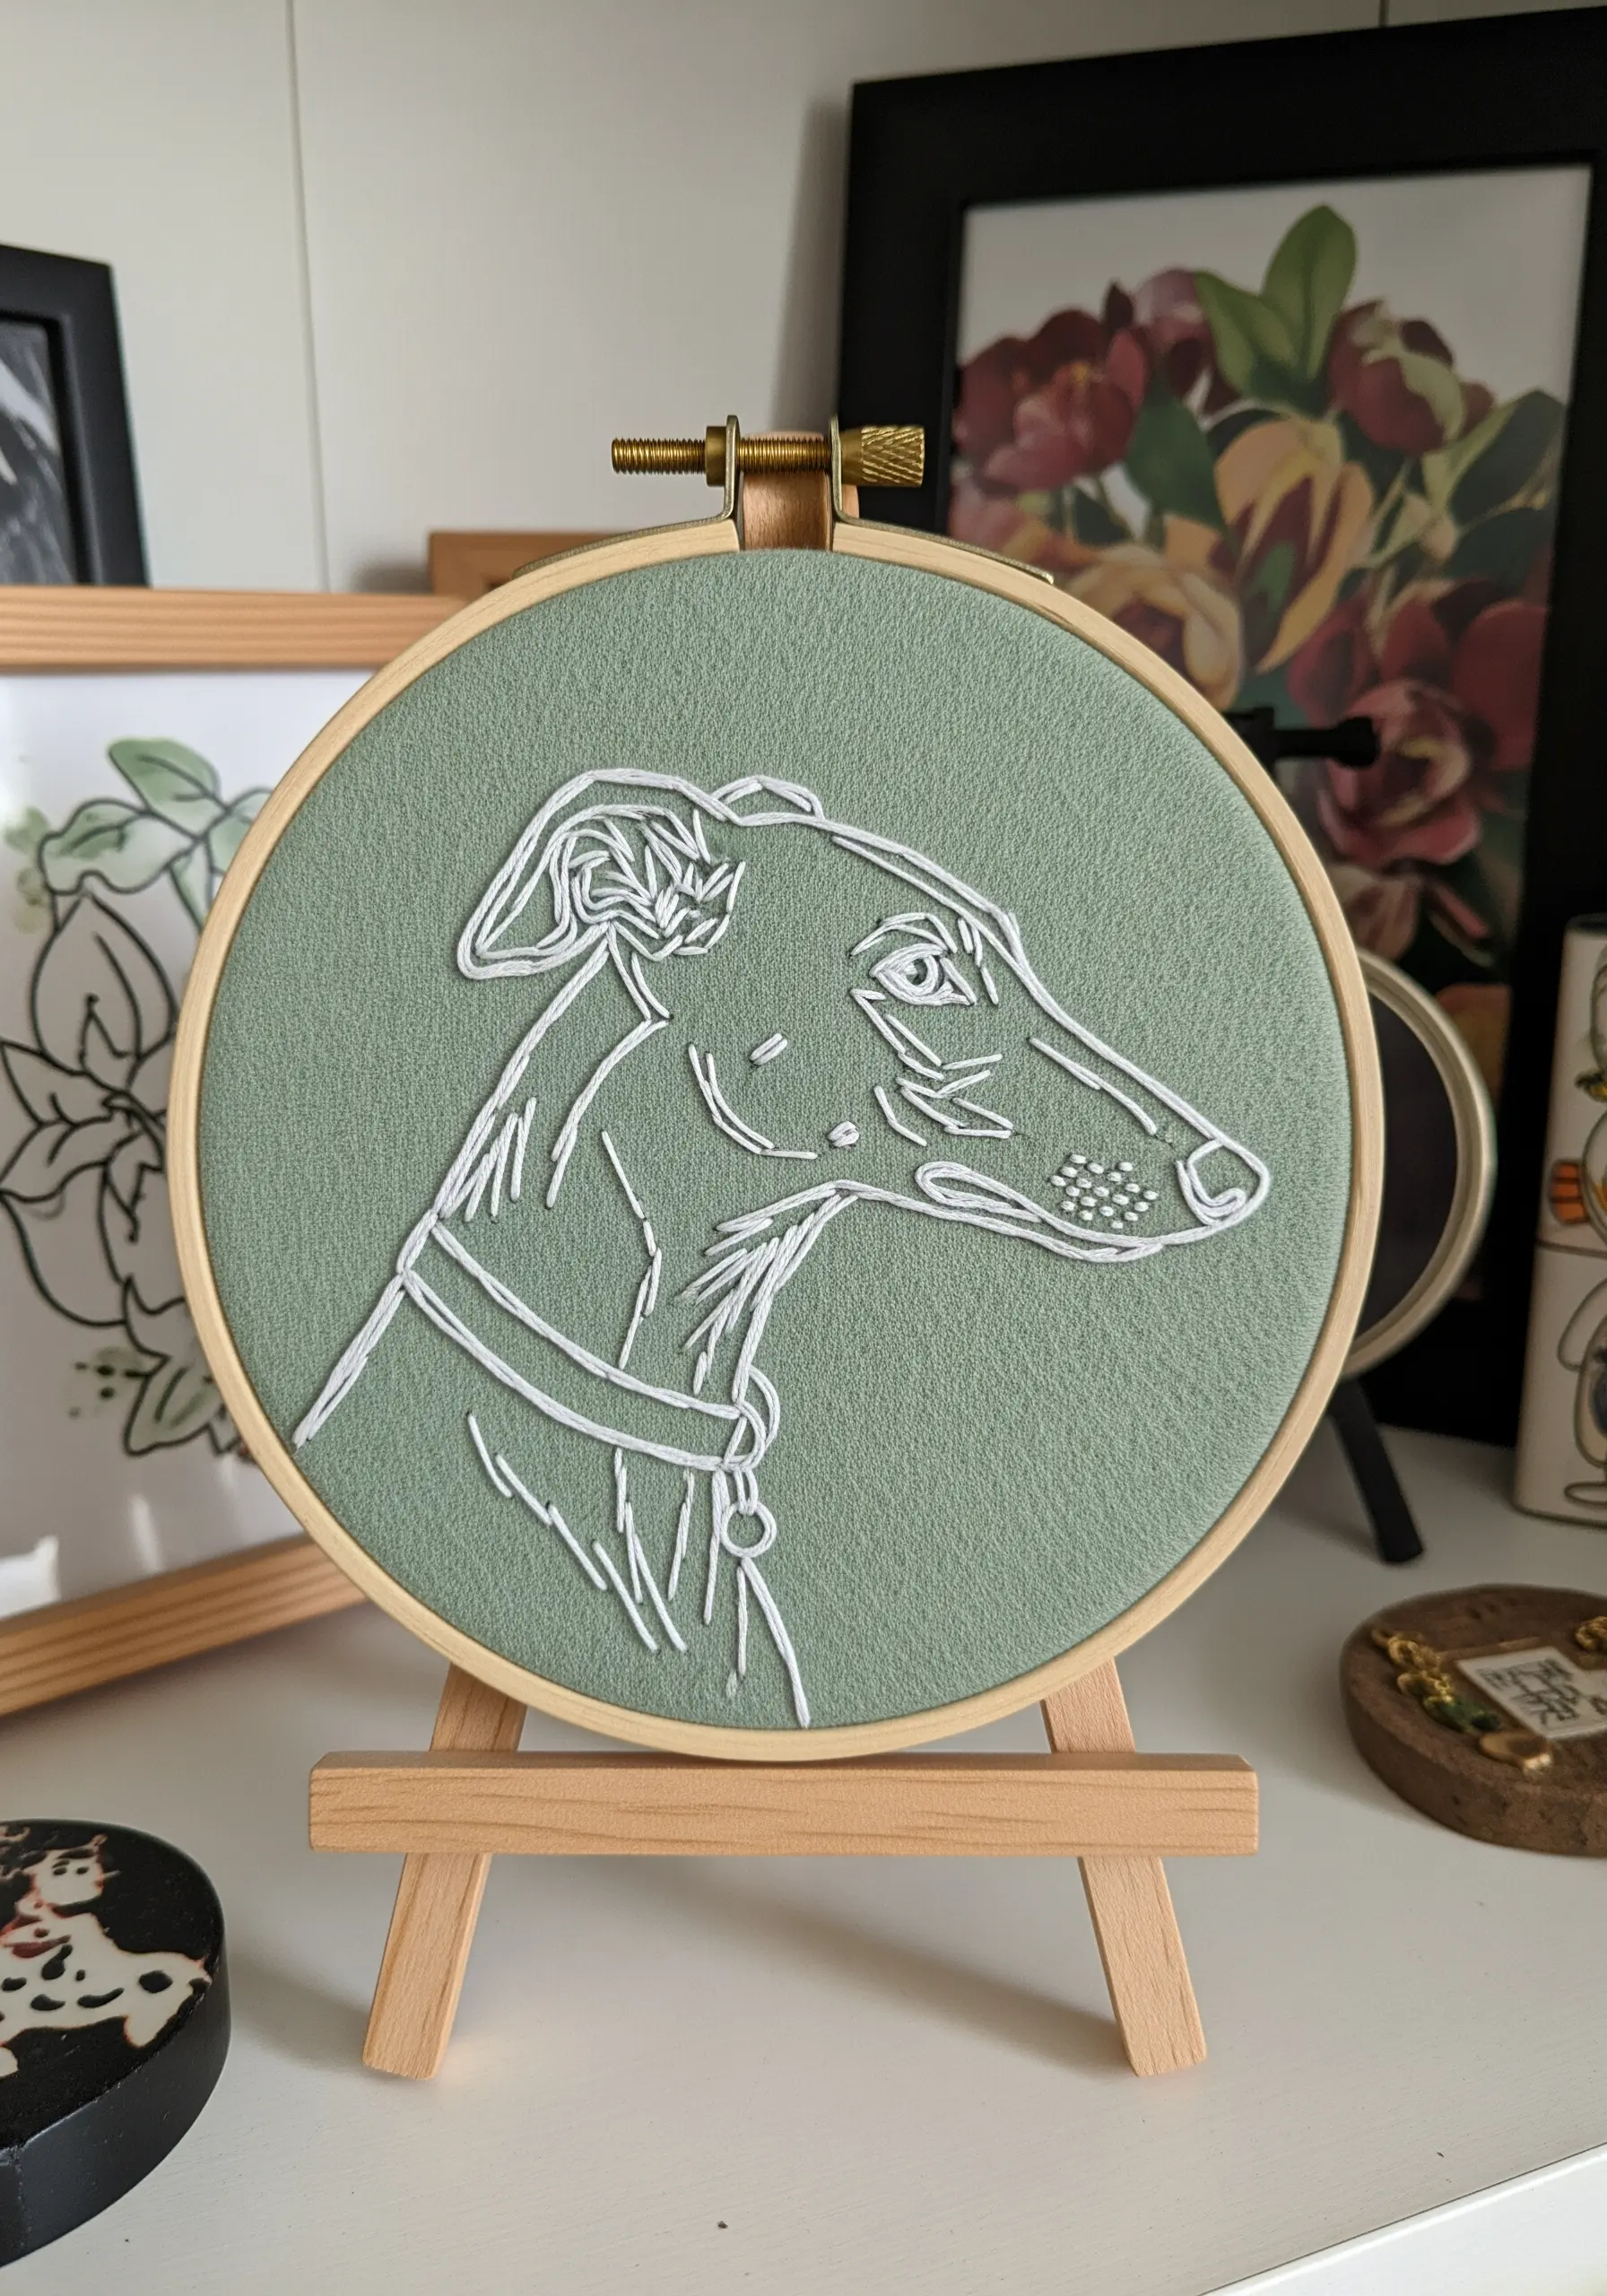
Capture the spirit of an animal not by replicating every detail, but by focusing on its defining contours and character.
Use a stem stitch to create a slightly raised, rope-like line that gives the outline more presence than a simple backstitch.
Add tiny satin stitches or seed stitches for subtle highlights, like the gleam in an eye or the texture on the nose.
This refined approach is perfect for delicate pet line-art embroidery ideas that feel both elegant and deeply personal.
8. Create a Wearable Statement with an Embroidered Patch

For detailed work on heavy fabric like denim, first stitch your design onto a separate piece of sturdy cotton canvas.
This gives you more control and prevents puckering.
Once complete, trim the canvas, leaving a raw, frayed edge for a relaxed aesthetic, and then appliqué it onto your garment.
This is the best method for line-art portrait embroidery ideas to personalize denim jackets without struggling with thick, unwieldy material.
9. Play with Transparency for an Ethereal Effect
Stitching on a sheer or semi-sheer fabric like organza or voile creates a beautiful, layered look where the threads appear to float.
The background becomes an active part of the artwork, interacting with light and shadow.
To prevent the delicate fabric from puckering, use a brand-new, sharp needle and maintain a very even, gentle tension.
The result is delicate and almost ghost-like, an excellent way to create dreamy, nature-inspired embroidery designs.
10. Deconstruct Features with Abstract Color Blocking

Break a portrait down into its essential shapes and assign each one a bold, primary color.
Use a smooth satin stitch to fill in the shapes, ensuring your stitch direction is consistent within each block for a polished, graphic finish.
This playful, cubist-inspired approach transforms a realistic portrait into a modern art statement.
It’s an excellent exercise in composition and one of the most expressive color blocking embroidery patterns.
11. Create Dynamic Movement with Long, Loose Stitches
To create an expressive, hair-like texture, use long straight stitches that are intentionally left a little loose on the fabric’s surface.
Layer these stitches in varying directions to mimic natural flow, volume, and energy.
This technique adds a sense of freedom that contrasts beautifully with the controlled lines of the face.
Because the threads can snag, this style is best suited for framed embroidery art pieces rather than apparel.
12. Incorporate Mixed Media for a Touch of Luxury
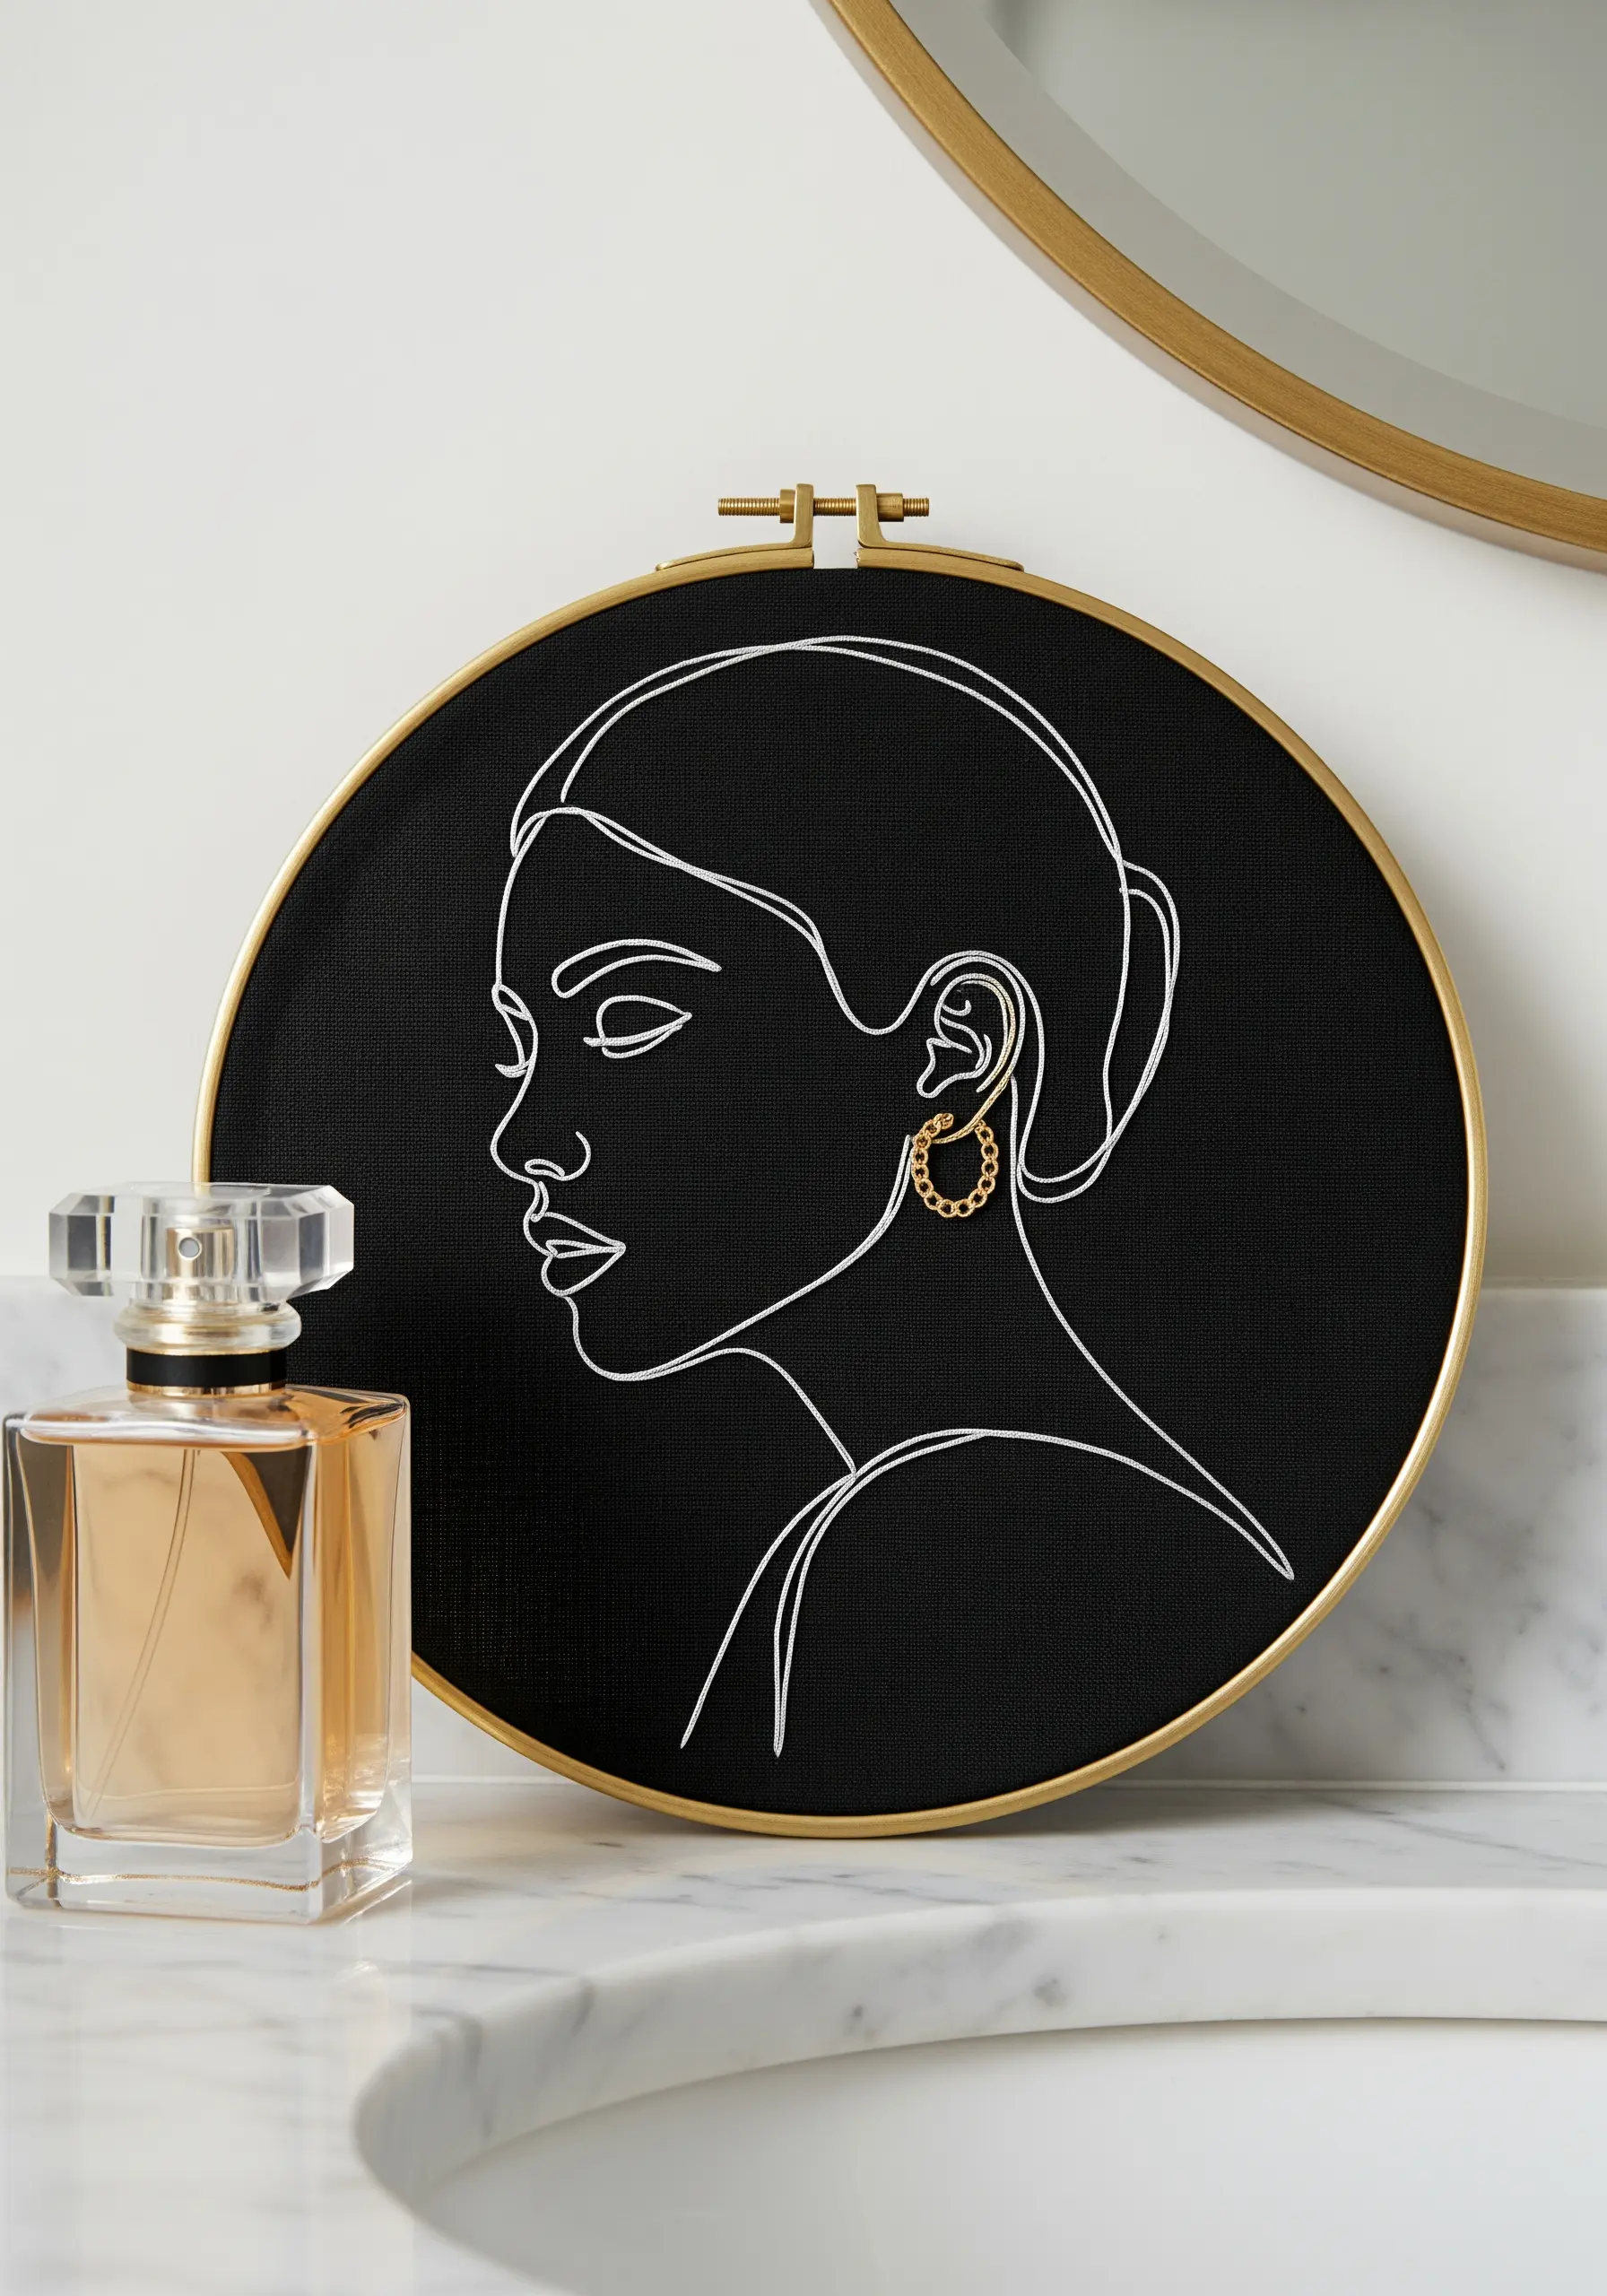
Elevate your embroidery by adding an unexpected non-thread element, like a small piece of jewelry.
A tiny metal hoop earring introduces a surprising and luxurious detail that catches the light.
Secure it to the fabric with a few discreet couching stitches using a matching metallic thread.
This simple addition turns your piece into a true mixed-media technique with a high-end feel.
13. Merge Line Art with Three-Dimensional Florals
Juxtapose the flat plane of your line art with a highly textured, three-dimensional element for a surreal effect.
The woven wheel stitch, also known as a spider web rose, is perfect for this, creating a raised, dense flower with a few simple, repetitive motions.
By placing it over the eye, you create an artistic focal point that invites a closer look.
This is one of those small floral embroidery inspirations that completely transforms a design.
14. Adapt Line Art for Textured Aida Cloth
While typically reserved for cross-stitch, Aida cloth’s distinct woven grid offers a unique texture for line embroidery.
To create smooth lines that don’t sink into the fabric’s holes, use a whipped backstitch or a stem stitch.
These stitches sit neatly on top of the fabric’s weave, making your lines appear bolder and more defined against the graphic texture of the cloth.
It’s a clever way to add subtle depth to your minimalist hoop art patterns.
15. Tell a Story with Themed Portraits

Move beyond simple headshots and create a portrait that conveys a person’s passions or personality.
The inclusion of a prop, like a book, immediately establishes a narrative of intellect, quiet, and contemplation.
Where possible, use a single, continuous line for the entire design to enhance the minimalist aesthetic.
This approach is beautiful for Dark Academia shirt embroidery patterns or any design meant to capture a specific mood.
16. Compose a Group Portrait with Overlapping Lines
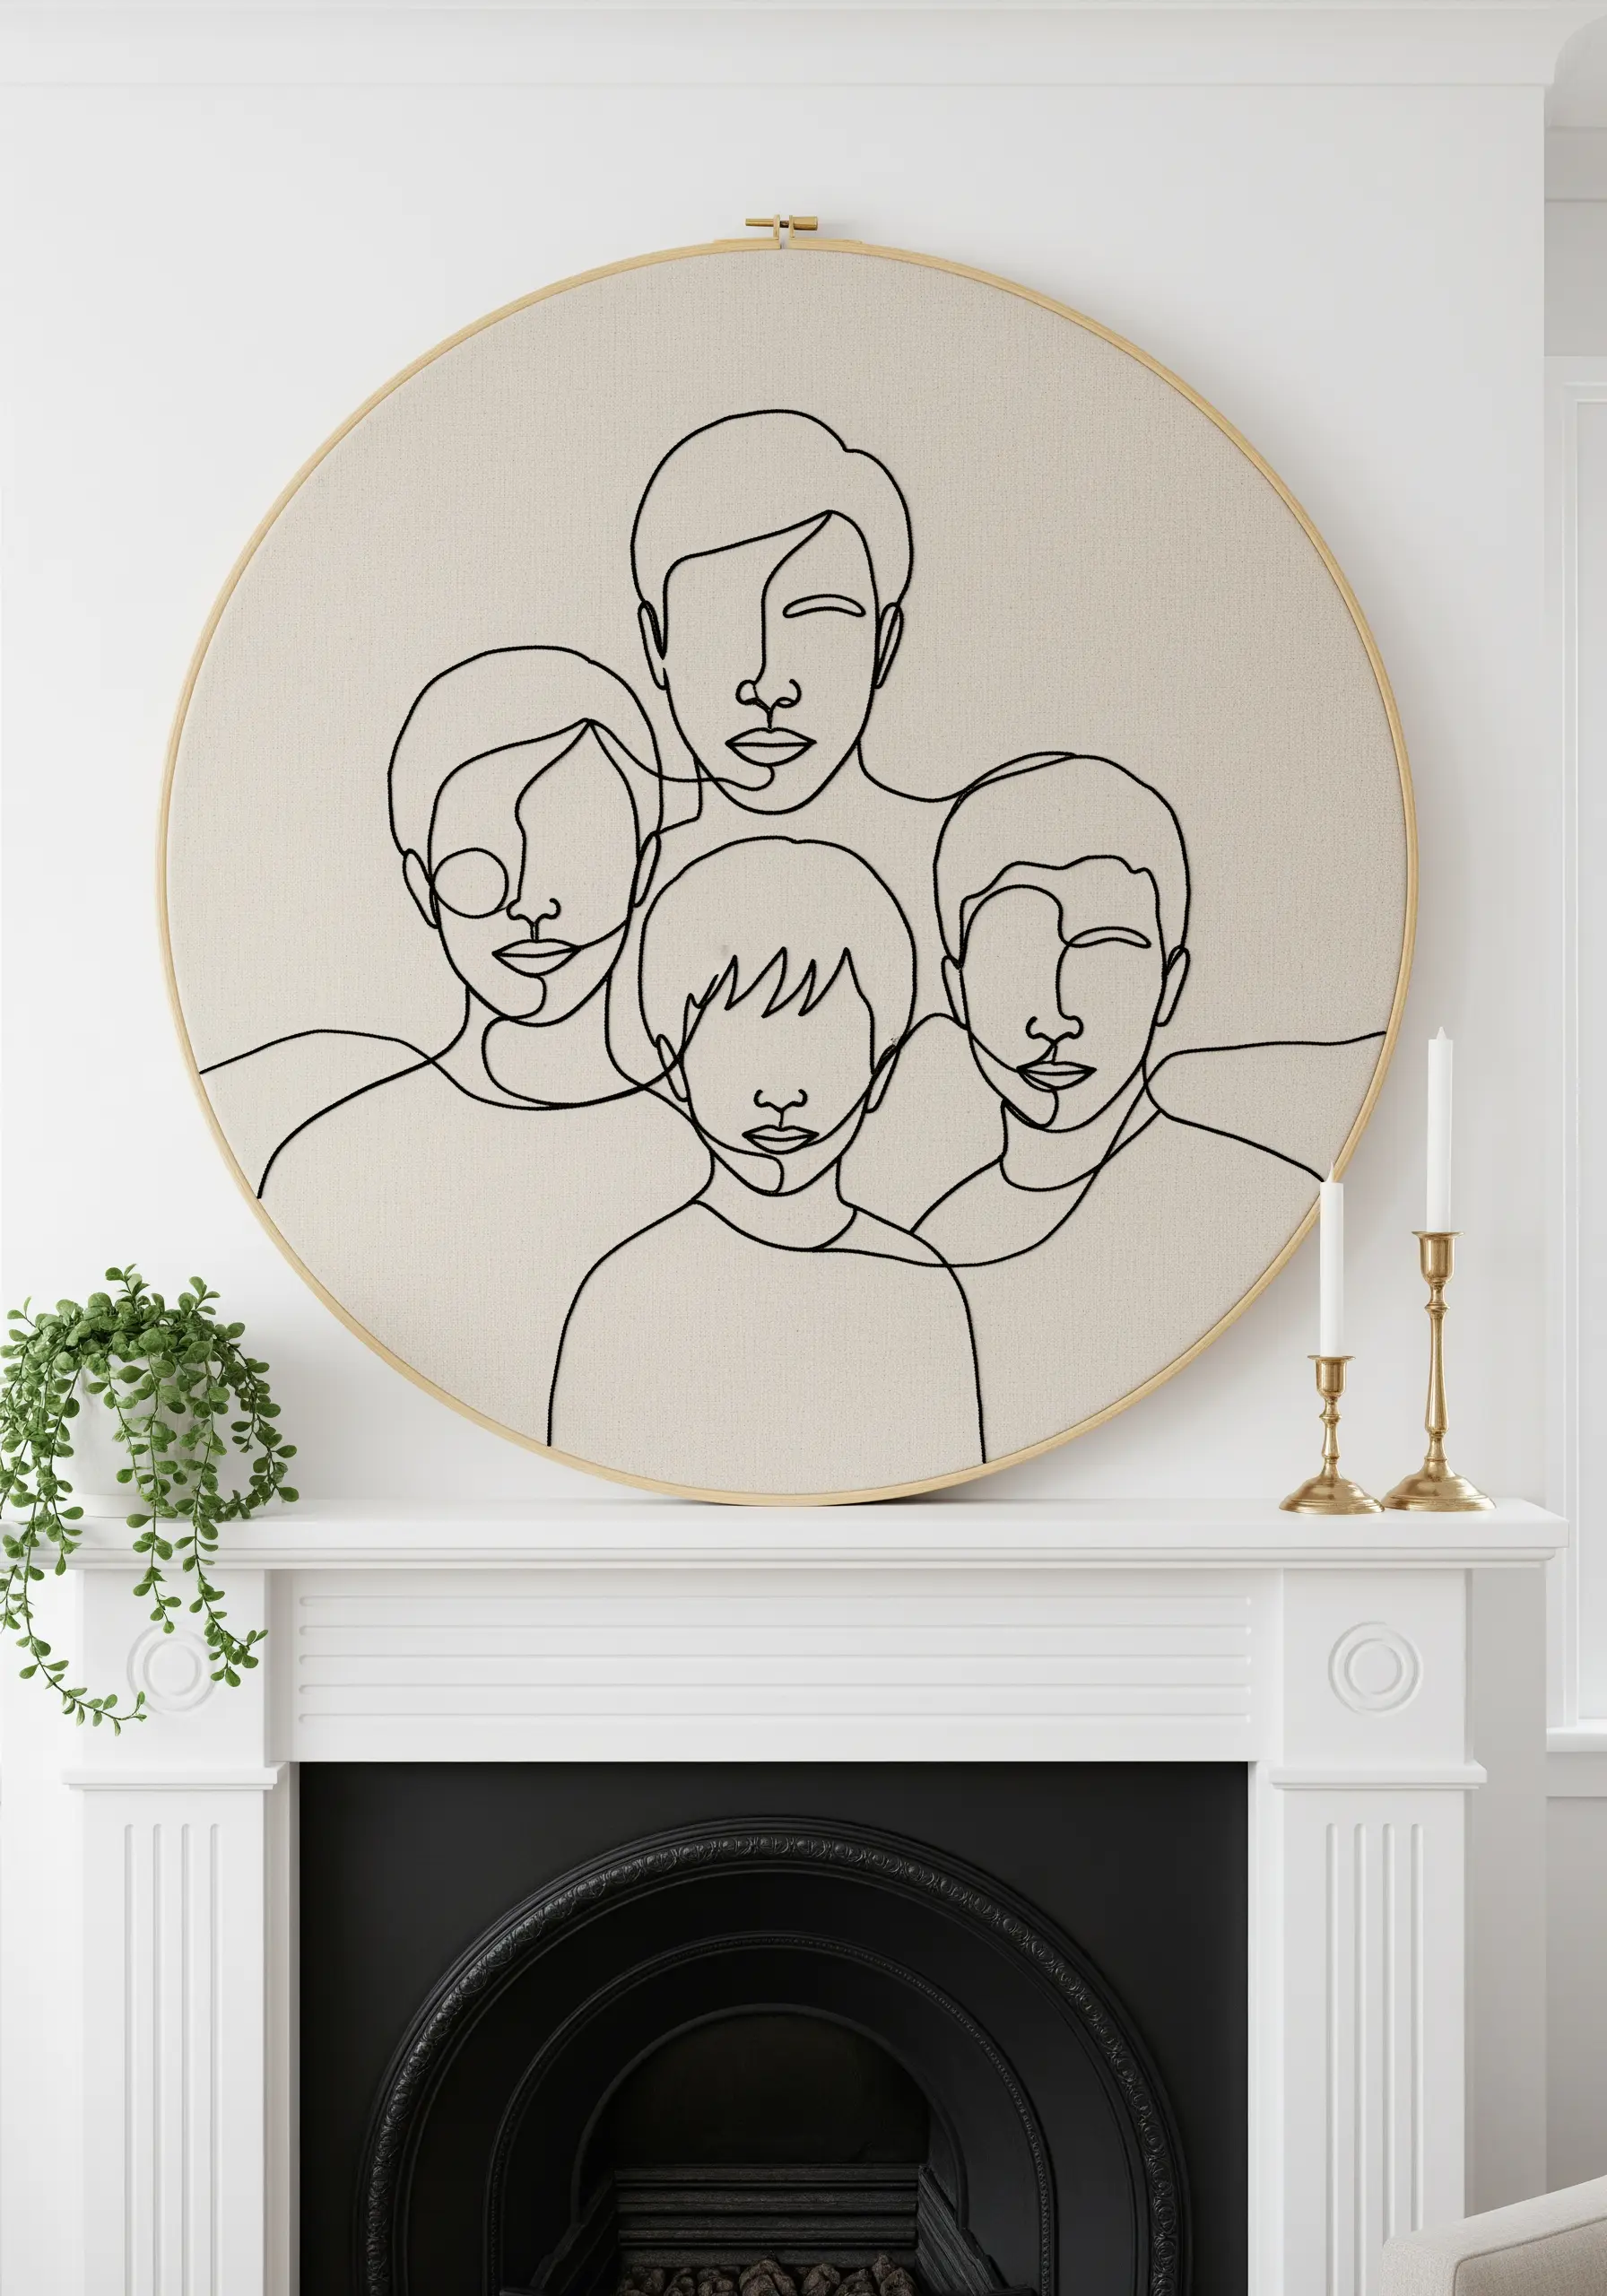
To create a sense of intimacy and unity in a family portrait, allow the lines of each individual to overlap and intersect seamlessly.
This technique visually connects the figures, reinforcing the idea that they are a single, cohesive unit rather than separate individuals.
Use a consistent line weight throughout to ensure the composition feels balanced.
Displayed in an oversized hoop, it becomes a significant piece of personalized wall embroidery.
17. Define Character with Distinctive Accessories
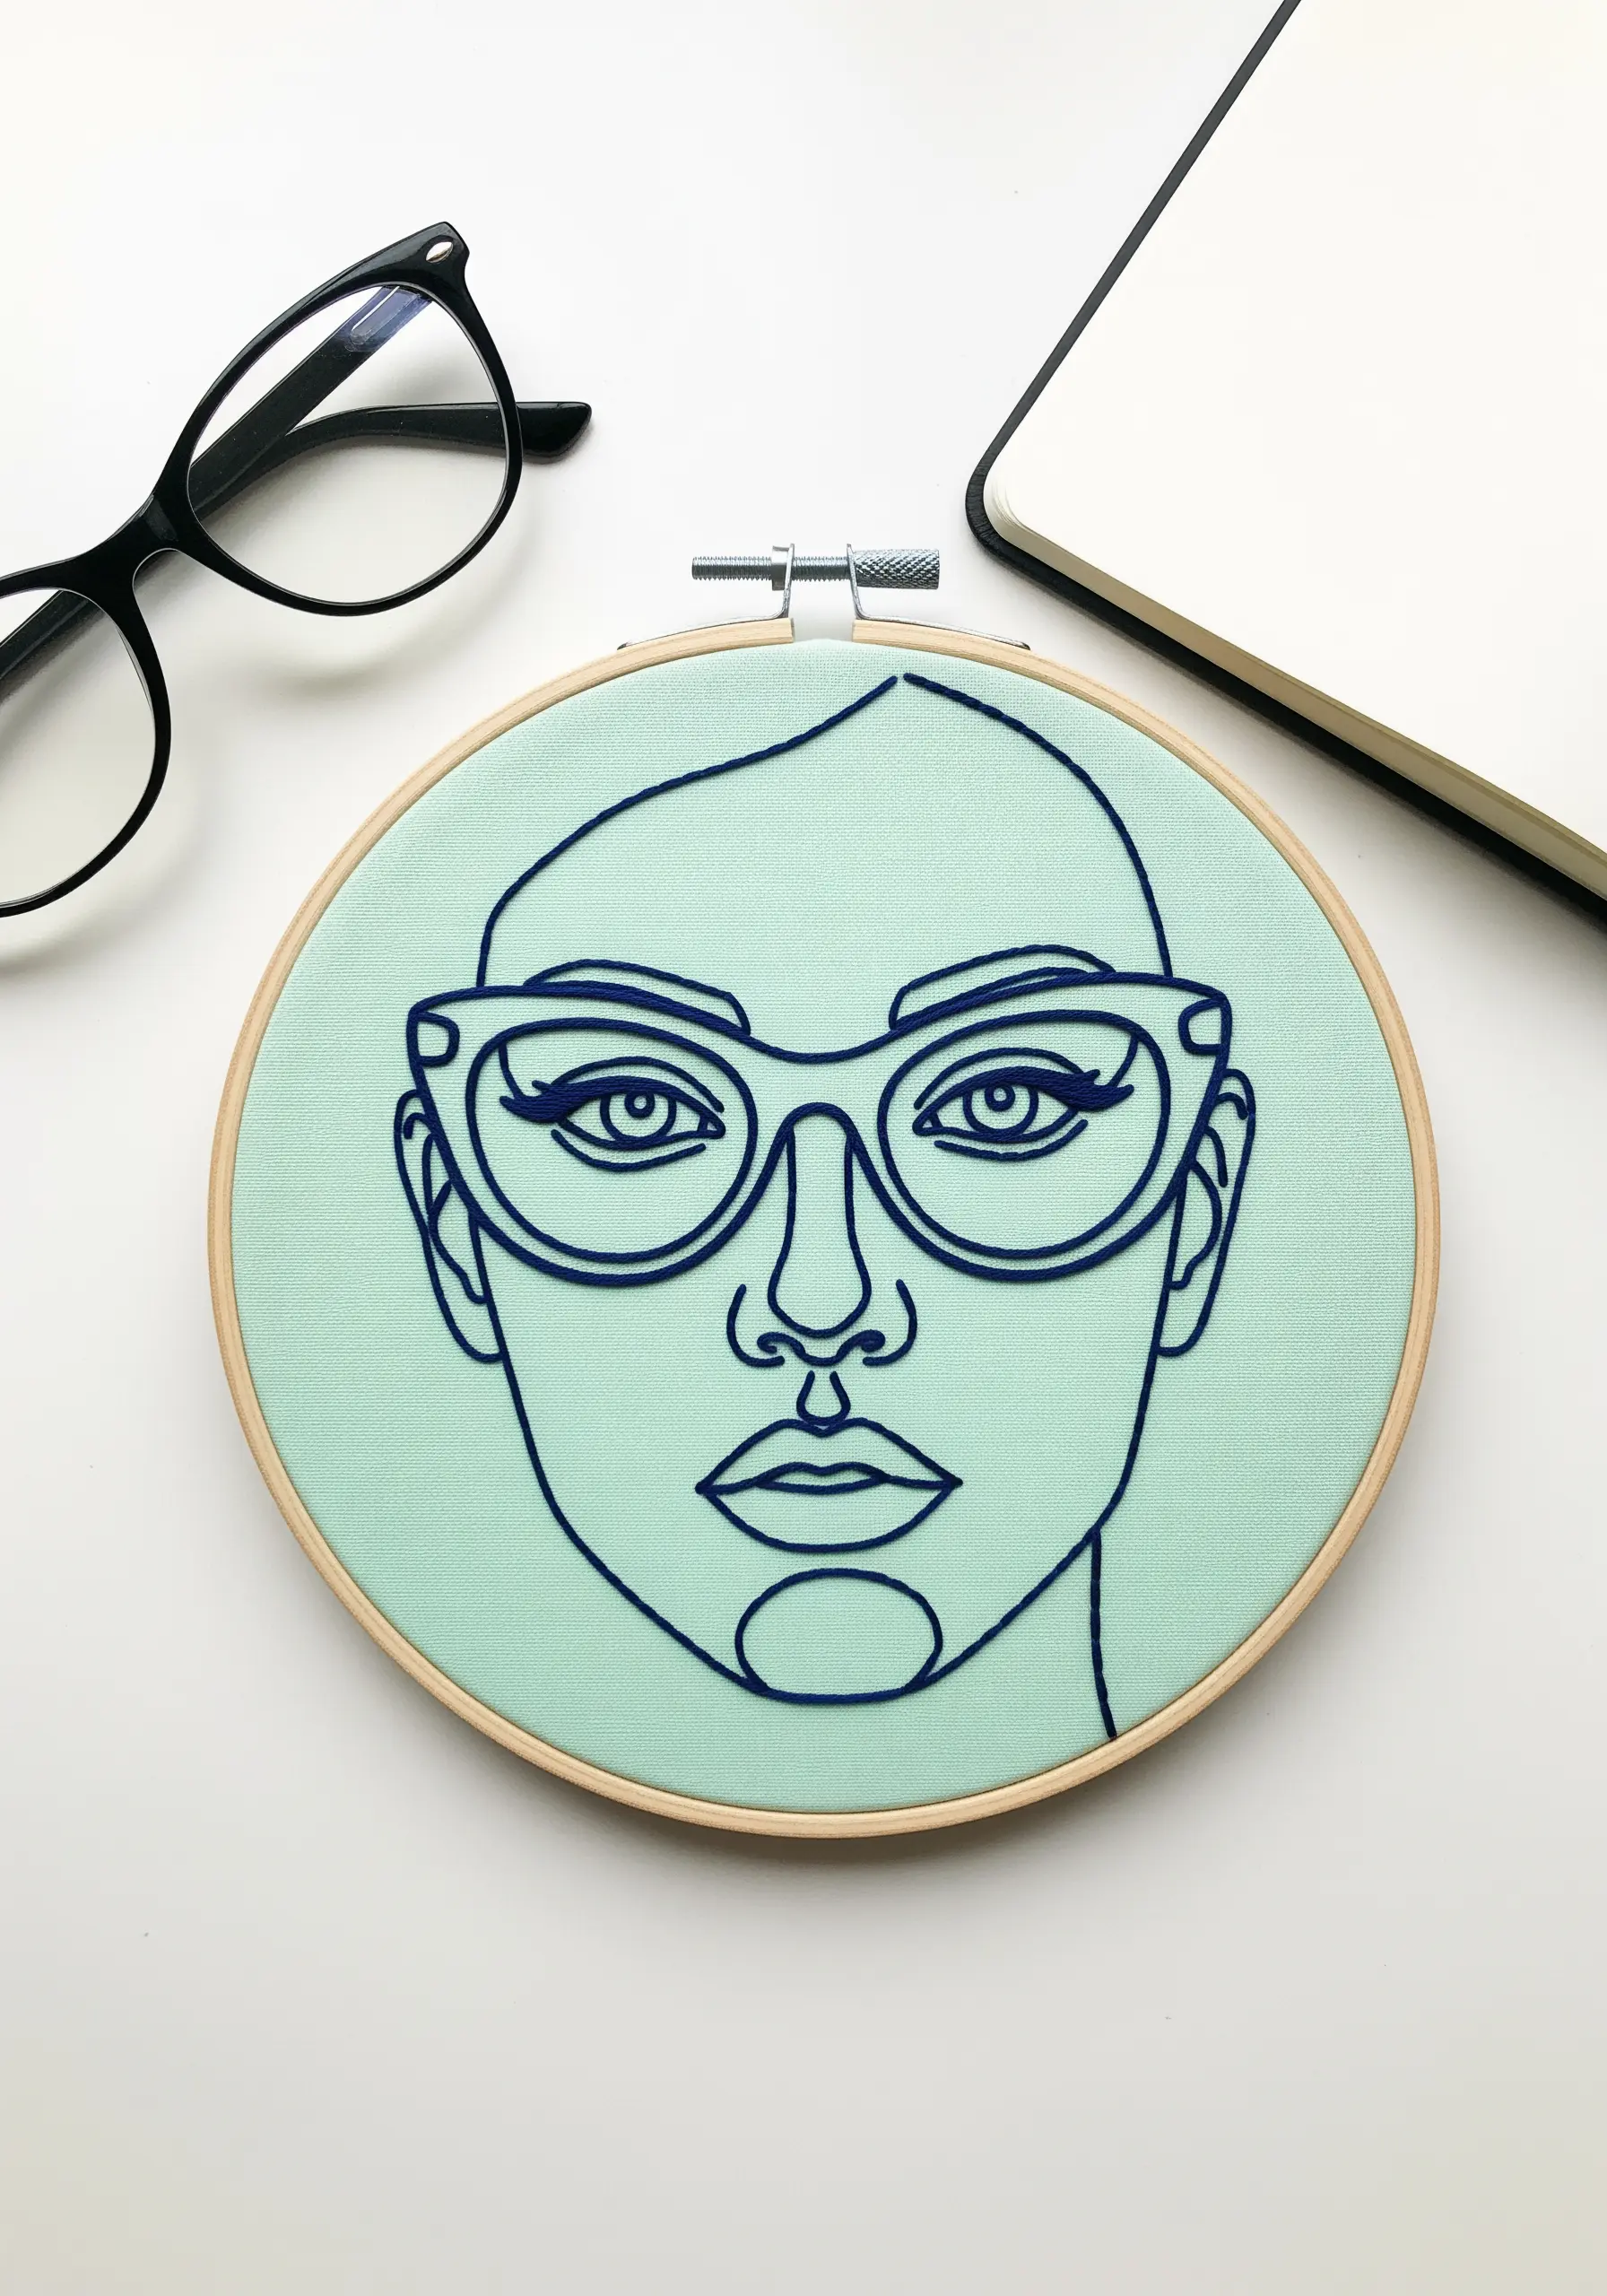
Accessories are a powerful shortcut to conveying personality in a minimalist design.
Stitching a pair of bold glasses instantly gives your portrait a specific style—in this case, intelligent, chic, and slightly retro.
Use a dense satin stitch to fill the frames, making them a solid, graphic element that stands out from the simple outlines of the face.
It’s an easy way to add character to otherwise minimal stitch motifs.
18. Weave in Celestial and Astrological Motifs
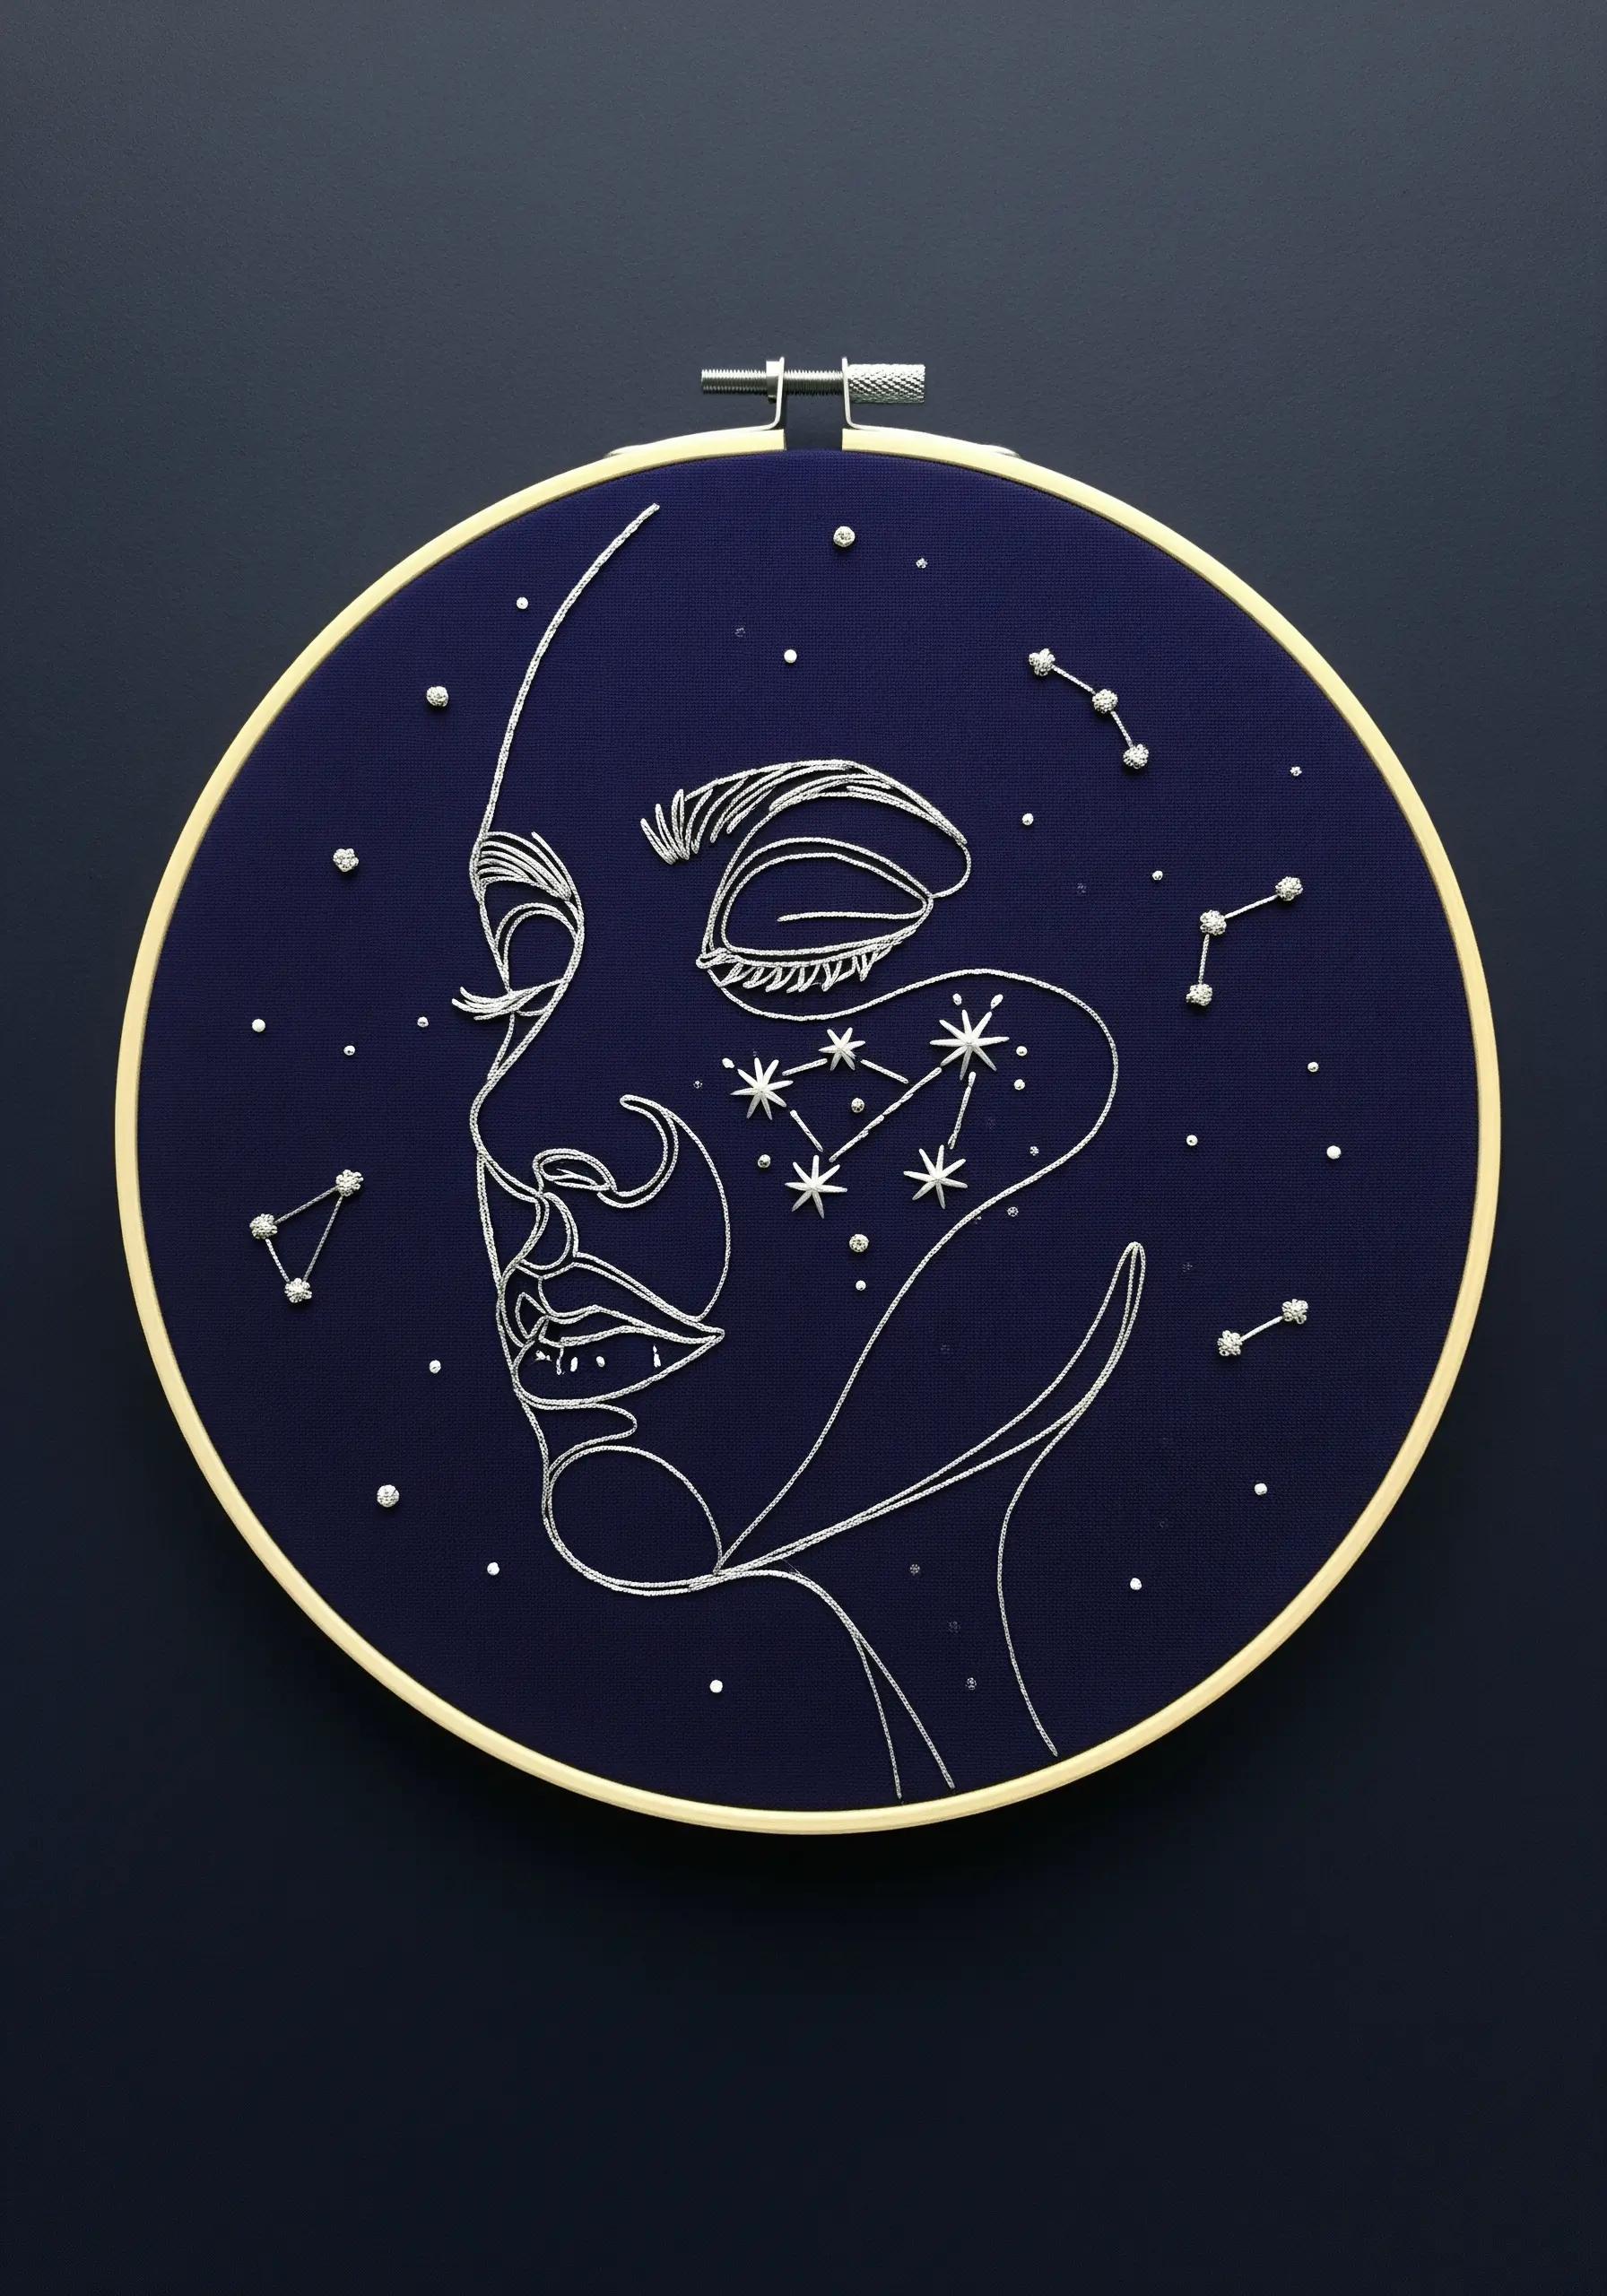
Add a layer of cosmic wonder by incorporating constellations into your portrait design.
Use a fine metallic silver thread to stitch the lines, giving them a subtle shimmer that catches the light.
Tiny, carefully placed seed stitches or single French knots work perfectly as stars.
You can choose constellations that are personally meaningful, turning the portrait into a unique piece of astrological art and elevating your moon and stars embroidery ideas.
19. Build Sculptural Texture with Bullion Knots
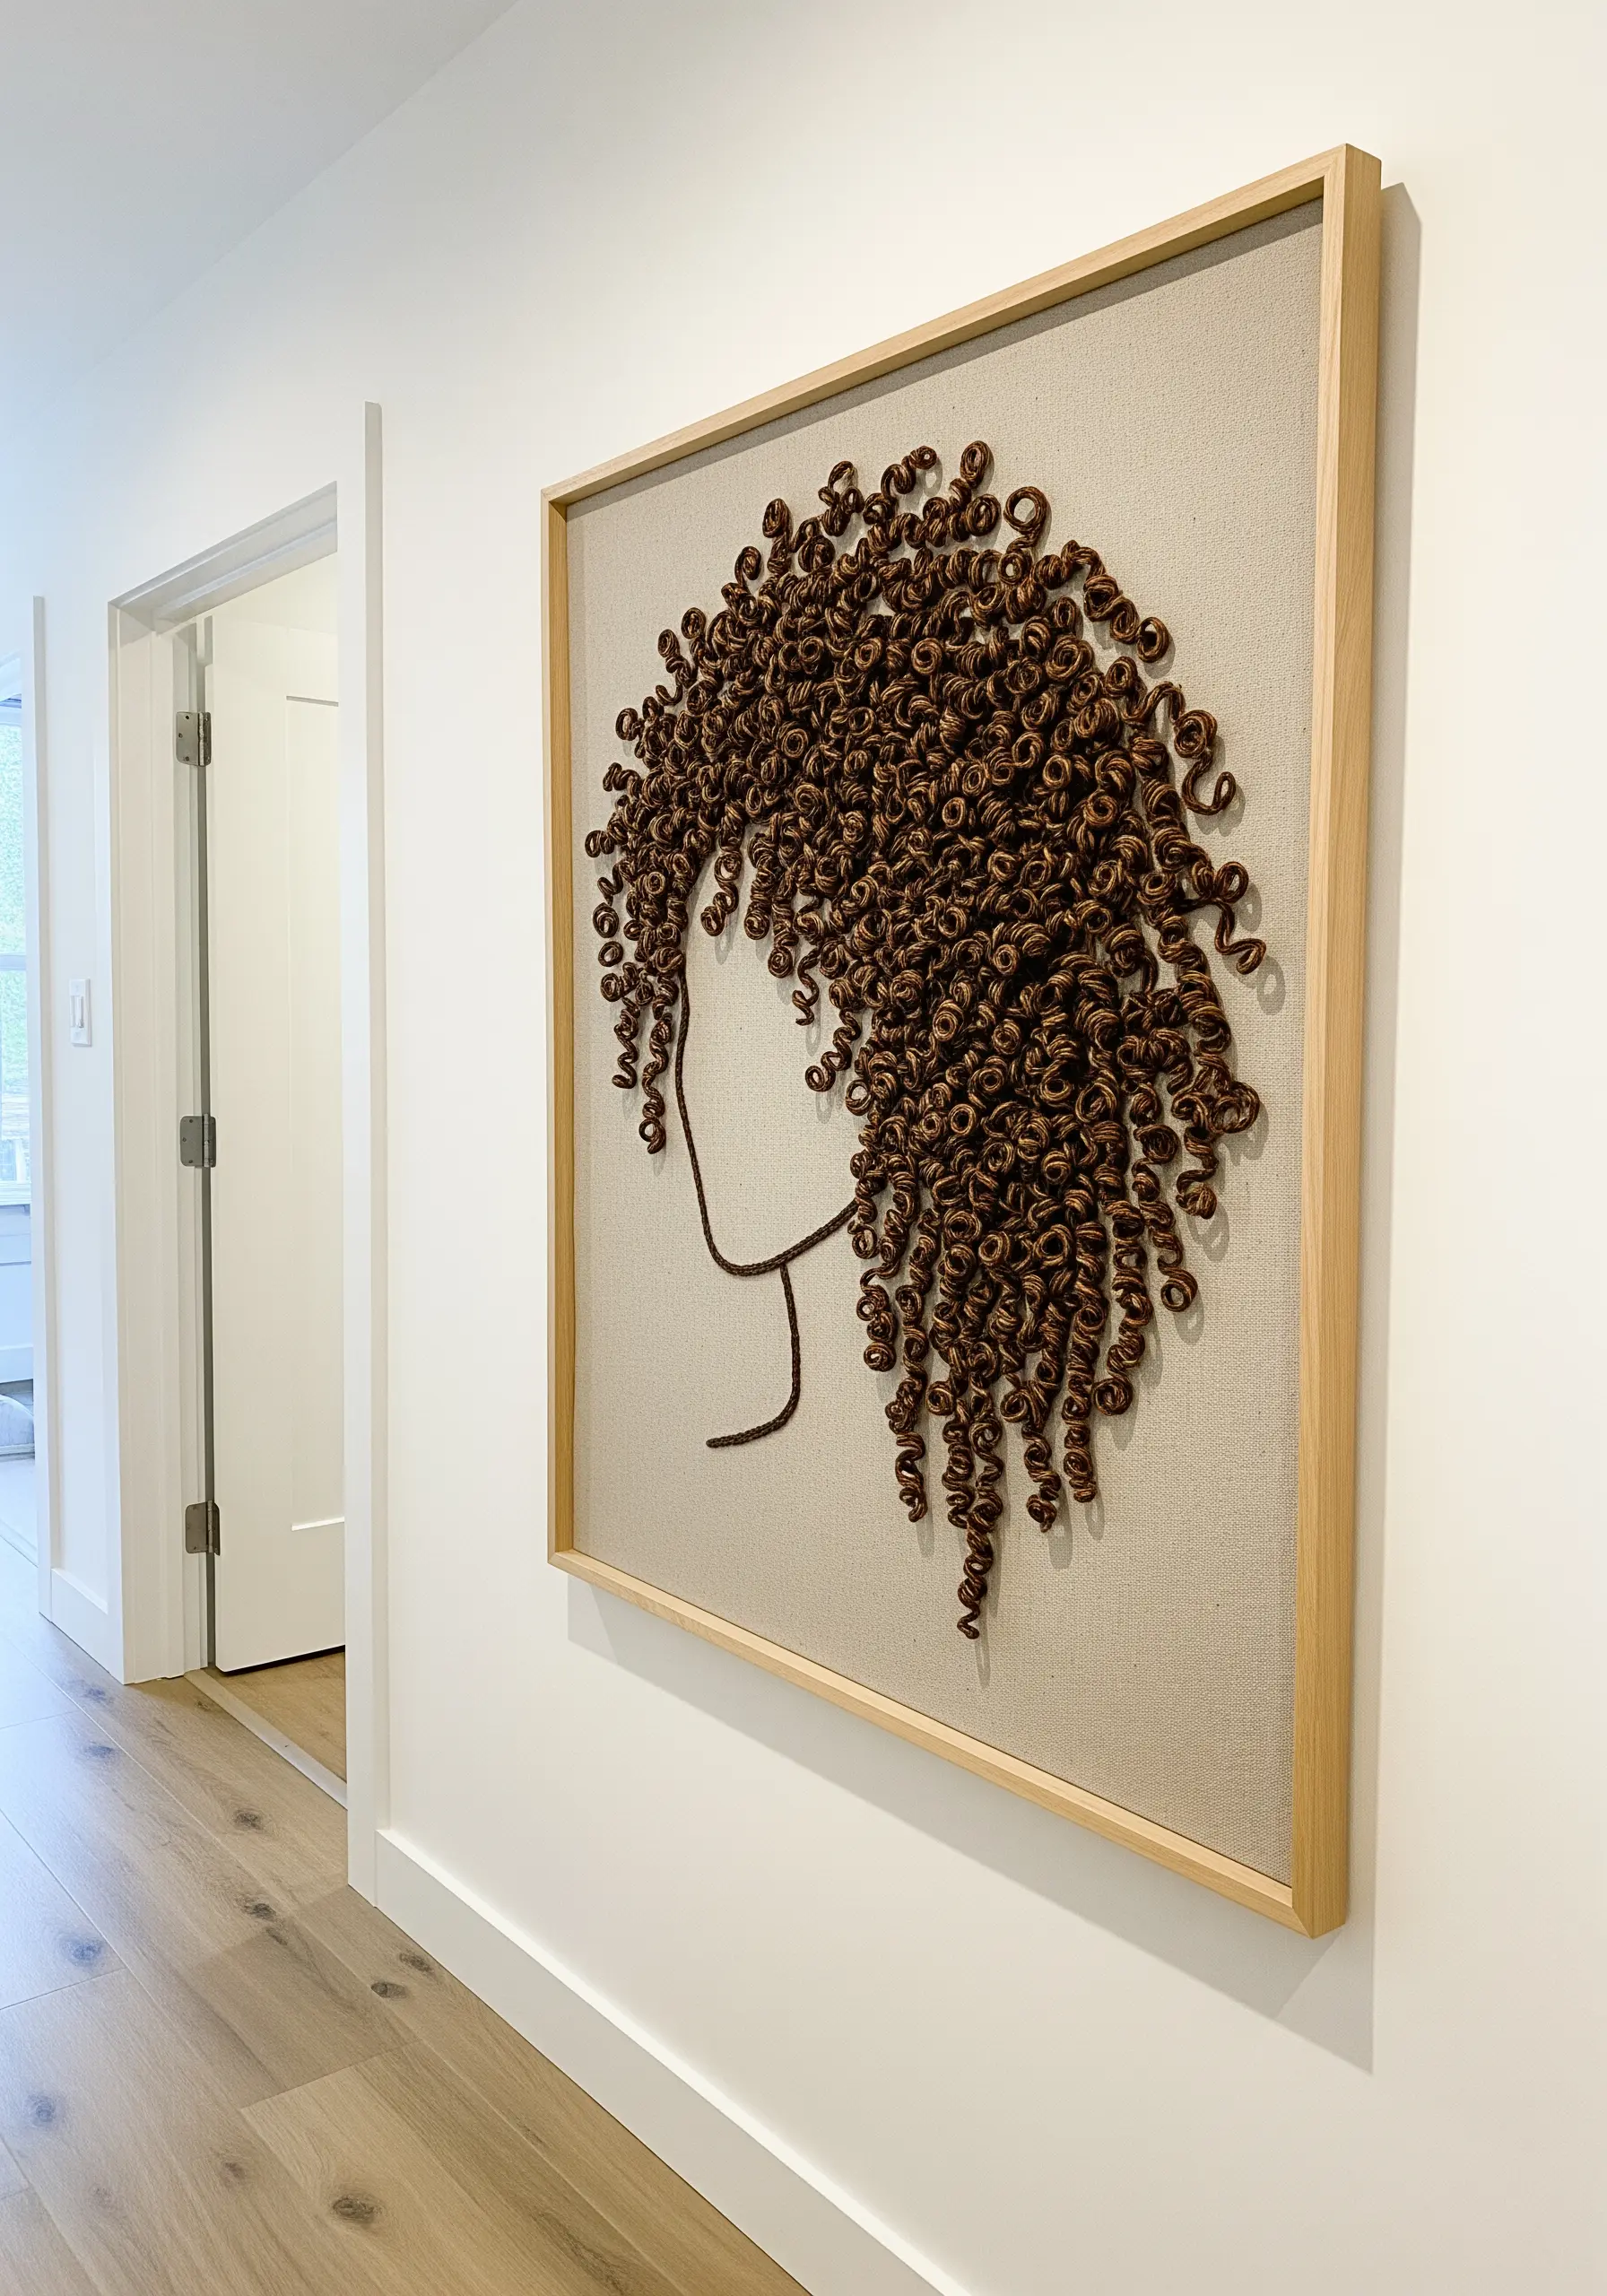
For creating realistic, voluminous curls that seem to lift off the fabric, the bullion knot is unmatched.
This stitch involves wrapping thread around the needle multiple times before pulling it through, creating small, tight coils.
Cluster these knots together densely to build up a rich, three-dimensional texture that looks and feels like real hair.
This advanced stitch will transform your work into a statement textured embroidery piece.
20. Create a Gradient Flow with Color Transitions

Instead of using a single solid color, let your lines flow through a beautiful spectrum.
To achieve this smooth gradient, use a blending technique: for a short distance, stitch with one strand of your first color and one strand of your second before switching entirely to the new color.
Plan your color path before you start to ensure a logical and elegant transition.
This method turns simple lines into dynamic color blending thread patterns.
21. Use Negative Space to Imply Form
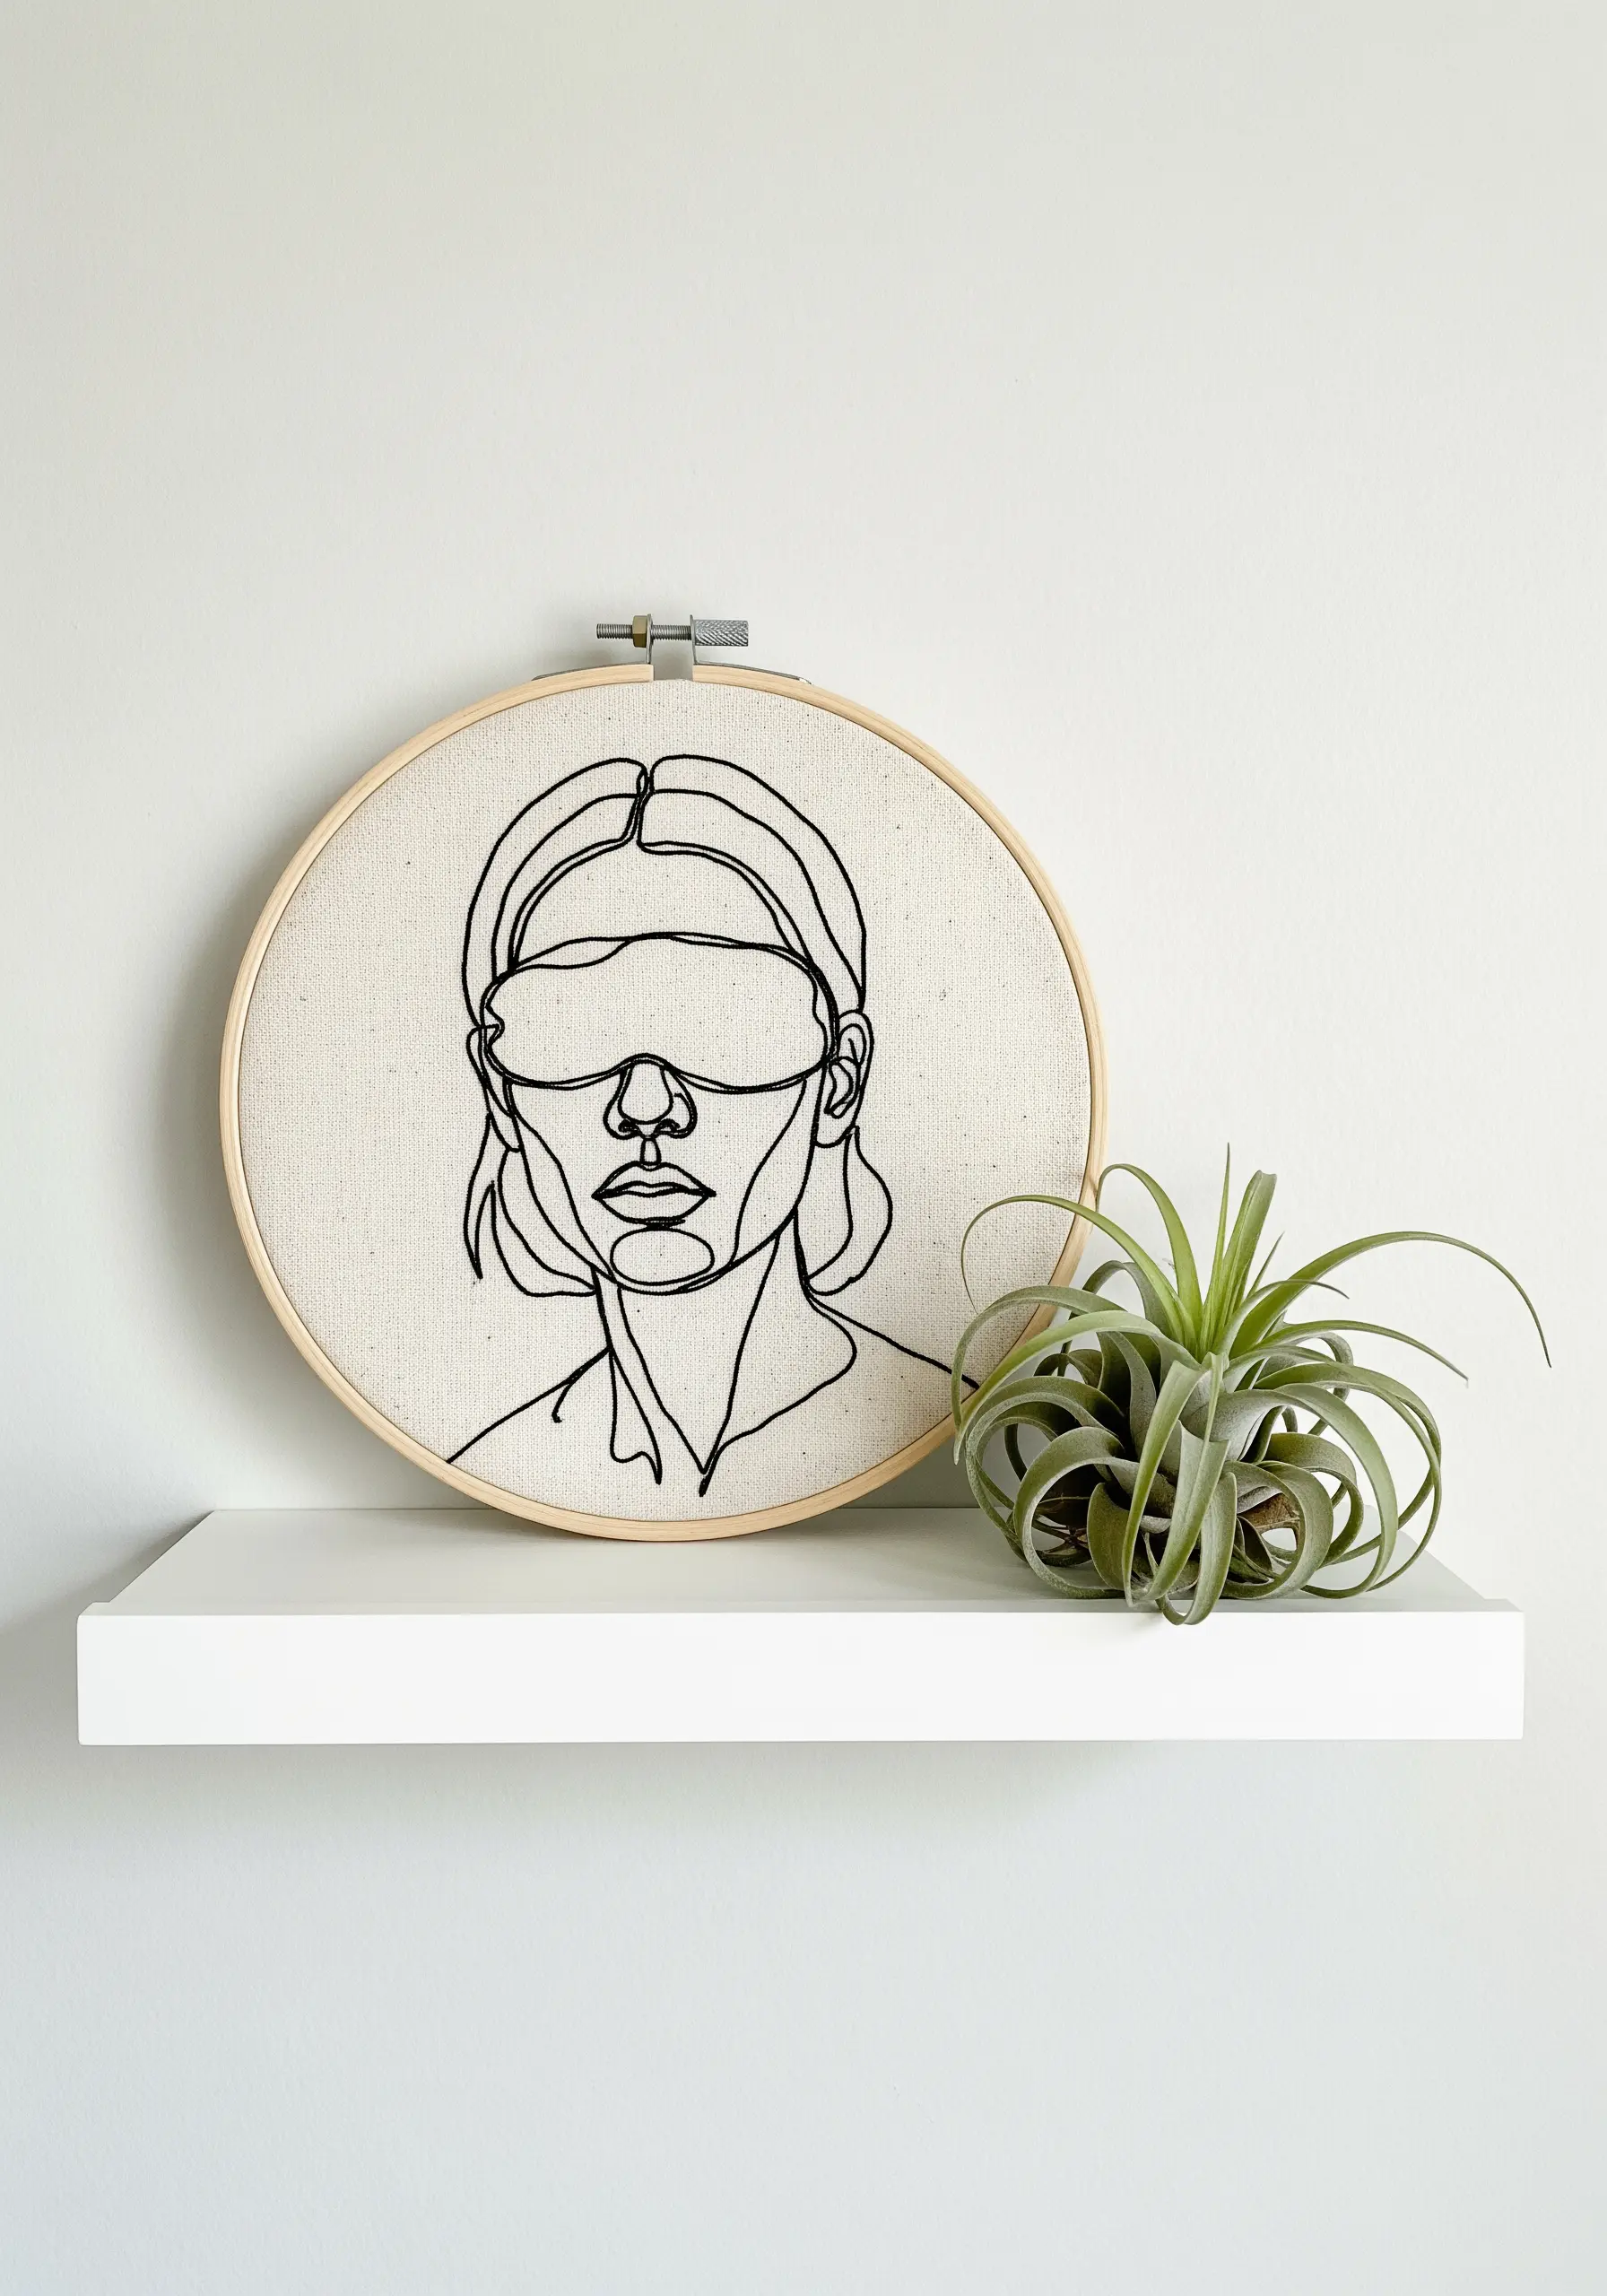
The artistic power of this design lies not in what you stitch, but in what you choose to leave empty.
The blindfold is defined entirely by the stitched lines around it, forcing the viewer’s mind to fill in the shape.
This sophisticated technique creates a compelling and thought-provoking image.
To make it work, your surrounding backstitches must be precise and clean, as they are essential for defining the empty area—a core principle of negative space embroidery techniques.


