
You have the yarn, the ideas, and the desire to create something beautiful for your walls. But how do you move beyond simple crafts and create something that feels like true art? The answer lies not in complexity, but in intention. Yarn is more than just a material for knitting; it’s a sculptural medium, full of potential for color, texture, and form.
In these projects, you’ll discover how to transform simple techniques—like wrapping, knotting, and weaving—into powerful visual statements. We will focus on the details that elevate a piece from homemade to handmade with artistry: the tension of a knot, the contrast of textures, the precise transition of a color gradient. This is your chance to play with fiber in a new way.
Each one of these tutorials is designed to be an accessible experiment that builds your confidence and refines your eye. You don’t need expensive equipment or years of experience. You just need to be willing to see yarn differently and embrace the simple, meditative process of turning thread into treasure.
1. Master the Chevron Knot for Dynamic Color Blocks
Create this structured look using a series of double half-hitch knots, which form clean, diagonal lines.
Maintaining consistent, firm tension as you tie each knot is the key to achieving that sharp, graphic quality.
Choose a sturdy macrame cord that holds its shape, rather than a soft, pliable yarn, to ensure your chevrons remain defined.
To create visual balance, trim the fringe at the bottom to mirror the angle of the V-shape, reinforcing the overall composition.
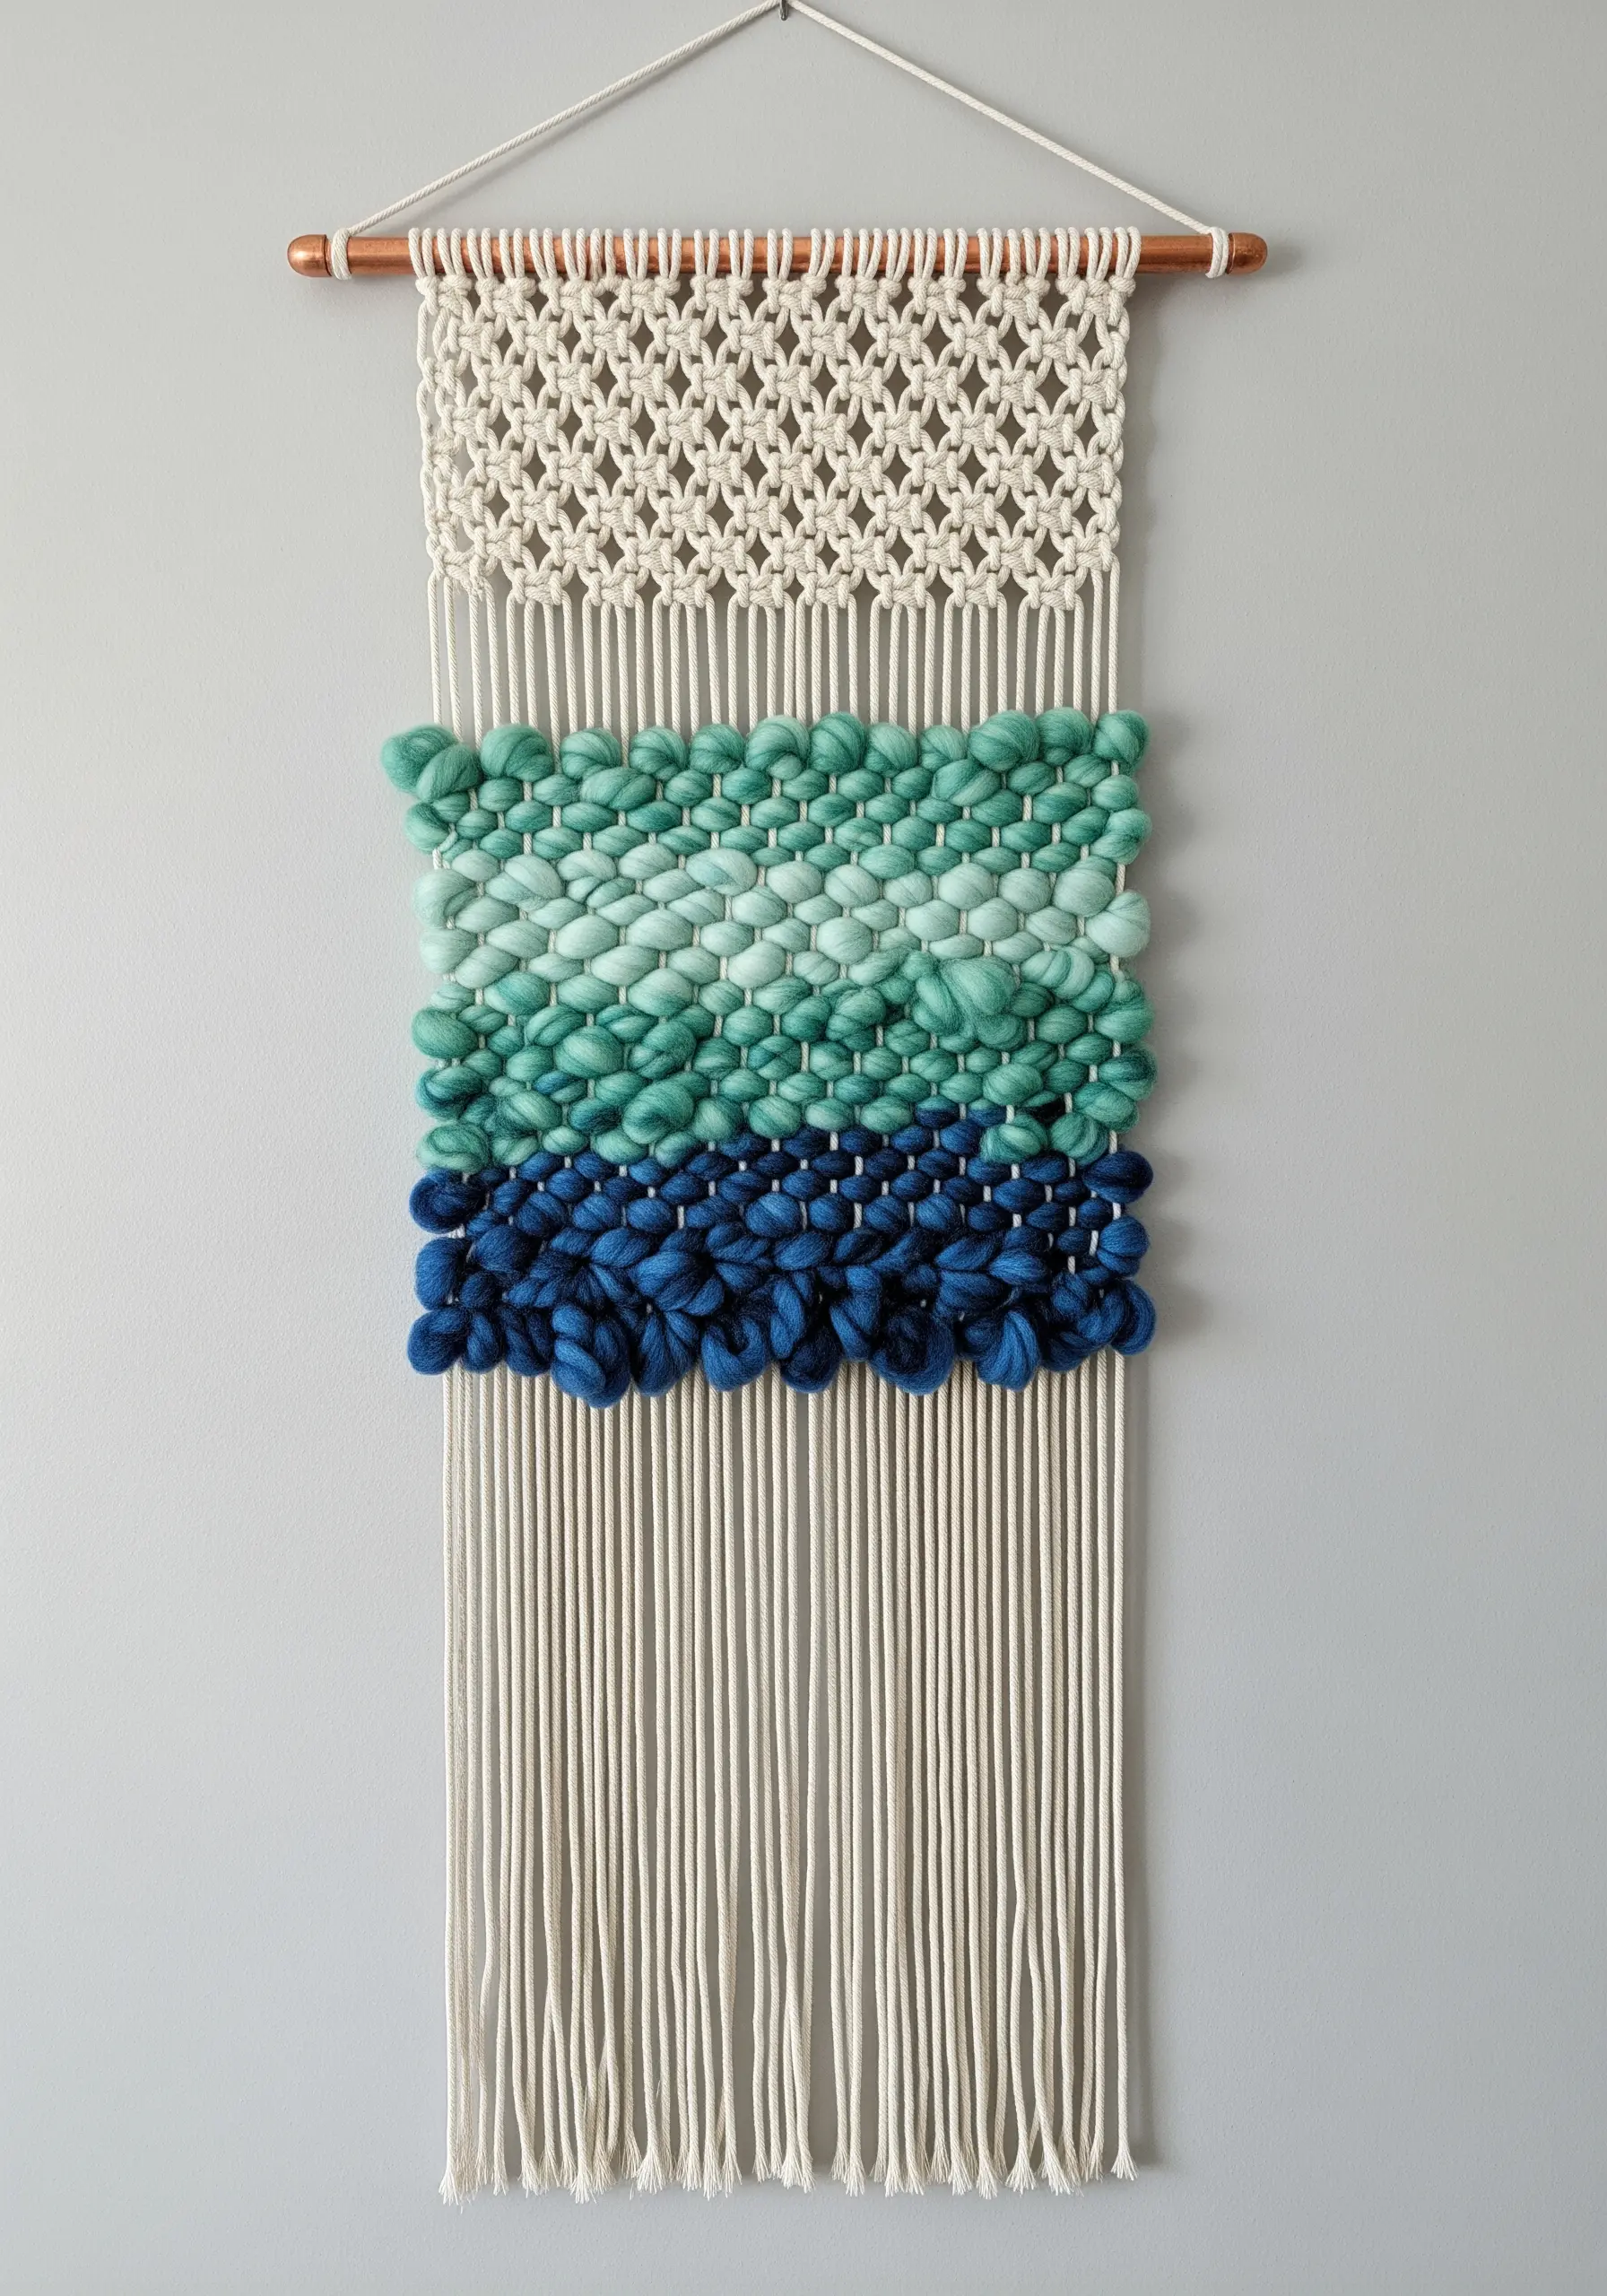
2. Blend Textures with Roving and Soumak Weaving
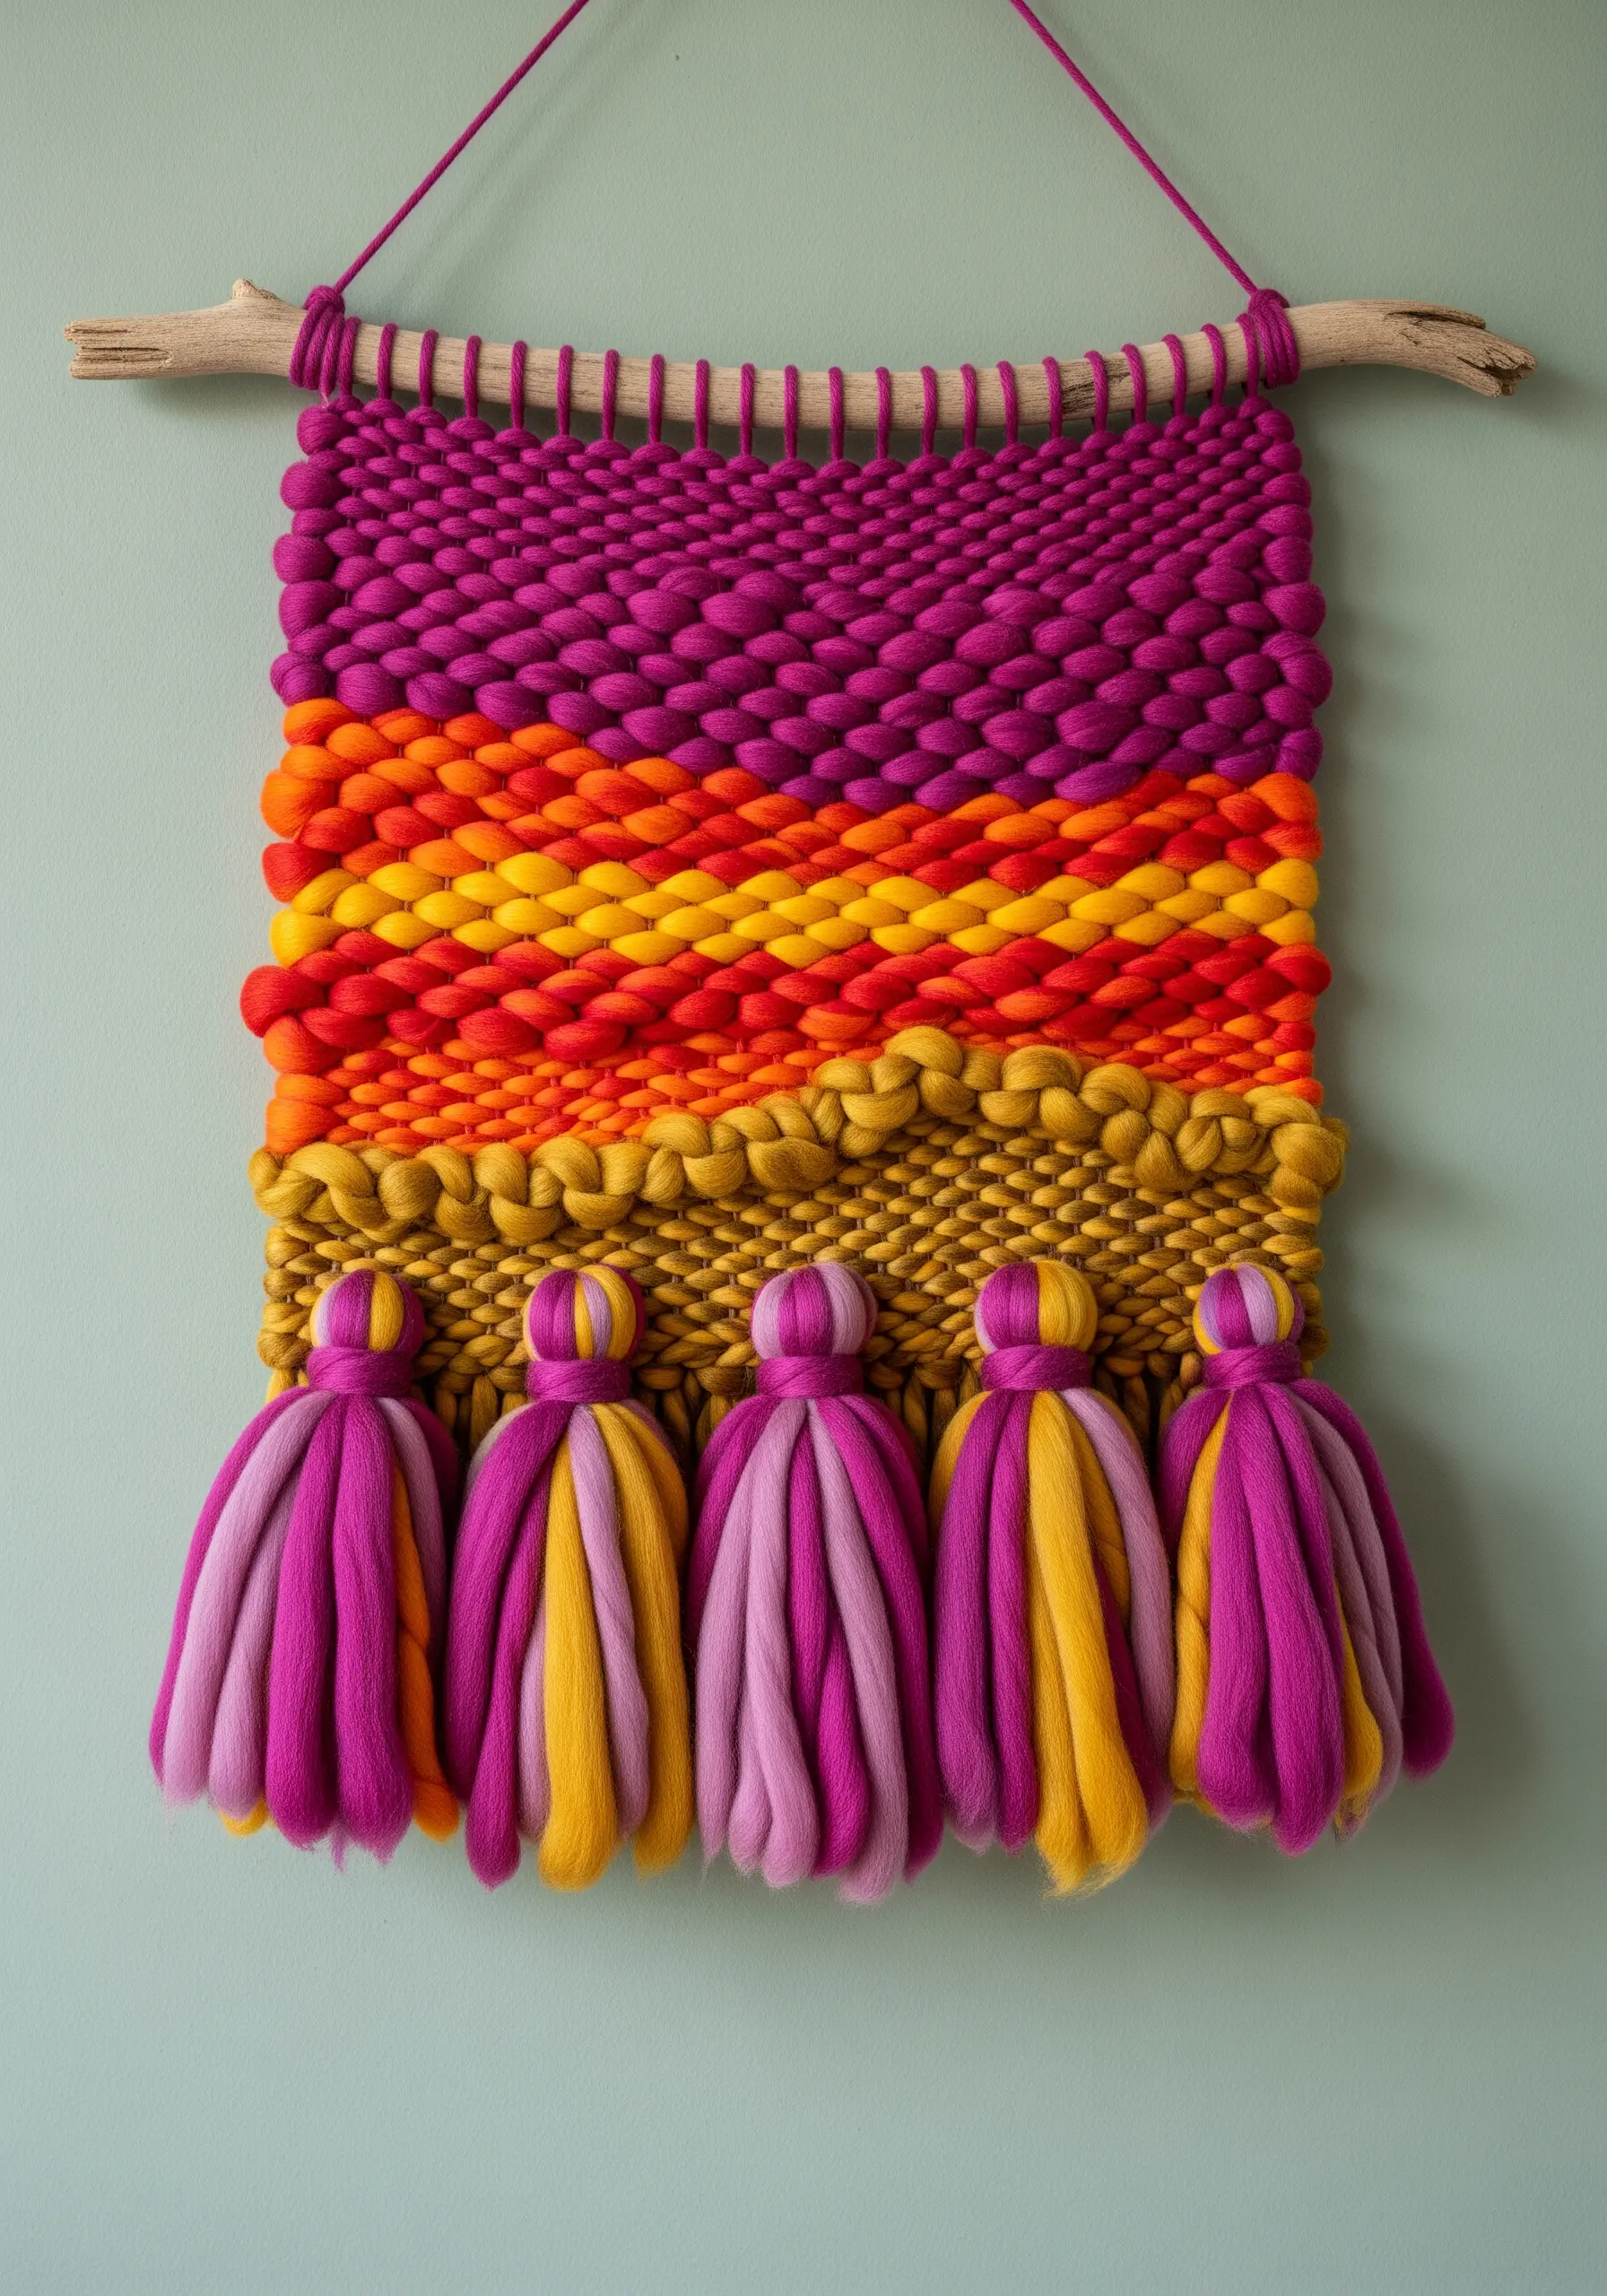
This is a study in tactile contrast, moving beyond simple weaving.
Combine tightly woven sections of plain weave with chunky, bubbled rows using thick, unspun wool roving for dramatic effect.
To create those raised, braid-like lines, use the Soumak stitch—it involves wrapping the weft yarn around the vertical warp threads.
The oversized tassels anchor the piece, balance the composition, and repeat the rich color story from the woven section above.
Explore other mixed fiber textures to see how different materials can transform your work.
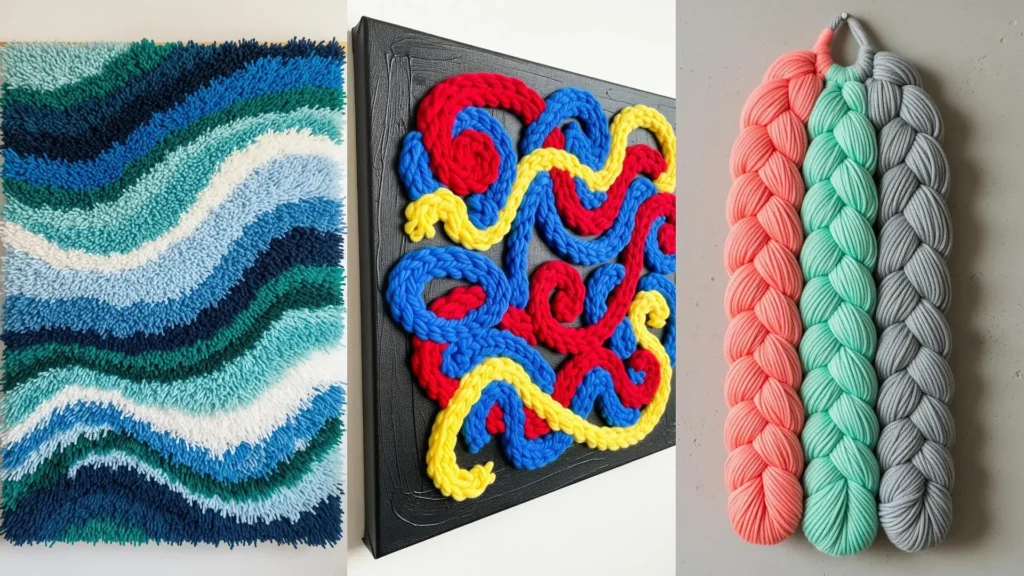
3. Sculpt with Punch Needle Loops for Graphic Art
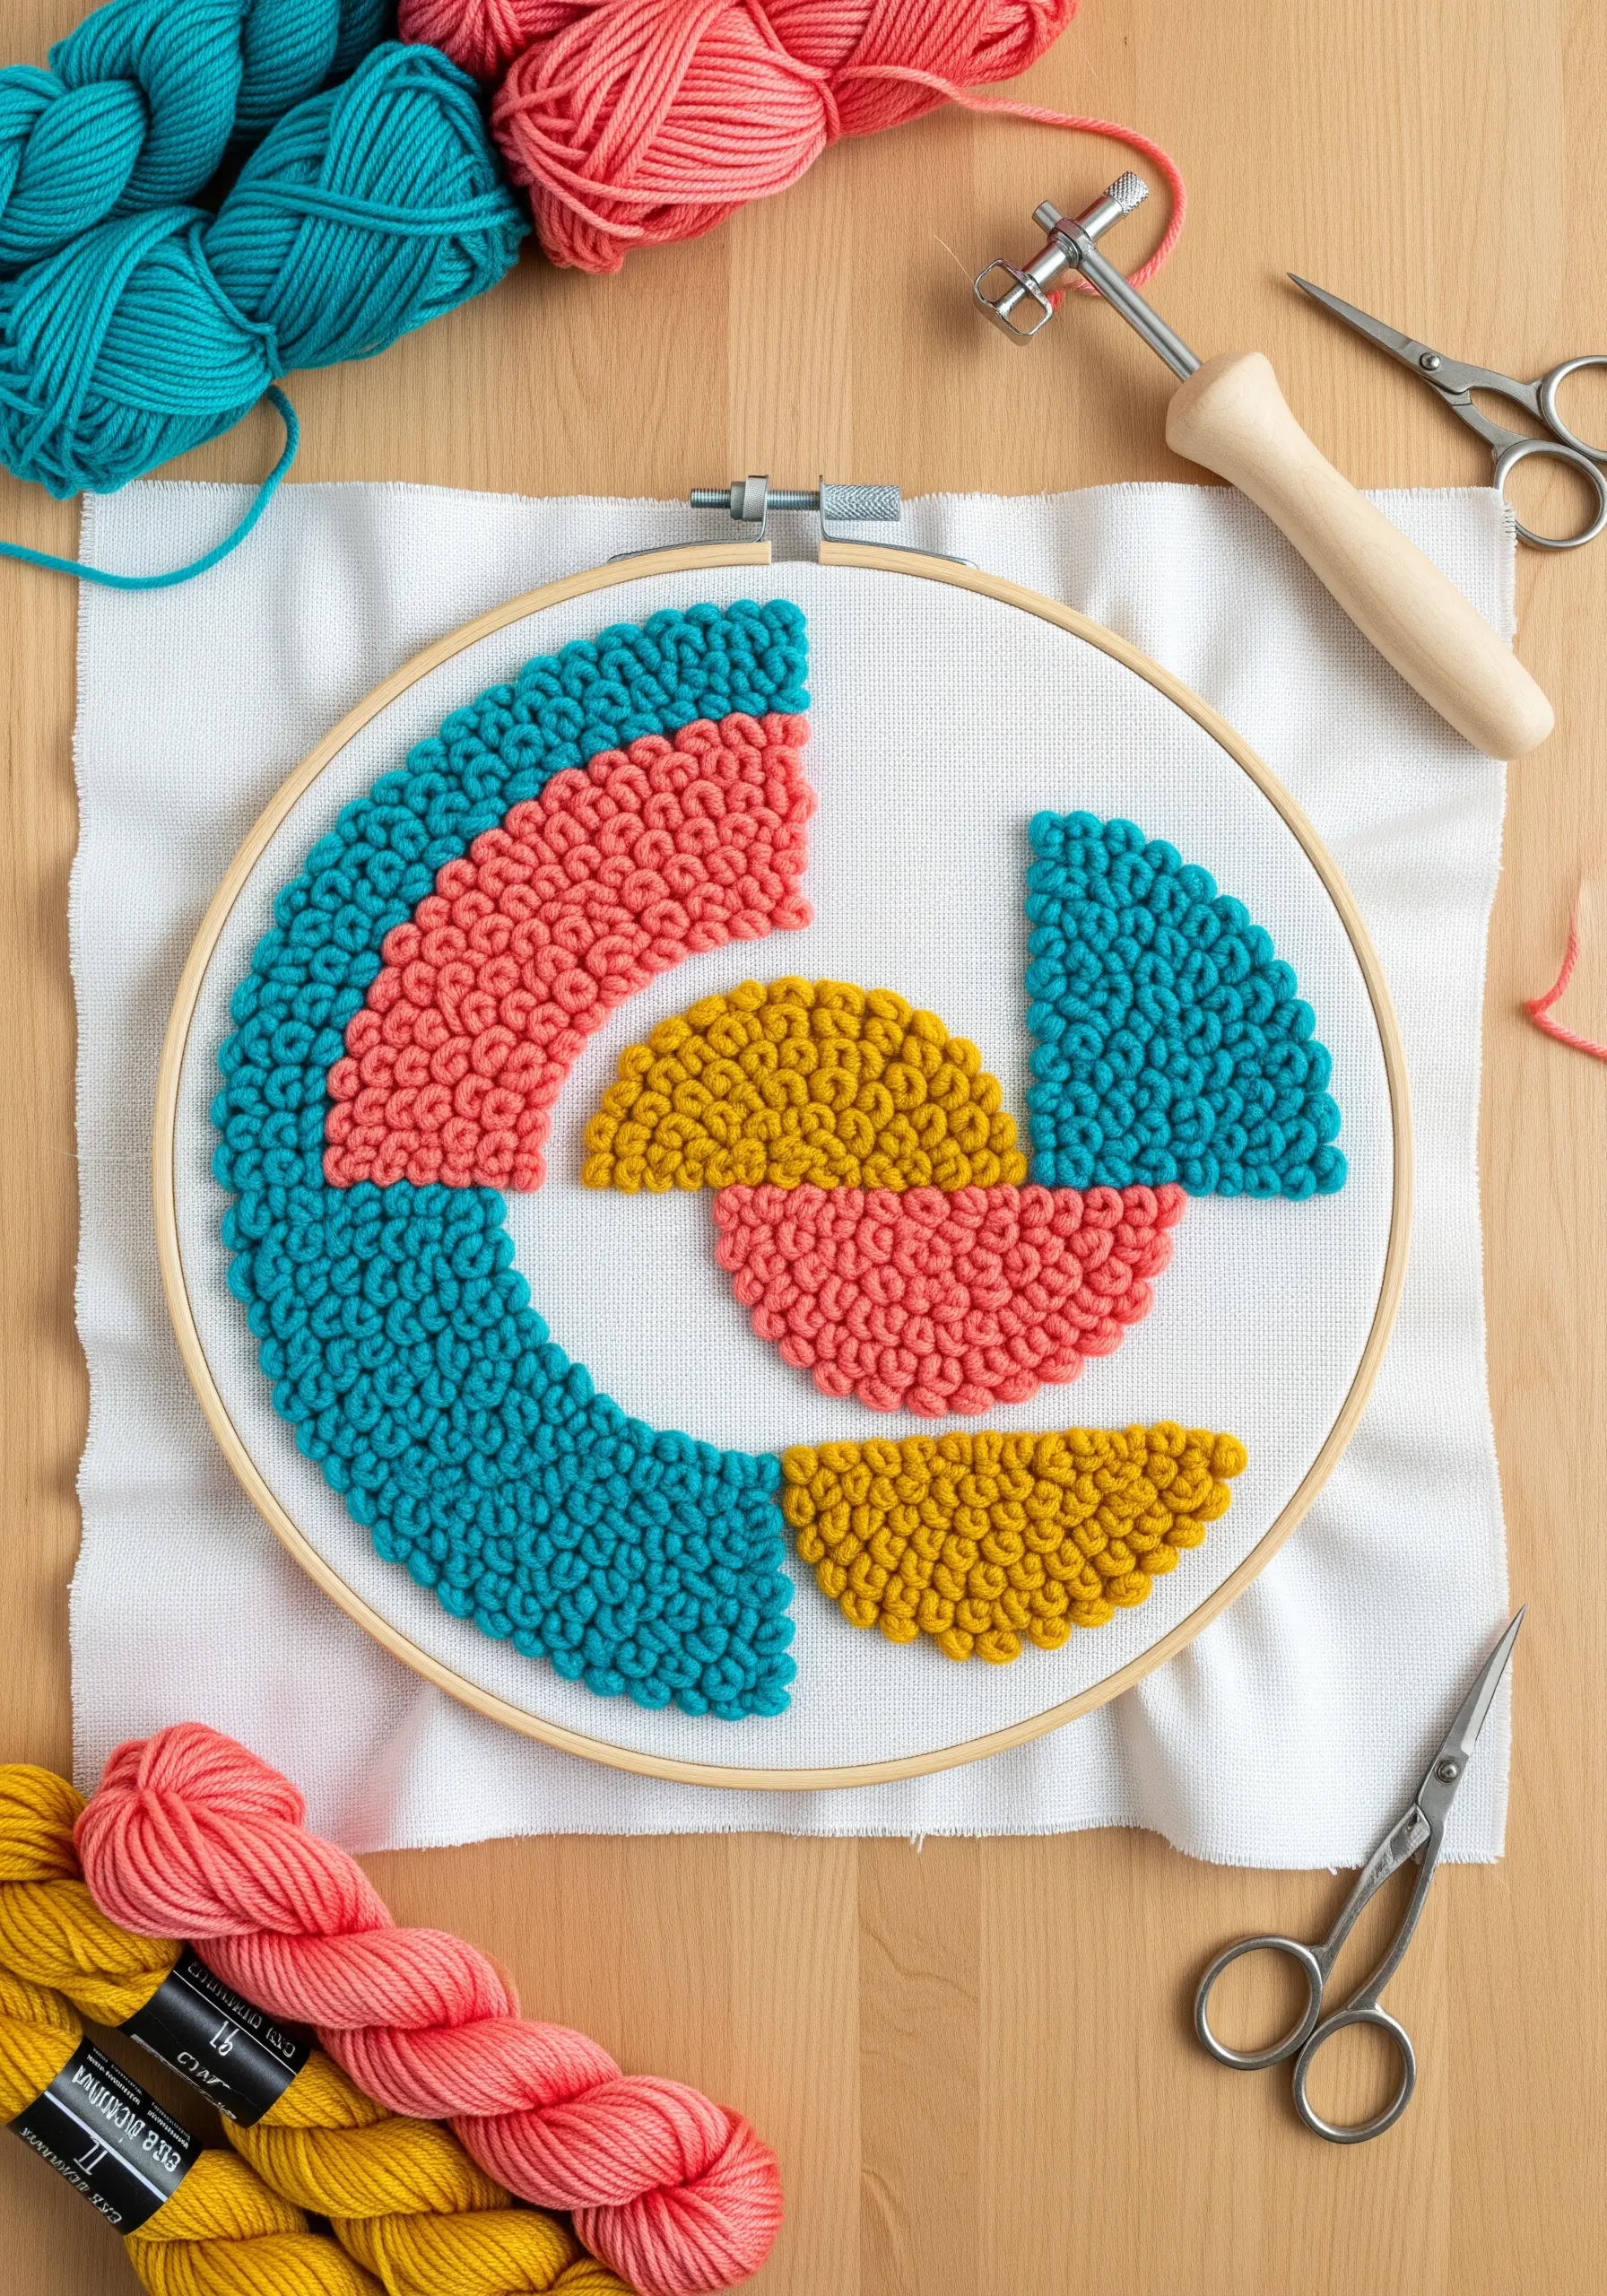
Punch needle embroidery allows you to create a dense, rug-like texture with incredible speed.
For crisp, defined shapes, outline each color block first before filling it in with rows of loops.
Adjust your needle’s loop height setting to be slightly longer for one color; this subtle shift in dimension will make that shape visually pop.
Always stretch your monk’s cloth or foundation fabric drum-tight on a non-slip hoop or frame to ensure even tension and prevent distorted loops.
4. Create Geometric Tension with Wrapped Yarn
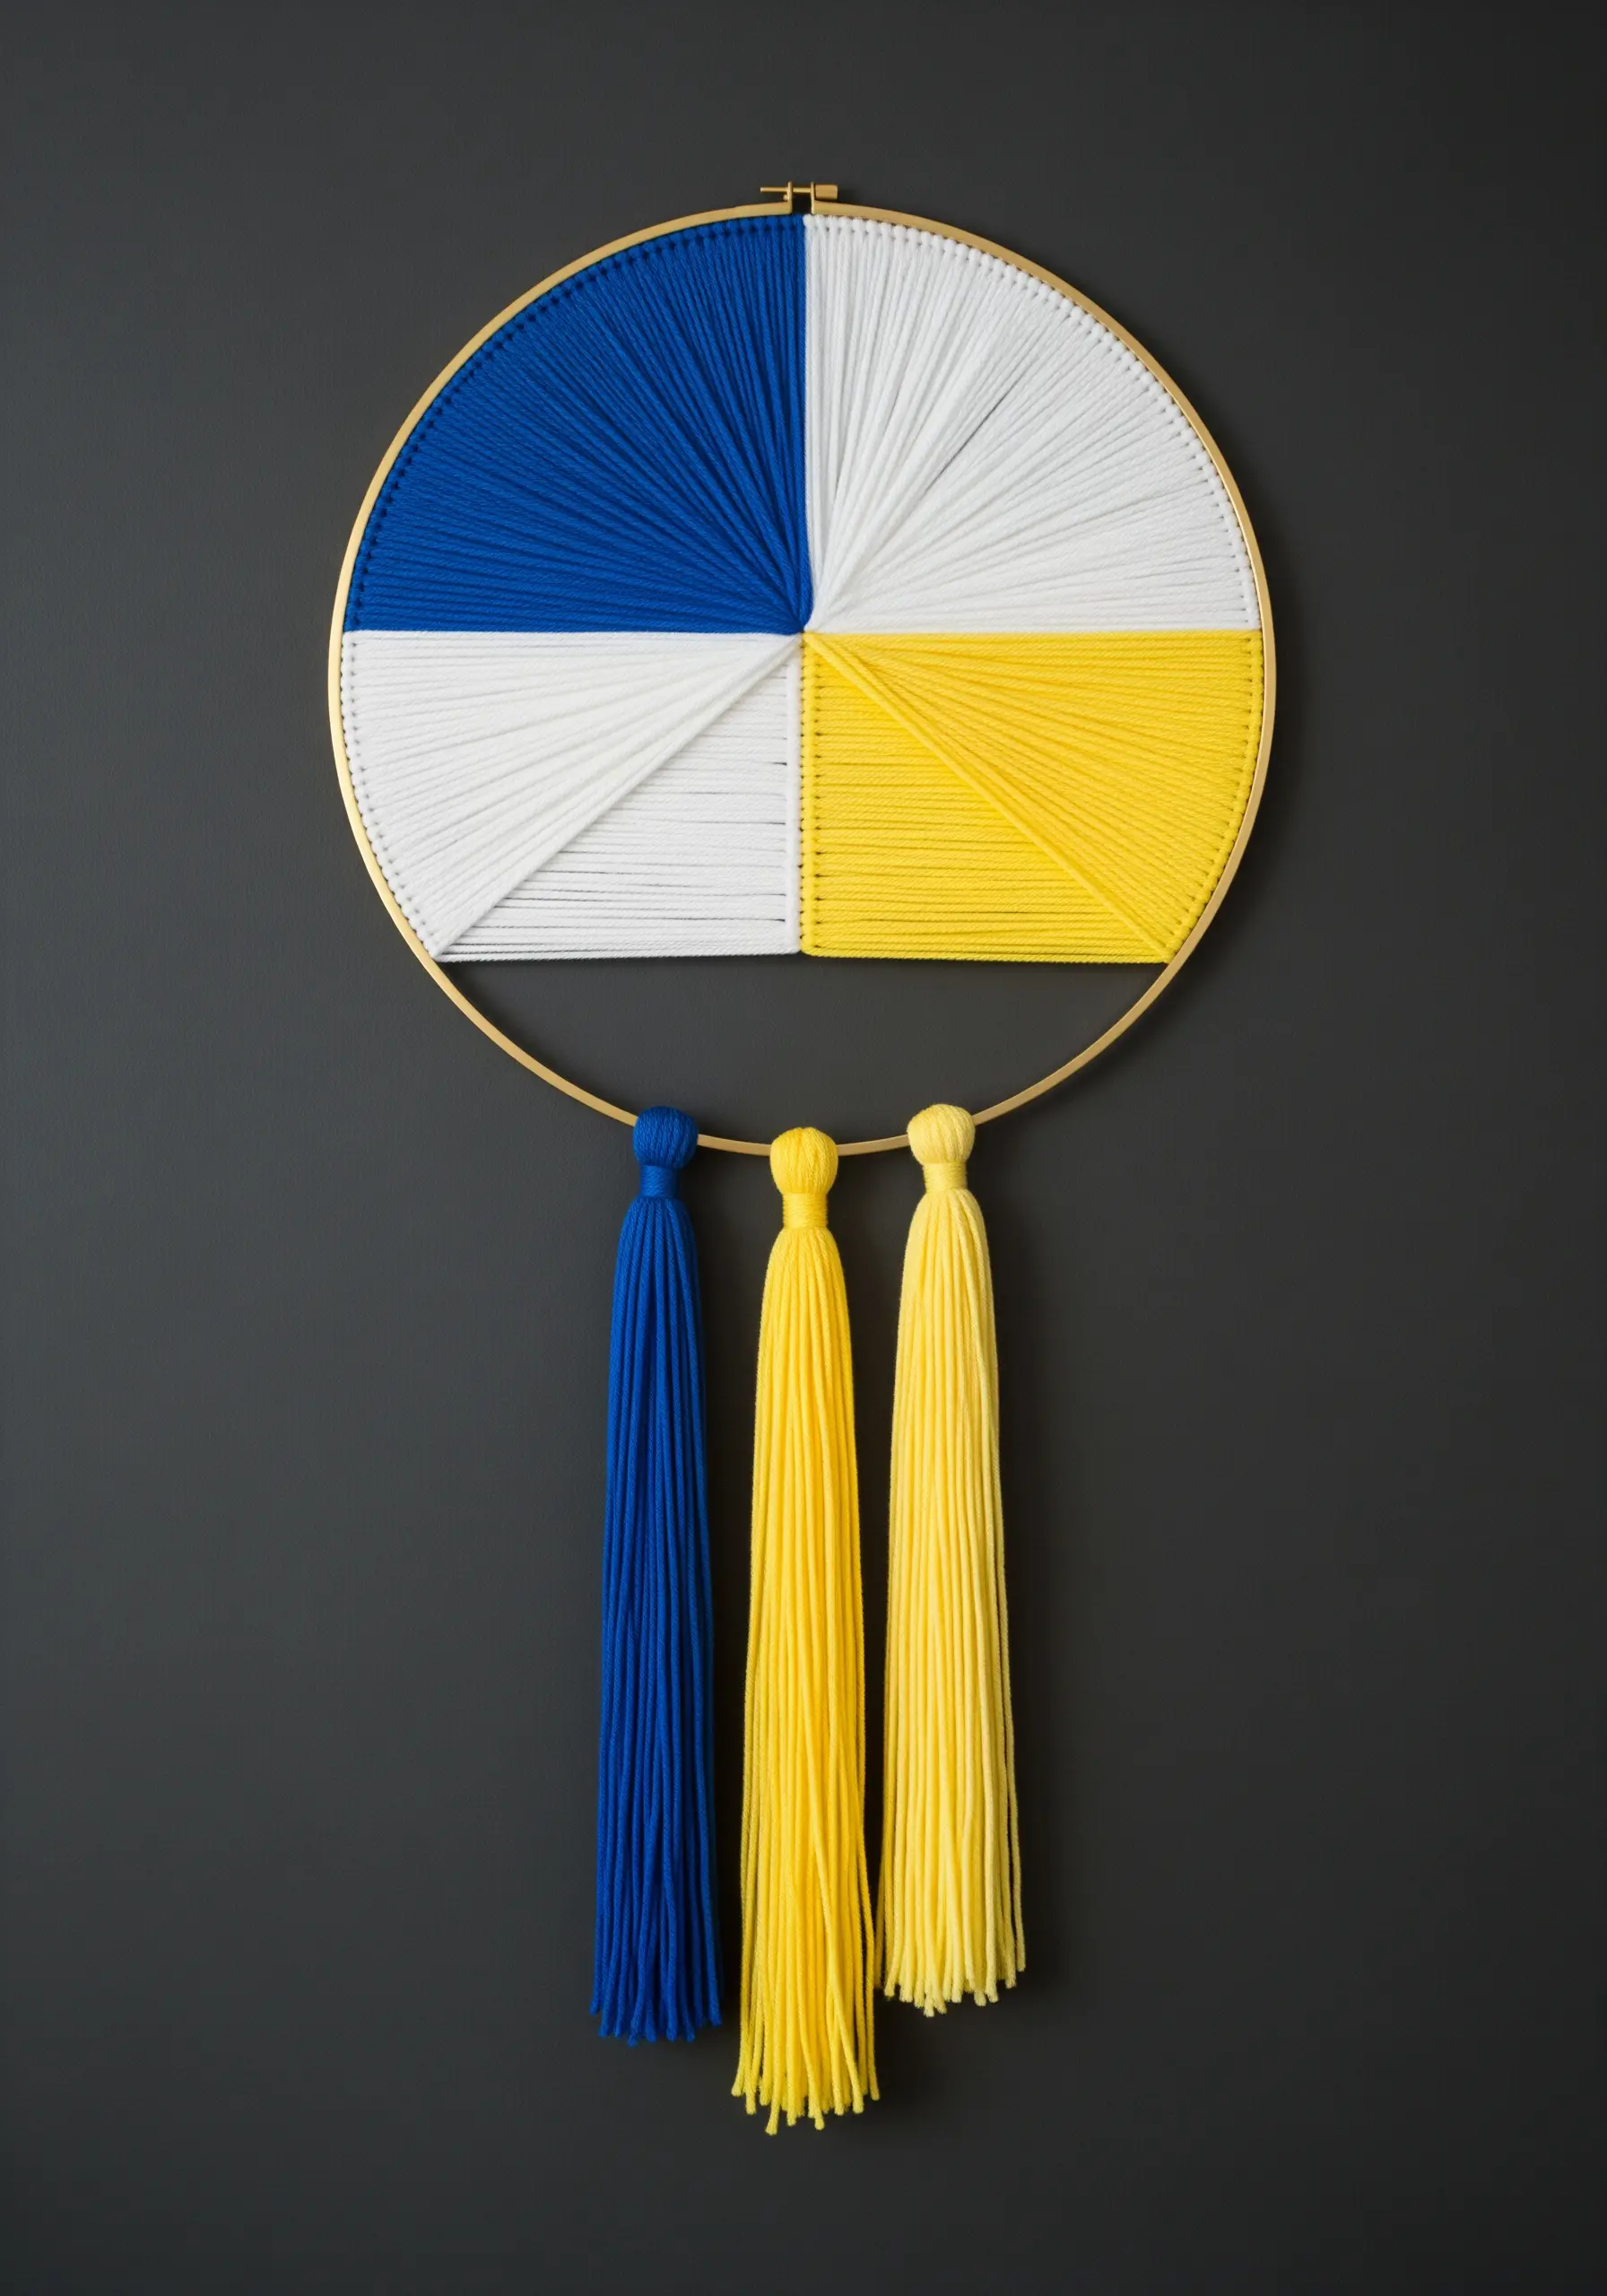
This technique relies on precision and tautness, wrapping yarn directly around a sturdy metal hoop instead of stitching through fabric.
To achieve perfectly sharp geometric lines, use a discreet marker to divide your hoop into equal sections before you begin wrapping.
Select a smooth, strong yarn that won’t fray or snap under tension, as the density of the wrapping is what creates the opaque color blocks.
The sleek, straight tassels provide a soft counterbalance to the rigid, graphic lines of the wrapped circle.
5. Build a Plush Surface with Latch Hooking
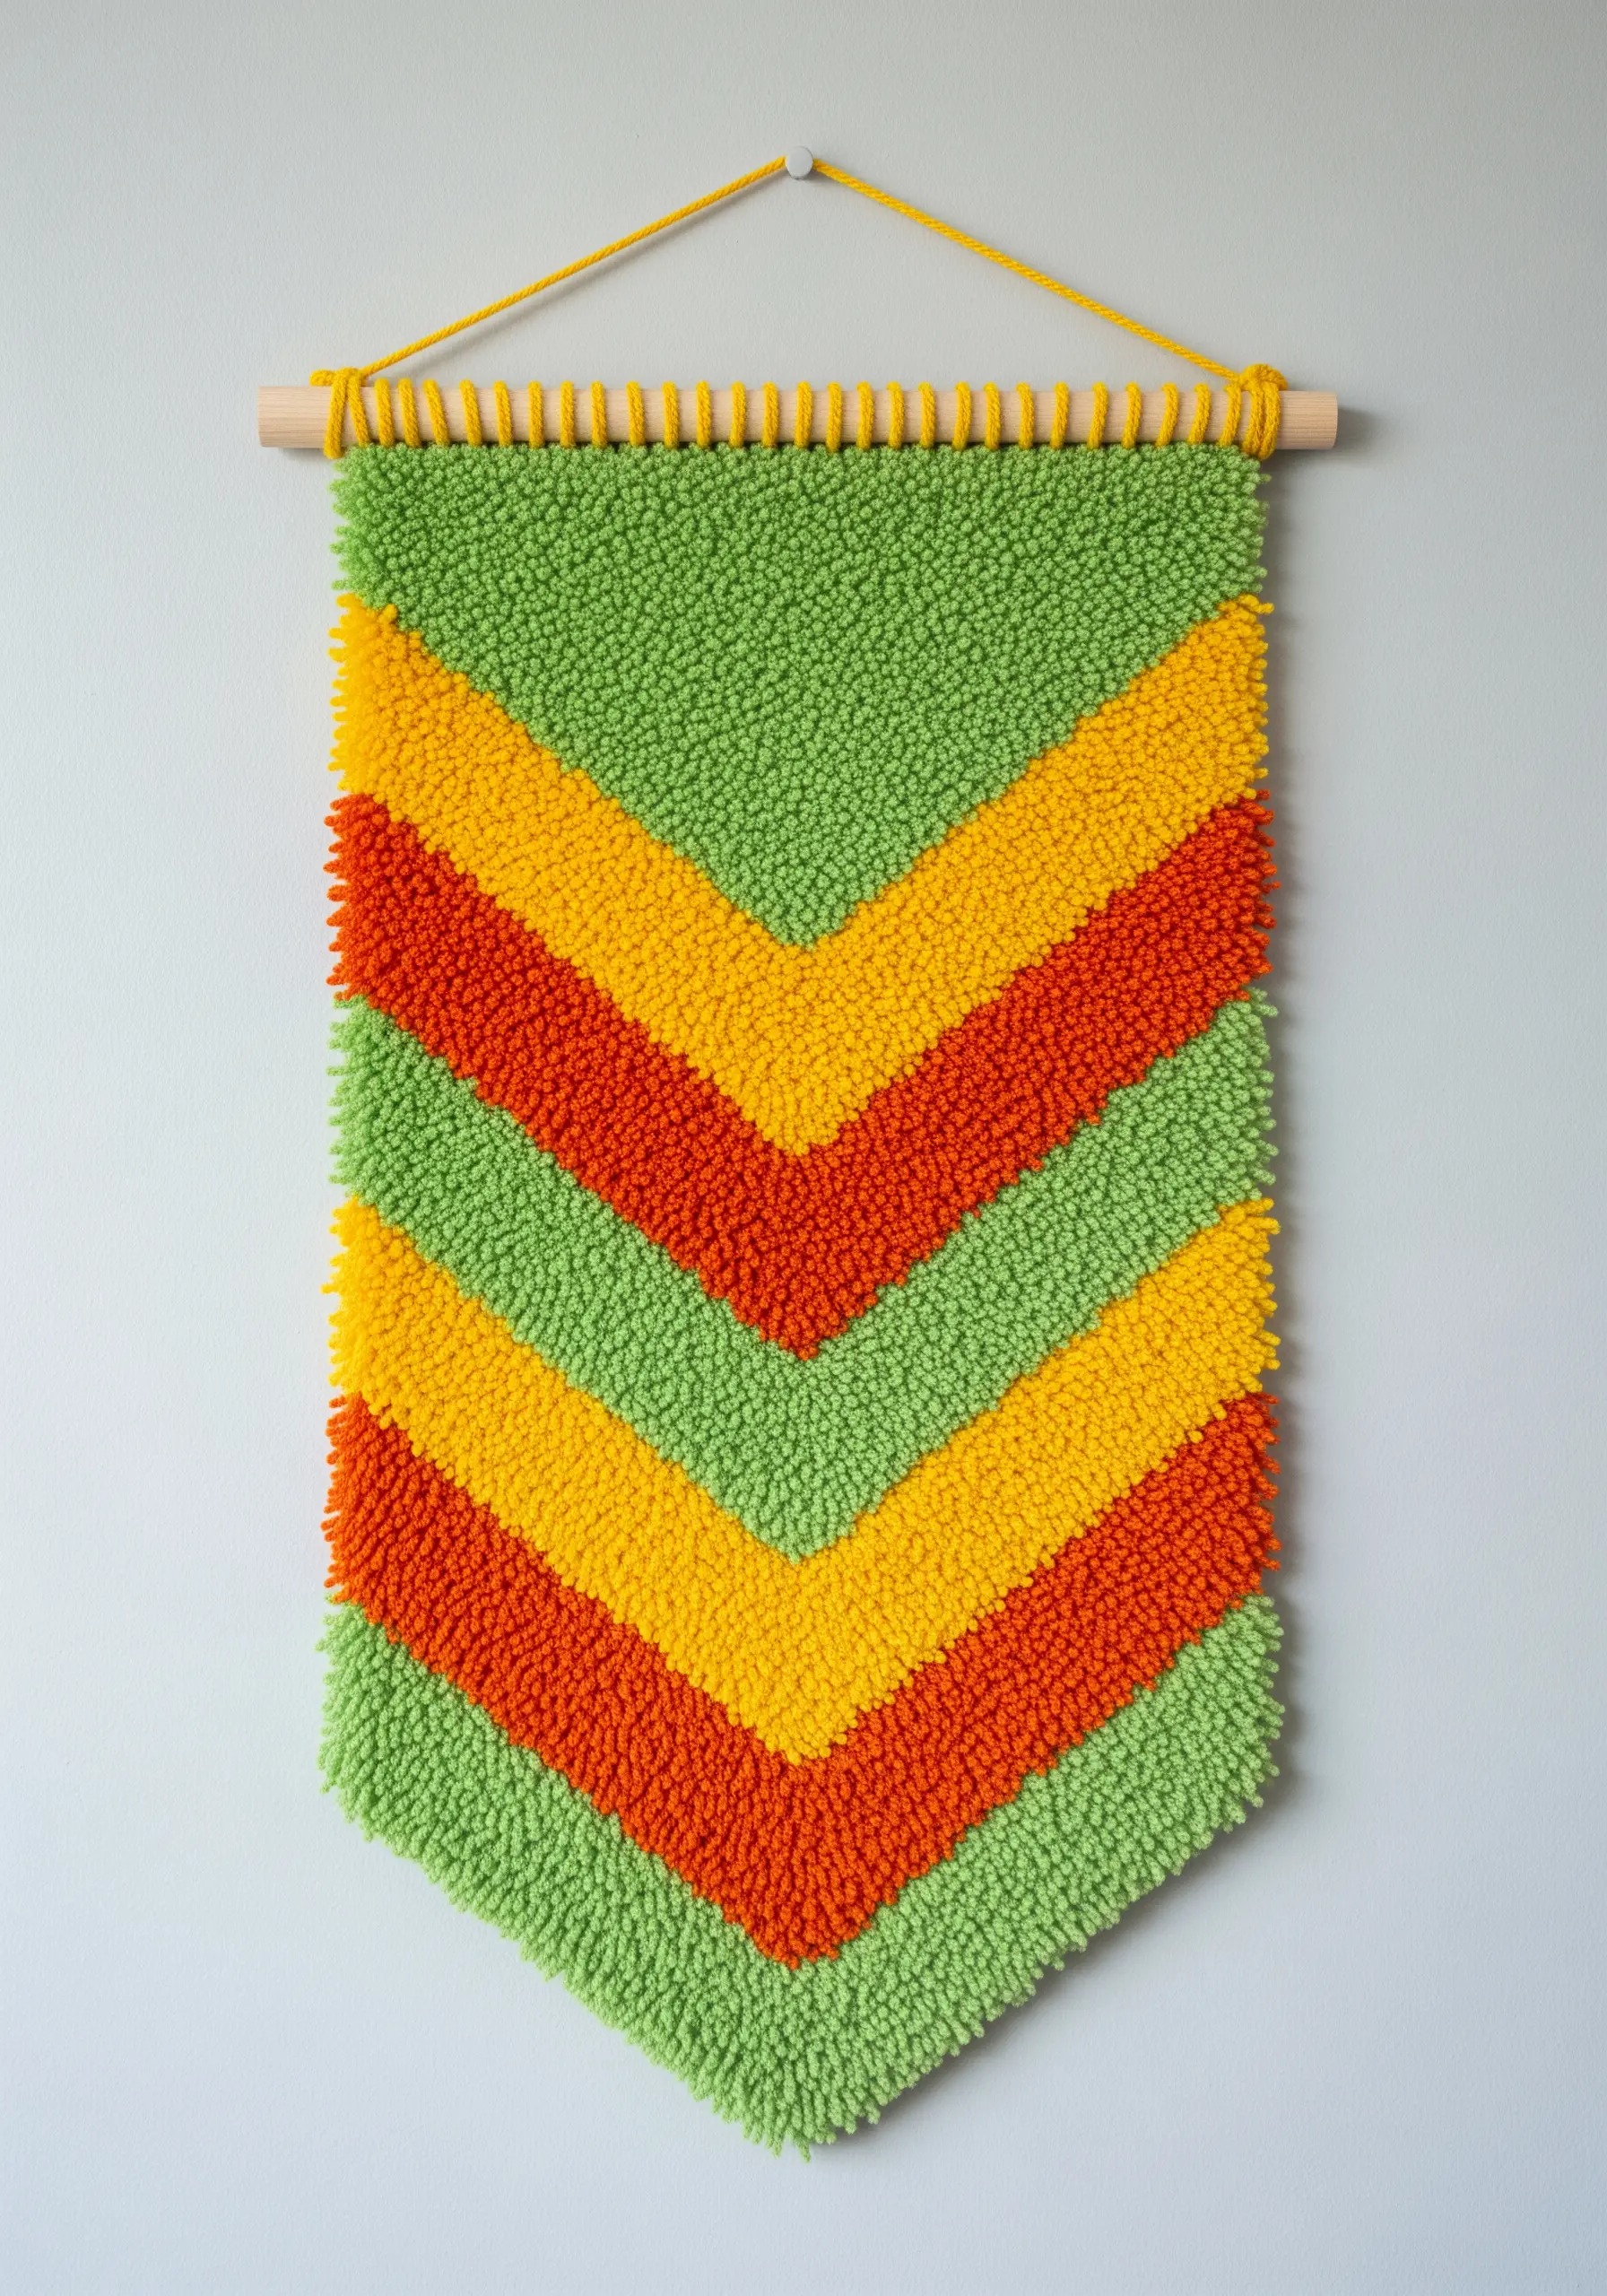
You can create a surprisingly soft and deep pile by latch-hooking pre-cut yarn pieces onto a rug canvas.
The chevron pattern is an ideal starting point for beginners because you can simply follow the grid lines of the canvas to create your angles.
For a more luxurious, dense feel, place your yarn knots in every single grid space without skipping any holes.
To create the pointed banner shape at the bottom, trim the rug canvas to your desired shape before you begin hooking.
6. Design a Rhythmic Garland with Pom-Poms and Tassels
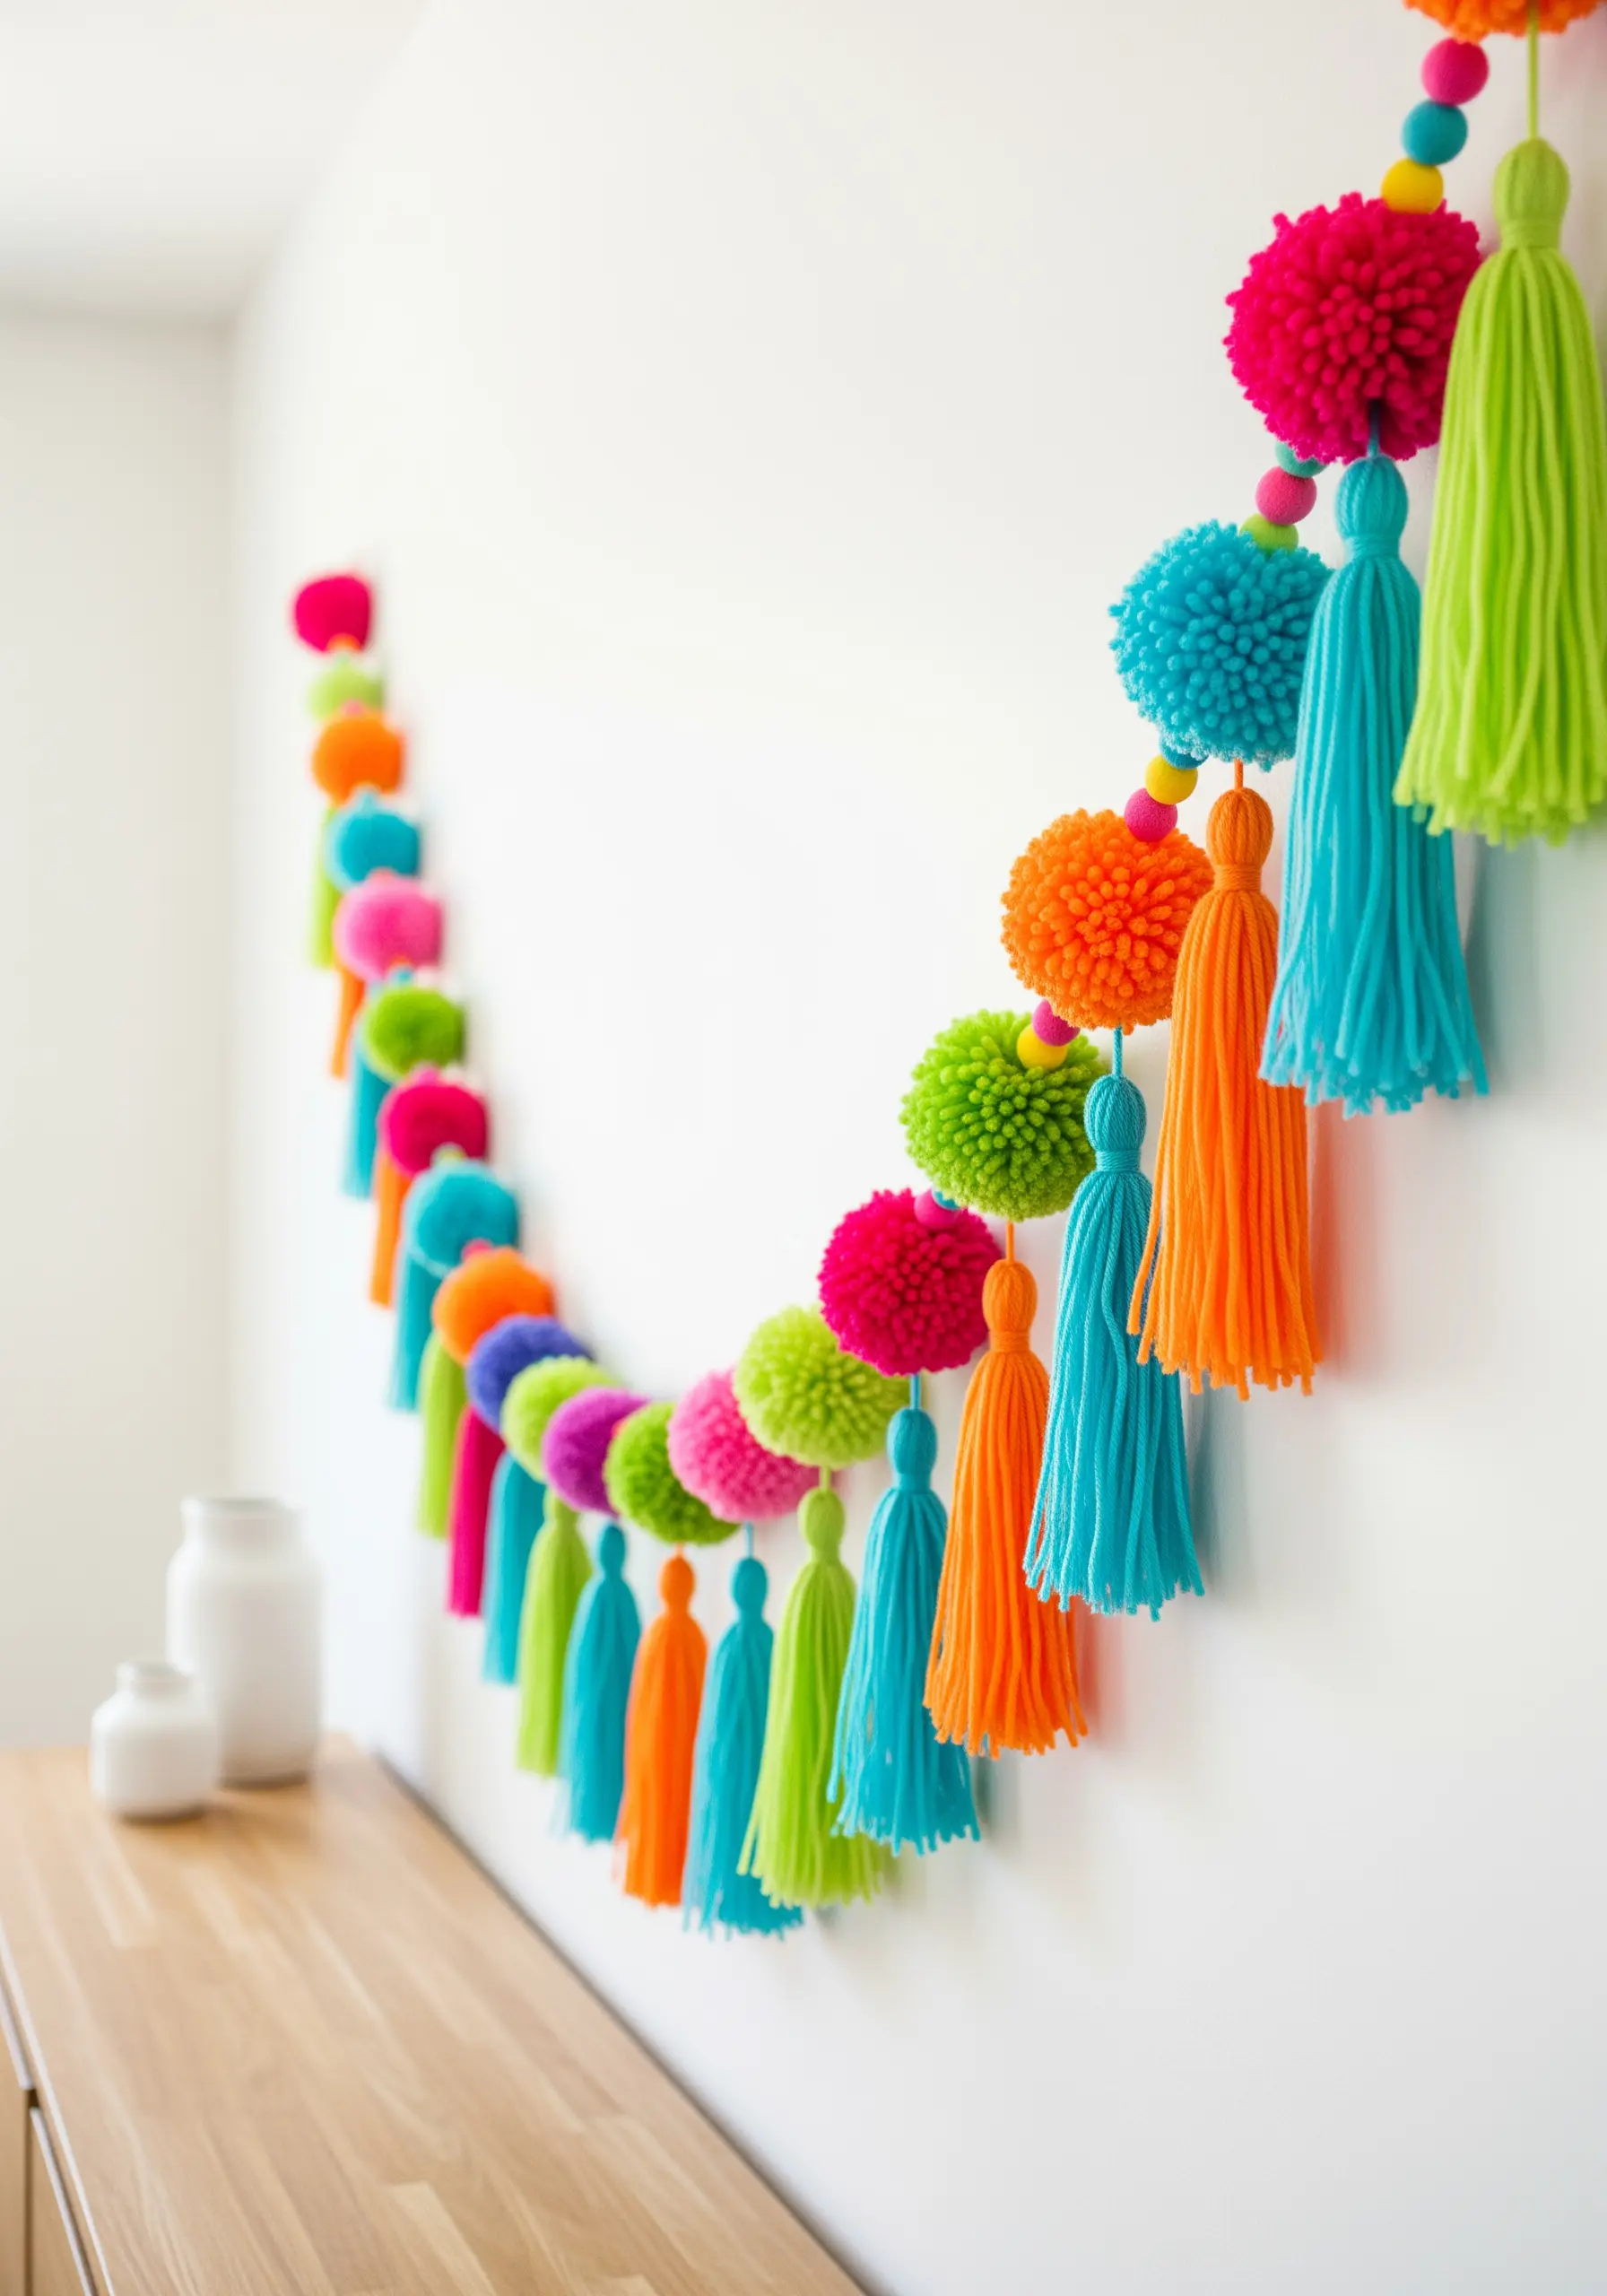
A sophisticated garland is all about creating a visual rhythm through variations in size, texture, and spacing.
Use a set of pom-pom makers to produce consistently round and dense pom-poms for a more polished look.
Alternate your fluffy pom-poms with sleek tassels and smooth wooden beads to introduce different textures and break up the pattern.
To prevent all the elements from sliding into a clump, tie a small, secure knot on the main cord on either side of each bead or tassel.
7. Frame a Woven Centerpiece with Unspun Roving
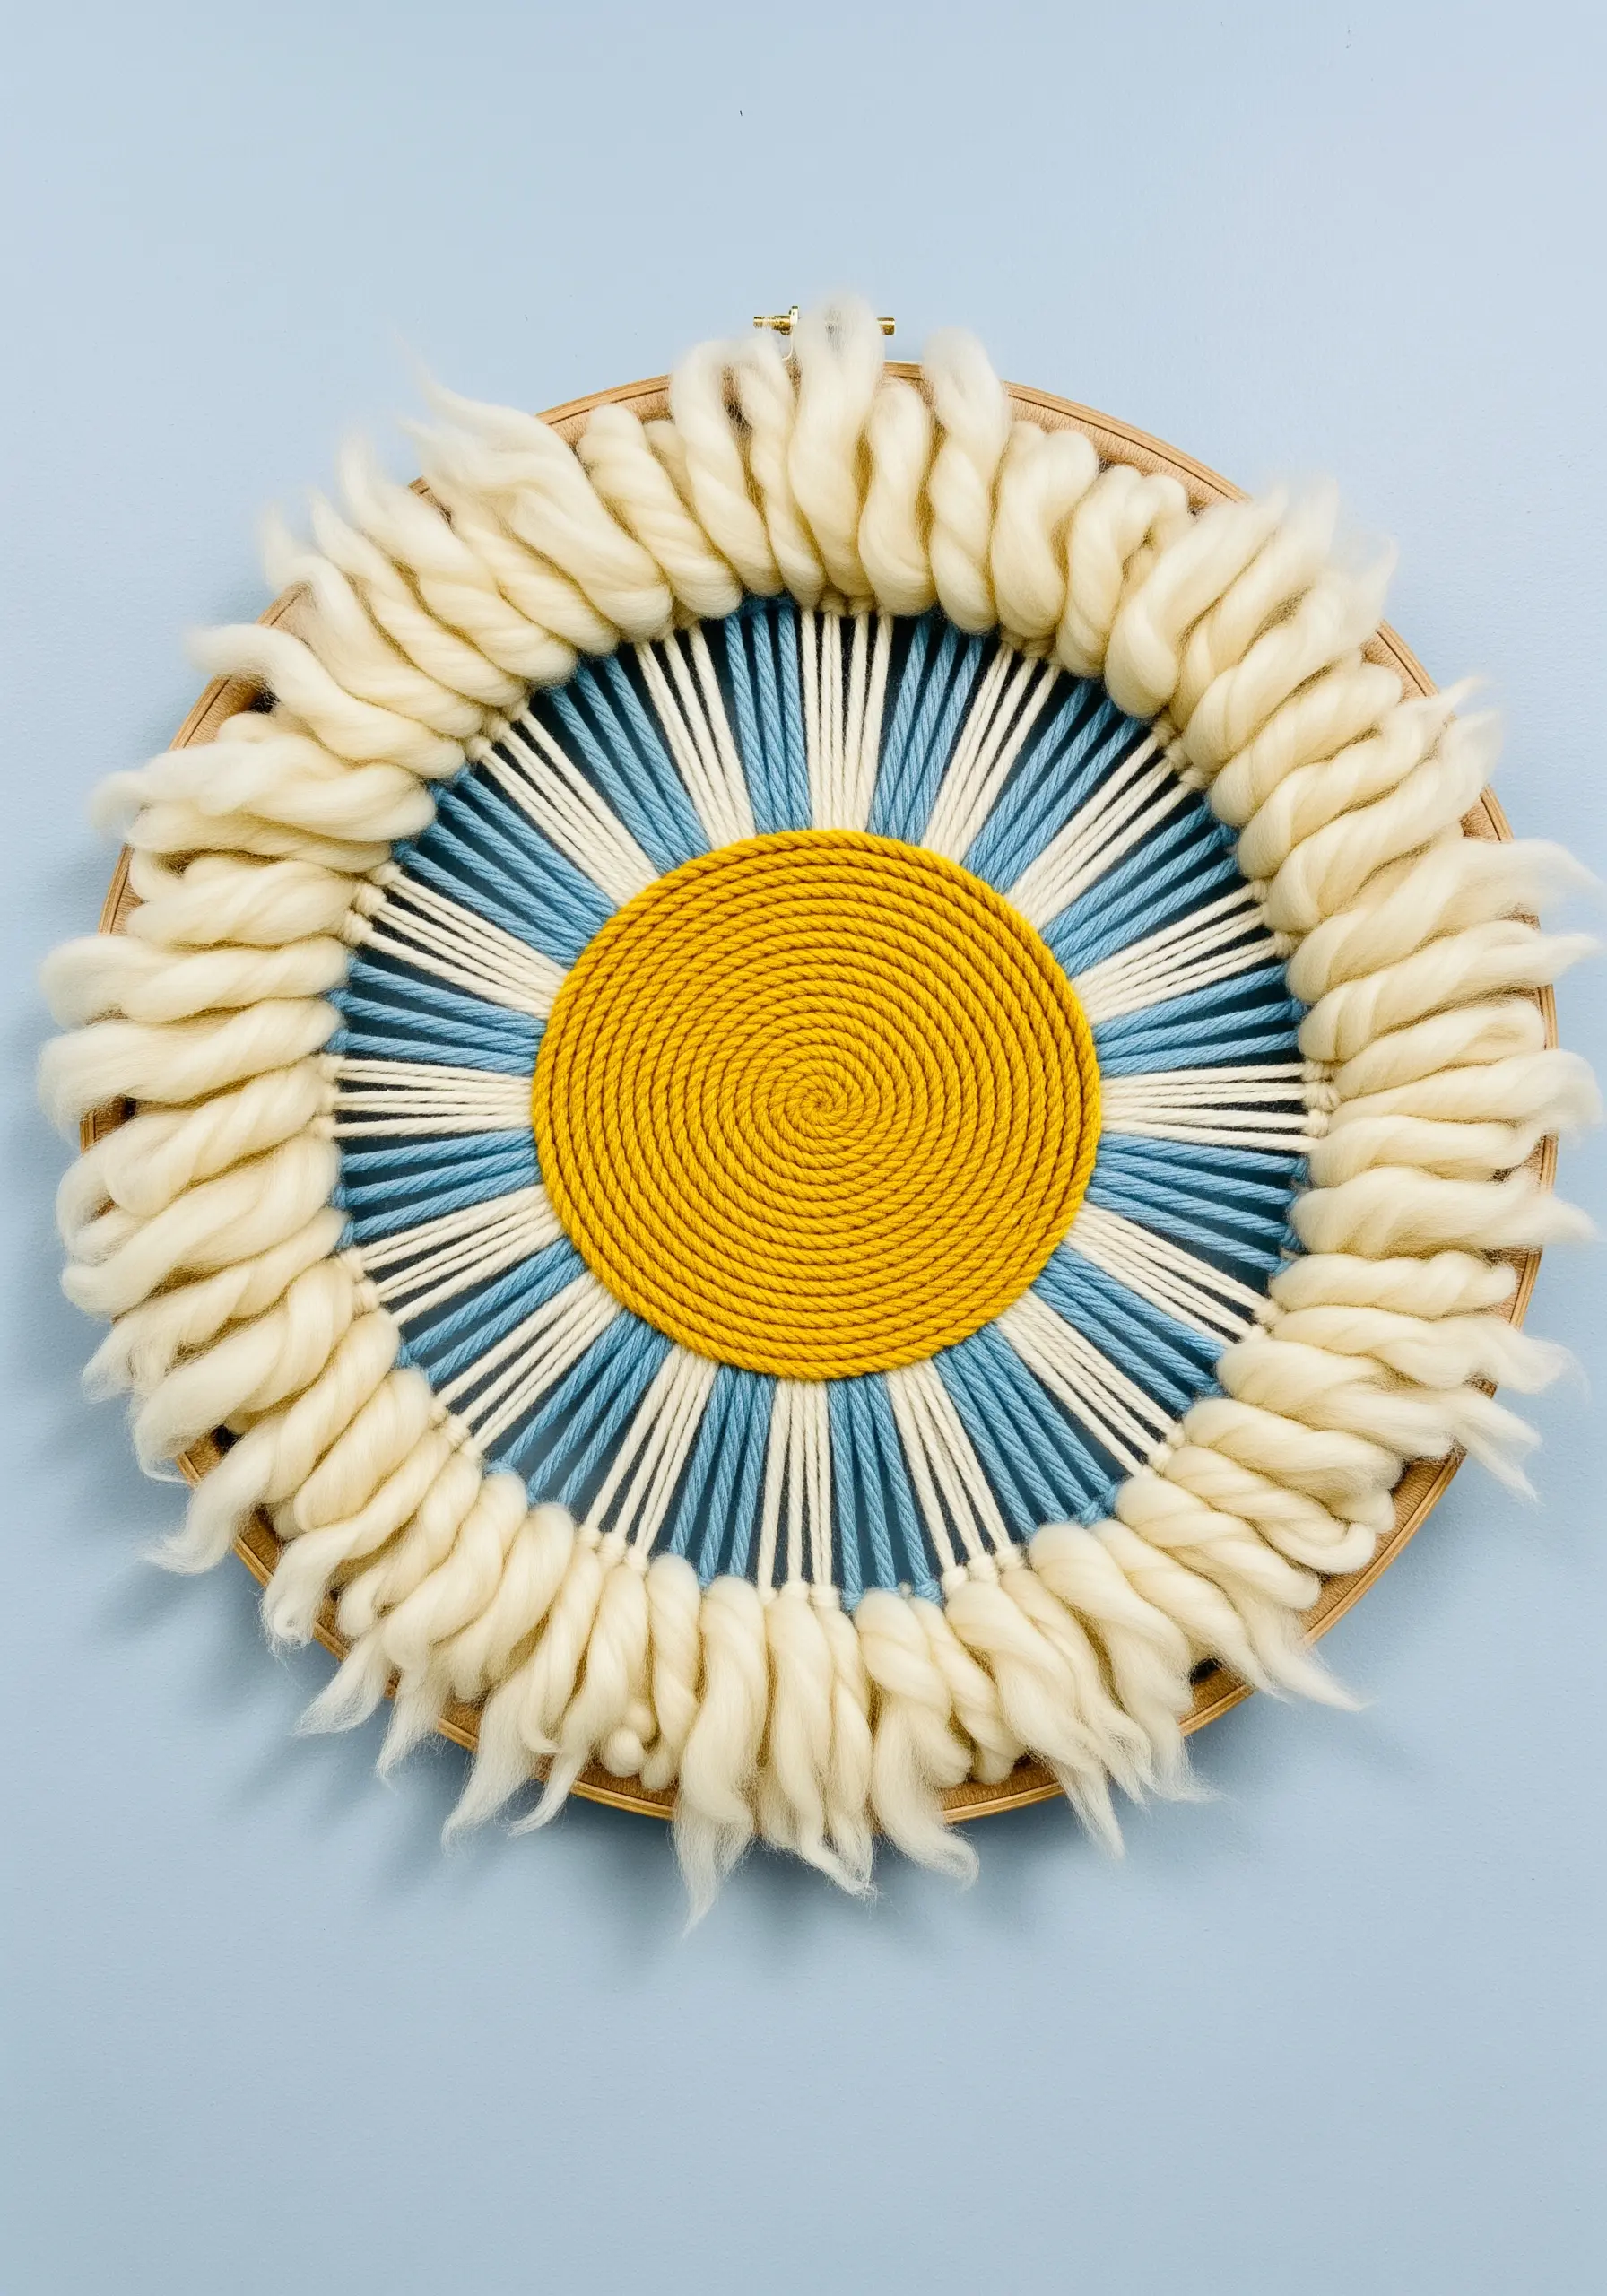
This design gains its power from the contrast between a tightly woven center and a soft, cloud-like frame.
First, create your warp by stringing yarn across the hoop like spokes on a wheel, then weave the blue and yellow central medallion.
For the dramatic border, gently wrap chunky, unspun wool roving around the hoop itself, tucking the ends securely on the back.
This is one of many fiber art installations using yarn in ways you’ve never imagined to add softness and scale to a room.
8. Explore Minimalist Composition with Wrapped Dowels
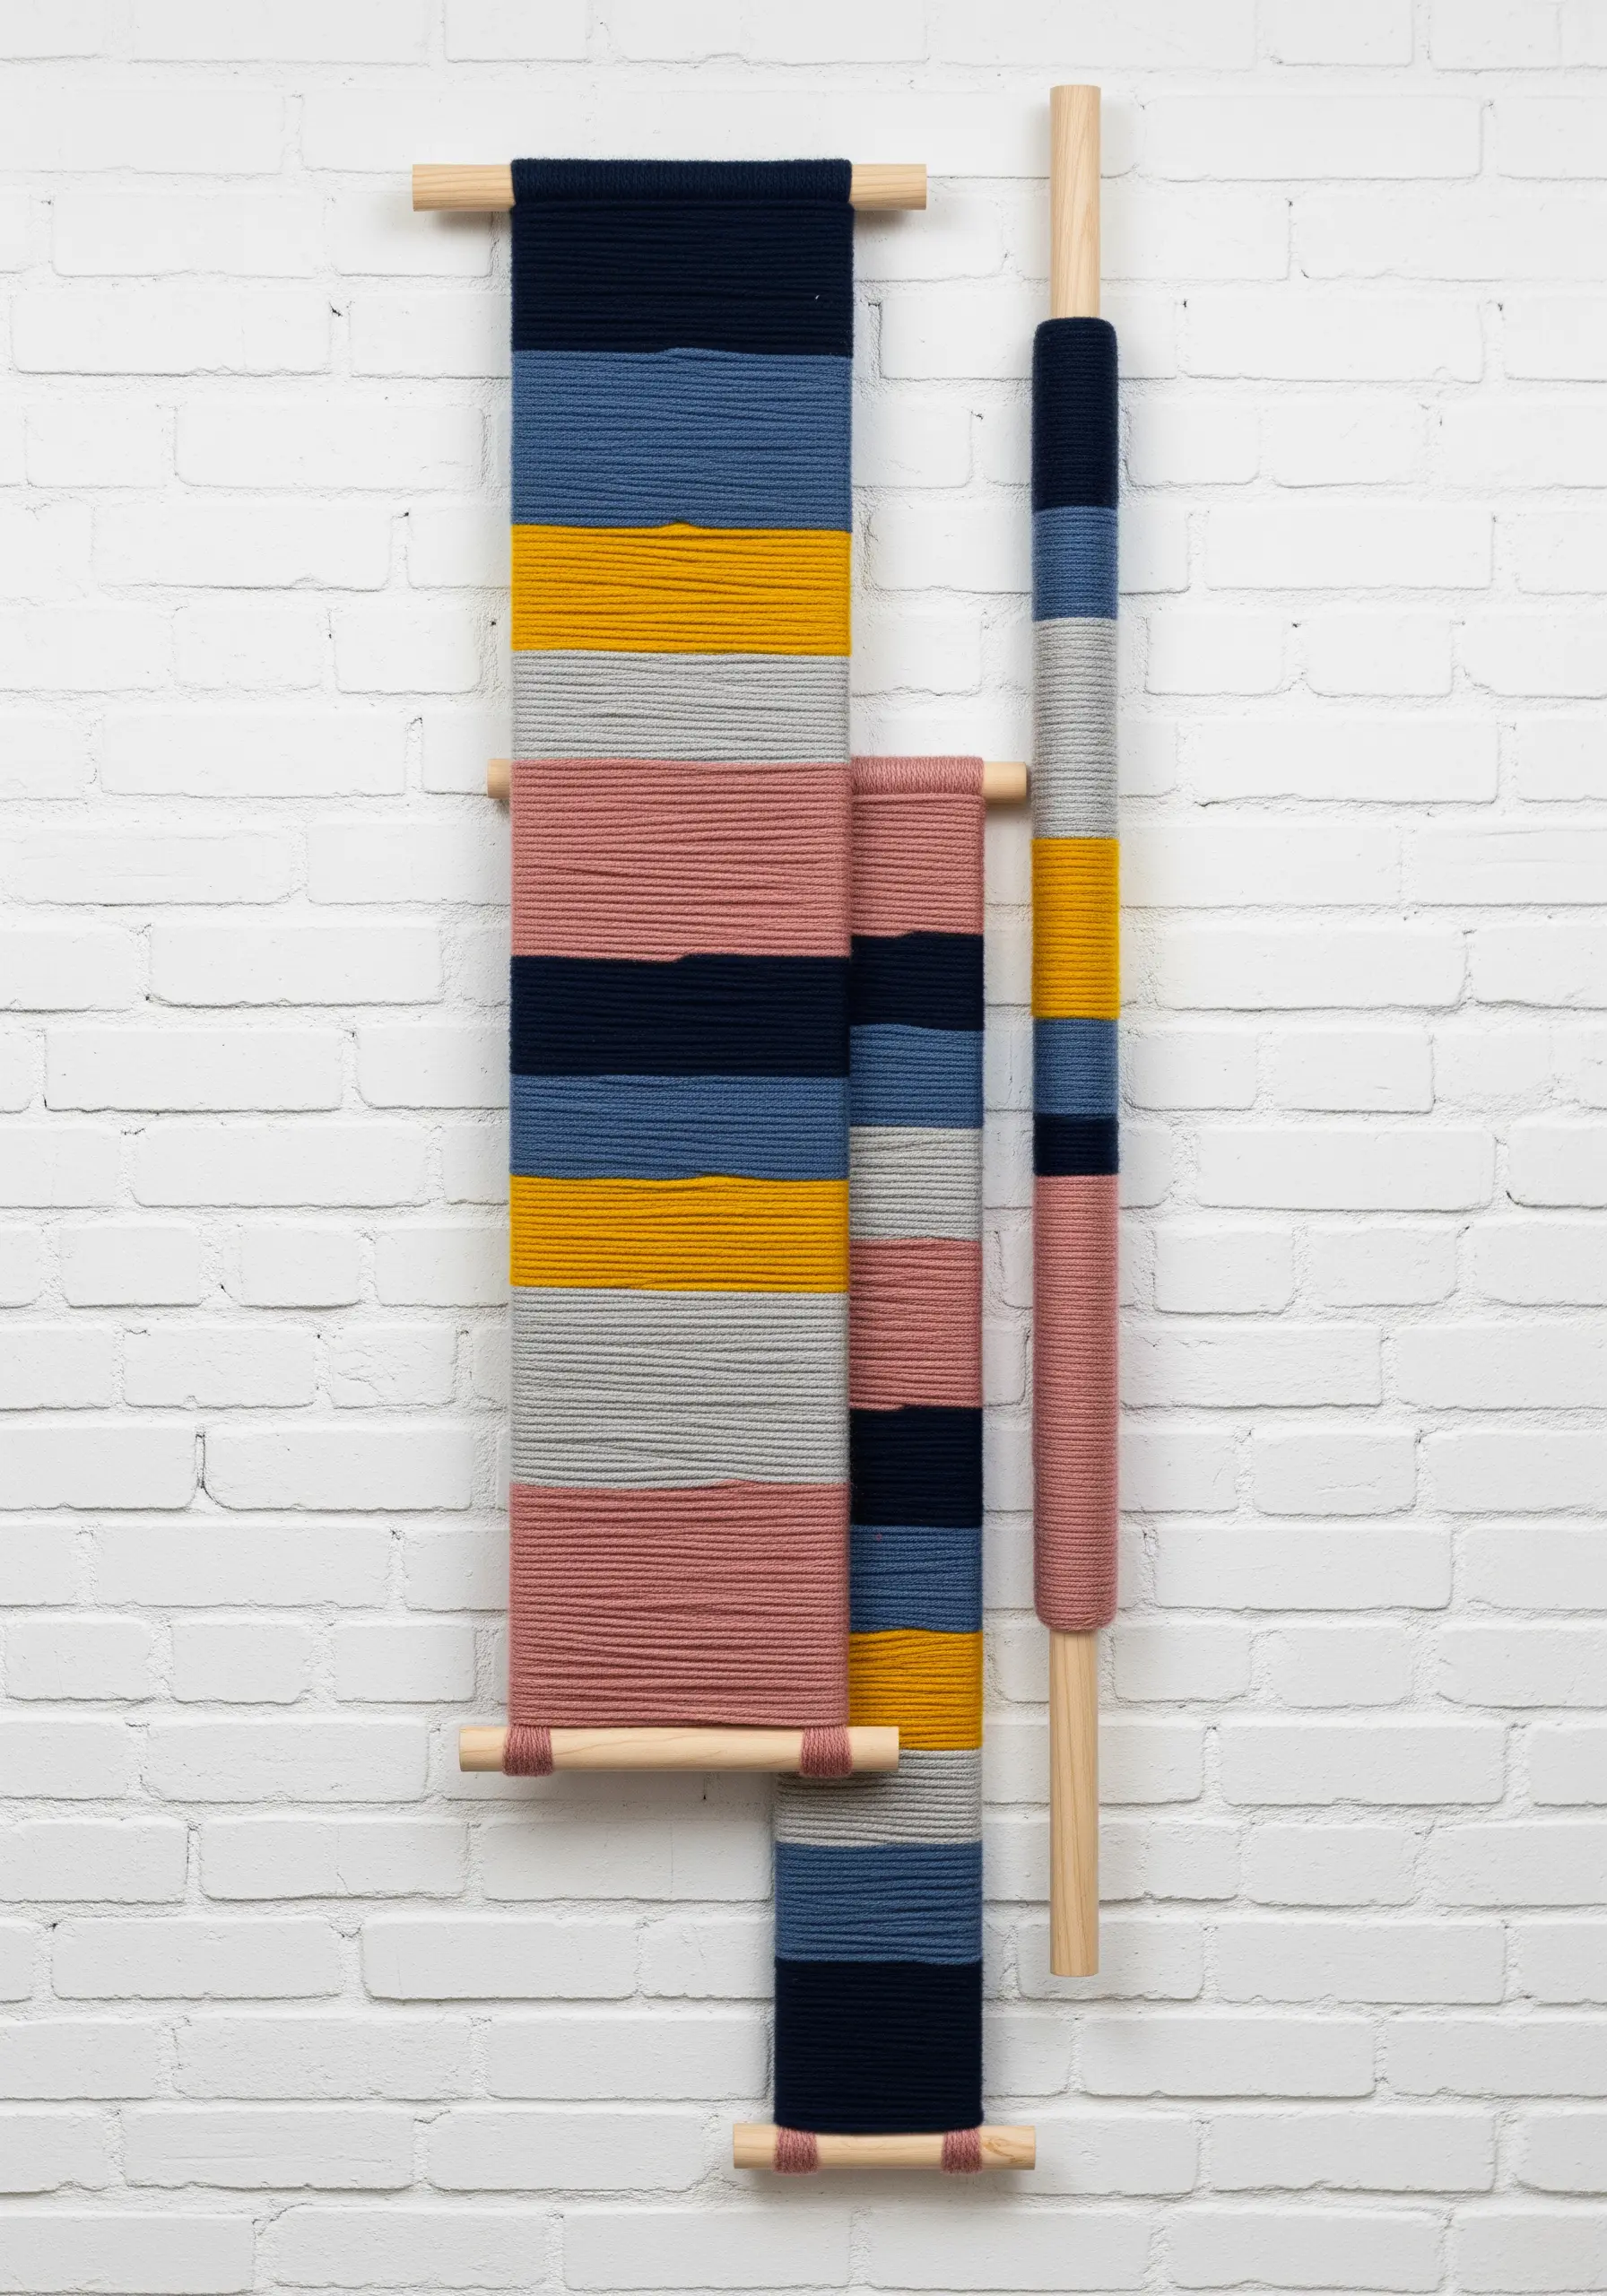
This project is an exercise in minimalist precision, focusing on color blocking and composition.
Create these sleek panels by tightly wrapping yarn around wooden dowels, ensuring each wrap sits snugly next to the last.
Use masking tape to mark off your sections before changing colors; this will give you perfectly crisp, clean lines.
The true artistry comes from the arrangement—grouping multiple panels of varying widths creates a dynamic installation where the negative wall space is part of the art.
9. Add Natural, Grounding Elements to Macrame Knots
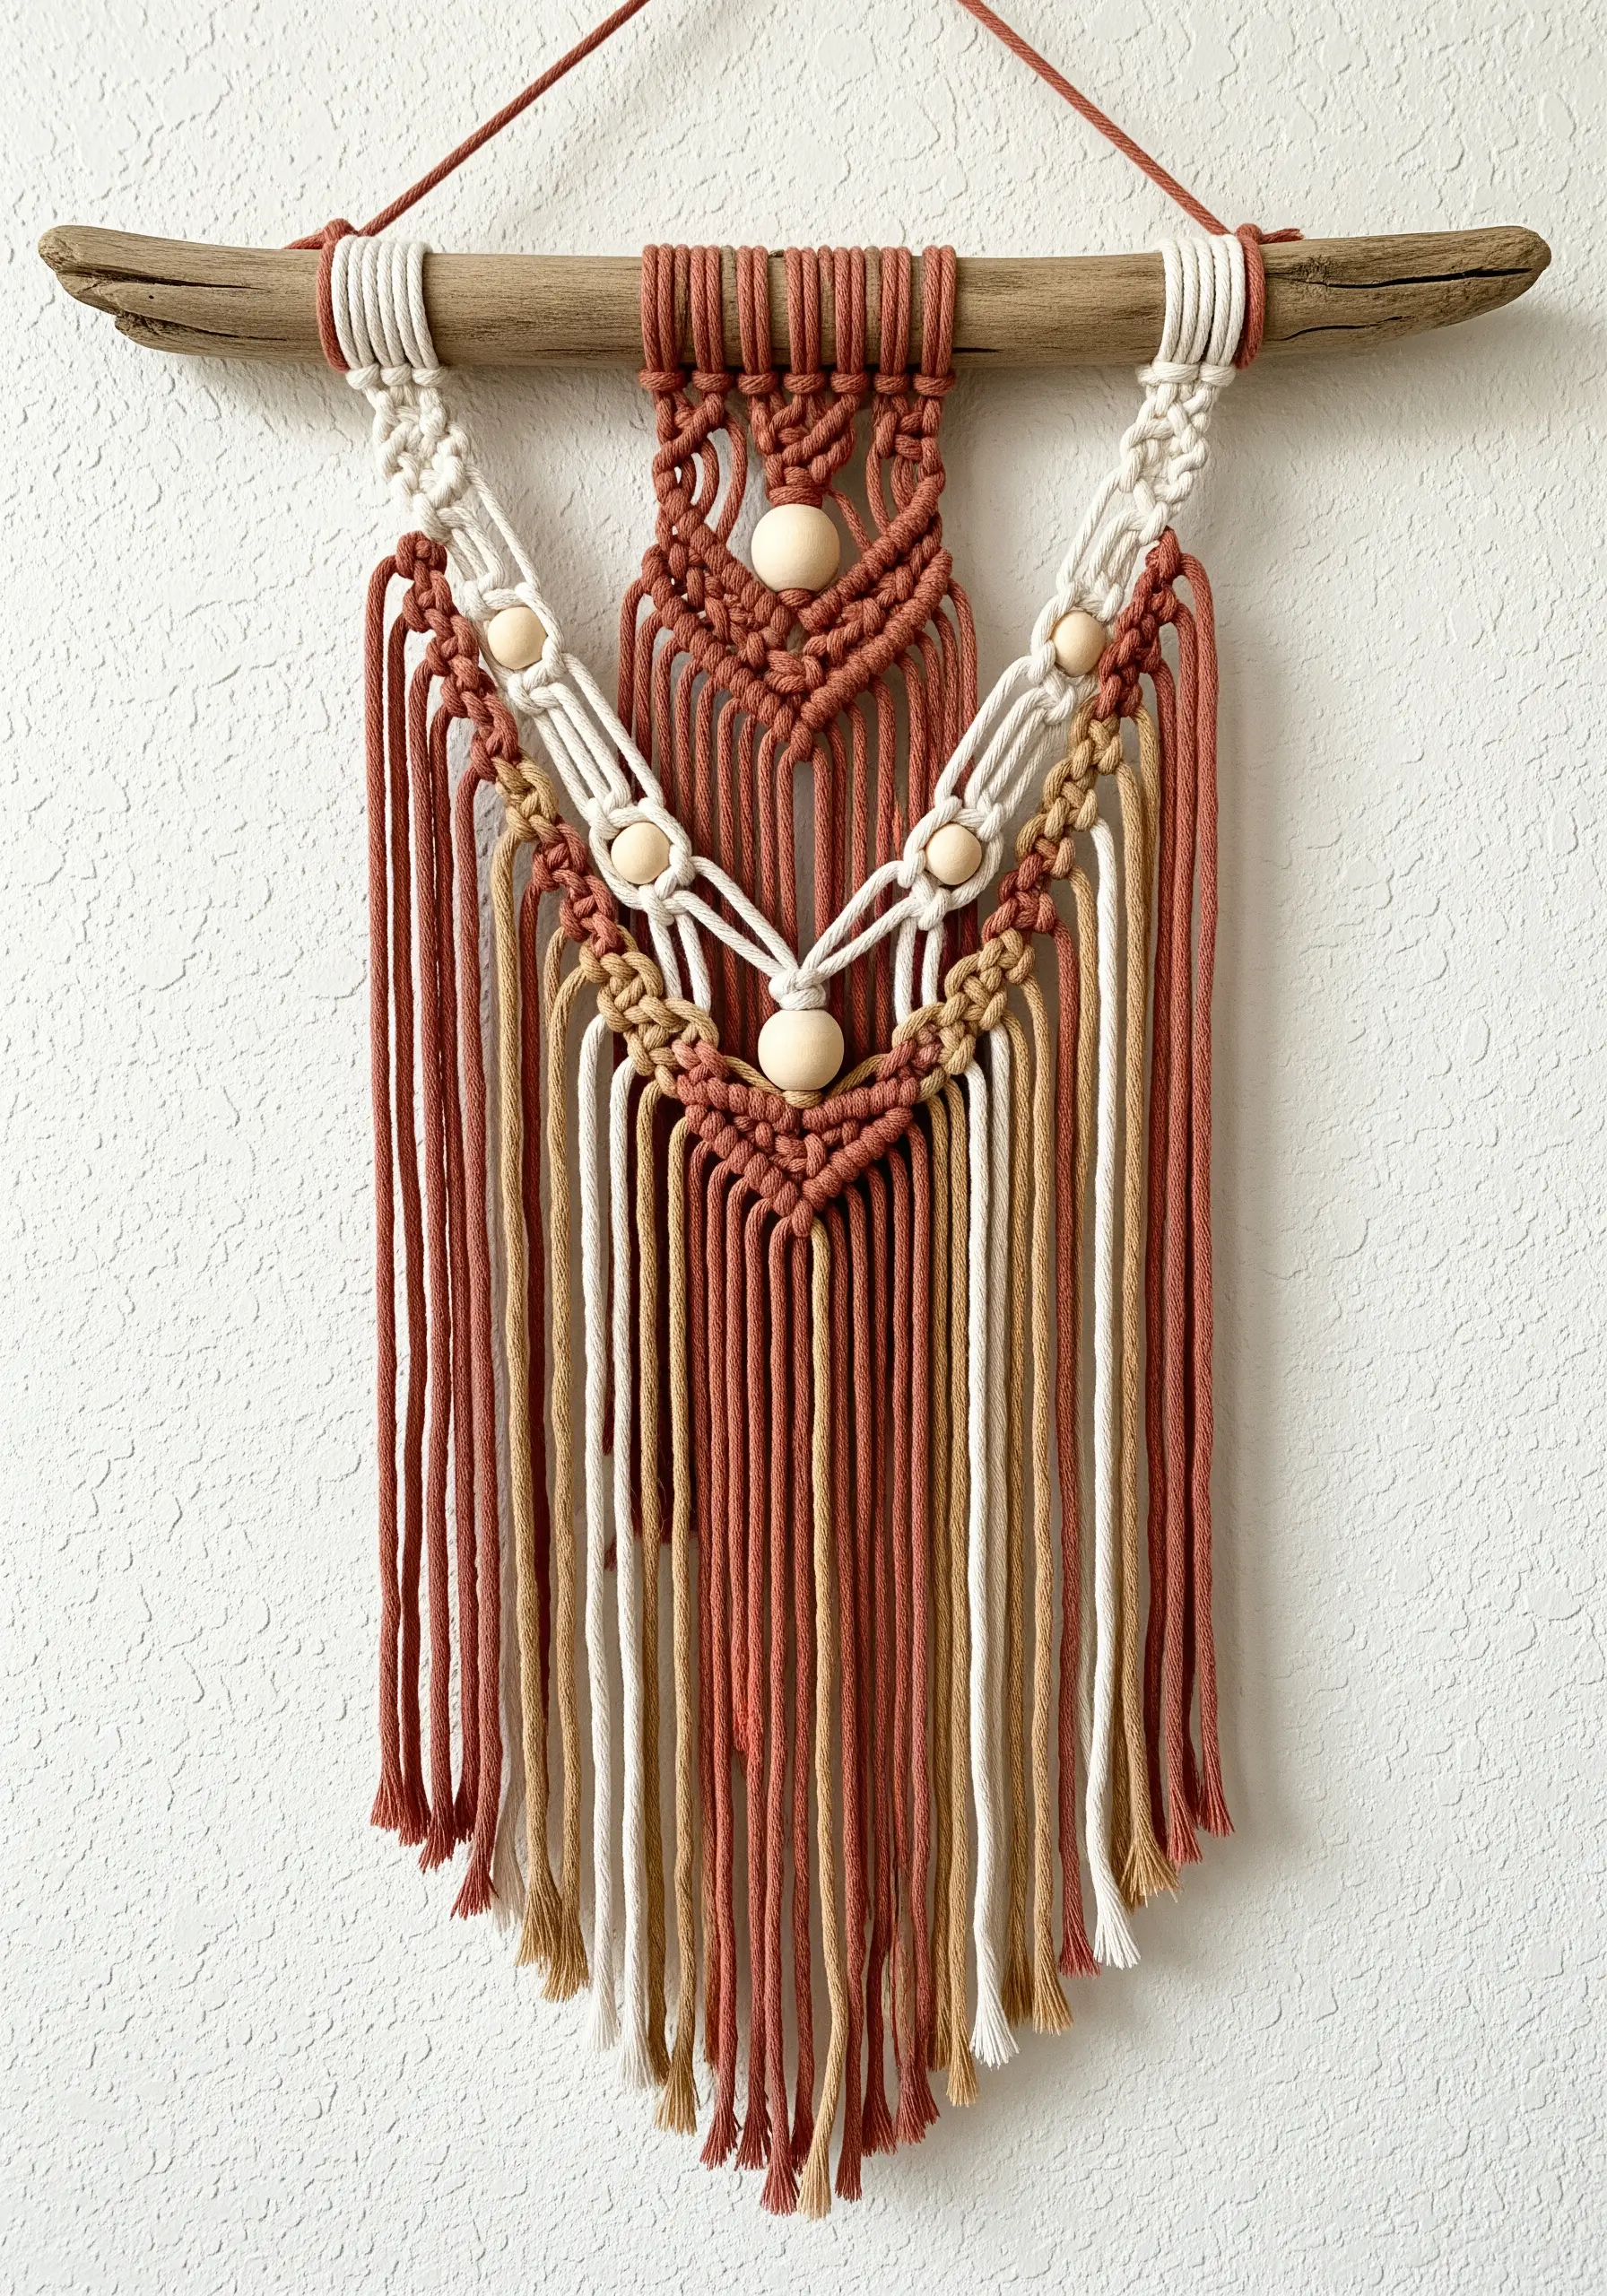
You can instantly elevate a standard macrame pattern by incorporating materials like wooden beads.
Simply thread the beads onto your center filler cords before tying the knots that will hold them in place.
This technique not only adds a decorative element but also introduces a new texture and helps to structure the overall design.
Varying your knotting patterns—for instance, switching from flat square knots to twisting half-hitch spirals—adds rhythmic complexity and visual interest.
10. Create 3D Petals with a Raised Chain Stitch Band
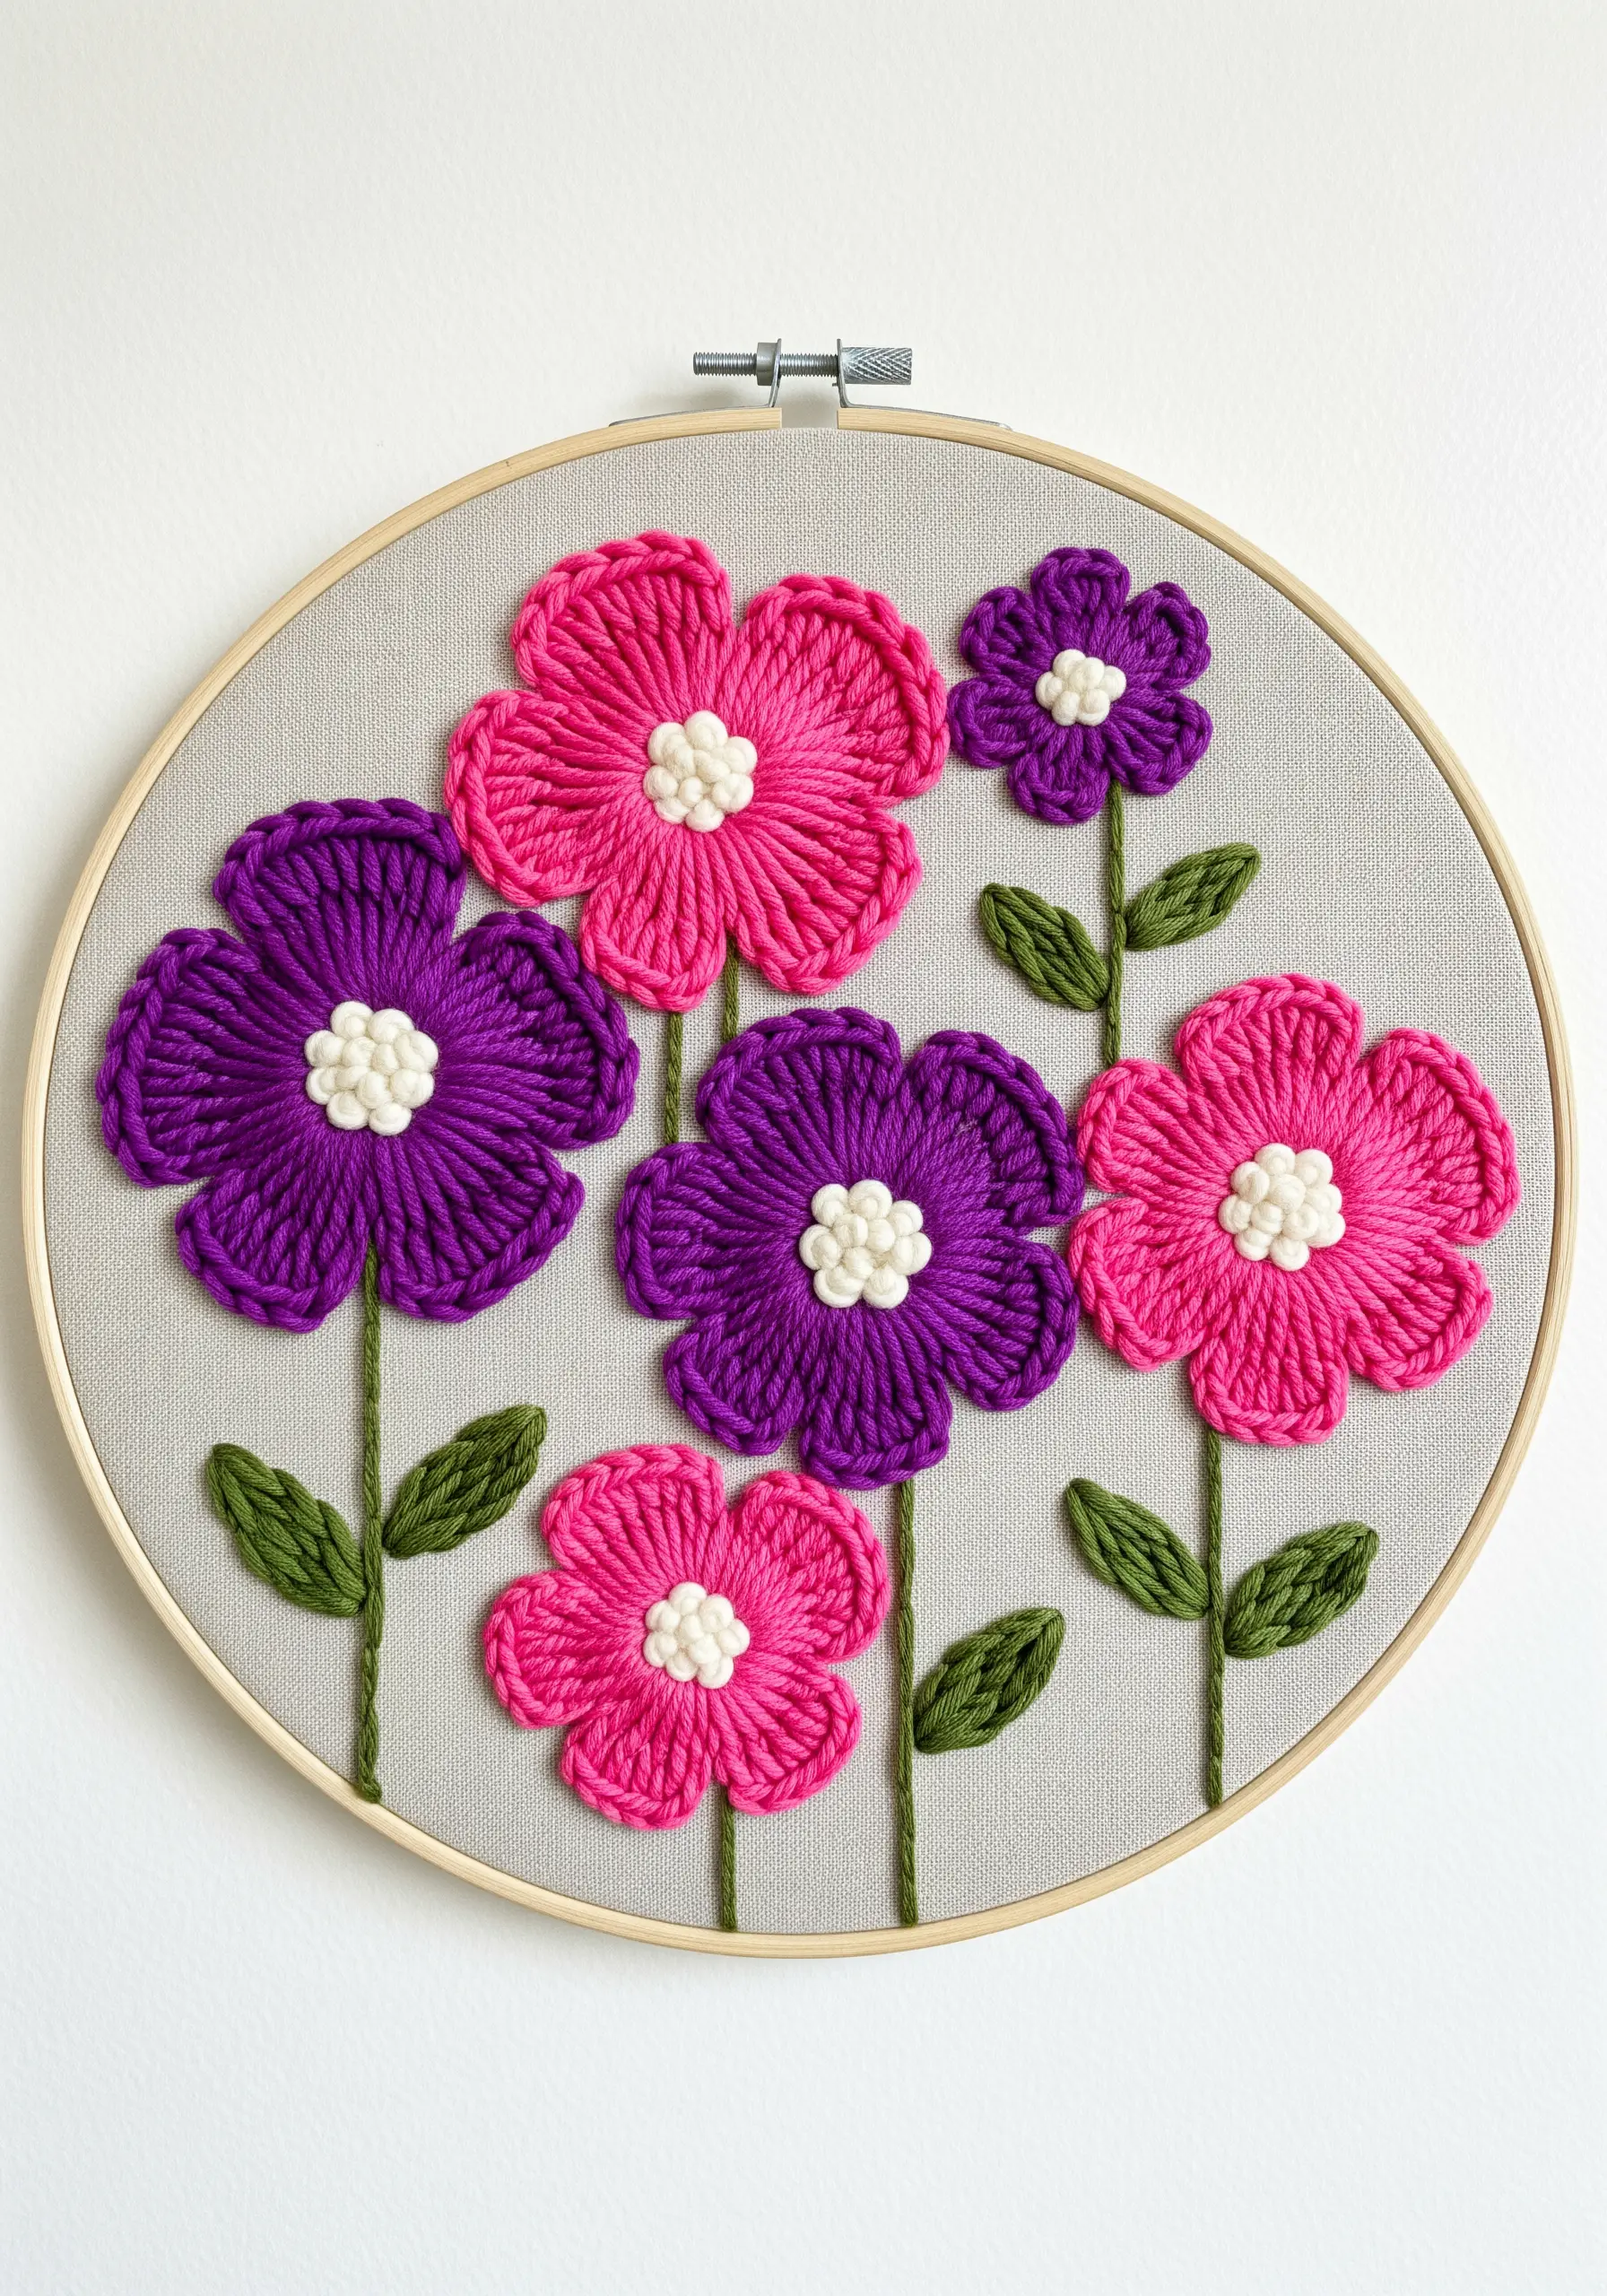
These dimensional flowers get their sculptural quality from a simple stitch executed with chunky yarn.
The petals are formed using a large-scale detached chain stitch, also known as a lazy daisy stitch.
For even more lift and definition, you can work this as a raised chain stitch band, which creates a padded base.
Fill the centers with tight French knots using a contrasting color to anchor the design and provide a clear focal point, exploring other 3D floral embroidery techniques can add more depth.
11. Frame a Modern God’s Eye Weaving for Gallery Appeal
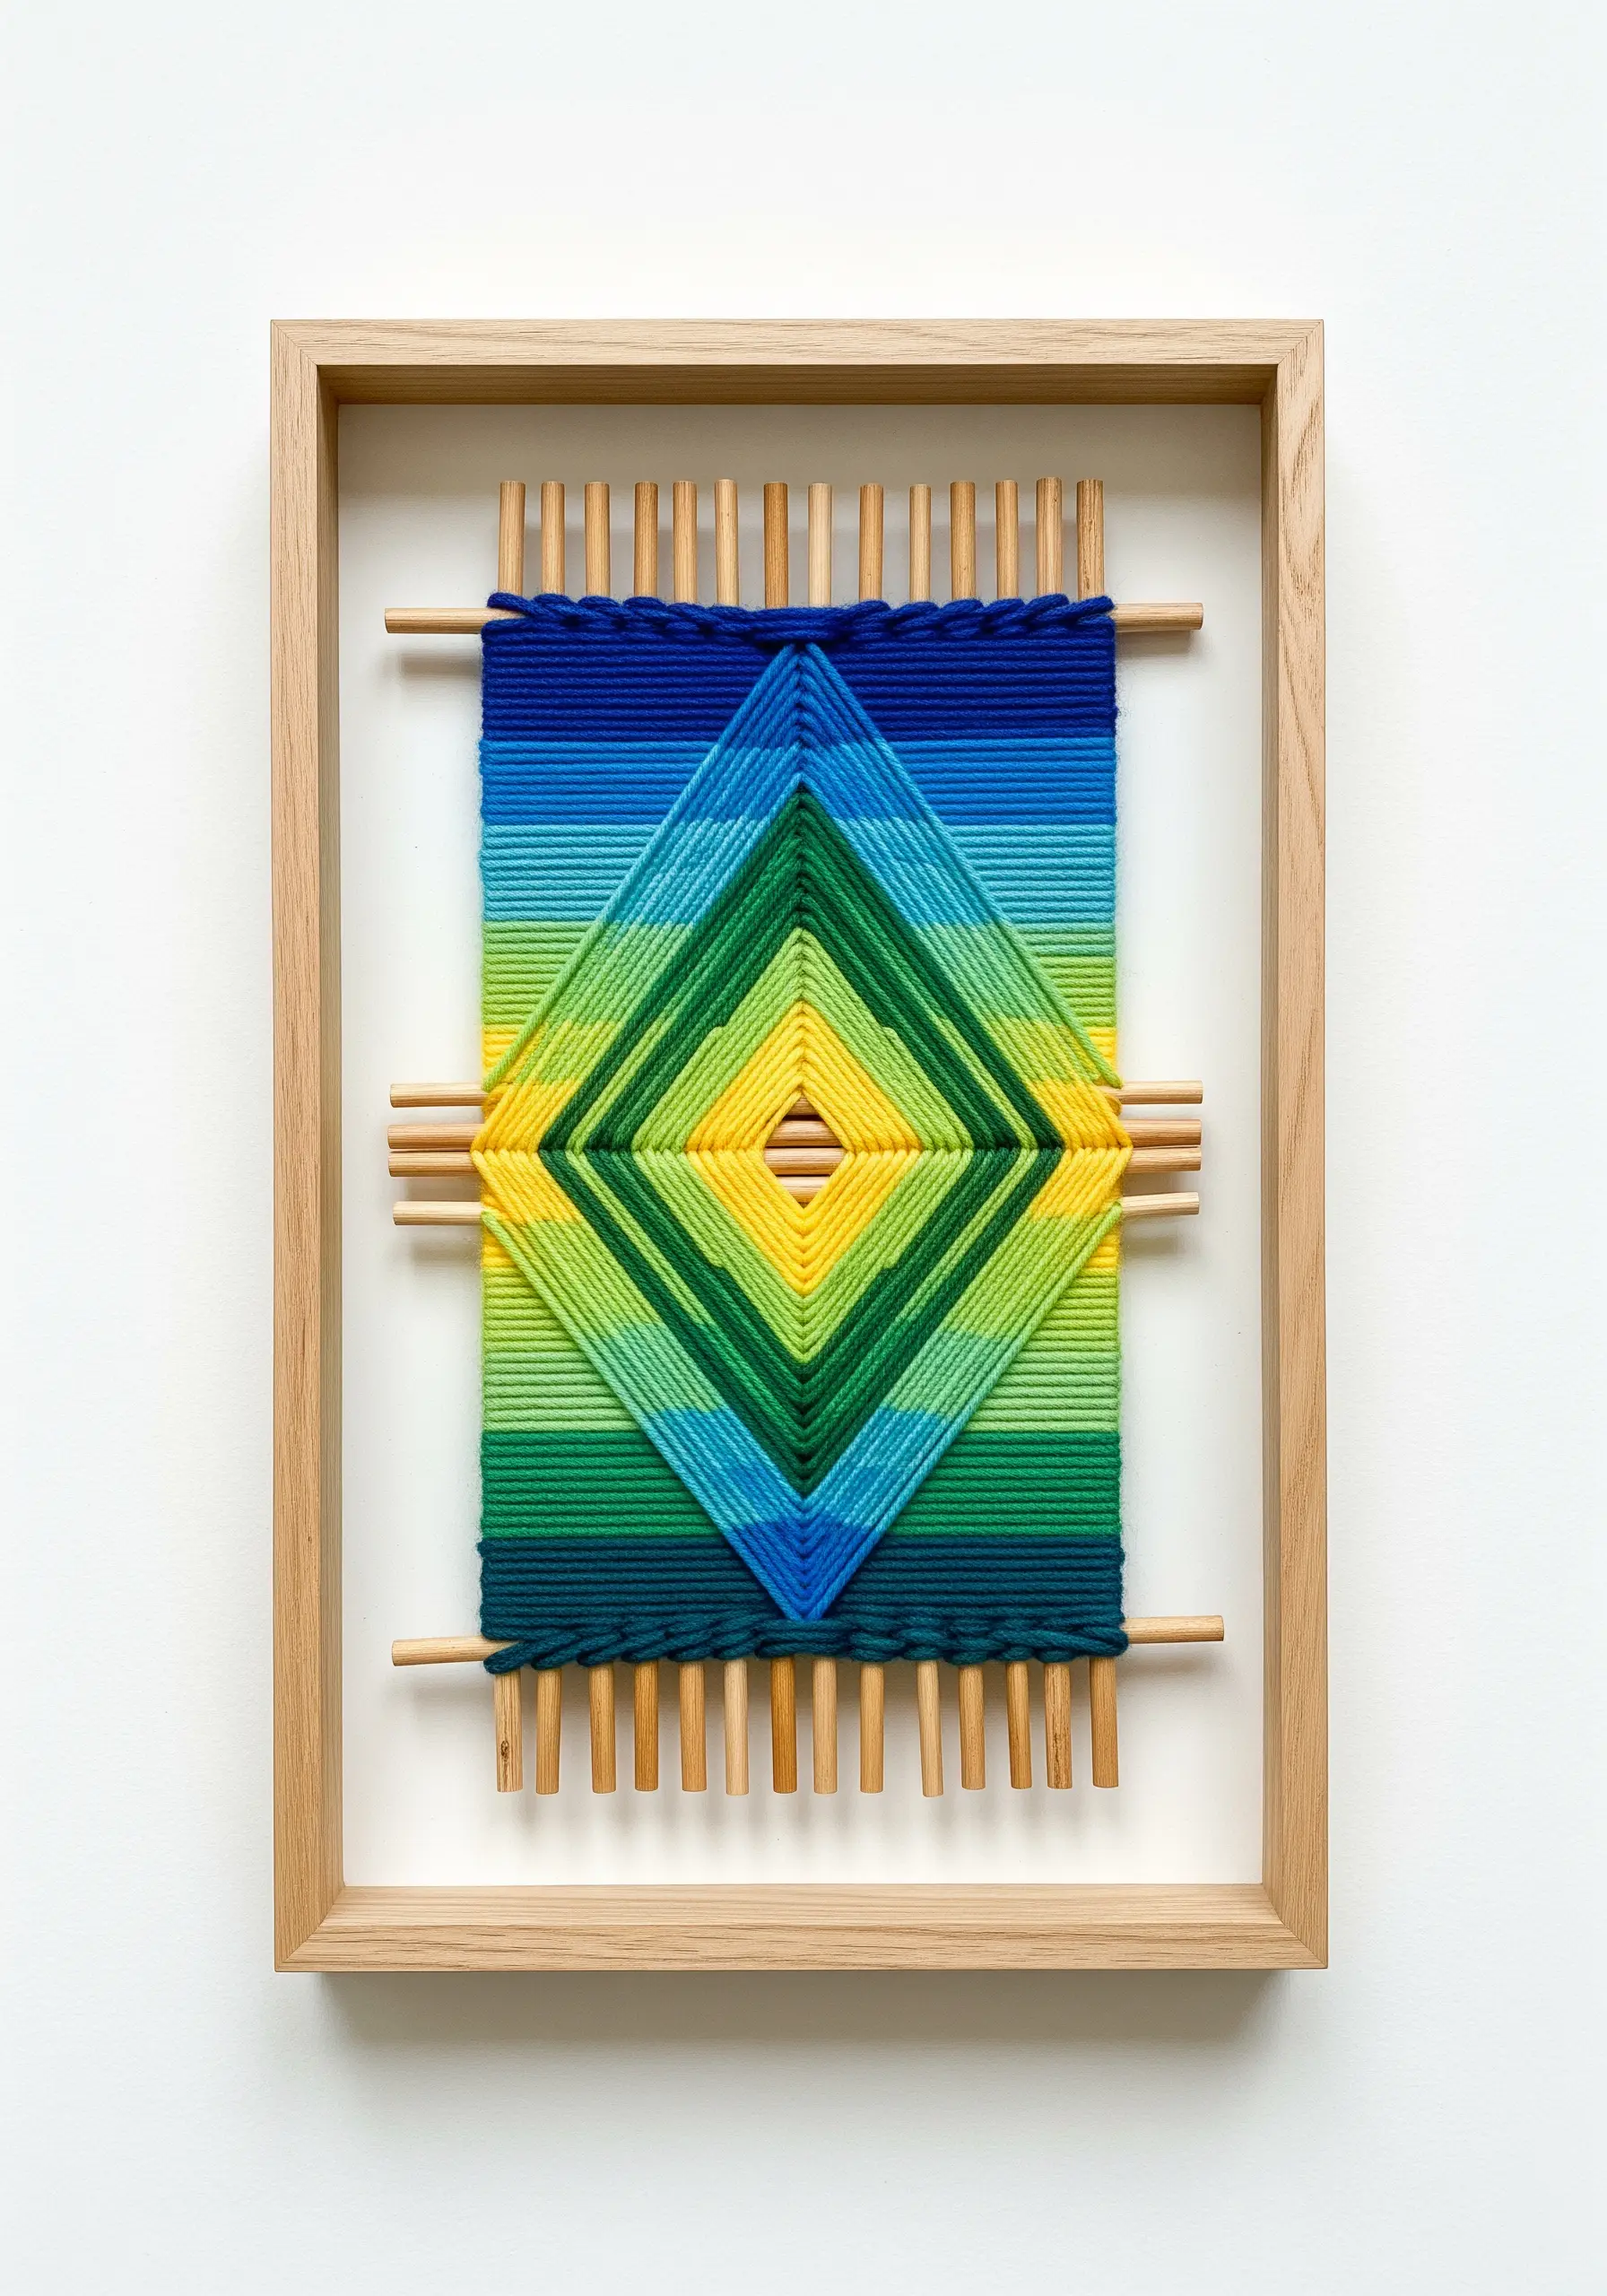
This is a contemporary take on the traditional Ojo de Dios weaving technique, focusing on color gradients and sharp presentation.
Construct a simple cross-frame with two dowels, then wrap your yarn around them sequentially, moving from the center outward.
The smooth gradient effect is achieved by methodically switching yarn colors every few rows, moving through shades of a single color family.
Placing the finished weaving inside a deep shadowbox frame elevates it from a rustic craft to a refined piece of modern textile art.
12. Sculpt with Knitted I-Cord on a Painted Canvas
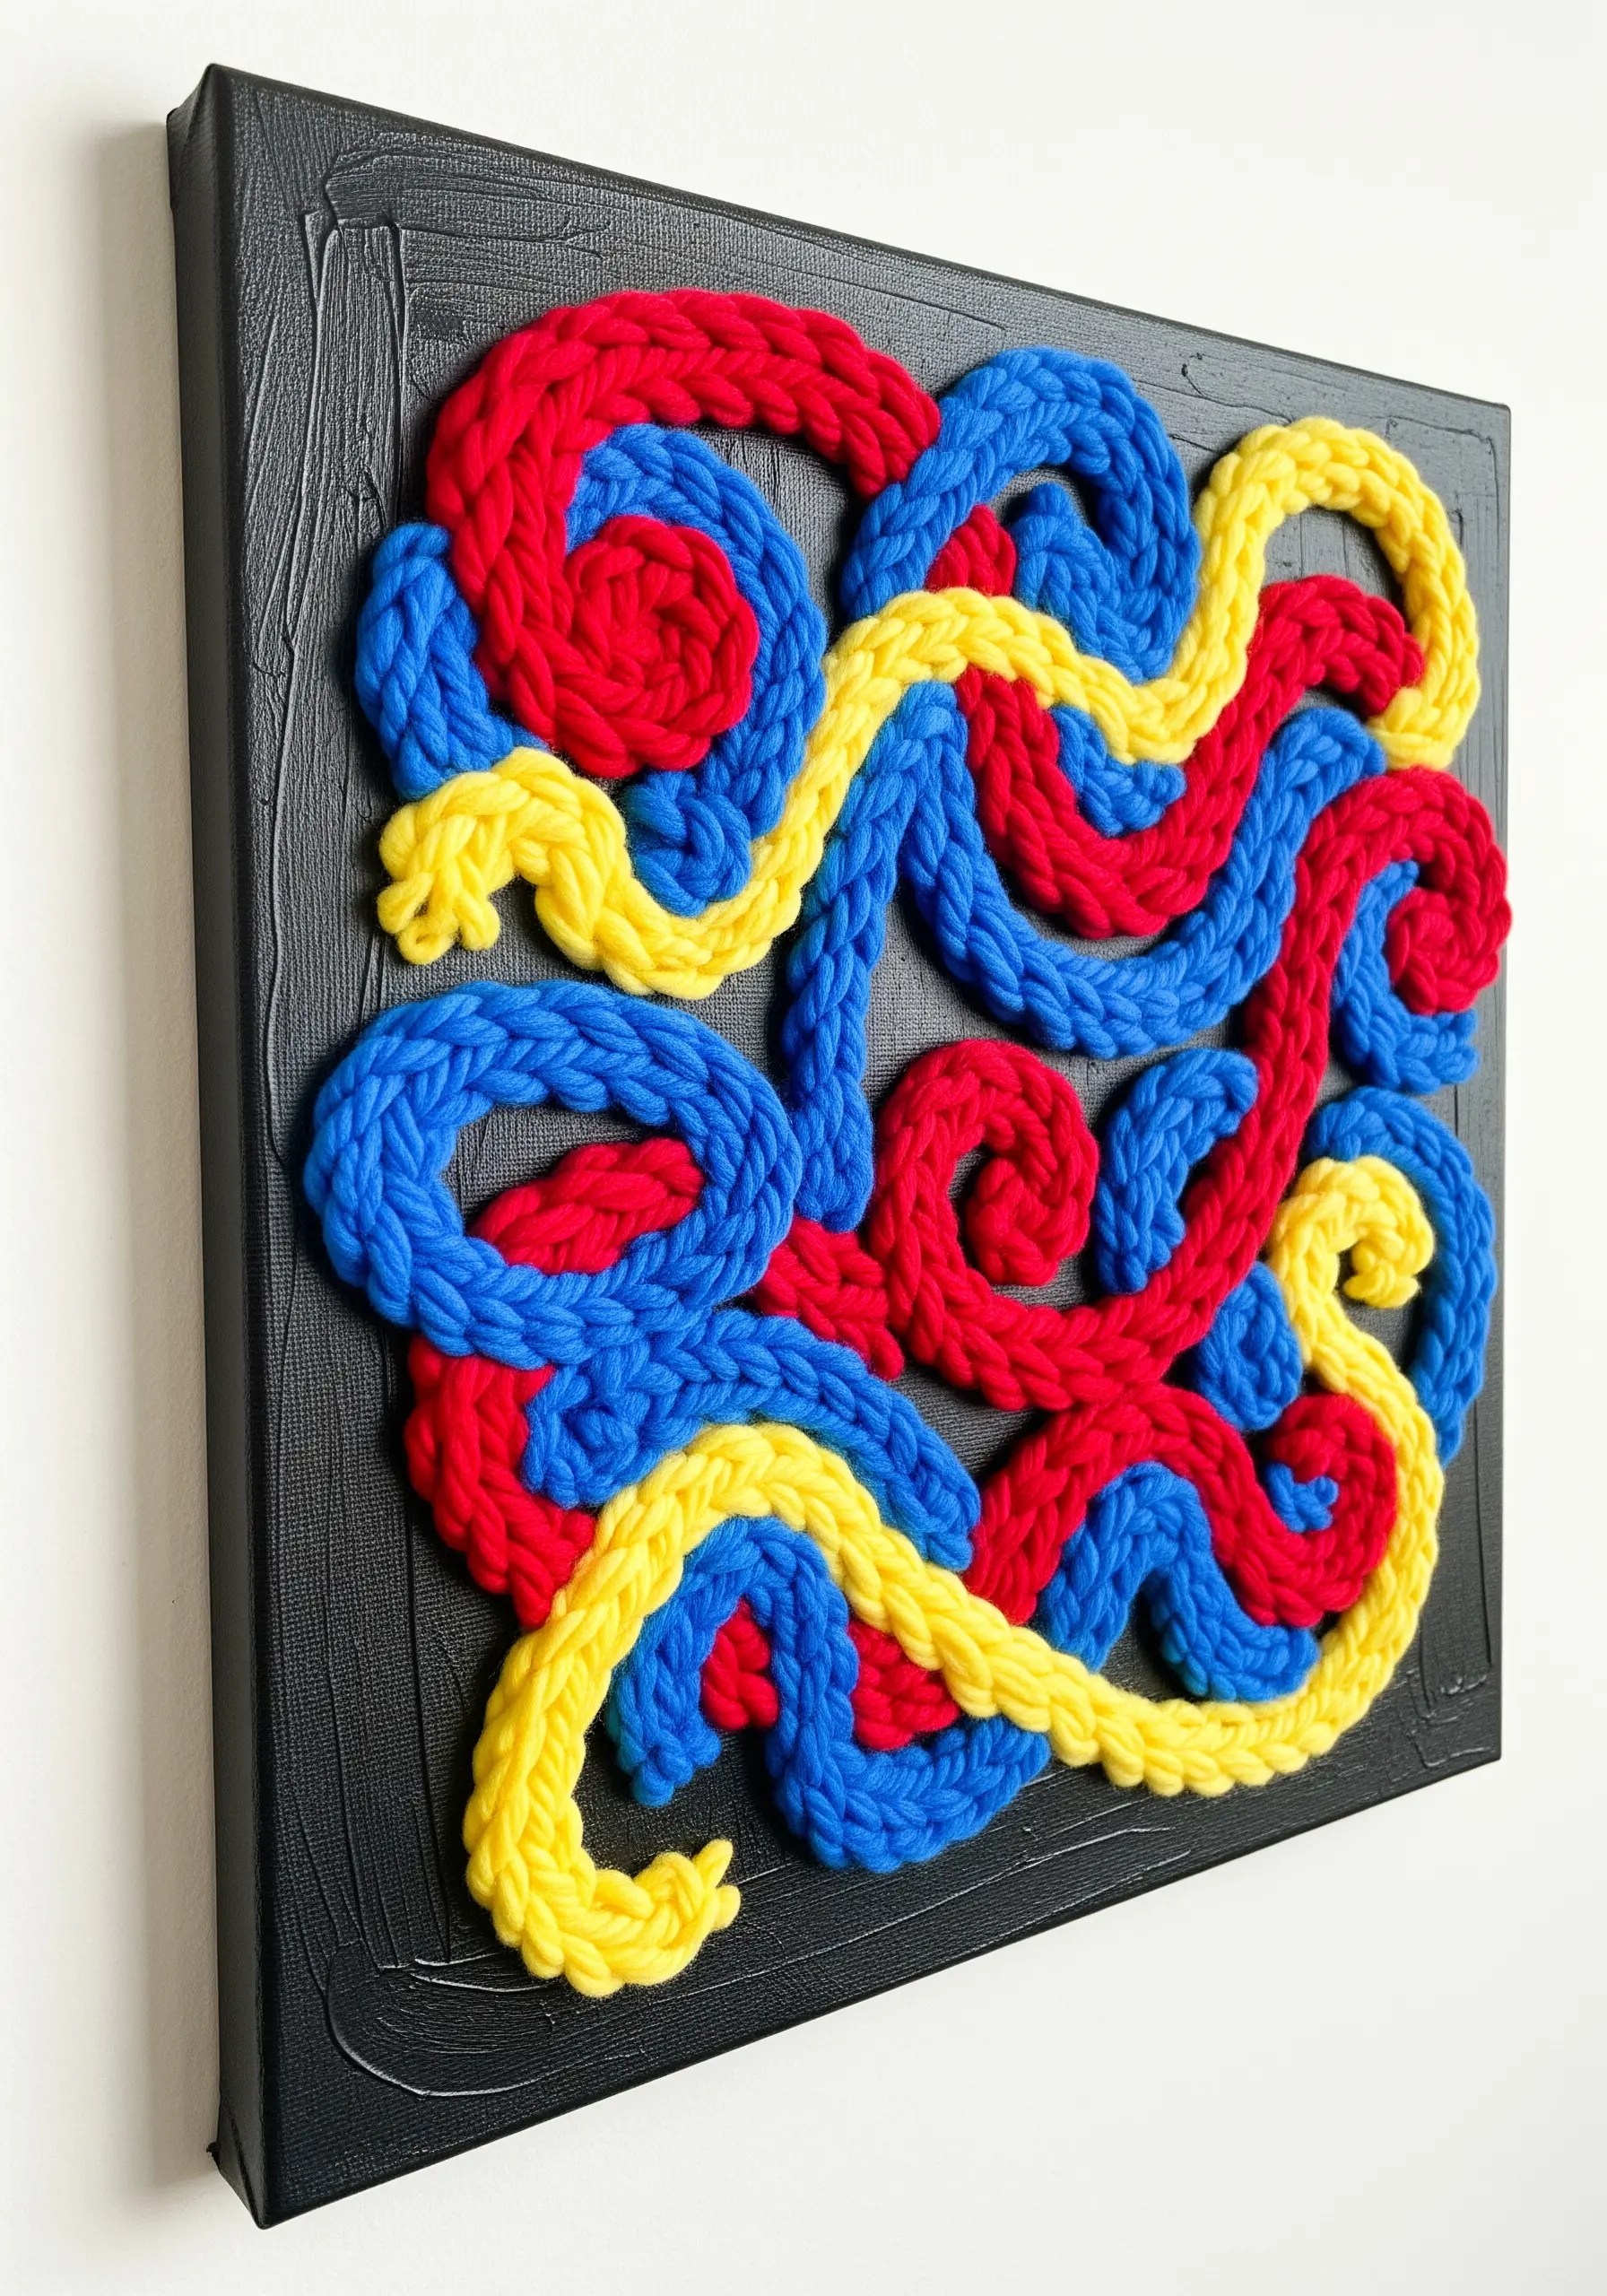
Create your ‘line’ by making long, knitted tubes of yarn—known as an I-cord—using either knitting needles or a simple hand-crank knitter.
Prepare your base by painting a canvas a solid, contrasting color; this makes the three-dimensional cords pop.
Arrange your finished I-cord in a free-form, abstract pattern, securing it to the canvas with a strong fabric glue or by tacking it down with discreet stitches from the back.
Explore more abstract thread sculpt designs that stand off the canvas like miniature art to push this technique further.
13. Integrate Weaving into Macrame for Textural Contrast
This hybrid technique, known as ‘macra-weaving,’ combines the structure of knots with the softness of woven yarn.
Begin by creating a stable header with a few rows of macrame knots, such as square knots or a clove hitch bar.
Use the long, hanging macrame cords as the warp for your loom, and weave a contrasting yarn directly through them.
The visual power comes from this juxtaposition of textures—leaving the bottom cords unwoven creates a clean, modern fringe that balances the dense top section.
14. Craft a Minimalist Tassel Wreath with Negative Space

This project proves that simplicity and repetition are powerful design tools.
The key to a refined result is creating perfectly uniform tassels; wrap your yarn around a piece of cardboard of a set width to ensure they are all identical in length.
Attach them to a simple brass or wooden hoop using a lark’s head knot for a clean finish.
The negative space of the empty hoop is a crucial part of the design, creating a sense of lightness and balance, so resist the urge to overcrowd it.
15. Construct a Wall Hanging with Finger-Knitted Braids
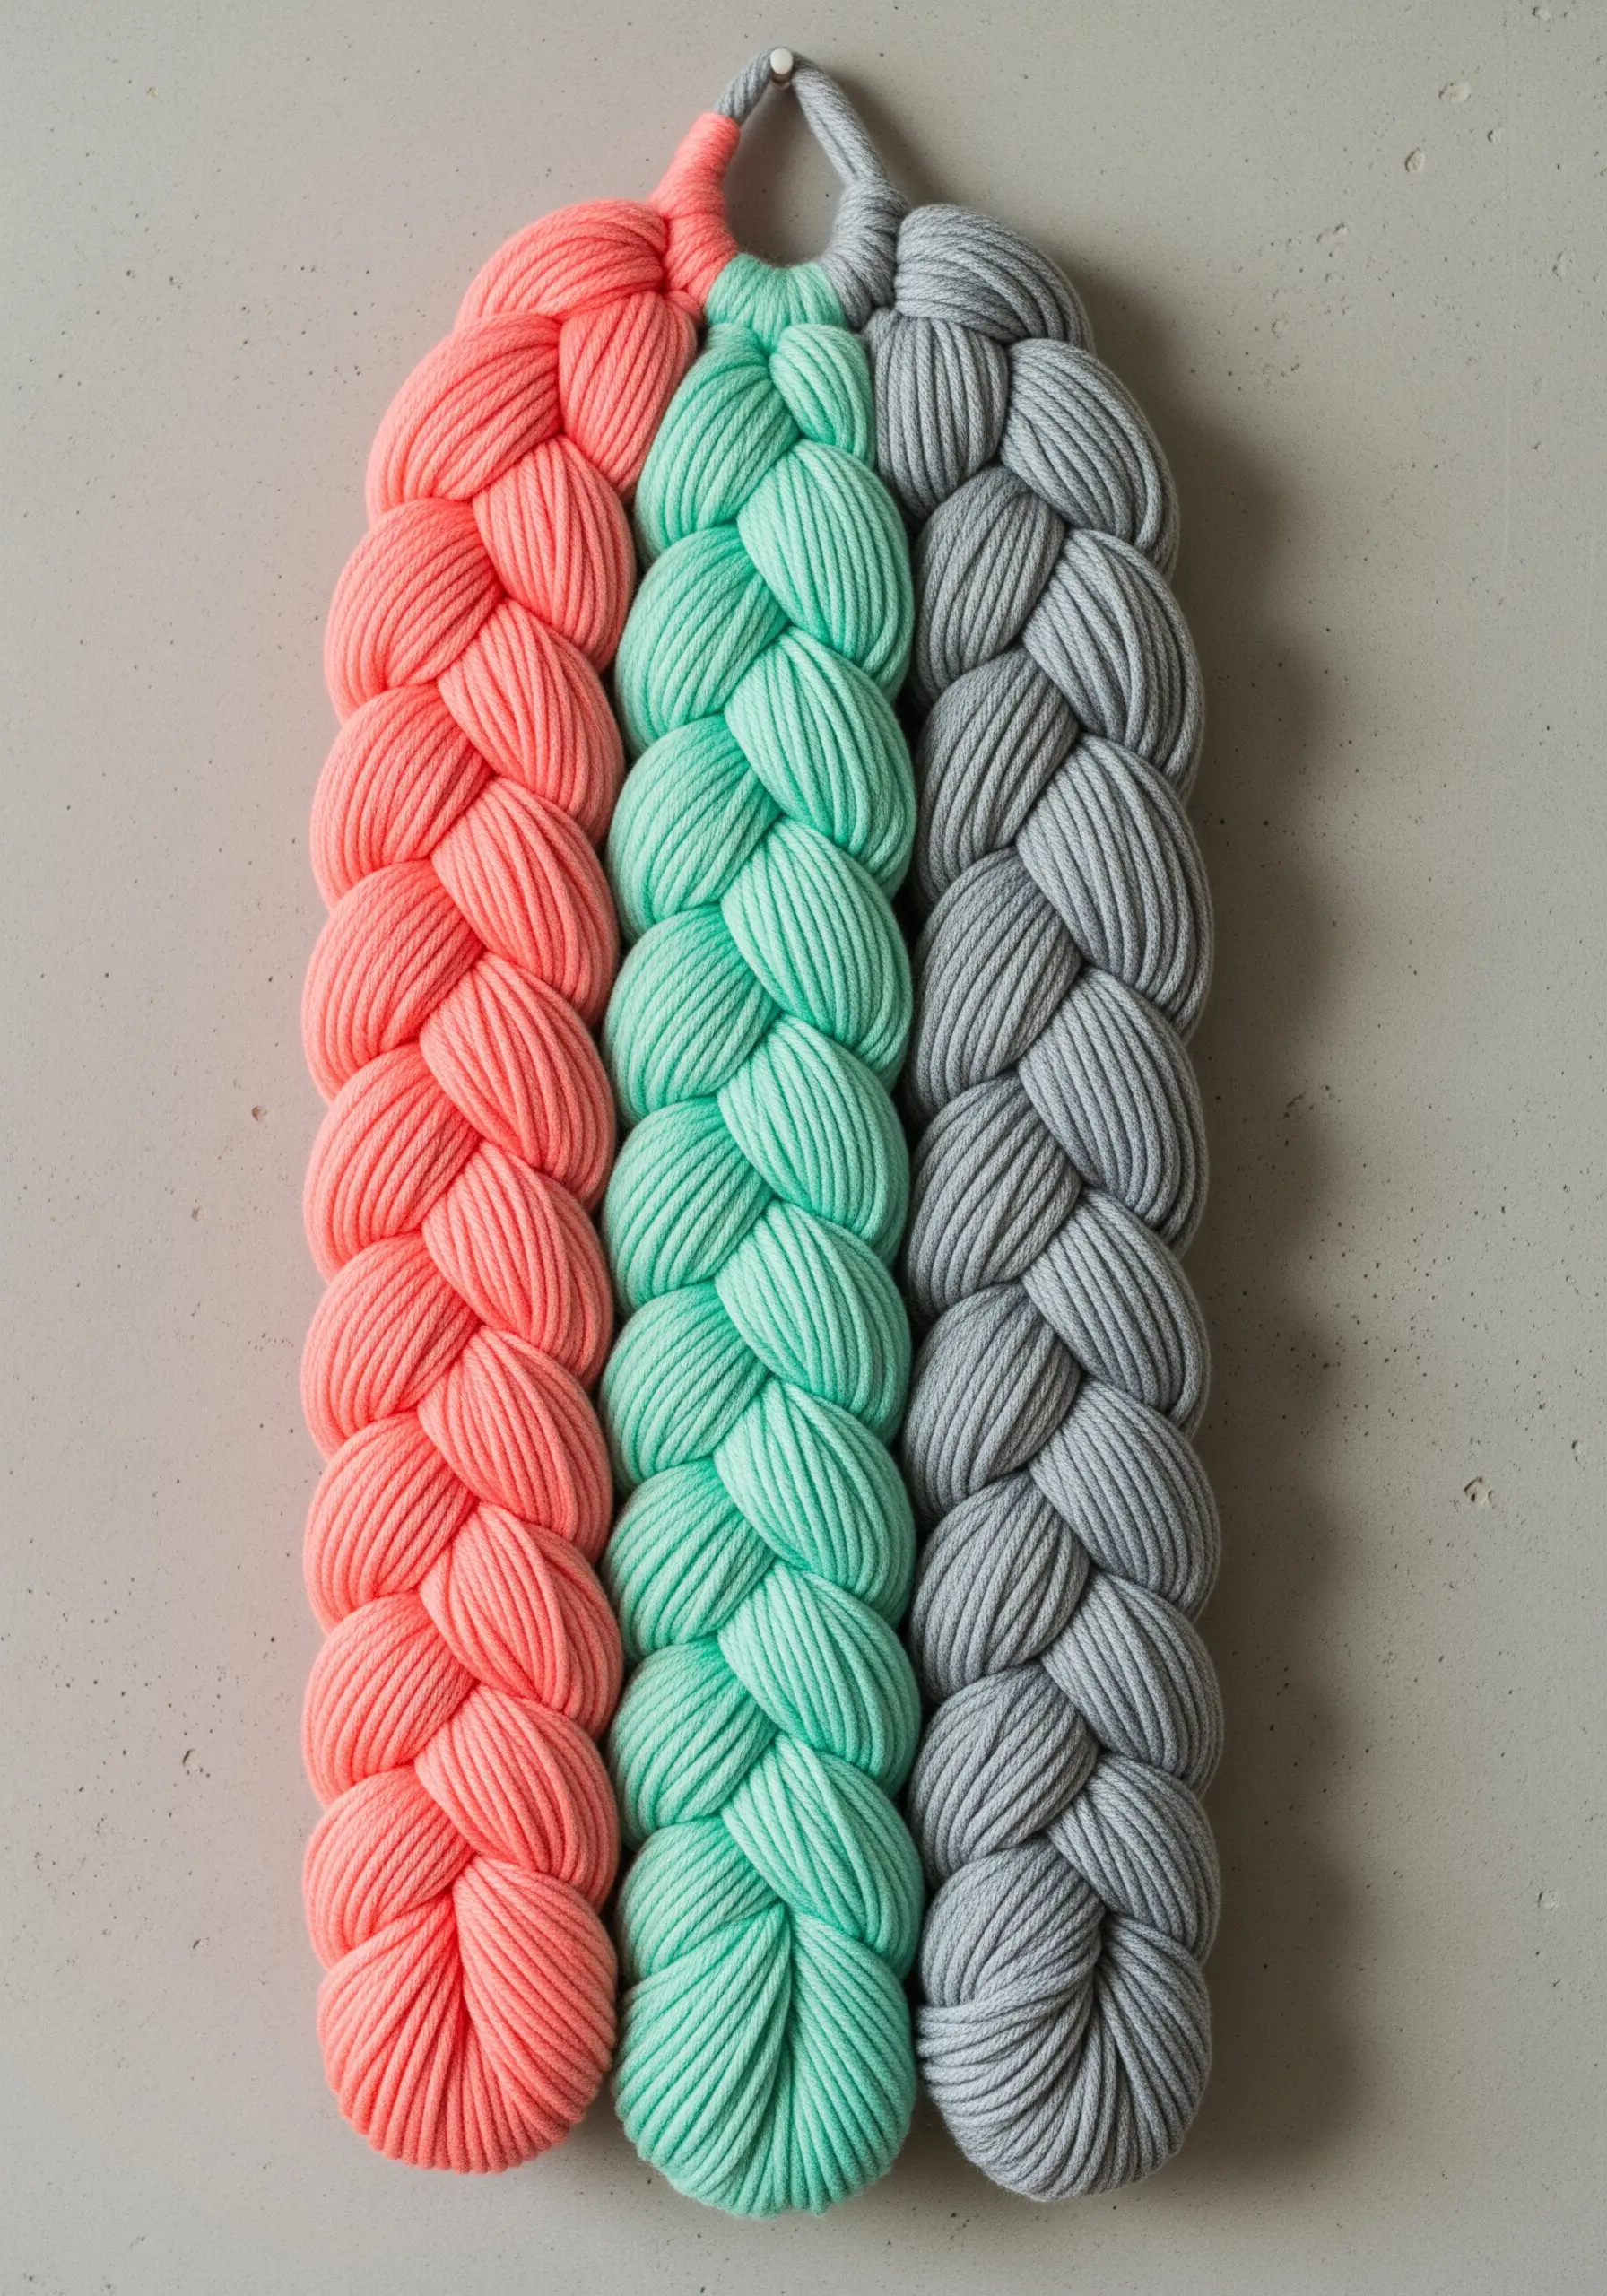
This highly tactile piece requires no tools except your hands, making it wonderfully accessible.
Use a super chunky, tubular cotton yarn, which creates substantial braids with beautiful stitch definition.
Create three long, separate braids using a finger-knitting or finger-crochet technique.
To form the final panel, simply lay the three finished braids side-by-side and discretely stitch them together along the back.
16. Create a Sculptural Crescent with Yarn Wrapping
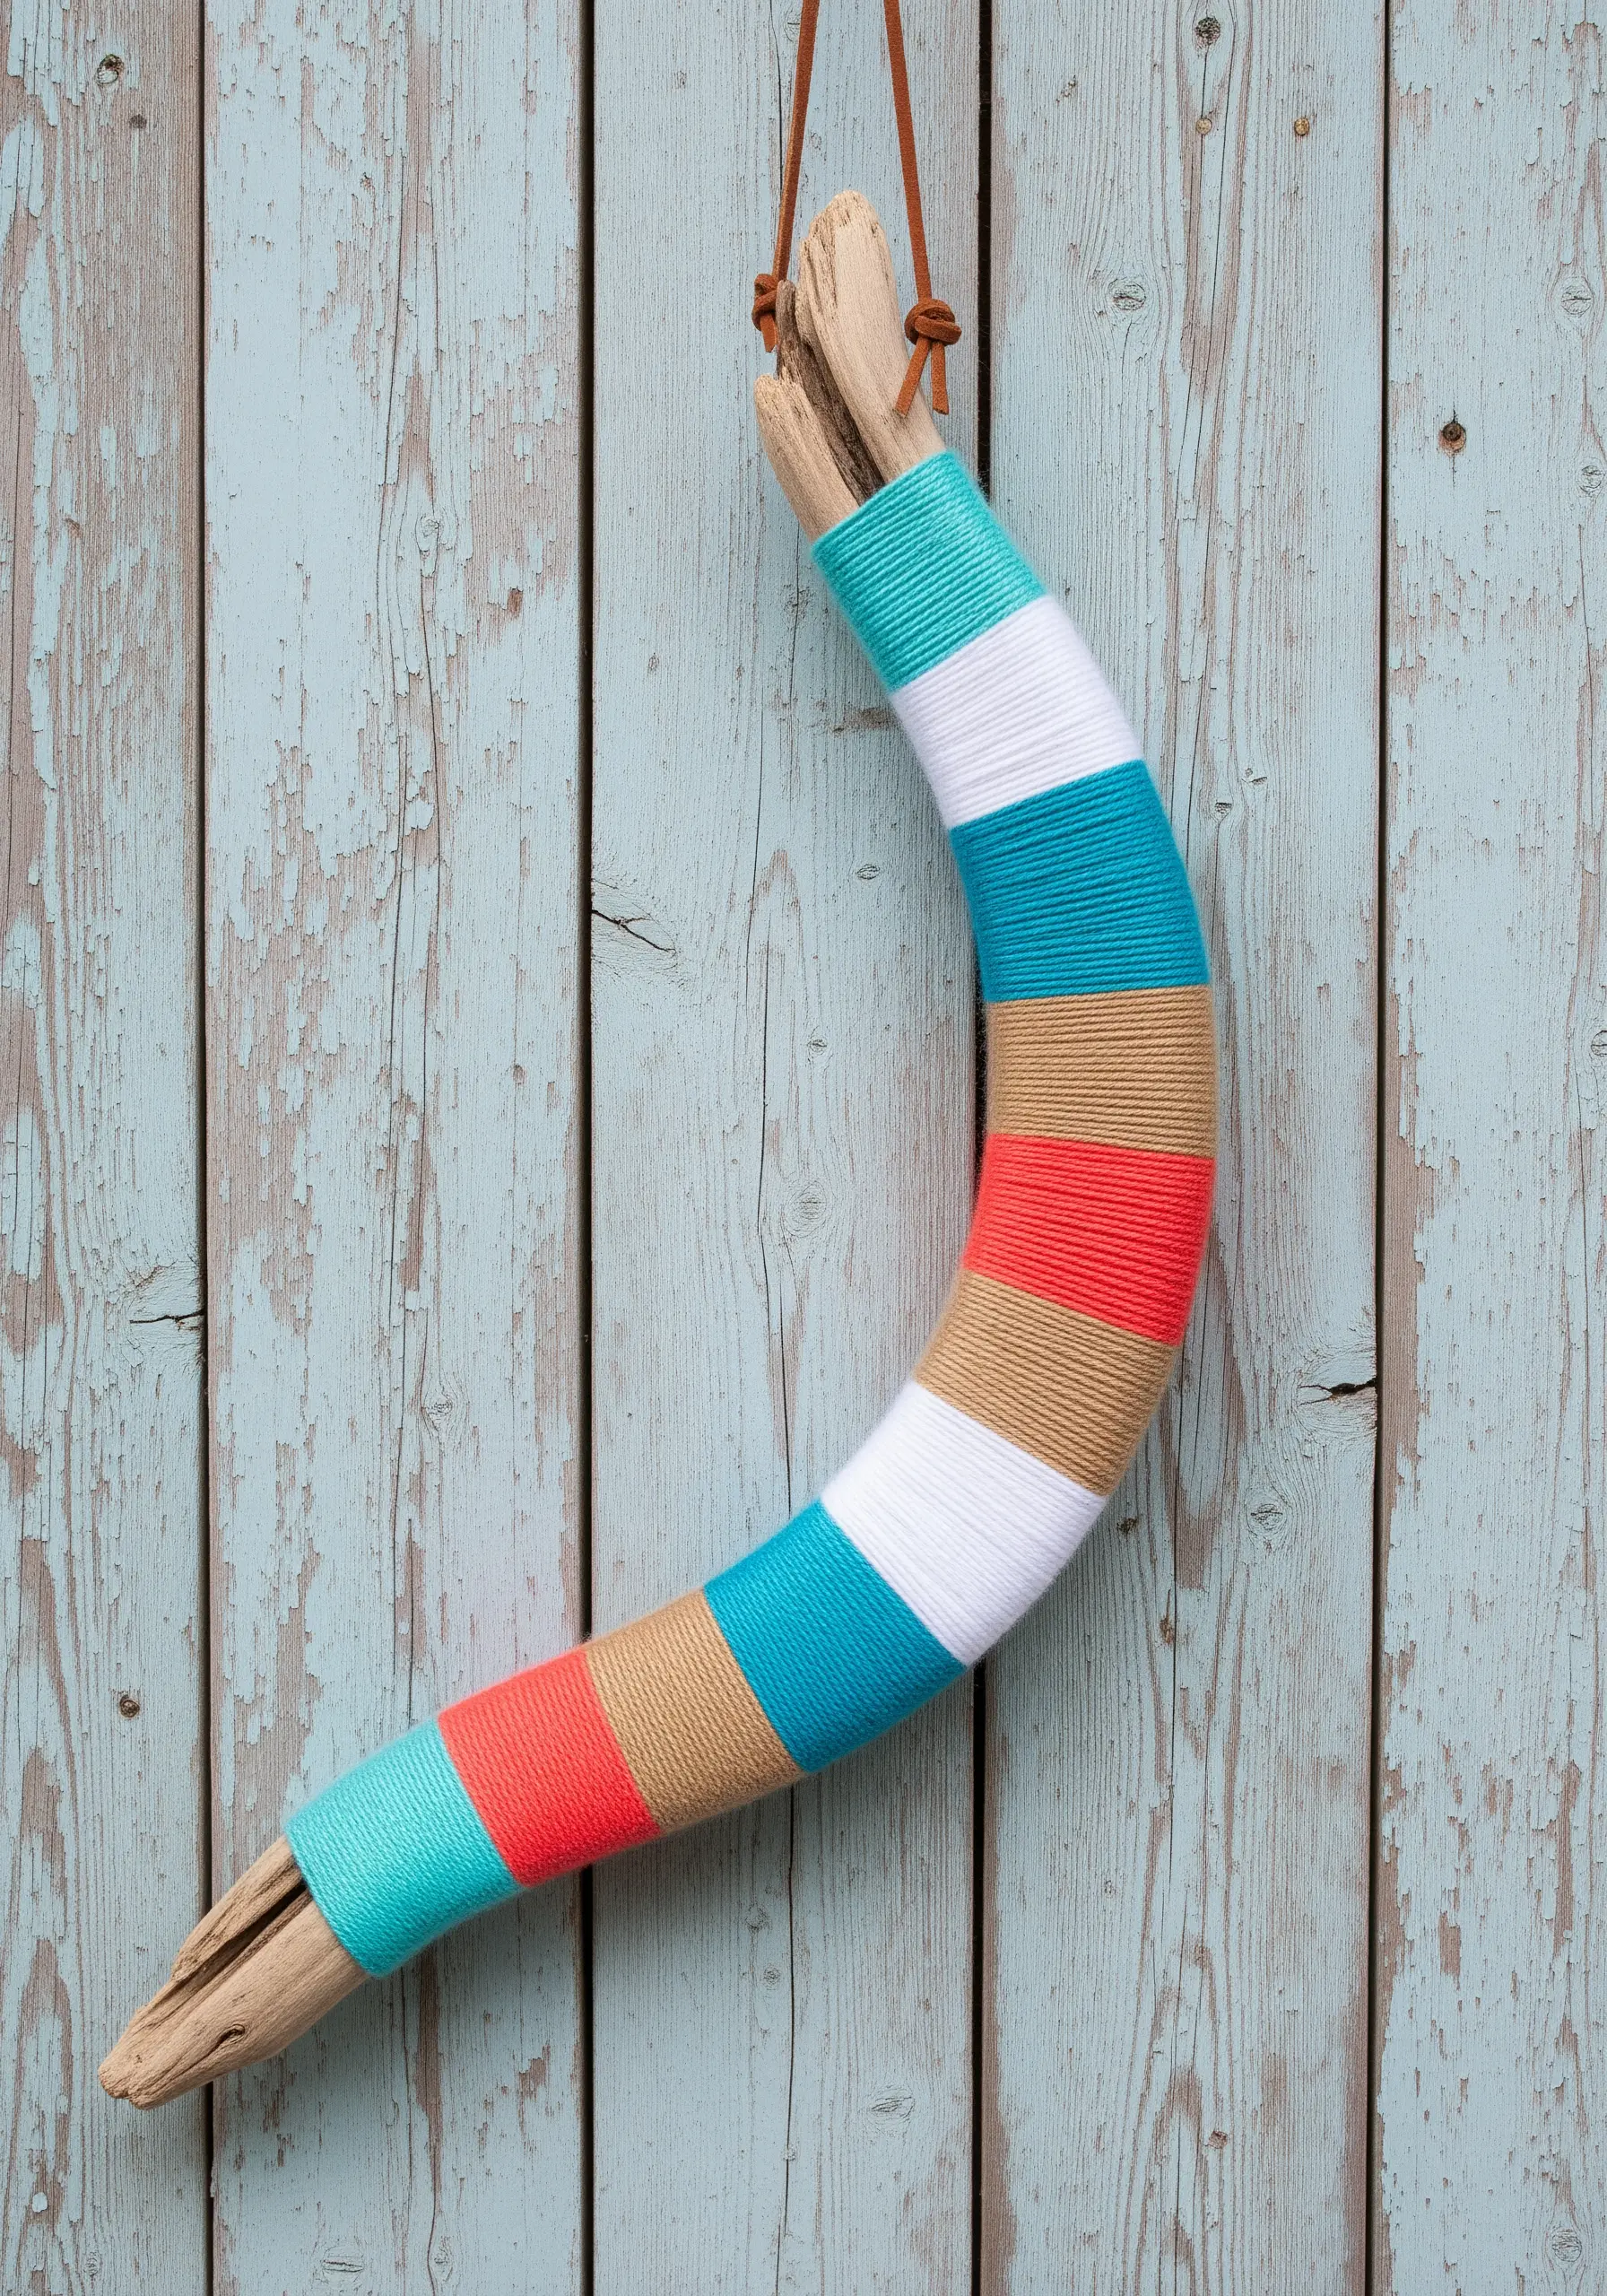
The success of this piece depends on having a strong, rigid underlying shape to wrap your yarn around.
You can create the crescent form yourself using thick wire, or purchase a pre-made metal wreath frame.
Wrap the yarn tightly and neatly, ensuring no gaps, and use a small piece of tape on the back to secure yarn ends when changing colors for a seamless finish.
Mounting the finished piece on driftwood introduces a natural, organic element that contrasts beautifully with the smooth yarn, perfect for coastal ocean-inspired string art ideas.
17. Paint with Color-Blocked Rya Knots
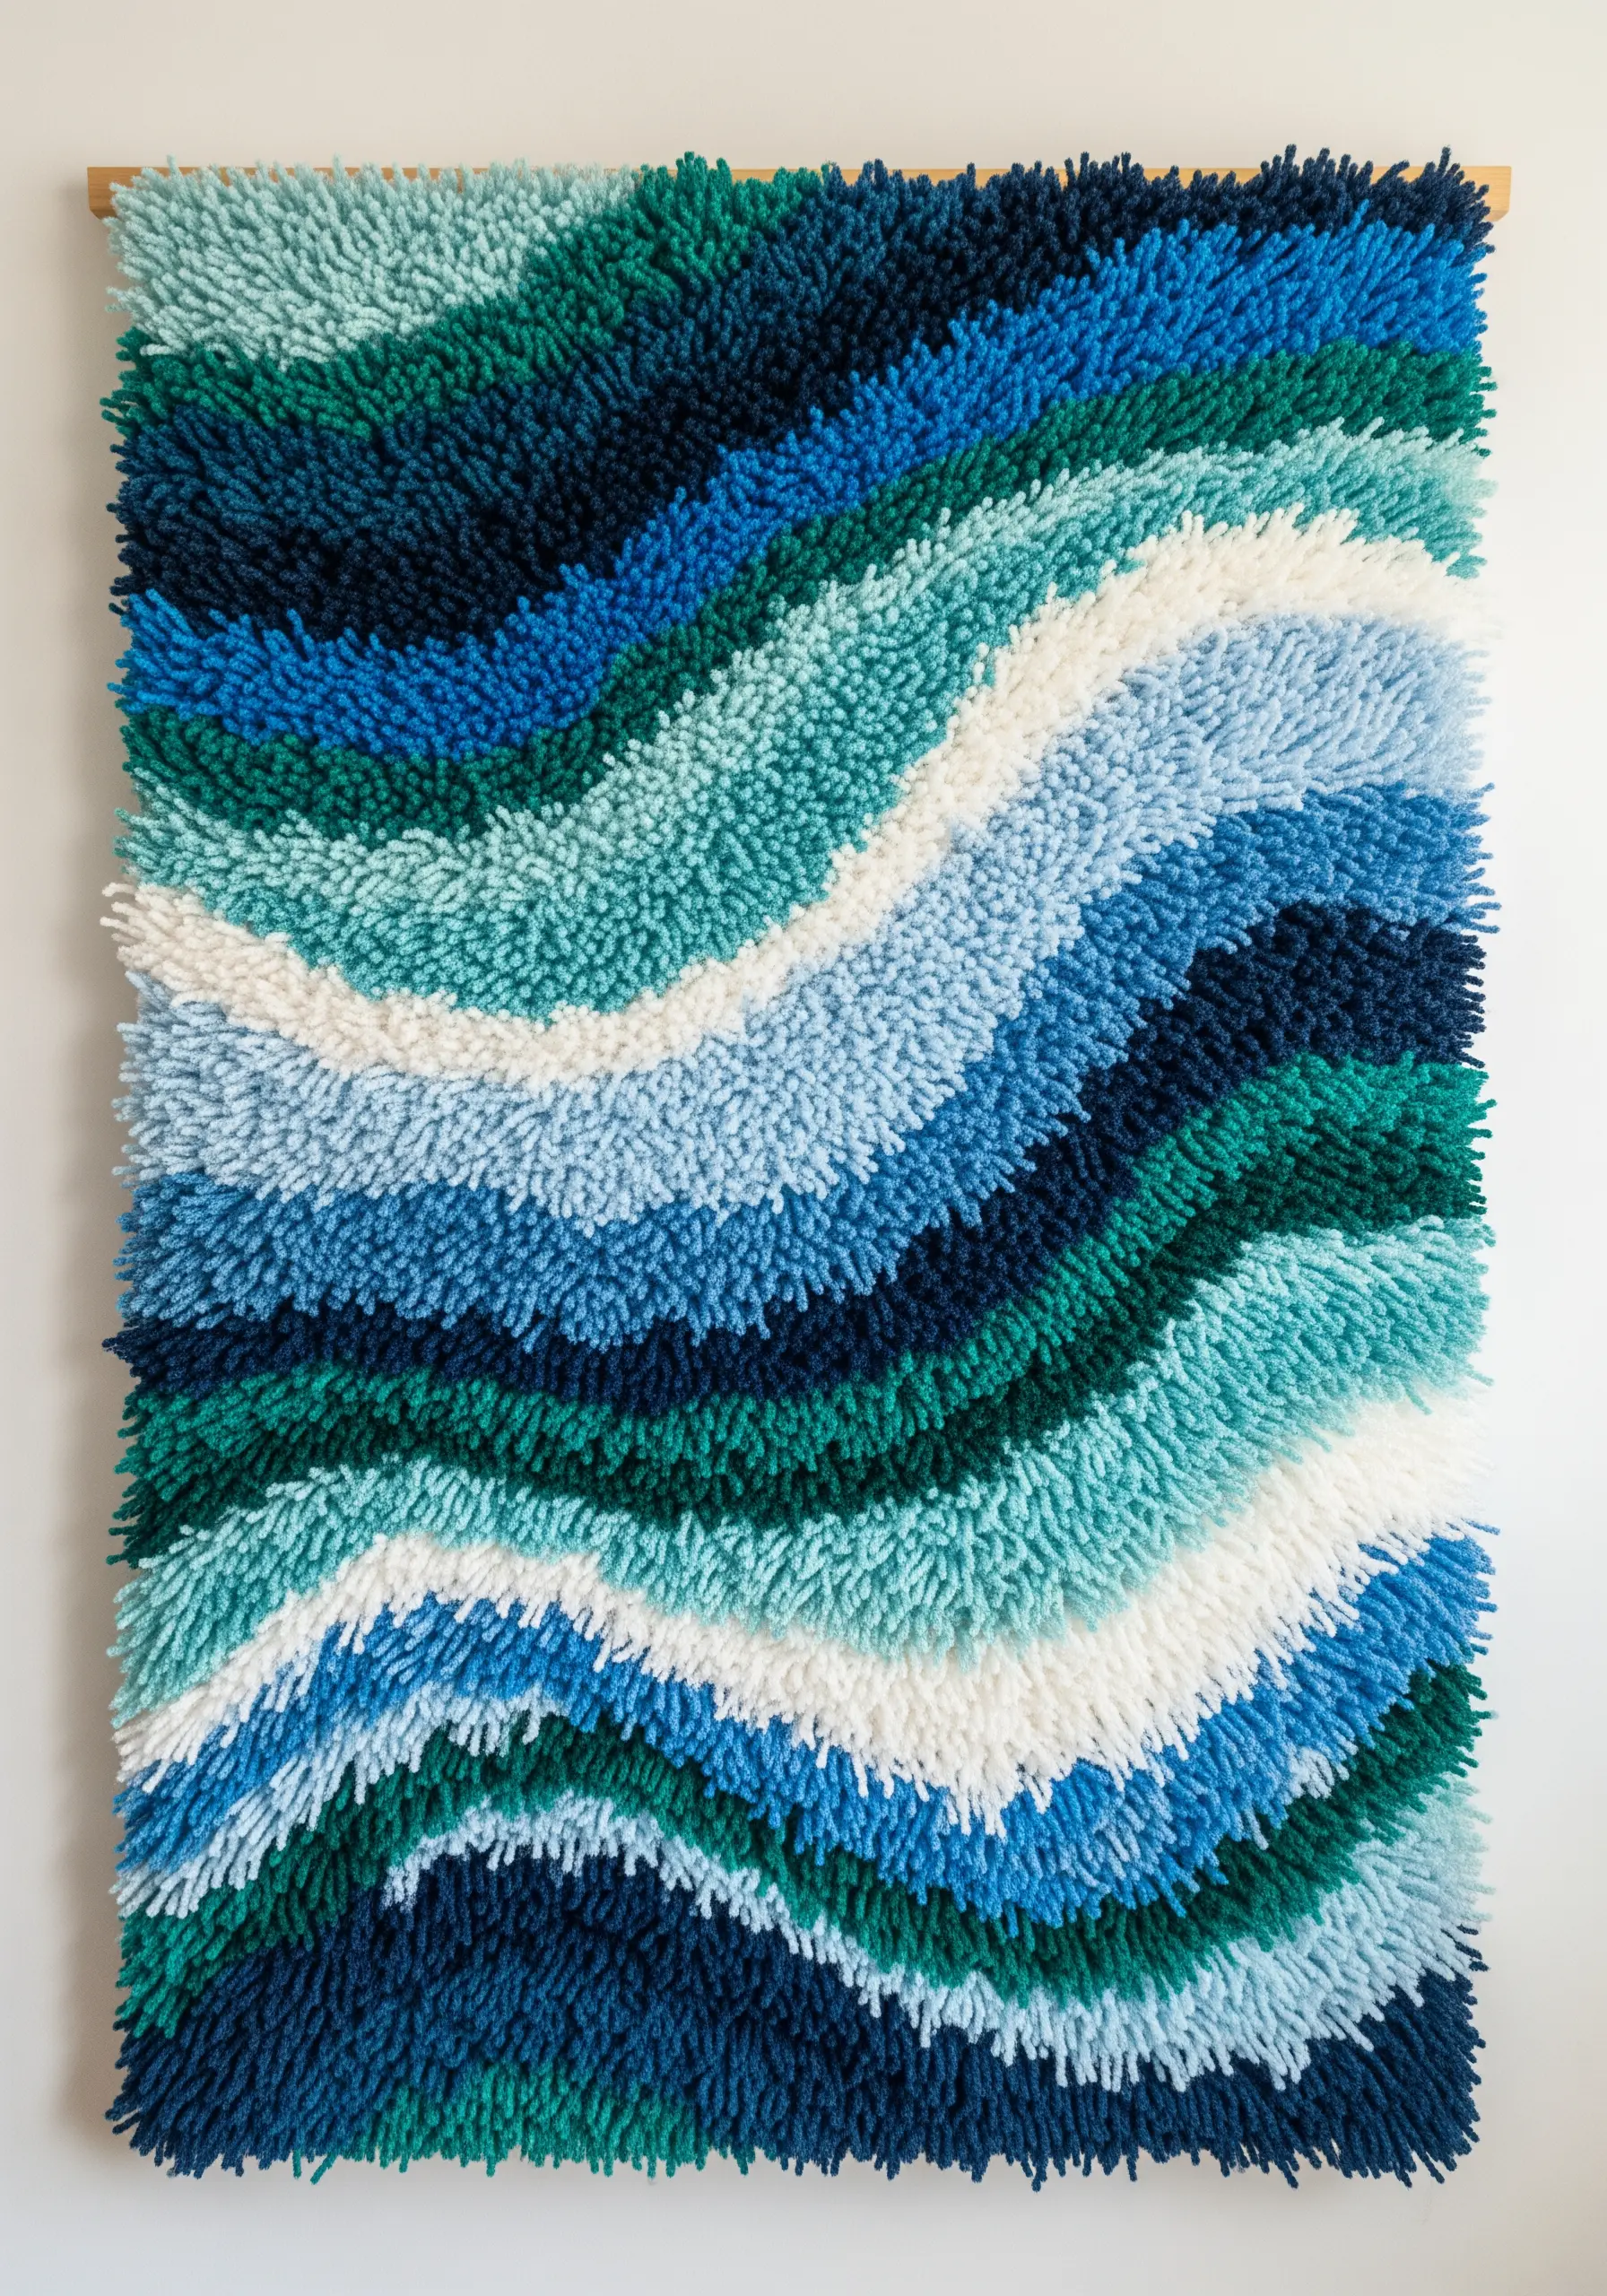
This incredibly dense and plush texture is created with Rya knots, a traditional Scandinavian rug-making technique.
You tie short, pre-cut lengths of yarn directly onto the vertical warp threads of a simple frame loom.
The organic, wavy lines are not accidental; they are achieved by mindfully changing your yarn color as you work across each row, essentially ‘painting’ with bundles of yarn.
Once complete, give the entire piece a light trim with sharp scissors to even out the pile and enhance the crispness of your color-blocked design.
18. Explore Linear Geometry with String Art
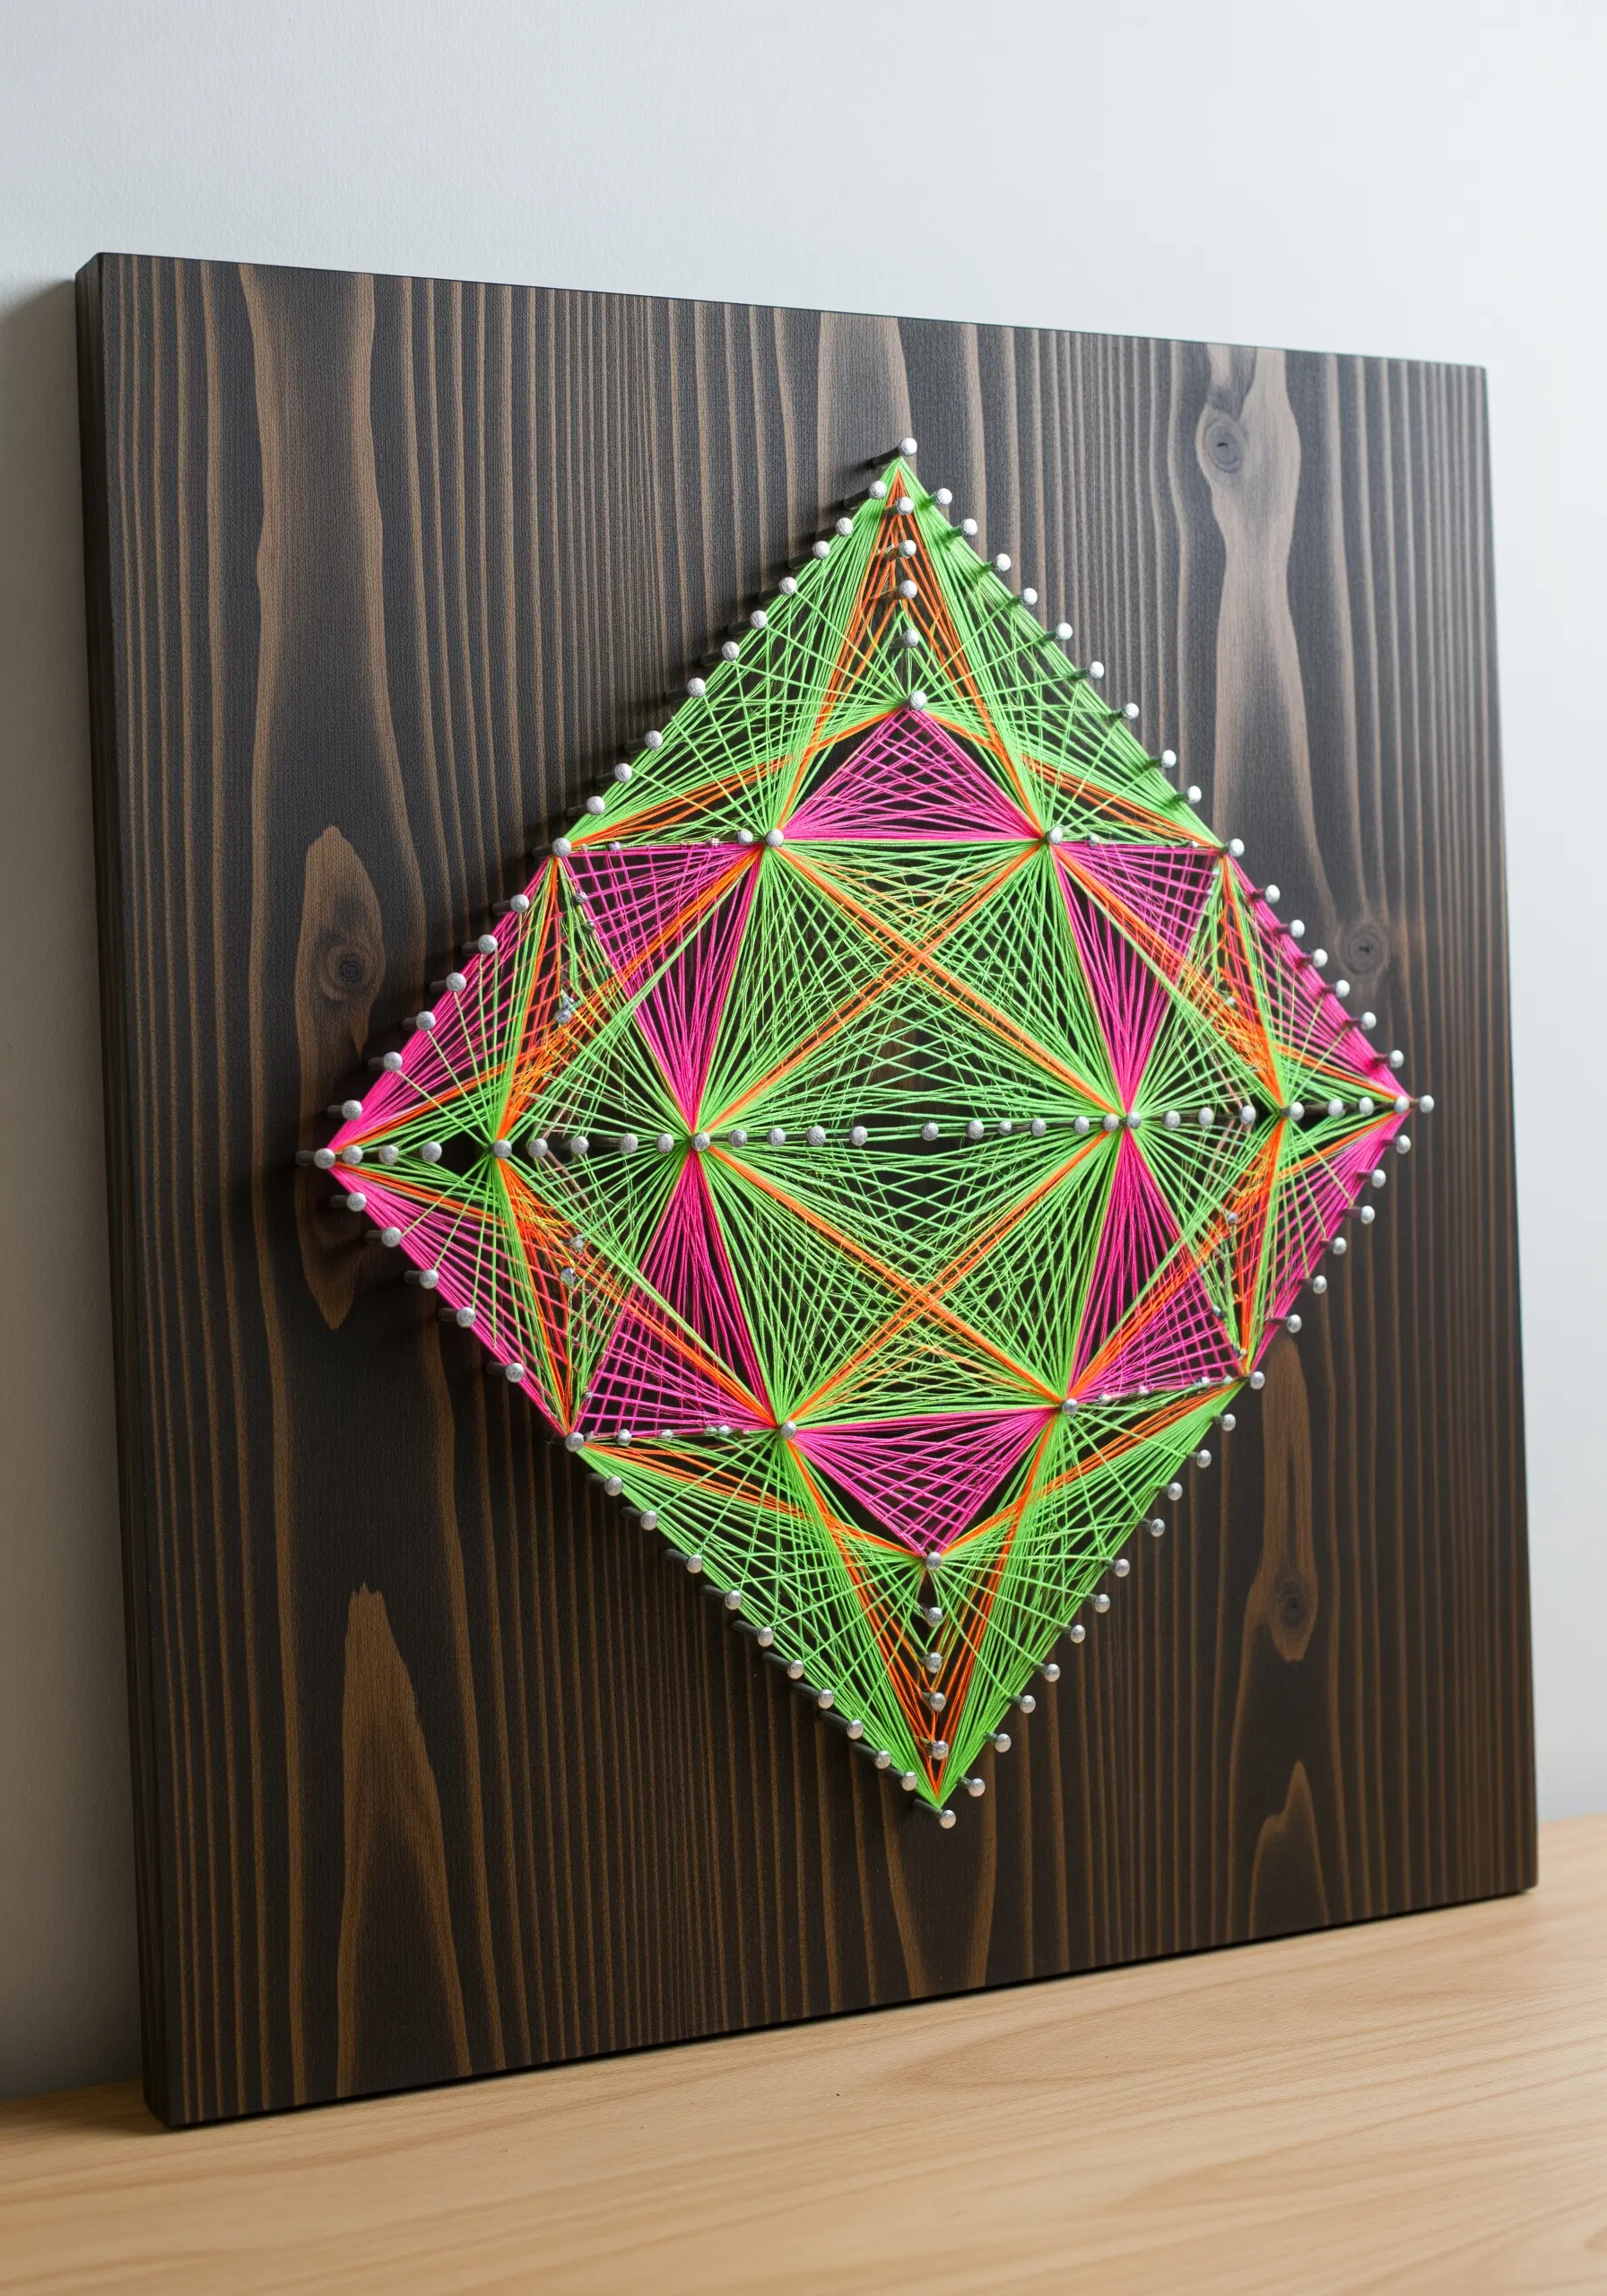
String art is a magical technique that transforms a simple grid of nails into a design of mesmerizing complexity.
Begin with a stained or painted wooden board for a polished backdrop, then hammer in small nails according to a precise, pre-drawn pattern.
Then, stretch thin, brightly colored string or embroidery floss between the nails, following a set sequence.
The optical effects emerge as the lines cross and overlap, creating new shapes and the illusion of curves from straight lines.
19. Construct a Hanging with Macrame Chain Links
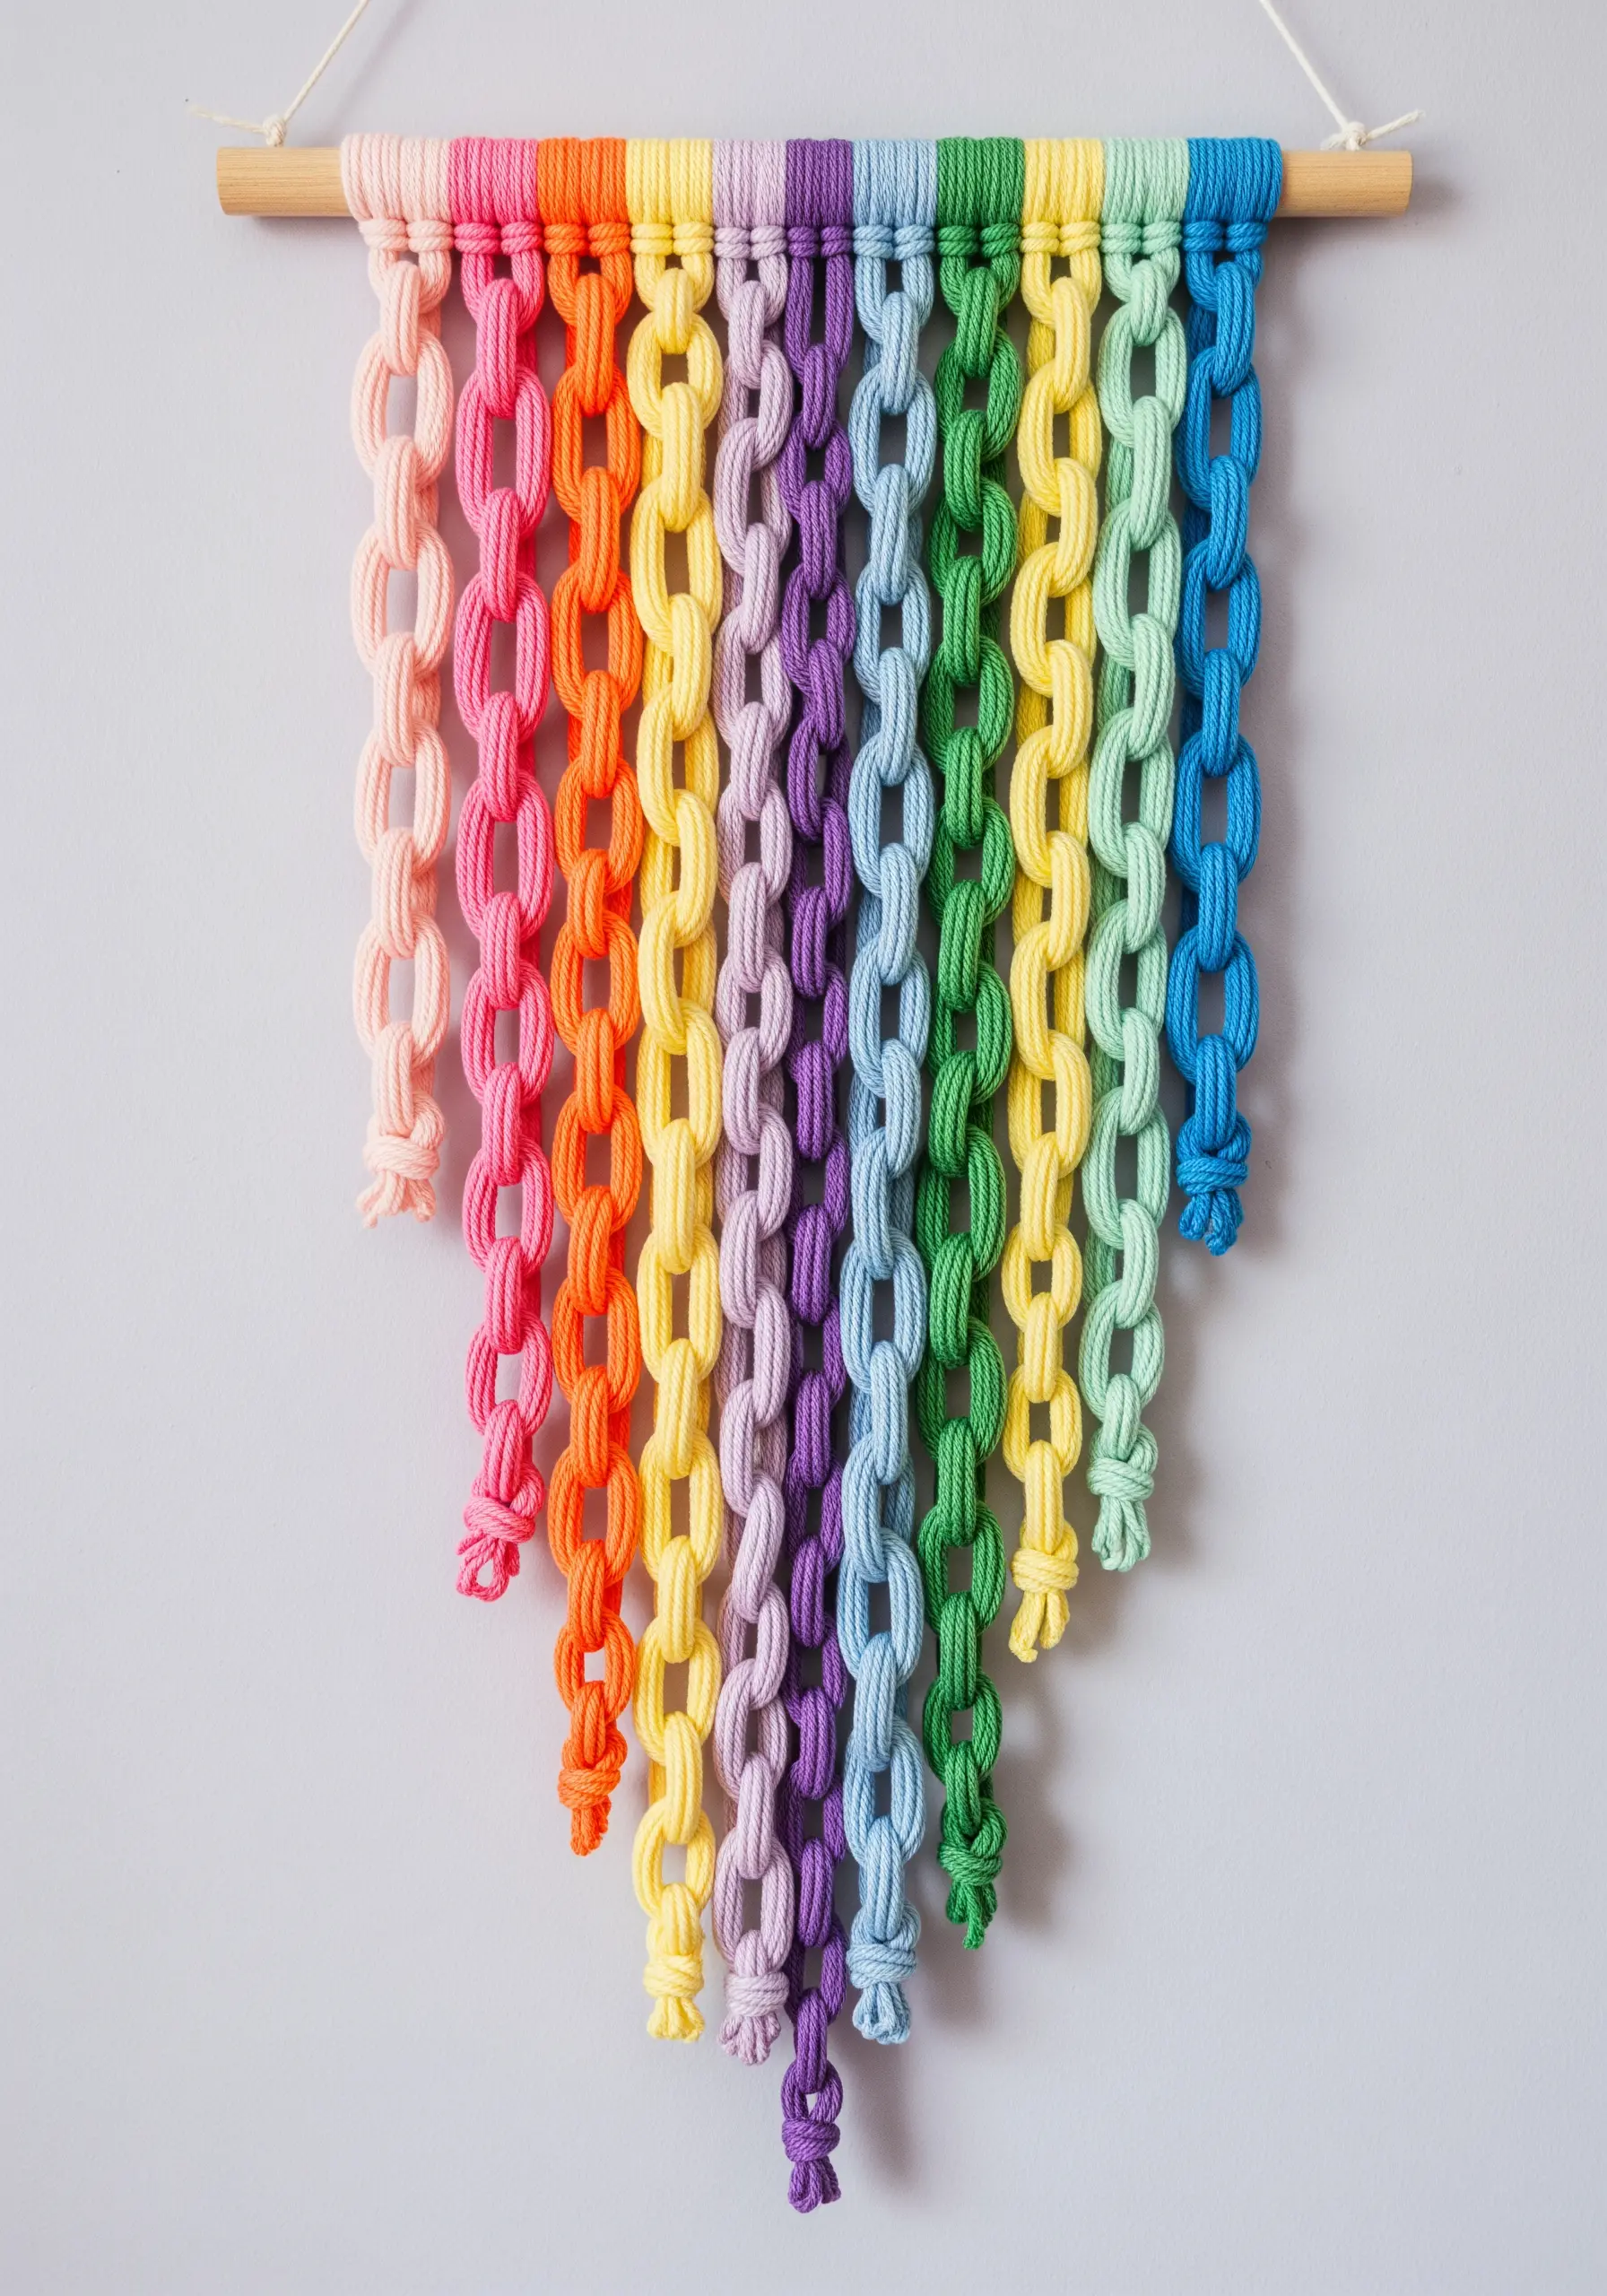
This playful design deconstructs macrame into its simplest element: the chain.
Each vertical ‘chain’ is made separately using a continuous half-knot sinnet, a simple knot that naturally creates a spiral.
Once you have created all of your individual color chains, link them through each other at the very top before mounting them on the dowel.
This method of construction gives the final piece an incredible sense of movement and a light, airy quality.
20. Achieve a Painterly Effect with a Thread Gradient
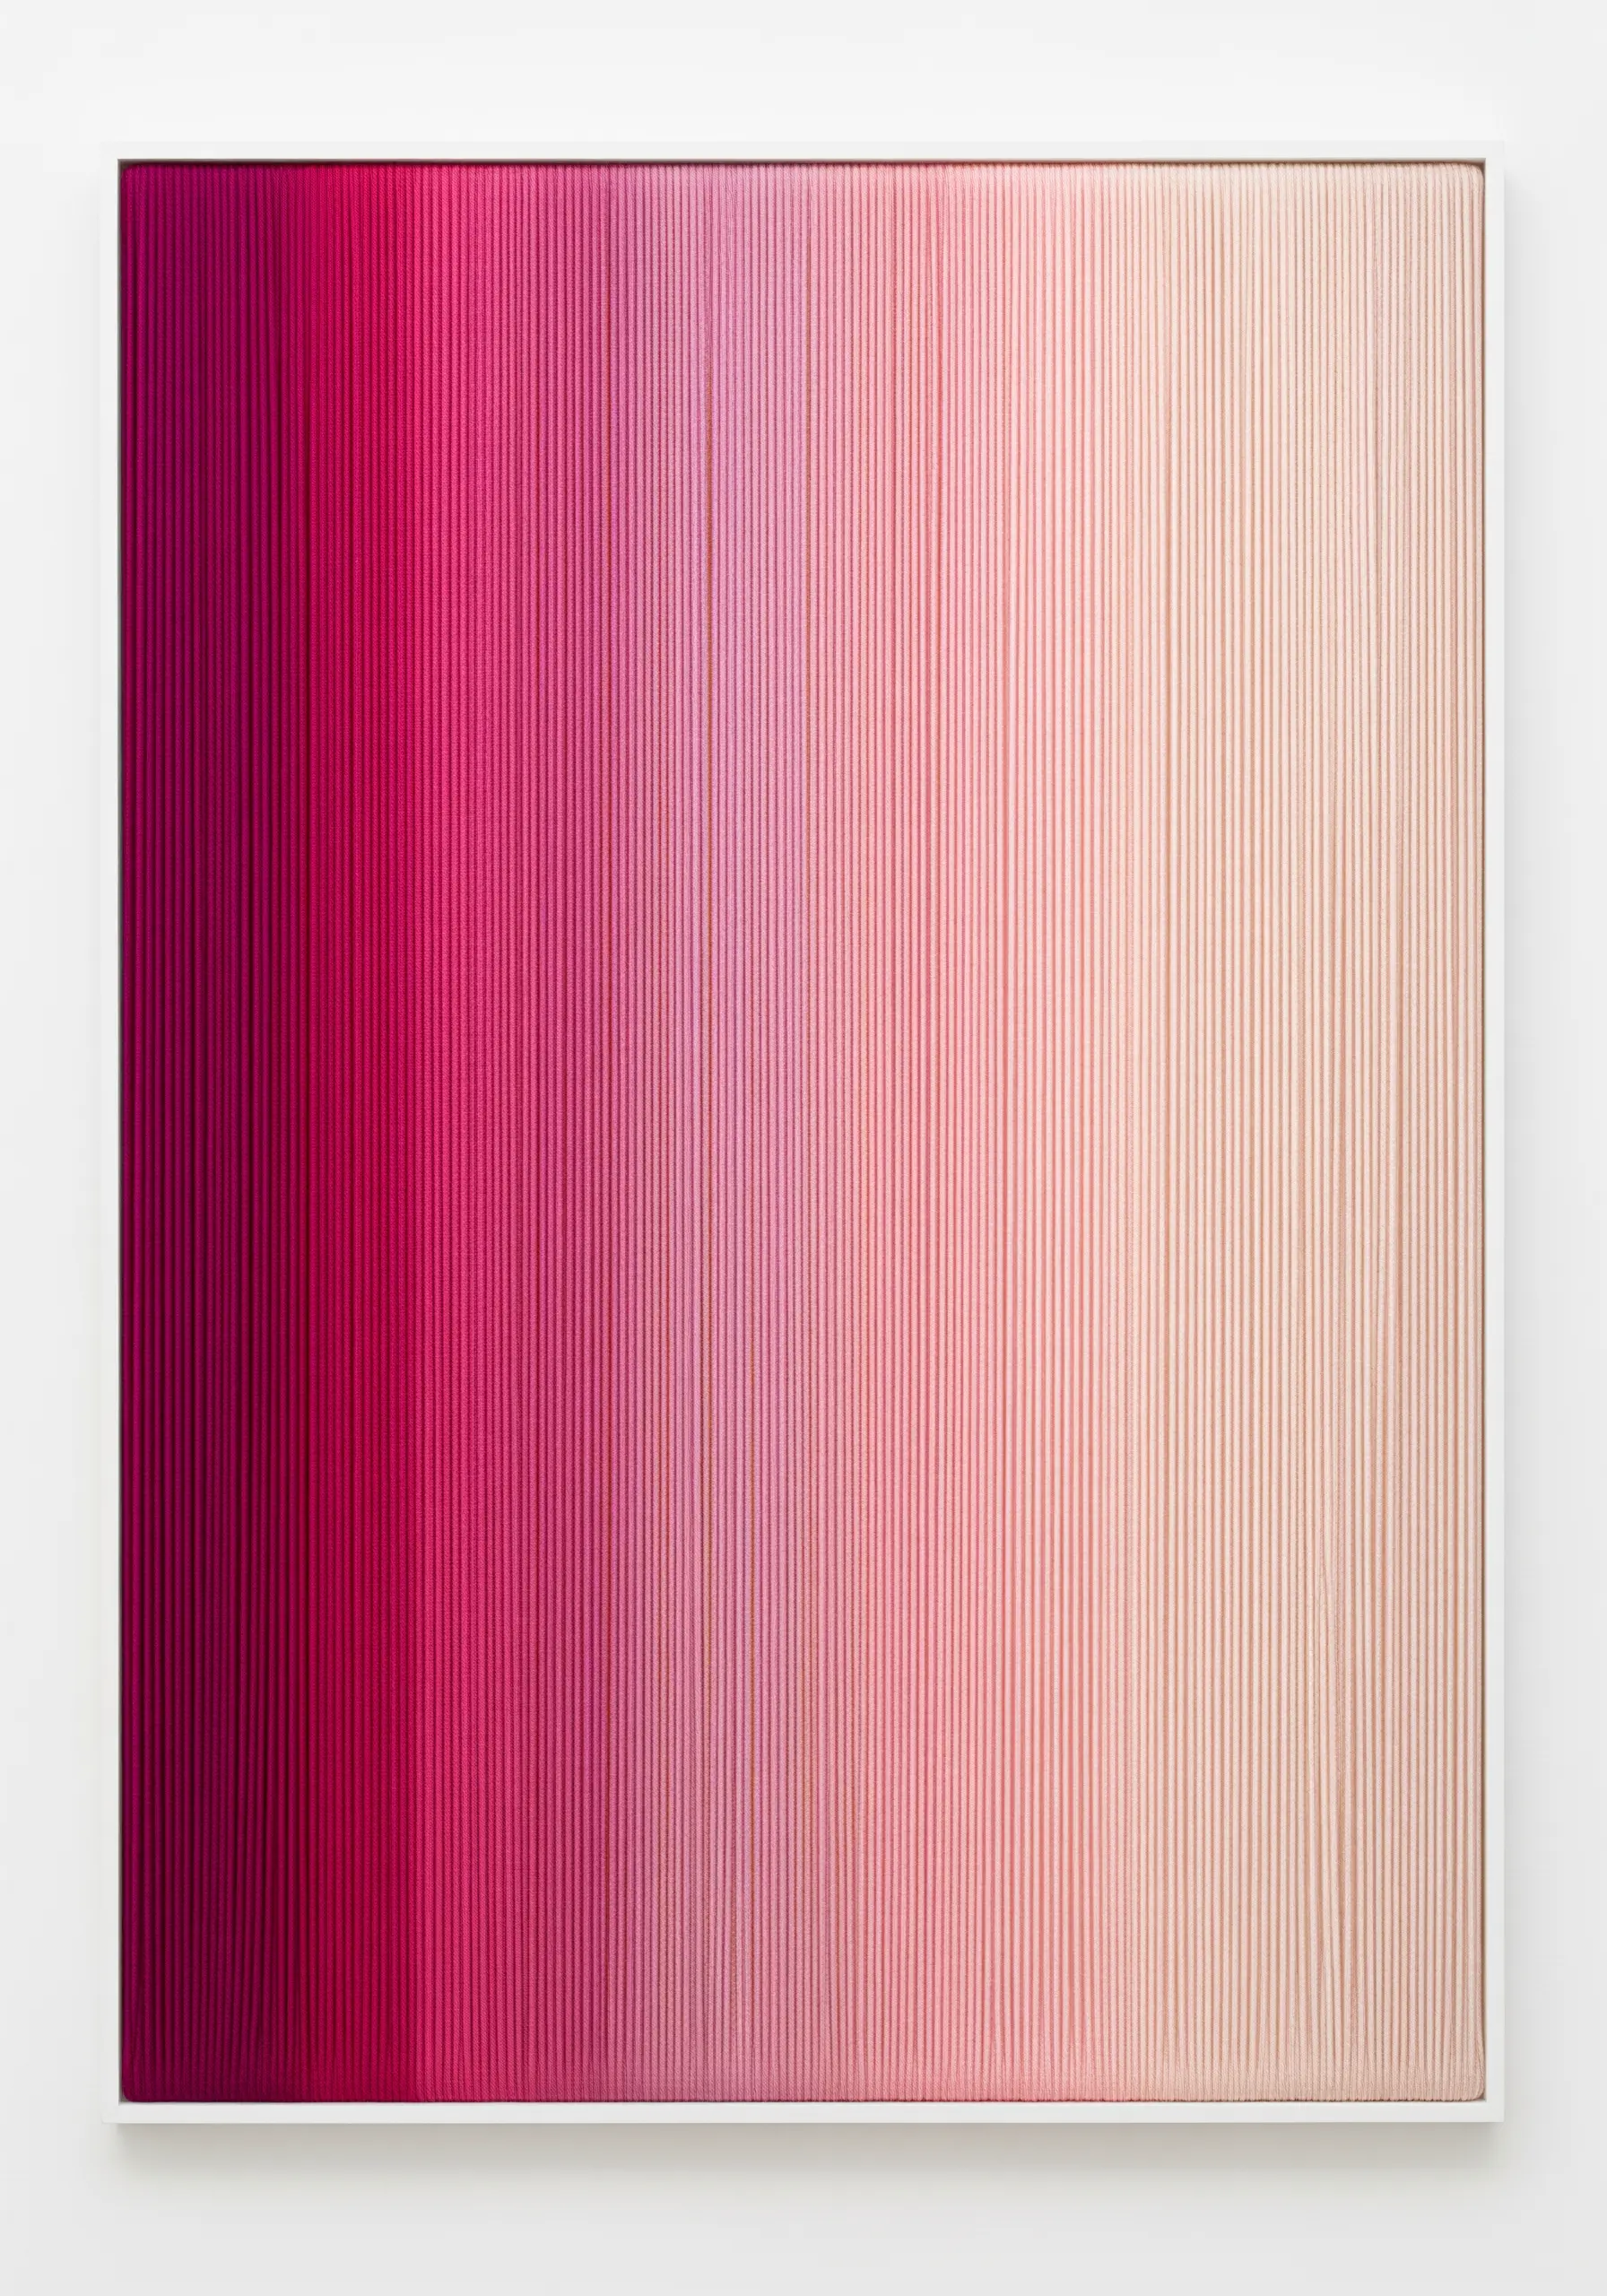
This sophisticated piece uses the subtle, systematic shift of color to create a profound visual impact.
The technique involves wrapping a single, continuous thread around a frame that has tiny, evenly spaced notches or pins at the top and bottom.
The smooth gradient is not an illusion; it is created by meticulously arranging dozens of shades of a single color family, from darkest to lightest.
The individual threads blend from a distance, creating a luminous surface that feels more like a painting, a perfect example of abstract color blend stitch ideas.
21. Weave a Cohesive Series of Graphic Mini-Banners
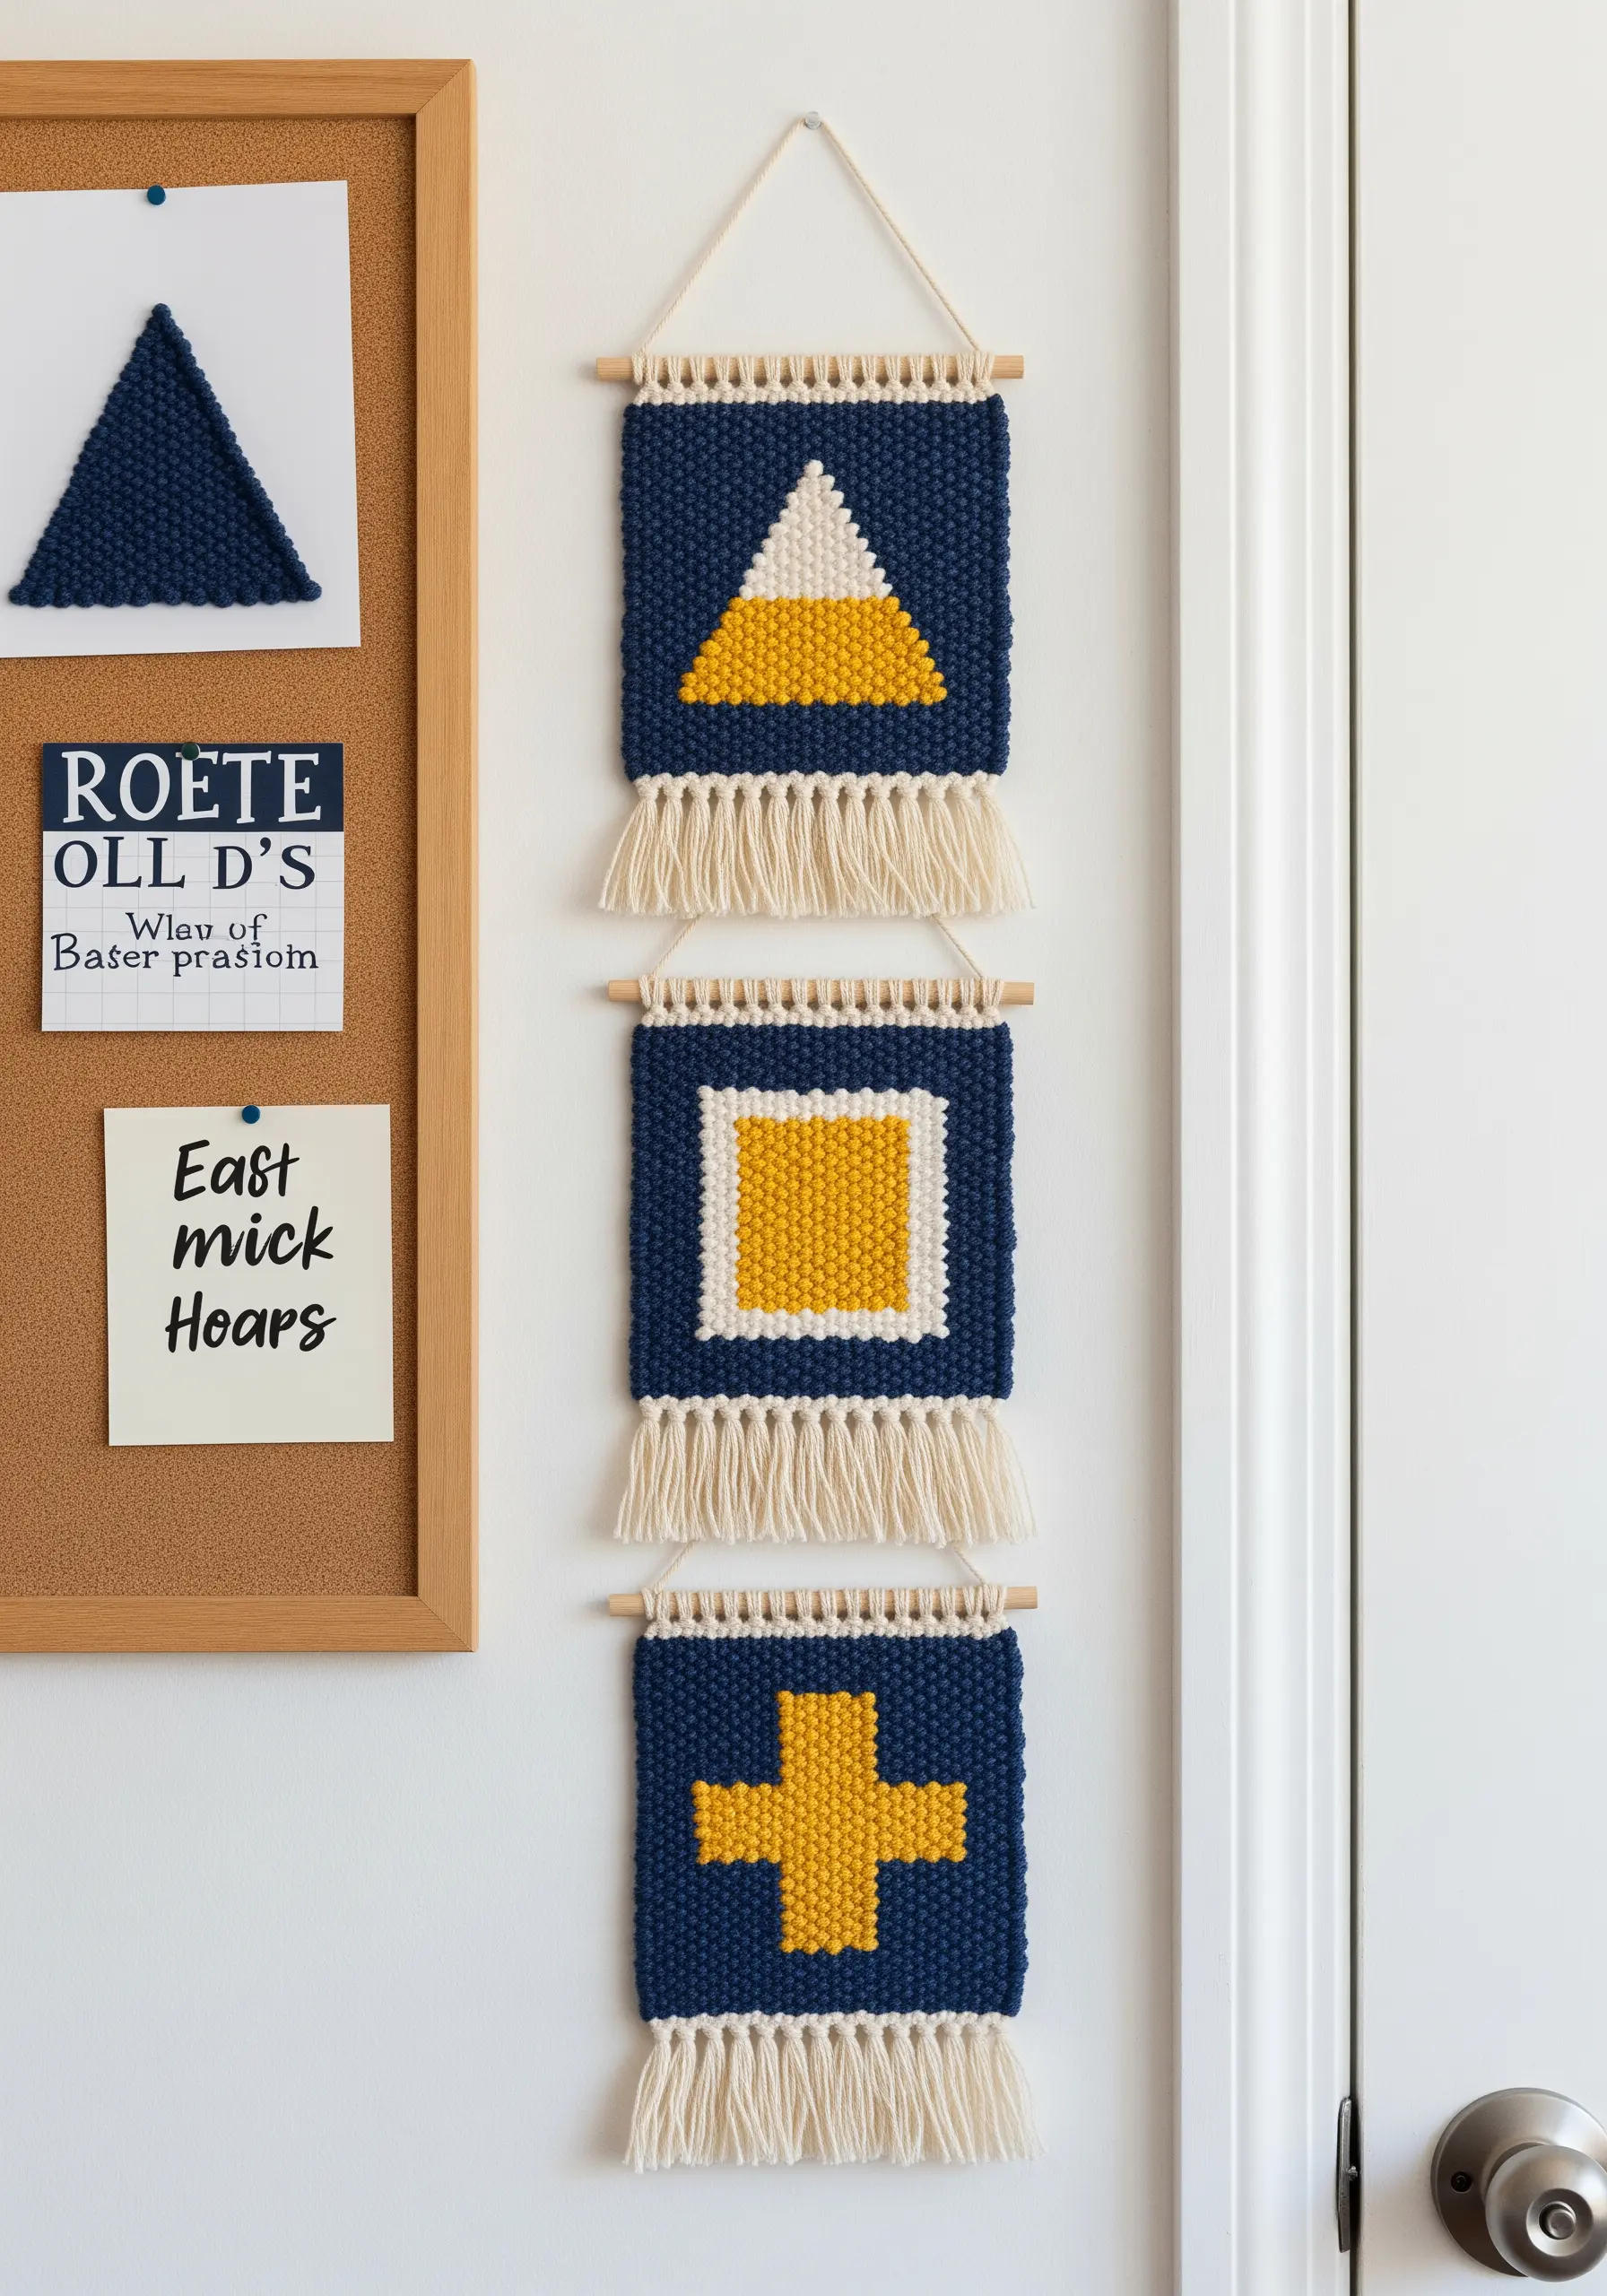
Instead of creating one large, time-consuming piece, you can achieve greater impact by making a series of small, coordinated weavings.
Using a simple lap loom allows you to quickly produce these geometric designs.
The technique for creating crisp shapes like squares and triangles is called tapestry weaving, where you work with different colors in distinct, interlocking blocks.
Hanging them as a trio creates a cohesive narrative and feels more substantial and intentional than a single small piece.
22. Build a Landscape with Braids and Wrapped Yarn
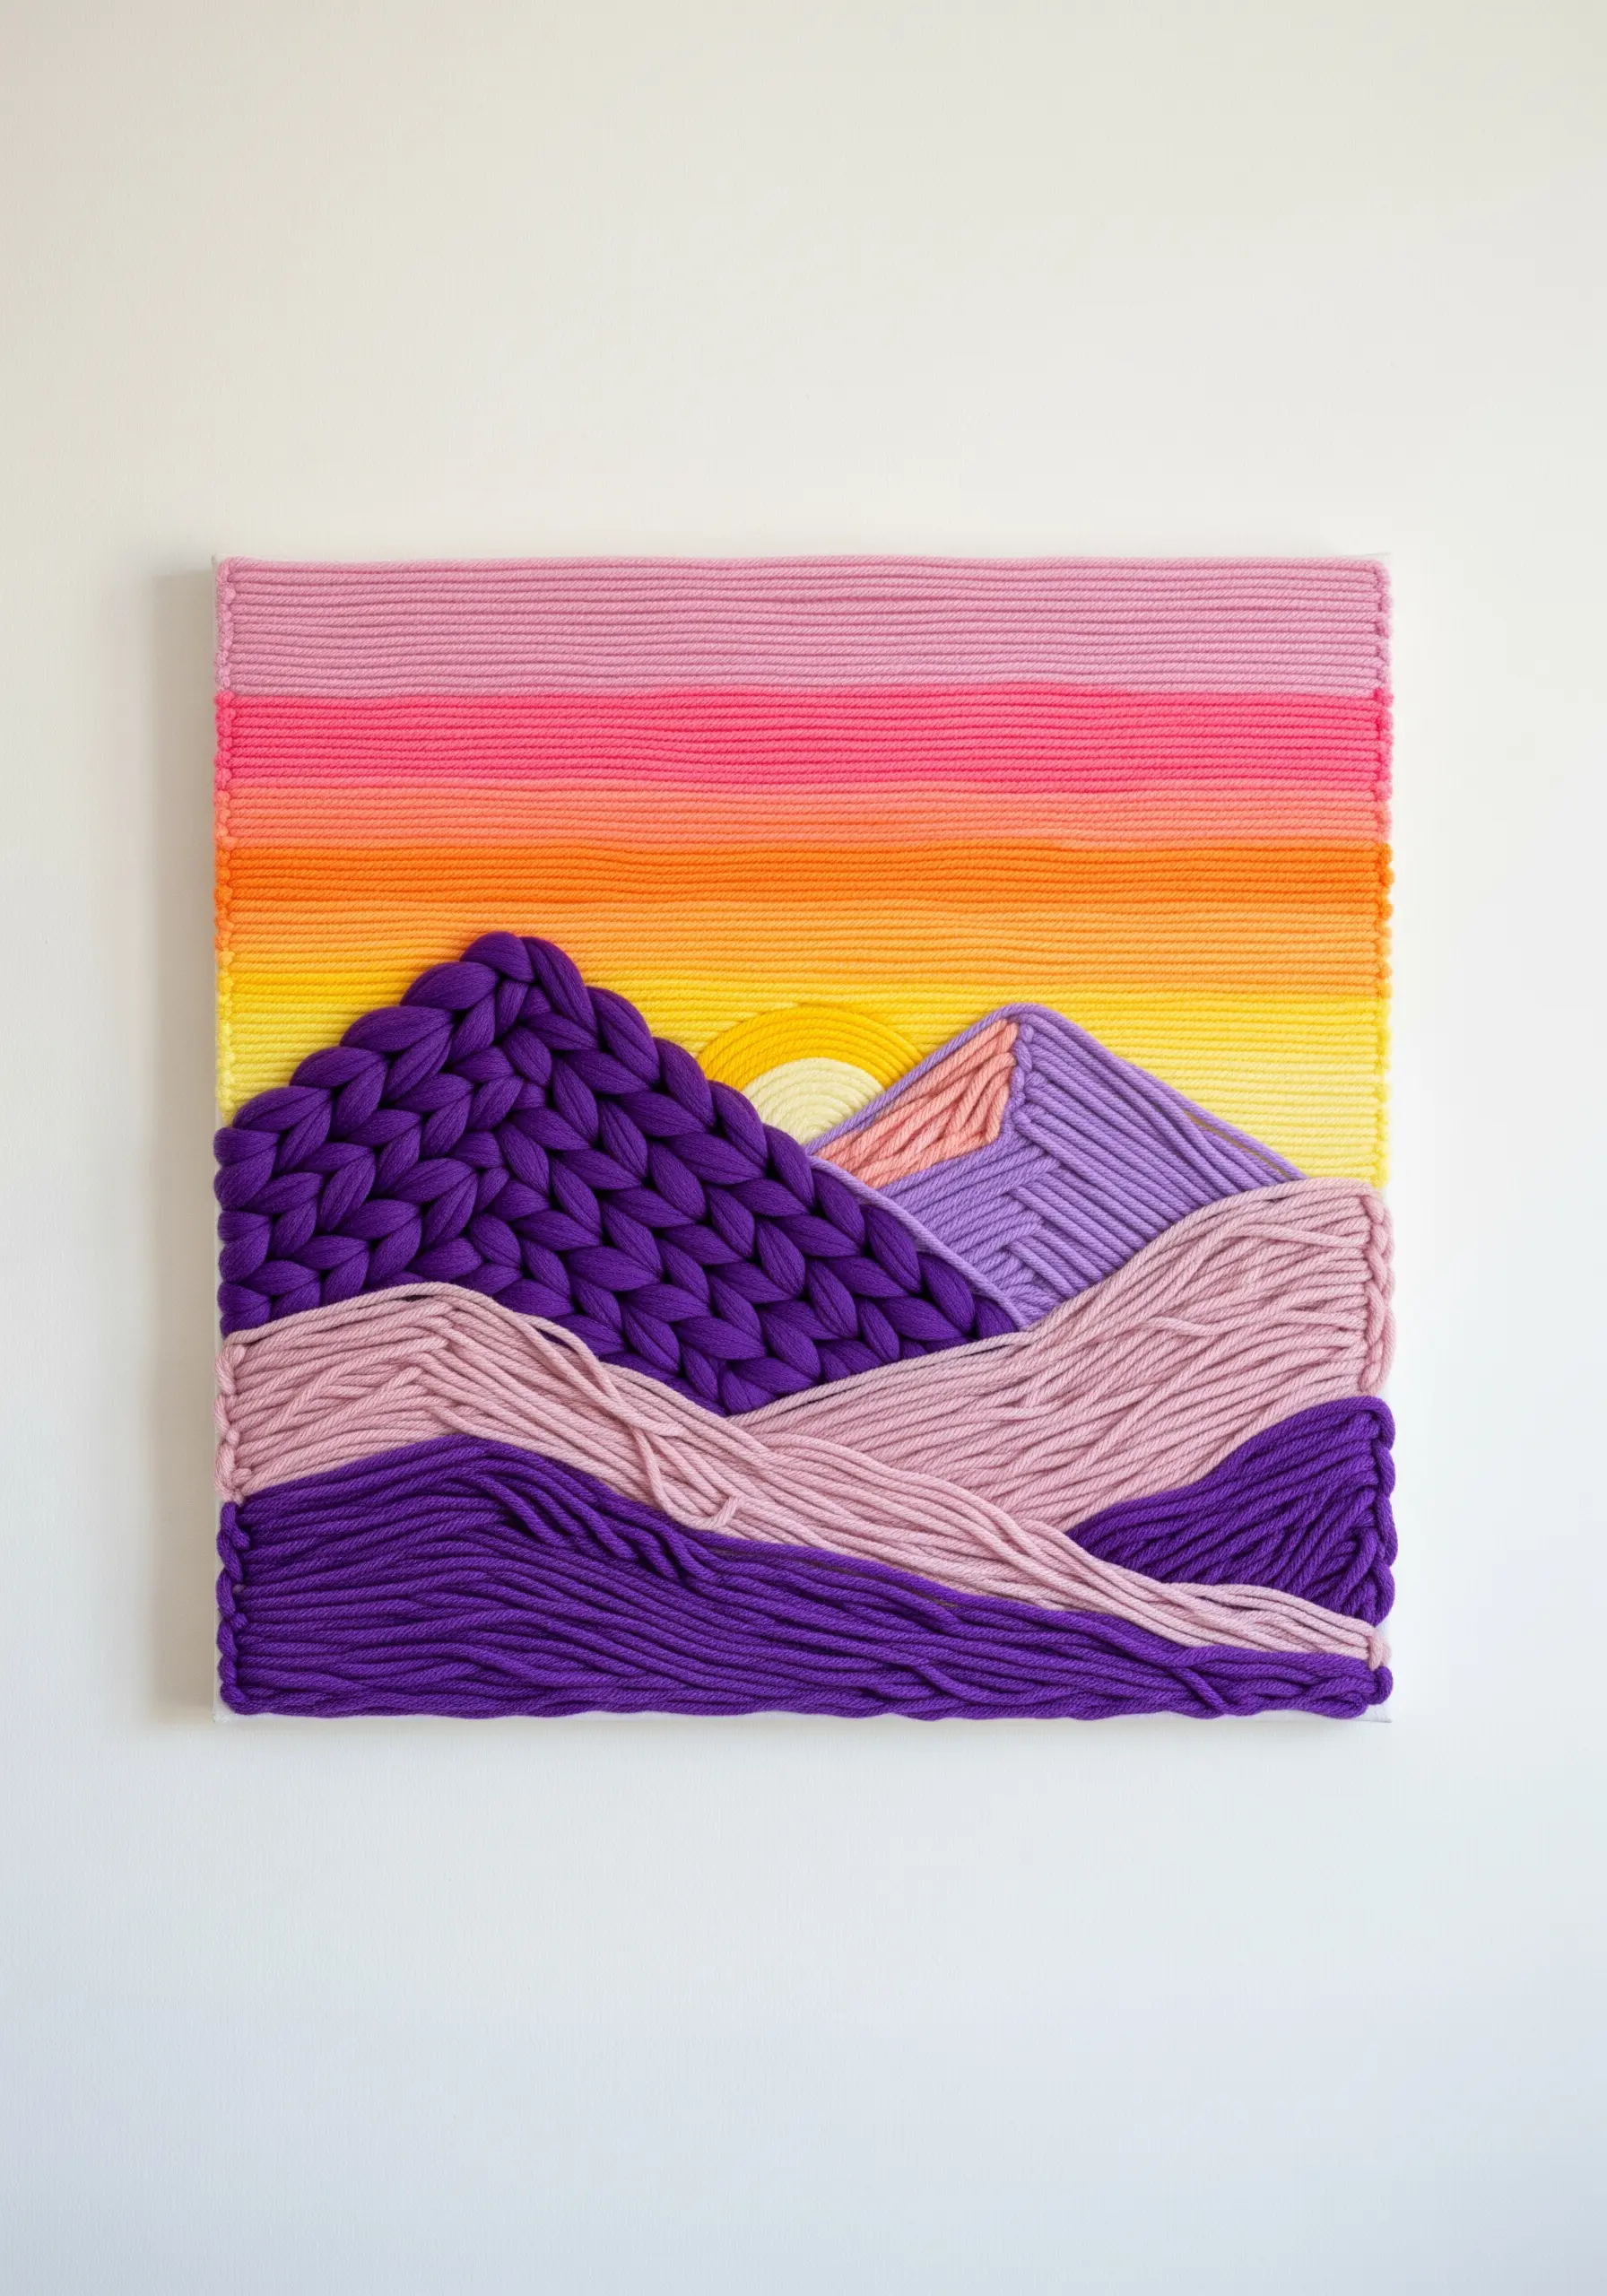
You can think of this method as a form of textile collage, building a picture with different yarn textures.
Create the flat, striped sky by tightly wrapping colored yarn around a canvas or sturdy foam board.
The mountains introduce the third dimension; make thick braids or finger-knit cords from chunky yarn and attach them in overlapping layers to create depth.
This contrast between the flat background and the sculptural foreground is what makes the piece so dynamic and is one of many layered yarn wall art projects for a 3D effect on your walls.
23. Showcase a Single, Sculptural Statement Knot
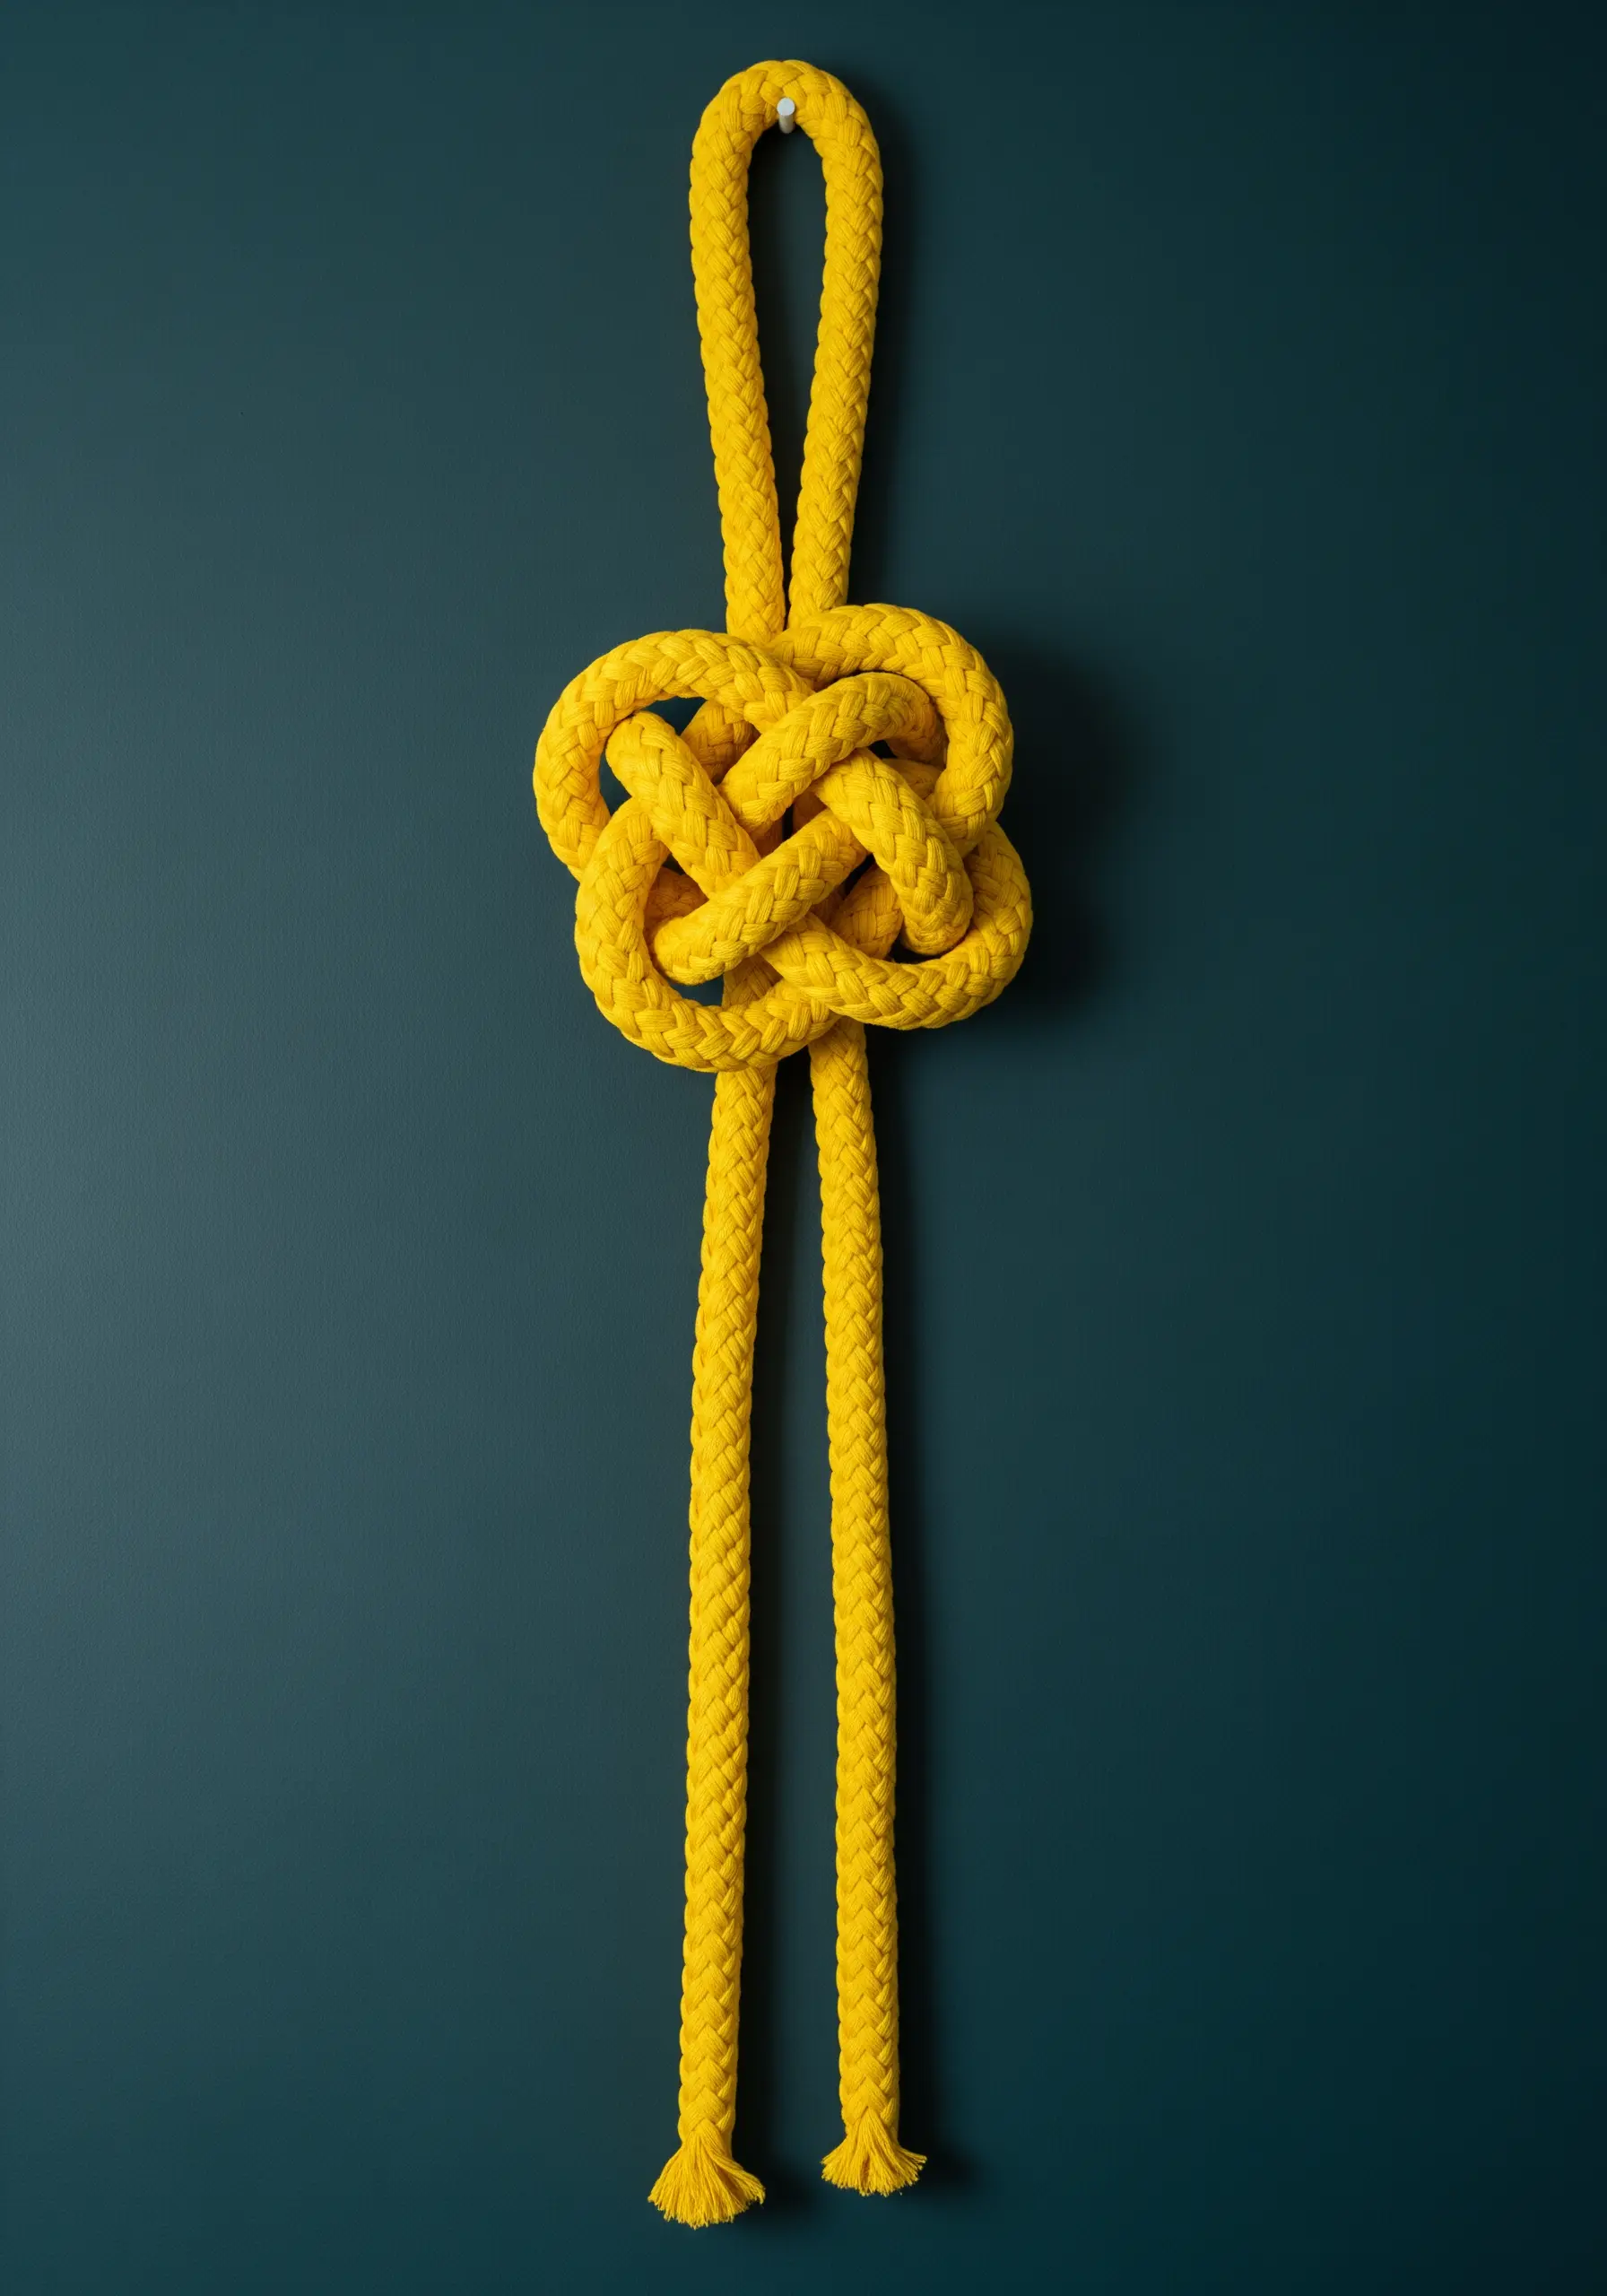
This project celebrates the idea that sometimes, one perfect element is more powerful than many.
It focuses on the intrinsic beauty of a single, complex knot, such as a Celtic knot or a decorative sailor’s knot.
Use a thick, semi-rigid rope or cord that will hold its intricate shape without sagging.
Practice tying the knot with a shoelace until you have the pattern memorized, then create the final piece and mount it directly onto a contrasting wall to let its form shine.


