
The heirloom linens we admire possess a quiet elegance that feels both timeless and intentional. But that quality isn’t just about age; it’s about artistry—the thoughtful combination of thread, fabric, and technique. It’s a language you can learn to speak with your own needle and thread.
The secret to transforming your work from simply ‘stitched’ to ‘masterfully composed’ lies in the details. It’s in knowing when to use a single strand for delicacy versus three for impact, how to blend colors to create the illusion of light, or how to pair a dense floral motif with an airy lace border for perfect balance.
Think of these combinations not as projects to copy, but as lessons in aesthetic choice. Each one reveals a specific technique or design principle that you can apply to your own work, right now. This is your guide to stitching with purpose, creating pieces that feel less like craft and more like art.
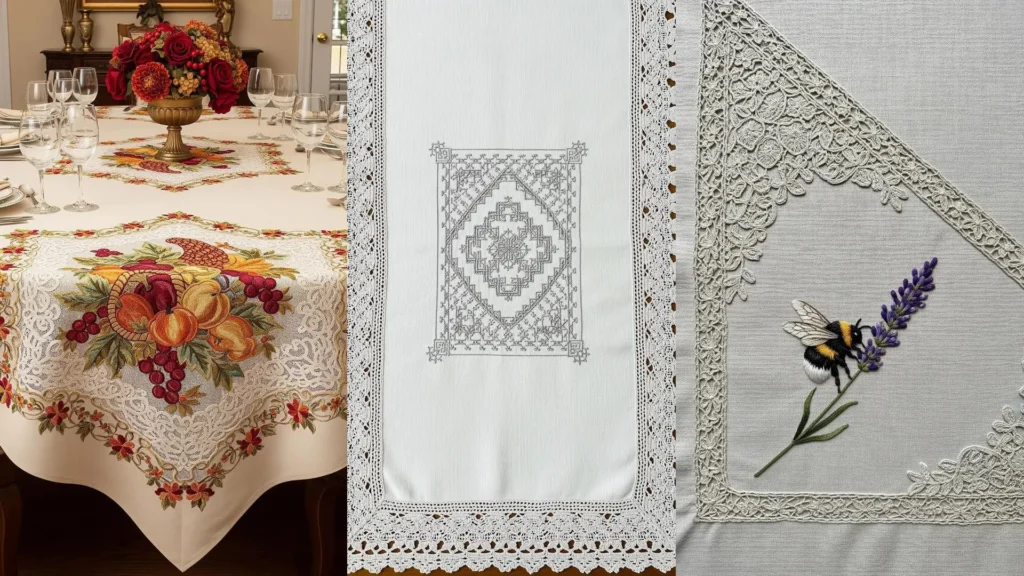
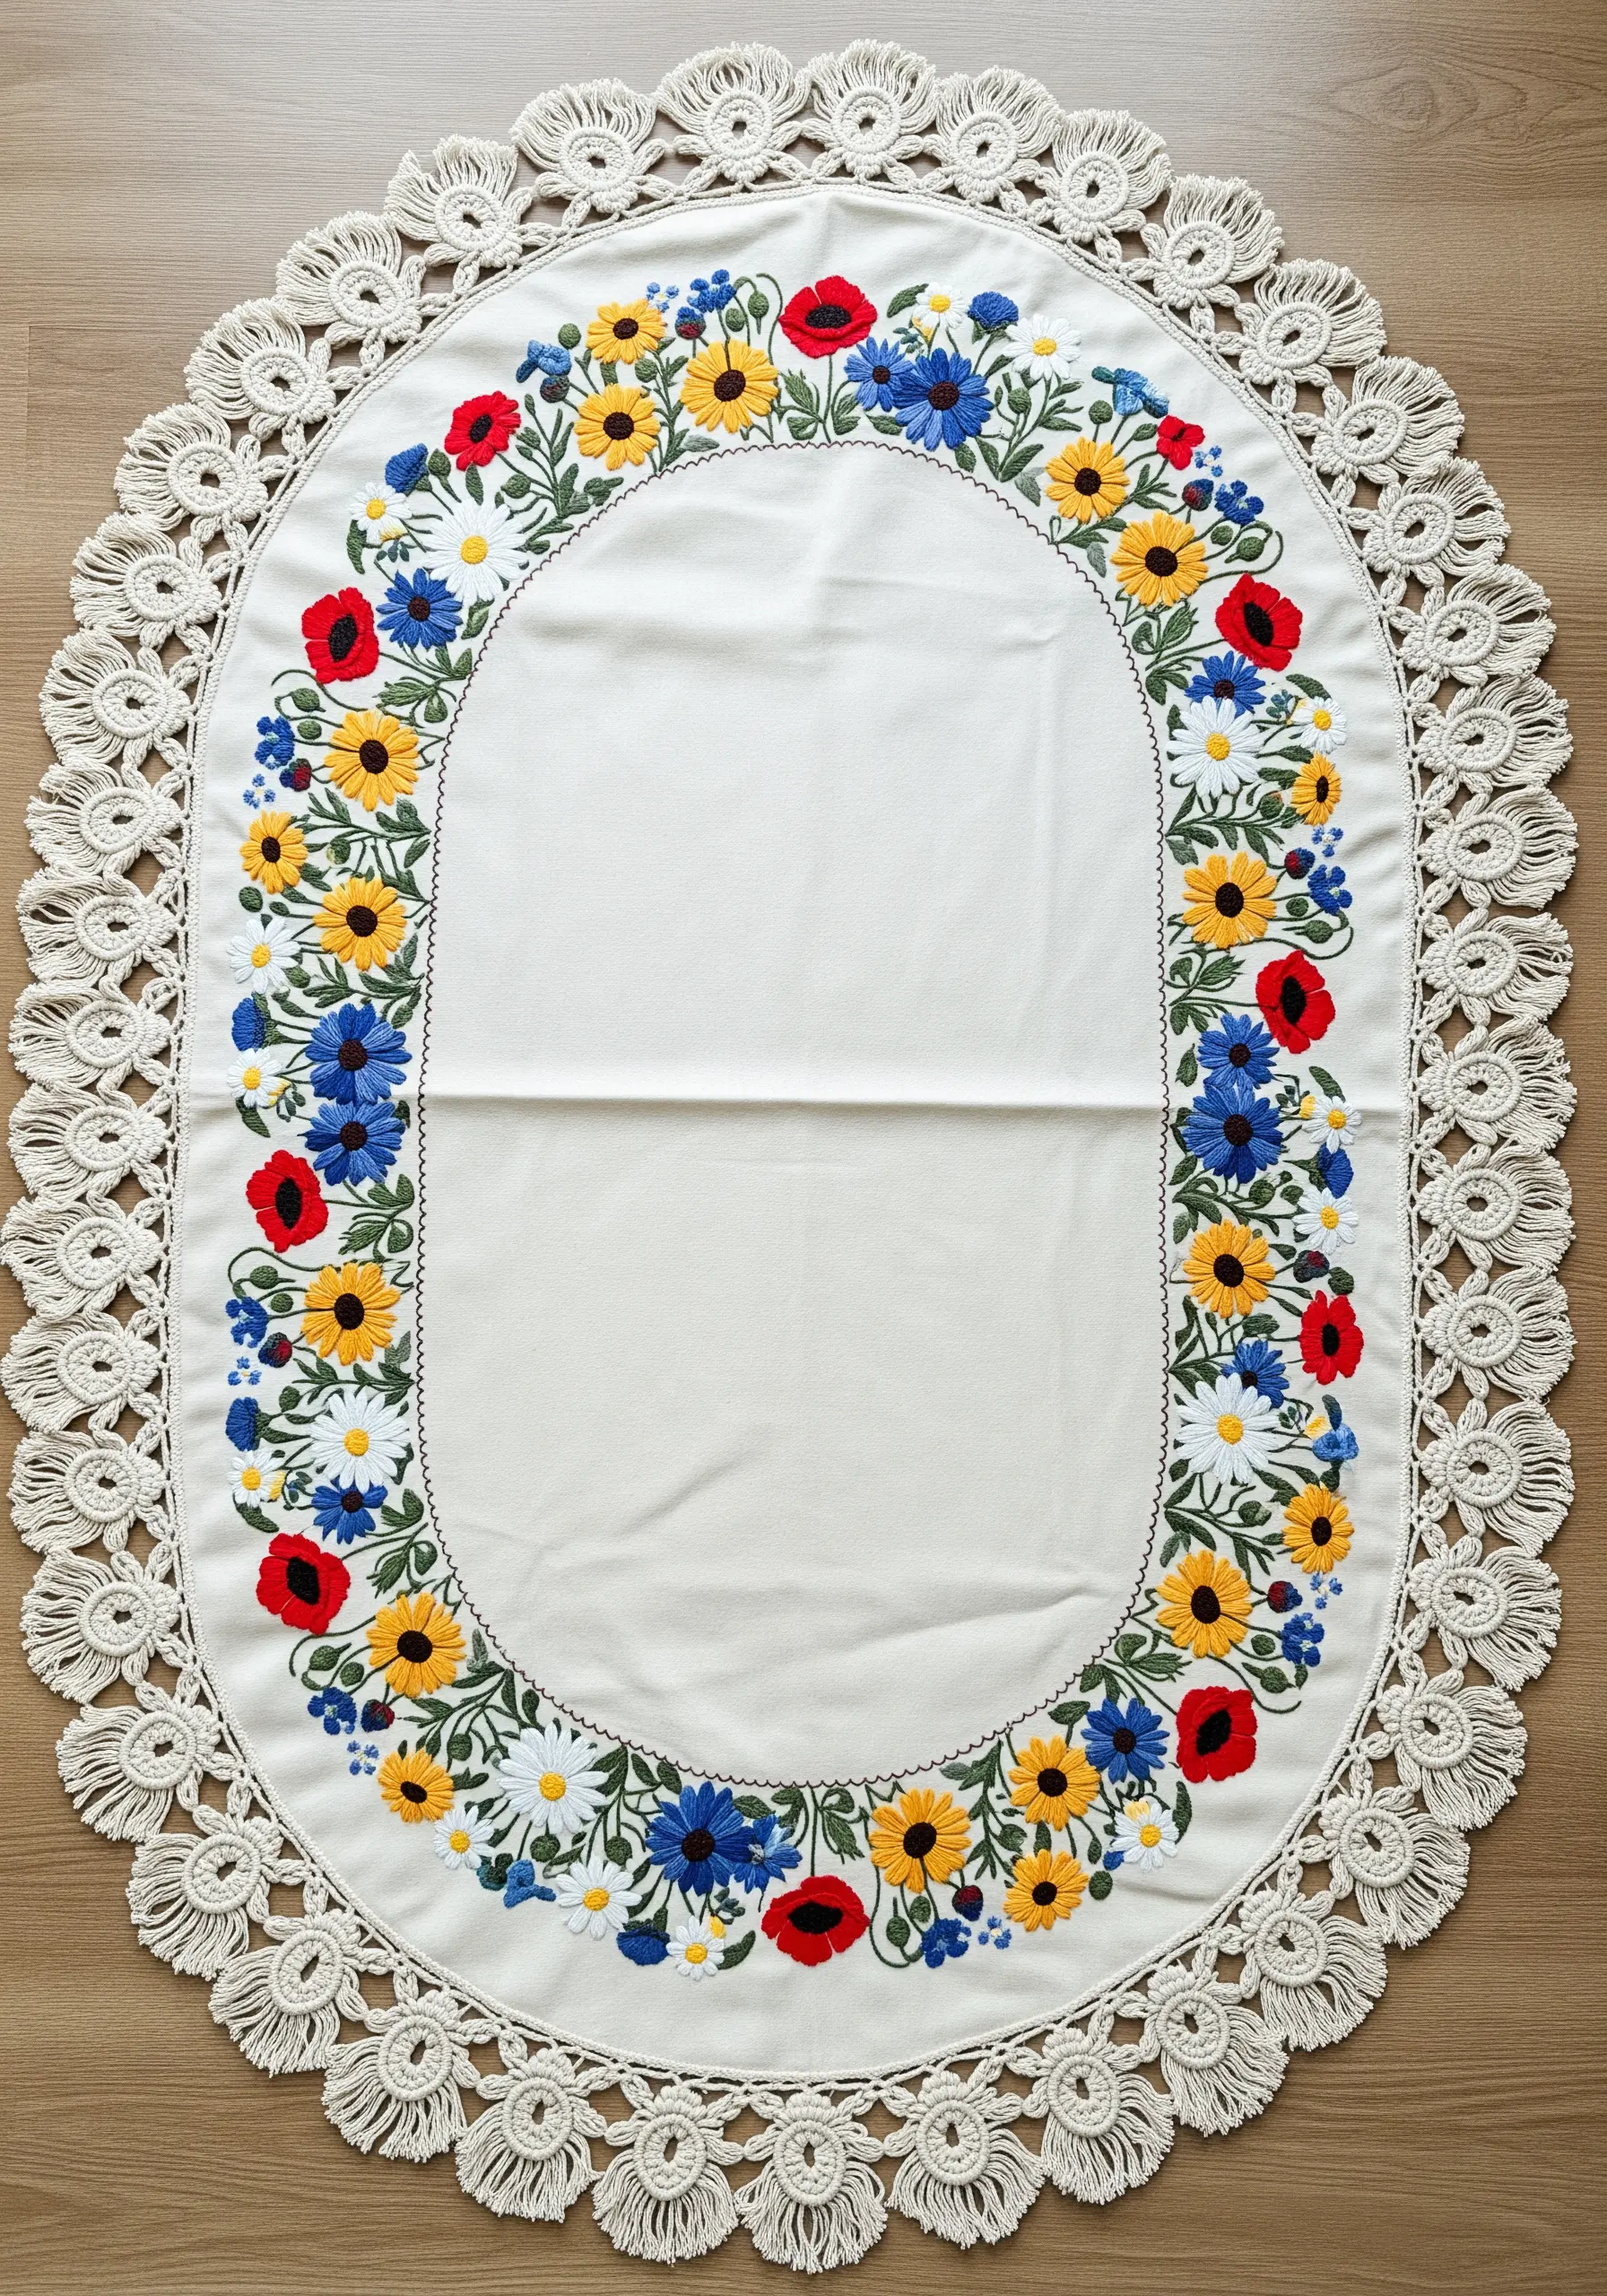
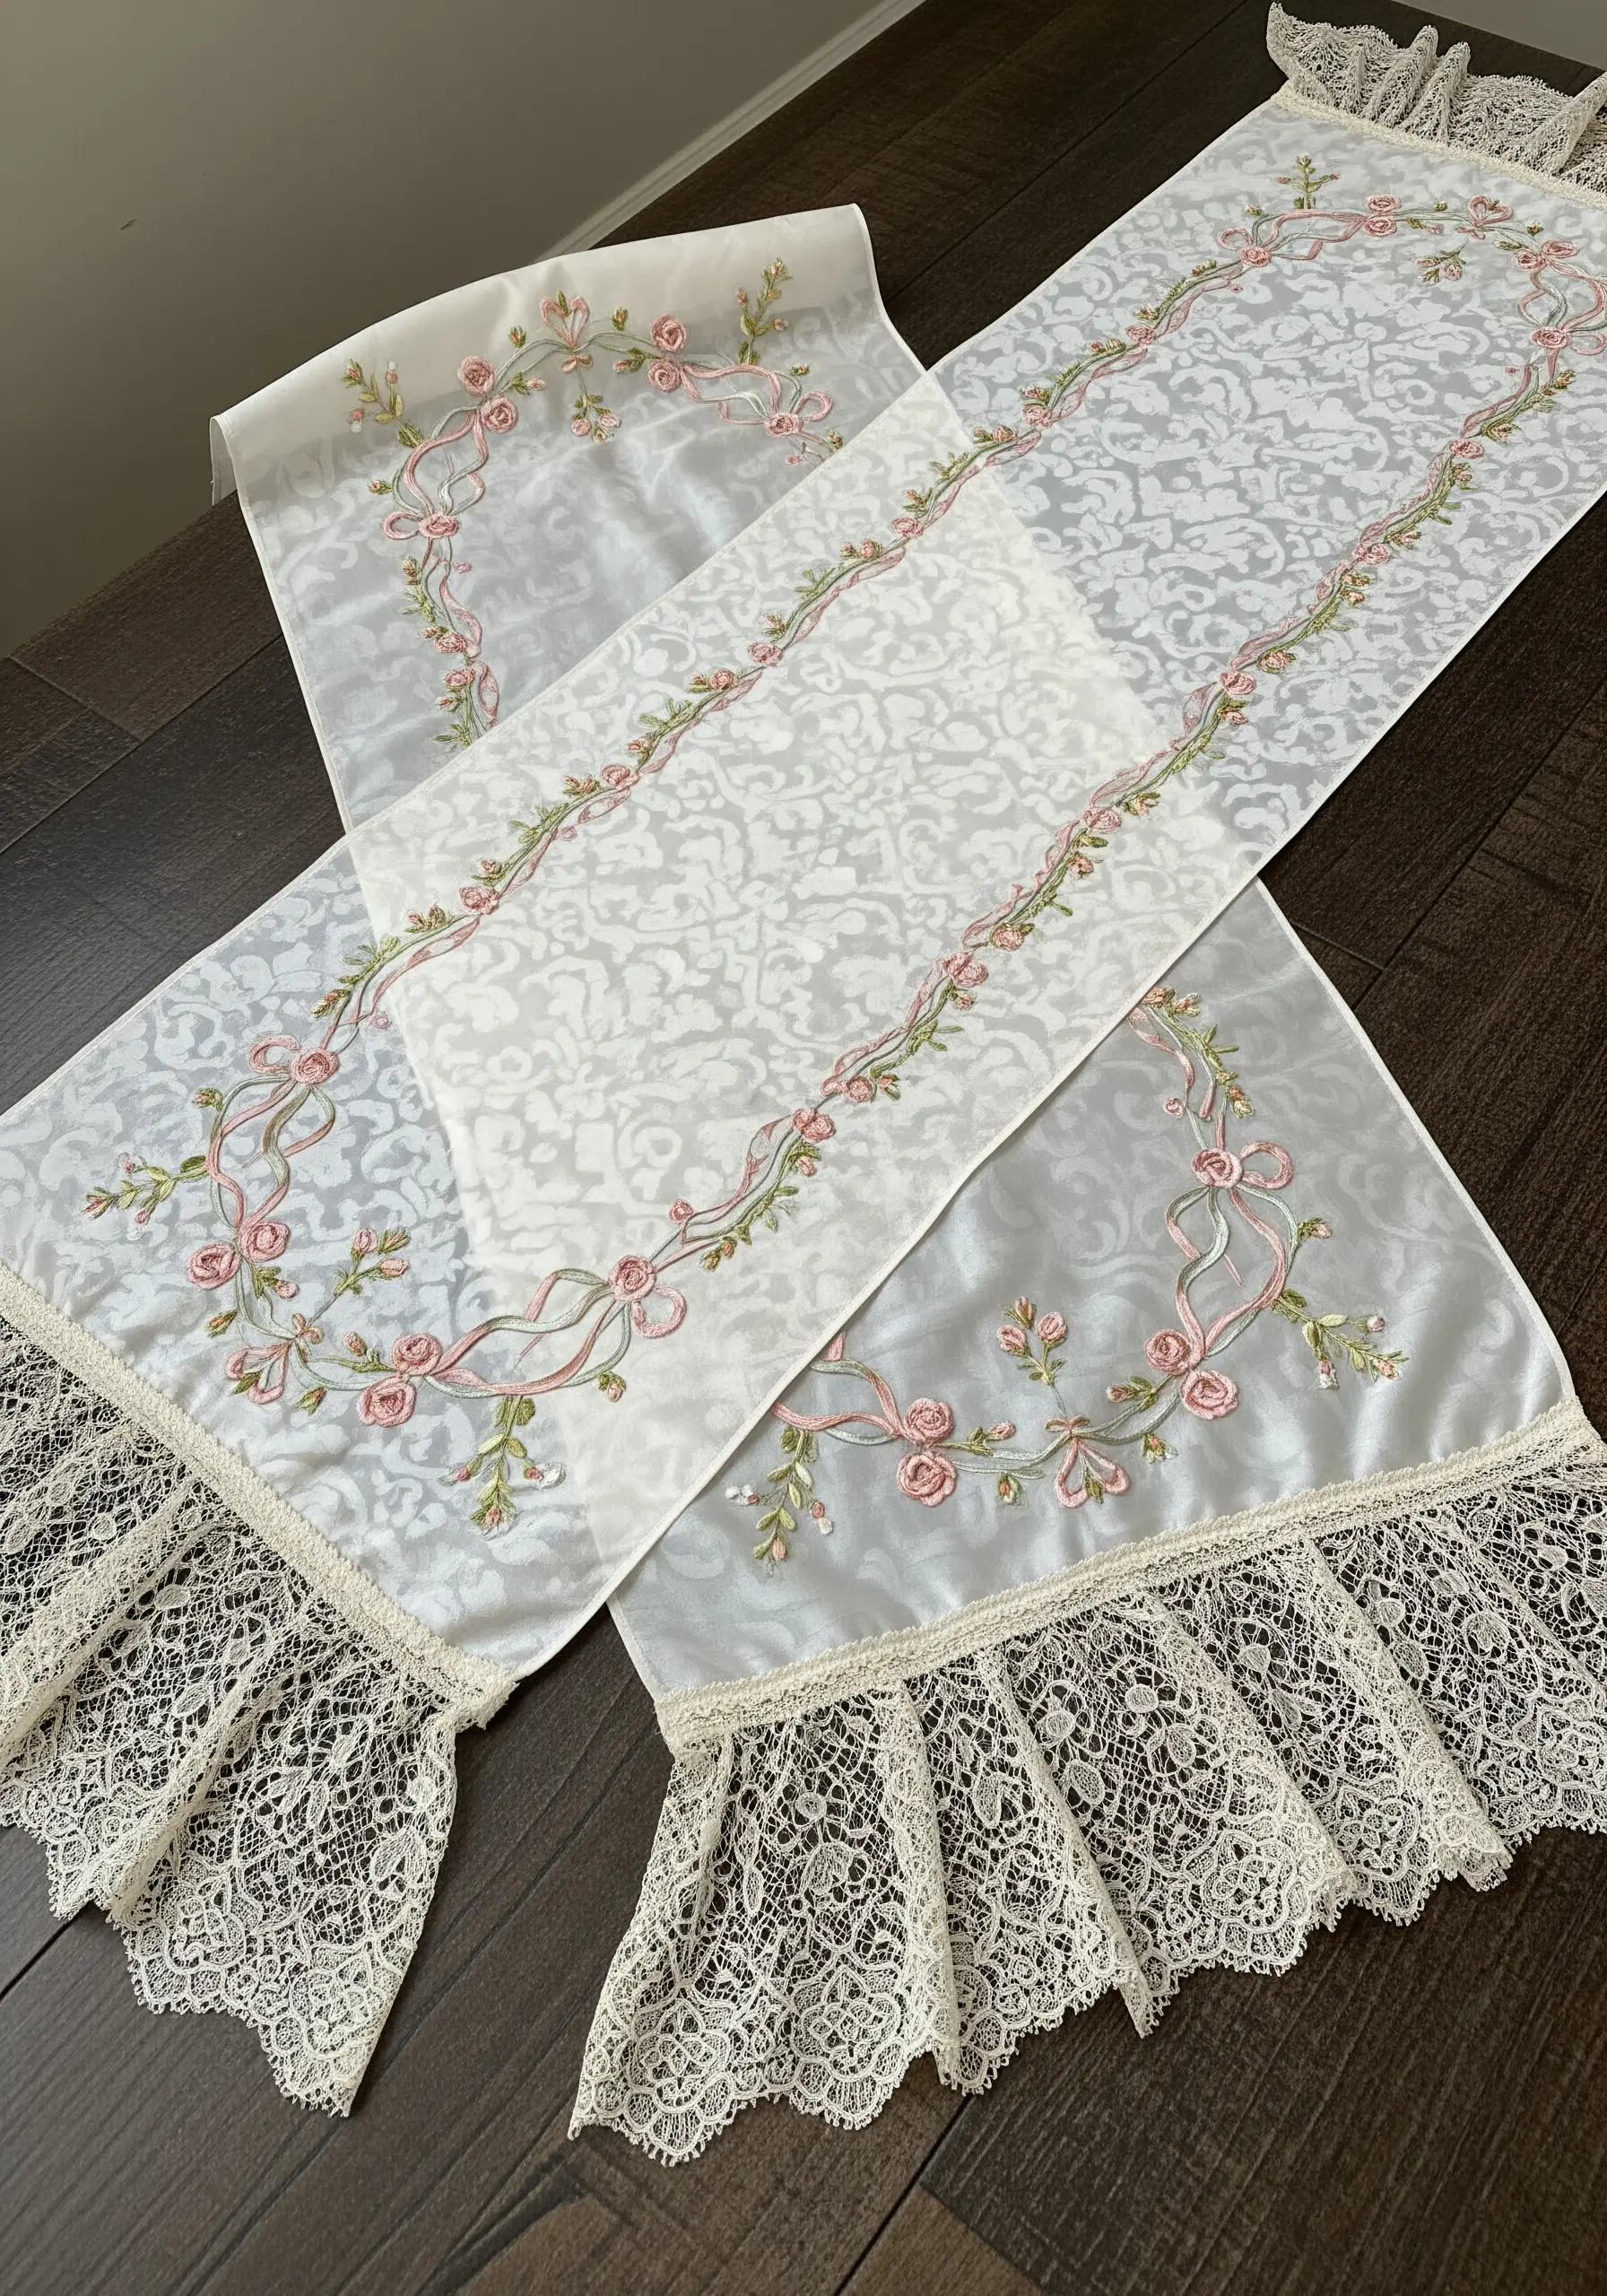
1. Harmonize Lush Florals with Heirloom Lace
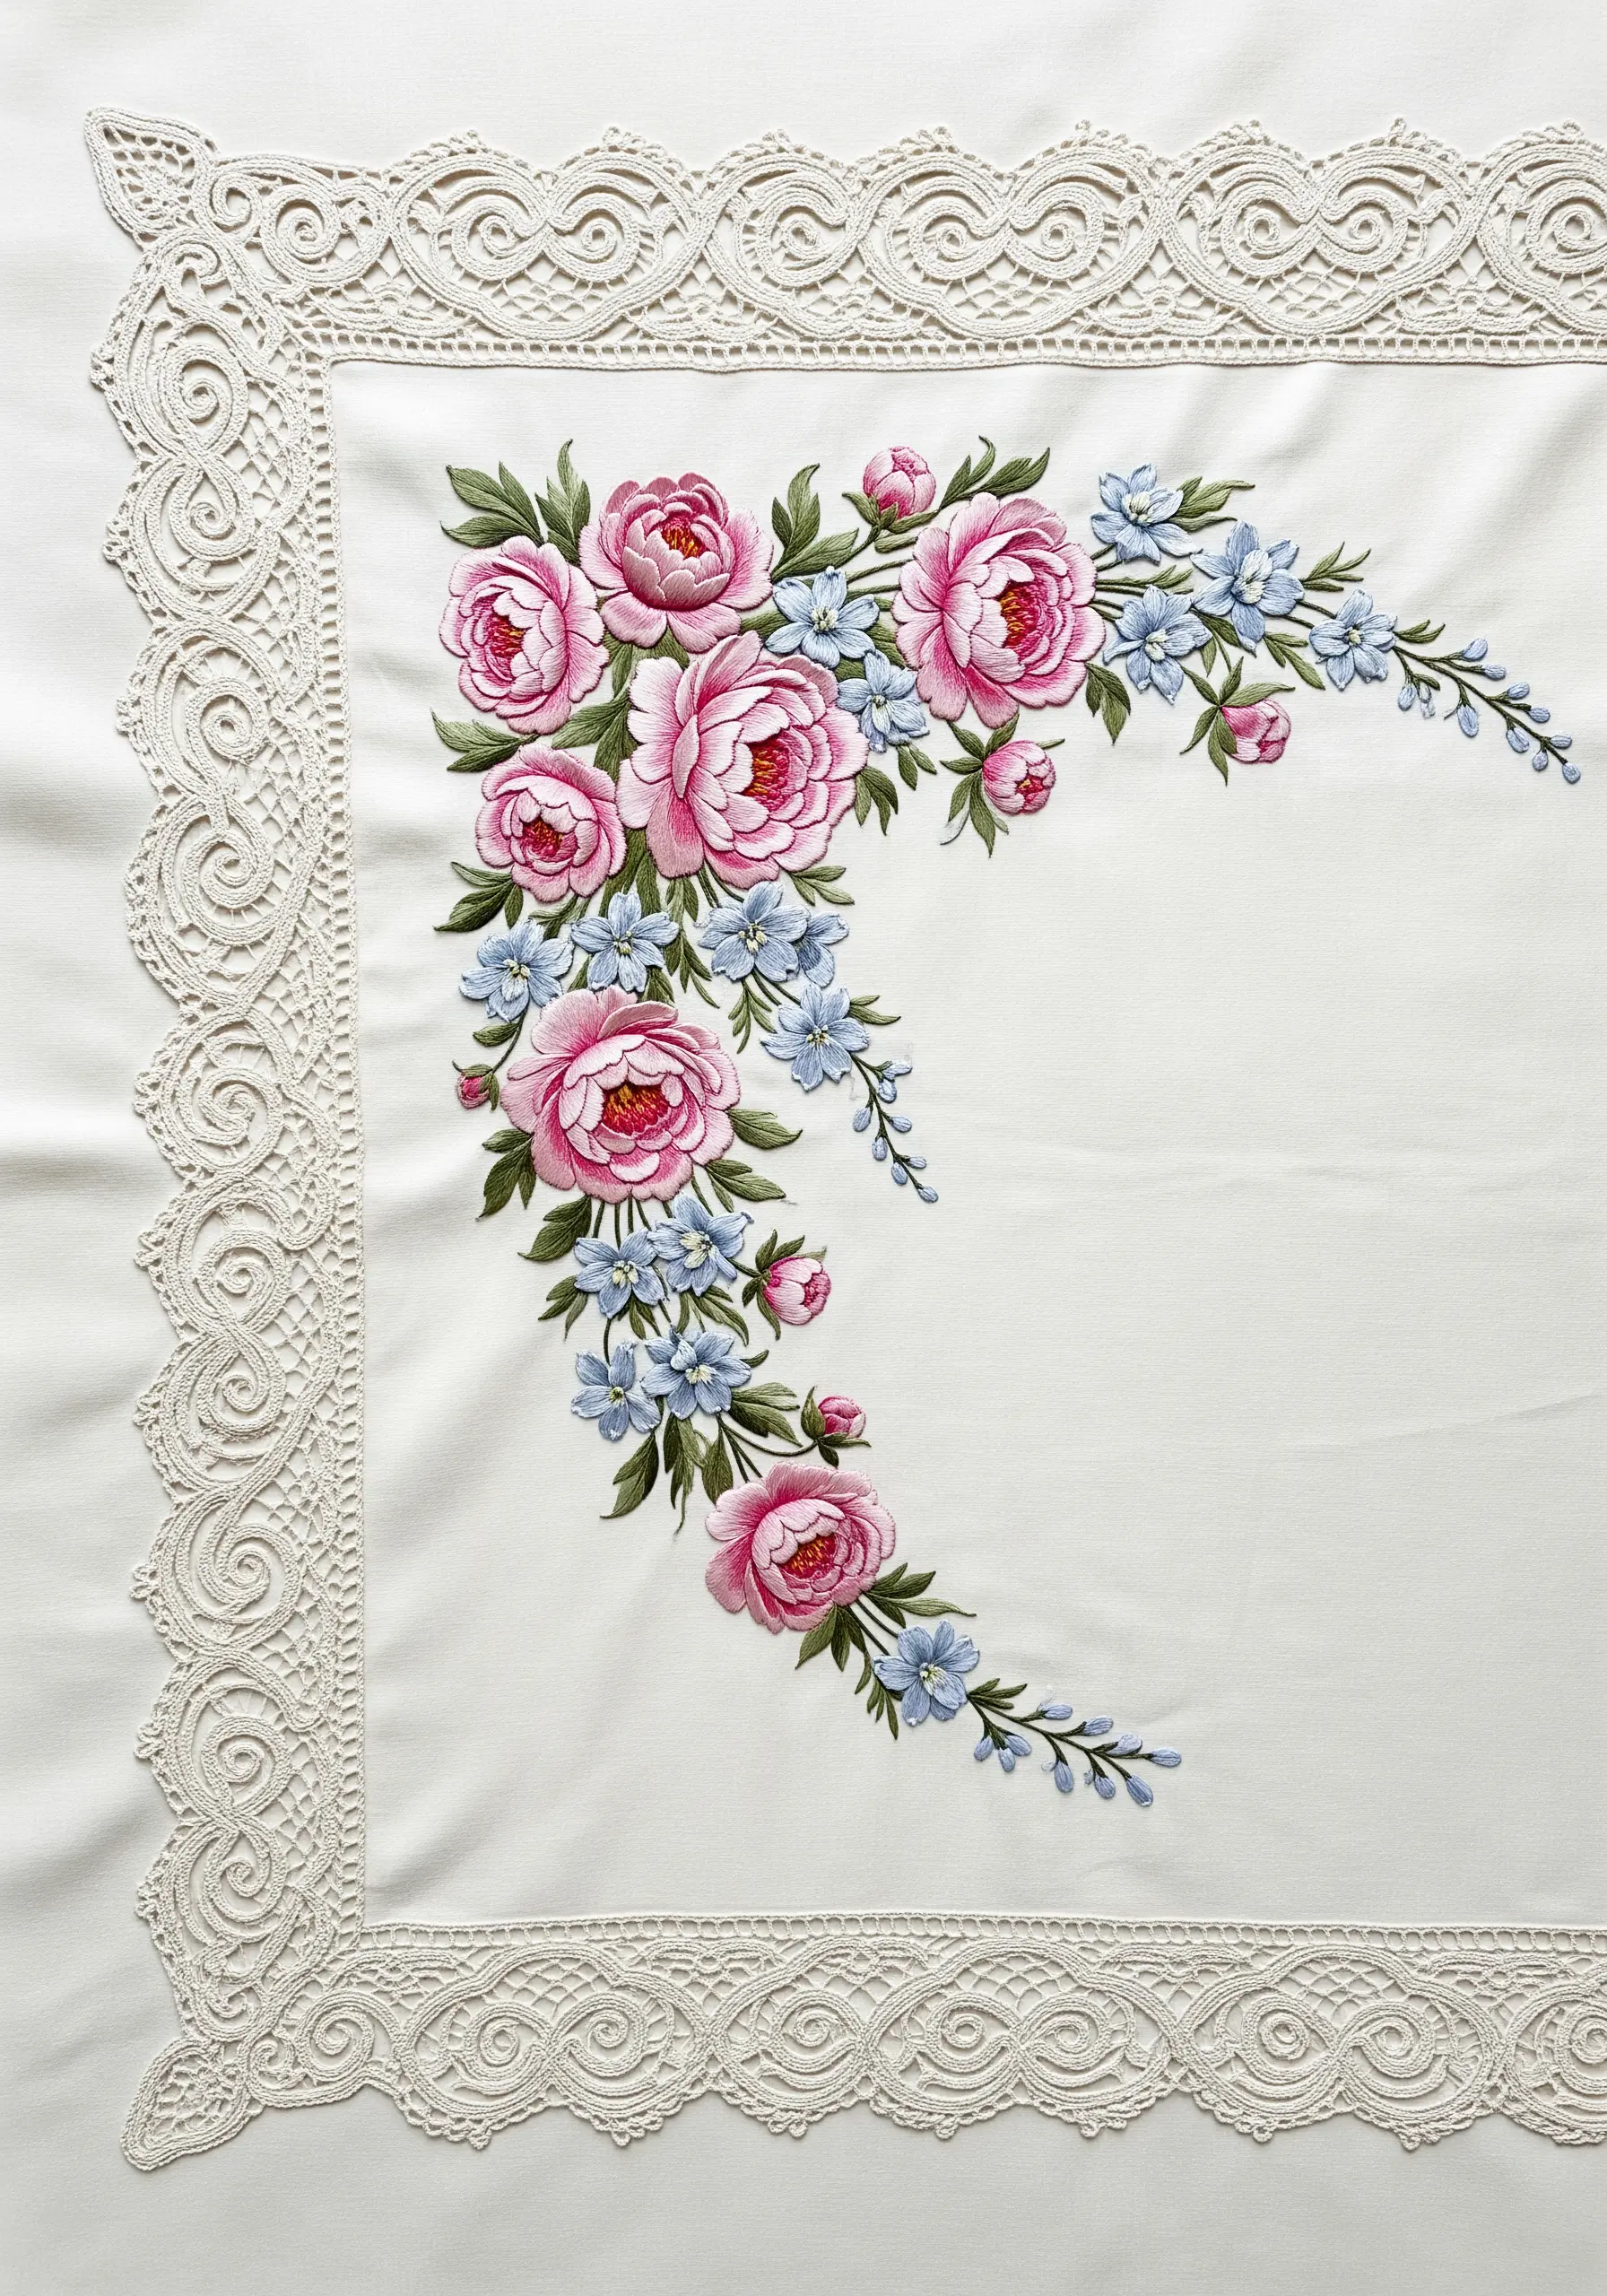
To achieve the plush, dimensional look of these peonies, fill each petal with long-and-short stitch, ensuring your stitches follow the natural curve of the petal.
Use four to five shades of pink, from a deep magenta at the base to a pale blush at the edge, to create a realistic gradient.
For the delicate blue filler flowers, switch to a single strand of thread and use simple lazy daisy stitches—this prevents them from overpowering the main blooms.
Finally, match the off-white tone of your fabric to a classic crochet lace border to create a cohesive, vintage feel.
2. Ground Your Design with a Flowing Botanical Motif
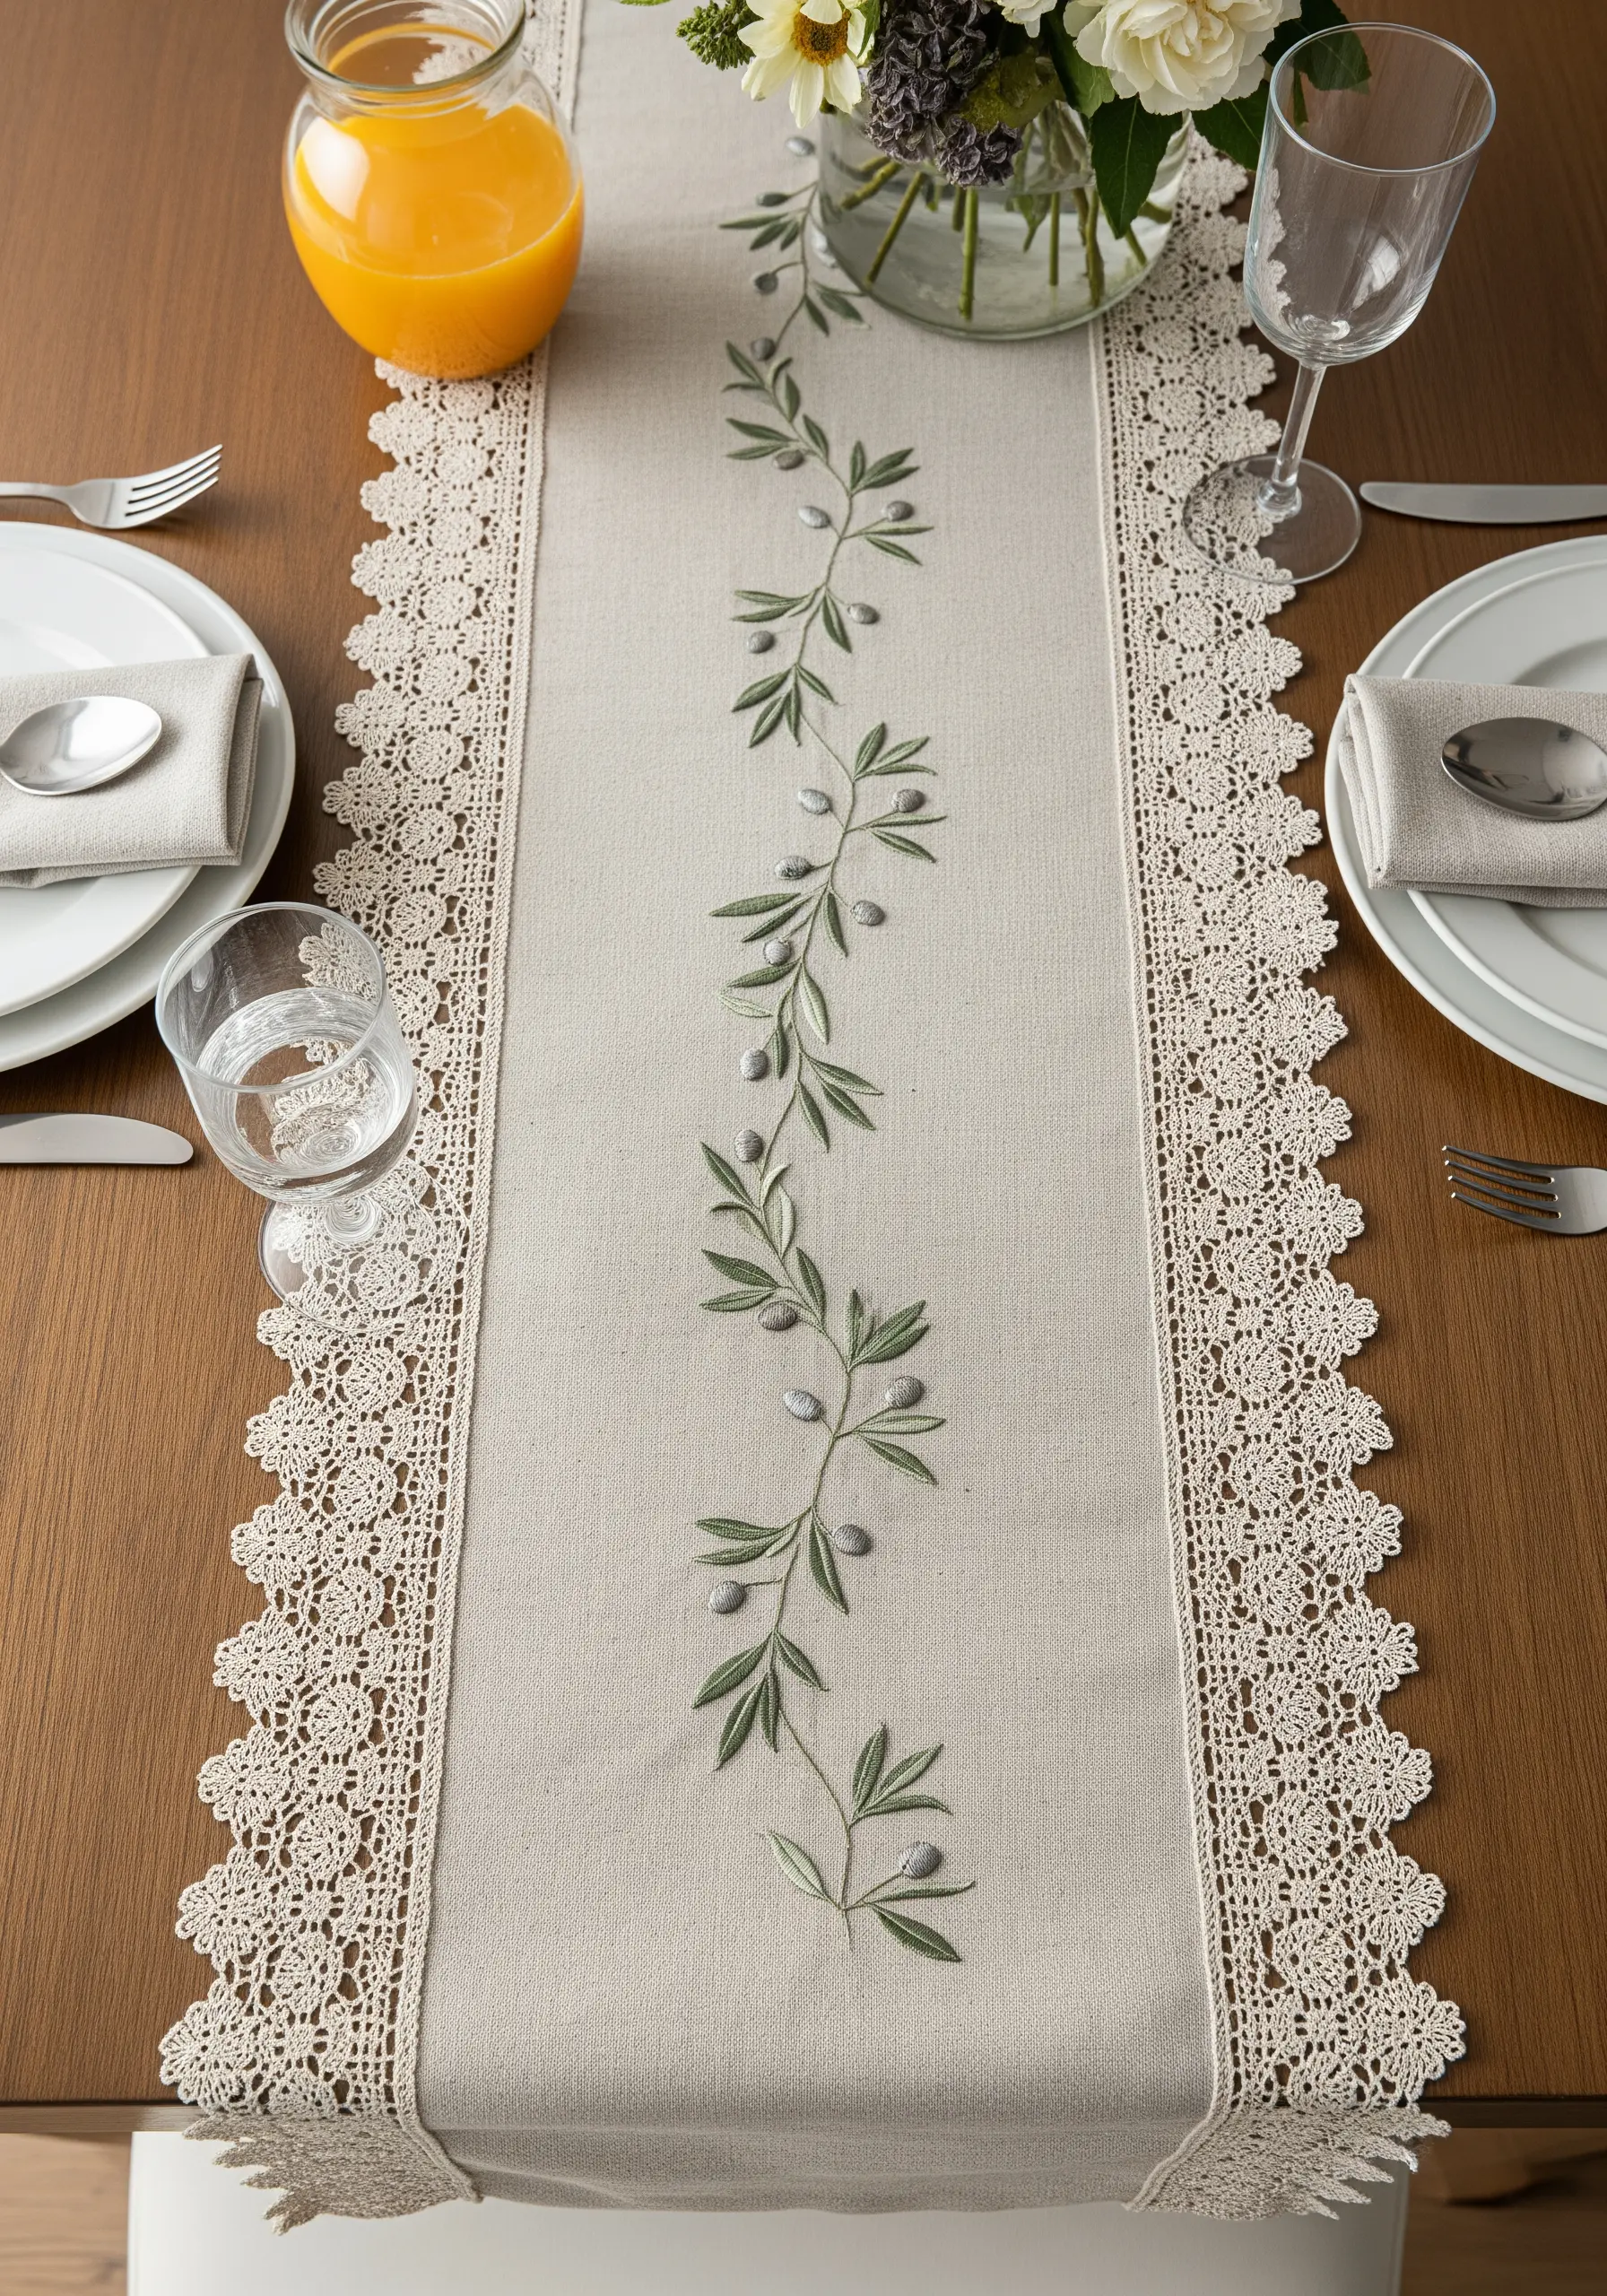
For an understated yet elegant table runner, choose a single, continuous motif like an olive branch that draws the eye along the length of the table.
Use a fine-tipped, water-soluble marker to sketch a gentle, meandering line first—this ensures your composition flows naturally.
Work the branches in a textured stem stitch and use fishbone stitch for the leaves to create a defined central vein, adding a touch of realism.
On natural linen fabric, choose muted thread colors like sage green and taupe to harmonize with the textile’s earthy tones.
3. Elevate Monograms with a Delicate Botanical Frame
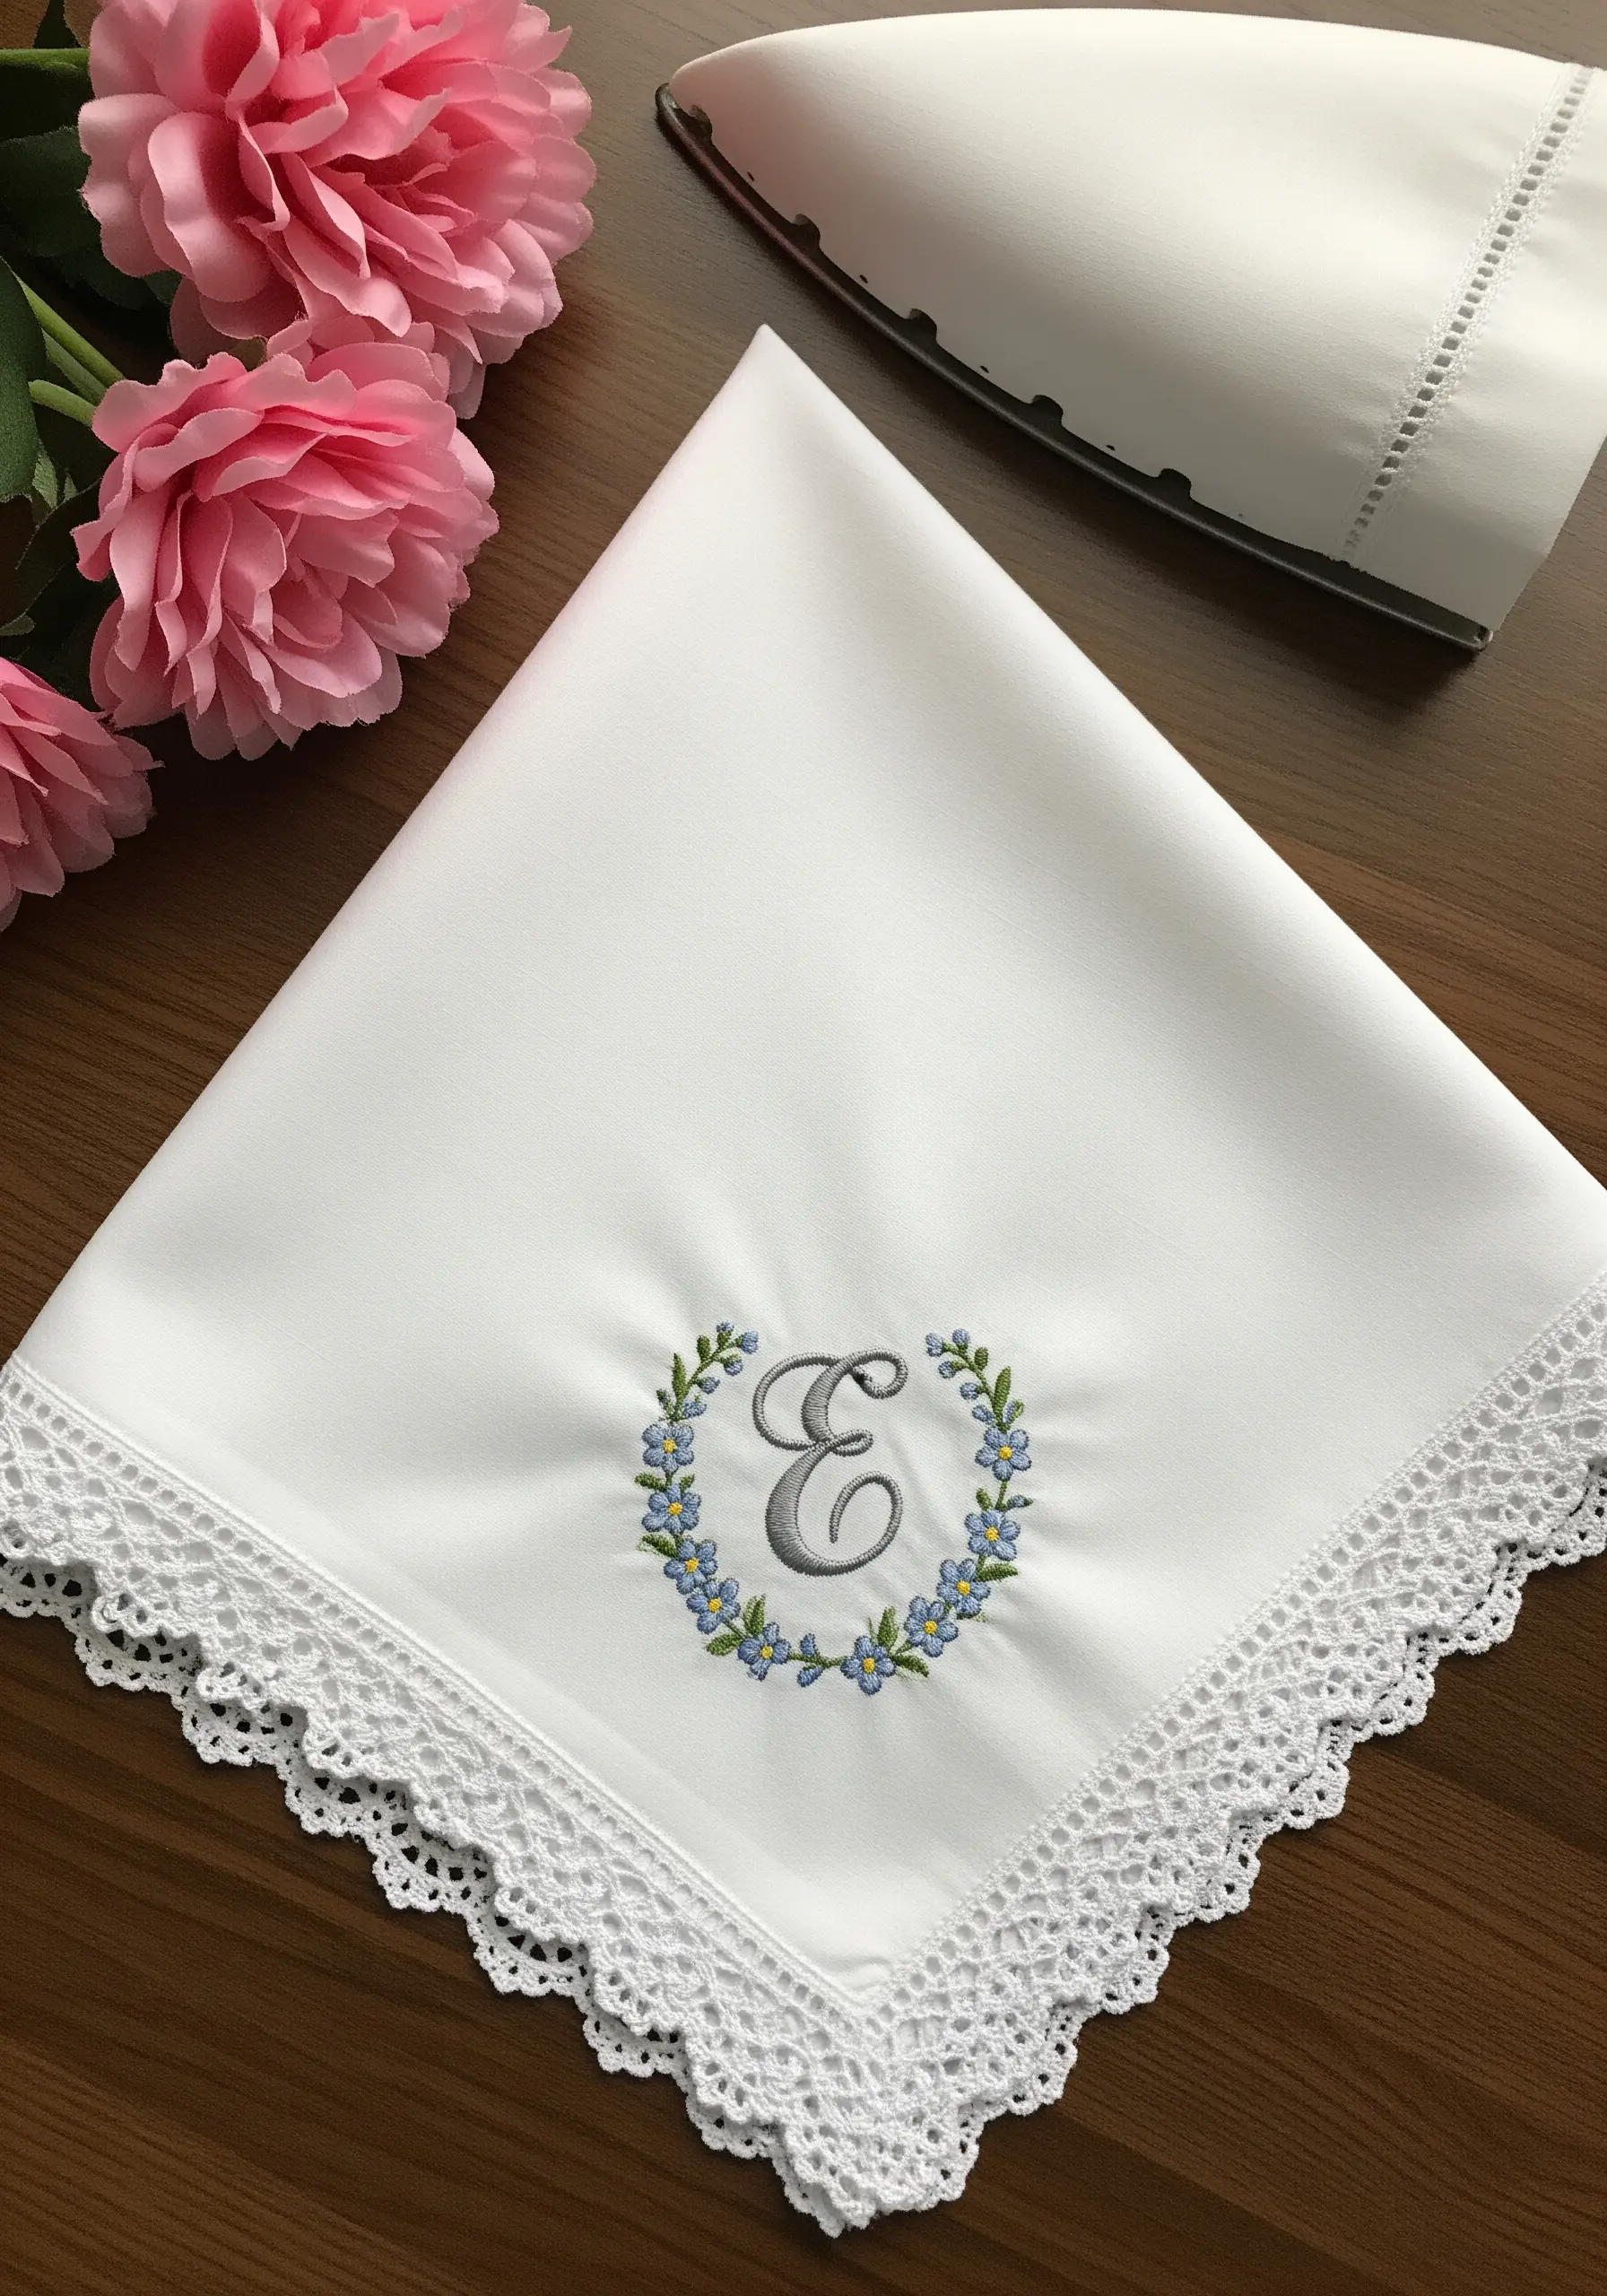
A simple monogram instantly becomes an heirloom piece when encircled by a delicate botanical wreath.
Stitch your chosen initial first, using a padded satin stitch to give it raised dimension and a smooth, luxurious finish.
Frame it with a whisper-light wreath made from tiny lazy daisy stitches for leaves and single French knots for blossoms, using only one or two strands of thread.
This contrast in scale and texture makes the central monogram the clear focal point while adding a touch of softness.
4. Capture Whimsical Movement with Minimalist Stitches
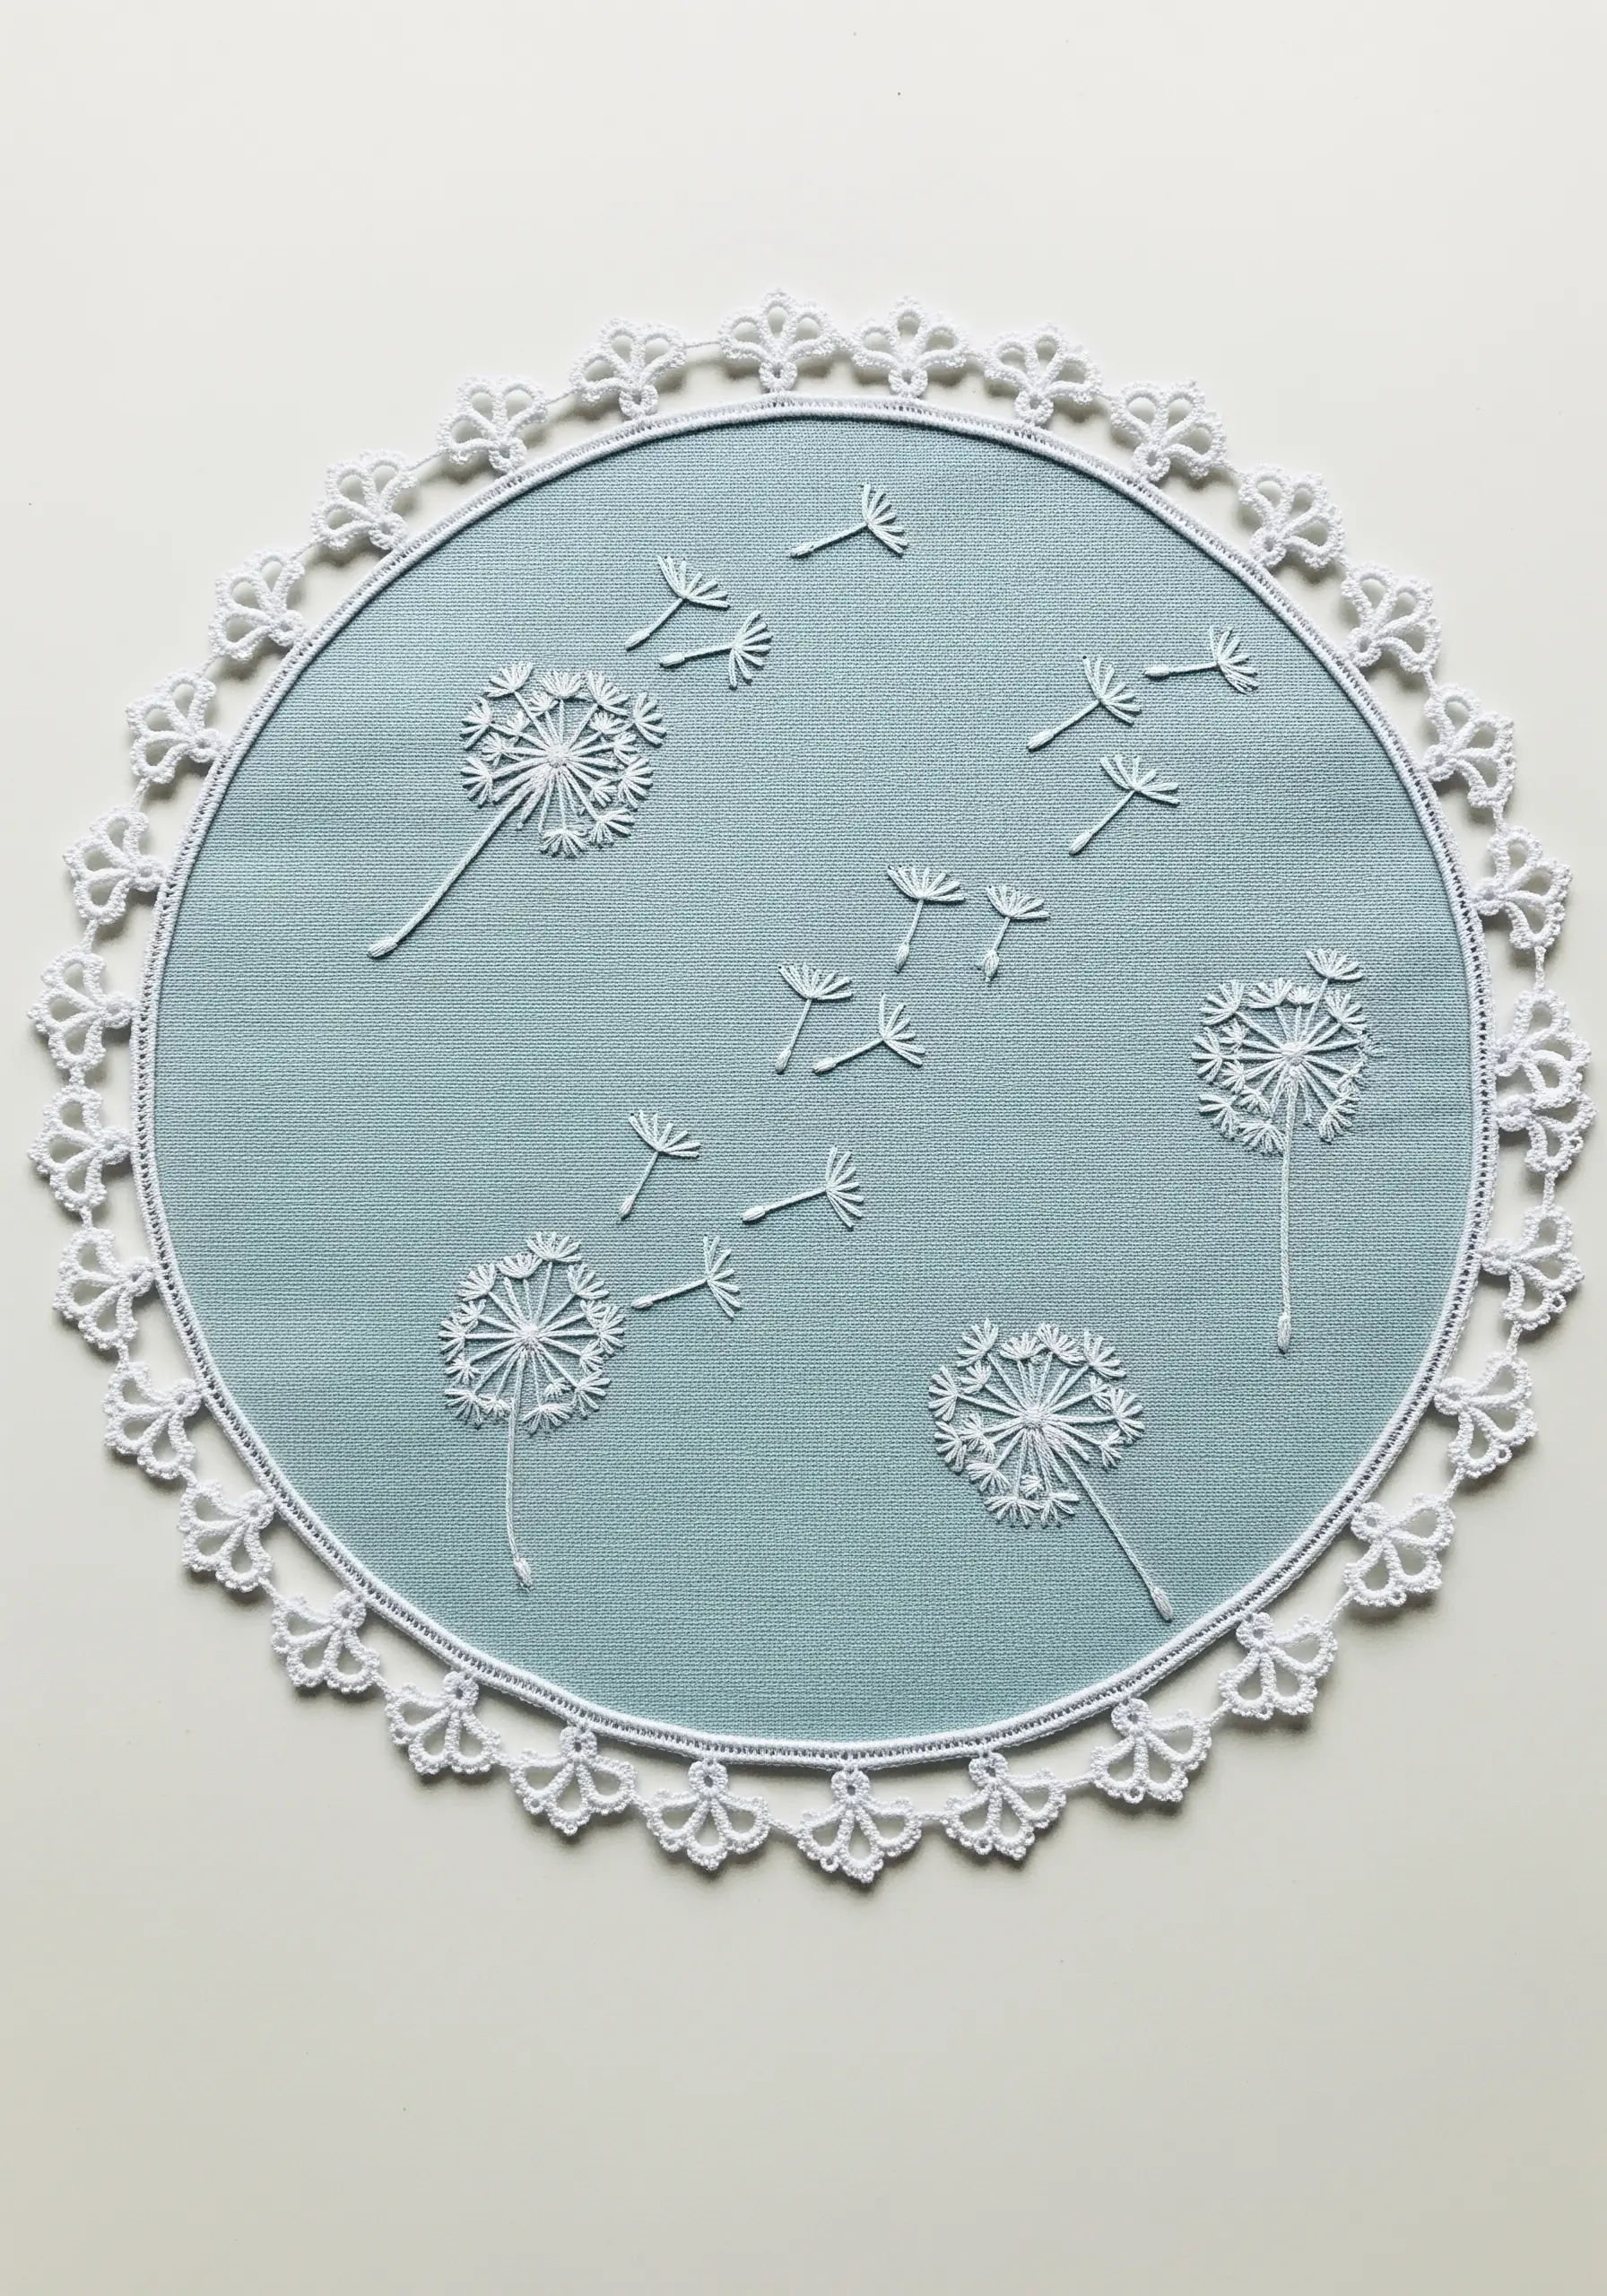
To create the illusion of dandelion seeds floating on the breeze, focus on stitch direction and spacing.
Use a crisp backstitch for the dandelion heads to create a clean, graphic look, then stitch the individual seeds using detached chain stitches.
Vary the length and angle of the straight-stitch stems on each seed to create a sense of dynamic, natural movement across the fabric.
Sticking to a single thread color on a contrasting background enhances the modern, airy feel of these whimsical embroidery patterns.
5. Integrate Embroidery Directly into Lace Panels
For a truly seamless look, use a lace insert as your primary canvas instead of just a border.
Before you begin, secure the lace panel to a layer of water-soluble stabilizer; this provides the tension needed for clean, dense stitching without puckering.
Use rich satin stitches to fill your motifs, ensuring full coverage so the colors appear vibrant and solid against the openwork of the lace.
This advanced technique transforms your piece into a cohesive work of art where embroidery and lace are one.
6. Use Dramatic Contrast for a Modern Floral Statement

Make your embroidery pop by stitching with light, vibrant colors on a dark, jewel-toned fabric like emerald green or deep navy.
To ensure your colors remain true and don’t get lost in the dark background, first lay down a base layer of white stitches in the same shape as your motif, then stitch your colors over it.
Pairing the composition with metallic accents, like the gold lace trim and chartreuse stems, elevates the design from simply pretty to truly striking.
These high-contrast metallic thread projects feel both modern and luxurious.
7. Explore Texture and Light with Monochrome Whitework
The beauty of whitework, or white-on-white embroidery, lies in the interplay of texture and shadow, not color.
Create dimension by combining different stitches: use padded satin stitch for bold, raised areas, pulled thread work for sheer, lacy sections, and tiny eyelet stitches for delicate accents.
Using a high-sheen cotton or rayon thread on a matte linen fabric will accentuate the light-catching properties of each stitch.
These monochrome thread embroidery ideas prove that a single color can create incredible depth.
8. Add Luminous Dimension with 3D Ribbon Stitches
When you want petals that physically lift off the fabric, switch from thread to silk ribbon.
Use a simple loop stitch or detached chain stitch with a wide silk ribbon to form the daisy petals; the ribbon’s body naturally creates volume and a soft sheen that thread cannot replicate.
Ground the 3D element by using traditional cotton floss for the finer details, like the textured French knot centers and slender backstitched stems.
This mix of materials adds both visual and tactile interest to your work.
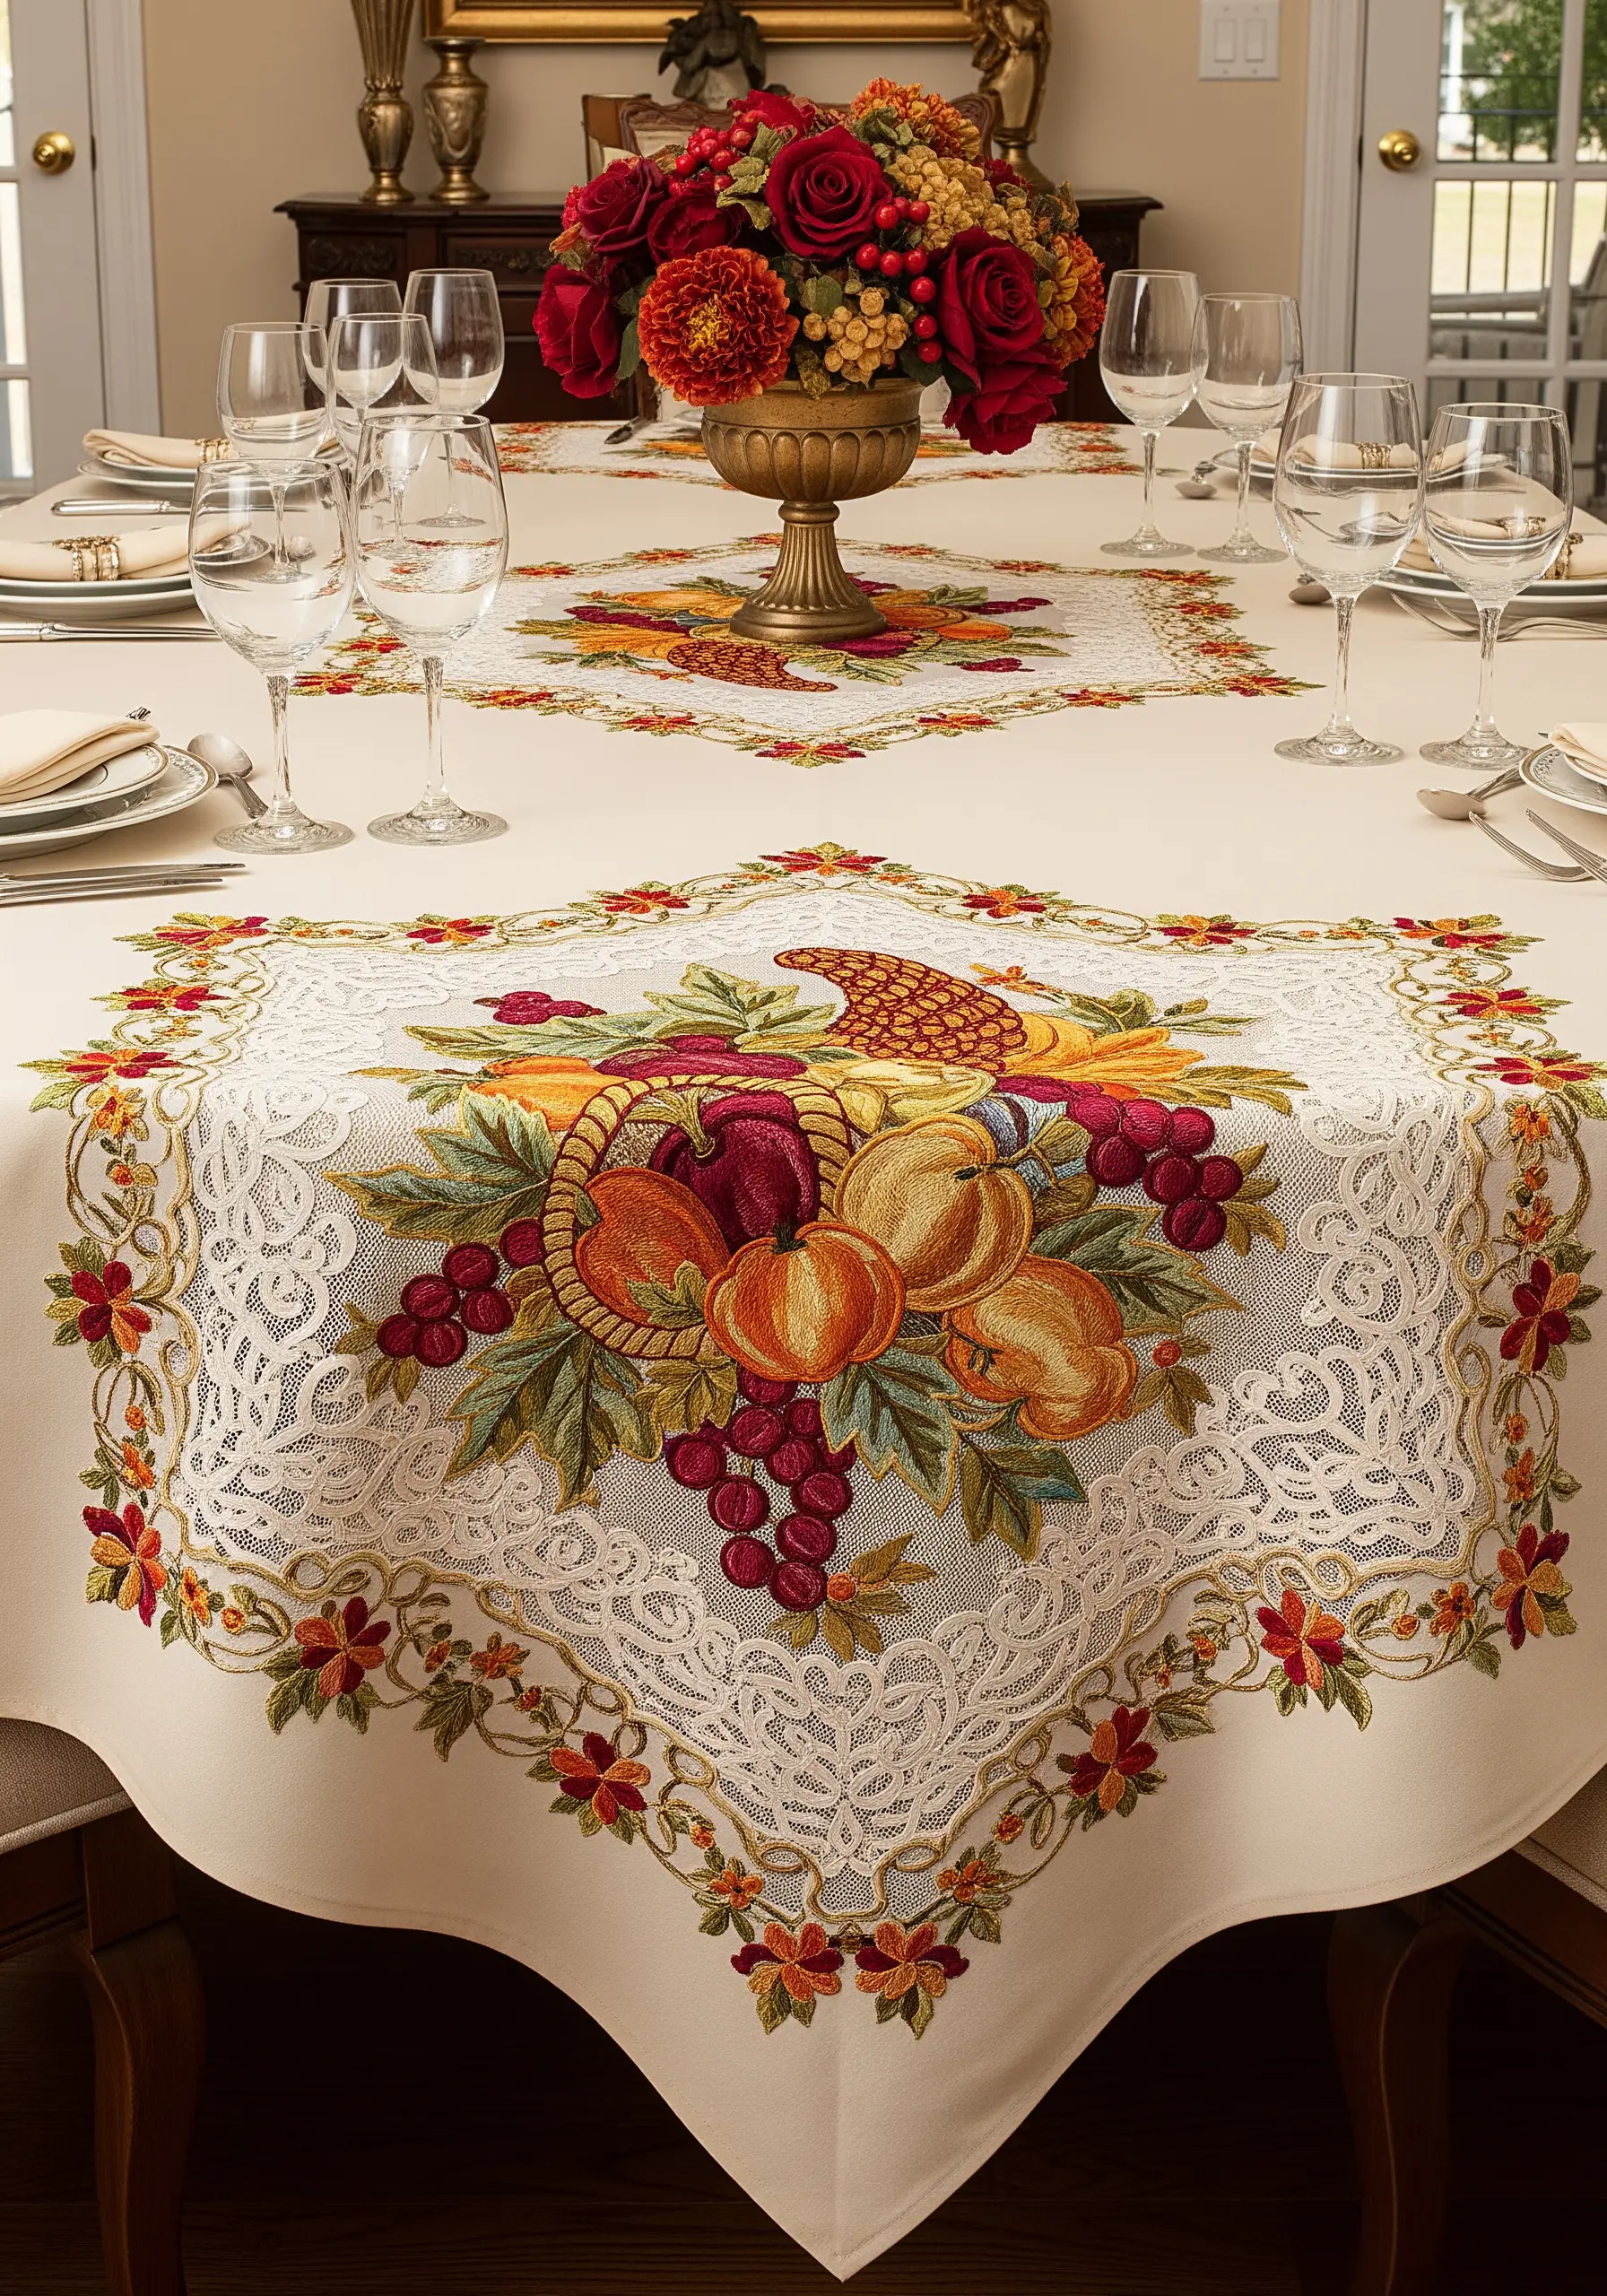
9. Create Playful Elegance with a Fruiting Vine Border
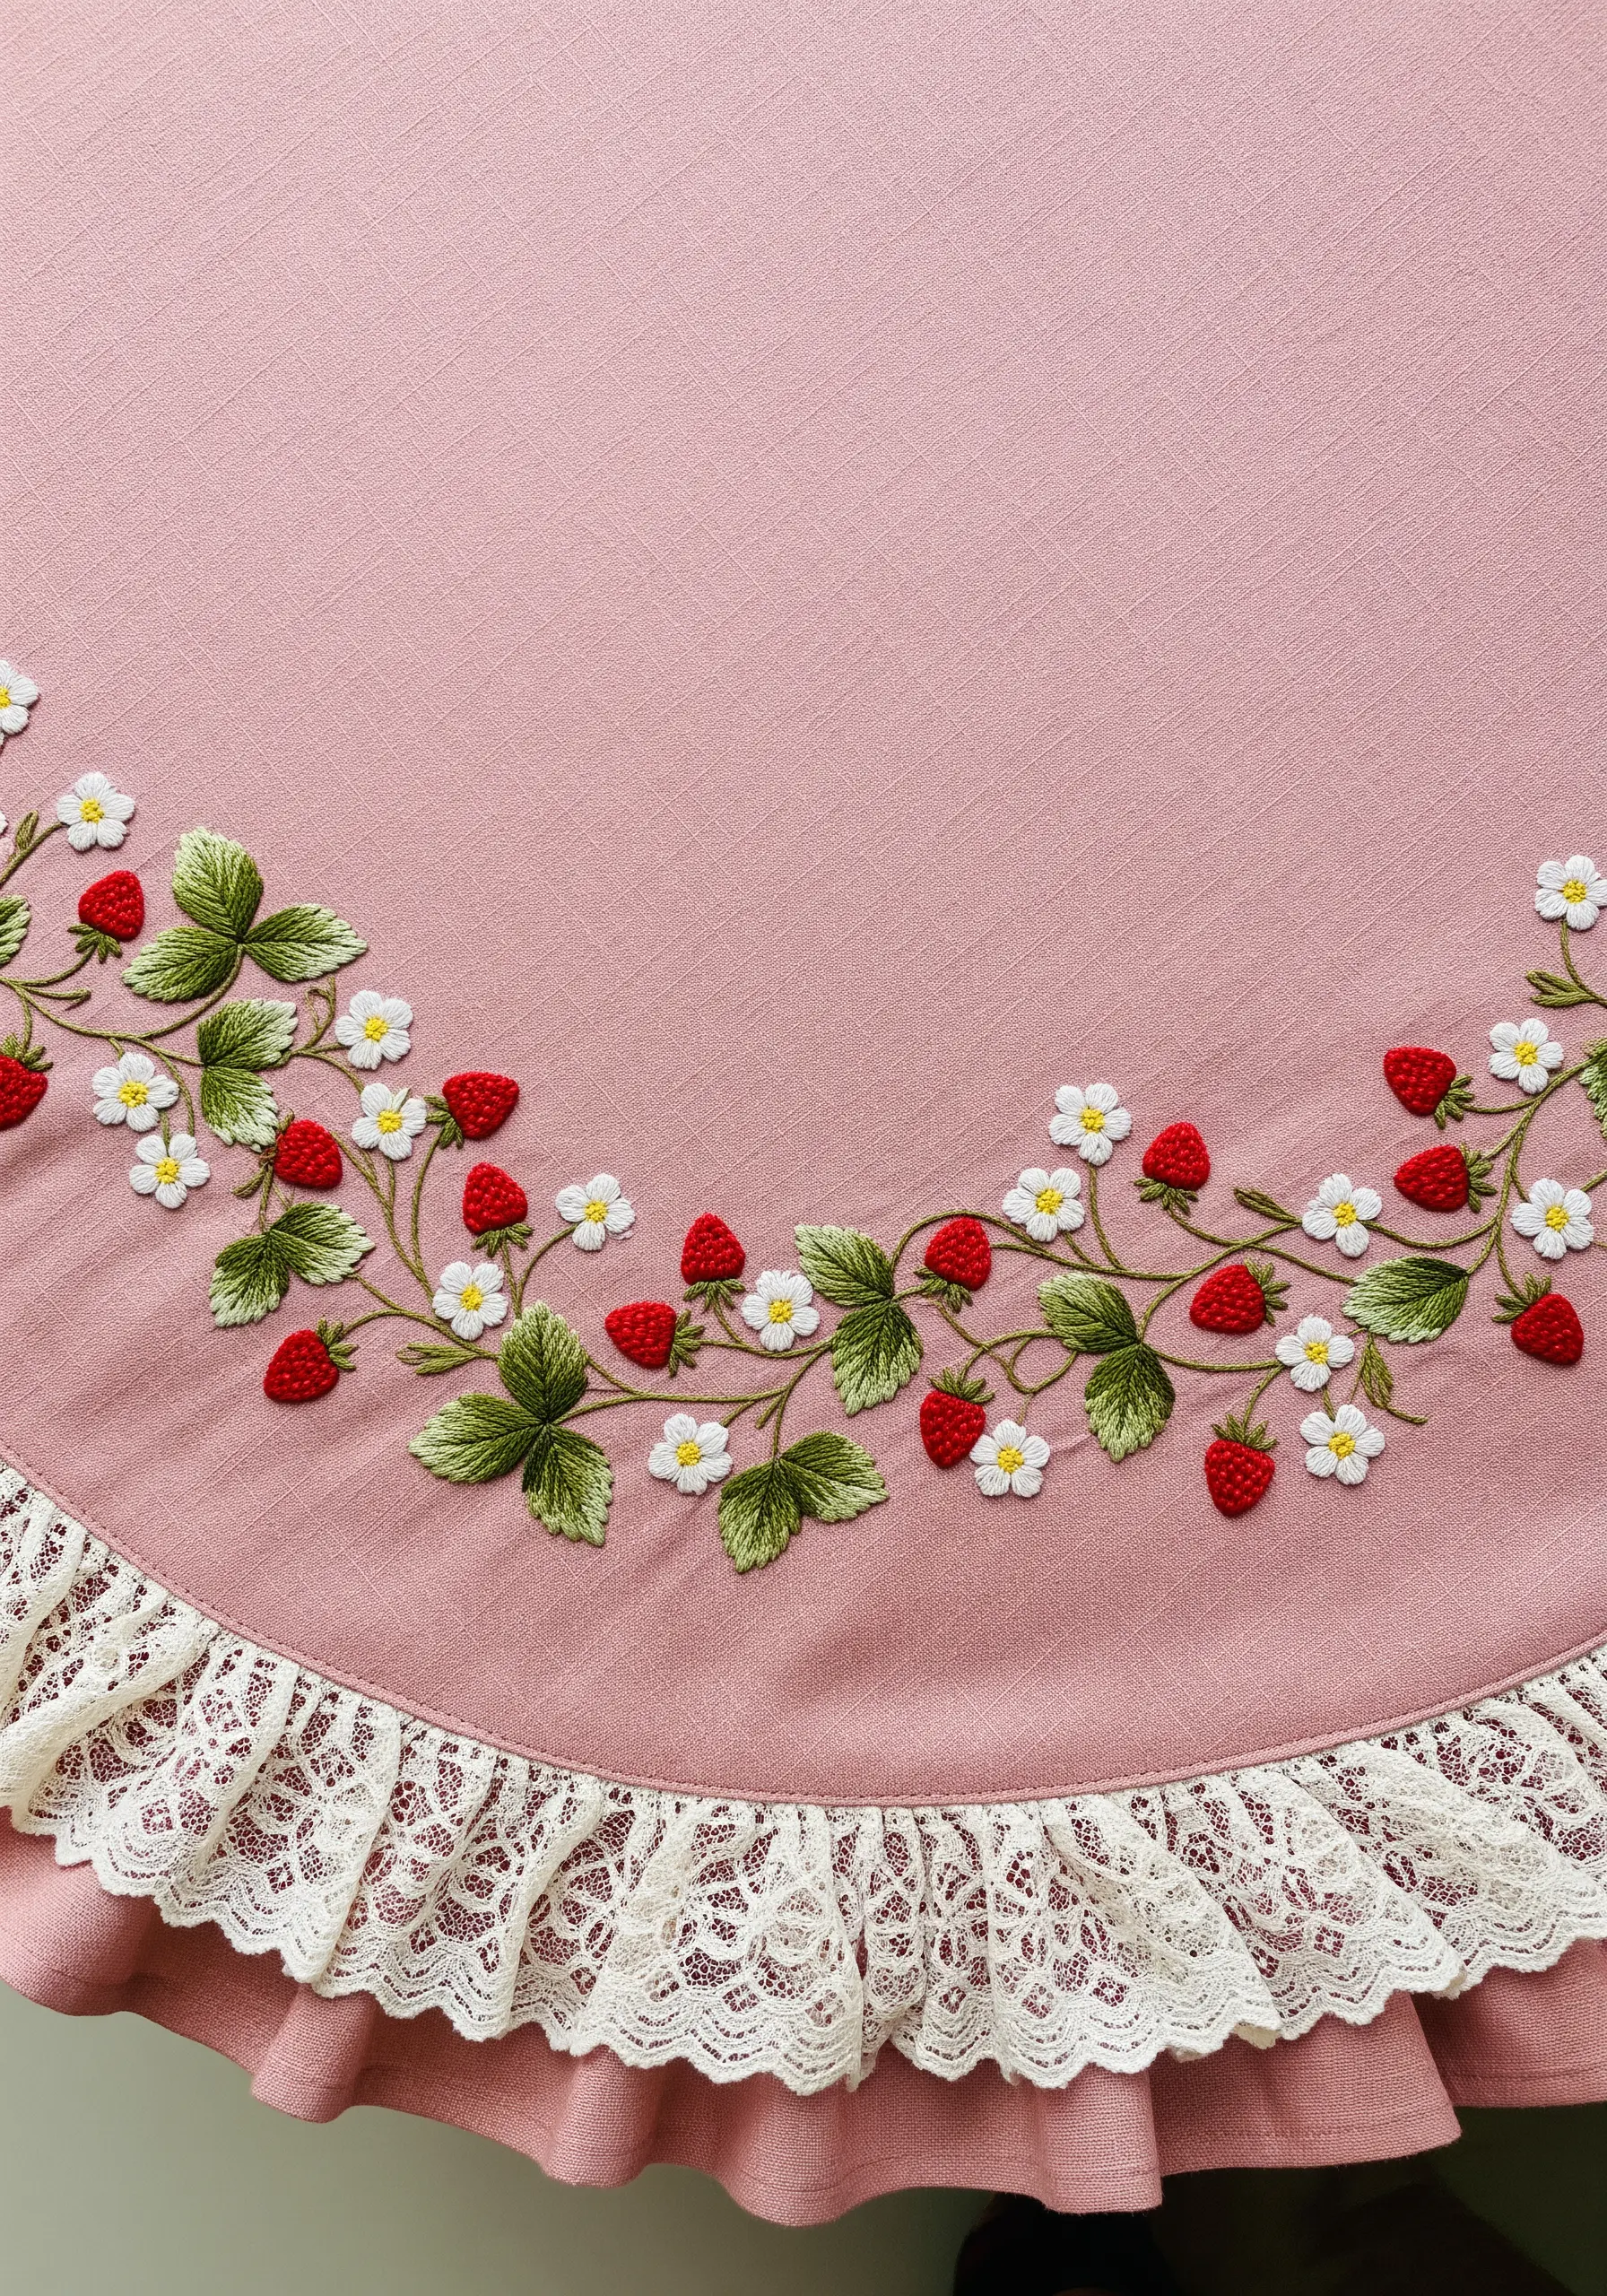
A meandering vine border adds a charming, organic frame to a round or straight-edged tablecloth.
To give the strawberries a plump, three-dimensional feel, use a padded satin stitch—a few small straight stitches laid underneath the final satin stitch layer will lift them from the surface.
Alternate the direction of the fishbone stitch on the leaves to mimic the way they catch light from different angles, adding subtle realism.
The ruffled lace trim complements the sweet, cottagecore aesthetic of the strawberry motif.
10. Embrace Geometric Glamour with Art Deco Motifs
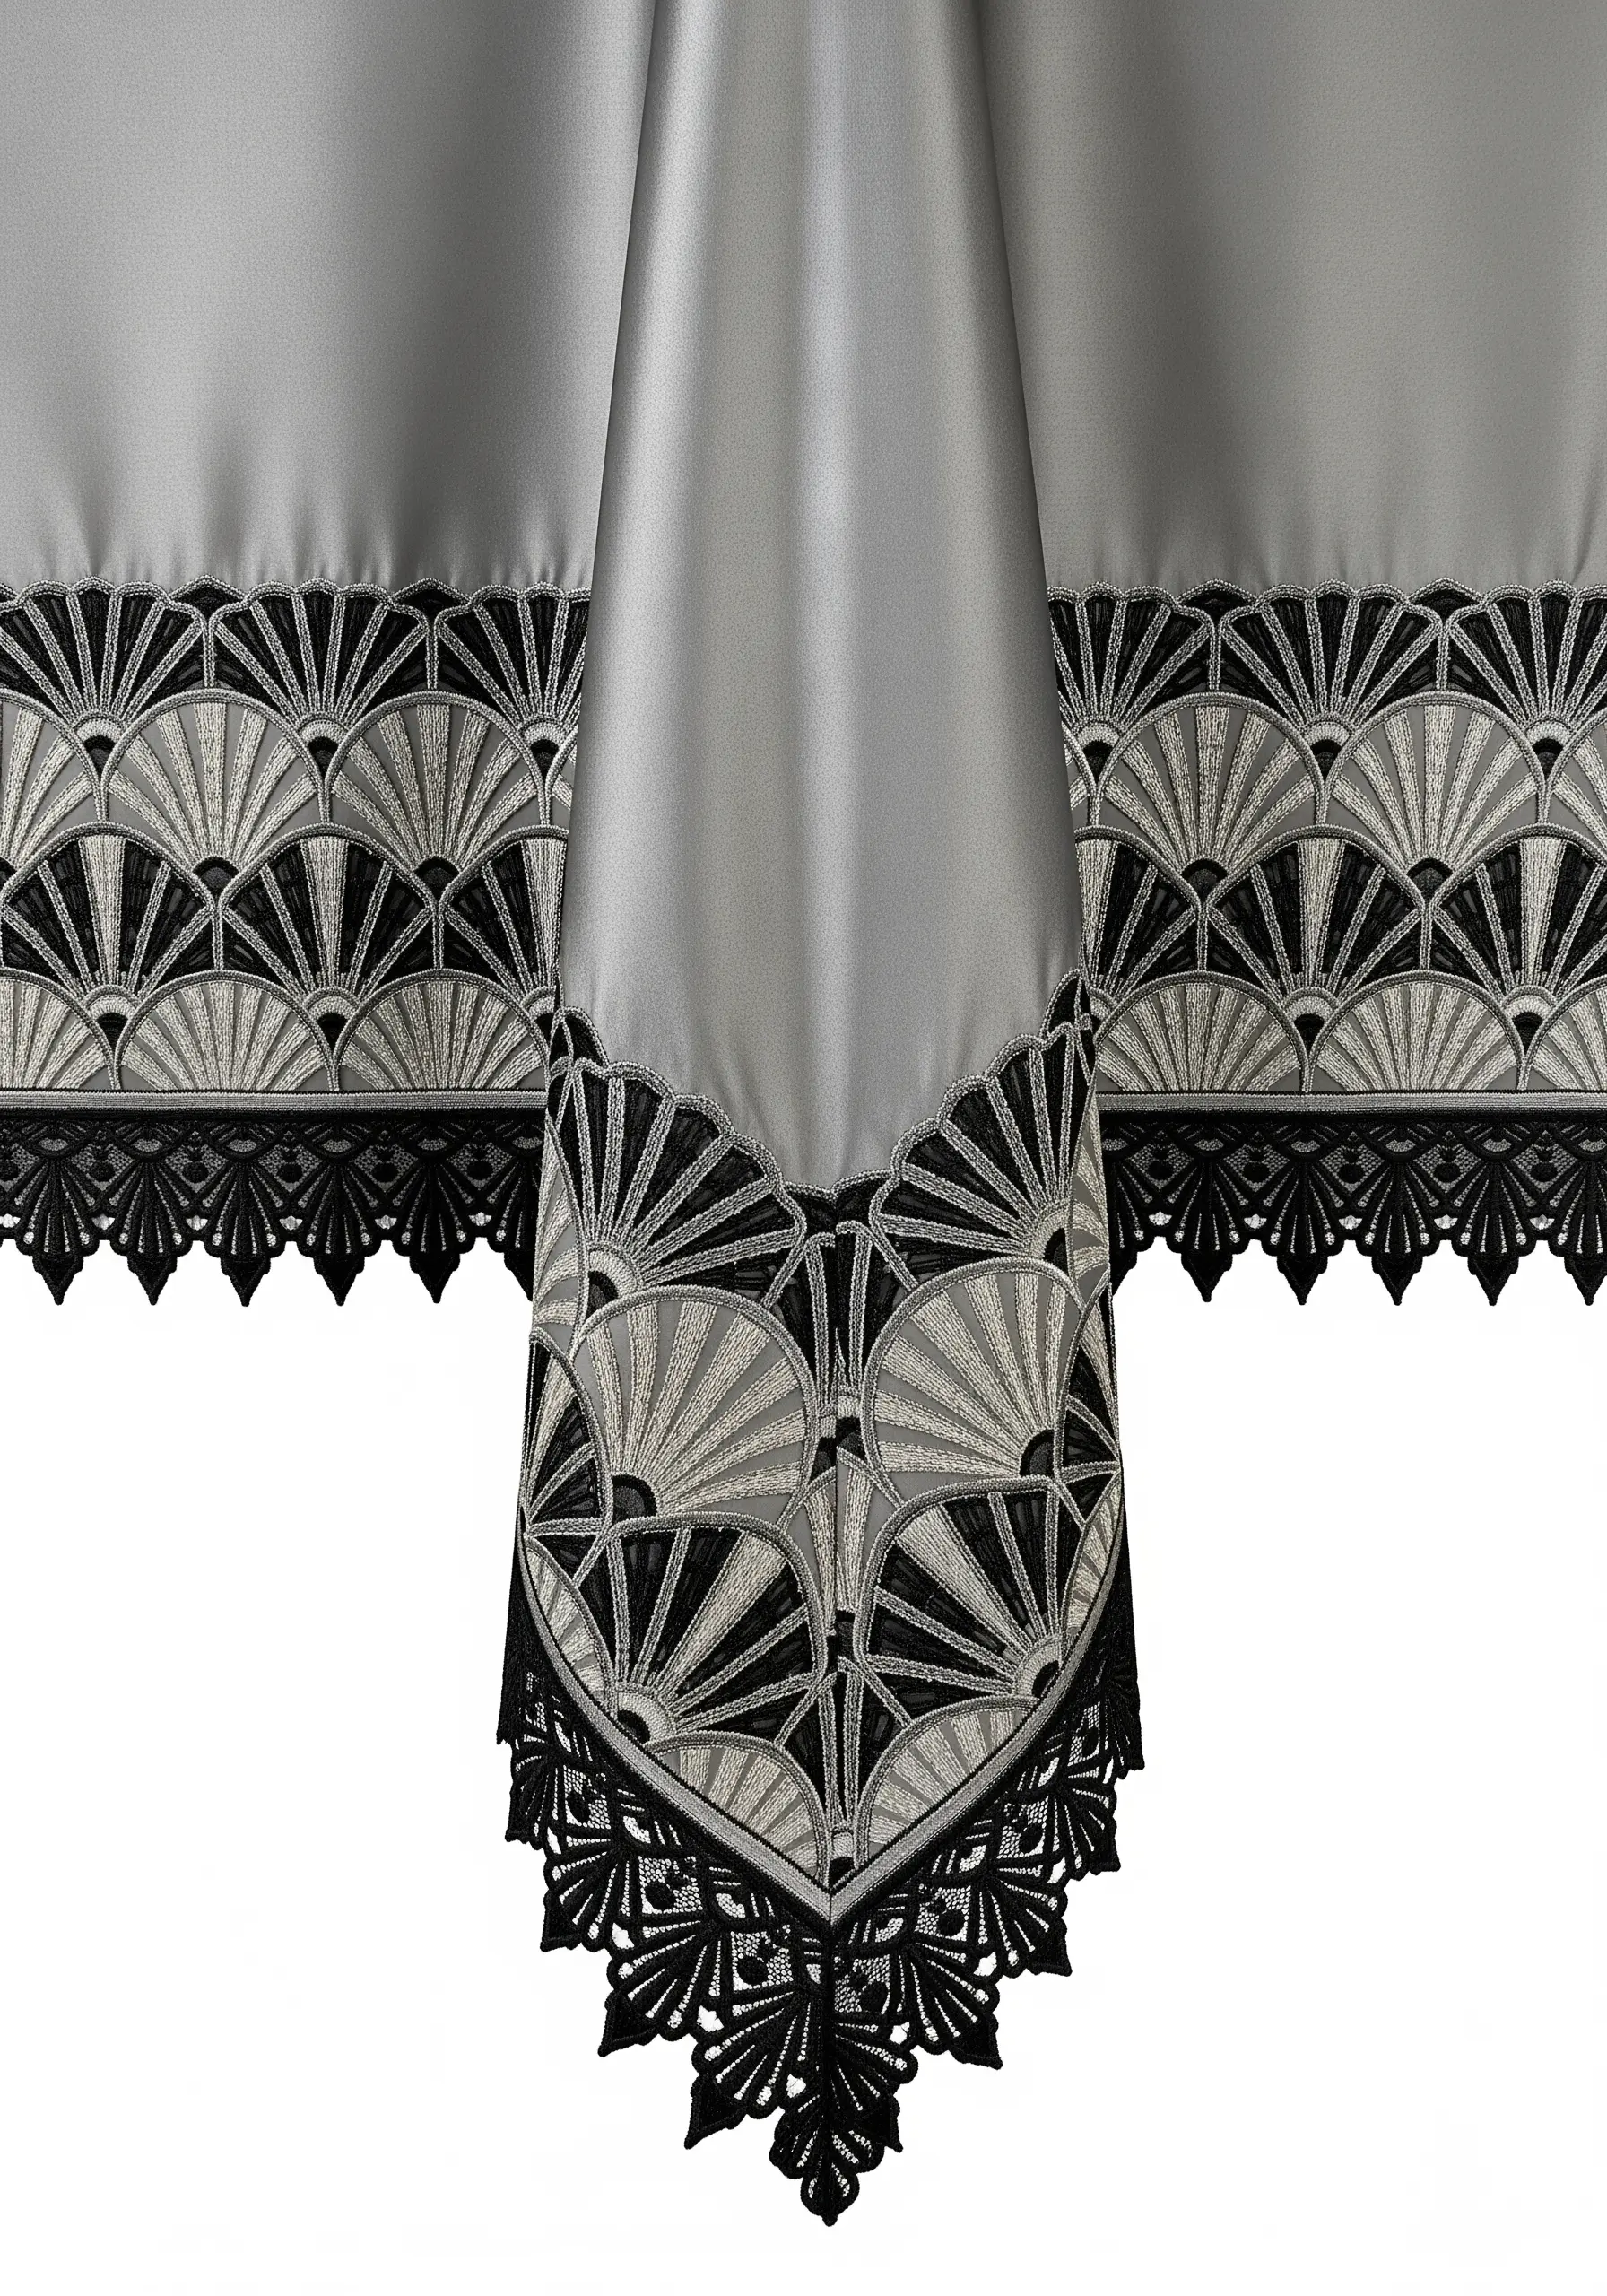
Channel the sophistication of the Art Deco era by focusing on strong symmetry, clean lines, and a limited color palette.
Use a high-sheen rayon or metallic thread for your fills to capture the glamorous, light-reflecting quality of the style.
Define each shape with a crisp, fine outline in black thread using a single-strand backstitch—this precision is key to the Art Deco look.
The sharp points of the lace border should echo the geometric nature of the embroidery, creating a cohesive design.
11. Achieve Intricate Detail with Counted-Thread Embroidery
Create complex, geometric patterns that look incredibly detailed by using a counted-thread technique like blackwork or cross-stitch.
These styles rely on building intricate designs from simple, repeated stitches on an even-weave fabric like linen or Aida cloth.
By using just one or two colors, you allow the texture and pattern of the stitches to become the main focus, resulting in a design that feels both modern and timeless.
These two-color embroidery ideas prove that simplicity can be profoundly elegant.
12. Capture Iridescence with Strategic Color Blending
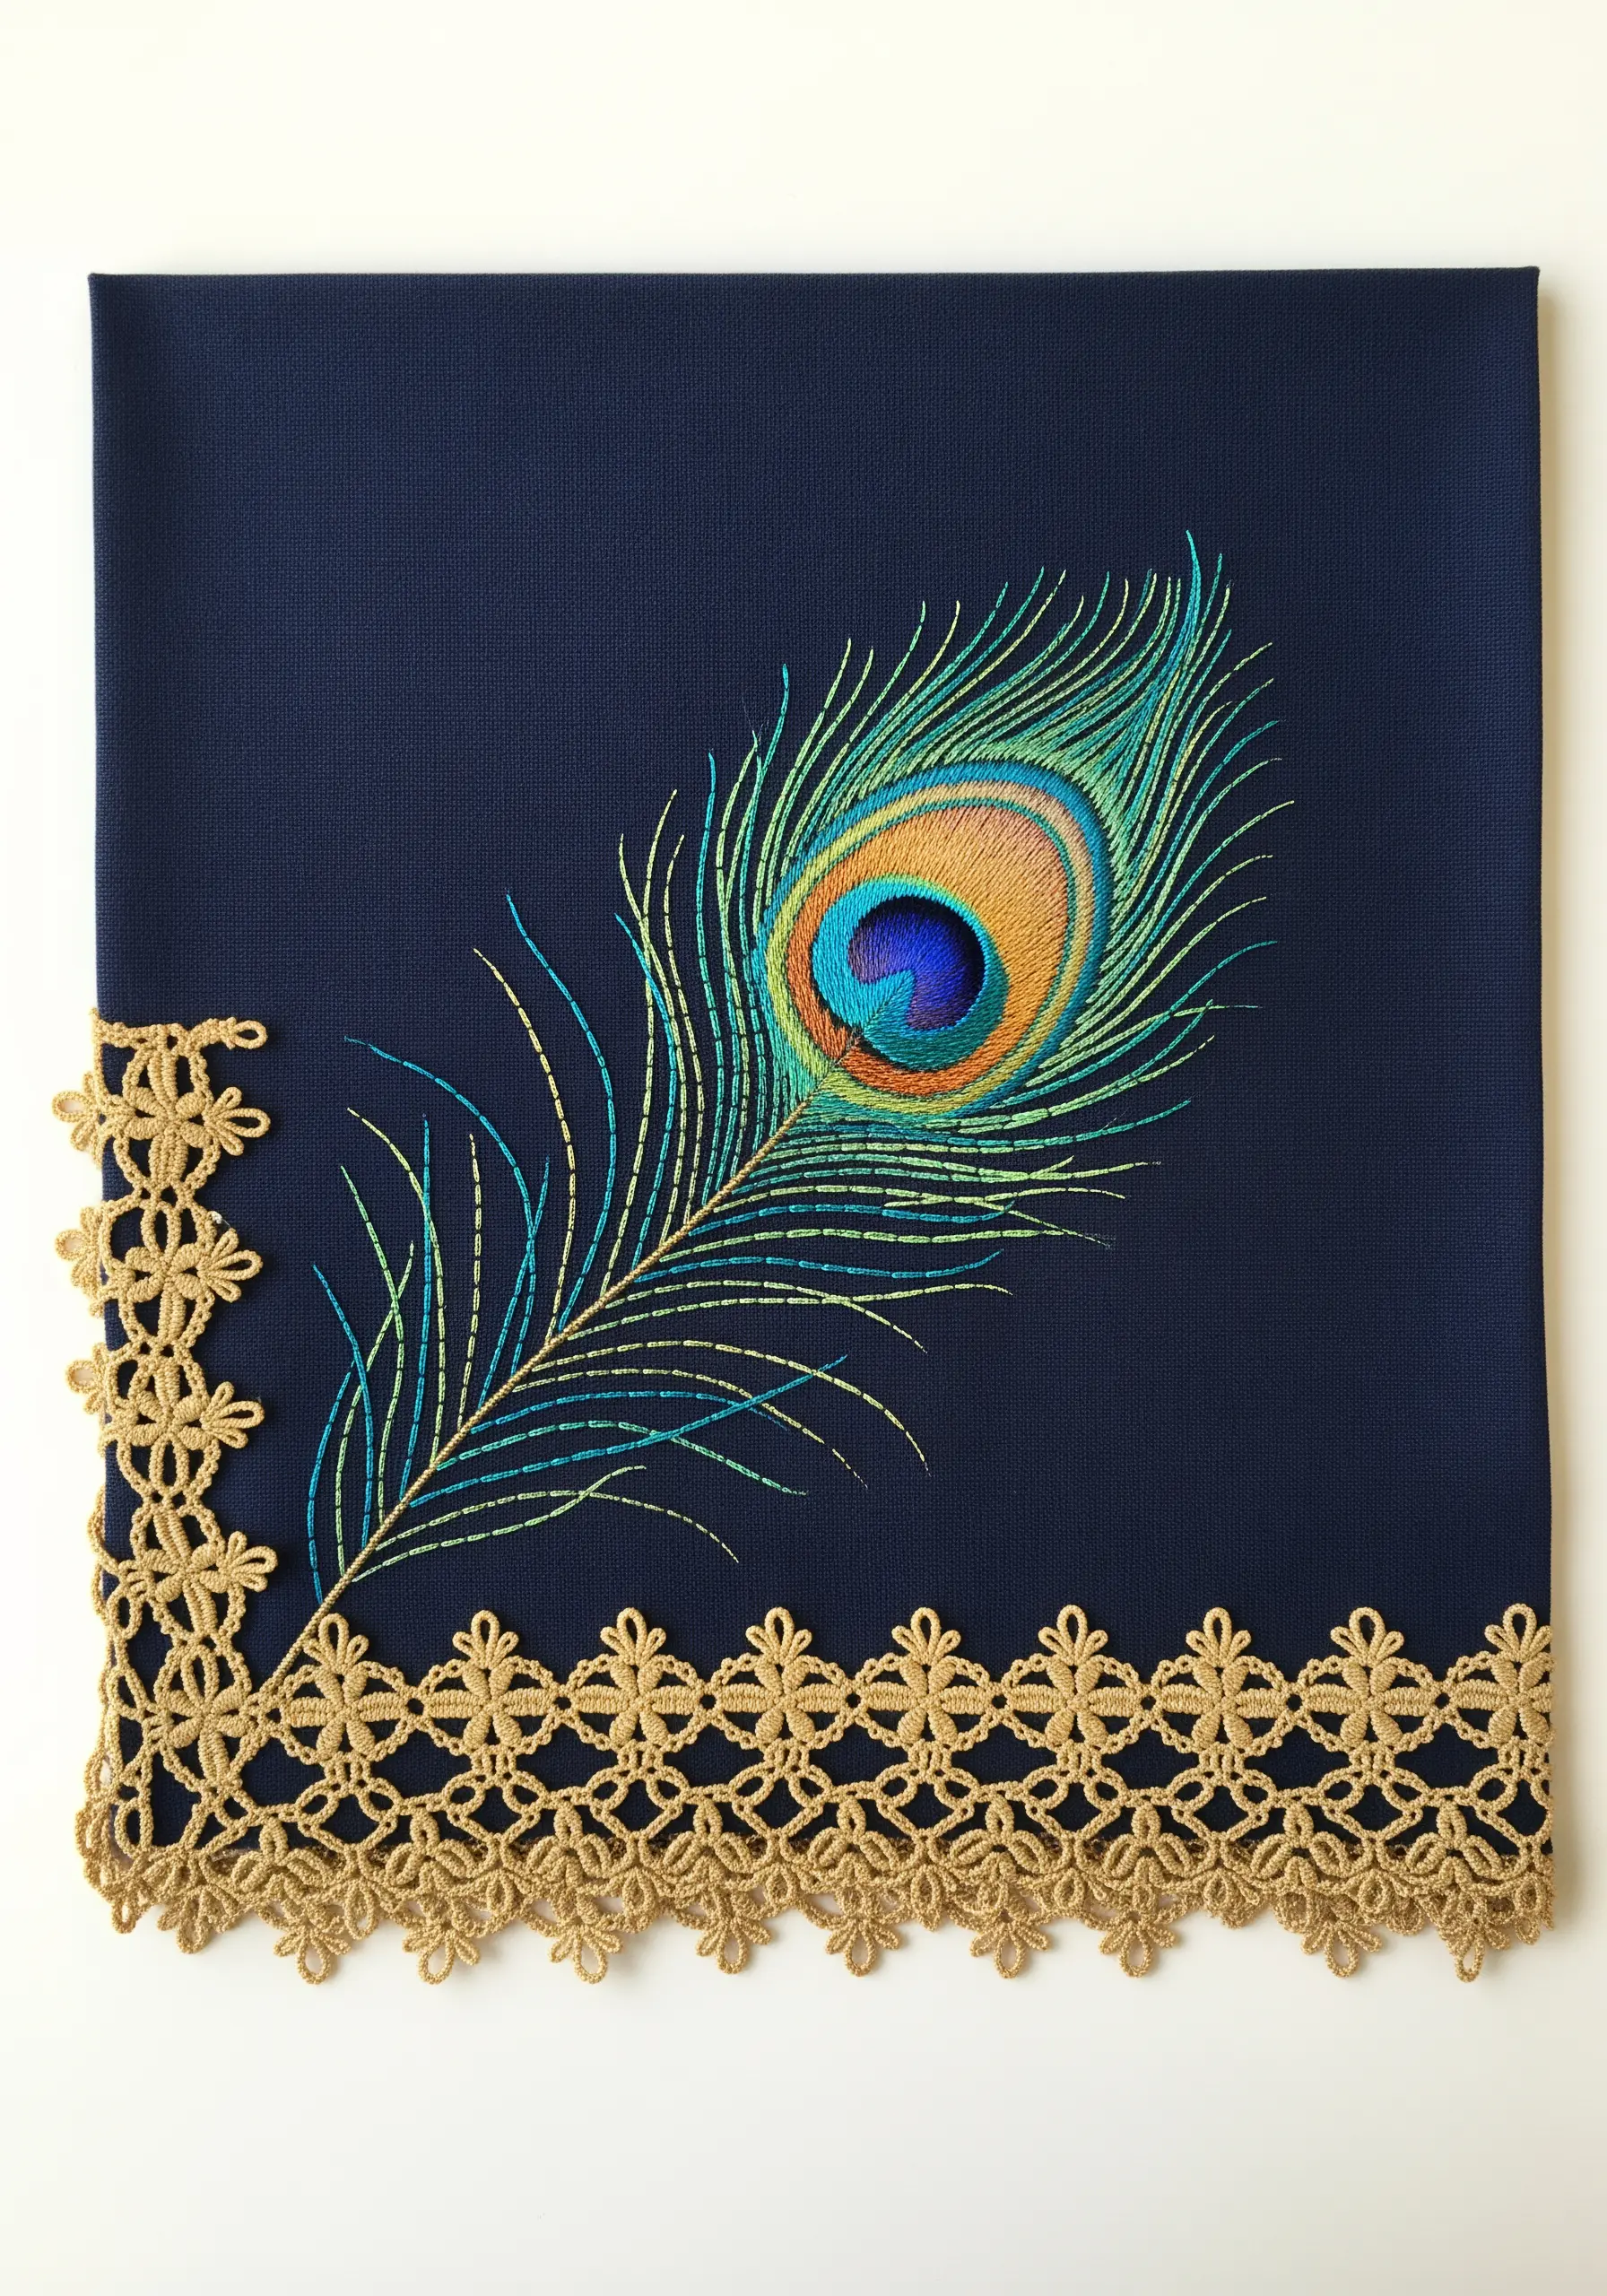
To mimic the shimmering quality of a peacock feather, thoughtful color placement is everything.
Work in sections, using a single strand of thread and the long-and-short stitch to seamlessly blend adjacent colors—like teal into royal blue, or copper into gold.
For the long, wispy barbs, use single, decisive straight stitches, allowing the dark fabric to show through to create a light, airy texture.
These color blend stitch ideas turn thread into a painterly medium.
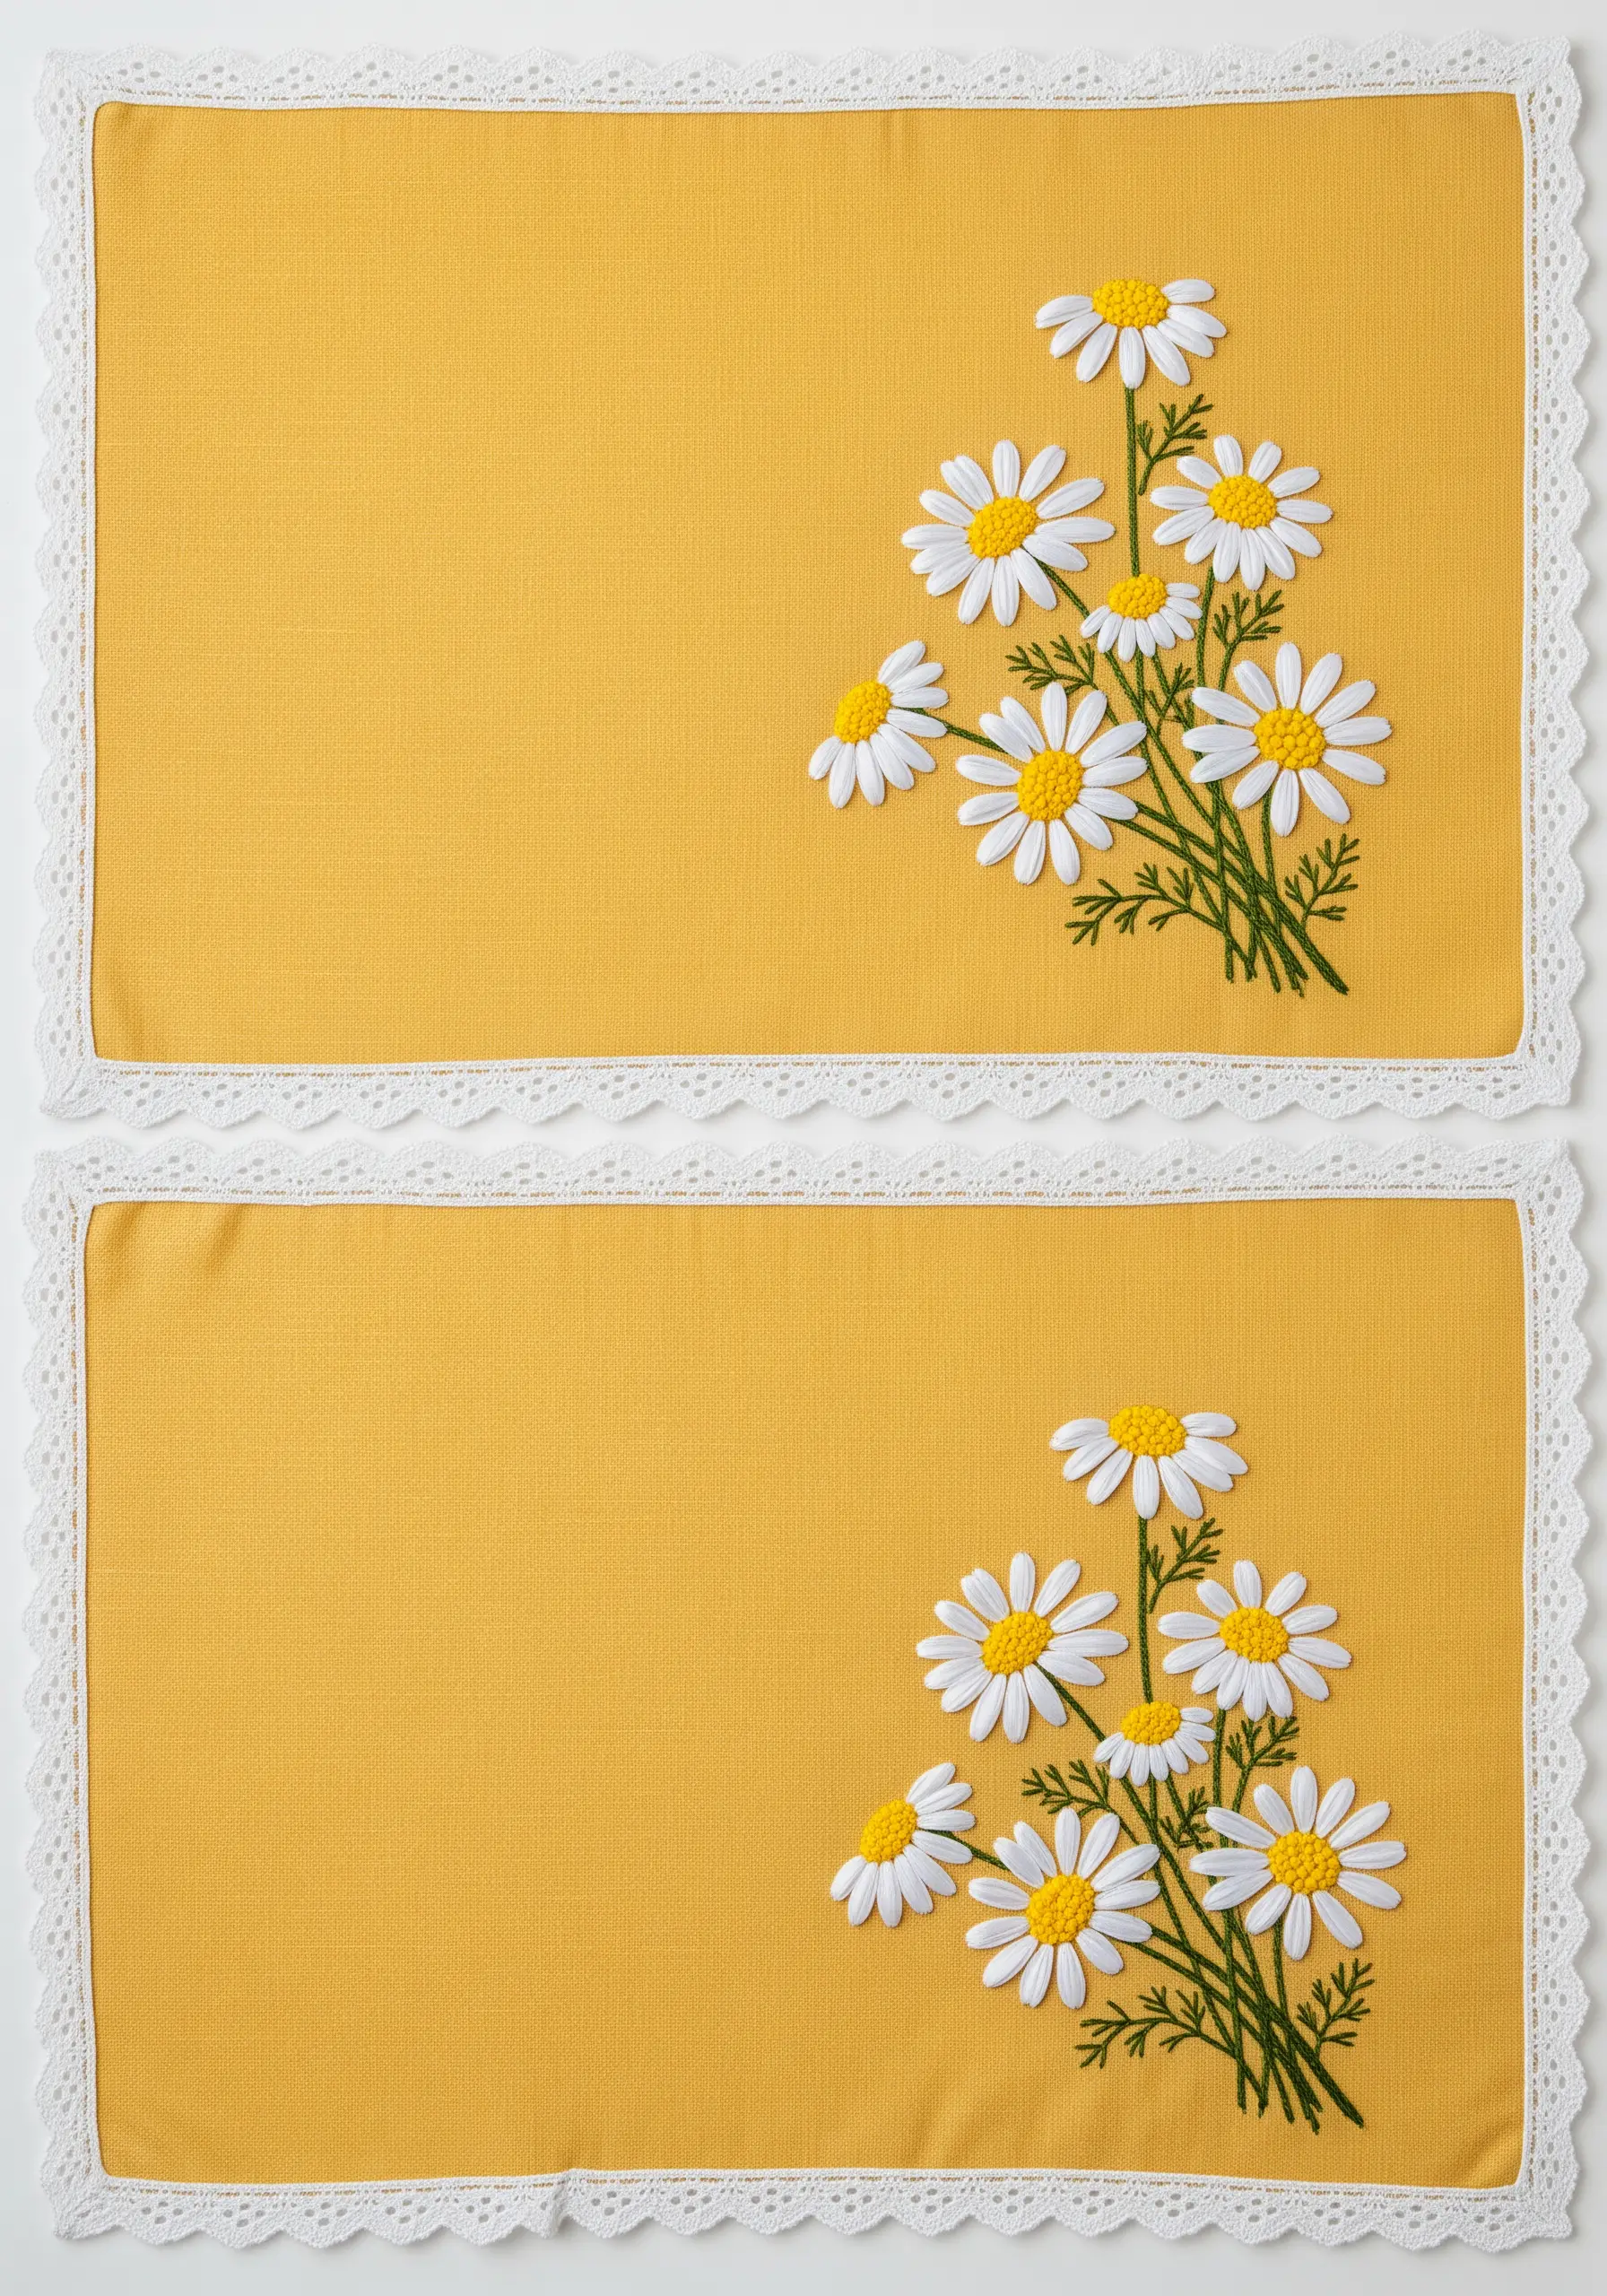
13. Frame Your Table with a Meadow of Wildflowers
A full floral border creates a stunning frame for your tablescape, and the key to a natural look is variety.
Combine flowers of different shapes, sizes, and heights—like bold poppies, delicate daisies, and tall cornflowers—to create a dynamic rhythm.
Use a mix of simple, classic stitches to build your meadow; lazy daisy for petals, French knots for centers, and satin stitch for bolder blooms.
This approach allows you to showcase a beautiful variety of hand-embroidered flower stitches in one cohesive piece.
14. Use Asymmetrical Placement for Modern Minimalism
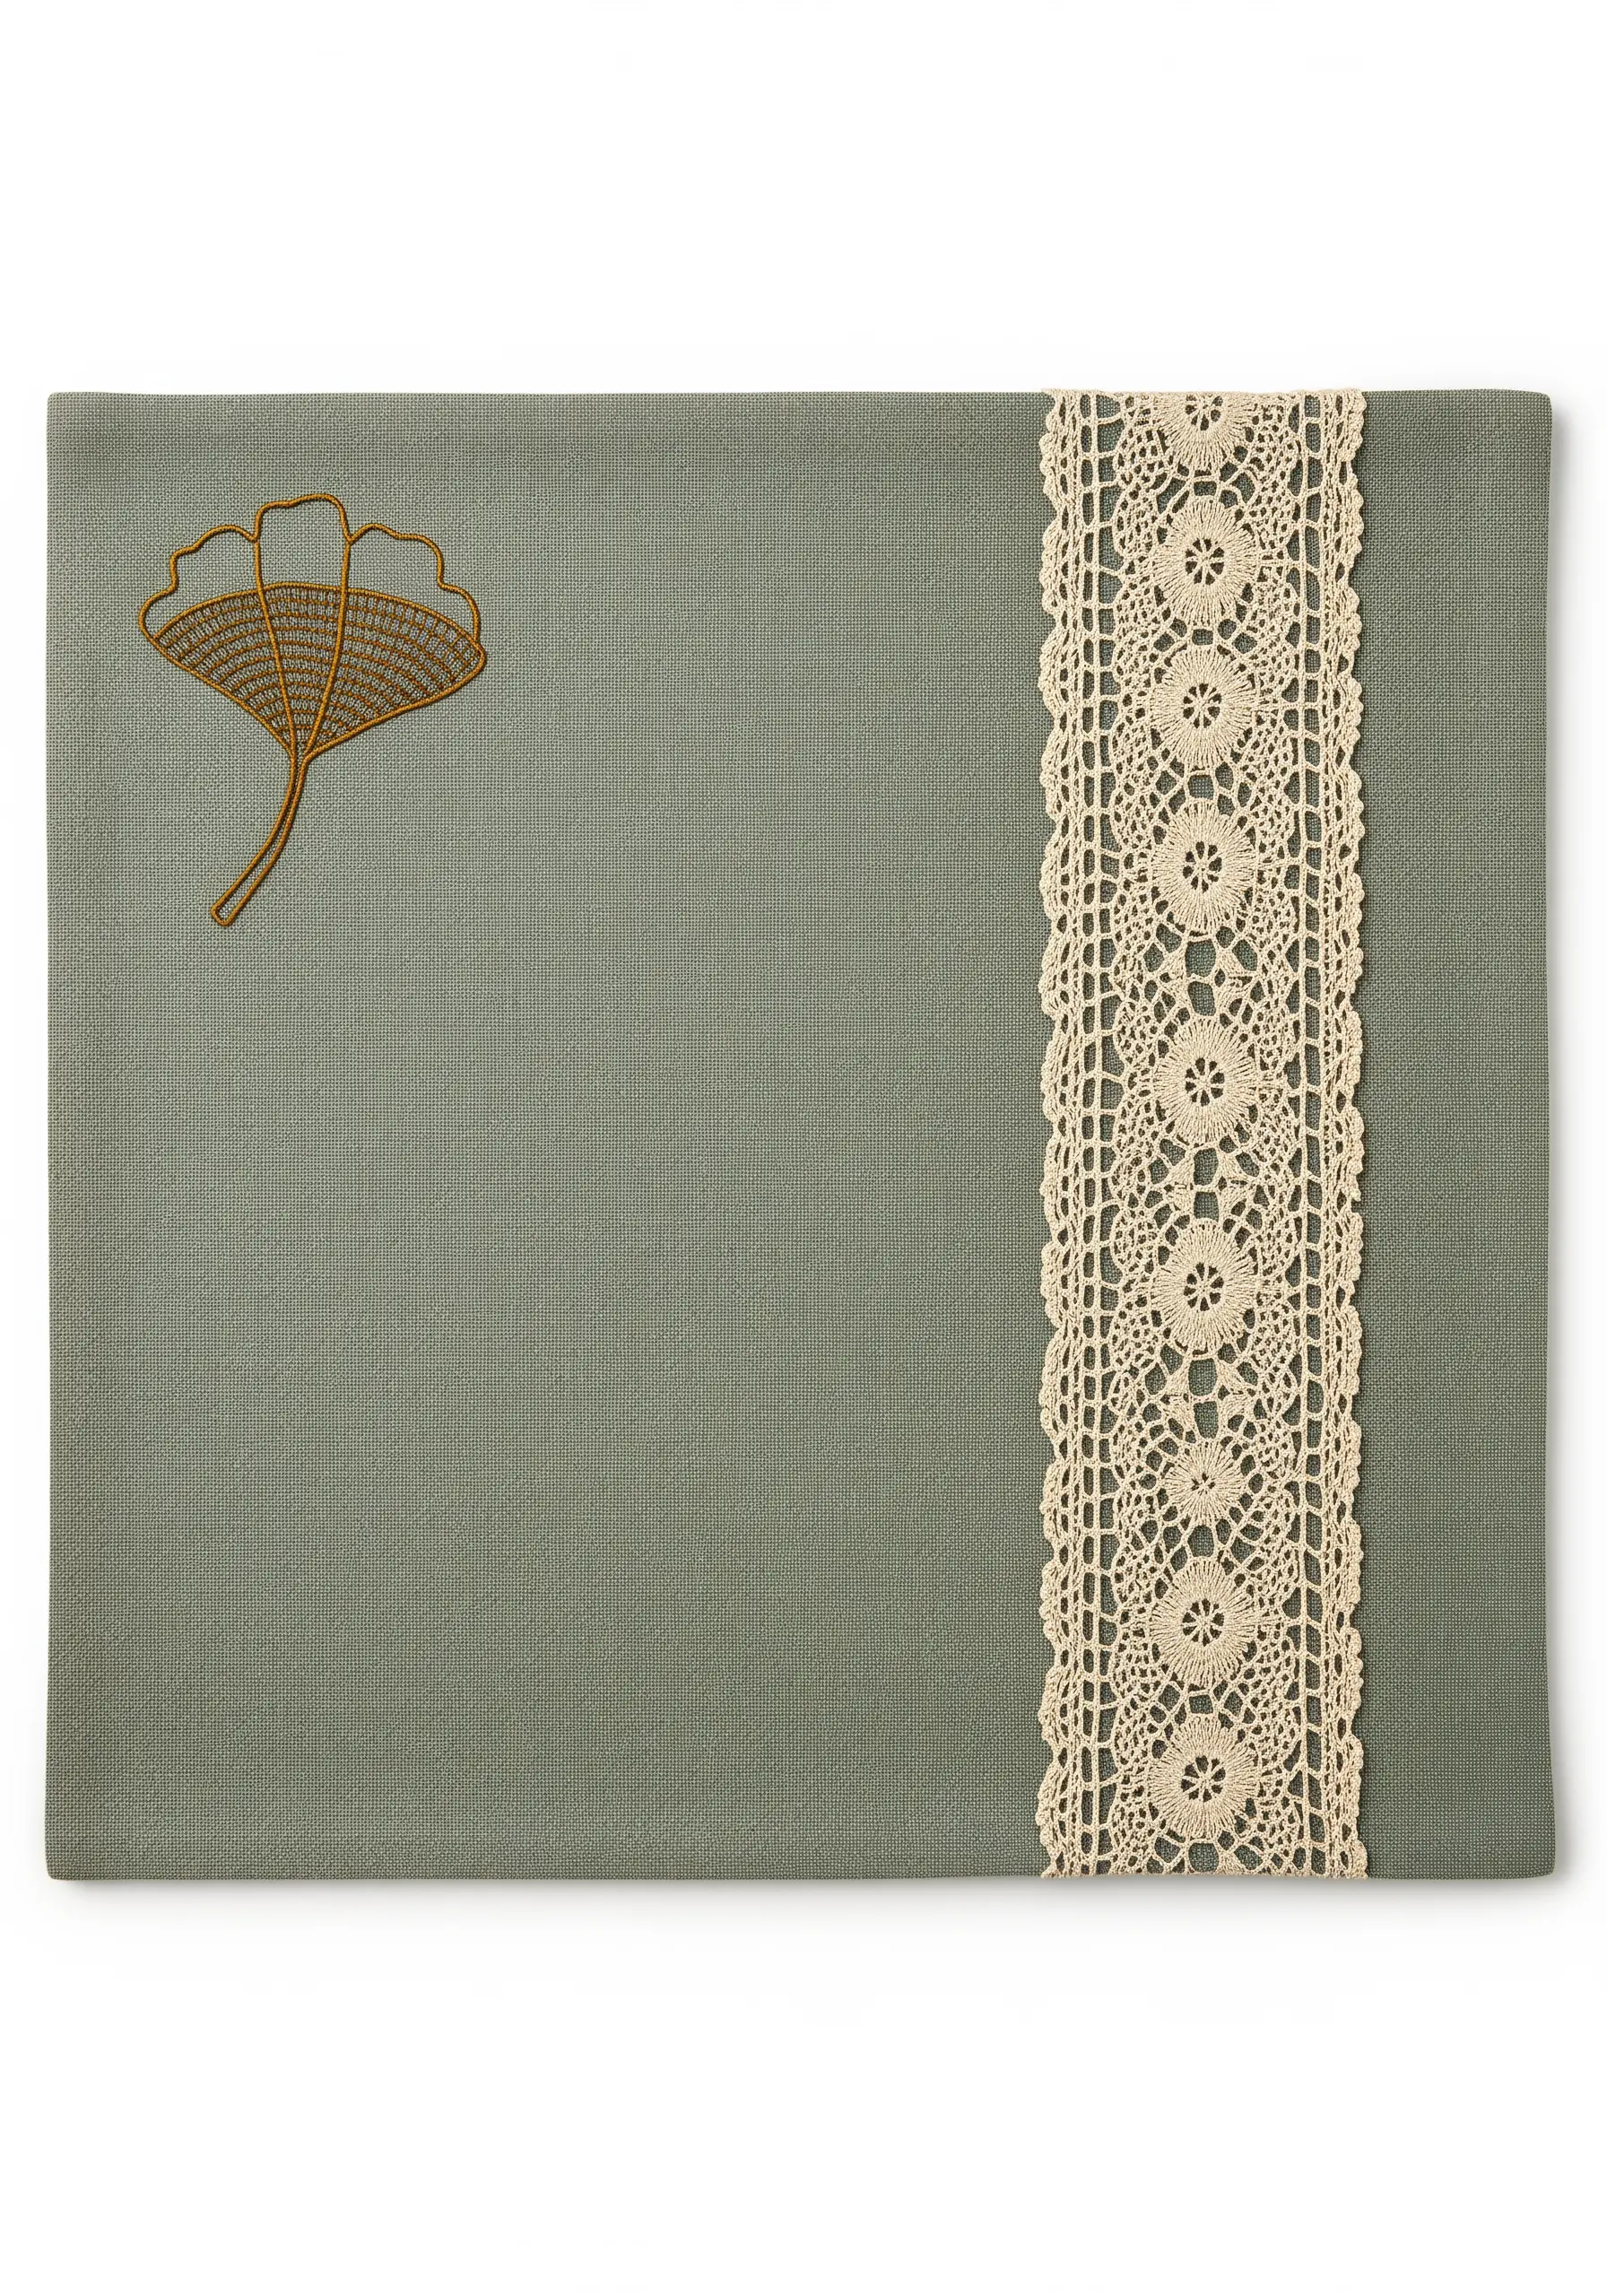
Create a sophisticated, contemporary look by embracing negative space.
Instead of centering your design, place a single, graphic motif in one corner and balance it with a textural element, like a vertical lace strip, on the opposite side.
For a motif like a ginkgo leaf, use rows of stem stitch or split stitch instead of satin stitch; this creates a subtle texture that encourages a closer look.
This intentional, asymmetrical composition feels artful and breathes modern life into classic minimalist embroidery.
15. Create Lifelike Texture with Precise Thread Painting
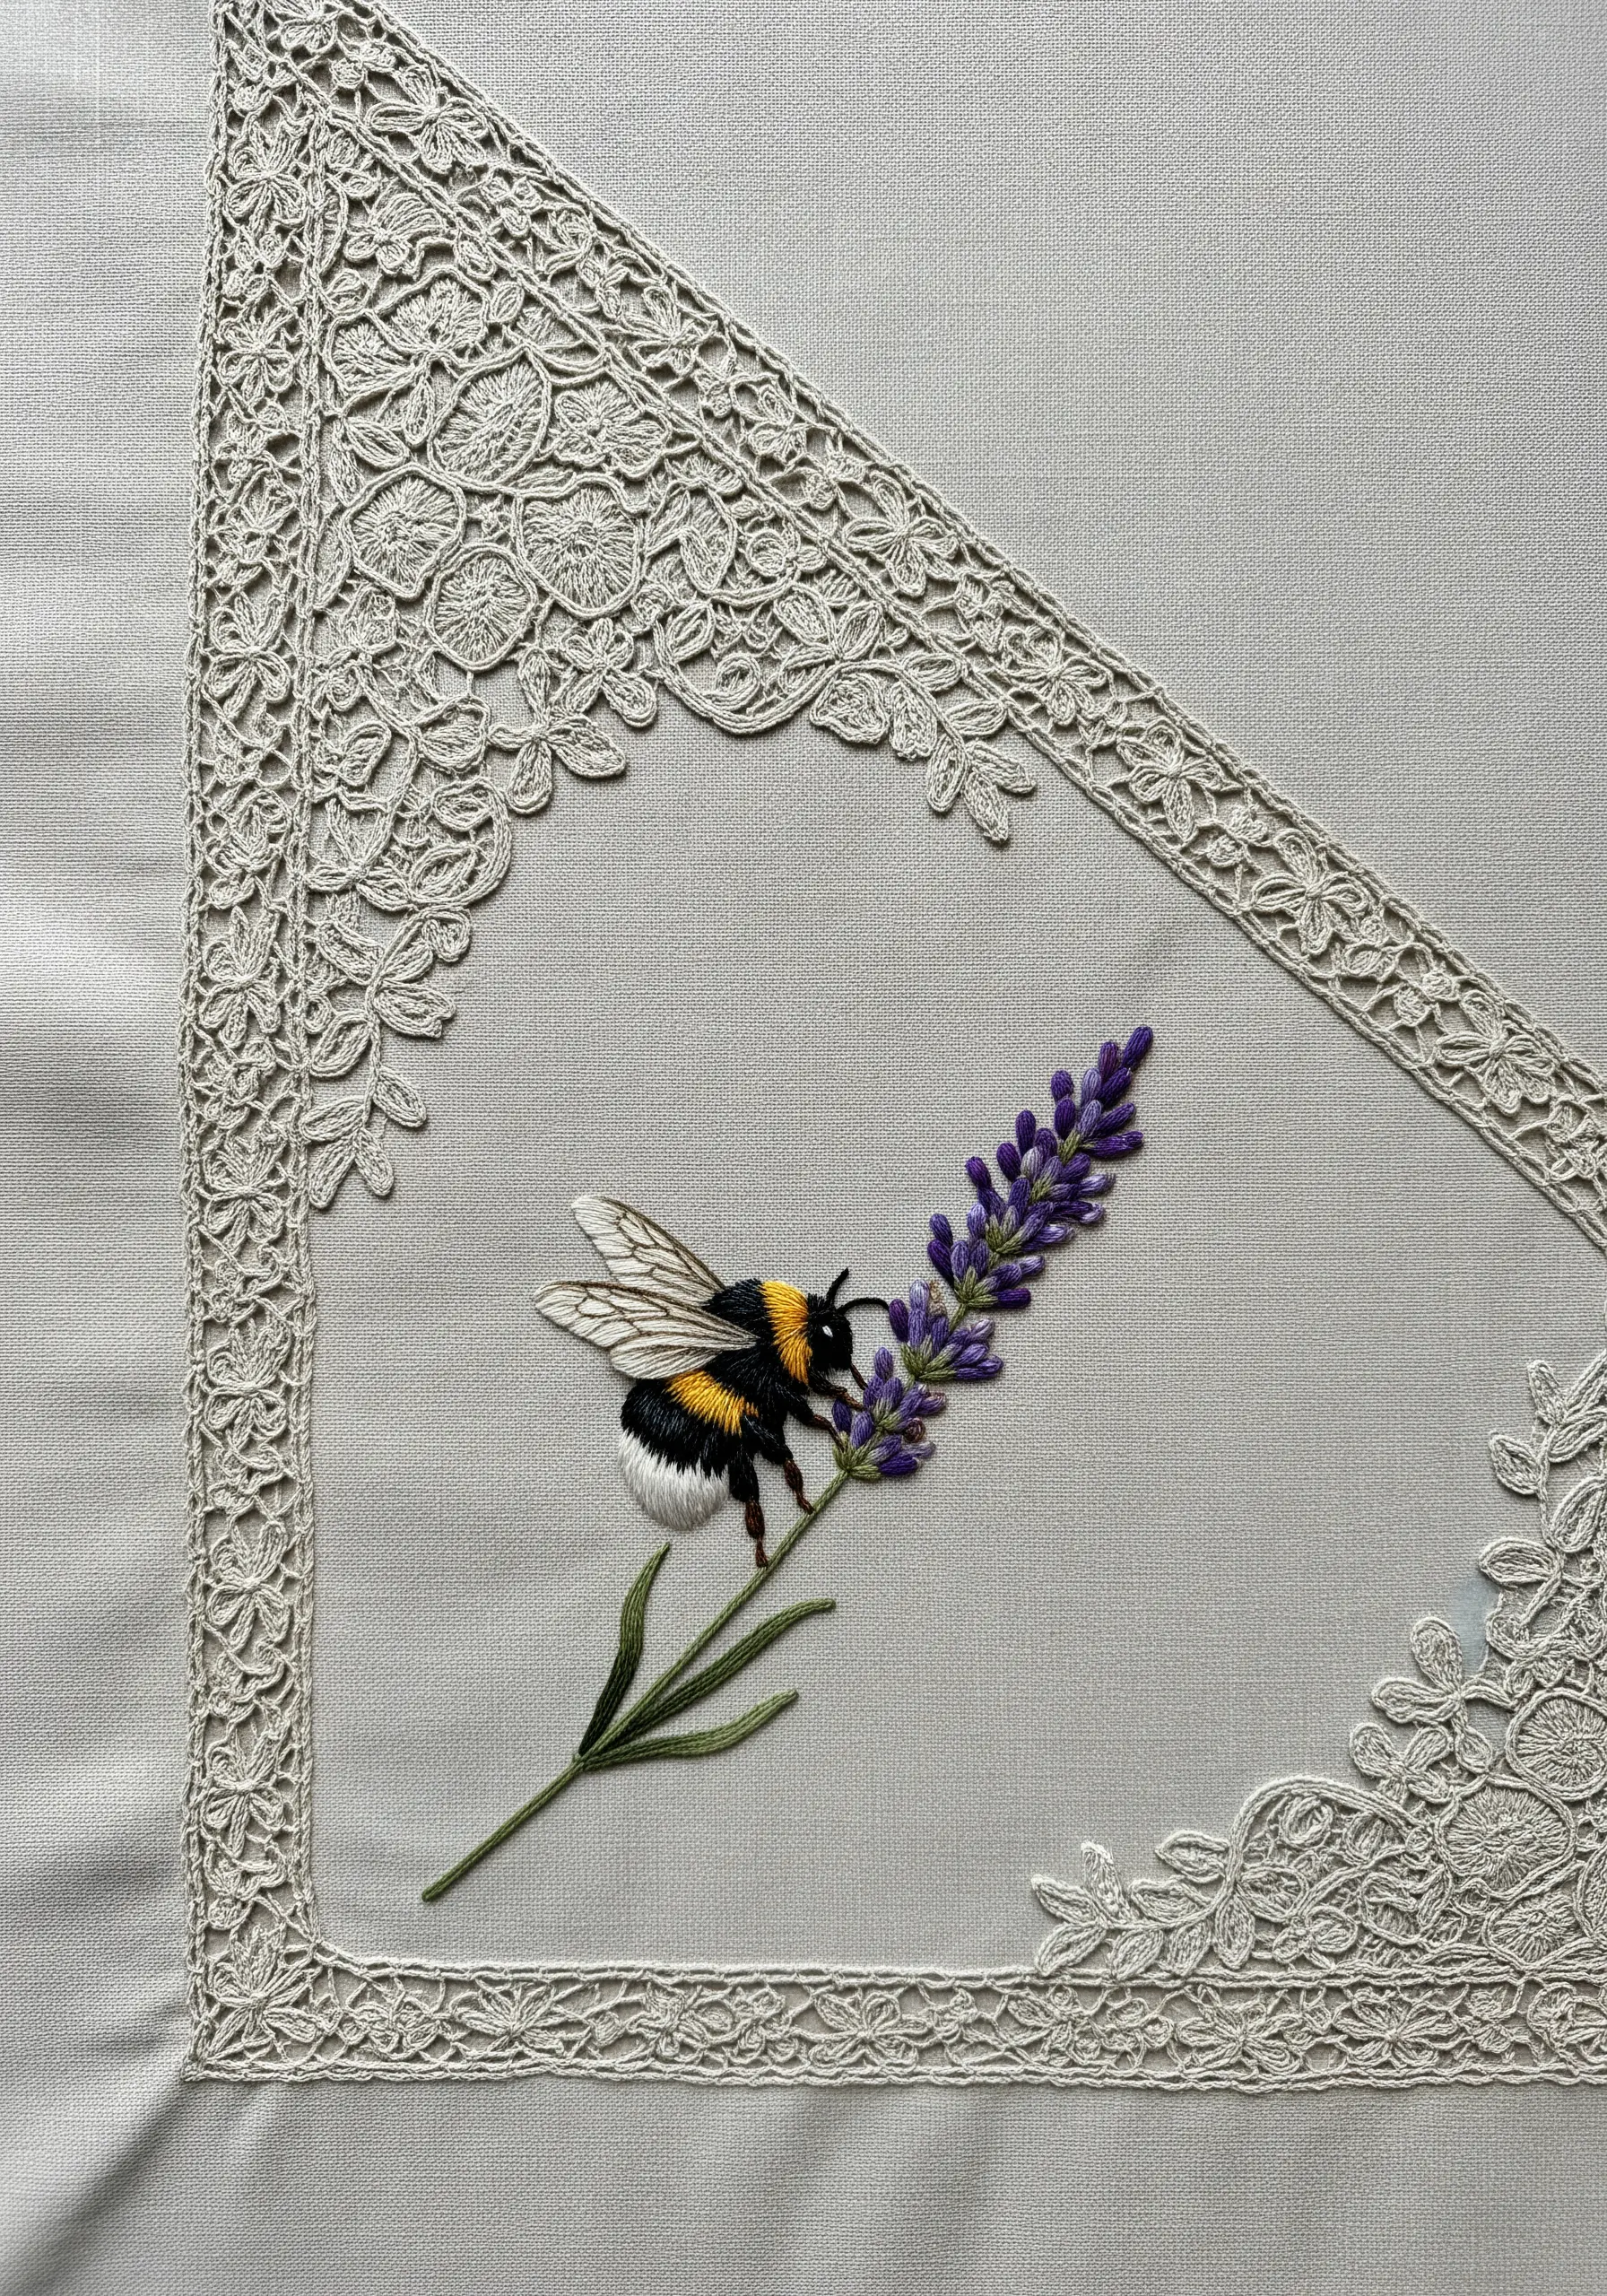
To bring a motif like a bumblebee to life, focus on recreating its textures with thread.
For the fuzzy yellow and black stripes of the body, use single-strand long-and-short stitch, angling your stitches slightly to suggest a soft, furry surface.
For the delicate, translucent wings, use an open fill stitch like seed stitch with a fine, greyish-white thread over a sheer organza appliqué.
This level of detail, achieved through thread painting, transforms a simple image into a stunning piece of nature art.
16. Master Tonal Shading for a 3D Effect
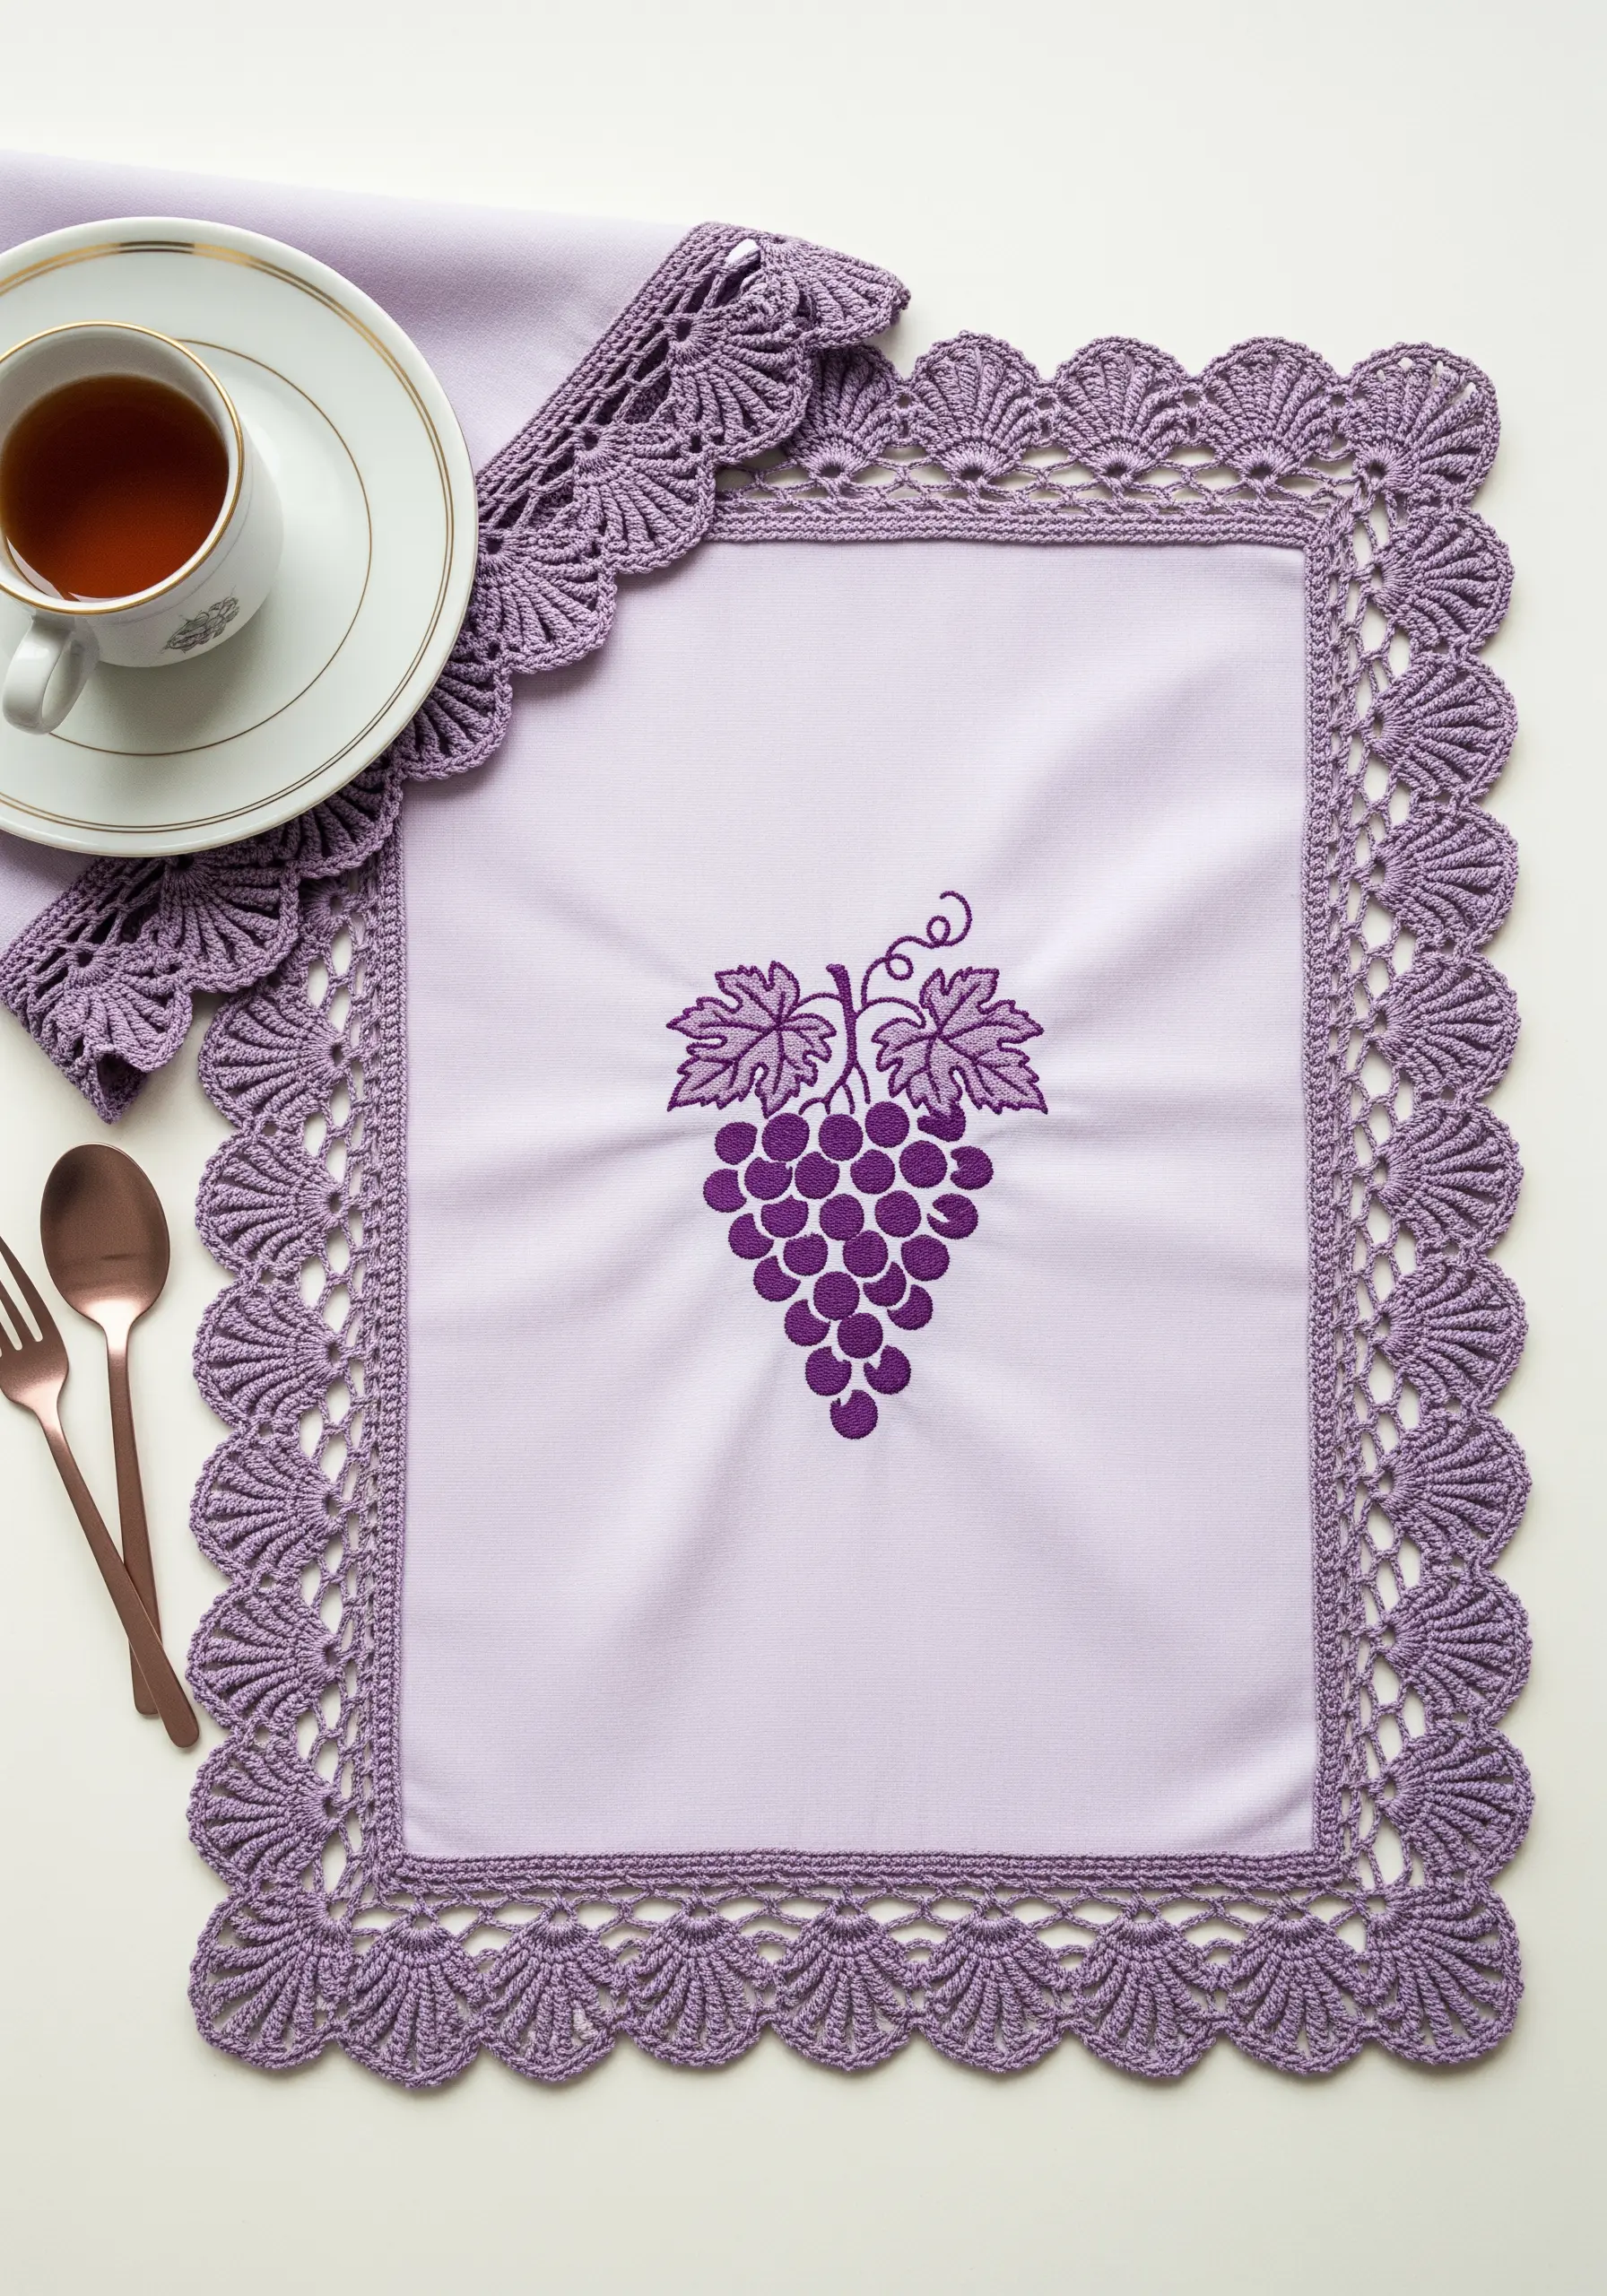
You can make a flat shape appear round and three-dimensional simply by using different shades of the same color.
For each grape, use two or three tones of purple. Fill the shape with satin stitch, placing the darkest shade at the bottom and gradually moving to the lightest shade at the top where the light would naturally hit.
This simple tonal shift instantly creates the illusion of volume and form, a key technique in monochrome embroidery.
Matching the lace border to your thread palette creates a beautifully cohesive finish.
17. Complement Patterned Fabric with Delicate Embroidery
Stitching on a patterned fabric like damask requires a design that enhances, rather than competes with, the existing texture.
Choose an open, linear motif—like these trailing vines and ribbons—that allows the subtle pattern of the fabric to show through.
For the woven ribbon effect, use satin stitch bars as your anchors and weave a contrasting color through them with a tapestry needle, creating an elegant, interlaced look.
This approach makes your stitching feel like an integral part of the textile itself.
18. Add Celestial Sheen with Metallic Thread
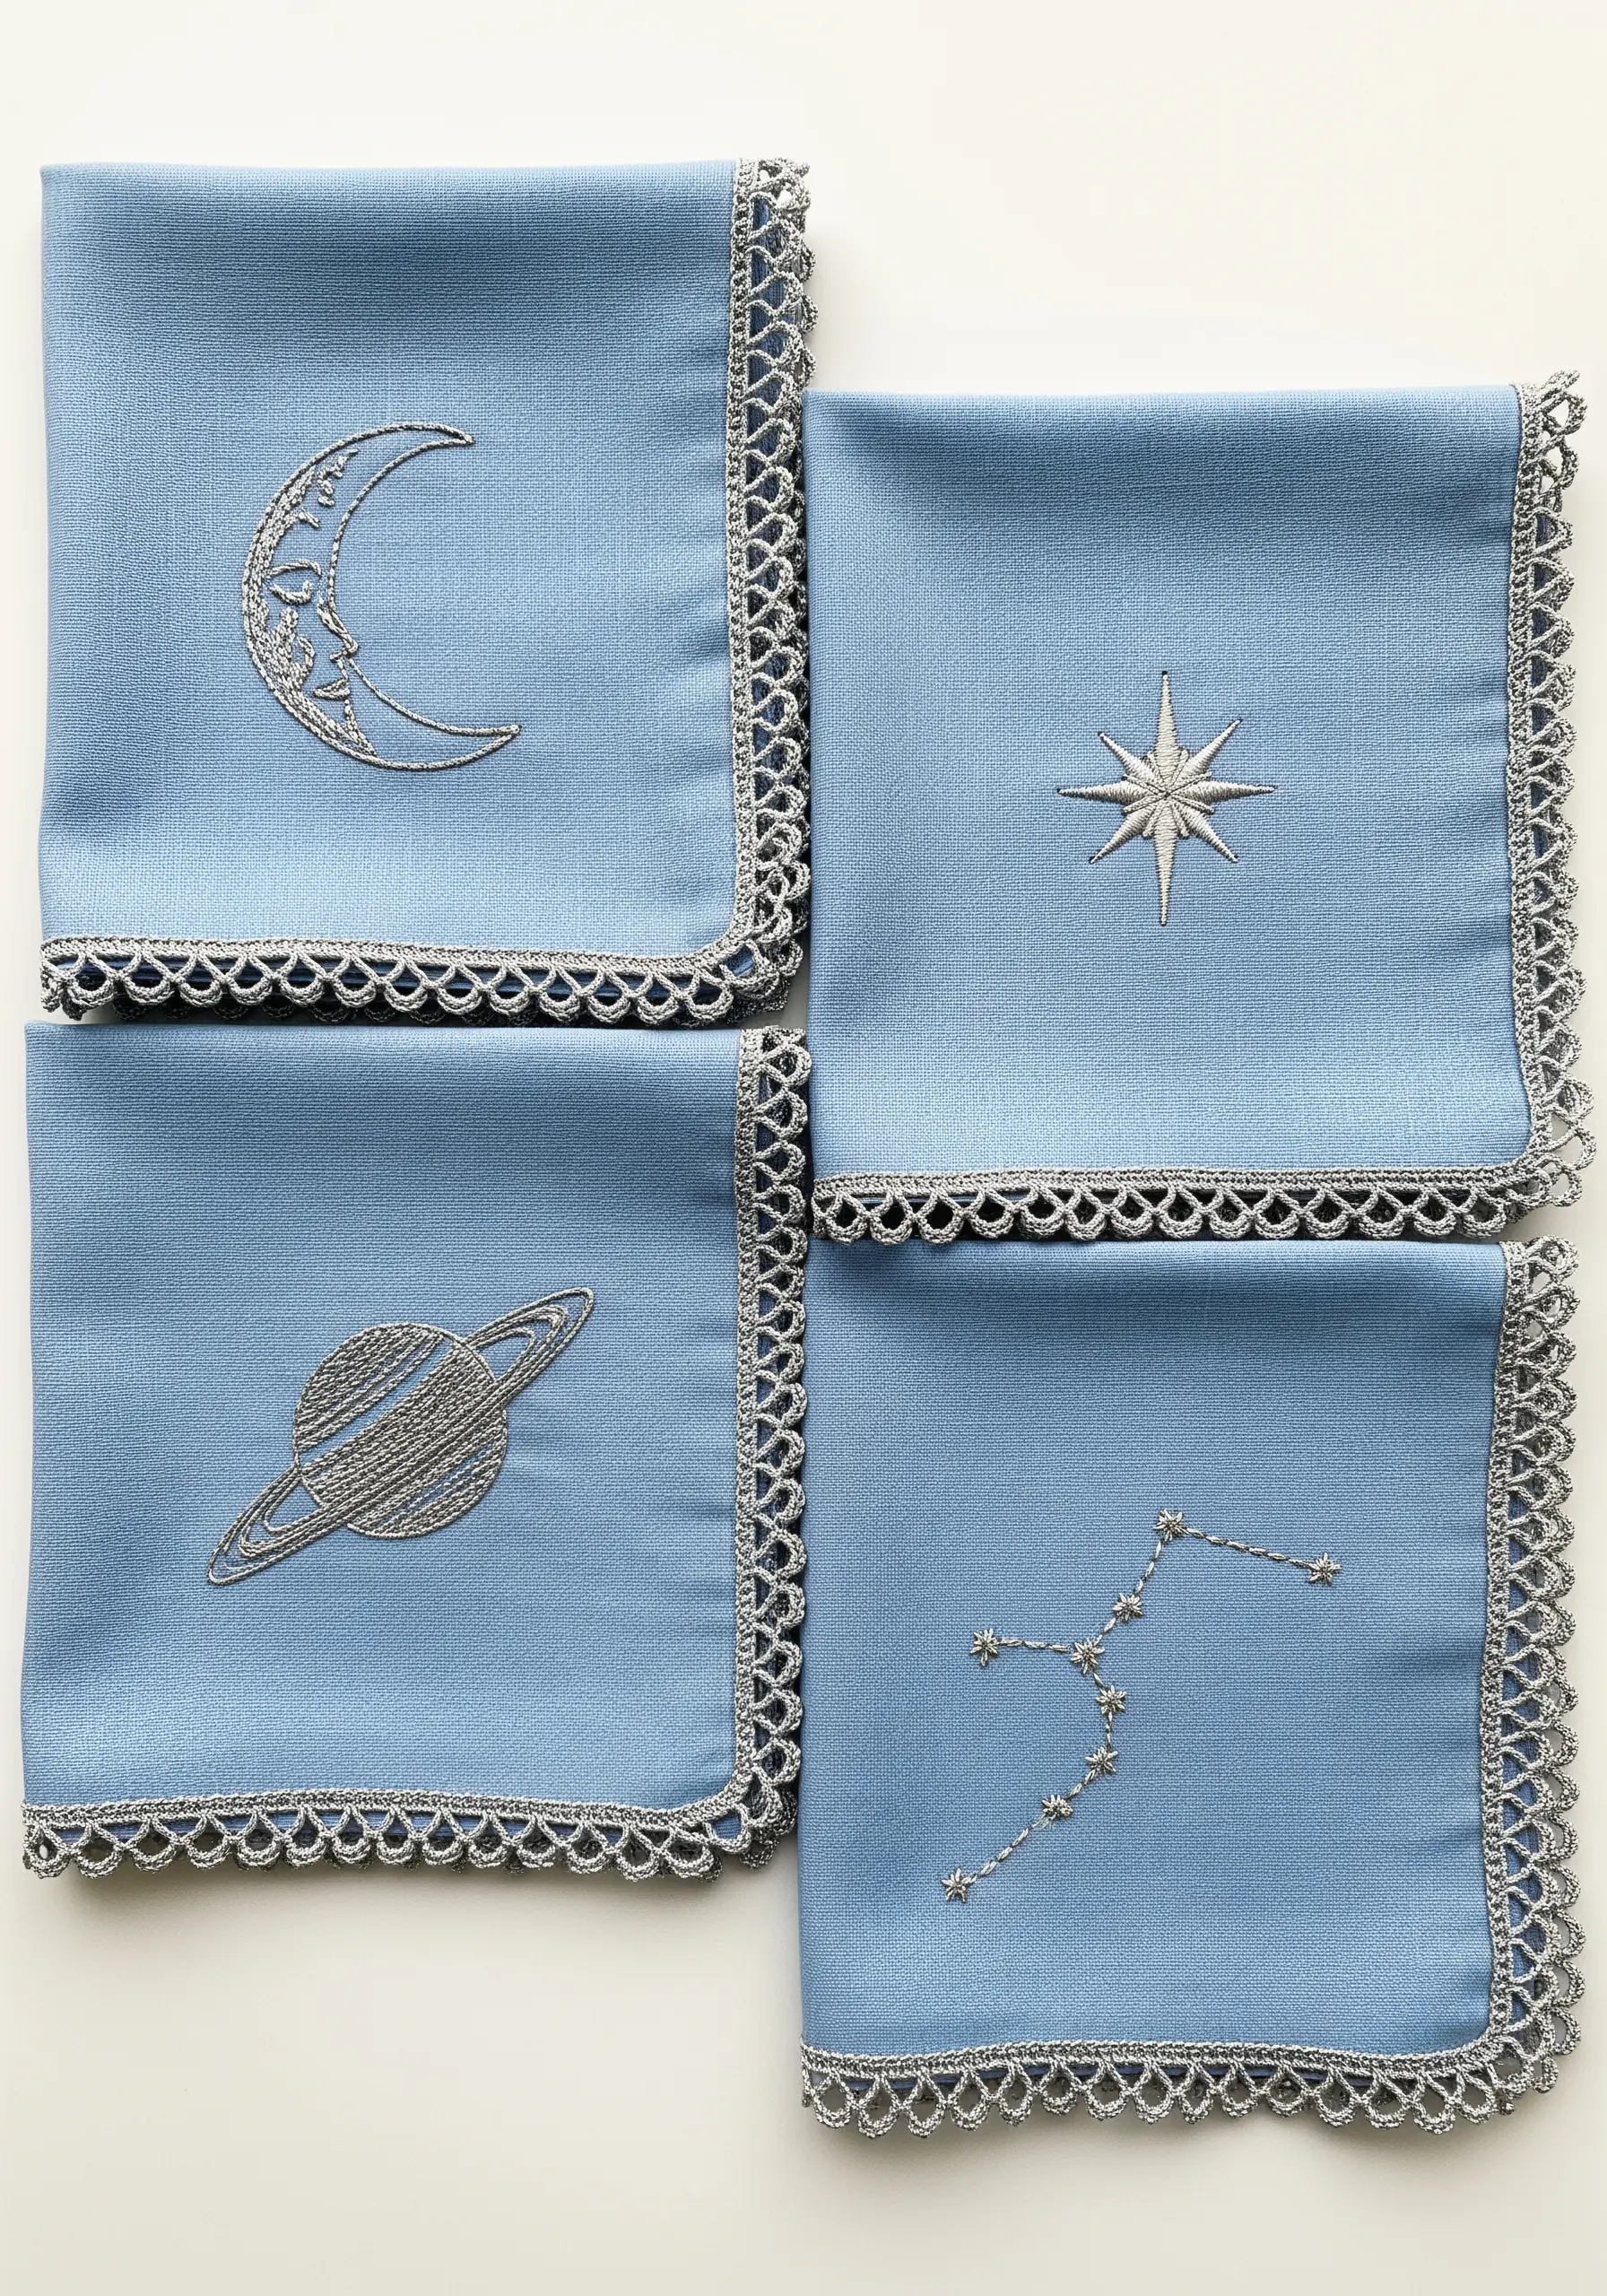
When working with metallic thread, a few technical adjustments will ensure a smooth, brilliant finish.
Use a needle with a slightly larger eye to reduce friction and fraying, and work with shorter lengths of thread than you normally would.
For filled areas like the crescent moon, use a laid stitch (or couching) by laying the metallic thread flat and securing it with tiny stitches of a matching, regular floss—this maximizes its shine and minimizes twisting.
These night sky embroidery designs look especially magical with this technique.
19. Achieve Delicacy with Tiny Stitches and Open Space
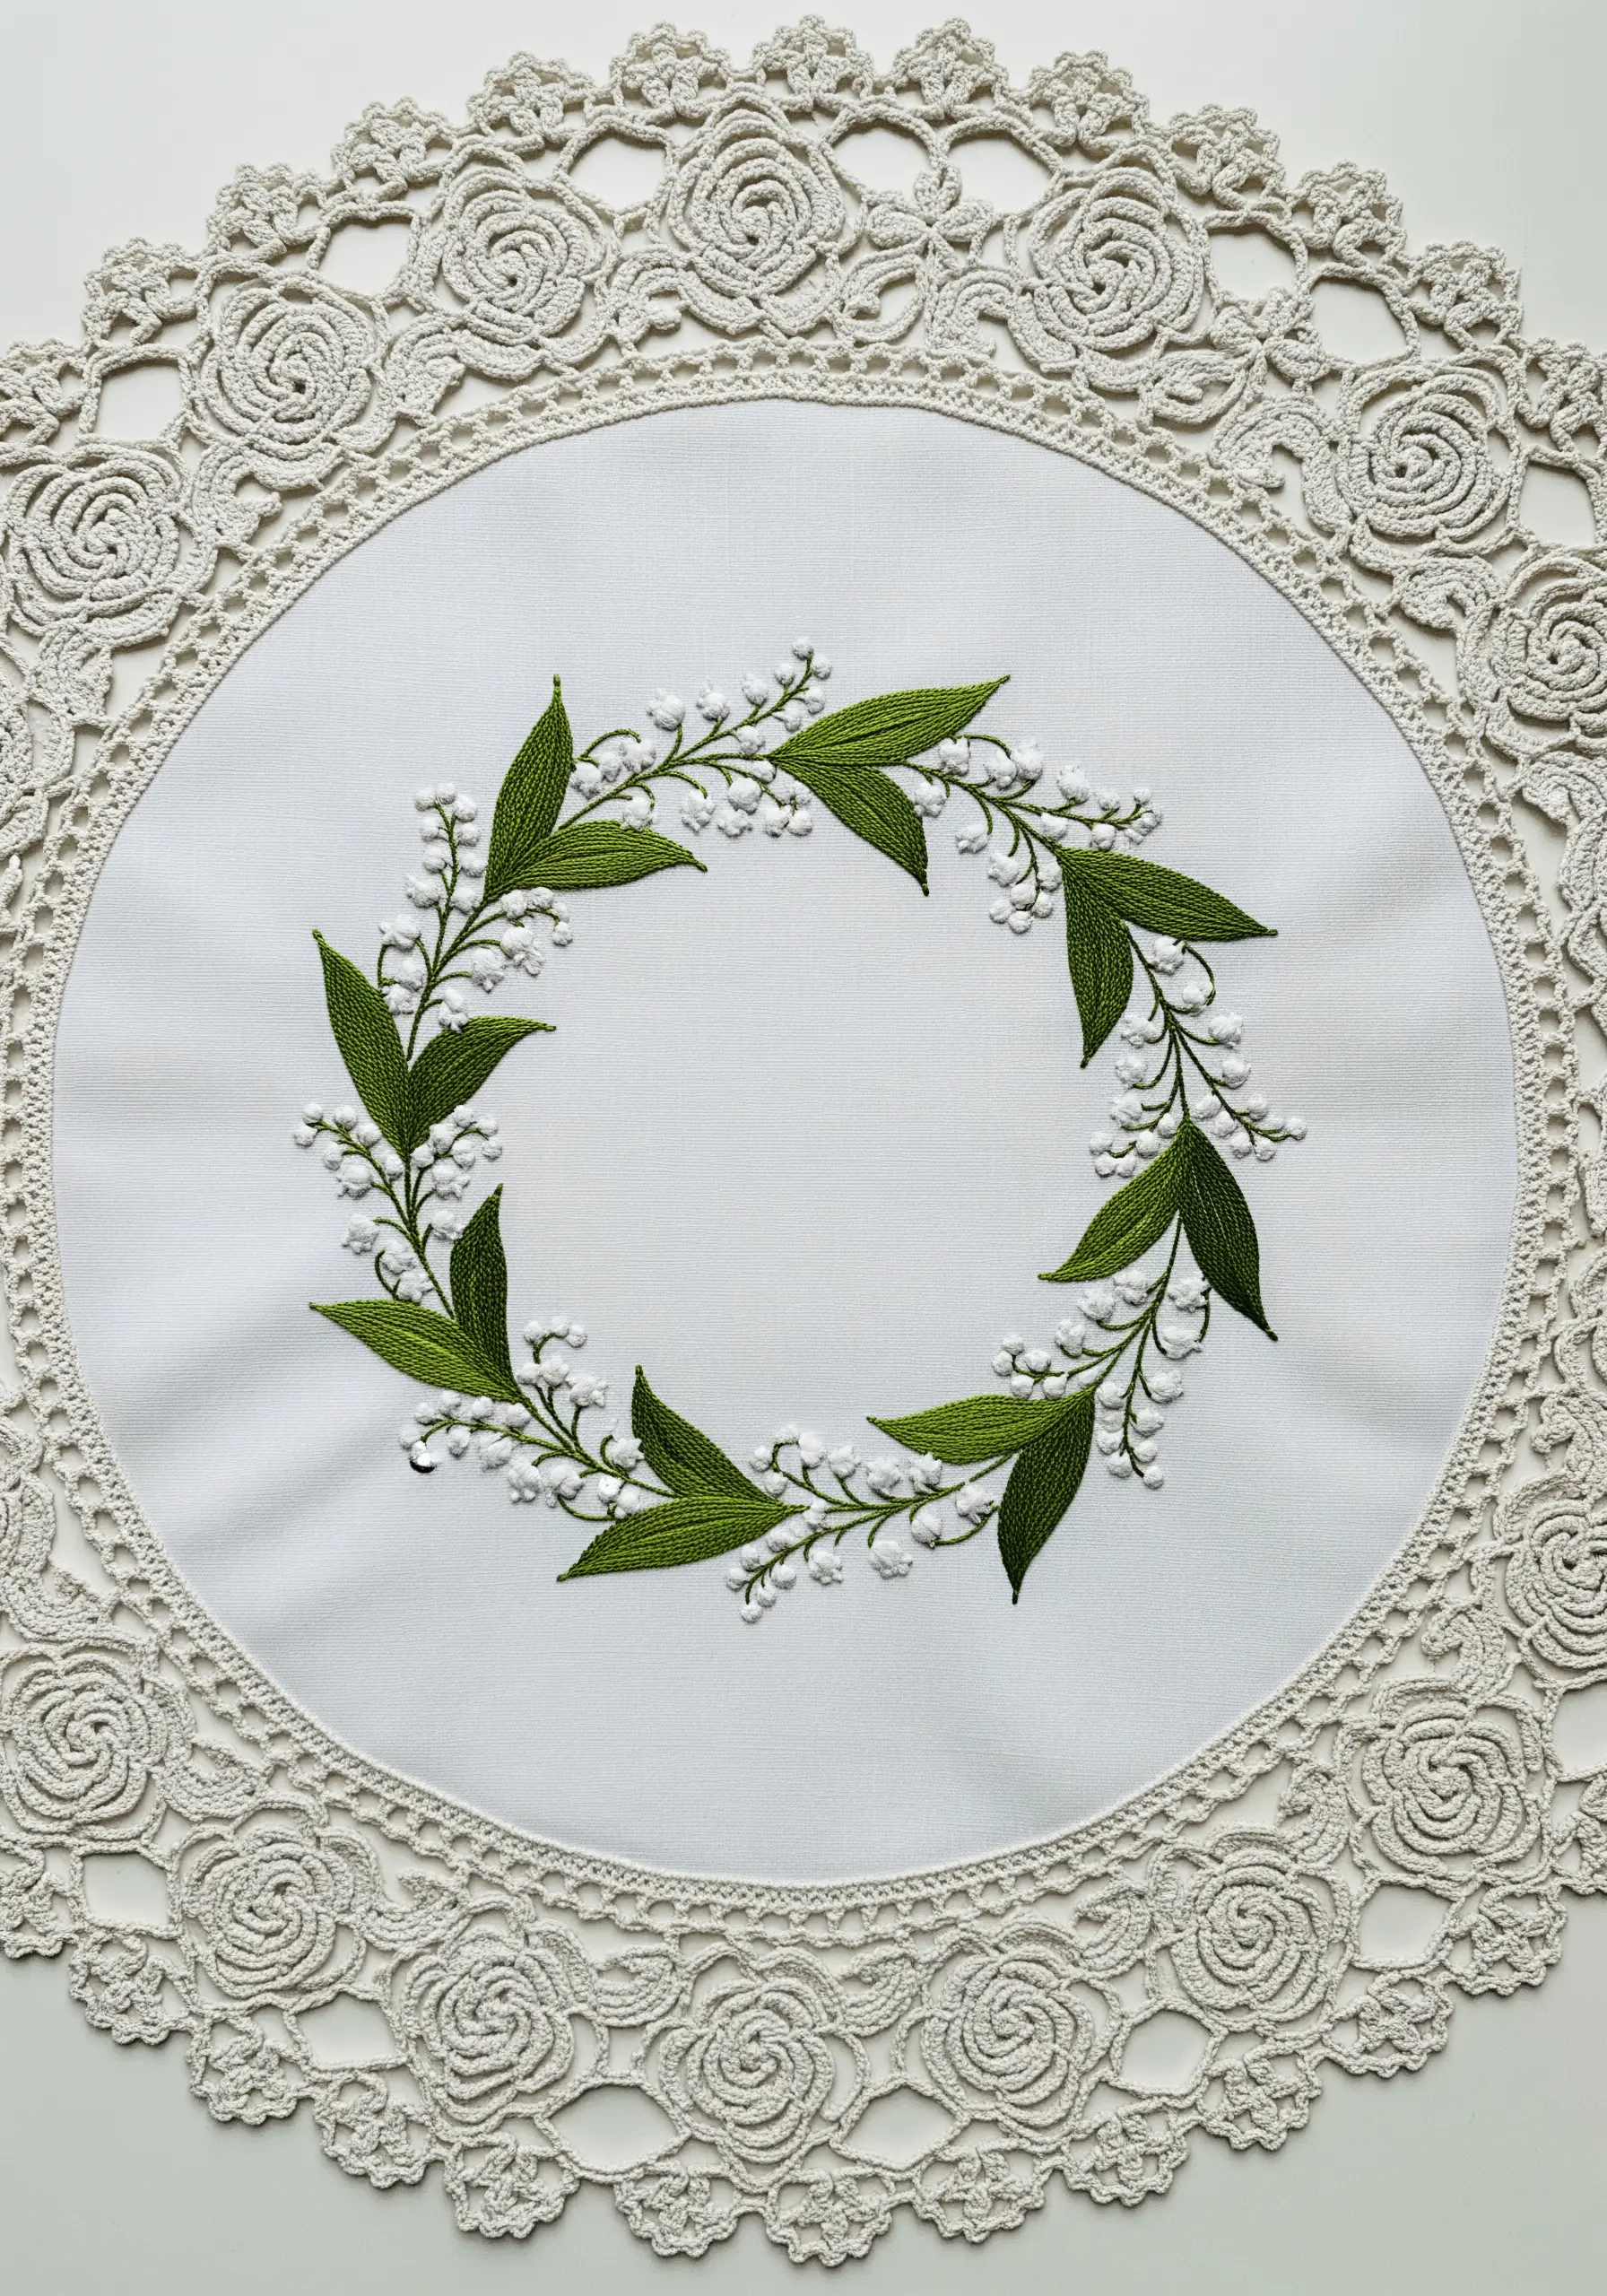
The elegance of a lily of the valley motif comes from its light, airy structure.
Recreate this by using minimal stitches: tiny, singular French knots for the bell-shaped flowers and a fine, single-strand stem stitch for the delicate stems.
The key to this design is the negative space; allow plenty of room between each element to maintain a sense of daintiness and prevent the design from feeling cluttered.
These wild botanical wreath patterns are perfect for this light-handed approach.
20. Create a Dynamic Textile with a Repeating Motif
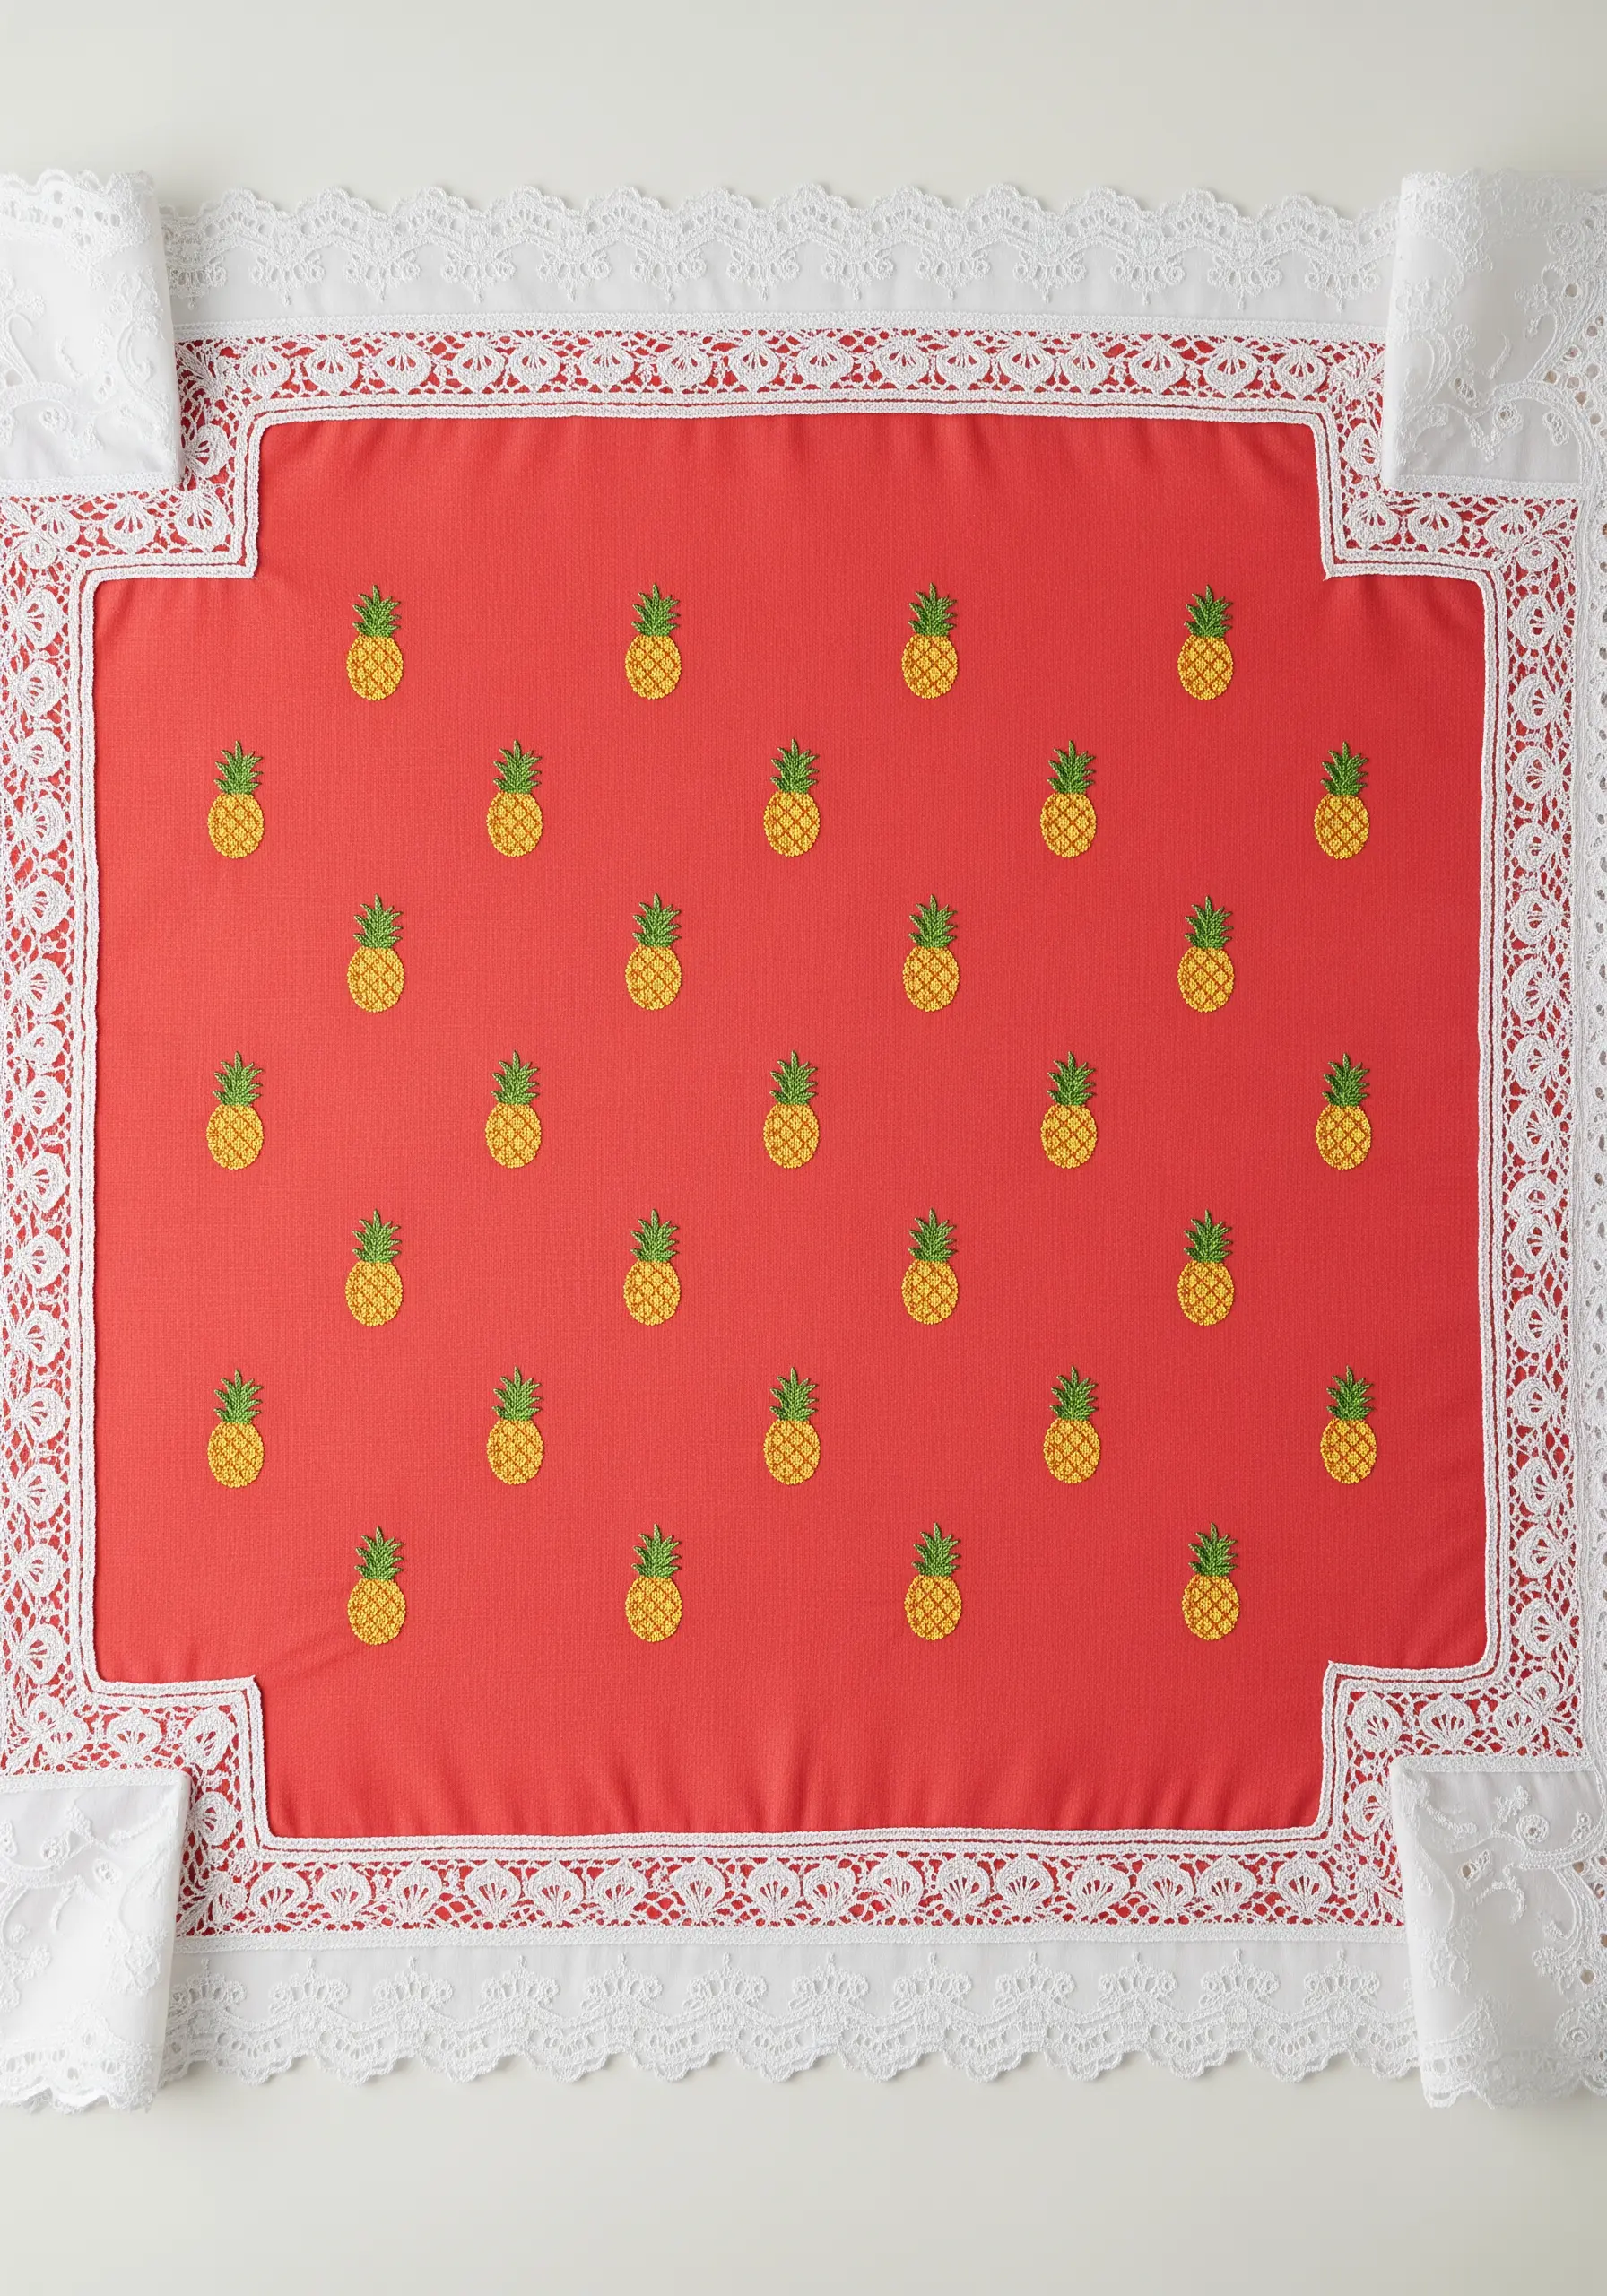
Turn a simple motif into a sophisticated, all-over pattern by focusing on methodical placement.
Use a fabric marker and a small template to plan your grid, opting for a staggered (or half-drop) repeat, which is more visually interesting than a simple block grid.
Keep the individual minimal fruit plant motifs simple, using just a few colors and basic stitches like satin stitch and straight stitch.
This ensures the overall pattern is the star of the show, transforming a plain placemat into a custom textile.
21. Use High Contrast for a Striking Still Life Effect
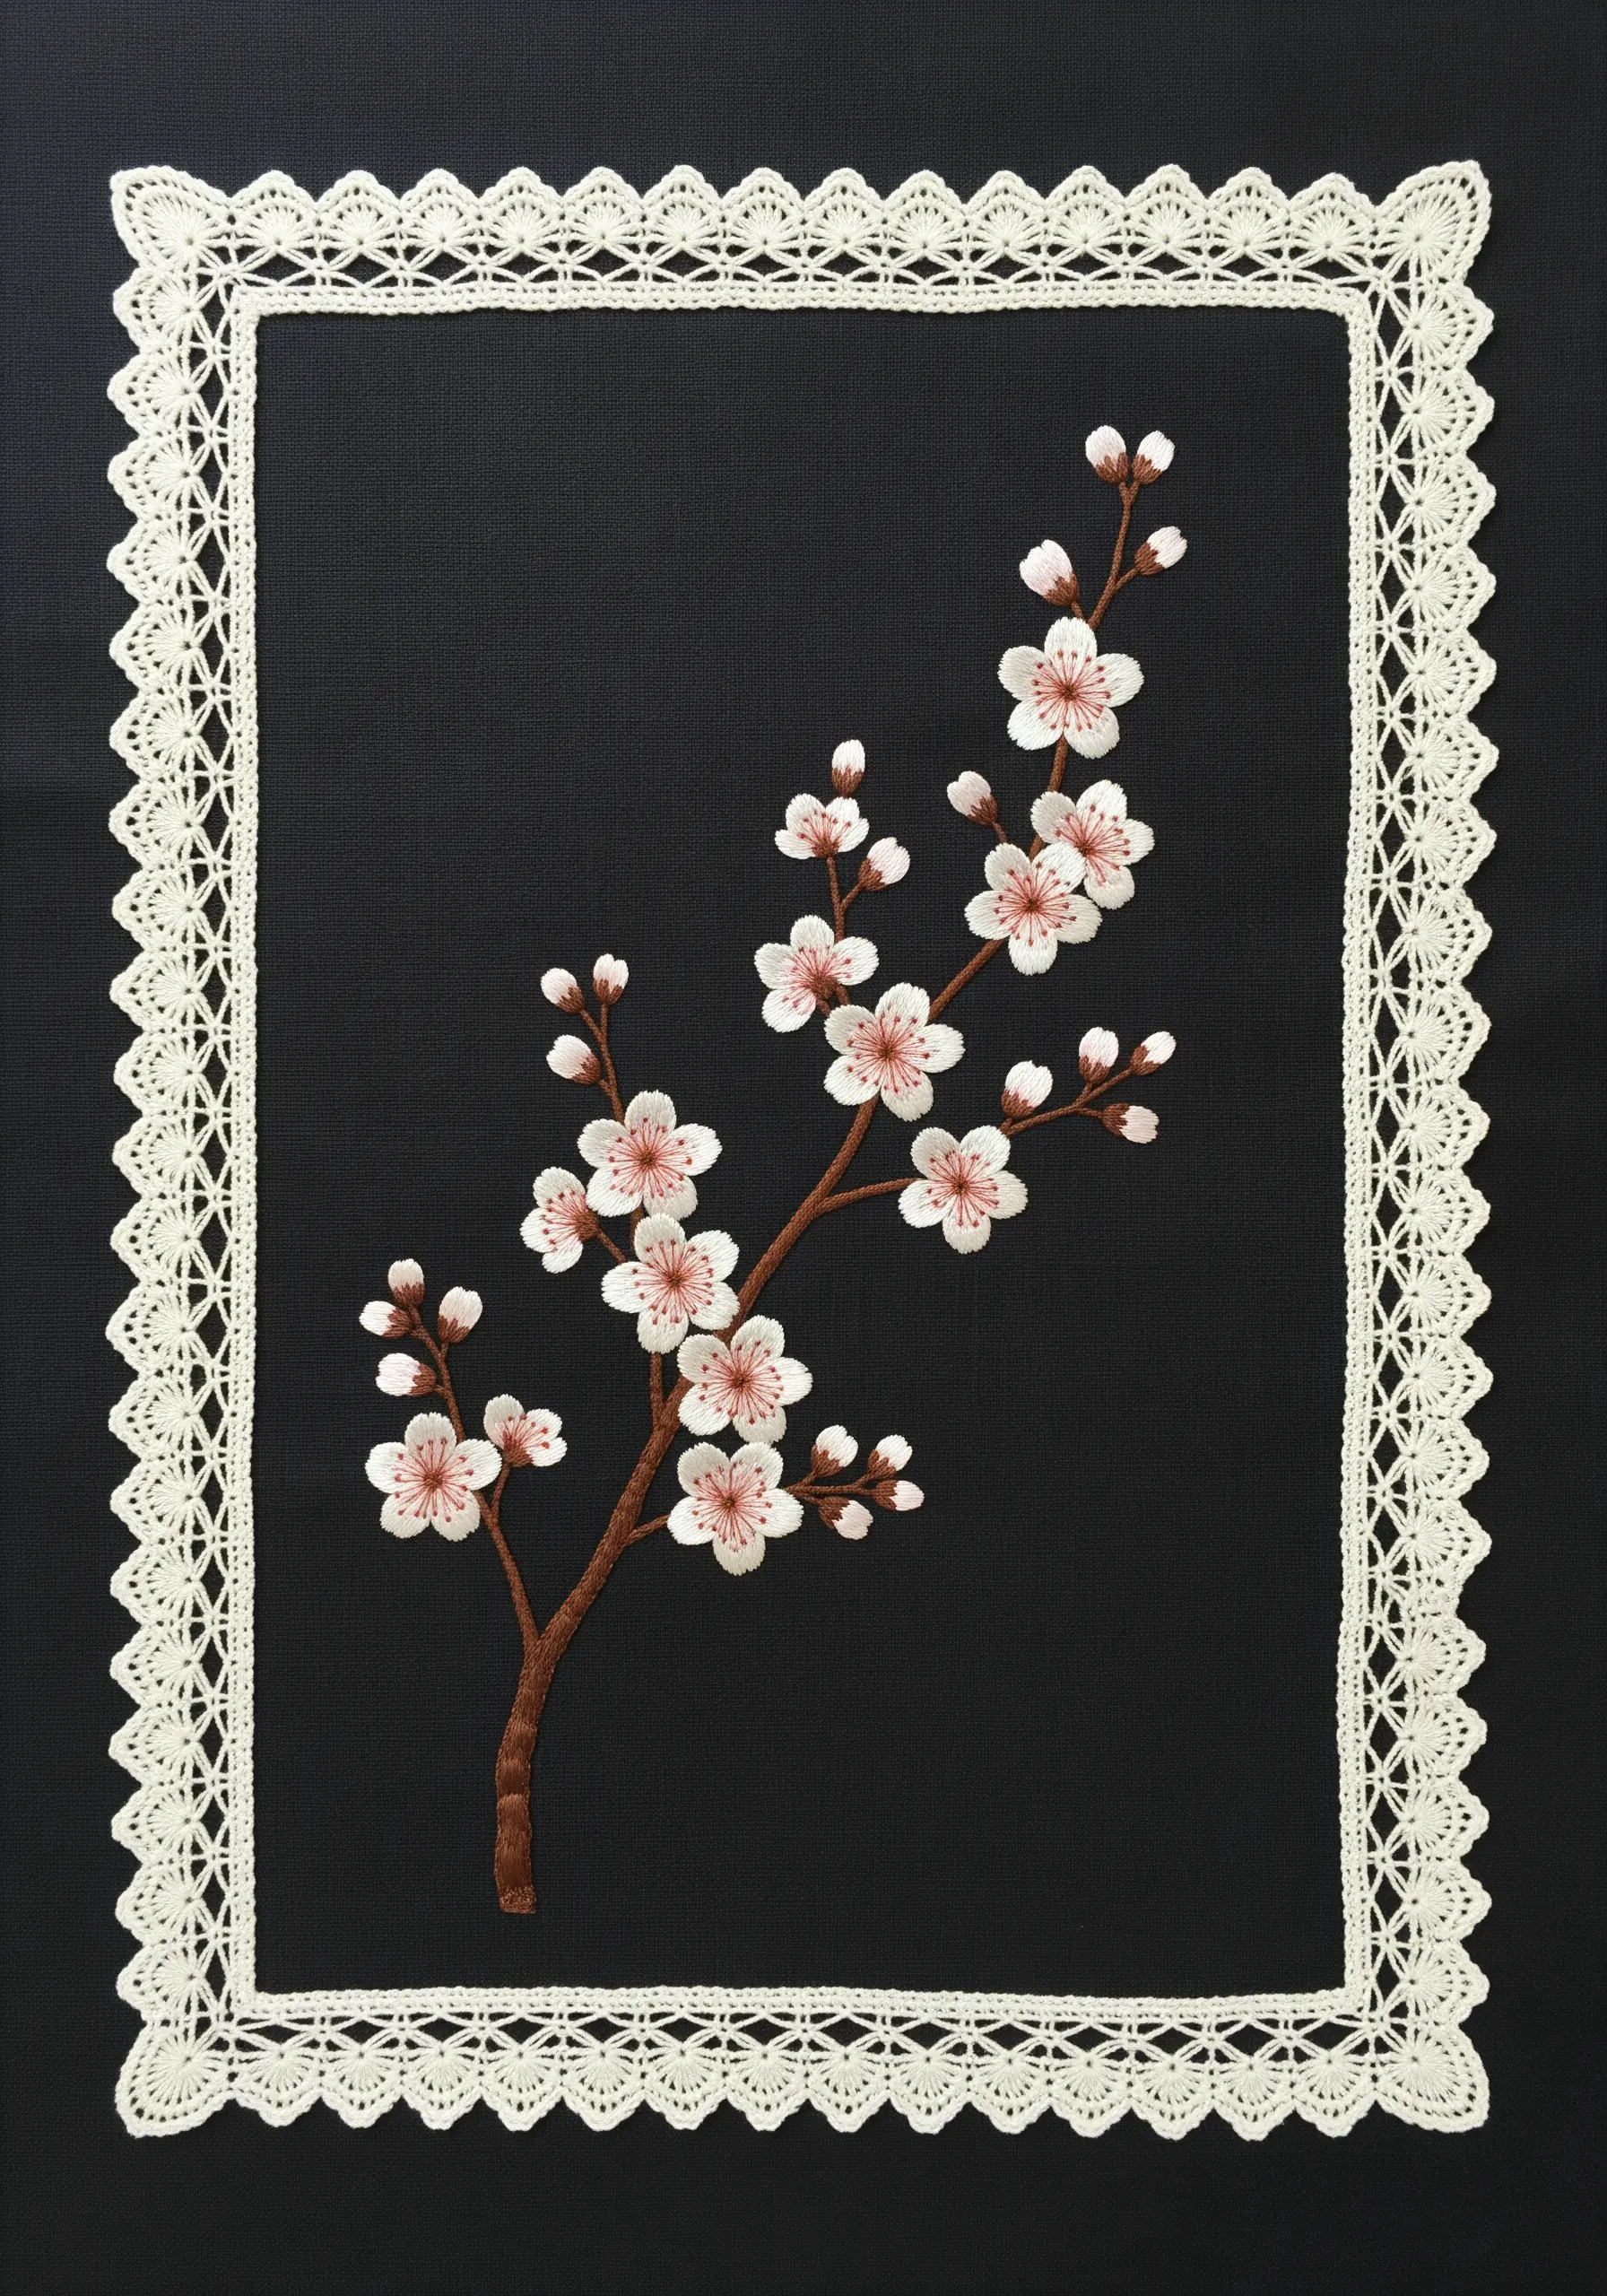
Make a simple botanical design feel like a piece of fine art by stitching it on a dramatic black background.
The deep, dark fabric makes even the palest pinks and whites of the cherry blossoms appear incredibly vibrant and luminous.
Use a slightly heavier thread weight—three strands instead of two—to give your stitches more presence and prevent them from receding into the dark fabric.
Framing the composition with a crisp white lace border enhances the illusion that you’ve captured a moment in time.
22. Blend Variegated Threads for Natural Color Shifts
To capture the multi-tonal beauty of autumn leaves without constantly changing your thread, choose a high-quality variegated floss.
A single strand of variegated thread contains multiple colors that flow into one another, creating organic and unpredictable color shifts as you stitch.
Use a simple fill stitch, like fishbone or satin stitch, and let the thread do the complex work of color blending for you.
This is the secret to creating nuanced, natural-looking gradients with minimal effort.
23. Pair Detailed Florals with Textural Macrame
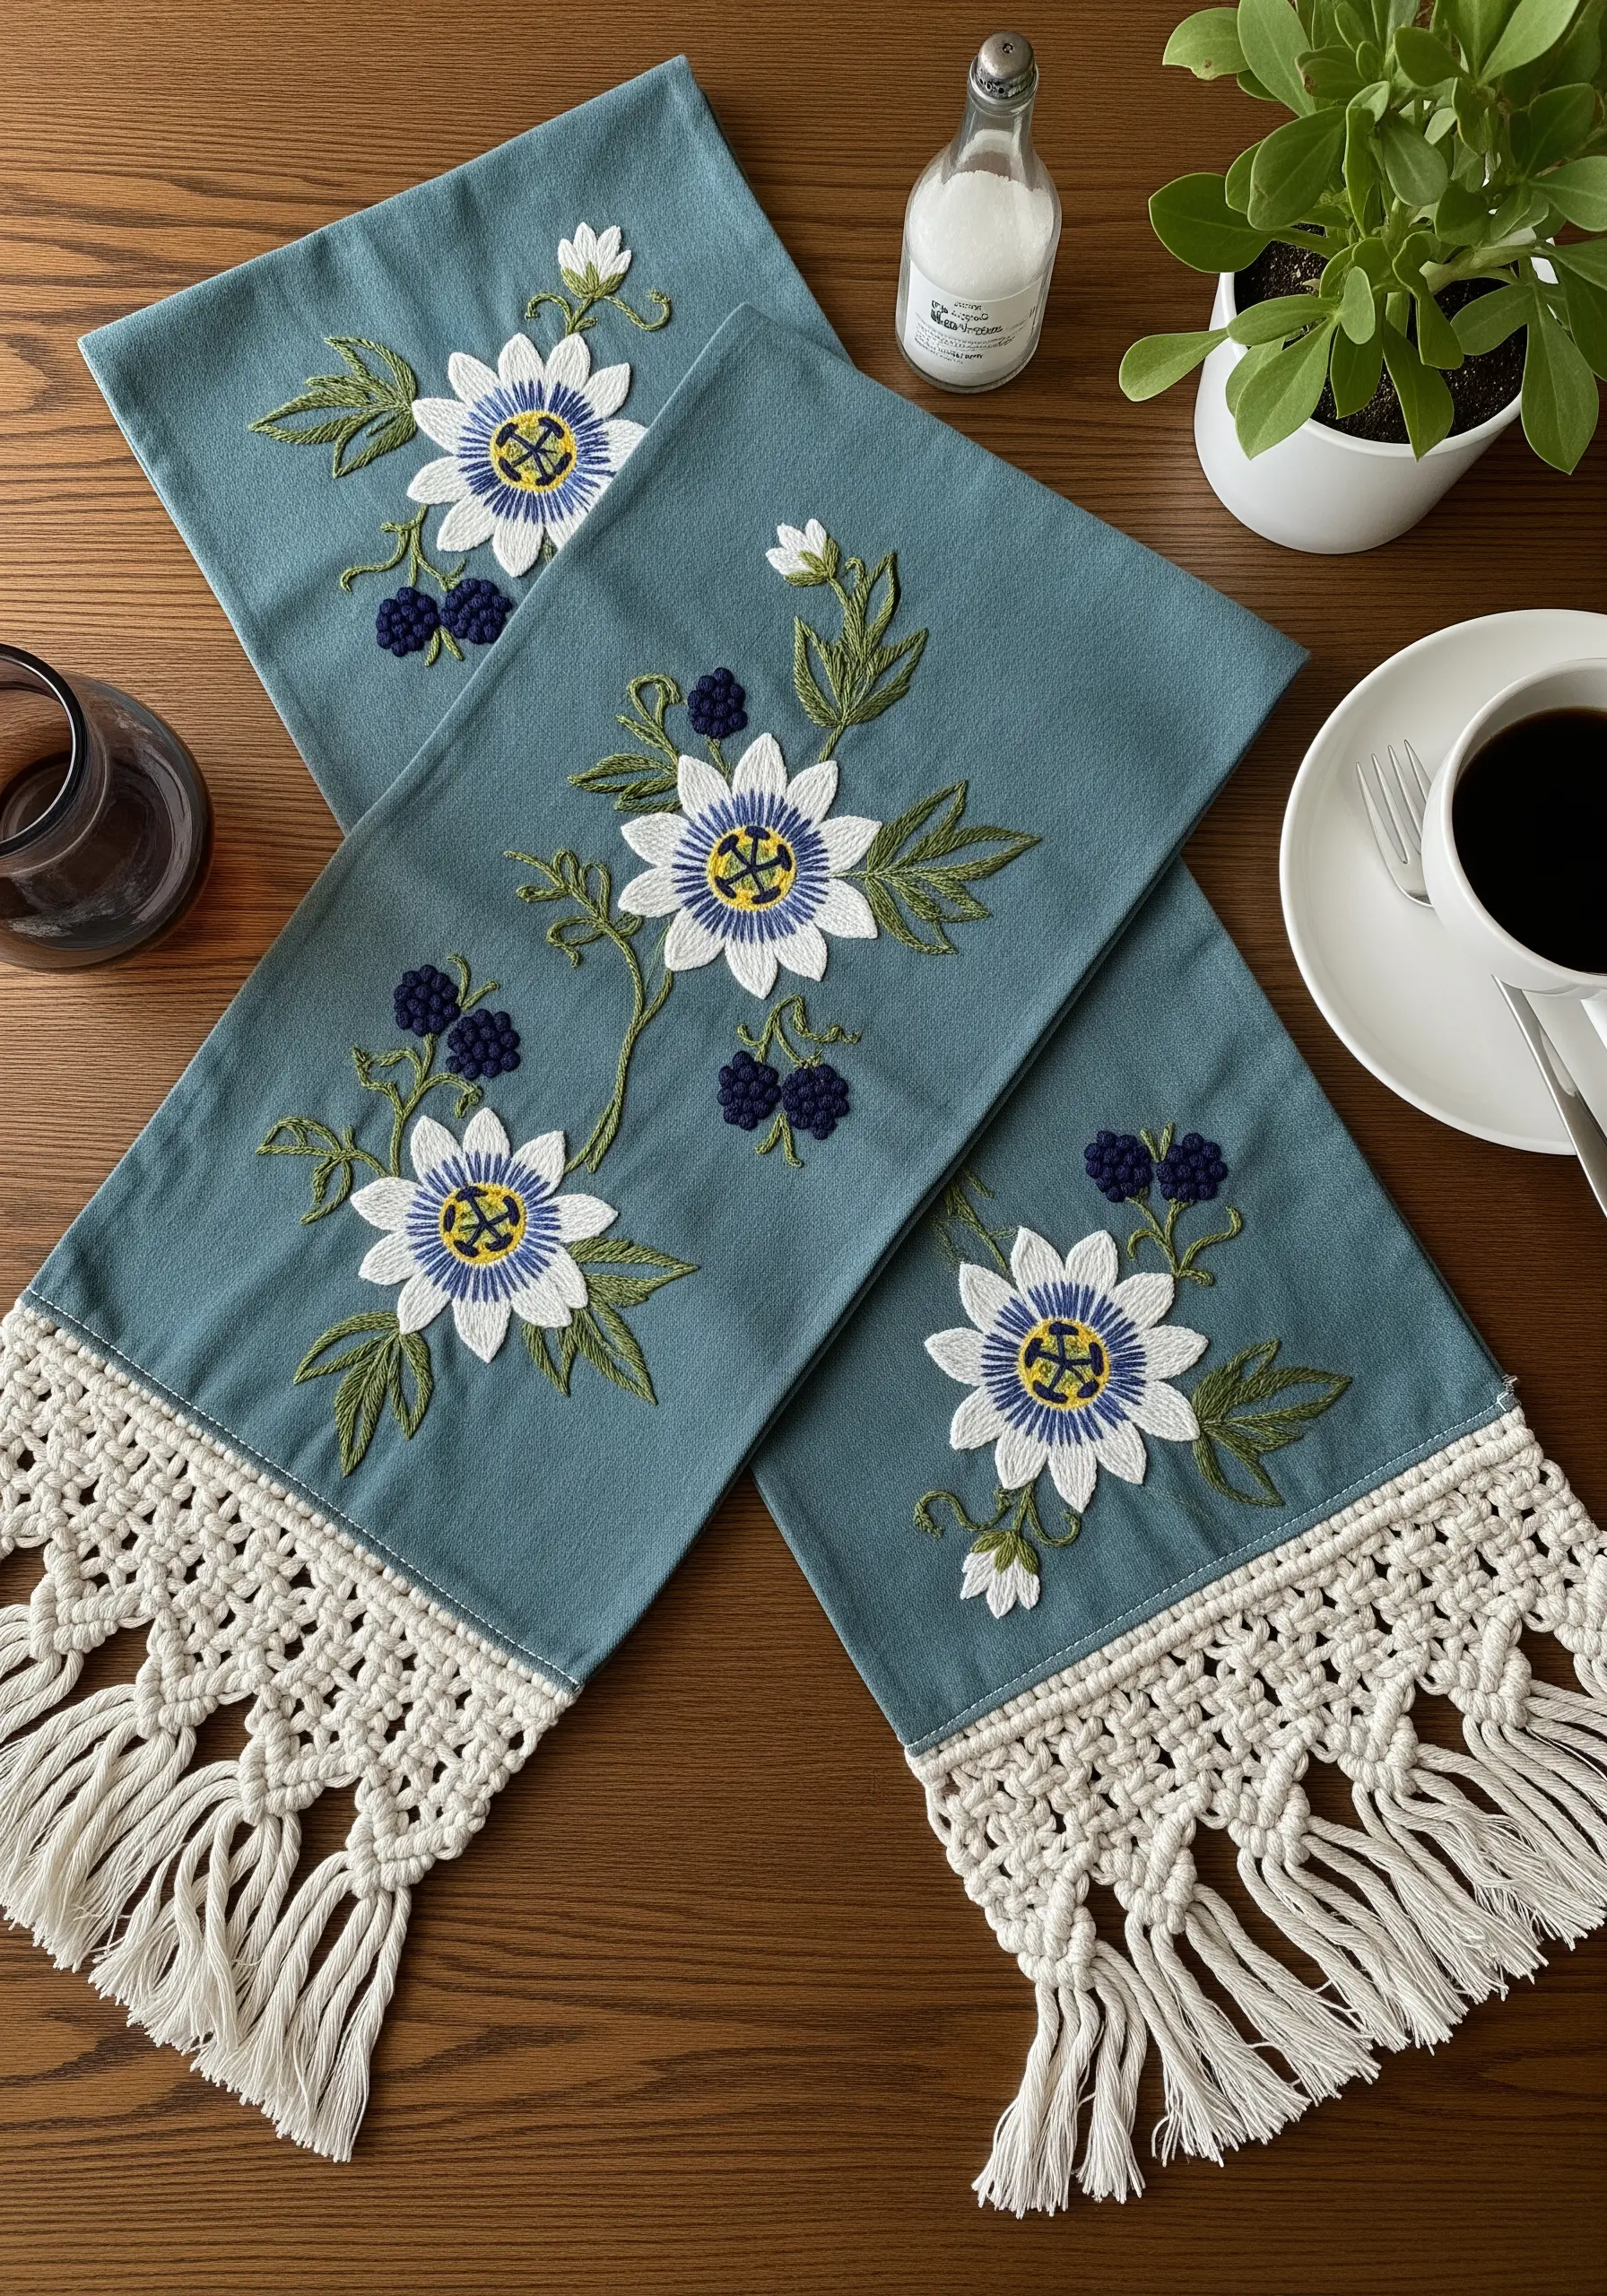
When your embroidery is highly detailed, choose a border that offers a contrasting texture rather than a competing pattern.
The intricate, layered stitching of a passion flower pairs beautifully with the soft, rustic, and geometric feel of a macrame fringe.
This combination of fine, detailed threadwork and chunky, knotted cord creates a rich tactile experience.
It proves that elegance can be achieved by balancing refined embroidery with more organic, bohemian finishes.


