

Have you ever finished an embroidery kit and felt a quiet desire for something more—something that fills a space with the same presence as a painting?
The path from stitching small motifs to creating large-scale fiber art is not about mastering impossibly complex techniques. It’s about shifting your perspective. It’s about learning to see yarn not just as thread, but as a line you can draw with, a color you can build form with, and a texture that can transform a room.
These ideas are your invitation to think bigger. To see your walls as a canvas, to play with scale and dimension, and to understand that a simple knot, stitch, or weave, when repeated with intention, can become something truly gallery-worthy. You already have the skills; now it’s time to give them space to breathe.
1. Architectural Macramé: Building Form with Knots
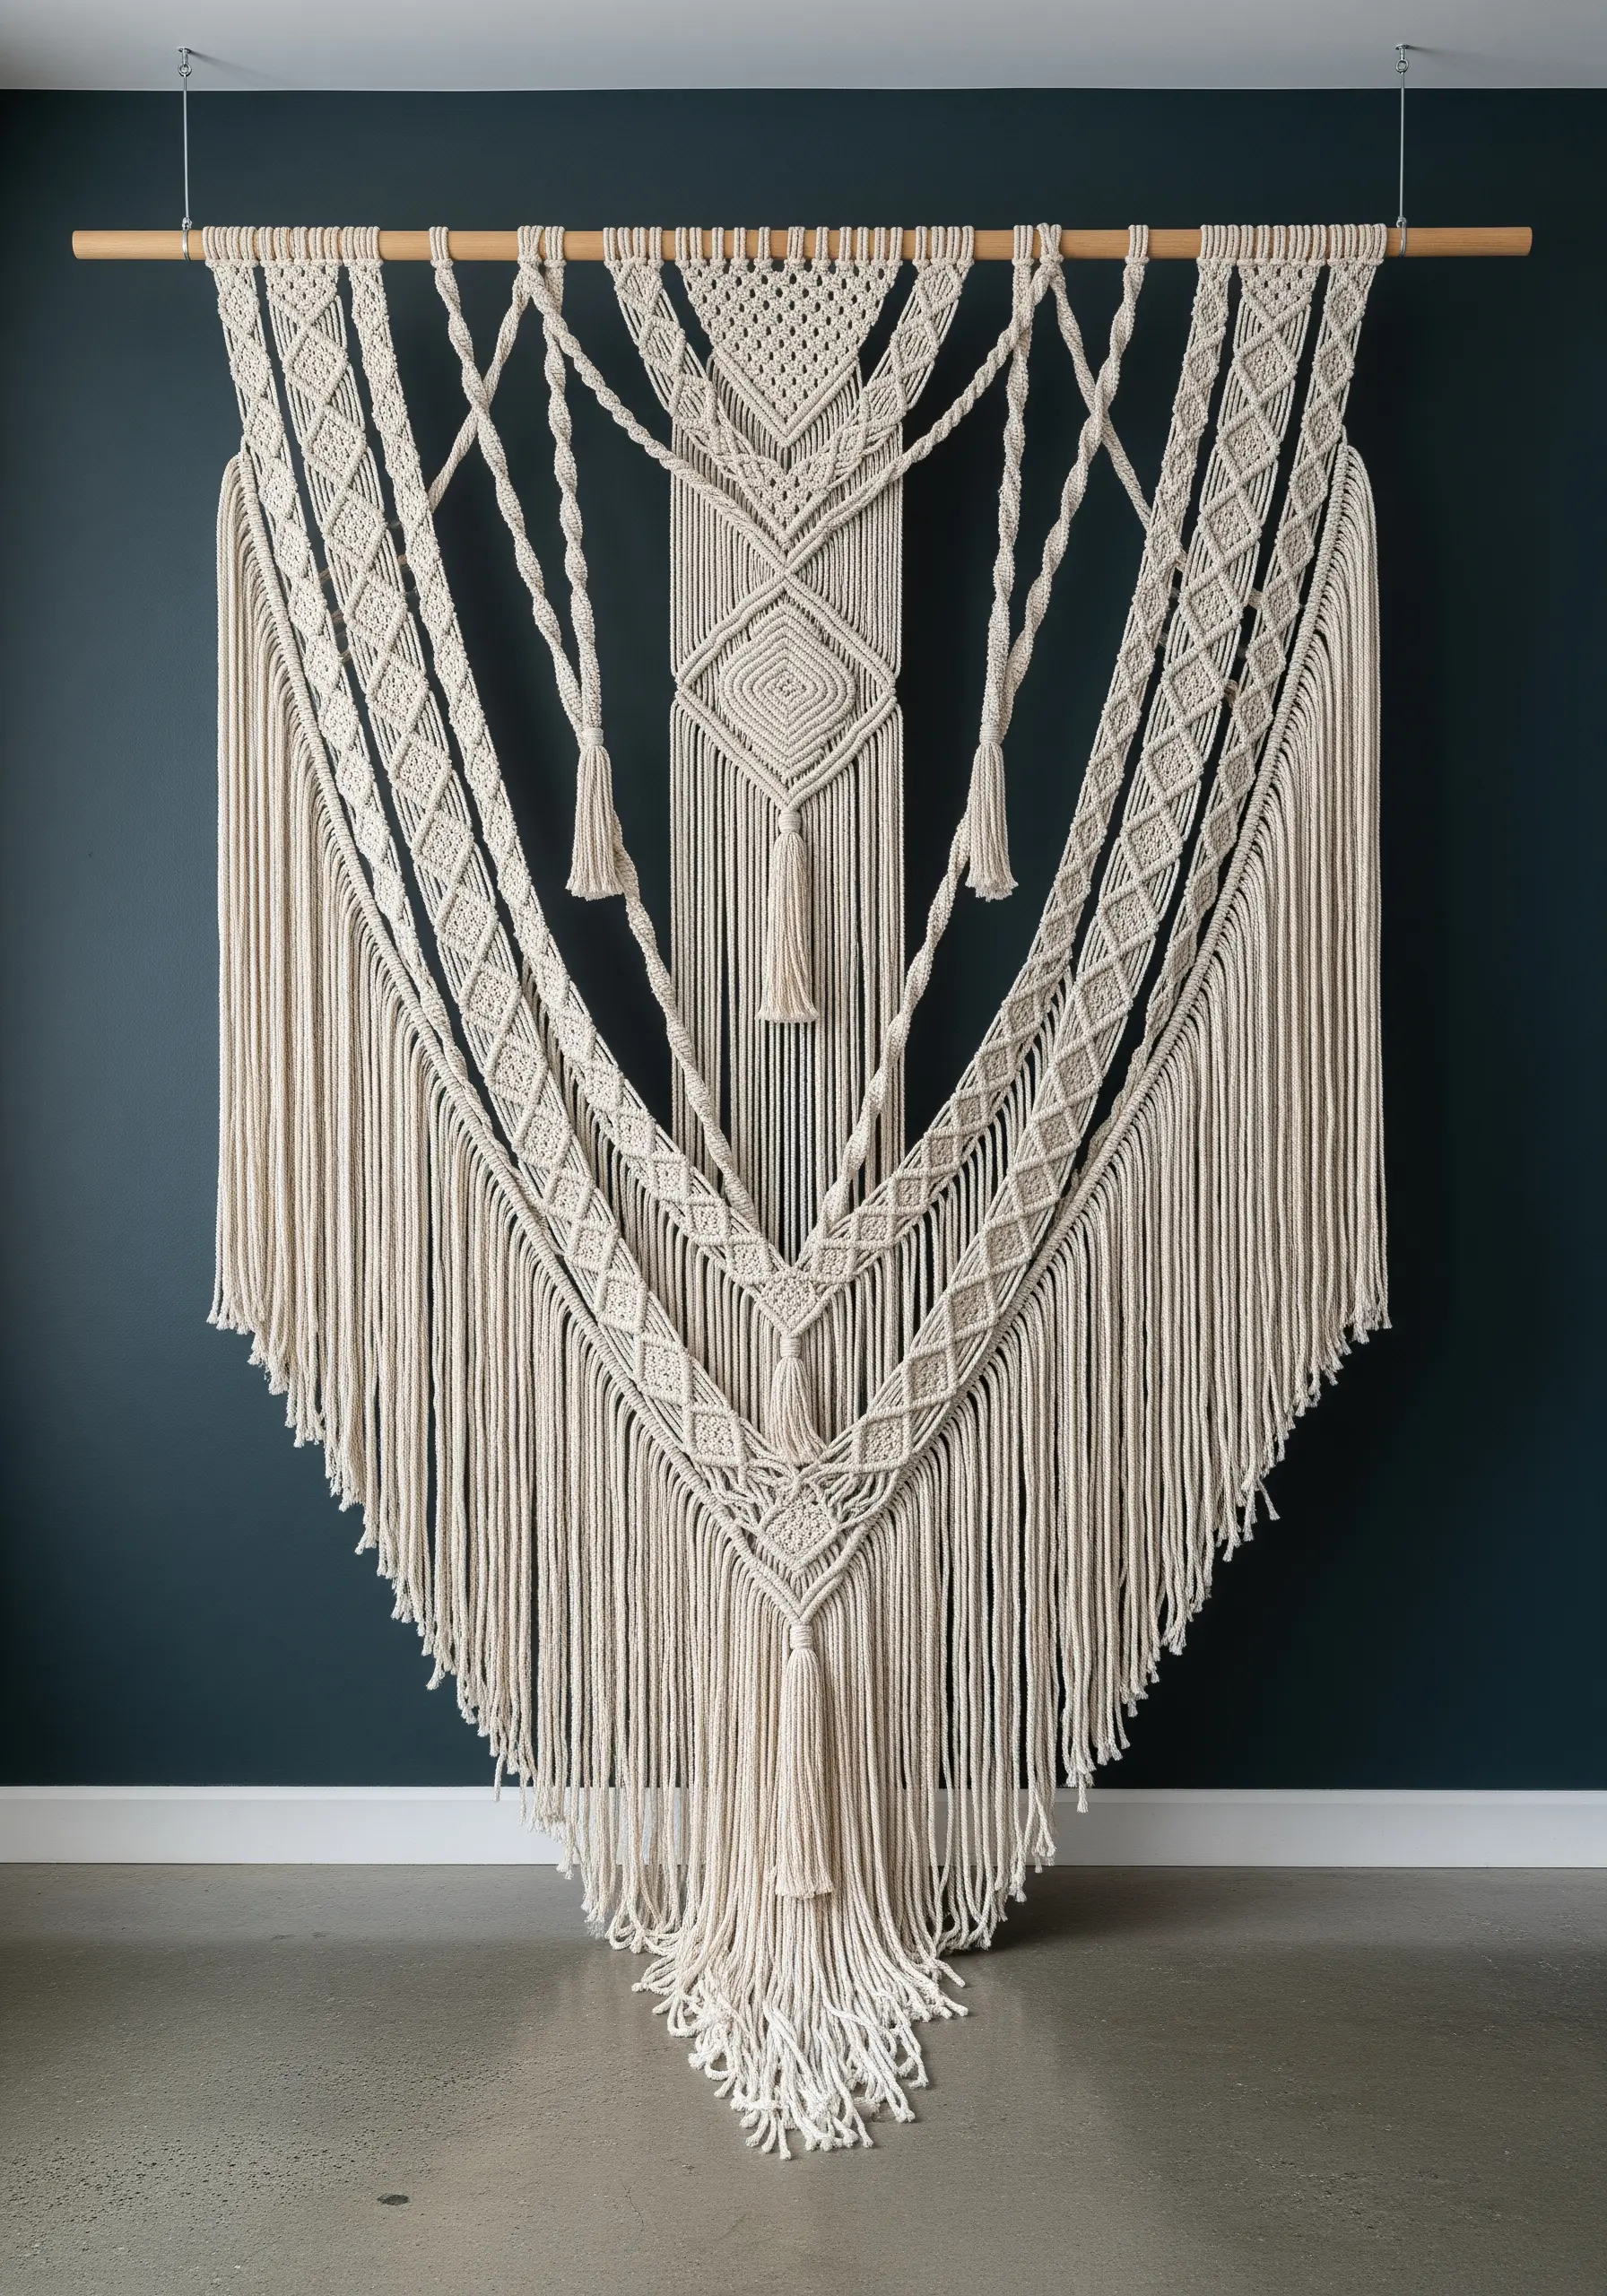
To create a large-scale macramé piece with this level of presence, you must think like an architect, planning for structure, symmetry, and negative space.
Start with a sturdy wooden dowel that can support the weight of the cord.
Vary the thickness of your cotton cord to create visual hierarchy; use thicker cords for the main structural lines and thinner ones for delicate, decorative details.
The design’s power comes from repeating knot patterns—like square knots and double half-hitches—to build geometric shapes that guide the eye.
This balance between dense sections and open, draping cords is what gives large-scale macramé its grace, echoing the principles behind the most serene boho embroidery patterns.
2. Celestial Weaving: Painting with Yarn on a Circular Loom
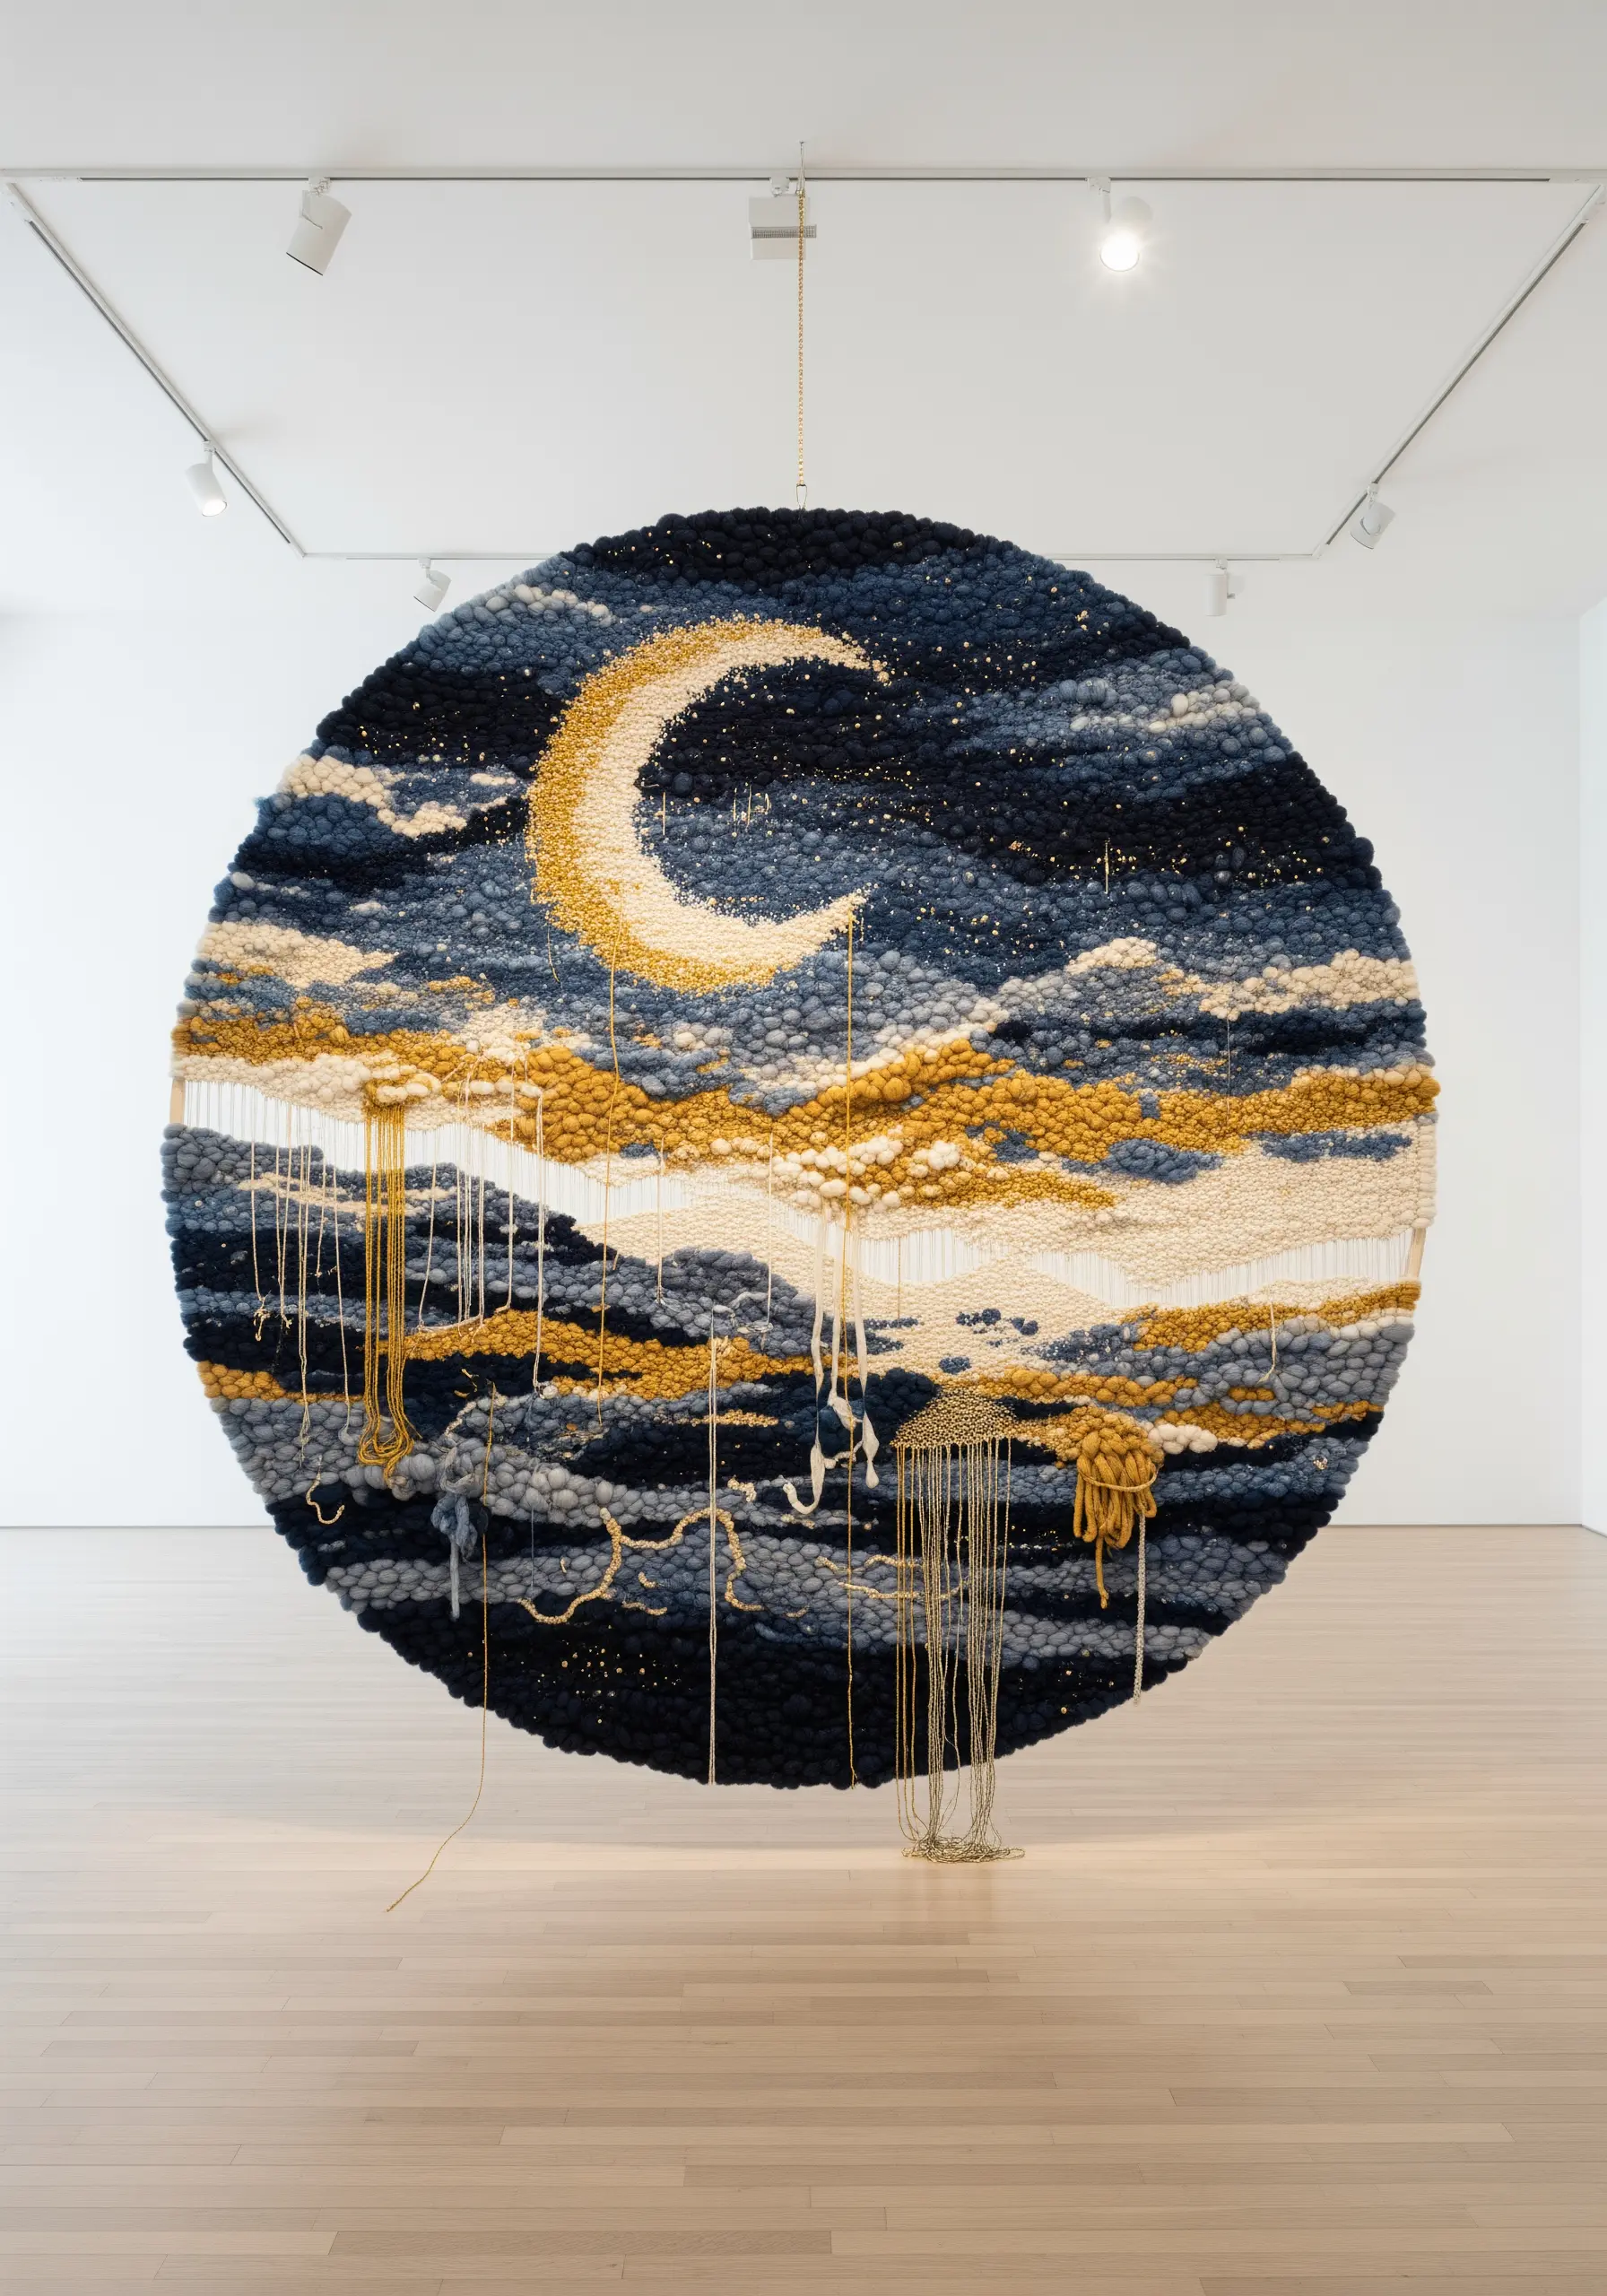
Use a large hoop as your loom to weave painterly, atmospheric scenes like this one.
The key to achieving this depth is to blend textures aggressively.
Combine chunky wool roving for soft, cloud-like masses with fine, high-sheen threads to create highlights that catch the light.
Use a tapestry needle to weave sections of color, but don’t be afraid to let threads drip and hang loose—this adds movement and an organic, untamed quality.
Think of it as building layers of fiber; some high texture fabric collage embroidery projects use this same principle to achieve a rich, tactile finish.
3. Sculptural Felting: Crafting Suspended Organic Forms
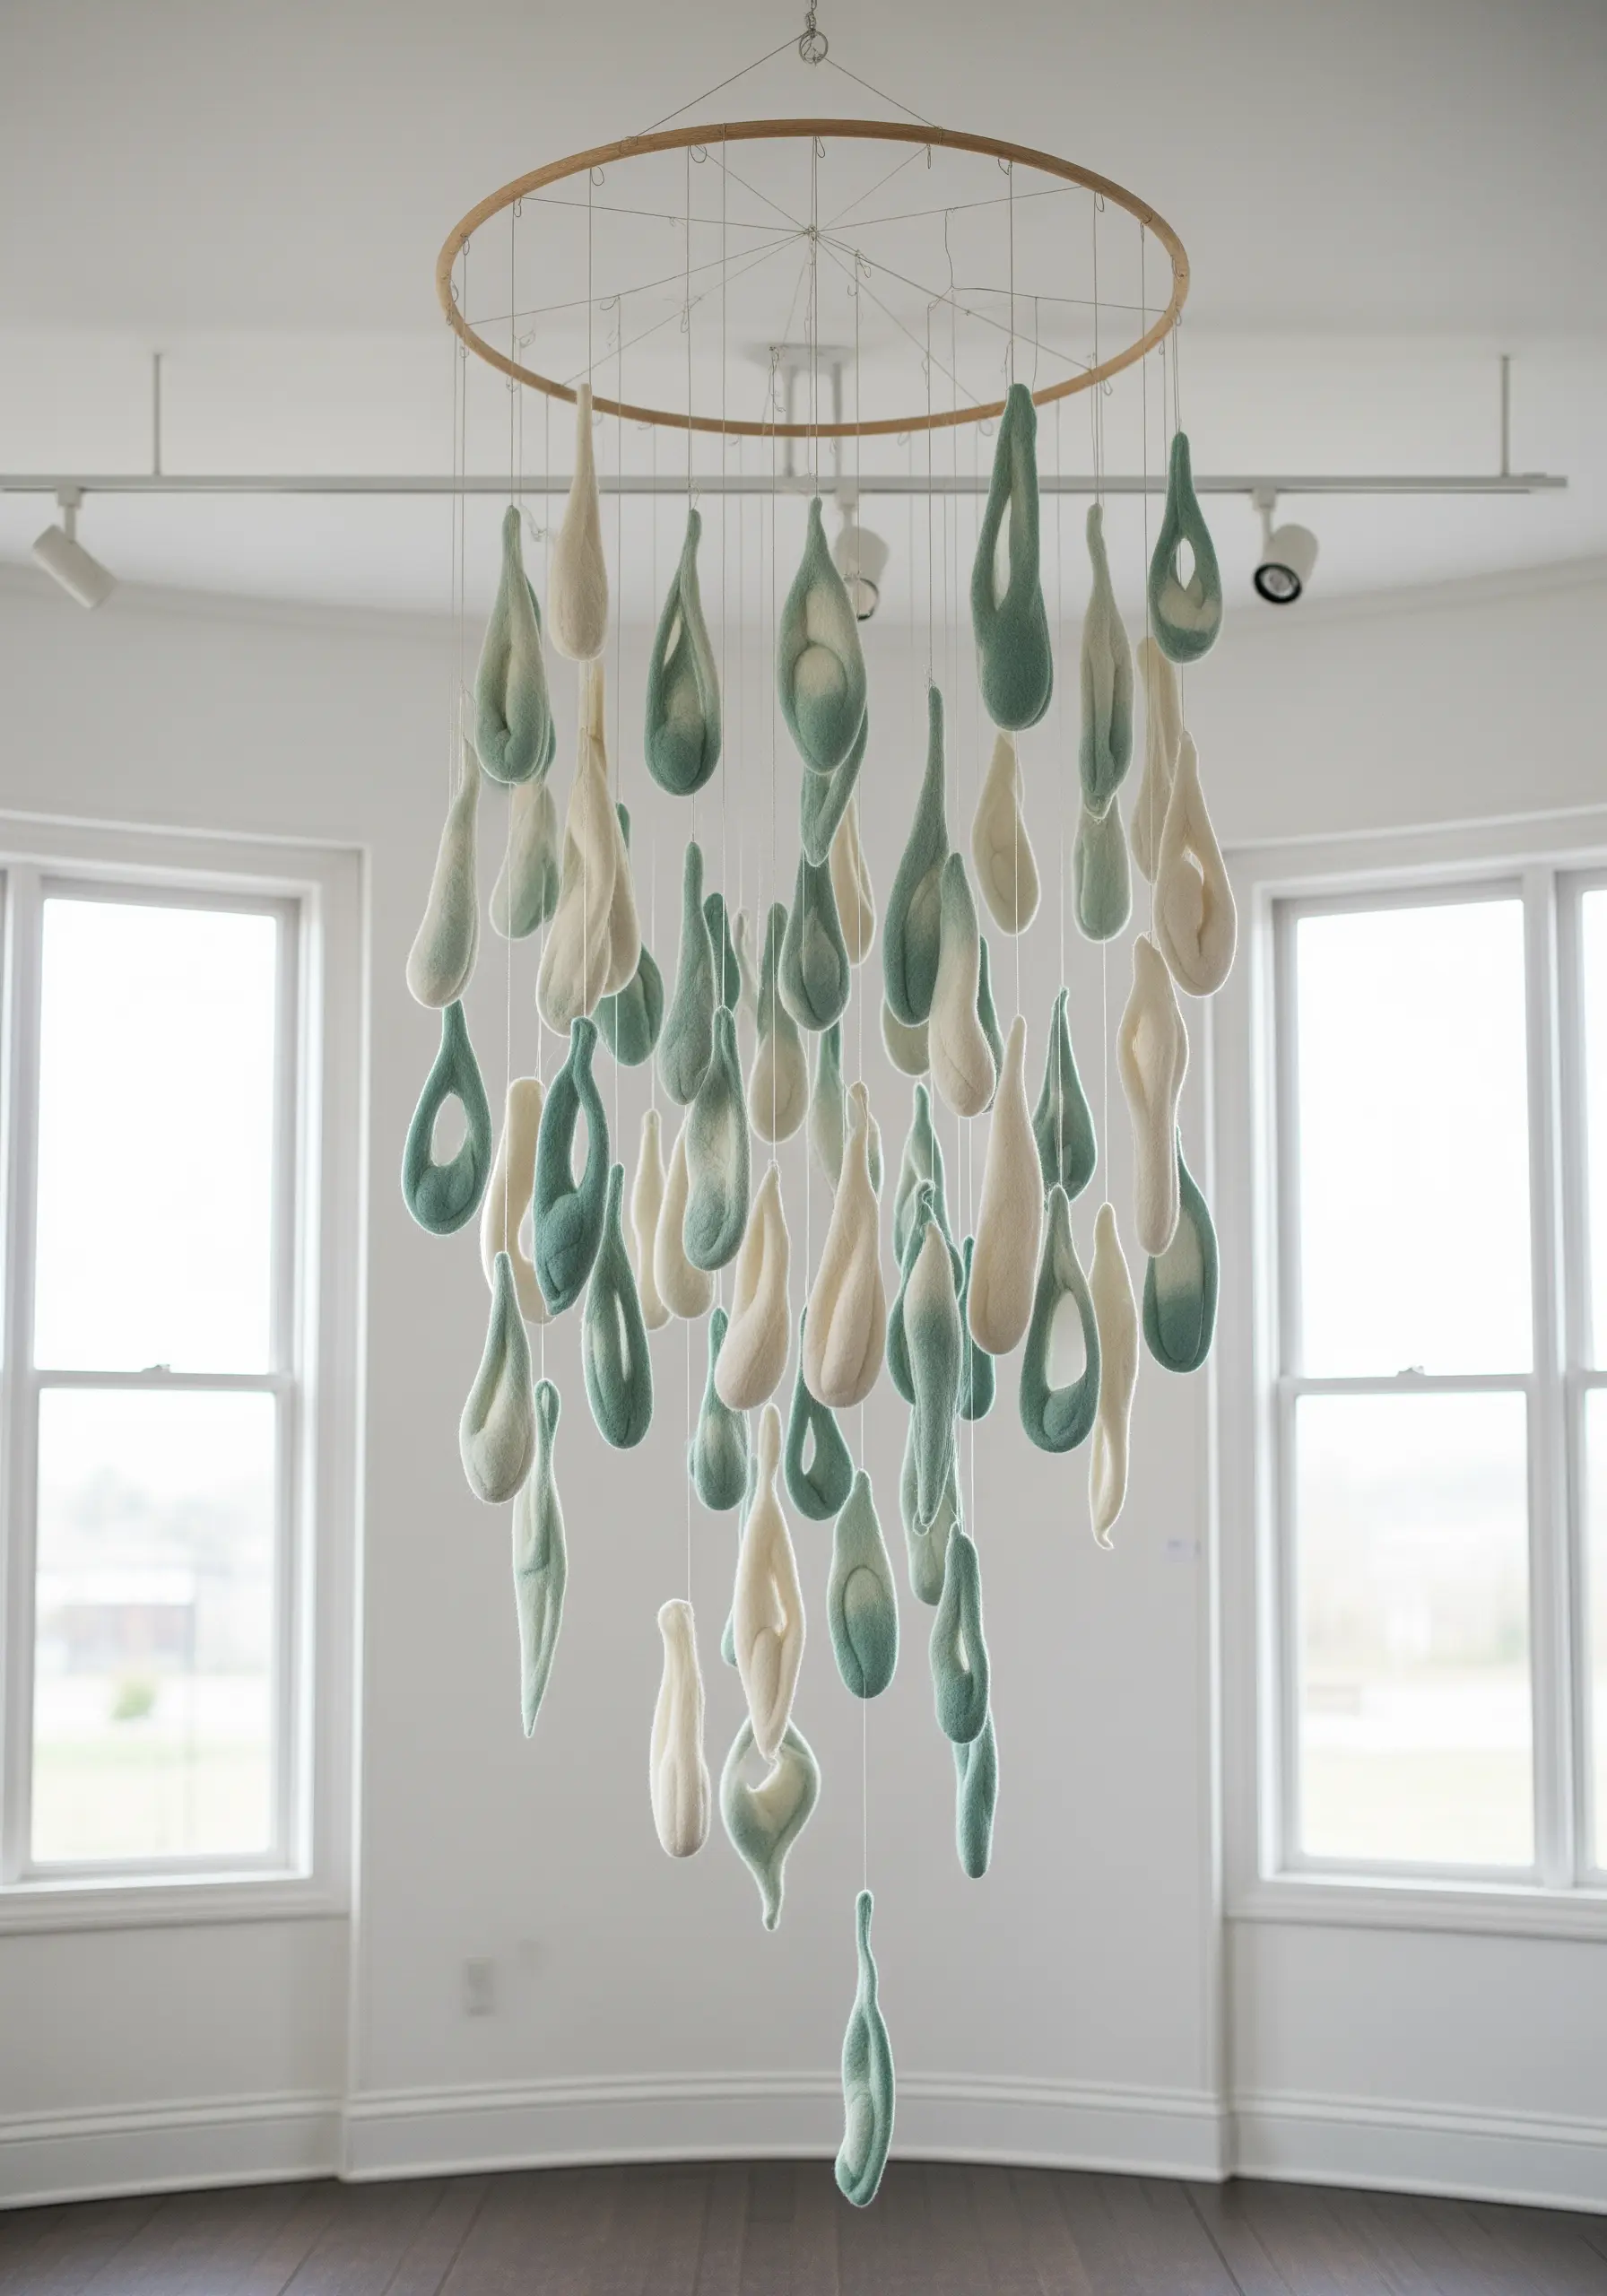
Move your fiber art from two dimensions to three by creating hollow, sculptural pods using wet felting techniques.
Work your wool roving around a resist—a flat, waterproof shape like bubble wrap or foam—to build the hollow form.
Introduce subtle ombré effects by layering different shades of wool before you begin the felting process; the colors will blend softly as the fibers mesh.
Suspend them from a simple wooden hoop at varying heights to create a sense of natural, gentle movement.
The goal is to create objects that feel grown, not just made, adding handmade embroidery touches that make every room feel natural and alive.
4. Modular Tufting: Designing with Geometric Blocks
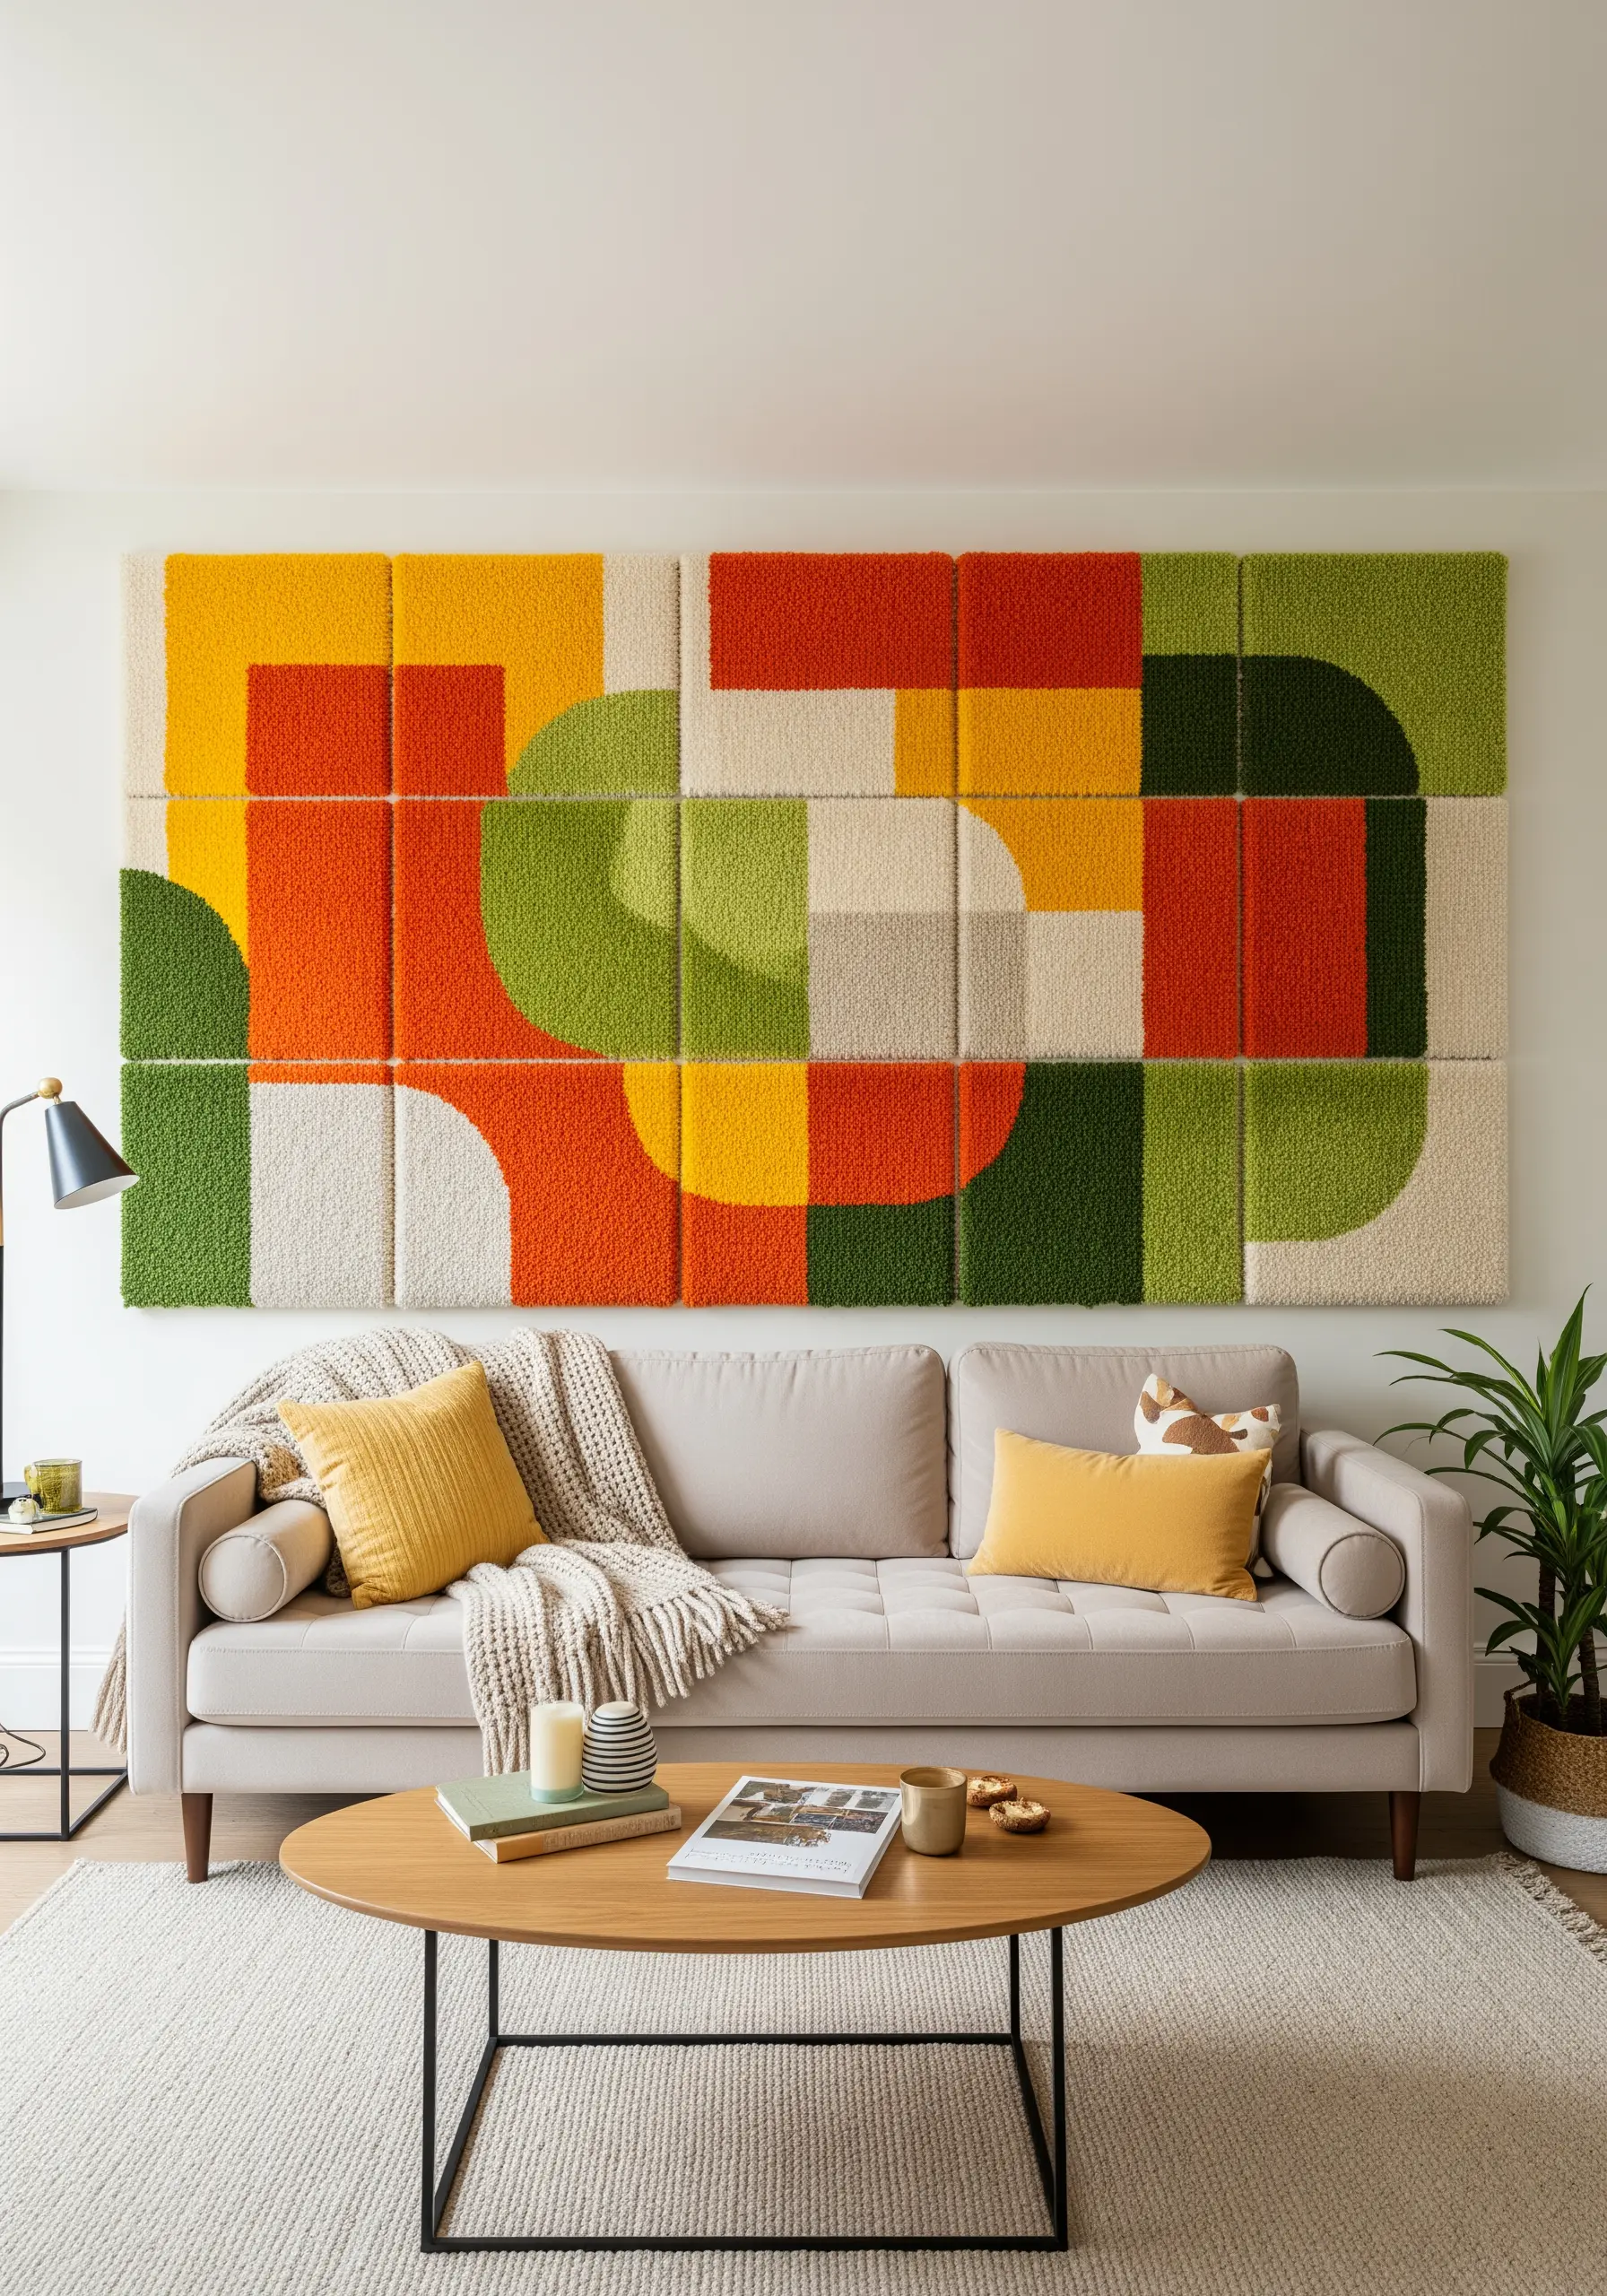
Tackle an ambitious, large-scale piece by breaking it down into manageable, modular panels.
This approach allows you to work on smaller, individual frames, ensuring clean edges and consistent tension before assembling the final composition.
Use a tufting gun to fill in your bold, color-blocked design, keeping the pile height uniform across all panels for a cohesive, professional look.
Planning your composition on a grid first is essential; it transforms complex yarn wall art projects inspired by geometric patterns into an achievable and stunning result.
5. Chromatic Tension: Sculpting a Room with Neon Thread

This is not just stringing thread; it’s drawing with light and tension to create an interactive form.
Use a sturdy frame or install anchor points (small nails or hooks) directly into the walls and floor.
The visual magic happens when you layer translucent neon threads. Where different colors overlap, they create new optical hues, an effect known as color mixing.
This is a study in how simple lines can create complex visual depth, turning retro string art patterns into a contemporary light installation.
6. Cascading Color: Treating Yarn as an Architectural Element
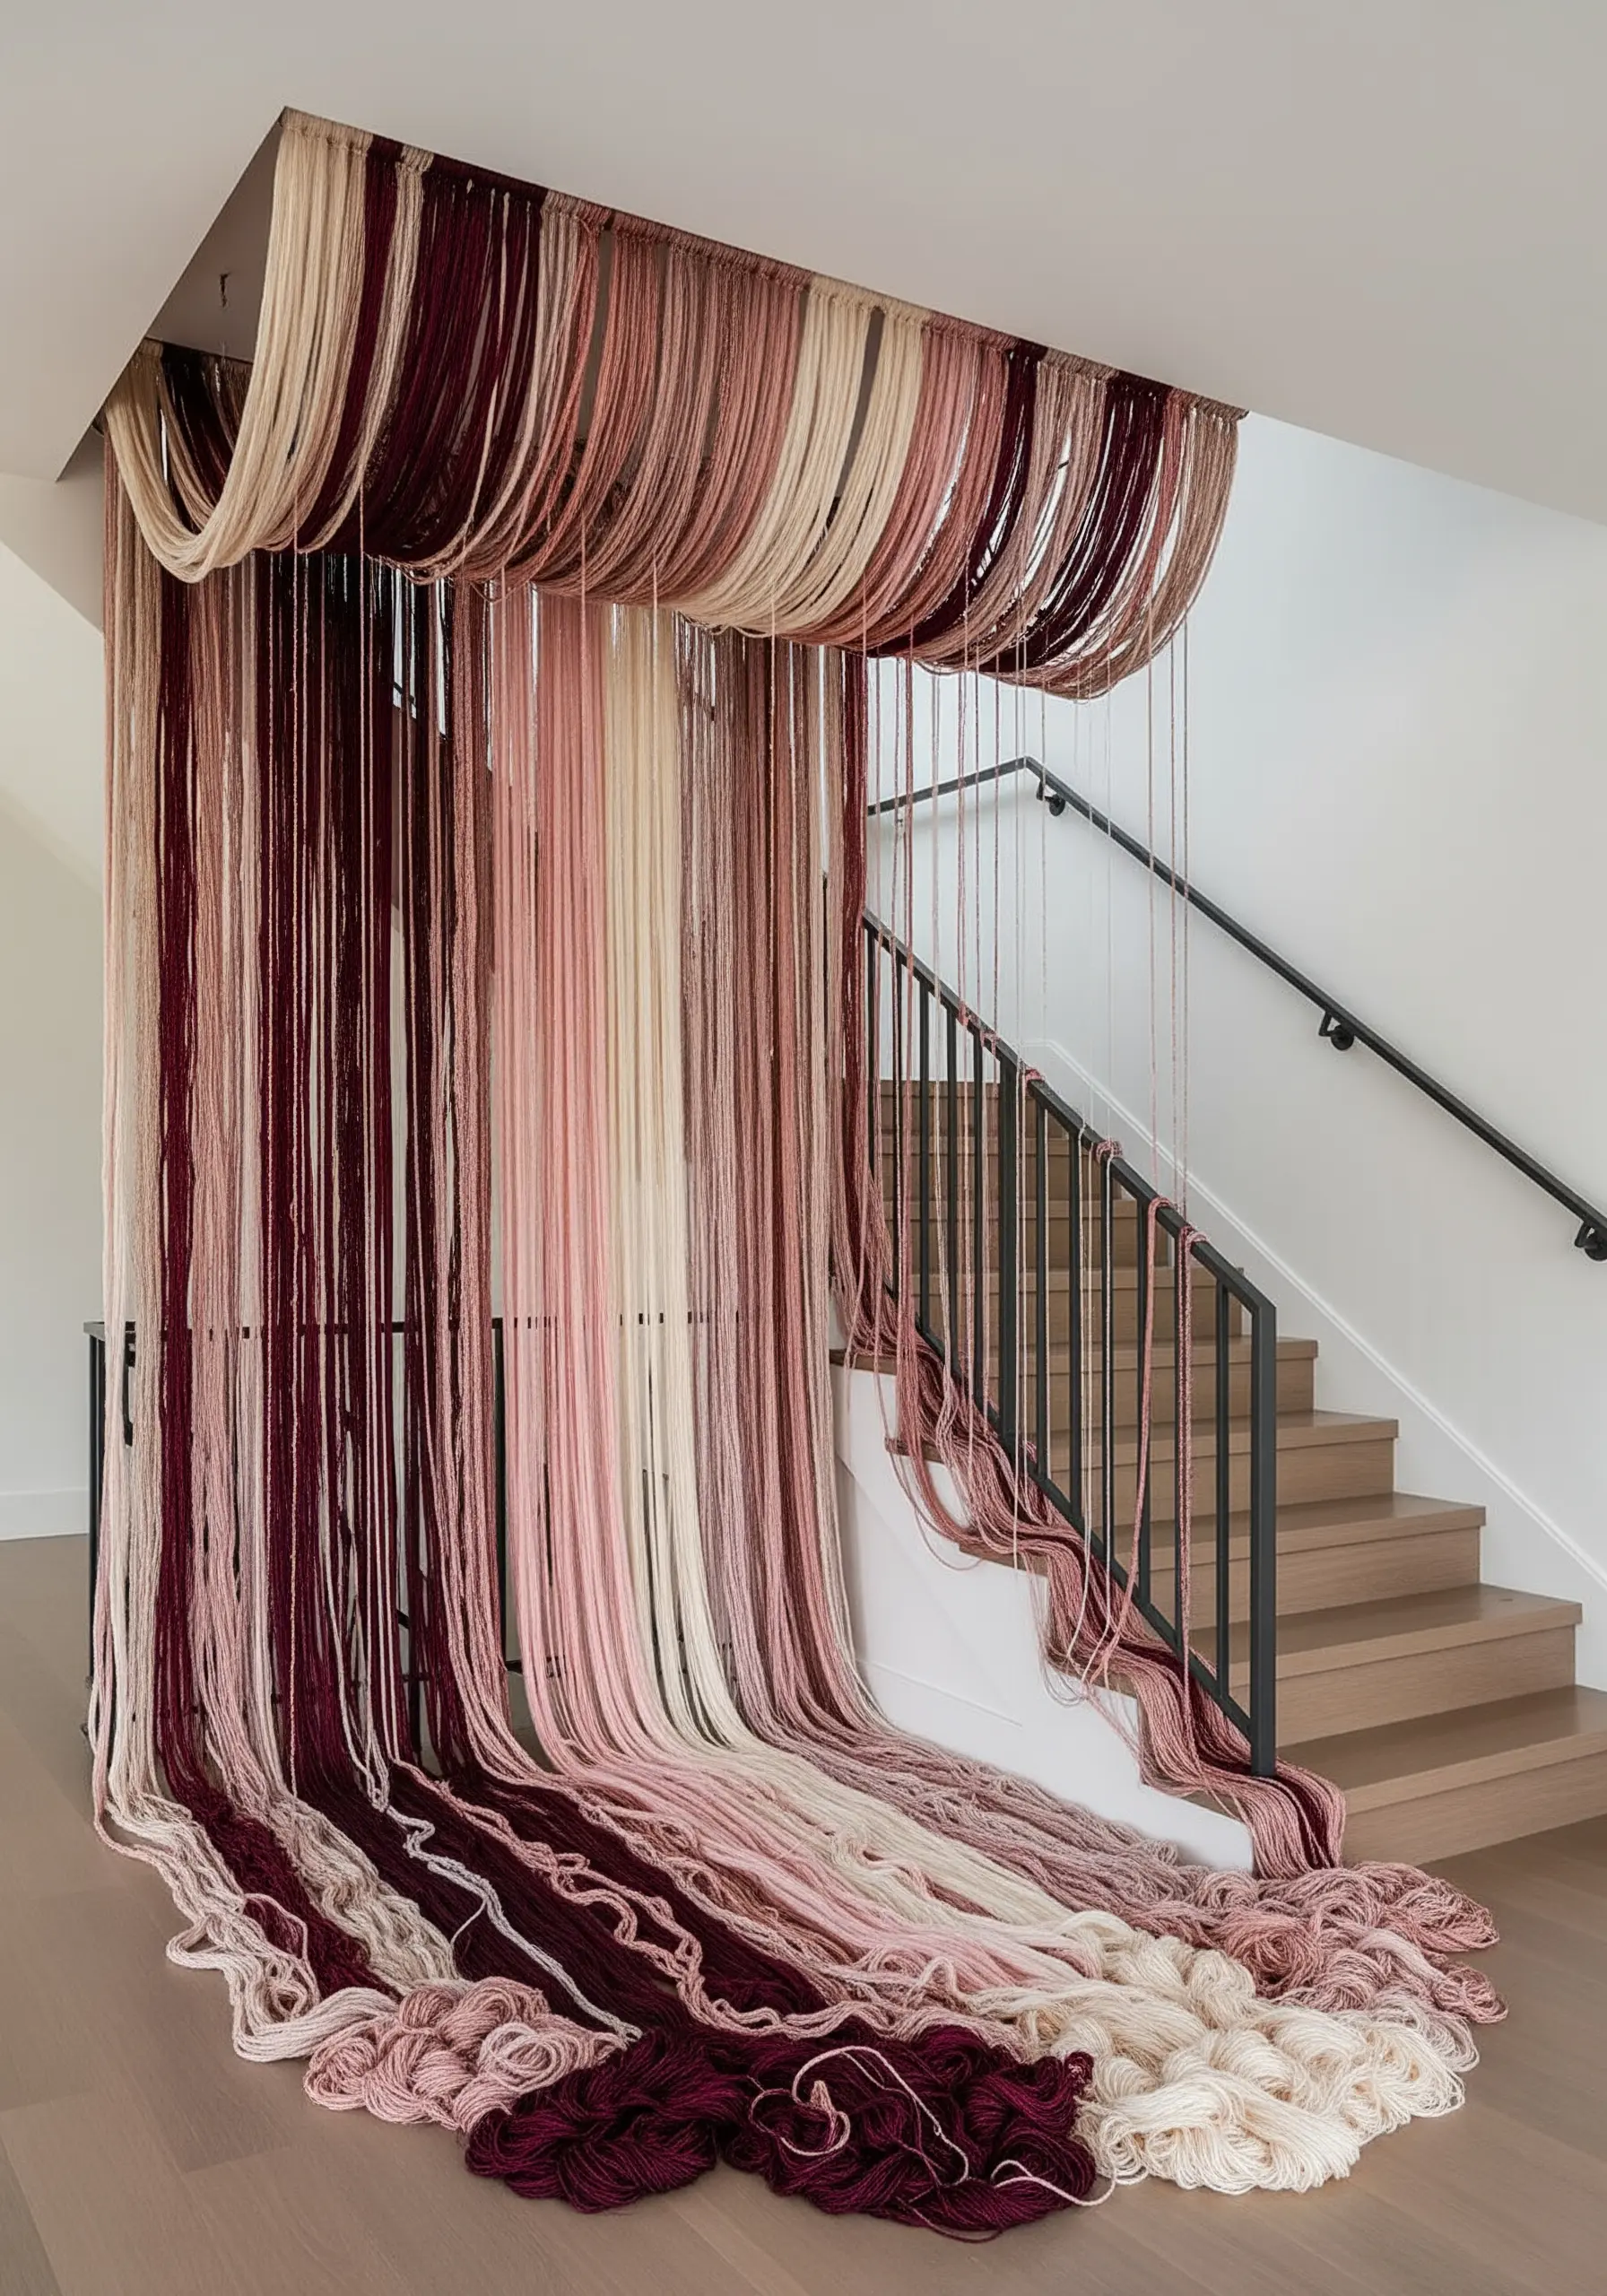
Reimagine yarn not as a tool for stitching, but as a fluid, architectural material in its own right.
The success of an installation like this hinges on a sophisticated, restrained color palette—here, analogous shades of blush, cream, and burgundy create a rich harmony.
Secure a hidden mounting board to the ceiling or high on a wall, then drape yarns of varying weights and textures, allowing them to pool on the floor.
The effect is luxurious and soft, completely transforming the perception of a staircase or entryway.
7. Topographical Punch Needle: Sculpting a Fiber Landscape
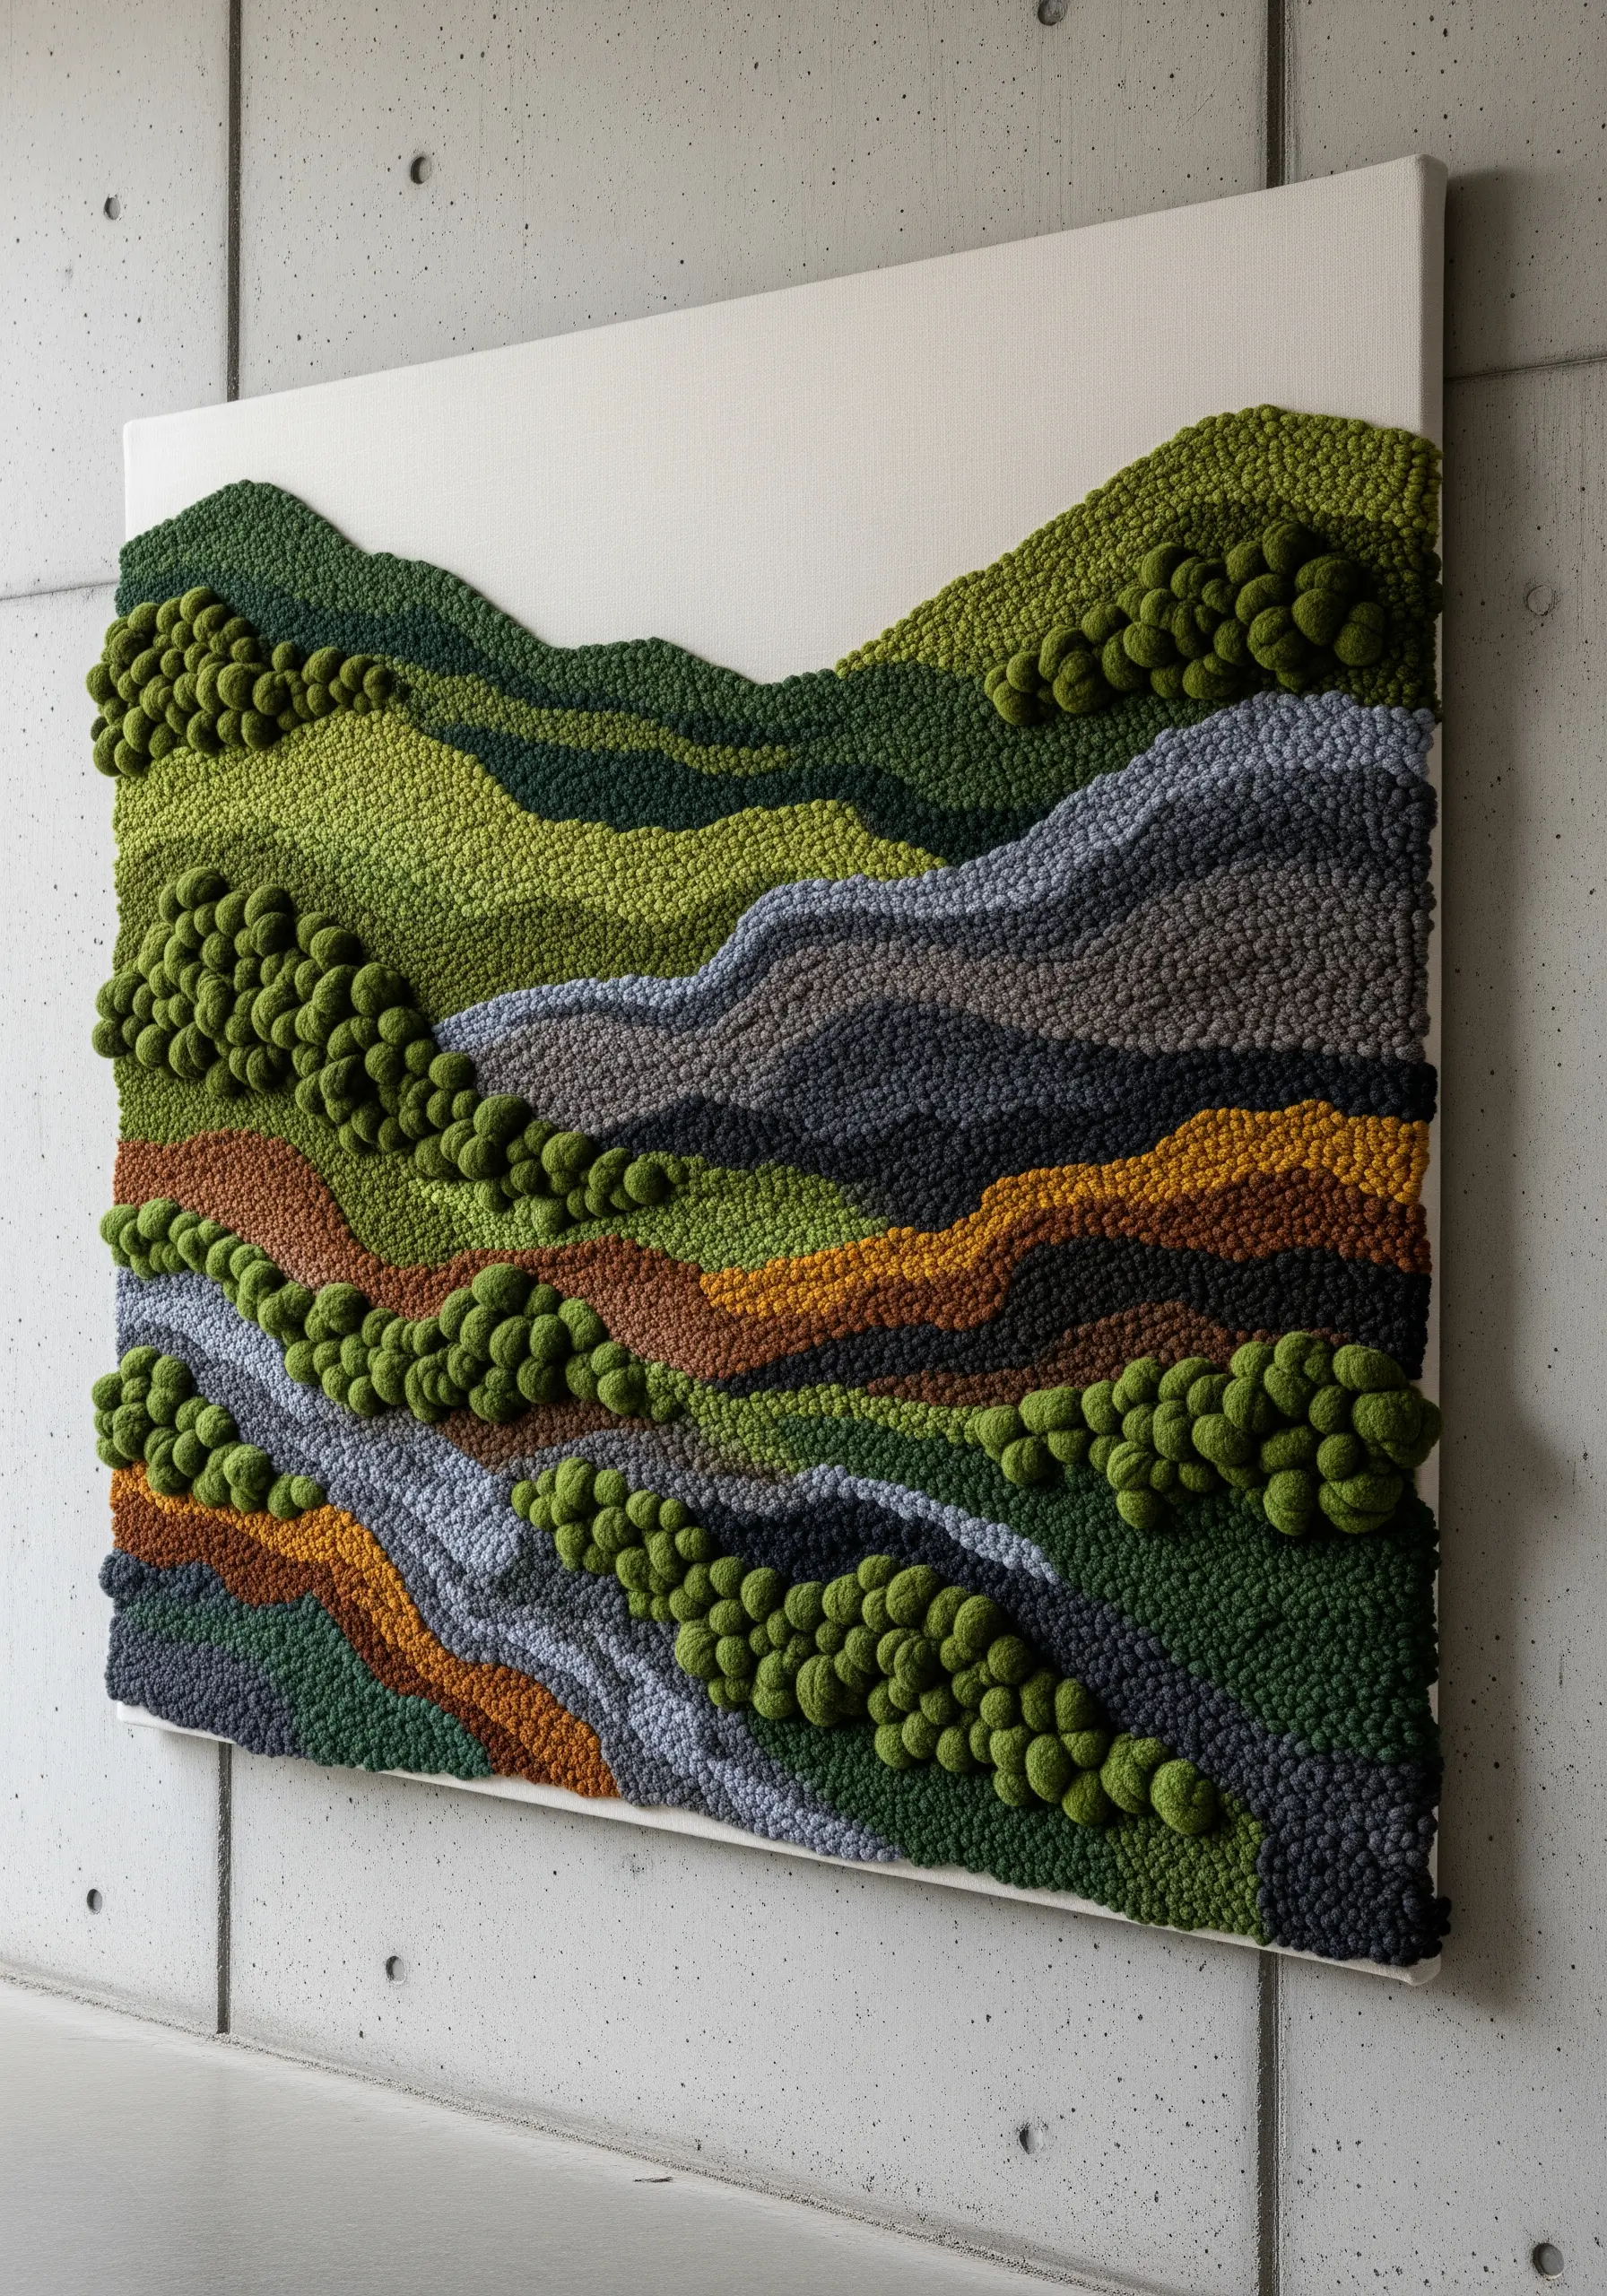
Elevate your punch needle work by varying your loop heights to create topographical depth and dimension.
Use an adjustable punch needle to create this effect. Tightly packed, short loops form the dense ‘valleys,’ while longer, looser loops rise up to form the ‘hills’.
You can create the clustered ‘trees’ by trimming very high loops into pom-pom shapes or by adding dense French knots after the main piece is complete.
This is one of the most effective embroidery projects inspired by textures you’d find on a nature walk, translating natural forms into pure texture.
8. Grid Weaving: The Modern God’s Eye Composition
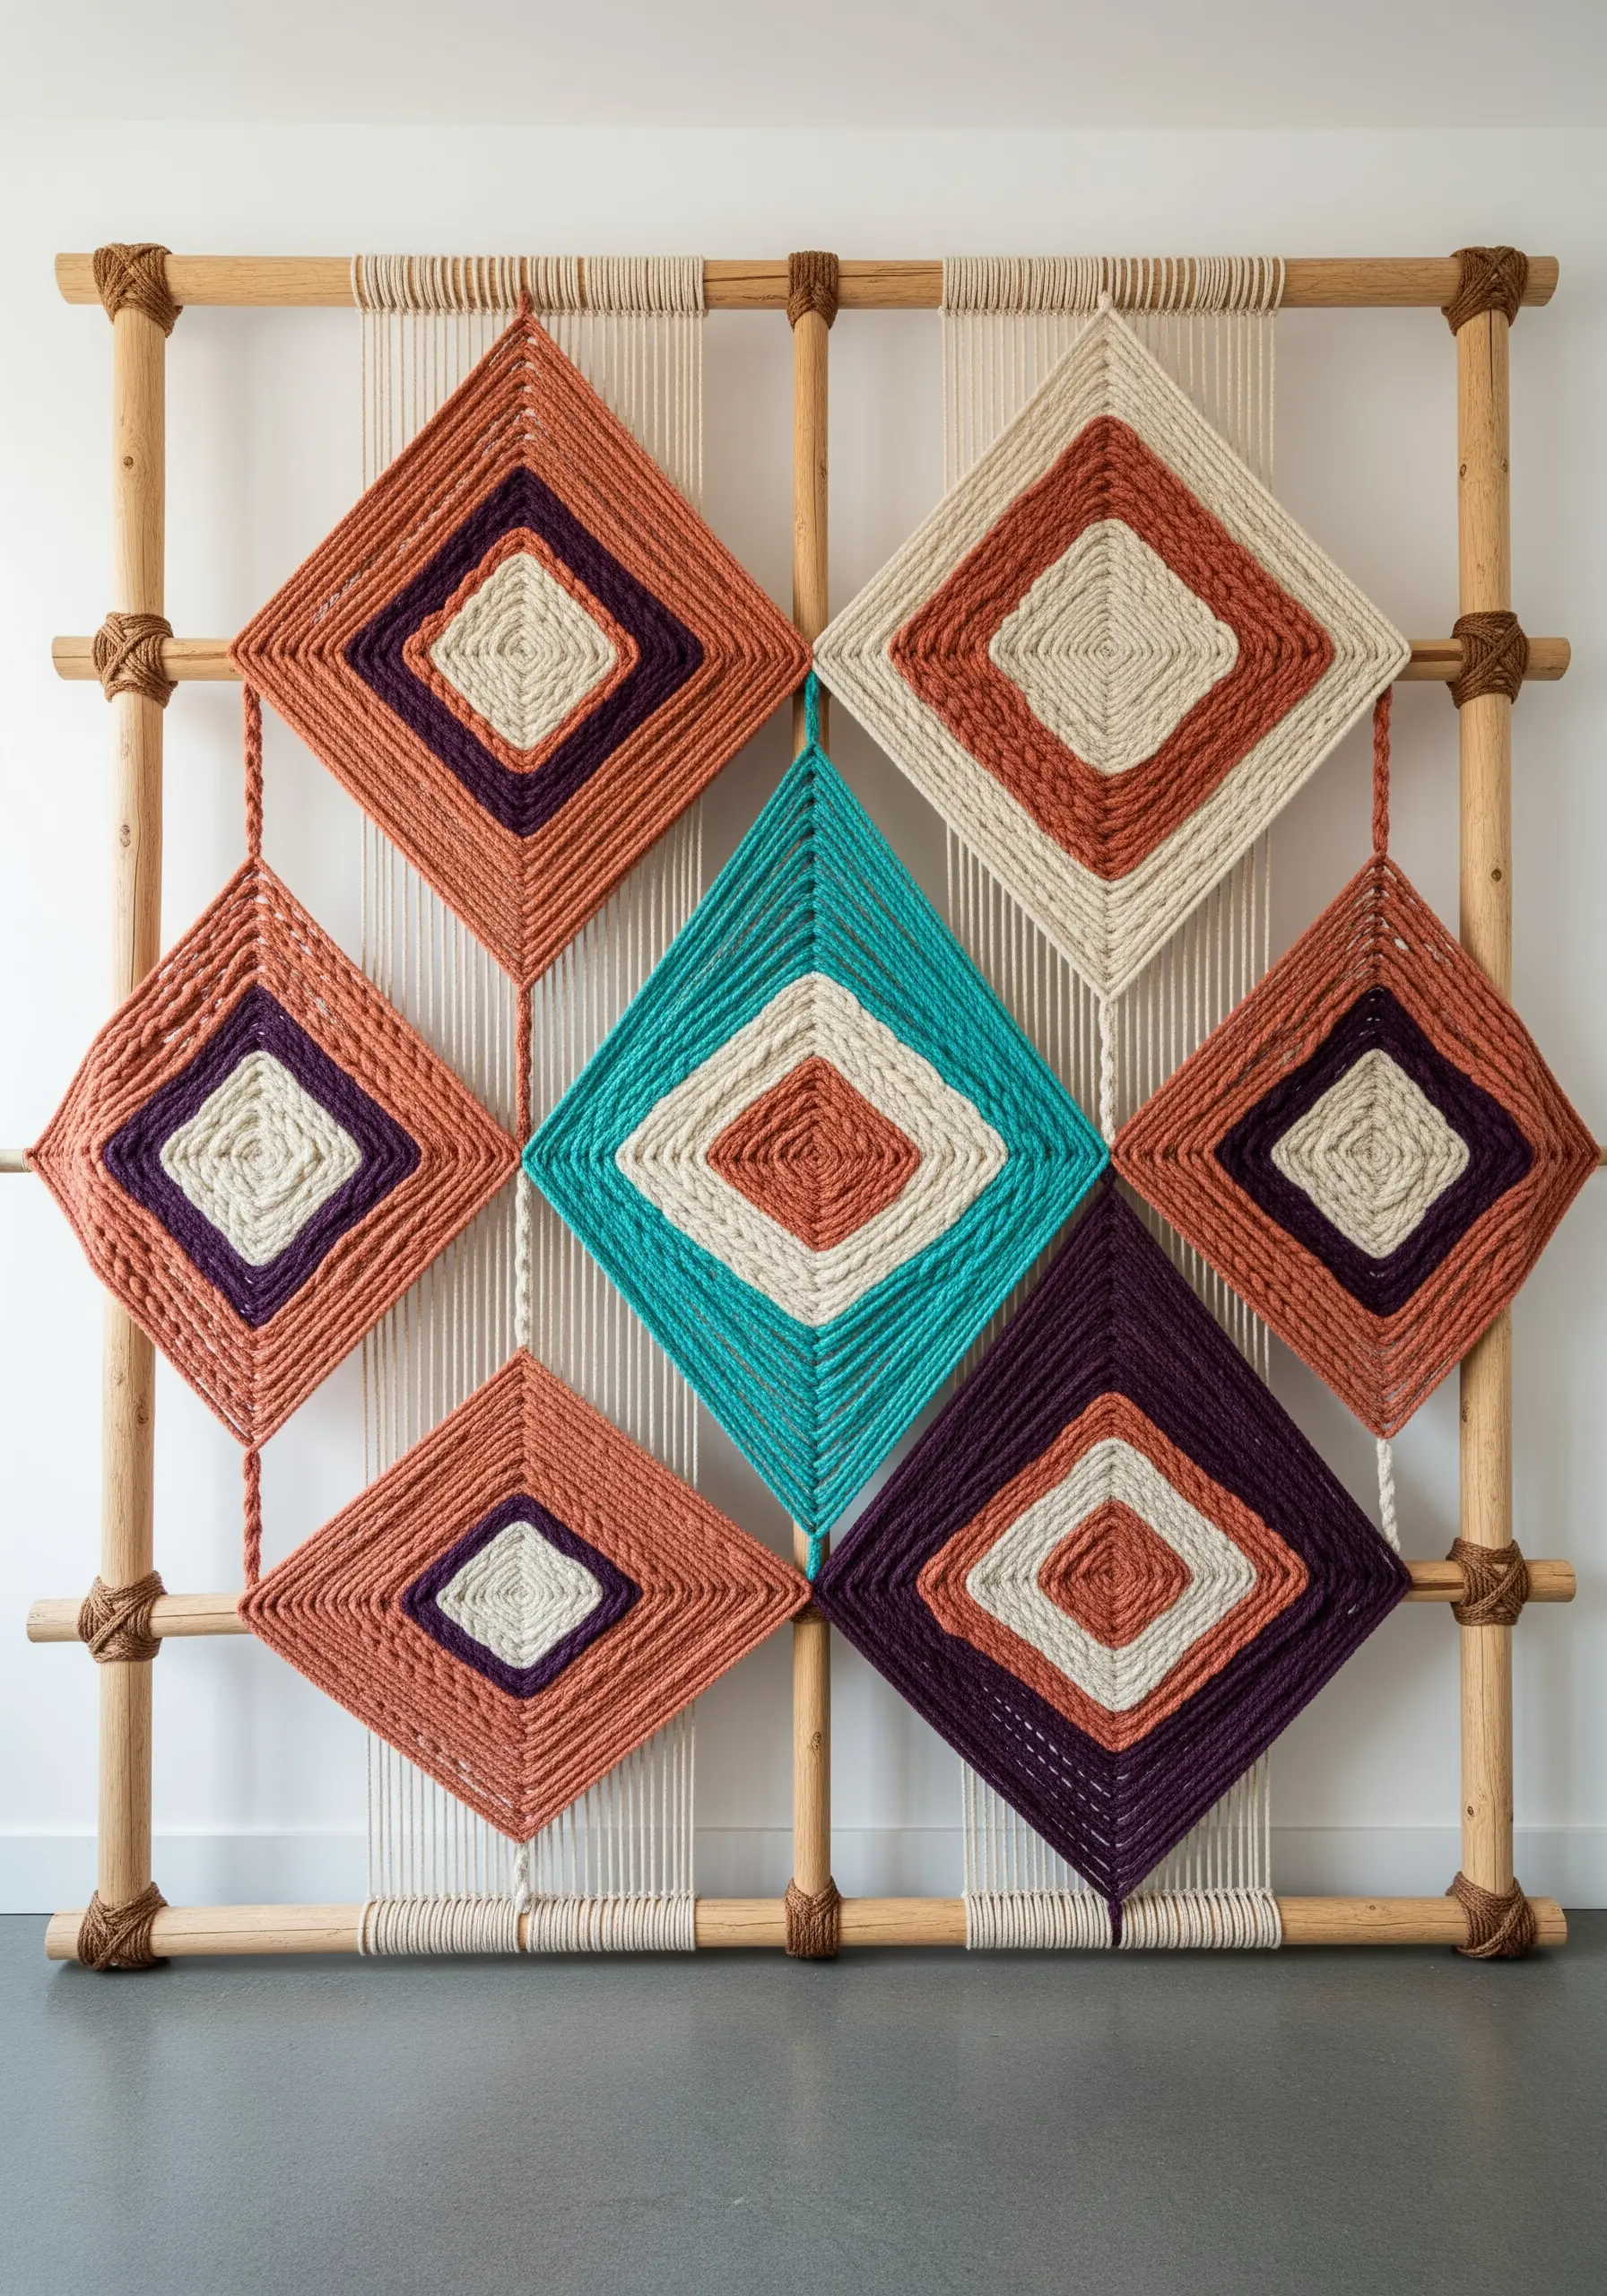
This installation updates a classic craft by deconstructing it and playing with scale and structure.
Build a simple, large-scale loom from bamboo poles or wooden dowels lashed together.
The technique is a variation of Ojo de Dios (God’s Eye) weaving, where you wrap yarn around intersecting points to create concentric diamonds.
Maintain consistent tension for sharp shapes, and remember that the negative space—the unwrapped vertical threads—is just as important as the woven areas.
The repetition is meditative, similar to working on floral mandala embroidery ideas for mindful stitching, allowing you to focus purely on color and form.
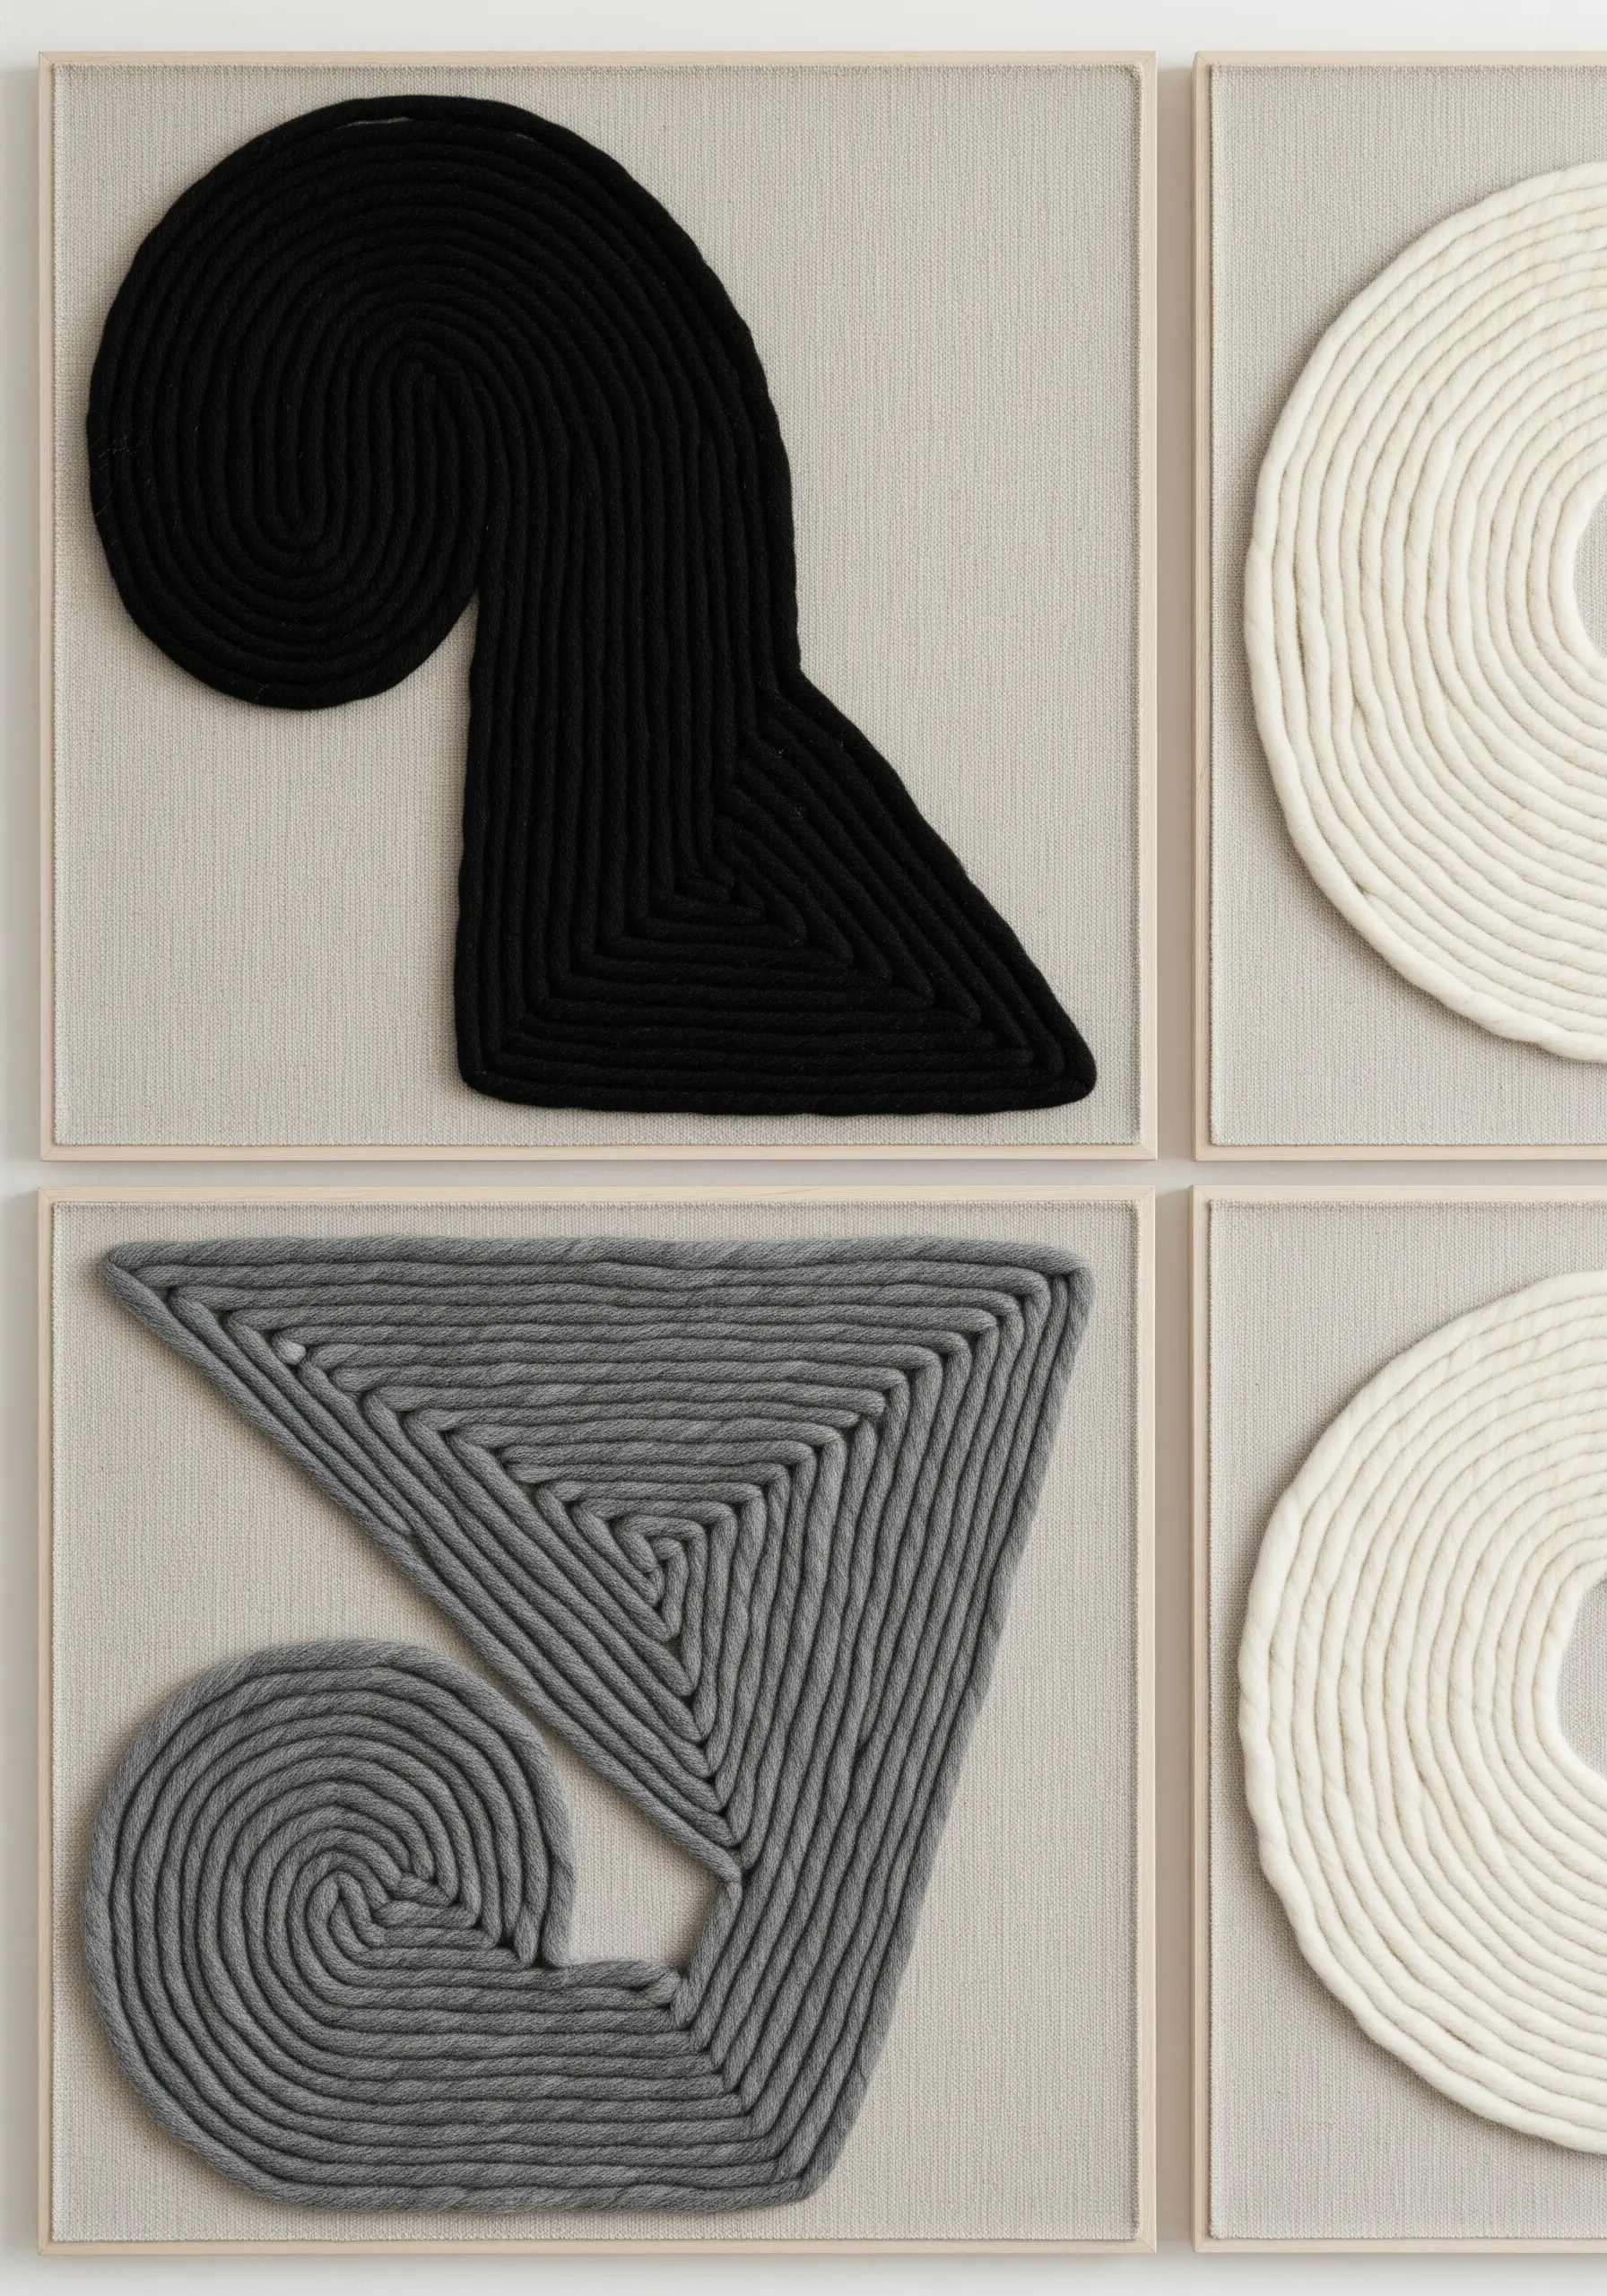
9. Monumental Coiling: Building Sculptural Vessels with Rope

This powerful technique uses thick rope, coiled and stitched together, to build large-scale, freestanding forms without an internal armature.
You can use a heavy-duty sewing machine with a zigzag stitch or stitch by hand with a sturdy, curved needle and waxed linen thread.
Build the shape organically, letting the stiffness of the rope guide the curves and structure.
Alternating between natural and white rope creates clean, graphic stripes that emphasize the piece’s sculptural contours.
10. Immersive Crochet: Crafting an Ethereal Canopy
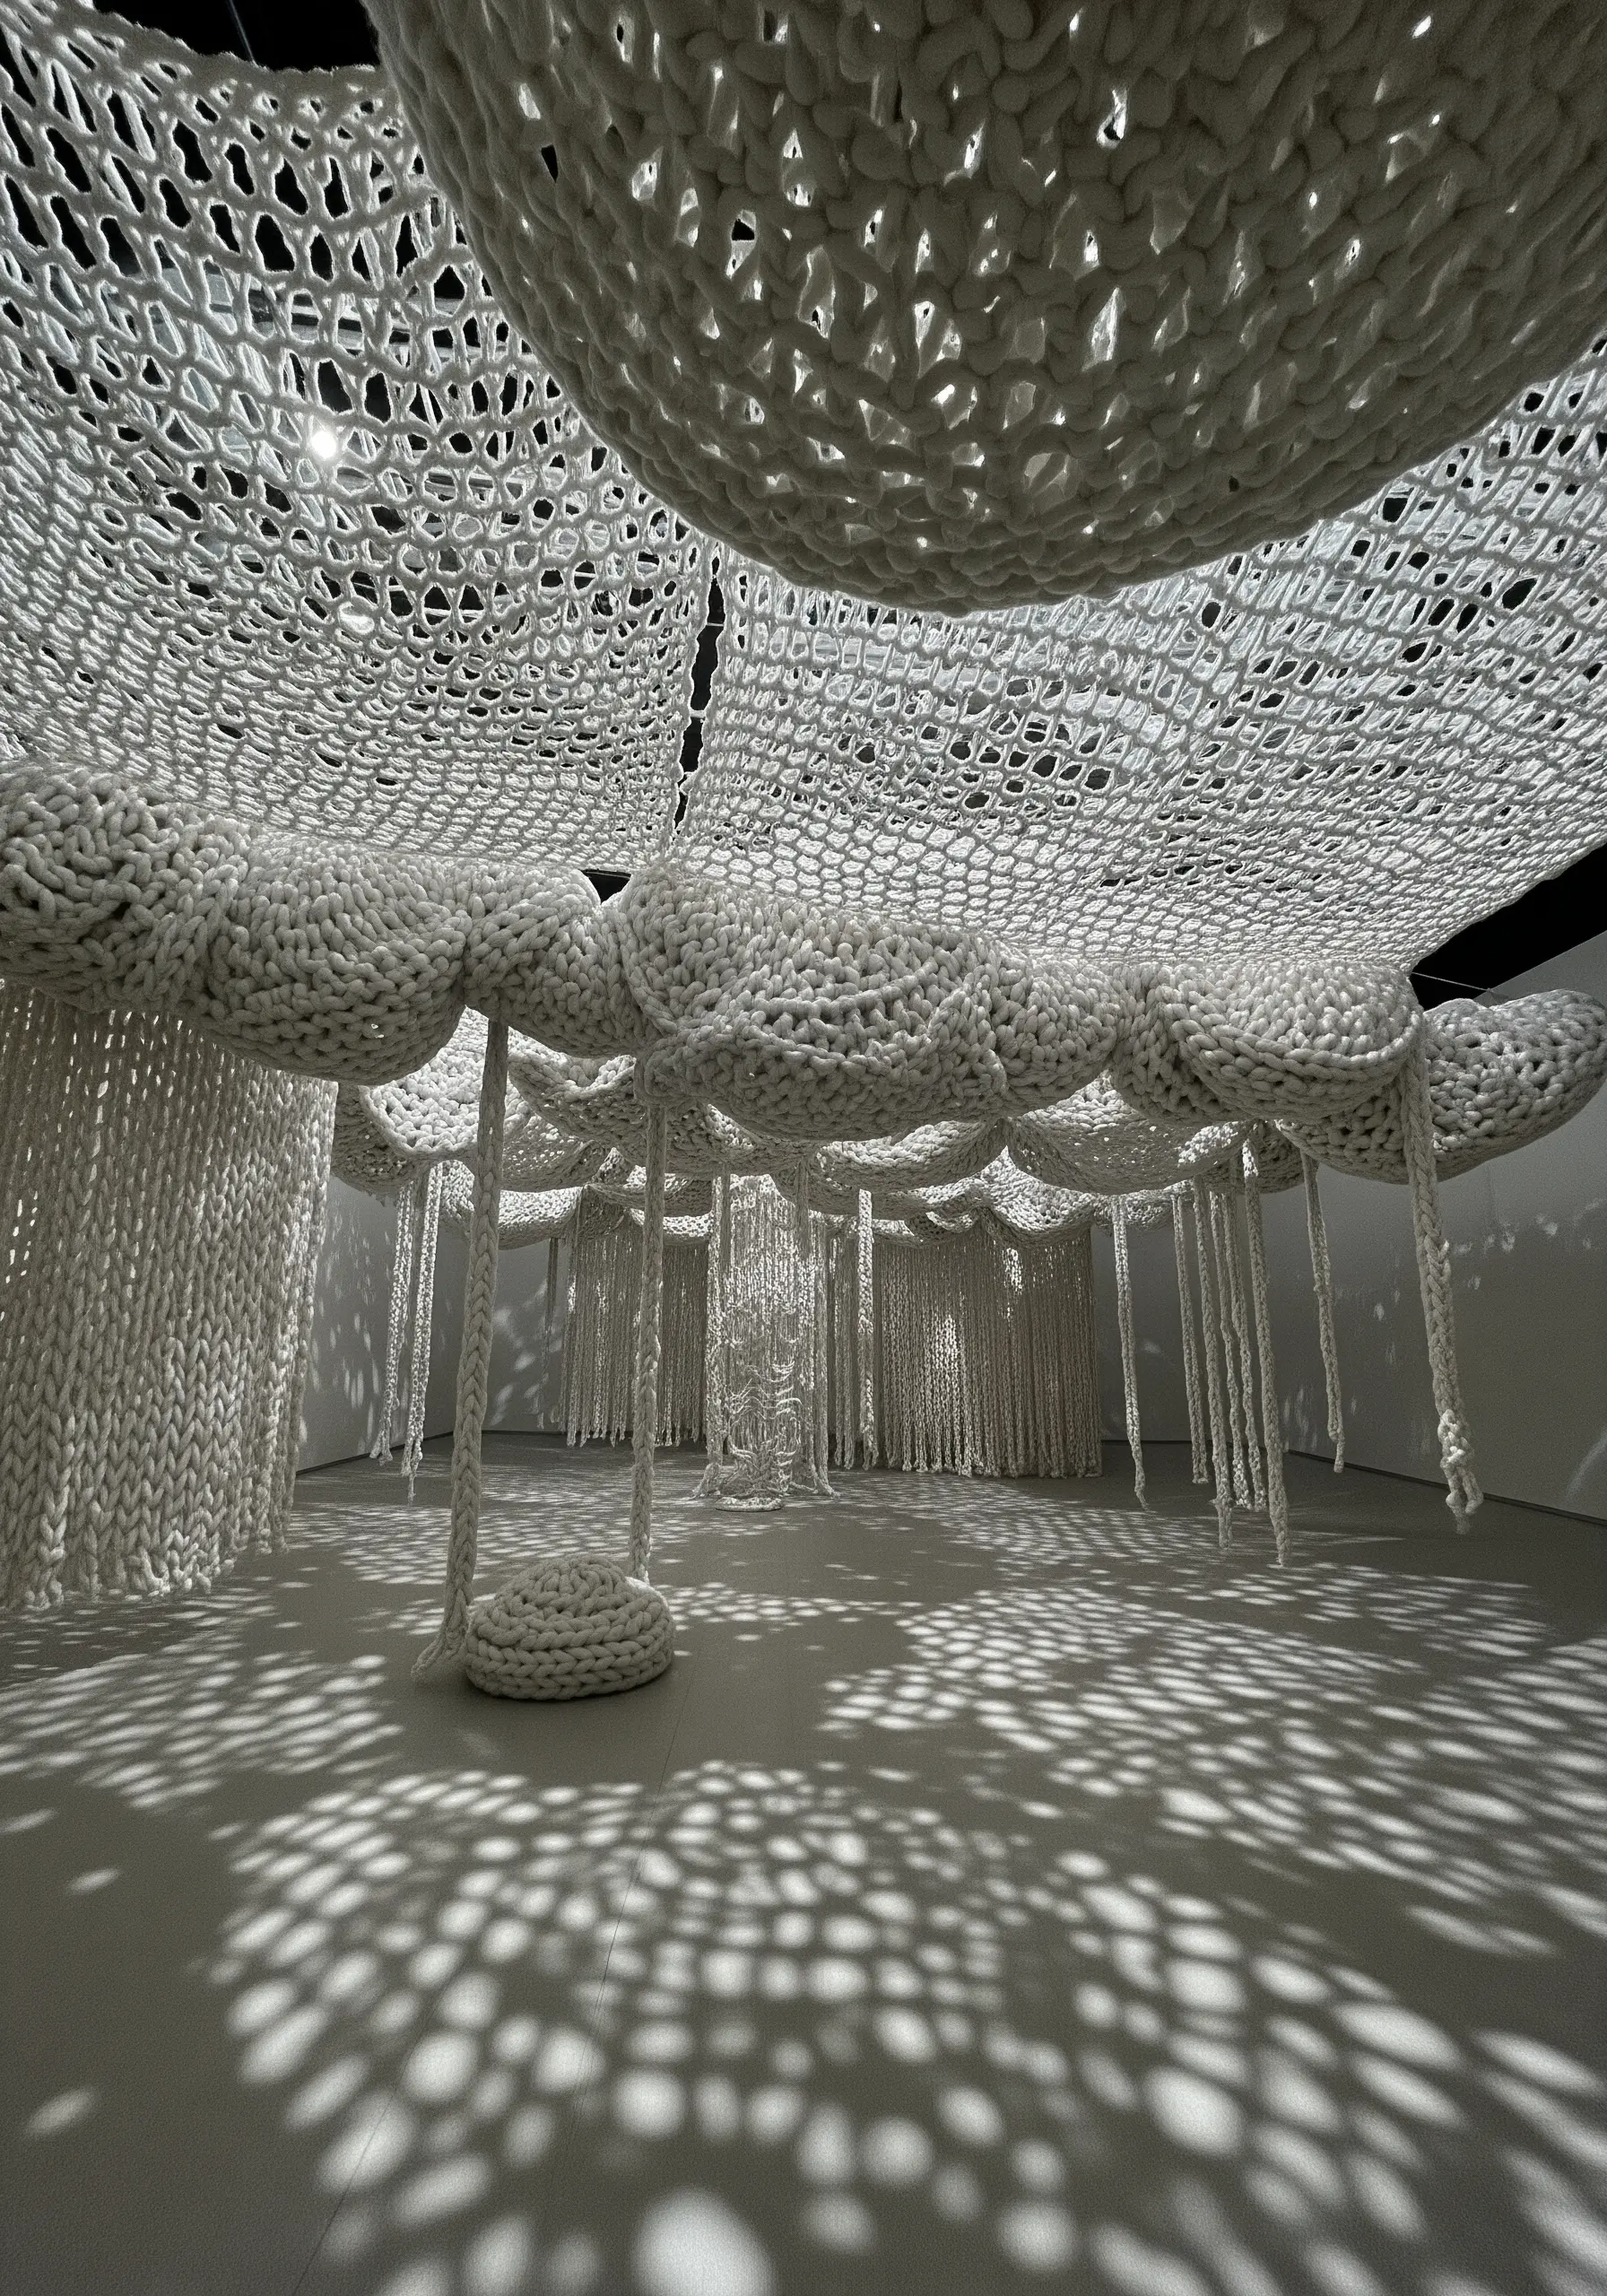
Completely transform a room by crocheting a textural ceiling that interacts with light.
Use a very large crochet hook and chunky, soft yarn—or even strips of fabric—to create open, web-like panels and denser ‘cloud’ shapes.
Suspend them from the ceiling at different heights to create layers and depth.
The true magic is in the interplay of light and shadow; the open stitches will cast intricate patterns on the walls and floor, creating a dream-like environment.
The effect is immersive and comforting, much like the tactile appeal of embroidered throws and blankets, but on an architectural scale.
11. Graphic Couching: Drawing with Thick Roving Yarn
This technique, known as couching, allows you to ‘draw’ with thick yarn or wool roving to create bold, graphic lines.
First, sketch your abstract design onto a stretched canvas or heavy fabric backing.
Lay the thick yarn along your sketched lines and secure it with small, discreet stitches using a thinner, matching thread.
This method lets you control the form precisely, resulting in stunning framed embroidery pieces that feel both hand-touched and graphically pristine.
12. The Pointillist Pom-Pom: Painting with Gradients of Texture
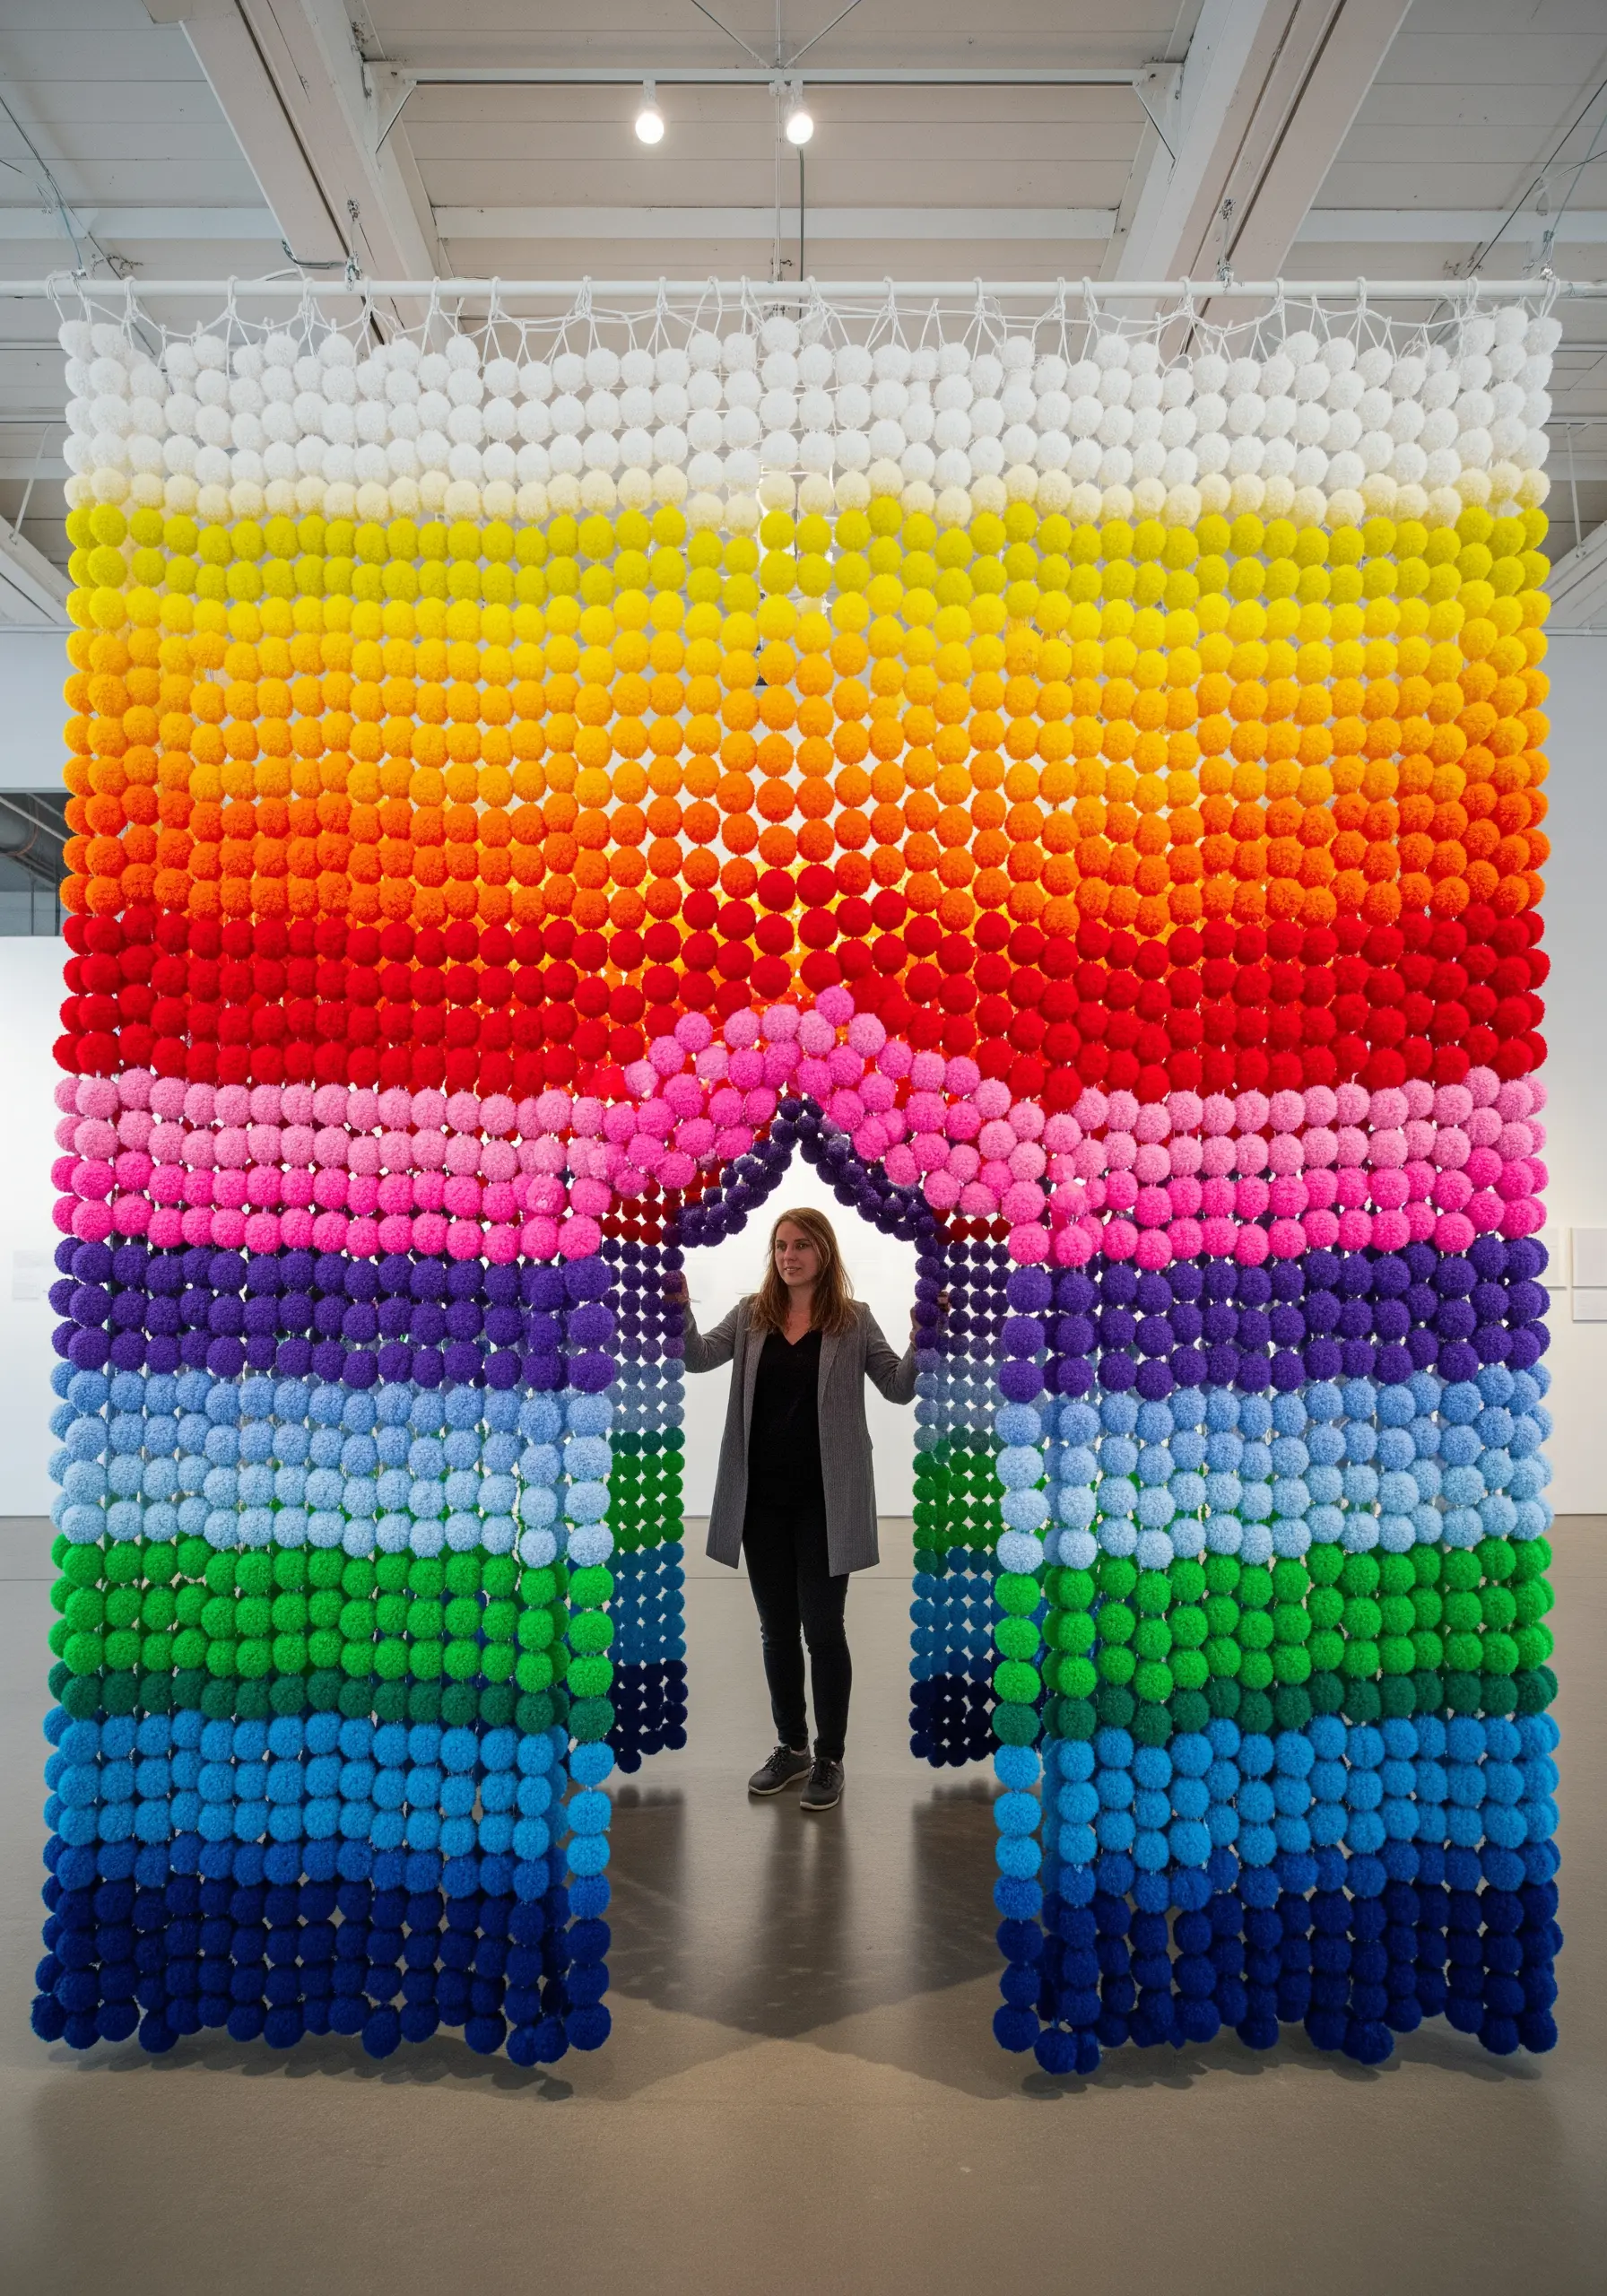
This joyful installation is an exercise in color theory, patience, and the power of repetition.
The impact comes from the sheer volume of pom-poms and their precise color arrangement.
Use a set of pom-pom makers to ensure every unit is consistent in size and density.
String them onto a durable cord and hang them from a grid or frame mounted to the wall.
Plan your transitions carefully on graph paper first—thinking of each pom-pom as a single pixel lets you create contemporary rainbow blend stitches on a massive, textural scale.
13. Woven Narratives: Incorporating Natural Elements
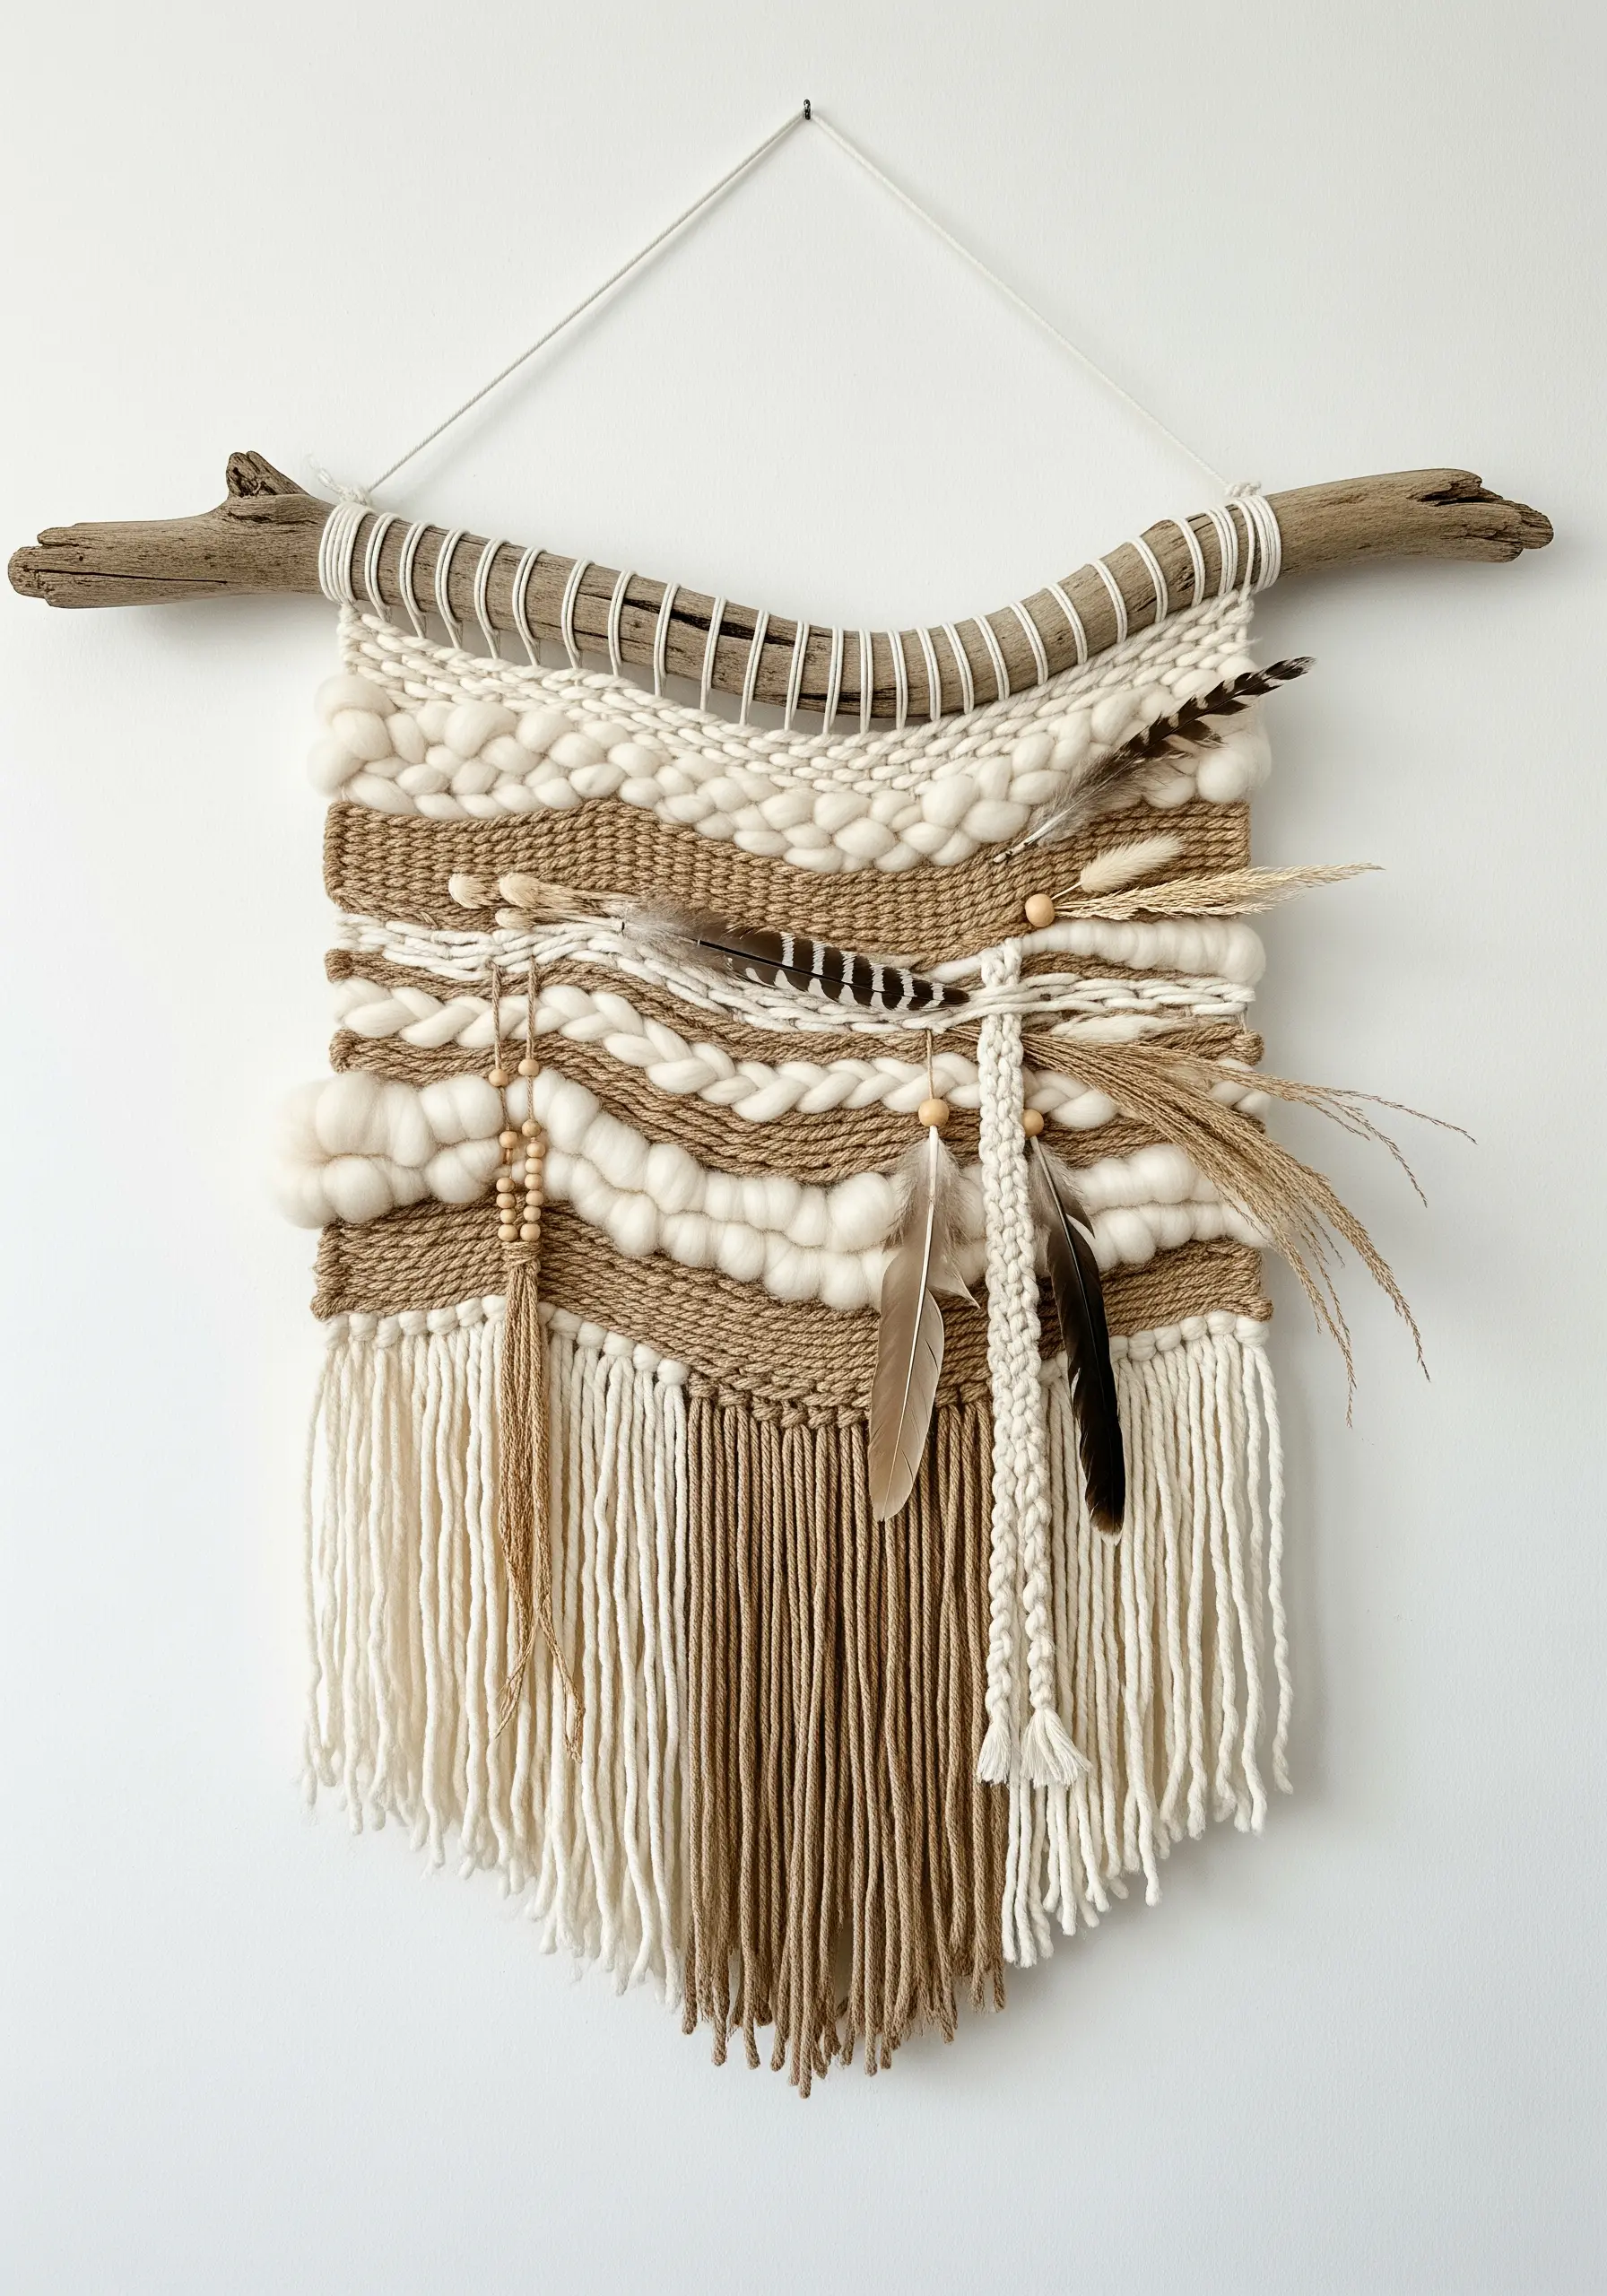
Elevate a simple weaving by incorporating non-traditional, found materials that tell a personal story.
This piece gains its unique character from the integration of feathers, dried grasses, and wooden beads directly into the weft.
Alternate these elements with soft, chunky wool roving and fine cotton yarn to create a rich tapestry of textures.
Using a piece of driftwood as your hanger unifies the aesthetic, turning your work into one of those mixed fiber creations inspired by nature.
14. Functional Fiber Art: Defining Space with Macramé
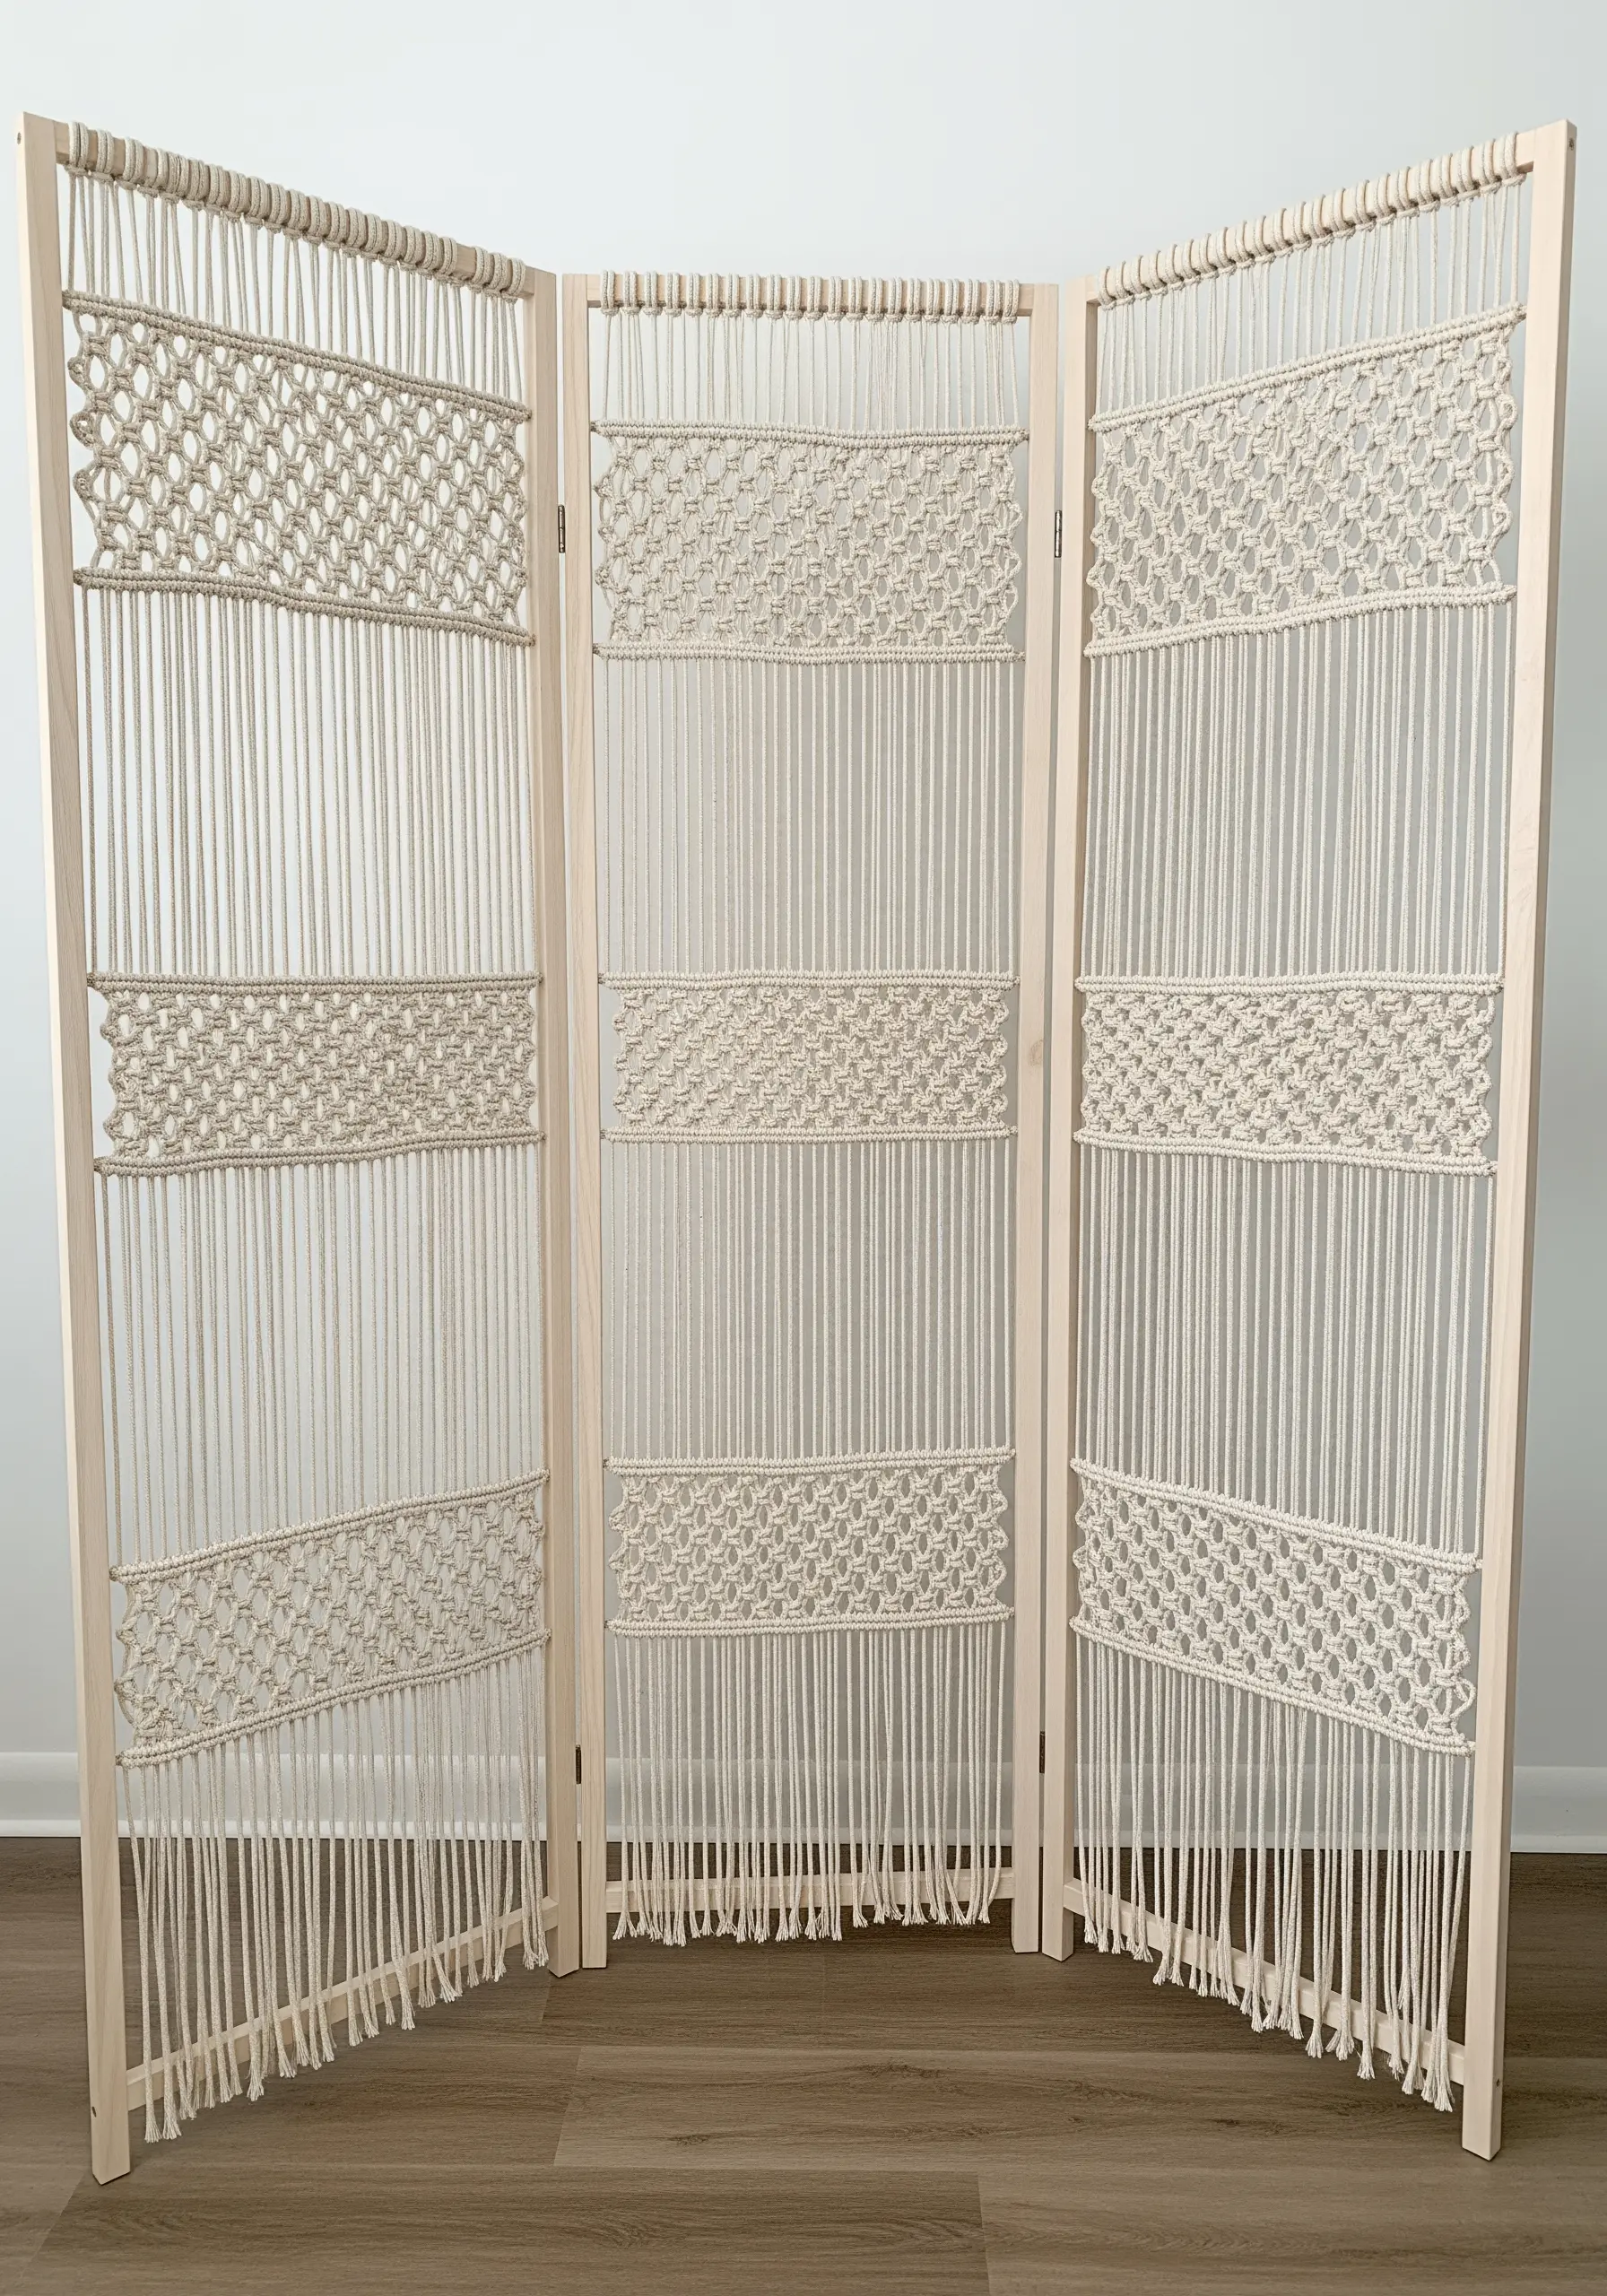
Use macramé to create functional art that shapes a living space, like this elegant room divider.
Build simple, lightweight wooden frames for each panel to act as your loom and structural support.
The design relies on the sophisticated interplay between densely knotted sections (using square knots) and long, un-knotted vertical cords.
This balance creates visual separation and pattern without blocking light, adding a soft, textural architecture to any room.
15. Floating Stitches: The Art of Embroidering on Tulle
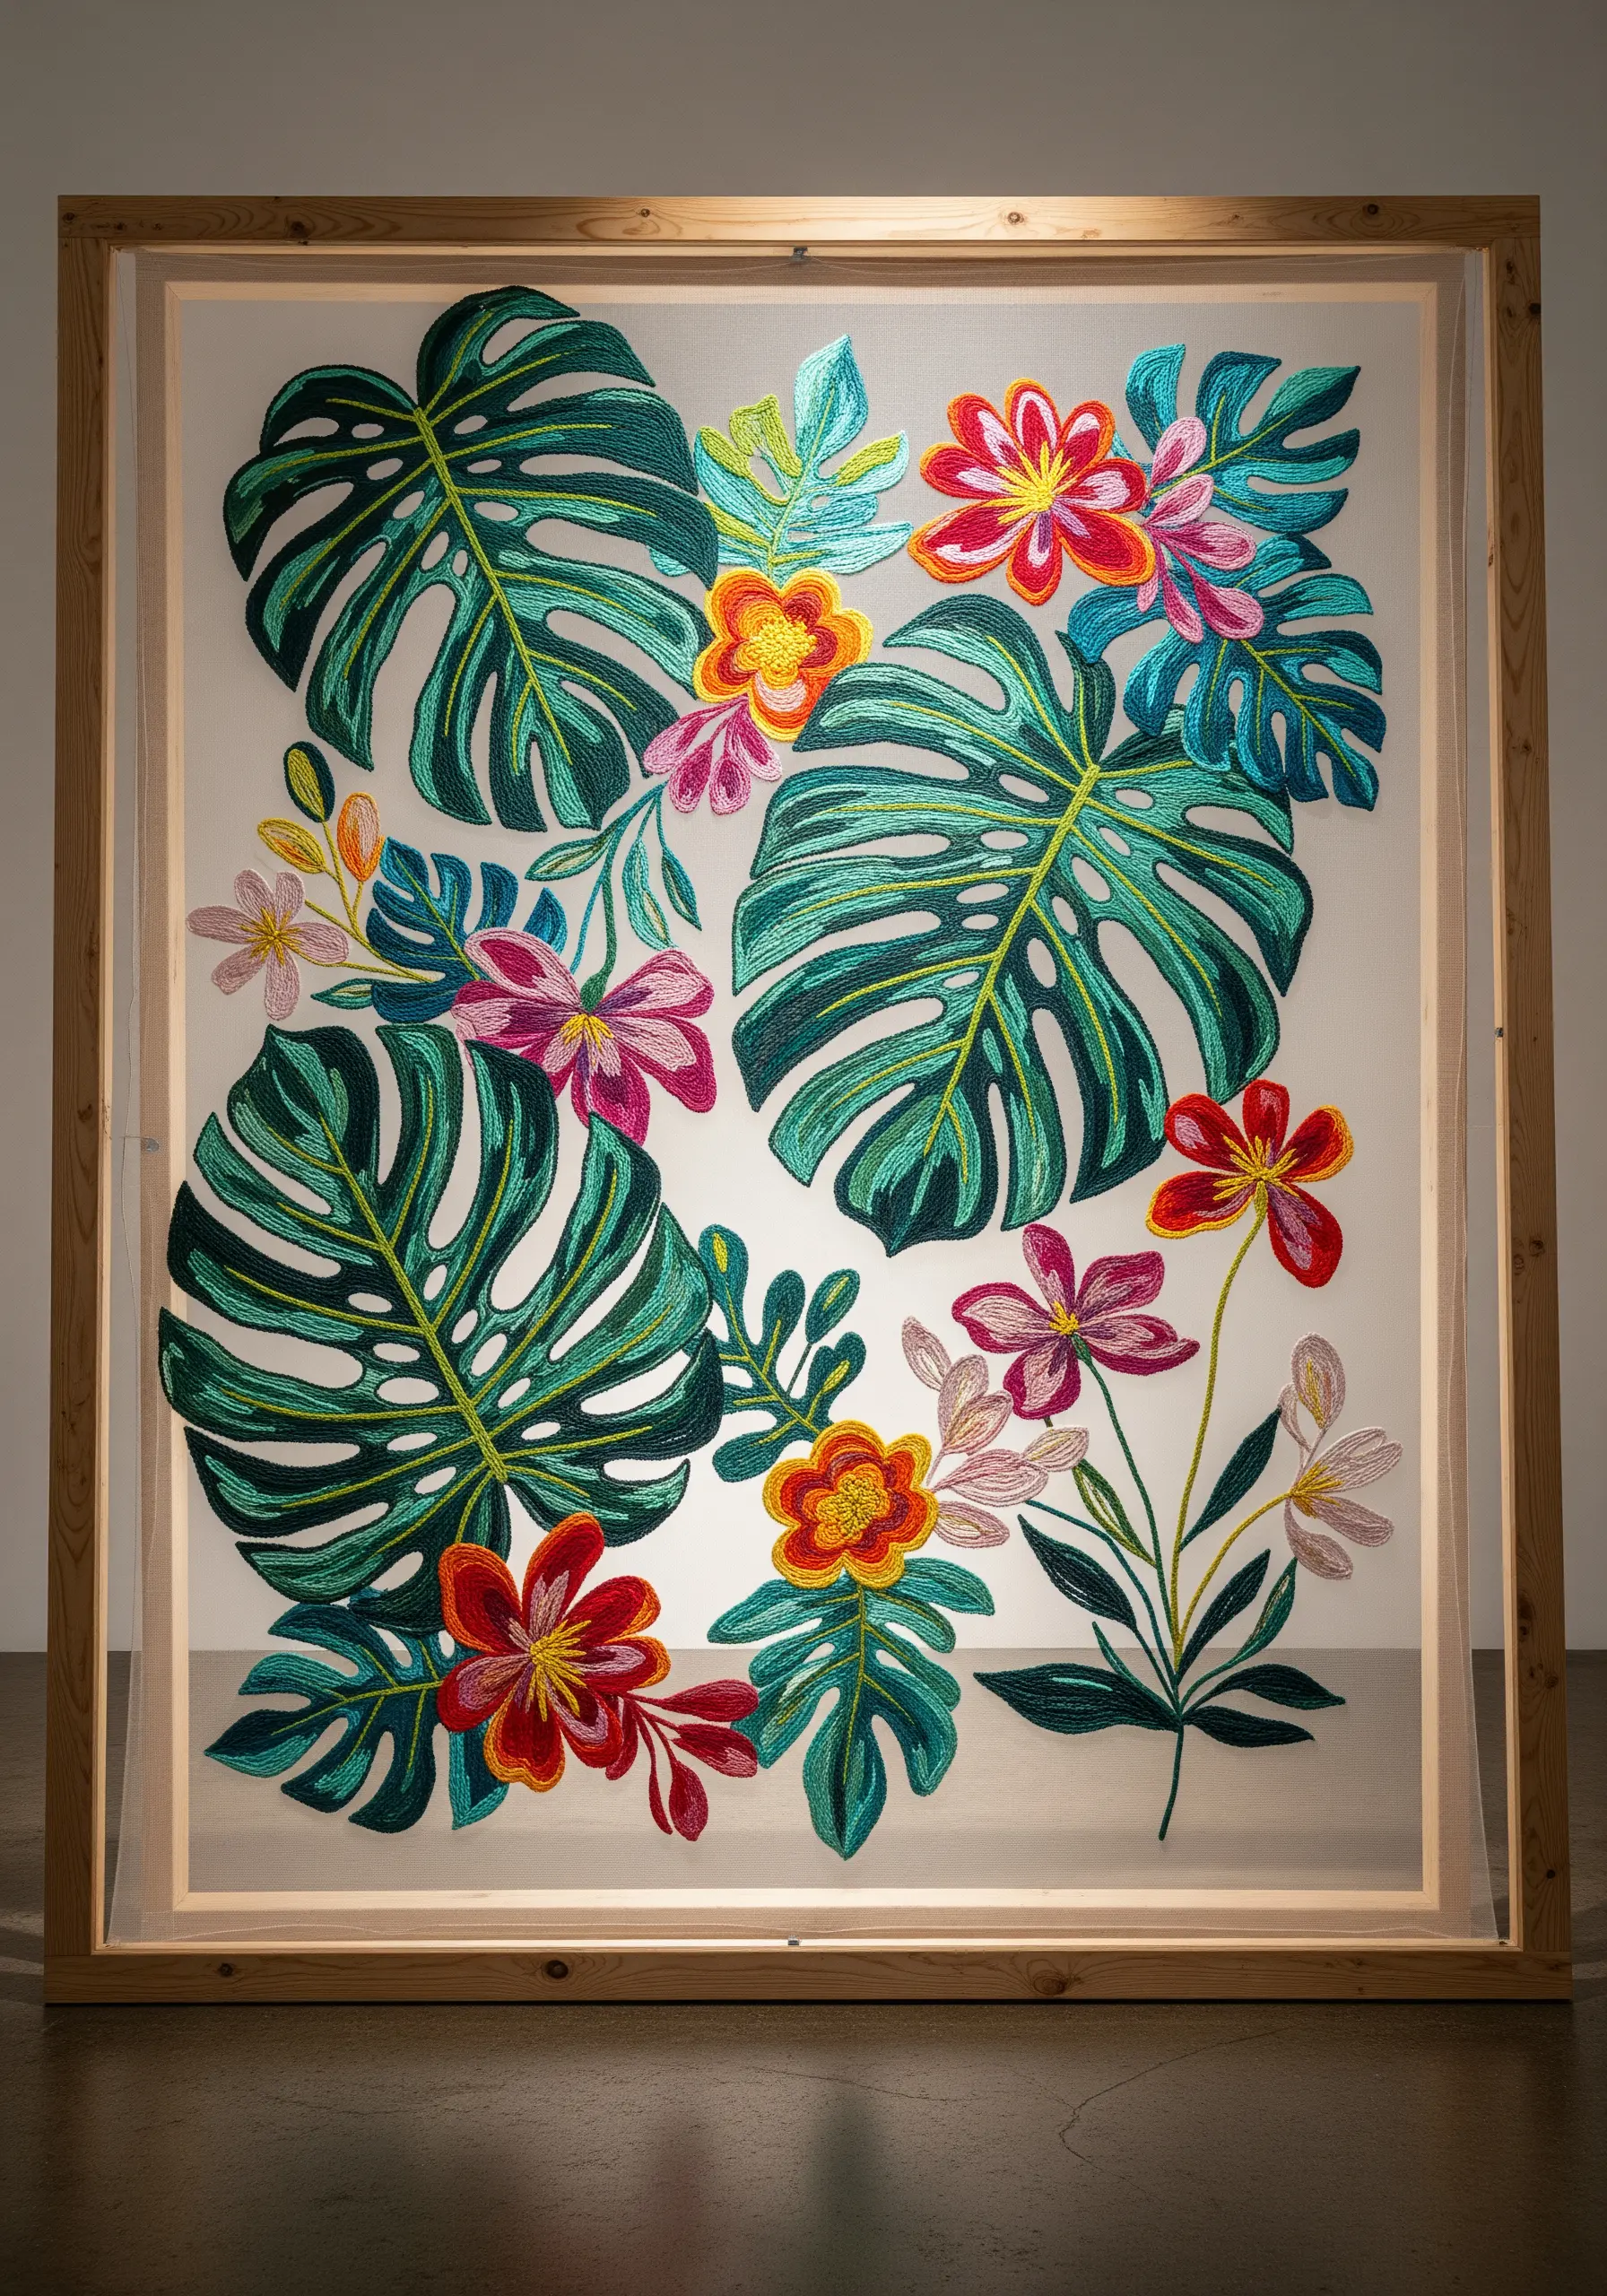
Create the breathtaking illusion of stitches floating in mid-air by working on a sheer fabric like tulle or organza.
You must use a stabilizer to support the delicate fabric; a water-soluble stabilizer is ideal, as it will disappear completely, leaving only the stitches.
Use bold satin stitches and clean outlines that will read clearly against the transparent background.
Framing the finished piece in a deep shadow box enhances the floating effect and gives your delicate botanical line art embroidery patterns an ethereal quality.
16. Sculptural Needle Felting: Growing a Fiber Tree
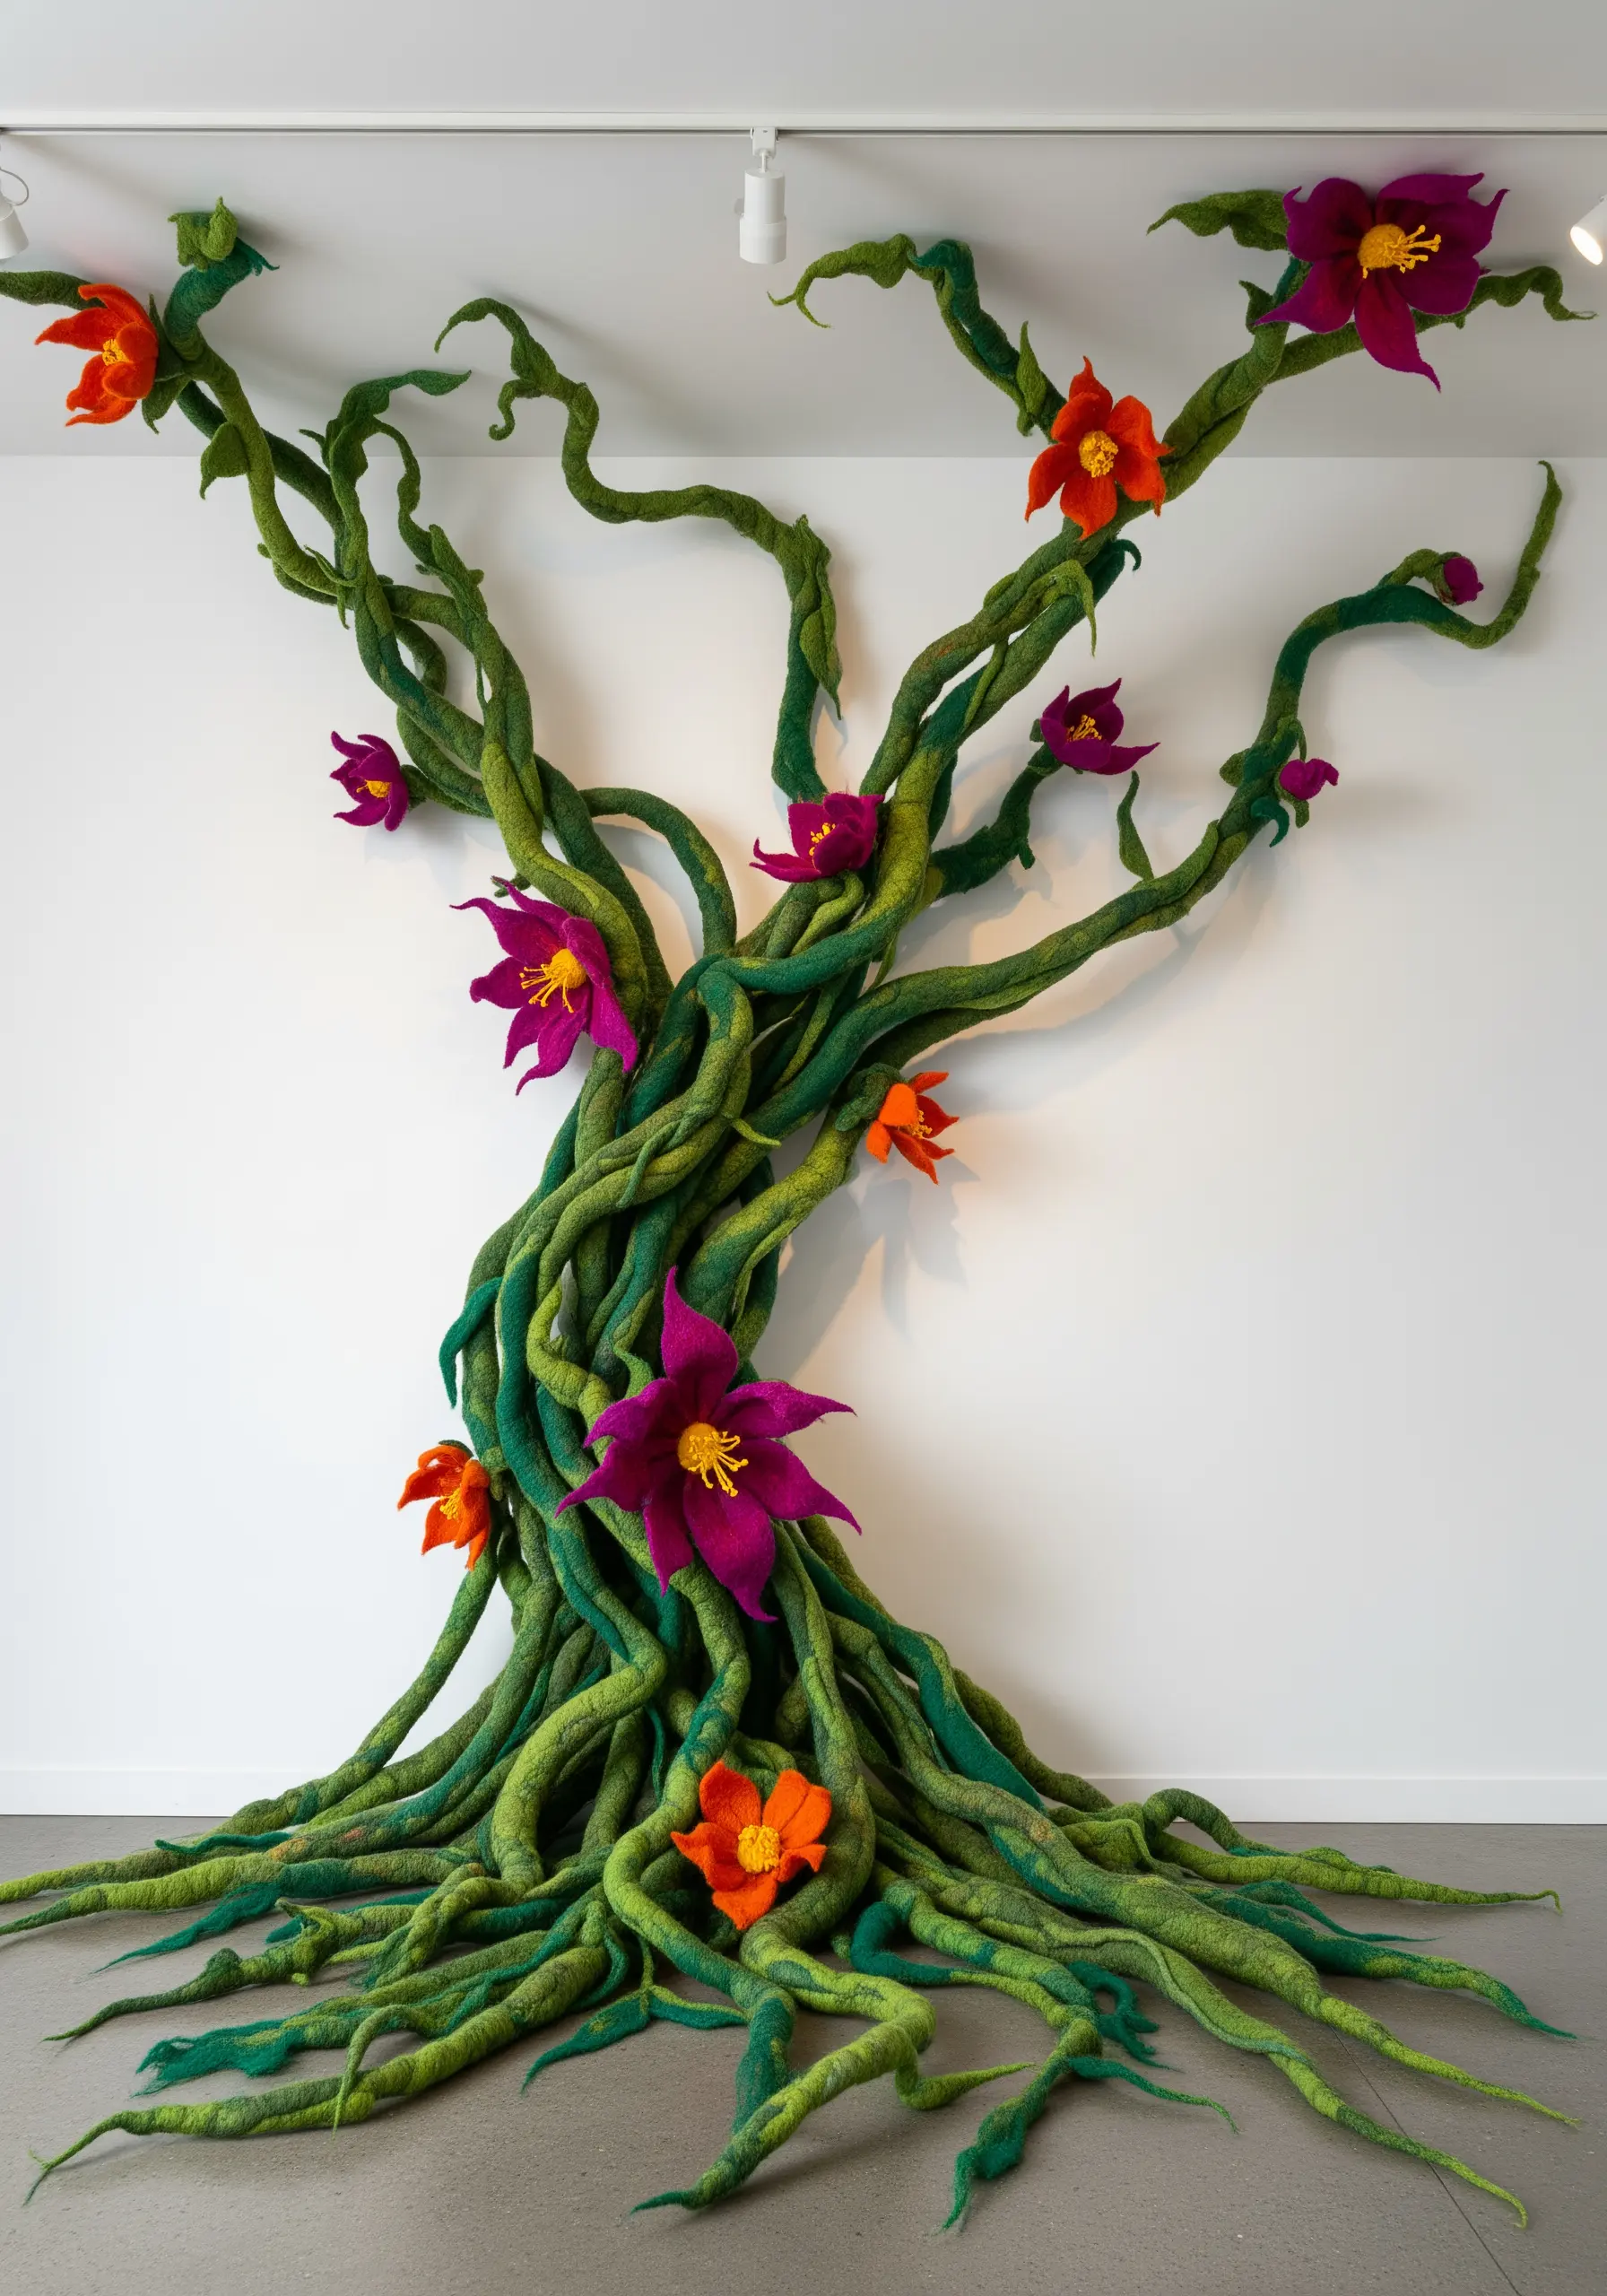
Build a large-scale, freestanding sculpture by needle felting wool roving over a sturdy wire armature.
First, create a ‘skeleton’ for the trunk and branches using a thick, pliable wire that can be bent into shape but will hold its form.
Wrap the armature tightly with wool roving, then use a felting needle to repeatedly poke and compact the fibers, sculpting the shape as you go.
Layer different shades of green to create realistic depth and texture on the bark.
17. Wrapped Forms: Composing a Sculptural Fiber Collage
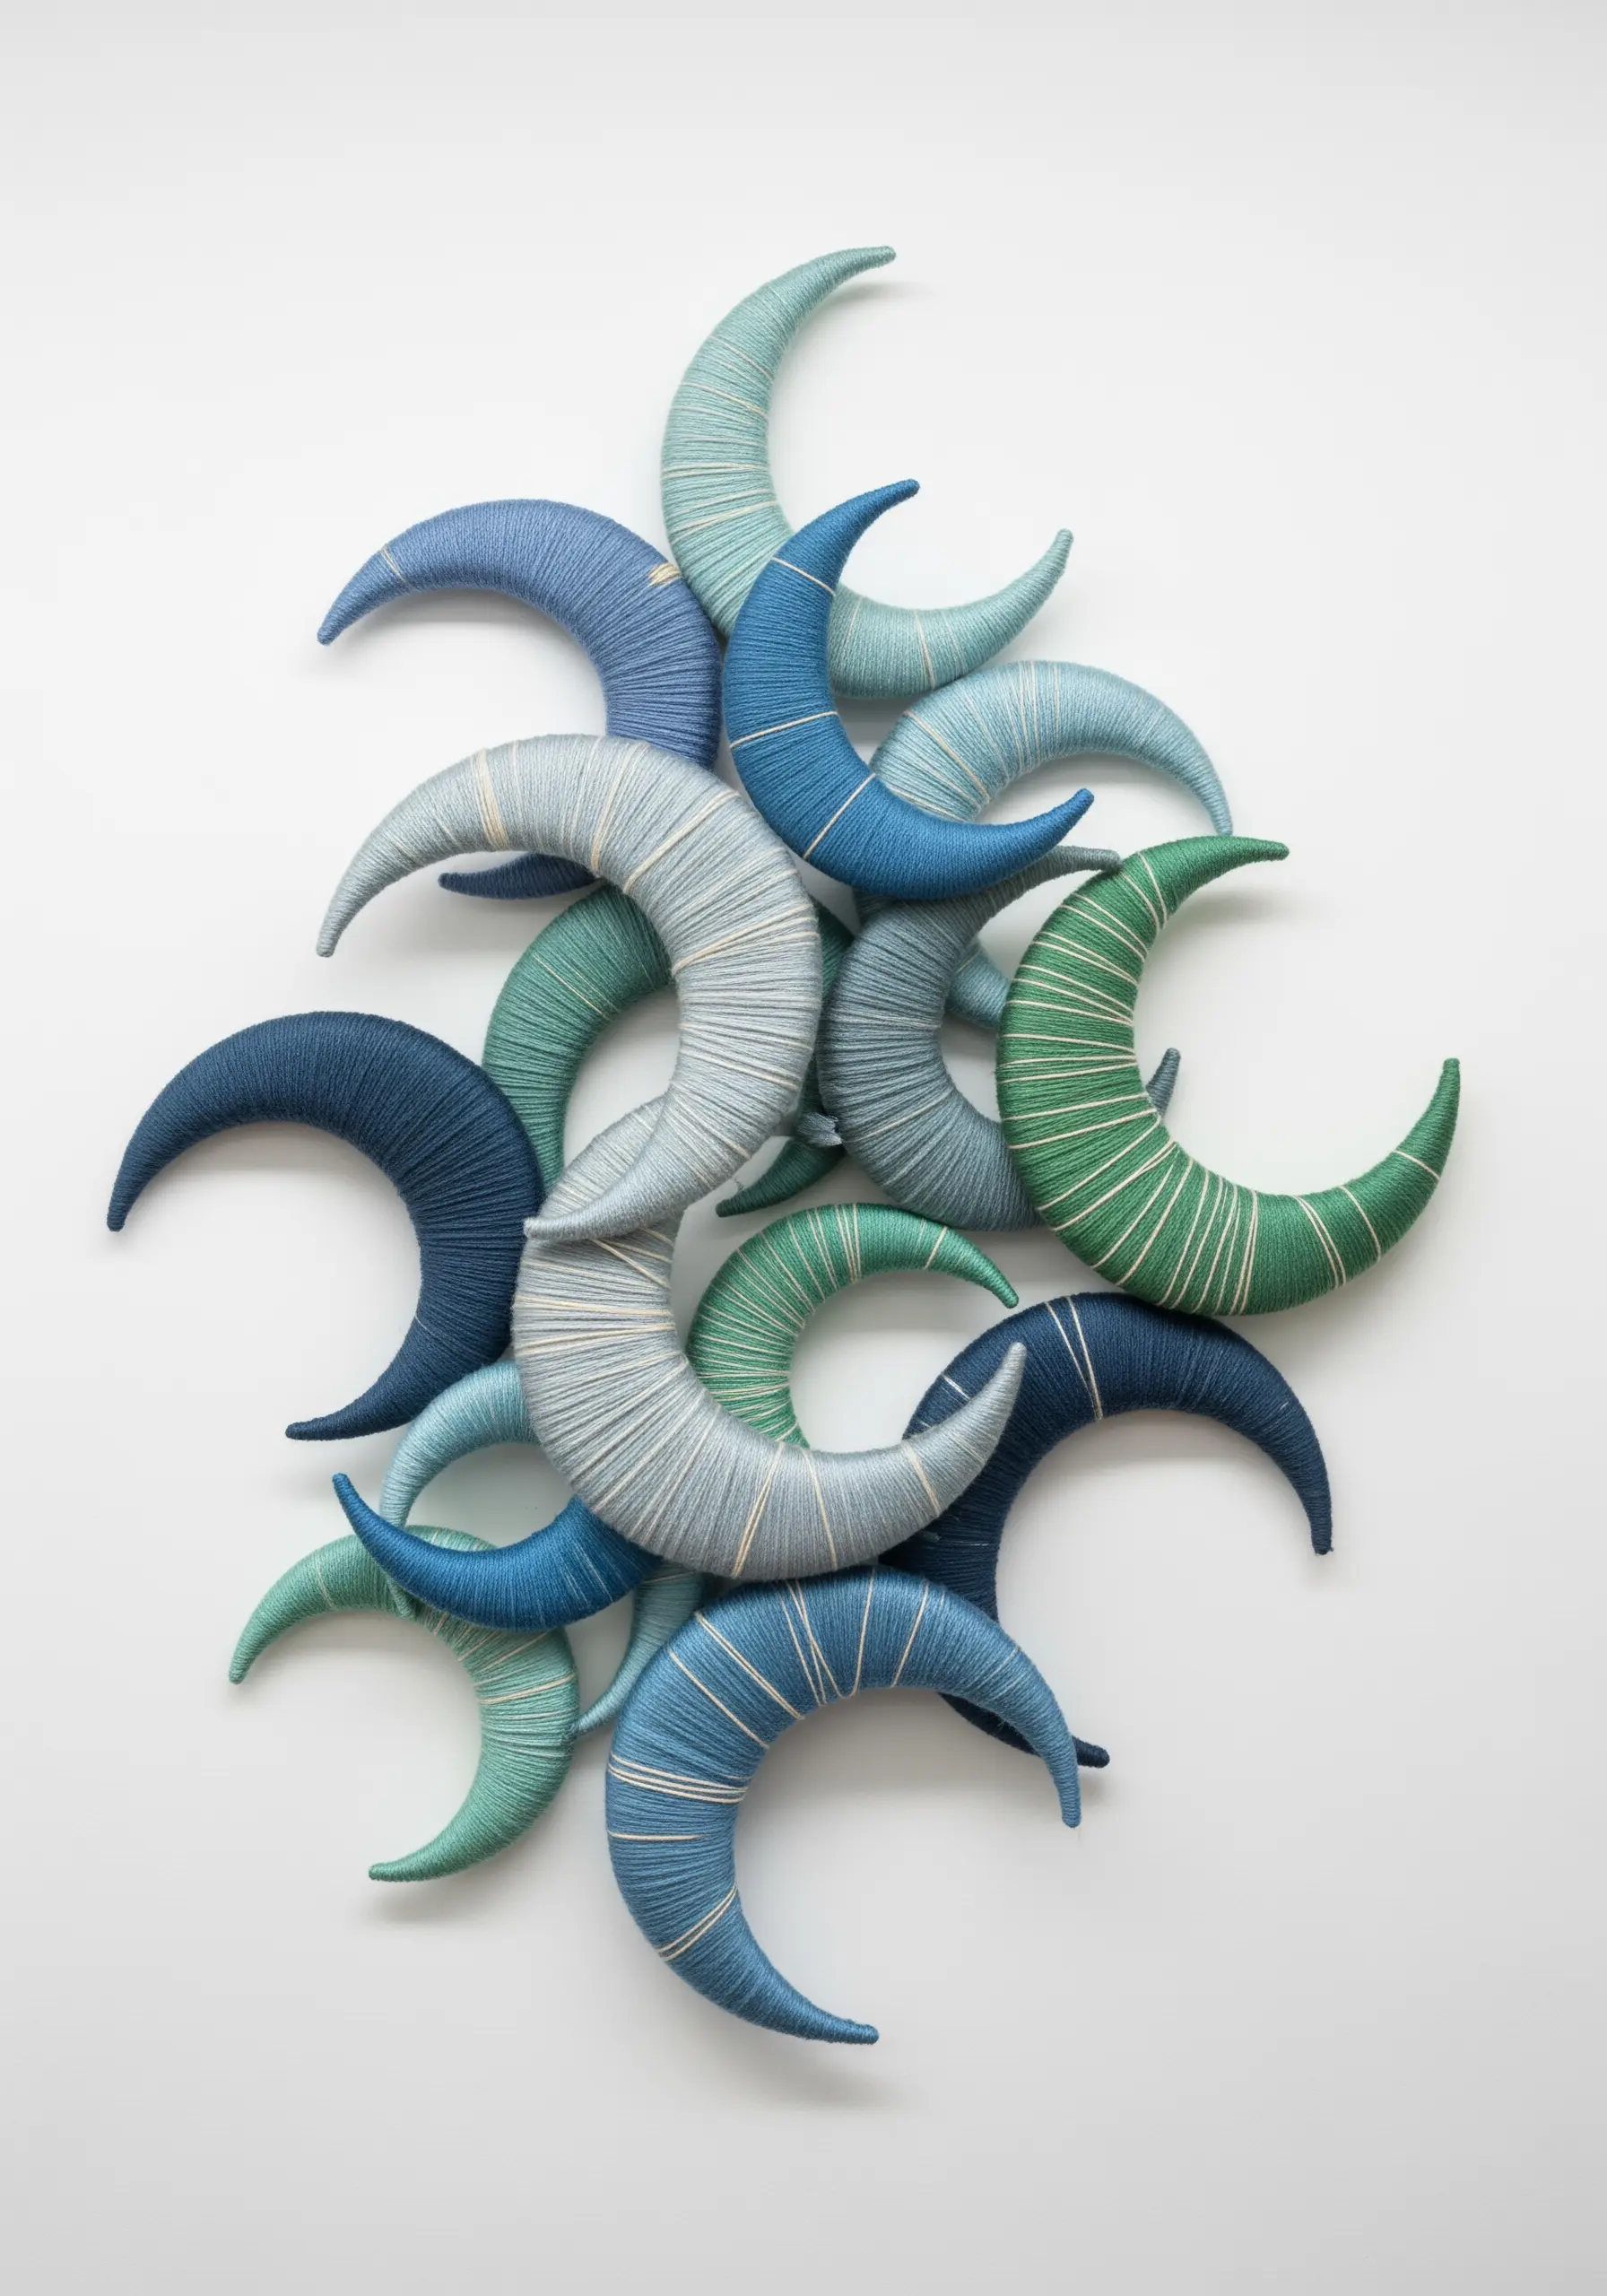
This highly accessible technique delivers a sophisticated, high-impact result with simple materials.
Cut crescent shapes (or any other form) from sturdy cardboard, foam board, or thin plywood.
Wrap them tightly and evenly with yarn, securing the ends discreetly on the back with a dab of fabric glue.
The true artistry comes from your color choices and the final arrangement; grouping multiple wrapped forms creates a dynamic, sculptural collage on your wall.
18. Monumental Braids: Exploring Architectural Scale
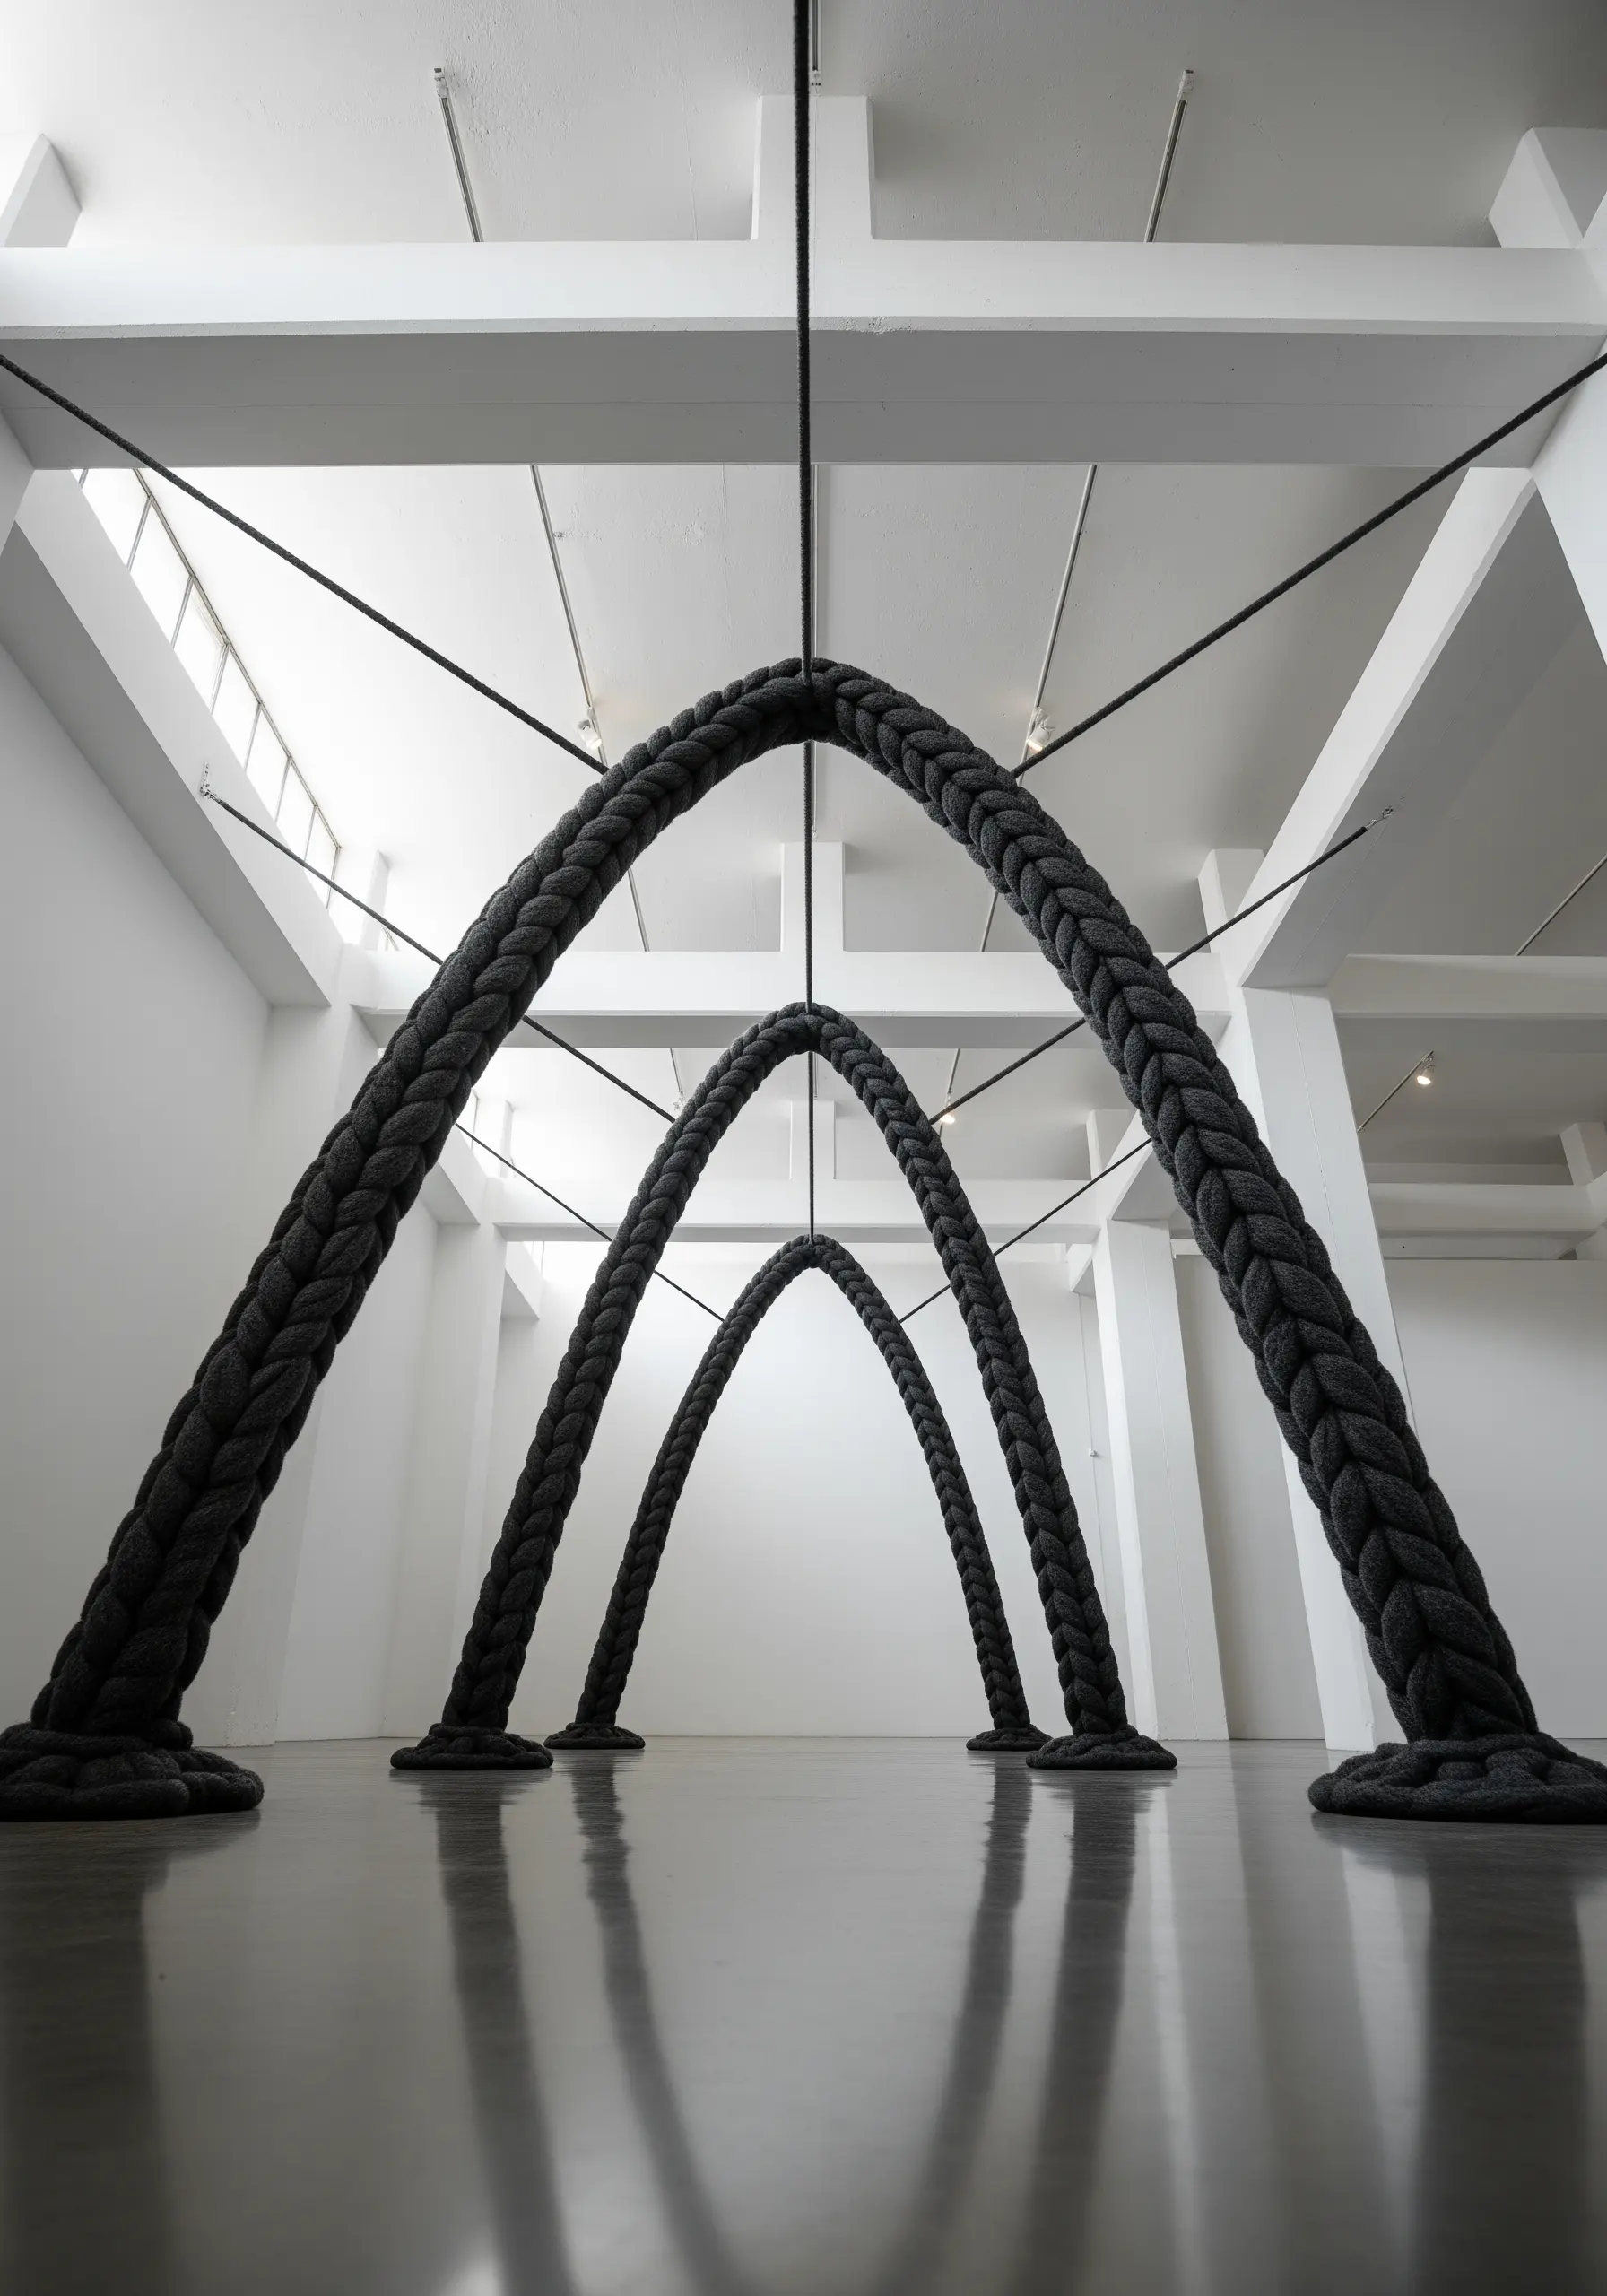
Take a simple, familiar technique—braiding—and push it to an architectural scale for a truly monumental impact.
Instead of thread, use massive bundles of thick felted wool, rope, or even fabric scraps twisted together.
To create the self-supporting arches, you will need an internal support structure, like flexible PVC pipe or heavy-gauge wire, hidden within the braid.
The immense texture of the braid itself becomes the focal point, transforming a humble craft into powerful sculpture.
19. The Knitted Sampler: A Library of Tactile Stitches
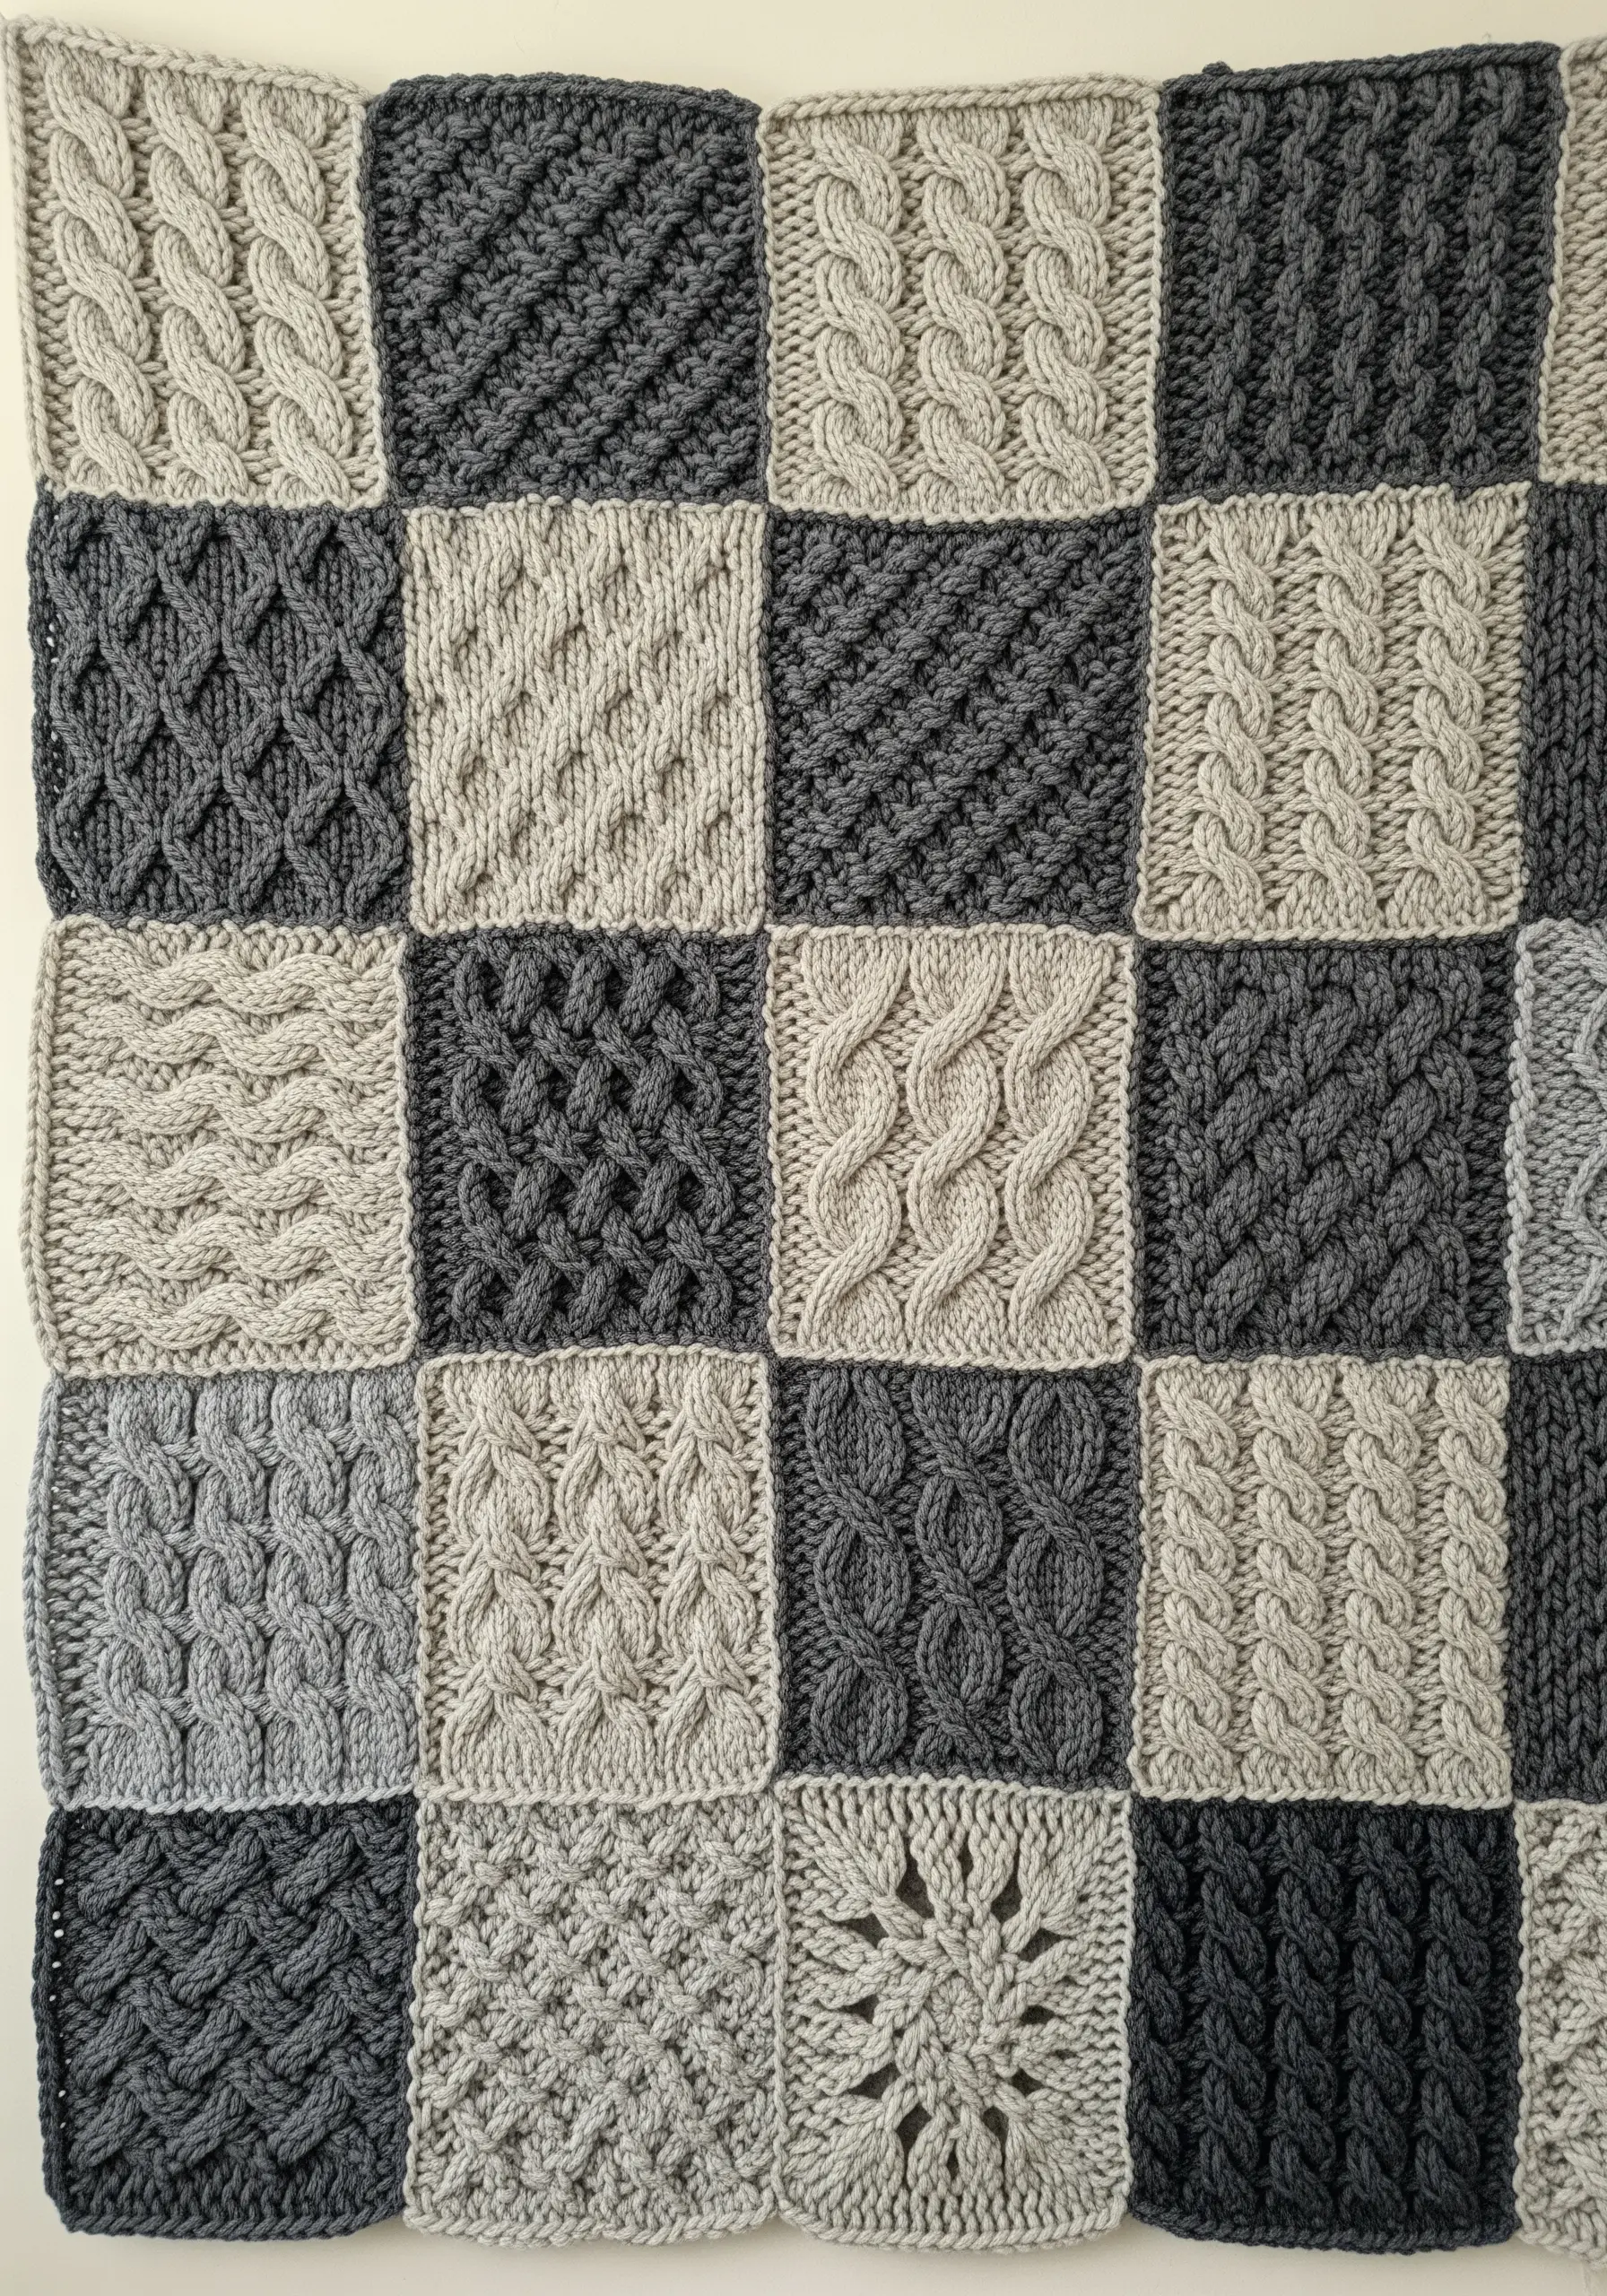
Create a piece that is both a beautiful object and a personal library of your knitting skills.
Knit a collection of squares, dedicating each one to showcasing a different stitch pattern: classic cables, moss stitch, basketweave, seed stitch, and more.
Working within a limited, monochromatic color palette allows the unique textures to become the main focus.
Once you have enough squares, arrange them in a pleasing grid and stitch them together. It’s a way to create nature-themed embroidery samplers through the language of knitting.
20. Kinetic Weaving: A Cascade of Miniature Looms

Craft a dynamic, moving installation that feels alive with color and energy.
Use small, simple looms—you can even make them from sturdy cardboard—to create dozens of miniature woven rectangles.
Embrace imperfection; the slight variations in size, color, and weave will add to the overall charm.
Leave the long warp threads at the top and bottom for hanging and for added fringe.
Suspend them from a ceiling-mounted grid or a series of rods at varying heights to create a floating, colorful cloud that shifts with the air currents.
21. Shibori Storytelling: Designing with Resist-Dye
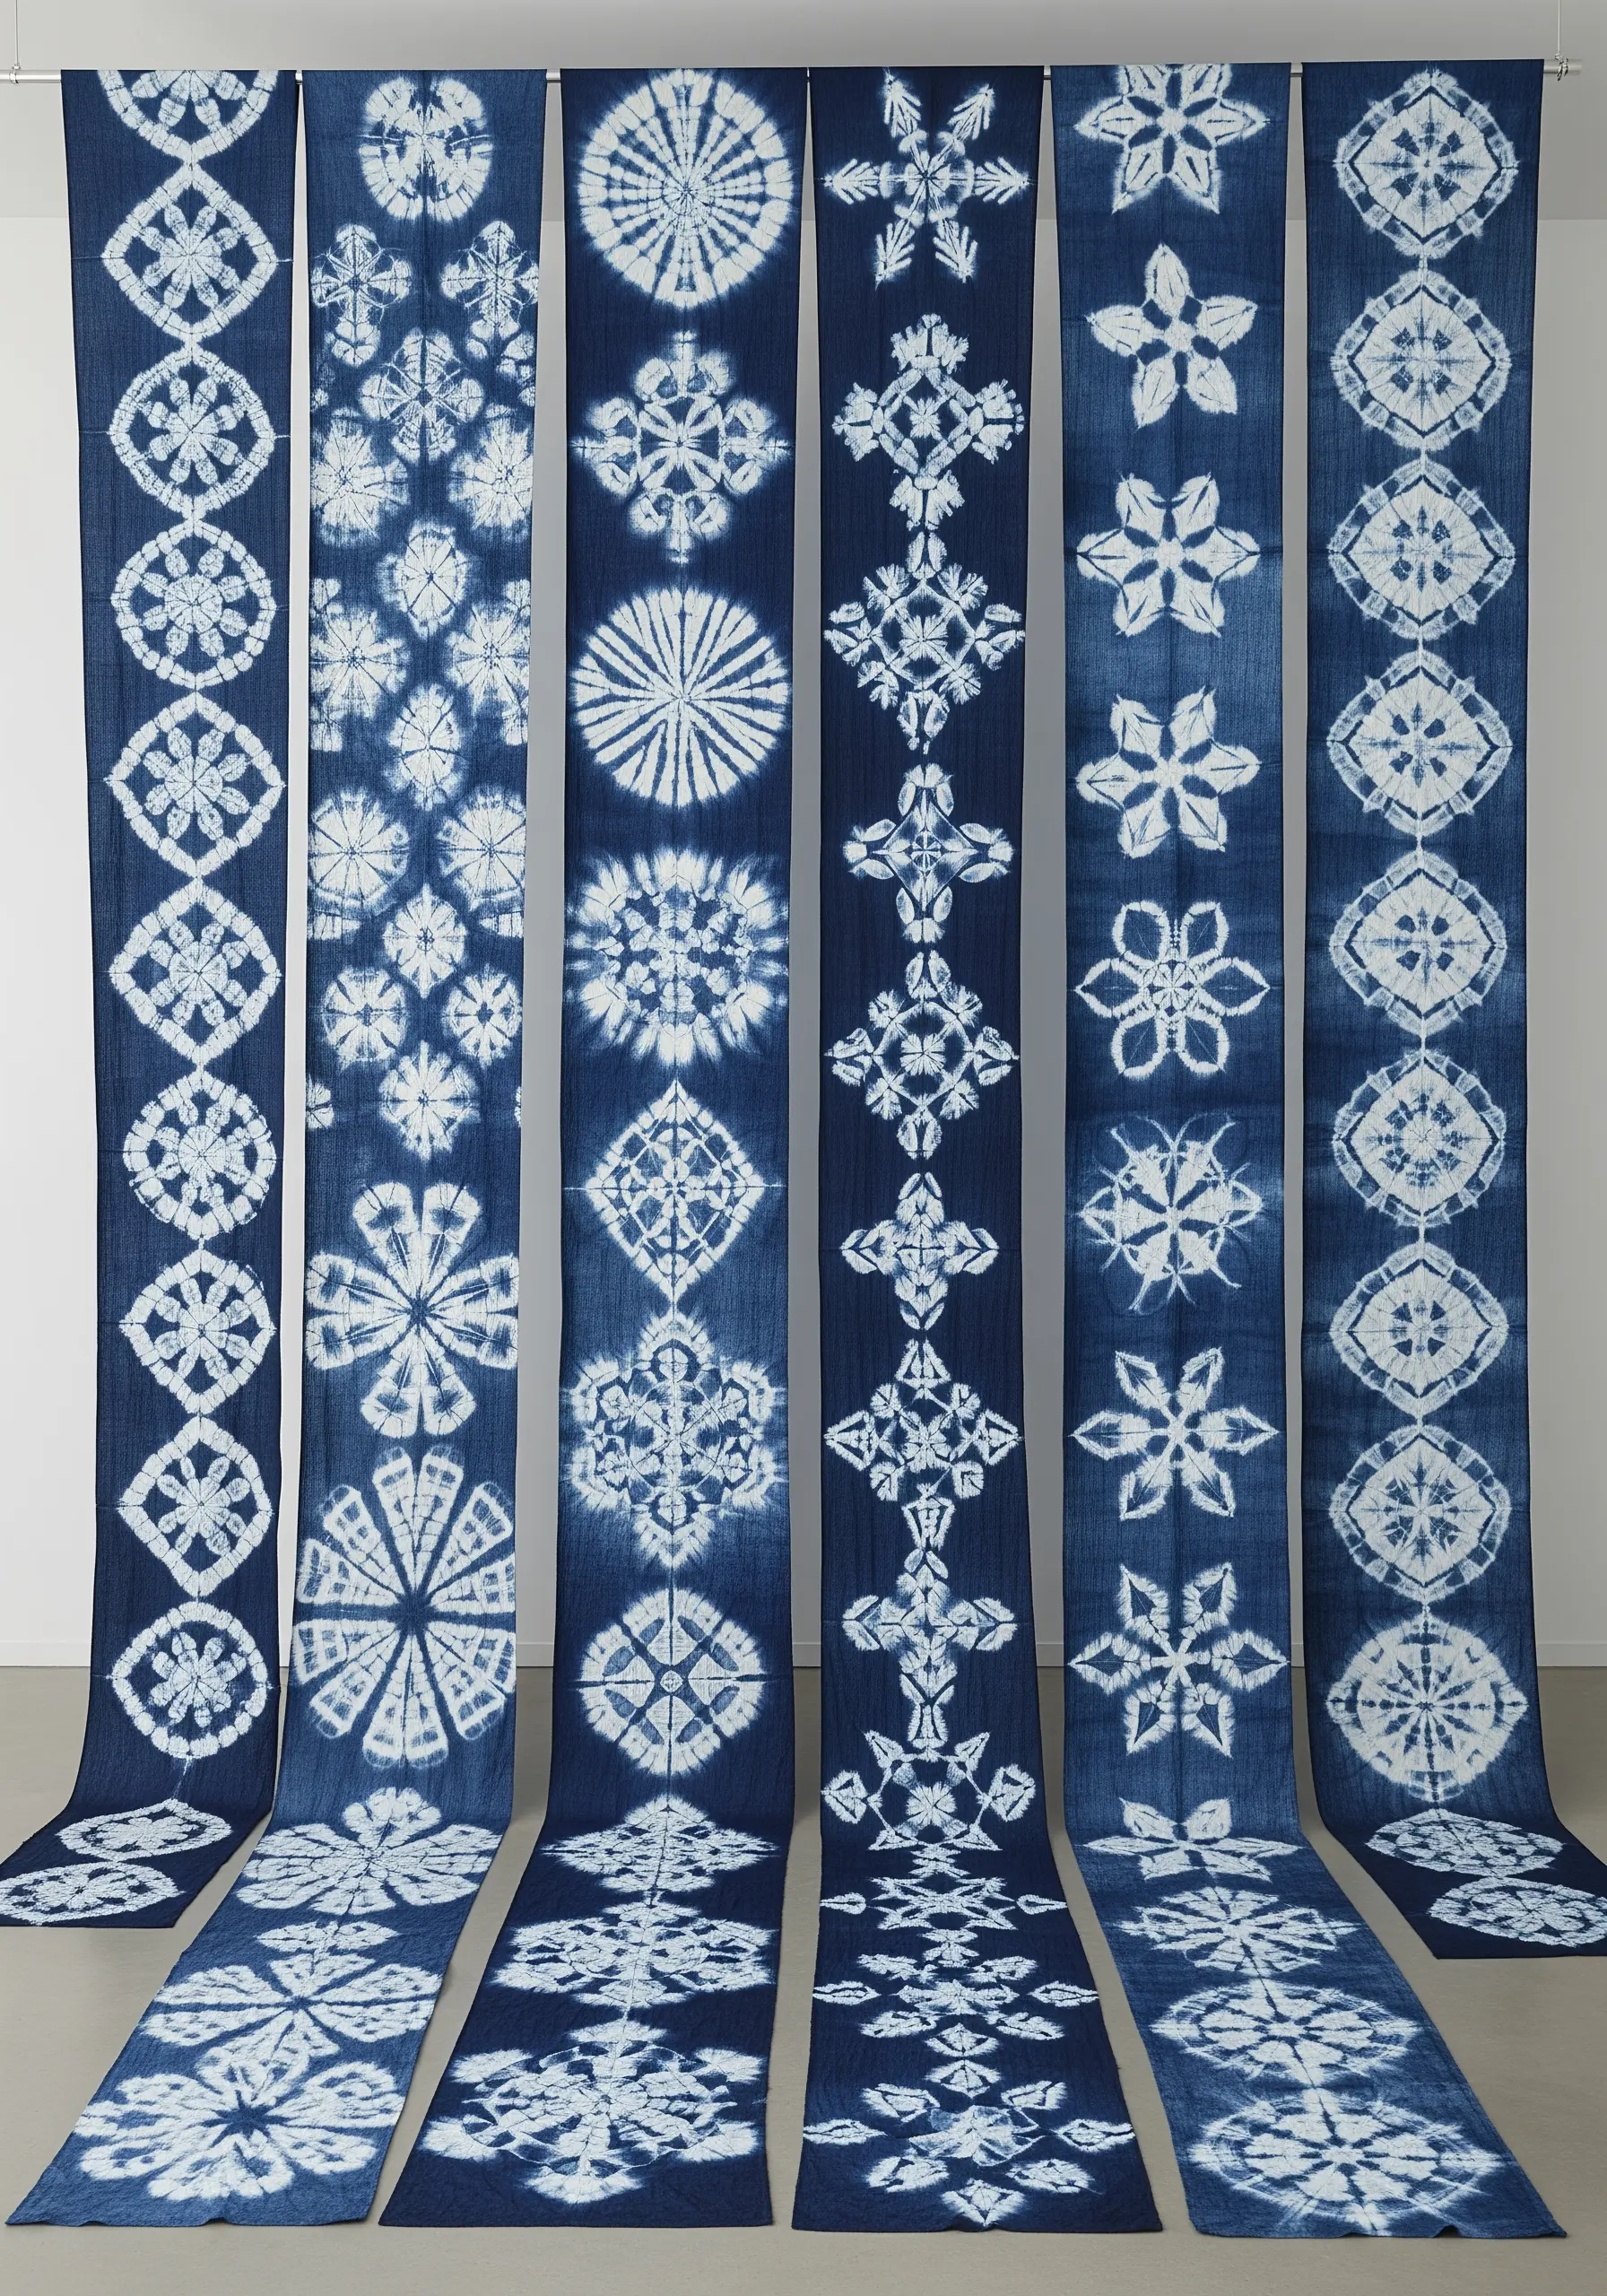
Explore the ancient Japanese art of Shibori to create stunningly intricate patterns on fabric.
This resist-dyeing technique involves folding, twisting, binding, or clamping fabric before immersing it in a dye bath, typically indigo.
Each method of resisting the dye creates a different, often surprising, geometric pattern, from delicate snowflakes to bold diamonds.
Dyeing a series of long, narrow panels and hanging them together creates a powerful, cohesive display that celebrates pattern and process.
22. Sculptural Crochet: A Playful Amigurumi Garden
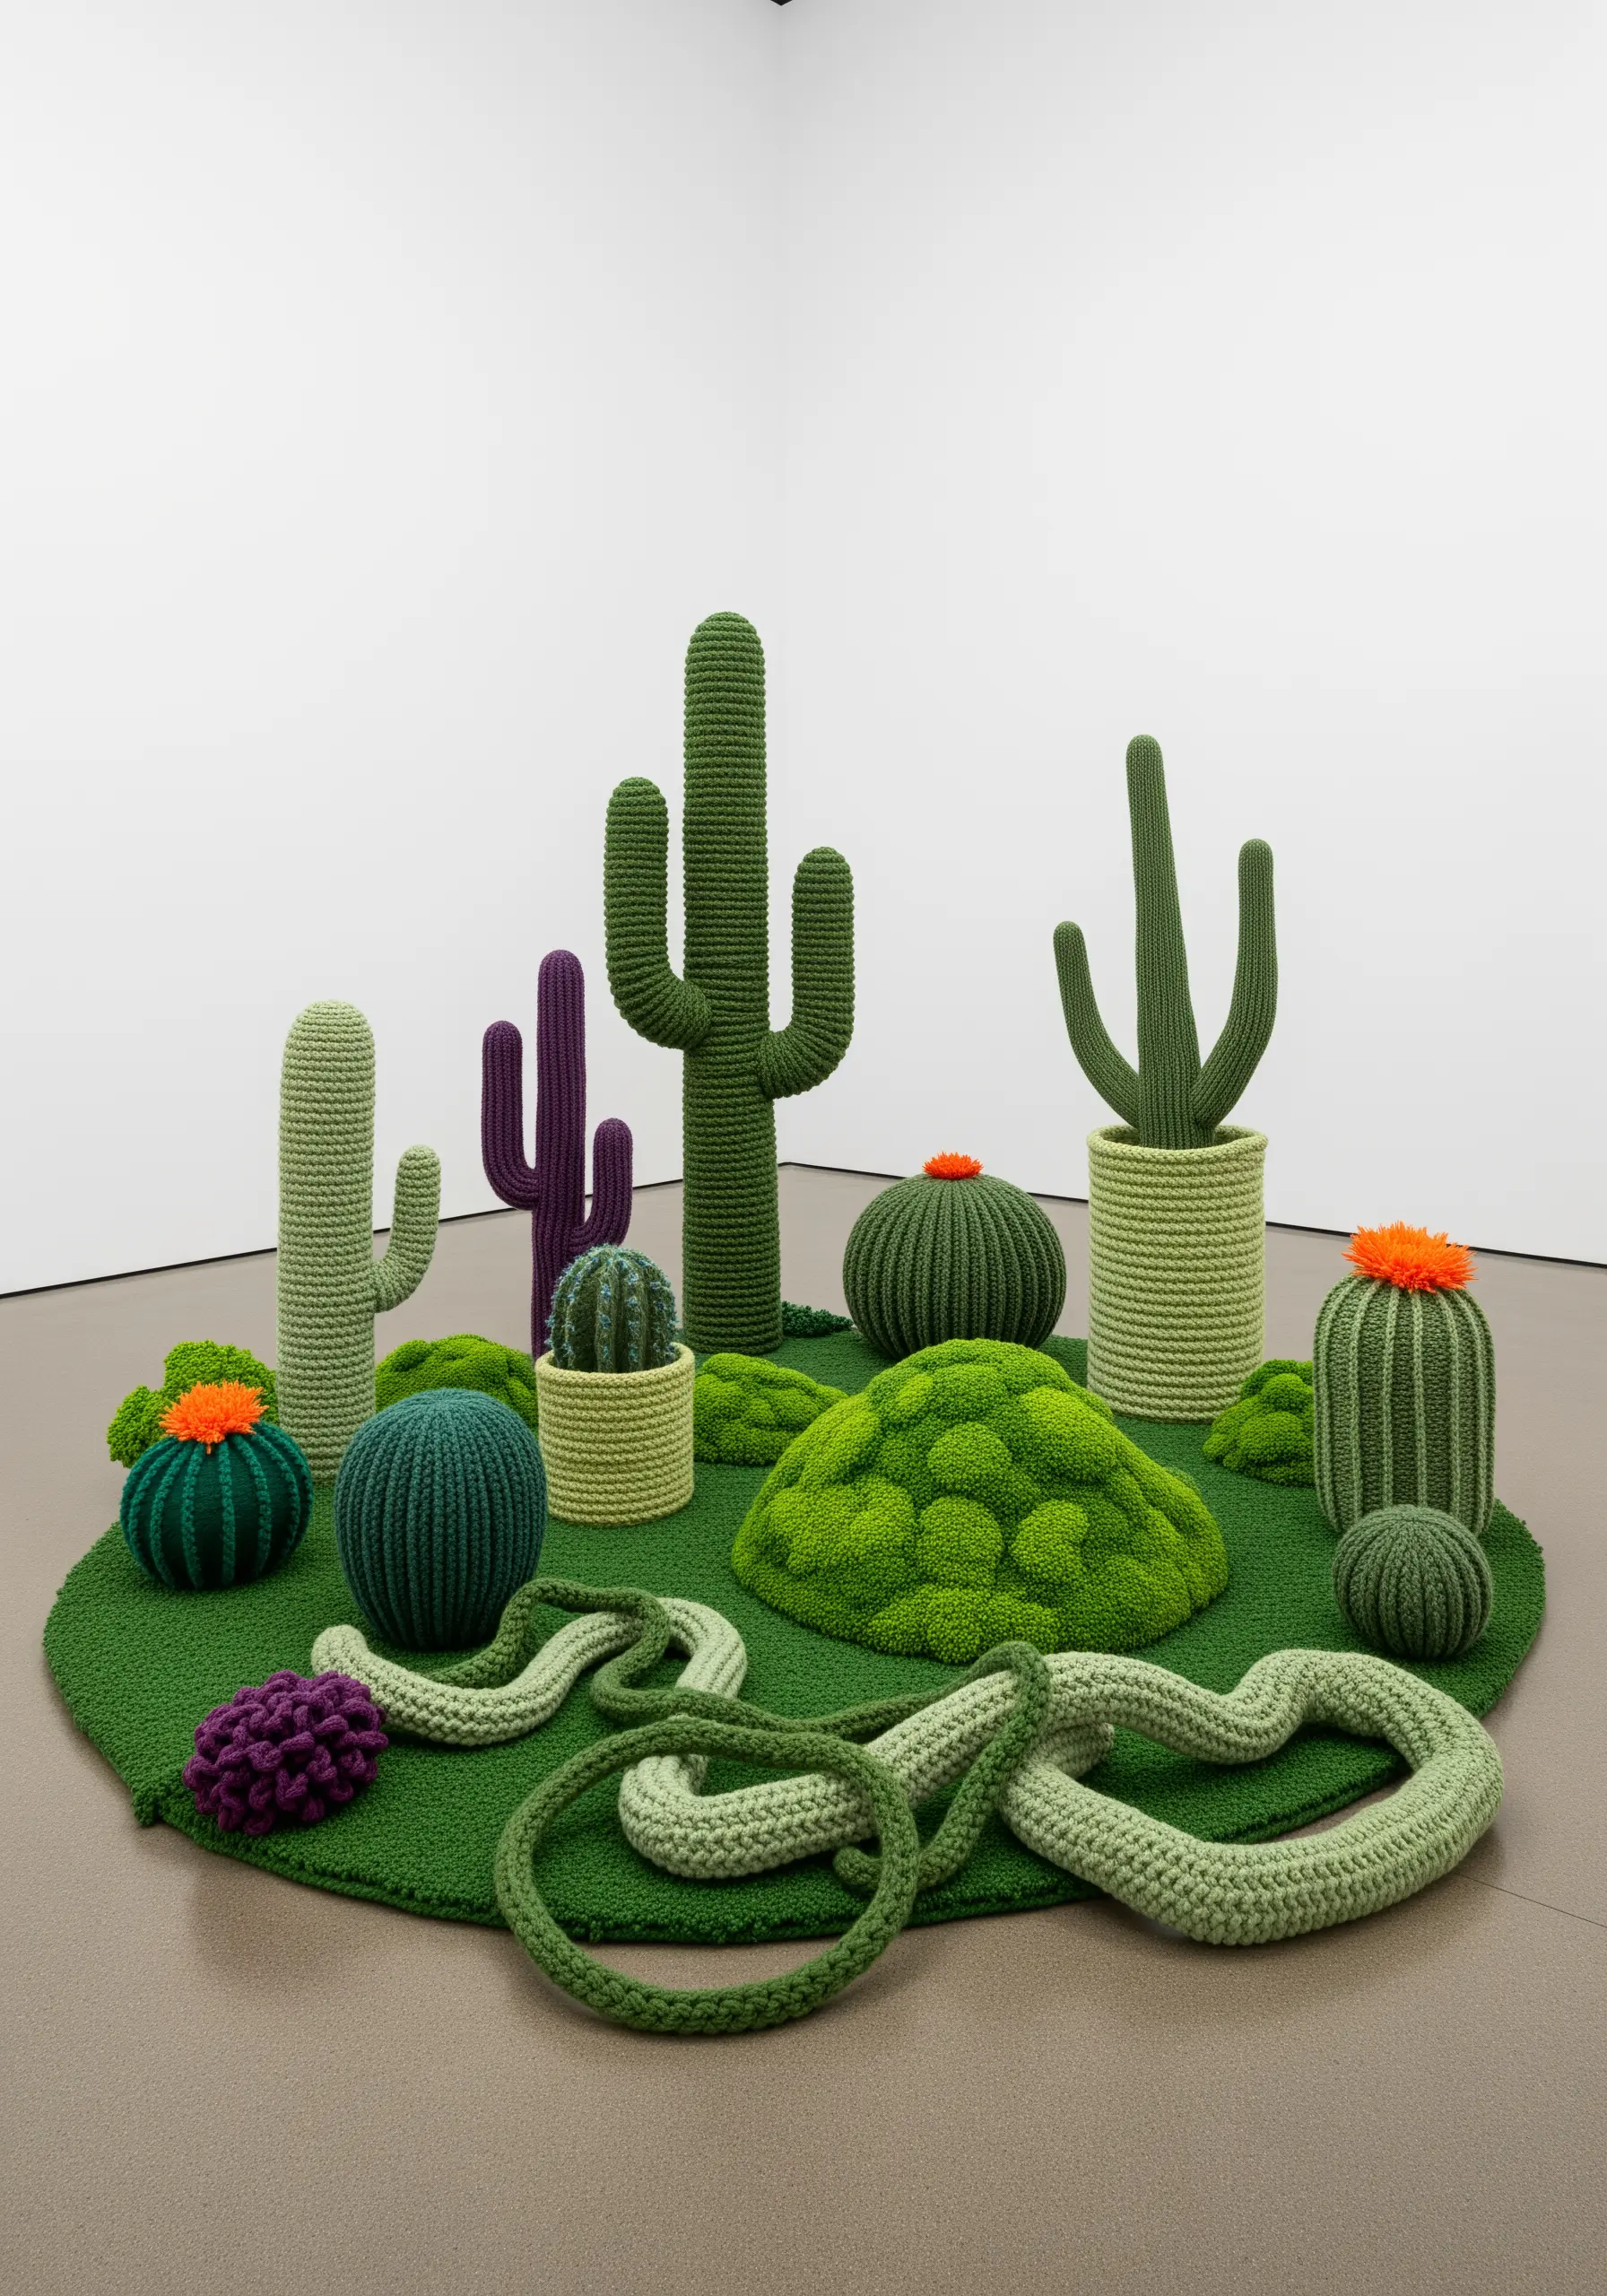
Apply amigurumi—the Japanese art of crocheting small, stuffed figures—to a larger, sculptural scale to create a whimsical installation.
Create various cacti and succulent shapes by crocheting in the round with different shades of green yarn and varying your stitches to create texture.
Stuff the forms firmly with fiberfill so they hold their shape and stand on their own.
Arranging them together on a crocheted ‘sand’ base creates a playful, textural desert garden, expanding on the charm of animal-themed pillow stitching ideas into a 3D world.
23. Open-Weave Compositions: Drawing in Space with Fiber
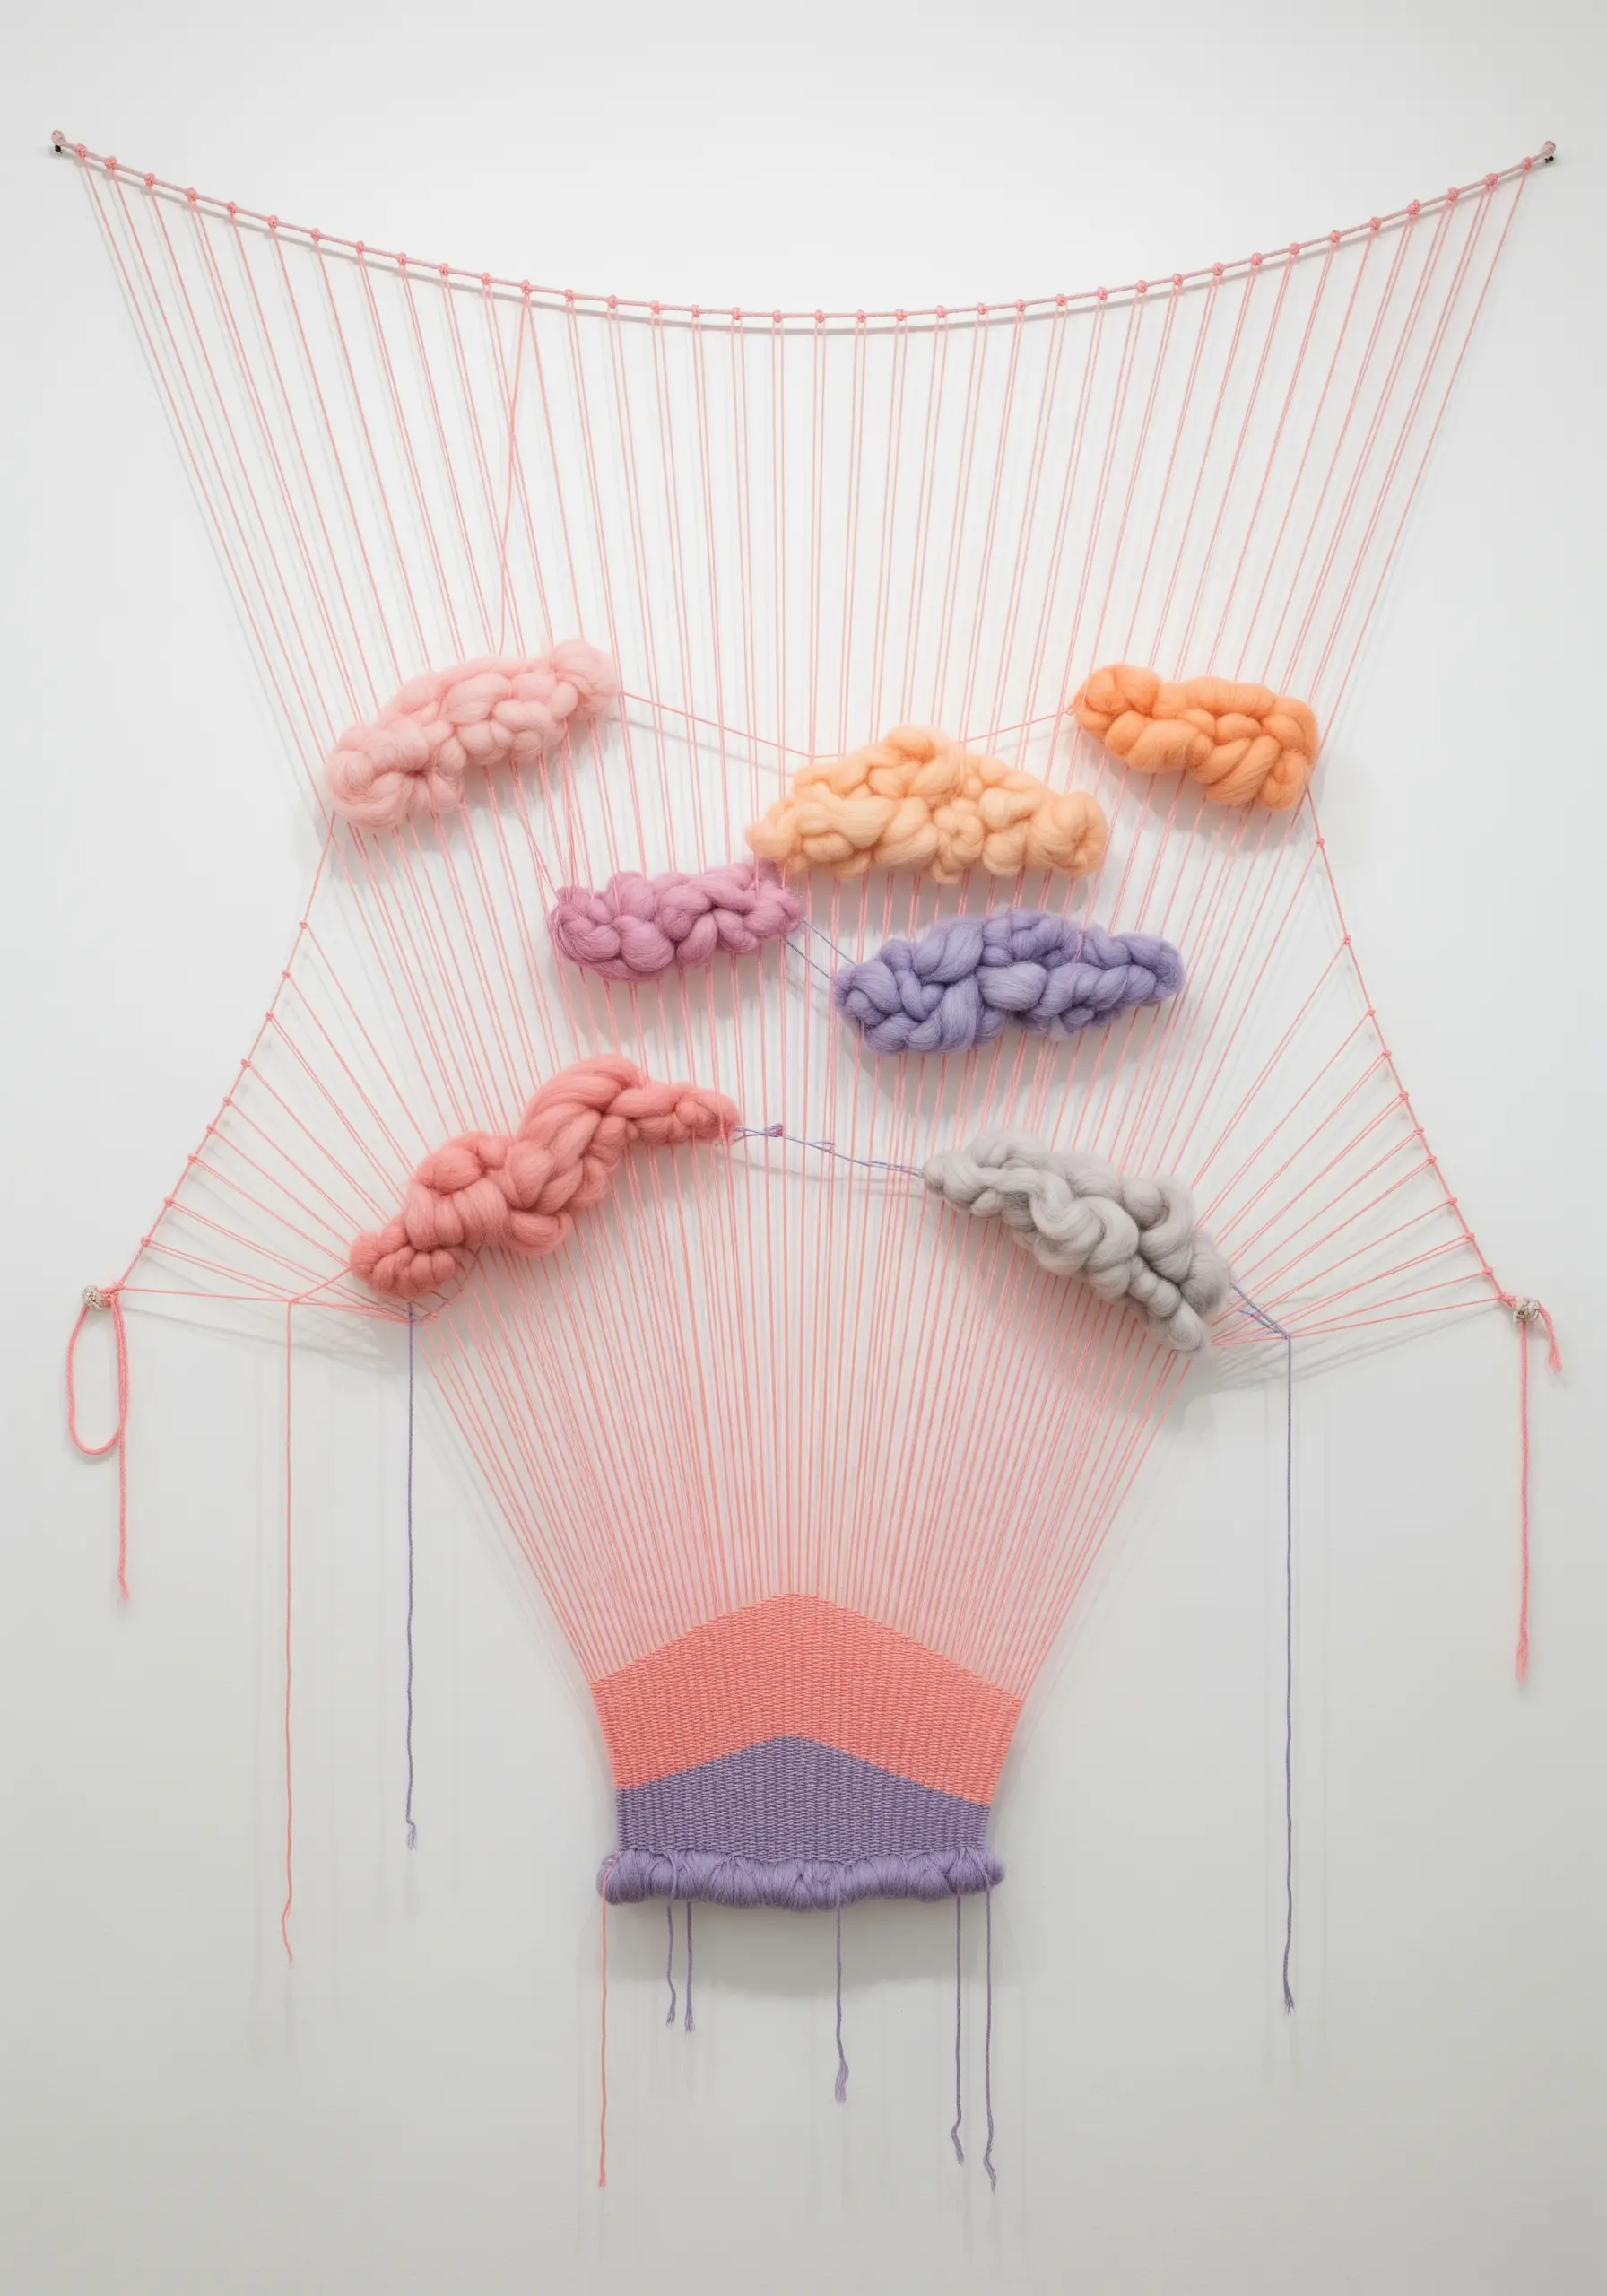
This delicate piece is more of a fiber drawing than a traditional, dense weaving.
Create a simple, open warp by stringing fine thread across a frame or directly between anchor points on a wall.
Instead of filling the entire space with weft, you selectively weave in small, concentrated areas of color.
Incorporate soft clouds of unspun wool roving by gently tucking them between the warp threads.
Here, the negative space is the primary element, making each fiber addition feel light, intentional, and poetic.


