

Before you pick up another needle, I want you to reconsider what a single line of thread can do. It doesn’t have to be complex to be beautiful. In fact, the most resonant embroidery often comes from restraint—from choosing the right stitch, the perfect thread weight, and letting the simplicity of the line speak for itself.
Think of your fabric as a piece of quiet paper and your thread as a fine ink pen. Each piece in this collection is a lesson in intention. You’ll see how a simple switch from a backstitch to a stem stitch can add dimension, or how using a single strand of floss instead of three can transform a line from bold to breathtakingly delicate.
These are not just patterns; they are exercises in precision, composition, and texture. Let them guide you toward creating work that feels less like a hobby and more like art—calm, confident, and completely your own. You have everything you need to begin right now.
1. Render a Ginkgo Leaf with Satin Stitch Veins
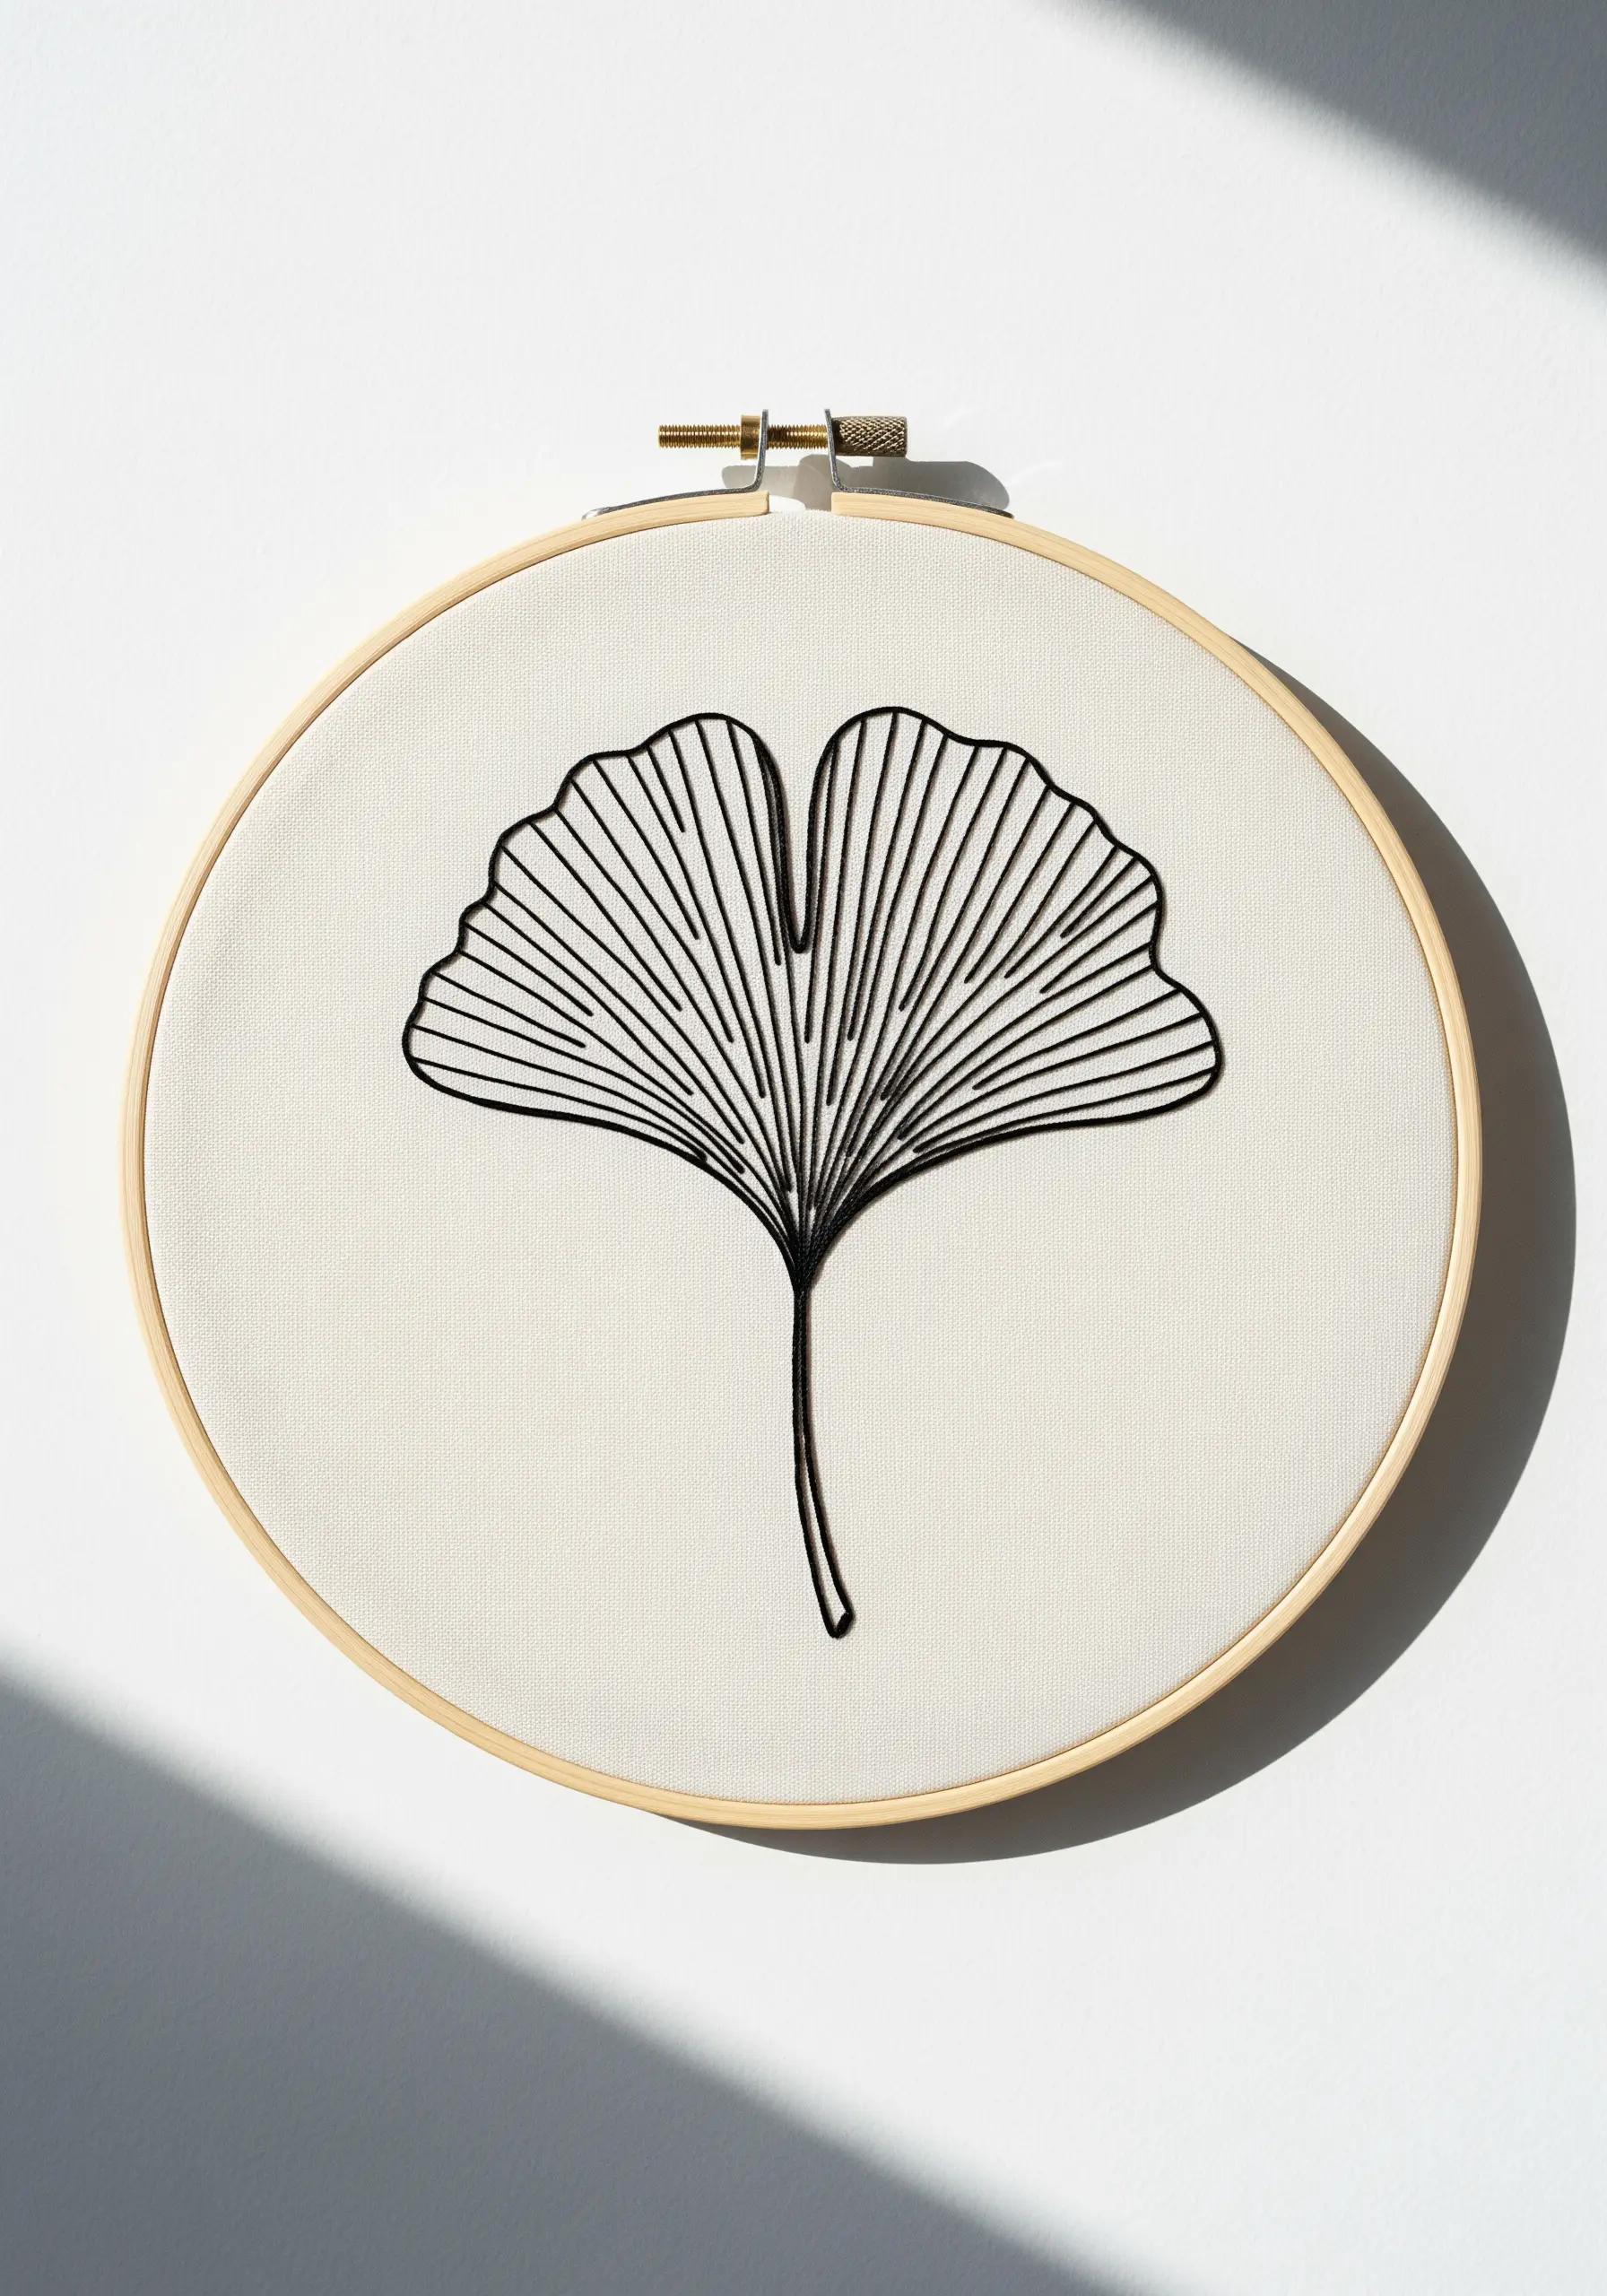
To create this striking graphic effect, use a simple backstitch for the main outline of the leaf with three strands of black floss.
For the delicate veins, switch to a satin stitch using only two strands of floss.
This subtle difference in thread weight makes the outline feel strong and grounding, while the veins appear finer and more detailed, adding a sense of realism and depth.
Ensure your satin stitches are laid closely together without overlapping to achieve that clean, parallel look.
2. Capture Mountain Ridges with High-Contrast Linework
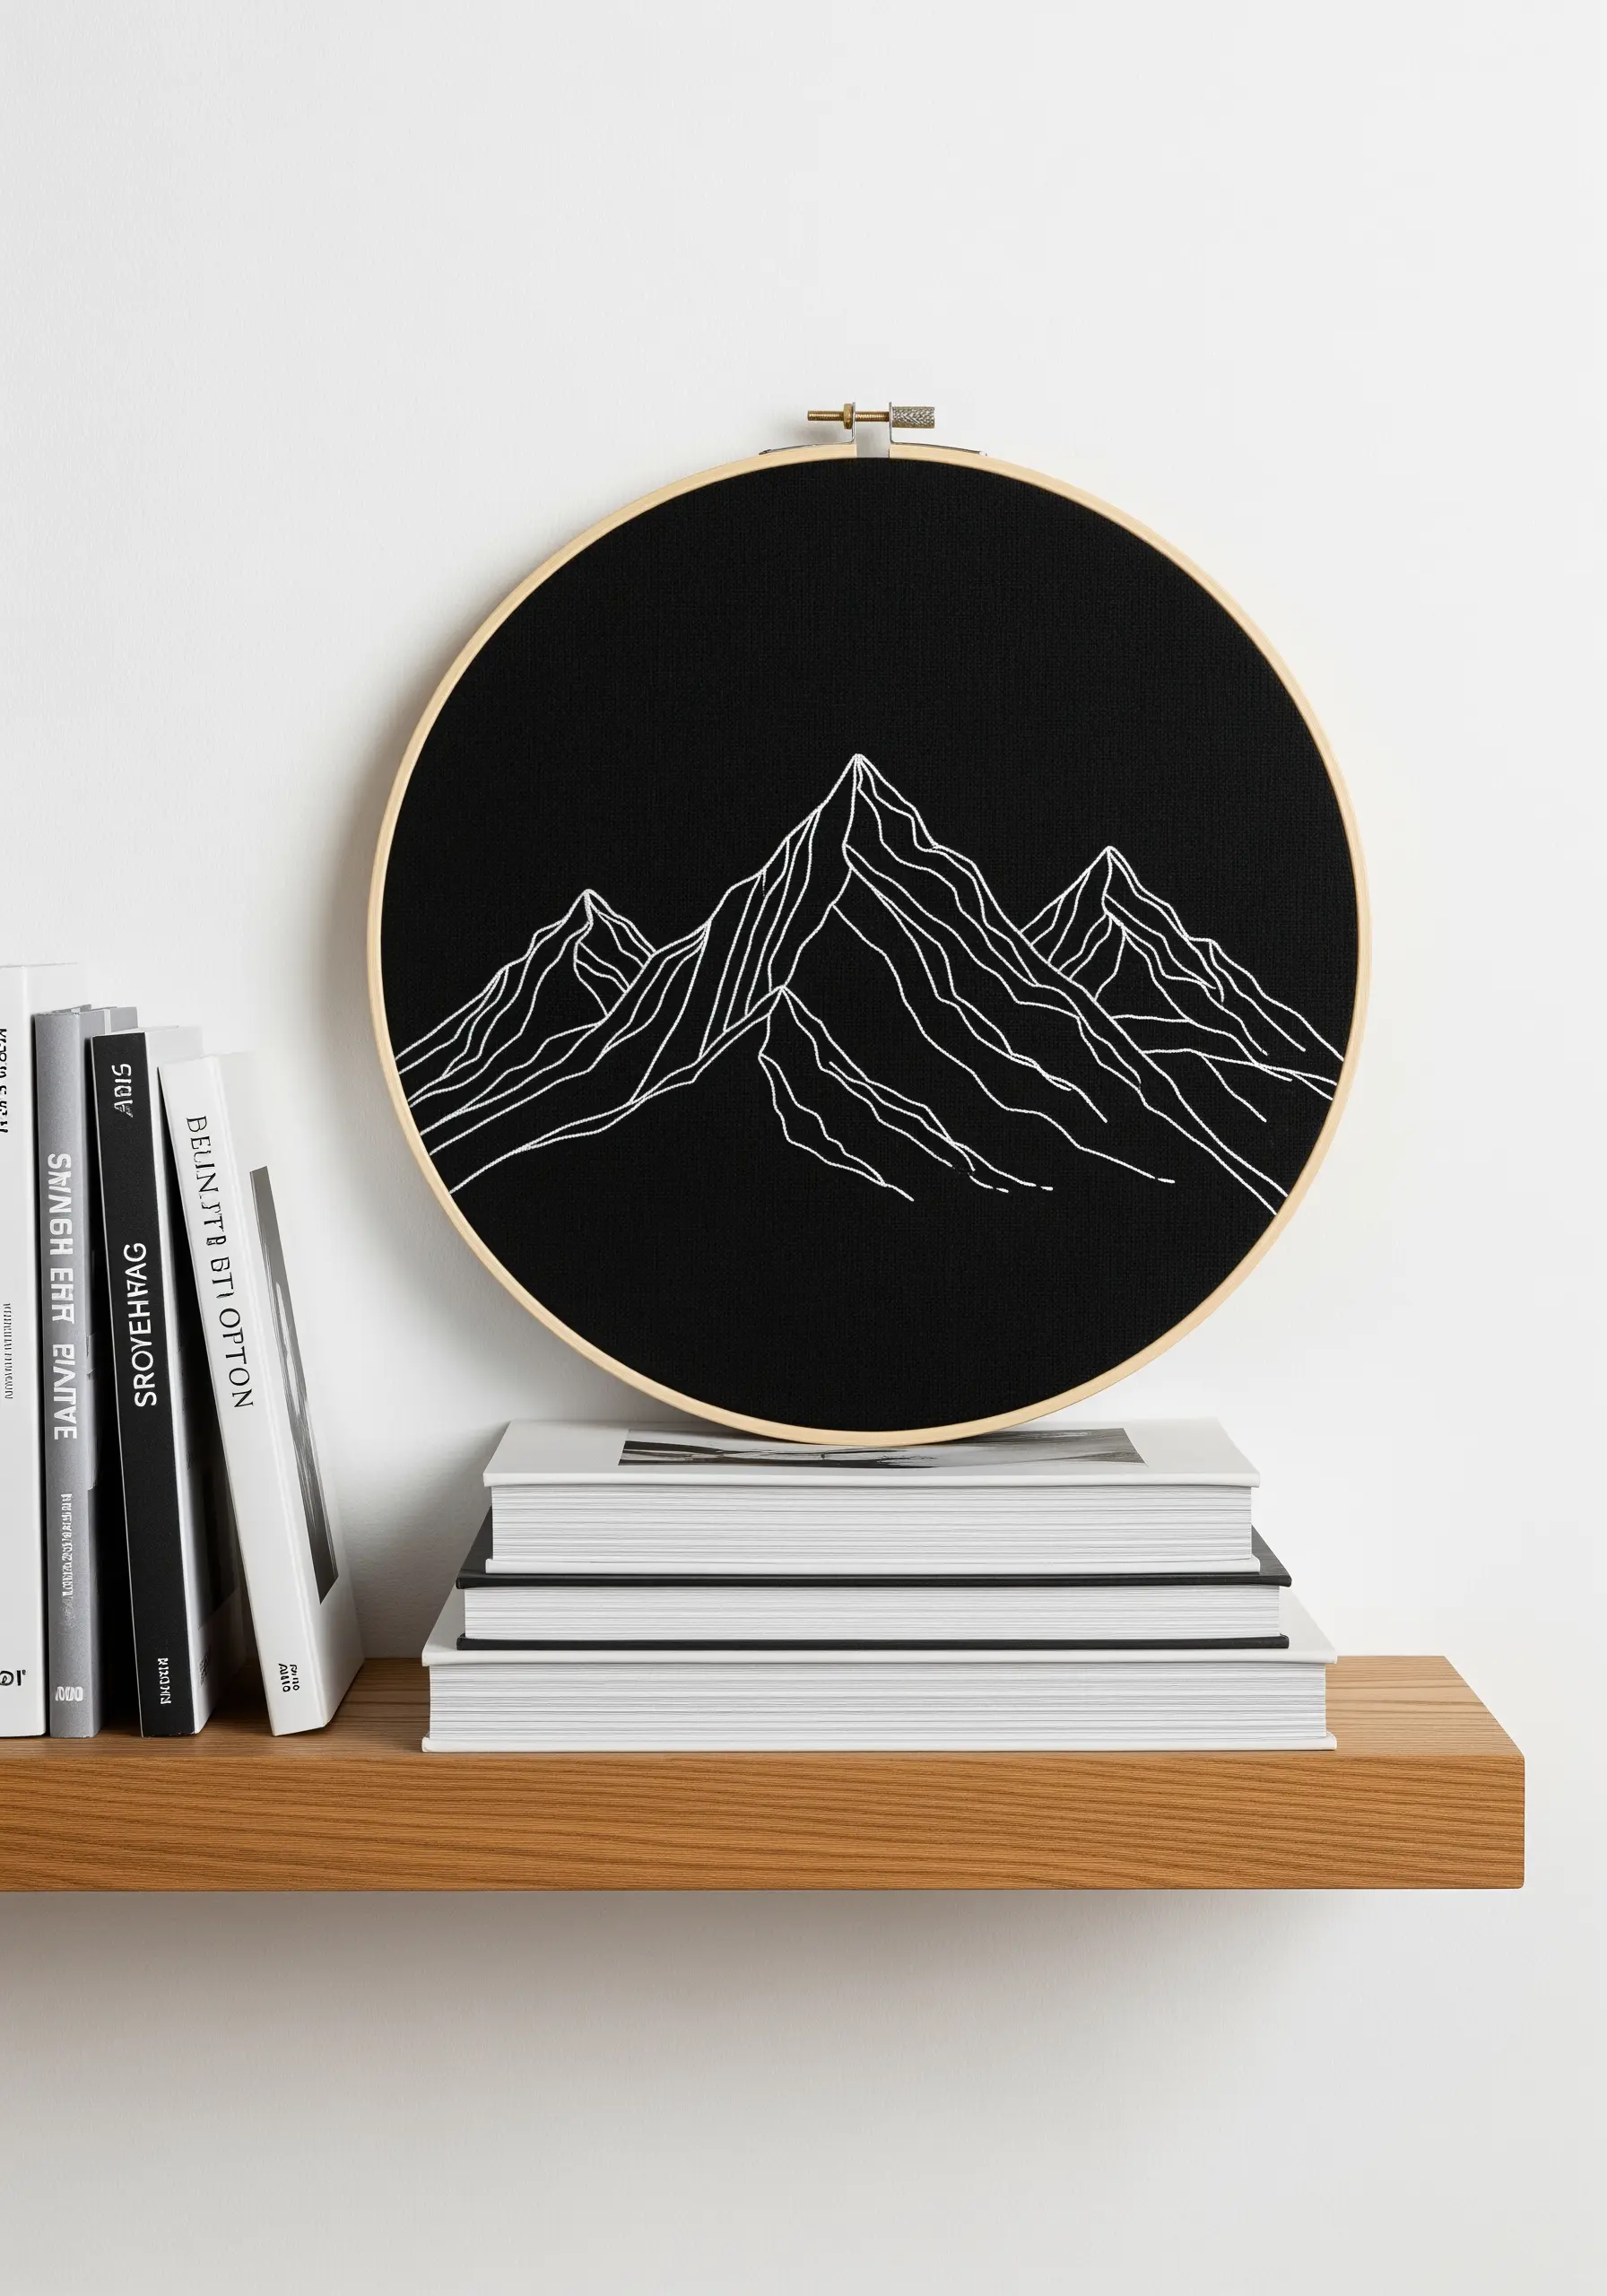
For crisp, sharp mountain peaks on dark fabric, the key is using a single strand of high-quality white cotton floss.
Using more than one strand can make fine lines look bulky or slightly blurred against the black background.
Work with a sharp needle and maintain taut fabric tension to ensure your lines are perfectly straight and clean.
A split stitch will give you the smoothest possible lines, especially on tight curves where a backstitch might appear jagged.
3. Illustrate a Dandelion’s Movement with Varied Stitches

Give your dandelion a sense of airy movement by varying the direction and length of your stitches for the floating seeds.
Use a single, long straight stitch for the stem of each seed, and finish with a cluster of three small, fanned-out stitches for the parachute-like pappus.
For the main flower head, use a combination of straight stitches and detached chain stitches to create a feeling of density and delicate chaos.
This technique turns a static image into a small story of wind and release.
4. Define a Monstera Leaf with a Textured Chain Stitch

Instead of a simple backstitch, outline your Monstera leaf using a chain stitch.
This stitch creates a slightly raised, rope-like line that gives the botanical form a bolder, more textural presence against the plain fabric.
It transforms a flat outline into a tactile piece of art, inviting the eye to follow the beautiful, interlocking loops.
Use three strands of floss to ensure the chain stitch has enough volume to stand out as a defining feature of the design.
5. Illuminate a Night Sky with Metallic Thread
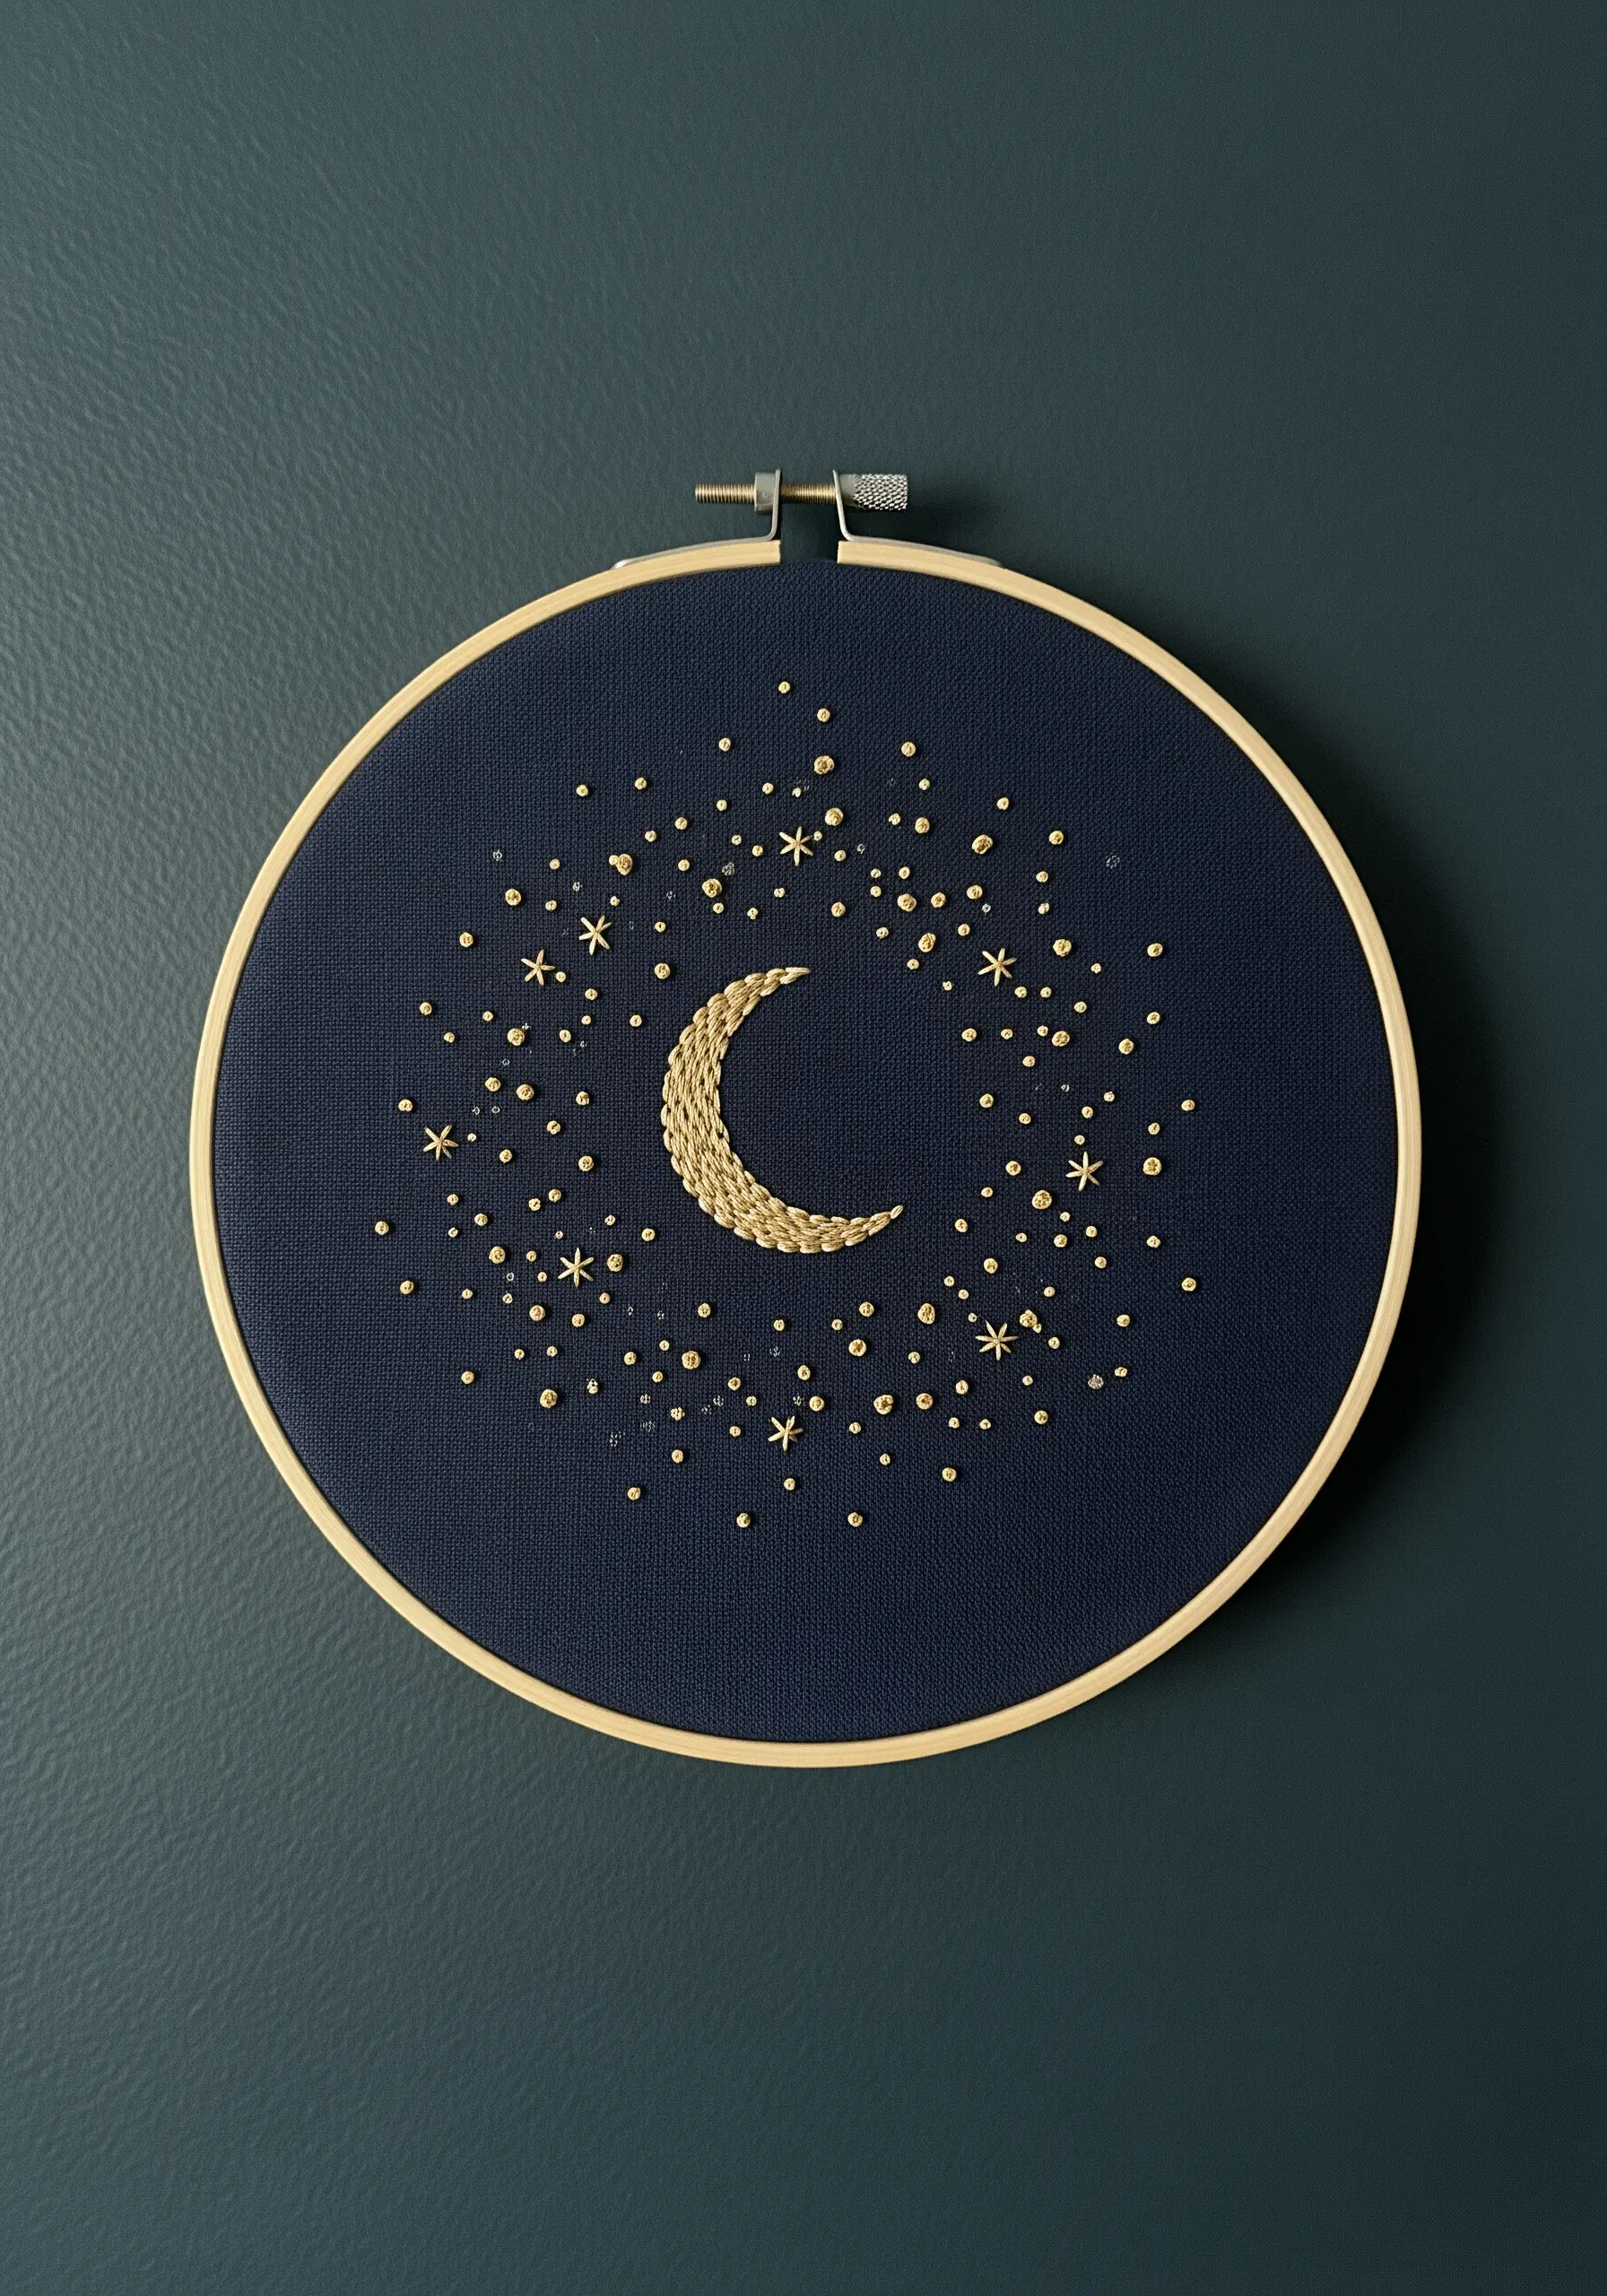
When working with metallic floss, which can be prone to fraying, cut shorter lengths of thread—no more than 12 inches at a time.
For the crescent moon, a closely worked satin stitch will create a solid, light-catching surface.
Create the surrounding stars using a mix of French knots for smaller points of light and simple star stitches (five intersecting straight stitches) for larger, more prominent stars.
This variety in stitch and size gives your celestial scene a dynamic, shimmering quality on dark fabric.
6. Create Fluidity in Water with Directional Stitches

To make your embroidered waves feel like they are in motion, ensure your stitches follow the direction of the water’s flow.
Use a split stitch for all the curved lines; it creates a smoother, more fluid curve than a standard backstitch, which can look segmented.
By aligning each stitch with the drawn line, you reinforce the sense of movement and energy, making the composition feel dynamic and alive.
Using a vibrant blue on a stark white background enhances this graphic, powerful effect.
7. Stitch Botanicals Directly onto Stretched Canvas
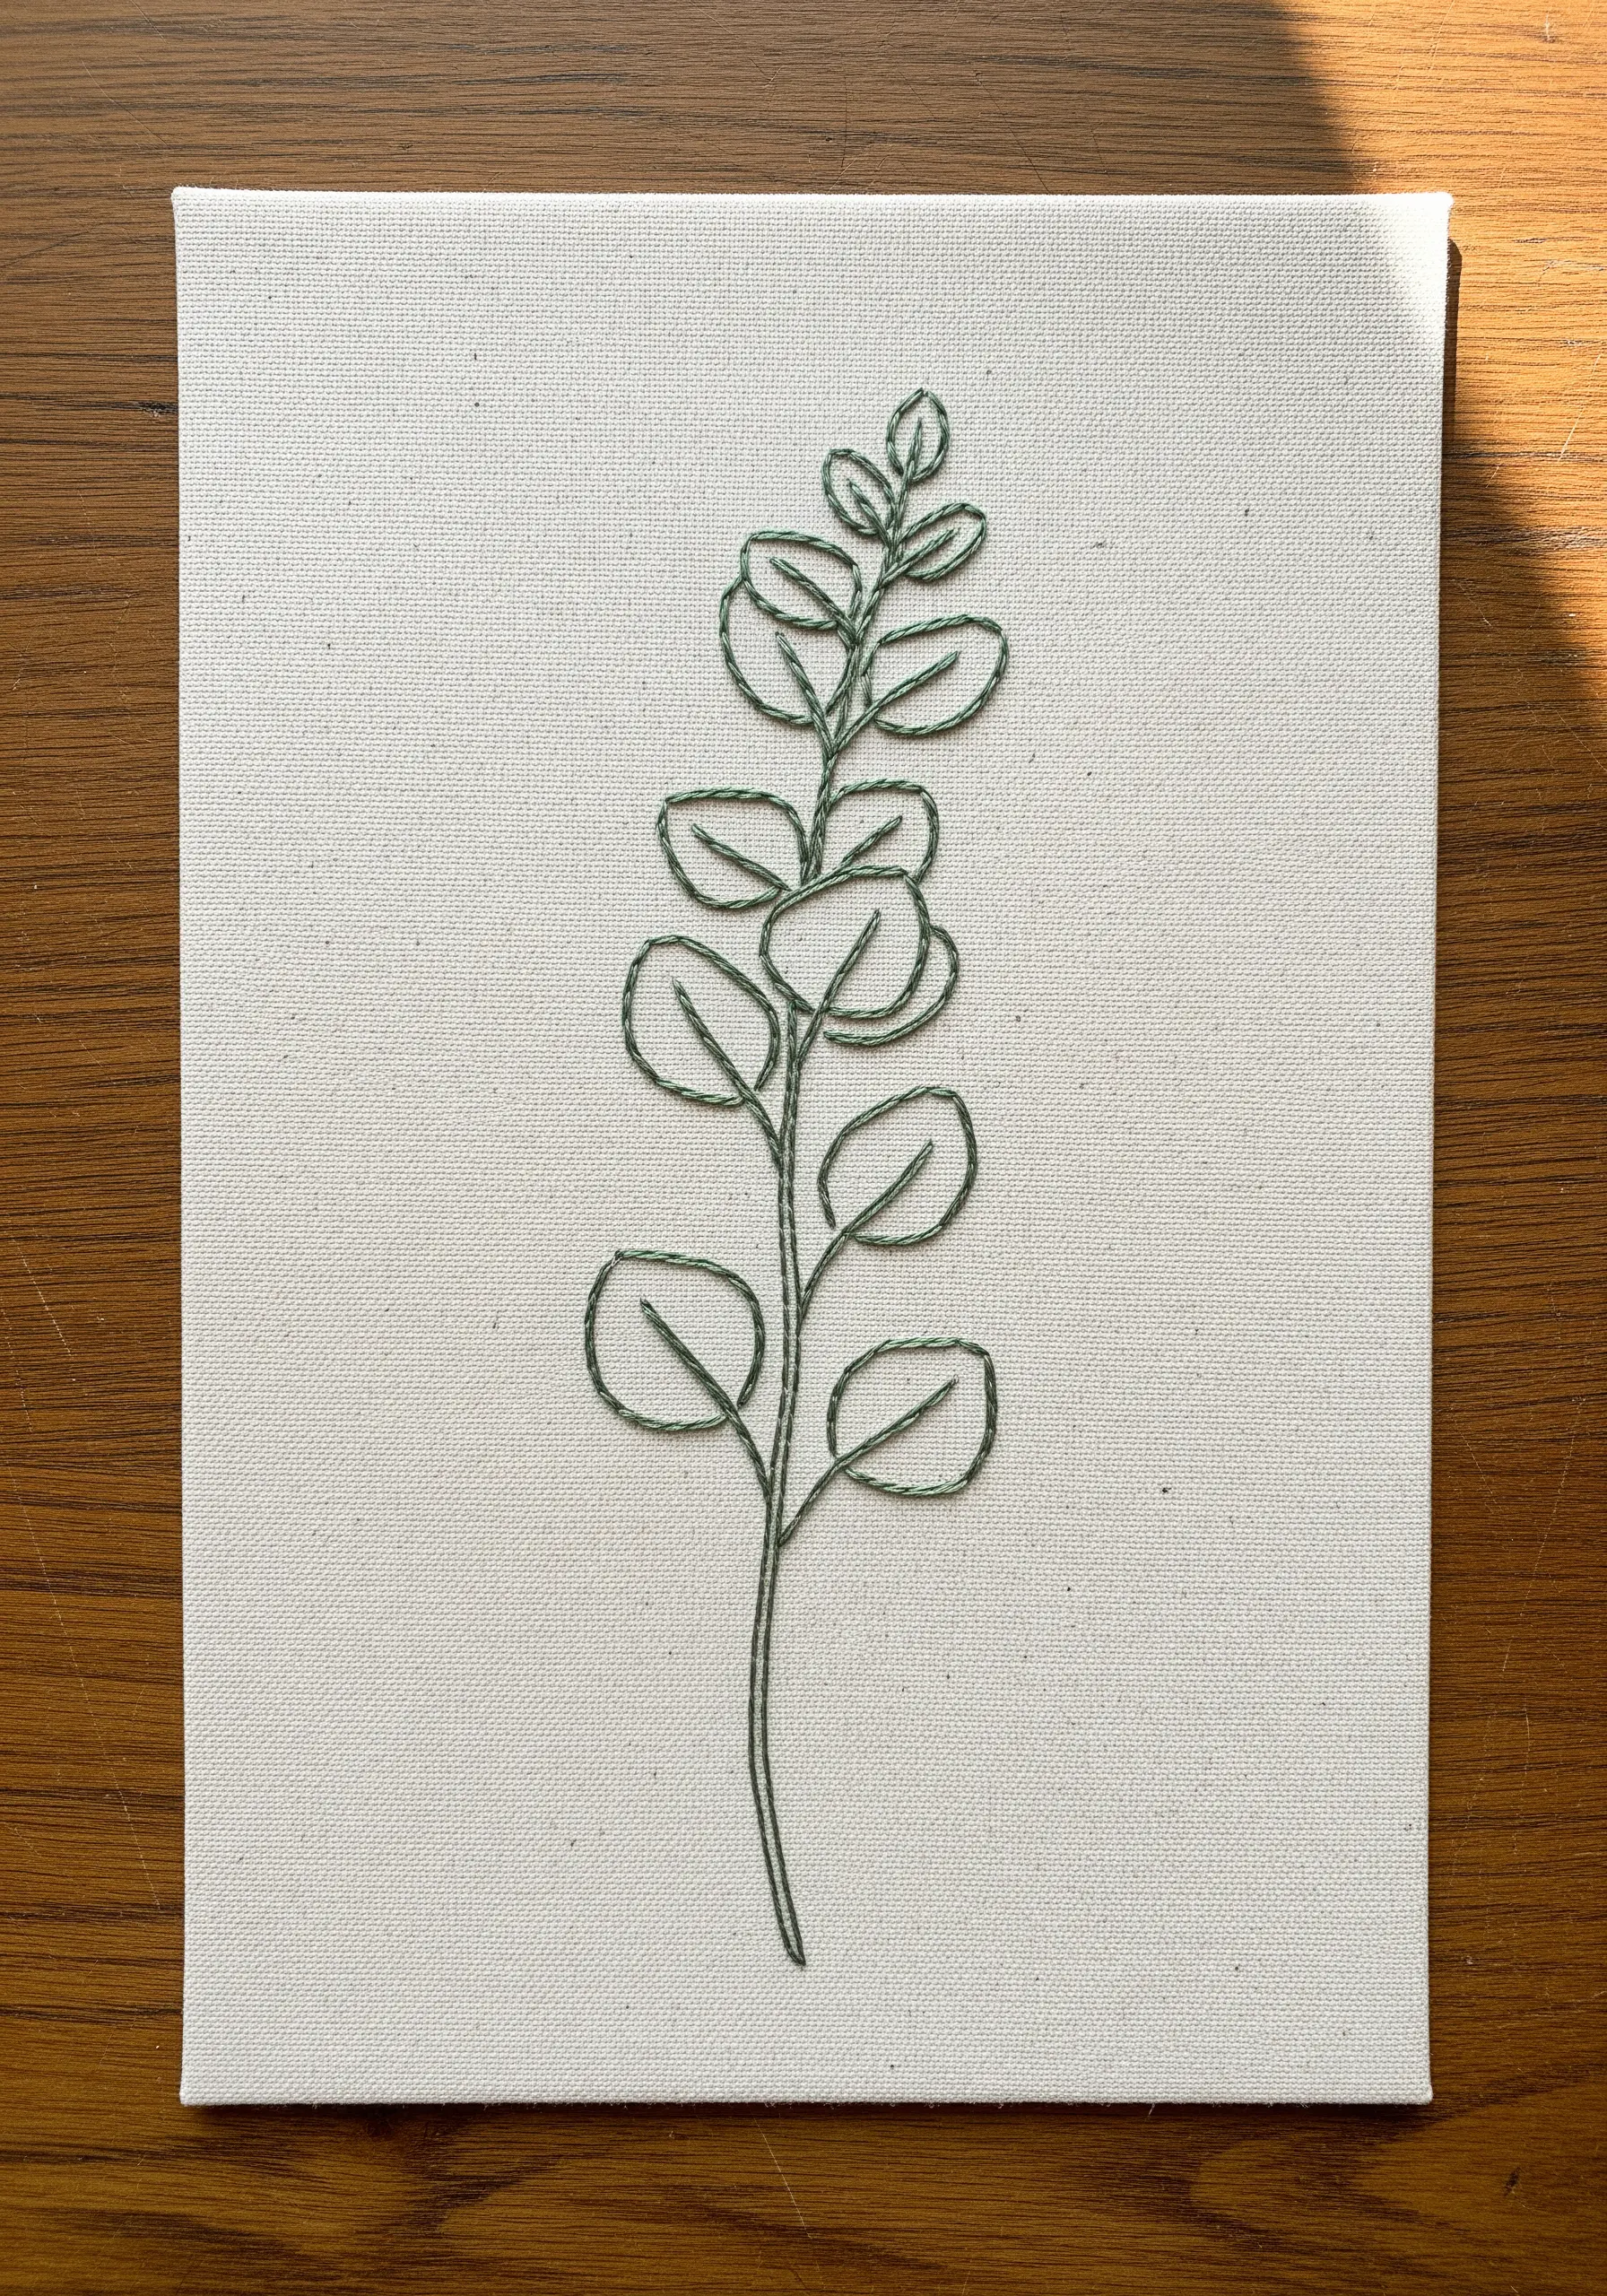
Move beyond the hoop by stitching your minimalist designs onto a small, stretched canvas for a modern, frame-free display.
Use a sharp, sturdy needle and a thimble to comfortably pierce the tight weave of the canvas.
A simple backstitch works beautifully here, creating a clean, graphic line that stands out against the textured surface.
This method transforms your embroidery on canvas into a piece of ready-to-hang wall art.
8. Map the Stars with Precision Star Stitches
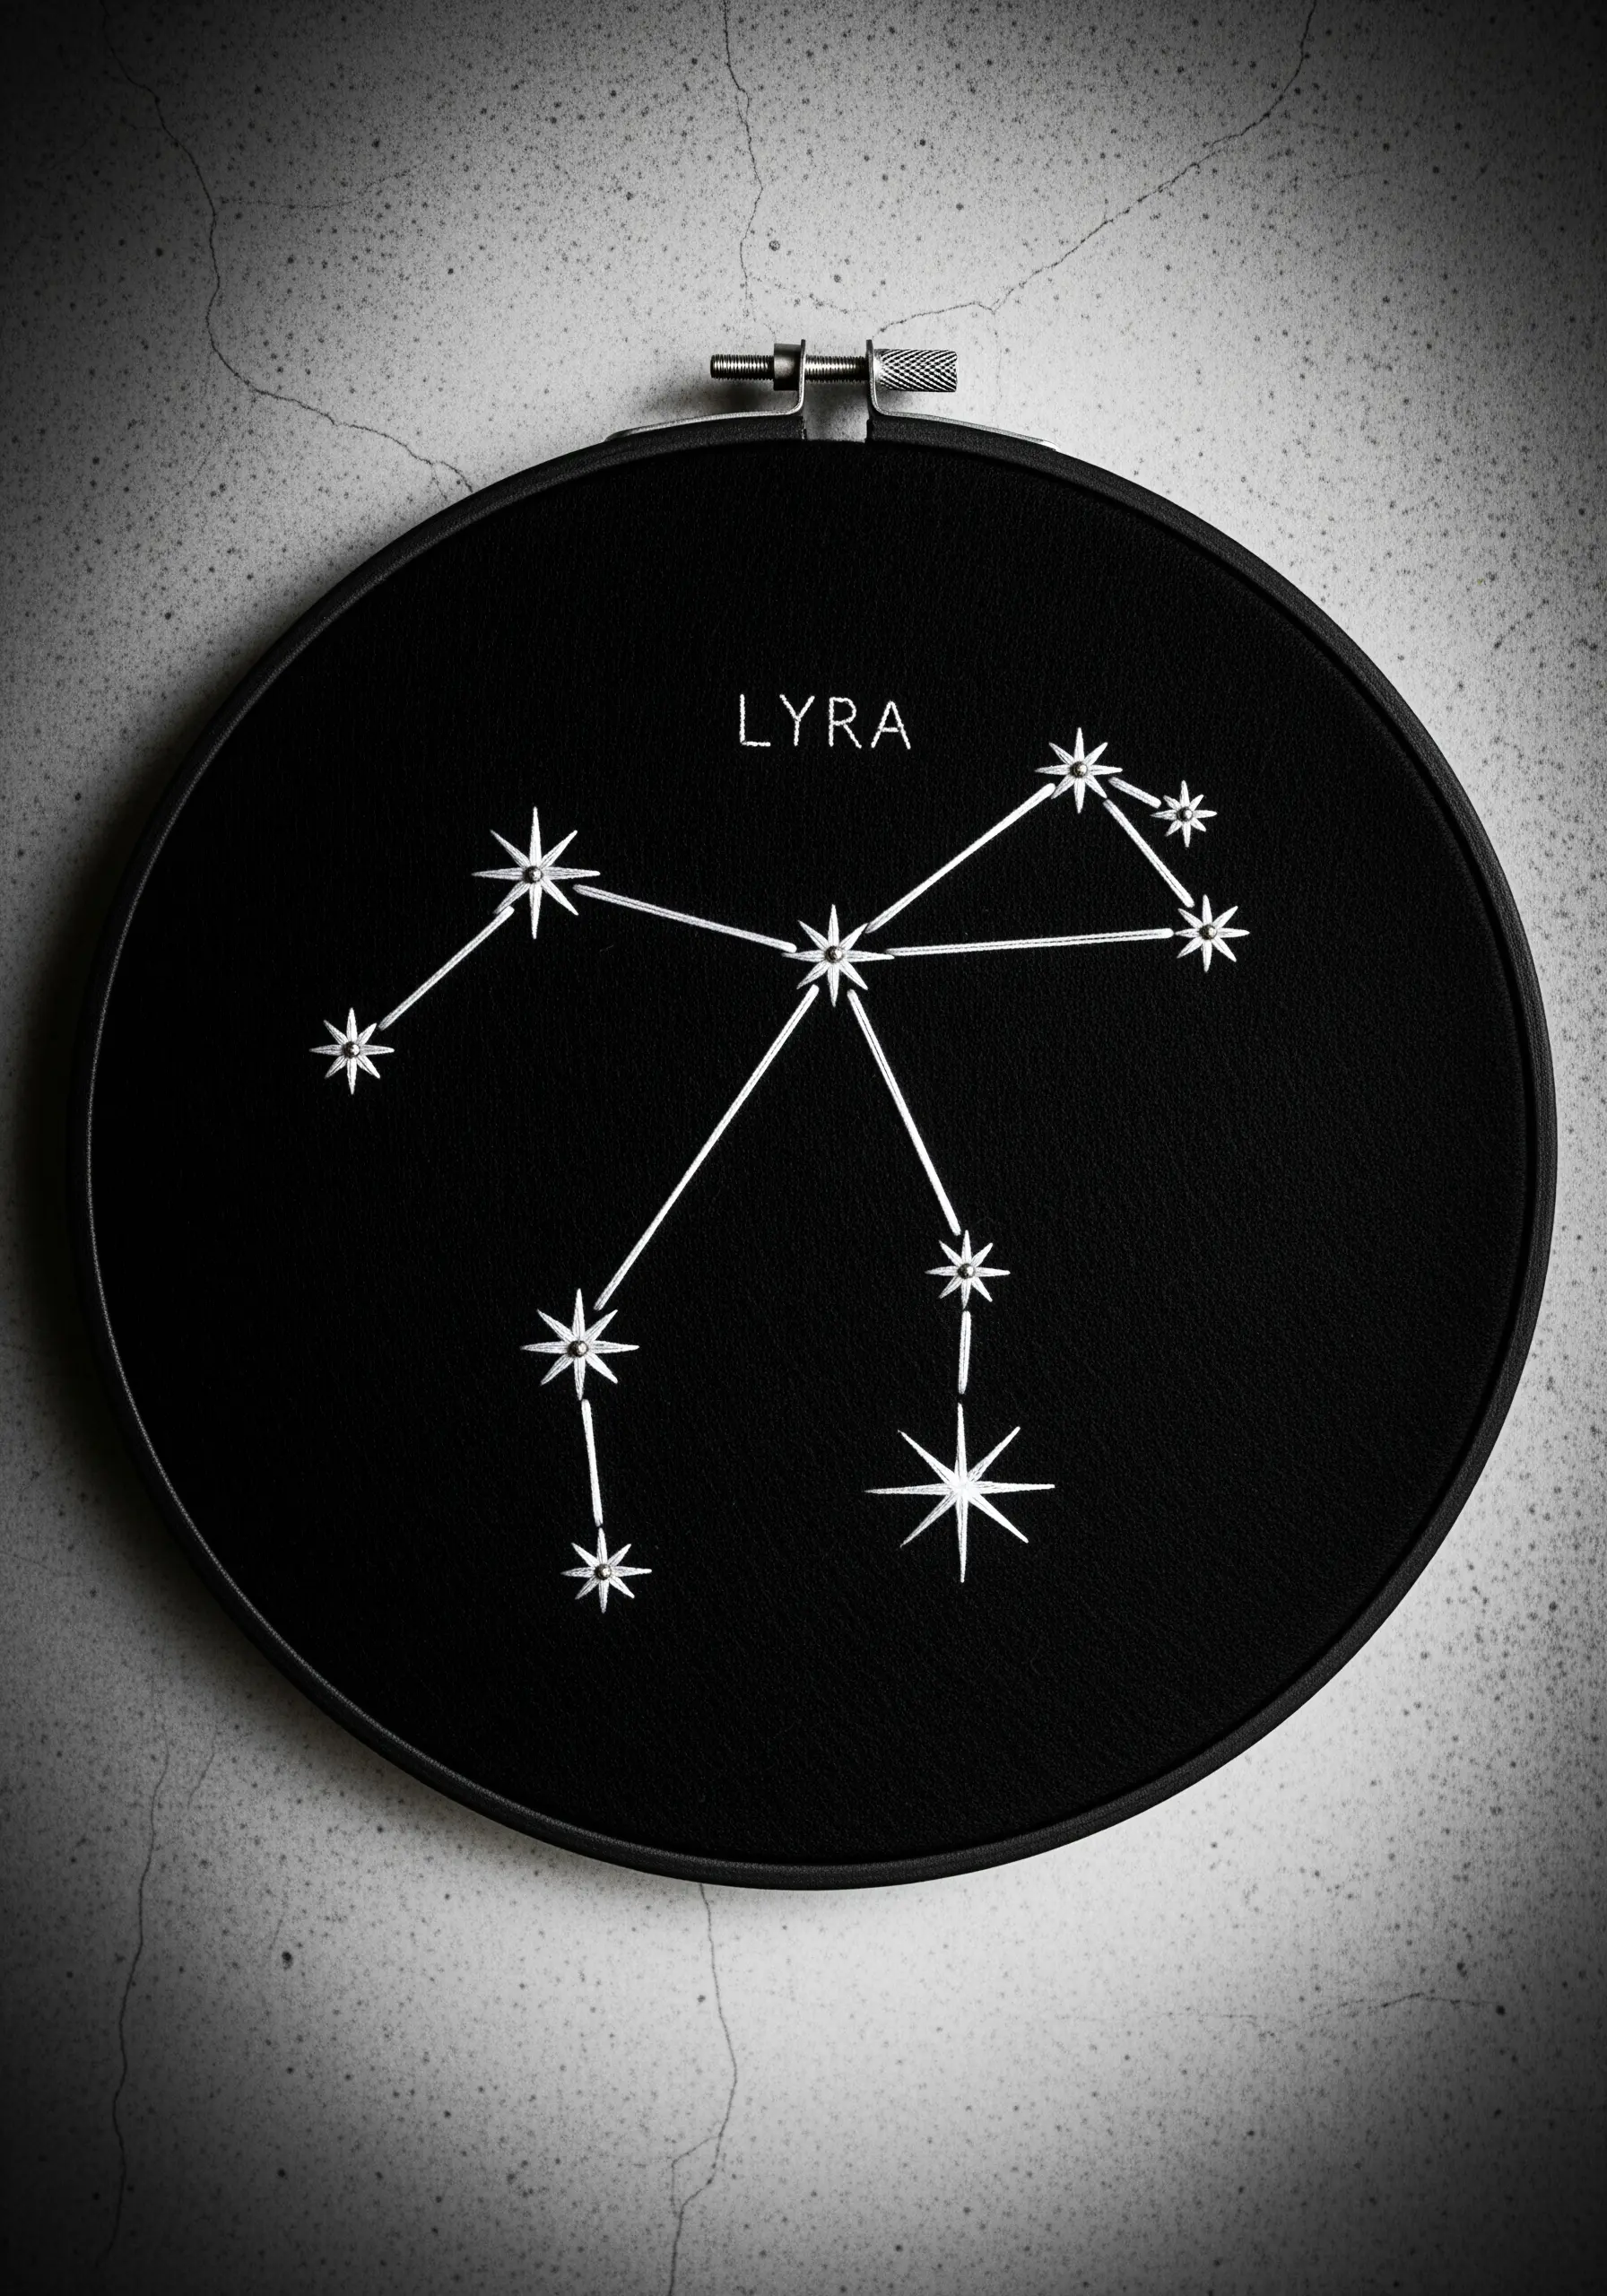
To create a precise constellation, vary the size of your star stitches to represent the different magnitudes of stars in the night sky.
For larger stars, use a six-point star stitch (three intersecting straight stitches), and for smaller ones, a simple four-point star stitch will suffice.
Connecting them with a clean, single-strand backstitch keeps the focus on the celestial points.
Using a bright white or silver thread against black fabric makes the design pop with astronomical clarity.
9. Soften Animal Outlines with a Whipped Backstitch
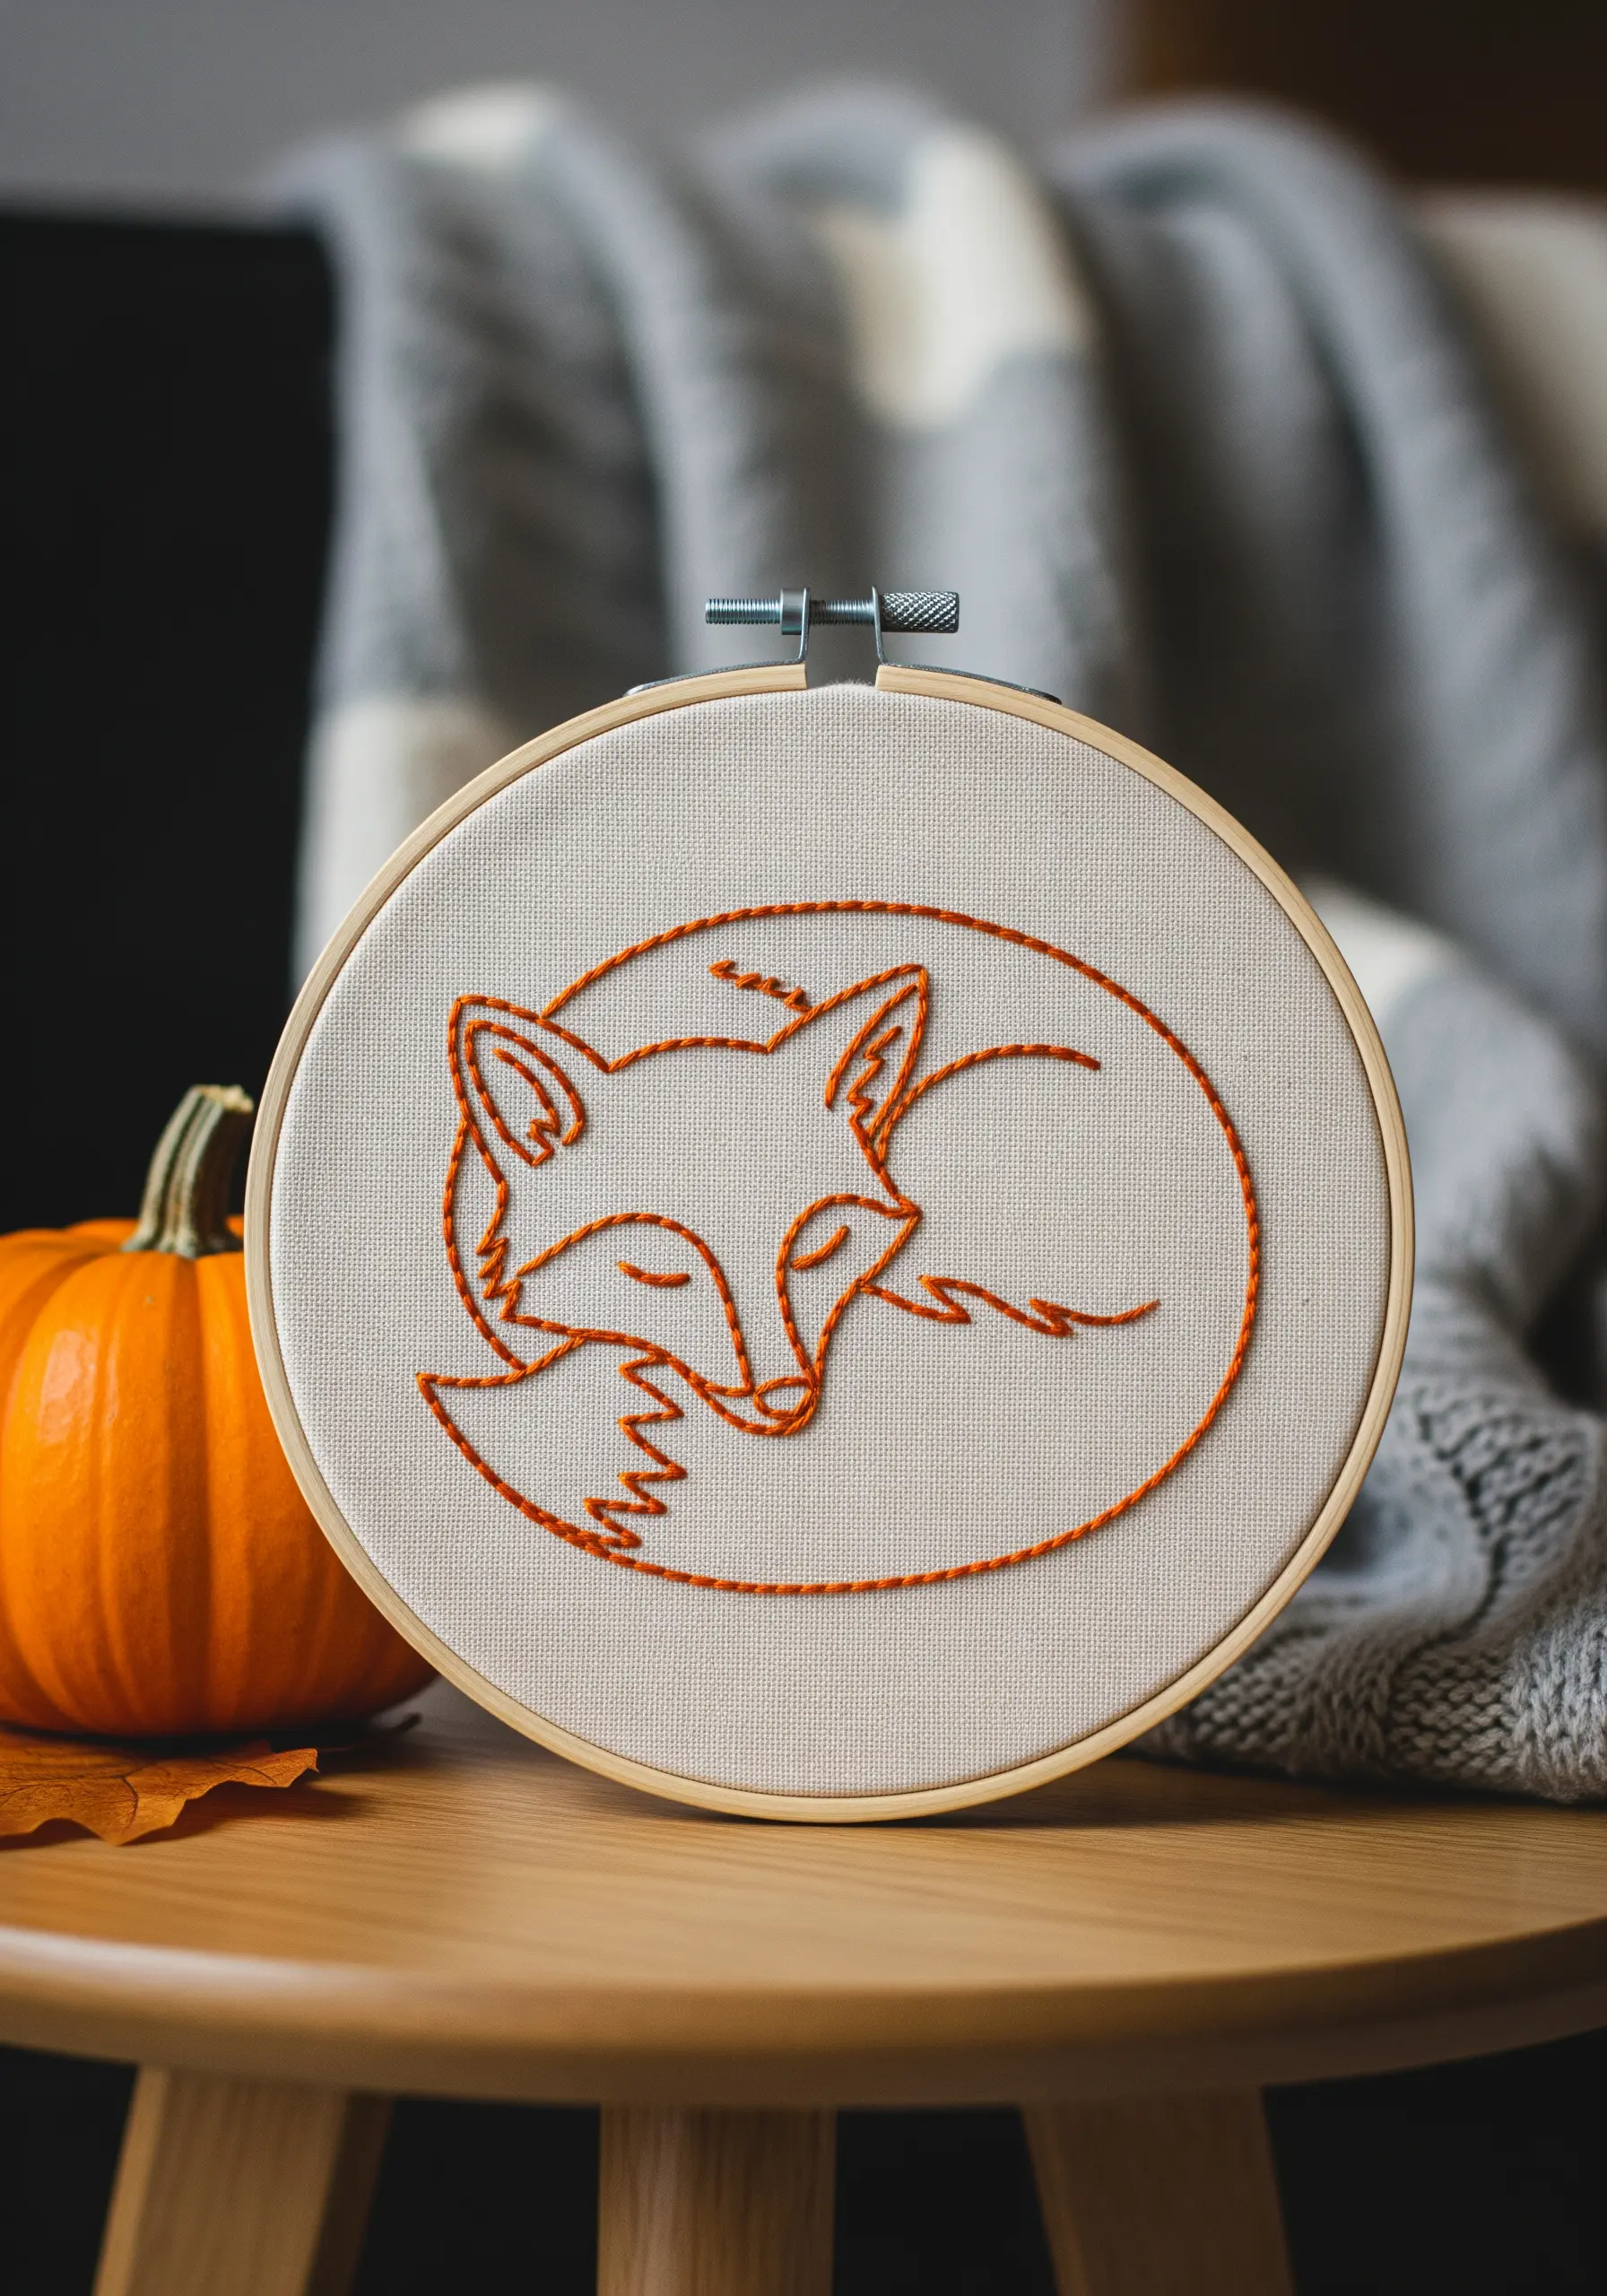
For a line that feels softer and more fluid than a standard backstitch, first lay down a row of backstitches along your design line.
Then, without piercing the fabric, use a second thread to whip, or wrap, around each backstitch, creating a smooth, rounded, and slightly raised line.
This technique is perfect for the curved, organic shape of a sleeping animal, giving it a gentle, cohesive appearance that enhances the cozy feeling of the motif.
10. Combine Fill and Outline for Graphic Impact
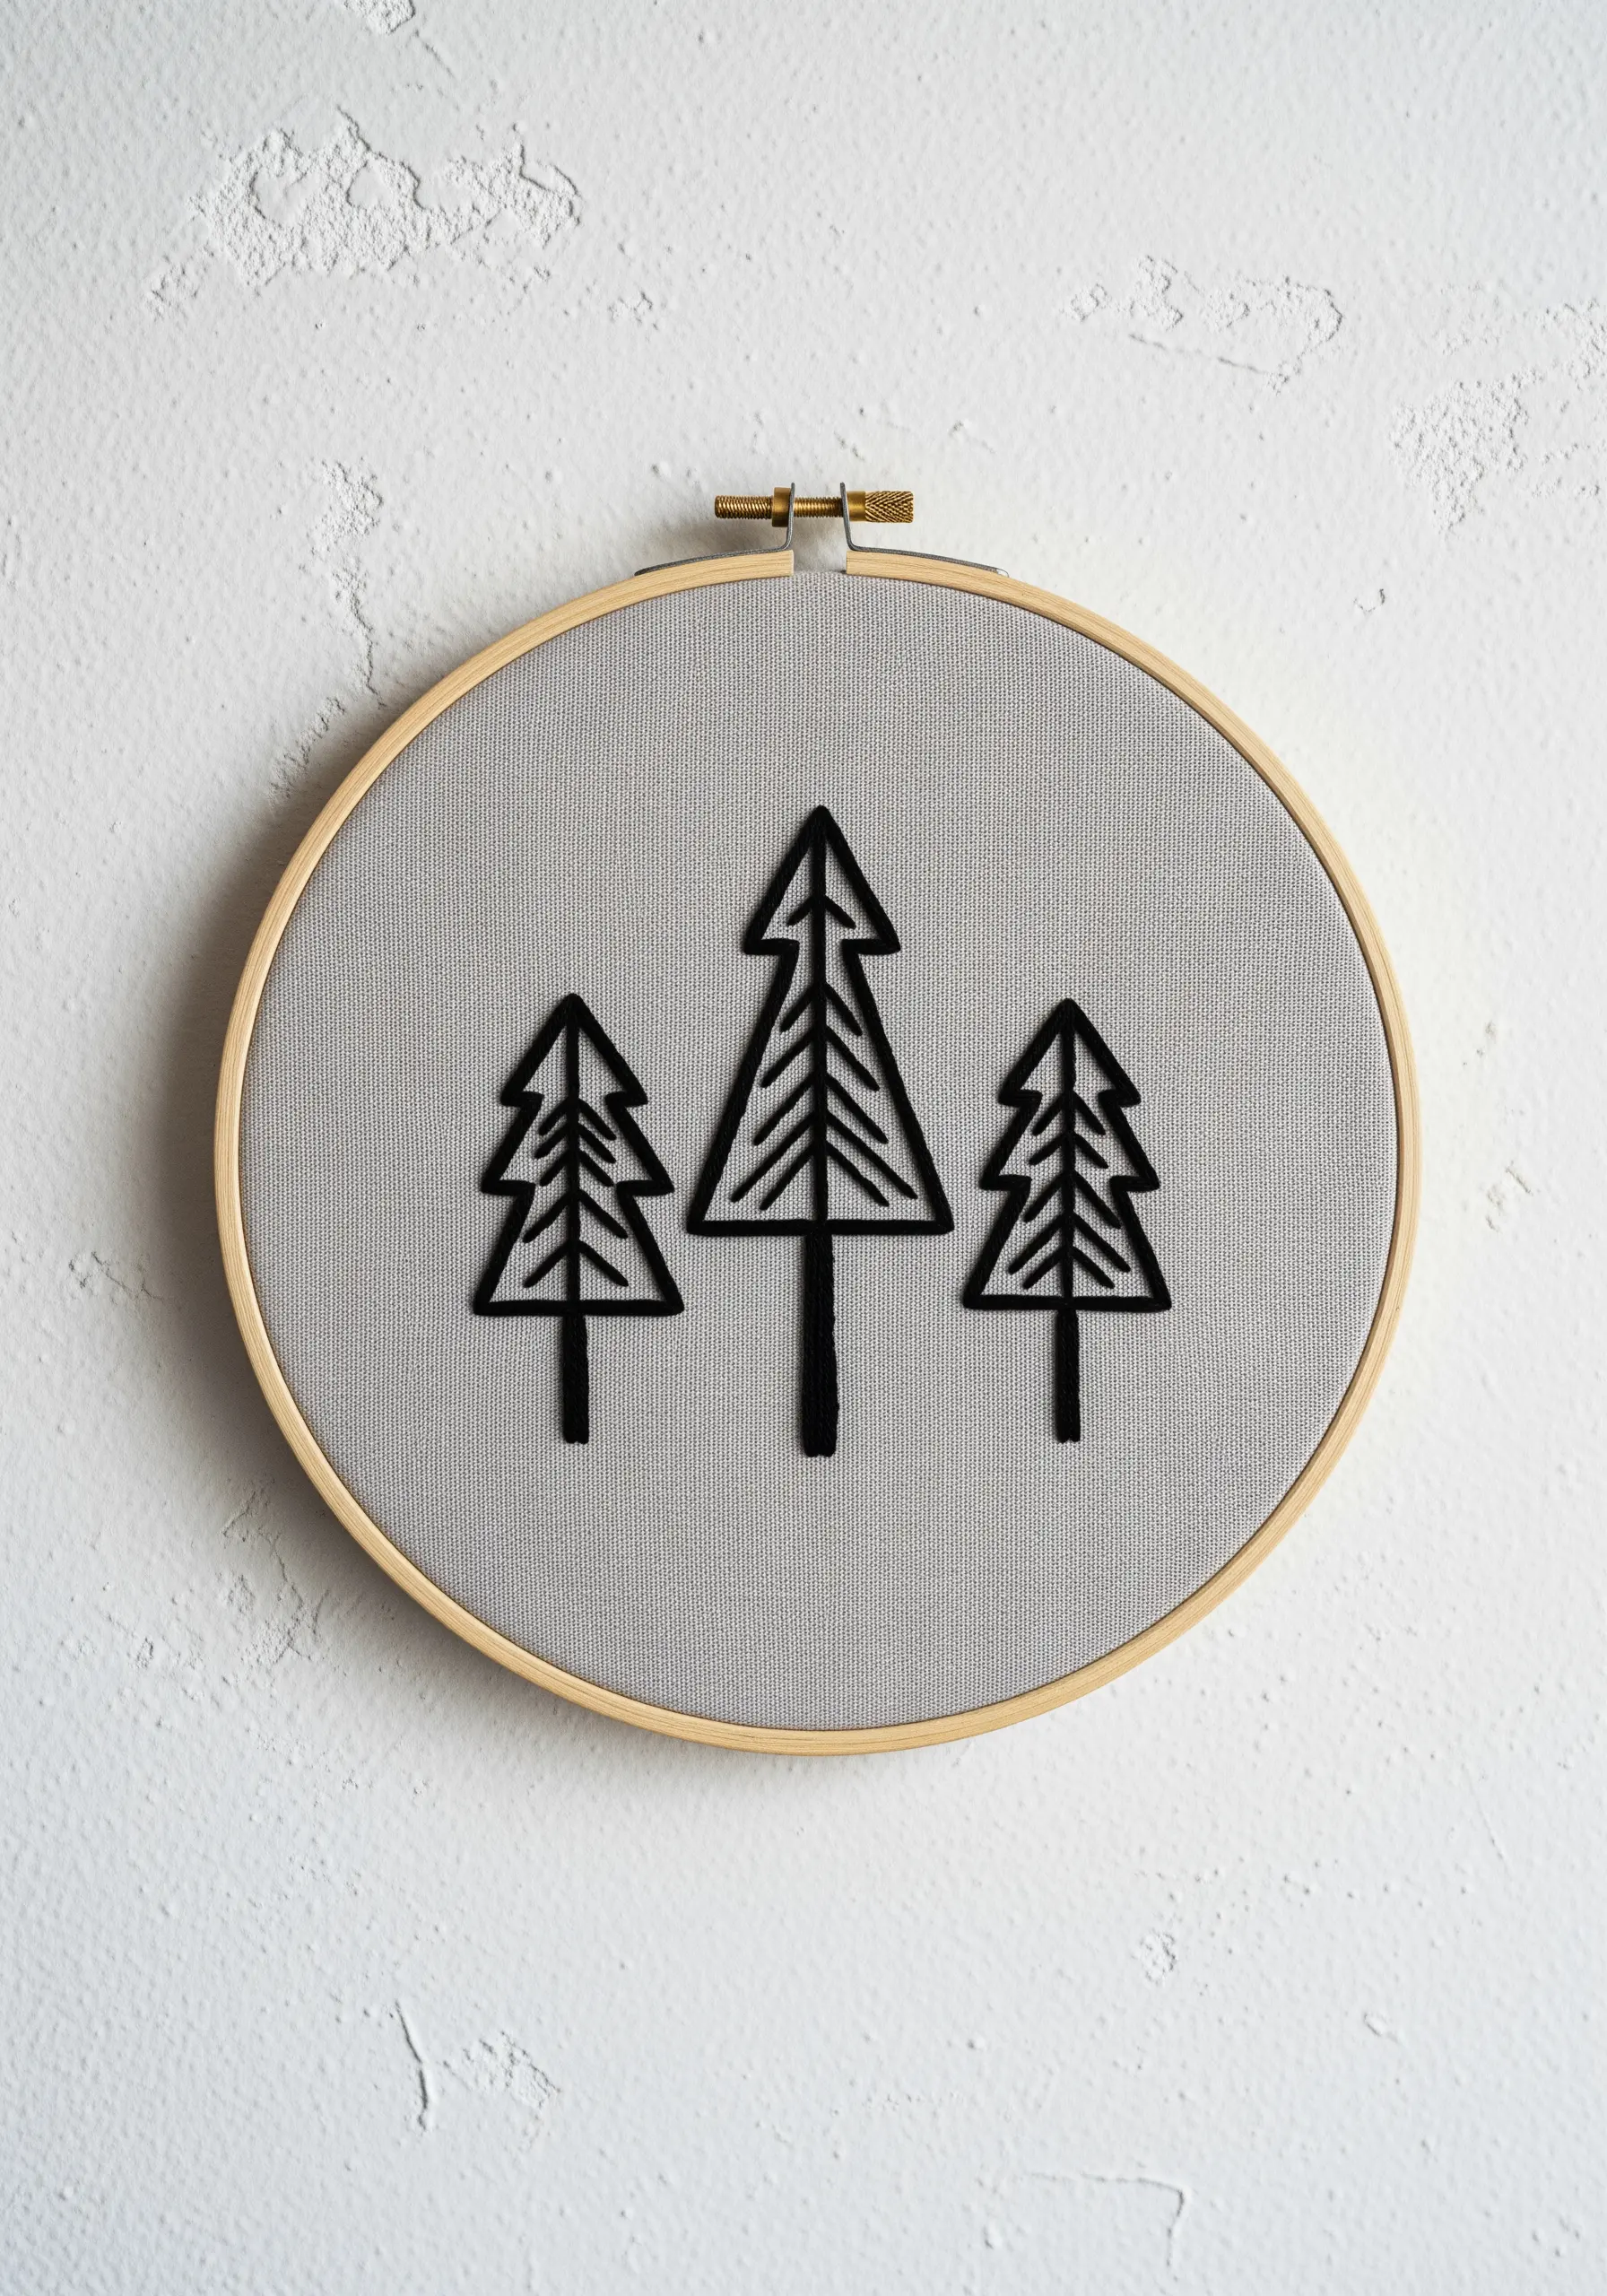
Elevate simple shapes by combining a dense satin stitch fill with a clean backstitch outline.
First, fill the tree shapes completely with a vertical satin stitch using three strands of black floss.
Then, go back around the edge with a two-strand backstitch in the same color. This defines the silhouette, sharpens the edges, and adds a subtle layer of dimension.
This technique gives your minimalist embroidery a bold, graphic novel quality.
11. Add Subtle Depth with Tonal Thread Variation

To give a single-color line drawing more life, use two very similar shades of the same color.
Use the slightly darker red for the stem and the outer edges of the poppy petals, suggesting shadow.
Then, use the slightly brighter red for the inner details and petal edges that would catch the light.
This subtle shift in tone is almost unnoticeable at first glance, but it gives the final piece a sophisticated depth that a single flat color cannot achieve.
12. Capture Botanical Details with Repetitive Stitches
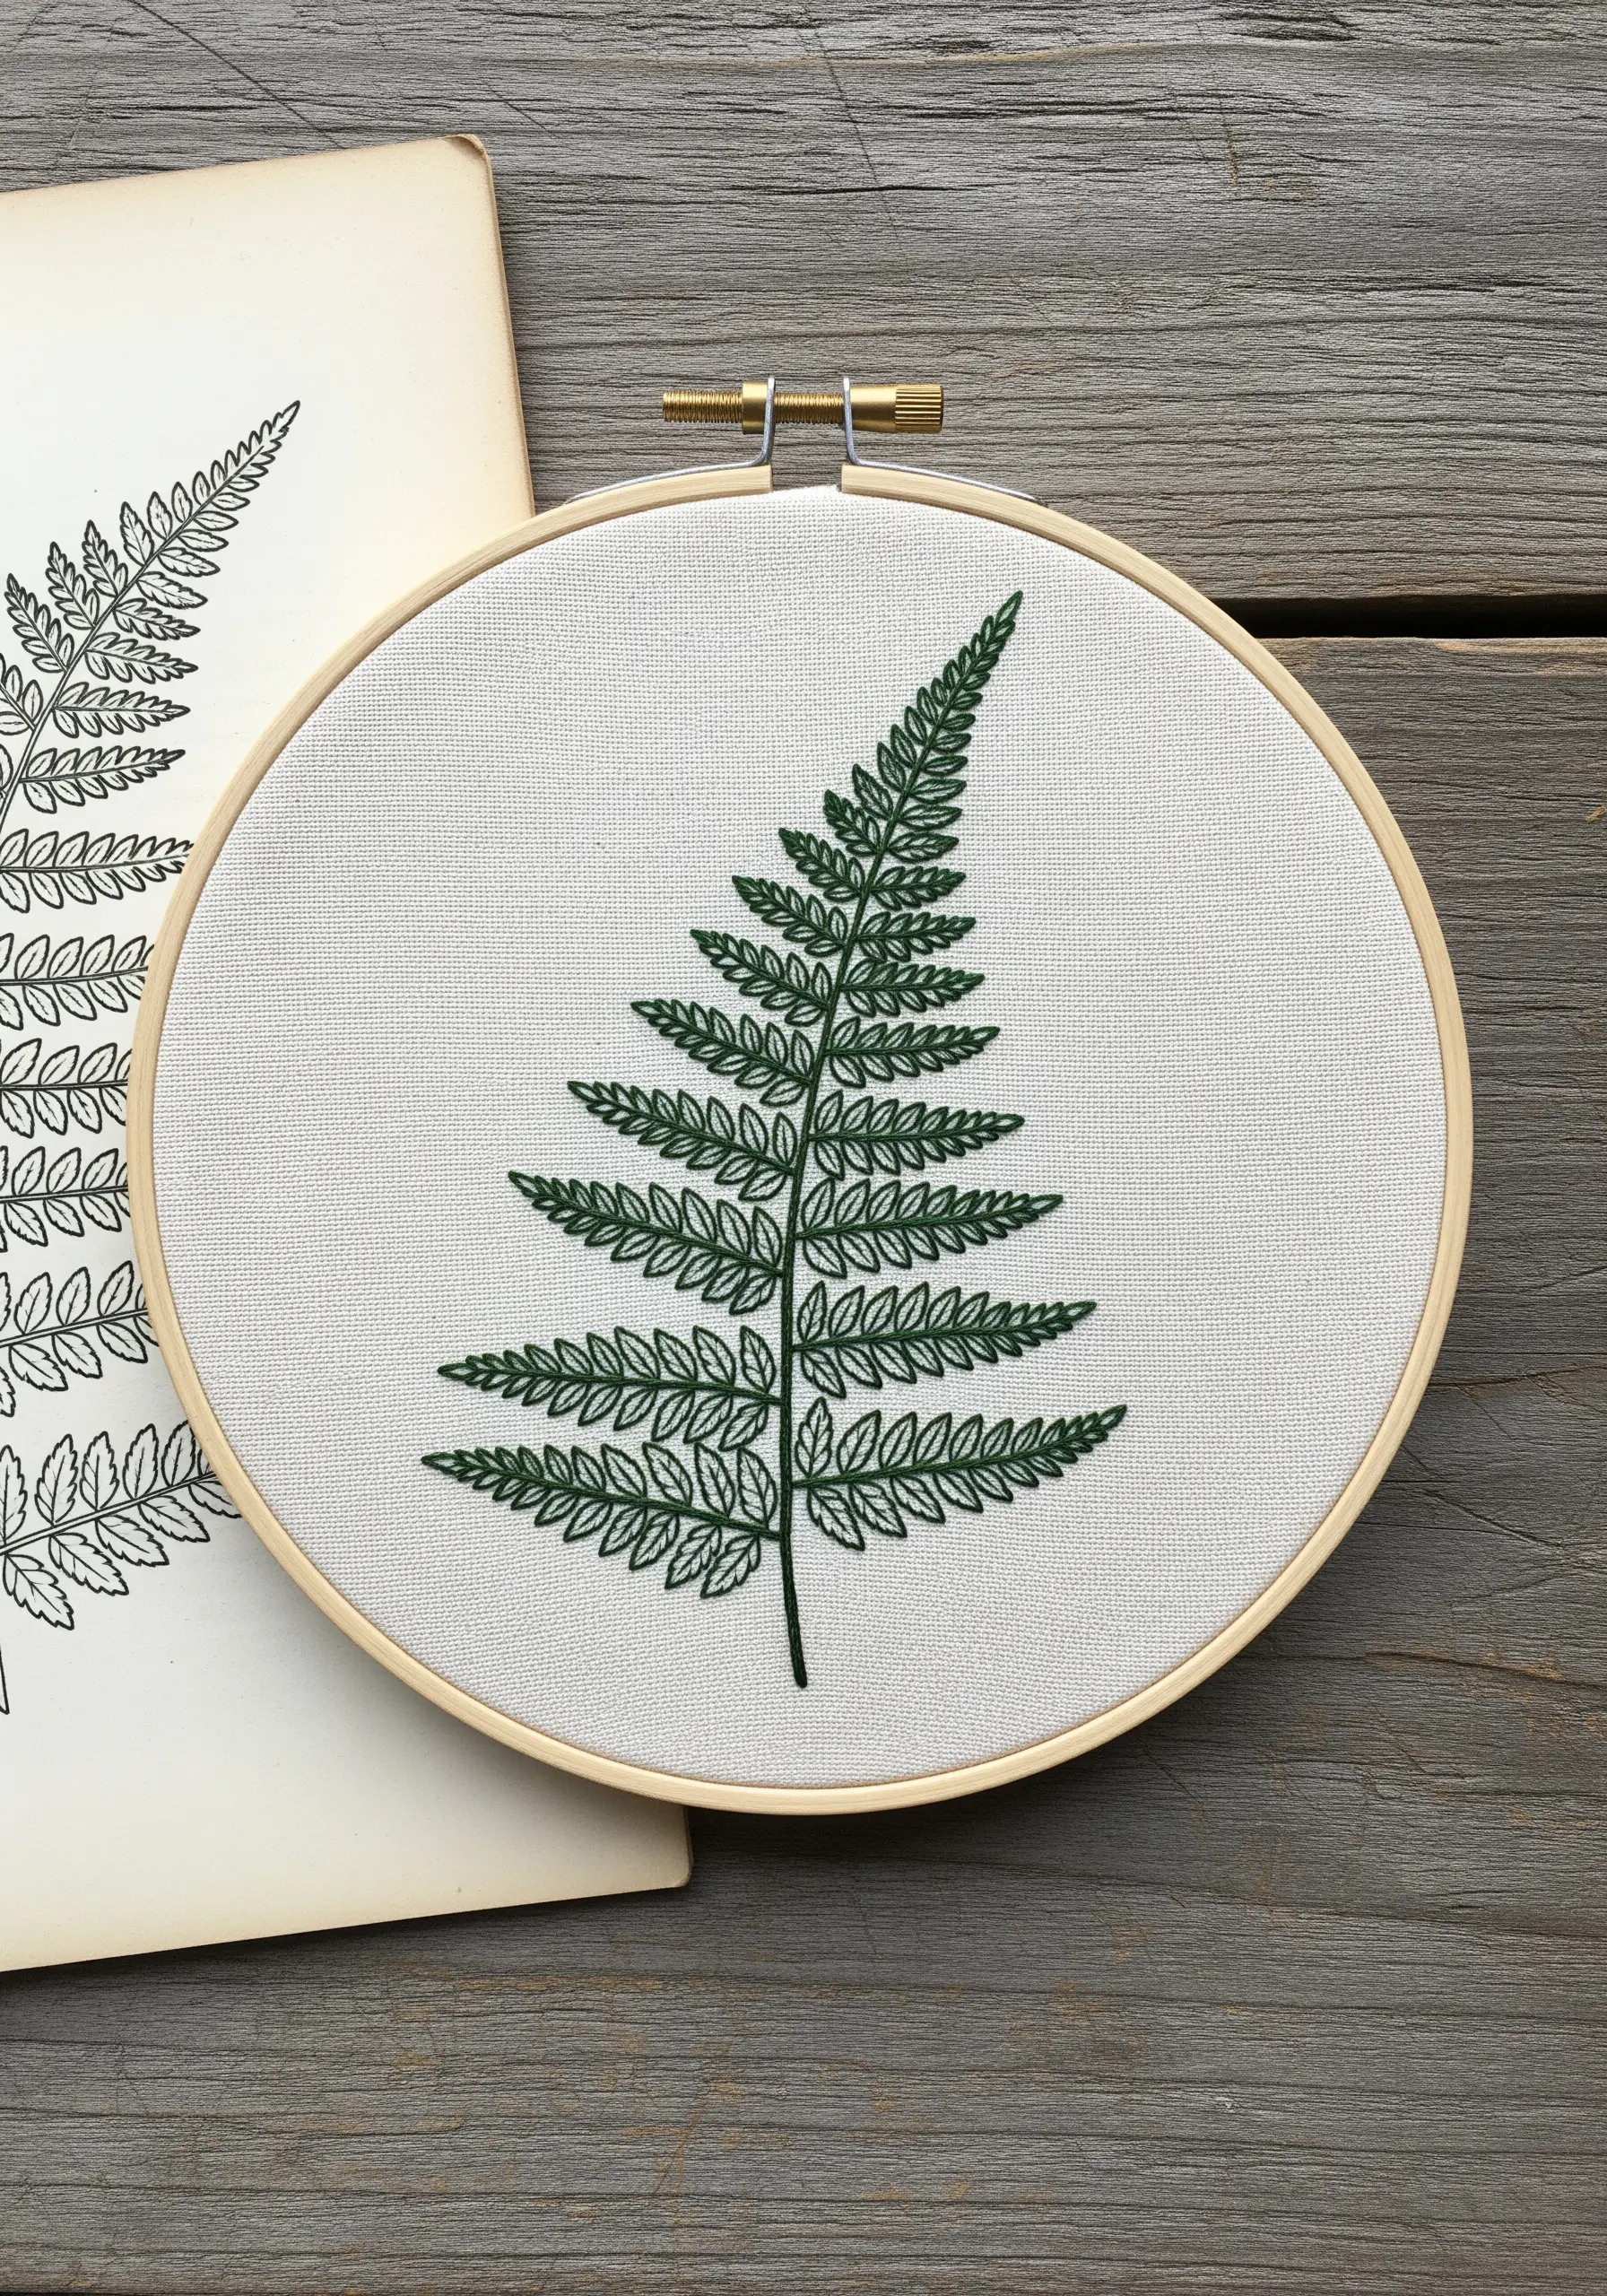
To recreate the intricate structure of a fern, use a stem stitch for the central stalk to give it a solid, rounded form.
For the delicate fronds, switch to a simple straight stitch or a tiny detached chain stitch, using only a single strand of floss for the finest detail.
Work from the central stem outwards, keeping your stitches consistent in length and angle to create a symmetrical, natural pattern.
These delicate leaf embroidery stitches are perfect for capturing nature’s precision.
13. Imply Motion with Deliberately Loose Threads

Turn your embroidery into a dynamic piece by incorporating intentionally loose threads that extend beyond the main design.
After completing the bird’s outline with a clean backstitch, add a few long, trailing stitches that break free from the form.
Let these threads hang loosely, creating a sense of energy and flight that suggests the hummingbird has just darted into the frame.
This technique adds an abstract, artistic layer to a traditional line drawing, making it feel contemporary and alive.
14. Create Lunar Texture with an Irregular Fill Stitch

Instead of a perfect satin stitch, fill your moon phases with a slightly randomized seed stitch or a dense collection of French knots.
This approach creates a textured, uneven surface that beautifully mimics the craters and shadows of the real moon.
Use a silvery-grey or off-white thread on a black canvas to maximize the contrast and celestial impact.
The tactile quality of the fill makes the design visually compelling, especially for minimalist embroidery wall art.
15. Build Realistic Lavender Buds with French Knots

To capture the clustered texture of a lavender sprig, use French knots for the flower buds.
Vary the size of the knots slightly by wrapping the thread around the needle once for smaller buds and twice for larger, fuller ones.
Cluster them tightly at the top and space them out more as you move down the stem.
Use a simple stem stitch for the stalk and straight stitches for the leaves, allowing the textured buds to be the main focus of these delicate lavender stitch ideas.
16. Achieve Geometric Precision with Straight Stitches

For a perfect geometric sunburst, precision is everything. Lightly draw your radiating lines with a water-soluble marker and a ruler before you begin.
Anchor your thread in the center and use single, long straight stitches for each ray, pulling the thread taut for a clean line.
This design relies on the tension and accuracy of your stitches to create its striking, architectural effect.
A wood-grain or dark-stained hoop can complement the natural, earthy tones of the thread.
17. Differentiate Form and Detail with Line Weight

Create a clear visual hierarchy in your design by using different thread weights.
Use three strands of floss for the main outlines of the mushroom caps and stems, making them feel solid and present.
Then, switch to a single strand of the same color for the delicate gills underneath the caps.
This technical choice draws the viewer’s eye to the overall form first, then invites them in to appreciate the finer details, adding professional polish to a simple sketch.
18. Combine Bold Fill and Fine Lines for a Striking Bee
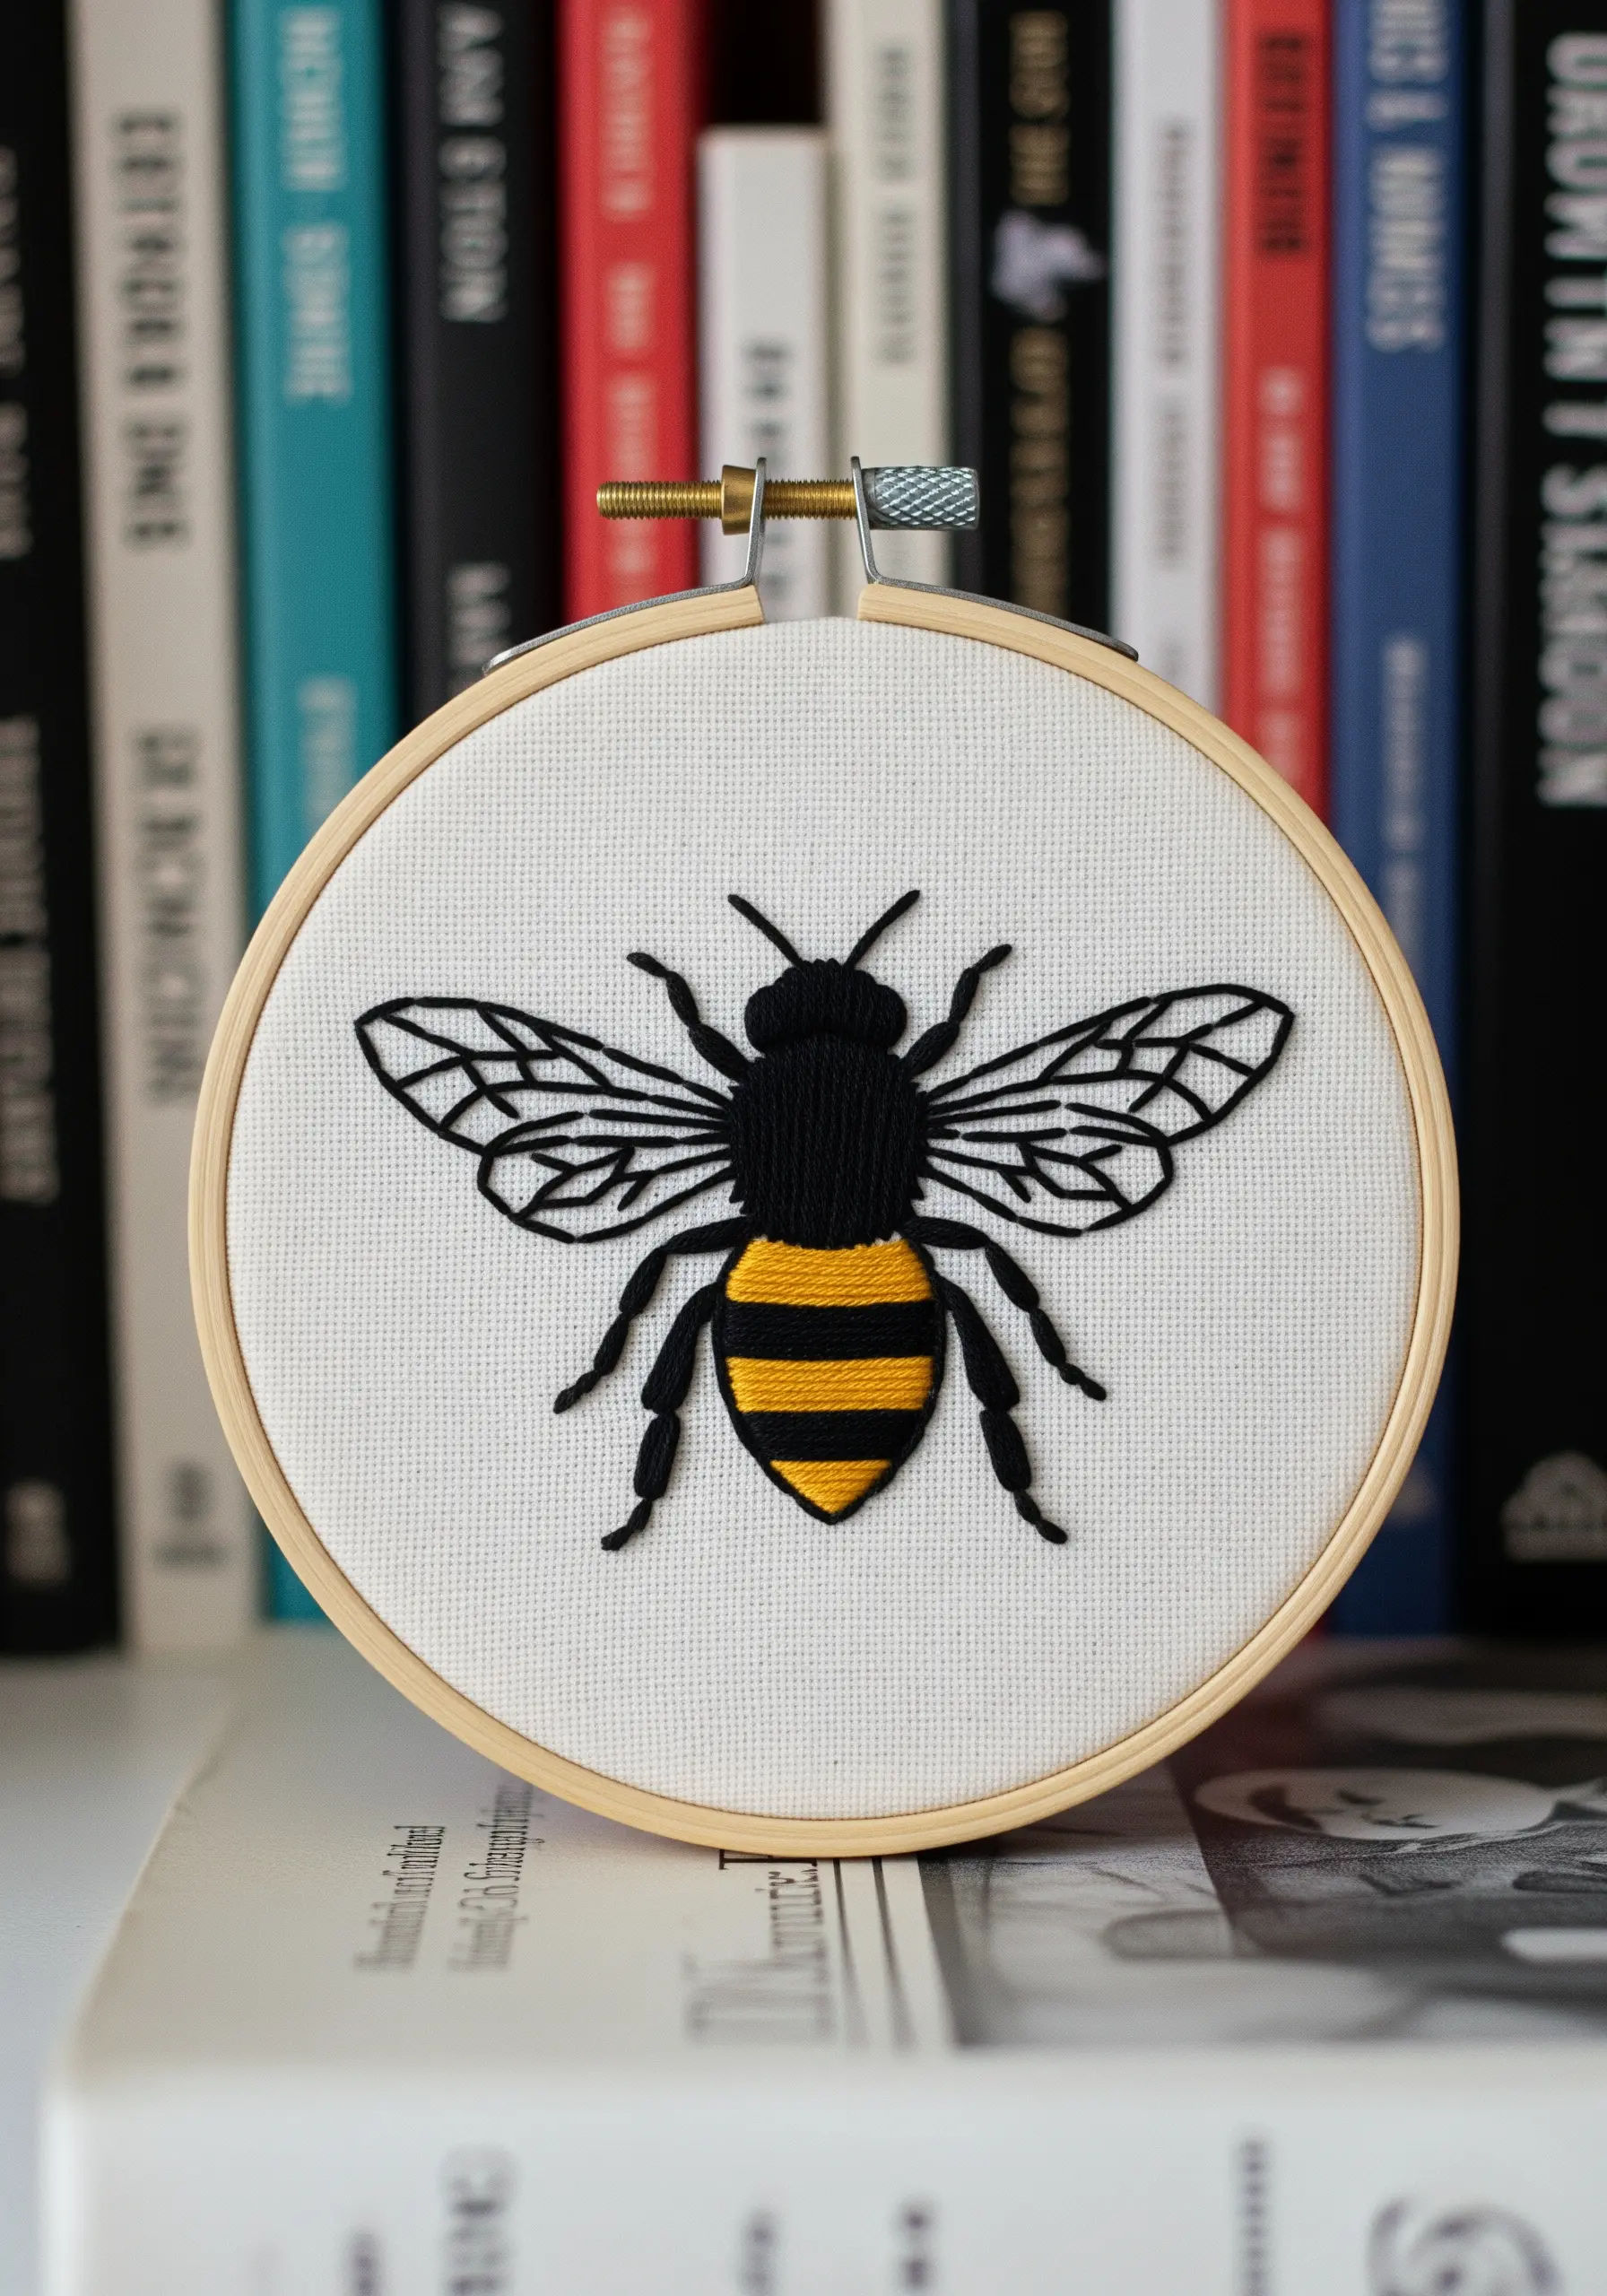
Create a powerful contrast by pairing solid satin stitch with delicate linework.
Fill the bee’s body with dense, smooth satin stitches in black and yellow, ensuring your stitches lie flat and even.
For the intricate wings, switch to a single strand of black floss and use a fine backstitch or split stitch.
This juxtaposition of solid form and transparent detail makes the bee feel both substantial and delicate, creating a visually dynamic and realistic effect.
19. Master the Fluidity of Continuous Line Art

The beauty of single-line art lies in its unbroken flow. To replicate this, use a stem stitch or a split stitch, which creates a smoother line than a backstitch.
Work slowly, ensuring your stitch length is consistent, especially around tight curves like the nose and lips.
Avoid pulling your thread too tightly, as this can cause the fabric to pucker and distort the delicate portrait.
These single line face profiles transform a simple thread into an expressive piece of art.
20. Create Harmony with an Earth-Tone Palette
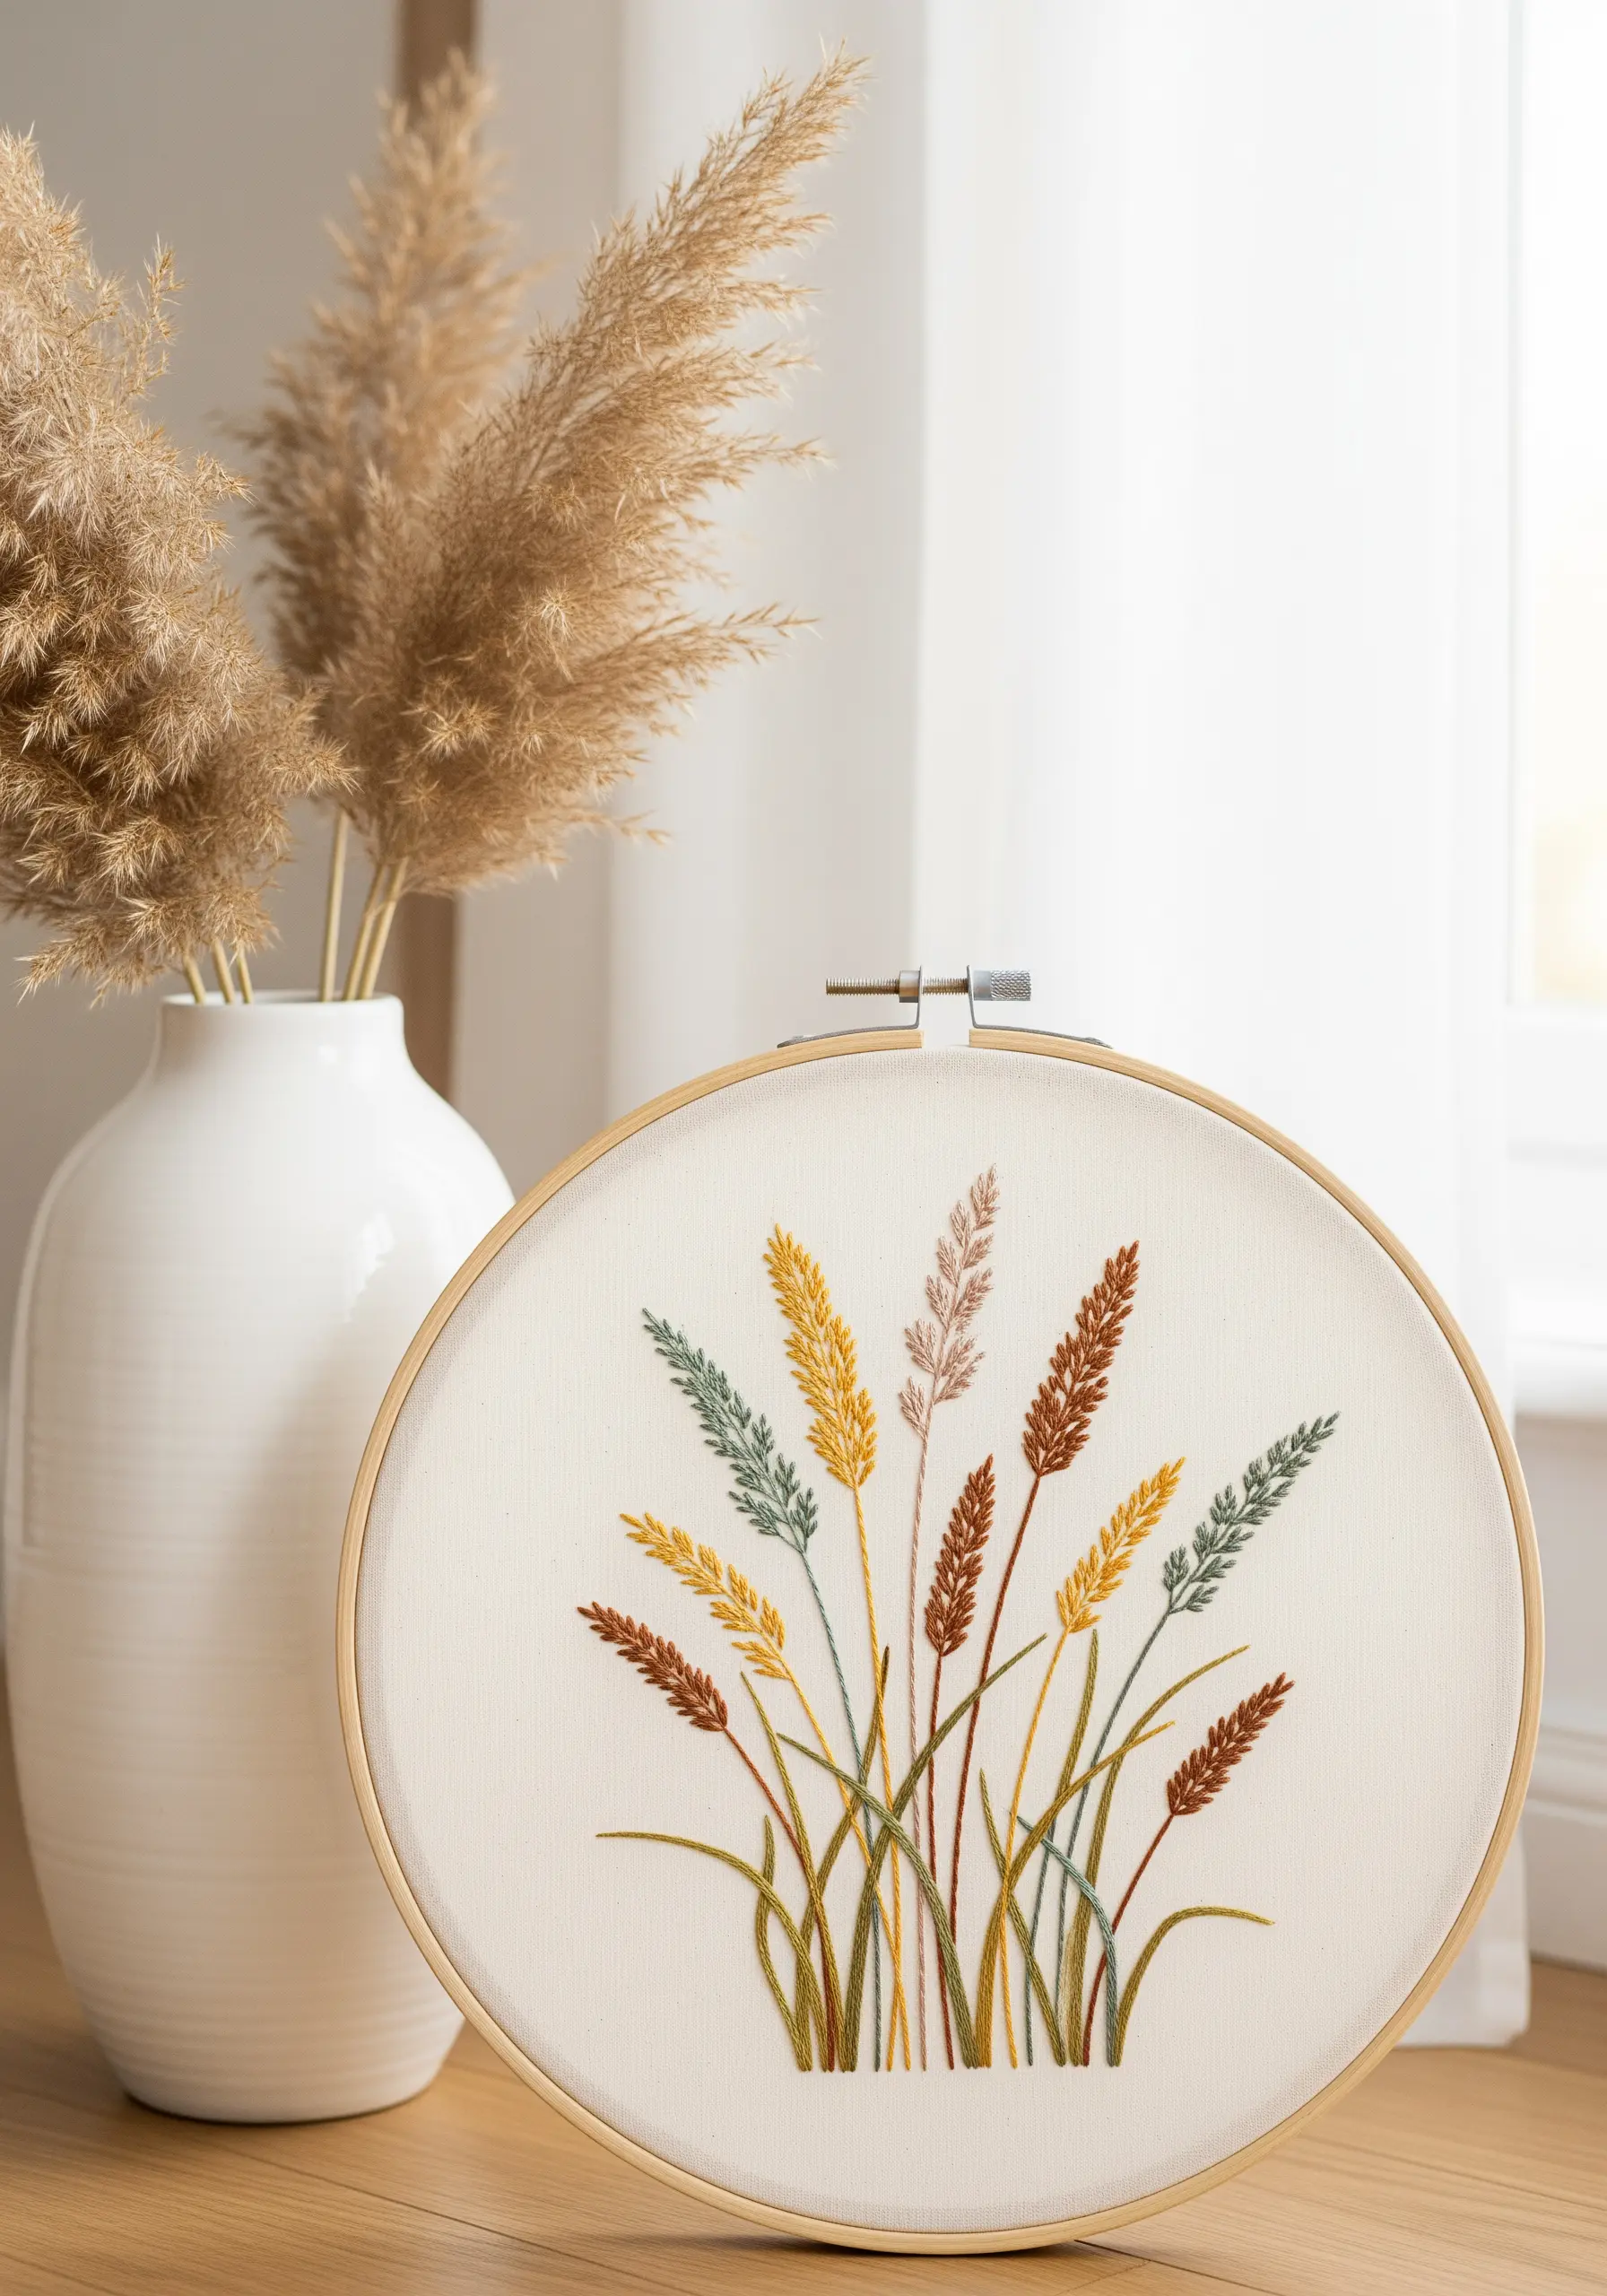
Elevate a simple botanical design by choosing a sophisticated, muted color palette inspired by nature.
Select four to five harmonious, earthy tones—like ochre, rust, sage, and dusty rose—instead of bright, primary colors.
Use a fishbone stitch for the wheat heads to create a subtle, herringbone-like texture.
This thoughtful color selection gives the piece a calm, organic feel that integrates beautifully into modern home decor, turning simple stitches into earth-inspired embroidery designs.
21. Vary Thread Thickness for a Realistic Tree Structure
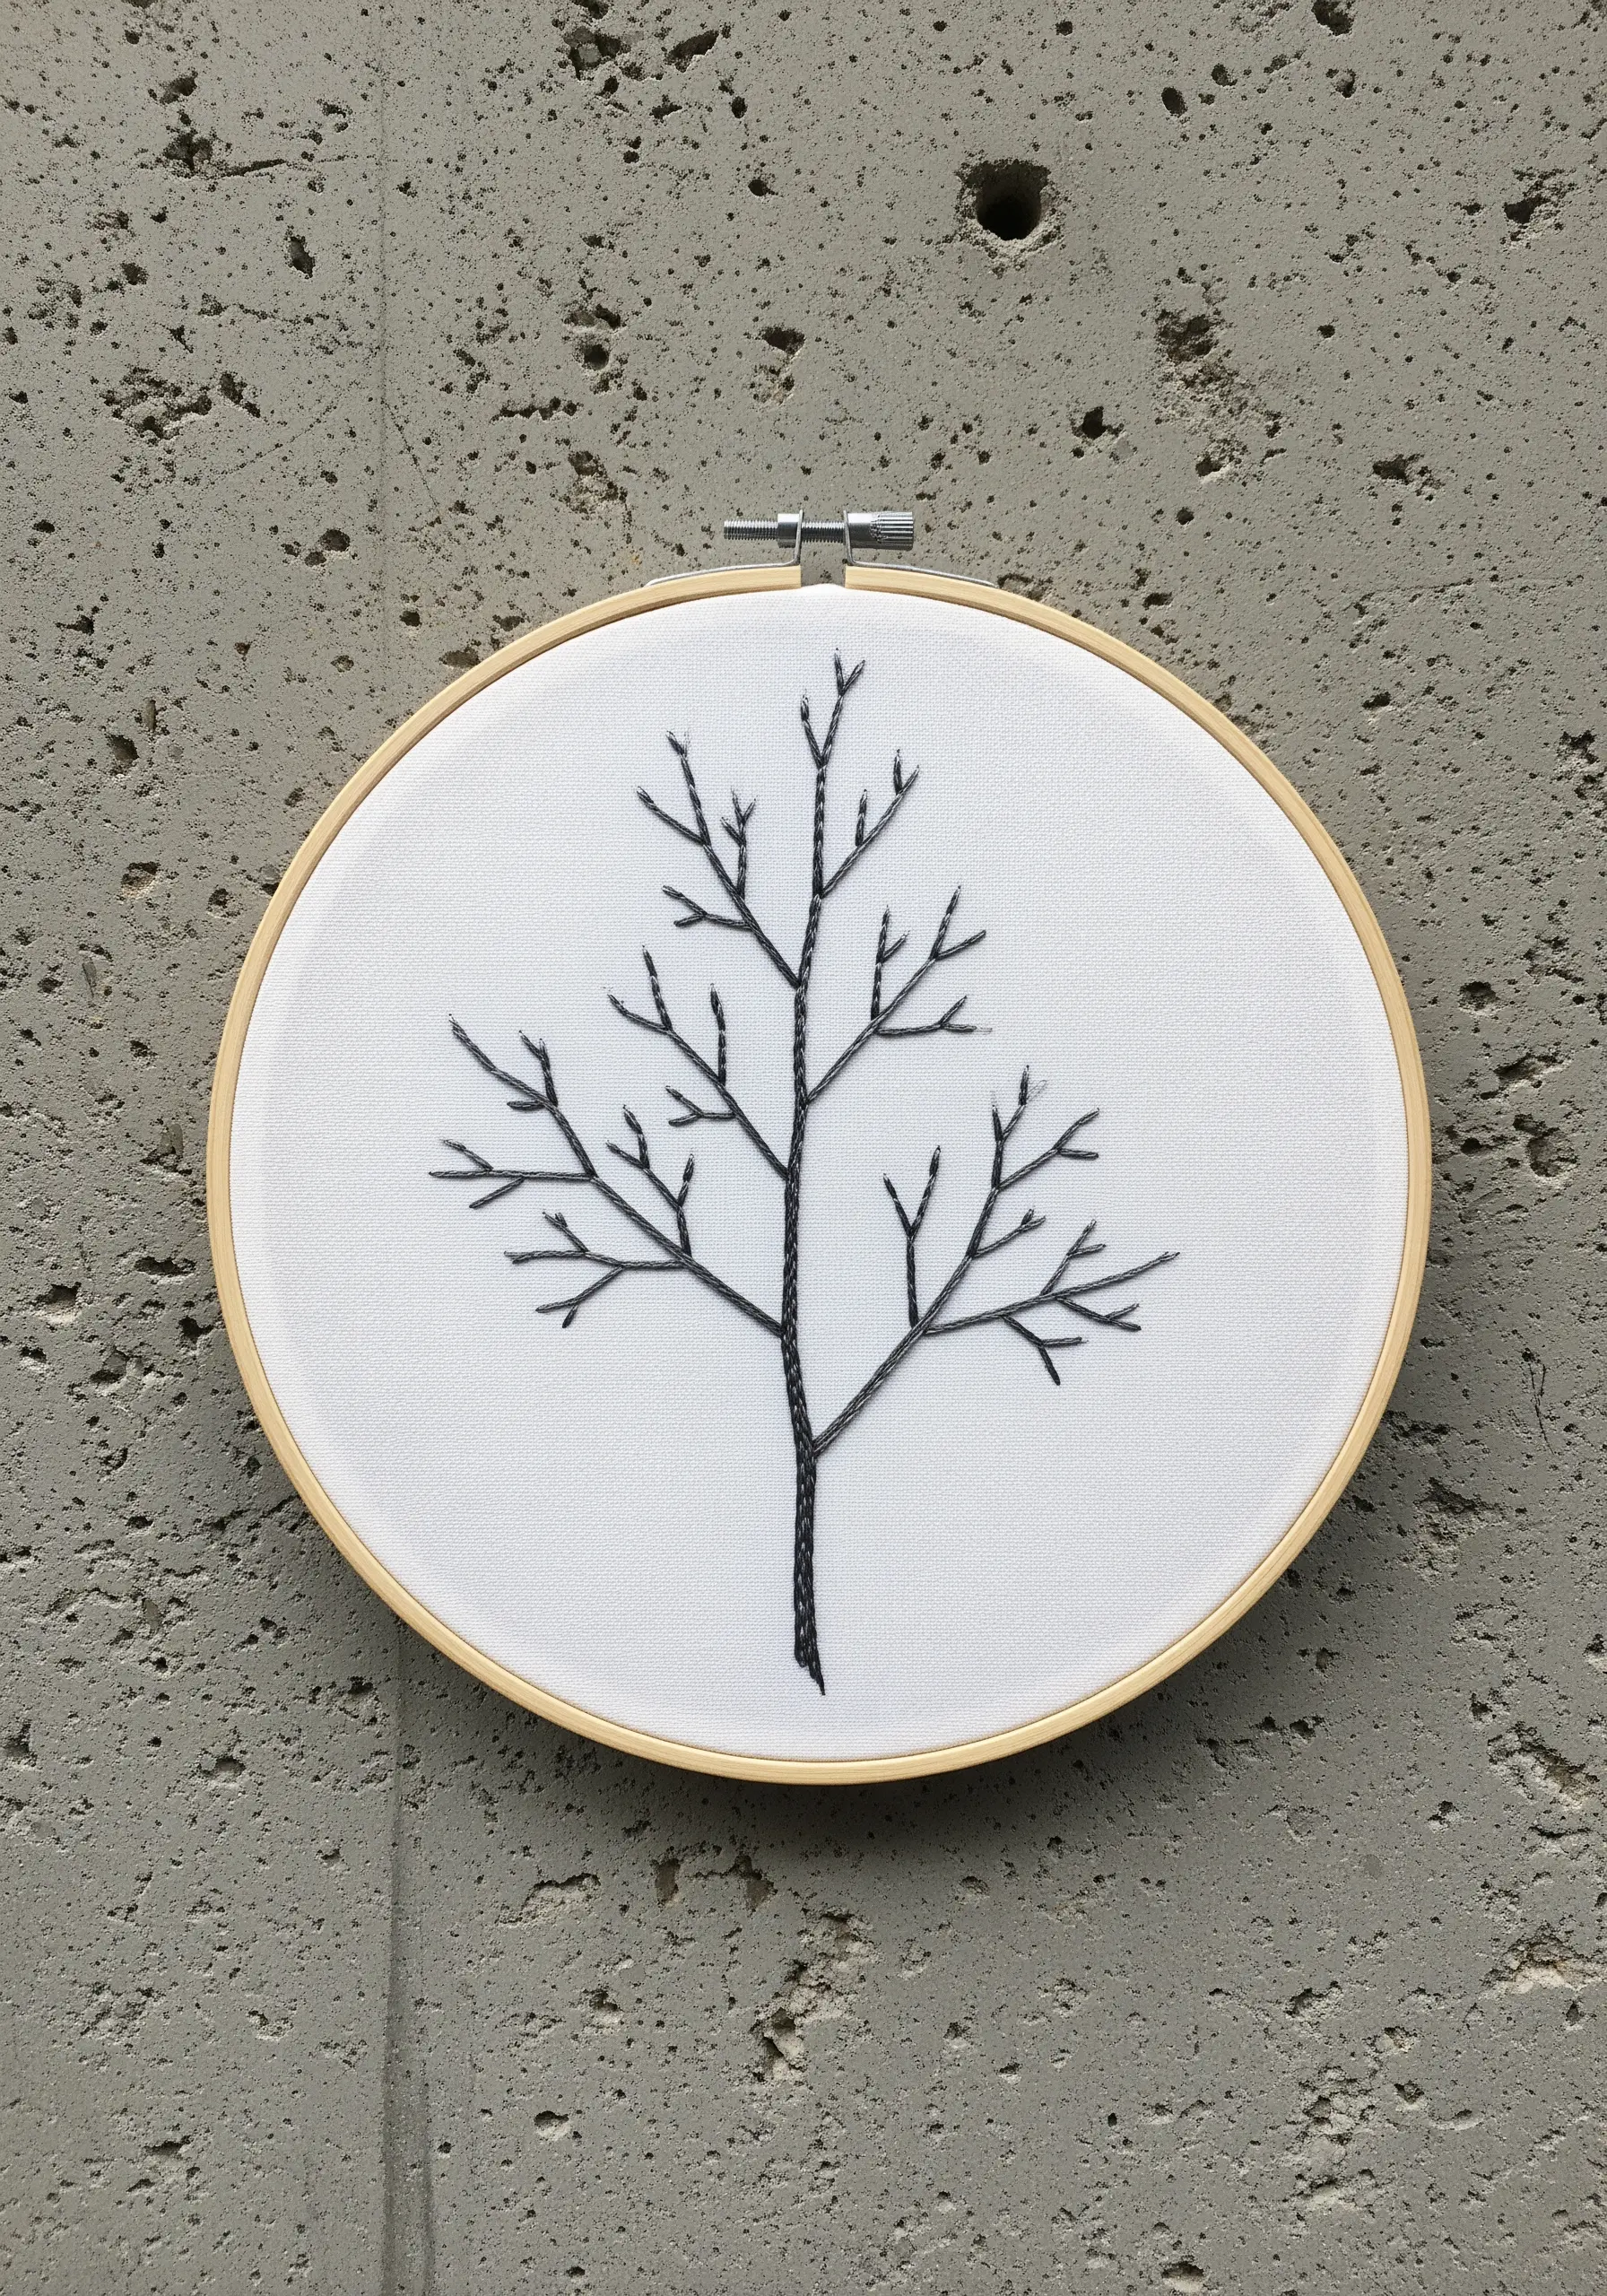
To give your tree a natural sense of scale, build the trunk with a thicker stitch or more strands of floss.
Use a whipped backstitch with four strands for the trunk to create a solid, rounded base.
As you move to the main branches, reduce to a two-strand backstitch.
For the finest twigs at the very tips, switch to a single strand. This gradual tapering of line weight mimics how trees grow and adds incredible realism to a minimalist design.
22. Express Energy with Dynamic Splash and Line Stitches
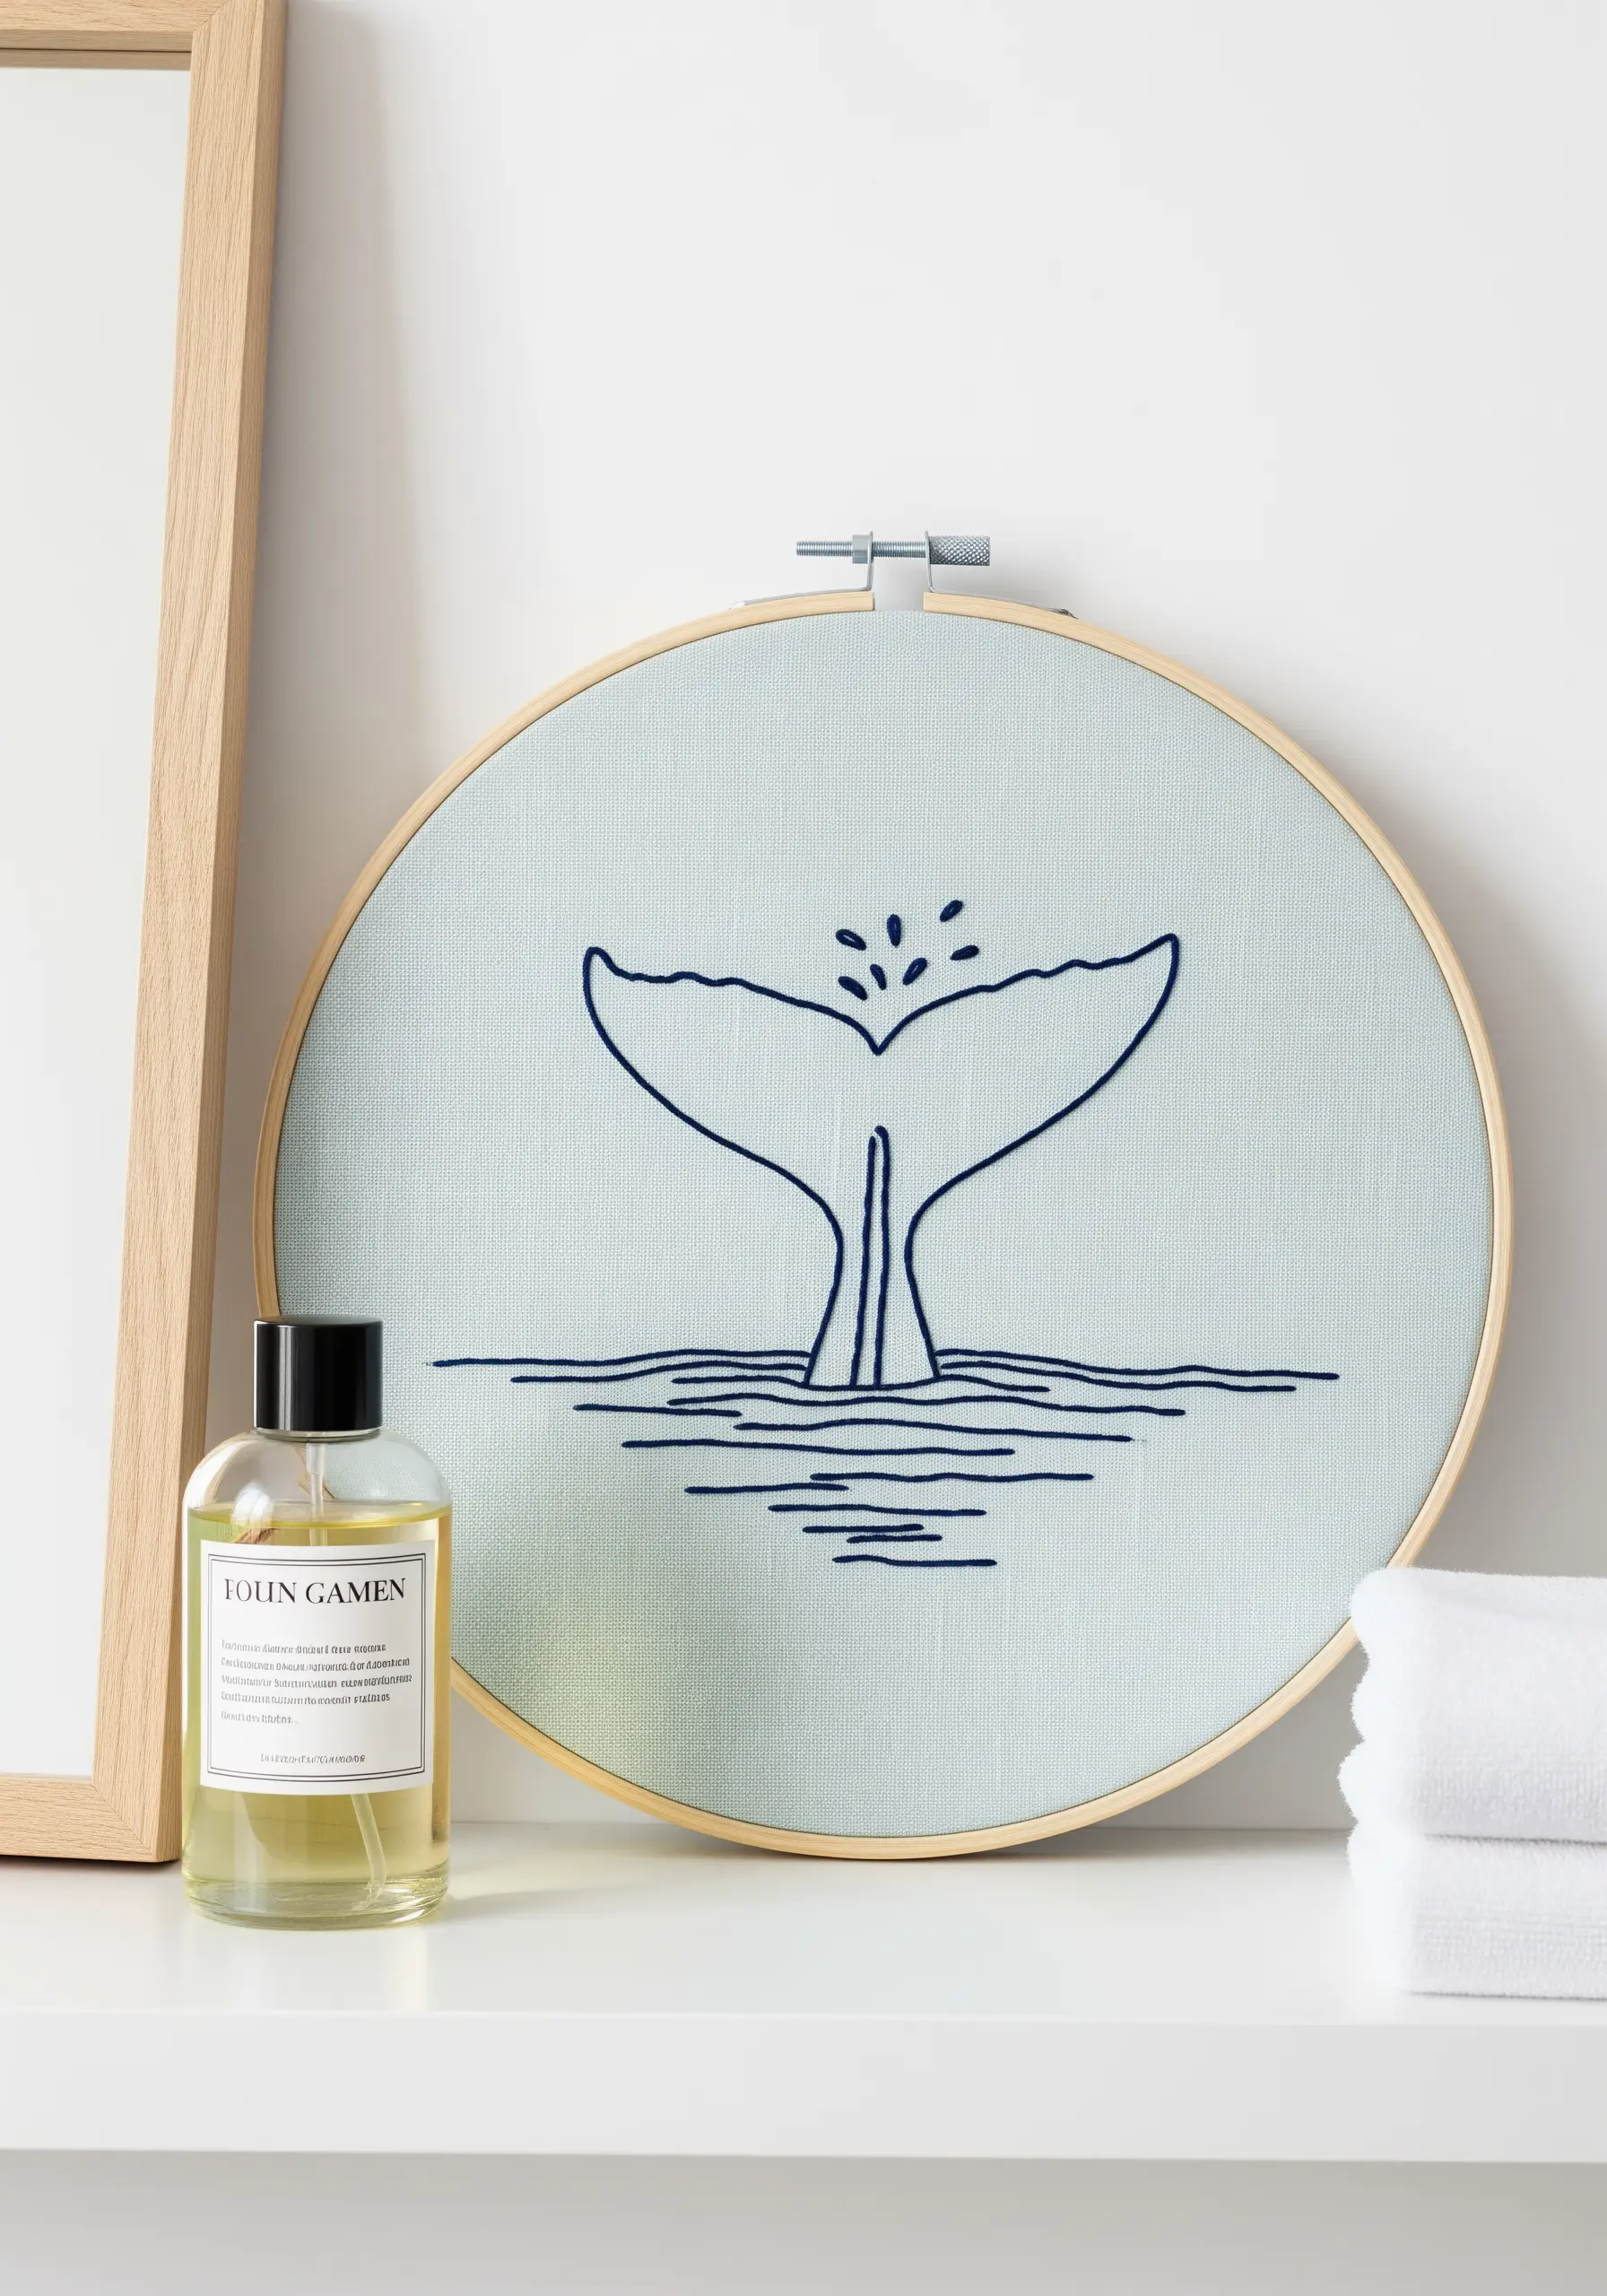
To capture the moment a whale tail splashes, use different stitches for the water and the animal.
Outline the tail with a smooth, solid split stitch to give it form and weight.
For the water, use a combination of simple straight stitches for the spray and slightly curved backstitches for the ripples.
This textural contrast makes the tail feel solid and the water feel light and energetic, creating a lively, dynamic scene.
23. Build Tactile Landscapes with Raised Stitches
To create the raised effect of topographic map lines, use a thicker thread like a cotton perle or even a fine yarn.
Alternatively, use all six strands of embroidery floss and a stem stitch. The twisting action of the stem stitch creates a rope-like, raised line that is perfect for this application.
Stitching on a neutral, textured fabric like linen enhances the organic, earthy feel of the design, inviting touch and adding dimension to your wall art. It’s one of the best ways to capture nature’s textures.
24. Achieve Fine Detail with a Single, Precise Thread
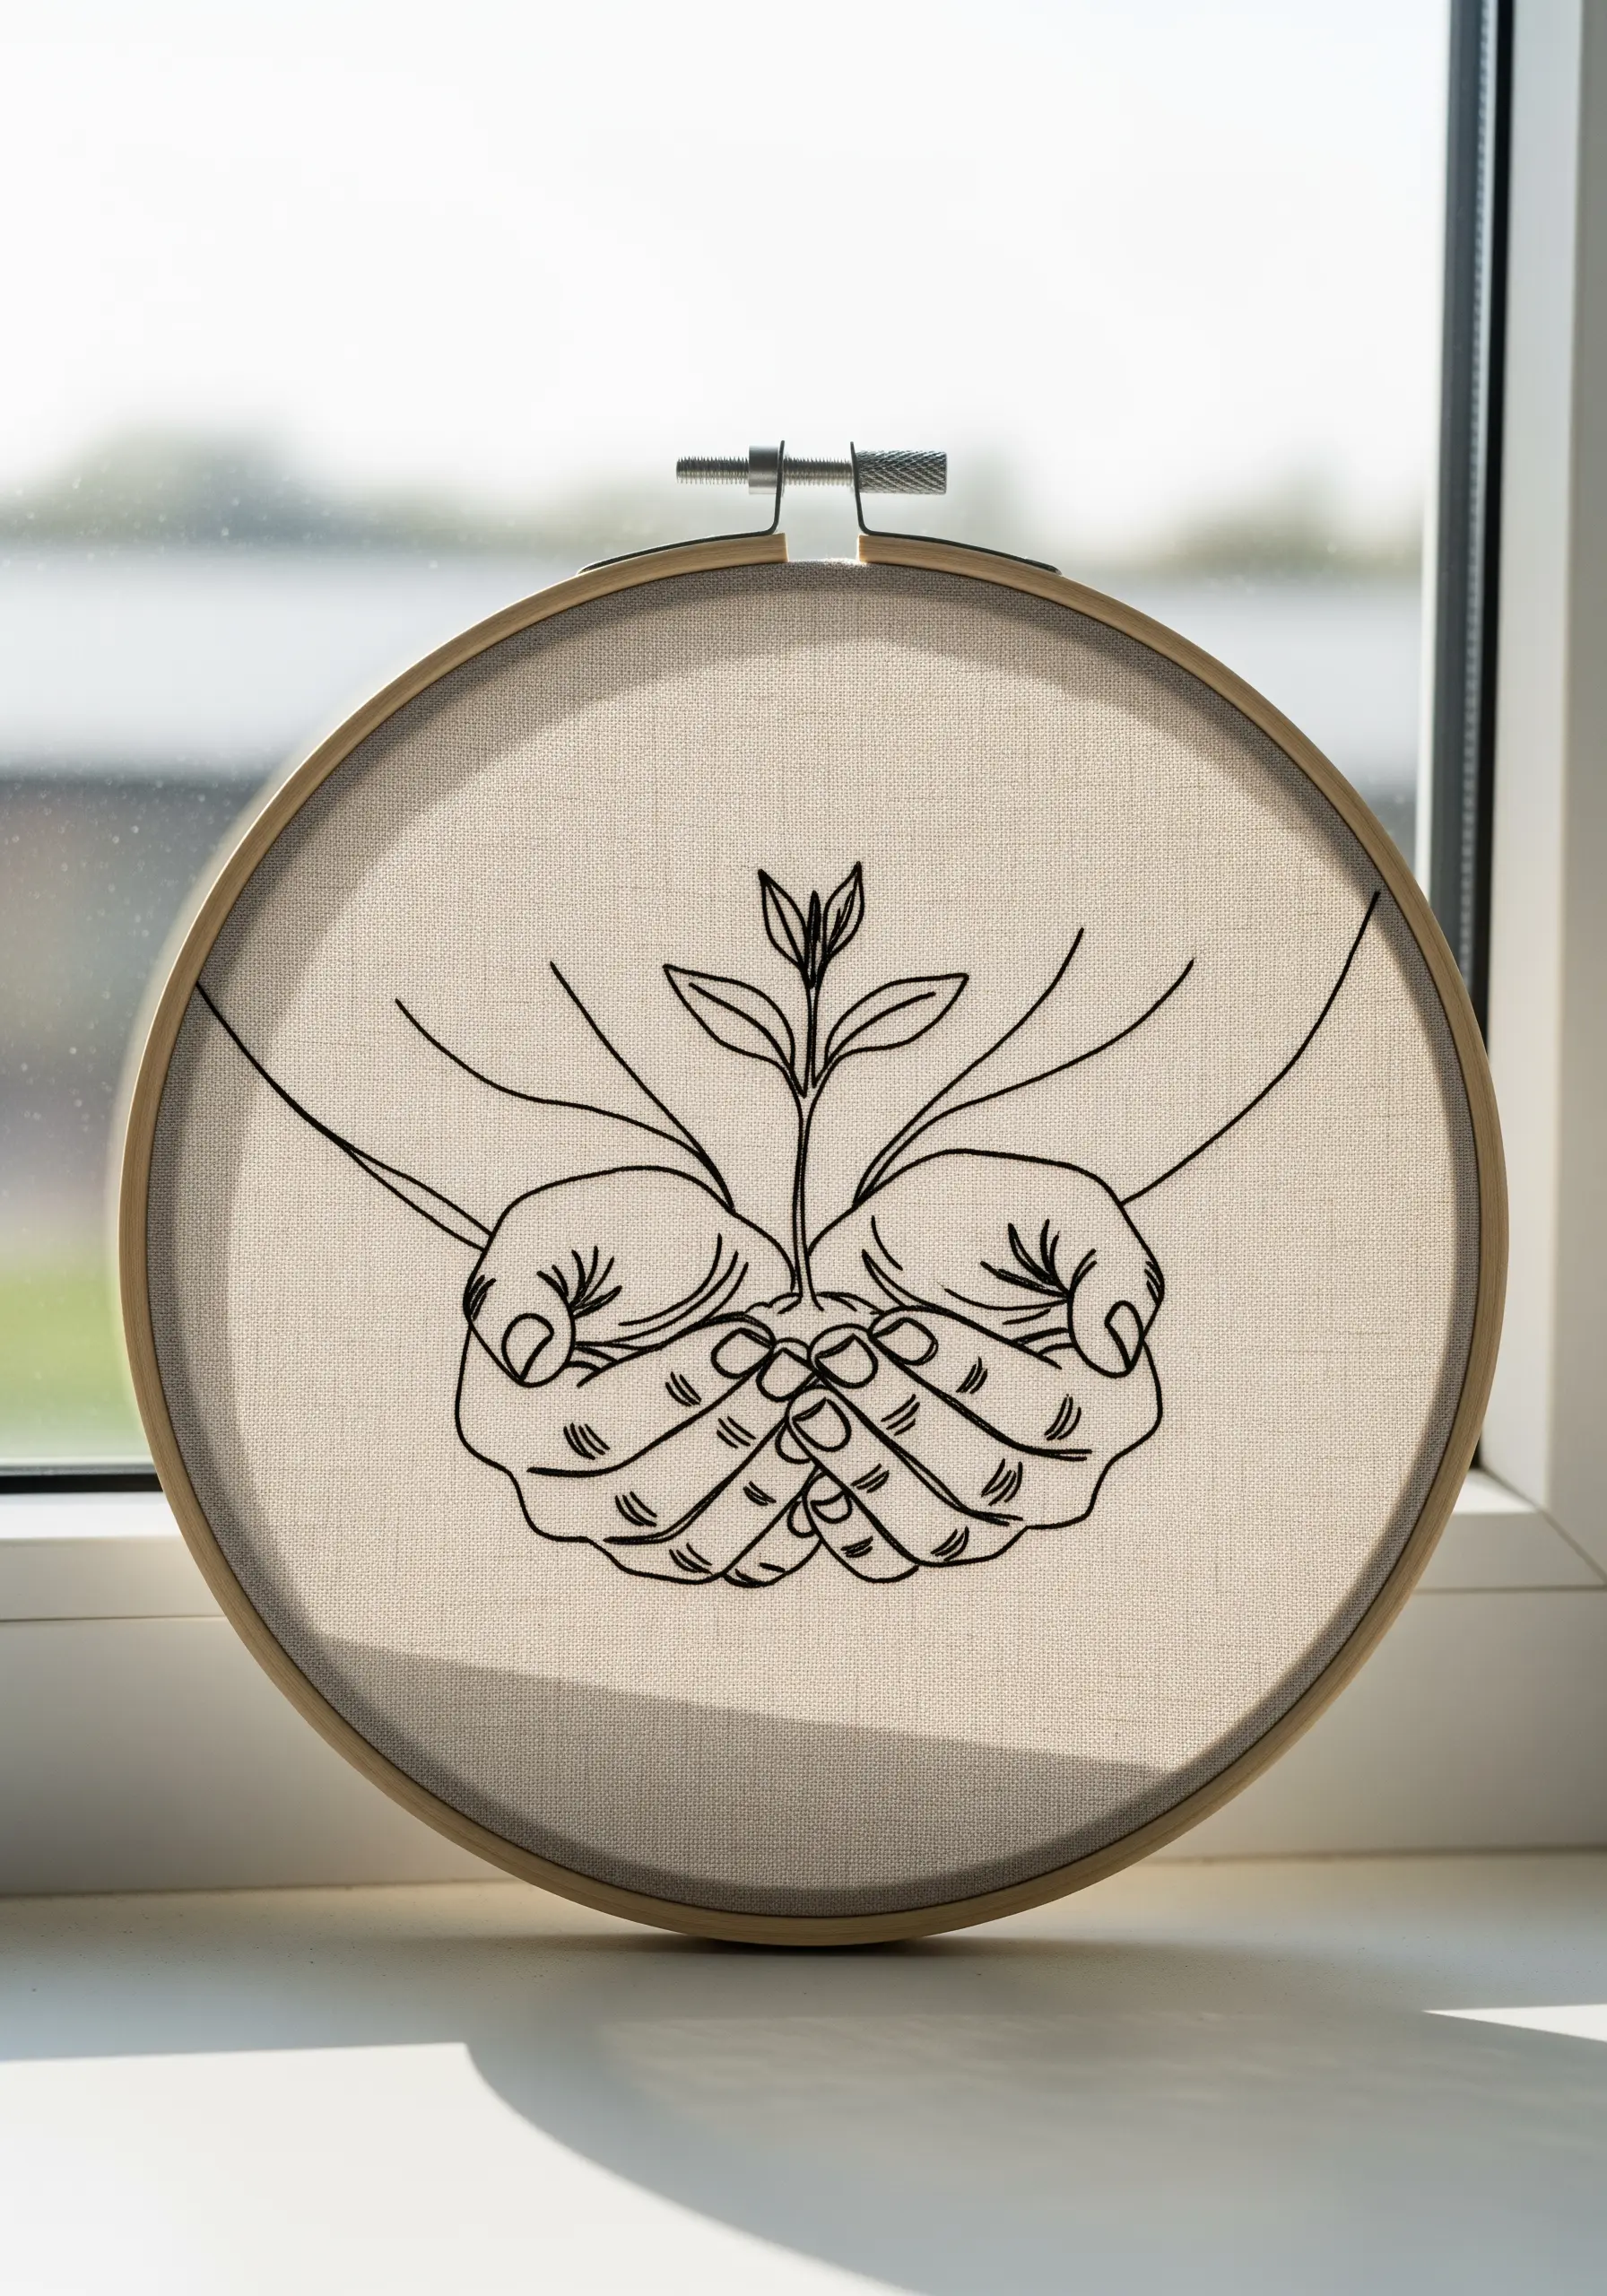
For designs with intricate details like hands, the key to clarity is simplicity. Use a single strand of black floss and a sharp, fine needle (like a size 10).
A simple backstitch is all you need, but focus on keeping your stitch length very small and consistent, especially around the curves of the fingers and knuckles.
This precision ensures that the lines remain clean and legible, capturing the delicate gesture without becoming muddy or cluttered.
25. Paint with Thread for a Soft, Realistic Feather
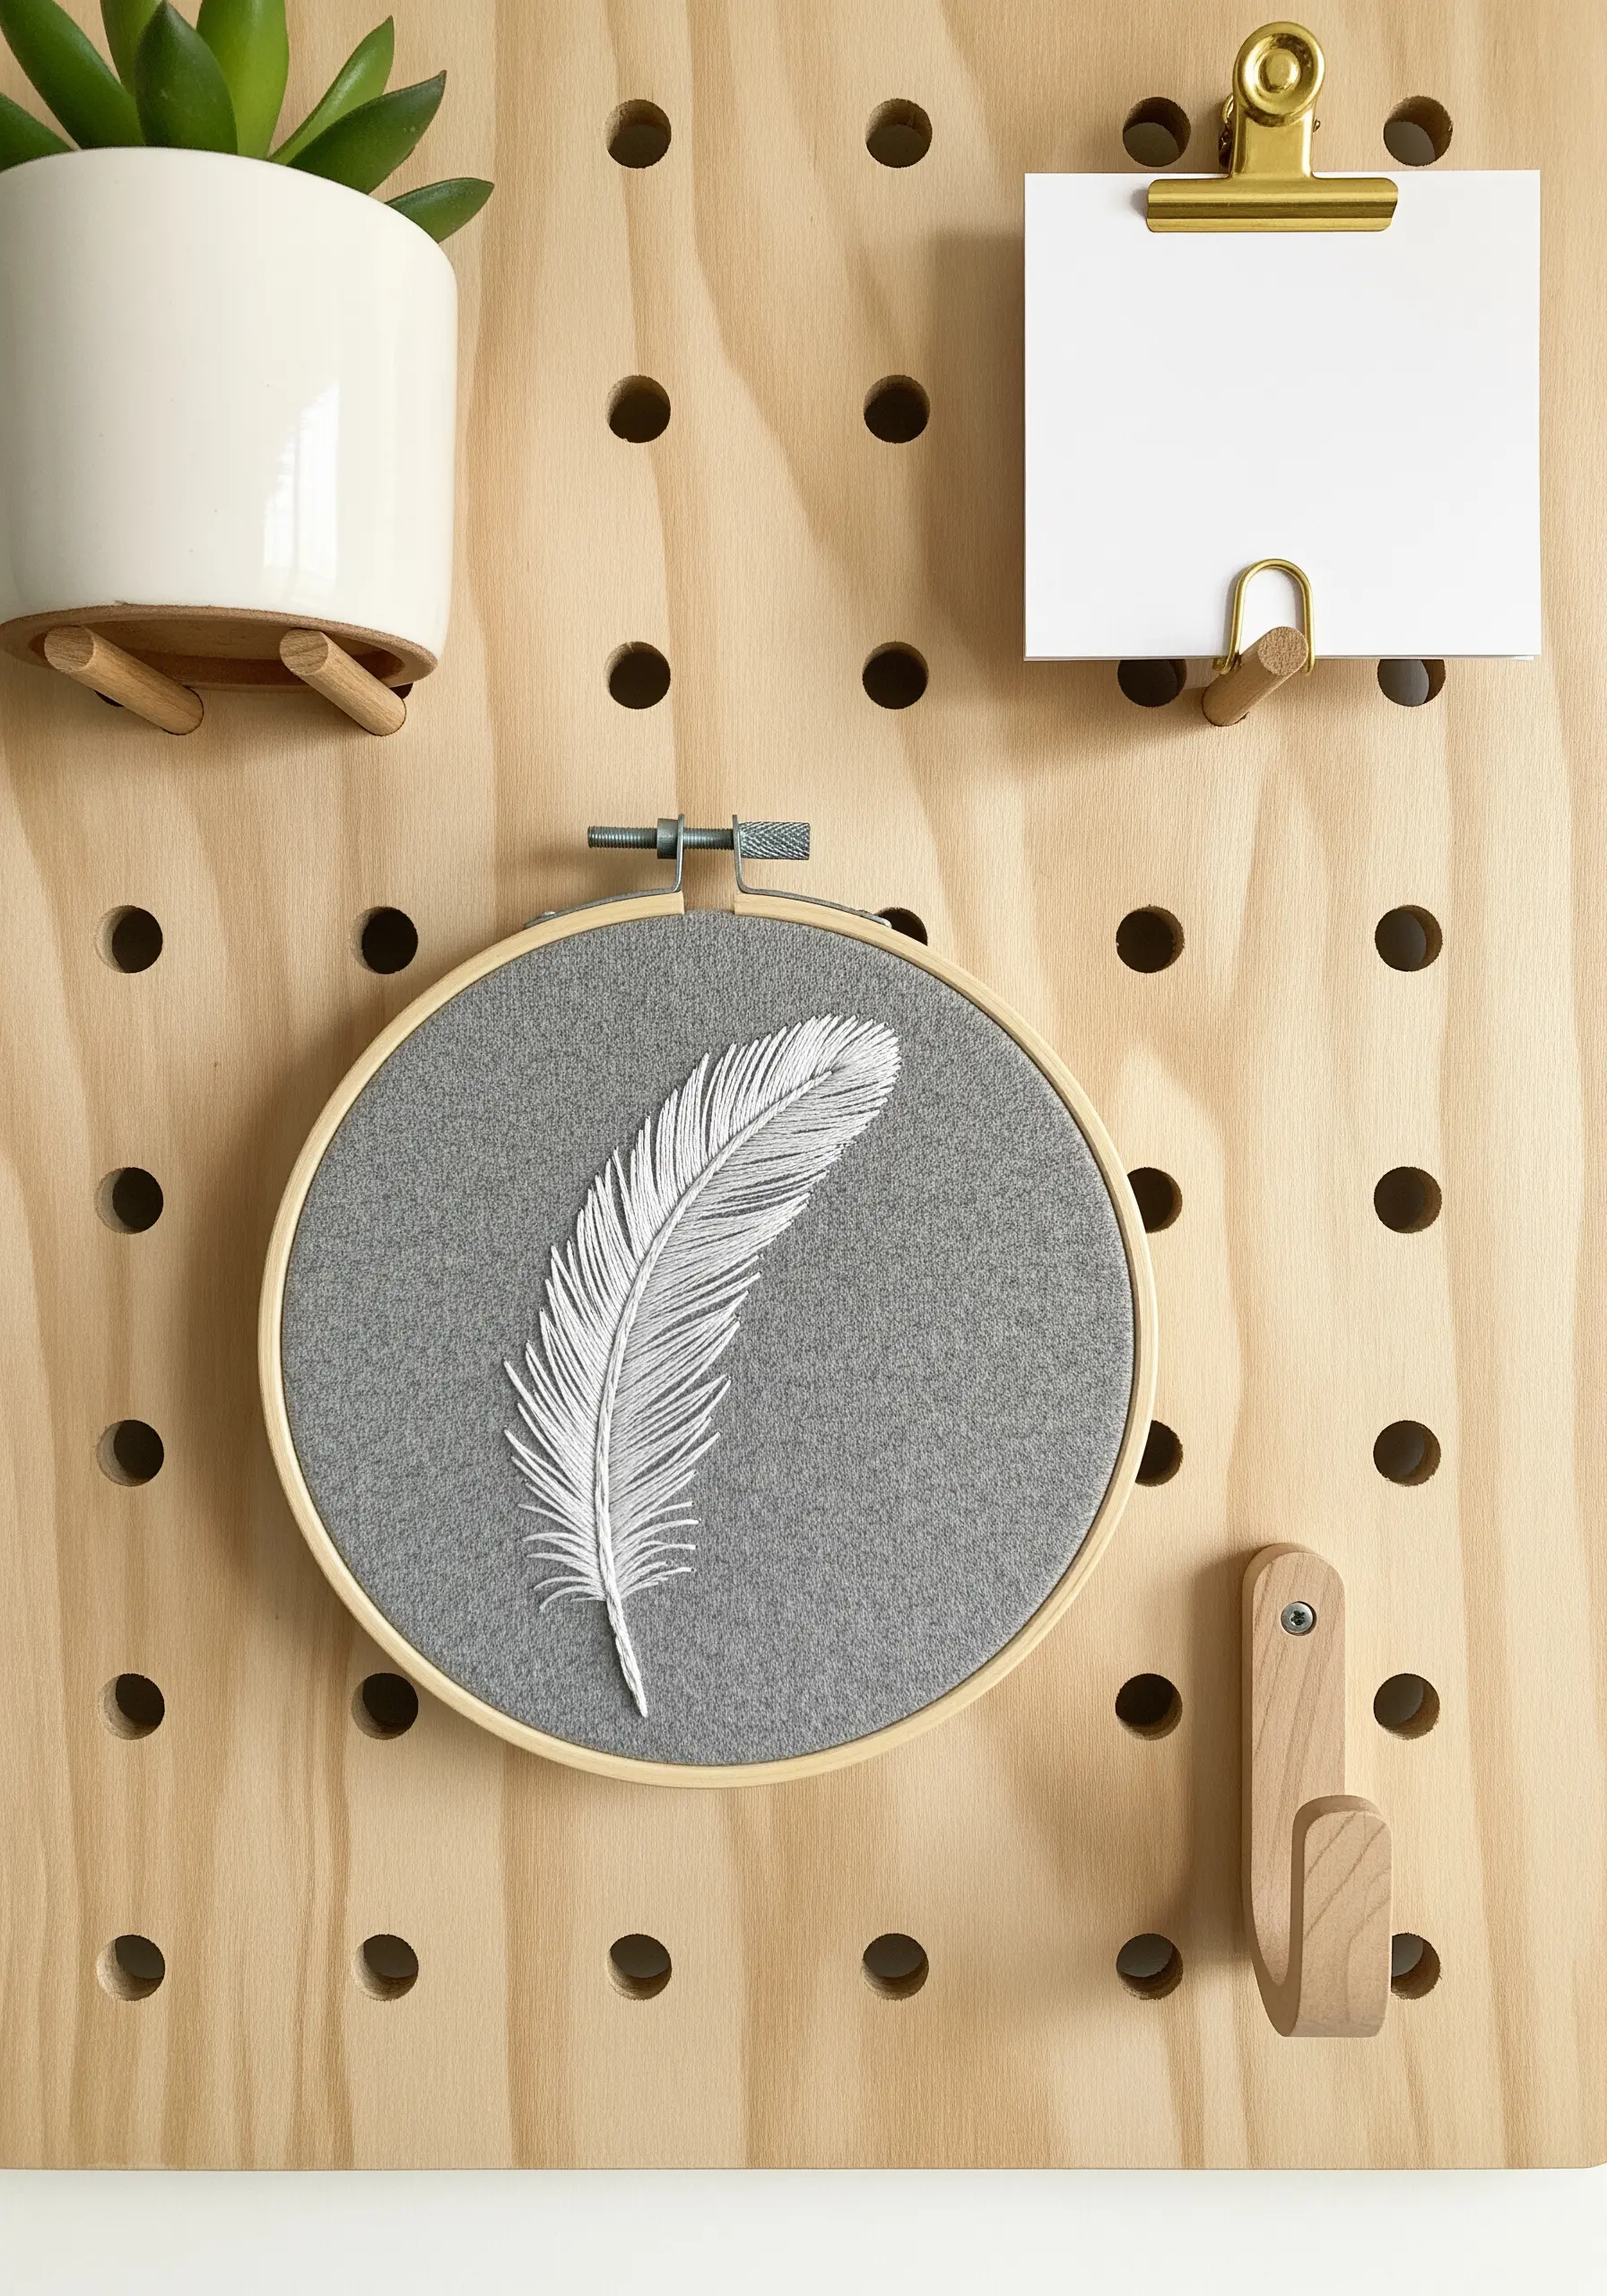
Create the soft, delicate look of a feather using the long and short stitch technique, even with just one color.
Use a single strand of white floss on a contrasting grey fabric. Start at the tip and work downwards, angling your stitches to follow the natural flow of the barbs away from the central shaft.
By slightly varying the length and overlapping your stitches, you create a seamless, blended texture that looks less like stitching and more like a soft, realistic illustration.
26. Craft Delicate Cherry Blossoms with Simple Stitches

You don’t need complex stitches for beautiful florals. Create each cherry blossom petal with a single detached chain stitch (also known as a lazy daisy).
Arrange five of these stitches in a circle to form the flower, leaving a small space in the center for a tiny black French knot.
Use a contrasting dark brown or black for the branches, stitched in a slightly thicker backstitch, to make the delicate pink blossoms pop.
27. Create a Narrative with Minimalist Silhouettes
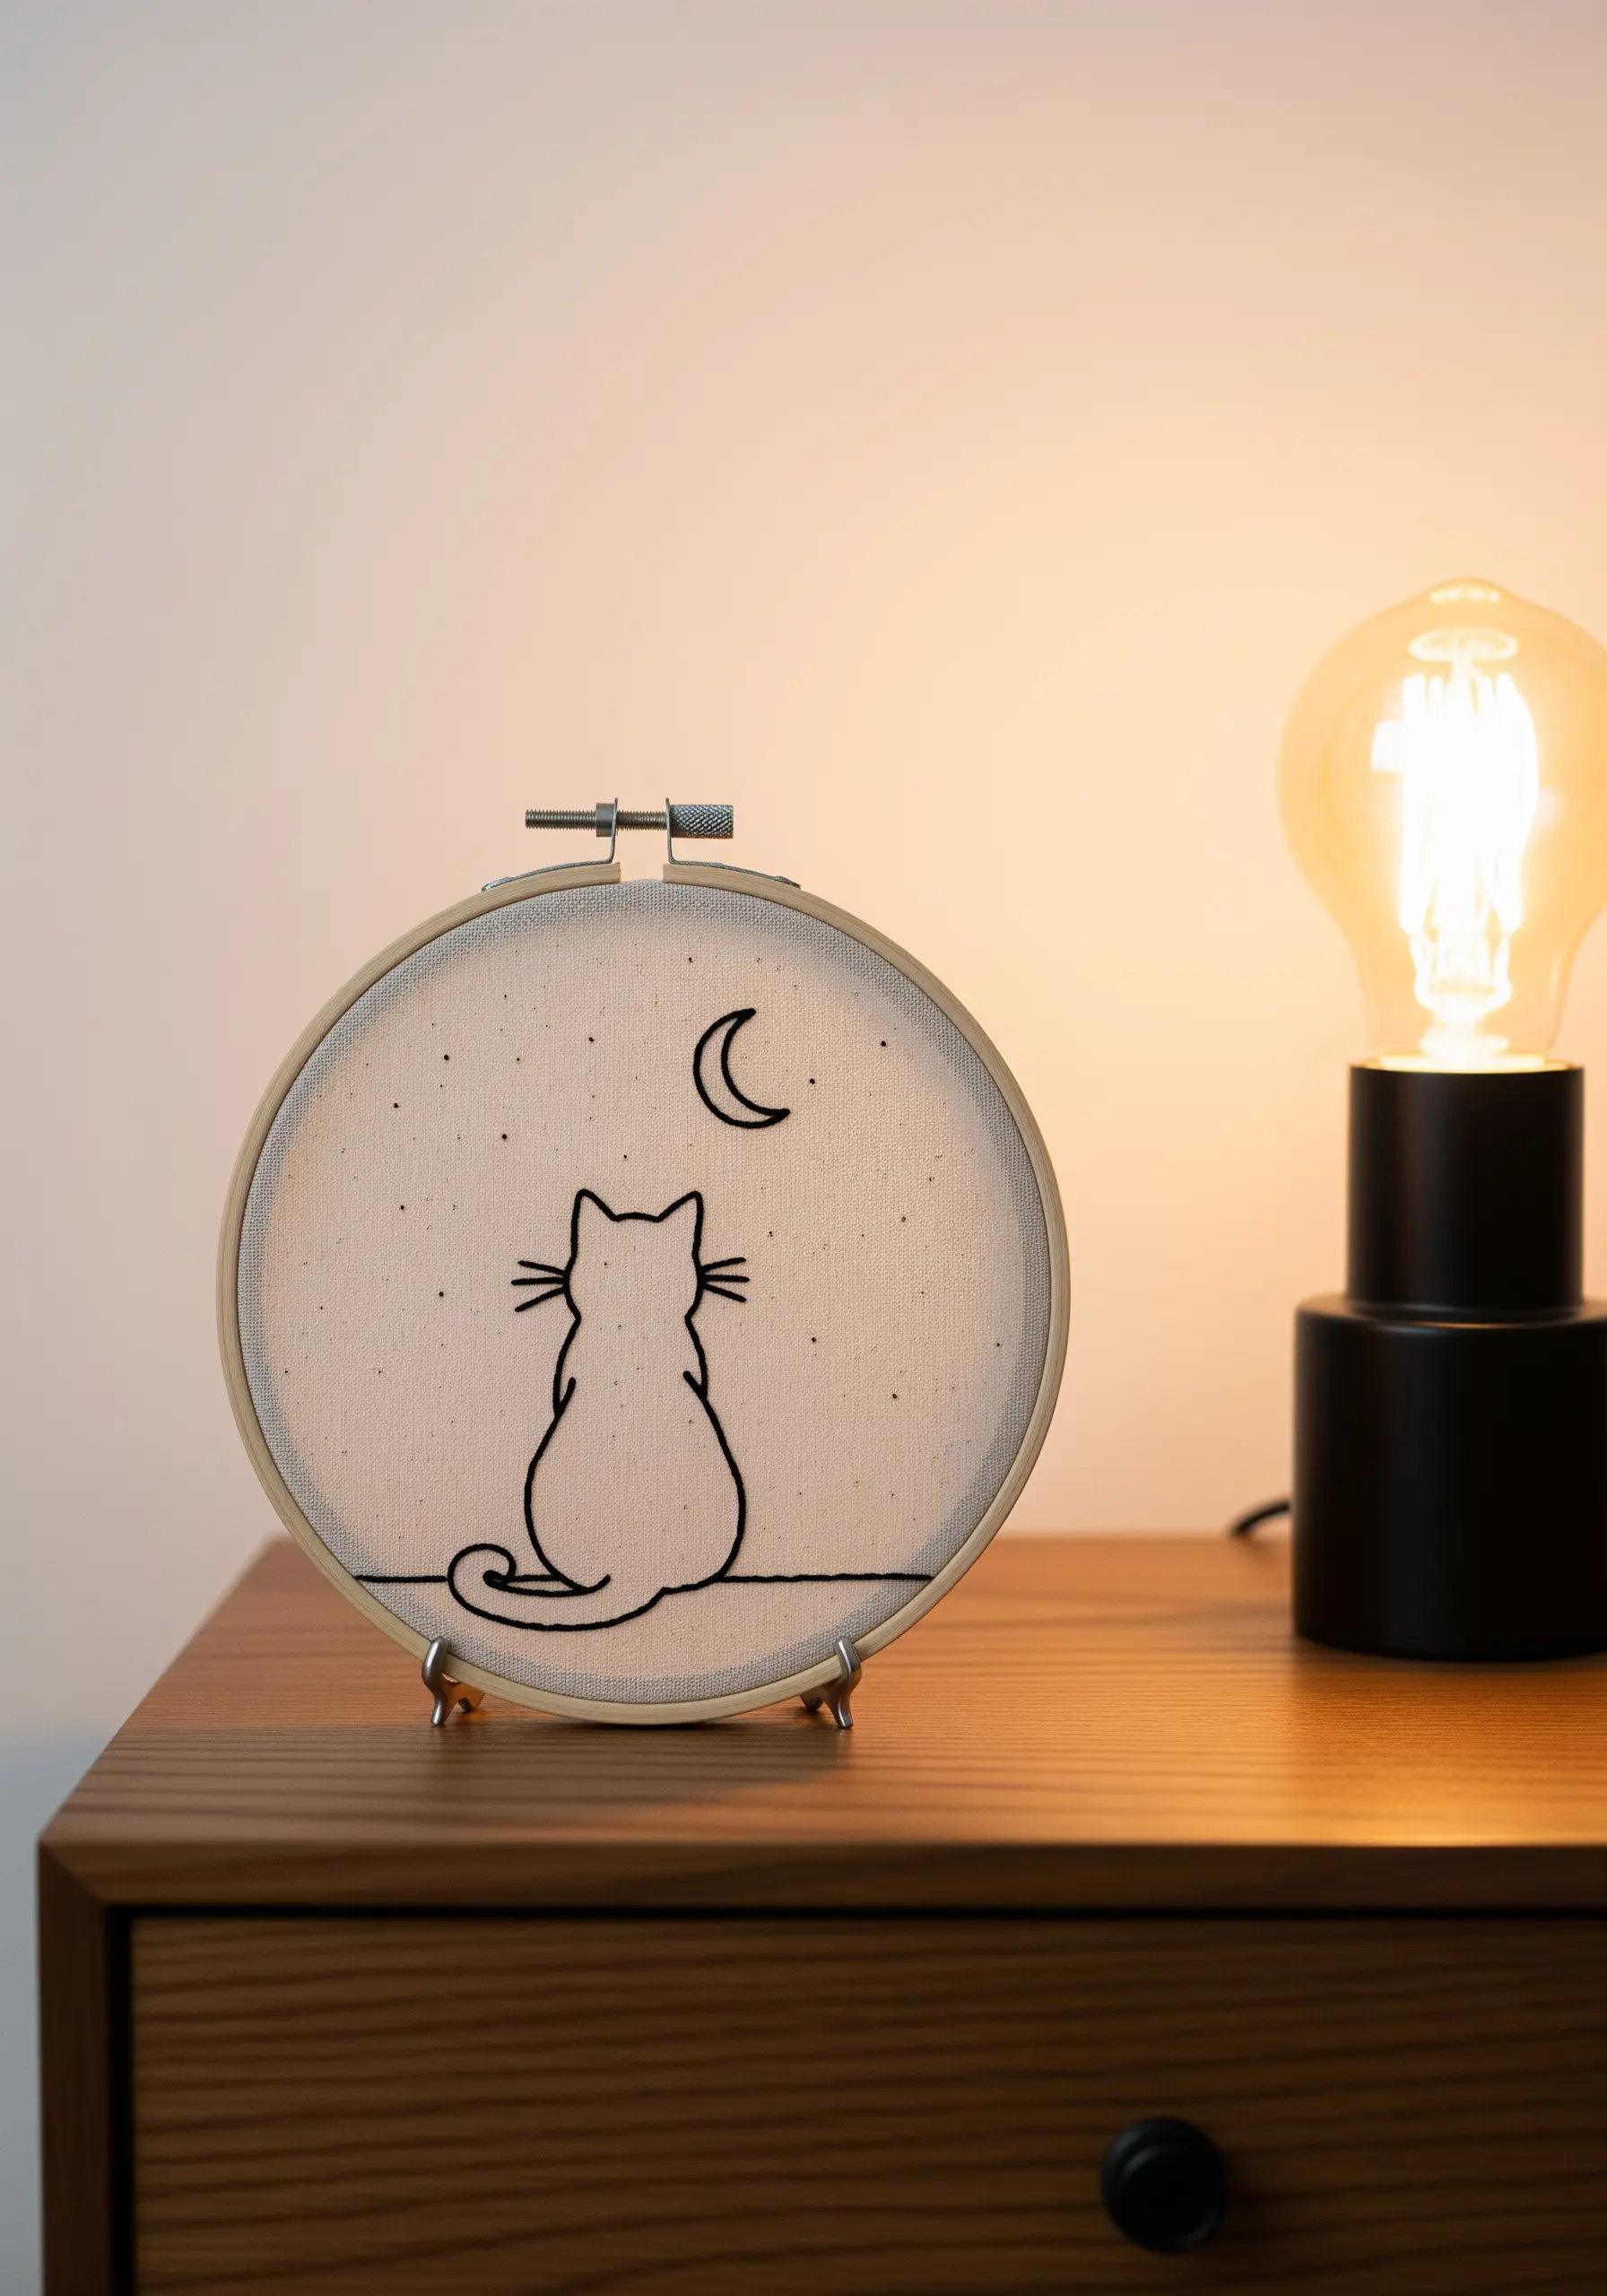
Tell a quiet story with a simple outline. Use a clean, two-strand backstitch to create the cat’s silhouette, focusing on the expressive curve of its back.
A few scattered French knots for stars and a tiny crescent moon complete the scene without adding unnecessary clutter.
The power of this design comes from its simplicity and the negative space around it, allowing the viewer’s imagination to fill in the peaceful, nighttime atmosphere. These minimal pet-themed line-art stitches are full of emotion.
28. Juxtapose Geometric Lines with Organic Forms
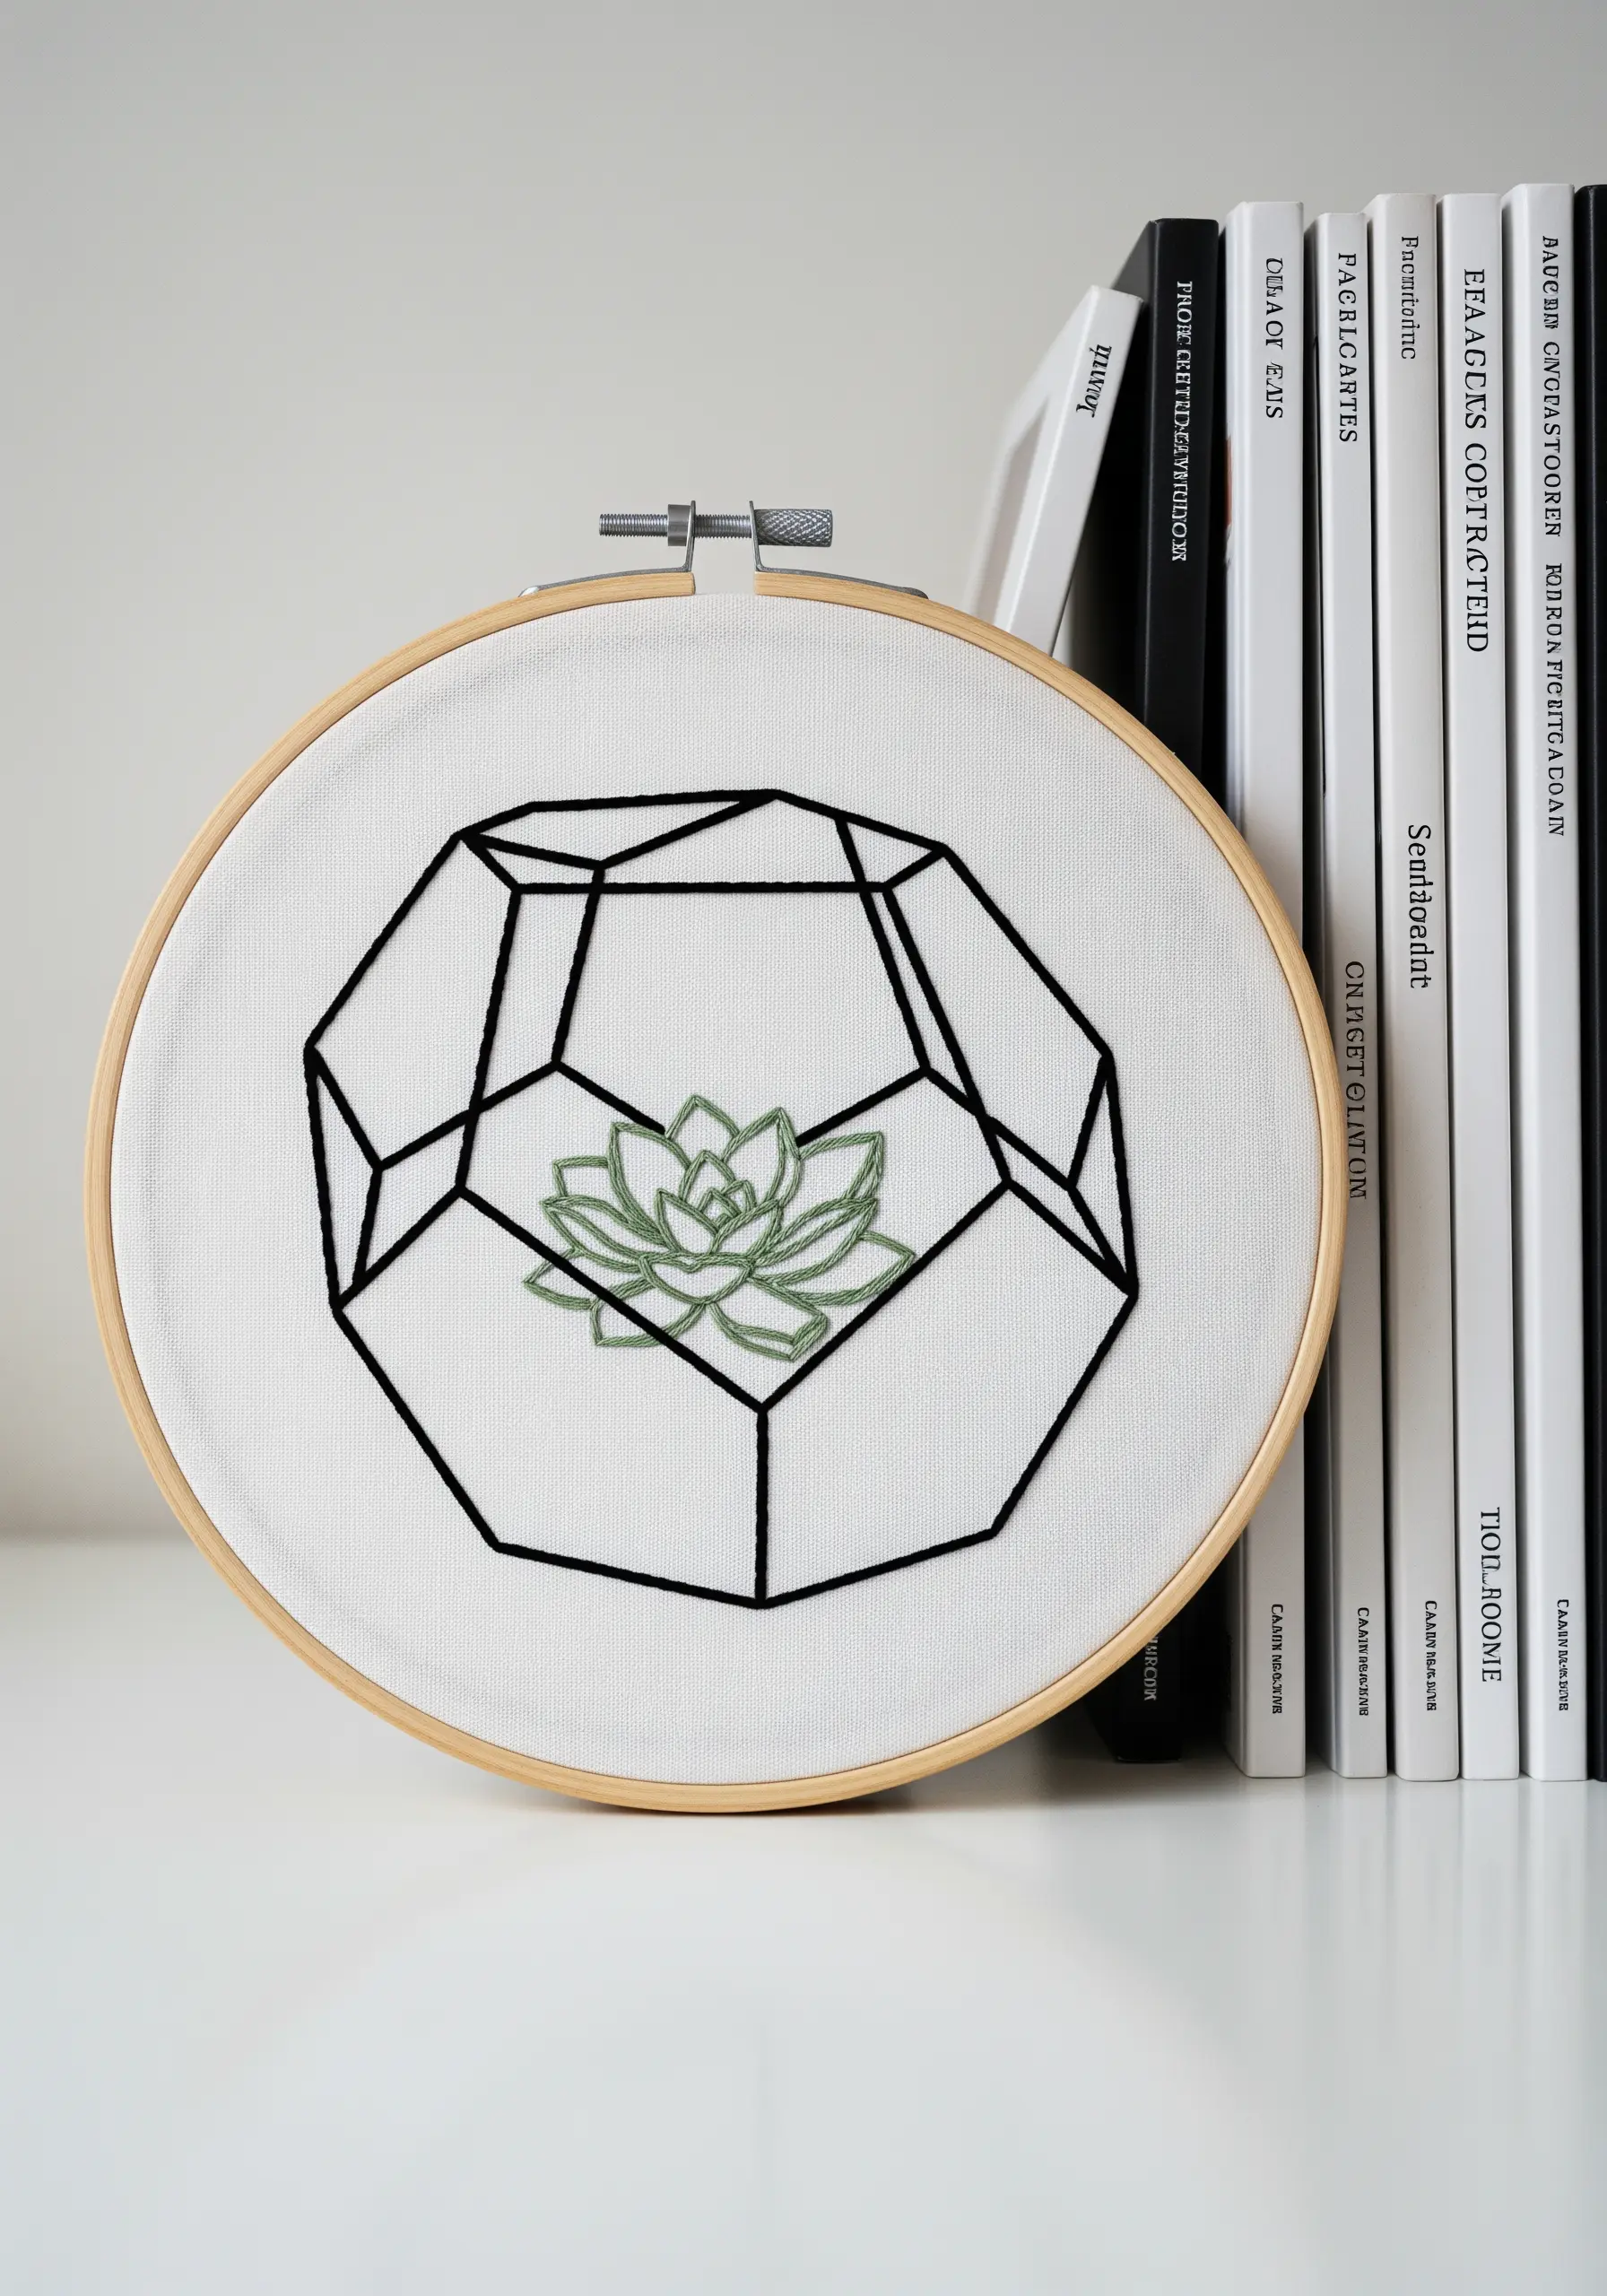
Create a striking visual contrast by pairing a rigid geometric structure with a soft, organic plant.
For the terrarium, use a black backstitch and ensure your lines are perfectly straight by lightly tracing them with a ruler and erasable pen first.
For the succulent inside, switch to a softer color like sage green and use a stem stitch or whipped backstitch to give its leaves a slightly more rounded, natural feel.
This interplay between sharp angles and gentle curves makes the design intellectually and visually engaging.
29. Elevate Line Art with a Raised Stem Stitch

Give your floral line art a three-dimensional quality by using a stem stitch for all the outlines.
The slightly twisted, cord-like texture of the stem stitch lifts the design off the fabric, creating subtle shadows and a tactile finish.
This is especially effective for elements like thorny stems and leaf veins, where the raised line adds a touch of realism and sophistication.
Using a rich, deep red color enhances this luxurious, sculpted effect.
30. Achieve Intricate Detail with Metallic Thread on Black

When executing a design with many fine, close-together lines, especially with metallic thread, a split stitch is your best friend.
It allows you to create sharp turns and precise details without the small gaps that can sometimes appear with a backstitch.
Stitching a gold or bronze metallic onto a deep black fabric creates a stunning, high-drama effect, where the thread catches the light and reveals the intricate details of the design.
This is perfect for abstract metallic thread projects that need to shine.
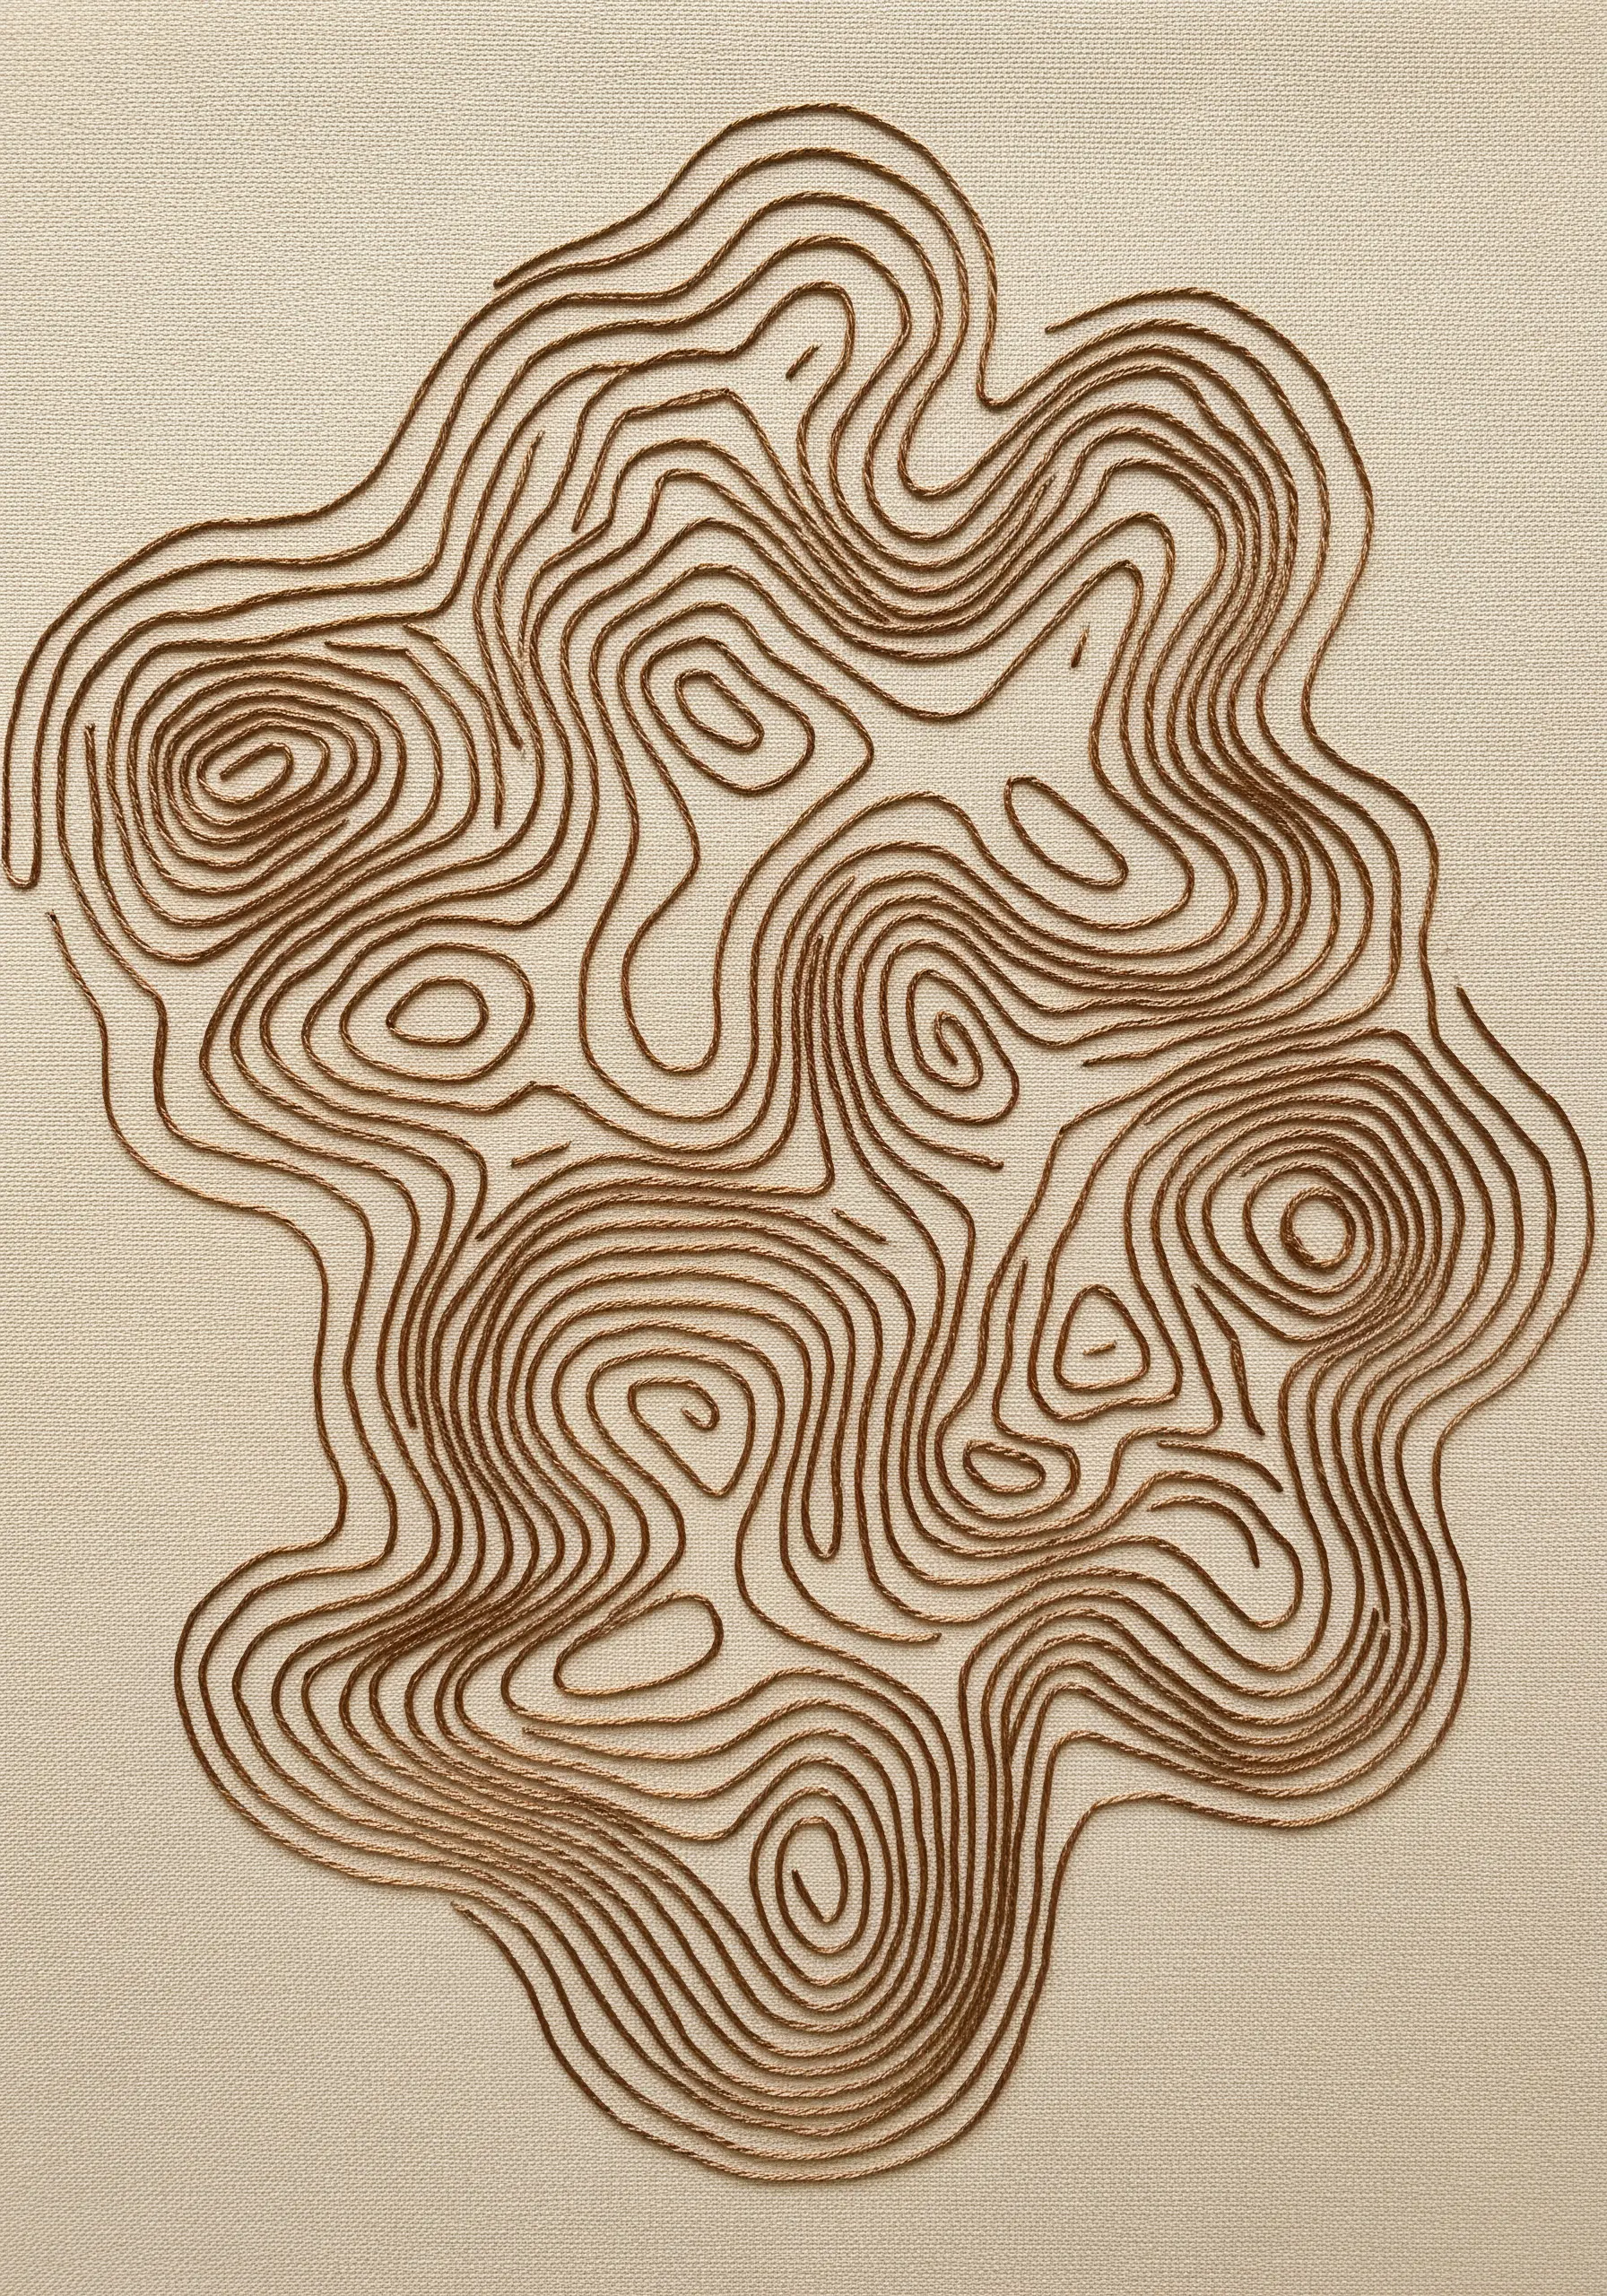
31. Mimic Natural Patterns with Couching Stitch
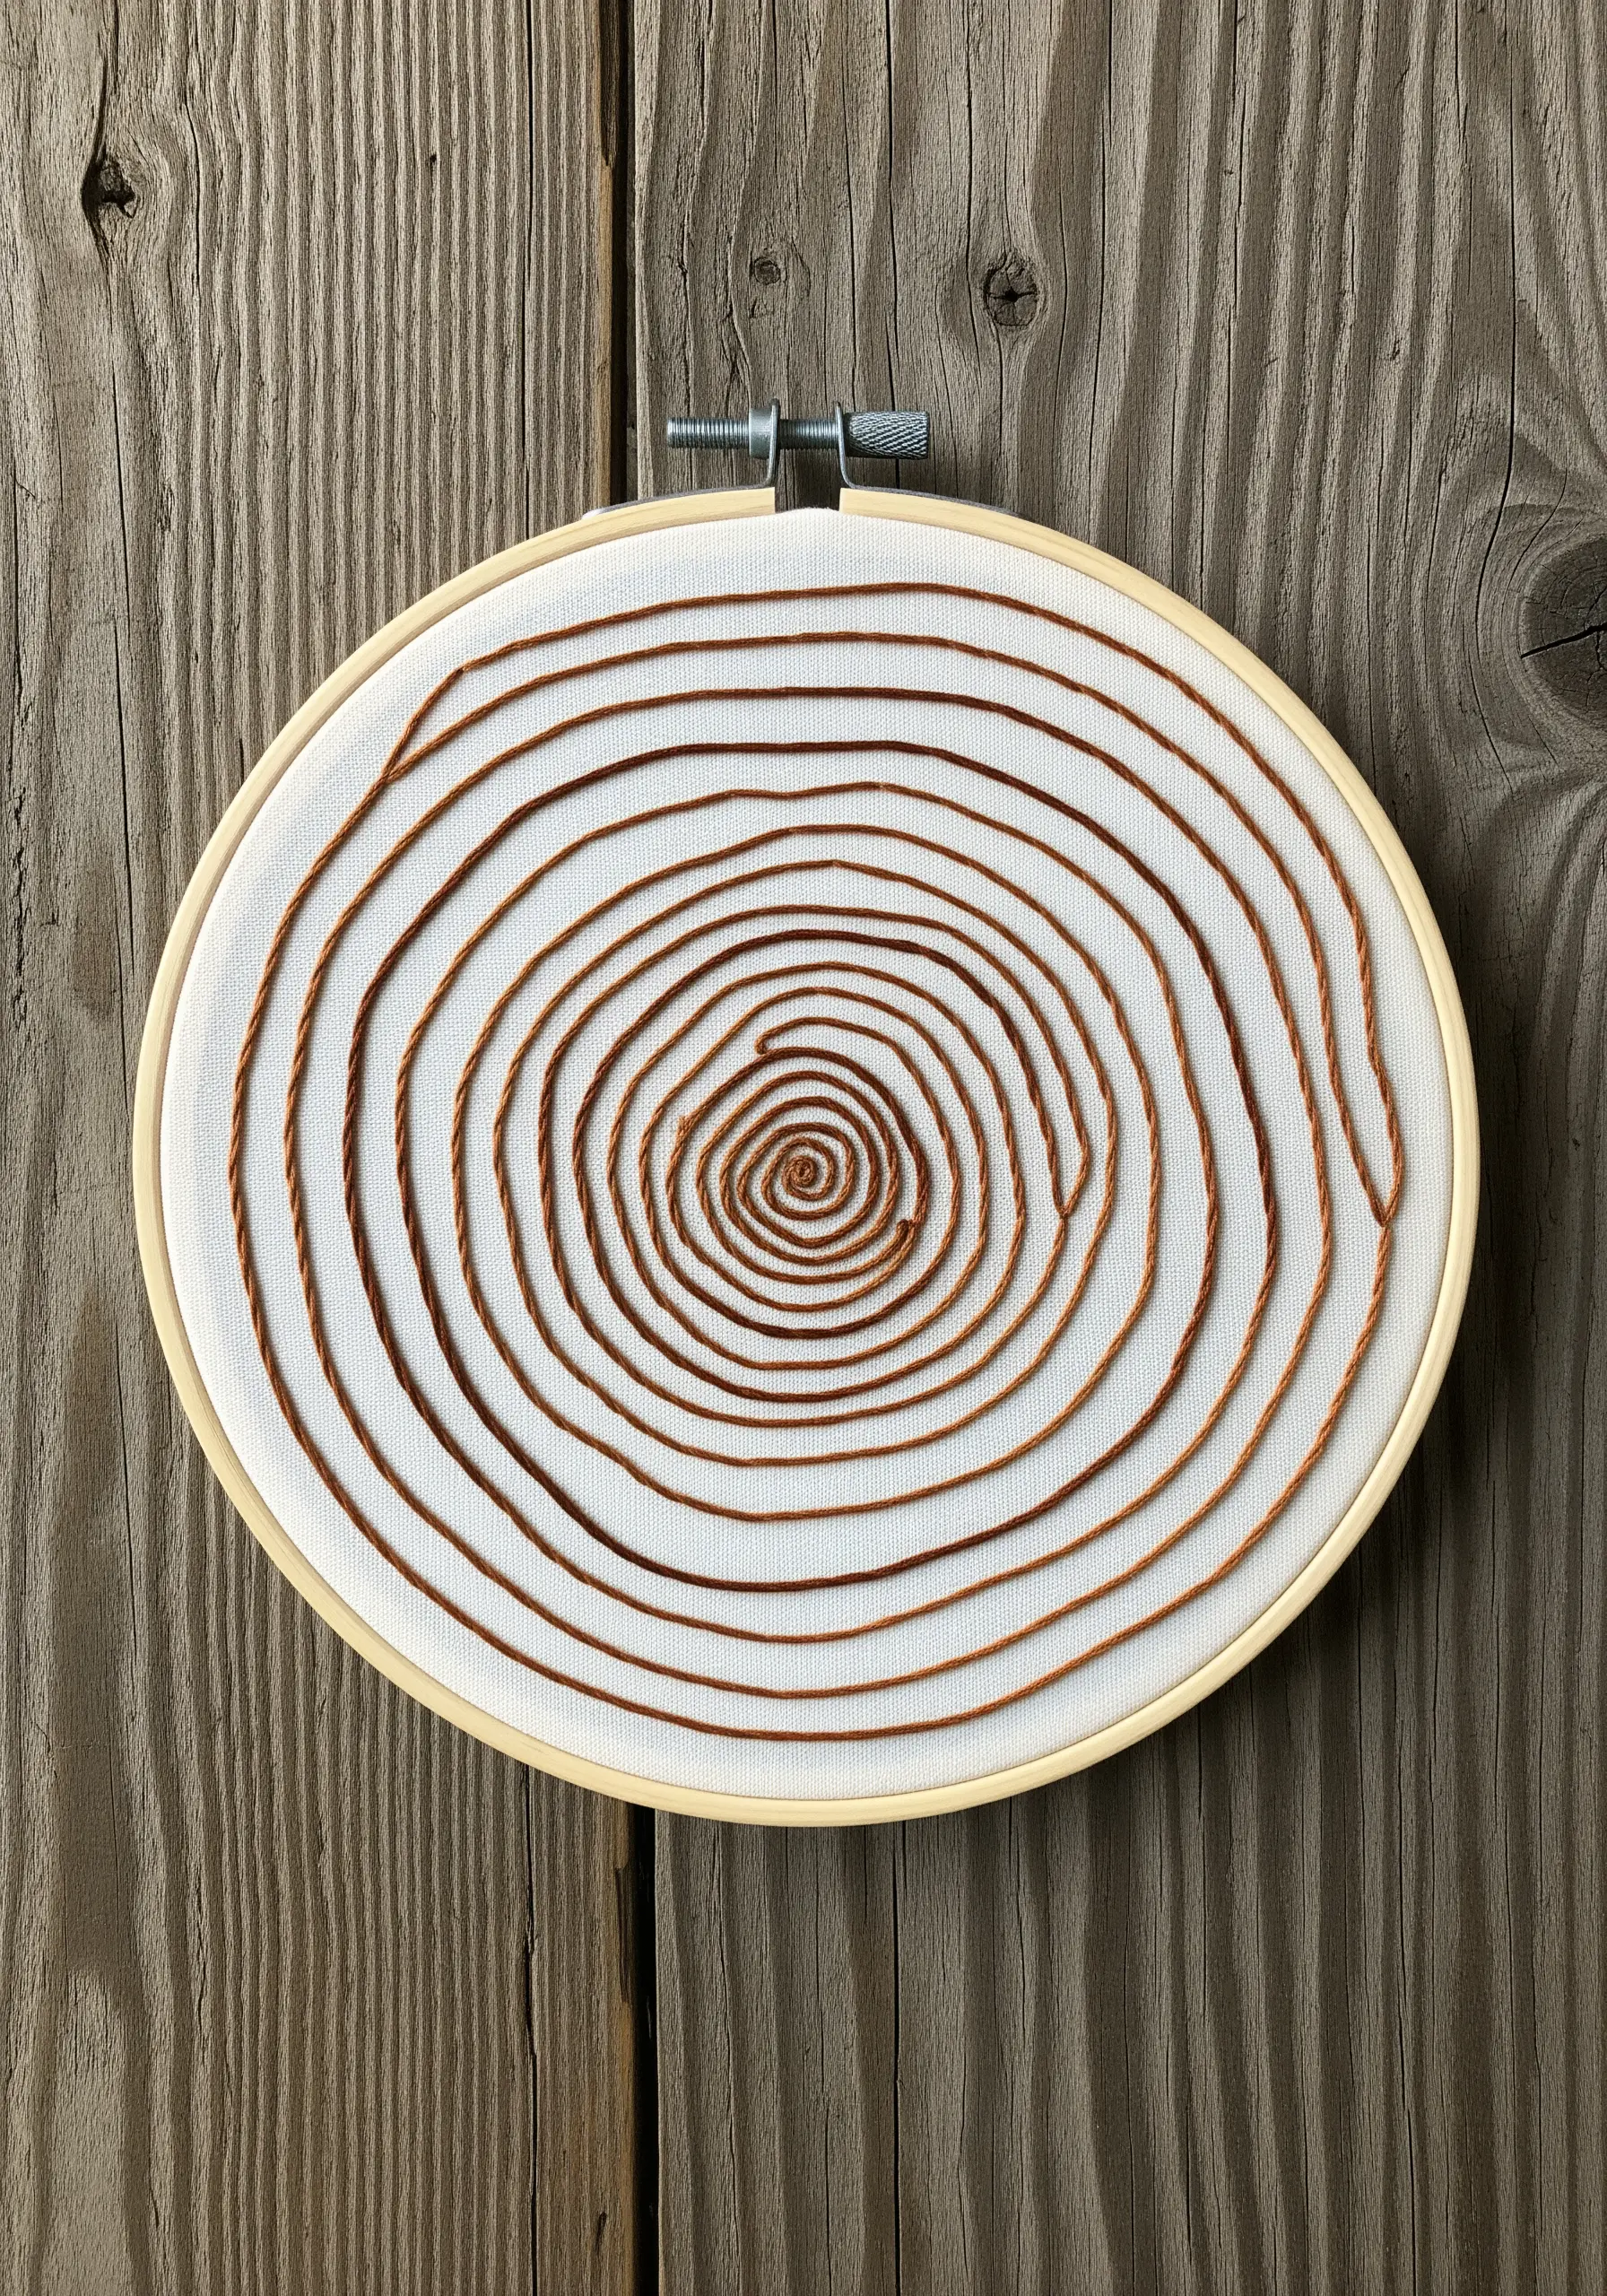
To create the organic, imperfect circles of tree rings, use the couching technique for a truly unique texture.
Lay down a thicker thread or a fine yarn on your fabric, shaping it into a spiral.
Then, using a second, thinner thread (in a matching or contrasting color), come up from the back of the fabric and make small, evenly spaced tacking stitches over the thick yarn to hold it in place.
This method allows you to create bold, textural lines with perfect control over their shape and flow.
32. Perfect the Simple Charm of Illustrative Outlines

Sometimes, the most elegant design is the simplest. For a clean, illustrative style, a well-executed backstitch is all you need.
The key to a professional finish is consistency. Focus on keeping your stitch length uniform throughout the entire piece.
Use two or three strands of floss to give the lines a pleasing weight that feels intentional and confident.
This disciplined approach to a basic stitch is what elevates a simple drawing into a polished piece of textile art.


