

Have you ever finished an embroidery project and felt that something was missing, that it lacked that final touch of polish? It’s a common feeling, but the shift from good to exceptional often lies in small, intentional adjustments to your technique.
A simple canvas tote bag is the perfect, low-pressure surface to explore these refinements. It’s your canvas for practicing the subtle art of color blending, the impact of textural stitches, and the clean finish of a perfect outline. This isn’t about learning dozens of new stitches, but about mastering the few that truly make a difference.
These tropical bird designs invite you to play with vibrant color palettes and intricate details. Each one offers a specific lesson—in creating movement, capturing light, or building dimension. Let’s transform that plain tote into a piece of wearable art that feels thoughtfully, beautifully, and uniquely yours.
1. Master Flowing Feathers with Thread Painting
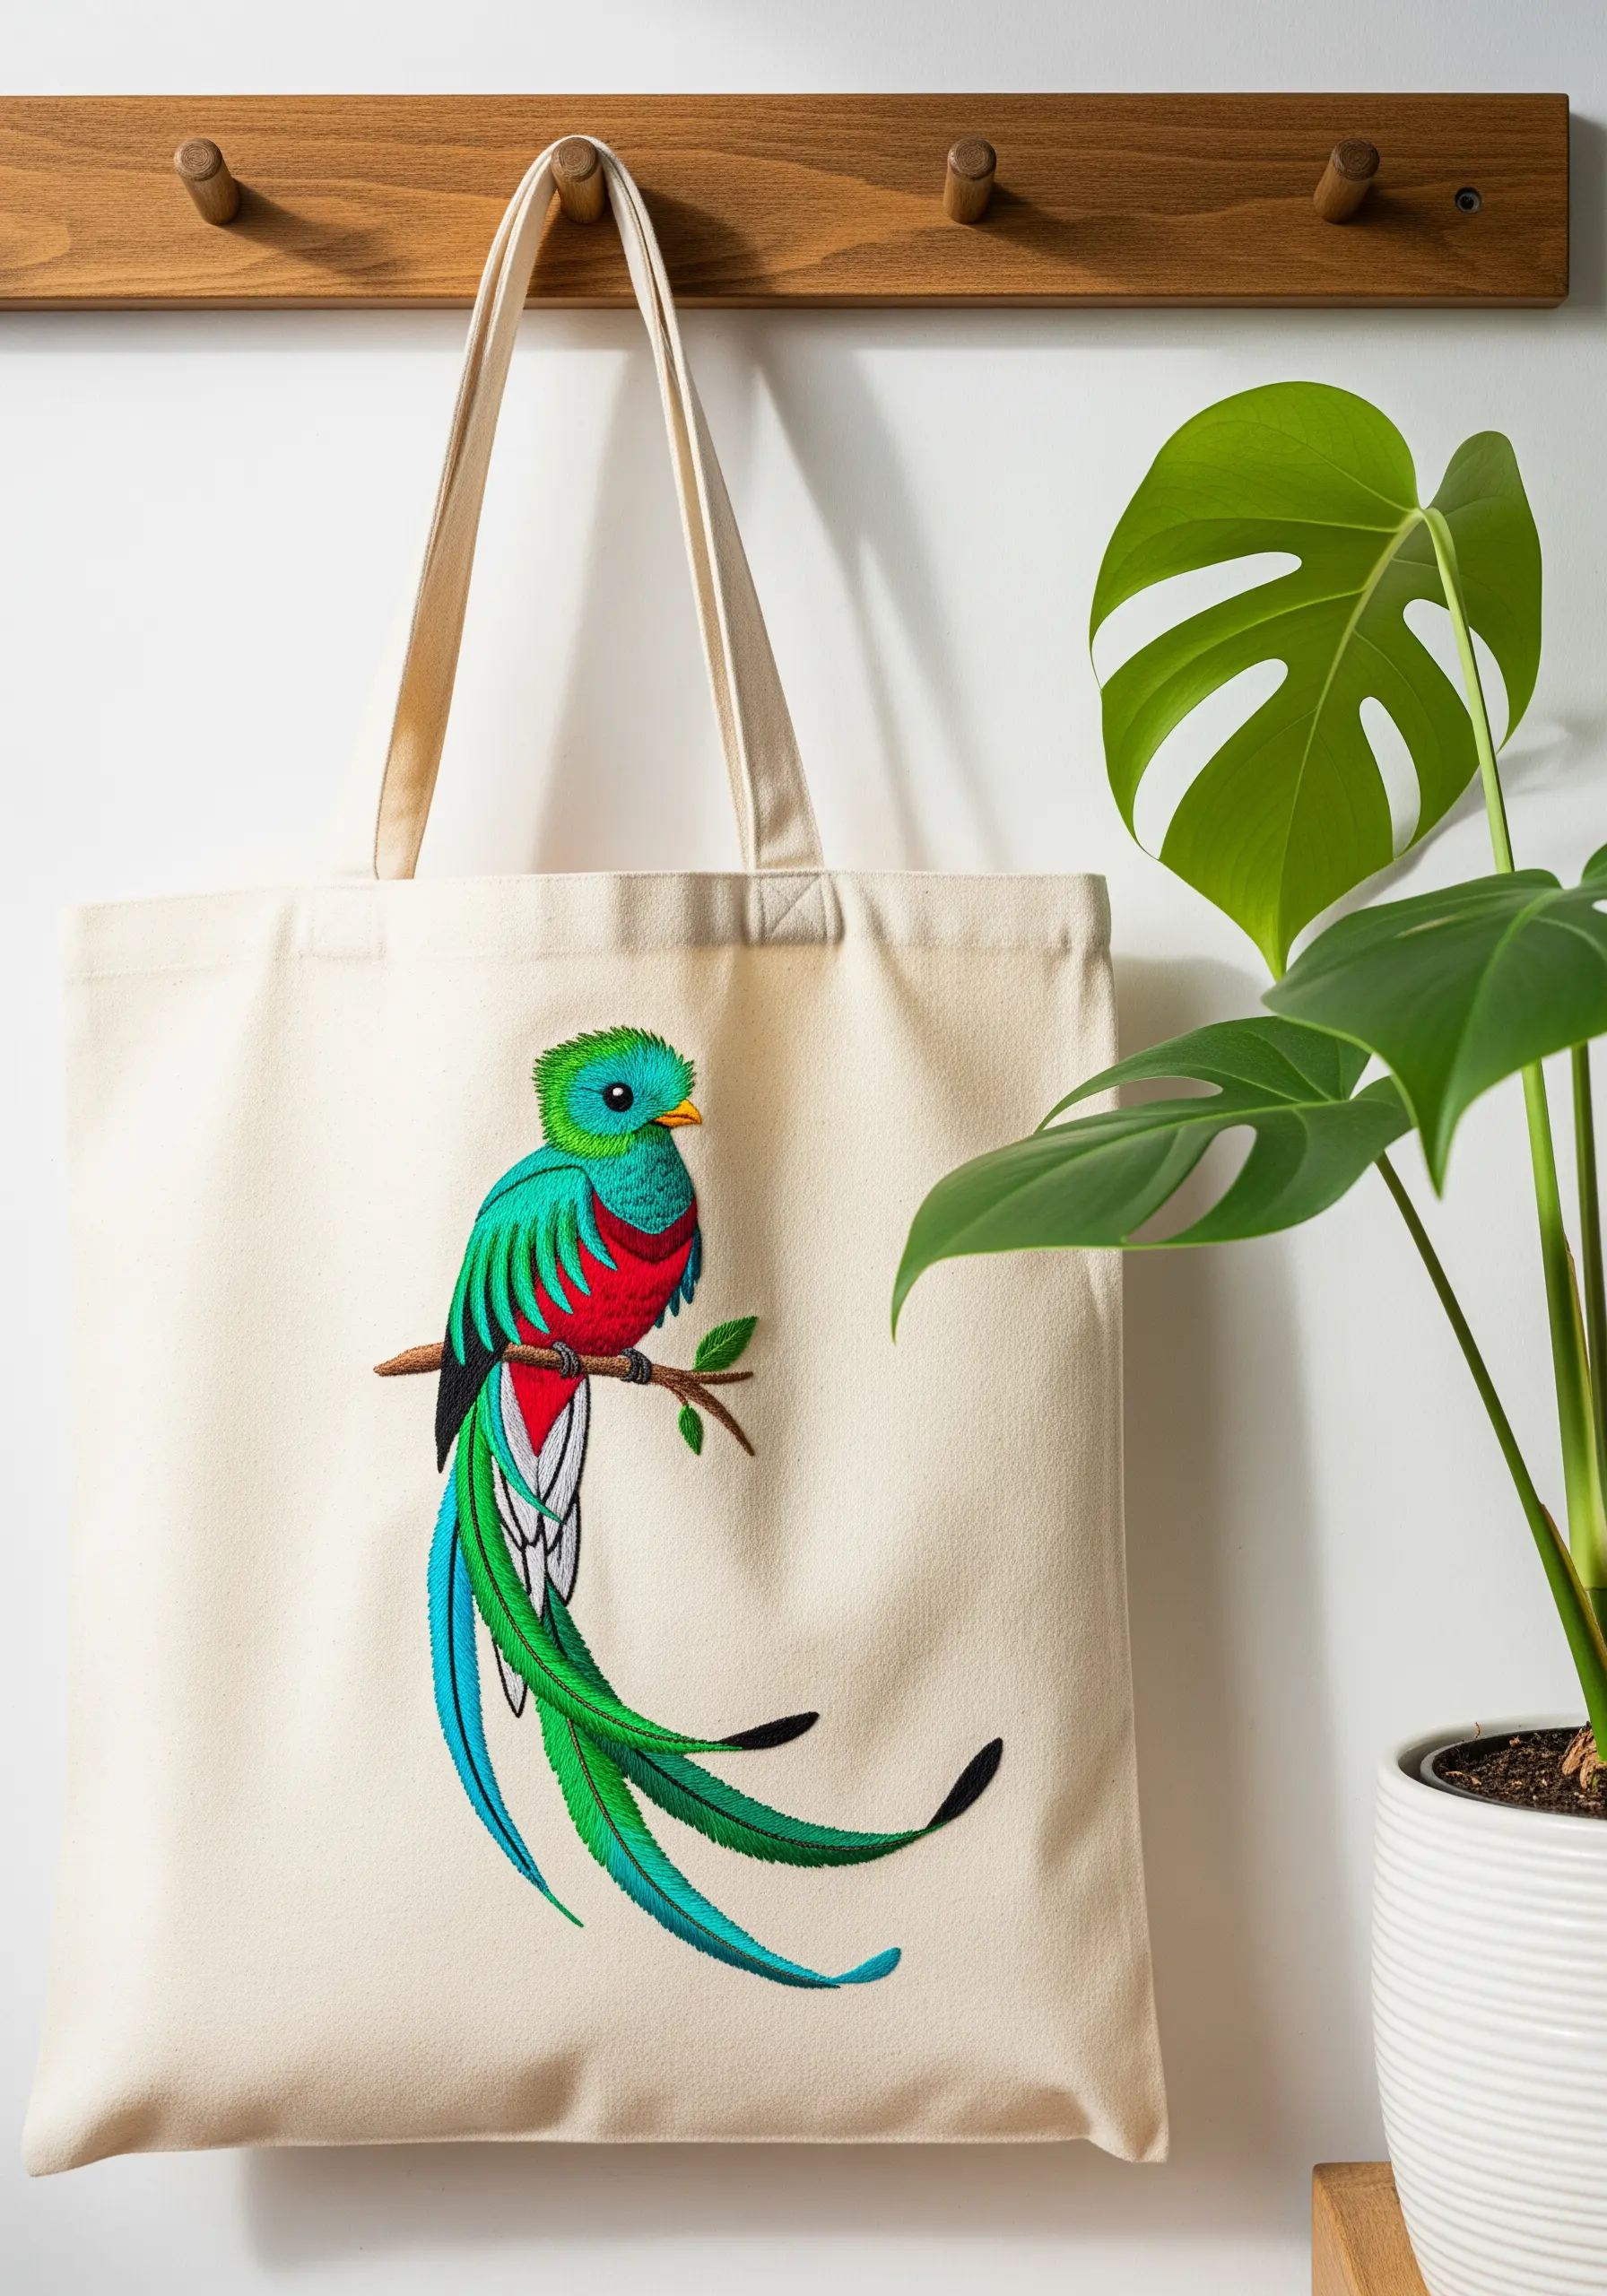
To capture the graceful movement of the quetzal’s tail, rely on the long-and-short stitch, often called thread painting.
Vary the length and angle of each stitch to mimic the natural, flowing drape of long feathers.
Use a single strand of embroidery floss for the bird’s head and chest to achieve fine, realistic detail and subtle color blending.
For the long tail feathers, you can switch to two strands to cover more area while still maintaining a smooth, silk-like sheen.
2. Create Flawless Color Blocks with Satin Stitch
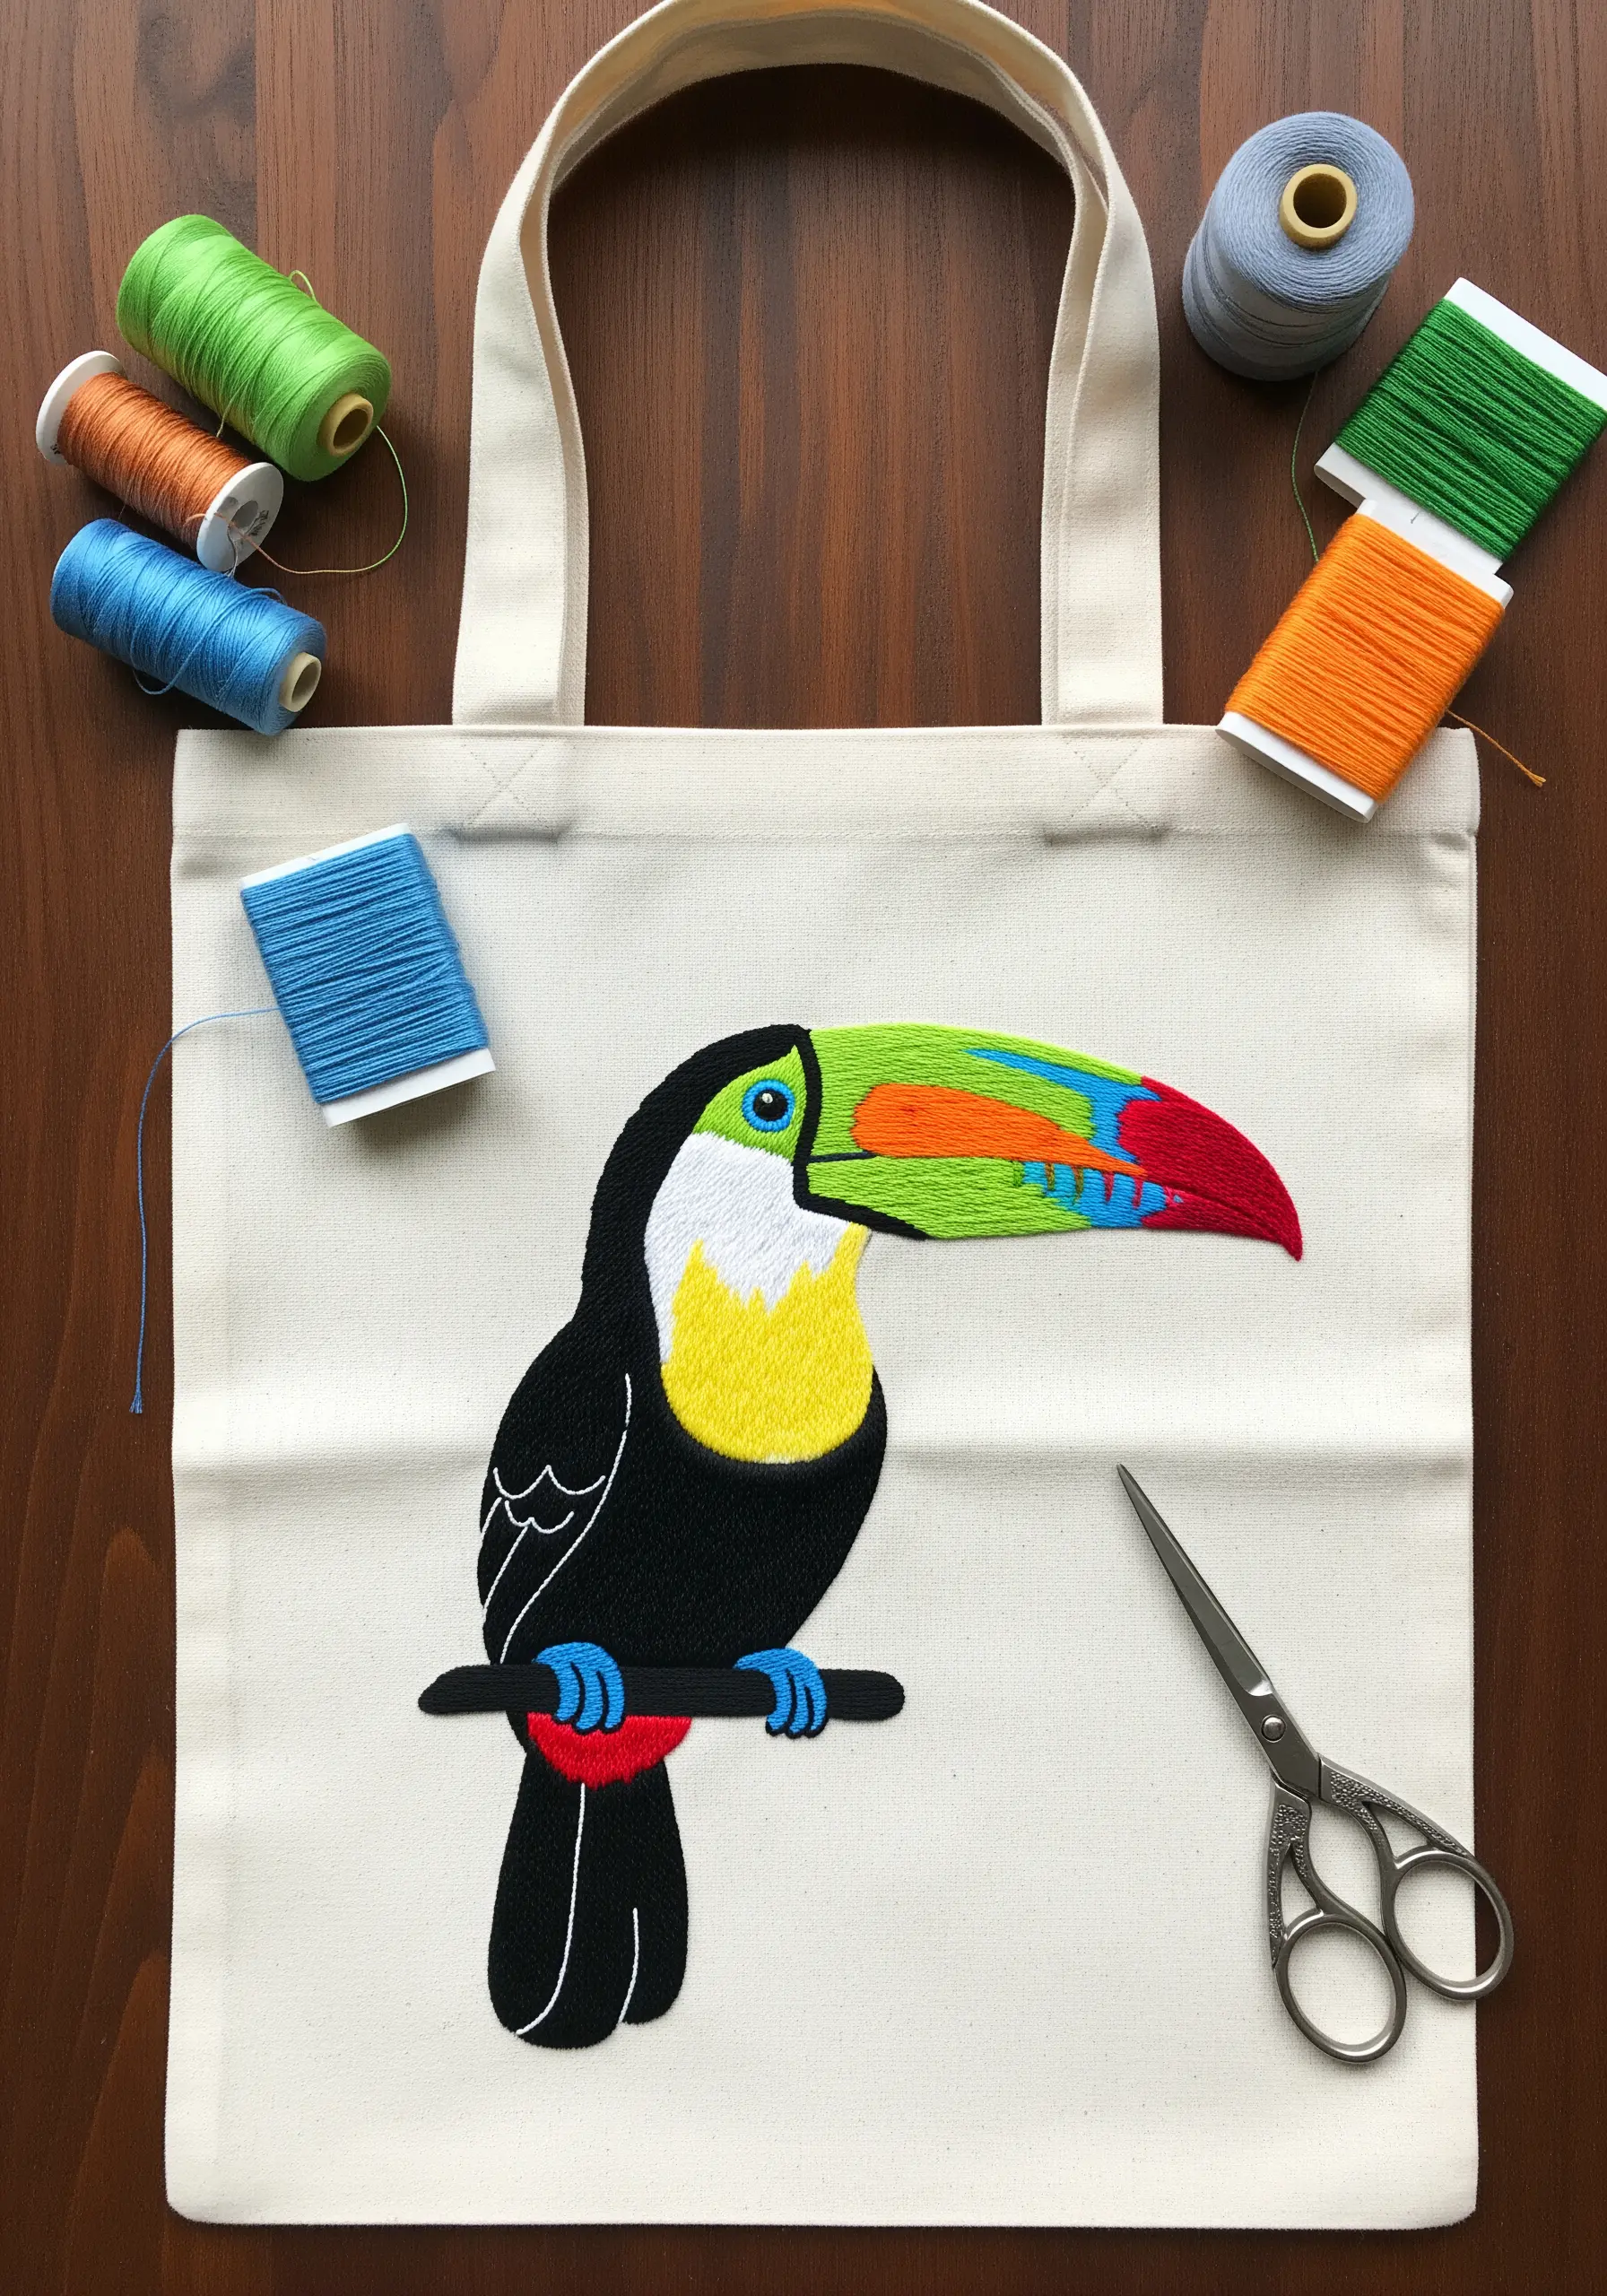
For the toucan’s bold, graphic appearance, a perfectly executed satin stitch is essential.
Before you begin filling in colors, create a sharp boundary for each section using a split stitch outline.
This simple preparation acts as a raised edge, preventing your satin stitches from slipping and ensuring your color blocks have crisp, clean lines.
Keep your stitch tension even across the entire area to prevent the tote’s canvas from puckering.
3. Build Symmetrical Wings with Layered Stitches
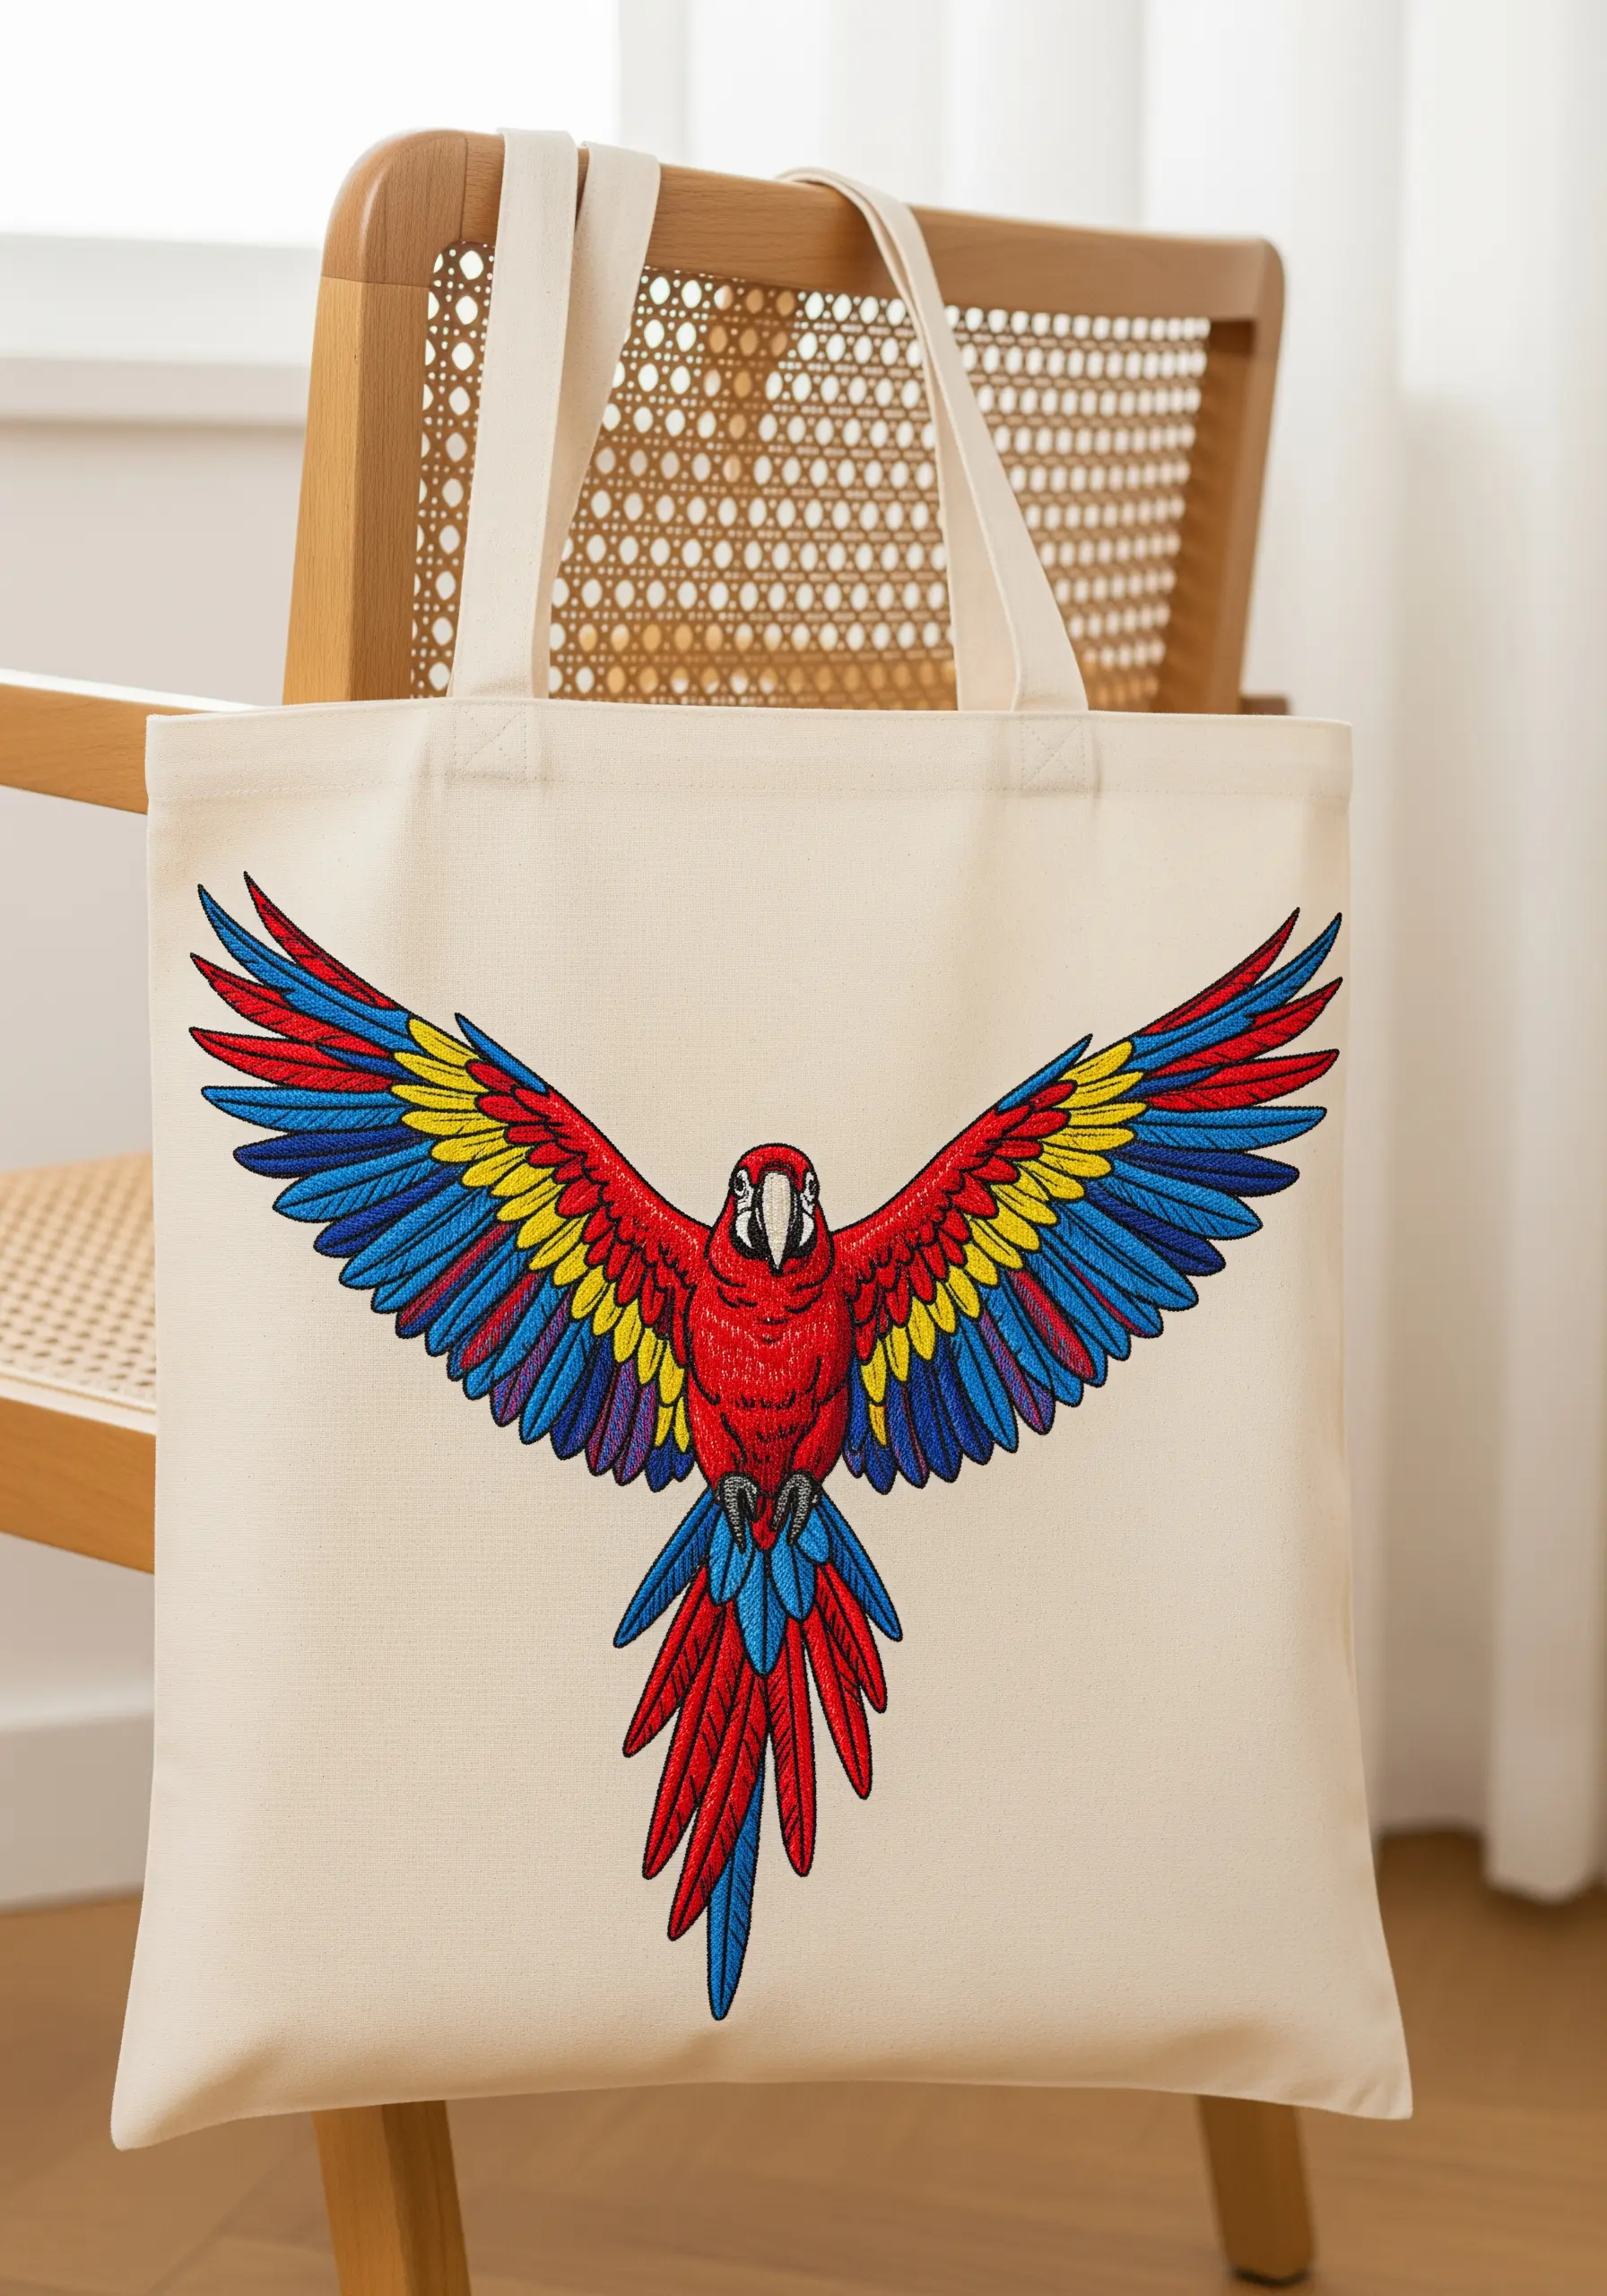
To create the macaw’s impressive wingspan, think in layers, just like real feathers.
Begin stitching the bottom-most layer of feathers first, then work your way up, slightly overlapping each new row over the previous one.
Angle your satin stitches to follow the natural curve of the wing, which creates a powerful sense of dimension and movement.
This layering technique is what gives the final piece its depth and realism.
4. Capture Iridescence with a Single Strand
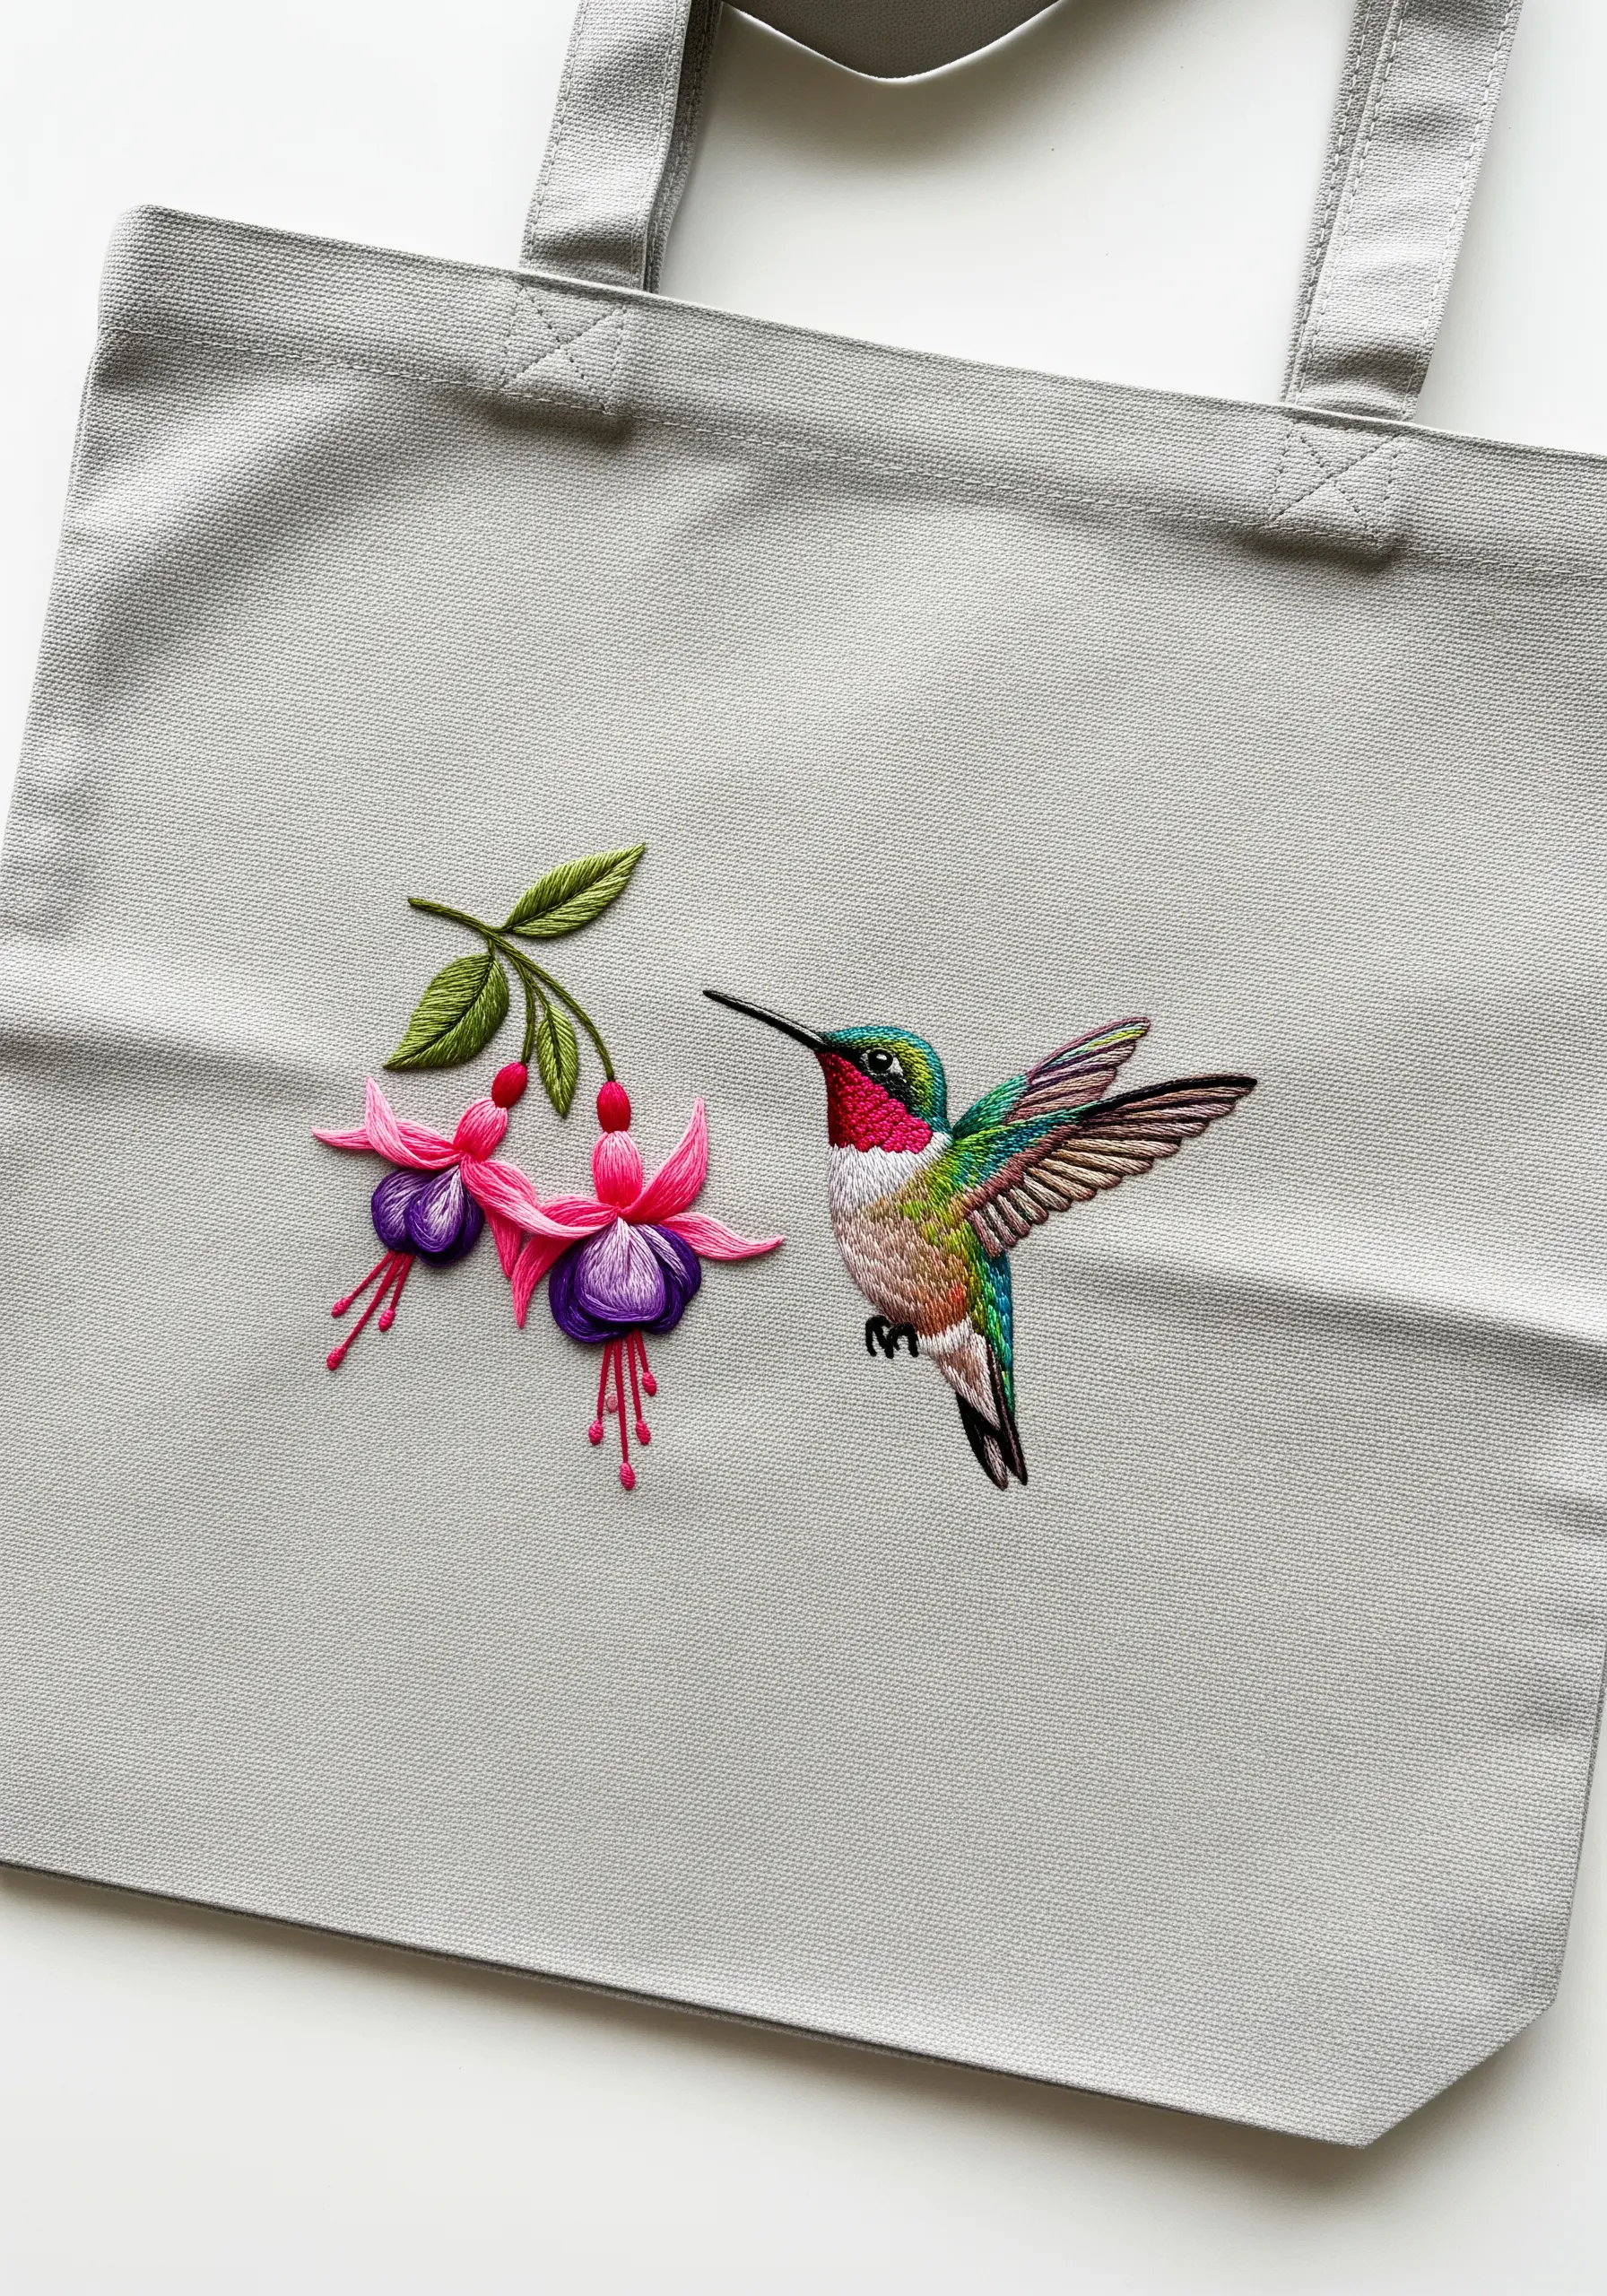
The shimmering throat of a hummingbird can be beautifully replicated using single strands of thread in closely related colors.
Place stitches of metallic red, fuchsia, and copper side-by-side using a long-and-short stitch to mimic the way light reflects off tiny feathers.
This is the essence of thread painting—letting the eye blend the colors for you.
For the fuchsia flowers, use a padded satin stitch to give the petals a subtle, three-dimensional lift from the fabric surface.
5. Define Feathers with Scalloped Textures

Instead of filling the cockatoo’s body with a flat white satin stitch, create texture by working in small, overlapping scallops.
Each scallop is a tiny fan of satin stitches, and layering them mimics the soft, tiered look of real feathers.
For the vibrant yellow crest, use long, straight stitches fanned out from the head to create a sense of energy and movement.
The simple circular border acts as a frame, turning your embroidery into a focused composition.
6. Achieve a Jewel-Tone Sheen with French Knots
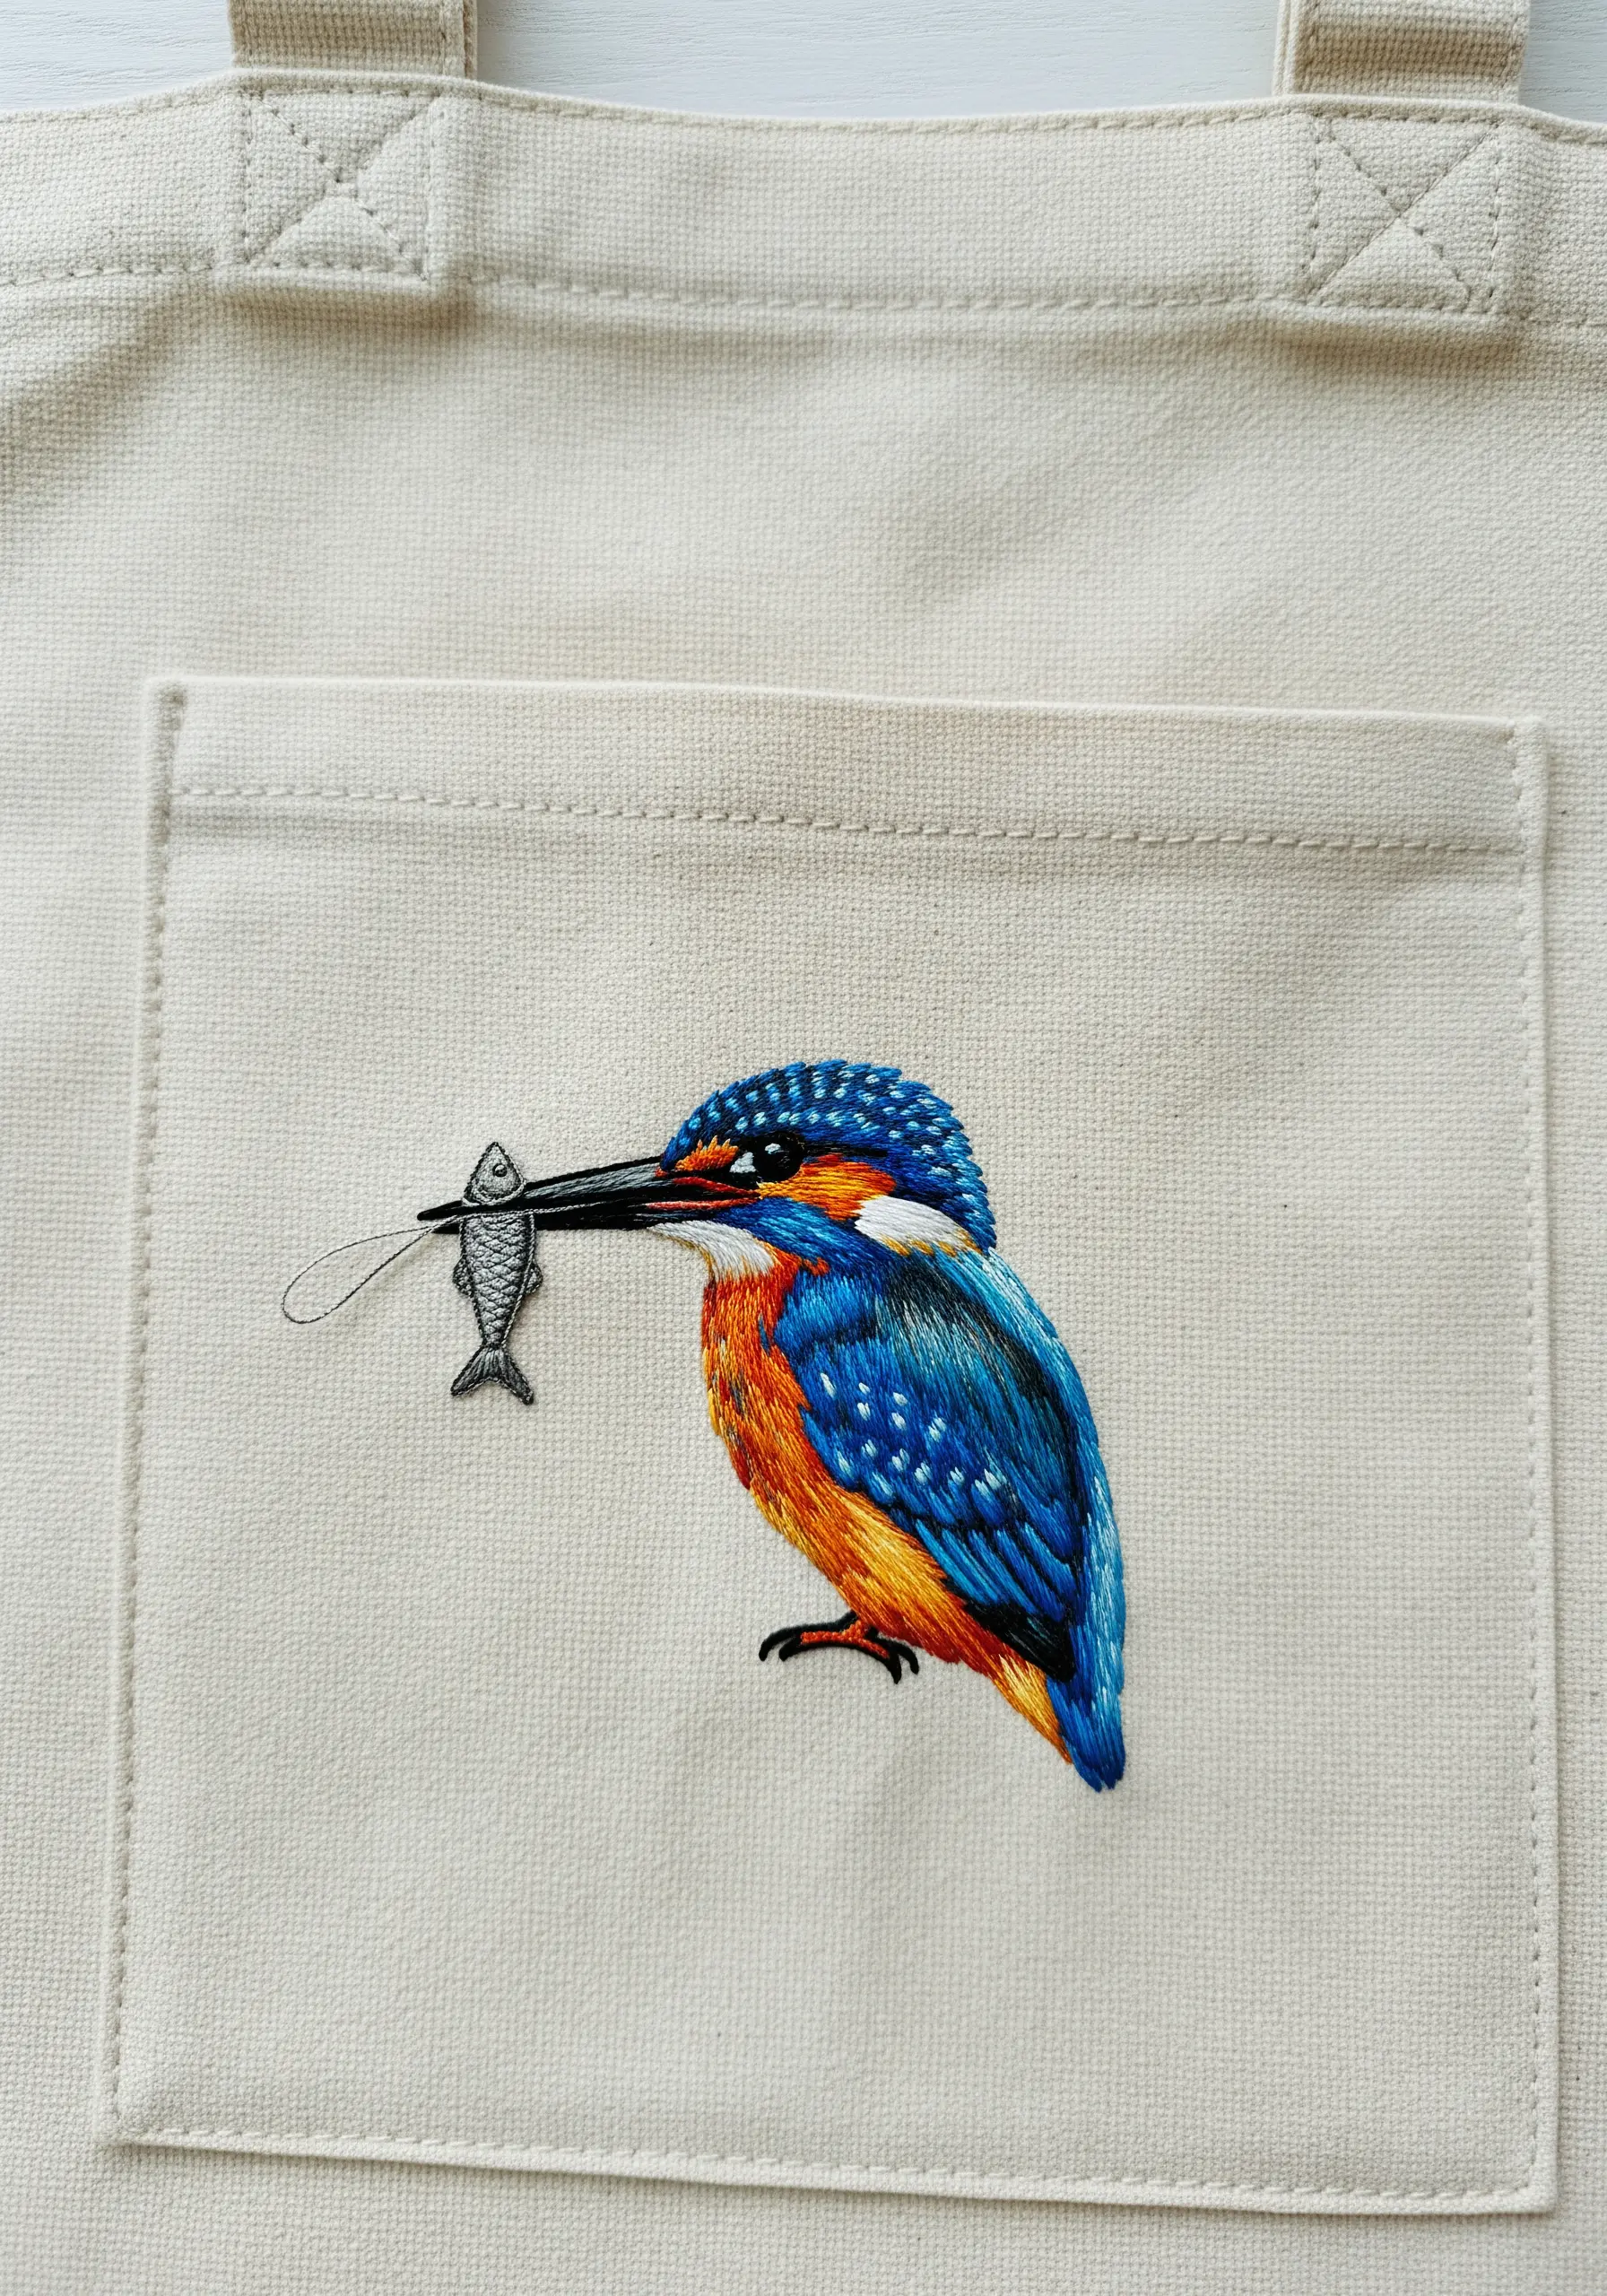
To capture the brilliant, speckled crown of the kingfisher, use tightly packed French knots in a high-sheen or metallic blue thread.
This creates a stunning textural contrast against the smooth, thread-painted feathers on the bird’s back and chest.
By combining distinct textures, you not only add visual interest but also make the different parts of the bird feel more distinct and lifelike.
7. Balance Fill and Outline for a Graphic Look
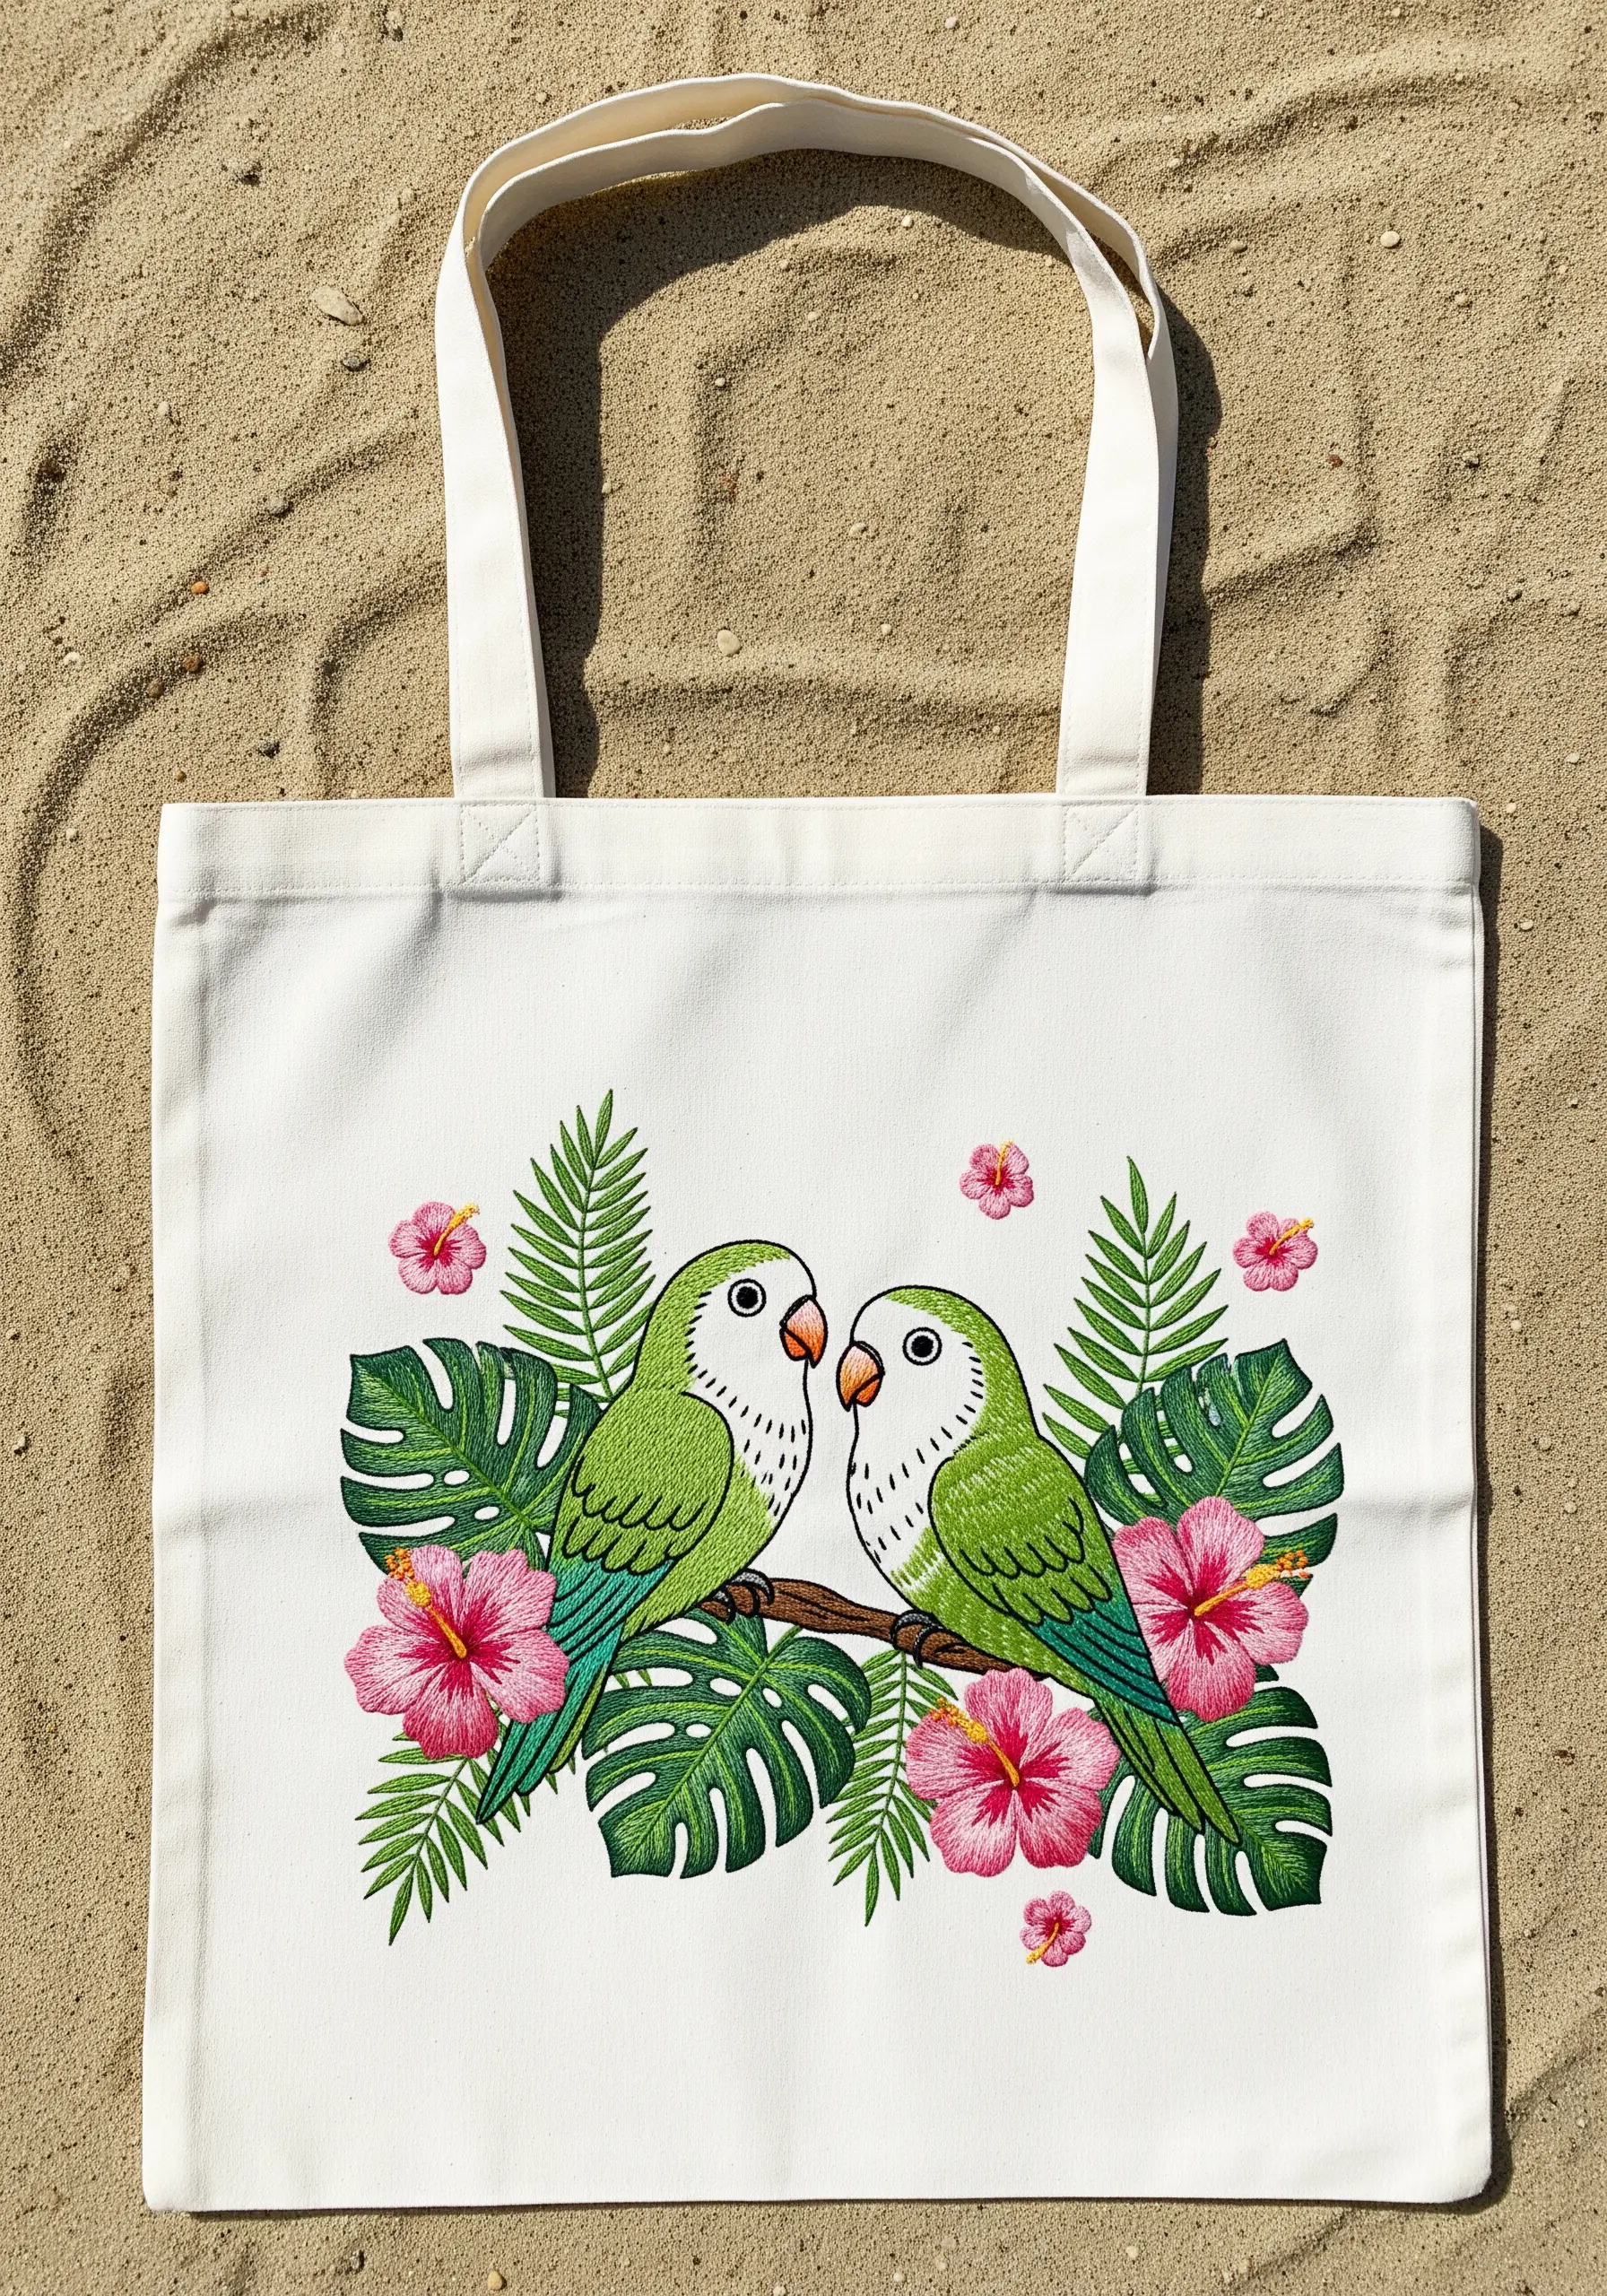
This charming design succeeds by balancing solid-filled shapes with delicate line work.
Use a consistent two-strand backstitch for all the outlines on the leaves and flowers to maintain a clean, illustrative feel.
For the birds’ bodies, a simple seed stitch adds a gentle texture that complements the bold outlines without competing with them.
This approach gives your tote a modern, storybook quality.
8. Make Colors Pop on a Dark Fabric Foundation
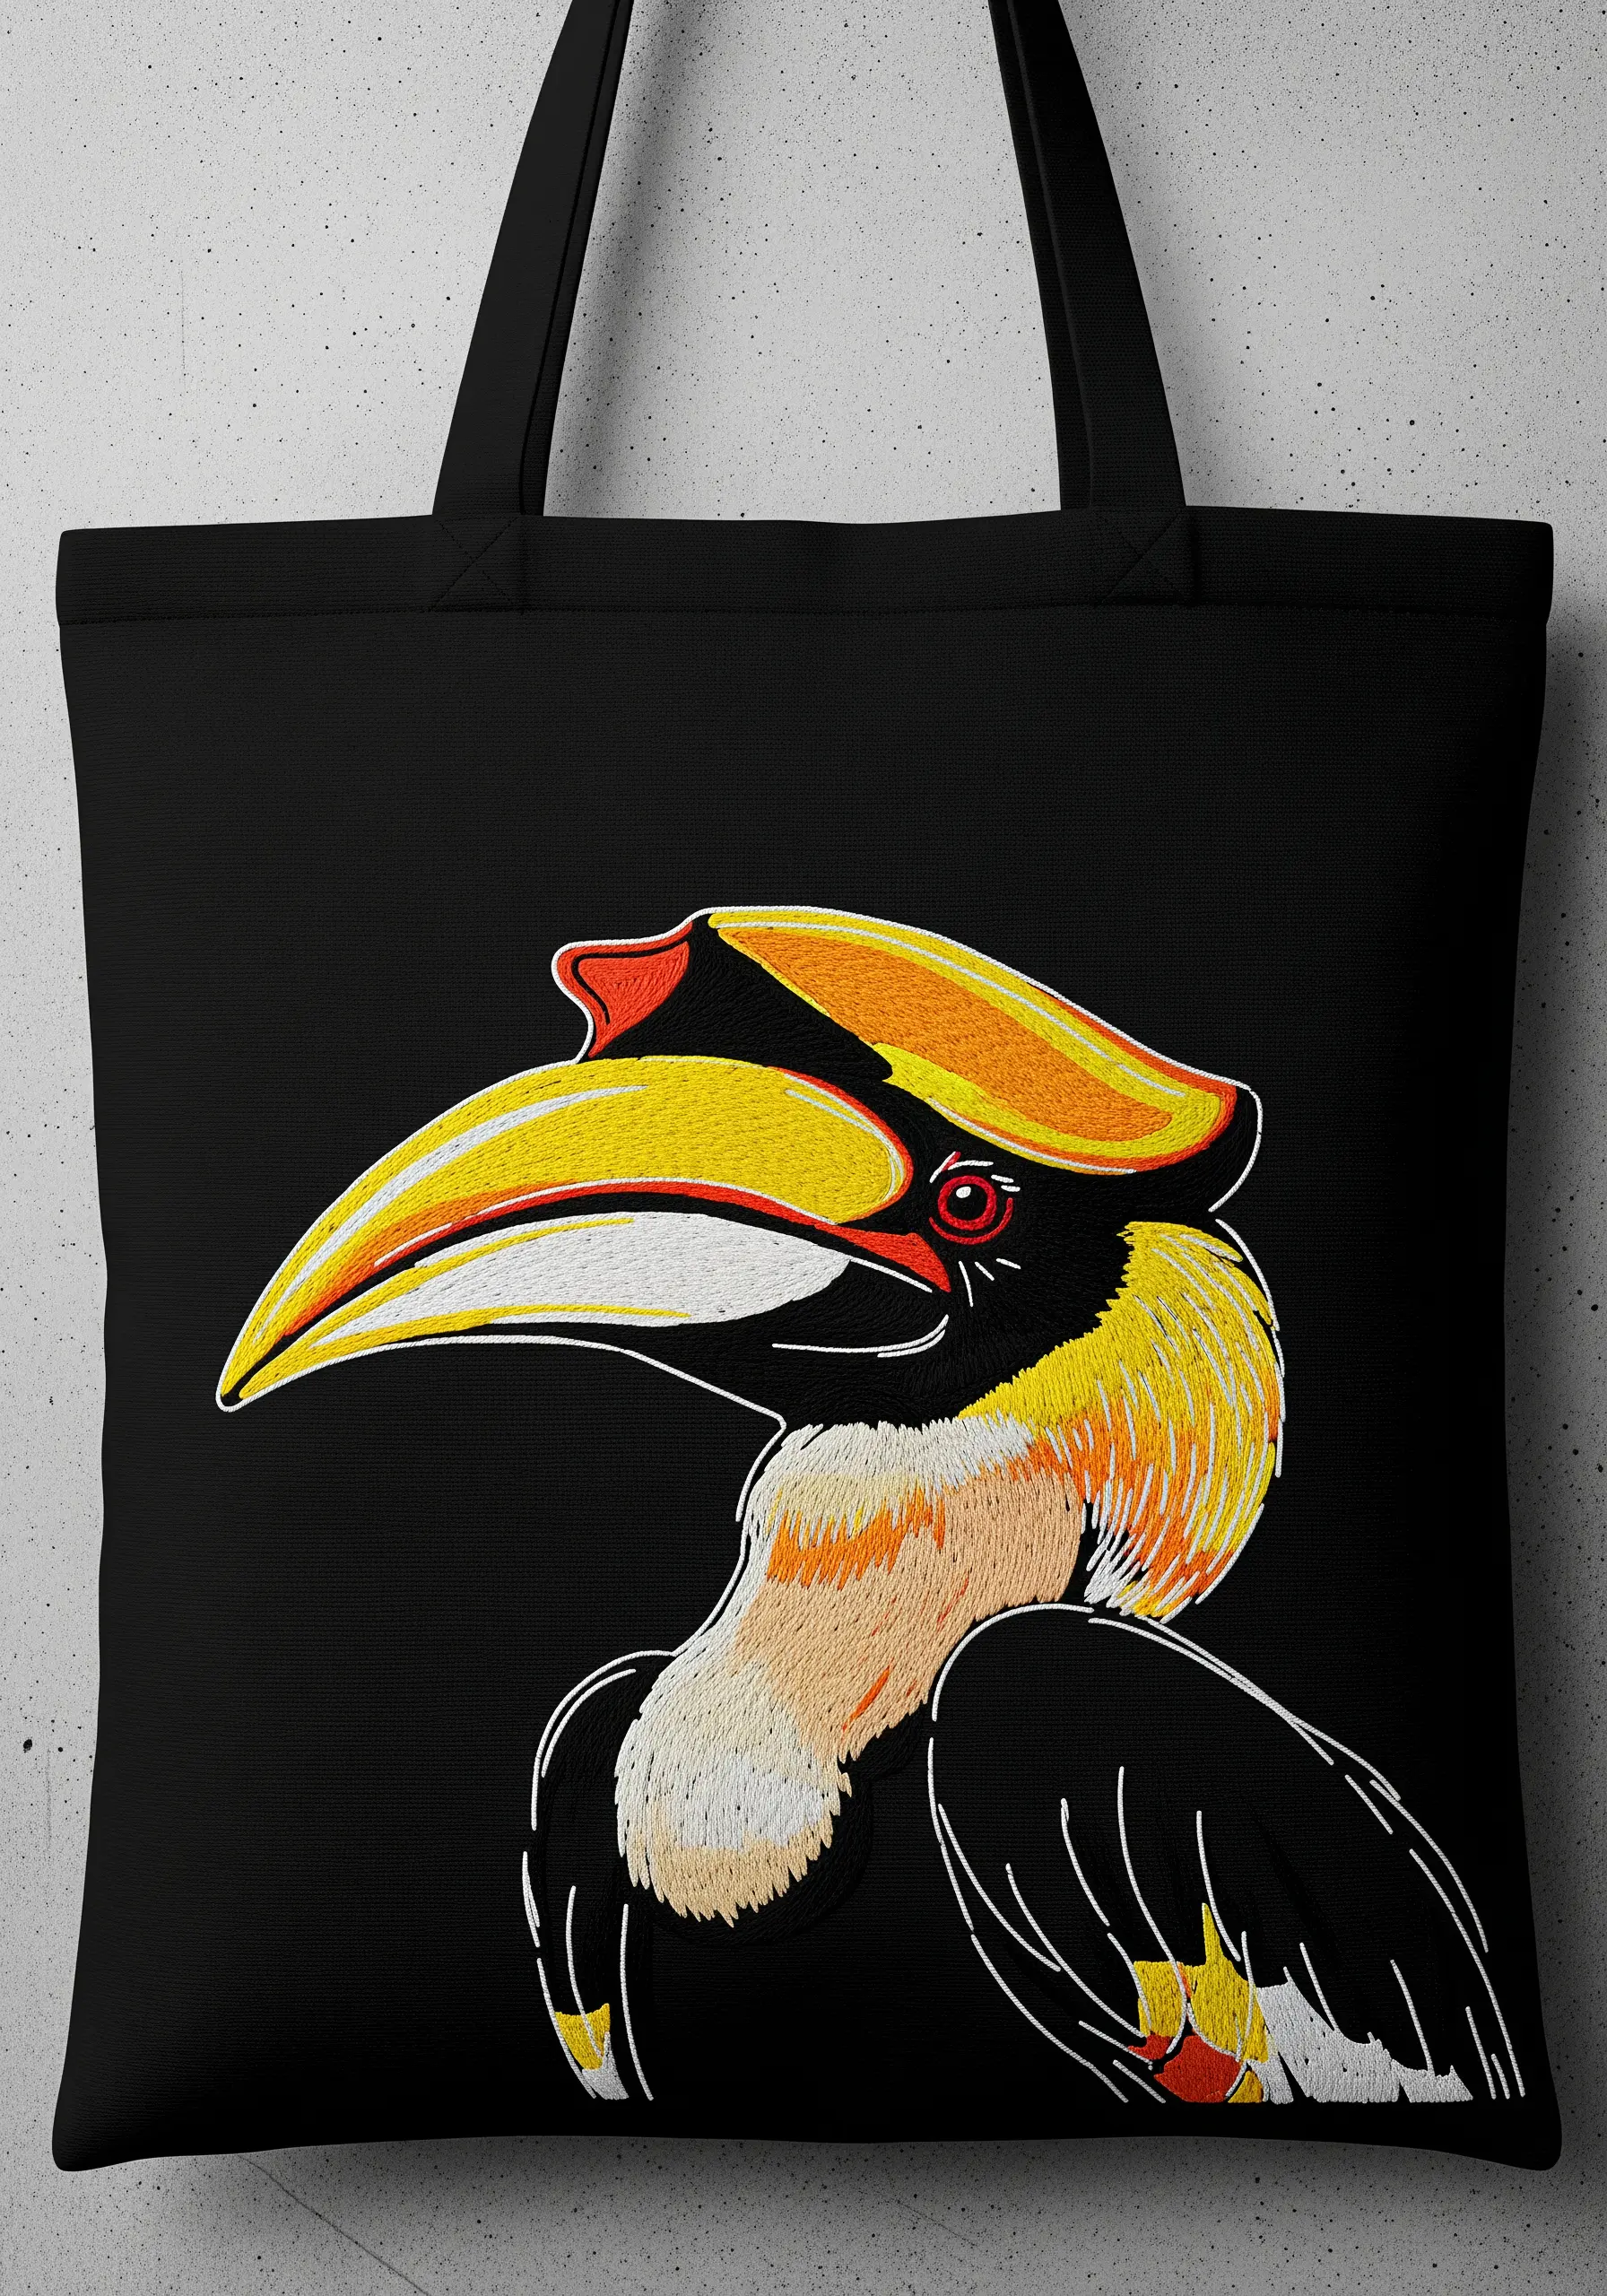
Stitching on a black or dark-colored tote bag instantly makes vibrant threads appear more luminous and saturated.
To ensure light colors like white and yellow remain opaque, first lay down a base of white stitches in the shape you want to fill.
Then, stitch your intended color directly over this foundation for a solid, bright finish that doesn’t let the dark fabric show through.
Use minimal line work to suggest feathers on the dark body, allowing the fabric’s negative space to define the form.
9. Create a Dynamic Pattern with a Simple Motif
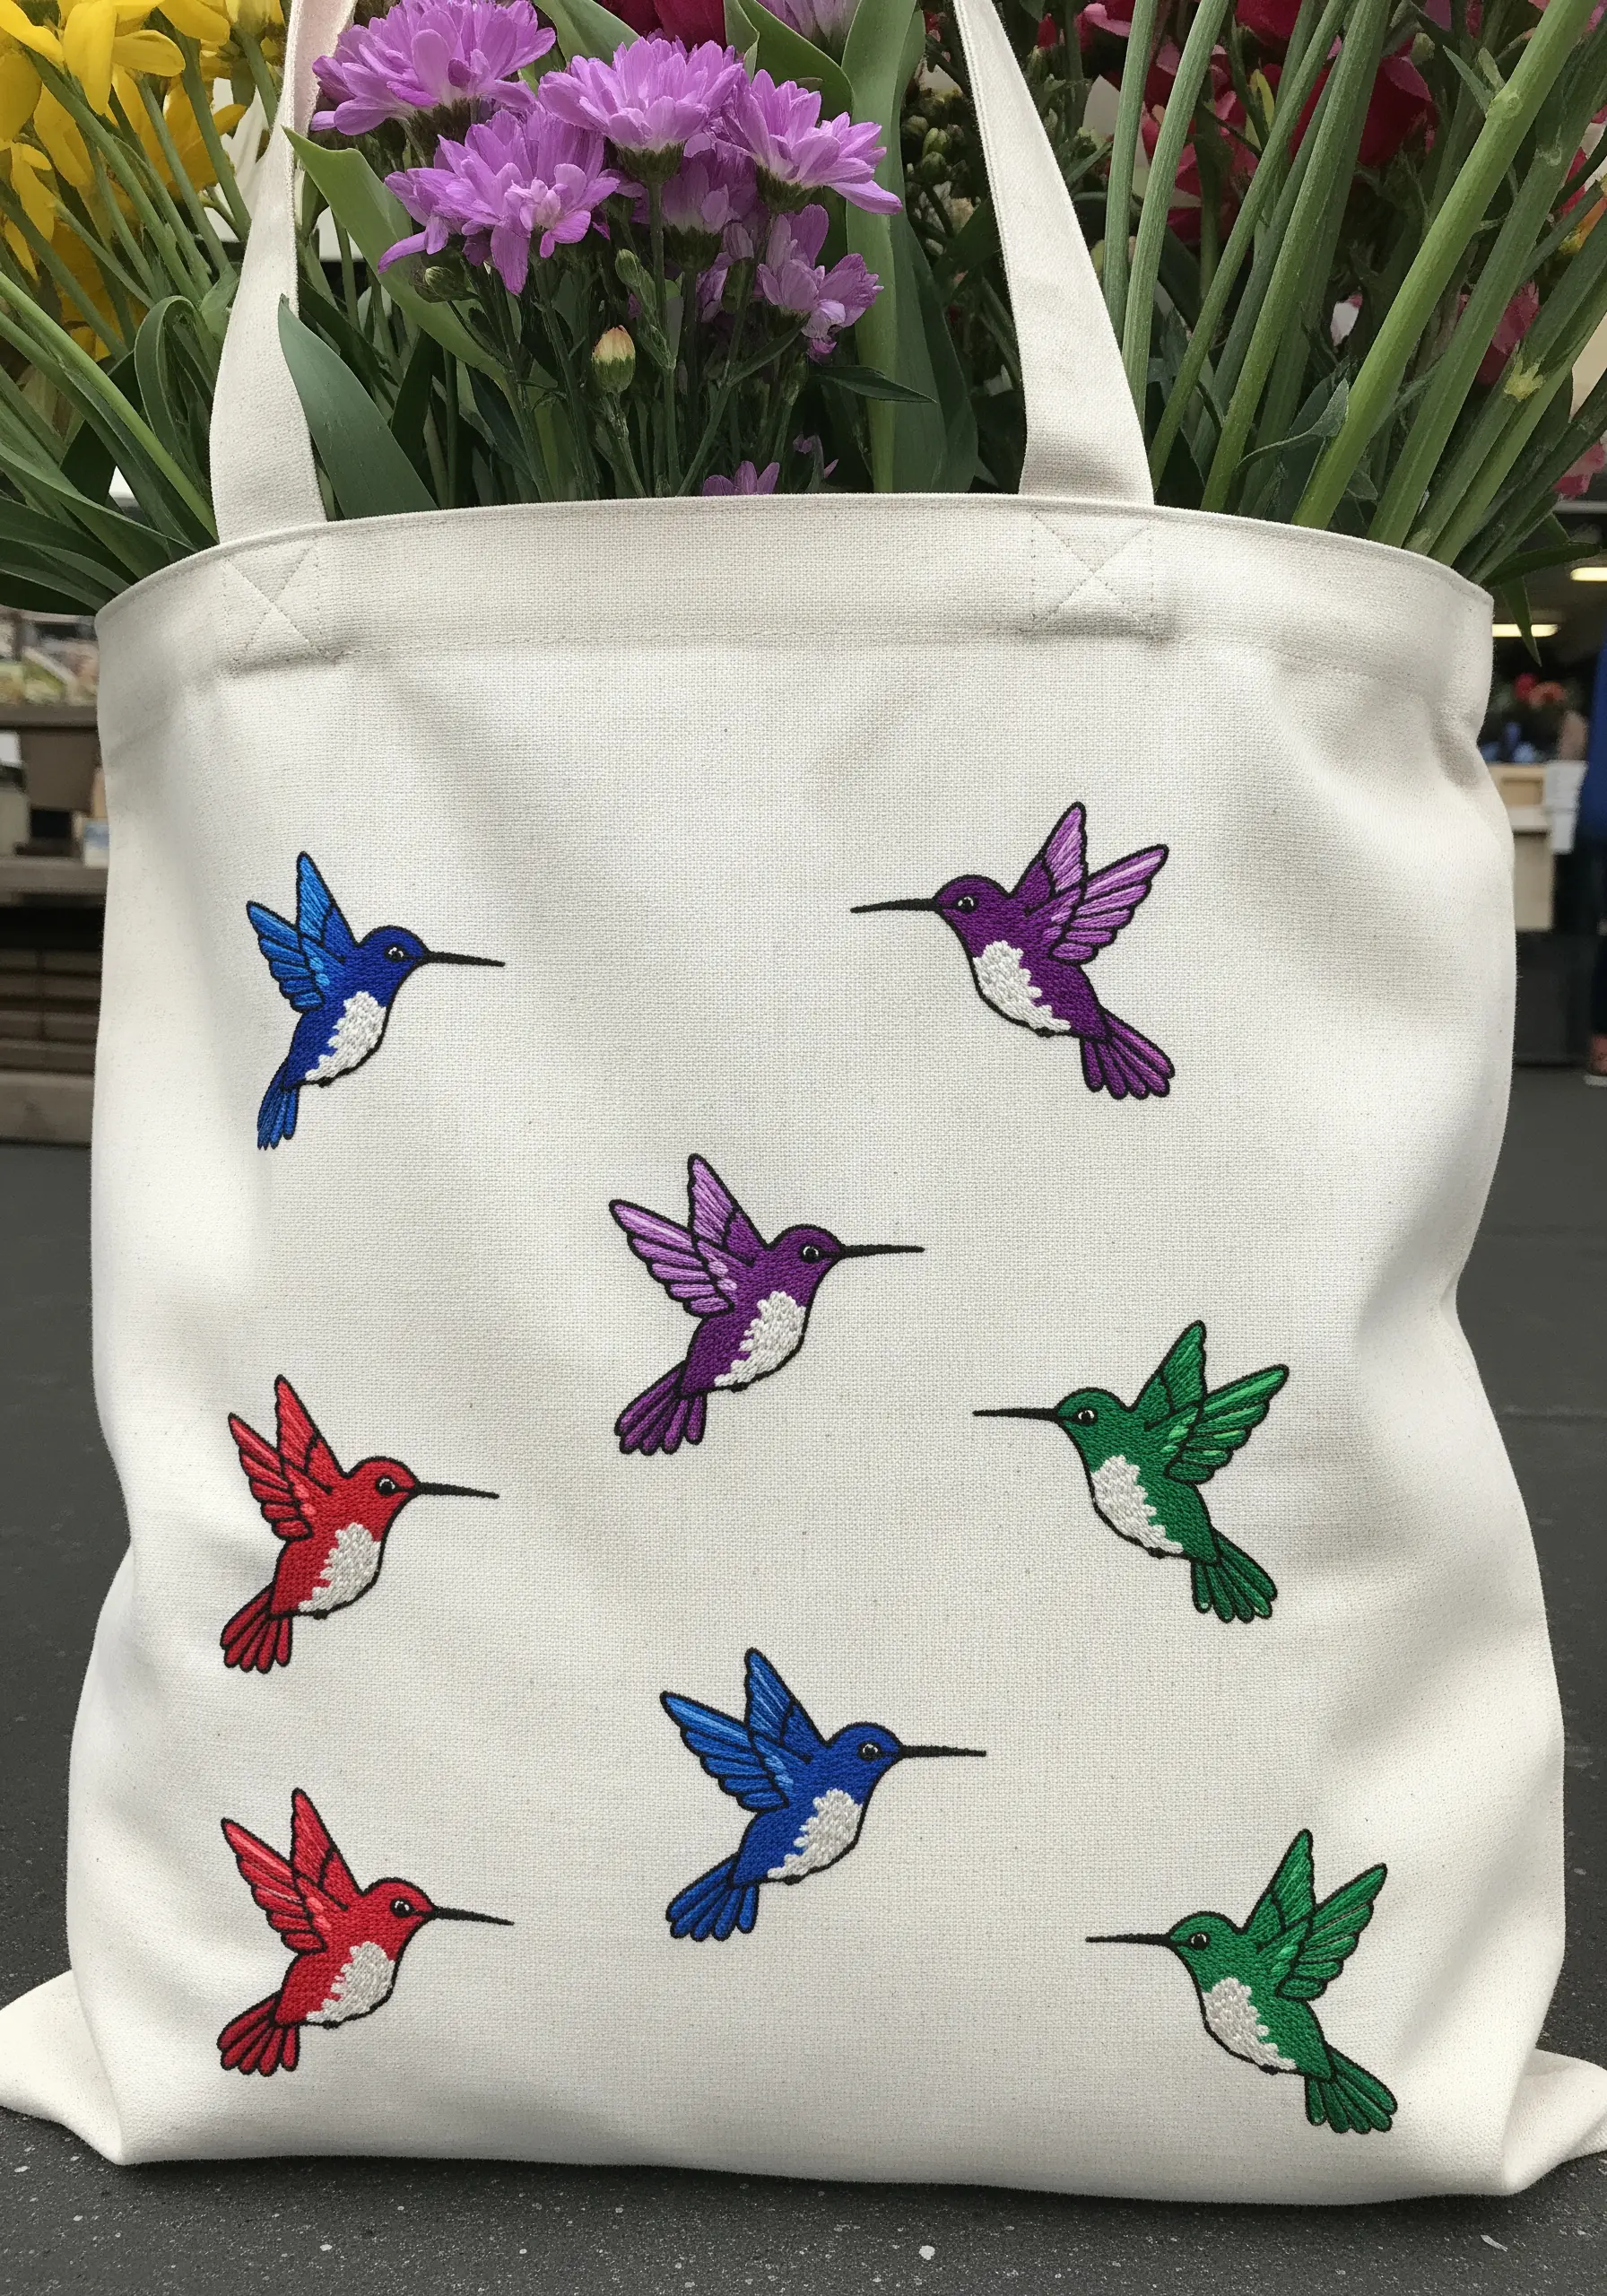
Instead of a single large design, transform your tote with a repeating pattern of smaller motifs.
The key to making this scattered pattern feel energetic is to vary the angle and placement of each hummingbird slightly, creating a sense of flight and movement.
Group colors together or mix them randomly for different effects.
A simple satin stitch with a backstitch outline is all you need for these easy small embroidery patterns, making it a quick yet impactful project.
10. Sculpt Dimension with Thread and Shadow
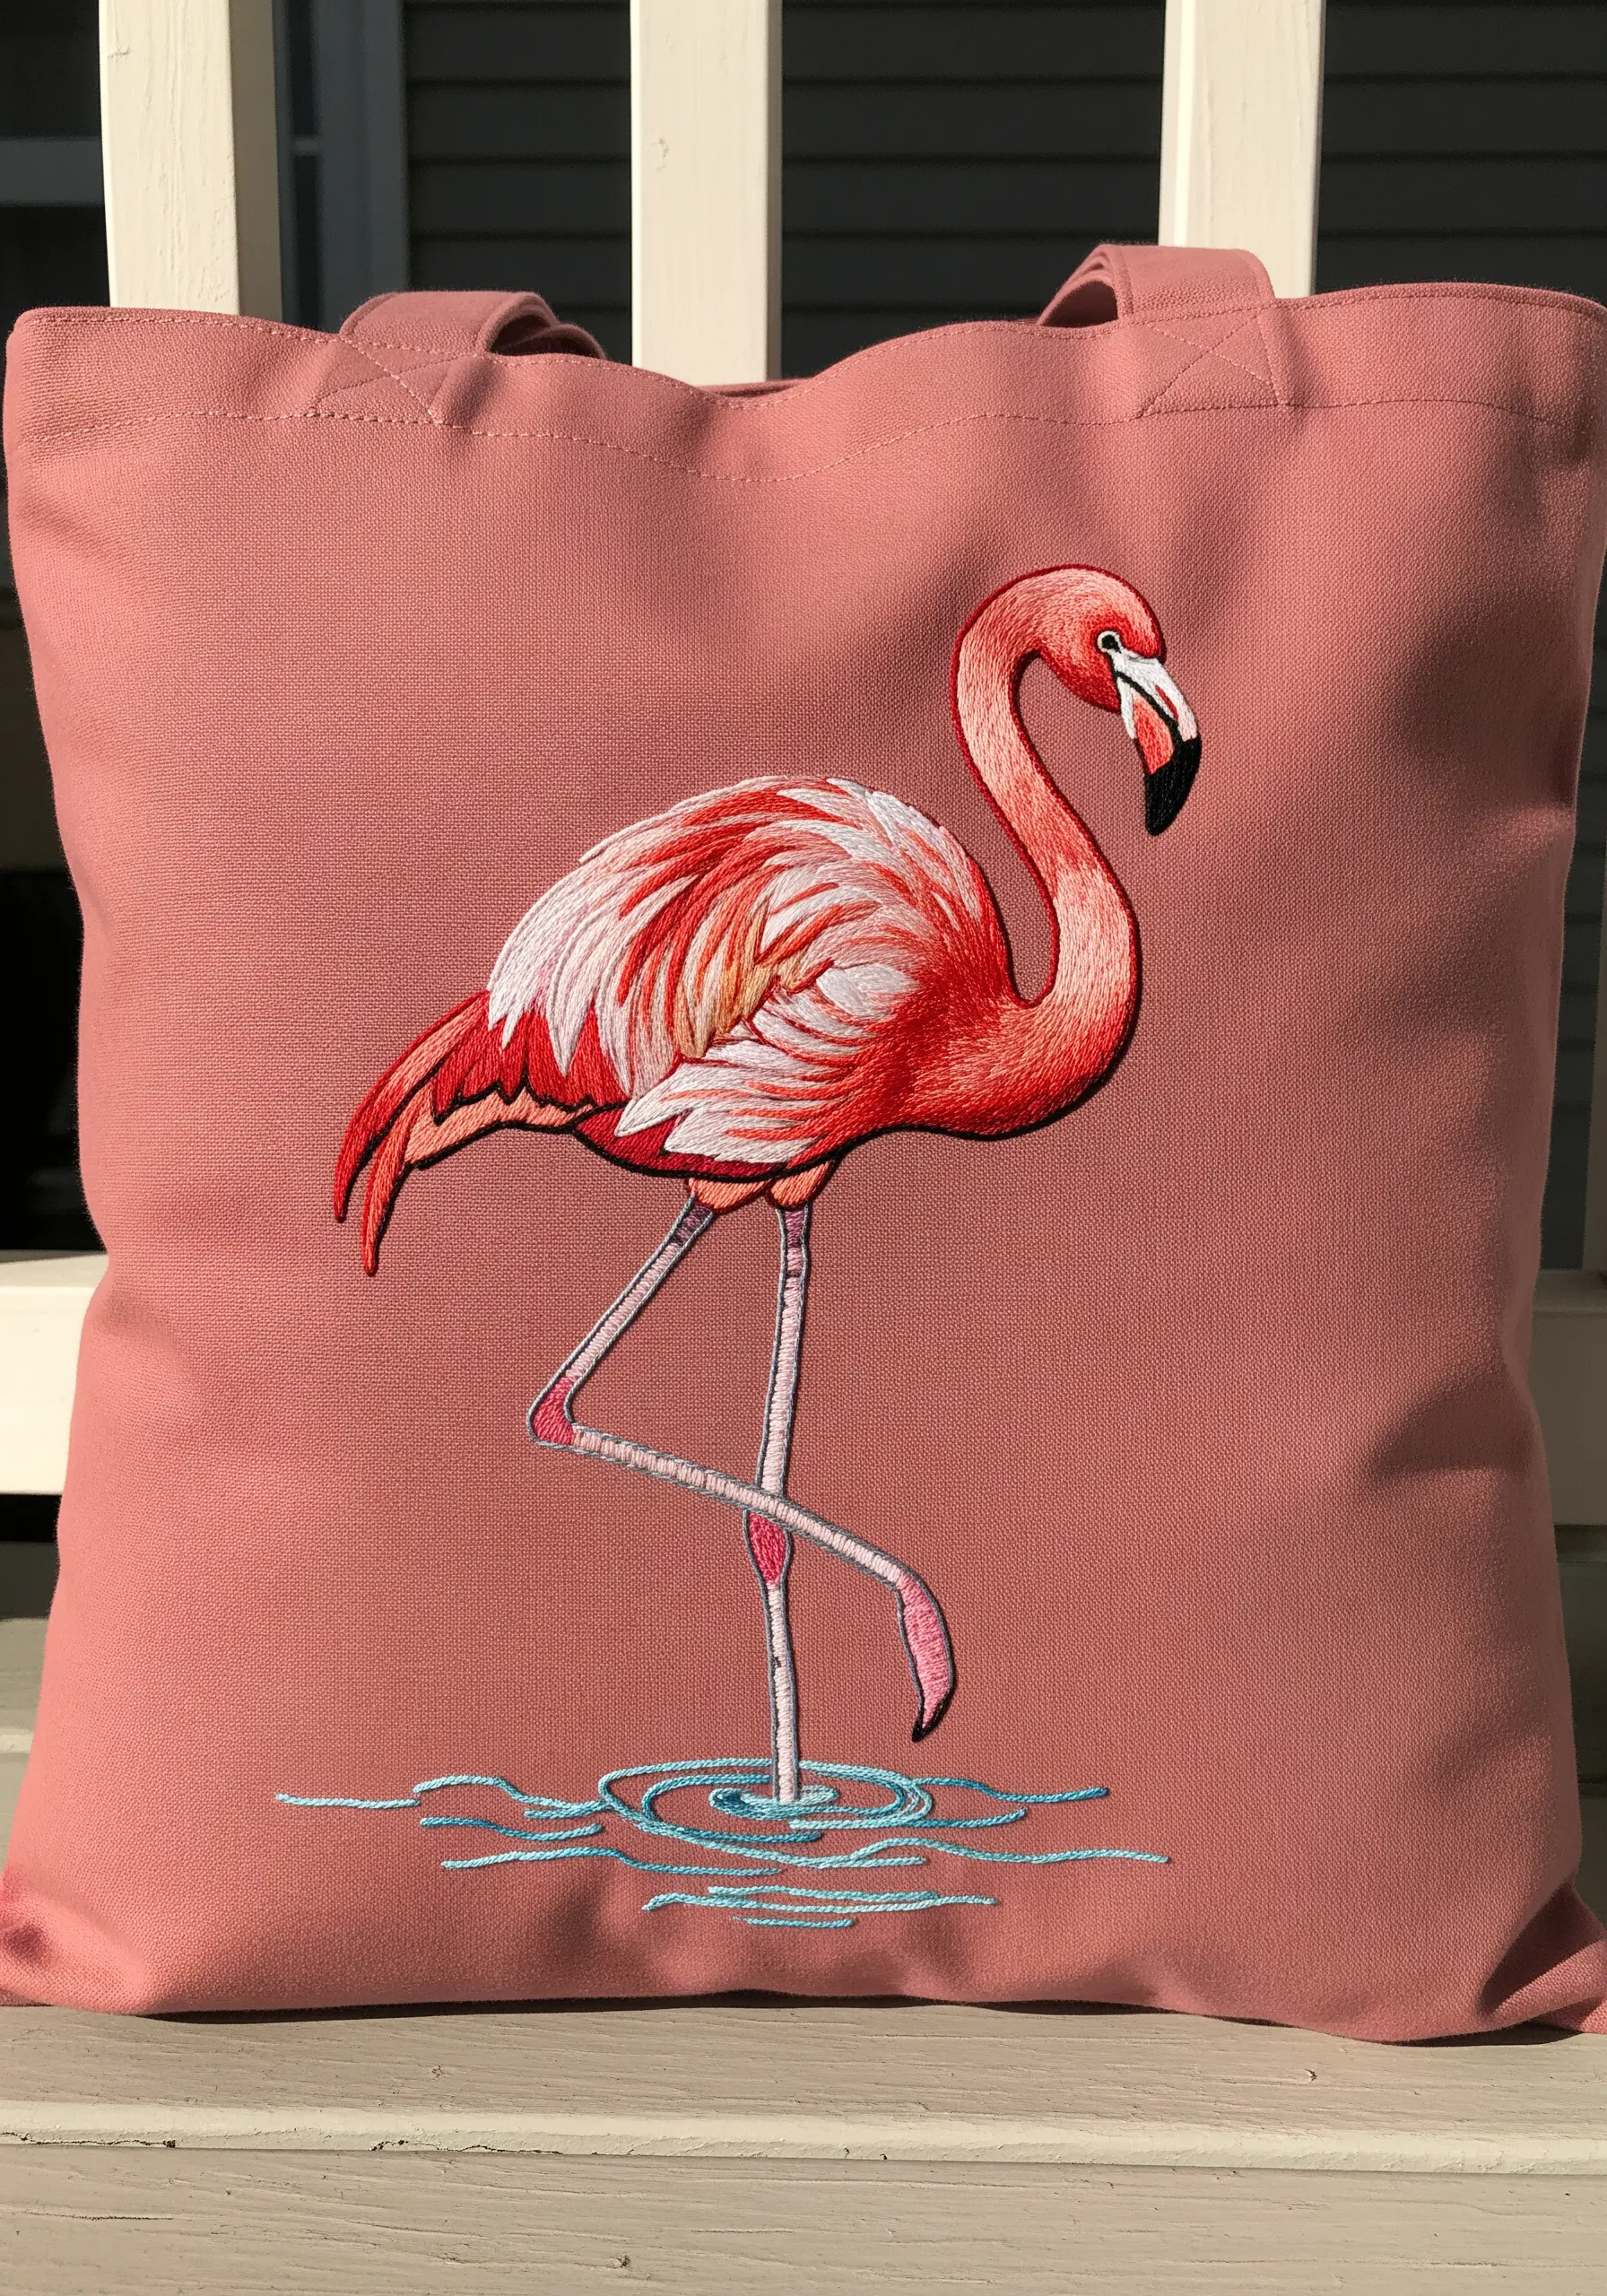
To give the flamingo a realistic, rounded shape, use three to four shades of coral and pink to create highlights and shadows.
Place your darkest threads along the underside of the body and neck, and use your lightest shade on the top where light would naturally hit.
Ensure your long-and-short stitches follow the curves of the bird’s body to enhance the illusion of volume and form.
11. Embrace a Spectrum of Stitches and Colors
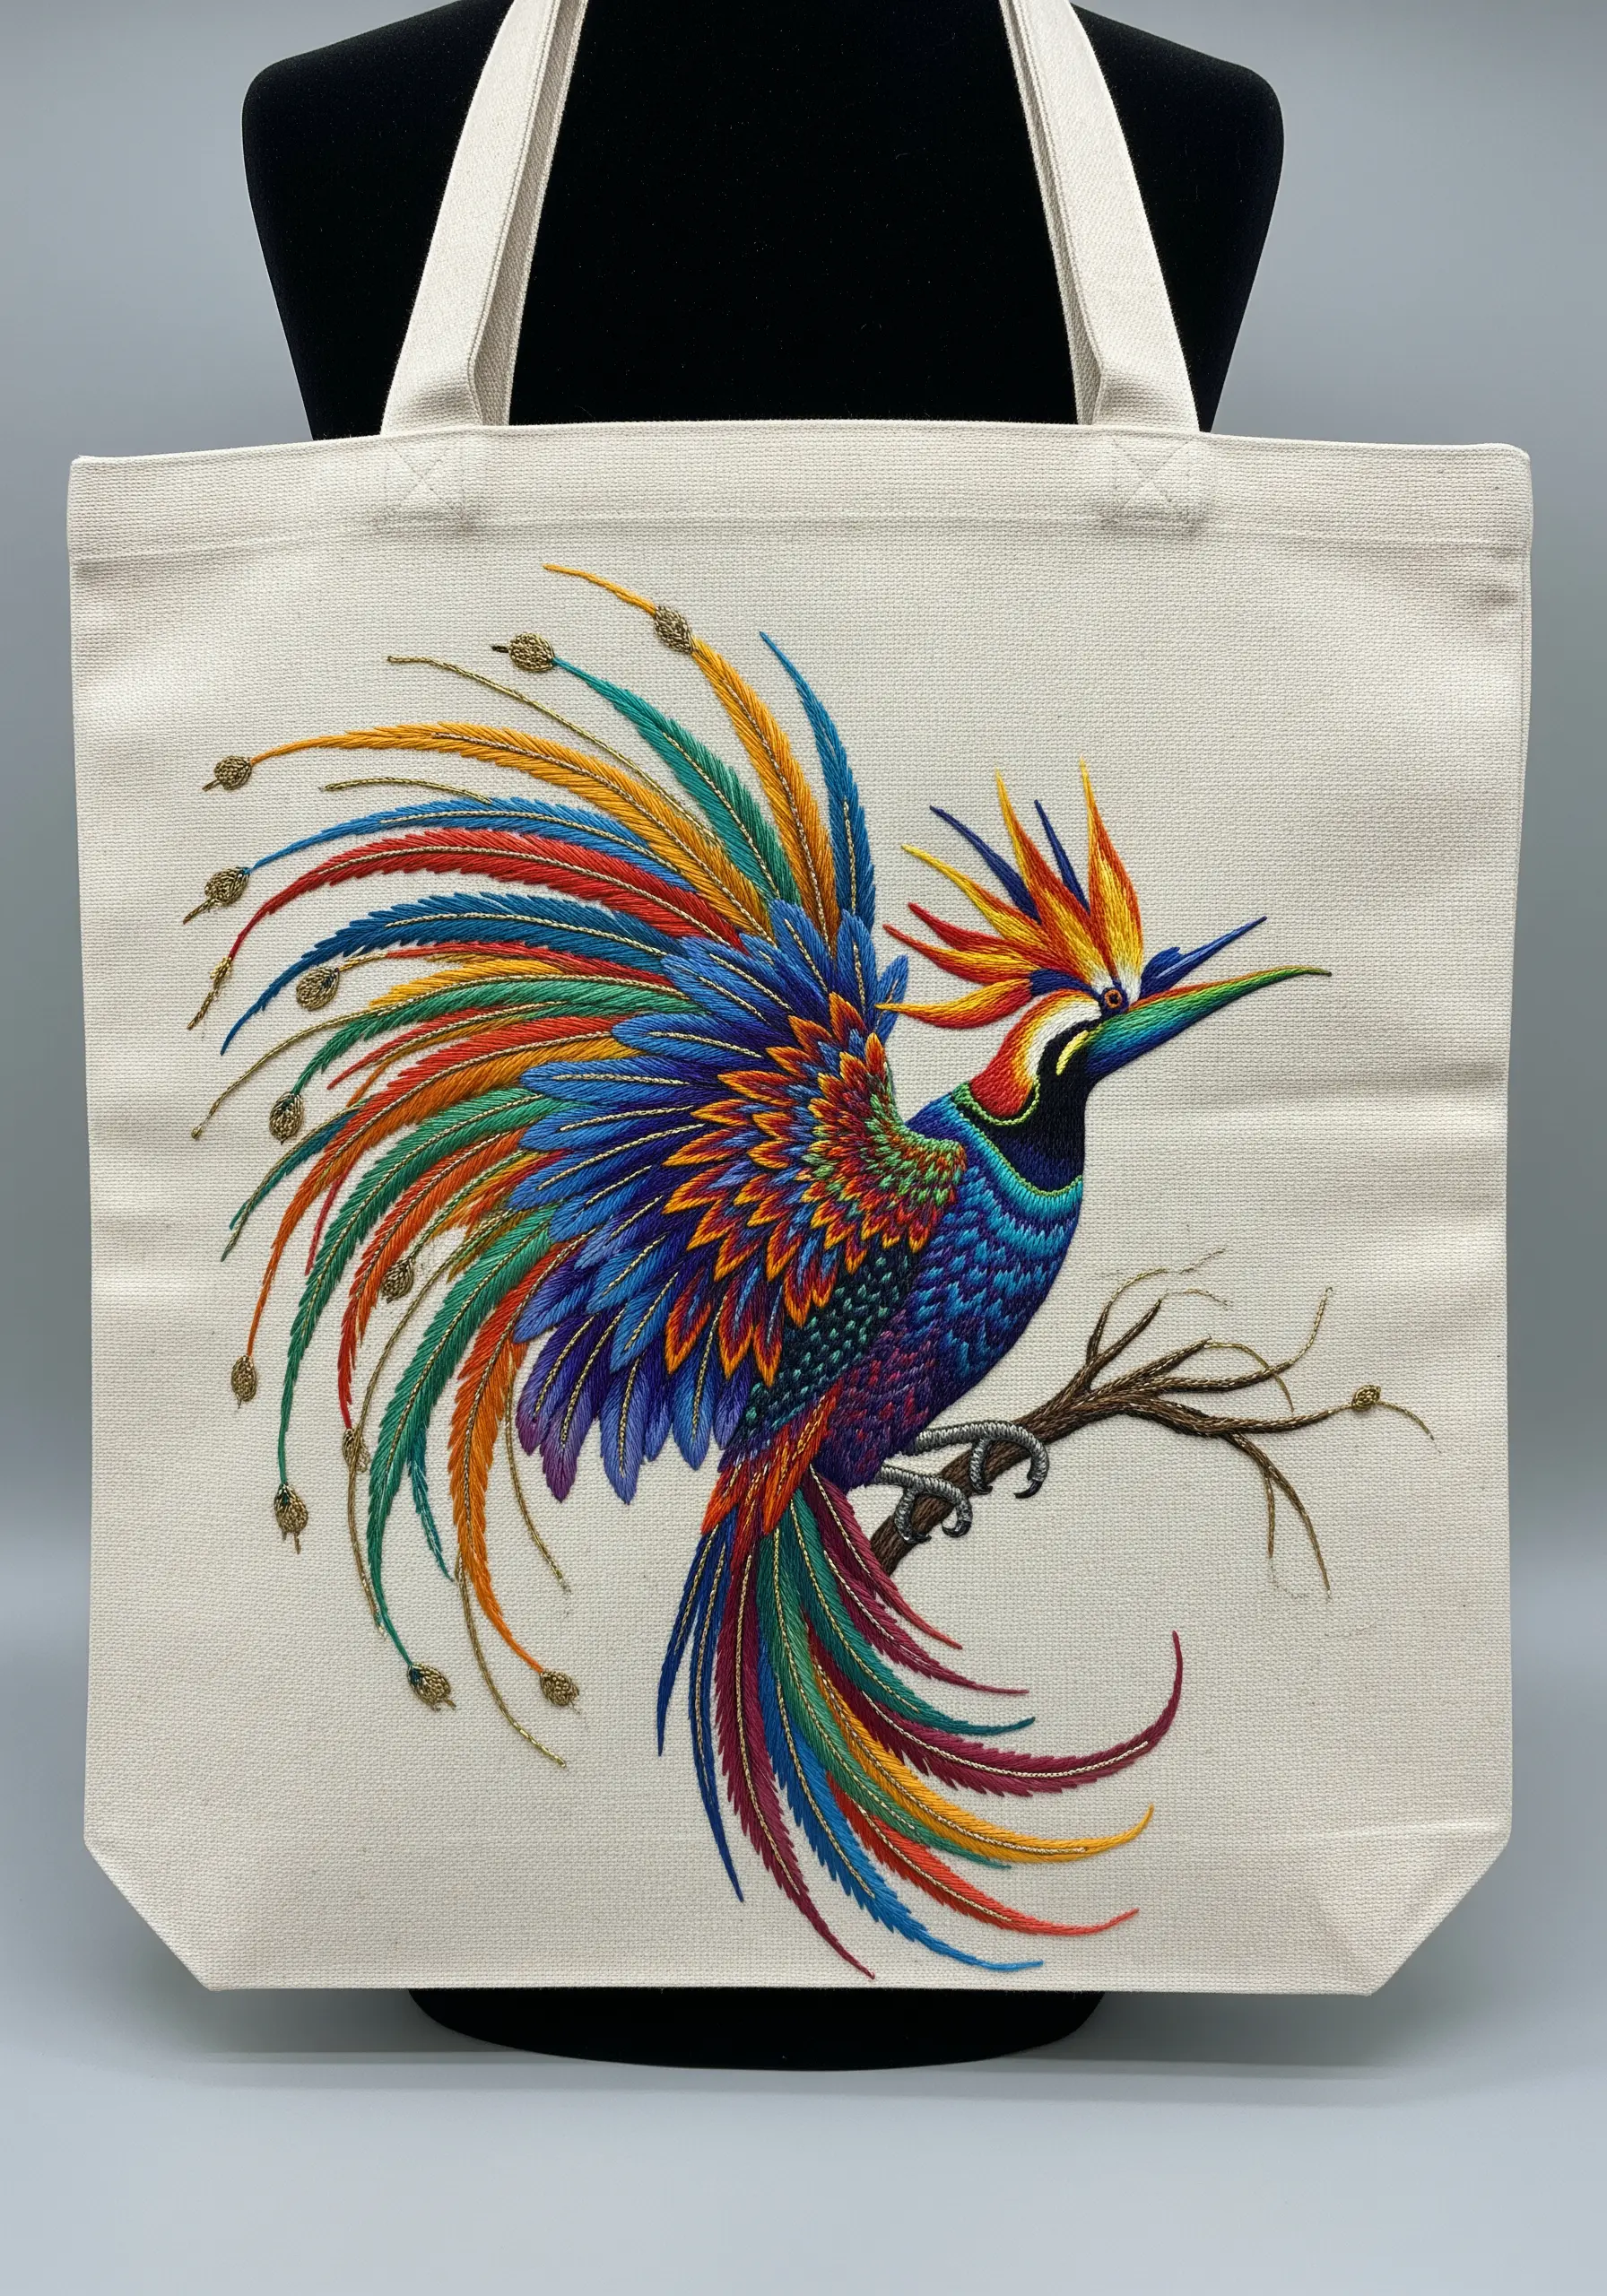
For a truly spectacular bird of paradise, go all in on color and texture.
Map out your design and assign different stitches to different feathers: use smooth thread painting for the body, detached chain stitches for fluffy areas, and long, dramatic straight stitches for the tail.
This is a perfect opportunity to use those vibrant, unusual colors in your collection, creating dazzling contemporary rainbow blend stitches that make the piece unforgettable.
12. Accentuate Character with a Bold Outline
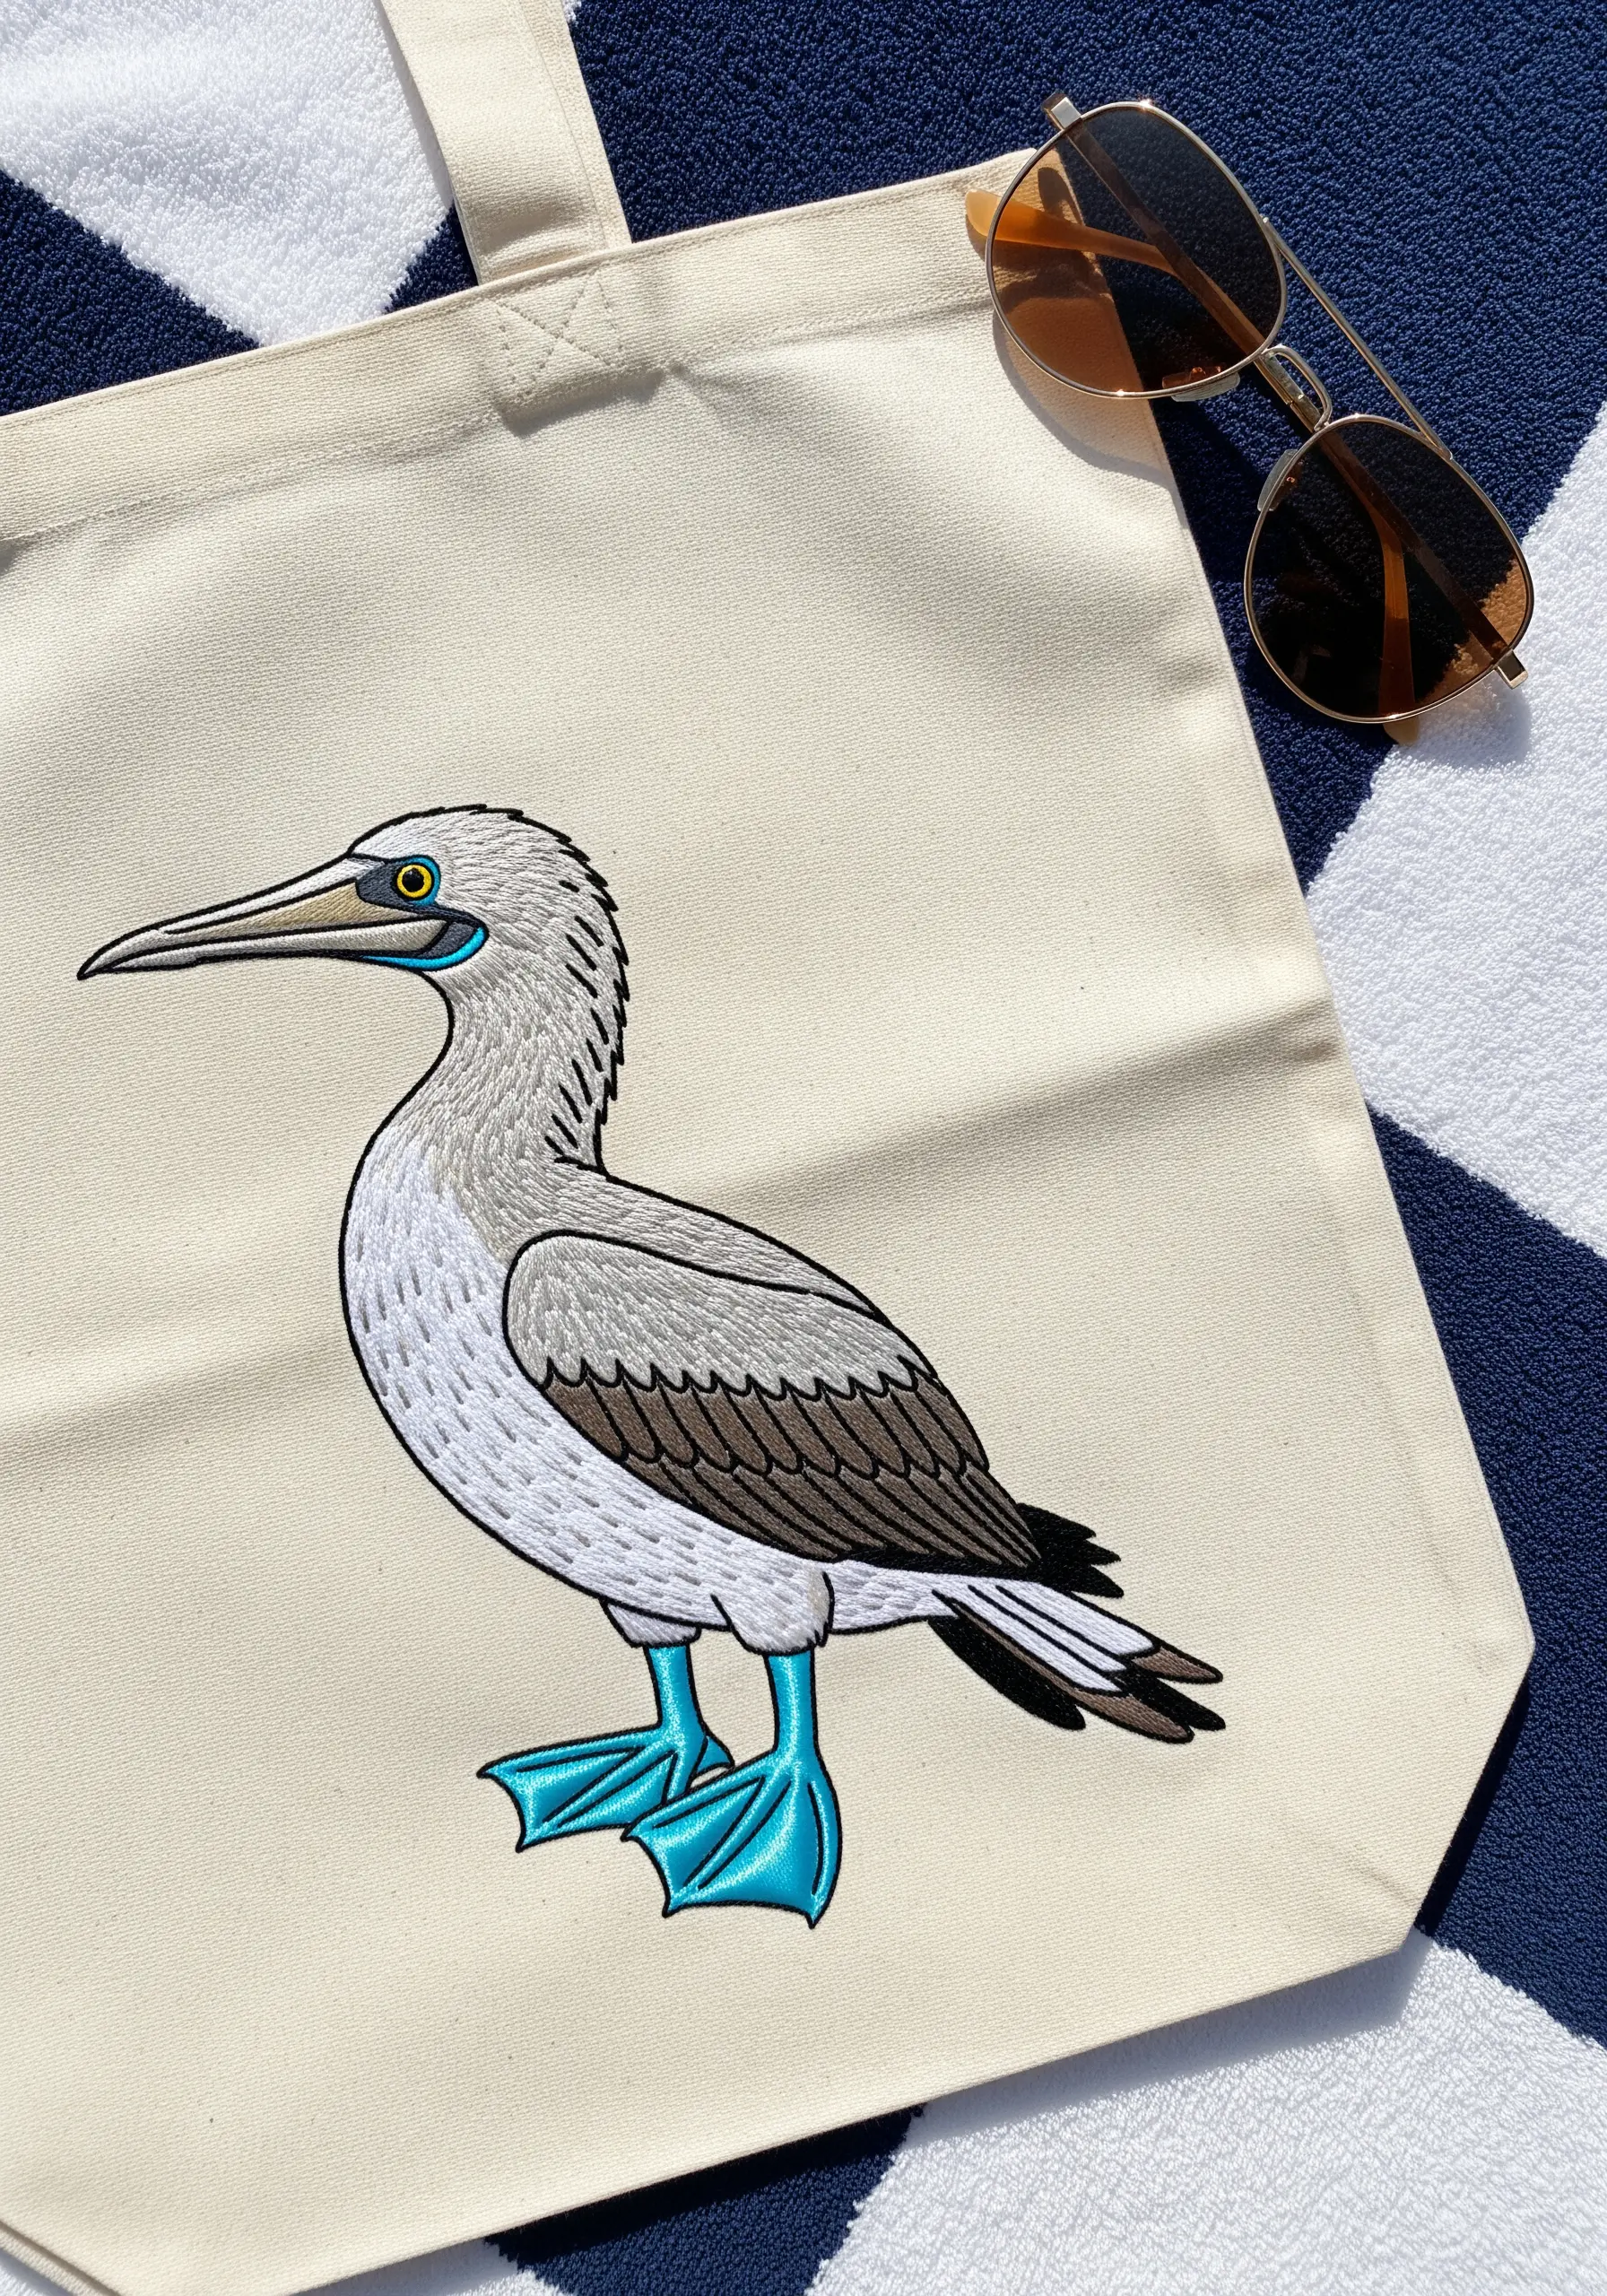
The playful personality of the blue-footed booby is captured perfectly through a strong, graphic outline.
Use a three-strand backstitch or stem stitch in black to create a solid, confident line around each shape.
This clean border contains your satin stitch fill and gives the entire piece a polished, illustrative quality.
For the iconic feet, choose the most saturated, unapologetic turquoise you can find—they are the star of the show.
13. Create a Lush Scene with Padded Stitching
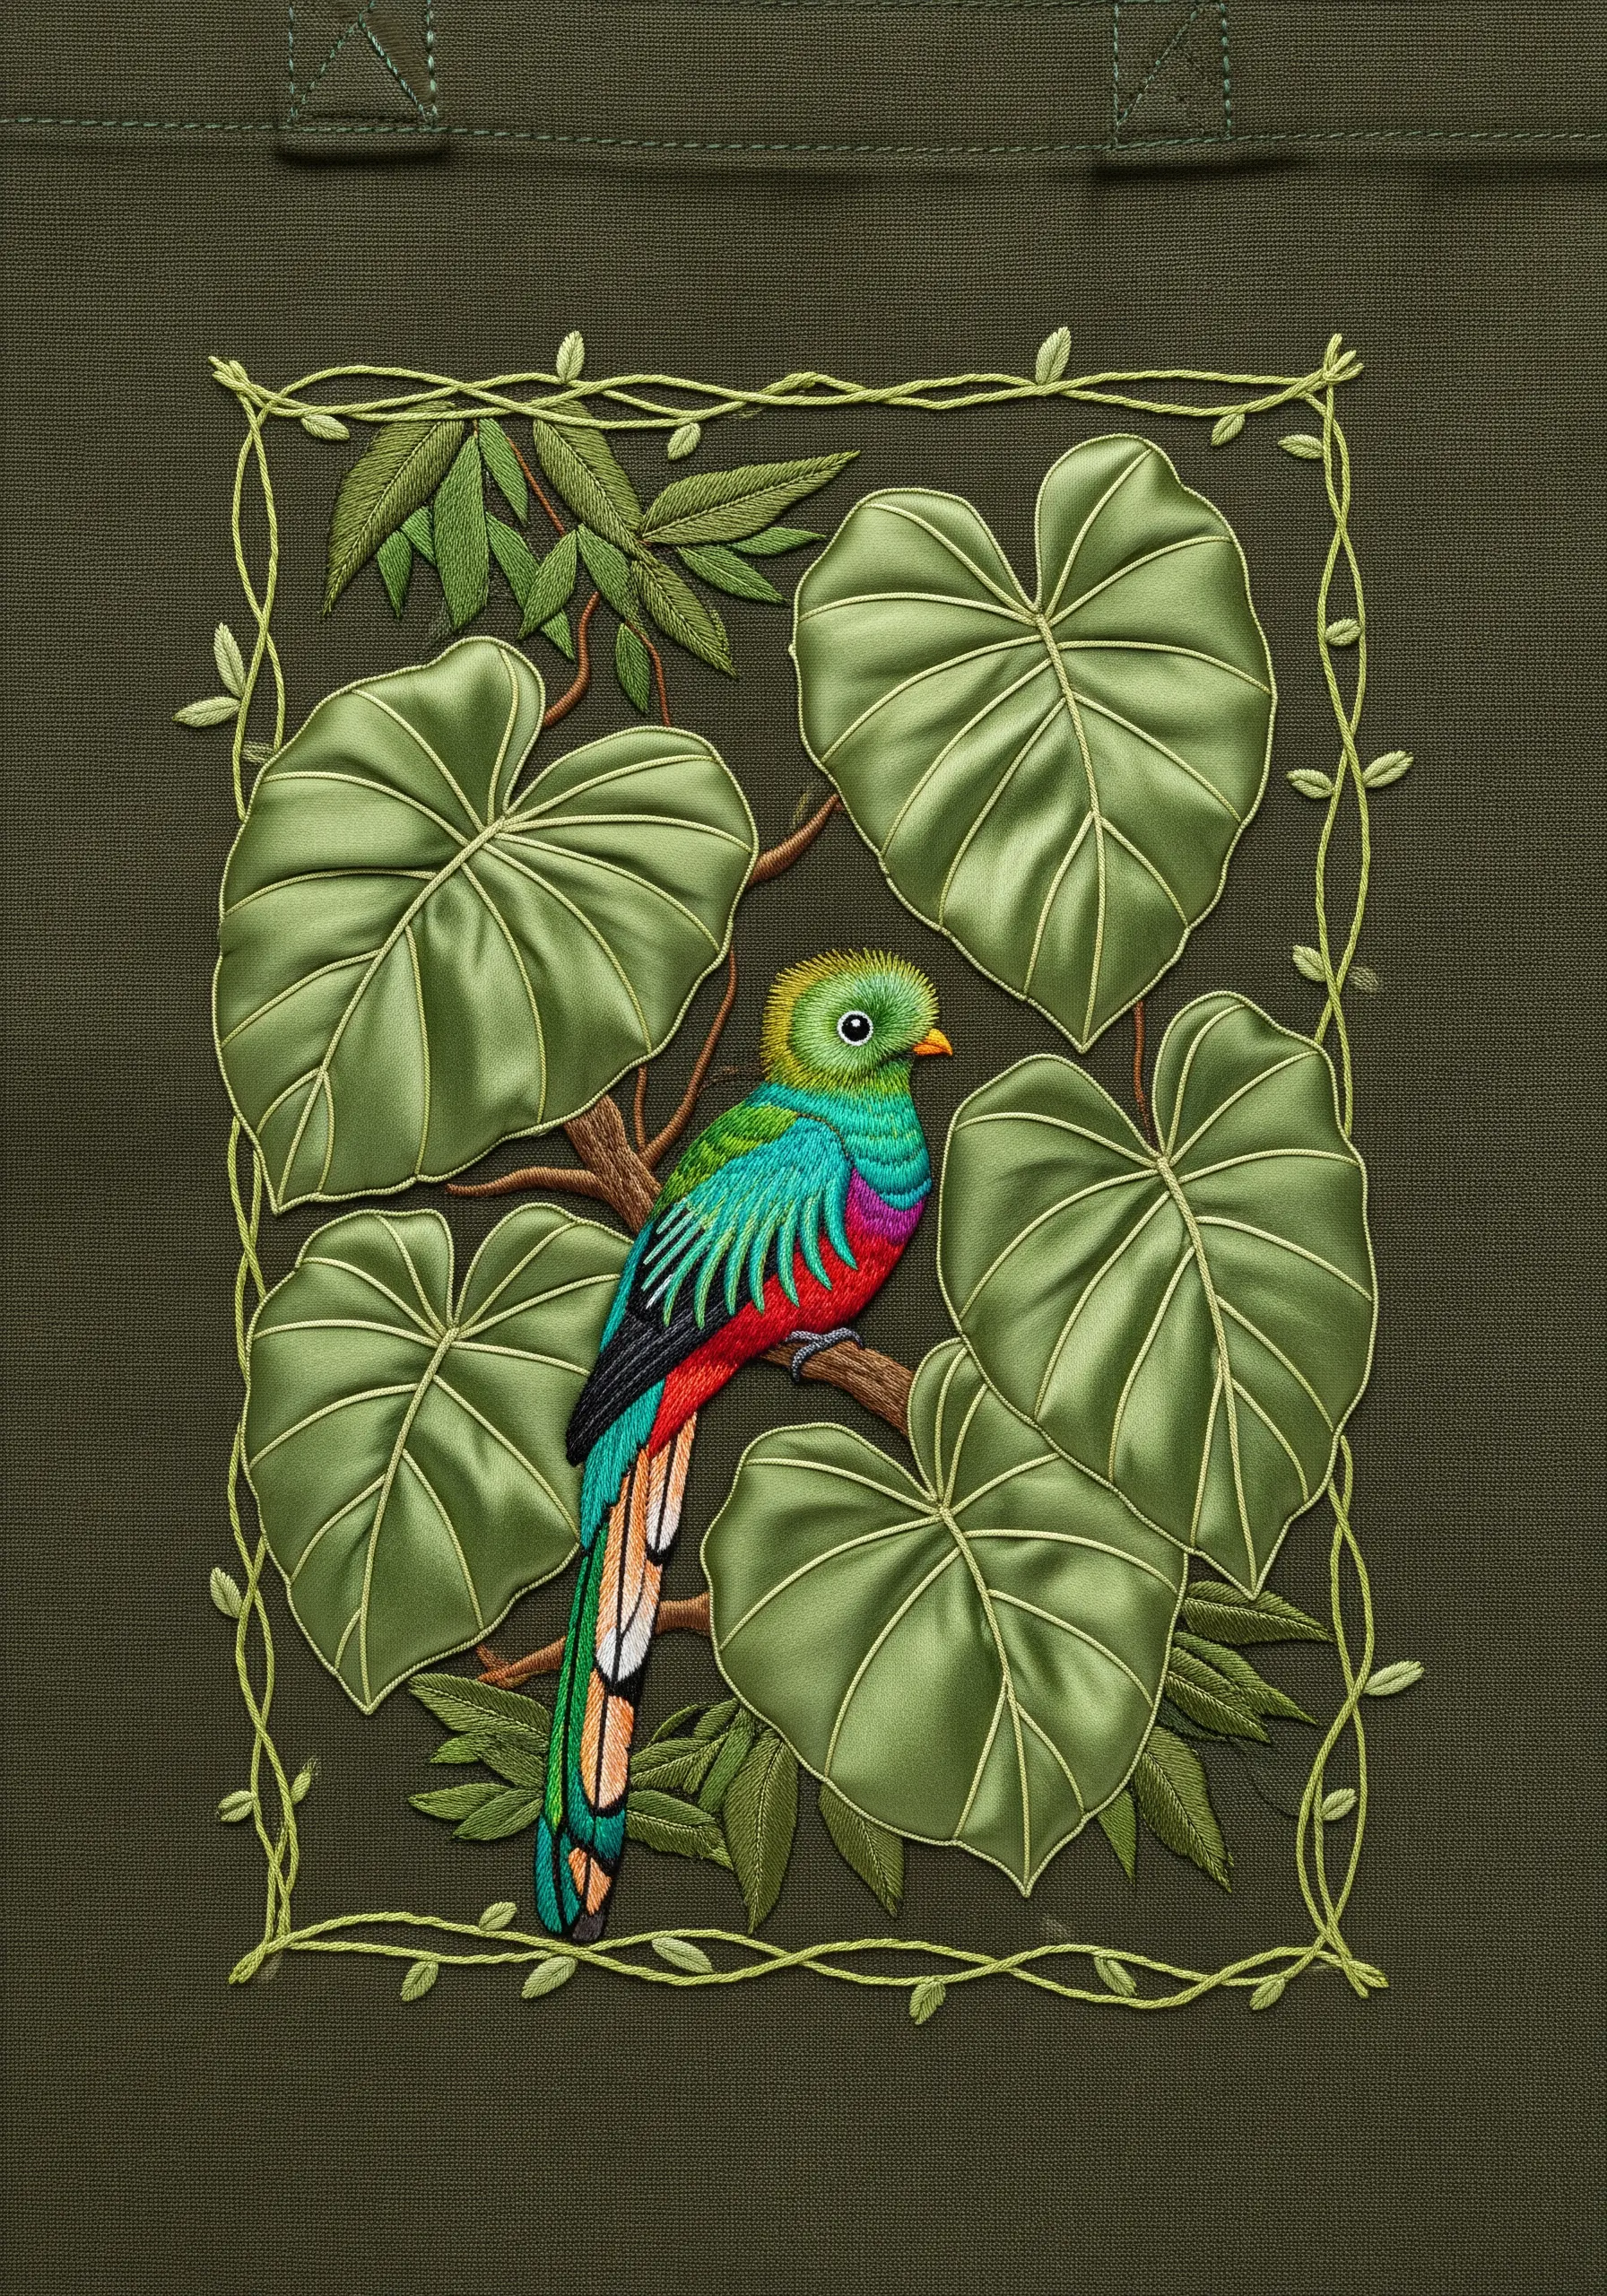
Give your embroidered foliage a stunning, three-dimensional quality by using a padded satin stitch.
First, fill the leaf shapes with a foundation of horizontal seed stitches, creating a small cushion.
Then, cover this padding with your final layer of vertical satin stitches.
This technique physically raises the leaves from the surface, making the bird appear nestled within a lush, tactile jungle and creating a handmade embroidery touch with tangible depth.
14. Tell a Story with Line Art and Selective Color
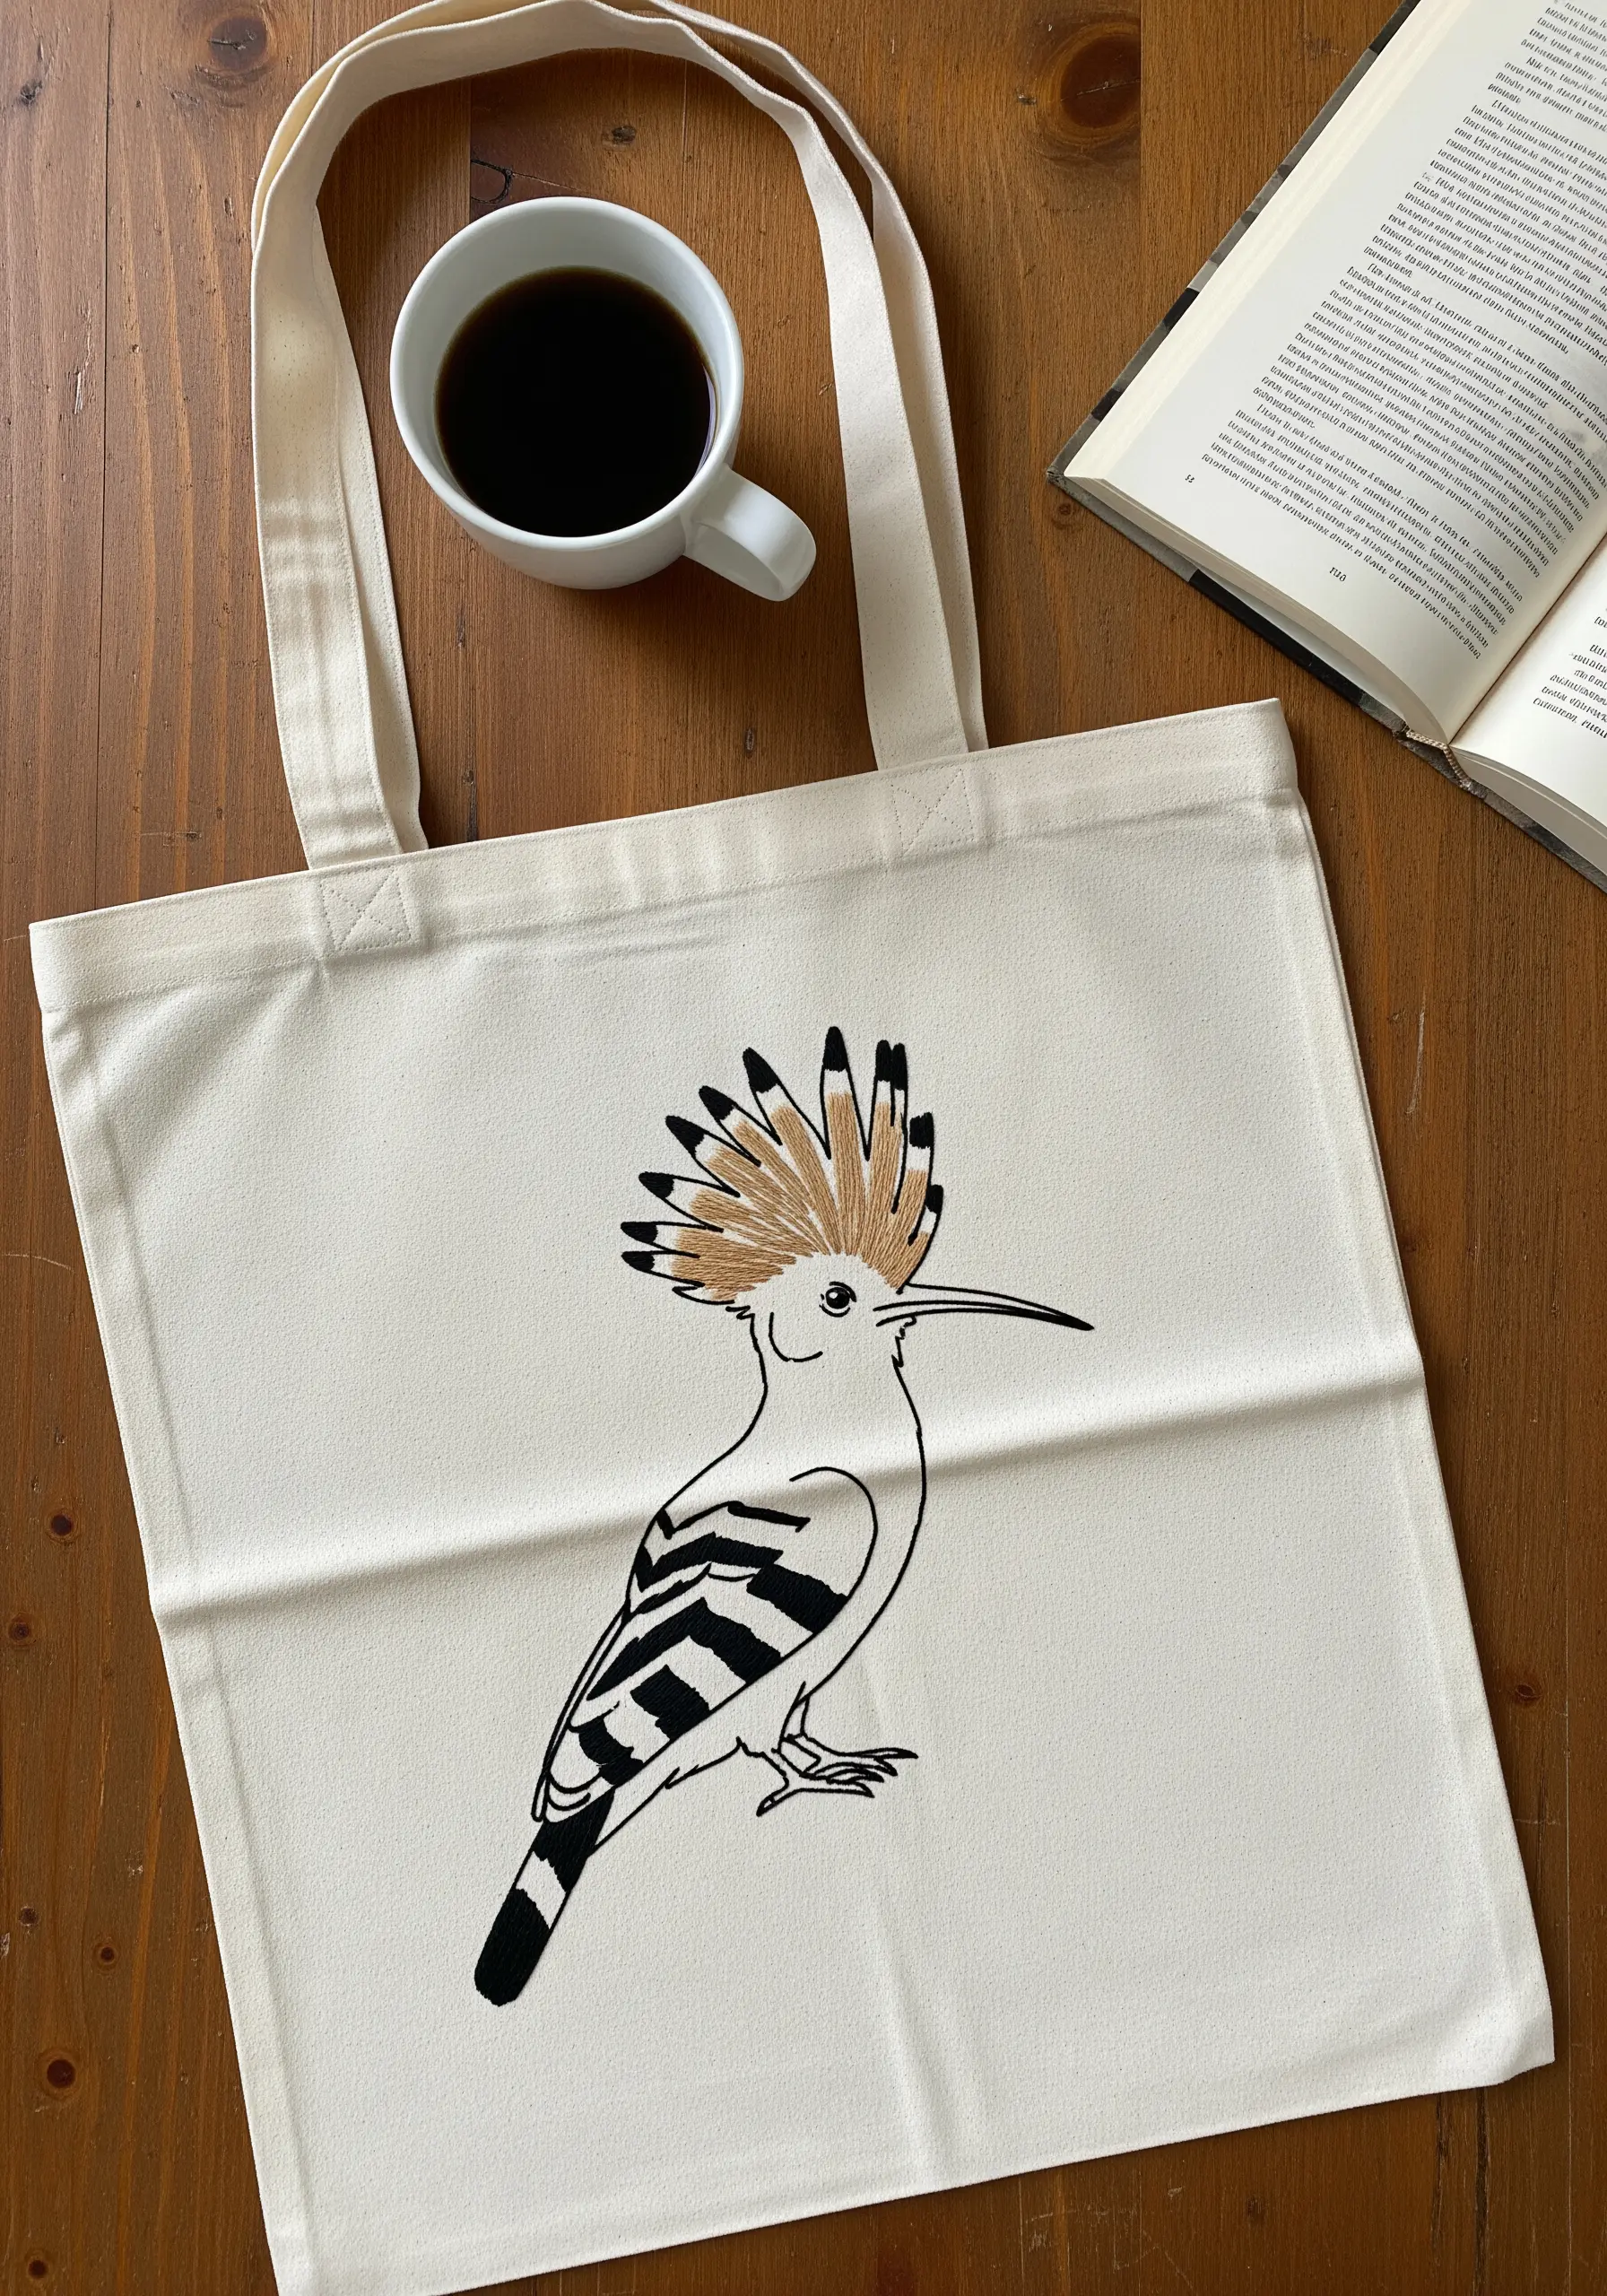
This elegant hoopoe demonstrates that you don’t need to fill every area to make a powerful statement.
Use a clean, two-strand backstitch to define the bird’s silhouette.
By filling only the most characteristic parts—the crest and the wing bars—you draw the eye and highlight the bird’s unique beauty.
This minimalist approach is sophisticated, stitches up quickly, and creates striking minimal embroidery designs that feel intentional.
15. Integrate Your Bird into a Floral Tapestry
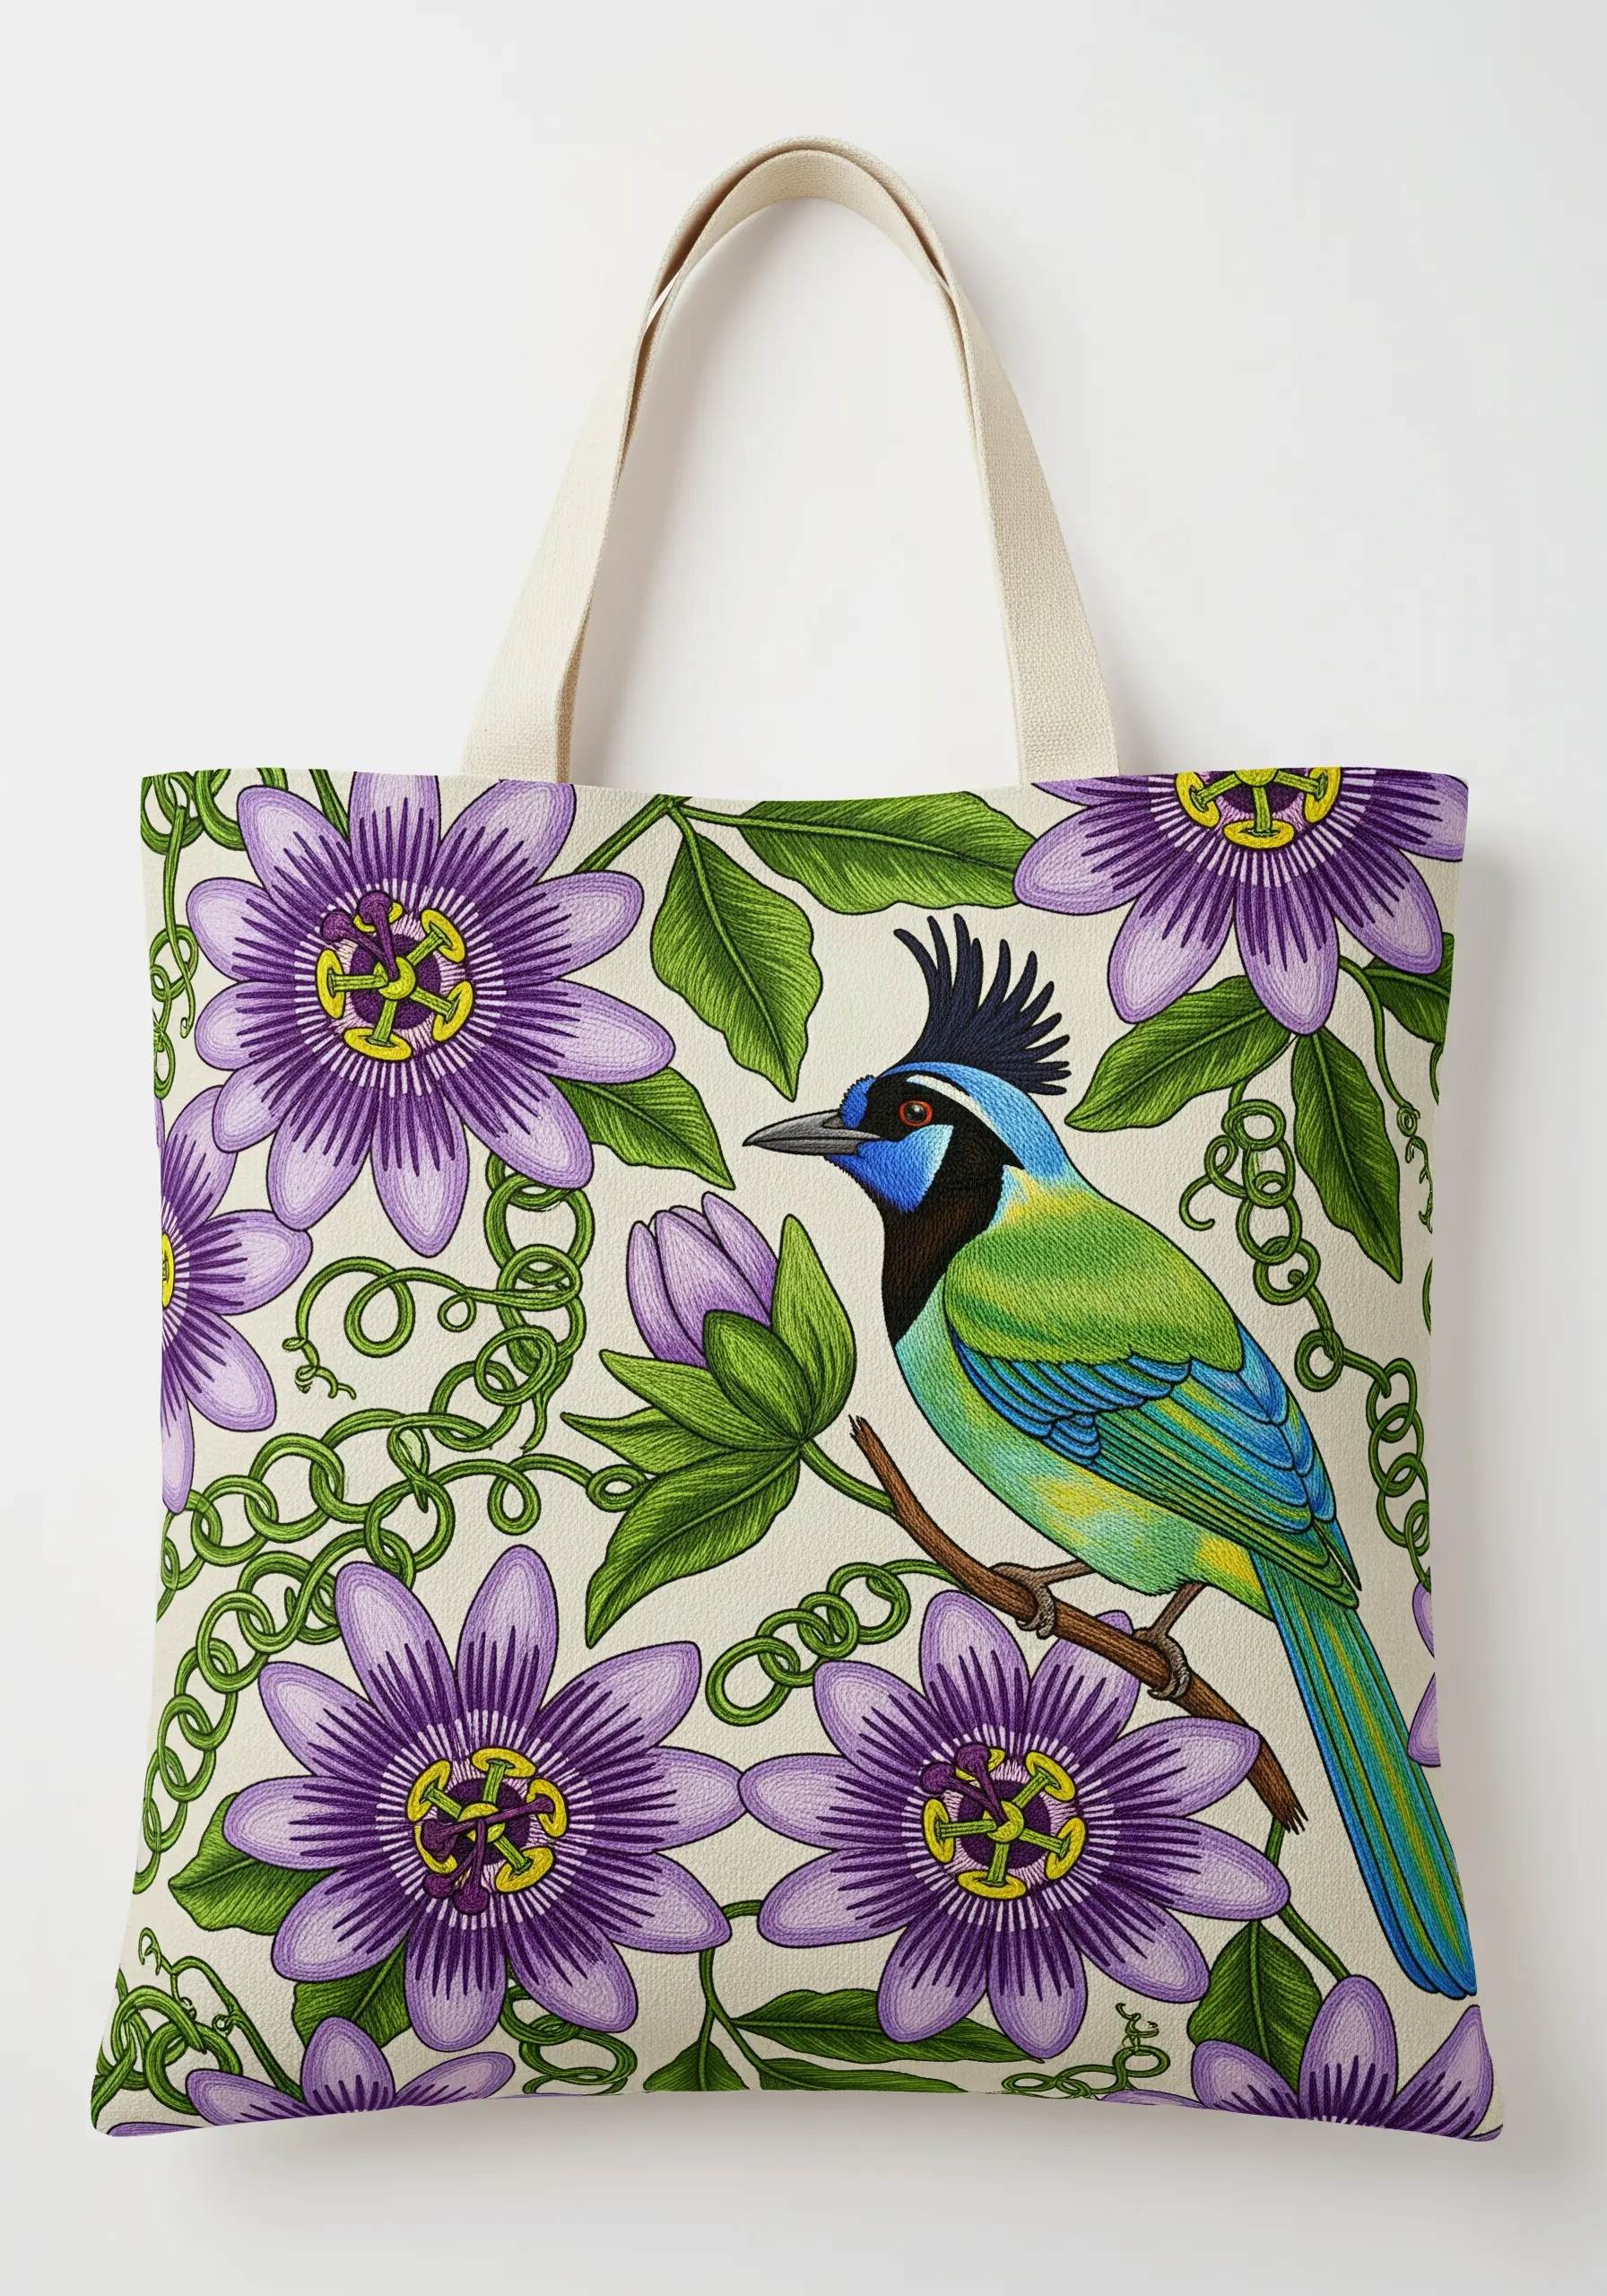
Turn your entire tote bag into a canvas by stitching a dense, all-over pattern of passion flowers and vines.
To ensure your green jay remains the star, use slightly brighter or more saturated shades of blue and green for its feathers.
Allow a few stitched vines to cross in front of the bird’s tail or body; this simple trick creates an incredible sense of depth, making the bird feel truly immersed in its environment.
16. Paint with Thread for a Watercolor Effect
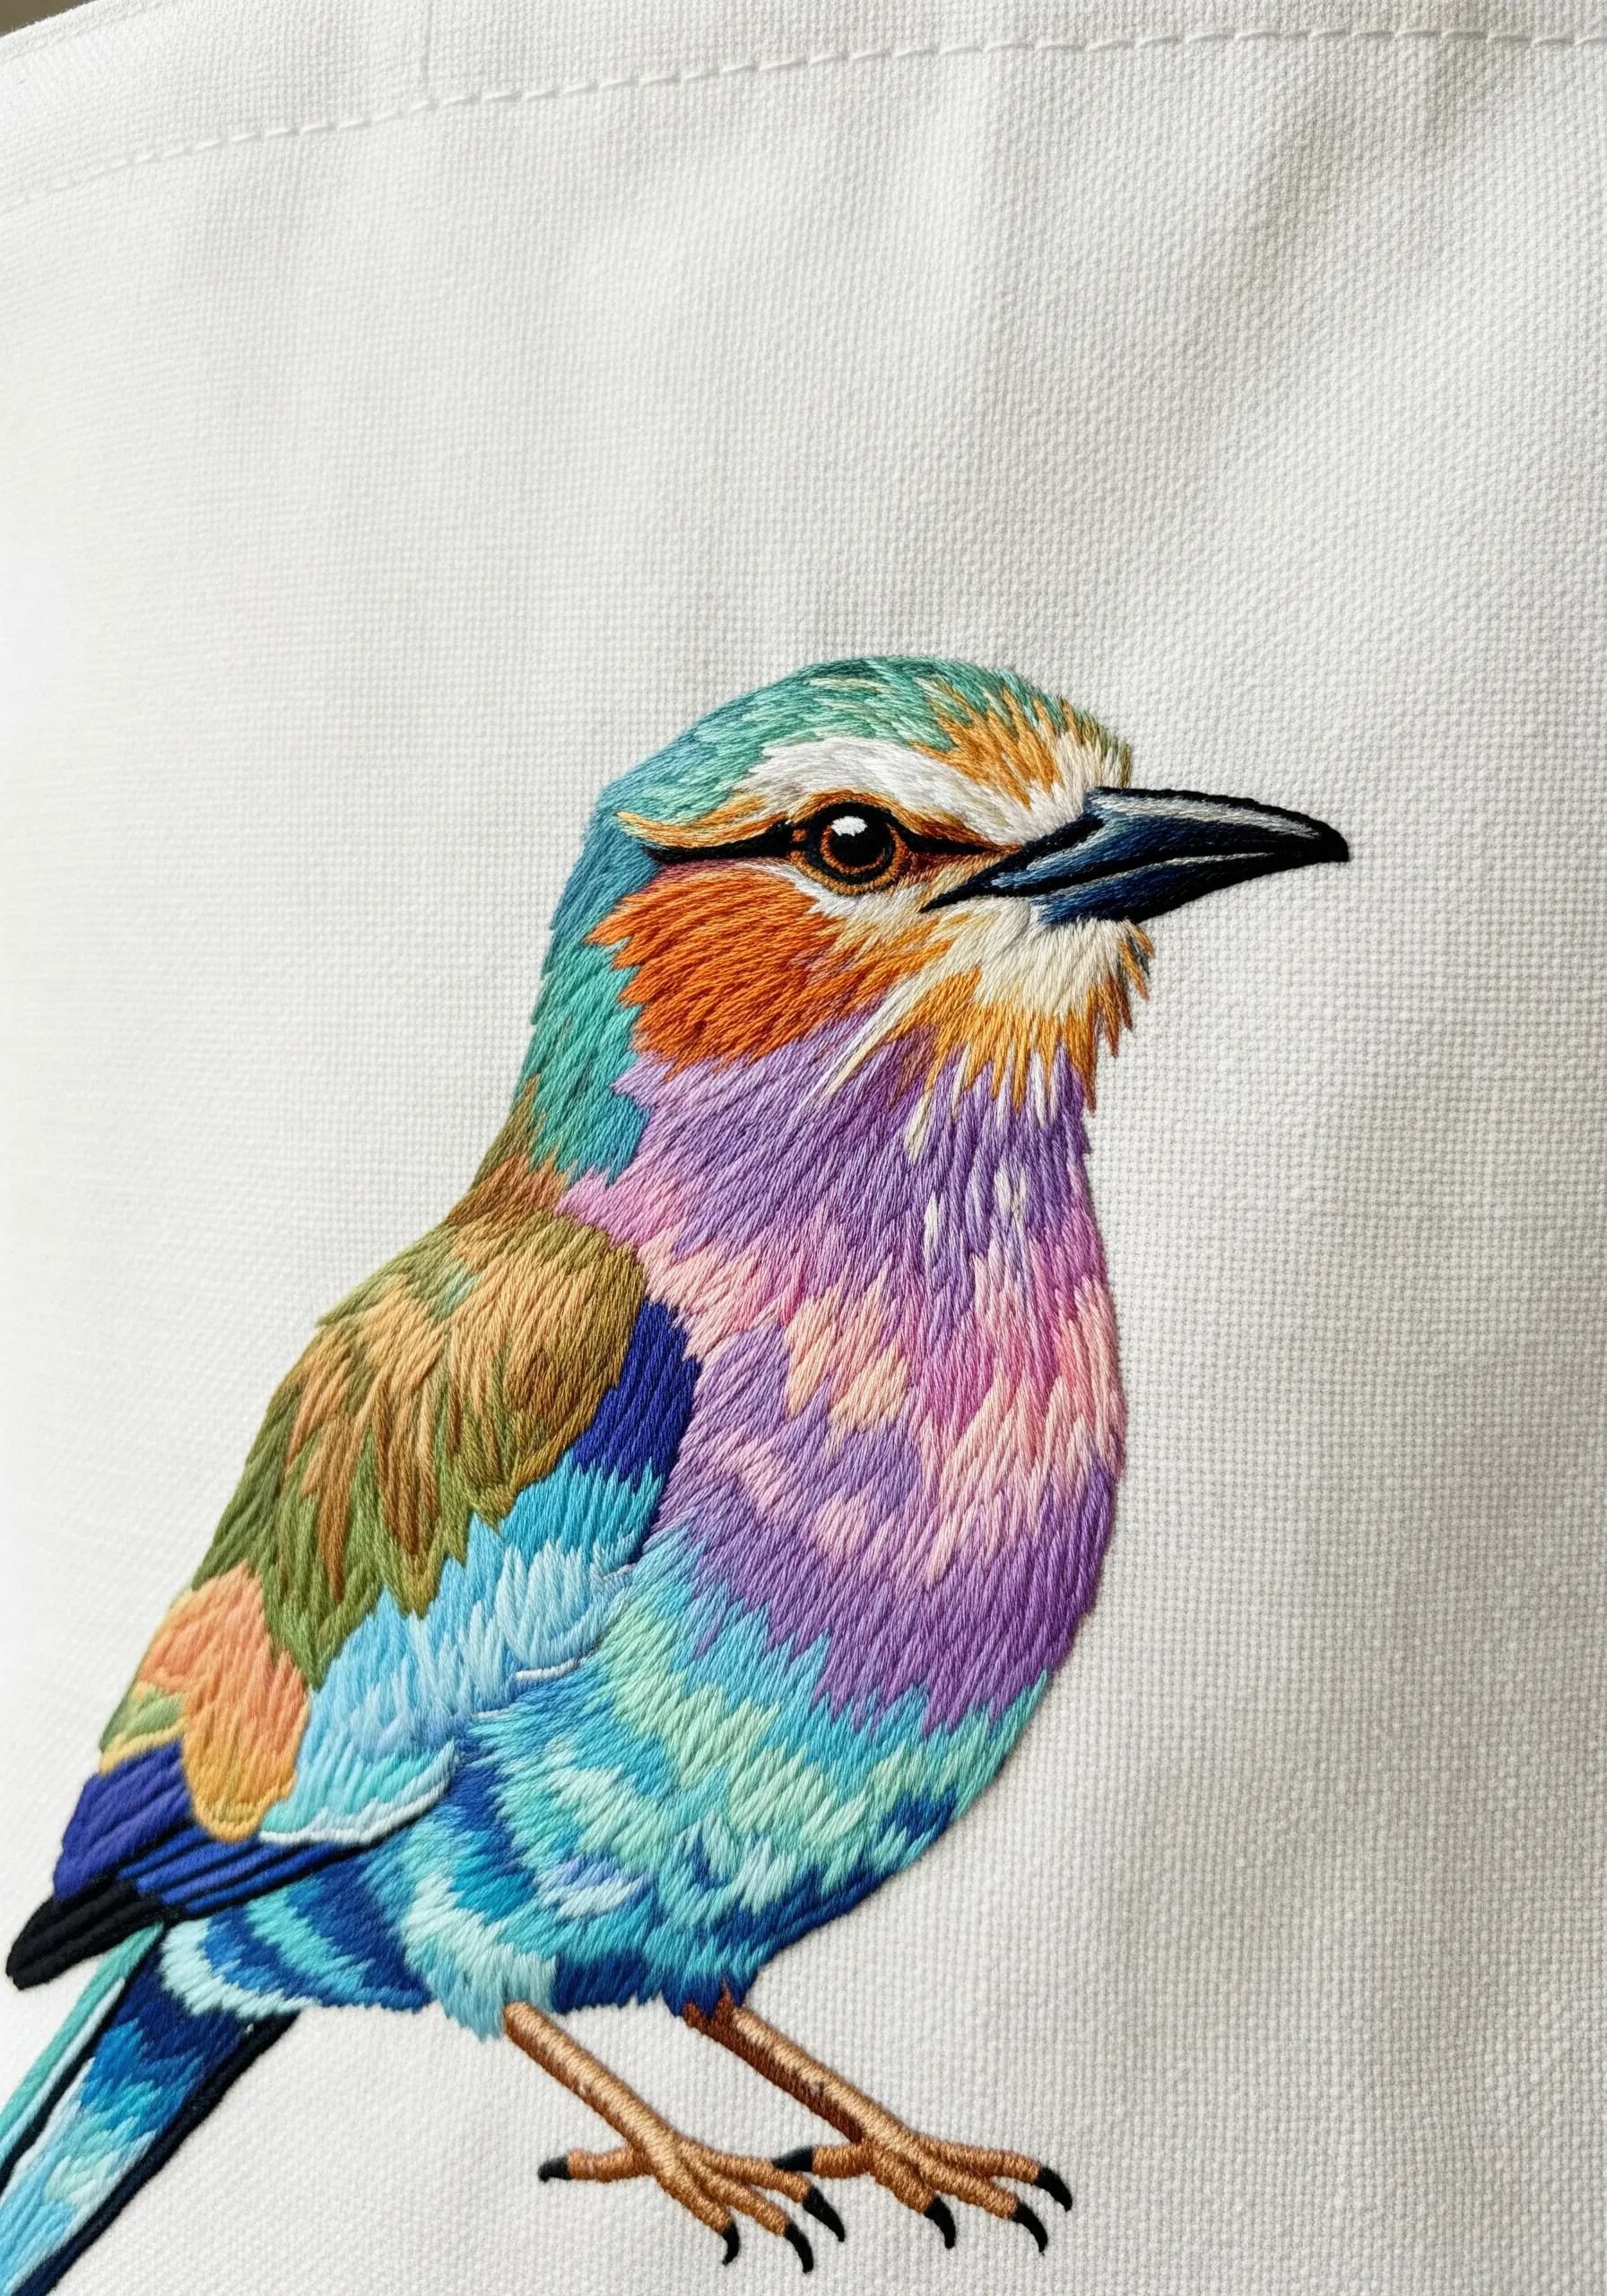
Achieve this breathtakingly soft, painterly look with meticulous thread painting using a single strand of floss.
Blend your colors seamlessly by varying the length and direction of your long-and-short stitches, avoiding any hard lines between shades.
Don’t be afraid to add unexpected hues—a touch of lilac in the blue, a hint of mint in the green—to capture the complex beauty of light on feathers.
This method is essential when you want to embroider realistic shadows and highlights.
17. Stitch a Modern, Geometric Interpretation
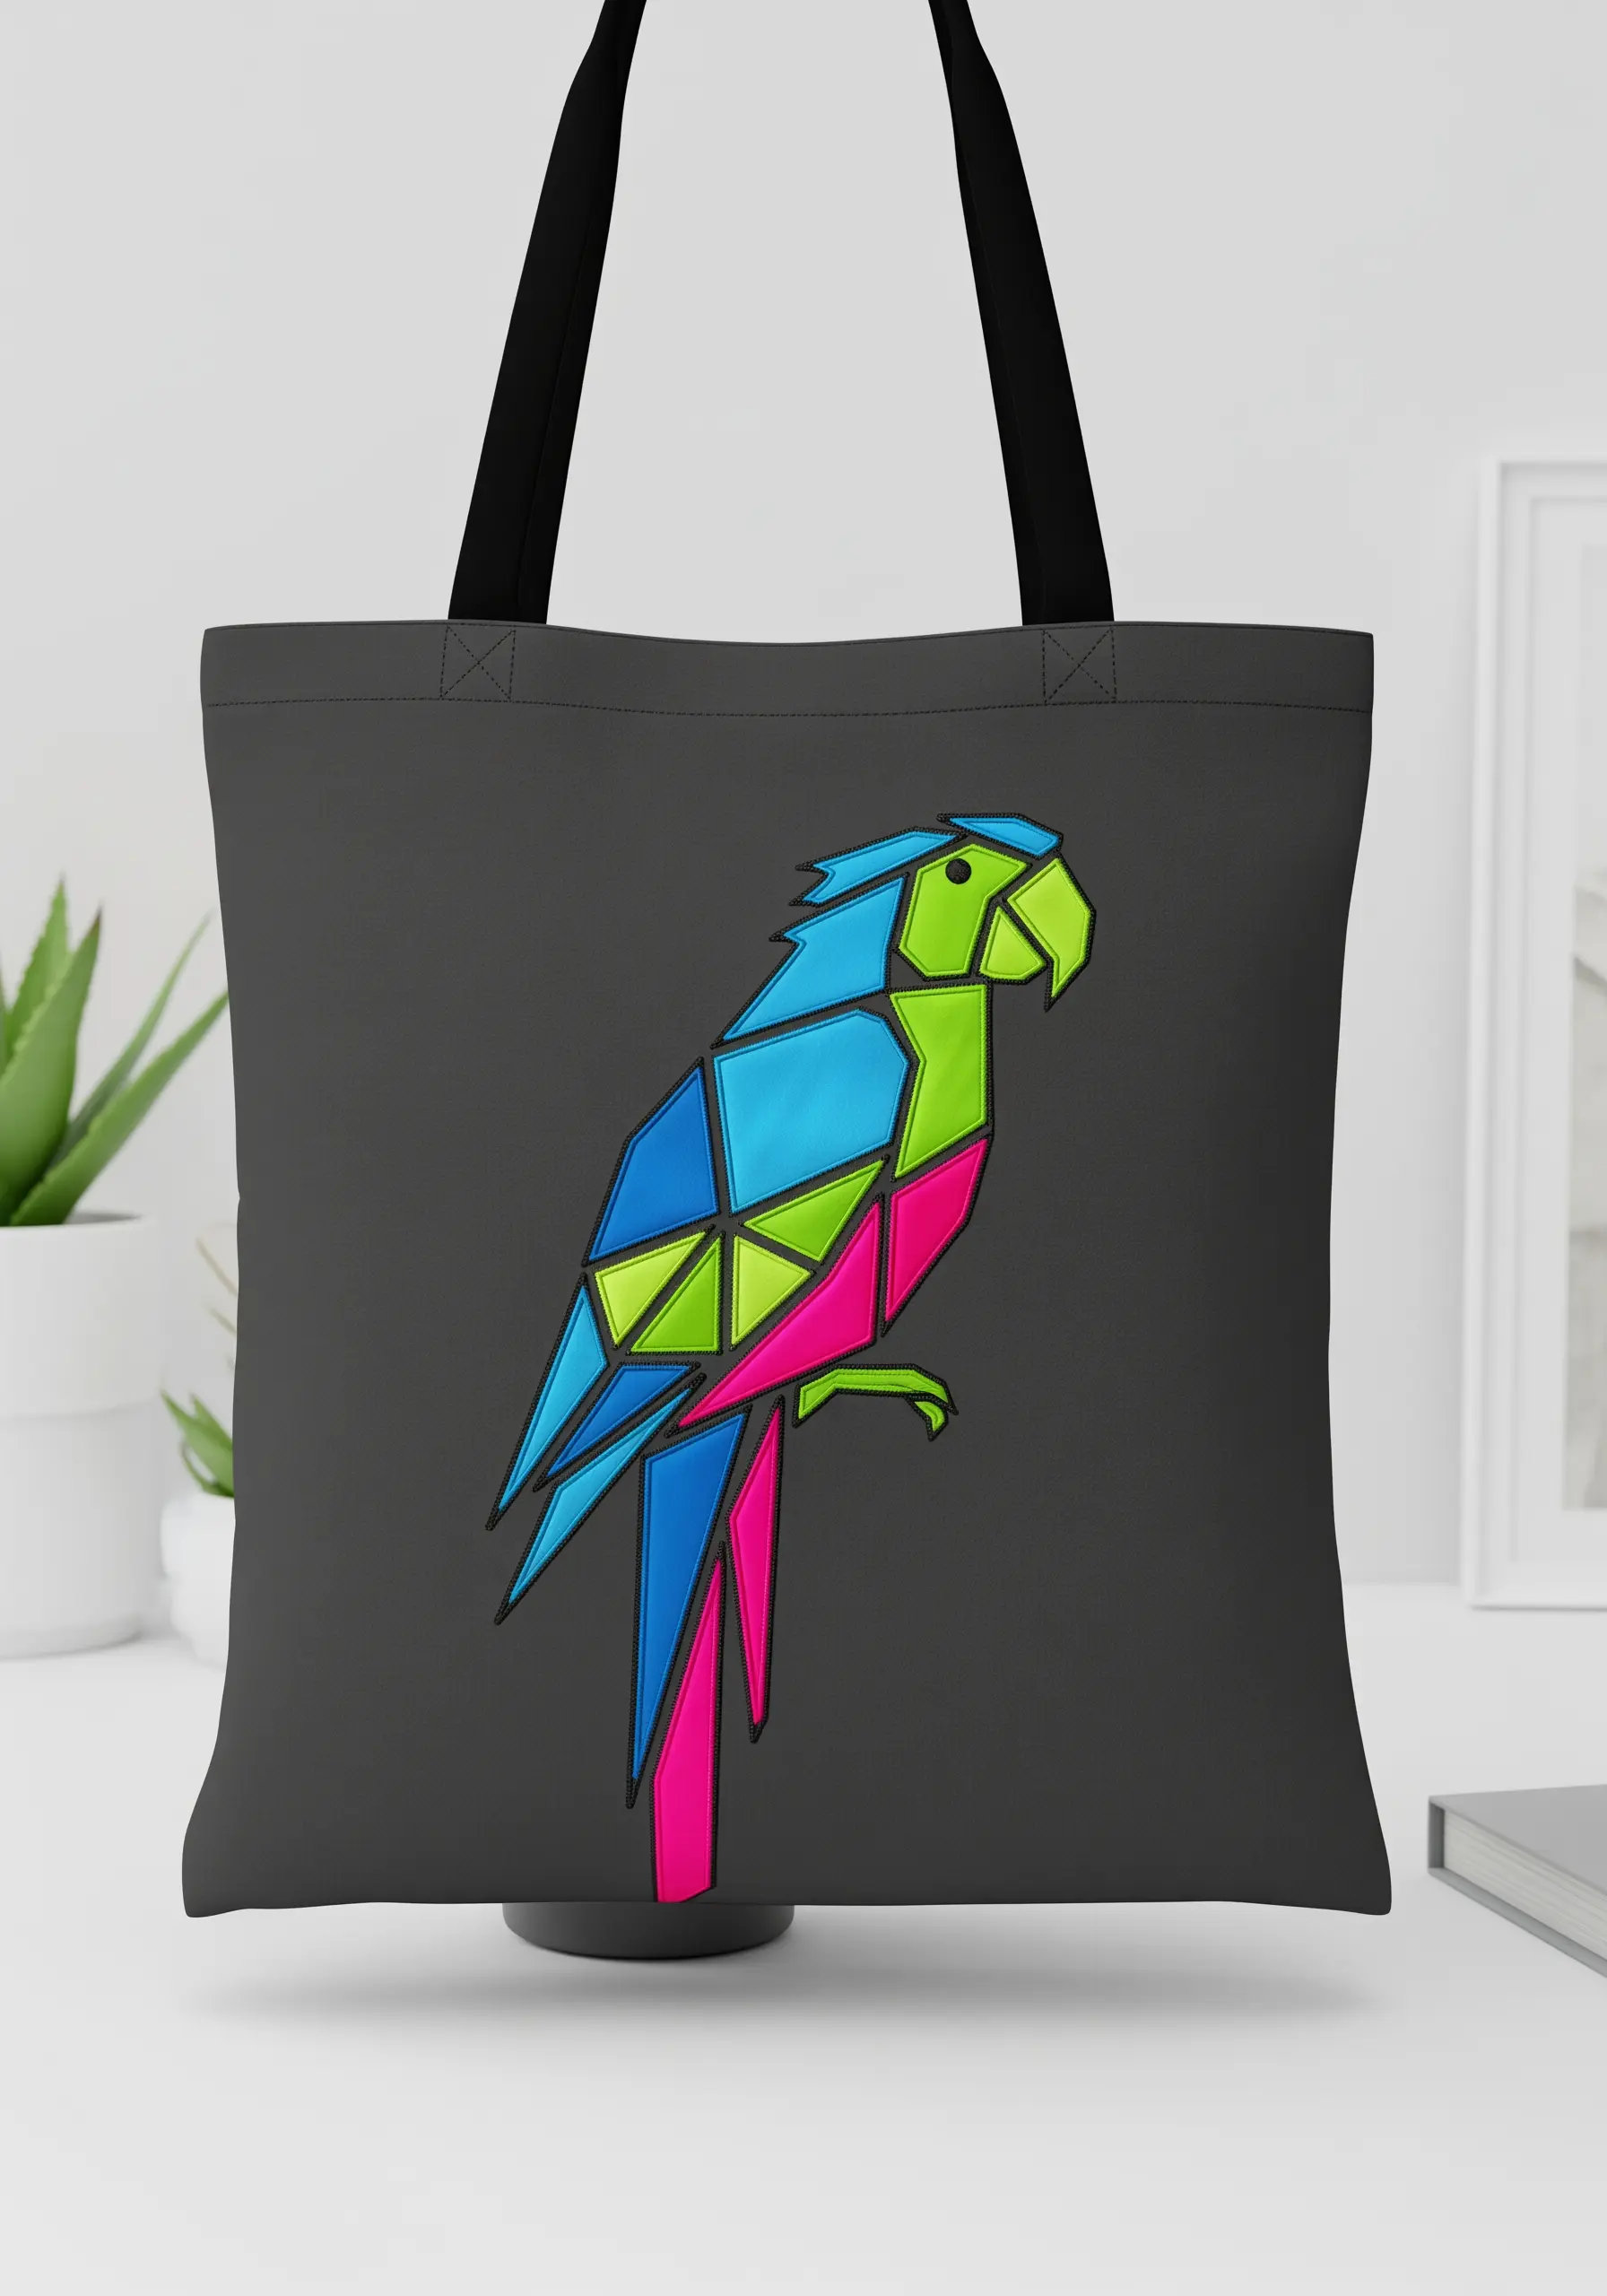
For a sharp, contemporary design, translate the parrot’s curves into a series of clean, geometric facets.
Fill each polygon with a precise satin stitch, keeping the stitch direction consistent within each shape to emphasize the crisp angles.
Use a bold black outline to define each shape and make the neon colors pop, creating a striking stained-glass effect on your tote bag.
18. Contrast Smooth Feathers with Tactile Details
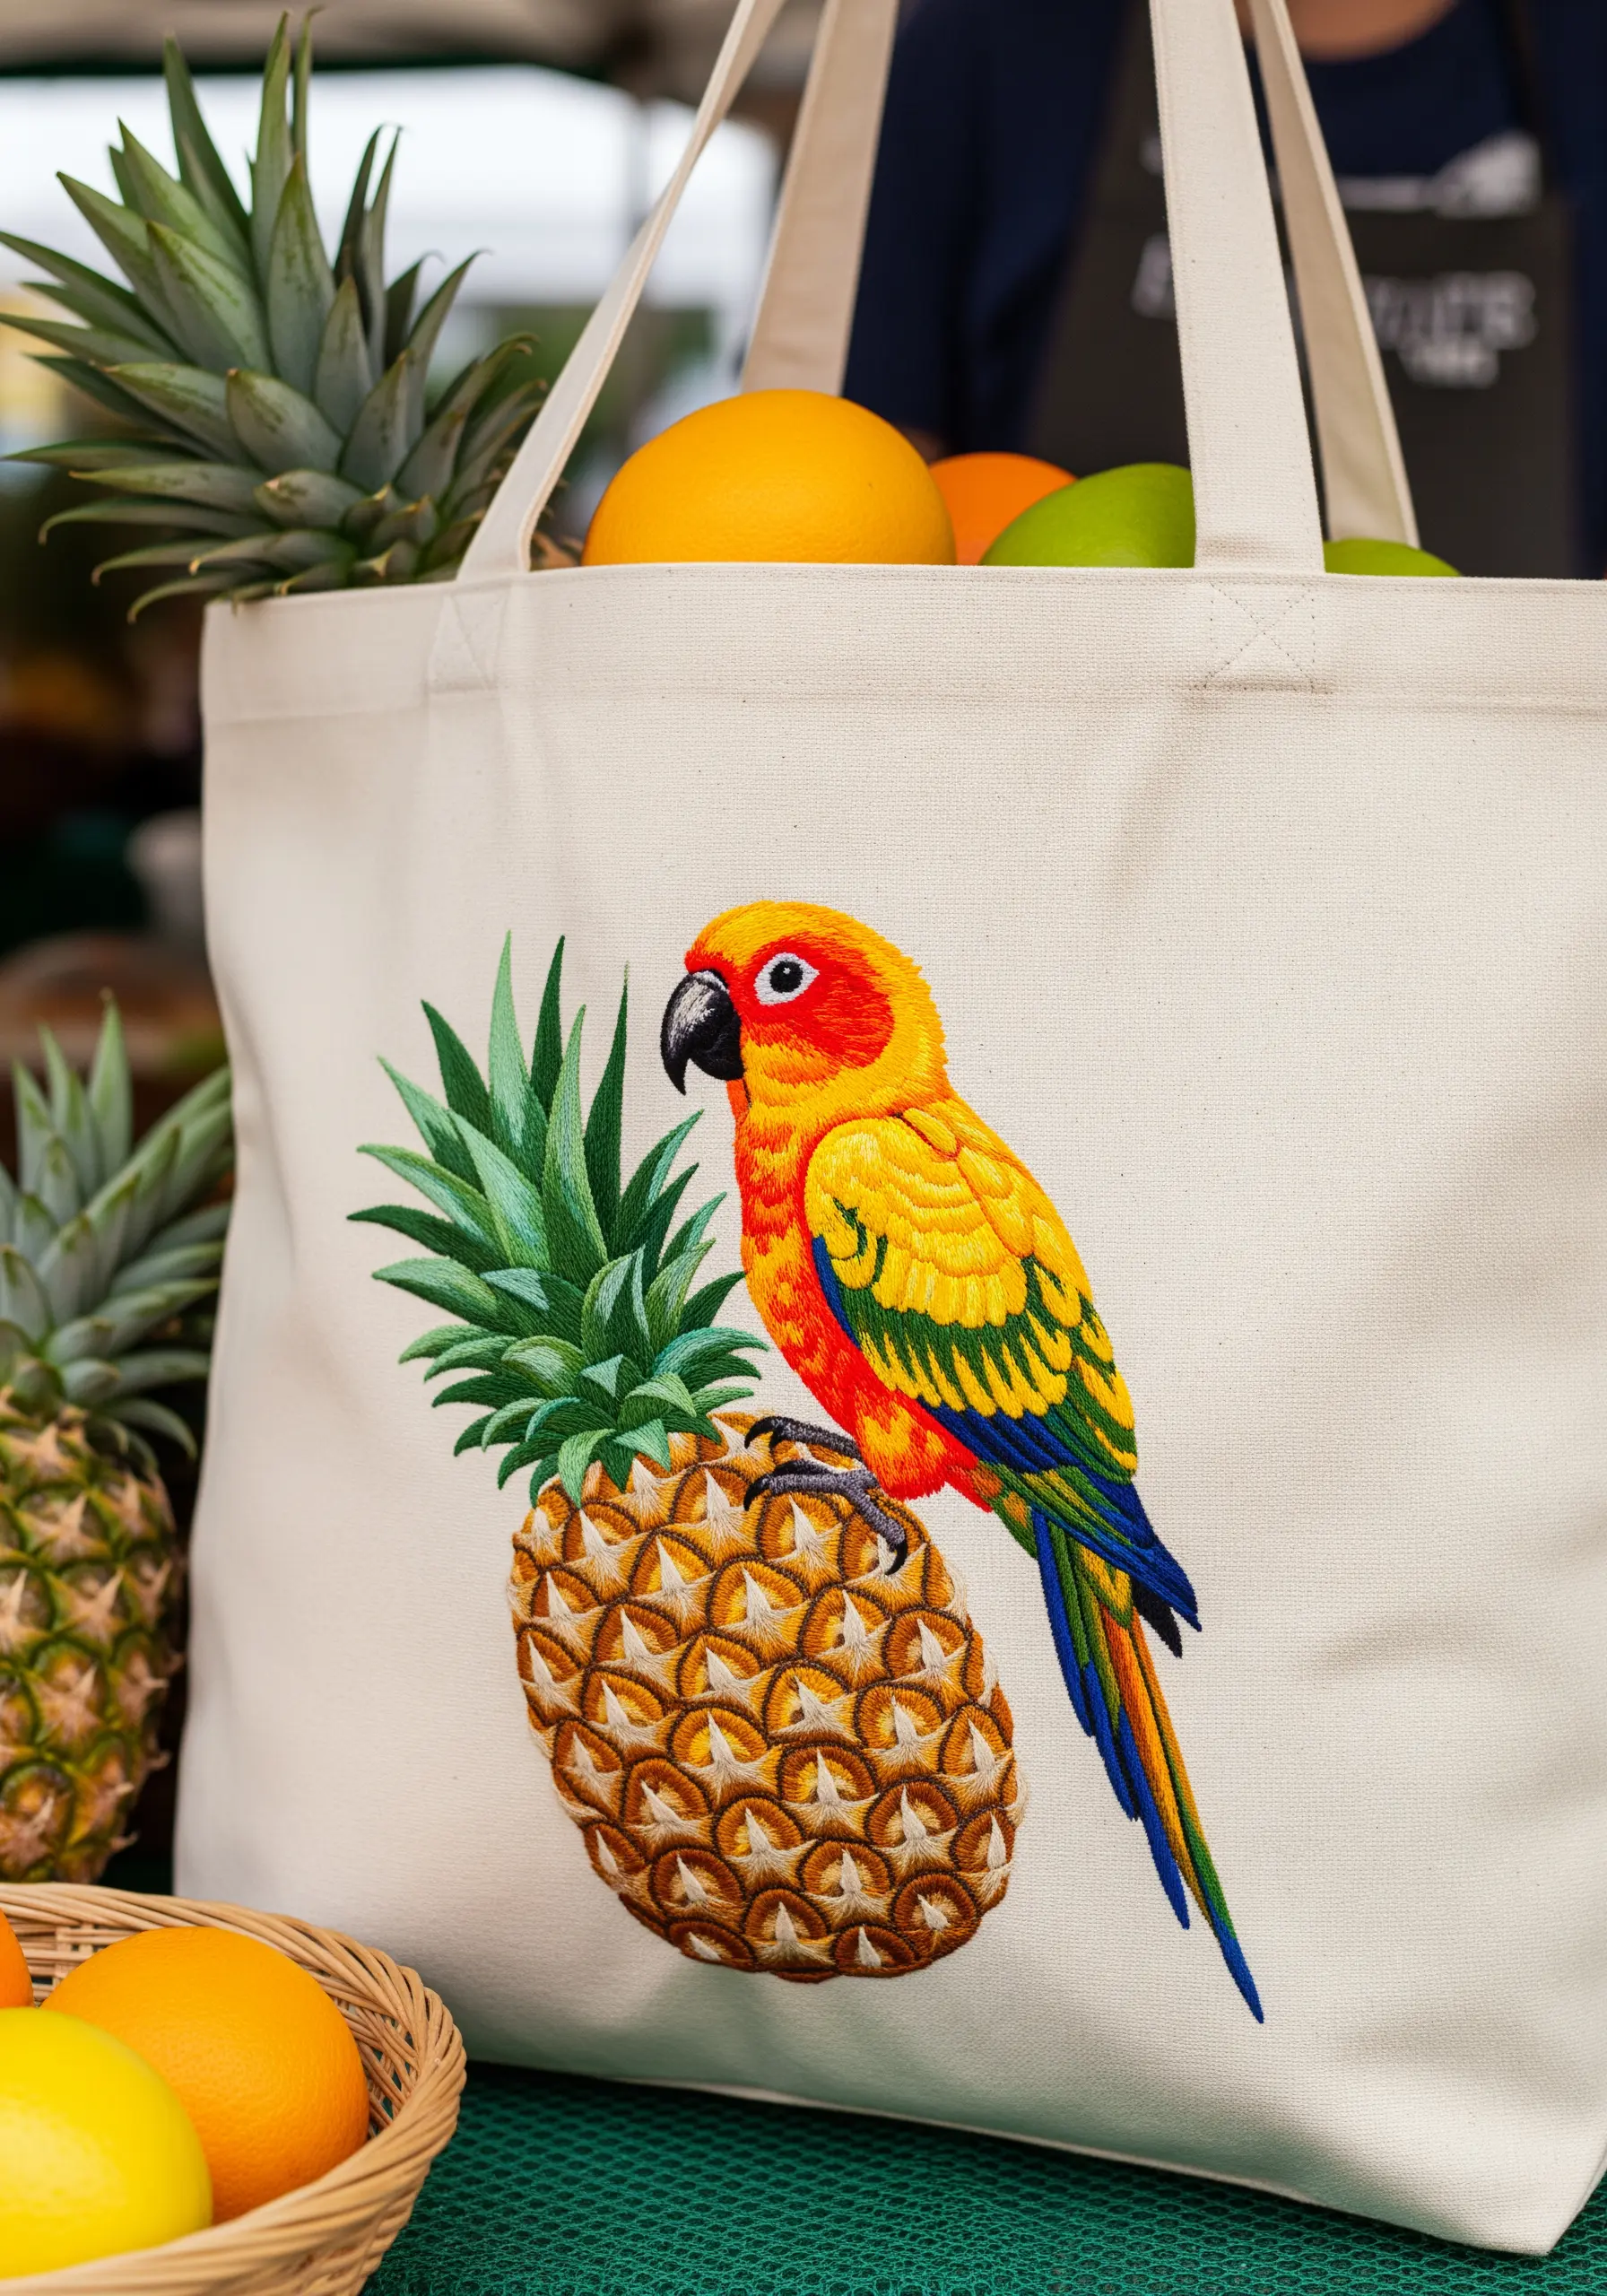
Elevate your design by pairing the smooth, thread-painted bird with a richly textured element.
The pineapple’s distinctive skin is the perfect opportunity to experiment: use a grid of woven stitches or a dense field of French knots in shades of gold and brown.
This tactile contrast not only adds visual depth but also makes the entire piece more engaging and delightful to touch.


