

When you stitch for a child, you’re doing more than just decorating a piece of fabric. You are creating a tangible piece of your affection, a future heirloom, a source of comfort and wonder. Even the simplest stitches can become magical when applied with intention.
The secret to embroidery that looks polished and feels special isn’t about learning dozens of complex techniques. It’s about understanding how small adjustments—in stitch direction, thread texture, or color blending—can elevate a simple design into something truly captivating.
Think of these ideas not as strict rules, but as gentle suggestions. Let them be the starting point for your own creativity. Whether you’re embellishing a tiny sweater or creating art for a nursery wall, your thoughtful touch is what will make it a masterpiece.
1. Create Depth with Directional Satin Stitch
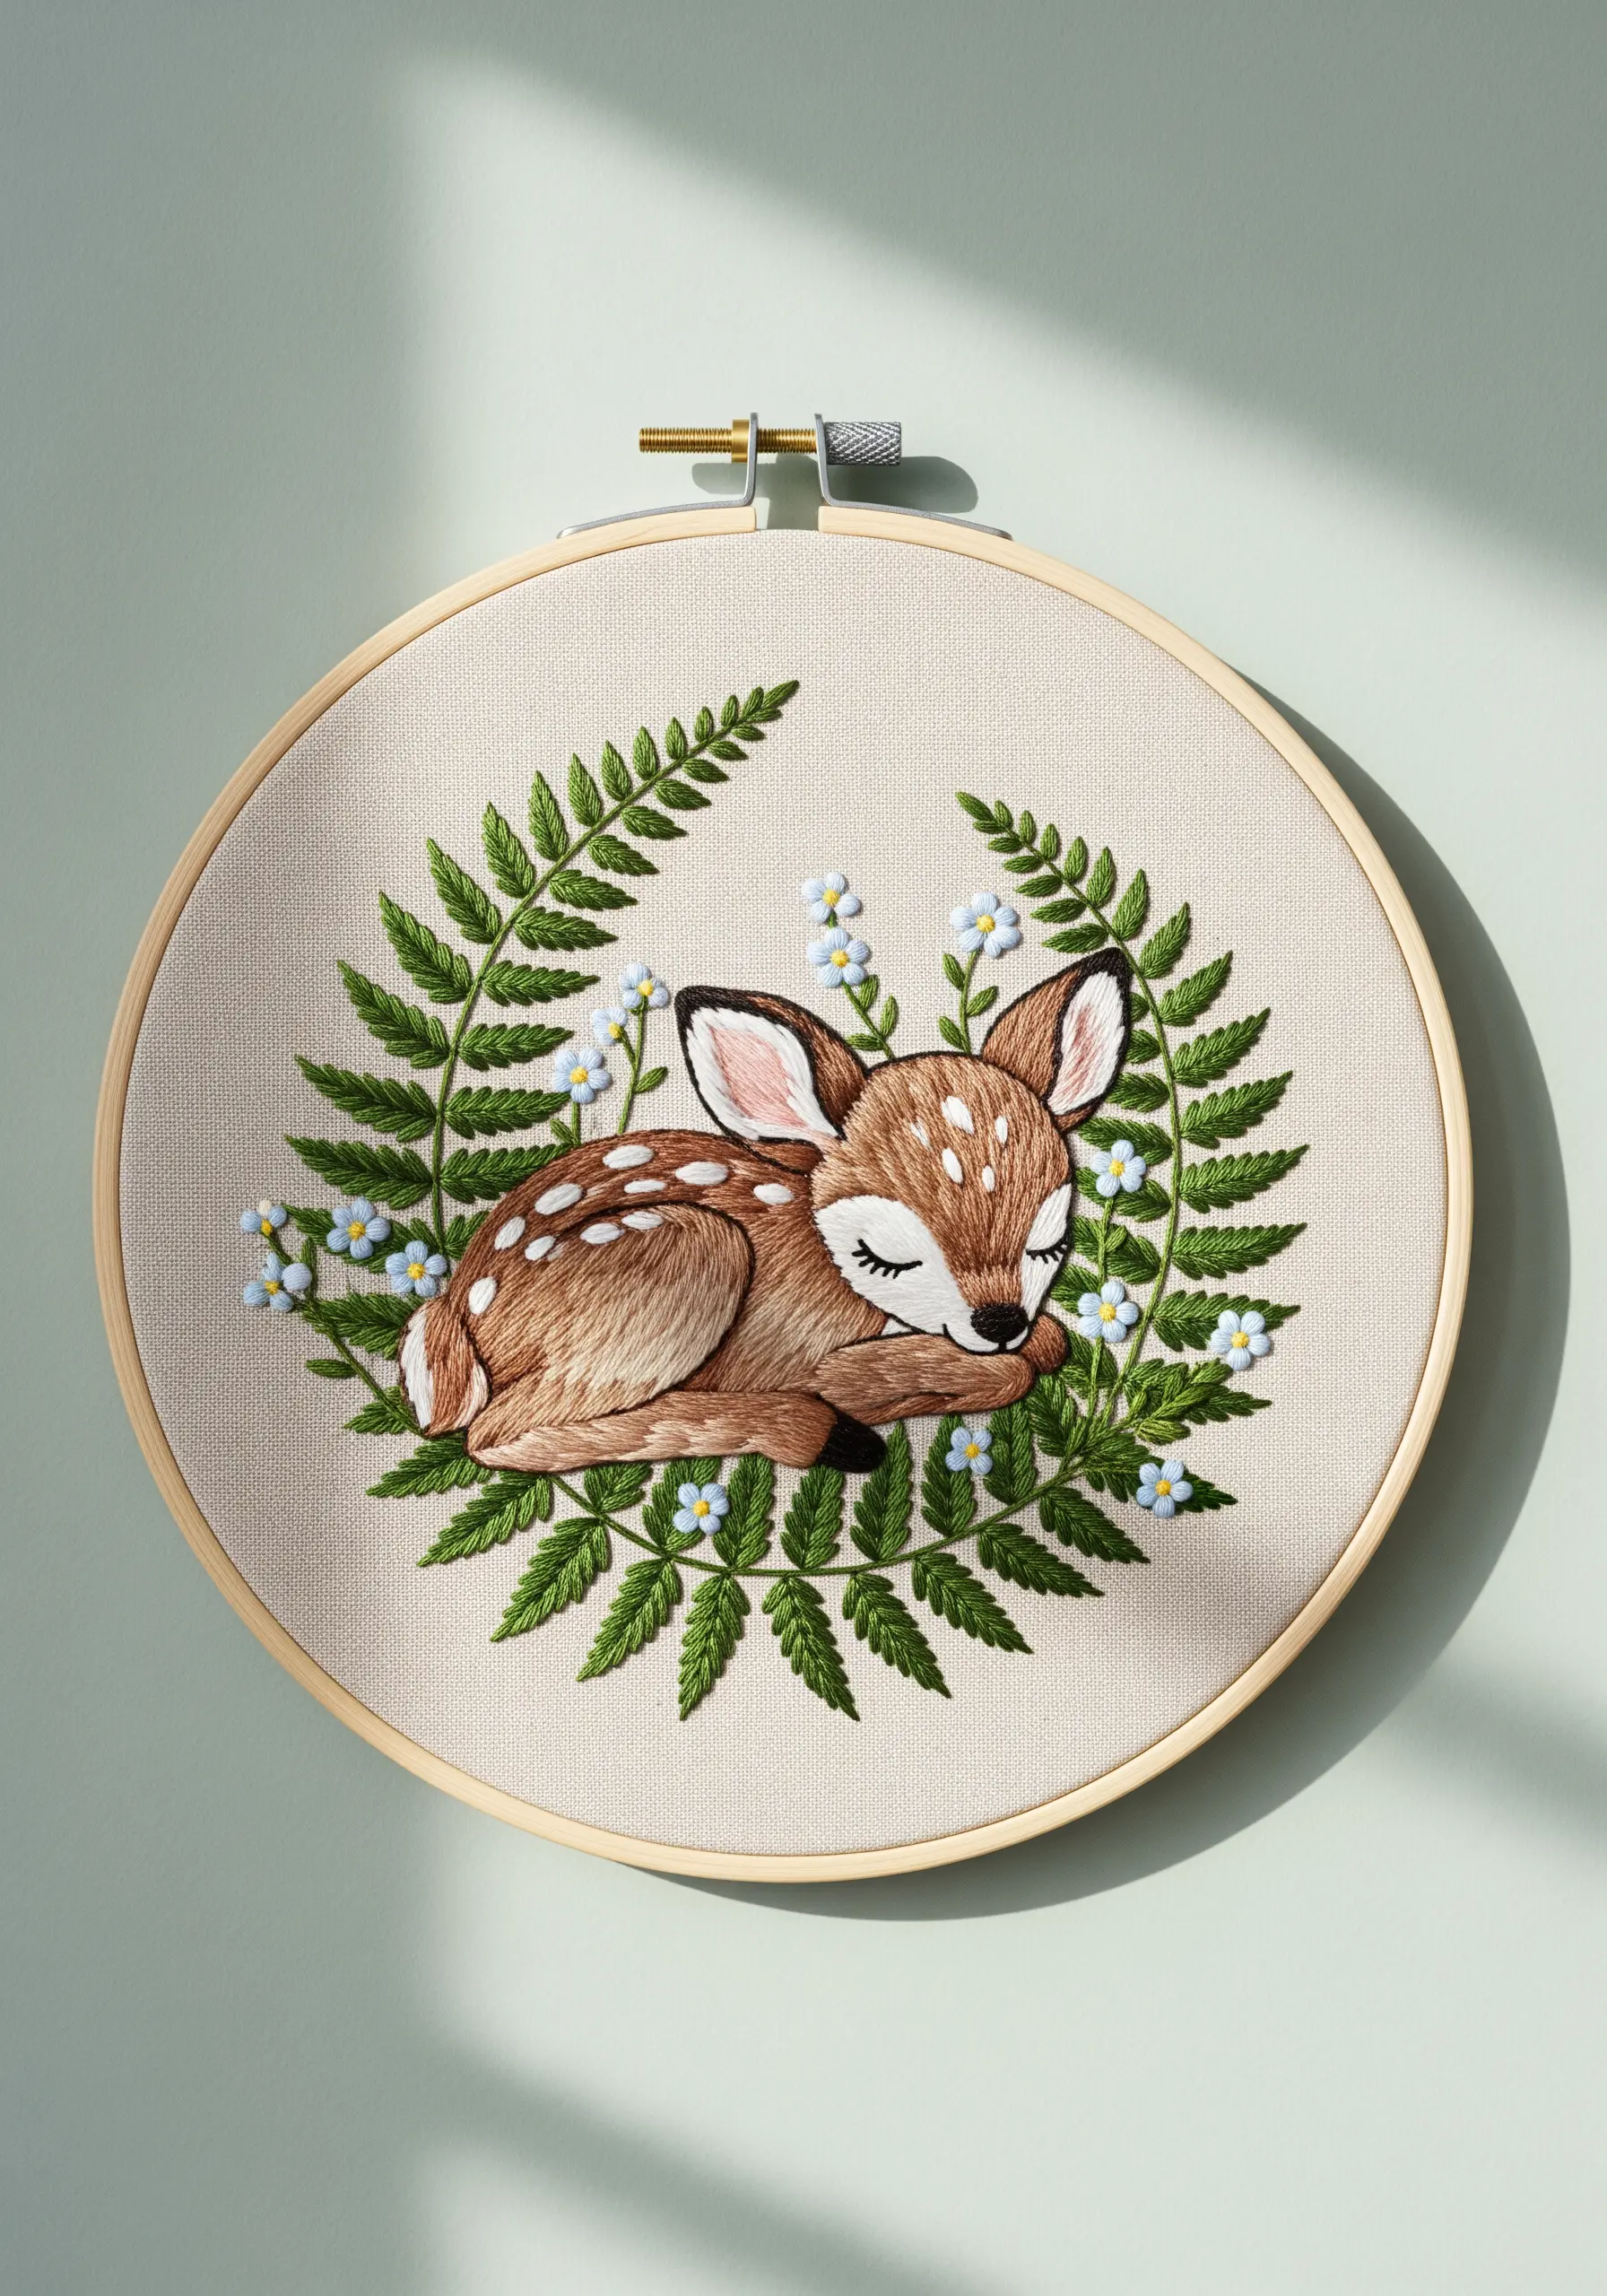
To give the fawn’s fur a soft, realistic dimension, use directional satin stitch.
Angle your stitches to follow the natural curves of the animal’s body—down the back, along the legs, and around the face.
This simple adjustment transforms a flat shape into a three-dimensional form.
For the delicate fern leaves, a fishbone stitch creates a defined central vein and a gentle, leafy texture that frames the central figure beautifully.
The tiny blue flowers are detached chain stitches with French knot centers, adding a final touch of softness.
2. Master Appliqué for Smooth, Raised Surfaces
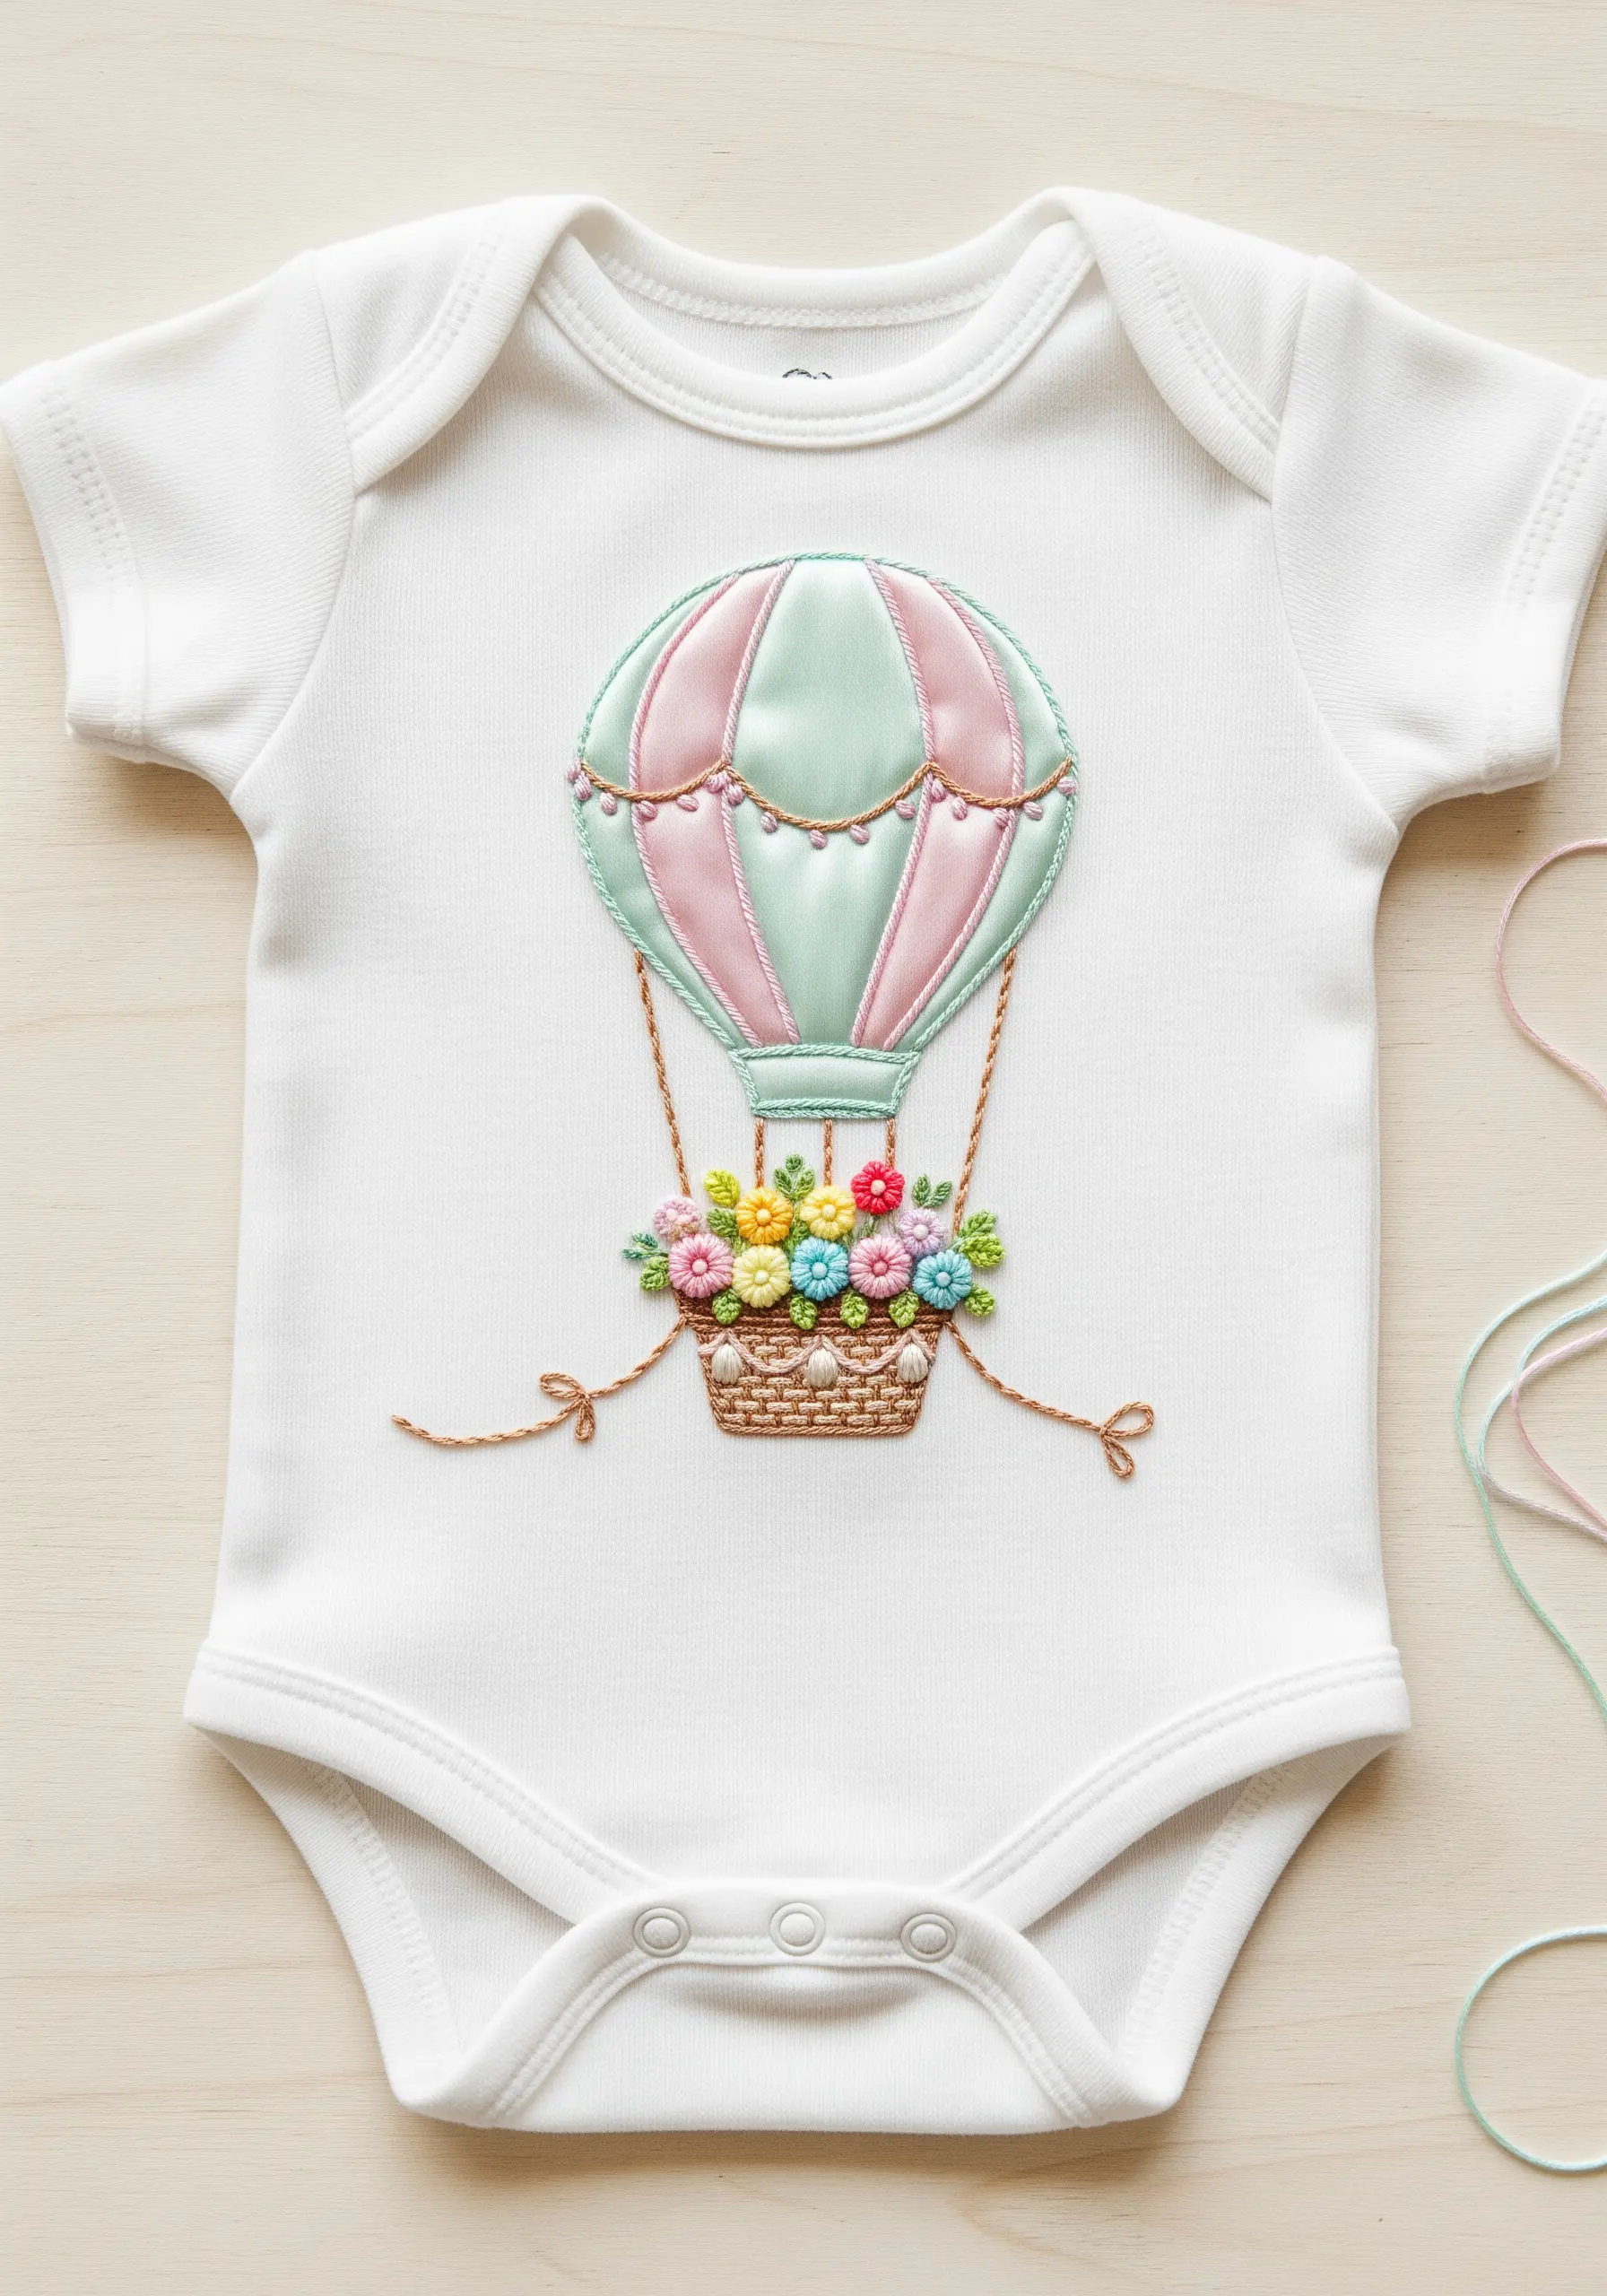
For large, smooth areas like the balloon panels, combine appliqué with your embroidery.
Cut your fabric shapes just smaller than the panel outline and use a temporary fabric adhesive to hold them in place.
Then, use a dense satin stitch to cover the raw edges, creating a clean, raised look that is much faster than filling the entire area with thread.
Always use a stabilizer on the inside of the garment to prevent the stretchy fabric from puckering under the stitch tension.
3. Blend Colors Seamlessly with Long-and-Short Stitch
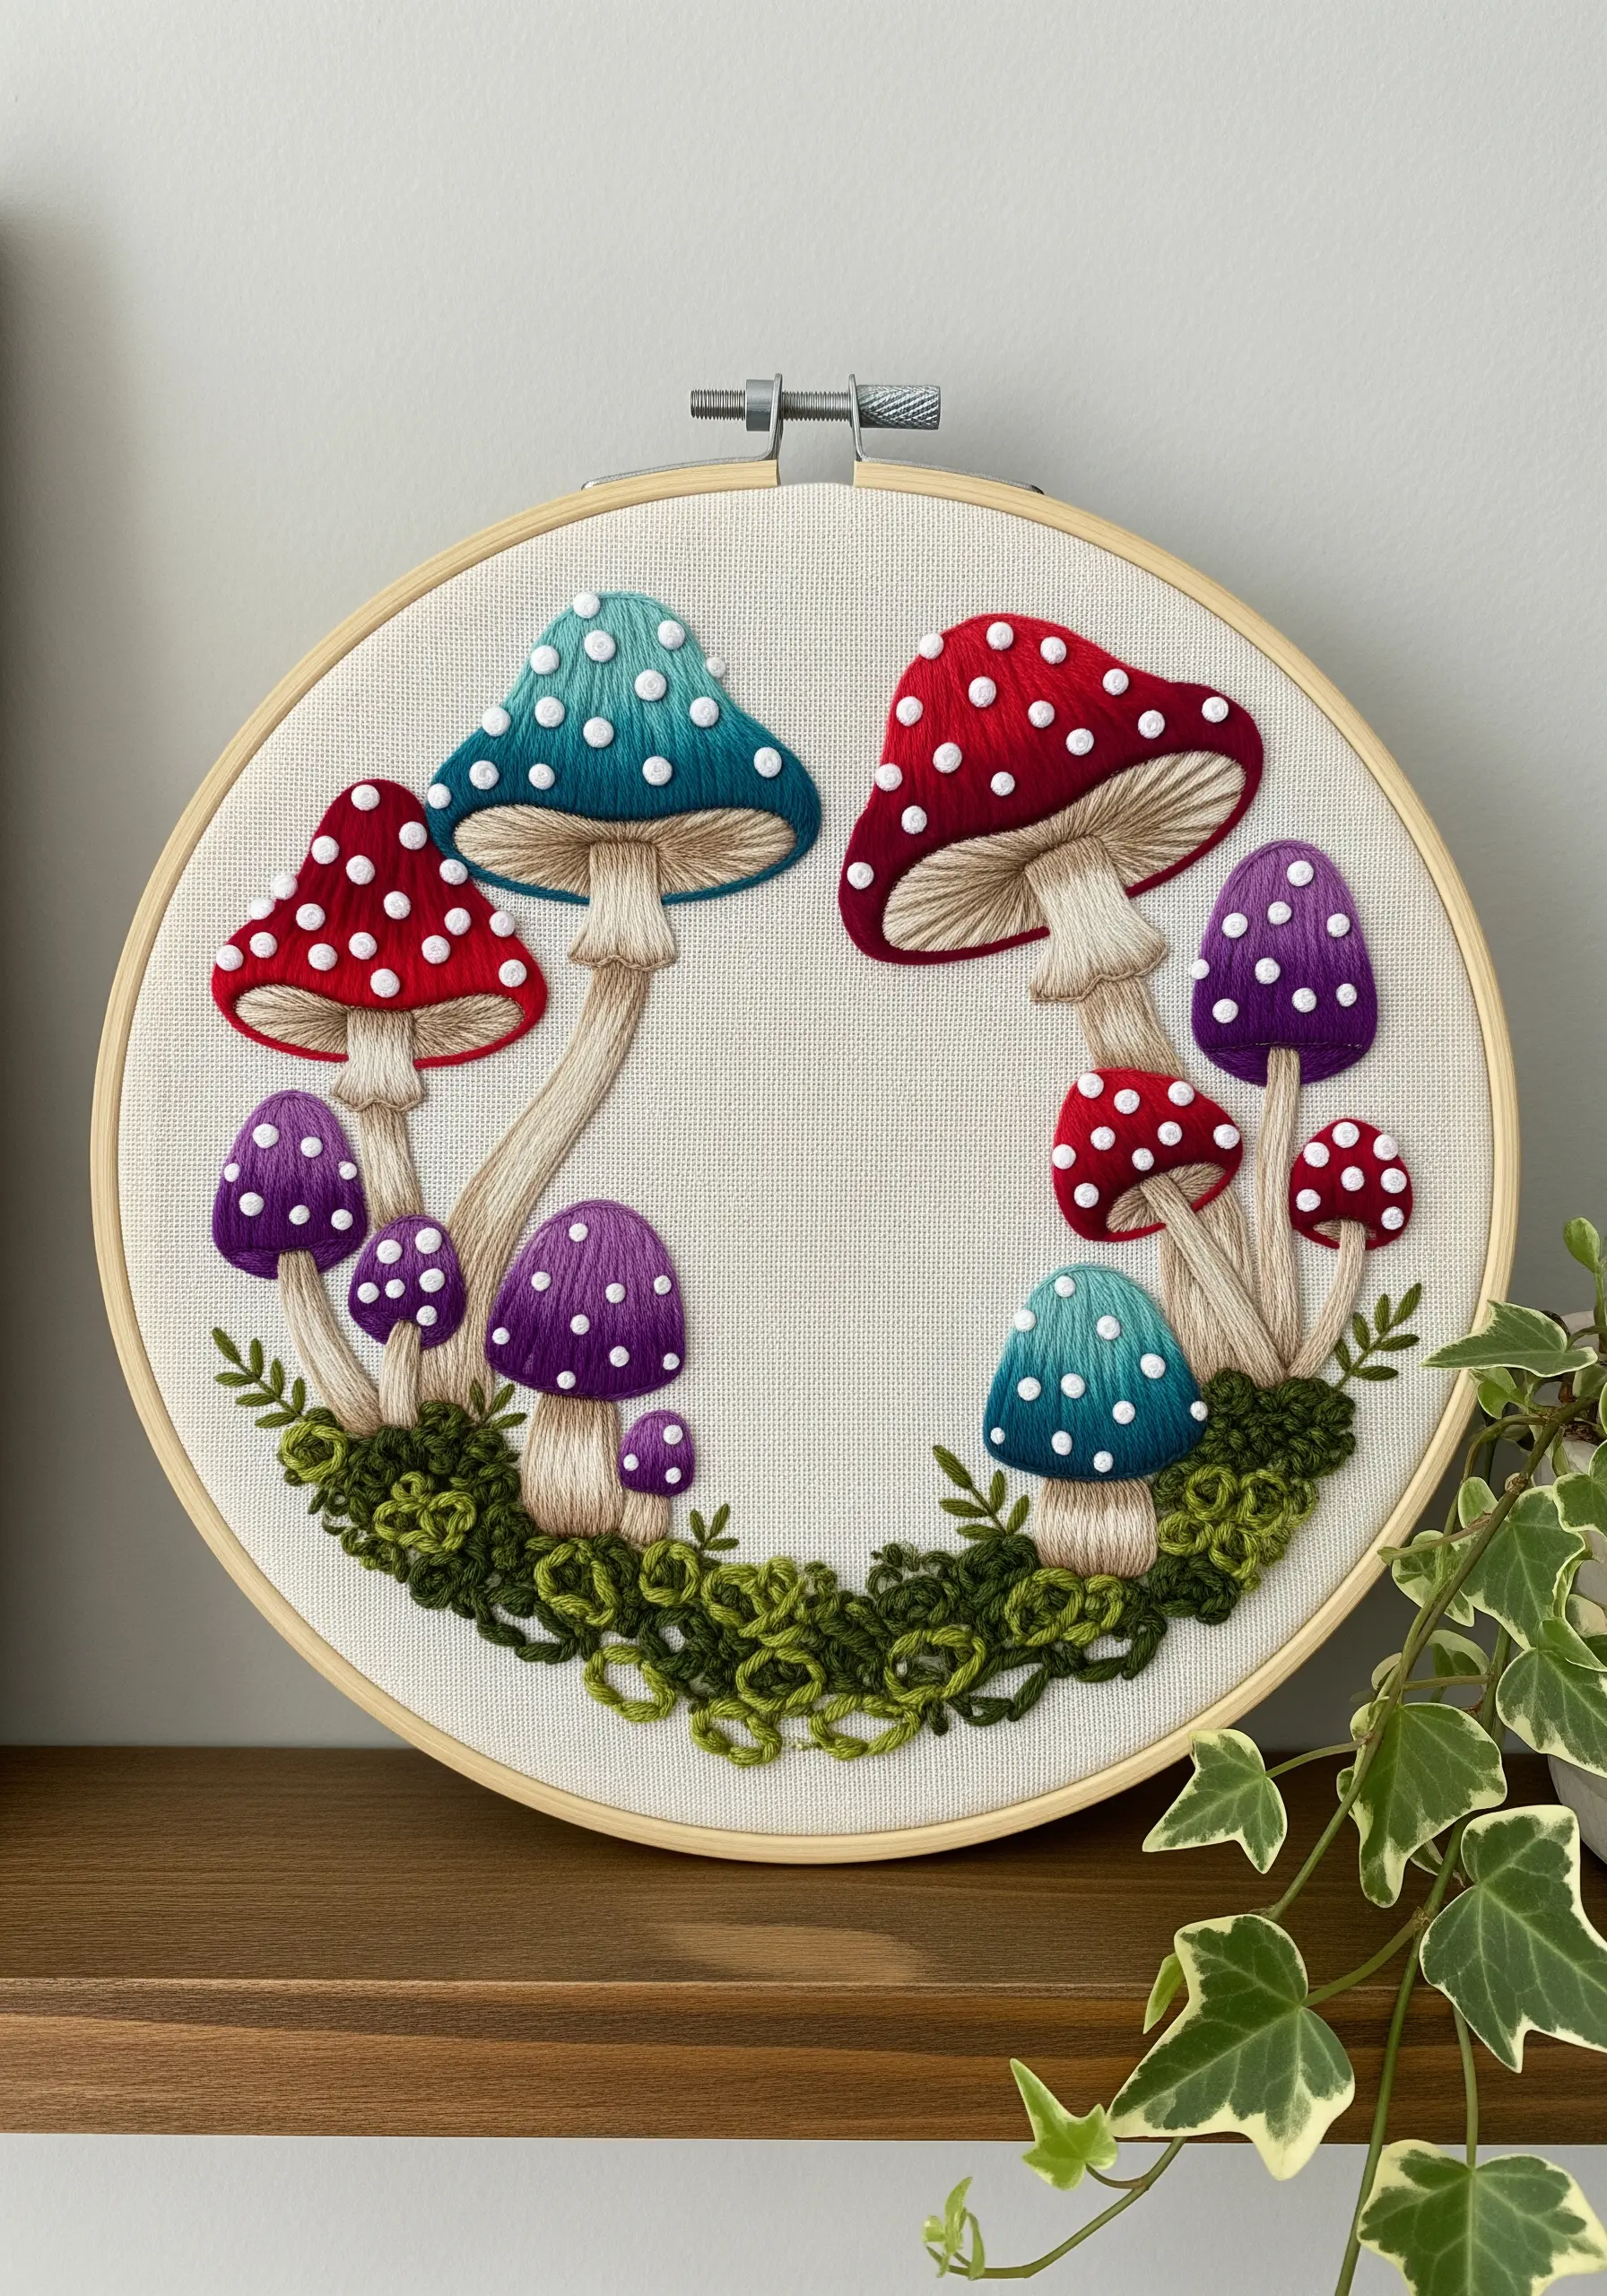
Achieve the magical, smooth gradient on the mushroom caps by mastering the long-and-short stitch.
Begin with one color at the outer edge, making stitches of varying lengths that fit closely together.
Bring your second color up from within the first layer, tucking the new stitches between the old ones to create a seamless, painted effect.
For the white dots, use raised satin stitch or dense French knots to give them a bubbly, three-dimensional quality.
The mossy ground is perfect for creating texture; use a chaotic mix of French knots and single straight stitches.
4. Define Motifs with a Bold Split-Stitch Outline
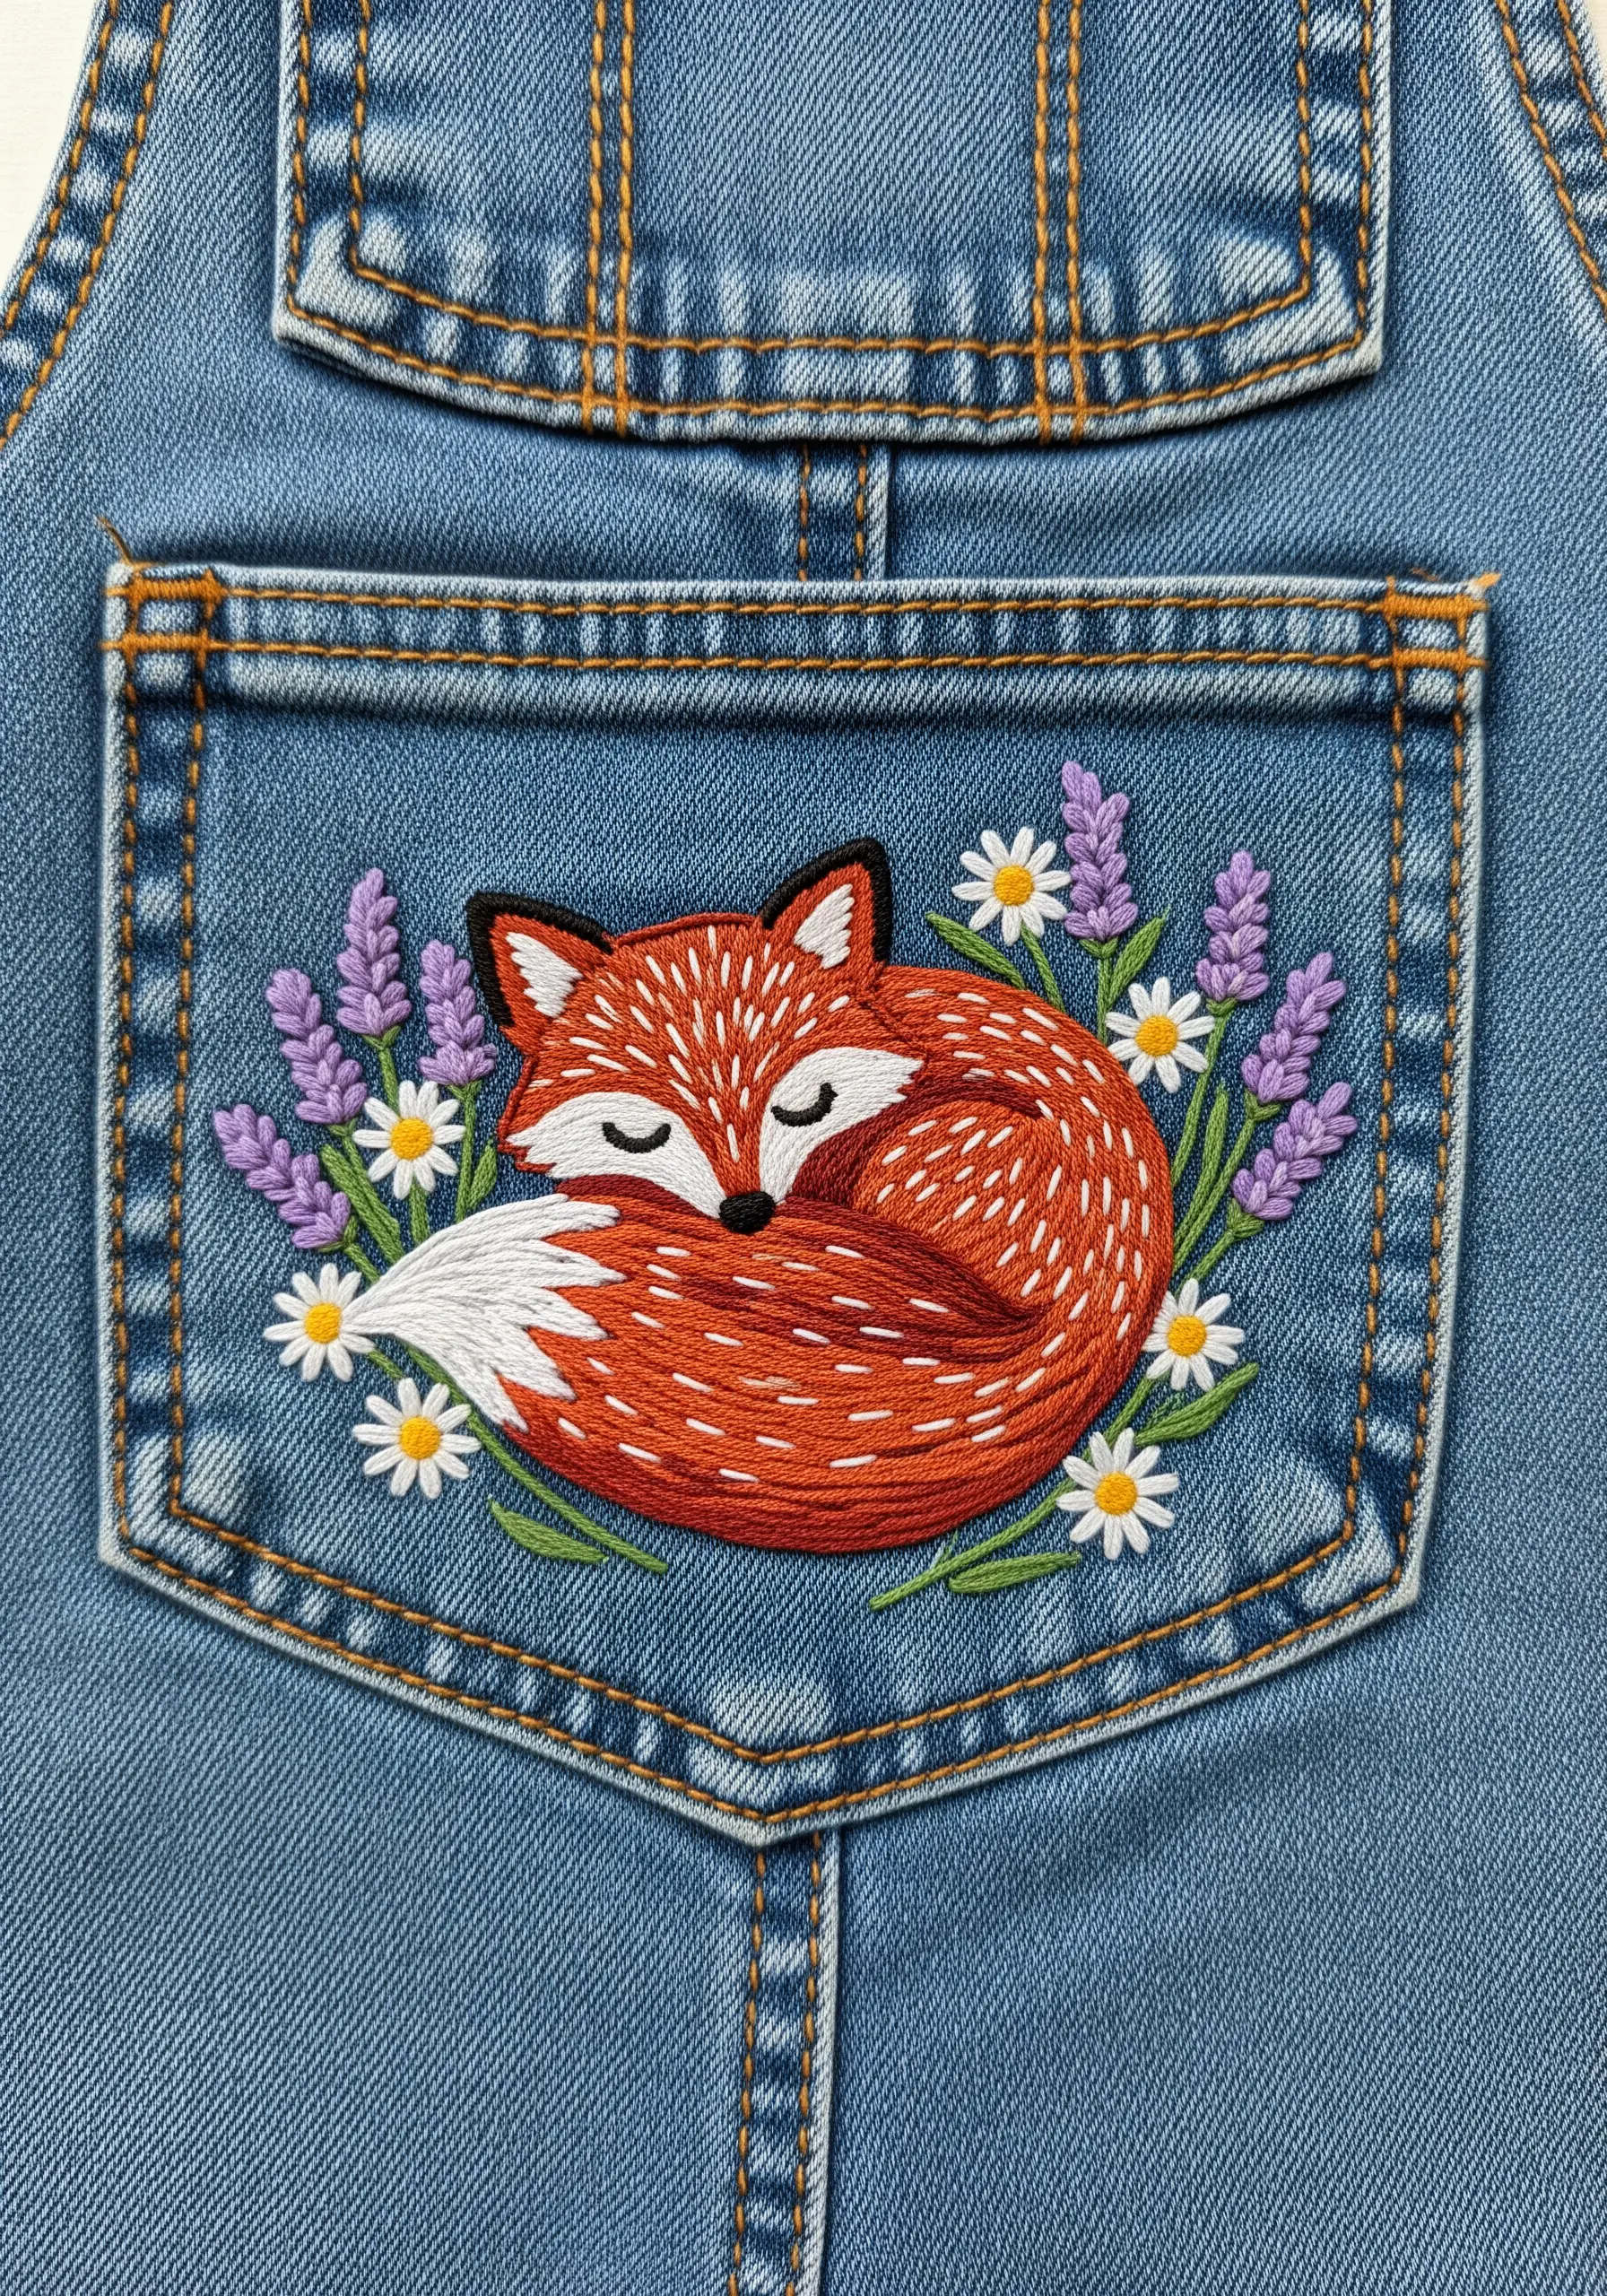
Make your designs pop on heavy fabrics like denim by establishing a strong, clean outline first.
Use a two-strand split stitch in a contrasting color, like black, to clearly define the fox’s shape.
Next, fill the interior with a smooth satin stitch, ensuring your stitches tuck just inside the outline for a crisp, contained finish.
To add a hint of fur texture, scatter a few small, straight seed stitches in a lighter color over the top of your satin stitch base.
5. Use Metallic Thread for High-Impact Contrast
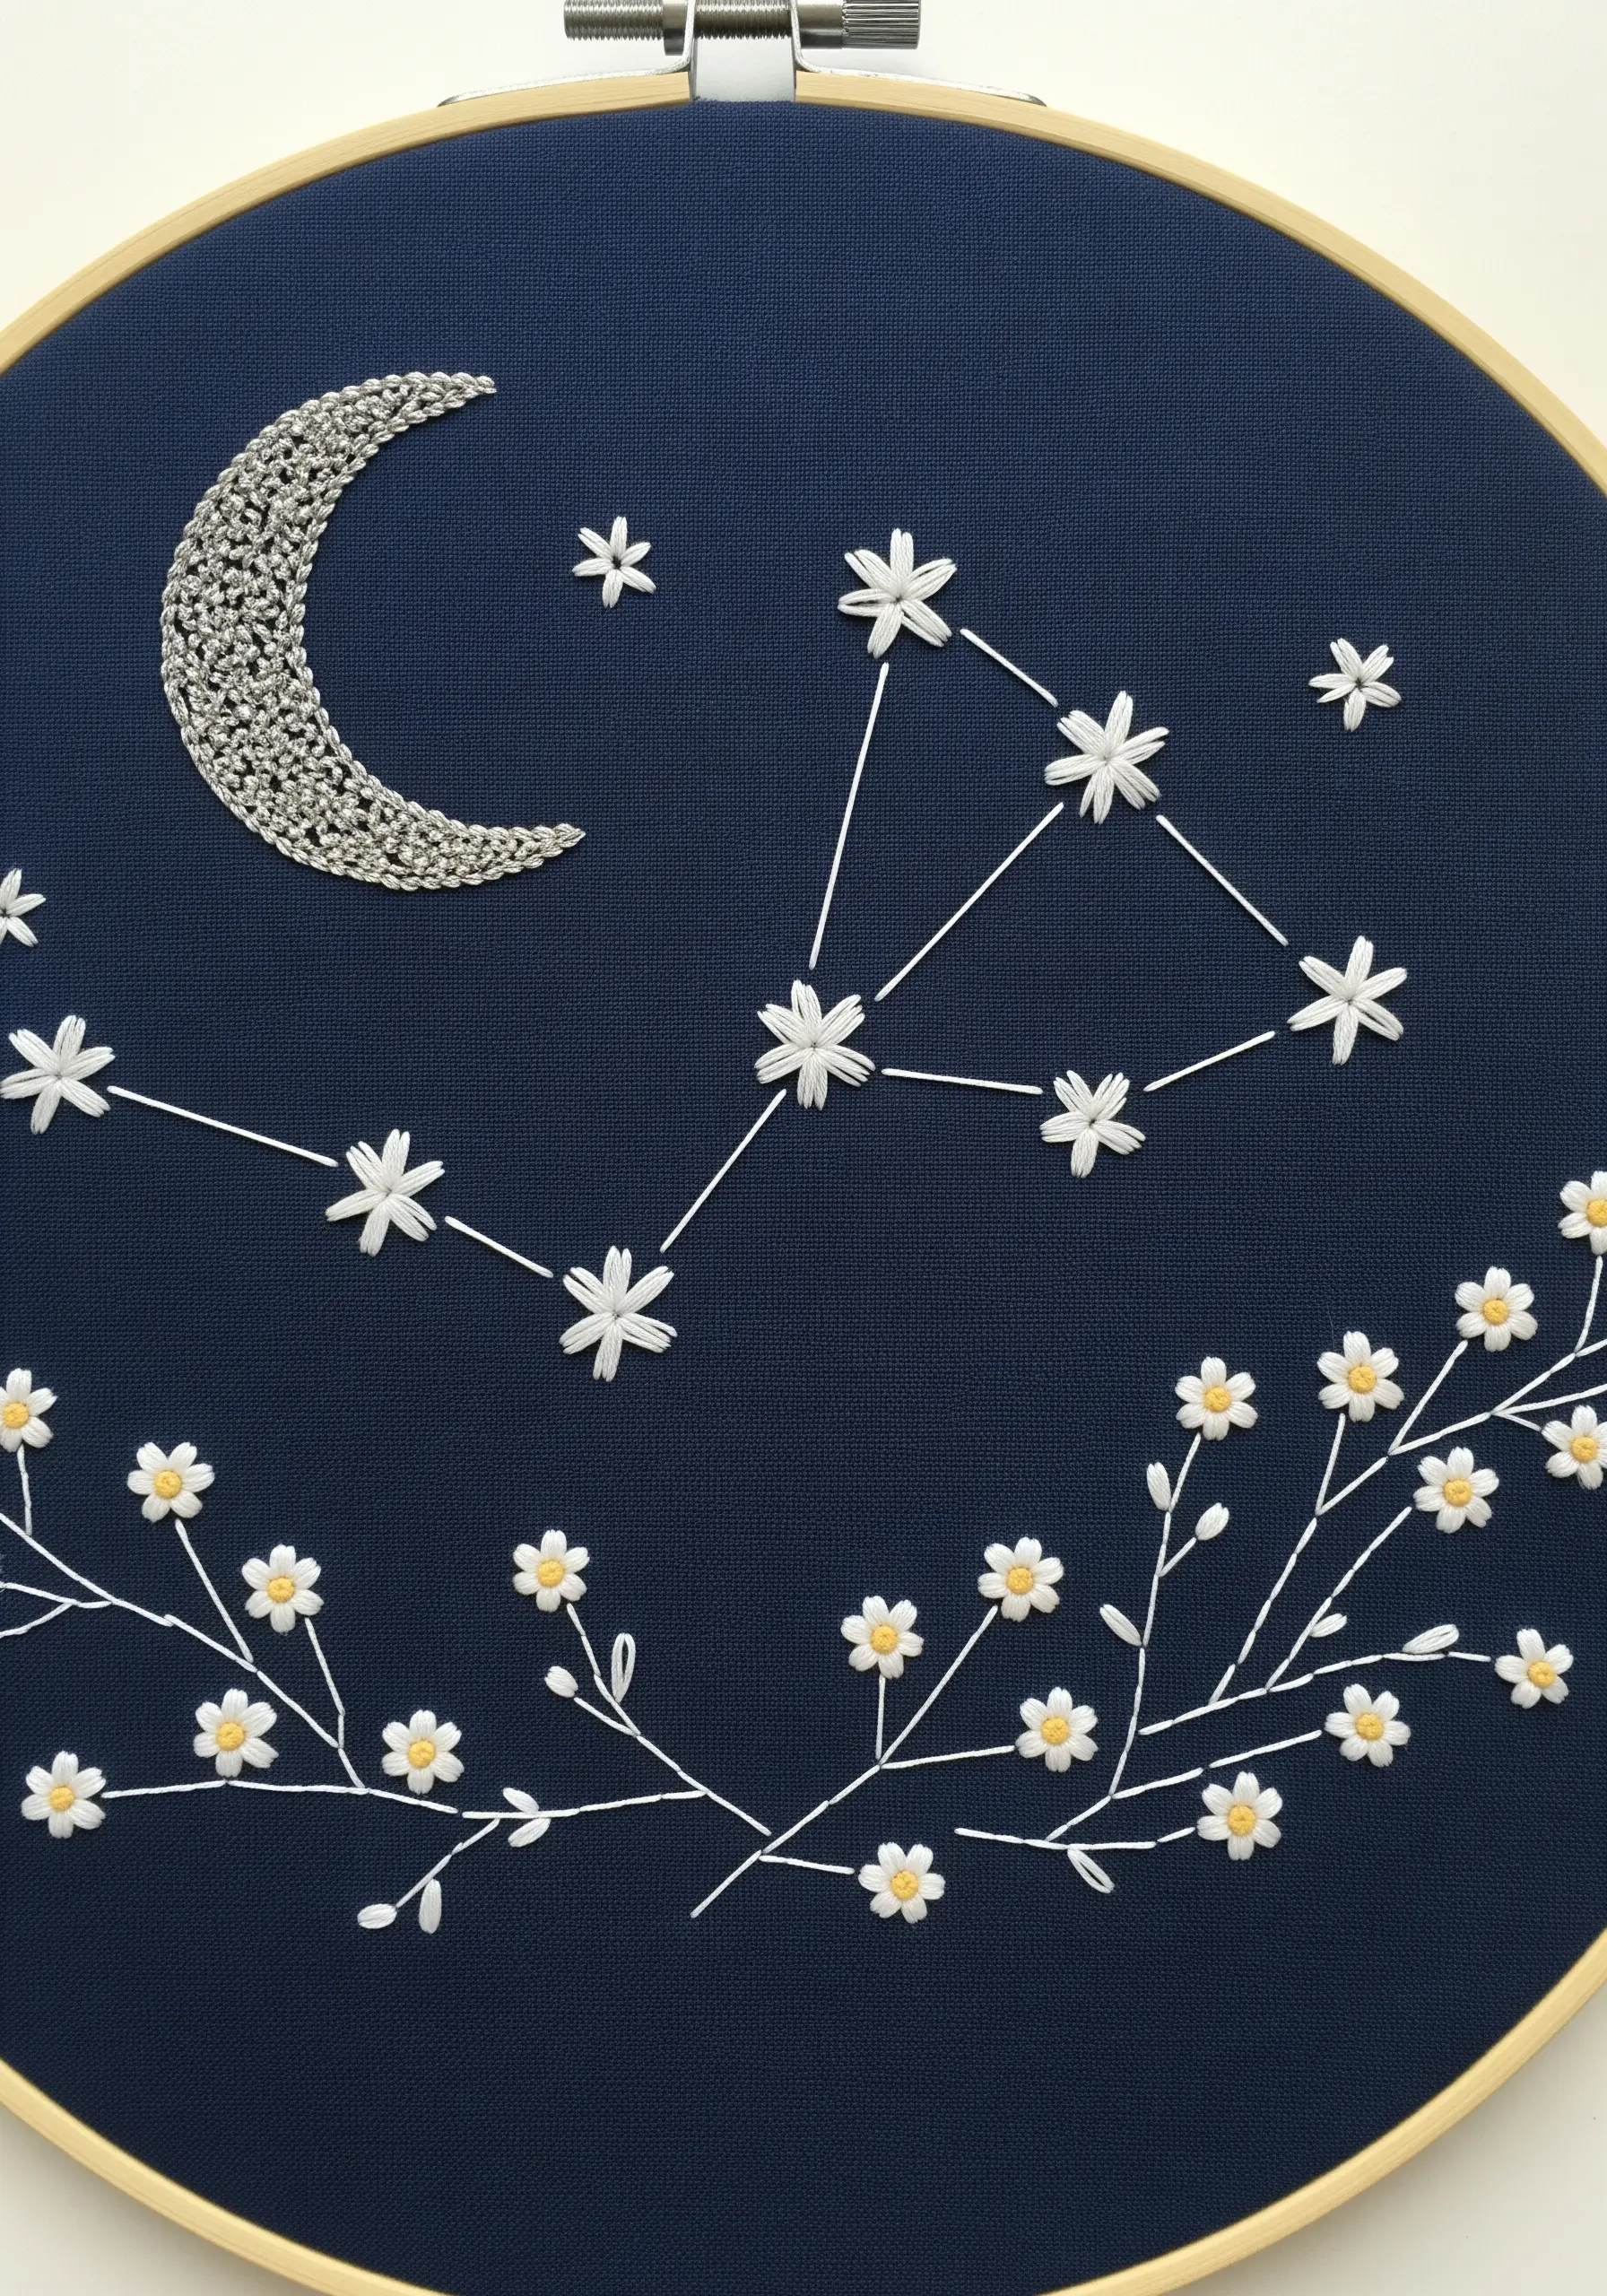
When embroidering on dark fabric, your primary tool is contrast.
For the moon, avoid the frustration of stitching with difficult metallic floss by couching it instead.
Lay the metallic thread on the fabric in a tight spiral and use a second, finer thread to tack it down with tiny, invisible stitches.
This creates a dense, light-catching texture that truly shines.
The constellation’s floral ‘stars’ are simple detached chain stitches, proving how minimal sky and moon designs can create maximum impact.
6. Add Playful Dimension with Woven Picot Stitch
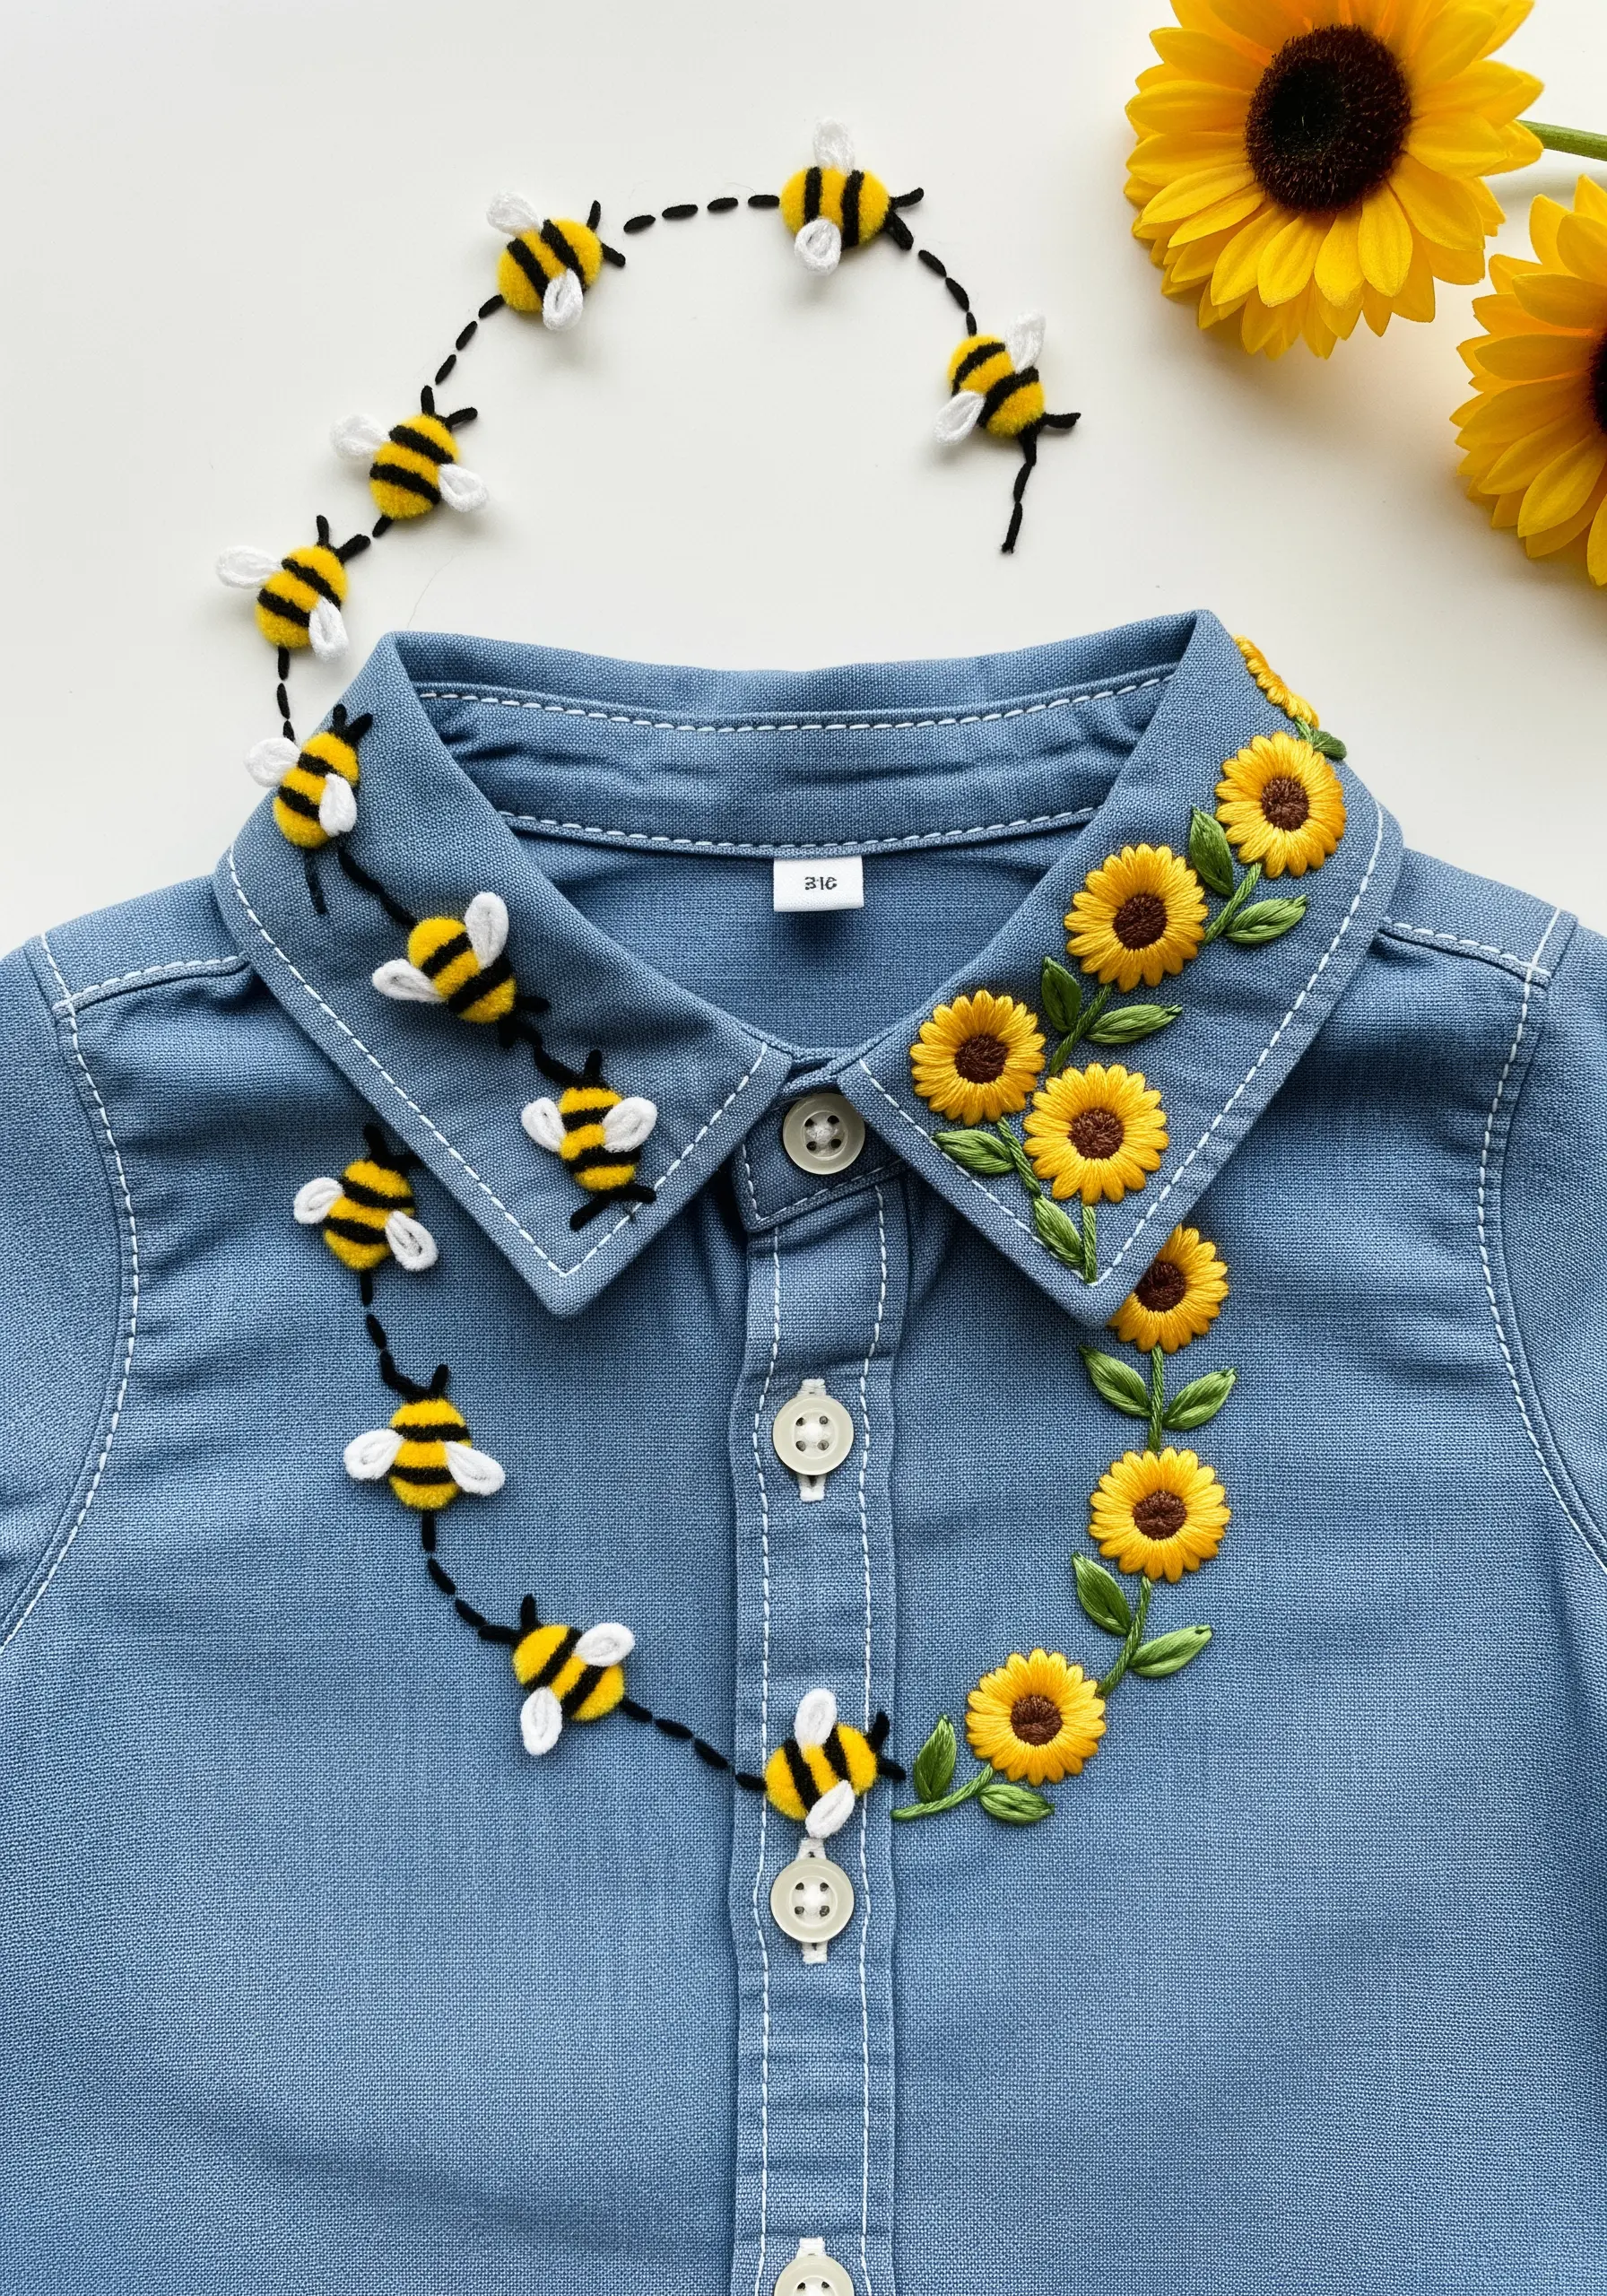
Elevate a simple shirt collar by adding three-dimensional elements that invite touch.
The sunflower petals are created with the woven picot stitch; make a foundation of three straight stitches and then weave your thread through them without piercing the fabric.
This builds a raised, petal-like shape that stands away from the collar.
For the bees, use padded satin stitch for the body and single detached chain stitches for the wings to make them appear to float.
7. Build Sculptural Texture with Knotted Stitches
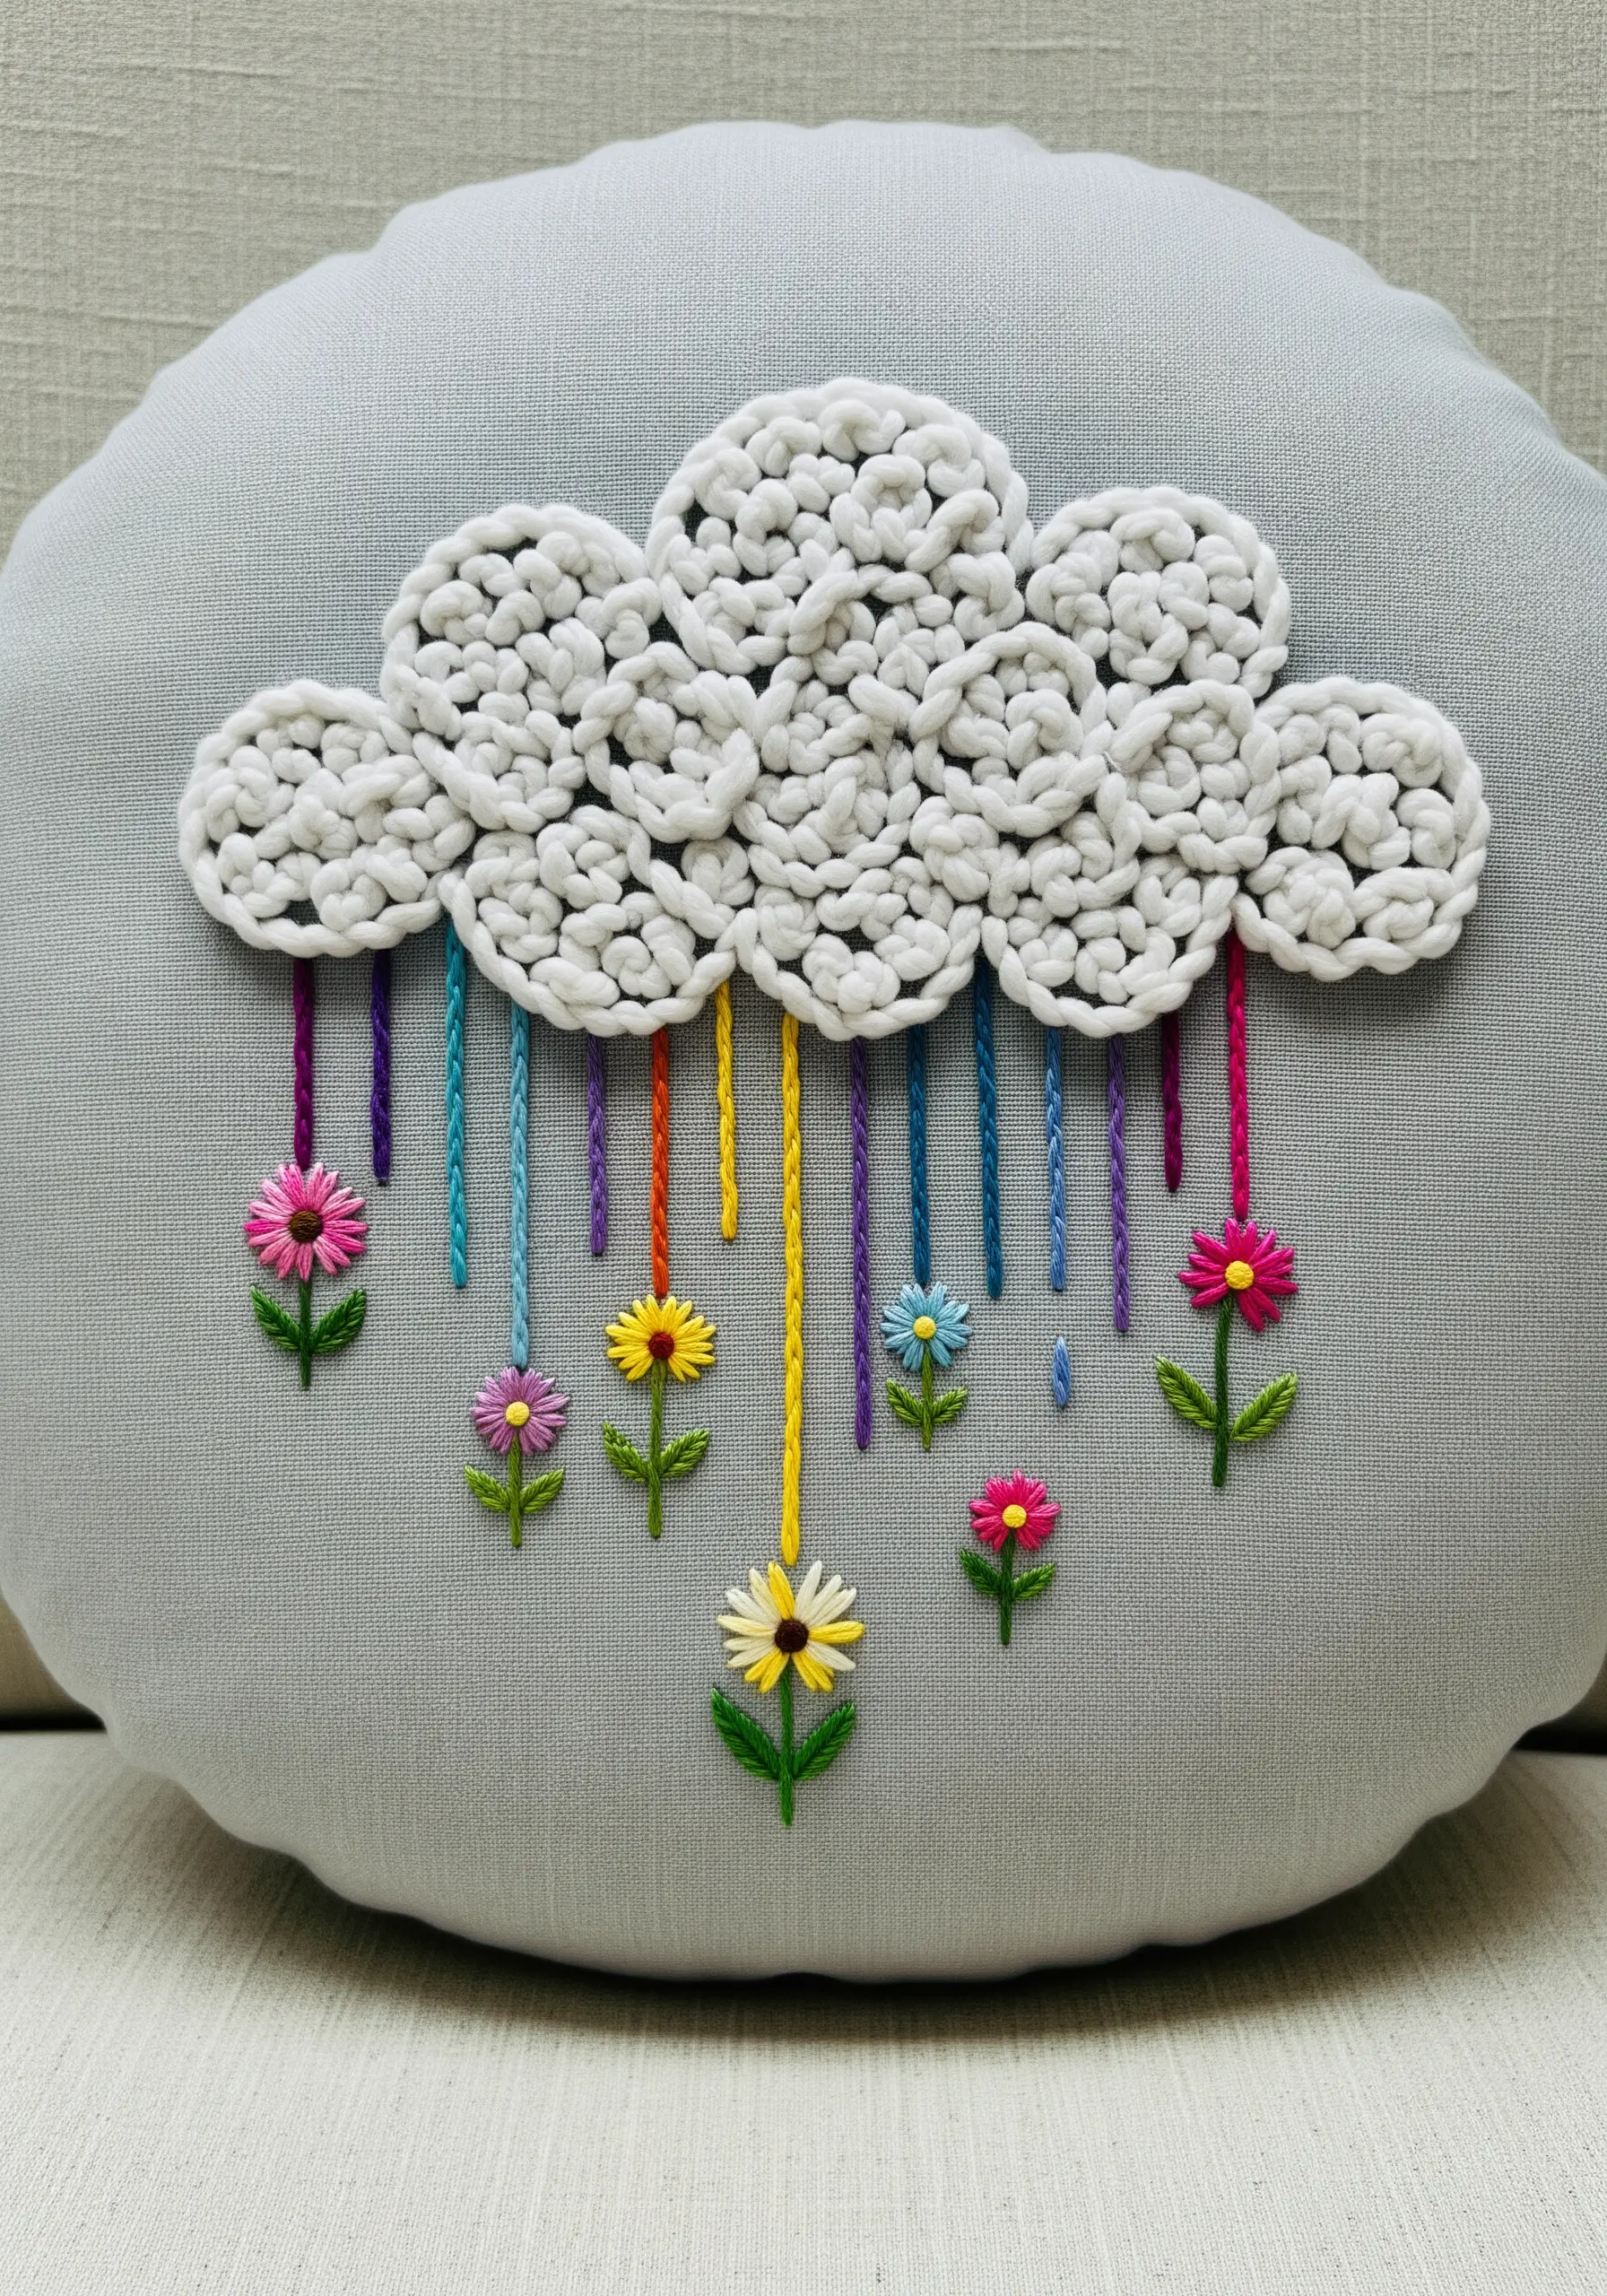
To create a cloud with a plush, tangible feel, fill the entire shape with colonial knots or French knots worked closely together.
Using a thicker thread, like cotton perle or even fine yarn, will accelerate the process and maximize the fluffy volume, creating a wonderful sensory element for a nursery pillow.
The rainbow rain is made from embroidery floss twisted into cords, tacked down at the top, and finished with a tiny lazy daisy flower at the bottom.
8. Integrate Found Objects with Delicate Stitches

Transform a treasured object, like an old key, into a focal point for your art.
Secure the key to the fabric using tiny, discreet couching stitches in a thread color that matches the metal’s patina.
Then, bring the piece to life by weaving delicate vines around it with a whipped backstitch for a smooth, cord-like finish.
Finally, add soft rosebuds using silk ribbon and the French knot technique for a touch of refined texture and color.
9. Adapt Your Stitches for Stretchy Knit Fabrics
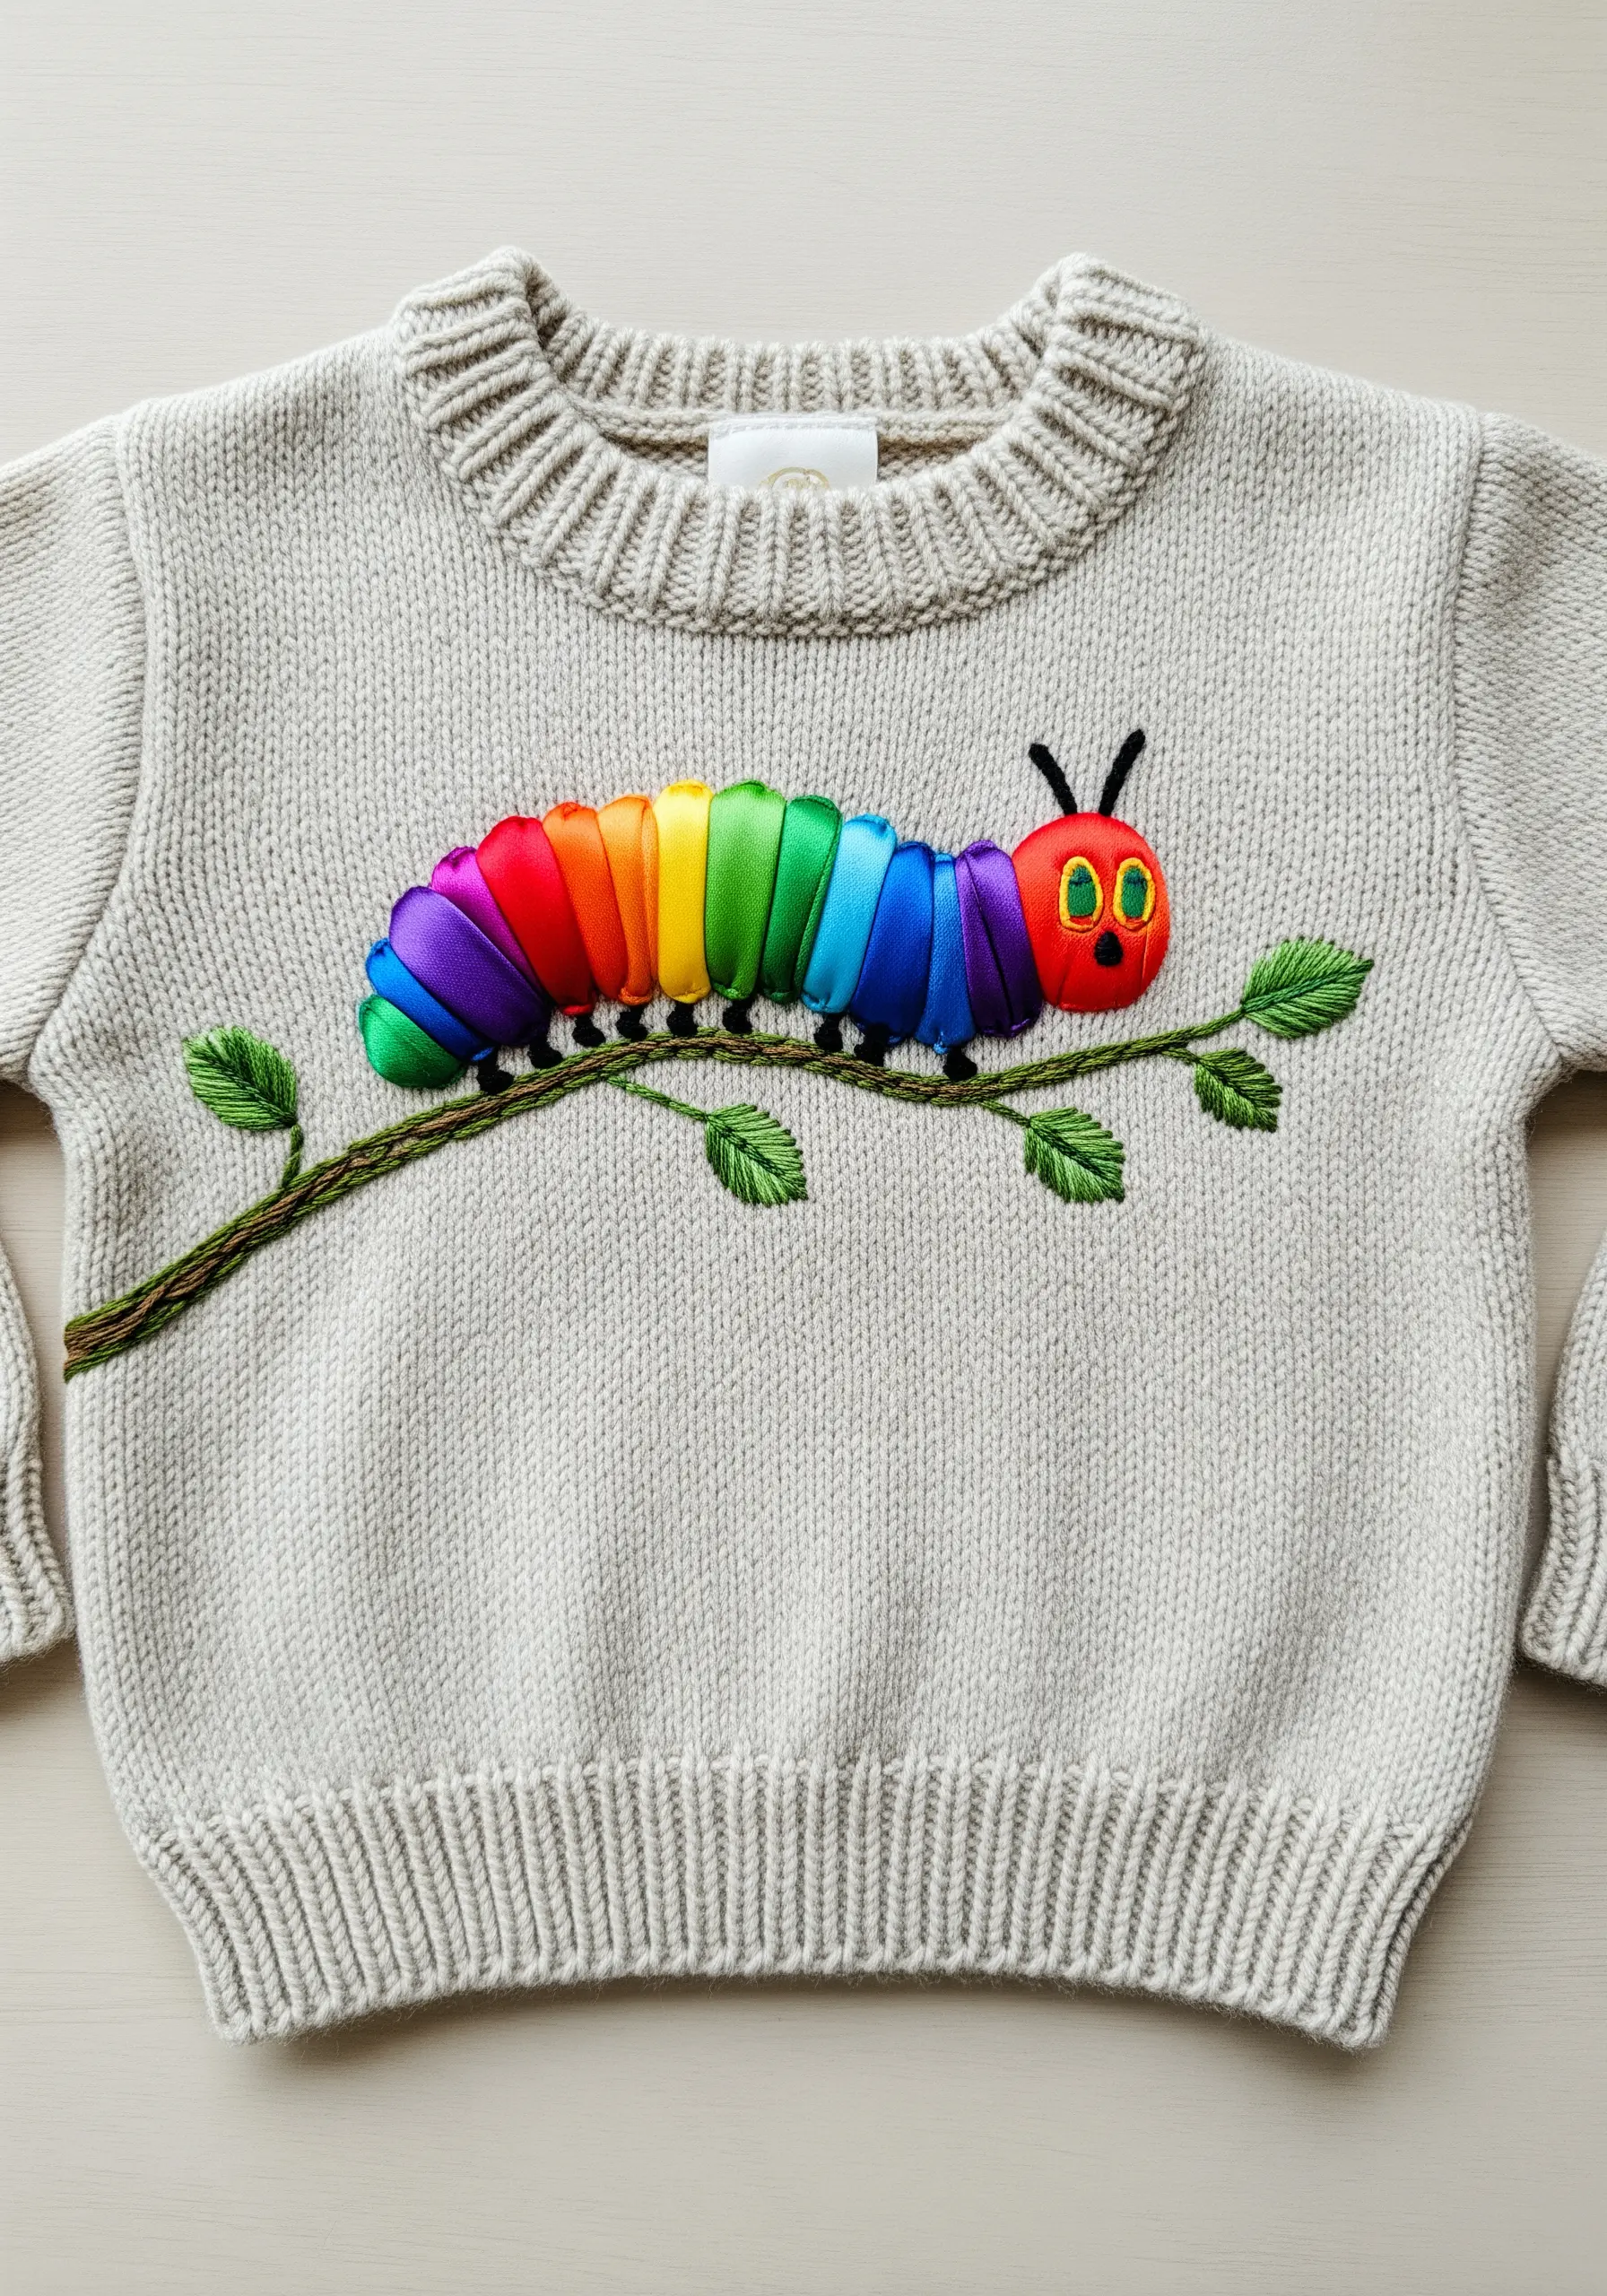
Embroidering on knits requires a lighter touch to avoid distorting the fabric’s natural stretch.
Always use a lightweight, tear-away stabilizer on the back to provide structure.
For the caterpillar’s vibrant segments, opt for a wide, padded satin stitch with slightly looser tension than you would use on woven fabric.
The padding—a simple base of straight stitches—helps the design stand out from the knit texture.
Use a chain stitch for the branch, as its looped structure has a natural give that moves with the sweater.
10. Create Layered Texture with Straight Stitches
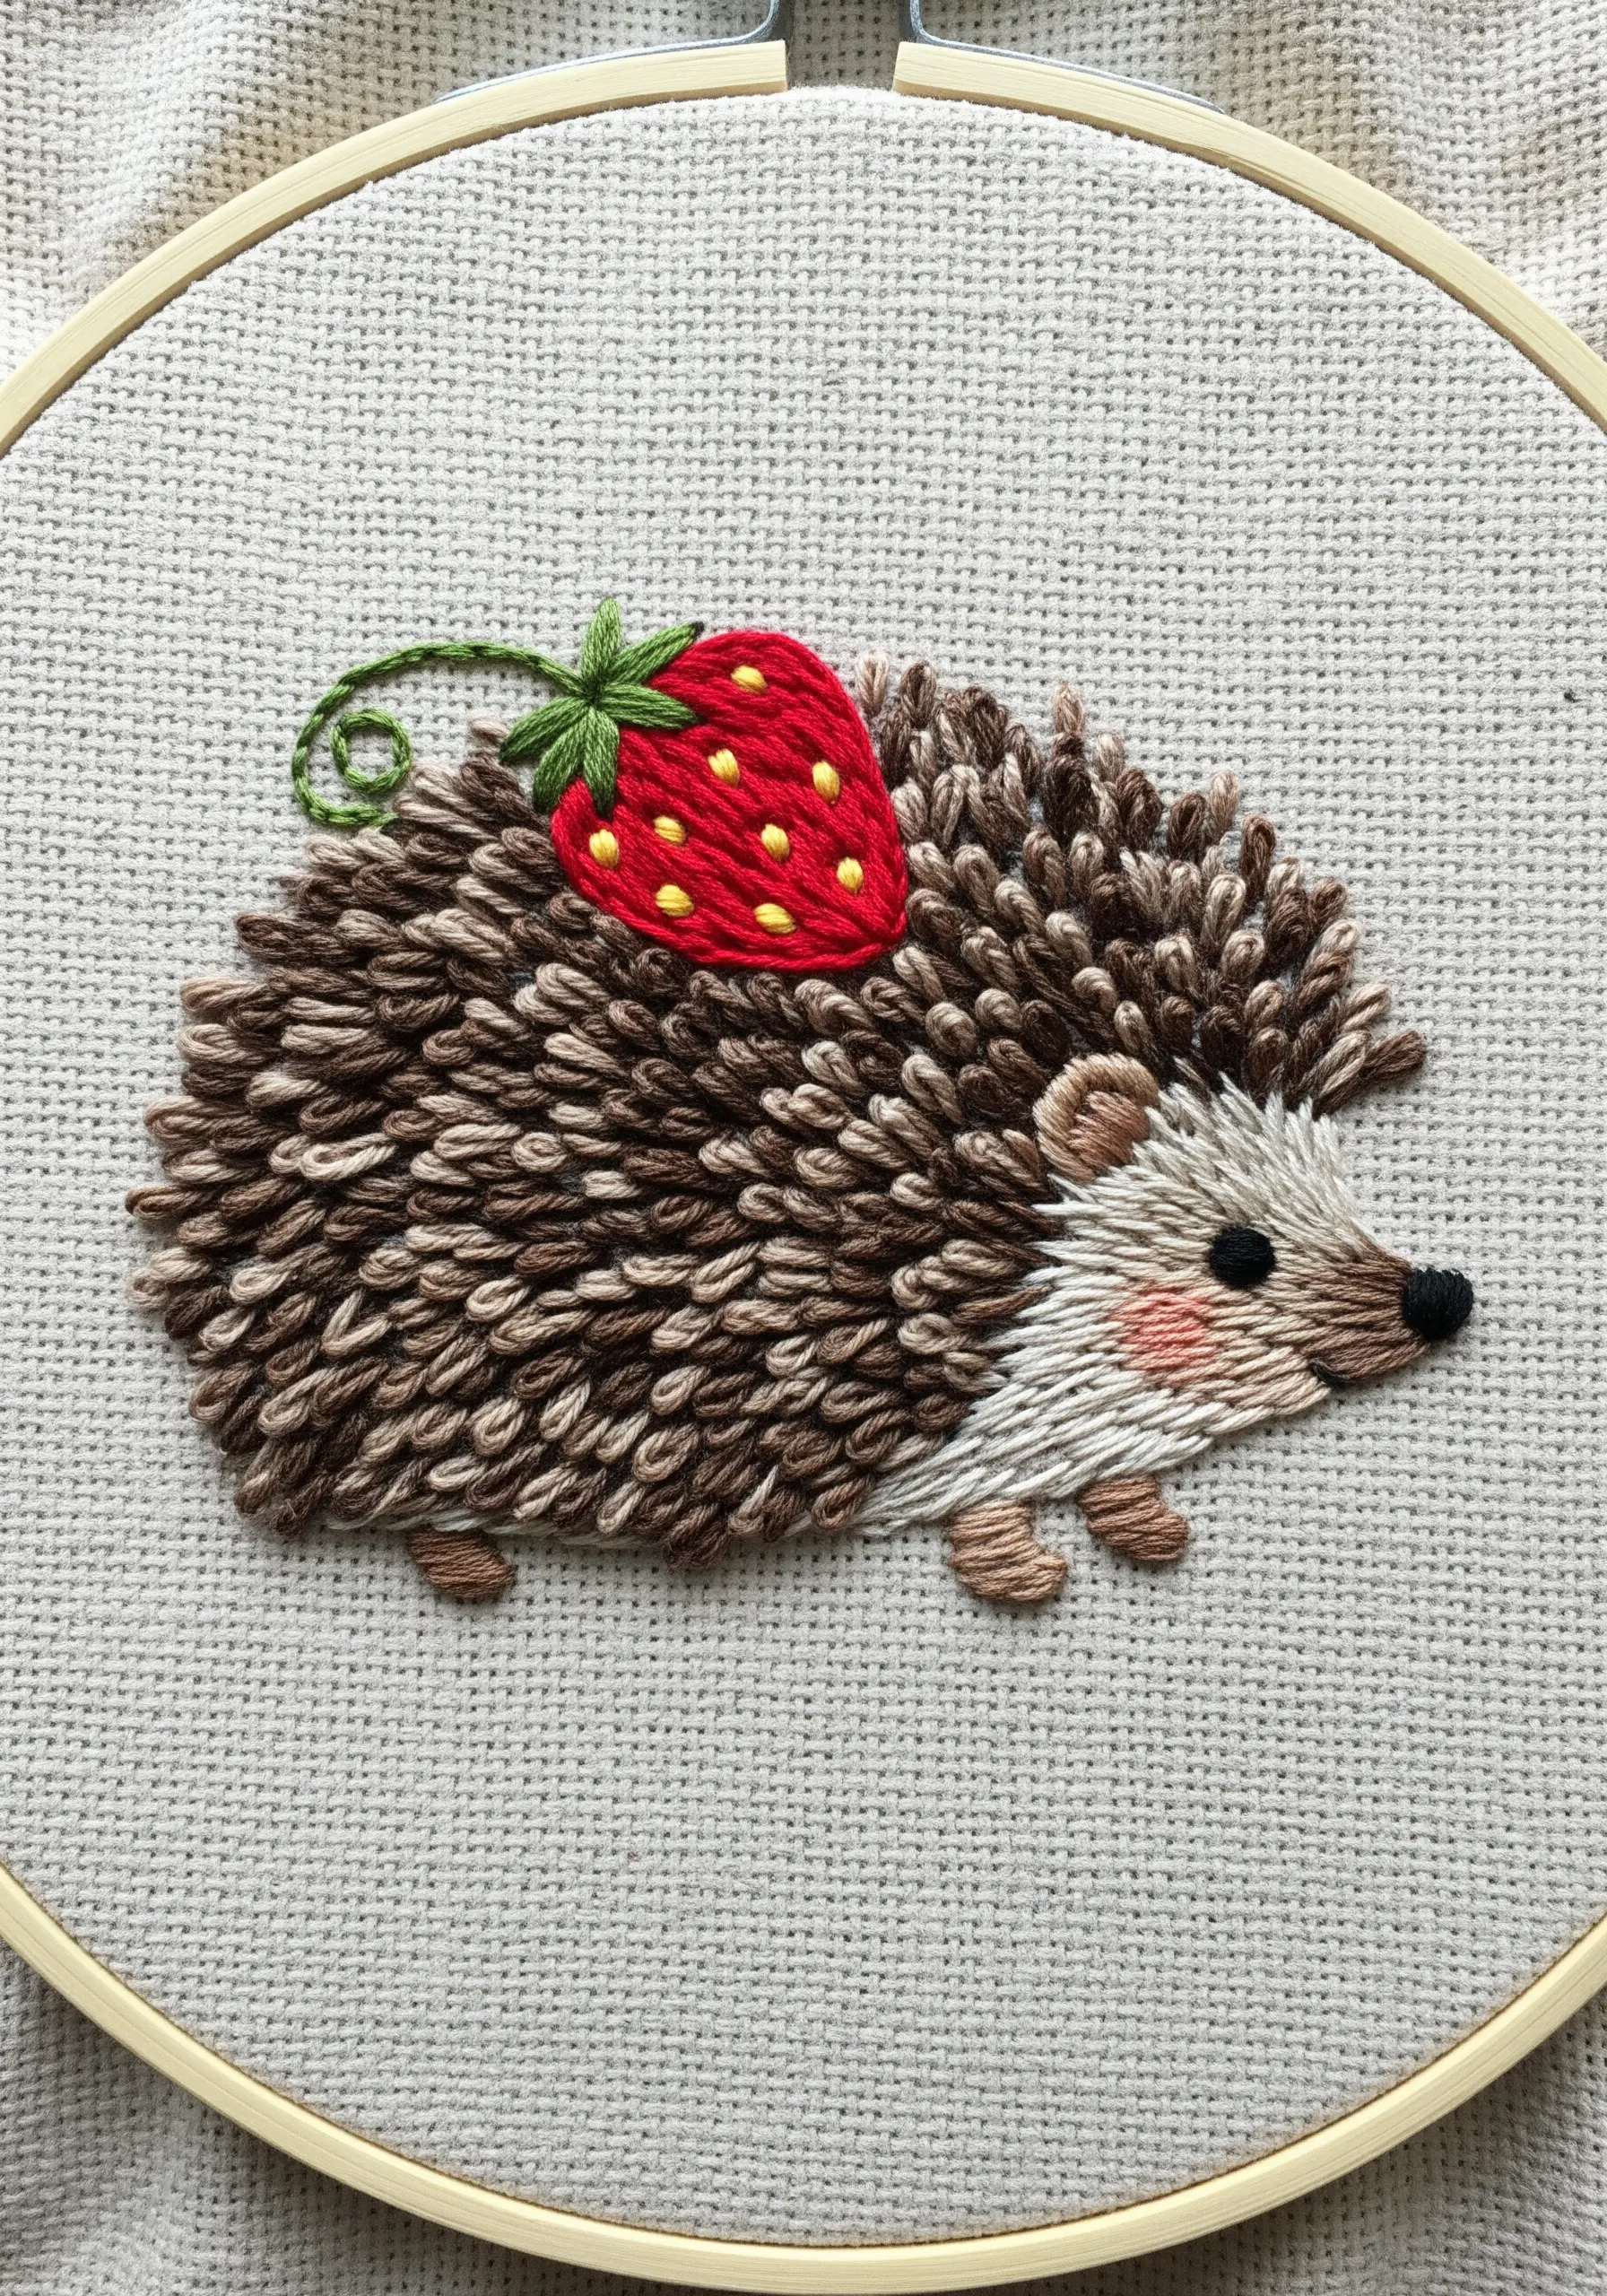
To convincingly mimic the hedgehog’s quills, rely on the simple power of layered straight stitches.
Start with a smooth base of satin stitch in a medium brown.
Then, working from the back towards the front, add layers of shorter, overlapping straight stitches in a mix of cream, beige, and dark brown.
Angle the stitches slightly outward to create a sense of movement and spiky dimension.
This forgiving technique builds a wonderfully rich and organic texture.
11. Weave Vibrant Spirals with Whipped Spider Web Stitch
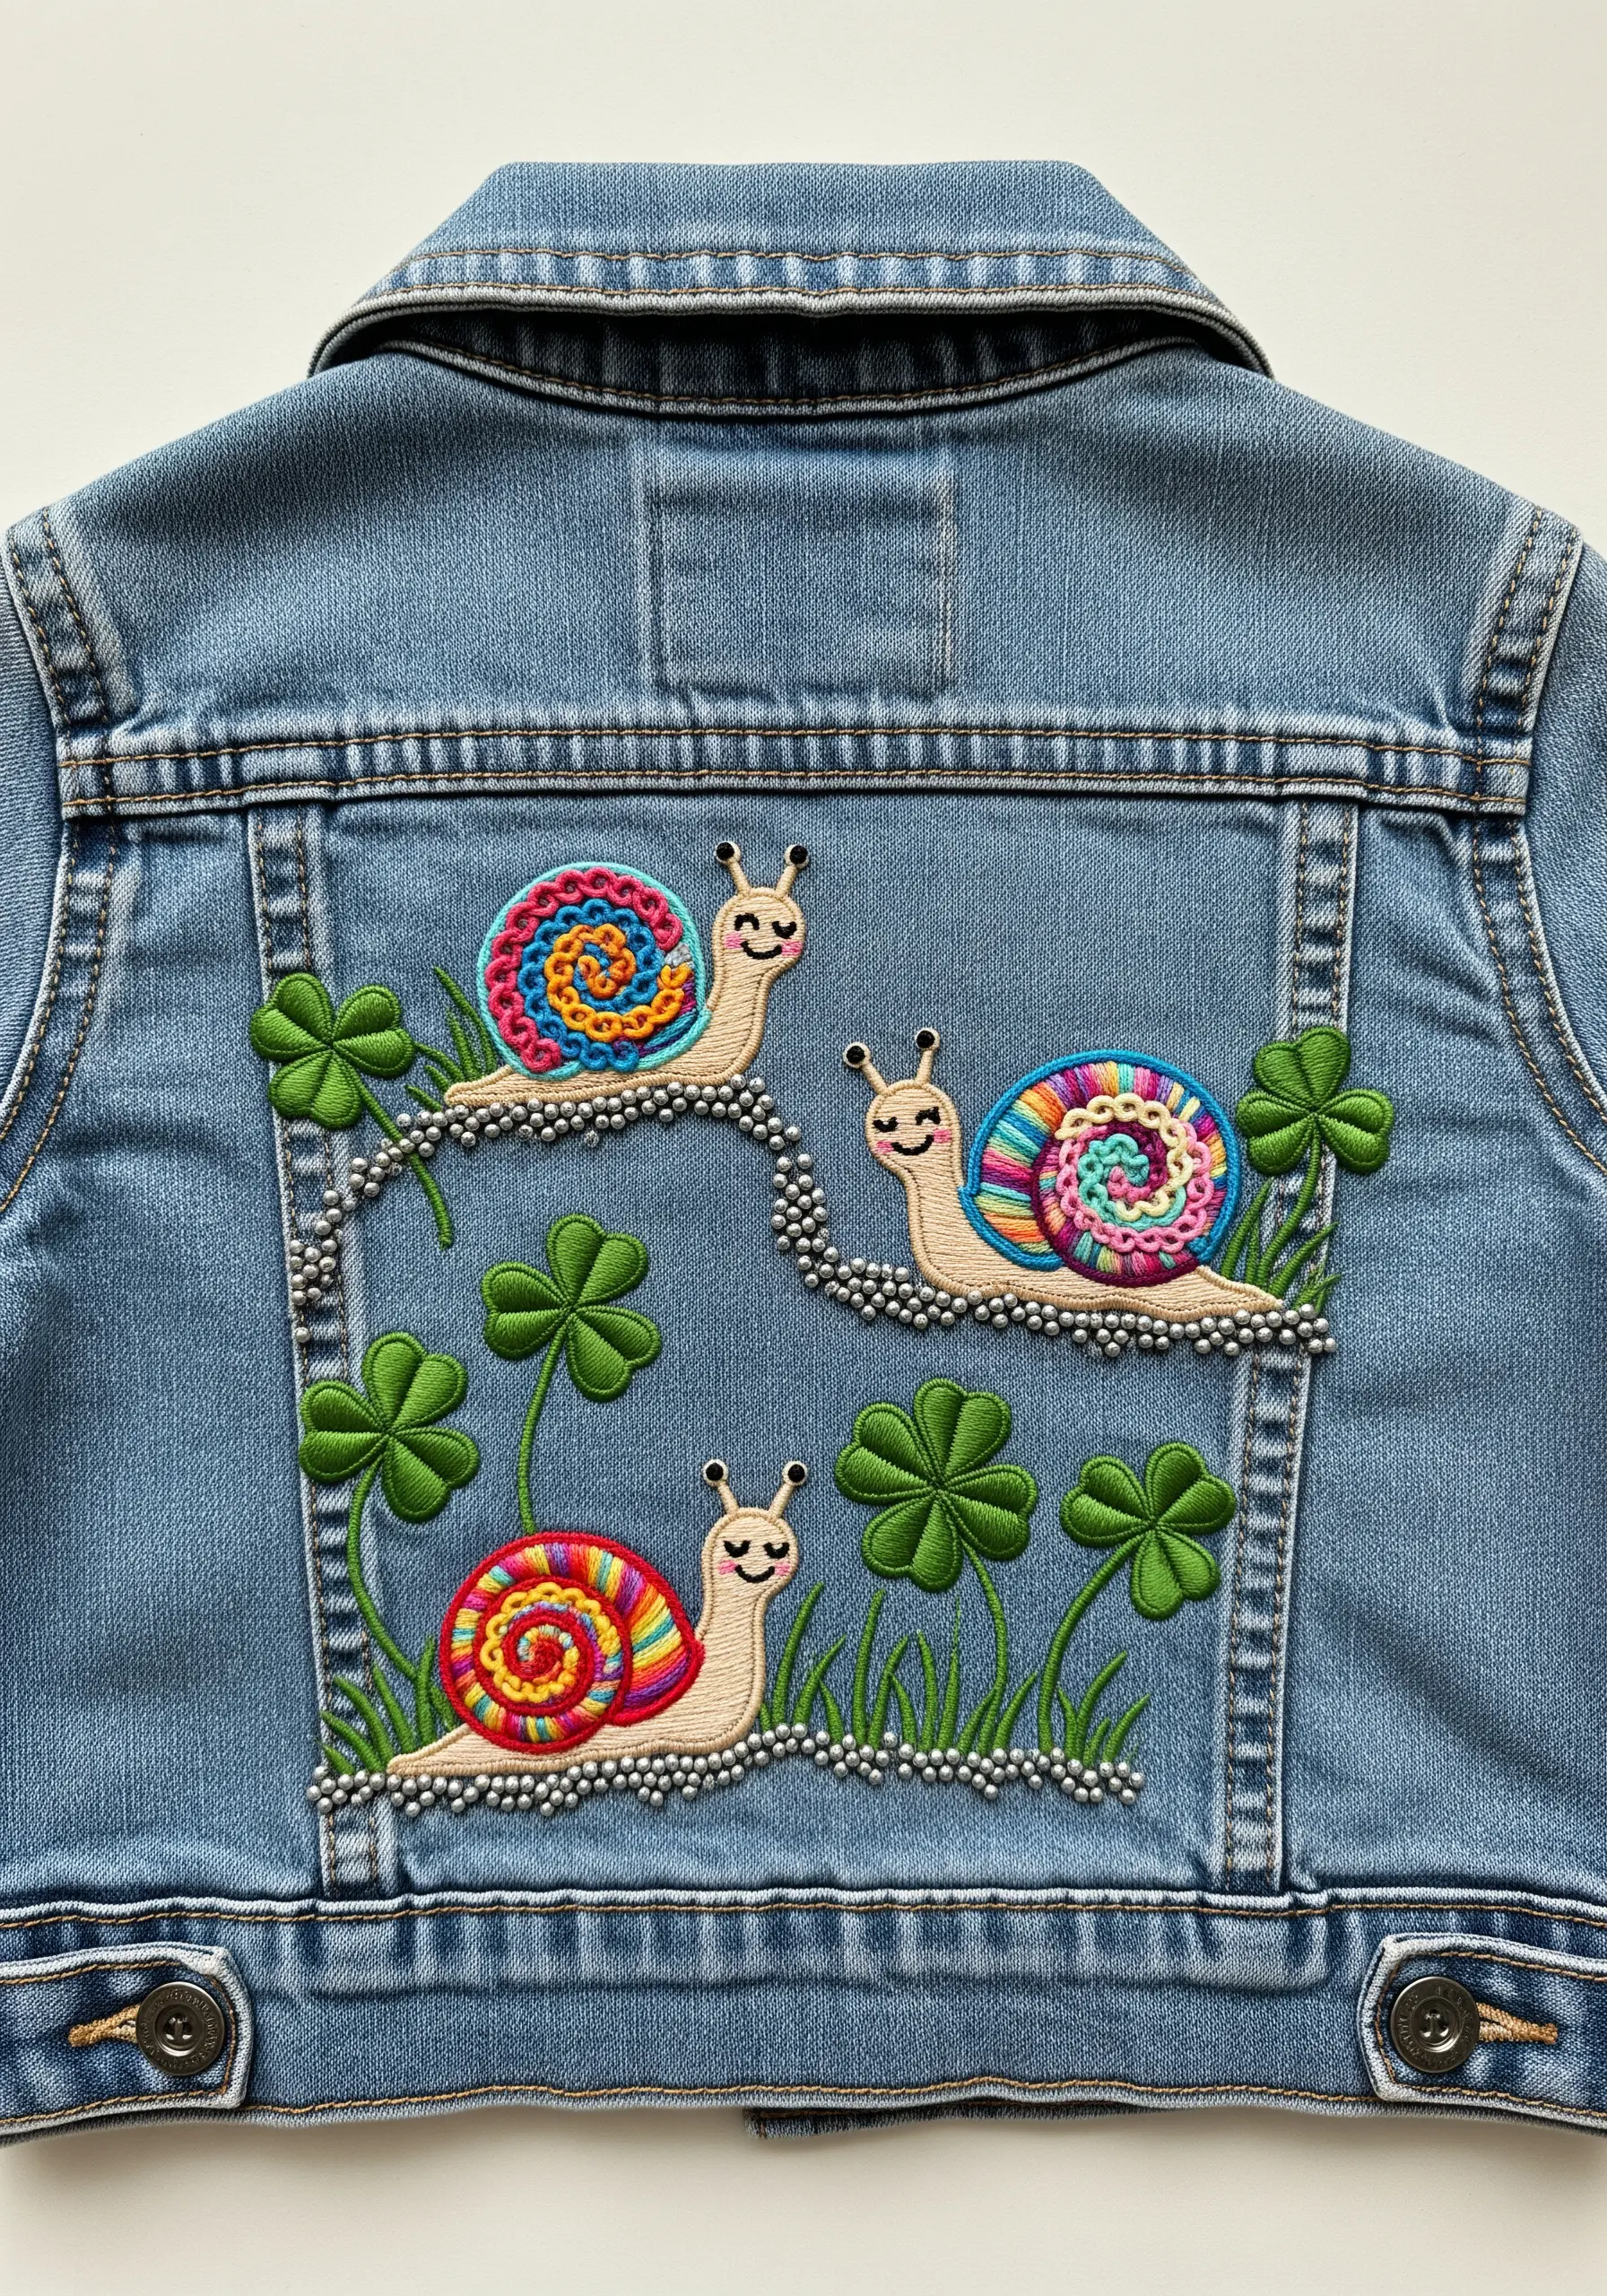
The snail shells provide a perfect canvas for vibrant color play.
Create a foundation of five straight stitches radiating from a central point, like the spokes of a wheel.
Then, using the whipped spider web stitch, weave your thread over and under these spokes without piercing the fabric.
Switch colors every few rows to build the cheerful rainbow spiral.
For the snail’s shimmering trail, use tightly packed French knots in a pearlescent white or silver thread.
12. Balance Clean Outlines with Dense, Textured Fills

Achieve a modern, illustrative style by contrasting sparse line work with lush, dense stitching.
First, outline the teacup and saucer using a clean backstitch or stem stitch with two or three strands of floss.
Then, fill the cup with a vibrant bouquet using a variety of high-texture stitches: lazy daisies for simple blooms, satin stitch for fuller flowers, and French knots for textural centers and accents.
This dynamic interplay between the simple outline and the rich fill immediately draws the eye.
13. Imply Movement with Open, Airy Stitches
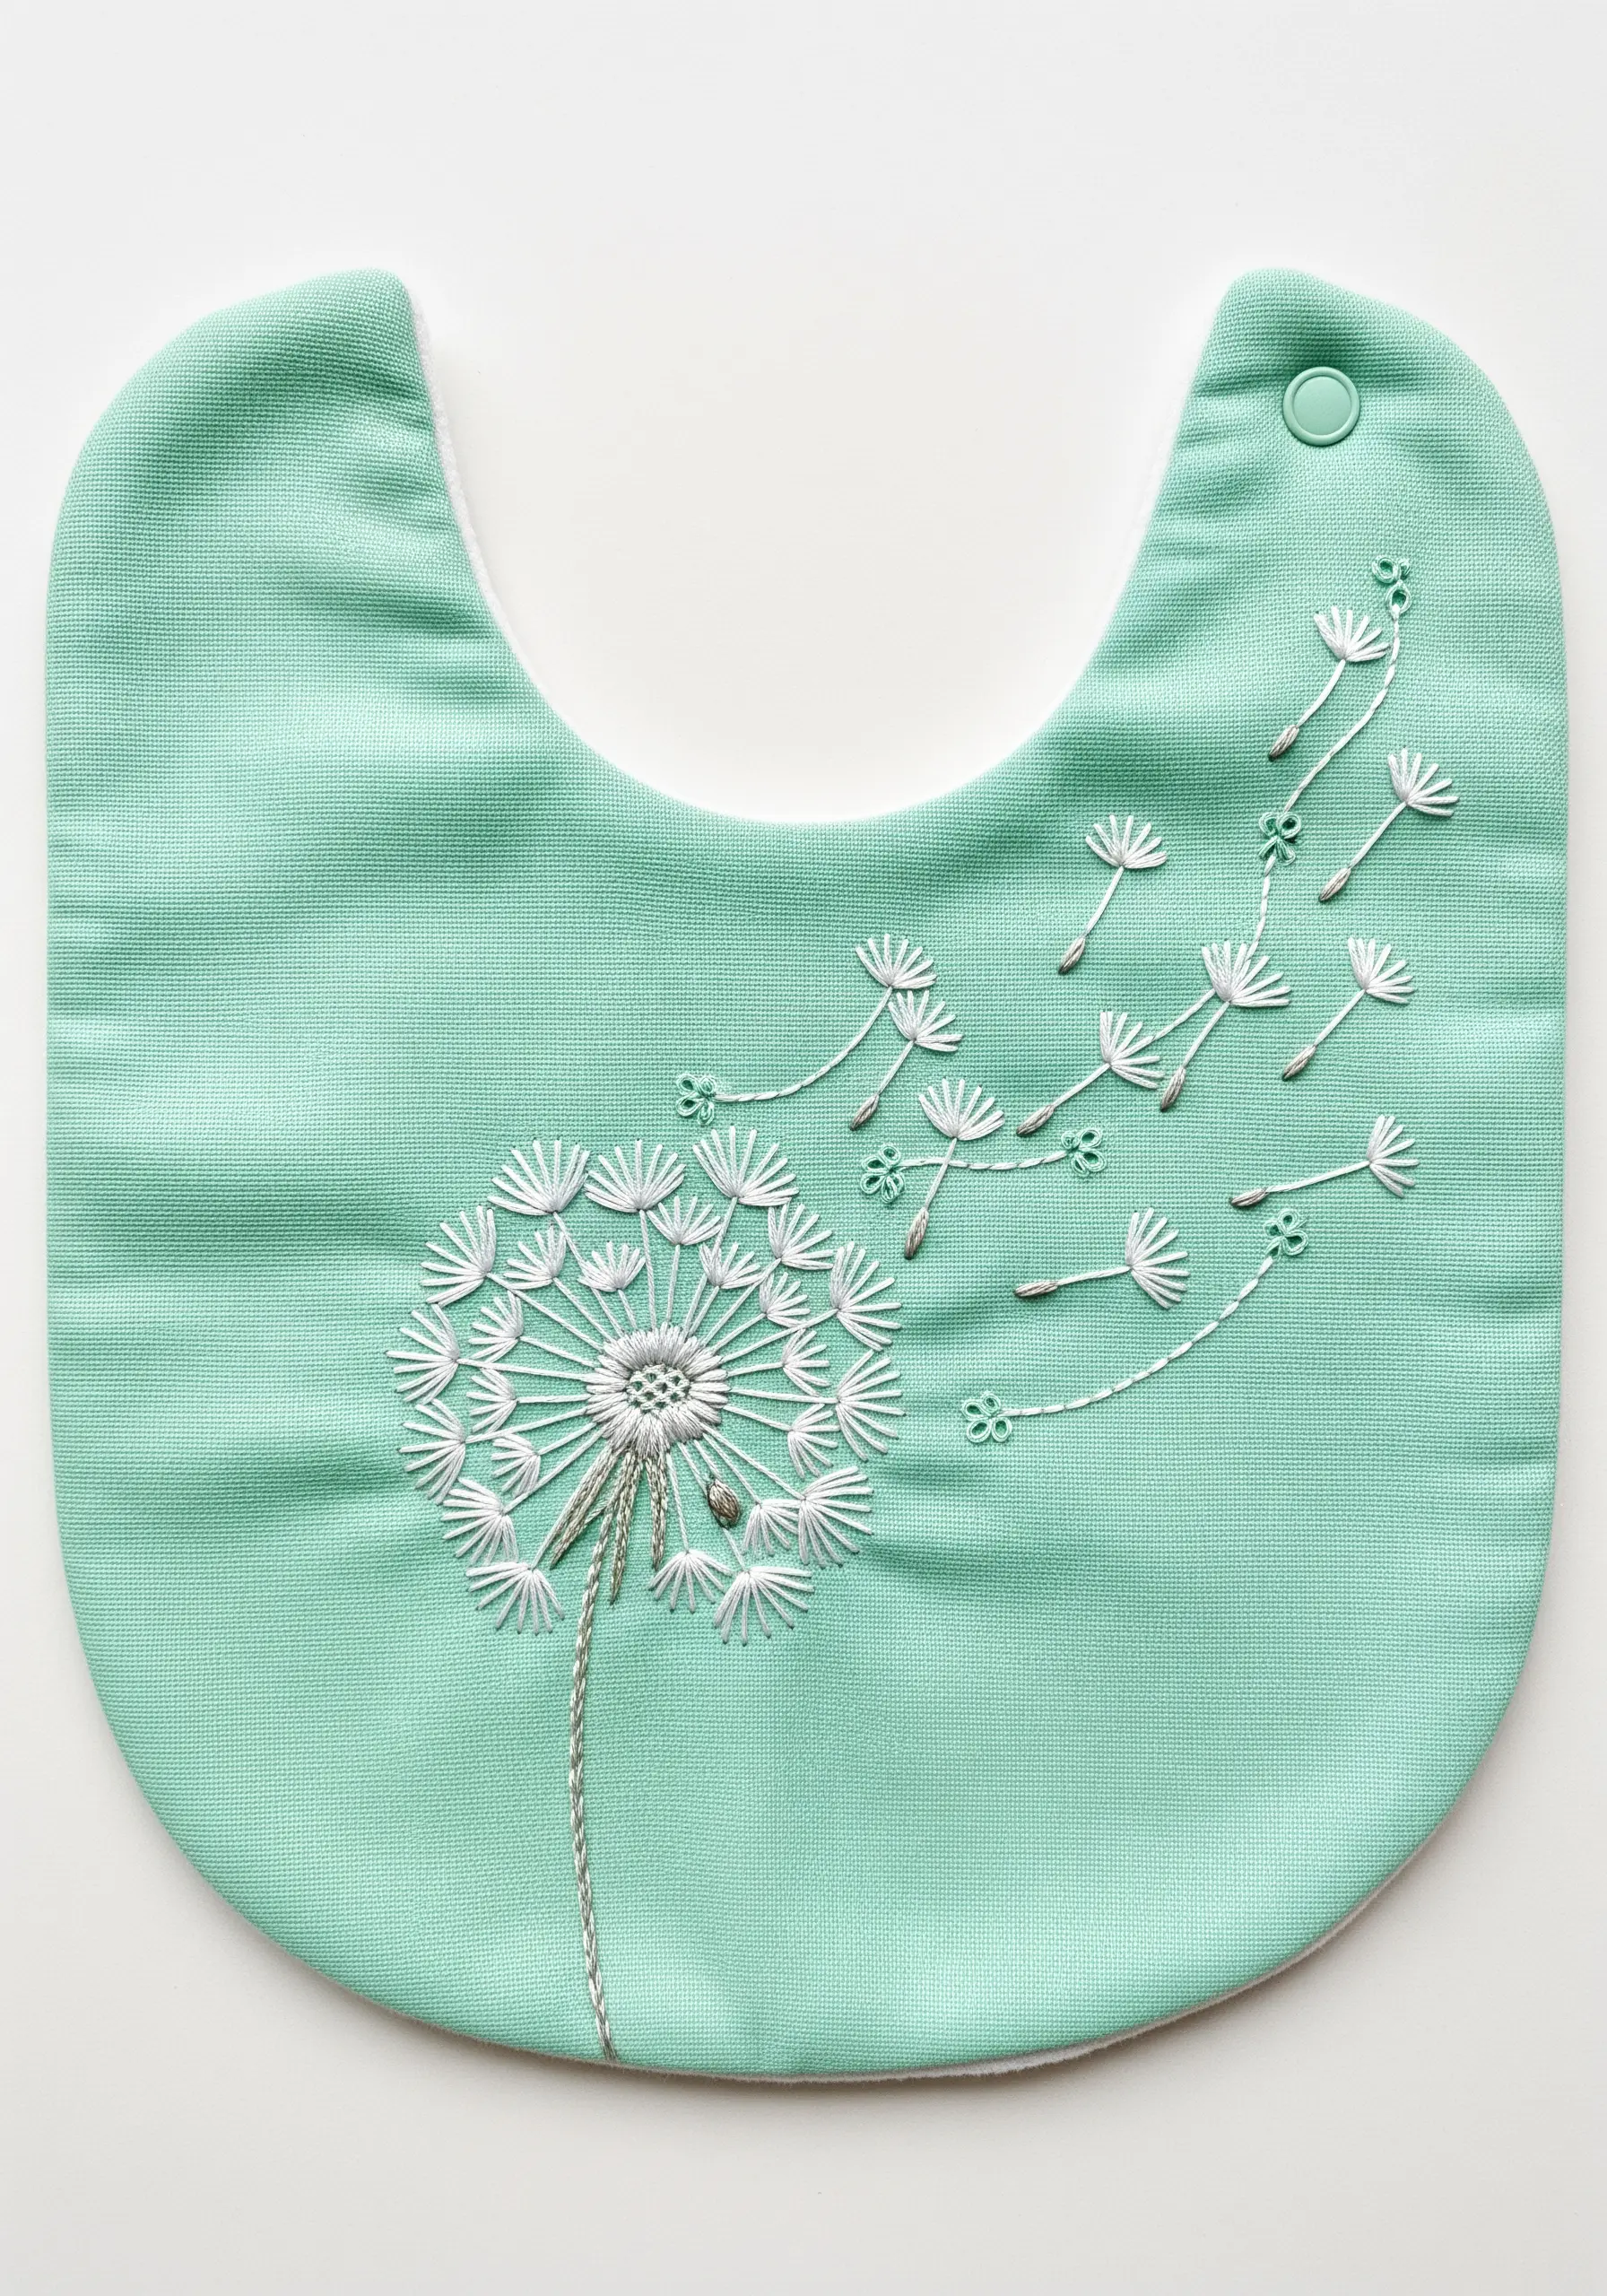
Capture the weightless quality of a dandelion by using negative space to your advantage.
For the seed head, use a sparse combination of straight stitches and French knots, allowing the background fabric to show through.
Create the floating seeds with a single strand of floss for the stem, topped with tiny detached chain stitches.
Incorporating a single strand of metallic silver thread alongside your white floss will add a subtle, magical shimmer to one of many handmade pieces that bring natural beauty to everyday items.
14. Map a Floral Pattern onto Any Shape
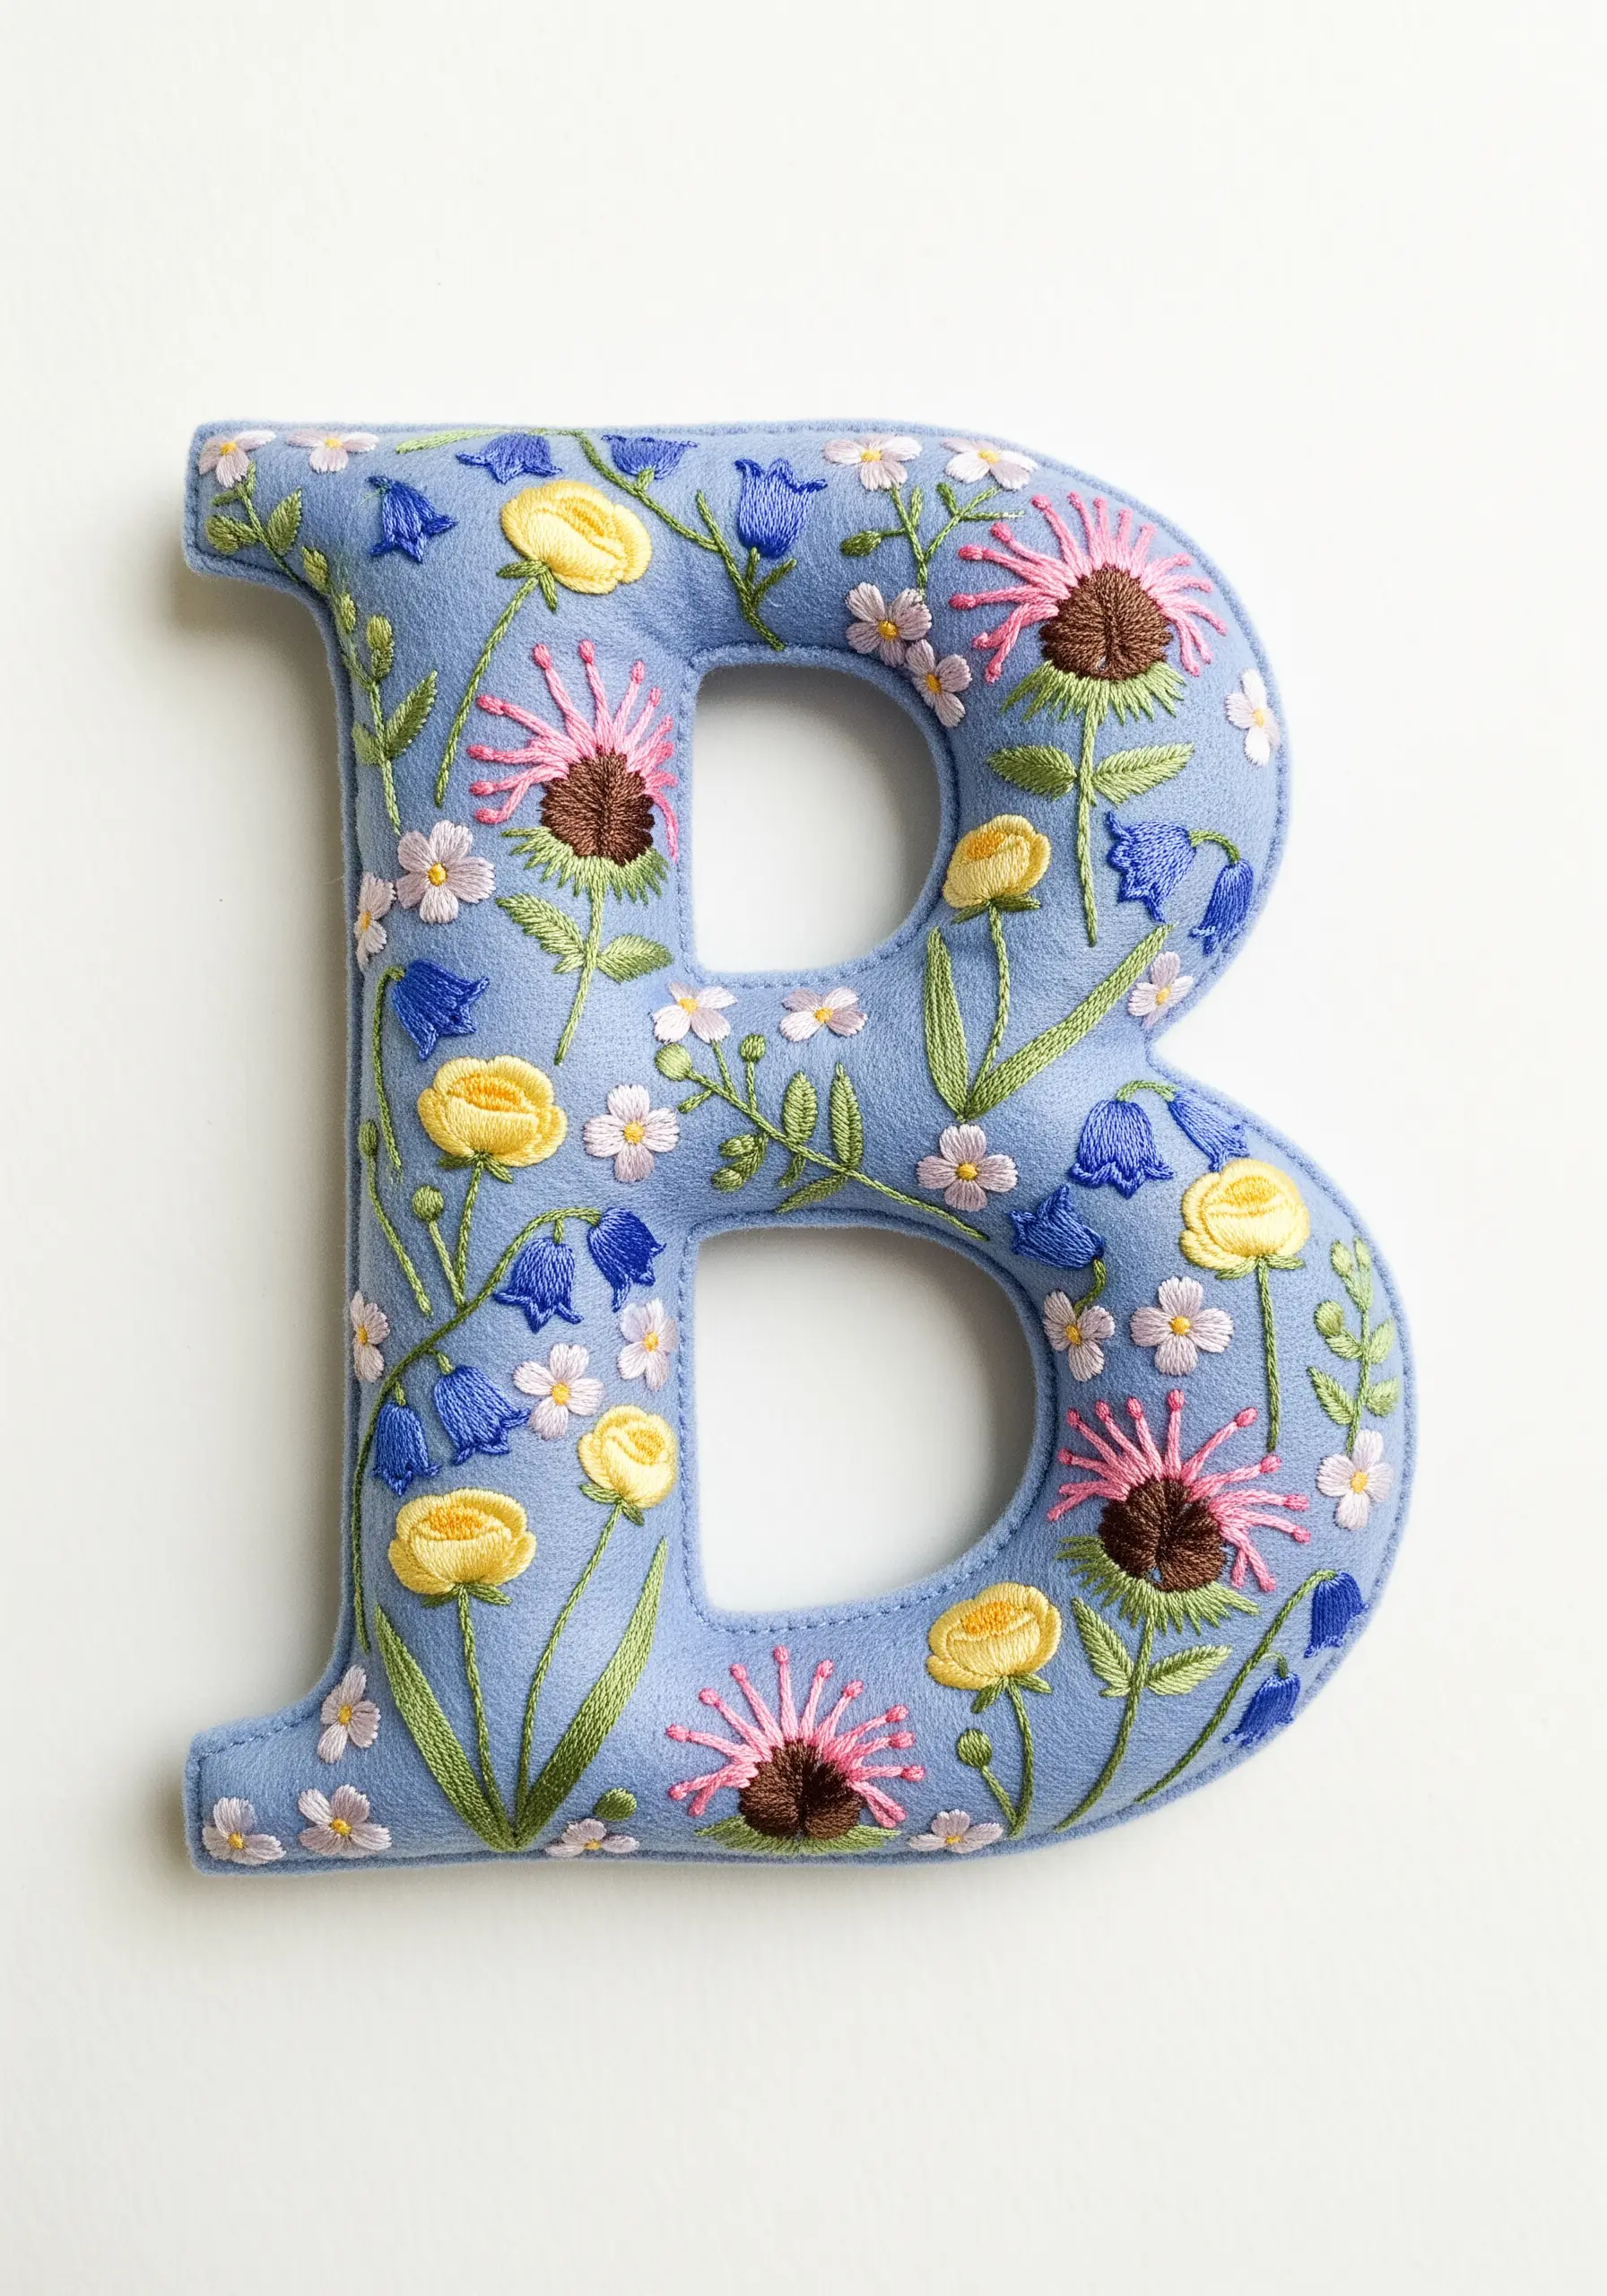
To create a dense, meadow-like effect on a monogram or other shape, work from largest to smallest element.
After lightly tracing your letter, scatter the largest flowers first—like the satin-stitched yellow ranunculus and detached-chain pink coneflowers.
Next, fill in the larger gaps with medium-sized blooms like the bluebells.
Finally, tuck in the smallest elements like leaves (fishbone stitch) and tiny white lazy daisies.
This top-down approach ensures a balanced and natural-looking composition every time.
15. Combine Thread and Beads for an Iridescent Effect

To capture the ethereal, translucent quality of a jellyfish, you need to mix your materials.
Embroider the bell shape using long-and-short stitch with single strands of pastel floss blended with iridescent metallic thread.
For the tentacles, create a flowing arrangement of couched threads, delicate chains of seed beads, and tiny pearls.
The beads and pearls add a subtle weight and a beautiful, water-like shimmer that thread alone simply cannot replicate.
16. Use Long-and-Short Stitch for Feathered Gradients
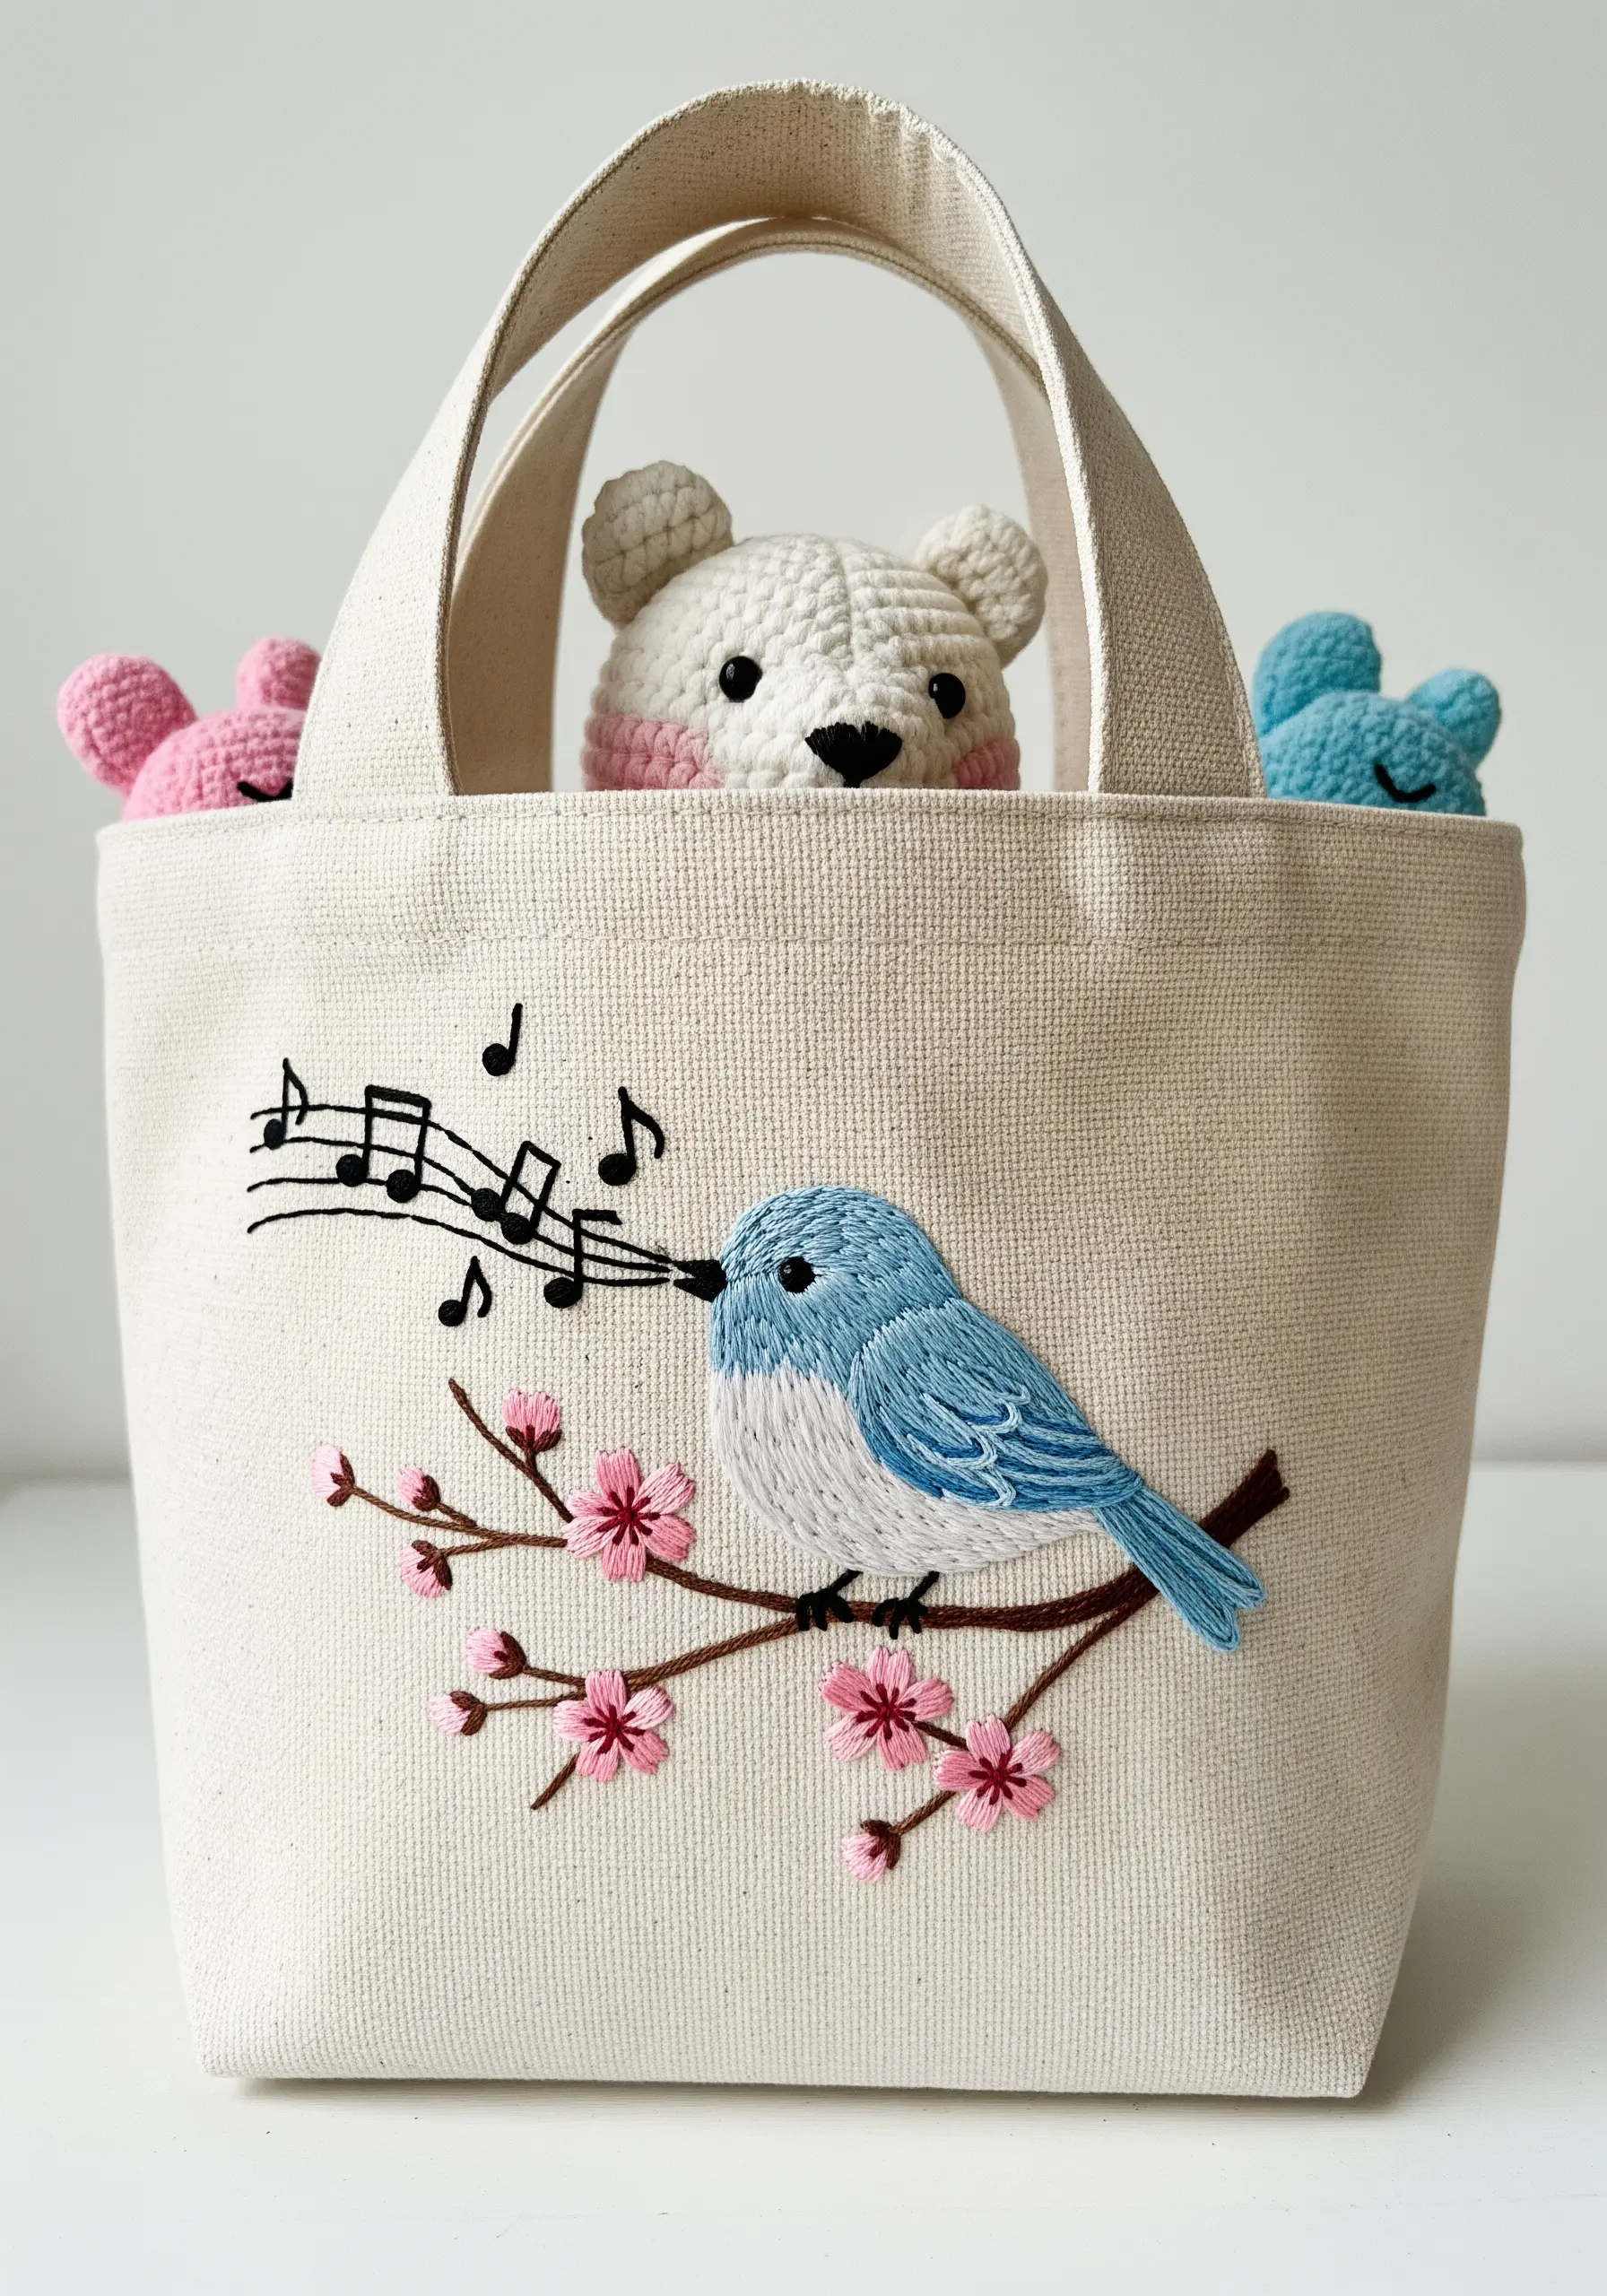
Give your embroidered birds a soft, realistic appearance by using thread painting, also known as long-and-short stitch.
Fill the bird’s body with carefully angled stitches, blending several shades of blue to mimic the subtle color variations in feathers.
Always stitch in the direction of feather growth for the most natural and convincing effect.
The crisp, backstitched musical notes provide a smart graphic contrast to the softly blended bird, elevating simple modern tote bag embroidery designs.
17. Design a Balanced and Flowing Border
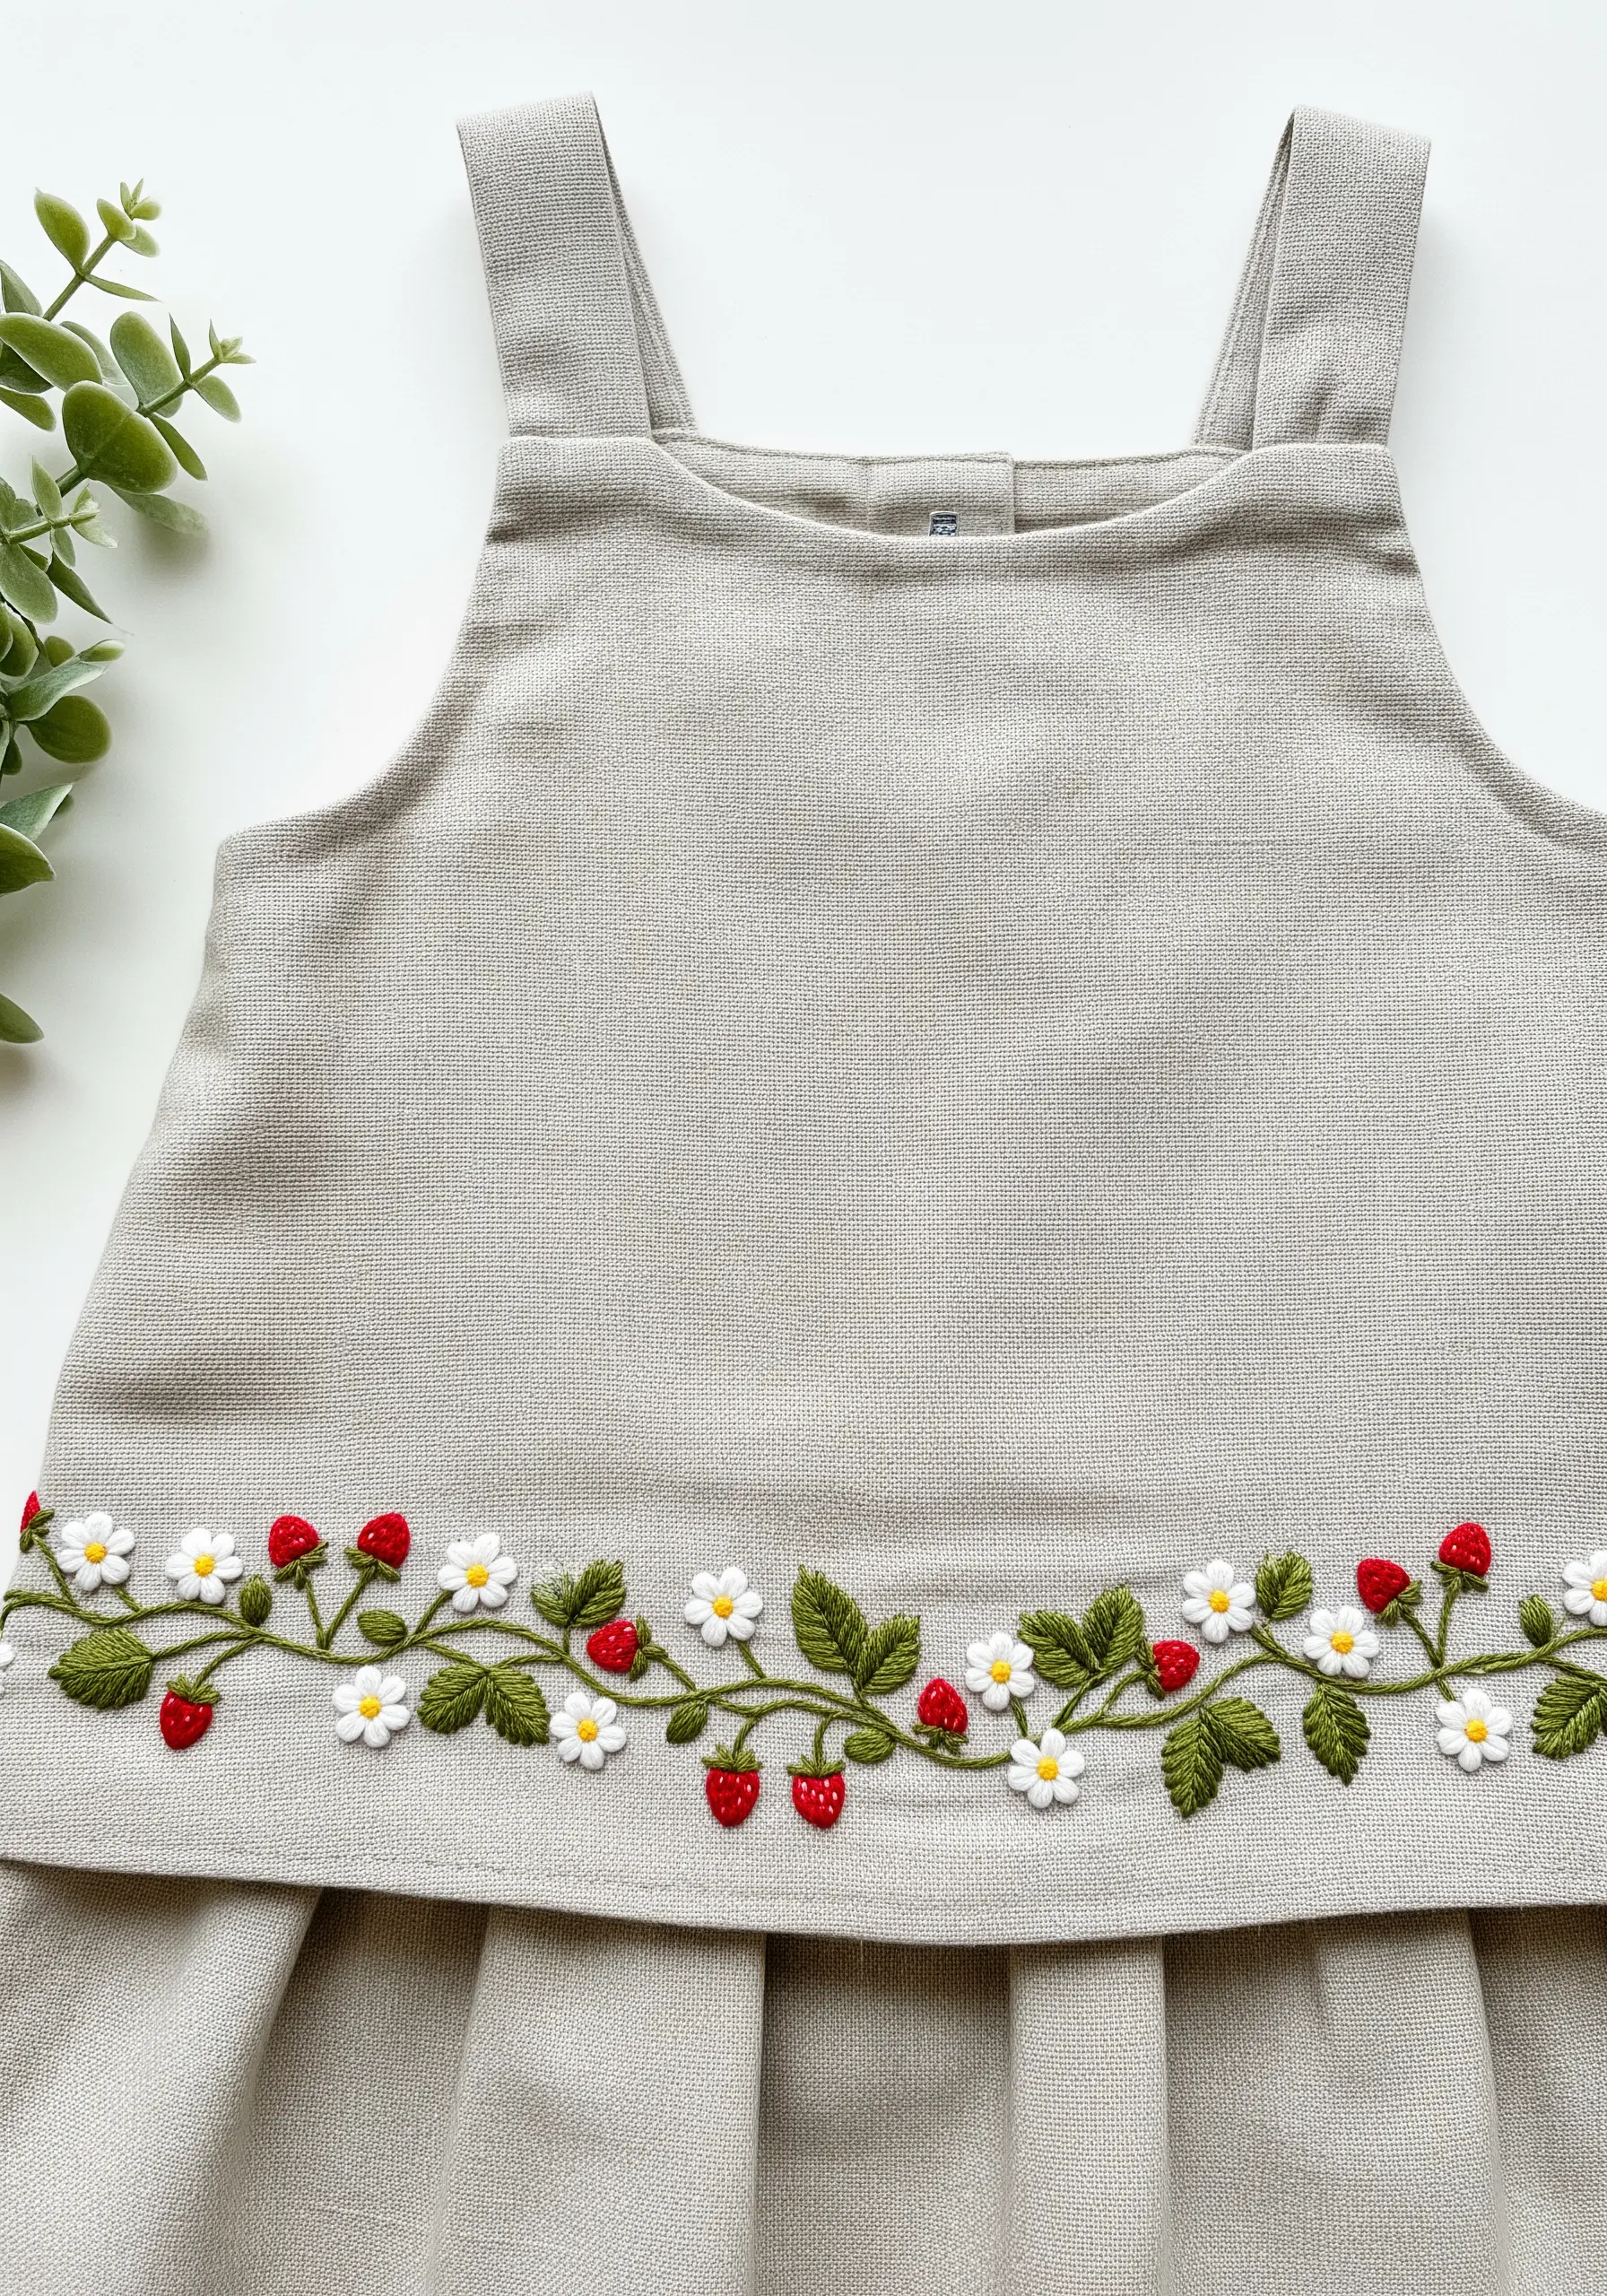
When adding a border to a piece of clothing, aim for natural, organic movement rather than perfect symmetry.
Begin by stitching the vine with a gently curving stem stitch.
Then, arrange the primary elements—such as strawberries (satin stitch), flowers (lazy daisy stitch), and leaves (fishbone stitch)—at irregular intervals along the vine.
This intentional imperfection creates a more graceful and less rigid look, perfect for a whimsical child’s dress or blanket edge.
18. Create a Convincing Glow Effect on Dark Fabric
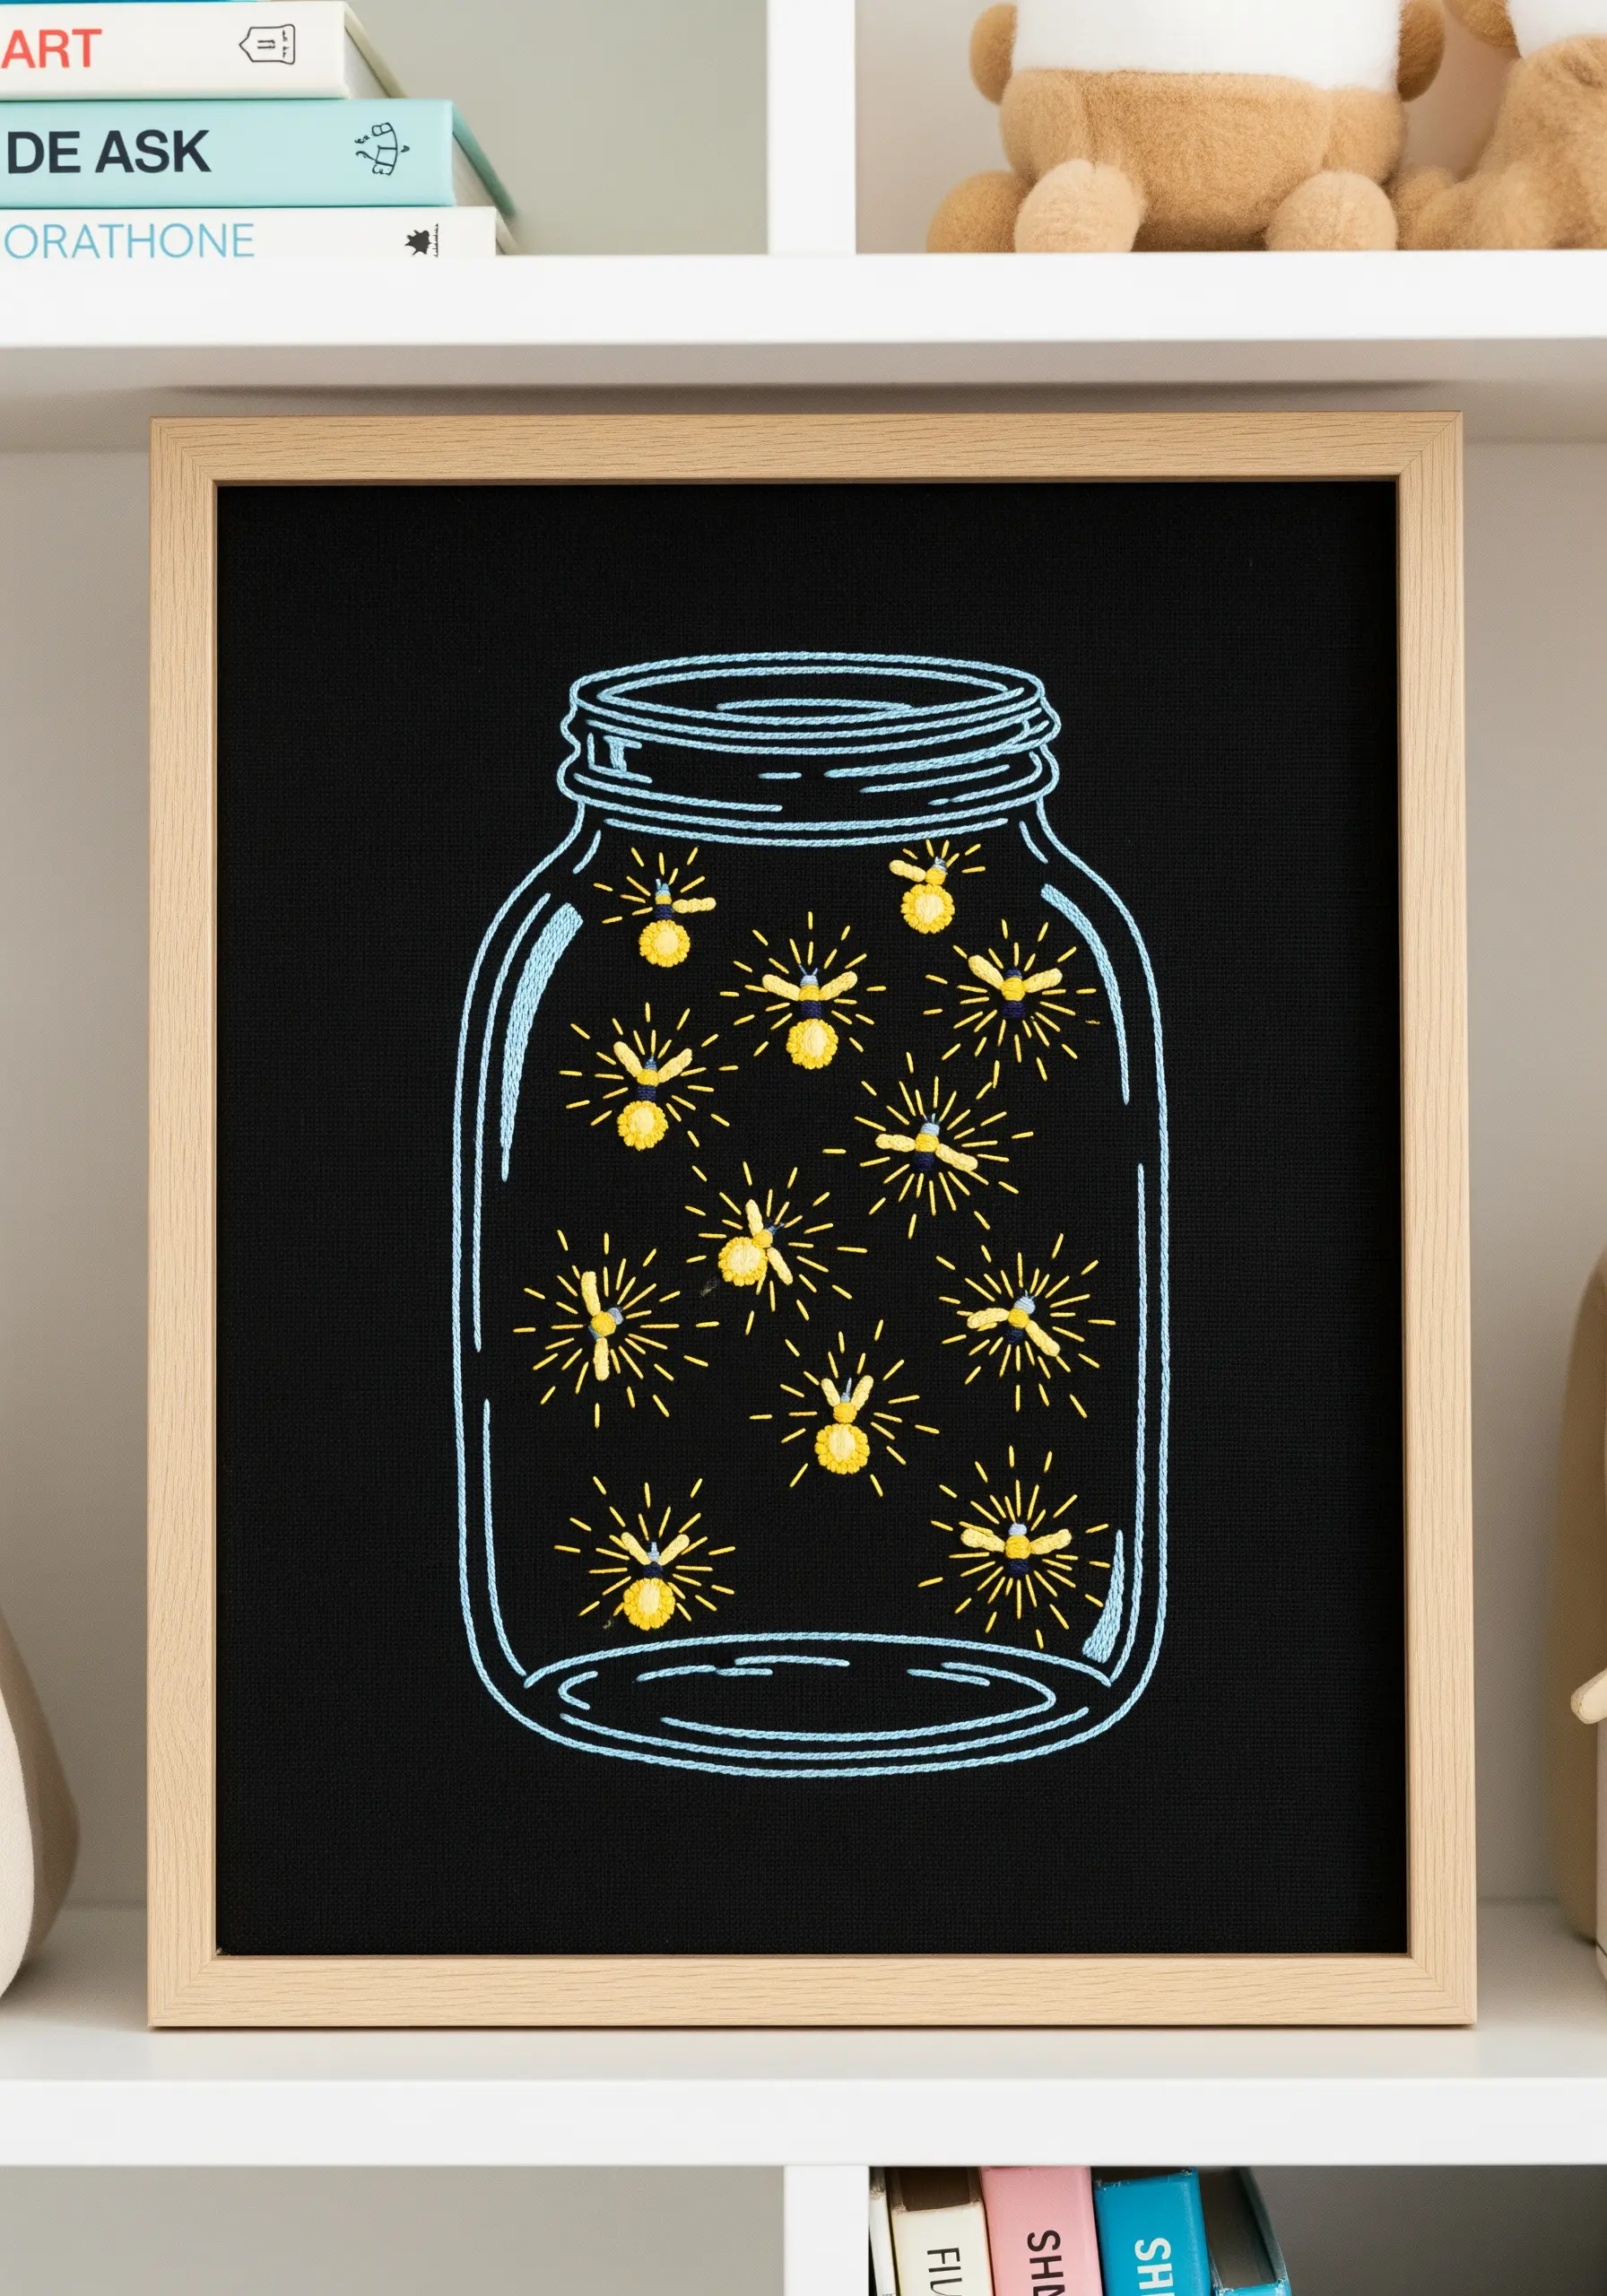
Making your fireflies appear to genuinely glow is all about high-contrast thread choices.
Use a bright yellow or chartreuse floss to stitch a small satin stitch oval for the body.
Then, using a metallic or even a glow-in-the-dark thread, radiate short, sharp straight stitches outward to represent light.
The simple backstitch outline of the jar defines the scene without competing for attention, allowing the glowing insects to remain the magical focal point.
19. Achieve a Fluffy Texture with the Turkey Stitch
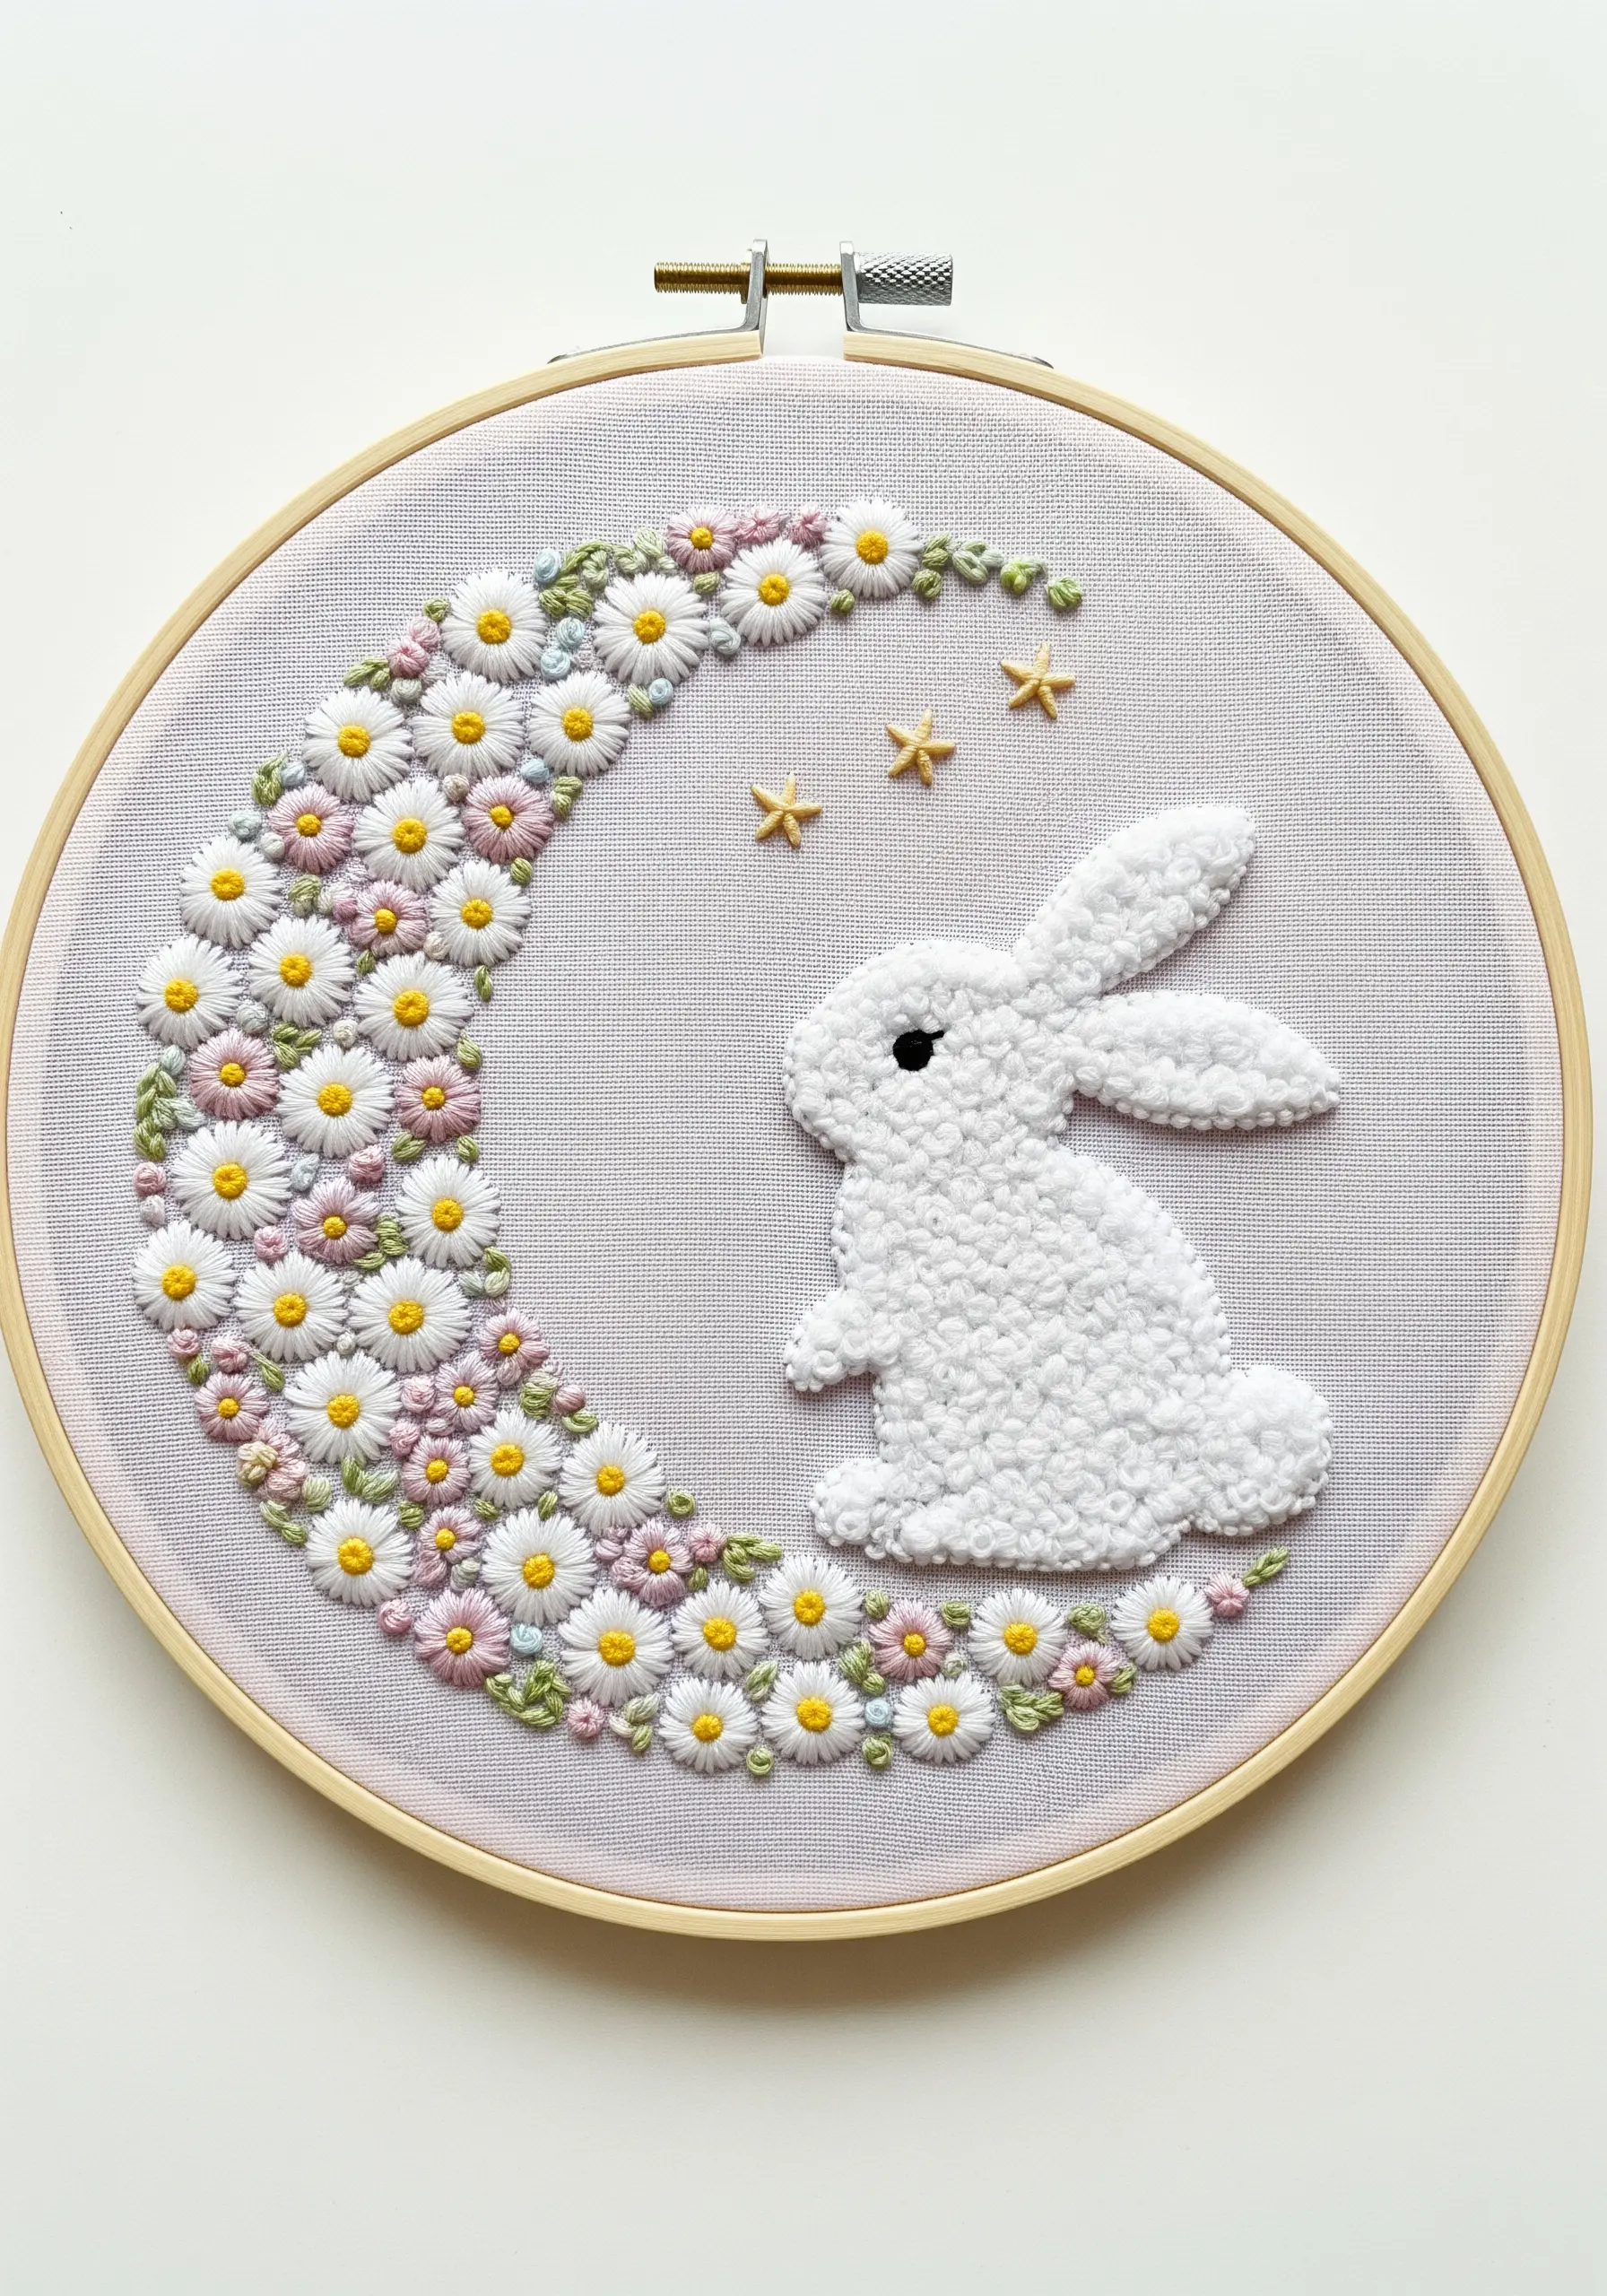
For the bunny’s wonderfully soft and pettable fur, the turkey stitch is your best technique.
This stitch involves creating a series of thread loops on the surface of your fabric, securing each one with a tiny tacking stitch.
Once you have filled the entire body shape, carefully trim the tops of the loops to create a plush, velvety pile.
The contrast between the bunny’s fluffy texture and the flat, smooth daisies creates a delightful sensory and visual appeal.


