
You have the stitches down. You’ve chosen your threads, and you have a vision in your mind. But sometimes, there’s a gap between the beautiful work you imagine and the piece sitting in your hoop. It feels good, but not quite… finished. Not quite art.
The secret to elevating your work often isn’t a more complicated stitch or an intricate pattern. It’s in the canvas itself. By thinking beyond fabric and inviting paper into your practice, you open up a world of texture, dimension, and modern polish that can transform your embroidery from a craft into a statement piece.
Here, you won’t find complex projects. Instead, think of these as 22 elegant shifts in perspective. These are simple, accessible ways to use paper—through collage, sculpture, and as a canvas itself—to make your embroidery pop. It’s time to create work you are truly proud to hang in any room.
1. Beyond Flat Stitches: Introduce Sculptural Ribbon Roses
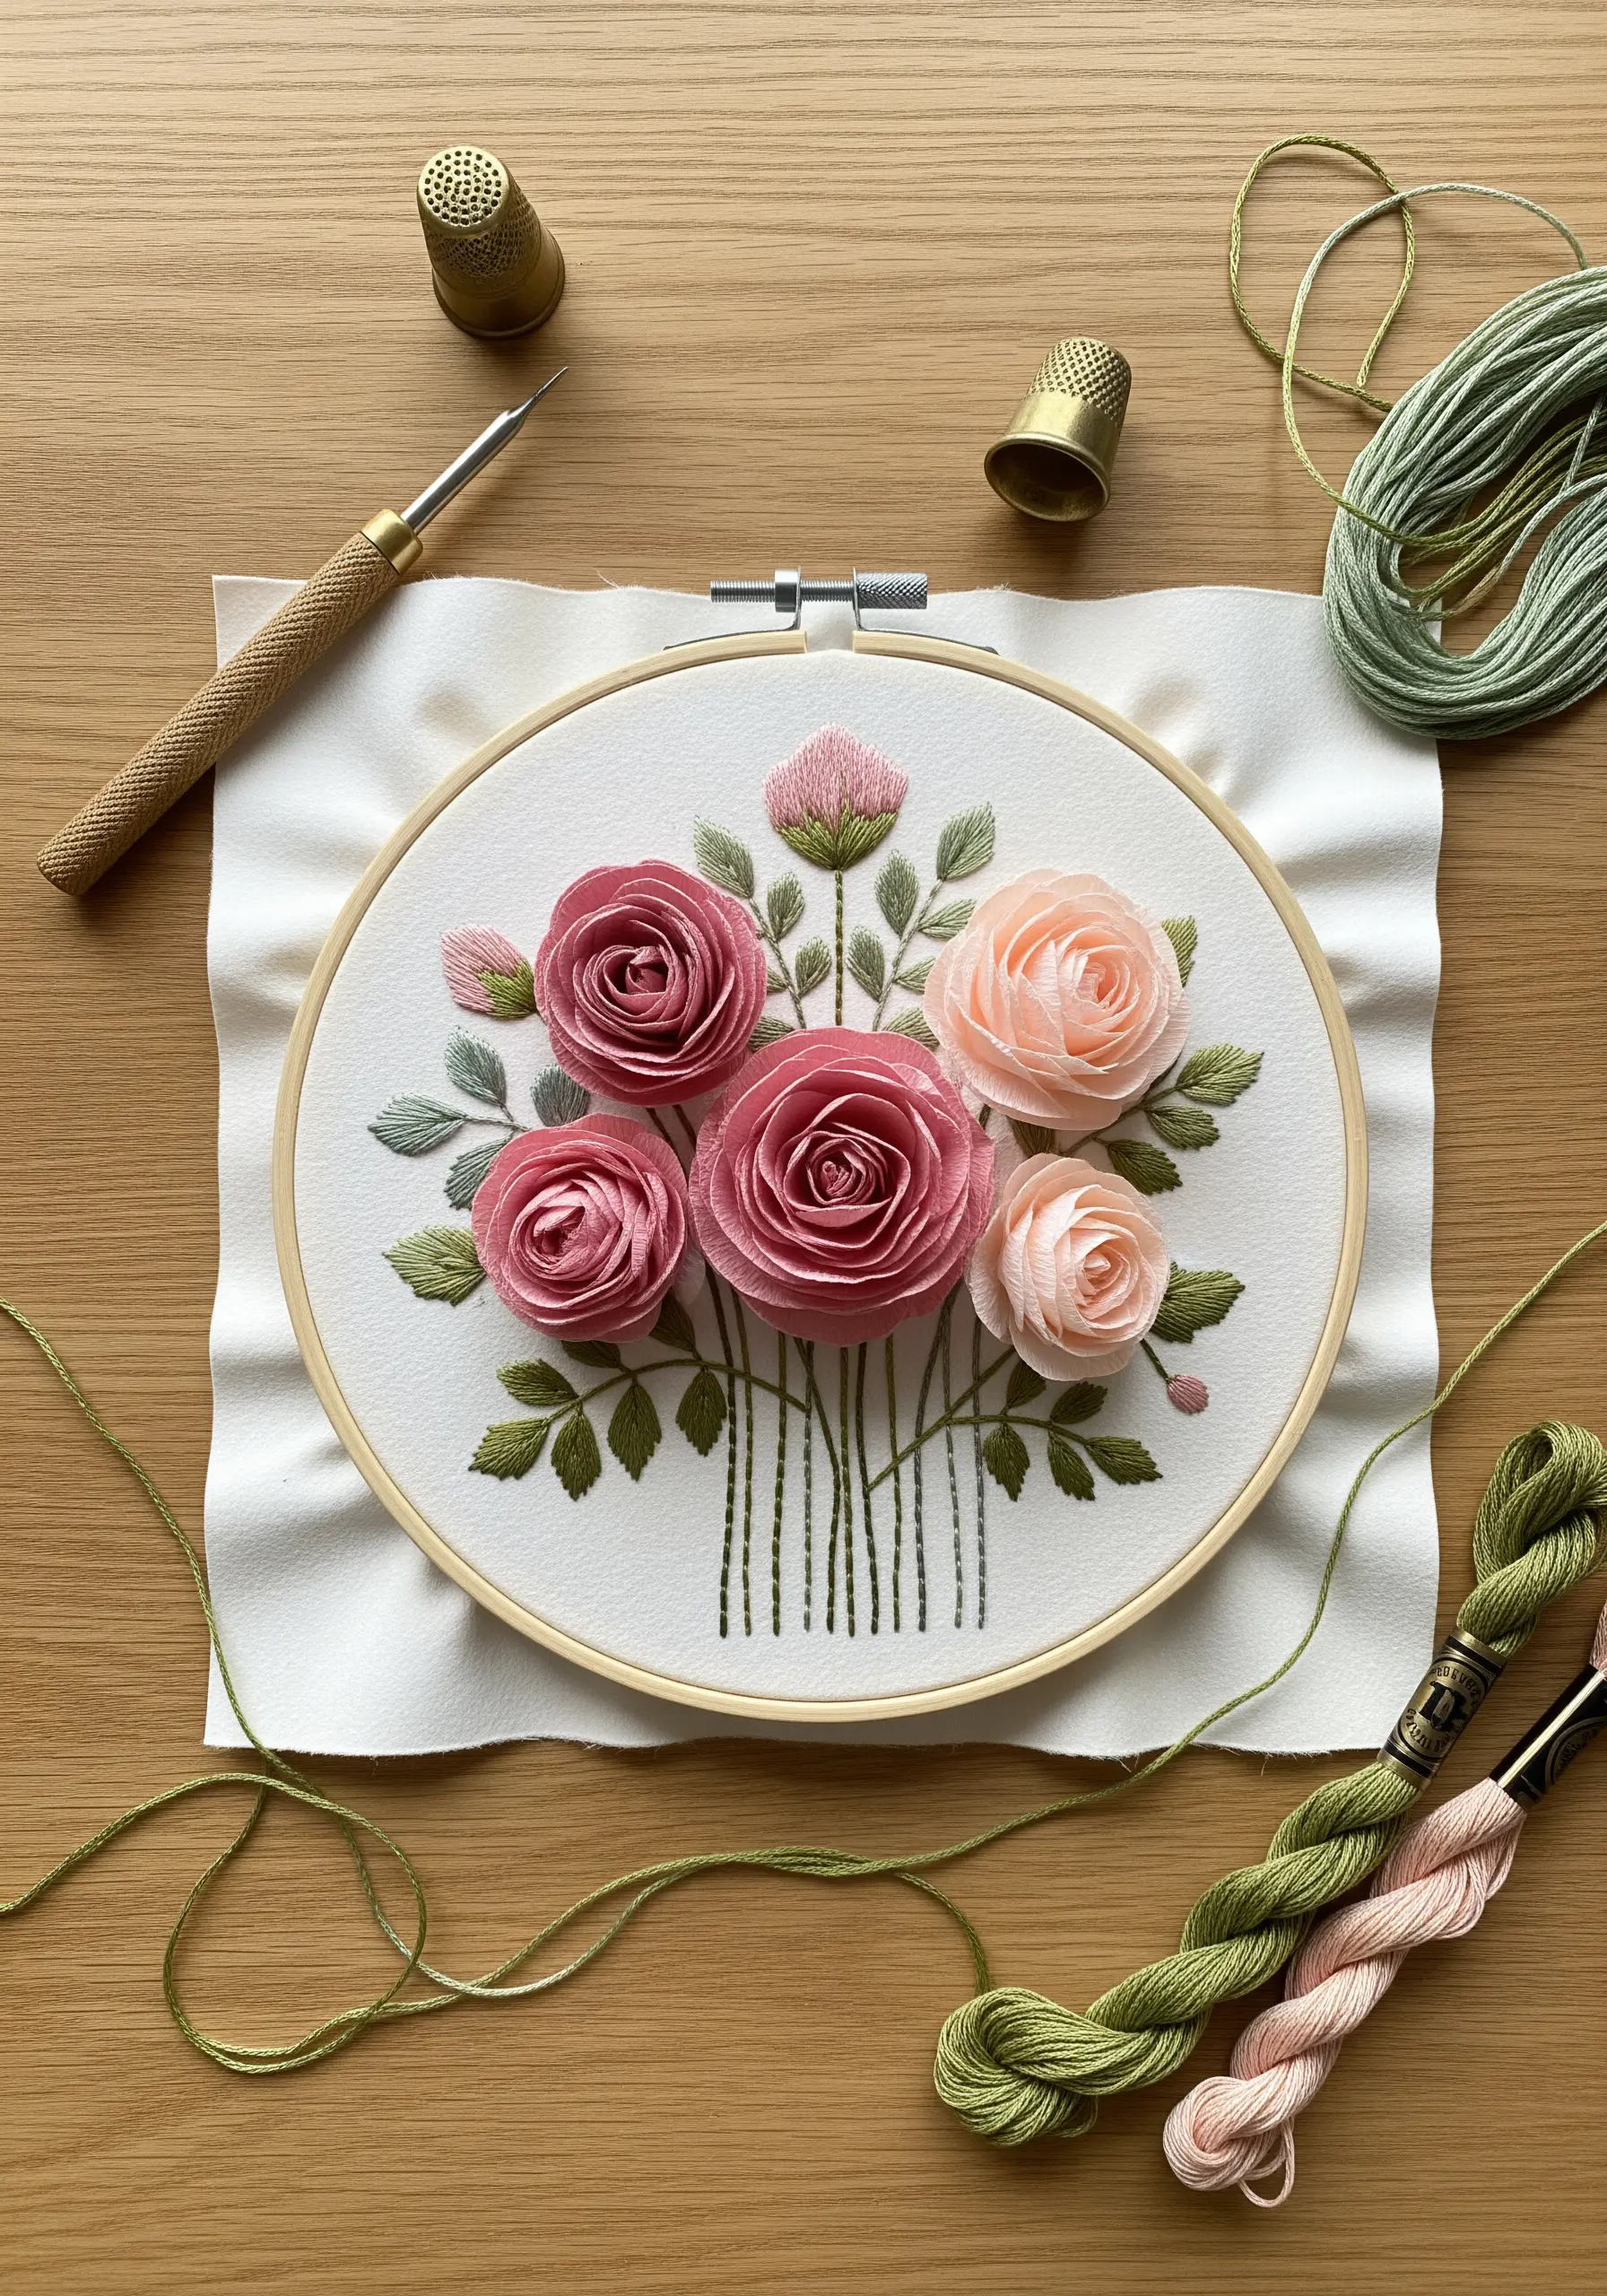
Move beyond flat florals by using silk or satin ribbon to create dimensional roses.
Create a foundation of five straight stitches in a star shape, then weave your ribbon over and under each ‘spoke’ to build the woven wheel rose.
Using a wider ribbon creates fuller, more dramatic petals, while a thinner ribbon results in delicate buds.
This is one of the simplest 3D floral embroidery techniques to master, adding instant volume and a romantic, lifelike texture that thread alone cannot replicate.
2. Frame Your Thread: Architectural String Art on Wood
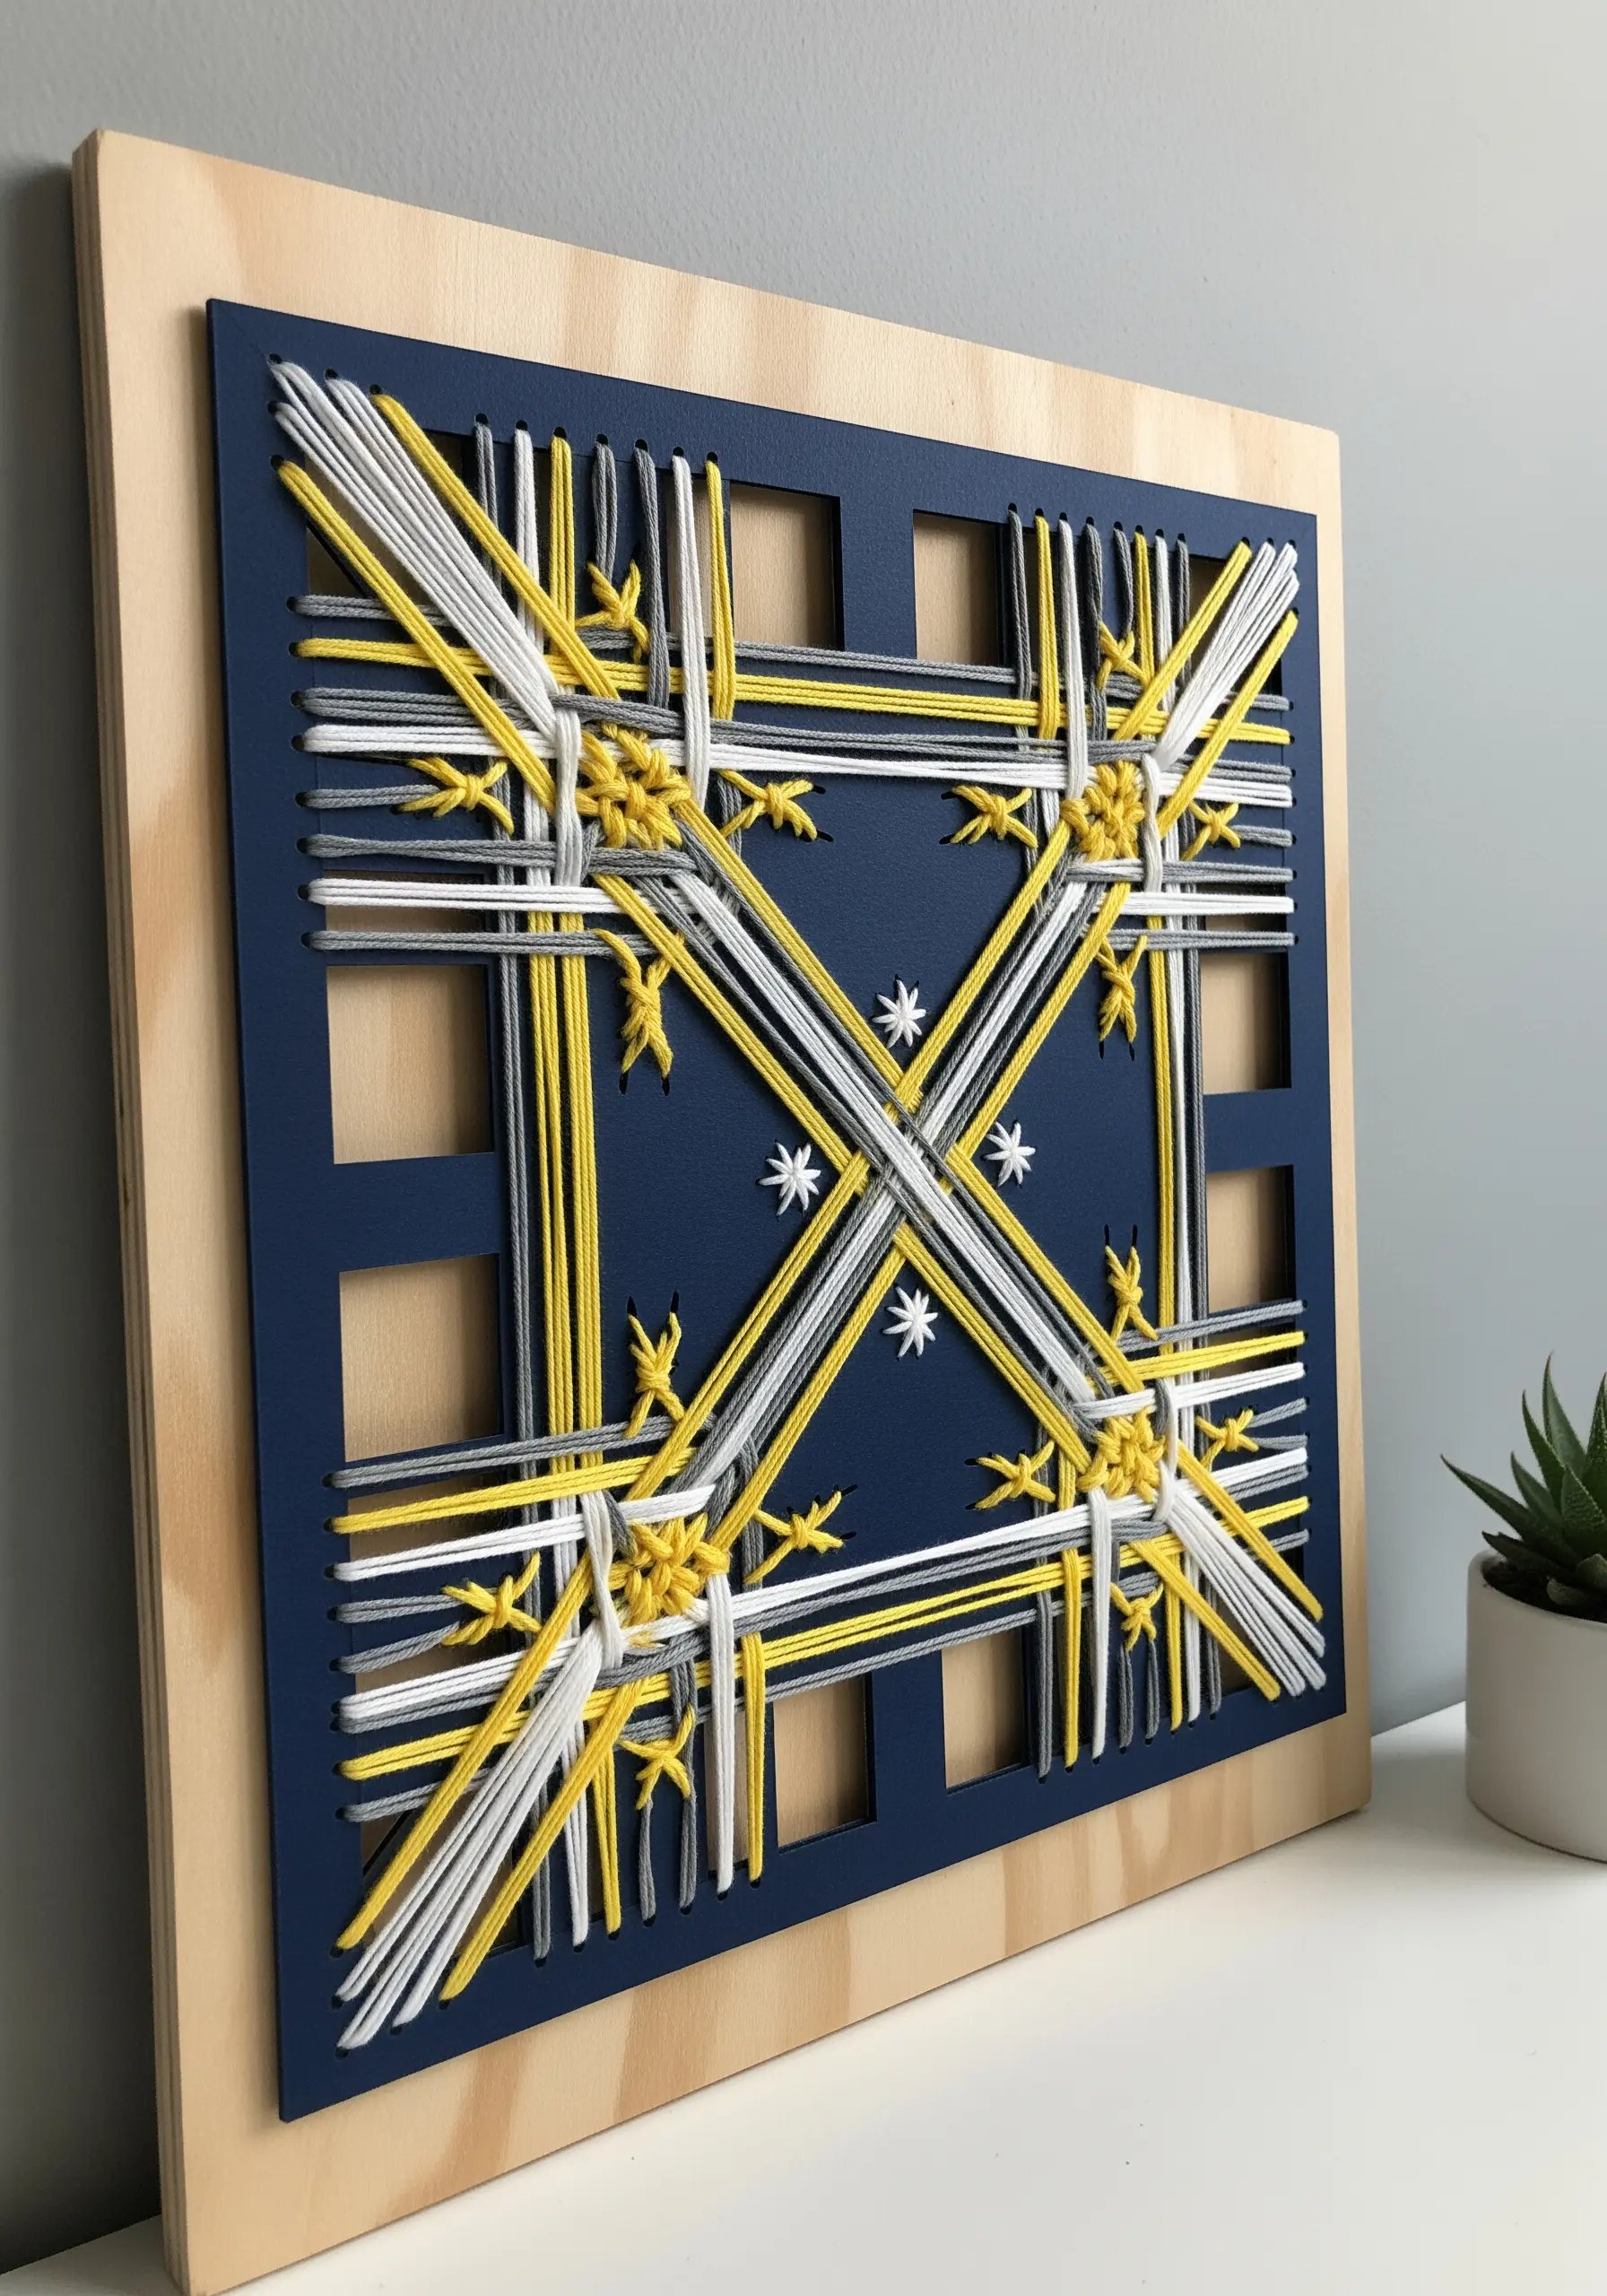
Trade your fabric for a pre-cut or laser-cut wood panel to transform your embroidery into modern wall art.
The grid provides a perfect guide for creating crisp geometric patterns, removing any guesswork from your composition.
Focus on maintaining tight, even tension as you wrap the thread; this is crucial for achieving clean, bold lines.
The result is clean, graphic, and one of the most effective modern geometric thread art ideas for any contemporary space.
3. Stitch the Stars: Constellation Paper Embroidery
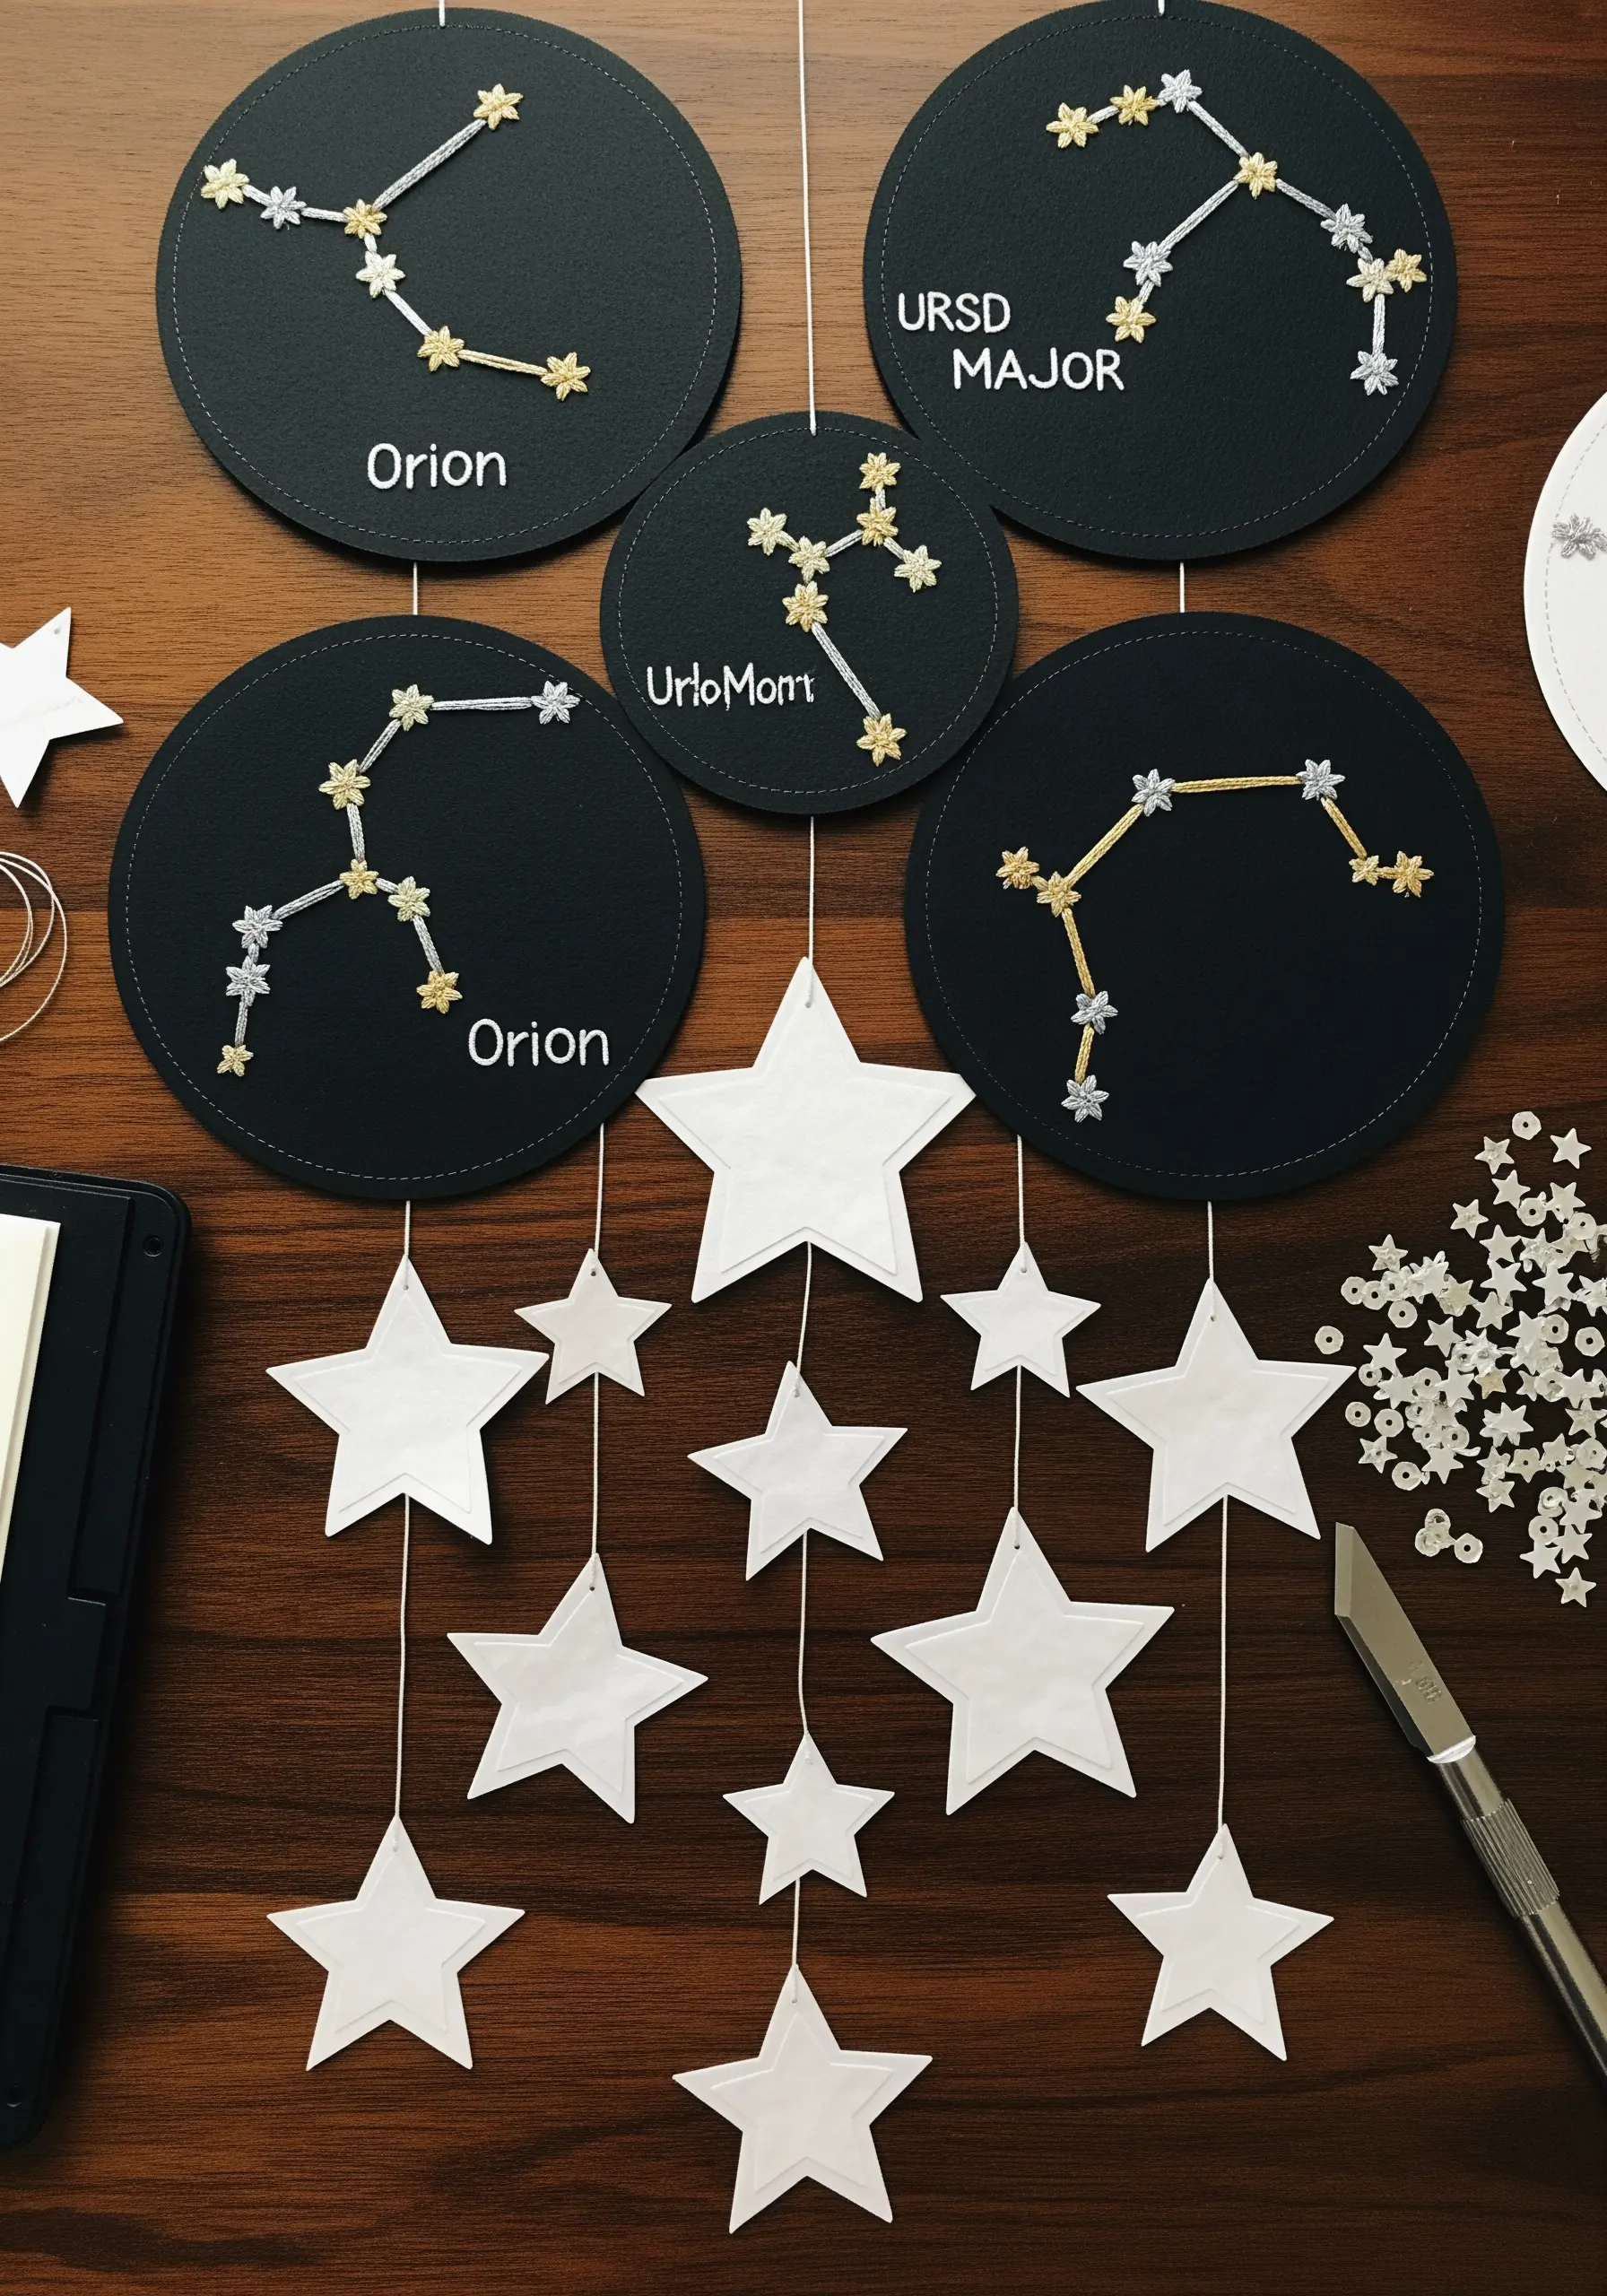
Embroider directly onto heavy cardstock to create delicate, graphic artwork.
To prevent tearing, always pre-punch your holes along the pattern using a small needle or an awl before you begin stitching.
Choose a high-contrast palette, like shimmering metallic thread on matte black paper, to make the constellations truly shine.
This is one of those simple but stunning paper embroidery projects you can finish in a weekend, perfect for creating greeting cards or delicate wall mobiles.
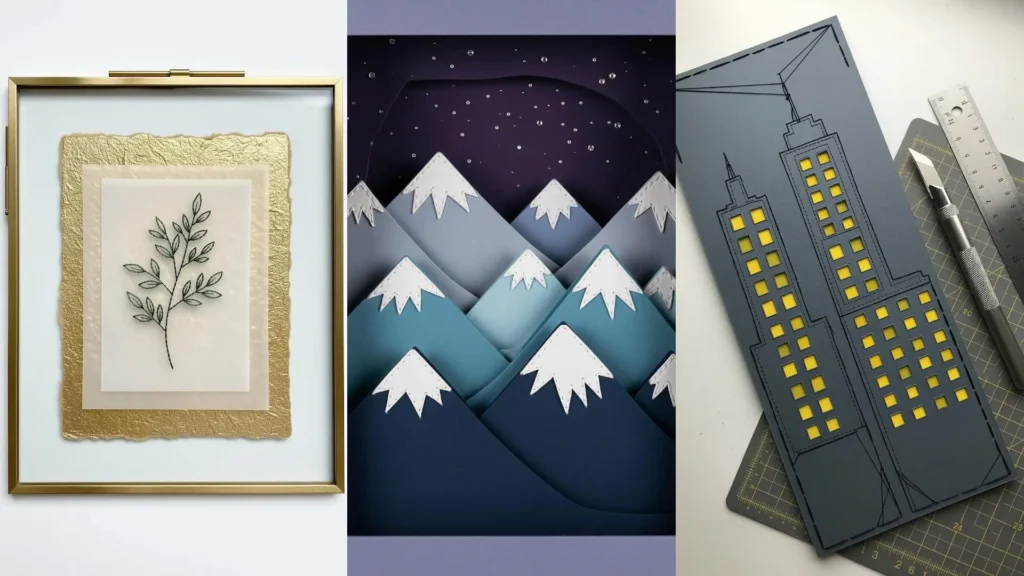
4. Layered Landscapes: Stitching Over Paper Collage
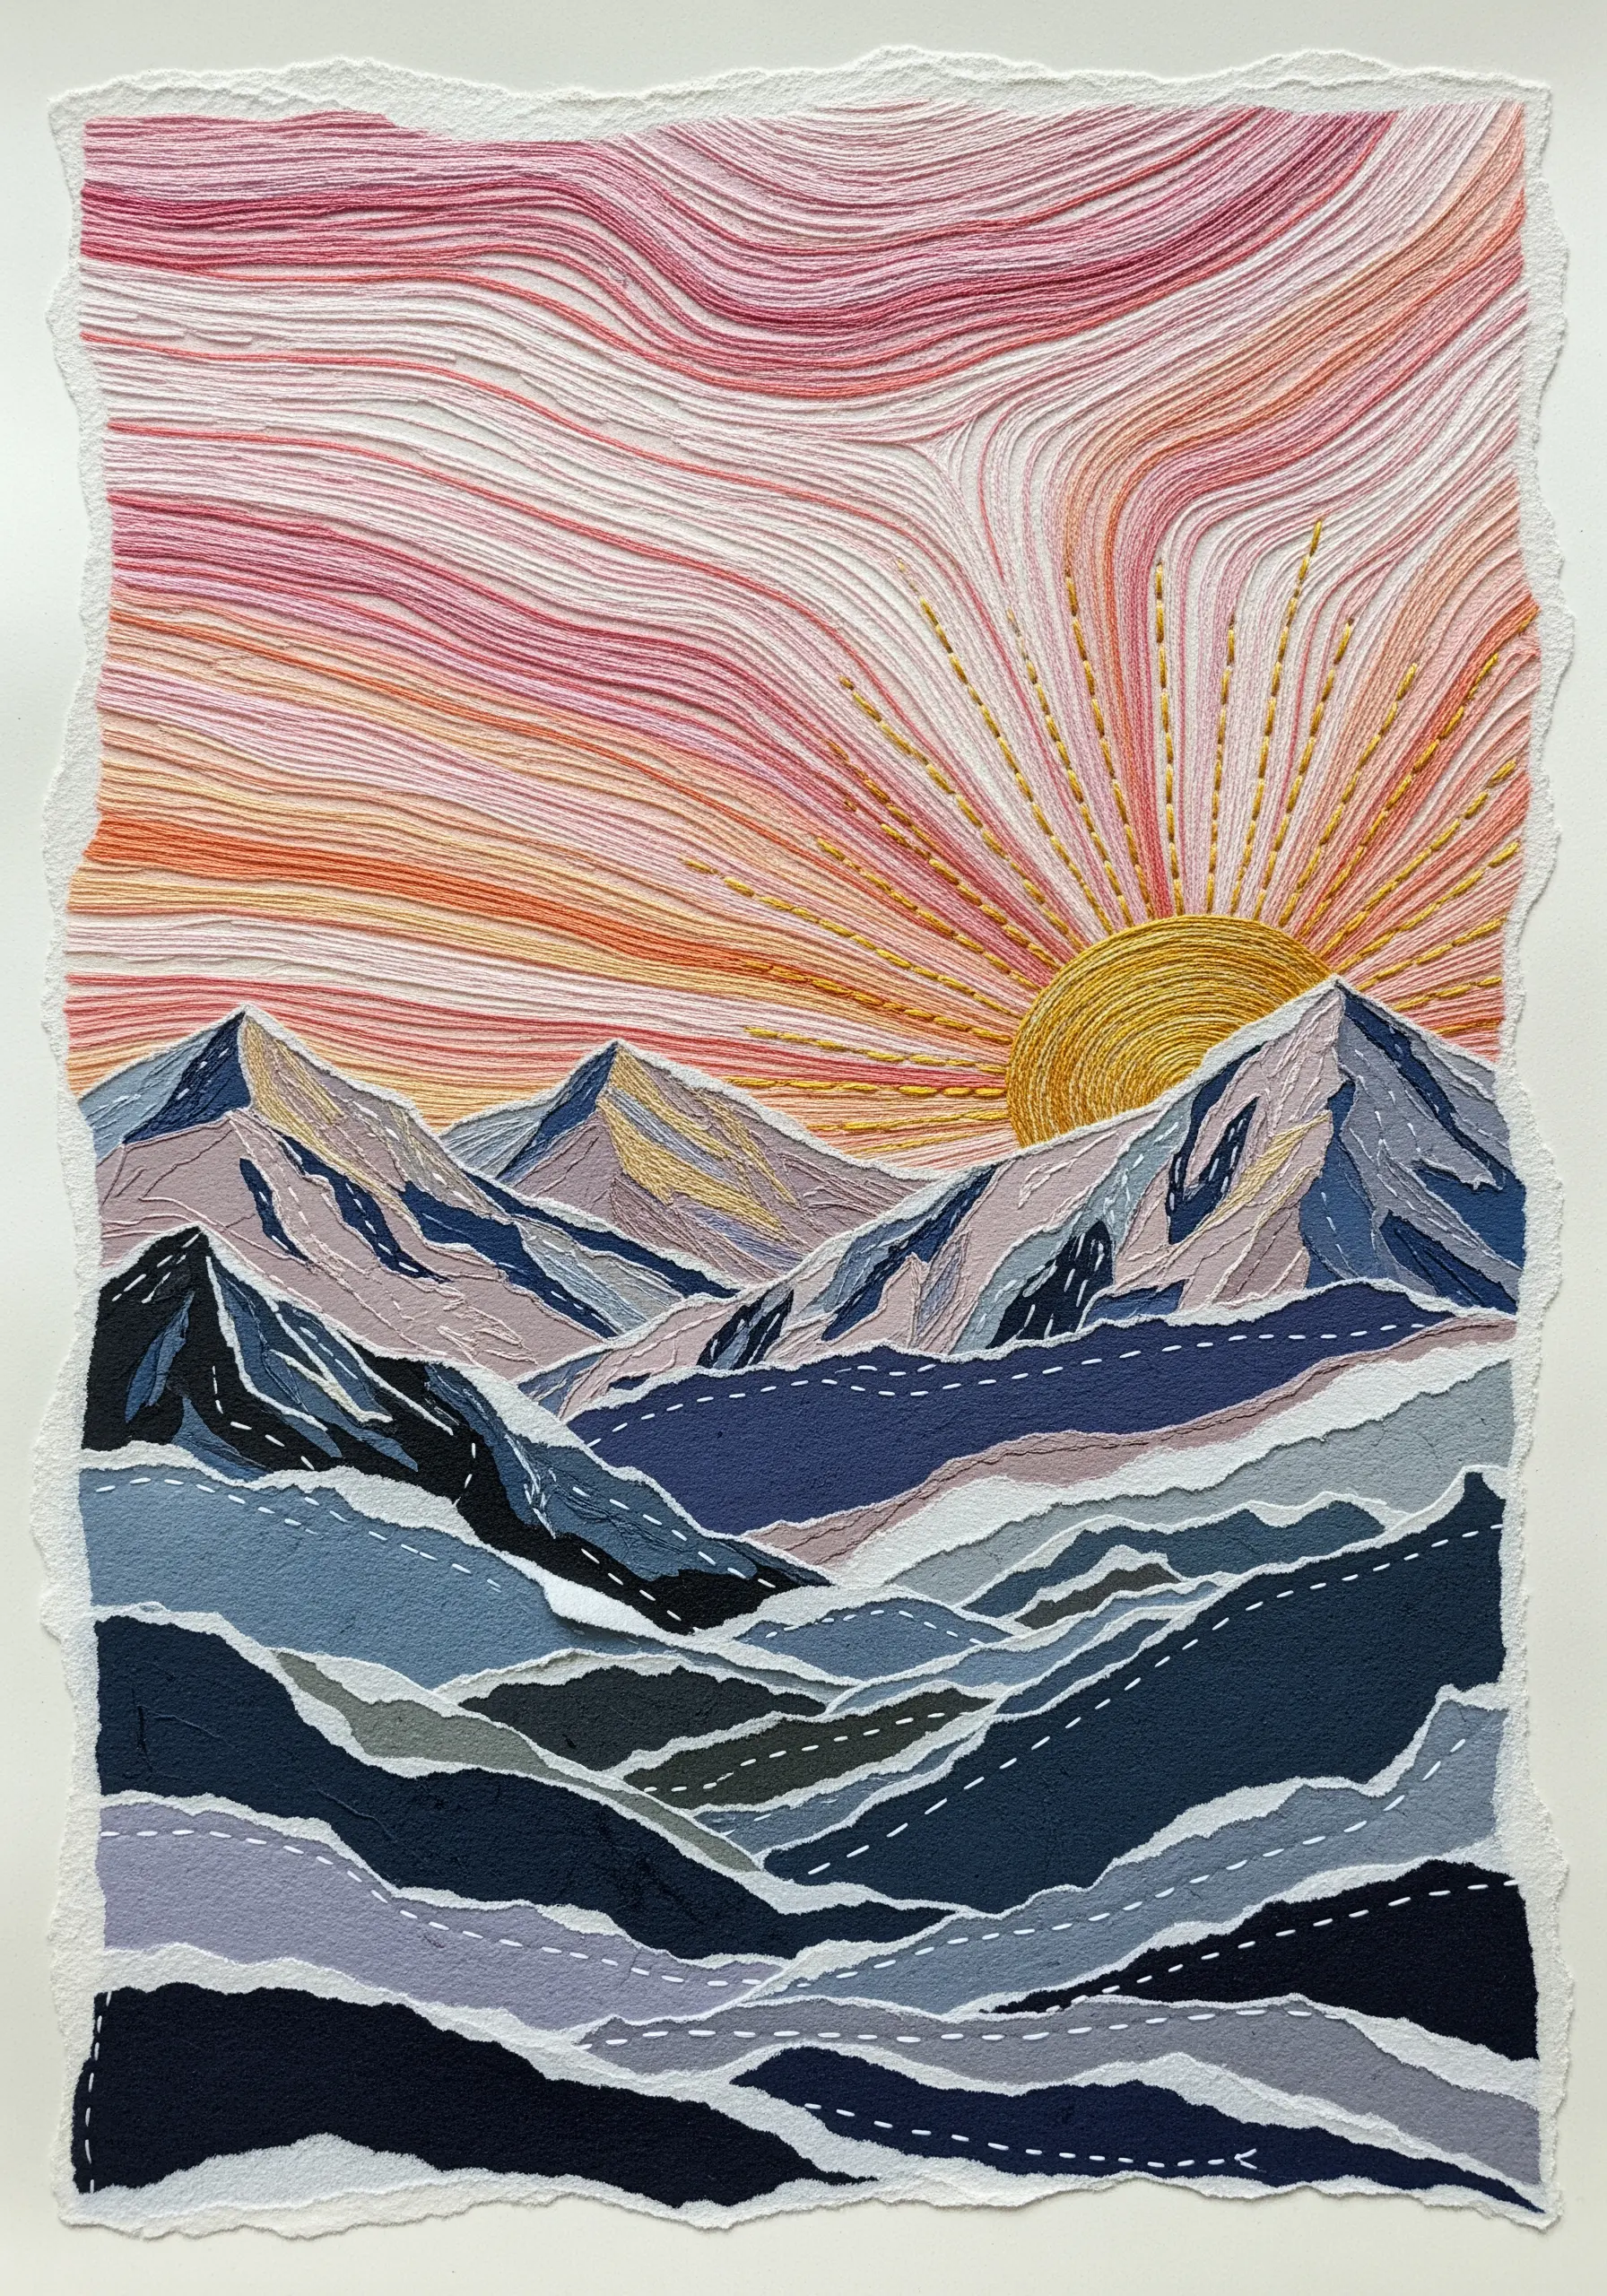
Combine paper collage and embroidery to build a piece with incredible depth and texture.
Begin by tearing and layering colored paper to block out the basic shapes of your landscape, like mountains and a sunset sky.
Then, use long, directional straight stitches to blend the paper edges, add detail, and create a sense of movement.
The torn paper edges provide an organic softness that beautifully contrasts with the sharp lines of the thread, making this one of the most expressive collage art ideas for textile artists.
5. Combine Disciplines: Paper Quilling Meets Embroidery
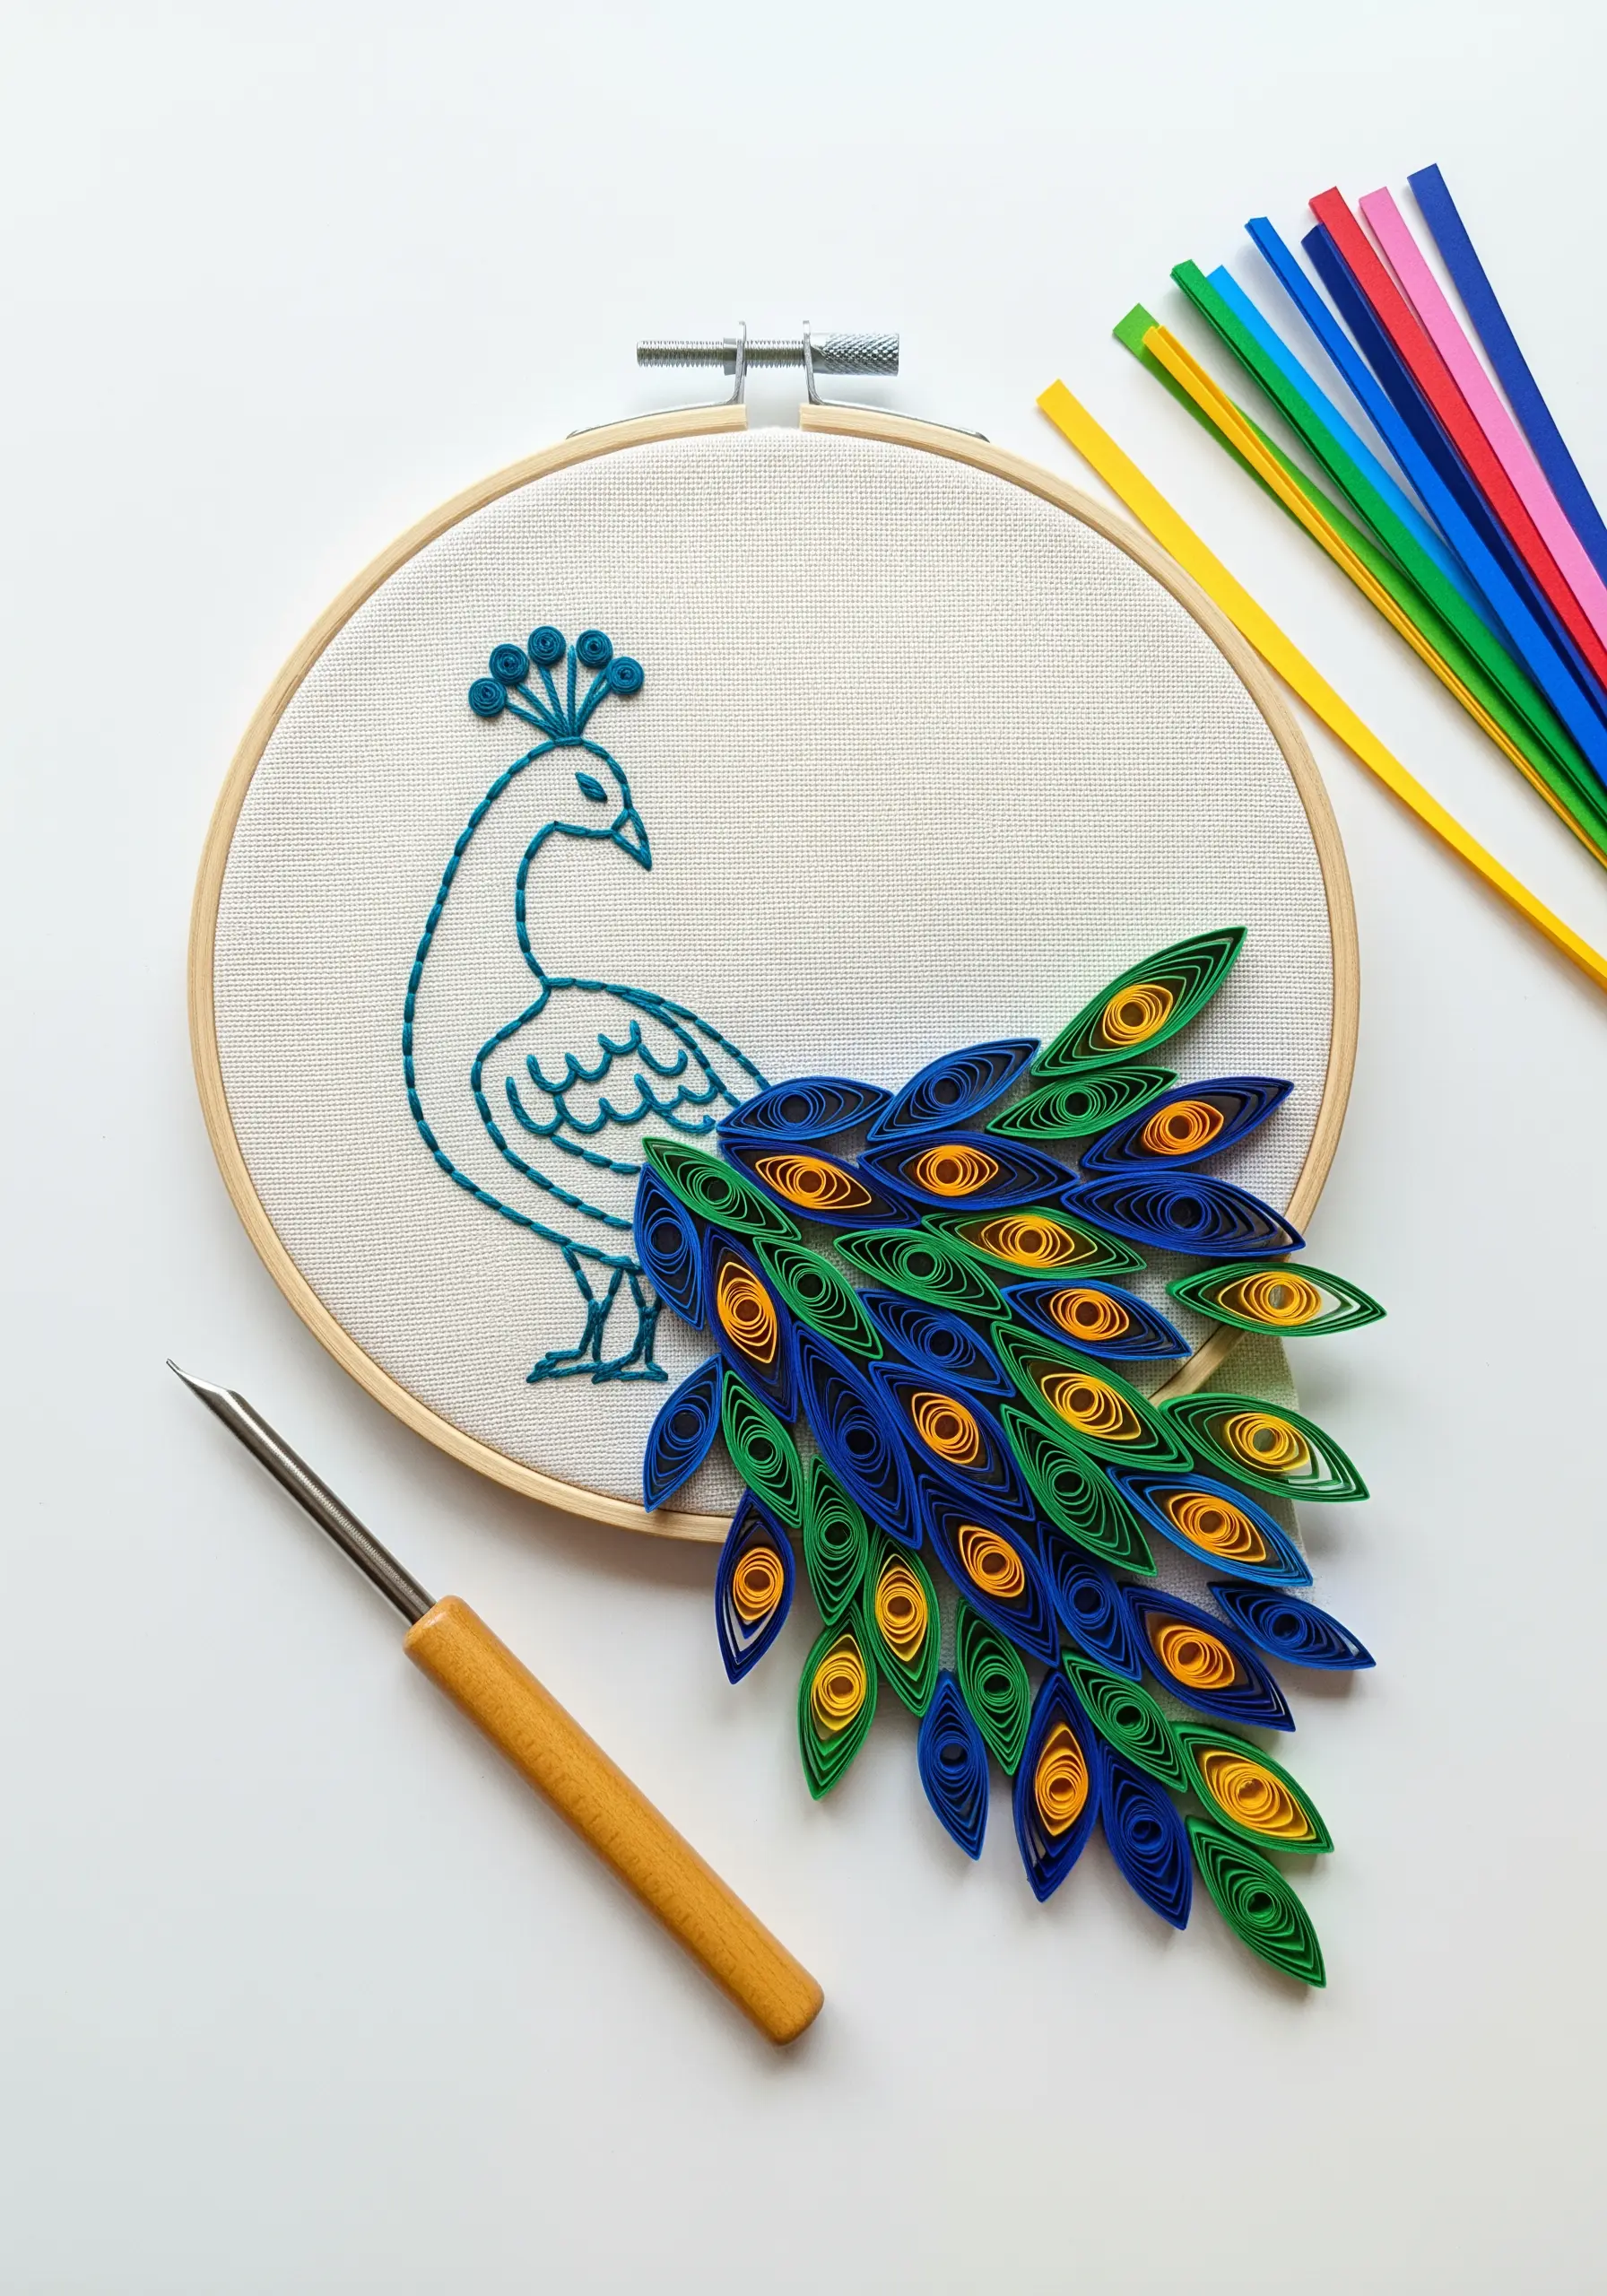
Create a striking mixed-media piece by pairing a simple embroidered outline with dimensional paper quilling.
First, stitch your main subject on fabric using a clean backstitch or stem stitch.
Next, use a quilling tool to roll strips of colored paper into tight coils and shapes, gluing them directly onto the fabric to fill the design.
This technique is a perfect entry into mixed-media crafts, blending the precision of line work with the sculptural freedom of paper.
6. Washes of Color: Embroidering on a Watercolor Base
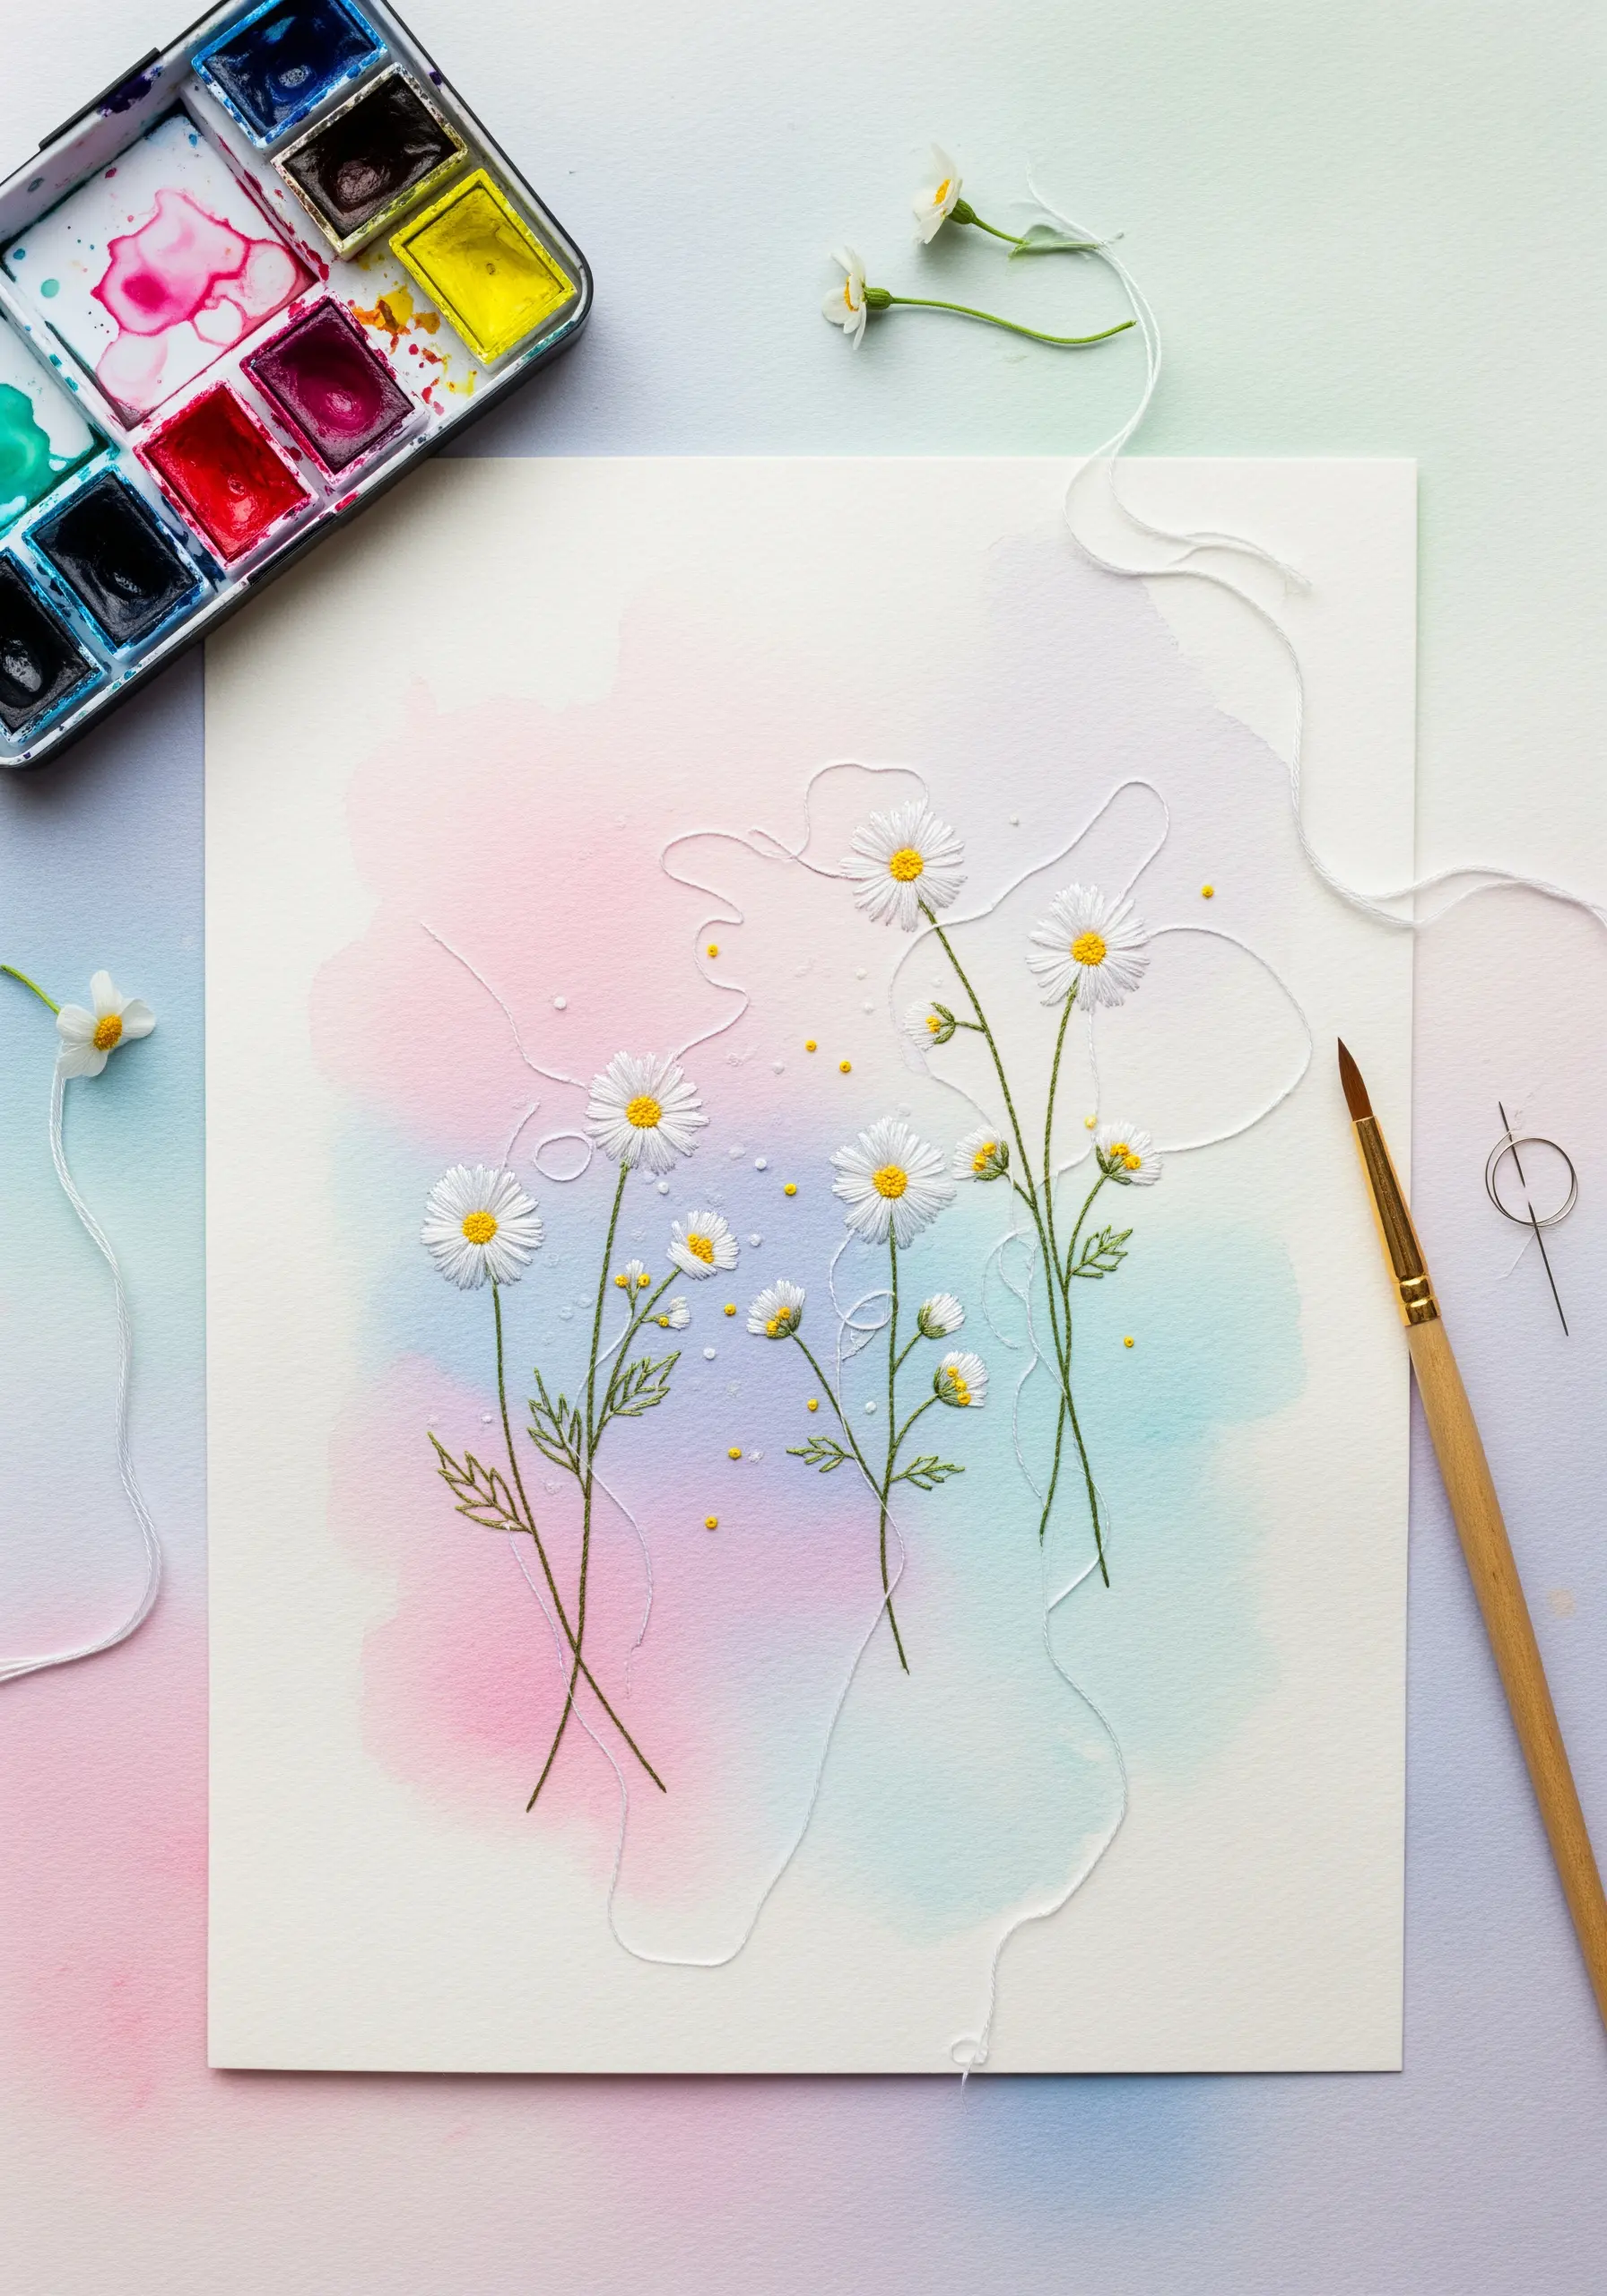
Add atmospheric depth to your work by painting a watercolor wash onto heavy paper before you begin stitching.
Use wet-on-wet techniques to create soft, blended backgrounds that complement your thread colors, and ensure the paper is completely dry before punching your first hole.
The transparent color creates a dreamy, ethereal quality that makes your embroidery feel like it’s floating.
This soft background is ideal for delicate, watercolor-style embroidery patterns, allowing each stitch to stand out with gentle emphasis.
7. Bold Contrast: Satin Stitch on Matte Cardstock
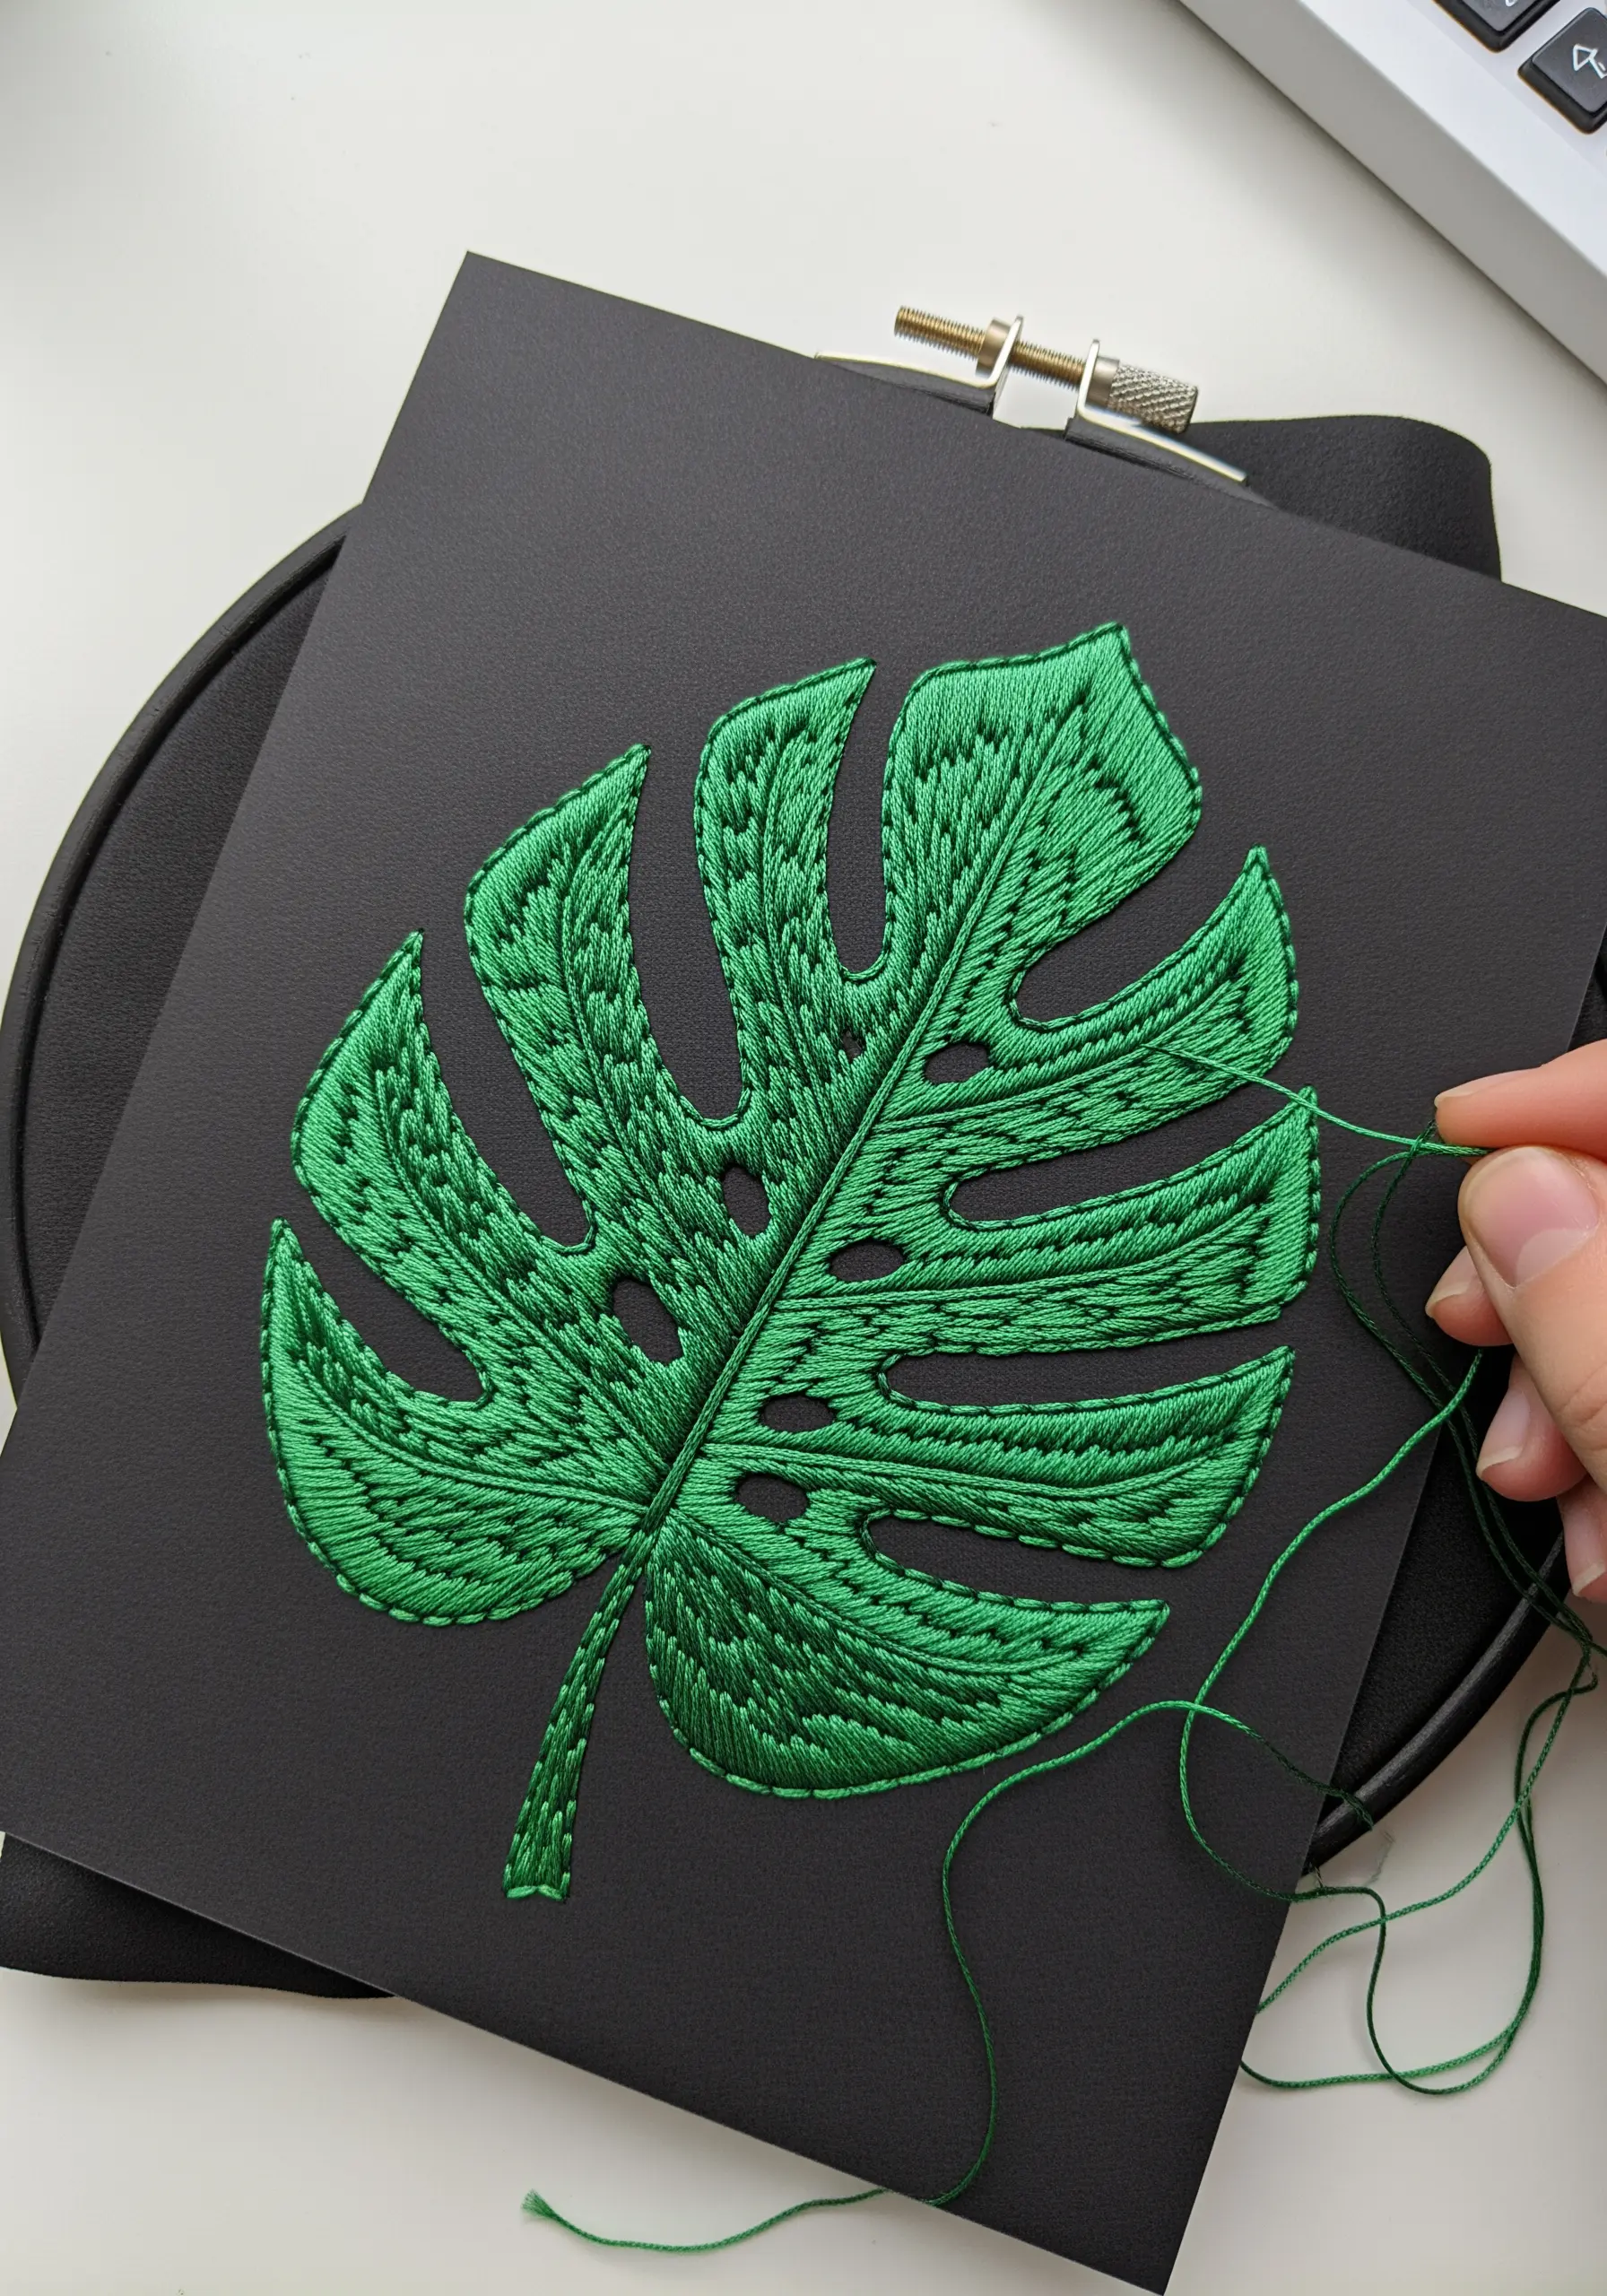
Achieve an ultra-clean, graphic finish by embroidering on smooth, heavy cardstock instead of fabric.
The key to success is careful preparation: use a sharp needle to pre-pierce every entry and exit point for your stitches to prevent bending or warping the paper.
Choose a high-sheen thread, like silk or rayon, and fill your design with satin stitch; the thread’s luster against the flat paper creates a stunning modern effect.
This is an especially effective technique for sharp, graphic houseplant embroidery motifs, where the crisp leaf edges are key.
8. Photo Embellishment: Selective Color with Thread
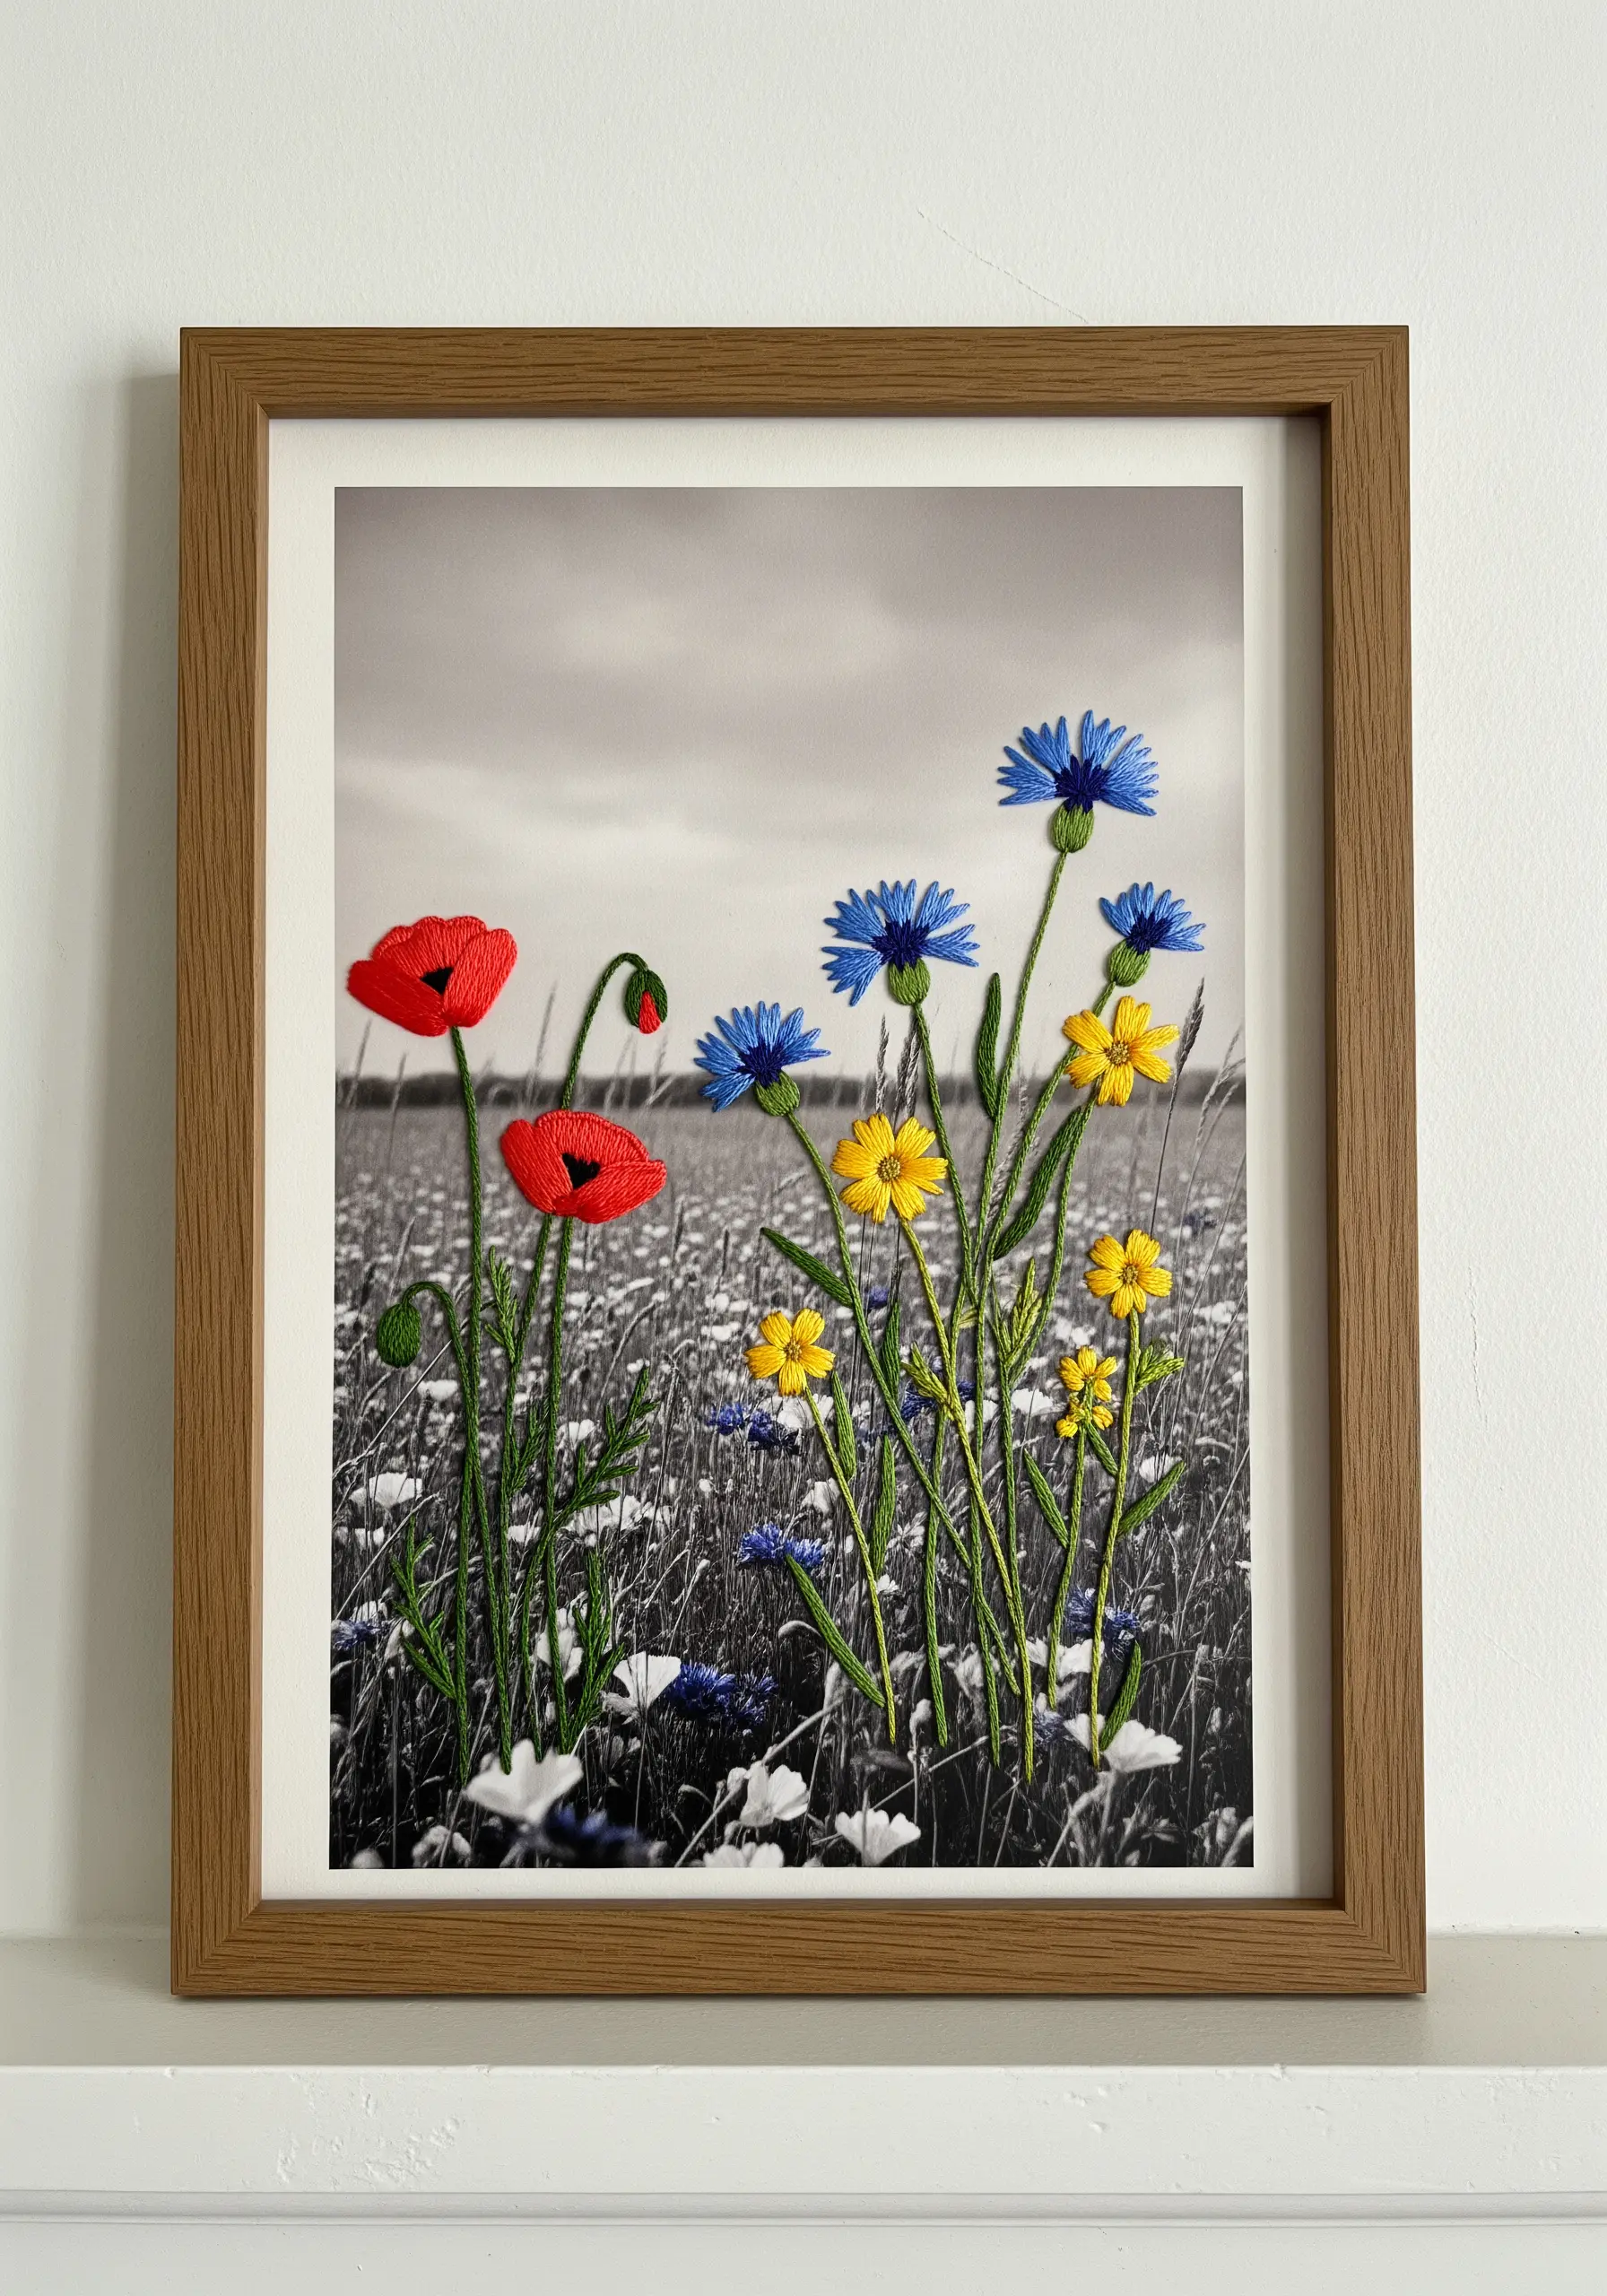
Breathe new life into a cherished photograph by adding hand-stitched details.
Print your image on matte photo paper for a non-glossy finish that won’t compete with your thread.
Using a black-and-white photo allows your colorful stitches to become the dramatic focal point, creating a powerful sense of selective color.
This process transforms a photo into a personal work of art, adding a layer of texture and memory.
9. Layered Translucence: Vellum and Textured Paper
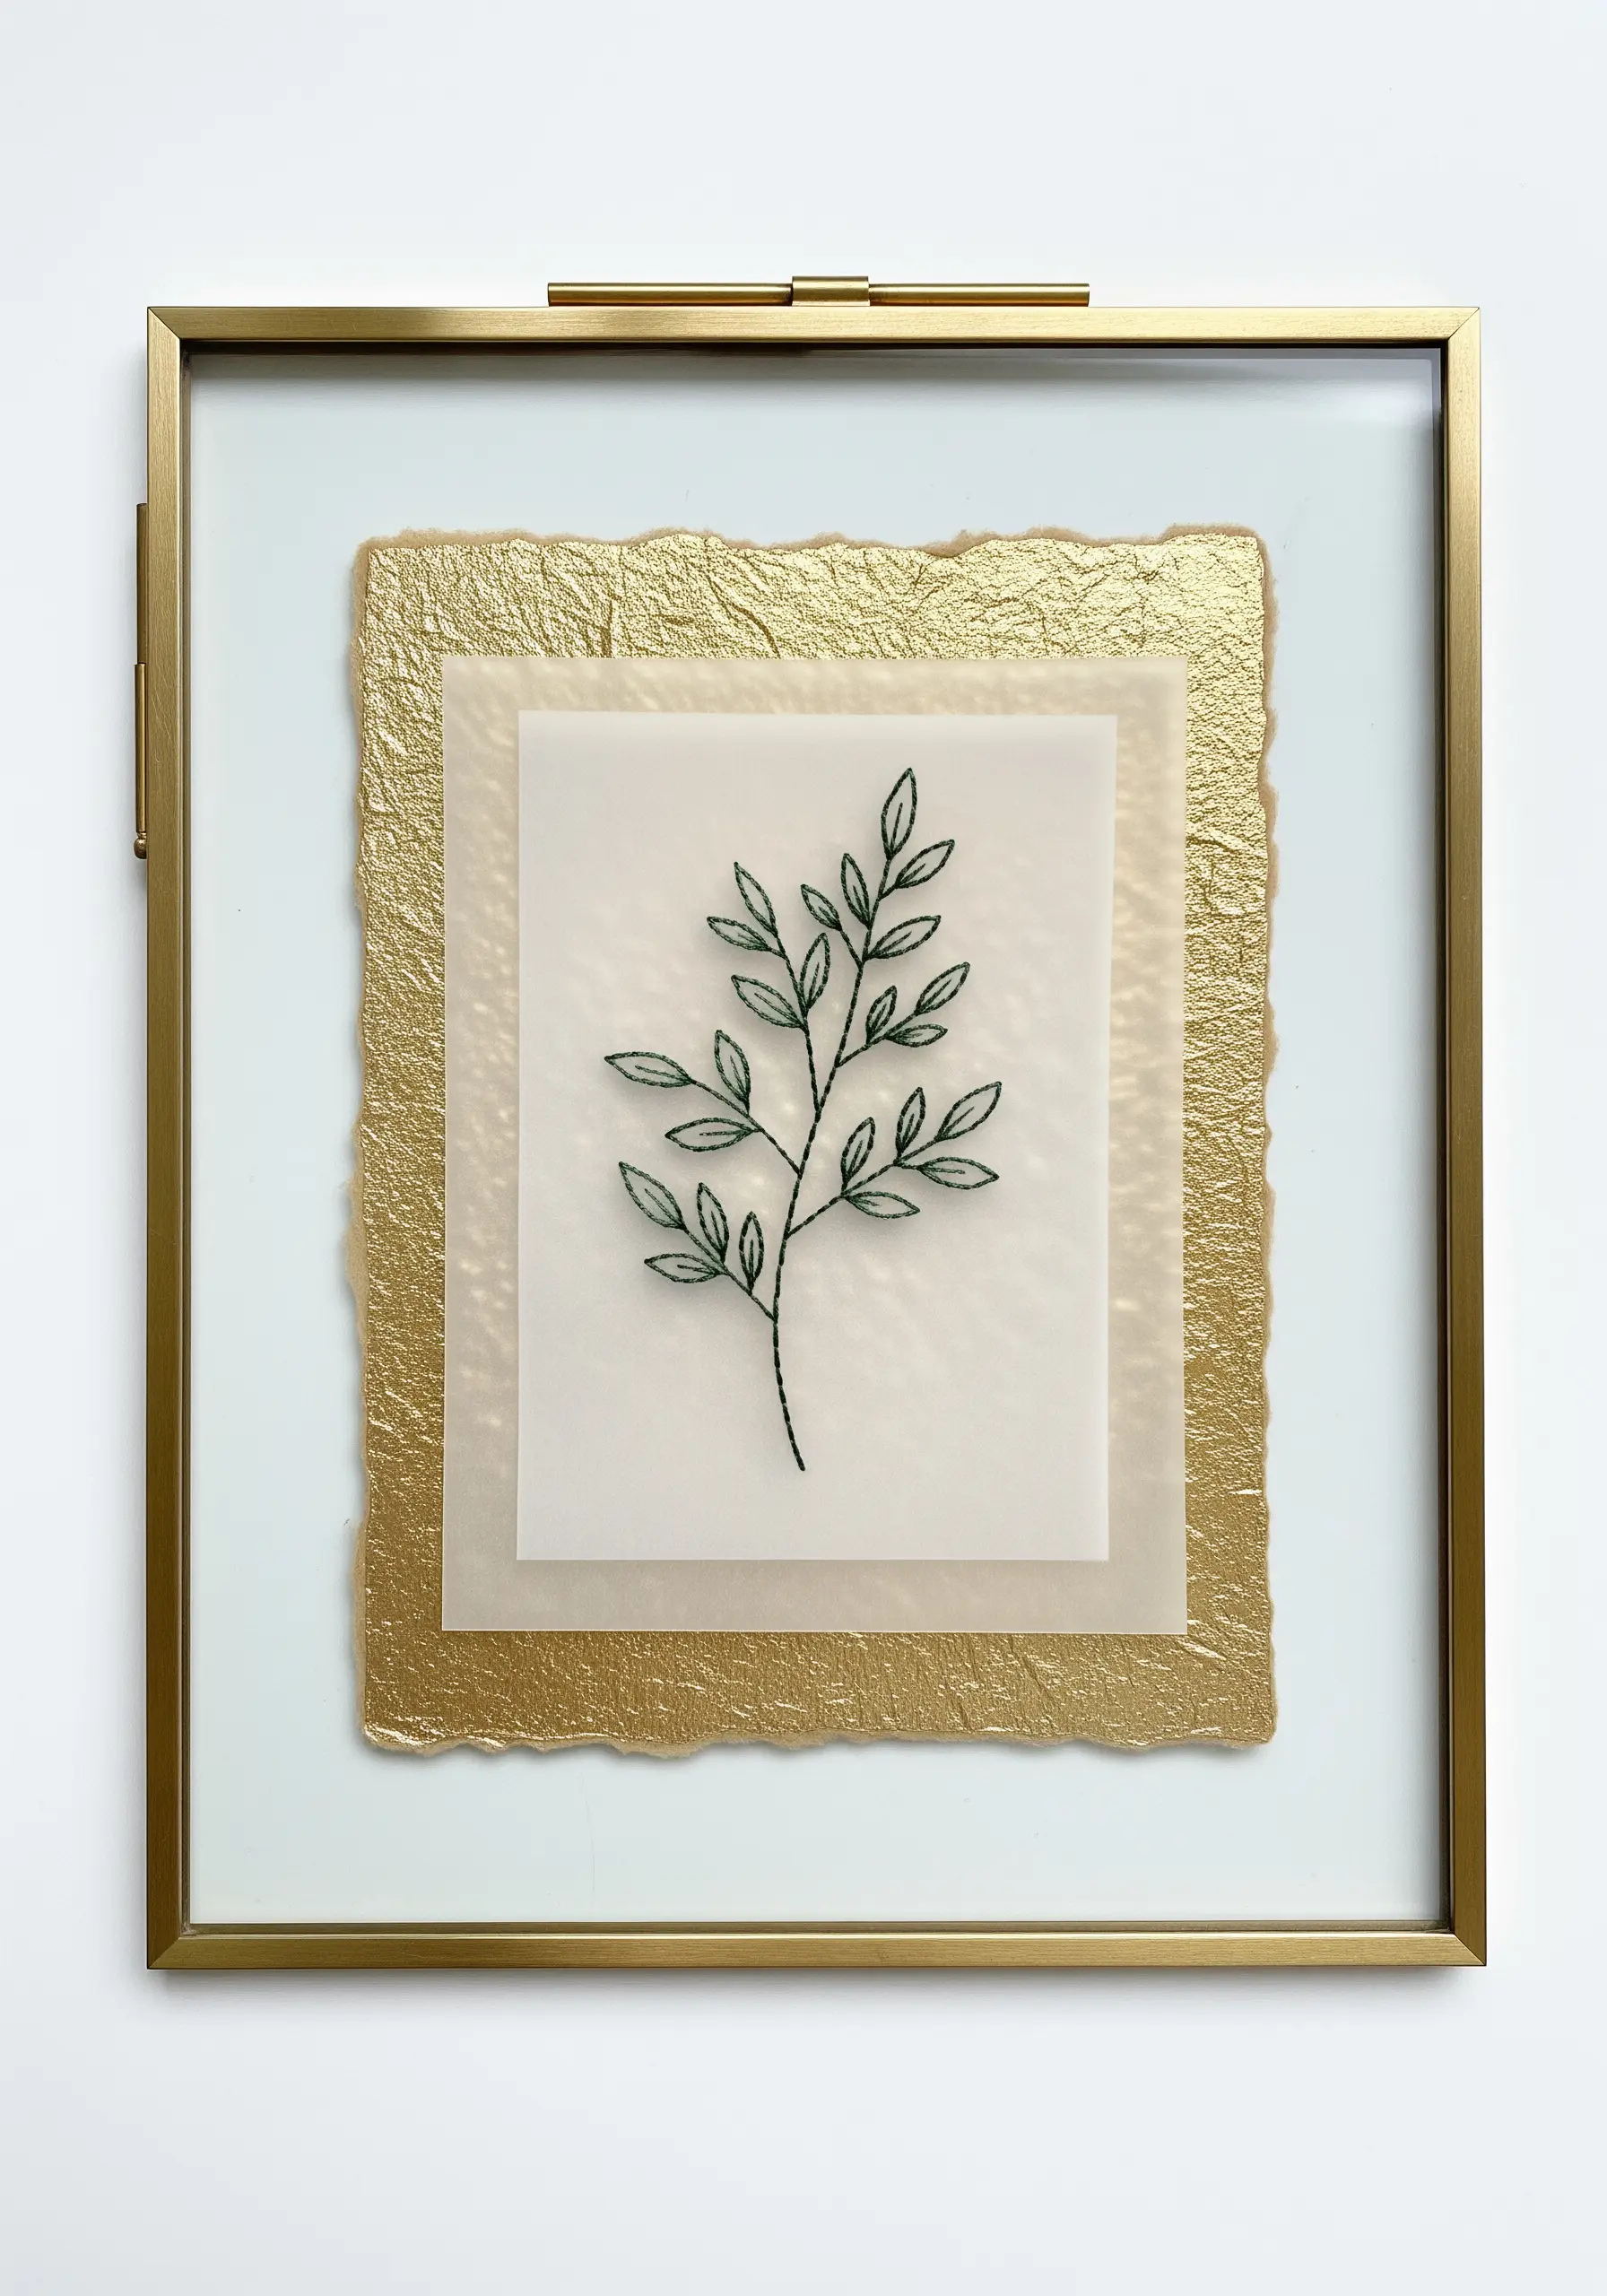
Create an ethereal, delicate effect by stitching your design on a semi-transparent surface like vellum.
Since the back of your work may be visible, focus on keeping your stitches neat and tidy.
Mount the finished vellum in a floating frame or layer it over a beautiful piece of textured or metallic paper.
The final result is one of those elegant framed embroidery artworks that feels both modern and timeless, playing with light, shadow, and texture.
10. Stitched Foliage: Paper-Cut Leaf Embellishments
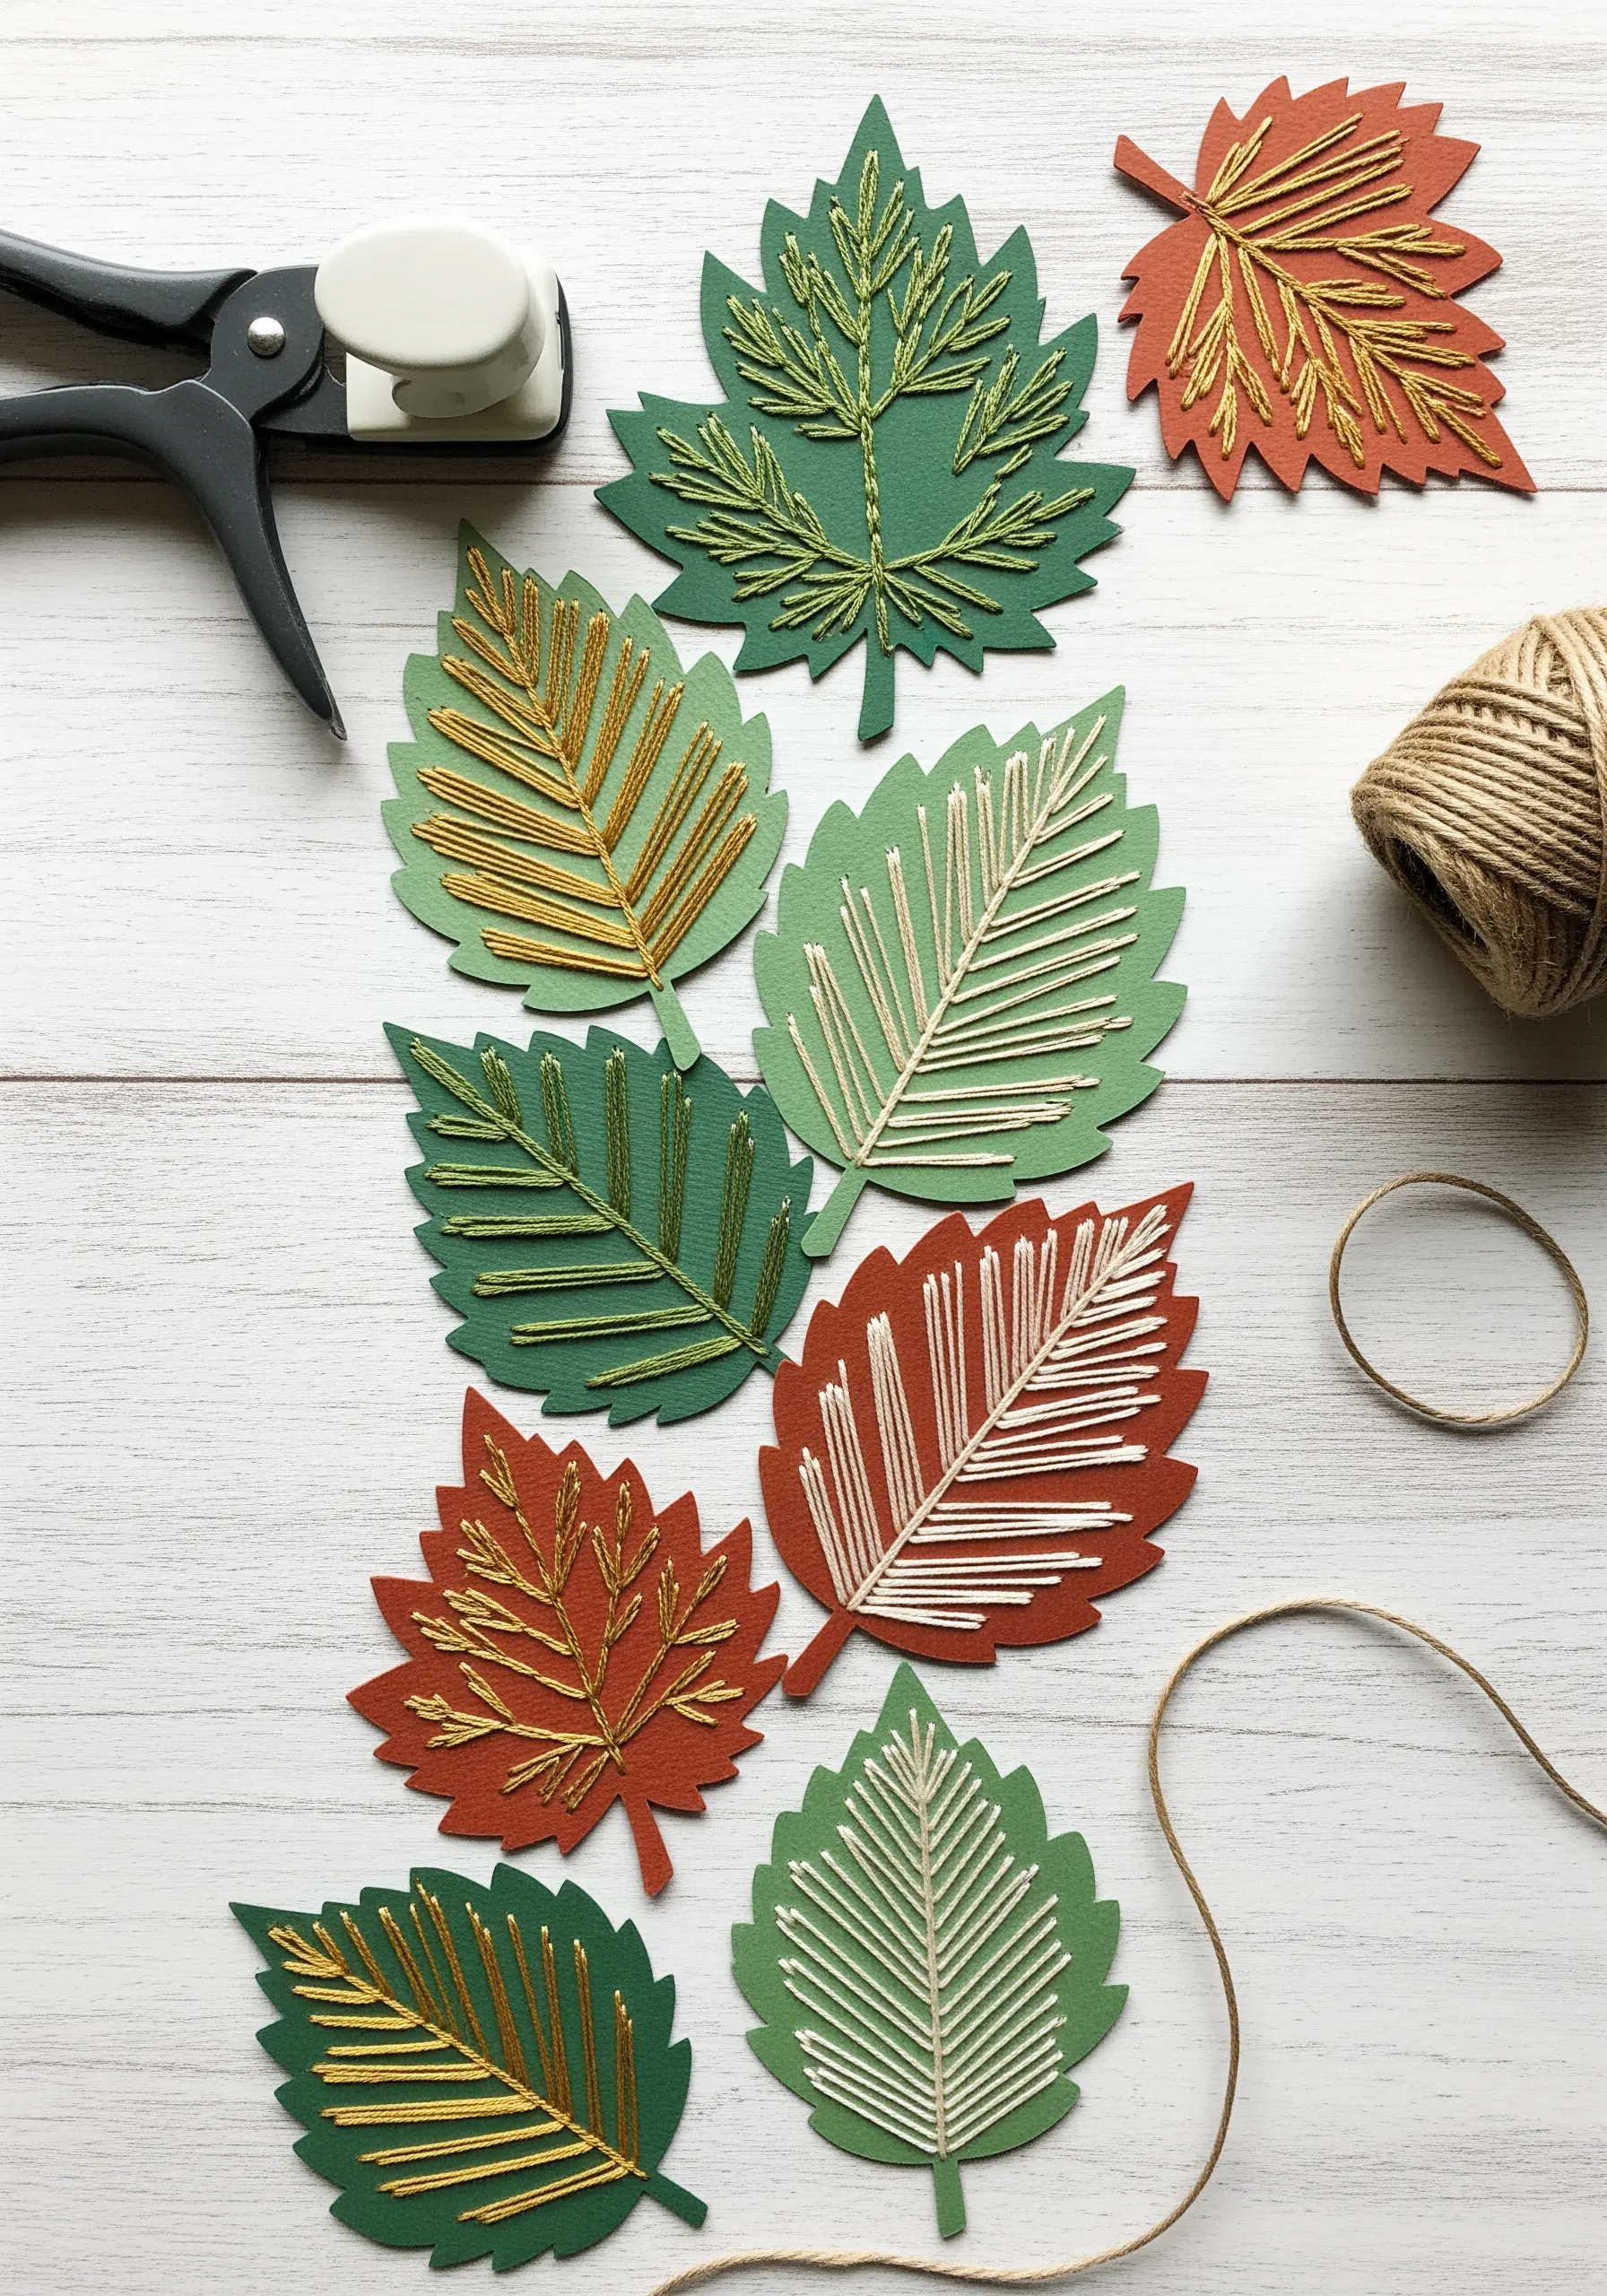
Turn simple paper cut-outs into charming, detailed ornaments or gift tags.
Use a craft punch or scissors to cut leaf shapes from colored cardstock, then use an awl to pre-punch holes for your stitching guide.
Use simple straight stitches or a delicate backstitch to create the veins, adapting the same leaf embroidery stitches you would use on fabric.
For an elevated touch, use metallic thread against a rich, autumnal paper color.
11. Structural Stitching: Building 3D Paper Forms
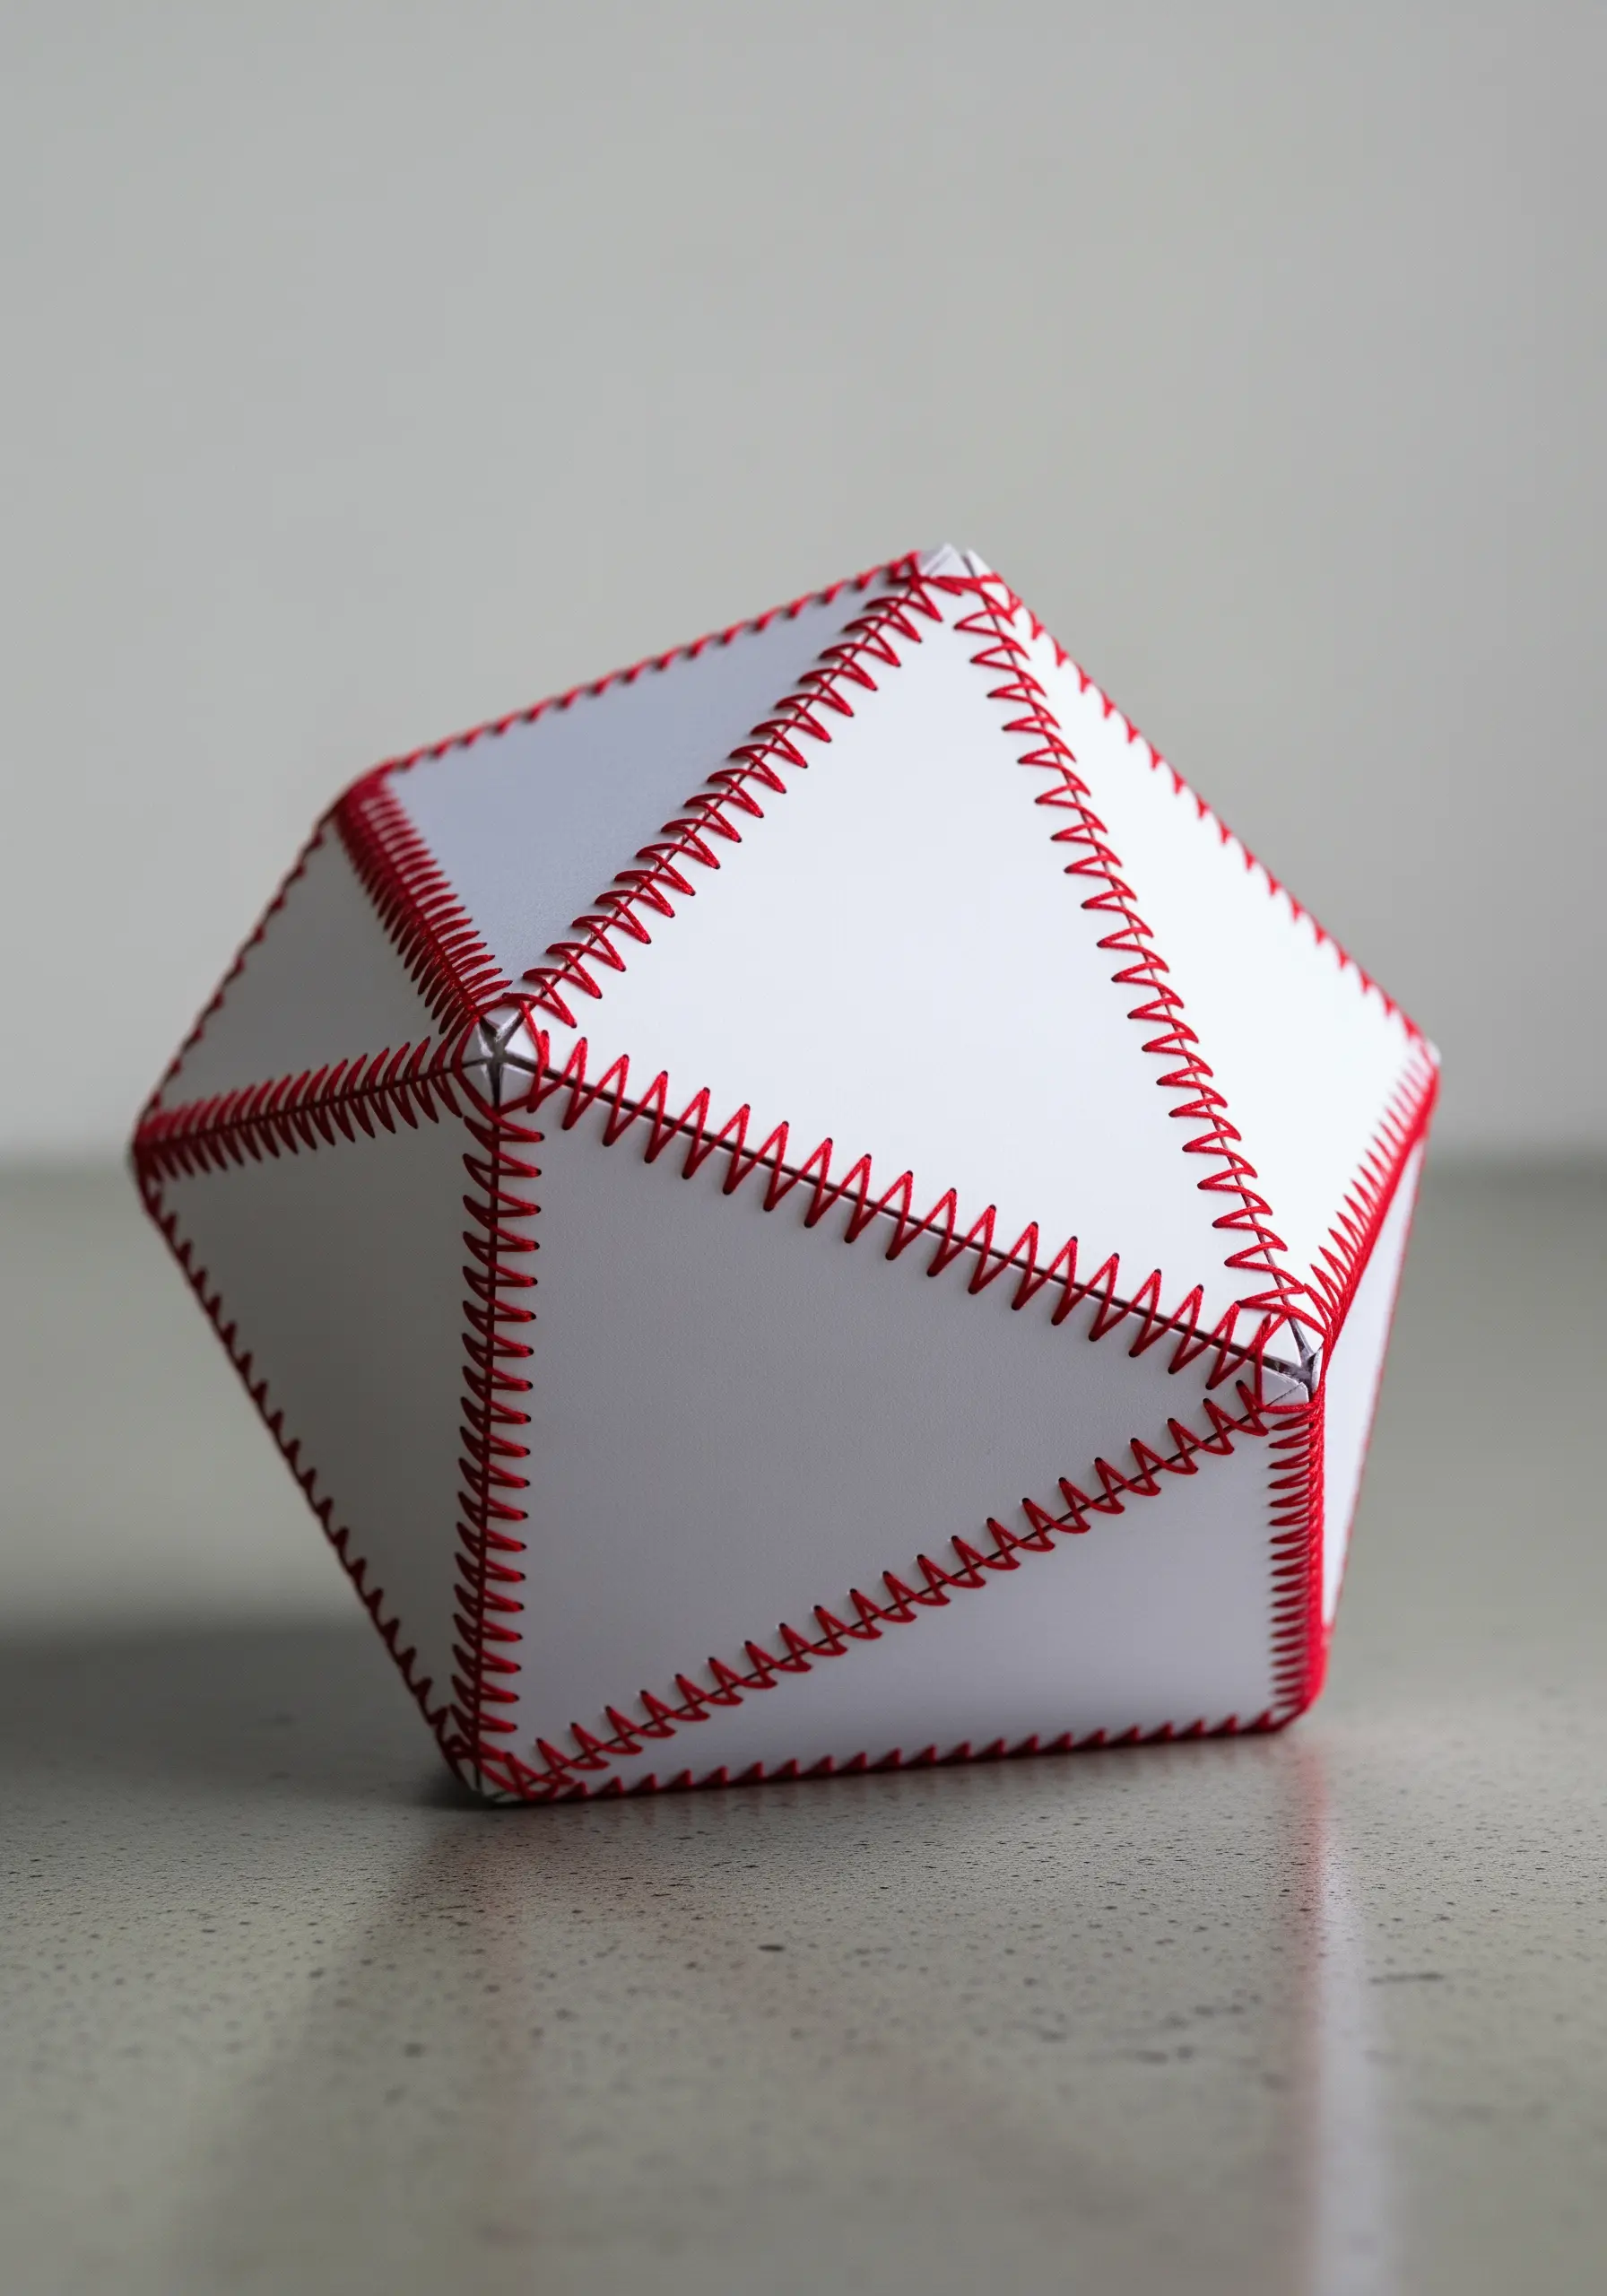
Use thread not just for decoration, but as a functional element to construct three-dimensional objects.
Cut panels from heavy cardstock to create a geometric shape, then punch evenly spaced holes along the edges that will join together.
Use a blanket stitch or whip stitch with a contrasting thread to literally sew the form into shape.
This is one of the more structural paper art techniques where thread becomes a functional, visible seam that highlights the object’s construction.
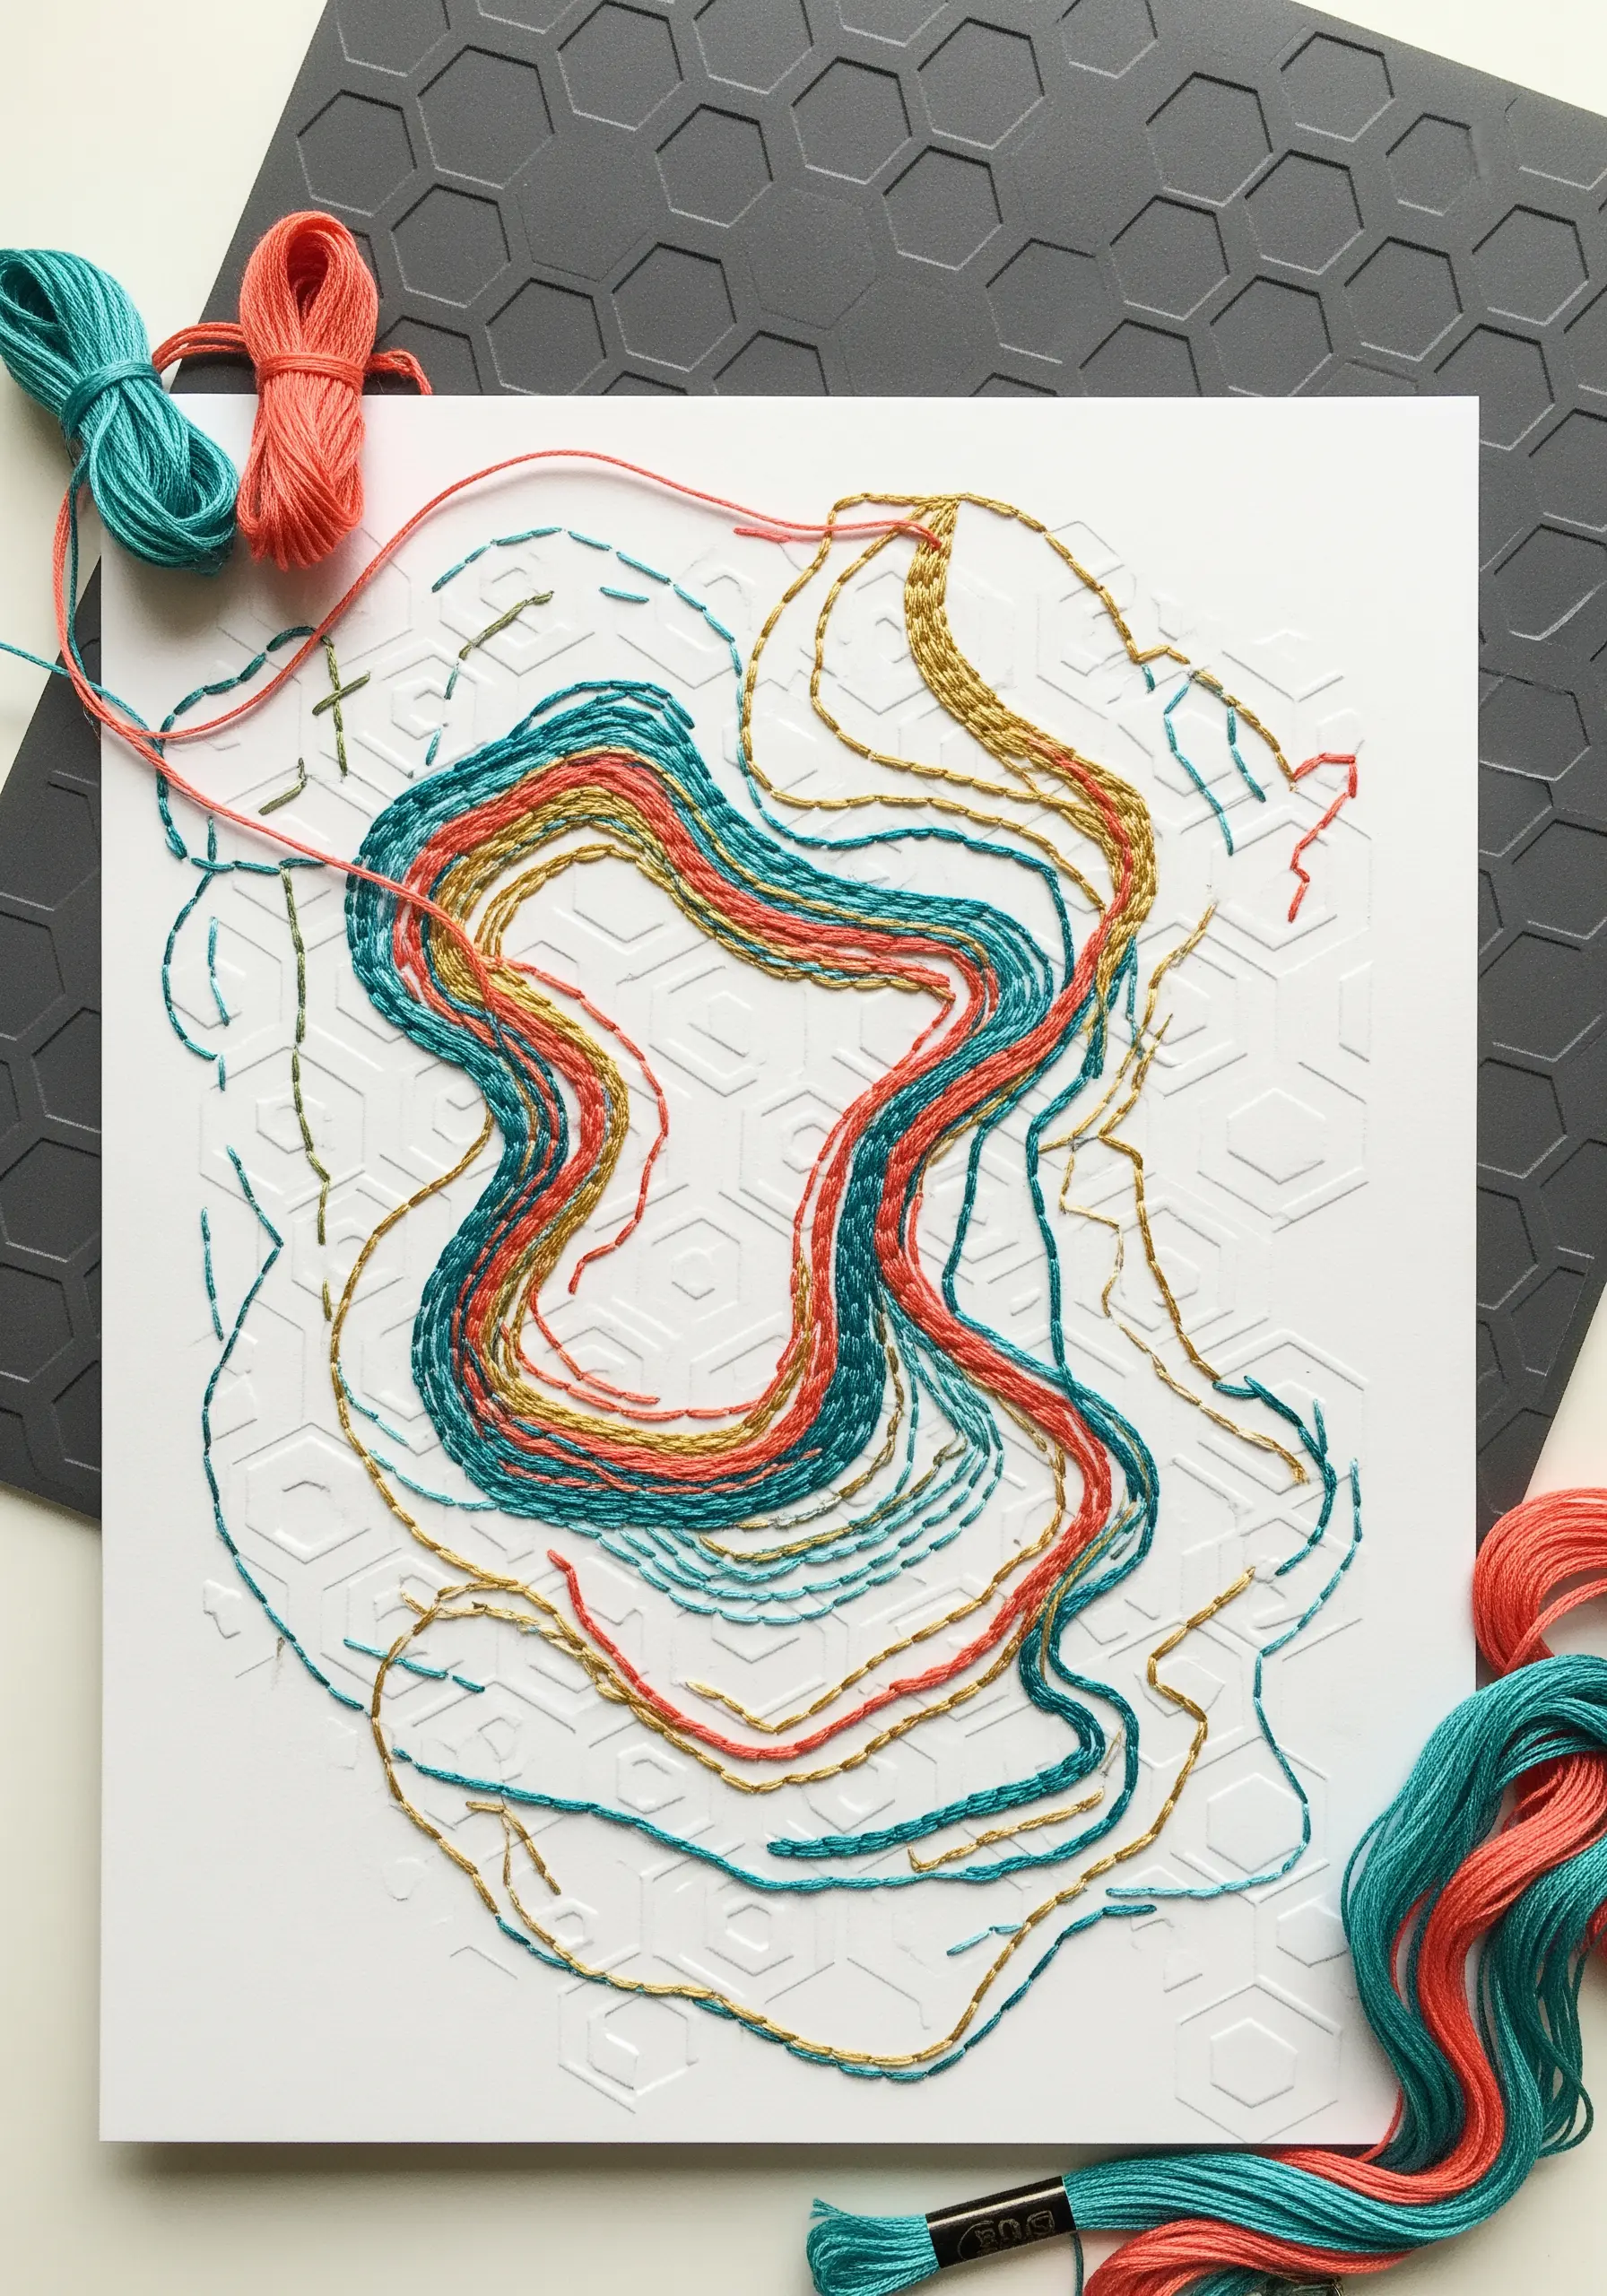
12. Meditative Mandalas: Precision on Deckle-Edge Paper
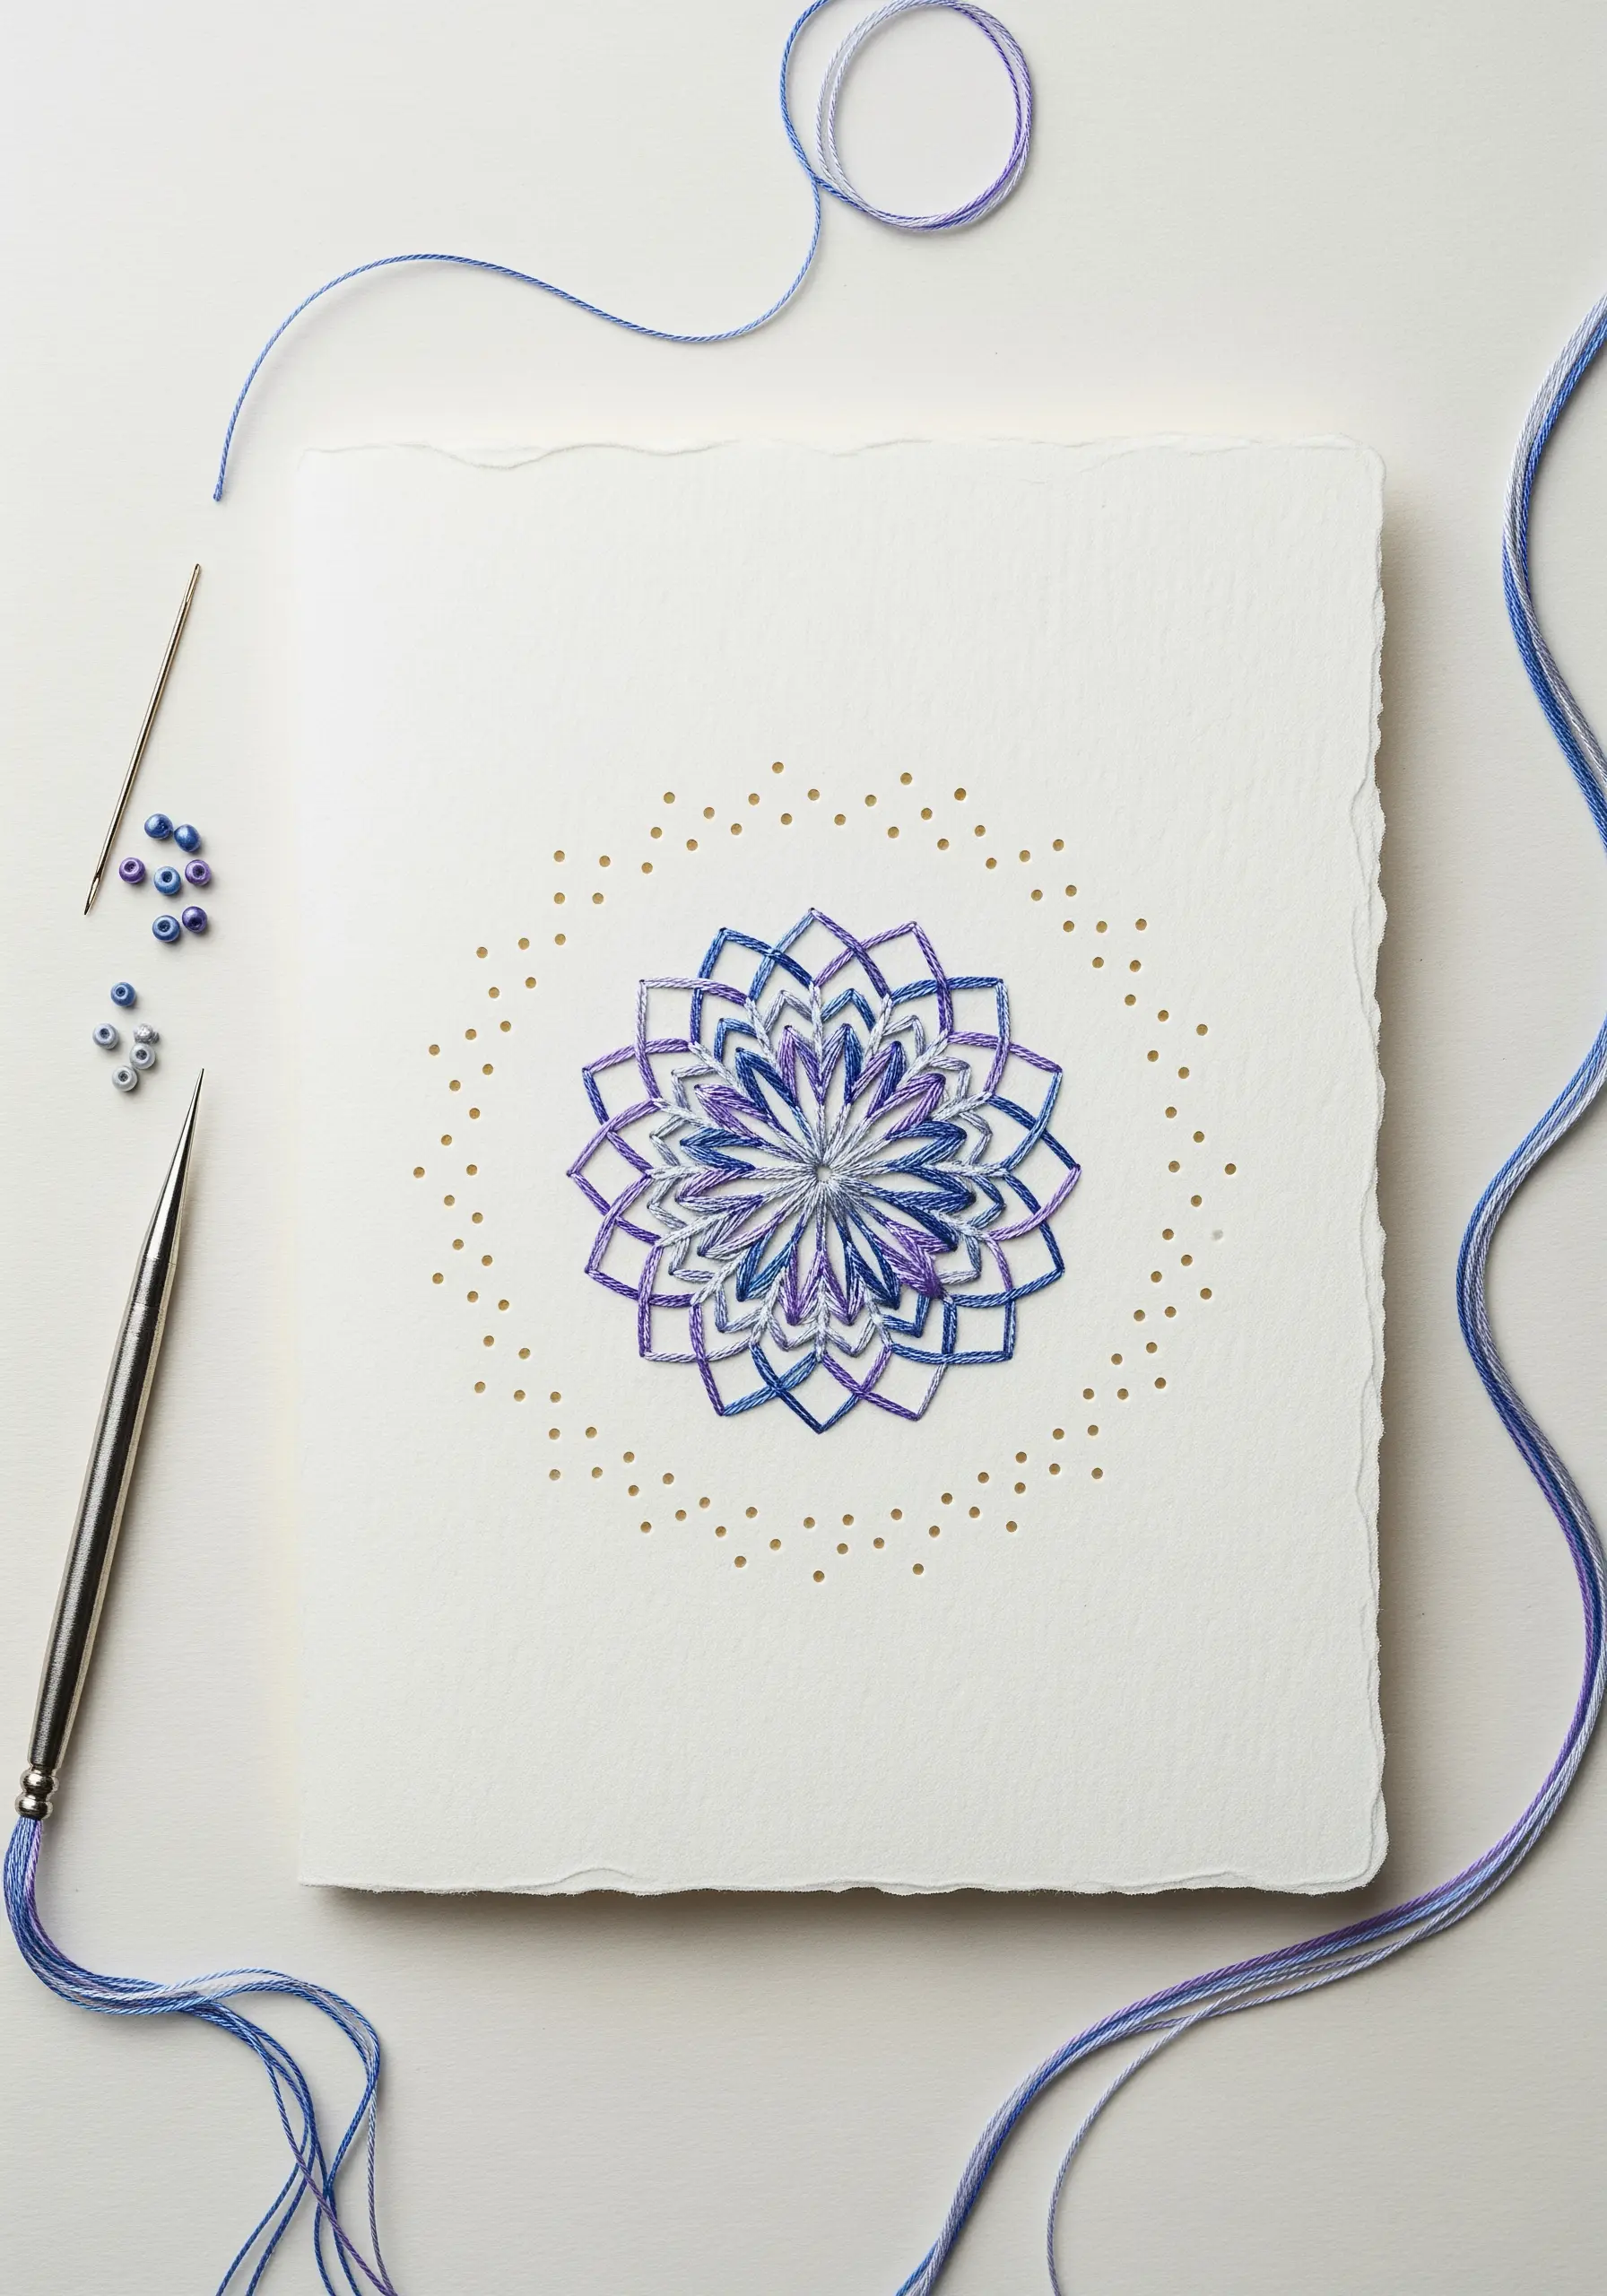
Combine the precision of geometric stitching with the softness of artisanal paper for a beautifully balanced piece.
Choose a high-quality cotton rag paper with a deckle edge for an organic, tactile feel.
Lightly draw your mandala pattern, then use an awl to pre-punch every hole before stitching to ensure perfect symmetry and prevent paper damage.
This approach is perfect for modern thread mandala ideas, where precision is part of the meditative process.
13. Woven Narratives: Stitched Accents on Paper Weaving
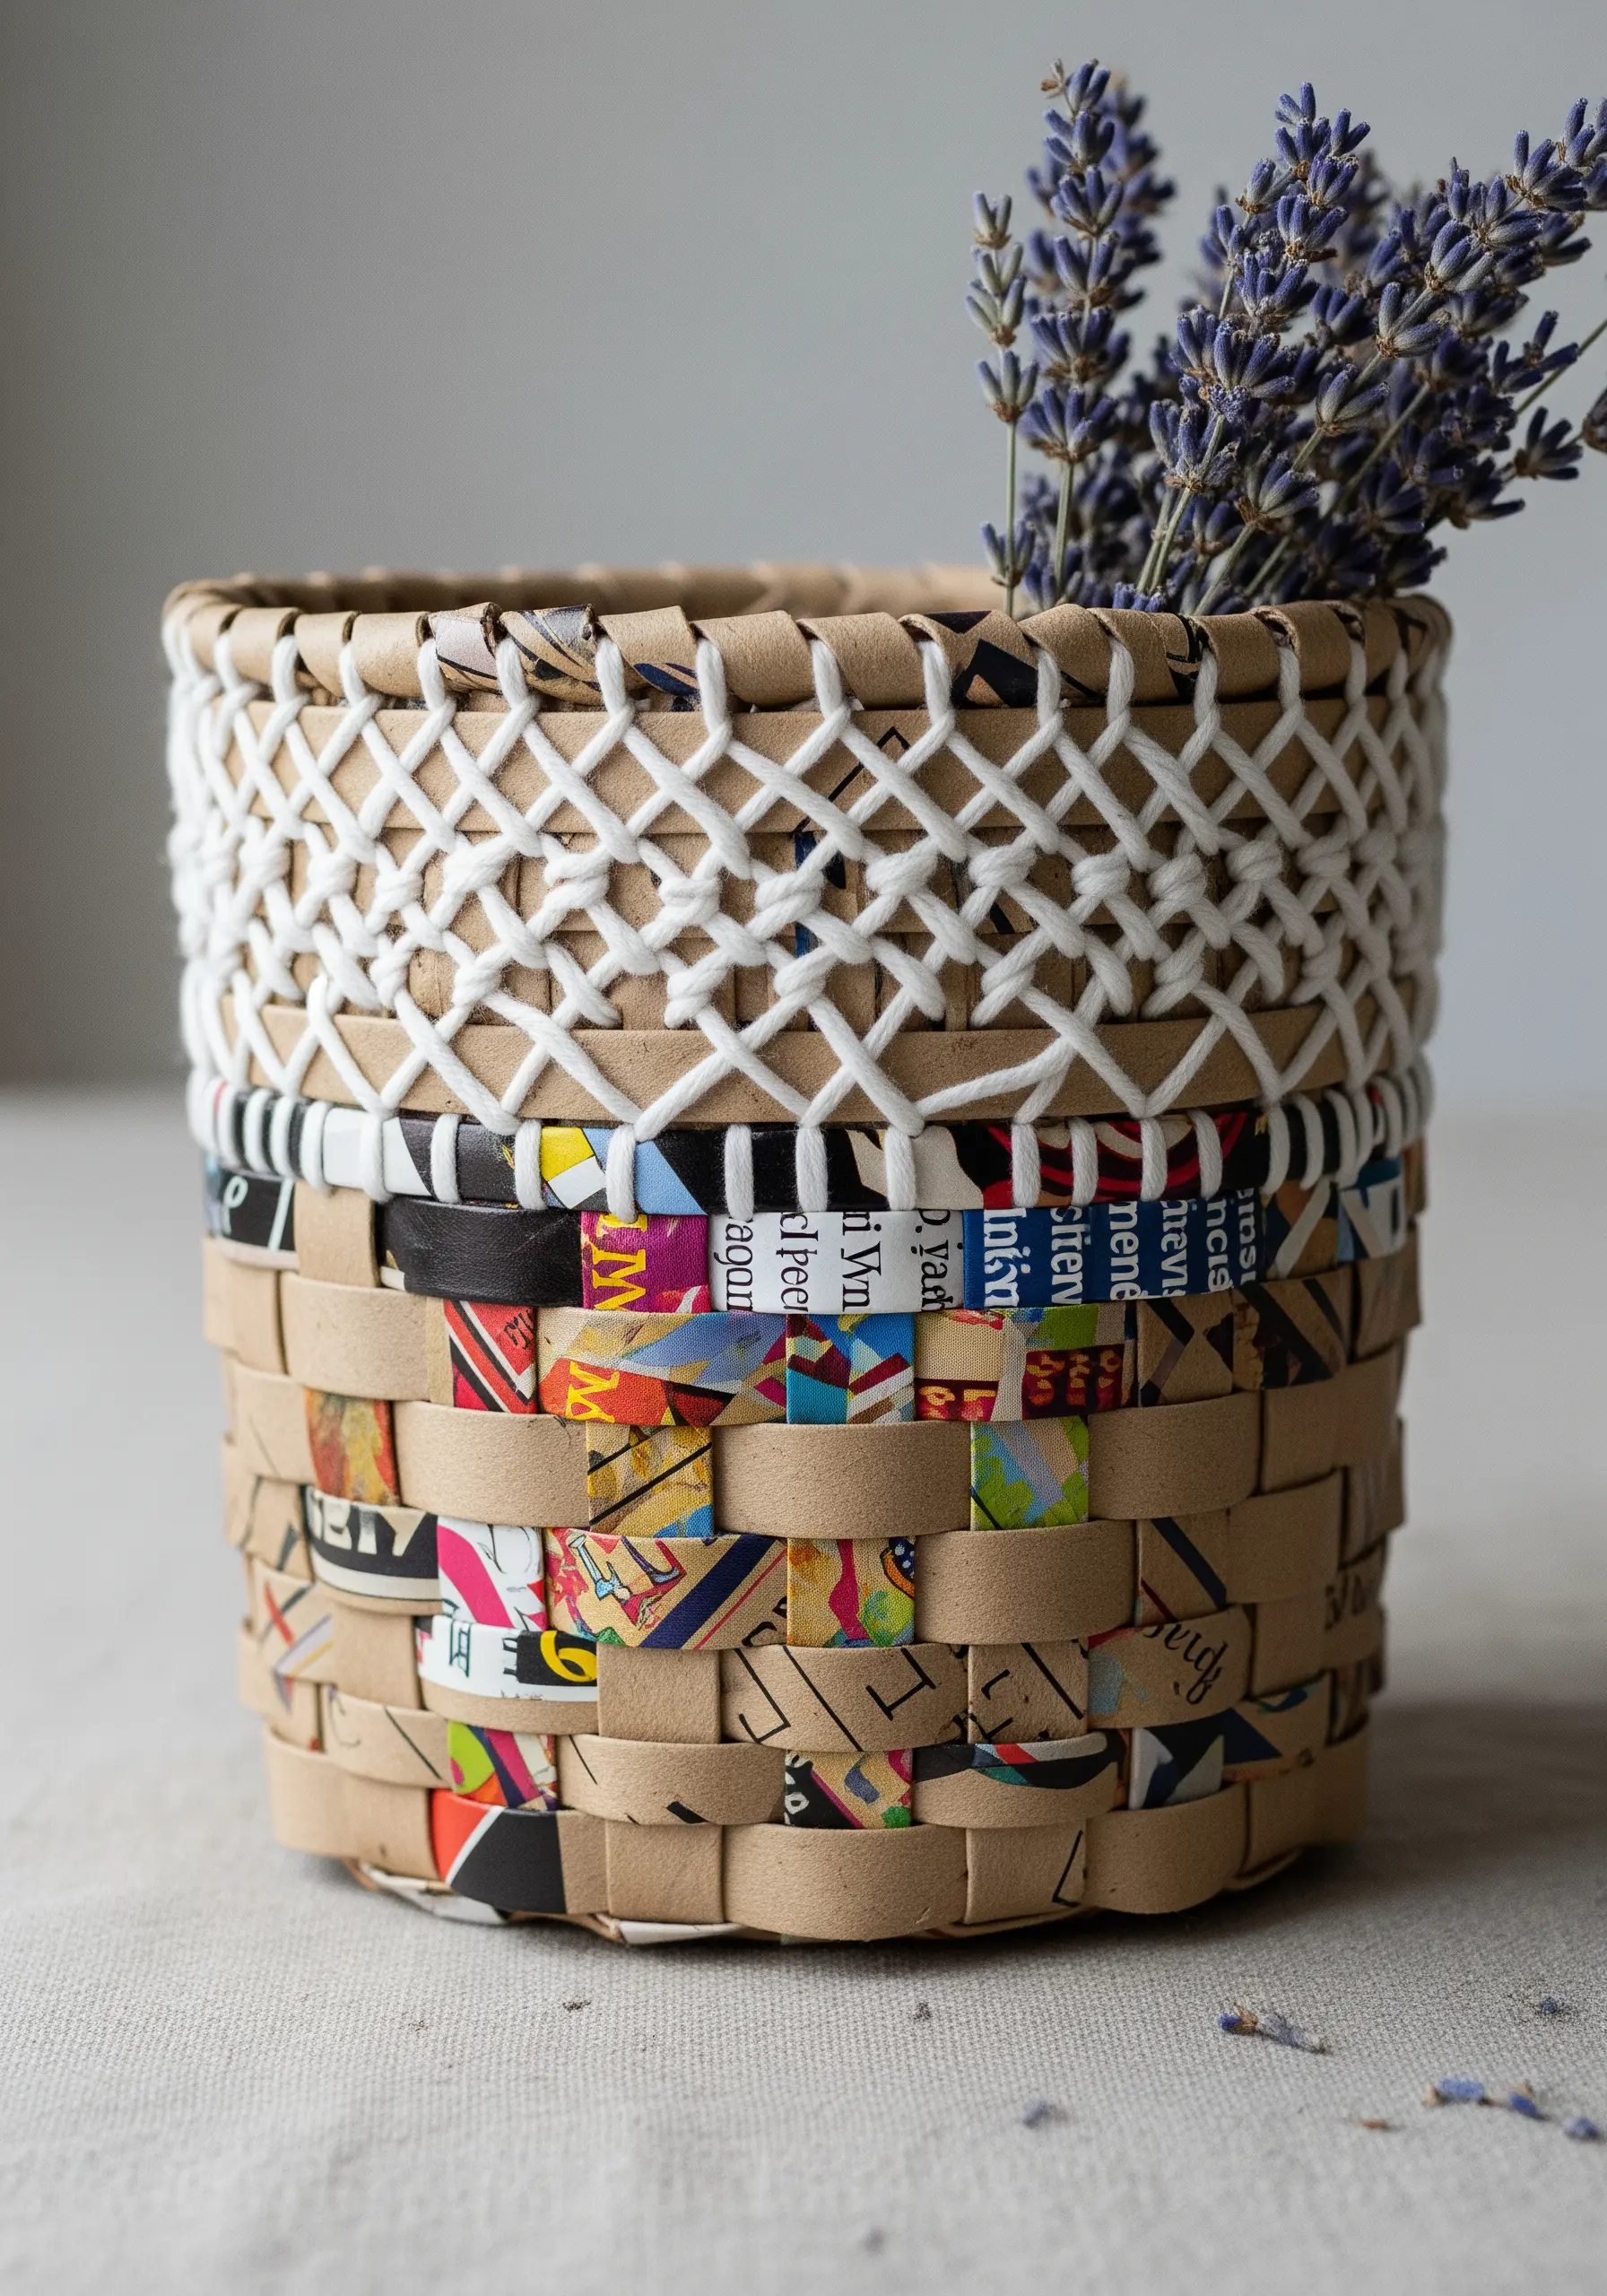
Elevate a paper-woven vessel from a simple craft to a finished art object with a touch of embroidery.
After weaving your basket from recycled paper strips, use a thick, contrasting thread like yarn or twine to add a decorative band around the rim.
A simple lattice stitch or a series of cross-stitches not only adds textural interest but also reinforces the top edge of the basket.
This simple addition transforms a humble craft into one of those unique handmade art objects that tells a story.
14. Urban Blueprints: Stitching Architectural Paper-Cuts
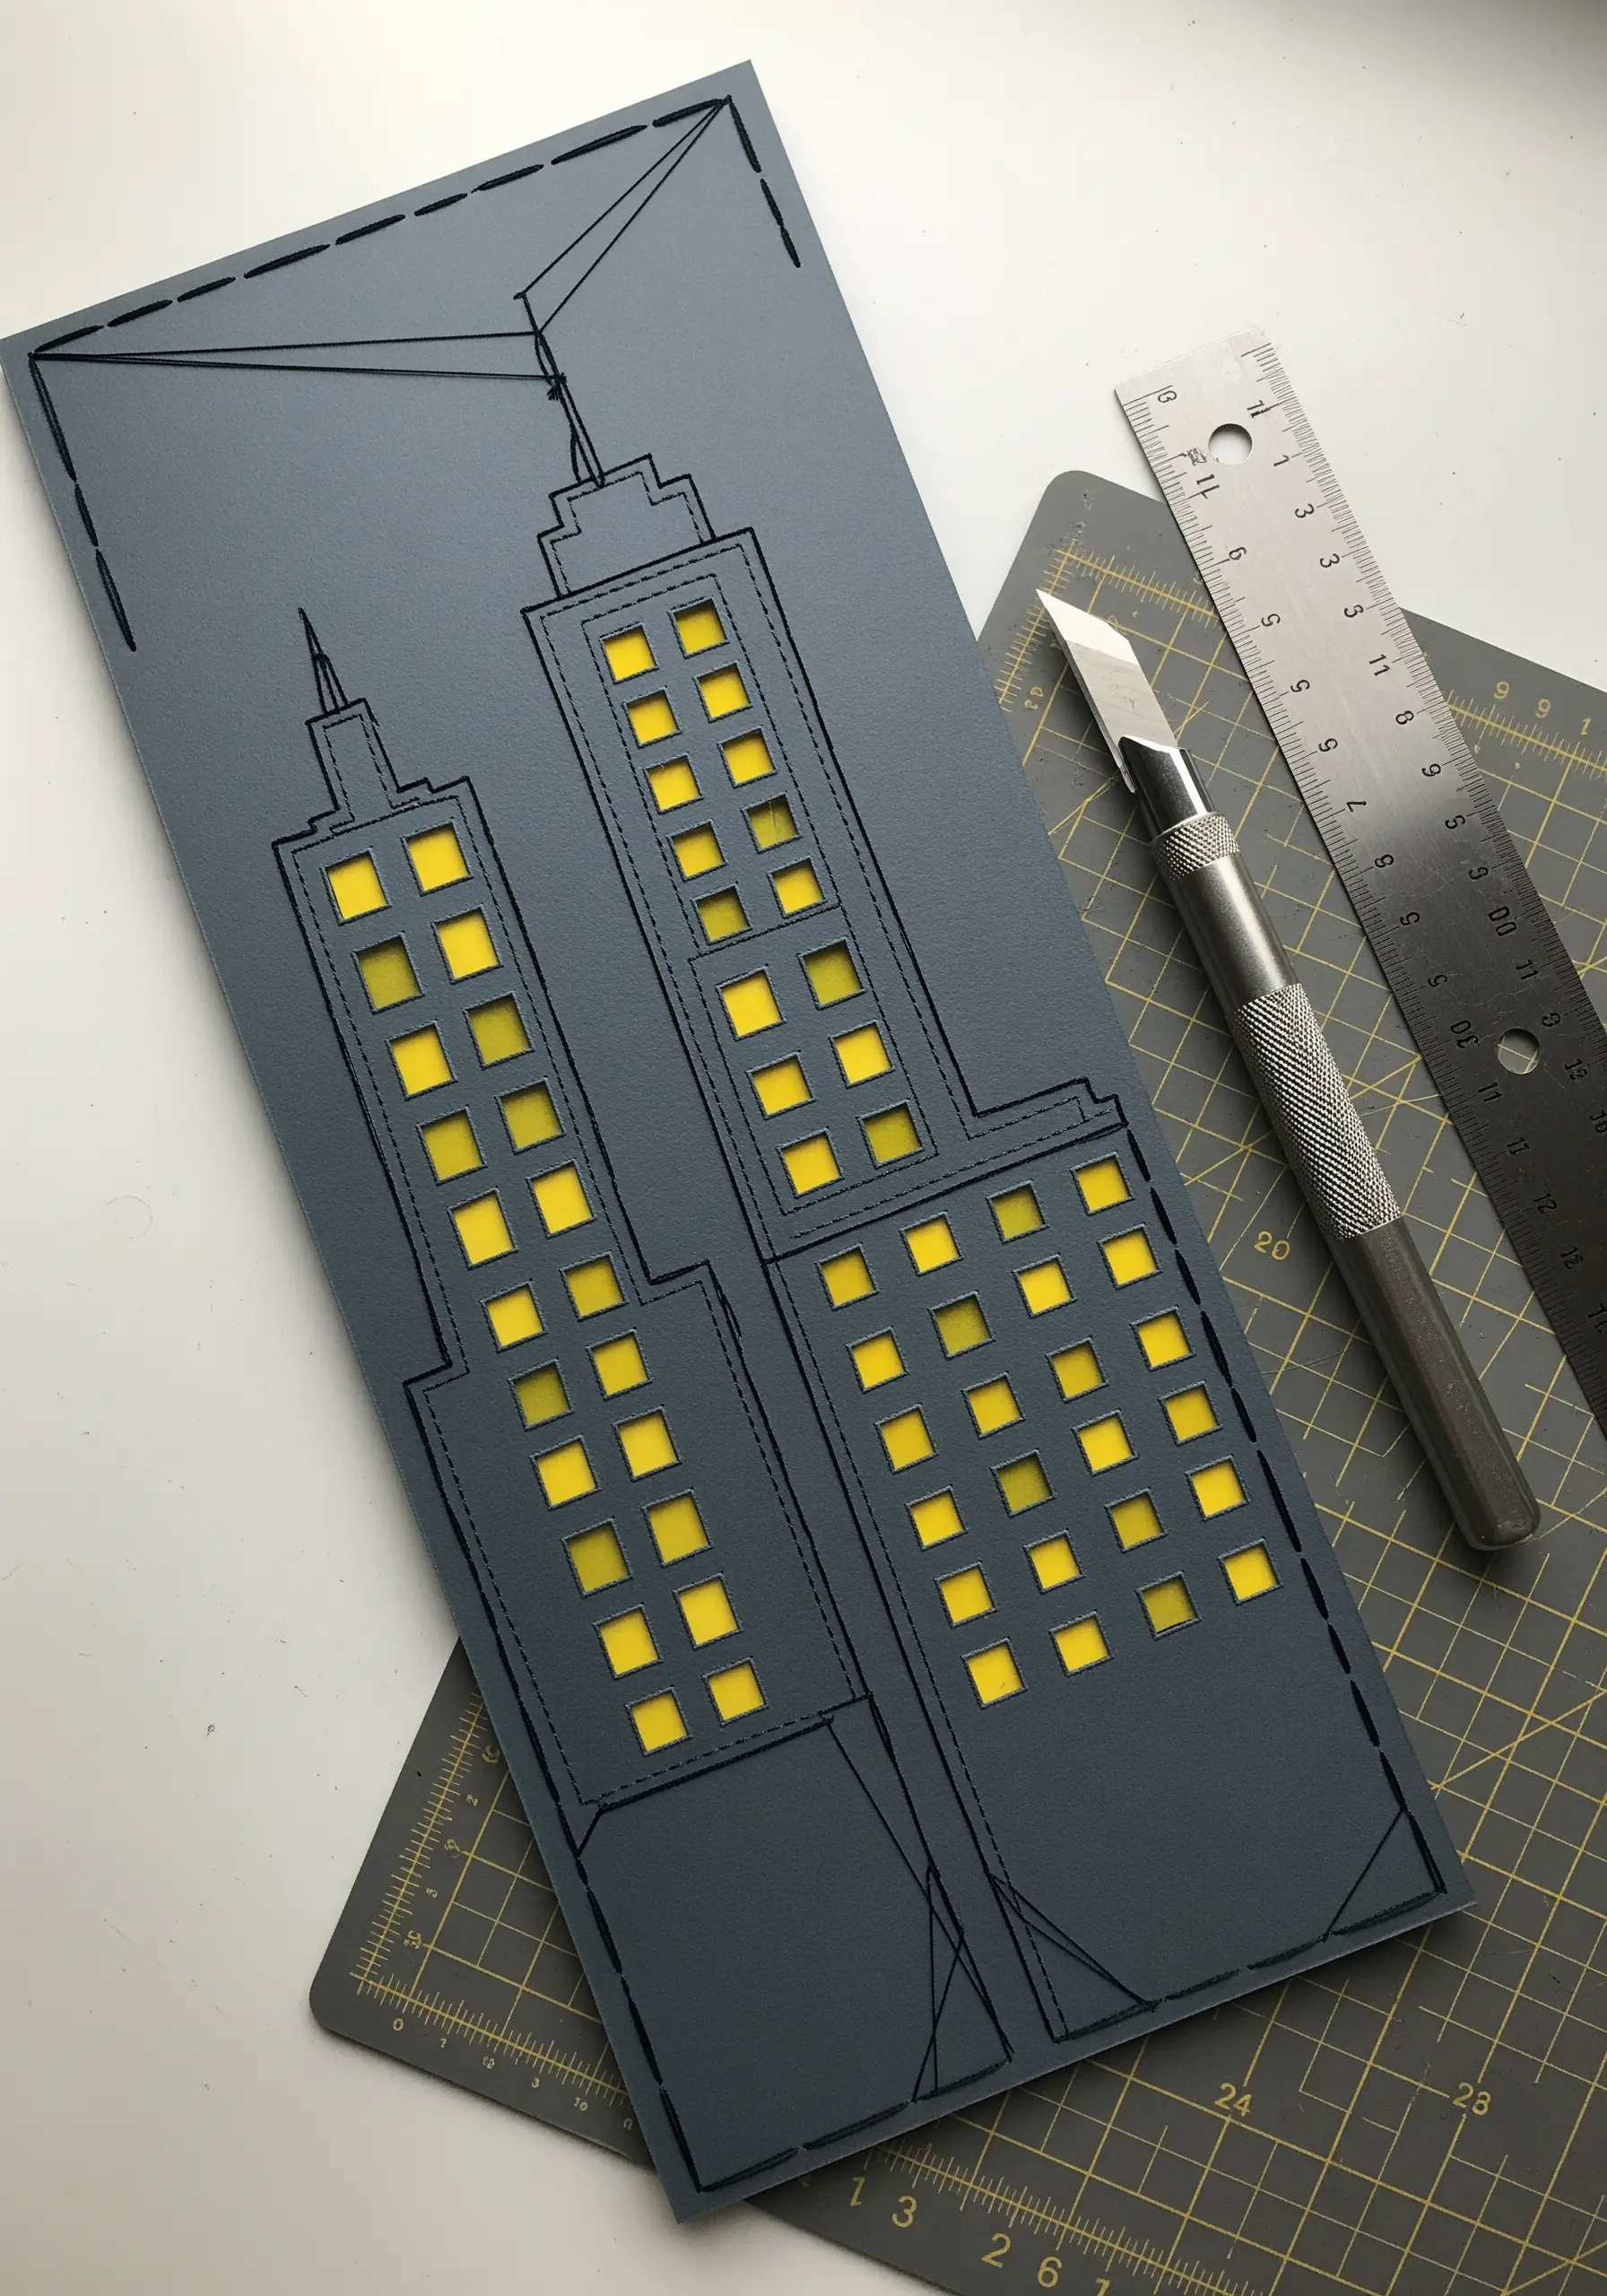
Add a layer of hand-drawn detail to a crisp, graphic paper-cut silhouette.
After cutting your cityscape from heavy cardstock with a craft knife, use a simple backstitch to trace the architectural outlines.
This subtle addition of thread adds texture and depth, transforming the piece from a simple cut-out into a more nuanced illustration.
It’s one of the simplest paper art DIYs to display embroidery skills in a new context, adding a hand-drawn quality to a graphic silhouette.
15. Layered Paper Fur for Textural Dimension
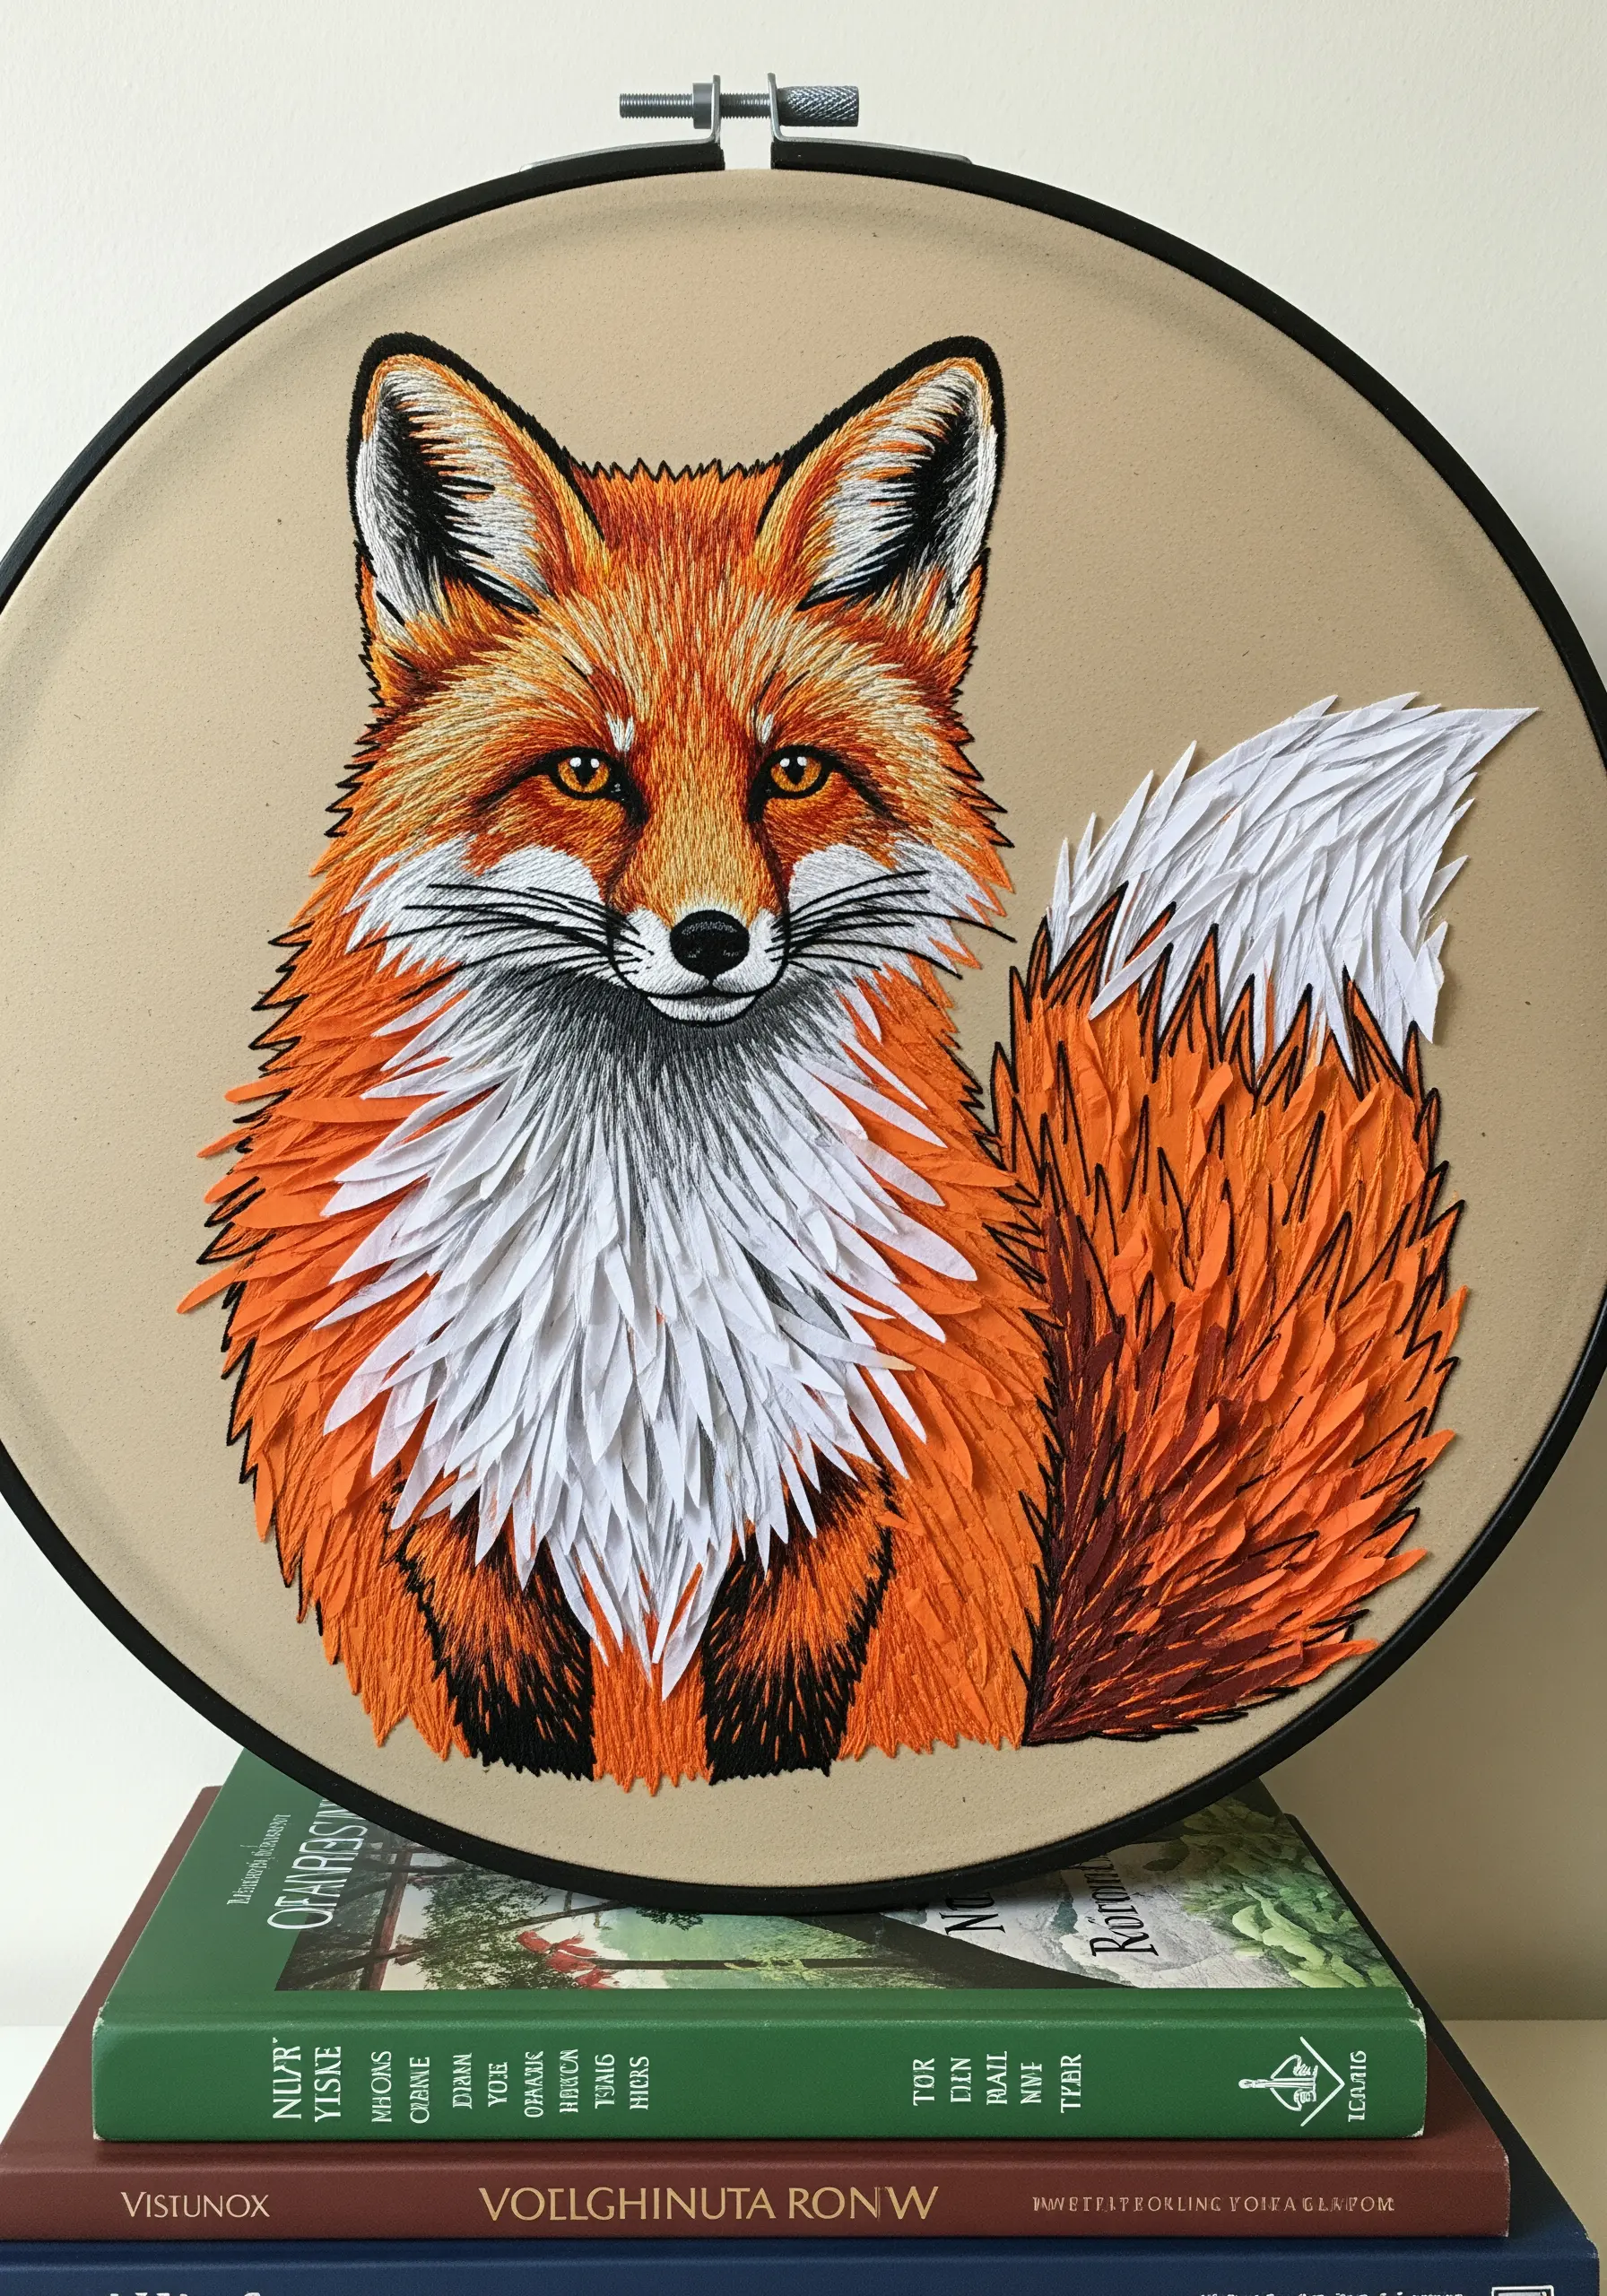
Create dramatic, touchable texture by combining embroidery with layered paper elements.
First, stitch the fine details of your subject, like the face and eyes, directly onto a sturdy paper or fabric background.
Then, for areas like fur or feathers, cut small, tapered shapes from paper and glue them on in overlapping rows, working from the bottom up.
This works beautifully for subjects with rich texture, like the fur in fox and deer embroidery patterns, creating a stunning 3D effect.
16. Stitching on Texture: Embossed Paper Backgrounds
Add another layer of dimension to your work by starting with a textured canvas.
Use a paper embossing folder with a die-cutting machine (or even a textured rolling pin) to press a pattern onto your cardstock before you stitch.
You can then create an abstract design that either follows or contrasts with the raised pattern, creating a subtle interplay between the thread and the paper’s surface.
This method is perfect for abstract thread embroidery ideas, adding a layer of subtle complexity and tactile interest to your work.
17. Deconstructed Canvases: Stitching on Corrugated Cardboard

Embrace unconventional materials by using corrugated cardboard as your embroidery base.
Tear away the top paper layer in sections to expose the inner fluting, creating a rugged, industrial texture.
Use these exposed channels as a natural guide for wrapping, weaving, and stitching thick yarn or thread.
The contrast between the raw cardboard and the soft, colorful thread results in a powerful, abstract art piece, turning simple abstract embroidery stitches into sculpture.
18. Integrate Embellishments: Paper Bead Flower Centers
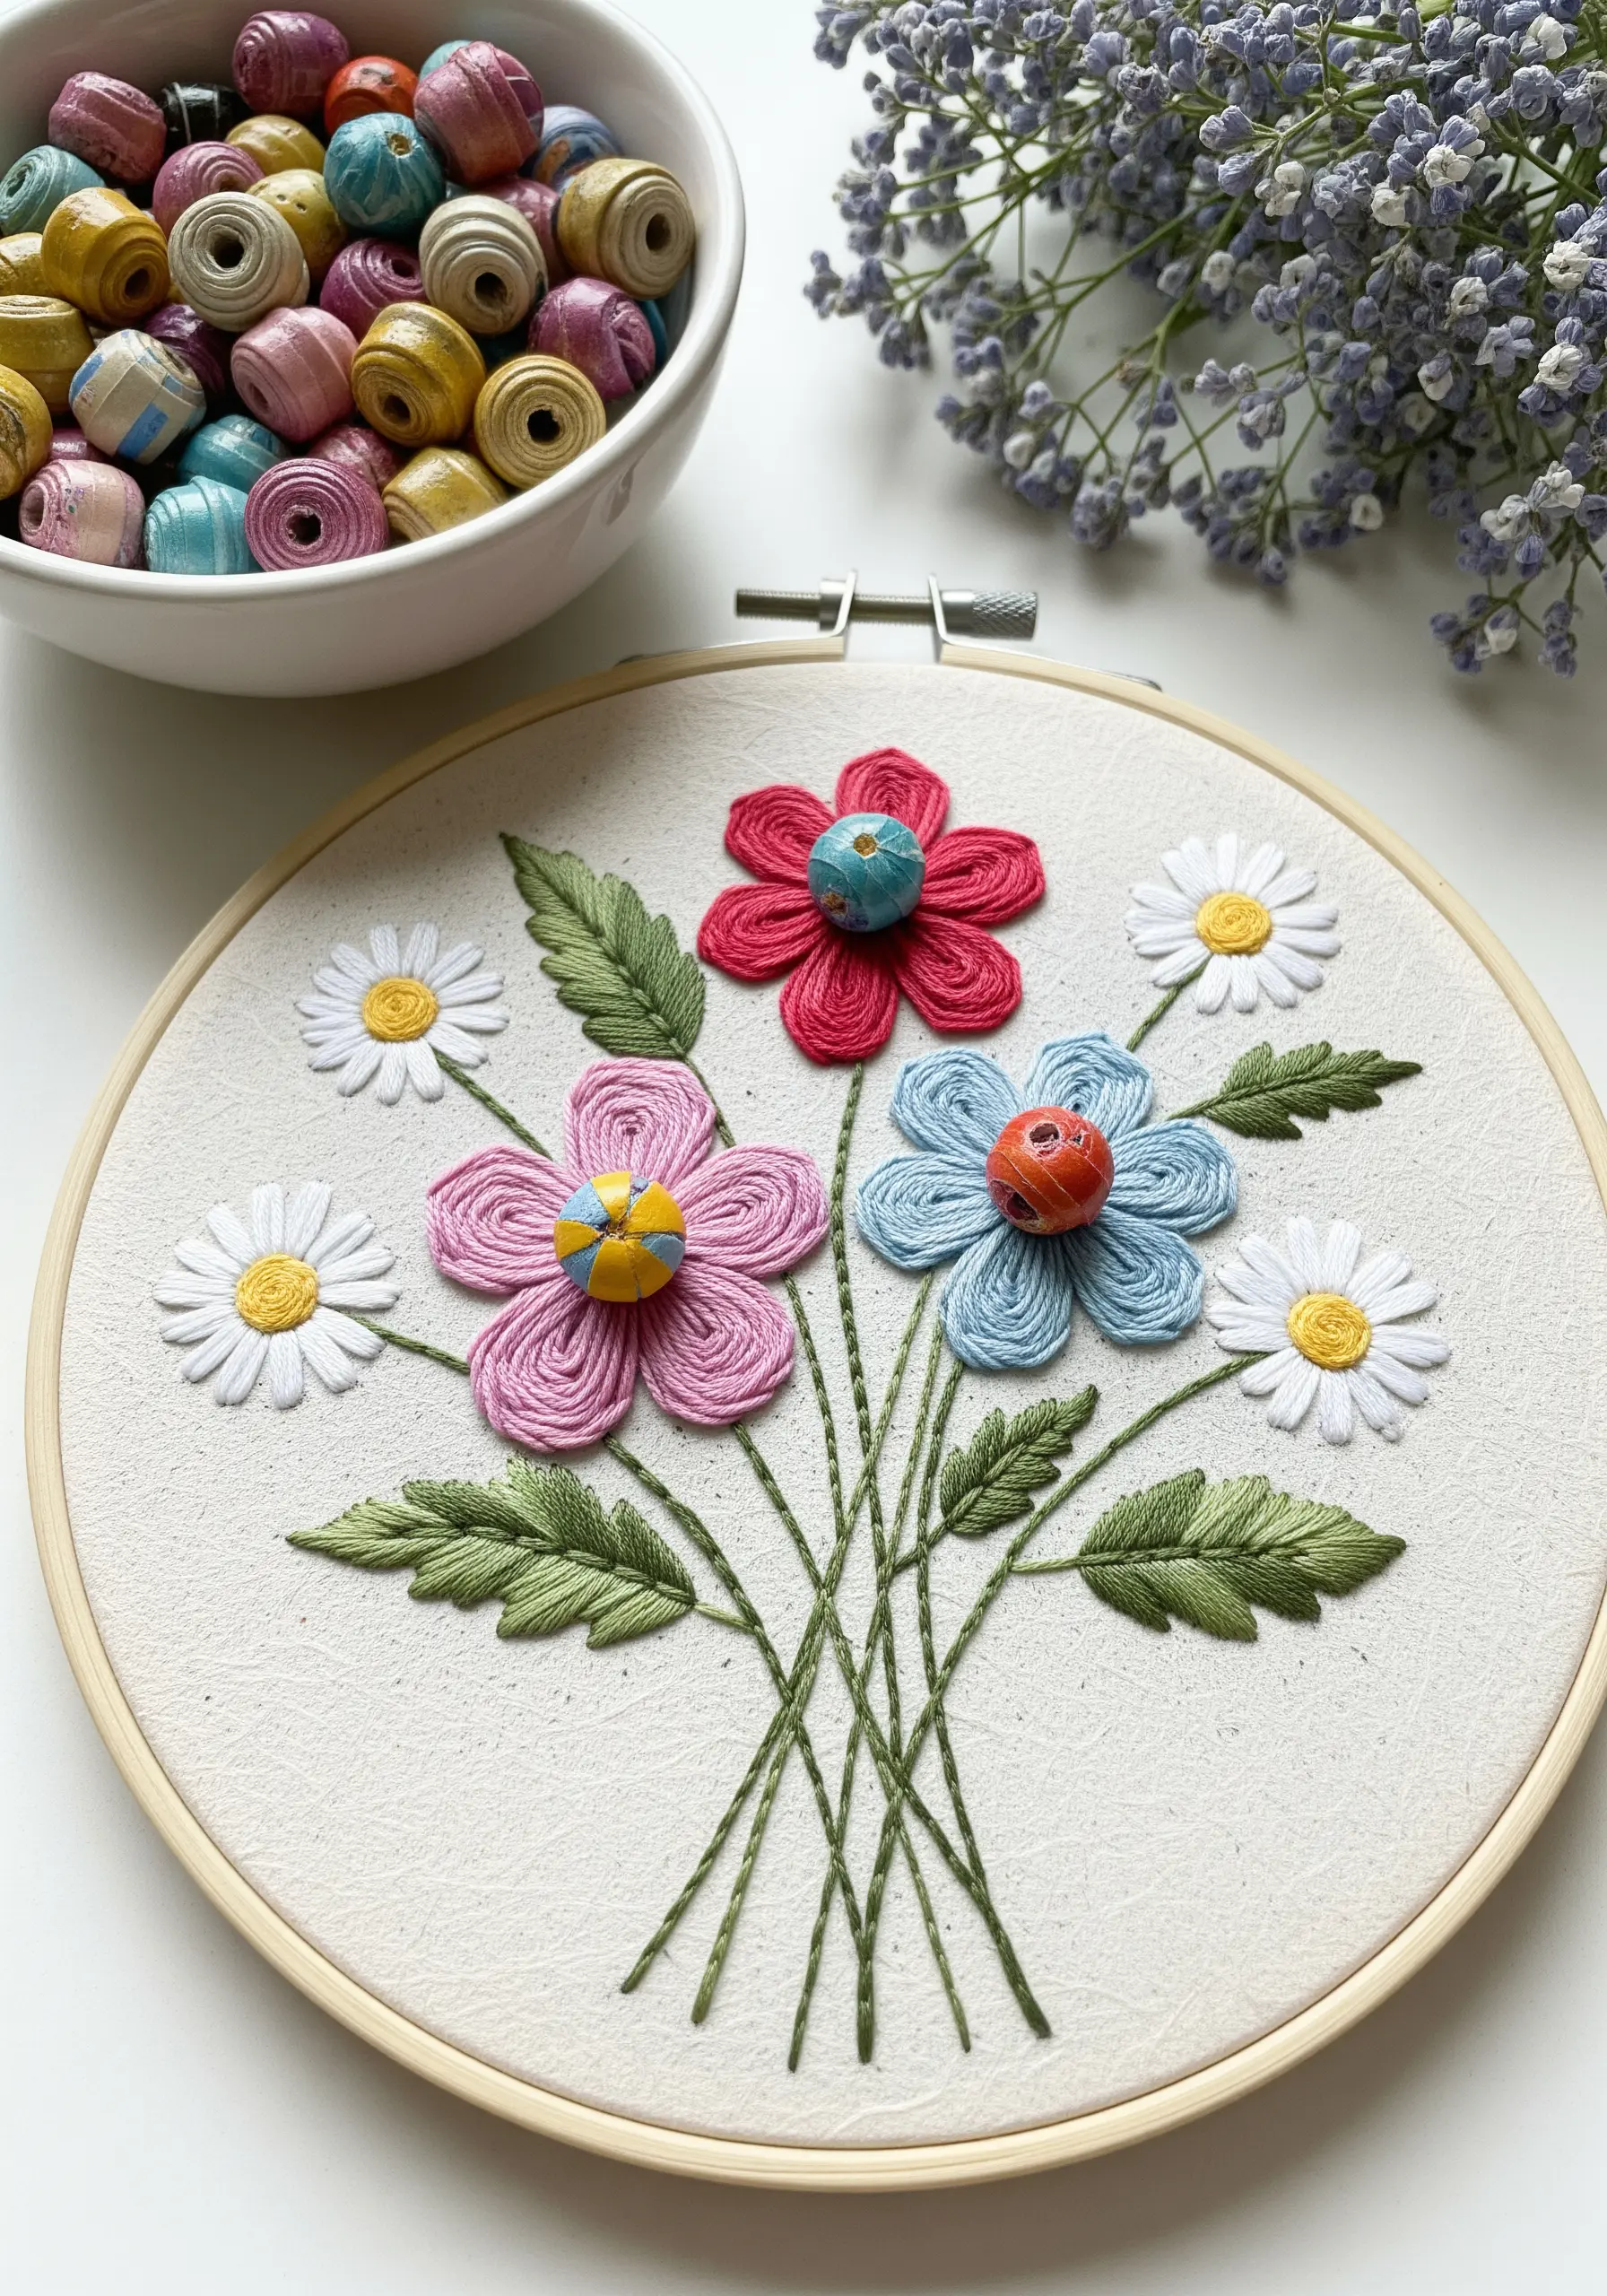
Give your embroidered florals a unique, three-dimensional twist by incorporating handmade paper beads.
Roll your own beads from strips of colorful magazine pages or scrapbook paper, securing them with a dab of glue.
After stitching your petals, simply sew a paper bead securely into the center instead of using a traditional French knot.
This turns your floral hoop into one of those charming handmade mini decor pieces with a surprising, personal touch.
19. The Folded Stitch: Embroidering Origami Forms
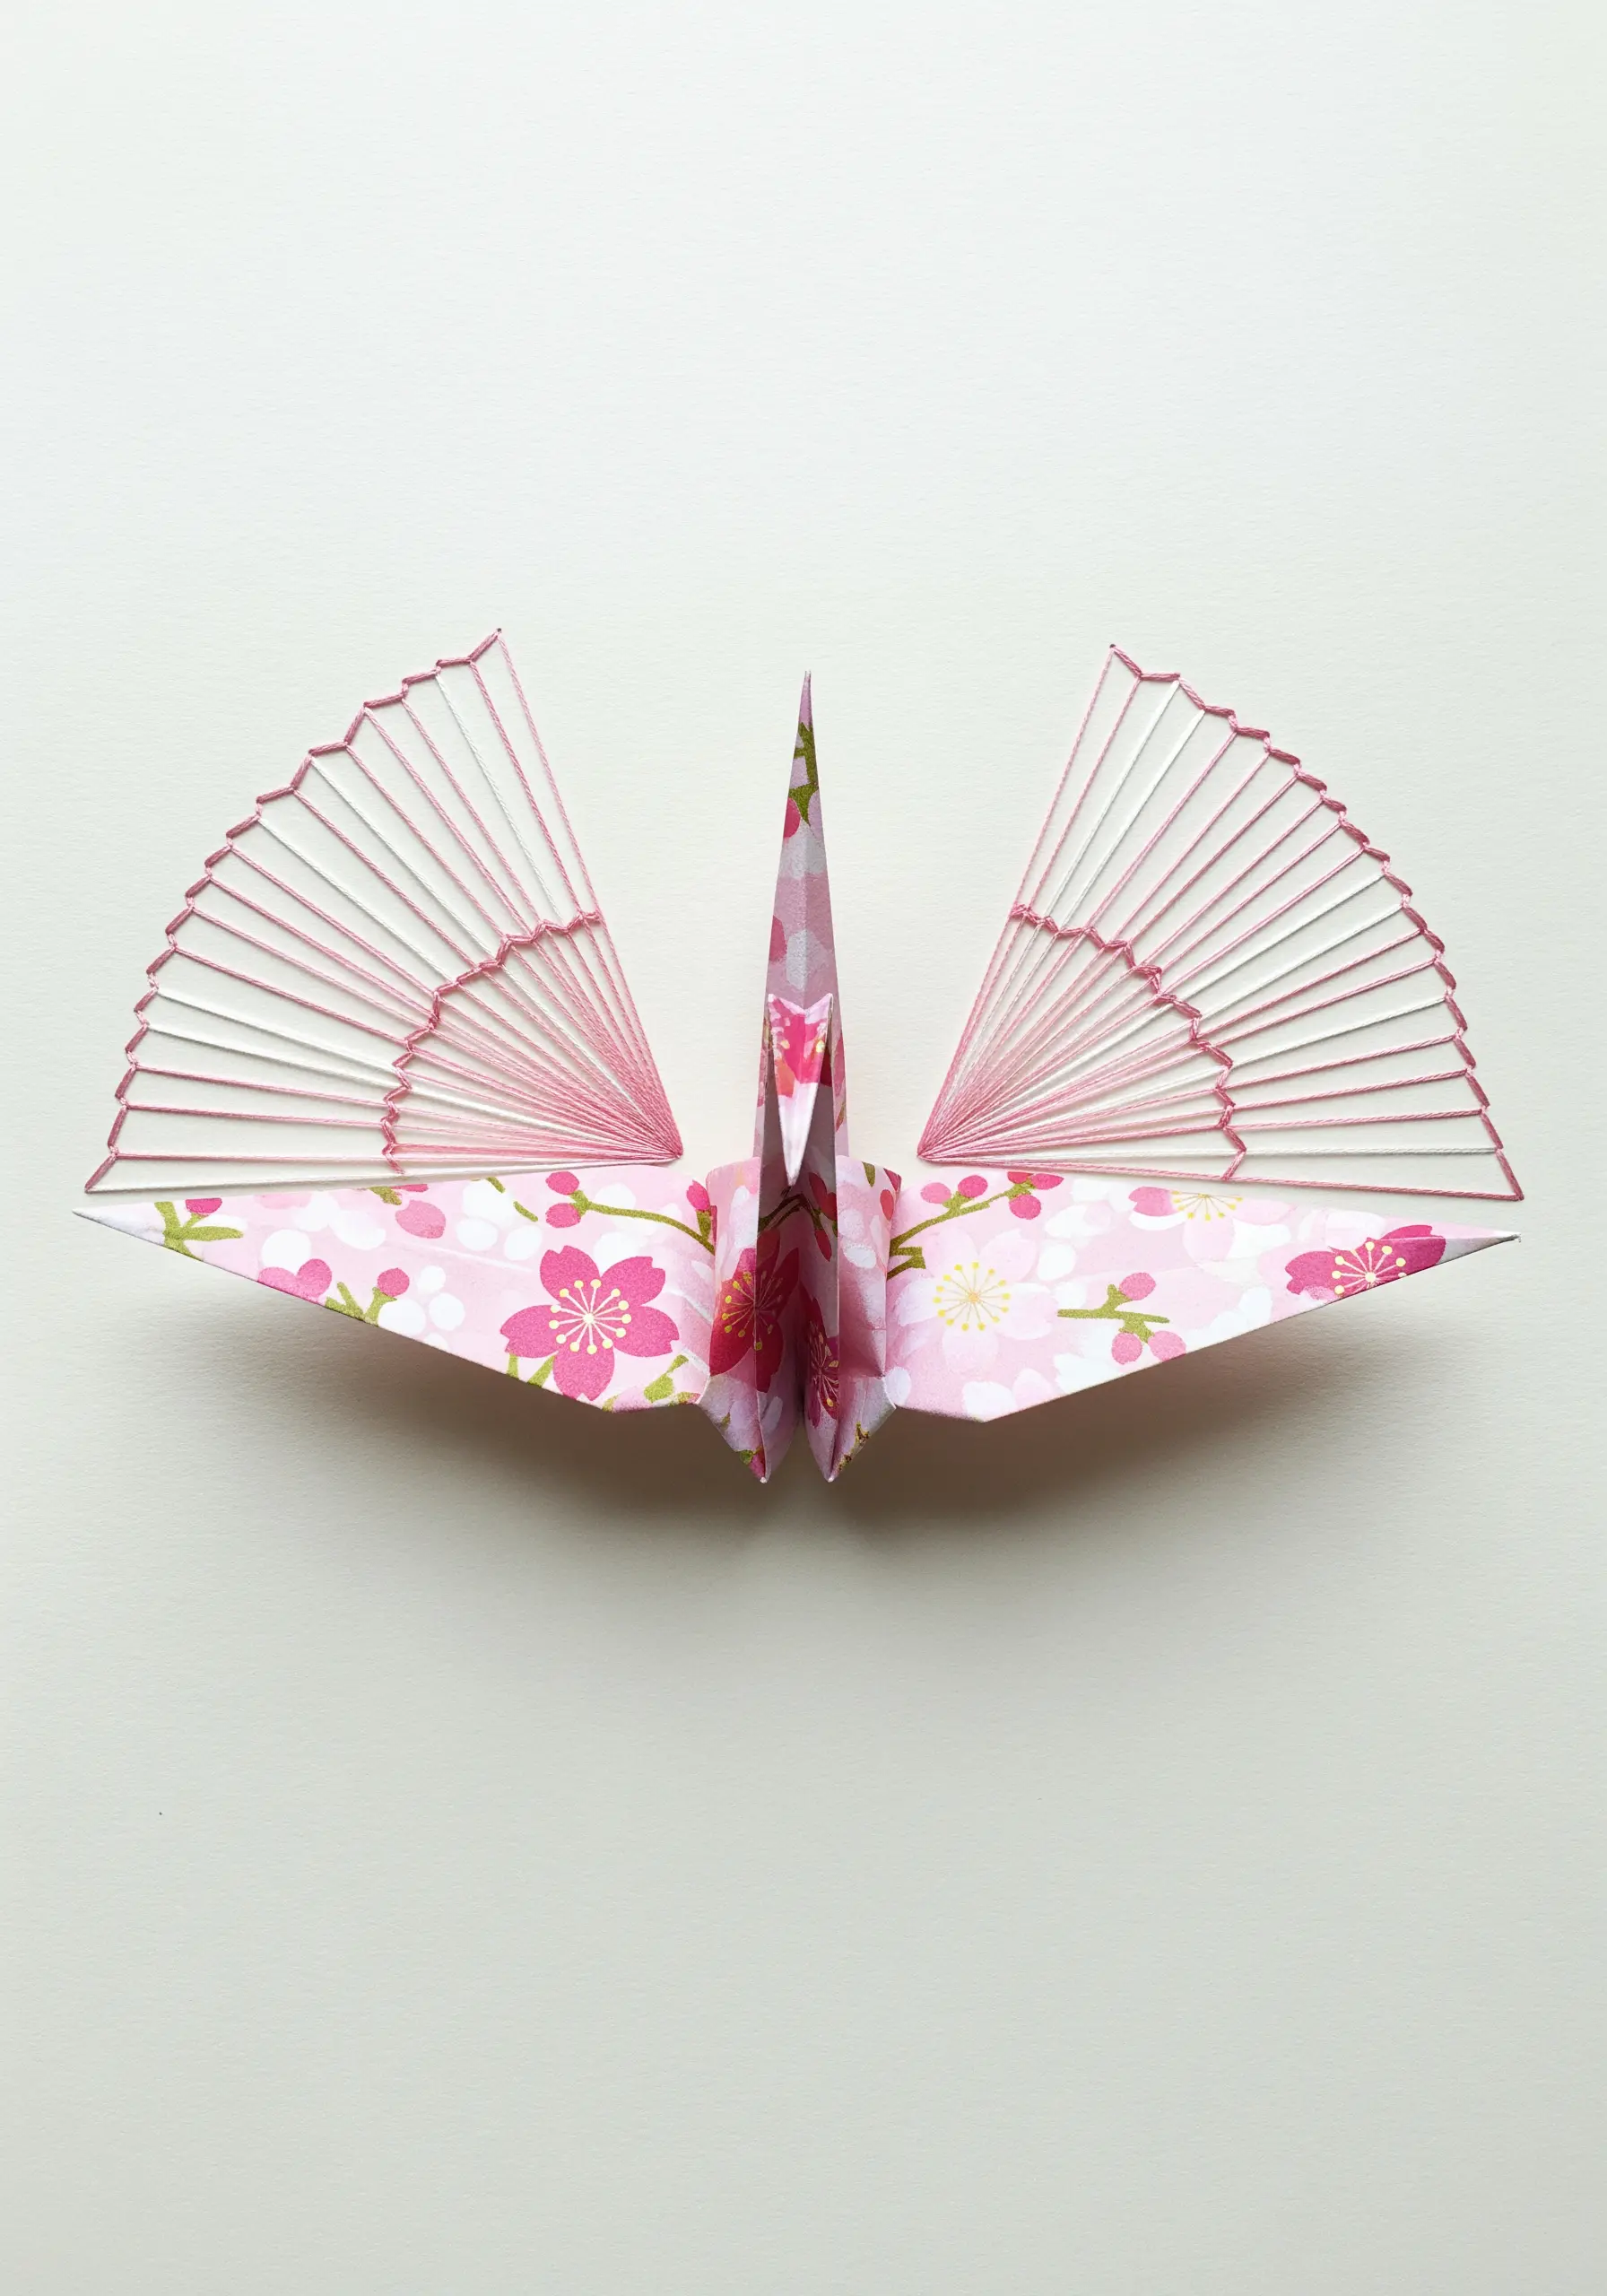
Integrate stitching directly into the art of paper folding for an elegant, unexpected result.
Before you begin folding, lightly mark your pattern and stitch it directly onto the flat sheet of origami paper.
Radiating straight stitches or simple geometric patterns work best, as they won’t interfere too much with the folding process.
It’s one of those unexpected paper art embroidery ideas where the process completely transforms the final object, making the stitches an intrinsic part of the final form.
20. Dimensional Monograms: Yarn Wrapping on Paper Mâché
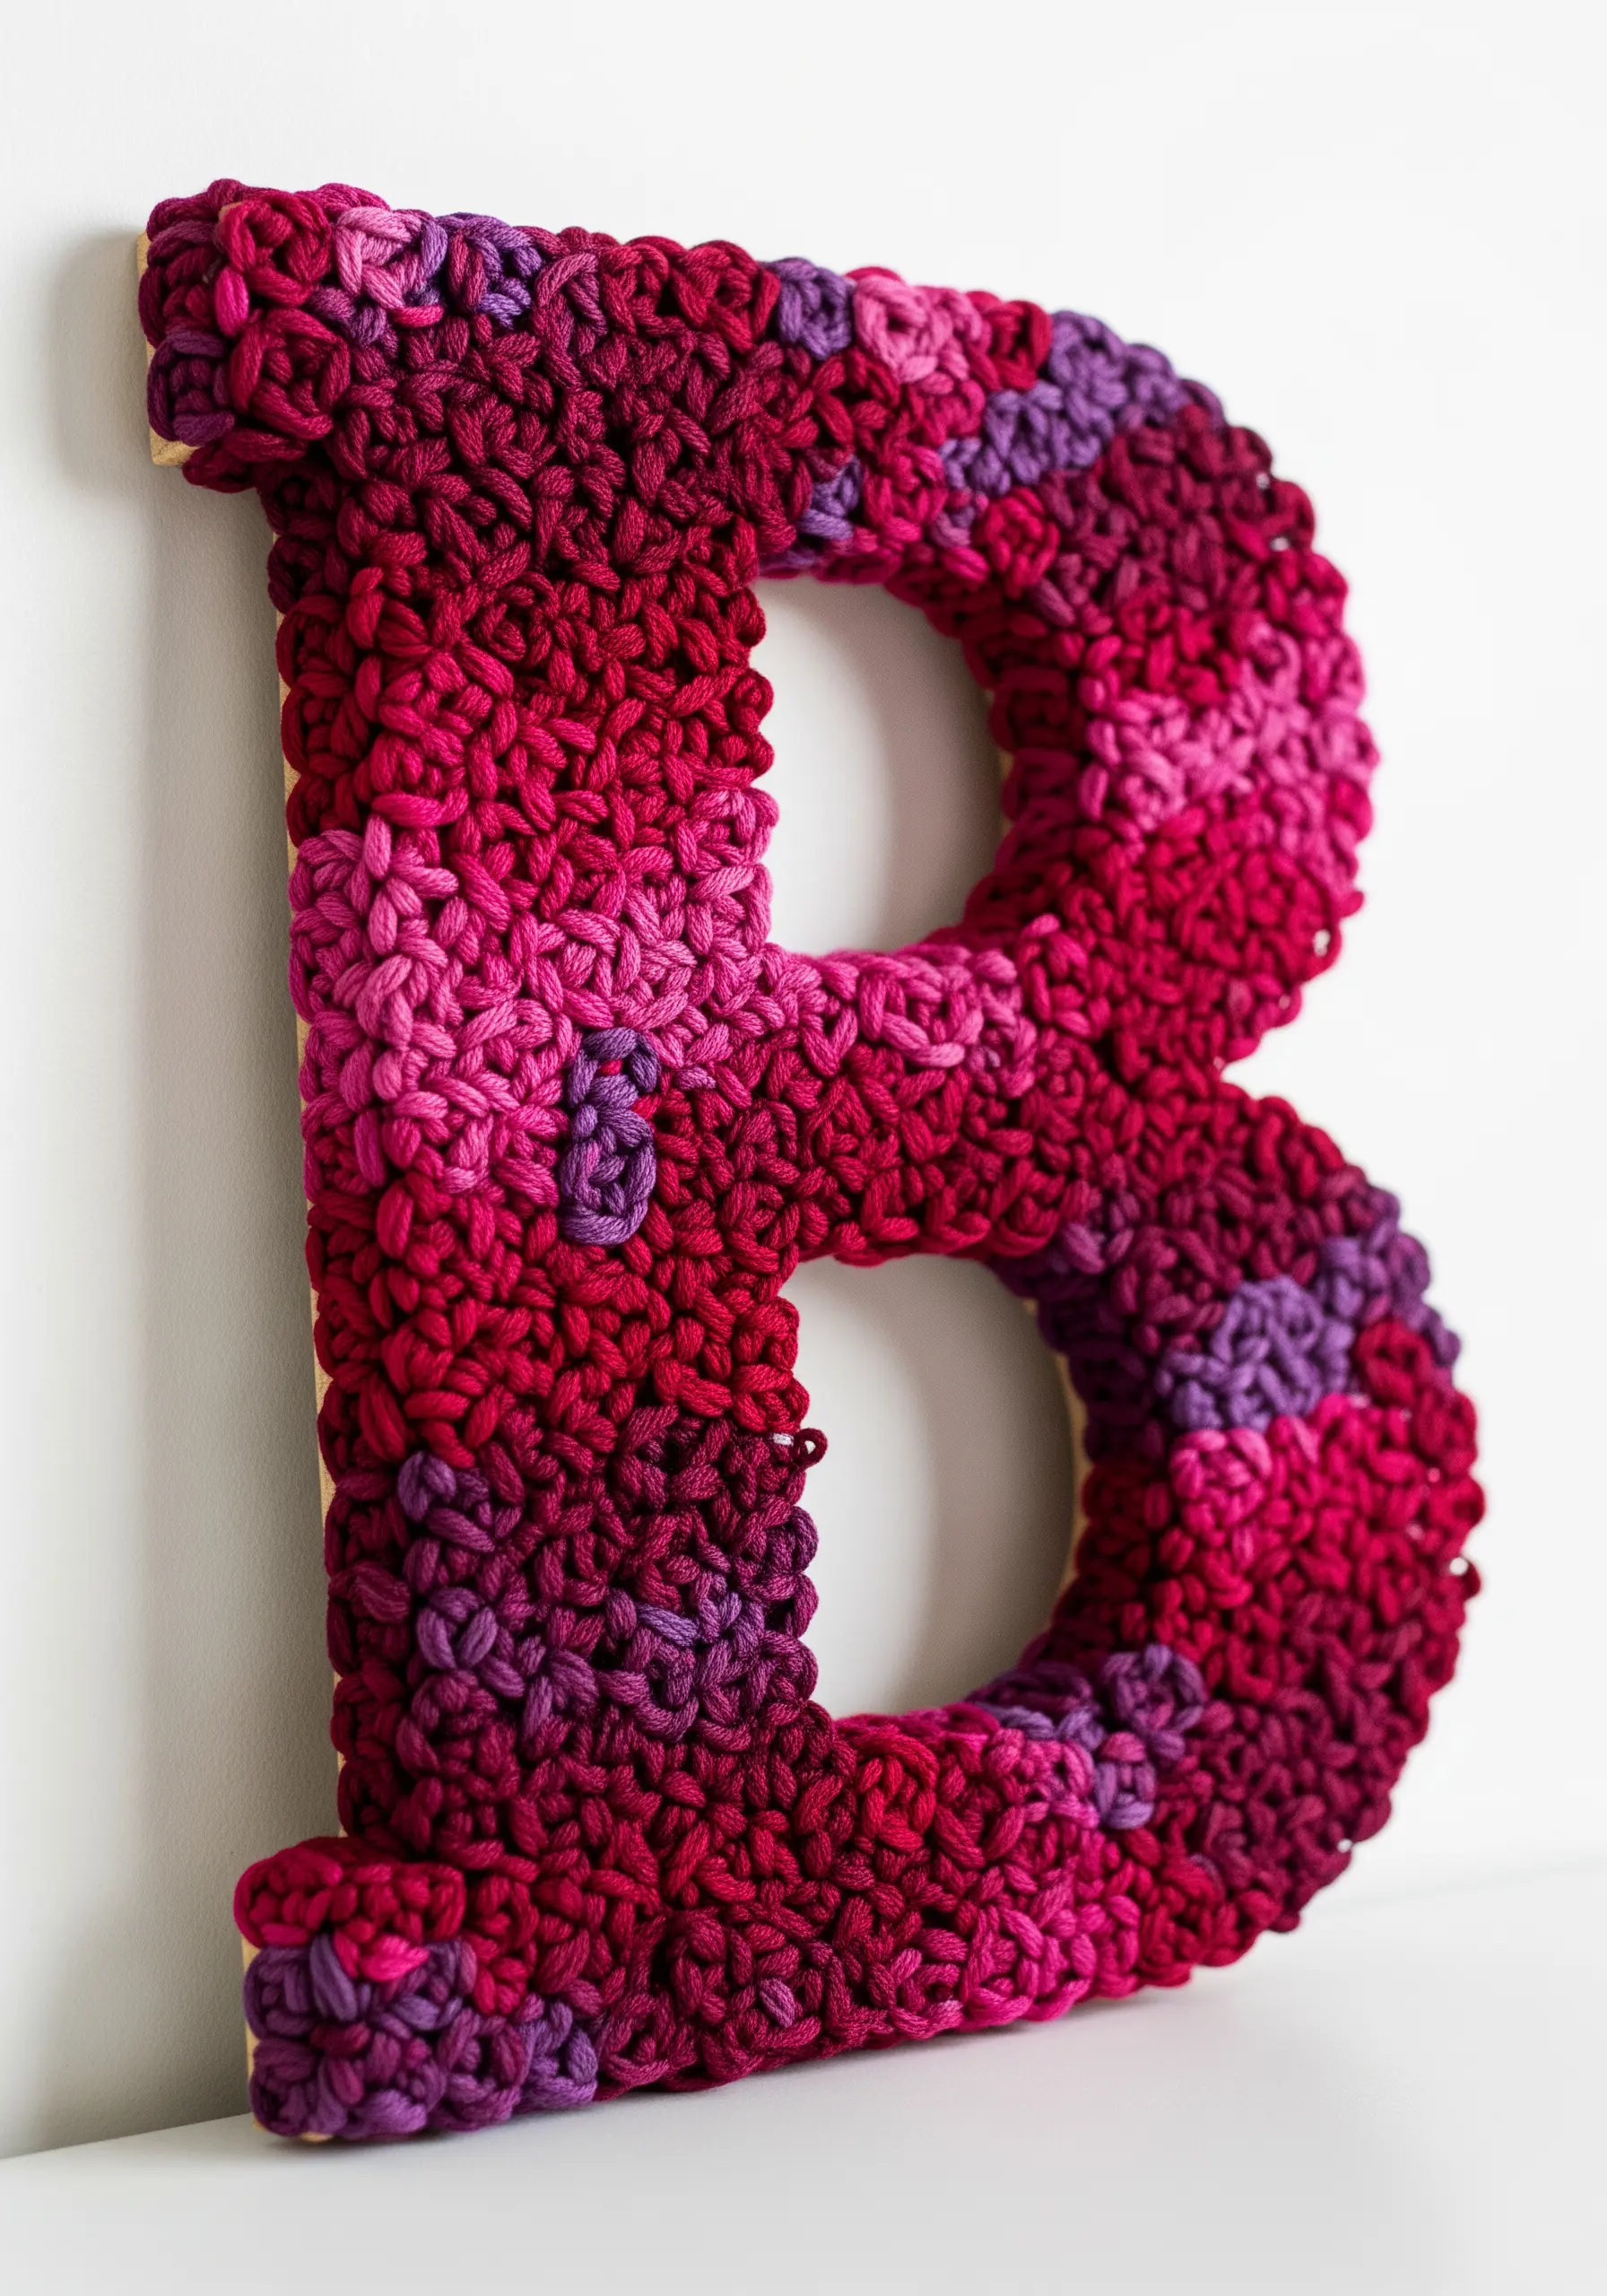
Use a large paper mâché letter as your base to create dimensional monograms that have a soft, sculptural presence.
Instead of painting, cover the entire form with thread or yarn.
You can achieve incredible texture by covering the surface in dense French knots, or create a smoother finish by simply wrapping the yarn tightly around the letter.
Plan your color changes to create an ombré effect or bold stripes for a truly custom piece of decor.
21. Deckle-Edge Framing: Layered Paper Mounts
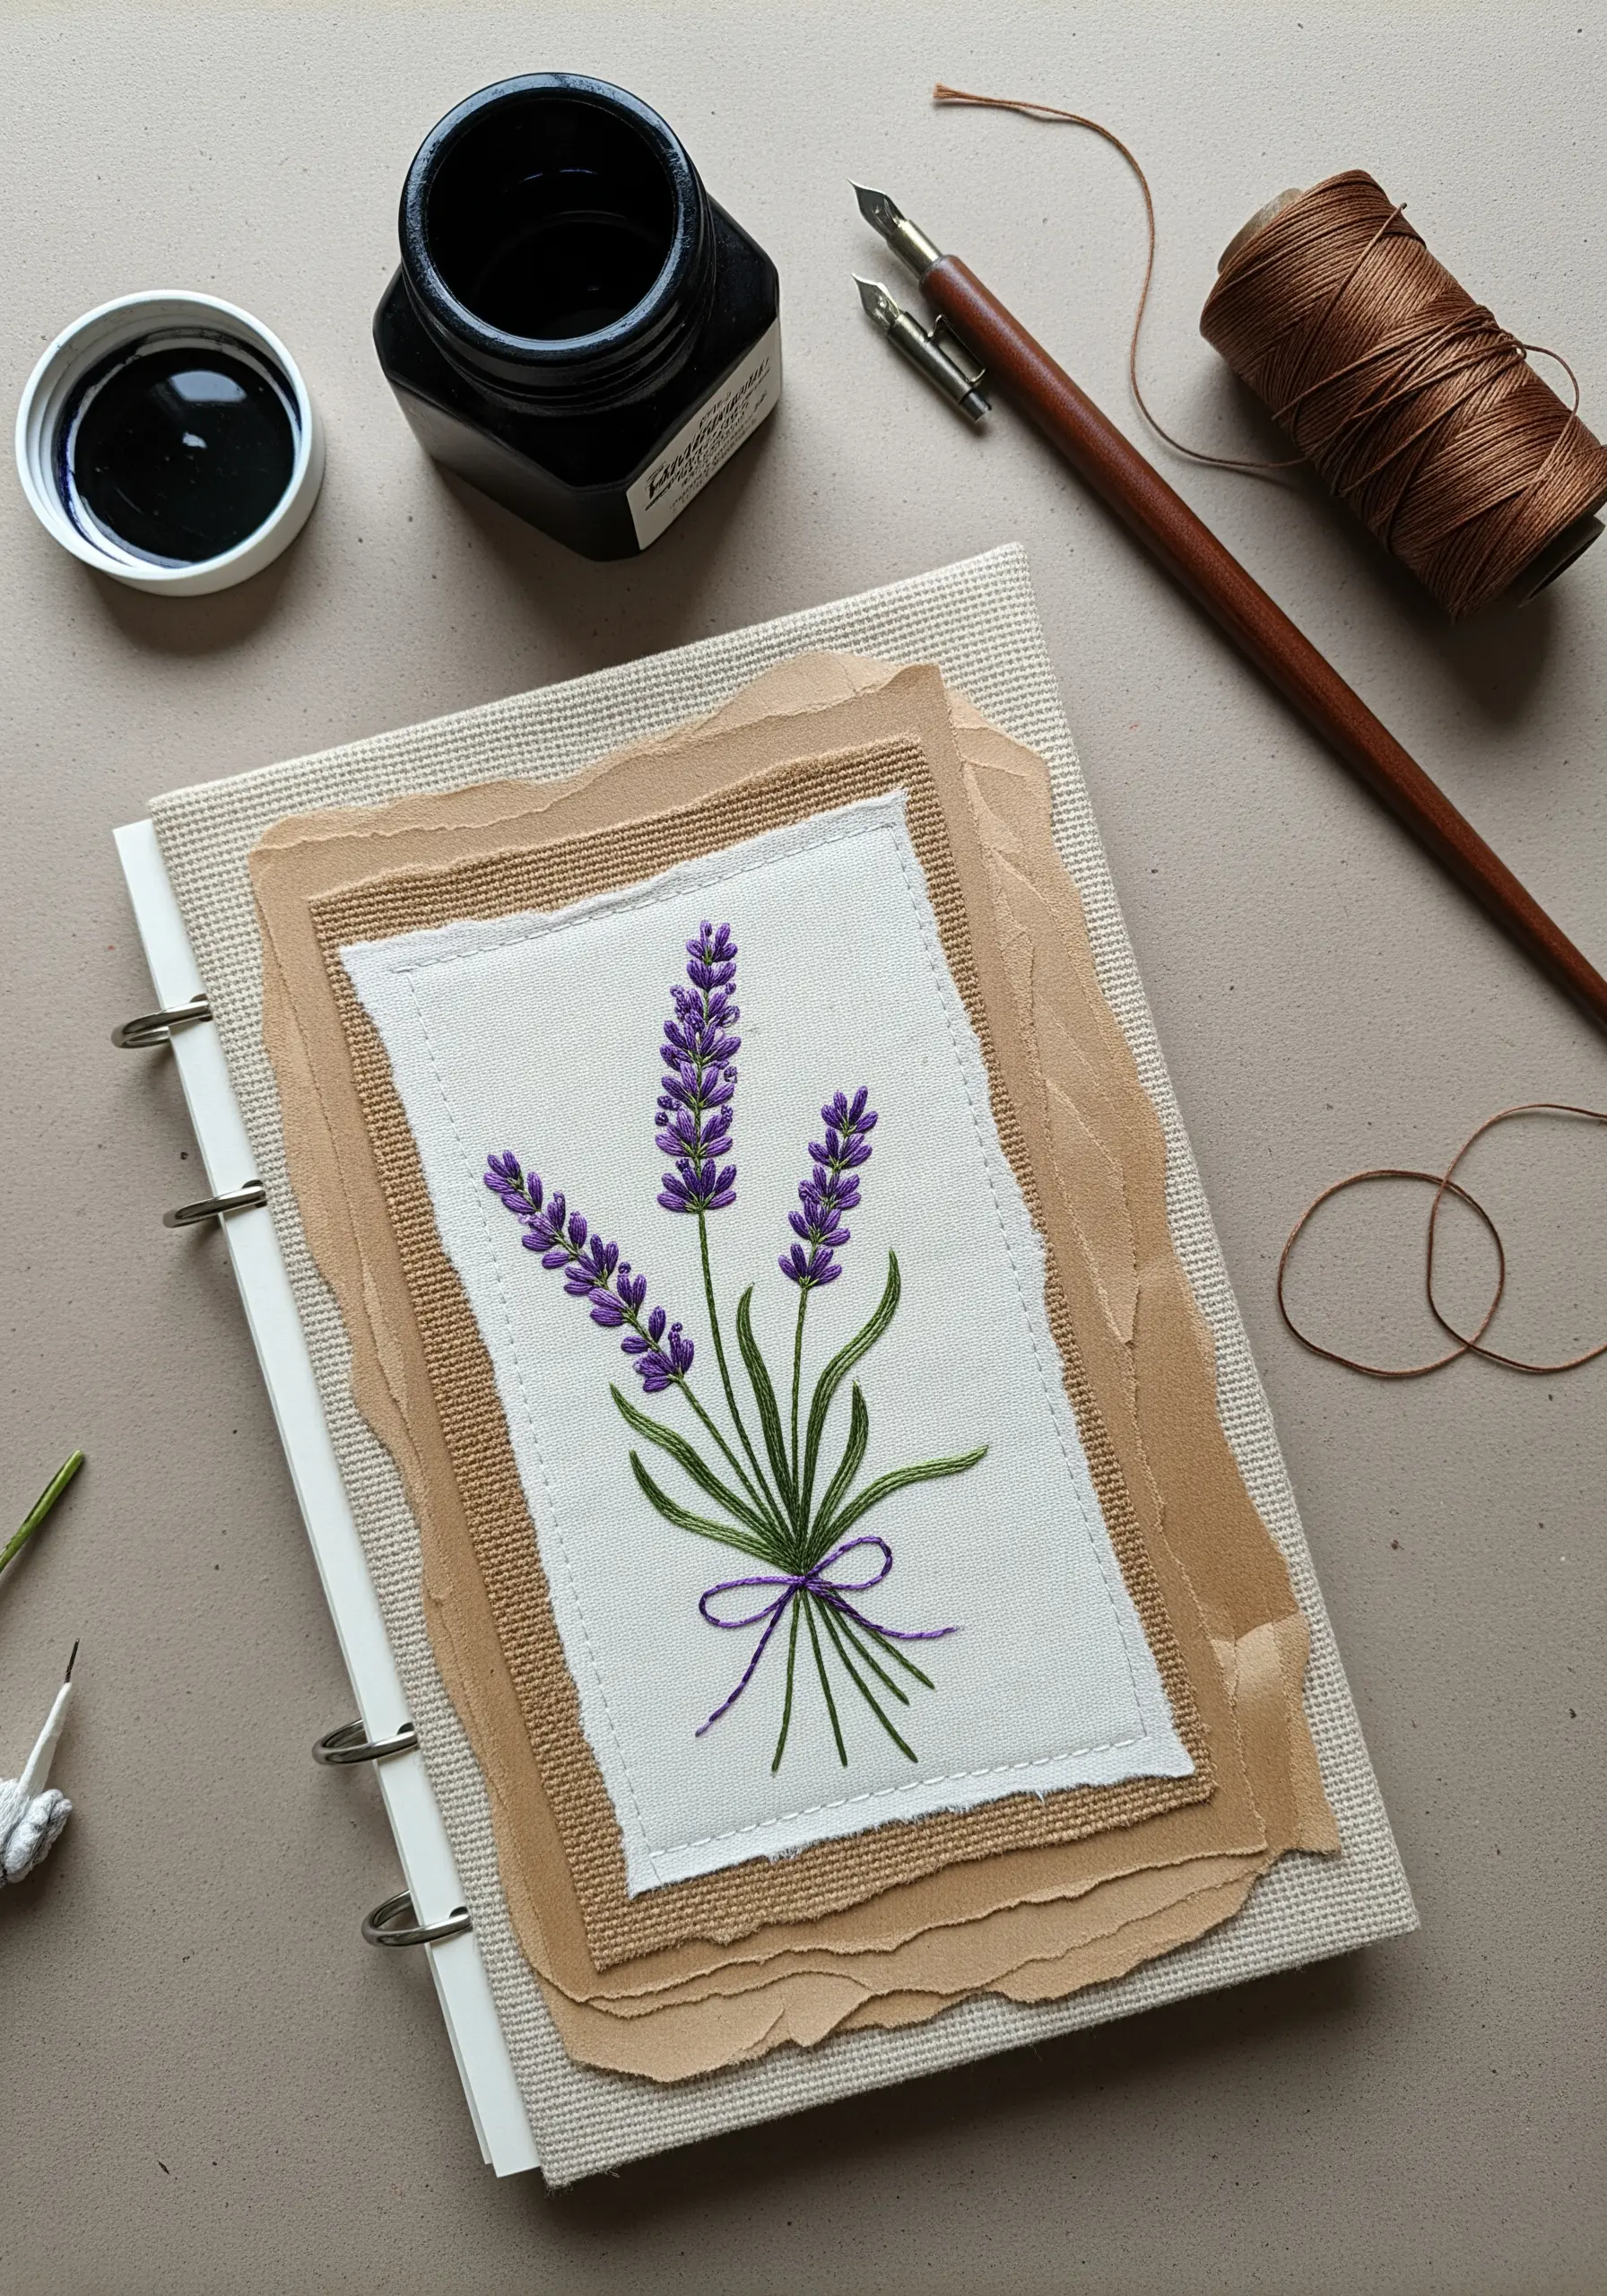
Give your finished embroidery a polished, gallery-ready look without a traditional frame.
After completing your stitching on fabric, carefully cut it out, leaving a small border.
Then, mount the fabric onto layers of heavy, textured paper with torn or deckle edges, using archival glue or a few hidden stitches.
It’s a perfect way to present a classic delicate lavender stitch design, turning it into a finished piece with a soft, organic feel.
22. Stitched Peaks: Adding Detail to Layered Paper Art
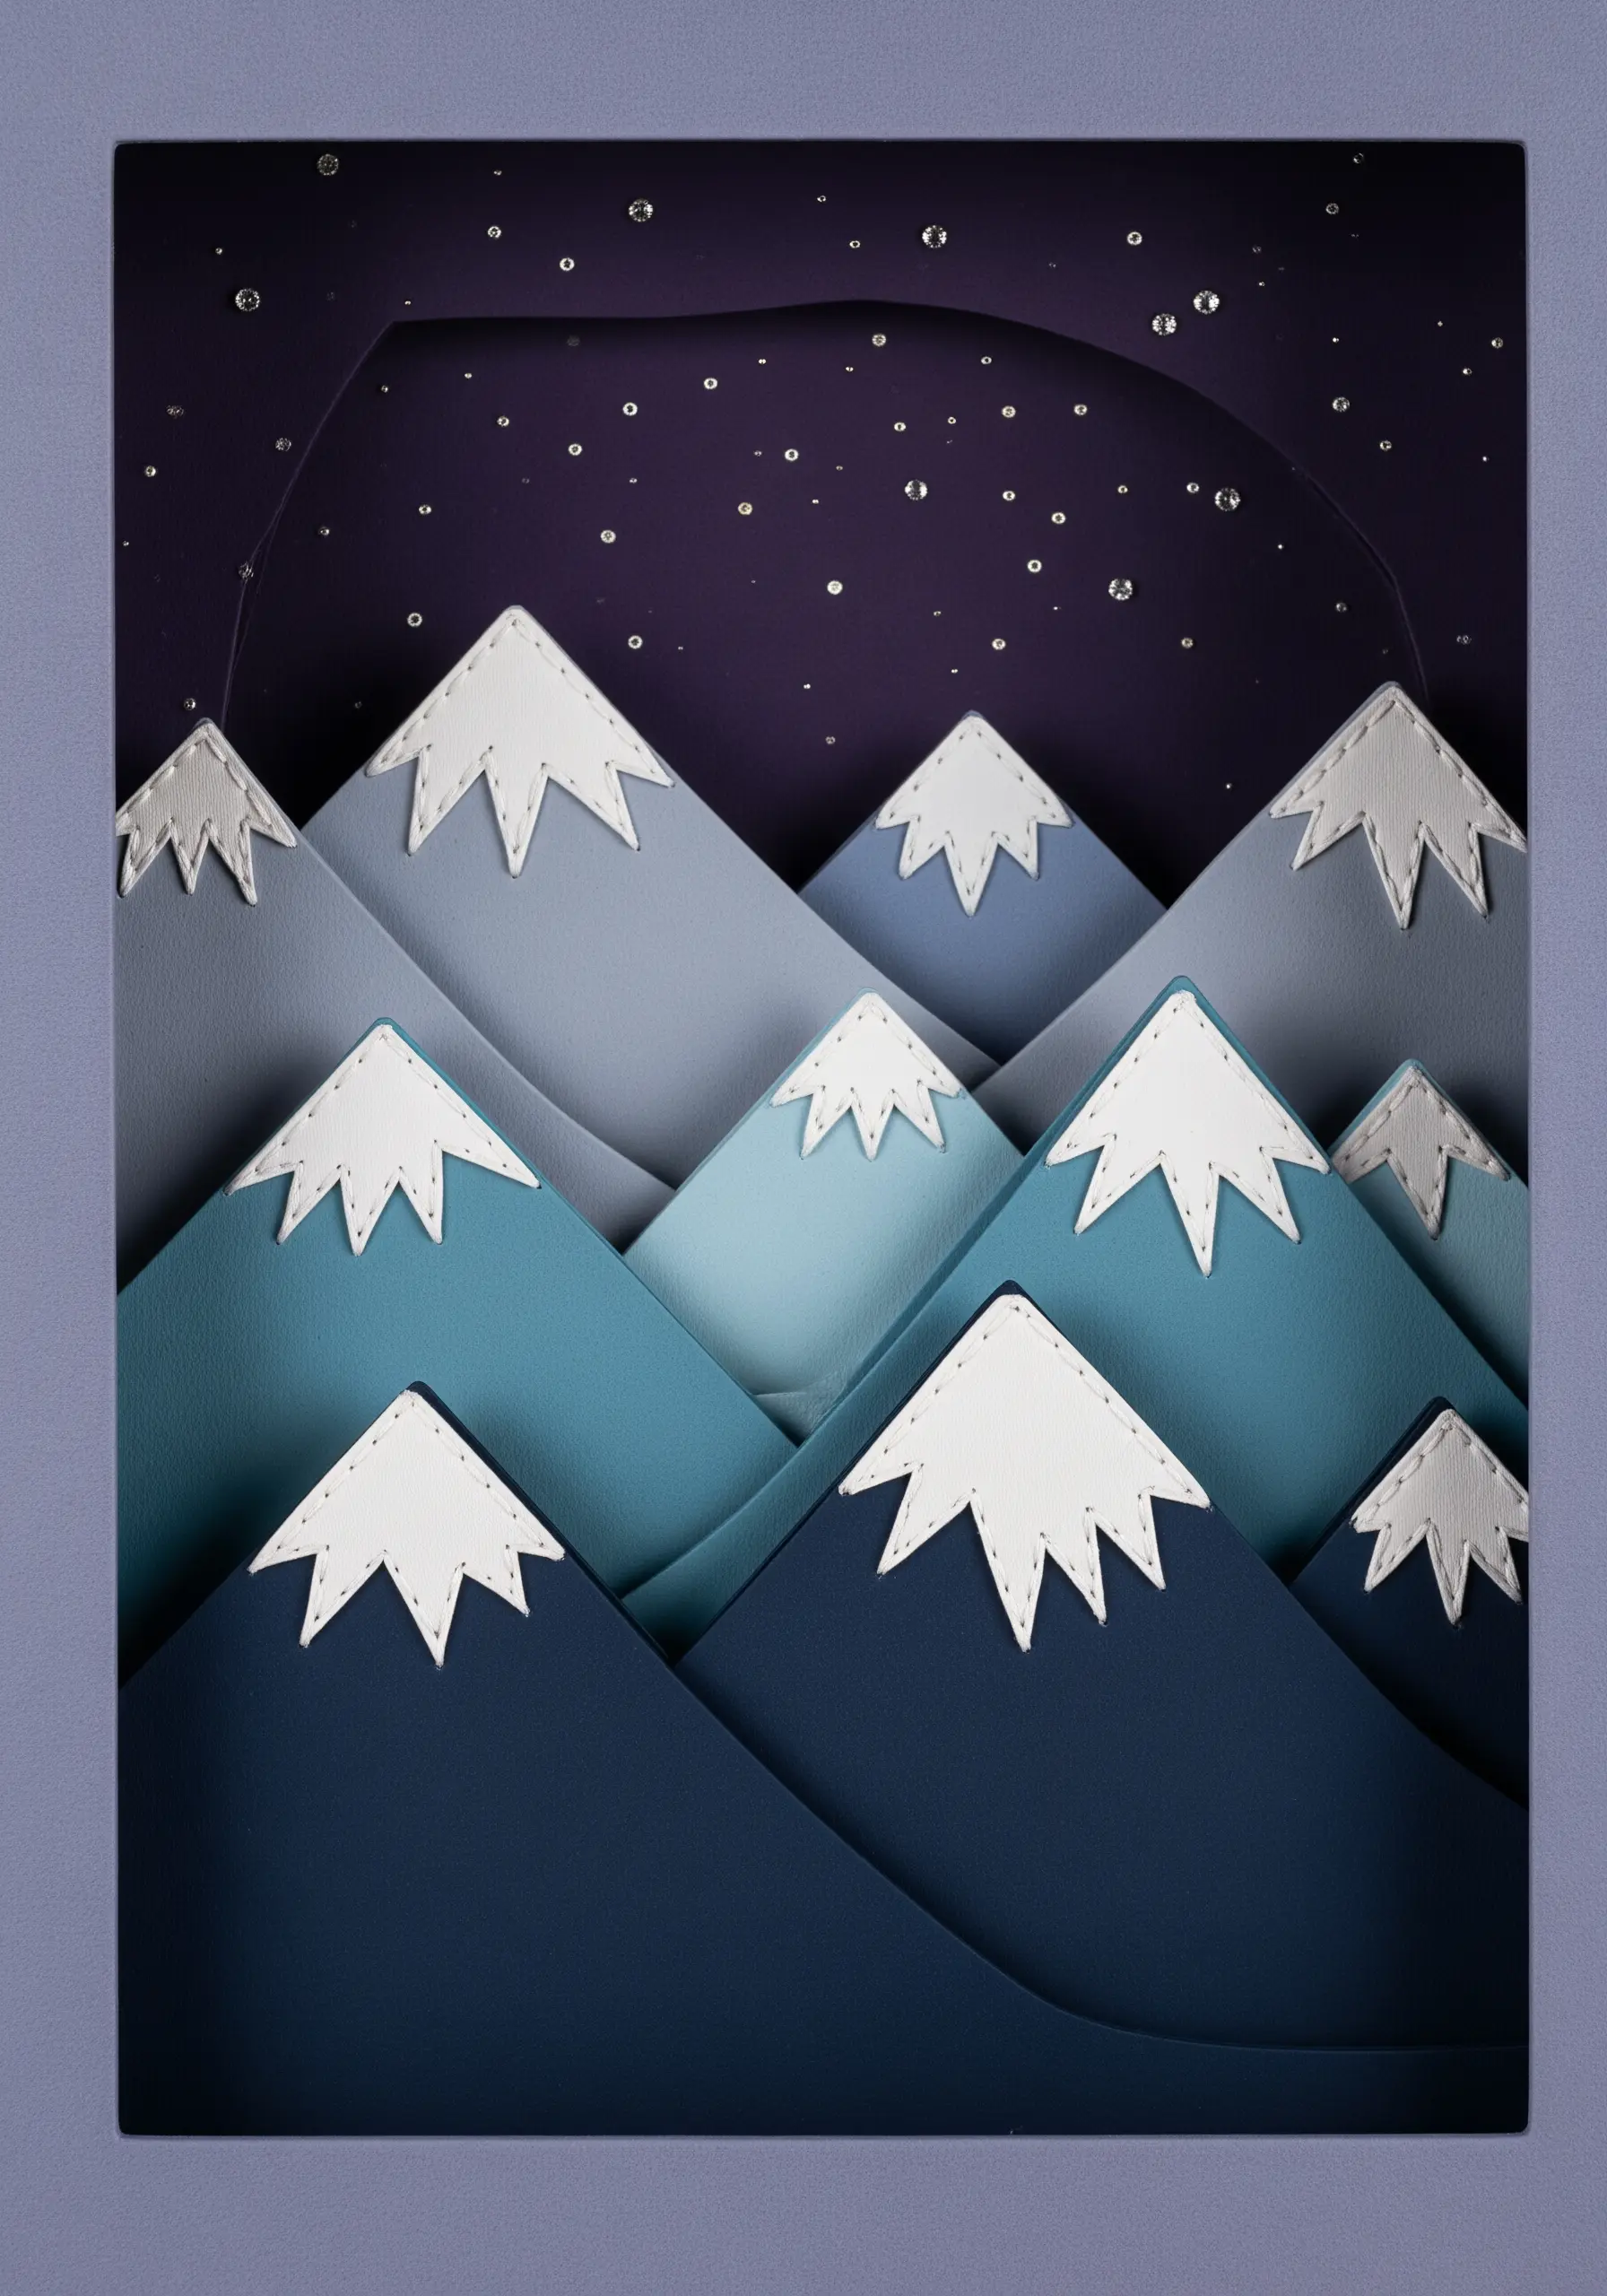
Use thread to add a final, handcrafted detail that unites a layered paper composition.
Create a mountain range by layering different shades of cardstock to build a sense of atmospheric perspective.
For the snow-capped peaks, instead of simply gluing them on, use a simple whip stitch or blanket stitch with white thread to attach them.
This small stitched detail adds a cozy, handcrafted feel to the entire scene, elevating simple layered paper art into something truly special.


