

A handkerchief corner is more than just a small piece of fabric; it’s a miniature canvas waiting for a story. And what better story to tell than one of fleeting beauty, captured in the form of a tiny hummingbird?
Forget simple outlines and basic stitches for a moment. Instead, I want you to think about thread as if it were paint. How can you blend two shades of green on a single wing to suggest movement? How can a single, well-placed French knot become the entire heart of a flower? It’s these thoughtful details that elevate a simple craft into a personal work of art.
In these ideas, you’ll find techniques for adding texture, dimension, and emotion to your work. Whether you’re a beginner looking to master a new stitch or an experienced artist seeking fresh inspiration, you have everything you need to create something not just beautiful, but memorable. Let’s begin.
1. Render Feathers with Photorealistic Detail
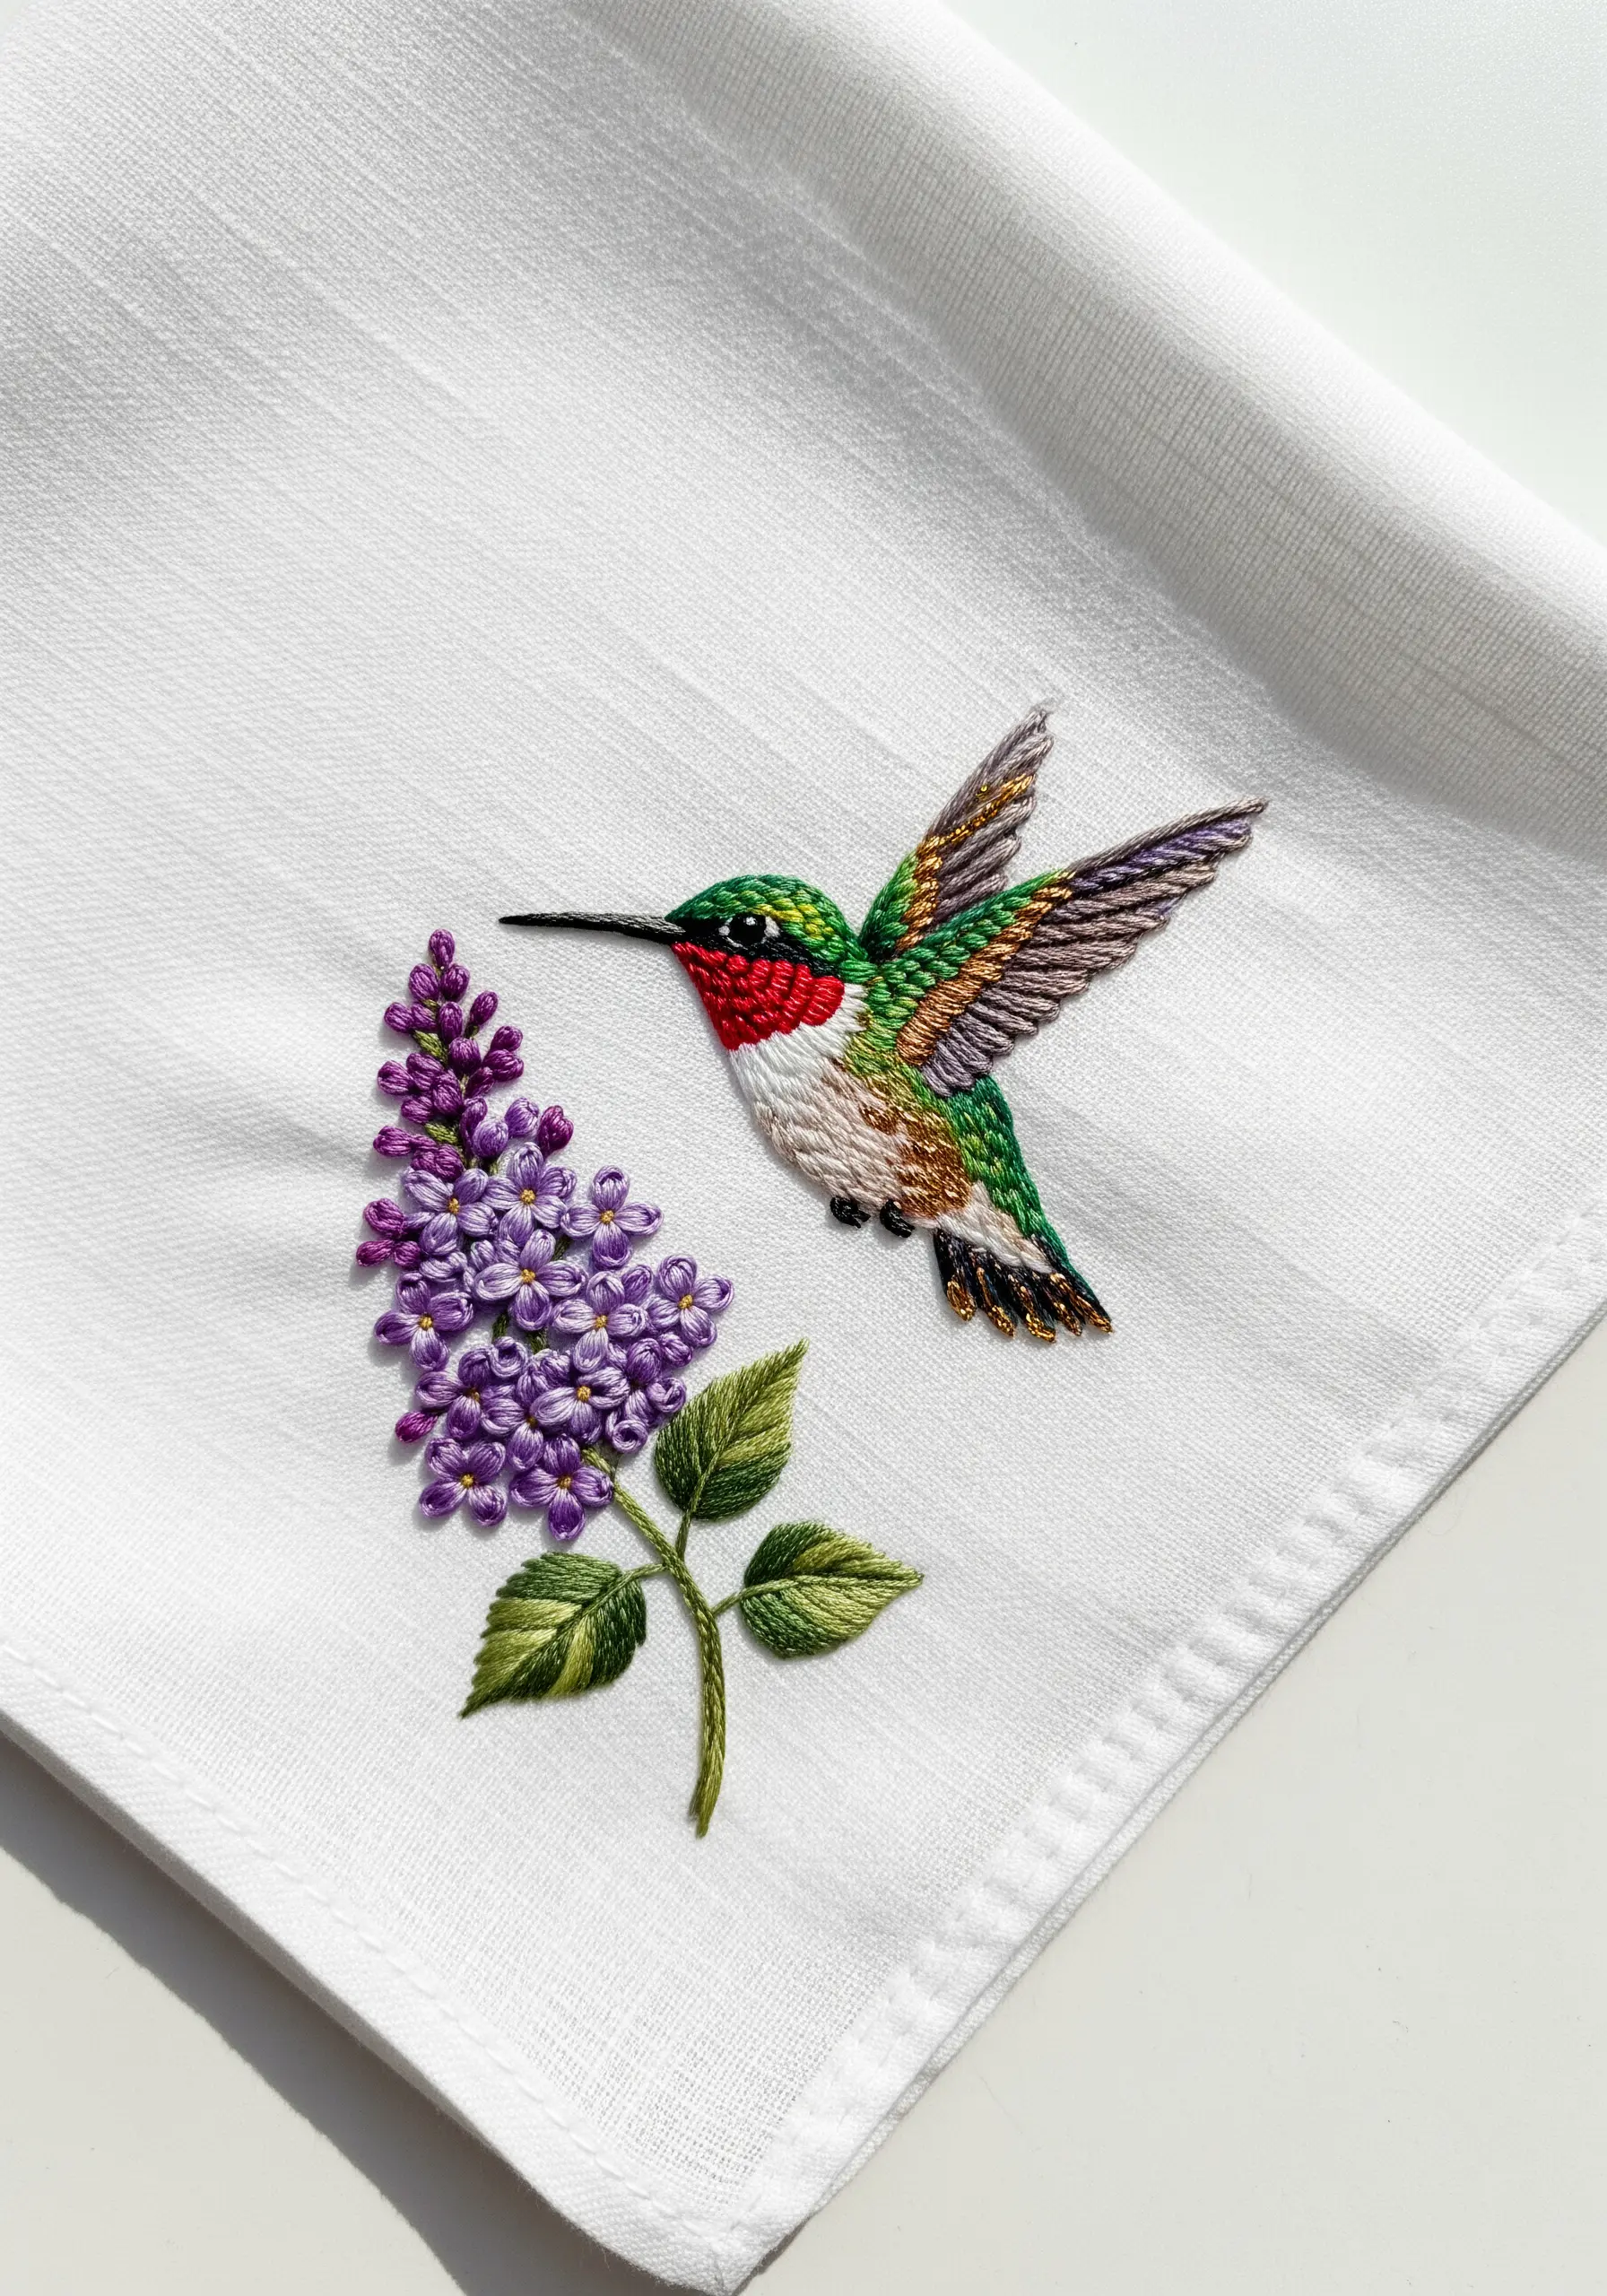
Use a single strand of six-strand floss to achieve the delicate texture of thread painting.
For the hummingbird’s iridescent throat and back, lay your long-and-short stitches at a slight angle, blending shades of green, gold, and a touch of metallic bronze to mimic light hitting the feathers.
Contrast the smooth bird with textured lilac blossoms created from clusters of French knots in shades of lavender and violet.
This contrast in texture—smooth feathers versus bumpy florals—is what gives the composition life and depth.
2. Create Volumetric Florals with Directional Satin Stitch

Give fuchsia blossoms their signature bell shape by angling your satin stitches to follow the curve of the petals.
Start stitching from the outer edge and work toward the center, slightly overlapping each stitch to create a seamless, rounded effect.
For the bird’s wings, blend magenta into purple using long-and-short stitch to create a soft, ethereal gradient that contrasts with the crisper floral form.
Use a single, long straight stitch for each stamen, ending with a tiny French knot to suggest pollen.
3. Design a Geometric Stained-Glass Effect
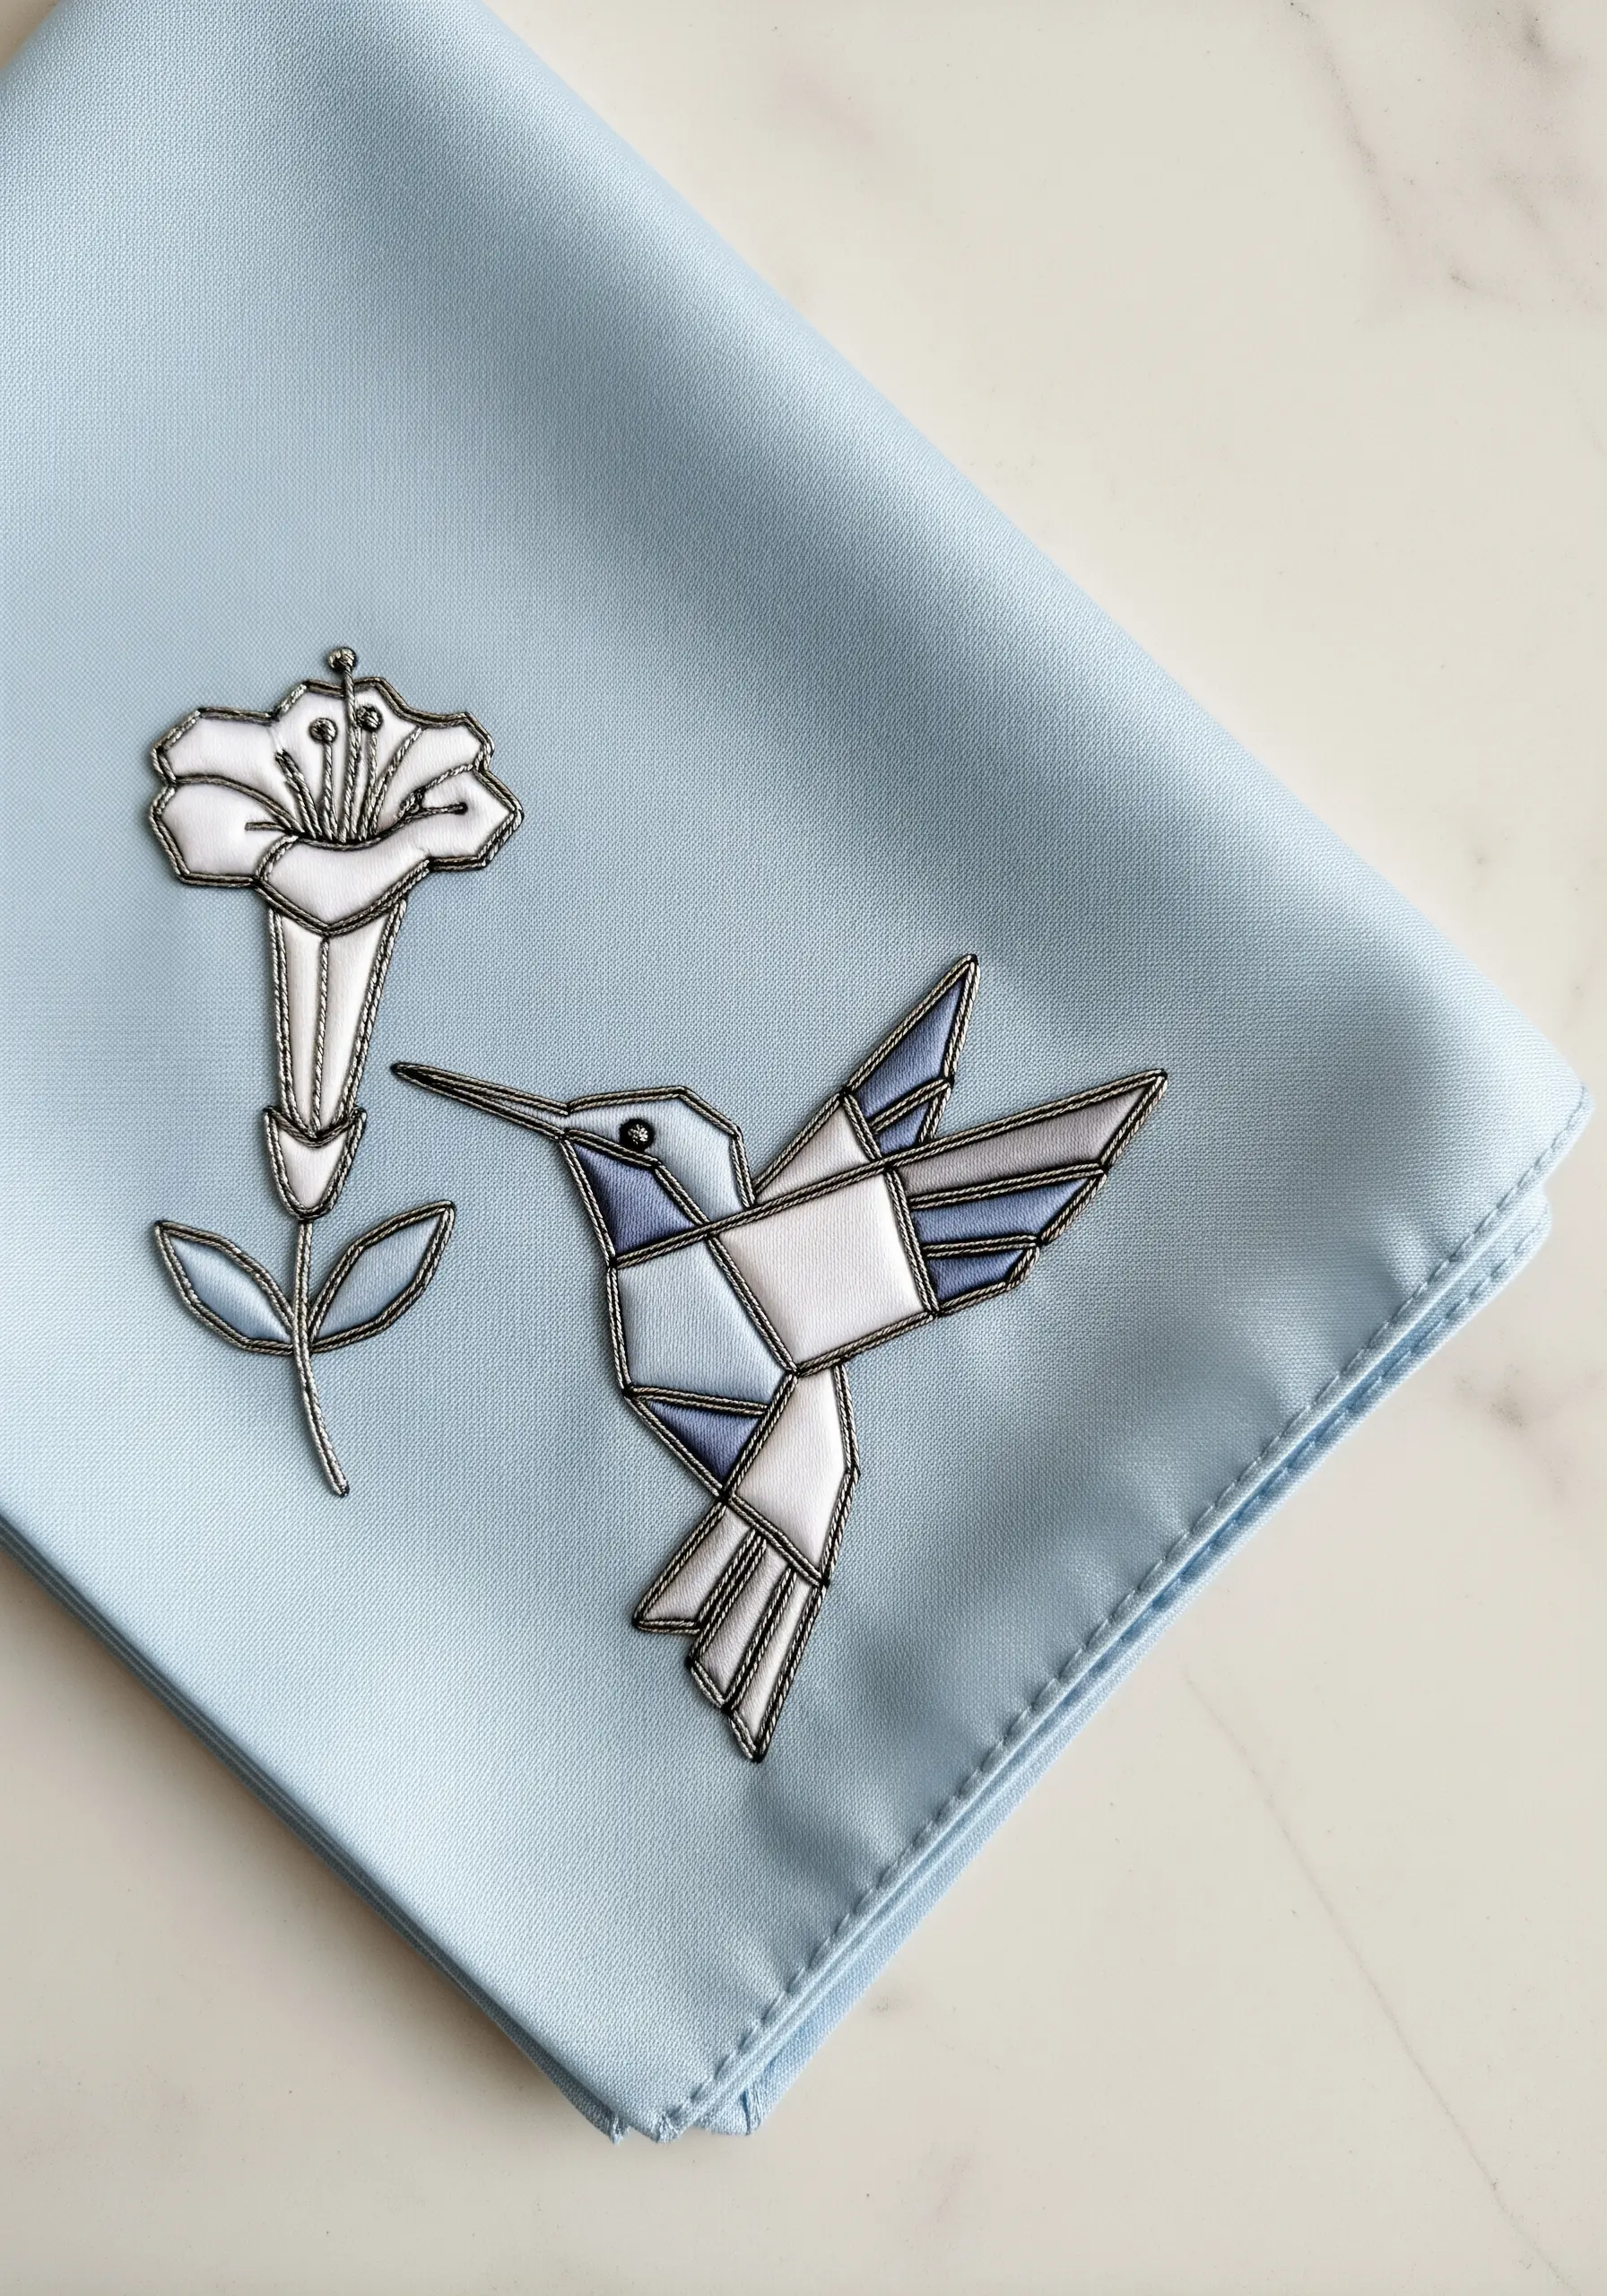
Create a modern, graphic look by outlining your hummingbird and flower in a heavy, dark thread like a fine silver metallic cord or a 3-ply black floss.
Use a couching stitch to secure the metallic outline, which gives it a raised, defined edge similar to lead in stained glass.
Fill each geometric segment with perfectly smooth satin stitches, paying close attention to the direction of your thread to create facets that catch the light differently.
Using shades of the same color within the segments adds depth without complicating the clean aesthetic.
4. Introduce 3D Stumpwork for Dynamic Wings

Elevate your embroidery by adding three-dimensional elements that lift off the fabric.
To create detached wings, stitch your design onto a piece of organza stretched in a separate hoop, outline the shape with a fine wire, and finish with a buttonhole stitch over the wire.
Cut out the wing and attach it to the bird’s body with a few small, anchoring stitches.
This stumpwork technique adds realistic movement and delicate transparency that flat stitching cannot replicate.
5. Frame Your Scene with a Decorative Edge
Unify your composition by adding a decorative border that echoes the colors within your embroidery.
A simple blanket stitch or a decorative hemstitch along the handkerchief’s edge in a complementary green ties the entire piece together.
For the tiny forget-me-nots, use a lazy daisy stitch for the petals and a single yellow French knot for the center, keeping them simple to balance the detailed hummingbird.
This approach transforms a simple motif into a finished, heirloom-quality piece.
6. Incorporate Beads for Playful Texture
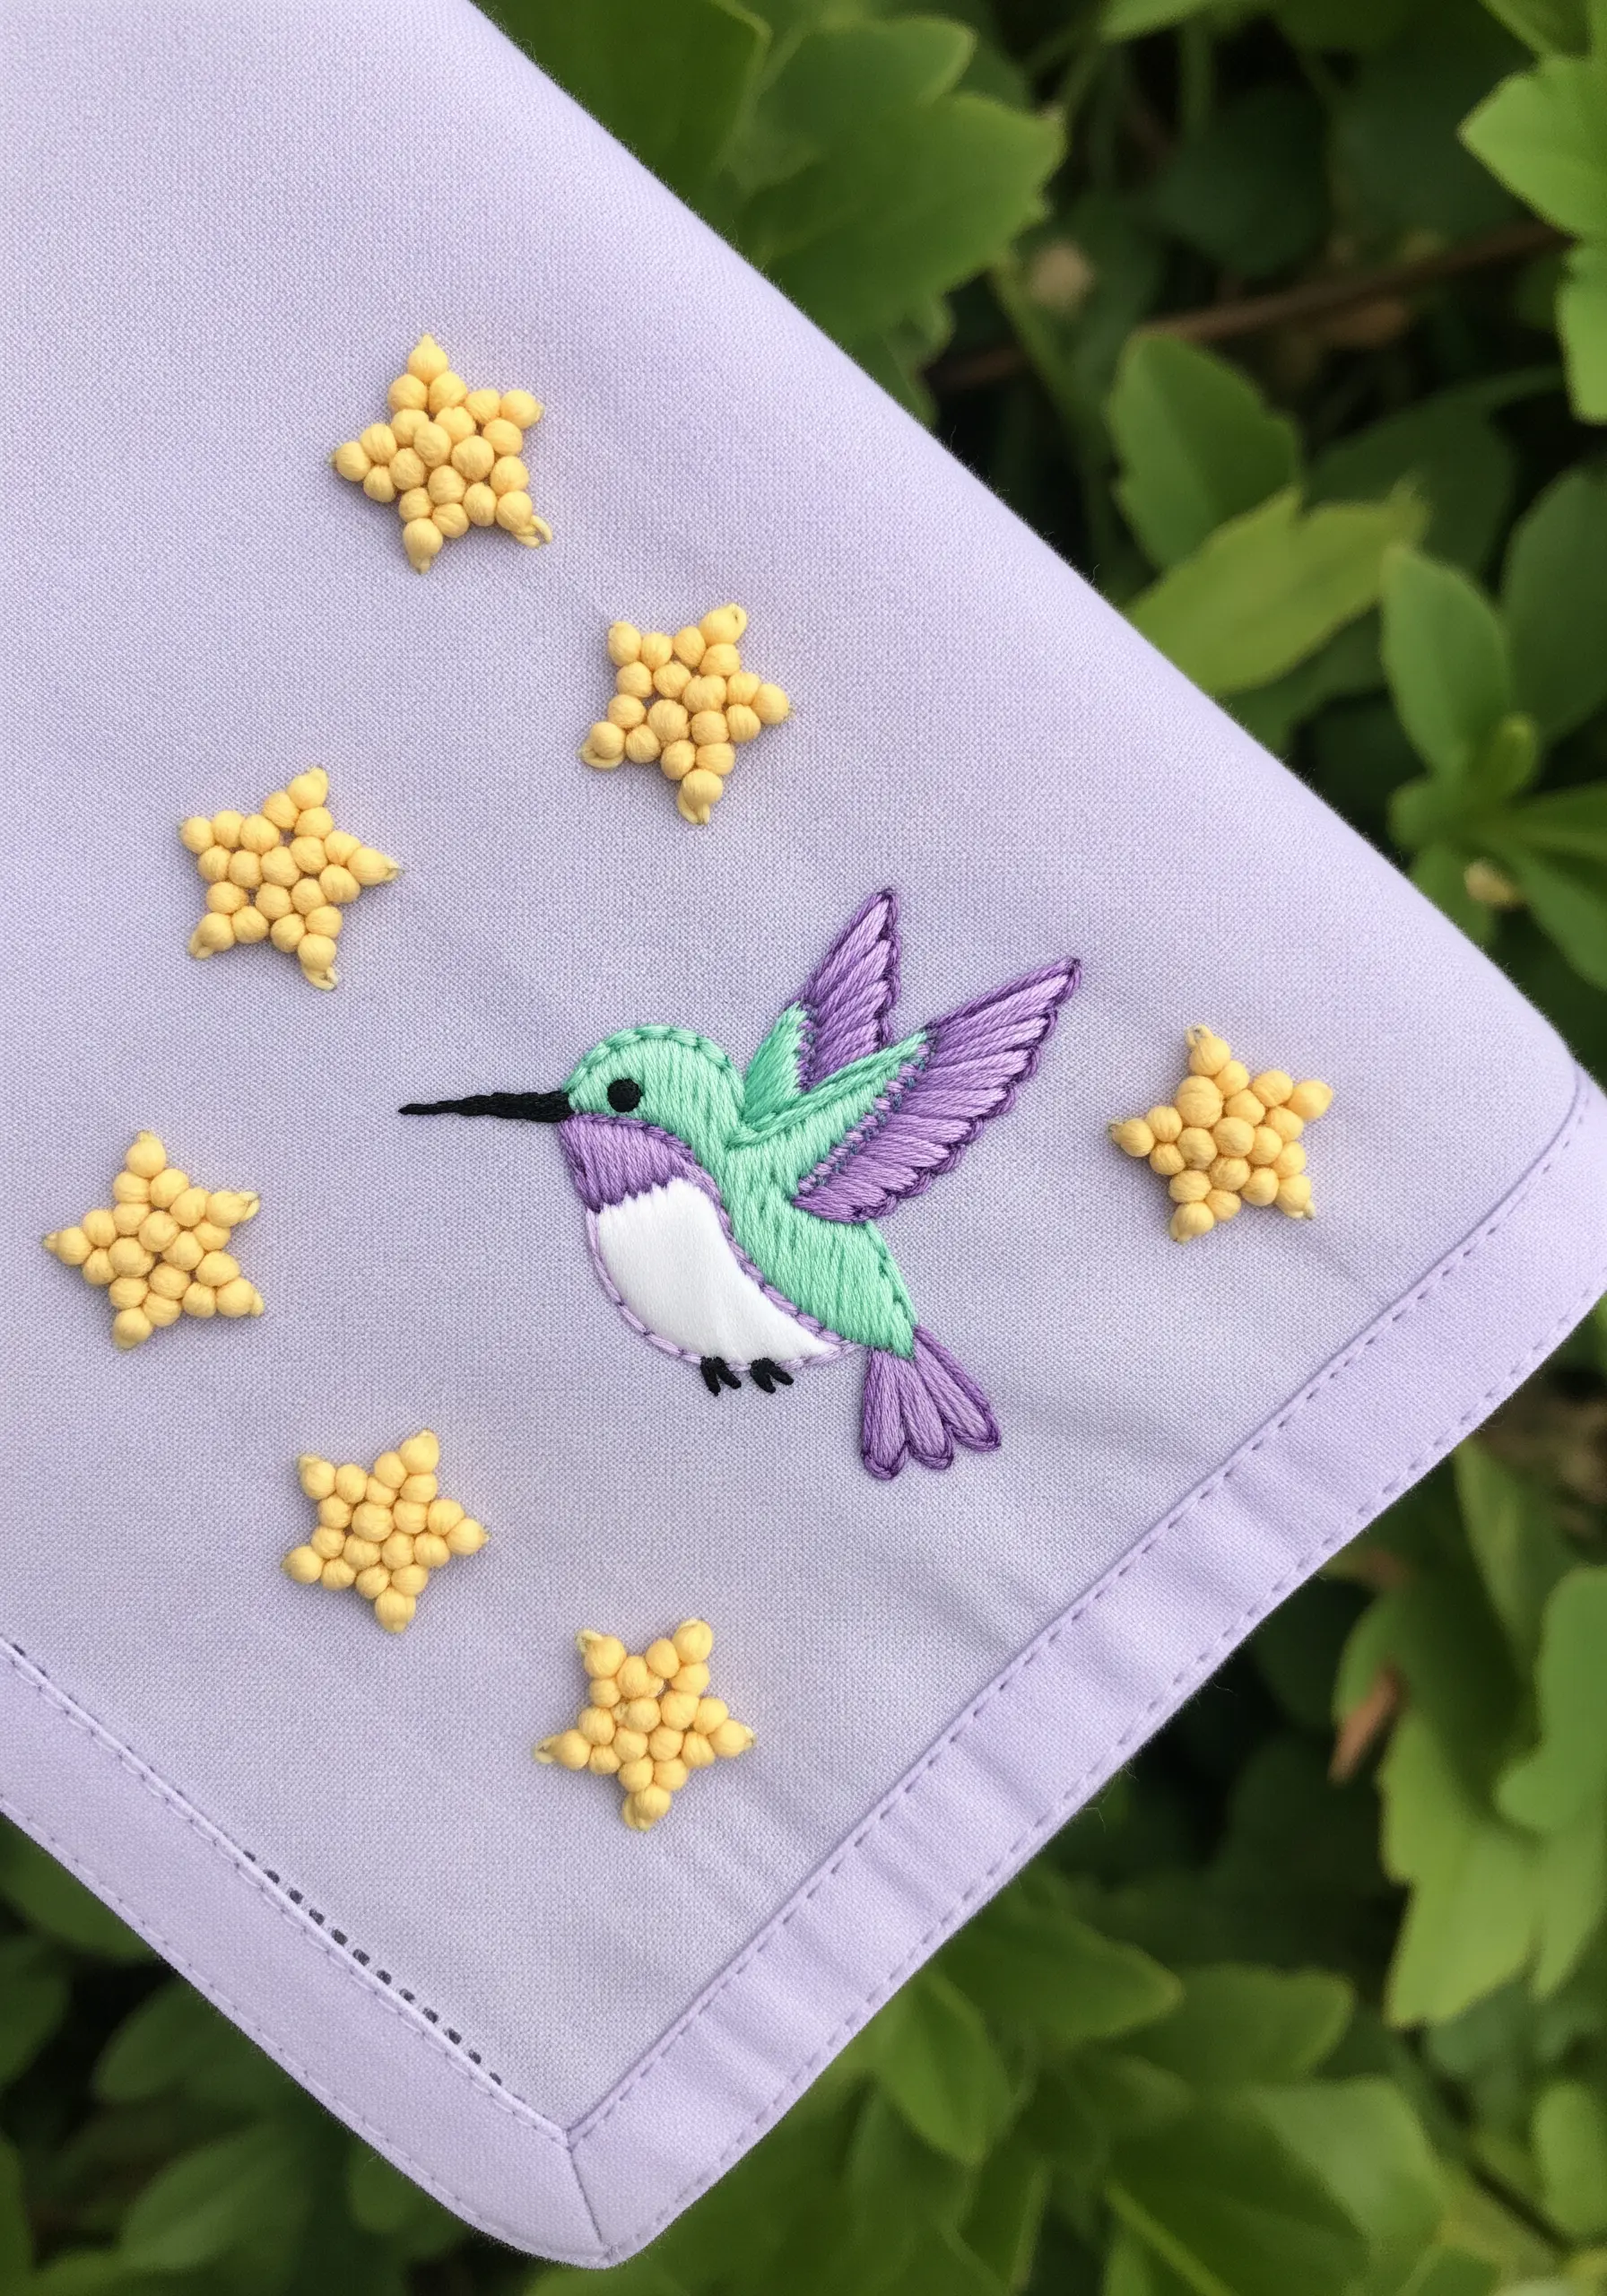
Combine smooth satin stitch with the tactile quality of beads for a whimsical effect.
After stitching the hummingbird, add dimension by filling in the star shapes with tiny seed beads.
To ensure they are secure, stitch each bead down individually or use a backstitch, passing through two beads at a time.
The contrast between the soft floss and the hard, reflective beads adds a surprising and delightful texture to the otherwise flat surface.
7. Use Dark Fabric for Dramatic Contrast
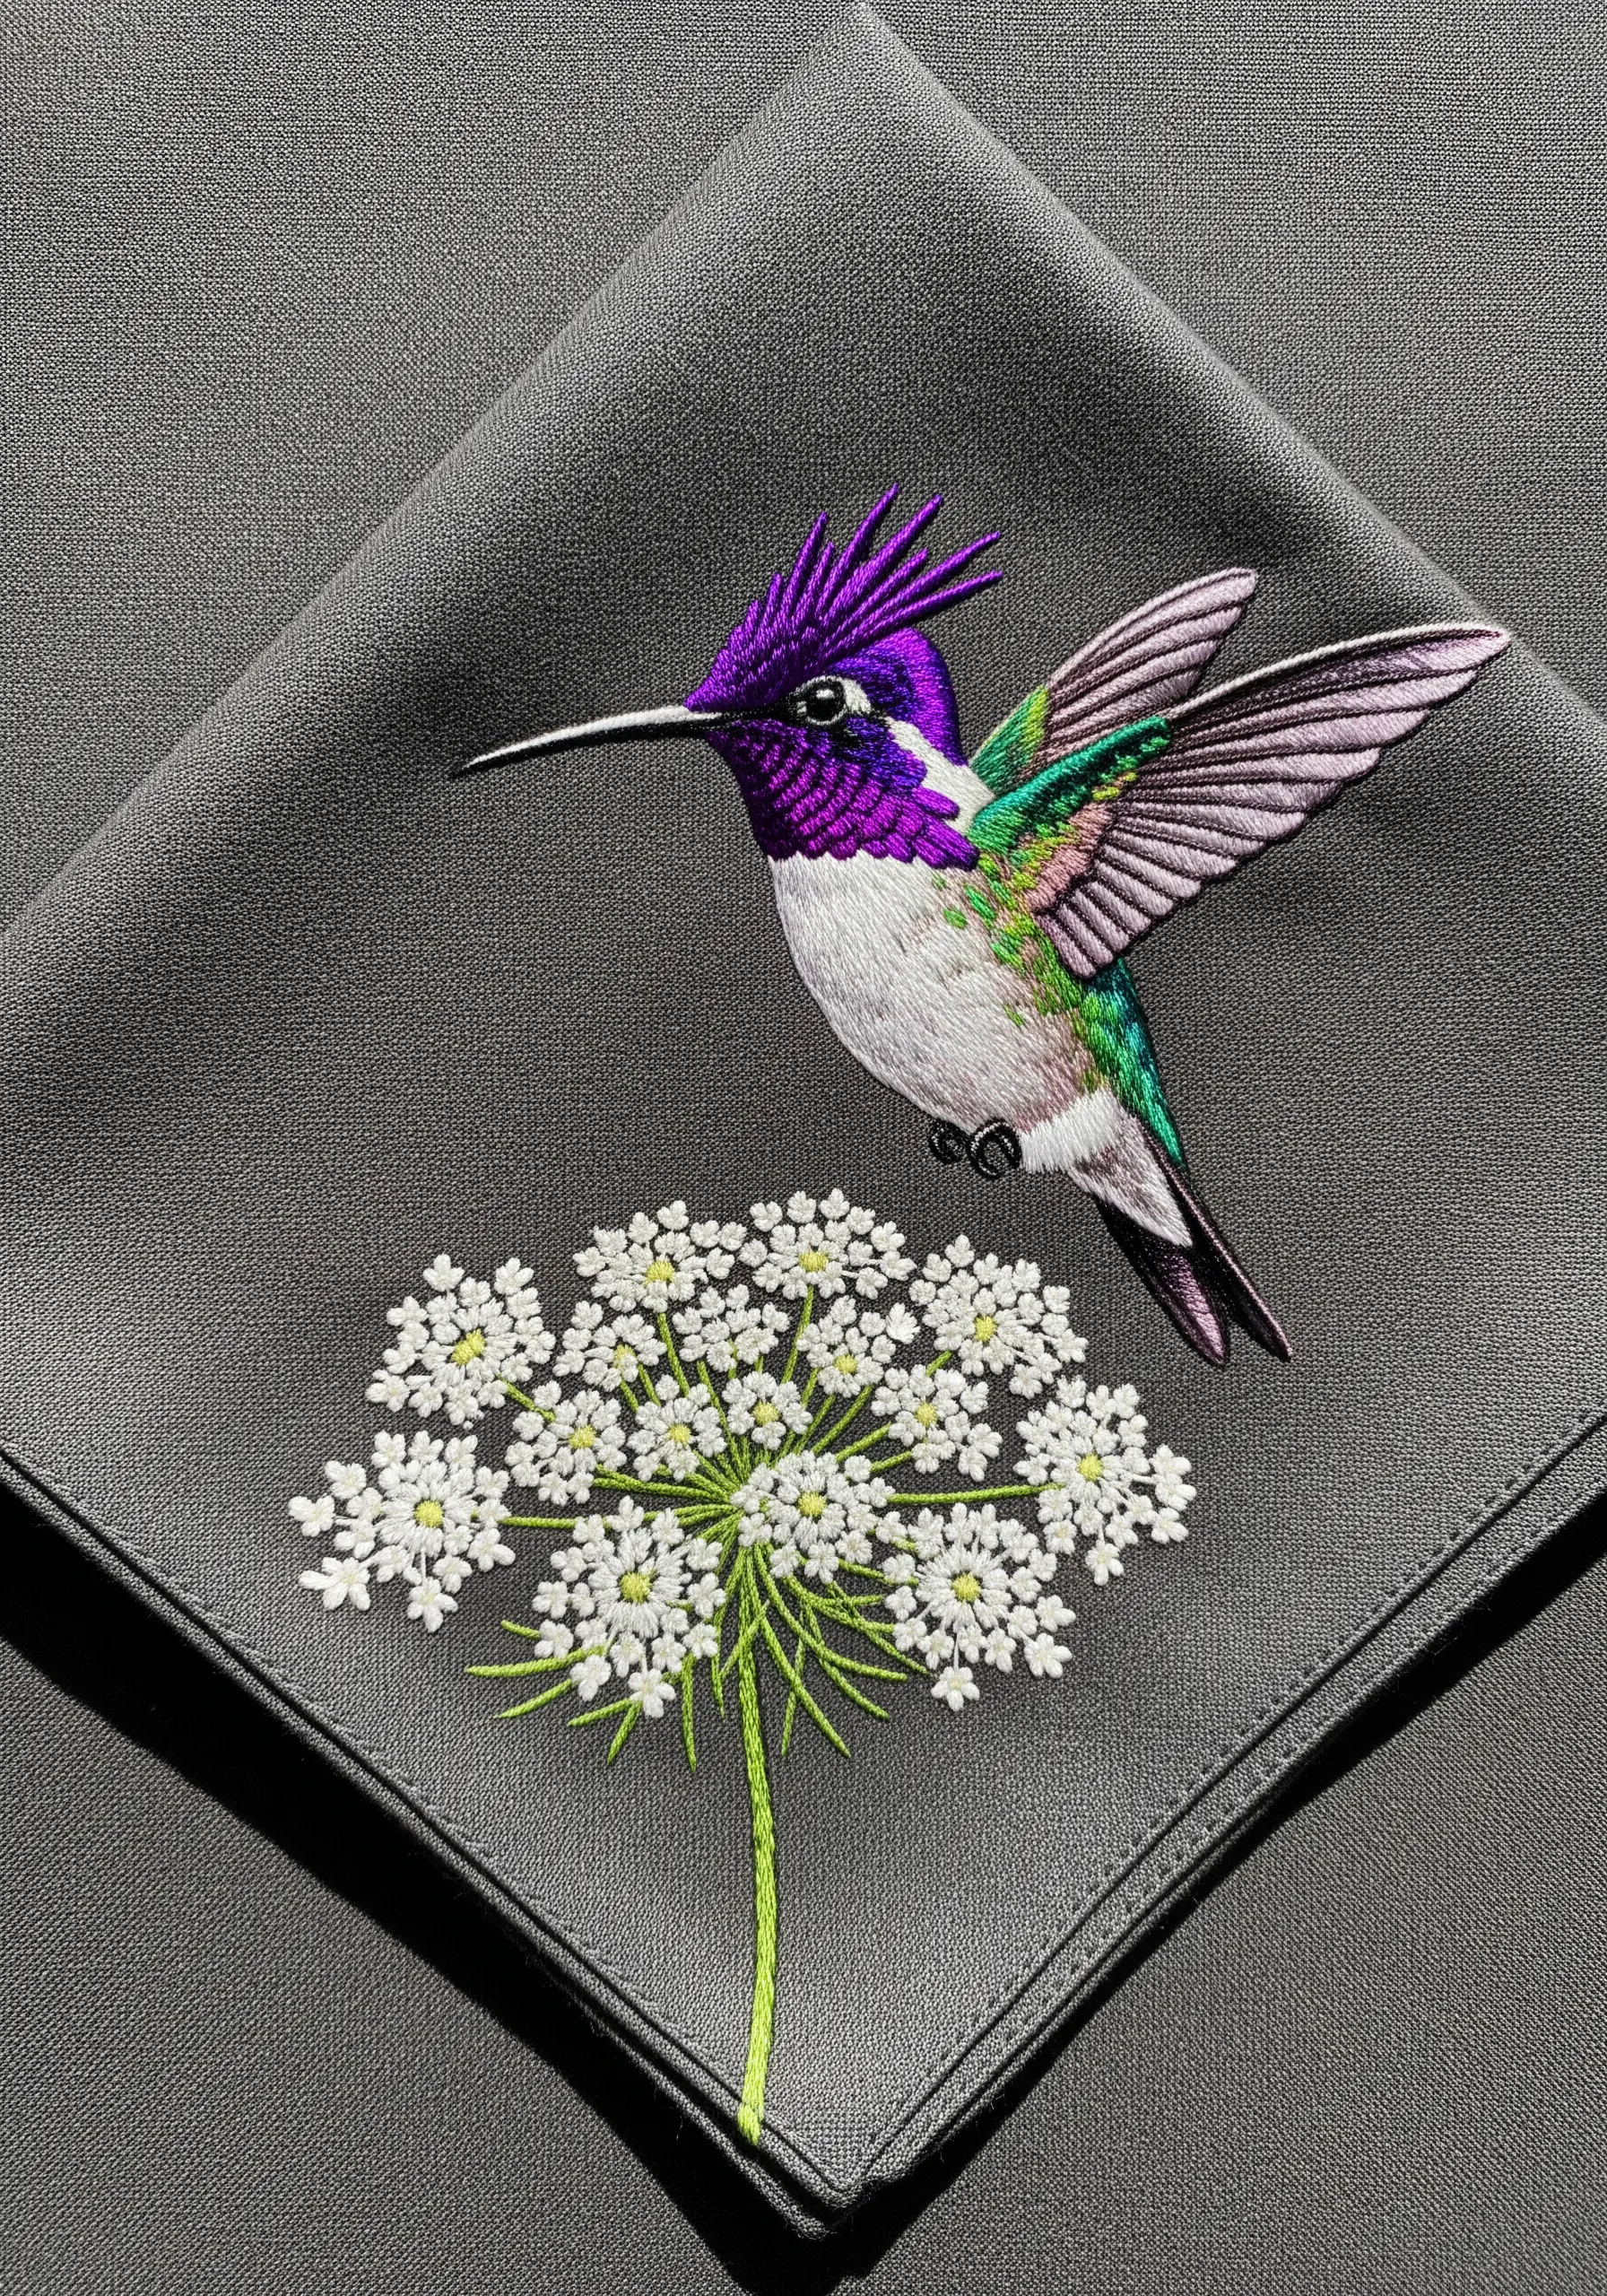
Make your colors appear more vibrant by choosing a dark background fabric like charcoal gray or navy blue.
The deep background makes the bright purples, greens, and whites of the hummingbird pop, creating a dramatic, high-contrast effect.
For the delicate Queen Anne’s Lace, use tiny, scattered French knots in white and off-white to create the airy flower head, allowing the dark fabric to show through and create depth.
This technique is especially effective for highlighting intricate details and jewel-toned threads.
8. Master the Minimalist Silhouette
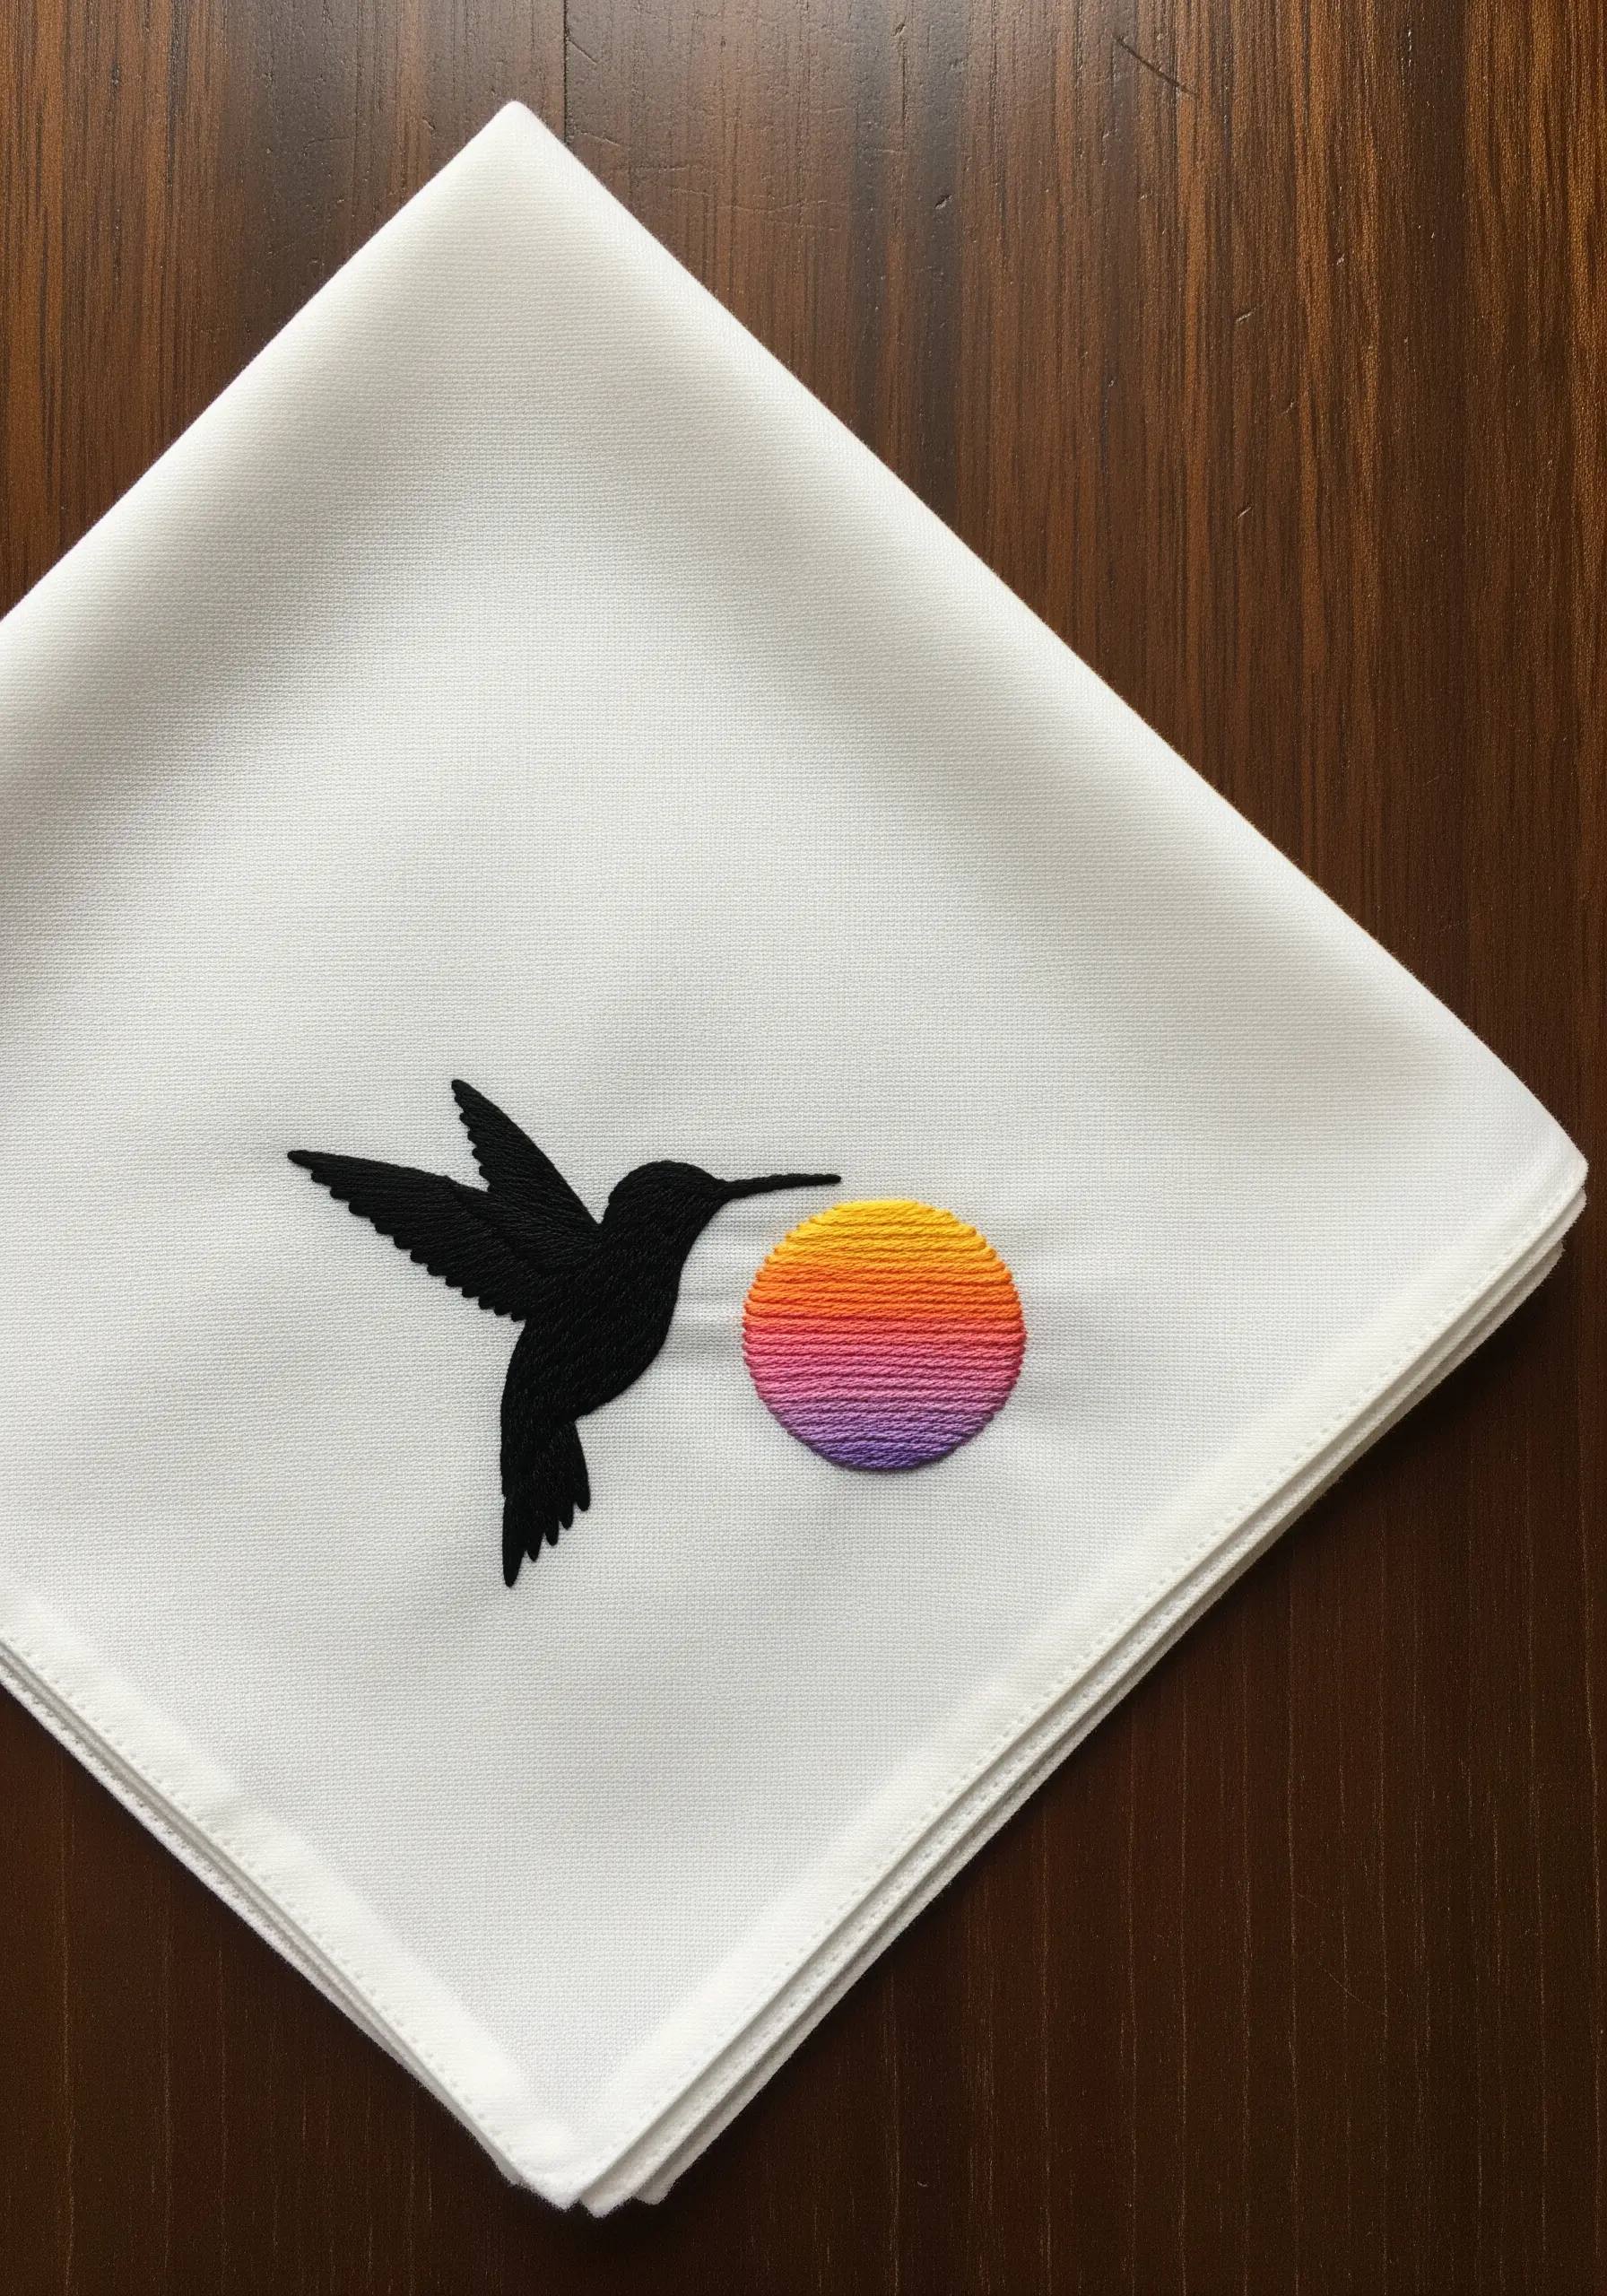
Create a powerful statement with a simple, solid silhouette.
First, outline the bird’s shape with a precise split stitch to create a stable edge for your fill stitches.
Then, fill the shape entirely with a dense black satin stitch, ensuring all your stitches lie in the same direction for a smooth, uniform finish.
The sharp contrast between the solid black bird and the contemporary rainbow blend of the sun creates a modern, graphic composition that is both simple and striking.
9. Emphasize Texture on Natural Linen
Let the fabric become part of the design by stitching on a textured material like linen or a cotton-linen blend.
The natural weave of the fabric adds a rustic, organic quality that complements nature-inspired subjects.
When working on textured fabric, use a slightly thicker thread or more strands of floss (3 instead of 2) to ensure your stitches have presence and don’t get lost in the weave.
The vibrant, jewel-toned threads of the bird stand out beautifully against the neutral, earthy backdrop.
10. Convey Delicacy with Open Line Work
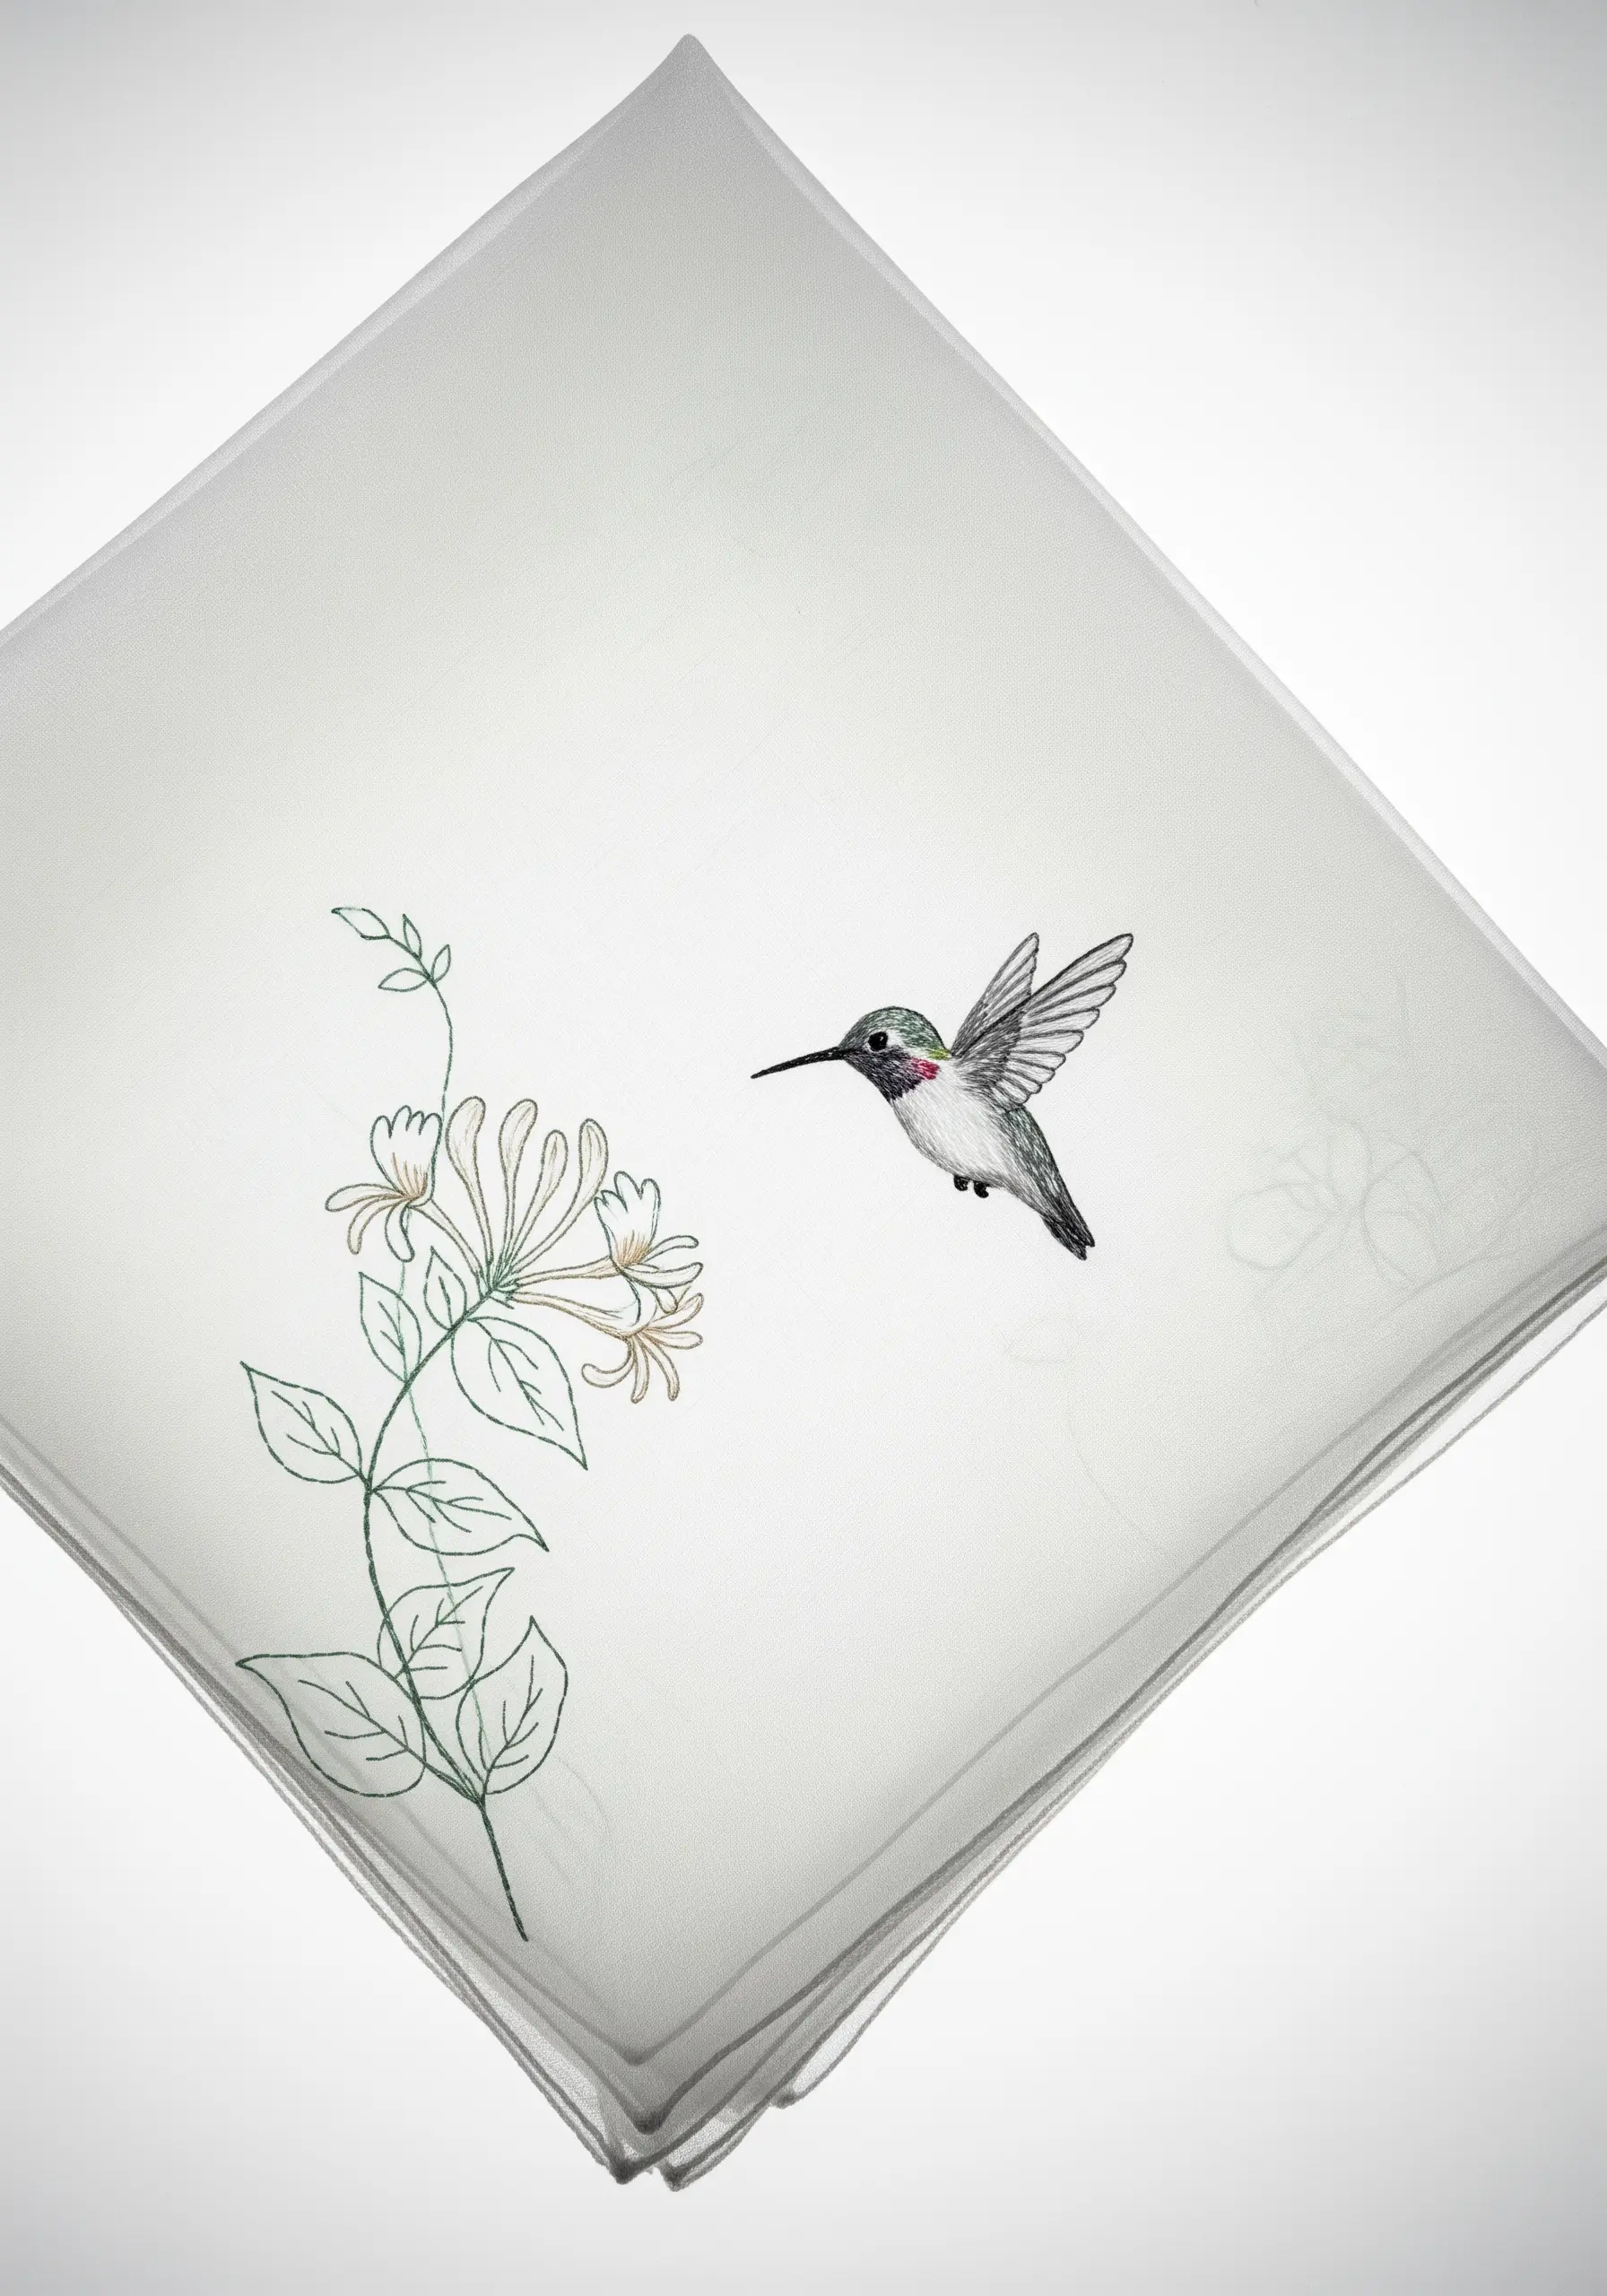
Suggest form rather than filling it completely for an ethereal, delicate effect.
Use a fine, single strand of thread and a simple backstitch or stem stitch to create the outlines of the honeysuckle vine.
Reserve your detailed thread painting for the hummingbird alone, making it the undeniable focal point of the composition.
This technique creates a sense of lightness and negative space, allowing the piece to feel airy and uncluttered.
11. Create a Frame with a Floral Wreath
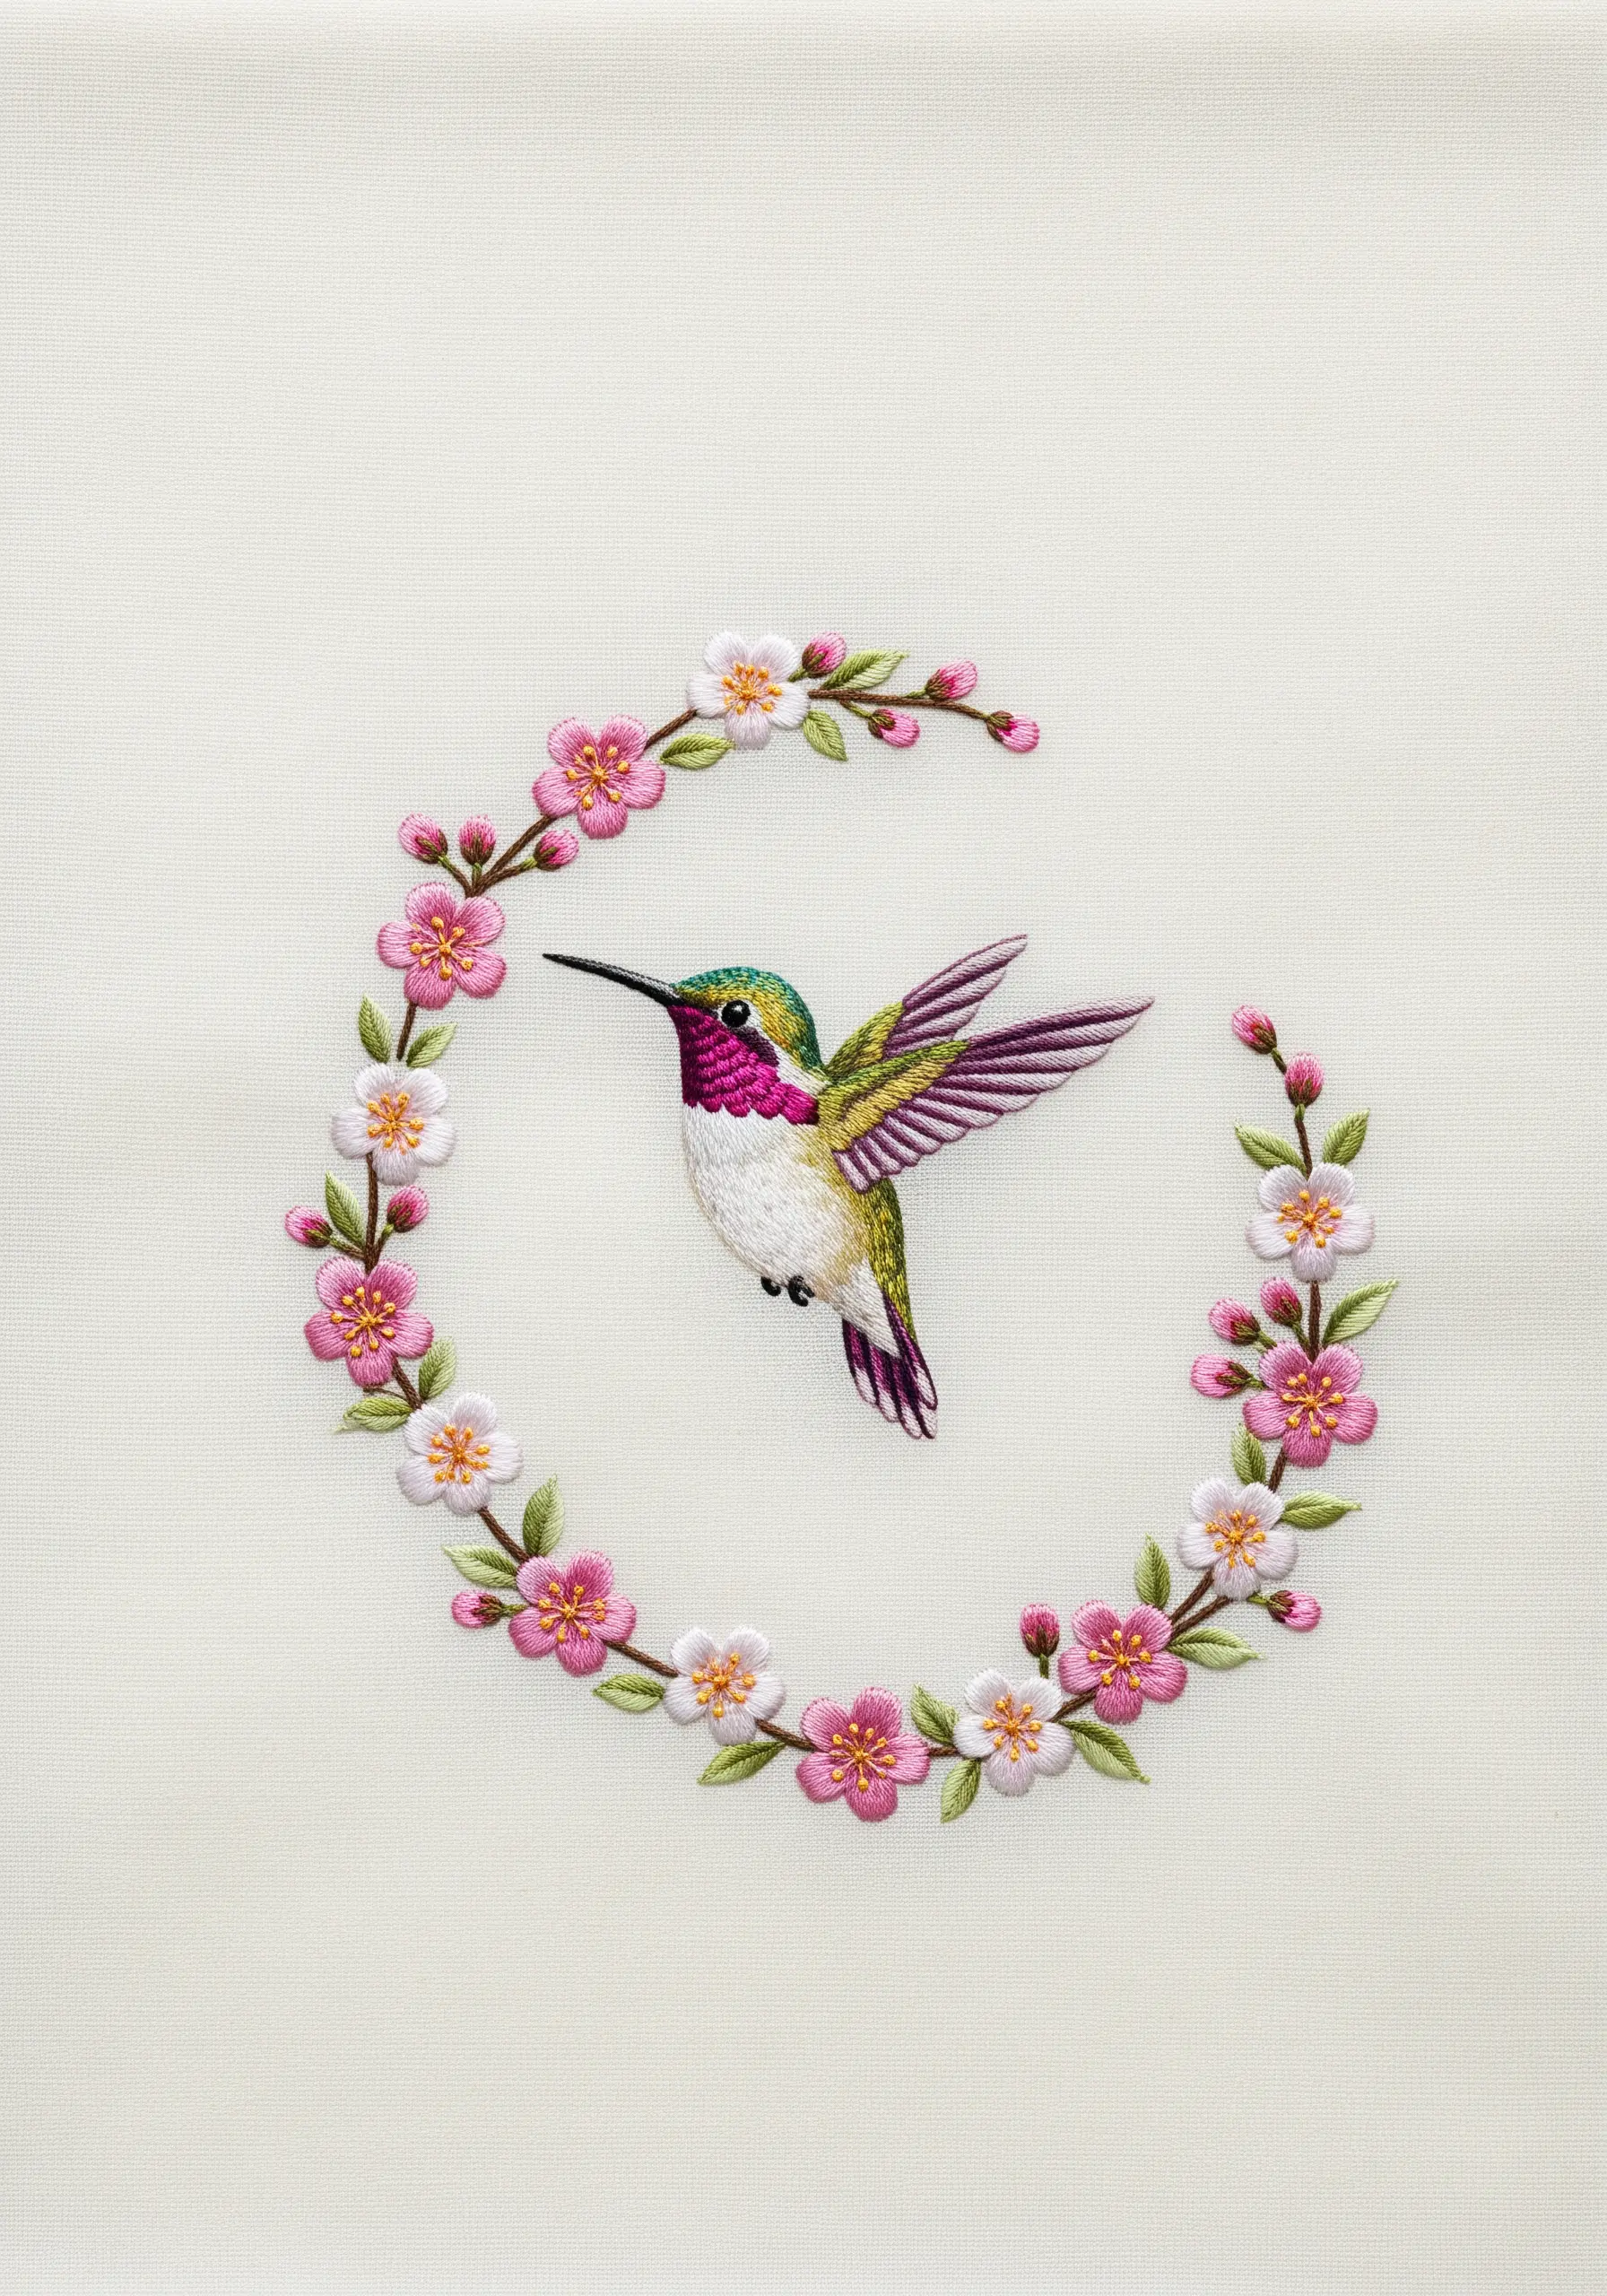
Guide the viewer’s eye and create a contained composition by encircling your subject with a delicate floral wreath.
Stitch a simple branch using a stem stitch, then add blossoms using satin stitch for petals and French knots for the centers.
By arranging the flowers in a crescent shape, you create a natural frame that draws attention inward to the hummingbird.
This is a classic composition tool that adds elegance and a sense of completeness to any motif.
12. Balance Line Art with a Pop of Color
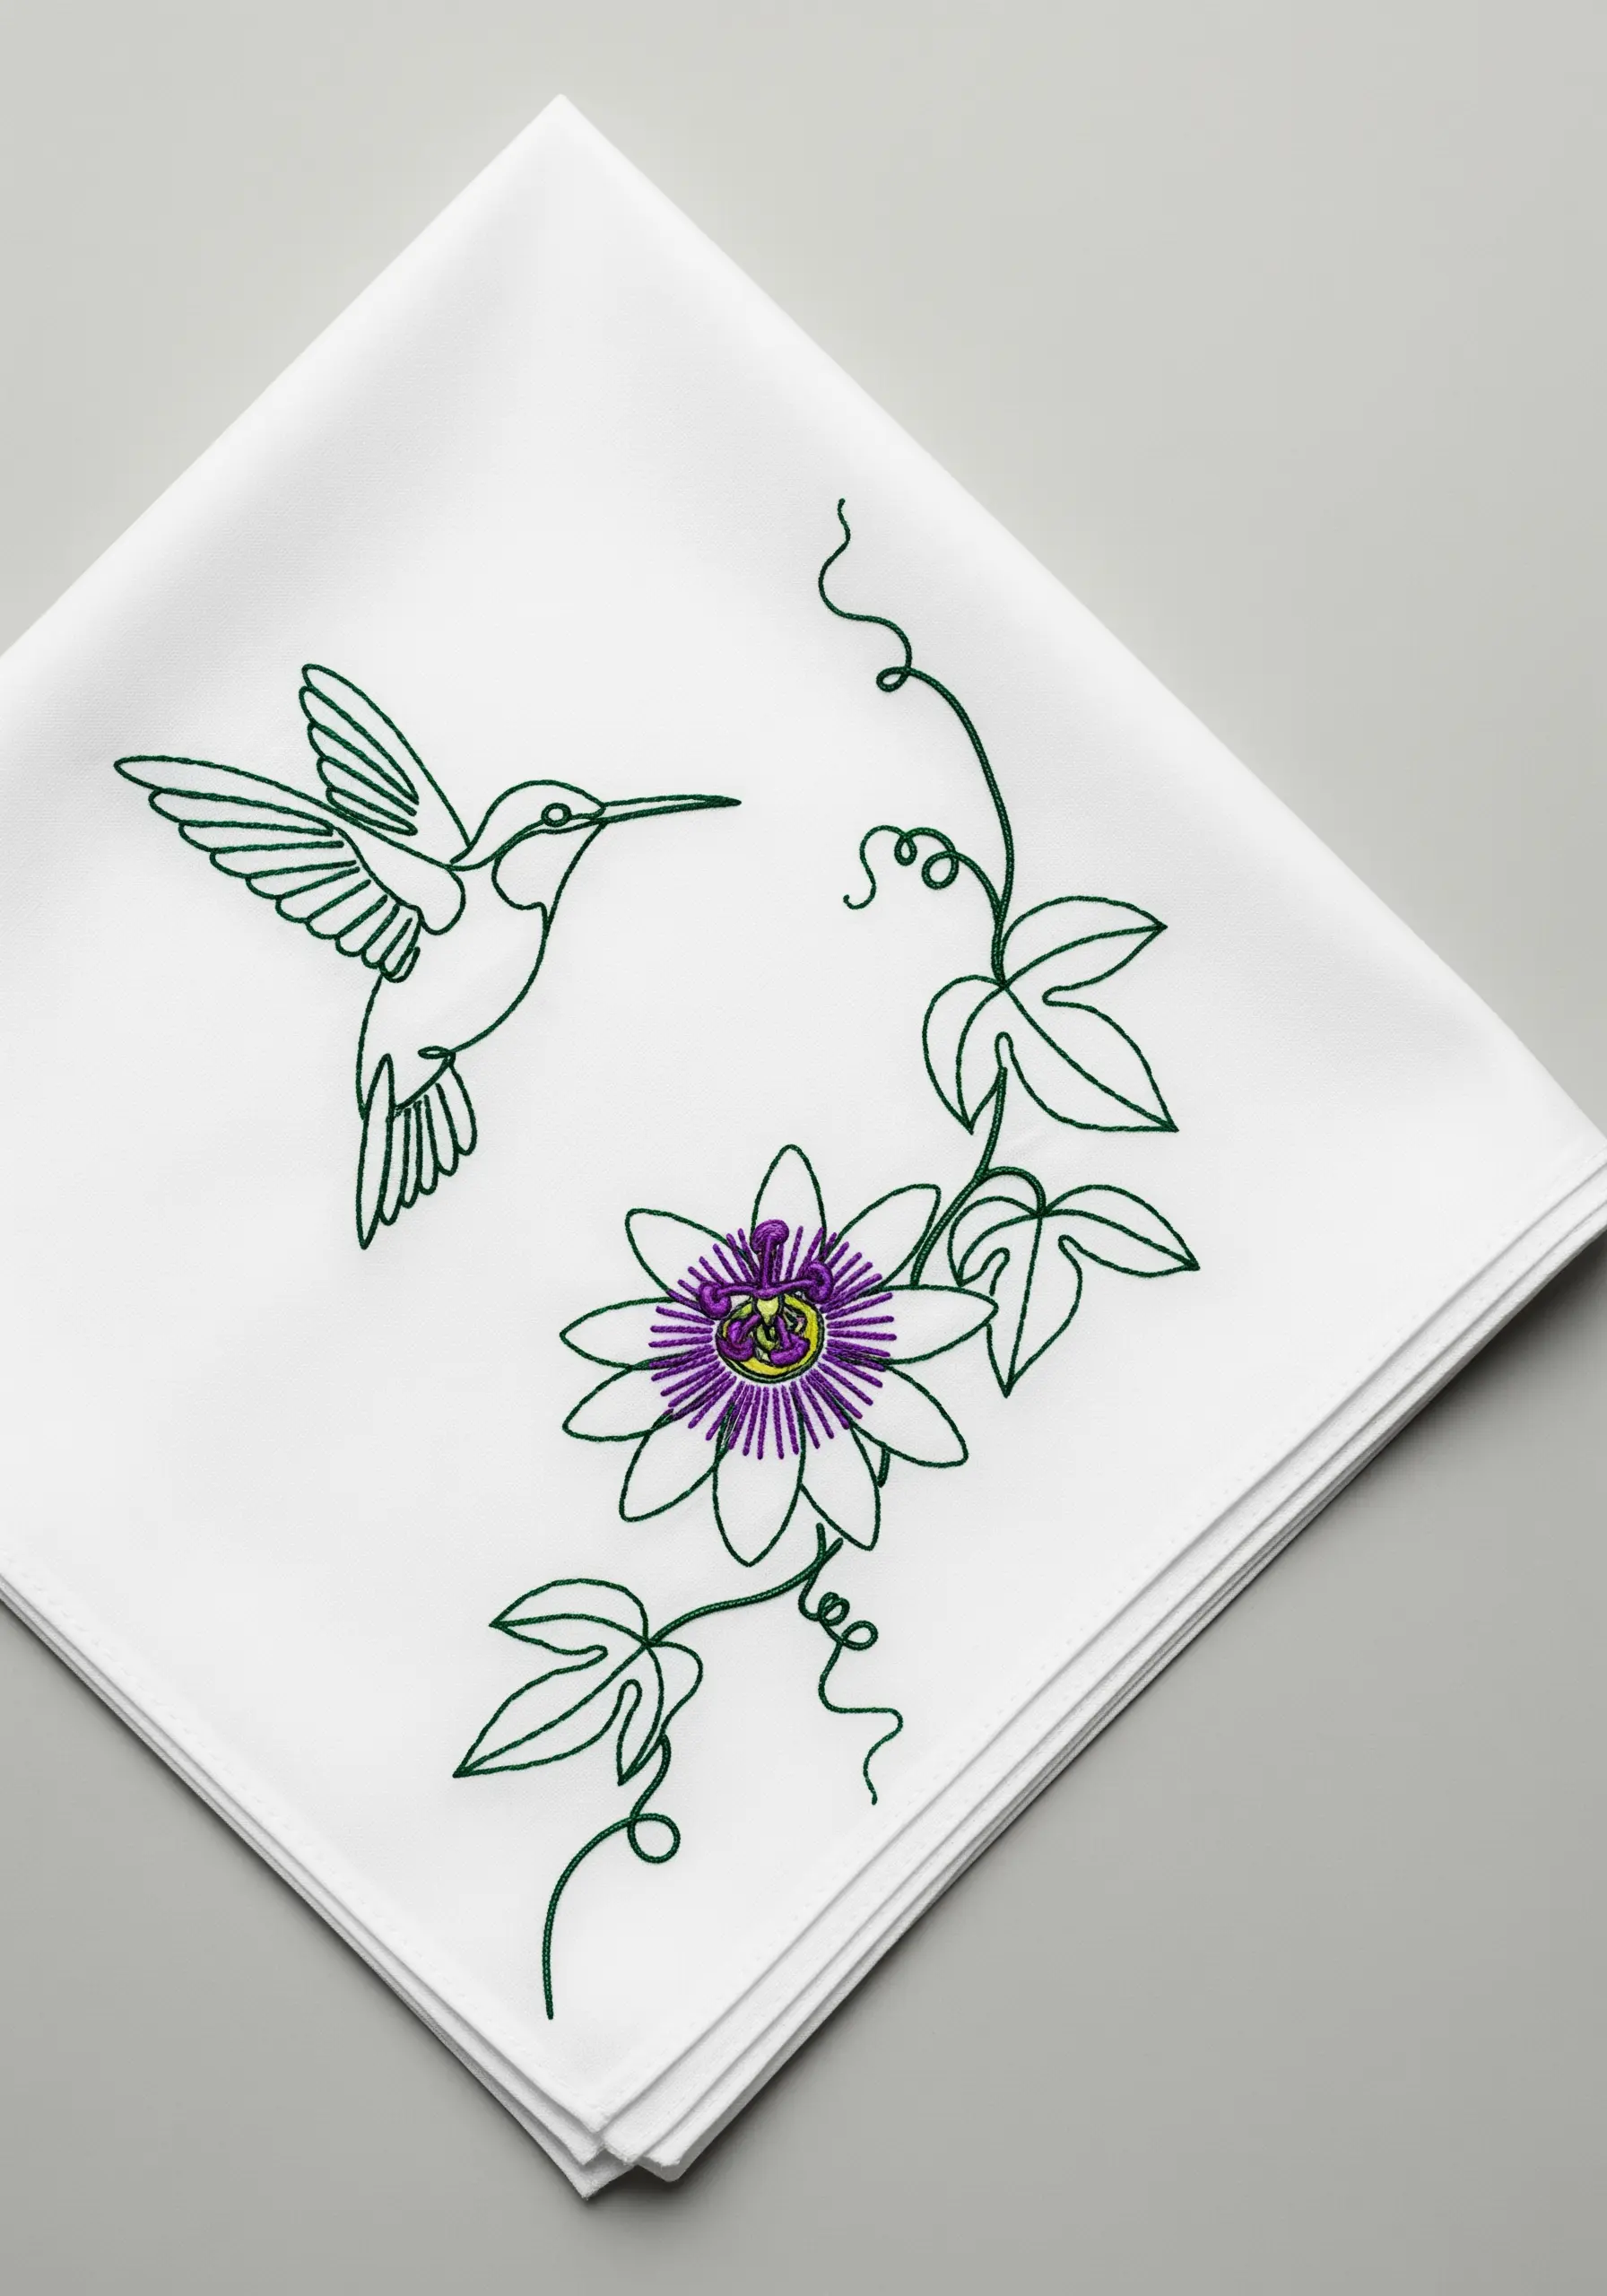
Explore the elegance of botanical line art embroidery patterns by keeping the majority of your design in a single color.
Use a smooth, consistent backstitch or whipped backstitch to create clean lines for the hummingbird and the passionflower vine.
Then, introduce a single, concentrated burst of color in the flower’s center using purples and yellows.
This technique creates a sophisticated and modern design where the small area of color becomes an impactful focal point.
13. Explore a Monochromatic Color Palette
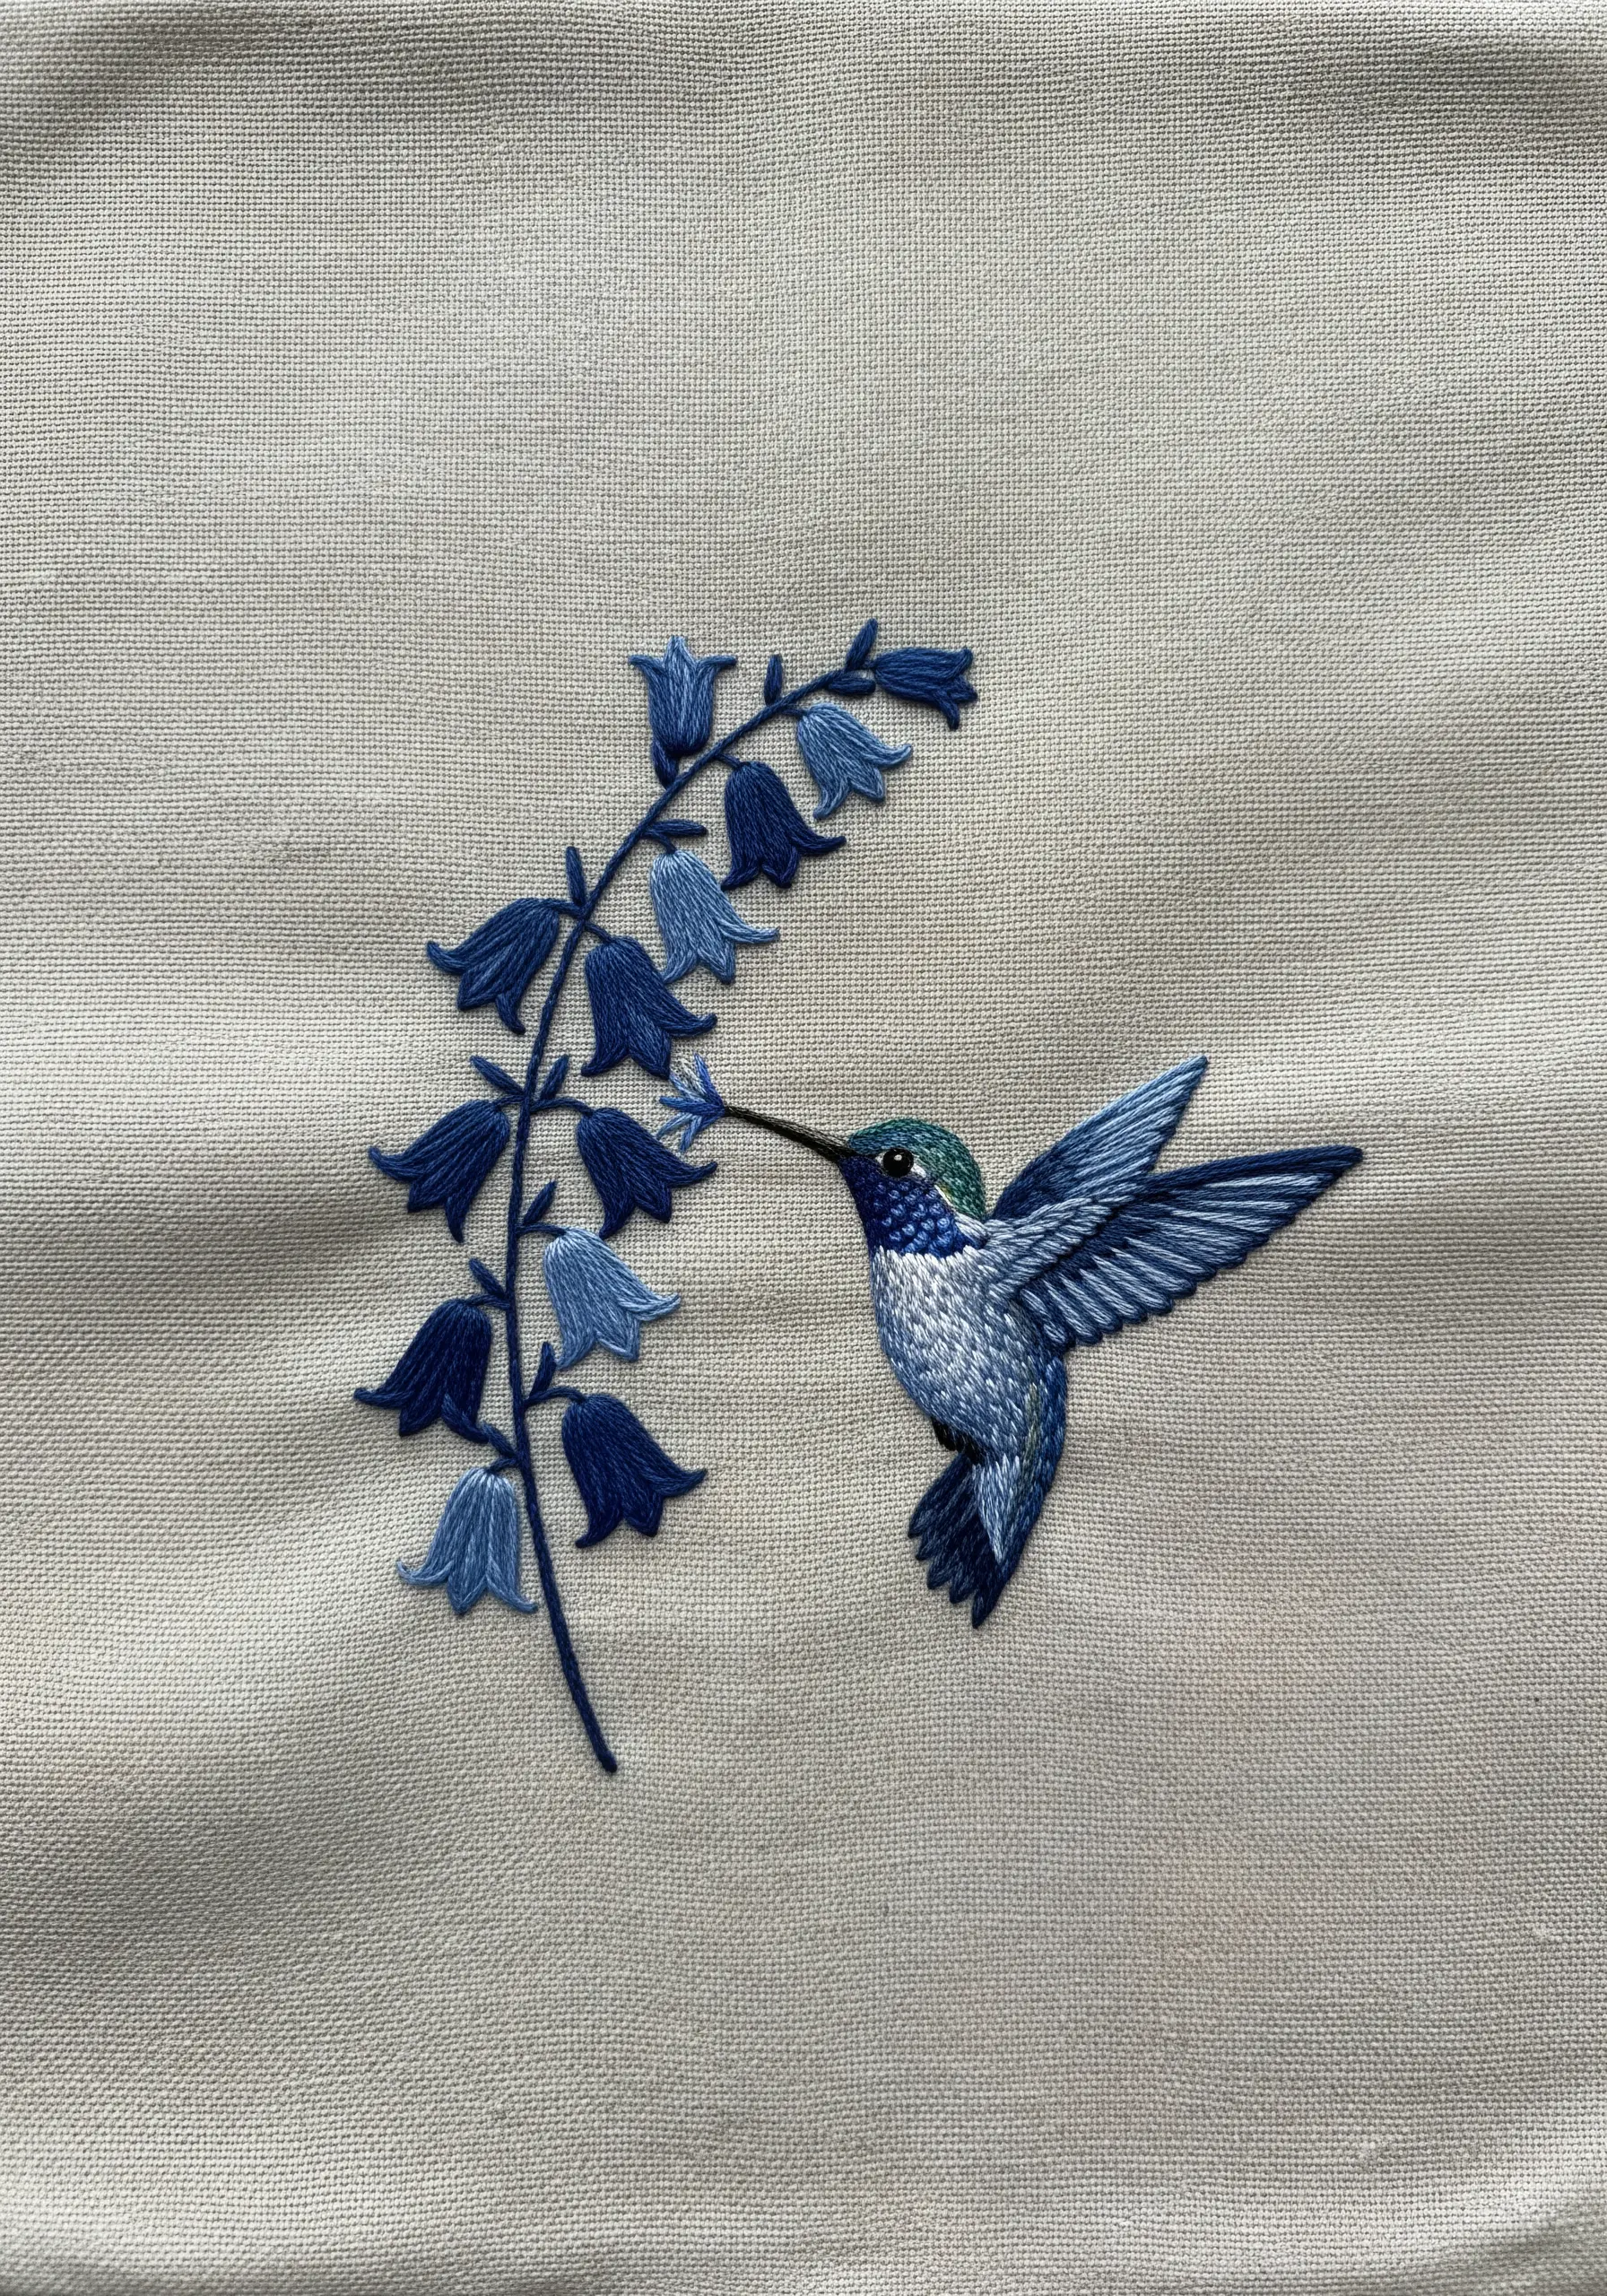
Challenge yourself by working within a single color family to create a sophisticated, harmonious design.
Select four to five shades of blue, from light sky blue to deep navy, and use them to thread-paint the hummingbird and the bluebells.
This limited palette forces you to focus on light, shadow, and texture to create definition, resulting in a cohesive and artful piece.
The key is to place the darkest and lightest shades next to each other to create contrast and form.
14. Capture Iridescence with Variegated and Metallic Threads
Mimic the complex, shifting colors of a hummingbird’s feathers by incorporating specialty threads.
Use a variegated thread that shifts between purple, blue, and green for the head and back, allowing the colors to blend organically as you stitch.
Introduce a single strand of metallic floss alongside your regular cotton floss in areas you want to highlight, like the crest or wing tips.
This subtle shimmer catches the light and adds a layer of realism and magic.
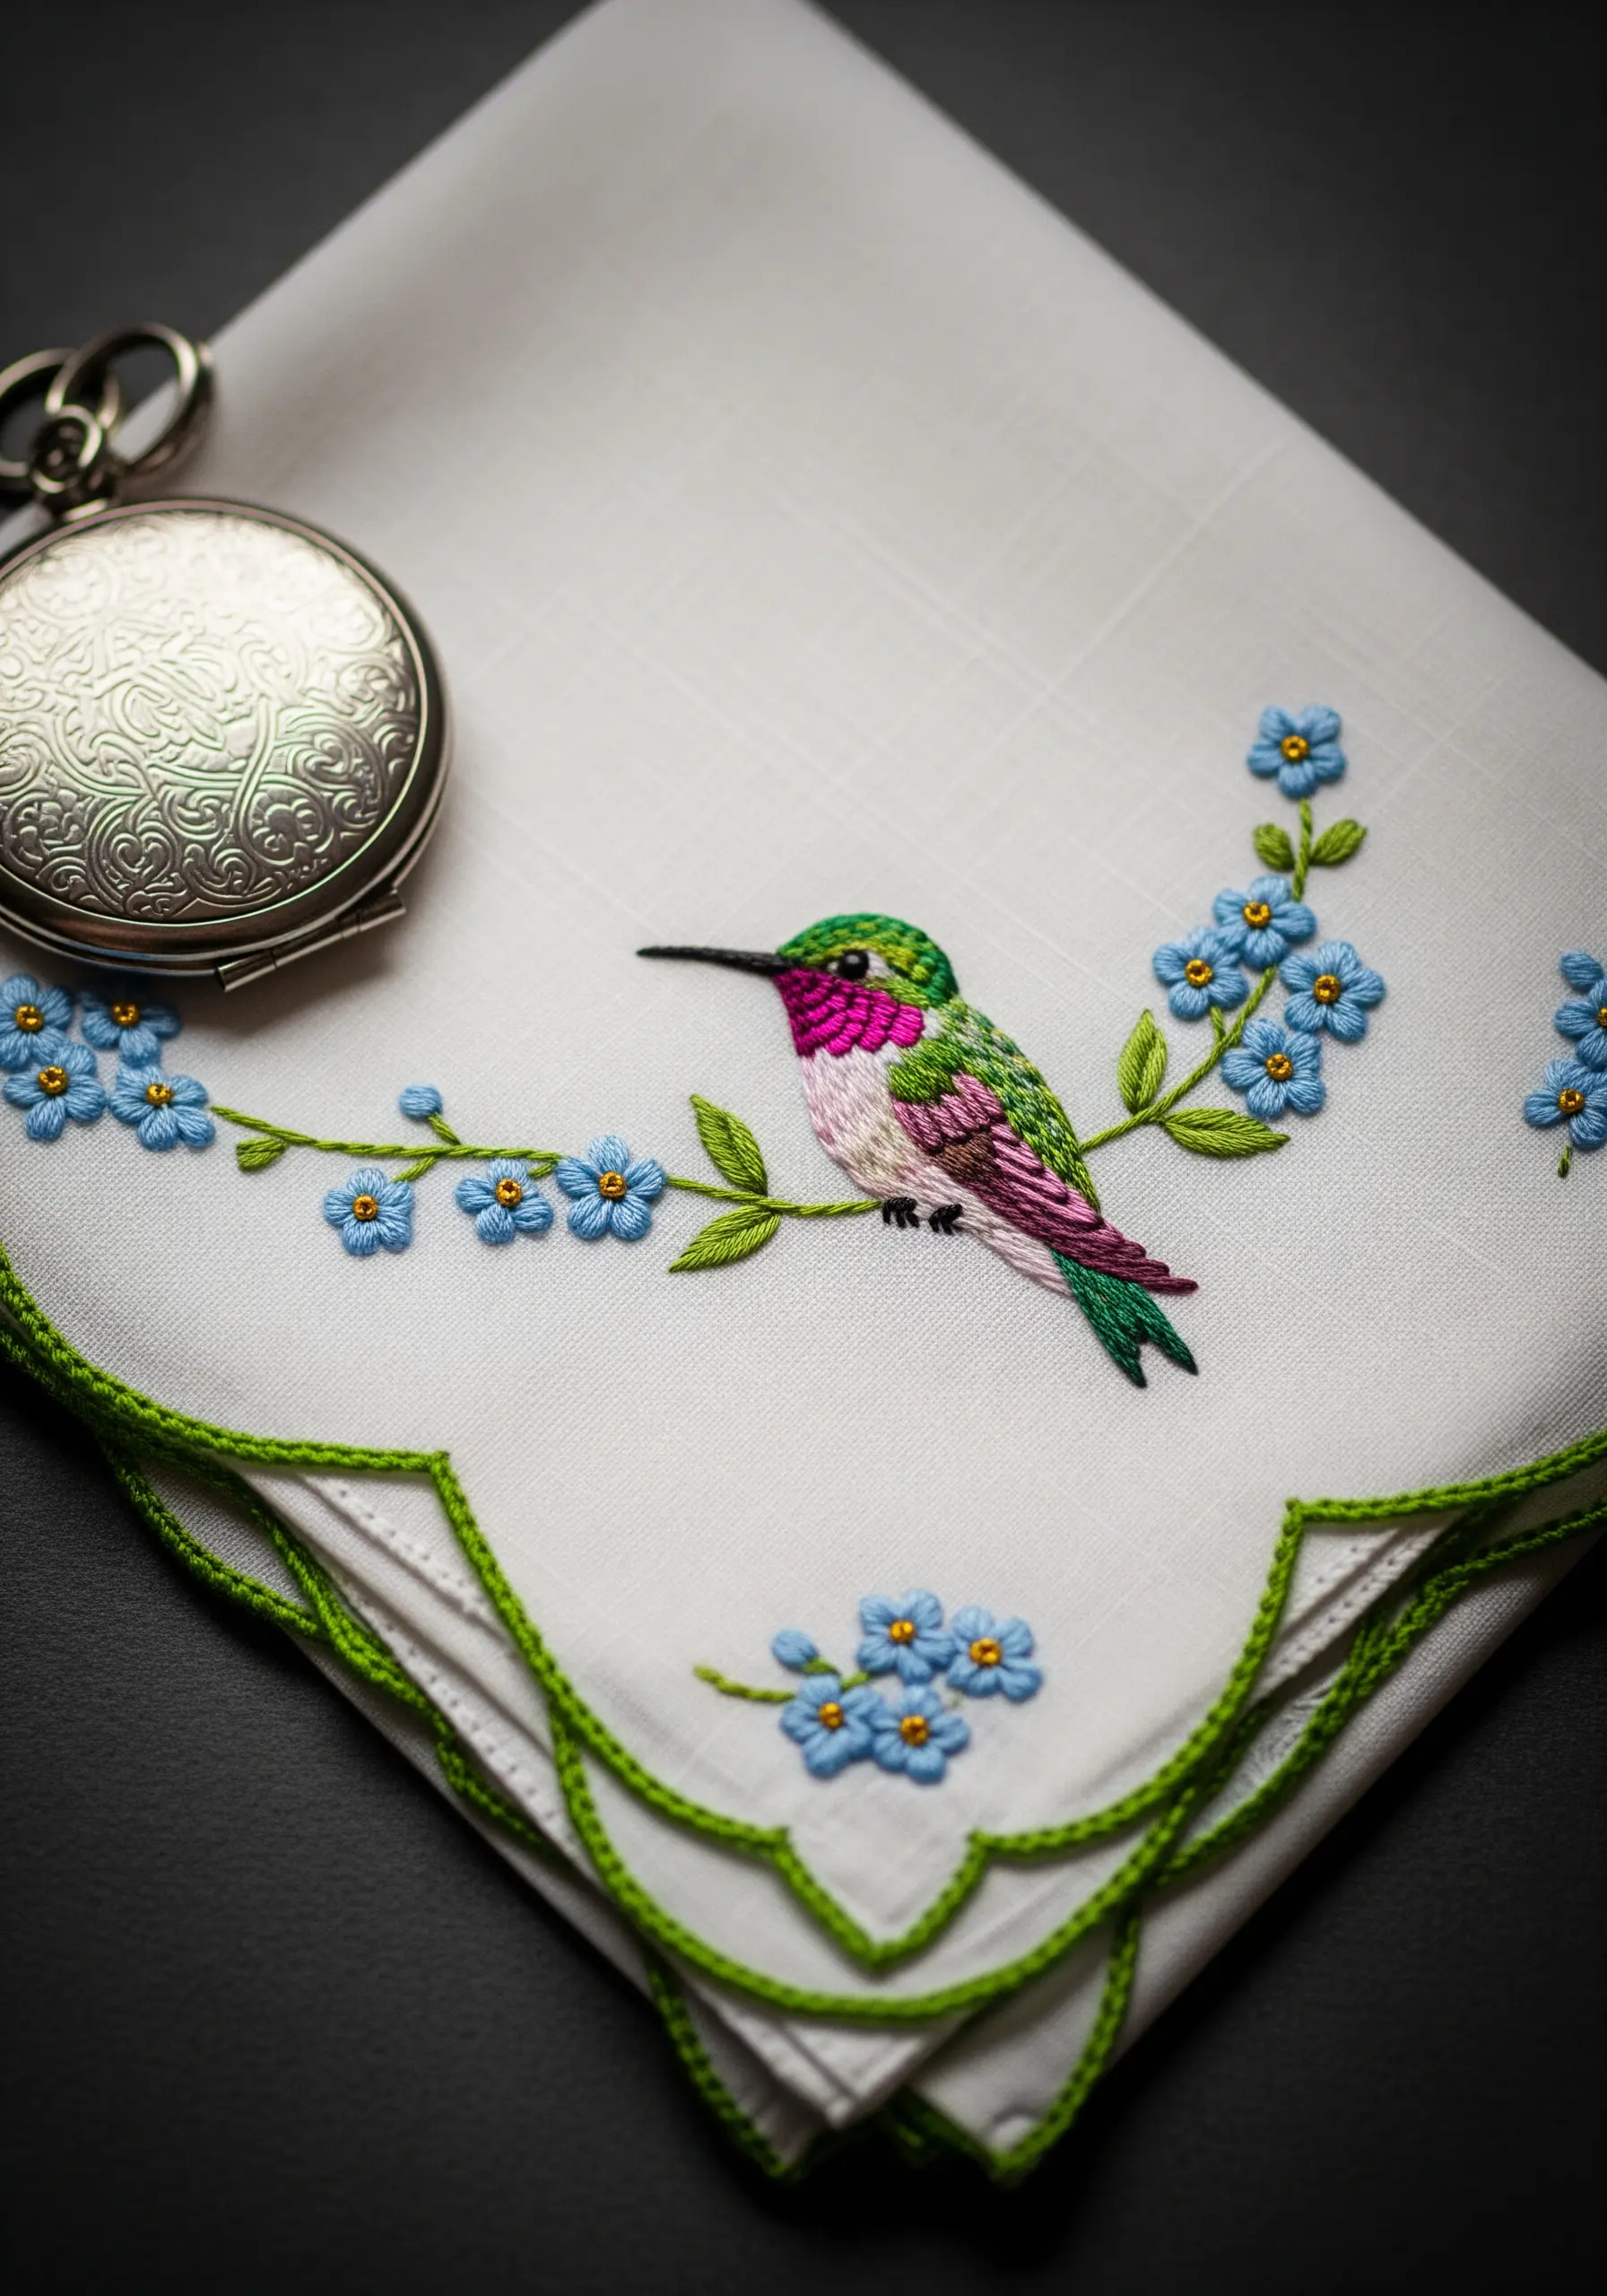
15. Build Tactile Dimension with French Knots

Move beyond flat stitches and create a highly textural surface using only French knots.
Fill the body of the hummingbird with tightly packed knots, varying the color to define different areas like the chest, throat, and head.
For a fluffier, softer look, use more strands of floss and wrap the needle only once or twice.
The nest can be made from a messier, more organic couched stitch to contrast with the bird’s uniform texture, creating a piece that invites touch.
16. Evoke an Autumnal Mood with a Warm Palette
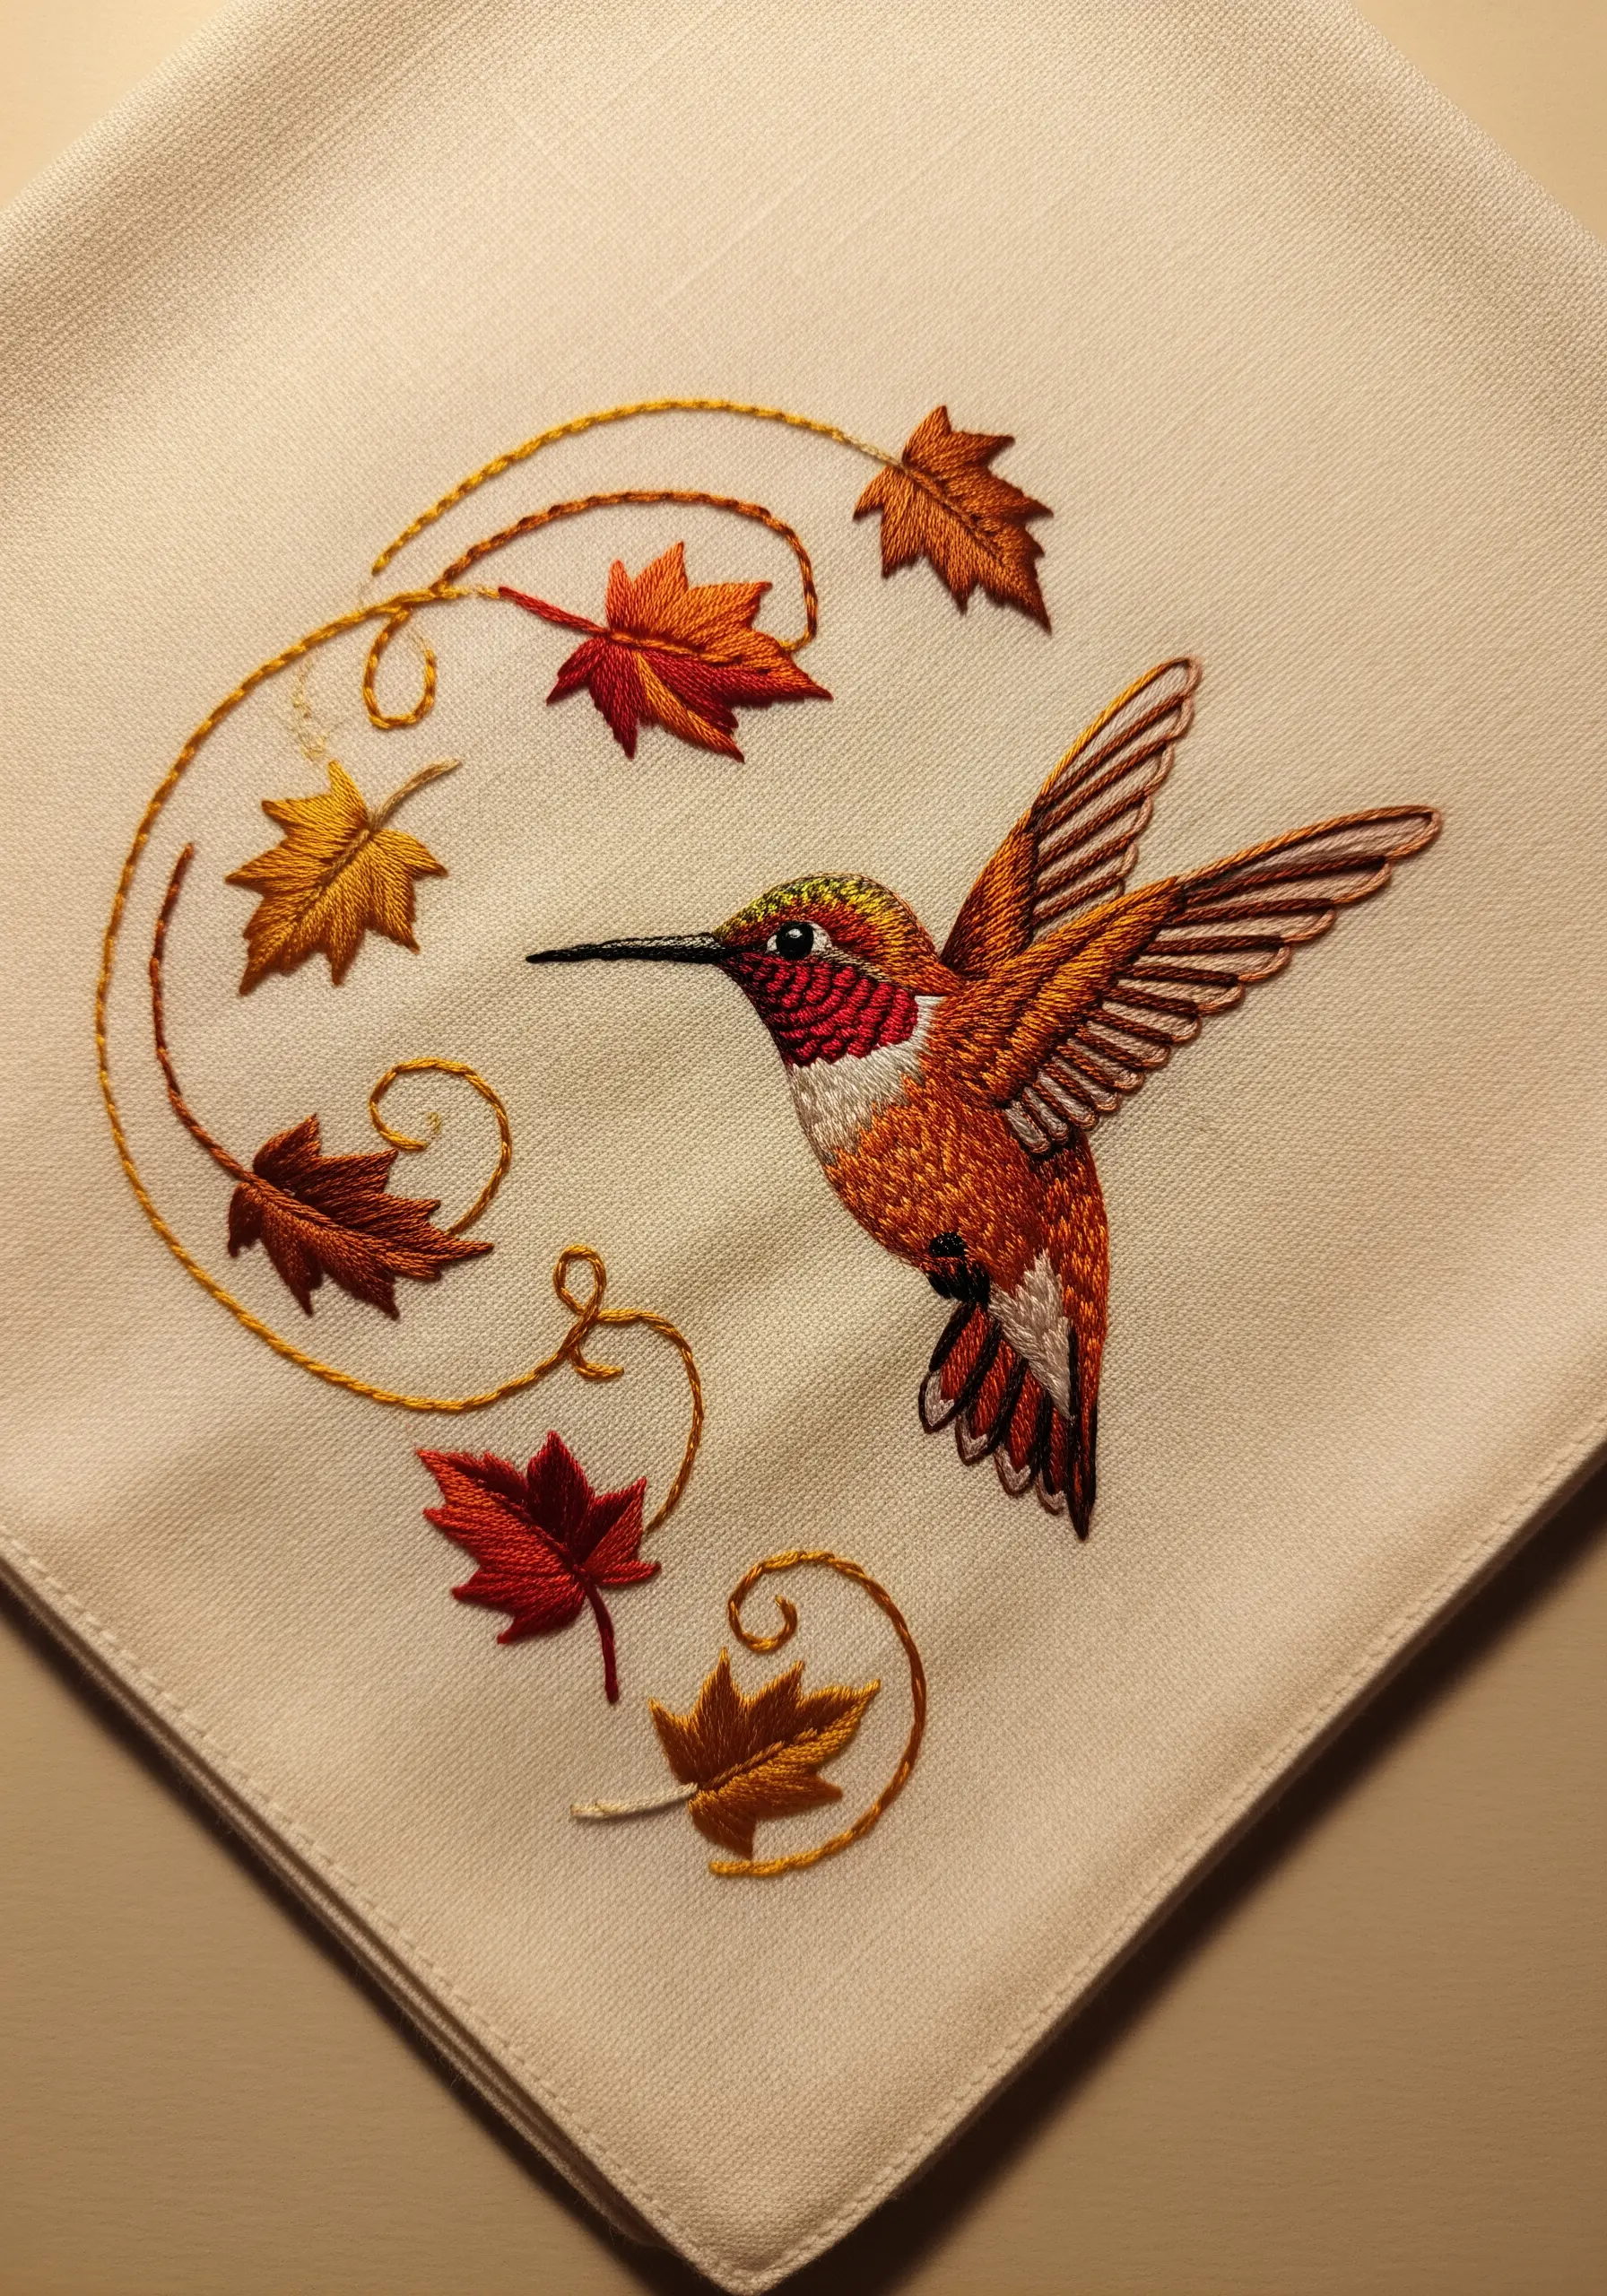
Set a specific mood by carefully selecting your color palette.
Choose warm, earthy tones like rust, gold, deep red, and brown to create an autumnal scene.
Use these colors for both the hummingbird and the swirling maple leaves to ensure the entire composition feels cohesive.
A simple whipped backstitch for the curling vines adds a sense of movement and connects the scattered leaves, guiding the eye through the design.
17. Experiment with Beads and Sequins
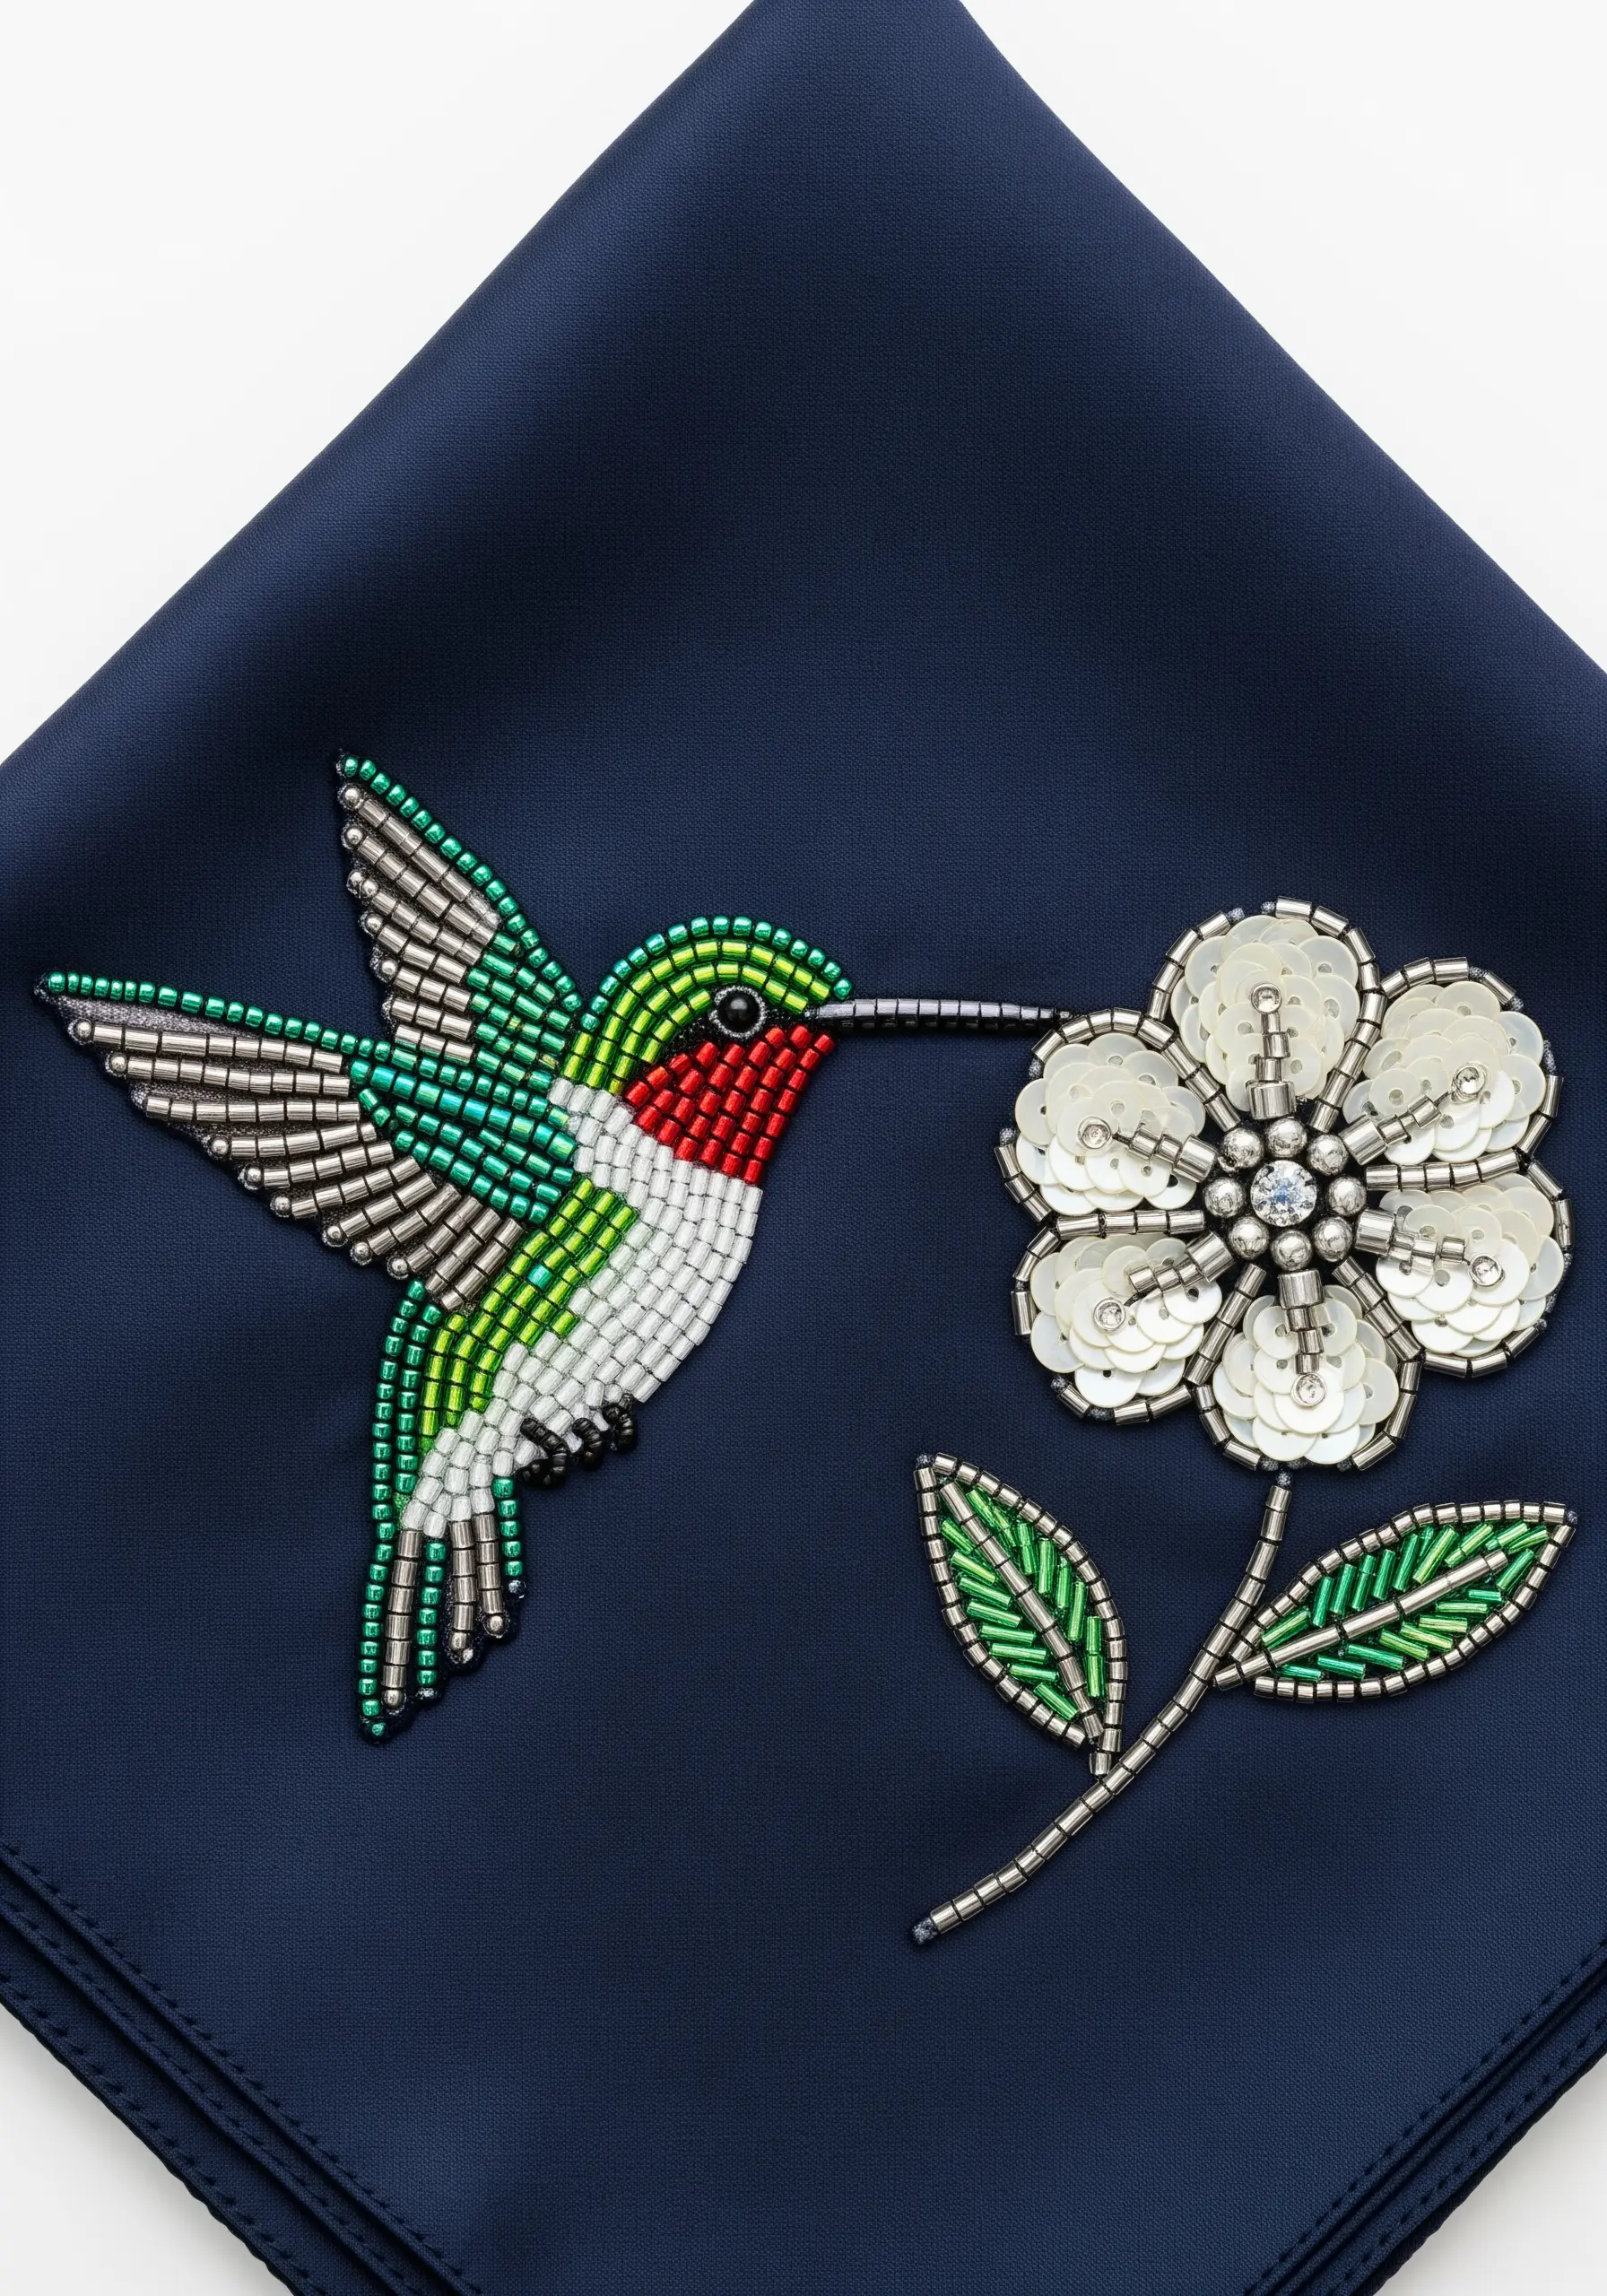
For a touch of glamour, translate an embroidery pattern into a beadwork design.
Use tiny bugle beads laid in rows to fill the body of the hummingbird, mimicking the direction of feathers.
Outline the flower petals with a row of silver beads, then fill the inside with flat, iridescent sequins, each anchored with a single seed bead.
This haute couture technique works beautifully on dark, luxurious fabrics like satin or velvet for maximum impact.
18. Weave a Celestial Story with Stitches
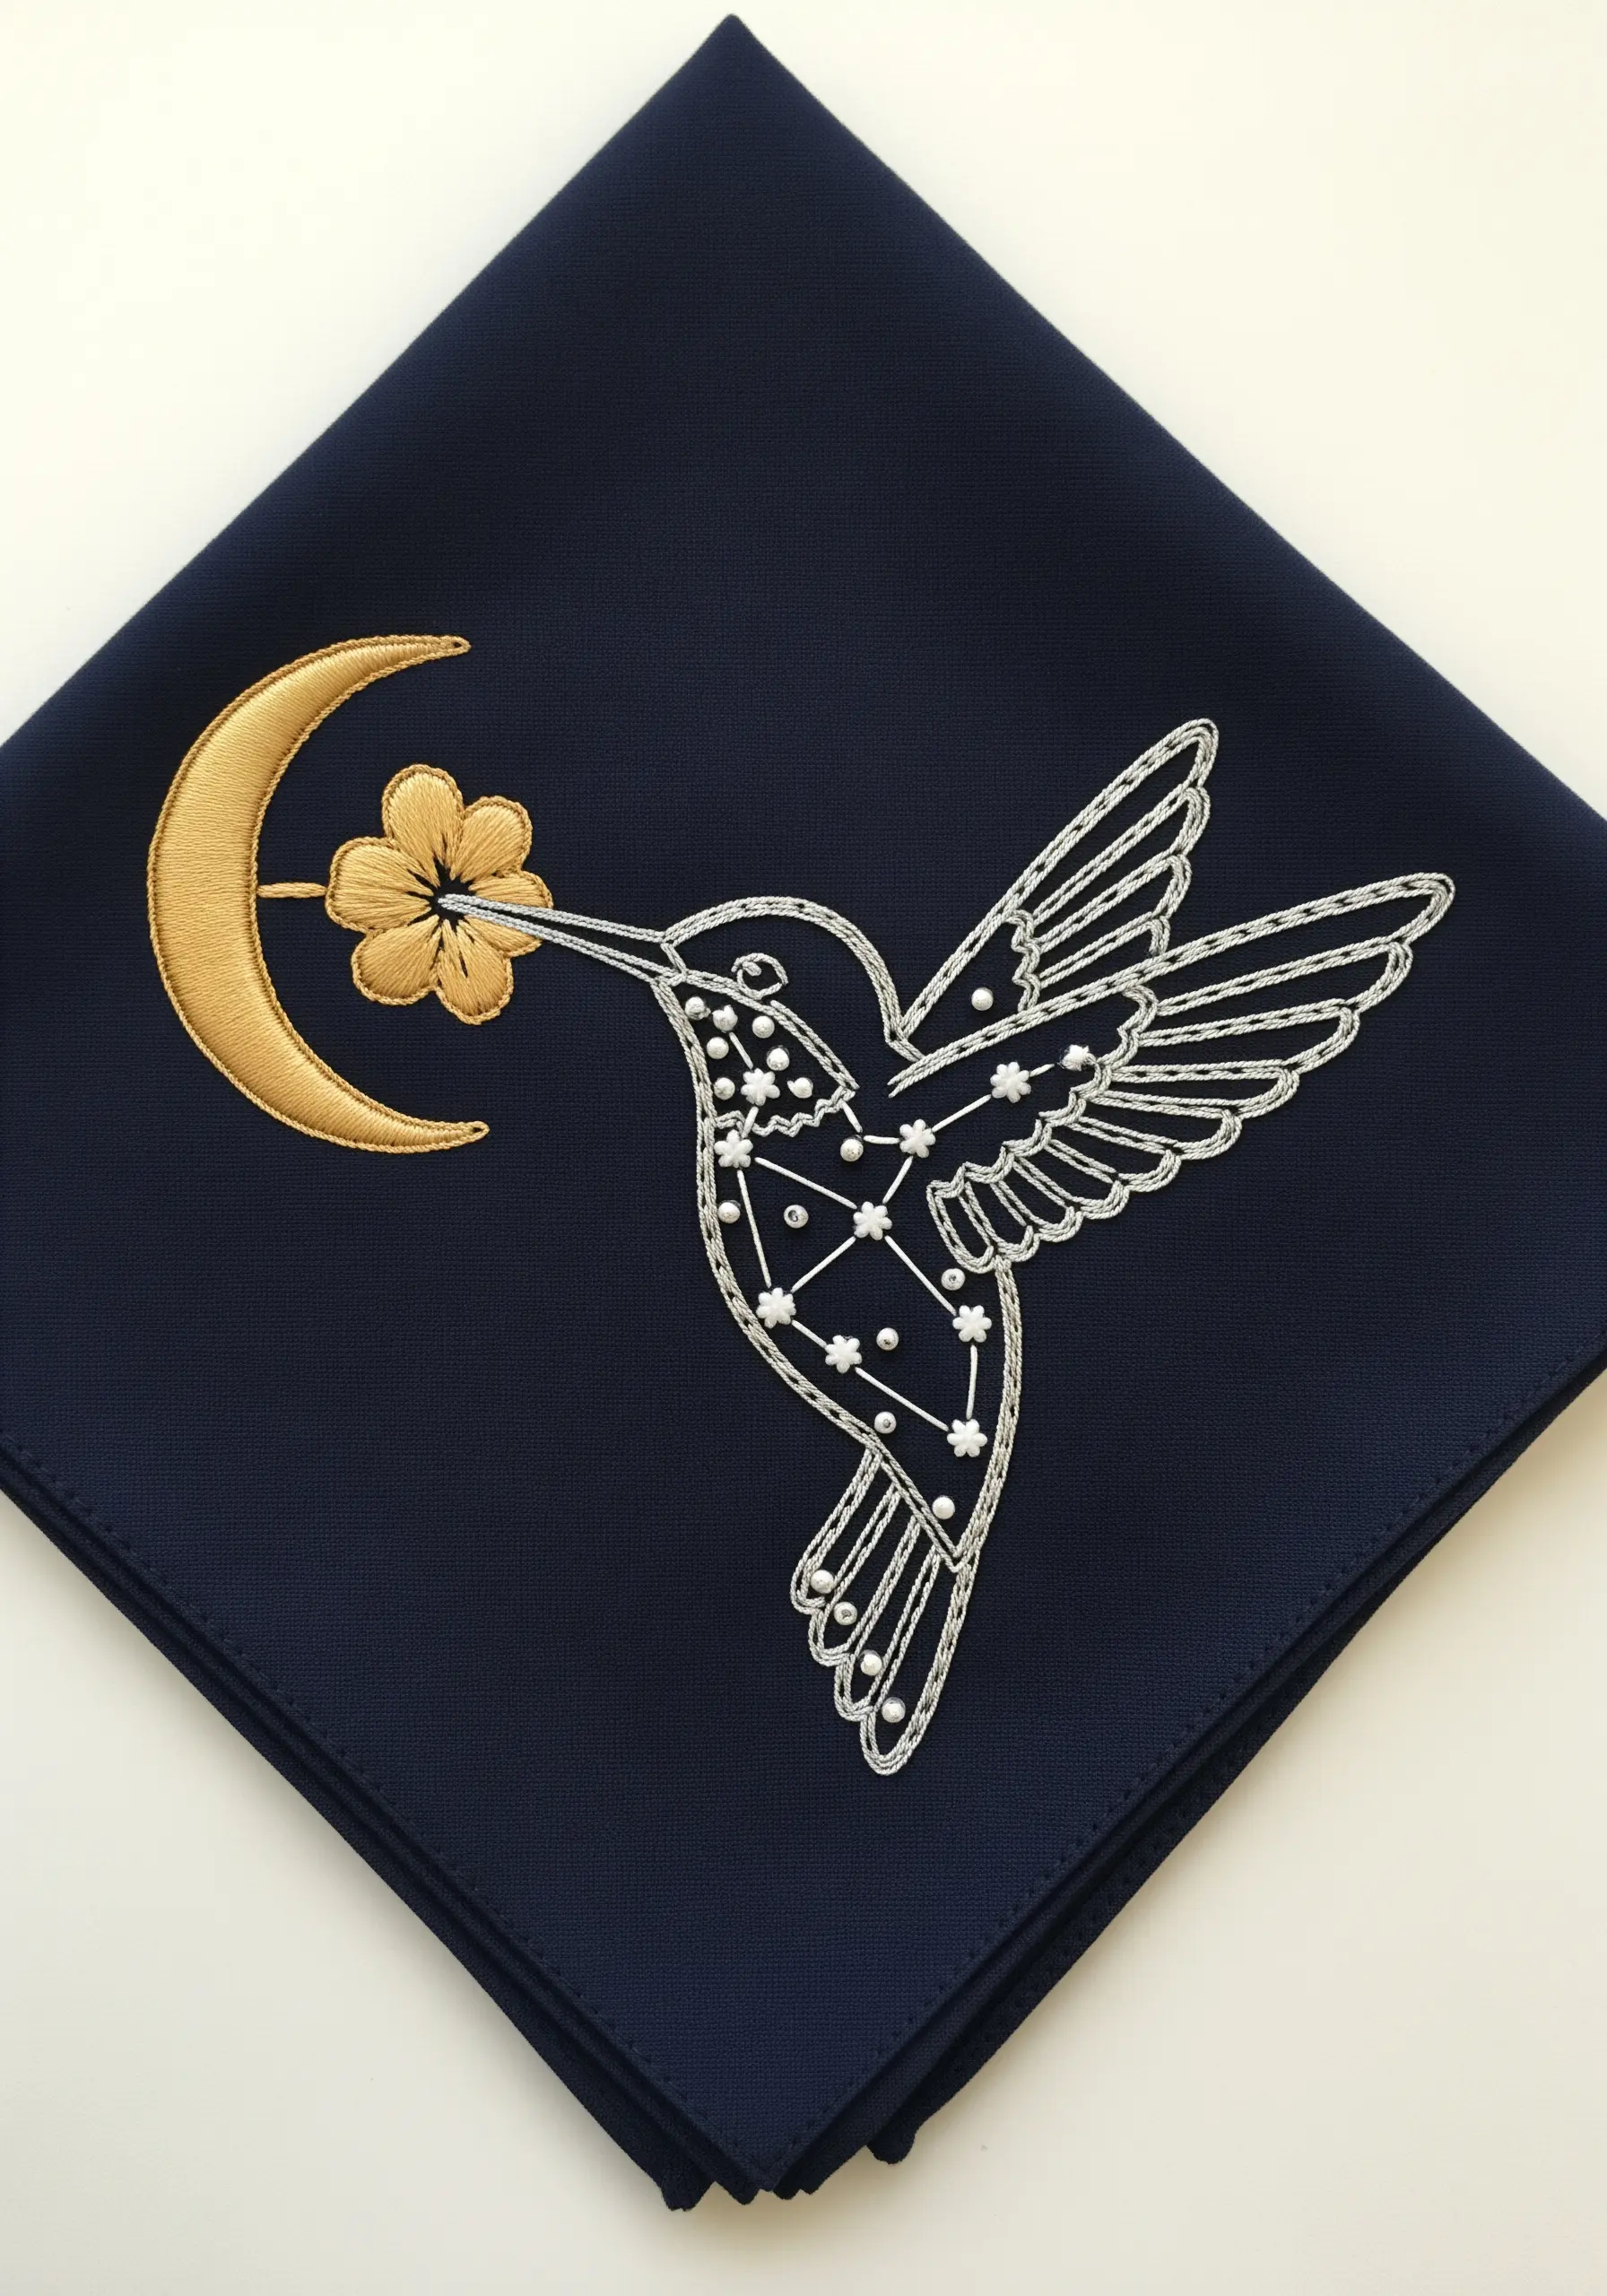
Transform a simple silhouette into a magical, celestial map.
Outline the bird in a bright silver metallic thread using a whipped backstitch for a smooth, solid line.
Inside the outline, plot a constellation using small French knots or seed beads for stars, connected by single straight stitches.
The contrast between the shimmering gold satin-stitched moon and the delicate silver star-work on the dark fabric creates a truly enchanting piece.
19. Combine Appliqué with Bold Embroidery
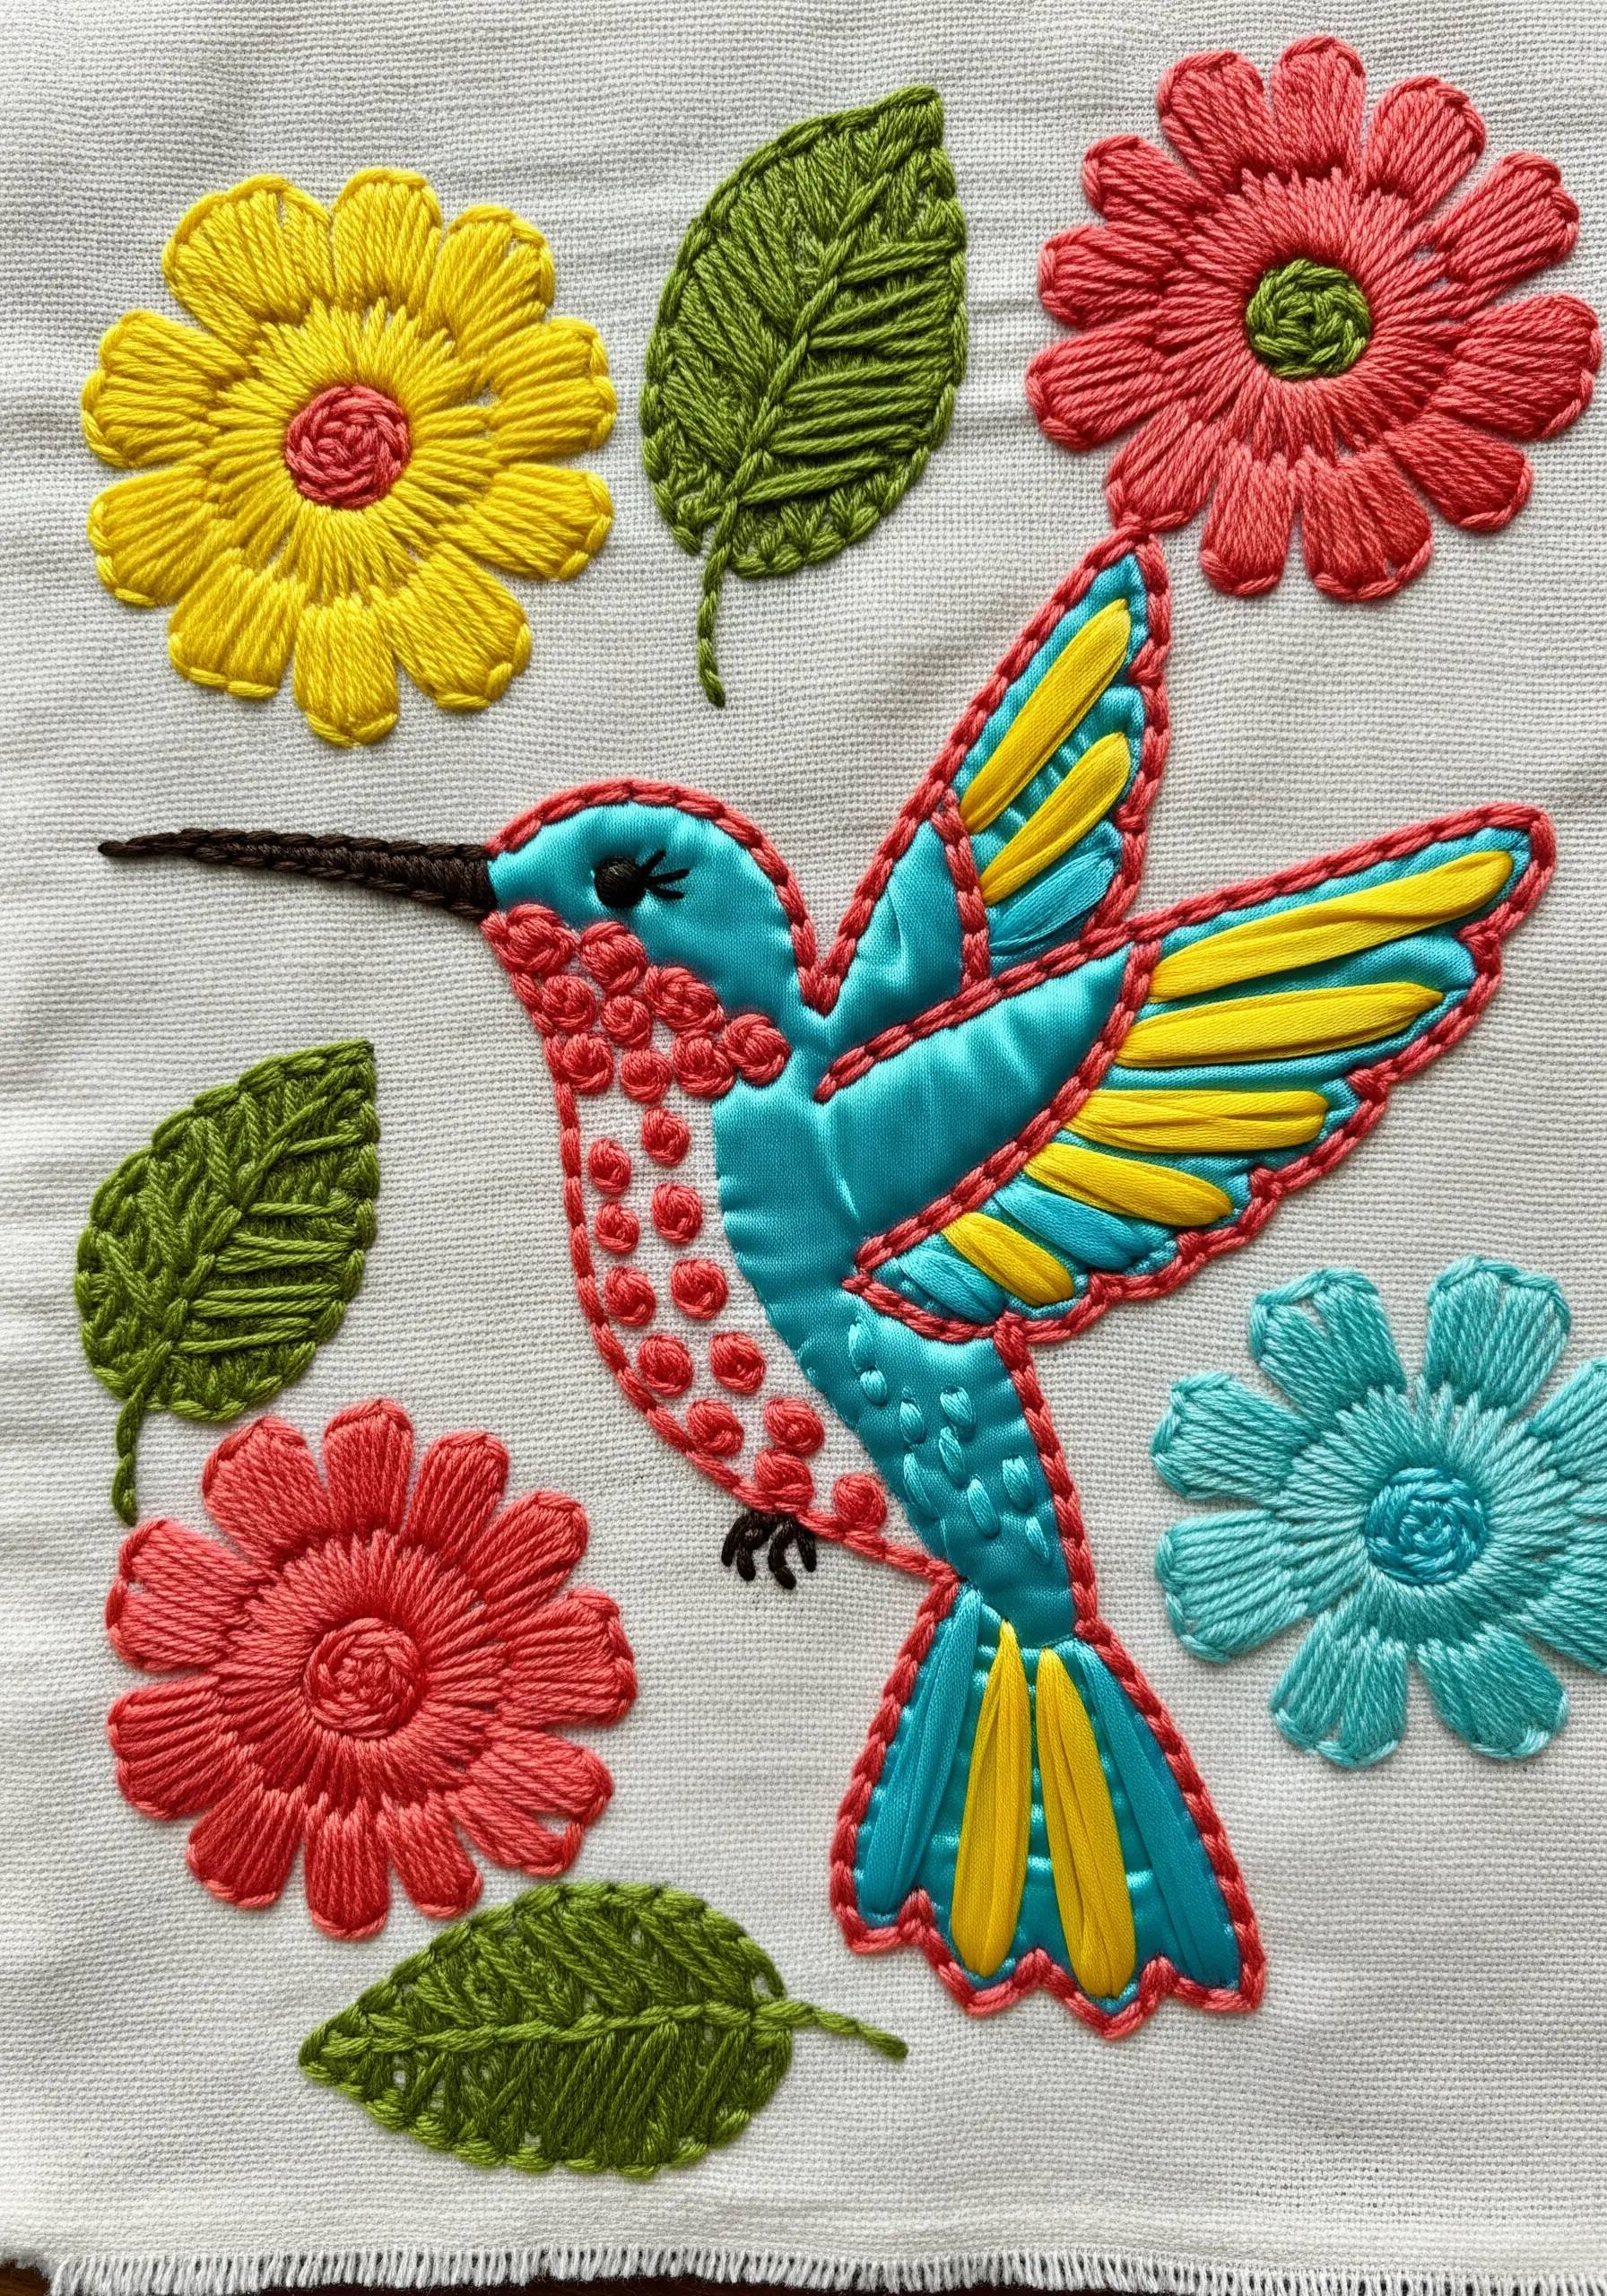
Create large areas of flat, smooth color by using fabric appliqué as a base for your embroidery.
Cut small pieces of colored satin or cotton fabric for the bird’s wings and body, secure them with fabric glue or fusible web, and then stitch over the raw edges with a tight satin stitch.
This technique allows you to achieve a perfectly smooth fill that would be difficult with thread alone and adds a unique, layered dimension to your work.
Add embroidered details like French knot textures on top of the fabric pieces to integrate them into the design.
20. Blend Watercolor Painting with Embroidery
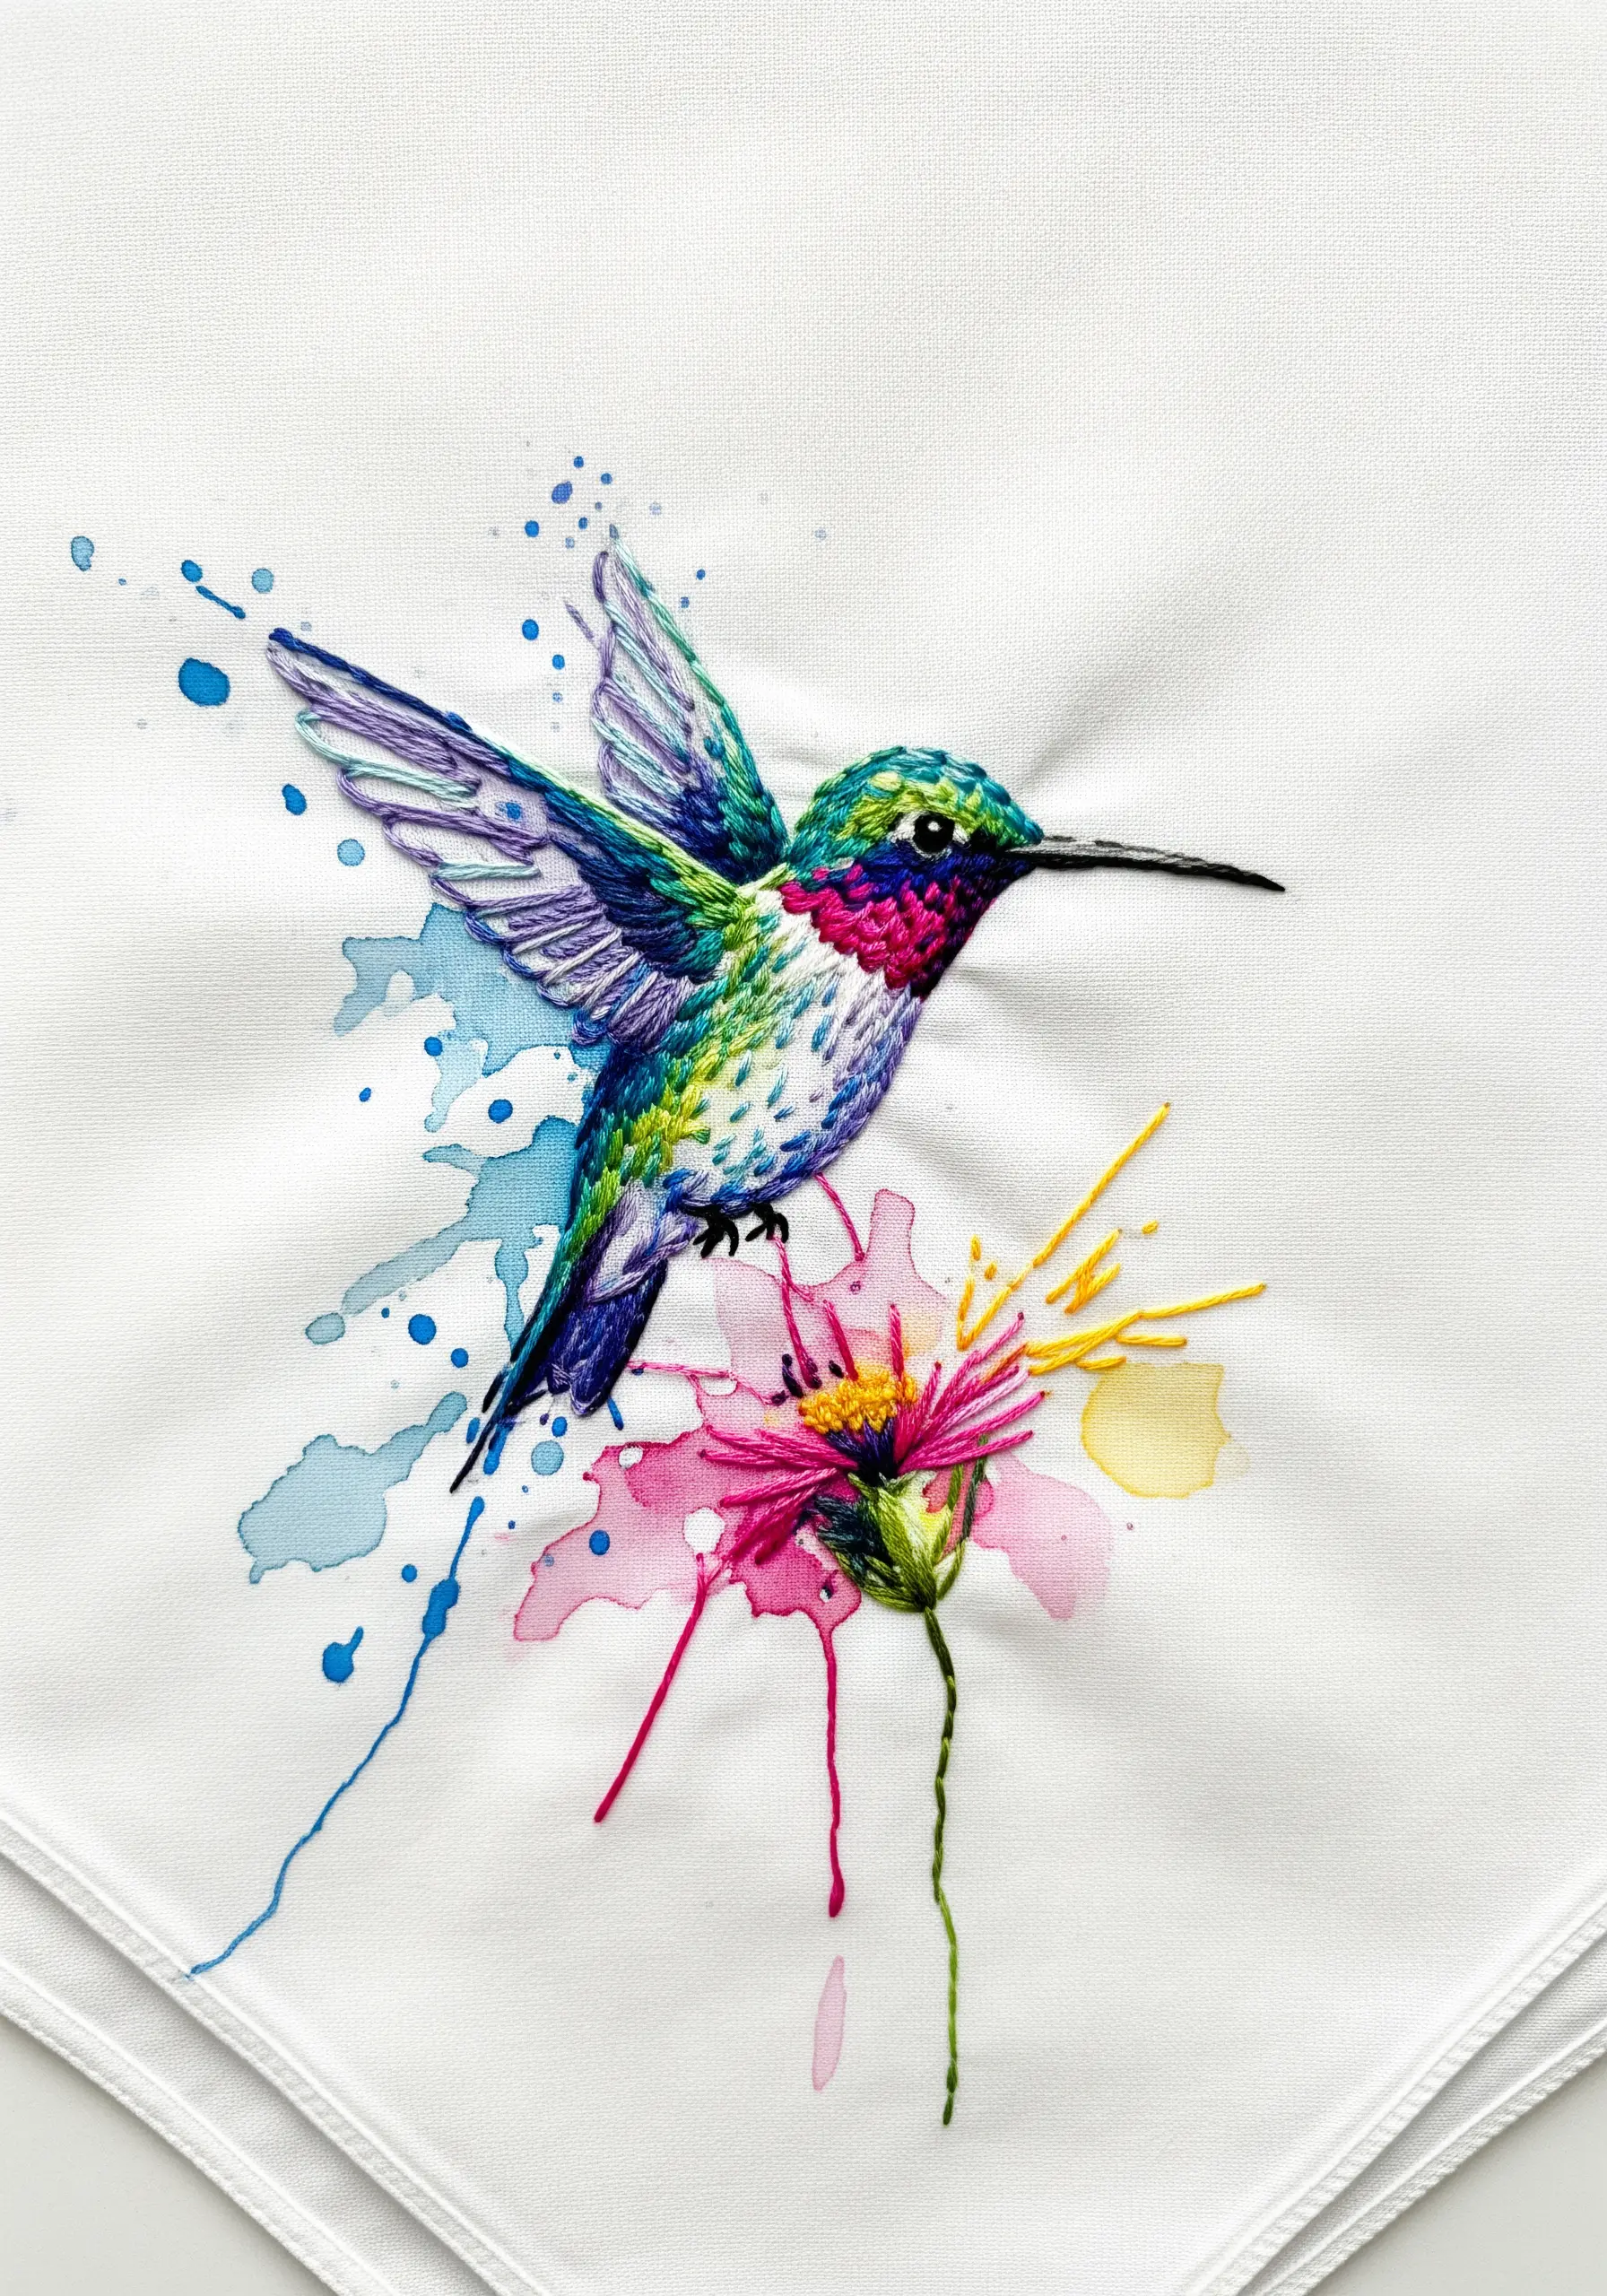
Create a fluid, expressive background by adding watercolor paint directly to your fabric before you stitch.
Lightly sketch your design, then apply loose washes of color and splatters, letting them bleed and blend naturally.
Once the paint is completely dry and heat-set with an iron, use embroidery to add sharp details and texture over the top, defining the bird’s shape and the flower’s center.
This abstract mixed-media embroidery approach combines the softness of paint with the precision of thread for a dynamic result.
21. Achieve Softness with Baby’s Breath
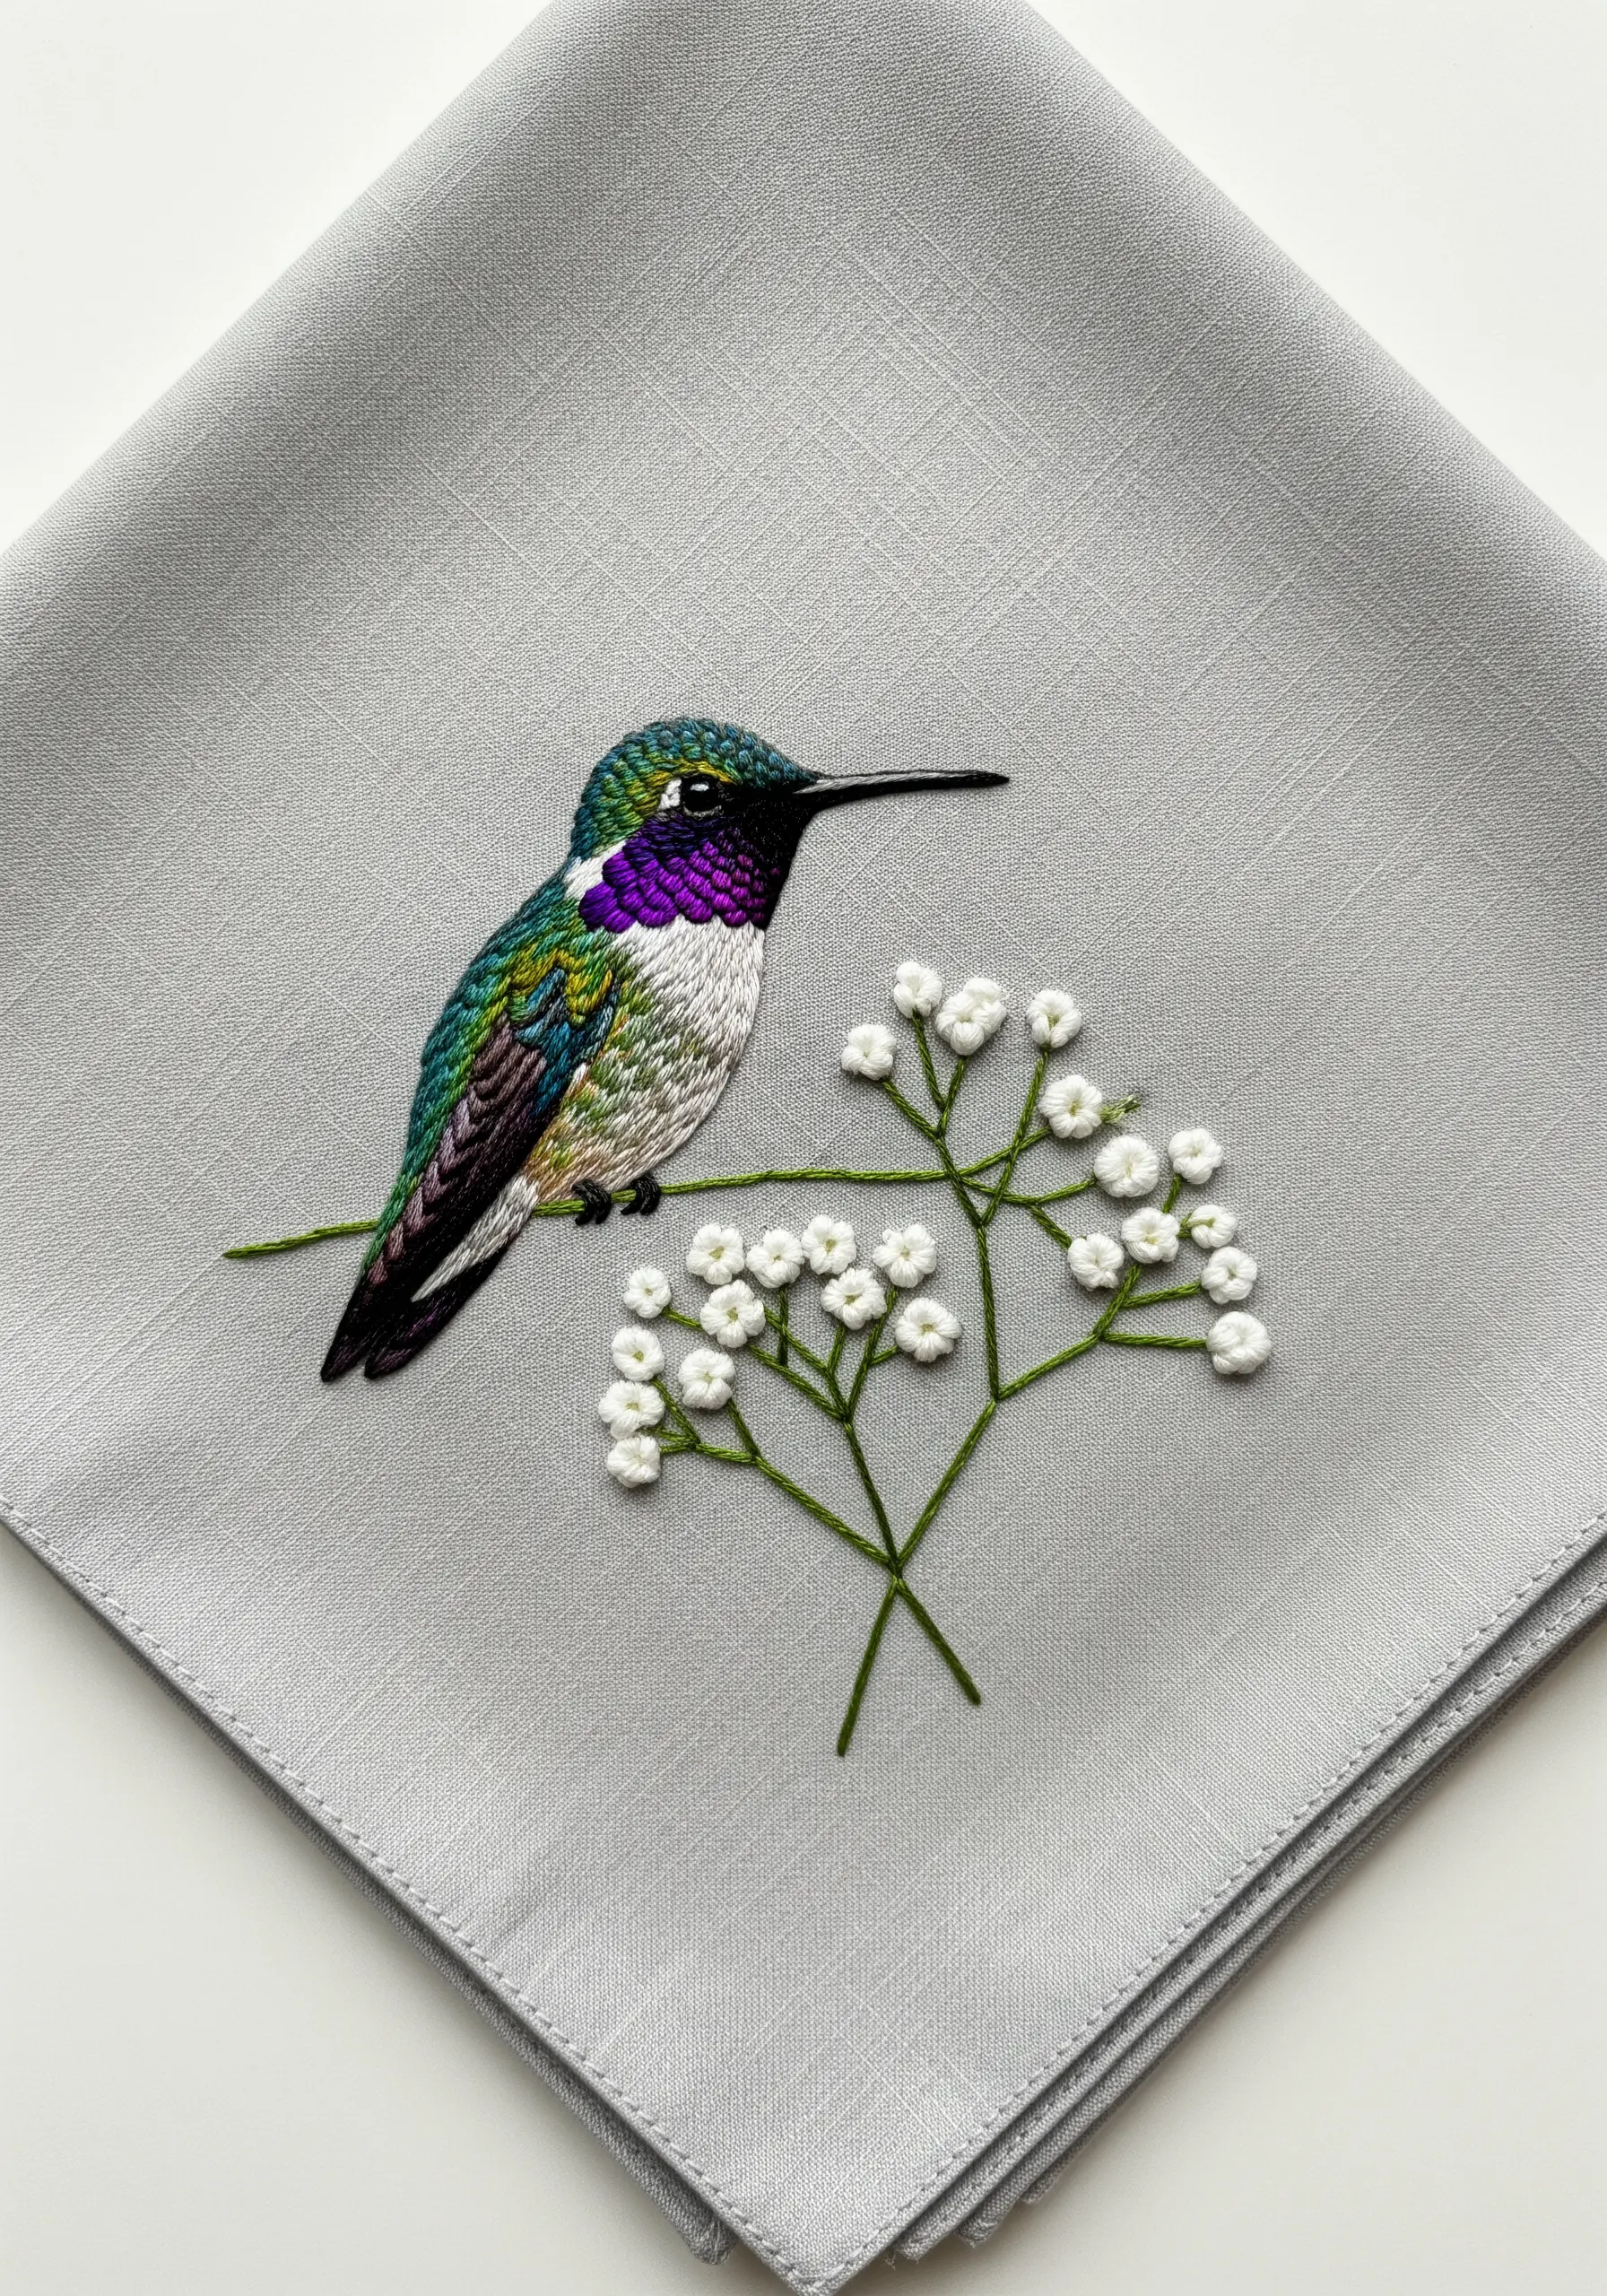
Balance a detailed, thread-painted bird with something intentionally light and airy.
Create delicate sprigs of baby’s breath using a simple straight stitch for the stems and tiny, slightly loose French knots for the blossoms.
Clustering the knots at the end of the stems gives the impression of delicate flower heads without adding visual weight.
This minimalist botanical element provides context for the bird without competing for attention, resulting in a beautifully balanced and serene composition.
22. Add a Subtle Festive Touch
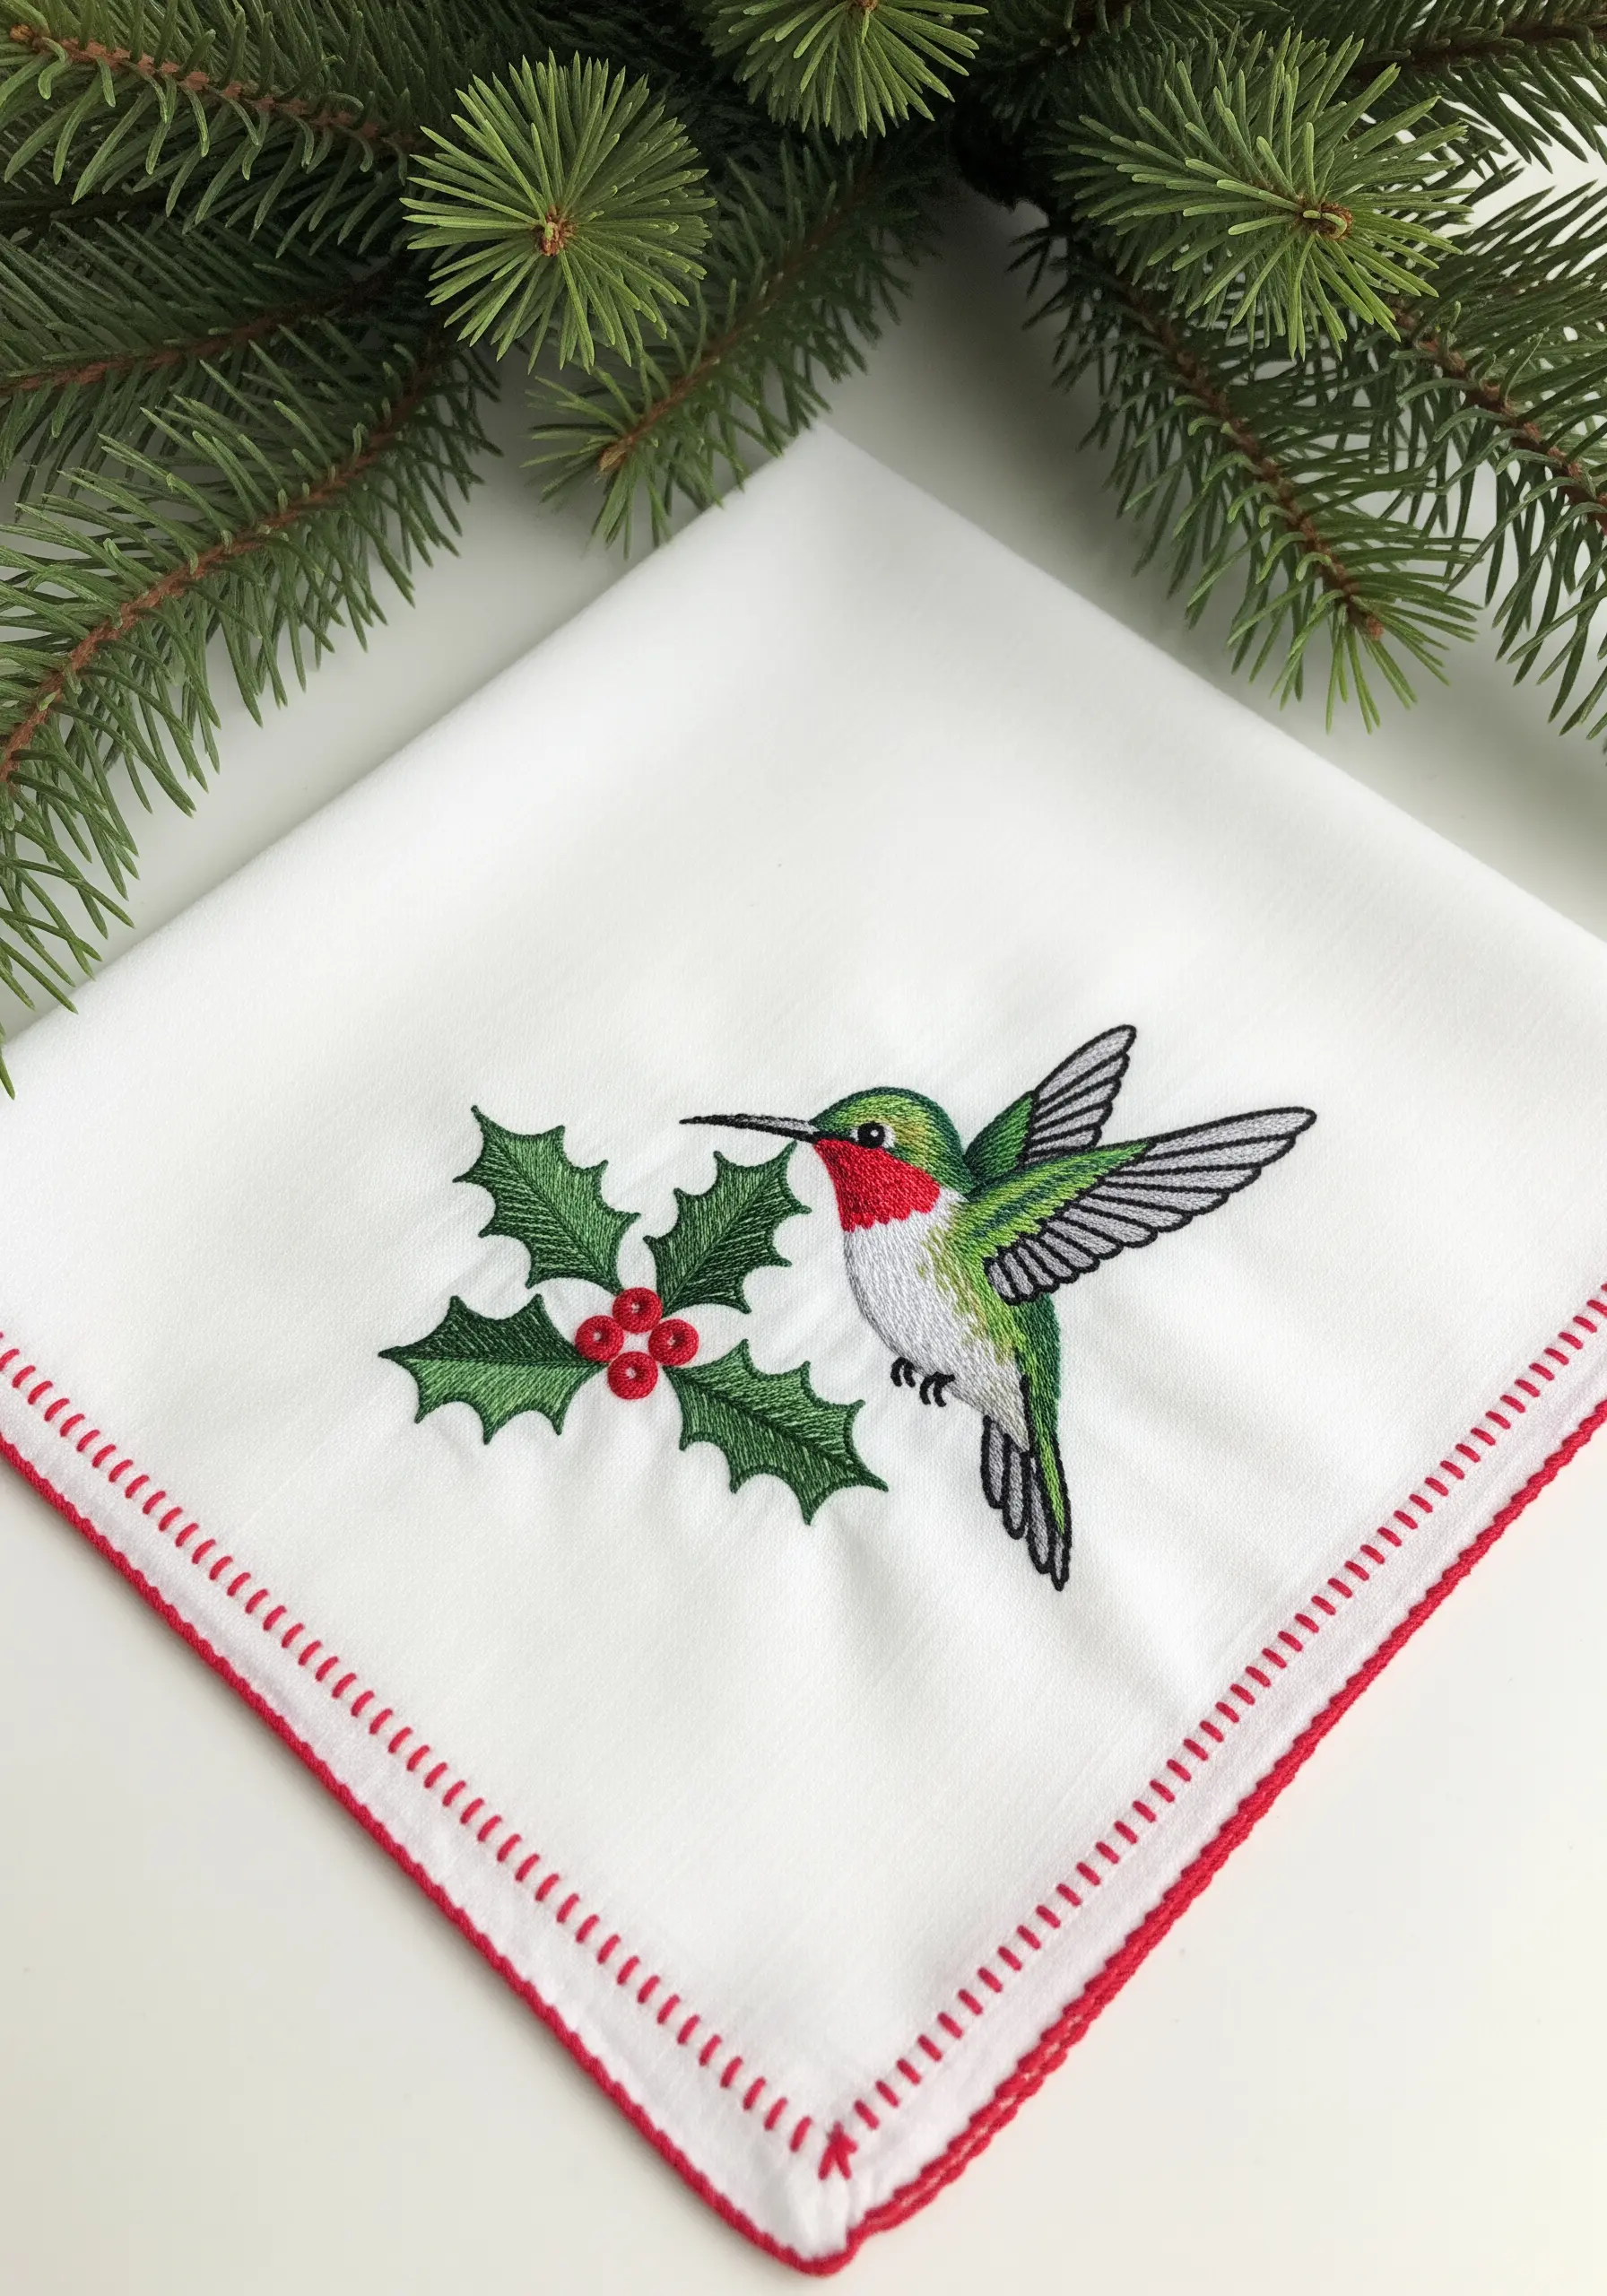
Adapt a classic motif for the holidays with a few simple additions.
Pair your hummingbird with a sprig of holly, using a padded satin stitch for the leaves to give them a subtle, raised dimension.
Create the berries with plump French knots or by stitching down small red beads.
Frame the handkerchief with a simple red running stitch to tie the festive color scheme together, creating a piece that is celebratory yet refined.
23. Master the Art of 3D Flower Petals
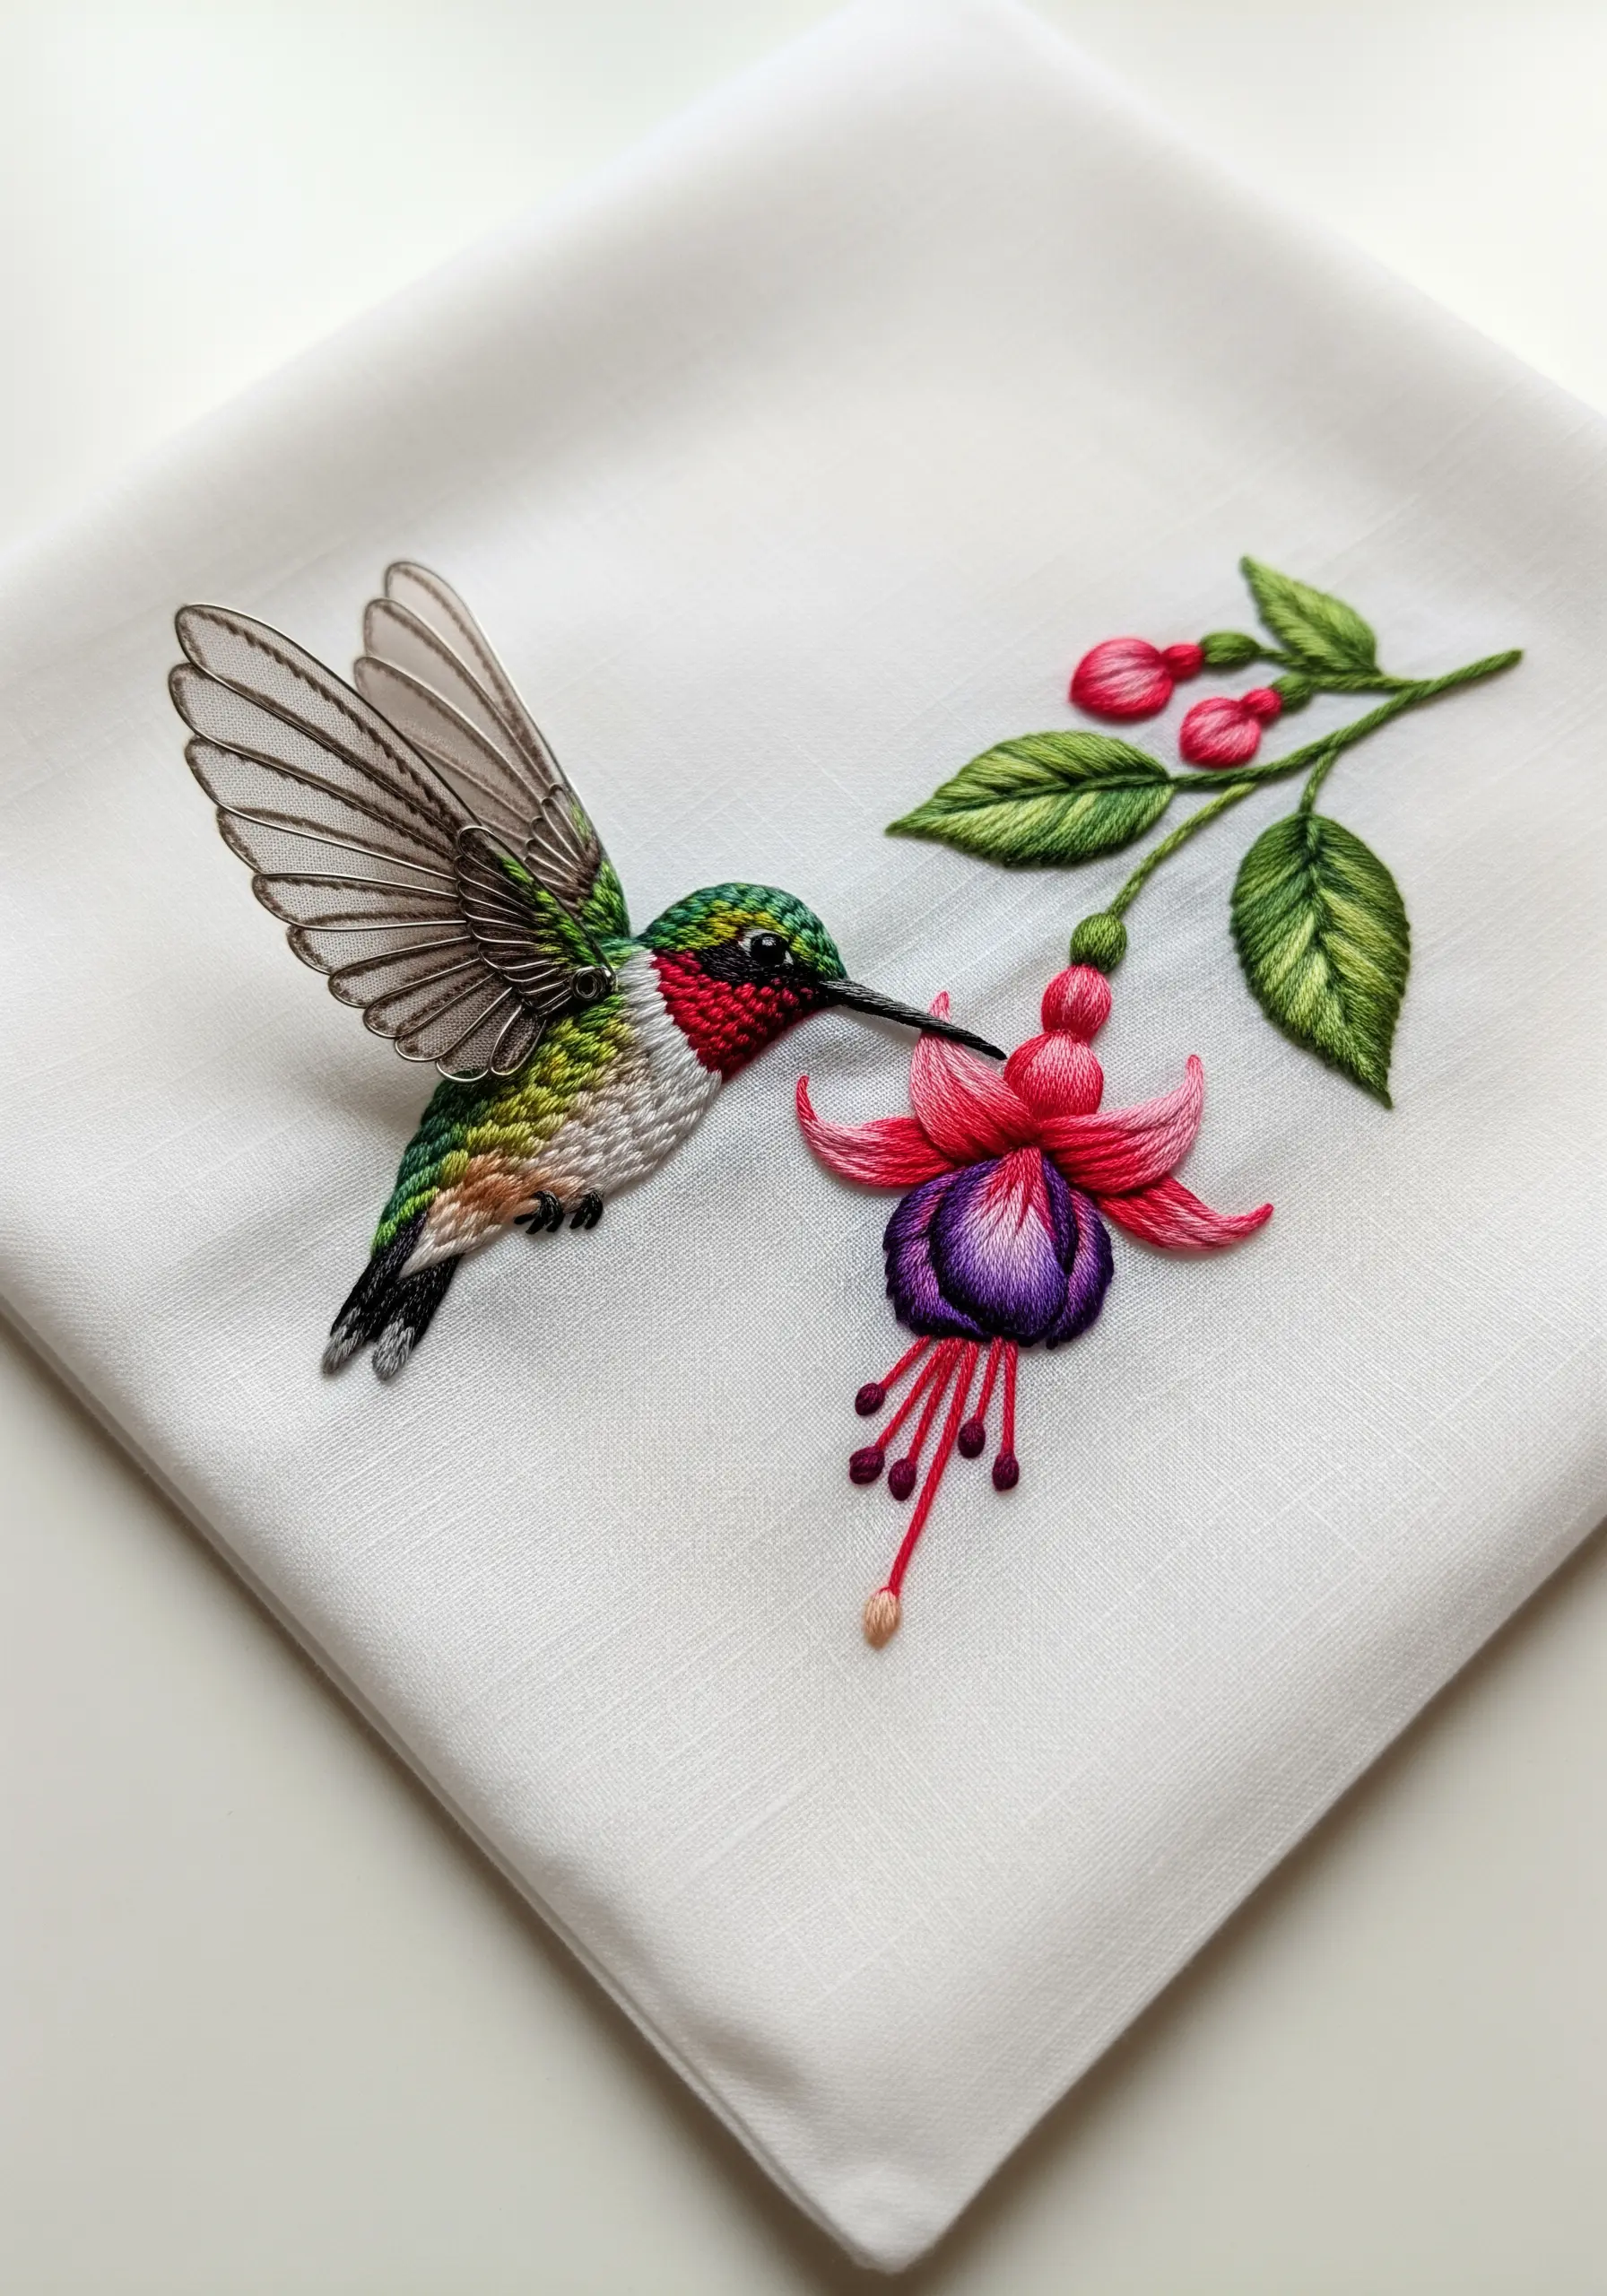
Create stunning, realistic flowers using advanced stumpwork techniques.
Each petal of the fuchsia is stitched individually on a fabric-covered wire frame, using long-and-short stitch to achieve beautiful color blending.
Once complete, the petals are cut out and carefully shaped before being assembled and stitched onto the background fabric.
This method results in breathtakingly lifelike flowers that add unparalleled depth and dimension to your embroidery.
24. Express Movement with Abstract Thread Tails
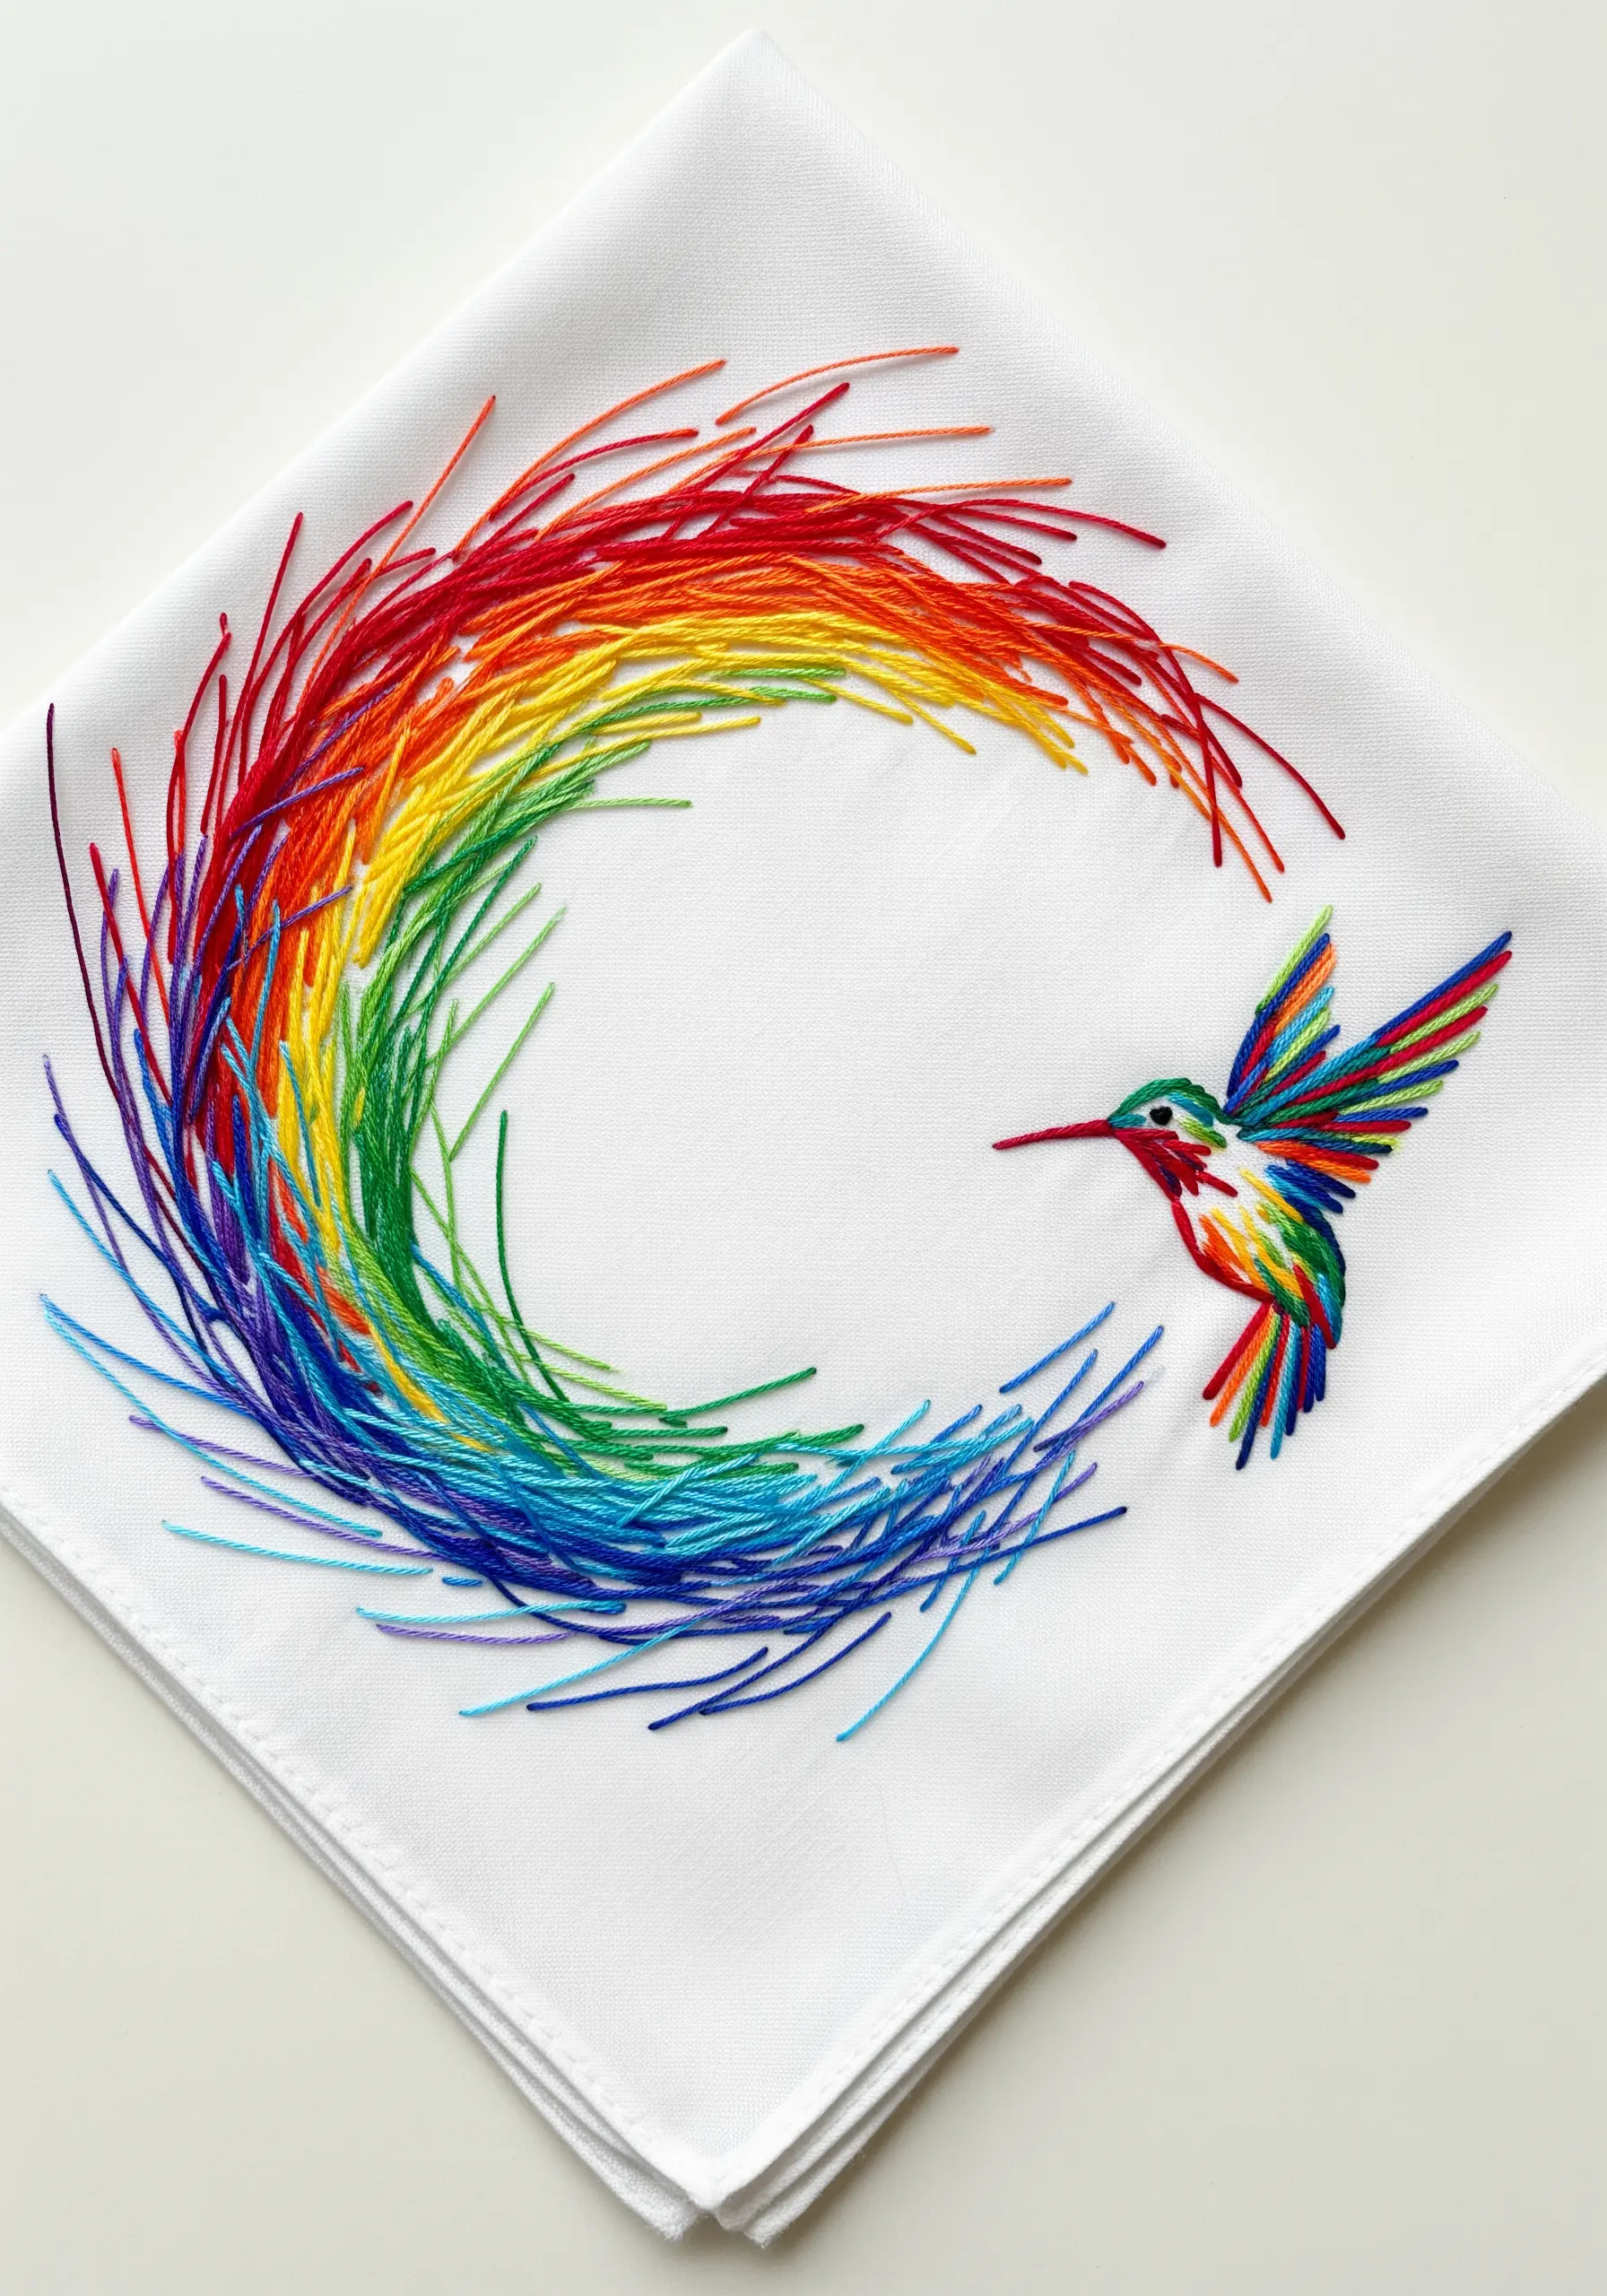
Create a dynamic sense of energy and motion by intentionally leaving your thread tails long and loose.
Stitch an arch of rainbow-colored threads, securing them at one end but leaving the other un-trimmed to create a sweeping, feather-like trail.
Anchor this abstract burst of color with a small, crisply stitched hummingbird, which provides a focal point amidst the creative chaos.
This technique transforms simple stitches into an expressive gesture of flight and color.
25. Craft a Jeweled Masterpiece
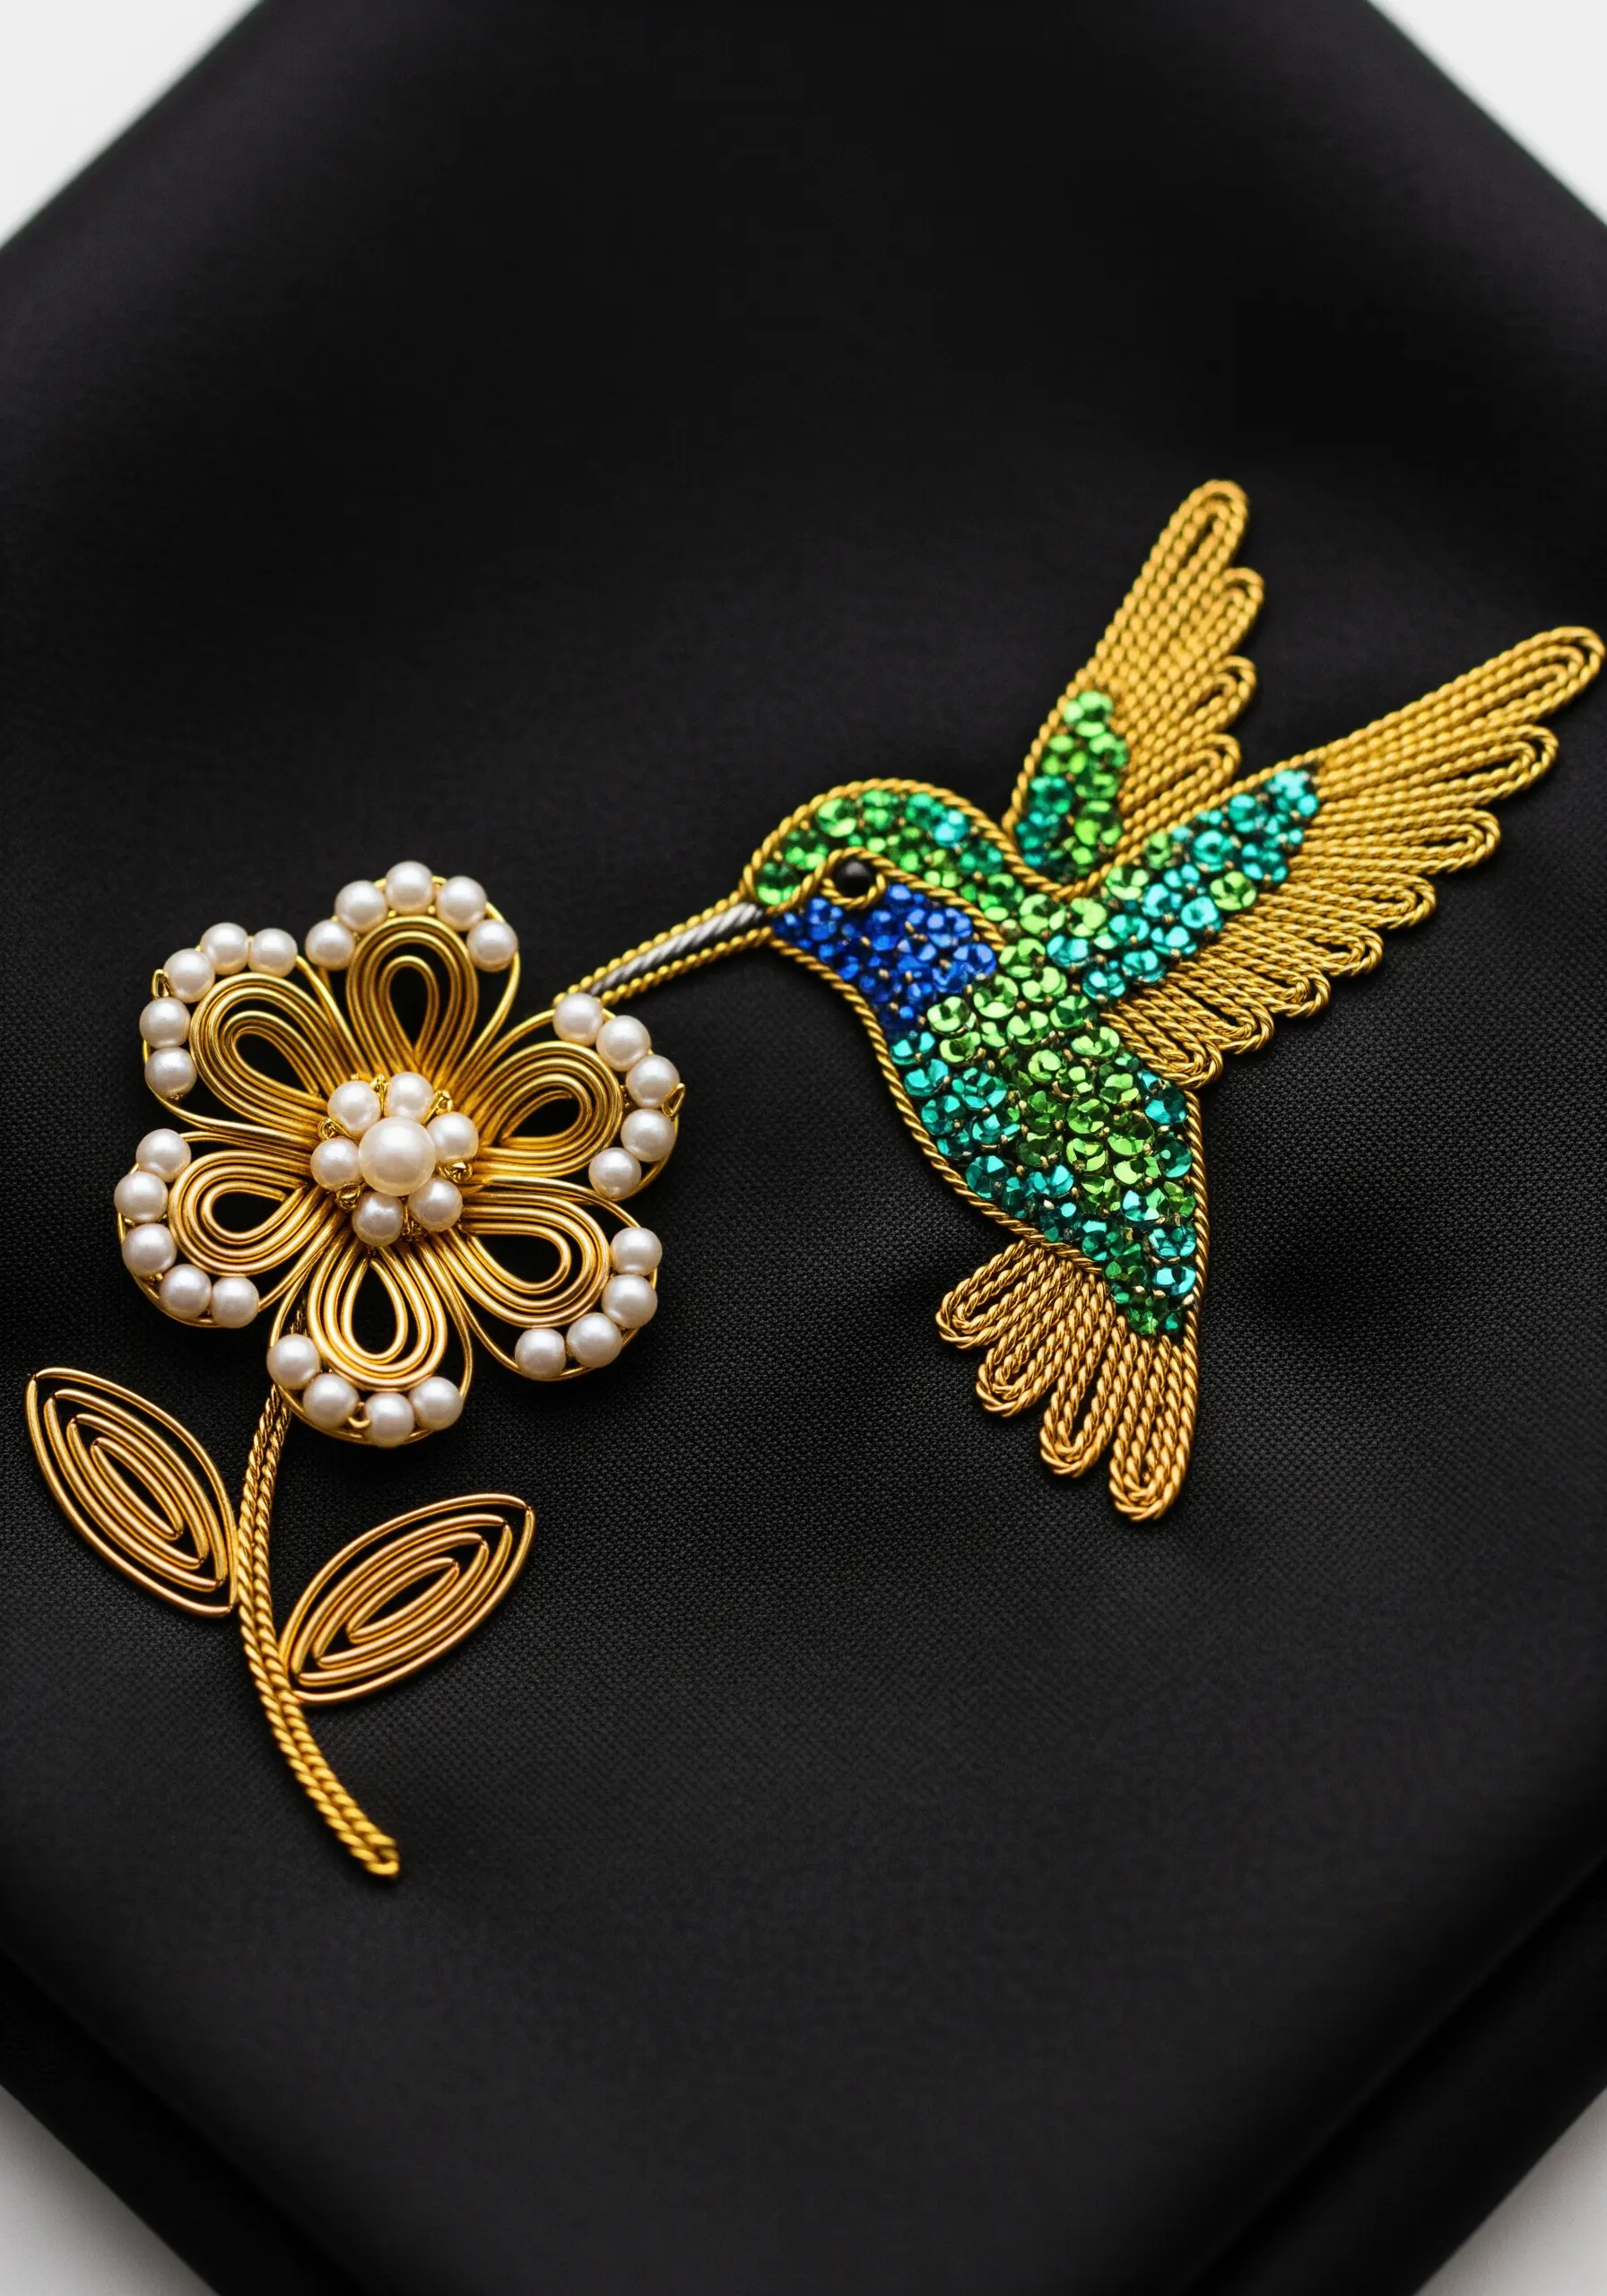
Combine wirework, beading, and crystals to create a piece that feels more like jewelry than traditional embroidery.
Shape fine-gauge gold wire to create the outlines of the bird and flower, then couch it onto the fabric.
Fill the sections with tiny, faceted crystals or seed beads for a pavé effect that catches the light brilliantly.
Use pearls for the flower’s center to add a classic, elegant touch to this luxurious design.
26. Create a Symmetrical and Sentimental Scene

Design a perfectly balanced composition by mirroring your subject.
Stitch two identical hummingbirds facing each other, ensuring your thread painting and color placement are as symmetrical as possible.
Place a single, simple motif between them, like a small heart stitched in a contrasting color, to serve as the central anchor point.
This classic layout creates a feeling of harmony, connection, and romance, making it perfect for thoughtful birthday gifts or anniversary keepsakes.
27. Define Form with Negative Space
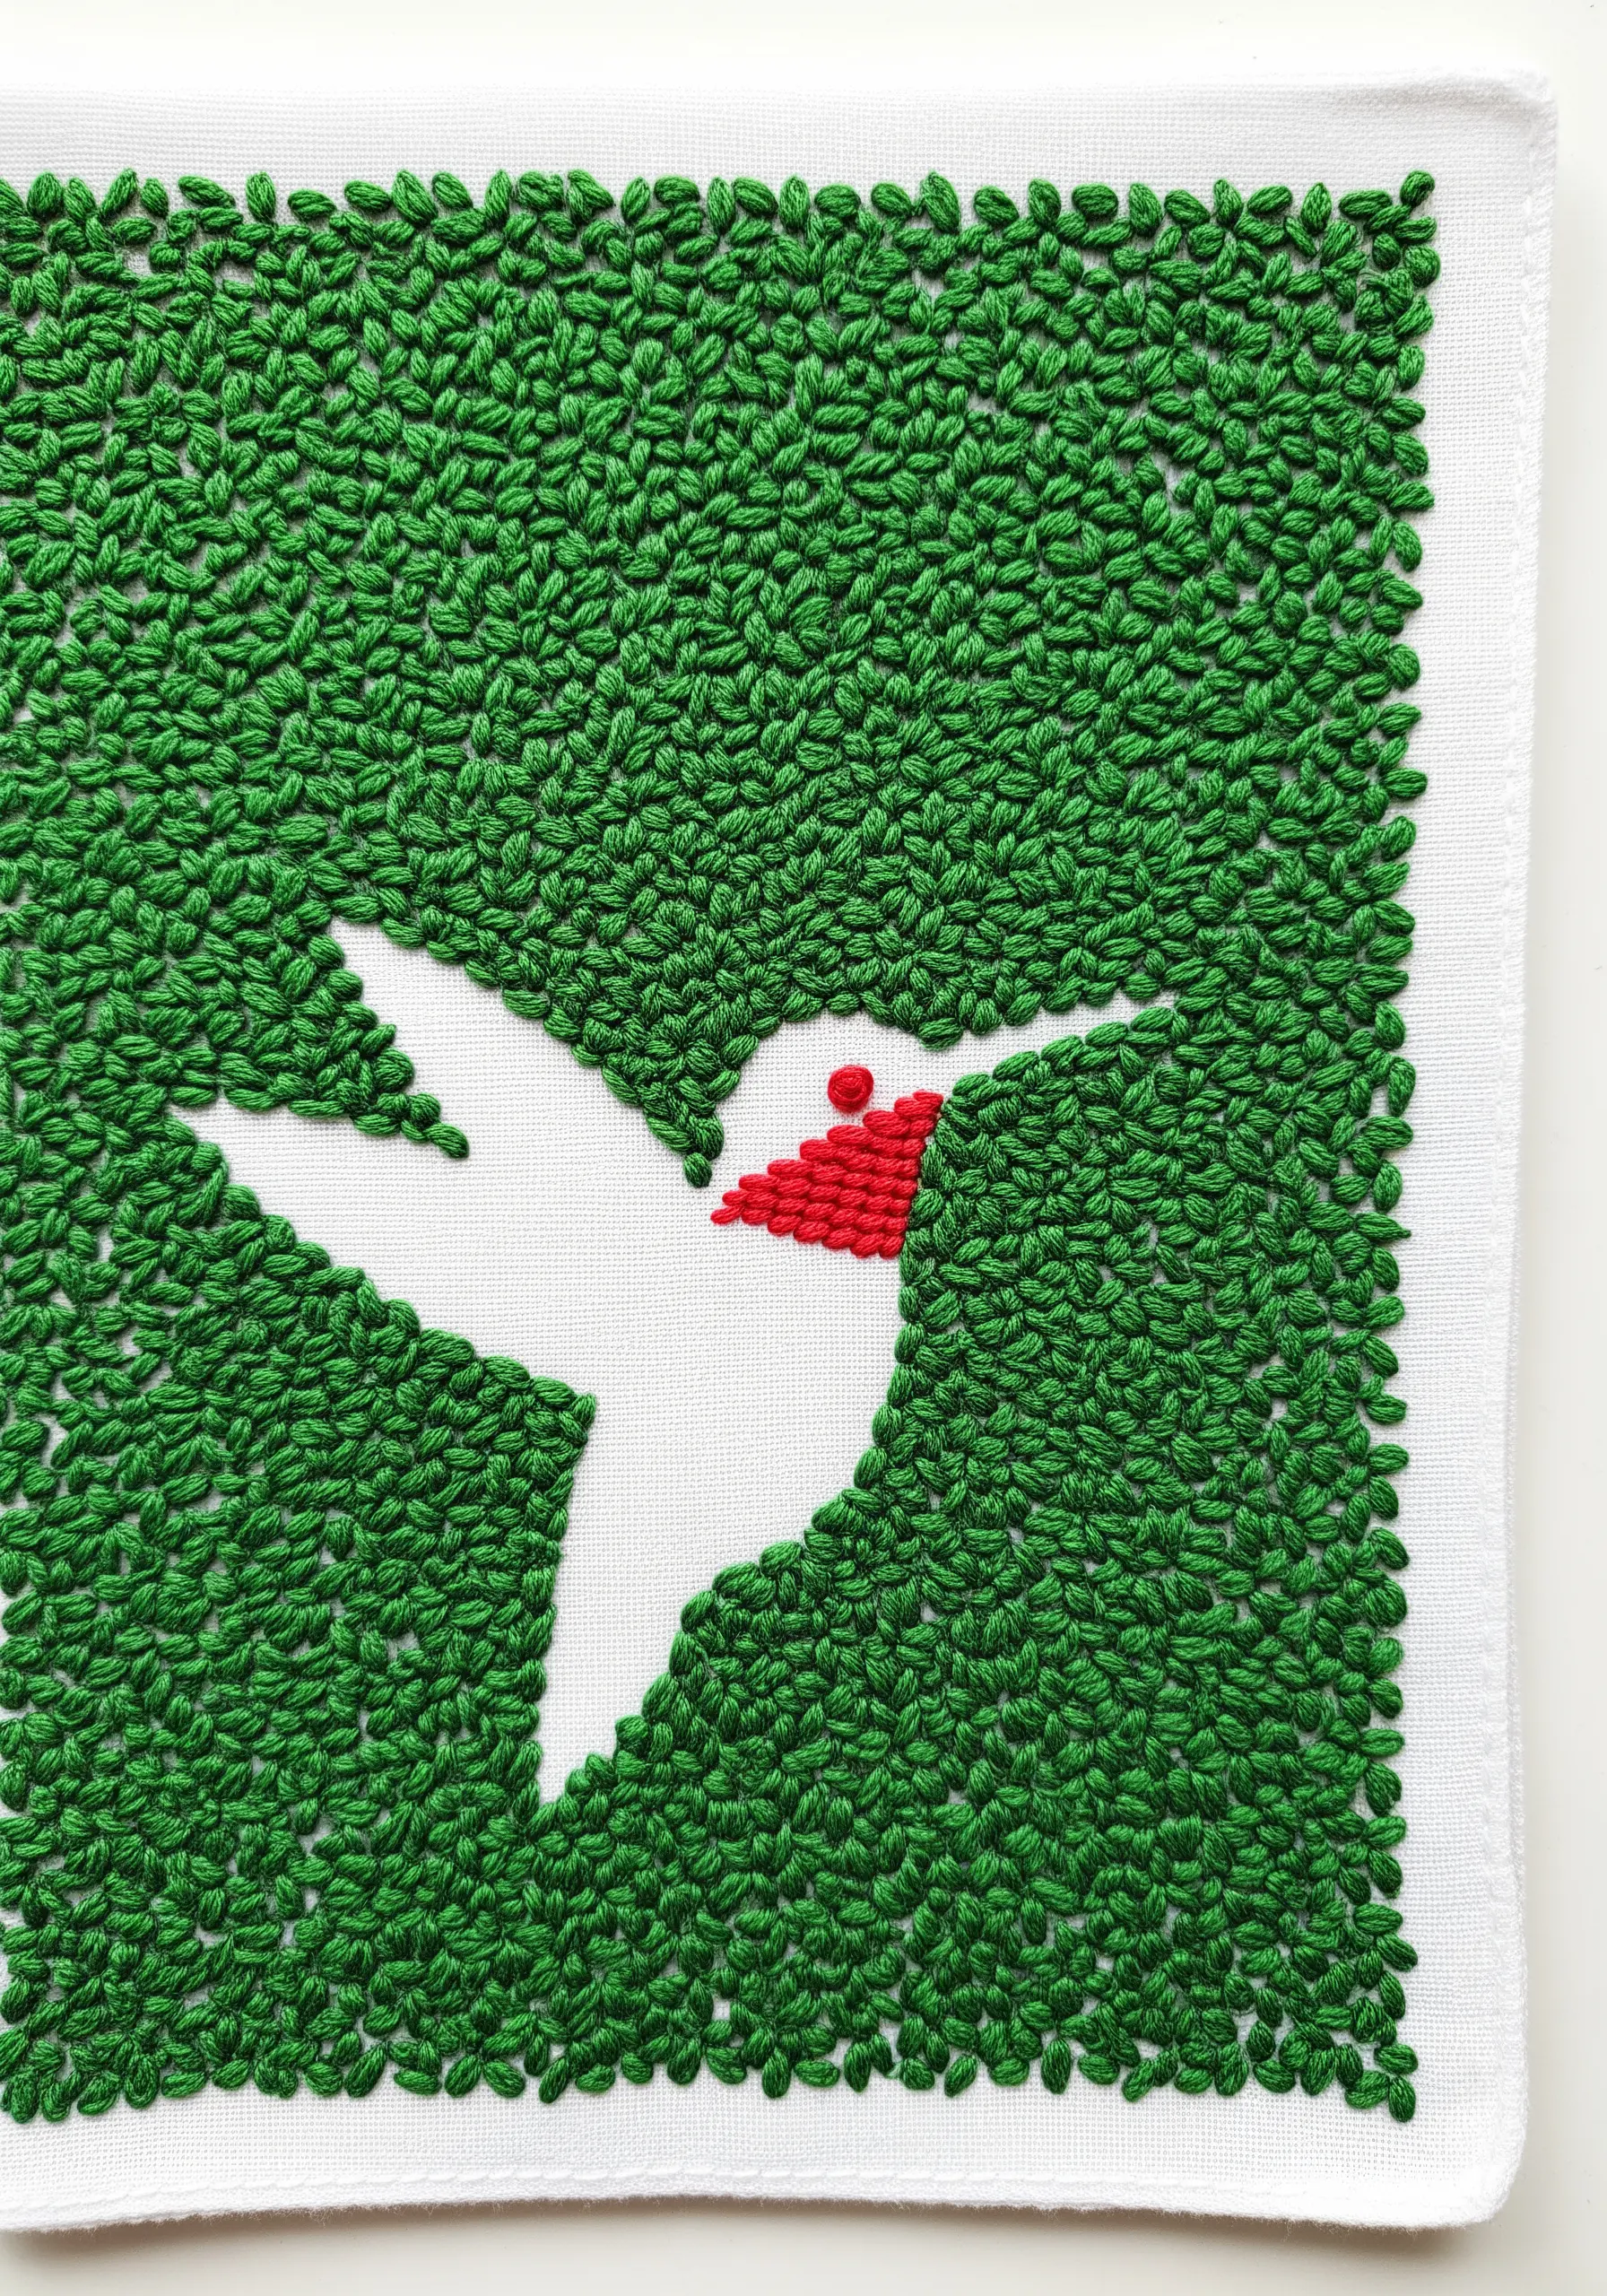
Create your subject not by stitching it, but by stitching the space around it.
Lightly trace the outline of a hummingbird, then fill the entire background with a dense, uniform texture like seed stitch or French knots.
Leave the traced shape of the bird completely empty, allowing the plain fabric to form the silhouette.
Add a single detail, like a tiny red satin-stitched eye, to bring the negative-space creature to life. This is a powerful, modern design technique.
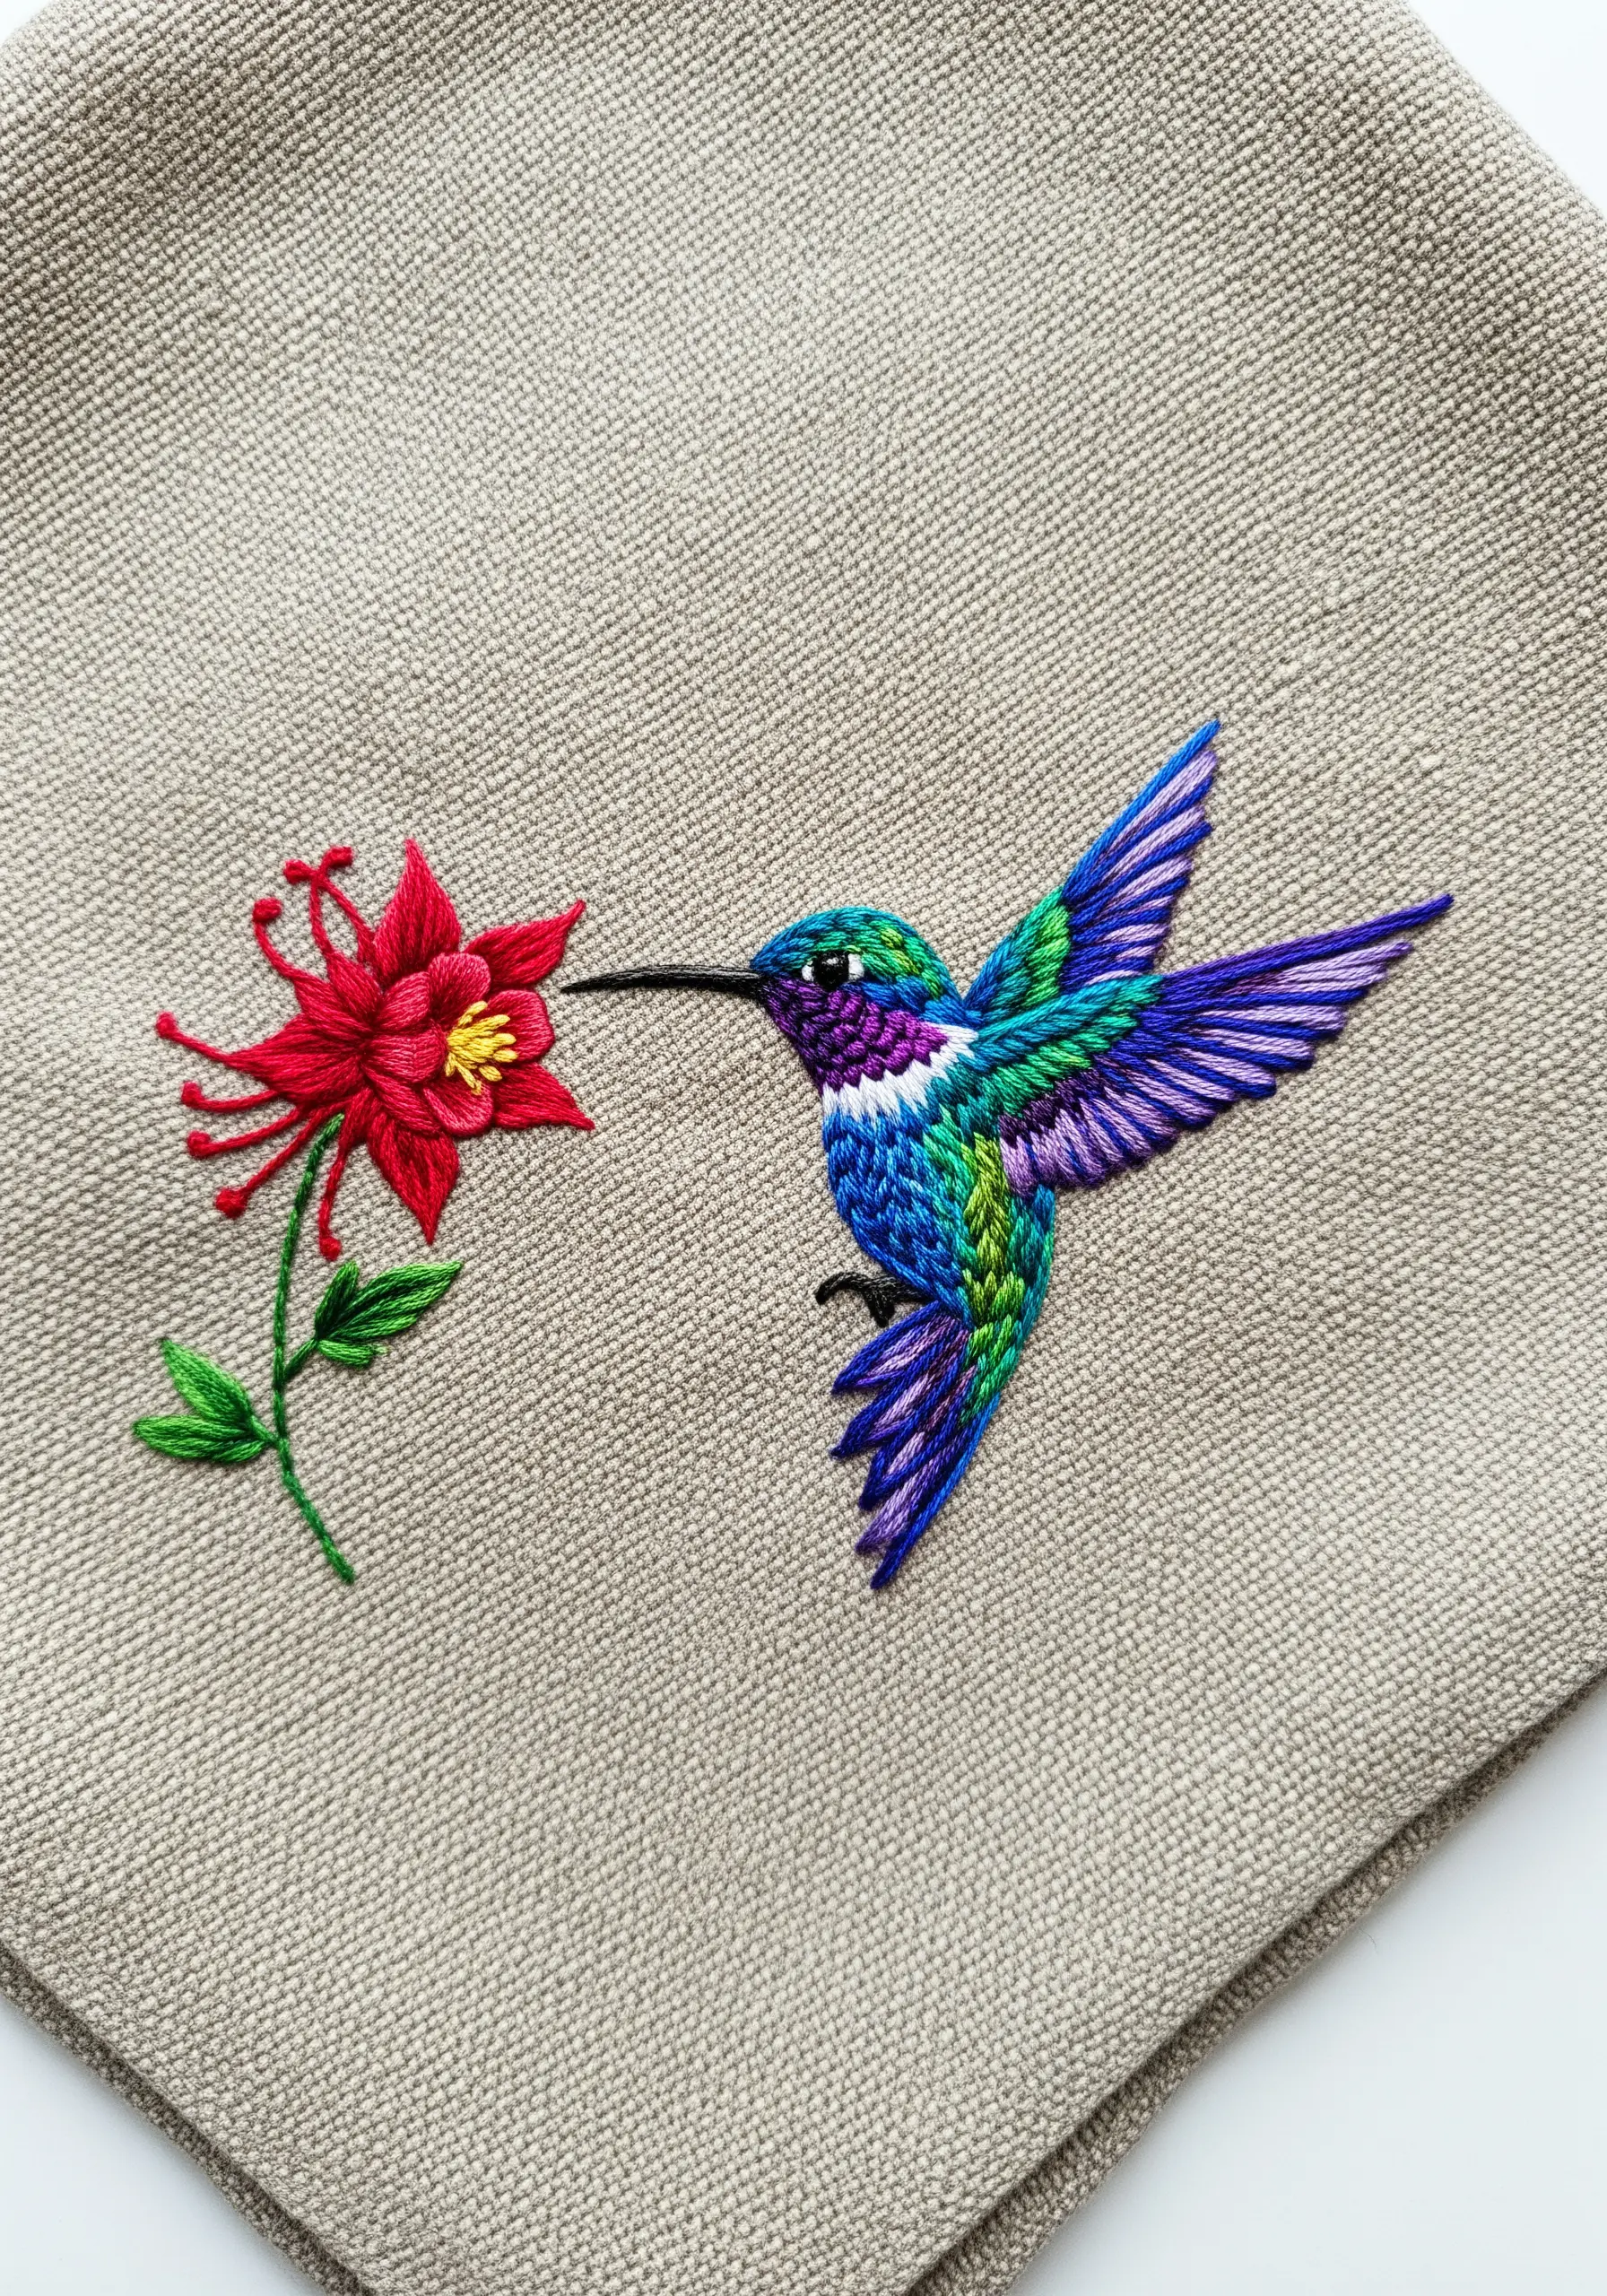
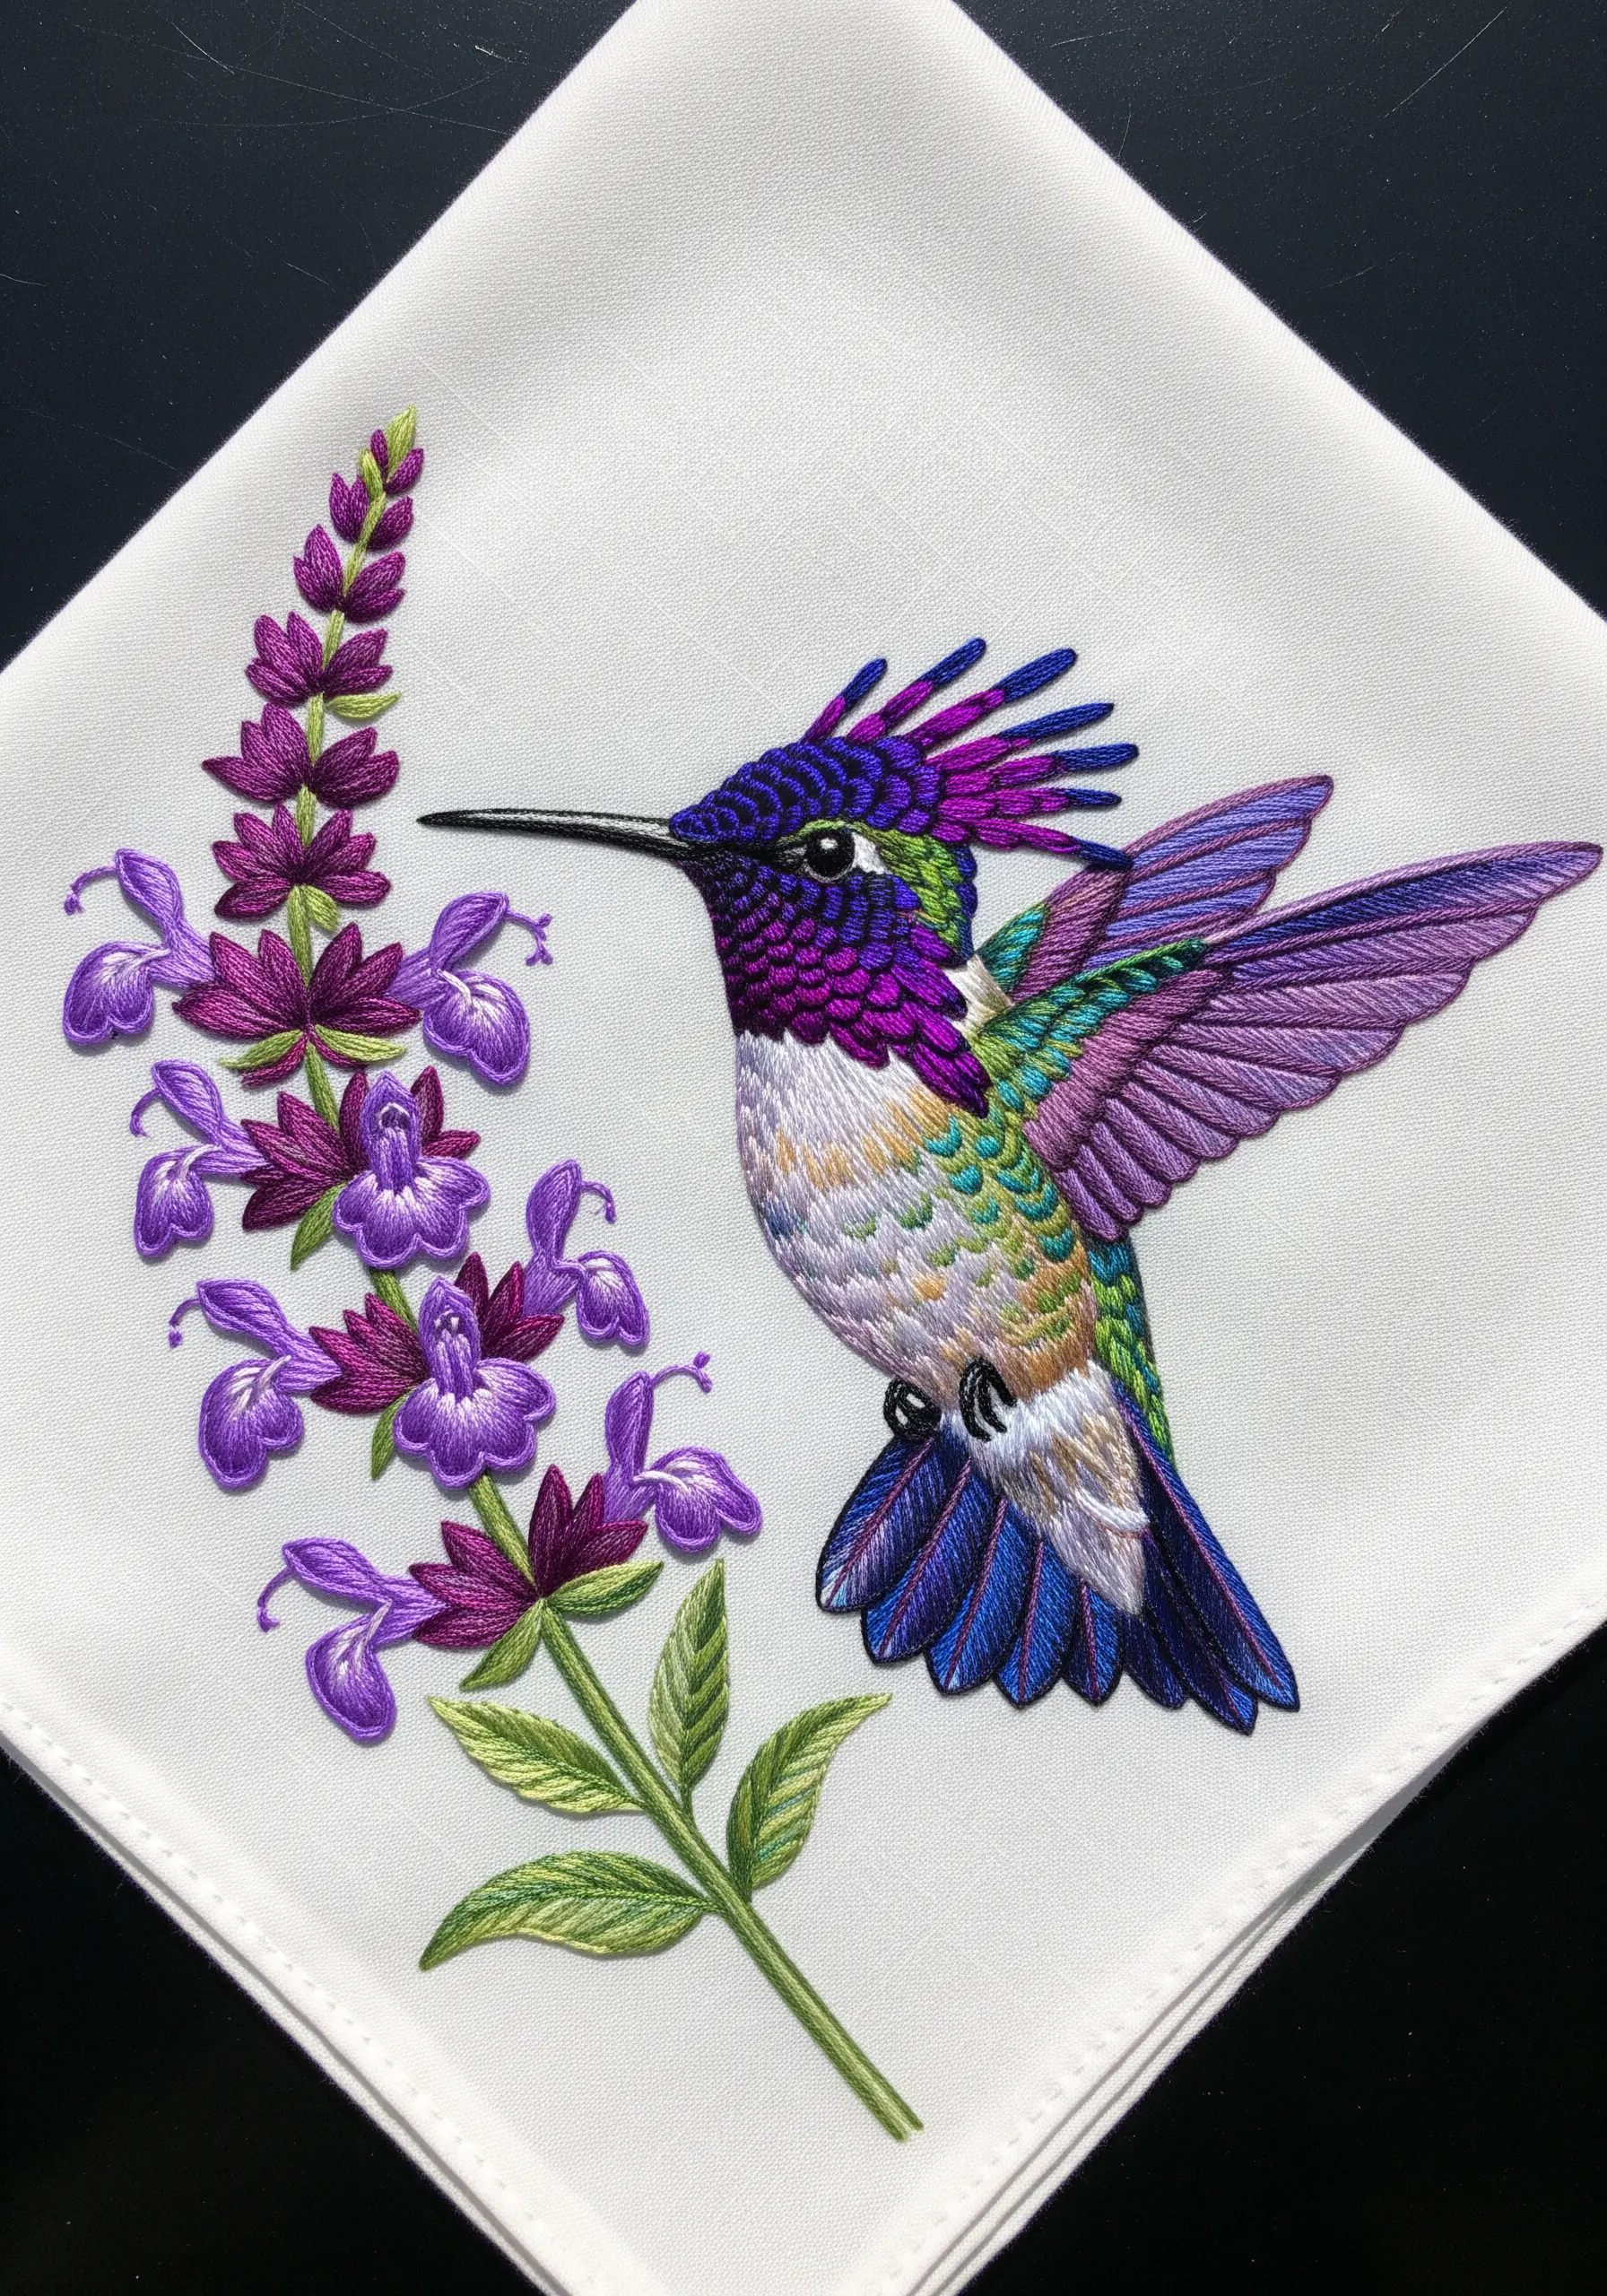
28. Achieve Vibrant Blends on Tropical Flowers
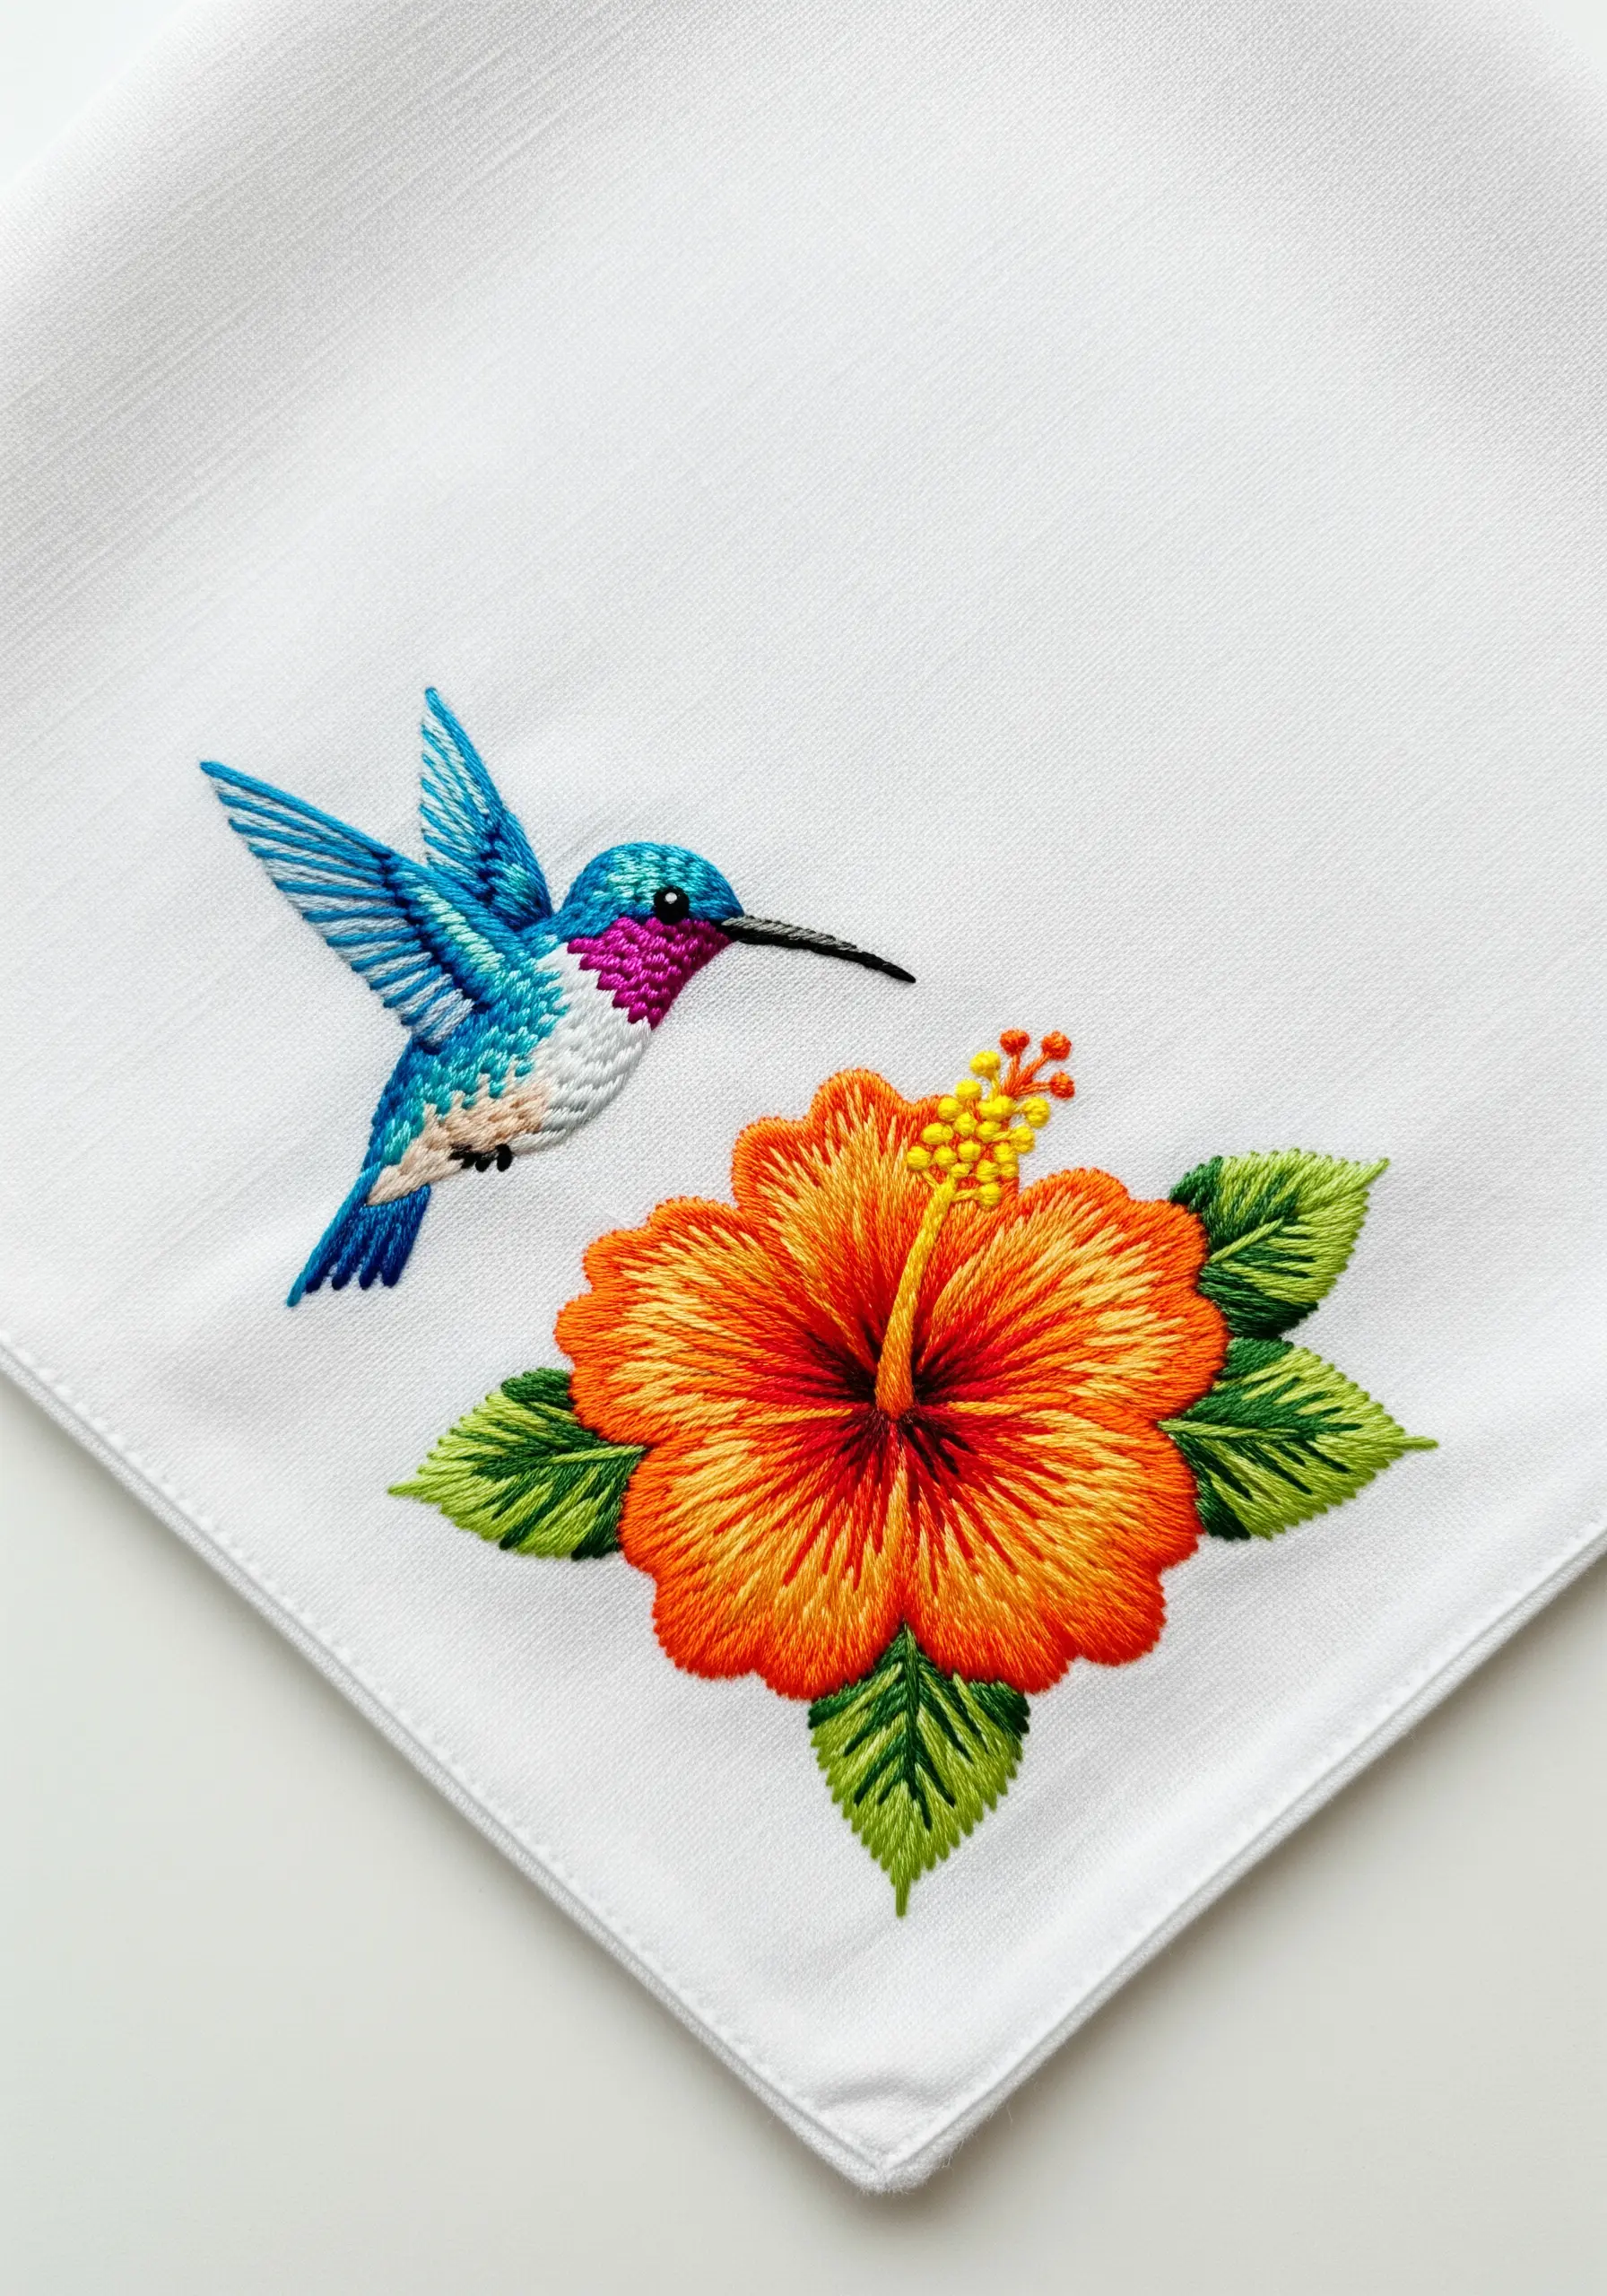
Capture the intense colors of a hibiscus by mastering smooth color transitions with long-and-short stitch.
Work in rings from the outside of the petal inward, blending from orange to yellow toward the center. Keep your stitches angled toward the flower’s center to create natural-looking petal lines.
For the stamen, use a wrapped backstitch or a thicker thread to give it prominence, and finish with a cluster of yellow and orange French knots.
Pairing these vibrant florals with the cooler blues of the hummingbird creates a stunning color contrast.
29. Create an Elegant Tone-on-Tone Design
Explore the subtle beauty of white-on-white embroidery, also known as whitework.
Use different shades of white, cream, and very light gray to create distinction between the hummingbird and the lily of the valley.
Focus on texture to define forms: use a padded satin stitch for the leaves to make them pop, and tiny detached buttonhole stitches for the bell-shaped flowers.
The result is a sophisticated, heirloom-quality piece where texture and shadow play a more important role than color.
30. Isolate Your Subject for Minimalist Impact
Make a single, small embroidered motif the hero by giving it plenty of negative space.
Stitch a detailed, thread-painted hummingbird on a simple branch, but leave the rest of the fabric completely unadorned.
This minimalist approach draws the eye directly to the intricate stitching and the subtle color shifts in the bird’s feathers.
It’s a confident design choice that proves a small, well-executed piece can have more impact than a large, busy one, perfect for tiny embroidery patterns that make your clothes look custom-made.
31. Add Elegance with Trailing Feathers

Create a sense of graceful movement by adding long, decorative tail feathers.
Use a fine metallic silver thread and a whipped backstitch or chain stitch to create the long, trailing lines, ensuring they have a gentle, organic curve.
This stylized element transforms a realistic bird into a more fantastical, elegant creature.
Echo the accent color from your main design—in this case, red—in a small detail in the corner, like a simple drawn thread work edge, to create a cohesive look.
32. Paint with Thread in Pastel Rainbows

Instead of realistic colors, opt for a dreamy, imaginative palette.
Use soft pastel shades of pink, yellow, blue, and lavender to thread-paint the hummingbird’s wings and body.
Place complementary colors next to each other (like yellow and purple) to create gentle contrast and visual interest.
This approach transforms the bird into a magical, whimsical creature and pairs beautifully with simple, classic botanicals like a daisy.
33. Contrast a Dark Background with Luminous Florals
Make light-colored subjects appear to glow by placing them on a dark, matte fabric like black linen or cotton.
For the orchid, use a padded satin stitch with white and pale pink threads to give the petals a raised, sculptural quality that catches the light.
The deep black background absorbs light, making the jewel-toned hummingbird and the luminous orchid the absolute stars of the show.
This dramatic contrast is a professional technique for creating visually stunning pieces.


