

You have the threads, the fabric, and the desire to create something beautiful for your home. But perhaps you feel that your work, while lovely, could have a little more… intention. A little more of that quiet, polished confidence you see in pieces you admire.
The secret isn’t about learning hundreds of complex stitches or buying expensive materials. It’s about refining your approach—thinking not just about the *what*, but the *how* and the *why*. It’s in the way a stitch direction can suggest movement, how negative space can feel as powerful as a dense pattern, or how a single, well-placed detail can transform an ordinary object.
This collection is designed to be your guide. It’s an invitation to look closer, to experiment with texture and subtlety, and to trust that the most profound statements are often made with the simplest, most thoughtful gestures. Let’s begin.
1. Render Organic Flow with Directional Stitching
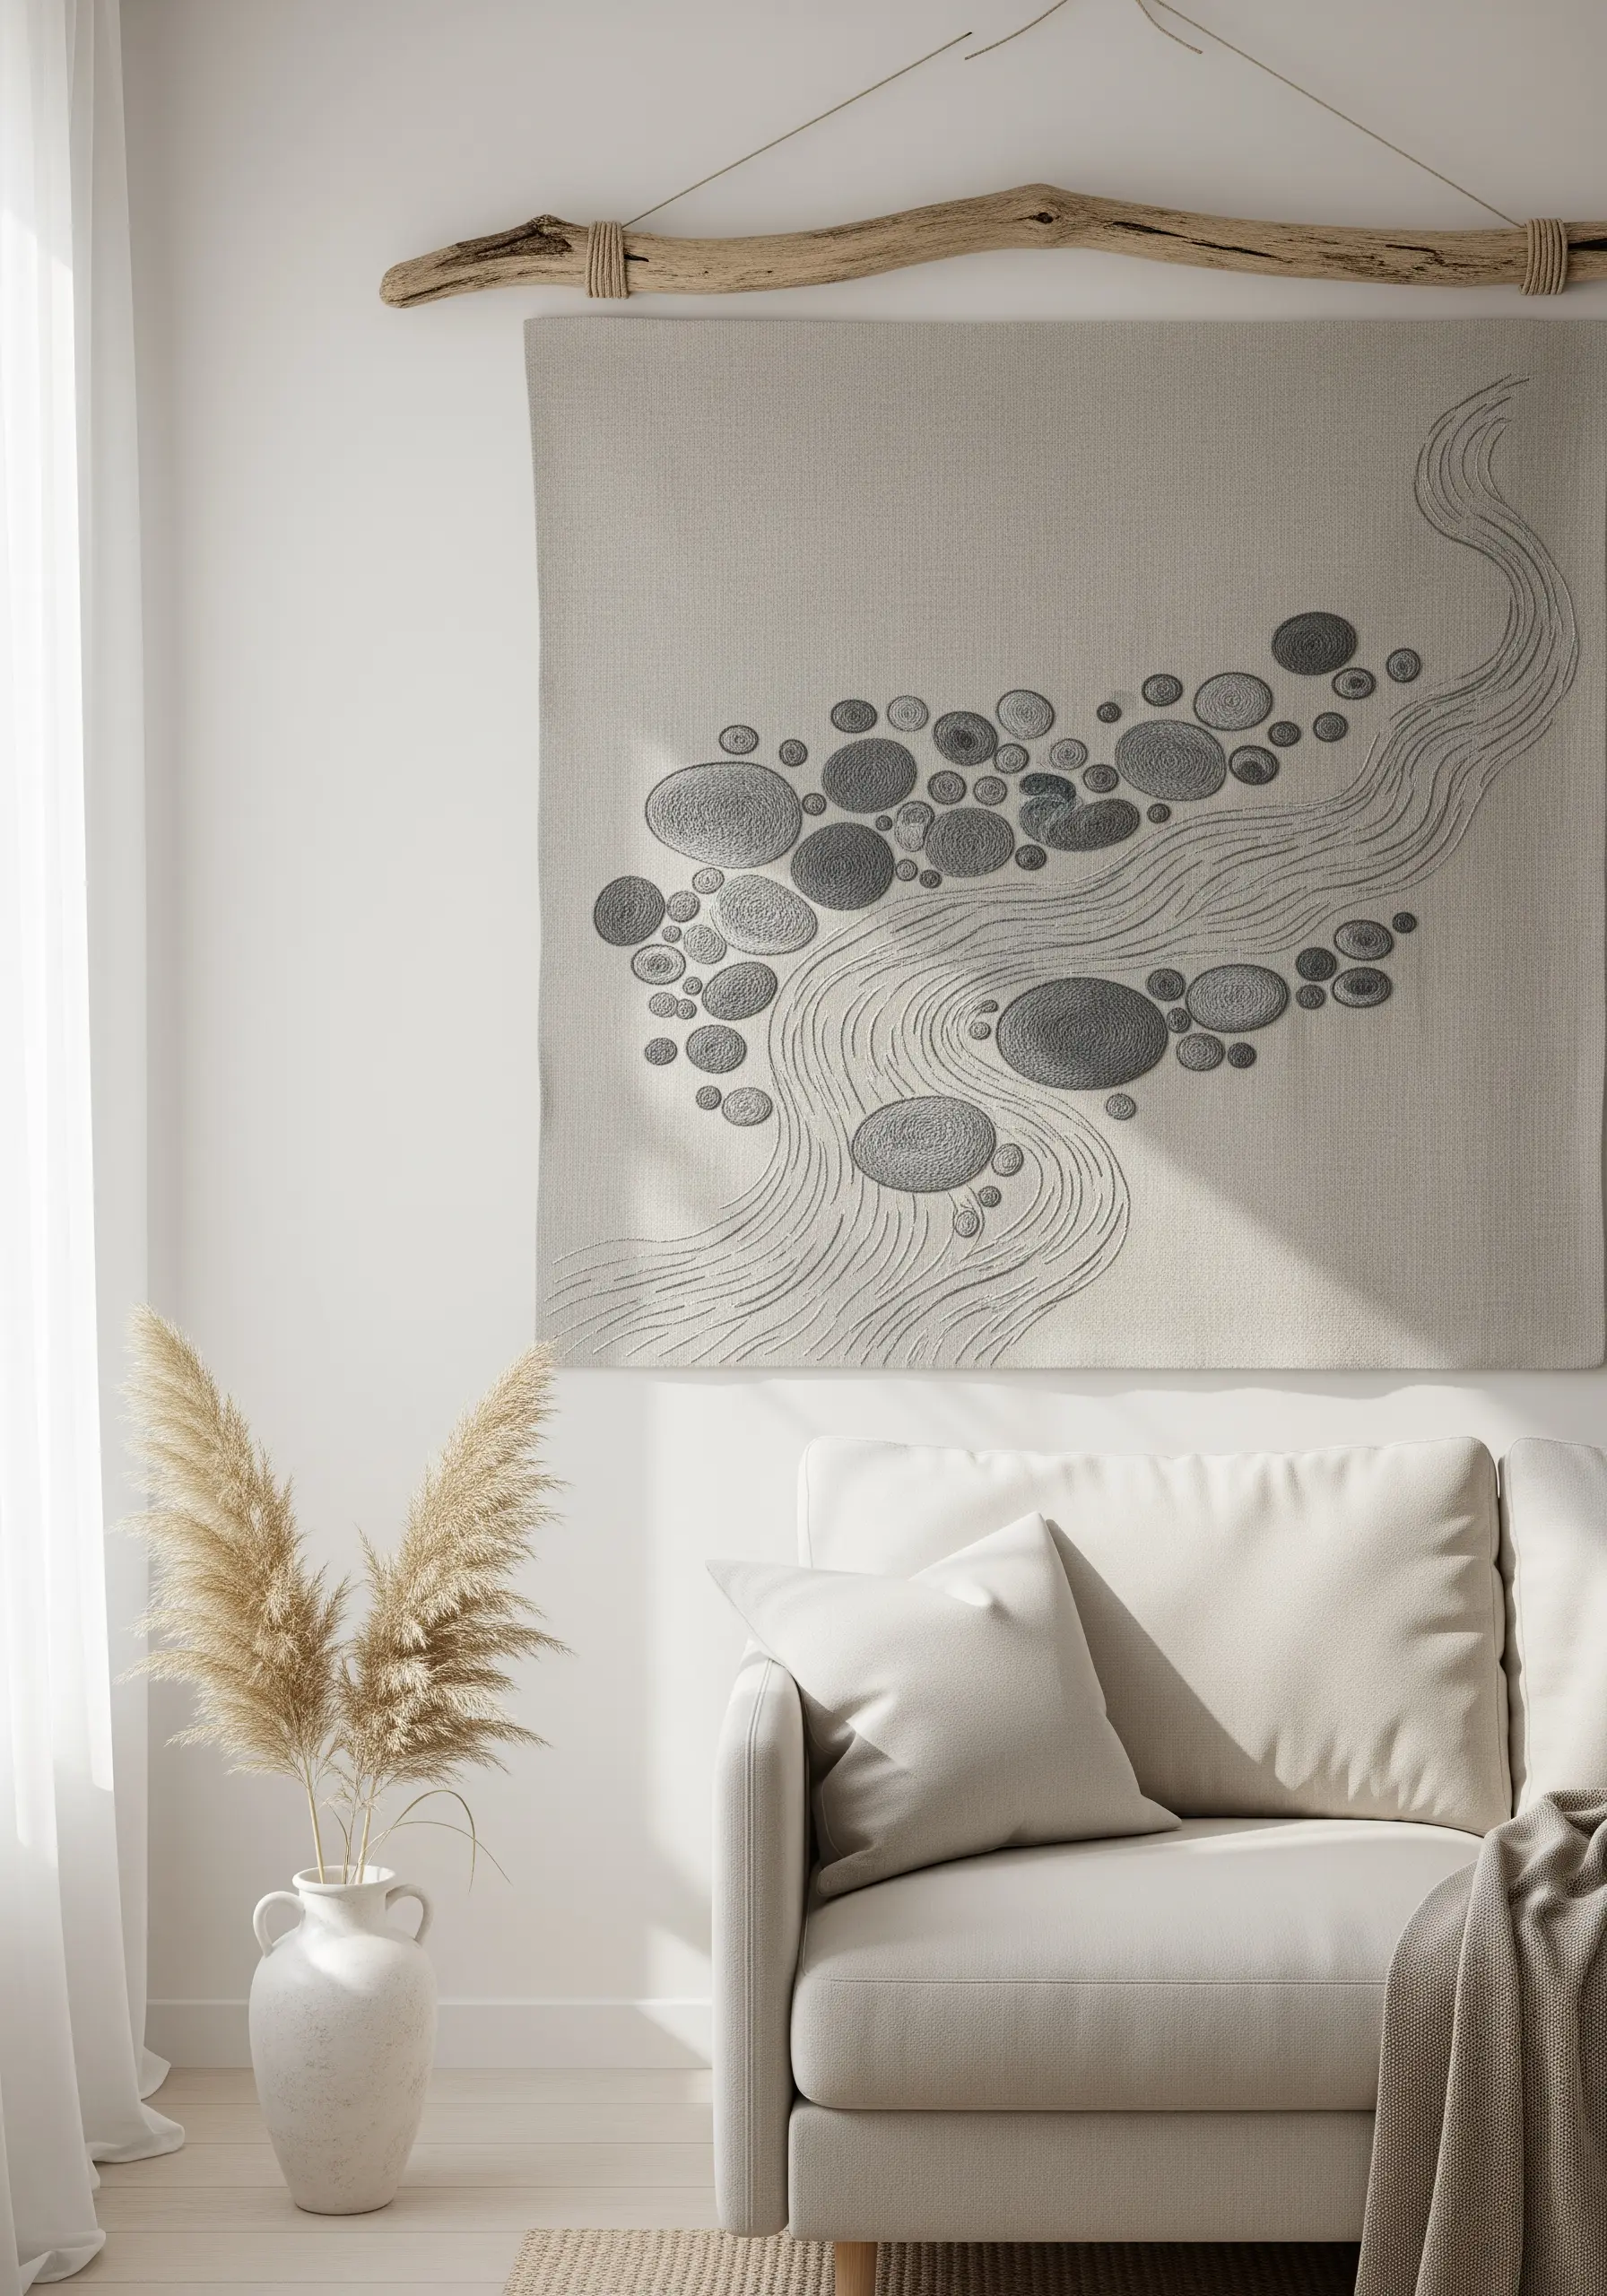
To create the illusion of flowing water or shifting landscapes, use long, parallel running stitches that follow the curves of your design.
For the solid ‘stone’ shapes, fill them with a dense satin stitch worked in a contrasting direction, such as horizontal fills against vertical lines.
This contrast in stitch direction creates a subtle tension and visual interest, making the entire piece feel more dynamic without adding a single new color.
The key is letting the direction of your needle guide the viewer’s eye through the abstract thread landscapes.
2. Isolate Botanicals for Graphic Impact
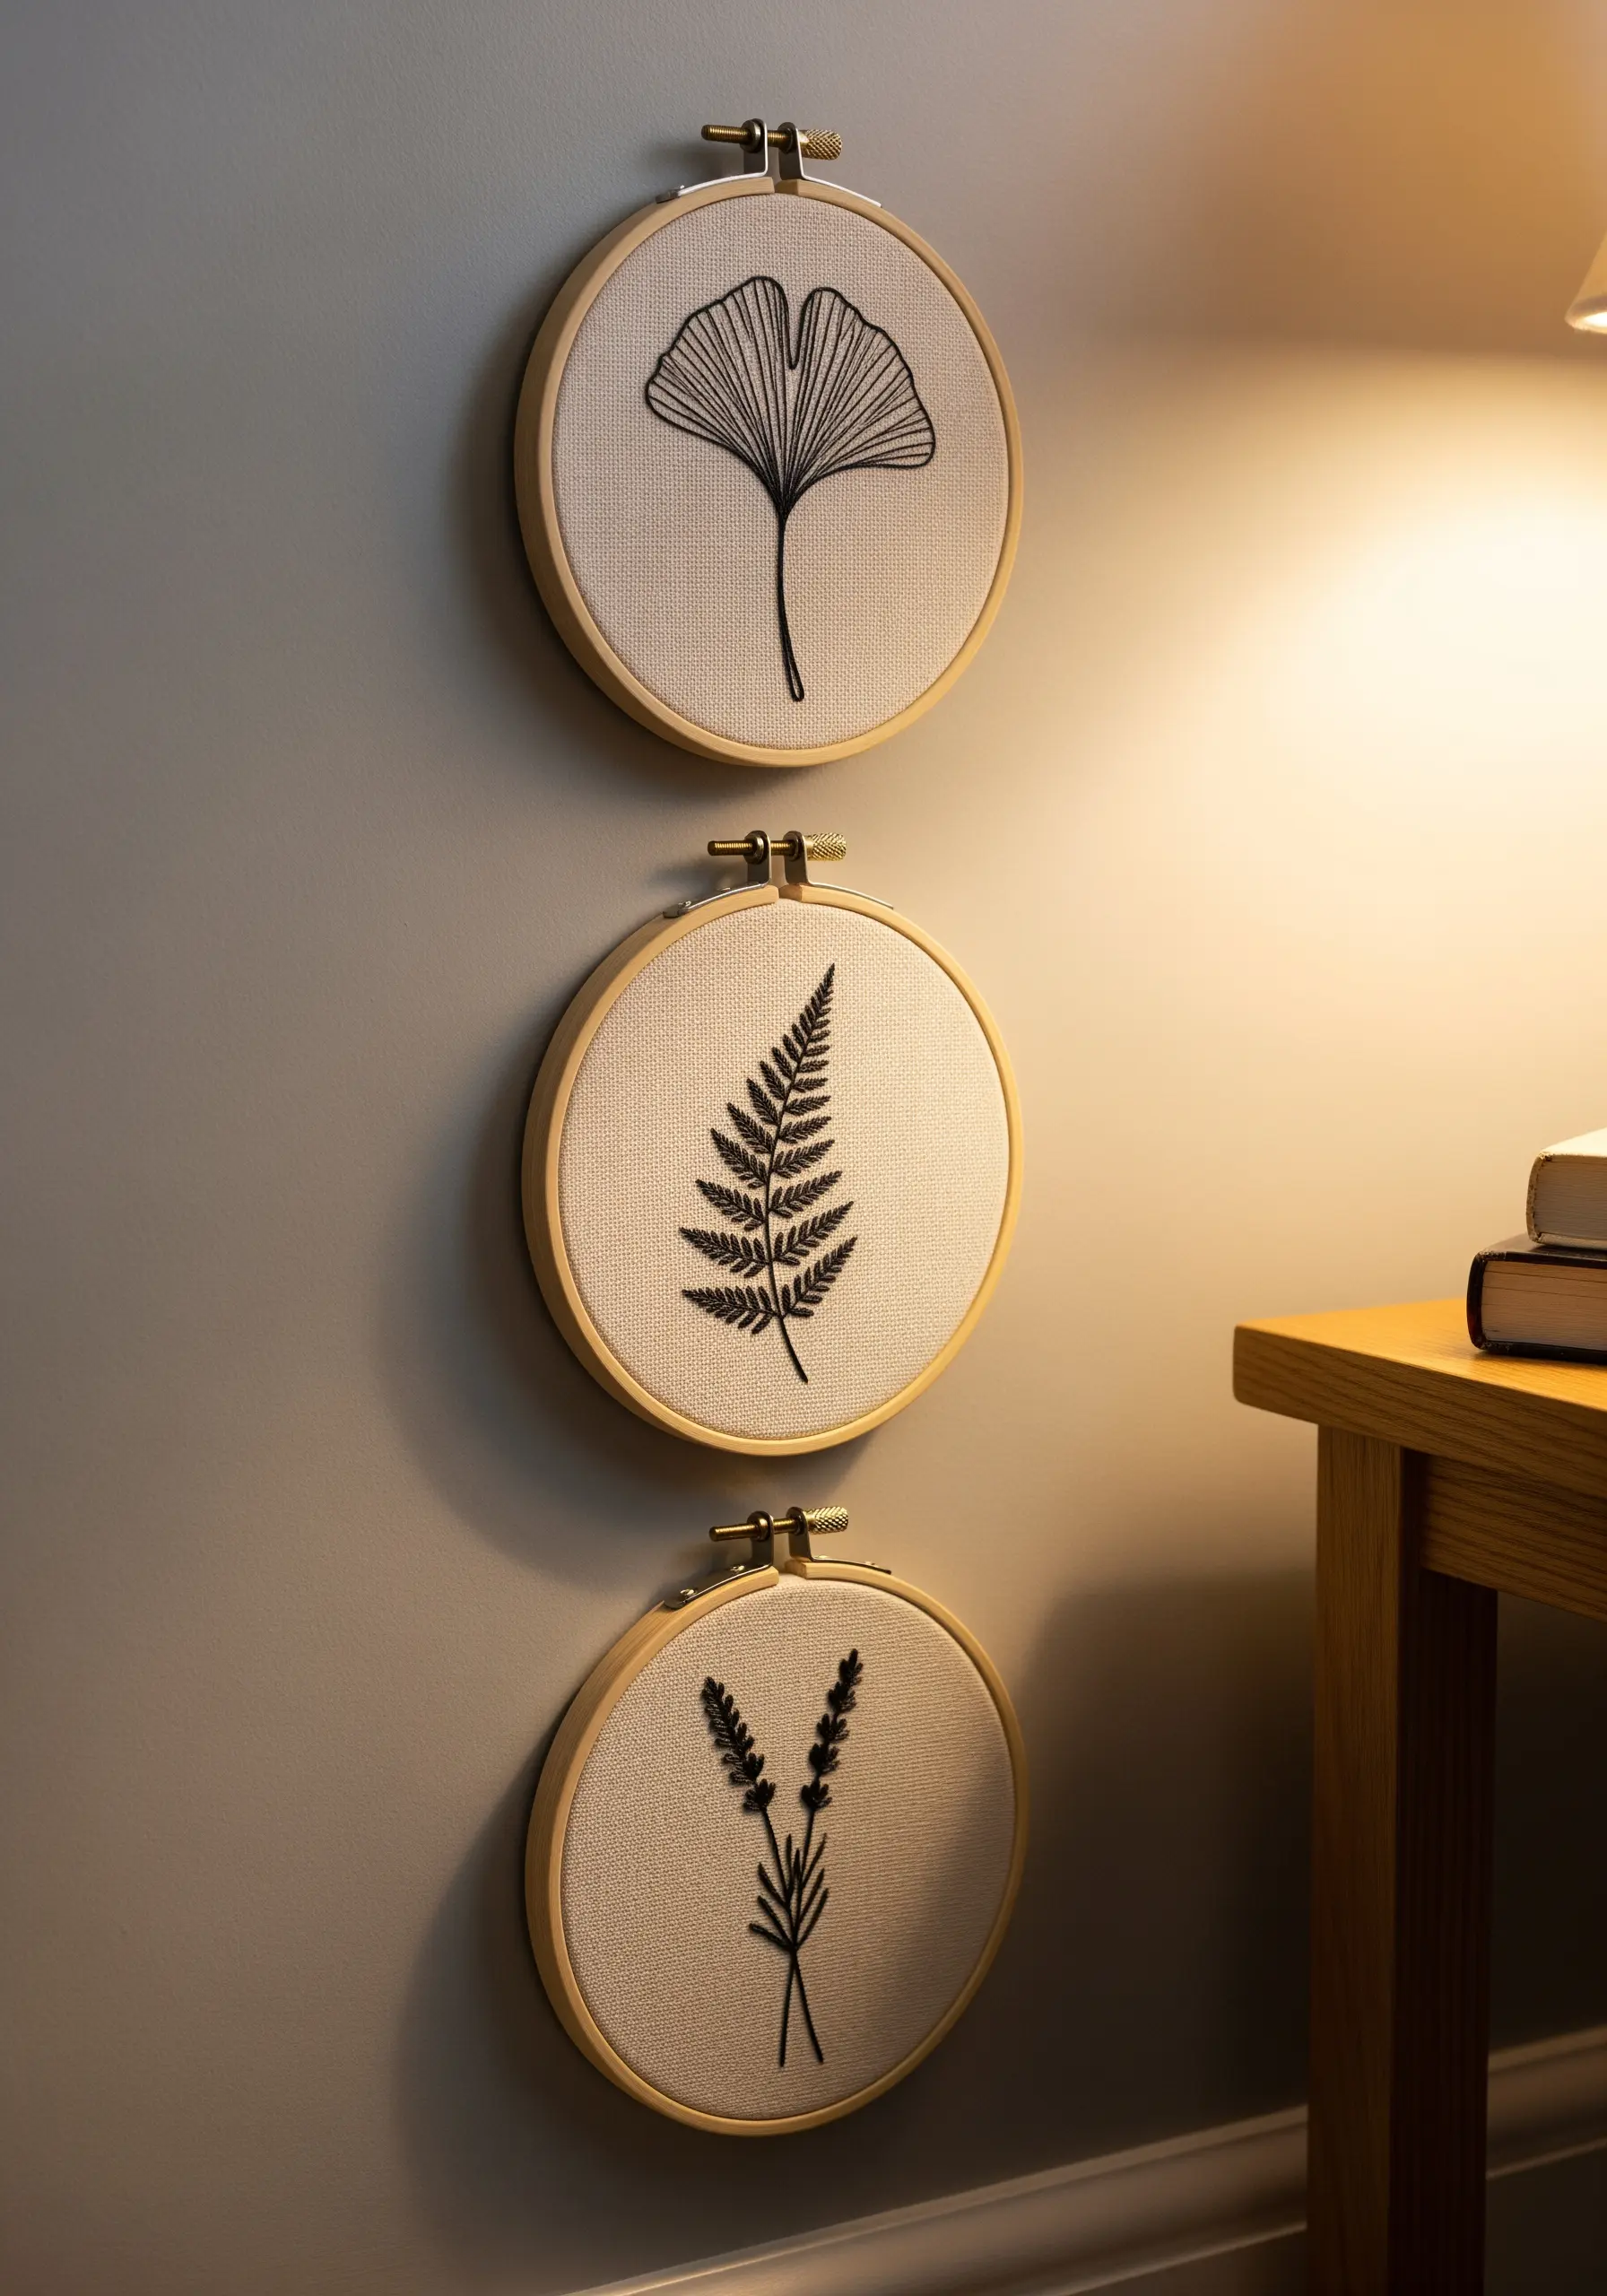
When working with detailed botanical subjects like ferns or ginkgo leaves, resist the urge to add more elements.
Instead, center a single motif in the hoop, leaving generous negative space around it.
Use a fine, sharp backstitch or stem stitch with just two strands of thread to achieve crisp, clean lines that mimic a delicate ink drawing.
This technique turns simple line work into sophisticated minimal botanical patterns, proving that restraint is often more powerful than complexity.
3. Adapt Your Stitch for High-Texture Fabrics

Embroidering on heavily textured fabrics like boucle, sherpa, or fleece requires a different approach than stitching on smooth linen.
Avoid delicate stitches that will get lost in the pile; instead, choose a bold, simple chain stitch or a thick stem stitch for your outlines.
Use a full six strands of floss or even a fine wool thread to ensure the design sits prominently on the surface rather than sinking into it.
This method ensures your adorable forest animal embroidery ideas remain clear and defined.
4. Couch Heavy Yarn for Sculptural Lines
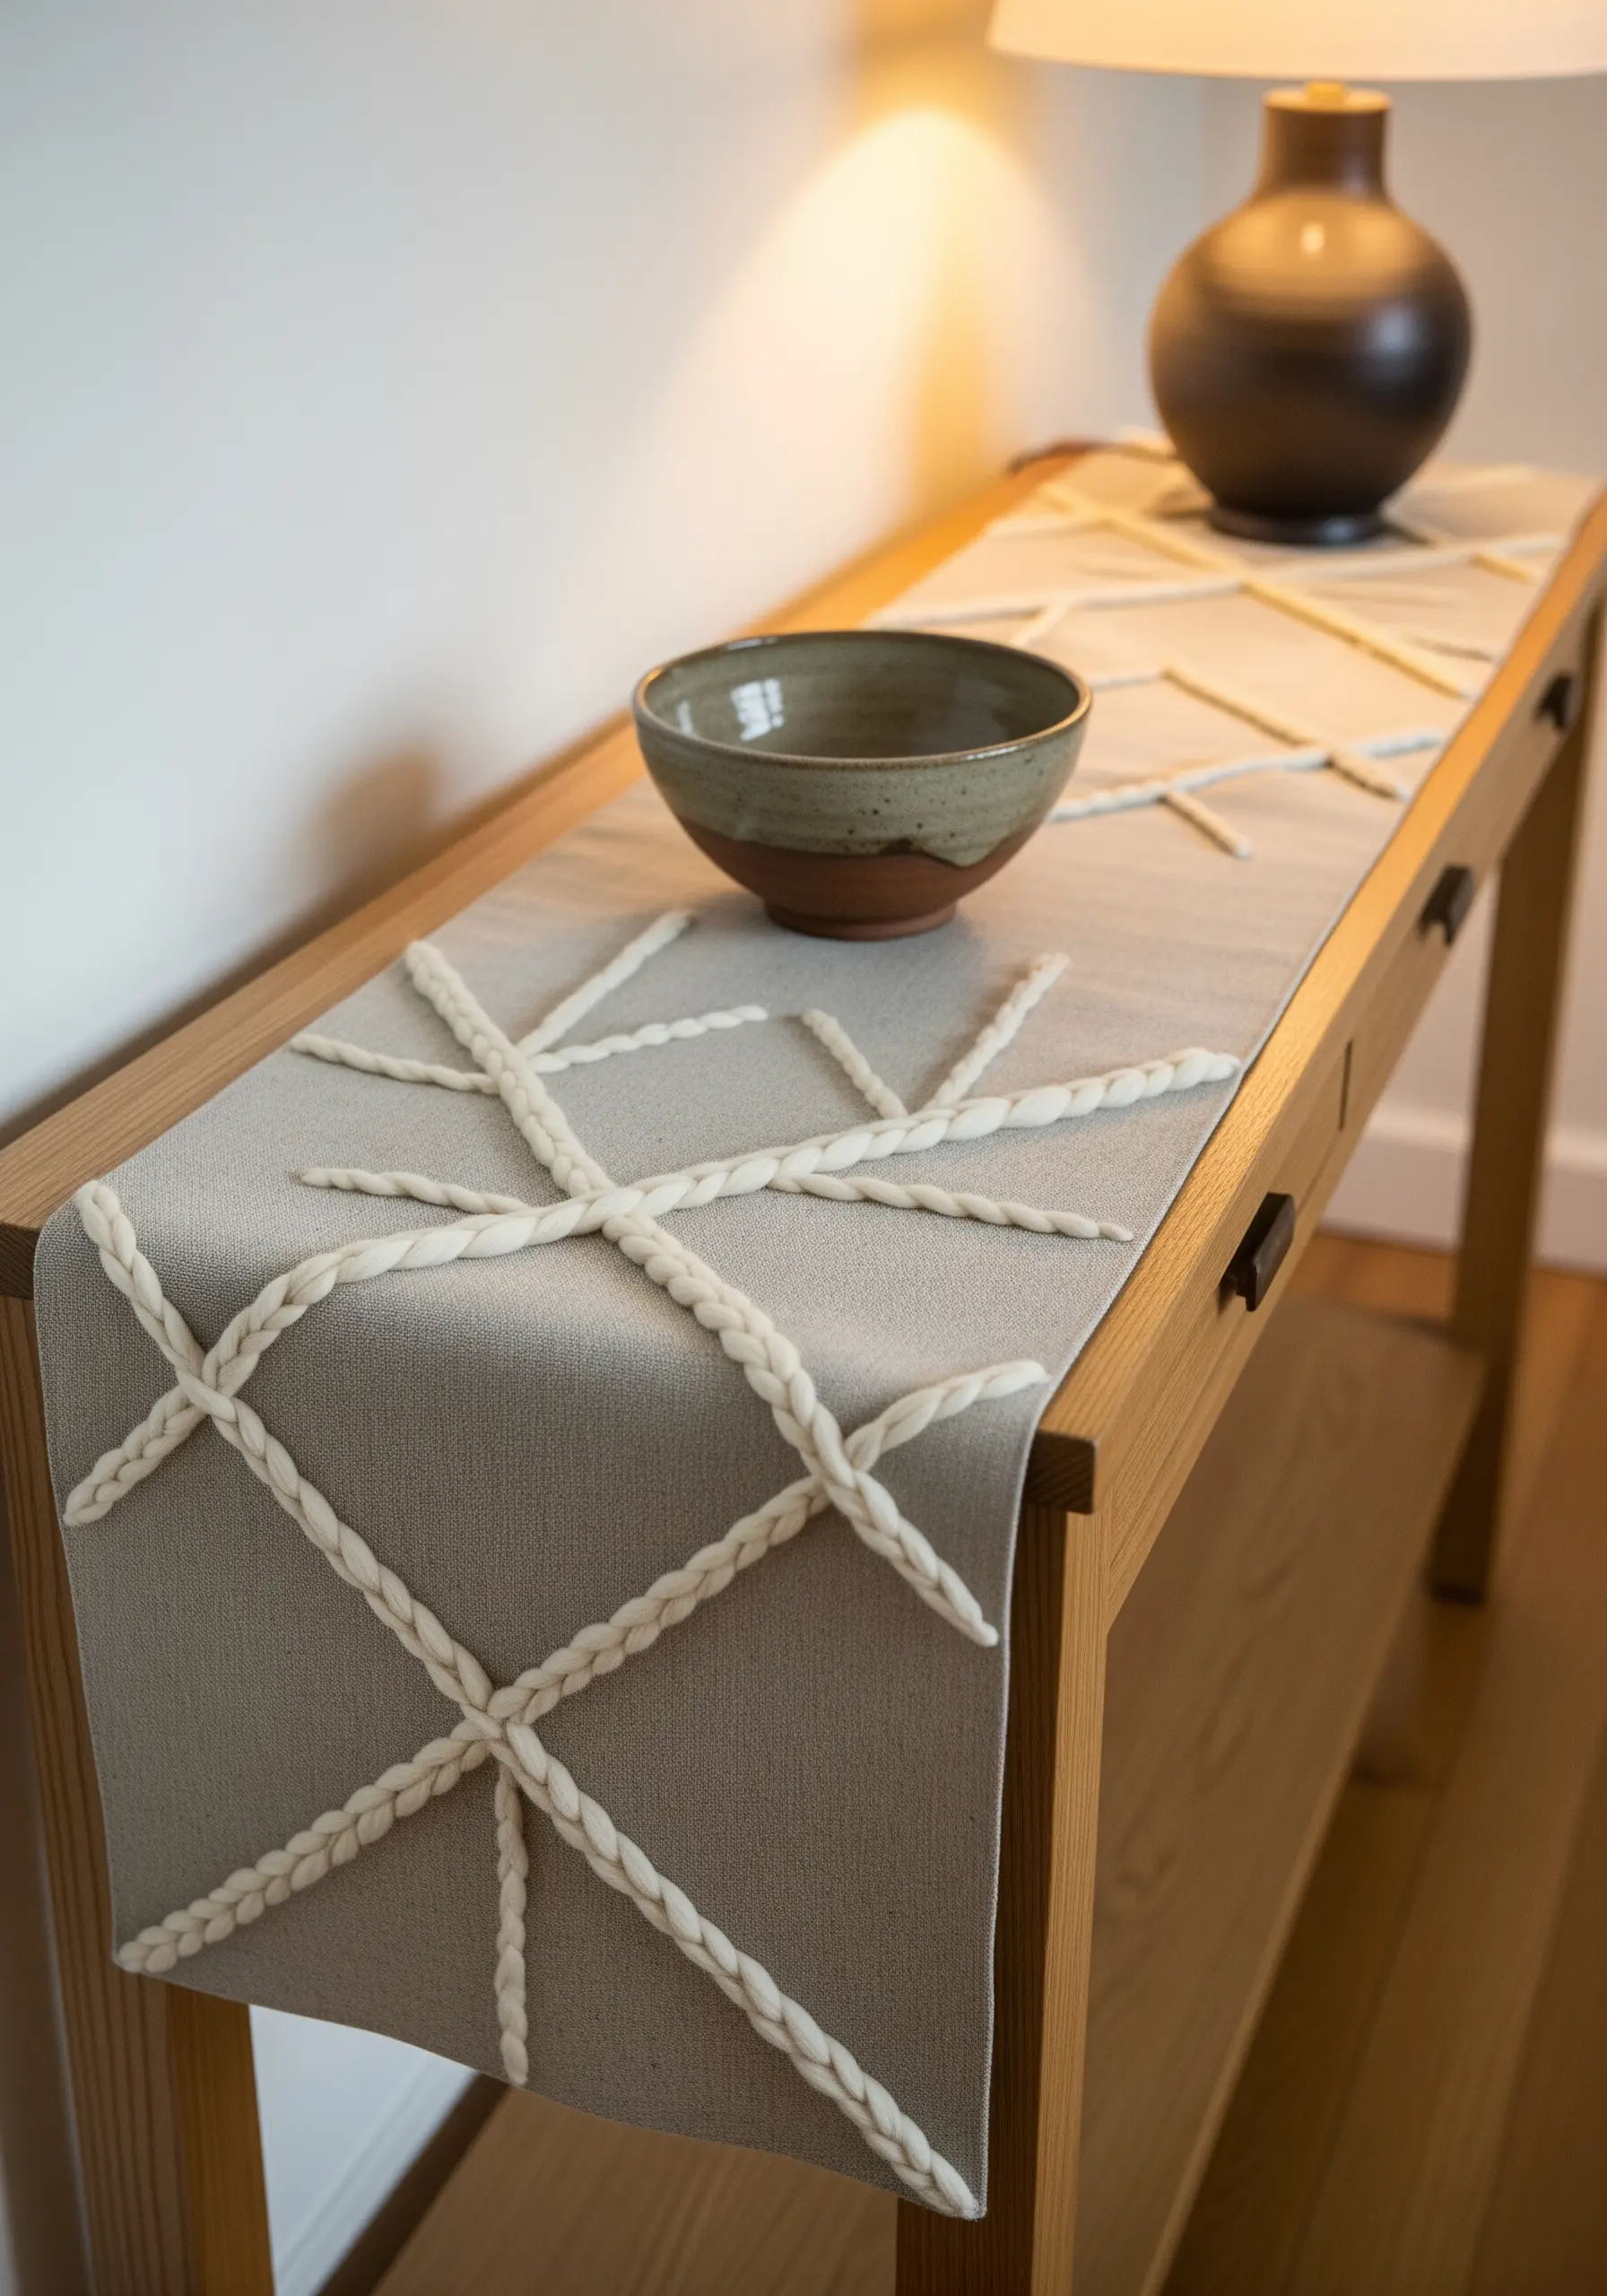
Introduce dramatic, three-dimensional texture to functional items like table runners by using a couching technique with thick yarn or soft rope.
Lay the thick yarn on your fabric in the desired pattern, then use a standard six-strand embroidery floss in a matching color to tack it down with small, perpendicular stitches.
This creates bold, graphic lines that are both visually striking and durable enough for everyday use, turning a simple surface into raised sculptural embroidery effects.
5. Paint with Texture Using French Knots
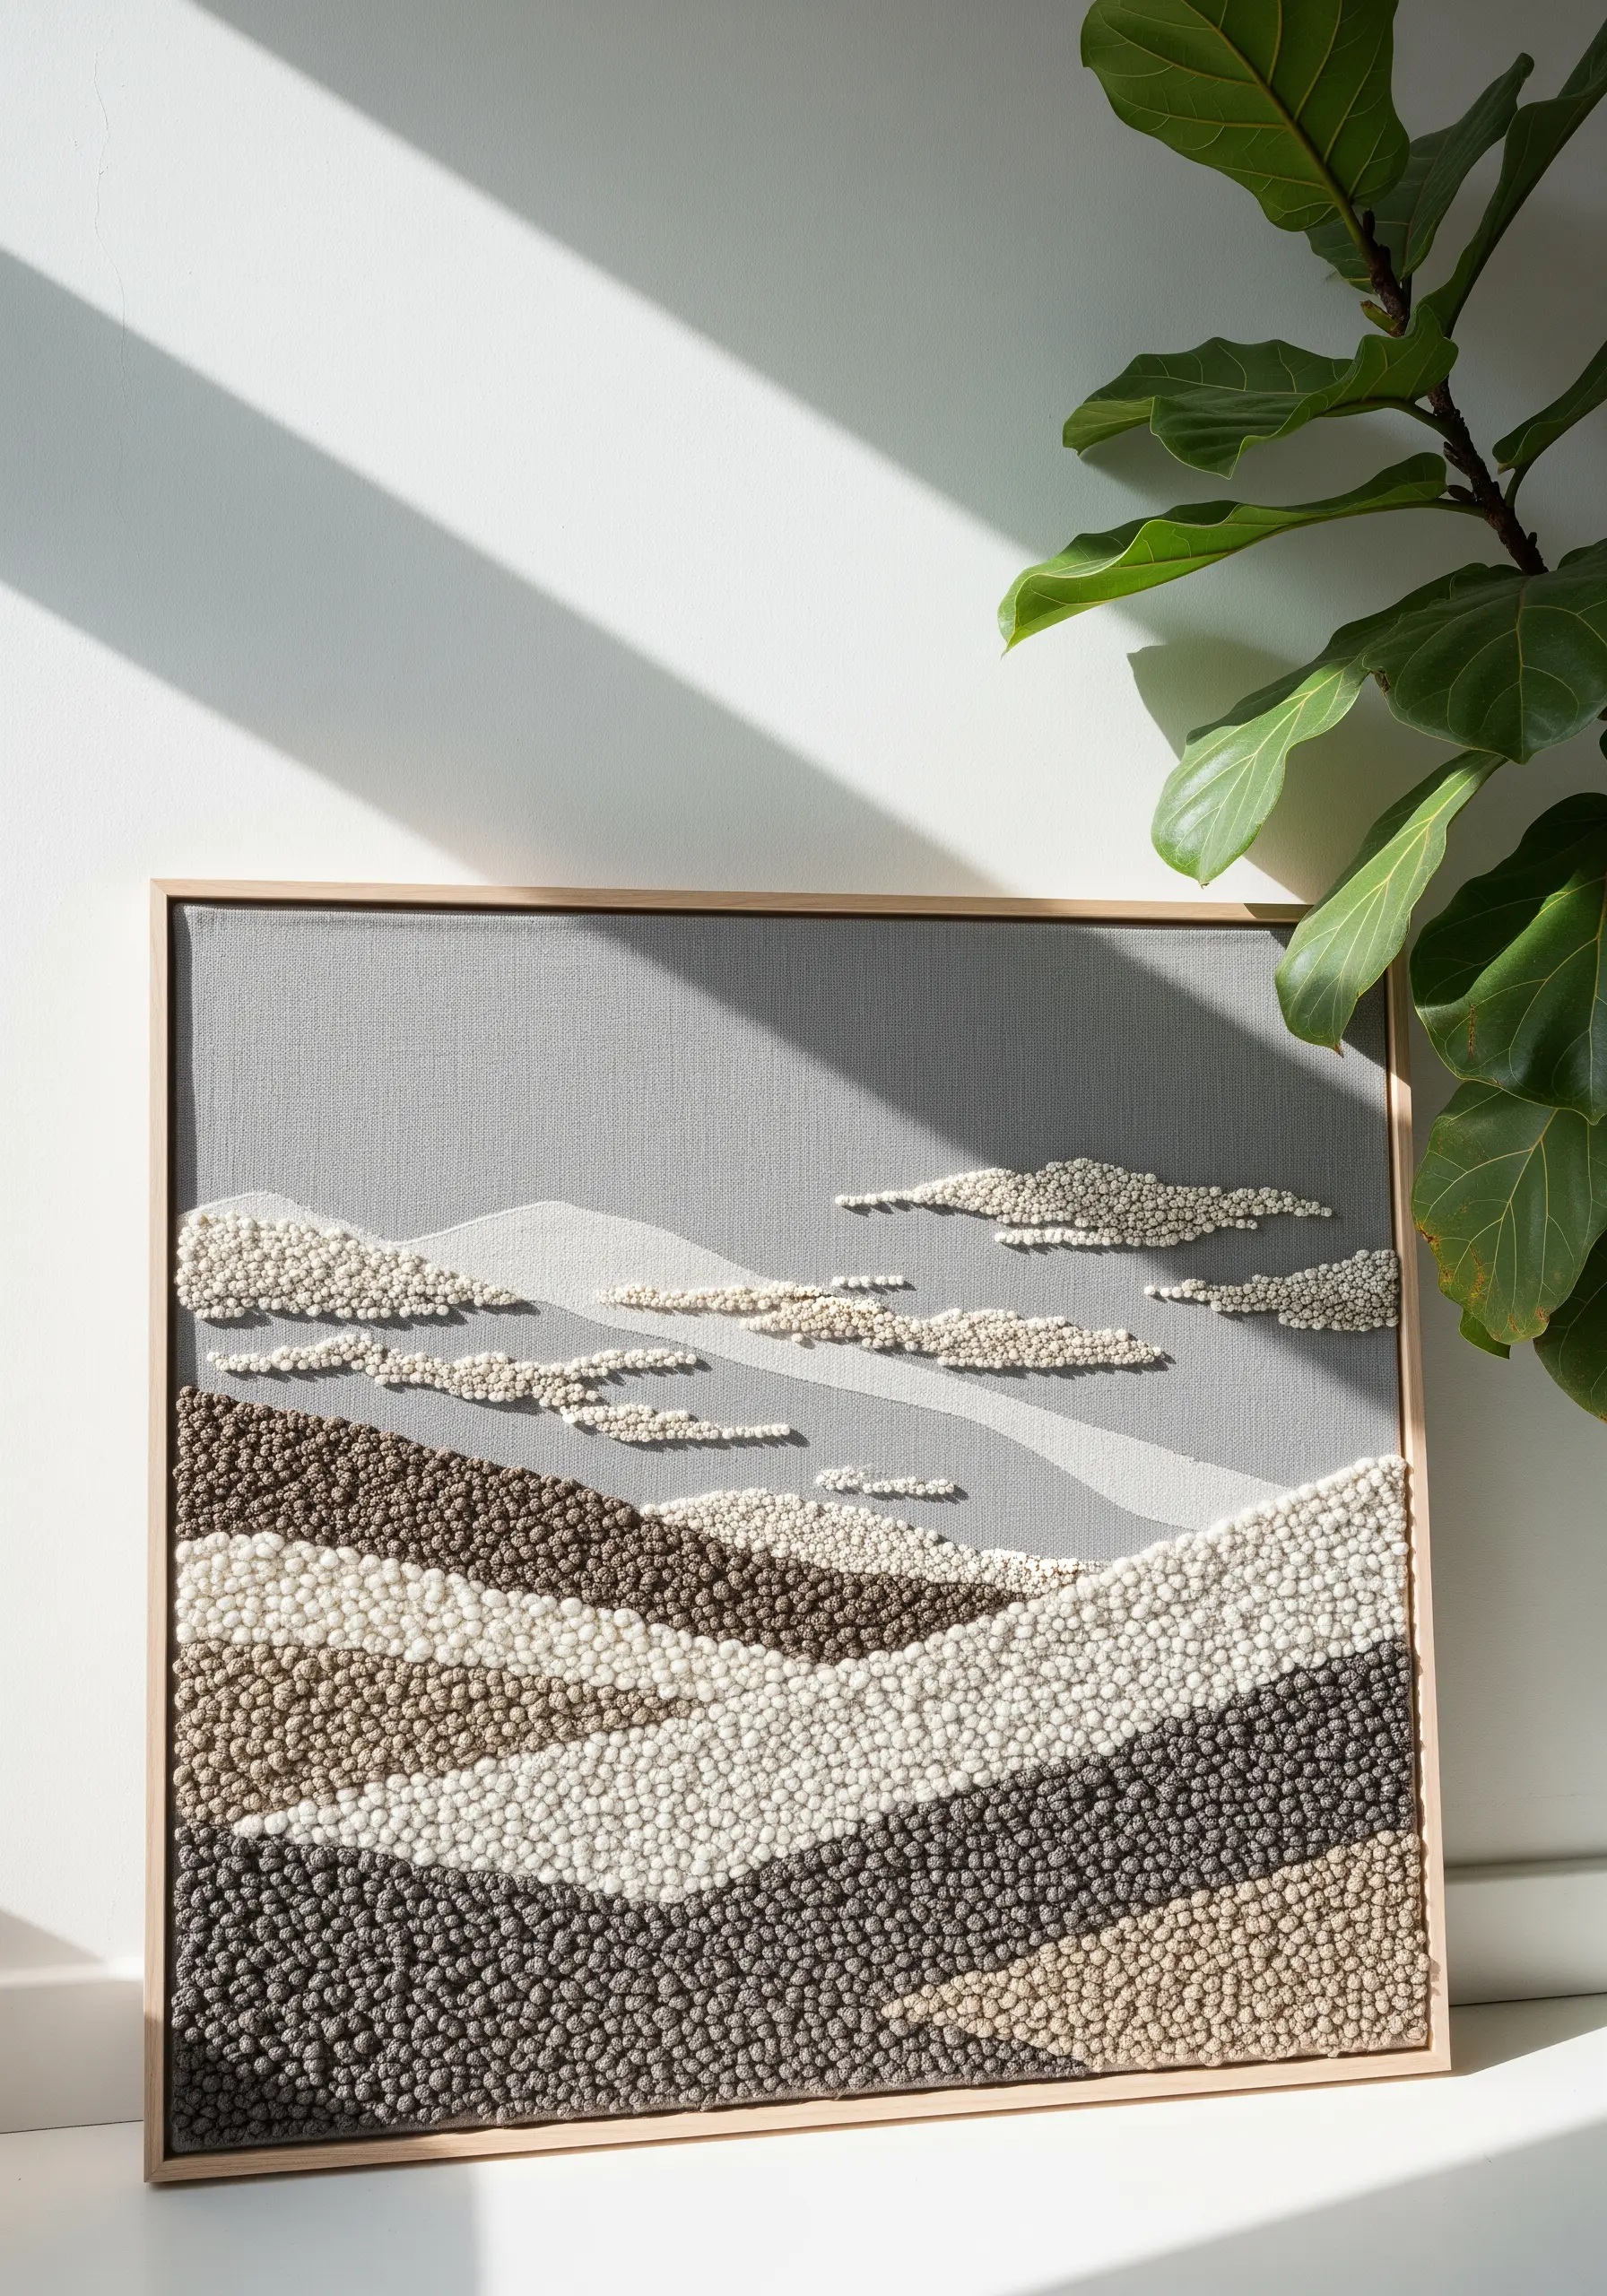
Move beyond line work and create entire landscapes using the pointillist effect of densely packed French knots.
Vary the texture and height by changing how many times you wrap the thread around the needle—one wrap for low, tight knots and two or three for plusher, more prominent ones.
Group shades of neutral threads closely together to build soft, organic gradients that mimic hills and clouds, resulting in earth-inspired embroidery textures that invite touch.
6. Integrate Stitches as Quiet Details
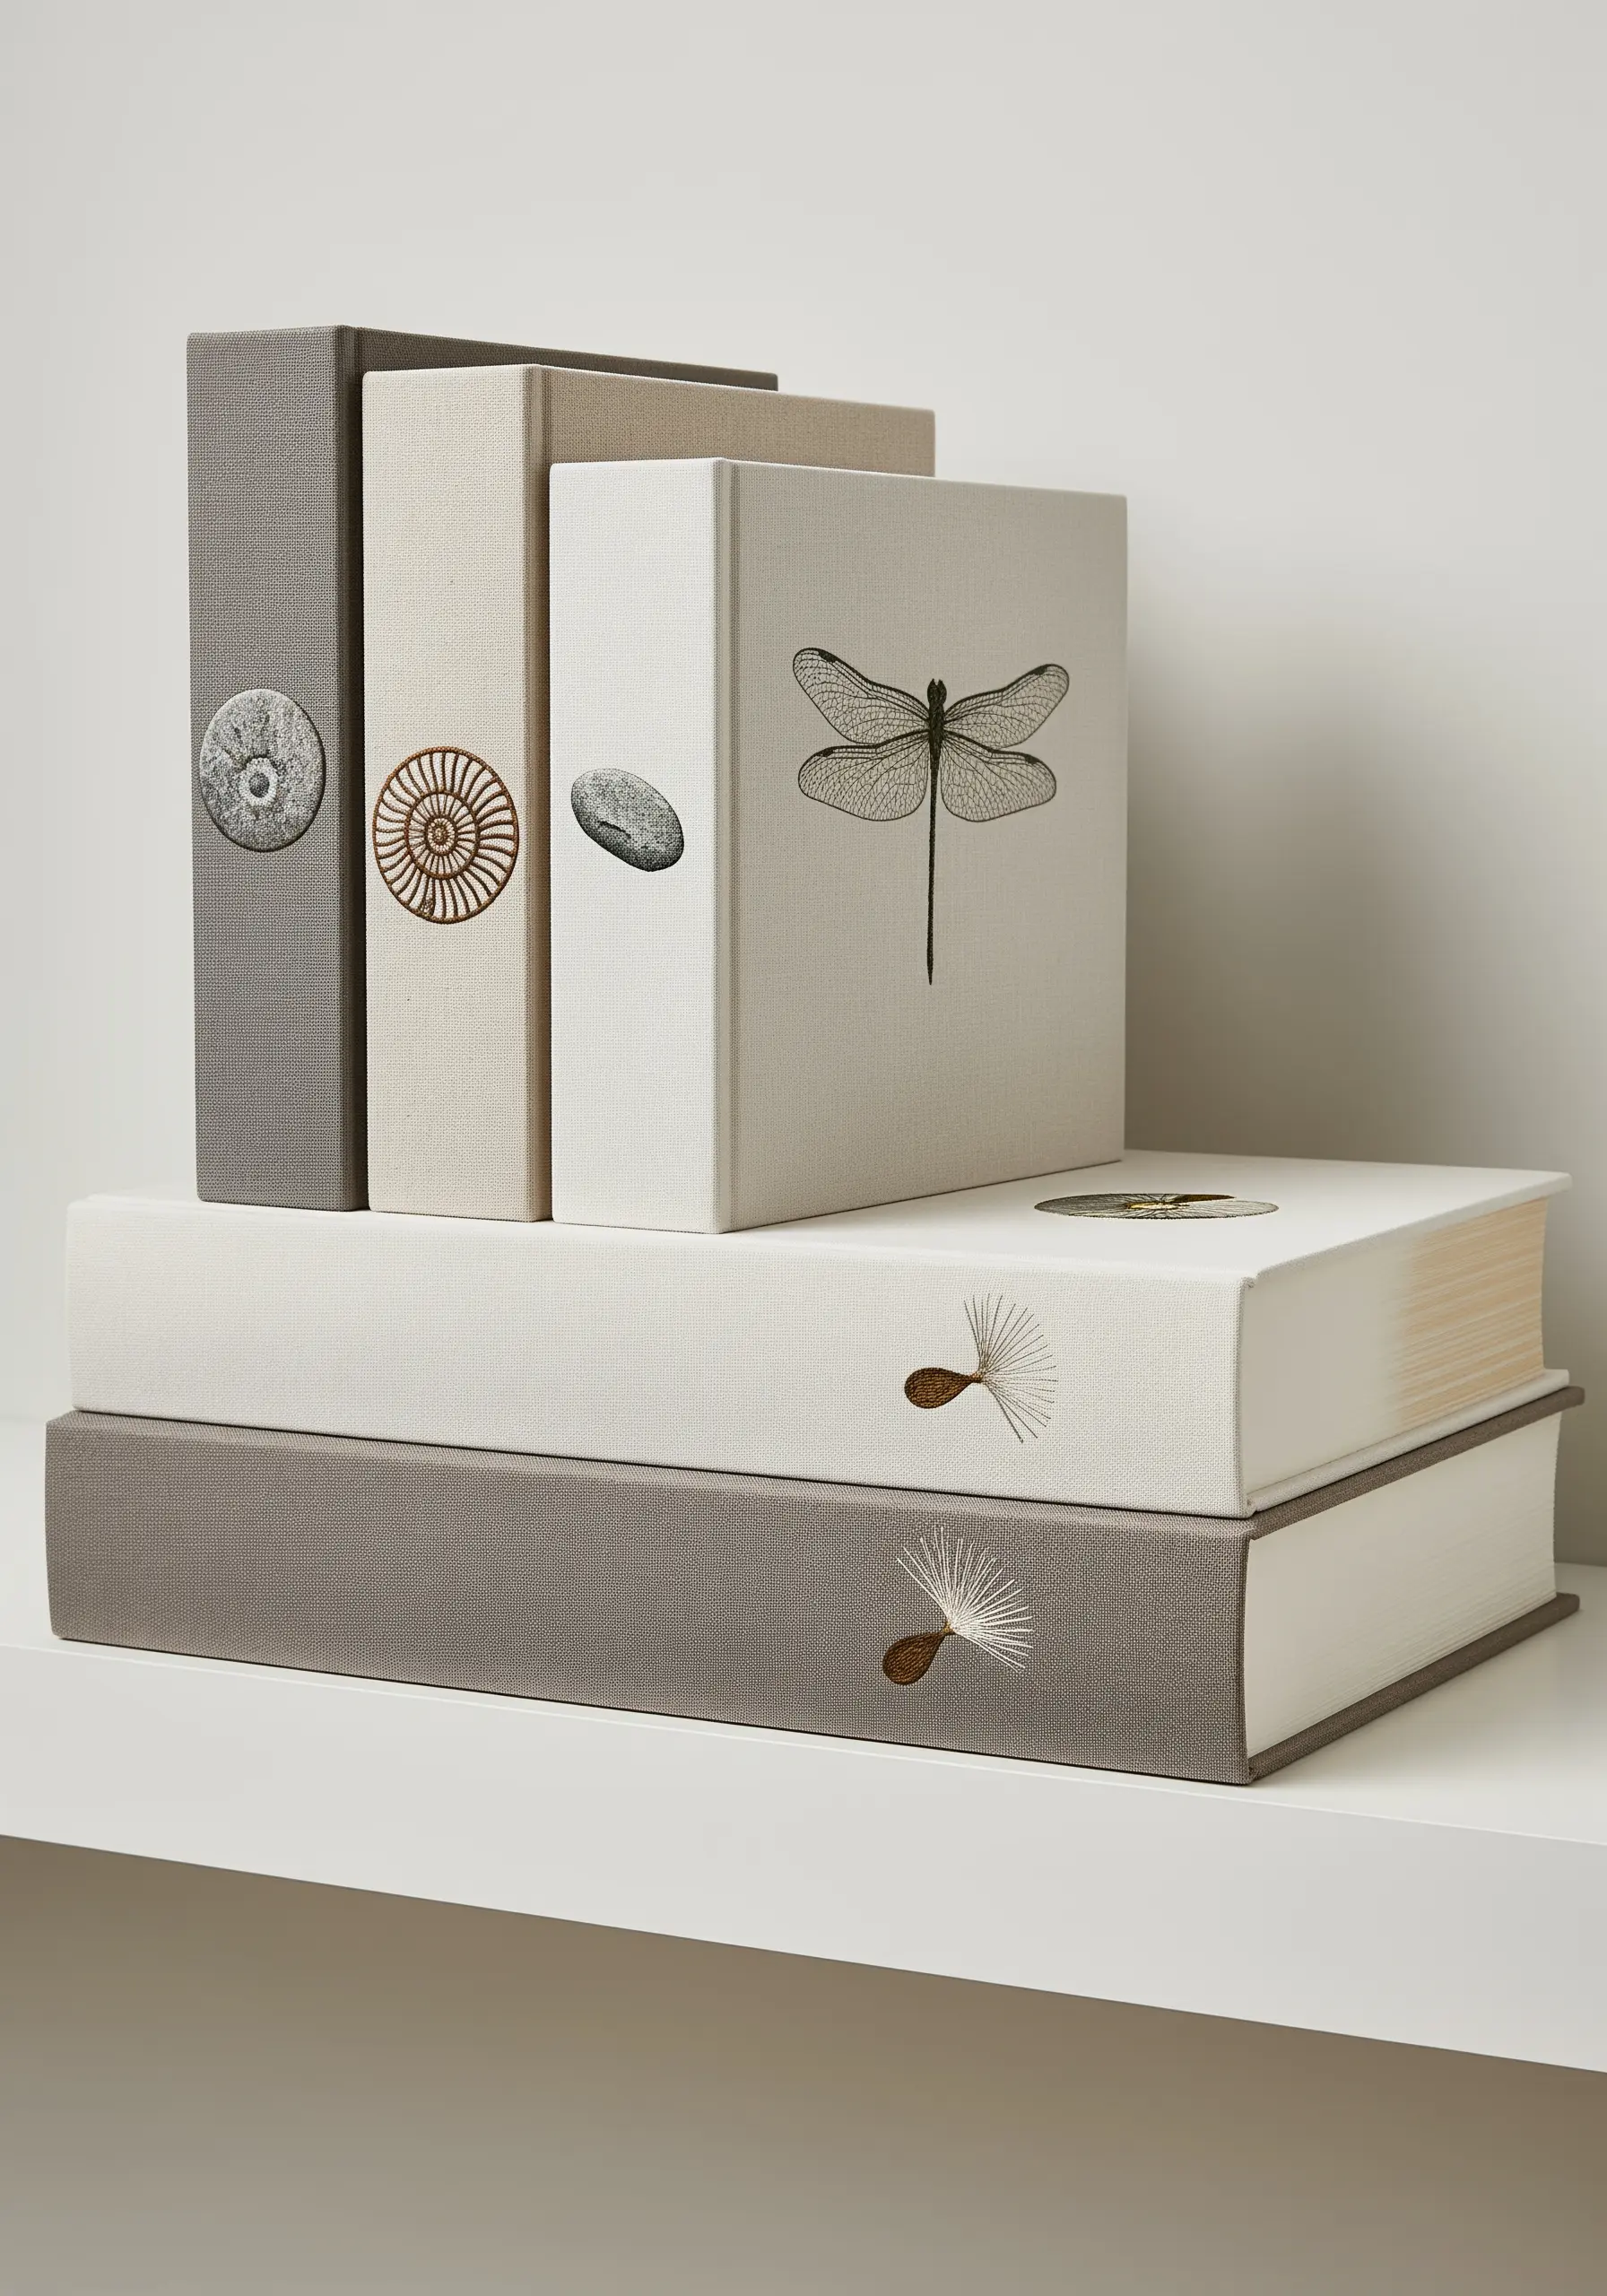
Elevate ordinary objects by adding small, unexpected embroidered touches.
Fabric-covered book spines, journal covers, or photo albums become treasured keepsakes with the addition of a tiny, precise motif.
Work with just one or two strands of floss for ultimate delicacy and choose a simple design—a fossil, a feather, a seed pod—that complements the object’s purpose.
These tiny stitched details transform functional items into personal art.
7. Frame Textiles with a Lustrous Border
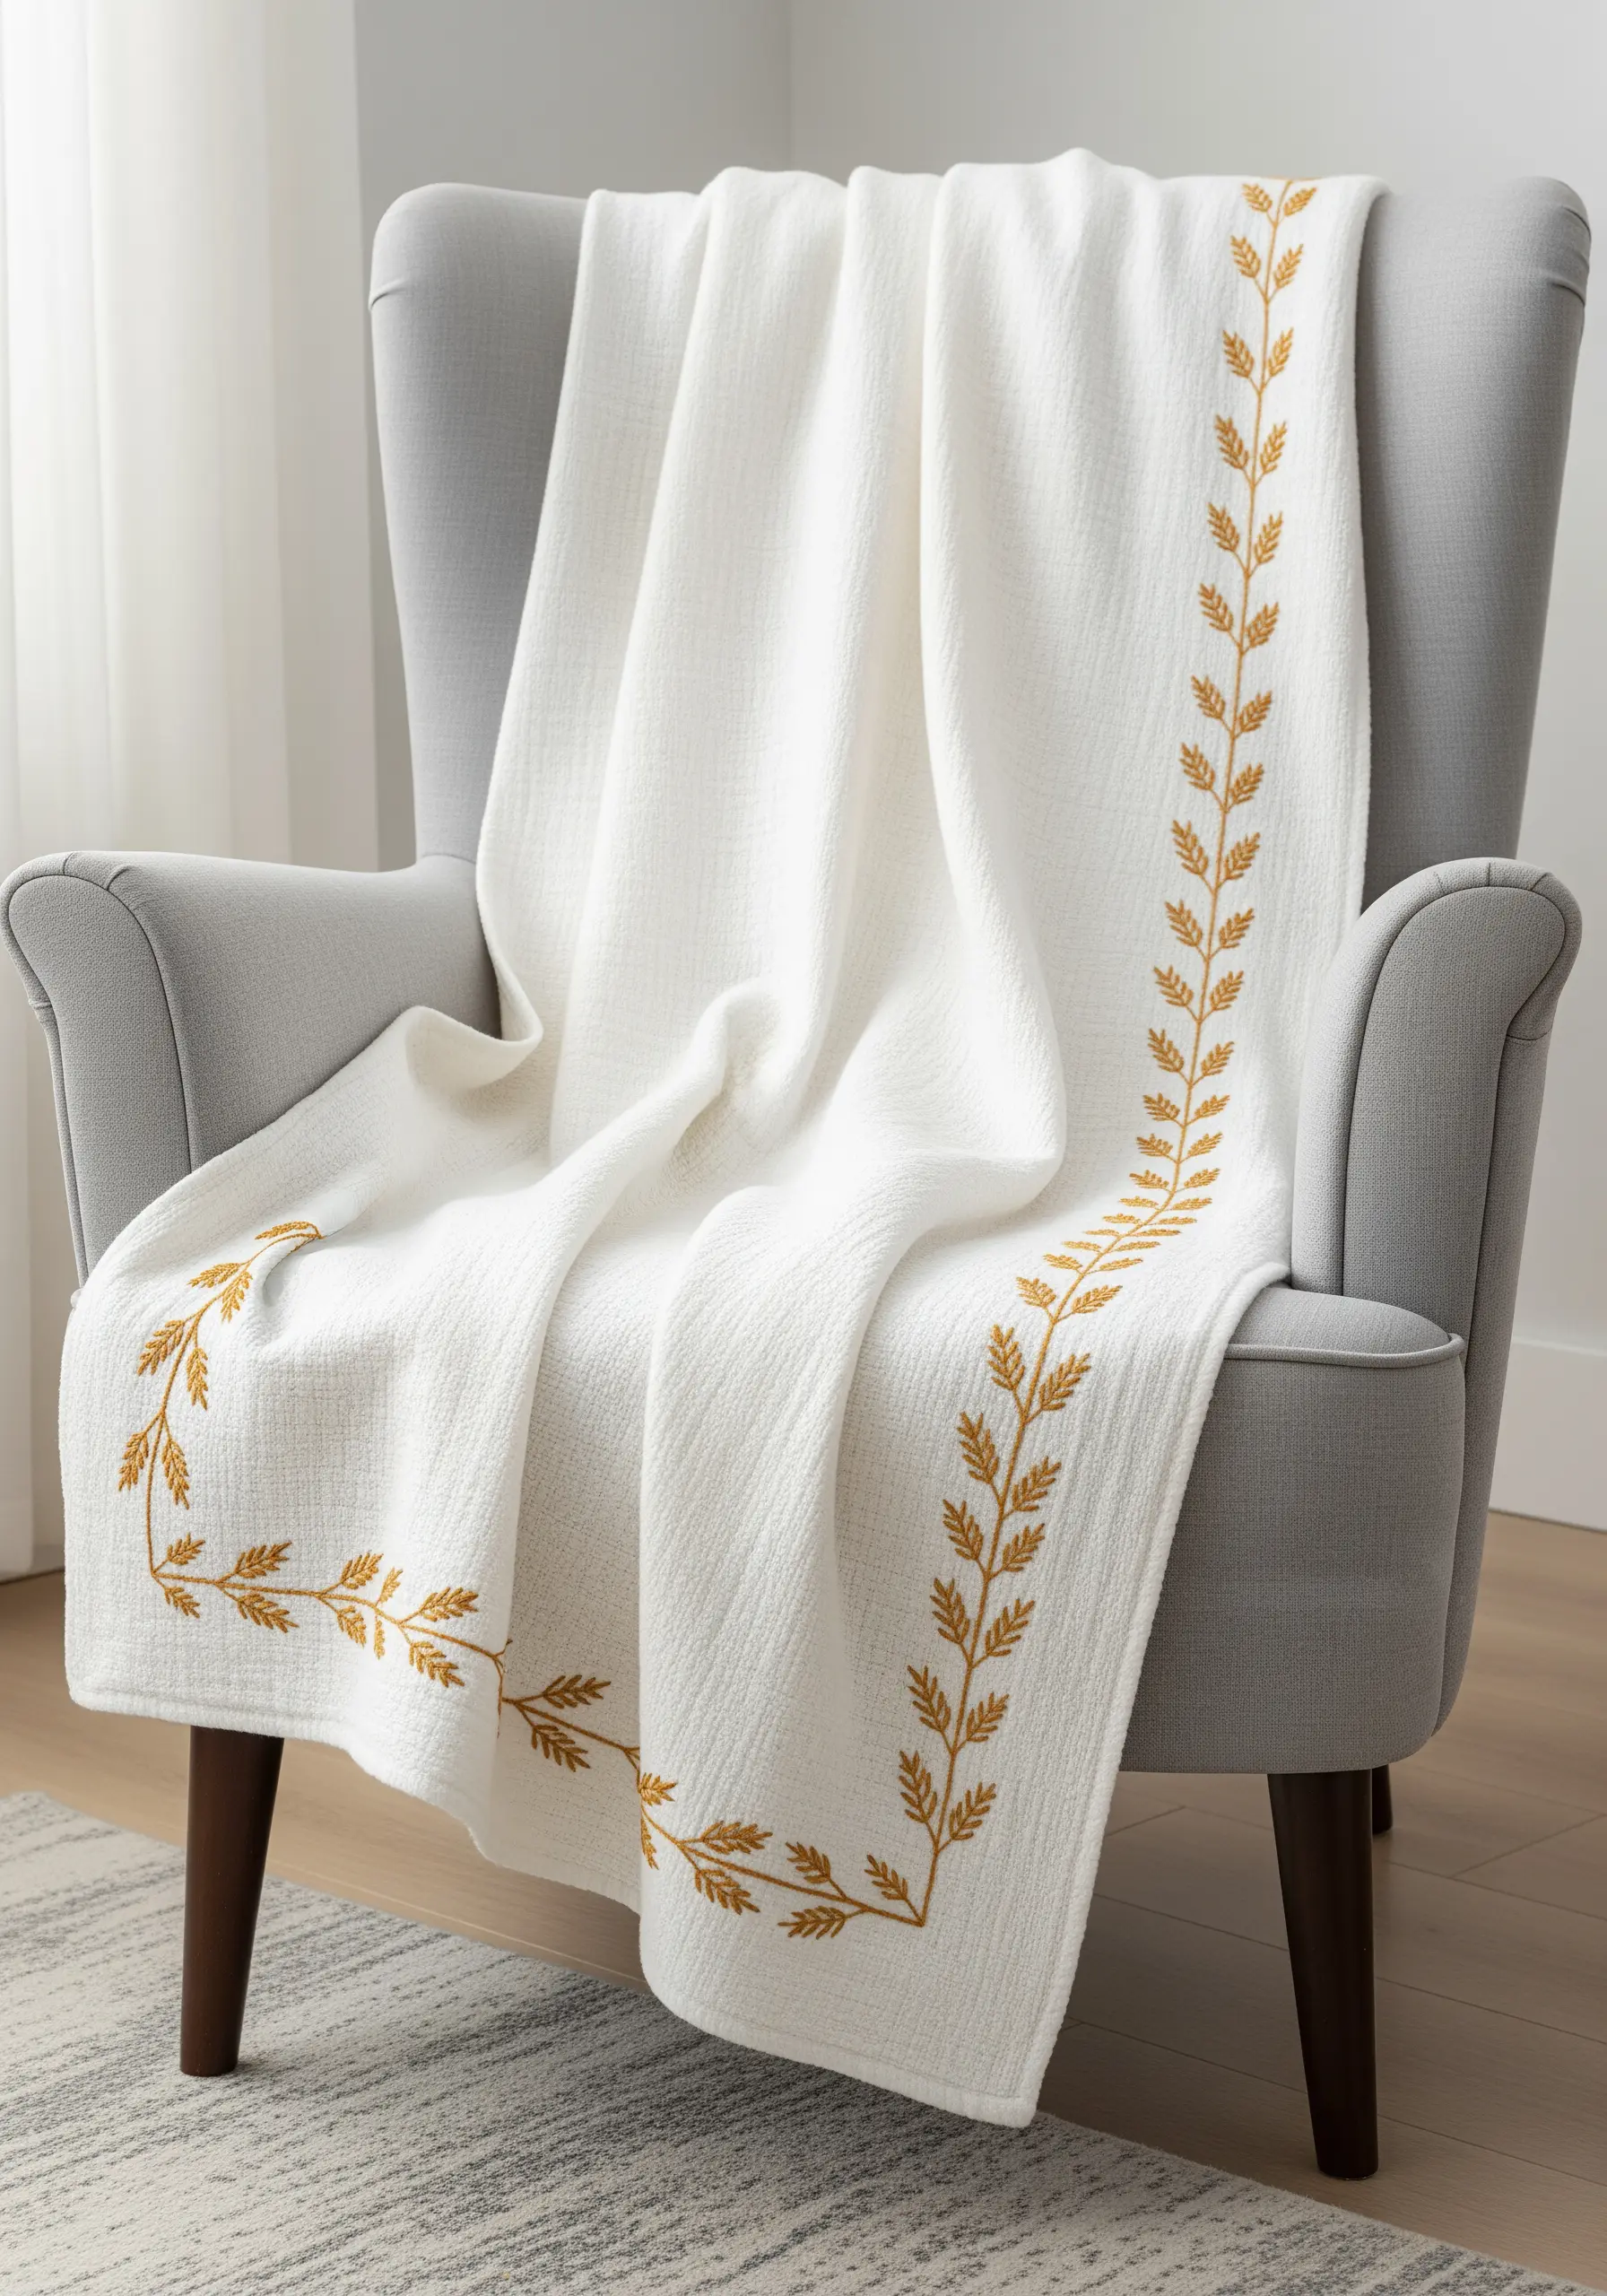
Transform a simple throw blanket or set of napkins by adding an elegant embroidered border.
To achieve a subtle glow, choose a rayon or silk-blend thread in a warm metallic or ochre tone, which will catch the light more beautifully than standard cotton floss.
Use a combination of stem stitch for the vines and satin stitch for the leaves to create a clean, classic design that adds a sense of finish and luxury.
This is one of the easiest ways to use neutral colors in embroidery to create a high-end look.
8. Master Delicacy on Sheer Fabrics

Embroidering on sheer curtains or voile requires a light touch to avoid puckering.
Use a very fine needle (size 9 or 10) and only one or two strands of embroidery floss to keep the stitches from weighing down the delicate fabric.
Choose an open, airy design, like floating dandelion seeds, and secure your thread ends by weaving them behind existing stitches instead of knotting.
This careful technique ensures your embroidered curtain & blind ideas appear to float effortlessly.
9. Weave Thread into Natural Fibers
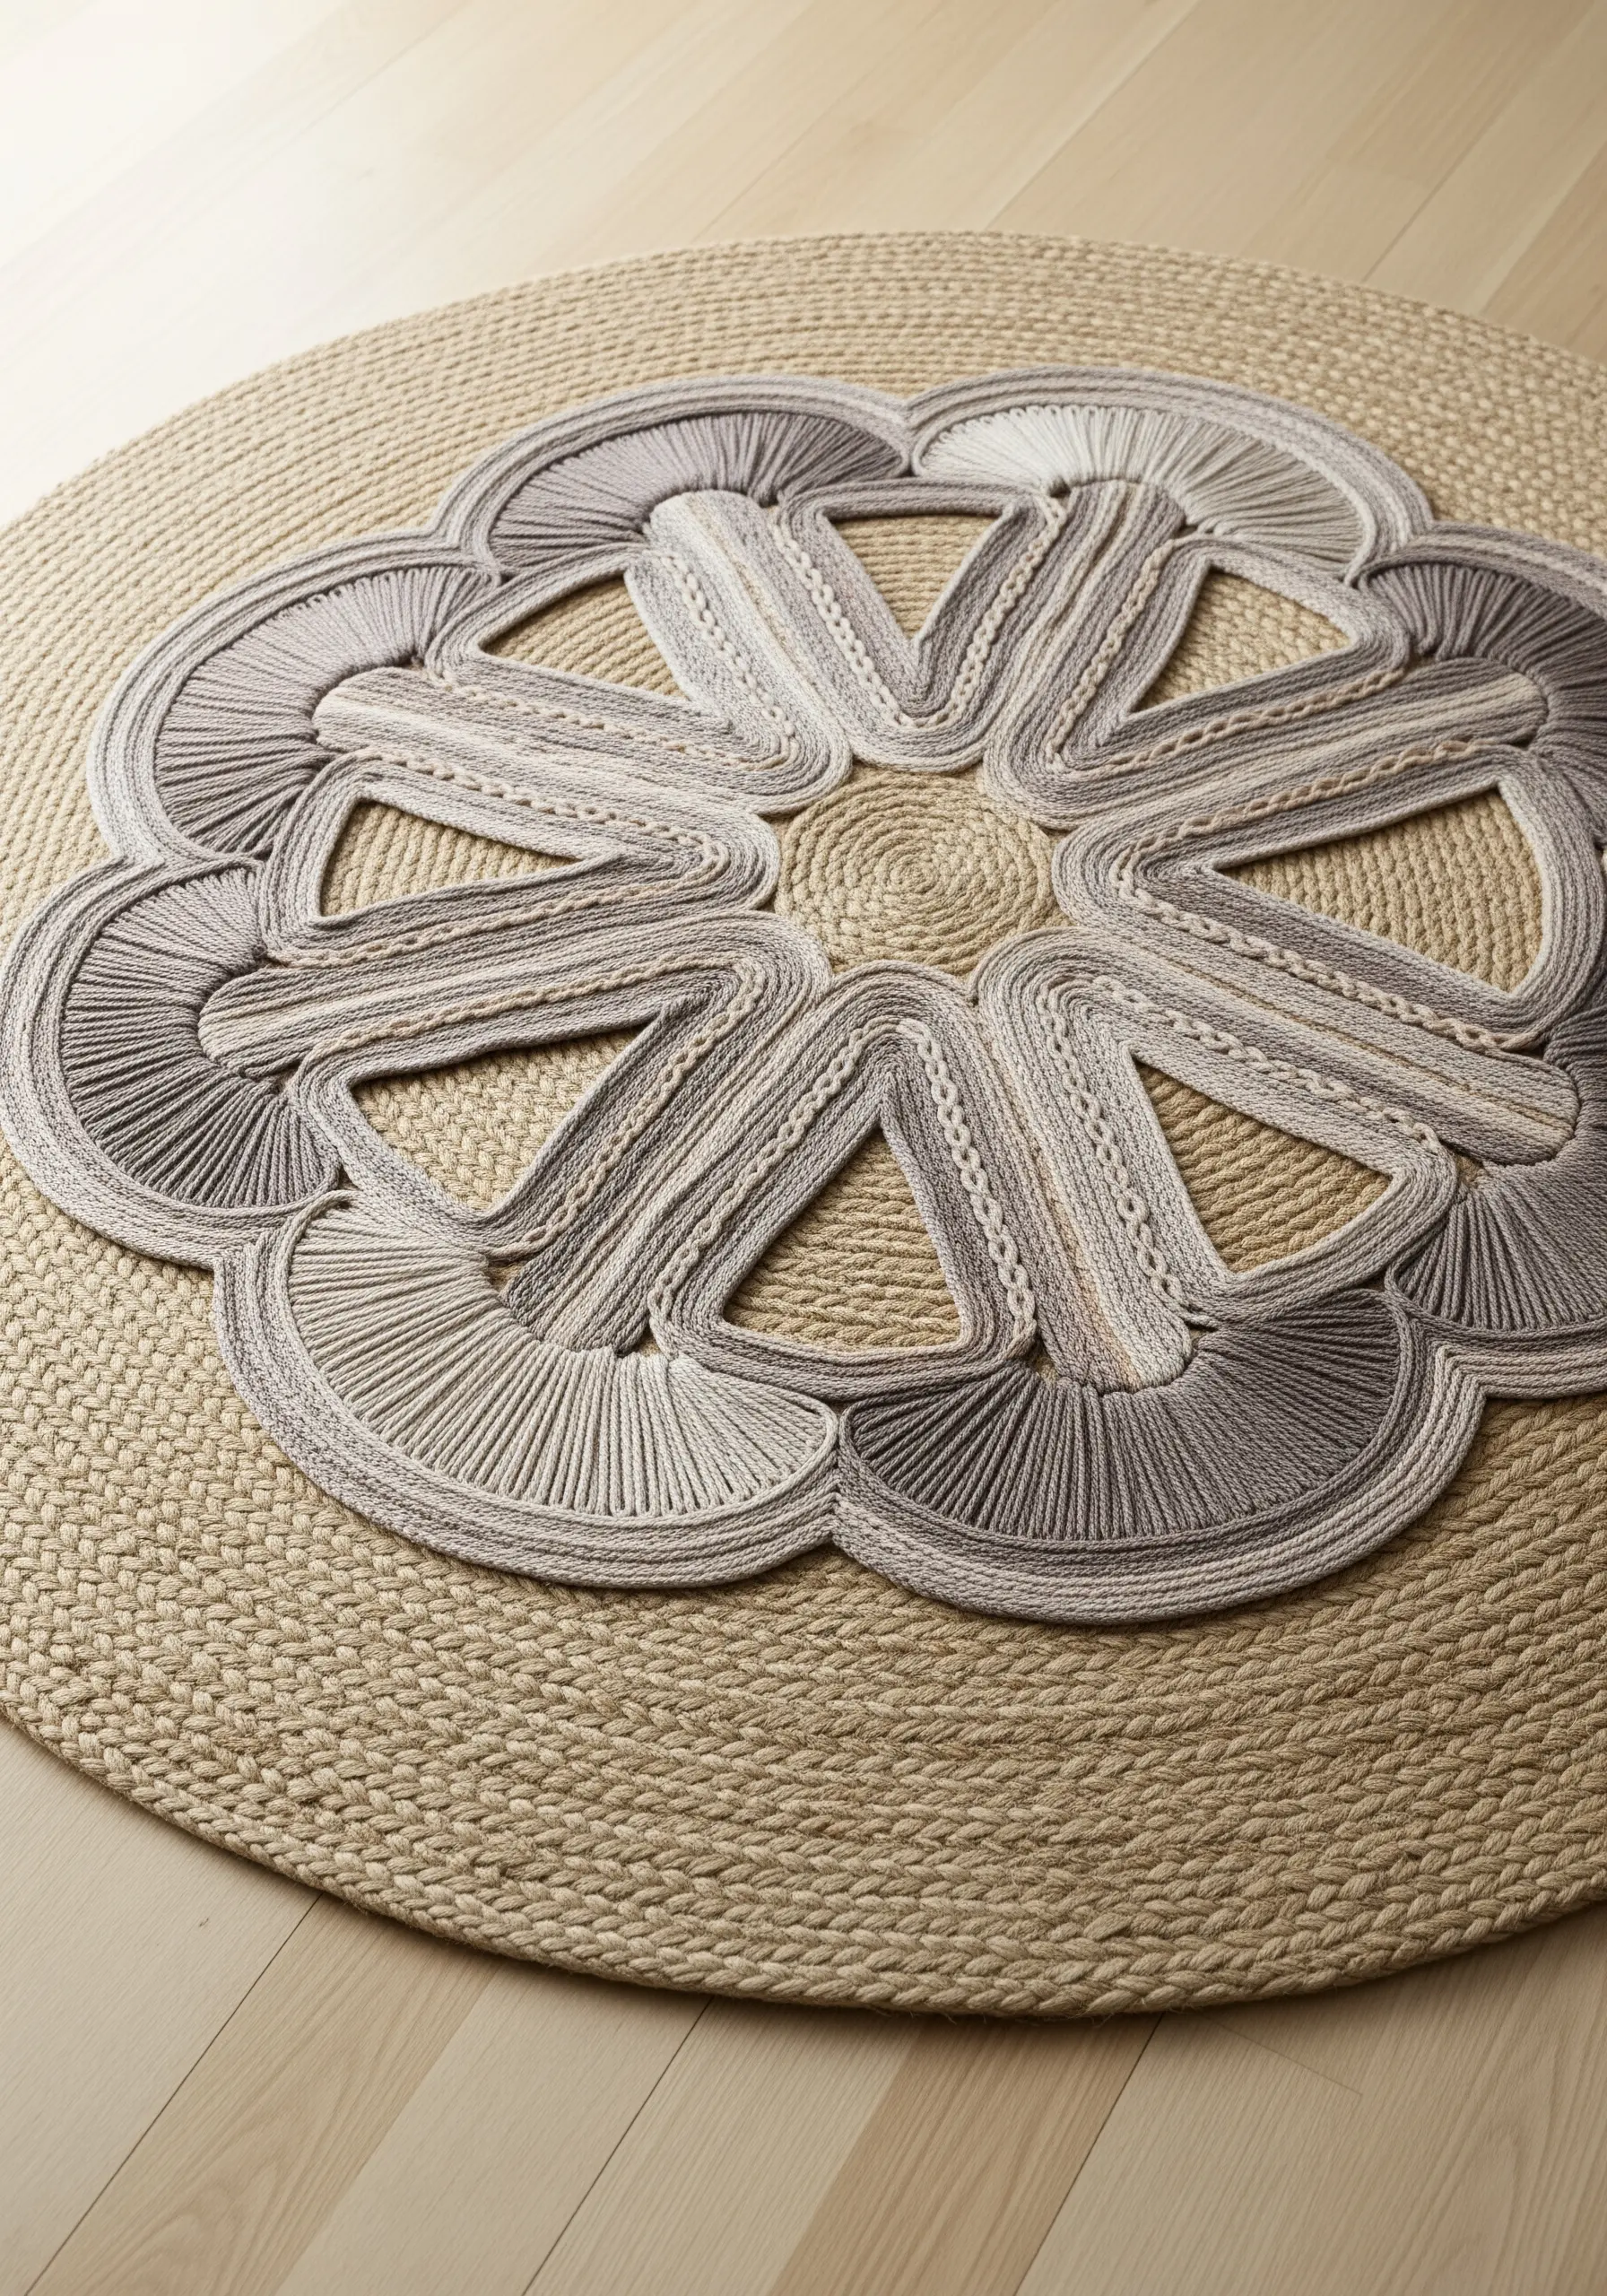
Create a stunning focal point by combining the coarseness of a natural jute rug with the softness of embroidery thread.
Use a thick tapestry wool or multiple strands of cotton floss and a large-eyed needle to couch or wrap the fibers around the existing braids of the rug.
This creates a bold, graphic pattern that highlights the contrast between textures, turning a simple floor covering into a piece of functional mixed-fiber embroidery patterns.
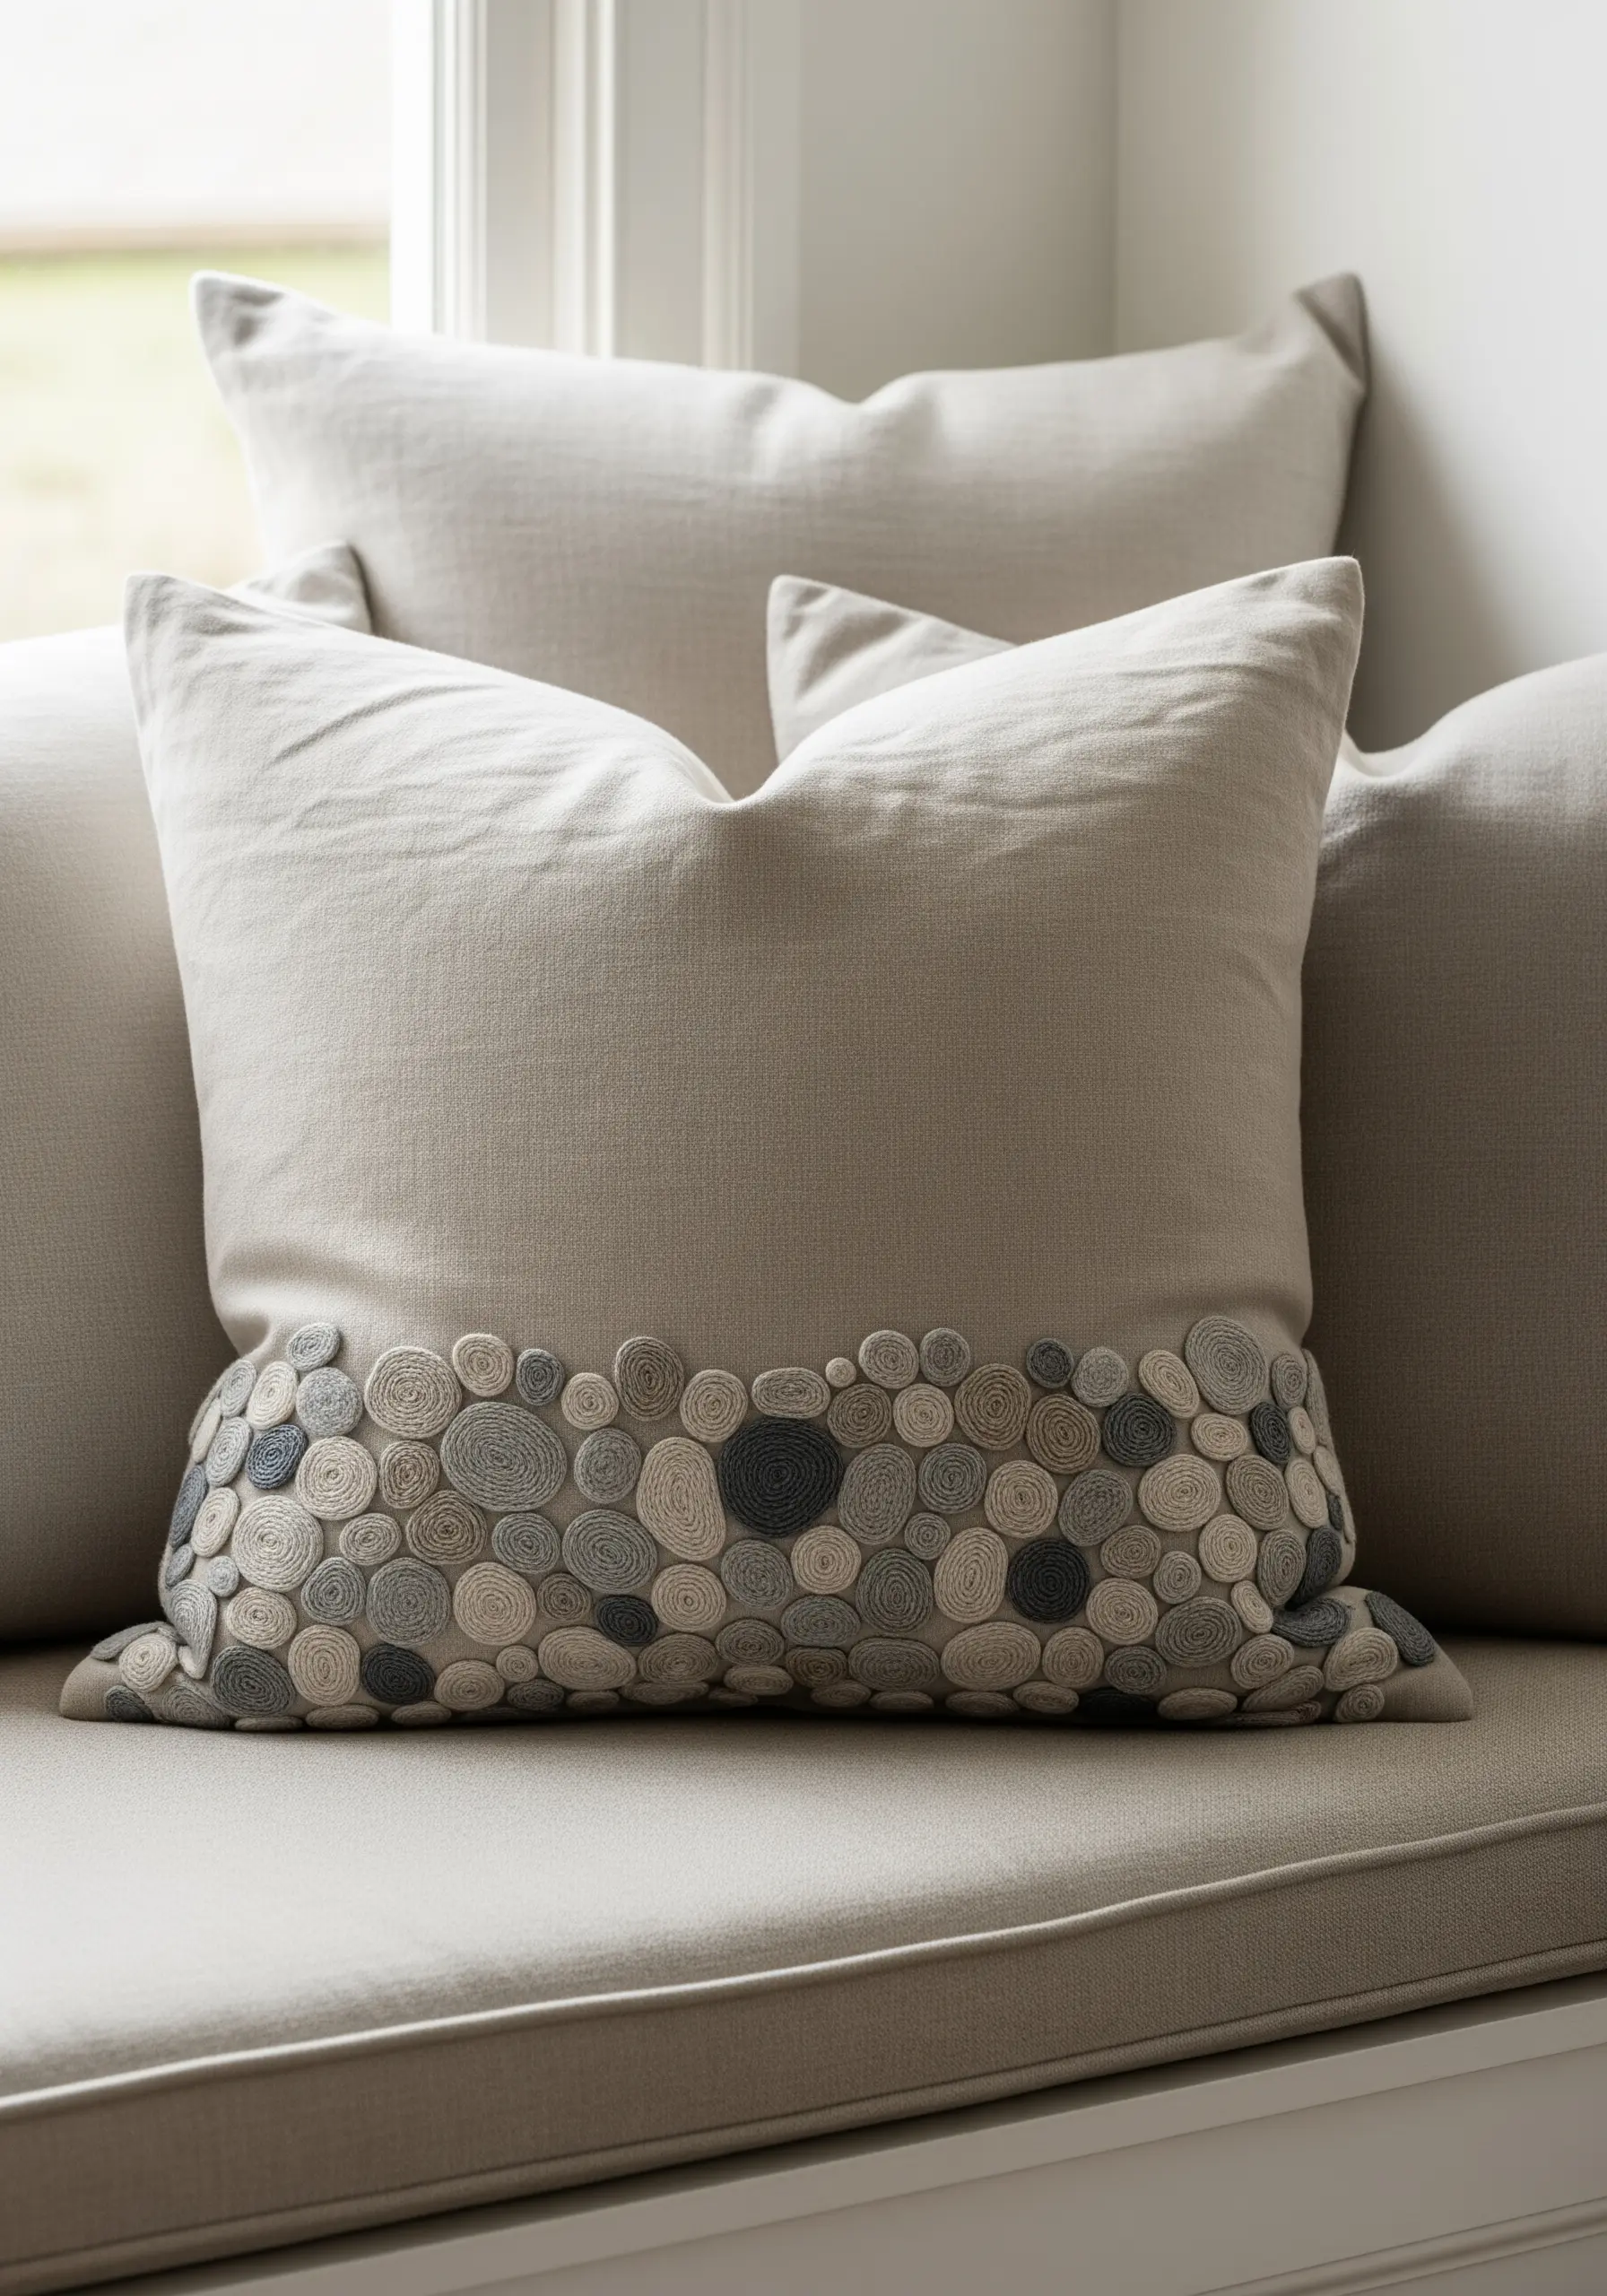
10. Create Depth with Line Density
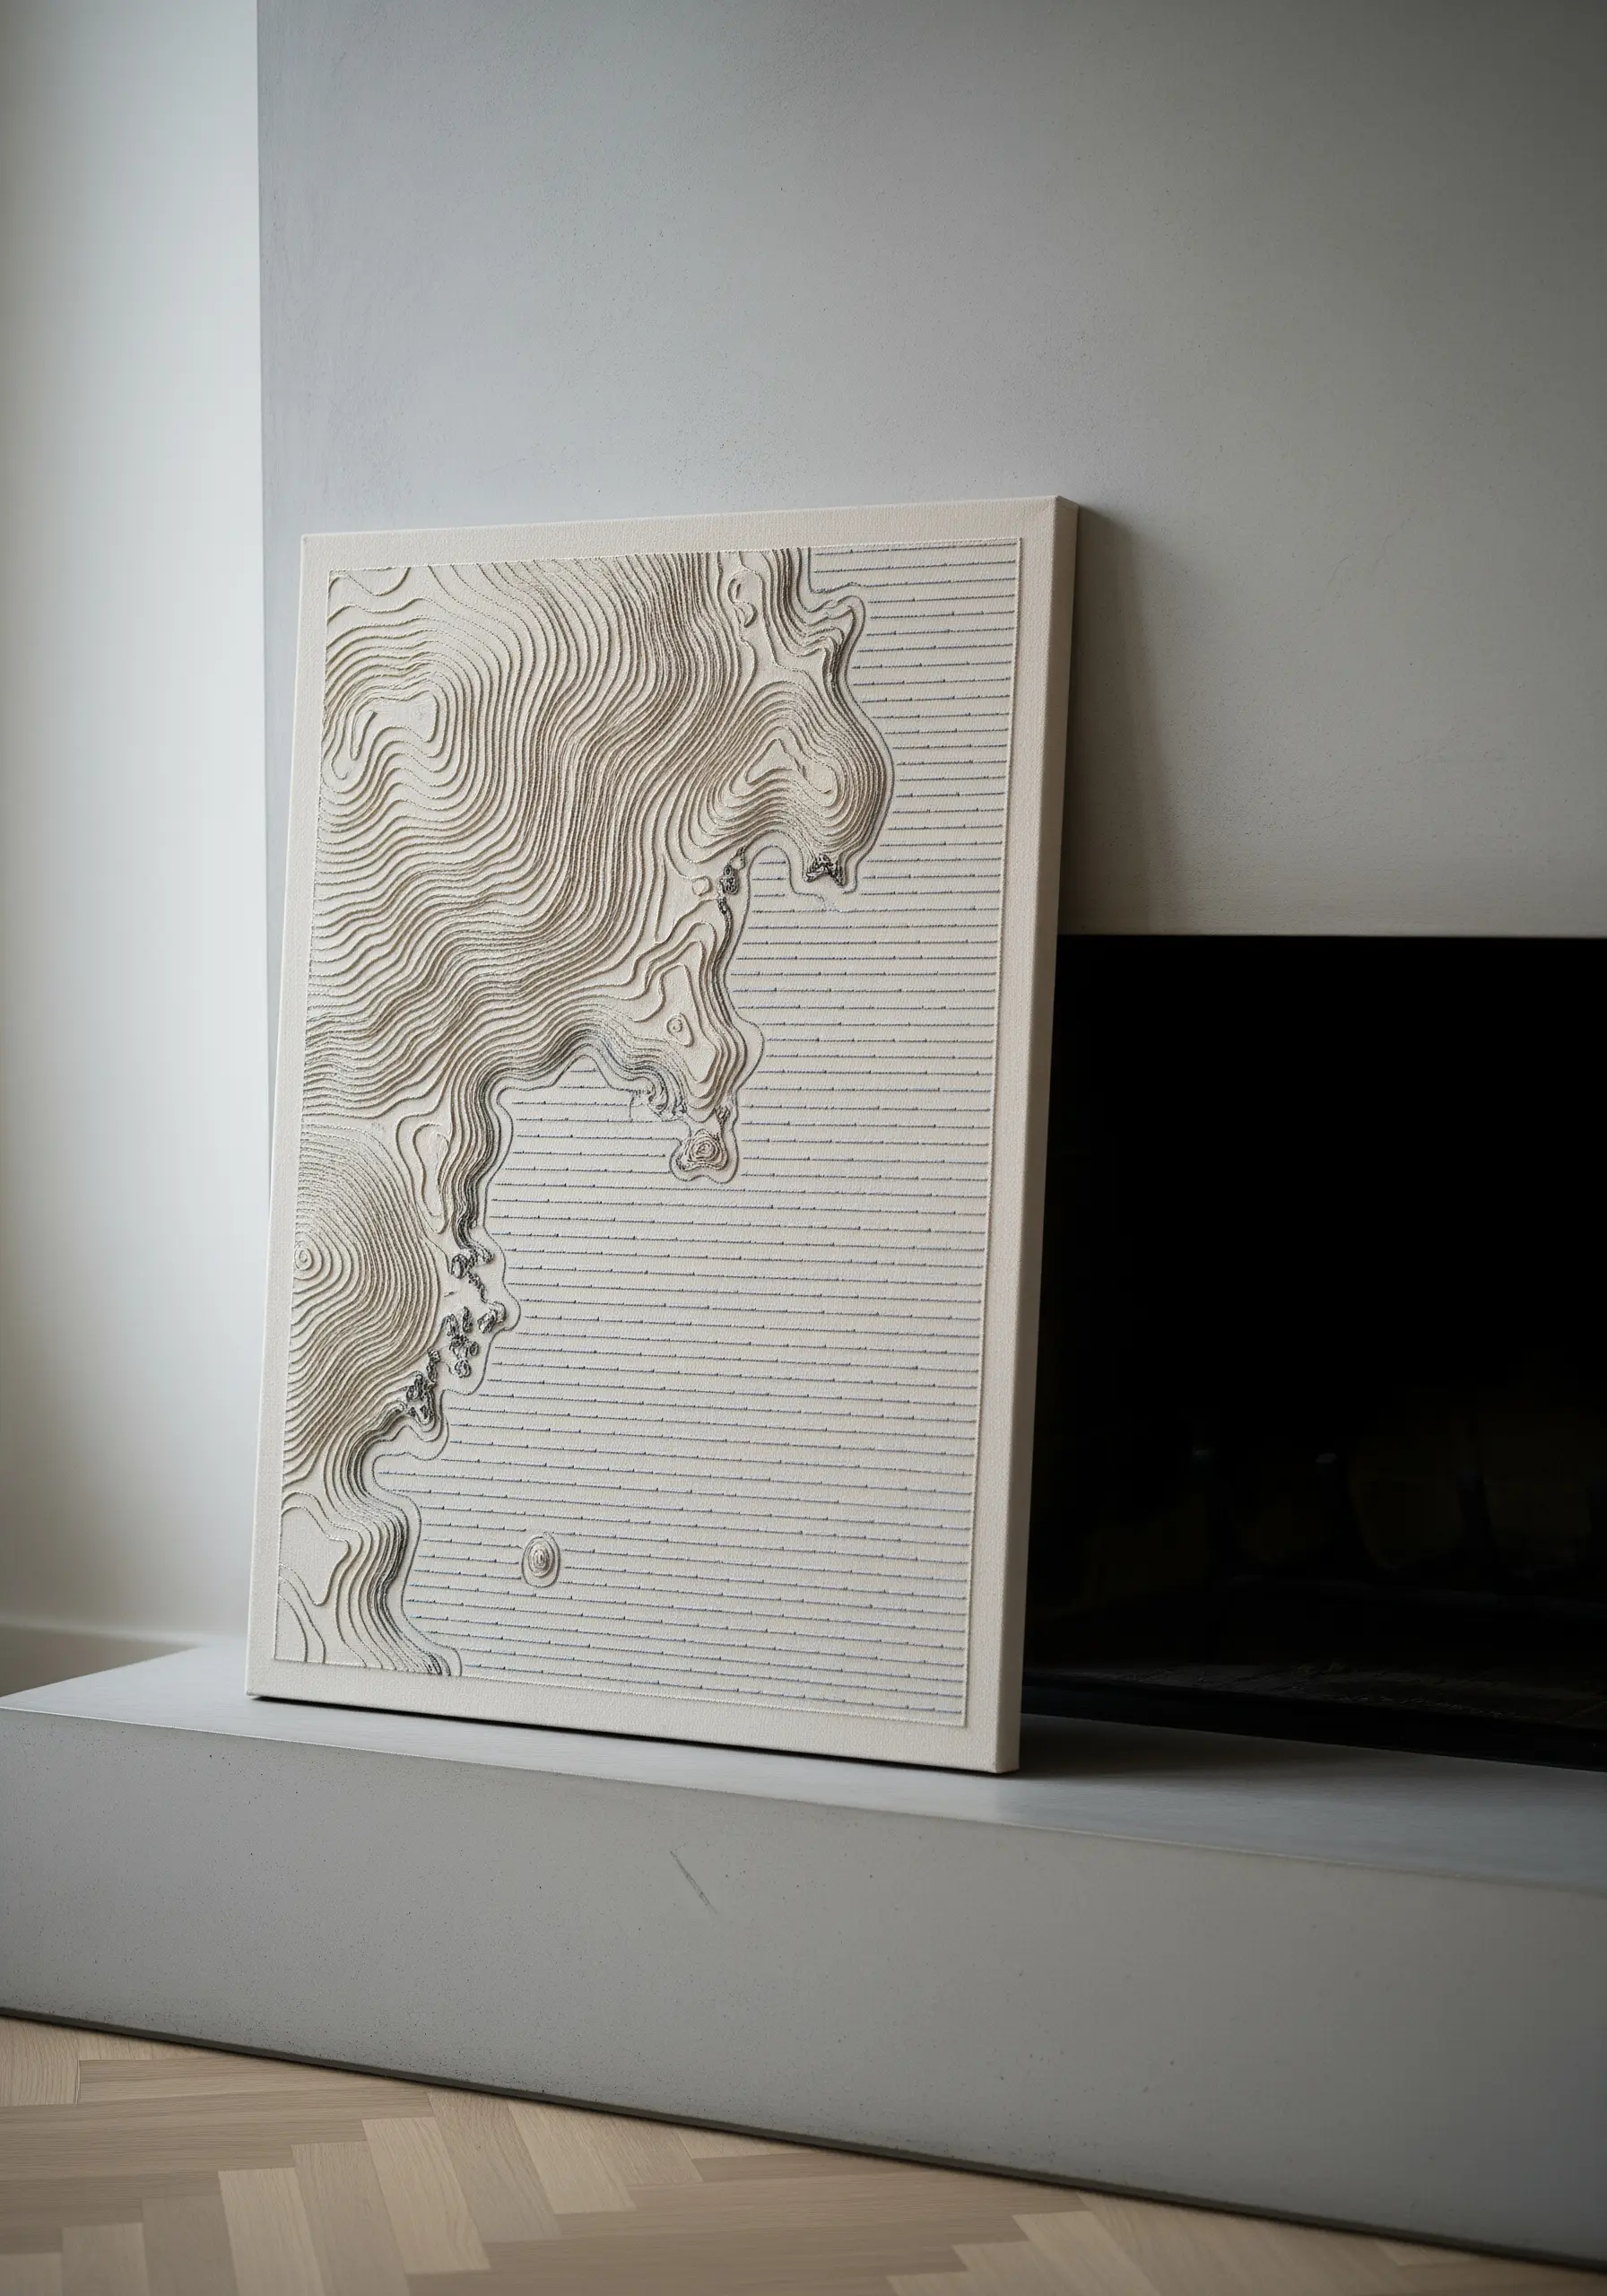
You don’t need shading to create the illusion of depth; you just need to control the density of your lines.
For a topographical map effect, use a single color of thread and a simple backstitch or running stitch.
Place your lines very close together in areas that need to feel ‘higher’ or more prominent, and space them further apart for the ‘lower’ areas.
This technique turns simple linework into sophisticated abstract thread illusion techniques.
11. Stitch a Pattern That Interacts with Light
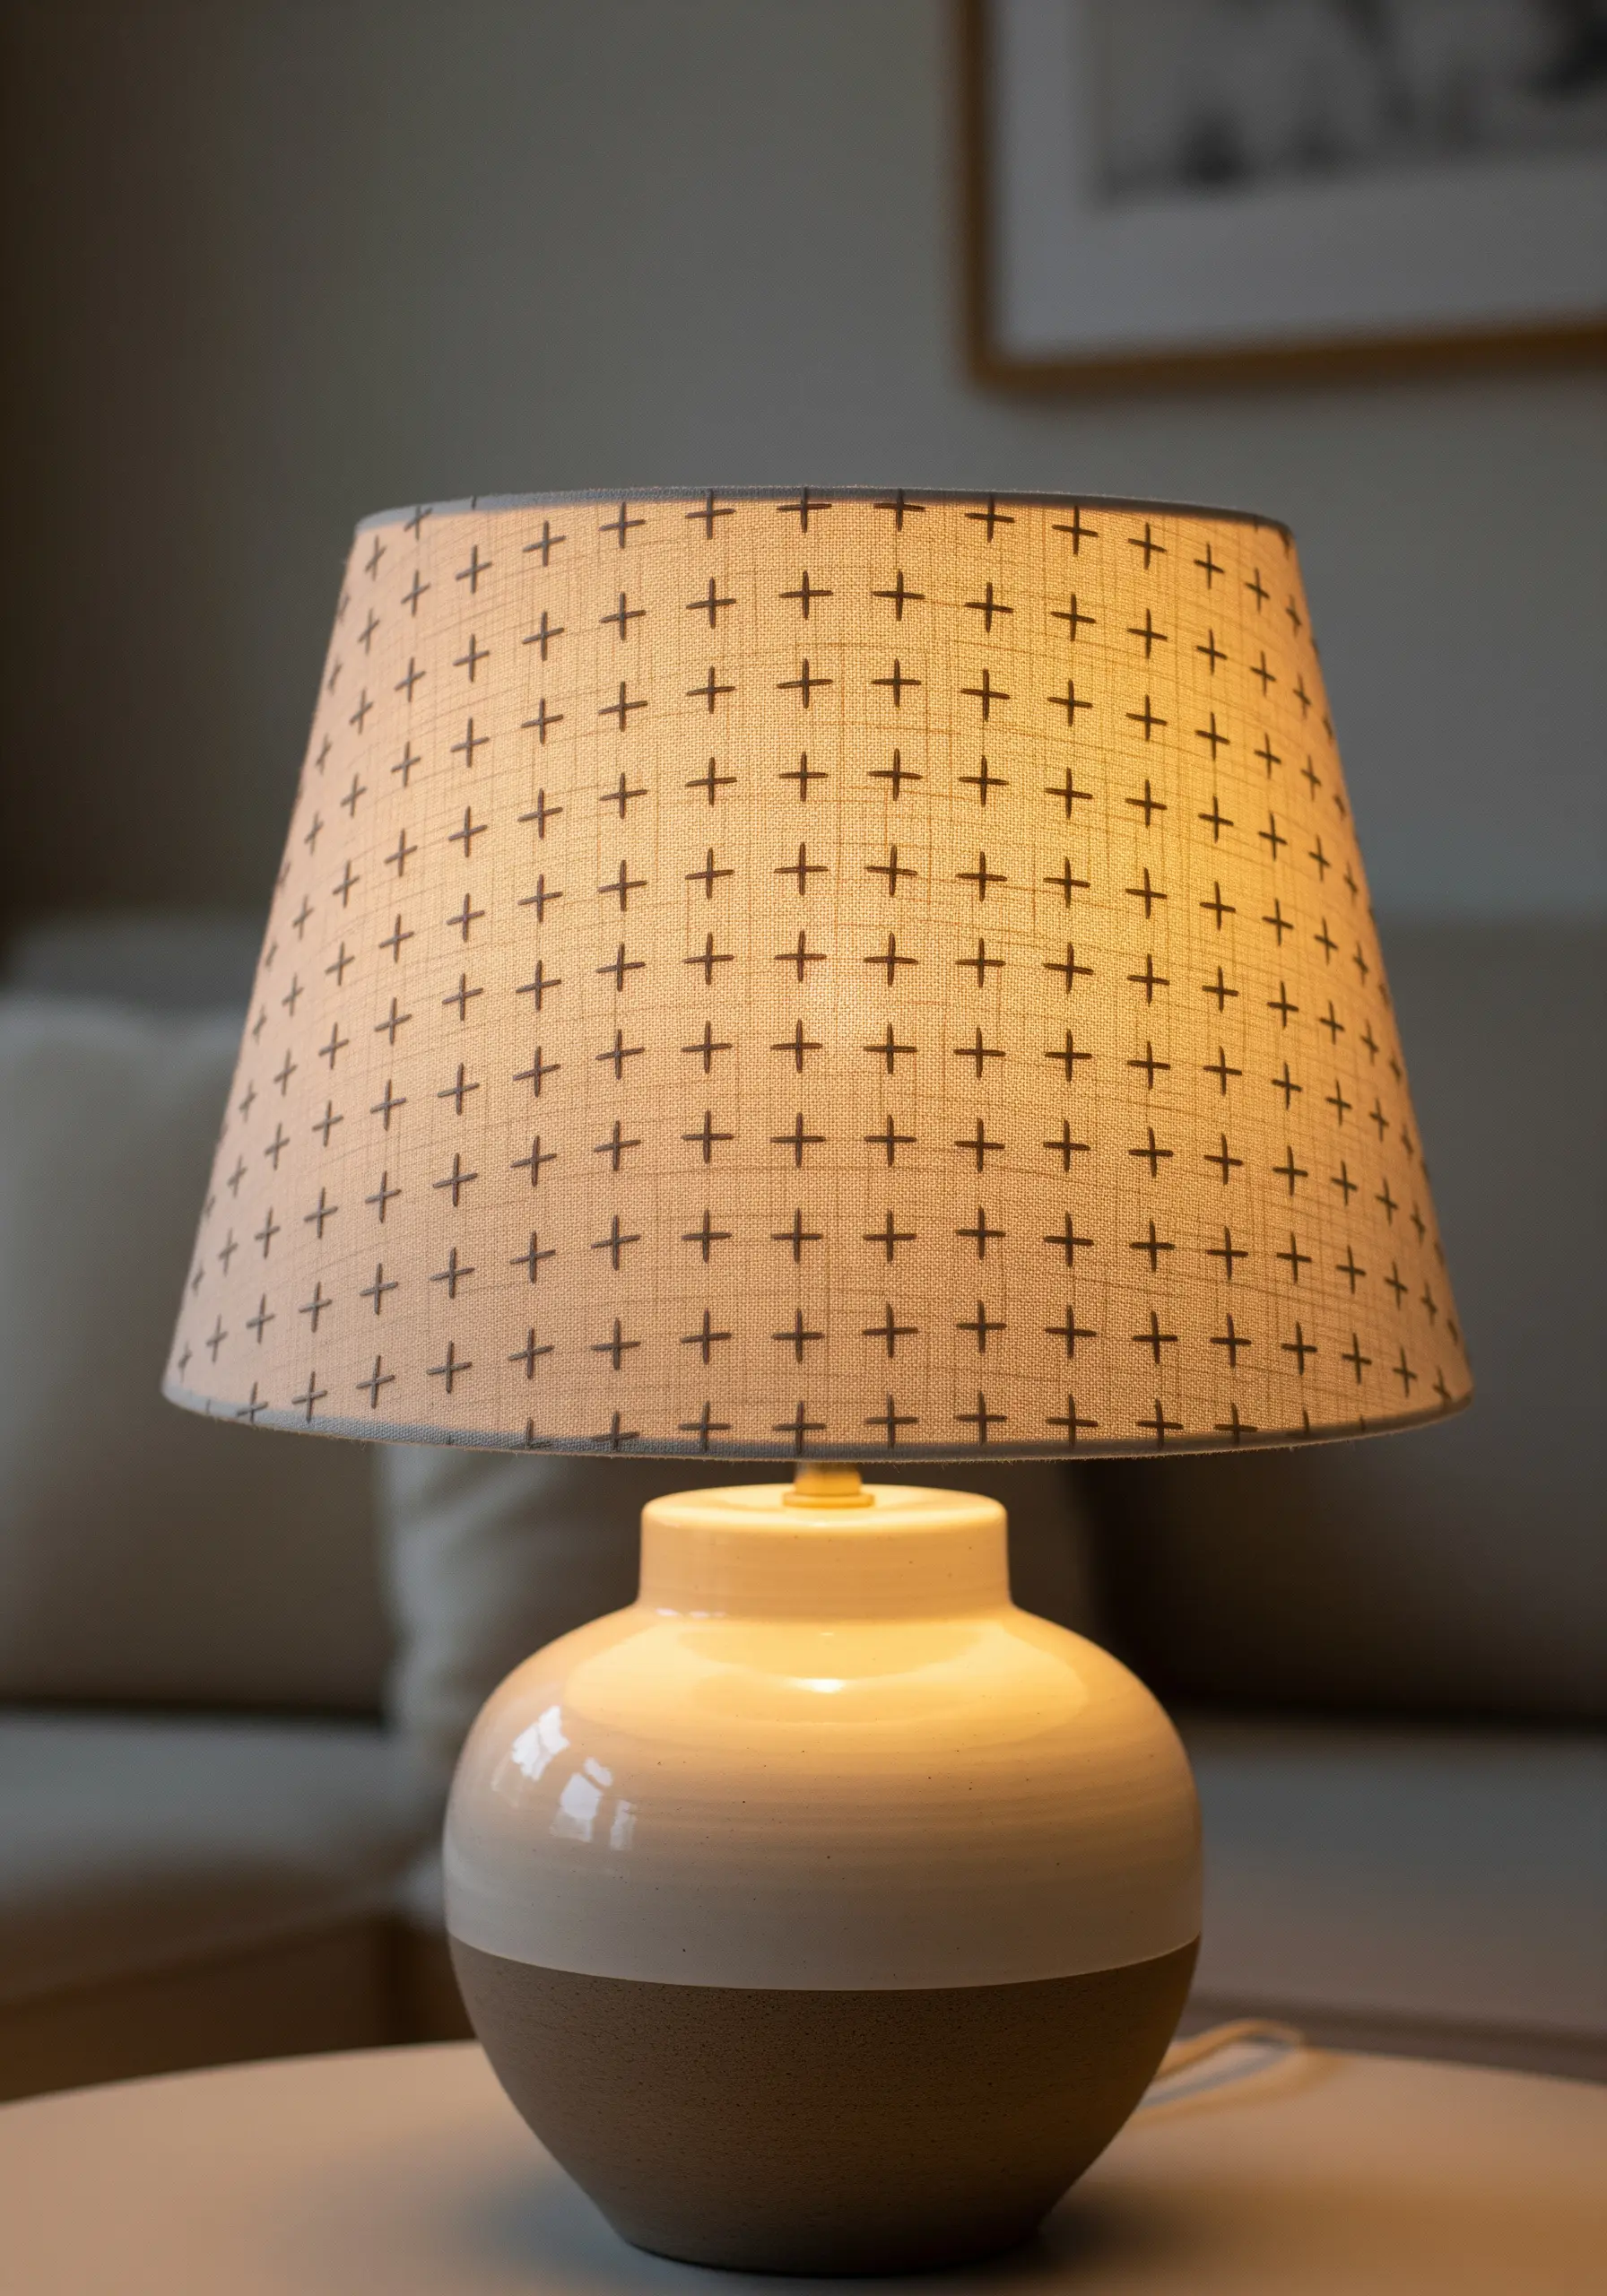
When embroidering an object that will be illuminated, like a lampshade, consider how the light will pass through your work.
A simple, repeating geometric pattern, such as a grid of cross stitches or plus signs, creates a beautiful, diffused glow when the lamp is on.
Use a medium-weight thread in a color slightly darker than the fabric for a subtle effect that is elegant both day and night, turning a functional item into one of your favorite small DIY textile decor pieces.
12. Curate a Cohesive Gallery Wall
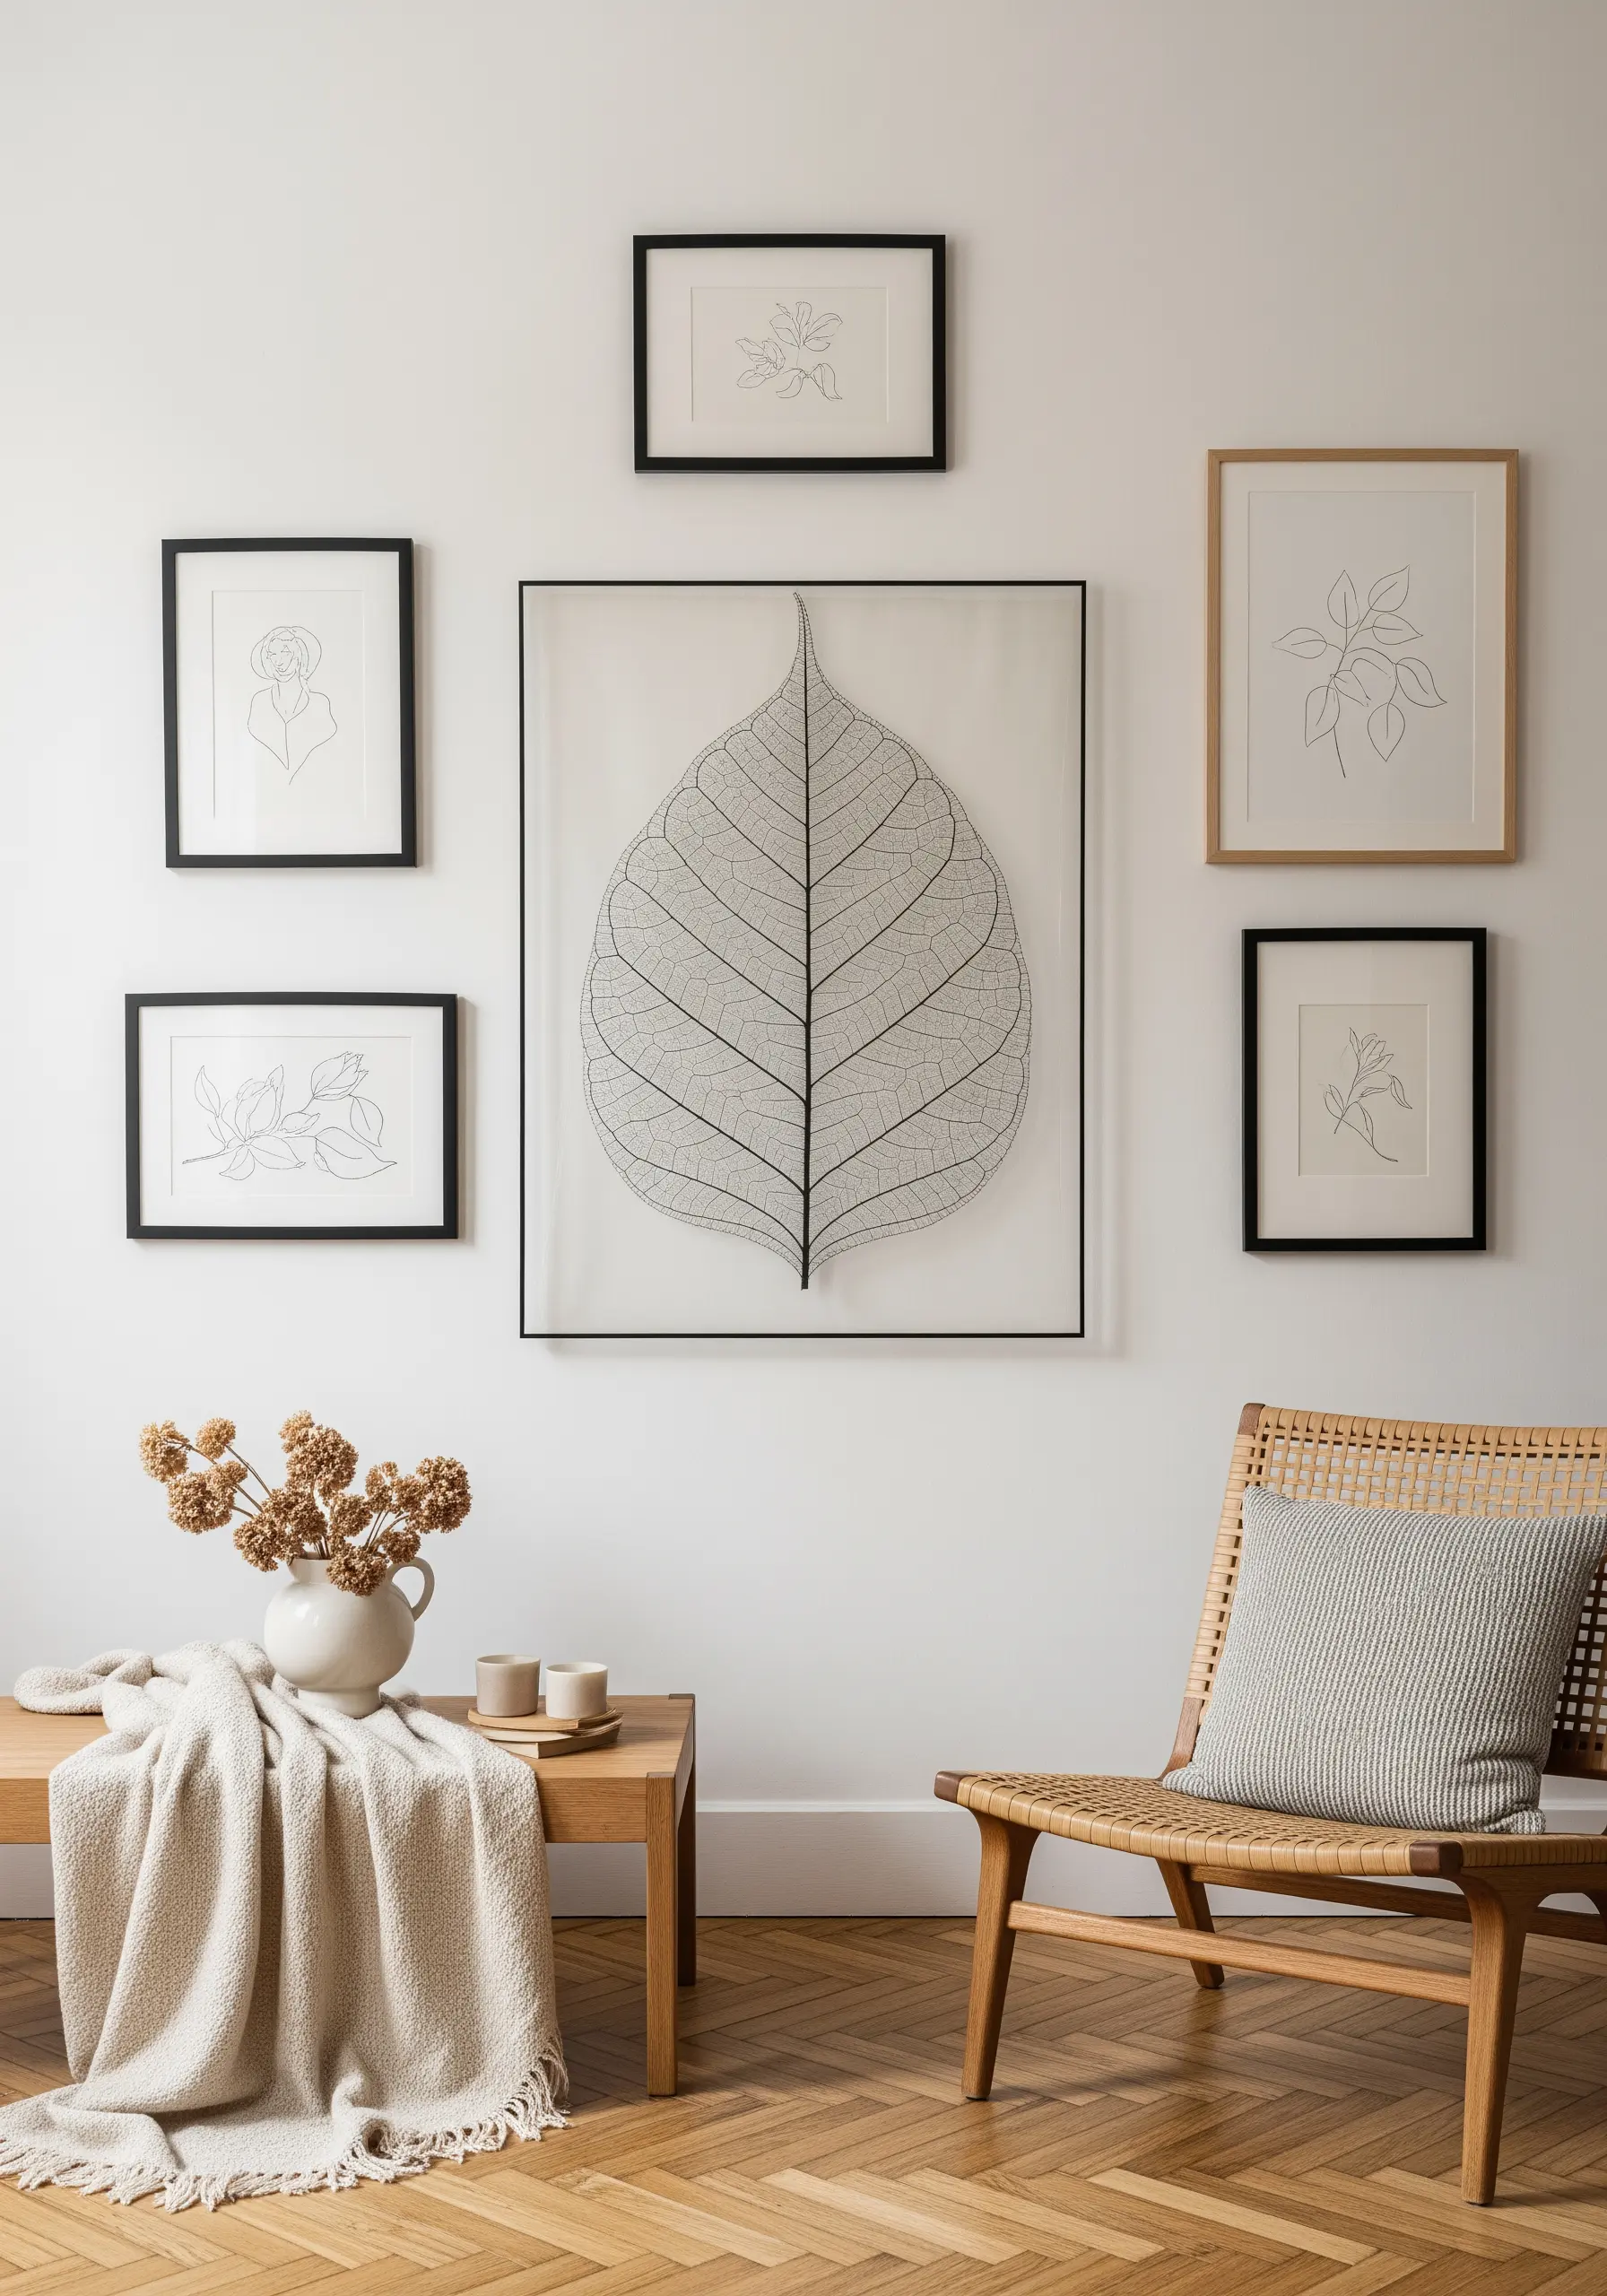
Create a powerful statement by grouping several small, related pieces together.
Choose a unifying theme, such as botanical line art, and stitch each design using the same single-thread backstitch technique for consistency.
Frame them in a mix of complementary frames to add warmth and variety, while the consistent style of the embroidery ties everything together.
This approach elevates minimalist line art nature embroidery from a single piece to a curated collection.
13. Add Durable Texture to Upholstery
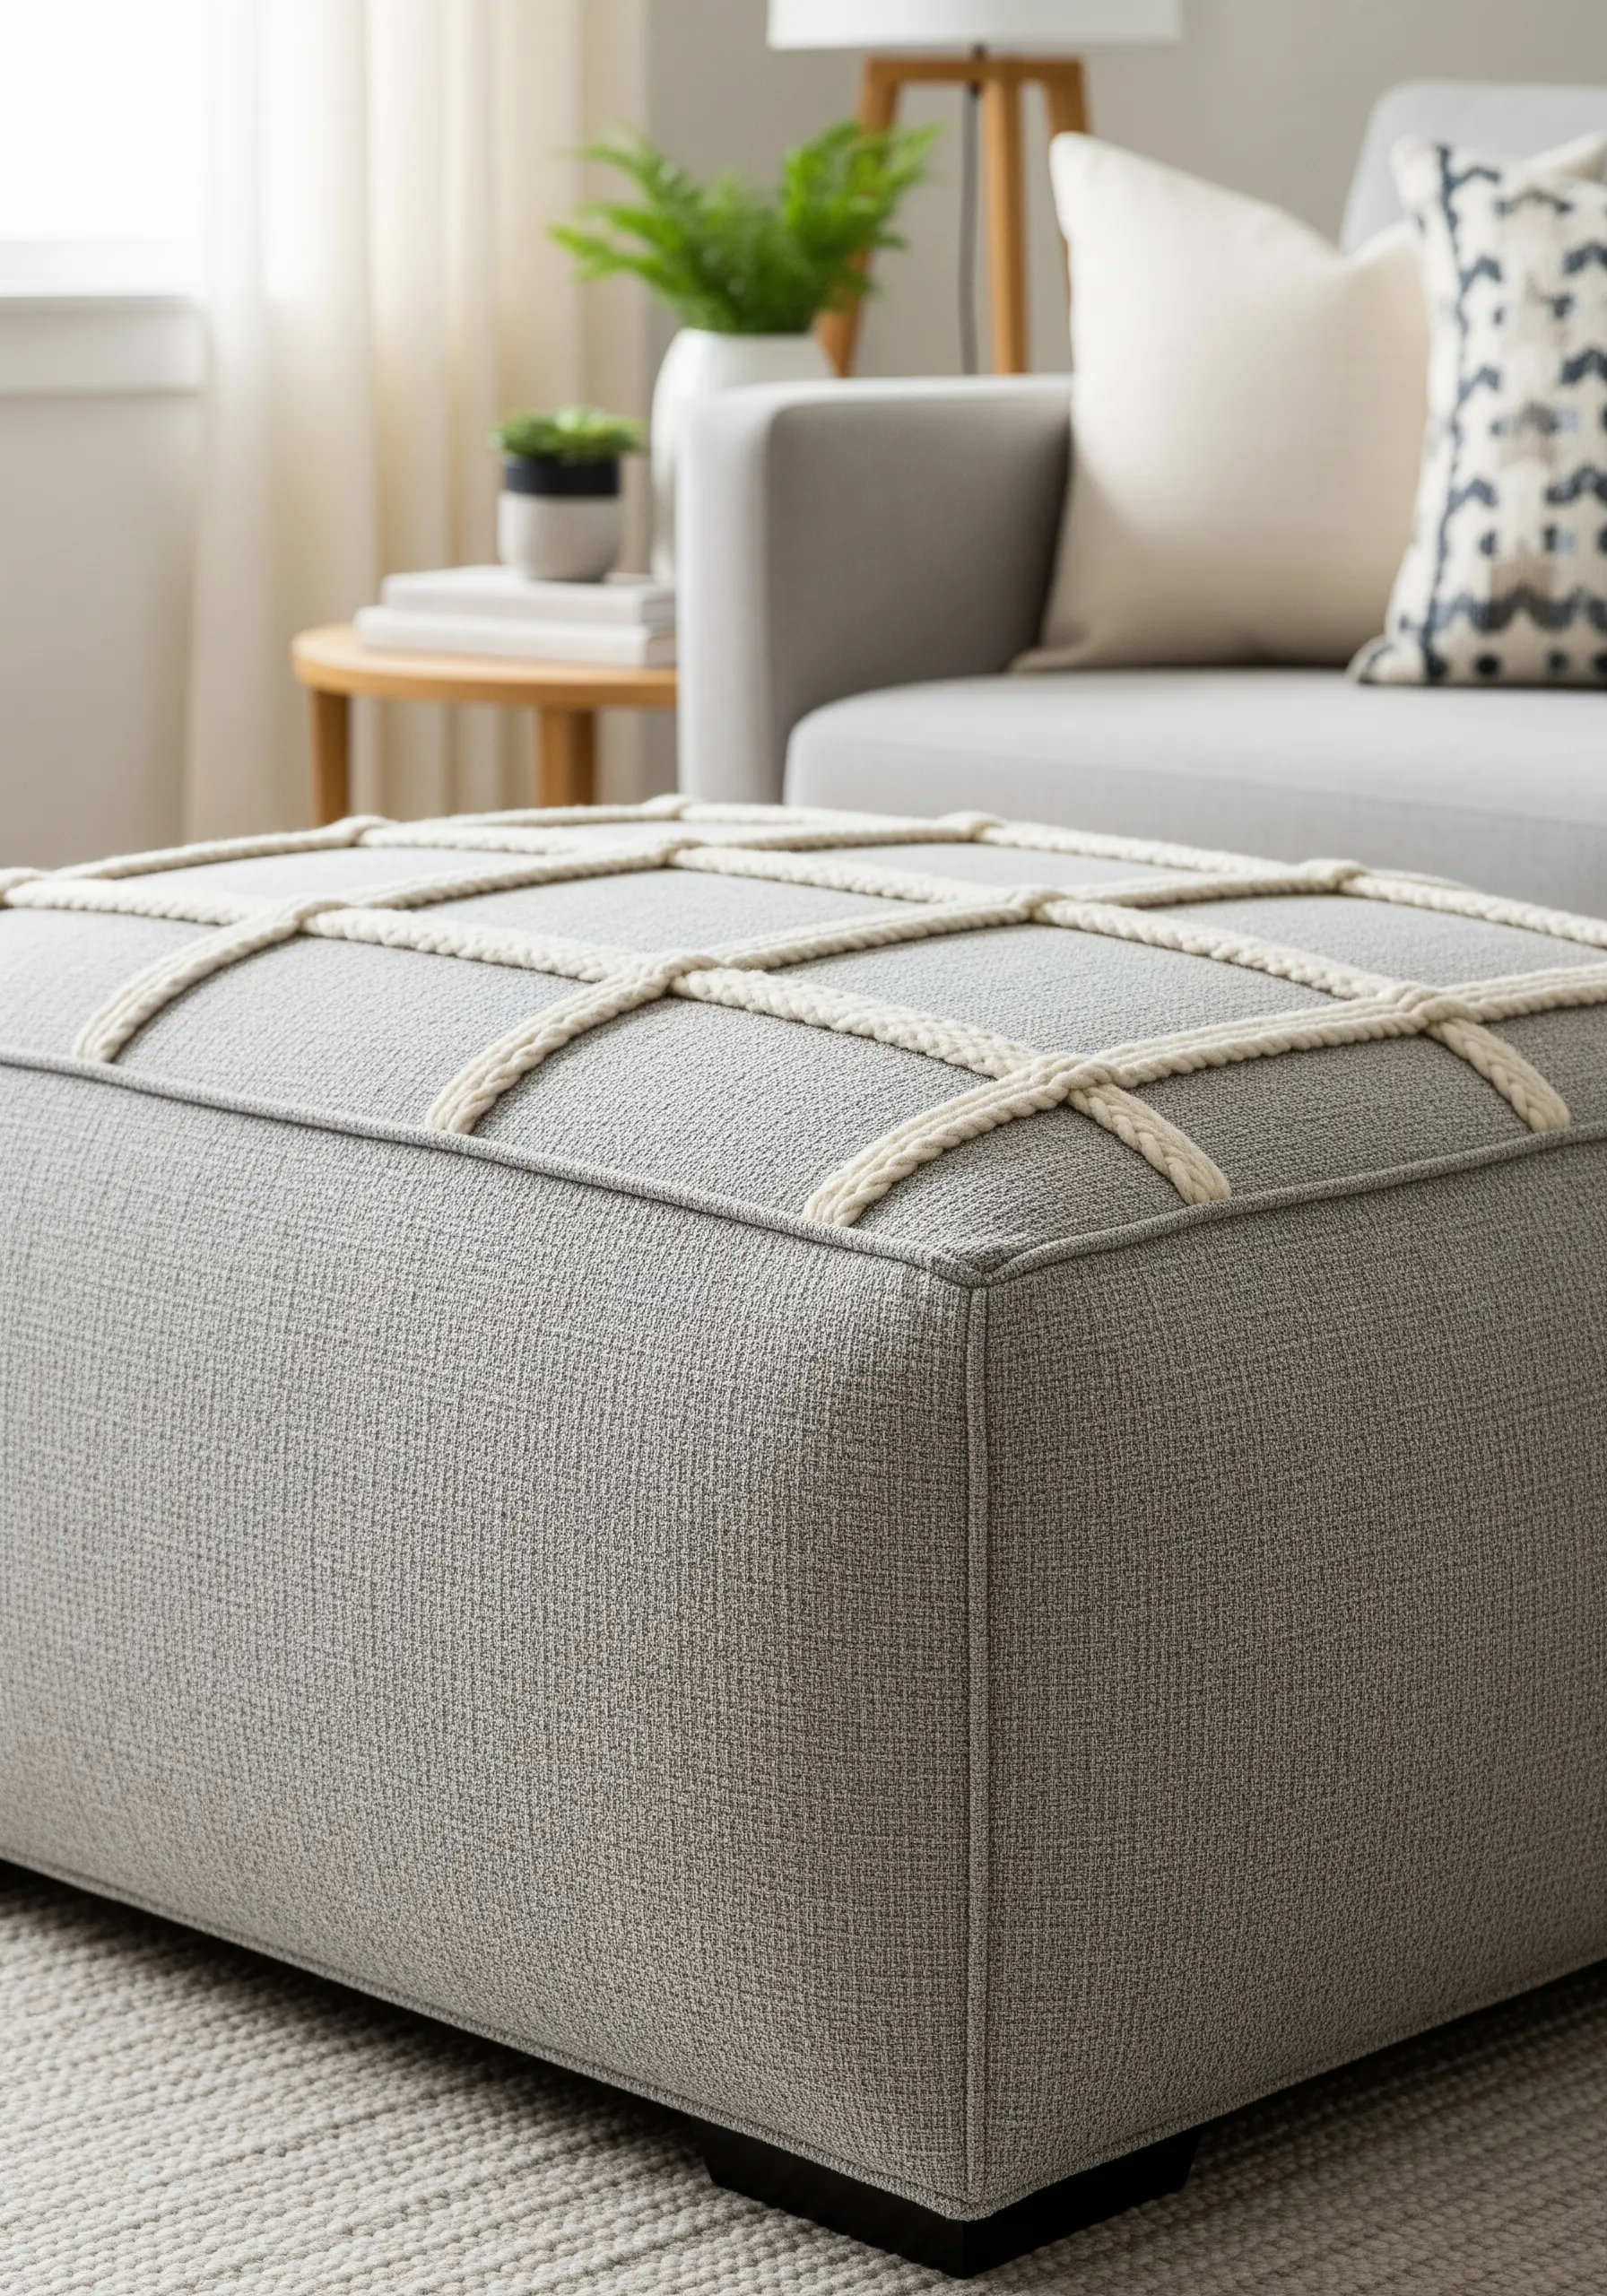
Embellish functional furniture like an ottoman or bench with techniques that can withstand daily use.
Couching thick, braided cord onto the surface with a strong, matching thread creates a textural grid that is both beautiful and highly durable.
Secure the cord with small, tight stitches on the underside or at the seams of the furniture for a clean, professional finish.
This transforms everyday furniture into handmade organic embroidery pieces that are meant to be lived with.
14. Build Rhythm with Repeating Arcs

Create a sense of calm and gentle movement with a pattern of repeating arcs.
Use a smooth satin stitch to fill each arc, ensuring your stitches lie flat and parallel for a clean, reflective surface.
Arrange the arcs in a scattered yet balanced composition, and use a muted, earthy color palette to maintain a sophisticated feel.
This simple motif is perfect for handmade pillow & cushion embroidery patterns that feel modern and serene.
15. Enhance Your Art with Thematic Framing
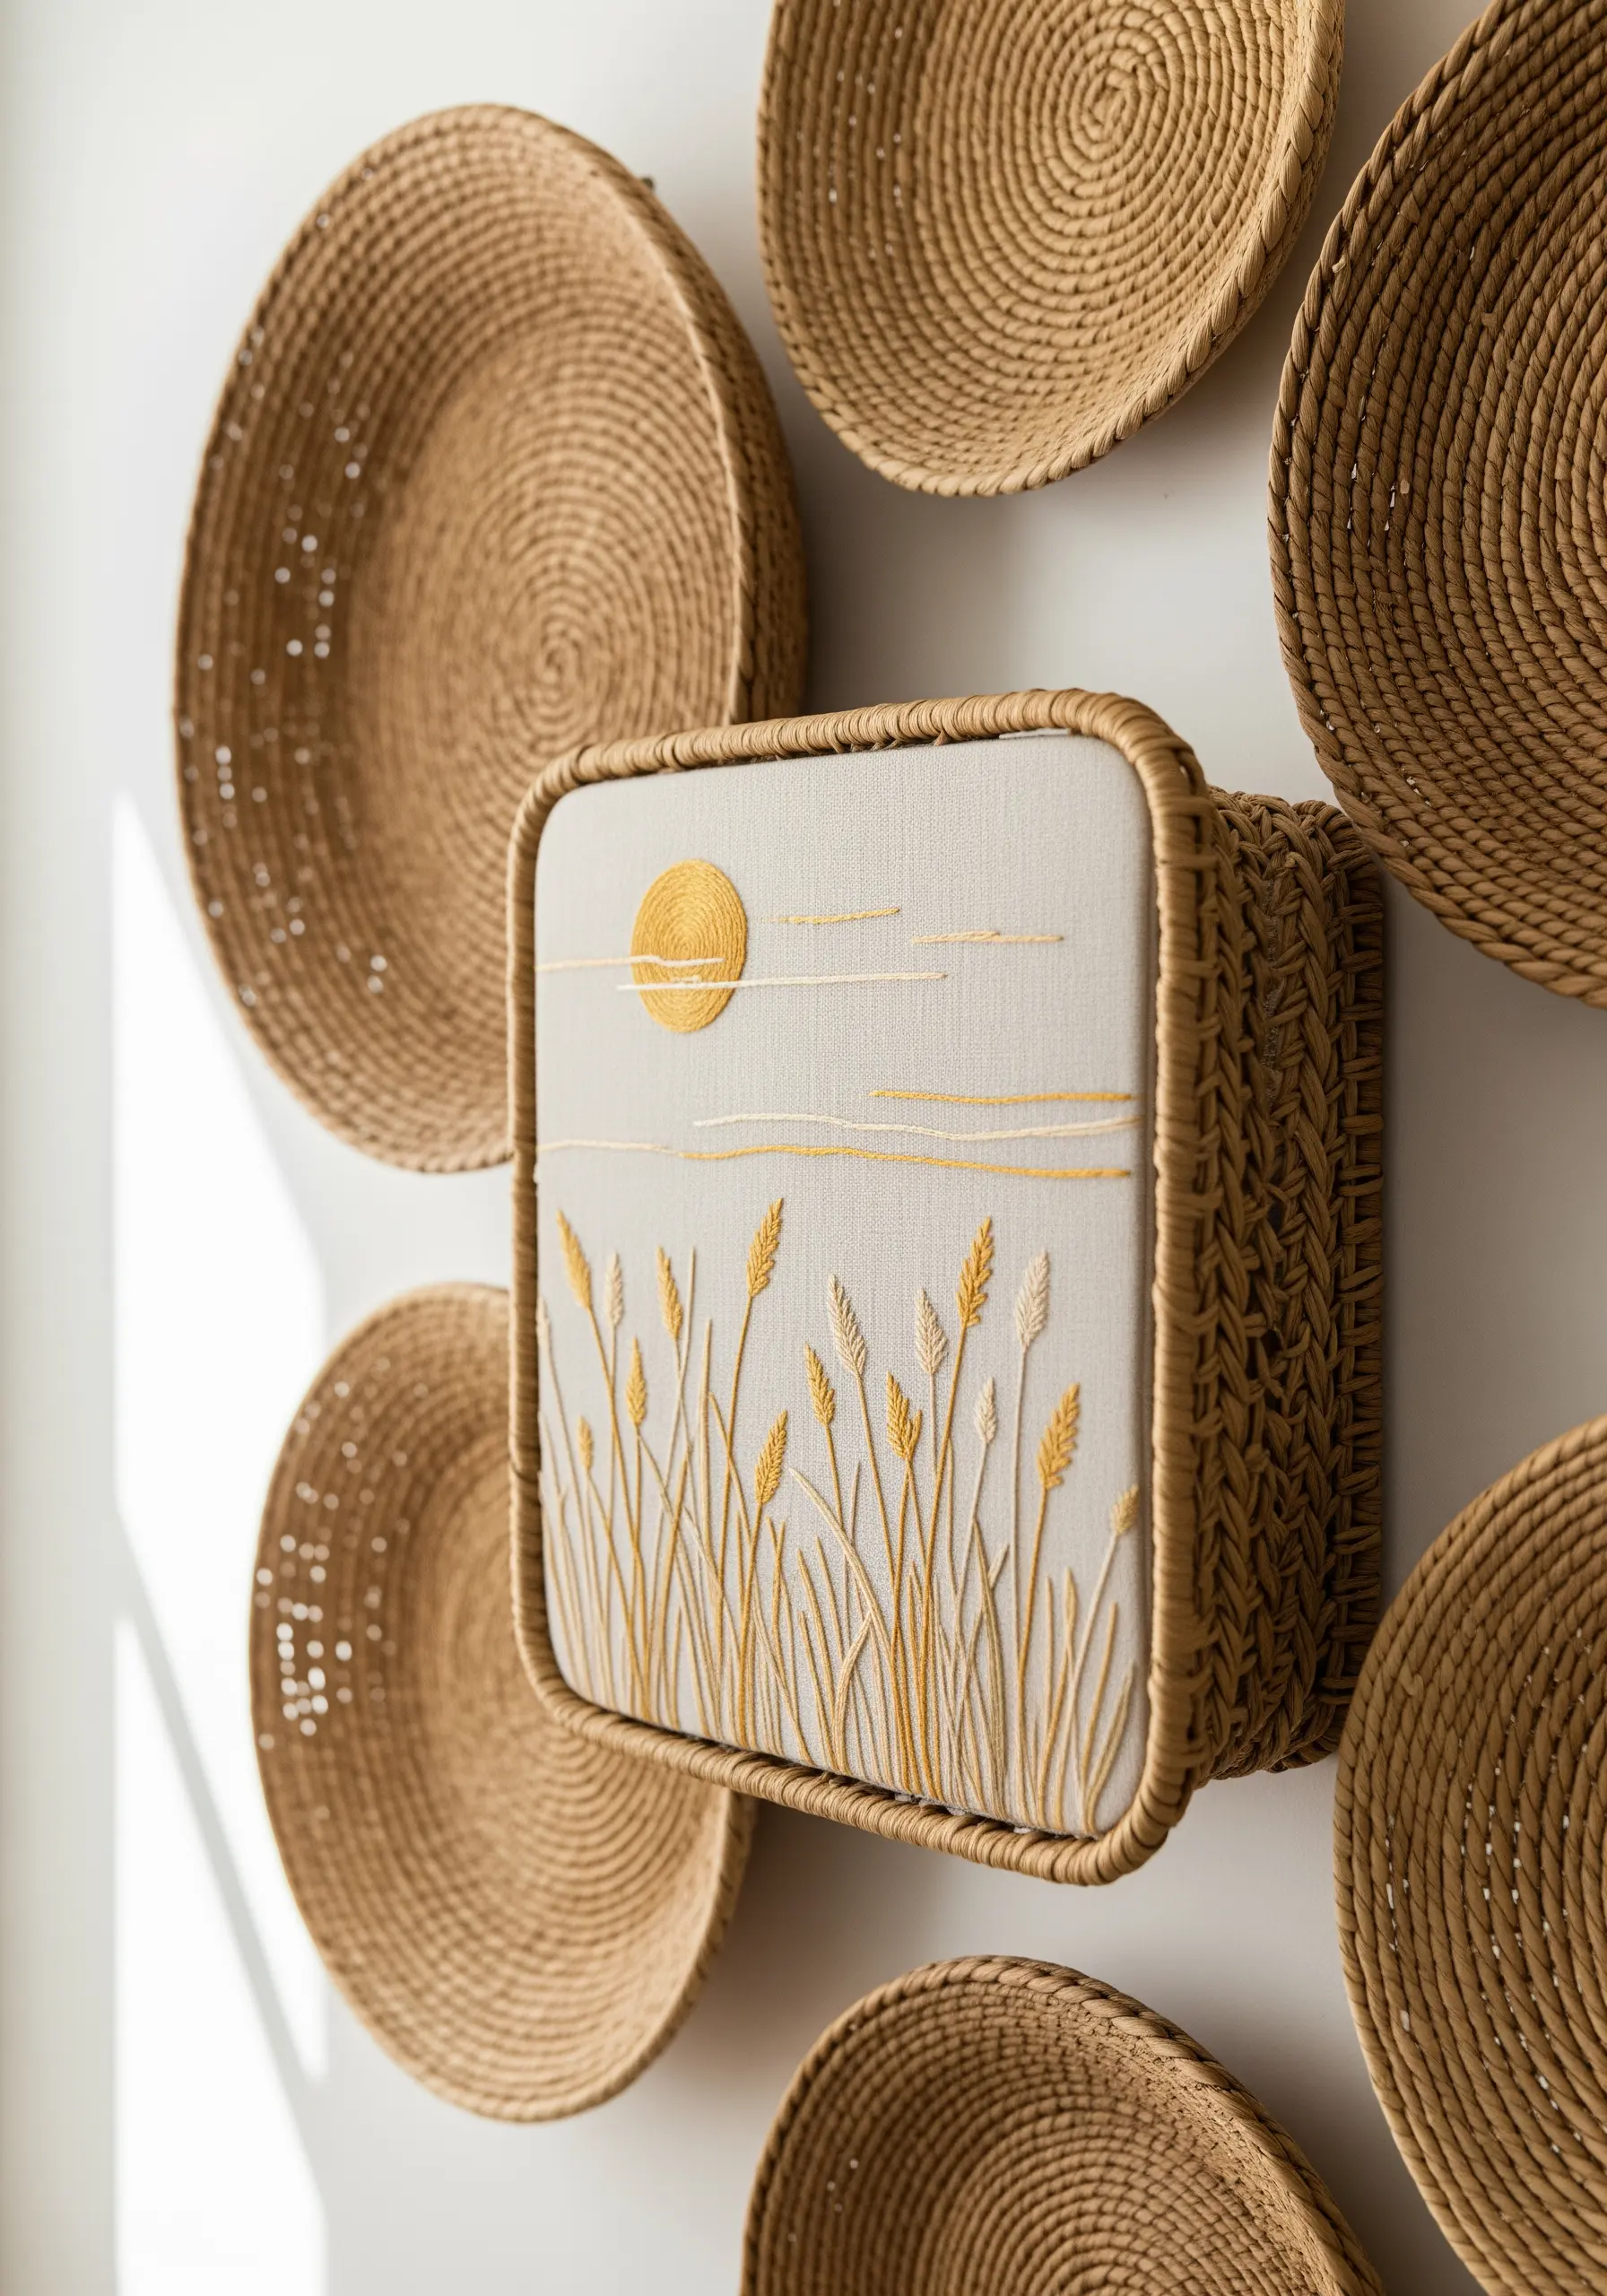
The way you present your embroidery is just as important as the stitching itself.
Complement a nature-inspired piece, like a field of wheat, by wrapping the frame or hoop with a natural material like rattan, twine, or jute.
This creates a cohesive, rustic aesthetic that extends the artwork beyond the fabric, making your hoop art feel more like a finished object.
Thoughtful presentation is key to hand-embroidered wall hangings that feel straight out of Pinterest.
16. Use High Contrast for Celestial Designs
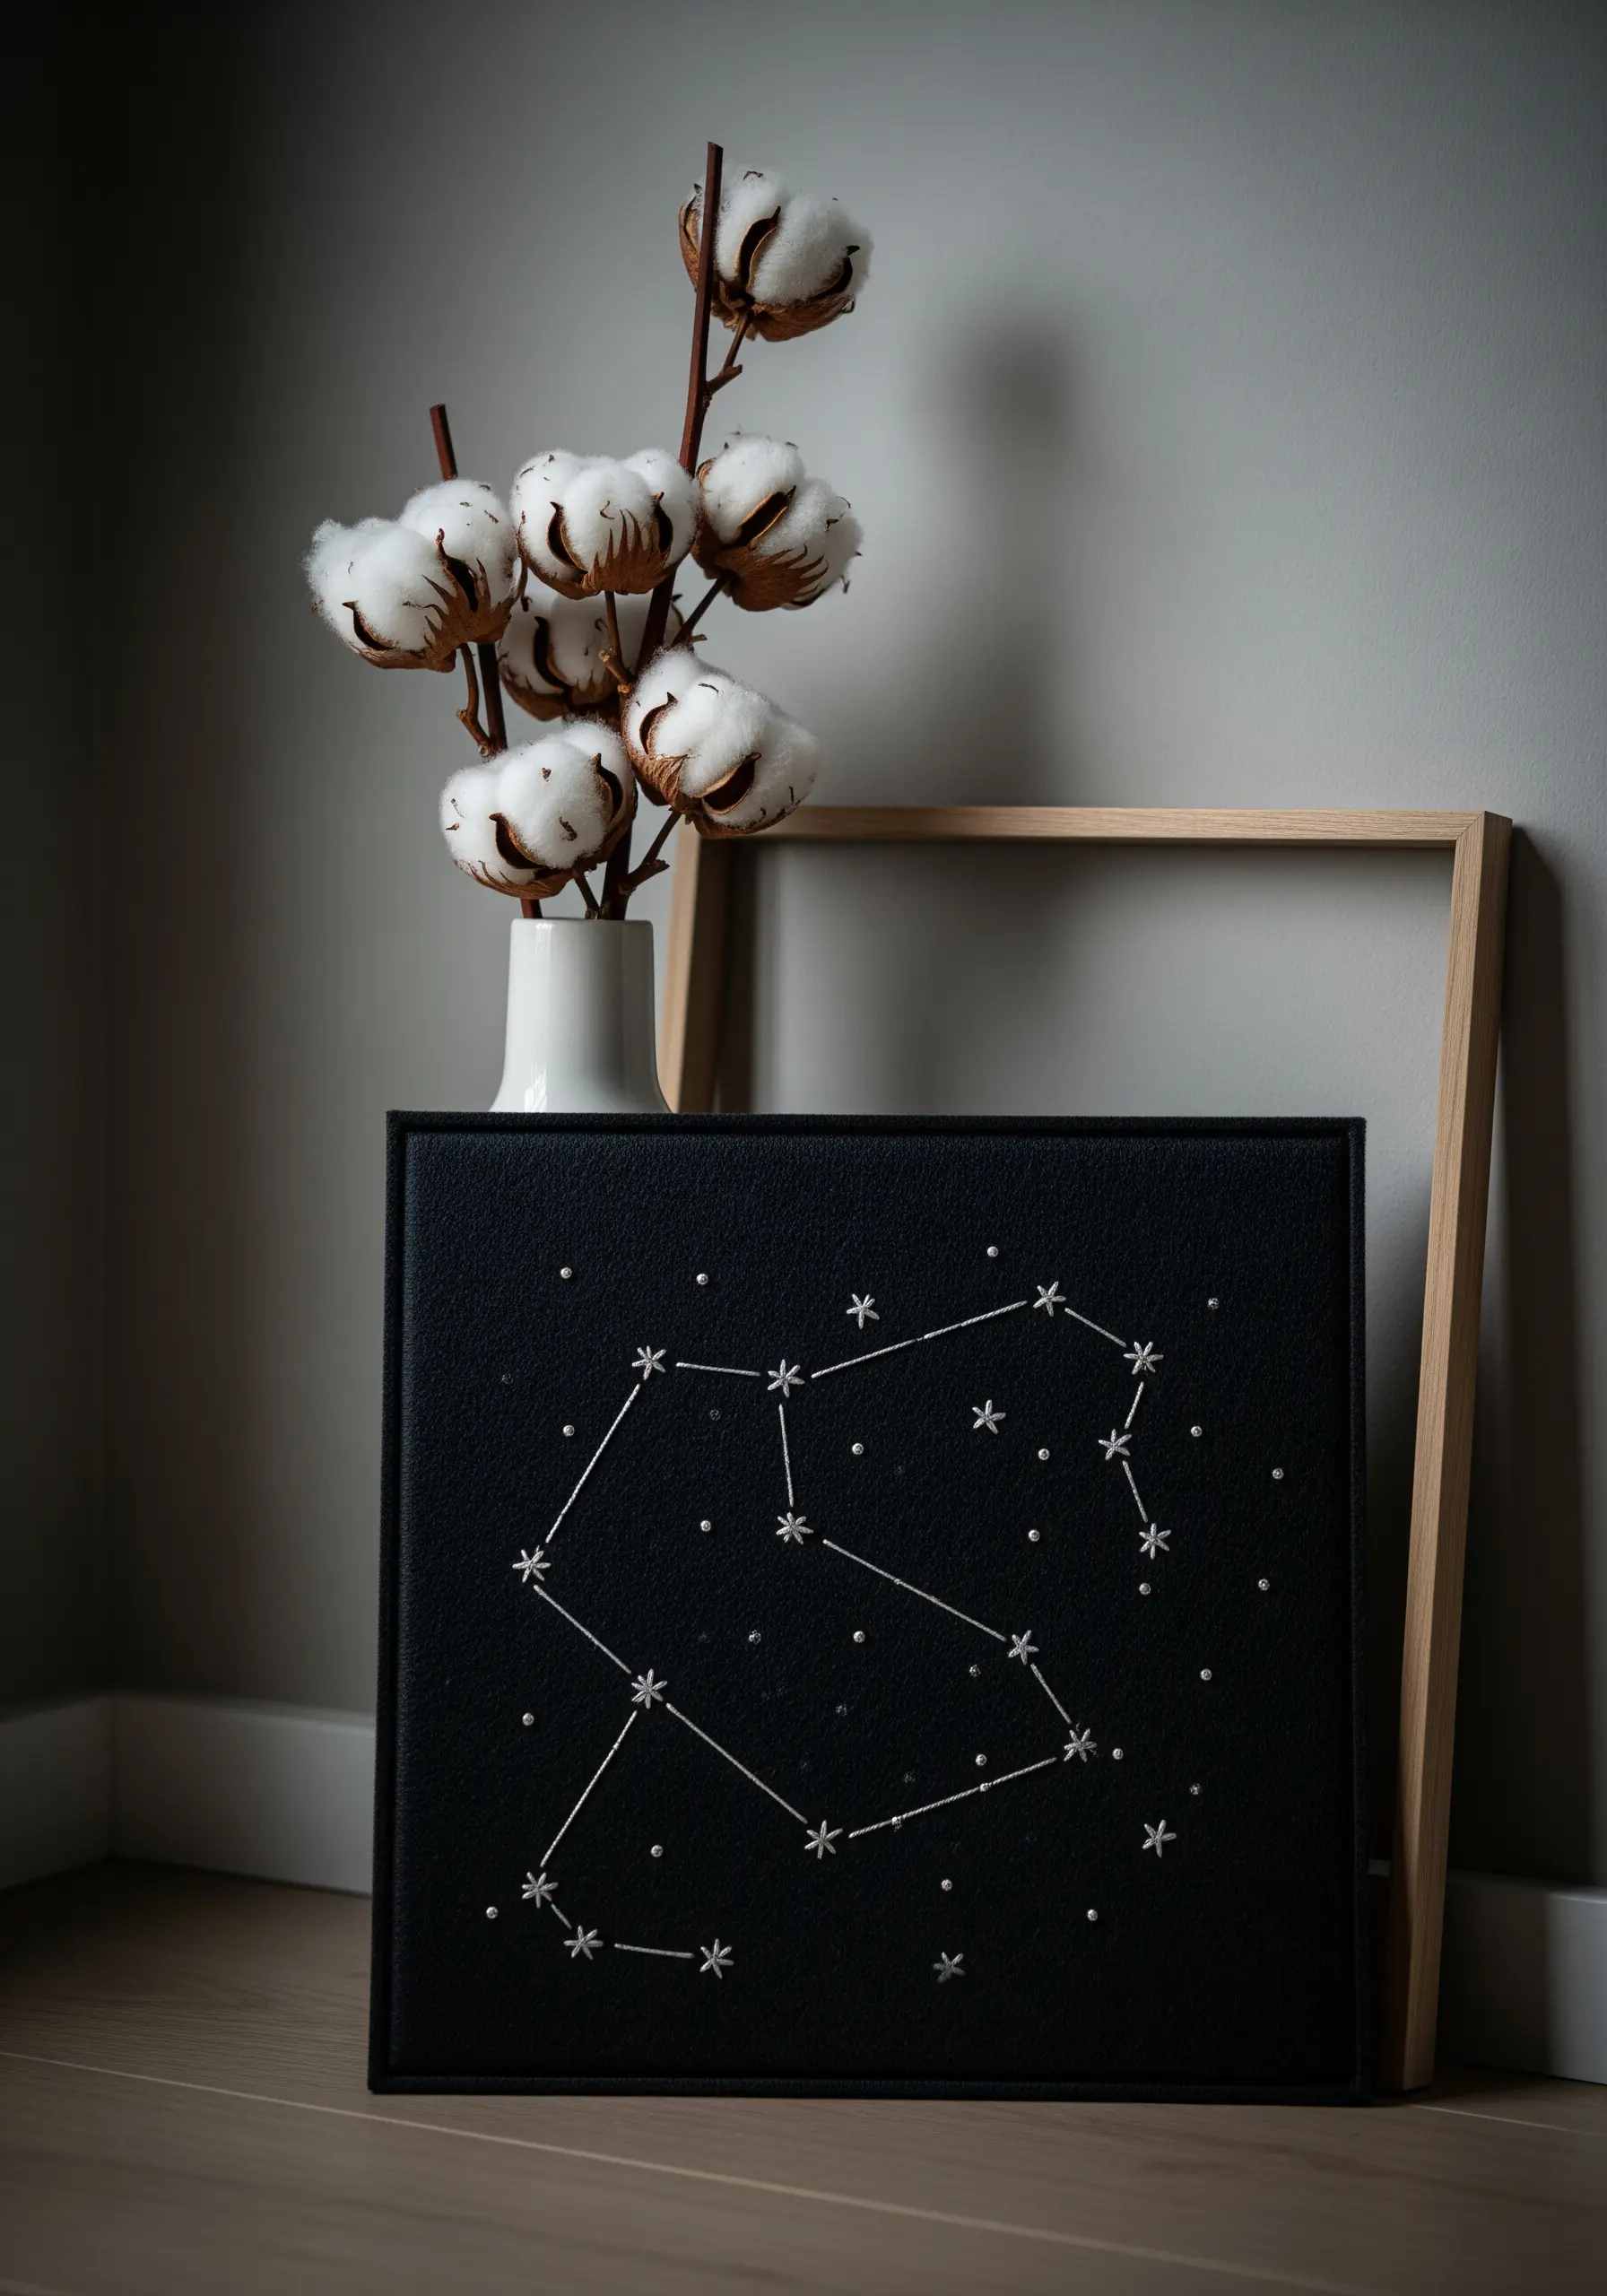
Make your celestial embroideries pop by stitching them on a dark, tightly woven fabric like black linen or cotton canvas.
Use a bright white or metallic silver thread for the constellation lines, employing a simple backstitch for clarity.
For the stars, a single French knot or a tiny seed bead will catch the light and add a subtle sparkle, creating a design that is both minimal and magical.
This high-contrast approach is perfect for monochrome embroidery ideas with a celestial theme.
17. Recreate Painterly Gestures with Thread
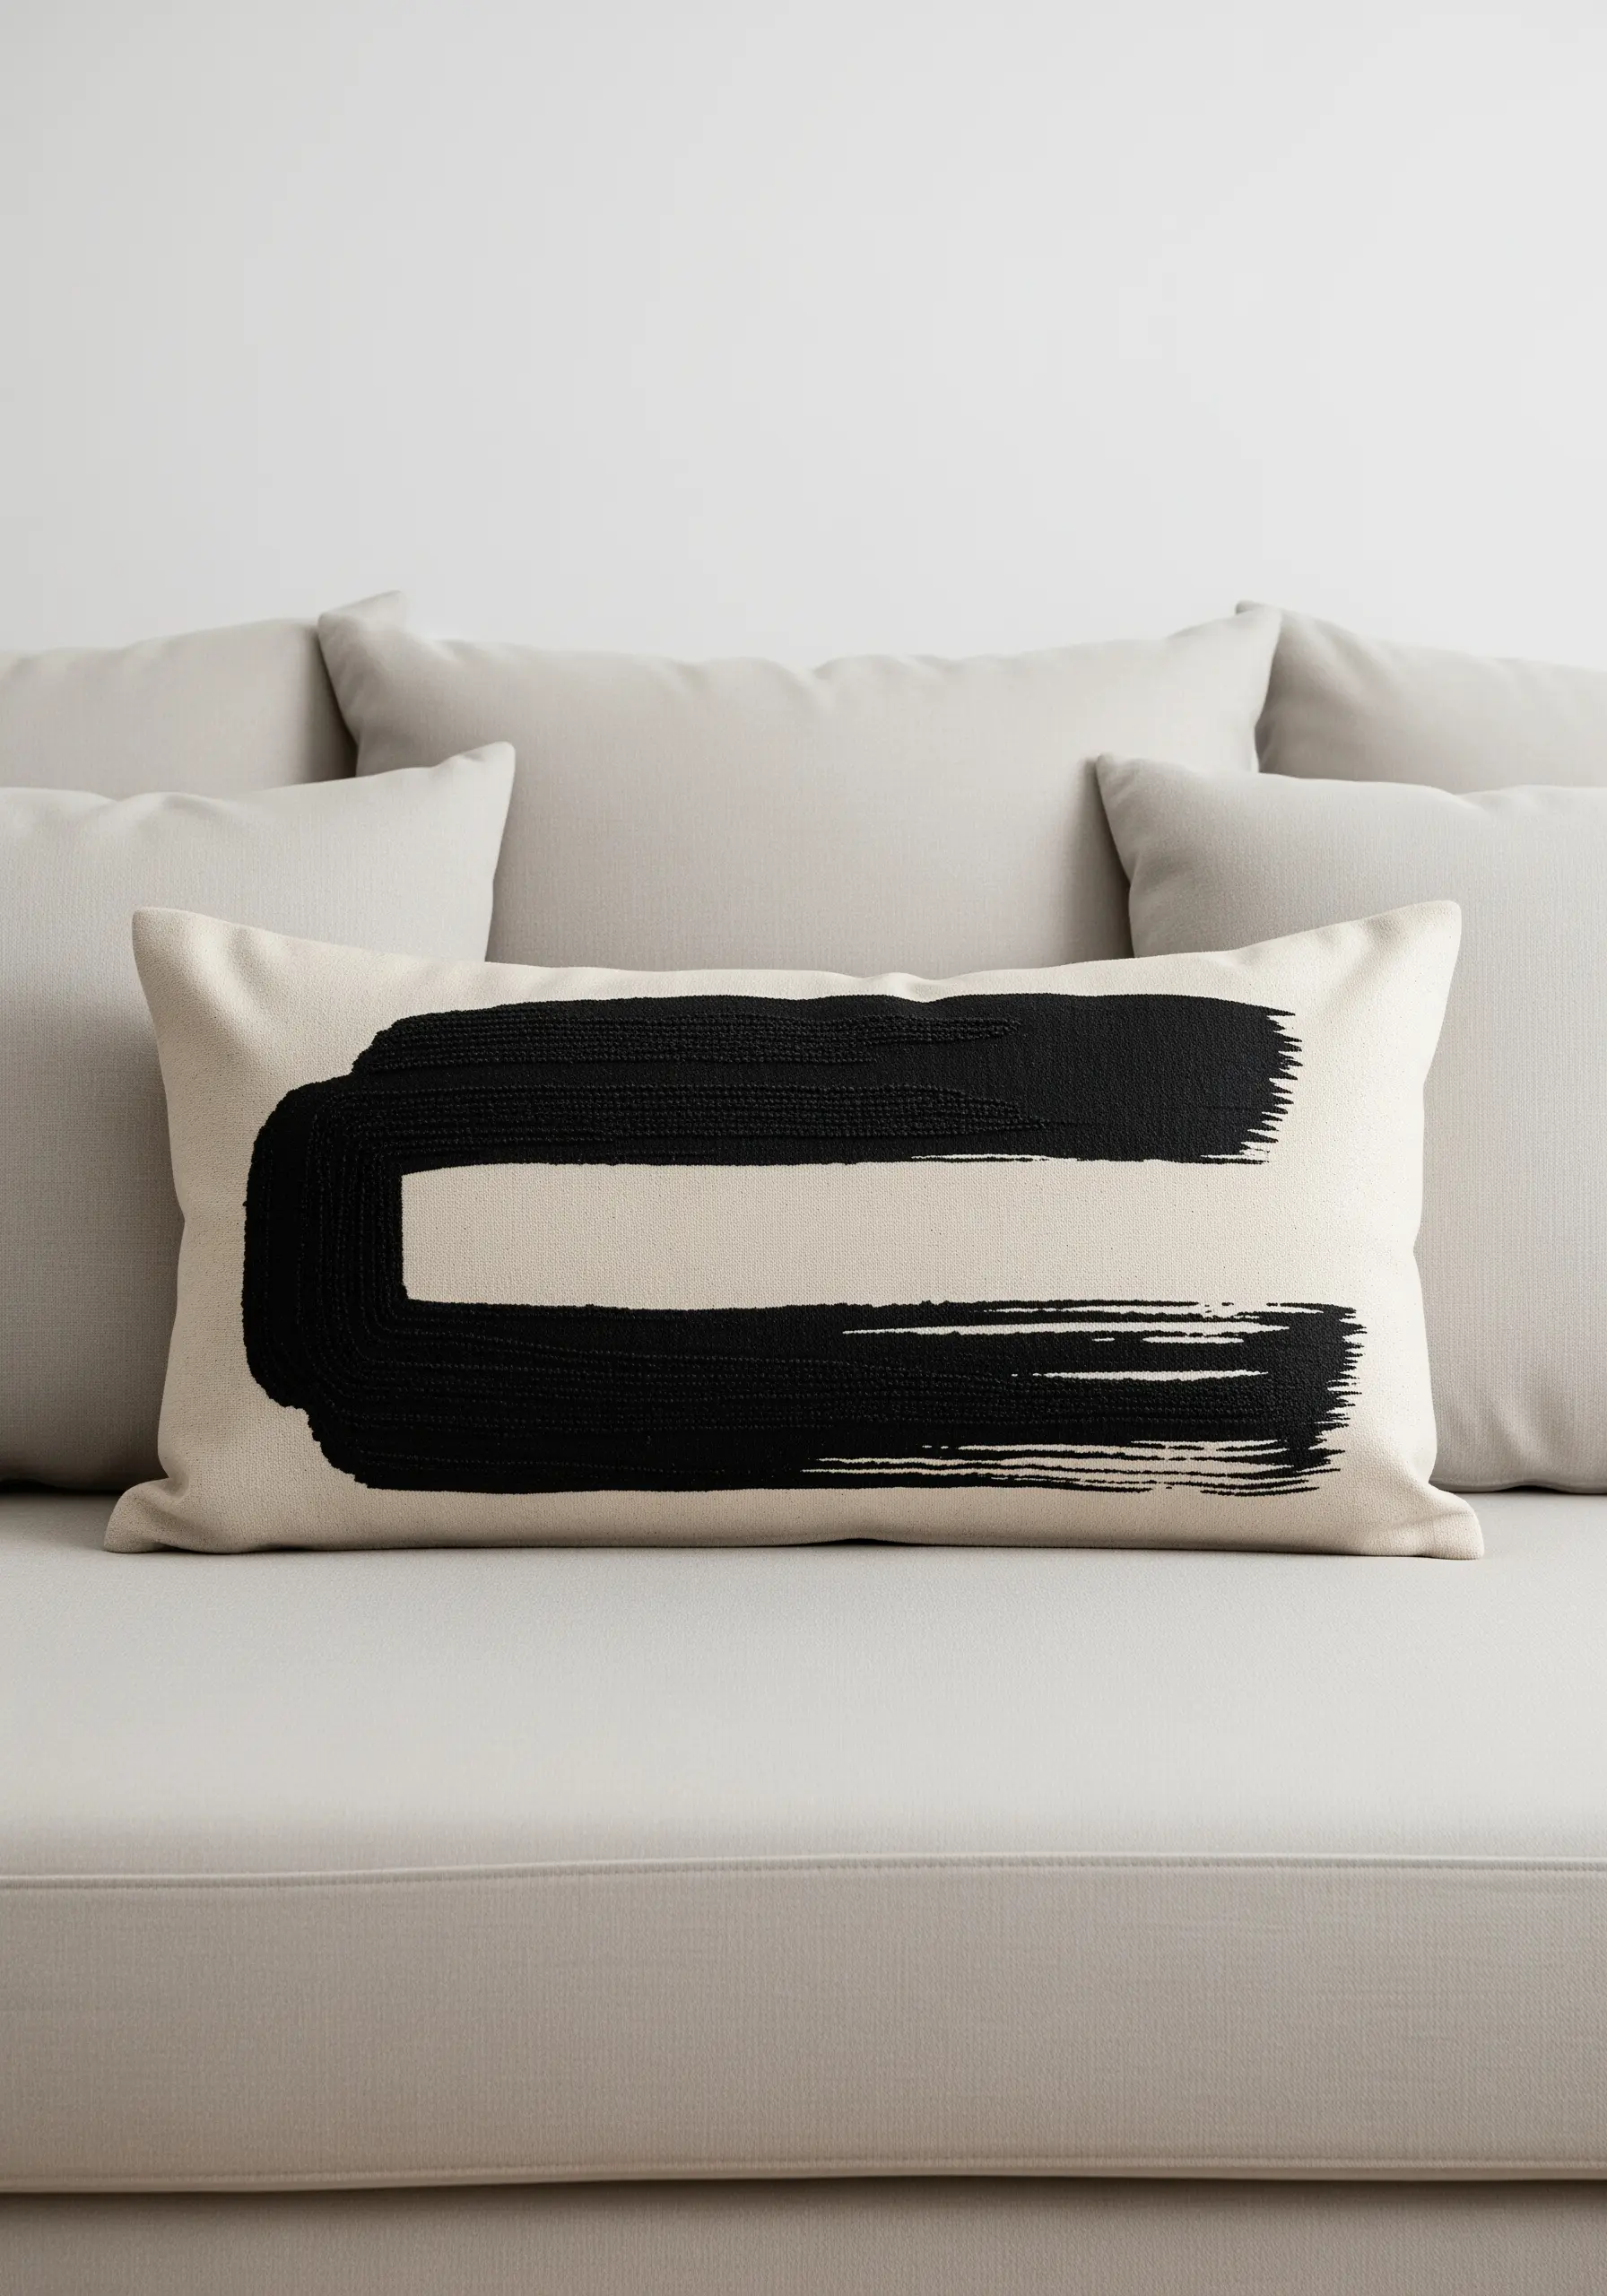
Capture the energy of a bold brushstroke by using dense, directional fill stitches.
Lay down long, slightly uneven satin stitches to form the main body of the shape, then add shorter, tapered stitches at the edges to mimic the frayed look of a dry brush.
By varying the length and angle of your stitches, you can create a dynamic, painterly texture that transforms a simple lumbar pillow into a piece of abstract thread painting.
18. Finish Your Edges with a Blanket Stitch
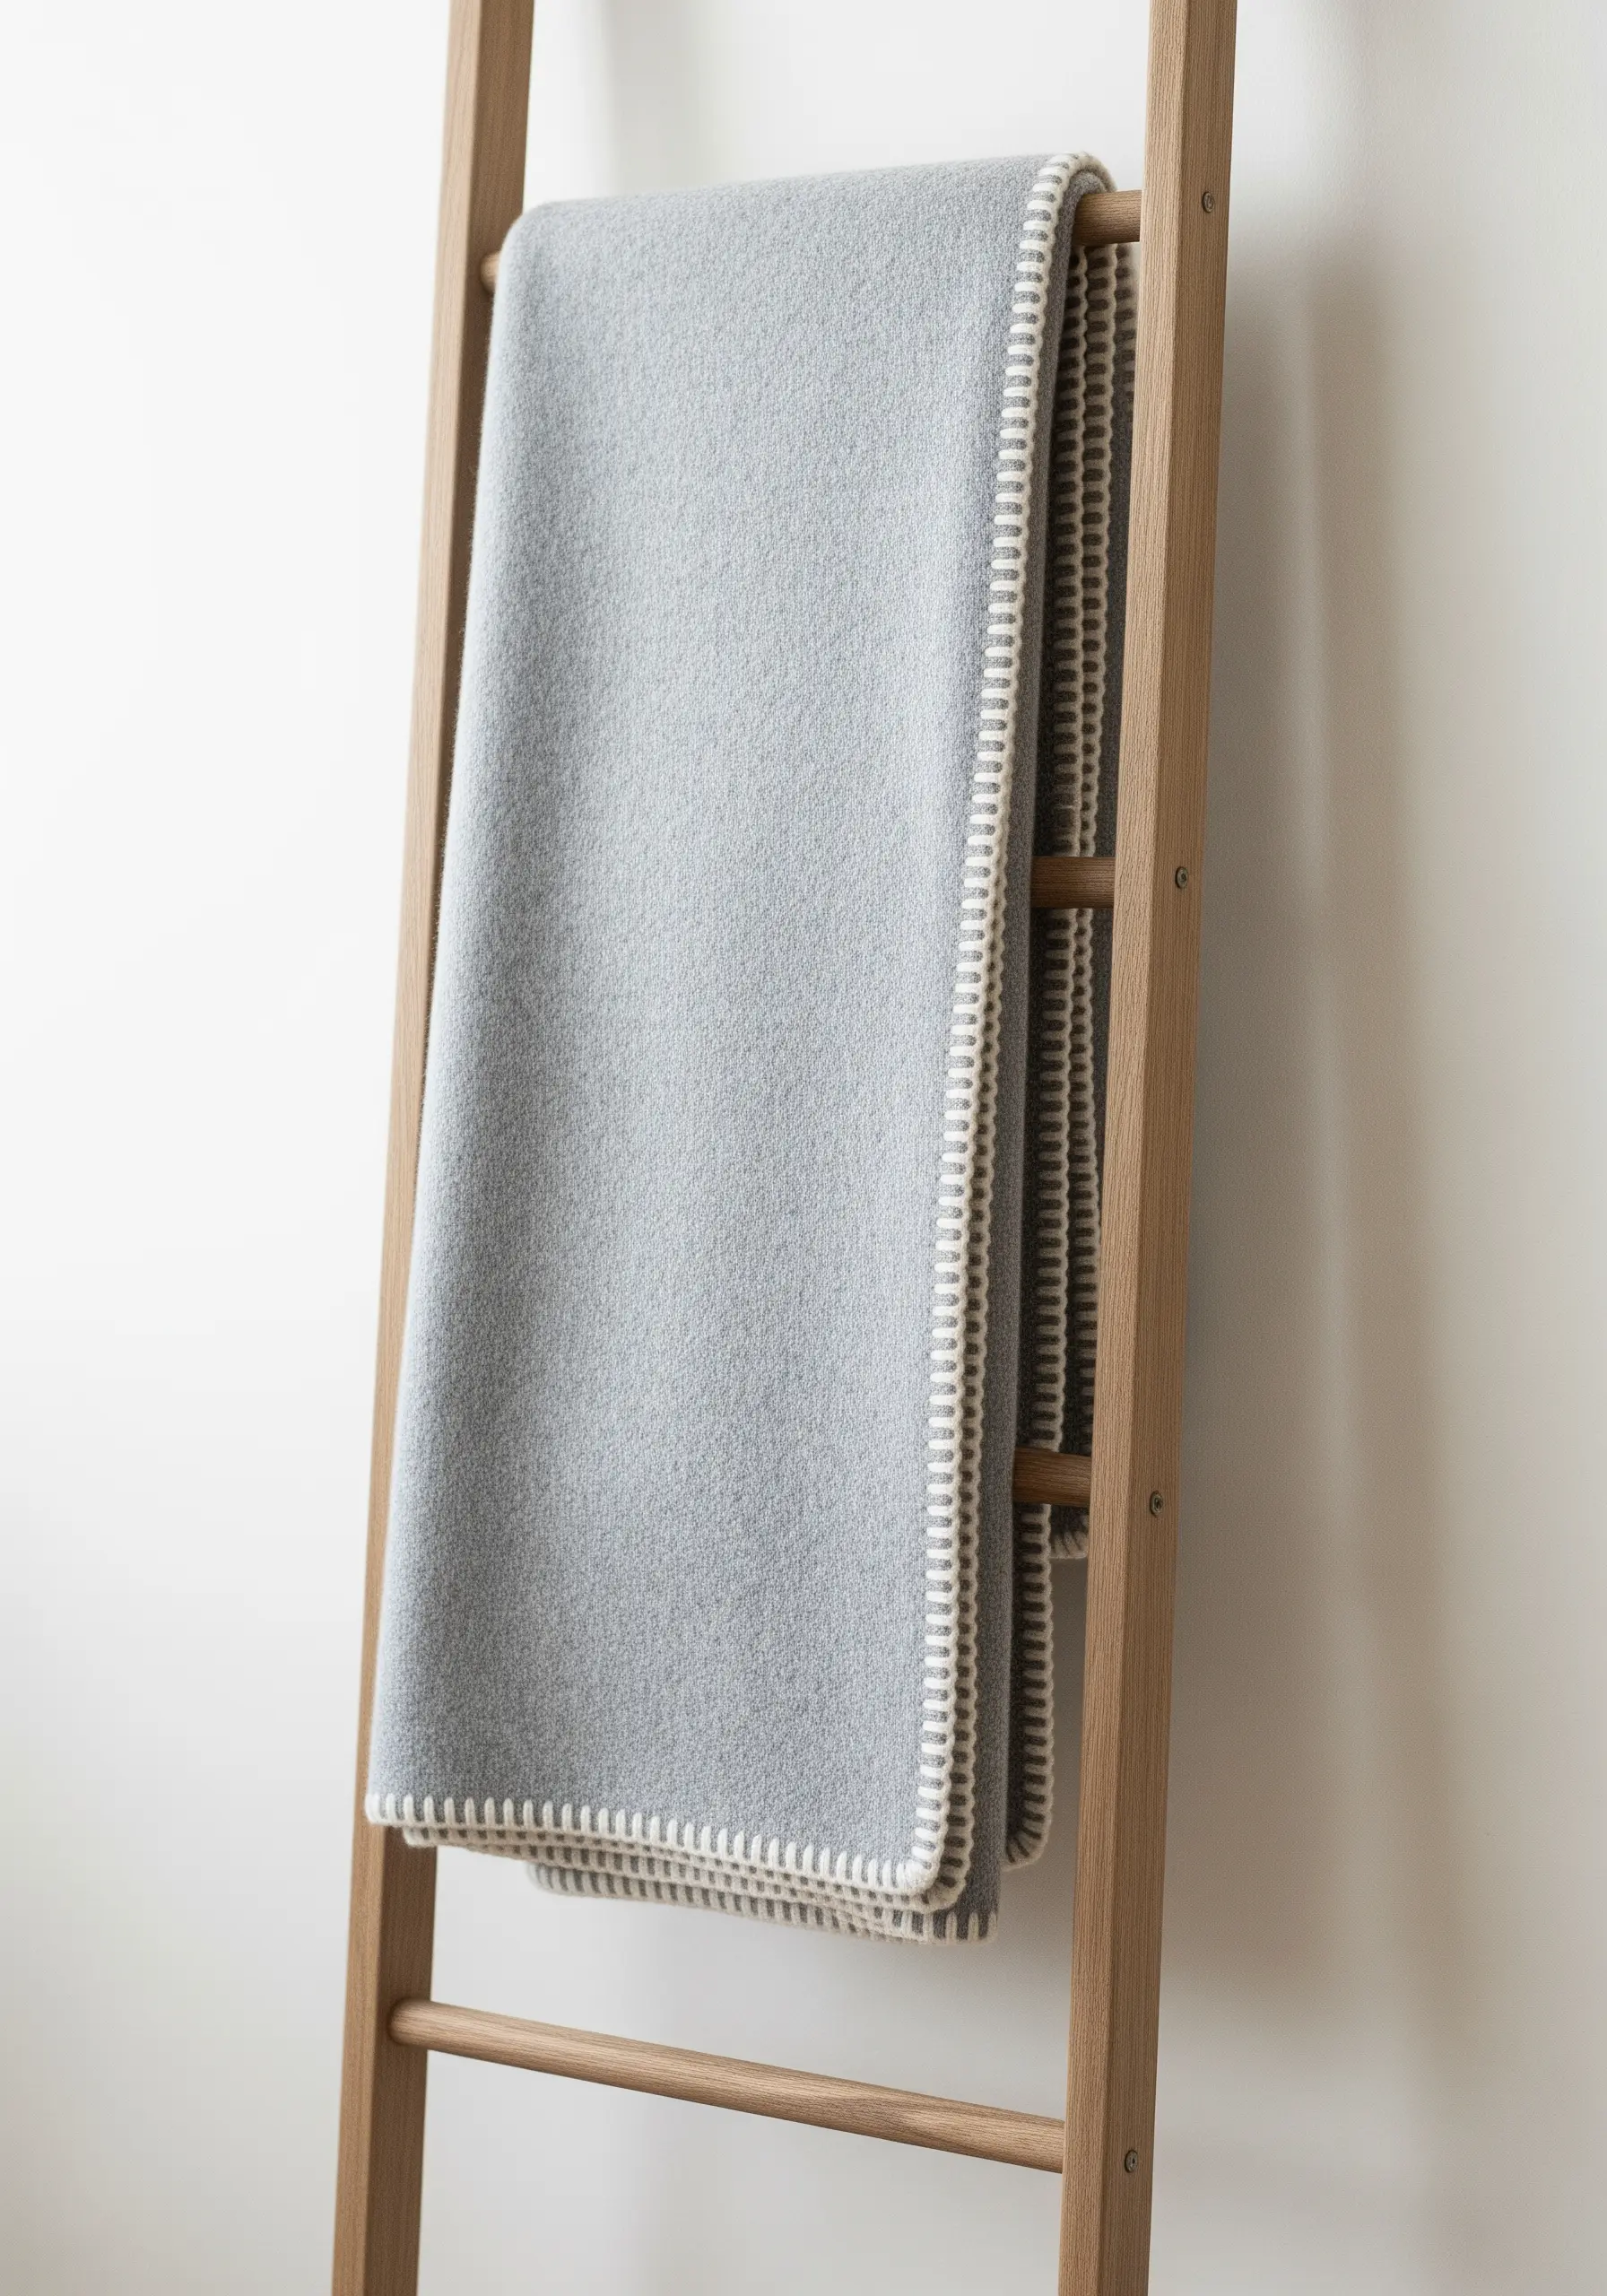
Elevate a simple woolen blanket by adding a decorative and functional edge finish.
The classic blanket stitch is perfect for this, as it prevents the fabric from fraying while adding a subtle, handcrafted detail.
Use a contrasting color of yarn or thick perle cotton for a graphic look, ensuring your stitches are evenly spaced for a professional, polished appearance.
This simple touch is one of the most effective handmade accents that make your space look Pinterest-perfect.
19. Treat 3D Objects as Your Canvas
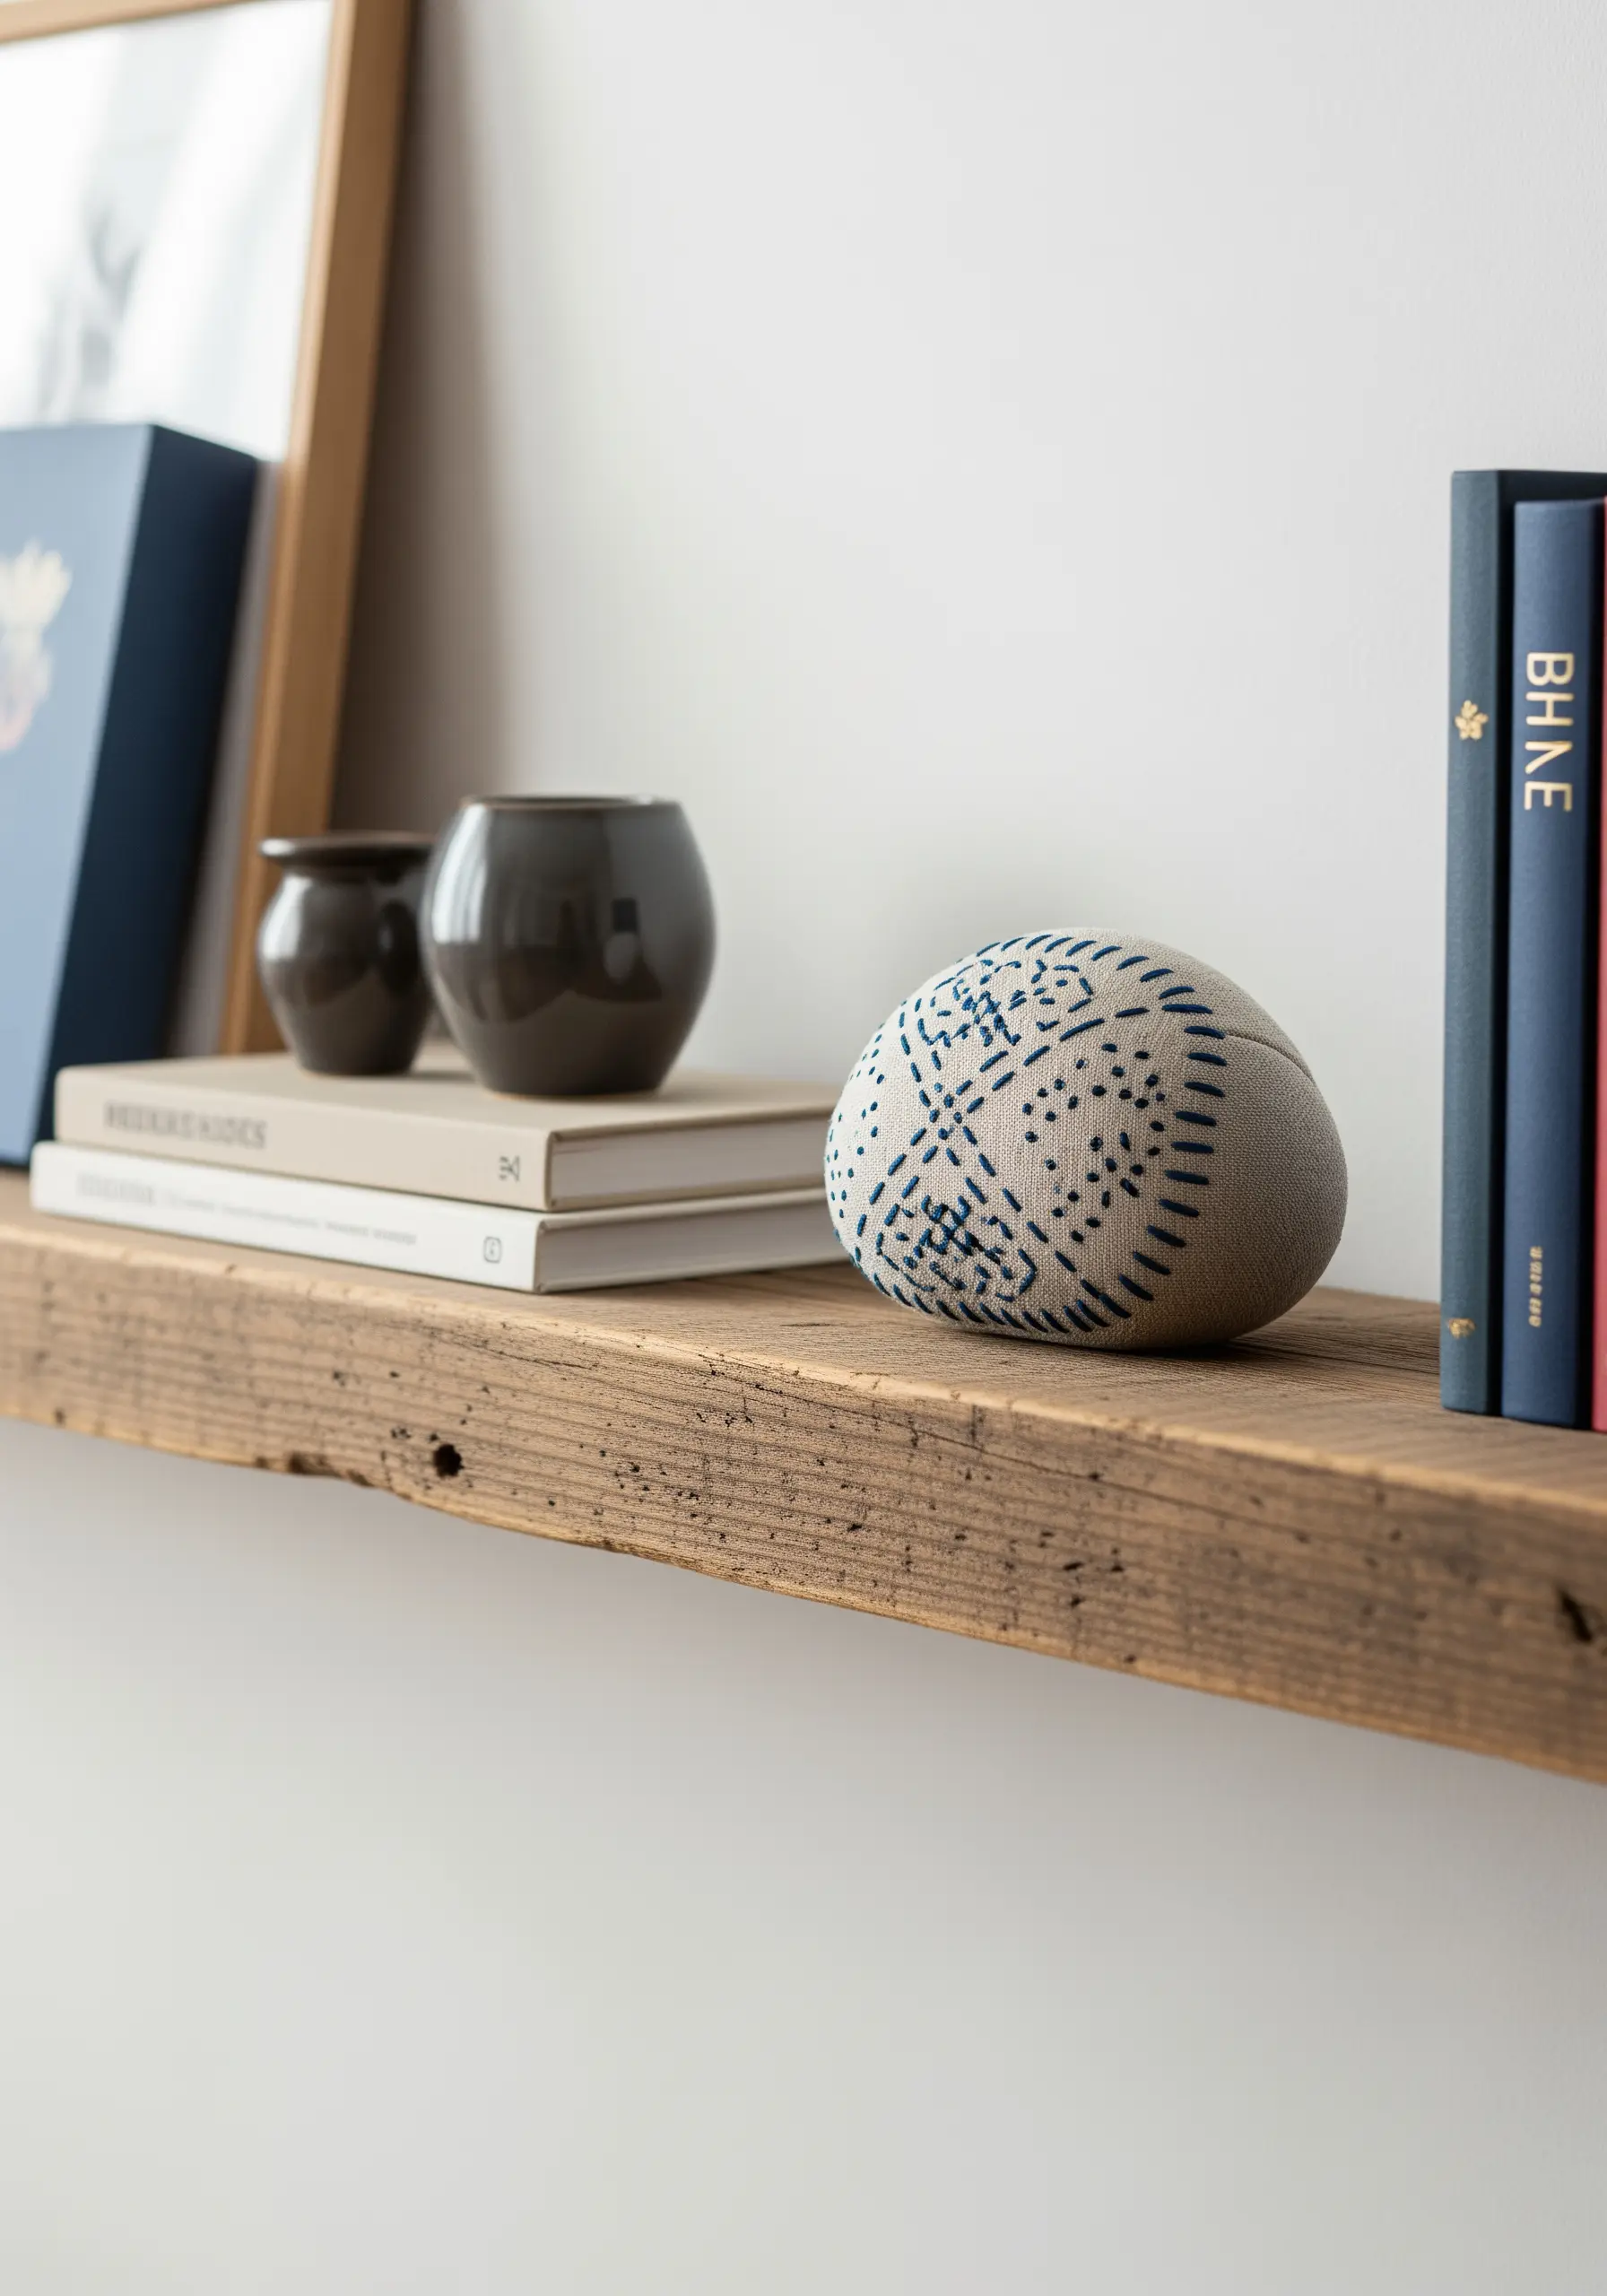
Take your embroidery off the hoop and onto three-dimensional surfaces for a truly unique decor piece.
Cover a smooth stone, a wooden form, or a styrofoam ball with linen or cotton, then stitch your pattern directly onto the covered object.
Use small, tight stitches like seed stitch or backstitch to create intricate patterns that follow the object’s contours, turning everyday shapes into creative handmade art objects.
20. Define Organic Shapes with Couching
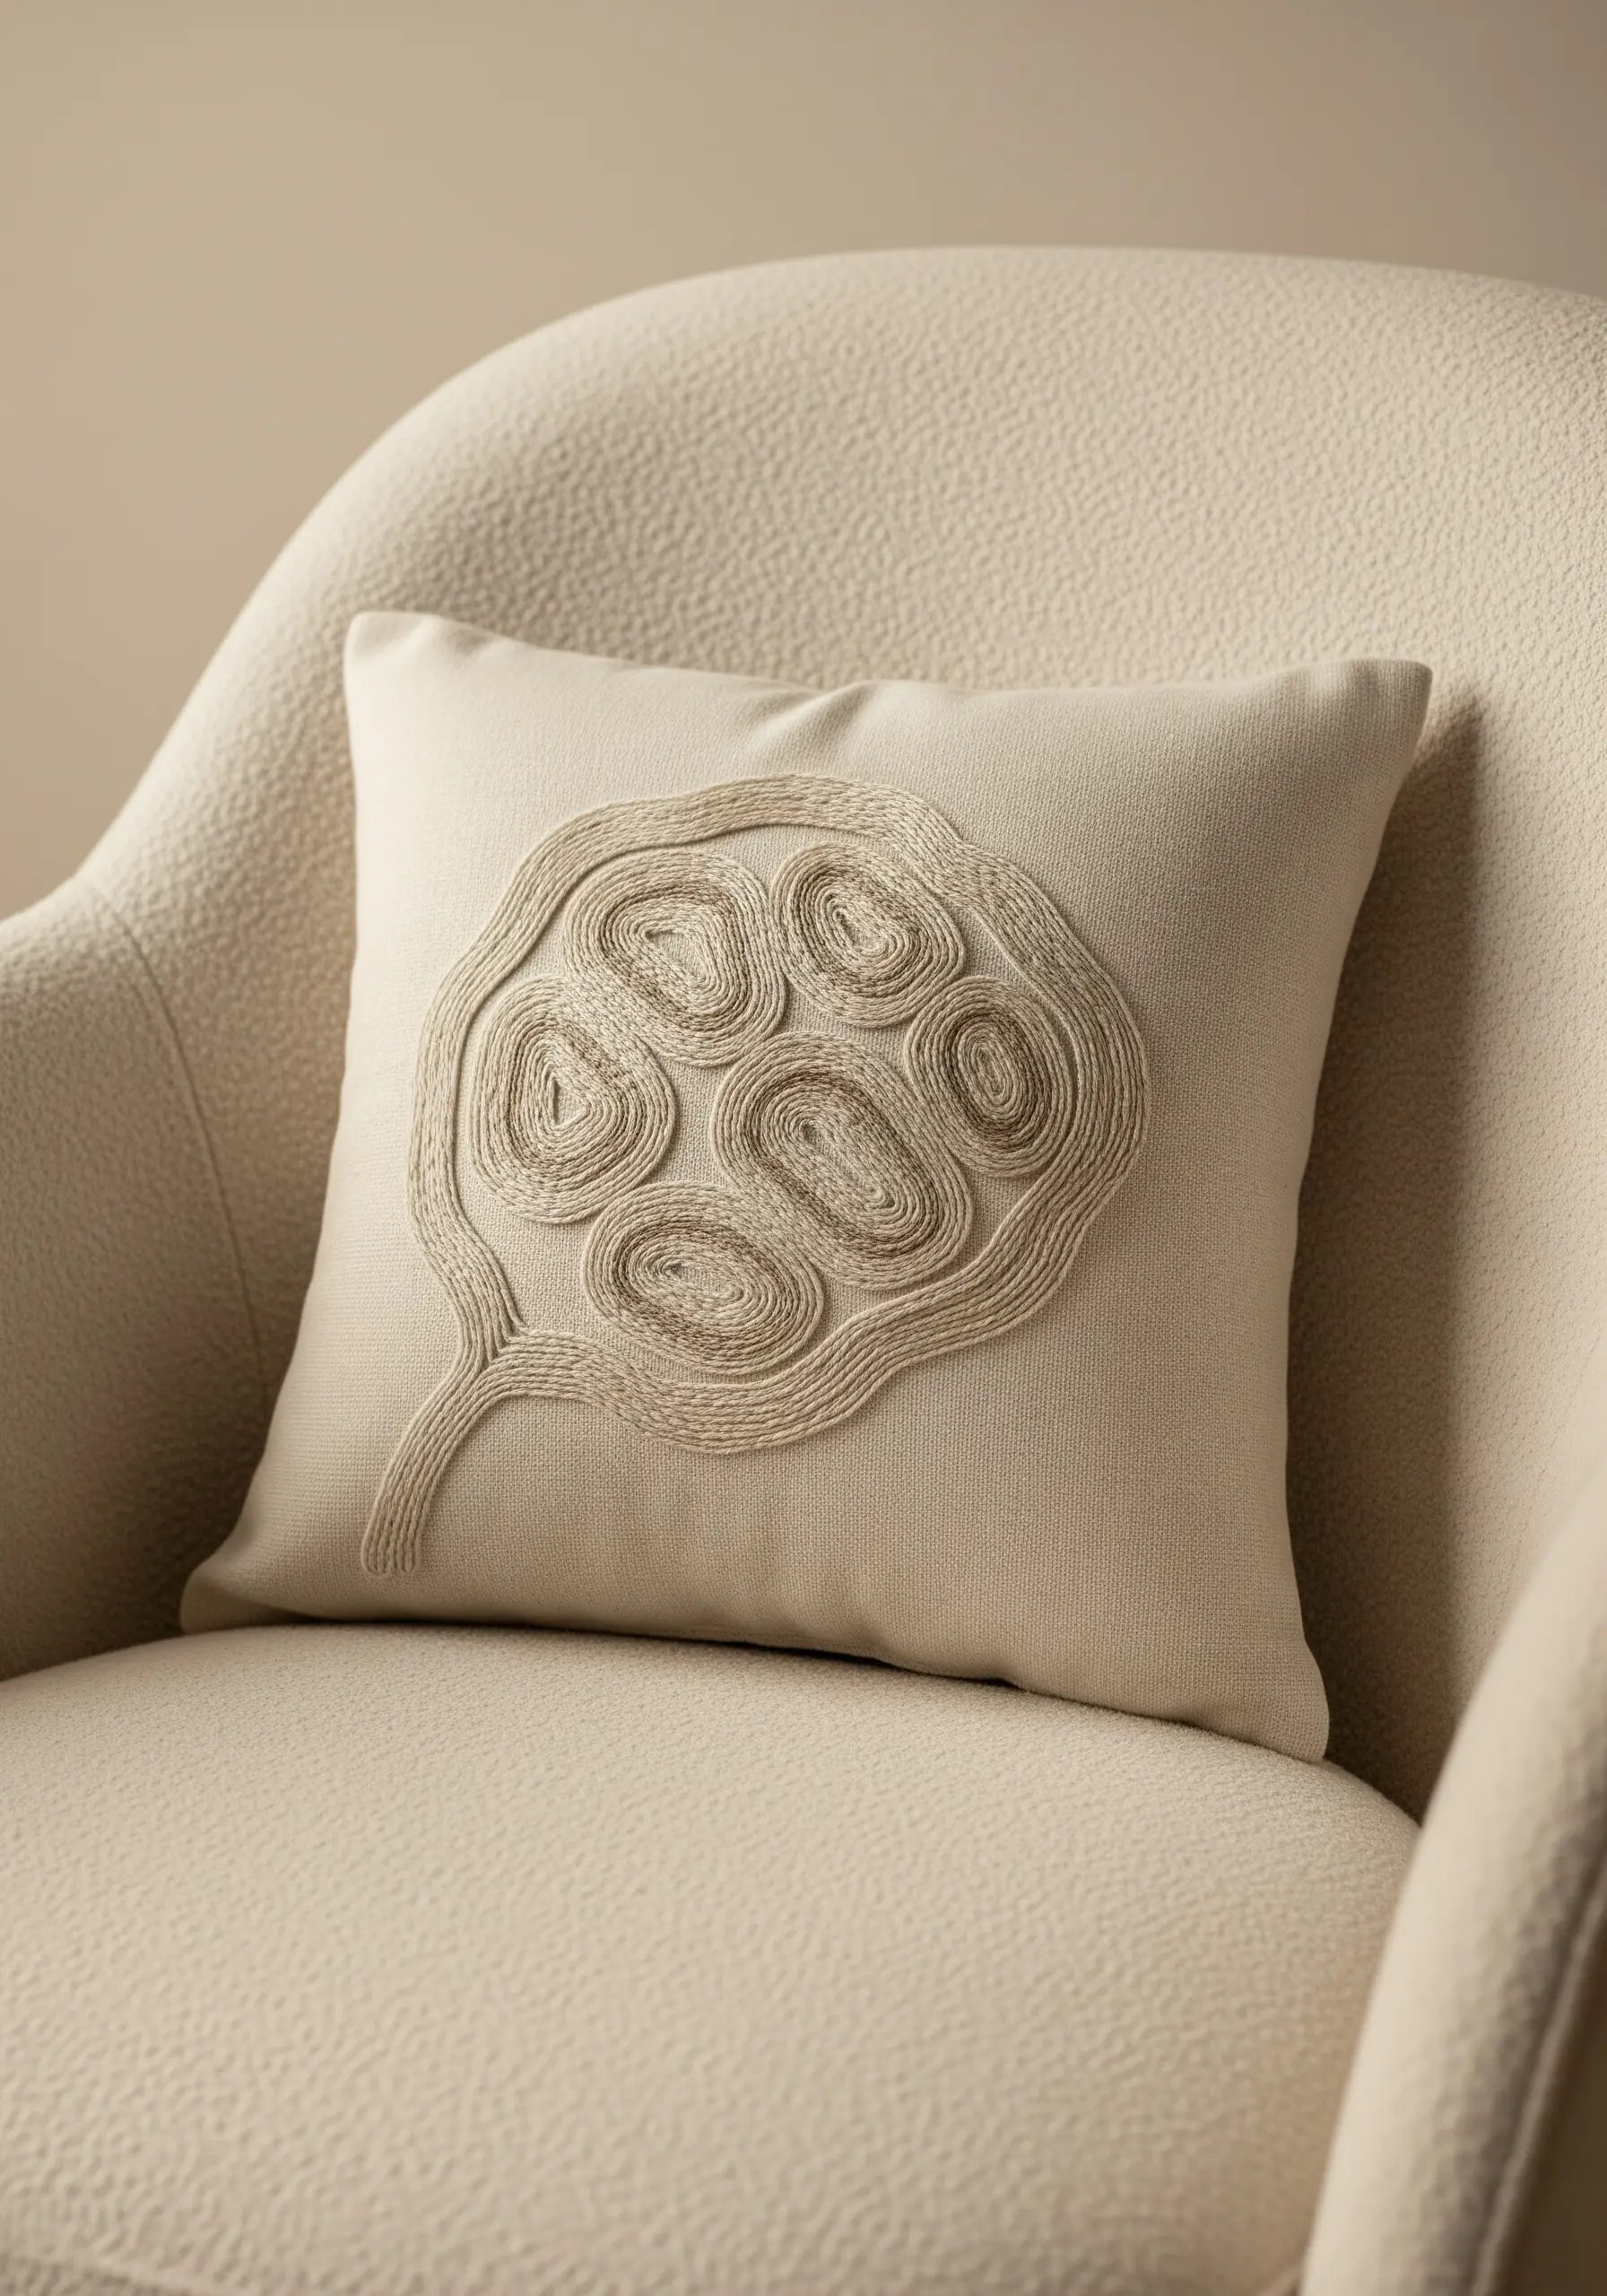
When you want to create bold, continuous outlines for organic shapes like this lotus pod, couching is the perfect technique.
Bundle several strands of thread or a thin cord together and lay it on your fabric, then use a single, matching thread to tack it down with small, almost invisible stitches.
This allows you to create smooth, sculptural curves that would be difficult to achieve with a standard outline stitch, resulting in beautiful, organic texture embroidery designs.
21. Design with Space in Mind
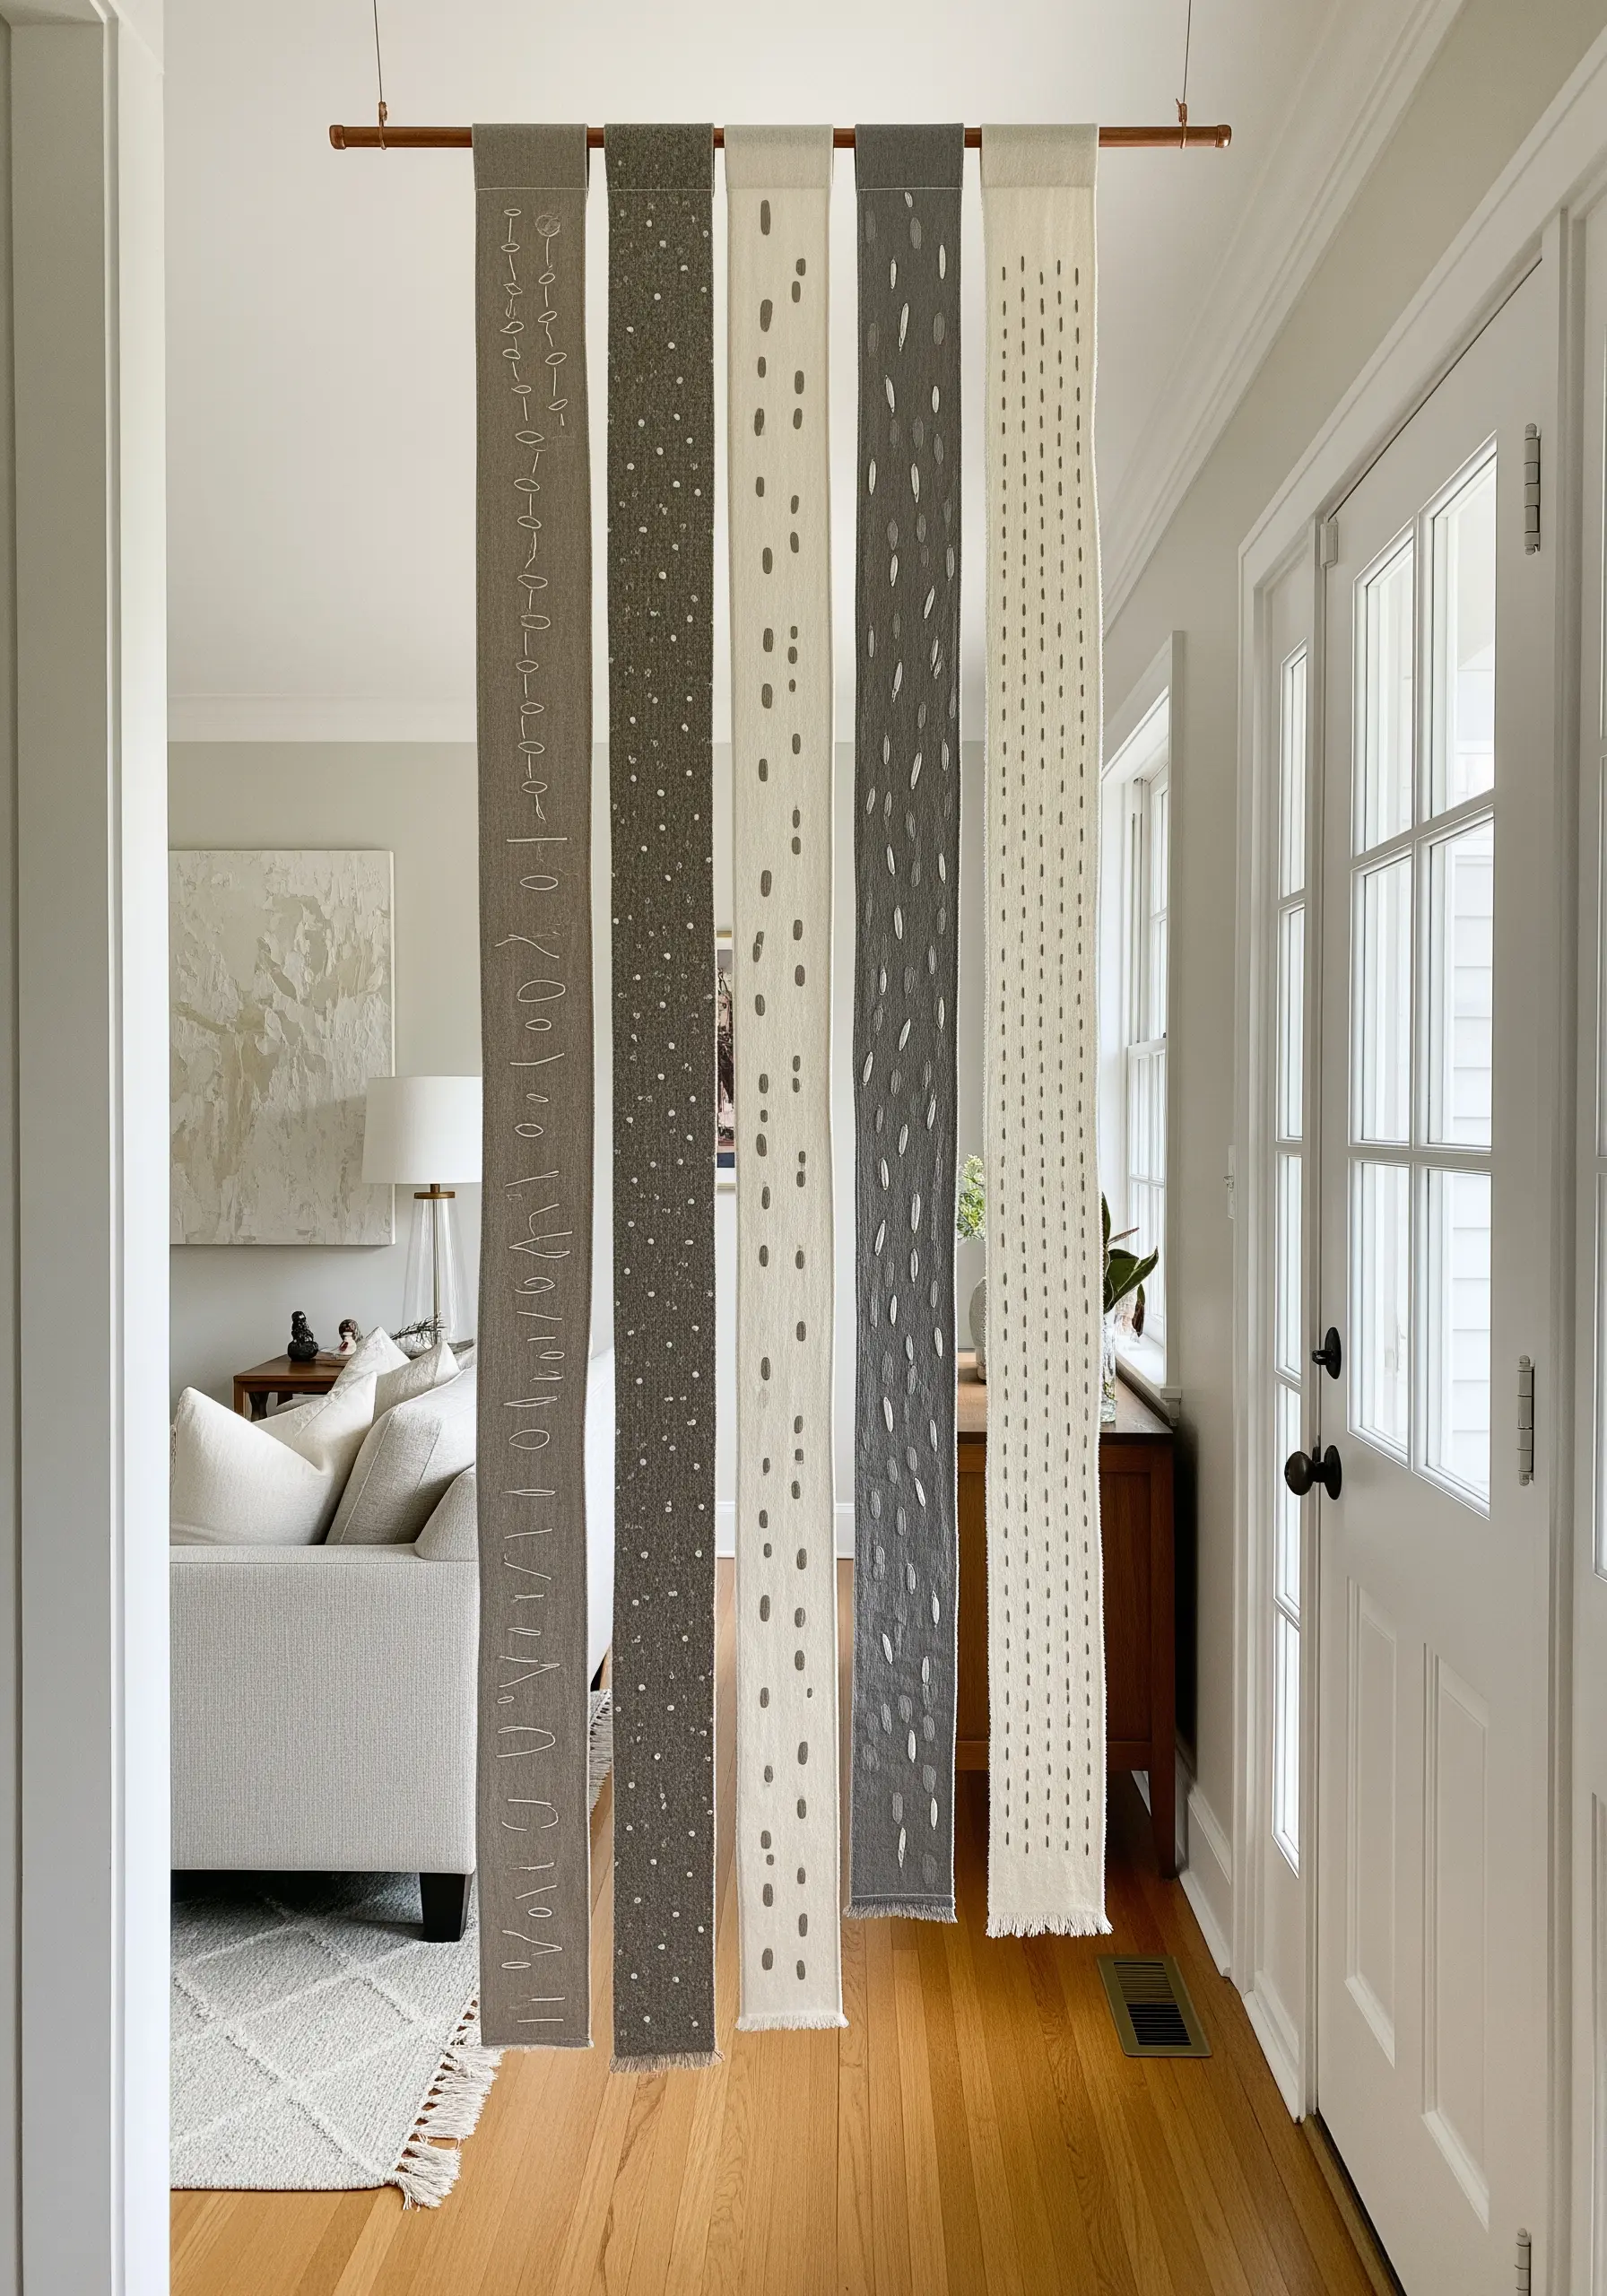
Use embroidery to create architectural elements like a room divider or a visual screen.
Stitch long, narrow panels of fabric with simple, repeating patterns—like scattered seed stitches or minimalist running stitch lines.
Hang them from a copper pipe or wooden dowel, allowing the subtle variations in your hand-stitching to create a gentle, organic rhythm.
This transforms your stitching into one of those fiber art installations that turn ordinary spaces into magical experiences.
22. Achieve Realism with Thread Painting
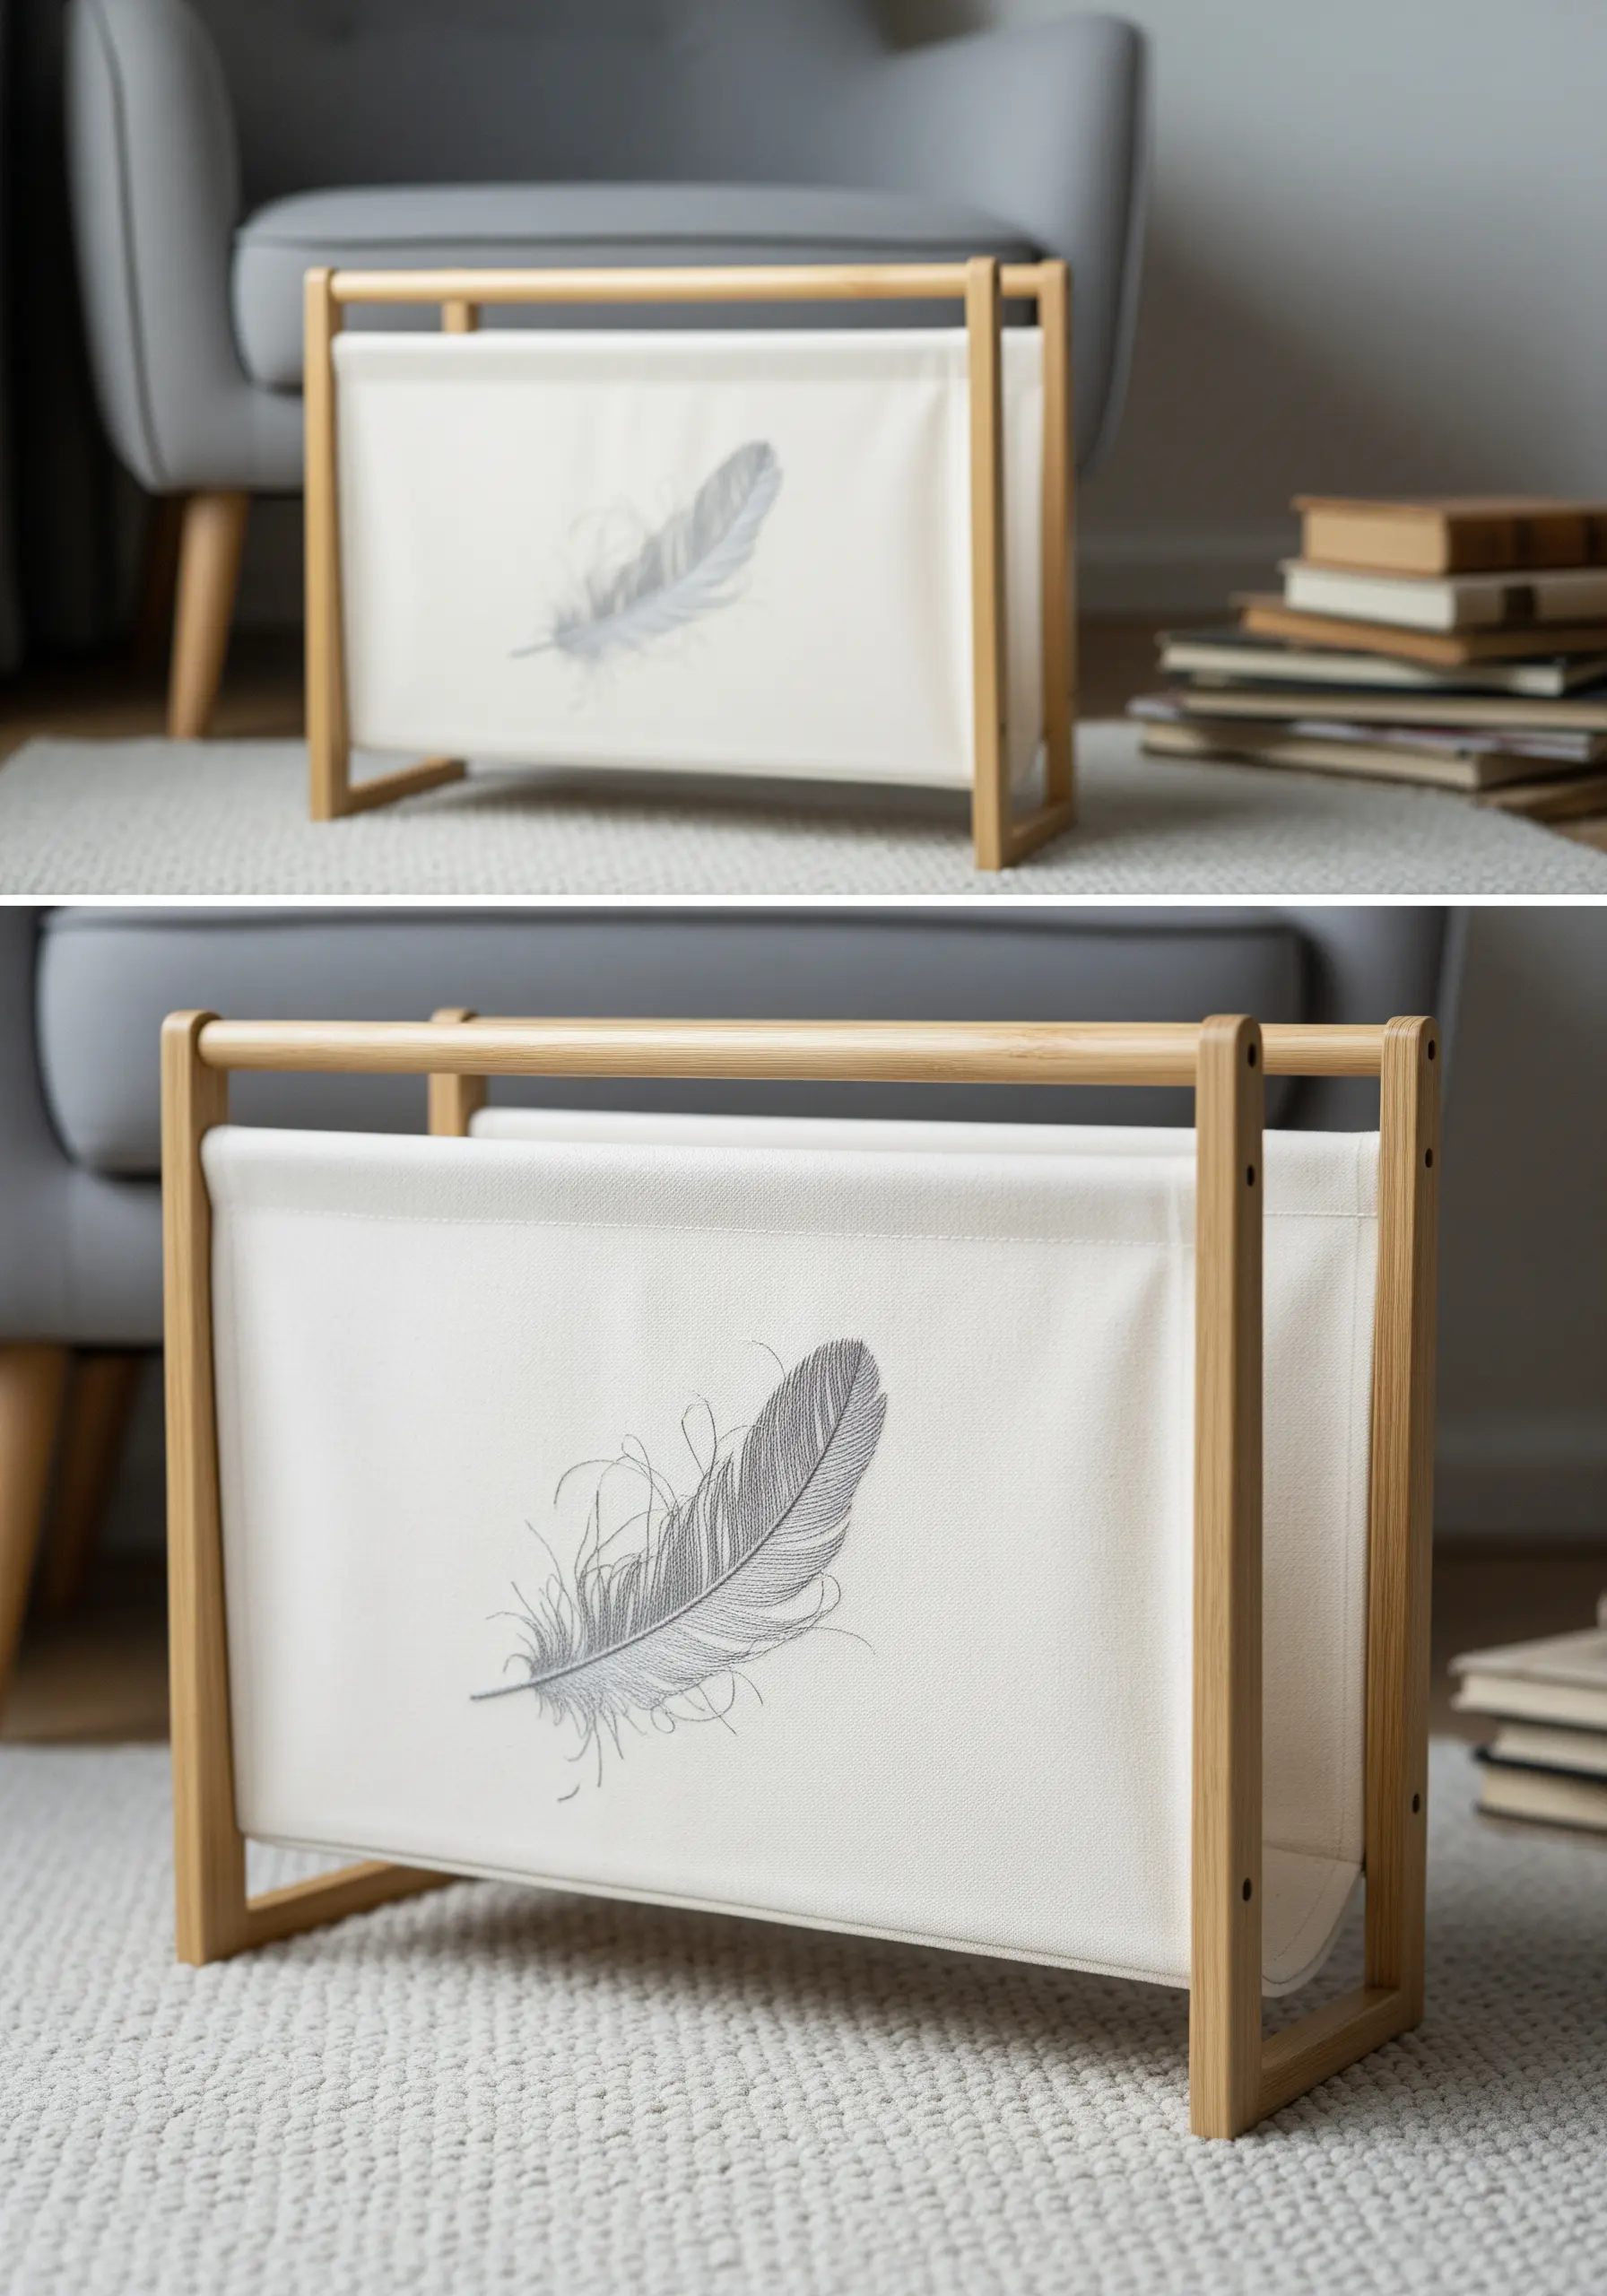
To create the soft, delicate look of a feather, use the long and short stitch technique, also known as thread painting.
Work with a single strand of floss in several closely related shades of grey, blending them with interlocking stitches to create soft, realistic gradients.
This meticulous technique adds incredible depth and realism, making it one of the most rewarding nature-inspired embroidery ideas you can try.
23. Stitch on Unconventional Materials
Add a touch of handcrafted elegance to materials like leather or cork by incorporating simple embroidery.
Because you can’t easily pass a needle through these materials, you’ll need to pre-punch the holes first using a small awl or a leather punch.
Then, use a blunt-tipped tapestry needle and a simple stitch like a running stitch or backstitch to create your design. This is a perfect way to create understated embroidery projects on unique surfaces.
24. Create Subtle Gradients with a Muted Palette
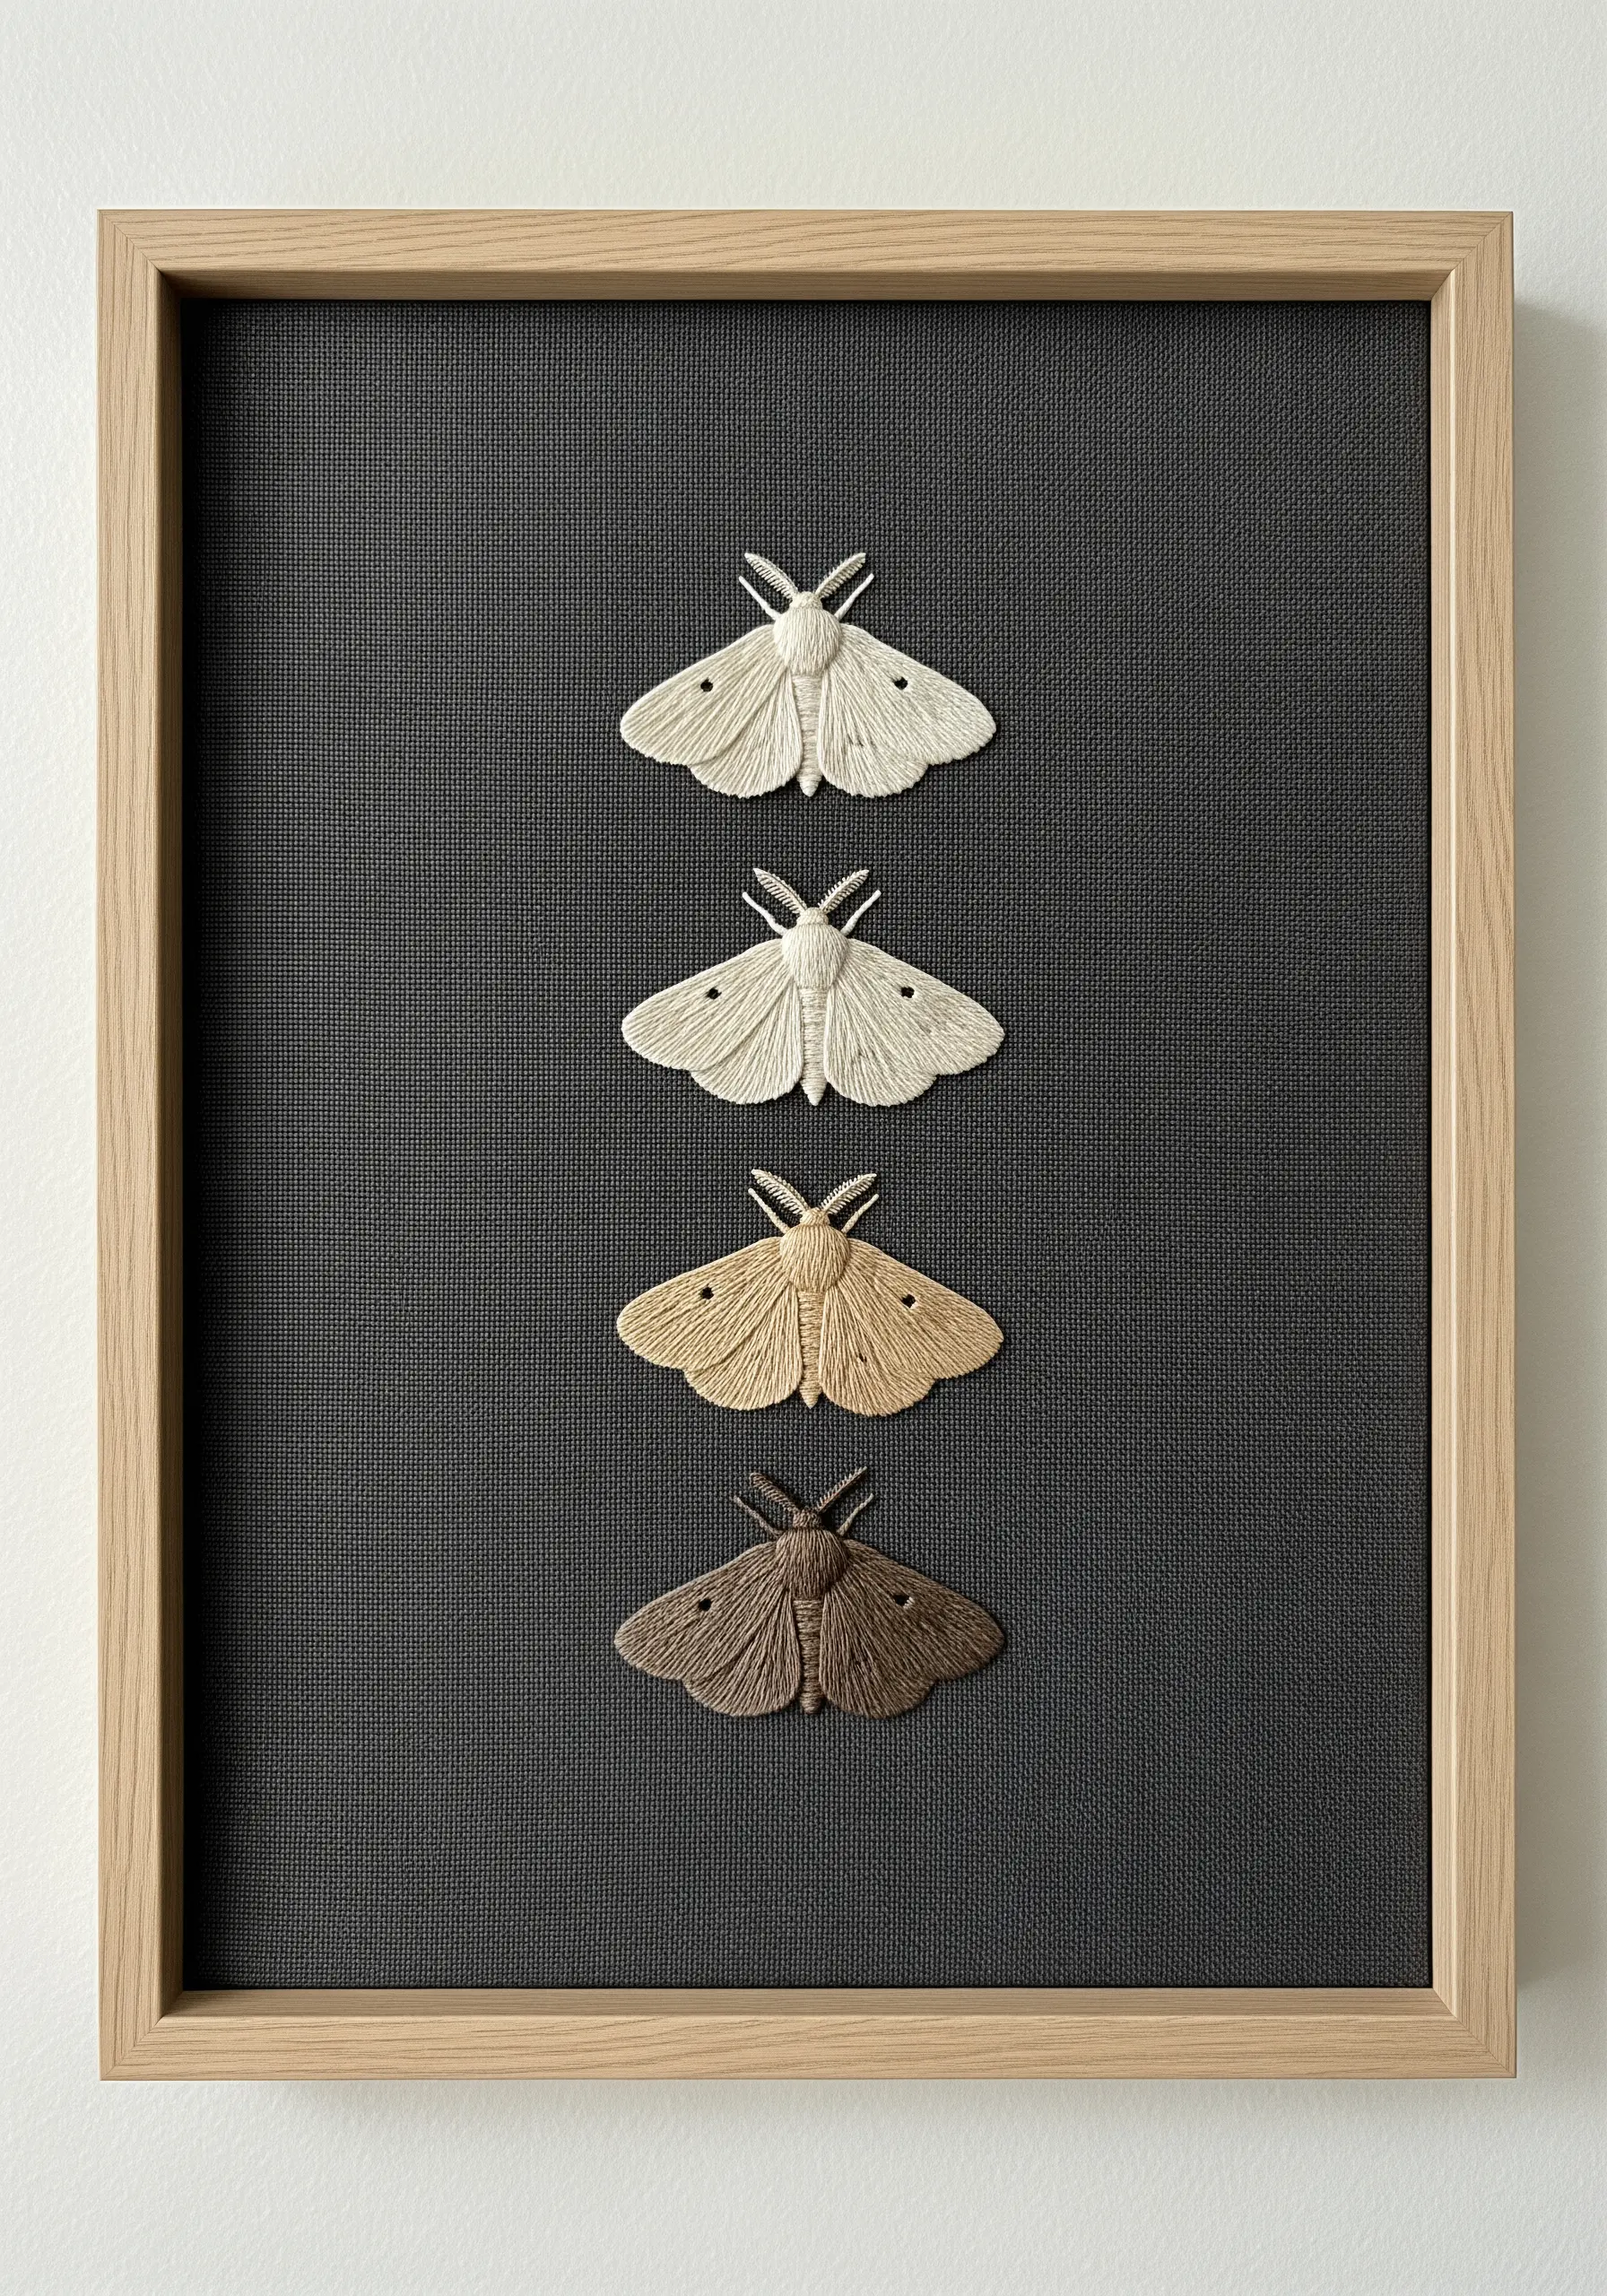
Tell a story of subtle change by embroidering the same motif in a gradient of neutral tones.
Use satin stitch to fill the wings of these moths, selecting four or five shades ranging from off-white to deep brown.
The key is to choose colors with the same undertone to ensure a harmonious transition.
This approach turns a simple scientific illustration into a sophisticated piece of neutral-tone thread palettes for elegant minimal wall decor.
25. Embellish Woven Baskets with Thread

Enhance a plain rope basket by adding color and texture with decorative stitching.
Use a thick yarn or perle cotton and a large, blunt needle to weave through the top coils of the basket.
Techniques like the blanket stitch, cross stitch, or simple wrapping can create beautiful, colorful bands that transform a functional object into a piece of decor.
This is a fantastic way to practice mixed-fiber embroidery techniques on a sturdy, forgiving base.
26. Explore Graphic Designs on Felt
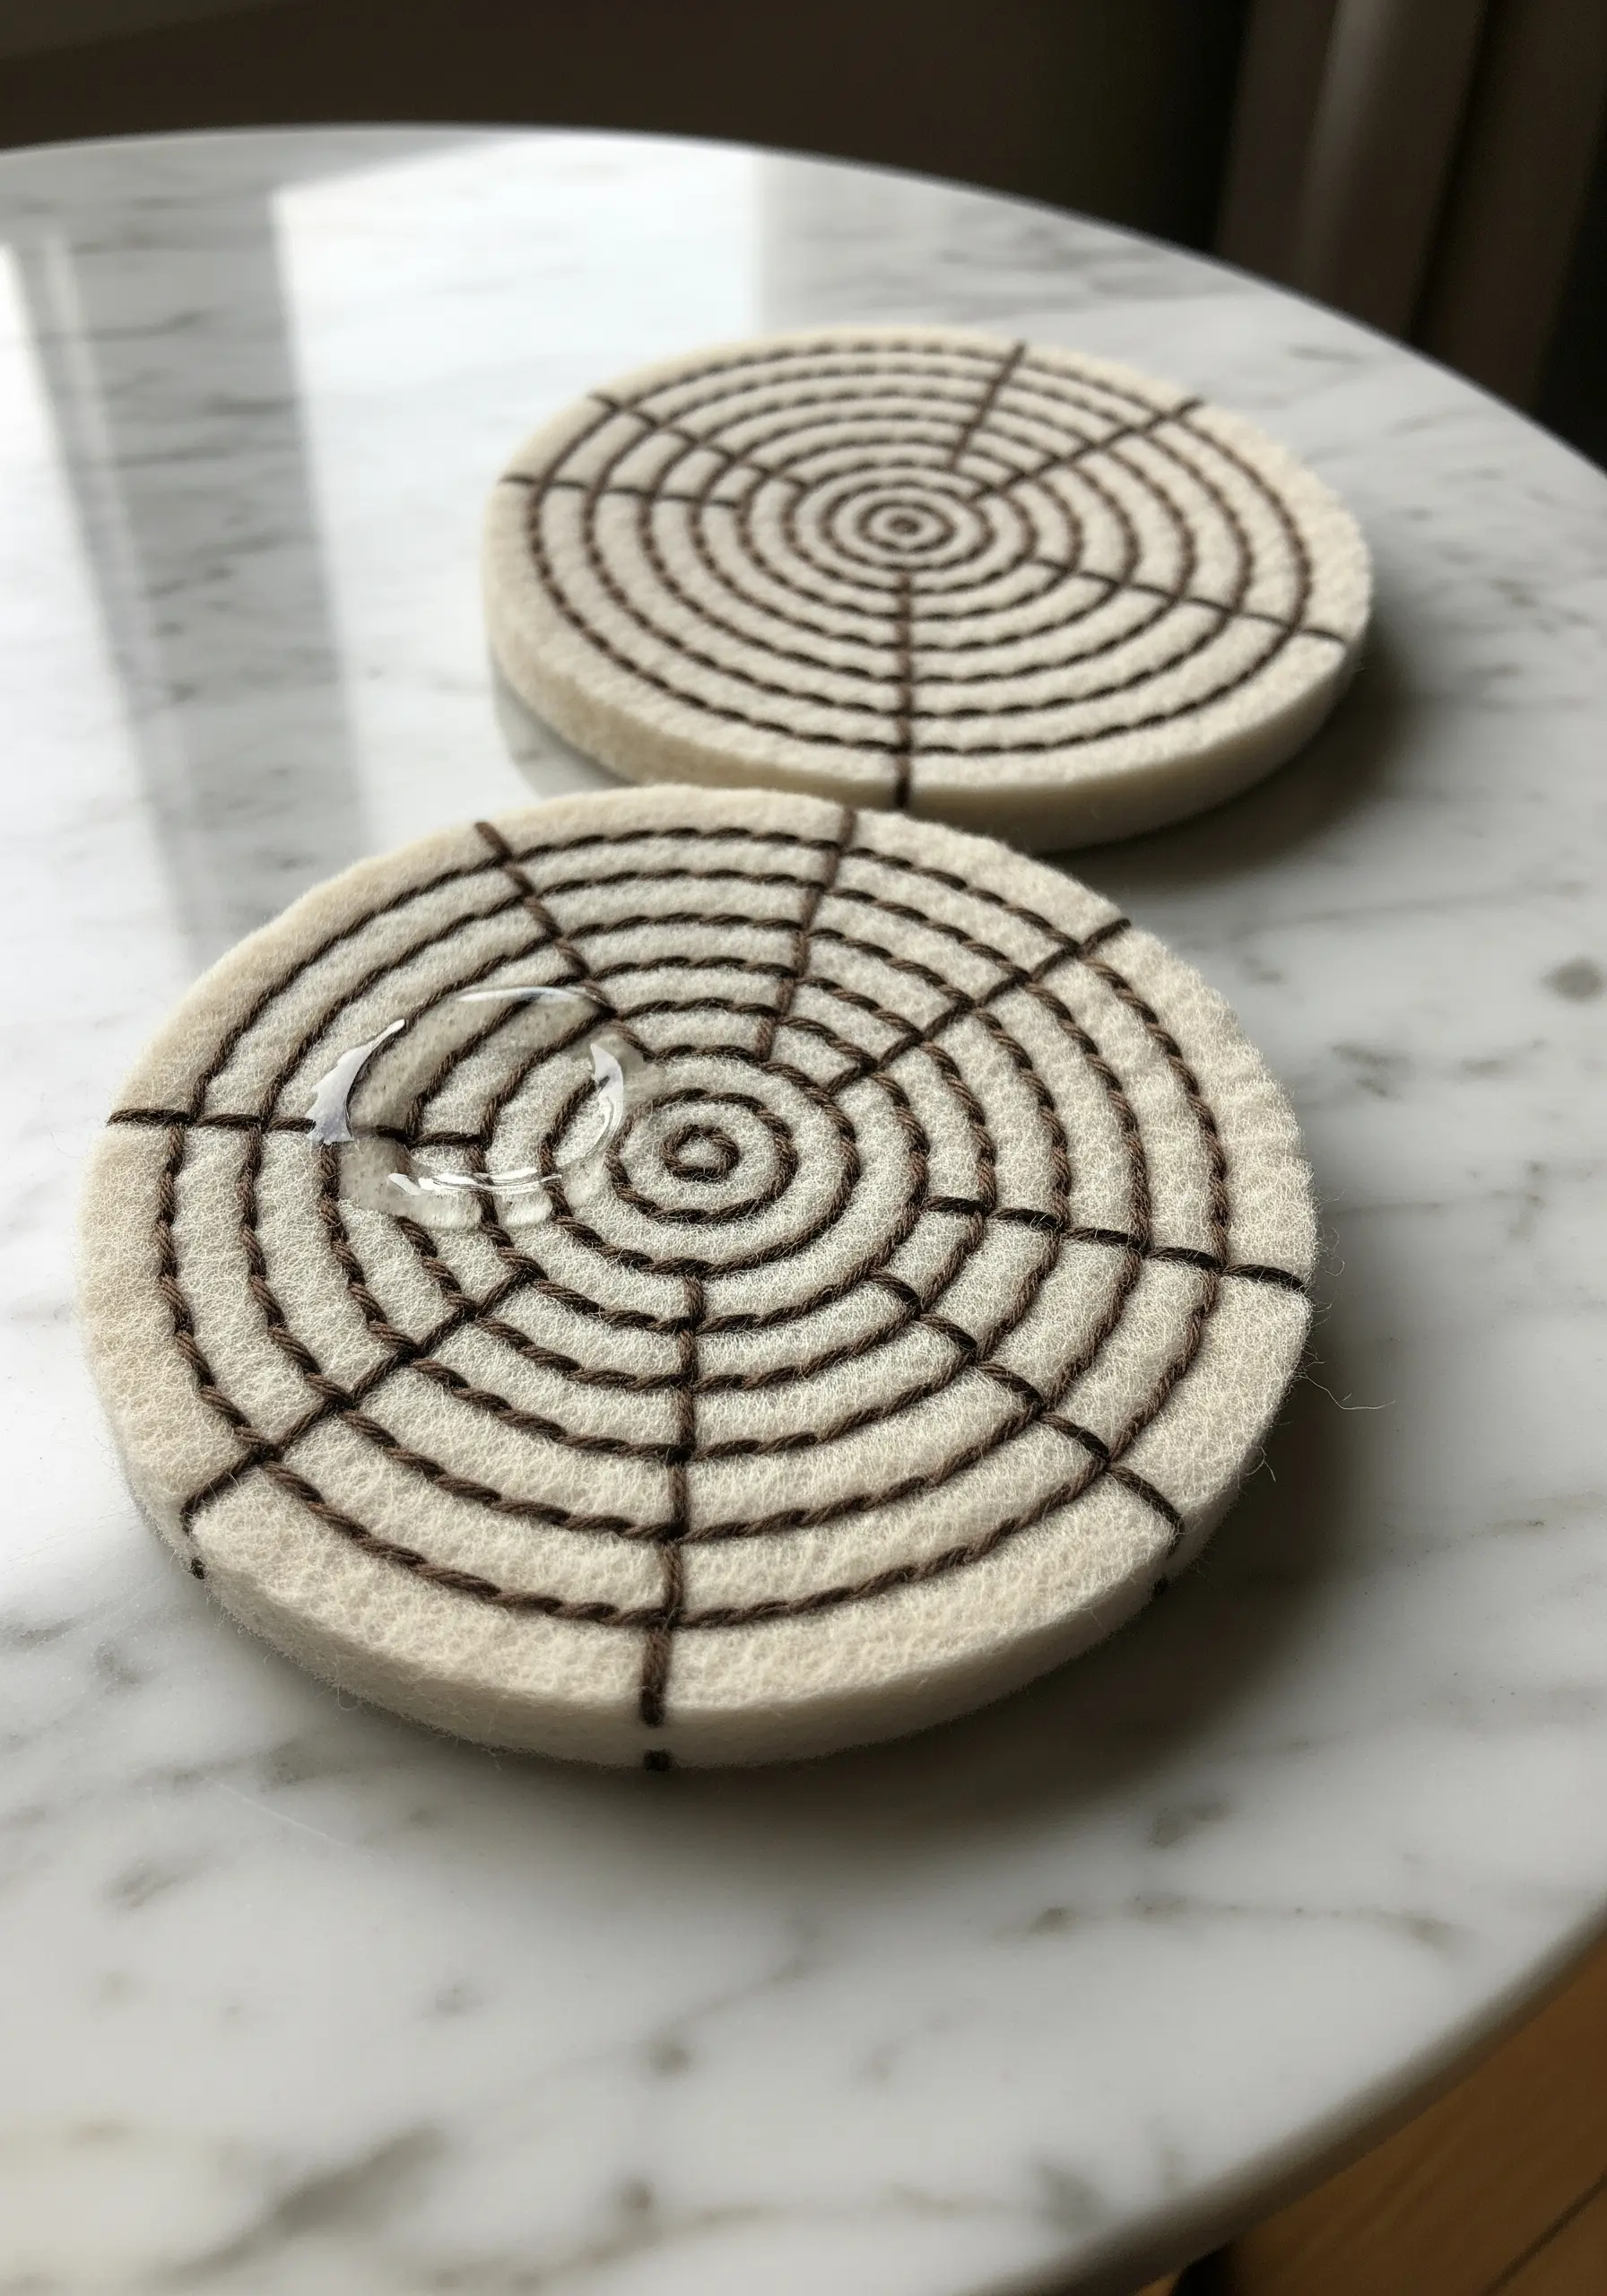
Felt is an ideal fabric for beginners and for projects that require clean, sharp lines, as it doesn’t fray.
Use a simple backstitch to create graphic, geometric patterns like this spiderweb design for a set of modern coasters.
The thickness of the felt provides a stable base, so you don’t need a hoop, making this one of the most accessible quick embroidery projects for a weekend.
27. Build Atmospheric Texture with Seed Stitch
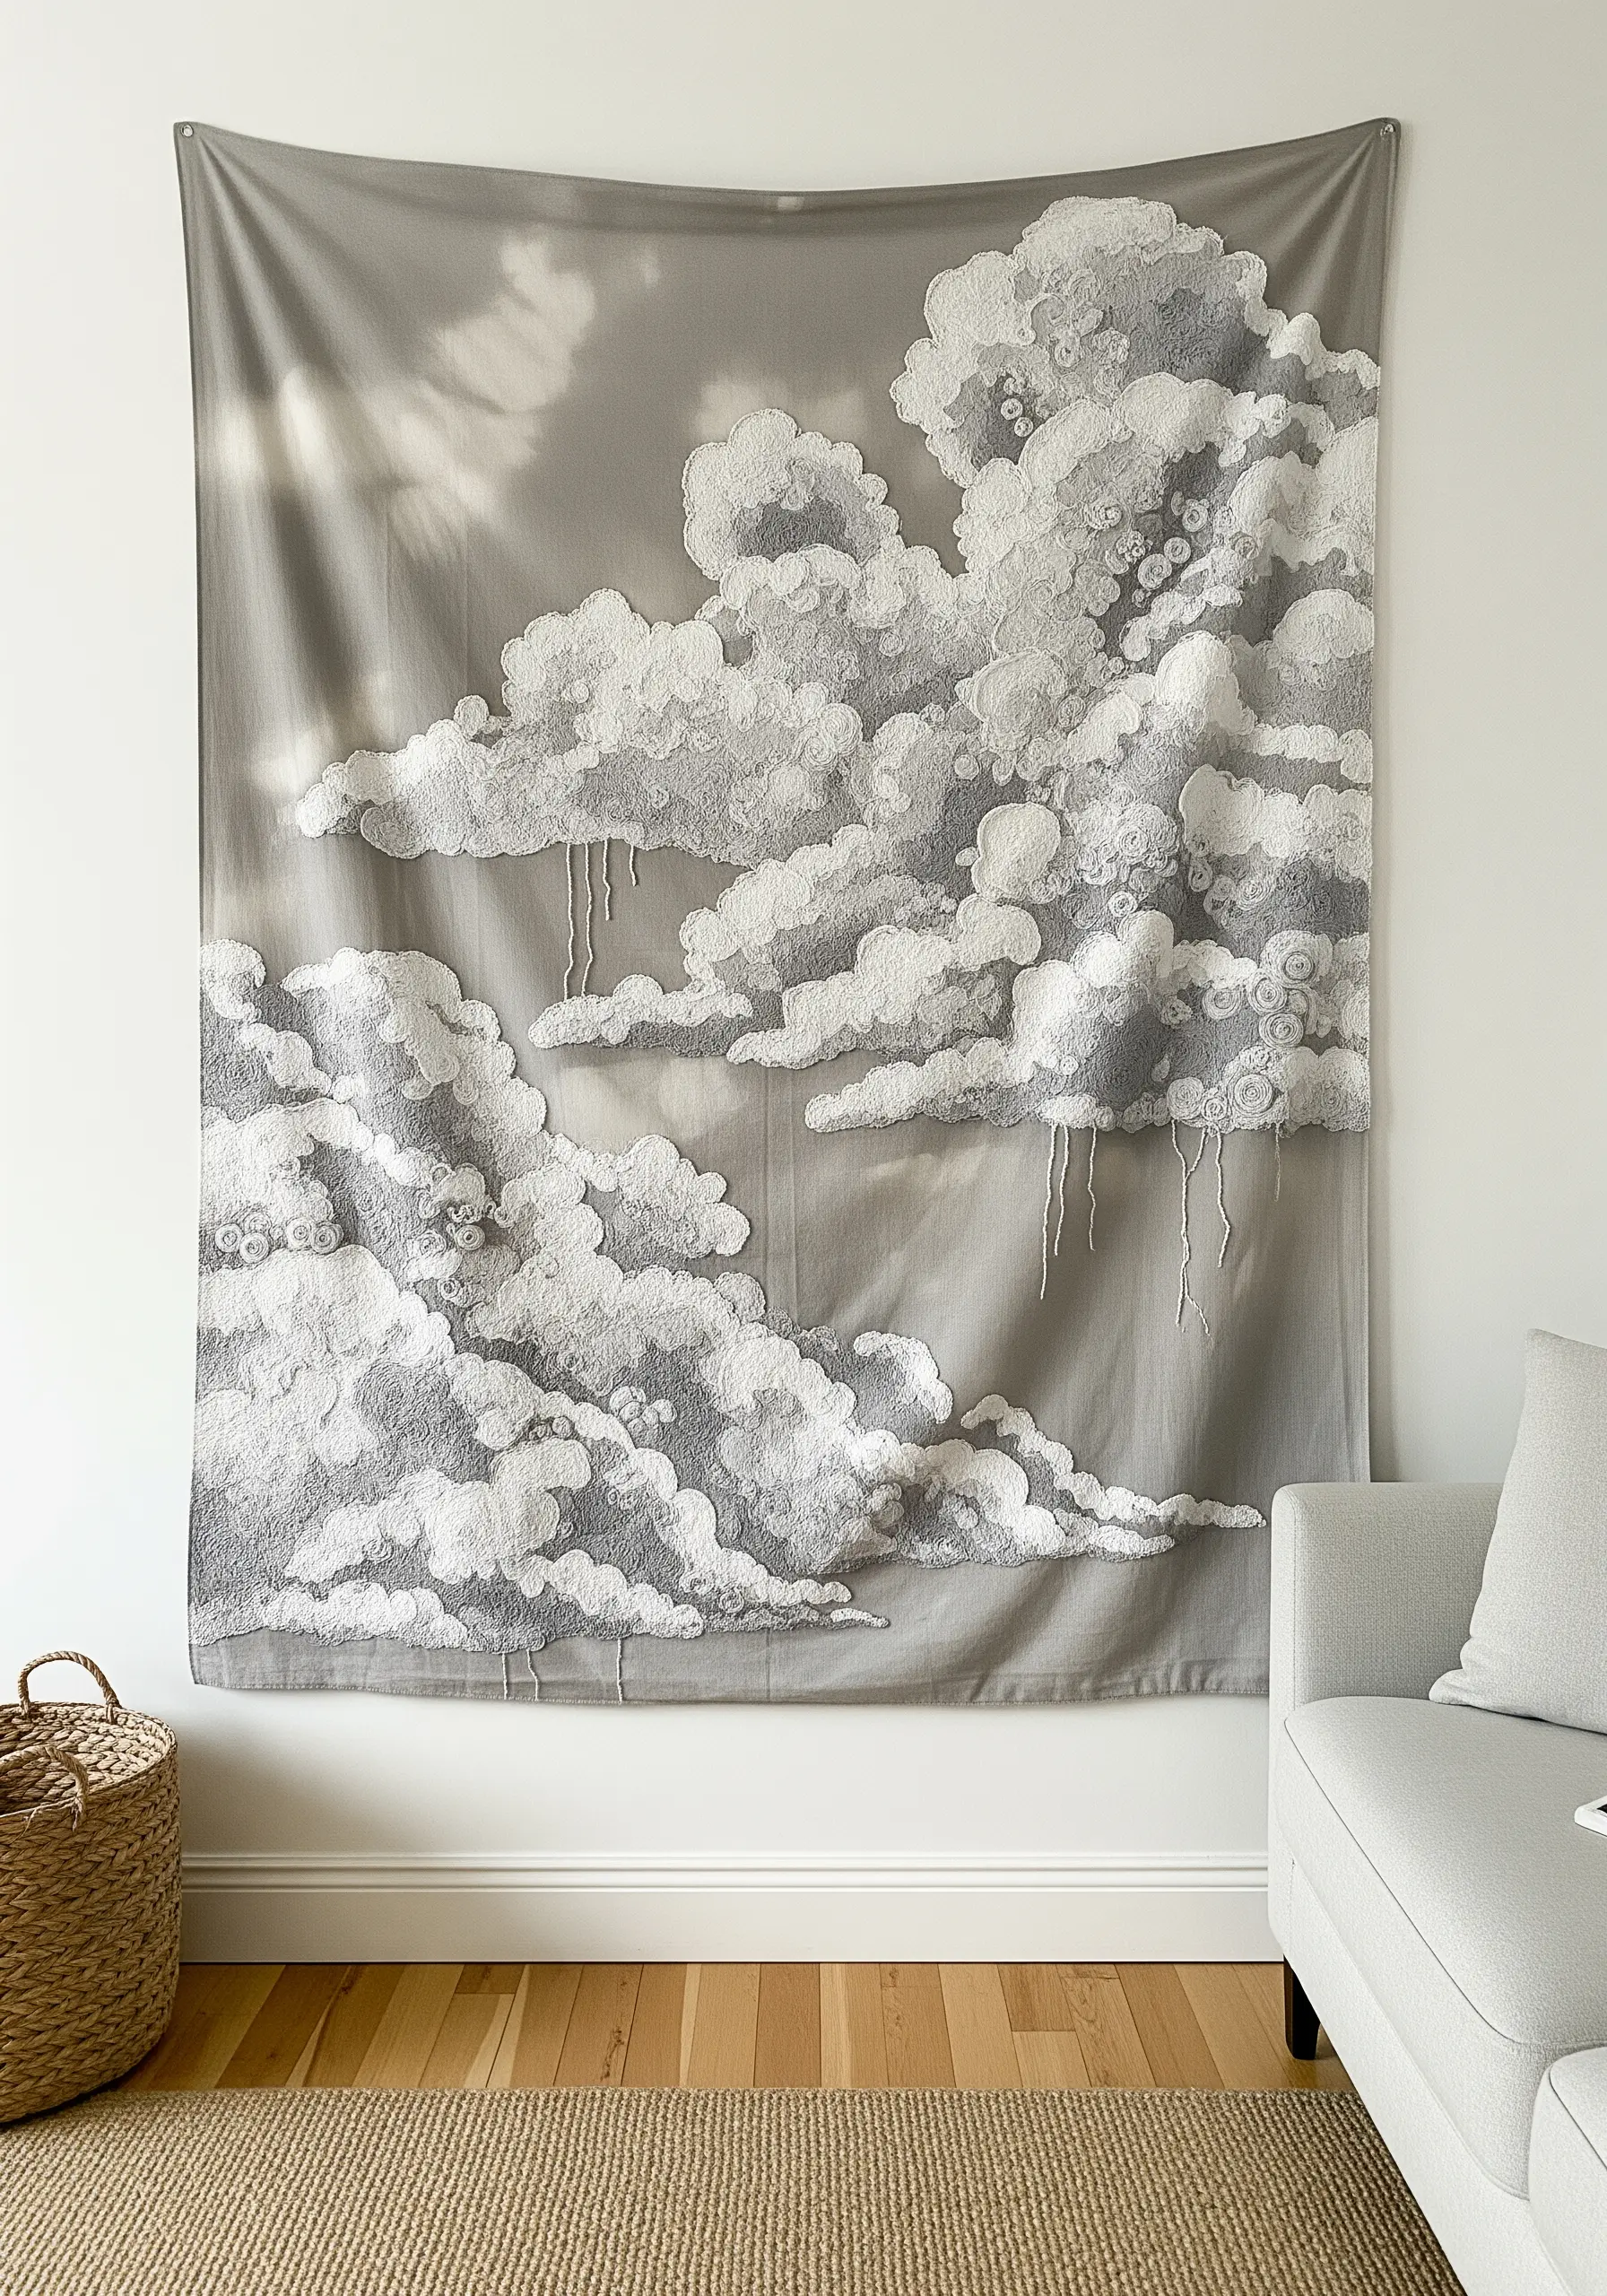
Create the soft, billowing texture of clouds by filling large areas with thousands of tiny, randomly placed seed stitches.
Use a single color of thread, like off-white or light grey, and let the density of the stitches create the shading—more stitches for opaque areas, fewer for wispy edges.
This meditative technique produces breathtakingly complex statement-size embroidered textile hangings with a surprisingly simple stitch.
28. Connect Canvases with a Continuous Thread
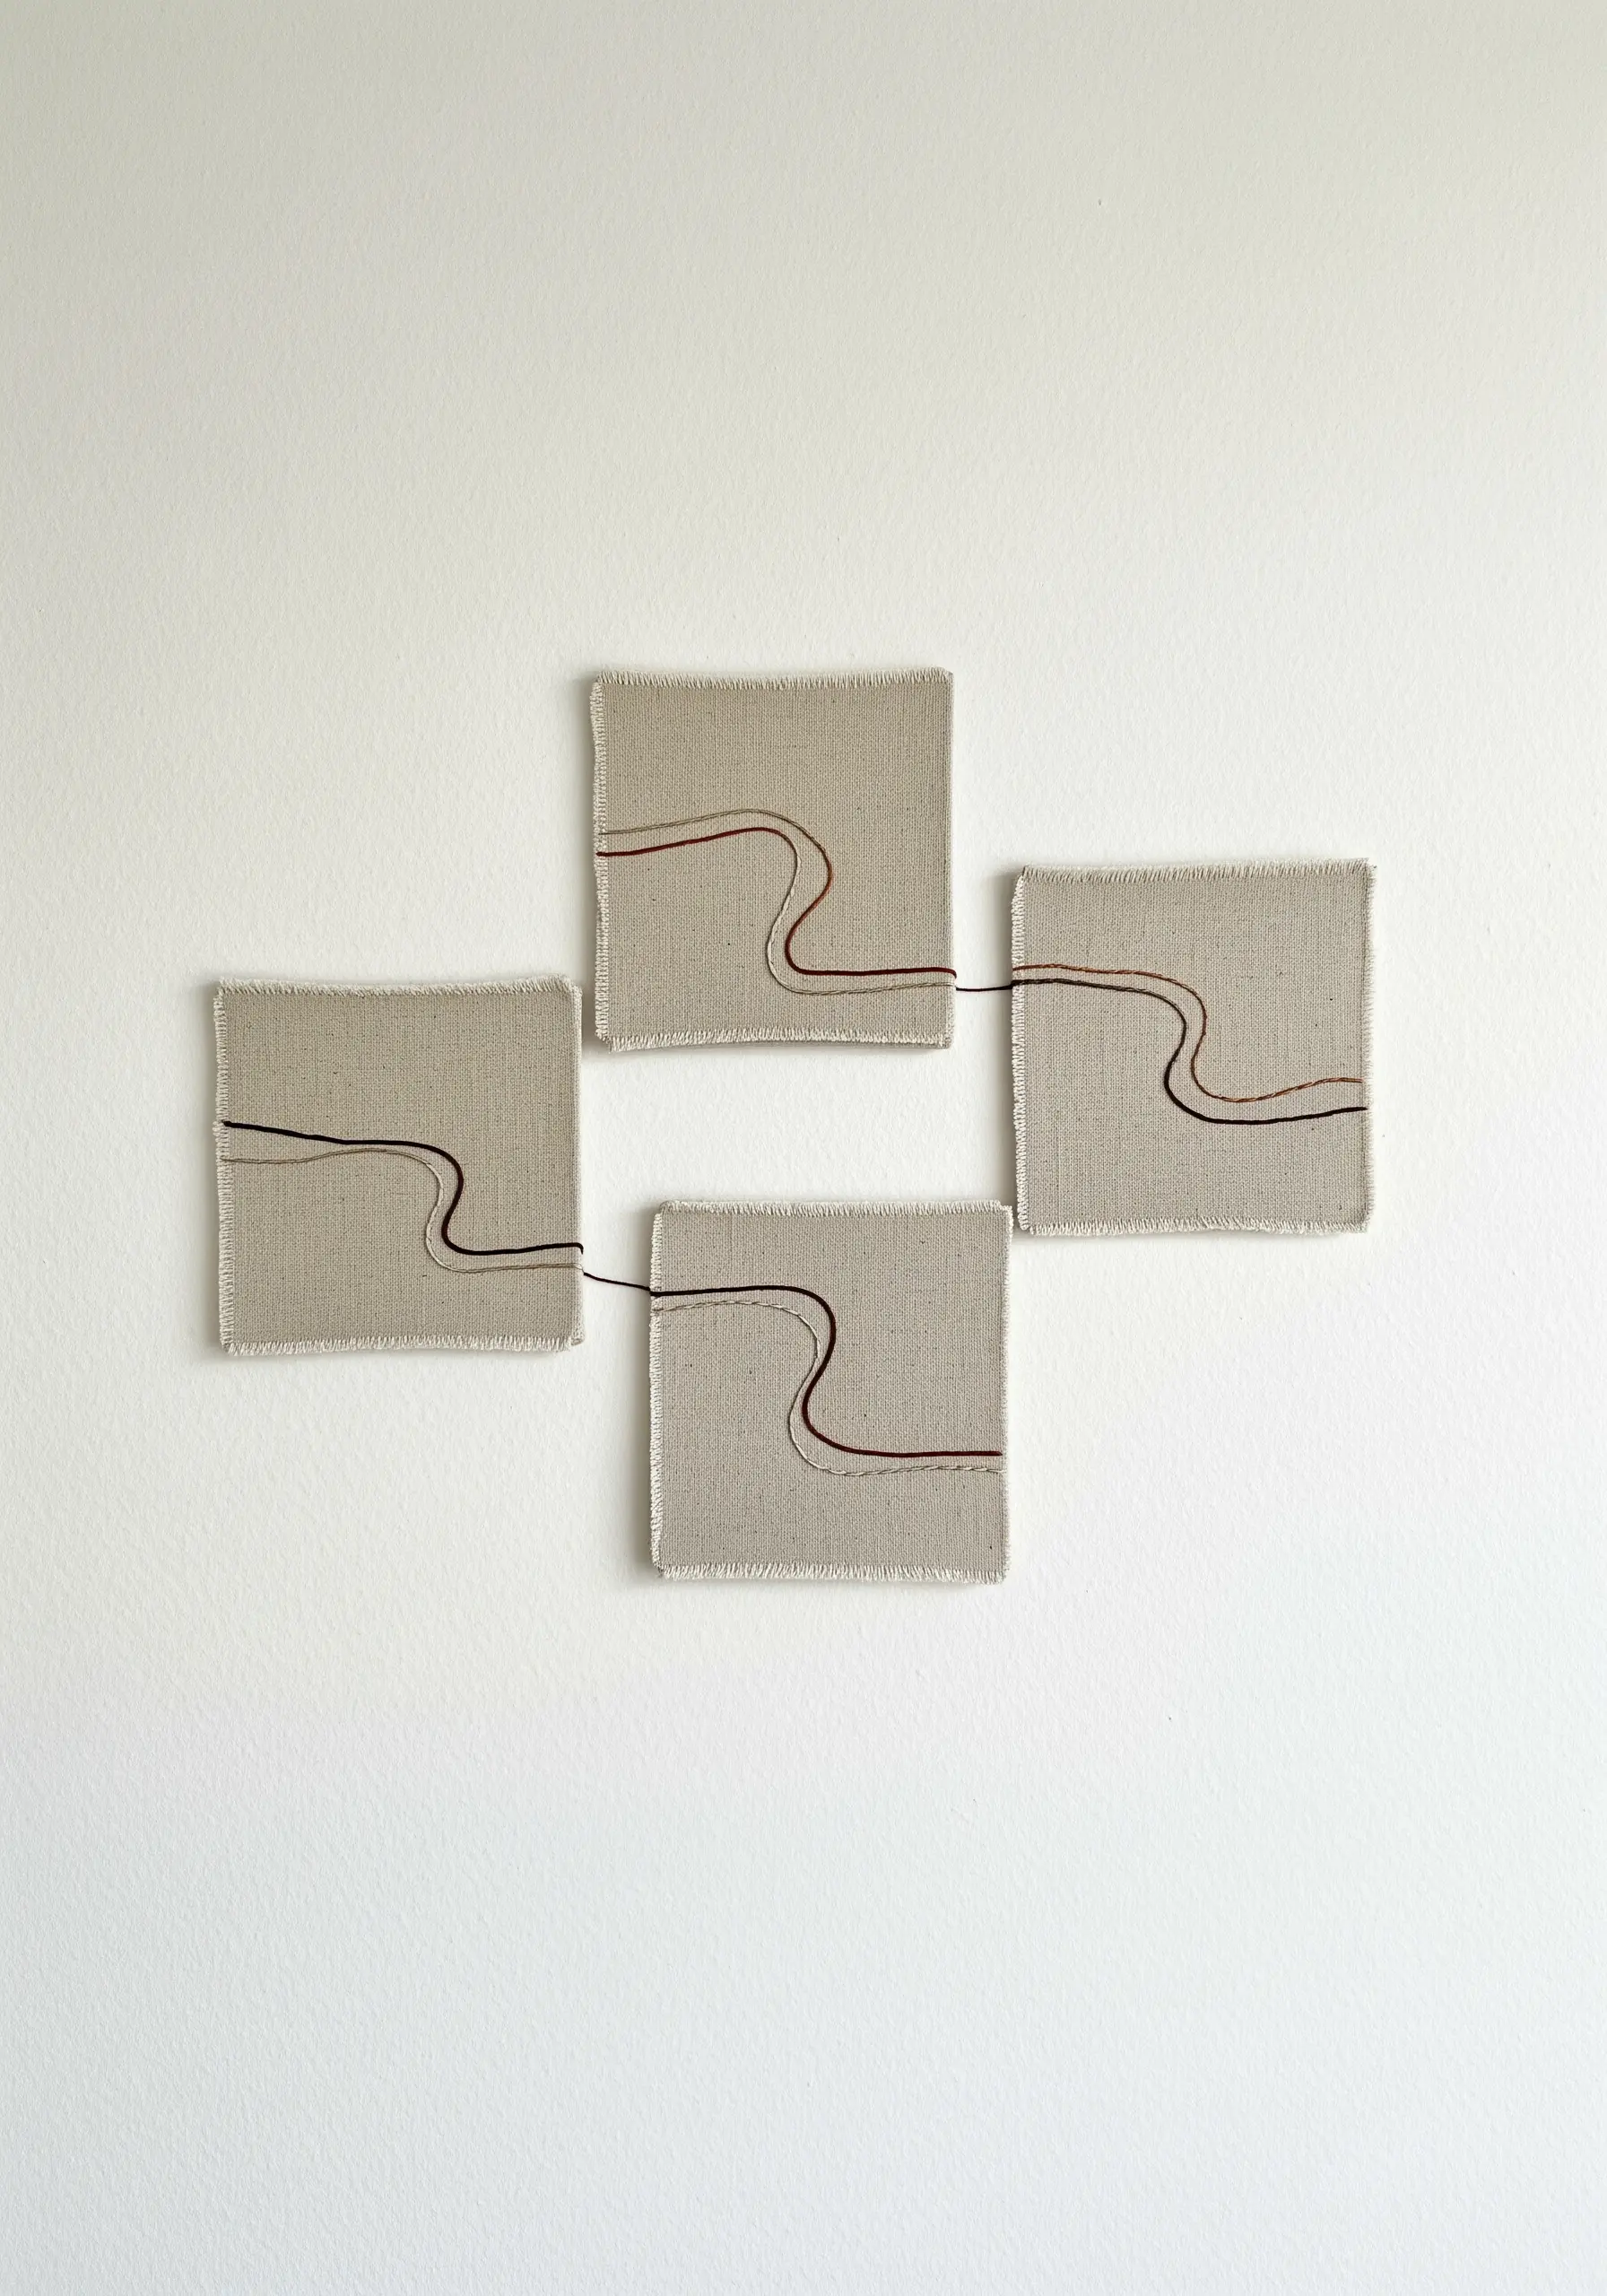
Challenge the boundaries of a single frame by creating a multi-panel artwork connected by a single, continuous line of thread.
Stretch linen over four small canvases, then stitch a flowing line that travels from one to the next, disappearing off the edge of one and reappearing on another.
This conceptual approach turns your thread into a narrative tool, creating abstract thread embroidery ideas that engage the viewer’s imagination.
29. Create Texture with Coiled Fabric
Add unique, sculptural dimension to a pillow by creating small ‘pebbles’ from coiled fabric strips or thick yarn.
Roll your material into tight spirals, then arrange them in a dense cluster and stitch them securely to the base fabric from behind or with tiny, hidden stitches.
Play with different neutral shades and textures to mimic the look of a natural riverbed, resulting in stunning earthy texture embroidery patterns.
30. Add Polish with a Perfect Blanket Stitch
When working with felt appliqué, the blanket stitch is not just decorative—it’s structural, holding your pieces together with a clean, polished edge.
To achieve a professional finish, focus on keeping your stitch height and spacing perfectly consistent.
Use a thread color that contrasts slightly with your felt to highlight the craftsmanship of your work, making even the simplest shapes feel special.
This detail is essential for handmade objects you can craft with kids to give them a finished look.
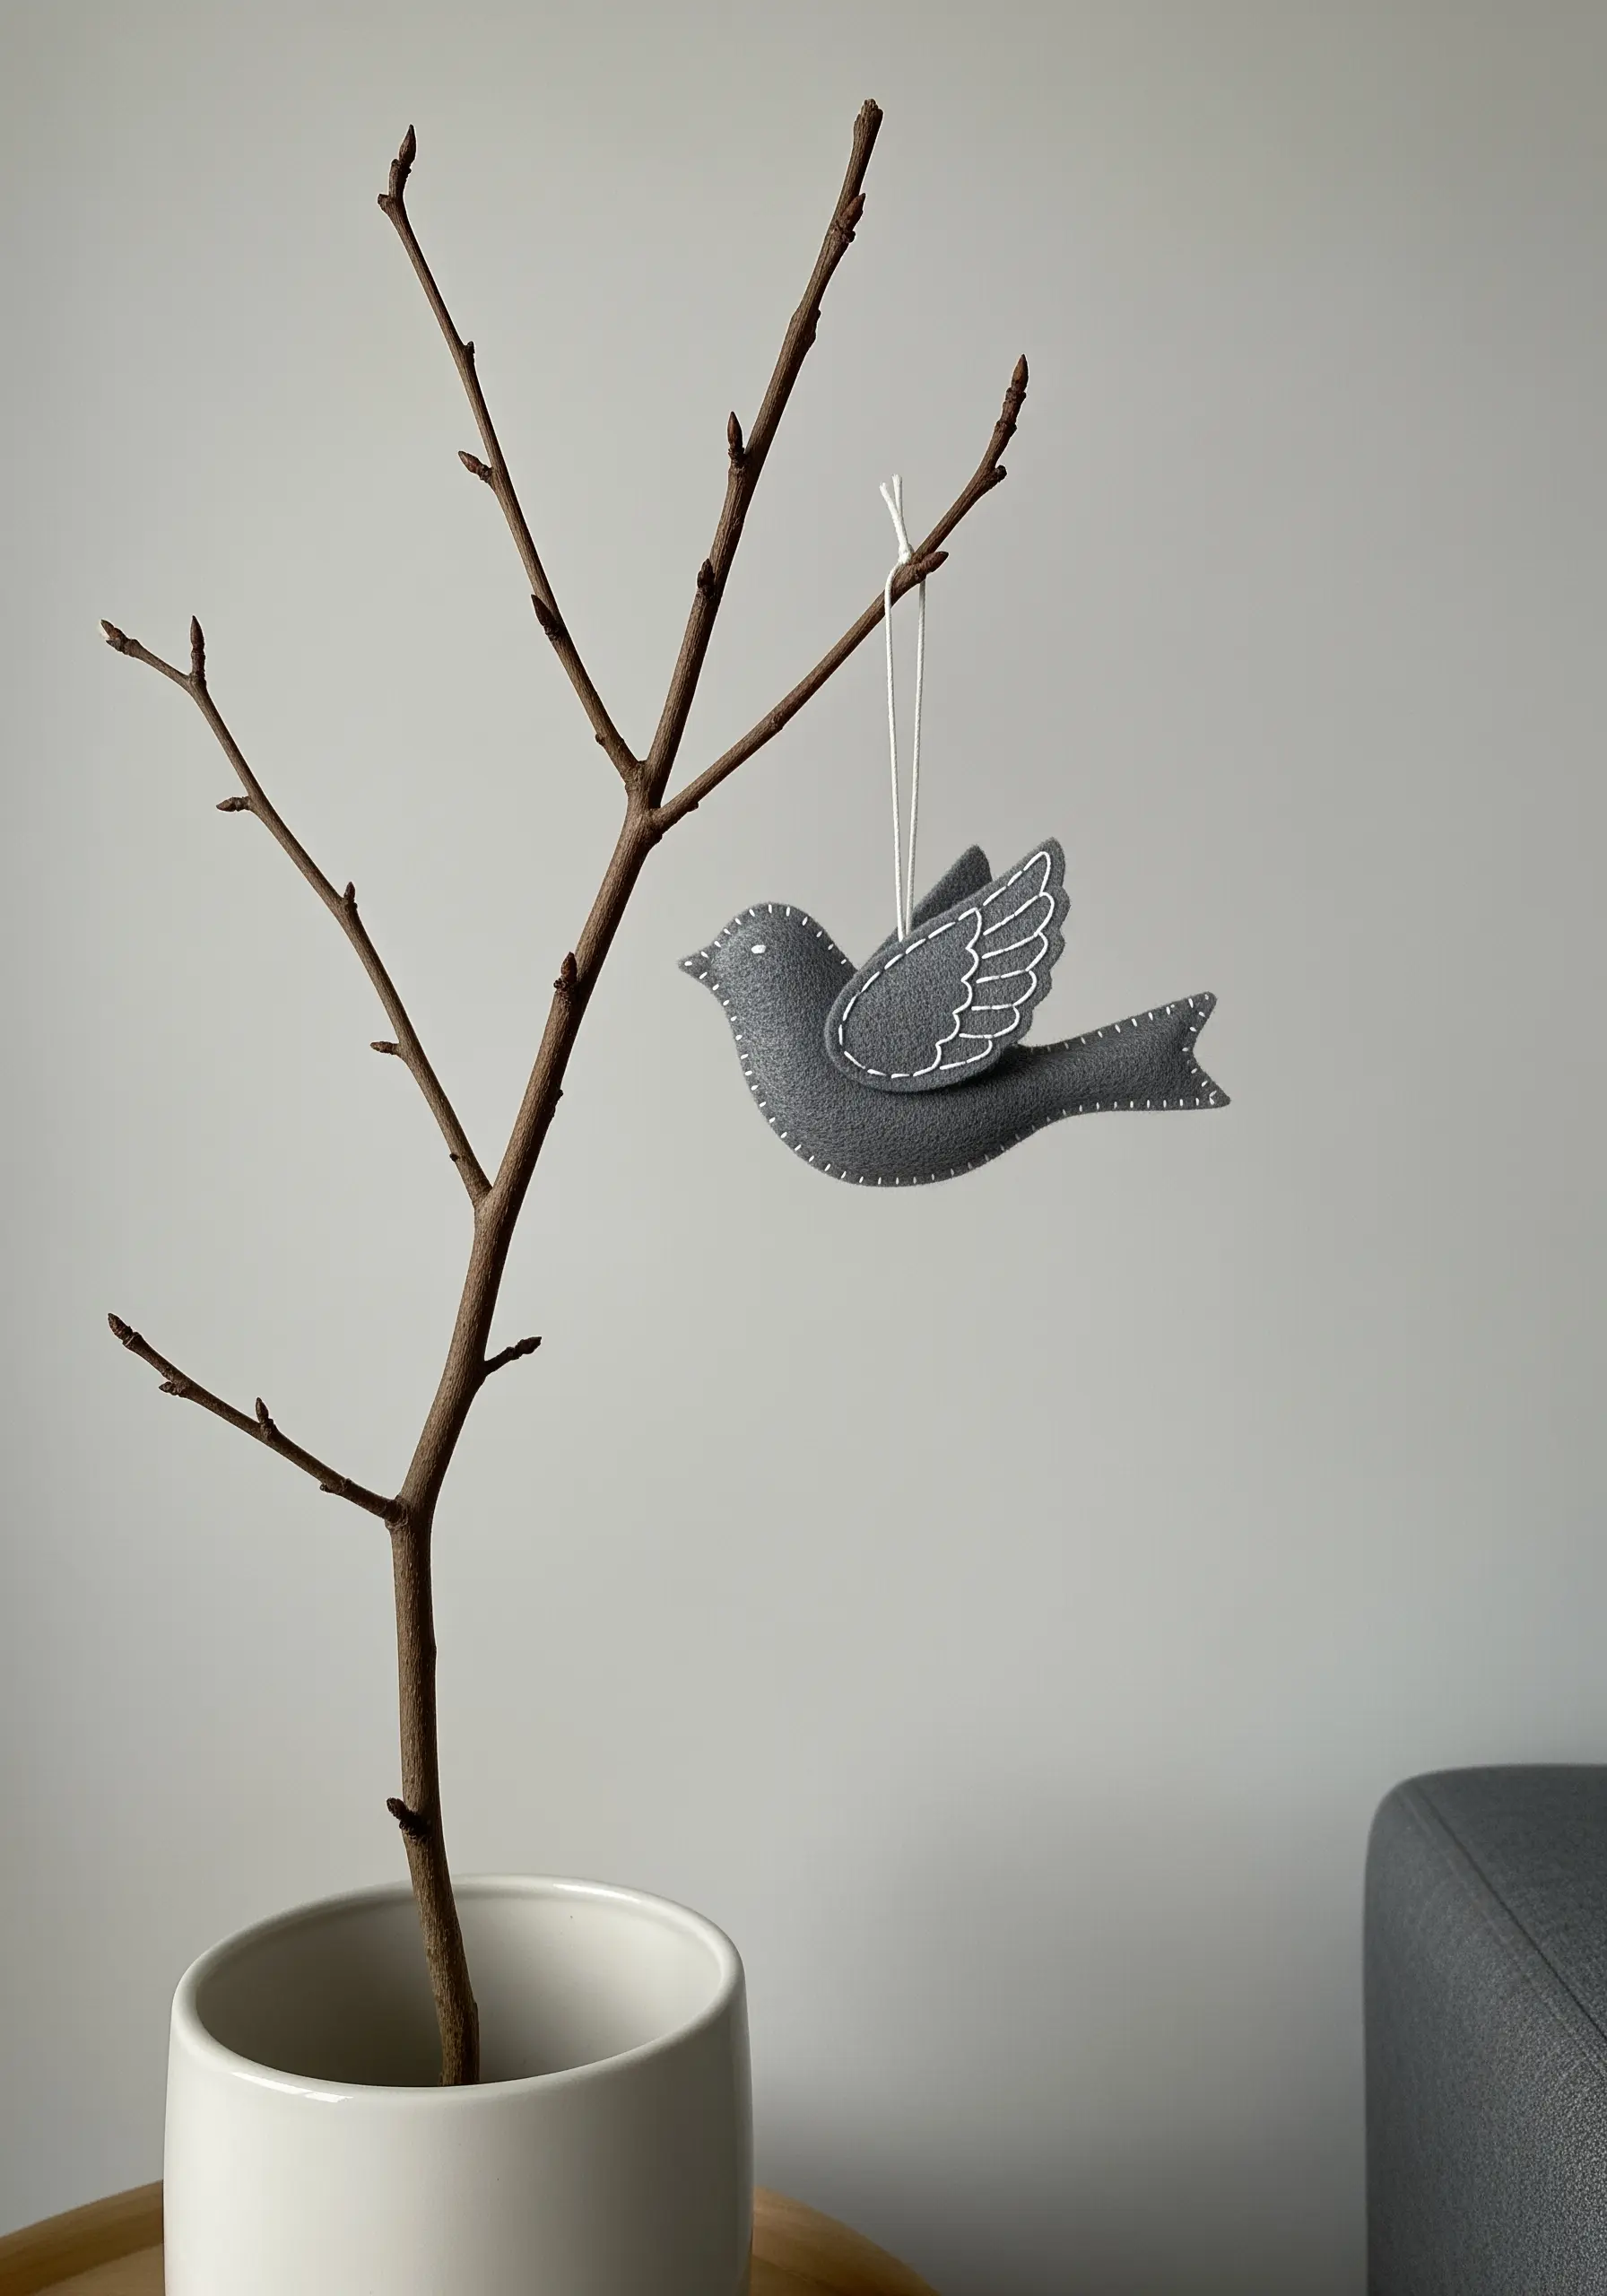
31. Capture Movement with Cascading Stitches
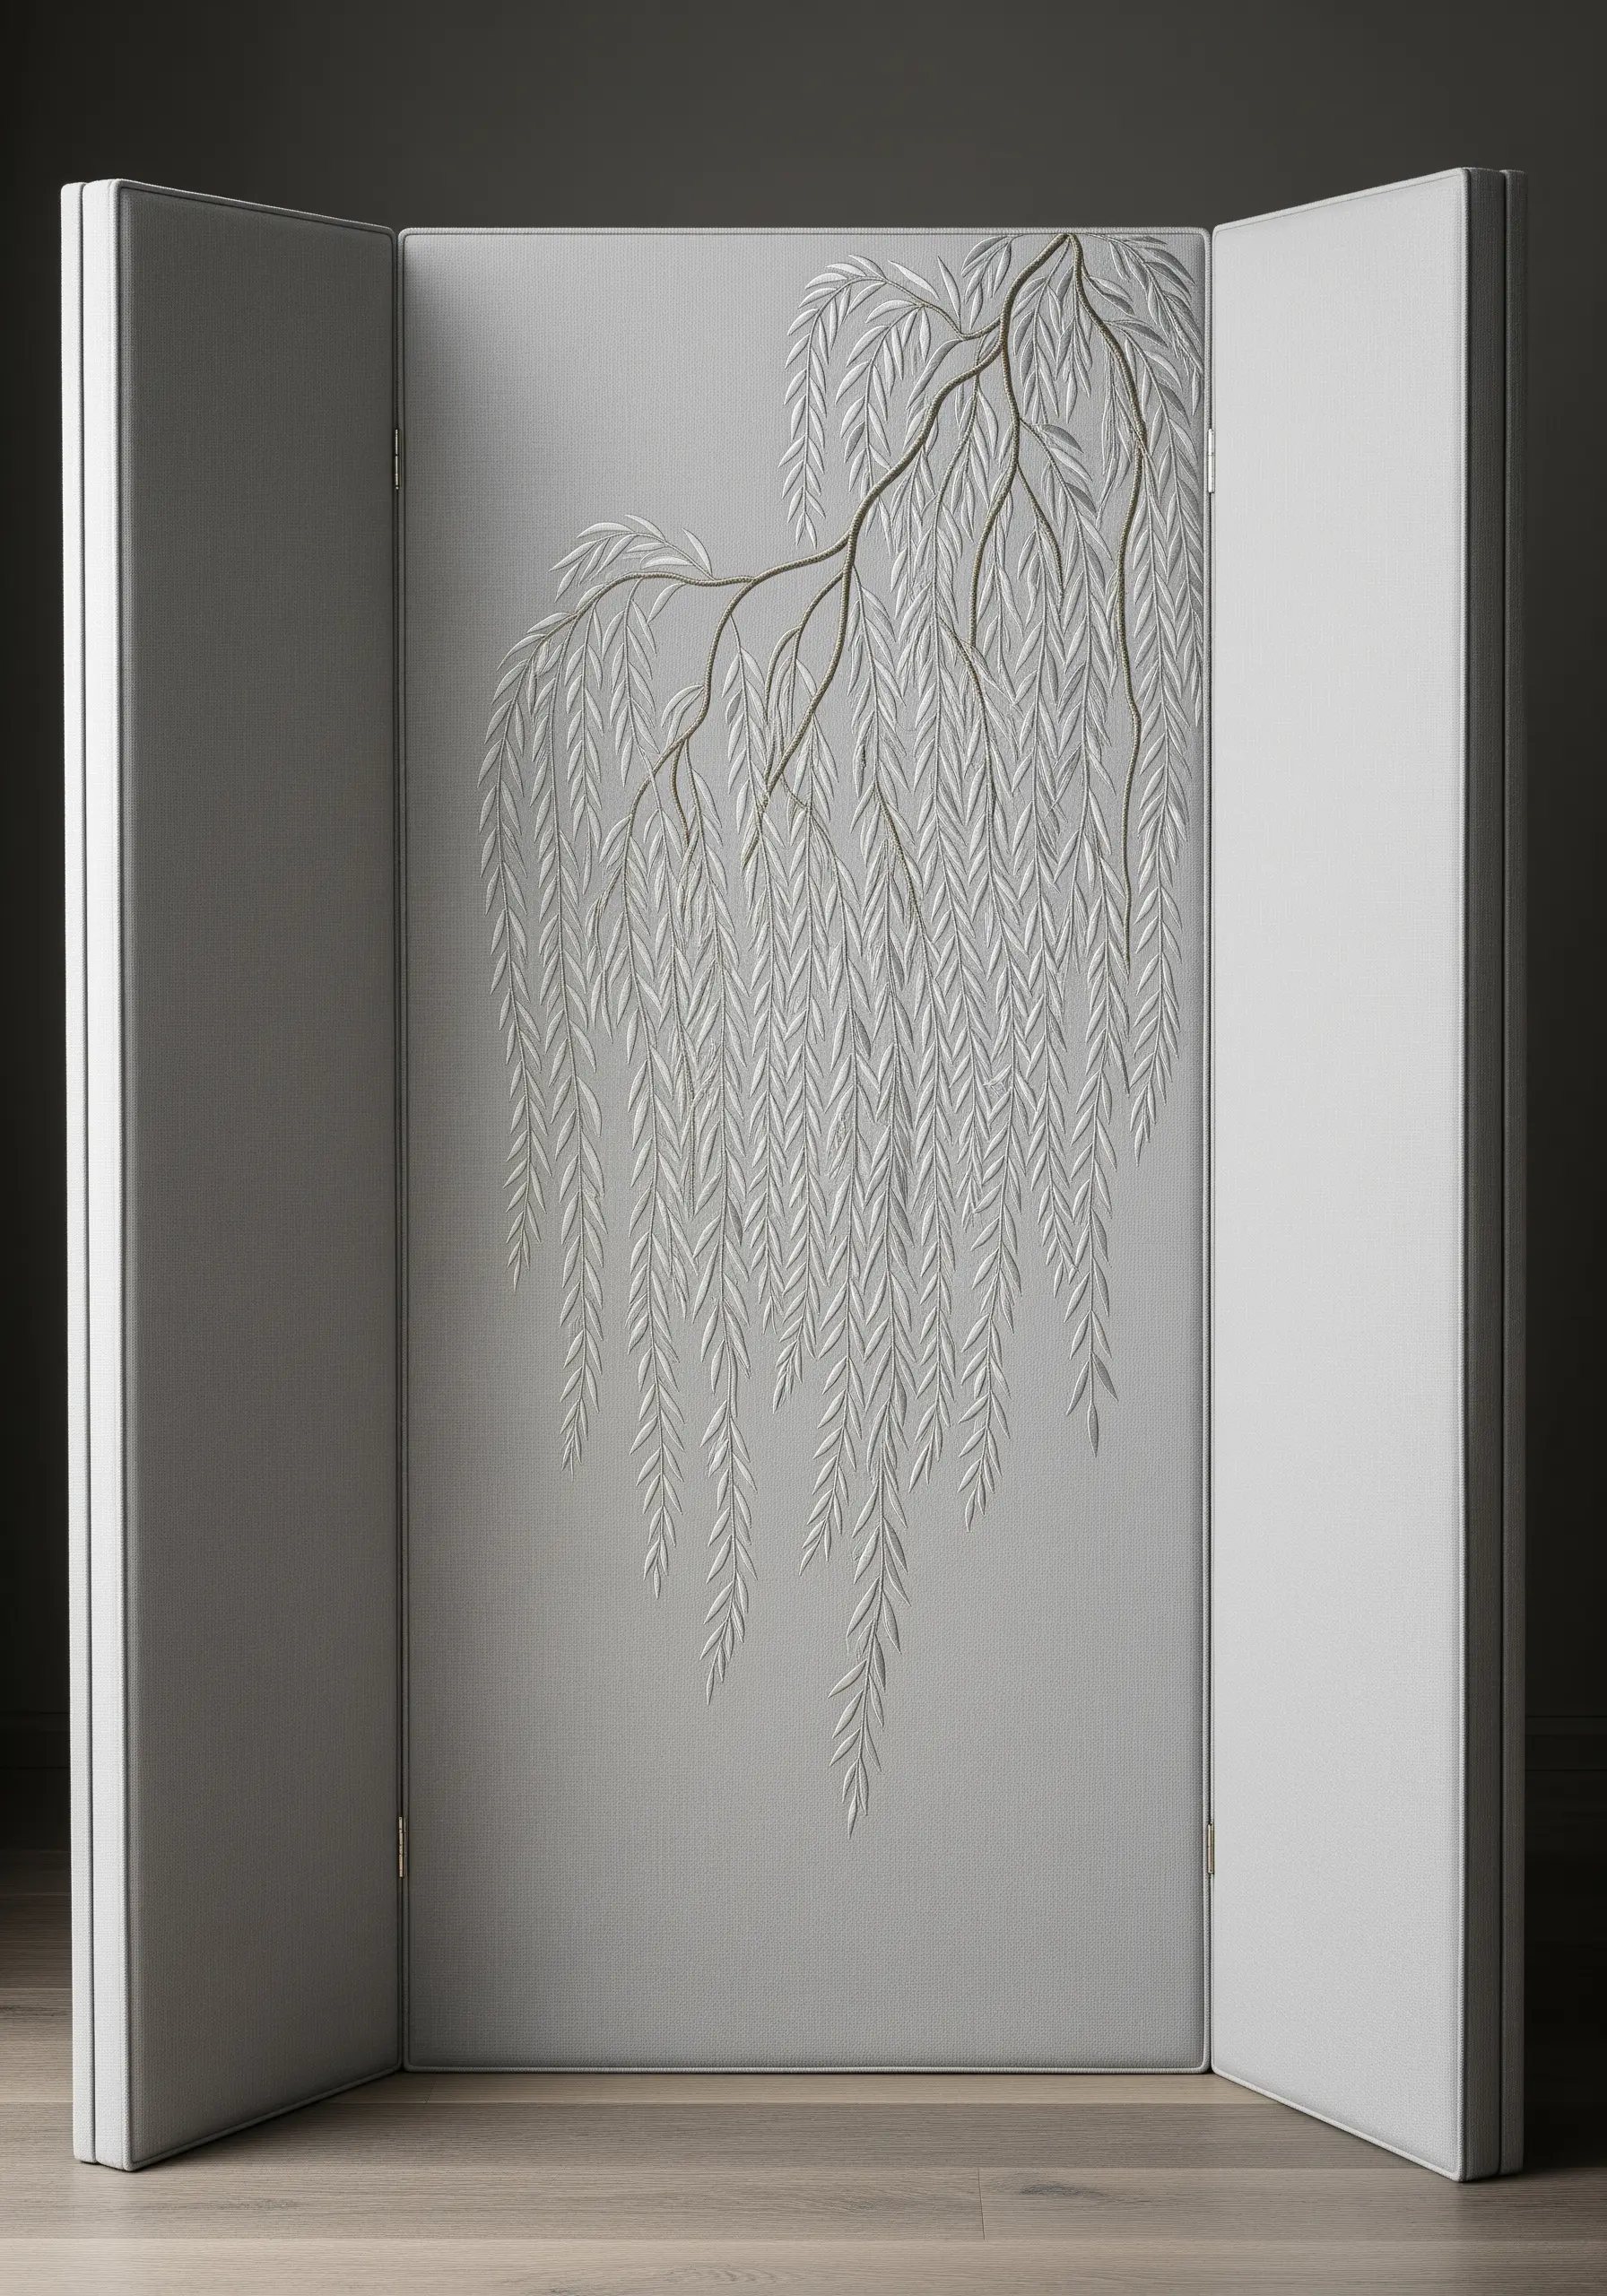
To embroider something with natural, flowing movement like a weeping willow, let your stitches cascade downwards.
Use a simple satin stitch or long straight stitches for the leaves, angling them to follow the natural drape of the branches.
Varying the length of the stitches slightly will add to the organic, graceful effect, creating elegant botanical textile art ideas that feel alive.
32. Use Stitches to Sculpt a Padded Surface
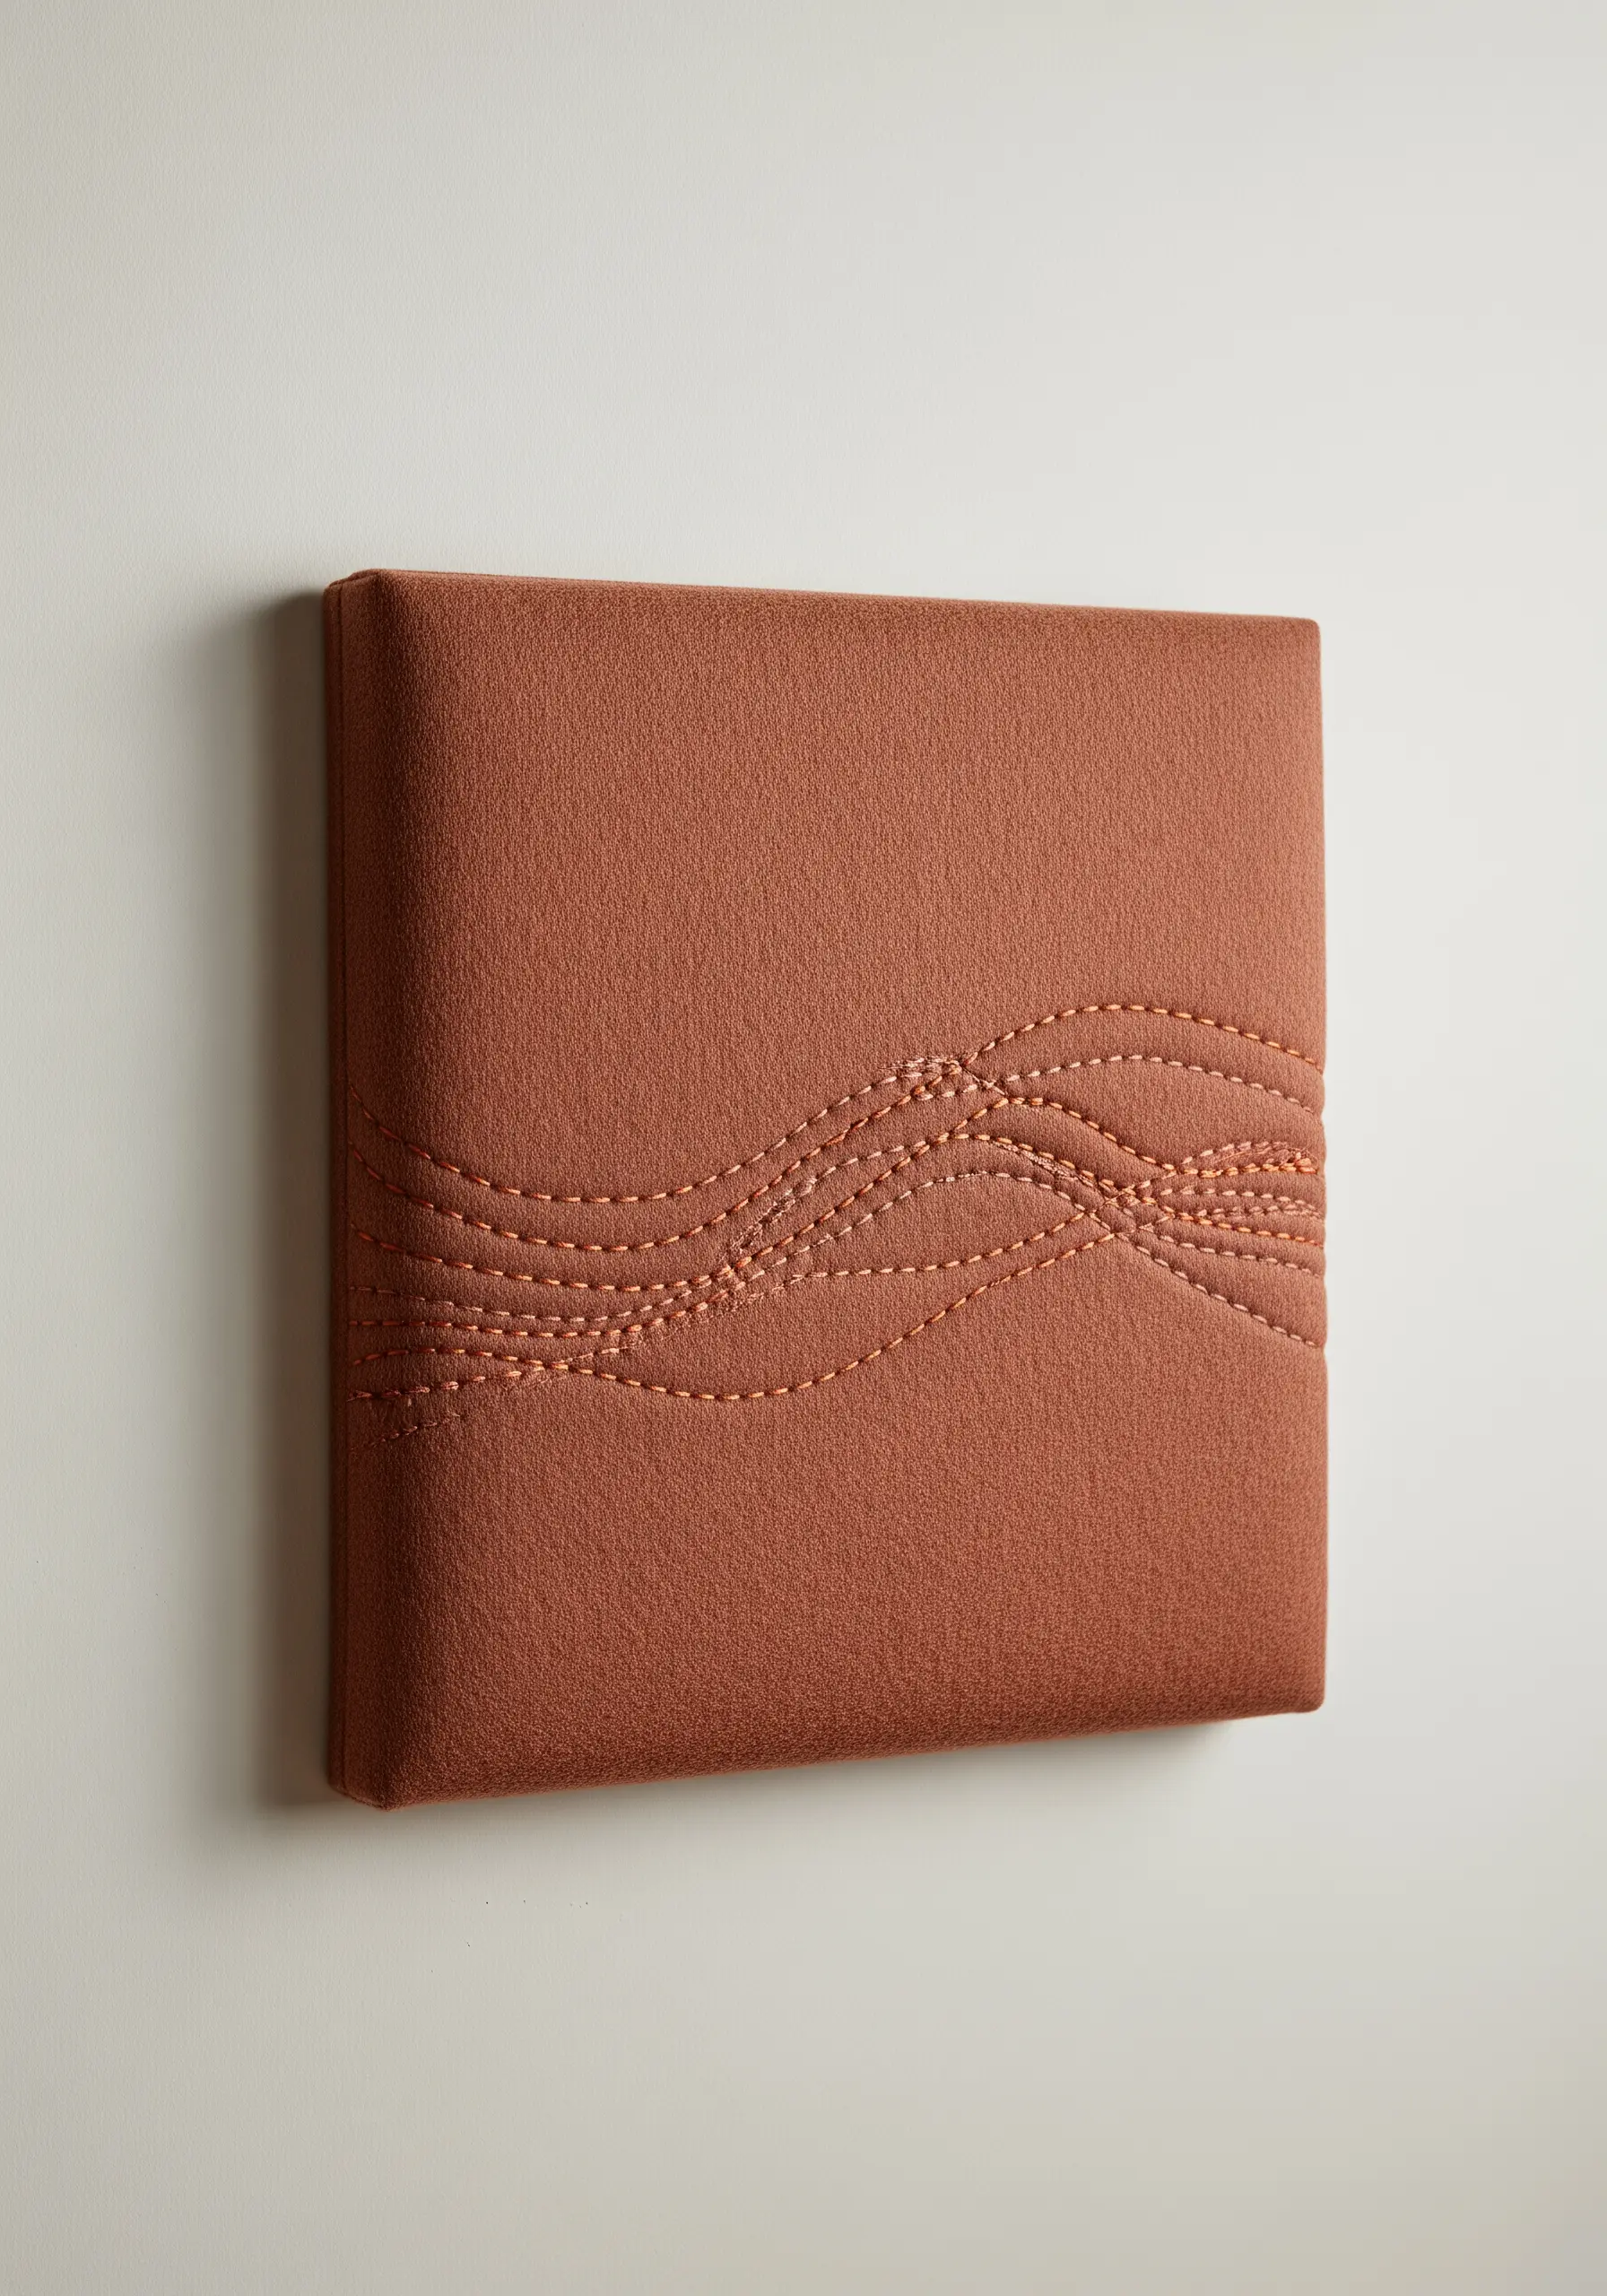
Stitching on a padded or quilted surface creates an entirely different effect, as the thread pulls and sculpts the fabric, creating soft contours.
Use a simple running stitch to create patterns of flowing lines.
The tension of your thread will create gentle valleys in the padded fabric, adding subtle dimension and shadow play to your design.
This technique elevates soft neutral embroidery patterns by adding a quiet, sculptural quality.


