

Have you ever felt that your creations, beautiful as they are, could use another dimension? That they’re waiting to leap off the fabric and into the room? This weekend, you can explore that feeling by thinking not just as a stitcher, but as a sculptor.
The principles are the same ones you already know: texture, color, and form. But instead of creating illusions of depth on a flat surface, you’ll be building tangible forms with fiber, thread, and wire.
These ideas aren’t about mastering complex new skills overnight. They are invitations to combine techniques you’re familiar with—simple stitches, basic knots, and a love for materials—in ways that build volume and presence. You have everything you need to begin right now.
1. Sculpting with Wool: The Art of Needle Felting

You can create incredibly lifelike forms by compacting wool roving with a barbed needle, a technique known as needle felting.
Start with a core of tightly rolled wool to build the basic shape, then add thin layers of colored wool on top.
To create the soft, blended fur effect, use a fine-gauge needle to gently poke the surface, directionally blending different shades of orange, white, and grey fibers.
This method allows you to build up dimension and realism gradually, turning simple fibers into handmade artworks that feel alive.
2. Combine Macrame Knots with Soft Sculptural Elements
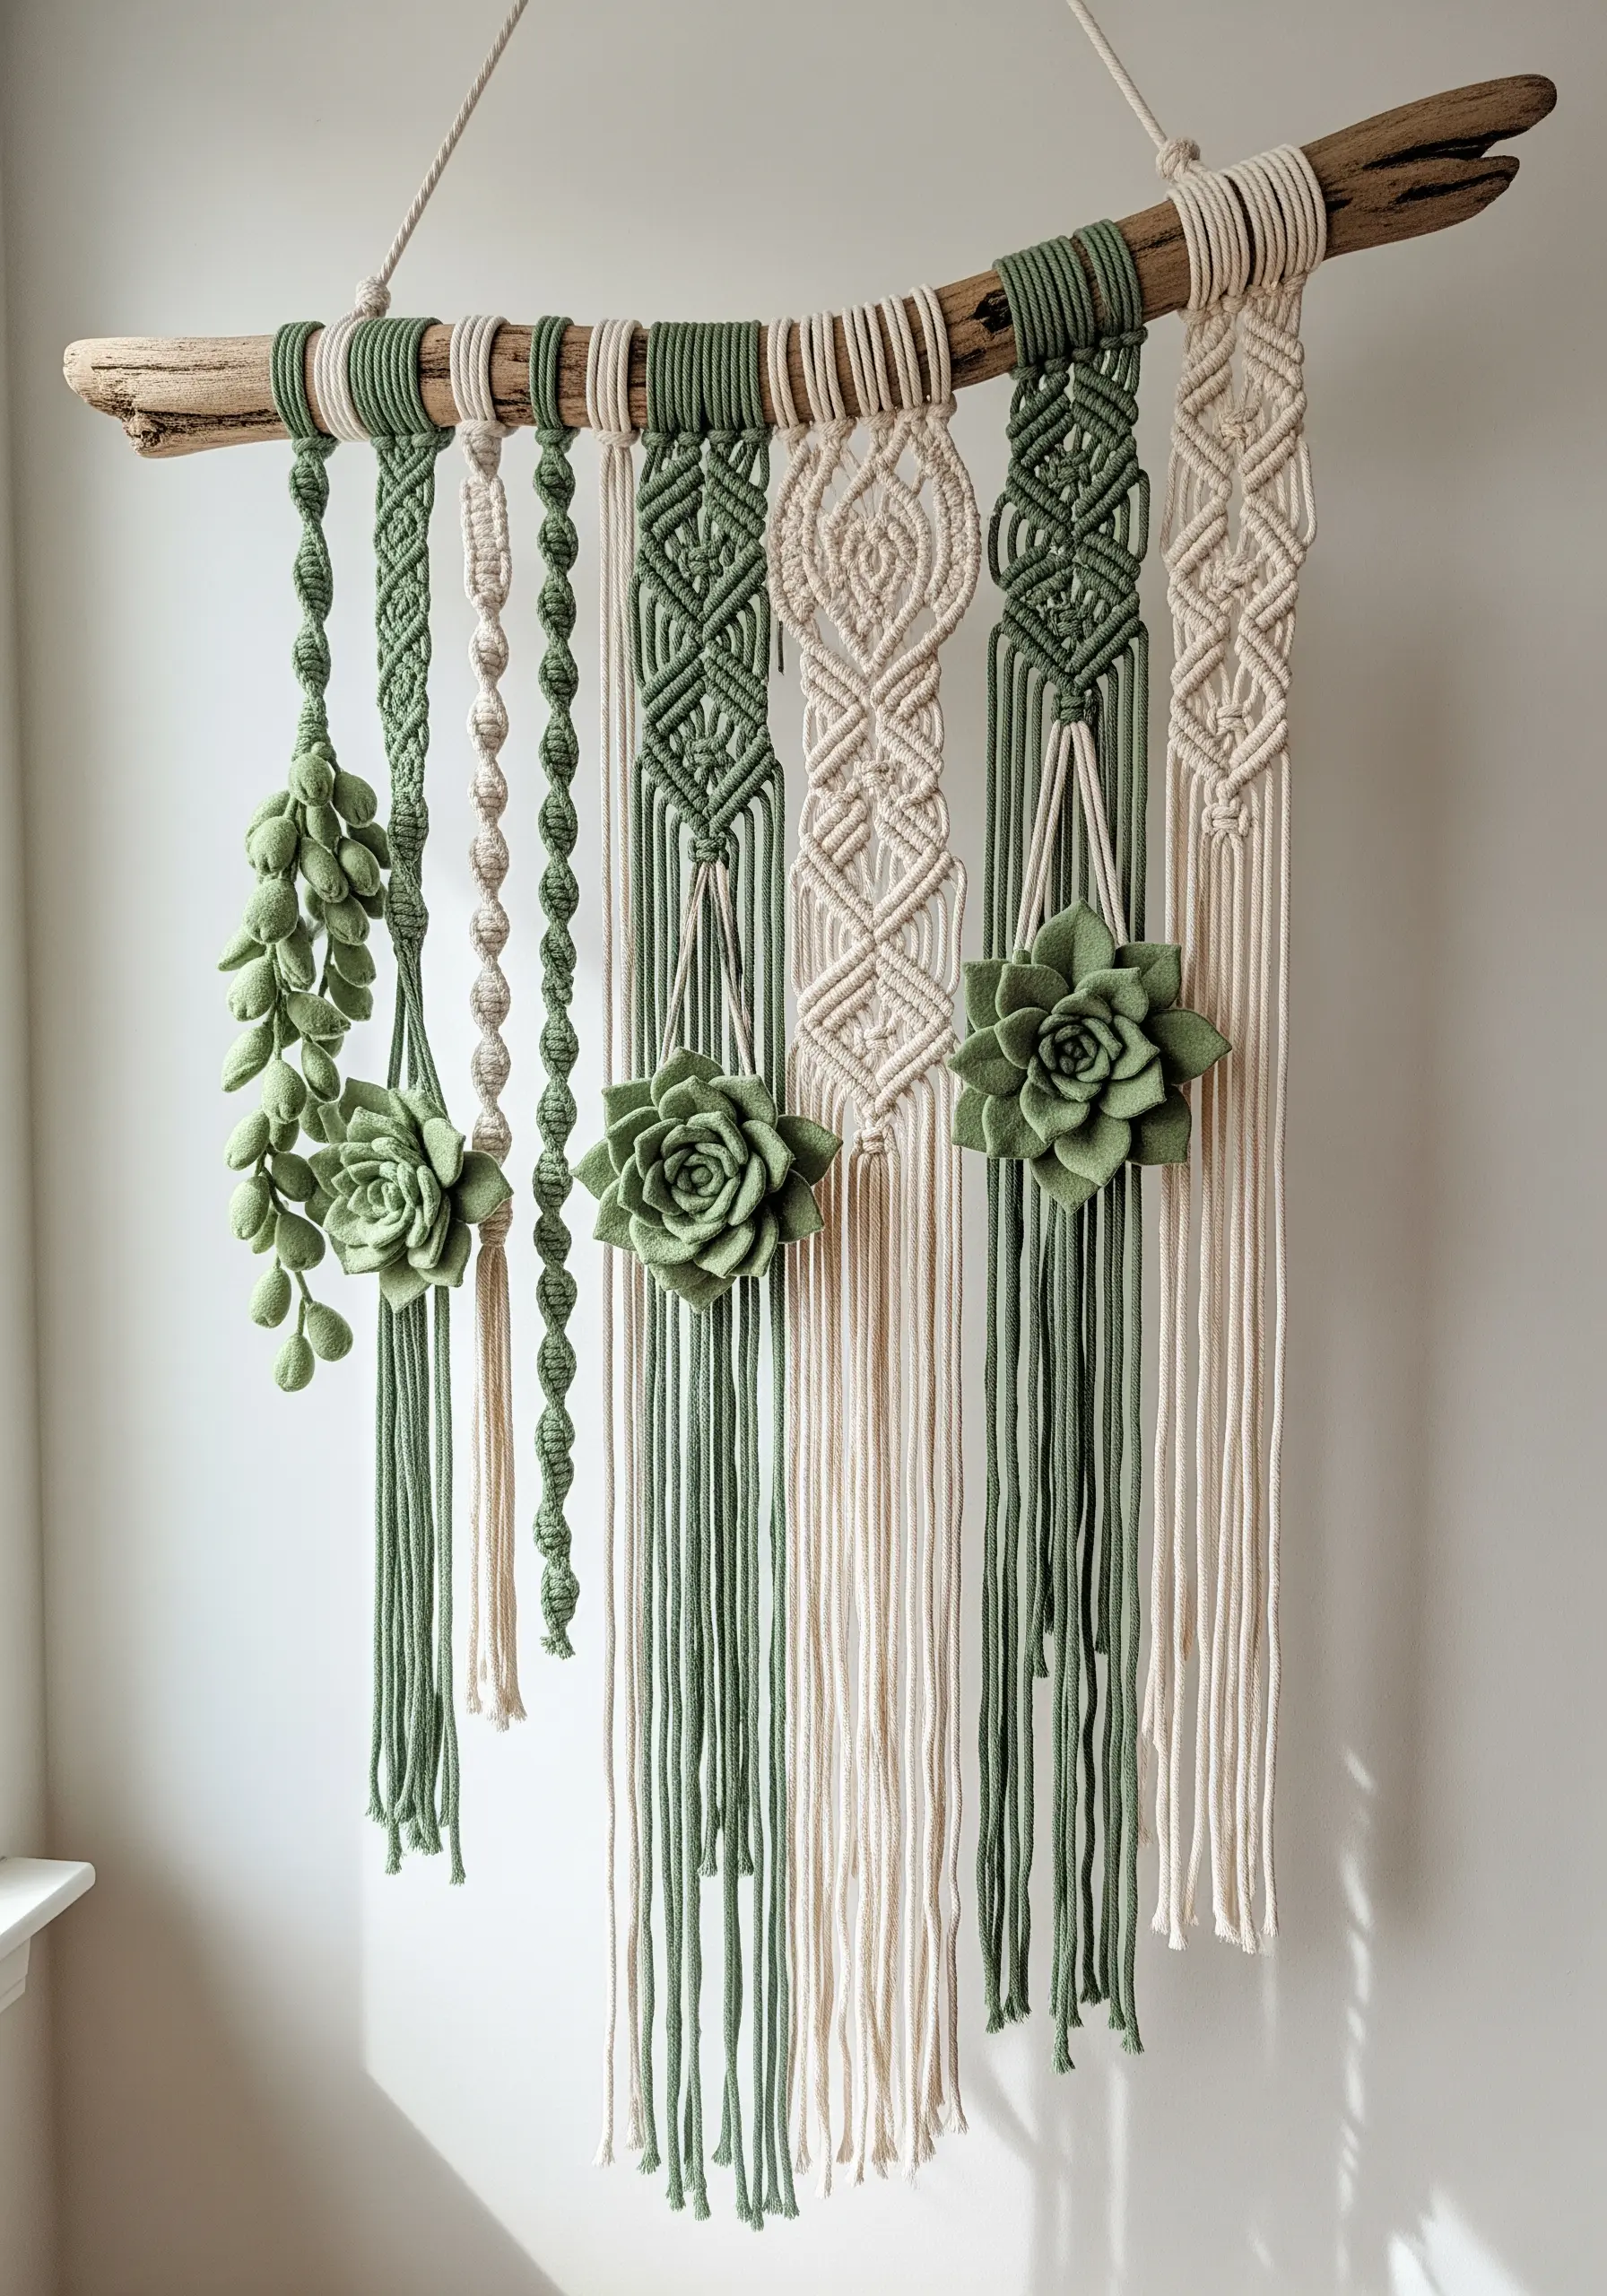
Elevate your macrame by integrating three-dimensional felt creations into the design.
Create your felt succulents by cutting and layering felt petals, securing them with a dab of hot glue or a few simple stitches at the base.
Contrast the firm, geometric structure of macrame knots like the square knot and half-hitch spiral with the soft, organic forms of the felt plants.
This juxtaposition of textures transforms a standard wall hanging into a dynamic botanical textile art piece.
3. Weaving with Wire: Ethereal Thread Sculptures
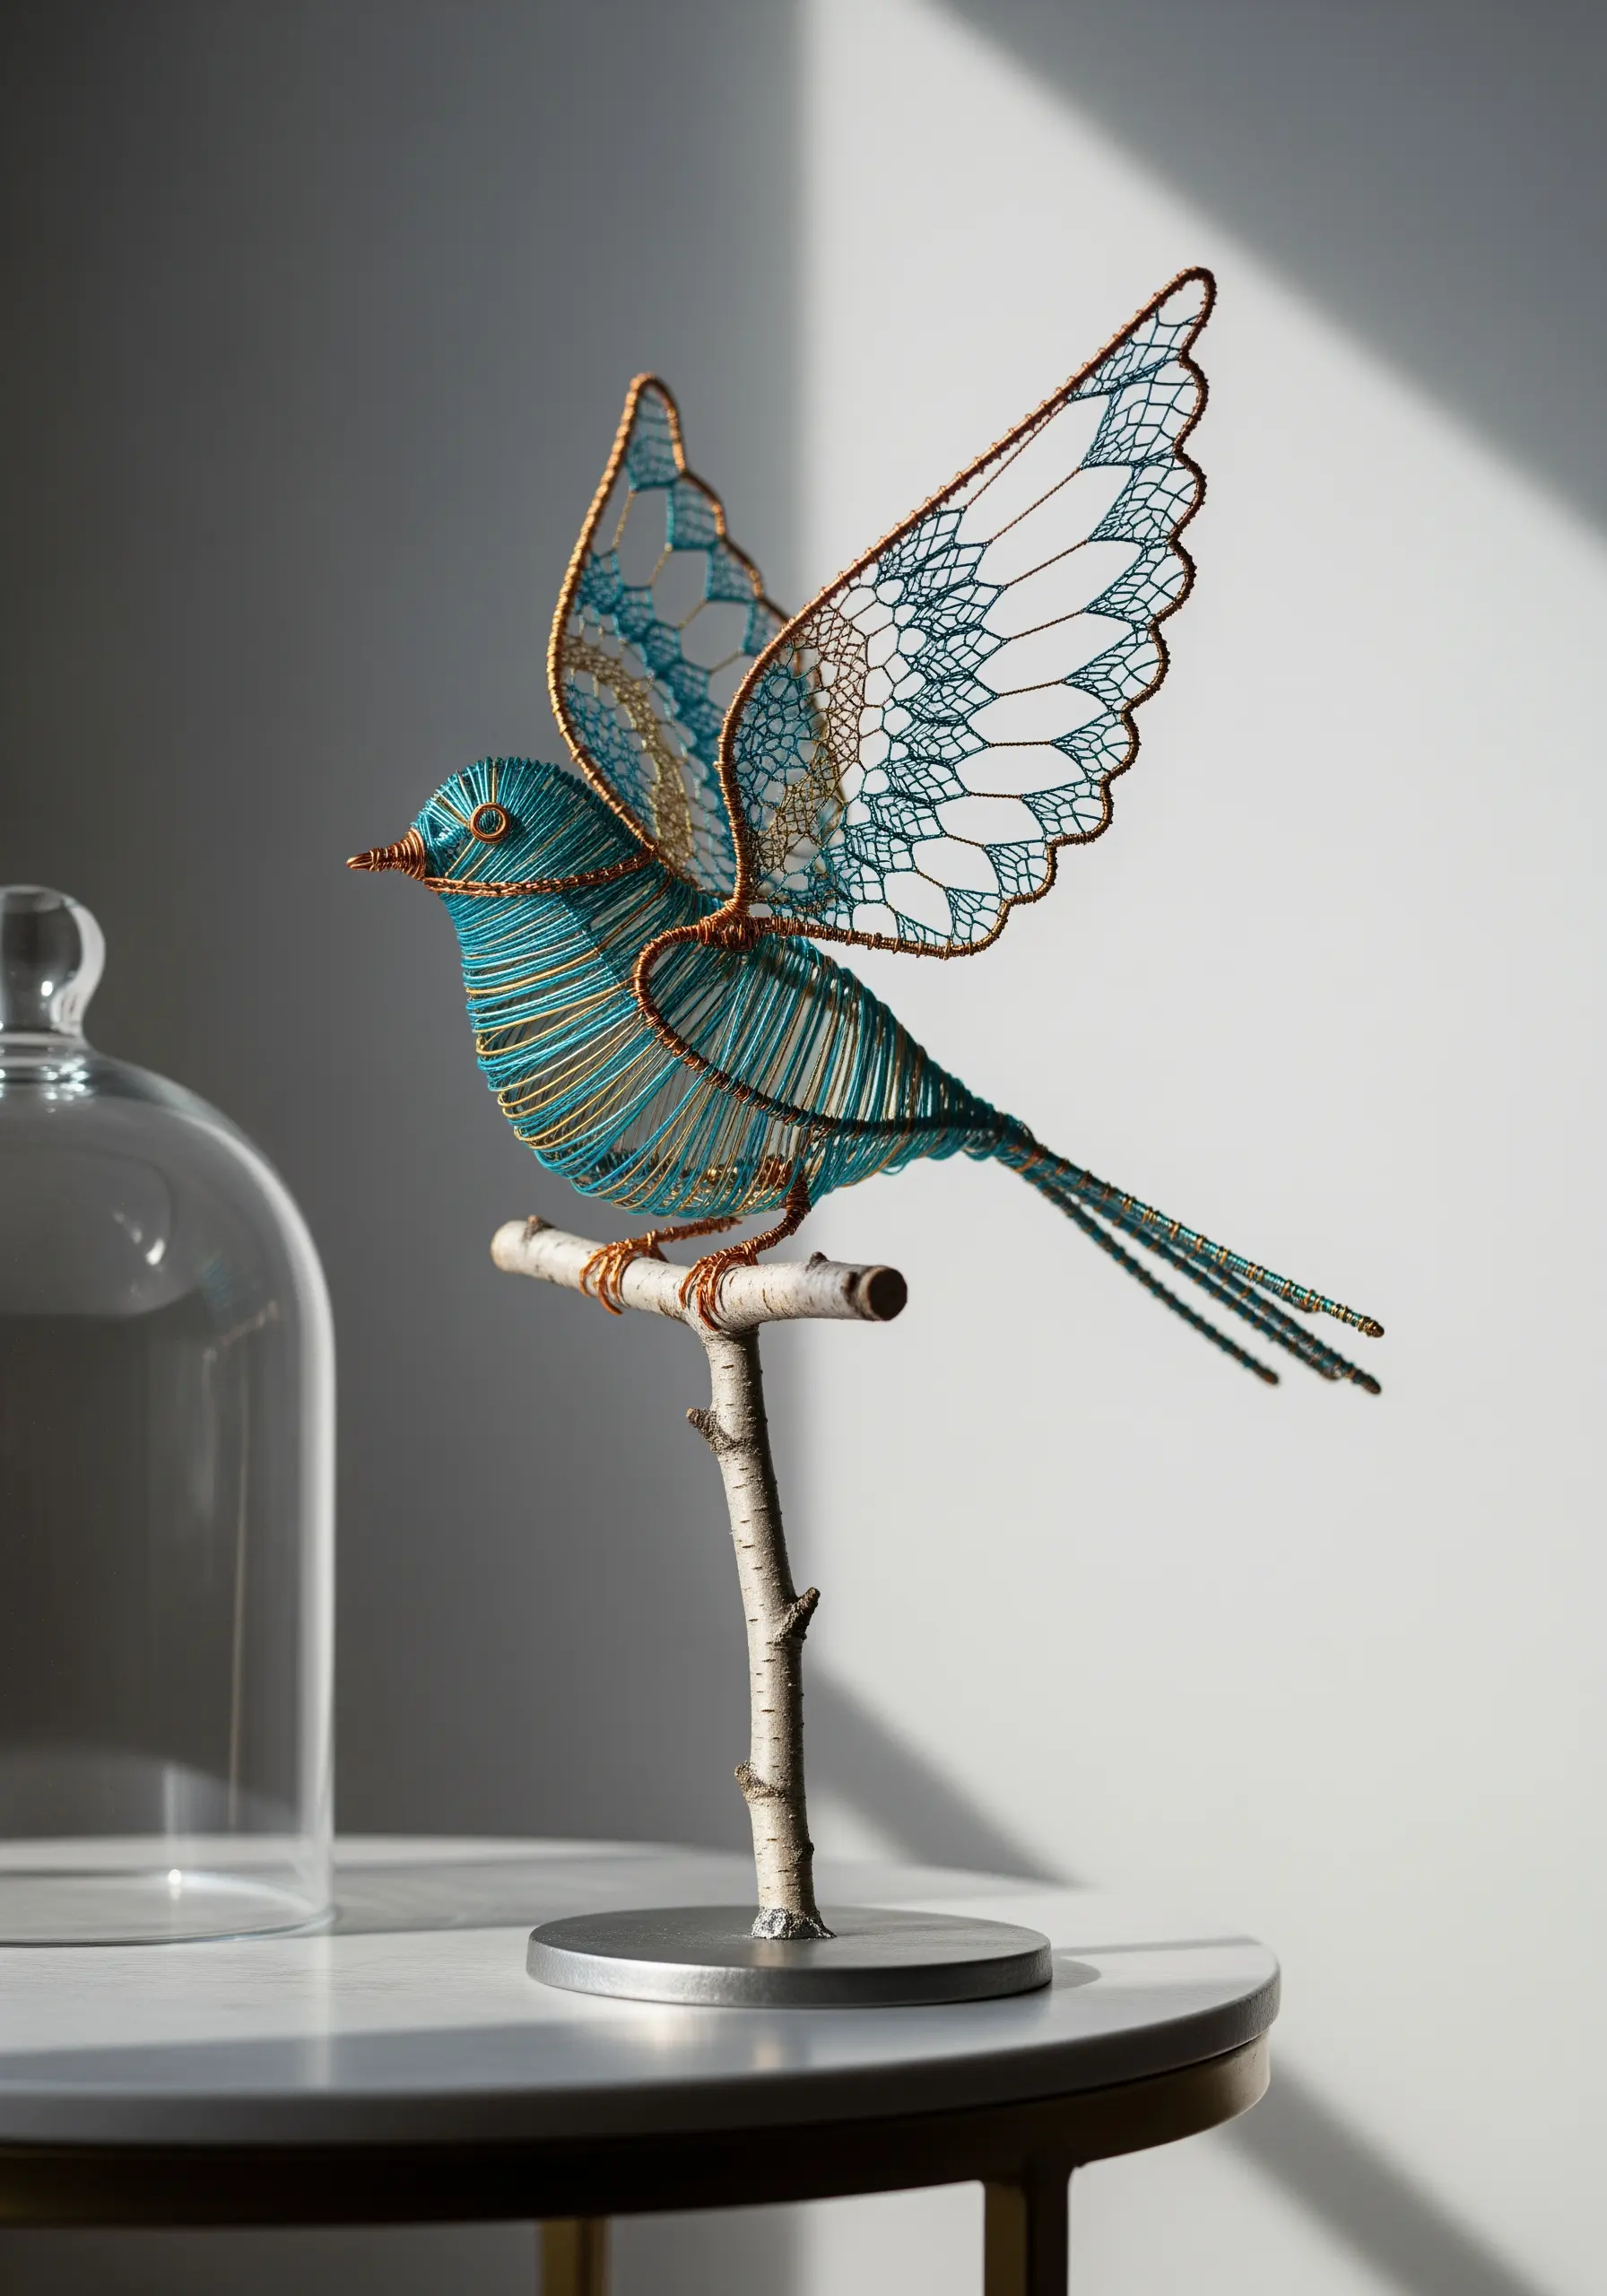
Use a malleable copper or aluminum wire to build a delicate armature, or framework, for your sculpture.
Once the frame is shaped, you can wrap it tightly with a single color of thread or create intricate patterns by weaving thread across the open spaces, mimicking lace-making techniques.
For the wings, create an outline with a thicker gauge wire and fill the interior with finer wire or thread to form delicate, transparent cells.
The interplay between the solid wire and the semi-transparent thread work creates a stunning sense of lightness and detail, perfect for bird & butterfly embroidery patterns brought to life in 3D.
4. Crafting Coiled Vessels from Fabric Scraps
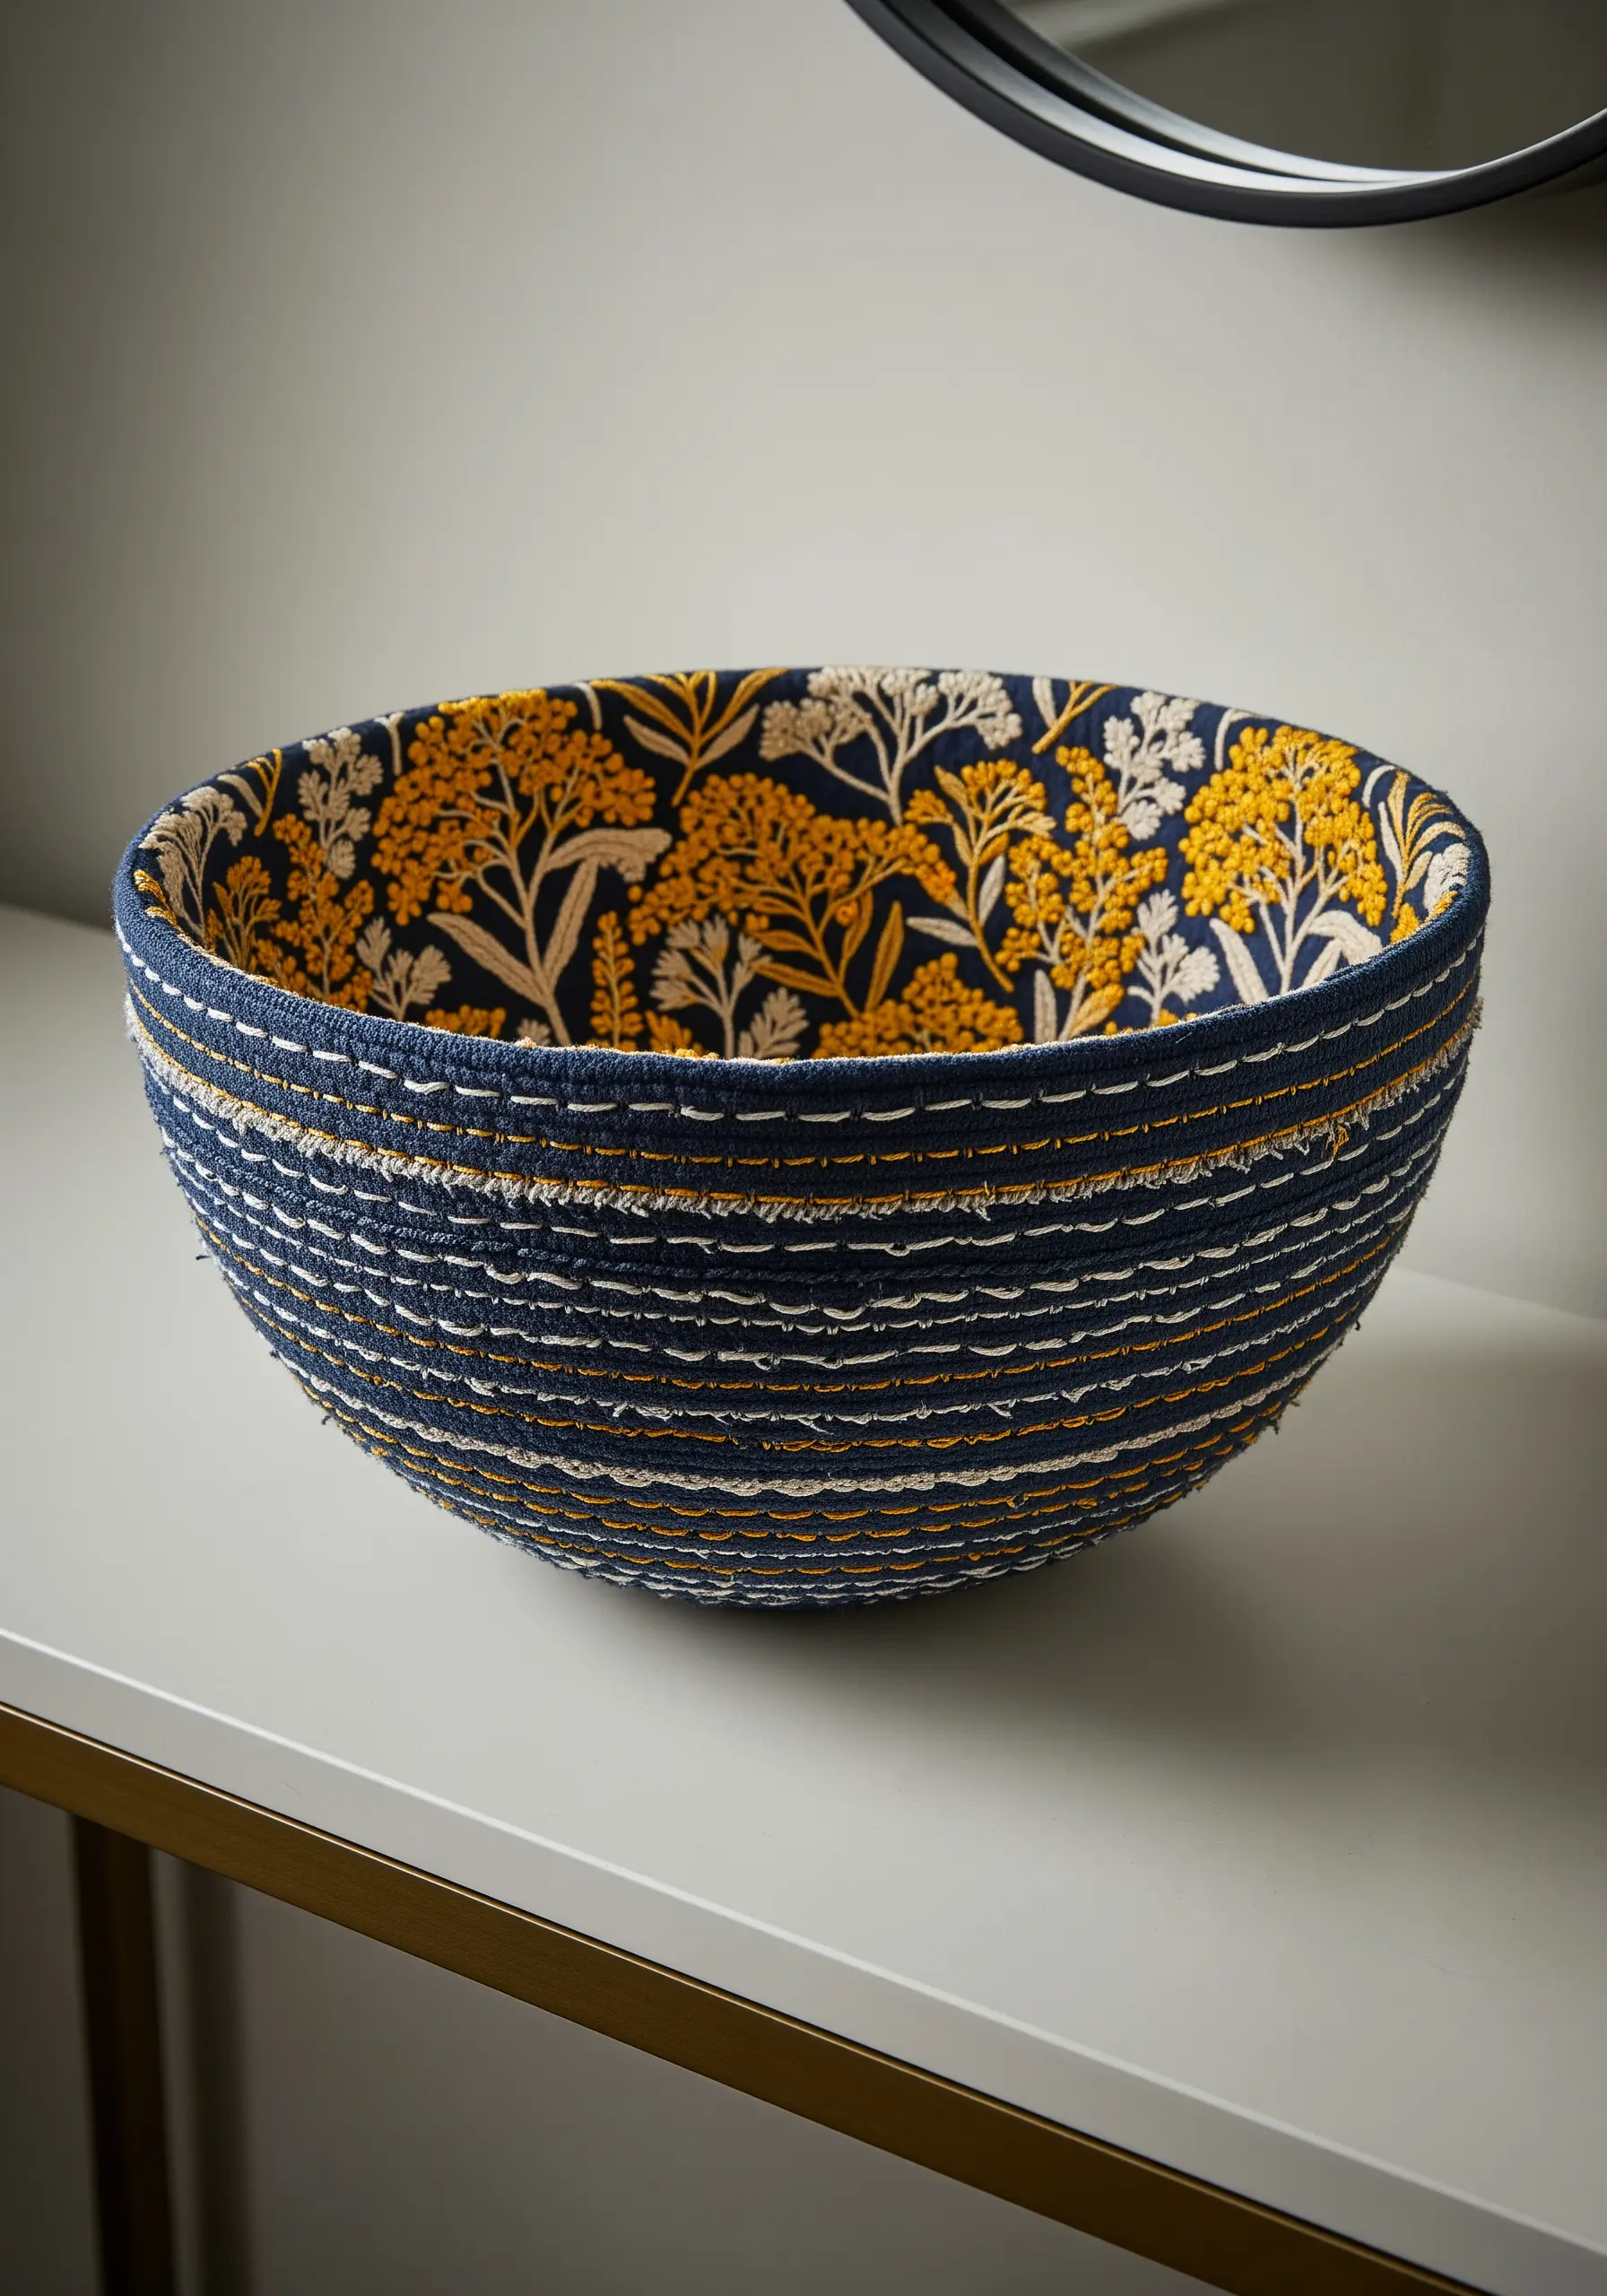
Transform fabric scraps into a functional work of art by creating a coiled rope bowl.
Wrap thin strips of your favorite fabric tightly around a cotton or jute rope core, securing the end with a stitch.
Begin coiling the wrapped rope into a flat spiral for the base, using a sturdy needle and thick thread to stitch the coils together as you go.
To build the walls, simply stack the coils vertically, adjusting the angle to shape the bowl. A contrasting stitch, like the blanket stitch, adds a beautiful decorative detail that enhances the handmade feel.
This is one of those fabric projects you can finish in a weekend and use for years.
5. Building a Diorama with Raised Embroidery
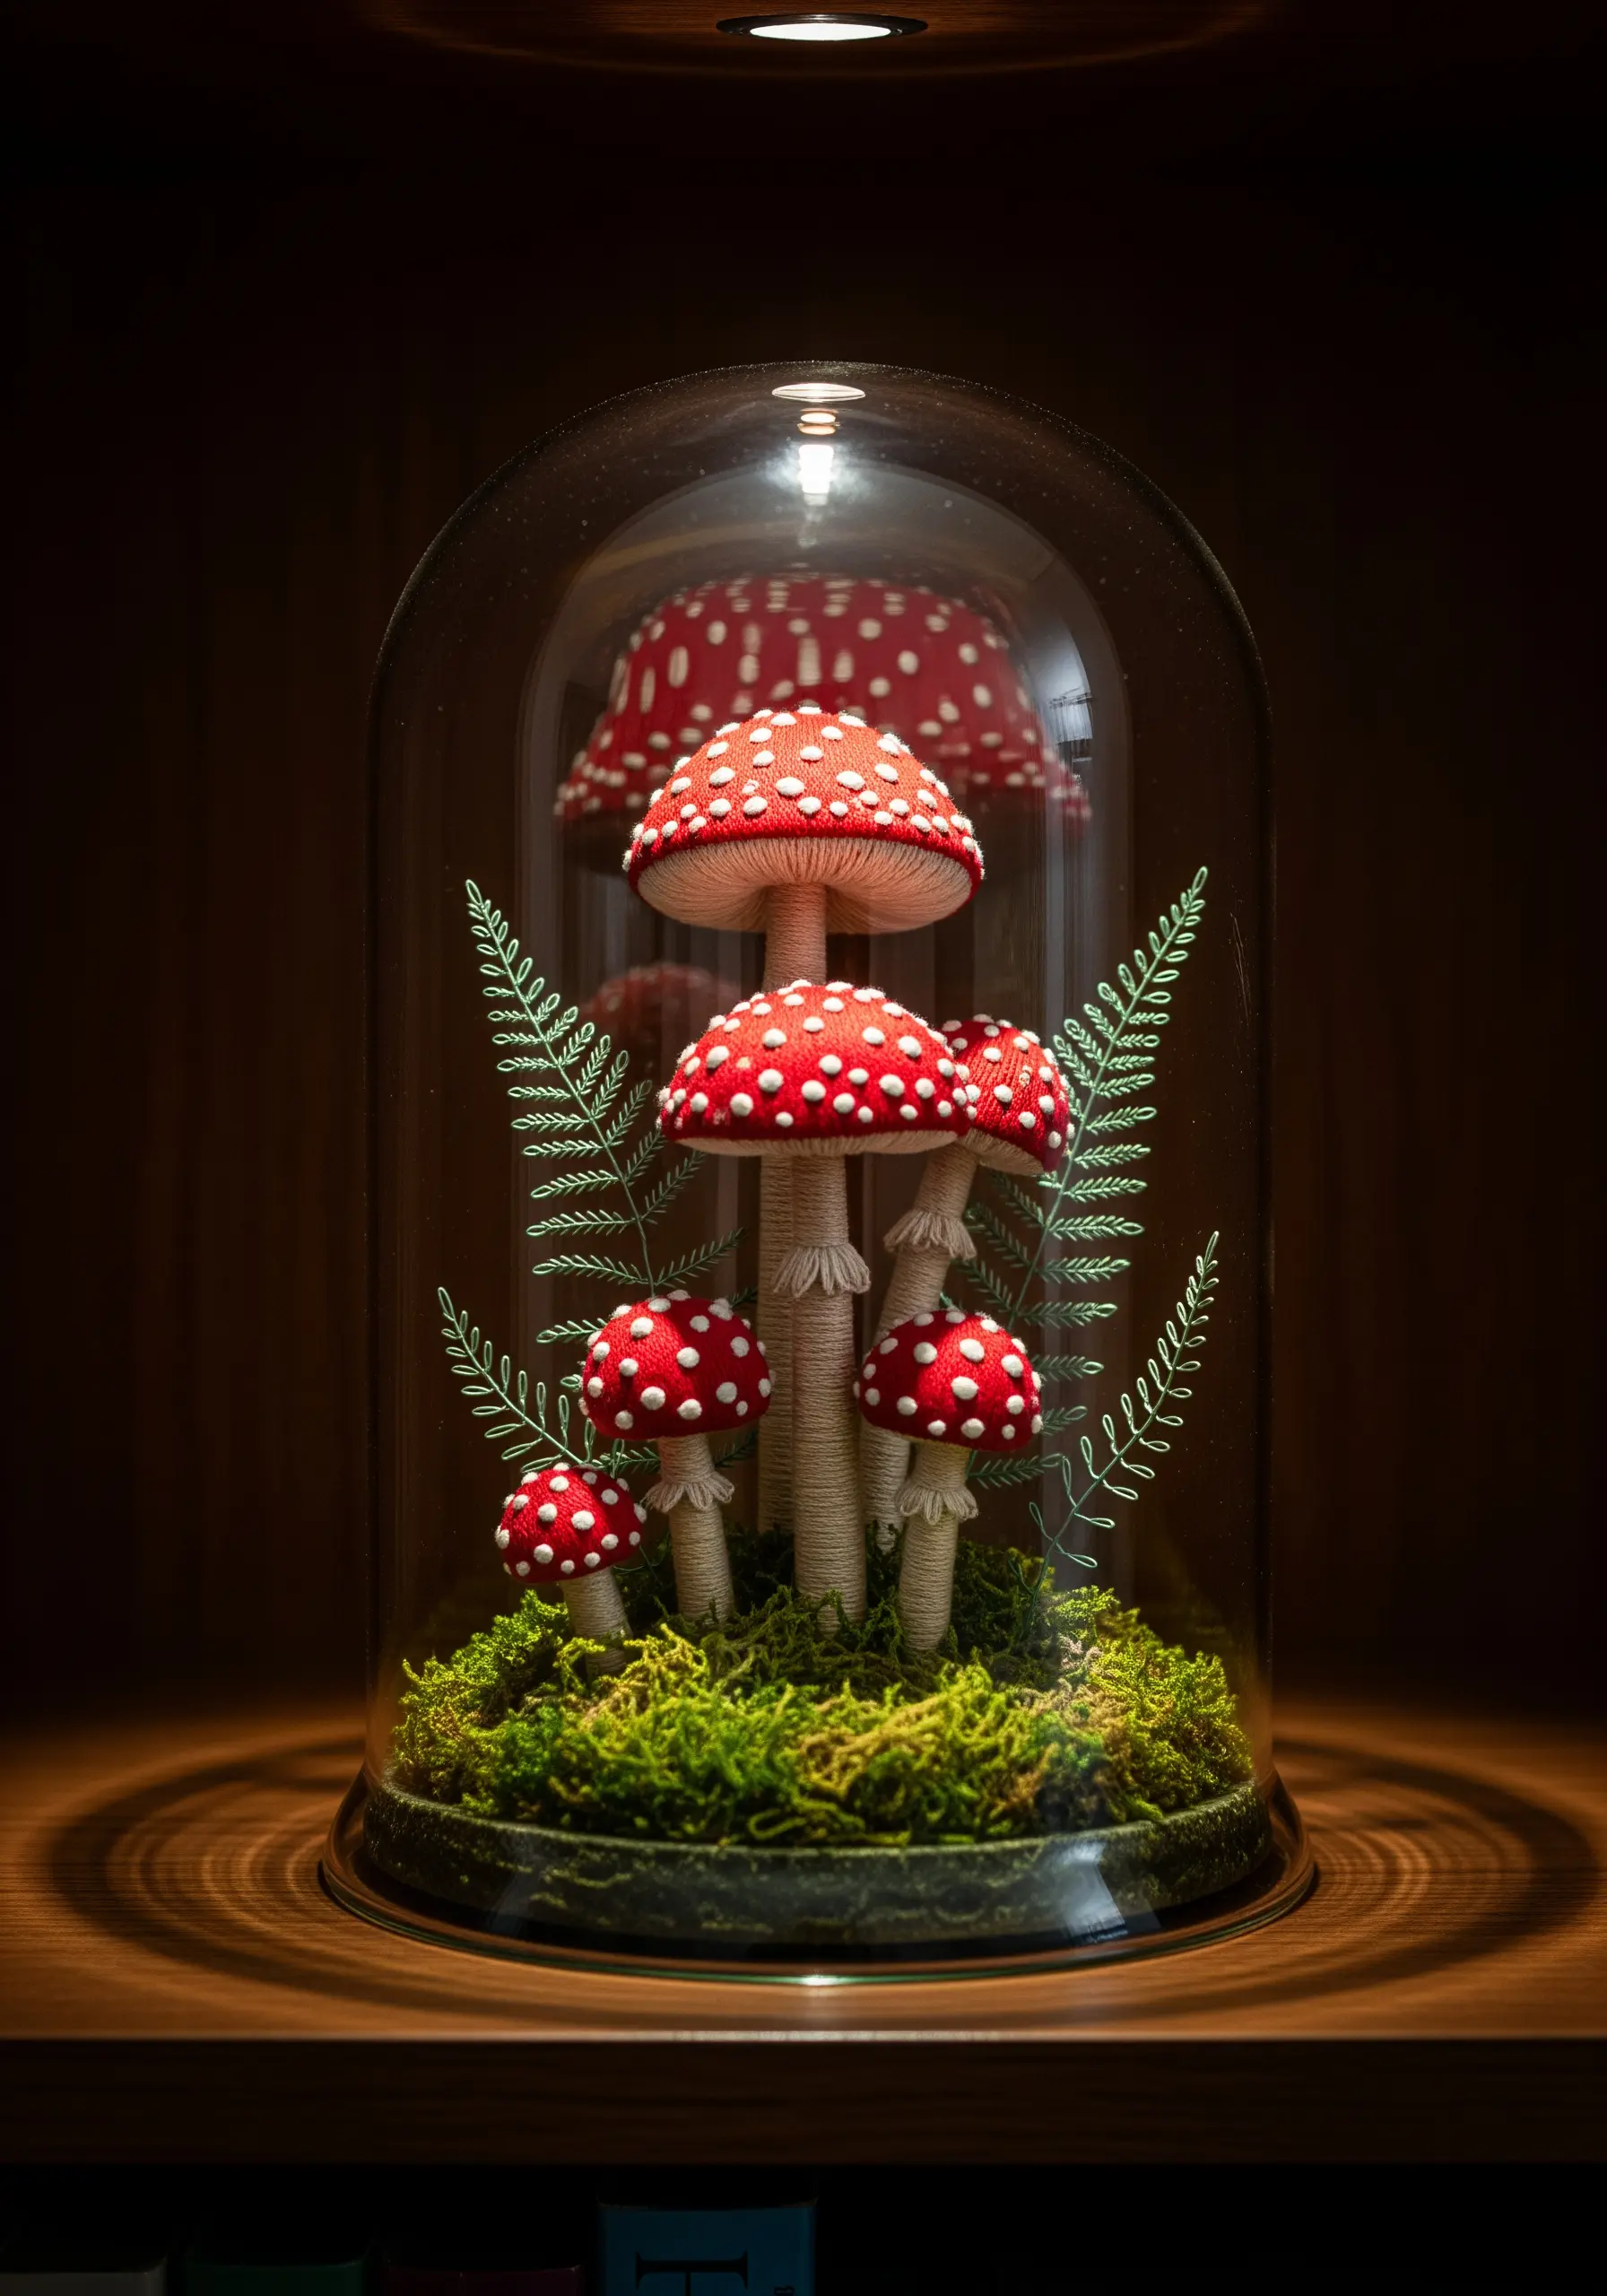
Create a captivating miniature world using stumpwork, a form of raised embroidery that gives motifs a three-dimensional quality.
For the mushroom caps, create padded satin stitch forms over felt or cotton batting to give them a rounded, pillowy shape. Use French knots for the white spots to add tactile texture.
The stems can be made by wrapping thread around a wire base, which allows you to bend them into natural positions.
Displaying your scene under a glass cloche turns it from a simple embroidery into a treasured object, perfect for forest floor botanical stitch ideas.
6. Creating Soft Sculptures with Simple Stitches
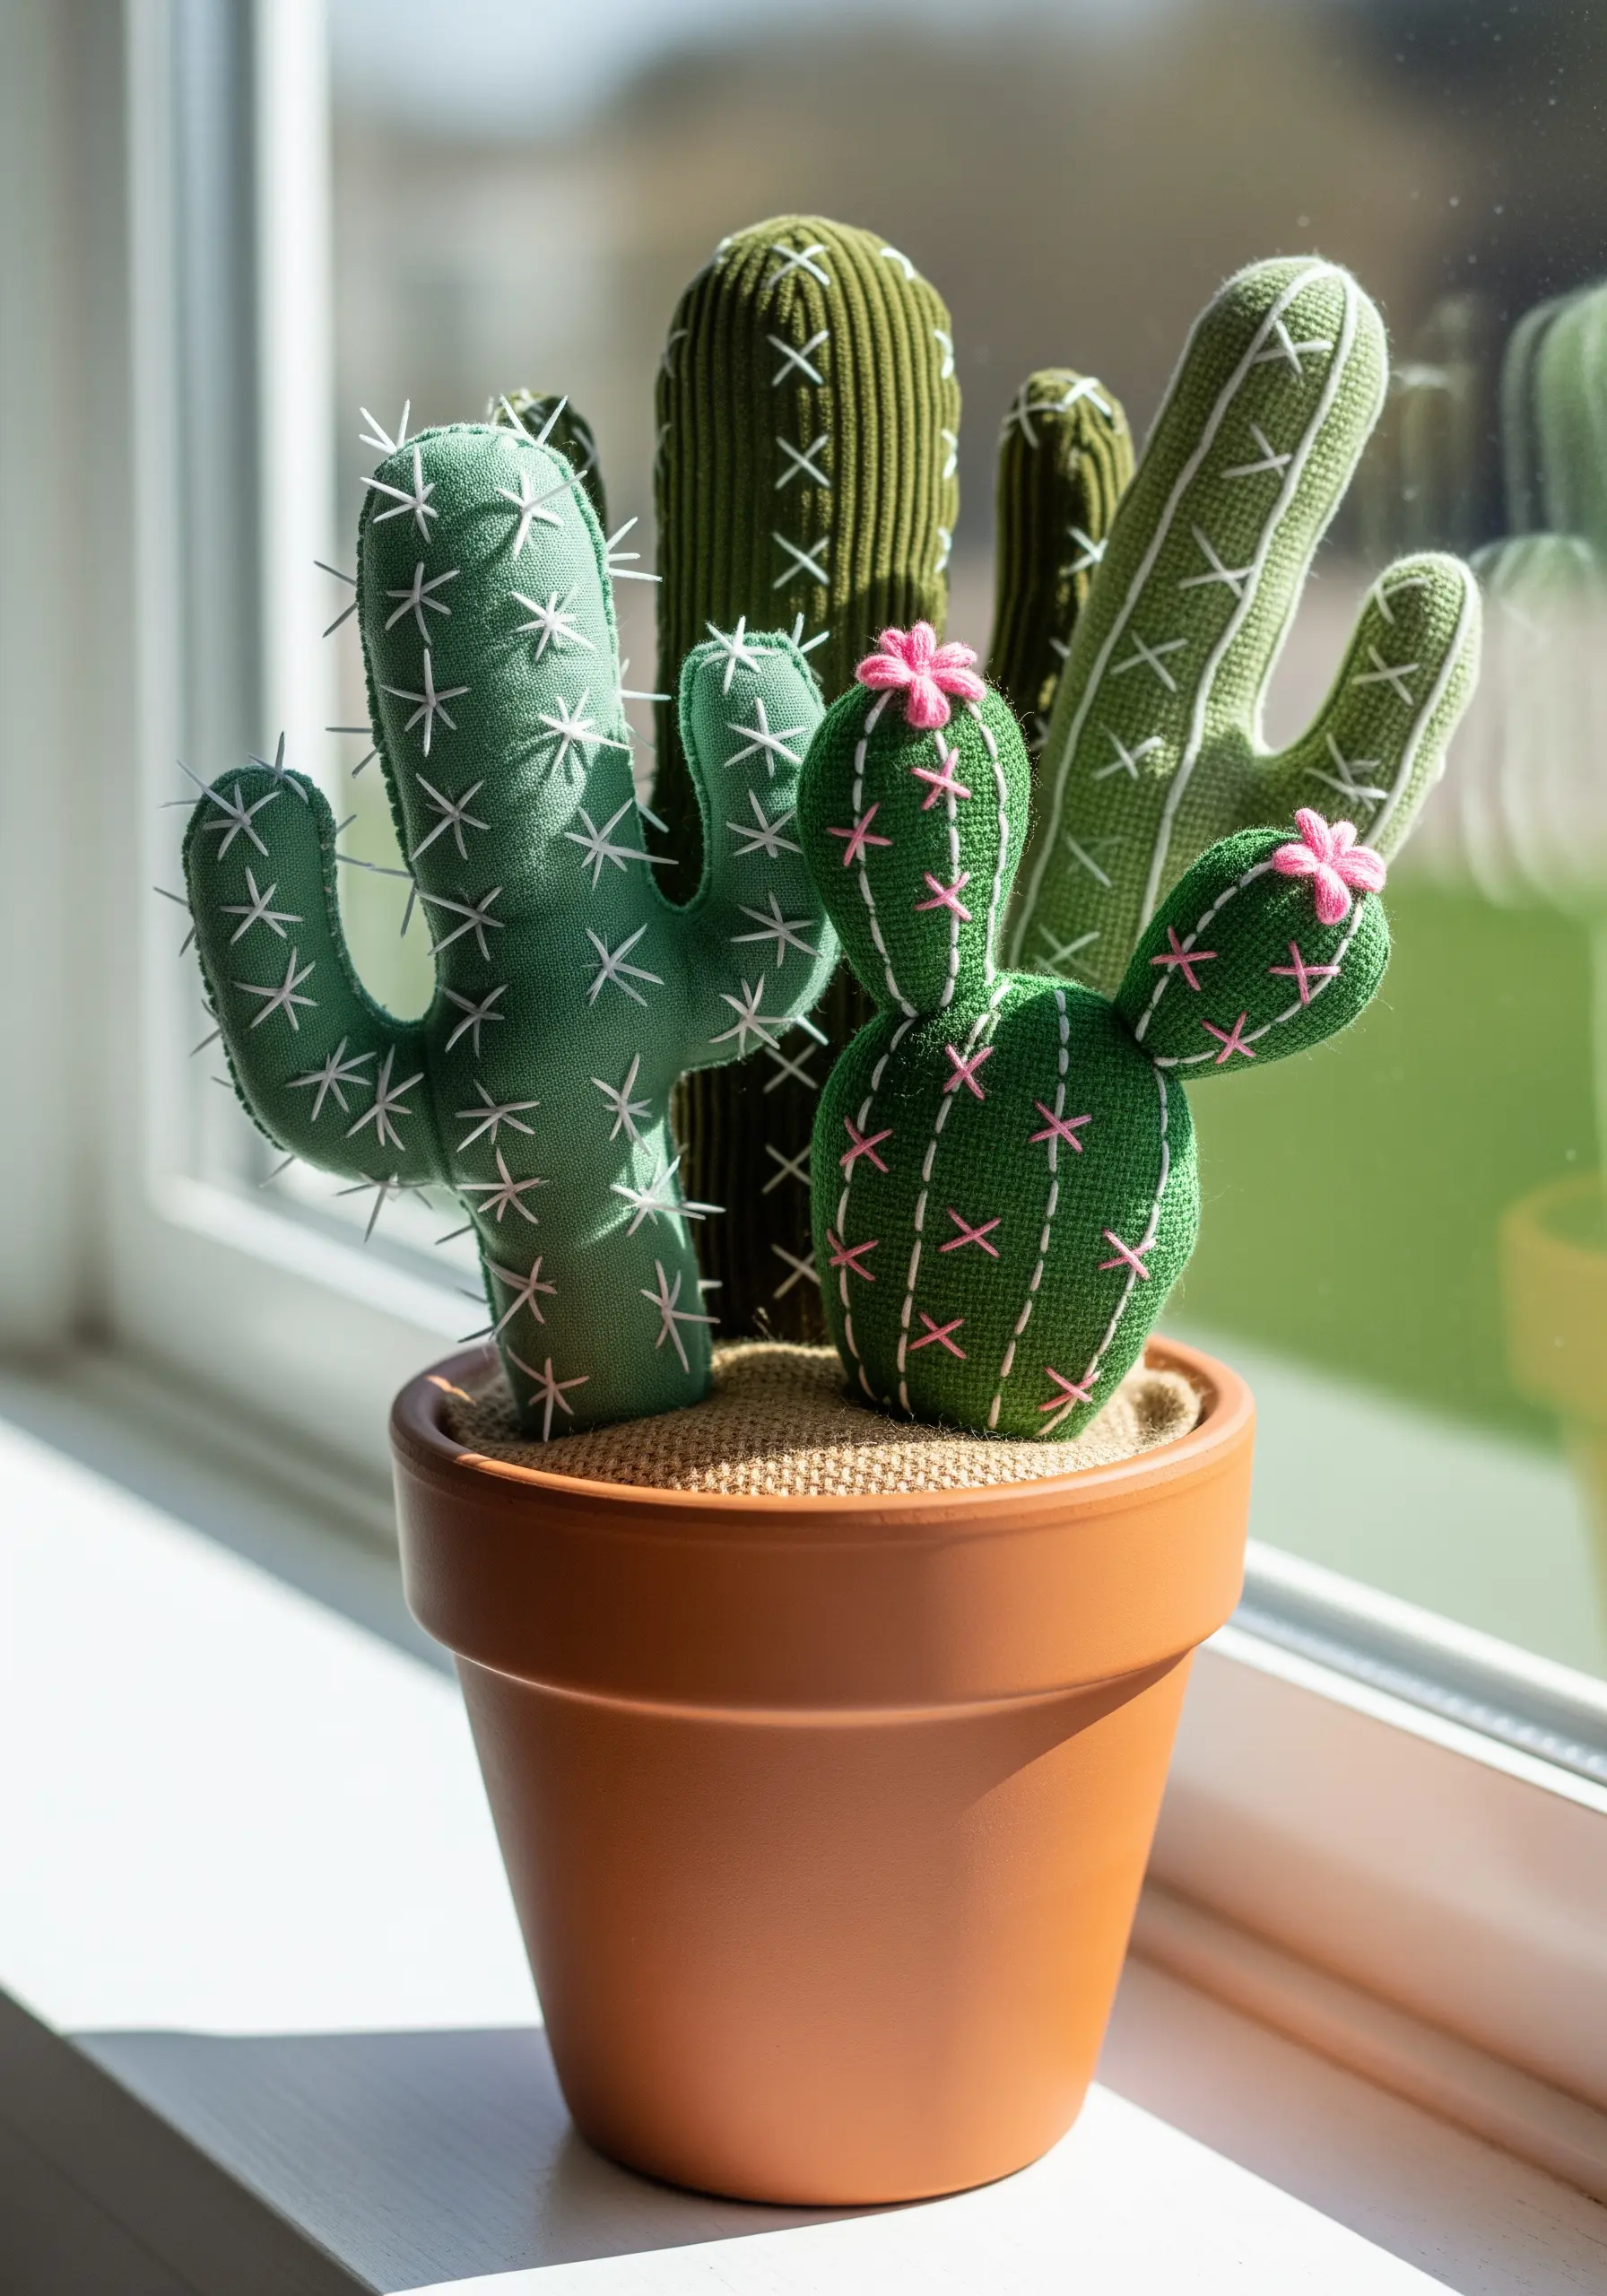
You don’t need complex patterns to create charming soft sculptures; basic shapes and thoughtful stitching are all it takes.
Cut simple cactus shapes from a sturdy fabric like cotton drill or linen, sew them together, and stuff firmly with polyester fiberfill for a solid form.
Use a contrasting color of embroidery floss to add details. Simple cross stitches or straight stitches can represent spines, while small, detached chain stitches create delicate flowers.
The beauty of this project lies in its simplicity—the stitches aren’t just decorative; they are essential to the character of the piece, turning them into tiny artistic crafts that add personality.
7. Exploring Abstract Form with Mixed Fibers
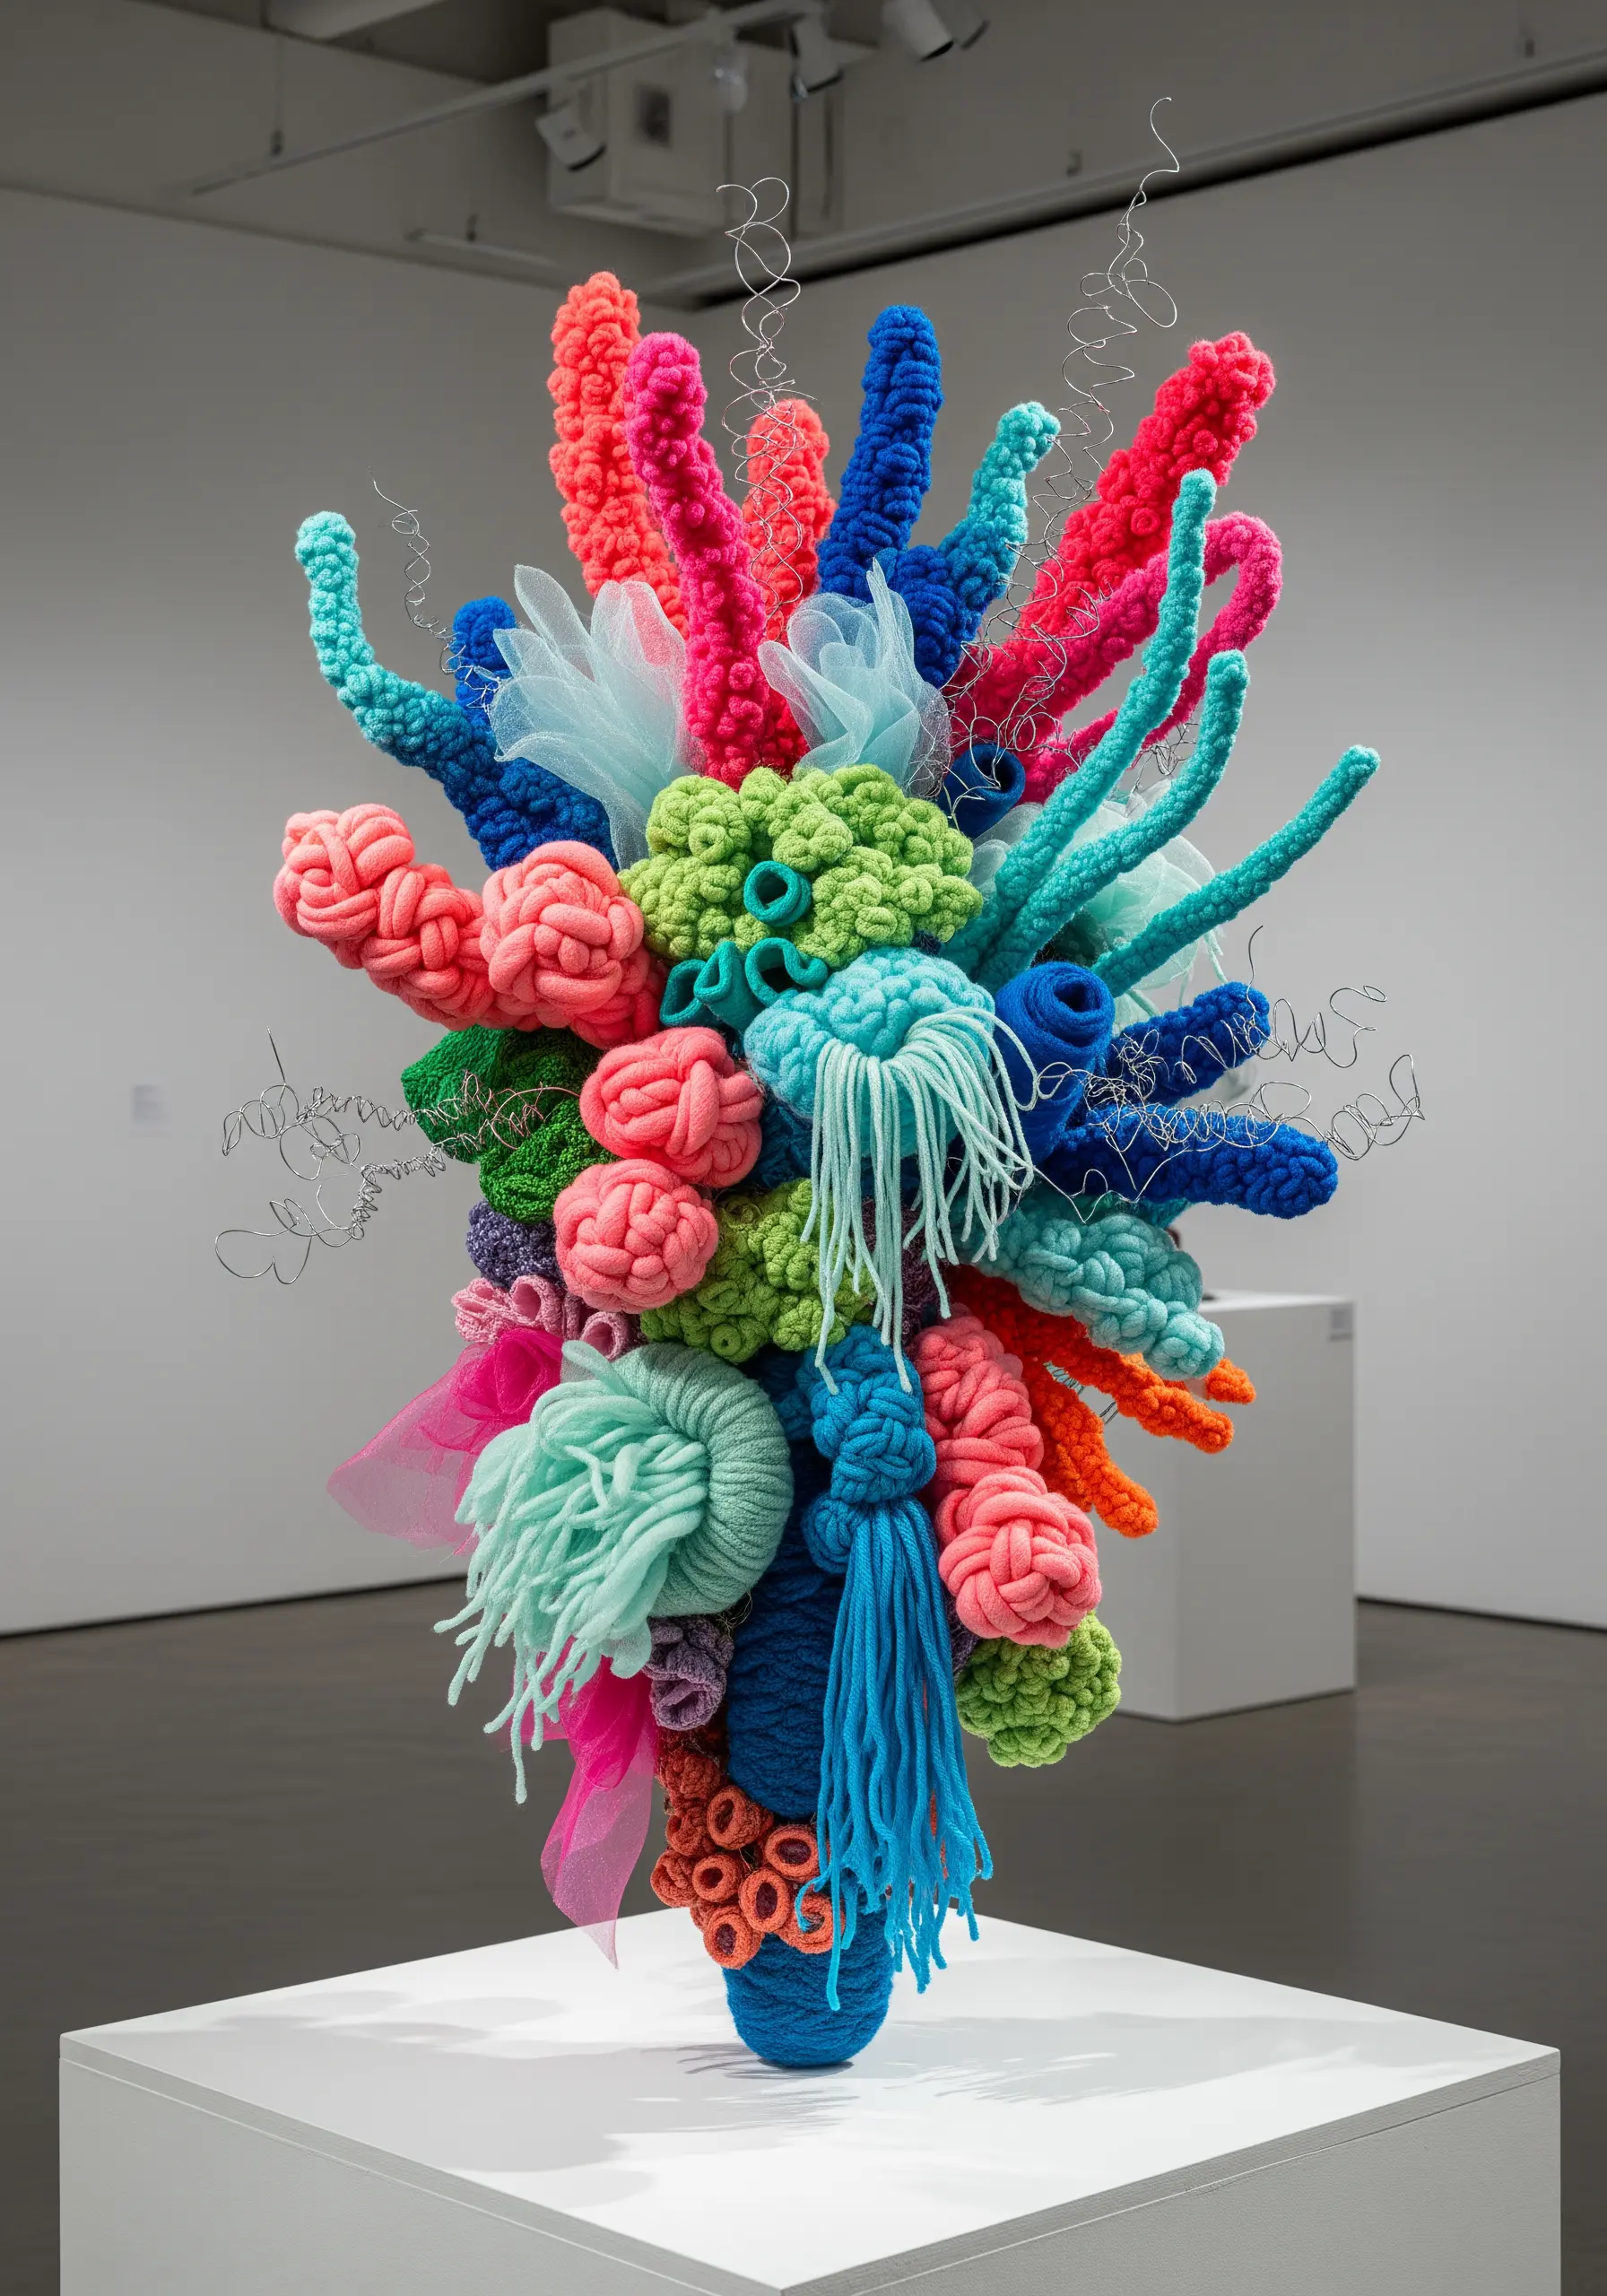
Let go of representation and focus on color, form, and texture to build an abstract fiber sculpture.
Experiment with different techniques: chunky knitted I-cords, crocheted baubles, wrapped wire, and bundled yarn tassels.
Combine a variety of materials, from soft merino wool and chunky yarn to stiff tulle and thin wire, to create a dynamic interplay of textures.
Assemble the individual components organically, letting one shape inform the placement of the next. This intuitive process results in fiber art installations that are truly one-of-a-kind.
8. Painting Landscapes with Wool Fibers
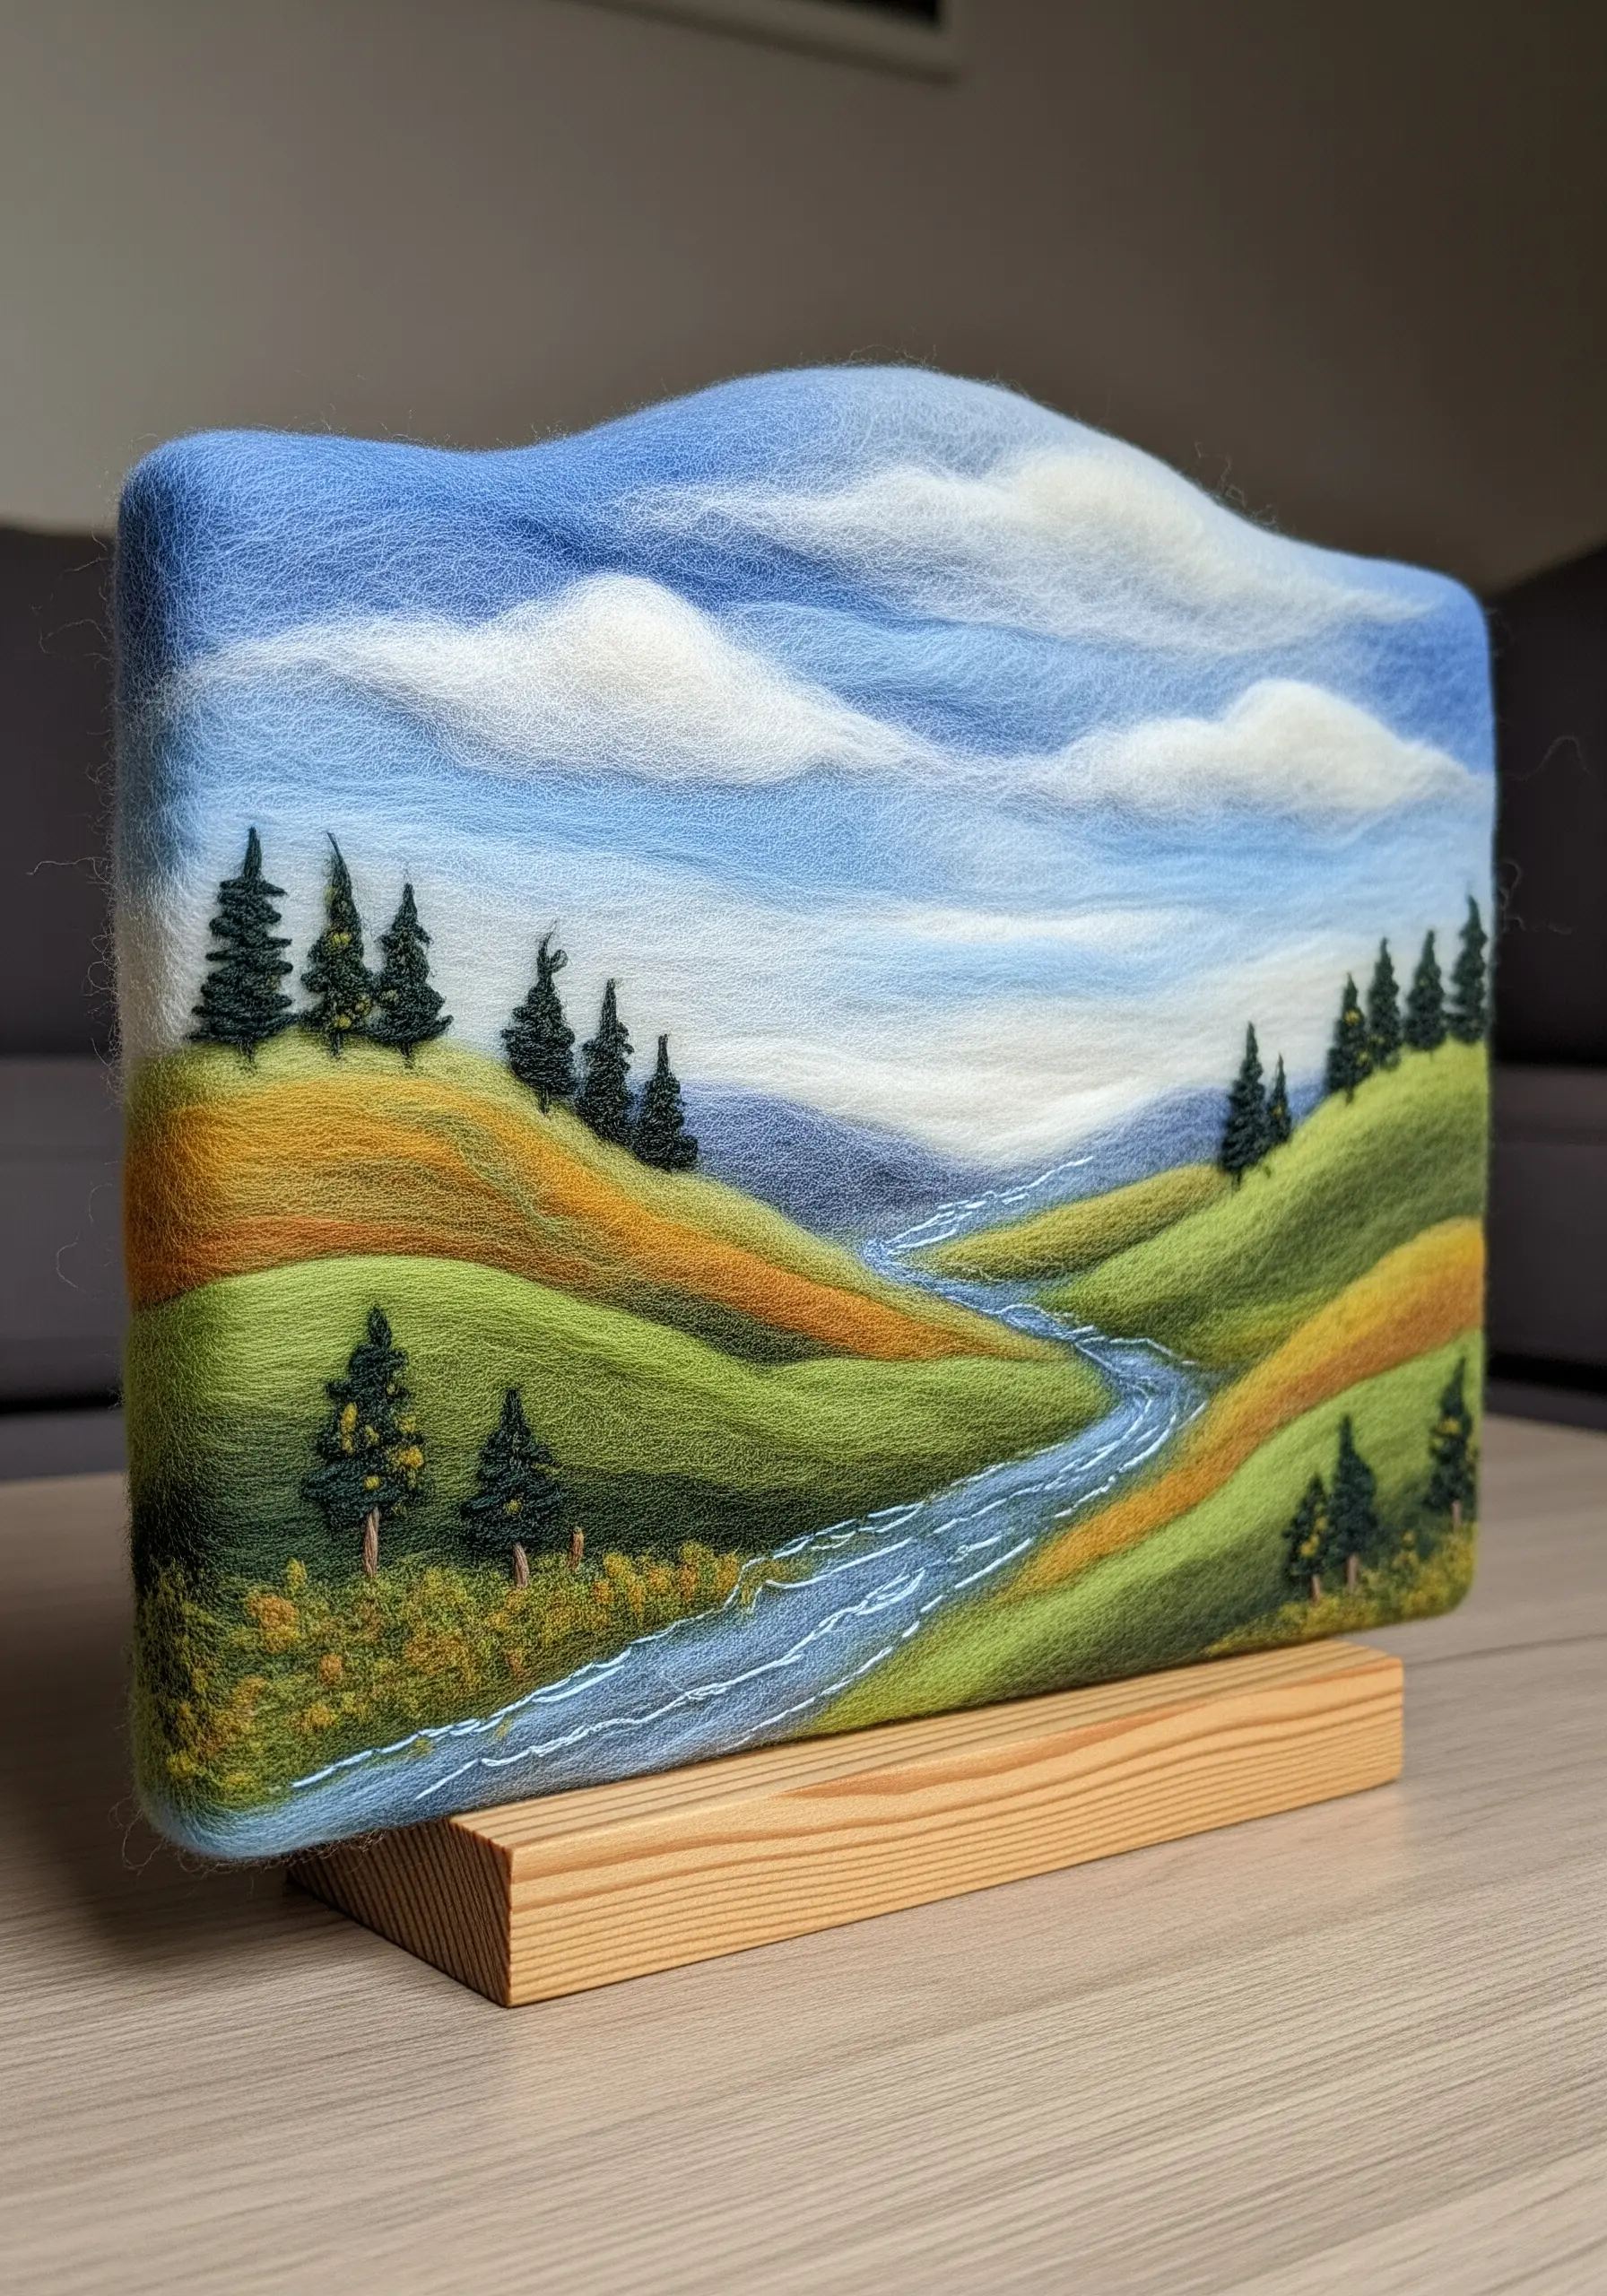
Create painterly, atmospheric landscapes using wool roving instead of paint in a technique called needle felting.
Start by laying down a base layer of wool for the sky and ground on a foam block, then add smaller tufts of different colors to build up your scene.
Blend colors directly on your piece by pulling the fibers apart slightly and overlaying them. A light touch with the felting needle will softly combine them, creating gentle gradients for hills and clouds.
Add sharp details like trees and riverbanks last, using tightly twisted fibers for crisp lines, turning your wool into one of these stunning abstract thread landscapes.
9. Weaving High-Relief Textural Wall Art
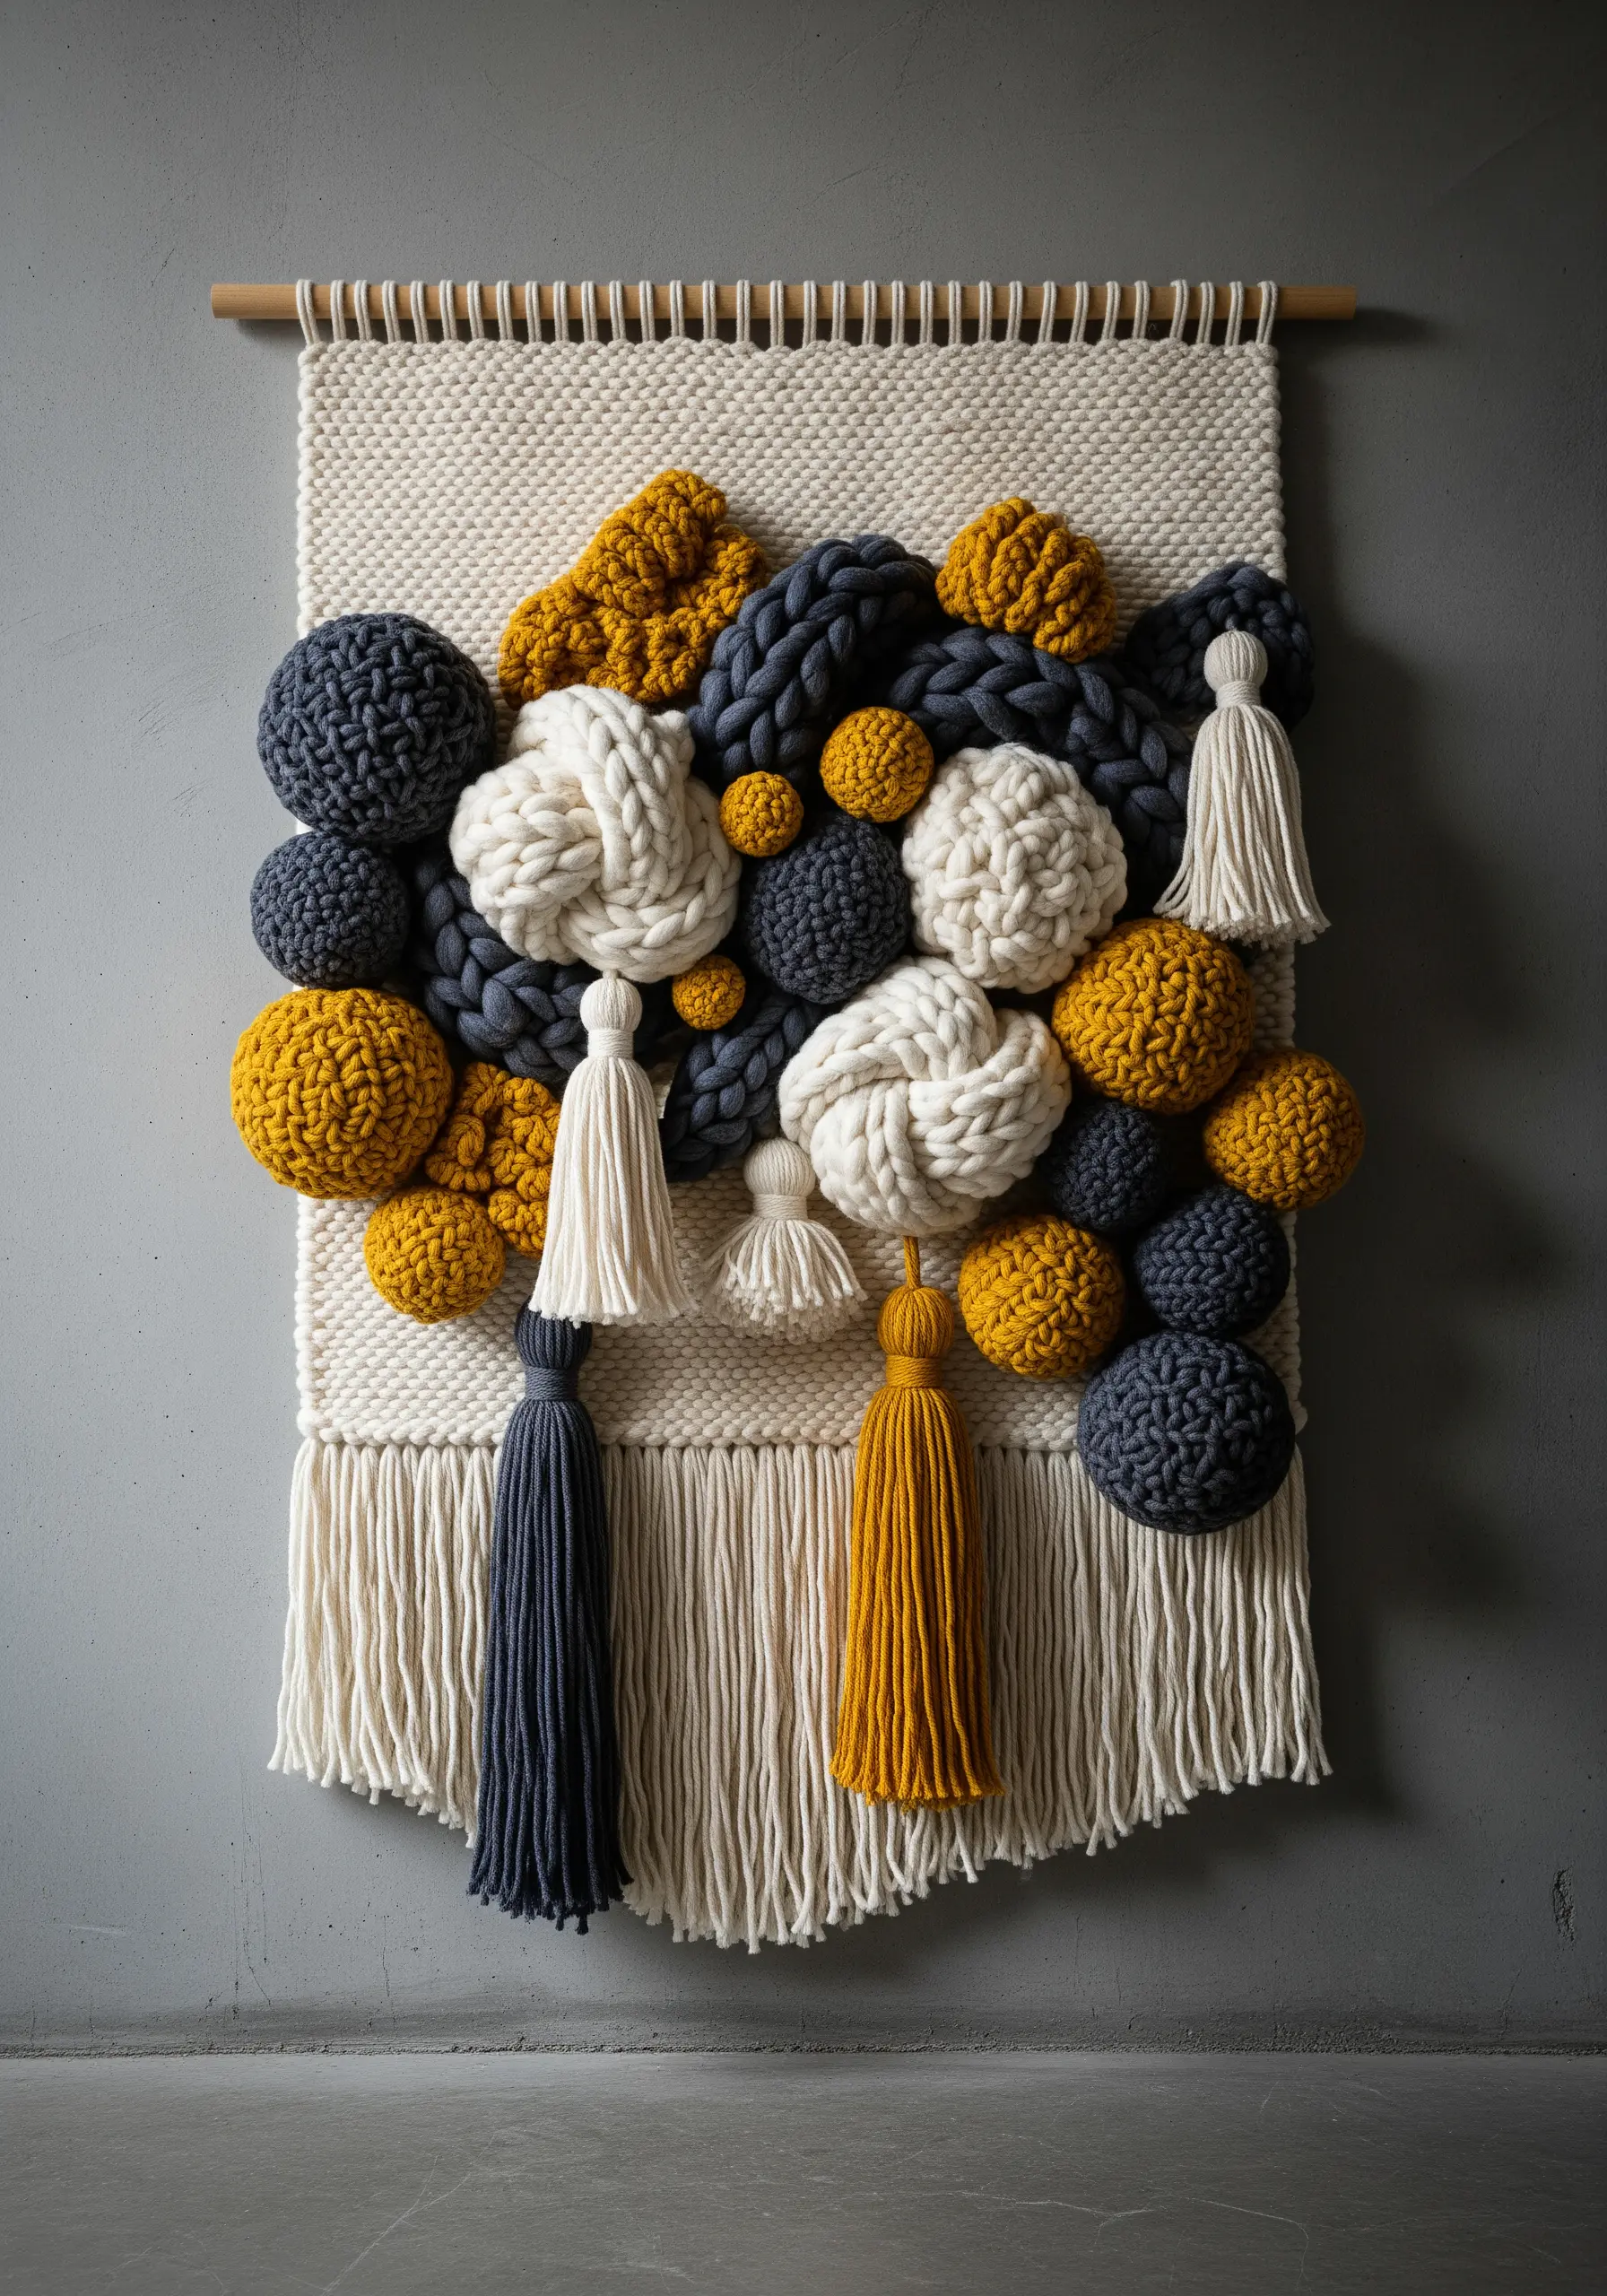
Move beyond flat weaving by incorporating highly textured, three-dimensional elements into your design.
Use super chunky yarn to create oversized knots, like the Celtic knot or monkey’s fist, and attach them directly to the woven base.
Vary the texture by alternating between flat-woven sections and densely packed soumak stitches or fluffy rya knots, which stand out from the surface.
This focus on texture and volume turns a simple wall hanging into a piece of sculptural yarn wall art that invites touch.
10. Crafting Typographic Art with Wire and Thread

Bend a sturdy yet pliable wire, such as 12-gauge aluminum, into a cursive word or phrase using pliers for sharp corners and your hands for gentle curves.
Once the wire form is complete, wrap it tightly and evenly with embroidery floss or fine yarn.
For a two-toned effect, wrap with two colors at once or switch colors partway through a letter for a color-blocked look.
This technique transforms a simple line into a personal statement, perfect for creating minimal typography quotes with sculptural presence.
11. Constructing Blooms with Fabric and Beads
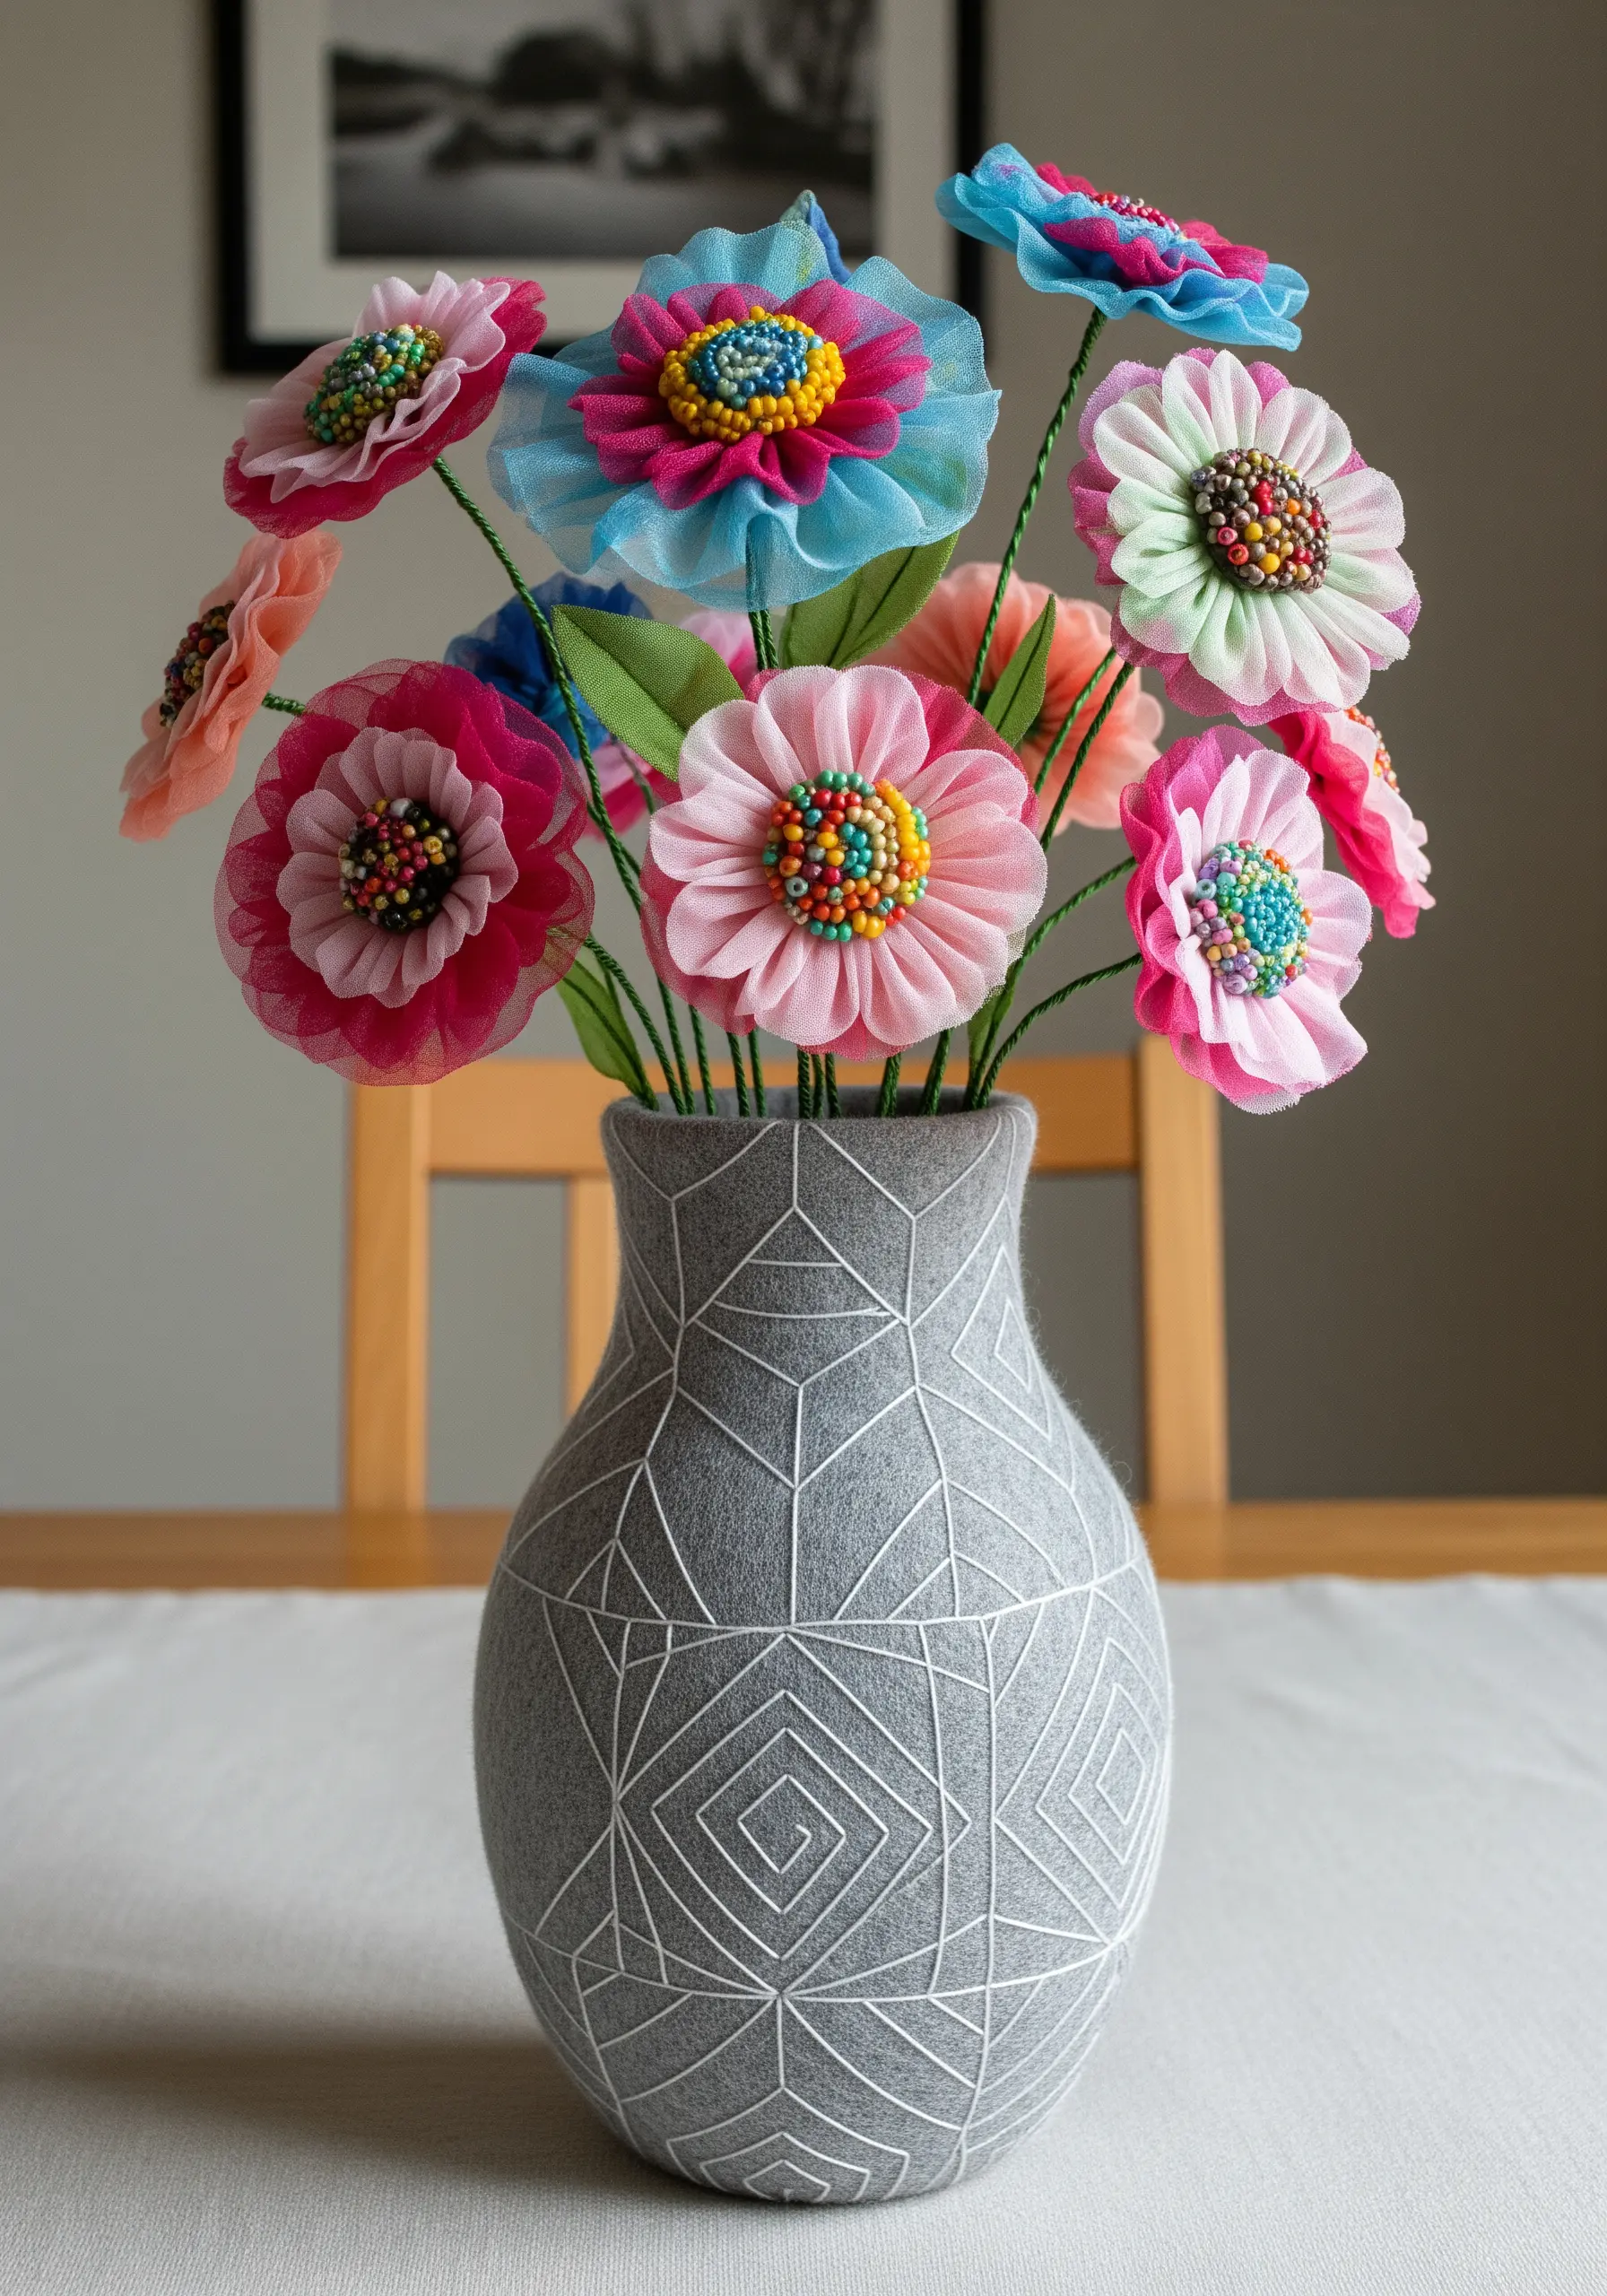
Create a bouquet that never fades by constructing flowers from folded fabric and intricate beadwork.
Use sheer, crisp fabrics like organza, which hold their shape well when folded into petals using techniques inspired by Japanese Kanzashi.
For the flower centers, create a small circle of felt and cover it with a dense cluster of seed beads, French knots, or bullion stitches for a rich, textured effect.
Attach each finished flower to a wire stem wrapped in green floral tape to build a vibrant, everlasting arrangement—a wonderful example of gorgeous floral embroidery ideas in 3D.
12. Embroidering on Three-Dimensional Forms
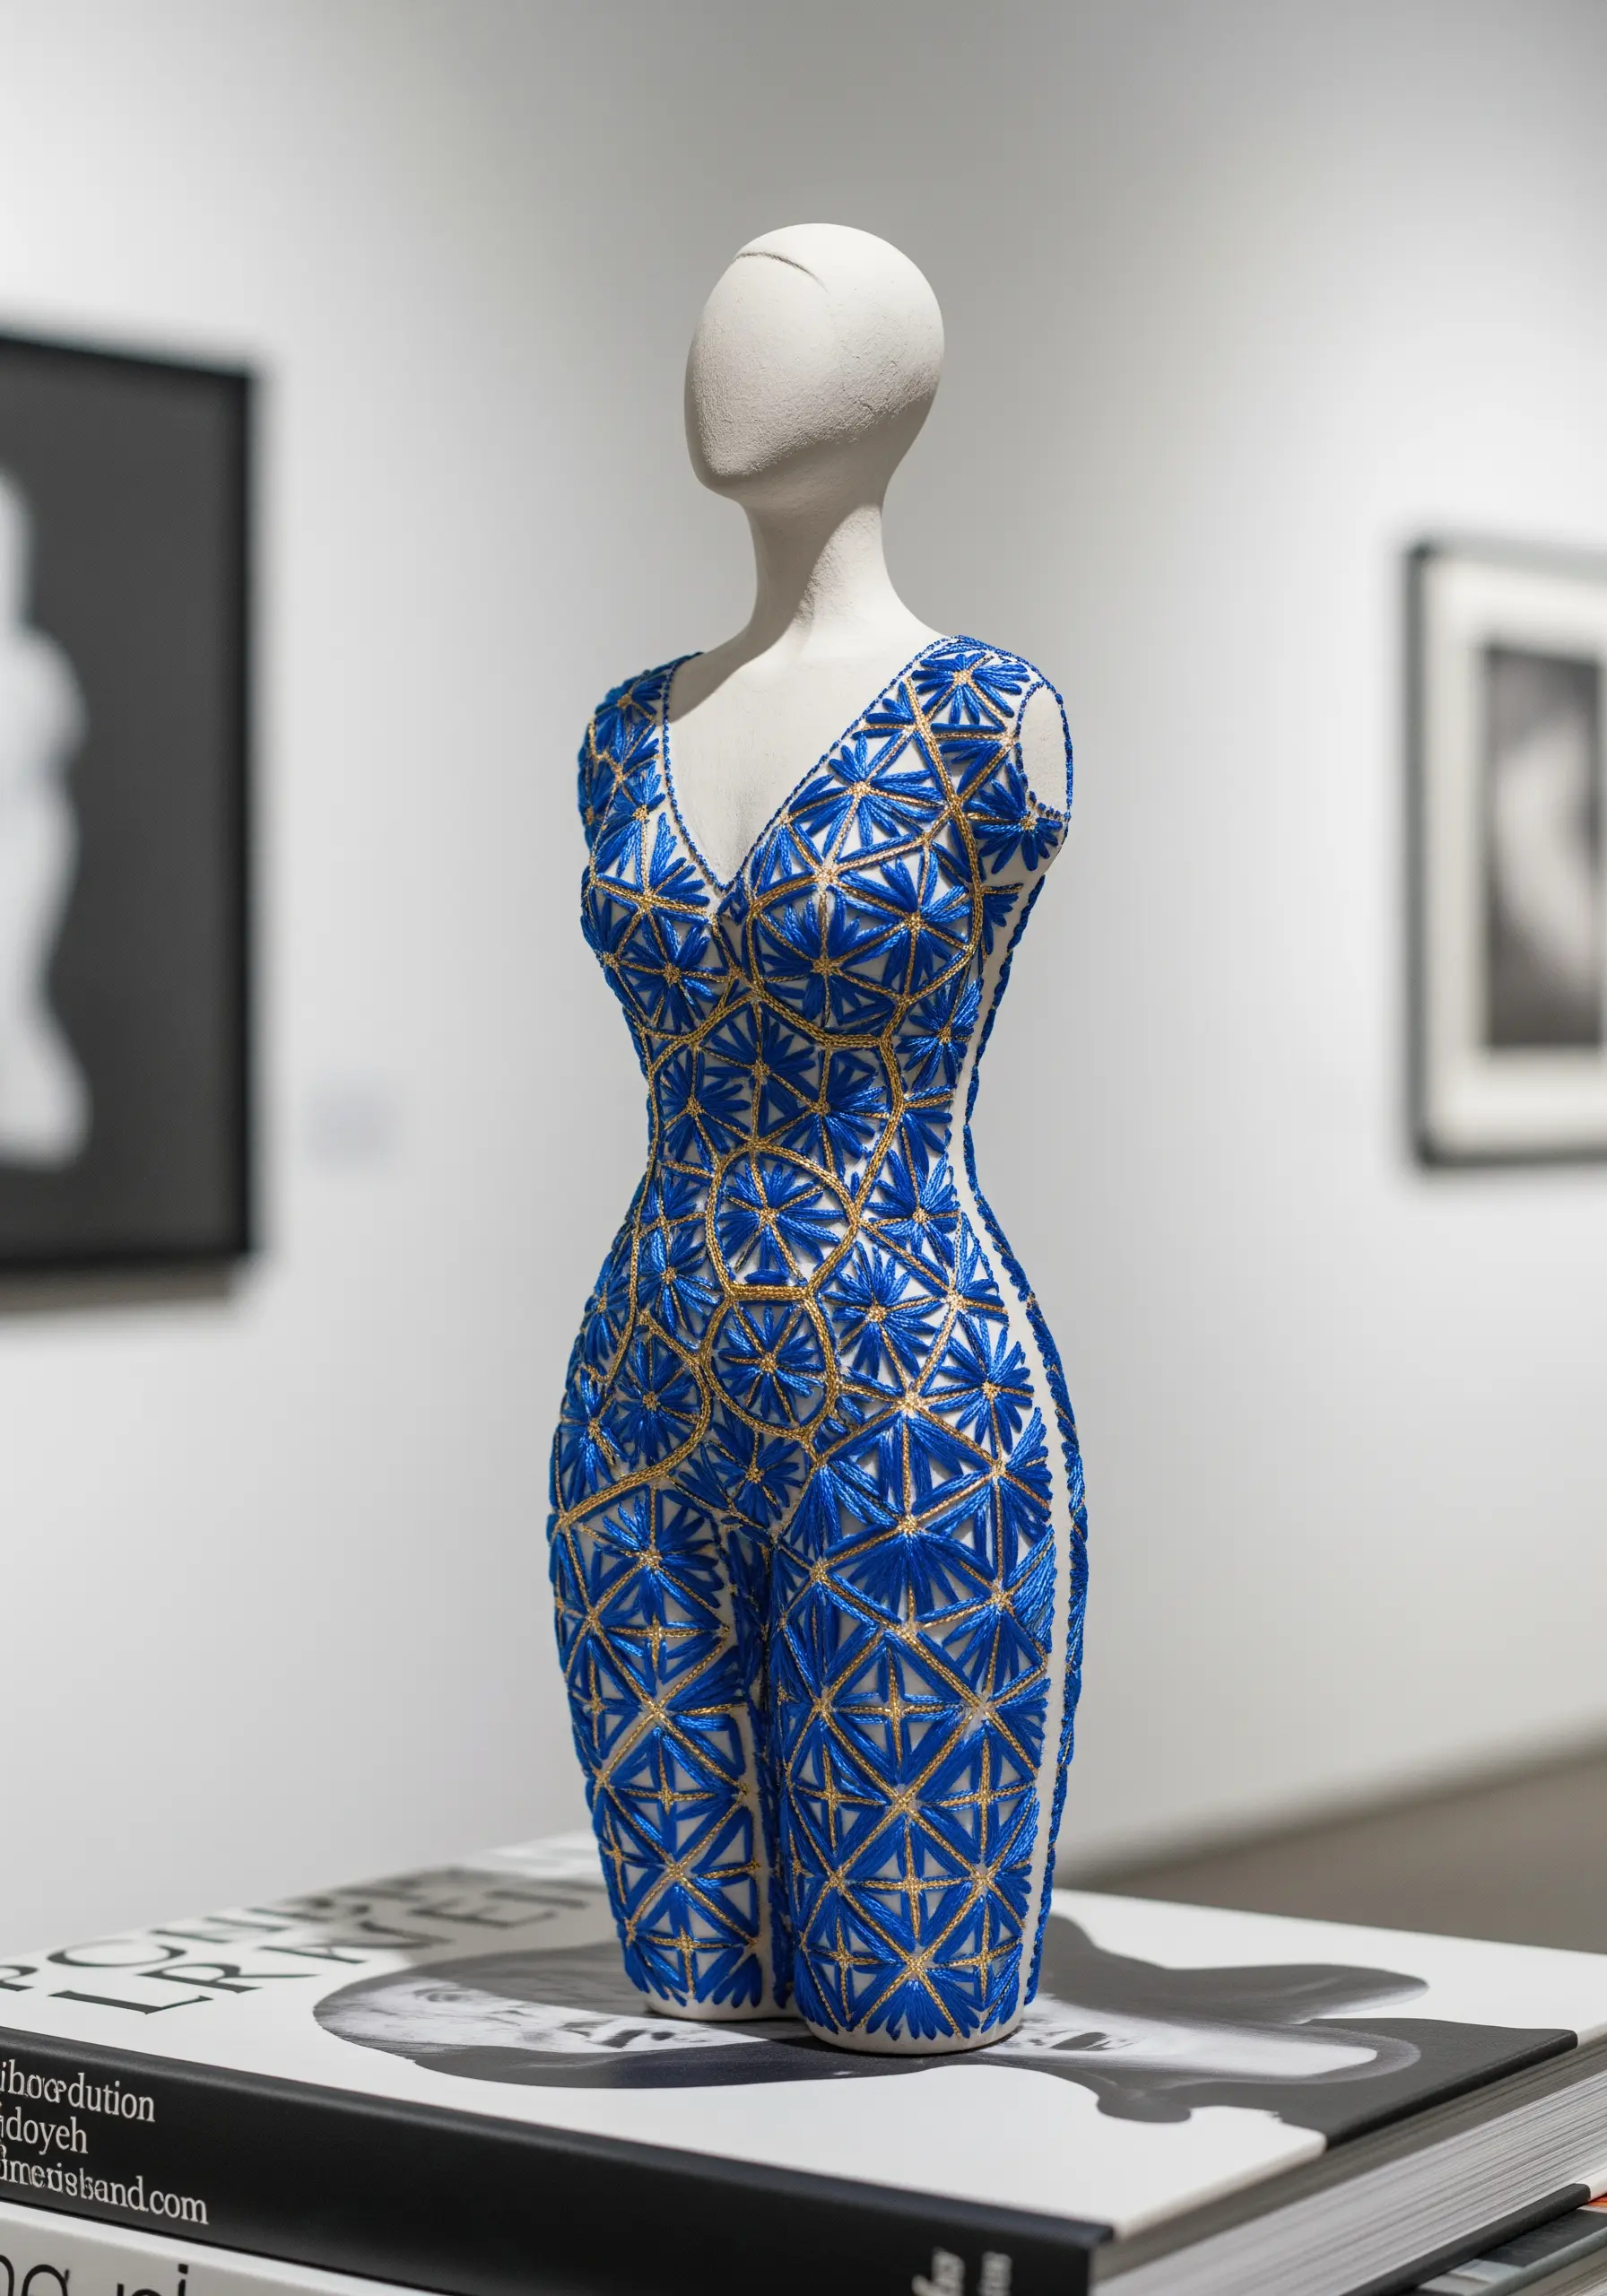
Take your embroidery off the hoop by stitching directly onto a three-dimensional object like a mannequin or a self-made form.
You will need to adapt your technique, using a curved needle and a thimble to navigate the contours of the shape.
Choose a geometric pattern that can be repeated and adjusted to fit the curves. The radial nature of this design works beautifully, as you can expand or contract the motifs to follow the shape of the torso.
Using a metallic thread for the outlines creates a structure that catches the light and defines the form.
13. Creating Statement Knots with Chunky Yarn
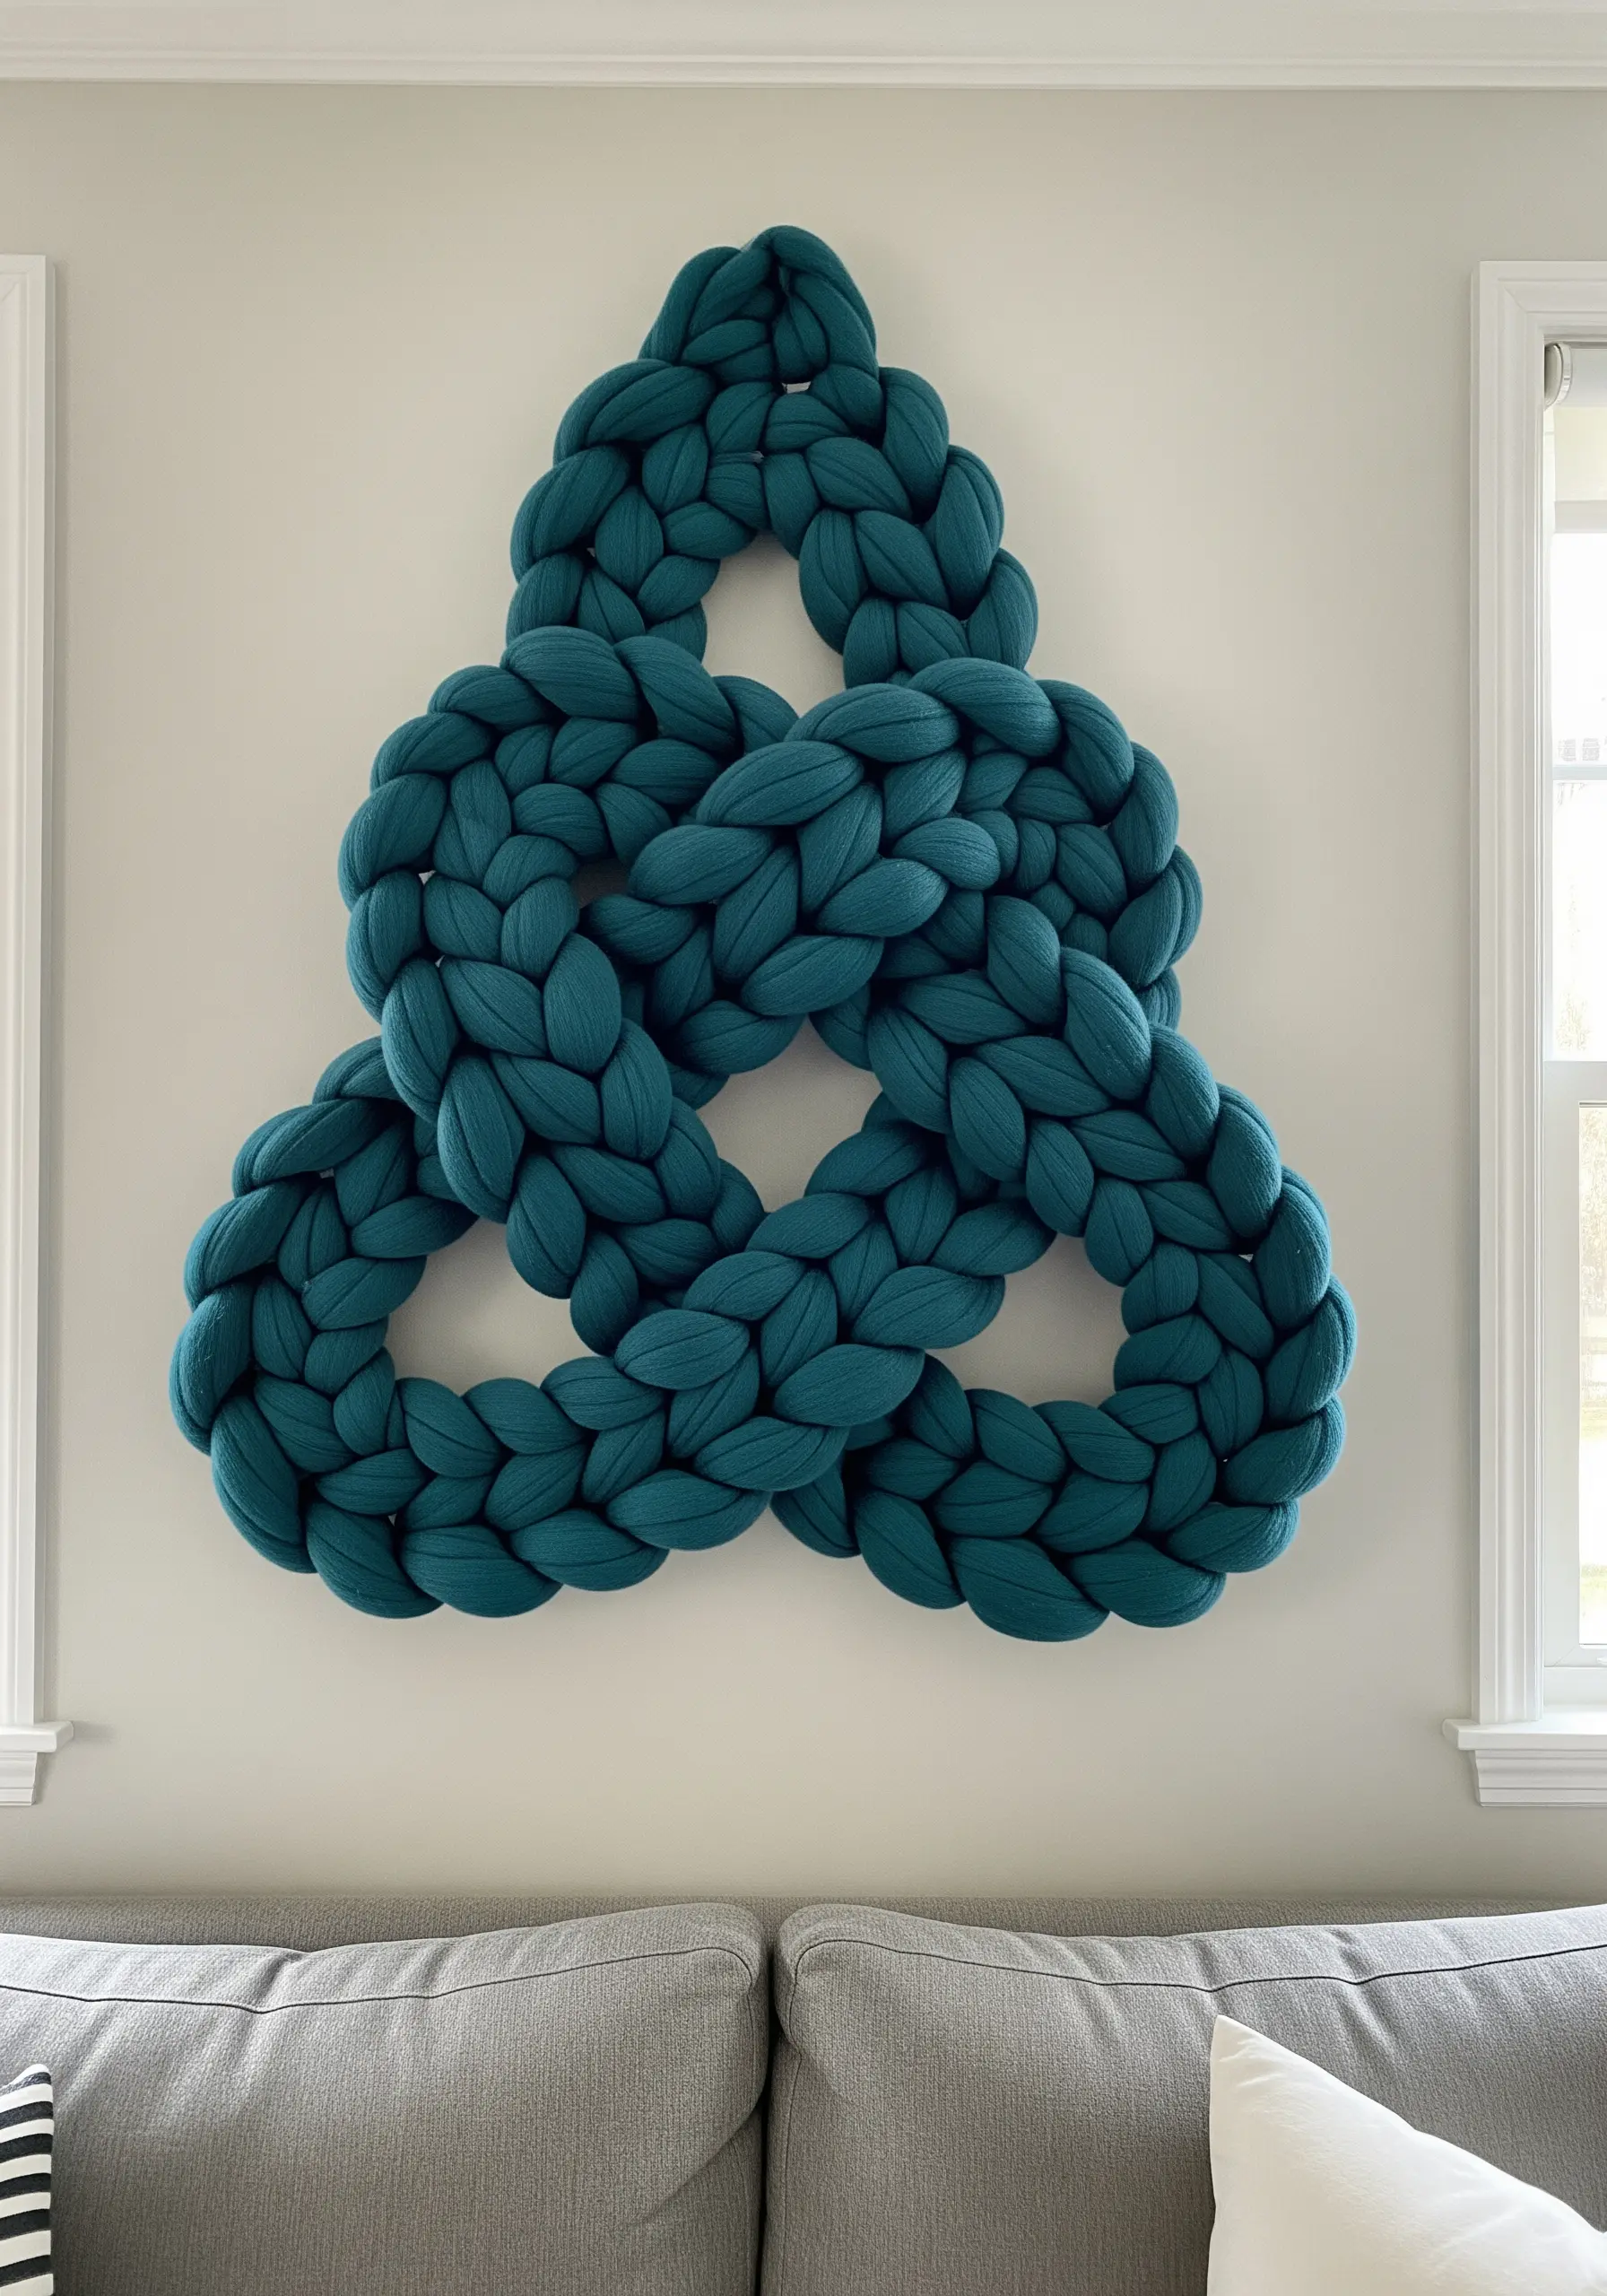
Make a significant visual impact with minimal effort by using oversized, chunky tube yarn for your fiber art.
This type of yarn, which is essentially a knitted tube stuffed with filling, is perfect for creating large-scale knots that hold their shape.
Practice tying a classic decorative knot, like a Celtic knot or a trefoil knot, on a smaller scale with rope first before attempting it with the chunky yarn.
This method allows you to create impressive, soft modern embroidered tapestry designs that feel both cozy and architectural.
14. Revealing a Crystalline World with Fiber and Beads
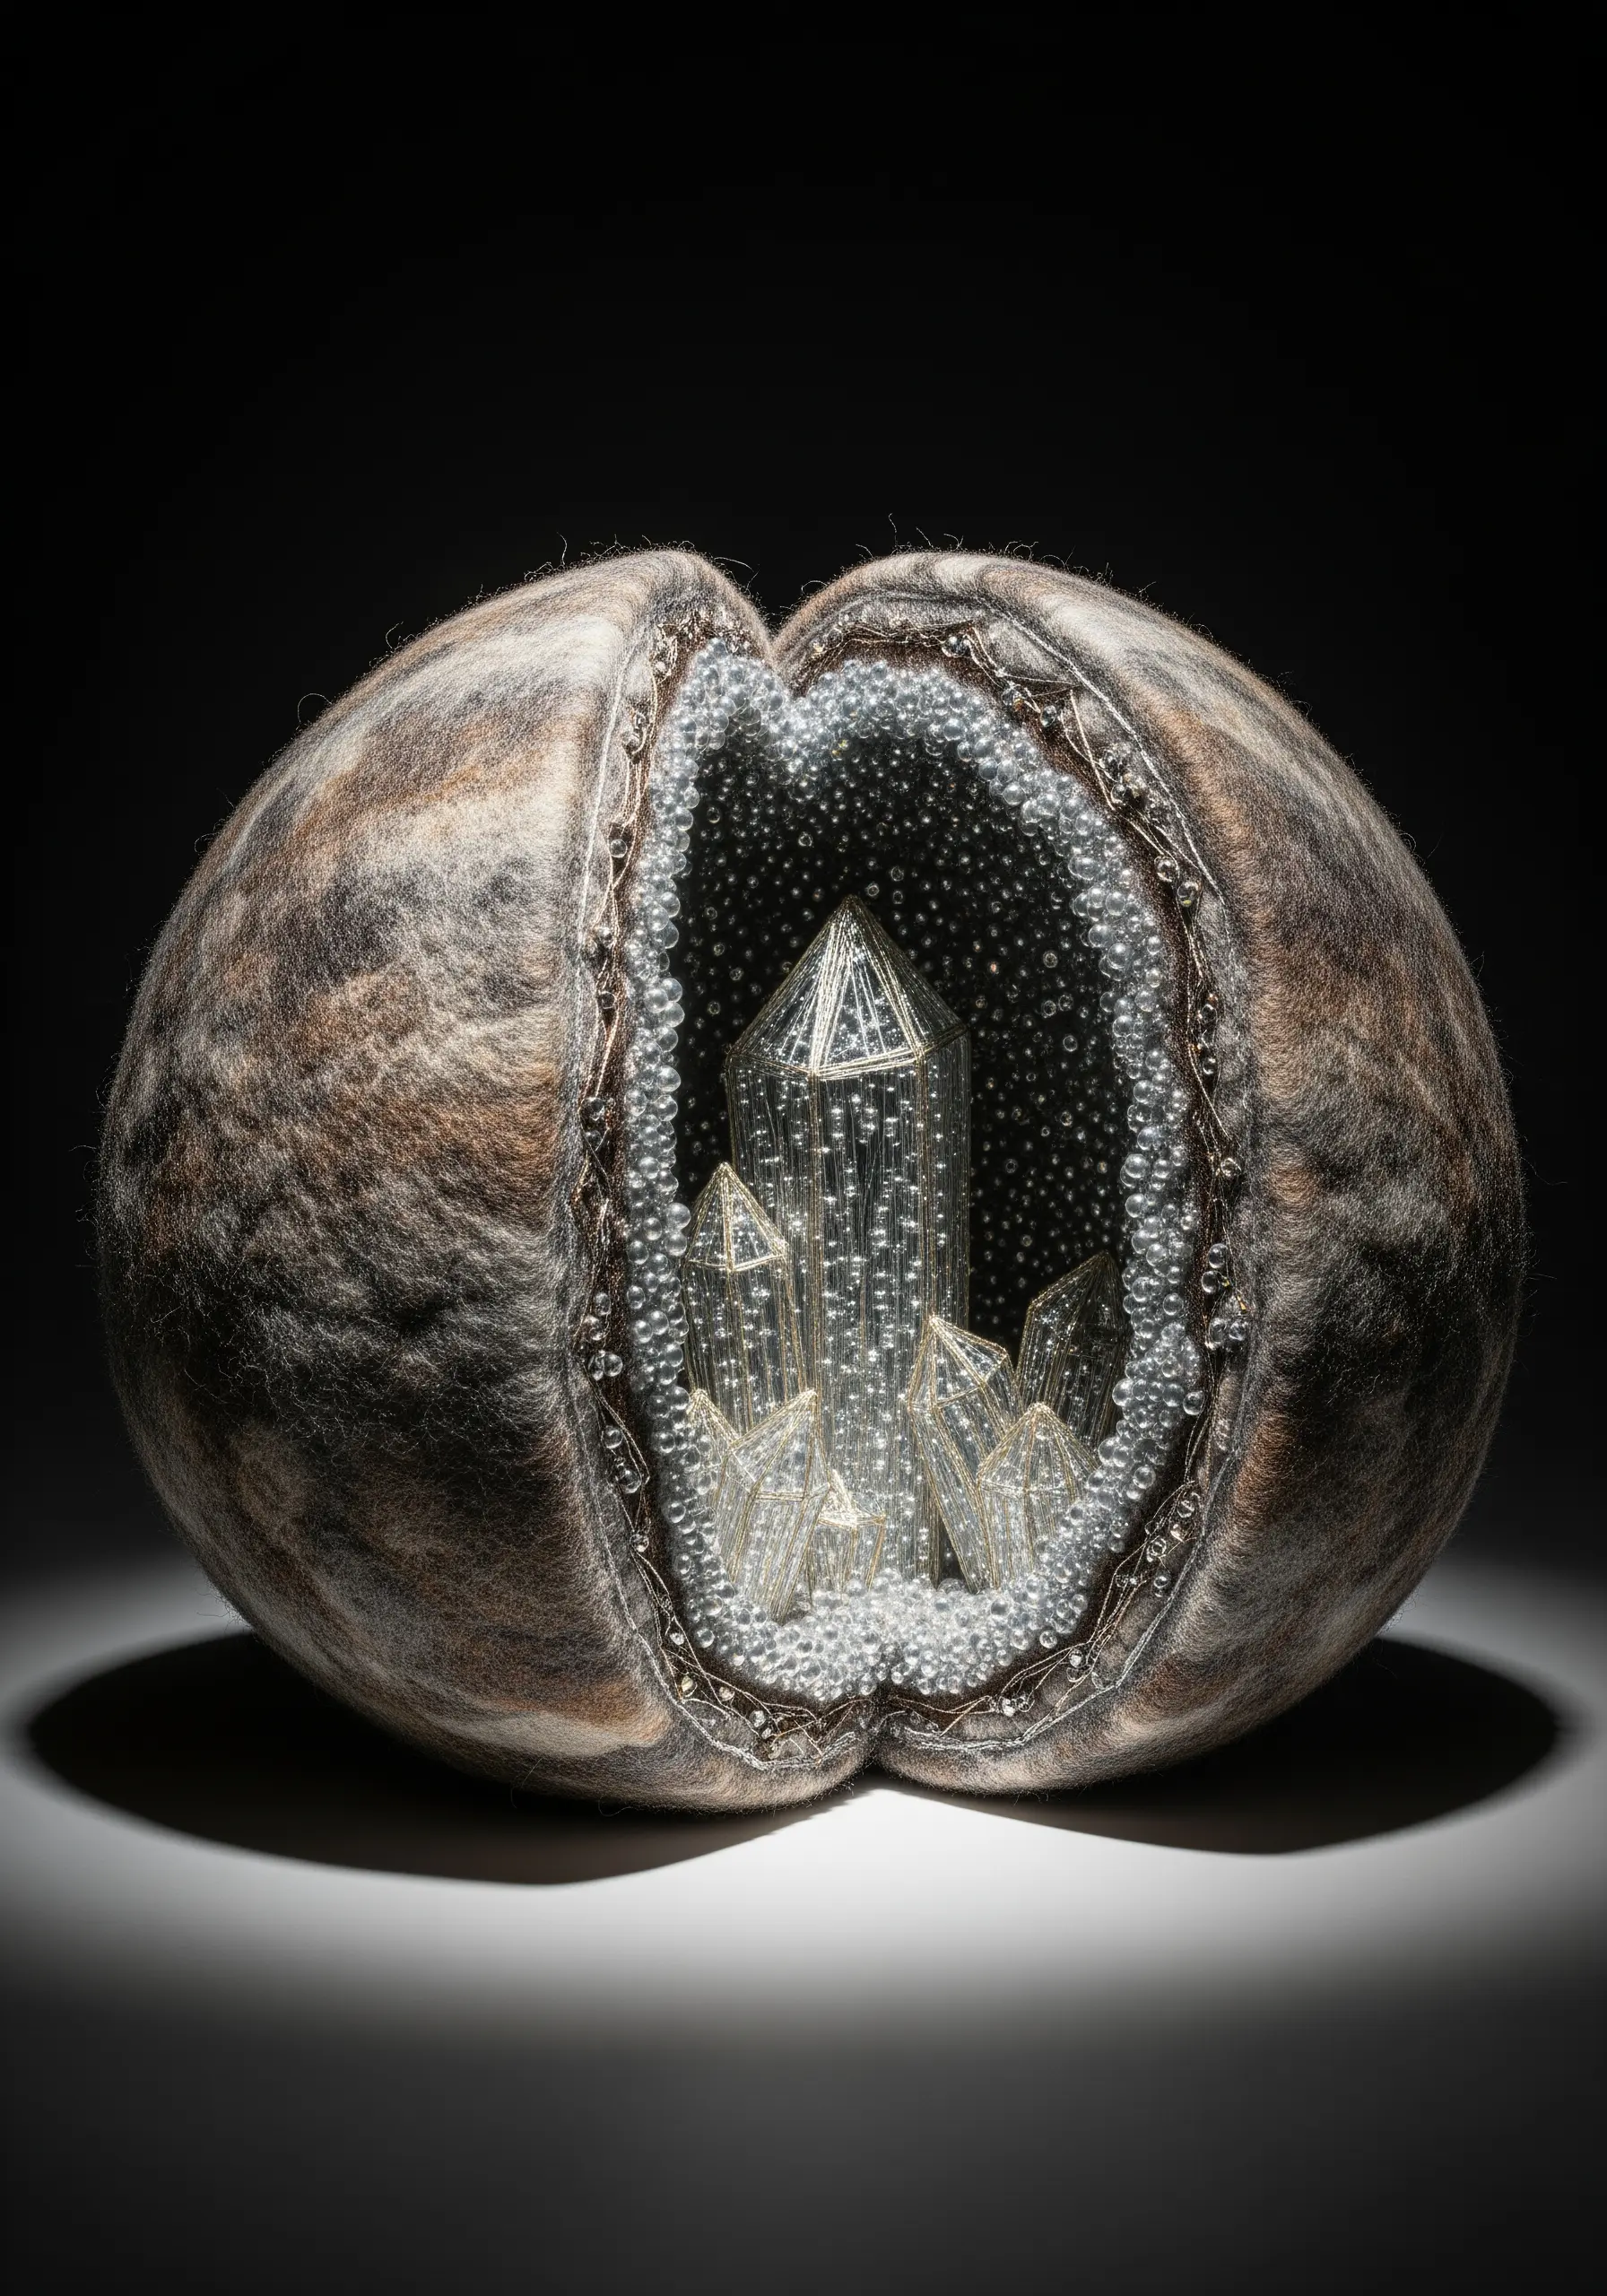
Combine the soft, organic texture of felt with the sharp, glittering structure of beads to create a stunning sculptural geode.
Create a hollow pod shape using wet-felting techniques, or by needle-felting wool around a foam ball that you later remove.
Cut the form open and line the inside with a dense layer of beads, pearls, and metallic threadwork to mimic crystal formations.
The dramatic contrast between the muted, fuzzy exterior and the sparkling interior creates a sense of discovery and magic, turning it into one of those creative handmade art objects that double as home decor.
15. Crafting Delicate Forms with Freestanding Lace
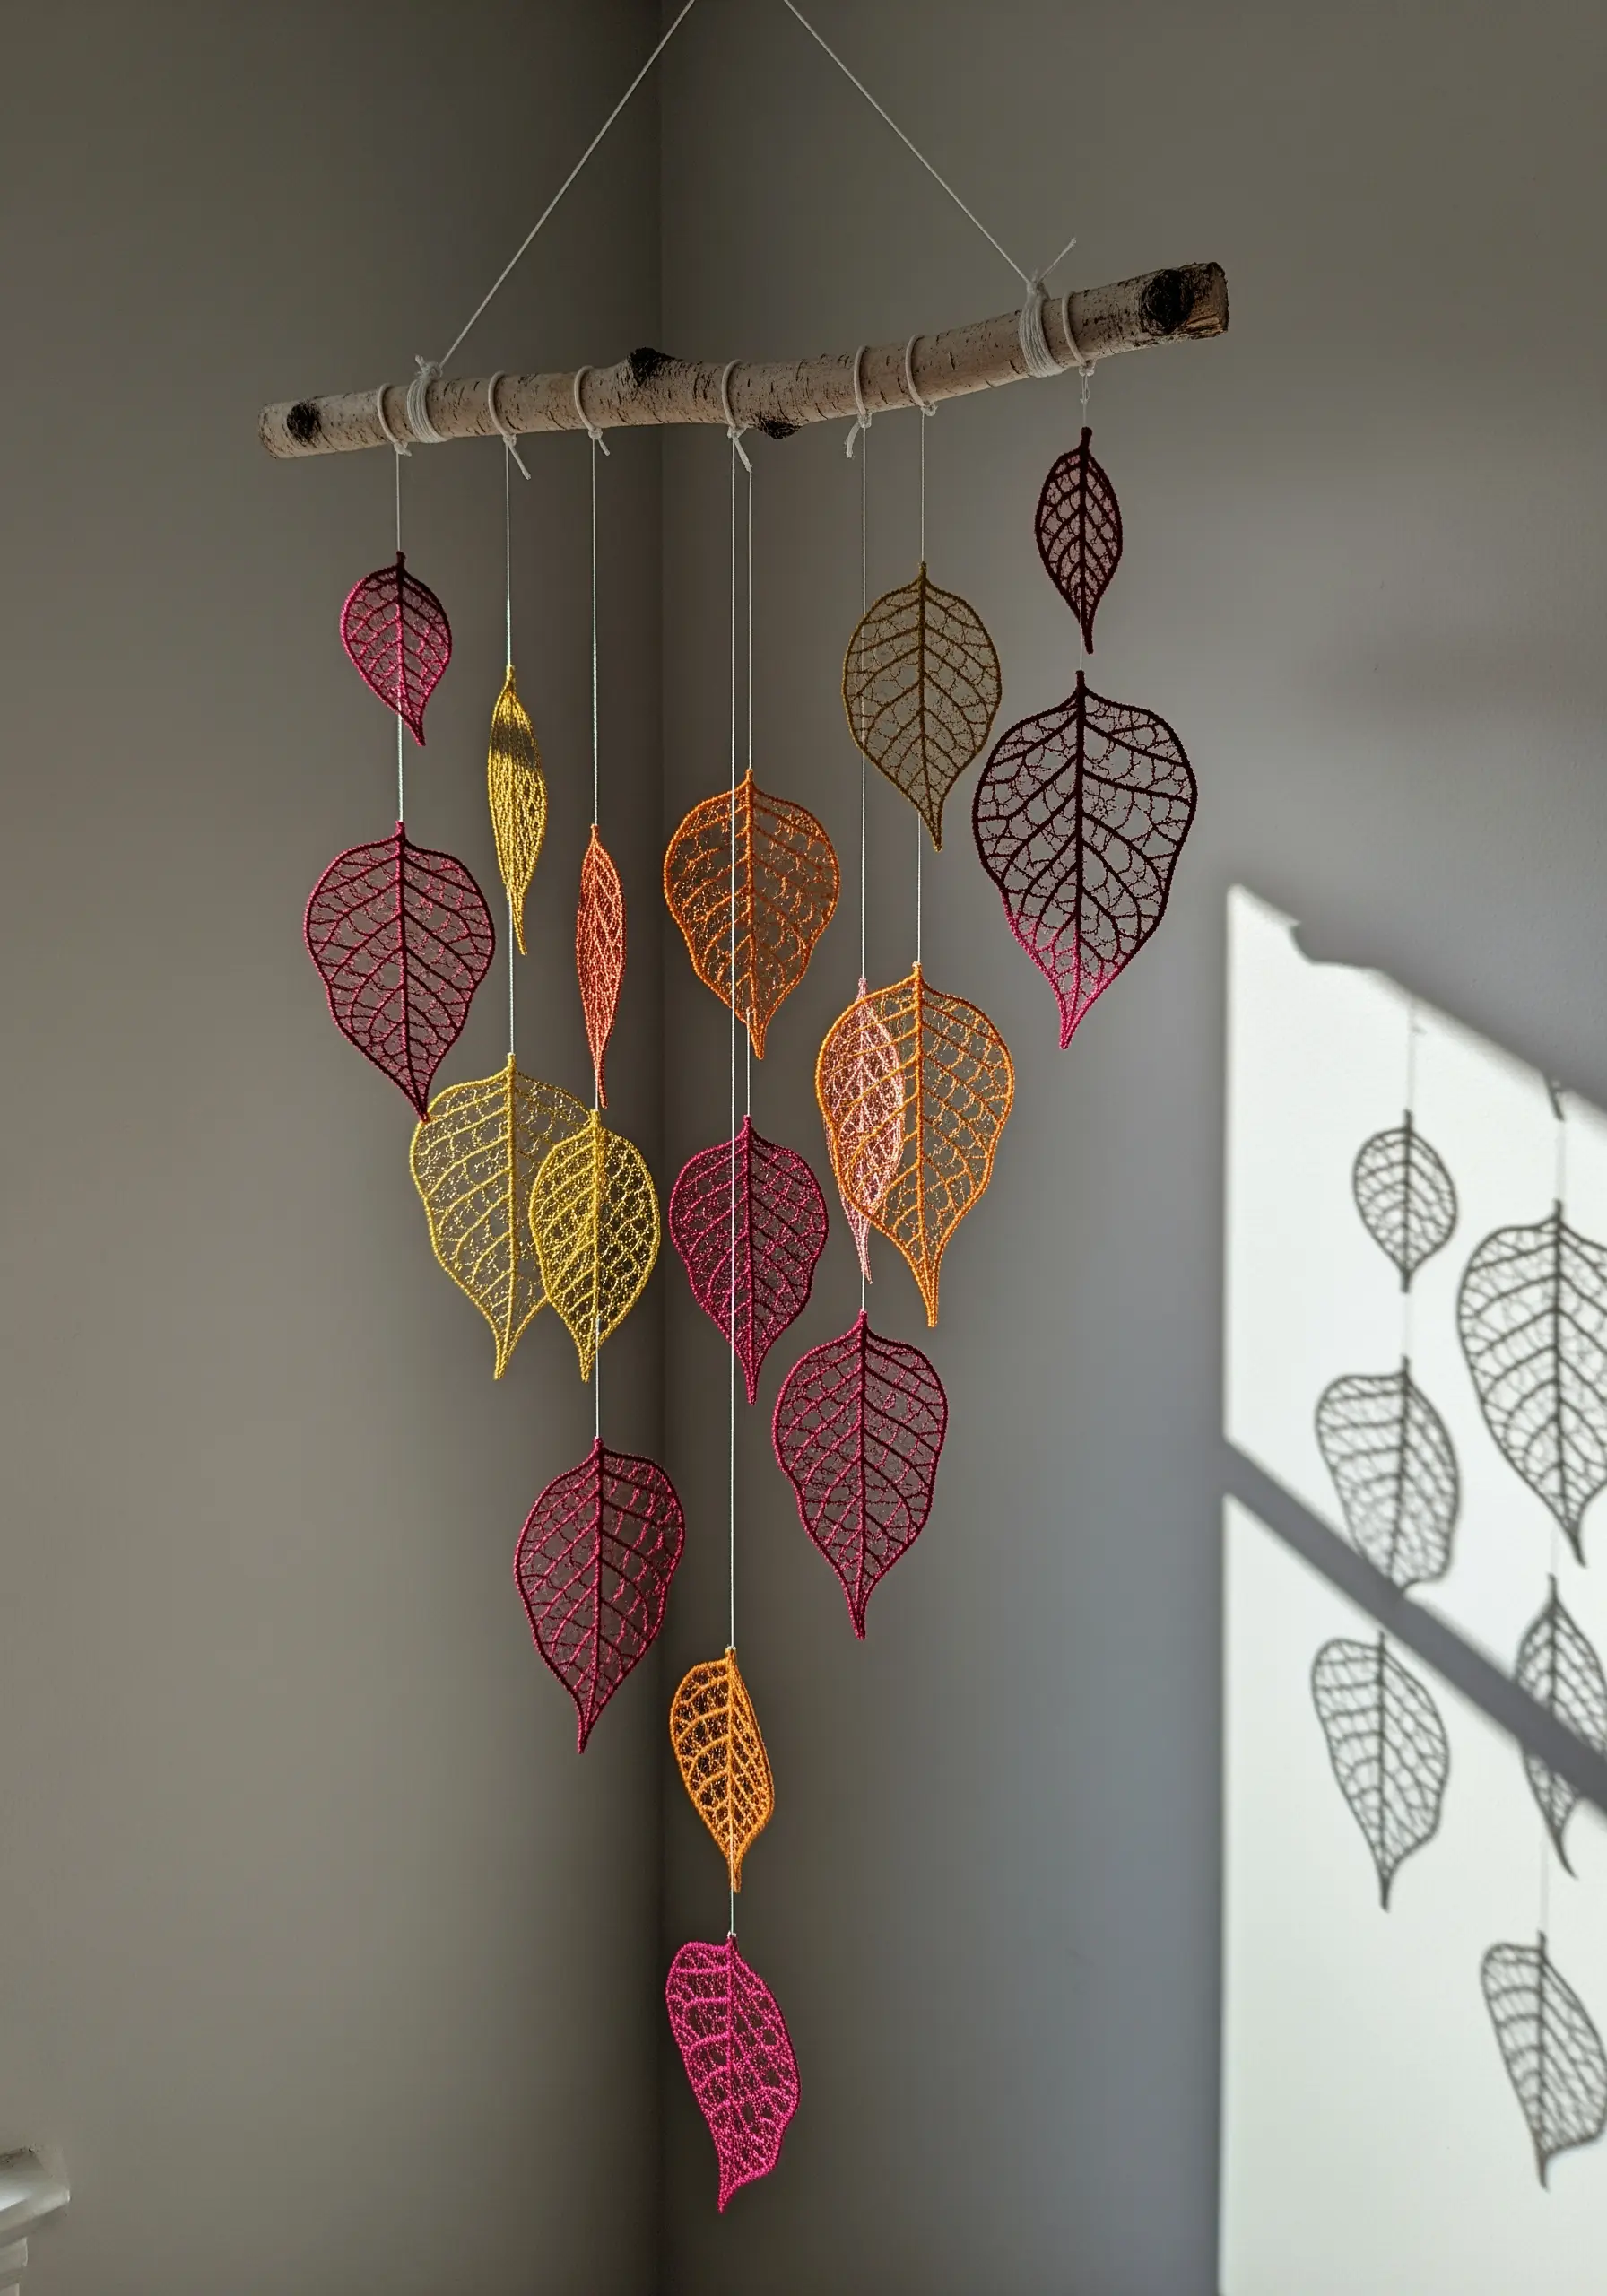
You can make delicate, transparent sculptures using a machine embroidery technique called freestanding lace.
The design is stitched onto a special water-soluble stabilizer. Once the embroidery is complete, you simply rinse the piece in warm water, and the stabilizer dissolves, leaving only the thread structure behind.
Choose designs with a dense, interconnected stitch pattern, as this ensures the final piece will be stable enough to hold its shape.
Hang the finished lace leaves from a branch to create a mobile that casts beautiful, intricate shadows, showcasing delicate leaf stitch techniques in a unique way.
16. Building Depth with Layered Felt and Stitches
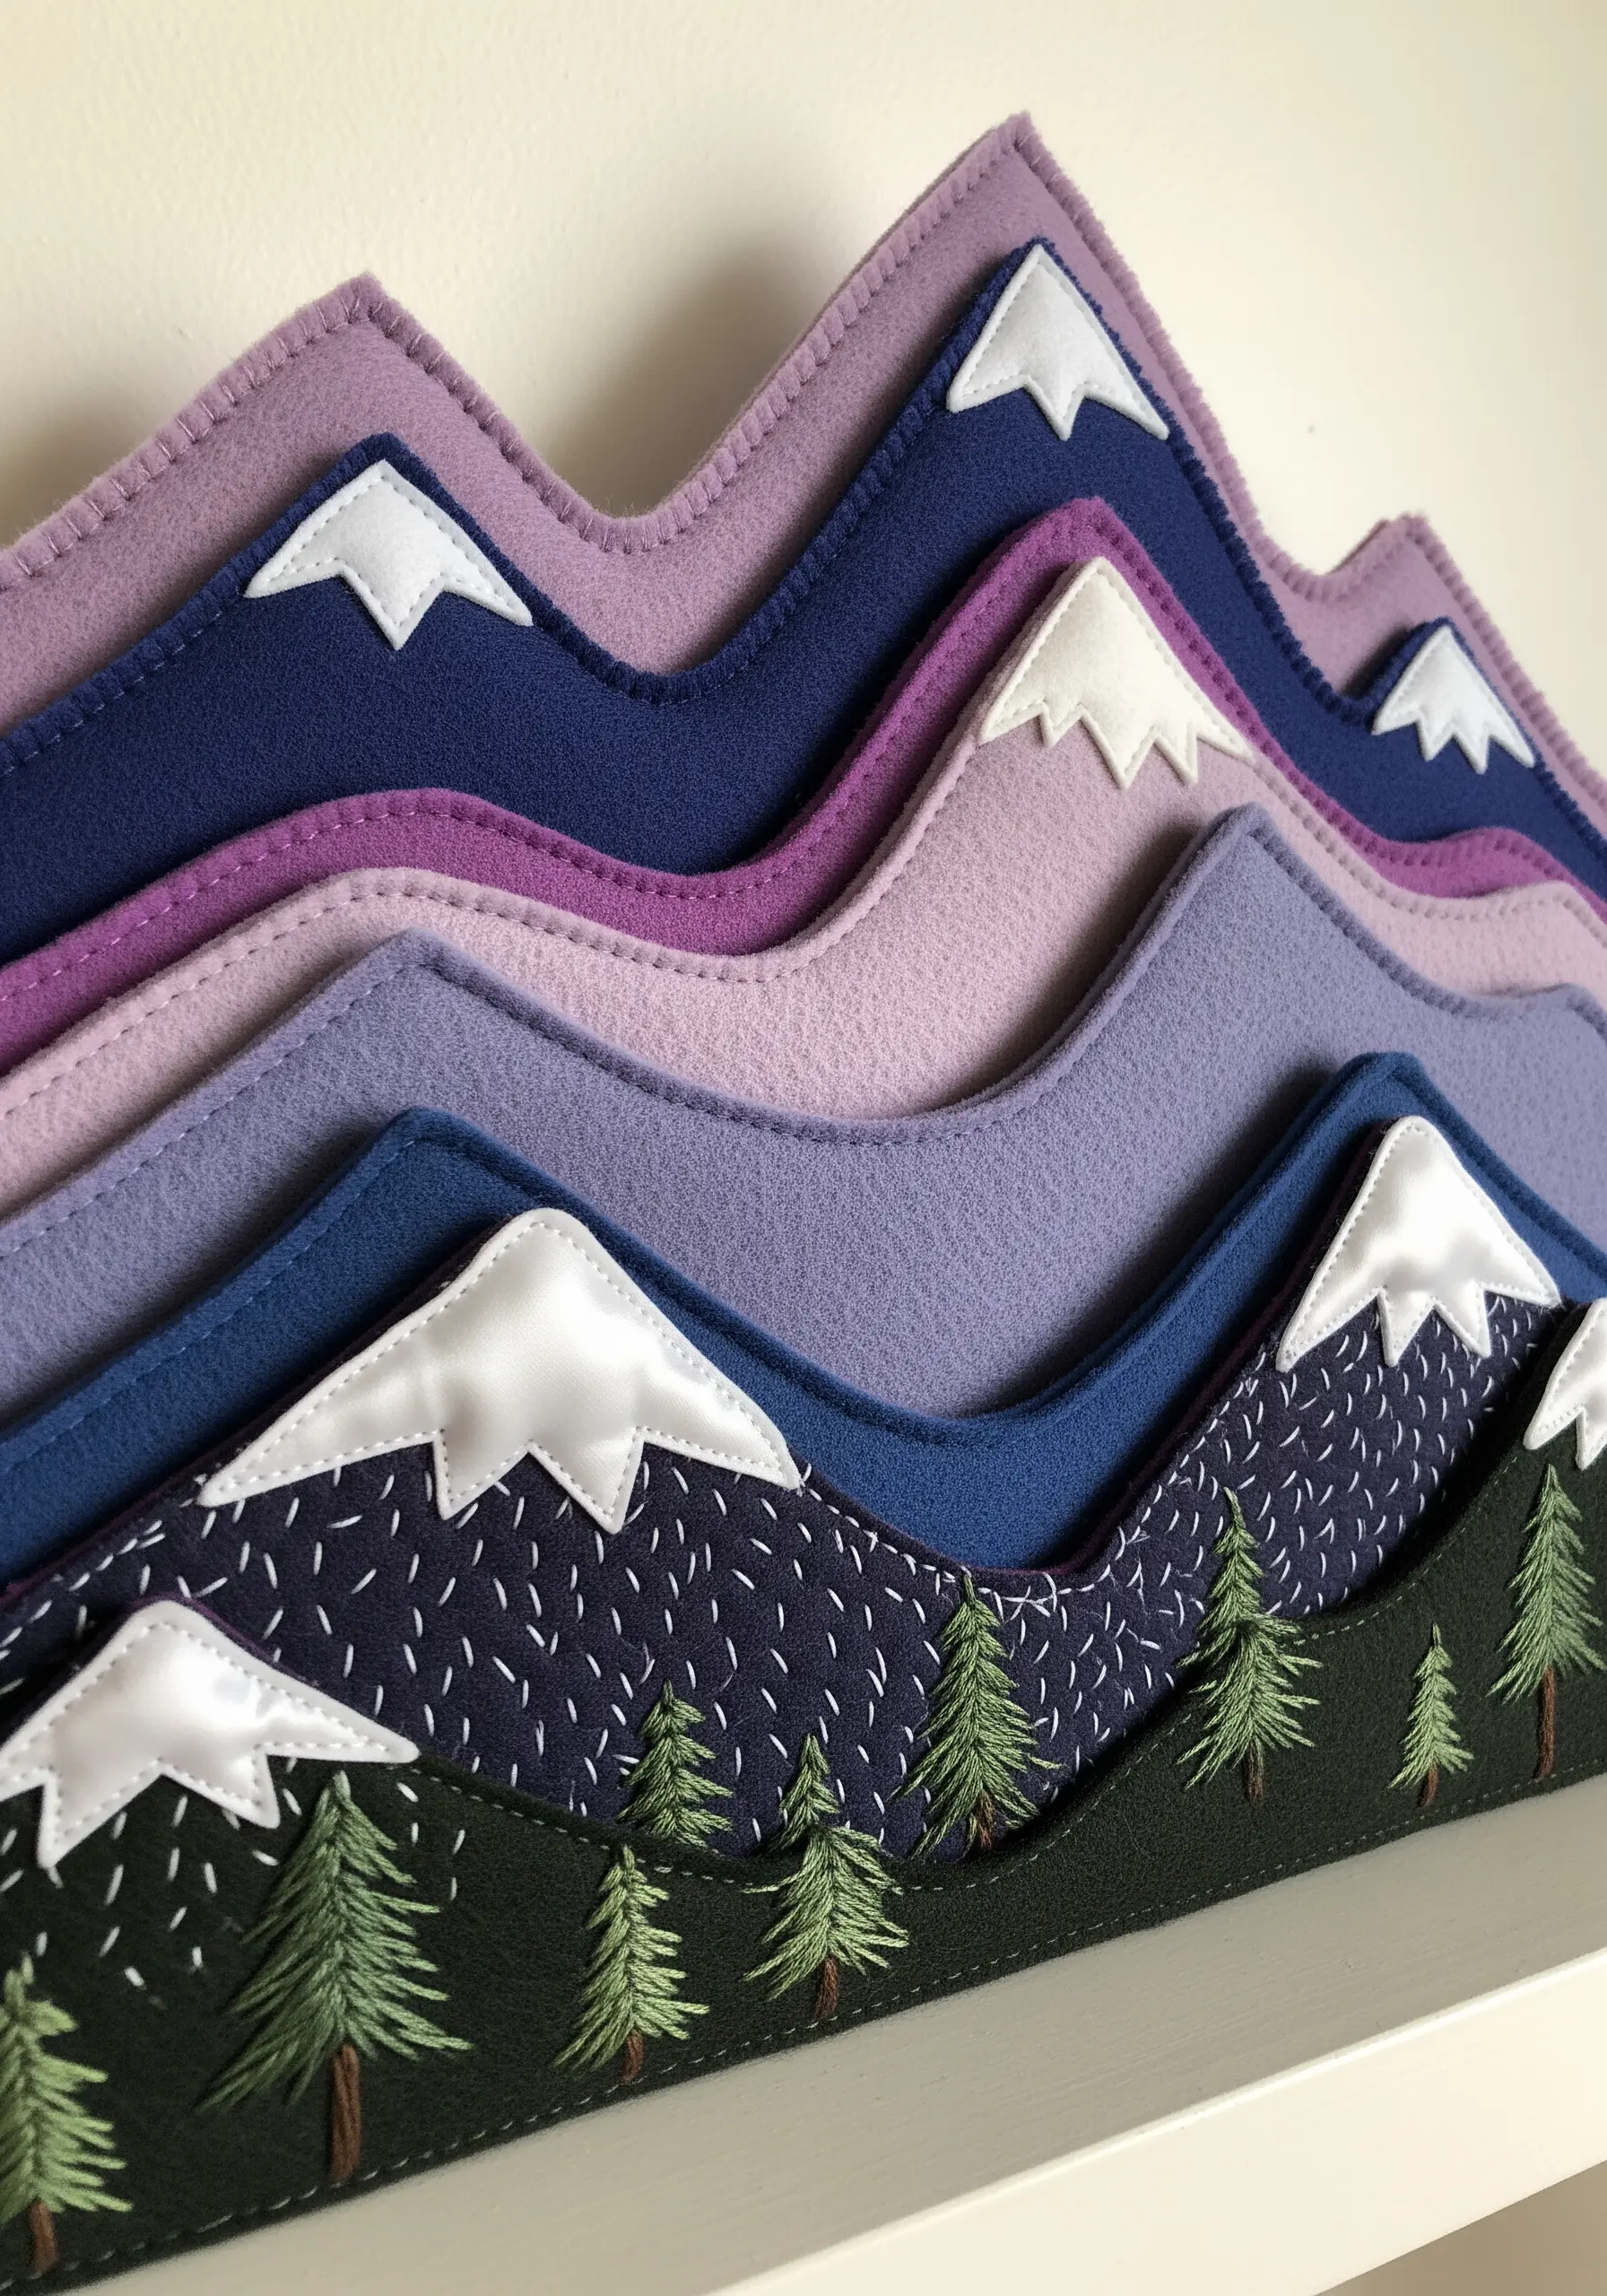
Create a dynamic, sculptural landscape by layering different colors of felt.
Cut rolling mountain shapes from several shades of felt, arranging them from darkest in the foreground to lightest in the back to create atmospheric perspective.
Before assembling, add embroidered details to individual layers. Focus the most intricate stitching, like the small trees and textures, on the foreground layer to enhance the sense of depth.
A simple running stitch along the top edge of each layer adds definition and a charming, handcrafted finish to these mountain landscape thread painting techniques in felt.
17. Embellishing Found Objects with Thread and Beads
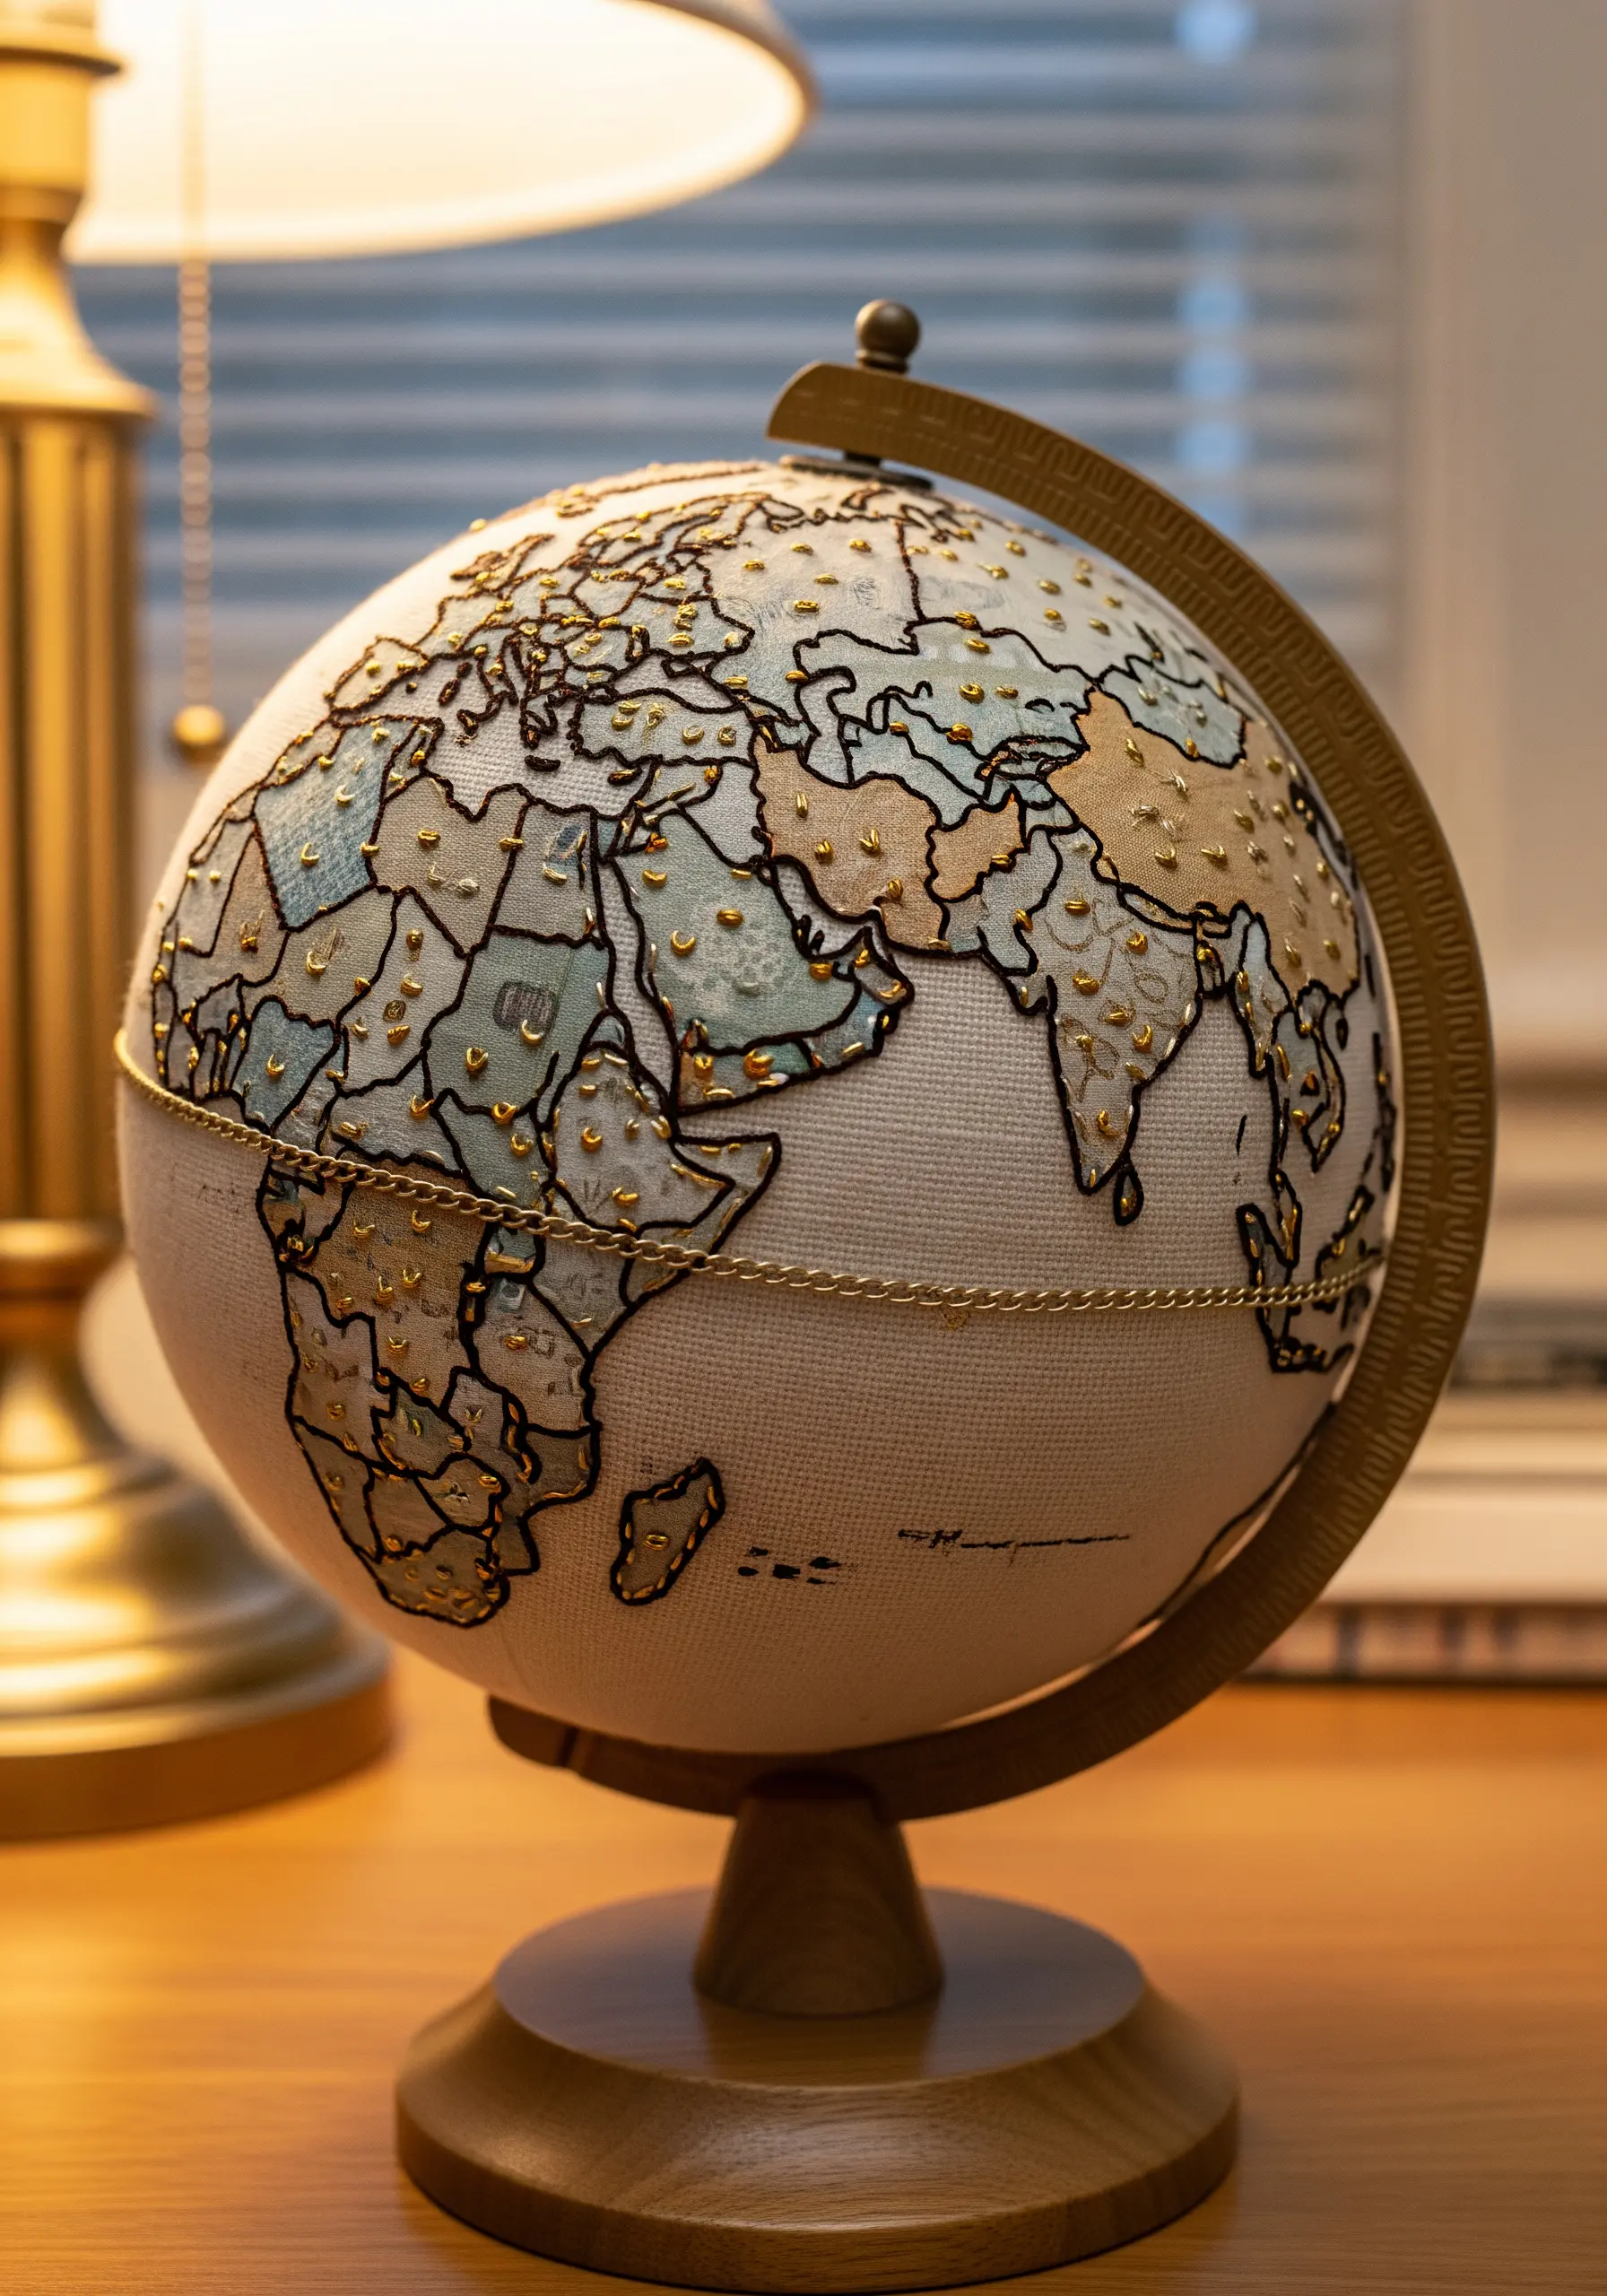
Transform an everyday object into a piece of art by using it as an unconventional canvas for embroidery.
To stitch on a fabric-covered globe, use a strong needle and a thimble to help you push through the tougher material.
Use a simple backstitch or stem stitch to outline the continents, and fill them with patterns of seed stitches or tiny beads for texture and color.
Adding lines of gold chain or metallic thread for borders or routes gives the piece a touch of antique elegance, turning a simple globe into a personal treasure map.
This is a perfect example of artistic embroidery projects that turn everyday items into presents.
18. Sculpting Nests from Fabric and Fiber
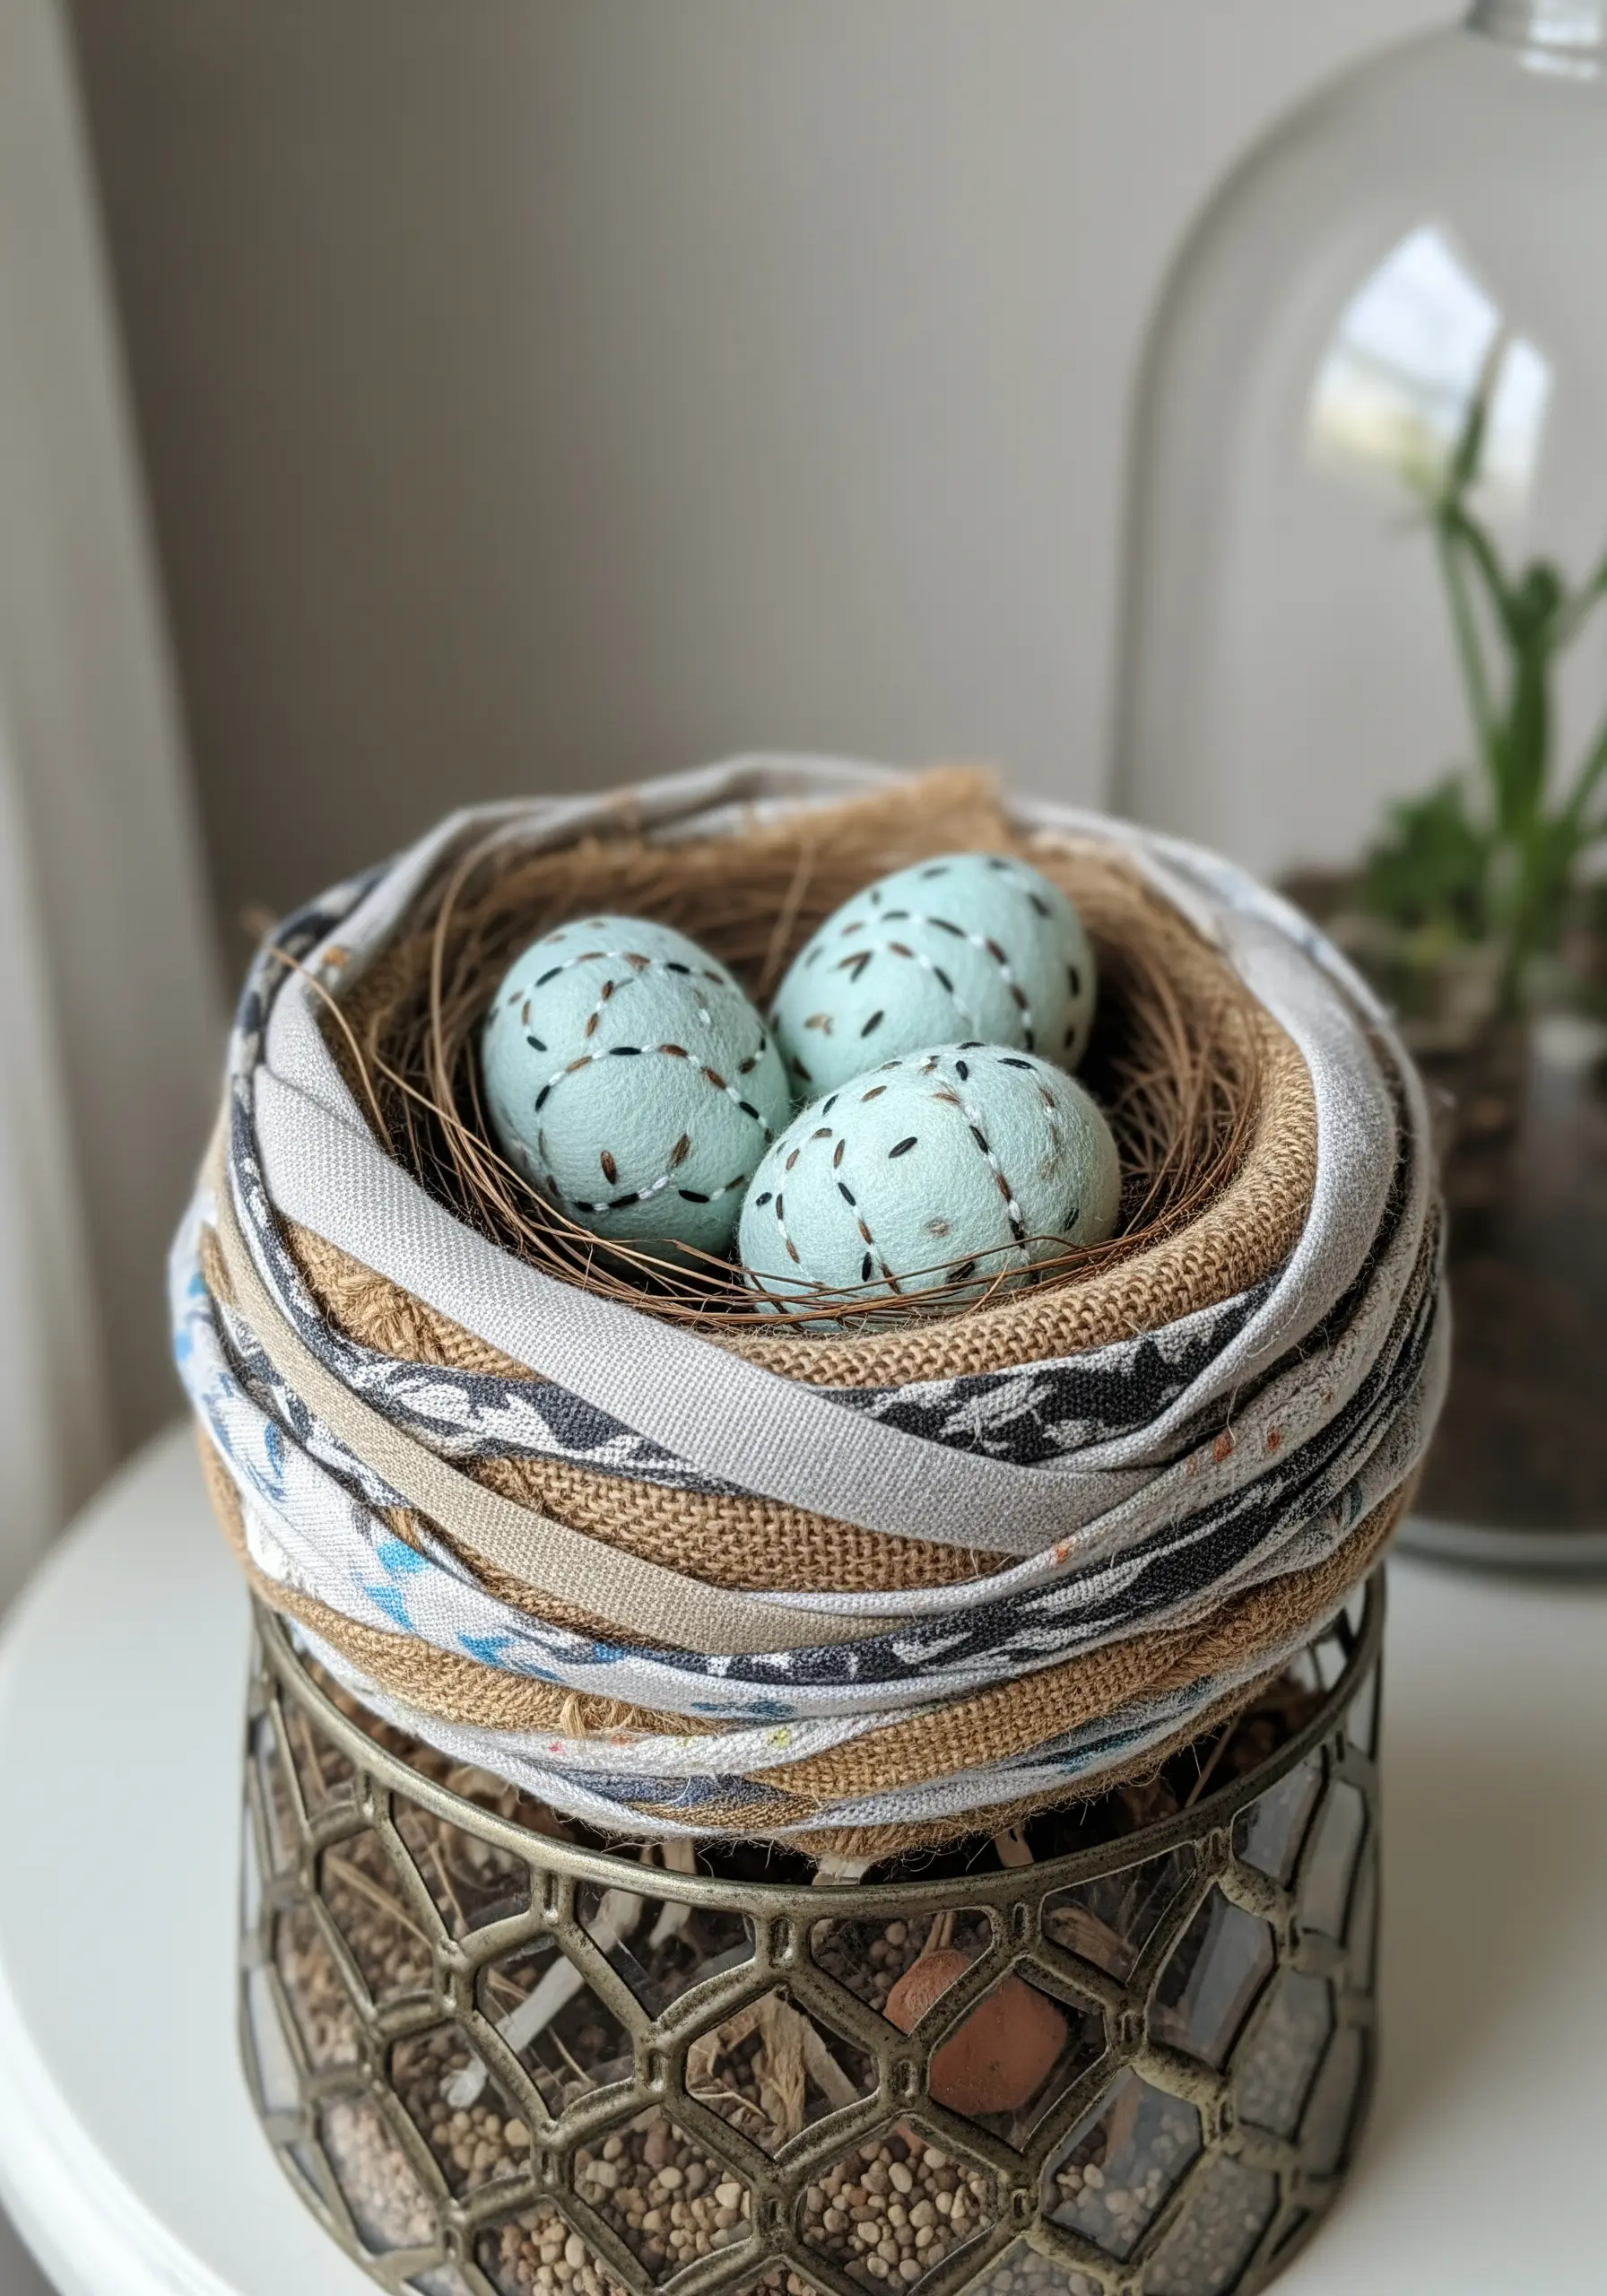
You can create beautiful, organic forms by wrapping and coiling strips of scrap fabric and burlap.
Start with a small bowl or form to use as a mold. Begin wrapping it with strips of burlap to create a sturdy base layer.
Next, introduce strips of patterned or colored fabric, weaving and tucking them to create a varied, rustic texture. Let the frayed edges show to enhance the natural feel.
Line the finished nest with soft fibers like jute or coconut coir to complete the look. The result is a charming piece of earth-inspired embroidery texture, built without a single stitch.
19. Defining Form with Wire Mesh and Wool

For large-scale, lightweight sculptures, use a base of wire mesh, often called hardware cloth.
You can easily cut the mesh with tin snips and bend it into fluid, abstract shapes. Secure the form by twisting the cut wire ends together.
Once you are happy with the shape, soften the industrial feel of the mesh by wrapping it with soft, unspun wool roving or thick yarn.
Wrapping only the edges, as shown here, creates a beautiful contrast between the delicate, grid-like structure of the mesh and the soft, solid line of the wool, resulting in a stunning piece of fiber art.


