

Have you ever completed an embroidery piece and felt it was missing a certain depth, a quality that invites you to reach out and touch it? You have the stitches down, your lines are clean, but the finished work feels… flat. That missing element is texture, and it’s simpler to achieve than you think.
Mastering texture isn’t about learning hundreds of complicated new stitches. It’s about thinking differently about the ones you already know. It’s in the choice to use six strands of floss instead of two for a plumper French knot, the decision to lay your satin stitches in a new direction to catch the light, or the courage to mix in an unexpected material like wool or twine.
These patterns and techniques are your invitation to look closer at the world around you—the rough grain of bark, the velvety surface of moss, the smooth curve of a sea-worn stone—and learn to translate that feeling into thread. You can create art that doesn’t just look beautiful, but feels alive.
1. Frame Organic Textures with Couching

Combine different artistic mediums by couching thick, braided yarn onto a fabric printed with a natural texture like tree bark.
Couching involves laying a thick fiber onto your surface and tacking it down with a thinner, less visible thread.
This technique allows you to create bold, dimensional lines that would be impossible with a needle alone, adding a sculptural quality to your work.
The contrast between the soft, bulky yarn and the detailed, flat background creates immediate visual interest and depth.
2. Build a Mossy Landscape with Knots
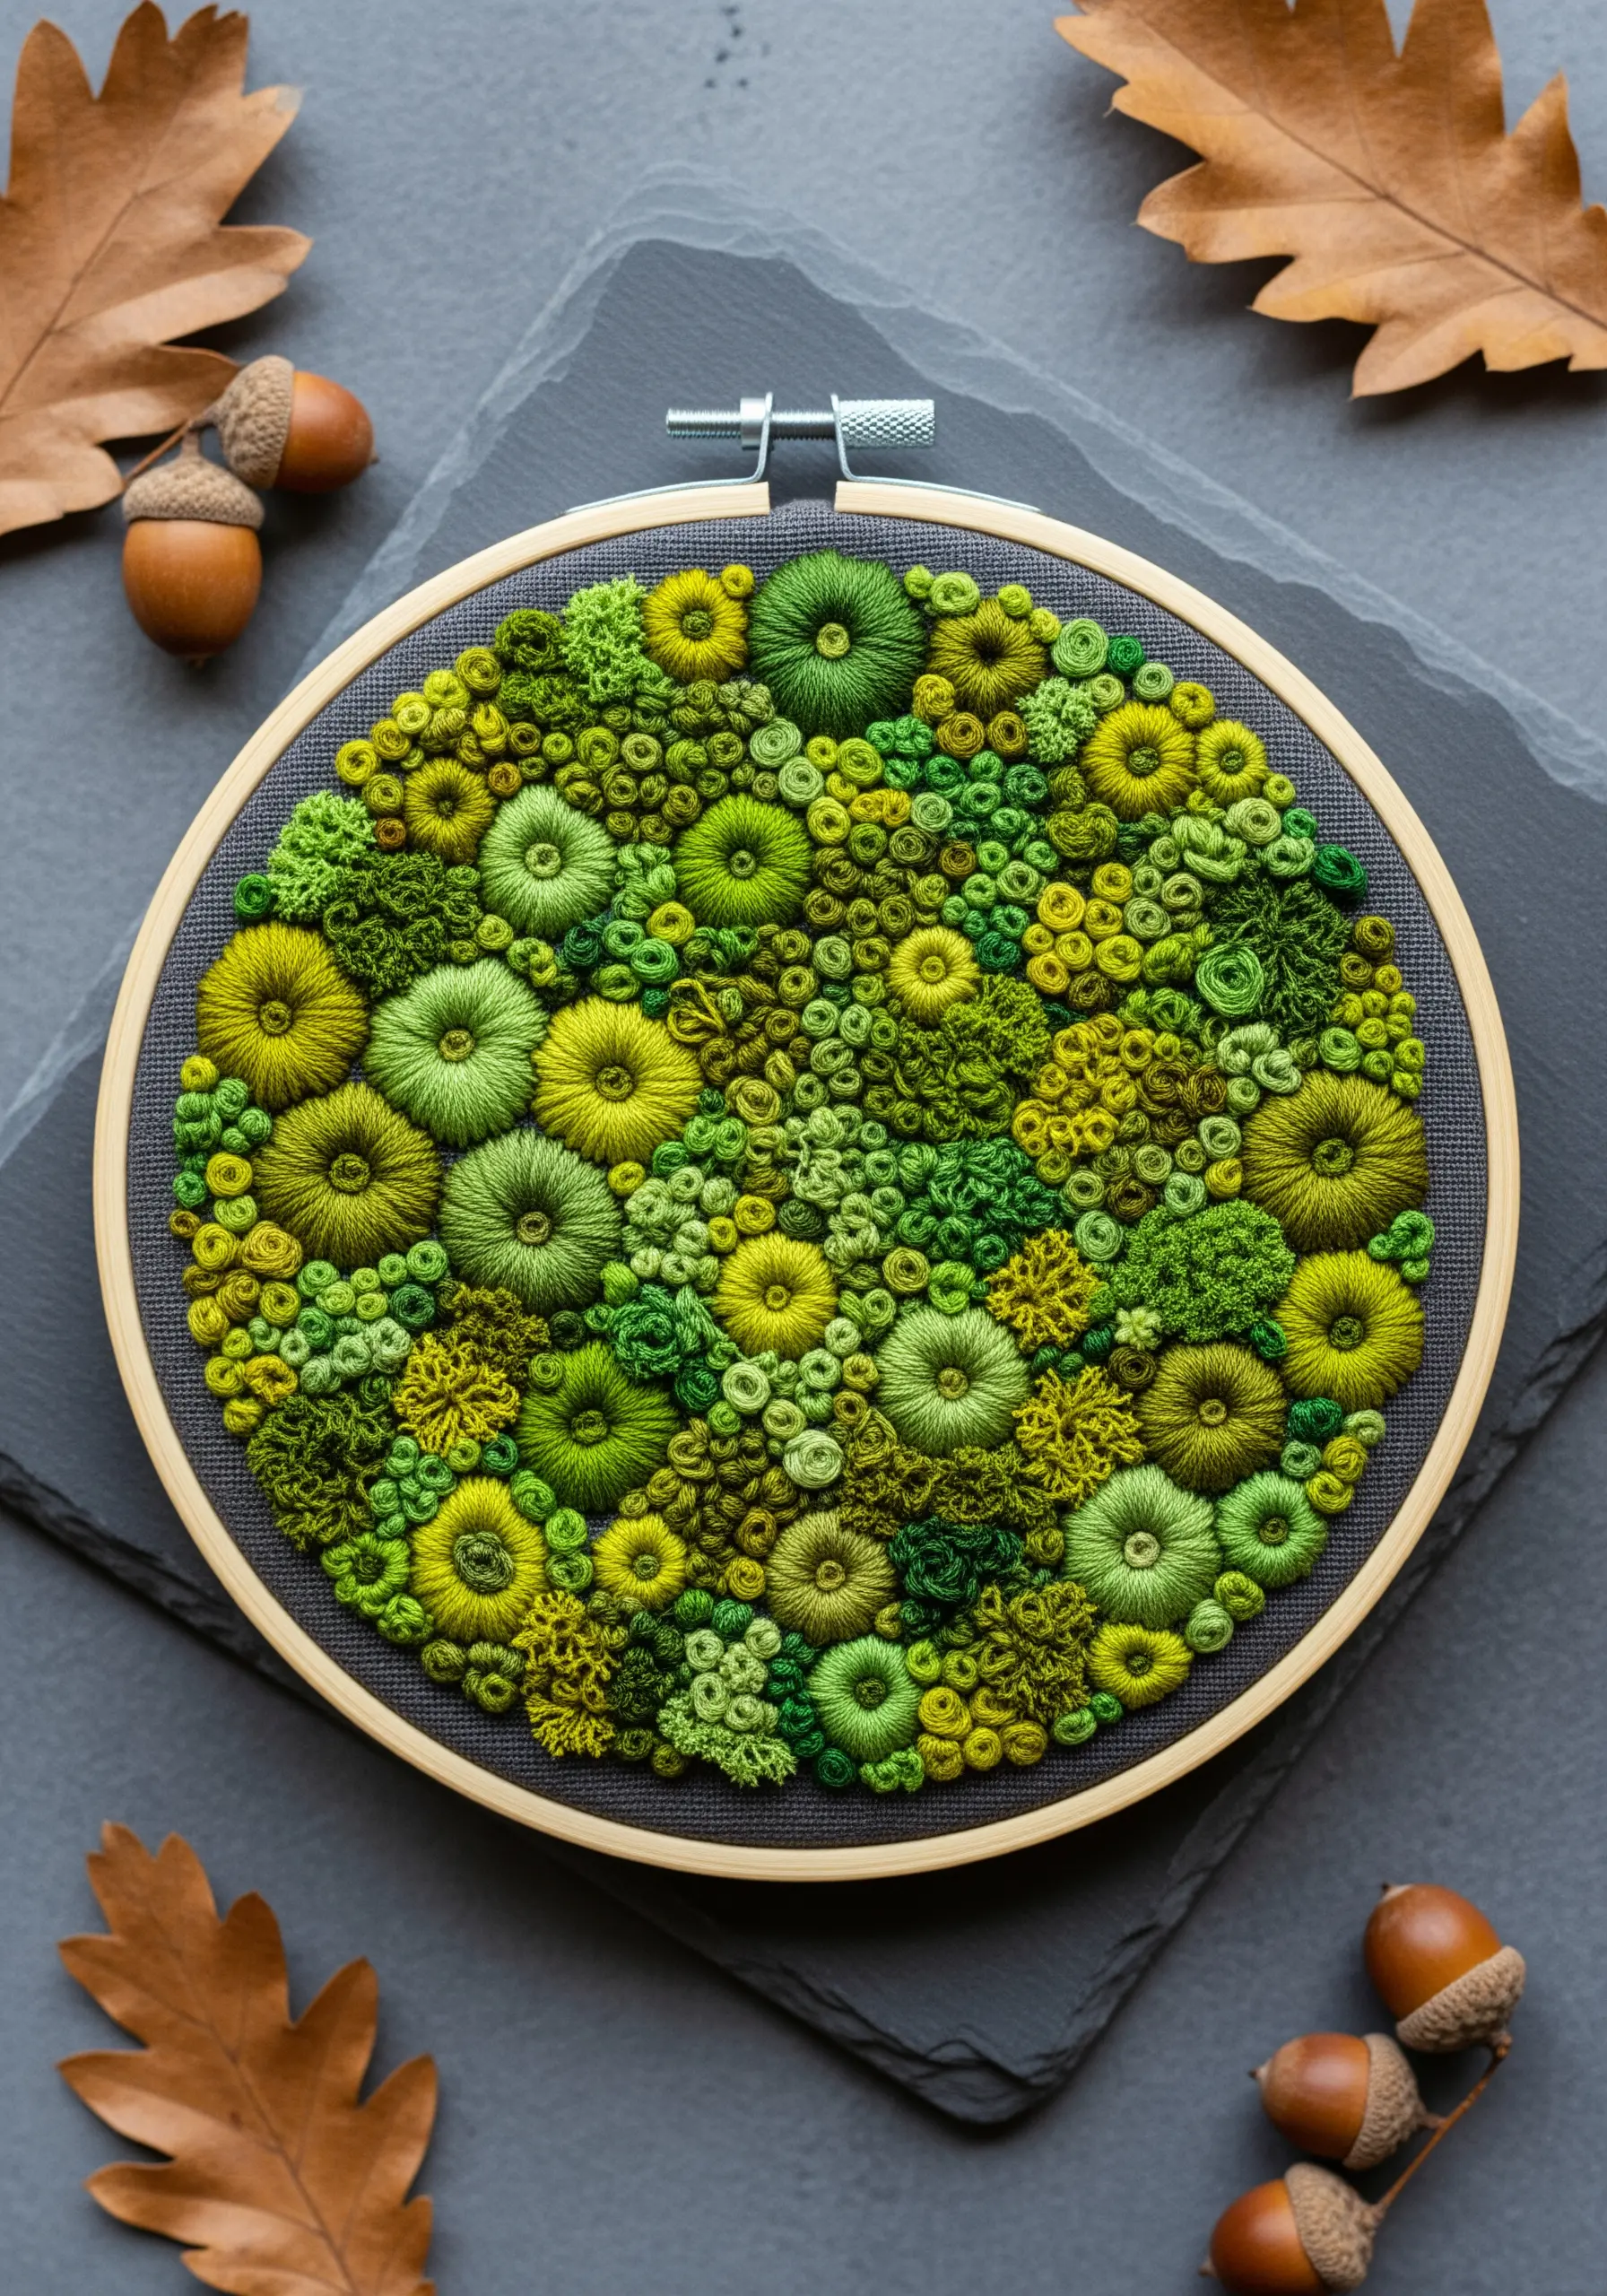
Create a dense, touchable surface by filling a space entirely with French knots, bullion knots, and colonial knots.
Vary the number of thread strands (from two to six) and the number of wraps around your needle to alter the size and texture of each knot.
Work in a tight, monochromatic color palette with multiple shades of green to mimic the organic variations found in real moss.
For an even more dynamic effect, use variegated thread, which changes color on its own and adds subtle depth without you having to switch floss.
This is one of the best embroidery ideas inspired by the subtle textures of nature for beginners.
3. Sculpt Stones with Padded Satin Stitch
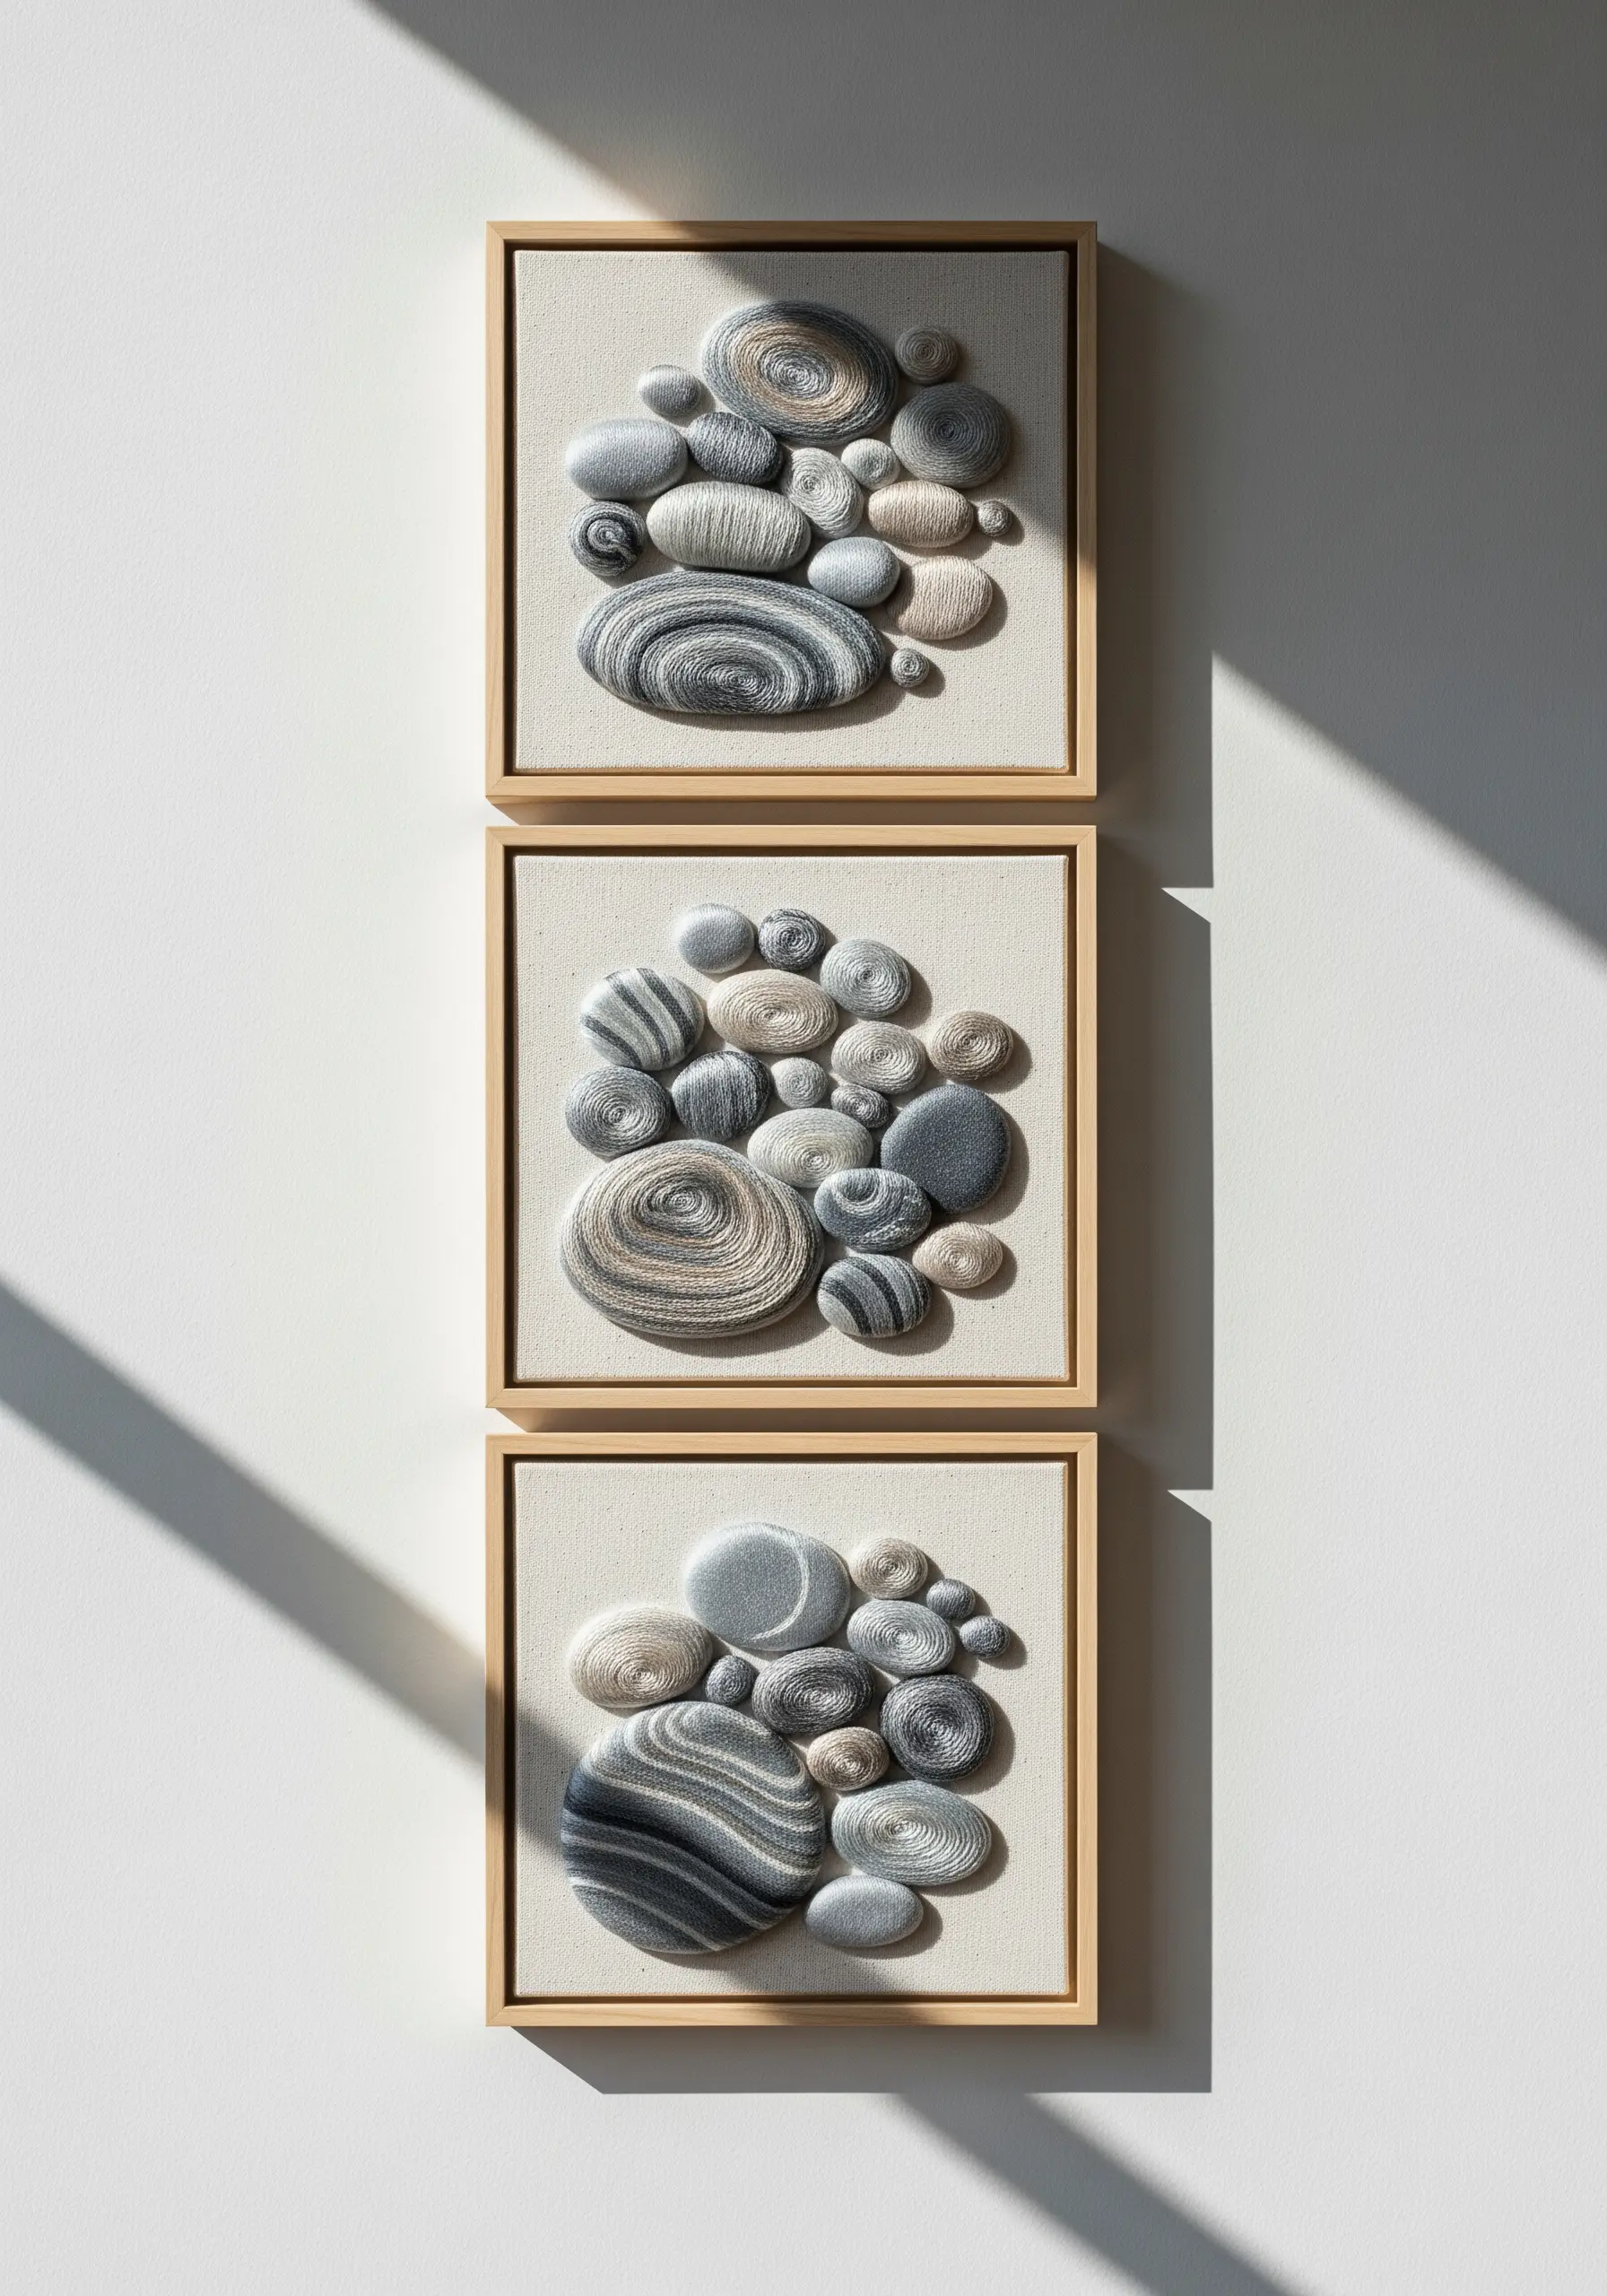
Achieve a three-dimensional effect by using padded satin stitch, a core technique of stumpwork embroidery.
First, cut small pebble shapes from felt or cotton batting and secure them to your base fabric.
Then, work satin stitches over these padded forms, pulling the thread taut to create smooth, rounded surfaces.
Use variegated grey, white, and beige threads to replicate the natural striations of river stones, letting the thread do the color-blending for you.
These greige ivory embroidery art ideas offer a modern, calming aesthetic.
4. Create Radial Texture with Bead Embroidery
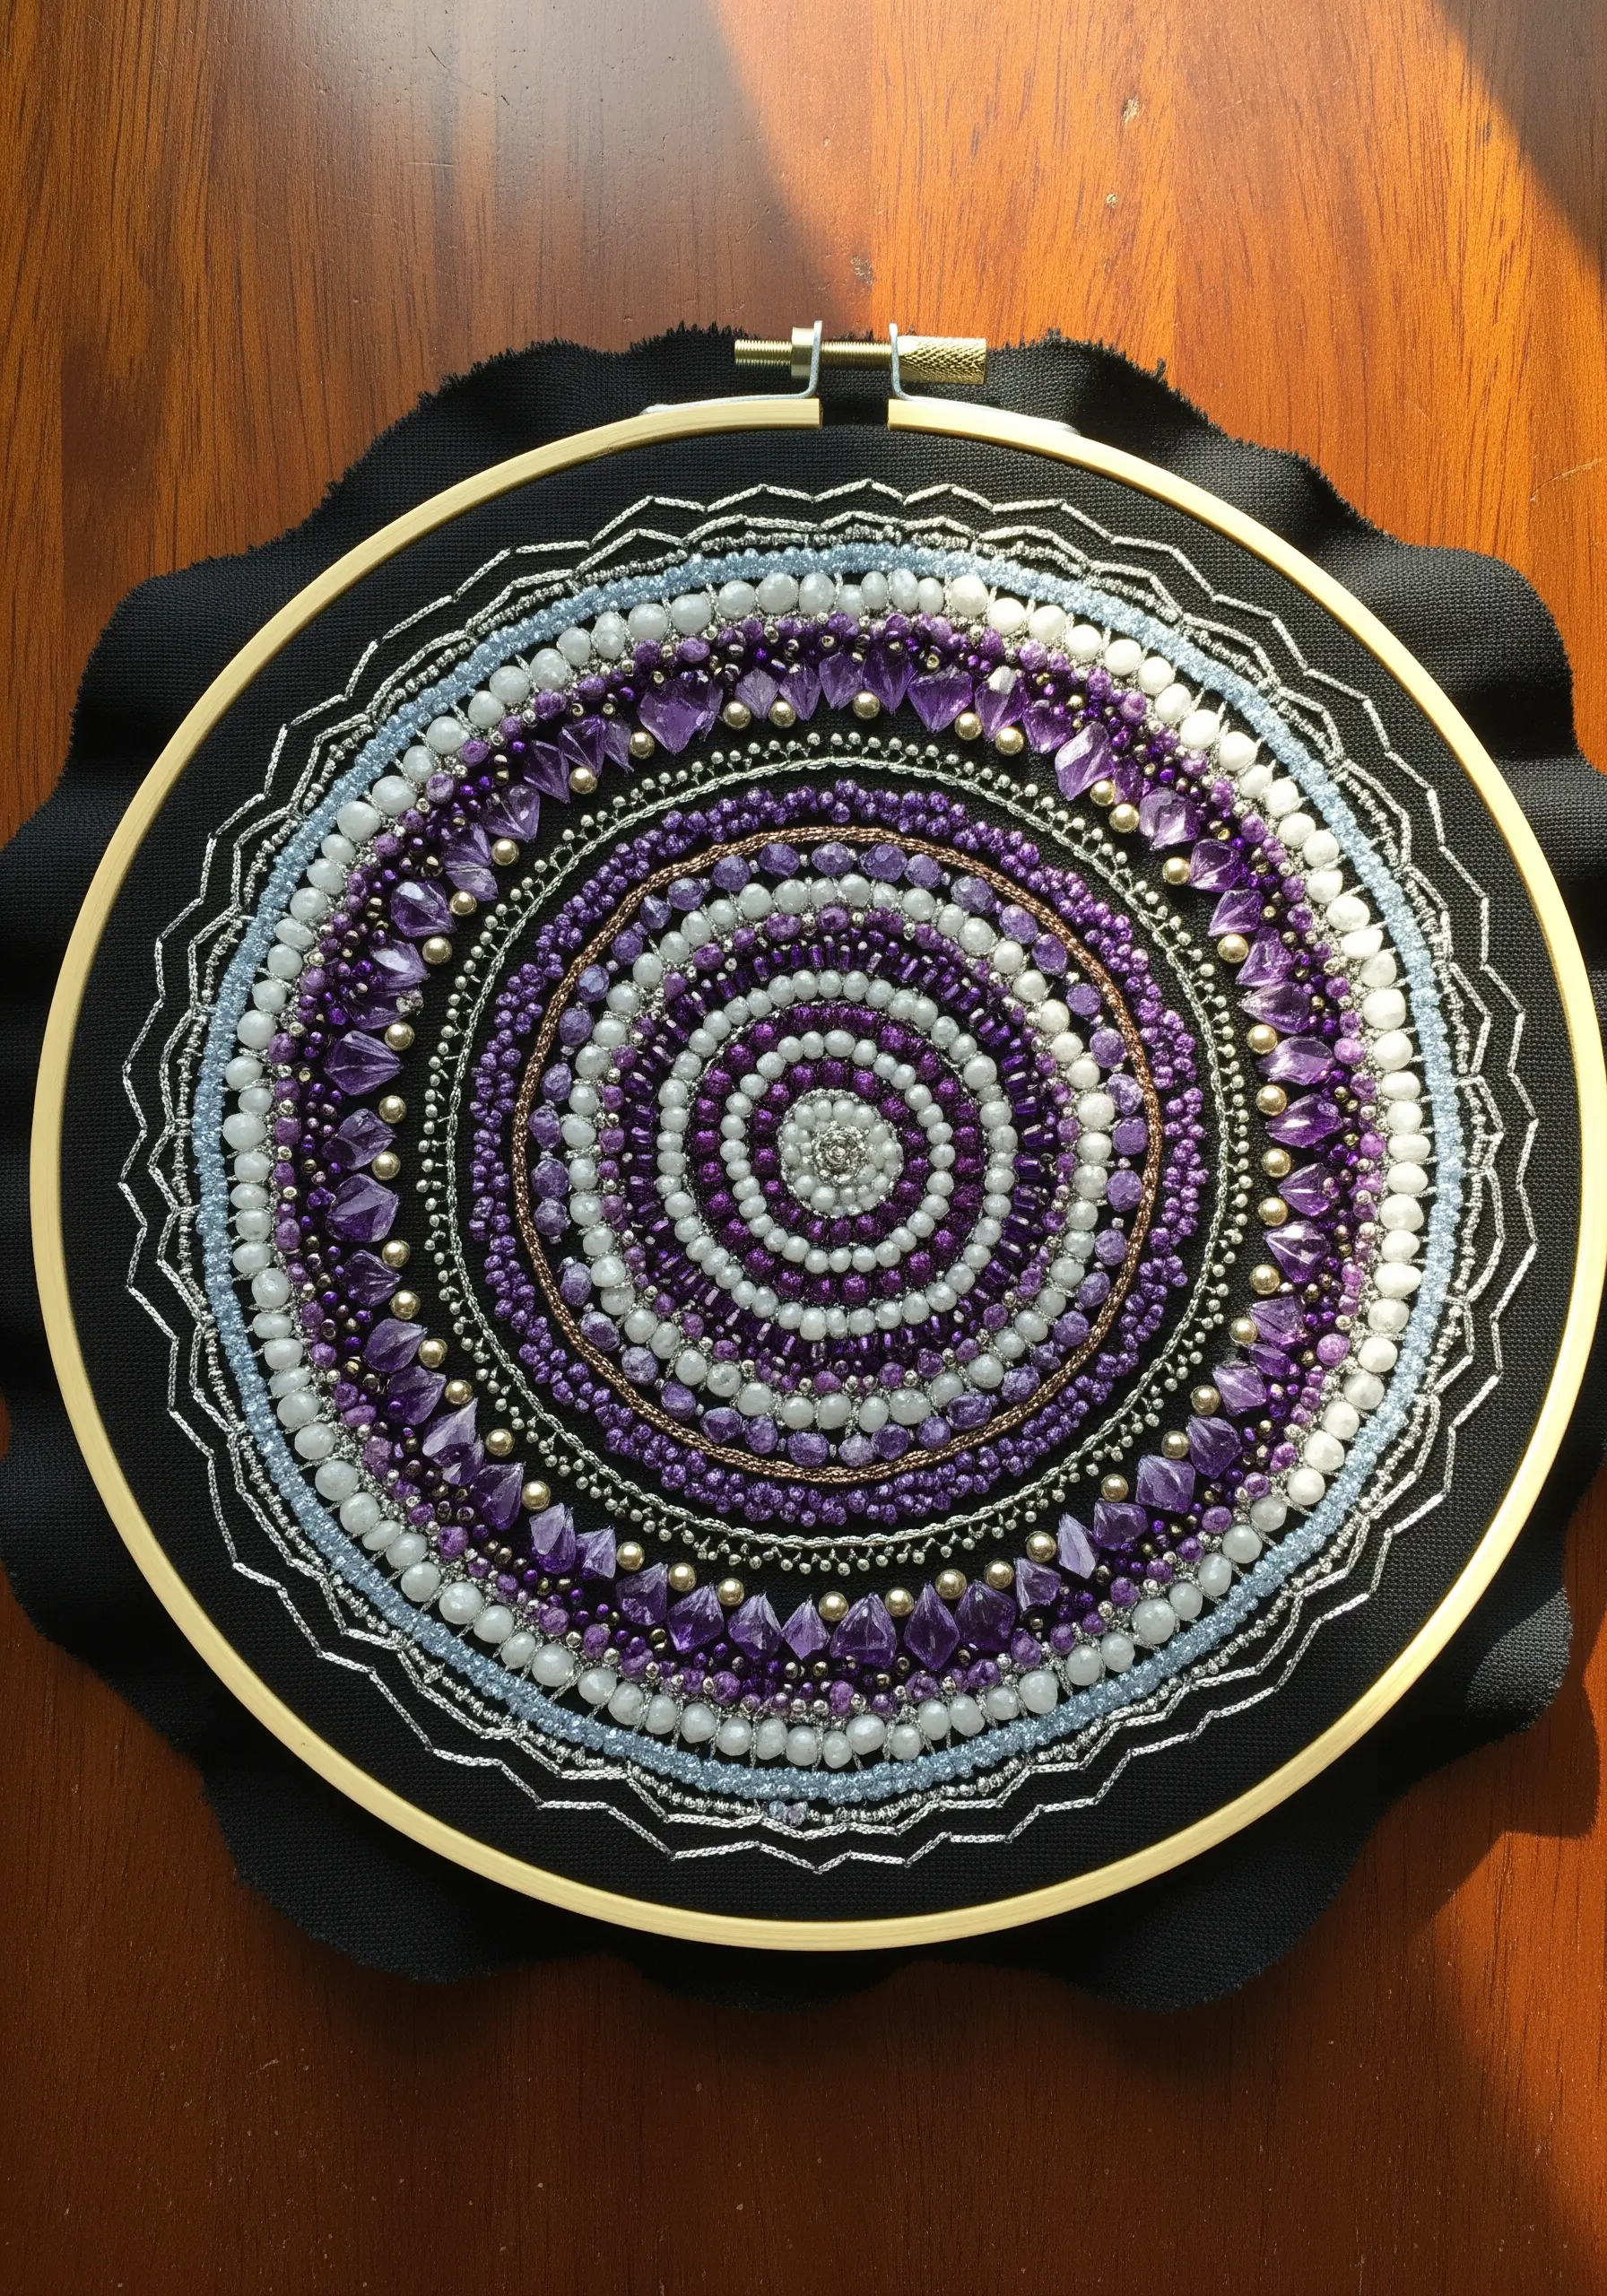
Move beyond thread to incorporate the smooth, reflective texture of beads into a mesmerizing mandala.
Use a strong thread and a simple backstitch to secure rows of seed beads, creating concentric circles of color and light.
Alternate between matte and metallic beads, or mix in larger crystal beads at regular intervals to create focal points and rhythm.
Stitching on a dark, sturdy fabric like black cotton drill makes the colors pop and provides a stable foundation that won’t pucker under the weight of the beads.
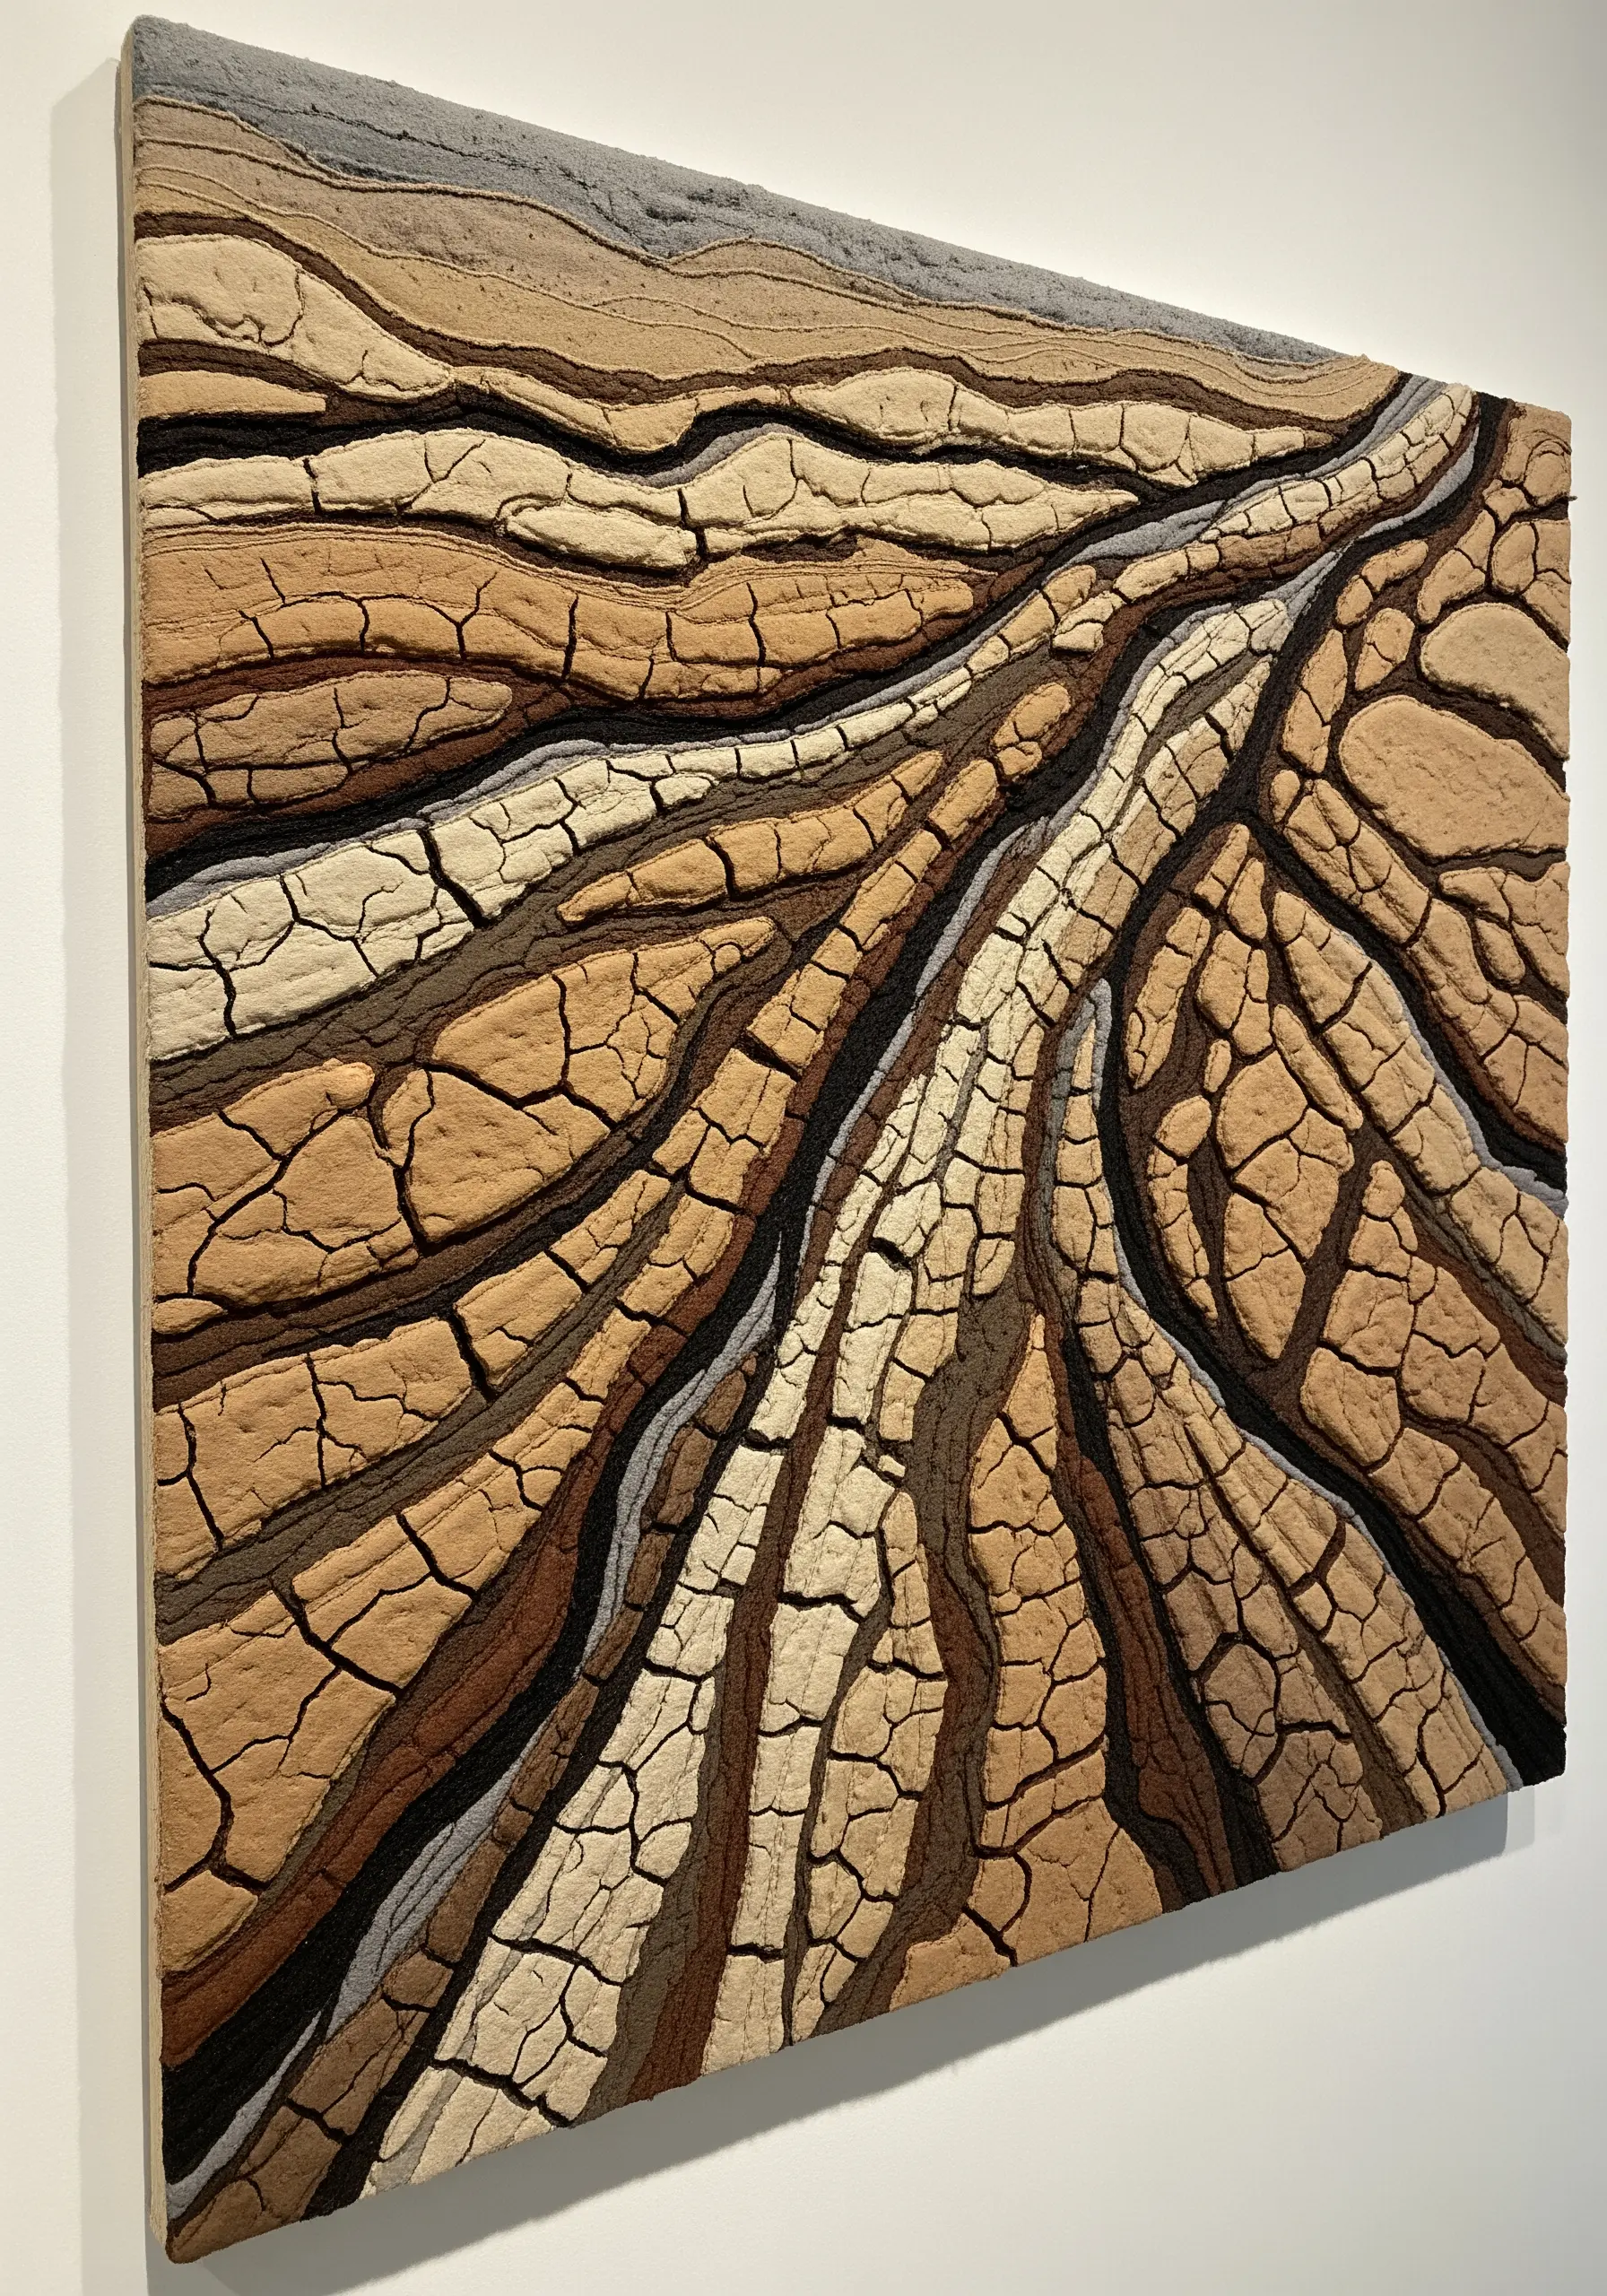
5. Mimic Geological Layers with Varied Stitches

Recreate the flowing lines of sandstone or agate by combining different stitch textures within a single composition.
Use dense seed stitches or French knots for rougher, more raised sections, contrasting them with smooth, flat satin stitches for calmer areas.
Define the flowing shapes with a simple backstitch or stem stitch before filling them in, which keeps your edges clean and intentional.
A palette of earthy reds, ochres, and creams enhances the geological feel, turning your fabric into a cross-section of the earth.
6. Add Dimension to Line Work with Woven Wheels
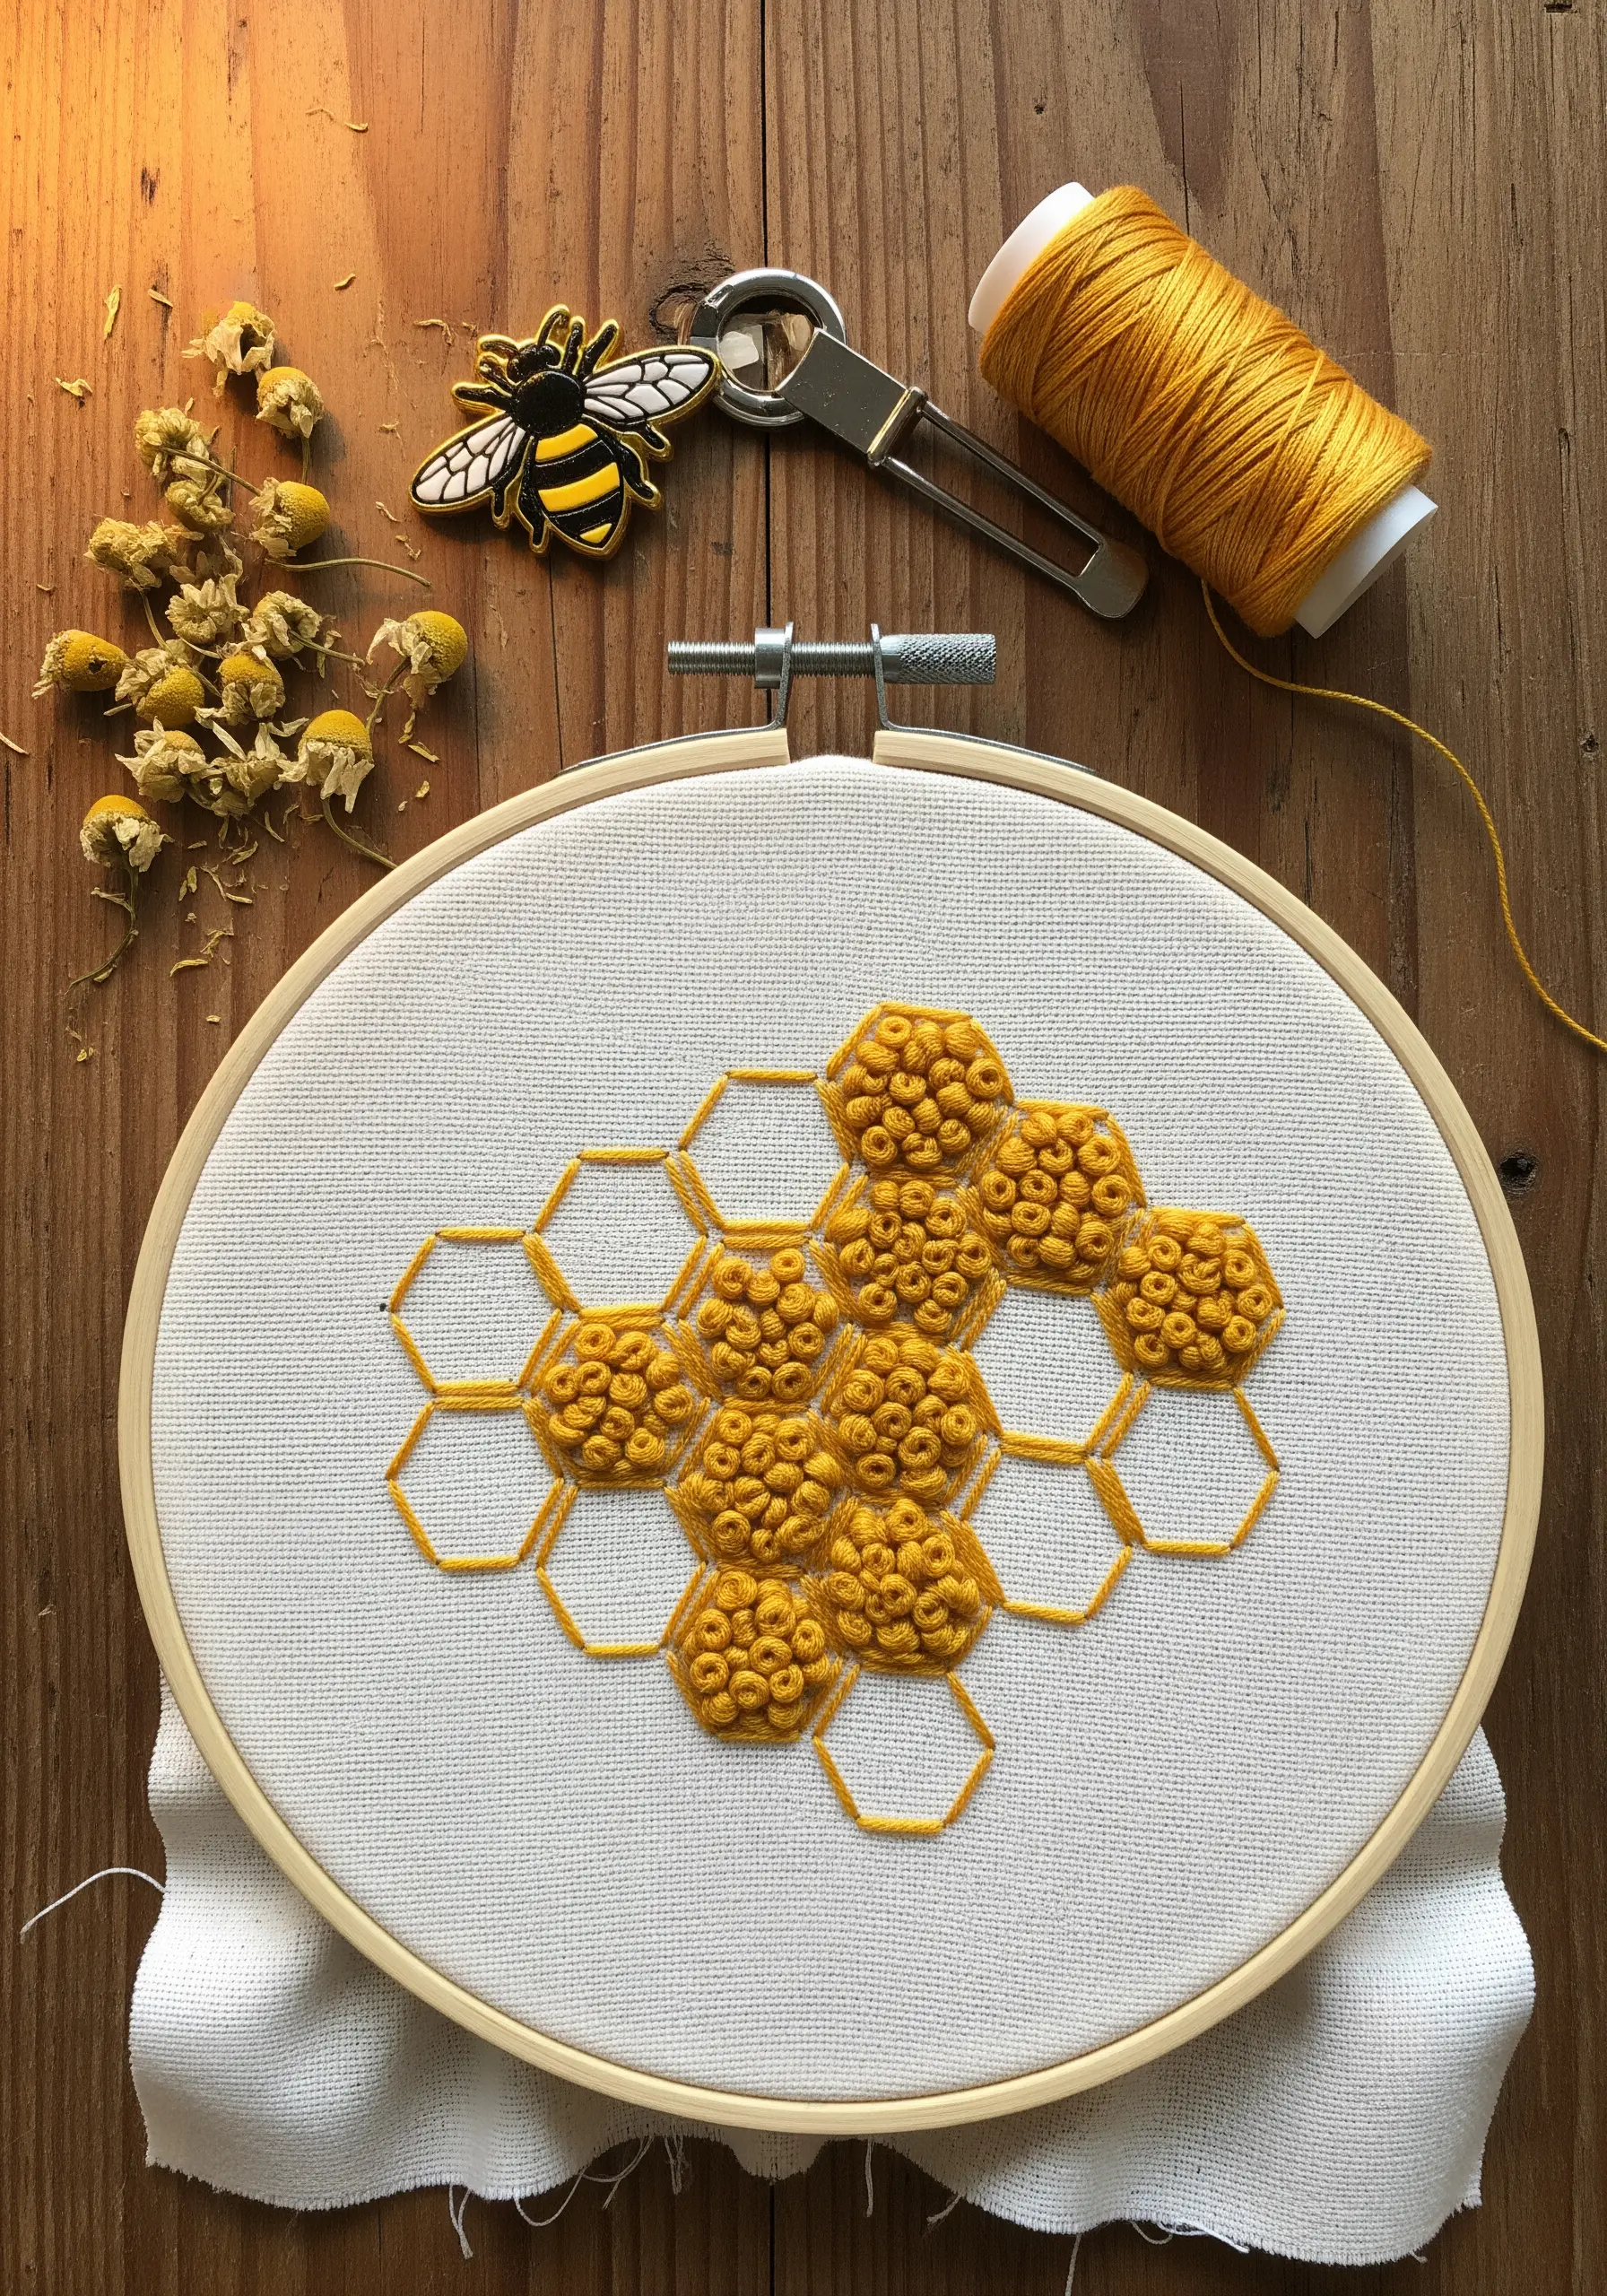
Elevate a simple line drawing by filling select areas with highly textured woven wheel stitches (or spider web stitches).
Instead of filling the entire honeycomb shape, fill only a few cells to create a dynamic balance between flat outline and raised texture.
This draws the eye and makes the simple geometry feel more complex and tactile.
Use a six-strand floss for the woven wheels to make them puffy and prominent against the delicate two-strand outlines.
7. Replicate Delicate Veins with Fine Thread
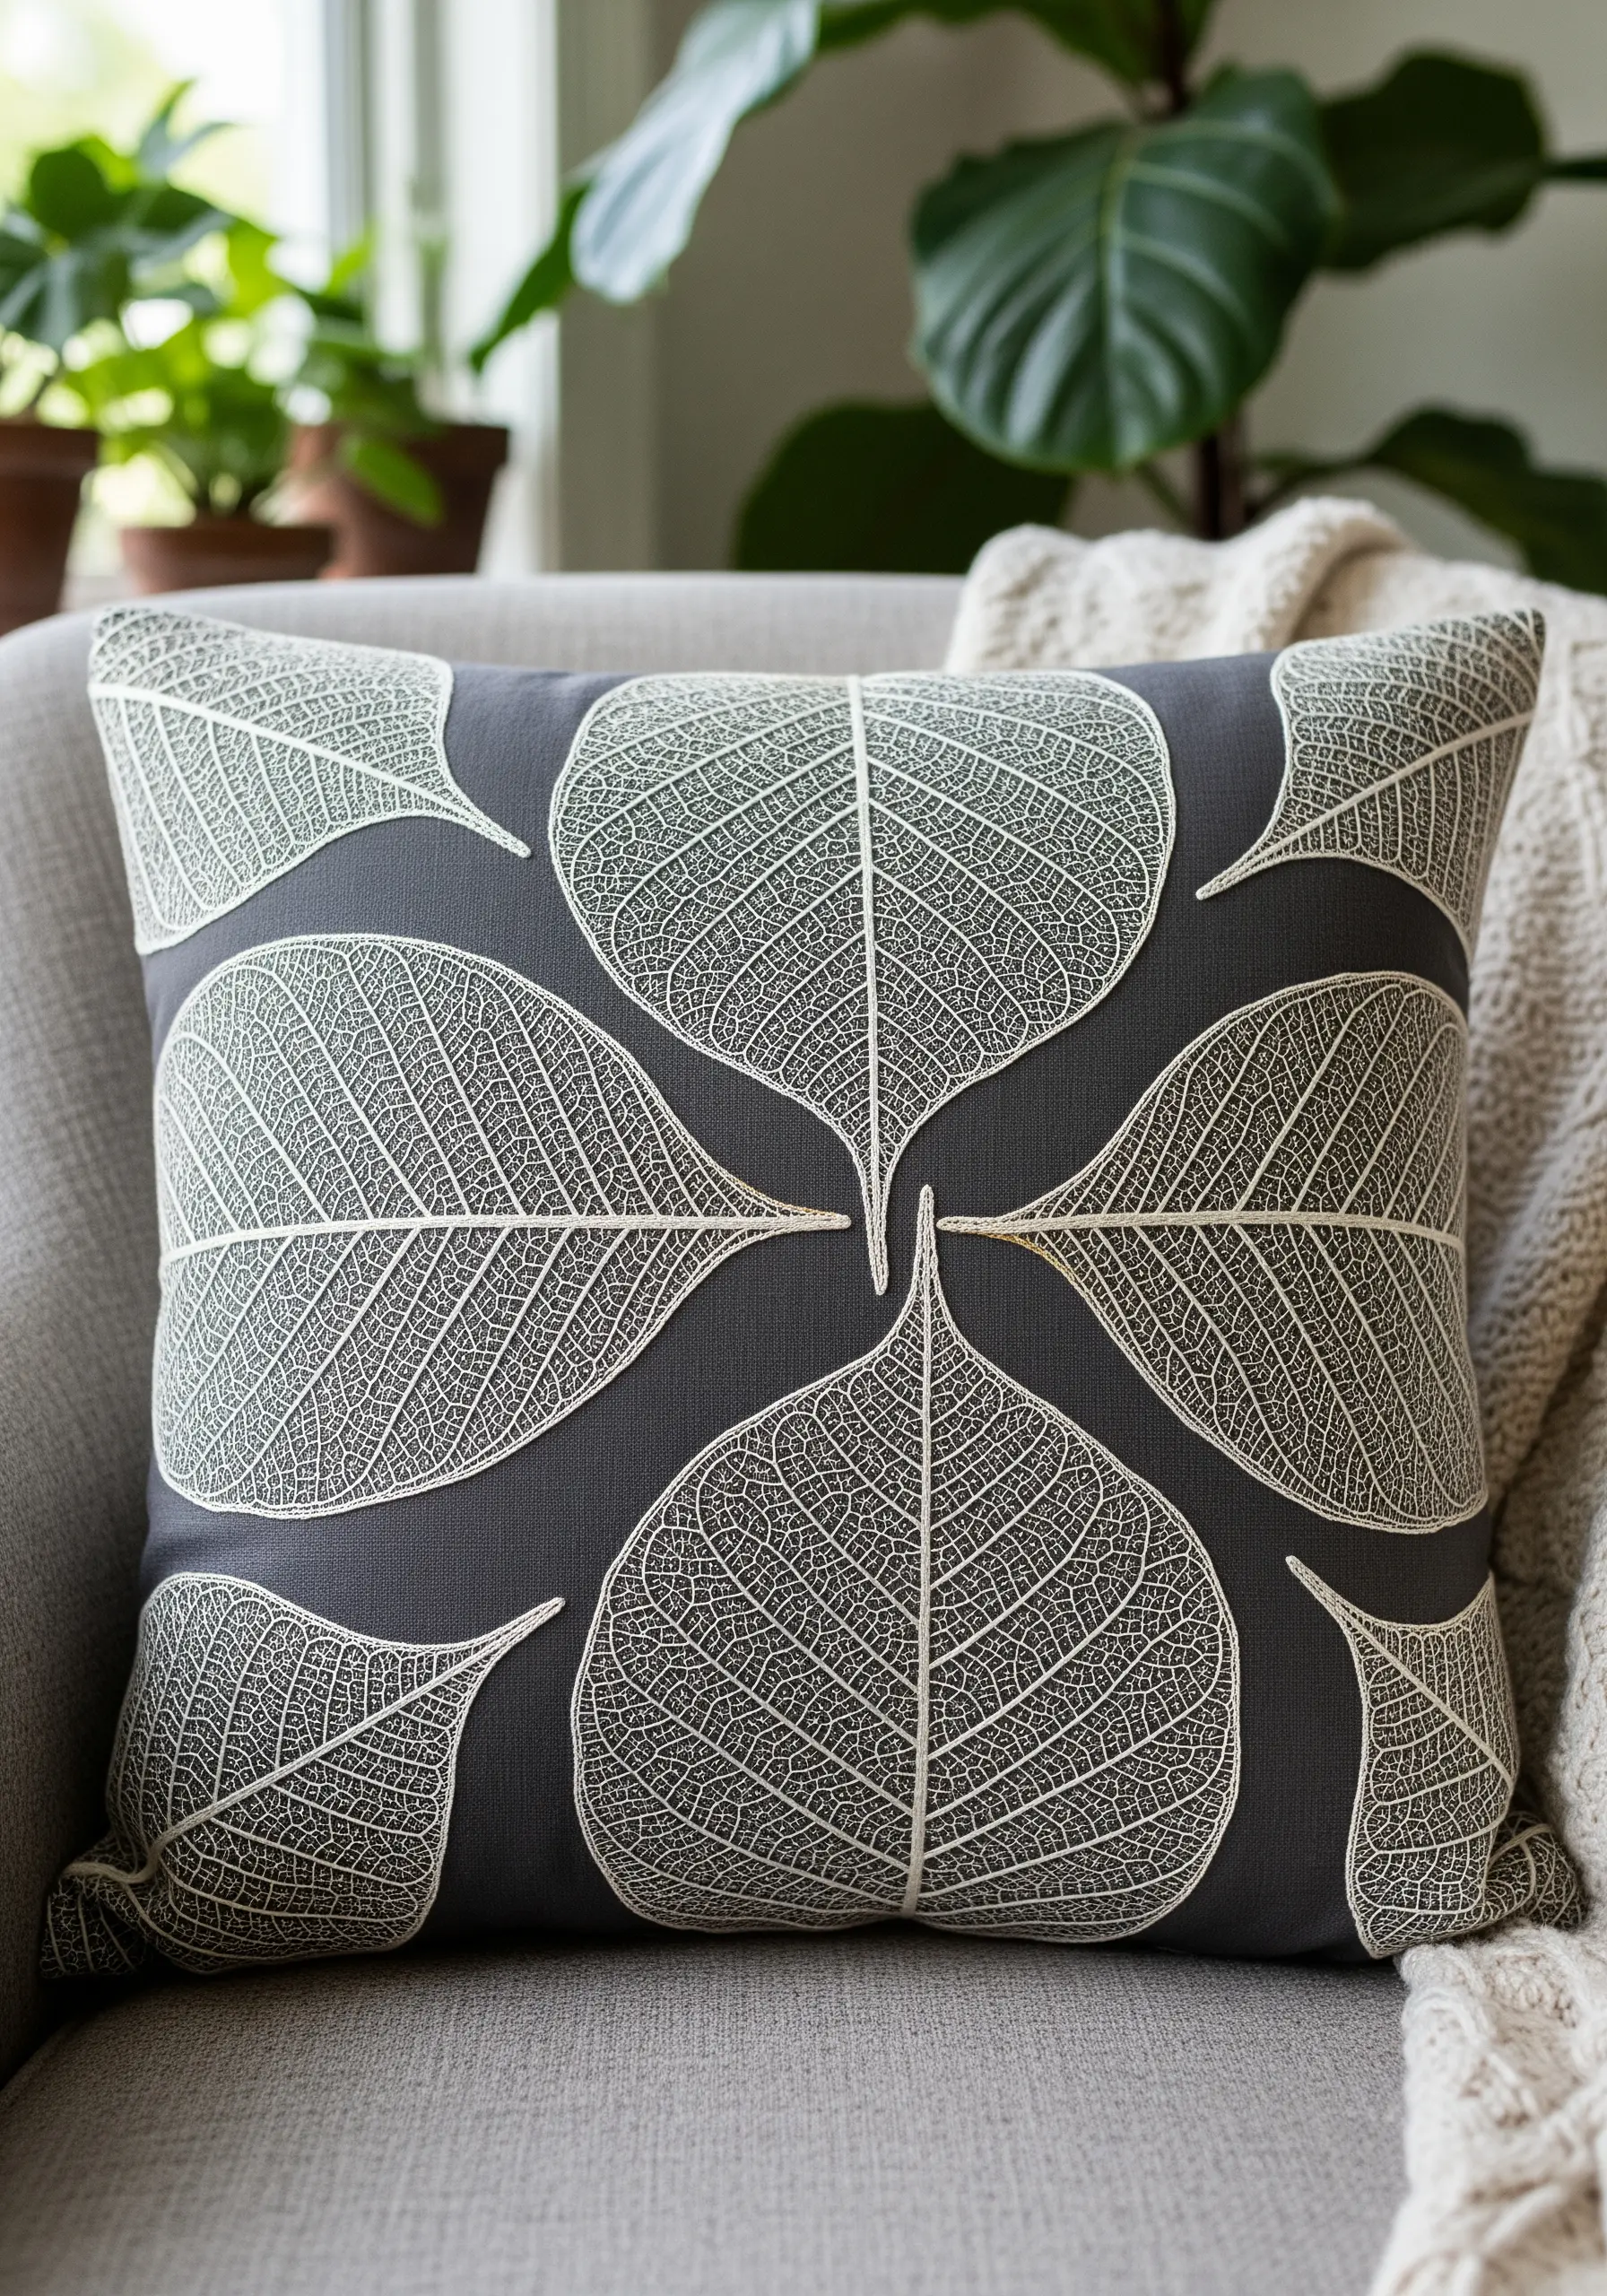
Capture the intricate pattern of a skeleton leaf by using a single strand of embroidery floss on a high-contrast background.
Use a whipped backstitch for the central veins to give them prominence and a simple, delicate backstitch or stem stitch for the finer, branching veins.
The key to this design’s elegance is the negative space; resist the urge to fill the leaf shape and instead let the delicate line work define the form.
This technique is perfect for upcycling home decor, such as turning a plain cushion cover into a piece of botanical art.
8. Emulate Cracked Earth with Turkey Work
Create the ultra-textured, raised surface of cracked earth by using Turkey work (or Ghiordes knot stitch).
This stitch creates loops that you can either leave as is or trim to create a dense, plush pile similar to a carpet.
For this effect, trim the loops at varying heights to enhance the rough, uneven texture of dry mud.
Work in blocks of earthy tones, defining the ‘cracks’ with recessed lines of dark backstitching to create the illusion of deep fissures.
9. Capture Sunflower Seeds with Angled Straight Stitches
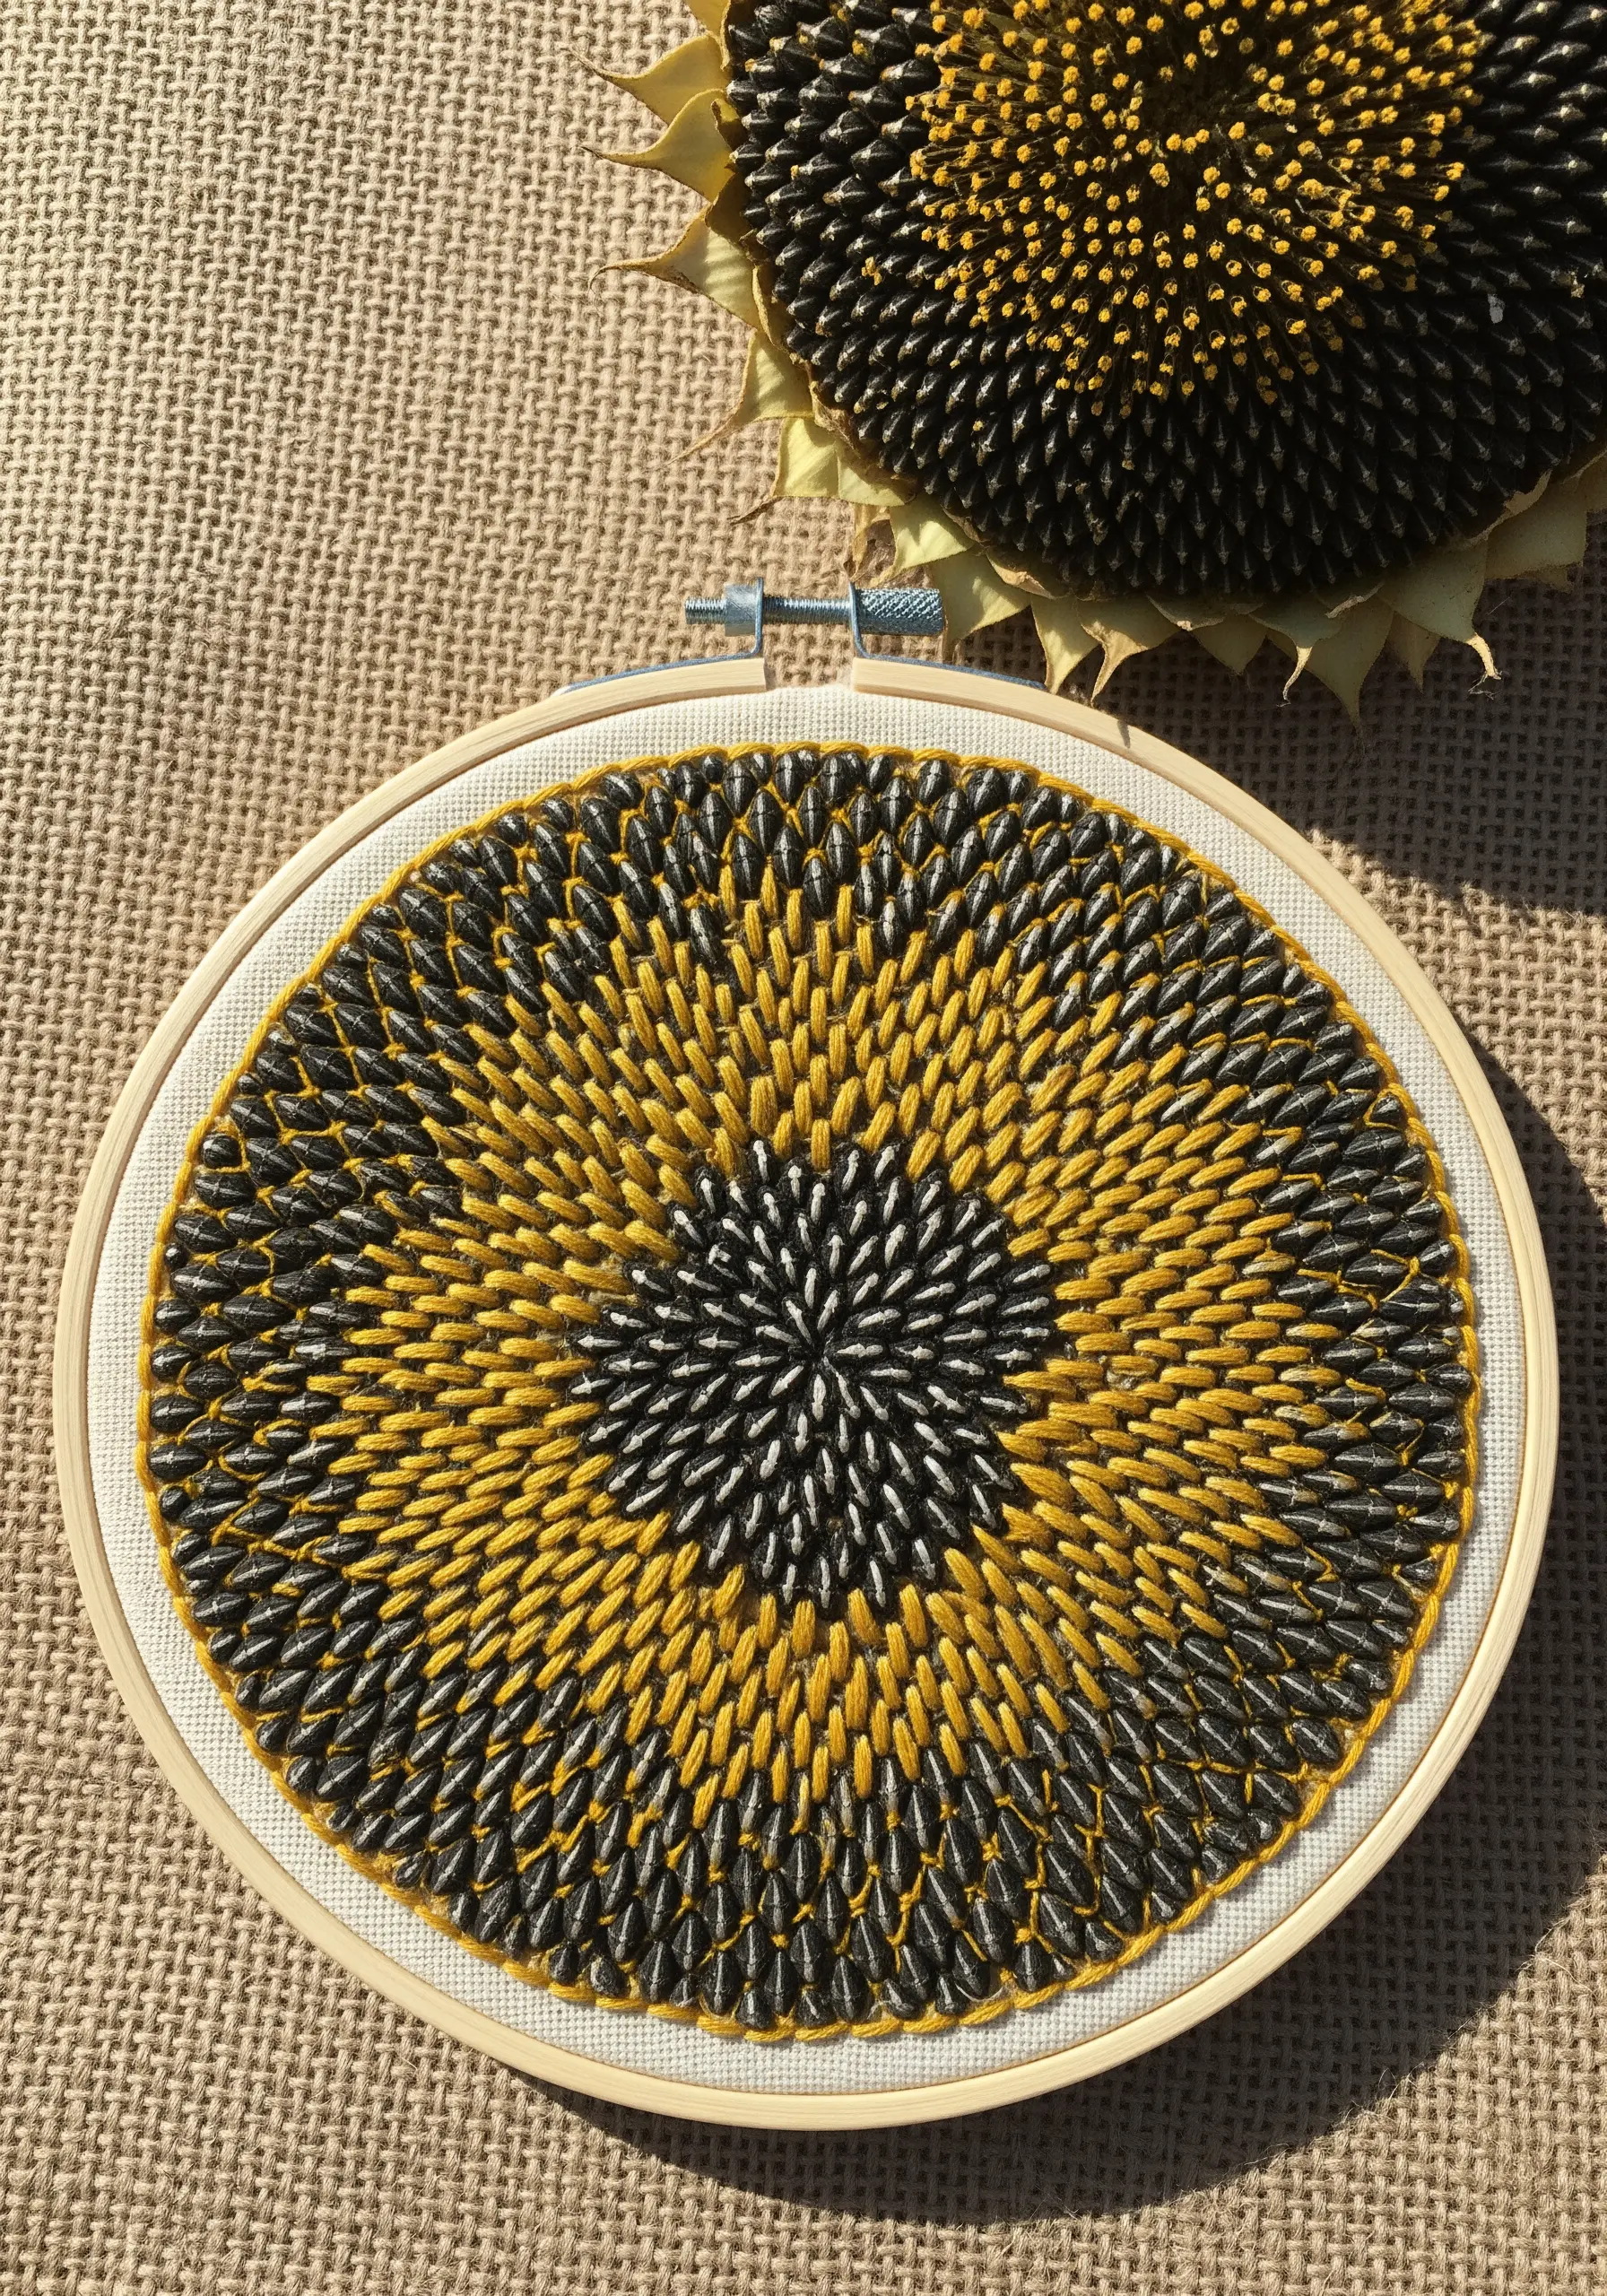
Recreate the mesmerizing spiral of a sunflower head by arranging simple straight stitches in a precise, radial pattern.
Work from the center outwards, angling your stitches to create the intersecting spirals characteristic of the plant.
Varying the color of your thread—from black in the center to grey and yellow on the outer rings—adds realism and depth.
This design relies on rhythm and repetition, making it a meditative project that yields a visually complex result from a very simple stitch.
10. Layer Crocheted Elements for a Scalloped Effect
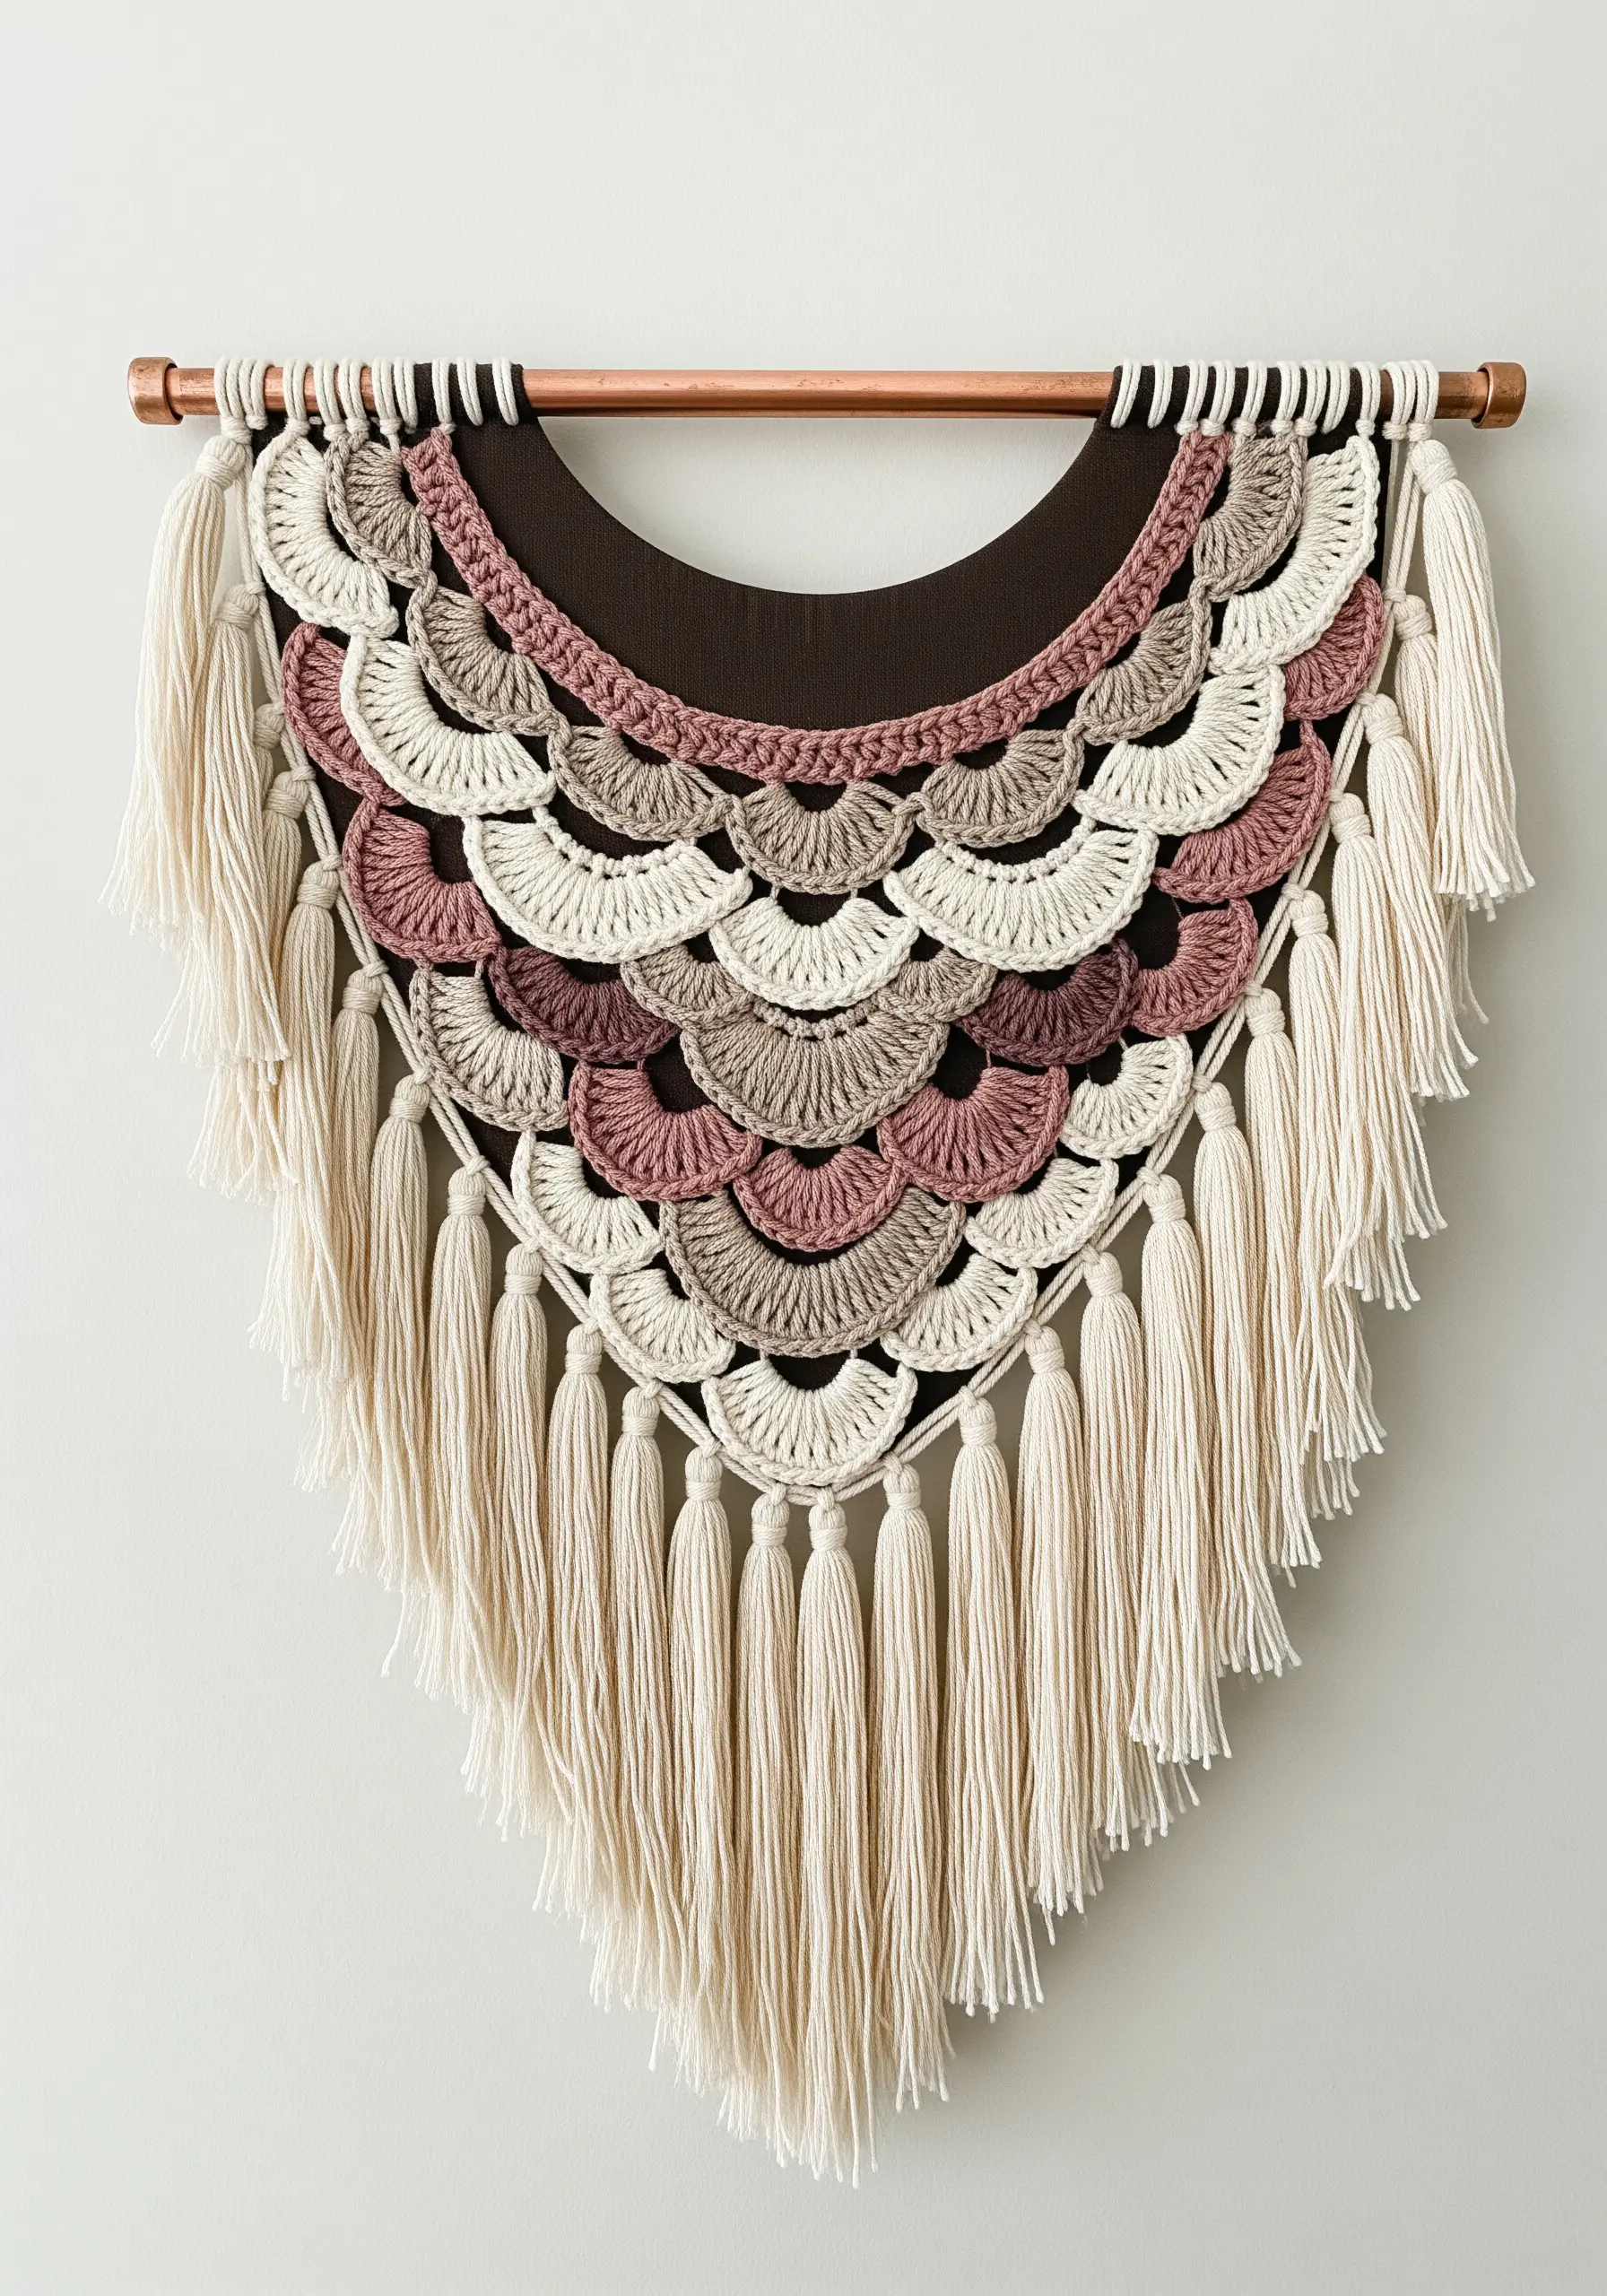
Combine embroidery and crochet to build a wall hanging with dramatic layers and texture.
First, create individual fan-shaped or scalloped motifs in crochet using yarns of different weights and colors.
Then, arrange and stitch these pieces onto a sturdy fabric backing, overlapping them to create a sense of depth and movement, much like fish scales or petals.
This mixed-media approach allows you to build texture much faster than with embroidery alone, perfect for creating statement walls.
11. Stitch a Birch Bark Pattern with Satin Stitch Blocks
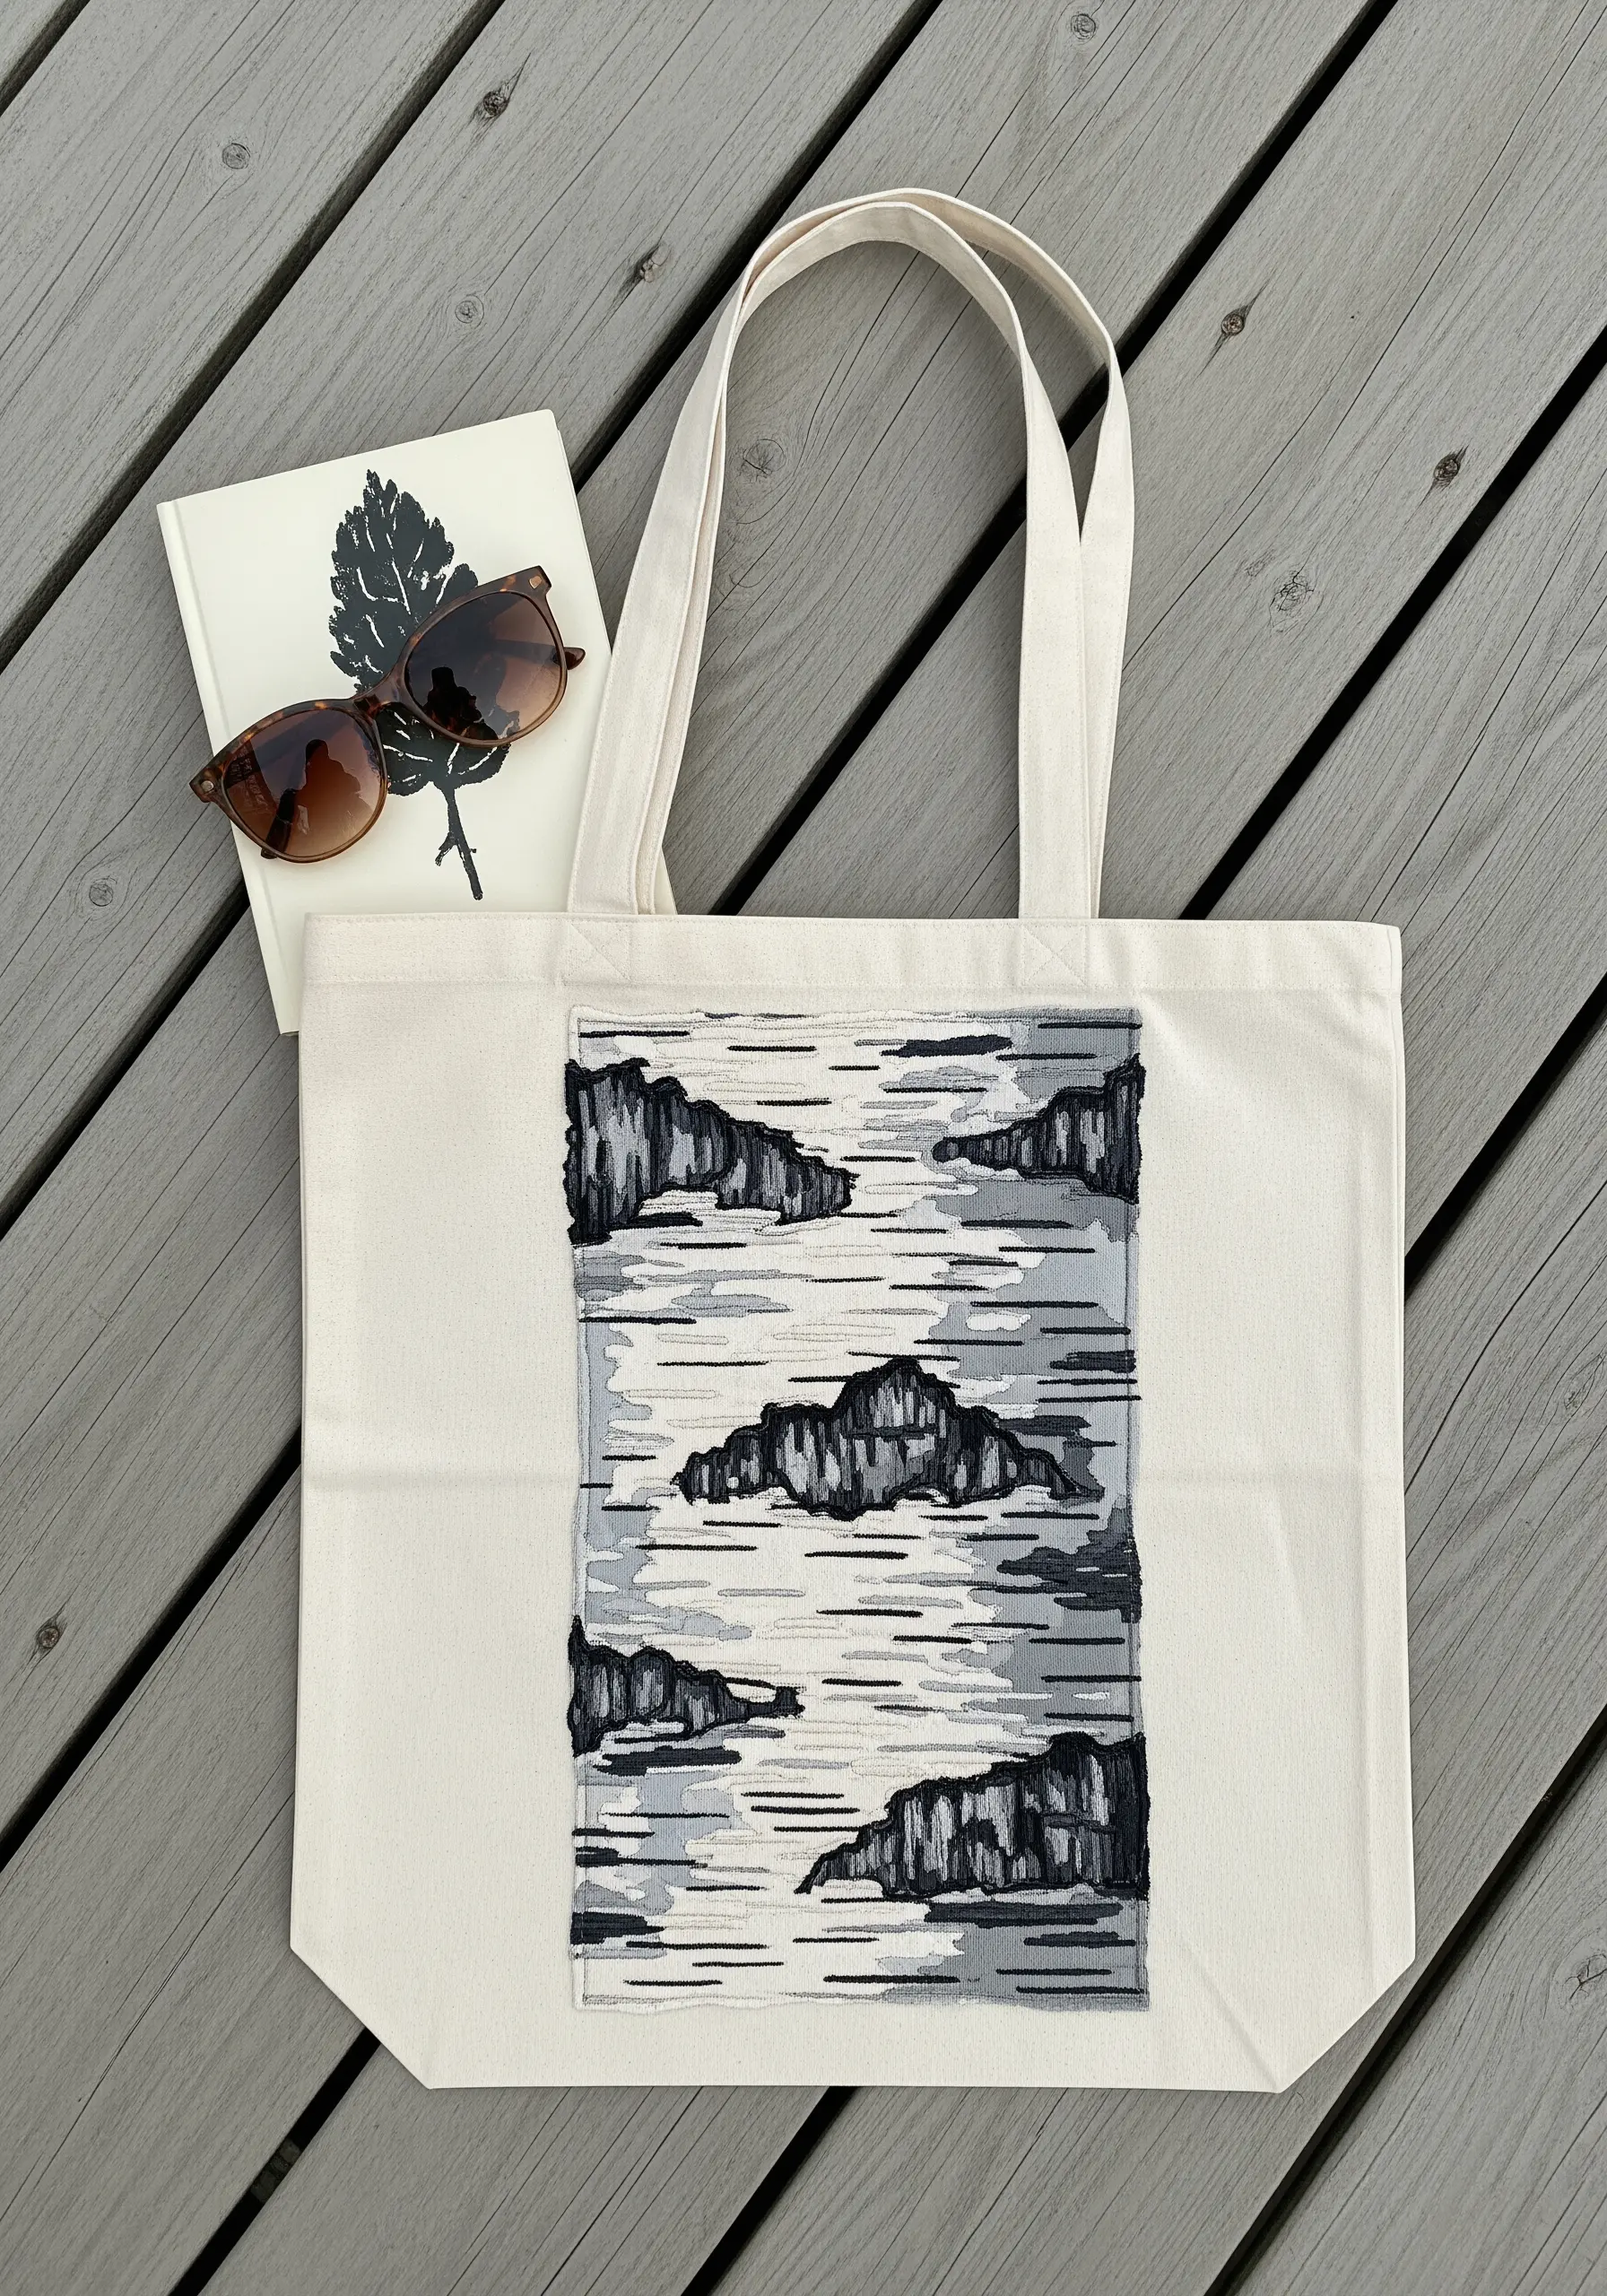
Mimic the graphic quality of birch bark by using blocks of horizontal satin stitch in white, grey, and black.
To create the characteristic texture, make sure your satin stitches are short and tightly packed, but intentionally leave small, uneven gaps between some of the color blocks.
Use black thread and short vertical stitches to add the distinctive dark markings found on the bark.
Applying this as an embroidered patch is a great way to turn plain tote bags into mini nature gardens or abstract landscapes.
12. Craft Sea Foam with French Knots and Woven Wheels
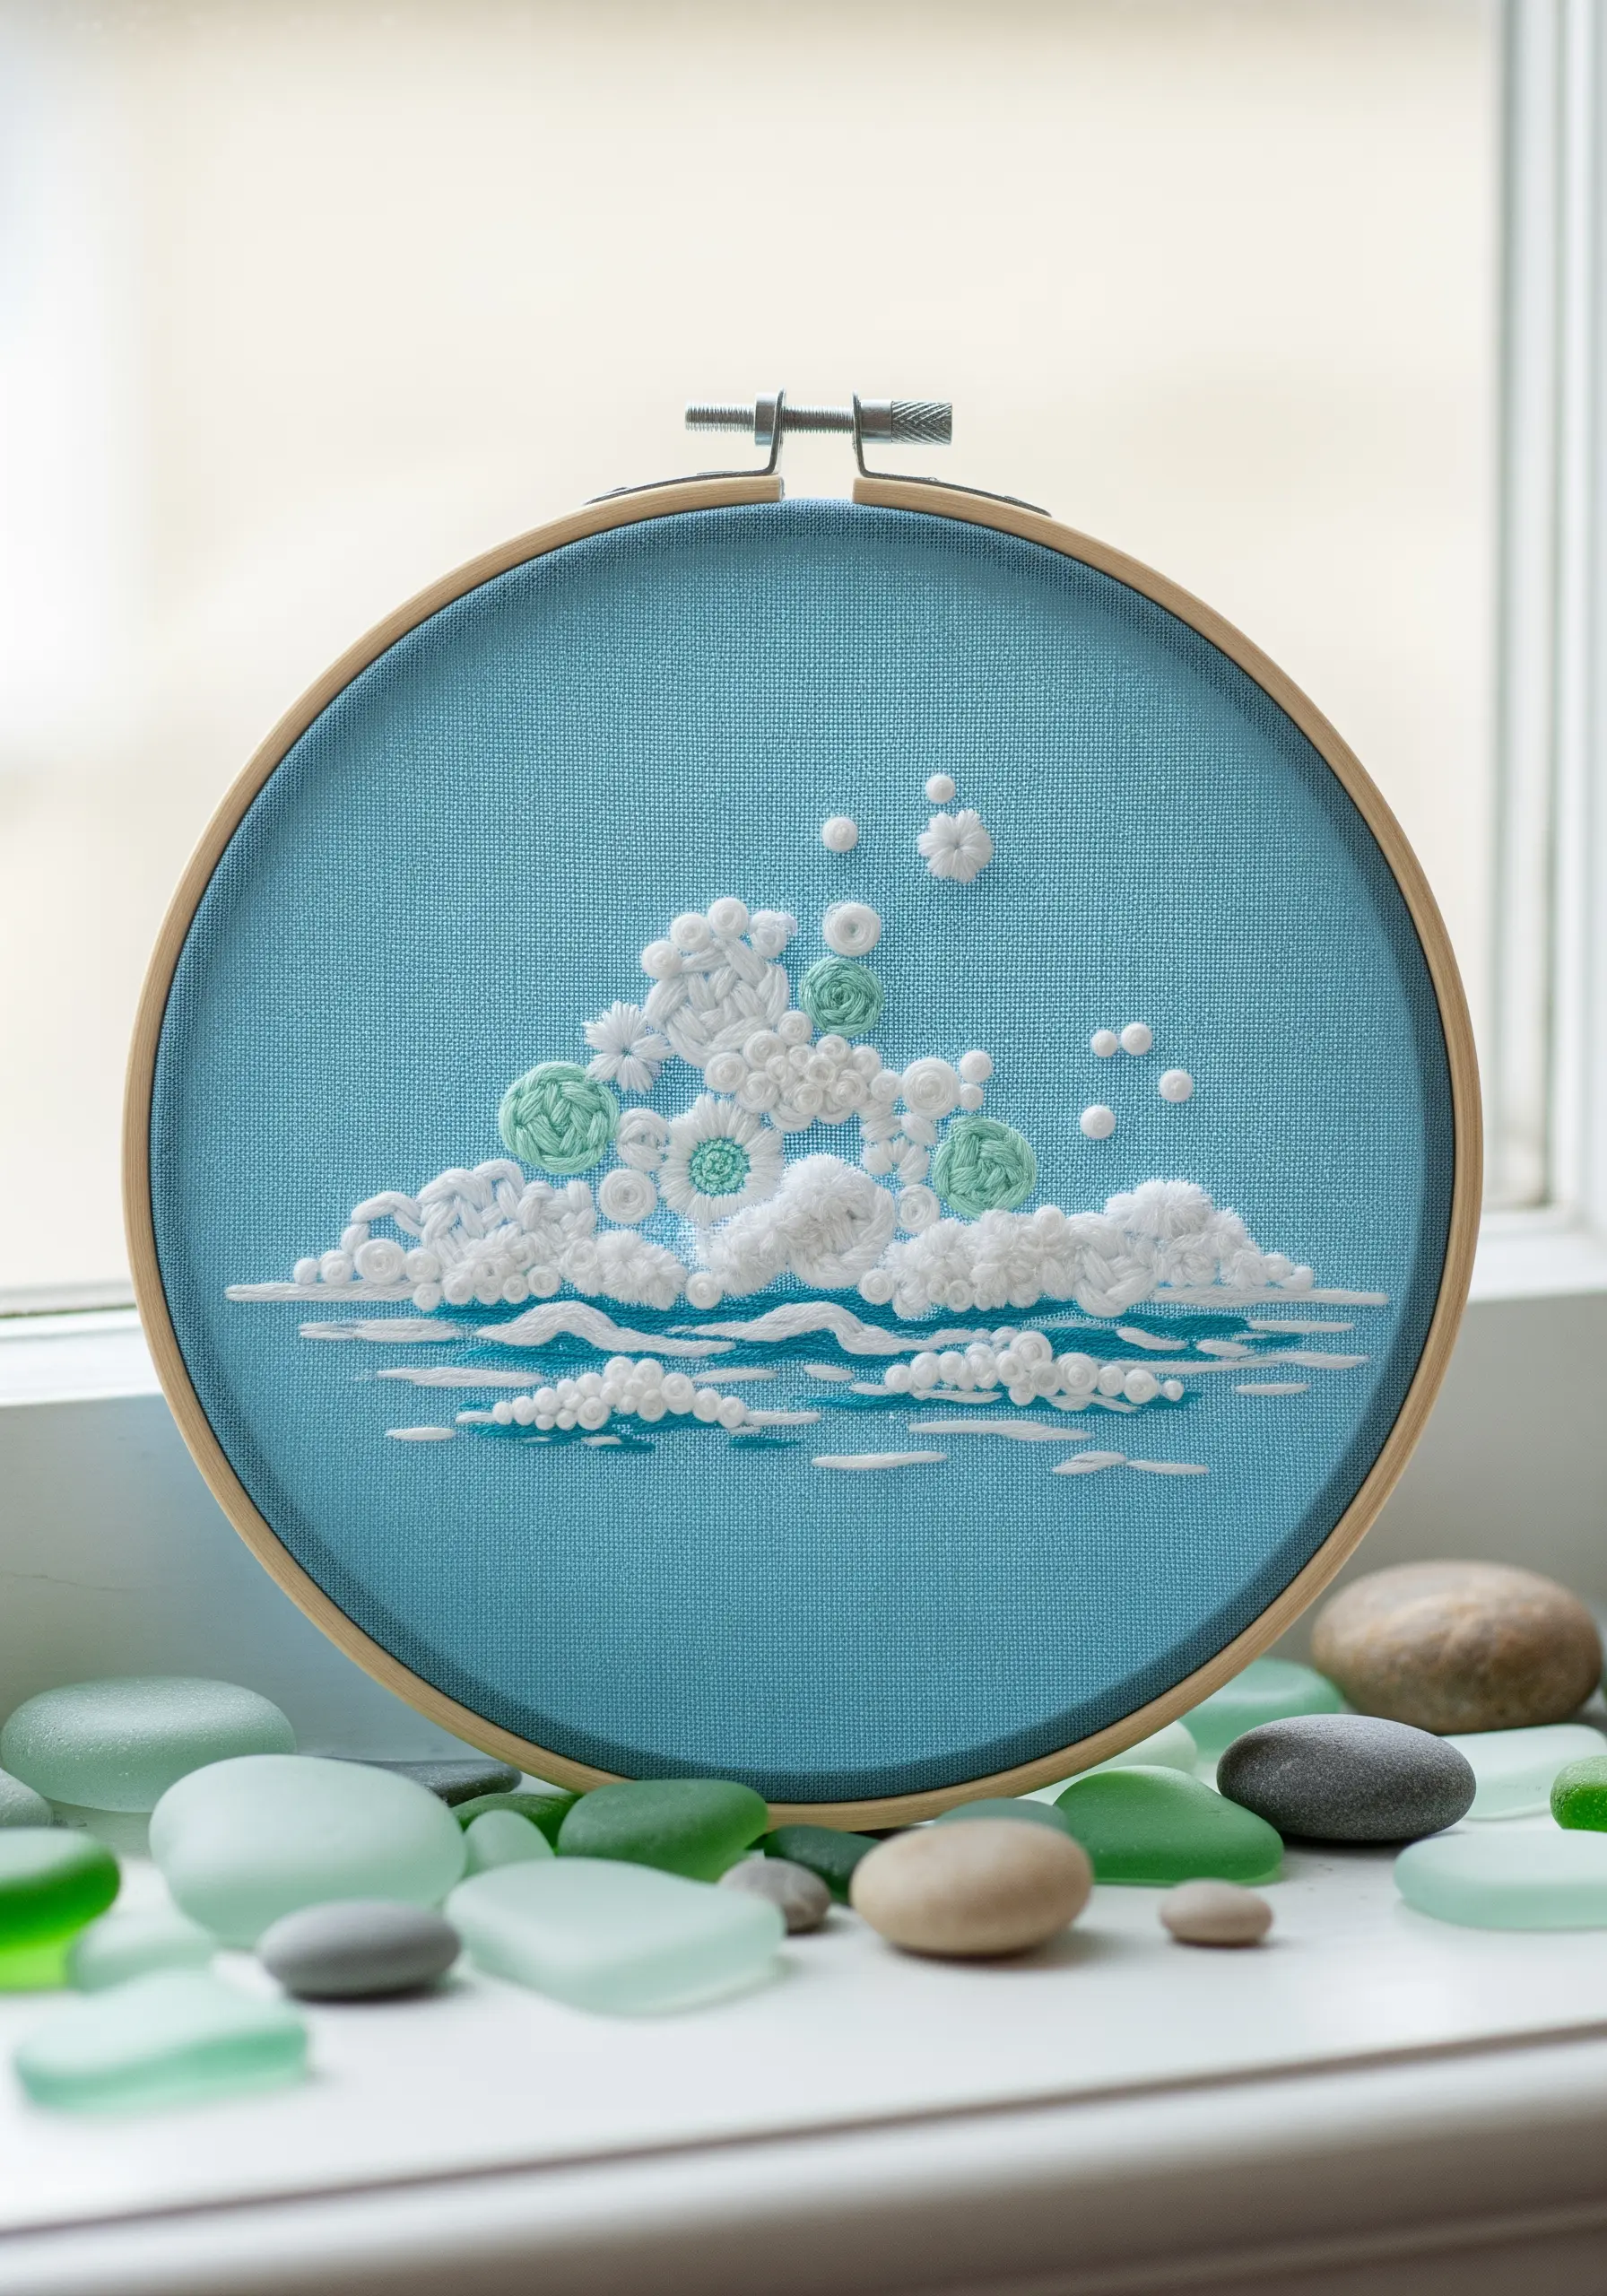
Capture the airy, bubbly texture of sea foam by clustering white and pale green stitches against a blue background.
Use a dense concentration of French knots for the main body of the foam, varying the size for an organic look.
Incorporate a few woven wheel stitches in a contrasting mint green to represent larger, more defined bubbles, creating visual anchors within the composition.
A few scattered single knots and straight stitches leading away from the main cluster give the impression of effervescence and movement.
13. Weave a Bird’s Nest with Unconventional Fibers
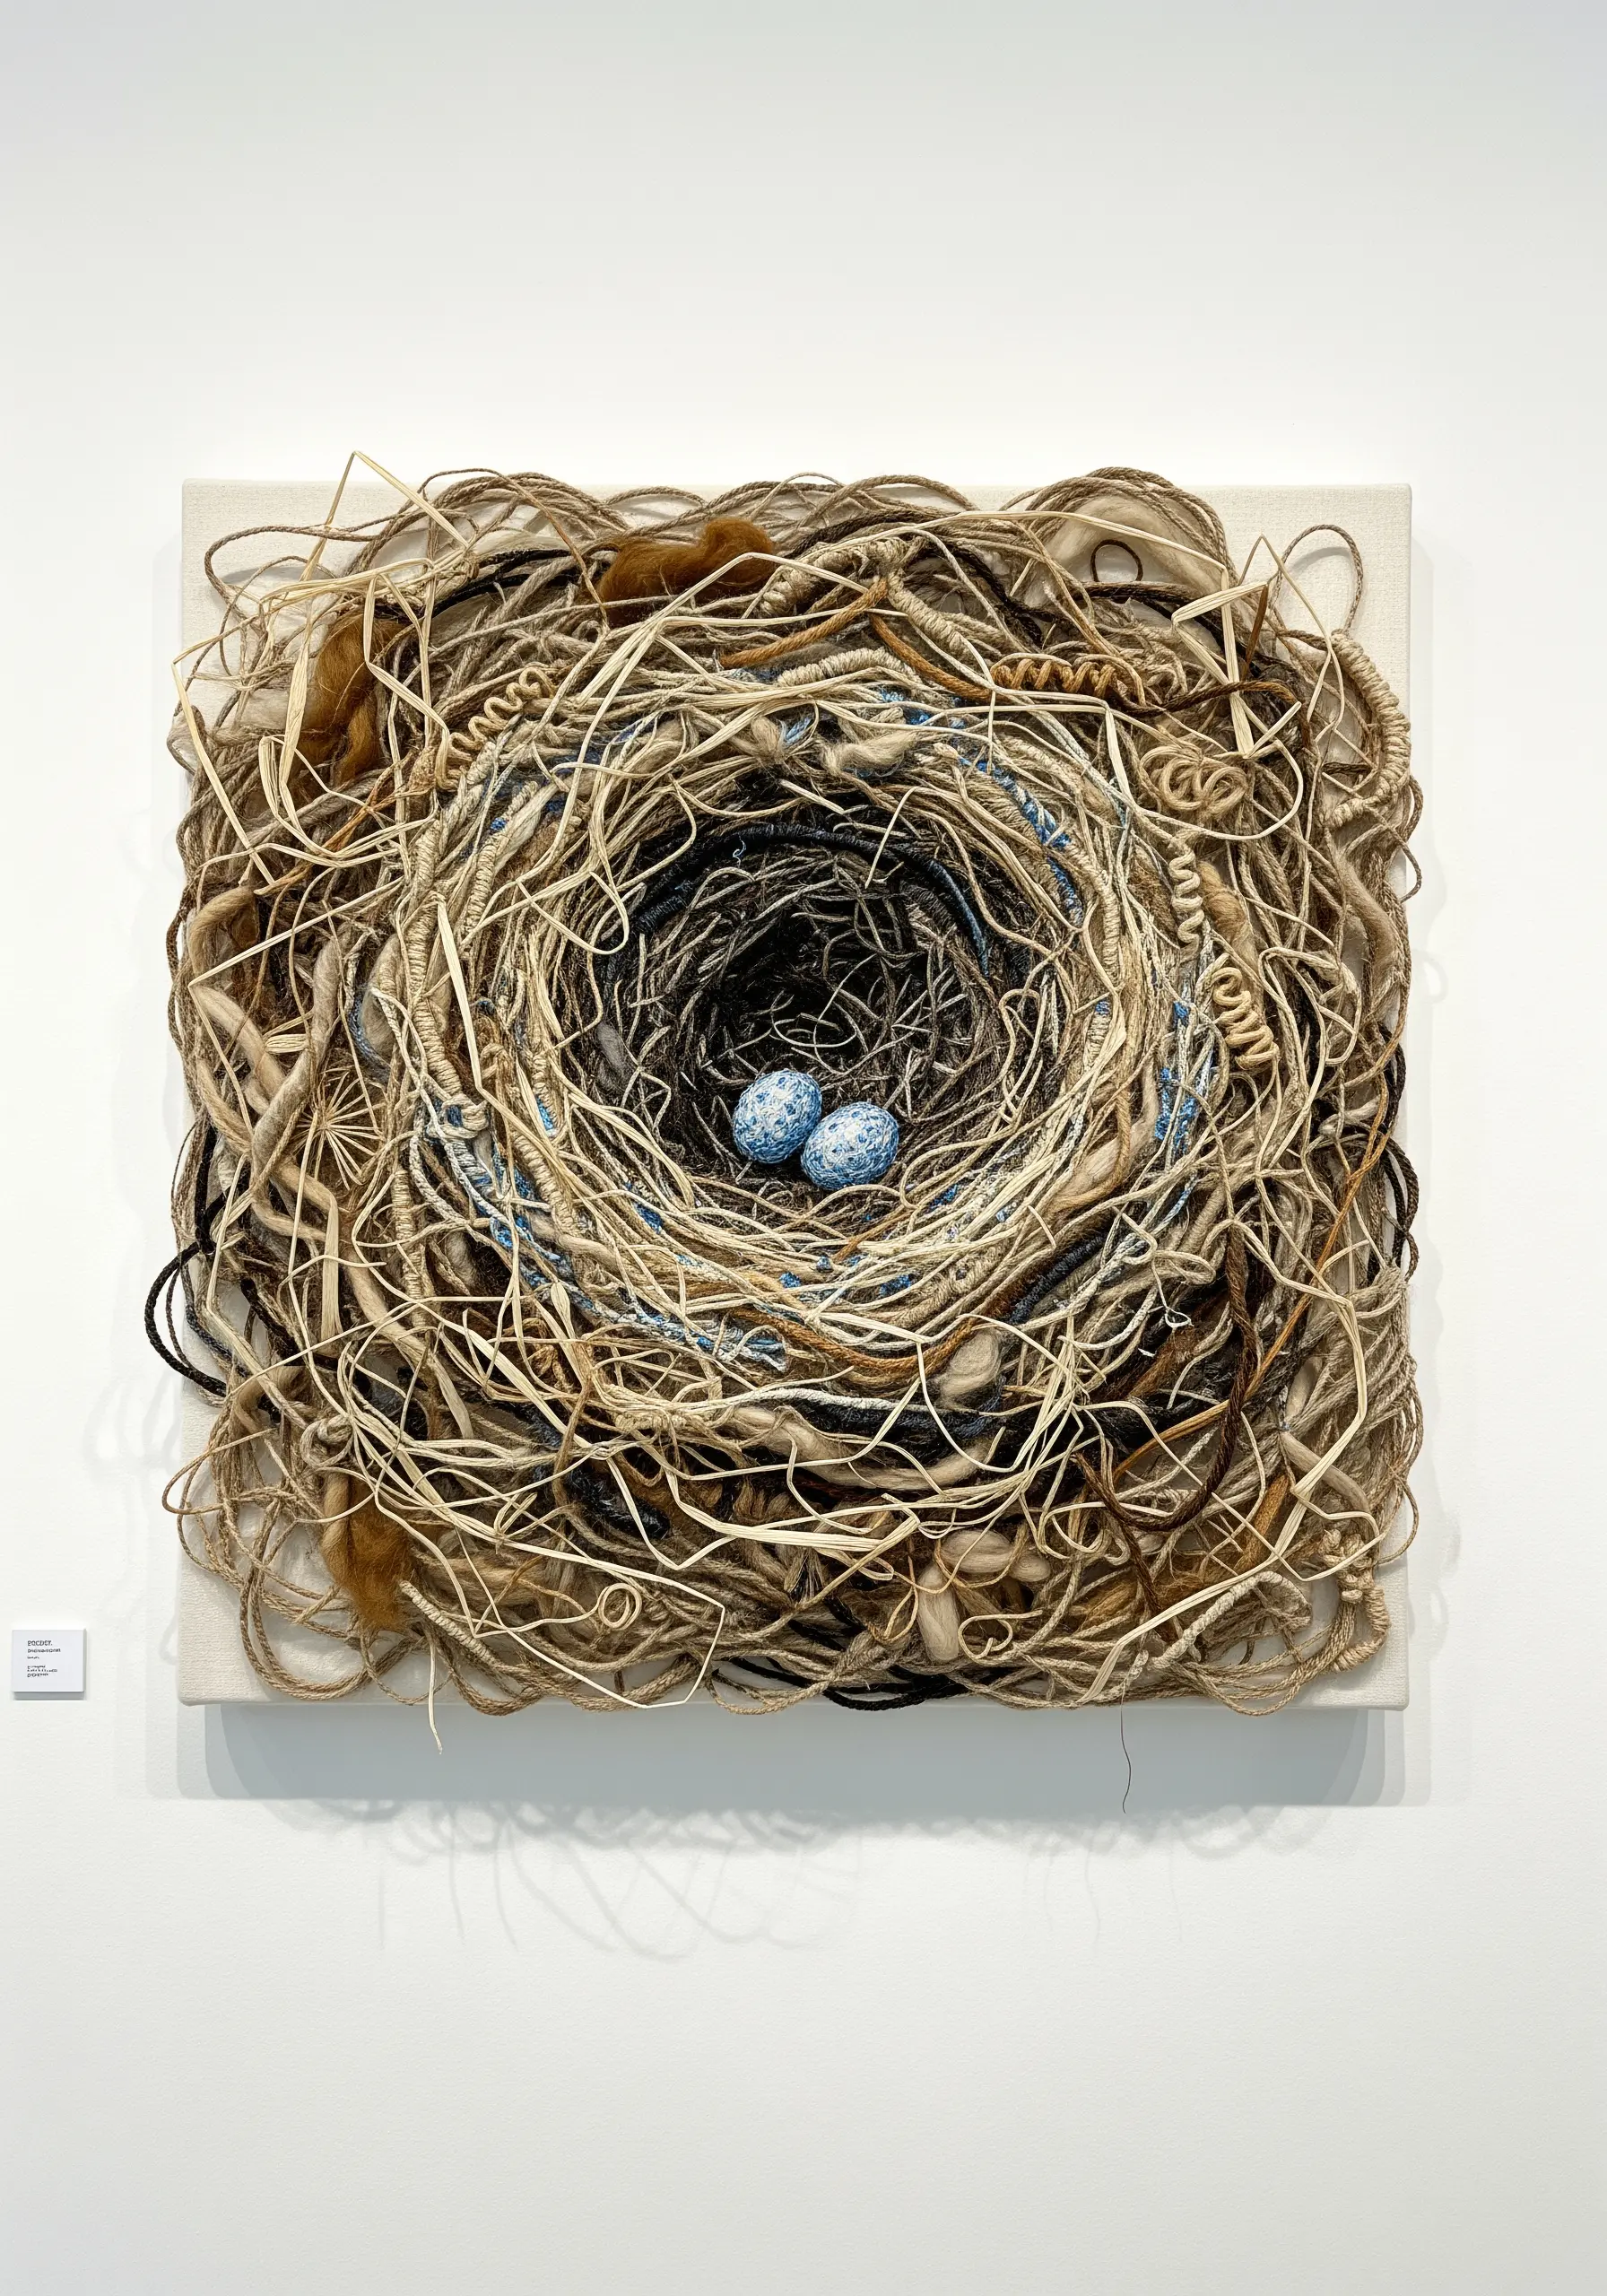
Step away from floss and embrace a truly organic process by couching and weaving with unconventional materials like jute, twine, raffia, and raw wool.
Start by creating a loose, circular base of thicker twine on your canvas, tacking it down discreetly.
Then, weave thinner, more varied fibers through this base, leaving ends loose and creating a chaotic, authentic nest-like structure.
This is a perfect example of how mixed-fiber creations inspired by nature can produce gallery-worthy art.
14. Achieve Dandelion Delicacy with Detached Chain Stitches
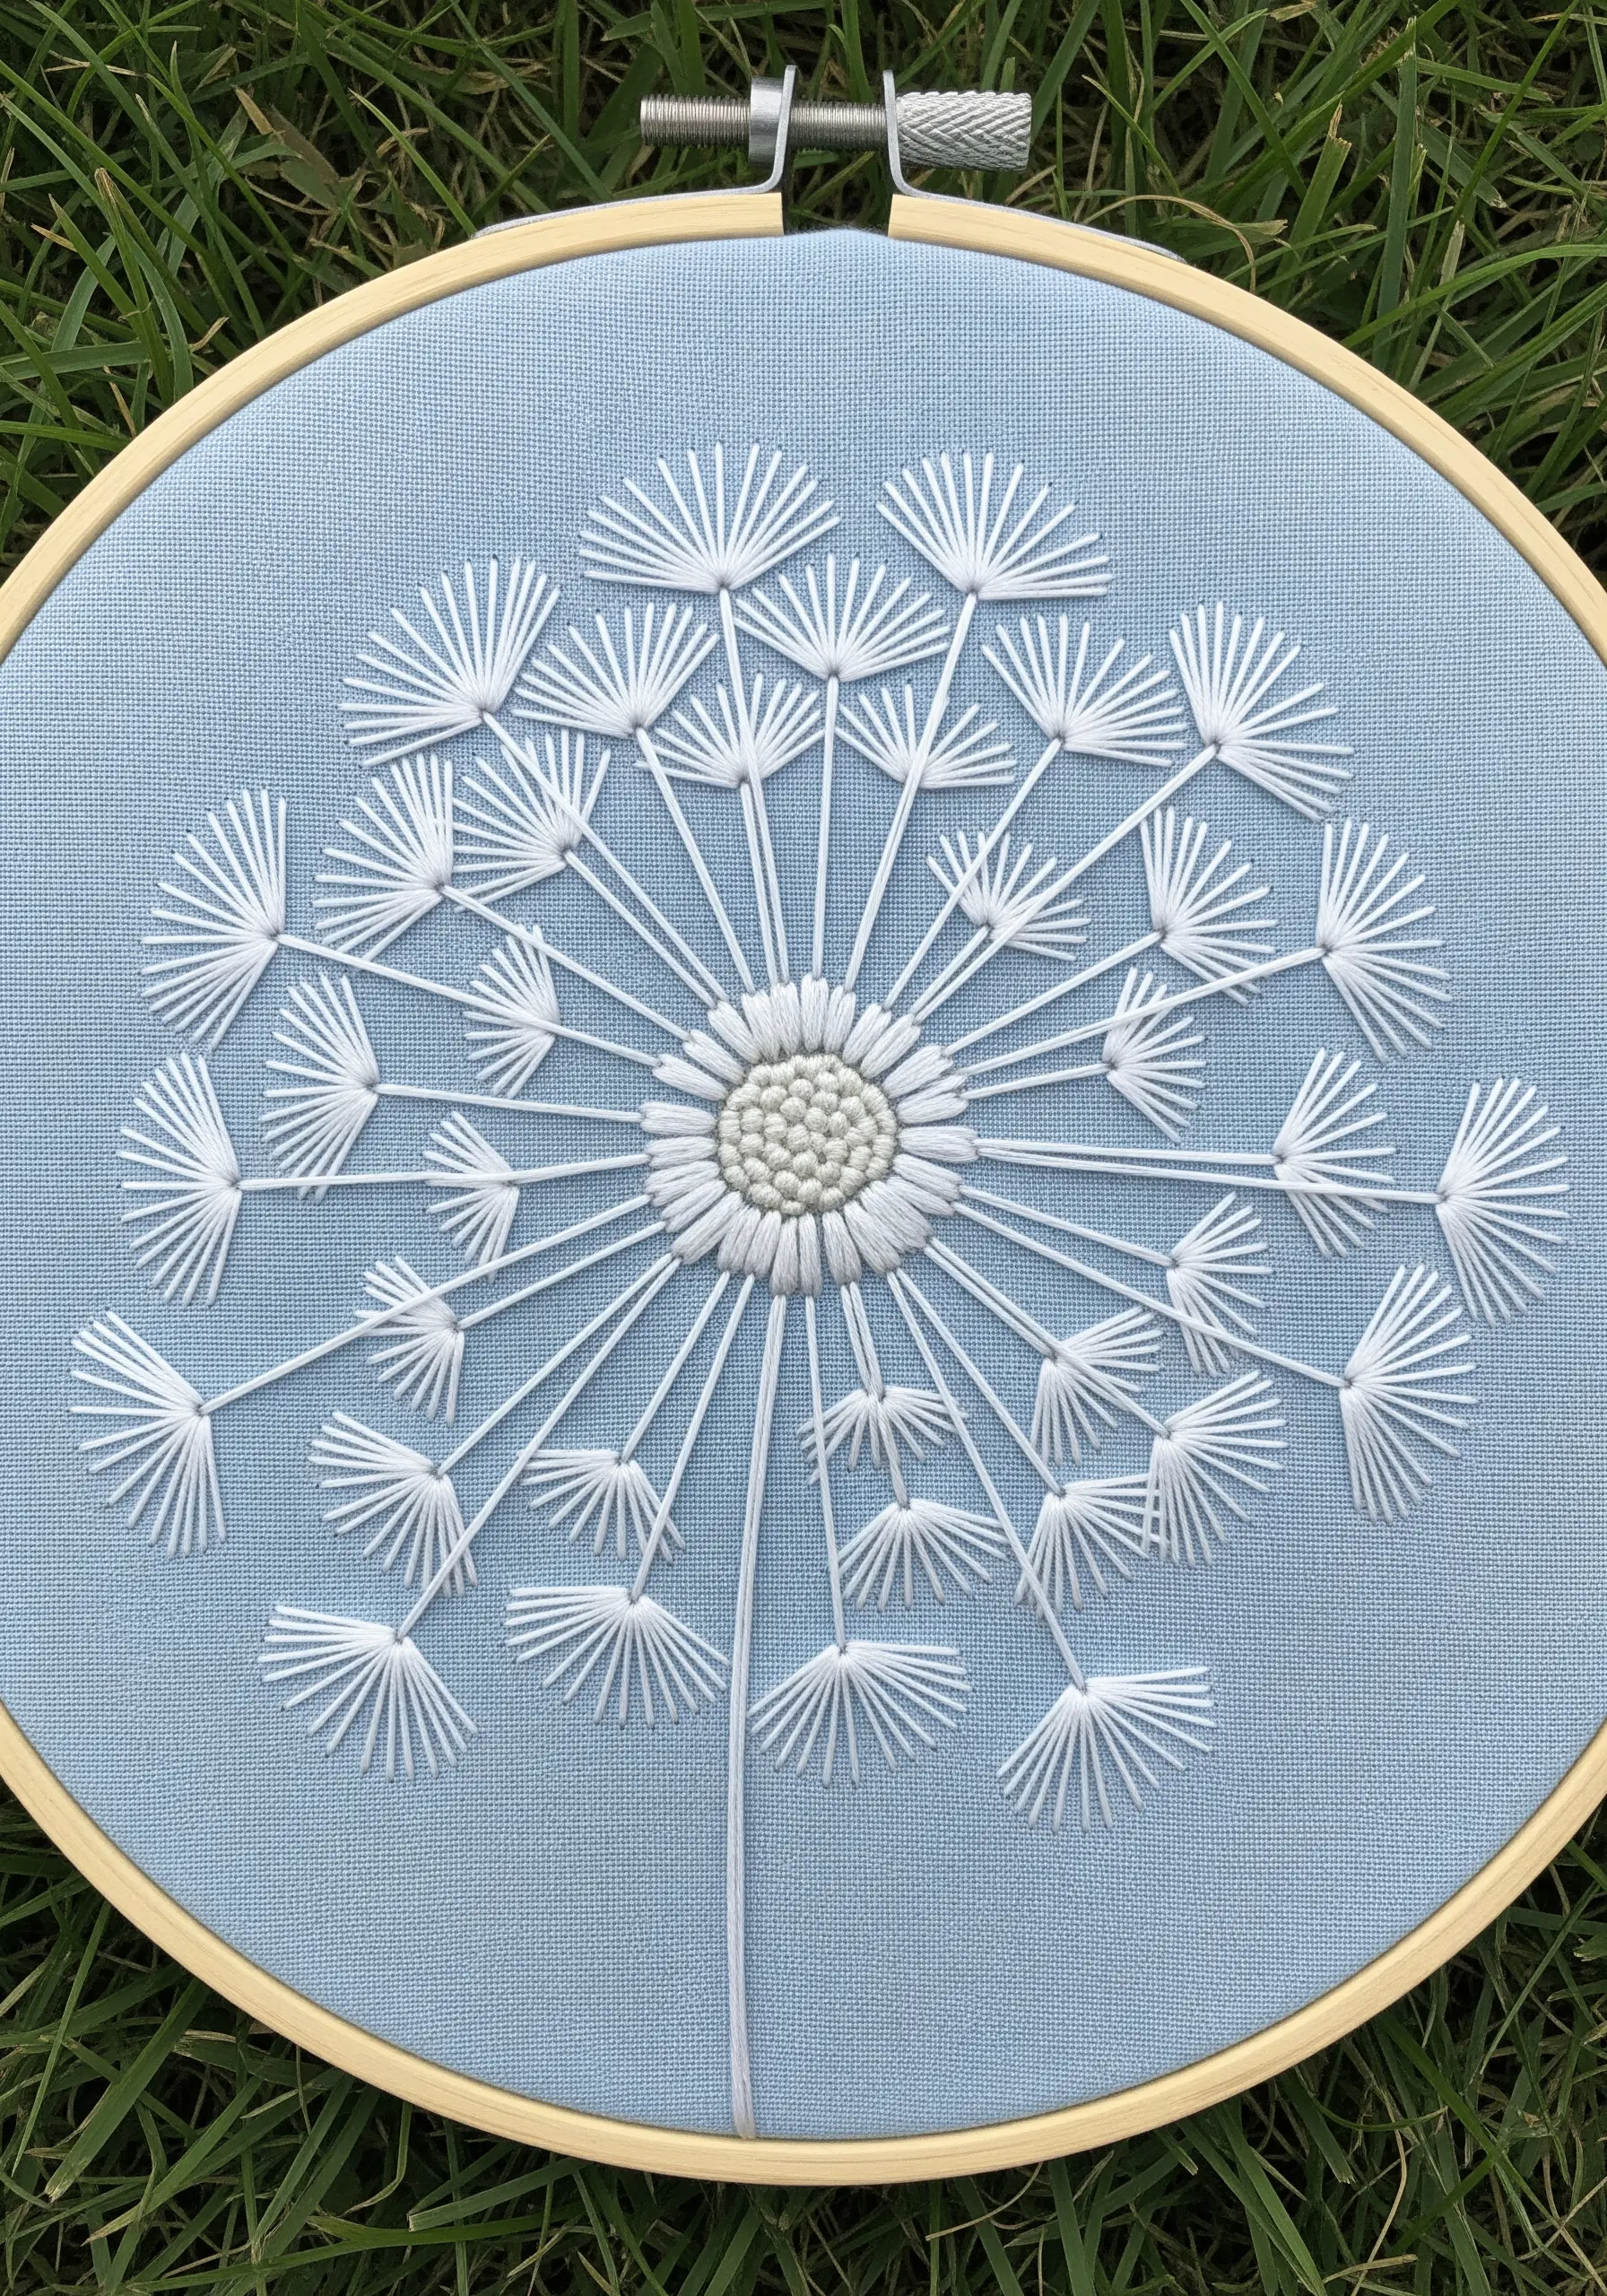
Create the airy fluff of a dandelion seed head using detached chain stitches (lazy daisy stitches) and straight stitches.
For each parachute-like seed, work a series of straight stitches fanning out from a central point.
Use a single detached chain stitch at the end of each stem to suggest the tiny seed itself, giving the composition a delicate, finished look.
Stitching with bright white thread on a colored fabric, like this muted blue, makes the delicate structure stand out beautifully.
15. Illustrate Tree Rings with Raised Stitches
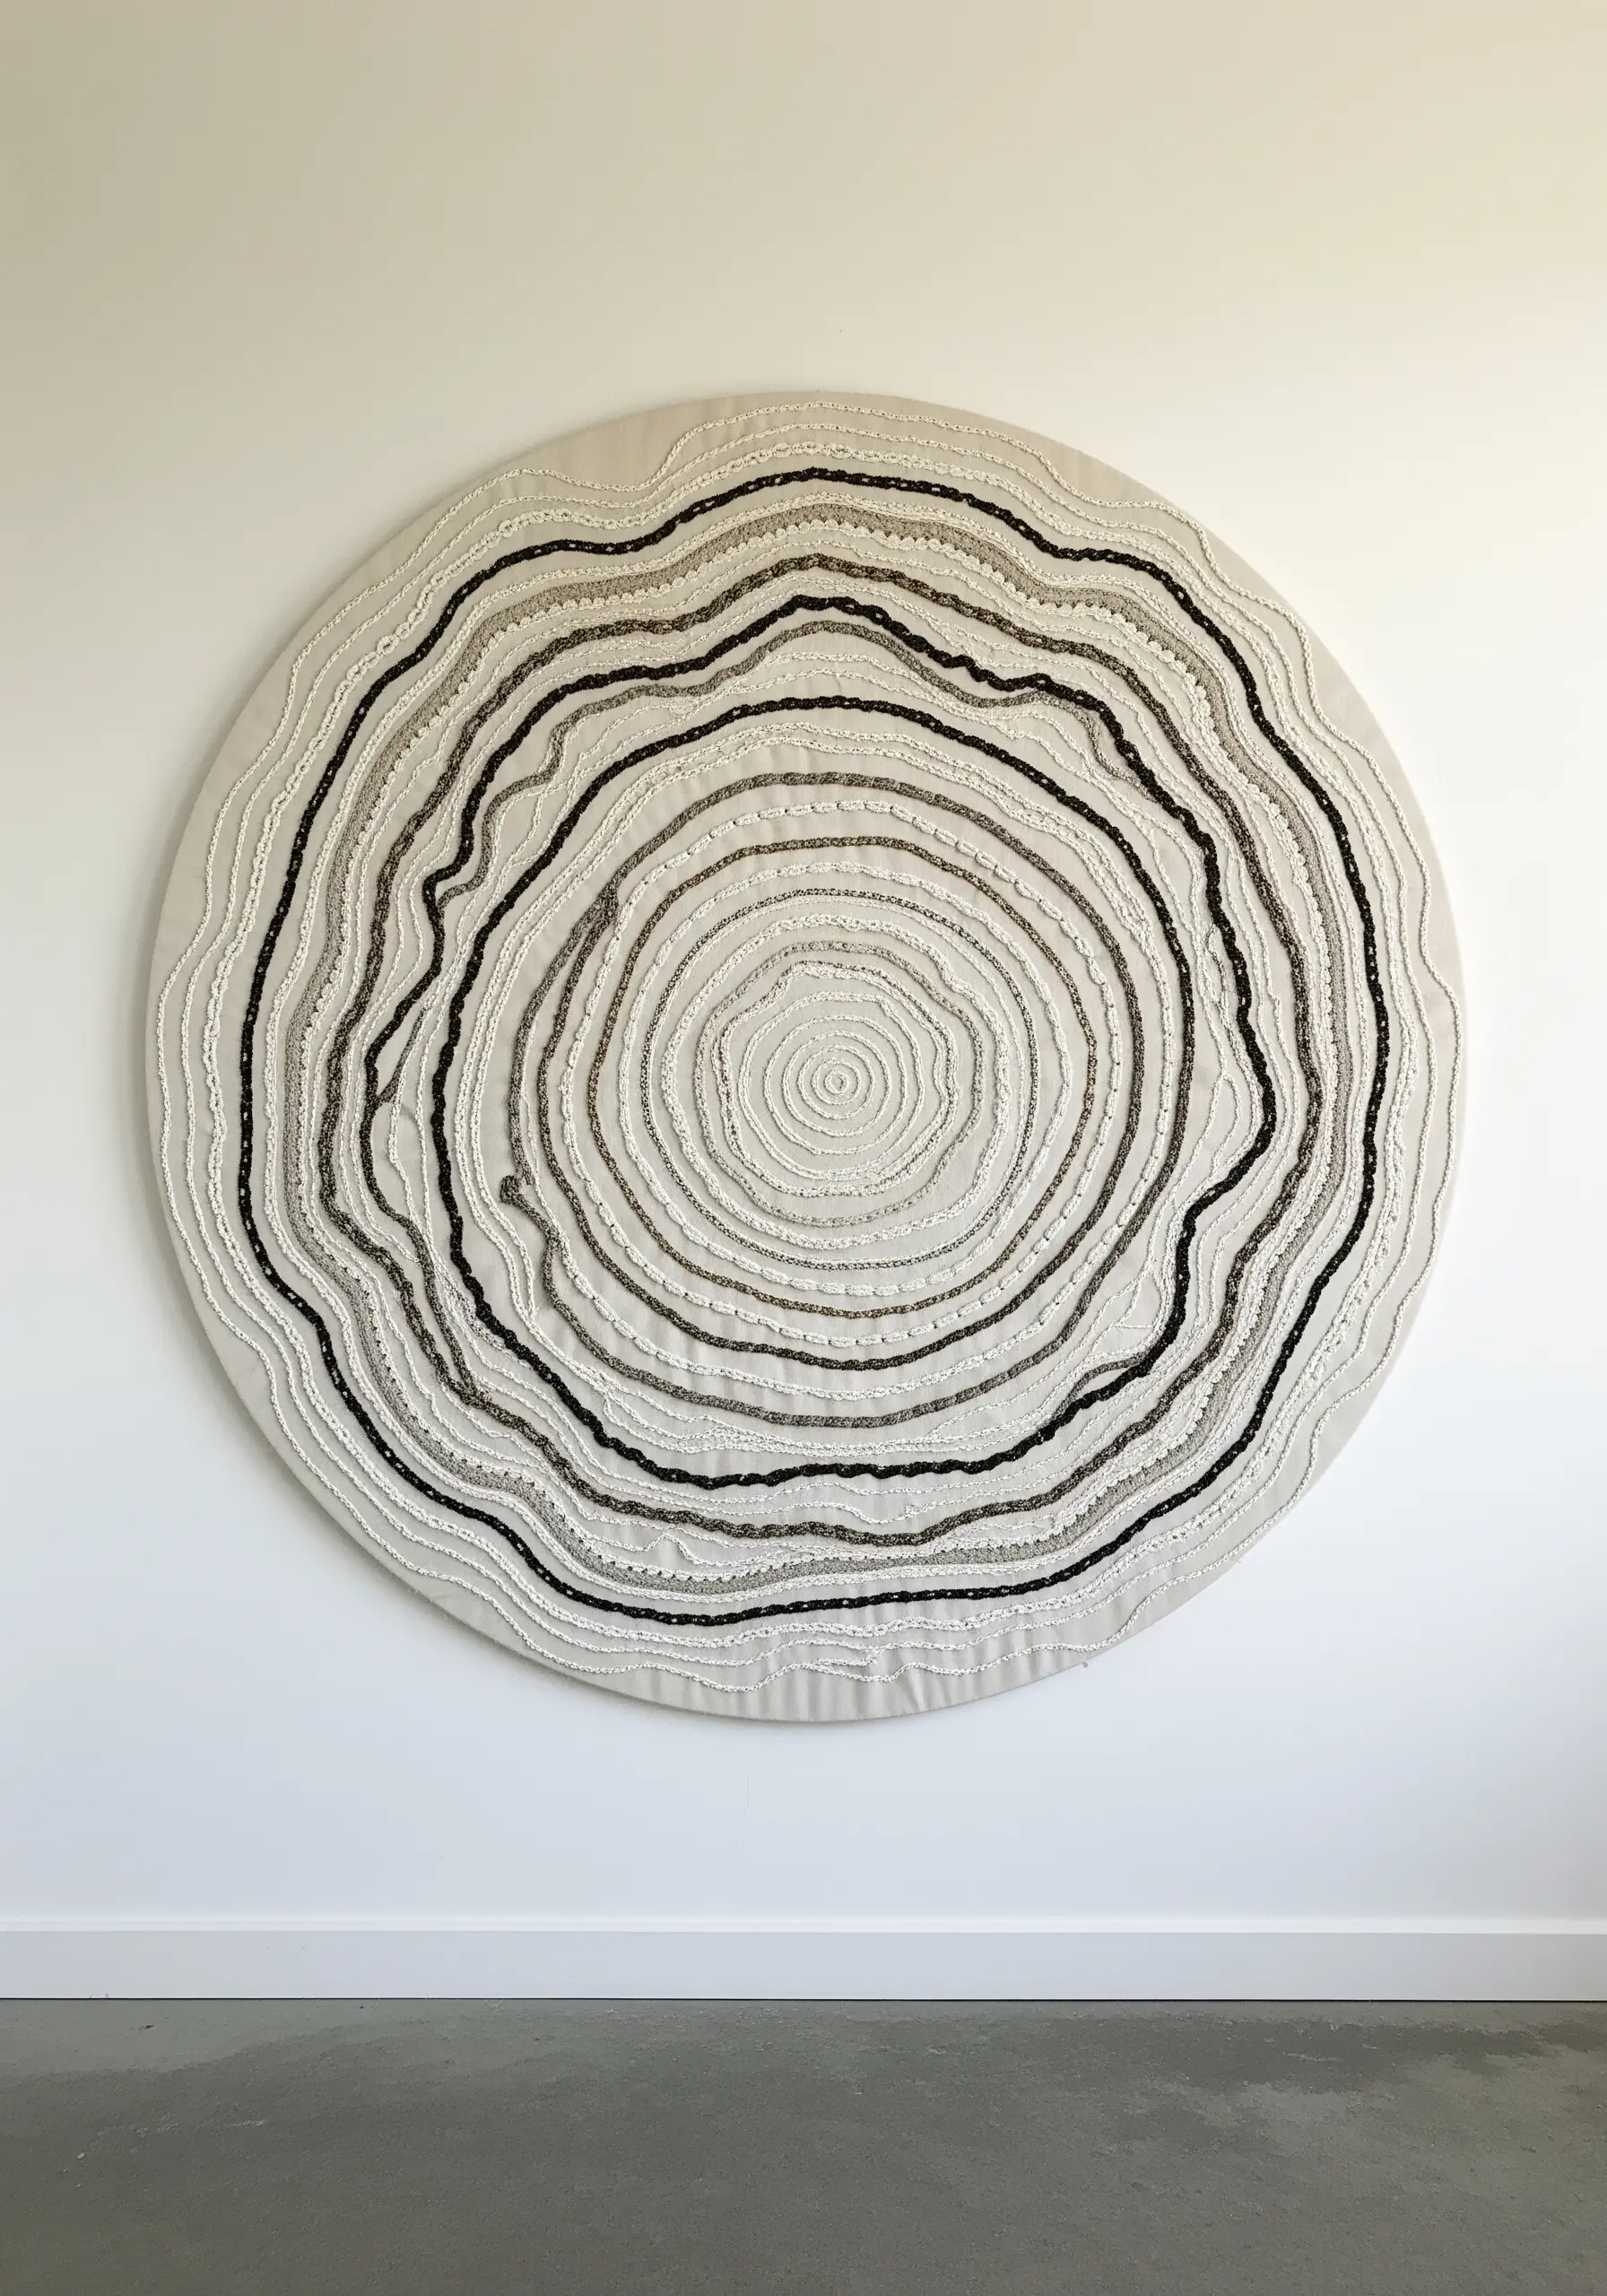
Translate the concentric rings of a tree cross-section into a tactile wall art piece using raised stitches.
Use whipped backstitch or stem stitch for the main rings, as their rope-like texture naturally mimics the lines in wood grain.
Vary the thread colors subtly between rings—using shades of cream, grey, and black—to represent the different stages of growth.
For a more dramatic effect, incorporate thicker threads or even thin cord for some of the rings to create variation in height and texture.
16. Add a Touch of Frost with Metallic Thread and Beads
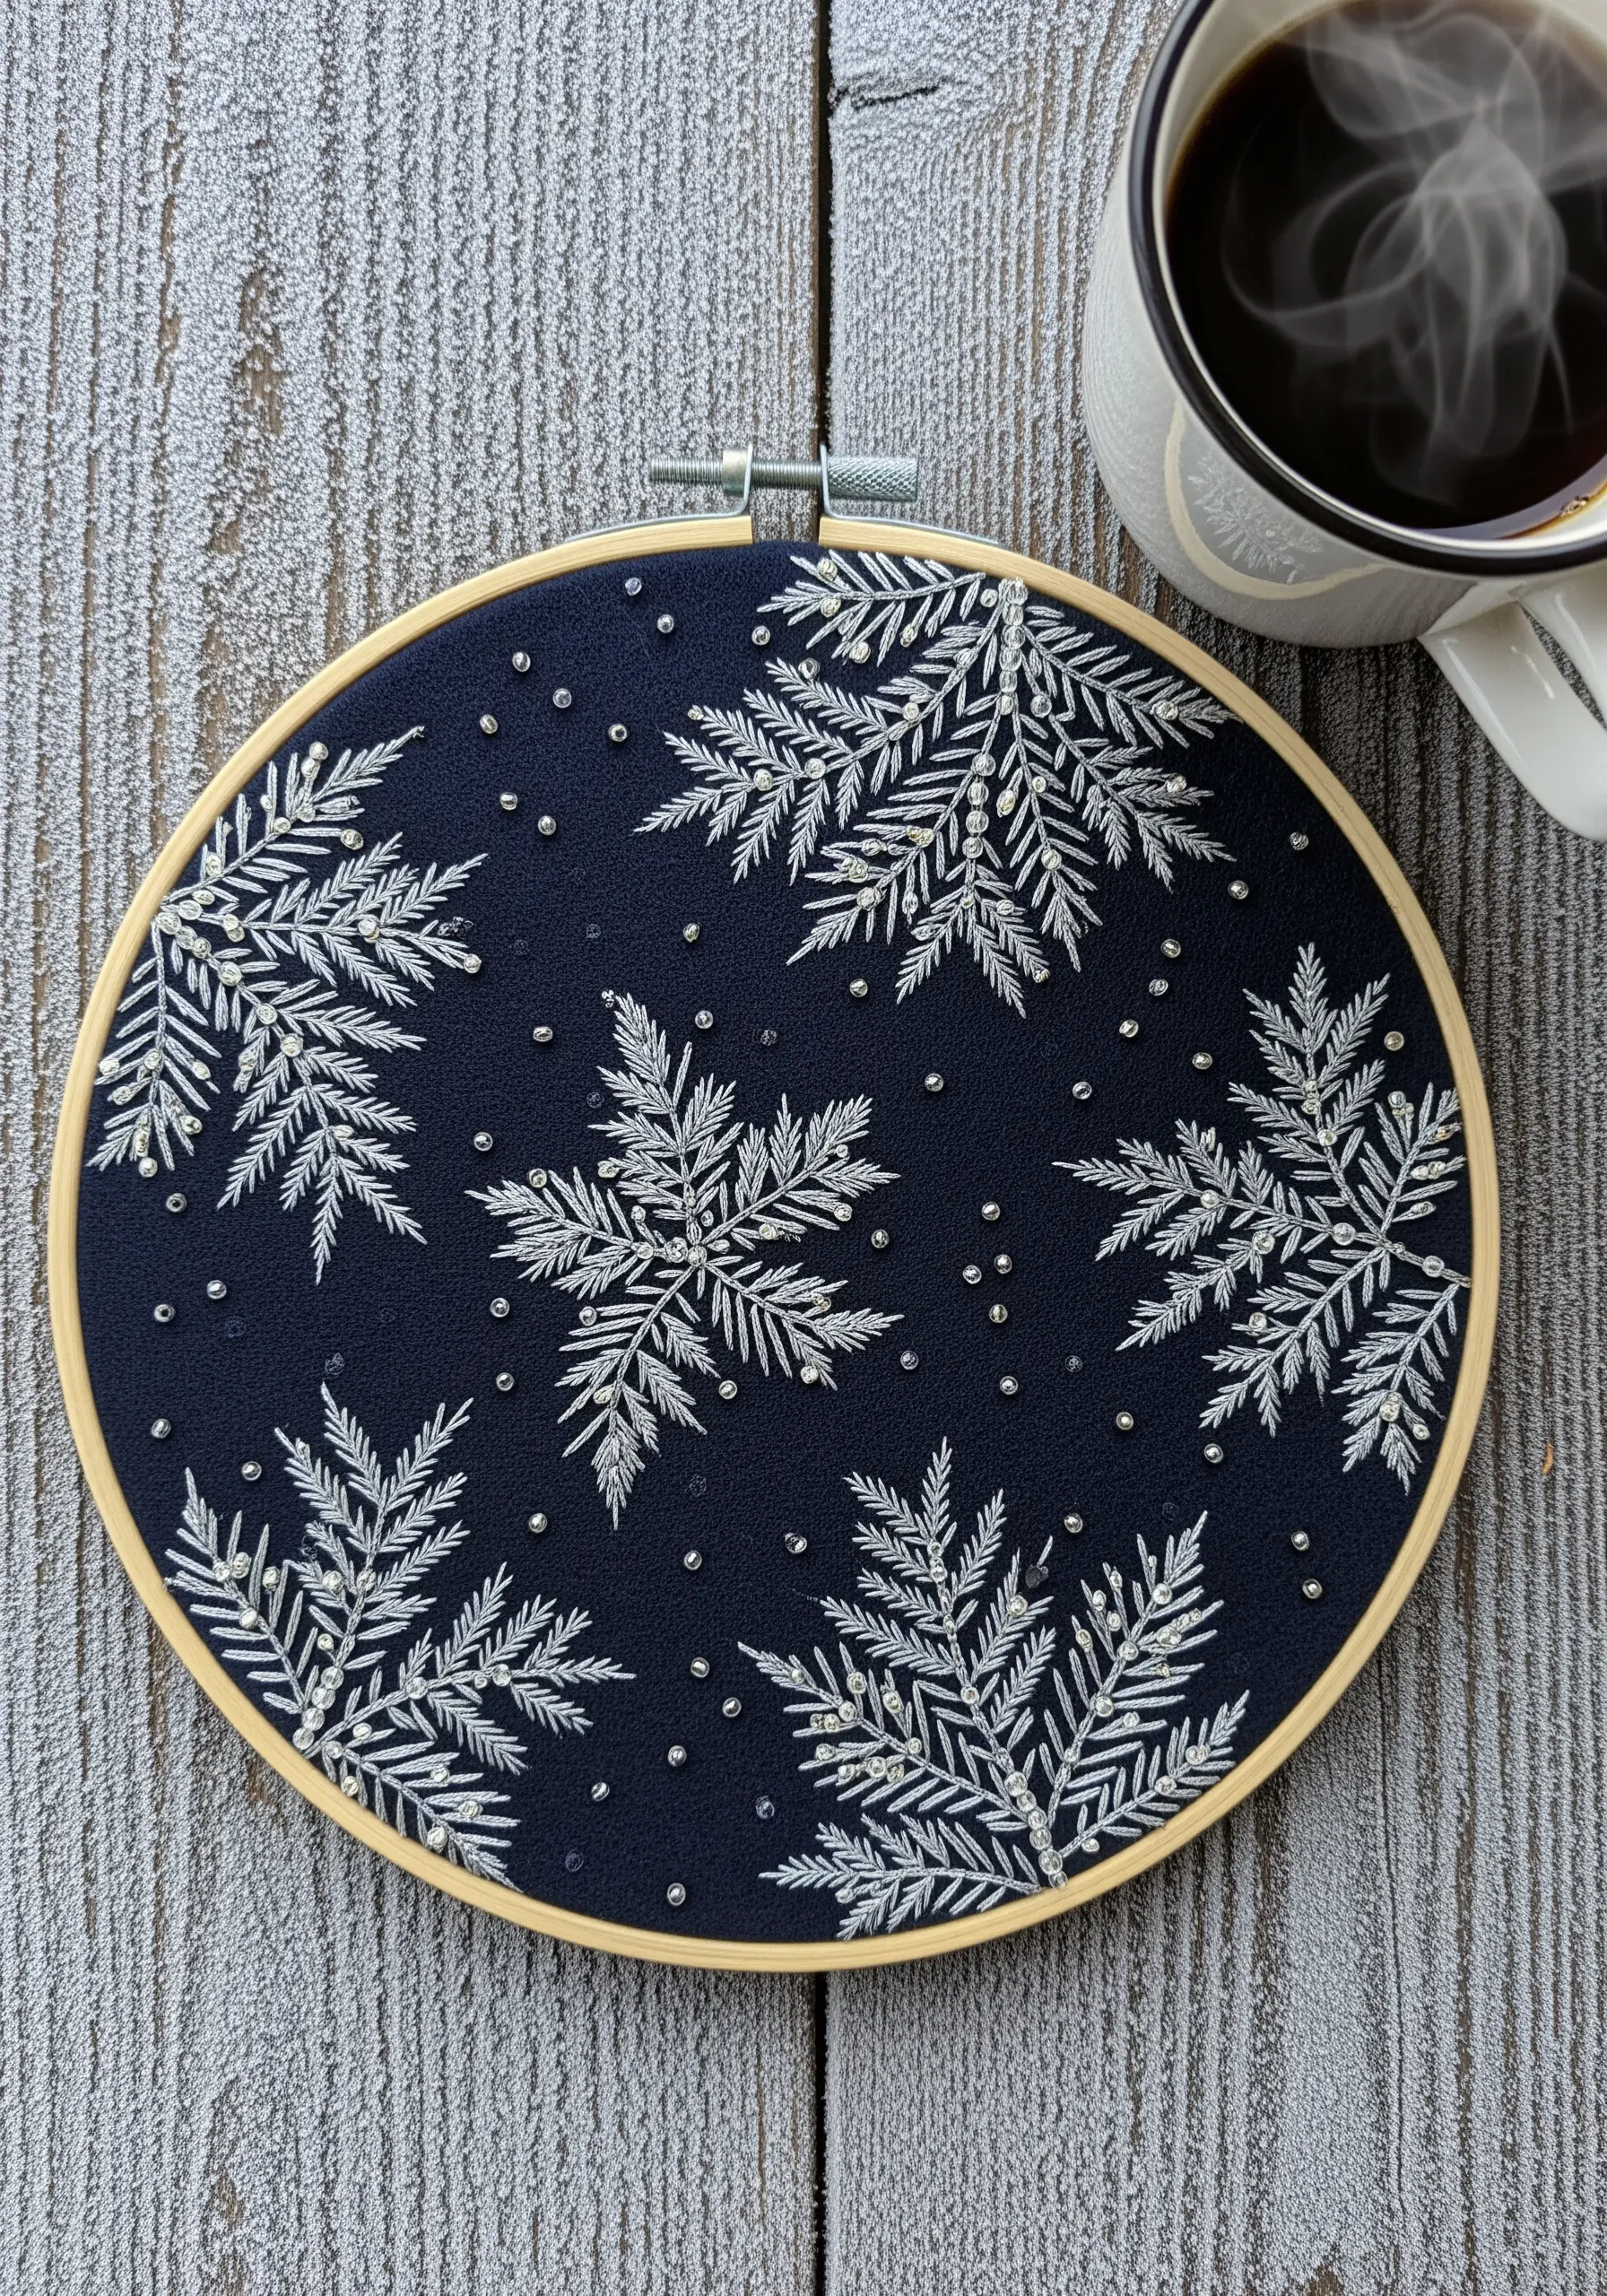
Capture the sparkle of frost-covered leaves by combining traditional stitches with metallic elements.
Use a light-colored floss, like silver or pale grey, to stitch the fern-like leaves with fishbone or fly stitch.
Then, discreetly add tiny silver seed beads throughout the design, concentrating them at the junctions of stitches to mimic ice crystals.
A single strand of silver metallic thread can be woven into your main floss to give the entire piece a subtle, uniform shimmer against a dark fabric.
17. Form a Sea Urchin with French Knots and Bullion Roses
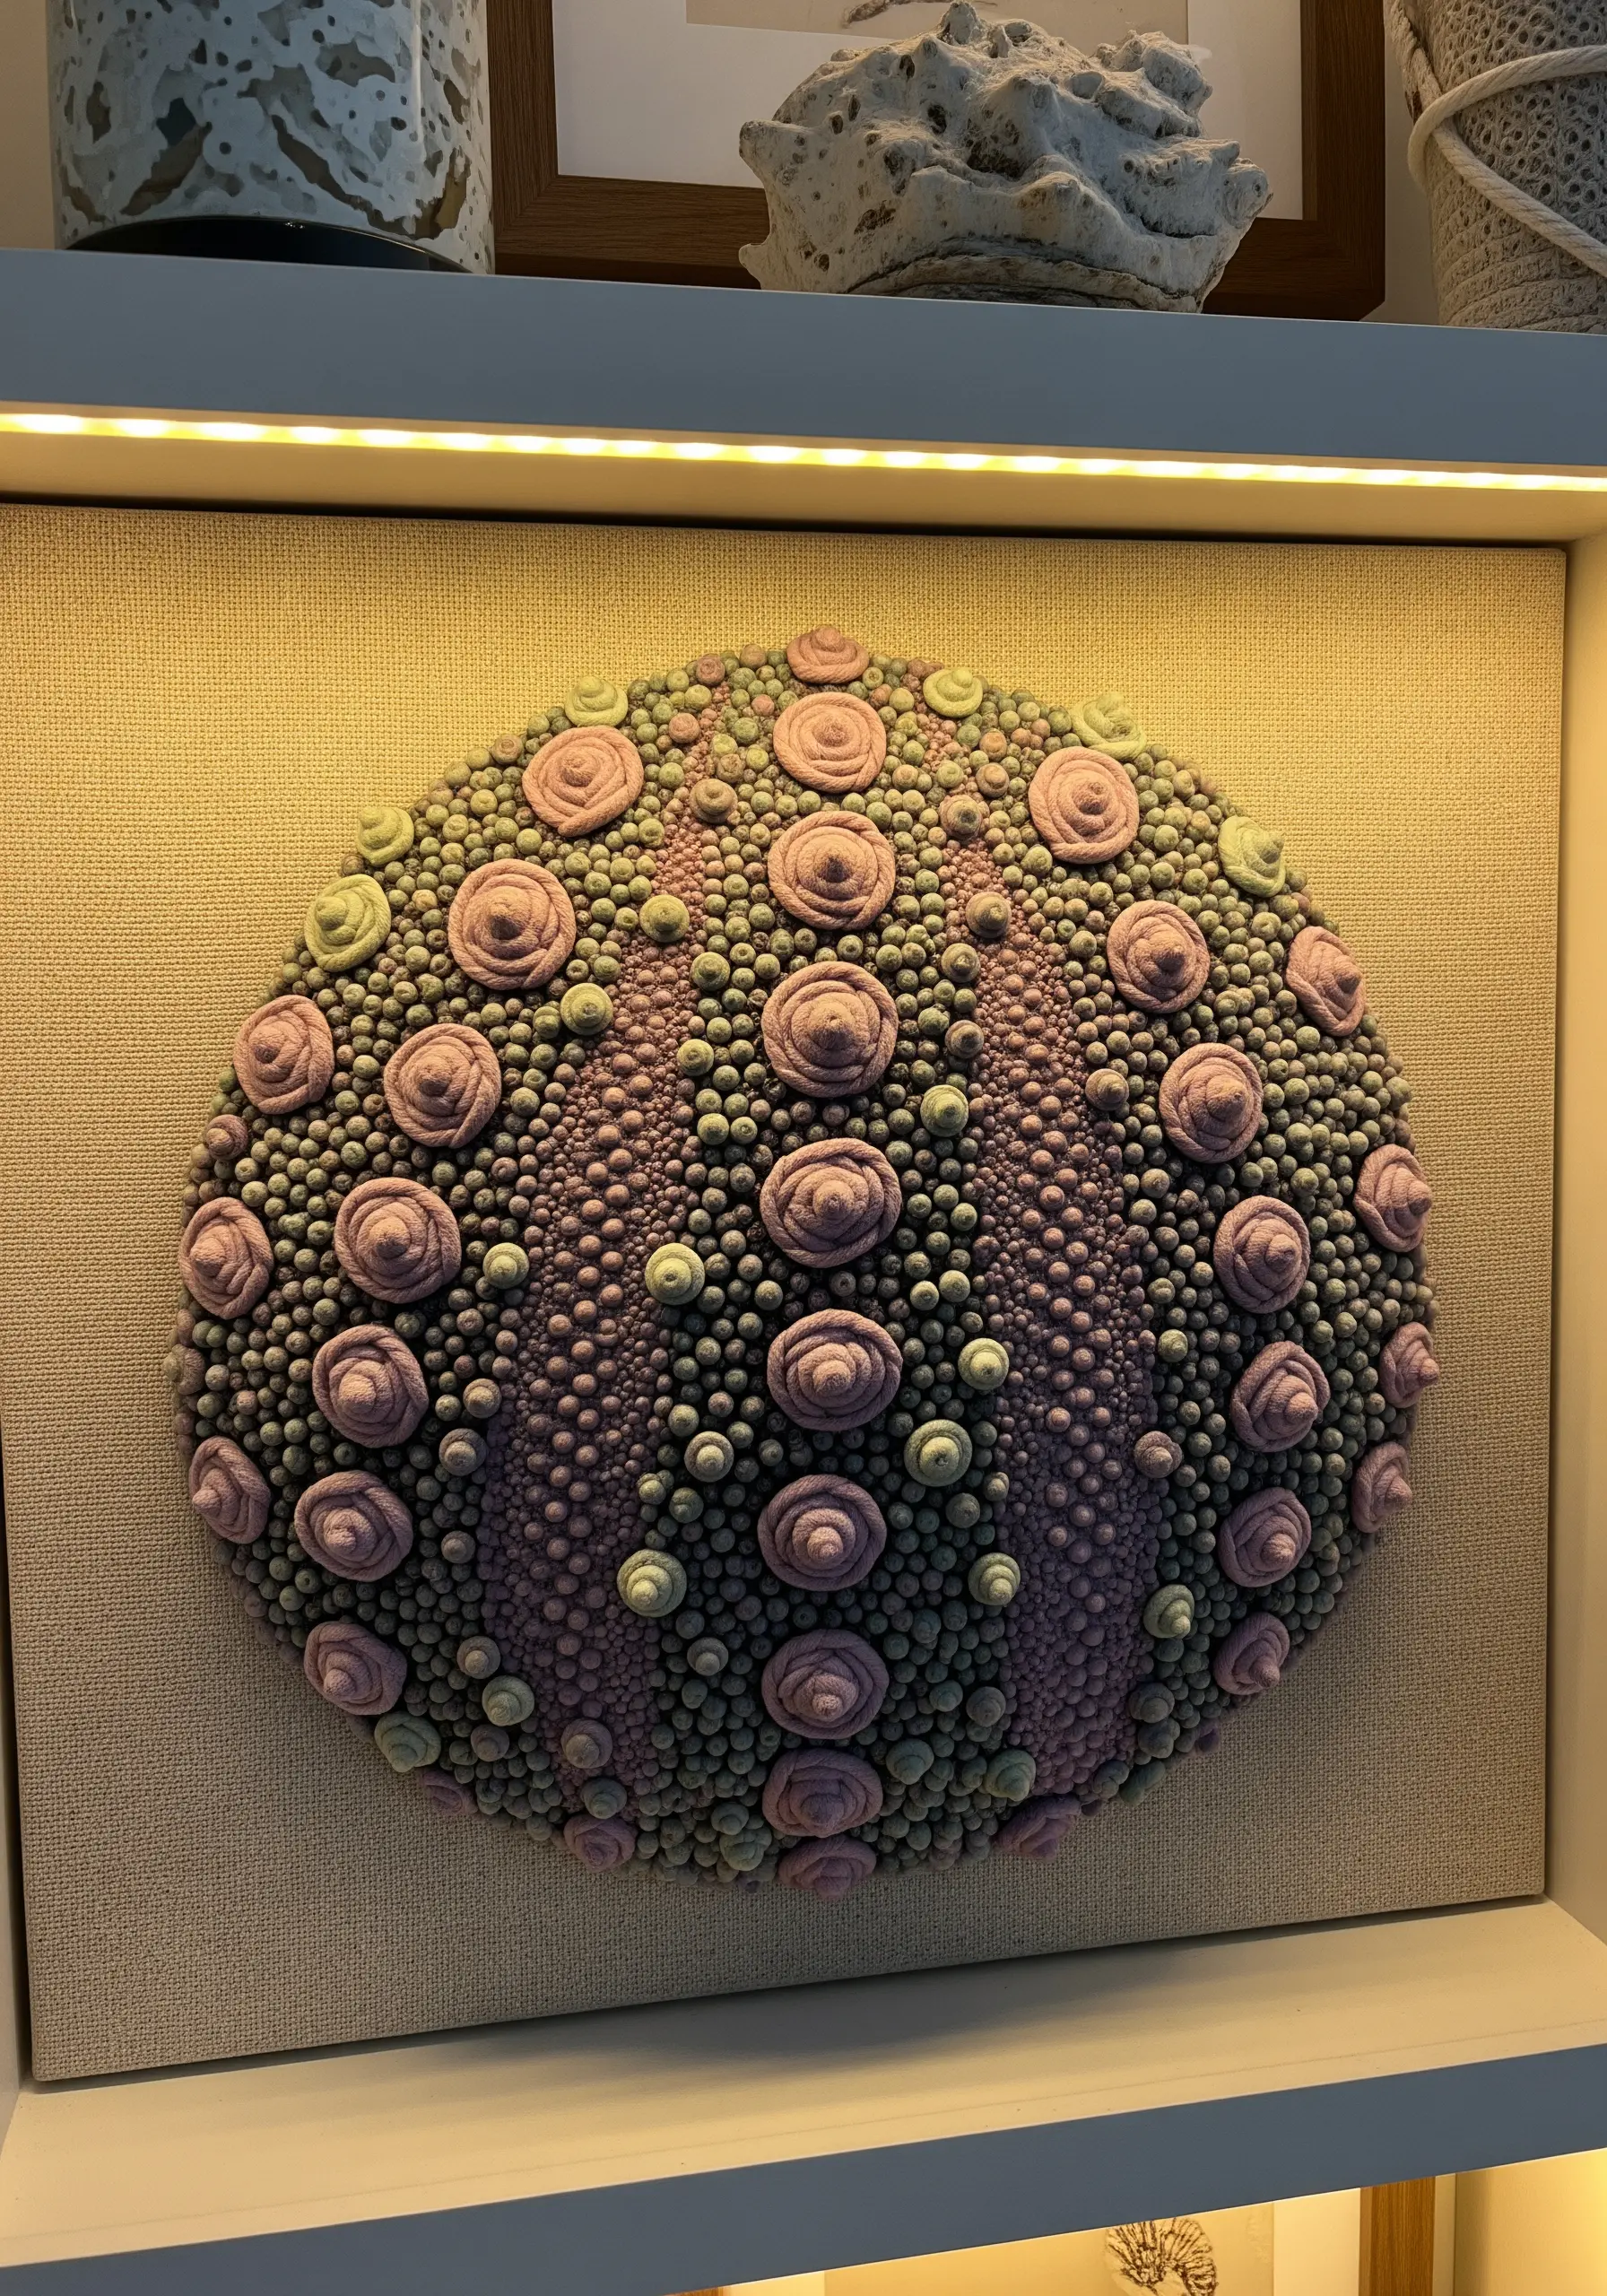
Recreate the bumpy, detailed surface of a sea urchin shell with a combination of French knots and raised rose stitches.
Use French knots in varying sizes and colors to create the base texture, packing them tightly together.
Incorporate larger, more defined bullion knot roses at regular intervals to replicate the shell’s tubercles.
Stitching this on a stretched canvas that is then box-framed gives the piece a clean, modern finish that elevates it to fine art.
18. Create Depth in a Lotus Pod with Appliqué
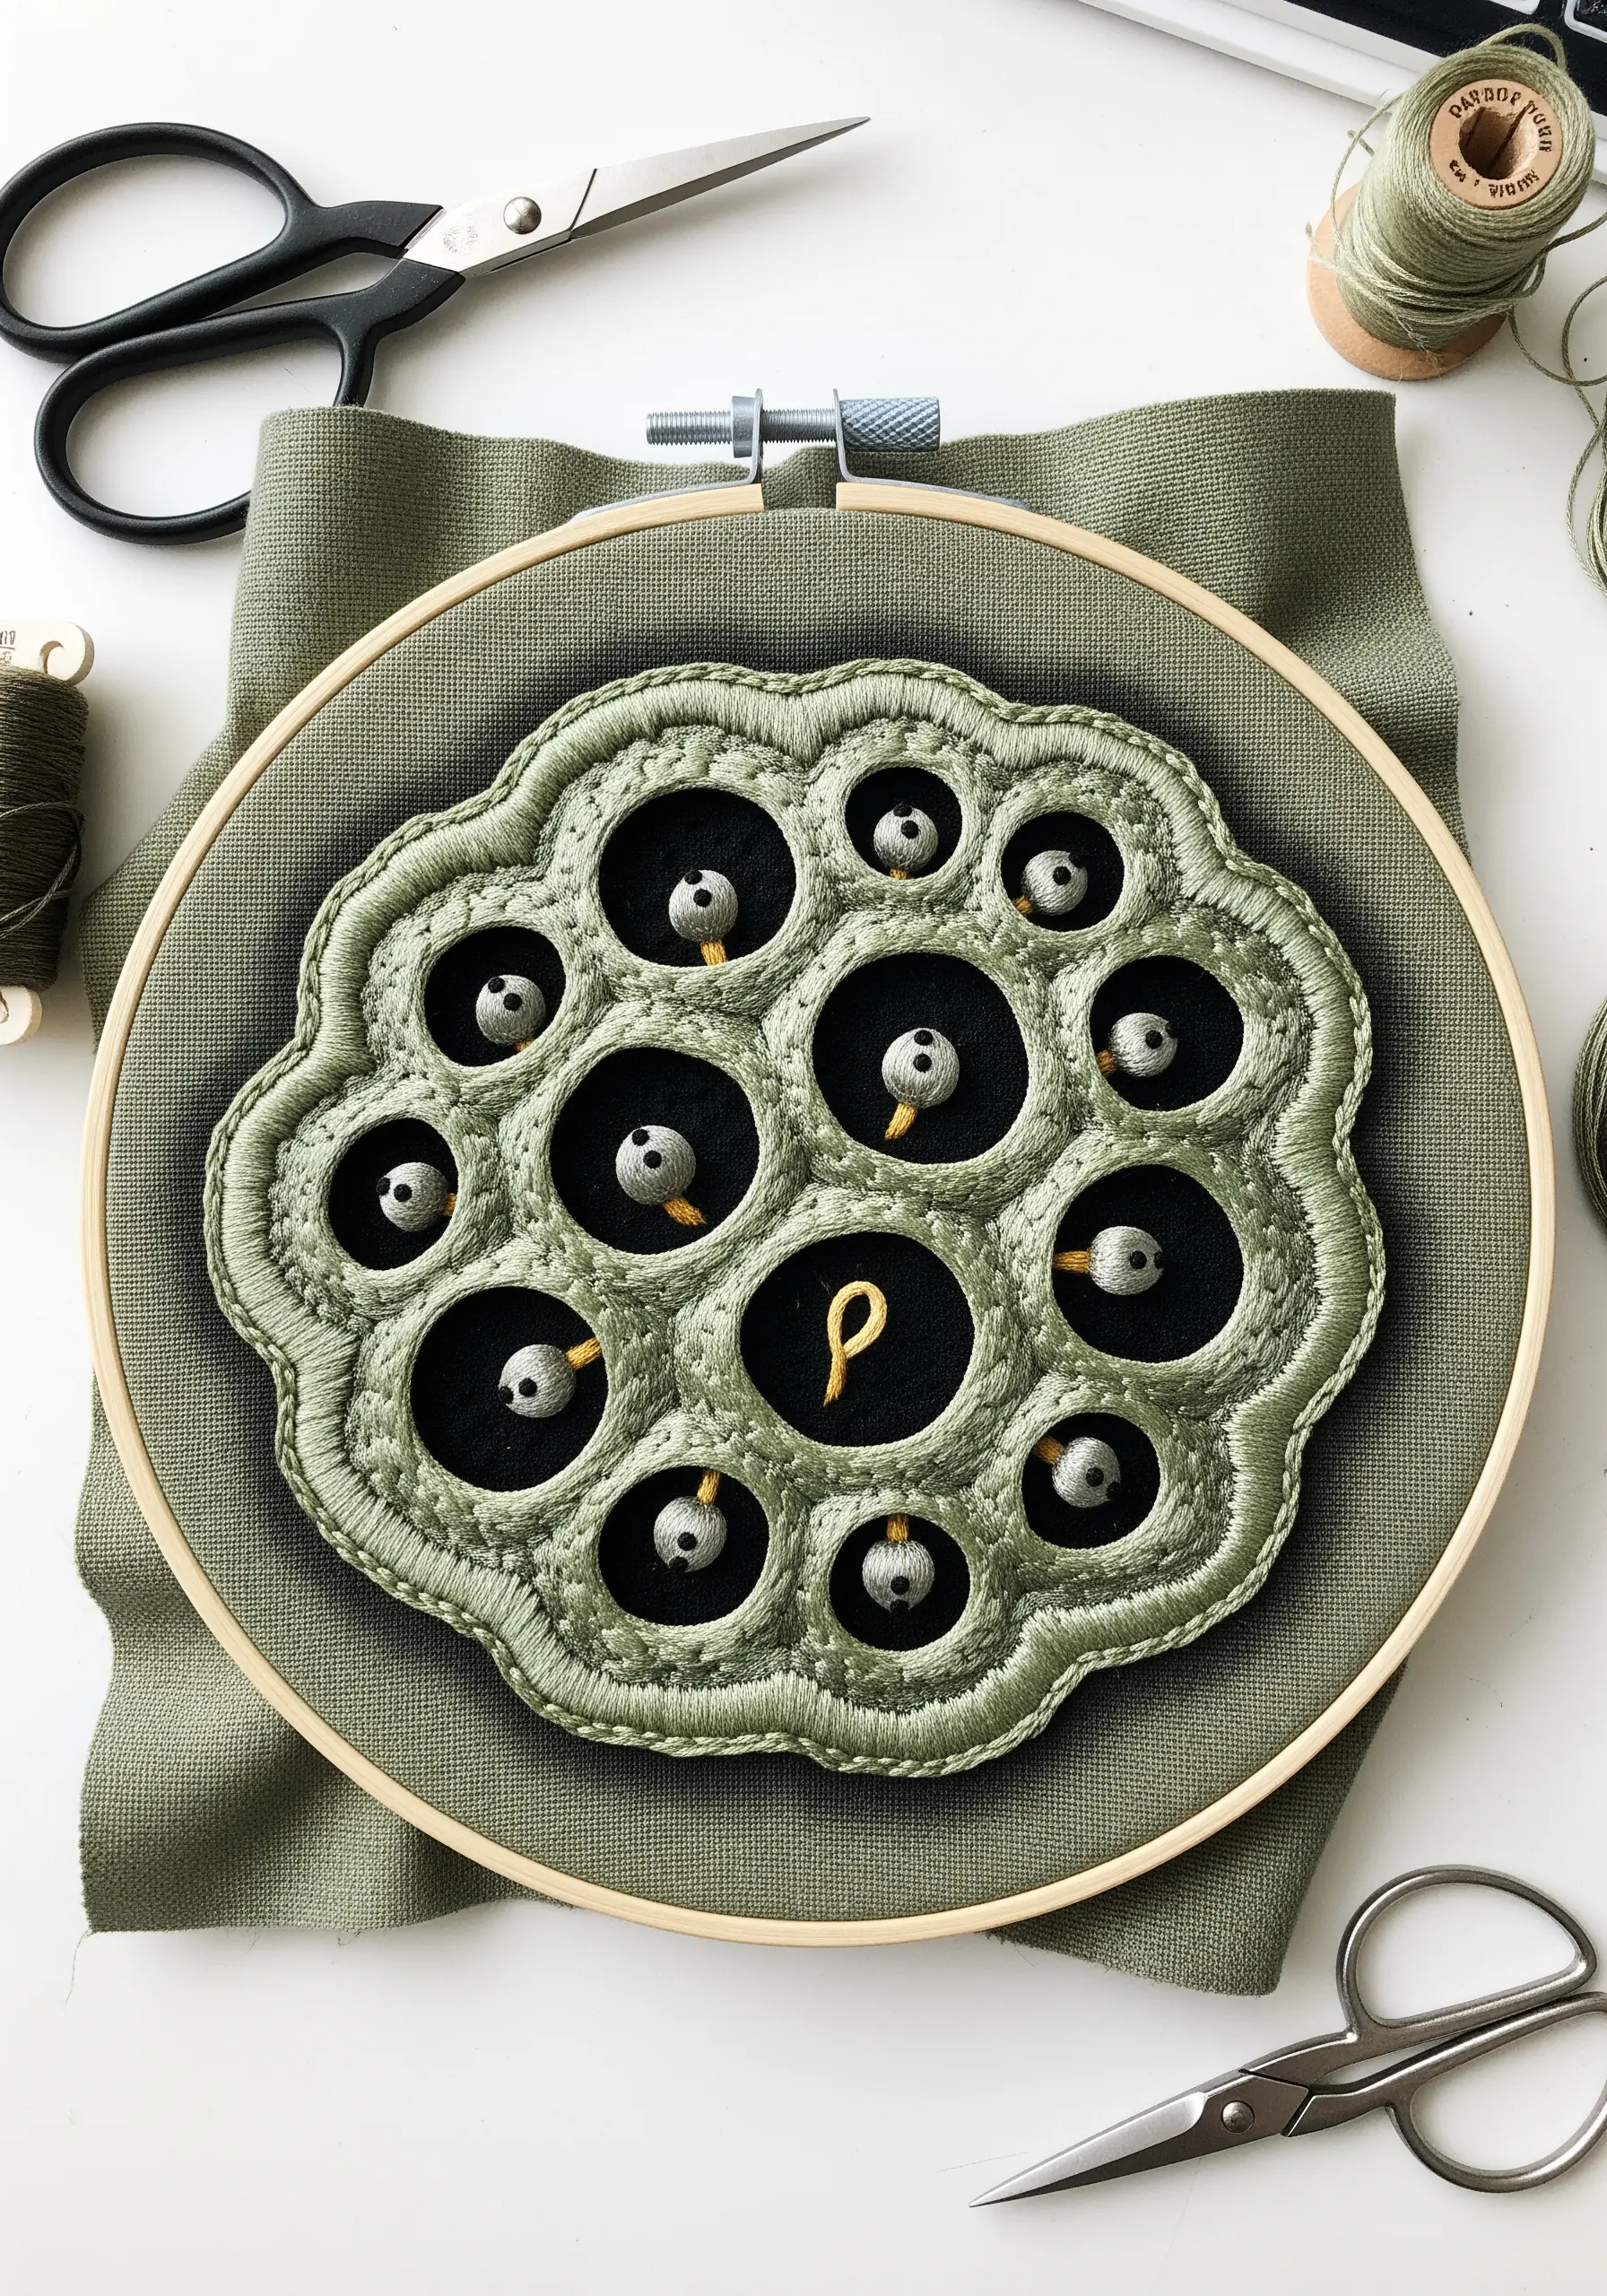
Achieve a true sense of depth by combining appliqué with raised satin stitch.
Start by cutting out the main pod shape from your green fabric and a piece of black fabric for the background.
Cut circles out of the green fabric where the seed holes will be, then appliqué it onto the black fabric.
Finish by embroidering the raised edges with satin stitch and adding the small seeds inside, which creates a stunning three-dimensional effect.
19. Craft Pussy Willows with 3D Turkey Work Tufts
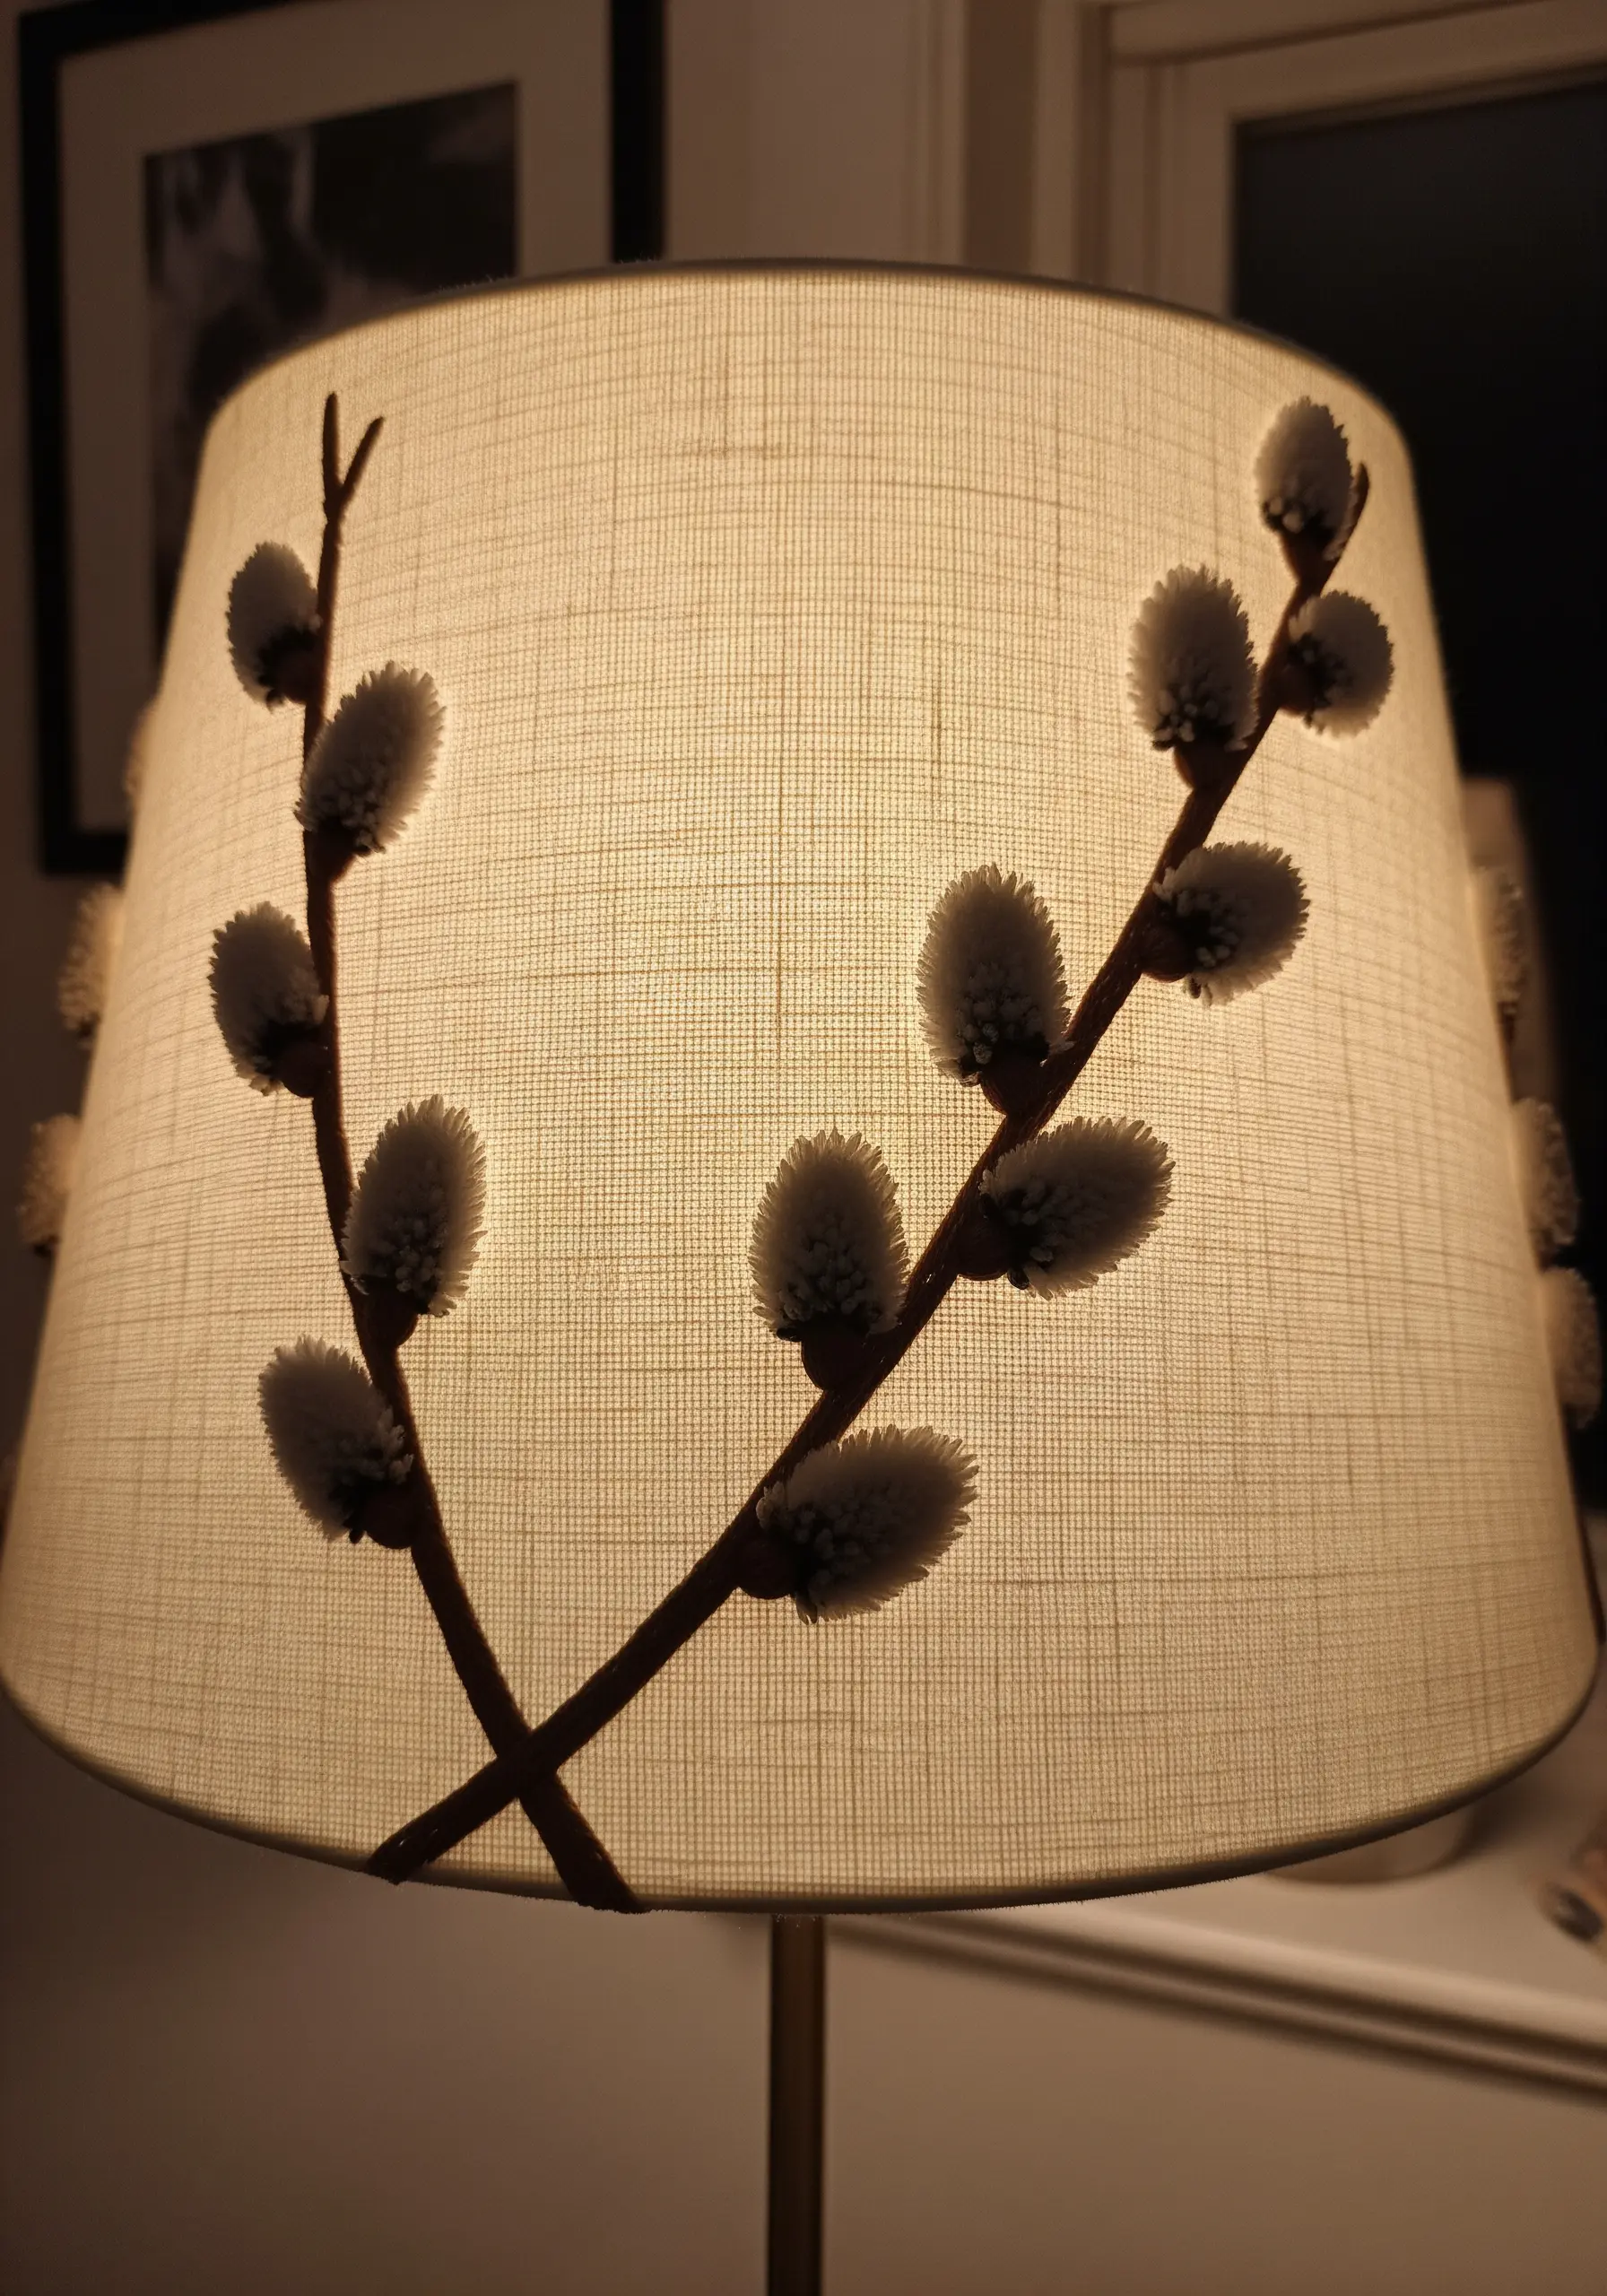
Bring pussy willow branches to life with soft, touchable tufts made from Turkey work loops.
First, stitch the brown branches using a stem stitch or a whipped backstitch for thickness.
At each bud point, work a small cluster of Turkey work stitches using a fluffy white or cream-colored yarn or thick floss.
Leave the loops uncut to create the soft, cottony texture of the catkins. This is a brilliant way to add tiny handmade decor ideas to unexpected items like lampshades.
20. Stitch Lichen Patterns with Dense French Knots
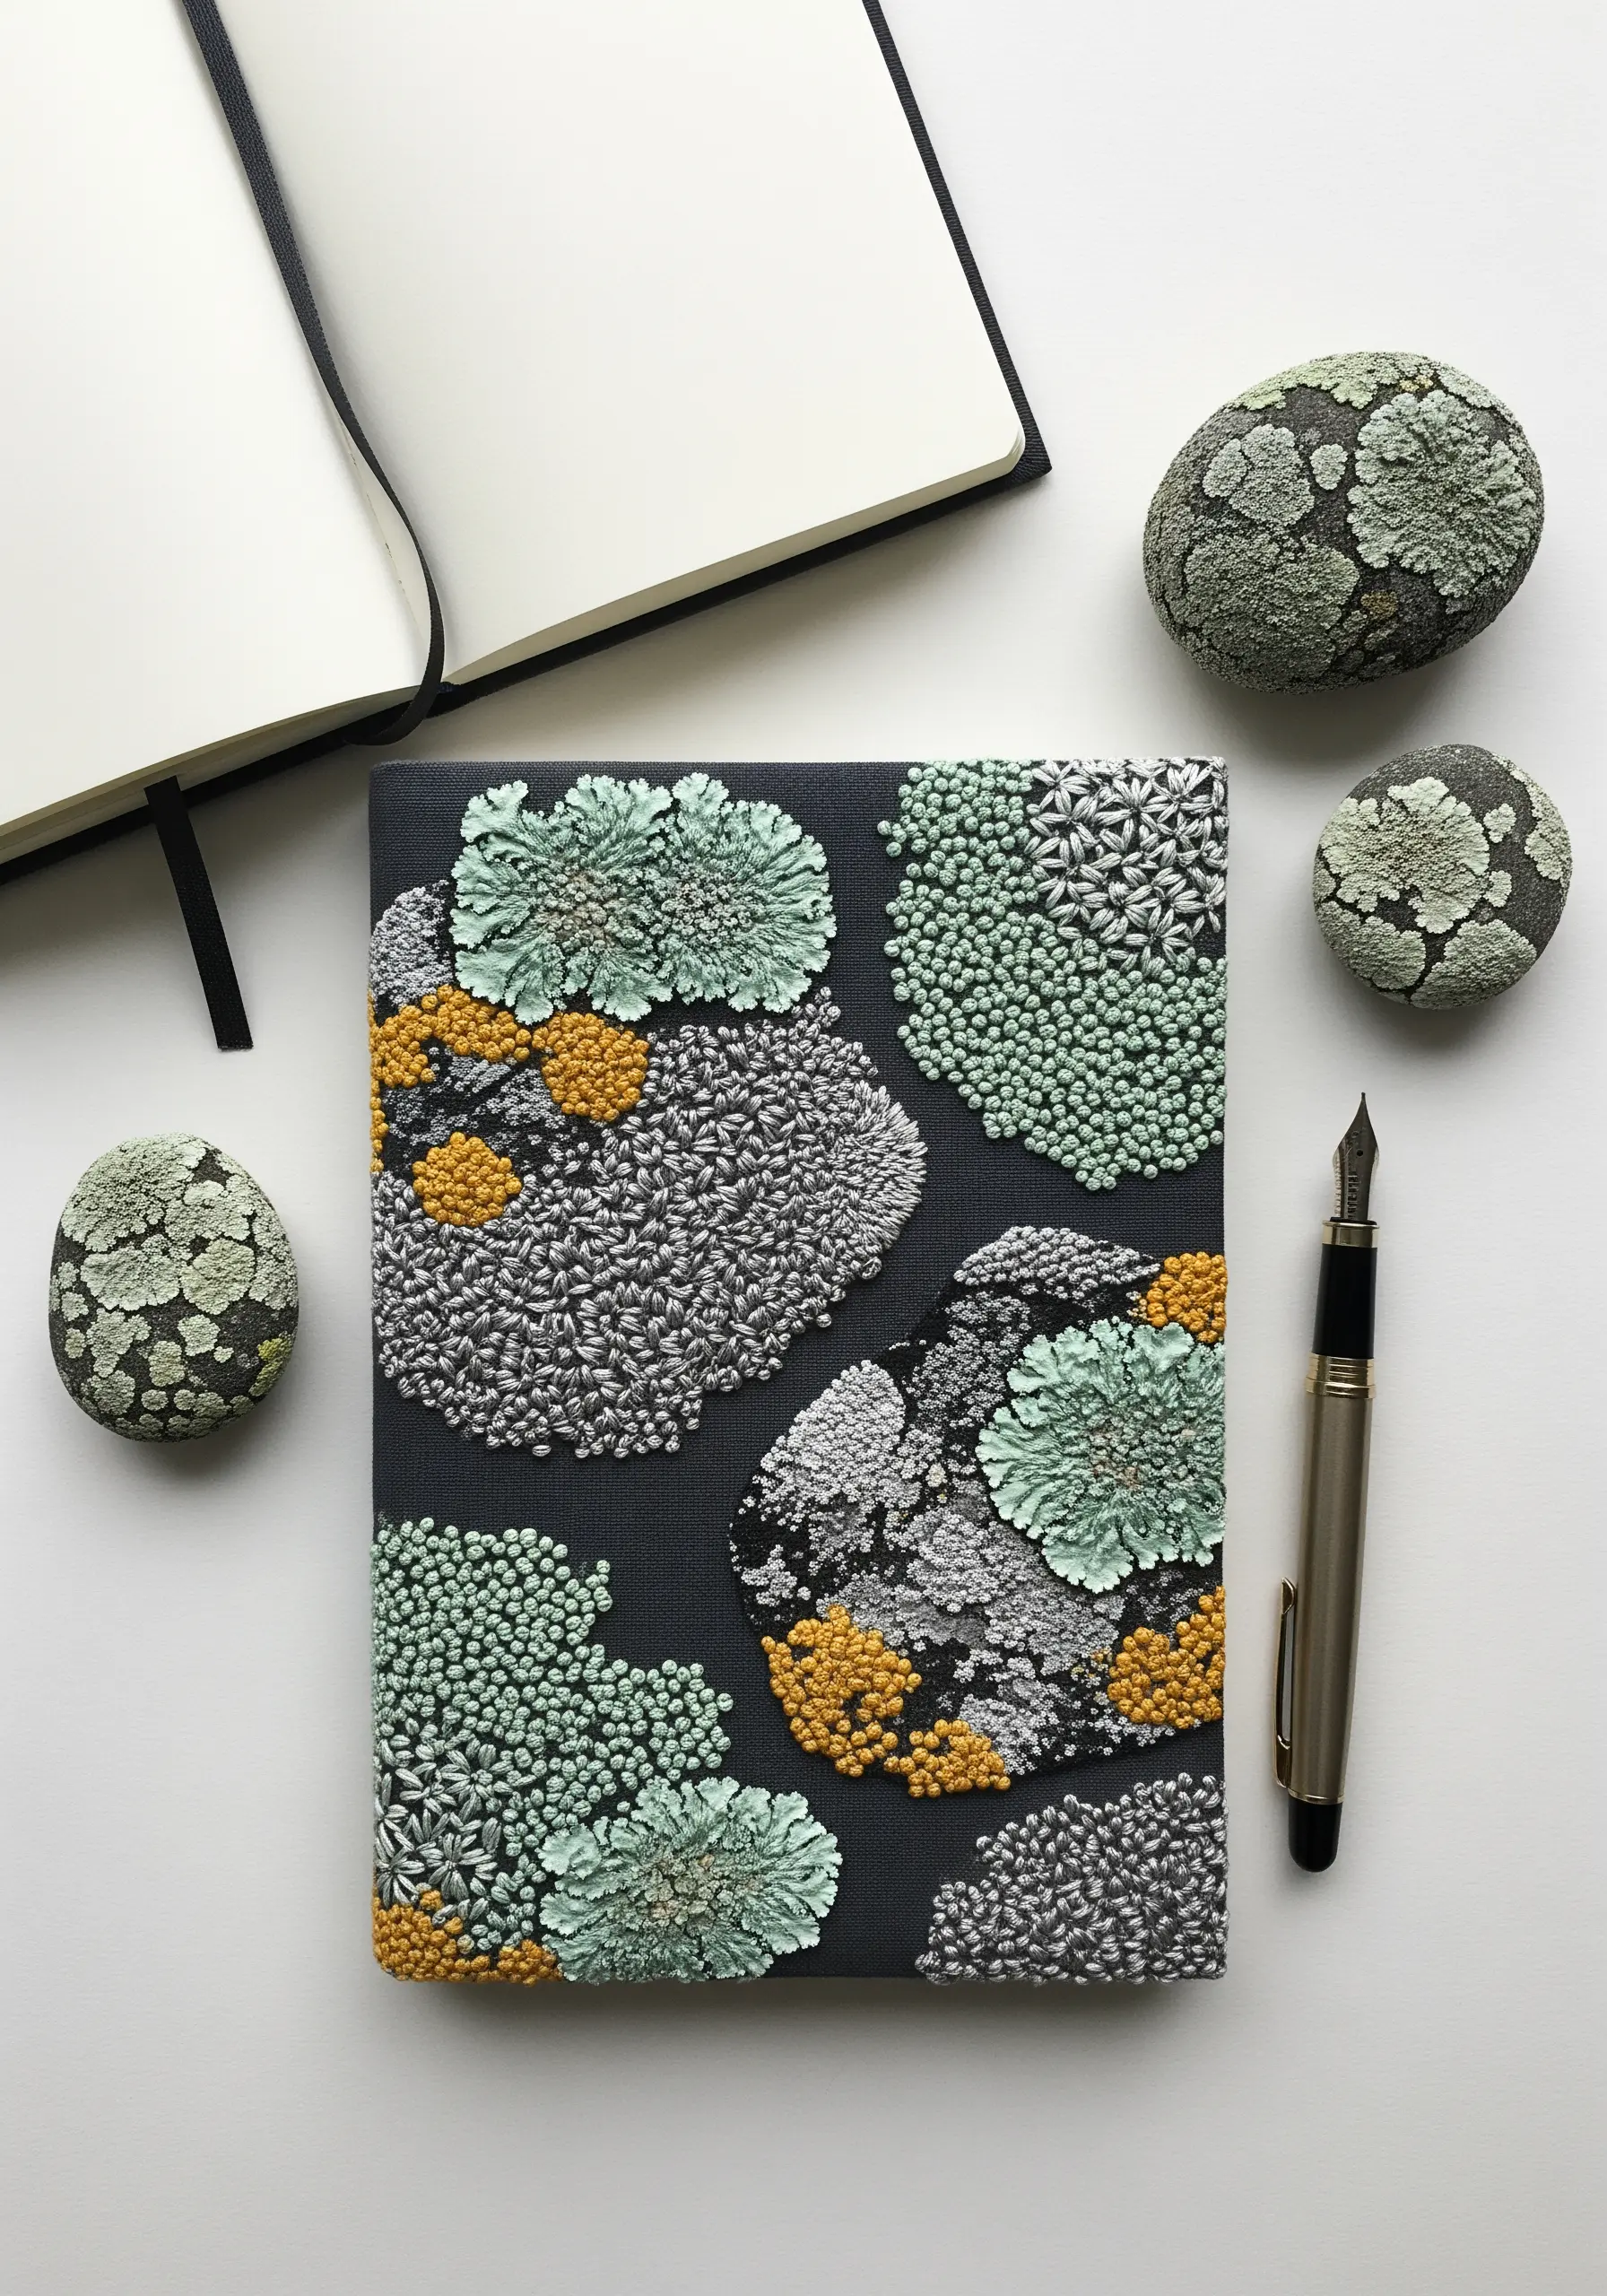
Replicate the intricate, clustered texture of lichen by filling organic shapes with dense French knots.
Draw abstract, rounded patches on your fabric, then fill each one with tightly packed knots using a consistent color palette of grey, sage, and ochre.
To create the slightly raised, cauliflower-like edges of some lichen, make the knots along the perimeter slightly larger by using more strands of floss or an extra wrap.
This technique is perfect for embellishing functional items like journals and daily planners.
21. Create a Water Ripple Effect with Chain Stitch
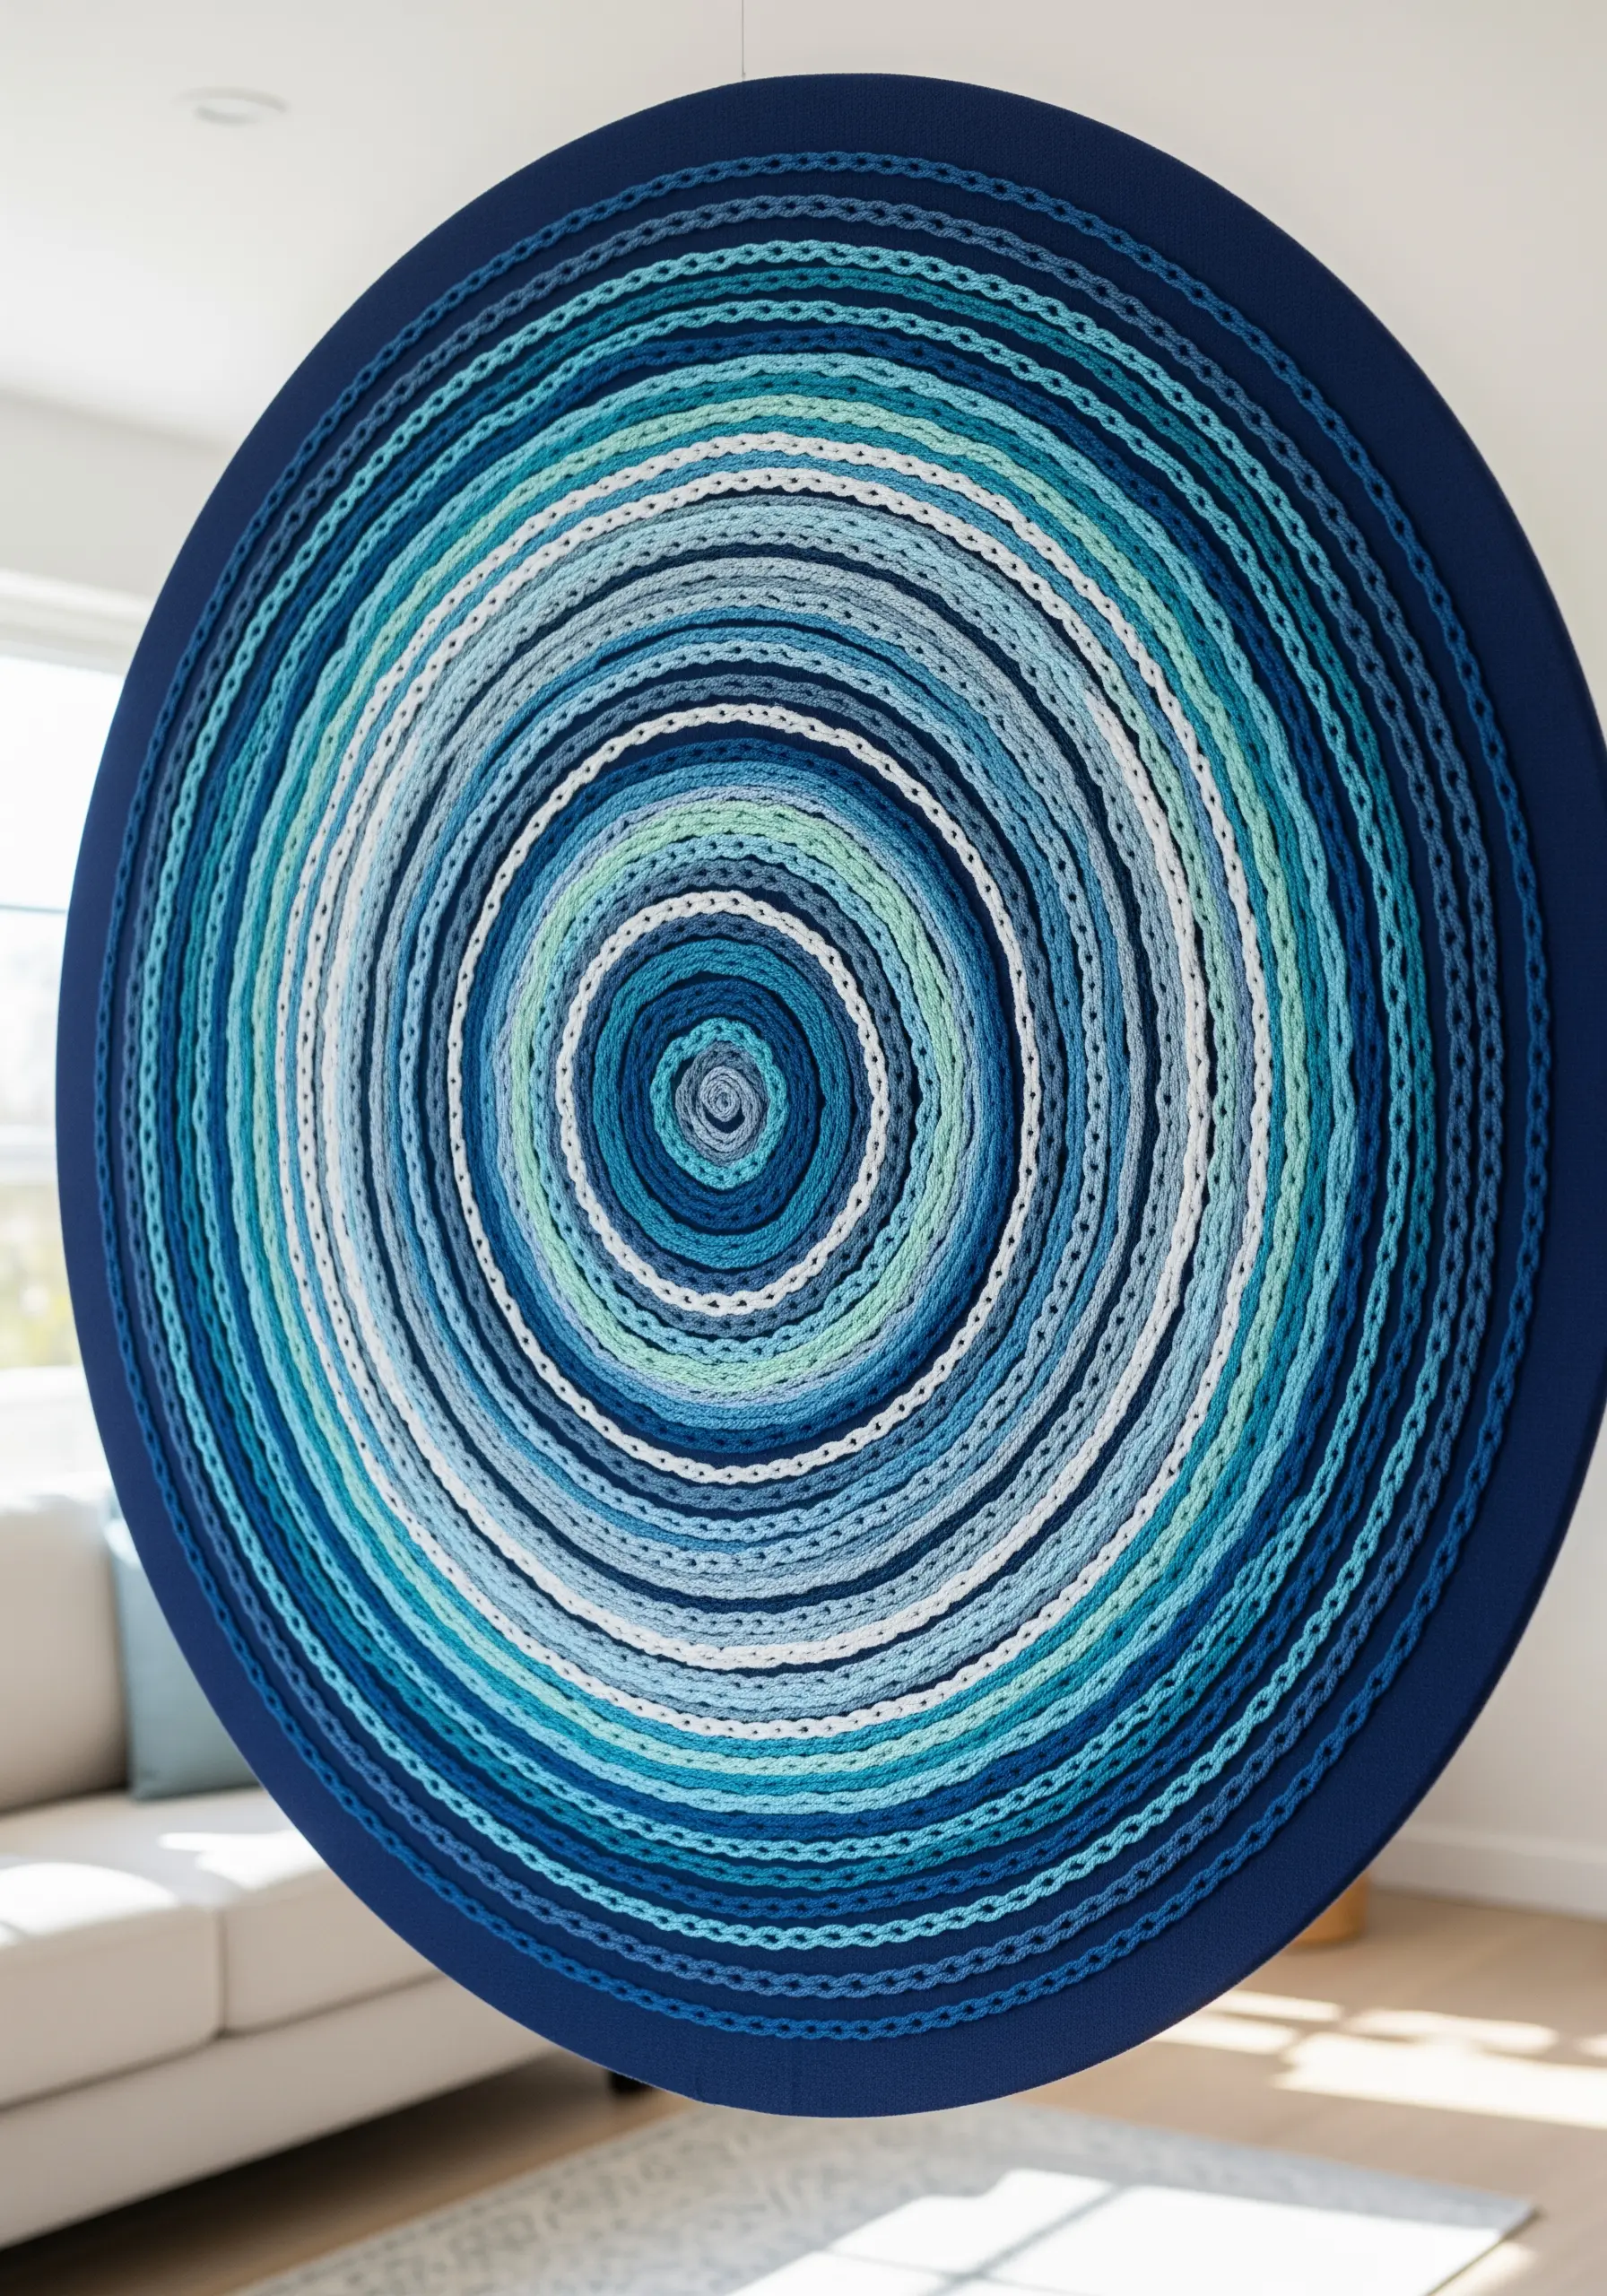
Achieve a fluid, gradient effect reminiscent of water ripples by stitching concentric circles of chain stitch.
The key is to select a wide range of analogous colors, from deep navy to pale seafoam, and arrange them to create a smooth transition.
The chain stitch itself has a braided texture that catches the light beautifully, enhancing the sense of movement and depth.
This is a wonderfully meditative project that transforms a simple stitch into stunning fiber art installations.
22. Design a Coaster Set Inspired by Nature’s Textures
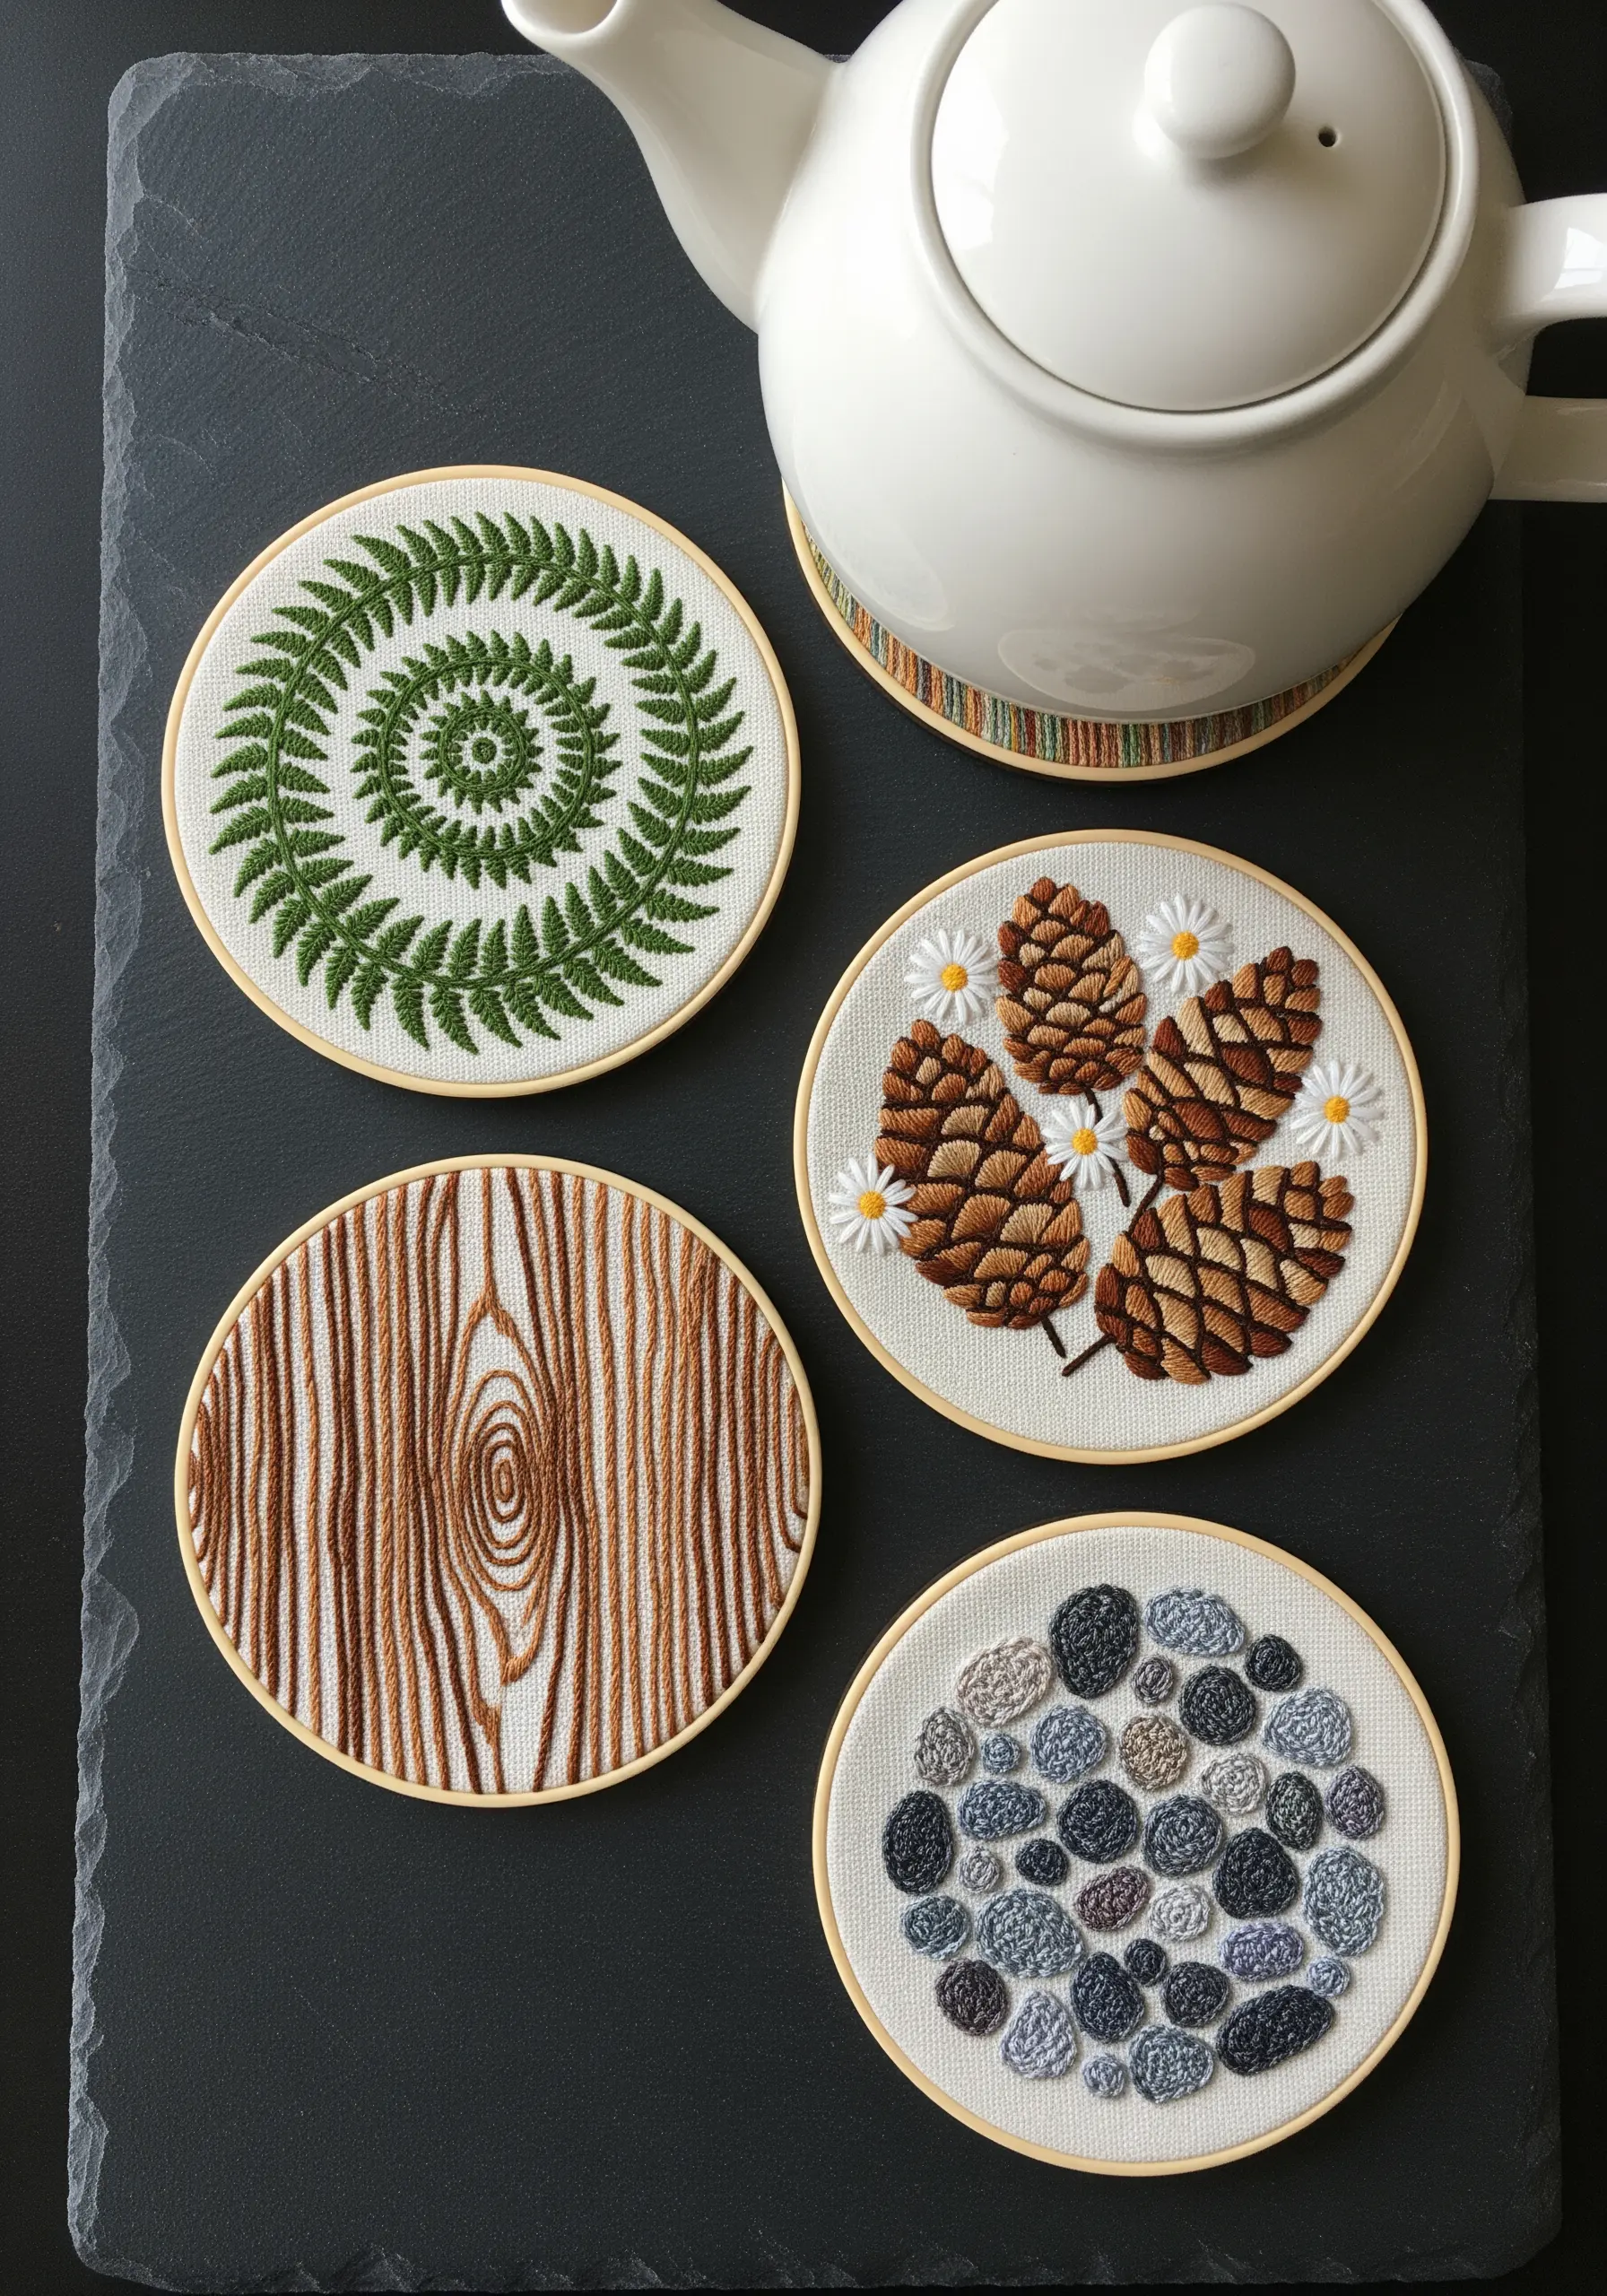
Practice a variety of textural stitches by creating a set of themed coasters, each focusing on a different natural pattern.
For wood grain, use long, flowing backstitches in shades of brown. For pebbles, use padded satin stitch. For pinecones, use layered satin stitches to create scales.
Finishing them in small hoops makes them functional and decorative, turning everyday items into miniature works of art.
This is one of those small handmade projects that double as thoughtful gifts.
23. Paint with Thread to Create Iridescent Wings
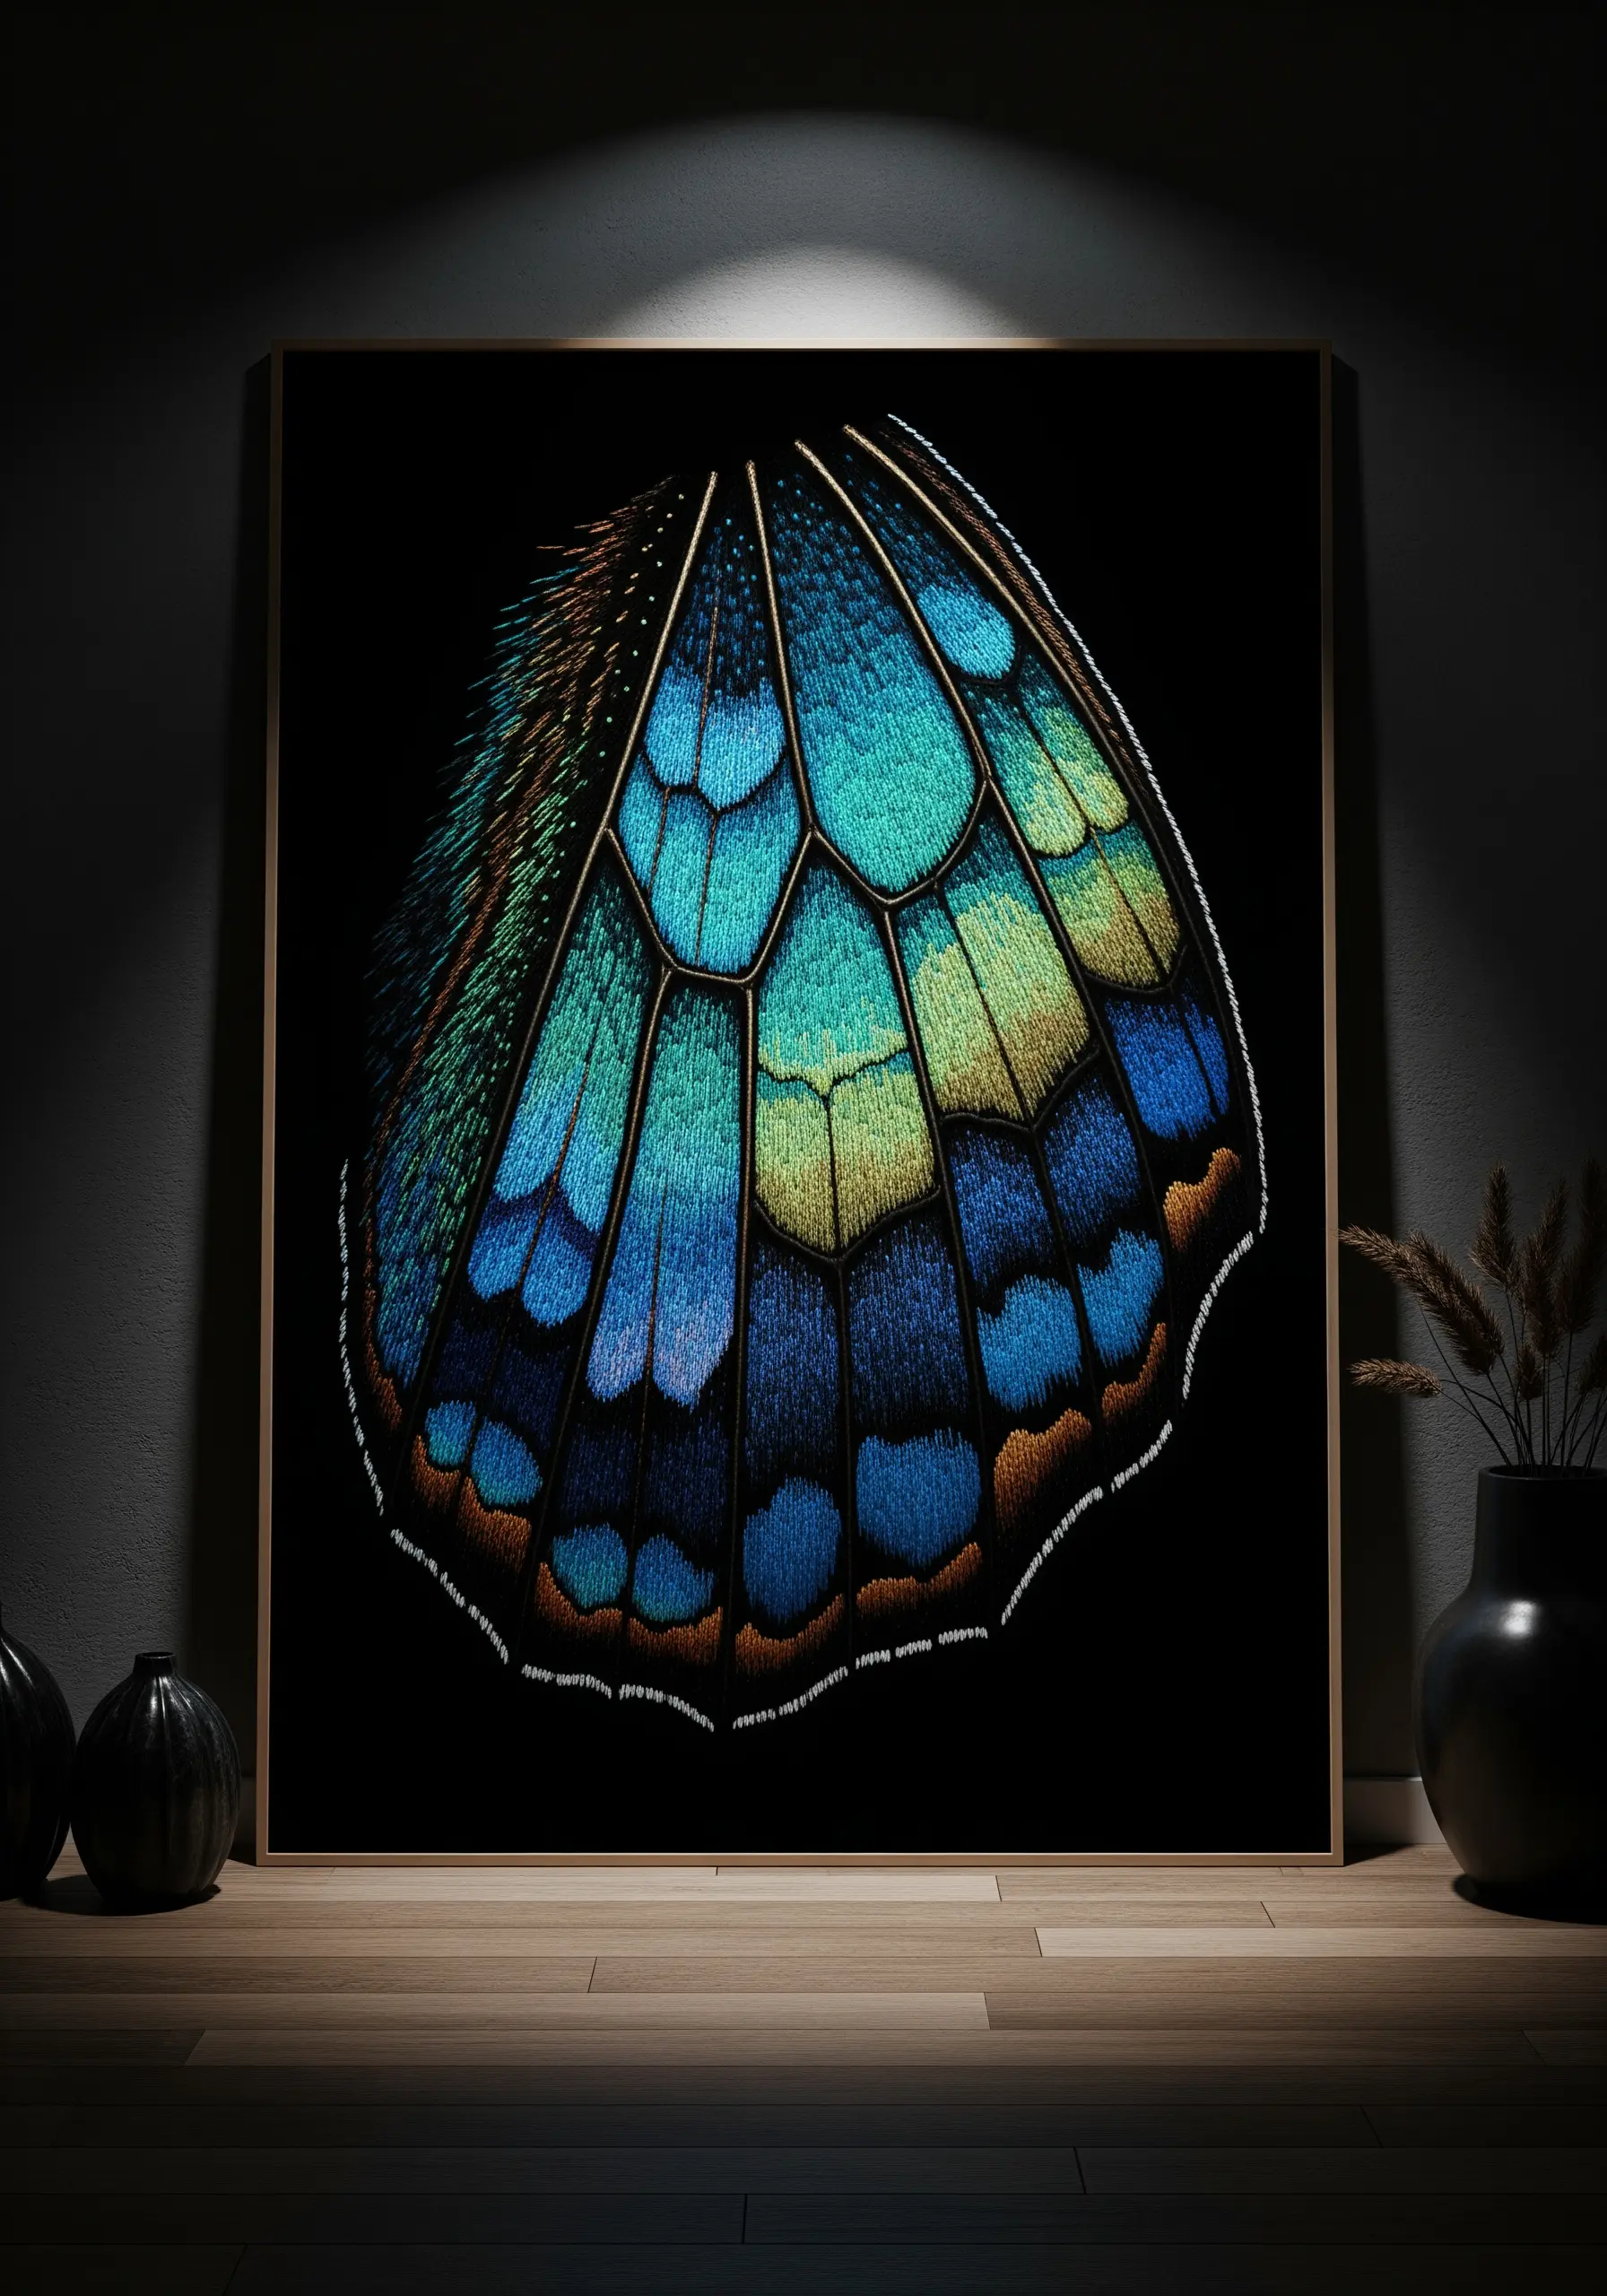
Achieve a painterly, iridescent effect by using the long-and-short stitch technique, also known as needle painting.
To create the seamless color blends of a butterfly wing, work in small sections, using multiple shades of a single color to create gradients.
Keep your stitches parallel to the direction of the wing’s pattern to enhance the realism.
For the fuzzy texture near the body, use short, dense straight stitches or Turkey work loops trimmed very short.
This technique transforms floss into stunning framed embroidery pieces that rival paintings.
24. Build a Coral Reef with Raised Knots and Stitches
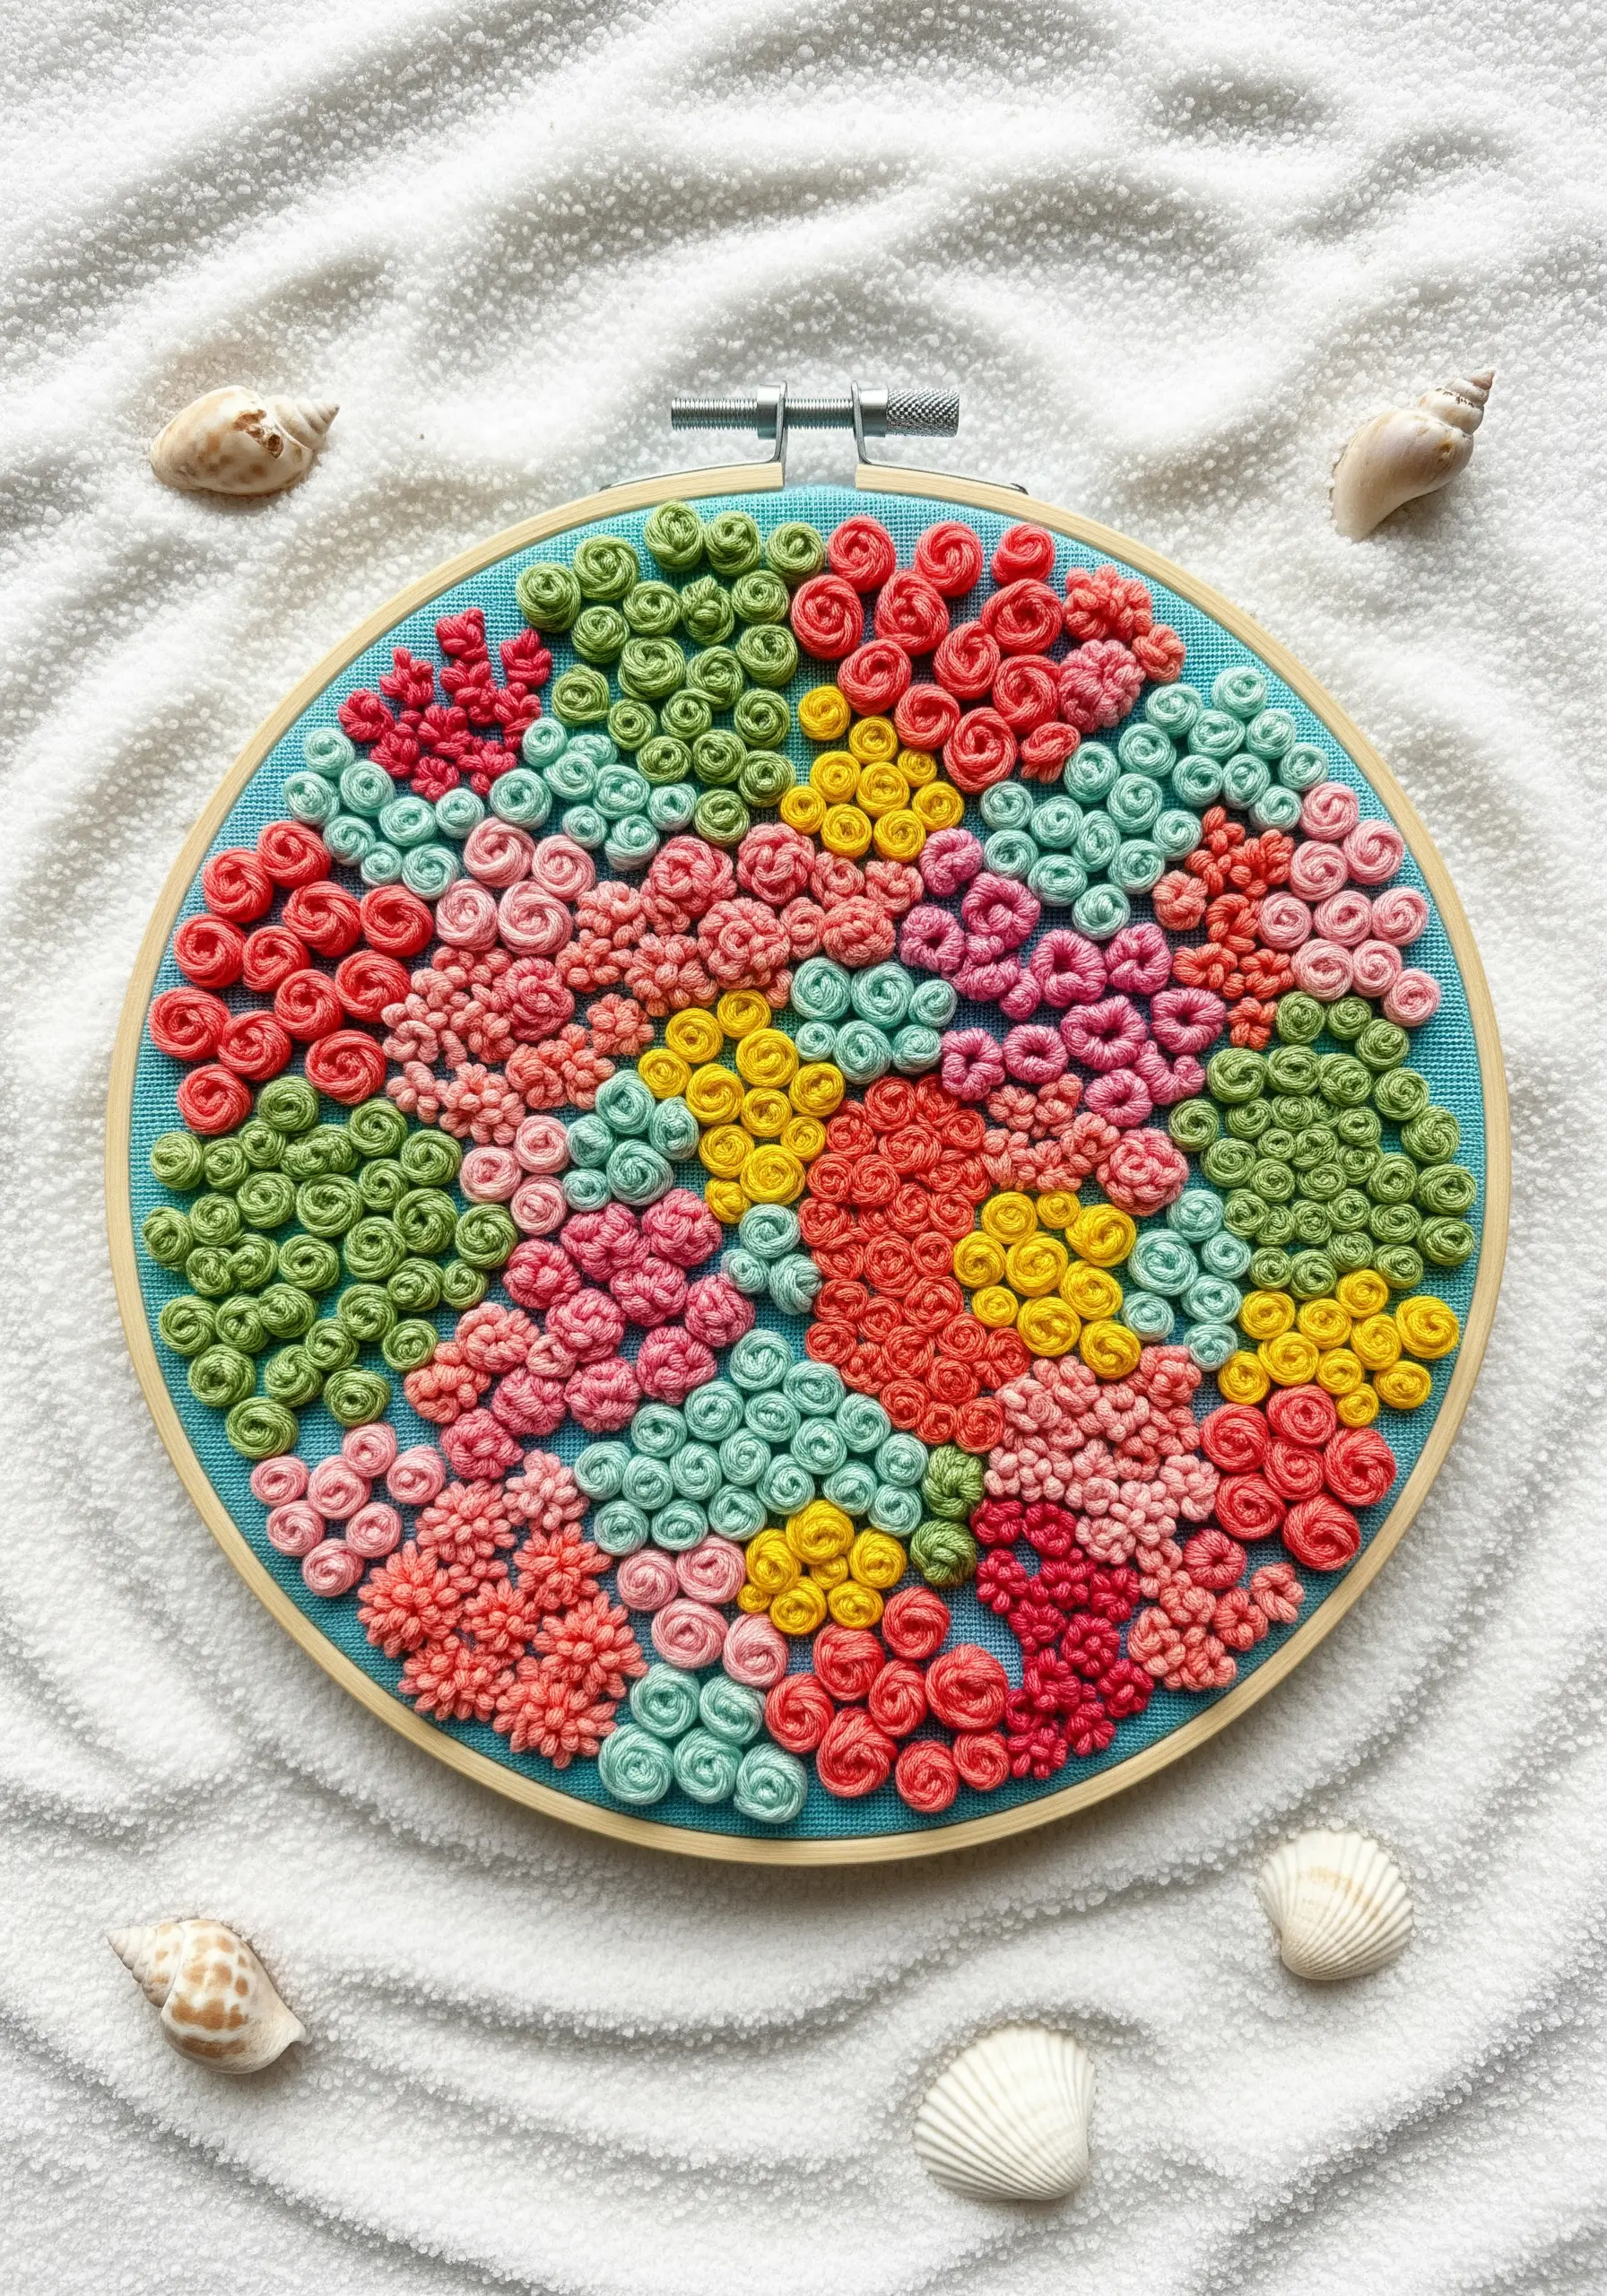
Create a vibrant, tactile coral reef using a dense collage of highly textured stitches.
Combine bullion knots, woven wheel stitches, French knots, and detached chain stitches in bright, tropical colors.
Cluster similar stitches and colors together to form distinct coral colonies, creating a rich tapestry of shapes and textures.
The key is density—pack your stitches tightly to completely cover the background fabric, making the textures the star of the show.
25. Craft Cattails with Plush Turkey Work
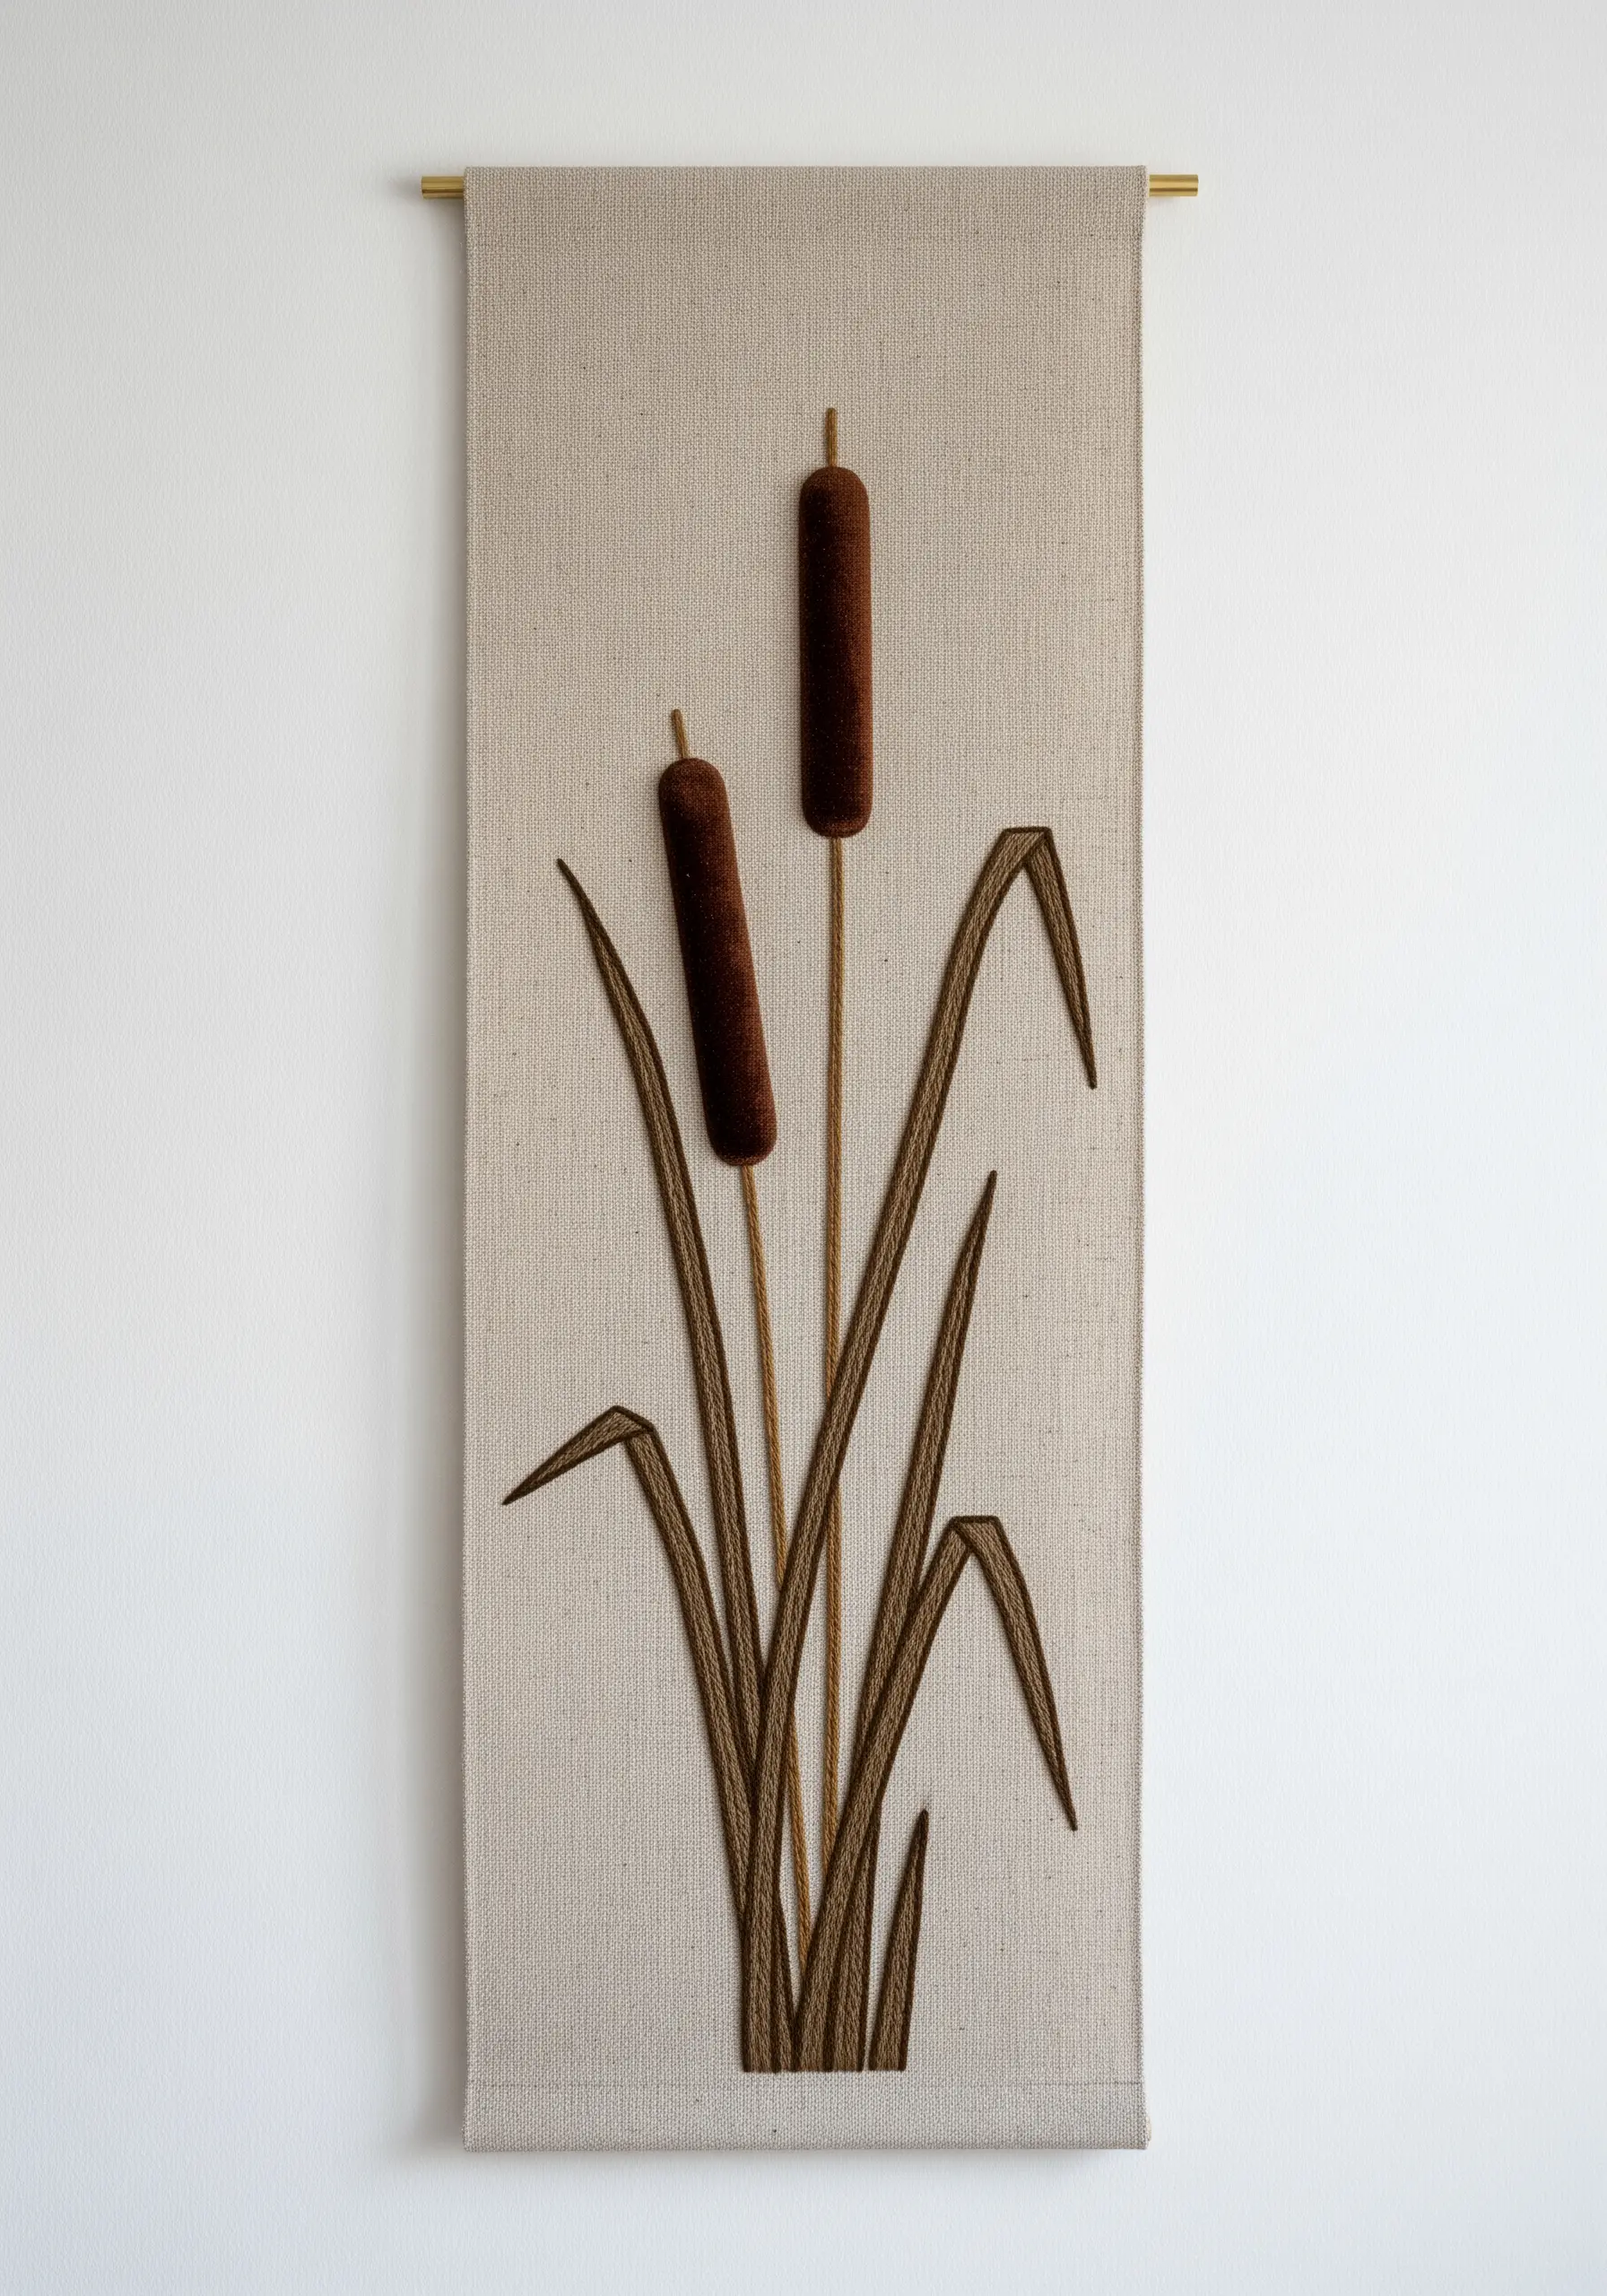
Replicate the unique, velvety texture of cattails using tightly packed, trimmed Turkey work stitches.
Embroider the stems first with a simple stem stitch. Then, for the characteristic brown head, fill the shape with Turkey work loops using a dark brown wool or crewel thread for extra fluffiness.
Trim the loops evenly and very short to create a dense, plush surface that you can’t resist touching.
The contrast between the flat, linear leaves and the 3D cattail heads makes for a striking and minimalist composition.
26. Define Tree Bark with Directional Stitching
Use the direction of your stitches to create the gnarled, textured look of an old tree’s bark and roots.
Instead of a uniform fill, use a slightly chaotic long-and-short stitch, varying the length and angle of your stitches to follow the contours of the branches and trunk.
Incorporate several shades of brown, grey, and black within the same area, using variegated thread to make this process intuitive.
This technique turns a simple table runner into a dramatic centerpiece, perfect for luxe spring centerpieces.
27. Create Snake Scales with Layered Satin Stitch
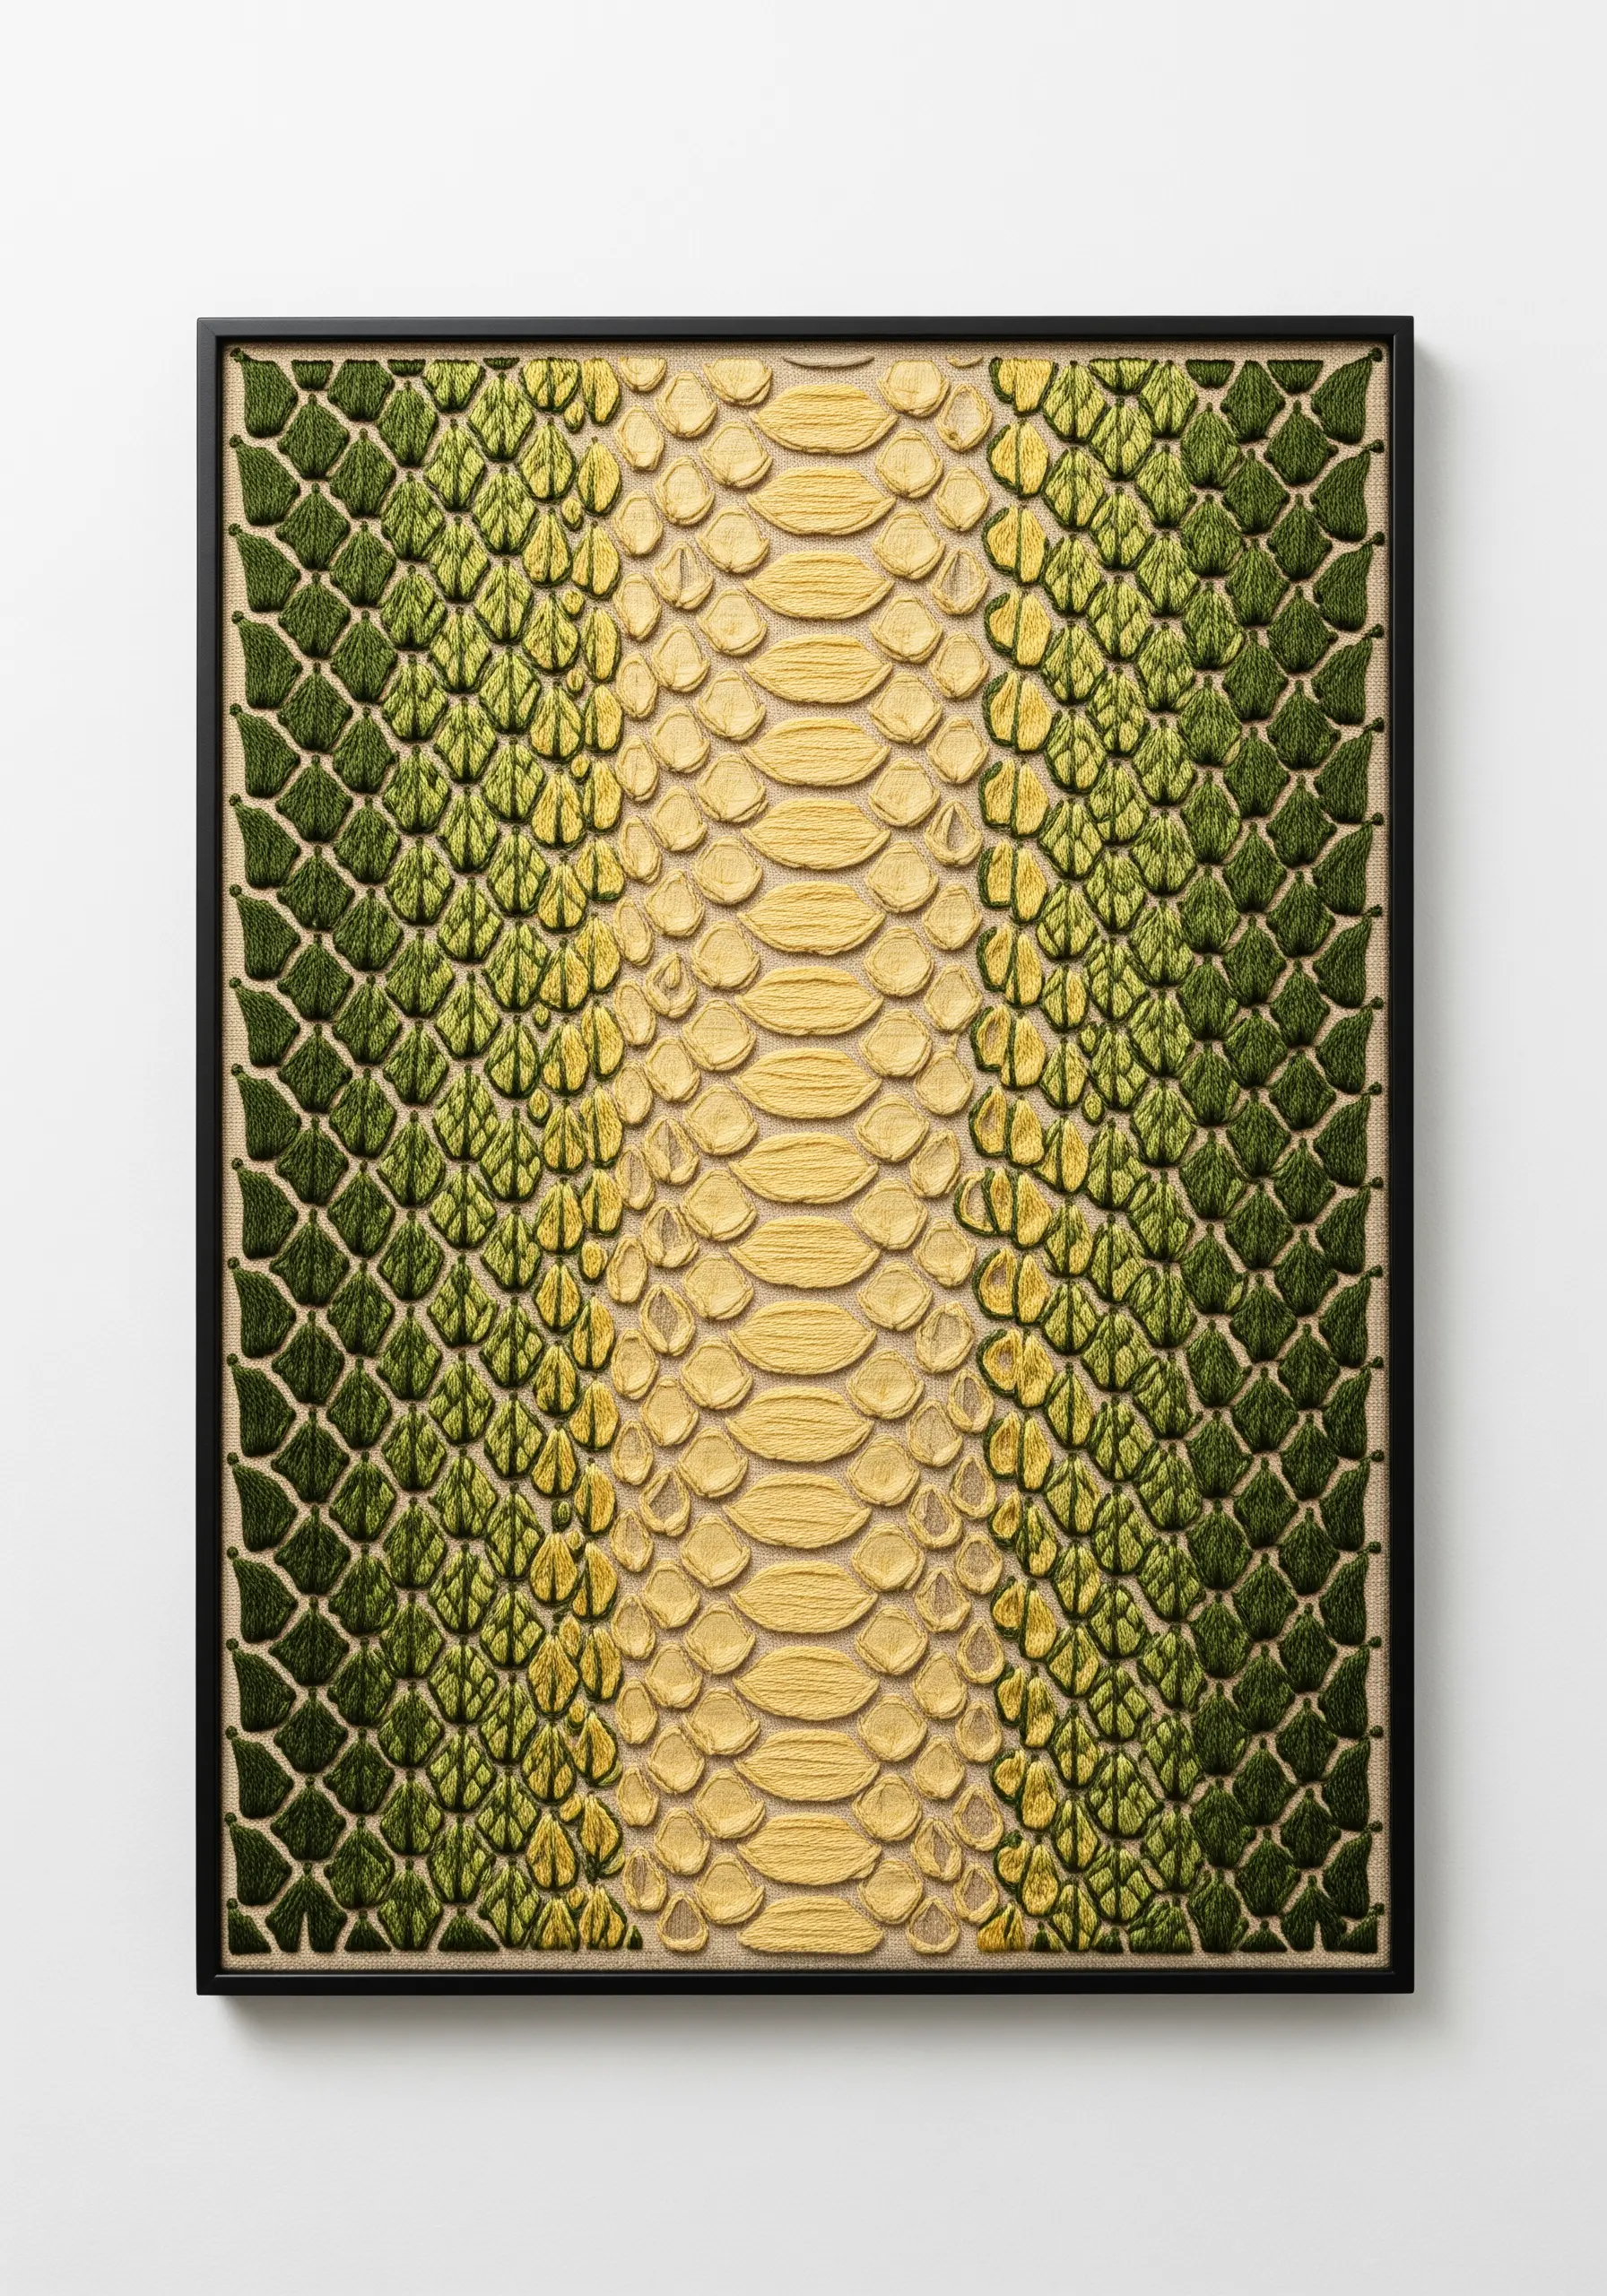
Mimic the overlapping, dimensional quality of scales by using strategically layered satin stitches.
Start from the bottom of a section and work your way up, slightly overlapping each new row of satin-stitched scales on top of the row below it.
Use a lighter shade of thread for the top edge of each scale and a darker shade for the bottom to create a subtle shadow effect that enhances the 3D illusion.
This meticulous technique results in a stunningly realistic and tactile surface.
28. Stitch Queen Anne’s Lace with French Knots
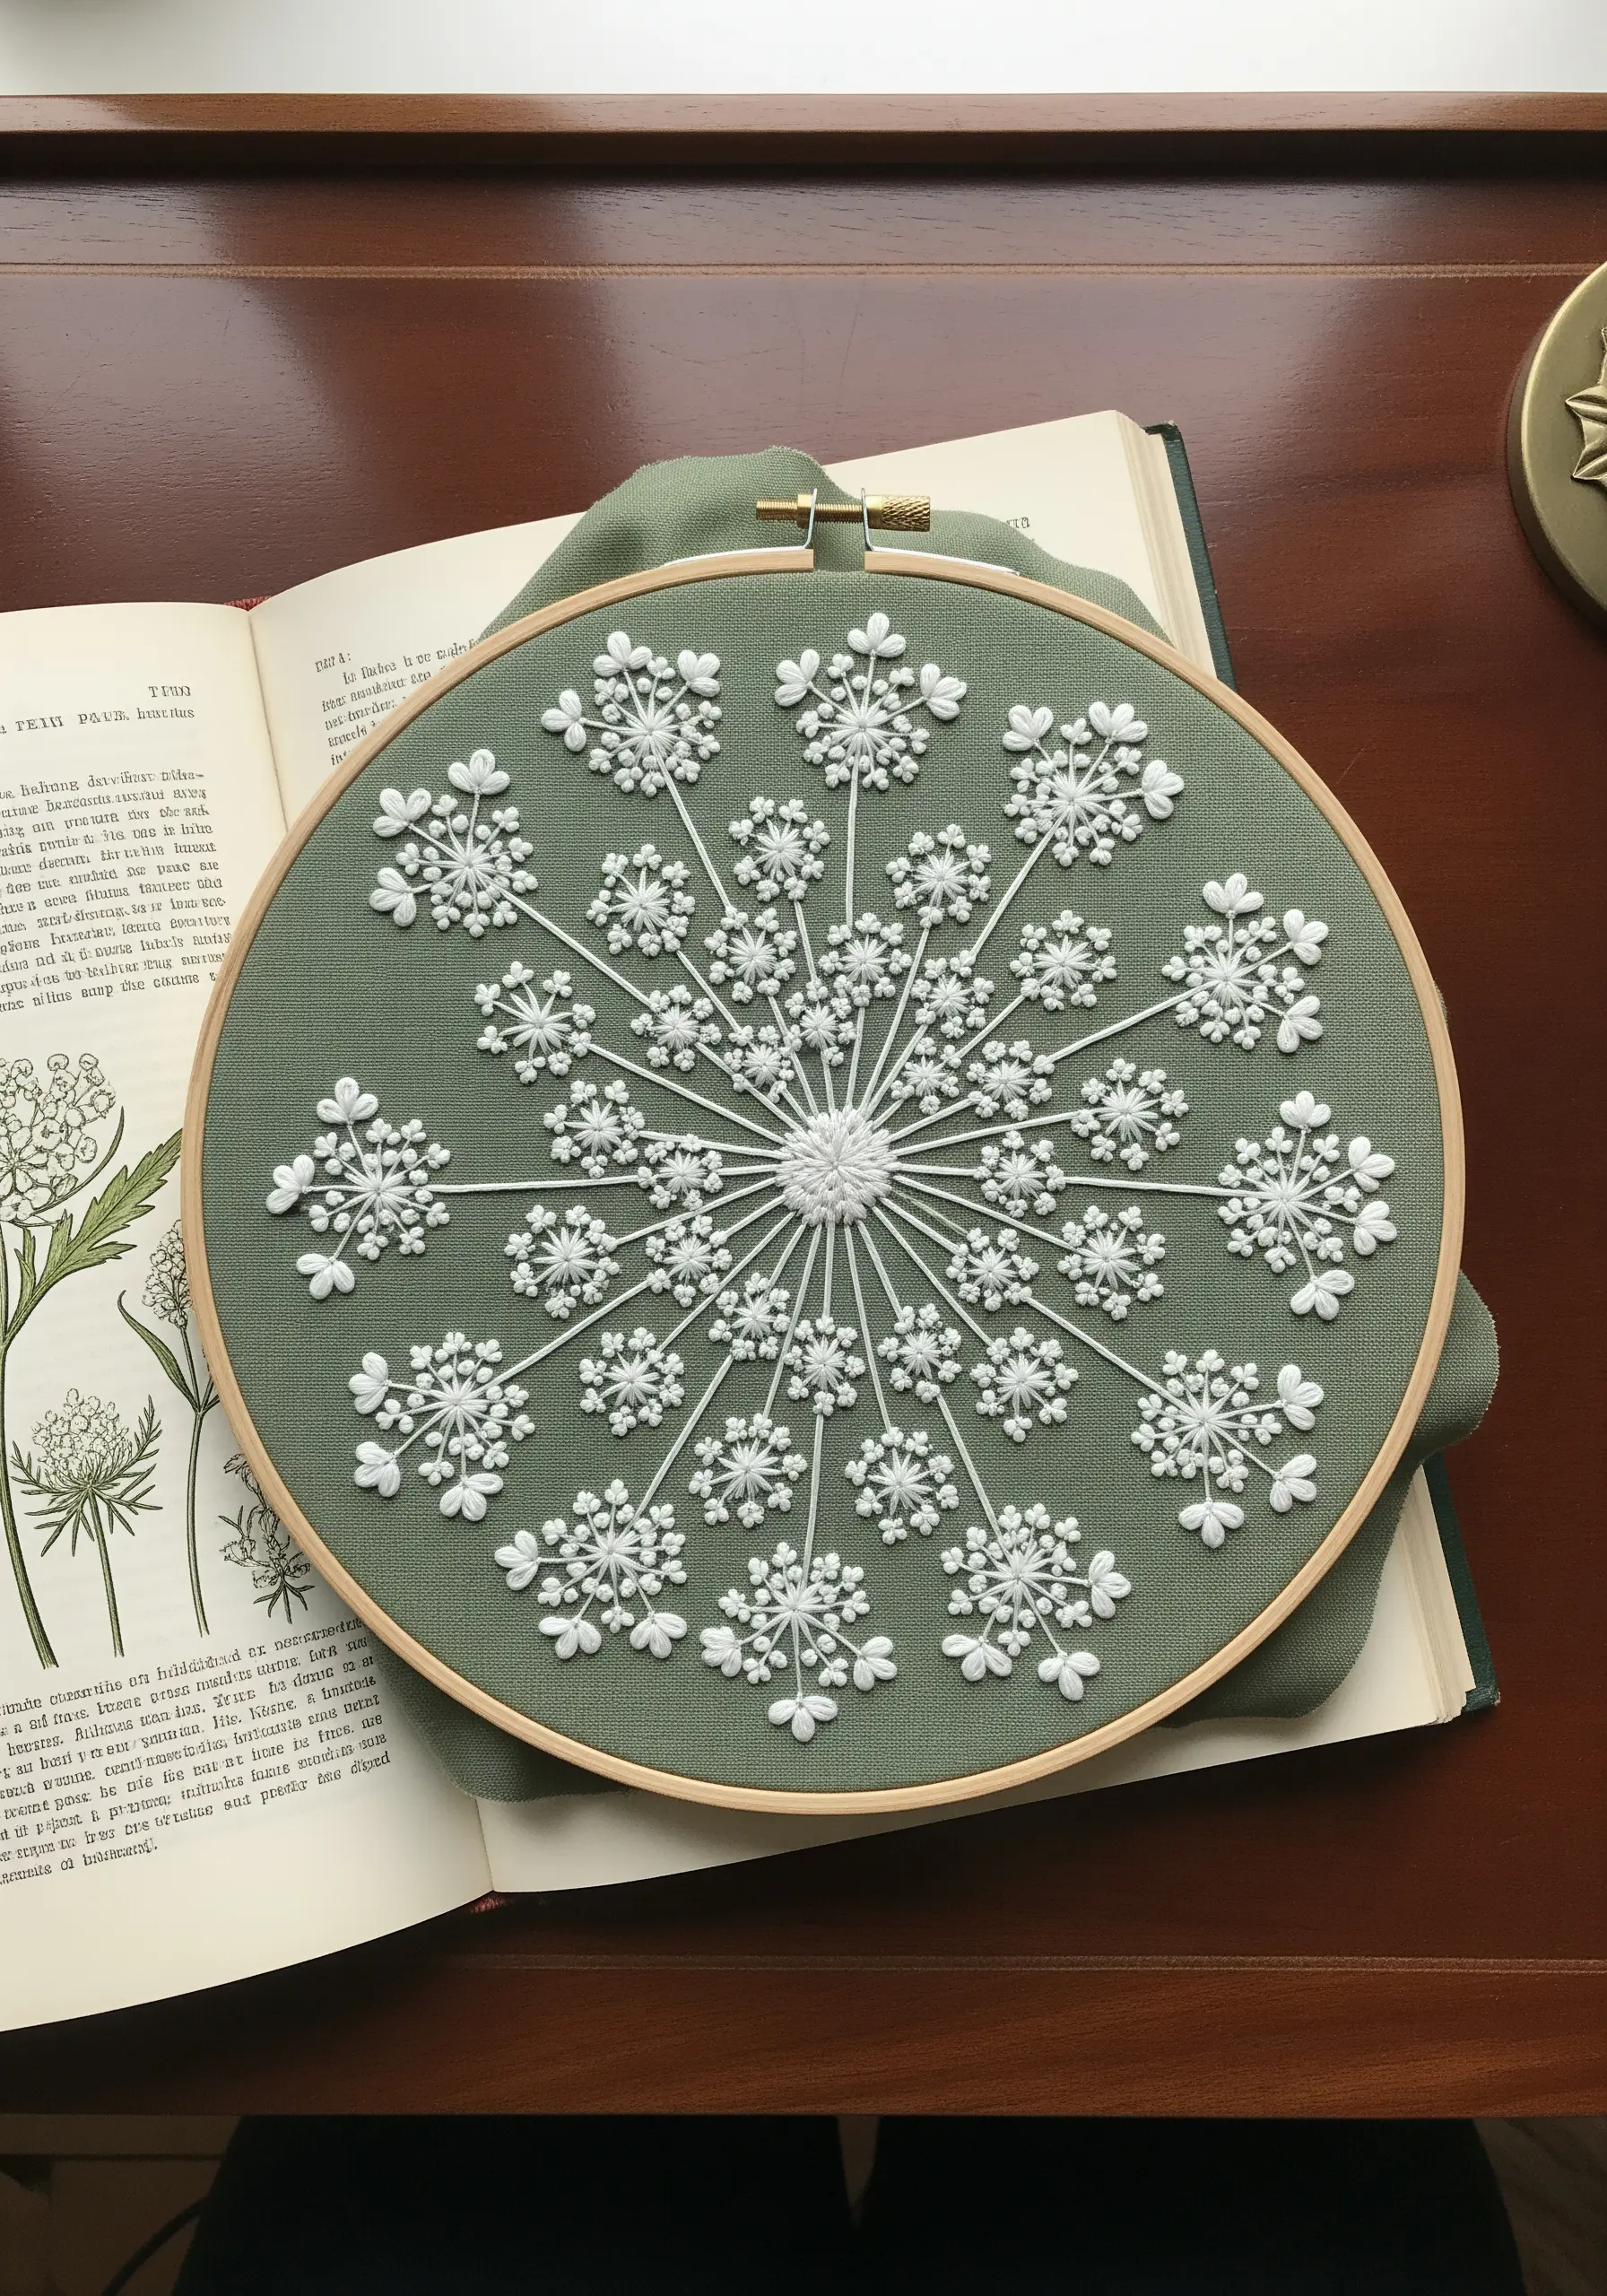
Capture the delicate, clustered look of a Queen Anne’s Lace flower head using strategically placed French knots.
Use straight stitches to create the fanning stems (the umbels), then place a small cluster of white French knots at the end of each stem.
For the central, larger cluster, use more knots and perhaps a slightly thicker thread to give it prominence.
Stitching this design on a muted, earthy green fabric allows the intricate white structure of the flower to take center stage.
29. Design a Celestial Swirl with Seed Beads
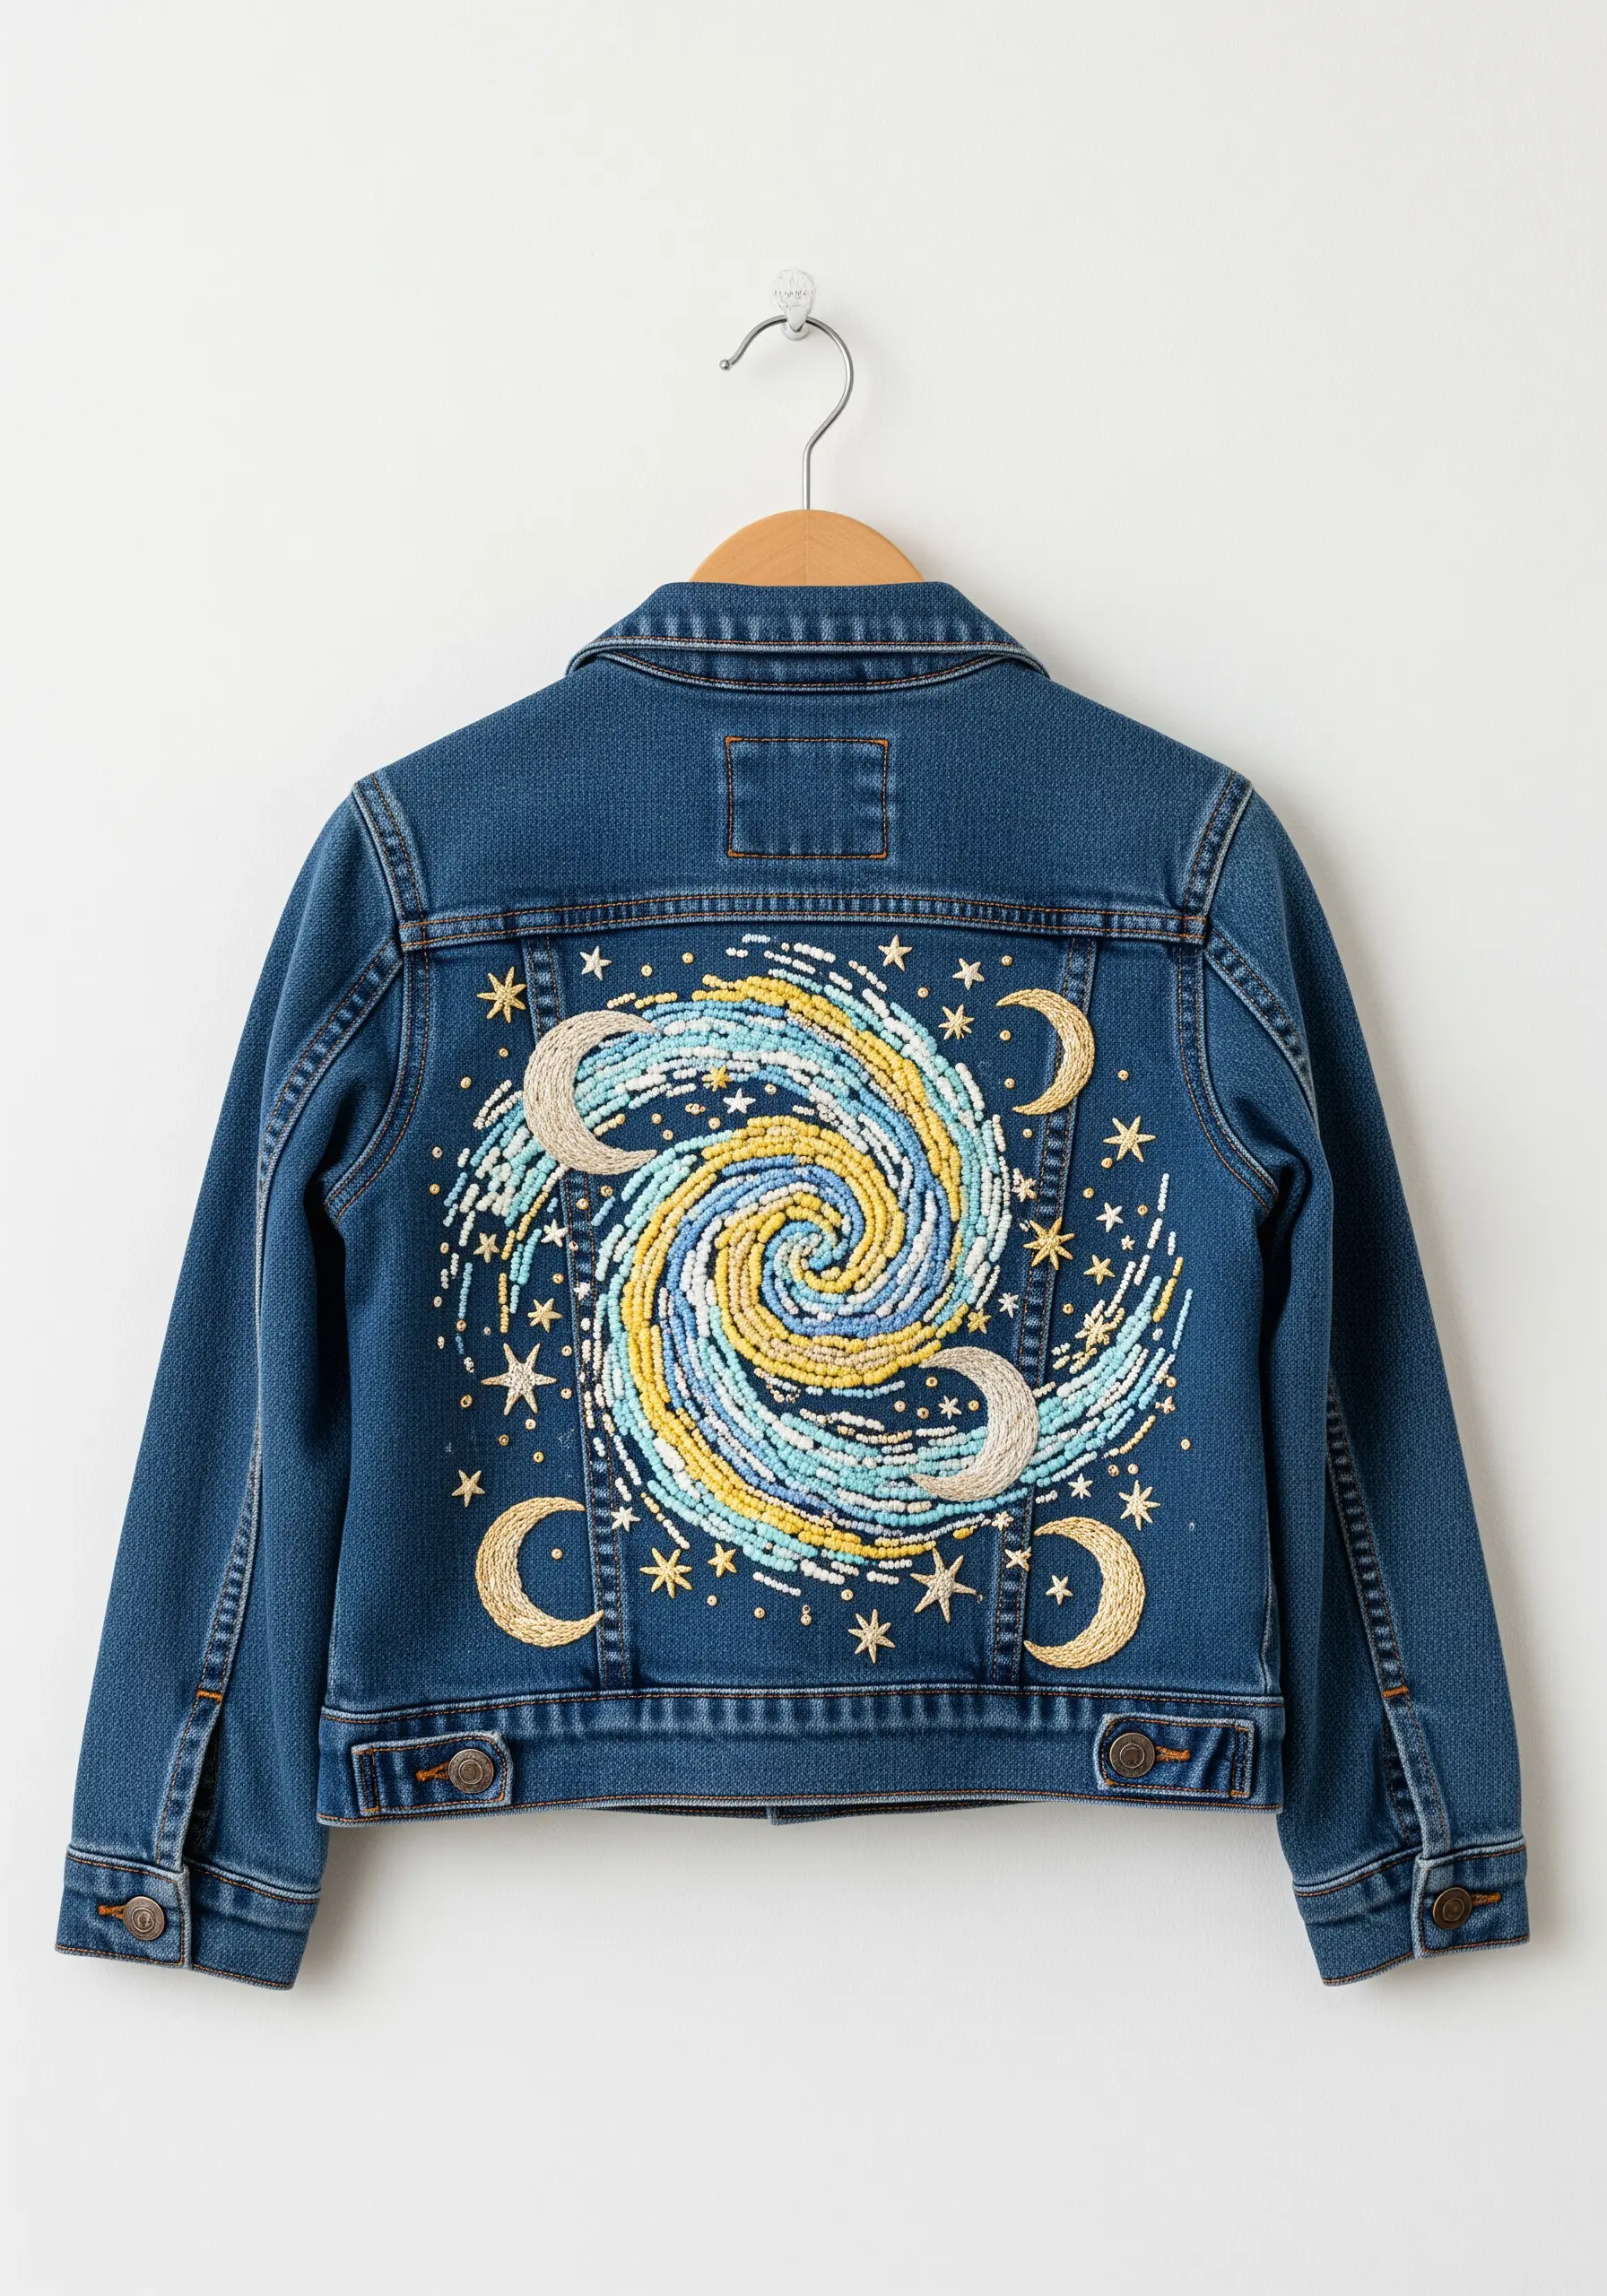
Embellish apparel by creating a dynamic, swirling galaxy with seed beads instead of thread.
Draw your swirling design onto the fabric with a removable marker, then fill the lines with different colors of beads using a simple backstitch.
This method allows you to create texture and vibrant color blocks quickly.
Incorporate embroidered stars and satin-stitched moons to complement the beaded texture, turning your old clothes into a piece of wearable art.
This is a great way to explore aesthetic embroidery ideas to turn your old clothes into art.
30. Capture the Movement of Wind-Blown Grass
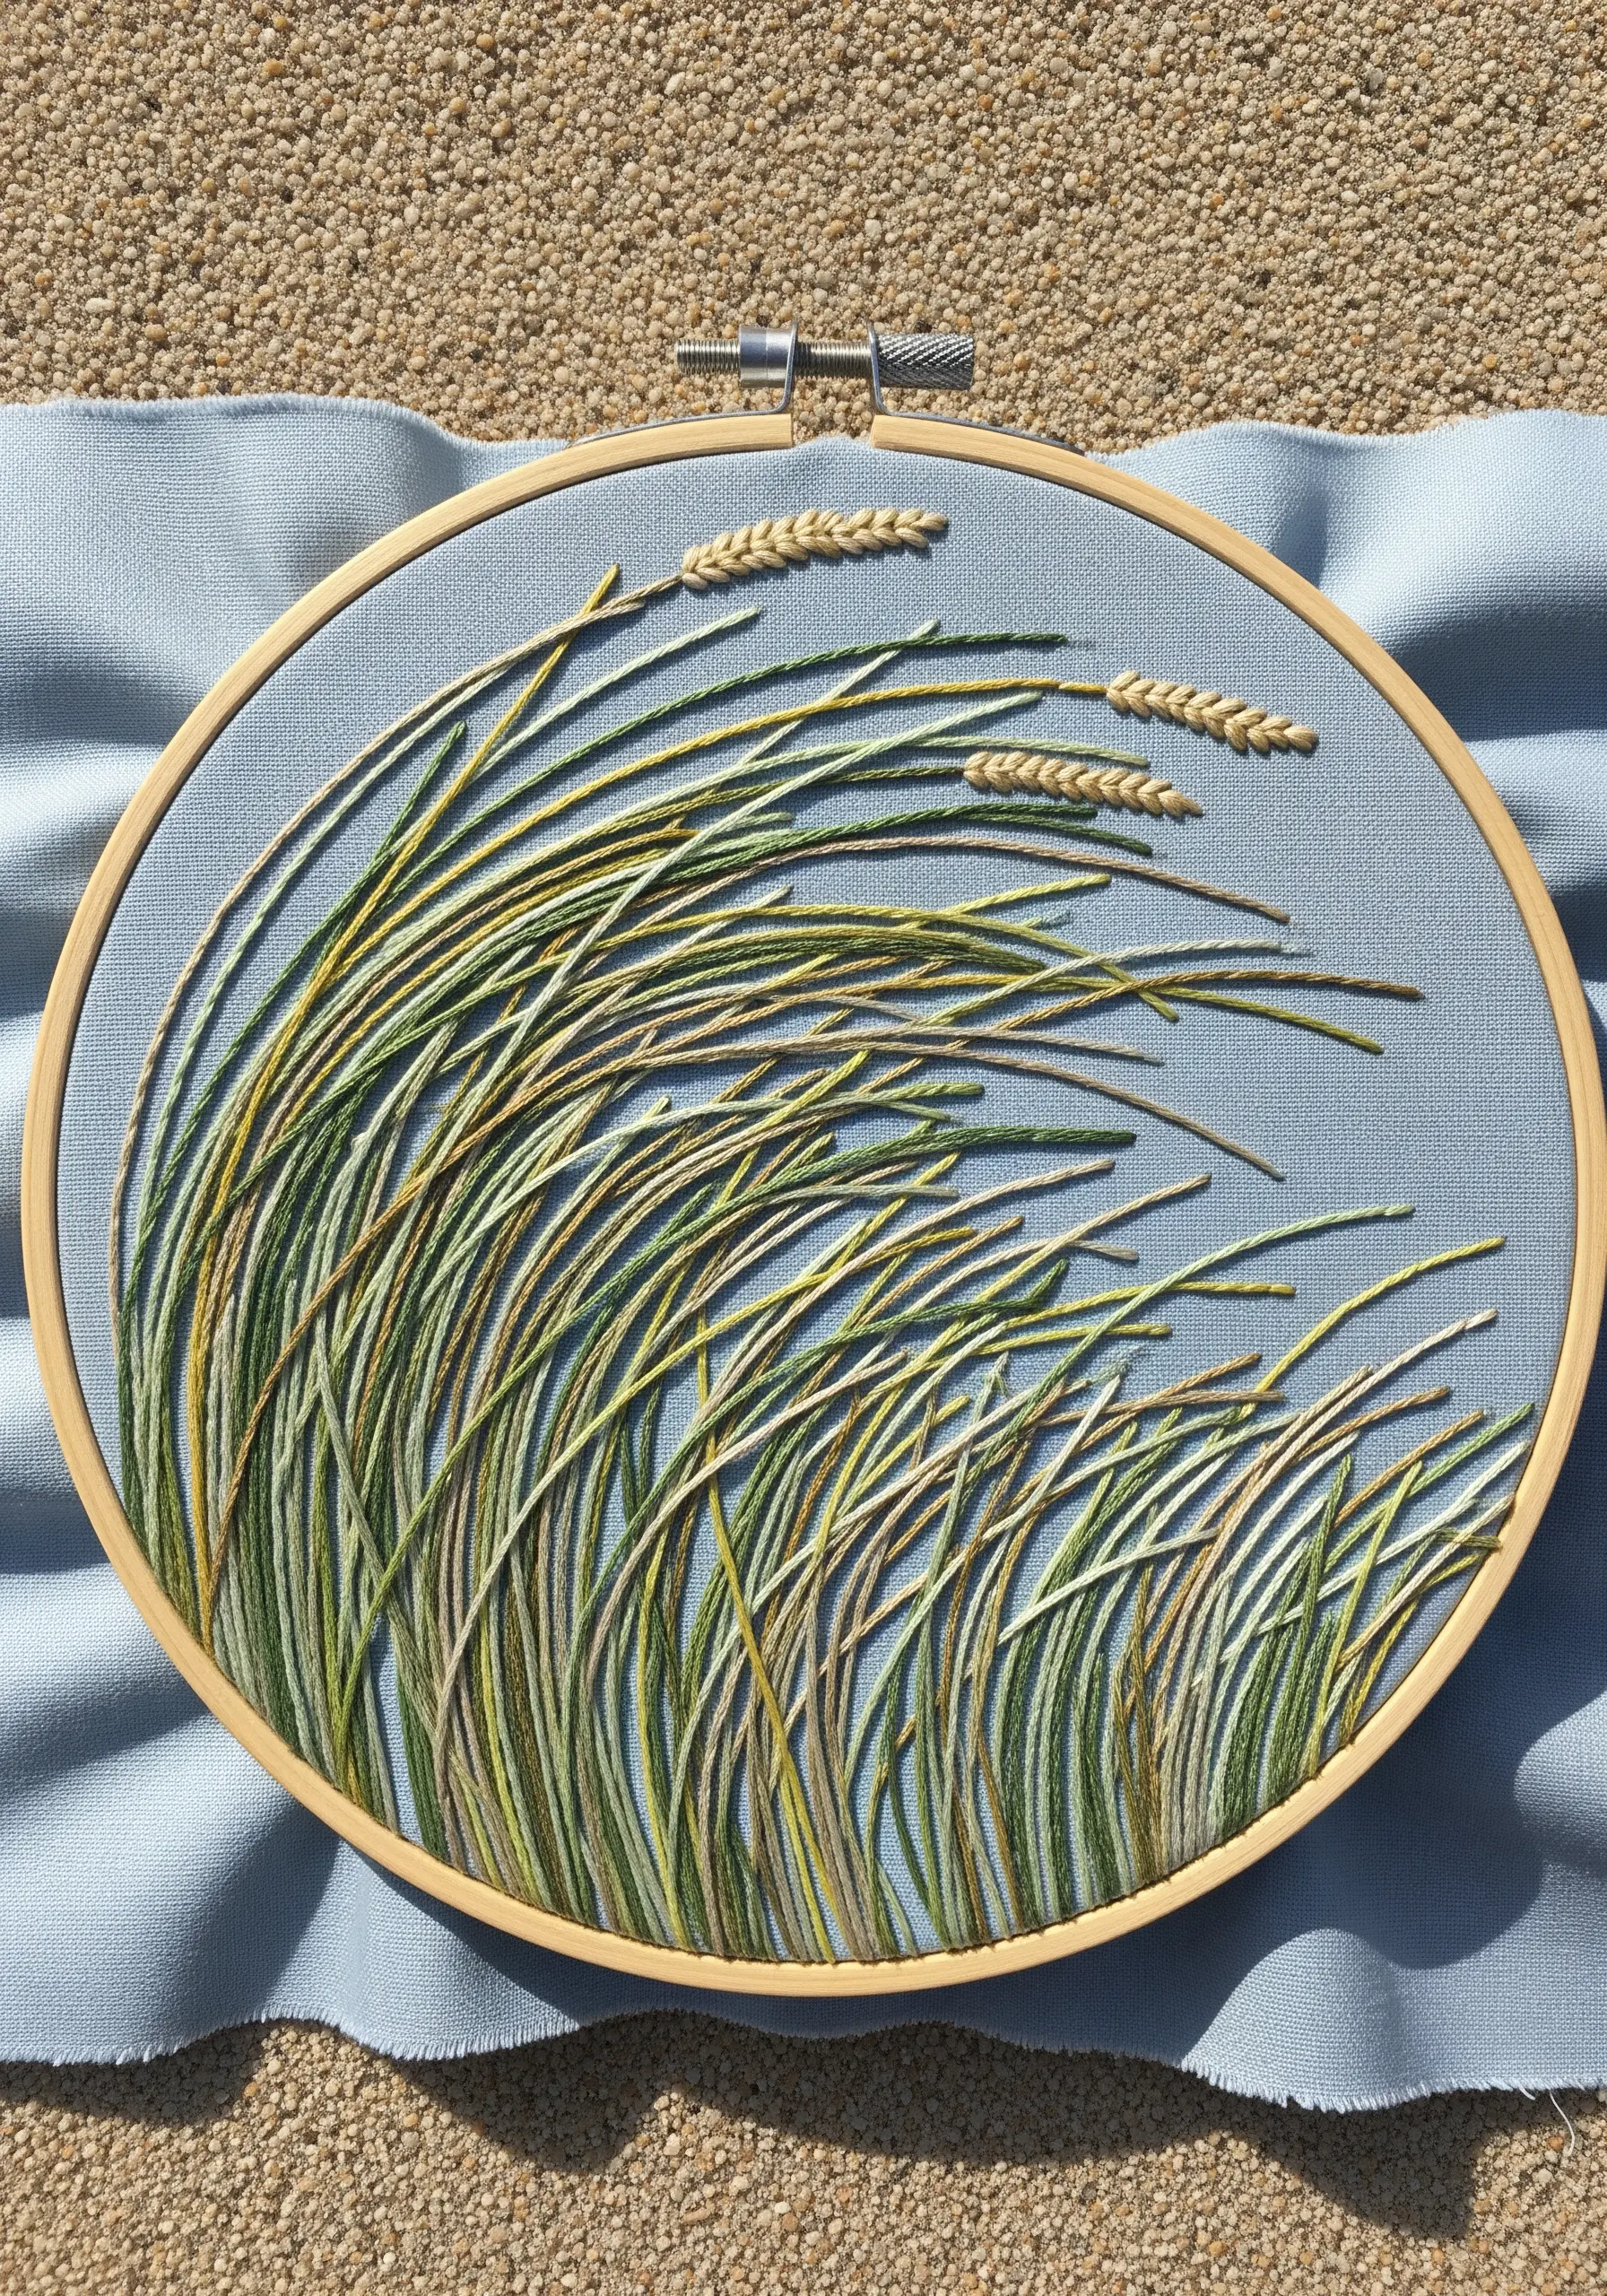
Create a sense of movement and direction by using long, sweeping straight stitches.
Layer stitches in various shades of green, yellow, and beige, ensuring they all follow the same gentle curve to suggest the direction of the wind.
Don’t pull the stitches too tight; allowing them a little slack adds to the feeling of fluid motion.
For the wheat heads at the top, use a small fishbone stitch or satin stitch to add a slightly different, heavier texture that contrasts with the light, airy grass.
31. Sculpt Volcanic Rock with French Knots and Couching
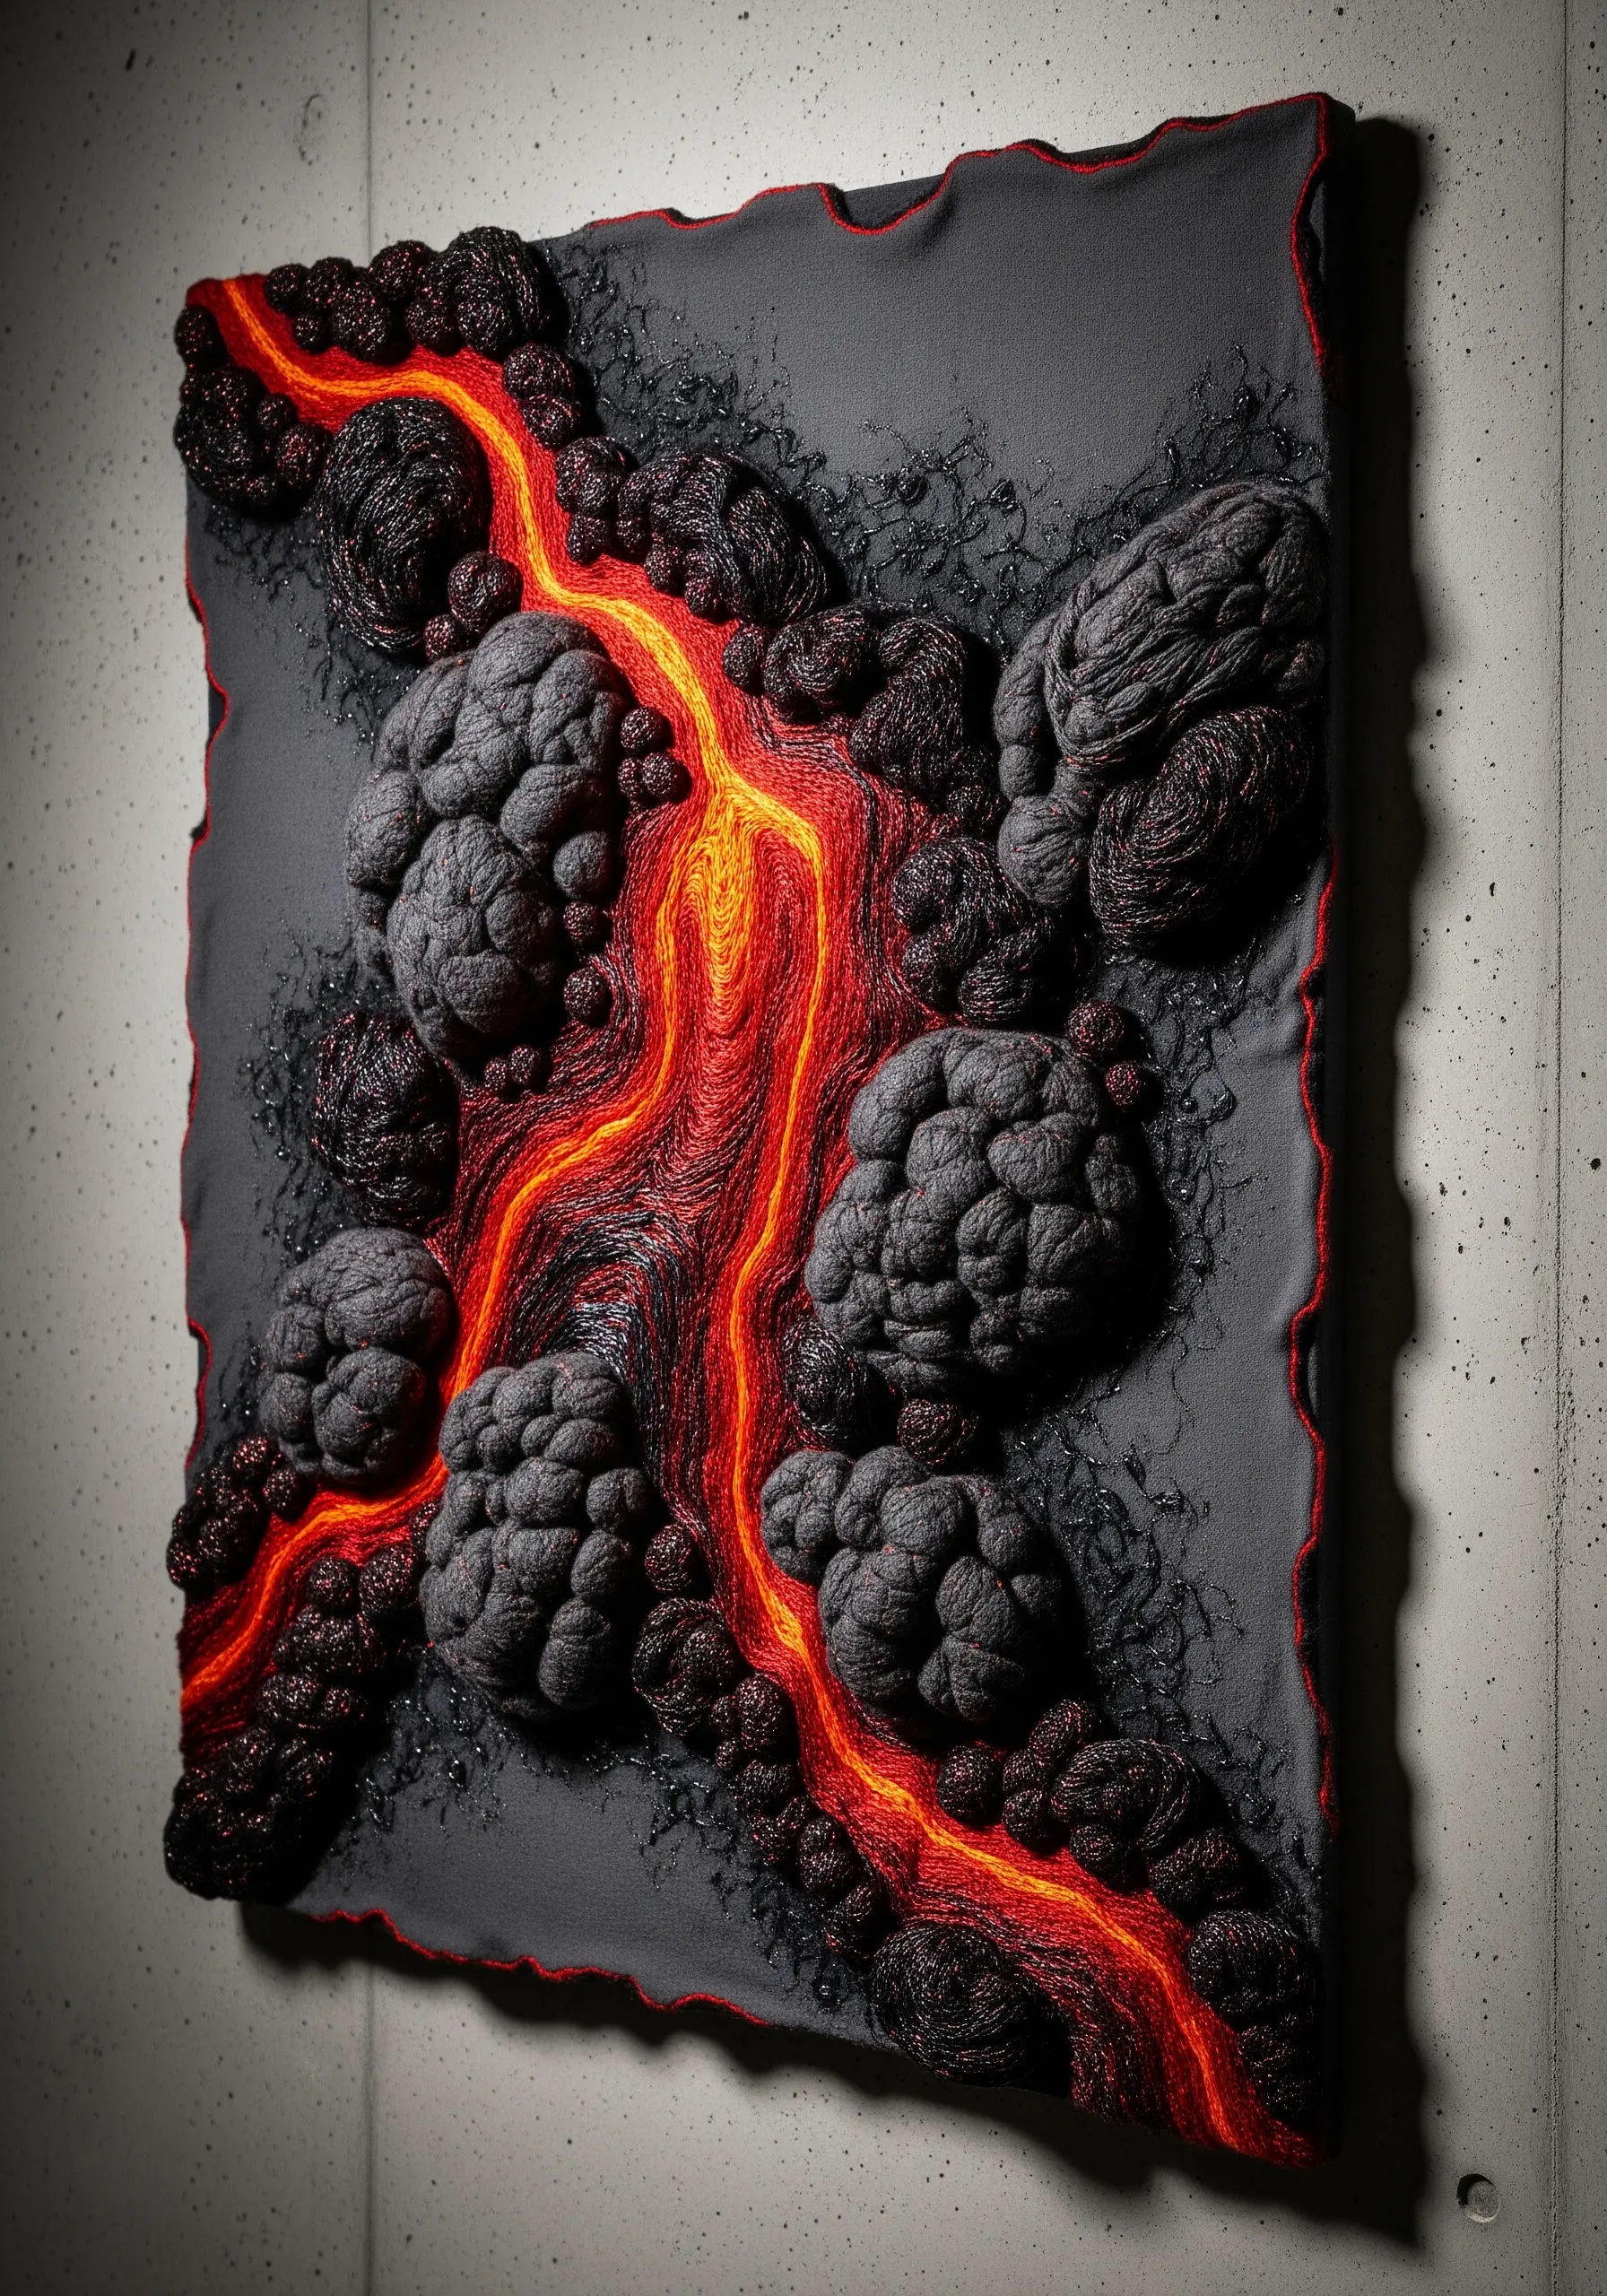
Embody the raw power of a volcano by combining the rough texture of French knots with the smooth flow of couched thread.
Create the cooling lava rock with dense clusters of French knots in black, charcoal, and grey, using thick wool thread for a bulky, porous look.
For the molten lava river, couch down bundles of bright red, orange, and yellow floss, blending them to create a fiery gradient.
This high-contrast, mixed-texture approach results in a dramatic and powerful piece of fiber art.
32. Fill Shapes with Flawless Satin Stitch
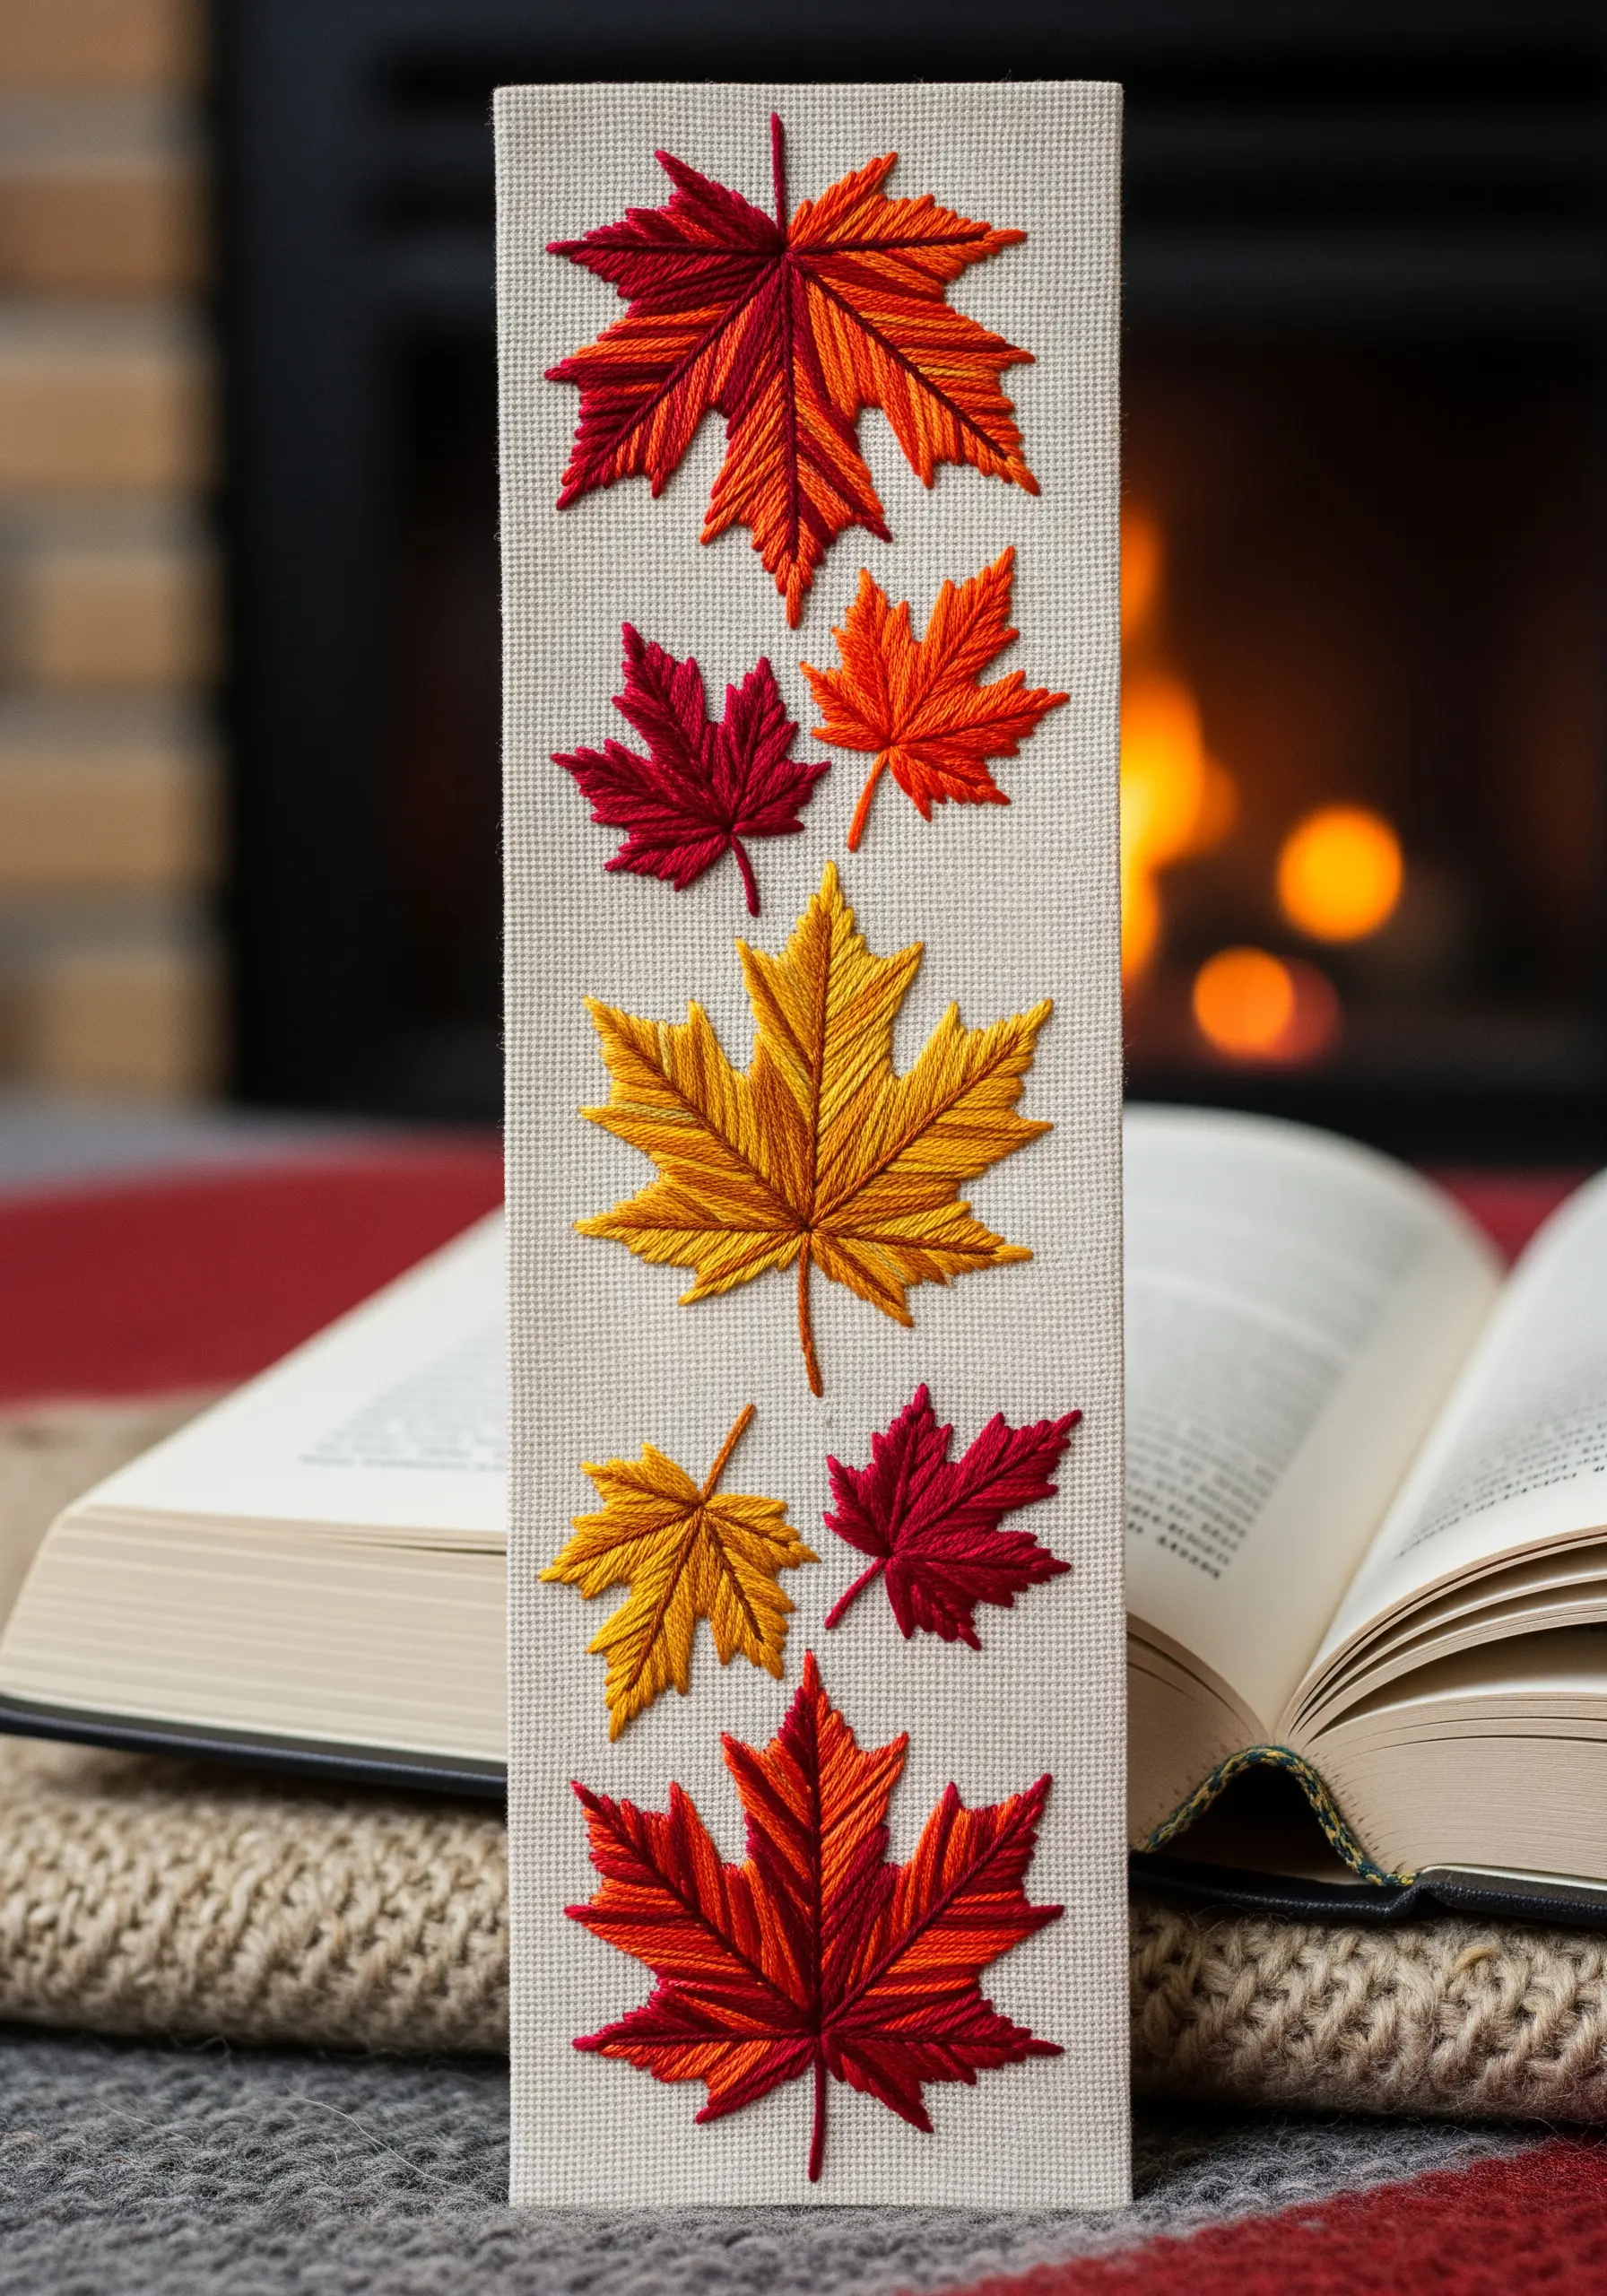
Master the satin stitch to give your leaf motifs a smooth, almost painted appearance.
To keep your edges perfectly clean, outline the shape with a split stitch or backstitch first. Your satin stitches can then tuck right up against this raised edge.
For the veins, add a simple backstitch on top of the completed satin stitch fill.
Using a gradient color scheme of autumnal reds and oranges makes a simple bookmark feel like a treasured keepsake.
33. Create Your Own Natural Texture Sampler
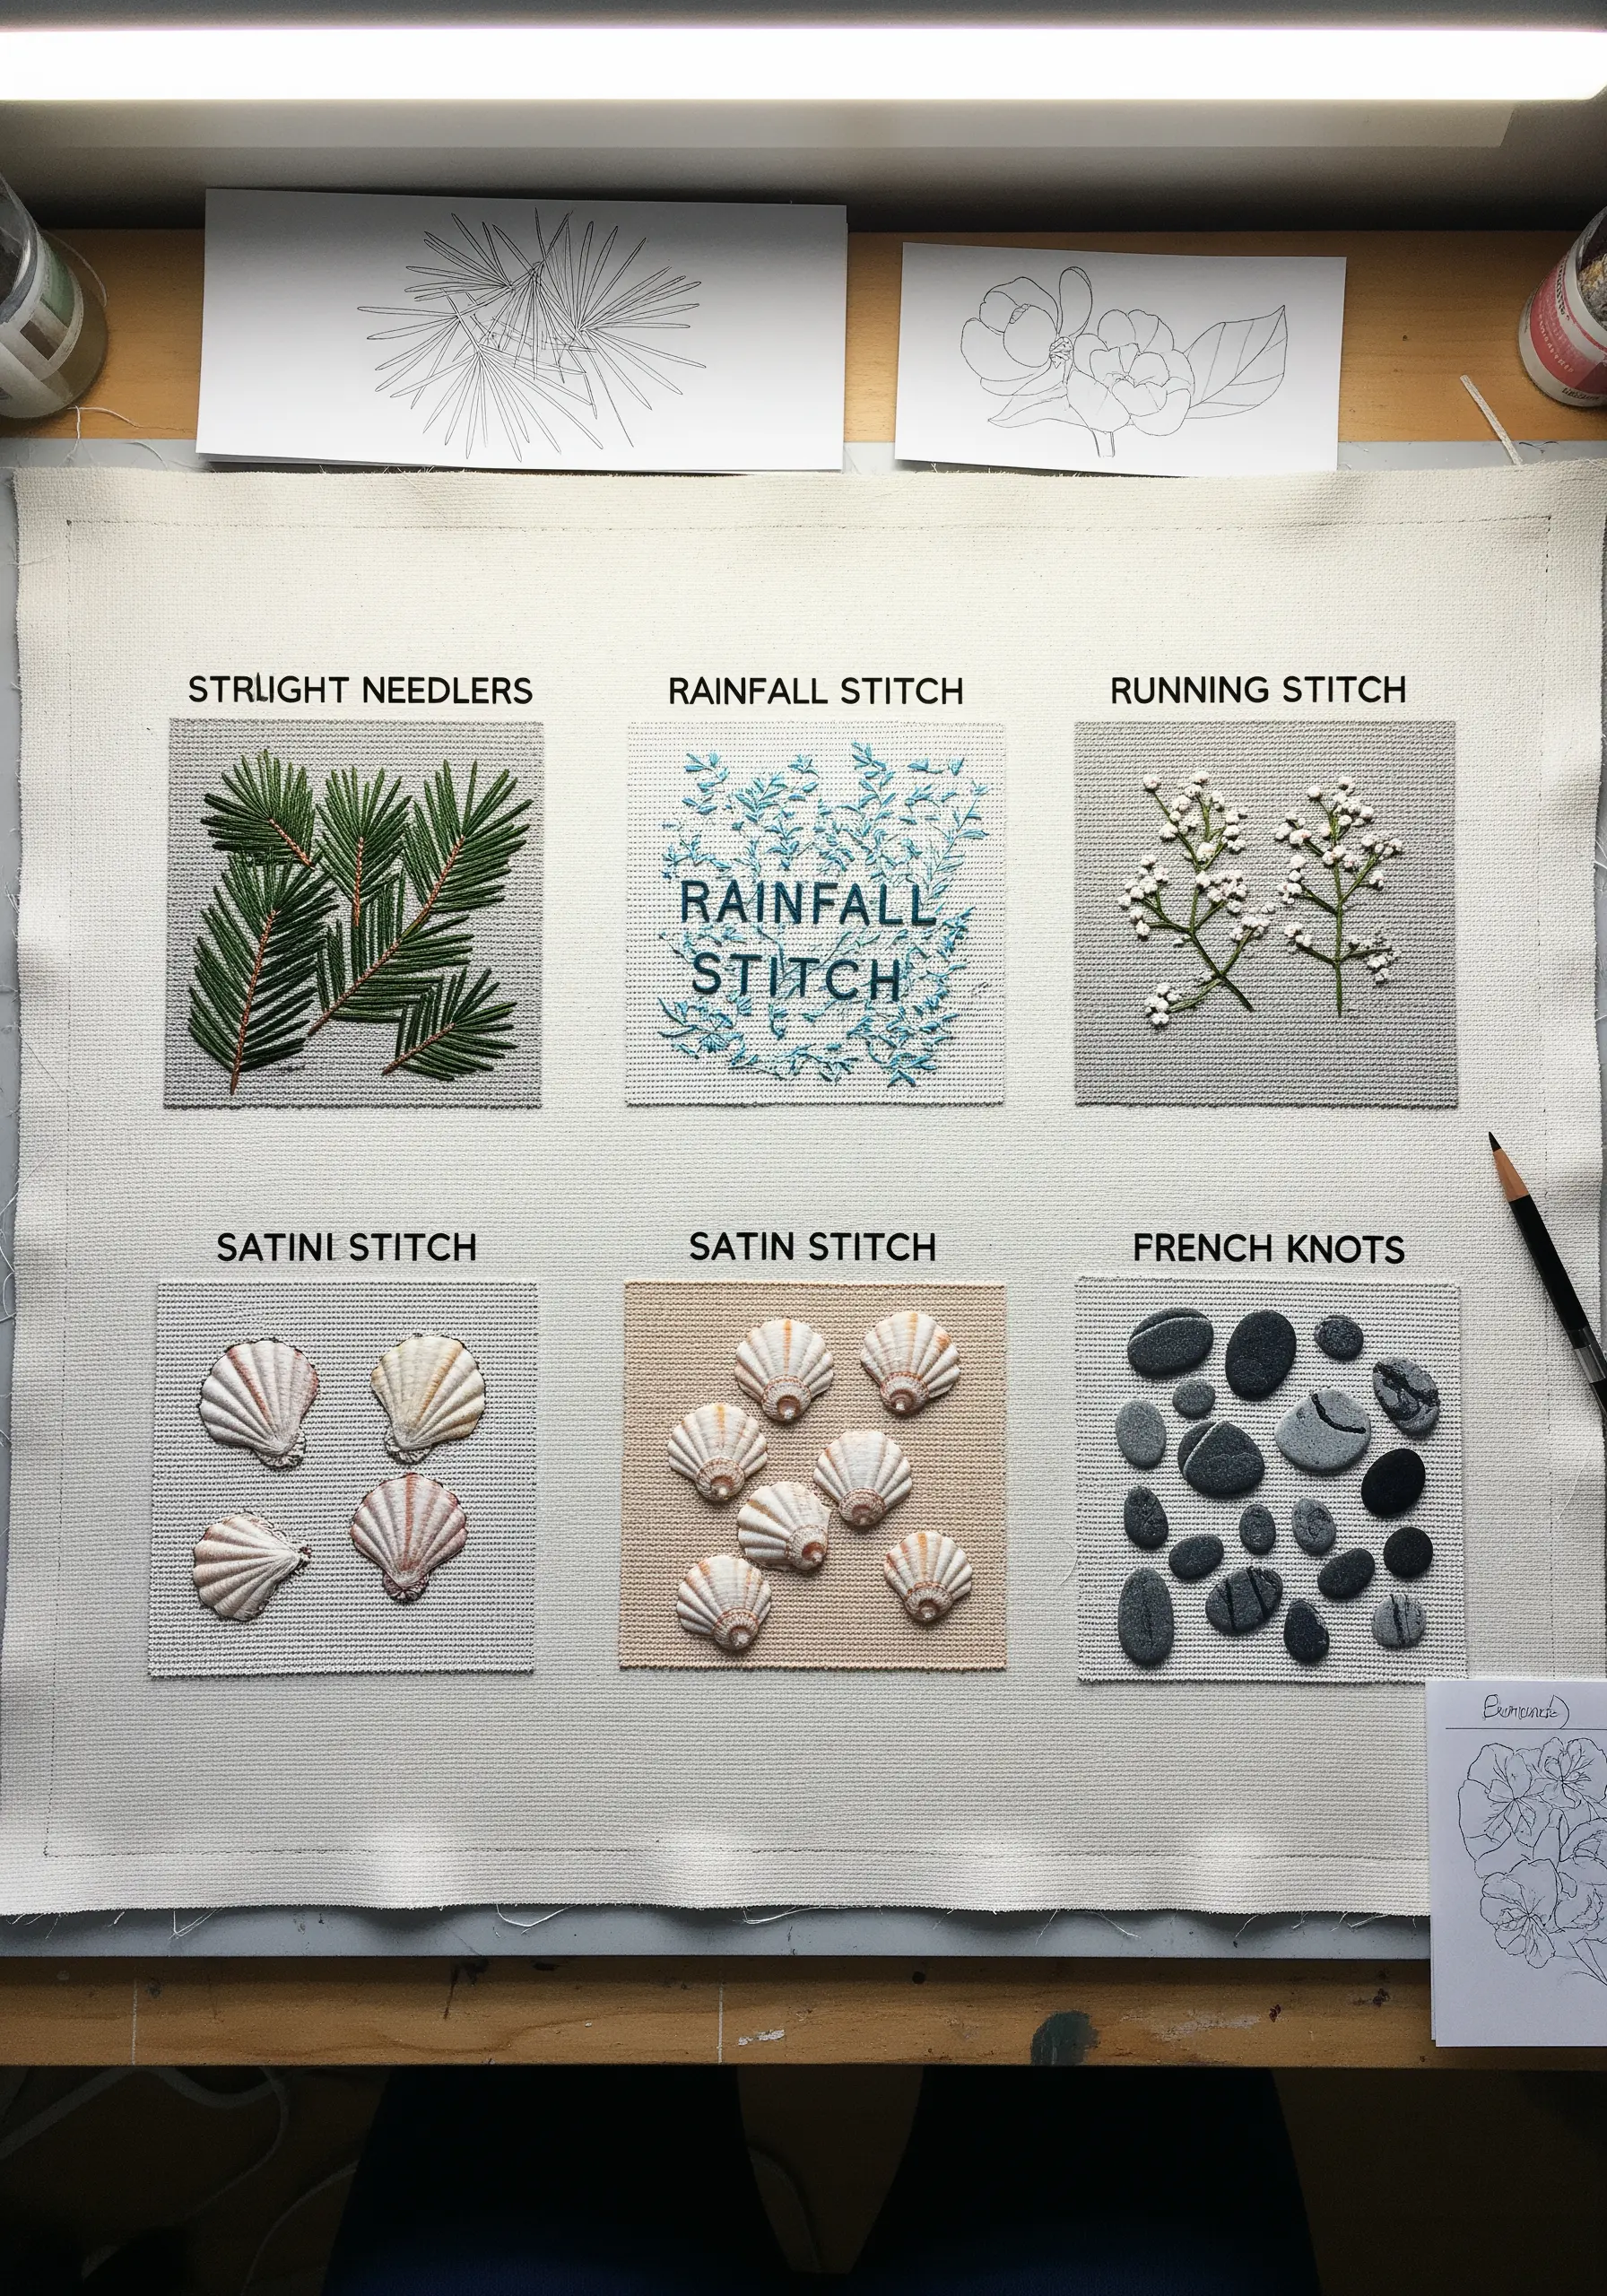
Build your skills and create a beautiful reference piece by designing a texture sampler.
Divide your fabric into a grid and dedicate each square to replicating a different natural texture: the smoothness of shells with satin stitch, the roughness of pebbles with French knots, the delicacy of flowers with running stitch.
This is not just practice; it’s a way to build a personal library of effects you can refer to for any future project.
It’s the most effective way to create nature-themed embroidery samplers to practice real plant shapes and textures.


