

Those small, overlooked spaces in your home—the narrow niche by the stairs, the empty corner in the hallway, the awkward wall above your desk—are waiting for a touch of intention. Instead of seeing them as a design challenge, what if you saw them as a perfectly sized canvas?
Embroidery allows you to transform these architectural quirks into intimate, personal art installations. This isn’t about simply hanging another framed piece. It’s about integrating texture, color, and story directly into the structure of your home, creating a focal point that feels both deliberate and deeply comforting.
Don’t let the word ‘mural’ intimidate you. Think of these as tiny, concentrated worlds stitched from thread. Each idea here is a starting point, showing you how to use specific stitches, textures, and compositions to create pieces that command attention, no matter their size. It’s time to pick up your needle and turn that forgotten corner into your favorite view.
1. Create a Sculptural Forest Floor
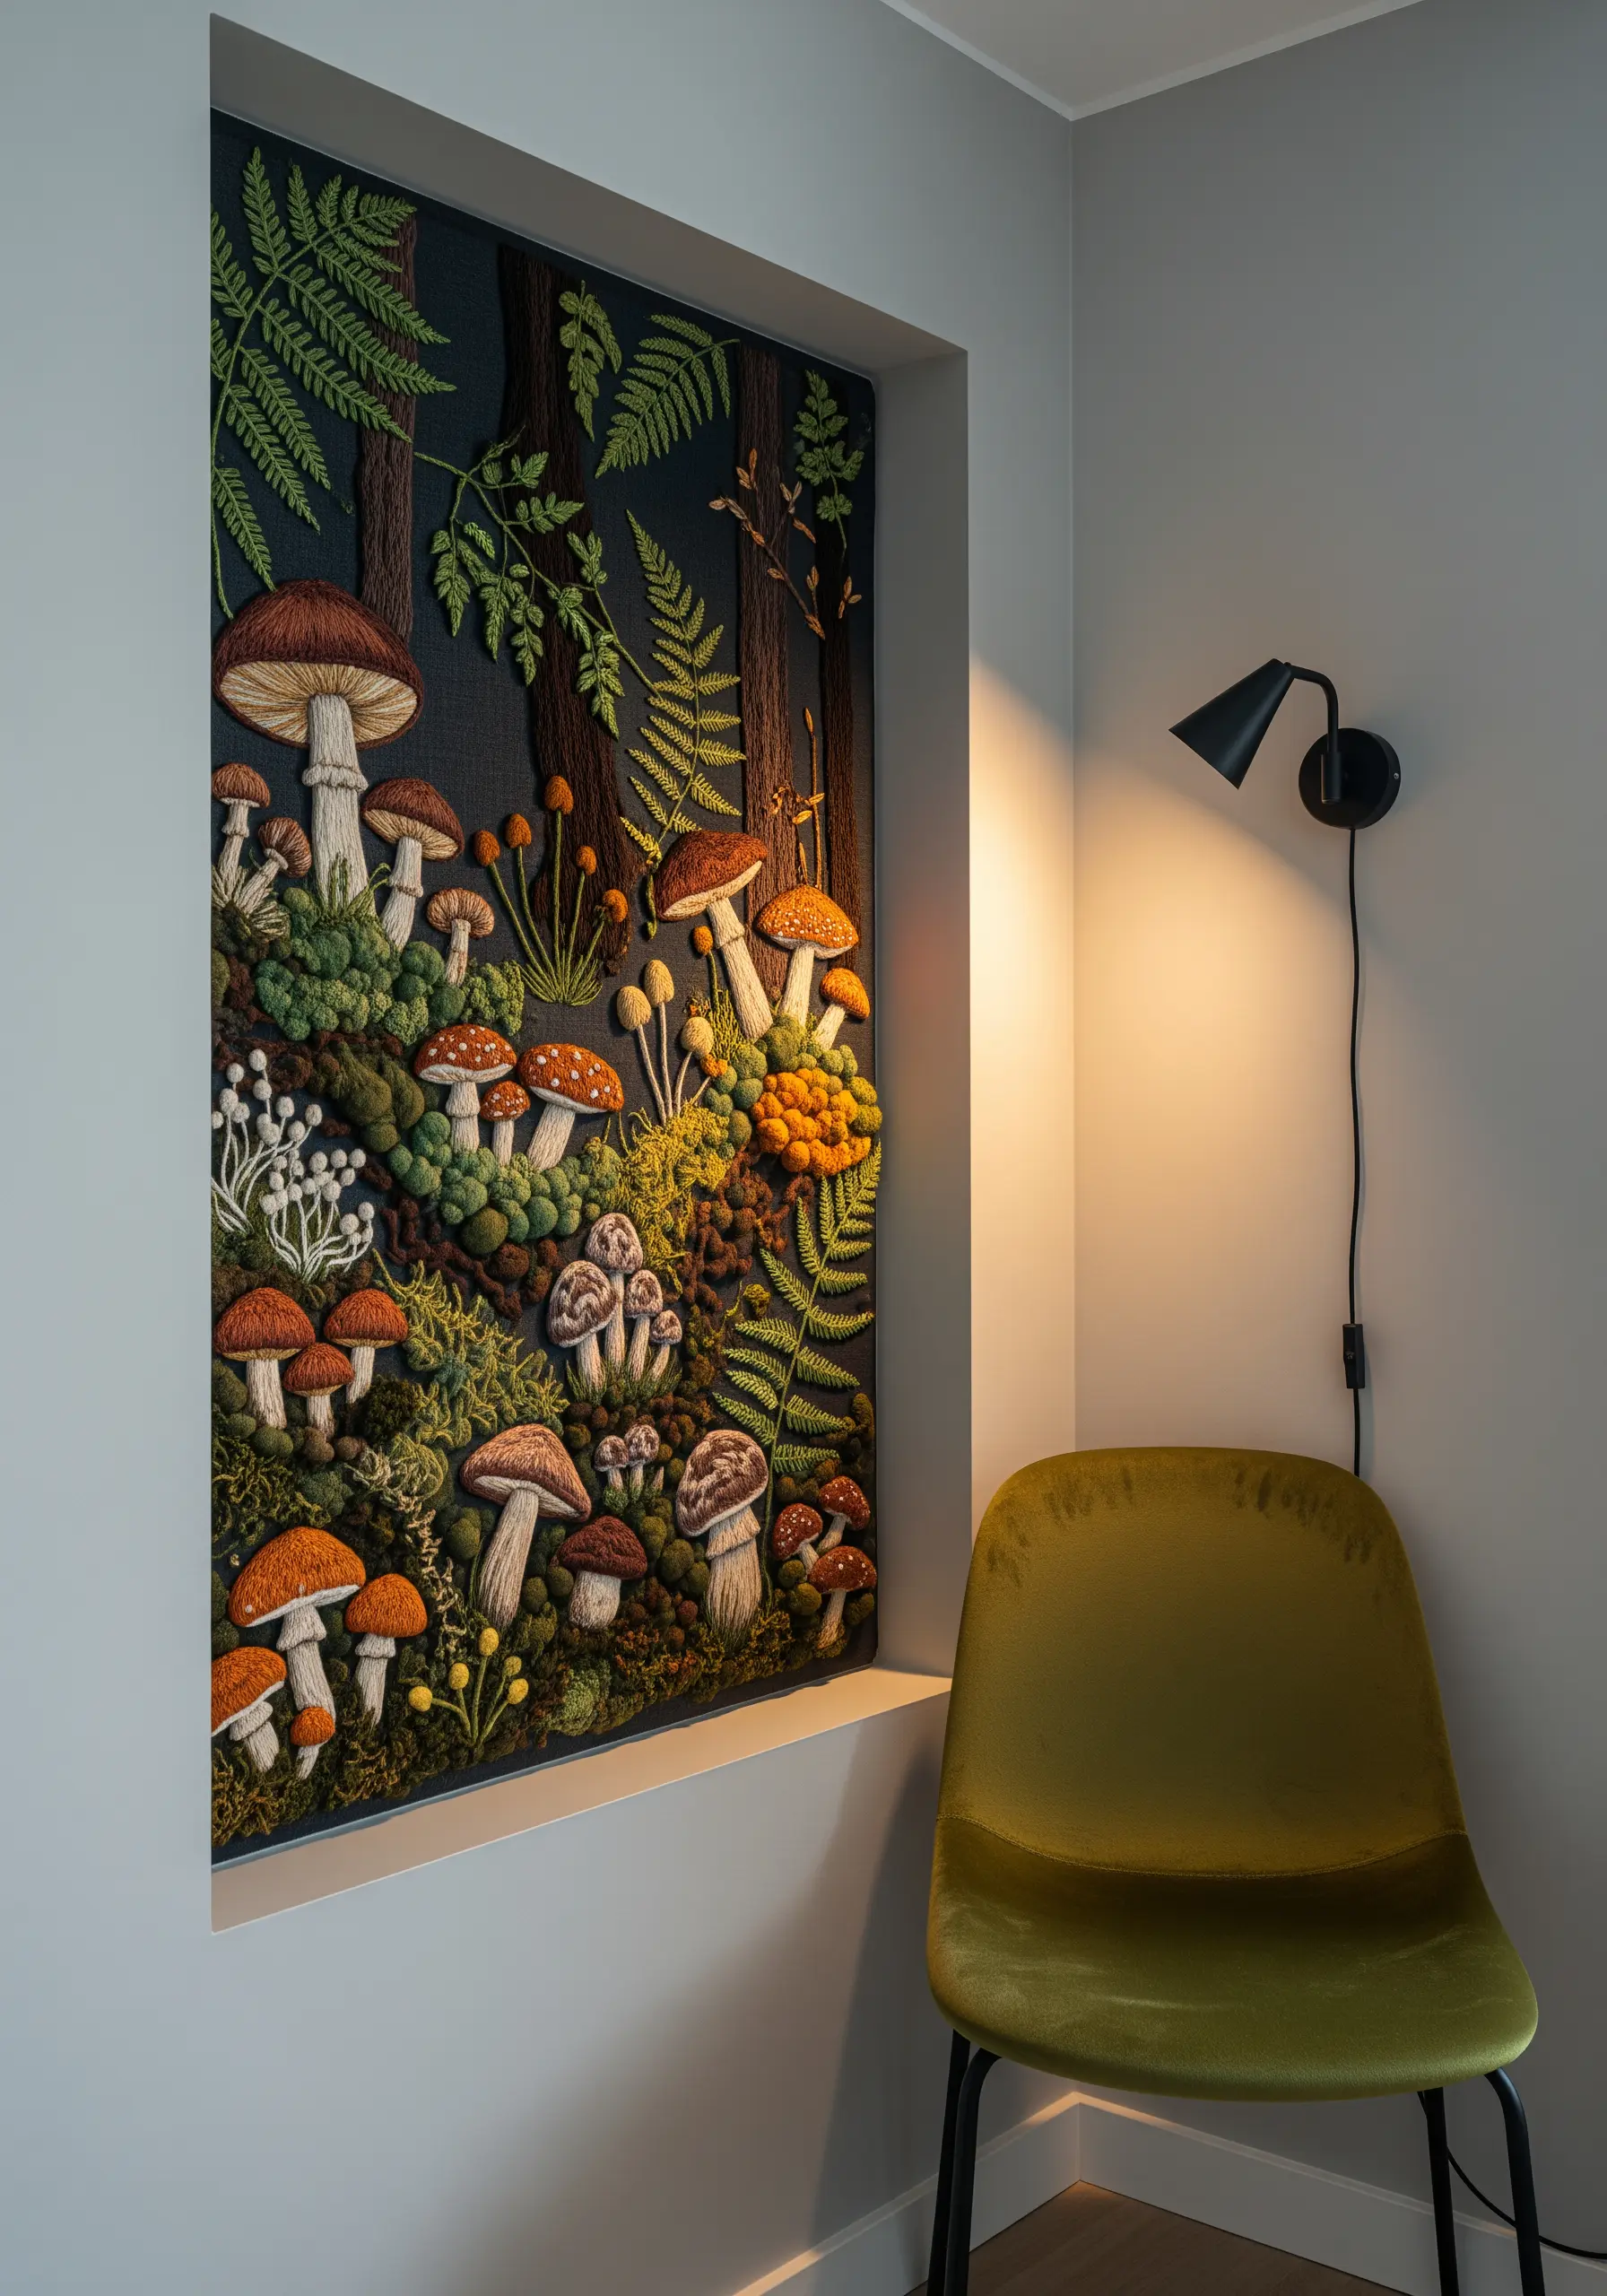
Build an immersive woodland scene by focusing on intense, layered texture.
Use raised satin stitch for the mushroom caps, adding a few straight stitches underneath in a darker tone to suggest gills.
For mossy ground, combine dense French knots with the turkey work stitch, trimming the loops to varying heights to create a realistic, untamed effect.
Layer ferns and background elements by stitching the farthest objects first, allowing foreground motifs to overlap slightly for a powerful sense of depth.
This approach transforms a simple niche into a three-dimensional botanical installation.
2. Define Edges with Negative Space
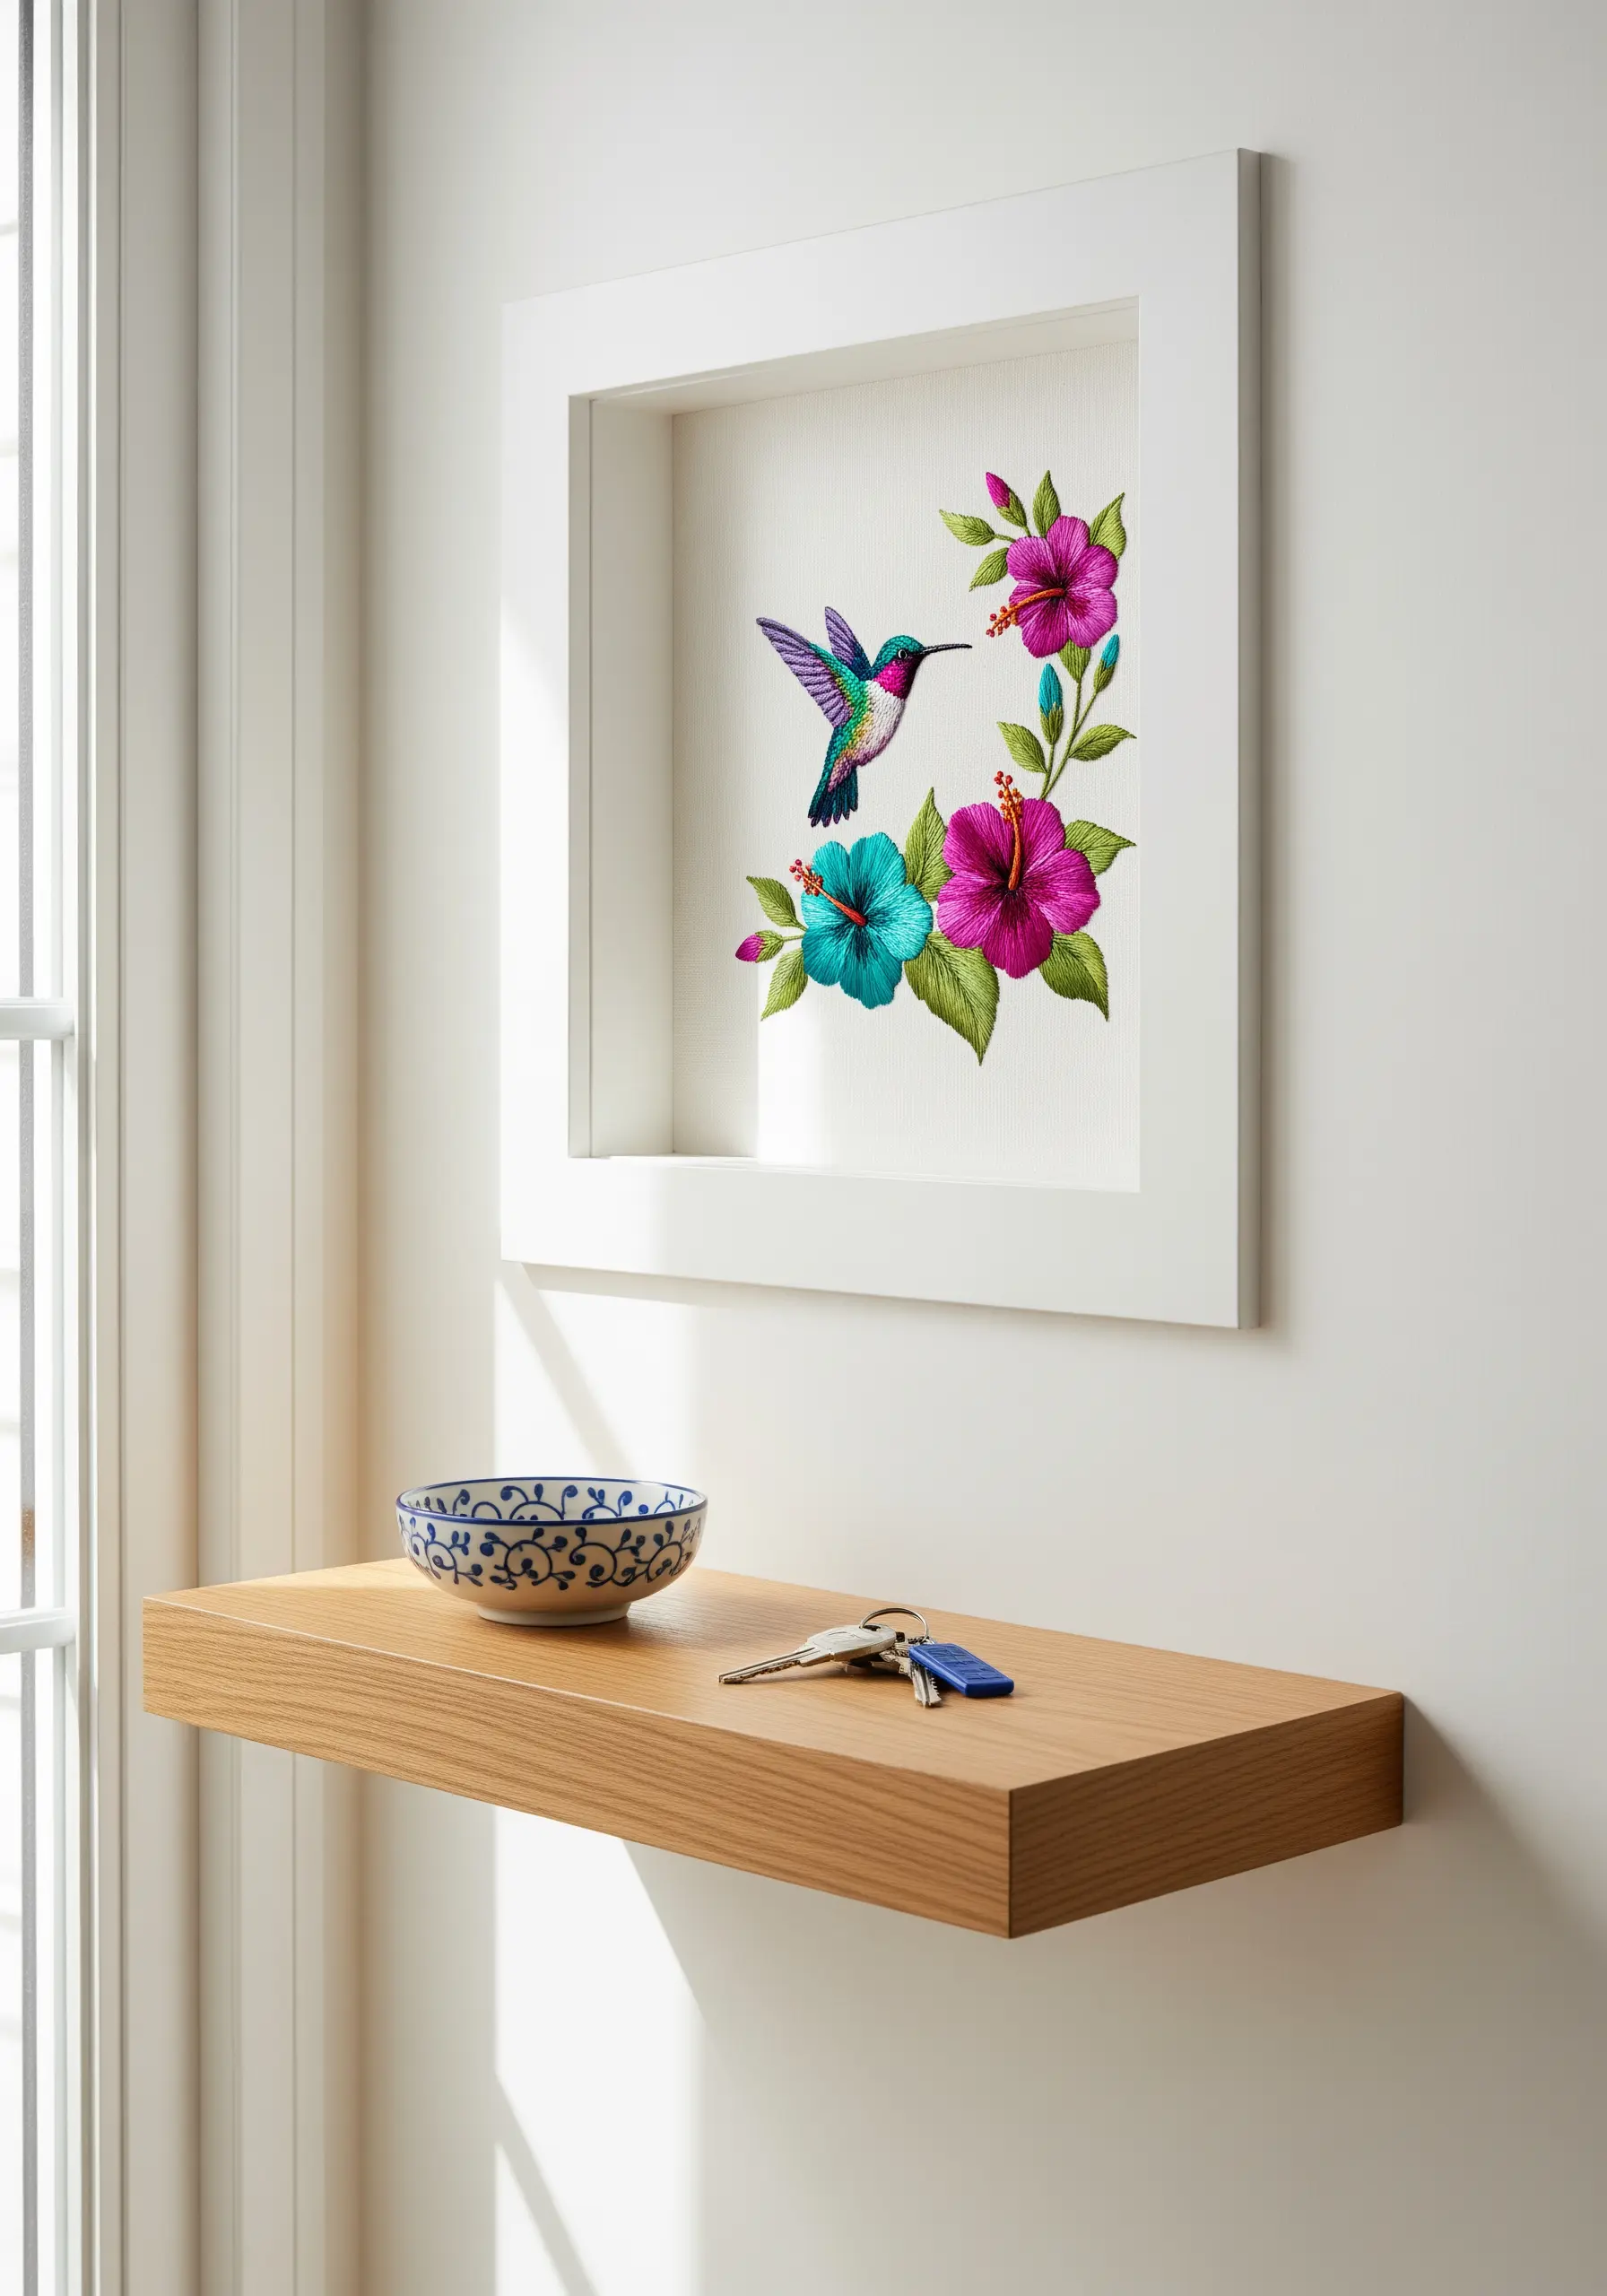
Make your motif feel like it’s floating by using the unstitched fabric as a natural frame.
Position your design to interact with the edges of the niche, allowing parts of leaves or petals to touch the boundary while leaving ample white space around the rest.
For the hummingbird’s iridescence, use a single strand of metallic or silk thread and blend colors with a short long-and-short stitch.
This technique draws the eye inward, making a small piece feel dynamic and intentionally placed rather than just centered.
The contrast between the stitched detail and the clean fabric creates a modern, gallery-like finish.
3. Illustrate Landscapes with Thread Tension
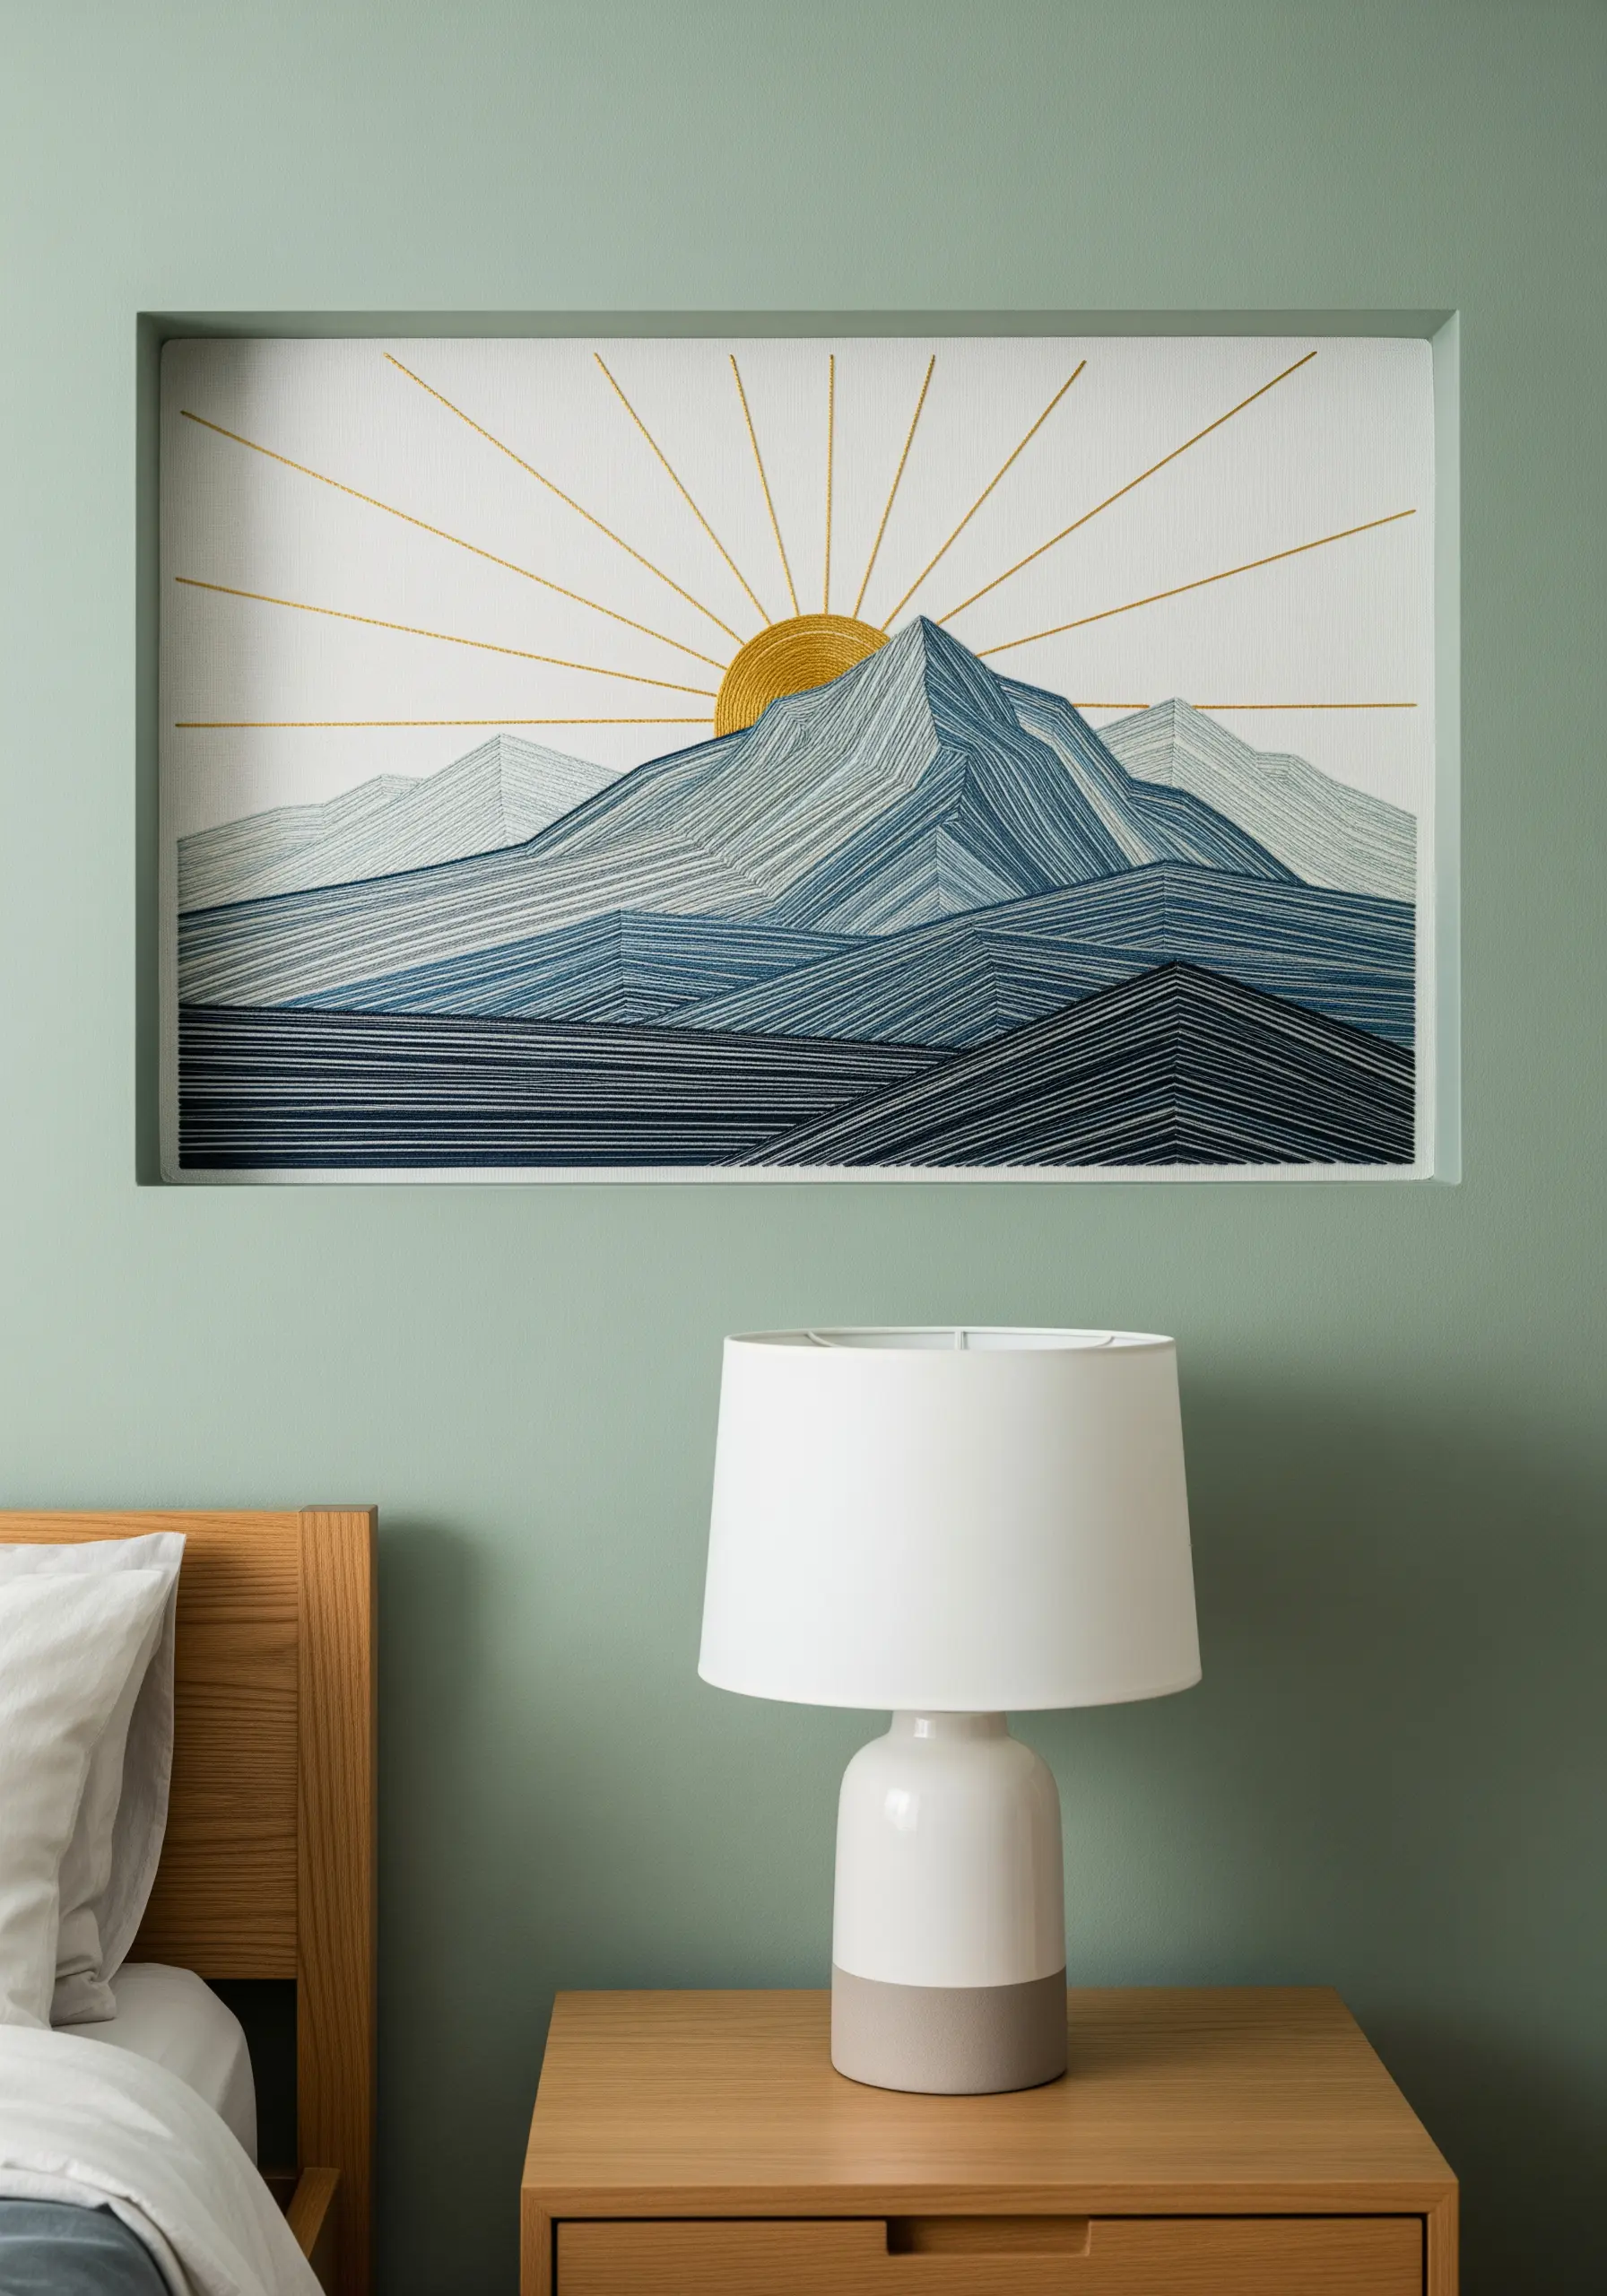
Recreate the clean, graphic lines of a mountain range using only straight stitches.
Map out your primary contours first, then fill each section with tightly packed stitches, changing the angle and thread color to define different slopes and shadows.
To keep your lines perfectly taut and avoid puckering on large fills, use a high-quality, non-stretch linen and consider adding a tear-away stabilizer to the back.
A single, bold element, like a sun stitched with gold metallic thread, provides a focal point and adds warmth to the cool palette.
4. Imply Movement with Translucent Stitches
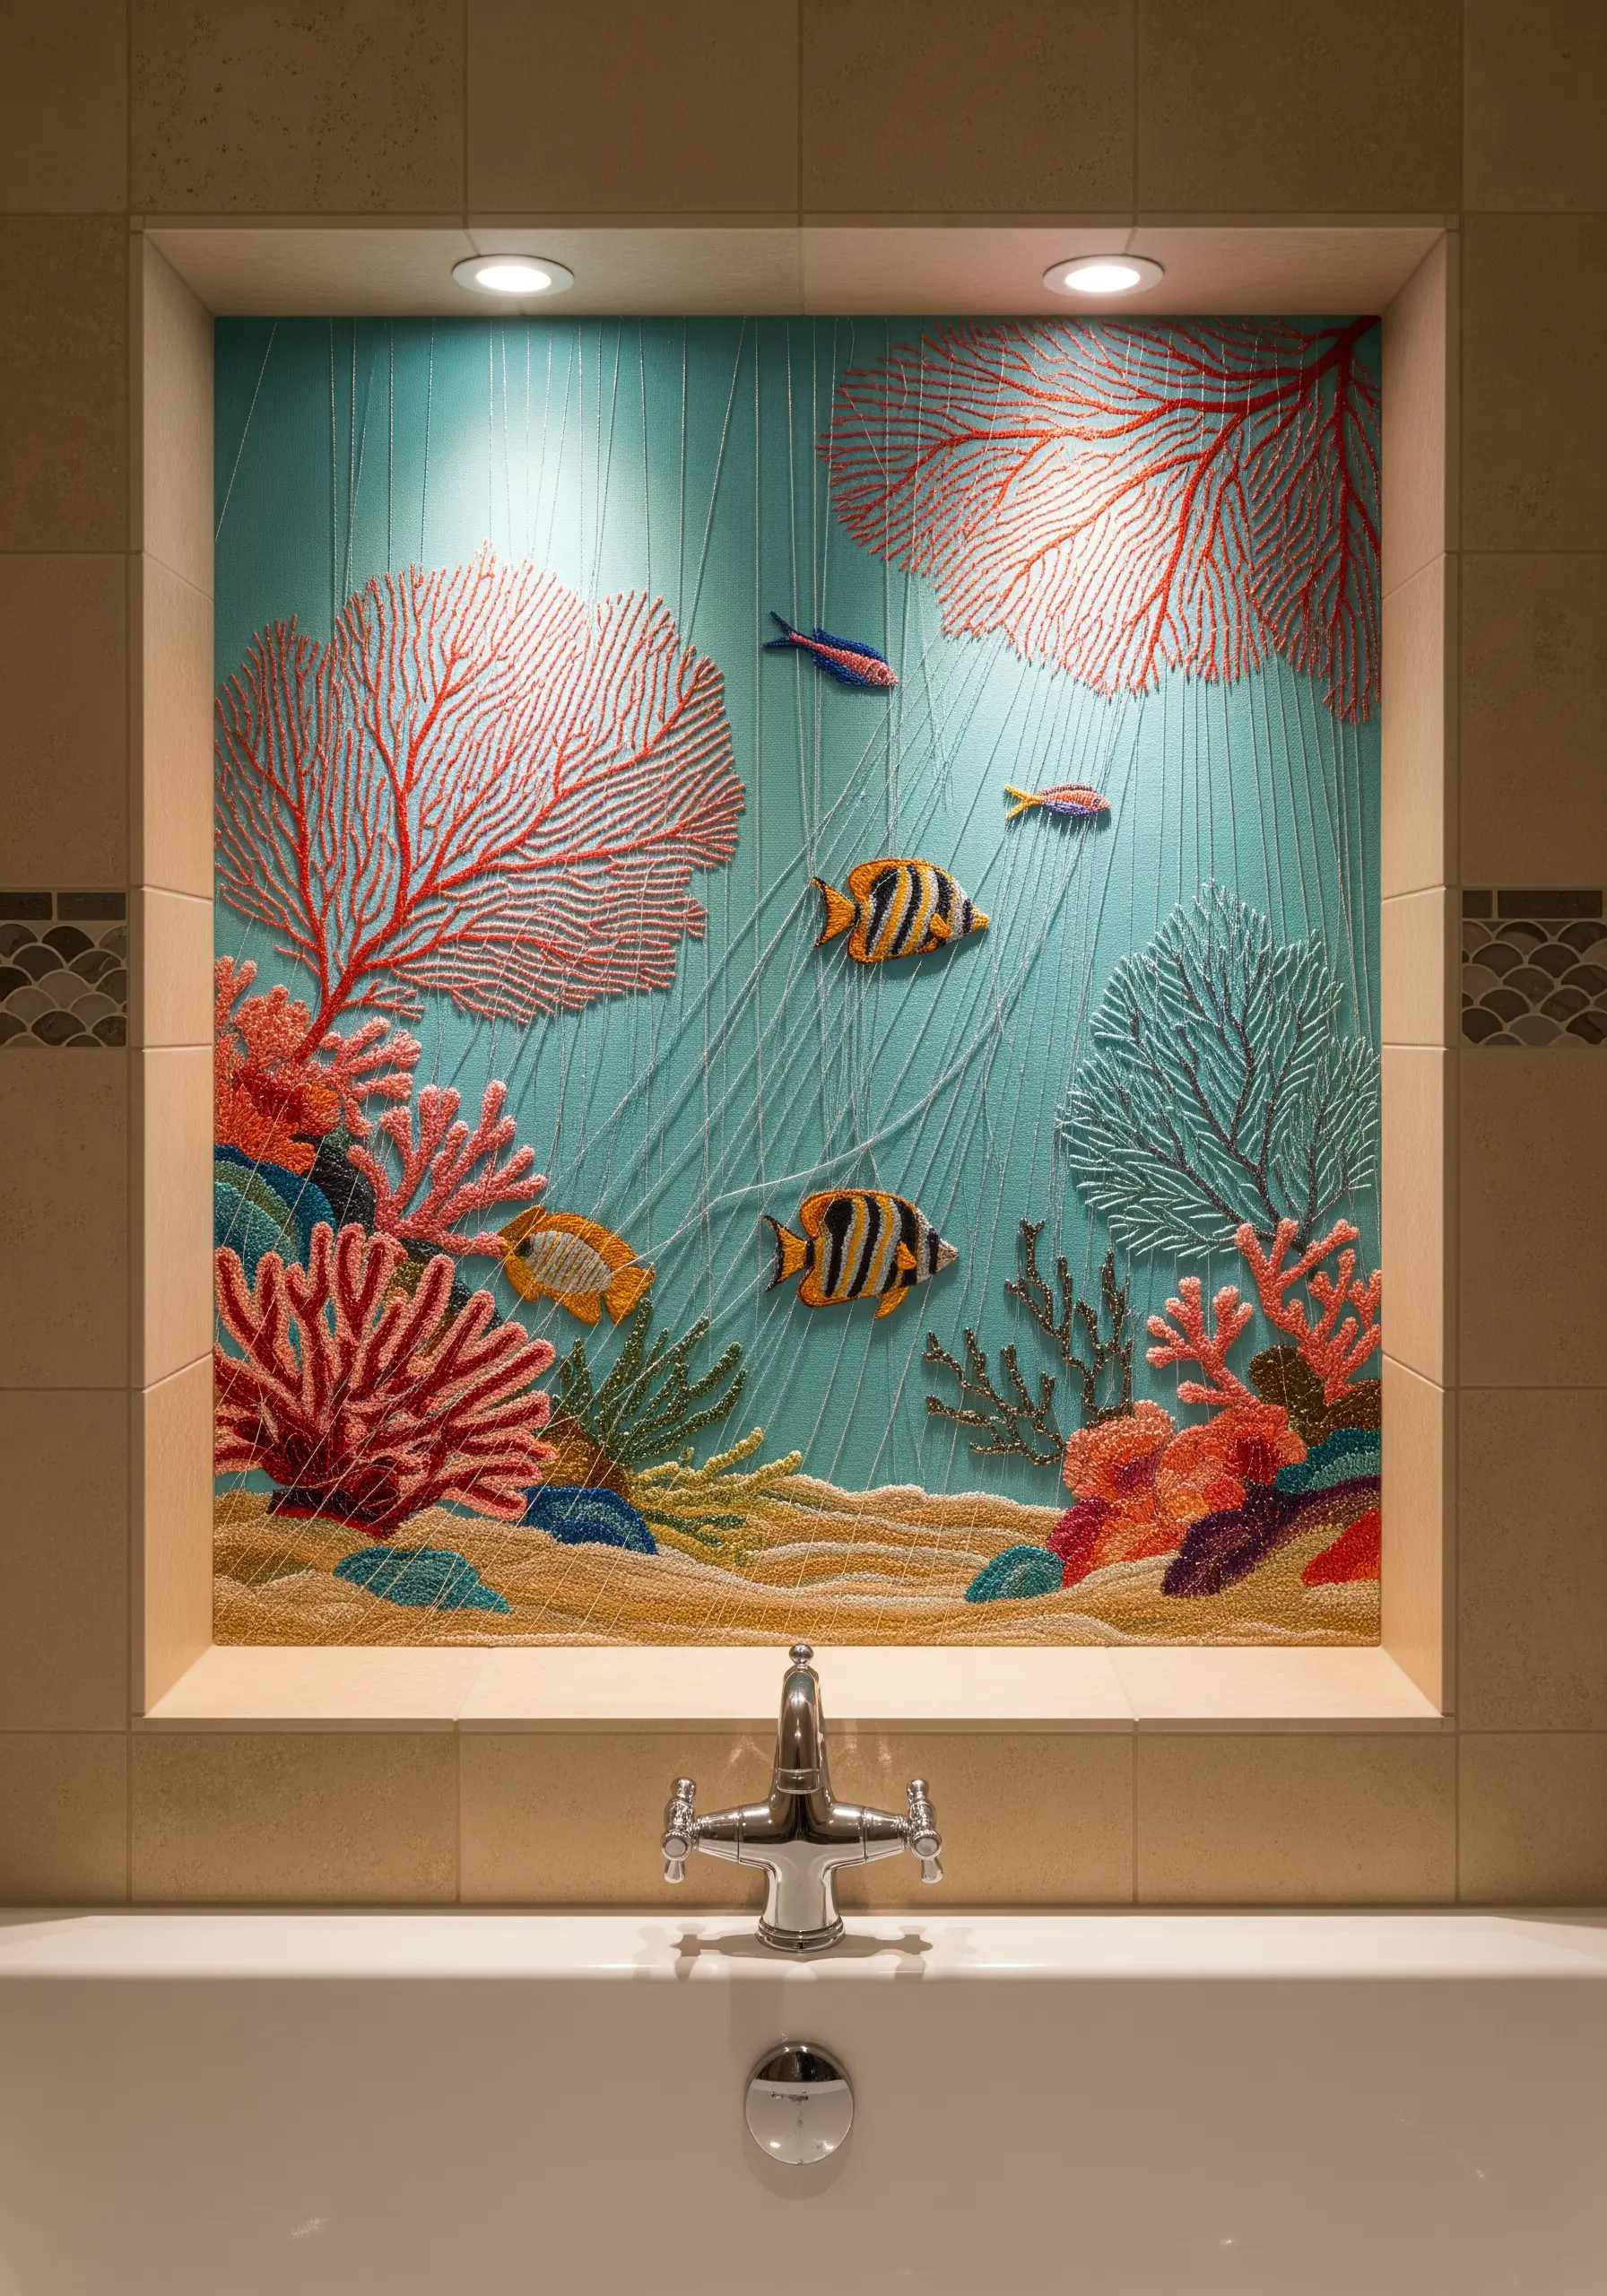
Suggest the gentle sway of water by stitching long, vertical straight stitches with a fine, semi-translucent thread over your background fabric.
Keep these stitches slightly irregular and spaced apart to create a subtle light-filtering effect, mimicking water currents.
For coral, use the couching stitch to lay down thicker threads or yarn, creating bold, branching shapes with minimal effort.
This combination of delicate, sheer stitches and heavy, textured elements gives the scene a beautiful sense of dimension and life.
5. Capture Botanical Details with Precision
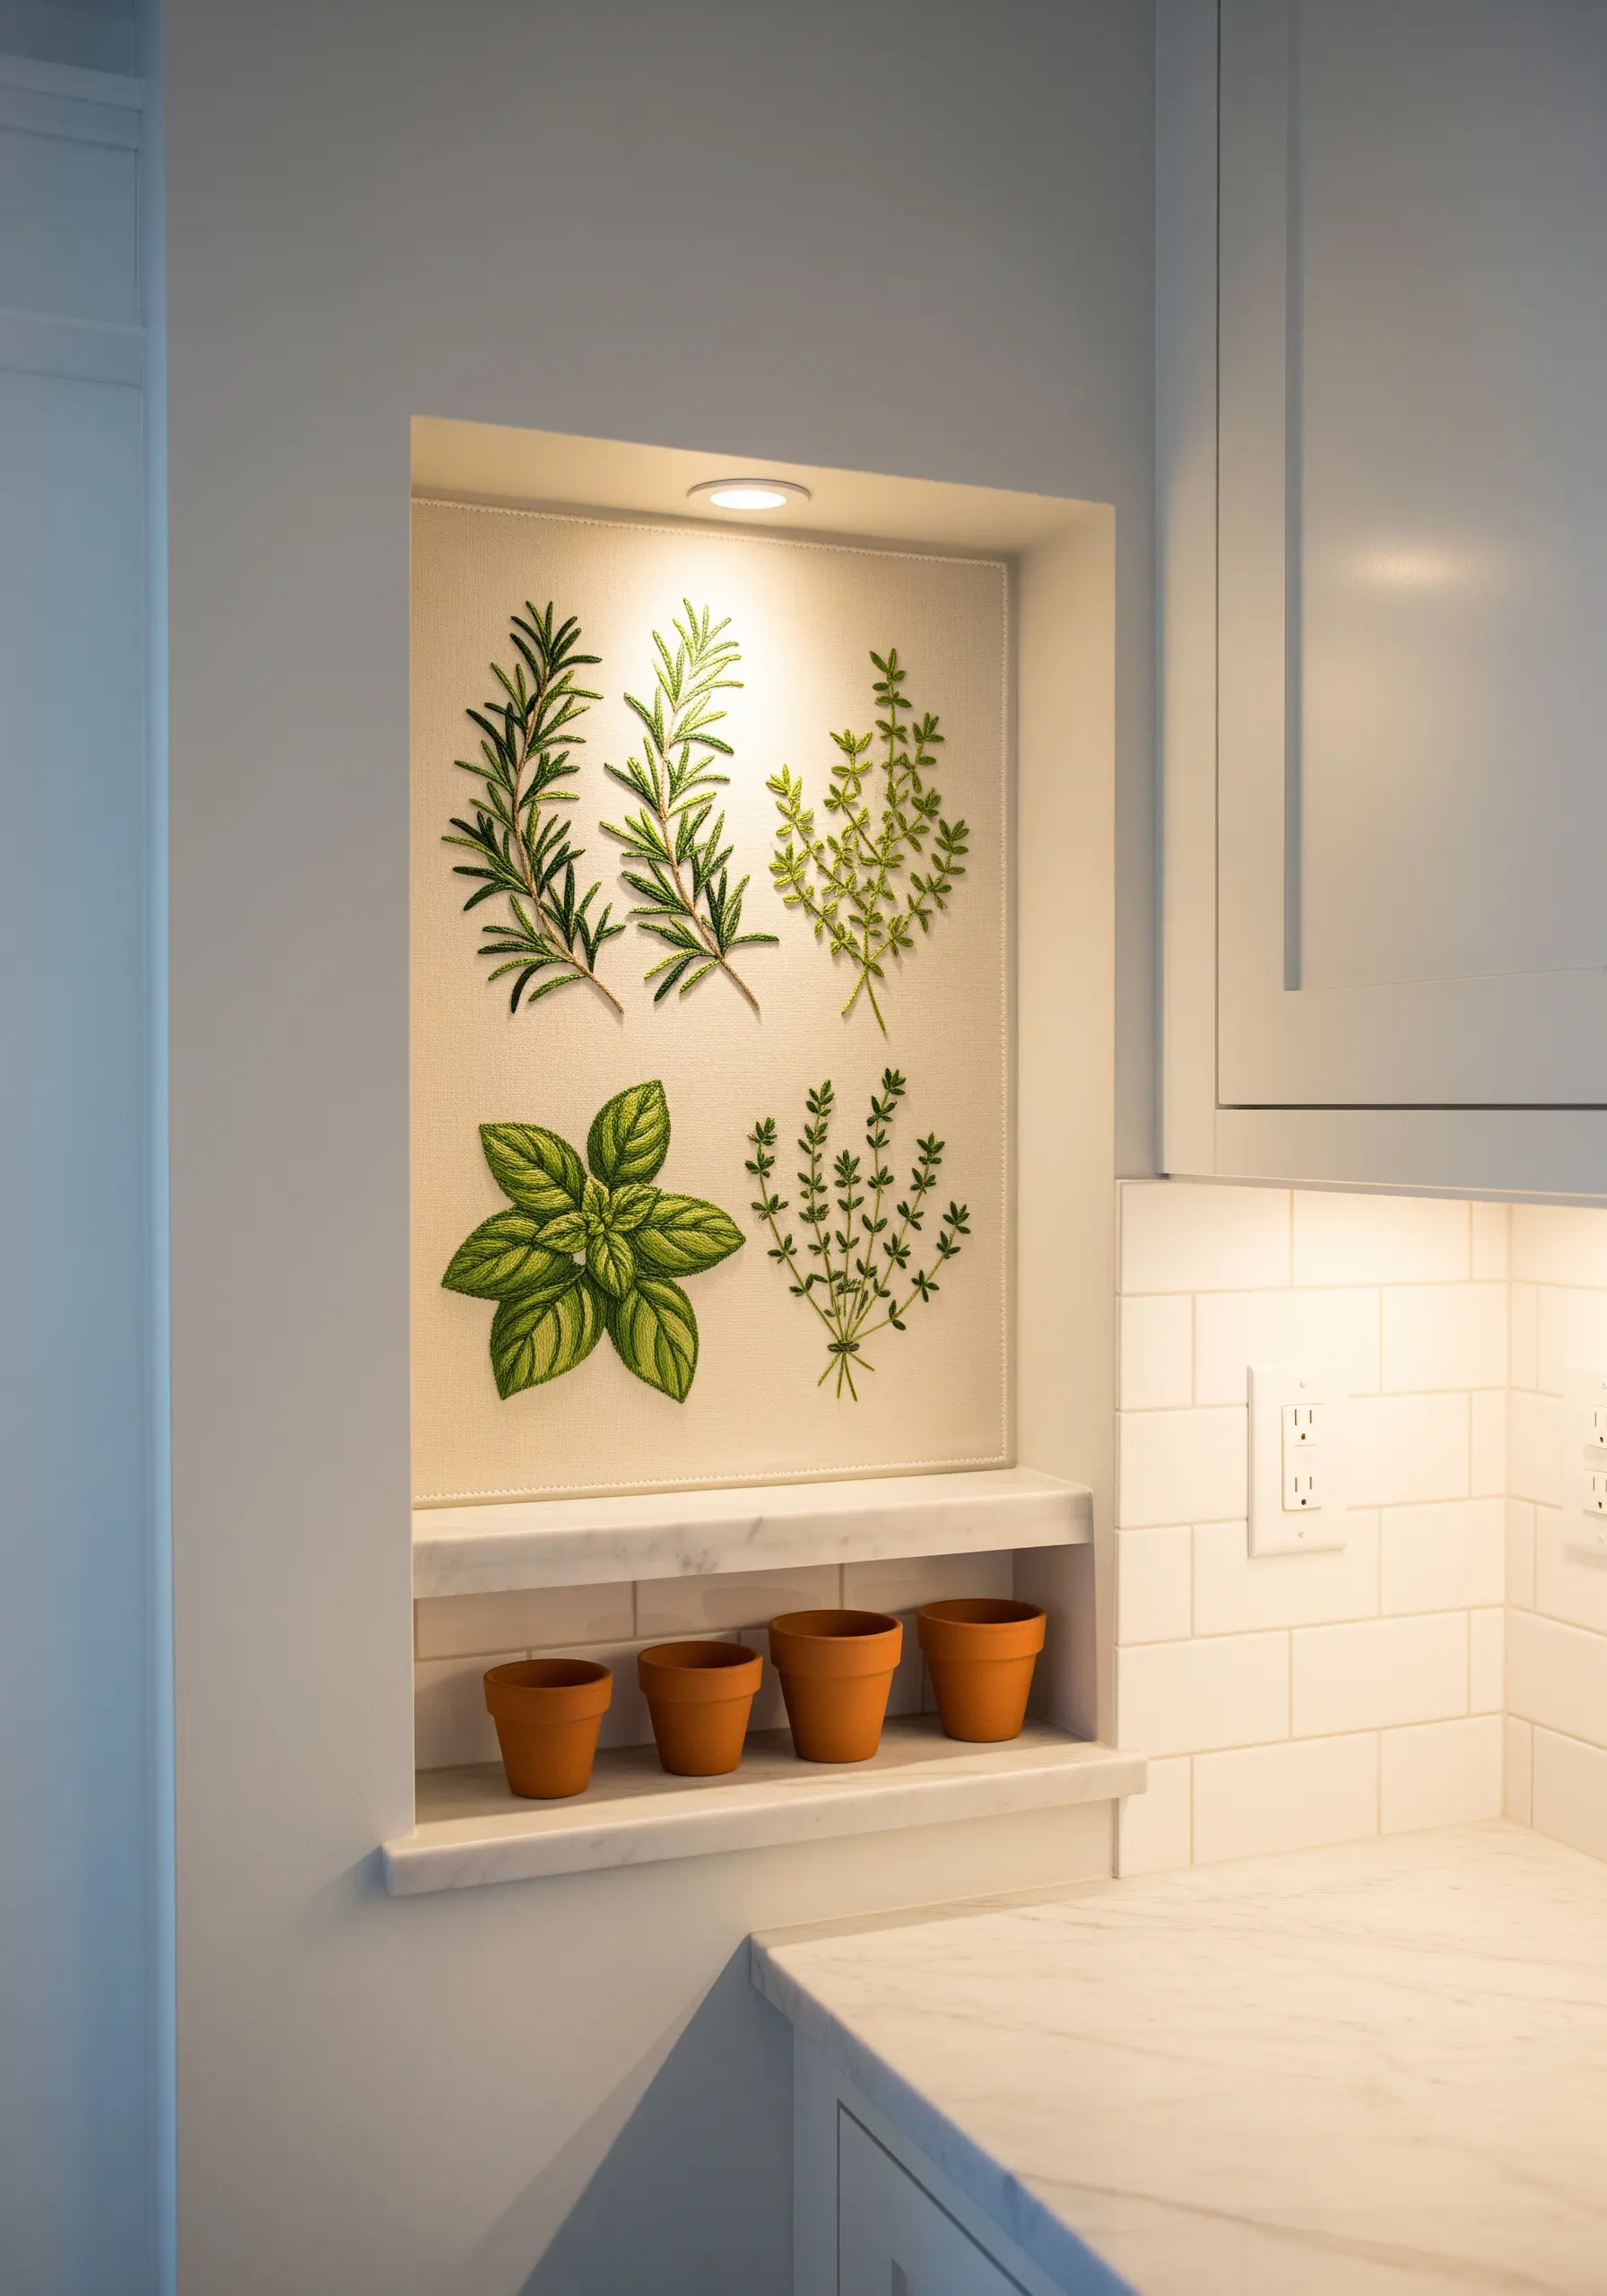
For realistic herbs, choose stitches that mimic their natural texture and form.
Use stem stitch for woody stems like rosemary, which creates a sharp, rope-like line.
For delicate thyme, scattered detached chain stitches perfectly replicate the tiny leaves.
Achieve the sheen on a basil leaf with directional satin stitch, angling your stitches outward from a central vein stitched with a single split stitch line.
These delicate leaf stitch techniques elevate simple botanical subjects into refined studies.
6. Replicate Bark with Linear Mark-Making
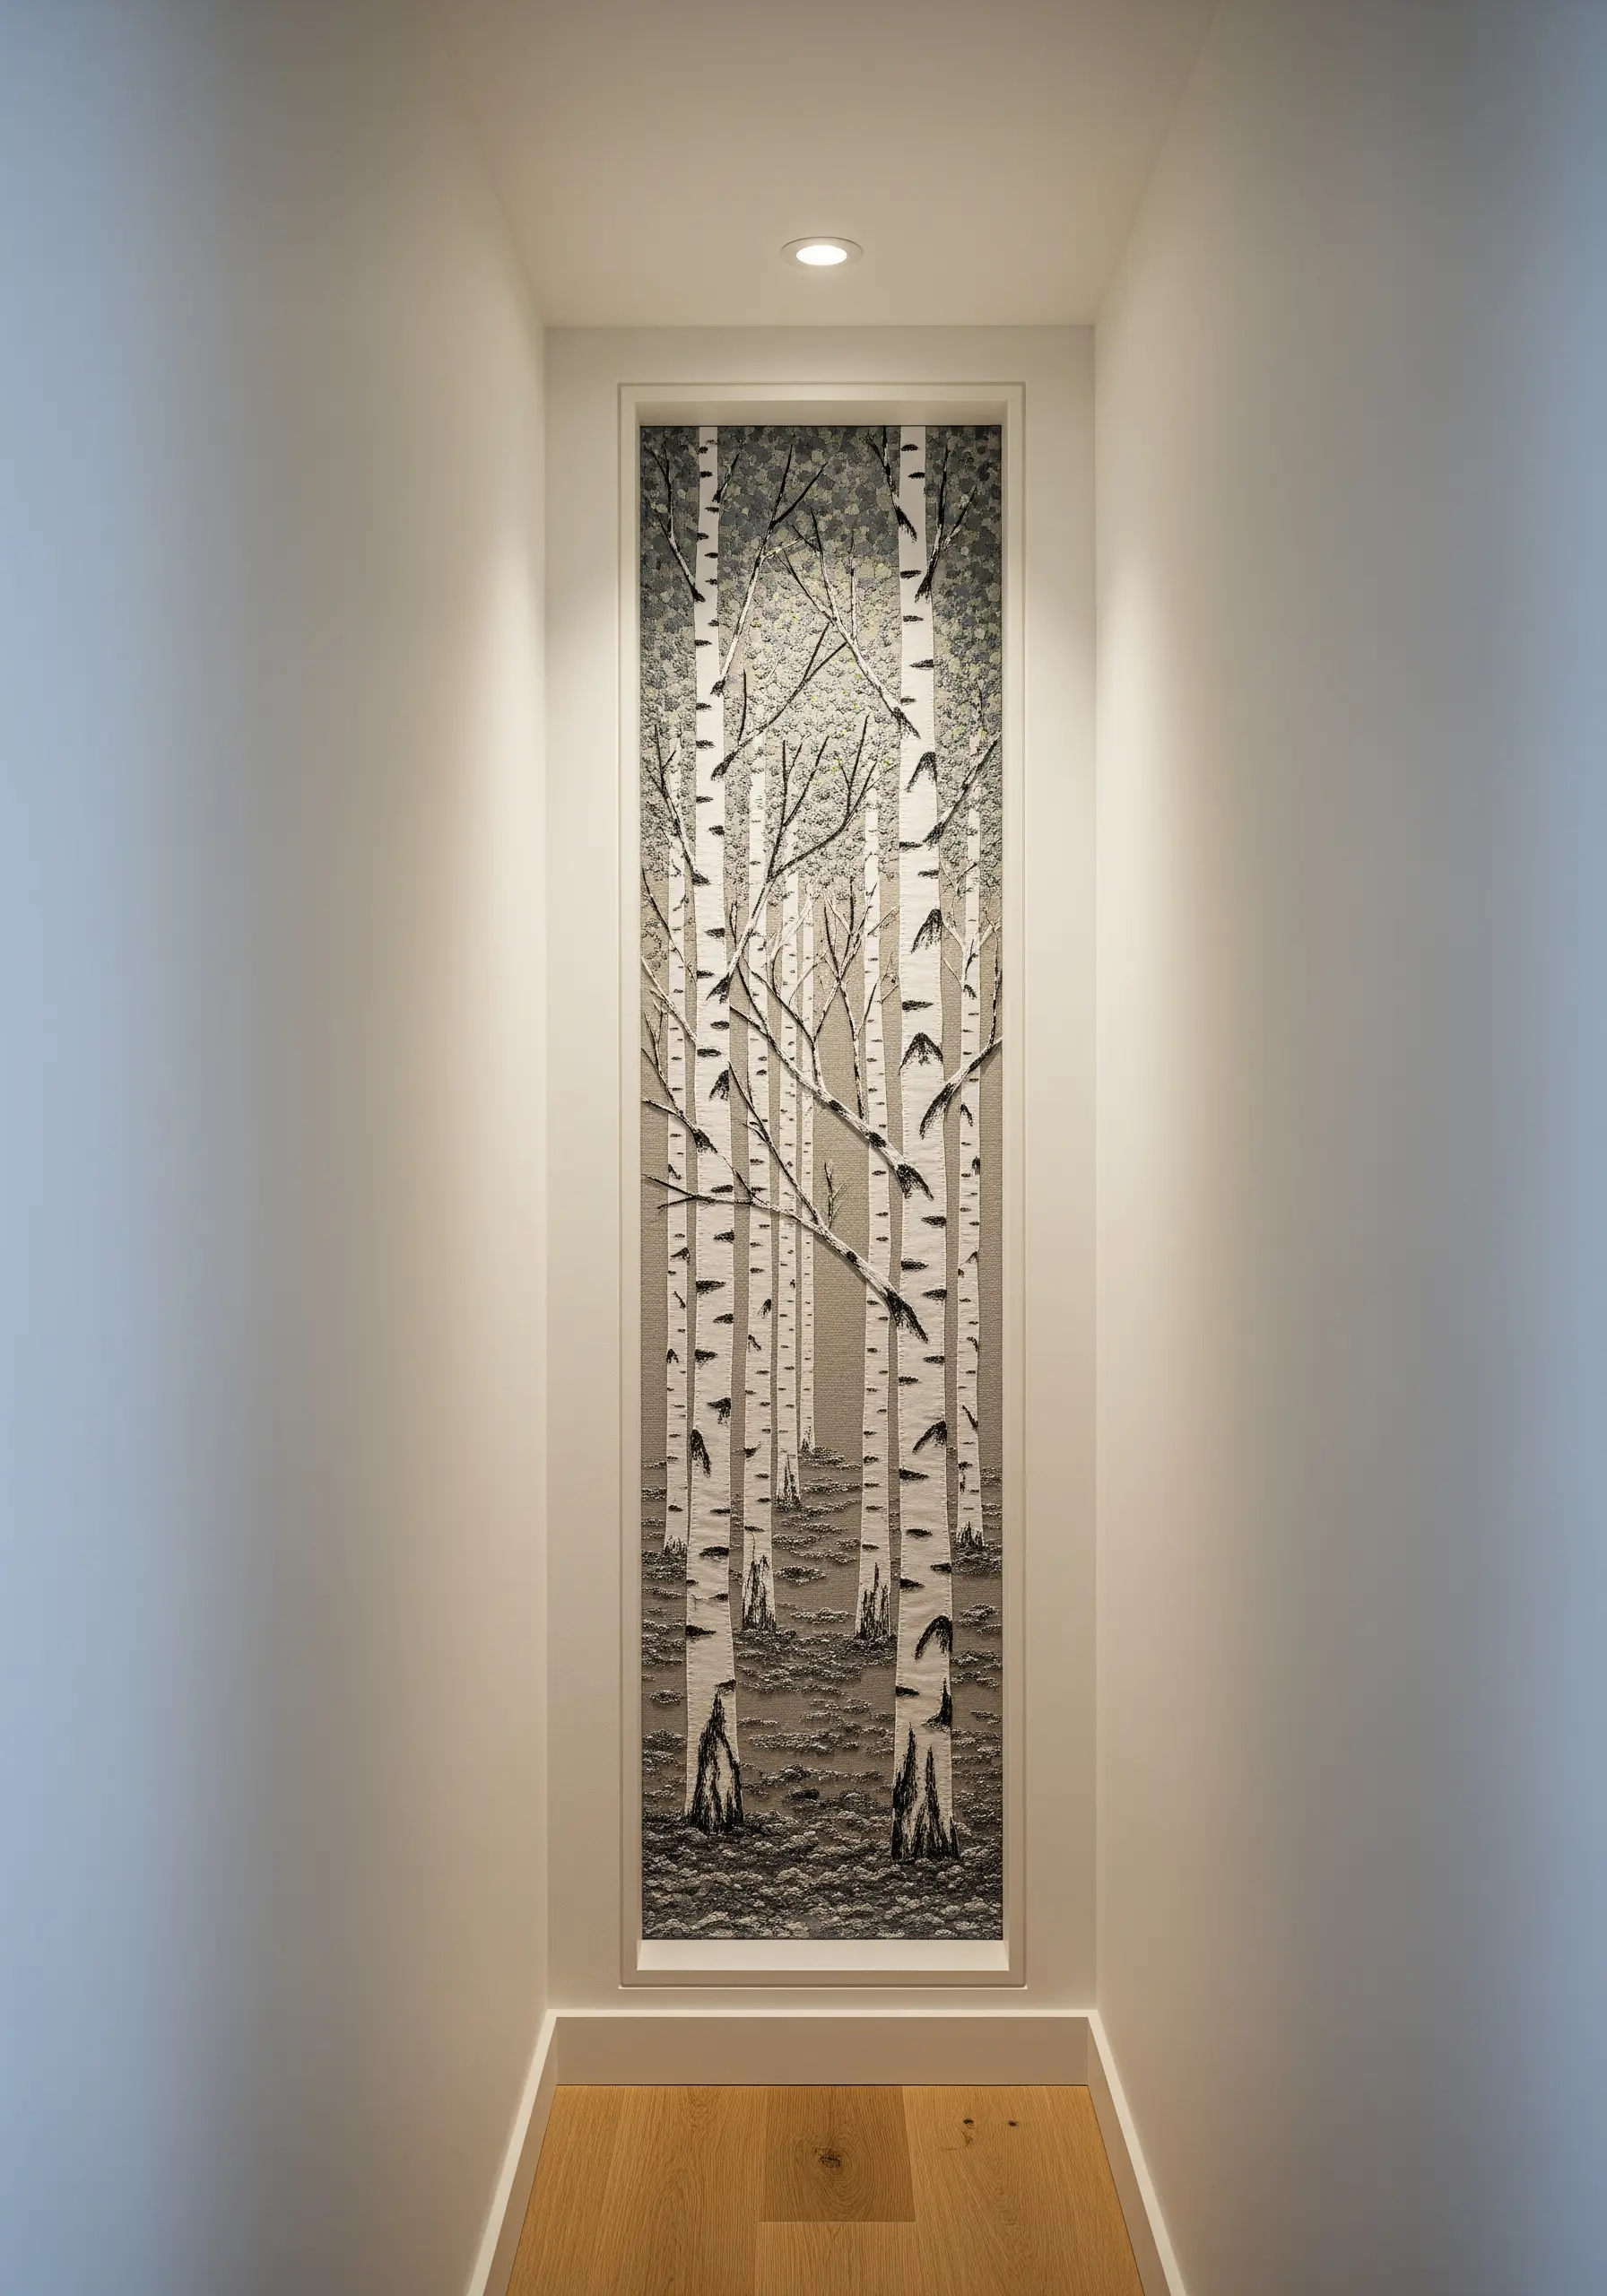
Create the iconic texture of birch bark without complex stitches.
First, fill the tree trunks with long, vertical satin stitches using an off-white or very light grey thread.
Then, come back with a single strand of black or dark grey thread and add short, horizontal straight stitches and dashes across the trunks.
Vary the length and placement of these dark marks to give each tree a unique, natural pattern.
The contrast between the smooth vertical fill and the sharp horizontal details is what makes the effect so convincing and visually striking.
7. Weave a High-Texture Living Wall

Go beyond the fabric surface to create a truly sculptural piece that fills its niche.
Combine multiple highly textured techniques: use woven wheel stitches for succulent shapes, bullion knots for clustered buds, and turkey work for mossy patches.
For large ferns, stitch the fronds separately on a soluble stabilizer, then tack them onto the main piece so they stand away from the background, casting their own shadows.
This mixed-fiber approach turns a corner into a vibrant, maintenance-free vertical garden.
8. Stitch the Cosmos on a Curved Surface
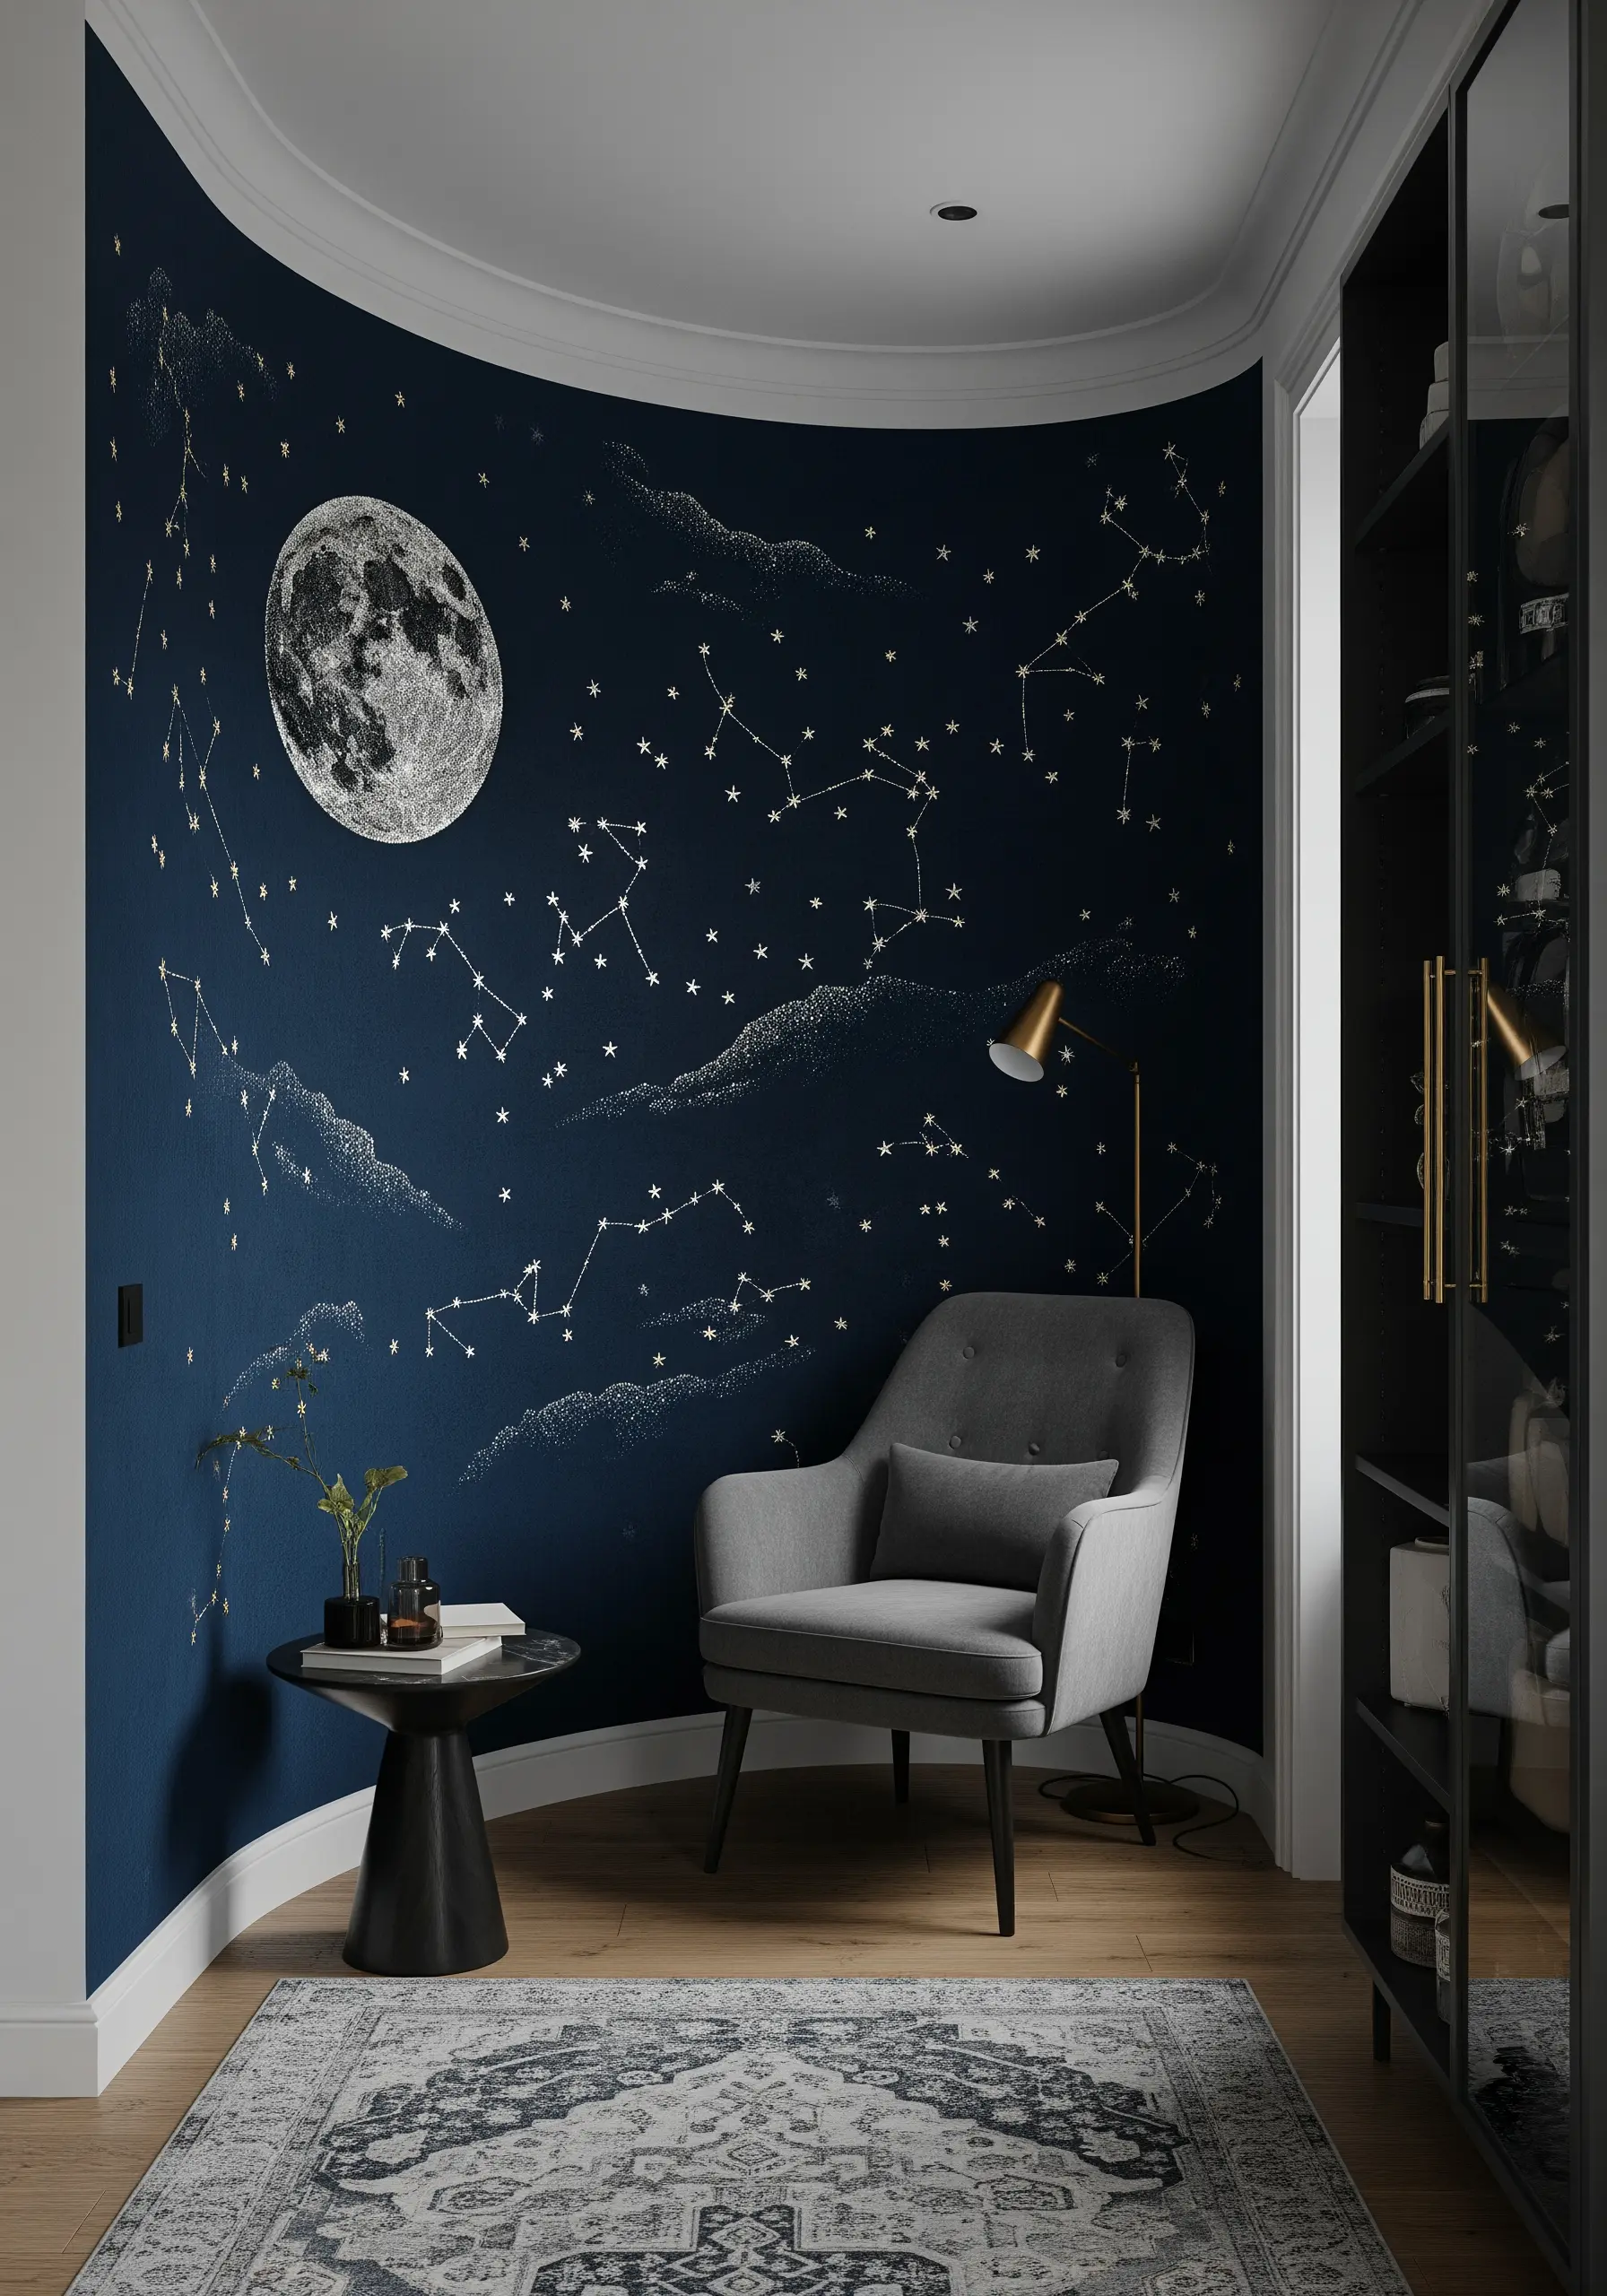
Transform an awkward curved wall into a celestial masterpiece.
For the moon, create a dense circle of French knots using several shades of grey and white thread to build up realistic craters and shadows.
Use a single strand of a bright white or metallic silver thread to stitch constellations with simple backstitches, connecting tiny star-like straight stitches or seed stitches.
Wispy clouds can be suggested with light, scattered clusters of seed stitches, creating a sense of atmospheric depth against the dark fabric.
9. Paint a Meadow with Varied Stitches
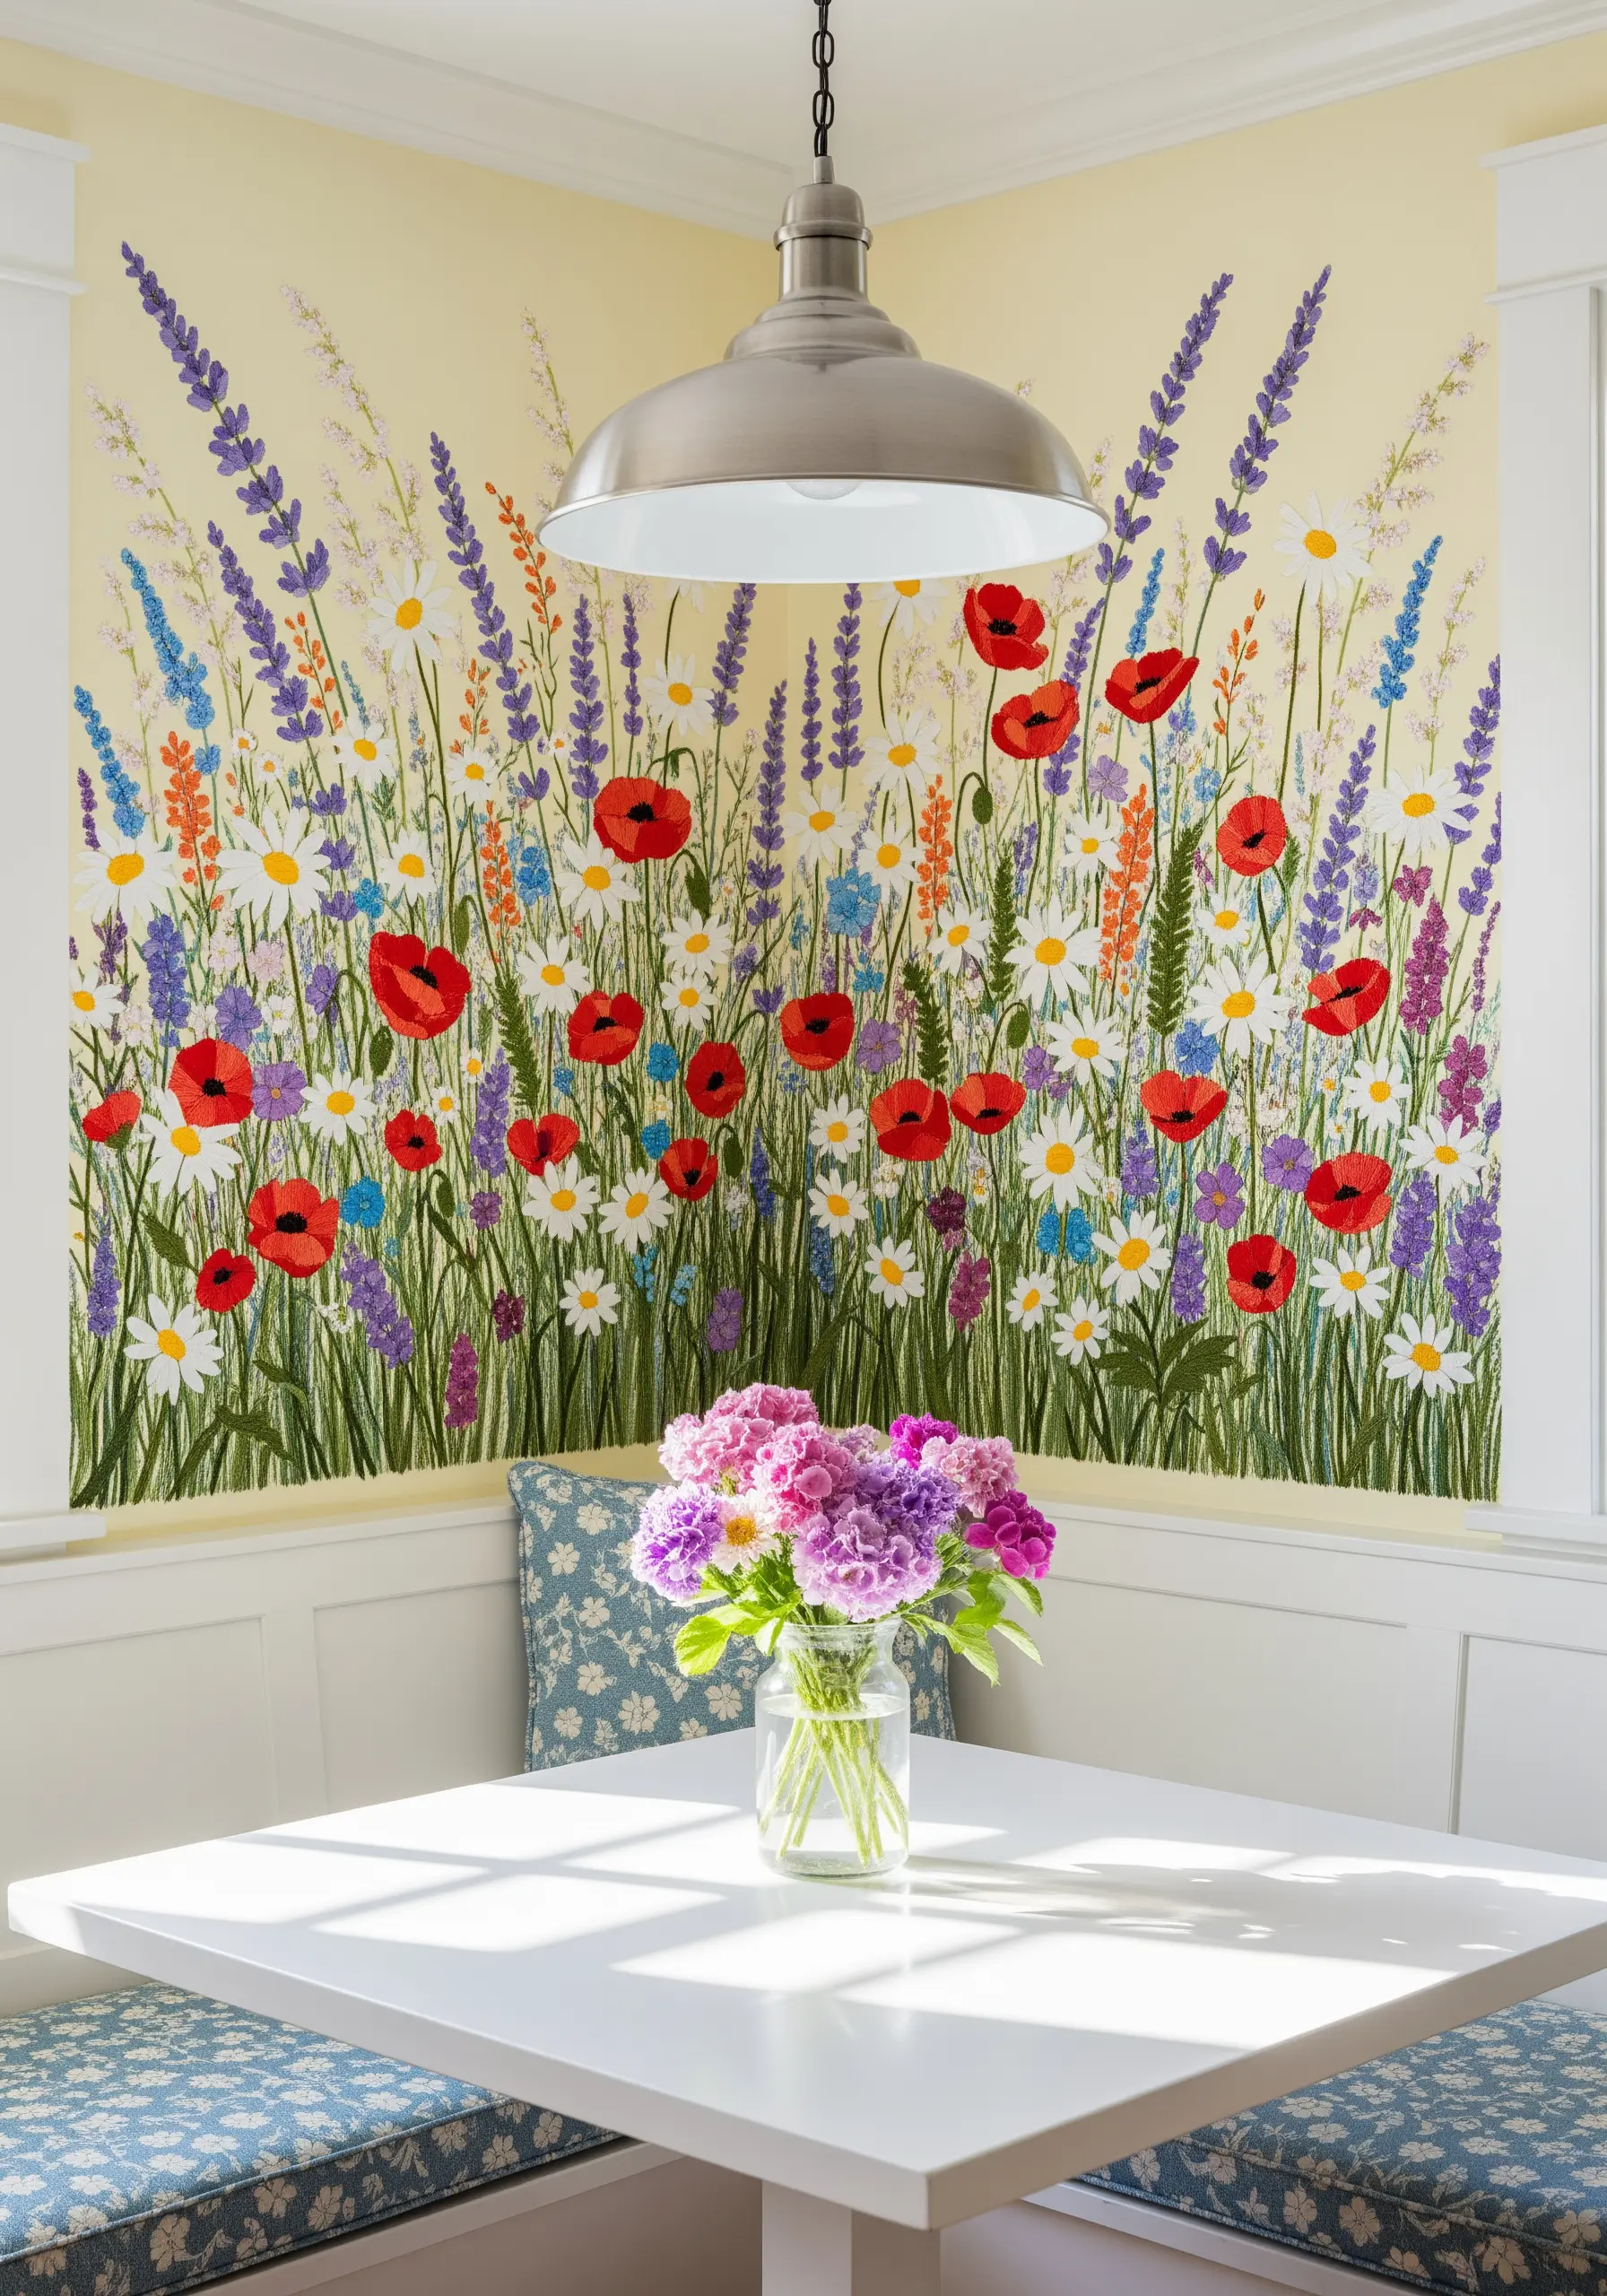
To create a wildflower field that feels lush and natural, avoid uniformity.
Use a mix of stitches to represent different flowers: lazy daisy for simple petals, straight stitches for grasses, and dense French knots for flower heads like poppies and cornflowers.
Layer your stems using backstitch or stem stitch, allowing some to cross over others to build density.
By varying the height, color, and stitch type, you can create the beautiful chaos of a meadow in full bloom, turning a corner nook into a cheerful escape.
10. Map Topography with Directional Fill
For a large-scale landscape, use the direction of your stitches to define the terrain.
Instead of a standard satin stitch, fill each canyon section with long-and-short stitch, angling the stitches to follow the natural contours and shadows of the rock formations.
This technique, often called thread painting, creates a sense of movement and dimension that a flat fill stitch cannot achieve.
Working on aida cloth or evenweave fabric can help guide your stitches and maintain consistency across a large surface.
11. Achieve Graphic Leaves with a Split-Stitch Edge

For bold, graphic botanicals like monstera leaves, the key to a professional finish is a perfectly crisp edge.
Before you begin your satin stitch fill, outline each section of the leaf with a precise split stitch using two strands of thread.
When you fill the shape, bring your needle up just inside the outline and down just on the other side of it.
This technique creates a slightly raised, corded border that keeps your satin stitches perfectly contained, resulting in a clean, defined, and impactful design.
12. Create Soft Characters with Felt Appliqué
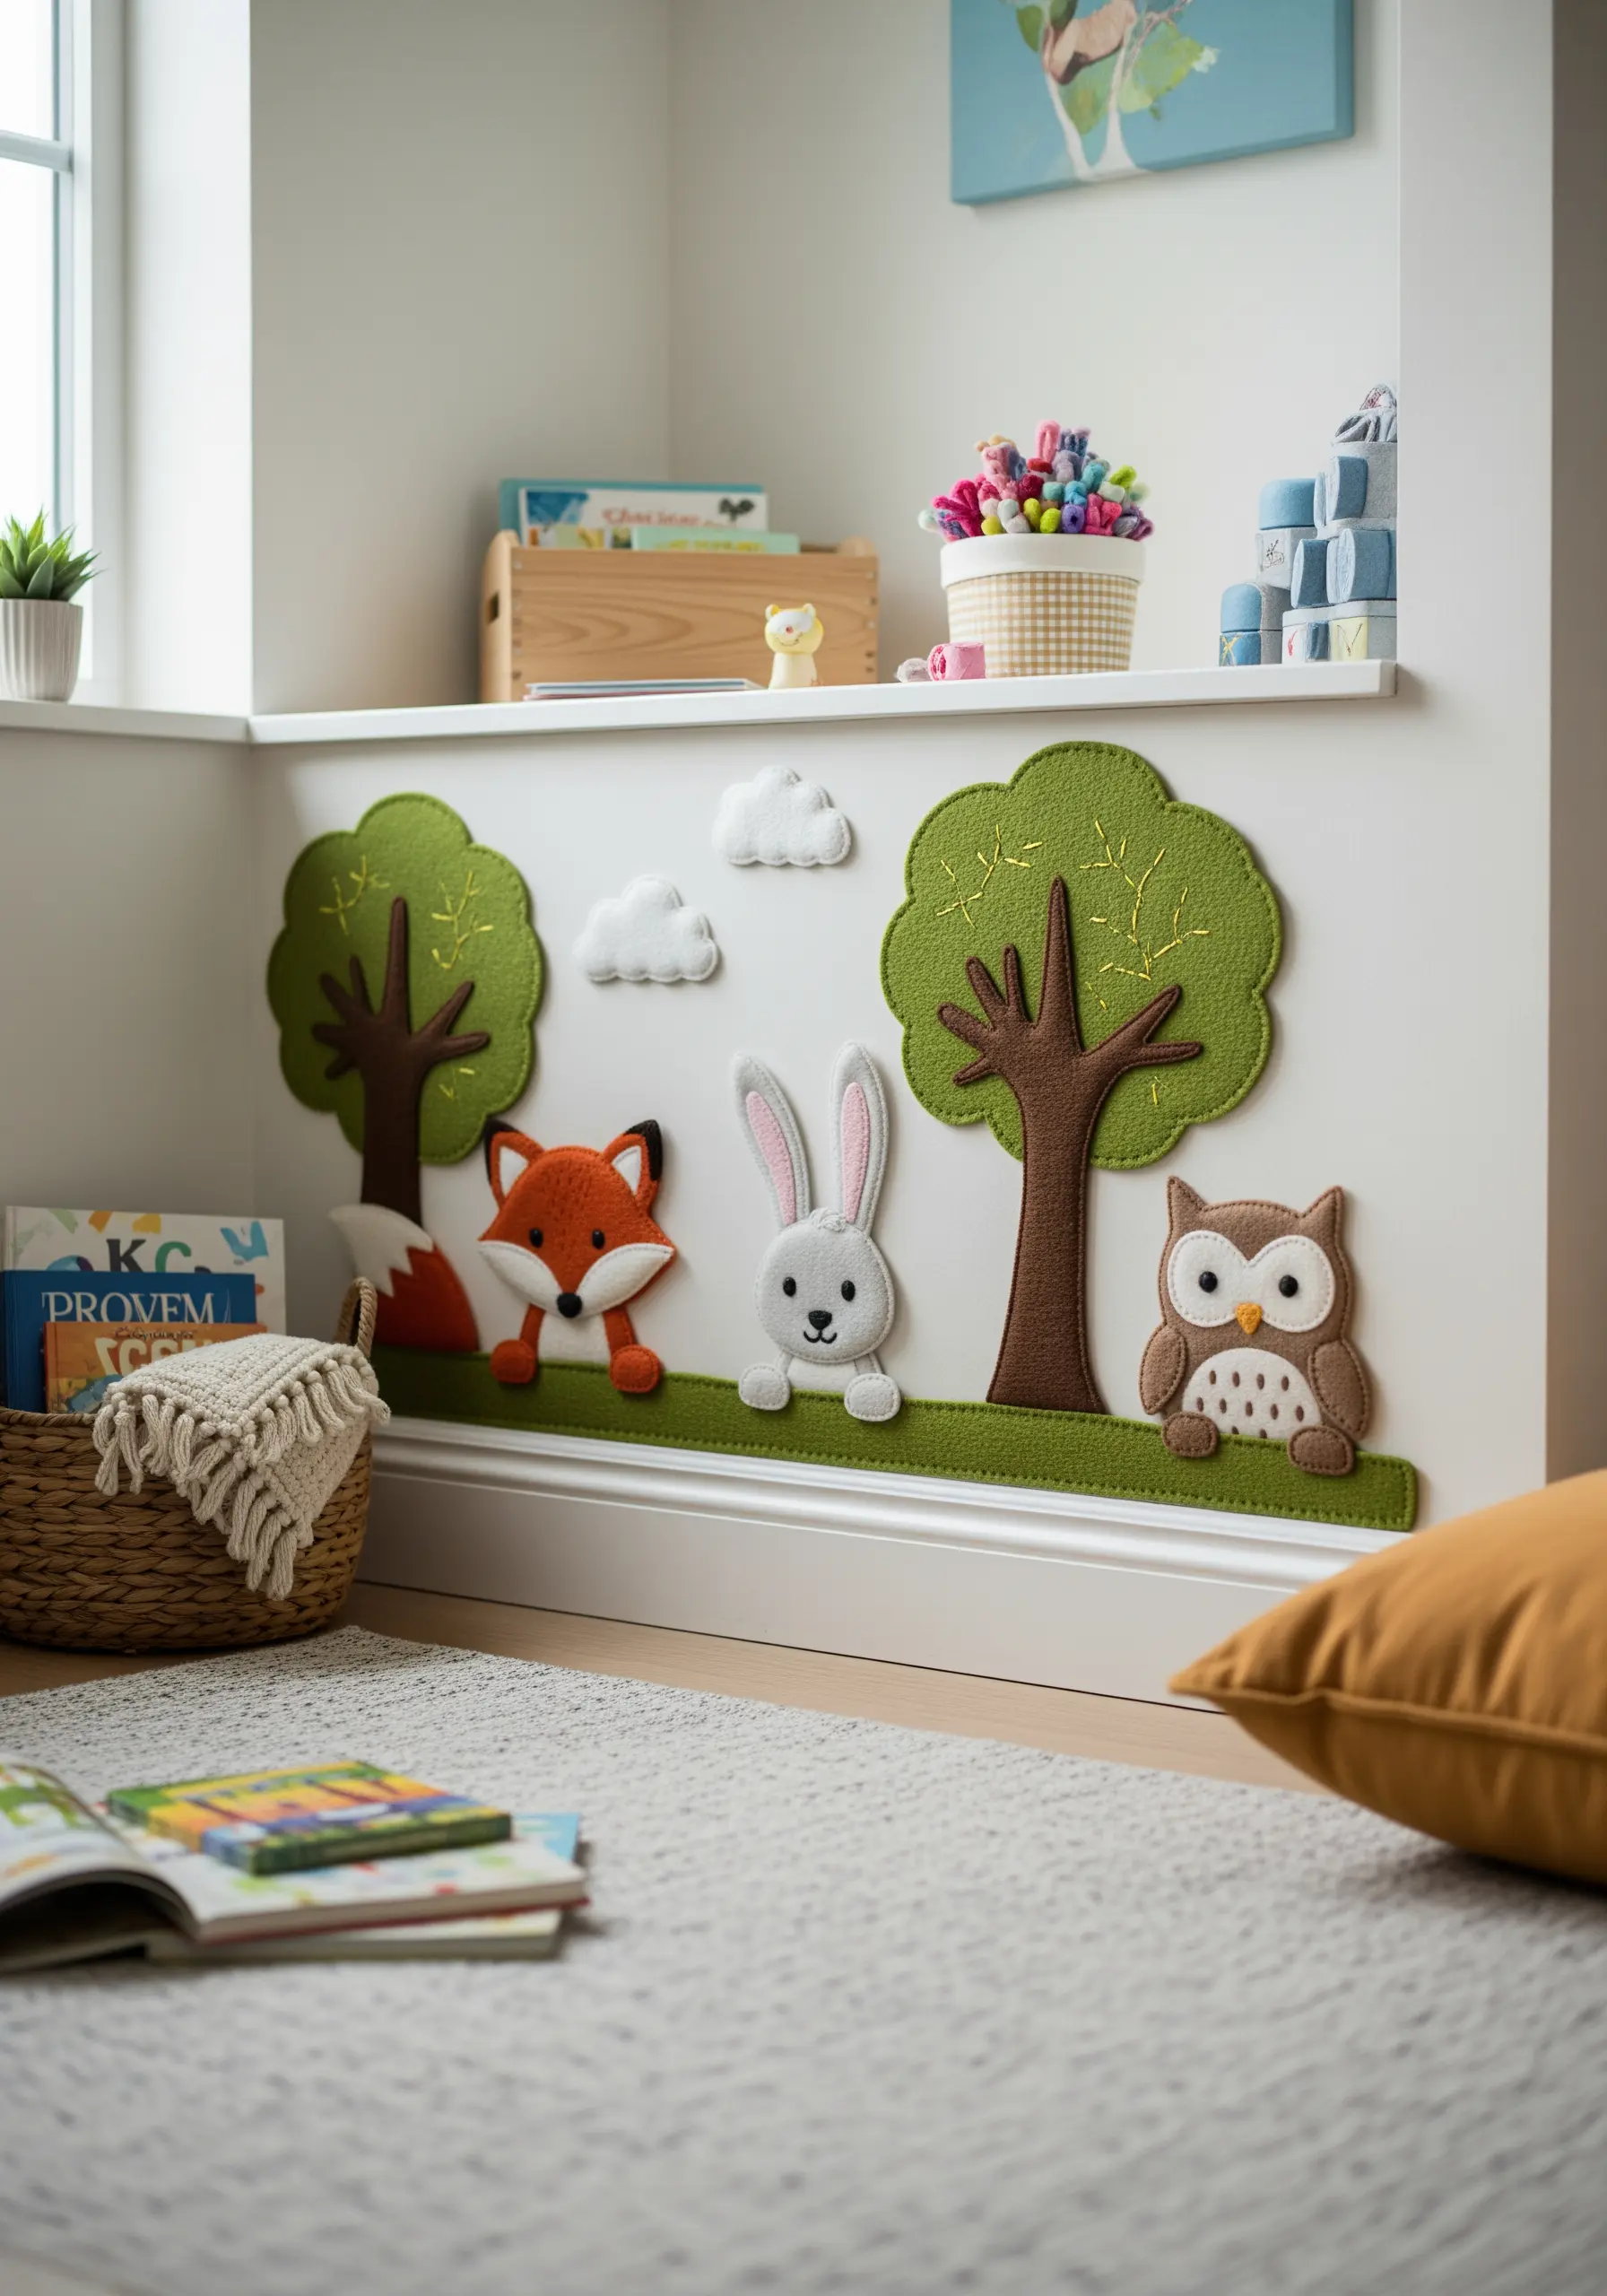
Build a charming woodland scene for a child’s room using felt appliqué enhanced with simple embroidery.
Cut your animal and tree shapes from wool-blend felt, which has a clean edge and a soft finish.
Secure each piece to your fabric background with a neat, evenly spaced blanket stitch around the perimeter.
Add personality and detail—like eyes, whiskers, and wood grain—with basic backstitch and French knots.
This method allows you to cover large areas quickly while still adding the special touch of hand-stitched detail.
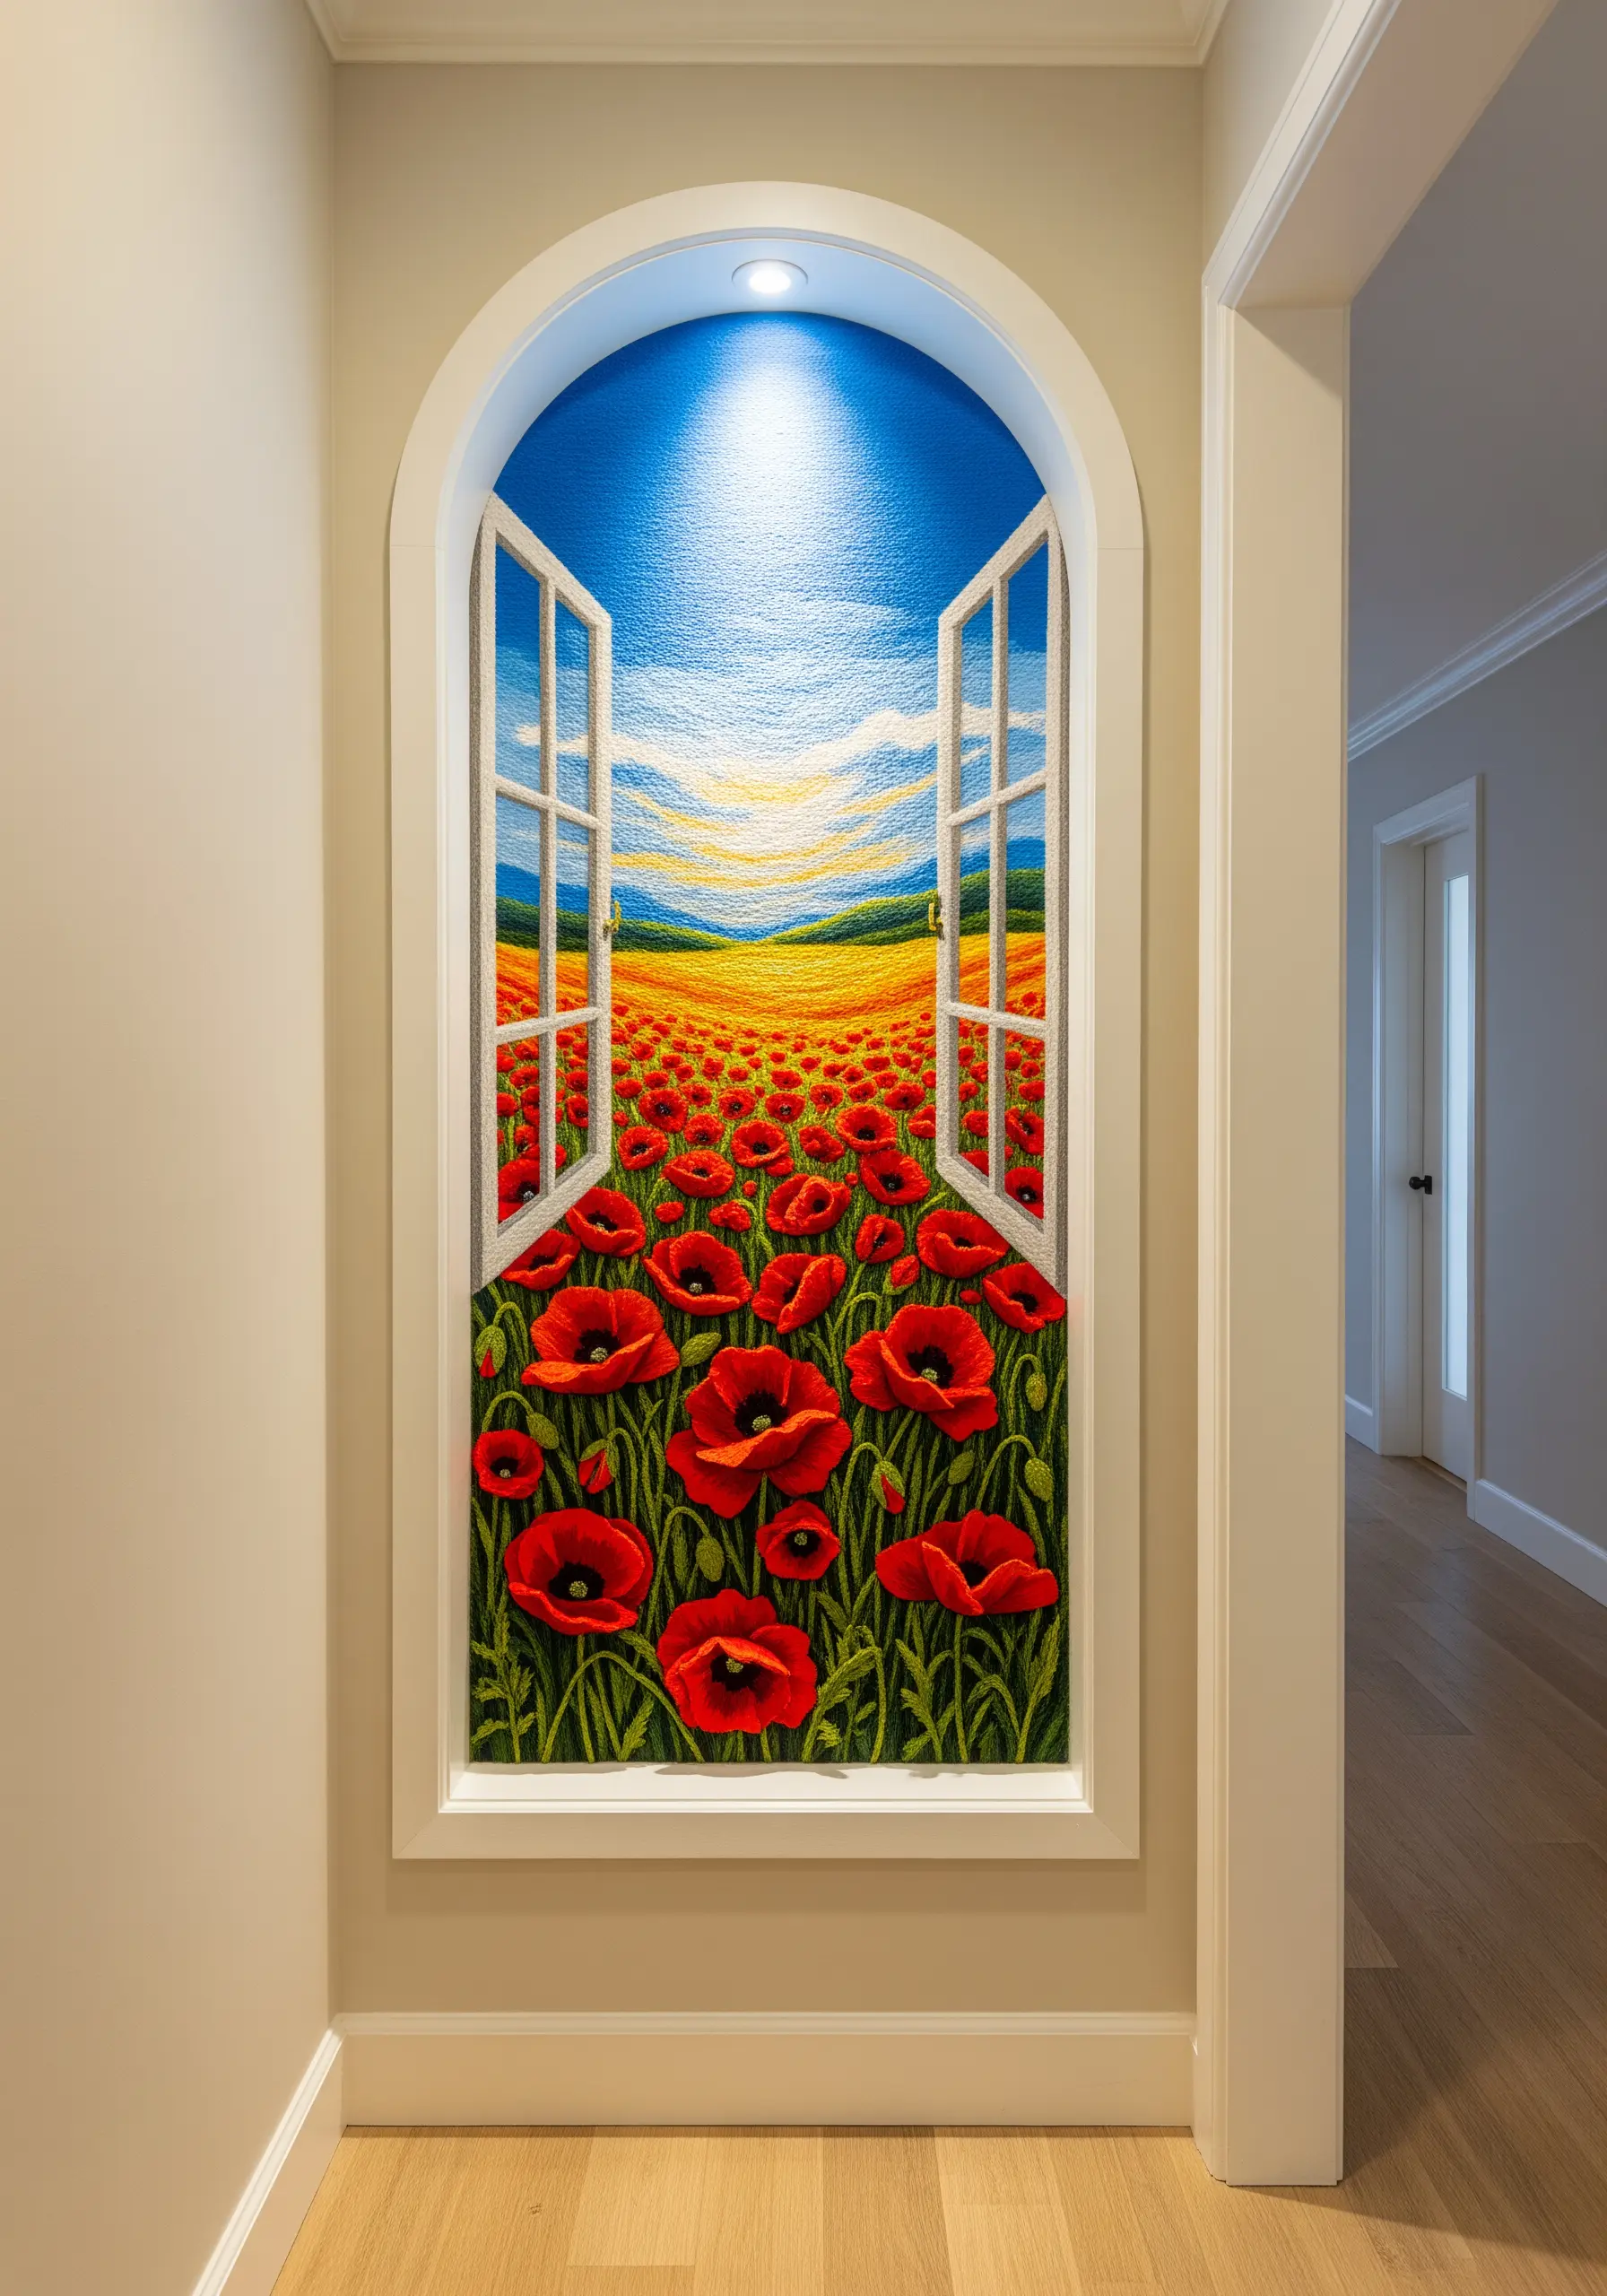
13. Design for Architectural Framing
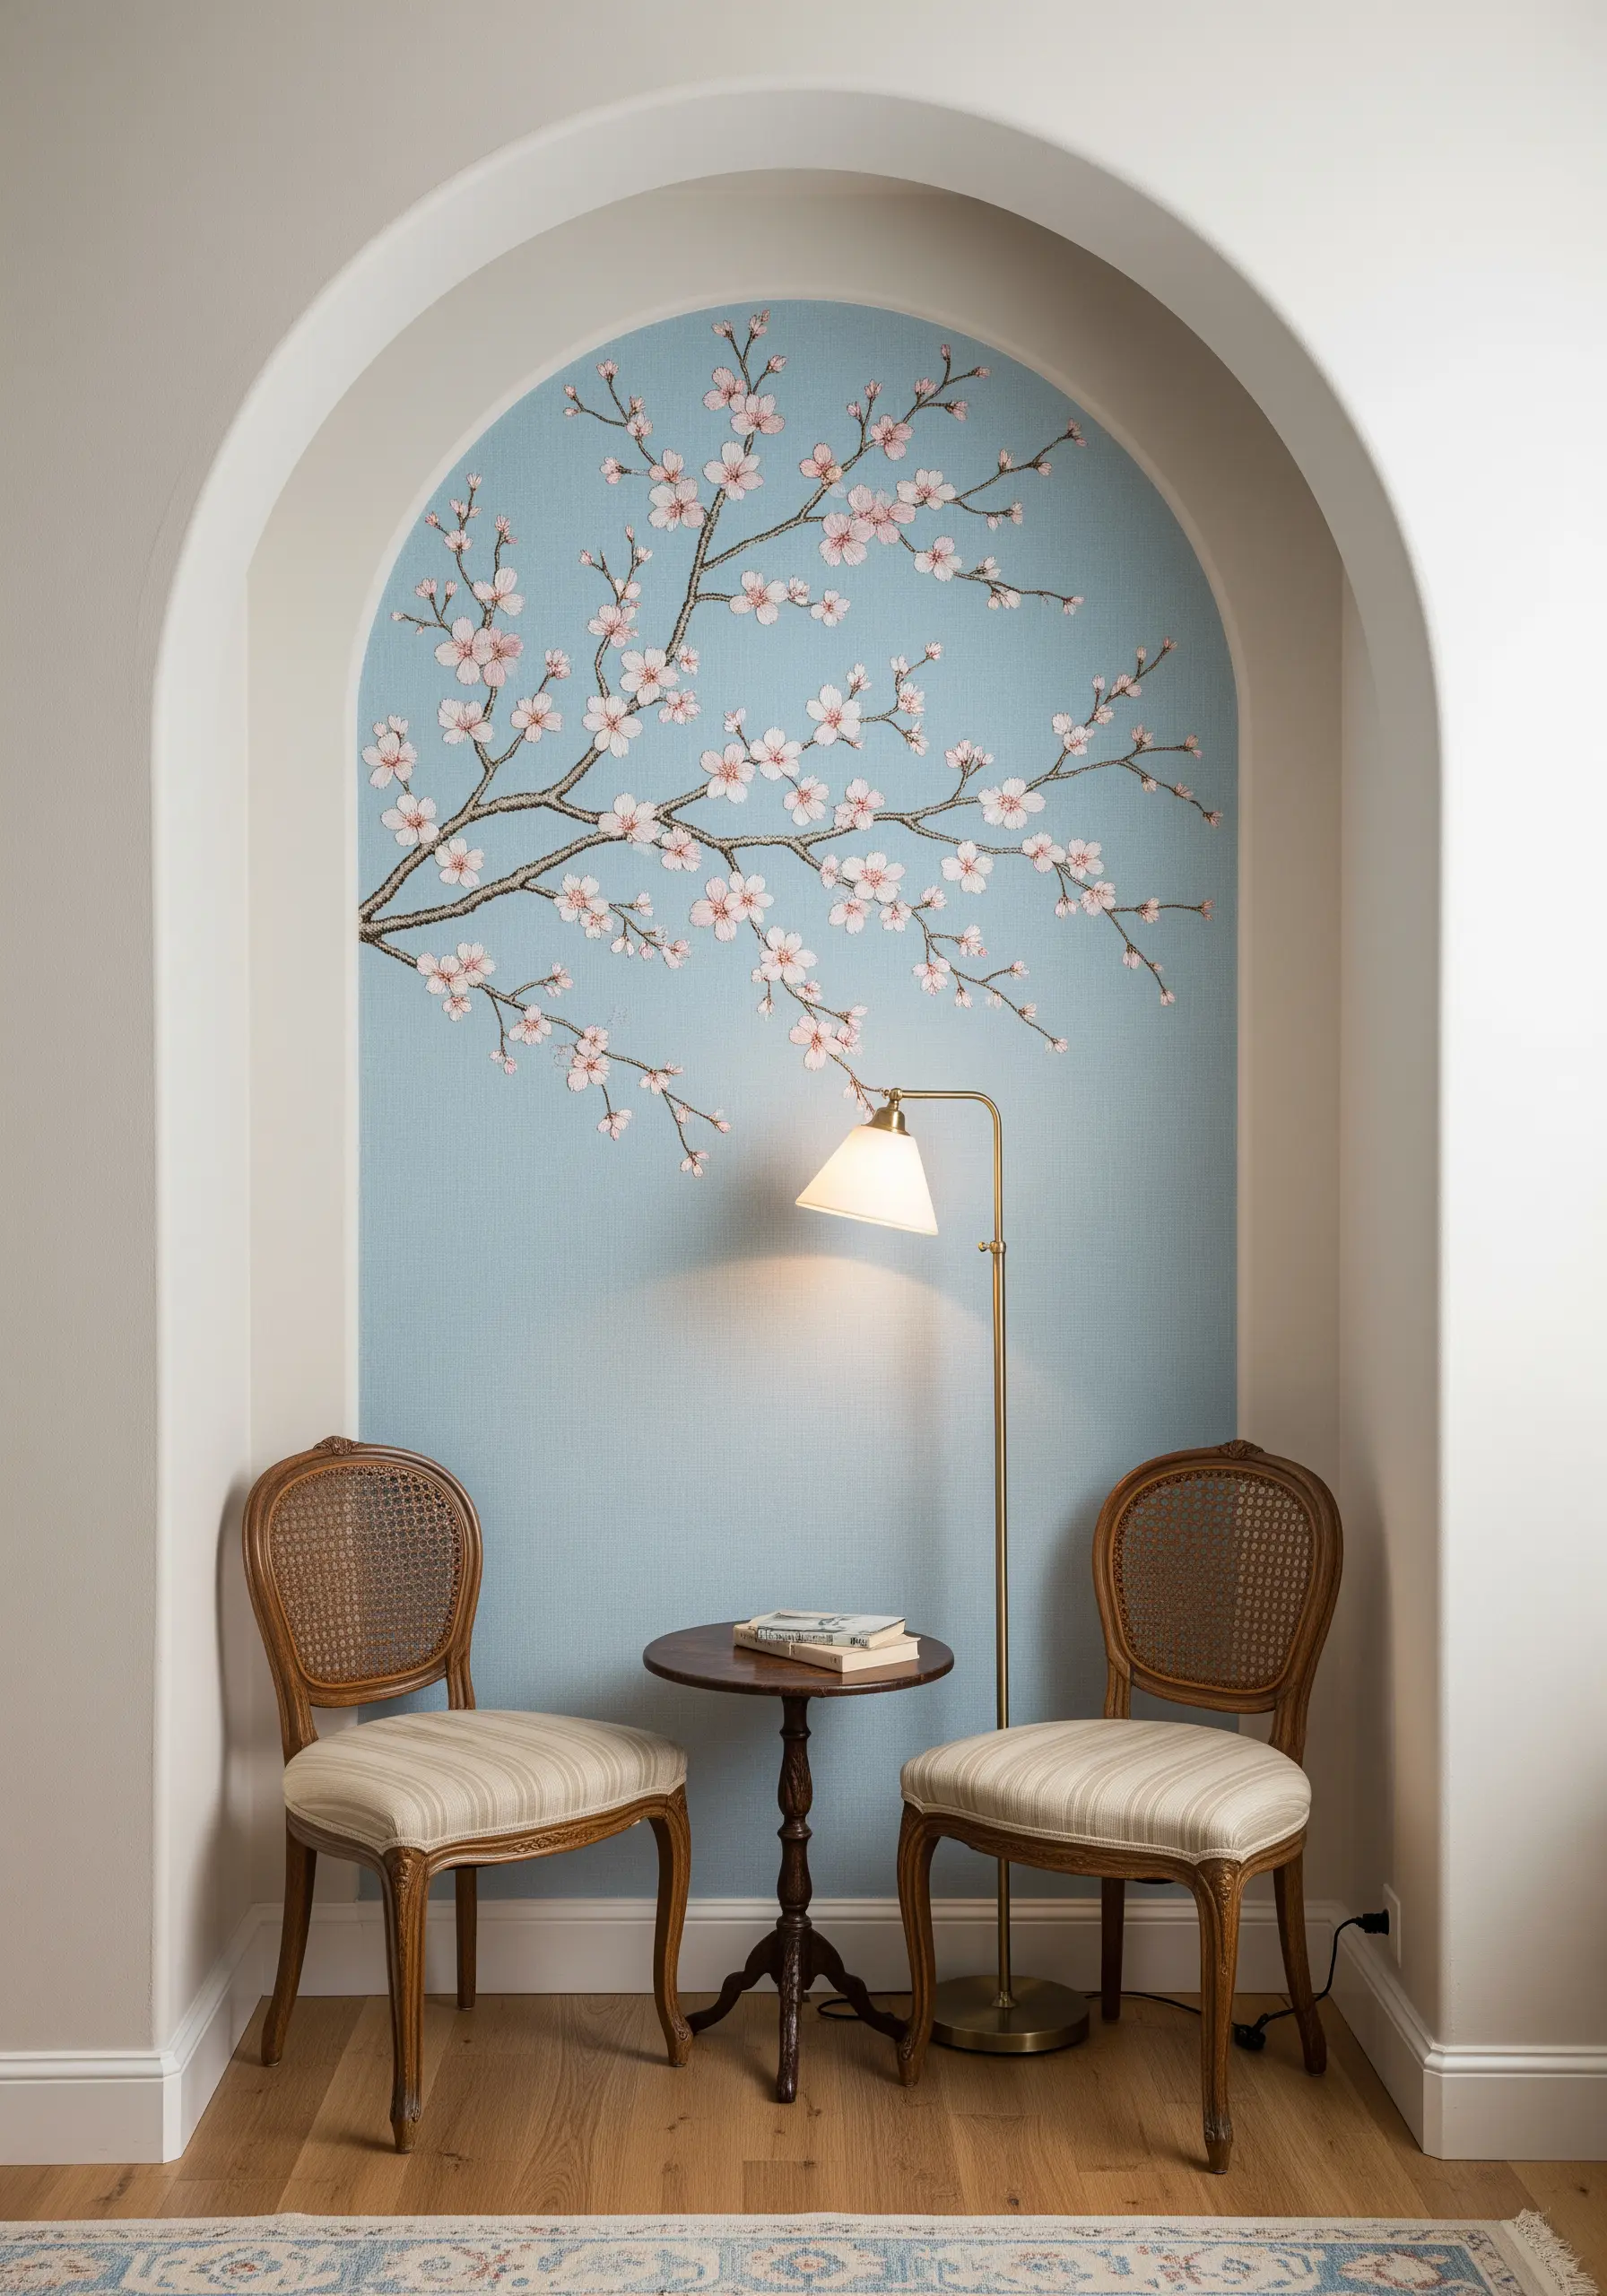
When working within an arch or an unusually shaped niche, use the architecture to guide your composition.
Allow your embroidered motif, like a delicate cherry blossom branch, to curve naturally within the space.
This makes the embroidery feel like an integrated part of the room’s design rather than just a picture hanging on the wall.
For the blossoms, use tiny, loosely stitched detached chain stitches in pale pinks and whites to create a soft, airy feel that complements the elegant archway.
14. Drape Corners with Cascading Stitches
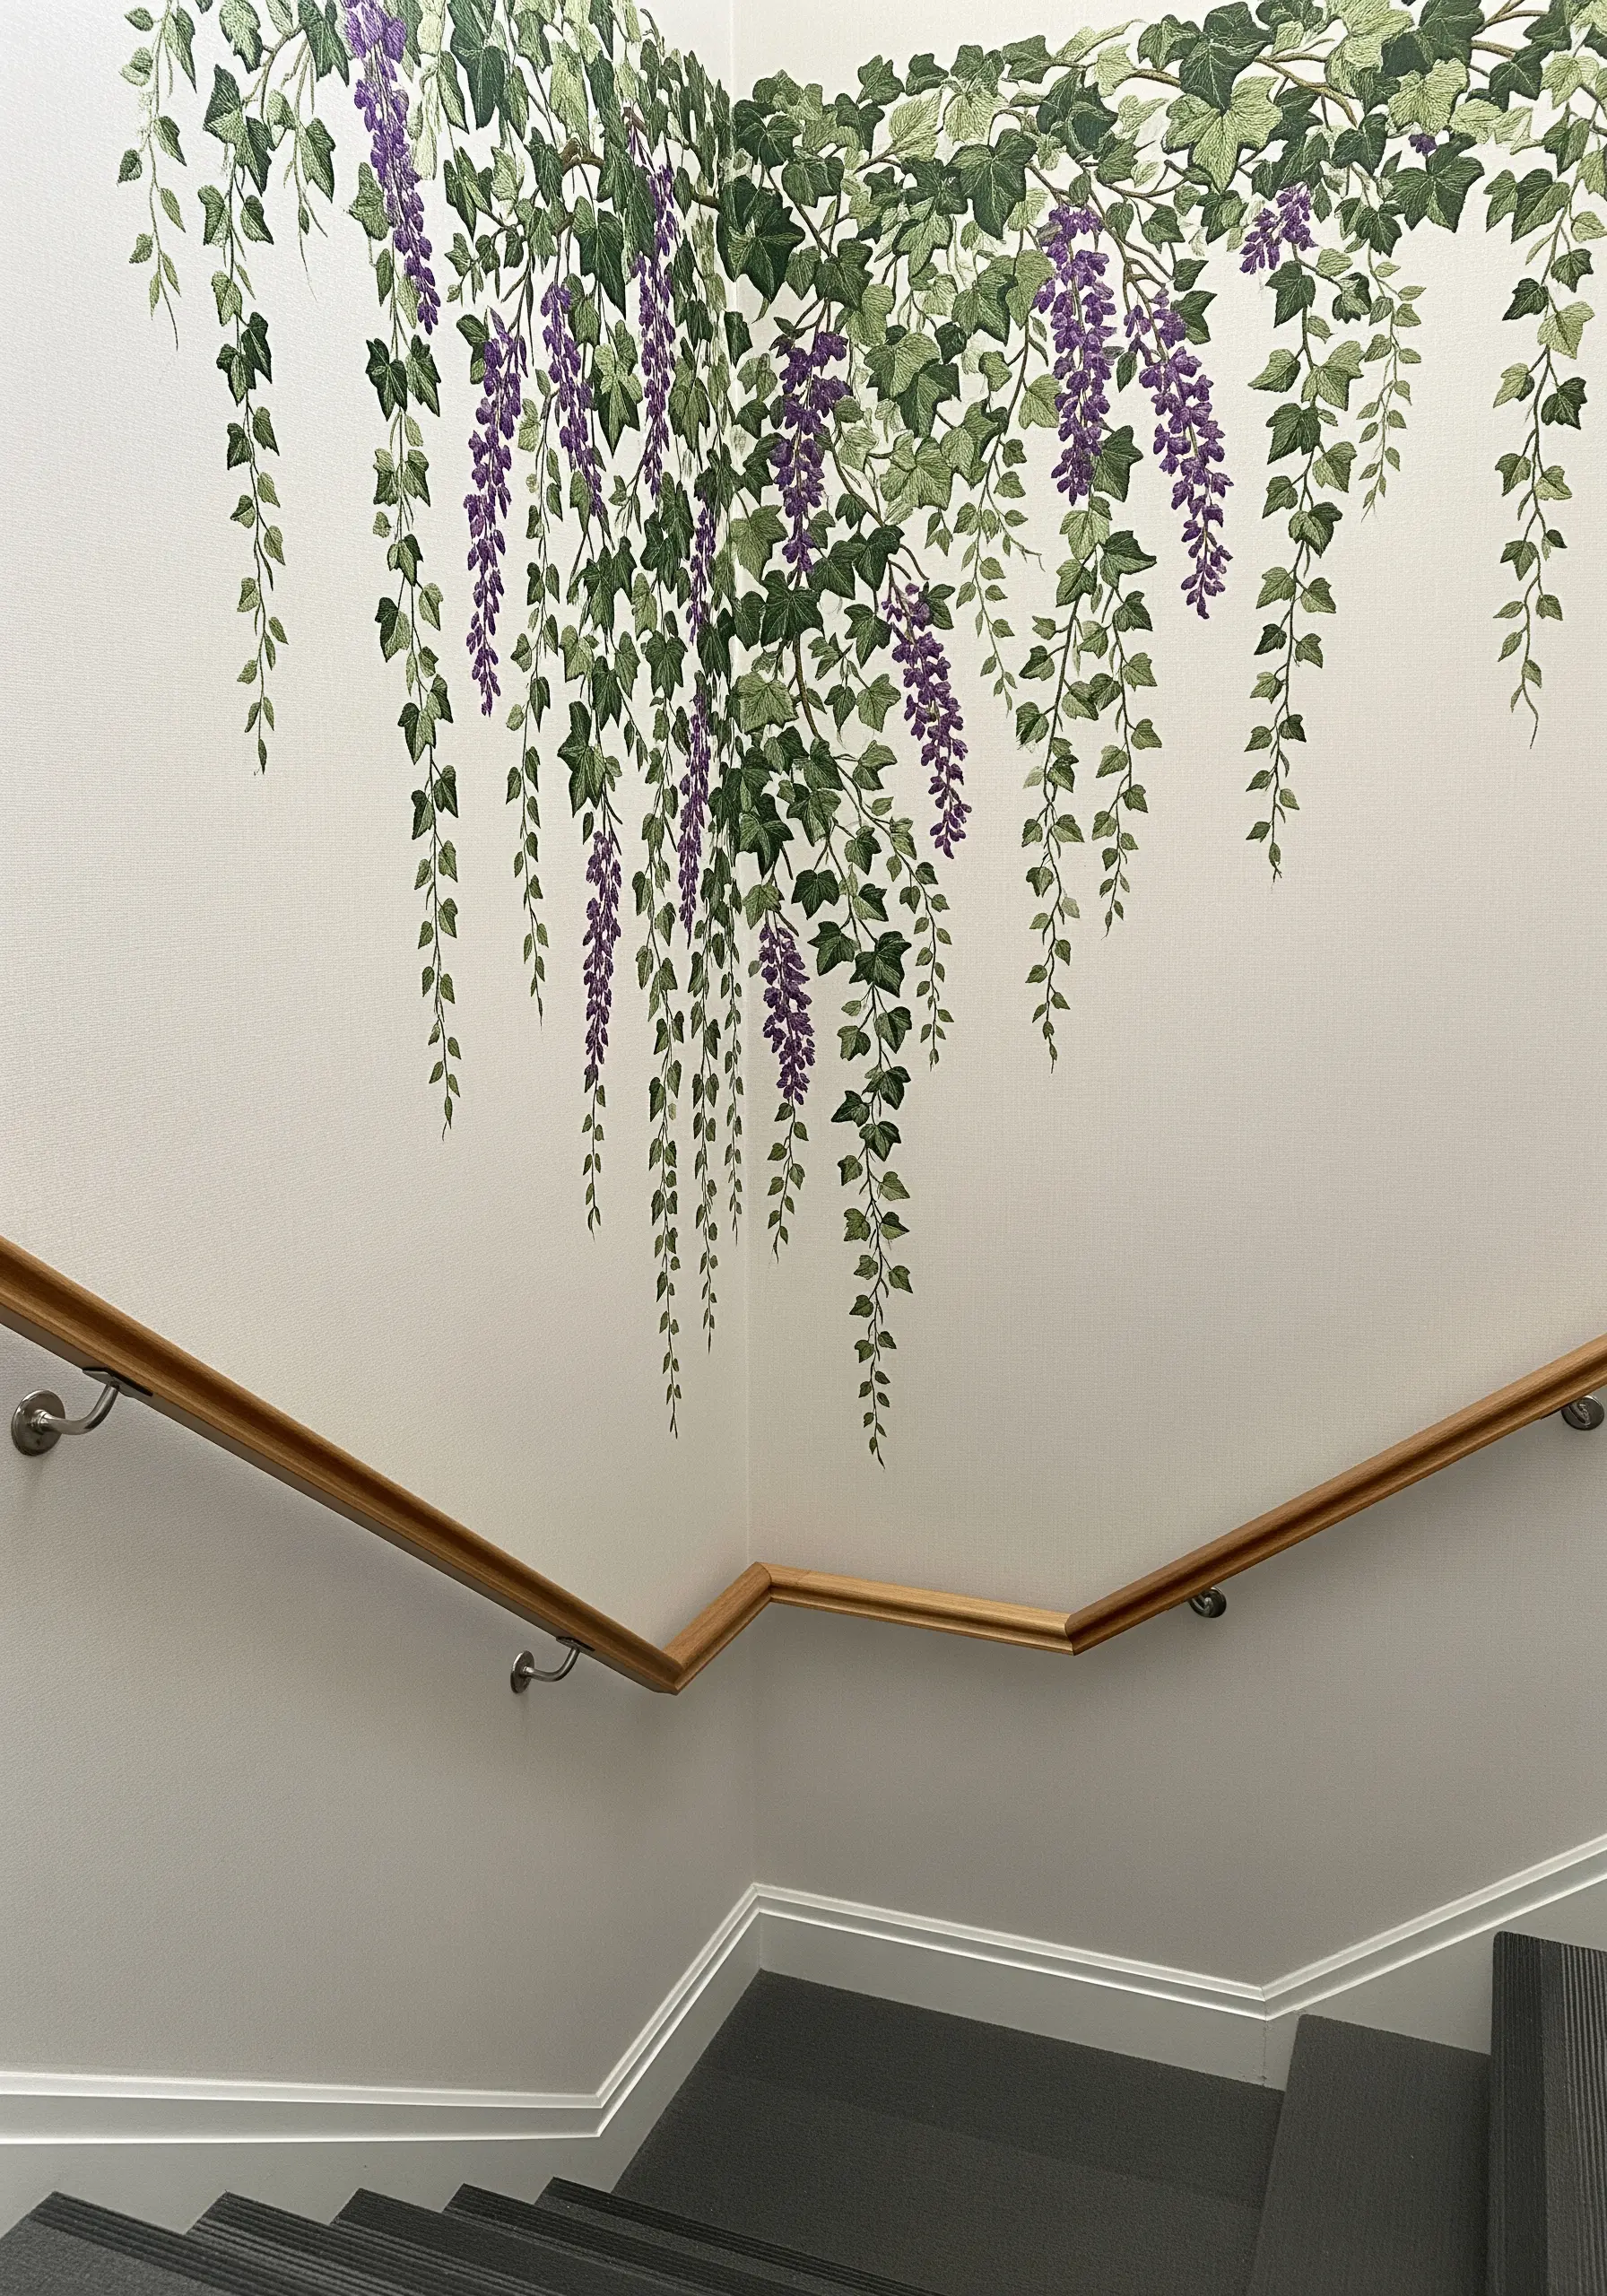
Soften the hard lines of a corner by stitching a design that appears to flow down the walls.
For cascading florals like wisteria, start your stitches in the corner and work outward and downward.
Create the flower clusters using a mix of French knots and long, straight bullion stitches in variegated purple thread, making them denser at the top and sparser at the bottom.
This creates a natural, gravitational pull in the design, turning an abrupt corner into a graceful, organic feature.
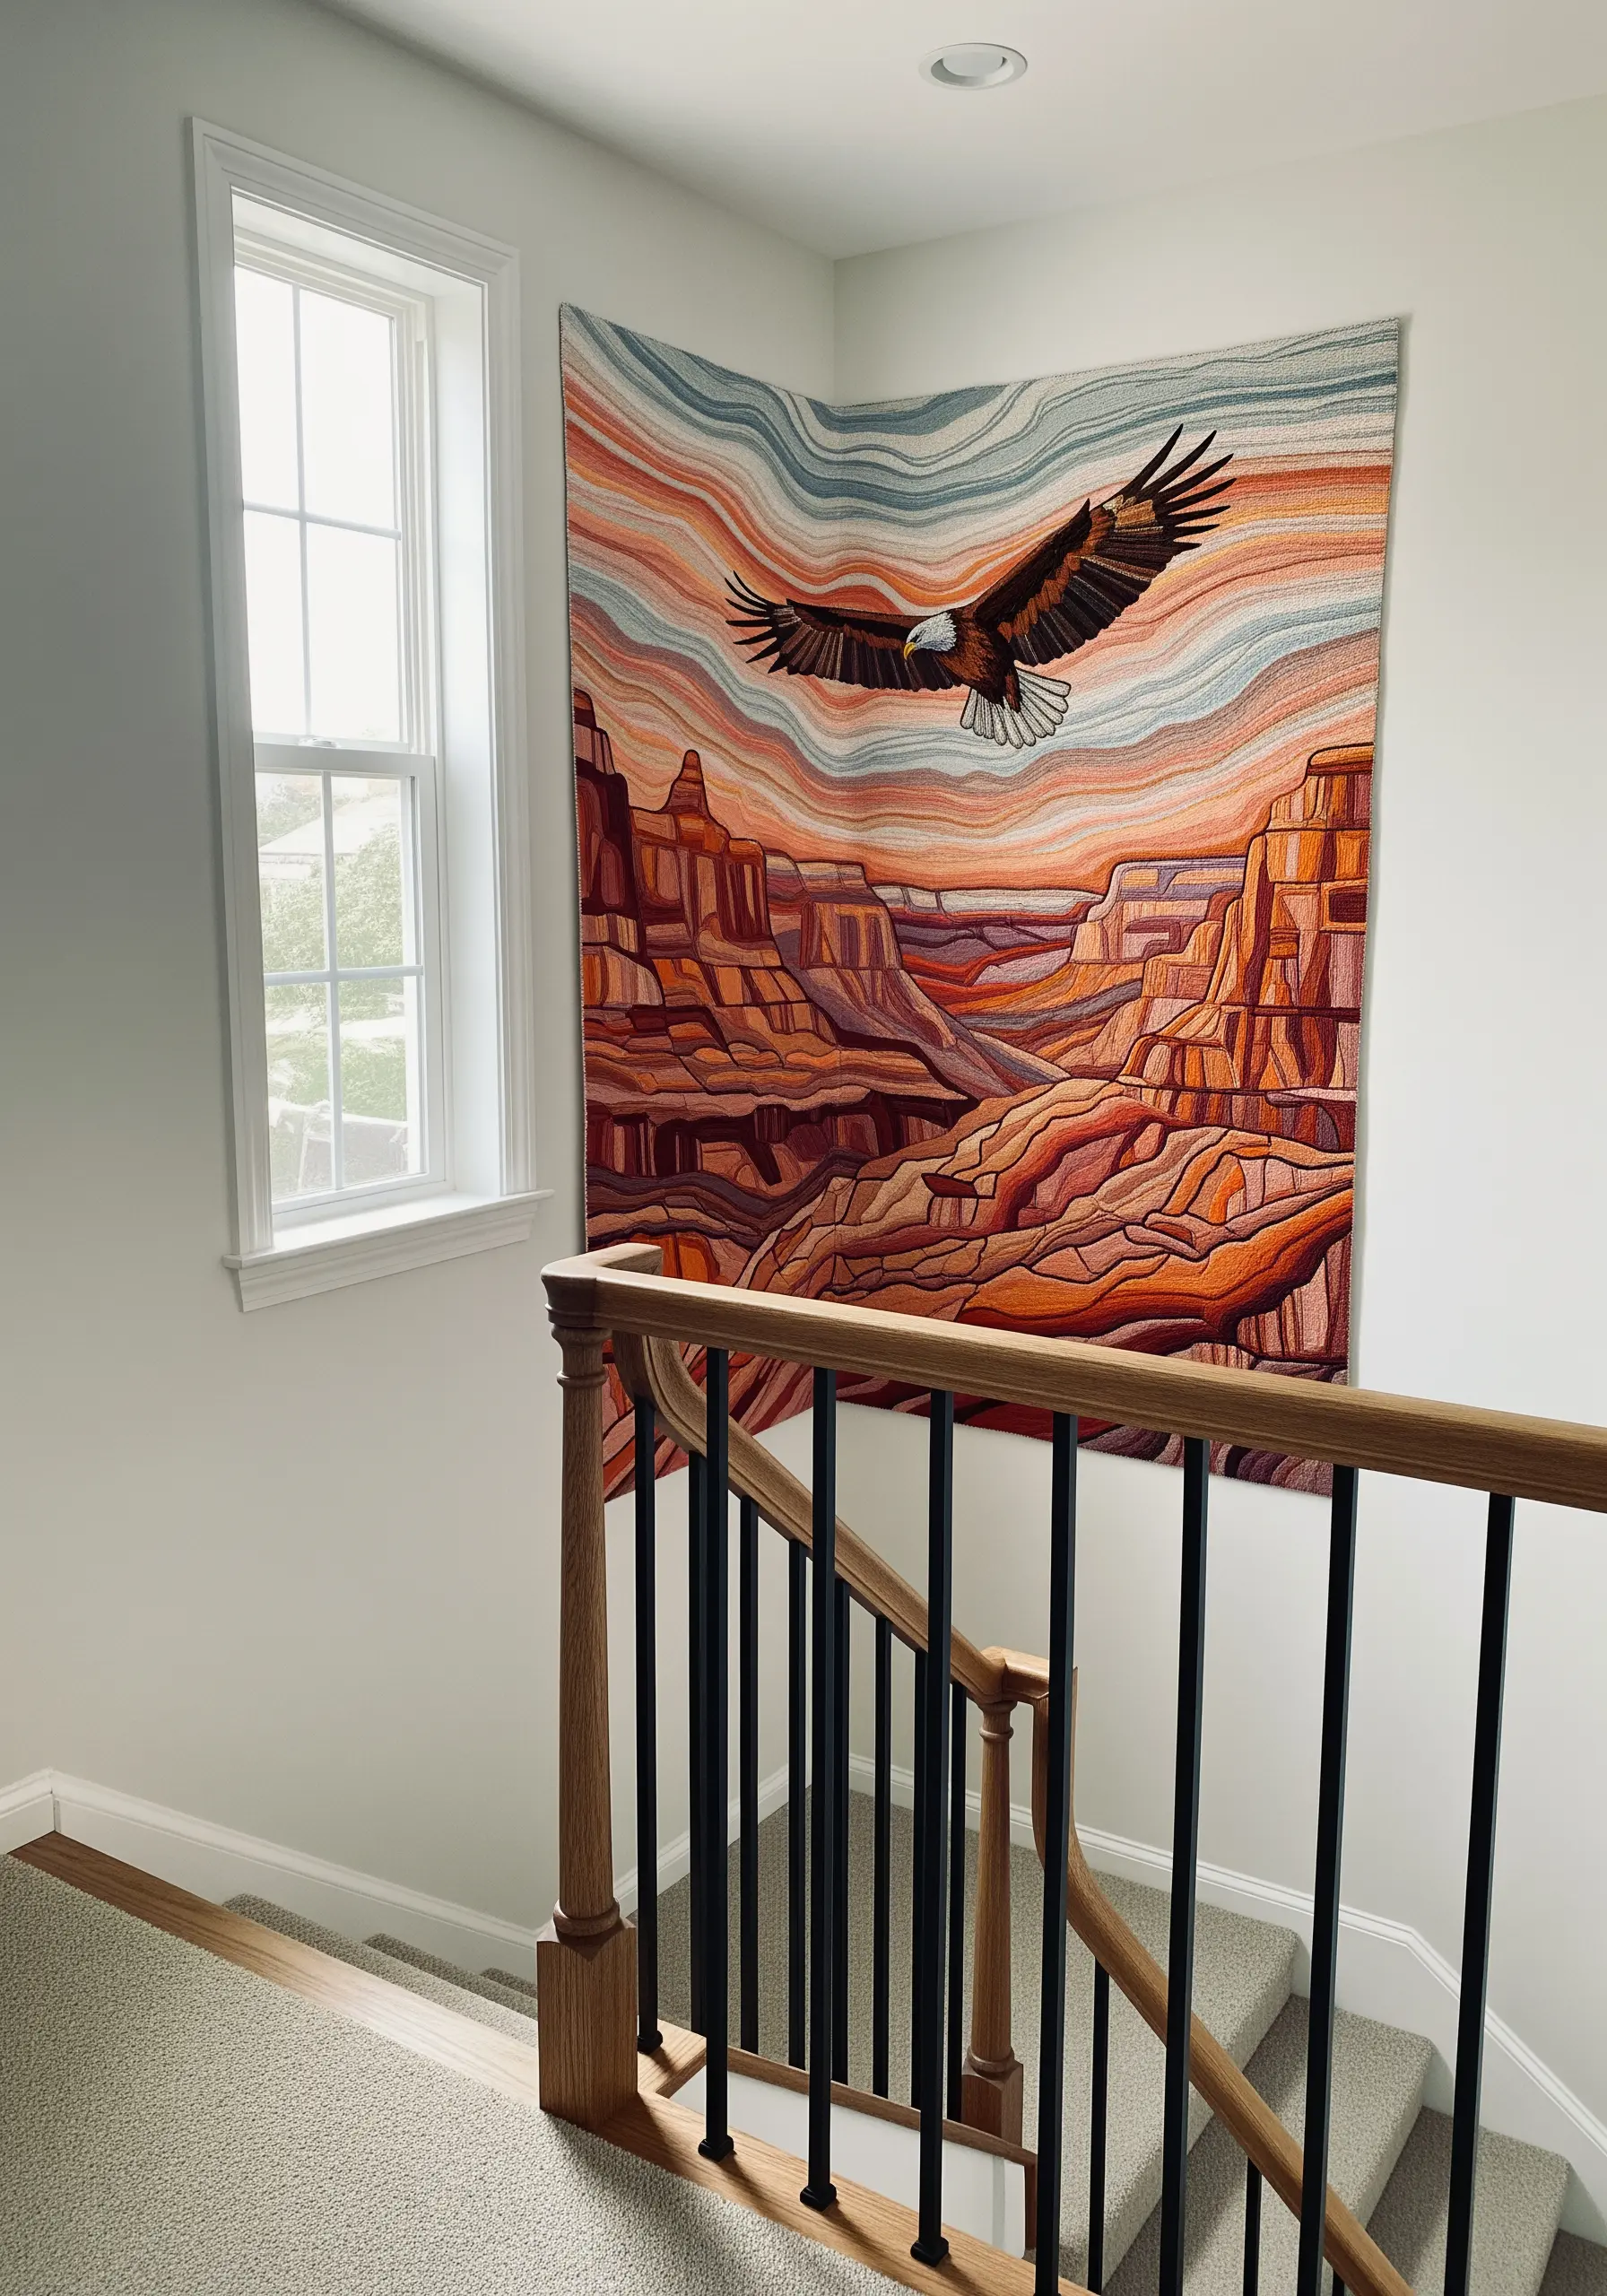
15. Select a Cohesive Earth-Tone Palette
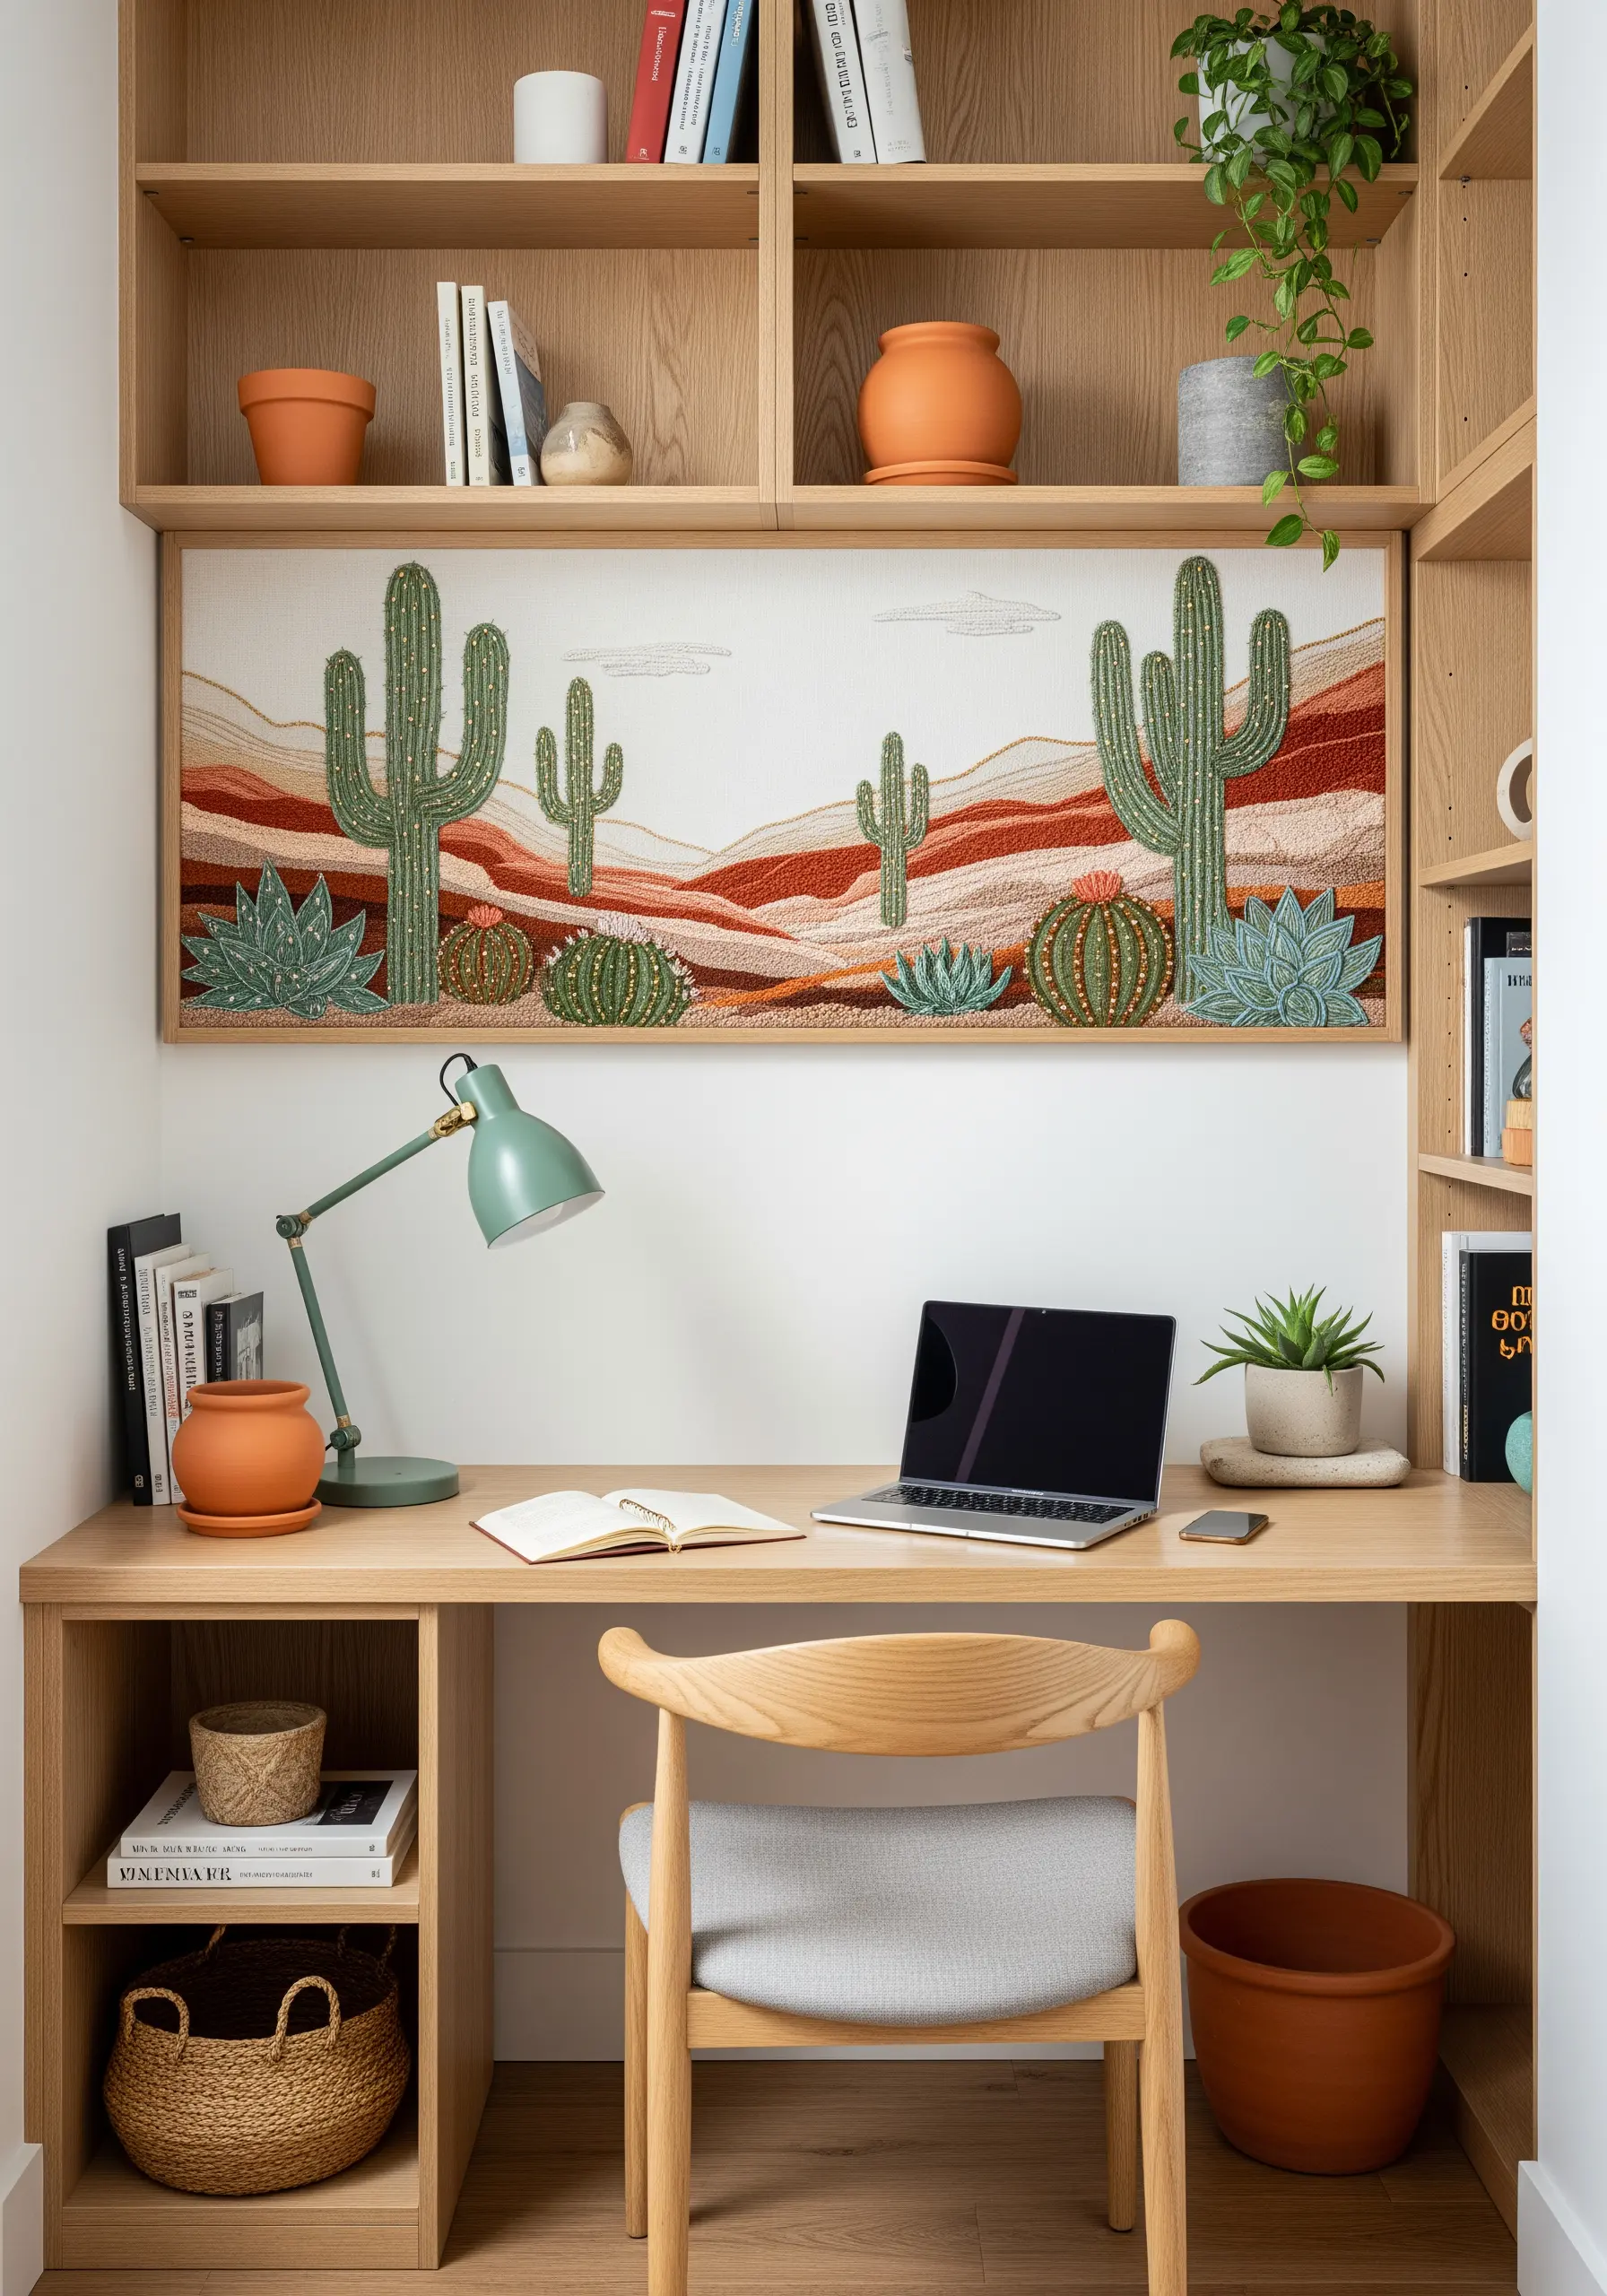
To ensure your desert scene feels harmonious and serene, curate your thread palette carefully.
Choose a range of five to seven colors in earthy tones like terracotta, sage green, sand, and muted ochre.
Use these colors to fill in the landscape with broad sections of long-and-short stitch, creating rolling hills and distant mountains.
A controlled, cohesive color story is what gives the finished piece its sophisticated, calming, and unified aesthetic.
16. Build a Canopy with Pointillist Knots
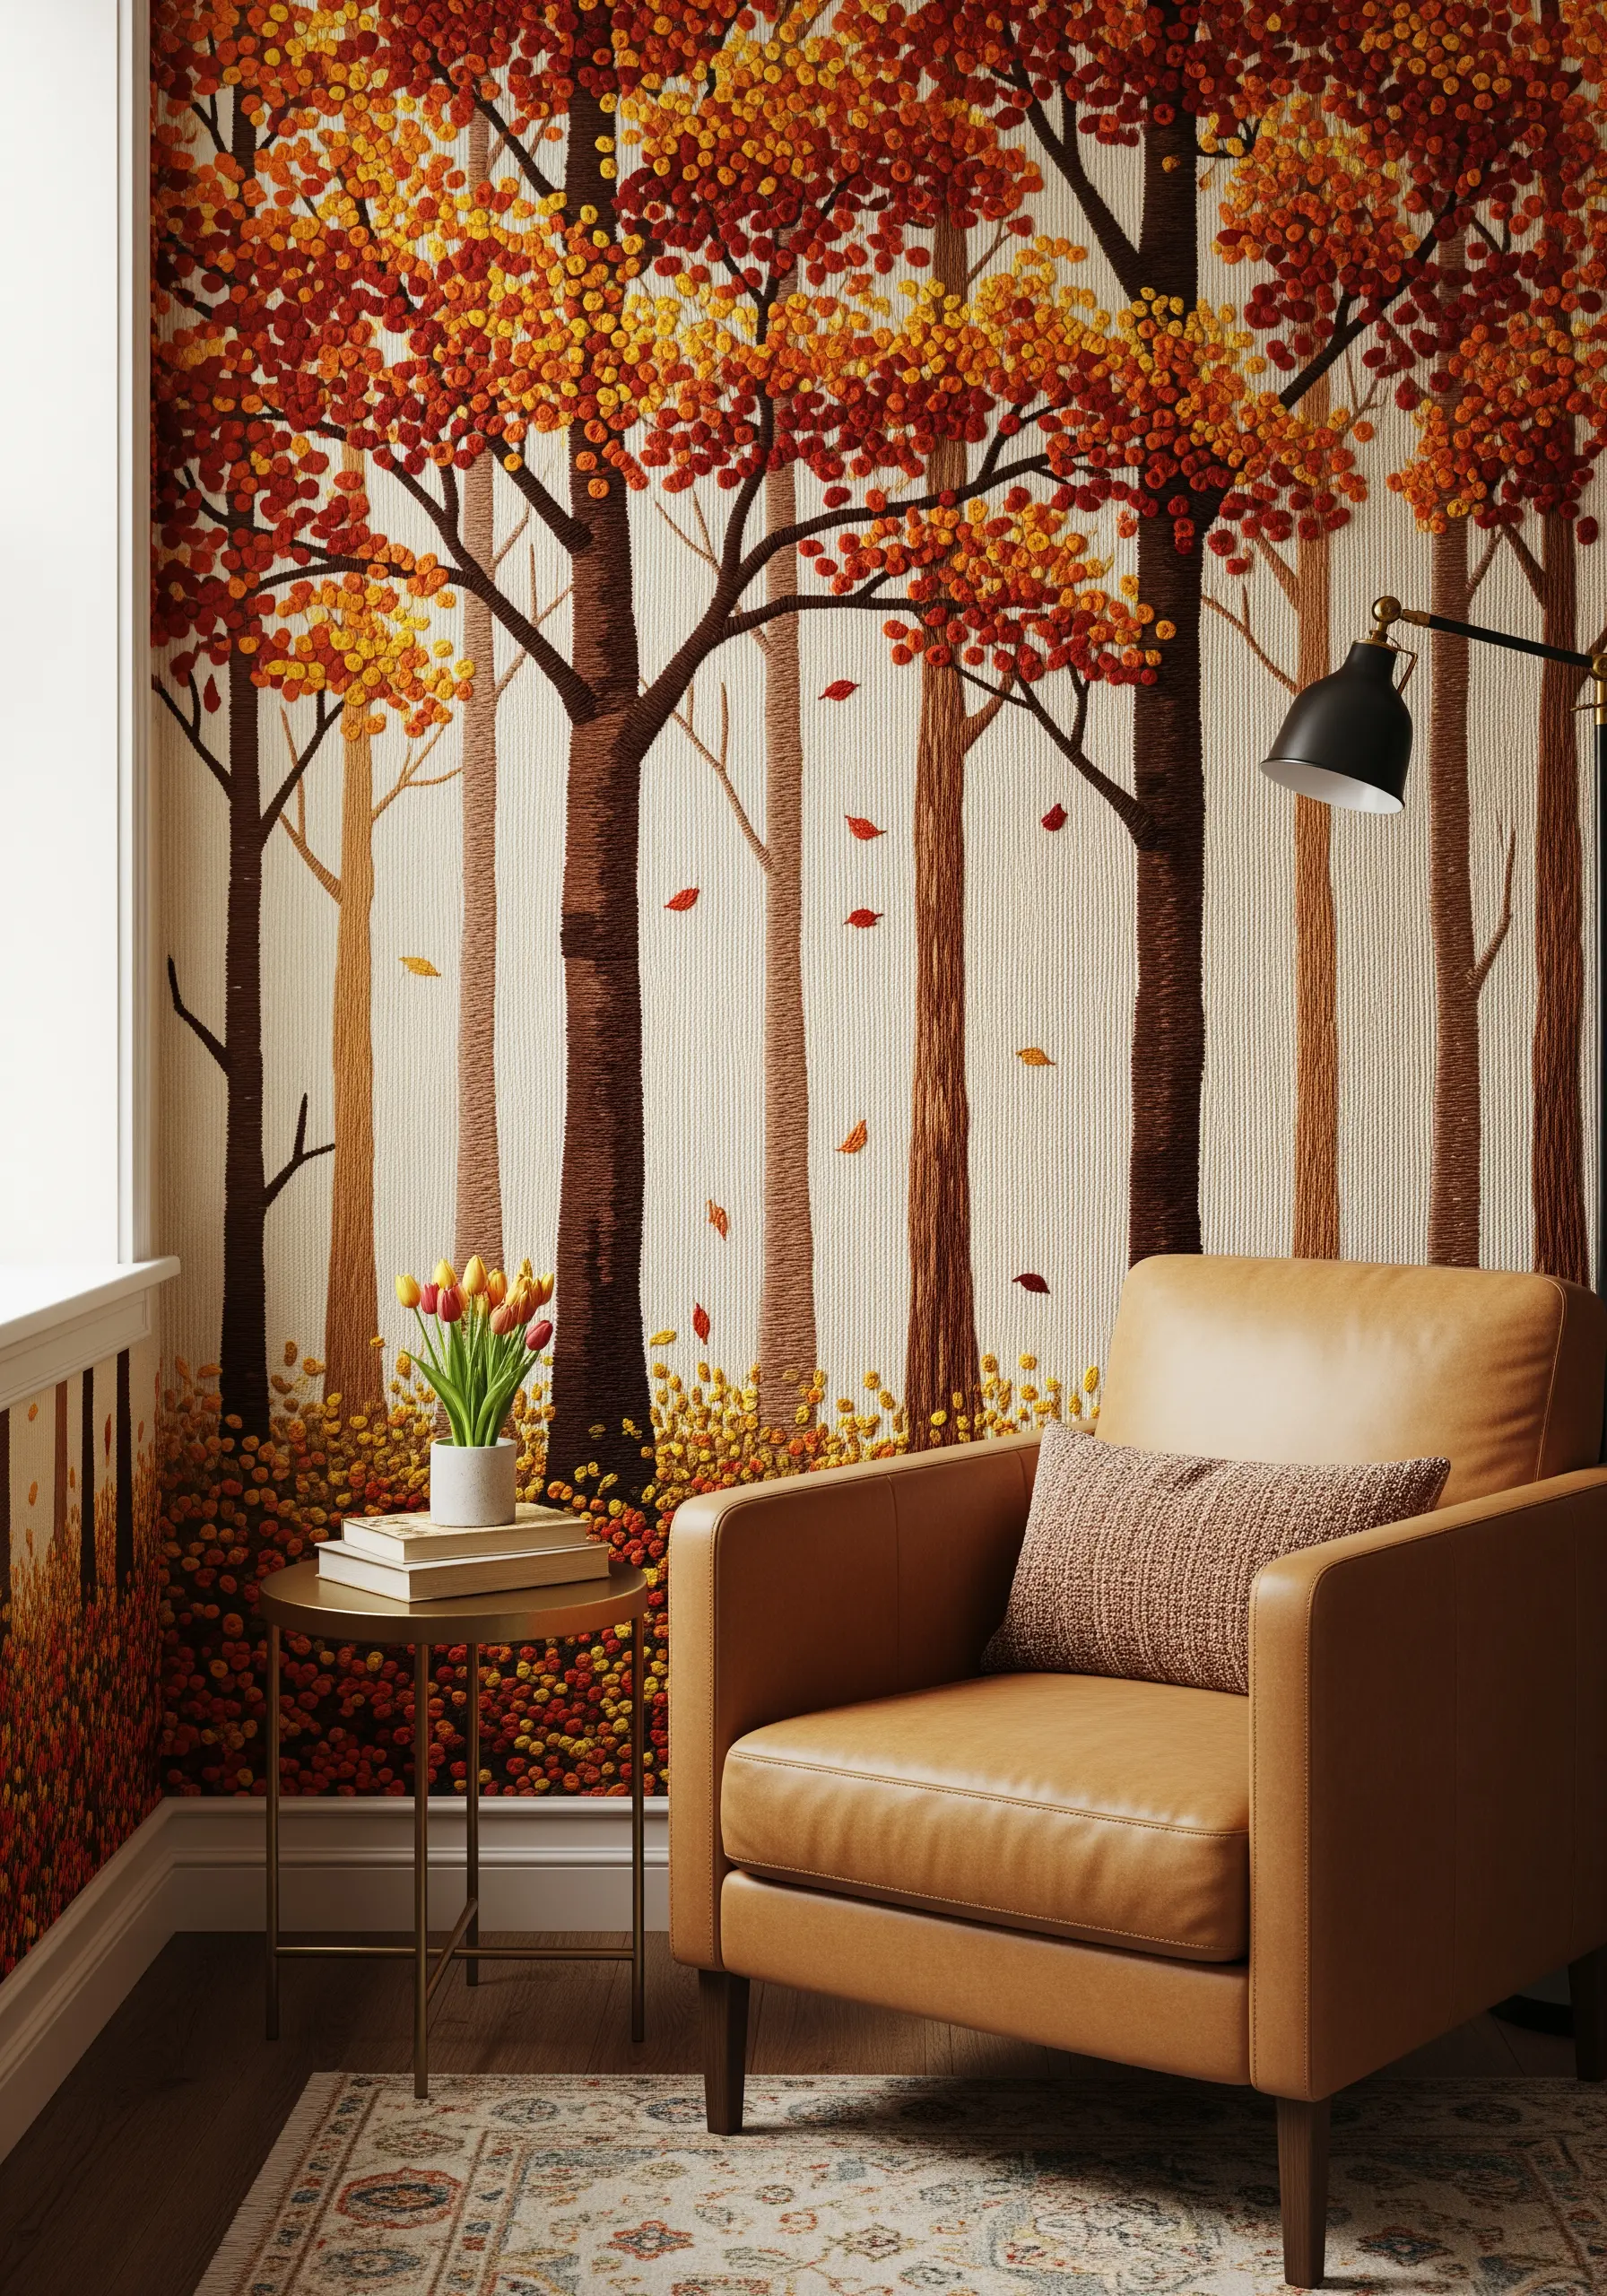
Create the rich, dense feel of an autumn canopy by using French knots like a pointillist painter.
Instead of filling leaves with satin stitch, mass together thousands of French knots in shades of red, orange, gold, and brown.
Vary the tightness and size of the knots, and blend the colors organically to create a mottled, light-dappled effect.
Fill the tree trunks with a simple, vertical backstitch in dark brown to provide a stable, linear contrast to the joyful chaos of the foliage.
17. Create Water Ripples with Contour Stitching
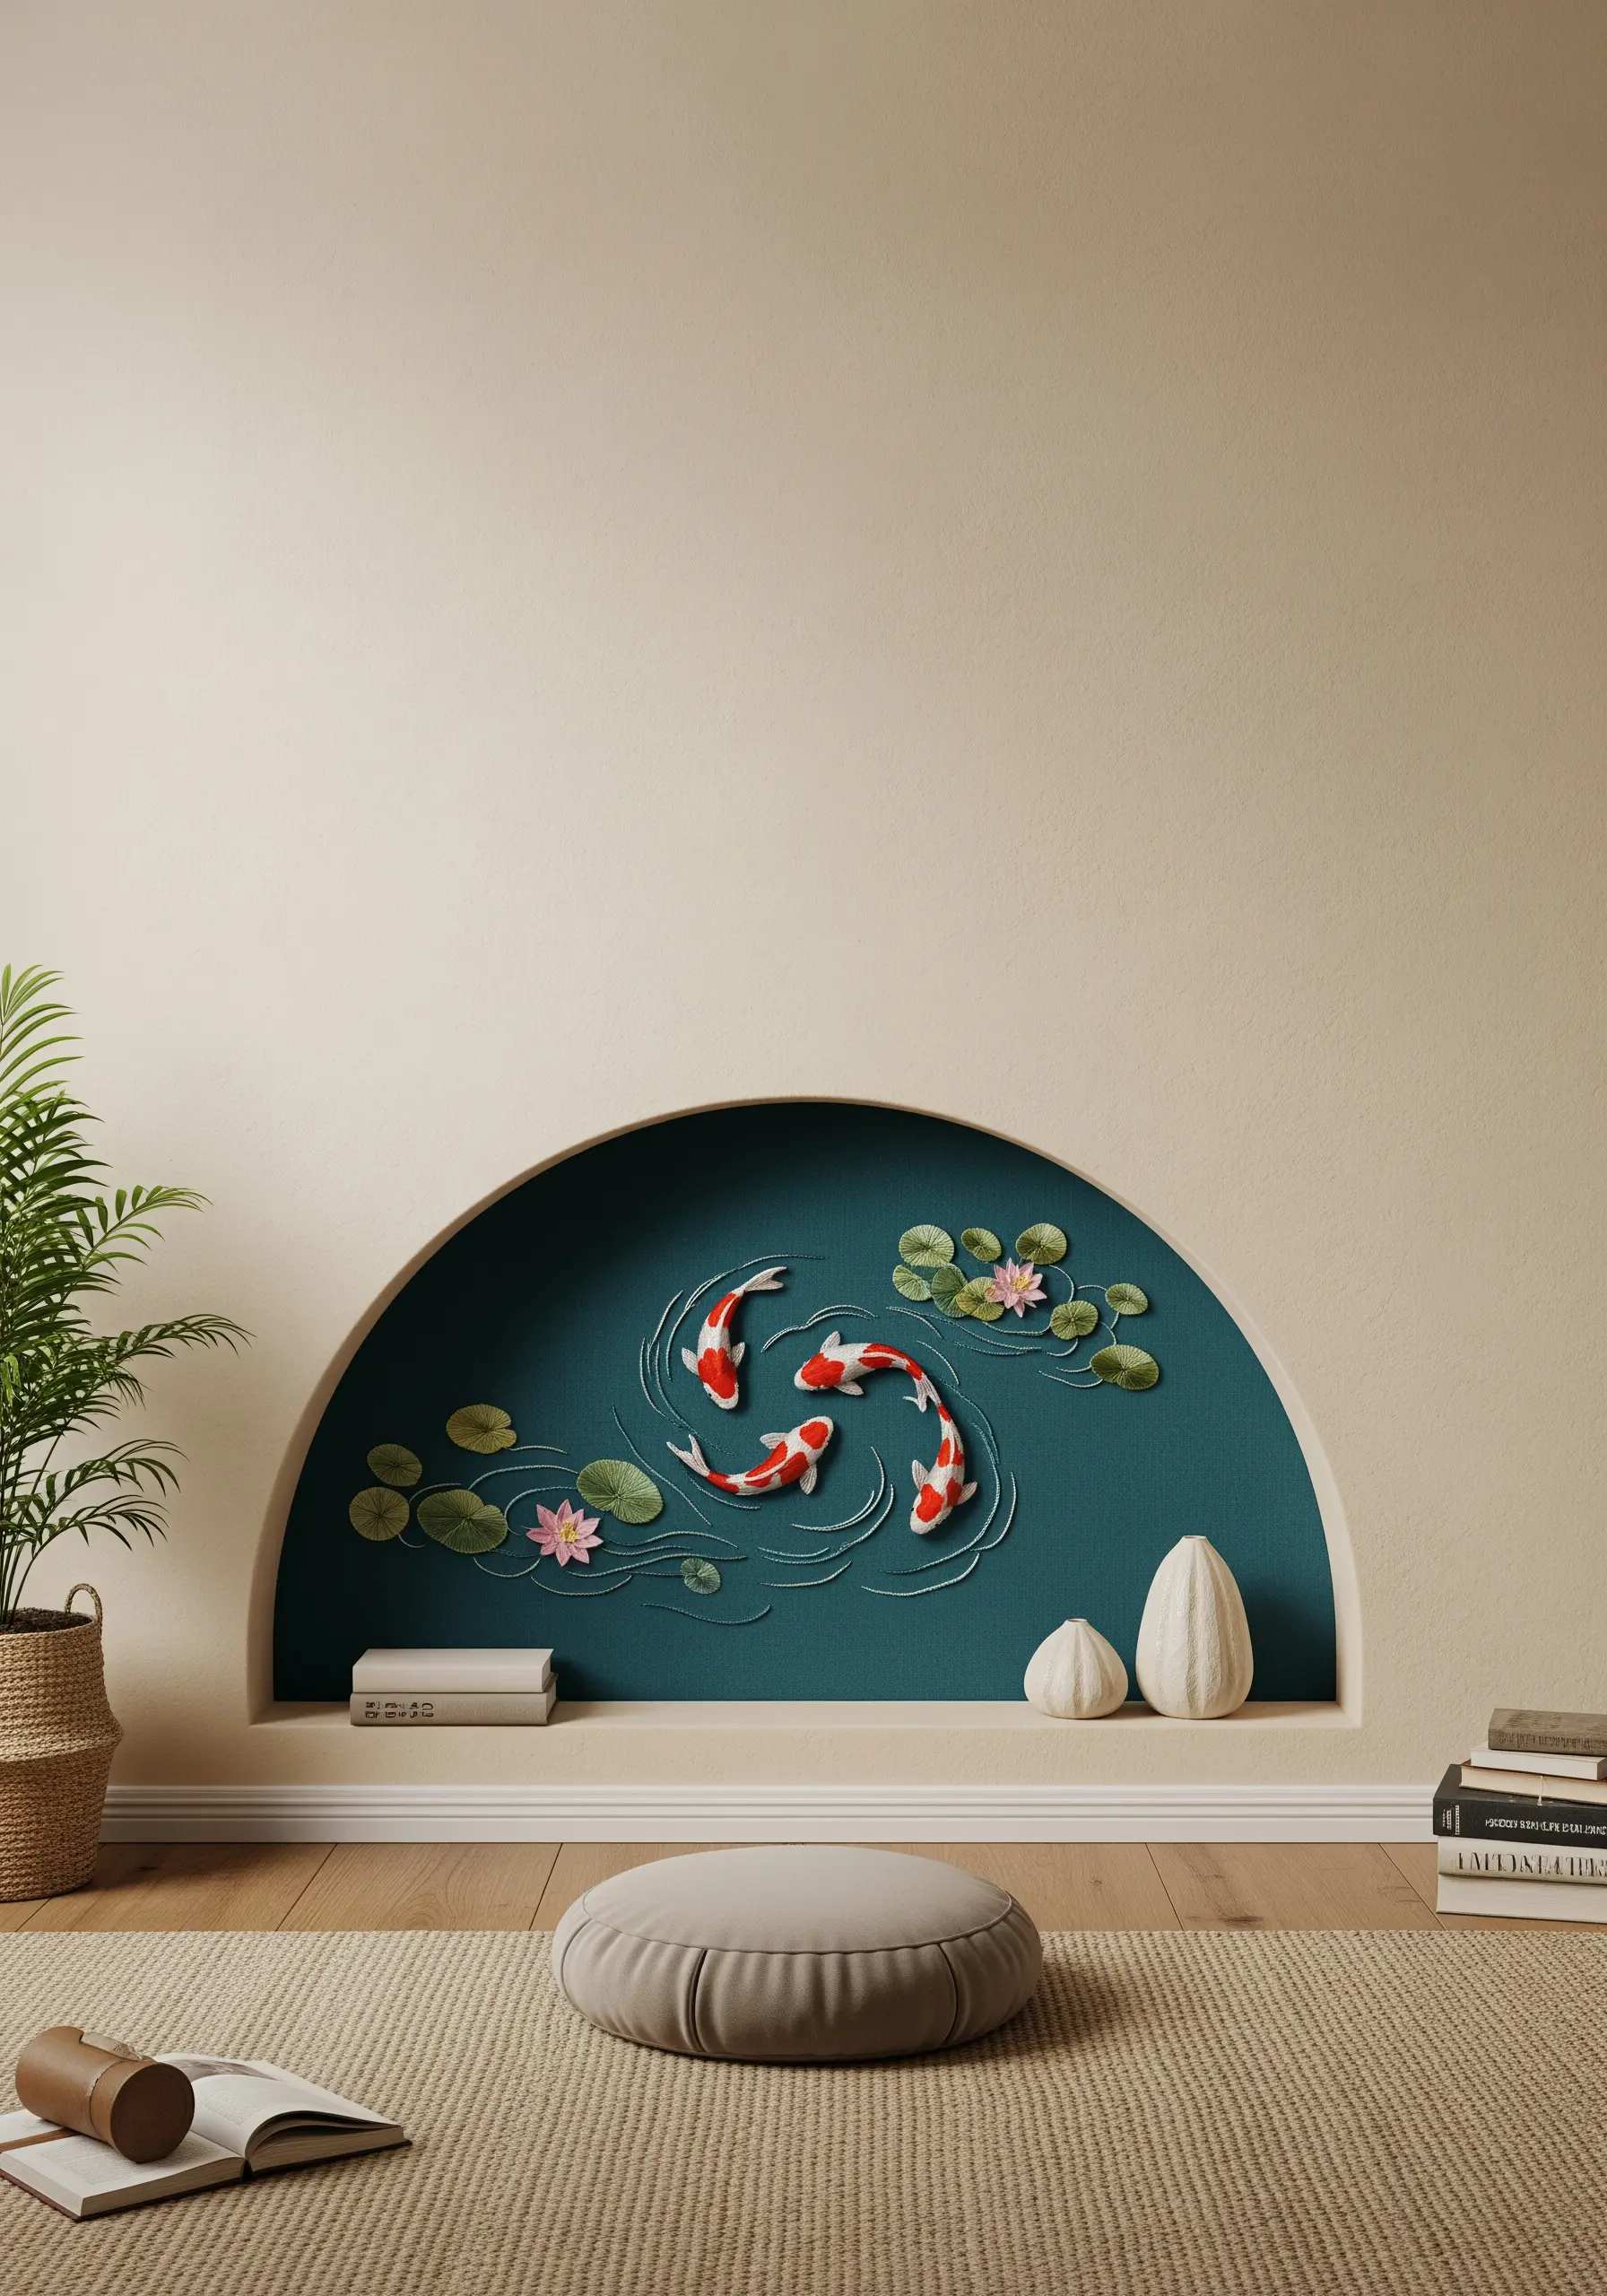
Suggest the gentle movement of water with just a few carefully placed lines.
After stitching your koi fish with a smooth satin stitch, add concentric, curved lines of split stitch around them using a single strand of white or silver thread.
This subtle detail is incredibly effective at creating the illusion of ripples radiating outward, bringing the static scene to life.
The contrast between the calm, unstitched water and the stitched contours is what makes the effect so believable and elegant.
18. Craft Translucent Wings with Organza
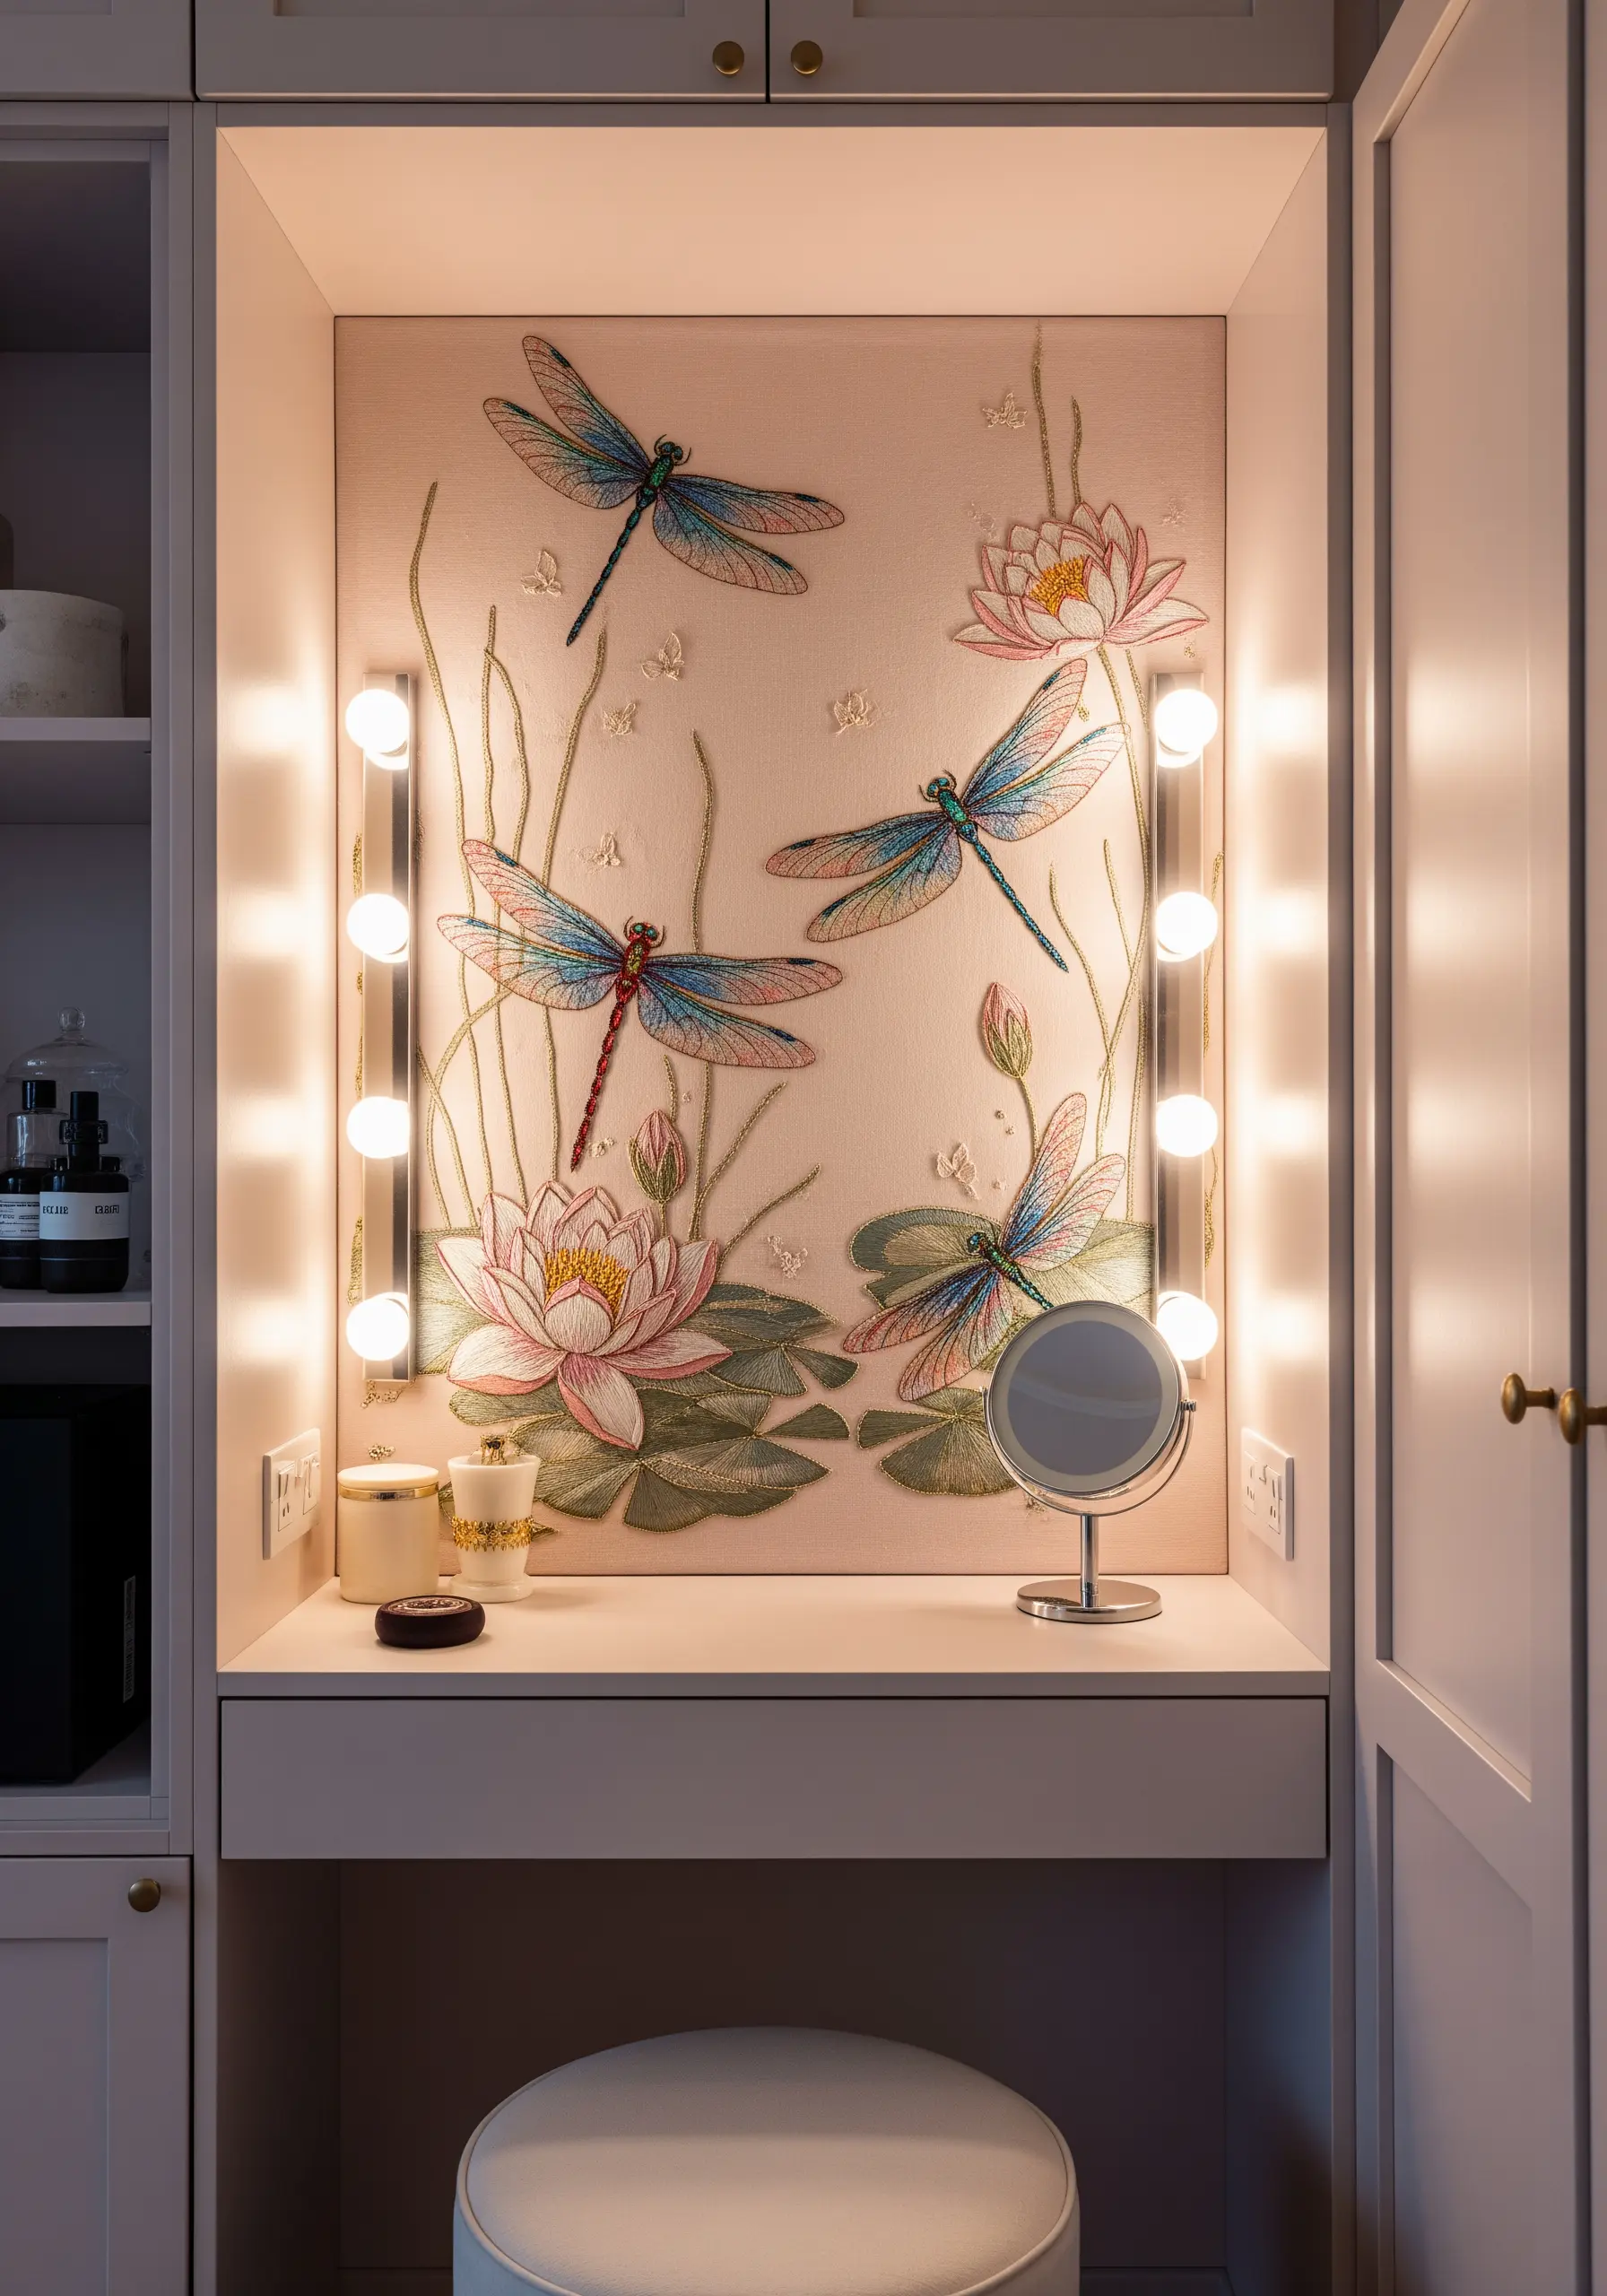
To capture the delicate transparency of dragonfly wings, stitch them on a separate piece of sheer organza fabric.
Use a fine backstitch for the veins and a light, open fill stitch for the interior.
Once complete, carefully trim the wings from the organza, leaving a tiny margin, and then tack them onto the main embroidery piece at the dragonfly’s body.
This appliqué technique allows the wings to lift slightly from the background, creating realistic shadow, movement, and a beautiful, ethereal quality.
19. Establish Perspective Through Scale and Detail
Give your embroidered landscape a convincing sense of depth by varying the scale of your motifs.
Stitch the poppies in the foreground larger, using more complex stitches like woven wheels and bullion knots for the centers, and multiple shades of red for the petals.
For the poppies in the mid-ground and distance, make them progressively smaller and less detailed—perhaps just a few simple straight stitches or a single French knot.
This strategic reduction in detail tricks the eye into seeing a vast, receding field of vibrant red flowers.
20. Mimic Natural Patterns with Variegated Thread
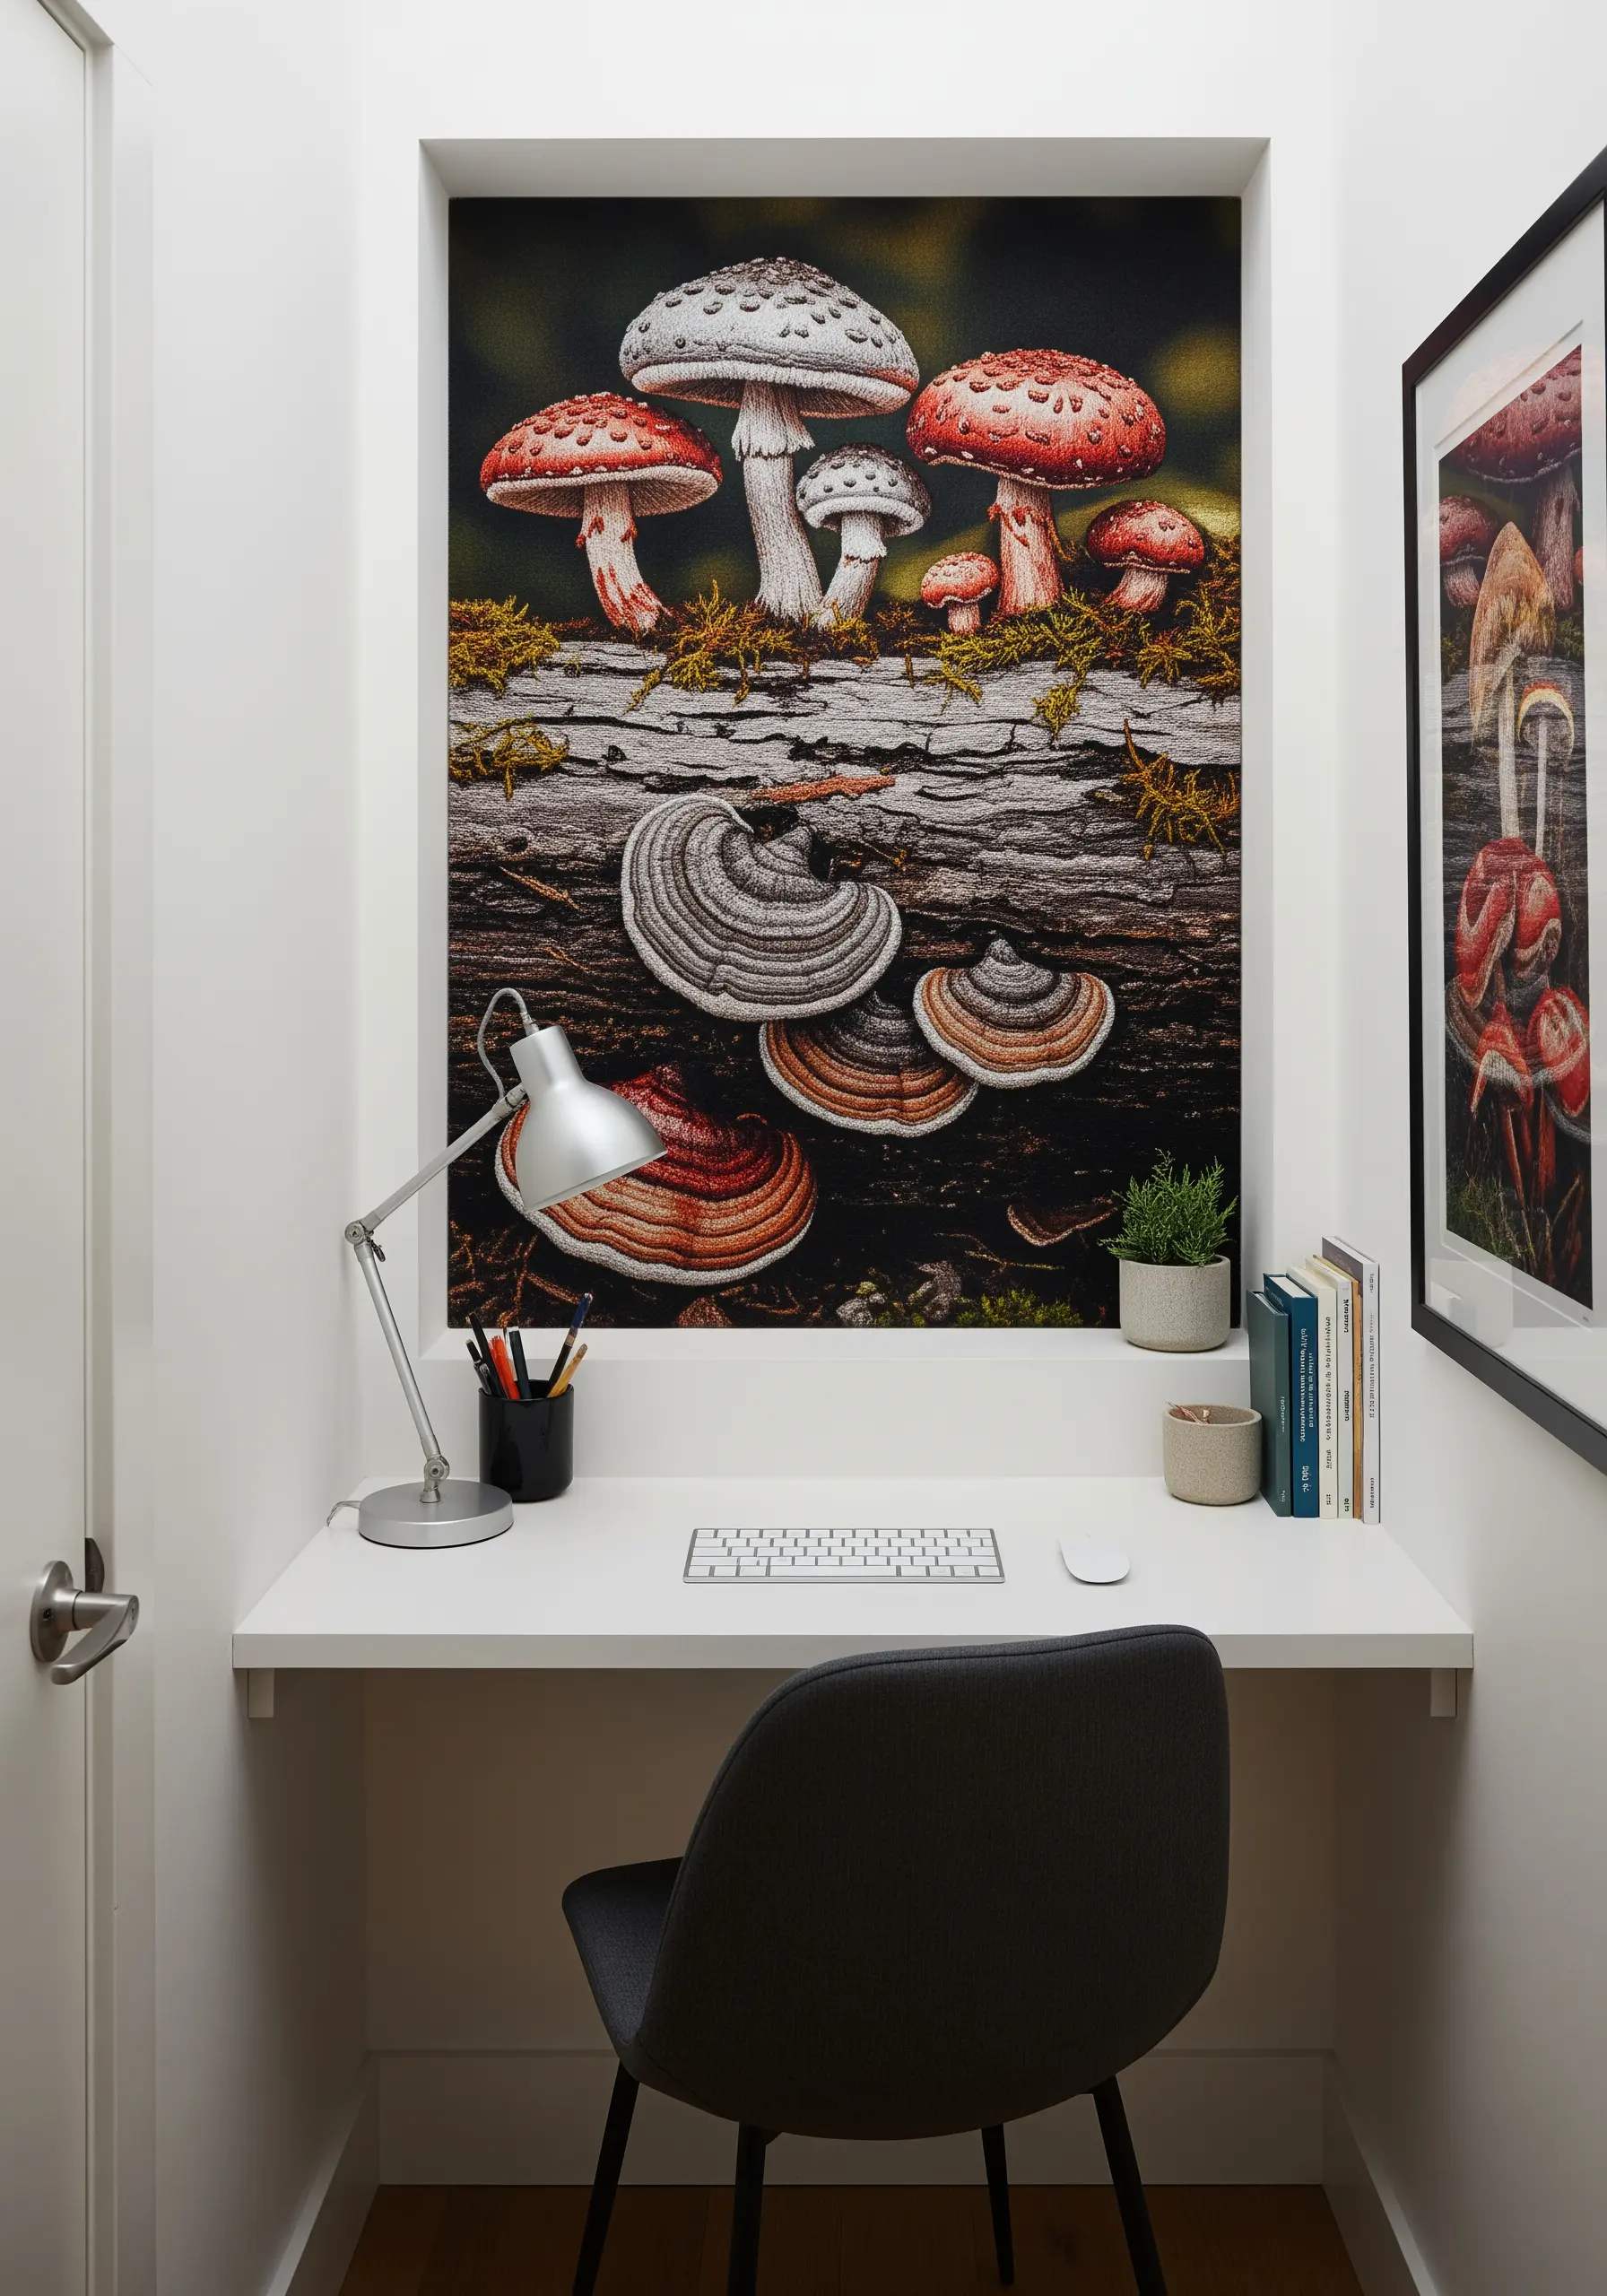
Achieve the beautiful, concentric stripes of a turkey tail mushroom with minimal effort by using variegated thread.
Choose a thread that shifts between shades of brown, cream, and rust.
Then, simply fill the mushroom shape with rows of stem stitch or split stitch, following its curved form.
The thread will do the color-changing work for you, creating organic, subtle stripes that perfectly replicate the patterns found in nature.
This is an efficient way to add complexity and realism without constantly changing your floss.
21. Blend Soft Textures for a Serene Shoreline
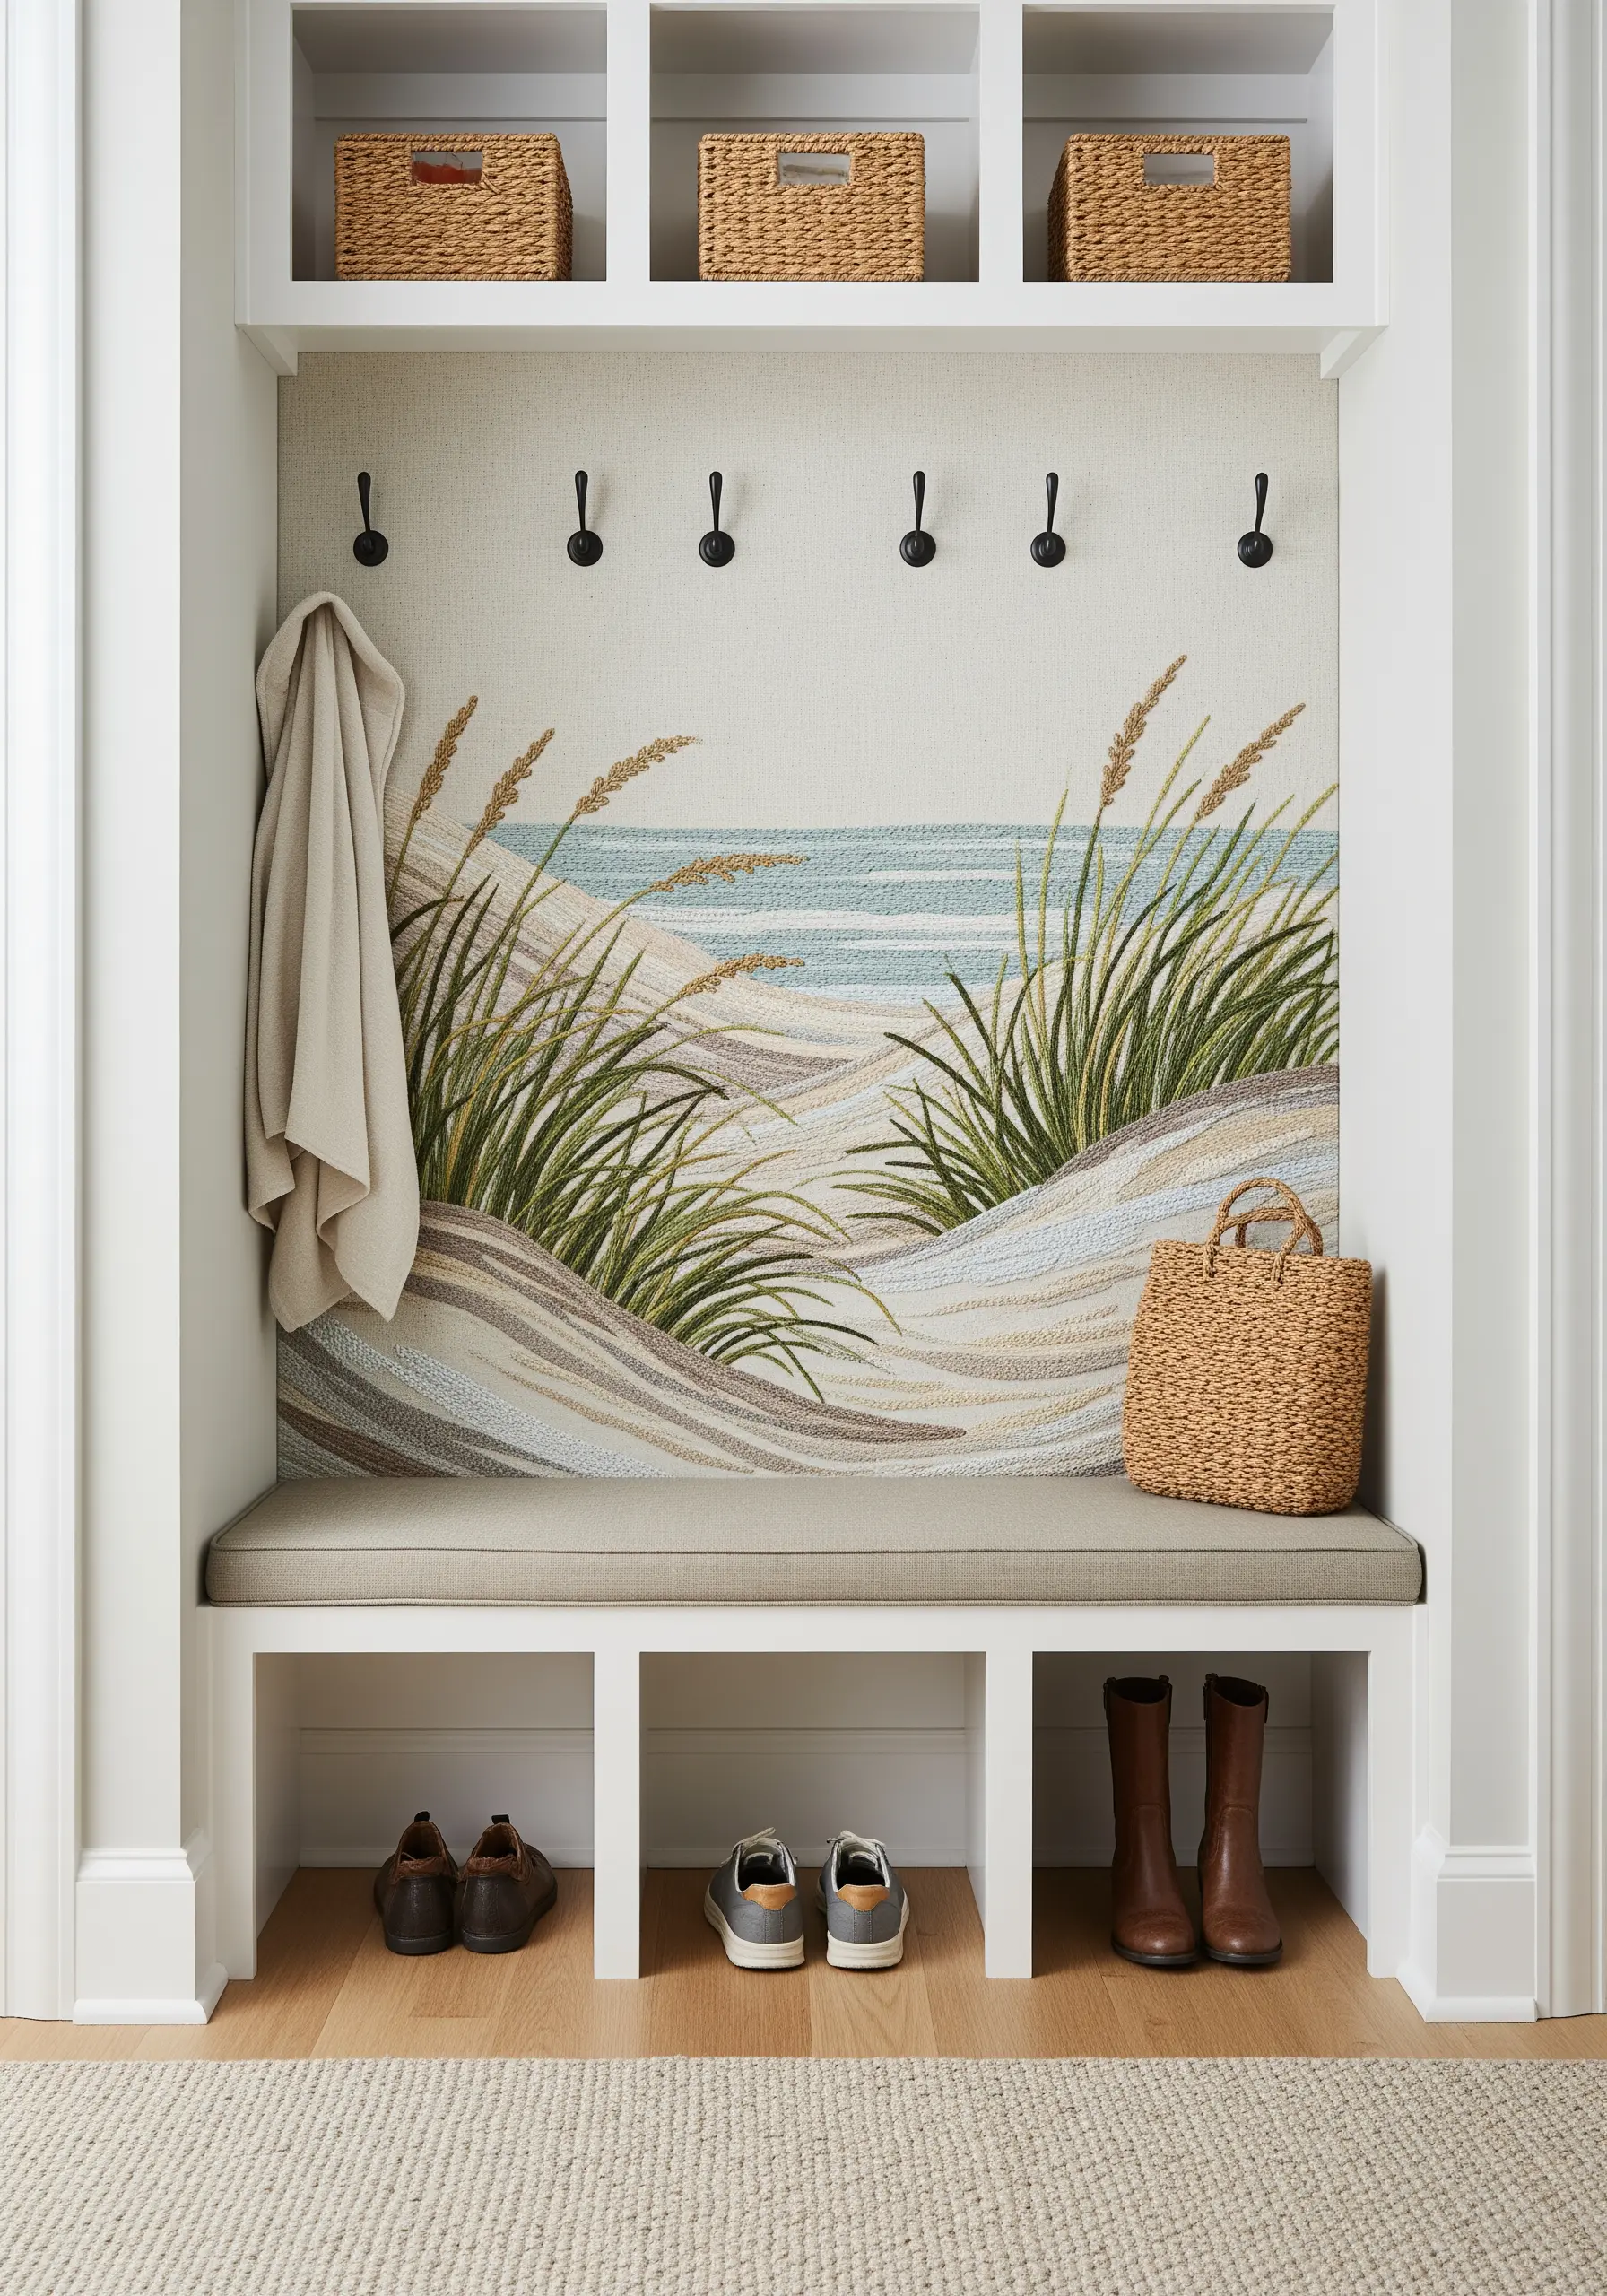
Capture the calm atmosphere of a beach by blending soft colors and textures seamlessly.
Use long-and-short stitch to create the gentle, sloping curves of sand dunes, using several shades of beige, grey, and cream for a natural look.
For the ocean, use horizontal bands of satin stitch in muted blues and seafoam green.
The beach grasses, stitched with fine, arching straight stitches, are what connect the two elements and add a touch of organic detail to the otherwise minimalist scene.
22. Achieve Lunar Glow with Padded Satin Stitch
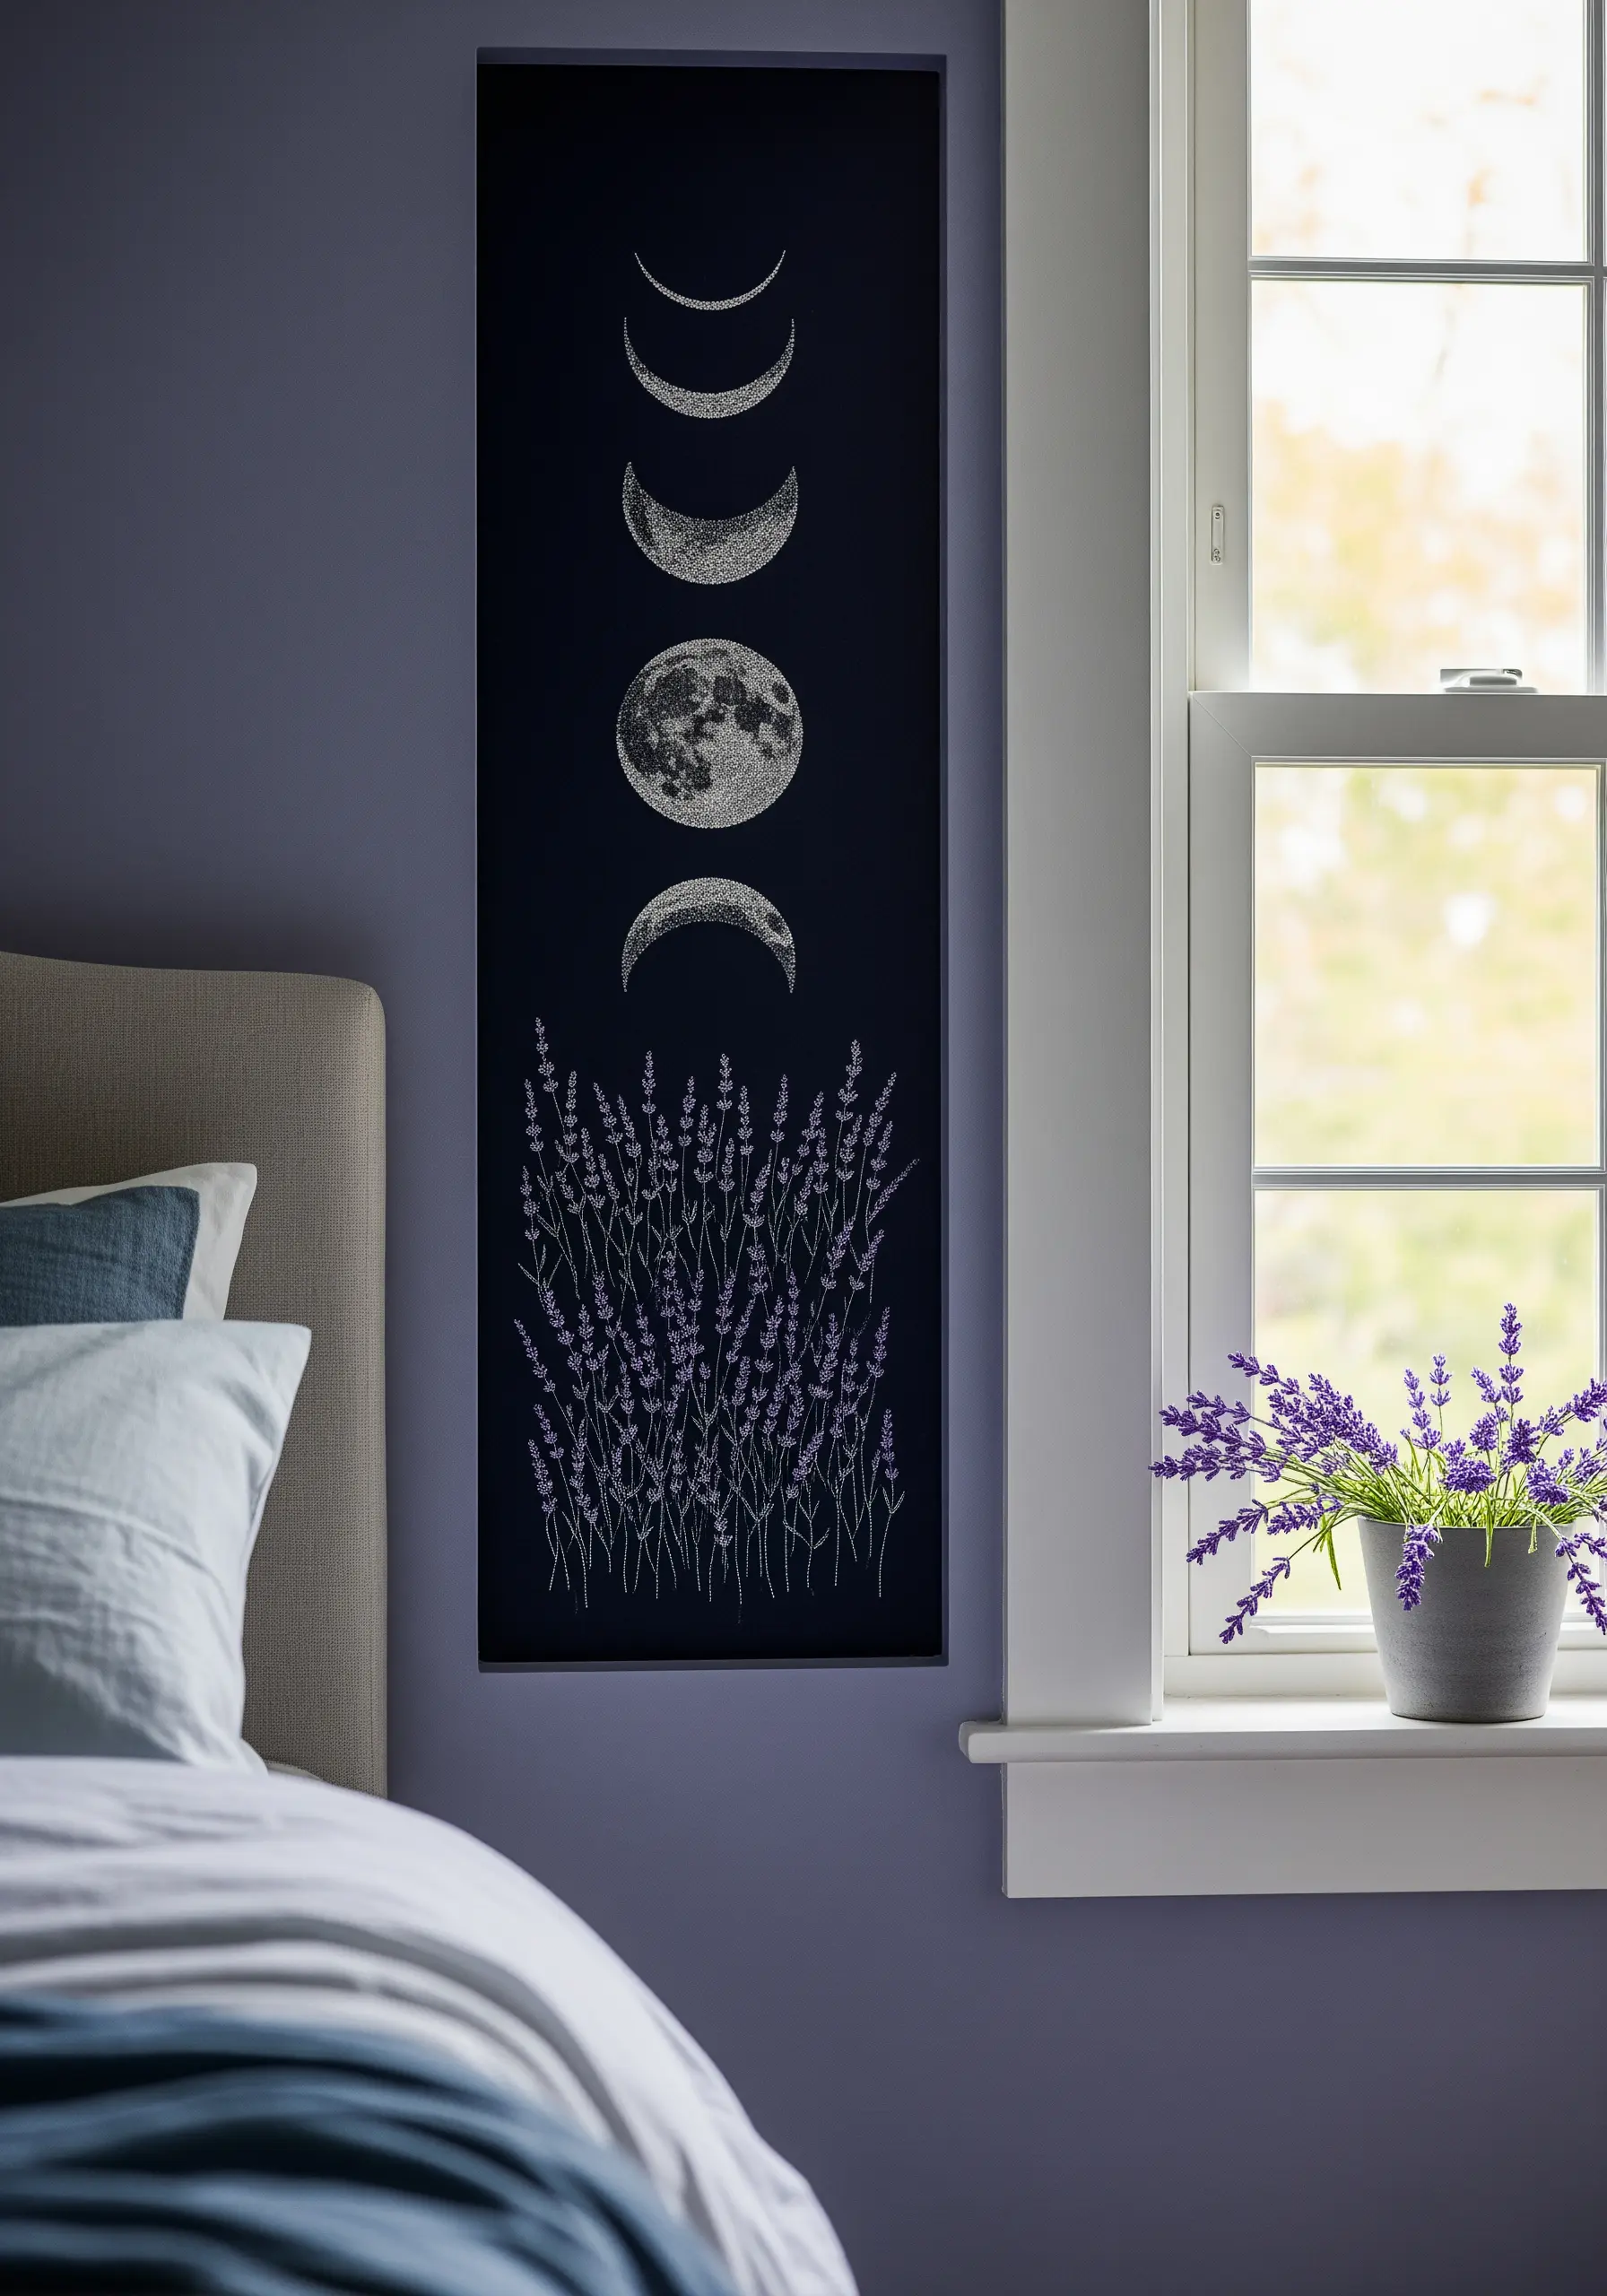
Give your embroidered moon a luminous, three-dimensional quality using padded satin stitch.
First, fill the moon shape with a base layer of small, underlying stitches (like seed stitches) worked perpendicular to your final layer.
Then, cover this padding with smooth, tight satin stitches using a white or silver thread.
The padding underneath raises the surface, causing it to catch the light more effectively and creating a beautiful, glowing effect that stands out against a dark fabric background.
23. Create Drama with Metallics and Lighting
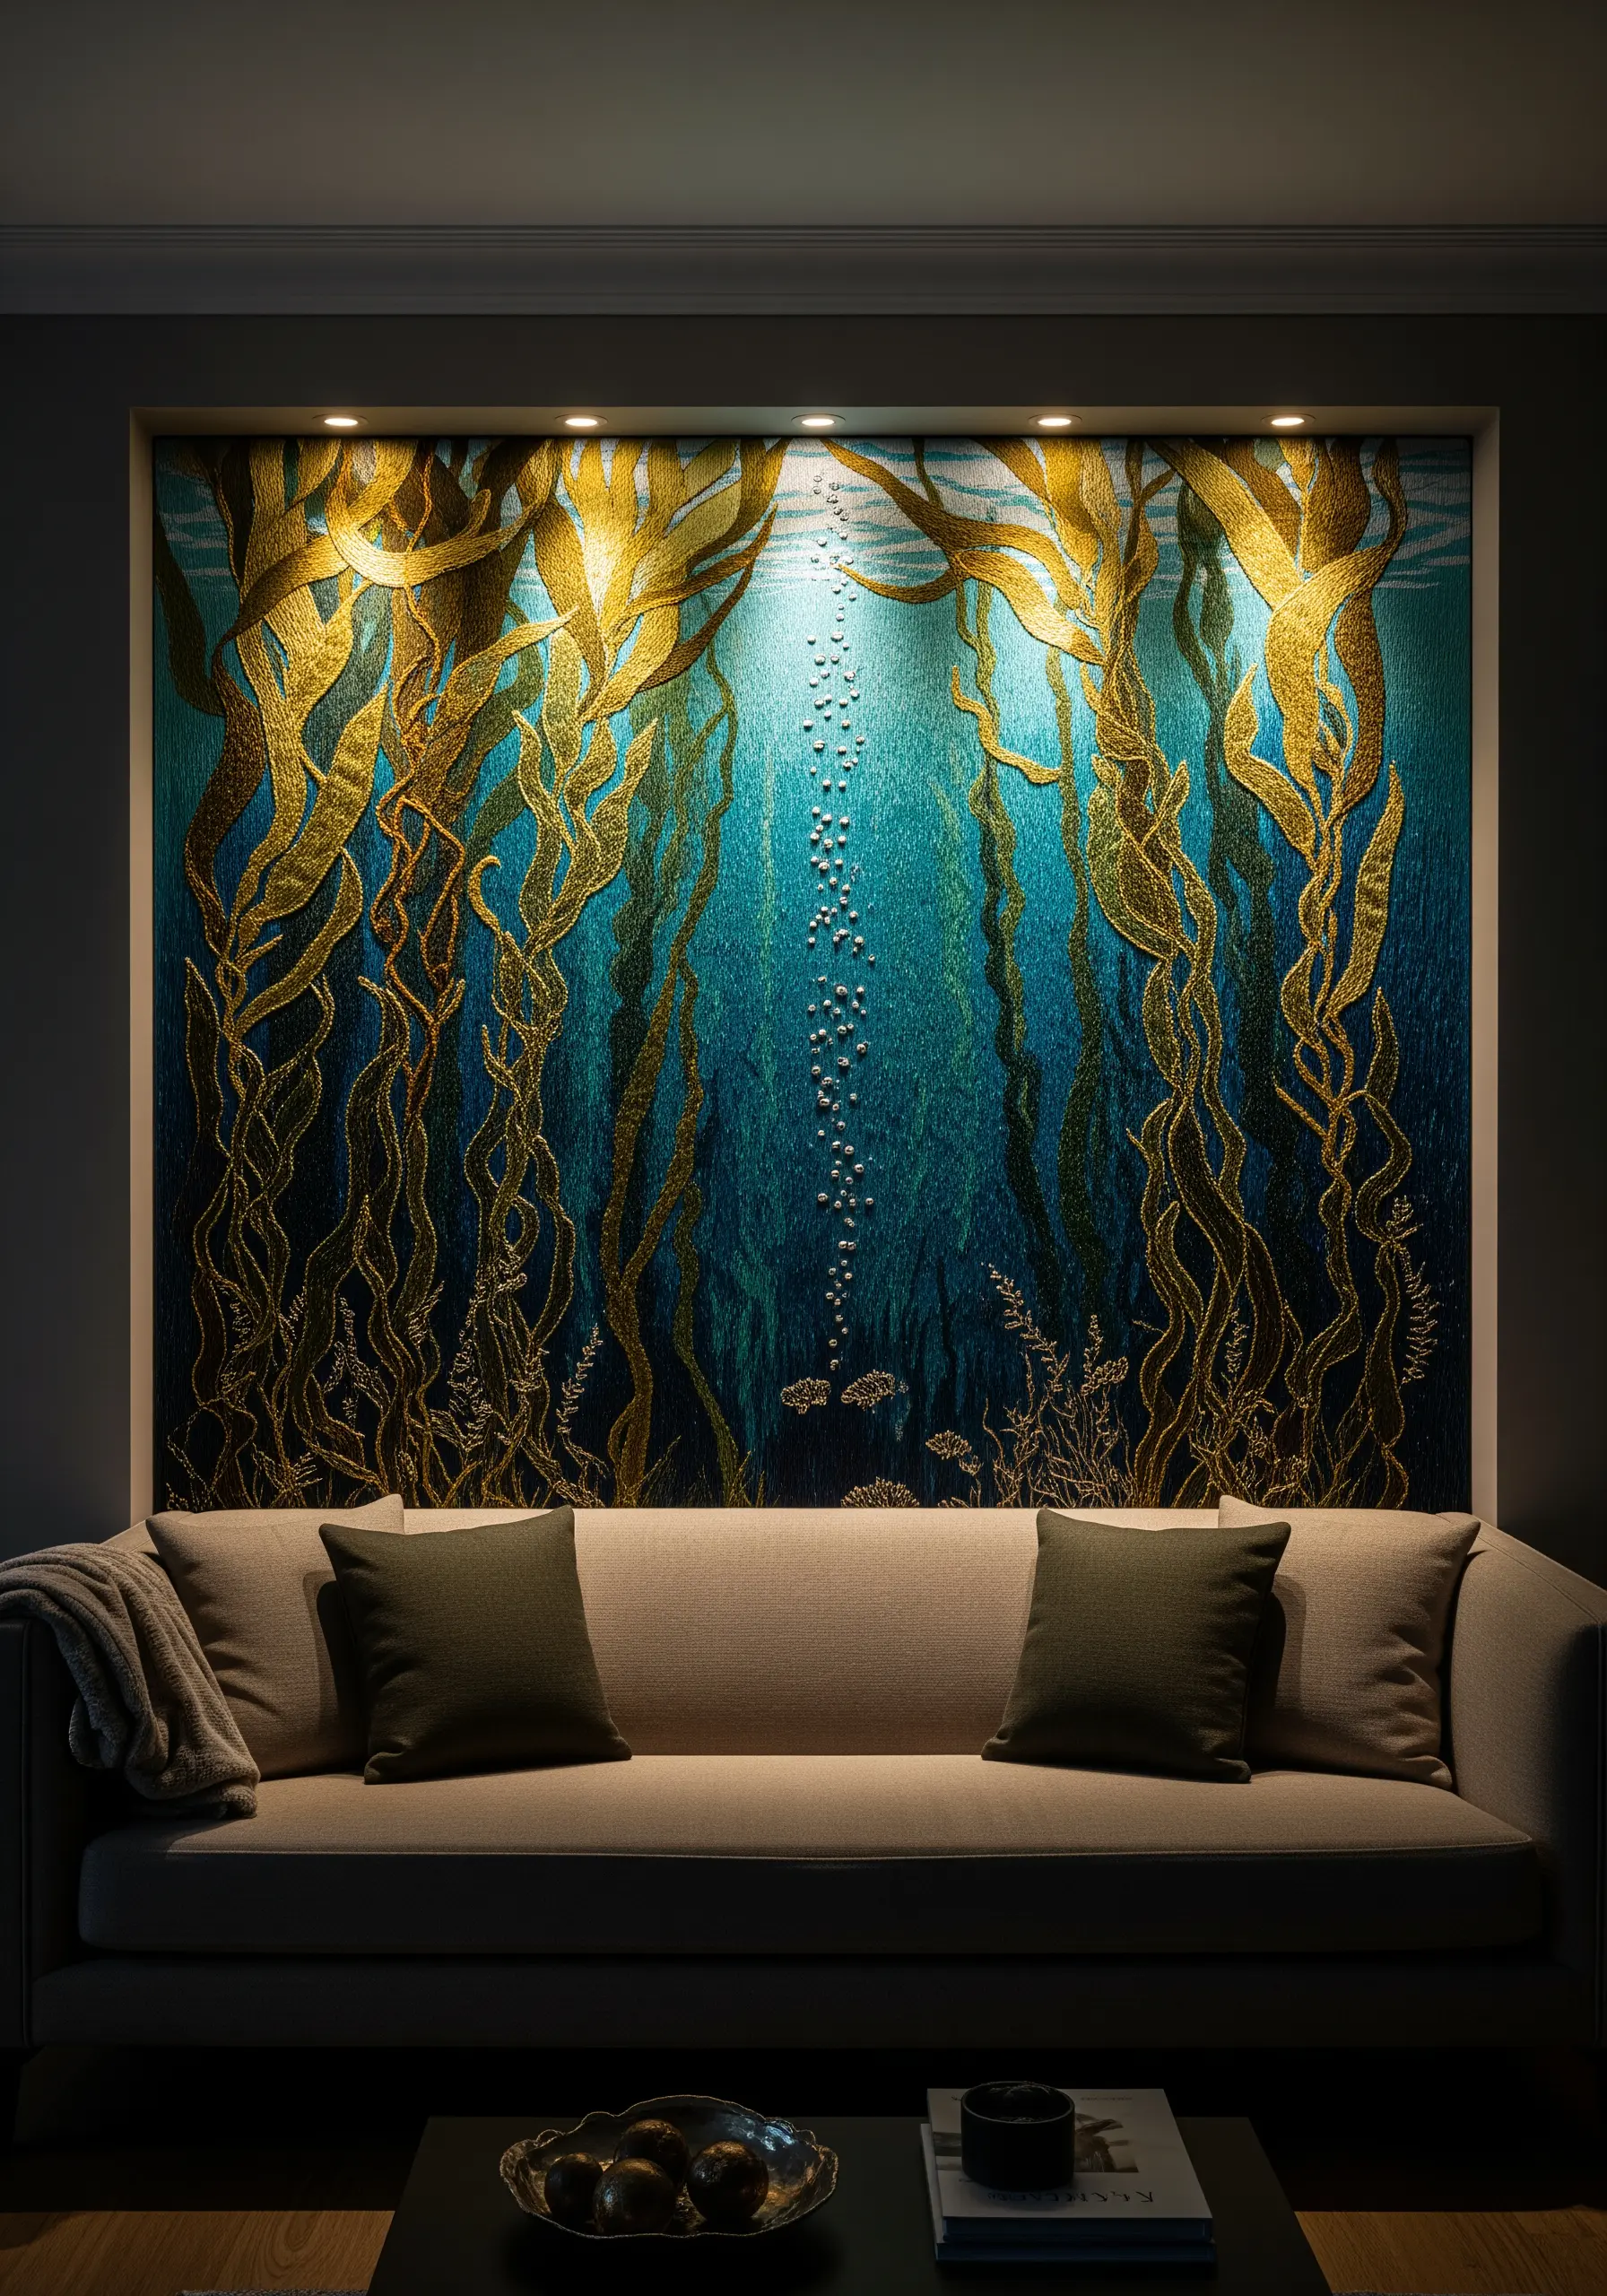
Elevate your embroidery into a true art installation by combining metallic threads with intentional lighting.
Use a gold or bronze metallic thread for key elements like this kelp forest, outlining the shapes with a robust chain stitch or whipped backstitch.
When lit from above, the metallic fibers will catch and reflect the light, creating a dynamic, shimmering effect that changes as you move around the room.
Tiny French knots made with pearl cotton or seed beads can represent air bubbles, adding another layer of reflective texture.
24. Cluster Knots for Plump, Realistic Fruit
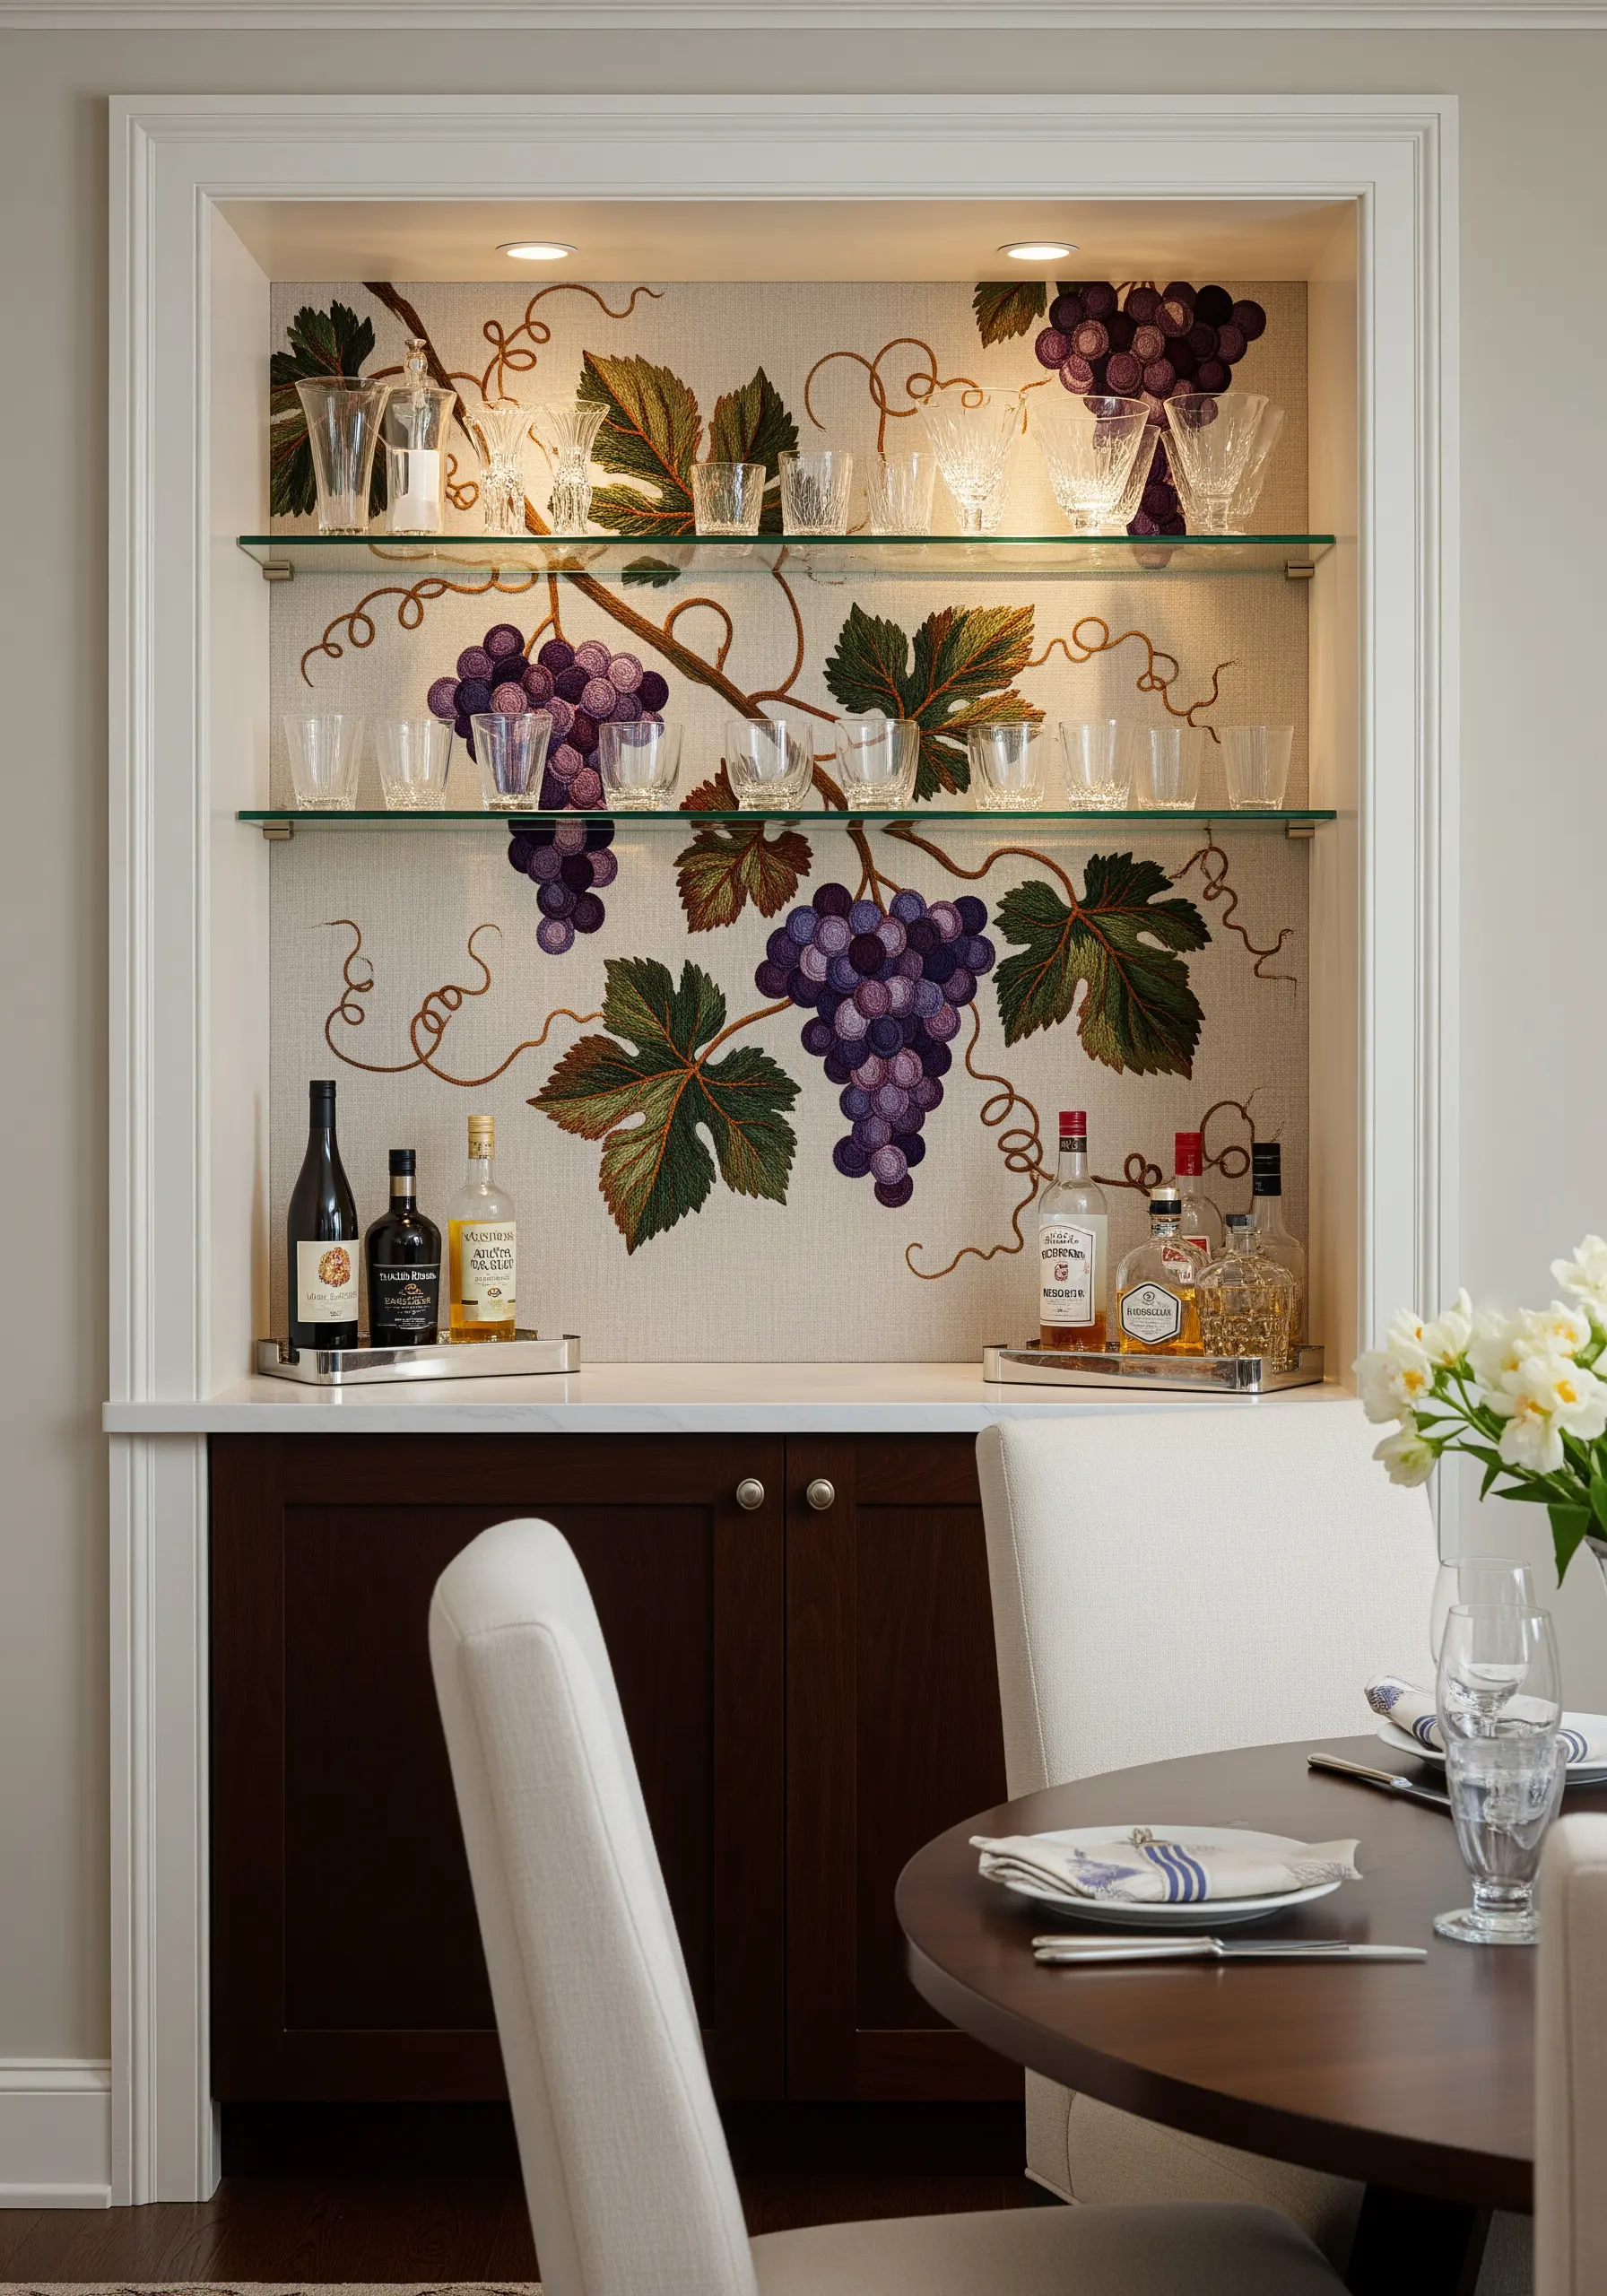
To make embroidered grapes look convincingly round and full, use a dimensional stitch like the bullion knot or a large French knot.
Work the knots very closely together, allowing them to push against each other to form a tight, three-dimensional bunch.
Use at least three or four slightly different shades of purple or green within each cluster to create highlights and shadows, which enhances the illusion of roundness.
This technique turns a flat surface into a luscious, tactile still life.
25. Build Up Snow with Chunky, Textured Yarn
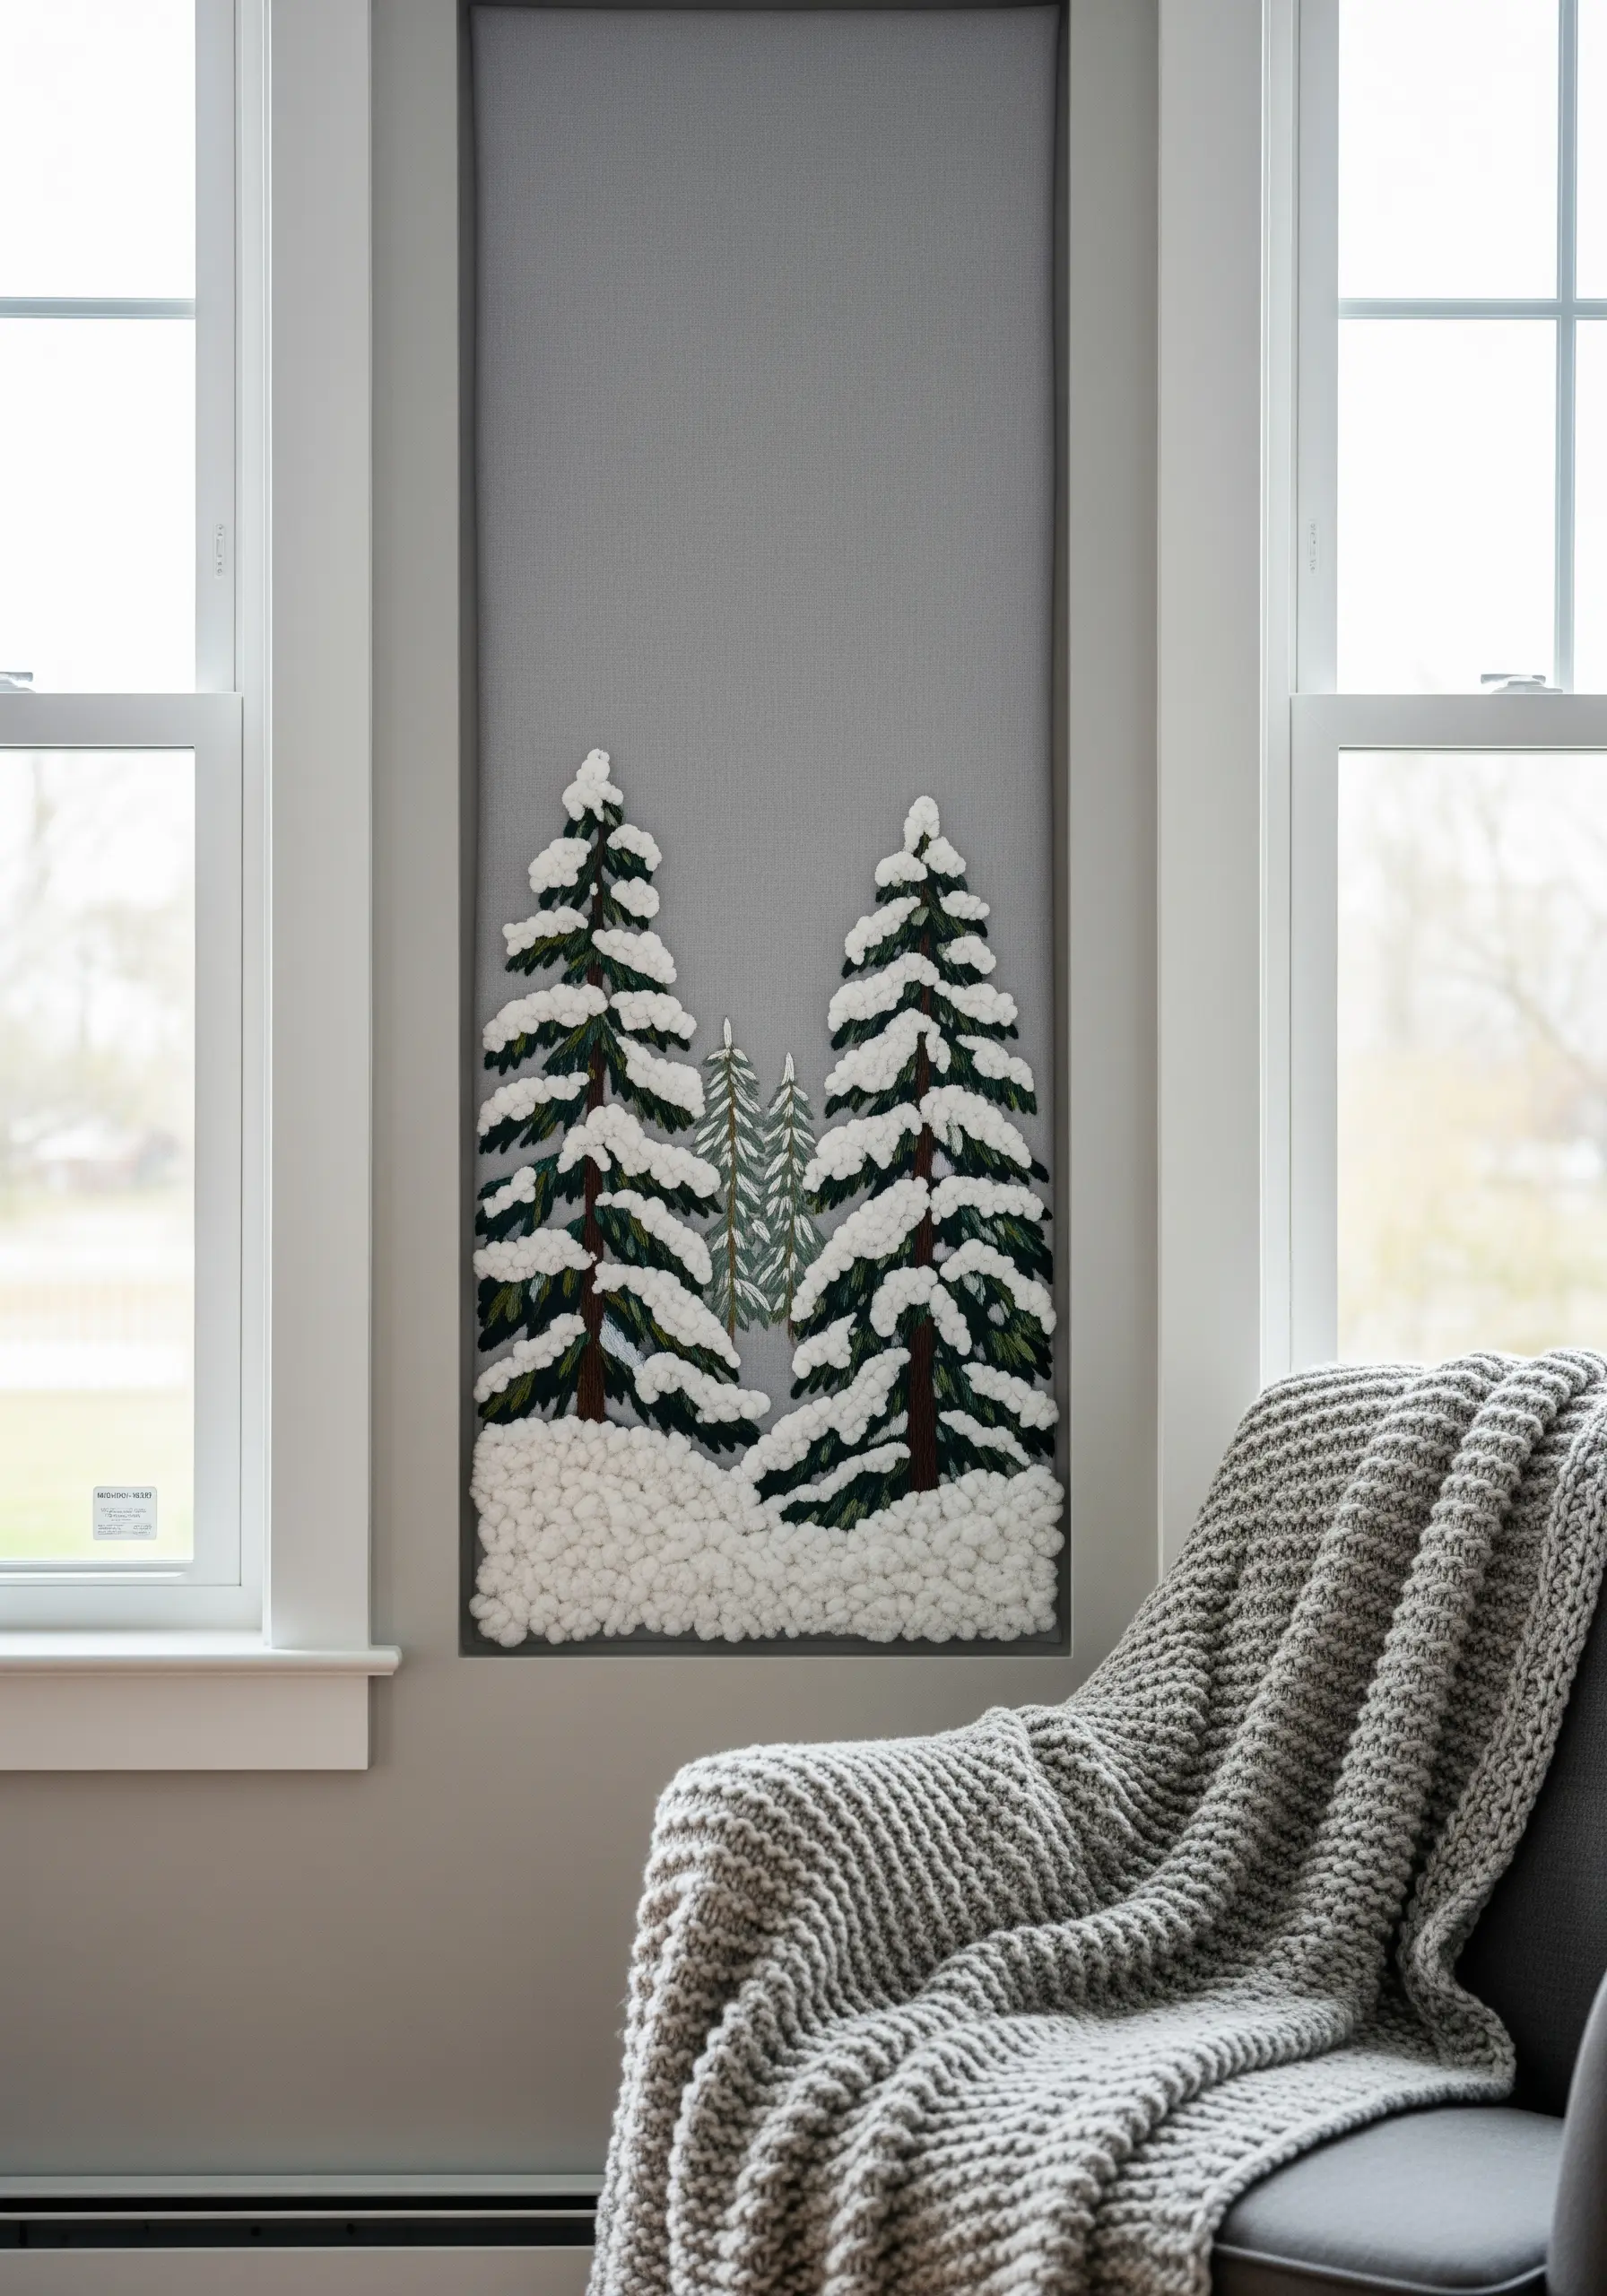
For a thick, freshly fallen snow effect, incorporate chunky yarn into your embroidery.
Use a punch needle or a series of loop stitches with a fluffy white wool yarn to create the deep snowdrift at the base of the trees.
For the snow settled on the branches, couch a thinner, textured yarn (like a boucle or chenille) onto the surface, following the shape of the boughs.
Combining traditional floss for the trees with thick, textural yarn for the snow creates a wonderful tactile contrast and a cozy, wintery feel.


