

If you’re ready to move beyond simply following a pattern and want to stitch animal art that feels truly alive, you’re in the right place. Often, the difference between a flat design and a captivating one isn’t complex skill, but thoughtful technique.
It’s about knowing when to use a chunky French knot for texture versus a smooth, blended stitch for softness. It’s understanding how the direction of your stitches can create form and how a few well-placed details can convey a world of personality.
Here, you’ll find simple adjustments and creative approaches that will instantly elevate your work. Think of each hoop as a small canvas to explore texture, color, and character—transforming thread and fabric into quirky, expressive decor you’ll be proud to display.
1. Master Fur Texture with Directional Stitching
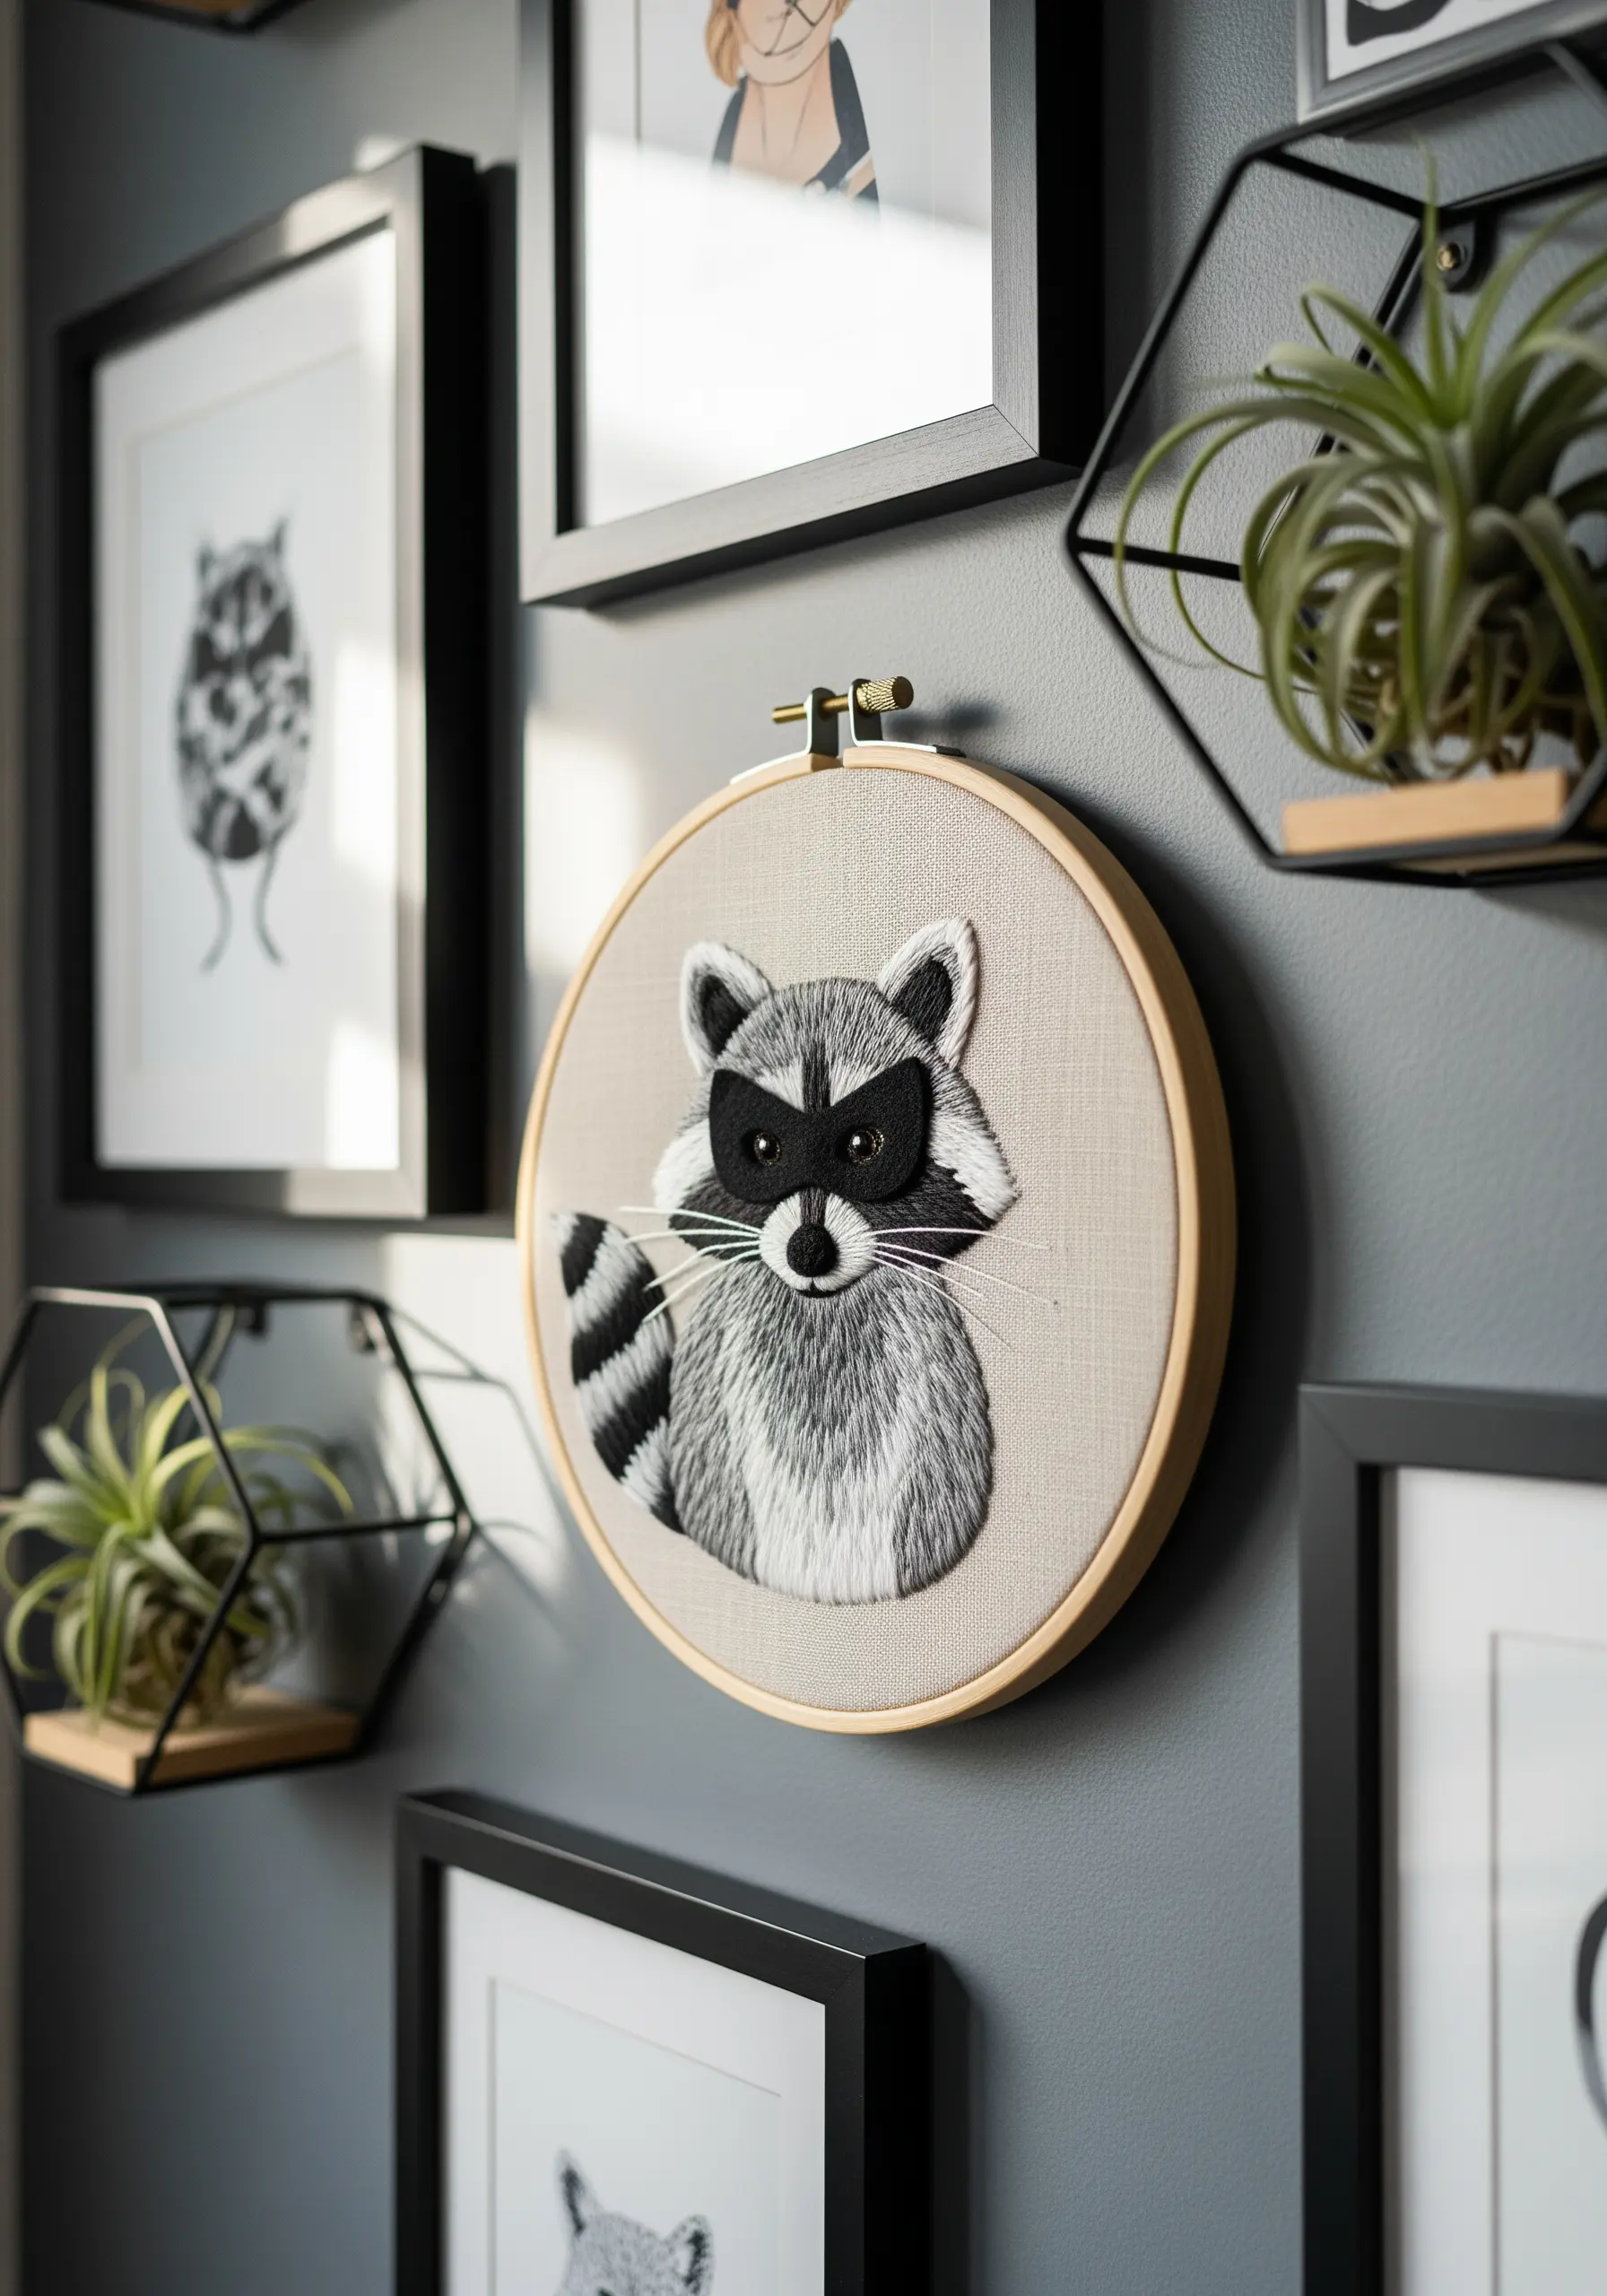
To create a realistic raccoon, focus on the direction of your long-and-short stitches to mimic the natural growth of fur.
Use single strands of floss in shades of grey, black, and white, blending them subtly to create depth and shadow, especially around the body.
For the iconic mask, consider applying a piece of black felt and securing it with a whipstitch before embroidering the facial details—this ensures a crisp, dense shape that contrasts beautifully with the softer fur texture.
Finally, use a few tiny straight stitches in white to create a catchlight in the eyes, instantly bringing your creature to life.
2. Evoke Coziness with Warm-Tone Thread Painting
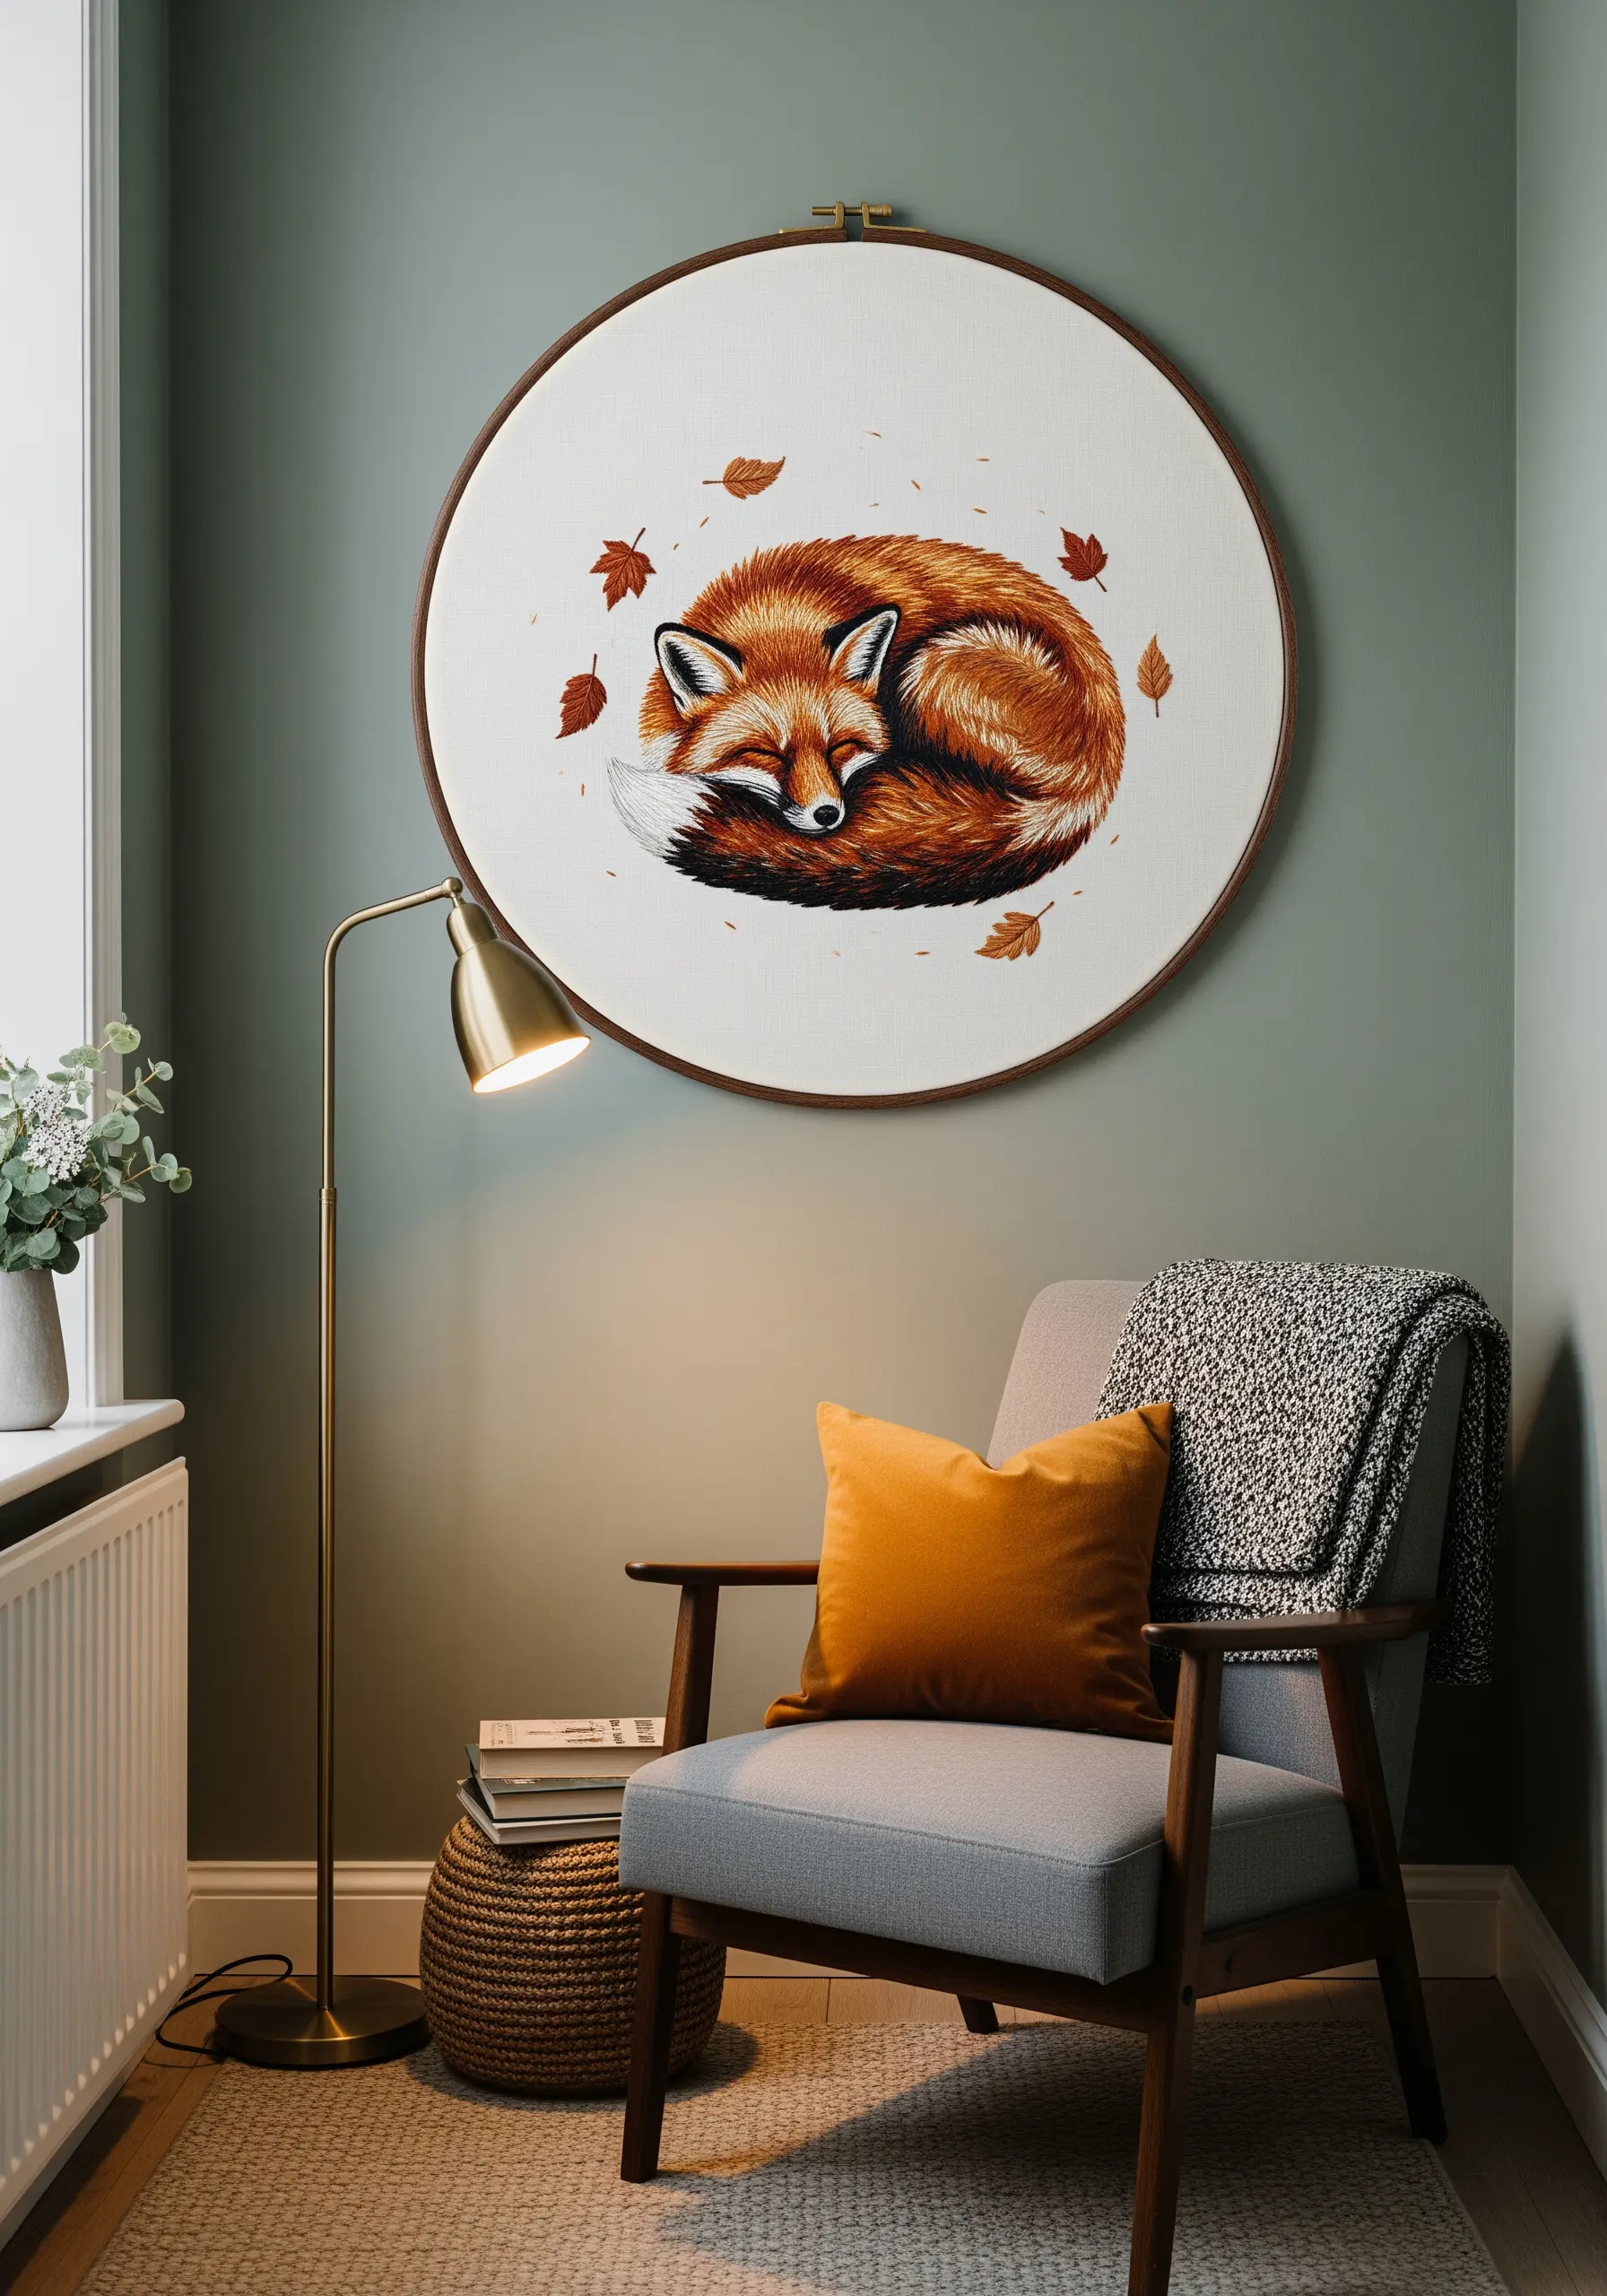
Capture the warmth of a sleeping fox by using thread painting to blend a palette of rust, orange, and cream floss.
Work with just one or two strands of thread at a time, using the long-and-short stitch to create seamless gradients that give the fur a soft, glowing quality.
Pay attention to the curve of the body, letting your stitches follow its form to enhance the sense of curled-up comfort.
Scatter a few floating leaves around the fox, using a darker shade for the veins to add a final touch of autumnal detail to your scene.
3. Design a Cohesive Trio for Nursery Decor

To create a charming vertical display for a nursery, unify your animal motifs with a consistent design language.
Choose a limited, soft color palette and use the same stitch—like a simple backstitch—for all the outlines to ensure they look like a matched set.
By keeping the expressions sweet and the fill stitches minimal, you create a light, airy aesthetic perfect for a child’s room.
Connect the finished hoops with a single piece of ribbon, turning individual pieces into one cohesive piece of art from your hooped wall collage layouts.
4. Build Playful Texture with Dense French Knots
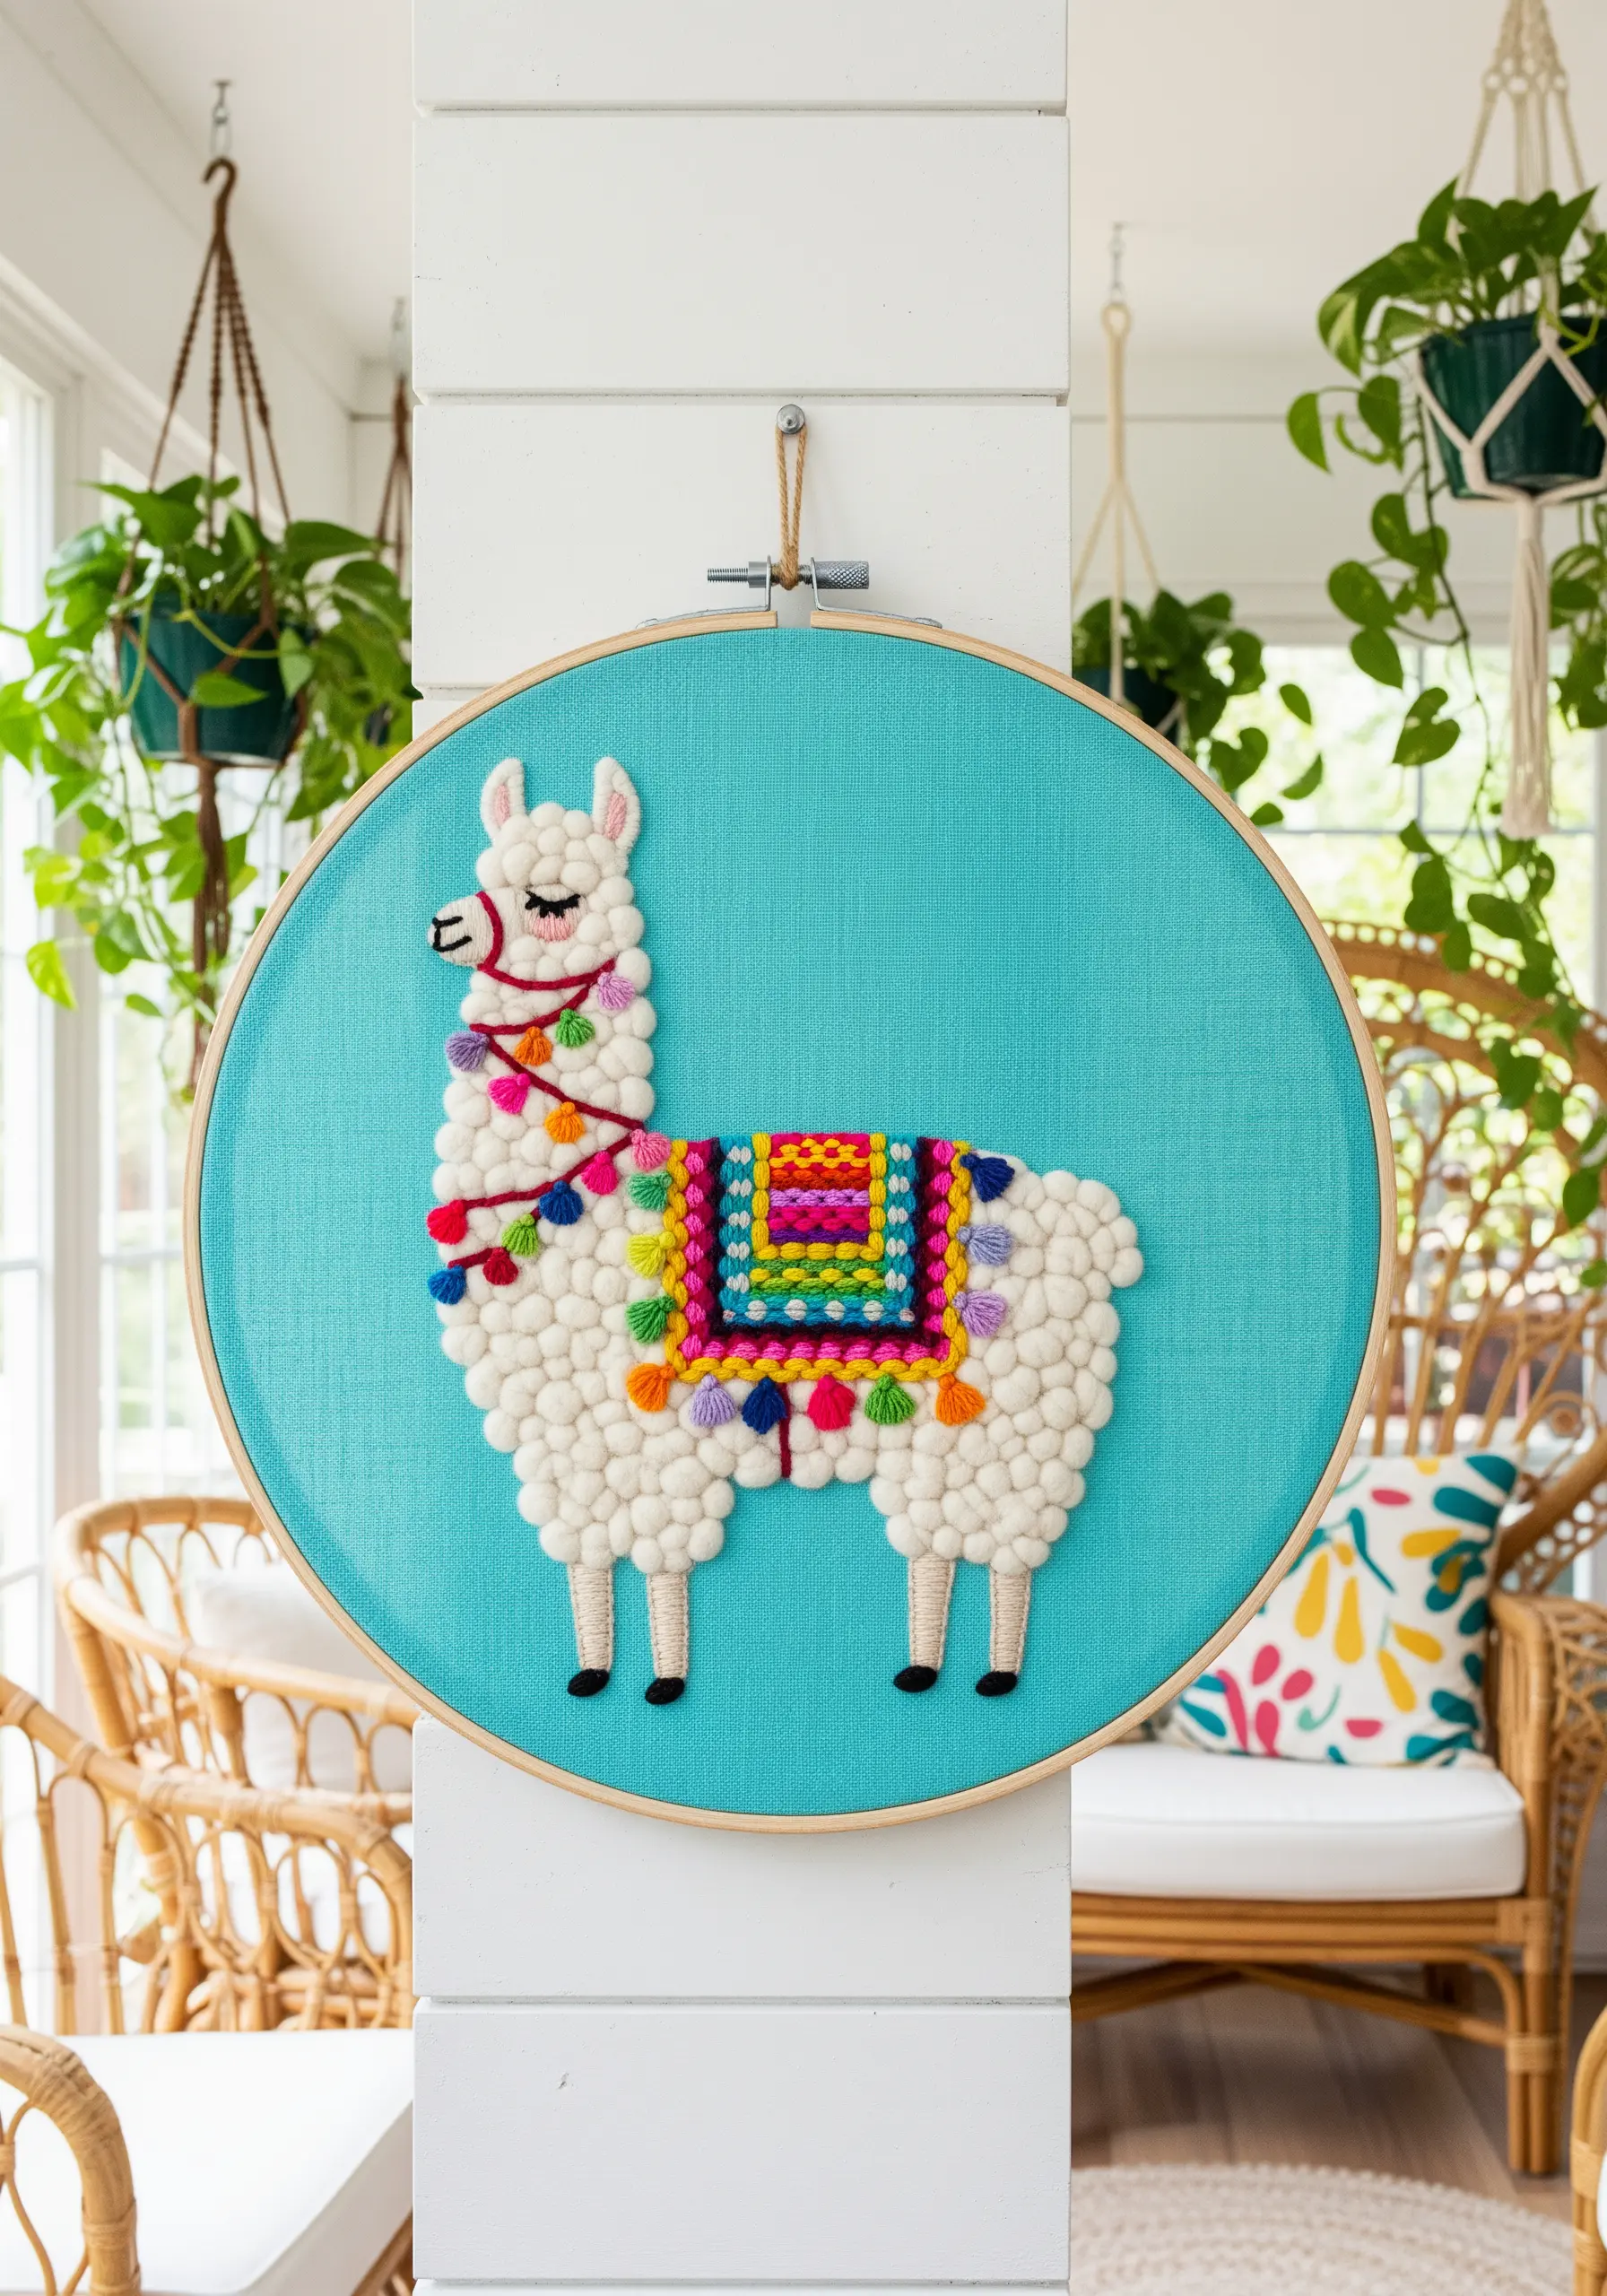
Give a llama a wonderfully fluffy coat by filling its entire body with densely packed French knots.
Use a thicker thread, like pearl cotton or all six strands of embroidery floss, to make each knot fuller and reduce the time it takes to cover the area.
For the colorful saddle, switch to a smooth satin stitch to create bold blocks of color that contrast sharply with the bumpy texture of the fleece.
Add tiny tassels using the Turkey work stitch for a final, three-dimensional flourish that makes the piece irresistibly tactile.
5. Sculpt a Hedgehog’s Spines with Bullion Knots
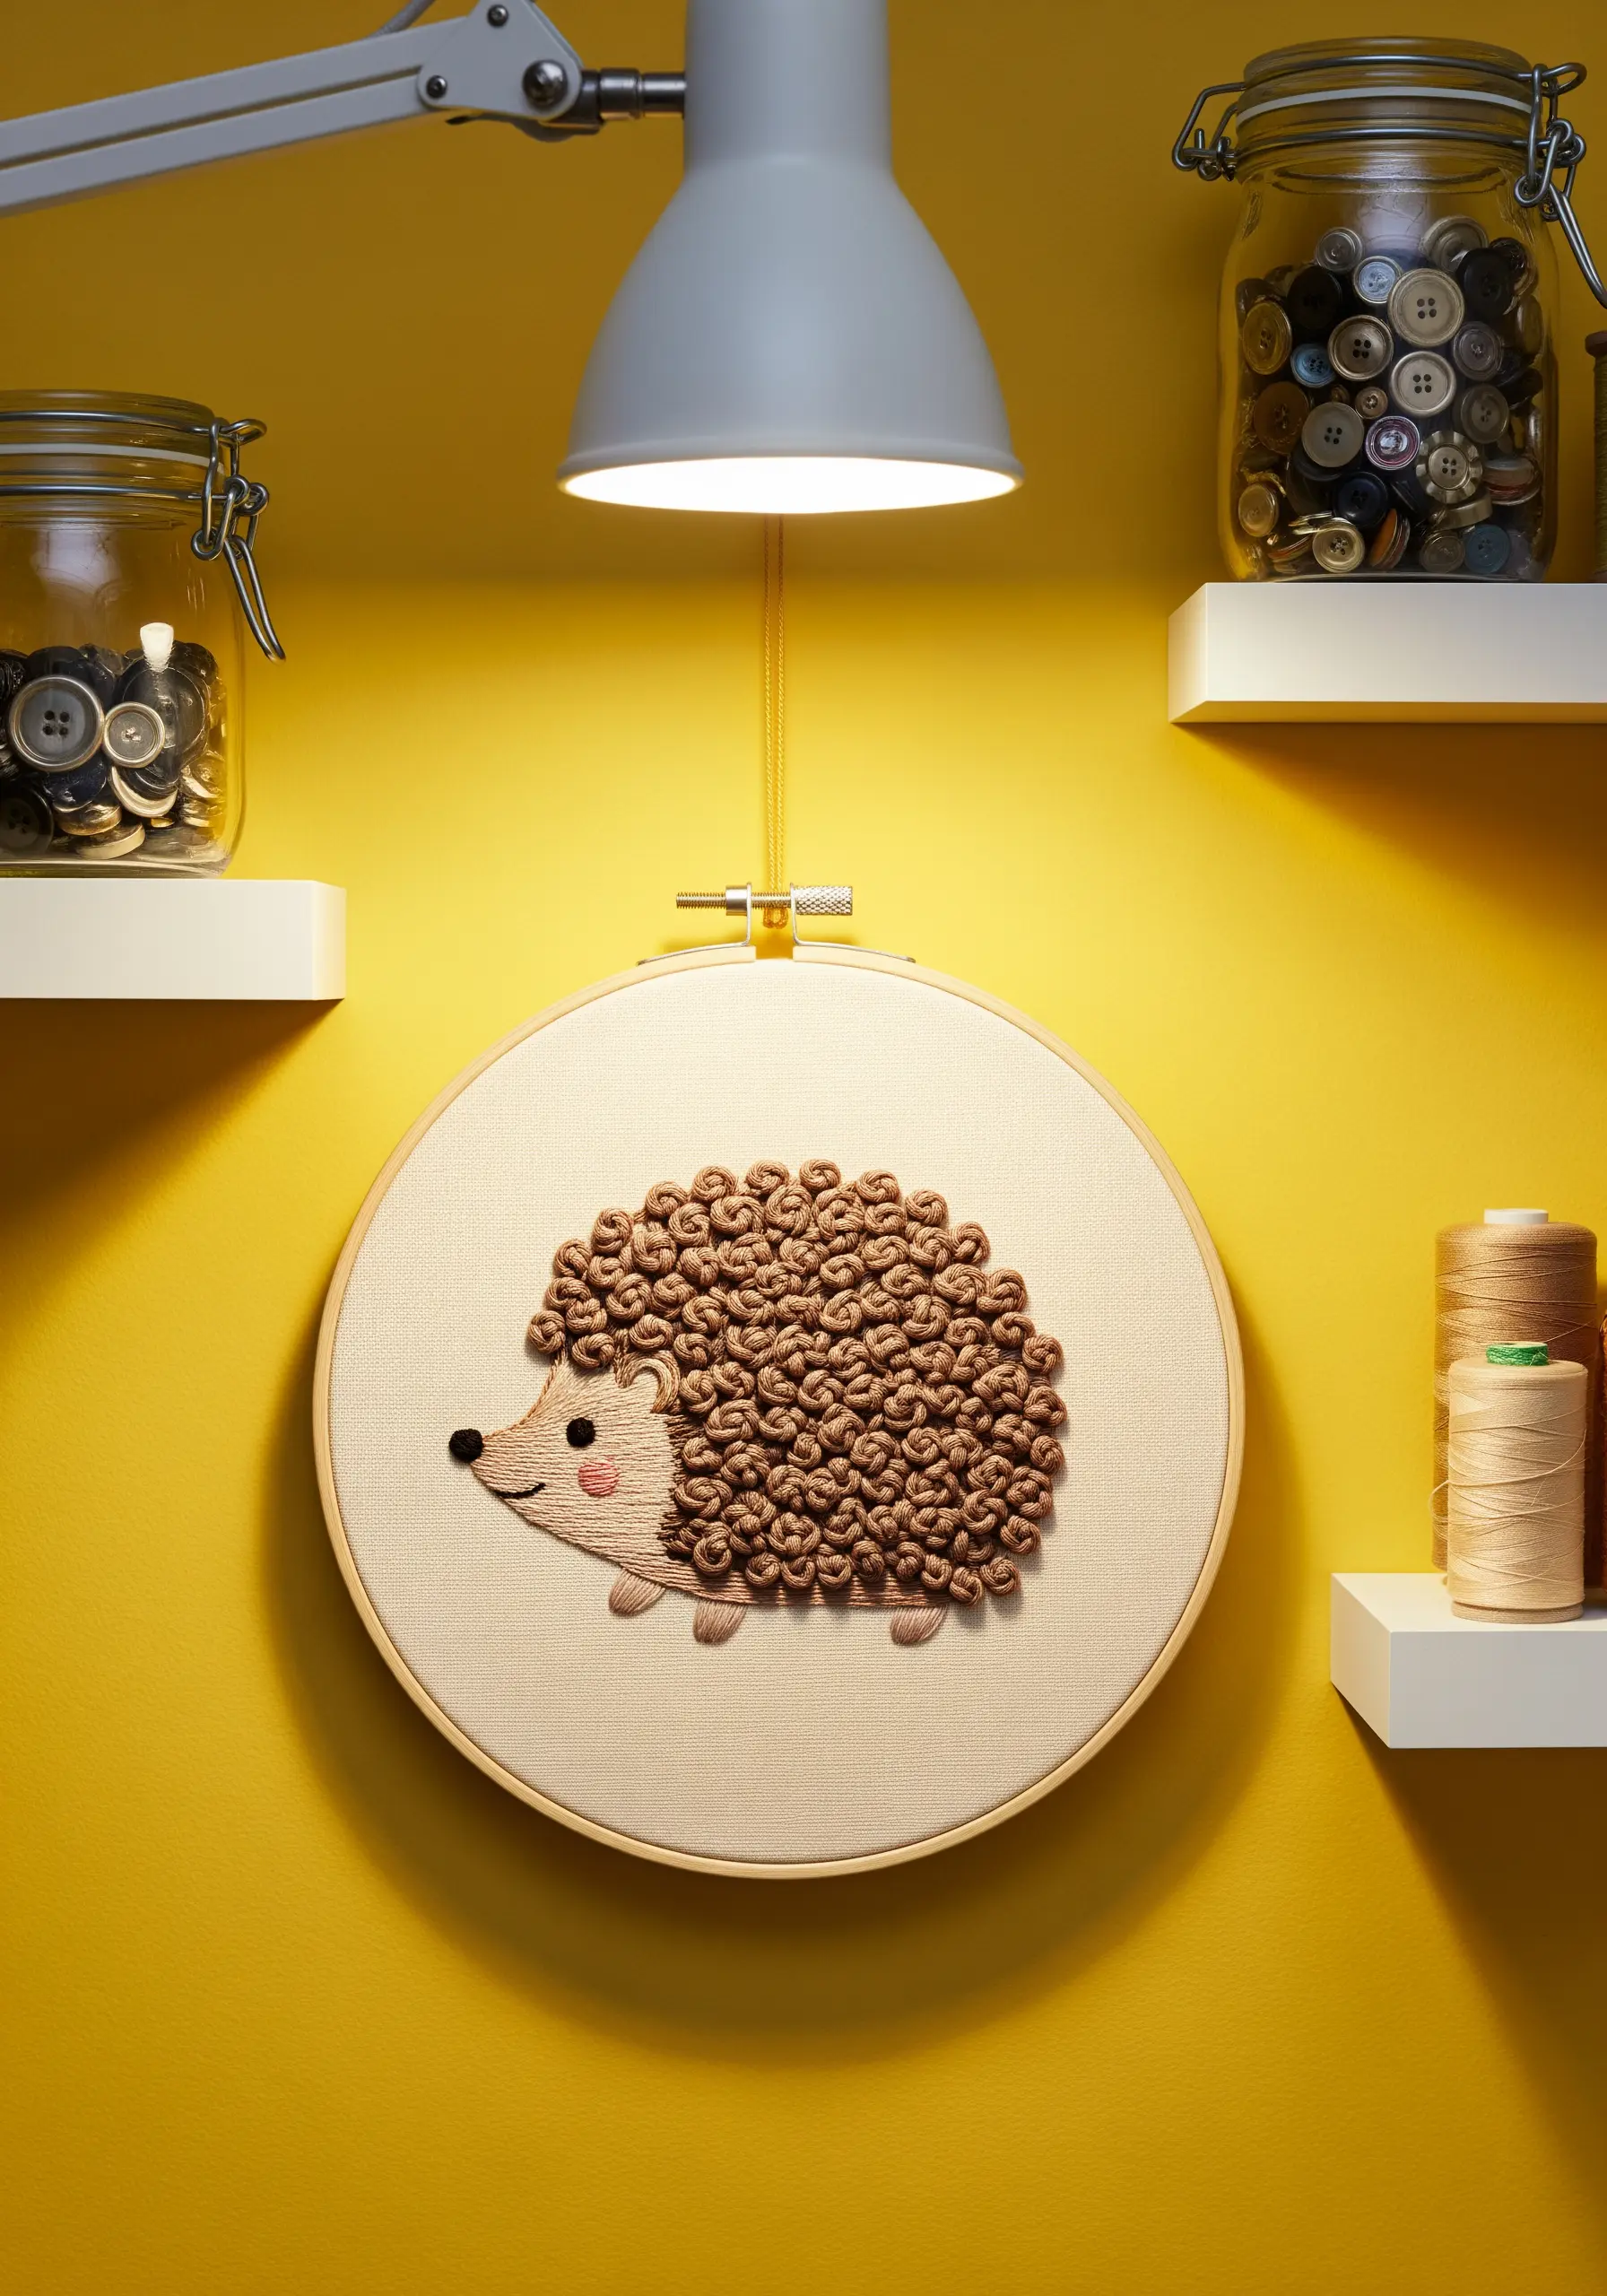
The bullion knot is the perfect stitch for creating the spiny texture of a hedgehog’s back.
Instead of making each knot identical, vary the length and angle of your stitches to give the quills a more organic, dynamic appearance.
Layering the bullion knots over one another adds depth and shadow, making the texture look even richer.
Keep the face simple with a satin-stitched cheek and a single French knot for the eye, ensuring the incredible texture remains the star of the show.
6. Combine Fluffy Fill with a Knitted Texture Accent
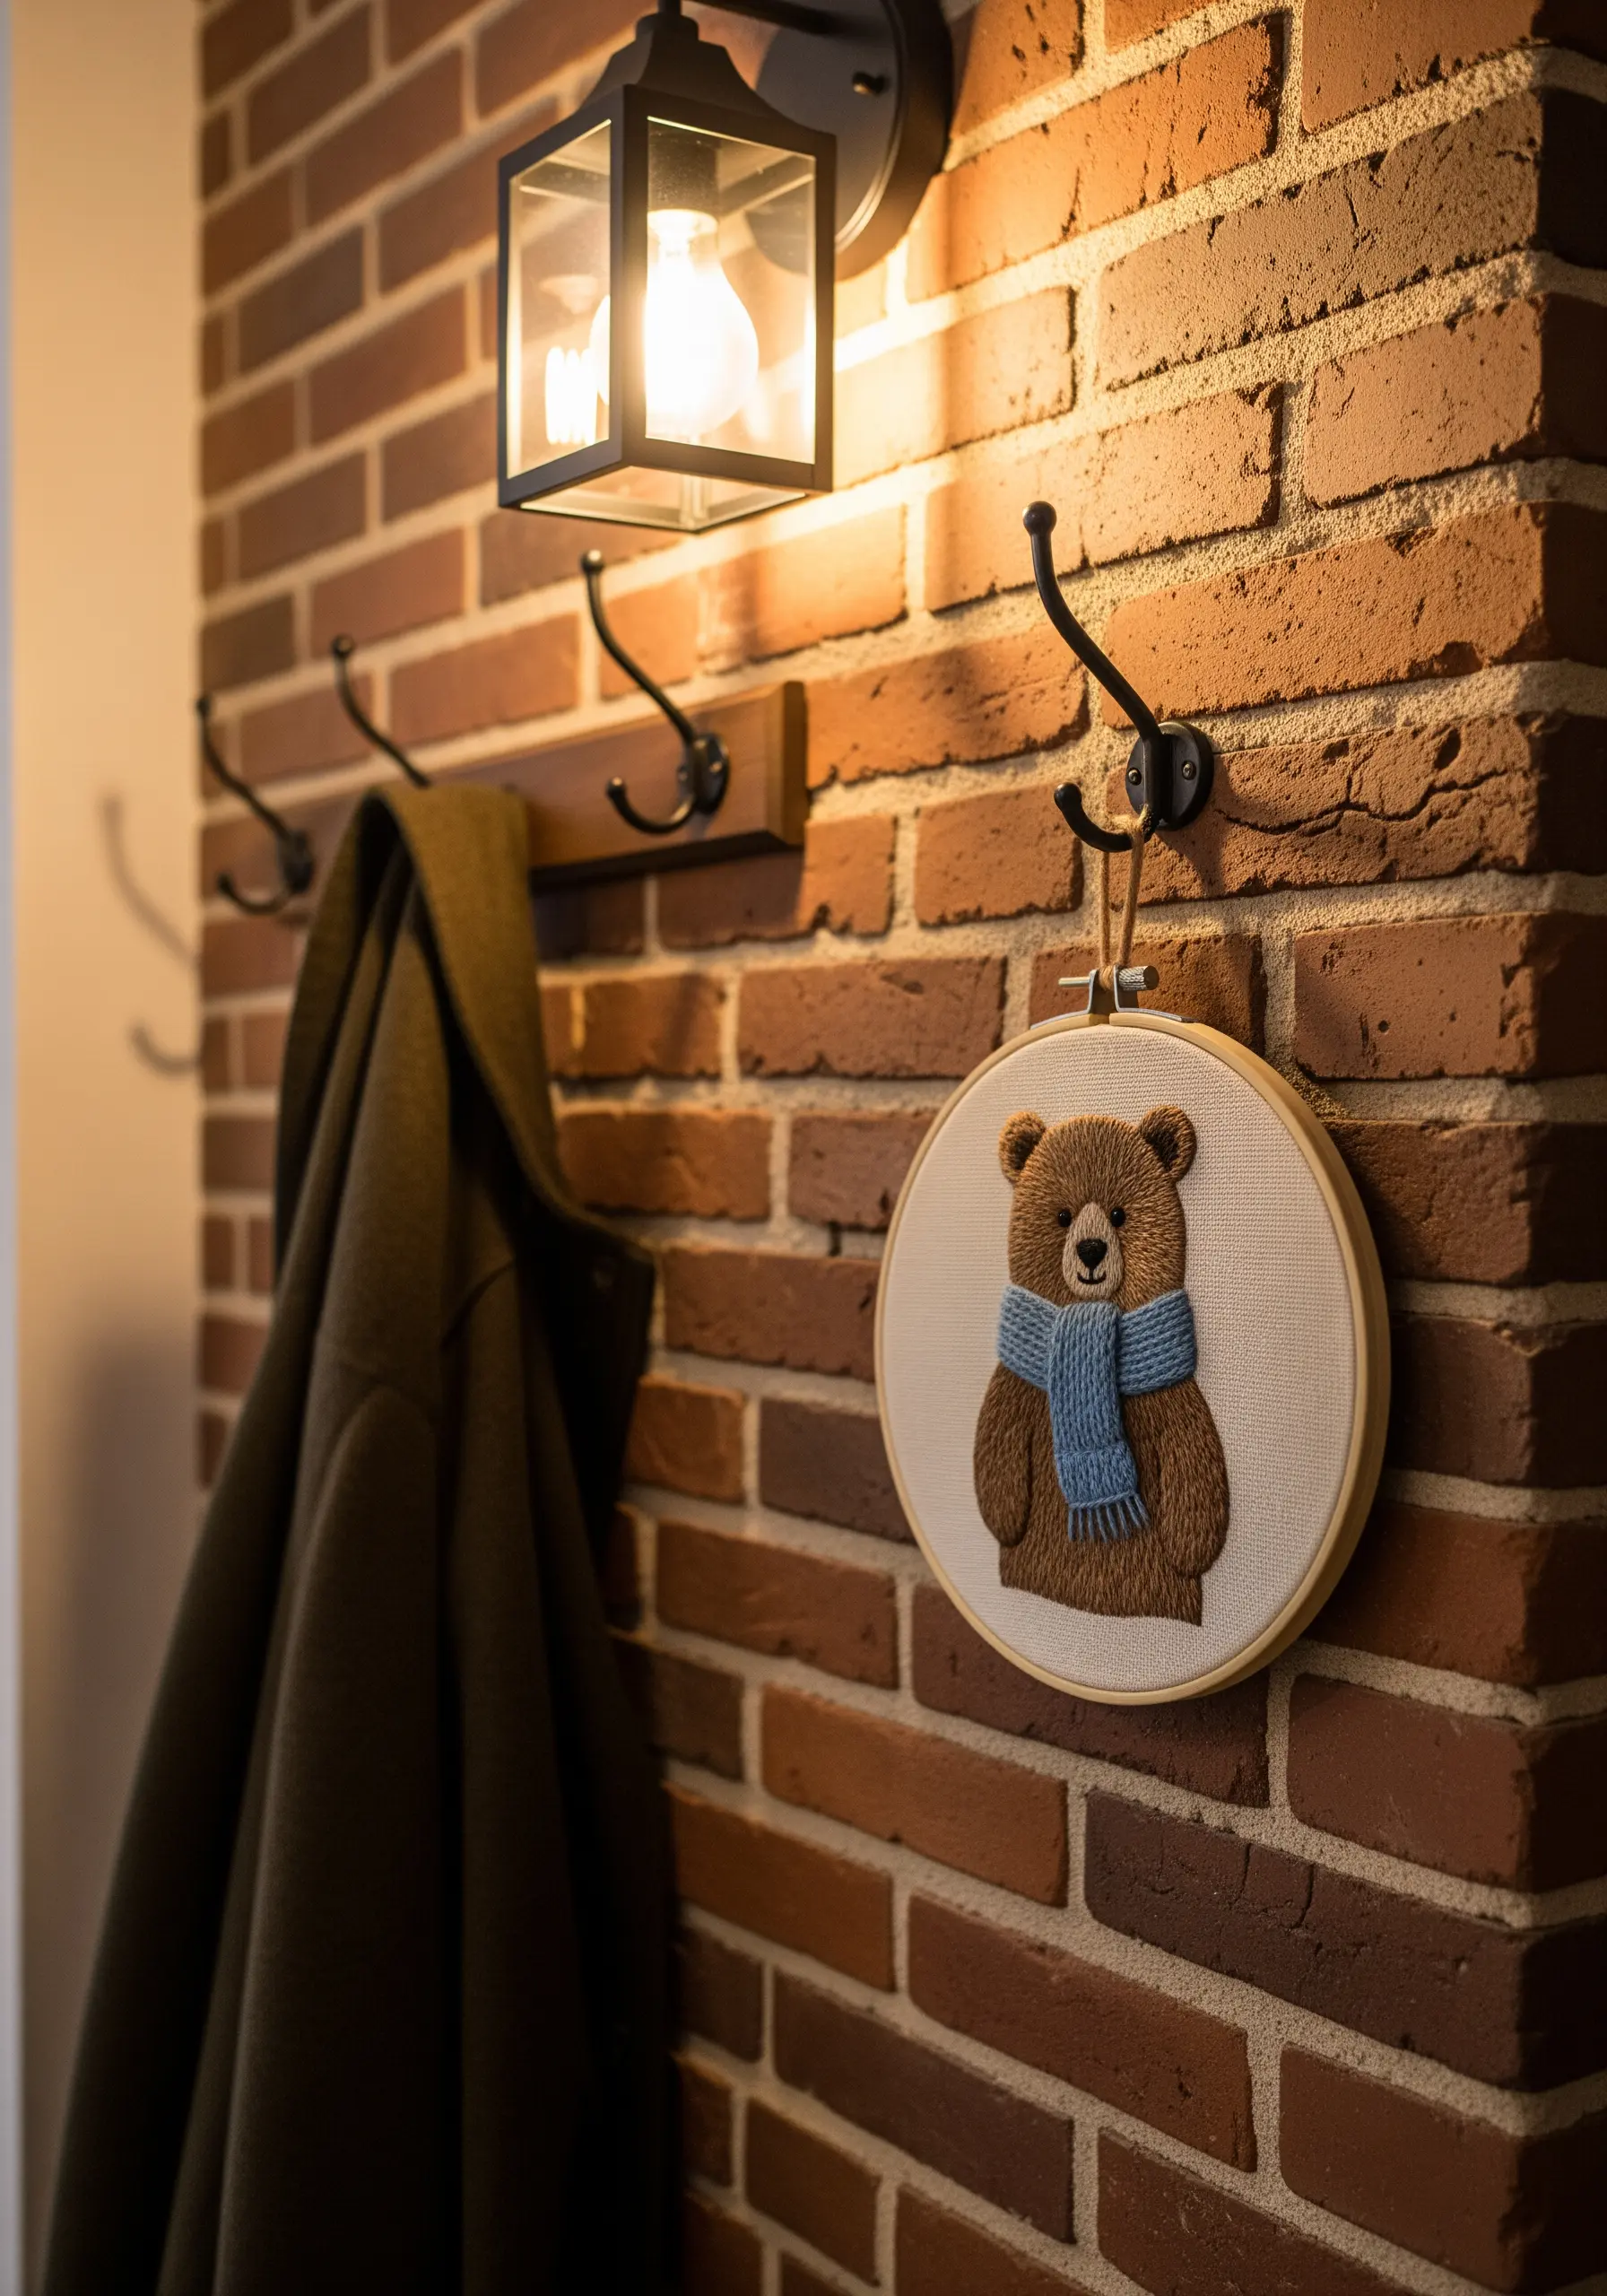
Create a sense of coziness by contrasting different textures within the same piece.
Embroider the bear’s fur with a classic long-and-short stitch to give it a soft, smooth appearance.
For the scarf, use a basketweave stitch or couch a thicker yarn onto the fabric to convincingly mimic the texture of a real knit.
This juxtaposition of soft fur and chunky knit makes the entire piece feel more tactile and heartwarming, perfect for an entryway or reading nook.
7. Create Graphic Impact with Felt Appliqué and Bold Lines
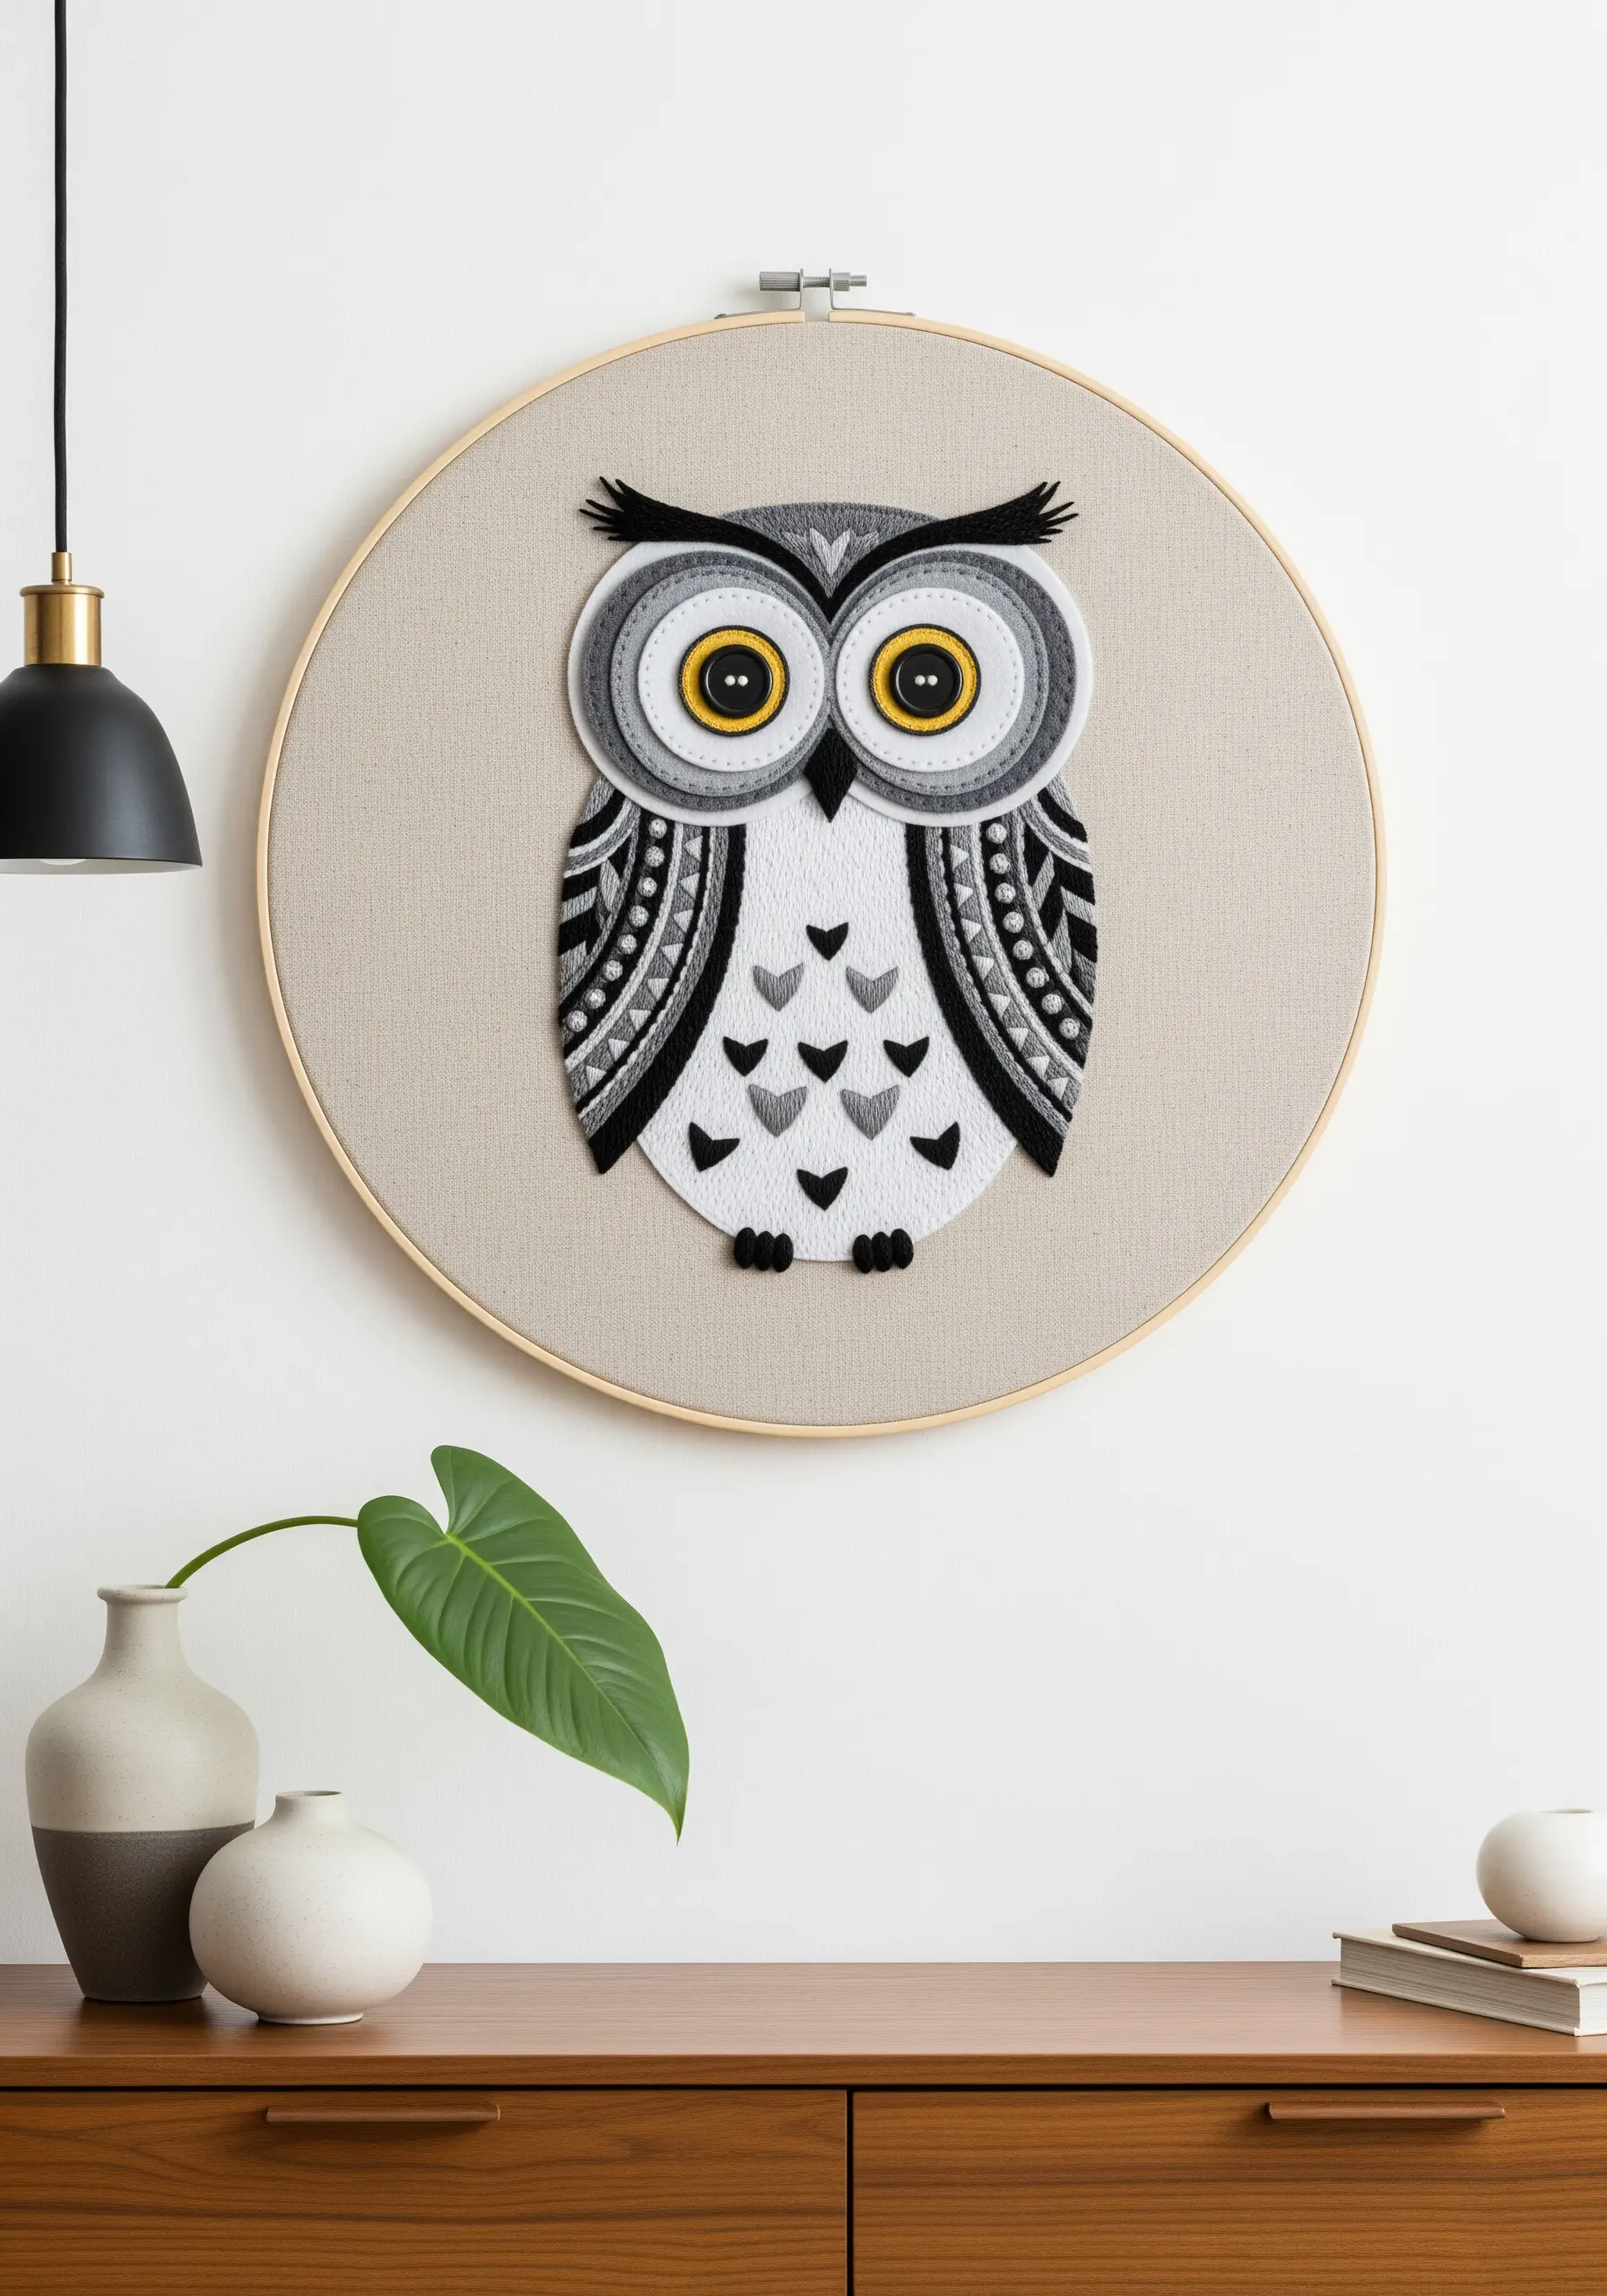
For a bold, stylized look, use felt appliqué as the foundation for your design.
Cut the main shapes of the owl from different colors of felt and secure them to your base fabric with a few simple stitches.
Then, use a thick black thread and a chain stitch or whipped backstitch to add the intricate patterns and strong outlines.
This method allows you to create crisp, clean shapes and multilayered textile wall art techniques with a modern, graphic feel, much faster than filling the entire area with thread.
8. Craft a Playful Dinosaur World with Felt Appliqué

Felt appliqué is a fantastic technique for creating vibrant, kid-friendly decor that is both quick and forgiving.
Cut dinosaur shapes from bright felt and attach them to a contrasting fabric background, like a sturdy navy cotton.
Add personality with simple embroidered details: satin stitch spots, backstitch smiles, and French knot eyes.
Grouping several of these playful hoop art ideas together creates an instant gallery wall that can easily be updated as your child grows.
9. Capture Pet Personality with Expressive Stitches

When stitching a pet portrait, the magic is in the small details that convey character.
Focus your attention on the eyes, using a tiny white stitch to create a reflective catchlight that brings them to life.
A single, carefully placed satin stitch can form a playful tongue, while a few backstitches can define a happy smile.
These delicate pet line art embroidery ideas prove you don’t need photorealism to capture the essence and soul of a beloved companion.
10. Blend Thread on a Painted Fabric Background
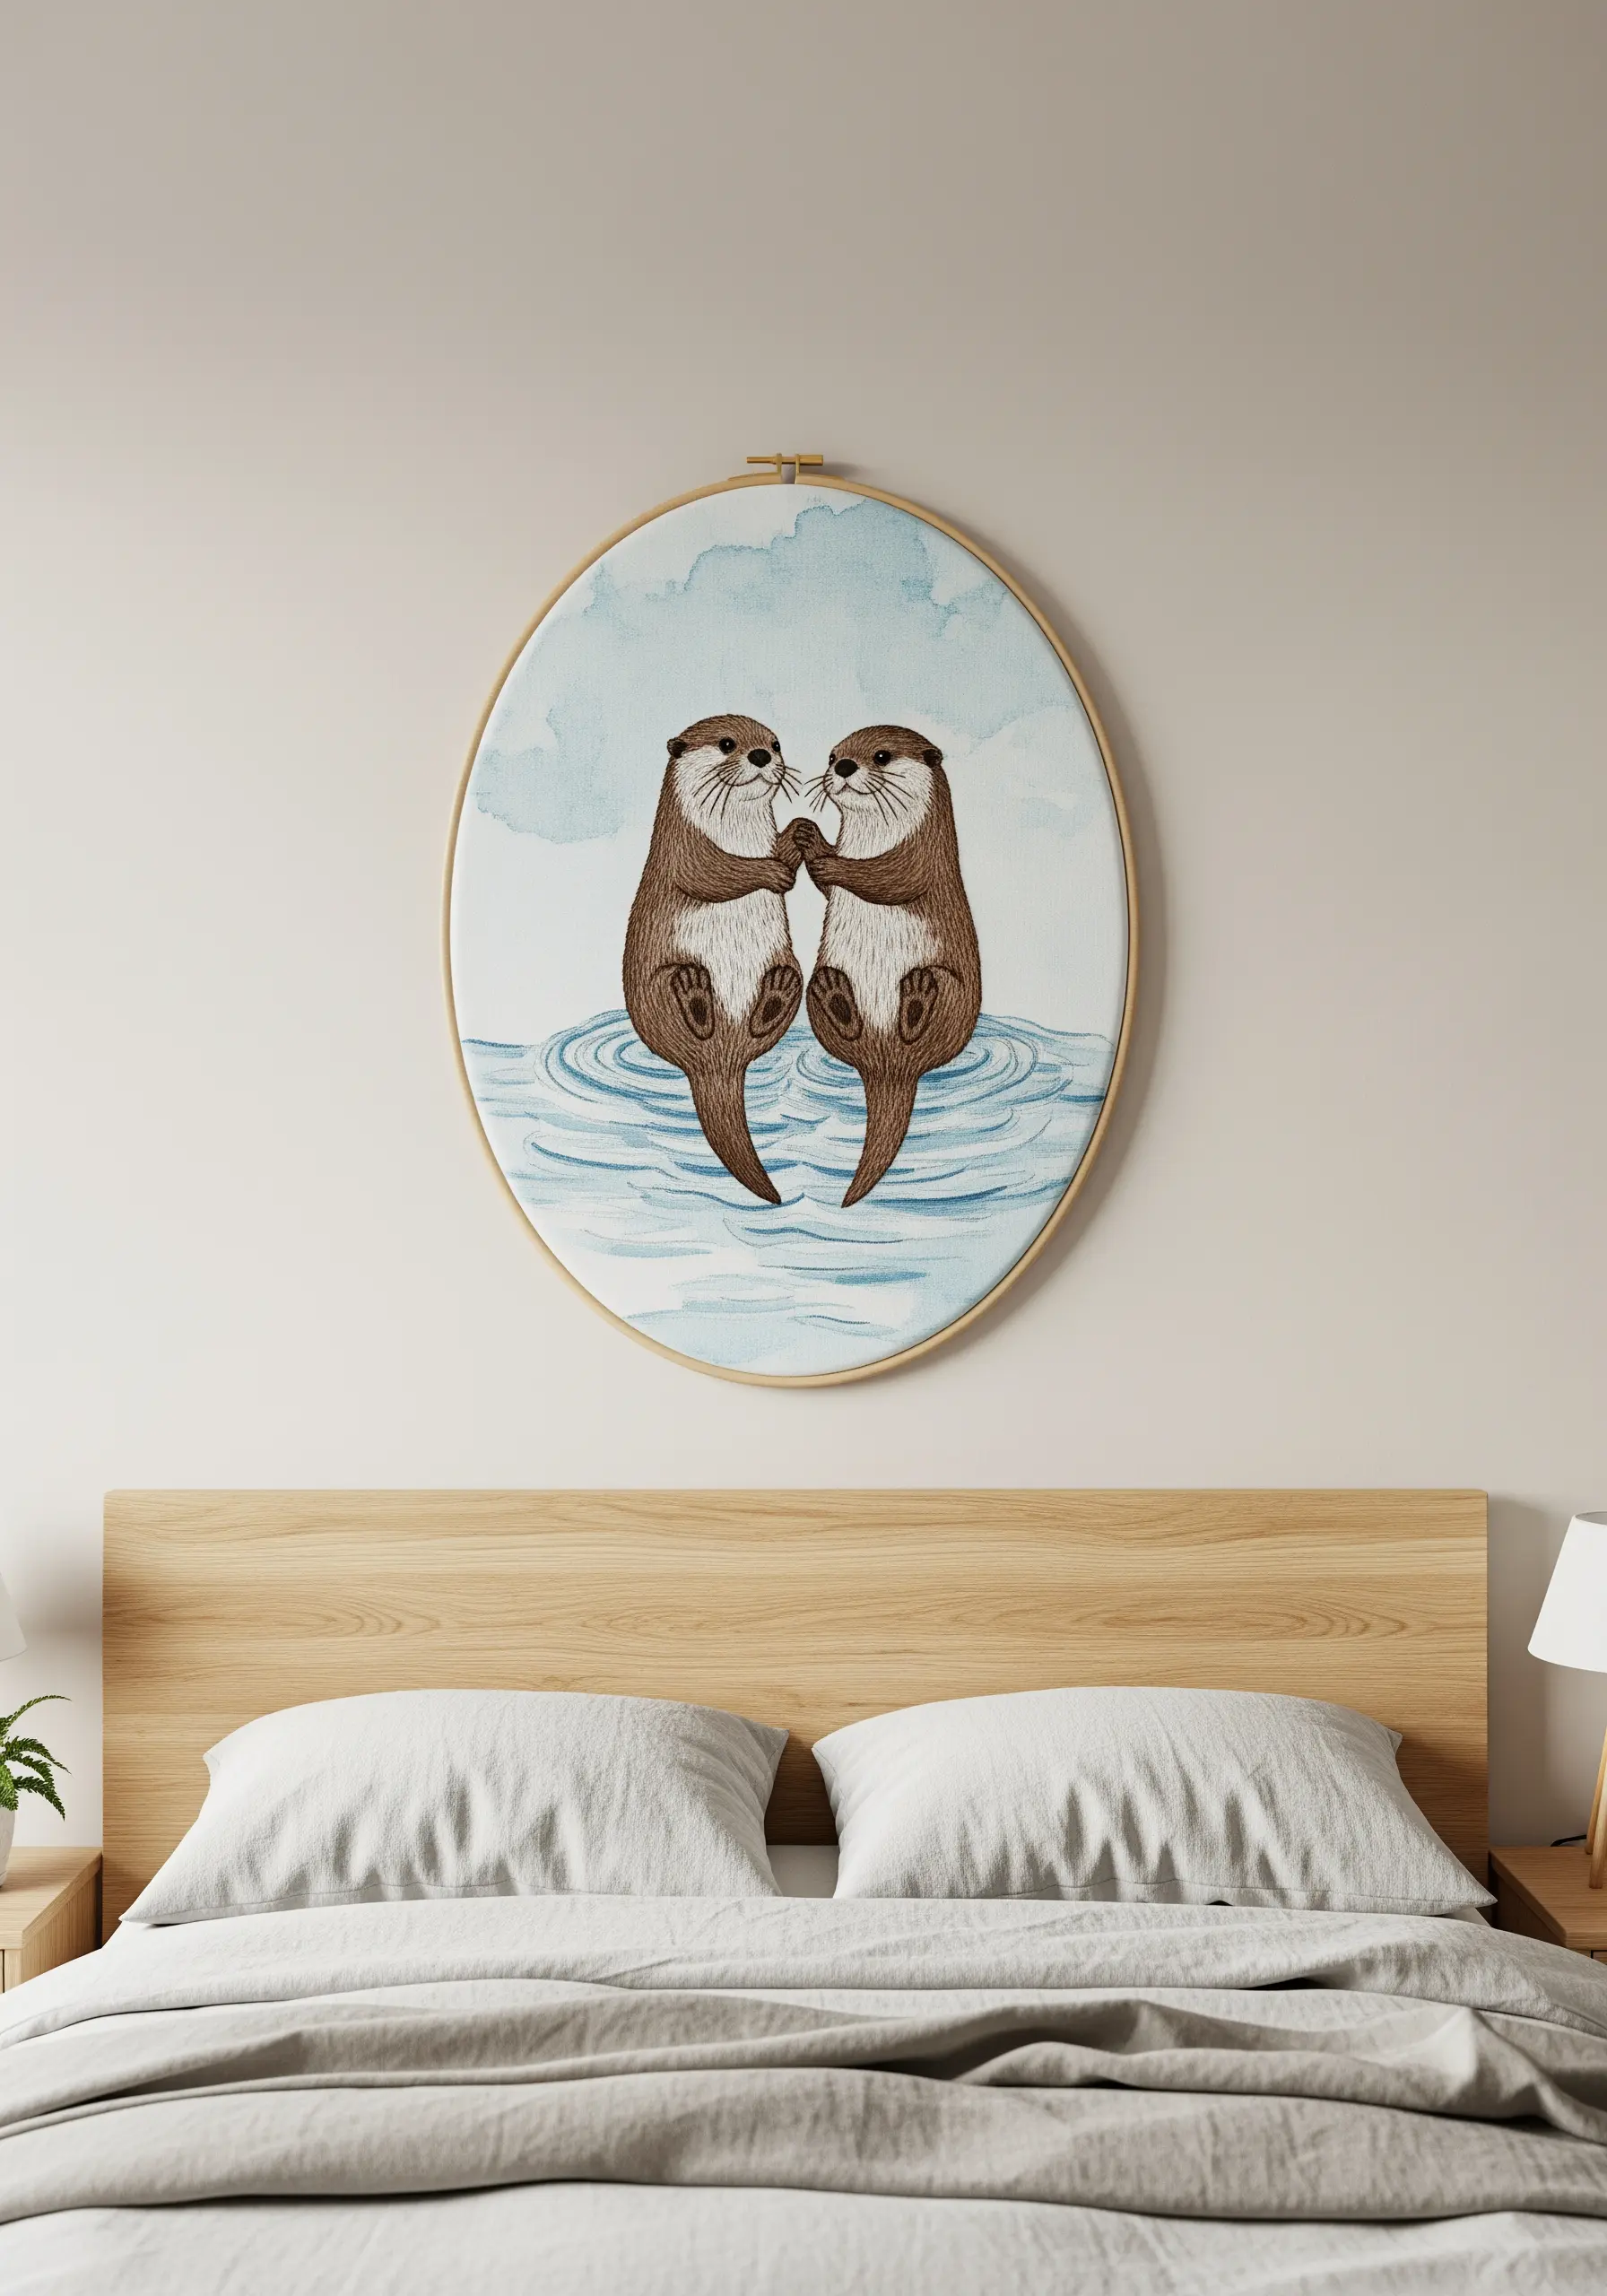
Achieve a soft, illustrative quality by combining embroidery with a painted background.
Before you begin stitching, apply a light wash of blue watercolor or fabric paint to your base fabric and let it dry completely.
Then, use minimal stitching—a simple backstitch for outlines and sparse satin stitch for shading—to define the otters.
This allows the painted background to show through, creating a dreamy, ethereal piece where thread and paint work in harmony, a hallmark of beautiful mixed media techniques.
11. Define Shapes with Crisp Outlines and Negative Space
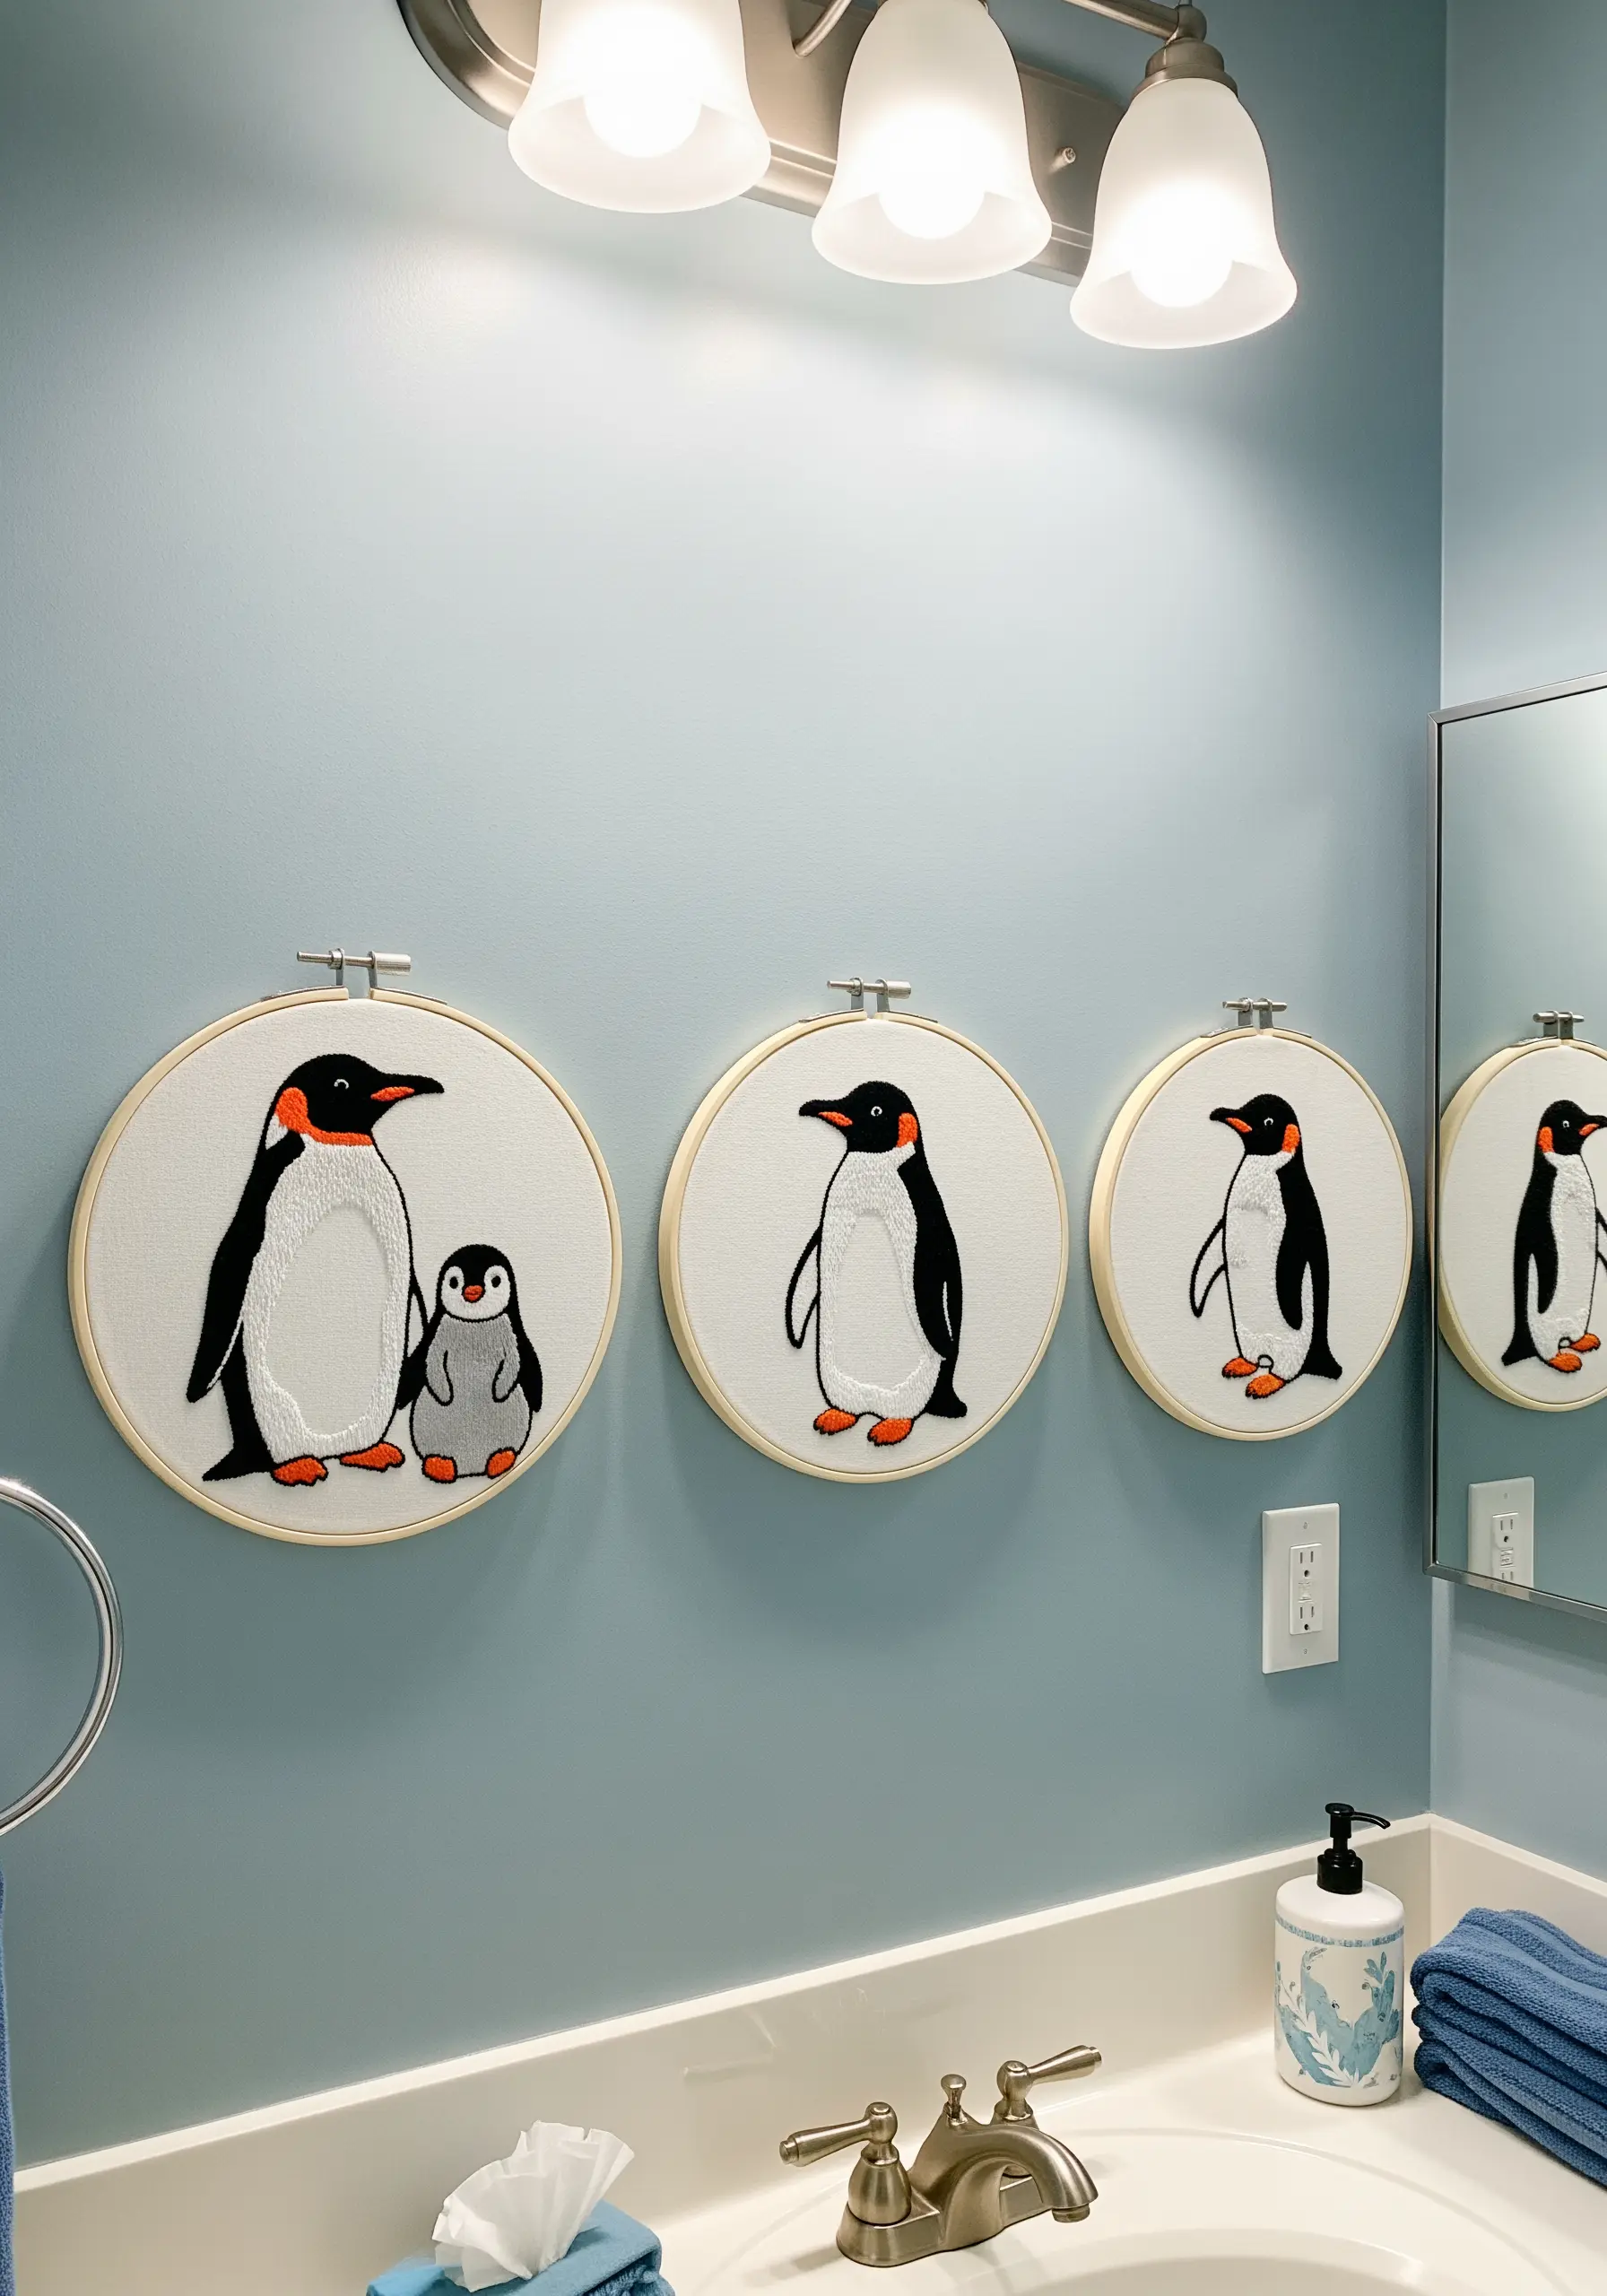
Embrace minimalism by letting the fabric do half the work for you.
Instead of filling in the penguins’ white bellies, use the untouched fabric as your white space.
Focus on executing a perfectly clean and consistent outline using a split stitch or stem stitch with black floss.
Fill in only the small, colorful areas like the beak and feet with satin stitch for a pop of color. This technique creates a clean, graphic design that is both elegant and efficient.
12. Emulate Iridescence with Silk and Metallic Threads
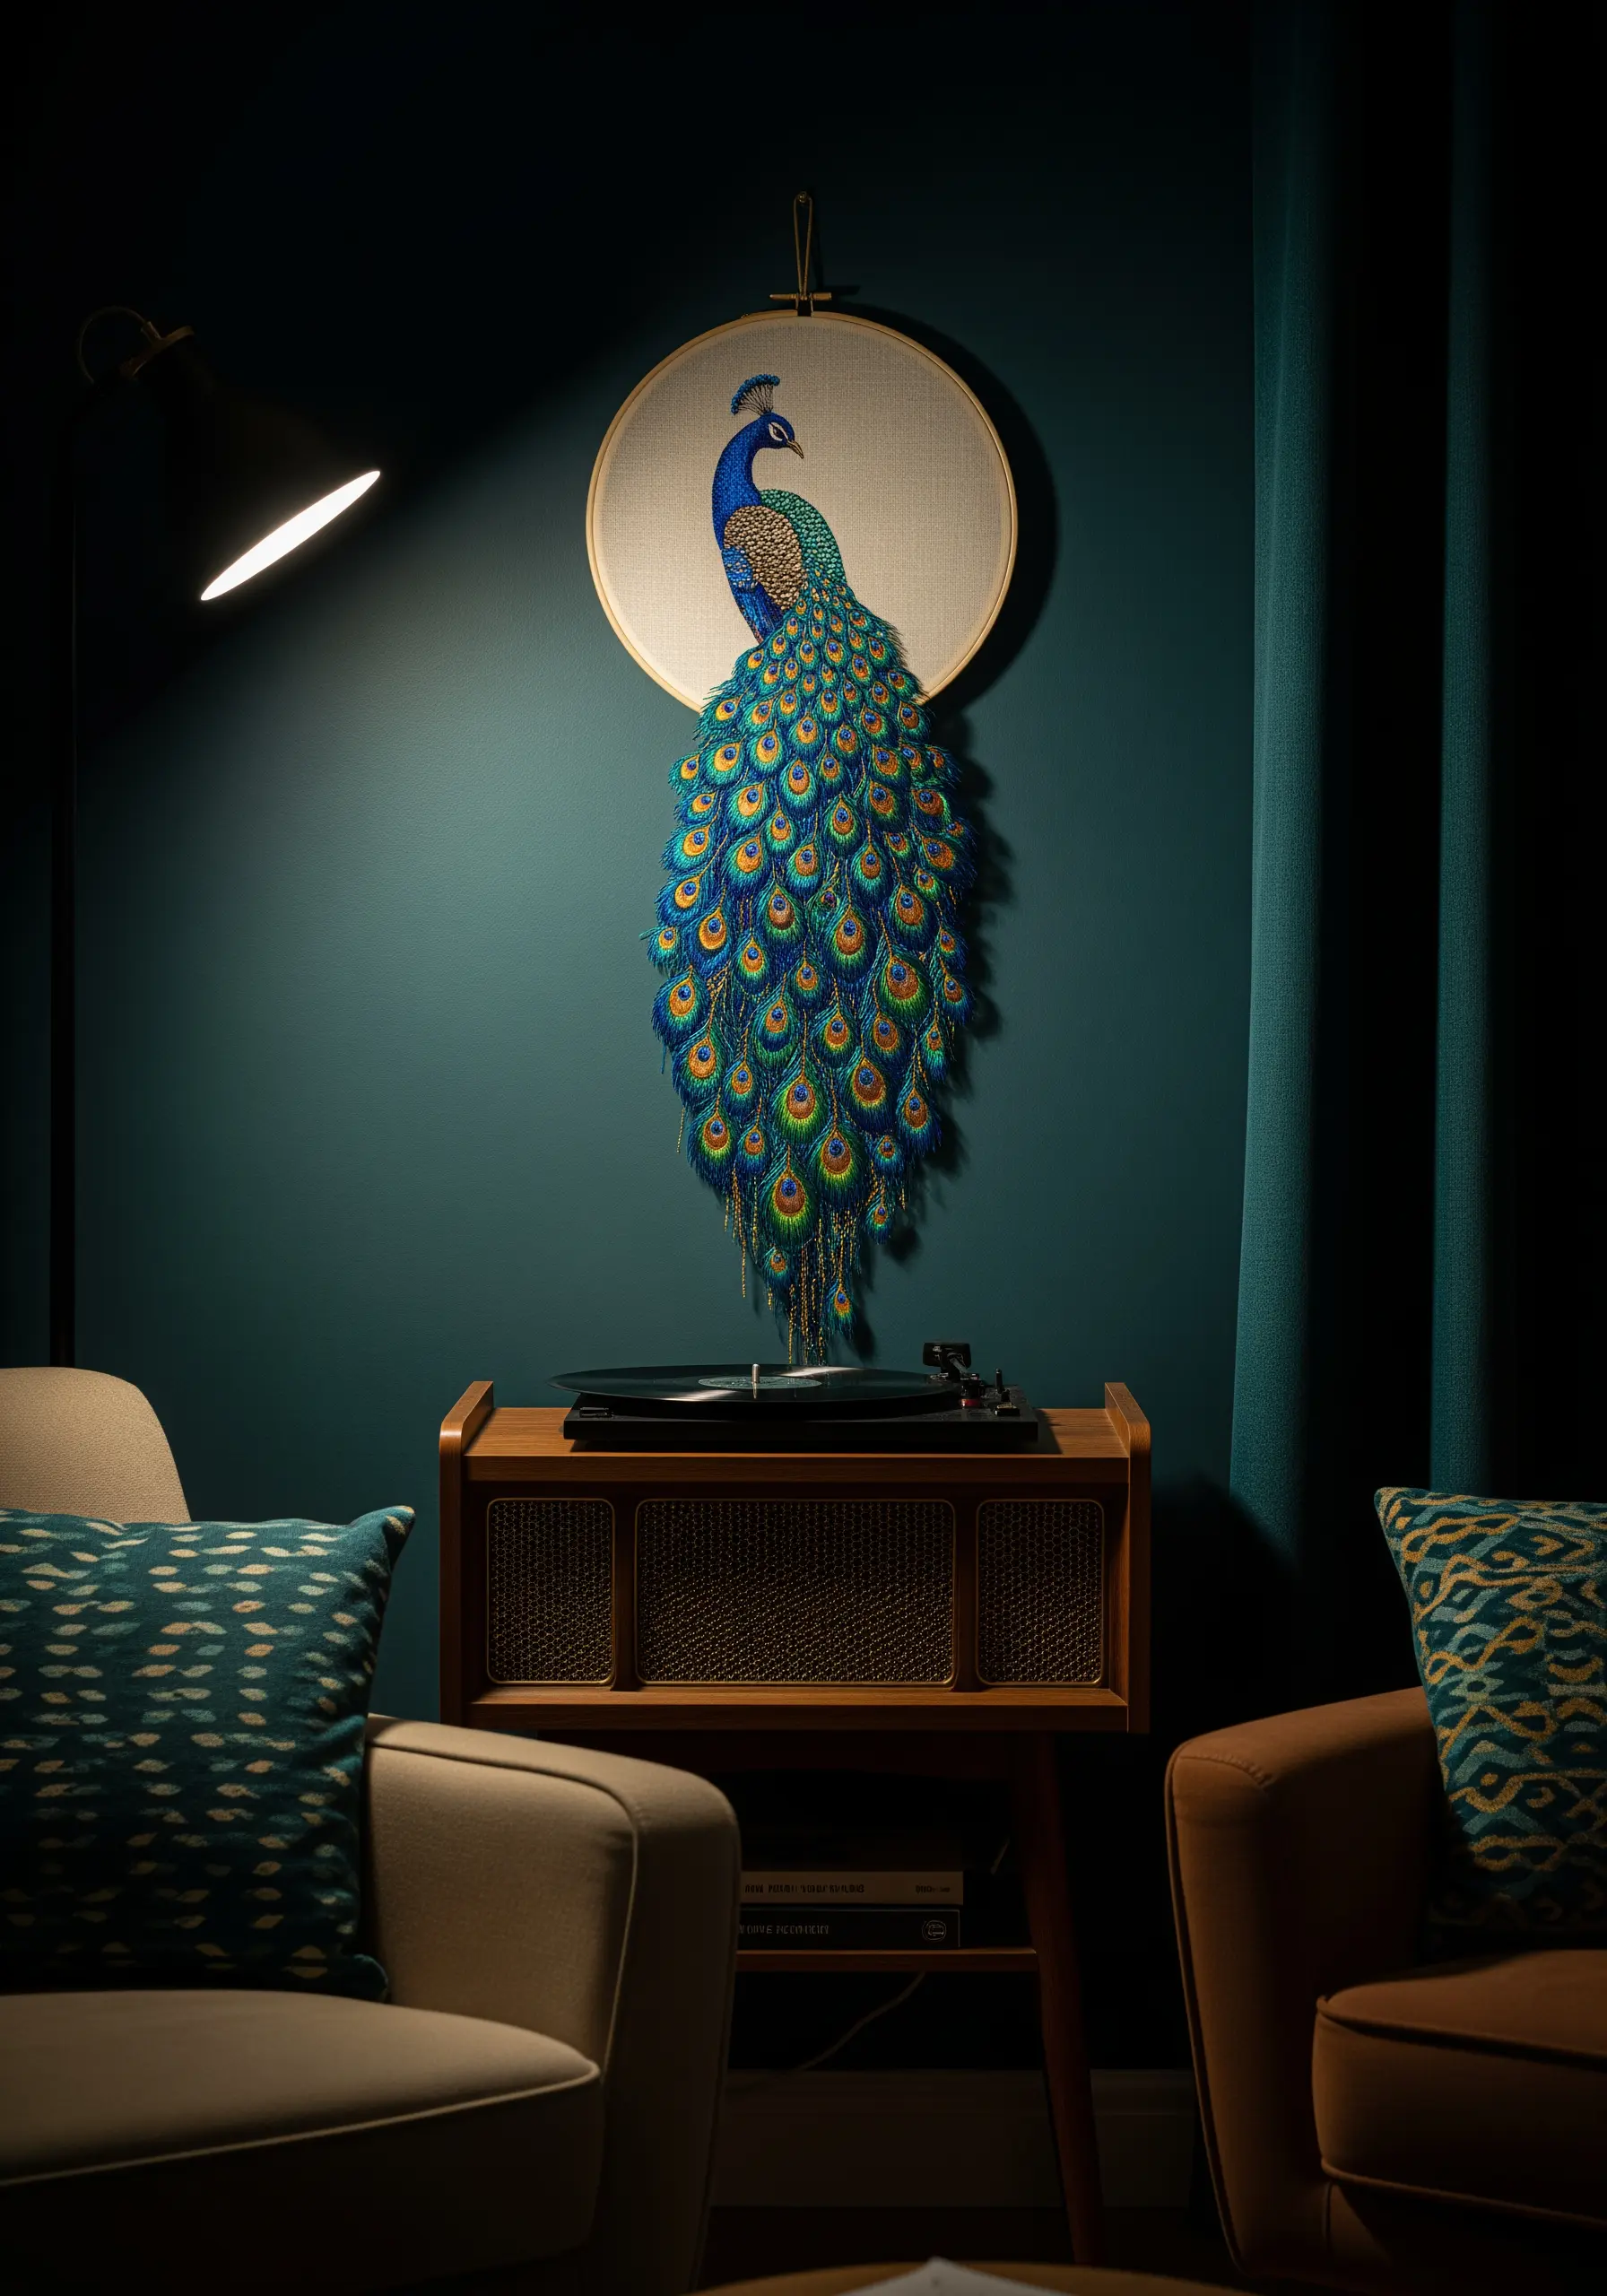
A peacock’s tail demands shimmer and light, which you can achieve by carefully selecting your threads.
Combine silk floss, which has a natural high sheen, with fine metallic threads for brilliant highlights.
For the iconic feather ‘eyes,’ layer shades of blue, green, and gold with satin stitch, finishing with a central French knot.
For a truly dramatic effect, let some of the tail feathers extend beyond the bottom of the hoop—a brilliant way of unexpected ways to use metallic thread.
13. Curate a Gallery Wall with Varied Hoop Shapes
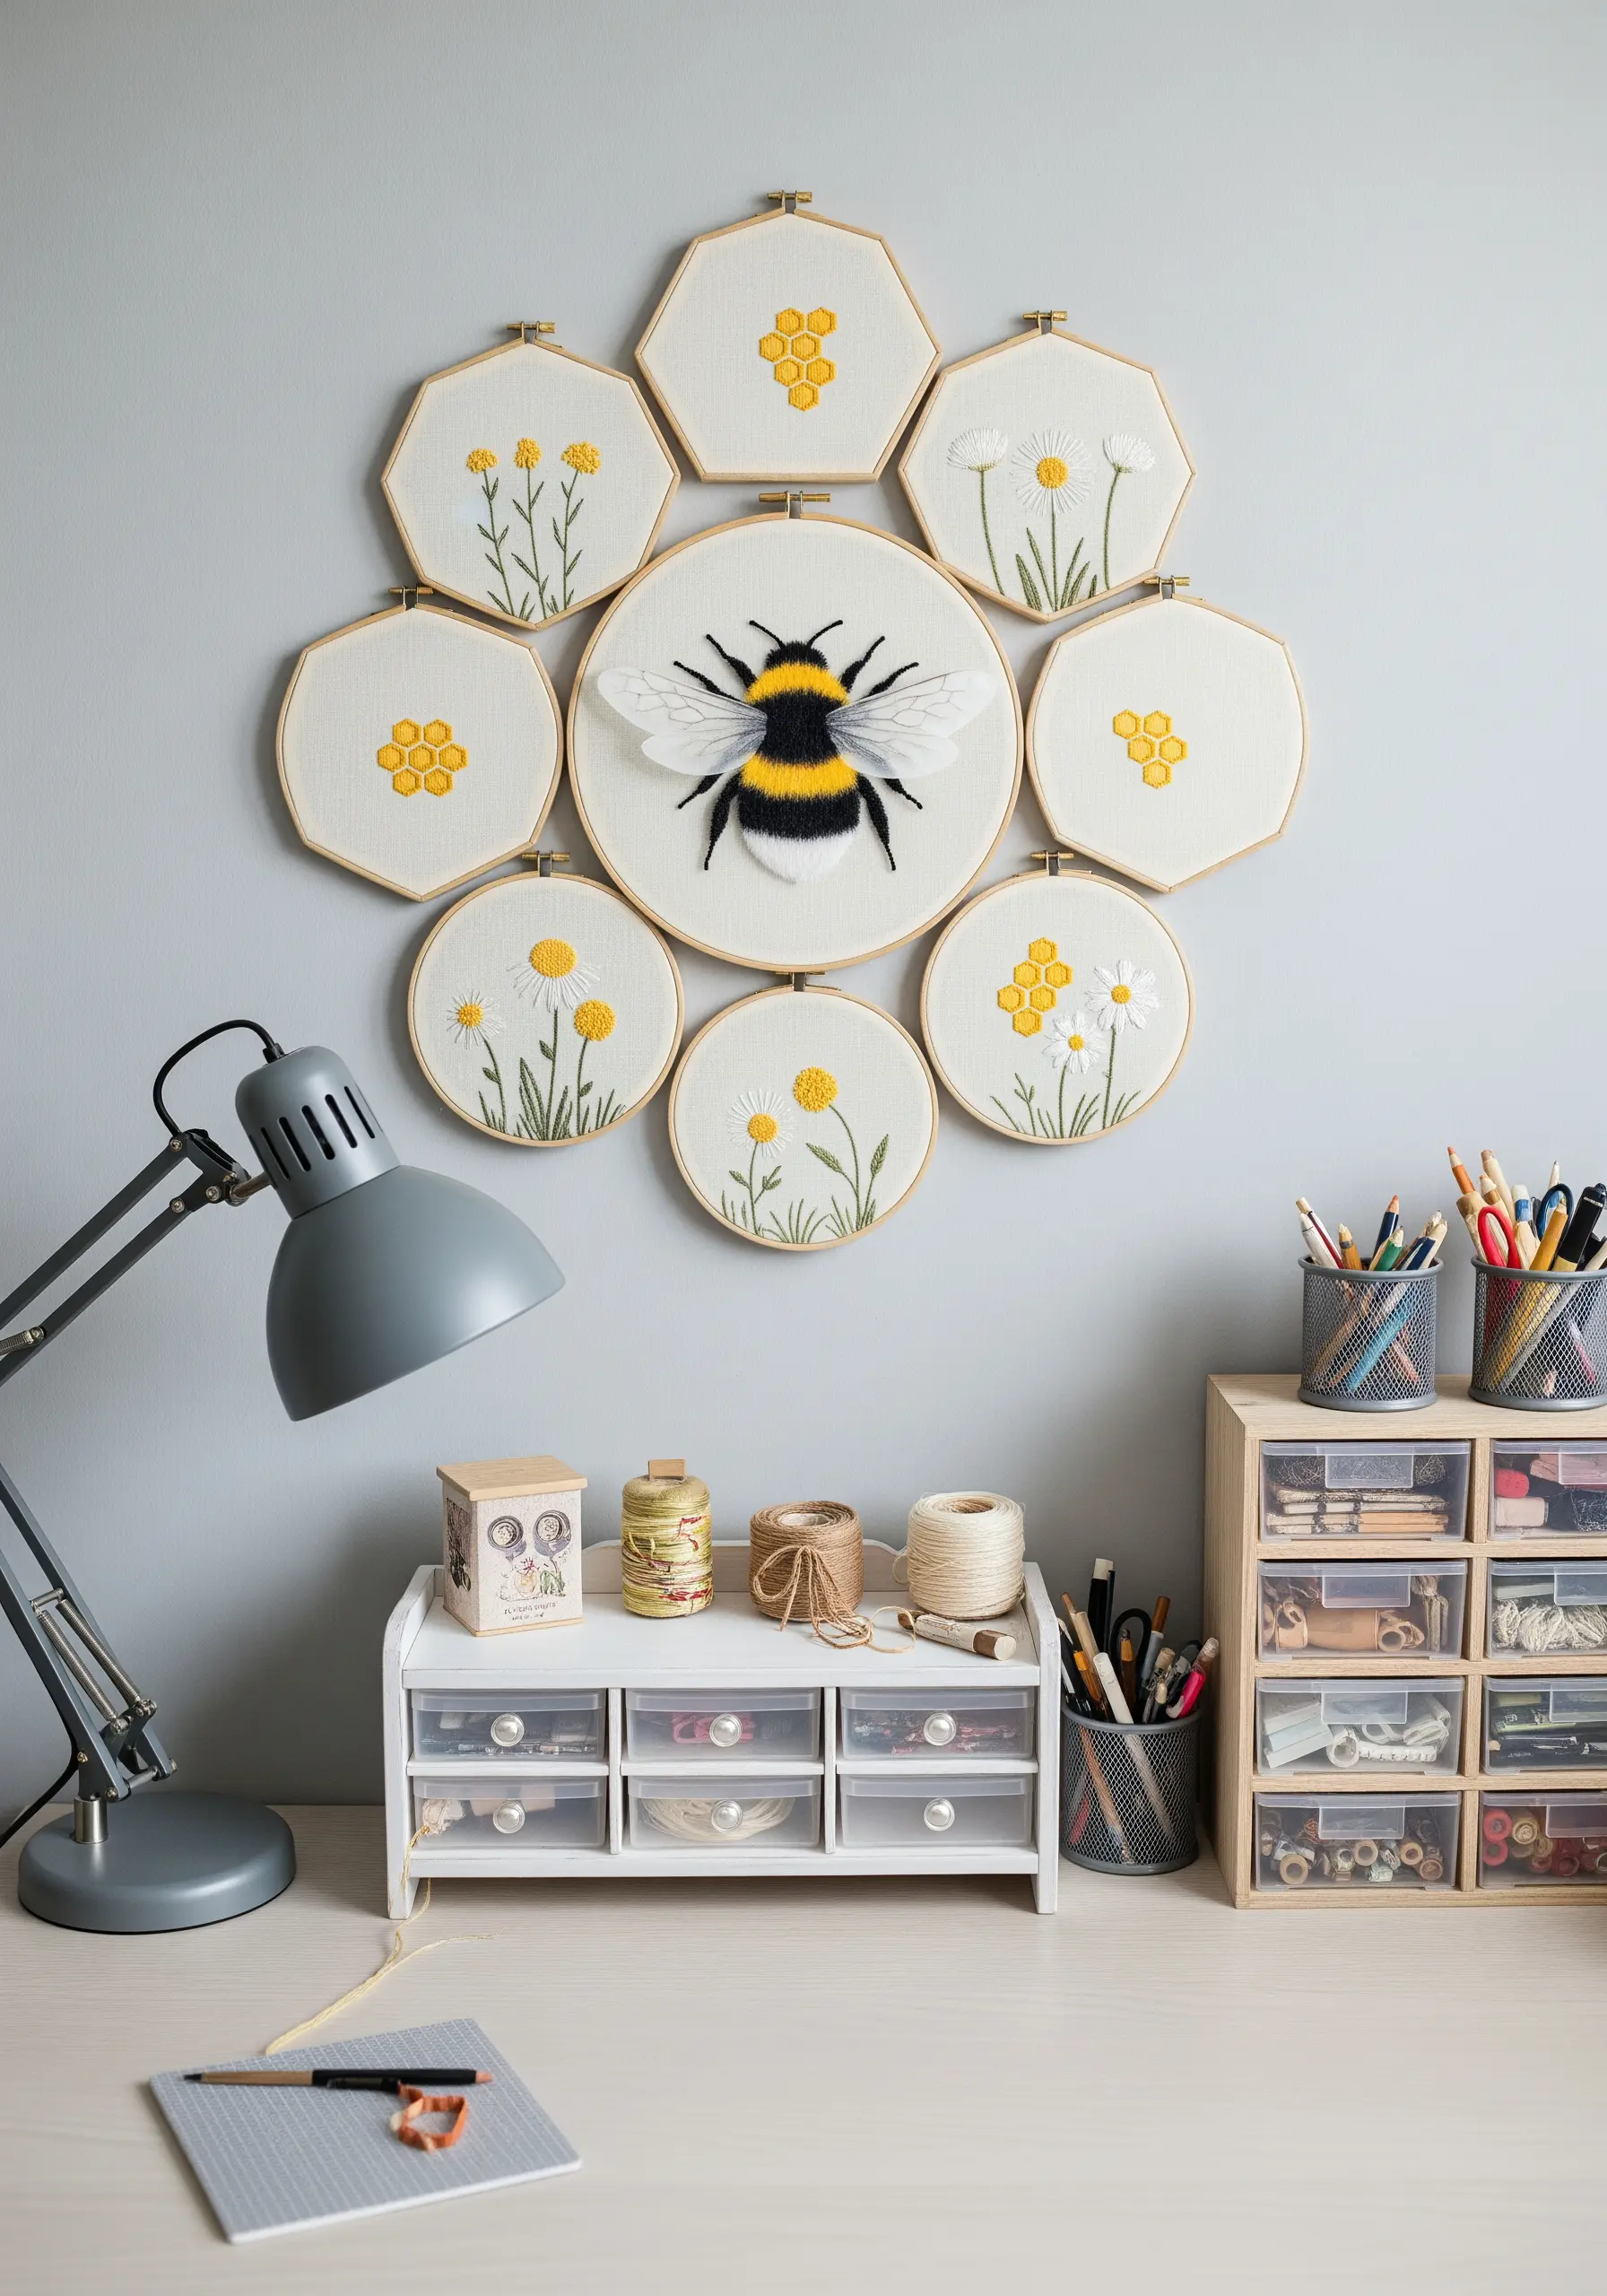
Elevate your embroidery display by thinking of it as a curated collection, not just a single piece.
Anchor your arrangement with a large, central motif, like the bumblebee, and surround it with smaller hoops containing complementary elements like flowers and honeycombs.
Incorporating different hoop shapes, such as octagons and circles, adds rhythm and visual interest to your hooped wall collage.
For the bee’s wings, try stitching over a layer of sheer organza to create a delicate, translucent effect.
14. Recreate a Calico’s Coat with Satin Stitch Patches
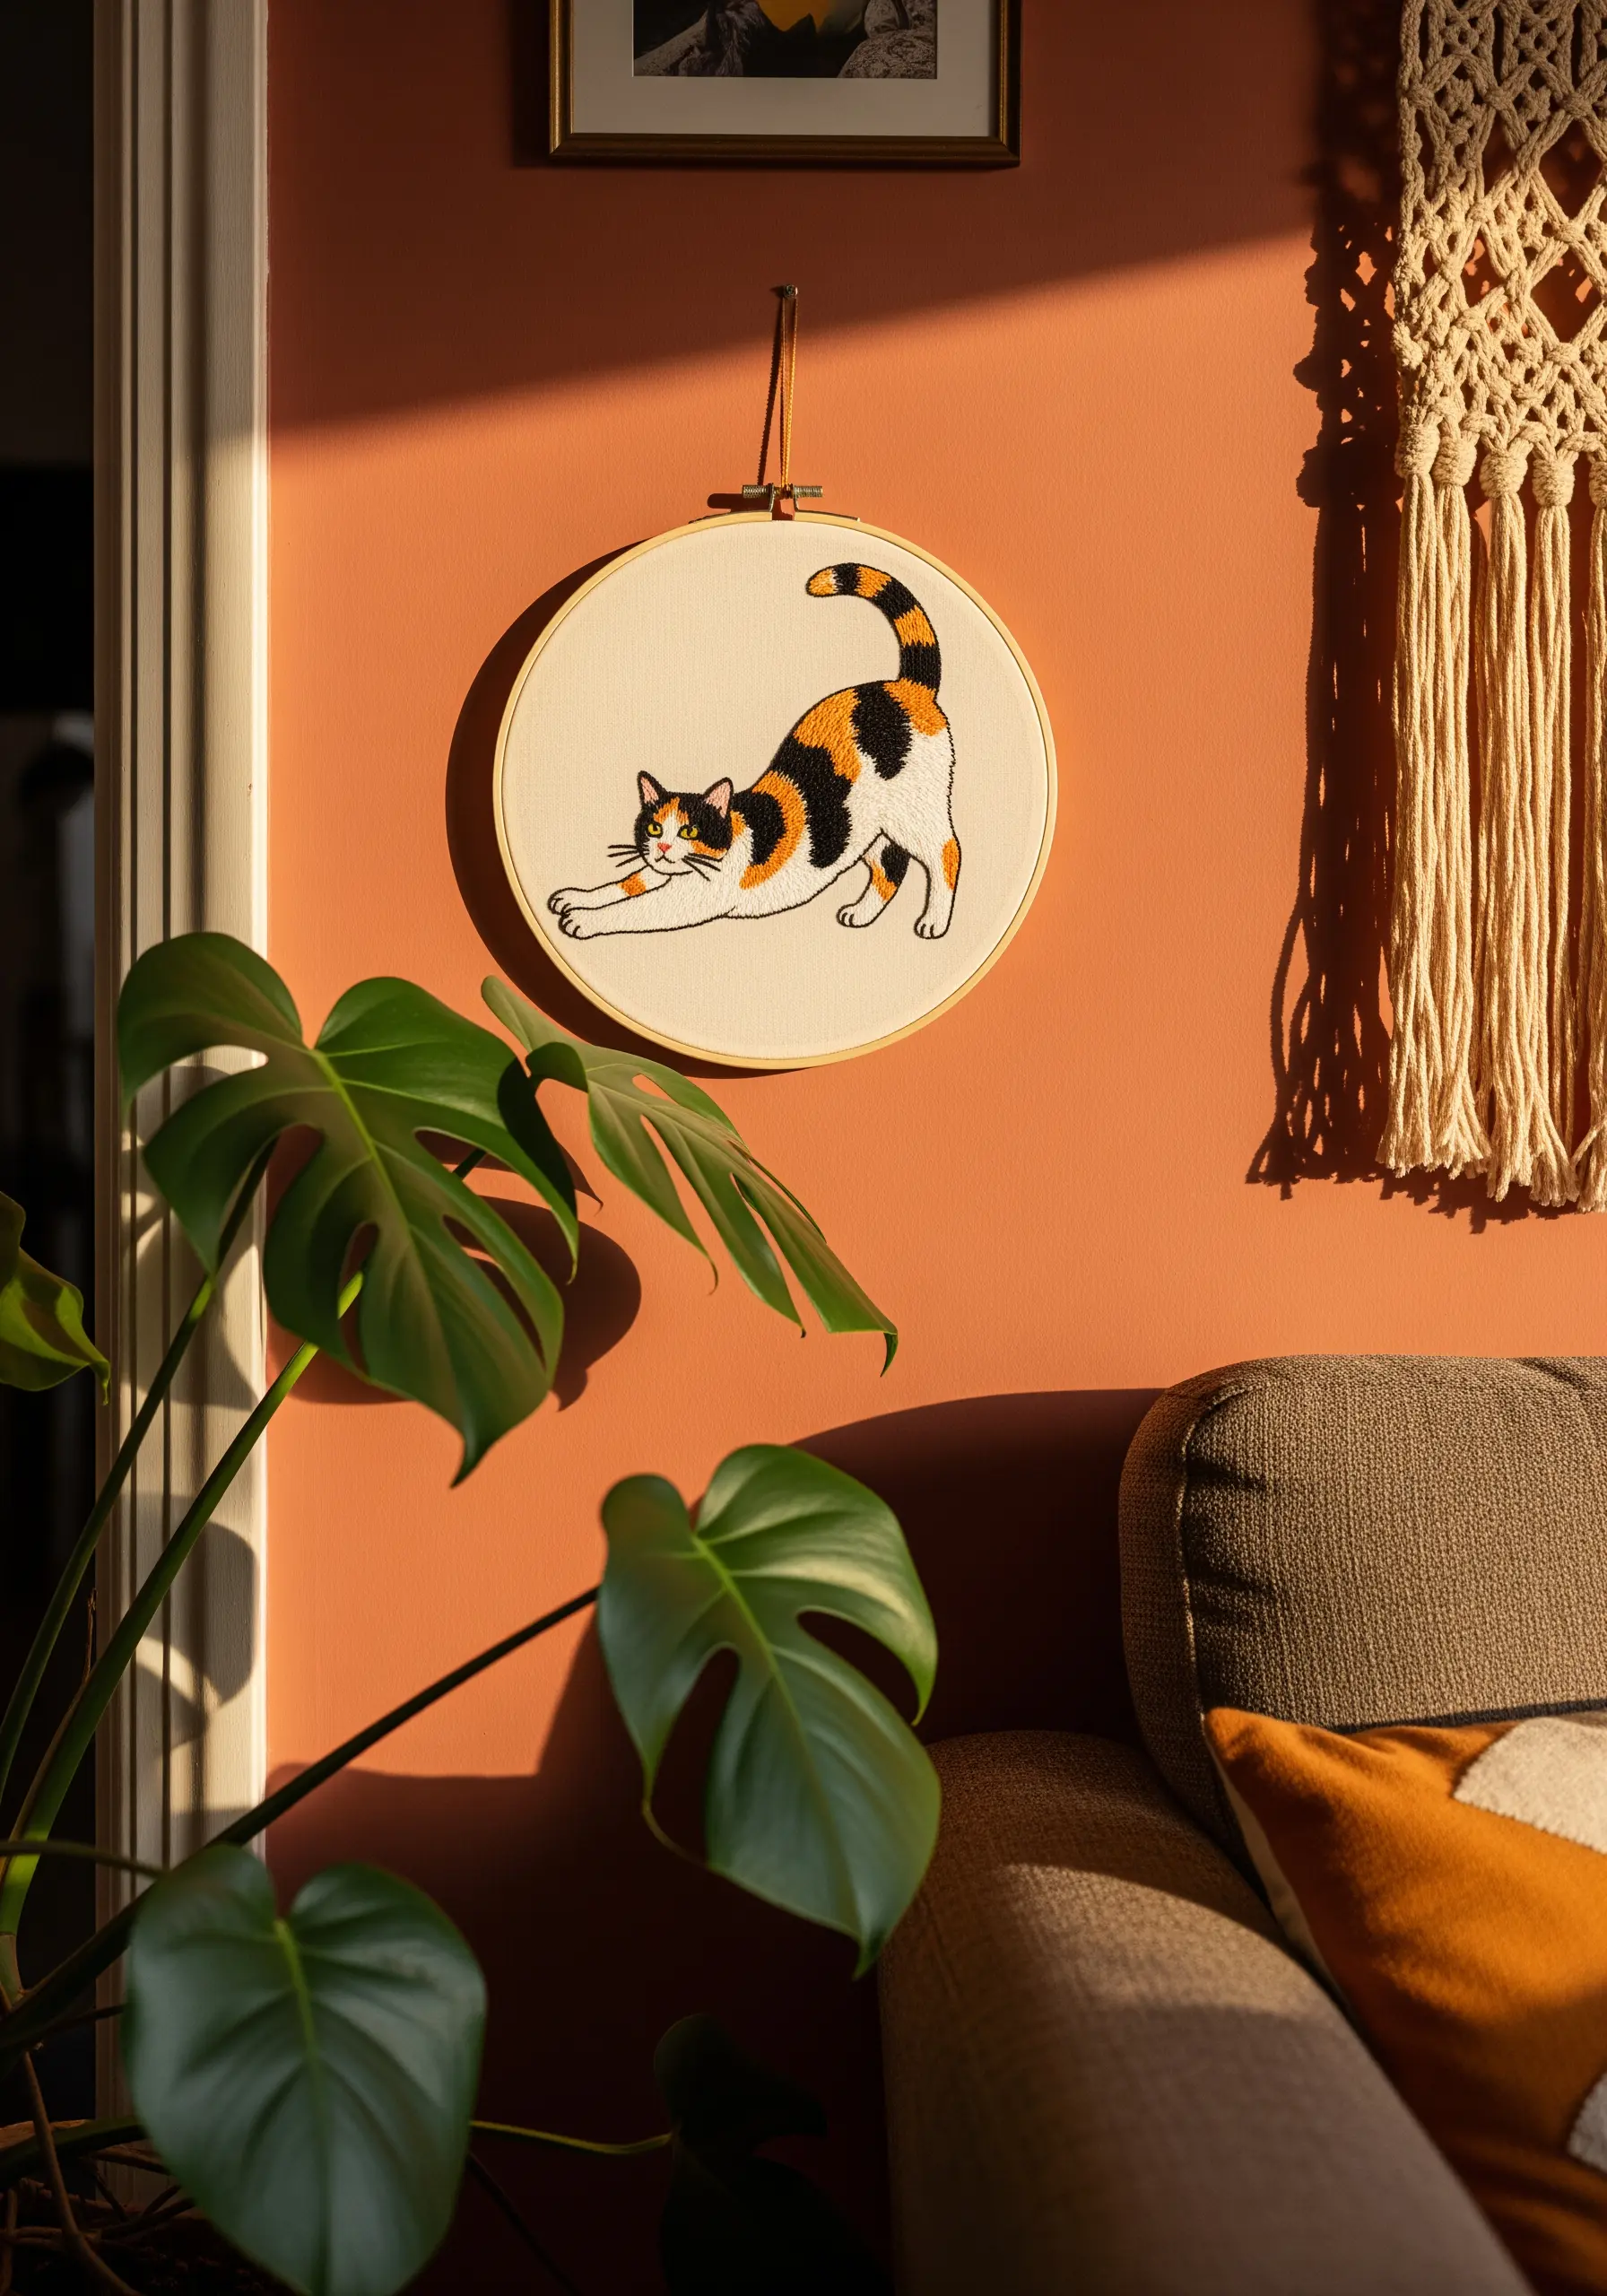
To capture the distinct markings of a calico cat, approach the design as a series of color blocks.
Lightly sketch the outlines of the black, orange, and white patches onto your fabric.
Fill each section with satin stitch, carefully angling your stitches to follow the direction of fur growth on that specific part of the body.
This directional stitching is key to making the patches feel integrated and natural, rather than flat and disconnected.
15. Achieve a Fluffy Finish with the Turkey Work Stitch
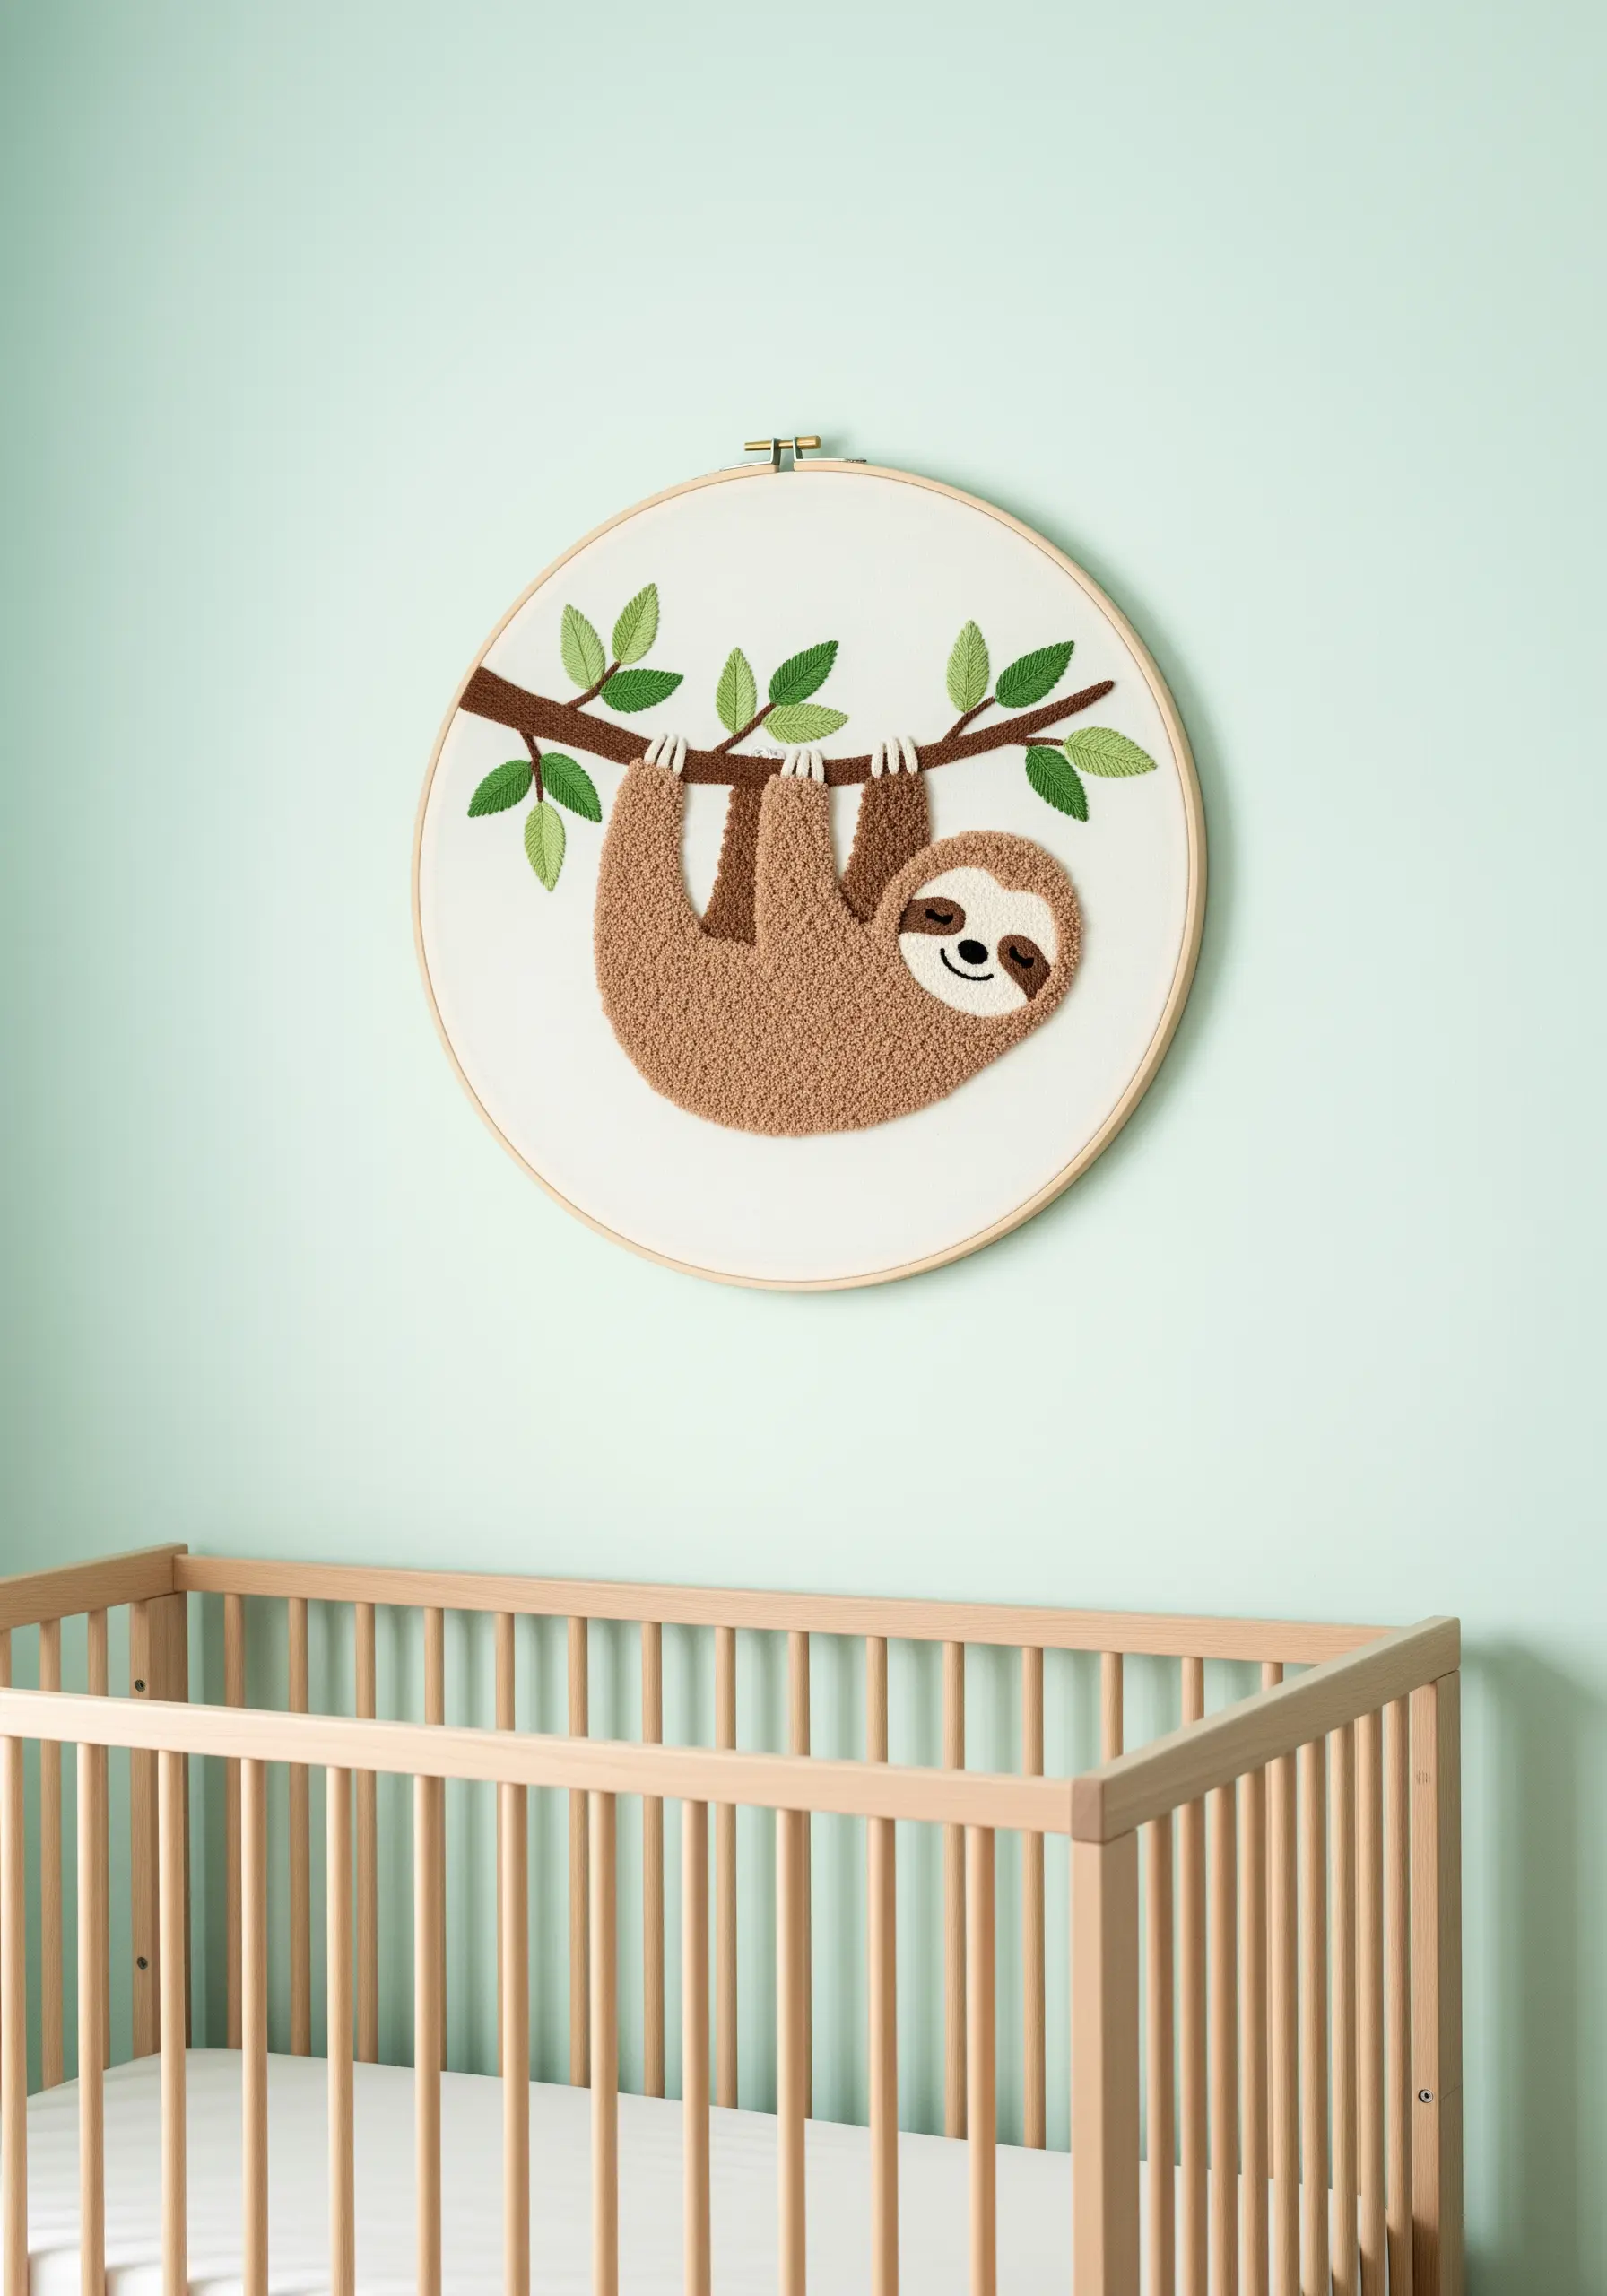
For an irresistibly soft and fuzzy texture, the Turkey work stitch is your best friend.
This technique creates loops on the surface of your fabric, which you can then trim to create a plush, fur-like effect perfect for a sloth’s body.
Keep the loops dense for a full look, and once you’ve trimmed them, you can gently fluff the threads with your needle.
Contrast this high-texture element with simple stitches for the branch and leaves to make the sloth’s fluffiness the star, one of the most creative ways to stitch natural textures.
16. Break the Frame by Extending Your Design
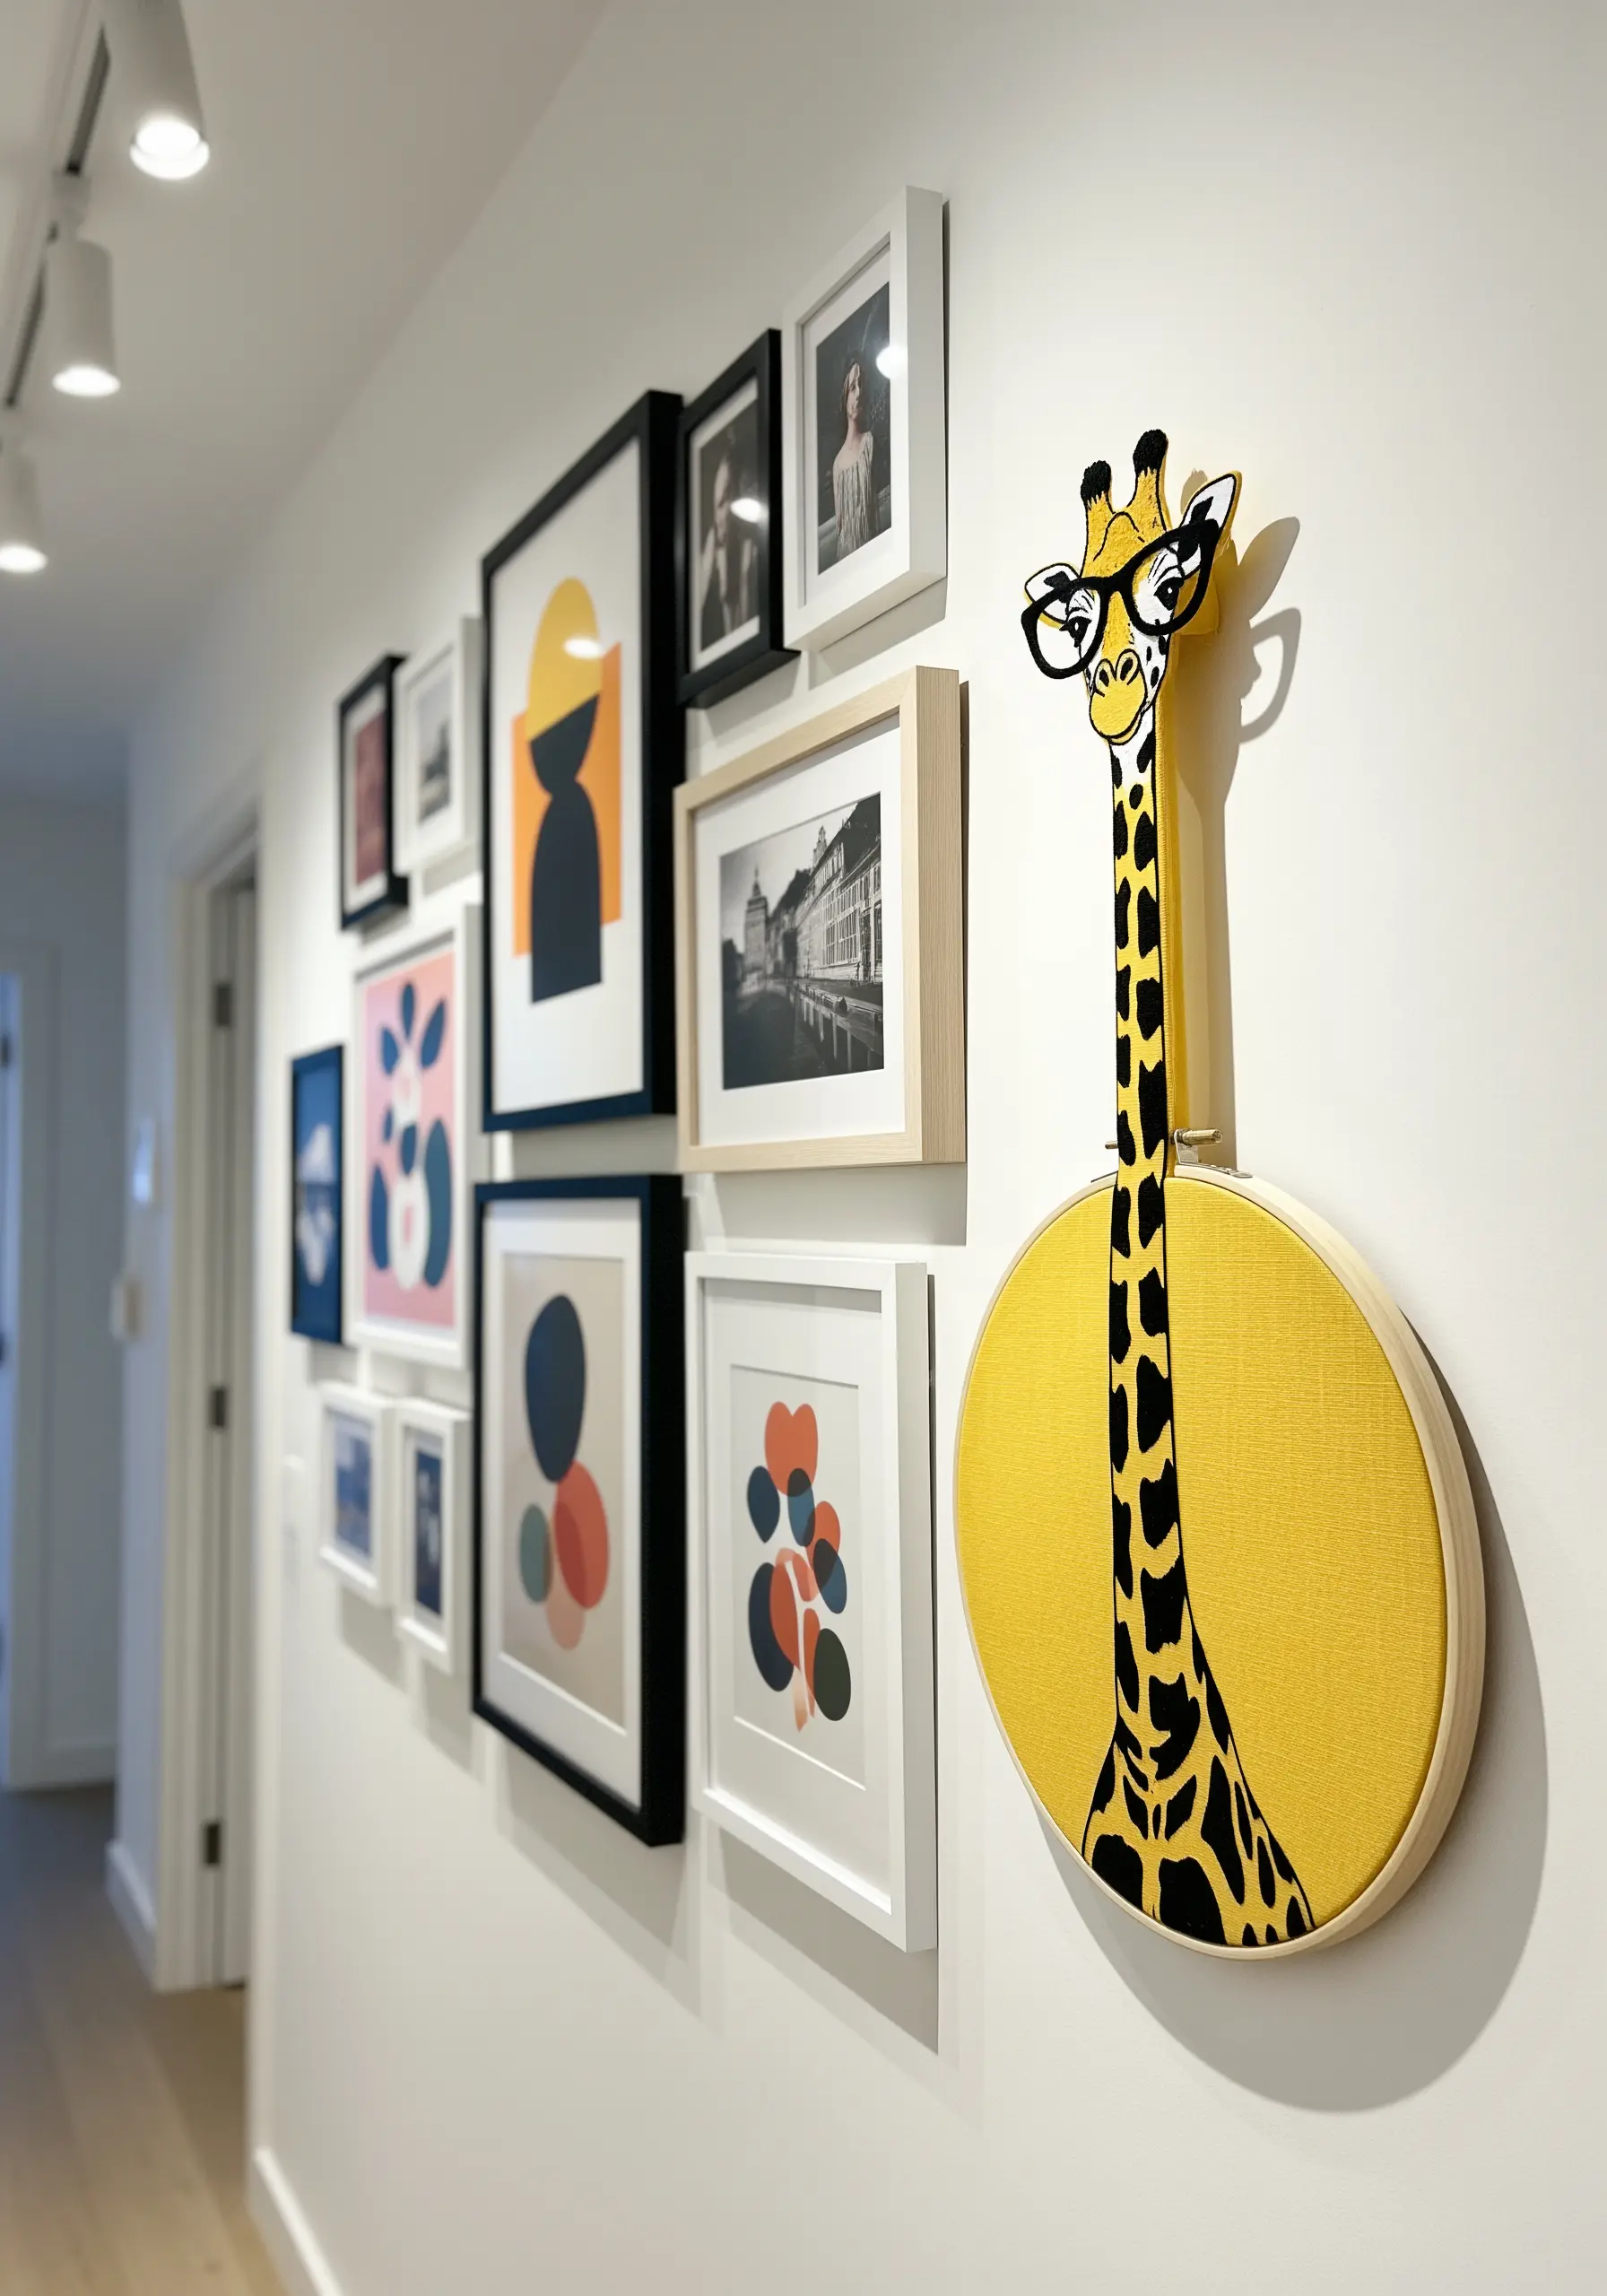
Add a surprising, sculptural element to your hoop art by allowing part of your design to extend beyond the circular frame.
Stitch the giraffe’s body on the fabric within the hoop as usual.
For the head and neck, embroider the details onto a separate piece of stiffened felt, carefully cut it out, and then securely attach it to the back of the hoop so it stands above the frame.
This playful technique breaks traditional boundaries and turns your embroidery into a unique piece of wall sculpture.
17. Weave a Tactile Fleece with Colonial Knots
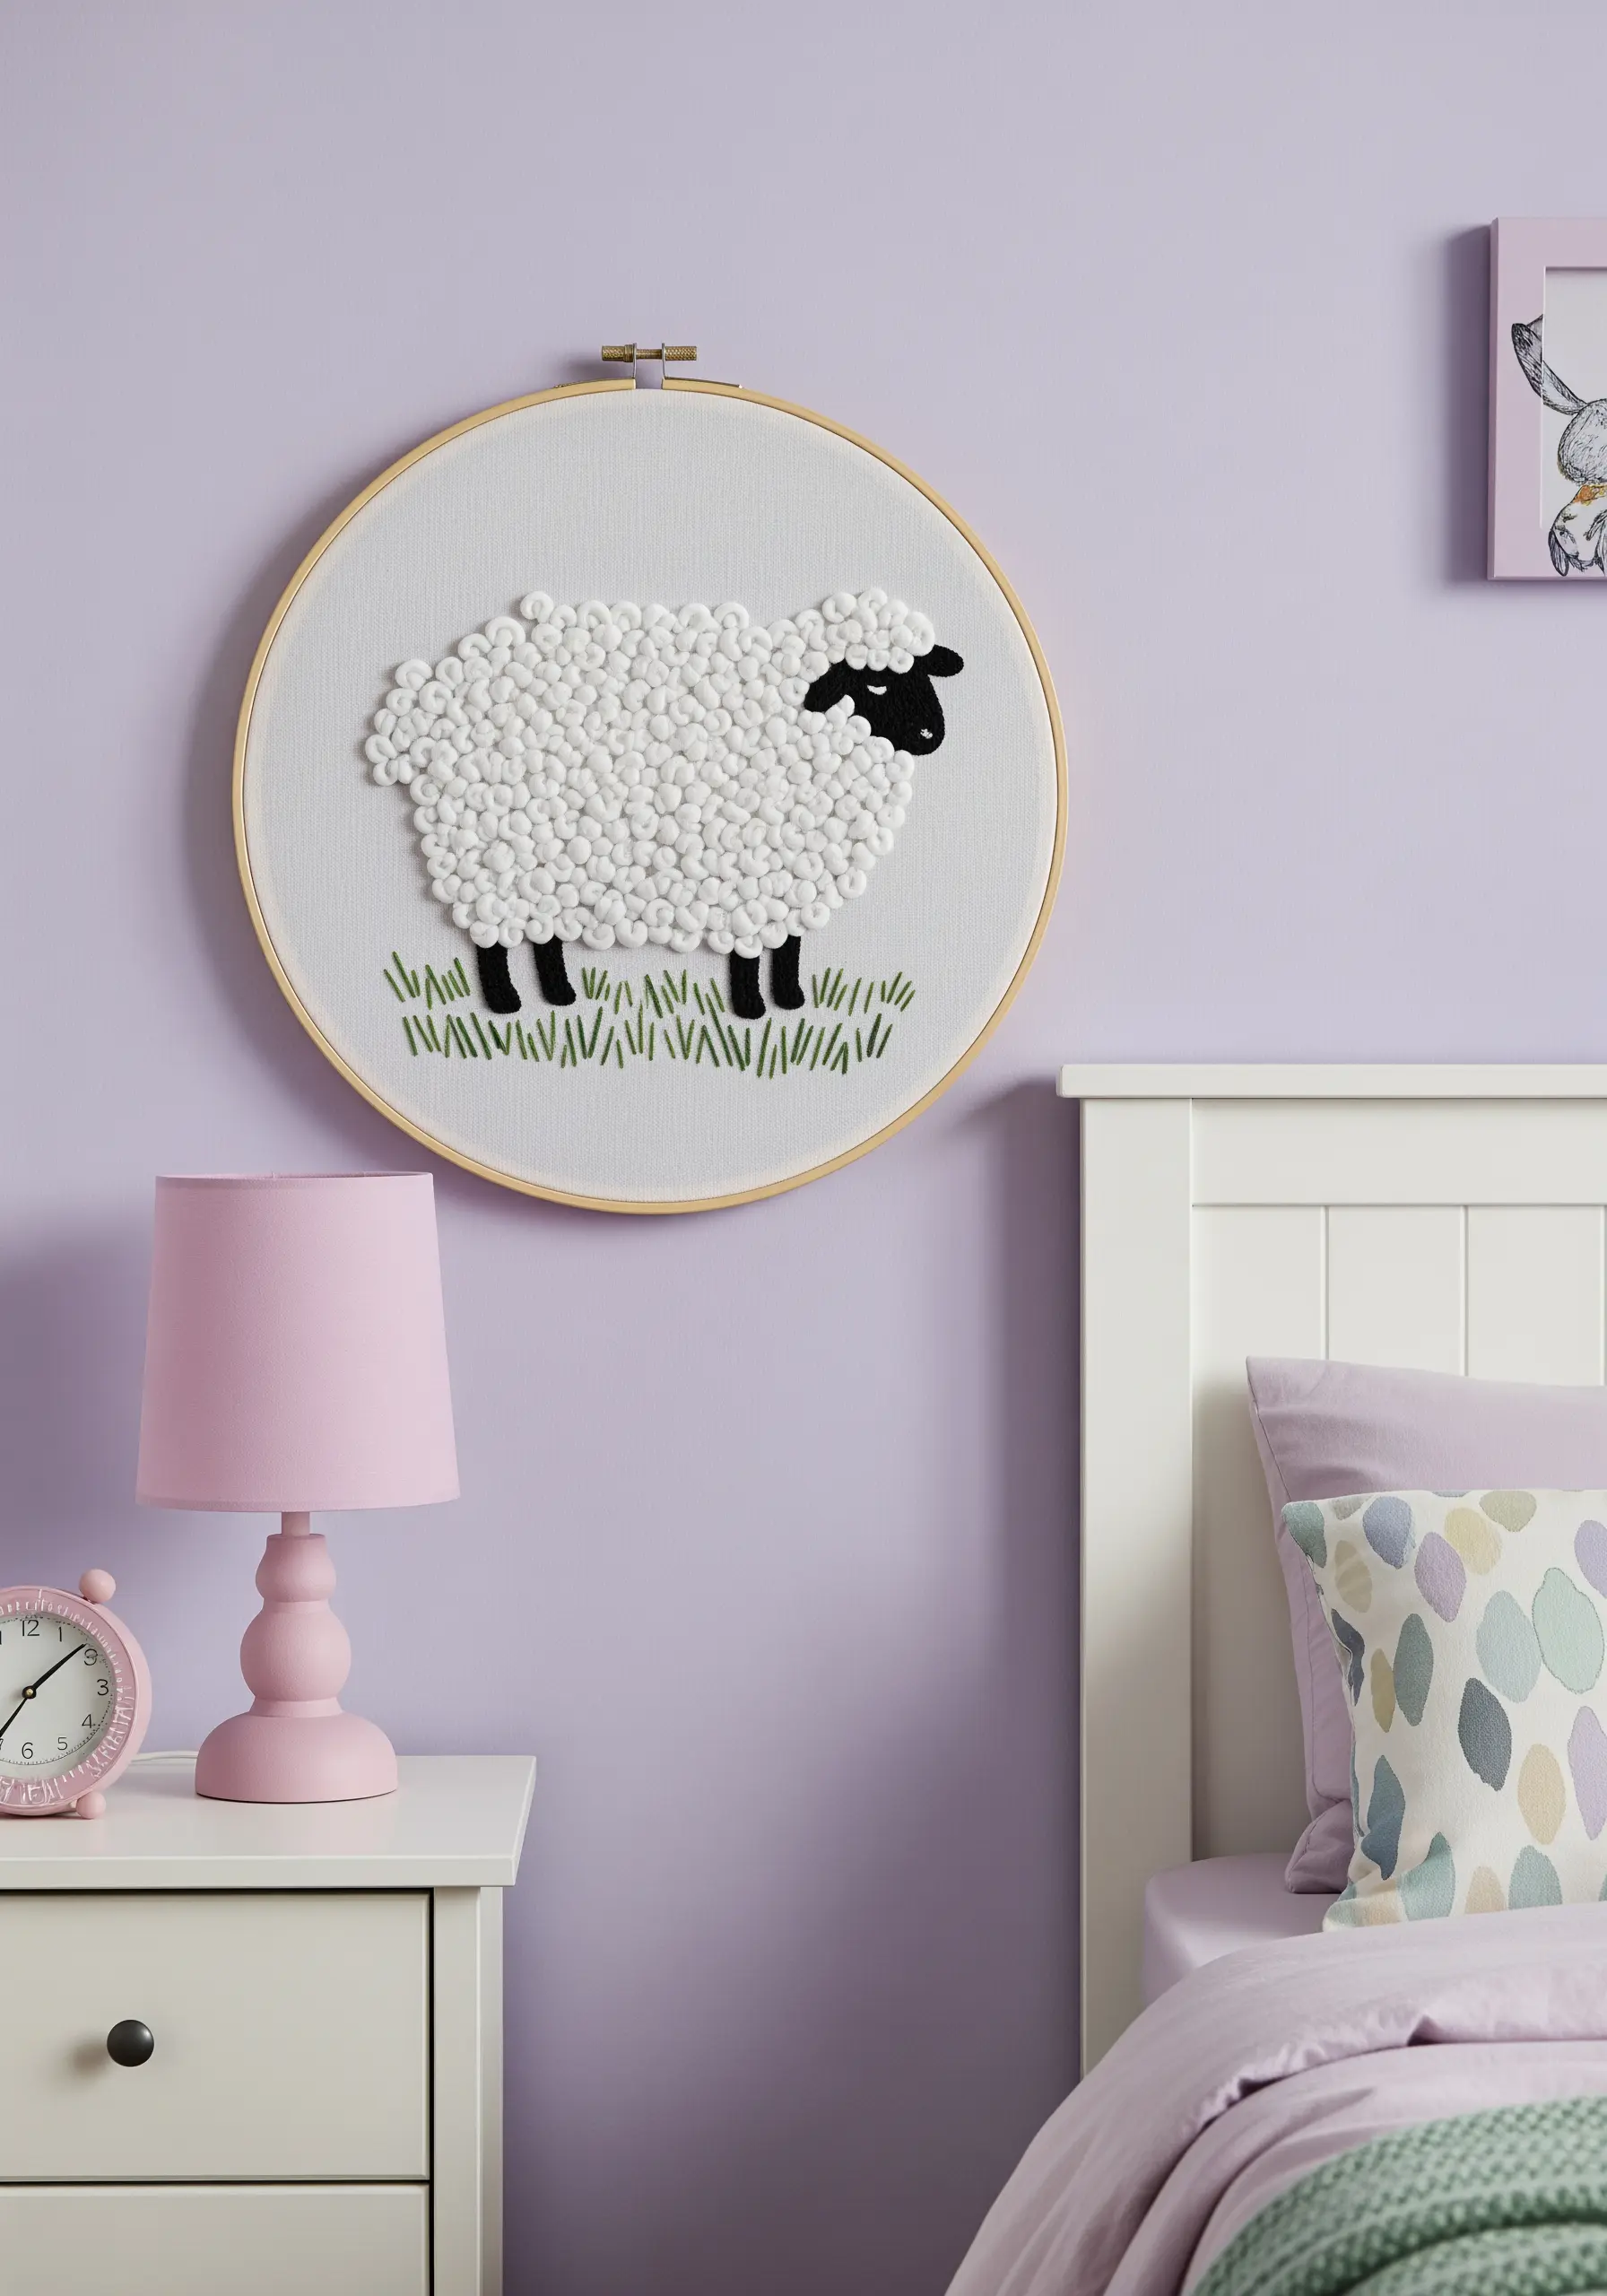
Create the perfect sheep’s fleece using the colonial knot, which produces a rounder, more robust knot than its French counterpart.
Work the knots closely together, covering the entire body to build a dense, bobbled texture that you can’t help but touch.
Using an off-white or cream thread instead of pure white will give the fleece a more natural, organic look.
Keep the surrounding elements, like the grass, simple with basic straight stitches, allowing the incredible texture of the fleece to take center stage.
18. Master Feather Gradients with Long-and-Short Stitch
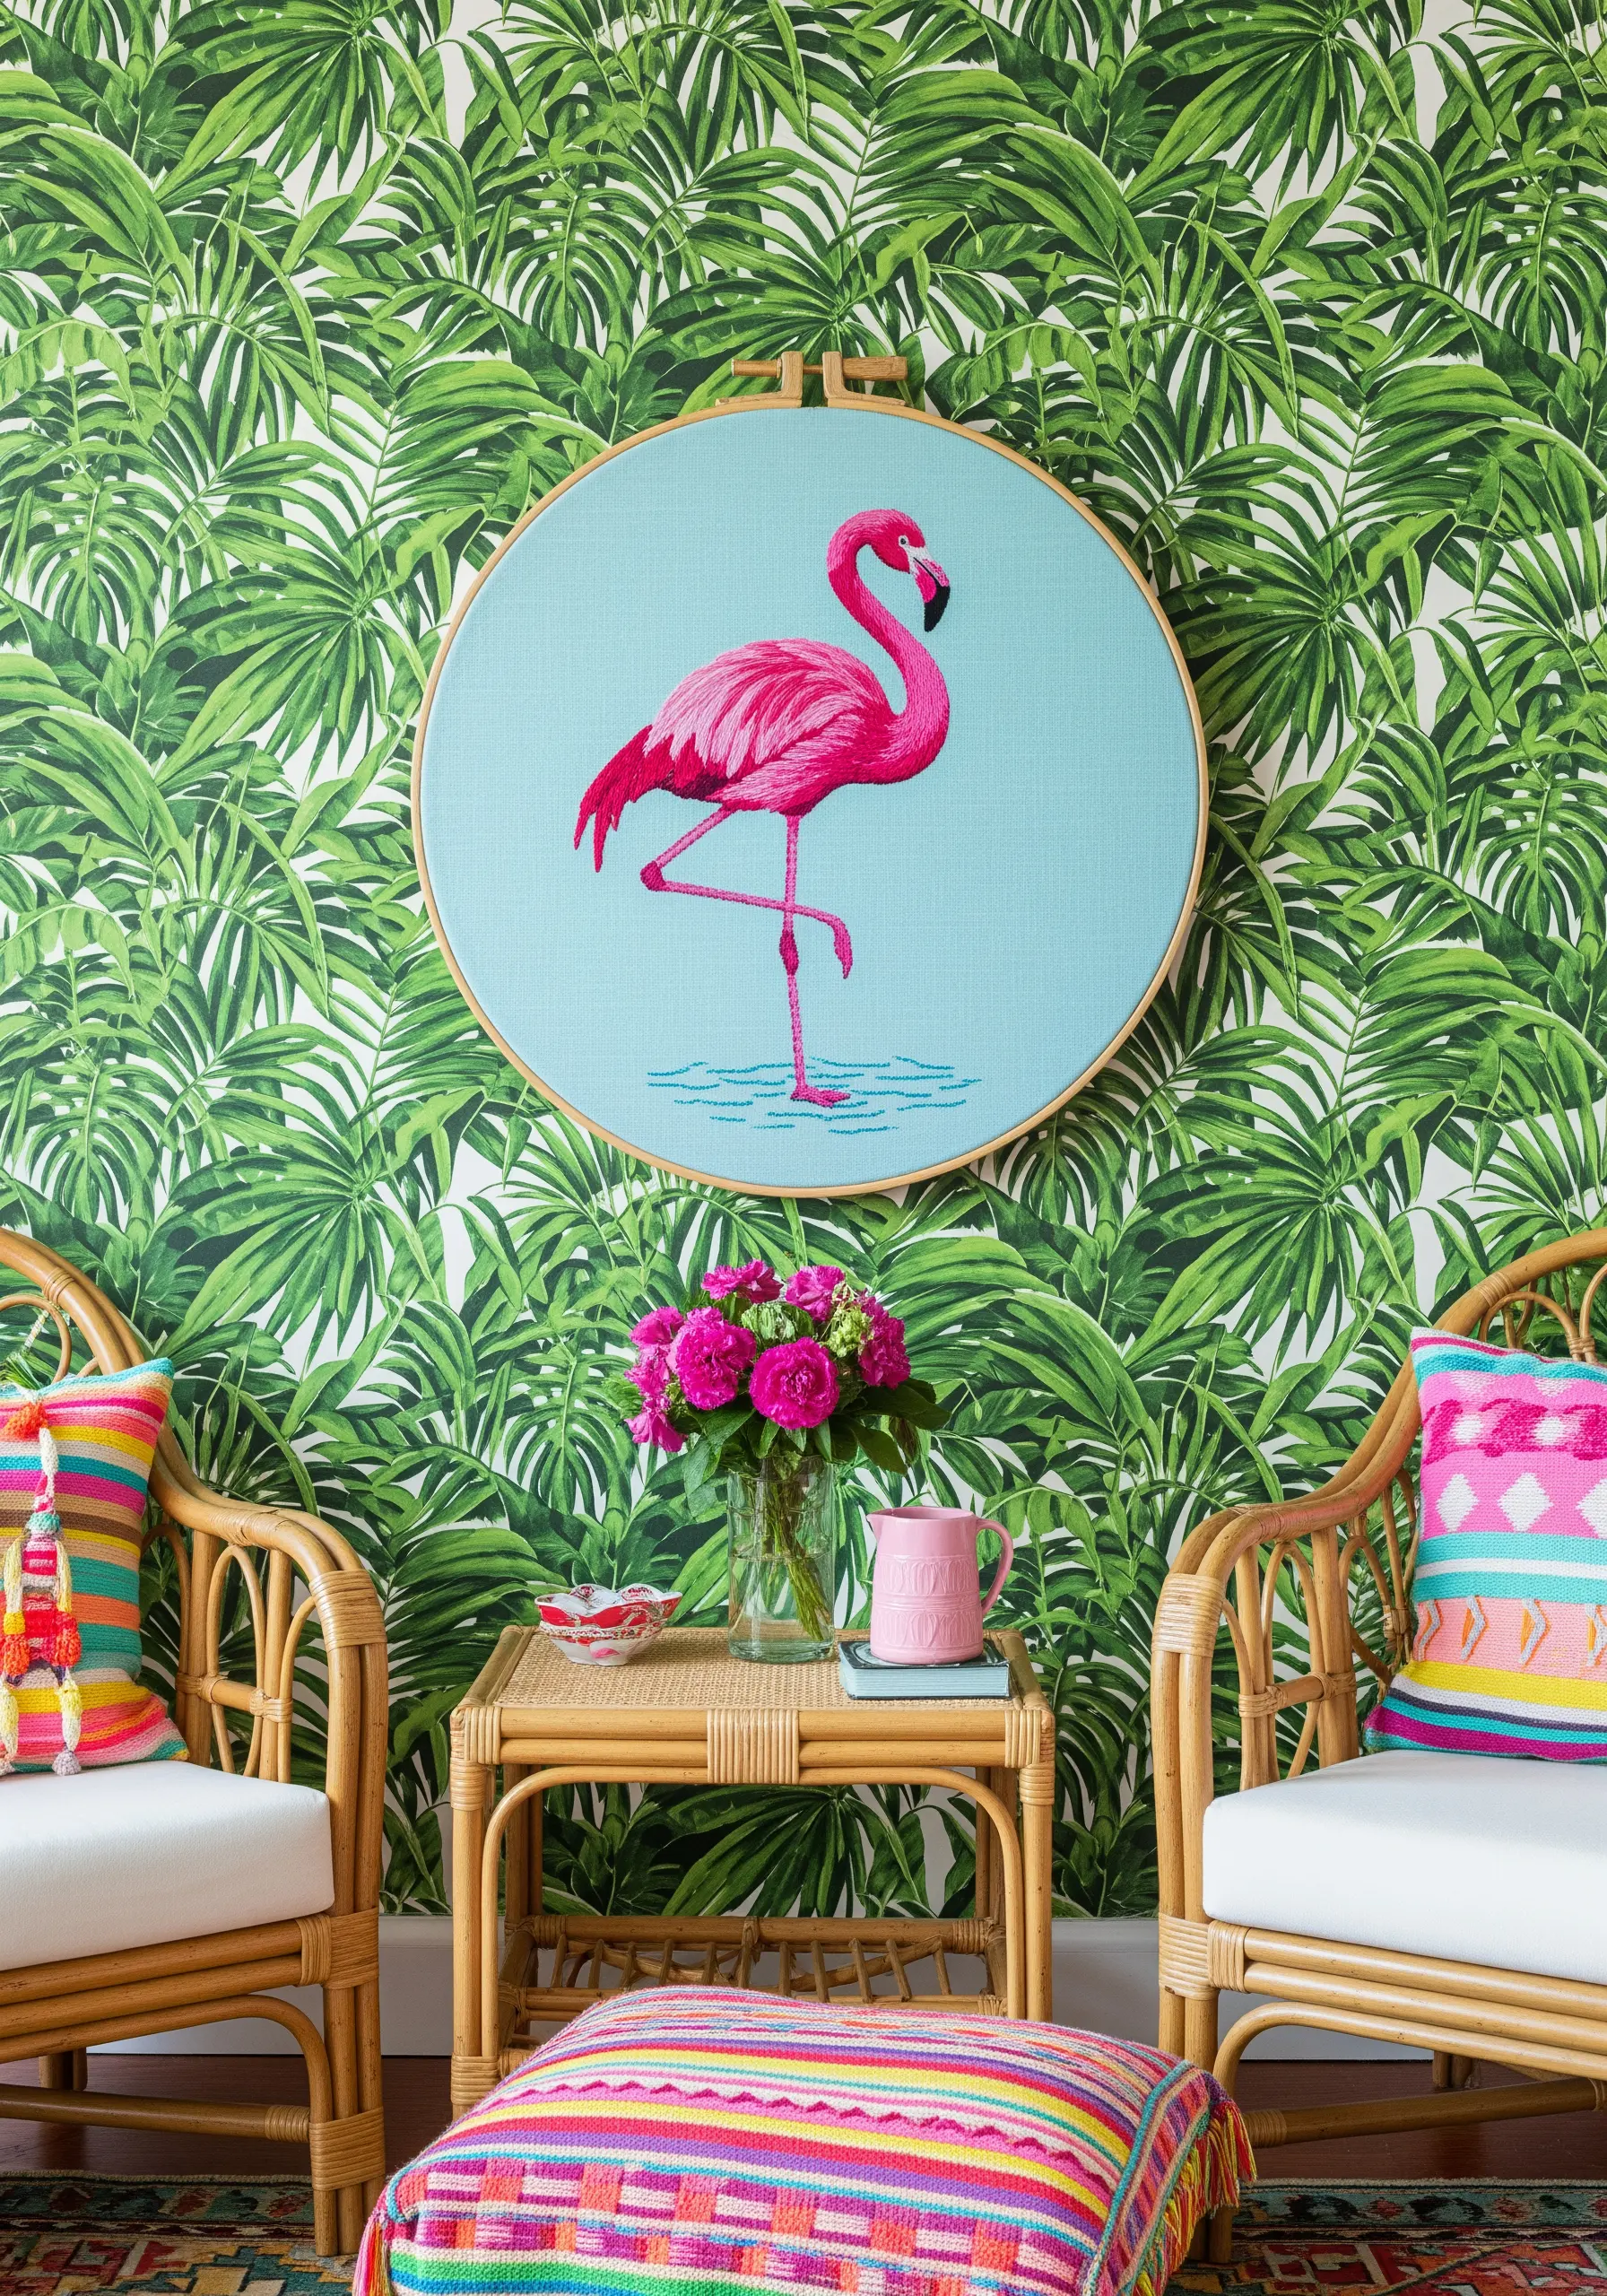
Capture the subtle beauty of a flamingo’s plumage by blending multiple shades of pink with the long-and-short stitch.
Choose three to four hues, from a pale blush to a vibrant coral, to create a believable gradient.
Work in sections, overlapping your stitches just enough to create a seamless transition between colors.
This thread painting technique gives the feathers a soft, realistic look that a single color could never achieve.
19. Illustrate Movement with Clustered French Knots

Bring your underwater scenes to life by using French knots to create the illusion of bubbles and moving water.
After stitching the whale with a smooth fill, surround it with clusters of French knots in white, light grey, and pale blue.
Vary the size of the knots by changing the number of times you wrap the thread around the needle.
Concentrate the knots near the whale’s body and scatter them outward to create a sense of energetic movement, perfect for your next sea animal embroidery ideas.
20. Build a Bushy Tail with Layered Fly Stitches
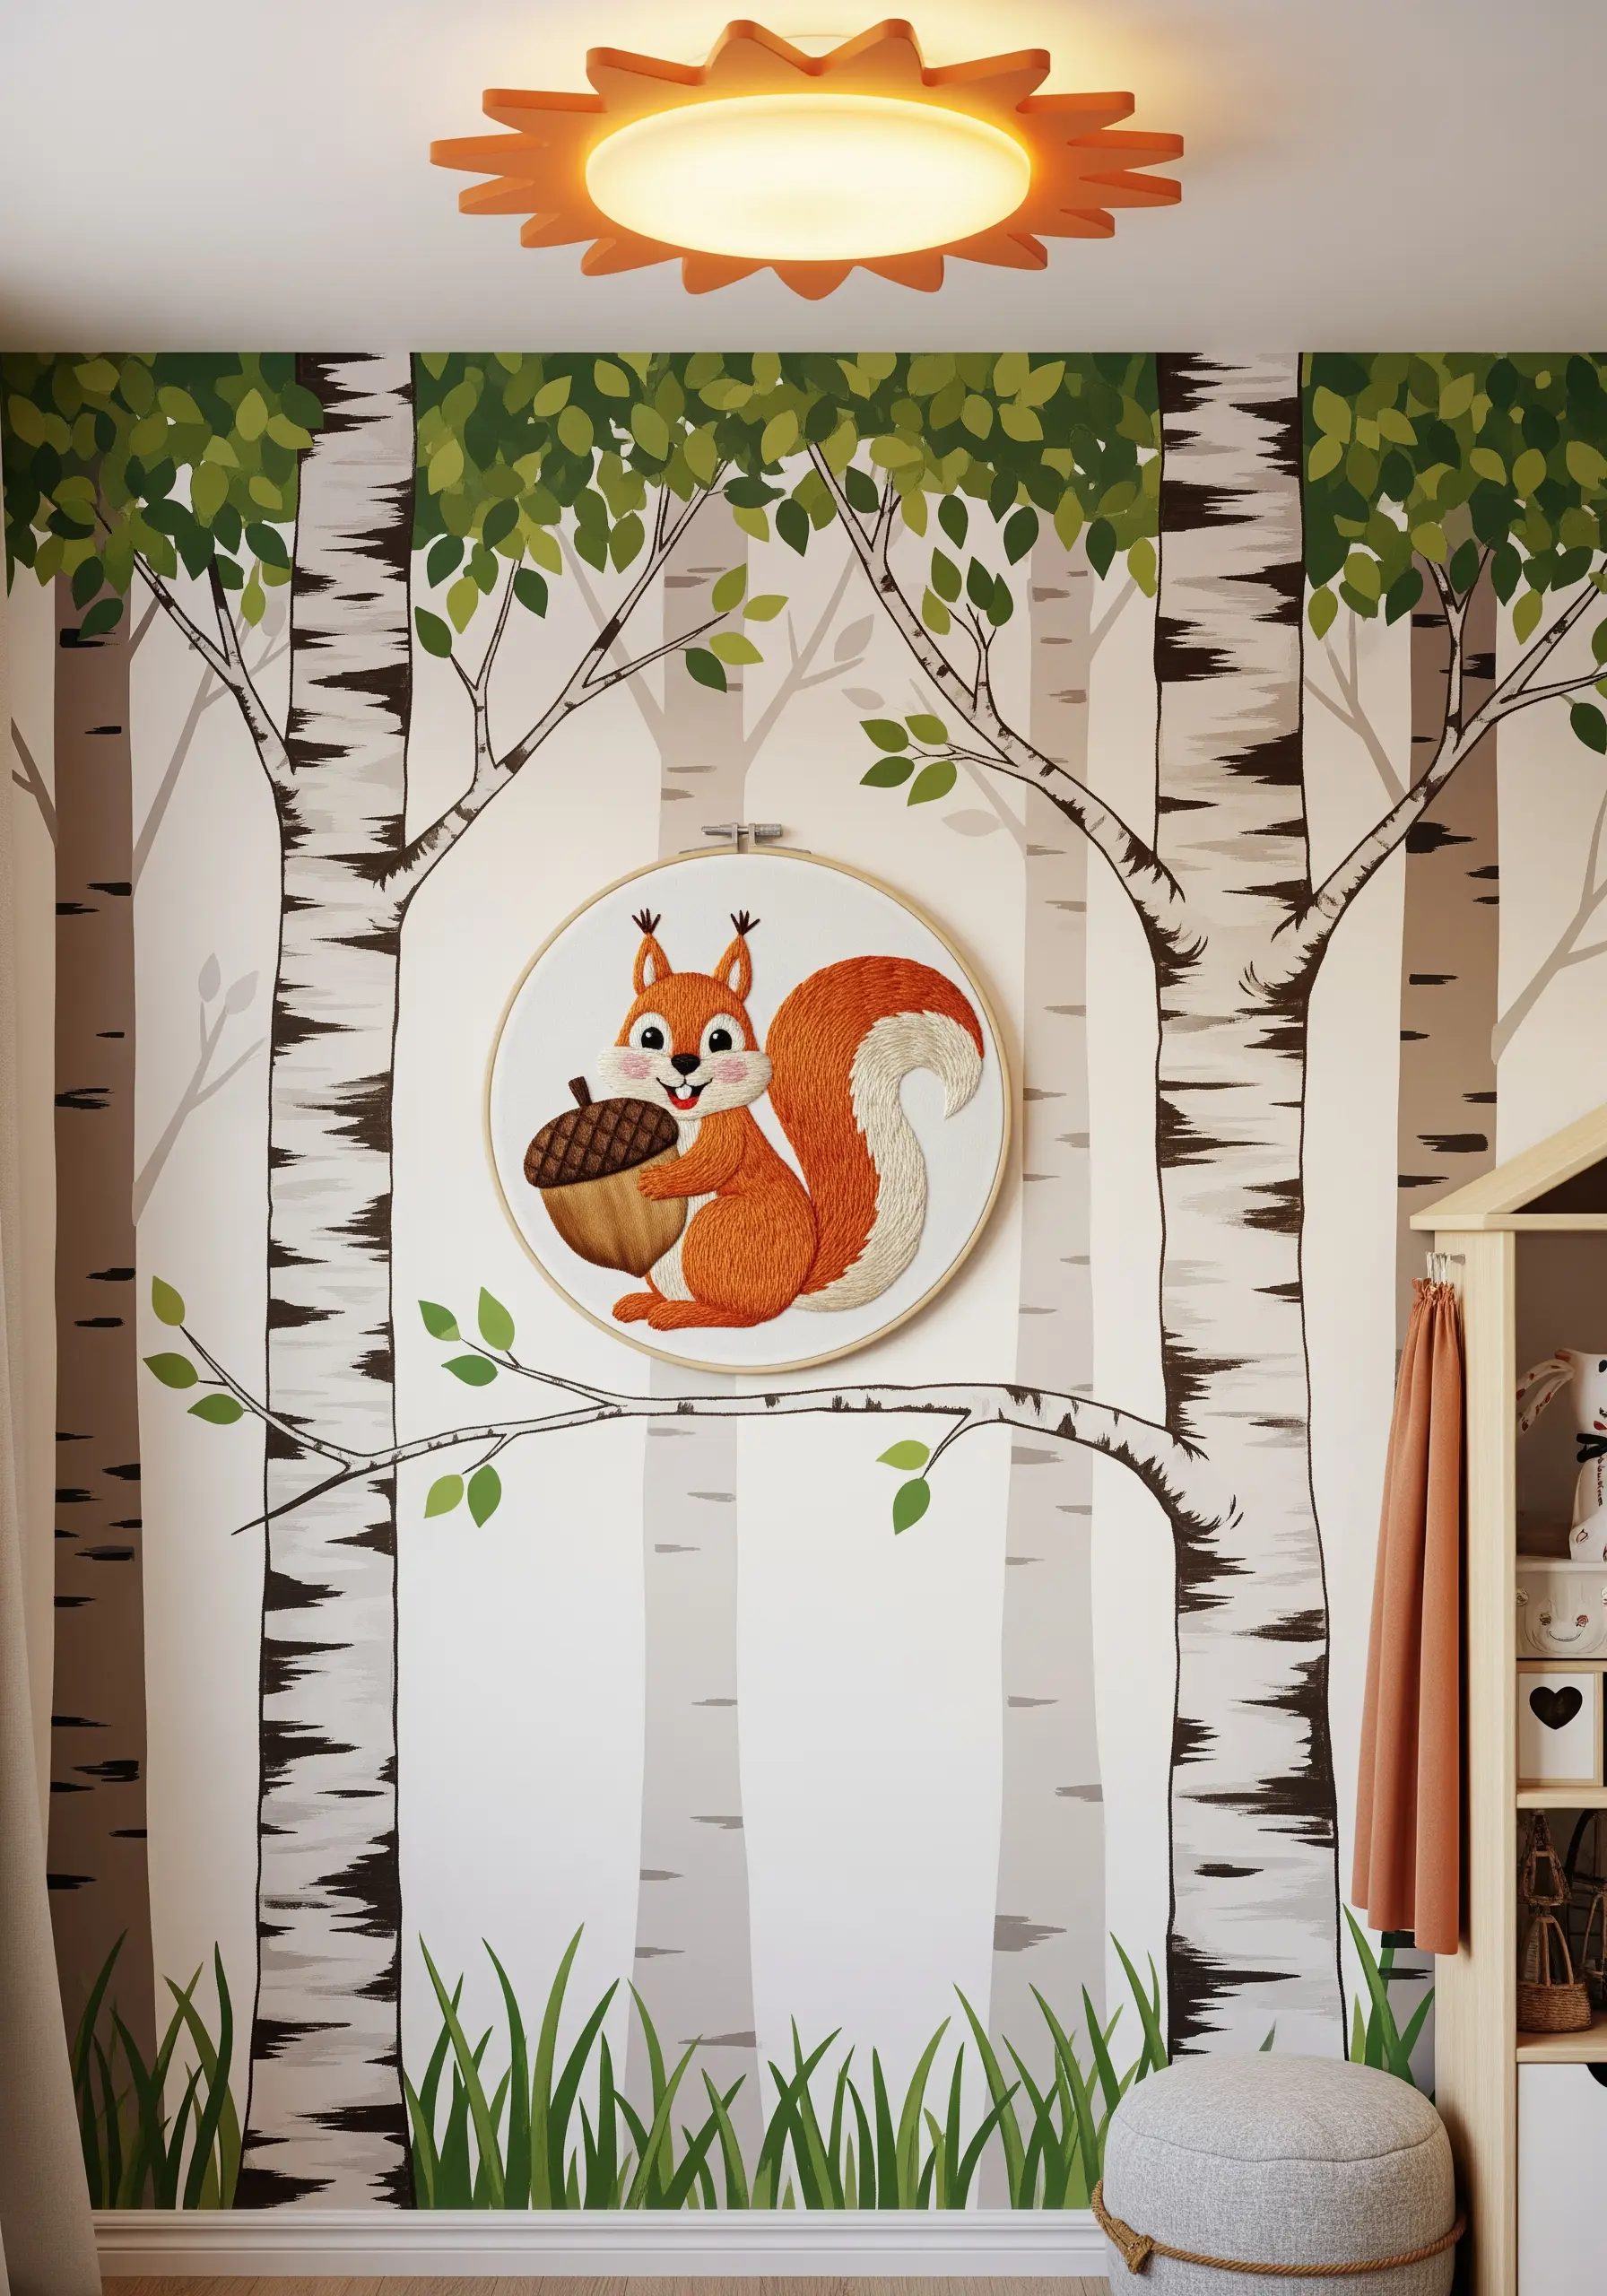
A simple satin stitch won’t do justice to a squirrel’s magnificent tail; instead, build up texture with layered fly stitches.
Start stitching at the base of the tail and work in rows toward the tip, overlapping each row slightly to build volume.
Using a slightly lighter shade of floss for the outermost stitches creates natural-looking highlights and enhances the sense of fullness.
This approach gives the tail a wispy, dimensional quality that makes it look genuinely fluffy.
21. Create a Soft, Looped Texture with Punch Needle
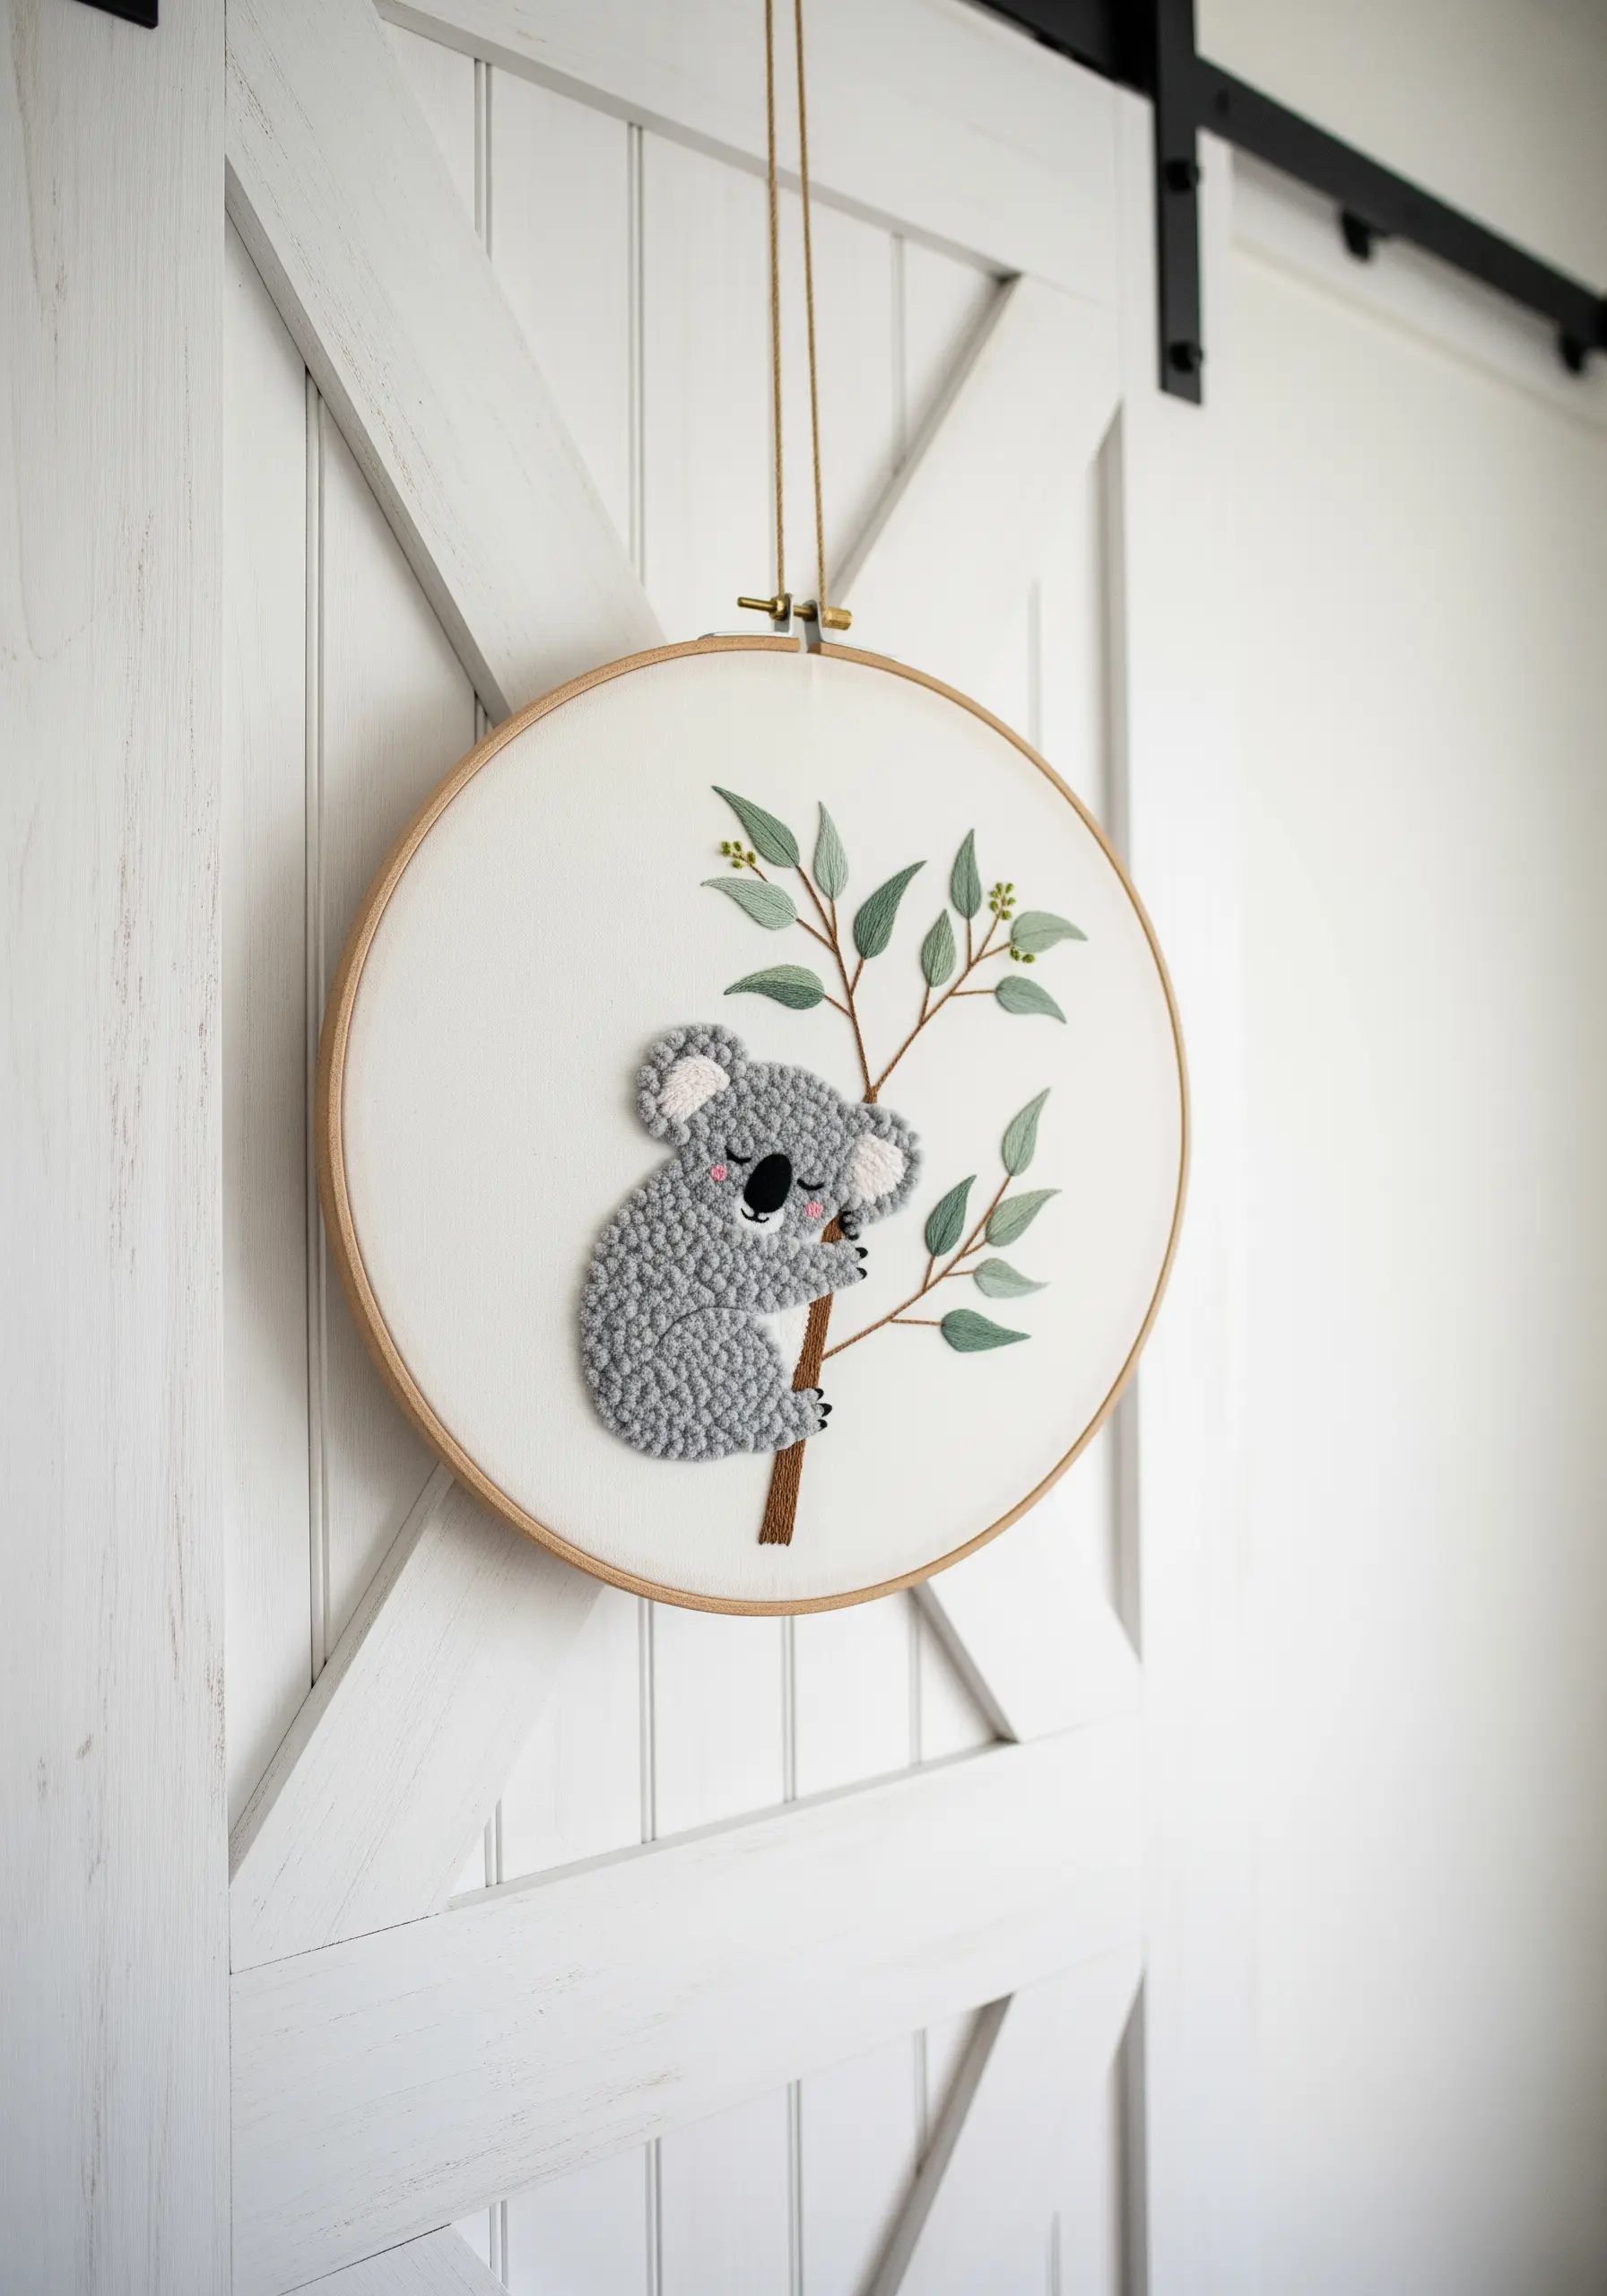
For a wonderfully soft and uniform texture, explore the world of punch needle embroidery.
This technique allows you to quickly fill the koala’s body with dense loops, creating a plush, almost carpet-like surface that’s perfect for cuddly creatures.
Once the main body is complete, you can switch back to traditional needle and thread to add the finer details, such as the satin-stitched nose and backstitched claws.
The contrast between the high-texture punch needle and the flat stitches creates a visually engaging piece.
22. Capture Expression with Detailed Thread Painting

The soul of an animal portrait is in its expression, which you can capture with precise, single-strand thread painting.
Focus on the face of the red panda, using tiny, deliberate long-and-short stitches to blend colors and define features like the eyes and snout.
Ensure your stitches follow the contours of the face to create a three-dimensional effect and a sense of realism.
This meticulous technique is what transforms a simple animal shape into a character with a story to tell, much like in abstract thread painting styles.


