

A simple canvas tote bag is more than just a practical accessory; it’s a blank surface waiting for your personal story. When you add embroidery, you transform it from a generic object into a quiet statement, a piece of art that carries your favorite things—both inside and out.
For those of us who find ritual and comfort in the aroma of coffee, stitching these motifs onto a tote is a beautiful way to honor that daily pleasure. It’s not just about the final design, but about the slow, meditative process of bringing it to life, one stitch at a time.
Here, you’ll find ideas that go beyond simple outlines. We’ll explore how to use thread to create texture, light, and dimension—how to make a coffee bean feel rounded, a croissant look flaky, and steam appear to rise. Let these designs inspire you to pick up your needle and create something that feels uniquely yours.
1. Master the Latte Art Swirl
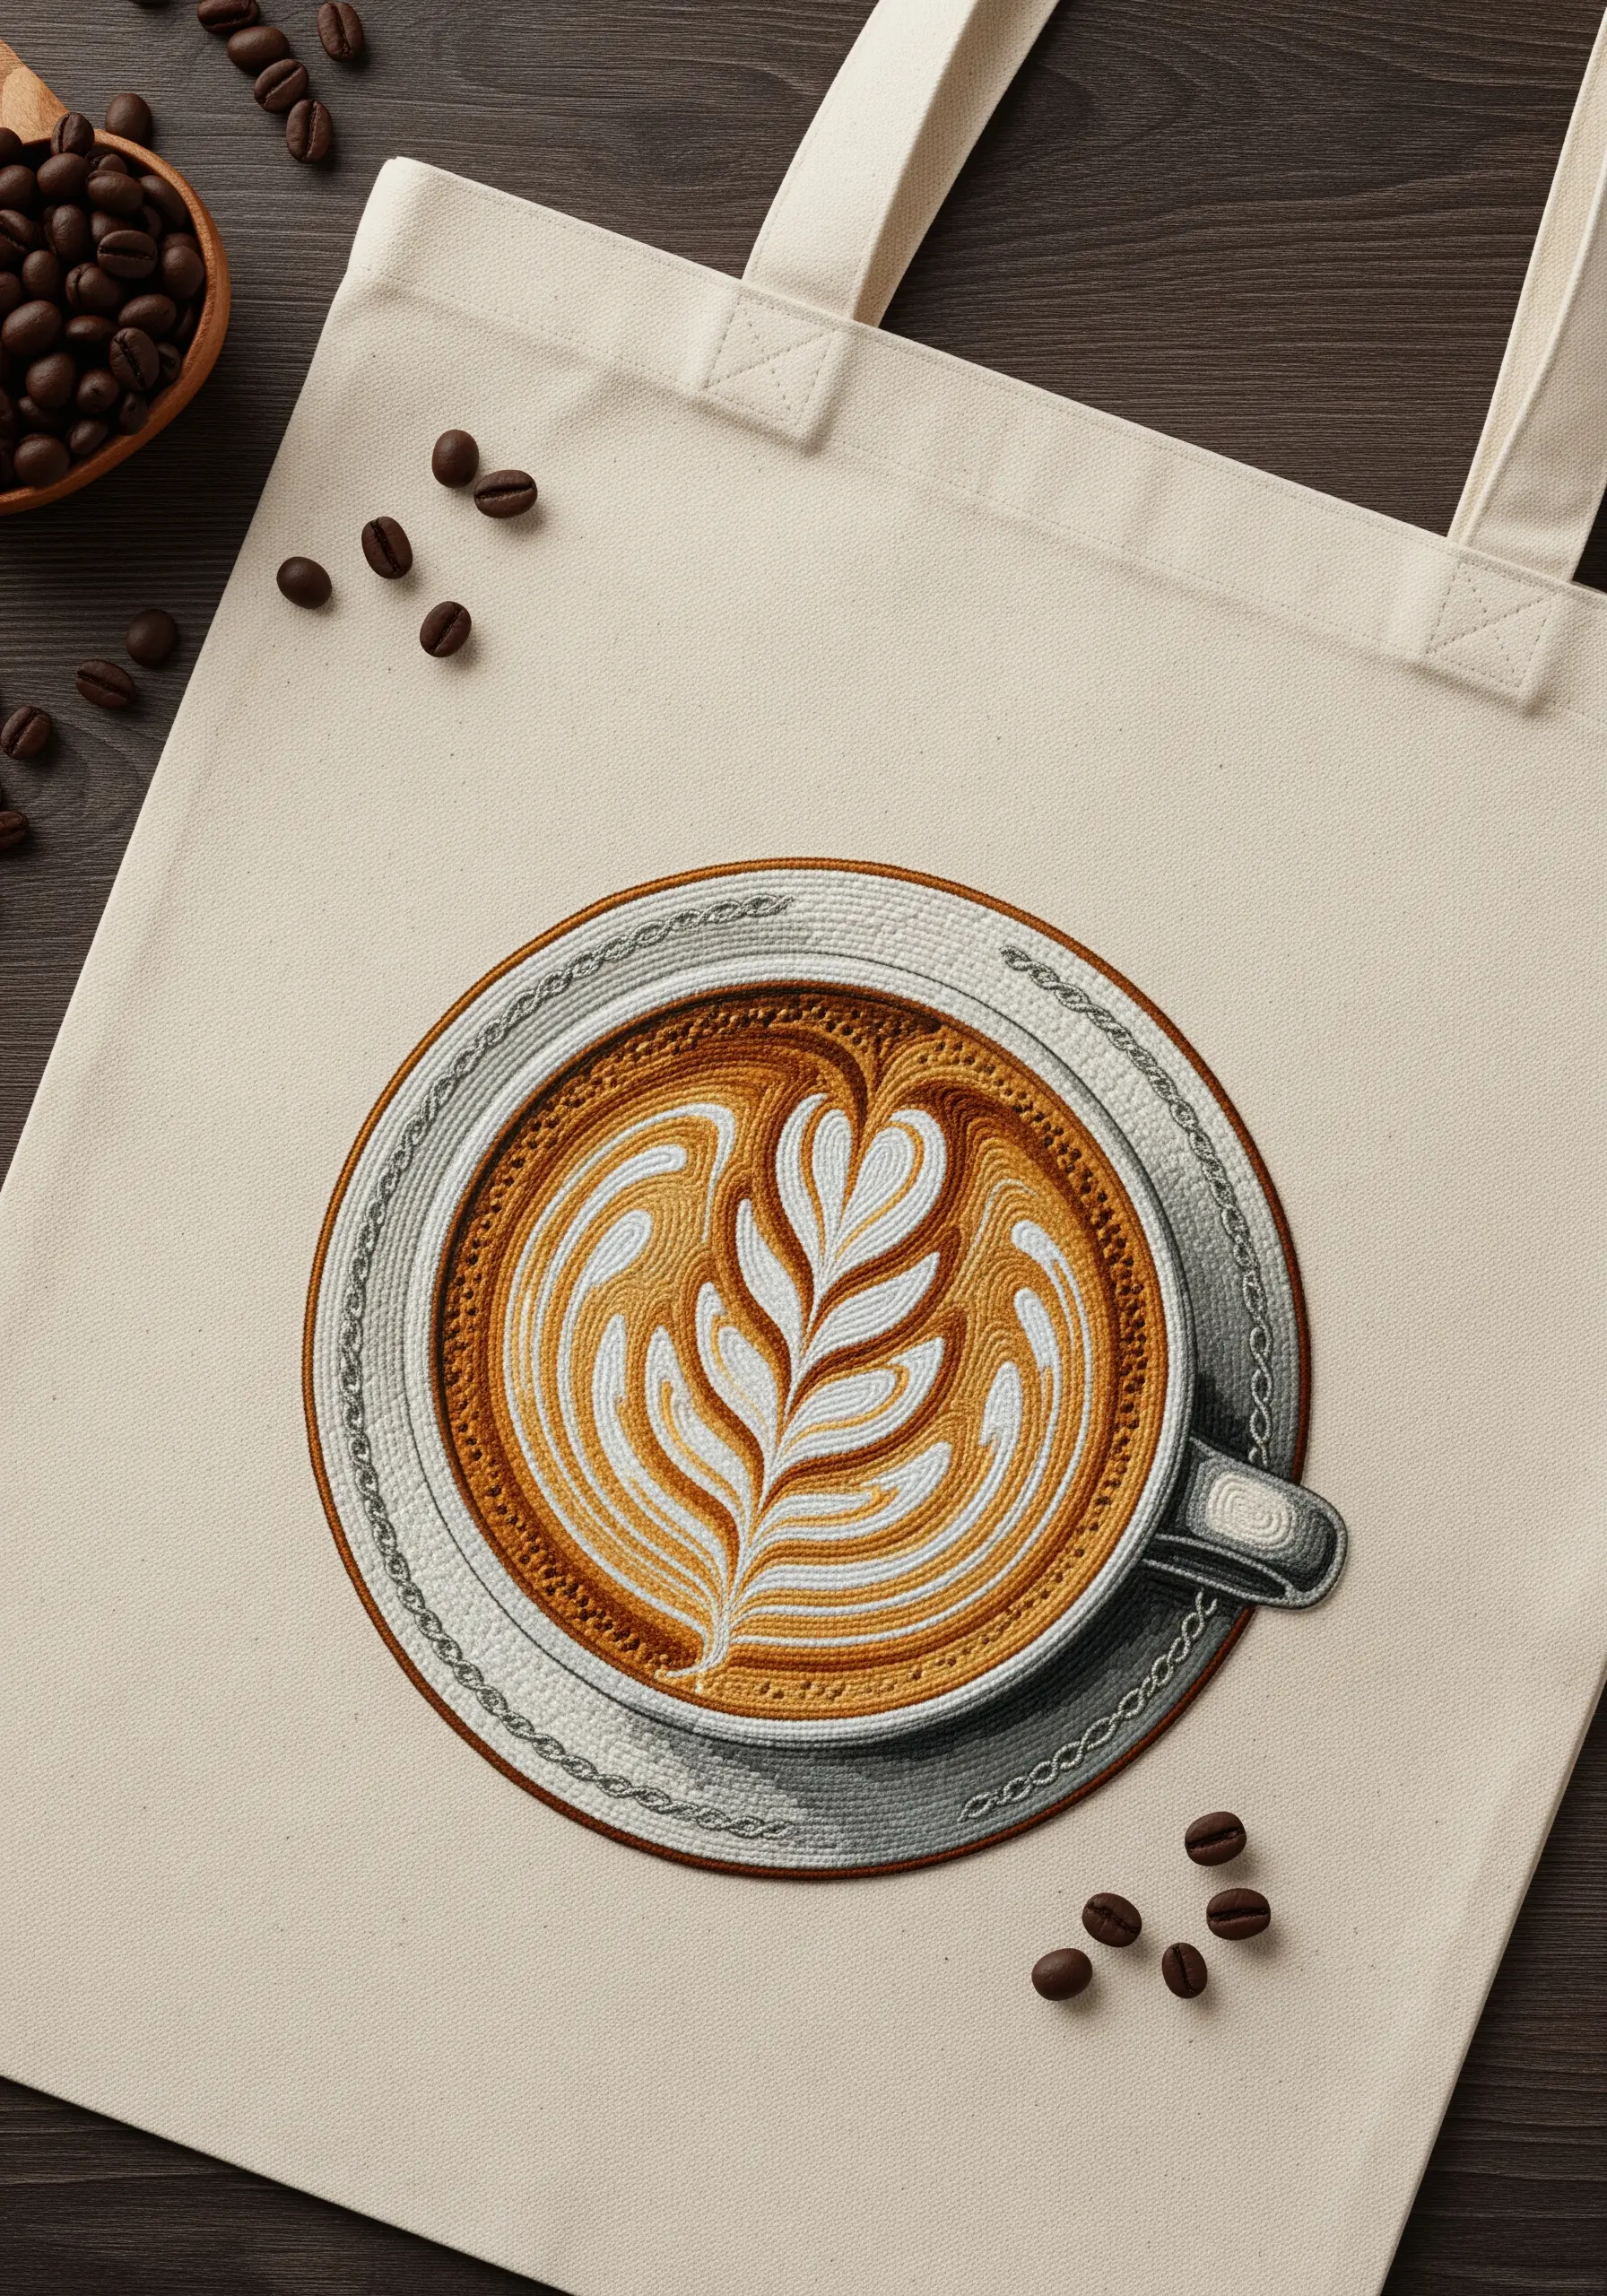
Capture the creamy texture of latte art by mastering the direction of your satin stitch.
Instead of stitching straight across, follow the curved lines of the milk foam, angling your stitches to mimic how a barista pours.
Use a single strand of off-white thread for the finest details and a slightly darker beige for the shadows to create depth.
For the espresso, use two shades of brown and blend them with a long-and-short stitch to achieve a rich, liquid-like gradient.
2. Stitch a Botanical Coffee Branch

Bring the coffee plant to life with thread painting techniques that capture variegation in the leaves.
Use at least three shades of green—from a pale lime to a deep olive—and blend them using a long-and-short stitch to create natural-looking stripes.
For the coffee cherries, use a padded satin stitch to give them a plump, three-dimensional feel. First, create a small satin stitch underlayer, then stitch over it in the opposite direction with a glossy red thread.
Add sharp vein details with a single strand of dark green using a simple backstitch to complete the realistic effect.
3. The Modern Pour-Over Outline
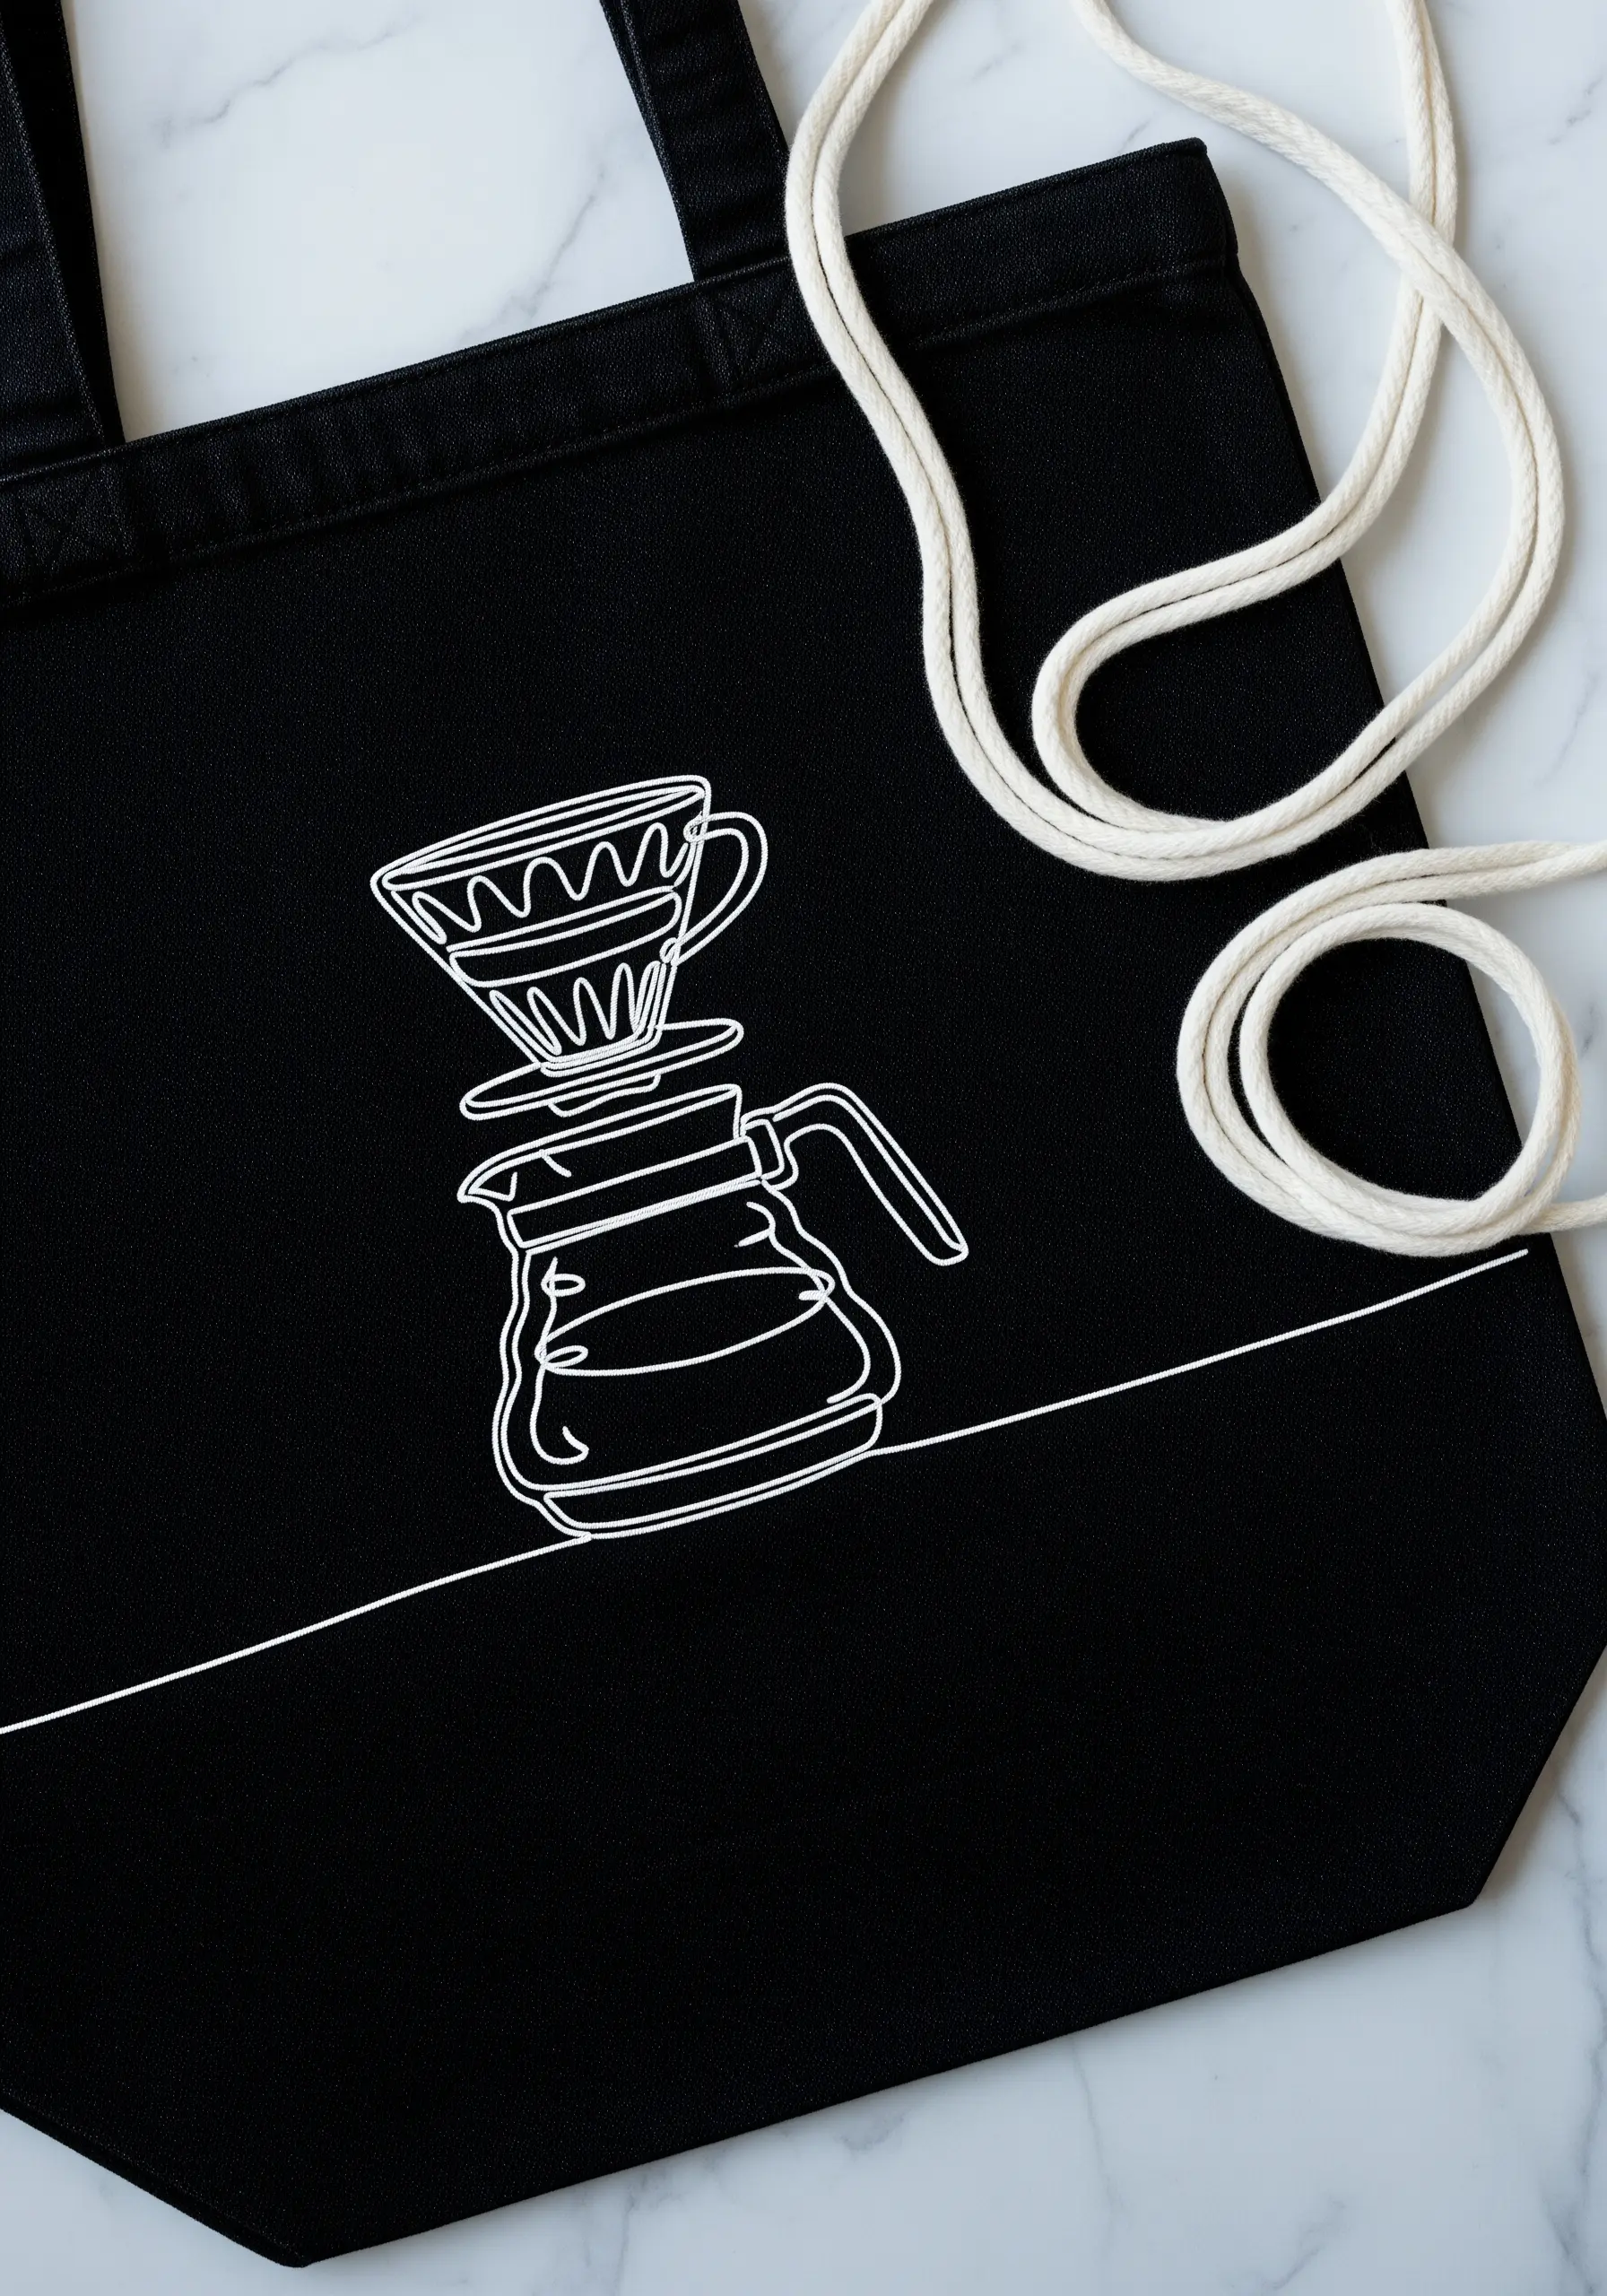
Embrace minimalism by focusing on the integrity of a single, continuous line.
A whipped backstitch or a stem stitch will give your outline a smoother, more substantial appearance than a standard backstitch, creating a rope-like finish that stands out.
Choose a high-contrast thread, like bright white on a black tote, to make the modern line art feel intentional and graphic.
Using a three-strand floss will provide the perfect weight—delicate enough for detail but bold enough to make a statement.
4. Illustrate a Metallic Moka Pot
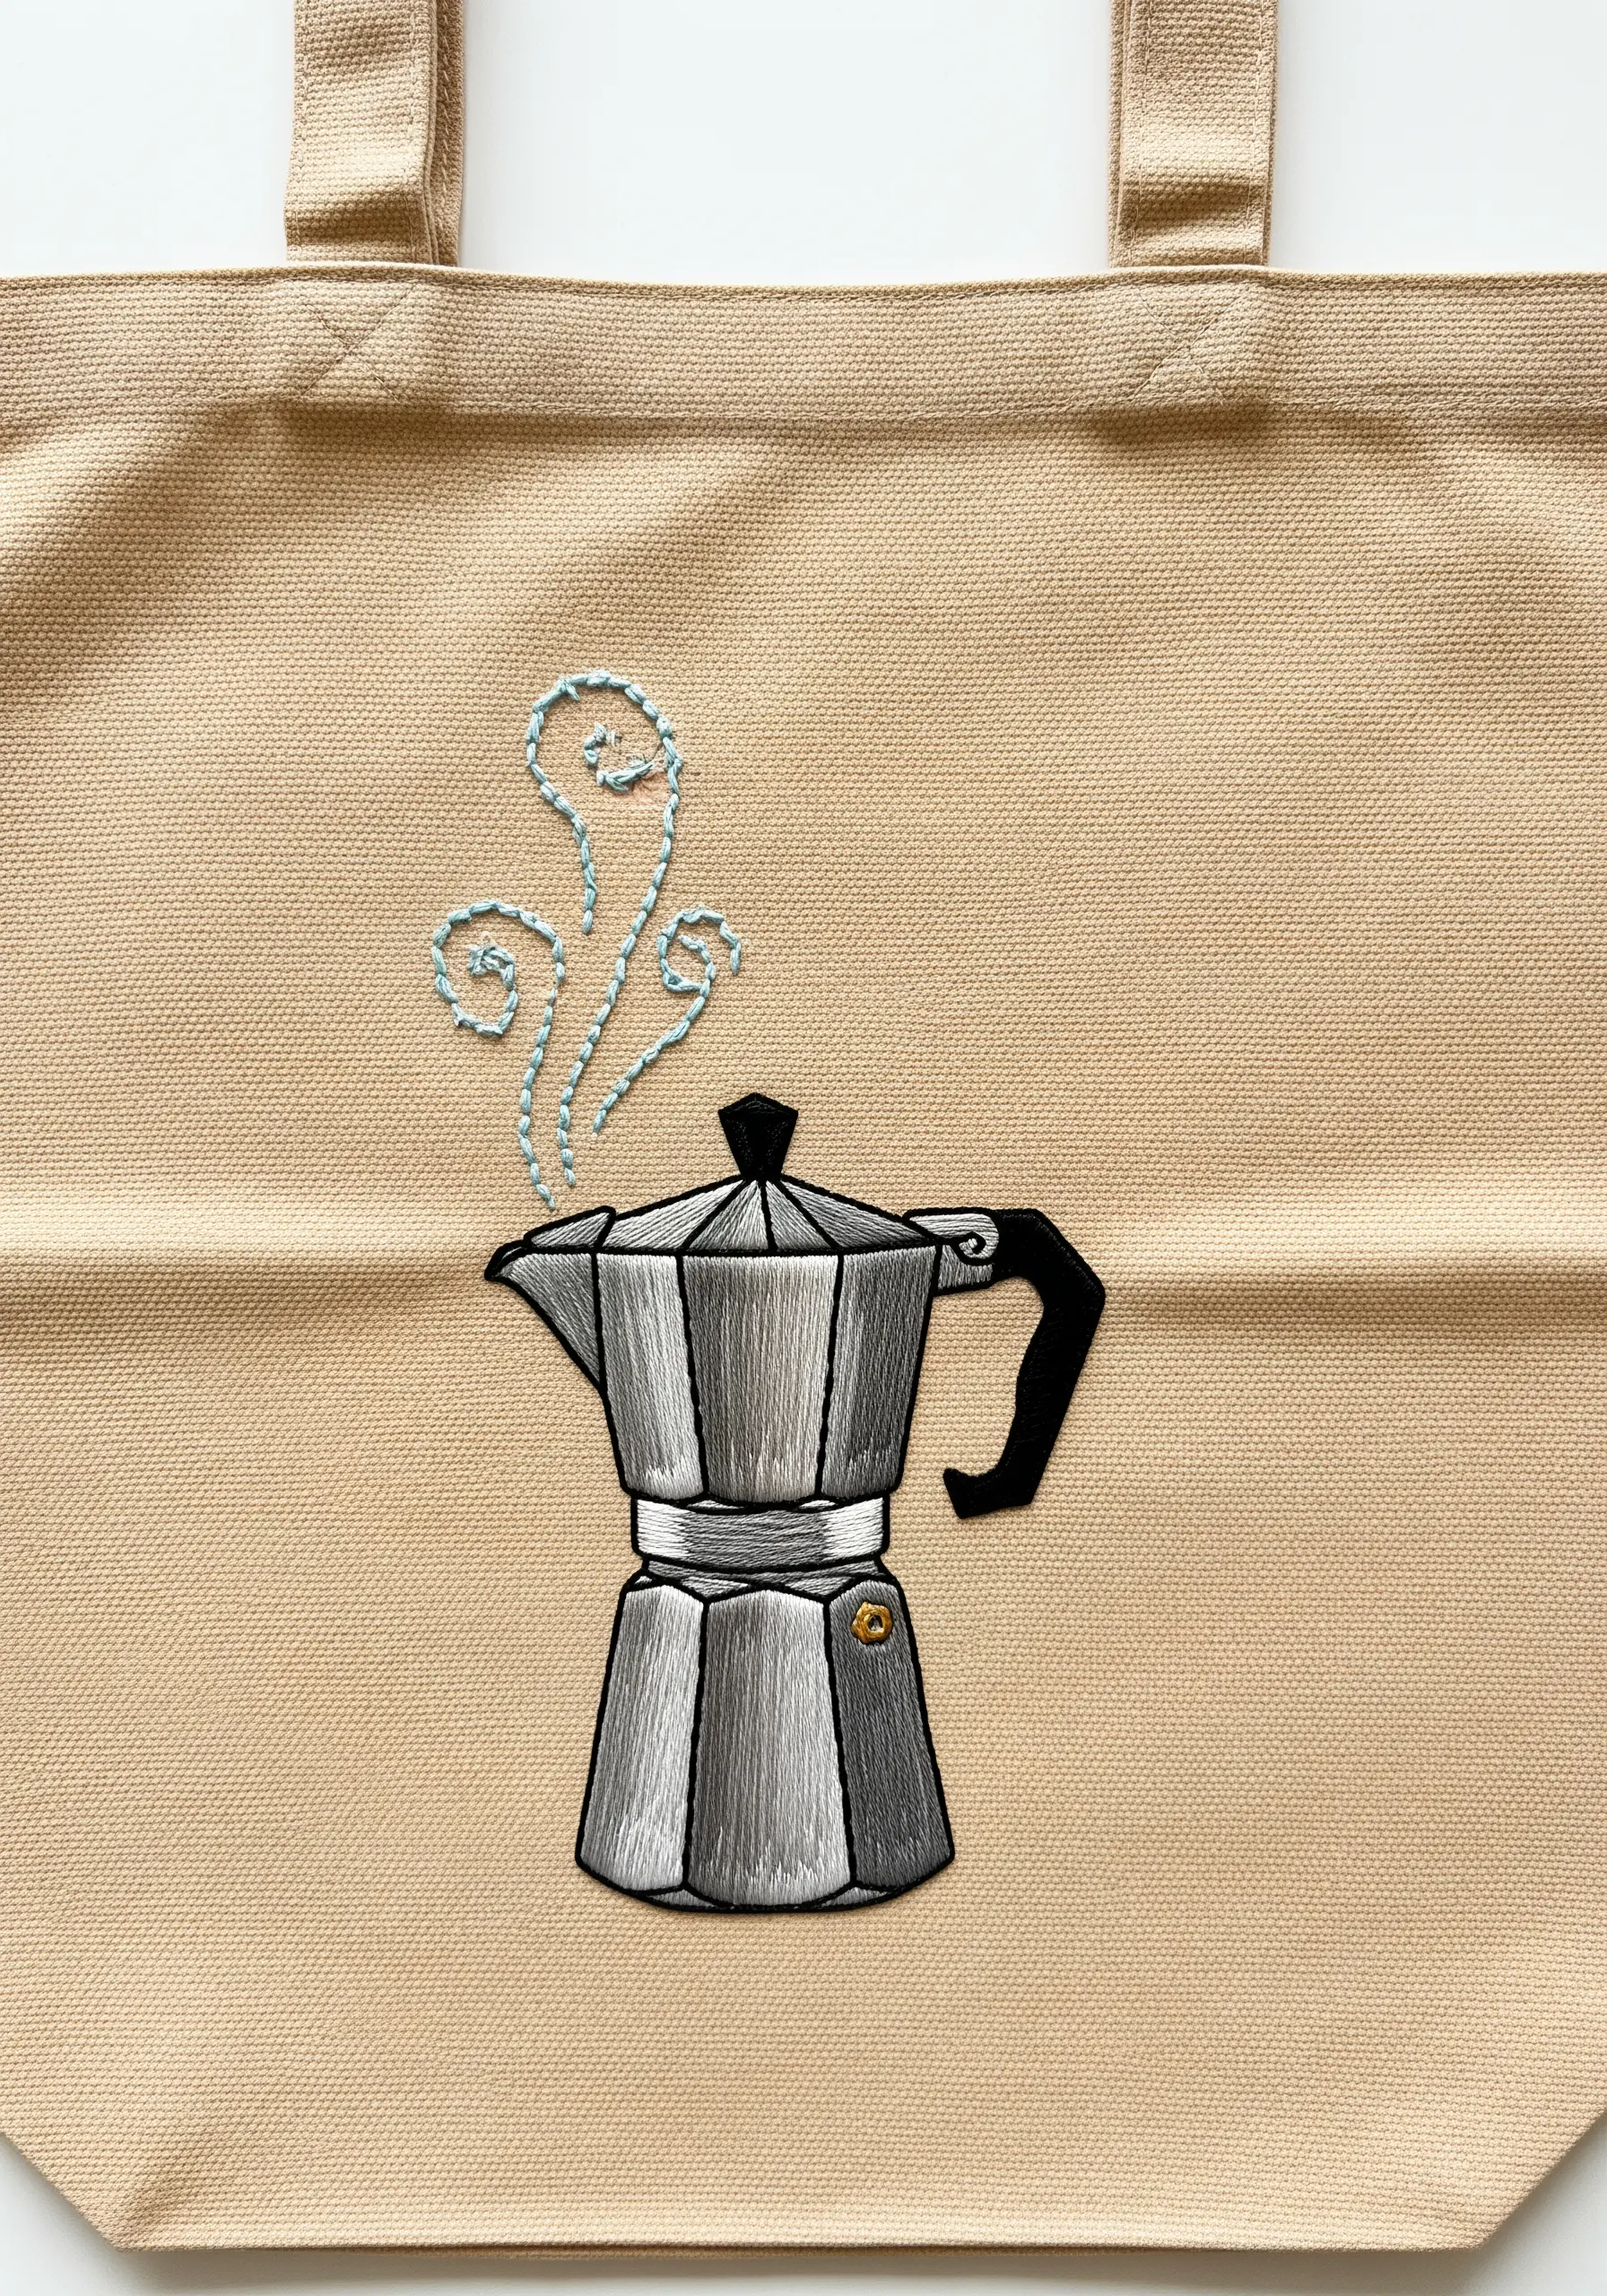
Create the illusion of a metallic sheen using nothing more than carefully chosen gray threads.
Use four to five shades of gray, from near-white to charcoal, and fill the sections of the Moka pot with long-and-short stitches.
Place the lightest gray threads where light would hit directly, creating sharp highlights that mimic reflection. This technique gives the object form and dimension.
For the steam, use a light blue thread and make scattered French knots or seed stitches that drift upward, giving it a whimsical, airy quality.
5. Stitch Bold Typography
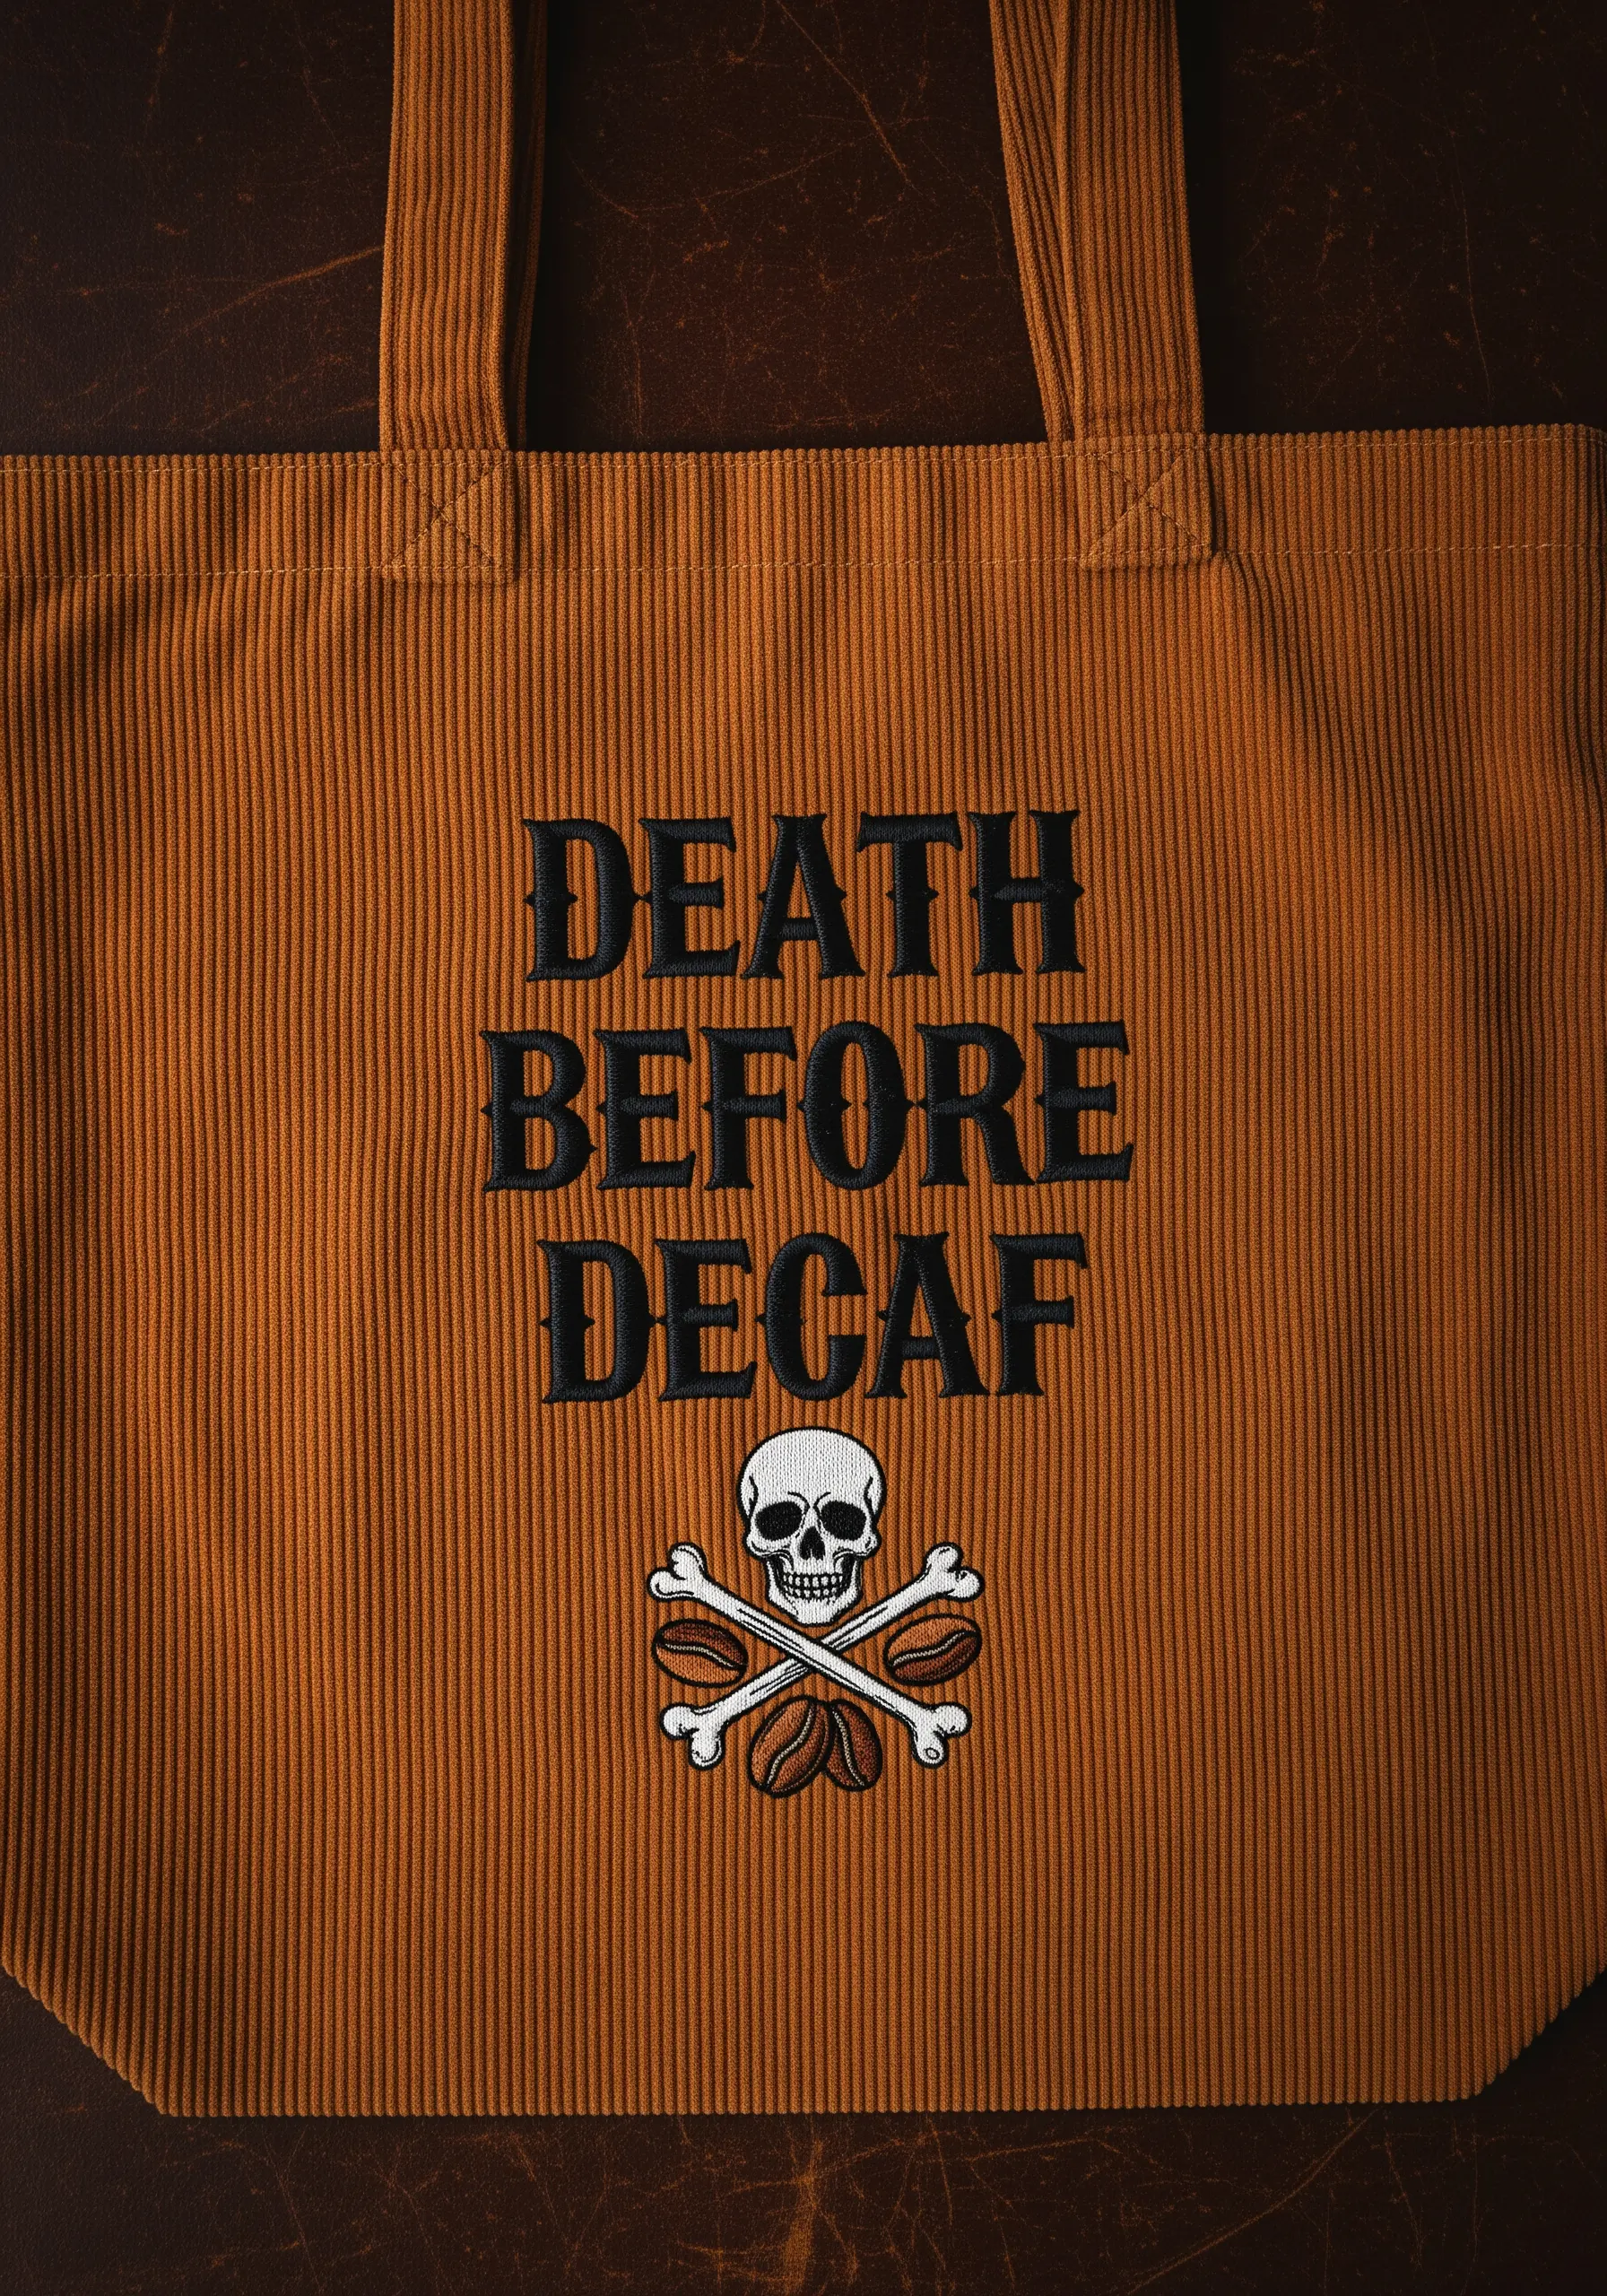
Make your text pop by using a padded satin stitch for a raised, professional look.
First, outline your letters with a split stitch. Then, fill the inside of the outline with horizontal satin stitches to create a padded base.
Finally, stitch your final layer of satin stitch vertically over the padding. This two-layer technique prevents the fabric from showing through and gives the letters a clean, dimensional edge.
Choose a thread color that contrasts sharply with the corduroy fabric to ensure your message is crisp and readable.
6. Design a Coffee Bean Pattern
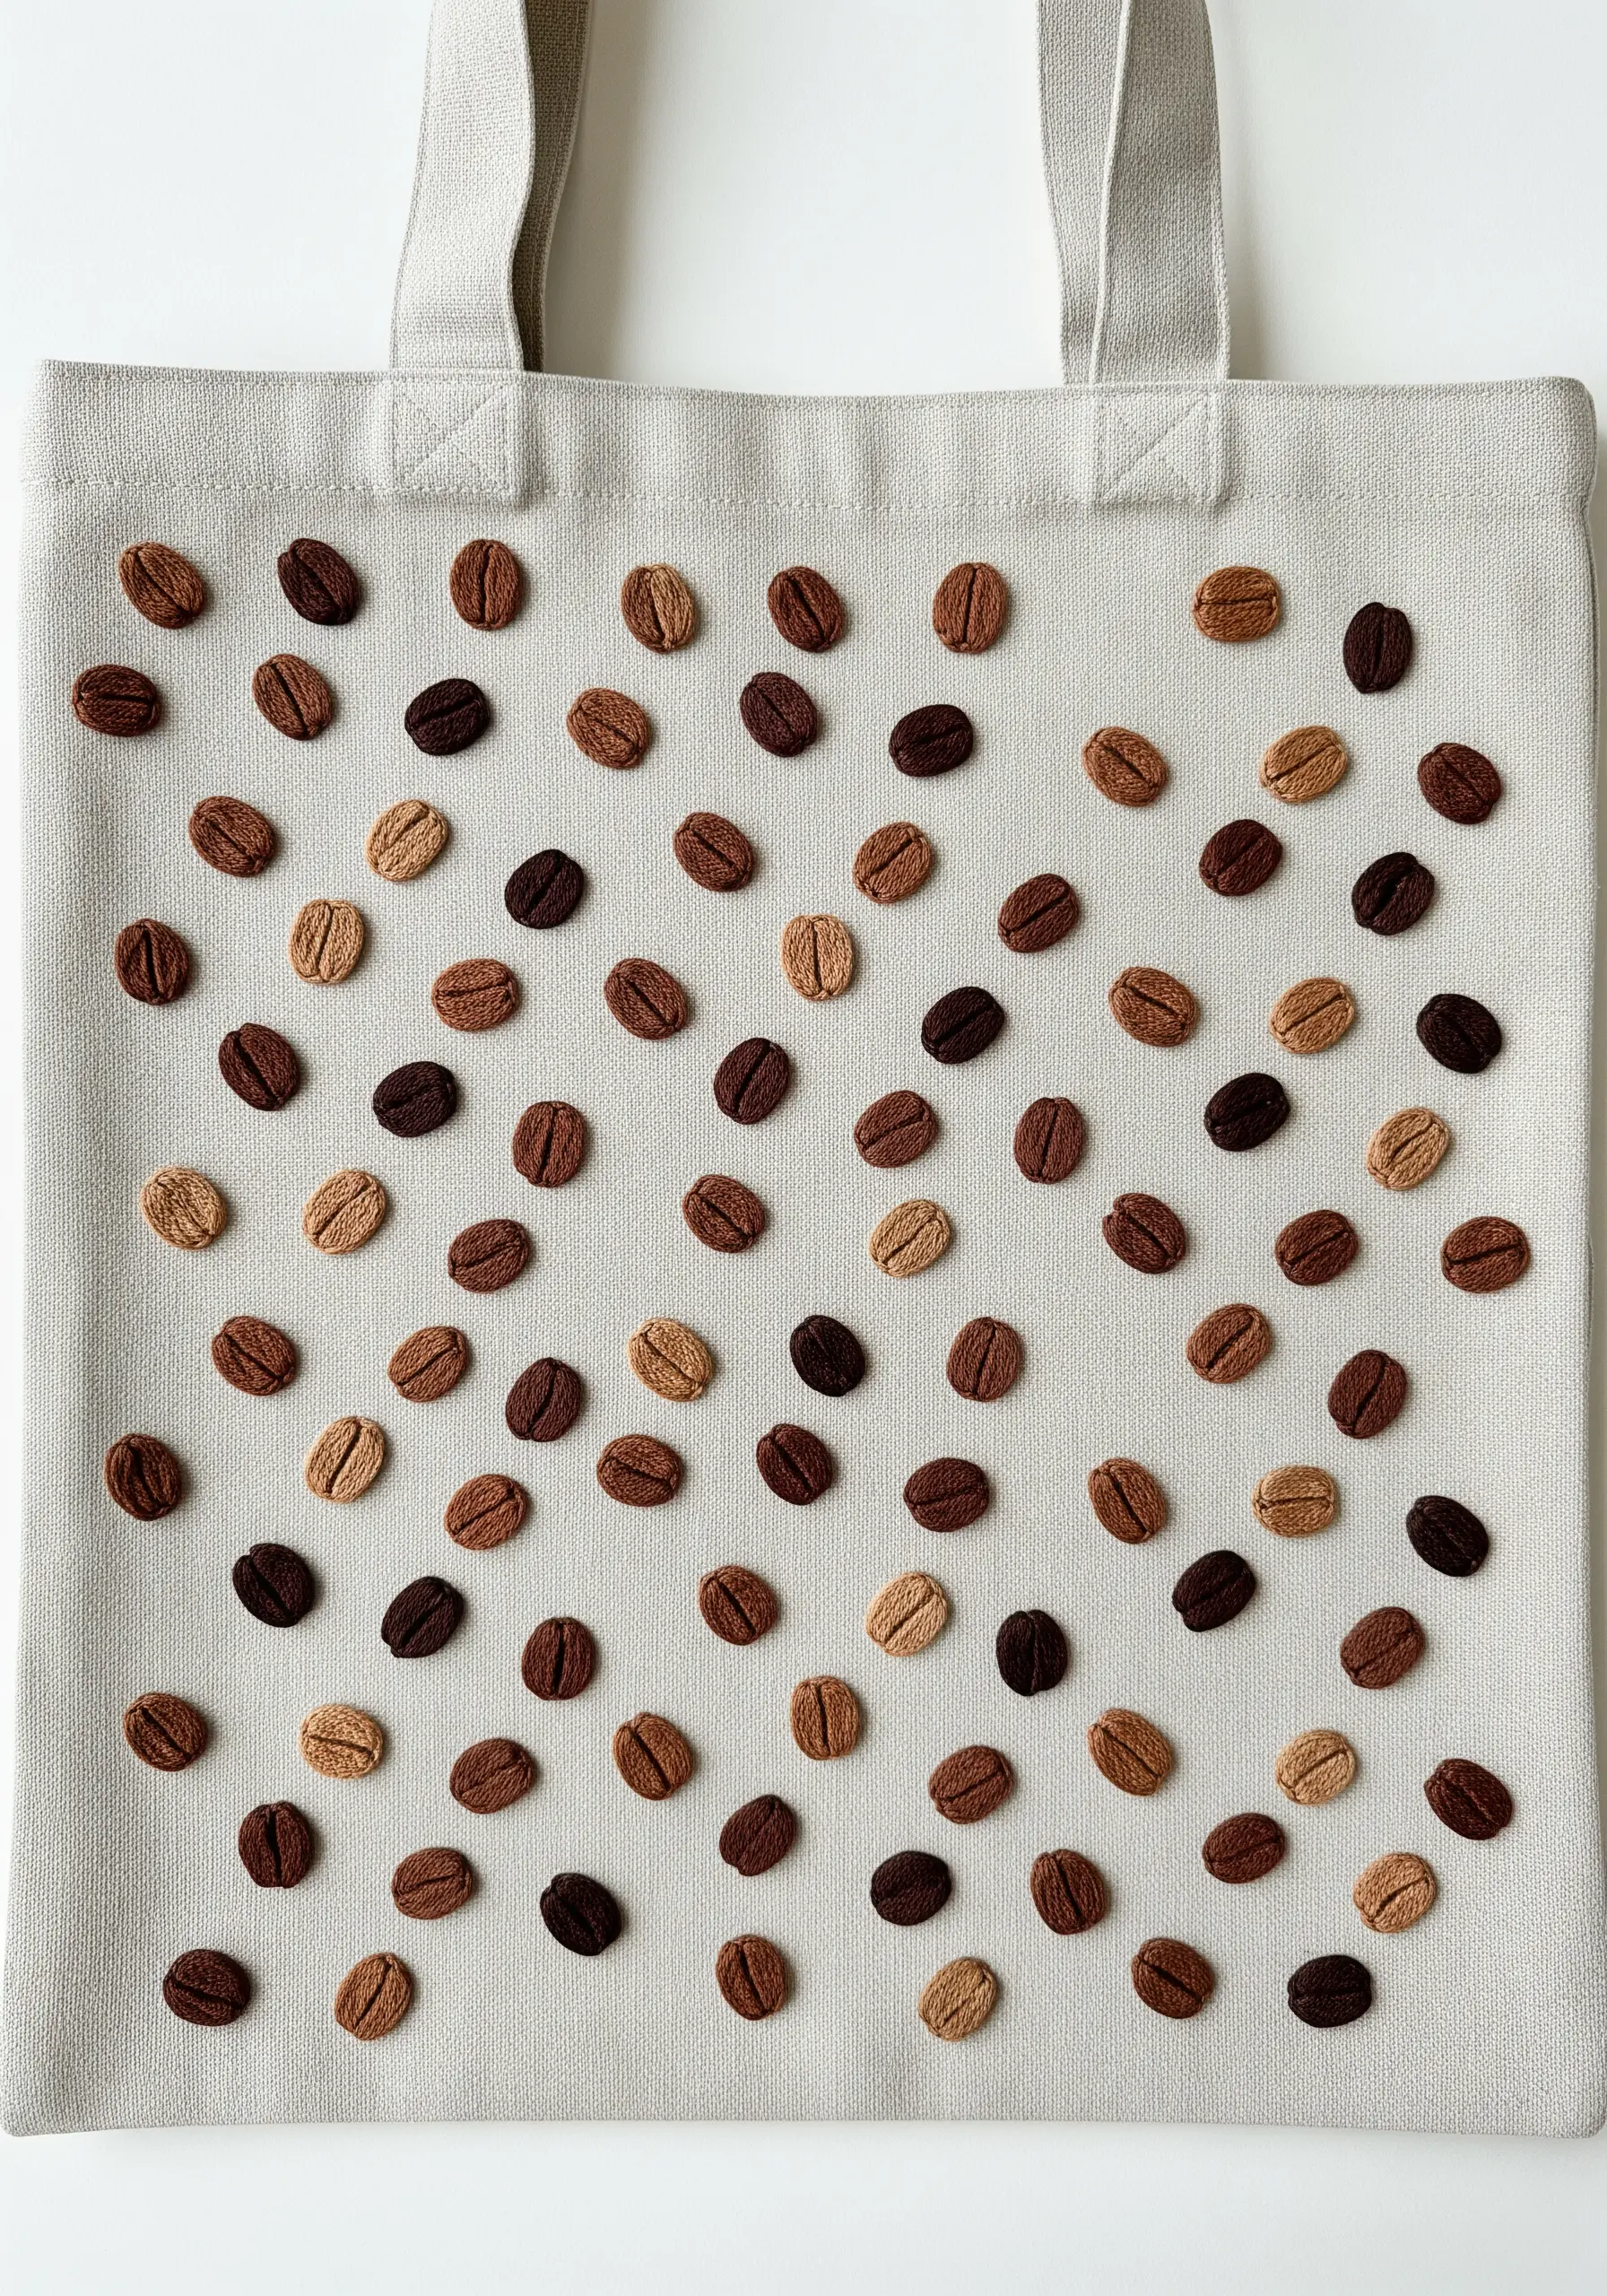
Transform your tote with a repeating pattern of simple coffee beans.
For each bean, use a padded satin stitch to create a raised, tactile shape. A few foundational stitches in the center before covering with the final layer will give them a satisfying plumpness.
Alternate between three or four shades of brown—from light roast to dark espresso—and scatter them randomly to create a dynamic, visually interesting surface.
This is a perfect project for using up leftover brown threads and creating beautiful, small embroidery designs that feel cohesive.
7. Illustrate a Parisian Café Scene
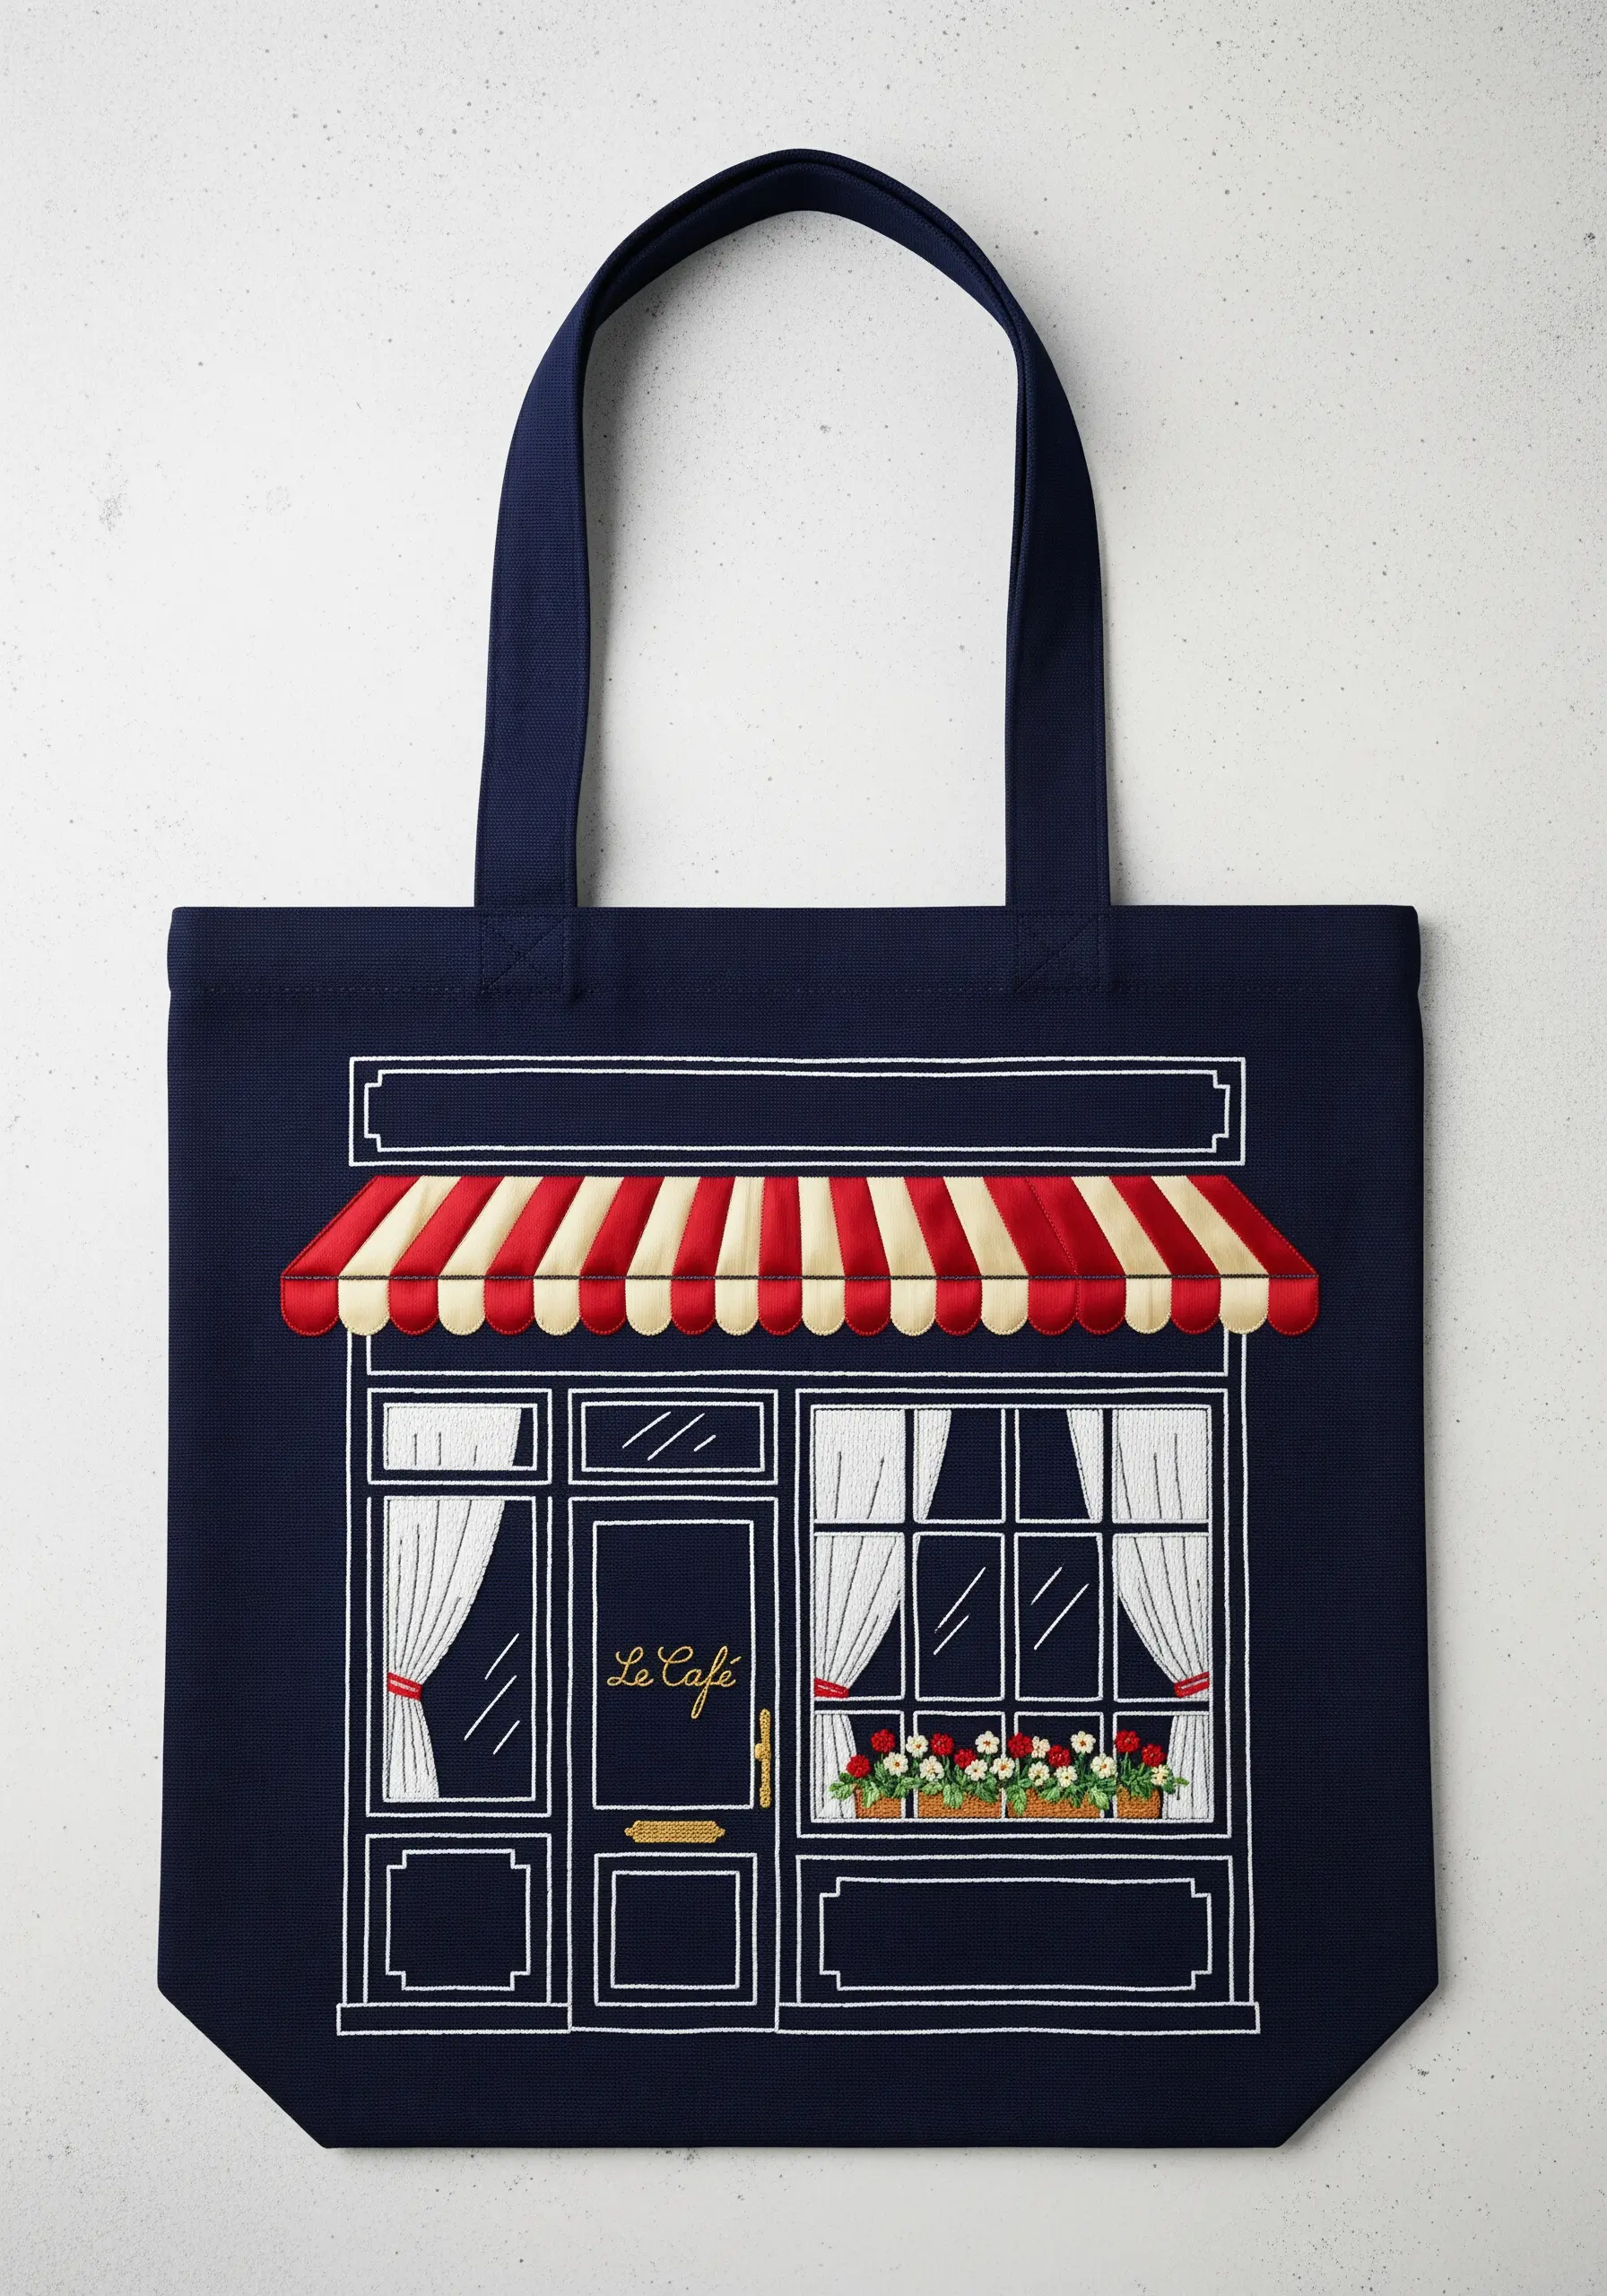
Capture the charm of a café facade by focusing on clean architectural lines and a strategic pop of color.
Use a simple backstitch with two strands of white floss for all the linear details—windows, doors, and masonry. This keeps the design looking crisp and delicate against the dark navy fabric.
Introduce color only in the awning, using a dense satin stitch in alternating red and cream. This limited color palette draws the eye and makes the entire design feel more intentional and chic.
Tiny French knots for the flowers in the window box add a final touch of texture and detail.
8. Create a Flaky Croissant Texture
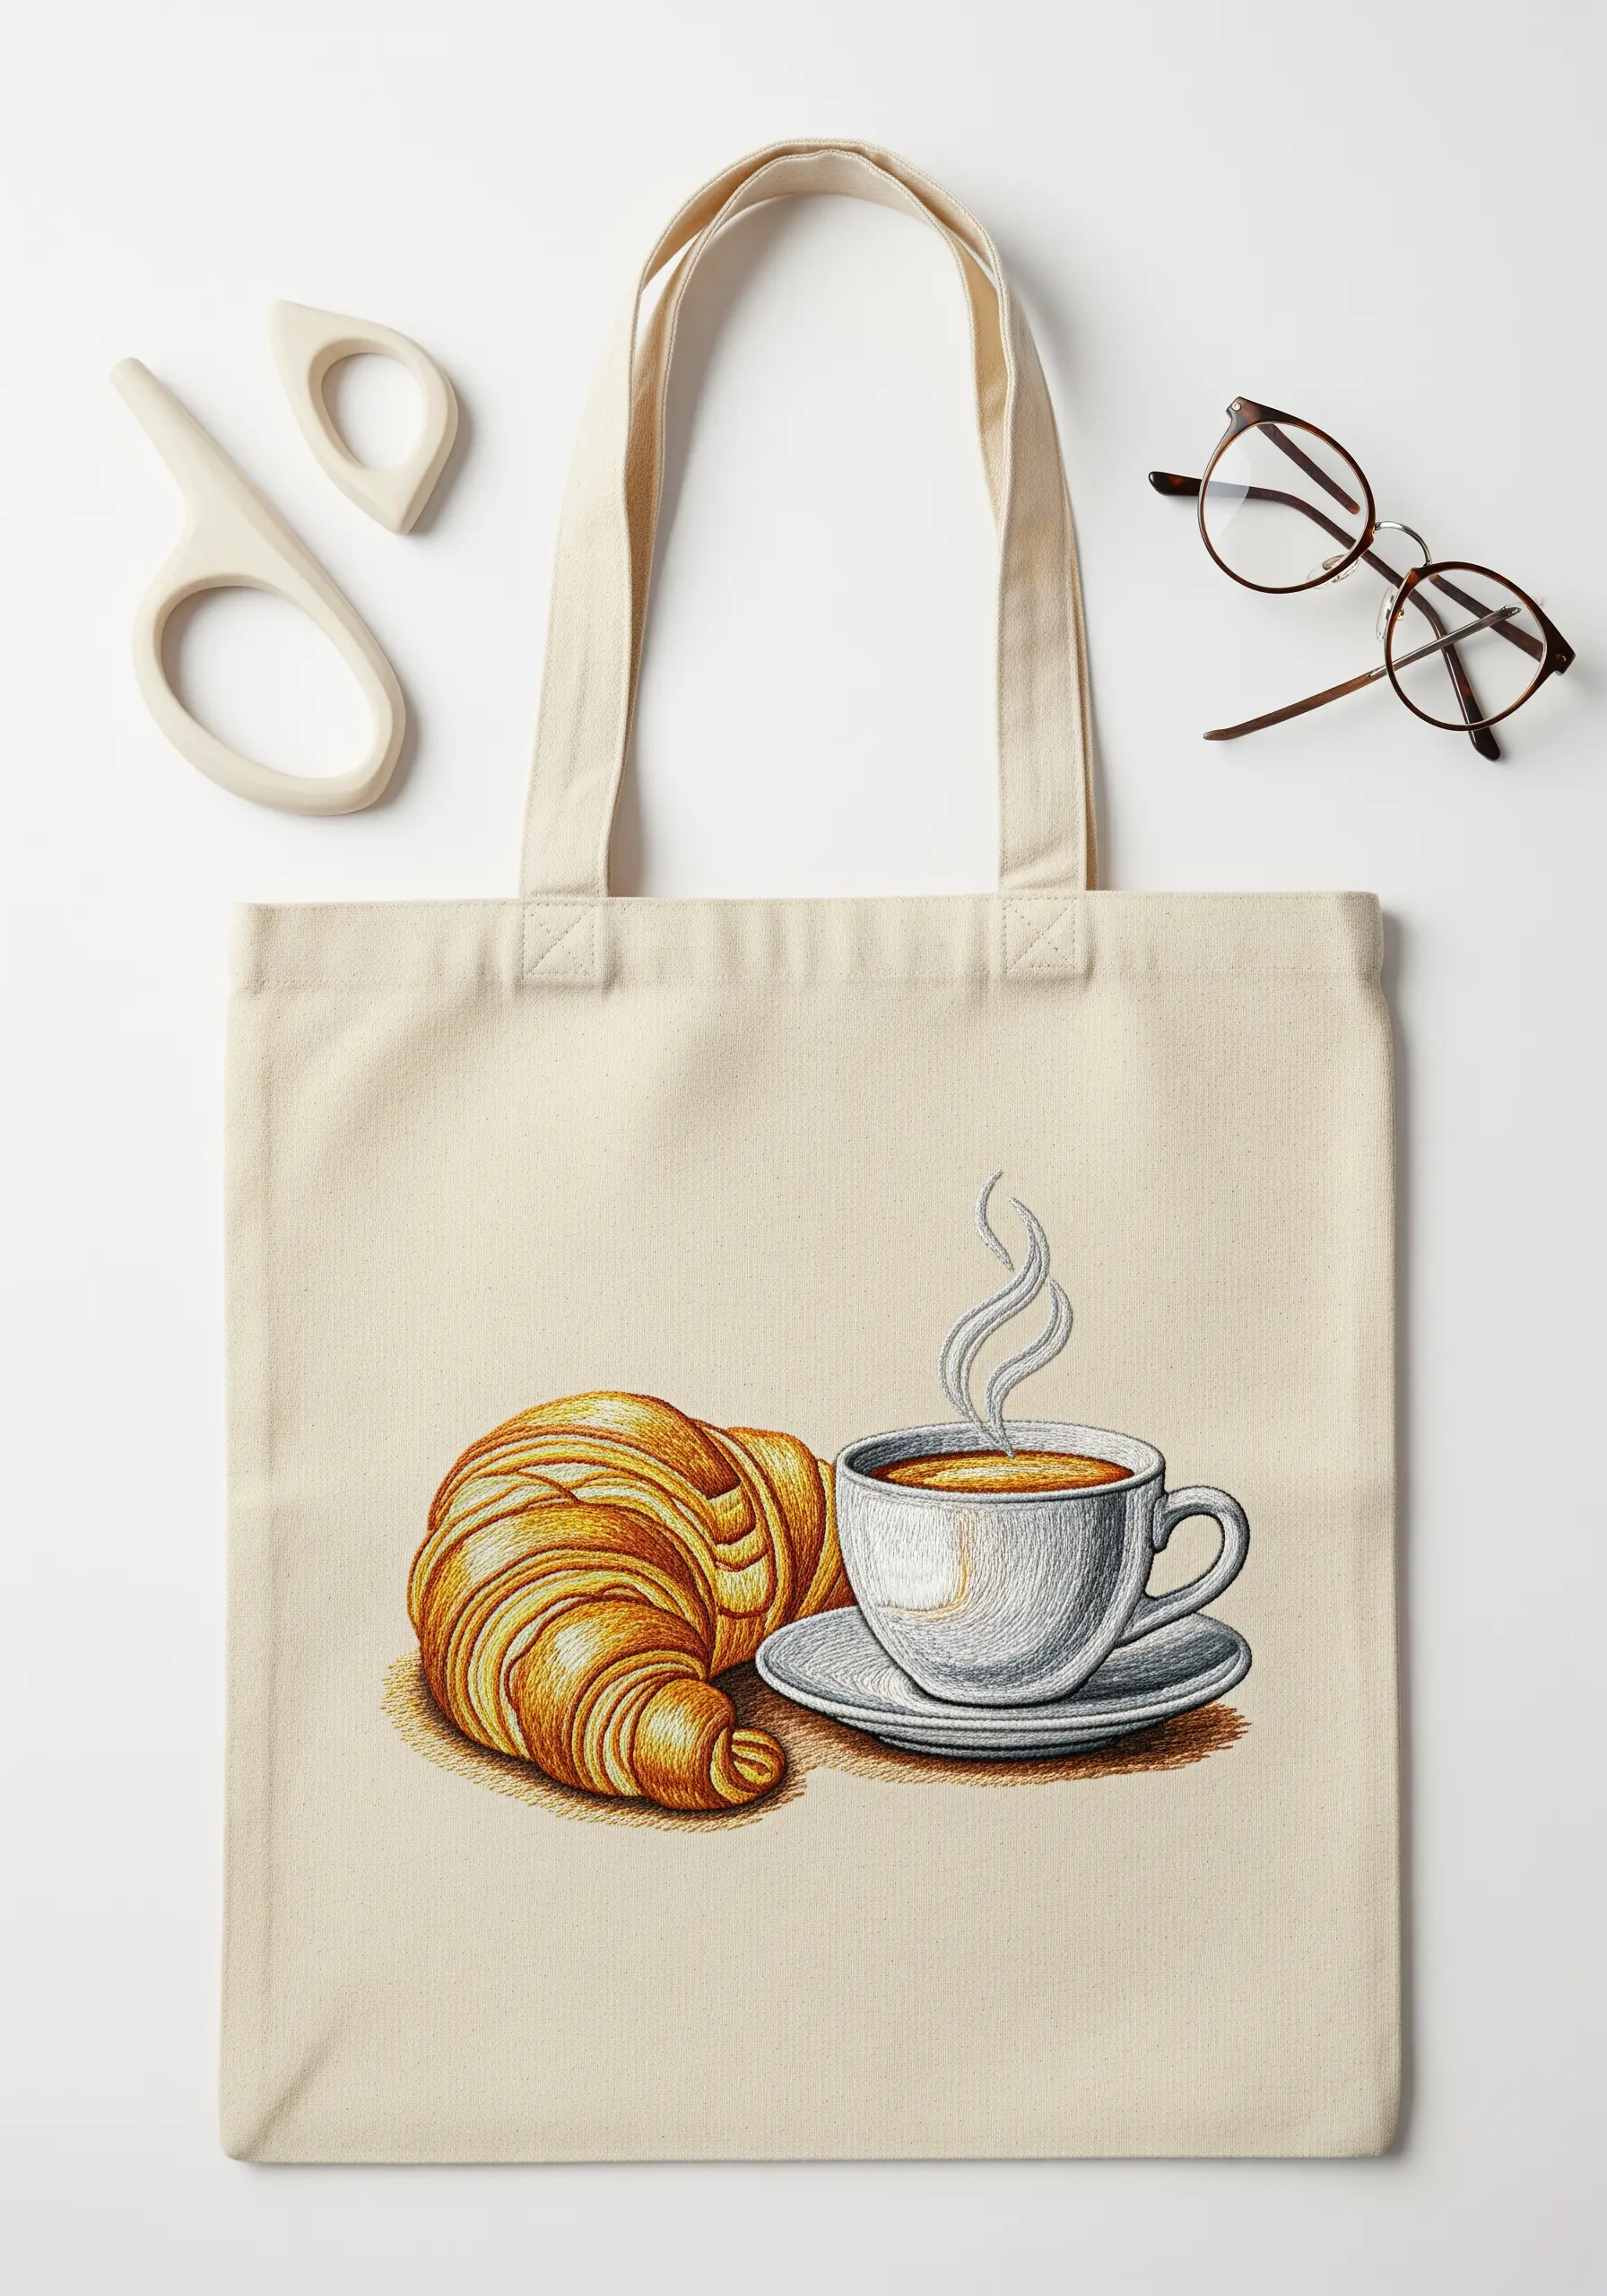
Recreate the delicate, buttery layers of a croissant through strategic thread painting.
Use a split stitch to fill the main shape, angling your stitches to follow the croissant’s curves. This creates a base texture that suggests layers.
Then, go over the base with single strands of thread in golden yellow, ochre, and deep brown. Use long, sparse stitches to act as highlights and shadows, mimicking the flaky, baked crust.
This approach adds realism without overcrowding the design, letting the texture of the stitches do the work.
9. Stitch the Caffeine Molecule
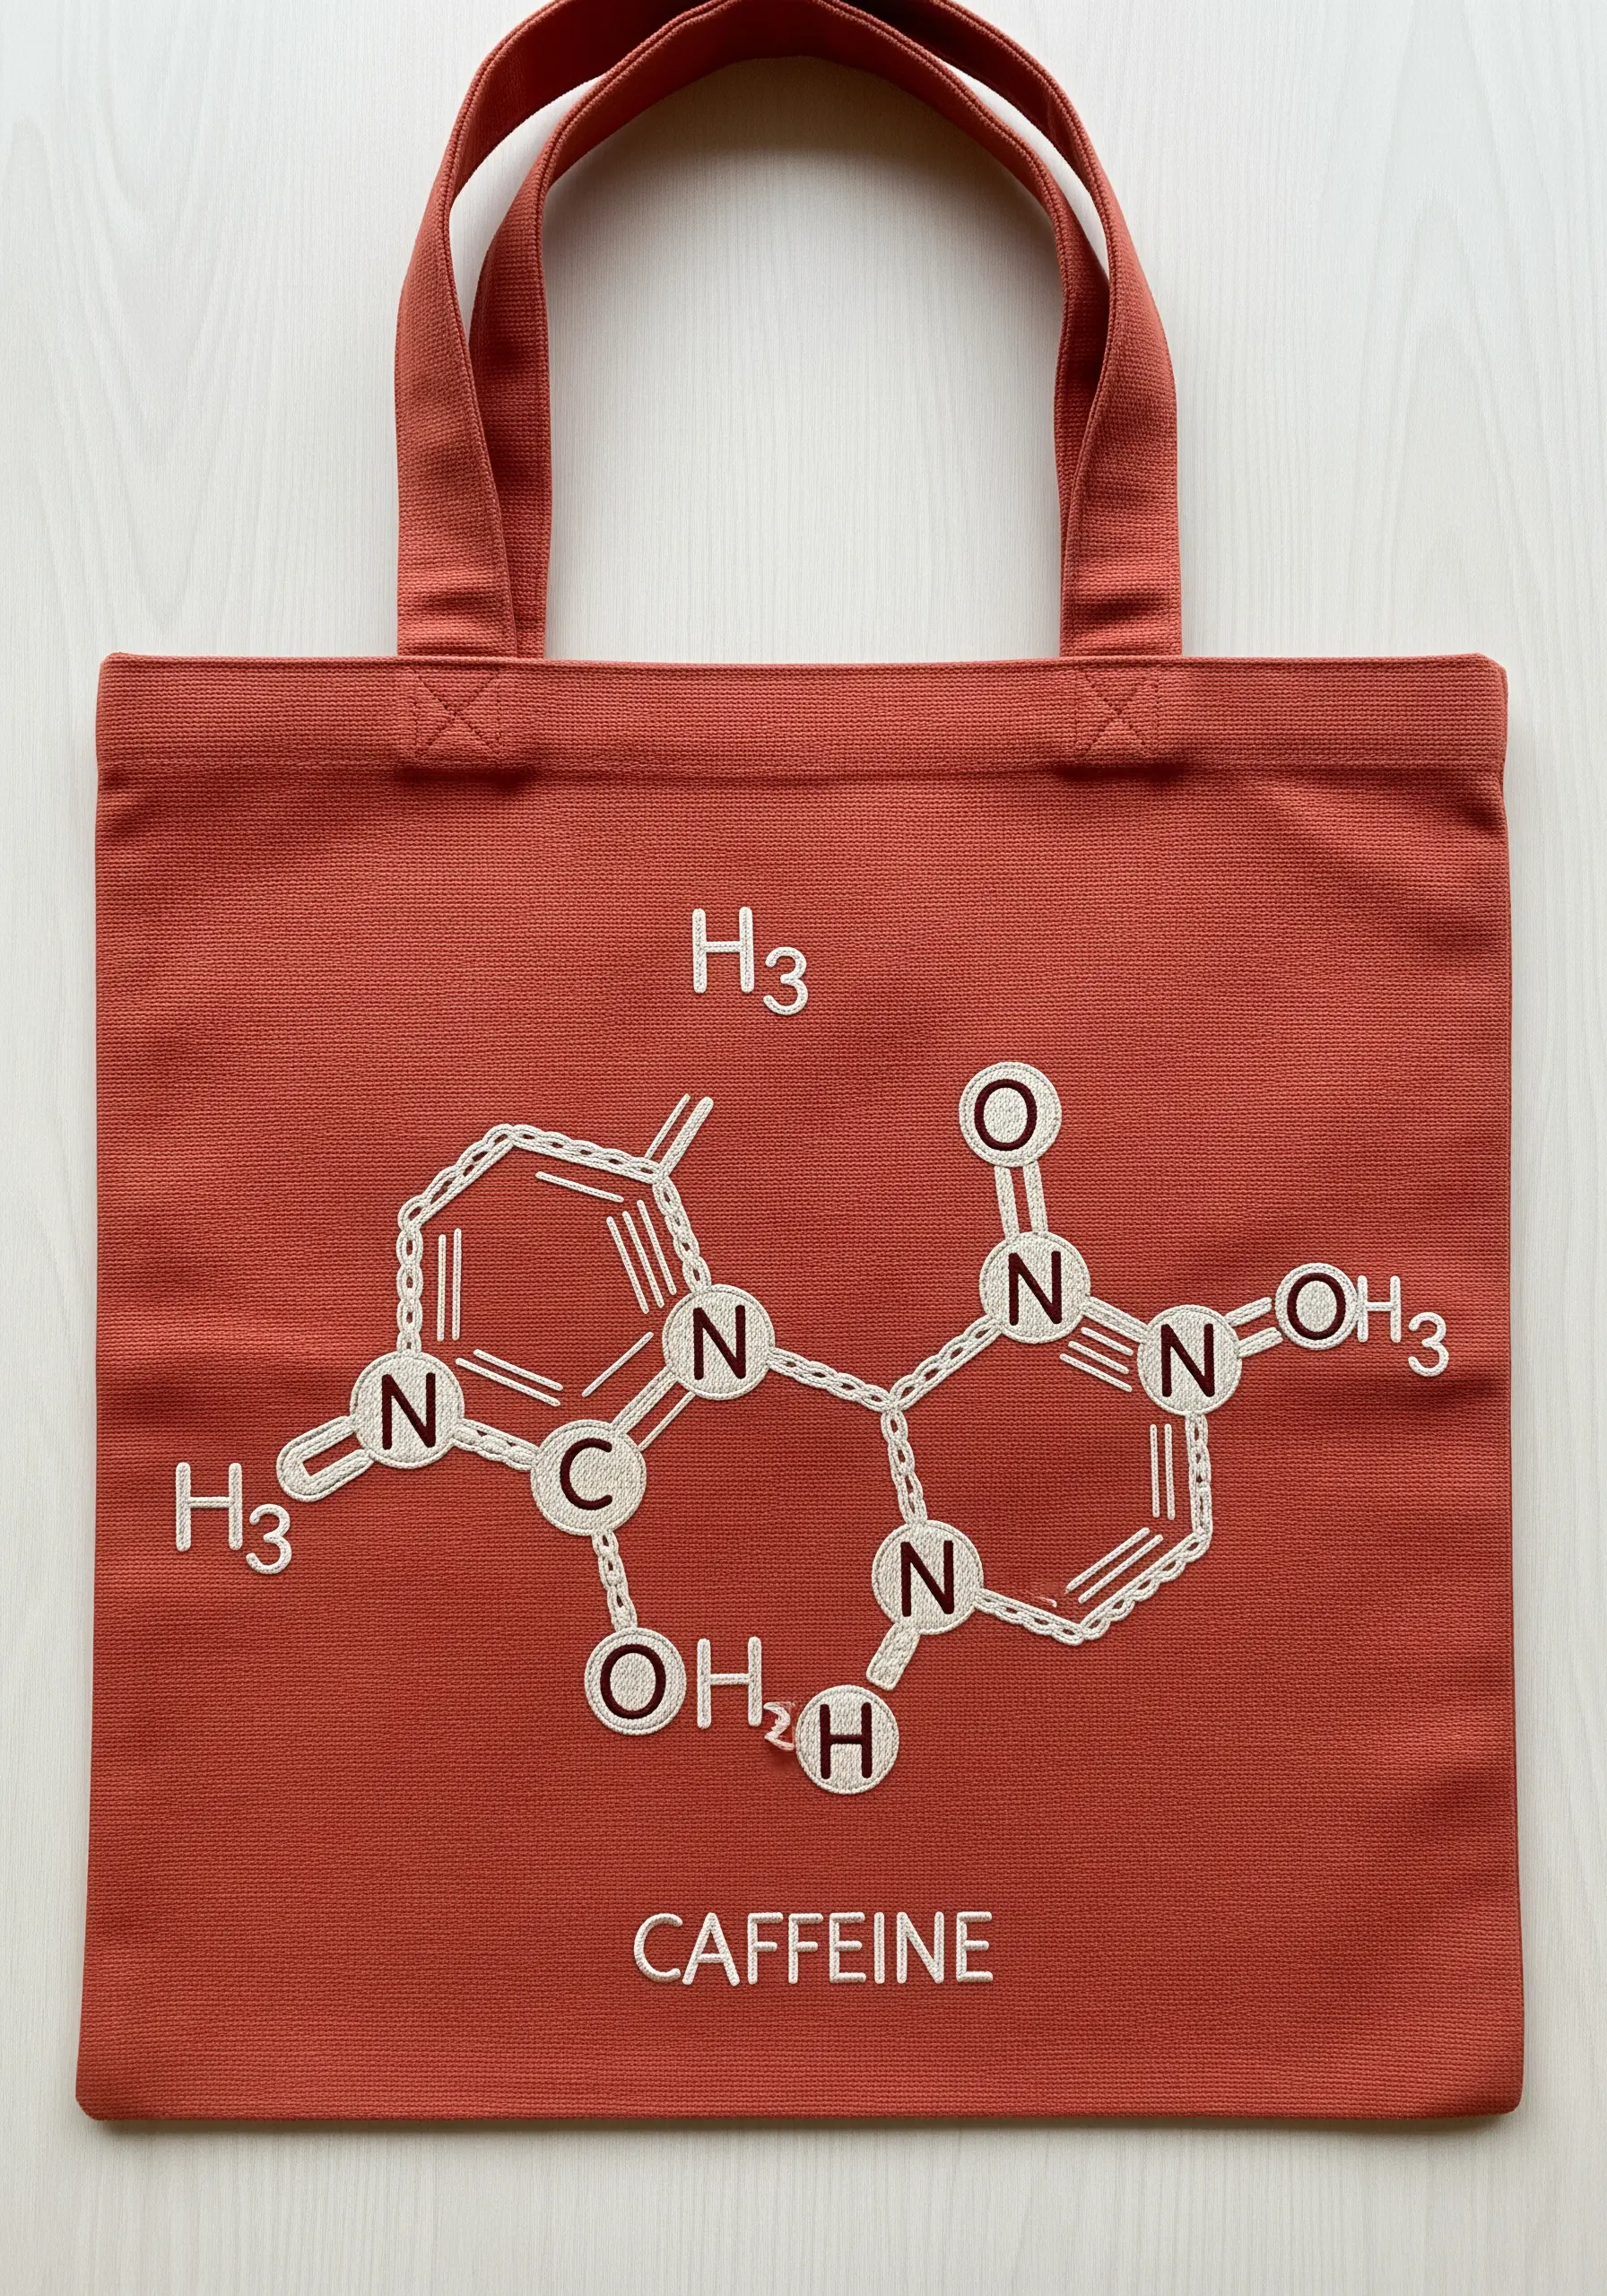
Translate a scientific diagram into a clean and modern embroidery piece with precision stitching.
Use a whipped backstitch for all the lines of the molecule. This creates a smooth, raised line that looks more refined and solid than a simple backstitch.
For the letters and numbers, use a tiny backstitch with a single strand of floss to ensure they are crisp and legible.
Stitching in a light, contrasting color like cream on a rust-colored tote makes the scientific structure feel like a deliberate piece of graphic art.
10. Capture an Abstract Coffee Splash

Create a sense of dynamic motion by combining directional stitches with textural details.
Use long, straight stitches or satin stitches of varying lengths for the main splatters, fanning them out from a central point. Overlap shades of brown, cream, and white to create a liquid-in-motion effect.
Incorporate French knots and seed stitches in coordinating colors, scattering them around the edges to represent smaller droplets.
Adding a few metallic copper French knots introduces a subtle shimmer, catching the light and adding a touch of sophisticated energy to the design.
11. The Anatomy of an Espresso Shot

This design is an exercise in creating distinct layers and textures within a small space.
For the dark ‘heart’ of the espresso, use a dense, horizontal satin stitch with a dark brown or black thread.
Transition to the ‘body’ with a lighter brown, using a long-and-short stitch to blend it softly into the layer below. Finally, create the ‘crema’ with shades of tan and beige, adding a few scattered French knots for bubbles.
The typography should be stitched last with a single-strand backstitch for maximum clarity and precision.
12. The Minimalist French Press

A simple outline design relies entirely on the quality and consistency of your stitches.
Before you begin, stabilize your tote bag fabric with a fusible interfacing on the back. This will prevent the fabric from puckering or stretching as you stitch, ensuring your lines remain perfectly straight.
Use a stem stitch for all outlines. It creates a slightly thicker, more rounded line than a backstitch, which is ideal for giving a simple sketch-like design a sense of substance and intention.
Choose a thread count of three strands to strike the perfect balance between delicacy and visibility.
13. A Tribute to Books and Coffee

Combine simple motifs by focusing on clean fills and balanced composition.
For the books, use a vertical satin stitch for the covers and a horizontal satin stitch for the pages to create subtle textural contrast. Outline each book with a single-strand backstitch to define its shape clearly.
Embroider the coffee cup with a brick stitch pattern to give it a cozy, woven texture that differentiates it from the smooth books.
Stitch the typography using a clean, simple backstitch. Its simplicity ensures it complements the other elements without competing for attention, like in these inspirations to beautify your notebooks.
14. Create a Gradient Iced Coffee
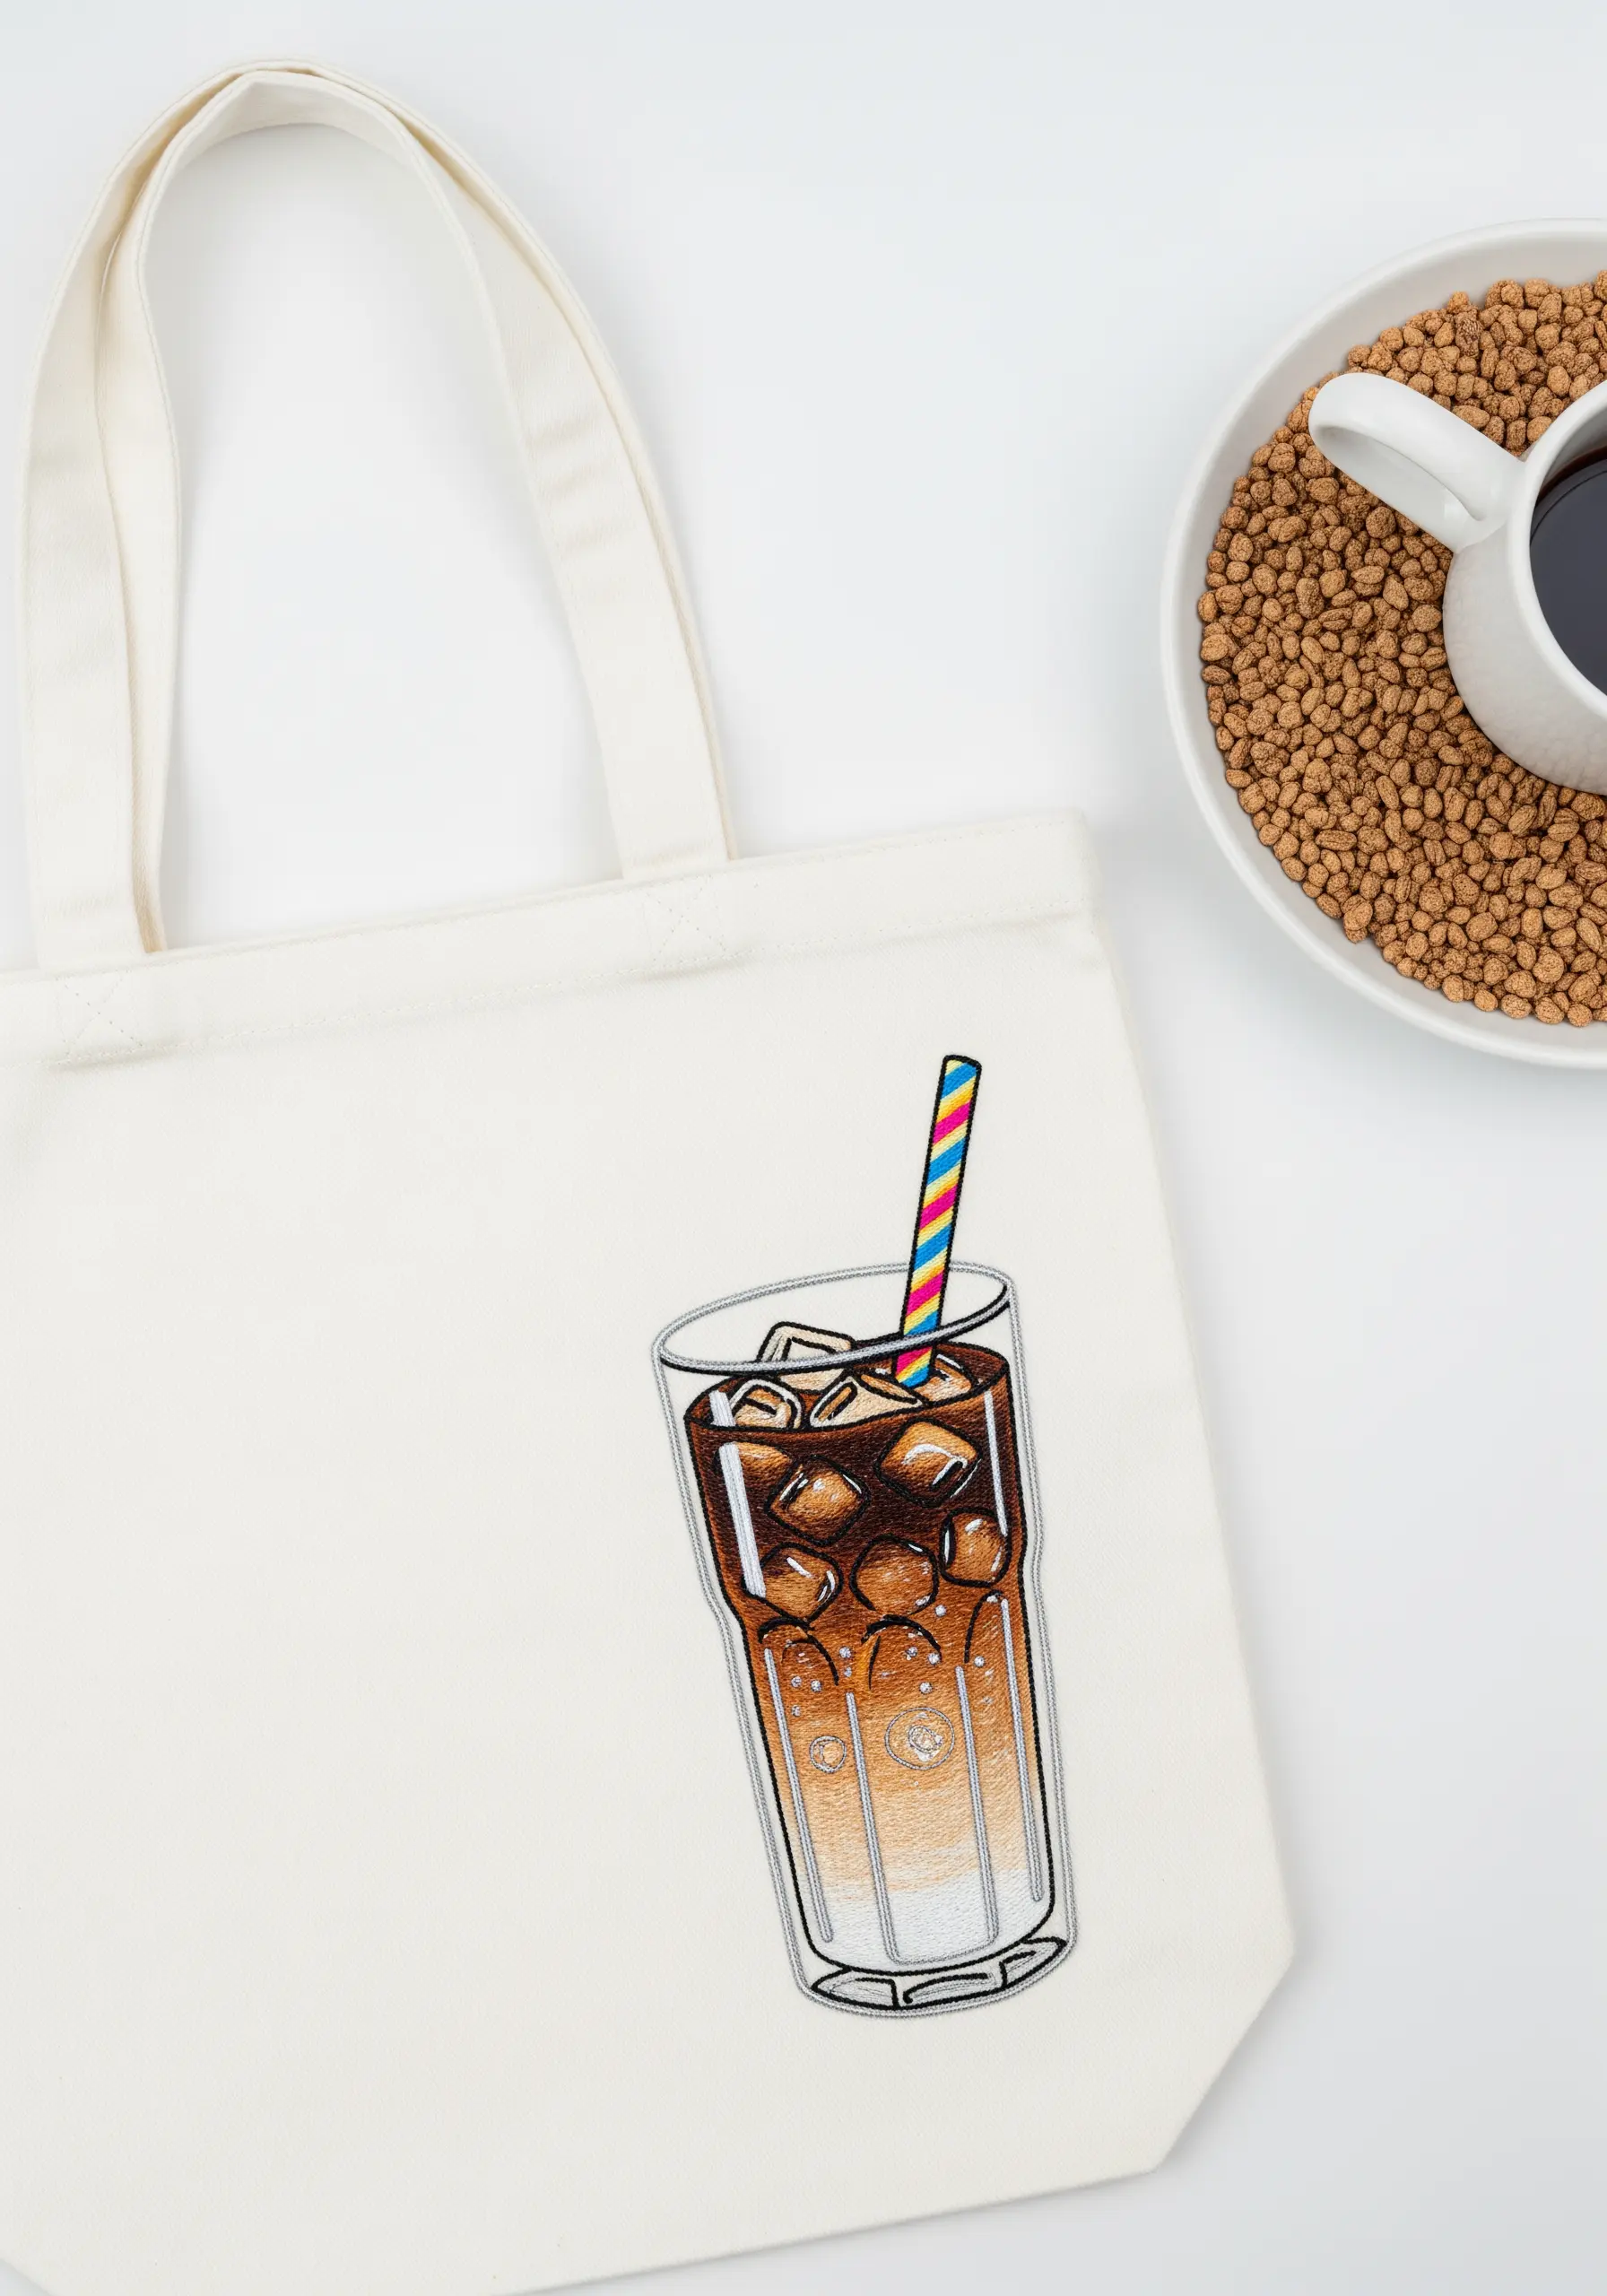
Achieve a realistic liquid gradient effect by carefully blending your thread colors.
Start at the bottom of the glass with a dark coffee color, using long-and-short stitch. As you work your way up, gradually introduce lighter brown and then creamy beige threads, one strand at a time, to create a seamless transition.
For the ice cubes, outline their shapes with a single strand of light gray or white thread. Fill them with sparse, angled satin stitches using a sheer or semi-translucent thread to give the impression of transparency.
This careful layering is what makes the drink look refreshing and real.
15. The High-Texture Coffee Bean
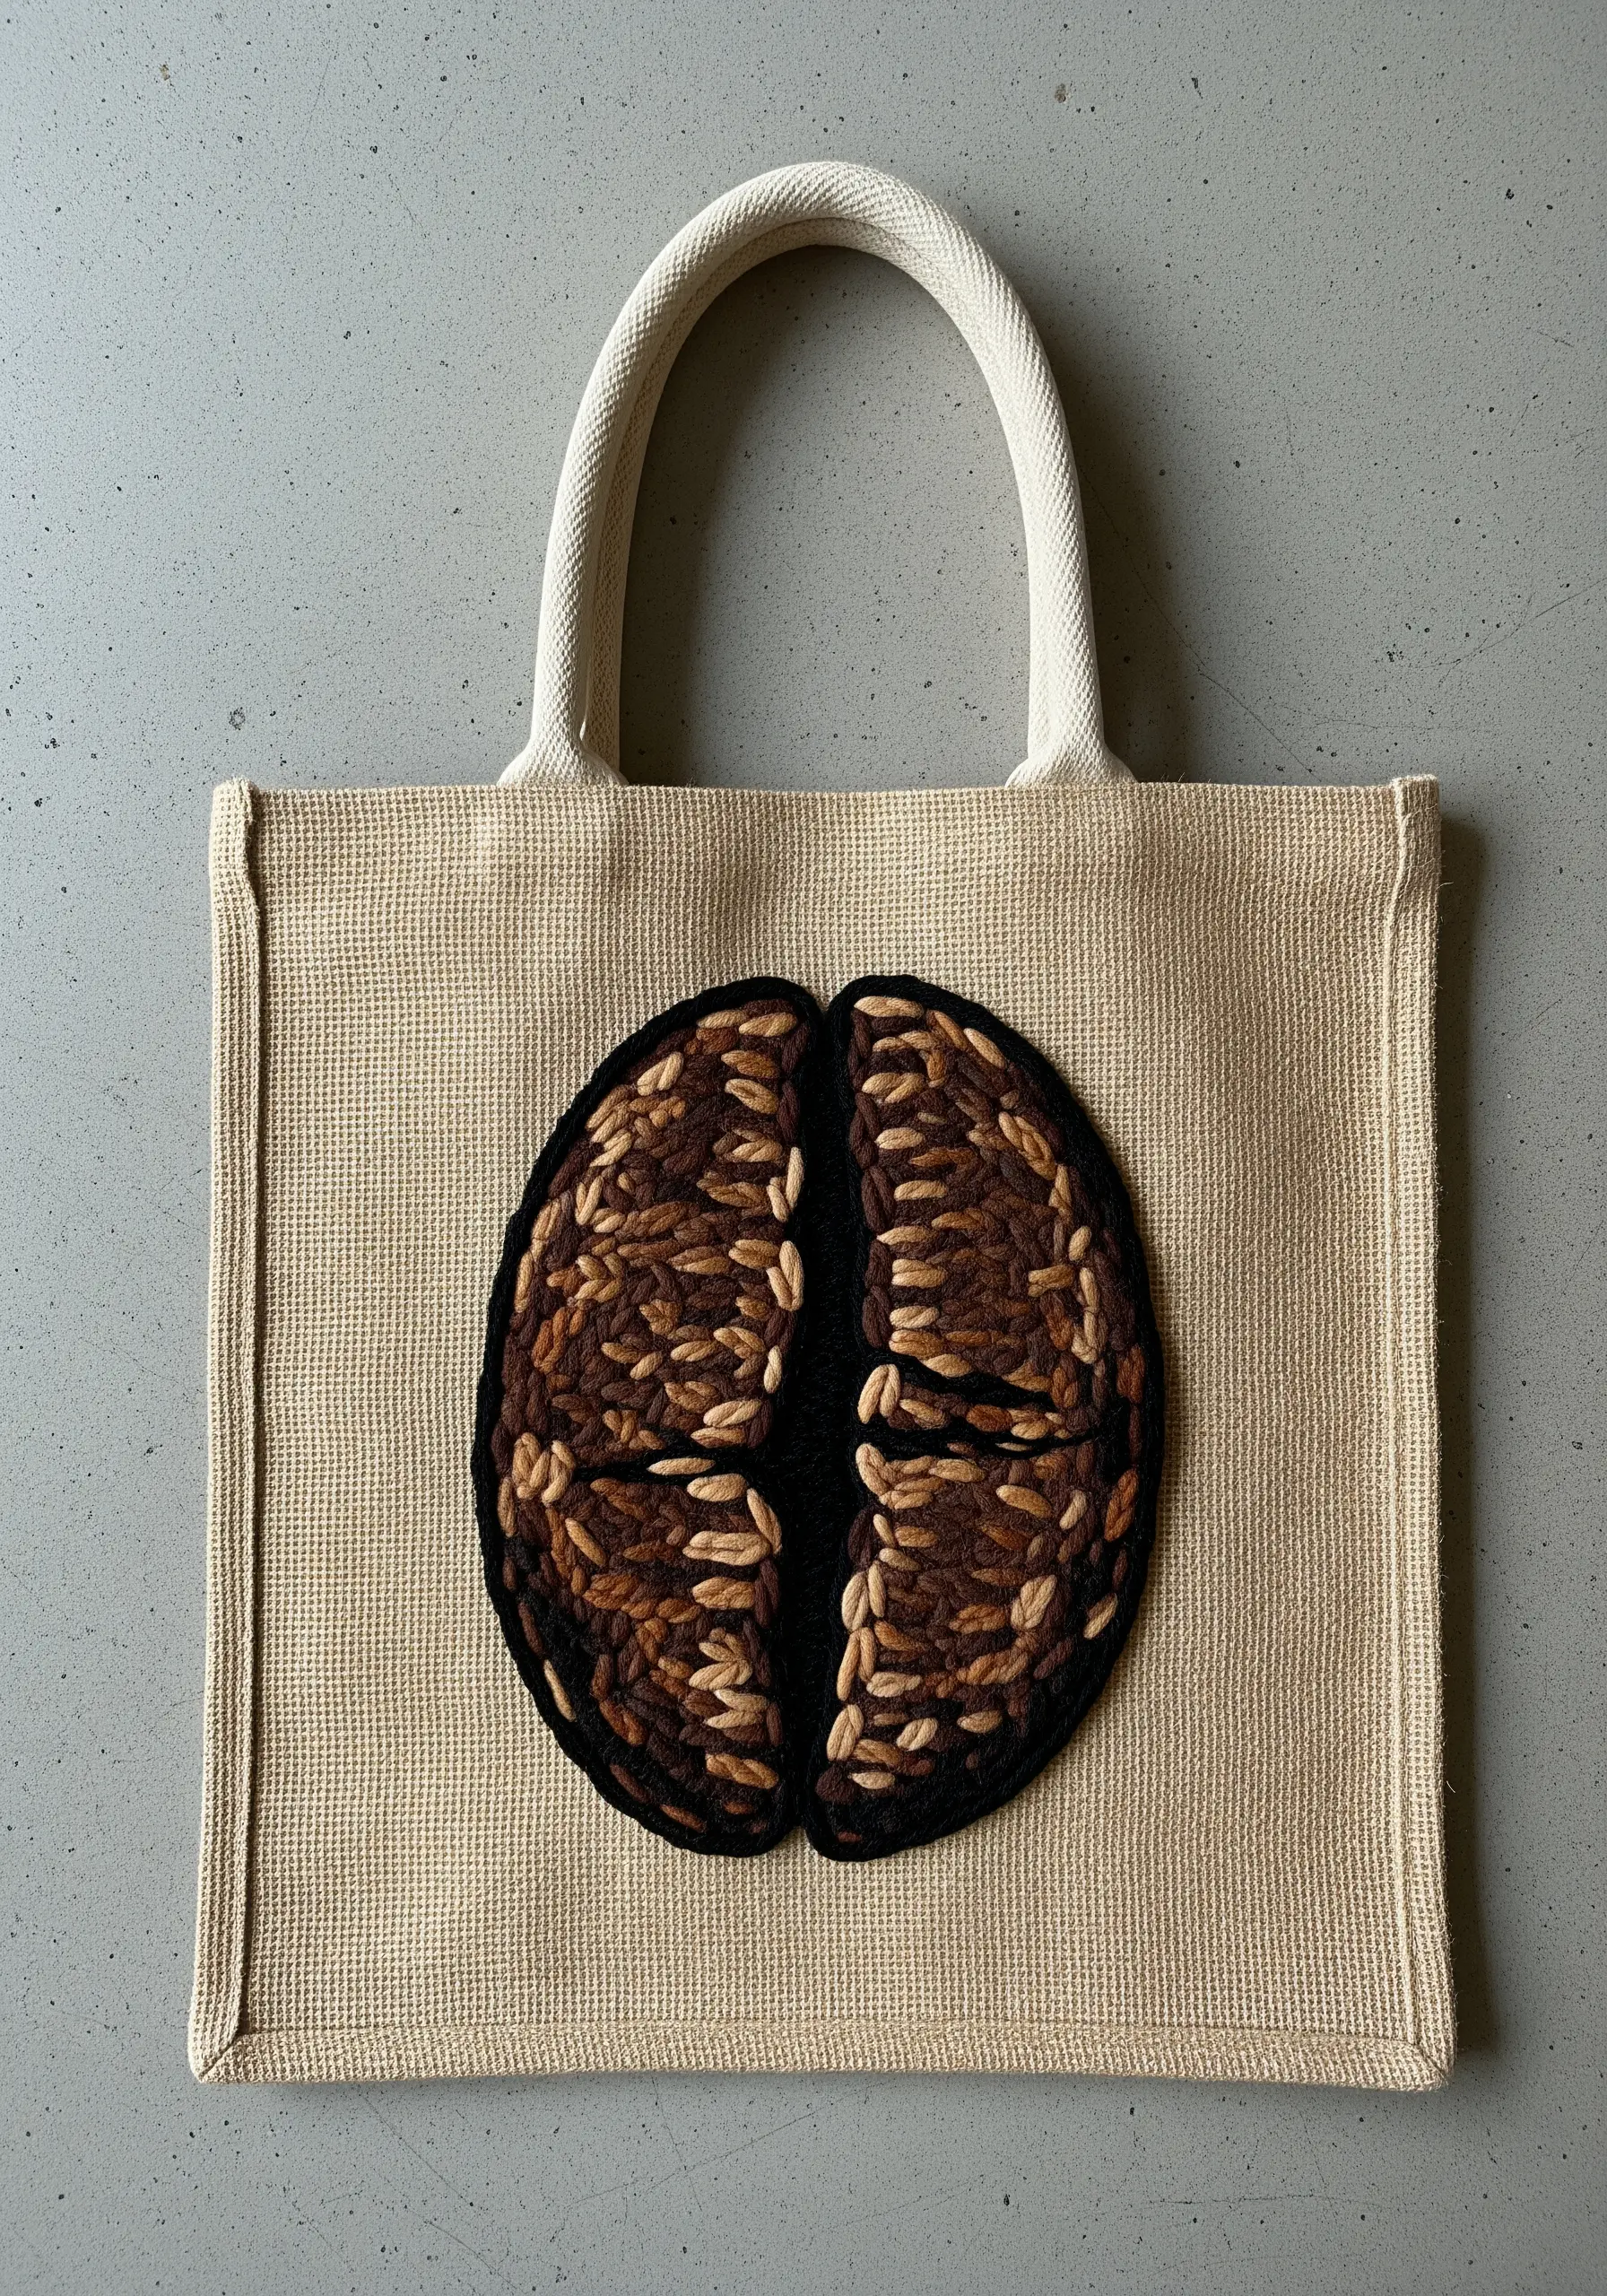
Move beyond flat stitches and create a design that invites touch with high-relief techniques.
Fill the two halves of the coffee bean with chunky, slightly loose satin stitches using thick wool or chenille thread. Vary the direction and length of the stitches to create an uneven, rustic surface.
Alternatively, fill the shape with tightly packed French knots in various shades of brown for a pebbled, deeply textural effect.
This focus on texture layering makes a simple motif incredibly compelling and artistic.
16. Embroider a Mountain Brew Scene
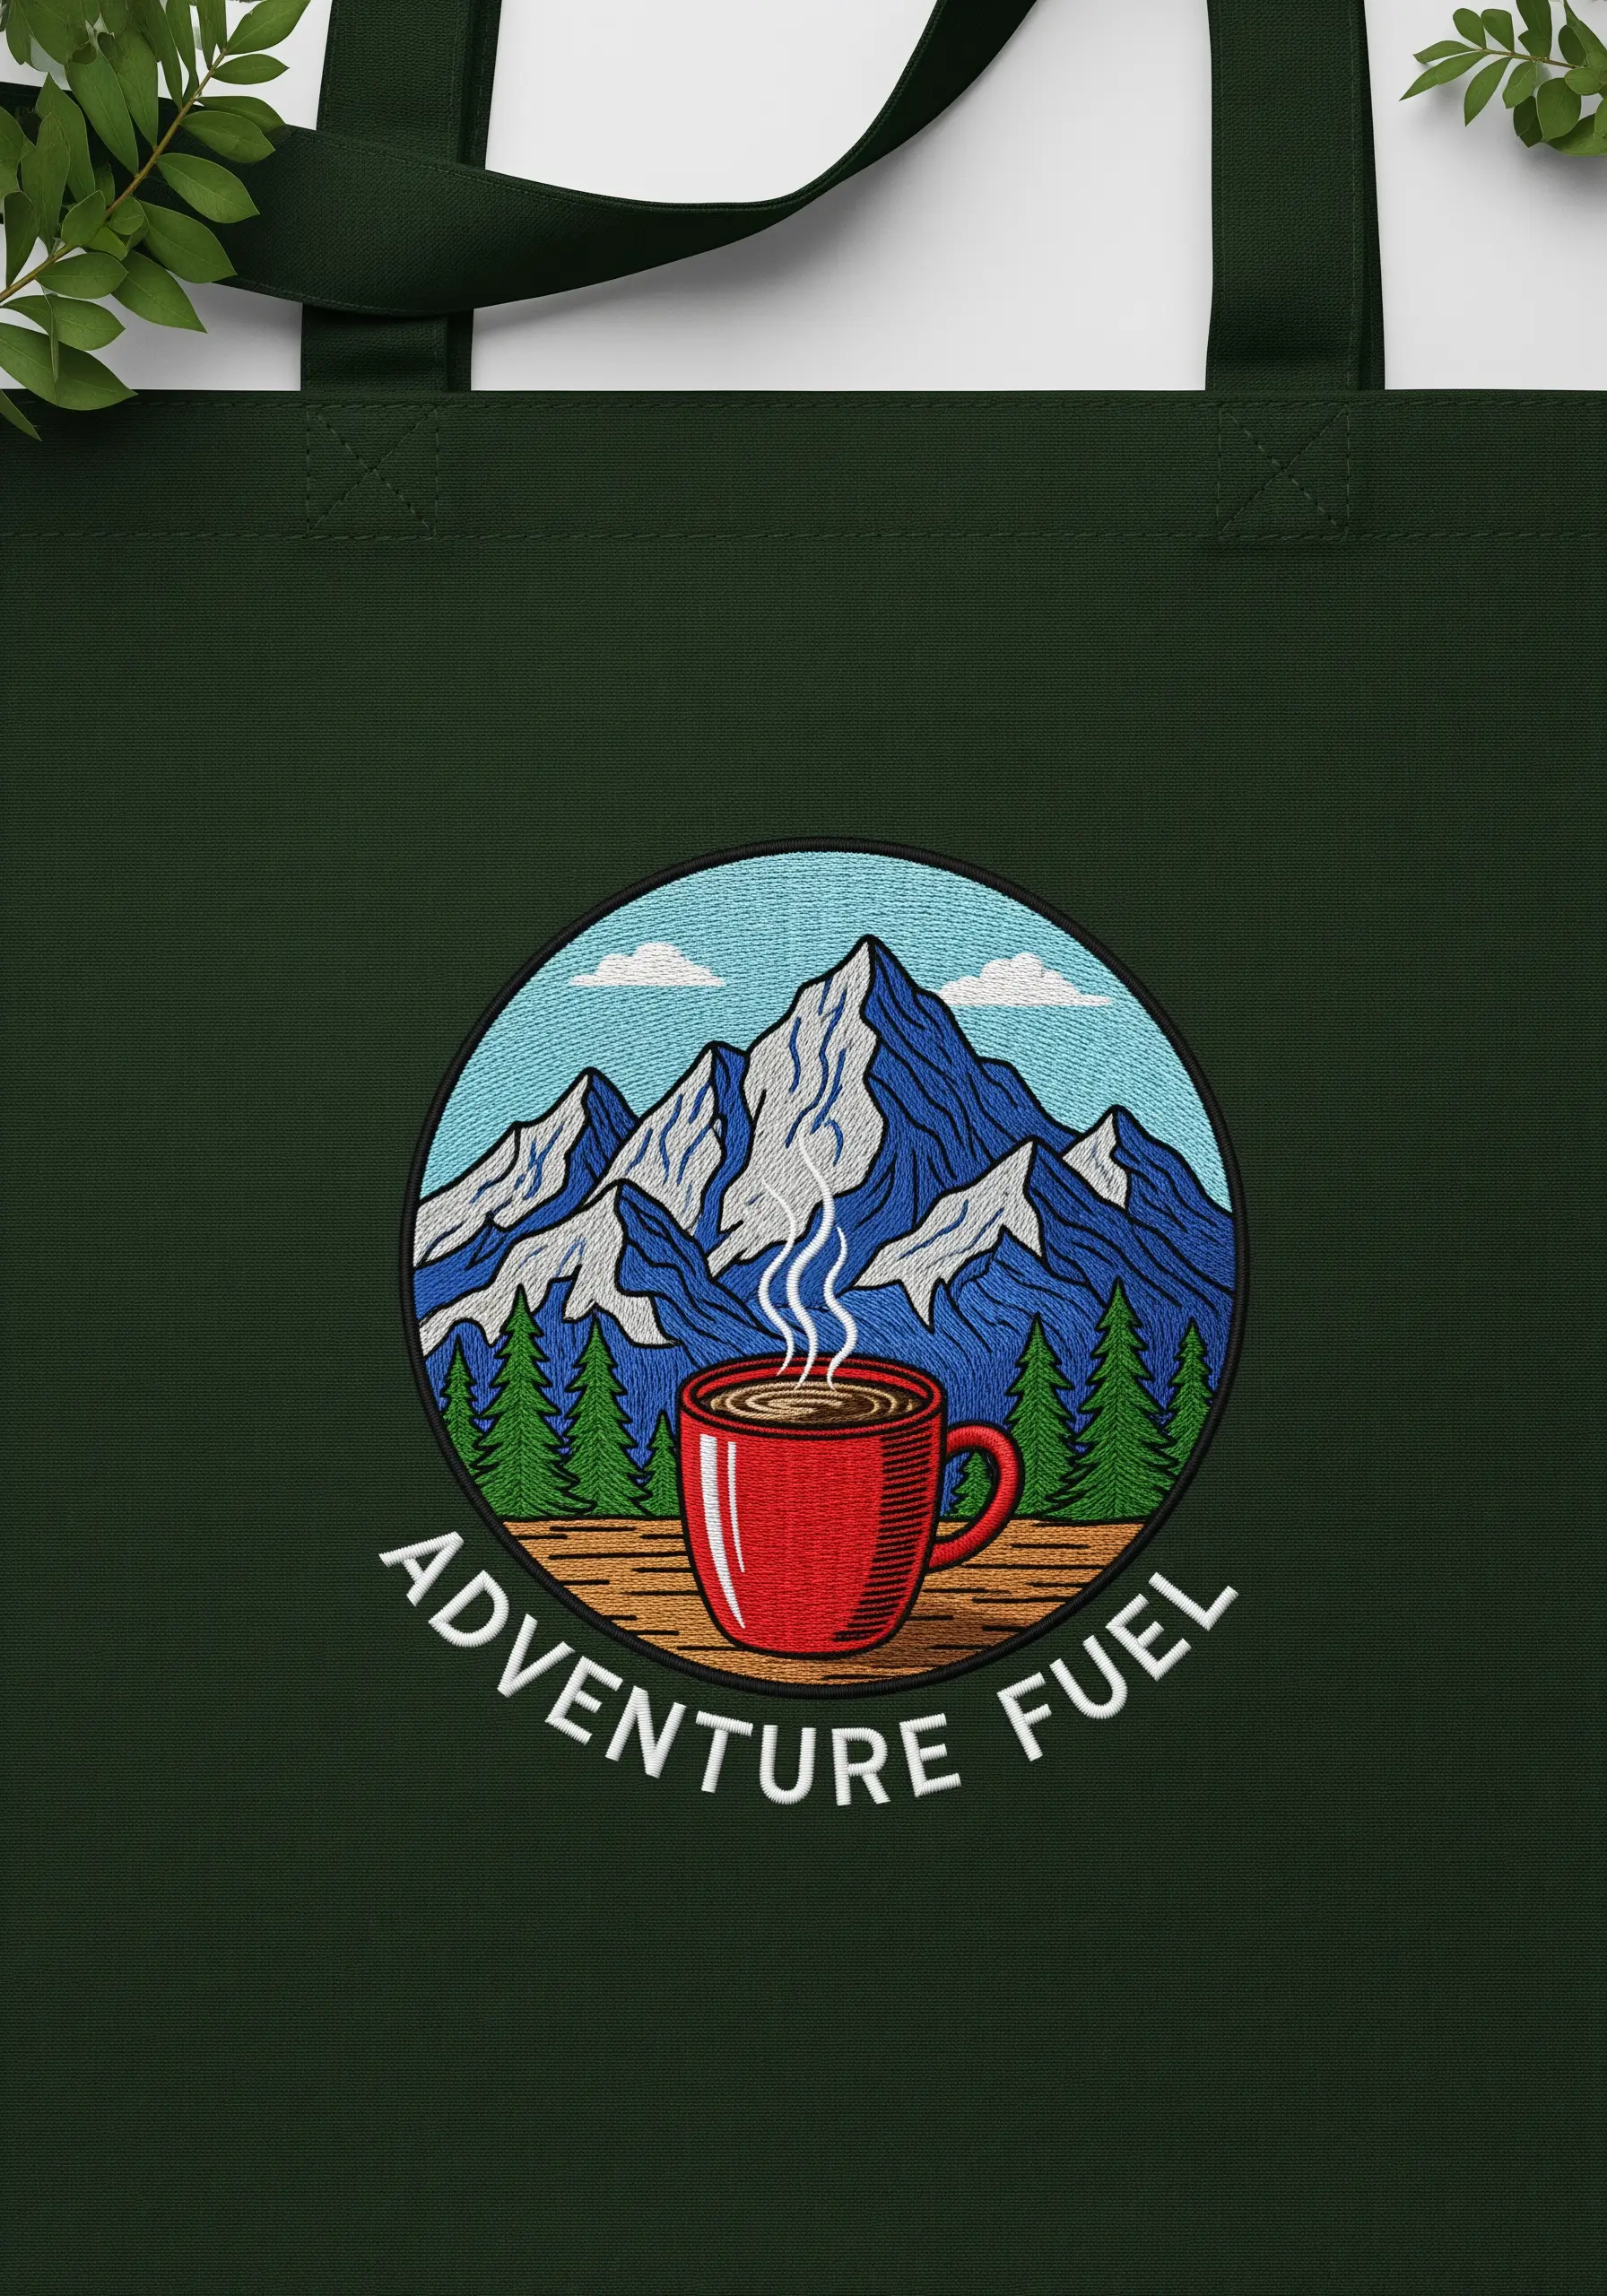
Craft a scenic patch by defining shapes with clear outlines and directional fills.
For the mountains, use different shades of blue and gray, filling each section with long-and-short stitches that follow the slope of the peak. This technique adds both color and a sense of form.
Use a single strand of white thread to backstitch the snow caps, keeping the lines sharp and distinct.
Employing mountain landscape thread painting techniques will give your small scene an epic feel, making the simple coffee mug in the foreground pop.
17. The Minimalist To-Go Cup
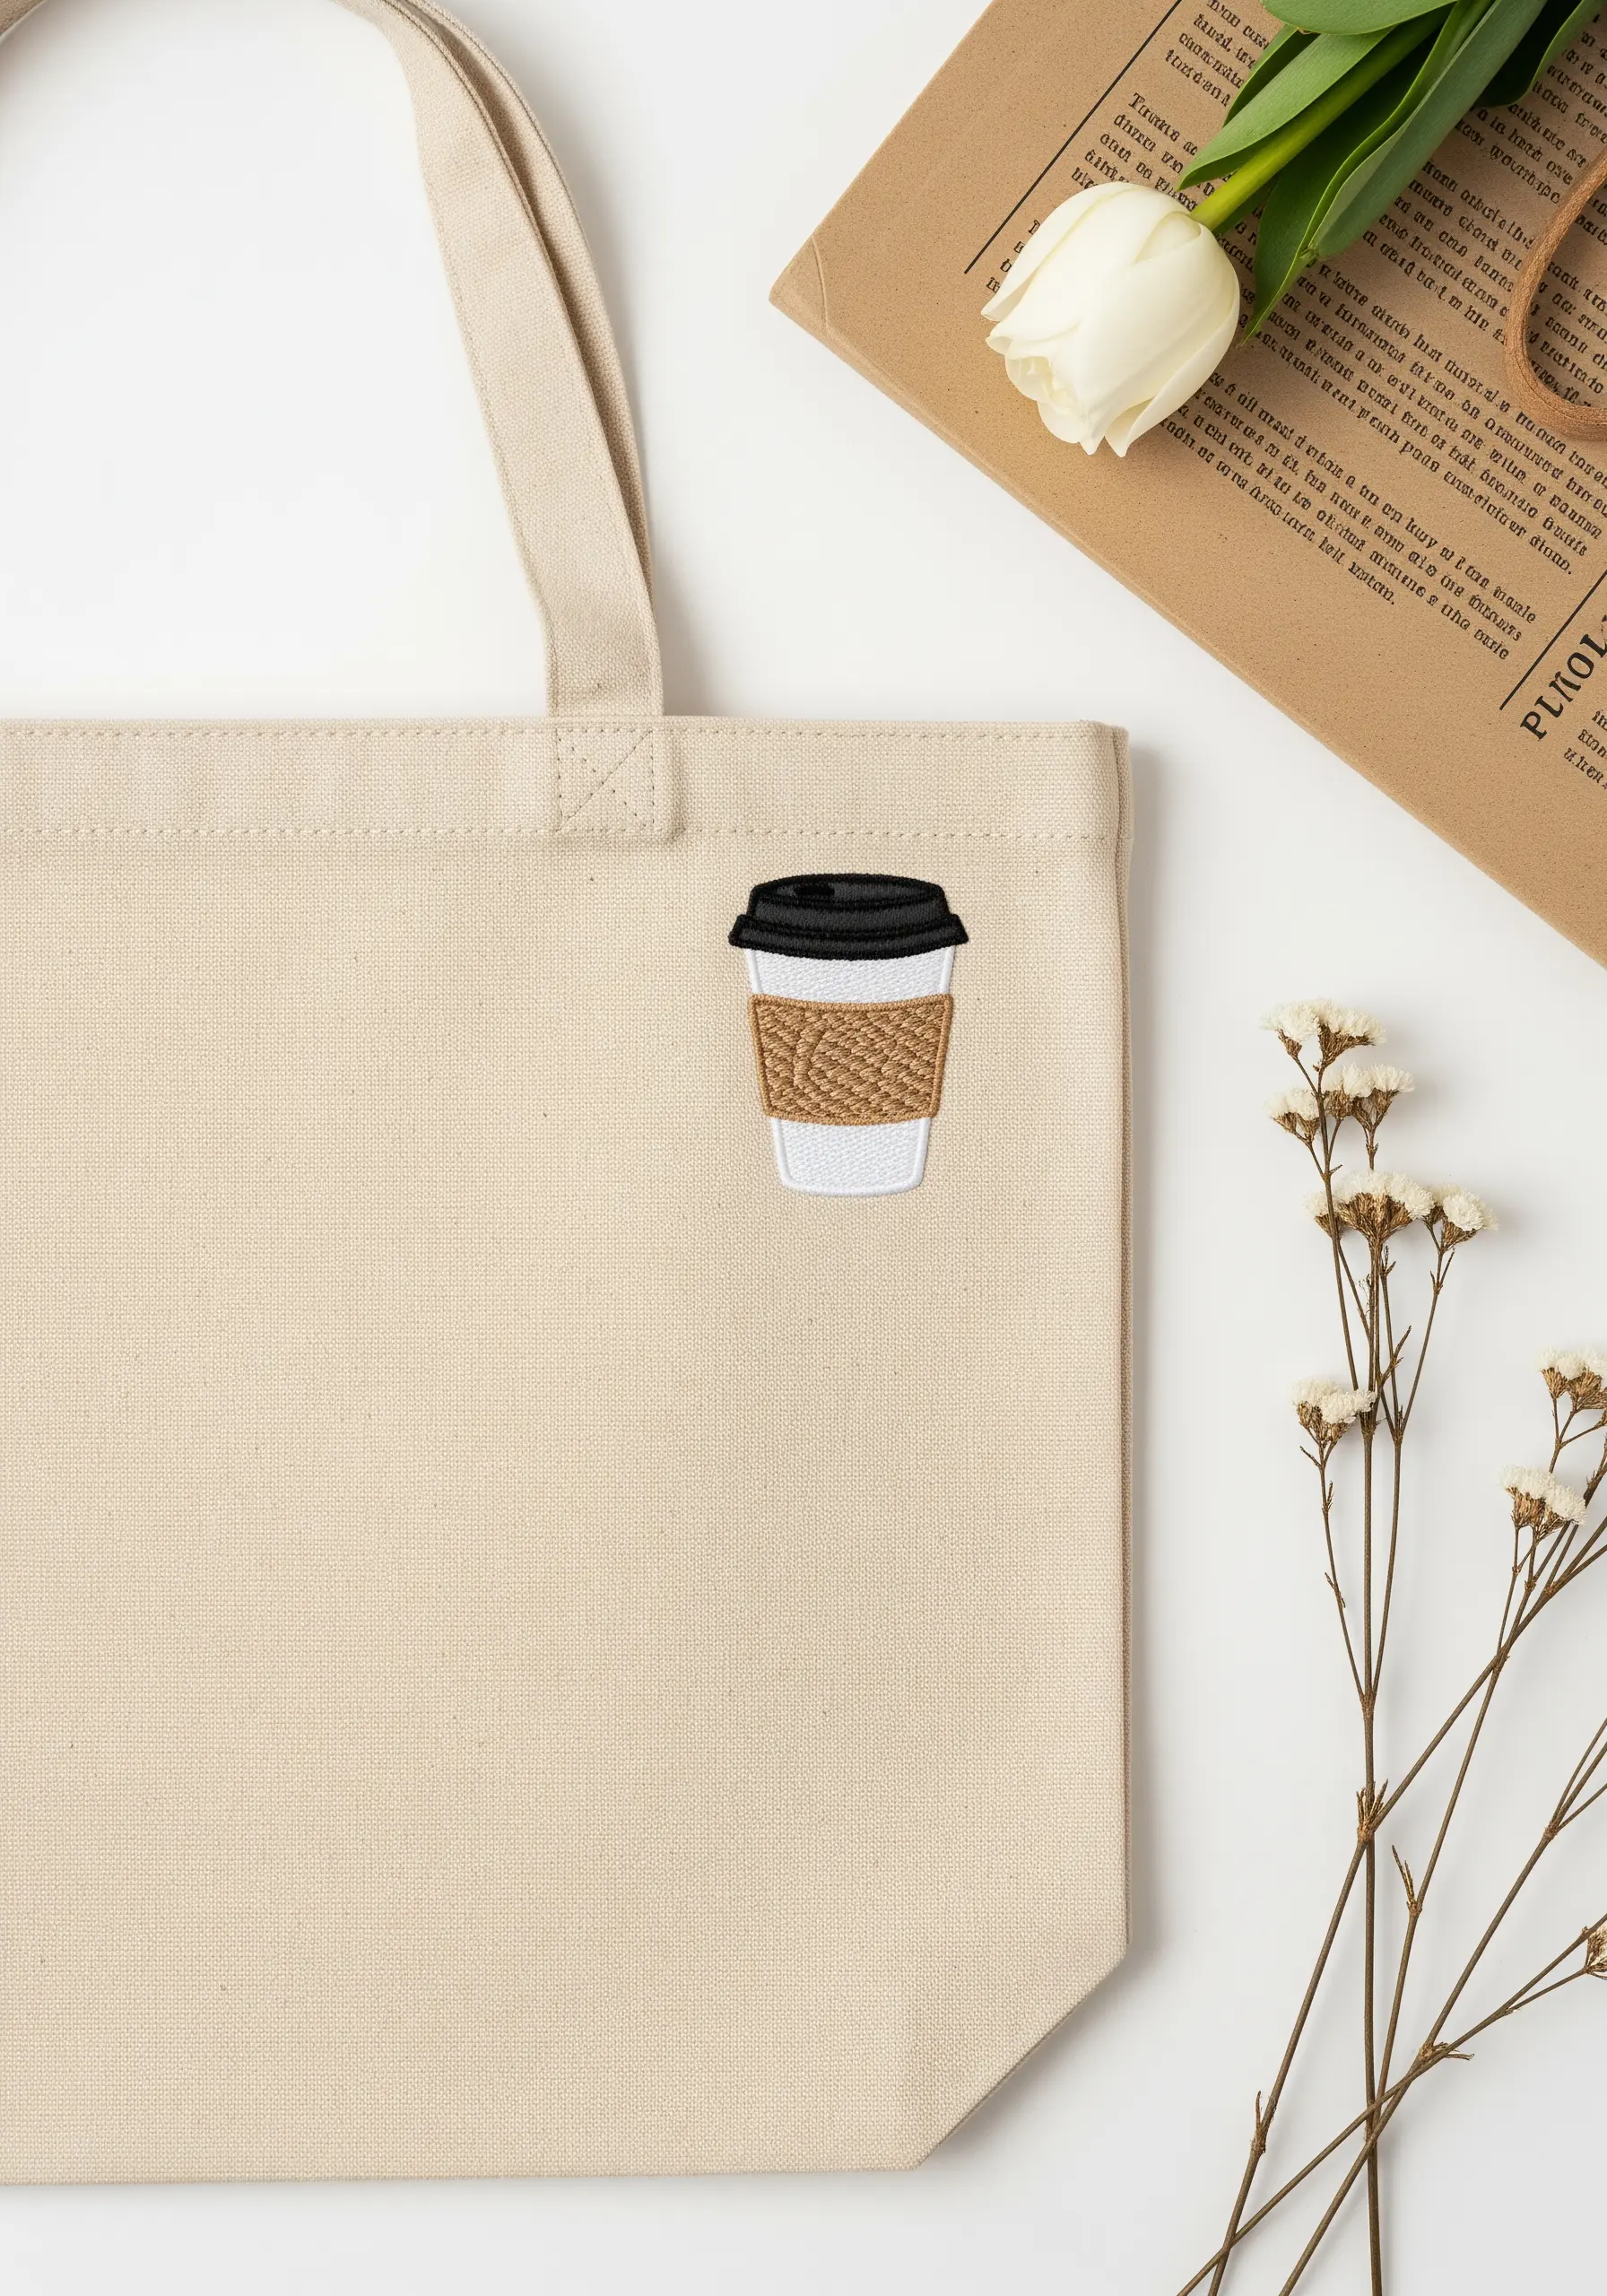
Elevate a simple icon by focusing on texture rather than complex colors.
For the corrugated coffee sleeve, use a woven stitch (also known as a basket weave stitch). This technique creates a raised, tactile pattern that perfectly mimics the texture of cardboard.
Use a light brown or kraft-colored thread for the sleeve to enhance the realism. For the lid and cup, a clean, dense satin stitch in black and white provides a smooth contrast to the textured sleeve.
This small detail transforms a basic shape into a sophisticated and clever design.
18. Elegant ‘But First, Coffee’ Script

Stitch delicate, flowing script that looks as smooth as calligraphy.
Use a stem stitch for the entire phrase. This stitch is ideal for curves, creating a fluid, rope-like line that has more presence than a simple backstitch.
For the thicker, downward strokes of the letters, go over the stem stitch a second time to add weight and create that classic calligraphic contrast.
Using a silky rayon or a fine pearl cotton thread will add a subtle sheen, making the lettering look incredibly luxe and refined on the matte canvas tote.
19. A Trio of Brewing Methods
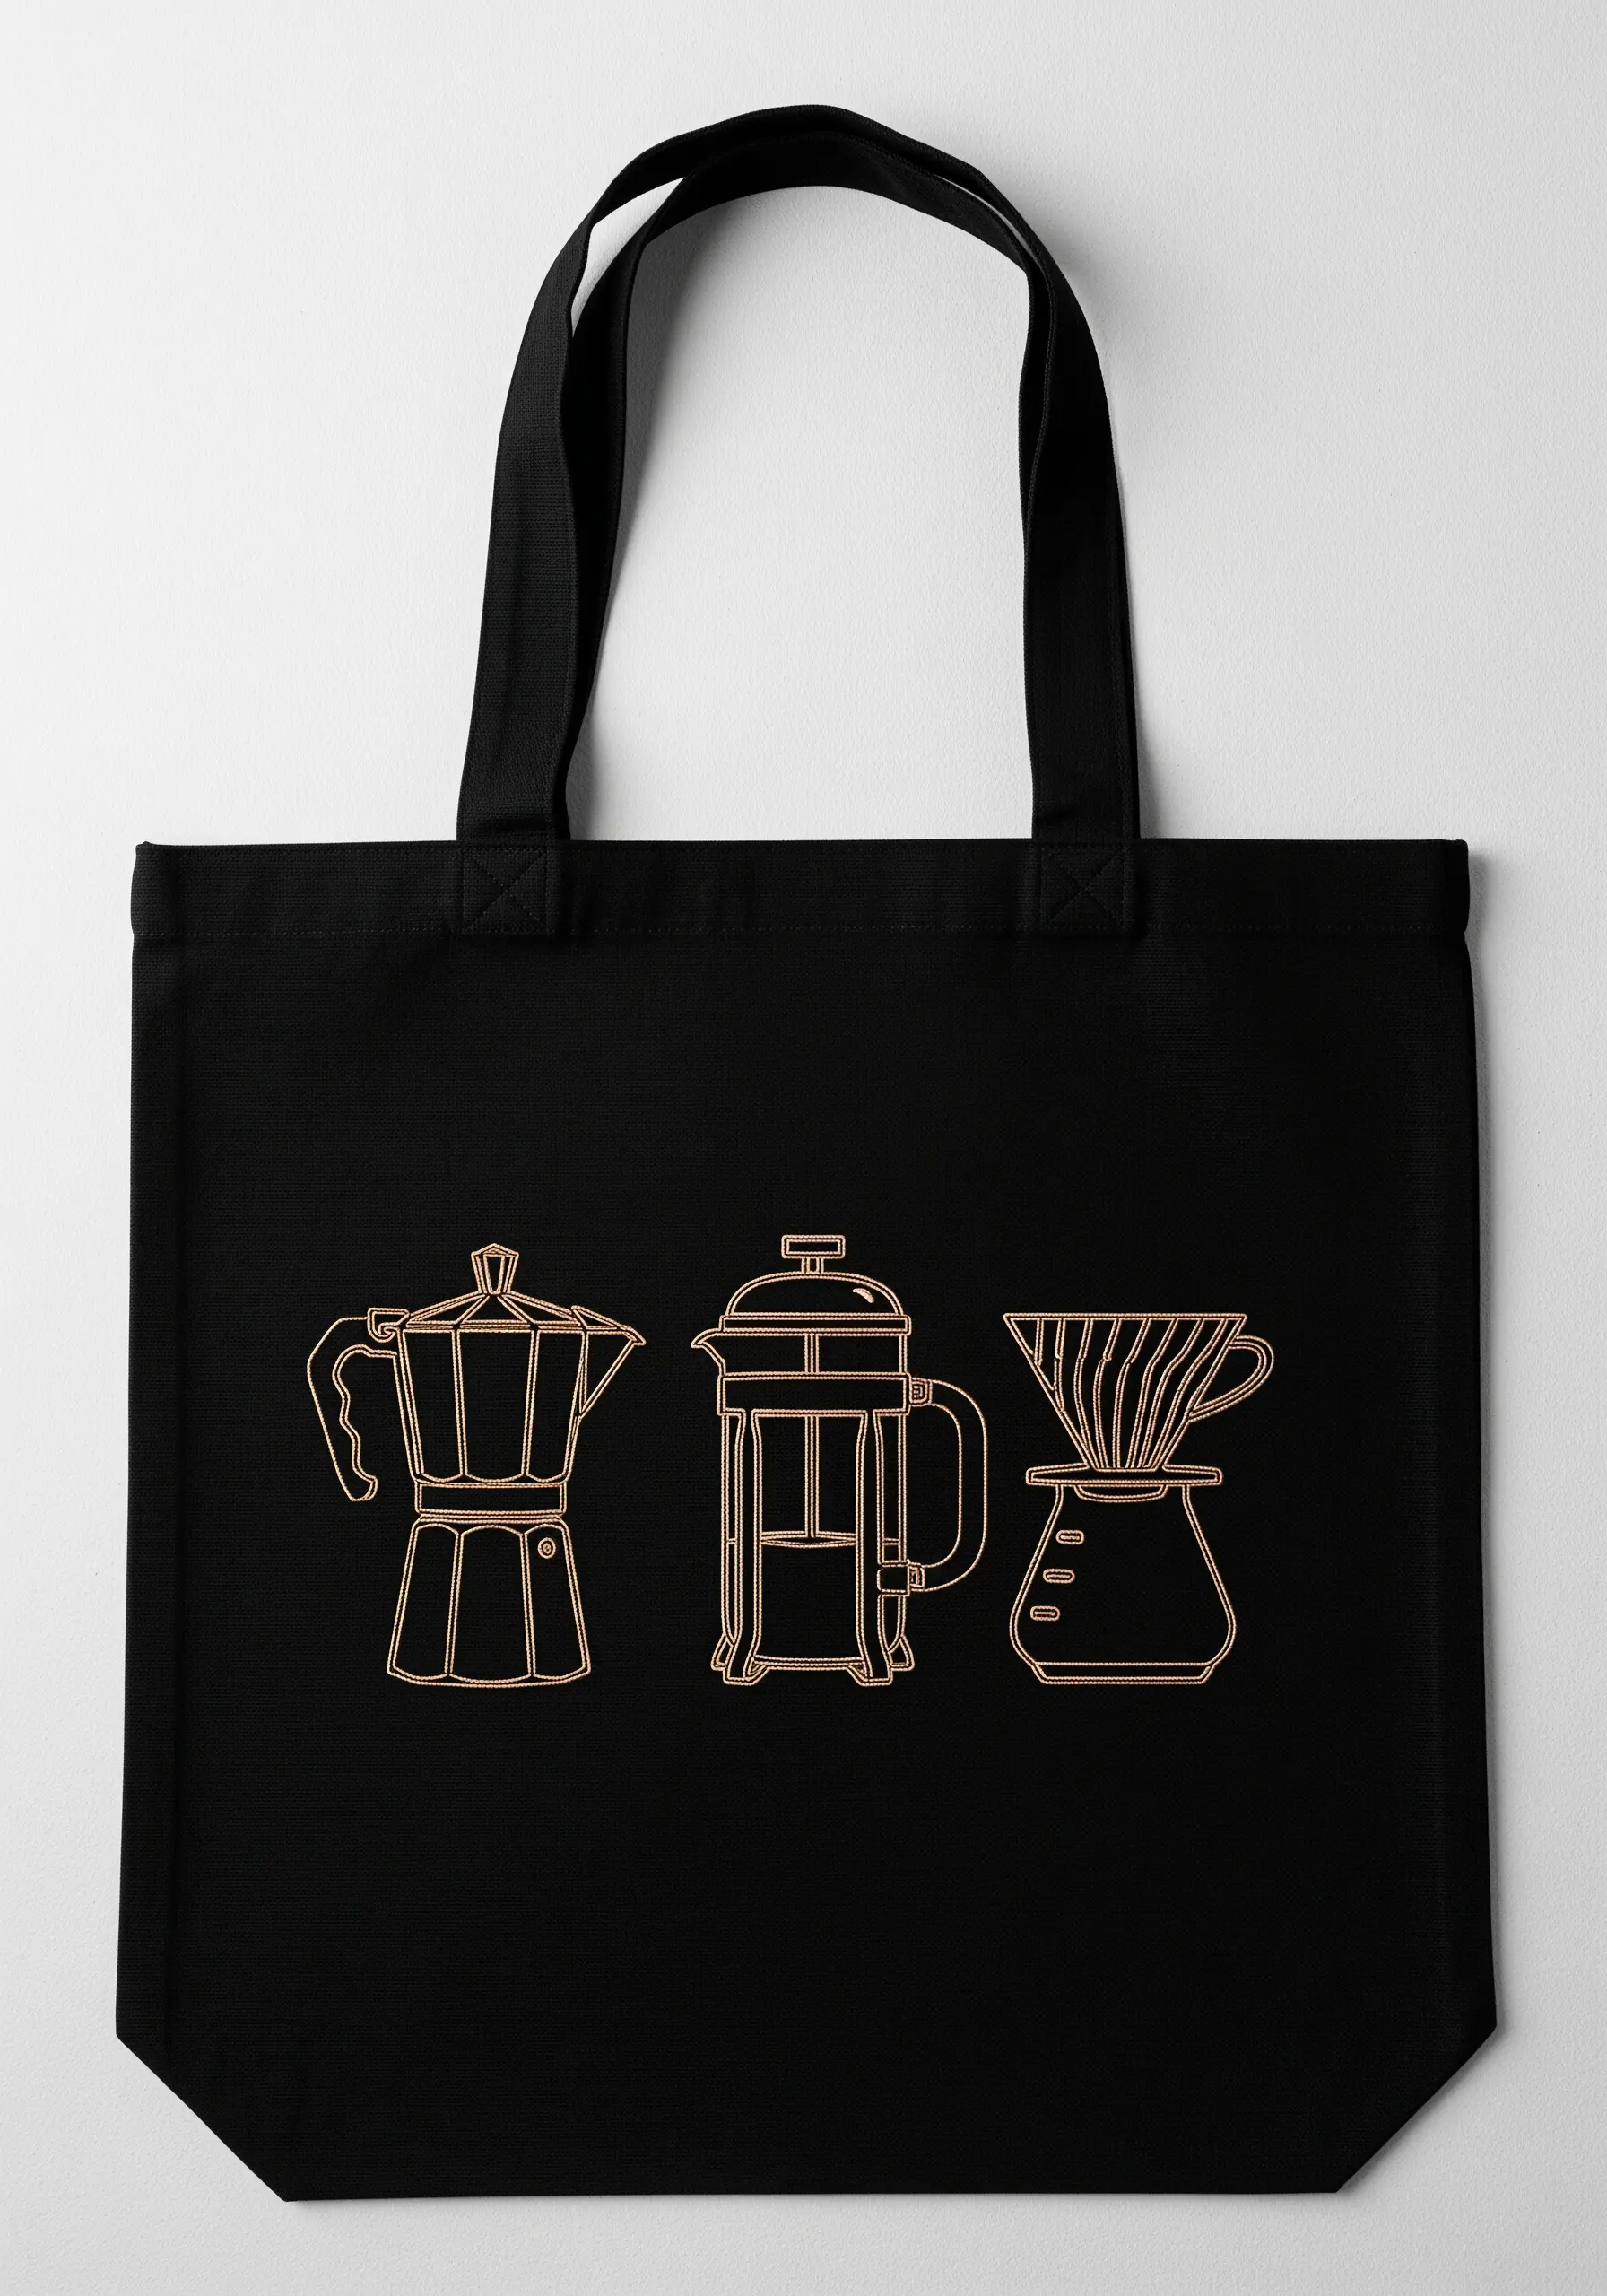
Create a striking graphic statement using the power of negative space and a single, vibrant color.
When stitching outlines on a dark fabric, use a thread color that has a high luminance value, like a warm gold, neon pink, or bright copper.
Trace the outlines with a three-strand backstitch for precision and clarity. The simplicity of the forms allows the bold color choice to take center stage.
This design proves that you don’t need complex fills or multiple colors to create a visually powerful piece; the contrast does all the work.
20. The Pre-Caffeine ‘Zzzs’
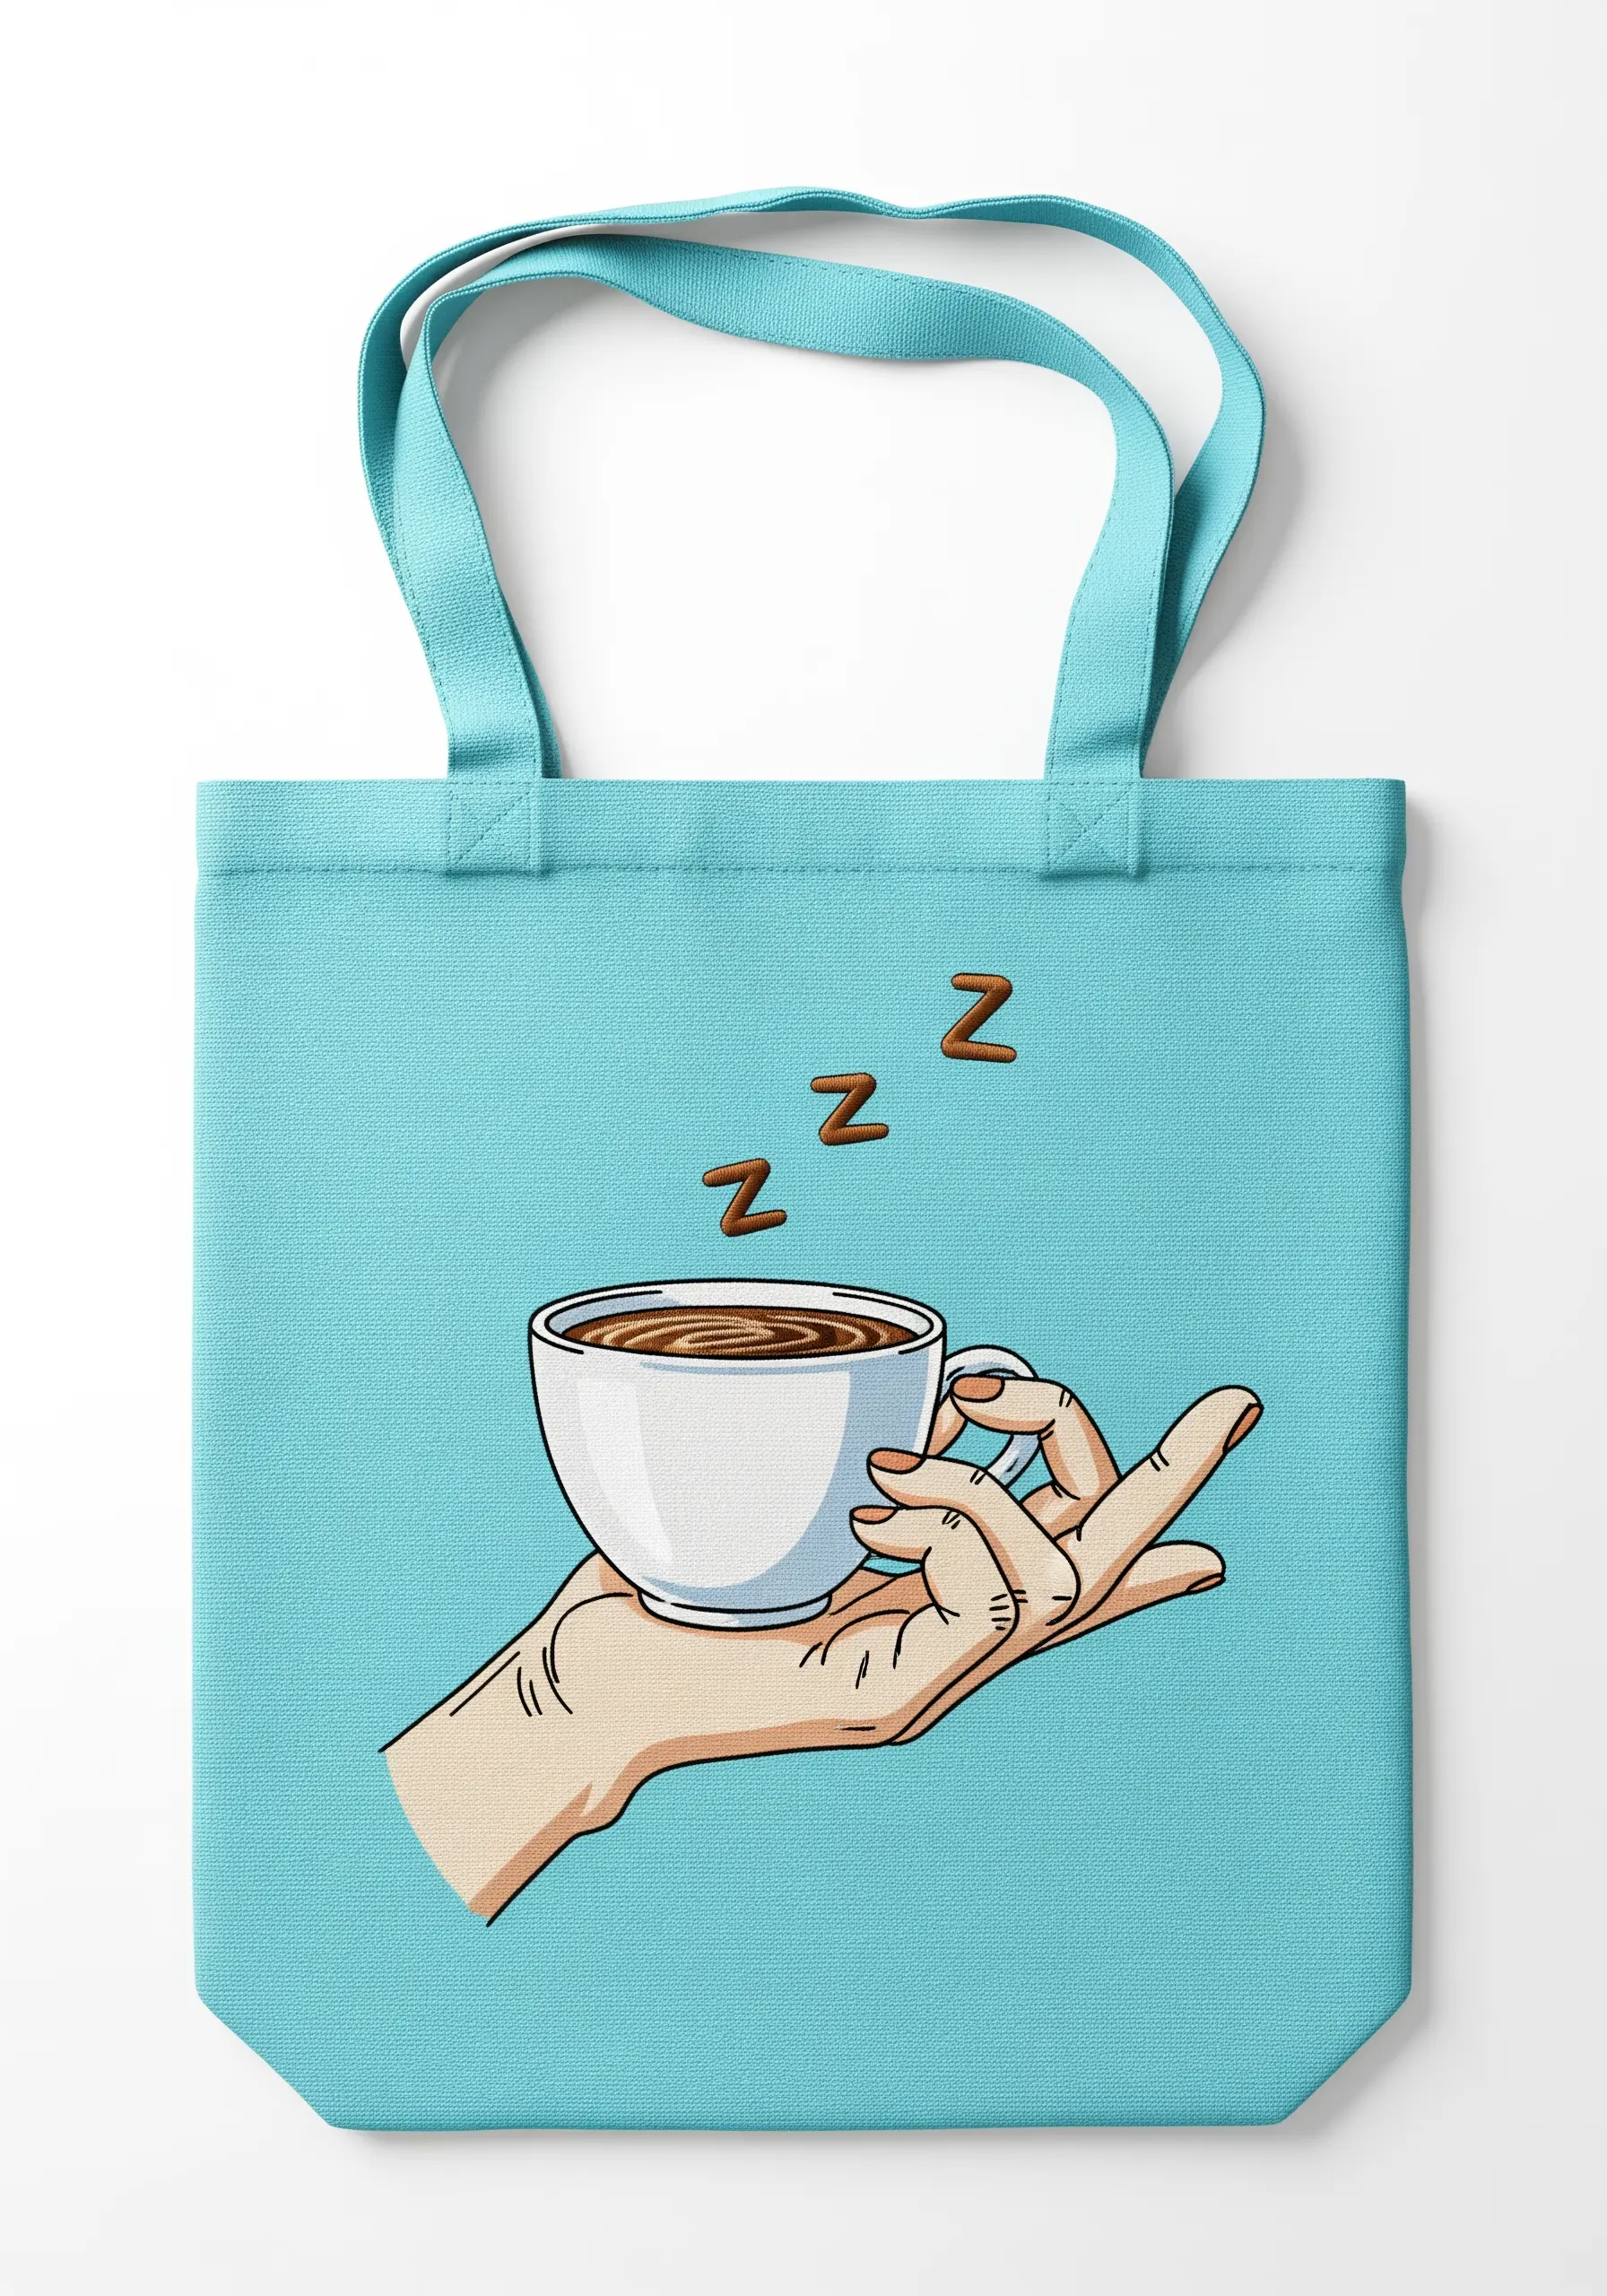
Add a touch of humor and character to your design with clean cartoon-style outlines and fills.
Use a consistent, bold backstitch for all the outlines to give the design a solid, illustrative feel. A three- or four-strand black floss works perfectly for this.
Fill the shapes with a smooth, dense satin stitch, ensuring all your stitches lie flat and in the same direction for a clean, polished finish.
The floating ‘Z’s are a playful detail; stitch them with a contrasting brown thread to connect them back to the coffee theme.
21. A Meditative Coffee Mandala
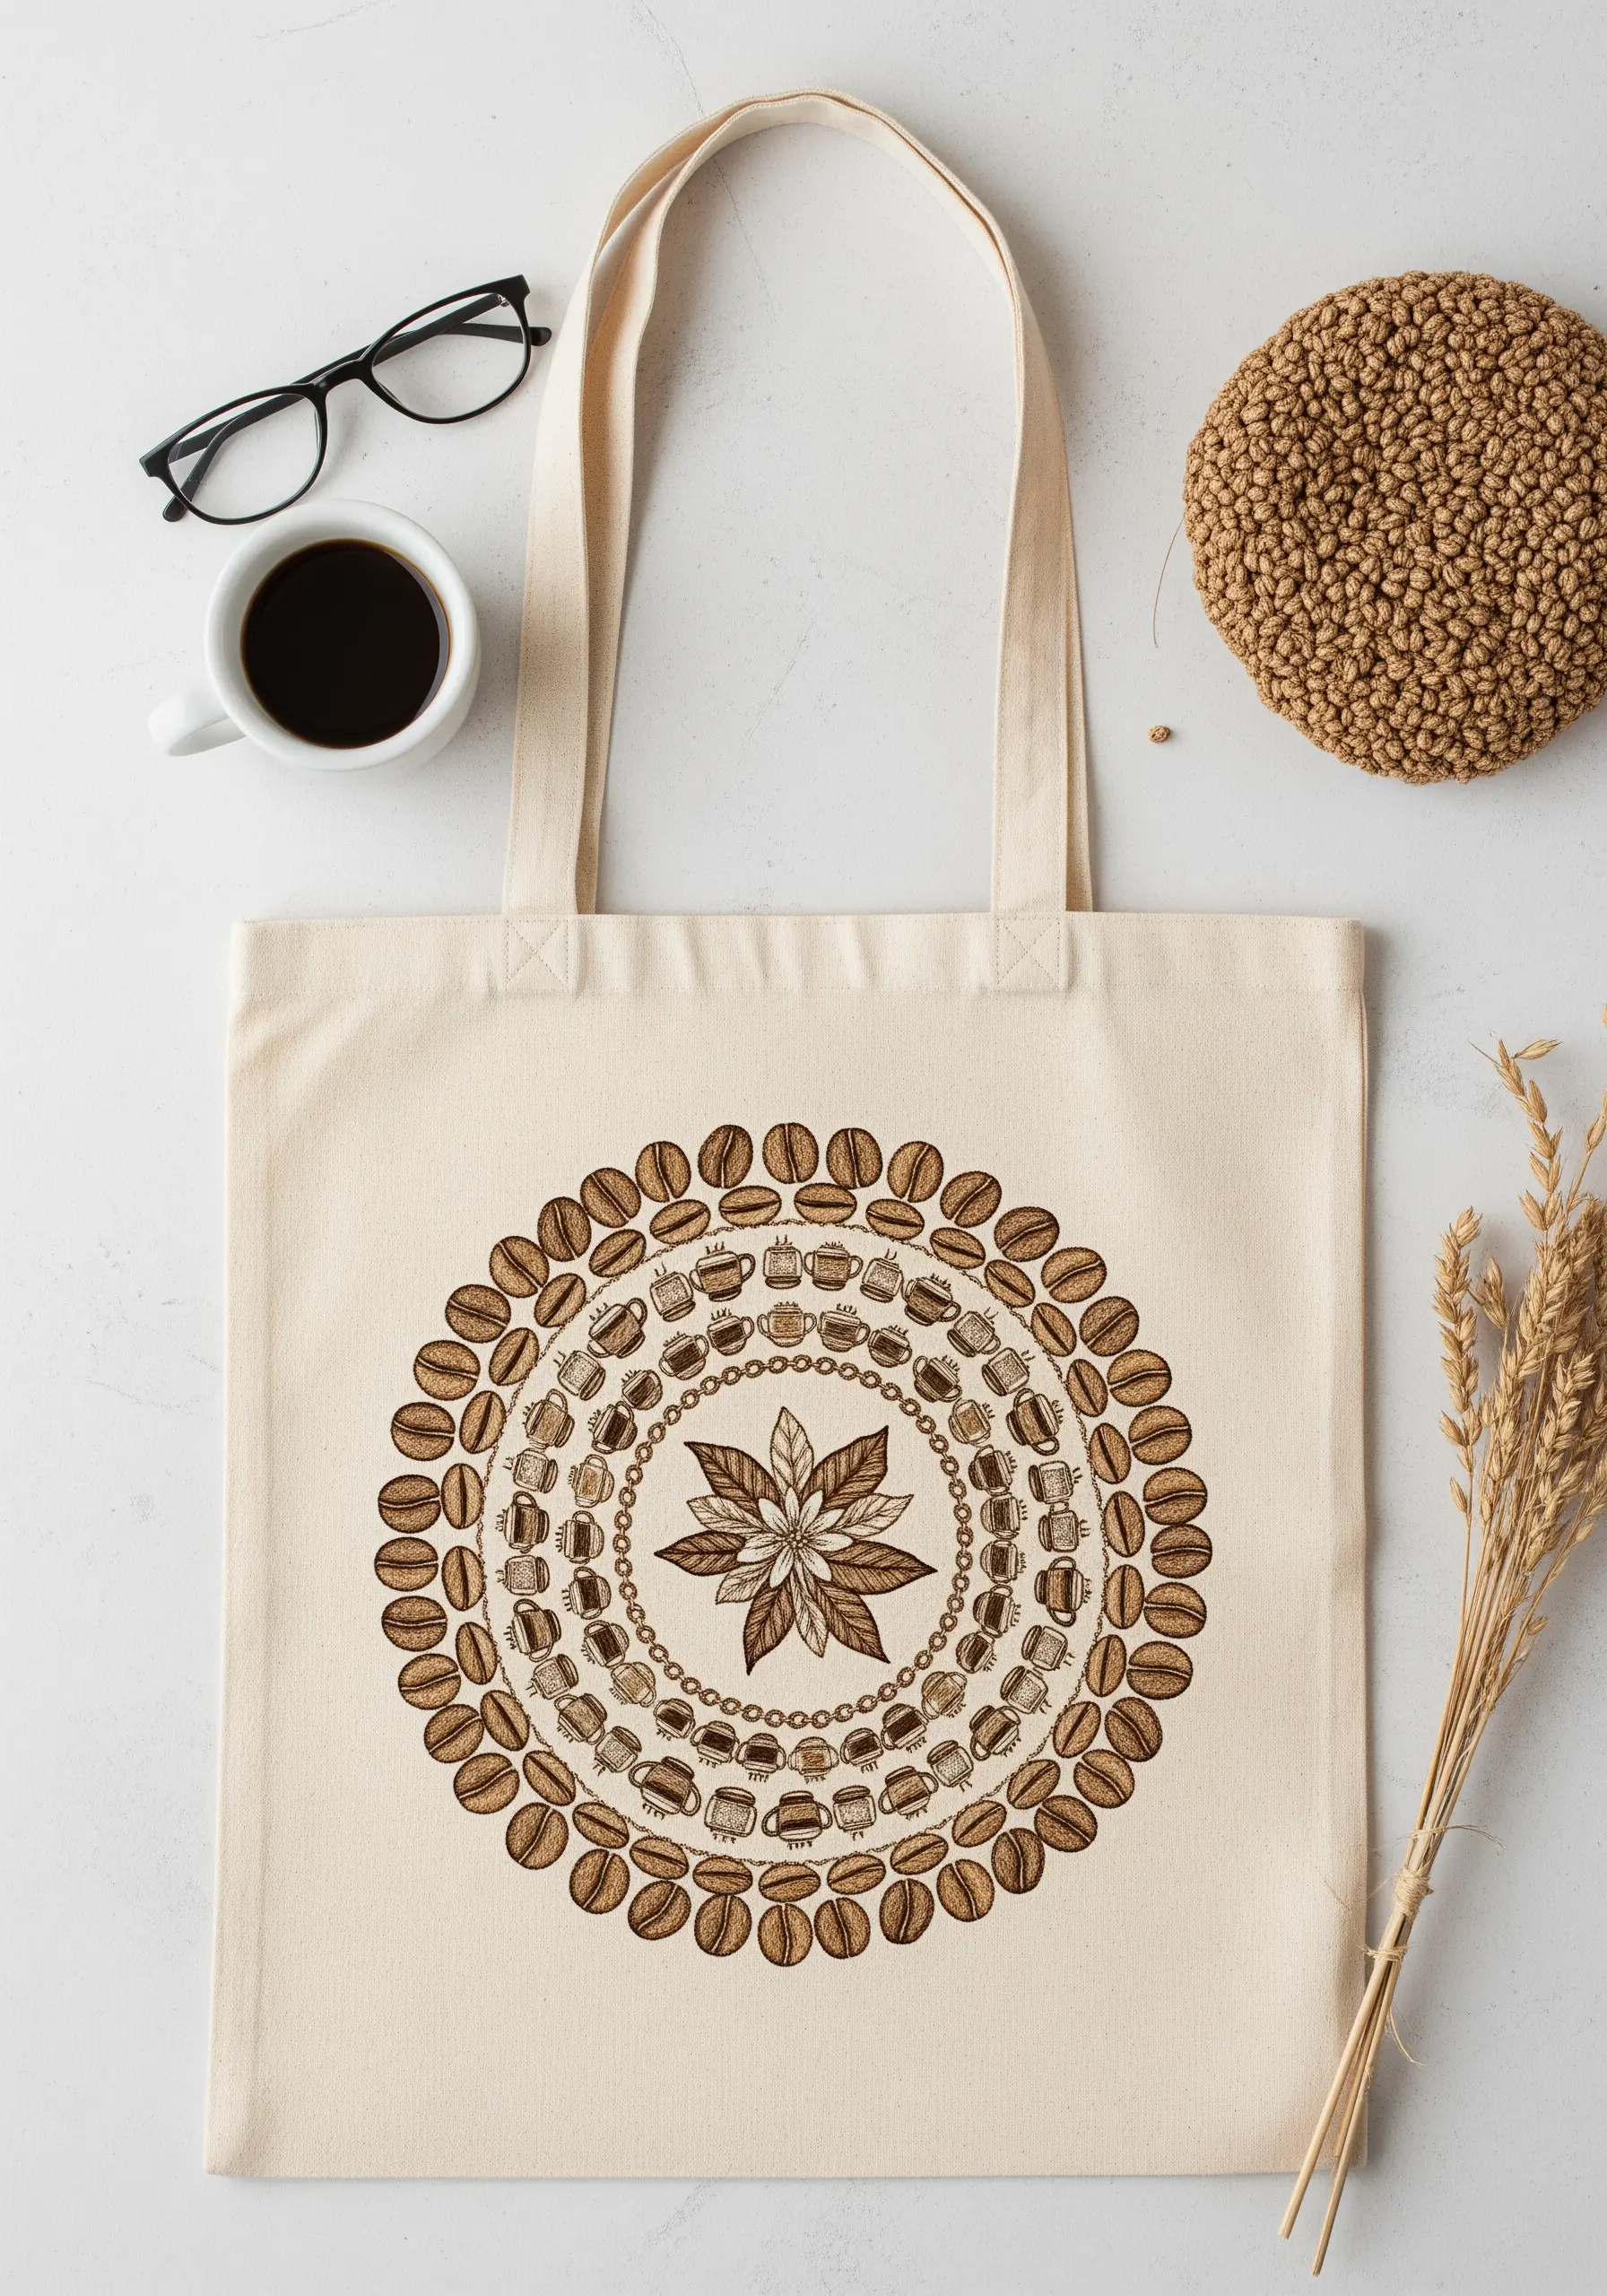
Combine your love for coffee and mindful stitching into one beautiful, circular design.
Build your mandala from the center out, starting with a central motif like a coffee leaf and radiating patterns of beans, mugs, and steam swirls.
Use a limited palette of coffee-inspired tones—creams, tans, and browns—to keep the intricate design from feeling chaotic.
The repetition of simple stitches like backstitch, satin stitch, and French knots creates a complex and harmonious whole, making it one of the most satisfying modern thread mandala ideas to create.


