

I know you love the feel of pulling thread through fabric. But I also know that feeling of looking at a finished piece and thinking, ‘It’s nice… but it could be more.’ You have the skill, but you’re looking for that shift—from simply following a pattern to making art that feels truly intentional.
The secret to elevating your work isn’t about learning dozens of complex new stitches. It’s about making subtle, intelligent choices: choosing a thread with a different sheen, understanding how the direction of a stitch can create movement, or seeing how a single textural detail can bring a whole piece to life.
Think of these ideas not as a list of projects to copy, but as a collection of techniques to try right now. Each one is designed to give you a visible, tangible improvement in your work. They are small shifts that will fundamentally change how you see your own creative potential, turning every piece into a confident expression of your unique style.
1. Botanical Realism with High-Contrast Thread Painting

To make your subjects pop, choose a dark, tightly woven fabric like black cotton twill.
This forces your thread colors to appear more vibrant and creates immediate visual depth.
For the mushroom caps, use the long-and-short stitch with single strands of floss, blending three to four shades to create a realistic gradient.
Introduce textural stitches for specific details: tight French knots for the morel’s pitted surface, and sparse straight stitches at the base to mimic delicate grass.
This combination of painterly blending and focused texture is what gives botanical embroidery its lifelike quality.
2. Sculptural Accents in Macrame Plant Hangers

Elevate a standard plant hanger by incorporating sculptural elements like these leaves.
Create each leaf by tying a series of diagonal Clove Hitch knots around a central filler cord.
Once the knotted shape is complete, unravel the cords on either side and comb them out thoroughly with a fine-tooth comb.
For a crisp, lasting shape, lightly spray the combed-out fringe with a fabric stiffener and trim the edges neatly with sharp scissors.
This technique transforms simple rope into handmade organic pieces with sophisticated, decorative flair.
3. Multi-Sensory Detail for Scented Sachets

To give your bee a fuzzy, three-dimensional body, use the turkey stitch (or Ghiordes knot).
Work the stitches closely together, then trim the loops to create a dense, velvety pile that invites touch.
For the lavender, cluster French knots using two to three shades of purple to give the blossoms dimension and a more natural appearance.
Using a full six strands of floss for these textural stitches ensures they stand out against the linen, creating a rich, tactile experience.
4. Weaving Landscapes with Textural Yarn

You can paint with fiber by varying the texture and thickness of your yarn to create pictorial depth.
Use a thick, unspun wool roving for elements like clouds or snowy peaks; its soft bulk creates a natural focal point.
For the sky and mountains, blend different shades of a finer yarn within the same row to achieve a soft, painterly gradient effect.
This intentional contrast between tight, flat weaving and chunky, plush textures is what makes woven landscapes so compelling.
5. A Lifelike Feather Bookmark with Gradient Shading

Mastering realistic gradients is about control and patience, best achieved with a single strand of floss.
Using the long-and-short stitch, work in sections down the feather, blending analogous colors to create a smooth, seamless transition from dark to light.
To capture the fluffy after-feather at the base, use single, detached straight stitches that radiate outward, breaking free from the solid shape.
Finish your work as a patch by ironing on a heat-fusible stabilizer, then cutting it out to create a unique and durable bookmark.
6. Celestial Mapping with Metallic Thread and Beads

Create a sophisticated celestial map by choosing a deep navy linen or felt that allows metallics to shine.
For the constellation lines, use a fine metallic thread and a simple backstitch for clean, sharp angles.
To make the stars feel distinct, represent them with a mix of materials: tiny silver seed beads for brighter stars and small French knots for fainter ones.
This subtle variation in texture adds a layer of astronomical authenticity to your night sky embroidery.
7. A Jeweled Pincushion with Bead Embroidery

Transform a simple utility item into a piece of art by adding dimensional beadwork.
Start by outlining your design with a row of backstitched beads to create a defined edge.
Fill the interior sections with a denser application of seed beads, securing each one with a tiny stitch for maximum durability.
Incorporate larger elements like crystals and pearls as focal points, stitching through them multiple times to ensure they are firmly anchored.
This layering of different bead sizes and sheens results in a truly luxurious and tactile object.
8. A Felt Leaf Garland with Structural Stitching

Give felt leaves a clean, professional finish by constructing them from two layers.
Before assembling, embroider the veins onto the top layer using a contrasting thread and a simple stem stitch for a defined line.
Place the second felt piece behind it and join the two layers with a neat, evenly spaced blanket stitch around the entire edge.
This double-layer technique adds weight and durability, preventing the leaves from curling and making your garland look polished from every angle.
9. Capturing Oceanic Motion with Directional Stitching
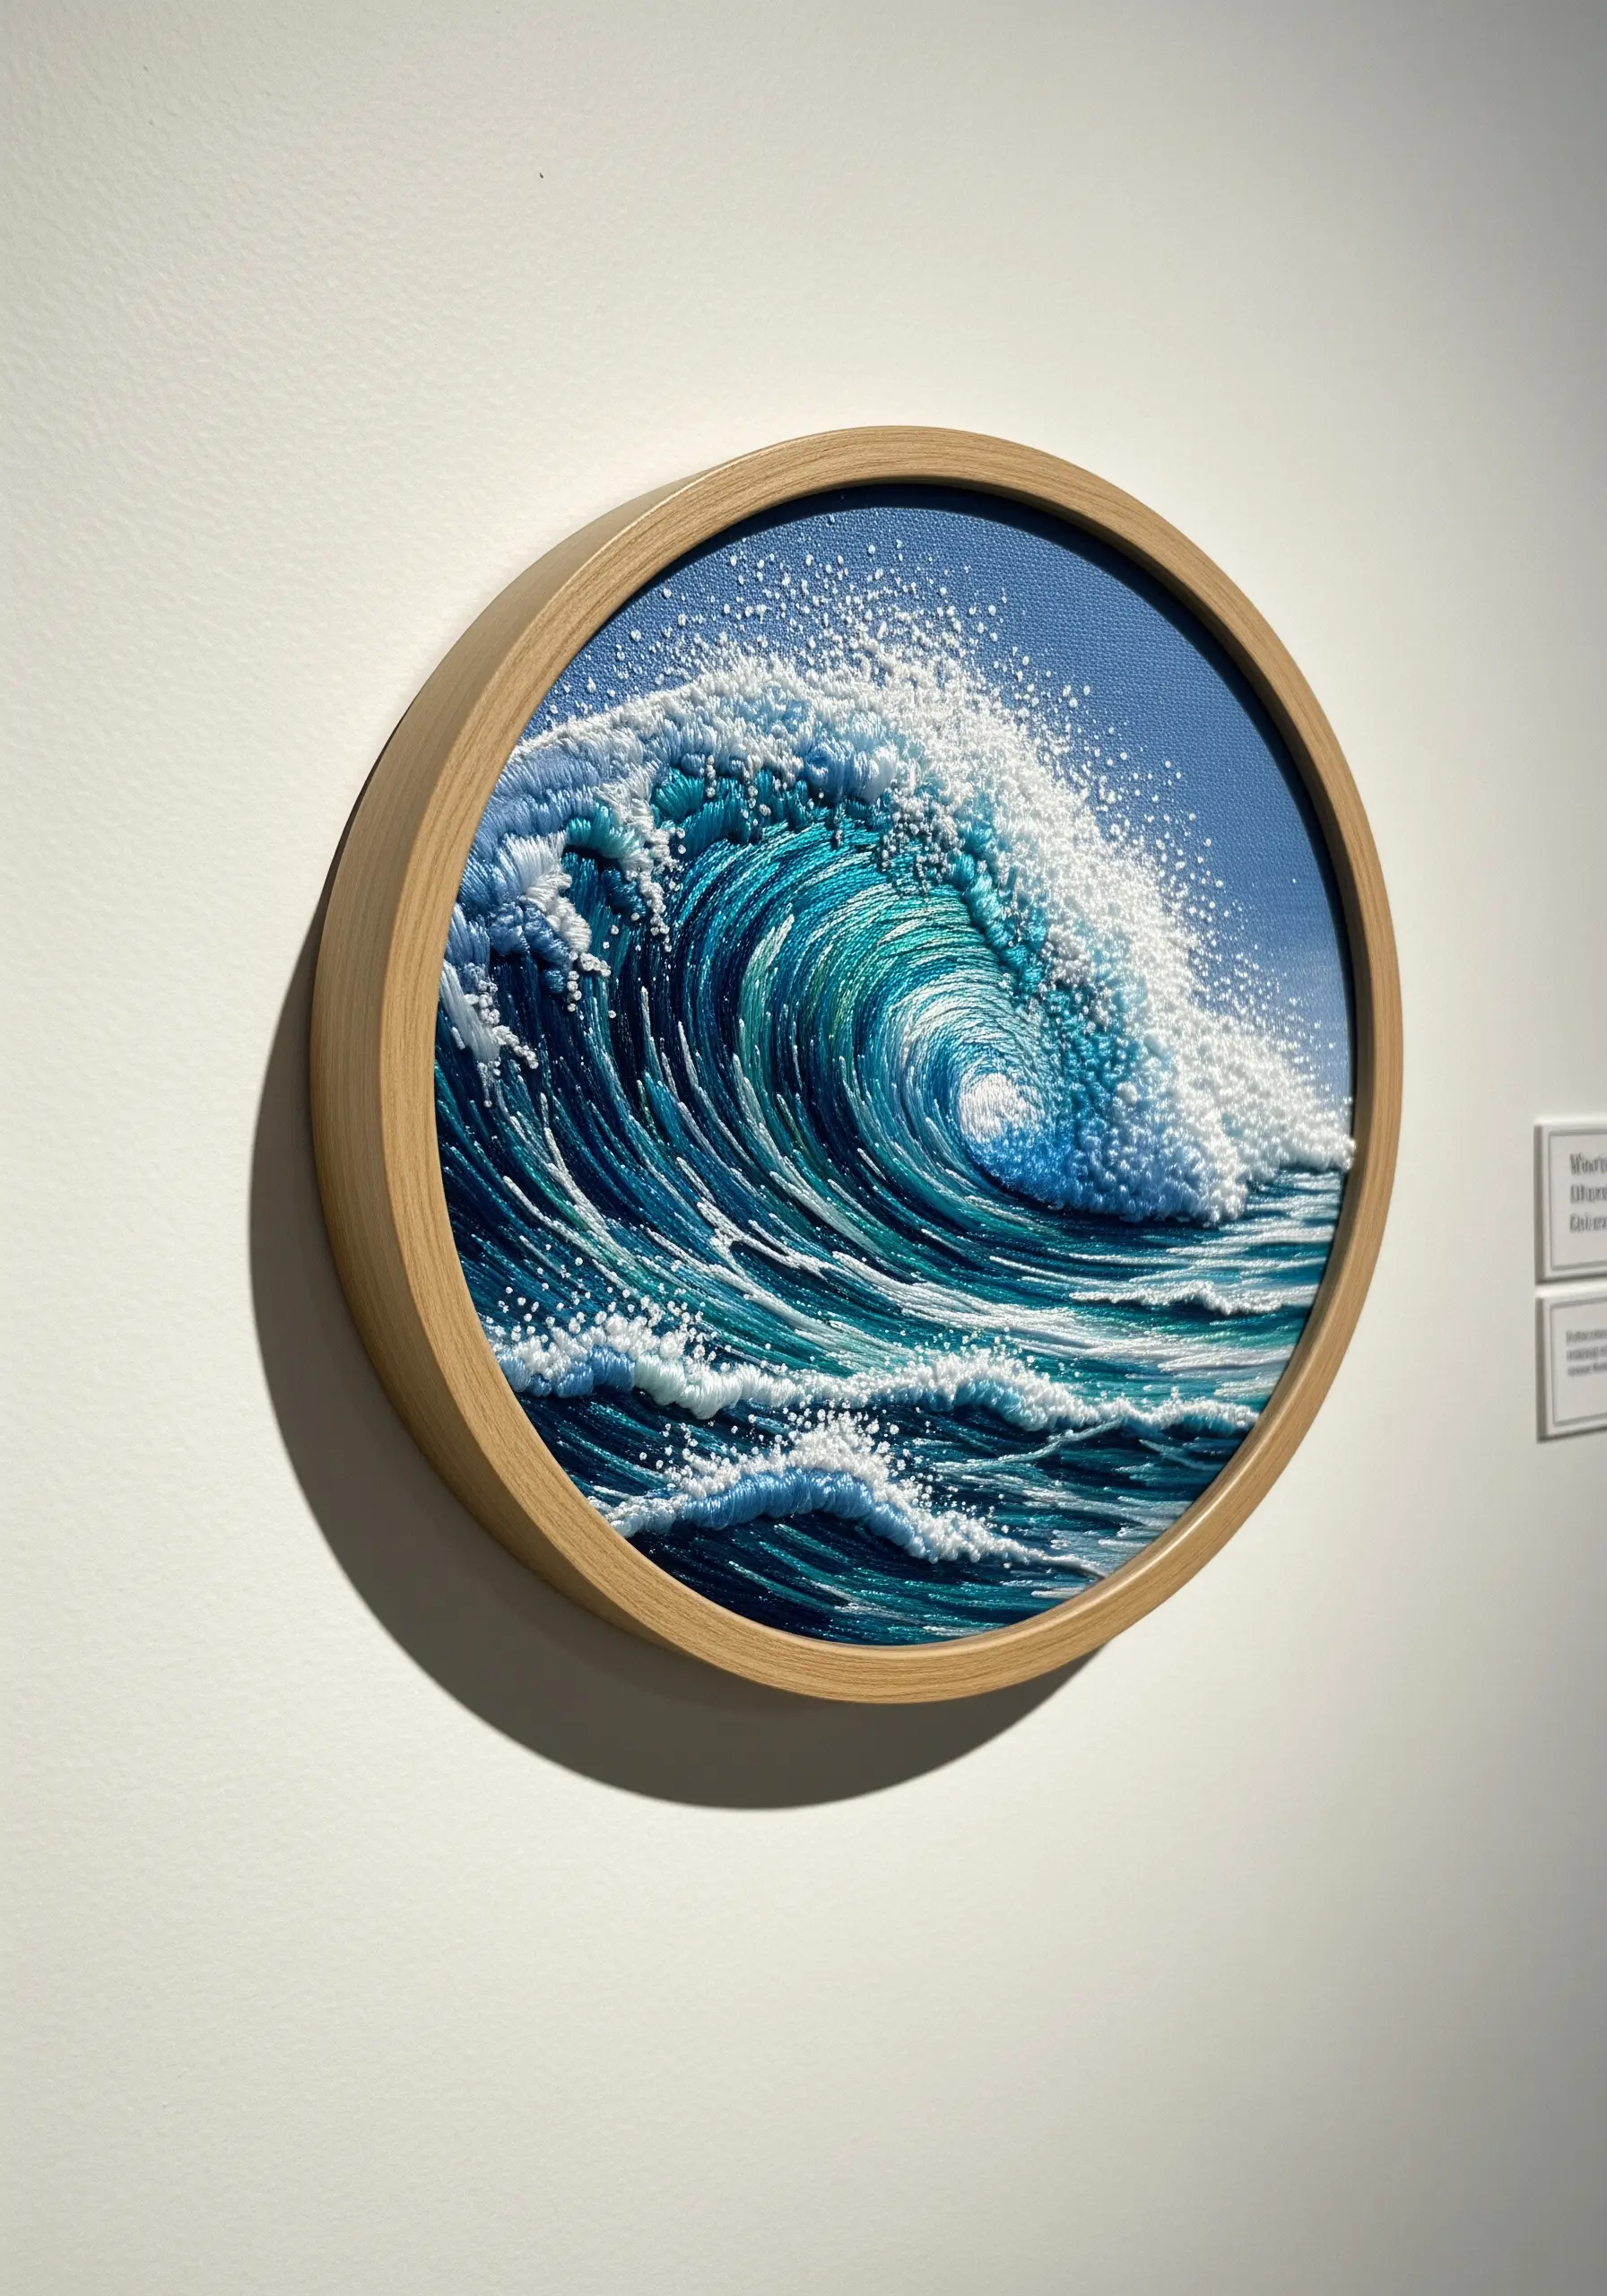
The energy of a wave is conveyed not by complex stitches, but by their direction and density.
Follow the natural curve of the wave with your long-and-short stitches, angling them to create the illusion of swelling and crashing water.
For the sea foam and spray, use a dense concentration of white French knots, varying their size and using single-strand thread for the finest, most delicate mist.
This disciplined use of stitch direction is the key to creating dynamic, realistic water scenes.
10. Bold Butterfly Patches with Padded Satin Stitch

To achieve a perfectly smooth, raised satin stitch, you must first build a foundation.
Outline every black section of the butterfly with a split stitch. This raised line will contain your satin stitches and create an impeccably sharp edge.
Fill the colored sections with directional satin stitches, keeping them parallel and dense for complete coverage.
This preparation ensures your finished butterfly patch has the clean, graphic quality of a professional embellishment.
11. Miniature Wildflower Napkin Rings

Working on a small scale requires you to make every stitch count.
Instead of complex techniques, rely on a thoughtful combination of simple stitches to create variety and texture.
Use lazy daisy stitches for petals, tight French knots for flower centers like chamomile, bullion knots for lavender buds, and a simple stem stitch for greenery.
This approach allows you to build a dense, detailed, and vibrant miniature meadow that feels rich and complex despite its size.
12. A 3D Moss Wreath with Mixed Fibers

Move beyond the hoop by creating sculptural fiber art with a mix of materials.
Mimic the texture of moss by creating chunky yarn pom-poms and Turkey stitch sections in various shades of green.
Incorporate found objects like small twigs, couching them onto the fabric with a matching fine thread to secure them invisibly.
Stretching a piece of dark green velvet in the hoop provides a lush, non-reflective background that makes your textured elements the star.
13. Pictorial Macrame with Shaped Guide Cords

Create images in macrame by using Clove Hitch knots over a shaped guide cord.
To form the sun’s rays and arches, lay a separate cord in the desired shape on top of your vertical warp cords and tie Clove Hitches over it.
Introduce new colors systematically to achieve the color-blocking effect for the sun, sky, and landscape elements.
This methodical approach turns knotting into a graphic art form, perfect for boho-inspired textile wall art.
14. Meditative Wrapping for Thread-Laced Stones

This project merges the hardness of stone with the softness of thread, creating a unique tactile object.
You can find pre-drilled stones for this craft, allowing you to easily lace thread through them.
Choose a smooth, strong thread like perle cotton that won’t fray as you pull it taut against the stone’s edges.
The beauty of these thread-wrapped stones lies in the uniform tension and the simple geometry of the lacing patterns, making the process itself a form of meditation.
15. An Ephemeral Dandelion Seed Mobile

To capture the airy quality of dandelion seeds, choose your materials for their lightness.
Create the fluffy seed heads by making tiny pom-poms from a fine, hazy yarn like mohair.
The delicate parachute fibers can be made from individual strands of frayed thread or wisps of silk roving, secured with a dab of glue.
Suspend each element with a translucent nylon thread from a minimal brass hoop to complete the illusion of seeds gently floating on the breeze. It’s perfect for a quiet reading corner.
16. Sculptural Succulents with Stumpwork

Bring your botanicals to life with stumpwork, a technique that raises embroidery off the fabric.
Create individual succulent leaves by working buttonhole stitches over a thin wire frame. This allows you to cut them out and shape them by hand.
Arrange and attach the shaped leaves in concentric circles to build your three-dimensional succulent.
For the soil, fill the area with a dense field of French knots in earthy tones, providing a nubbly textural base that makes the smooth, sculptural plants stand out. This is one of the most effective contemporary texture techniques.
17. Hyper-Realistic Insects with Organza Layers

The secret to creating lifelike, translucent insect wings is to work them on a separate piece of silk organza.
Use a single strand of thread and a fine backstitch to trace the delicate veins.
Once complete, carefully cut out the wings and attach them to the body, which is stitched directly onto your main background fabric.
This appliqué method creates a layer of genuine transparency and depth that is impossible to achieve with stitching alone, leading to stunningly realistic results and an abstract thread illusion of life.
18. Weaving with Embedded Natural Materials
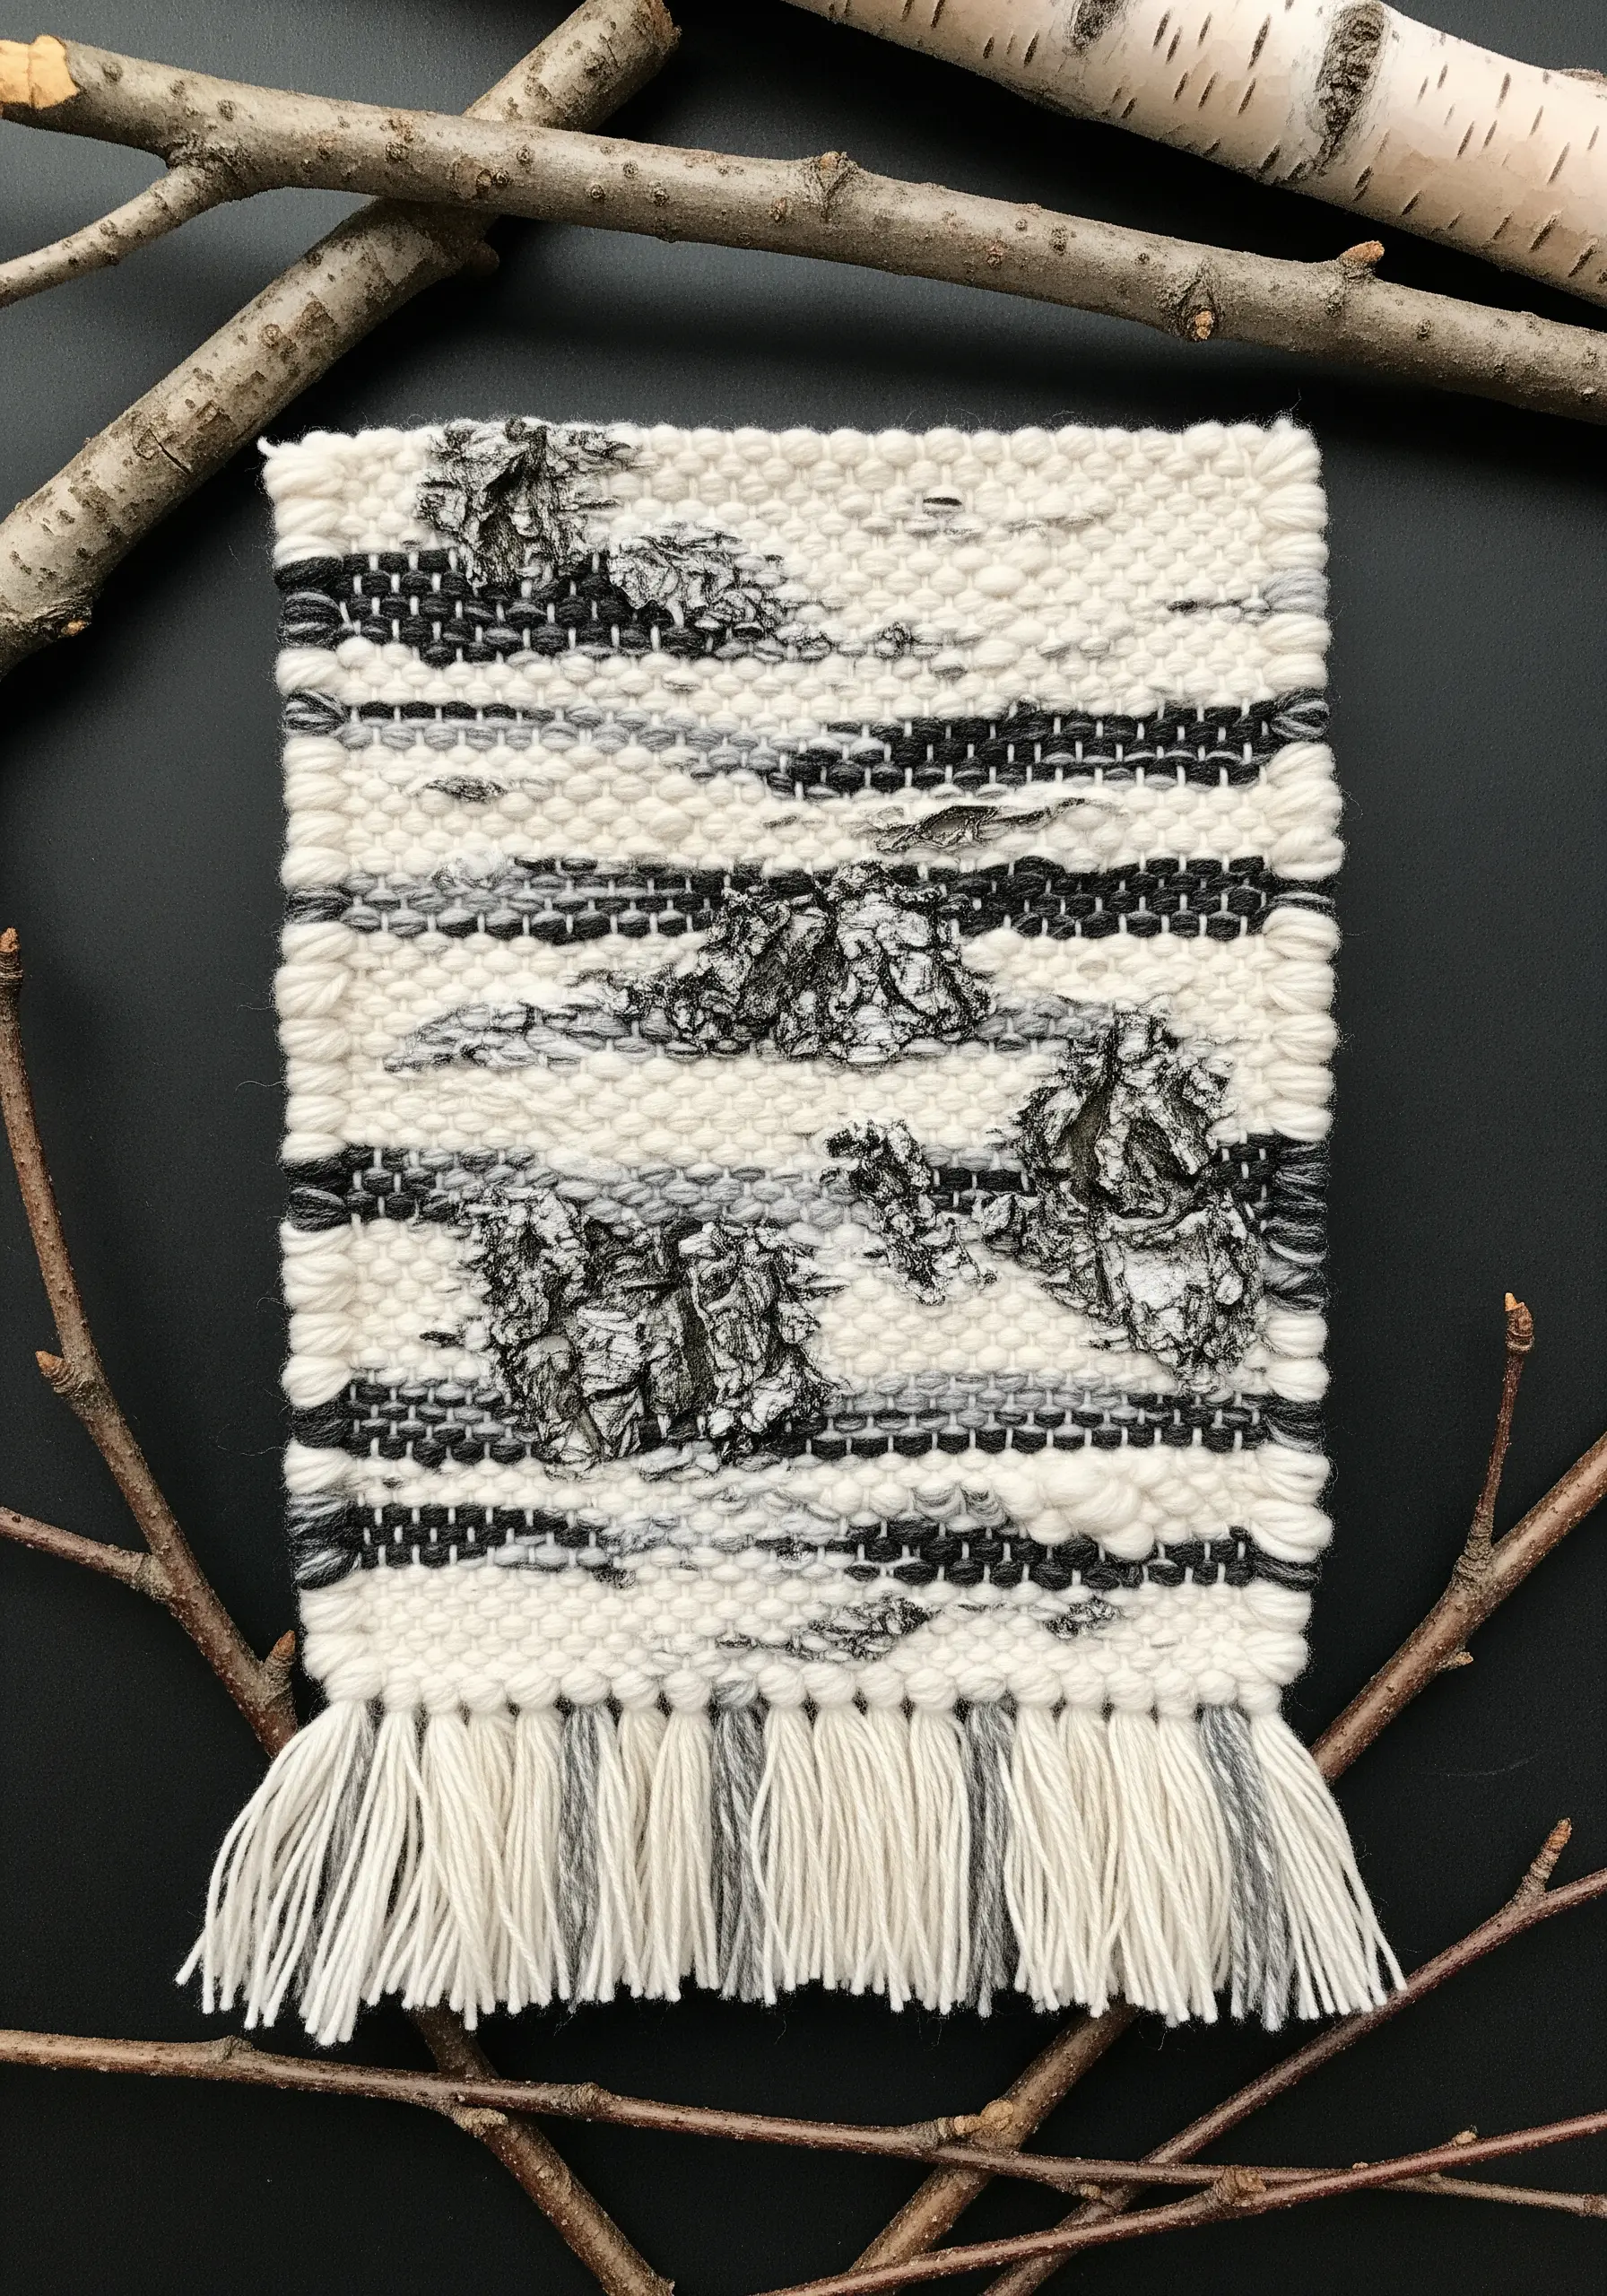
Integrate the authentic texture of nature directly into your weavings for a truly organic piece.
As you weave with neutral yarns, intentionally leave open spaces in the weft (the horizontal threads).
Gently insert thin, pliable pieces of birch bark or pressed leaves into these gaps.
Continue weaving around them to lock them in place. This technique creates a powerful dialogue between soft fiber and the raw textures of the forest, perfect for art inspired by nature’s lines.
19. A Bioluminescent Coral Sculpture

You can mimic the otherworldly glow of deep-sea life using fluorescent threads.
This piece is crocheted, but the principle applies to any fiber art. Use freeform stitches—like bullion knots, French knots, and woven wheels in embroidery—to build up organic coral shapes.
When viewed under a UV or blacklight, these neon threads activate, creating a stunning bioluminescent effect.
Displaying your creation under a glass cloche enhances its identity as a precious, glowing specimen. This is a great way to experiment with modern neon on black thread art.
20. A Narrative Frame of Pressed Flowers and Thread

Create a visual story by pairing real botanicals with their embroidered counterparts.
In a hinged, double-sided glass frame, arrange delicate pressed flowers on one side.
On the other side, stitch a simple, illustrative motif—like this bee and its flight path—onto a sheer fabric like tulle.
The transparency of the tulle allows the two halves to feel connected, creating a thoughtful dialogue. This is one of the most beautiful ways to combine pressed flowers with embroidery for stunning wall art.


