

Look closer at the world around you—not just at the flower, but at the cracked bark of the tree it grows on. Not just the landscape, but the concentric rings of a fallen branch. These are the textures that tell a story of time, resilience, and quiet beauty, and they are waiting to be translated by your needle and thread.
Stitching these patterns is more than just recreating what you see. It’s an exercise in observation that will sharpen your artistic eye and deepen your connection to your craft. You’ll learn to see in terms of line, shadow, and texture, moving beyond simple outlines to create work that has depth, character, and a tangible sense of life.
In this collection, you won’t find step-by-step instructions for a single project. Instead, you’ll discover techniques—from sculptural knots to thread painting—that empower you to interpret nature’s artistry in your own unique voice. Let these ideas be the starting point for developing a richer, more textural, and more personal embroidery style.
1. Layered Fibers for Birch Bark Relief
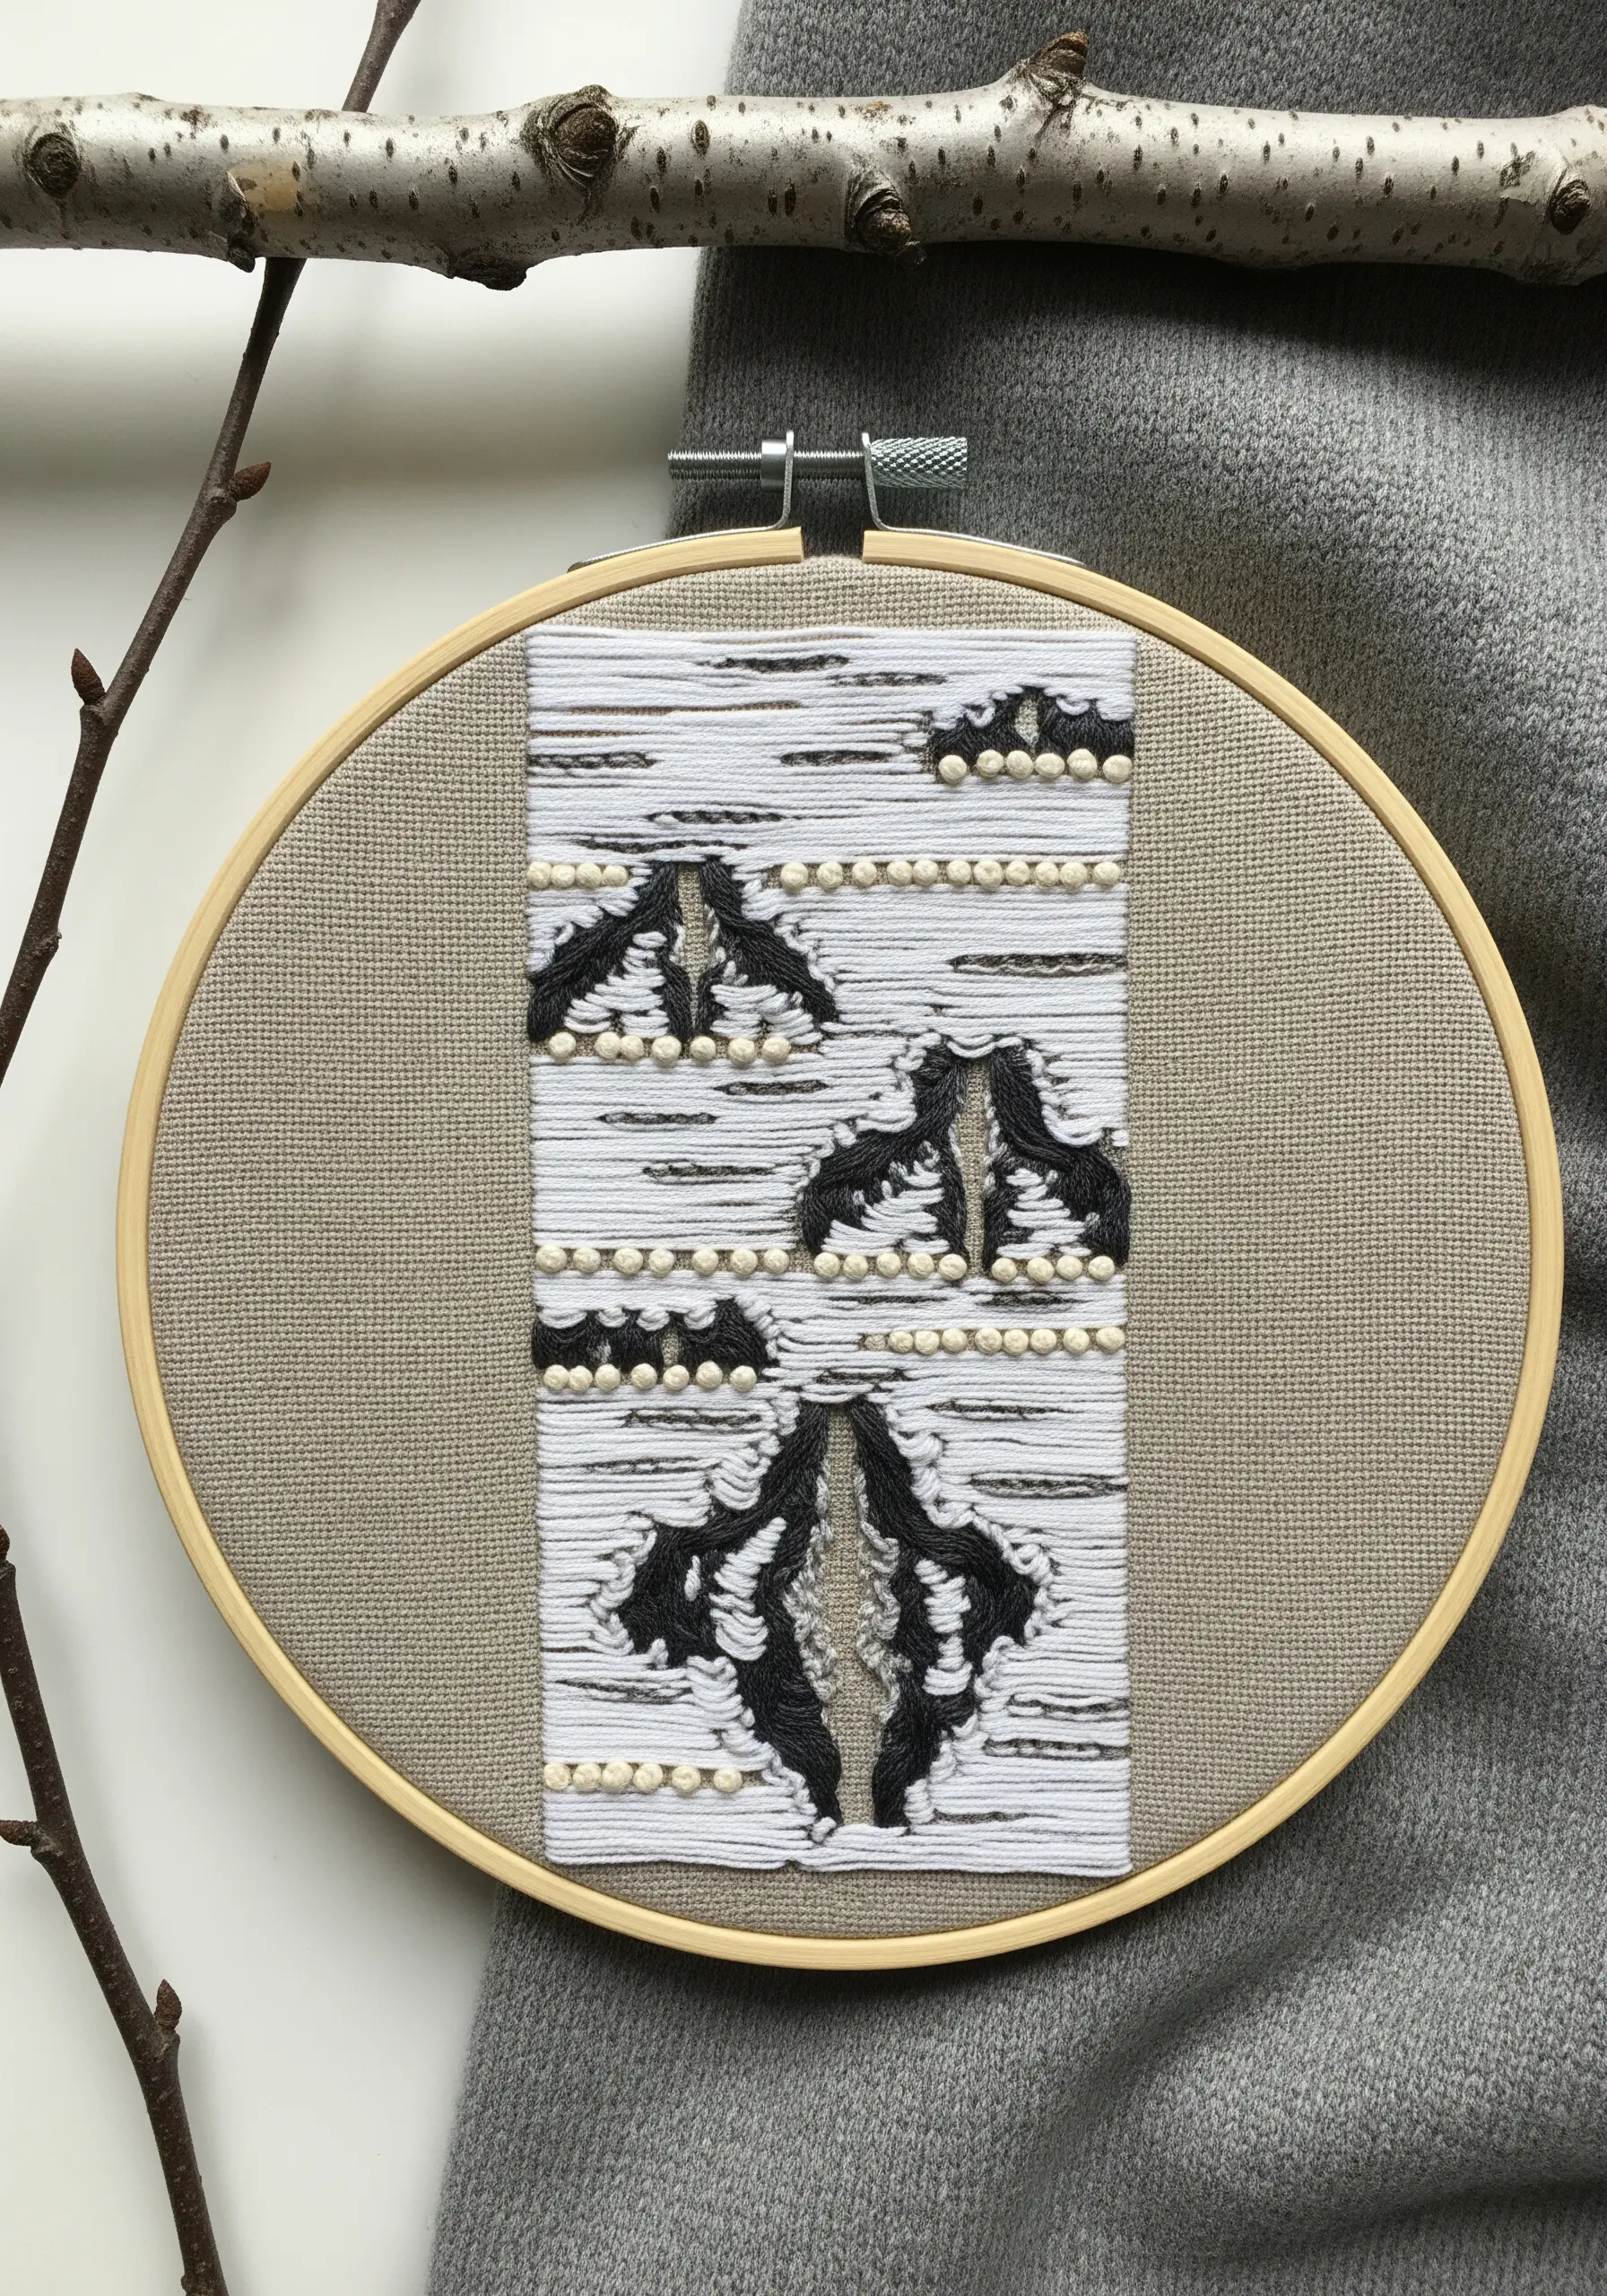
Create the papery quality of birch bark by layering different textures directly onto your fabric.
First, lay down a foundation of long, horizontal satin stitches using a matte white or off-white floss.
Then, couch thicker black or charcoal gray yarn over the top to form the characteristic dark markings.
For the raised, bumpy details, use colonial knots or tightly packed French knots with a slightly pearlescent thread to catch the light and add dimension.
This combination of flat, couched, and knotted stitches gives your work a sculptural quality that feels both realistic and artistic.
2. Precise Color Blocking for Tree Rings

To achieve clean, graphic tree rings, focus on precise outlines and intentional color shifts rather than complex blending.
Use a consistent backstitch or stem stitch for every ring, which creates a steady, rhythmic line.
Select a palette of five to seven shades of brown, from pale tan to deep umber, and apply them in distinct blocks.
This method transforms the organic pattern into a bold, modern design. The key is the uniformity of the stitch, which allows the color changes to define the form.
3. Vertical Couching for Expressive Bark
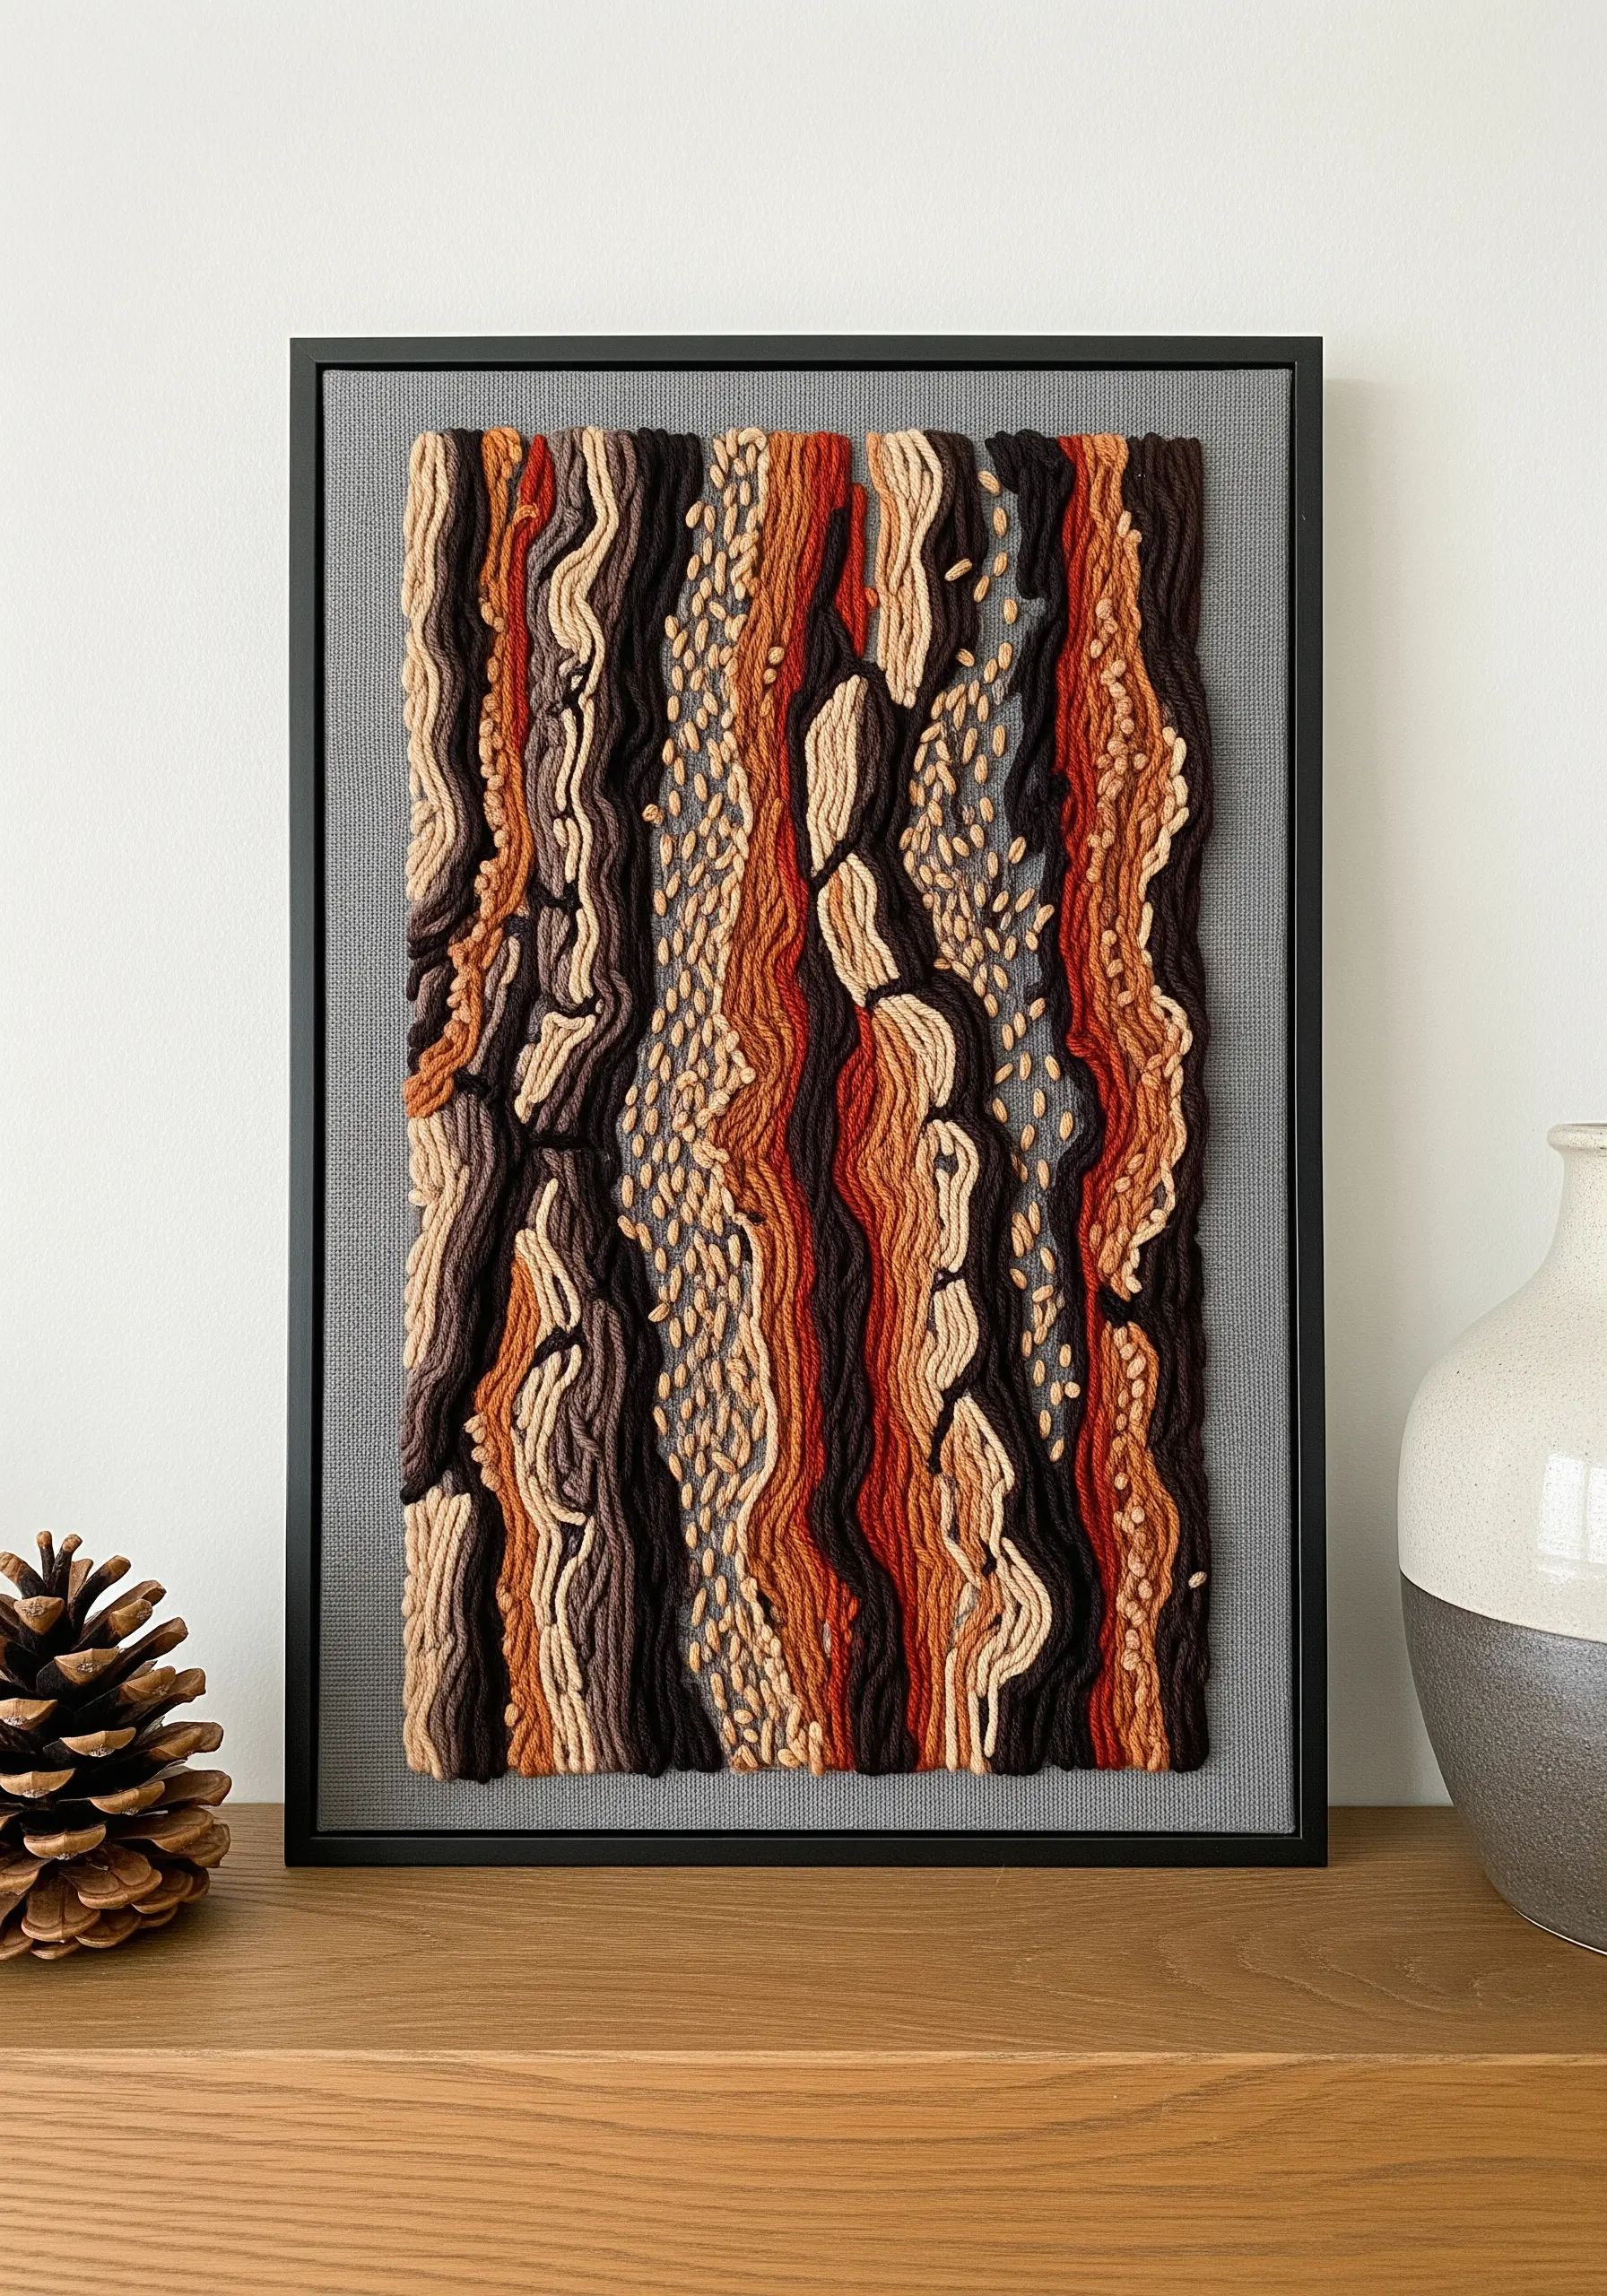
Mimic the deep grooves of tree bark by couching thick, textural yarns in vertical lines.
Lay down strands of wool or multi-ply cotton thread and secure them with a thinner, contrasting thread using small, evenly spaced tacking stitches.
Introduce variety by slightly curving the yarn paths and varying their thickness.
Intersperse these channels with delicate seed stitches or French knots to represent the finer, speckled texture of bark, creating a rich and dynamic surface.
This technique is perfect for creating fiber art installations with dramatic visual weight and tactility.
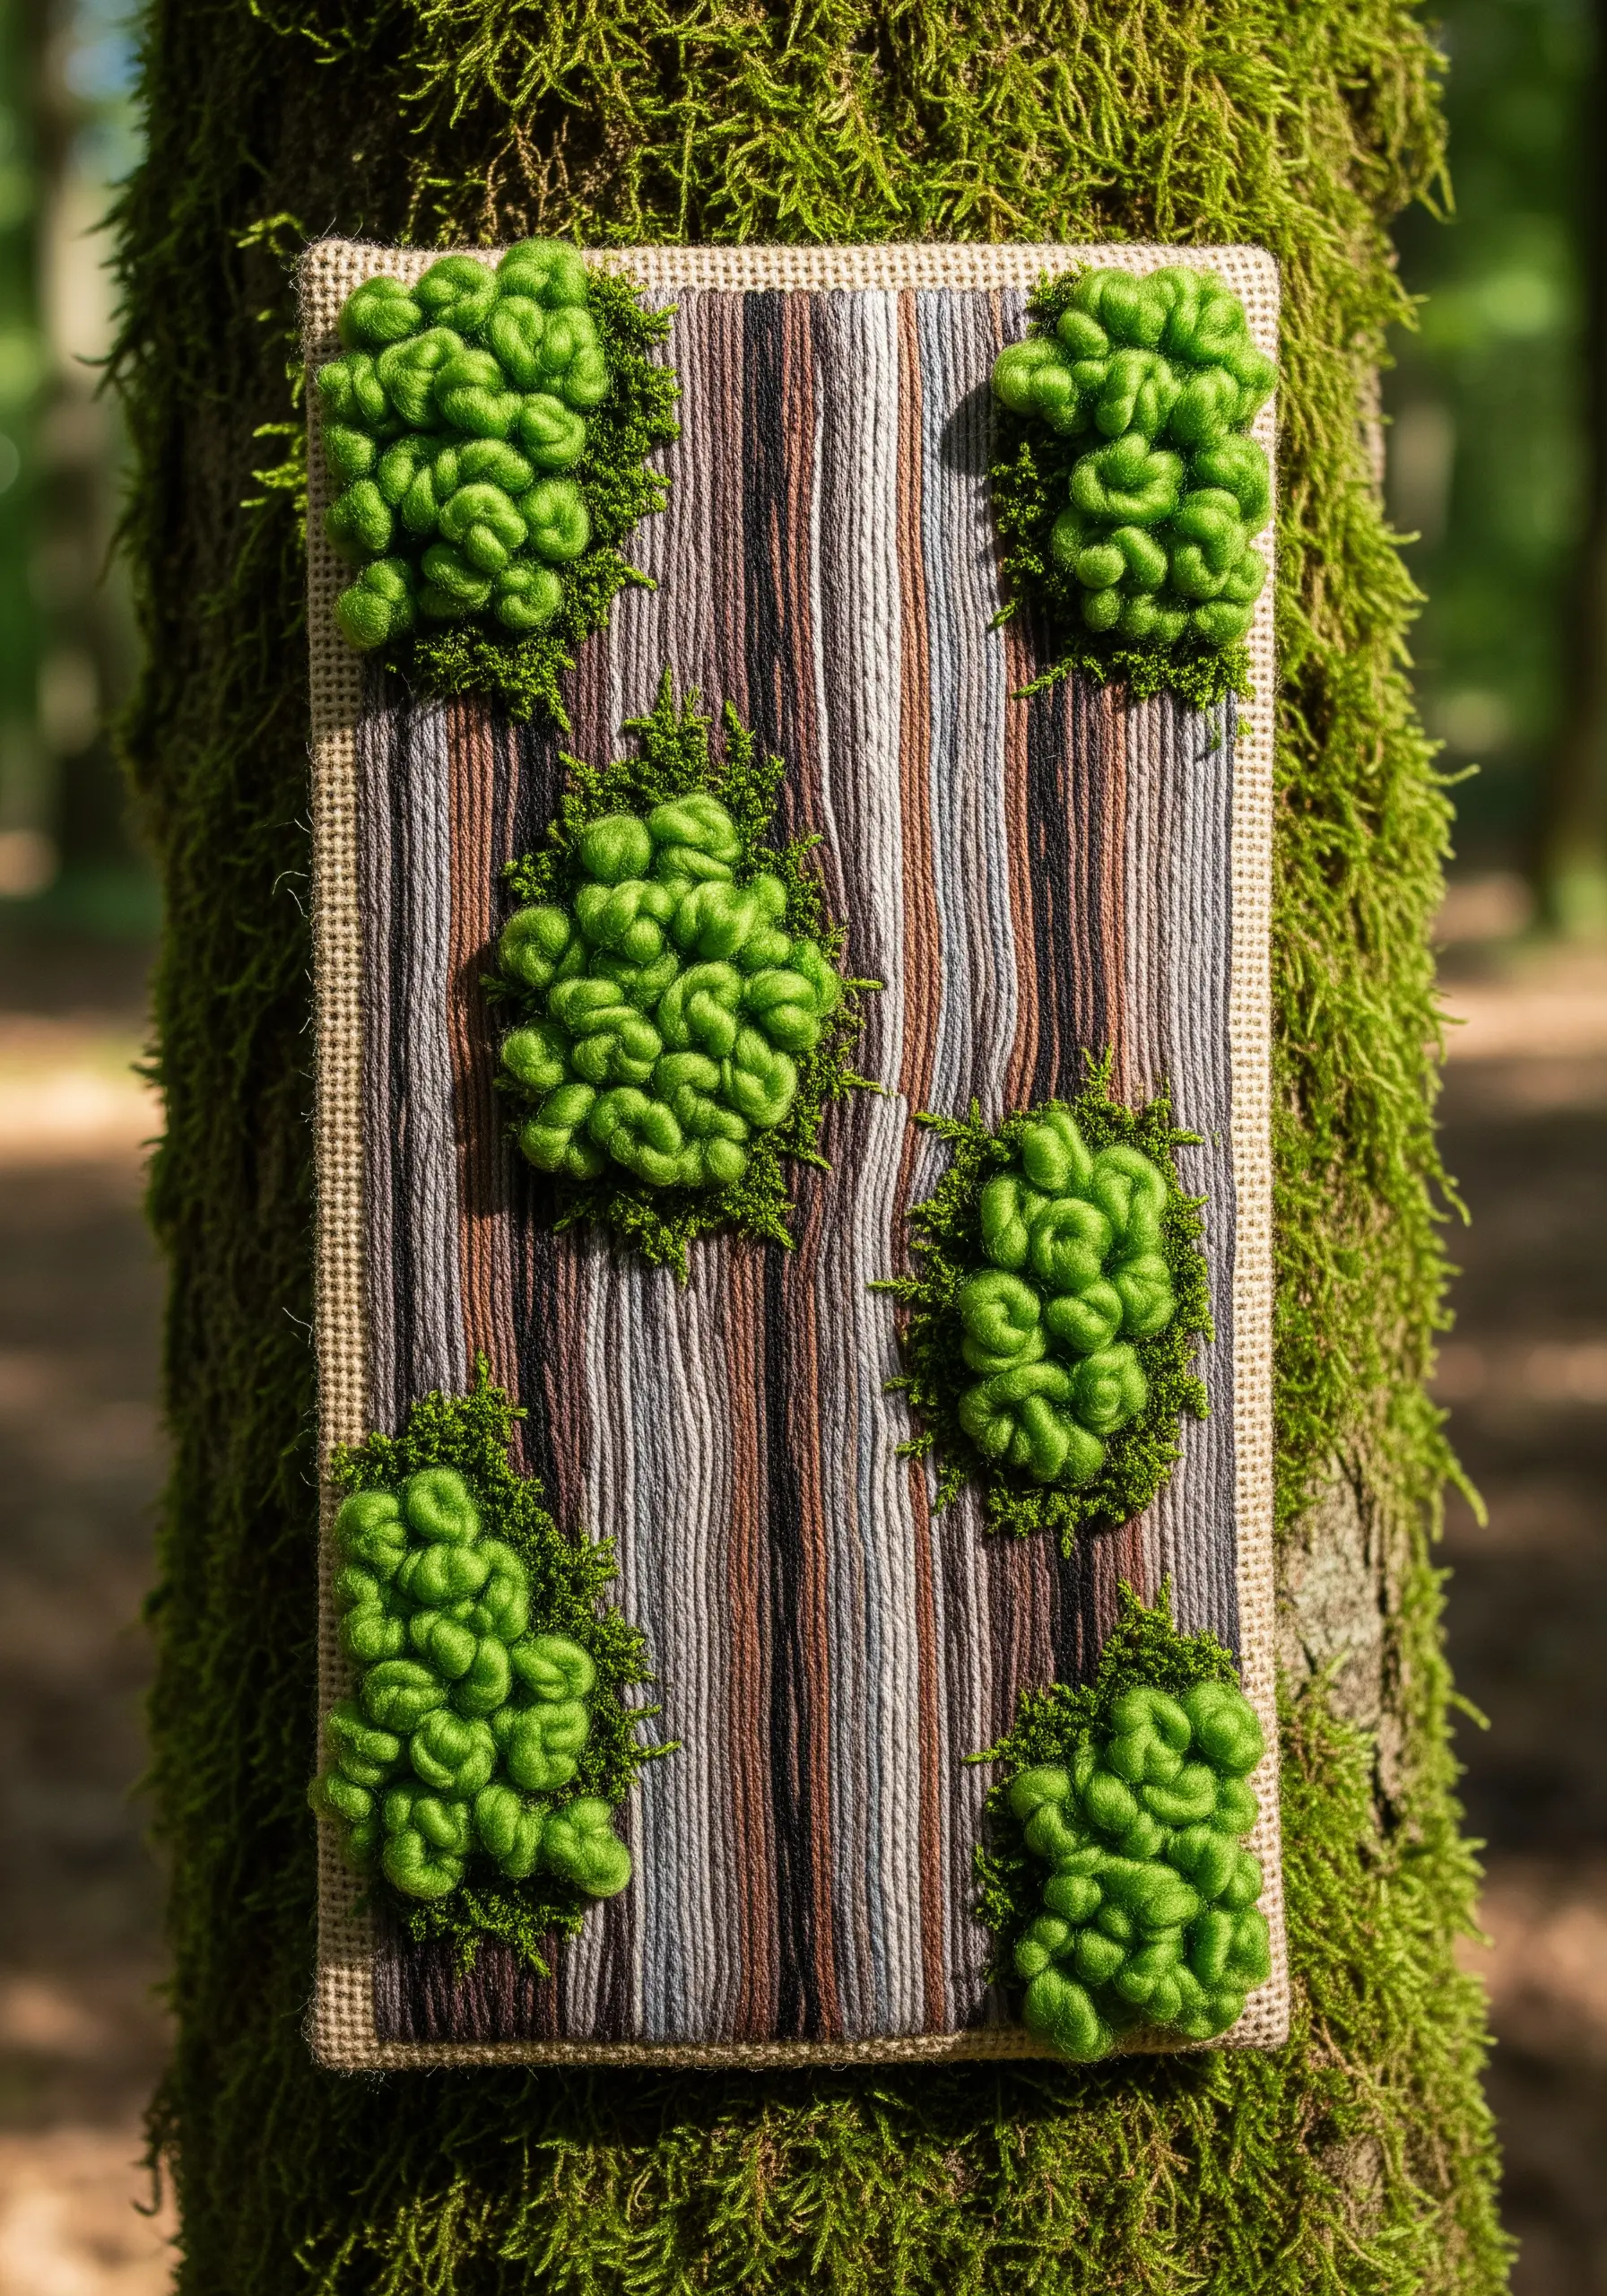
4. Stumpwork and Knots for 3D Lichen
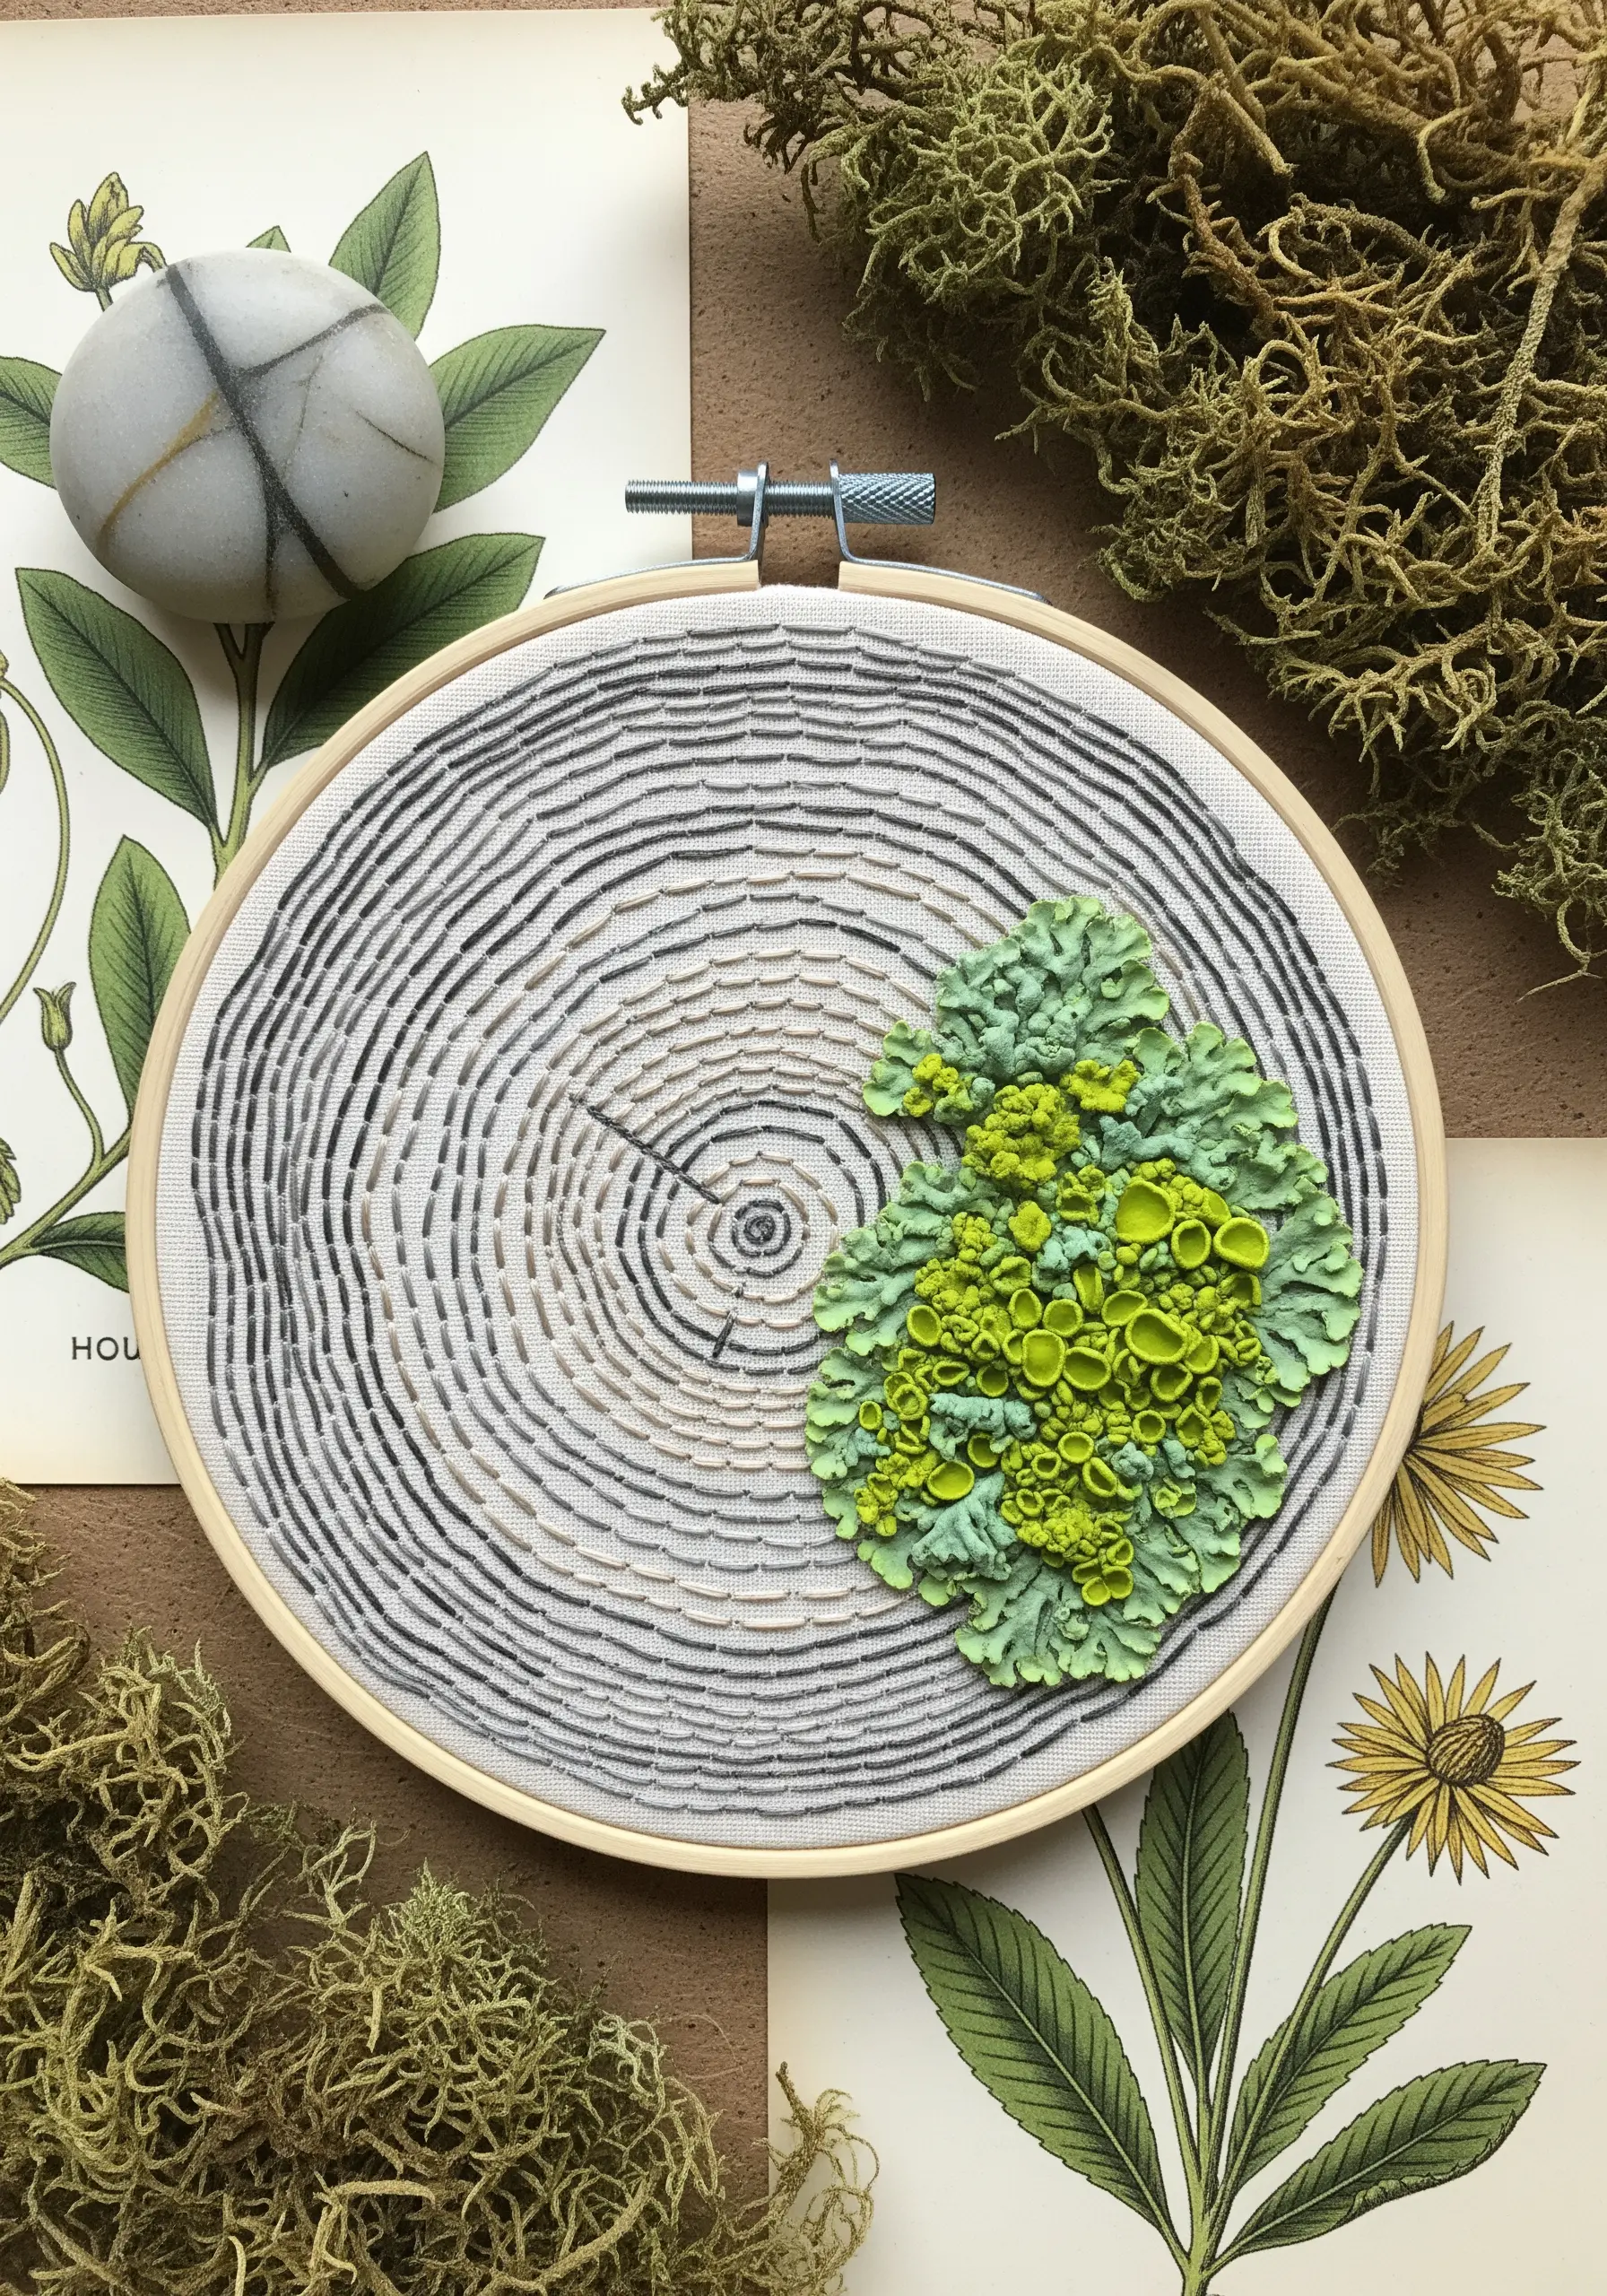
Bring your embroidery into the third dimension by adding stumpwork lichen to a flat-stitched tree ring.
The tree rings themselves can be rendered with a simple split stitch to create fine, dense lines.
For the lichen, create a base of felt padding cut into organic shapes. Cover this padding with a dense layer of French knots, bullion knots, or cast-on stitches in vibrant greens and chartreuse.
Vary the size and tension of your knots to create an uneven, natural surface that mimics lichen’s clustered growth.
5. The Power of a Single, Flowing Line
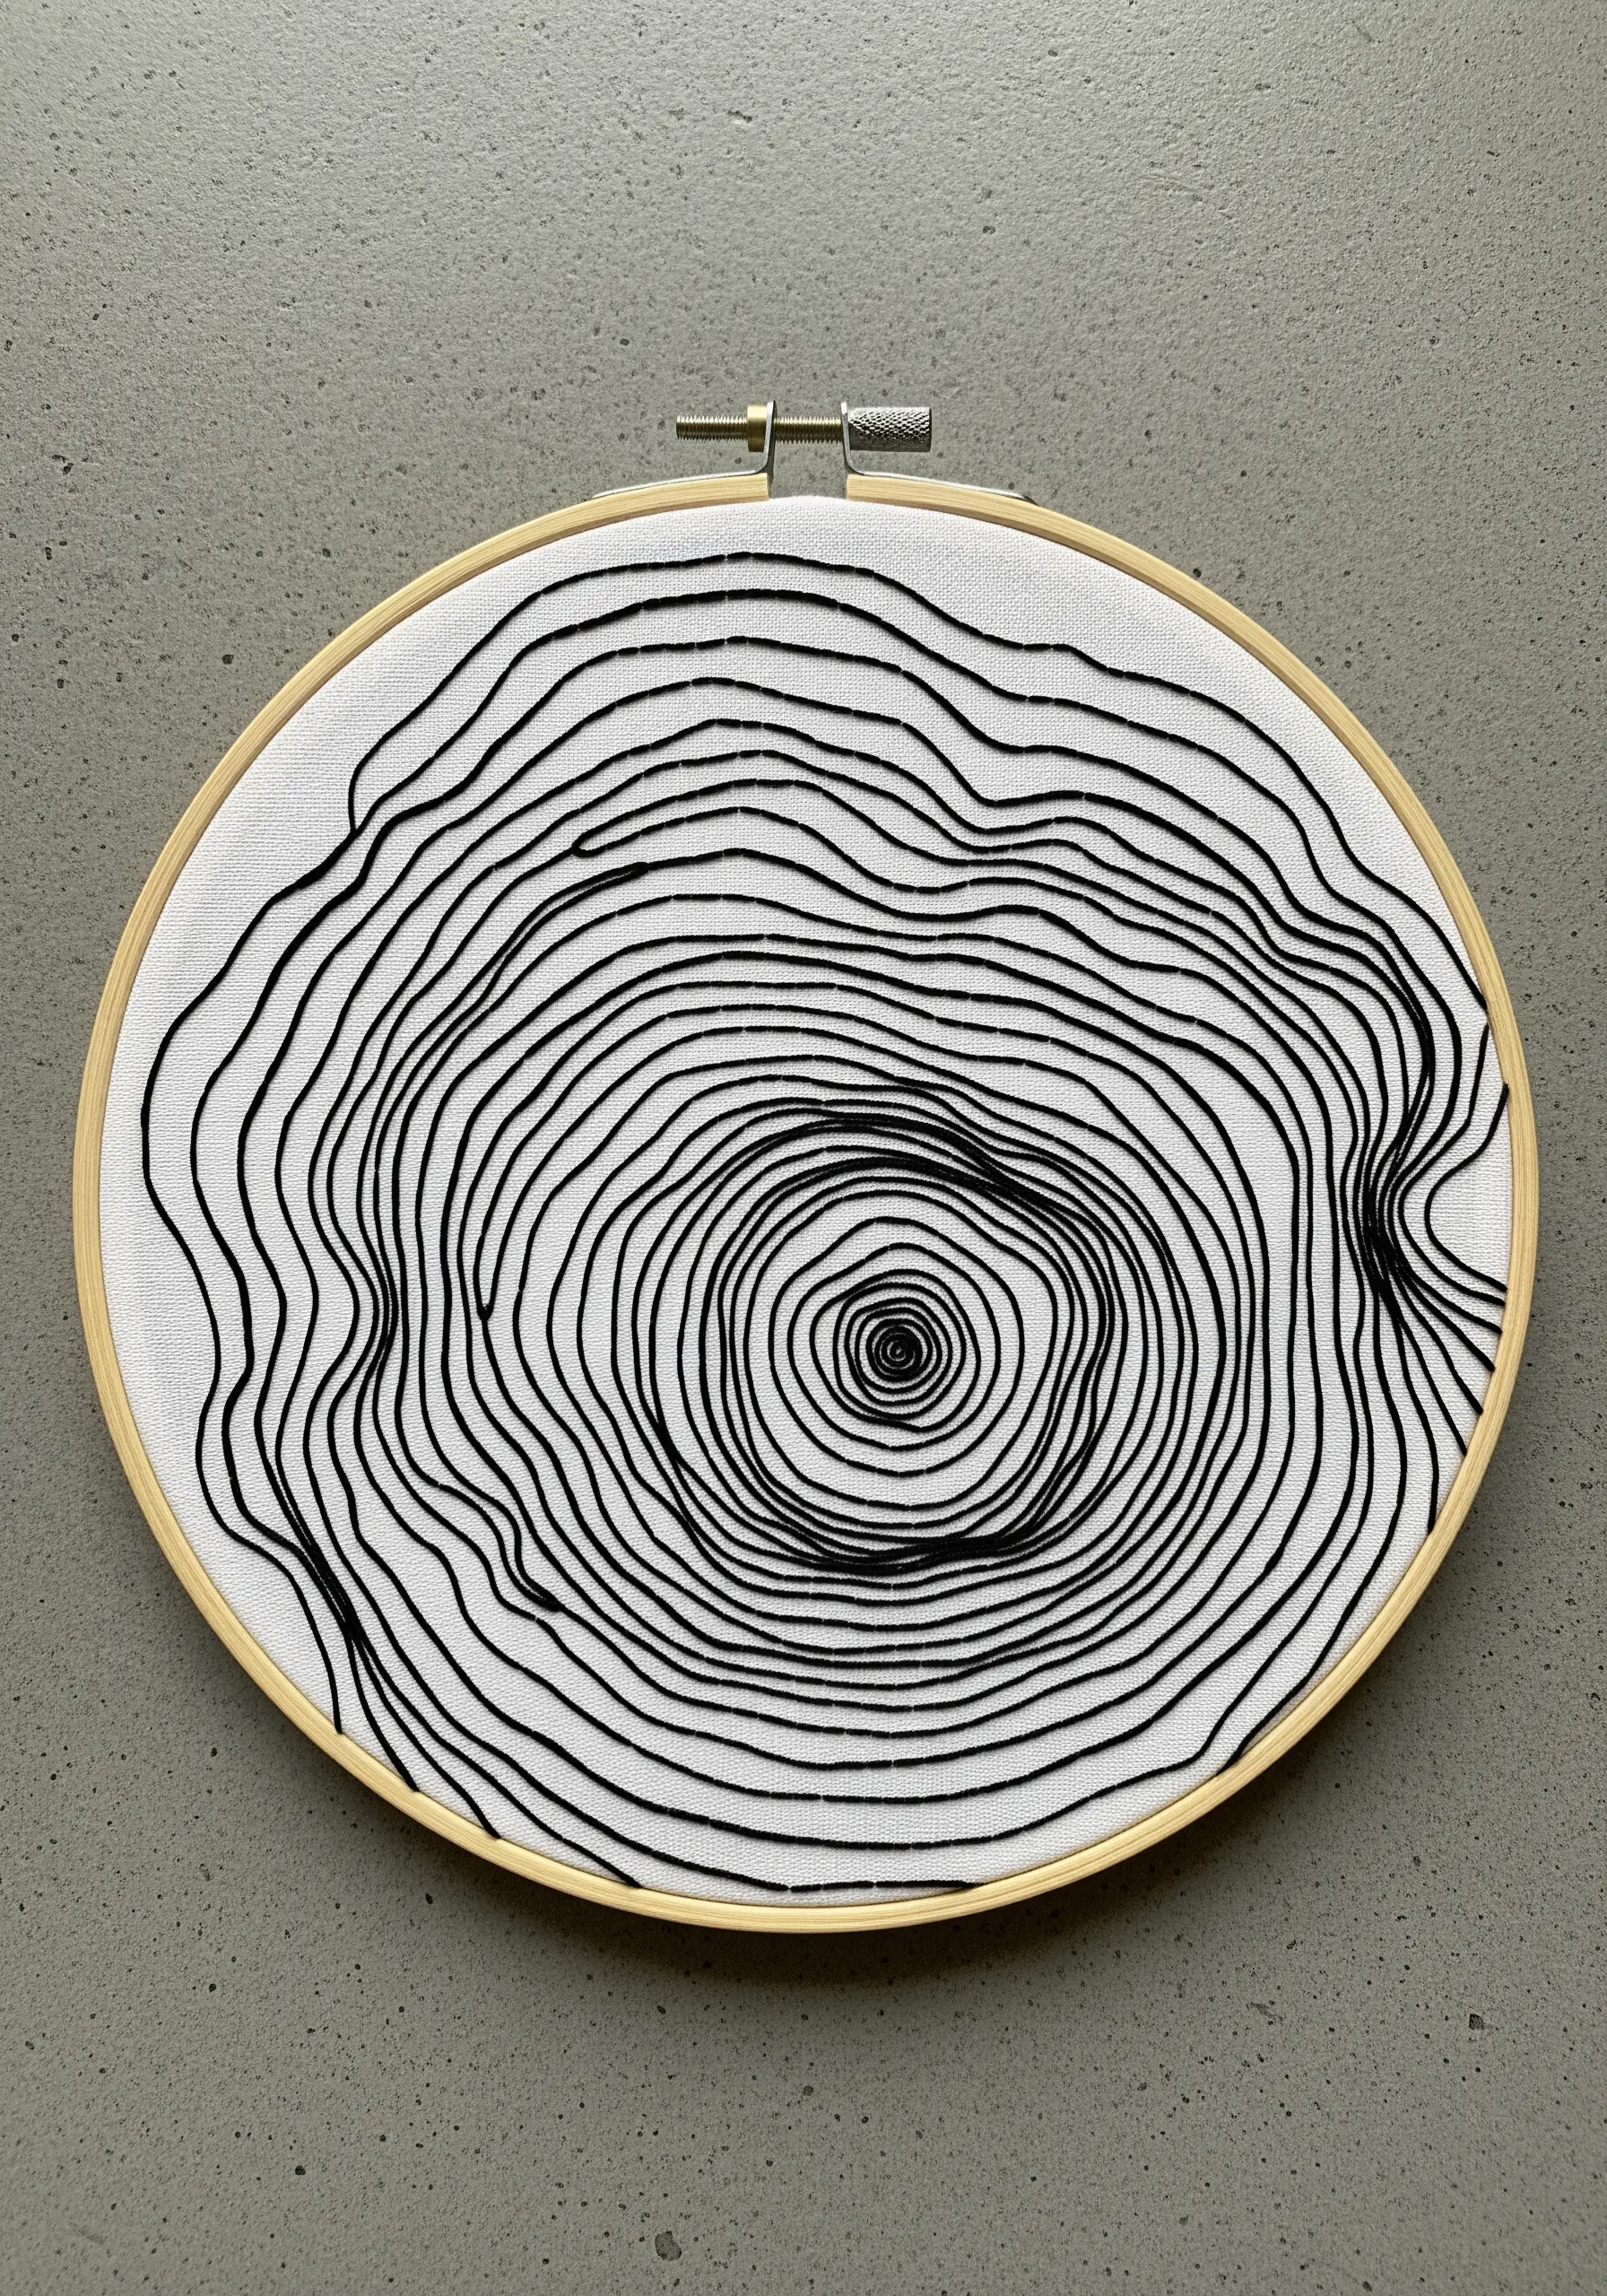
Explore the beauty of imperfection by stitching tree rings with a single, continuous line that deviates from a perfect circle.
Use a whipped backstitch or a heavy chain stitch to create a bold, uninterrupted line that has weight and presence.
Allow the line to wobble and warp, mimicking the organic variations of natural growth. This approach turns a simple subject into a piece of minimalist thread art.
Working in a high-contrast palette, like black on white, emphasizes the purity of the line itself.
6. Abstracting Bark with Bold Color
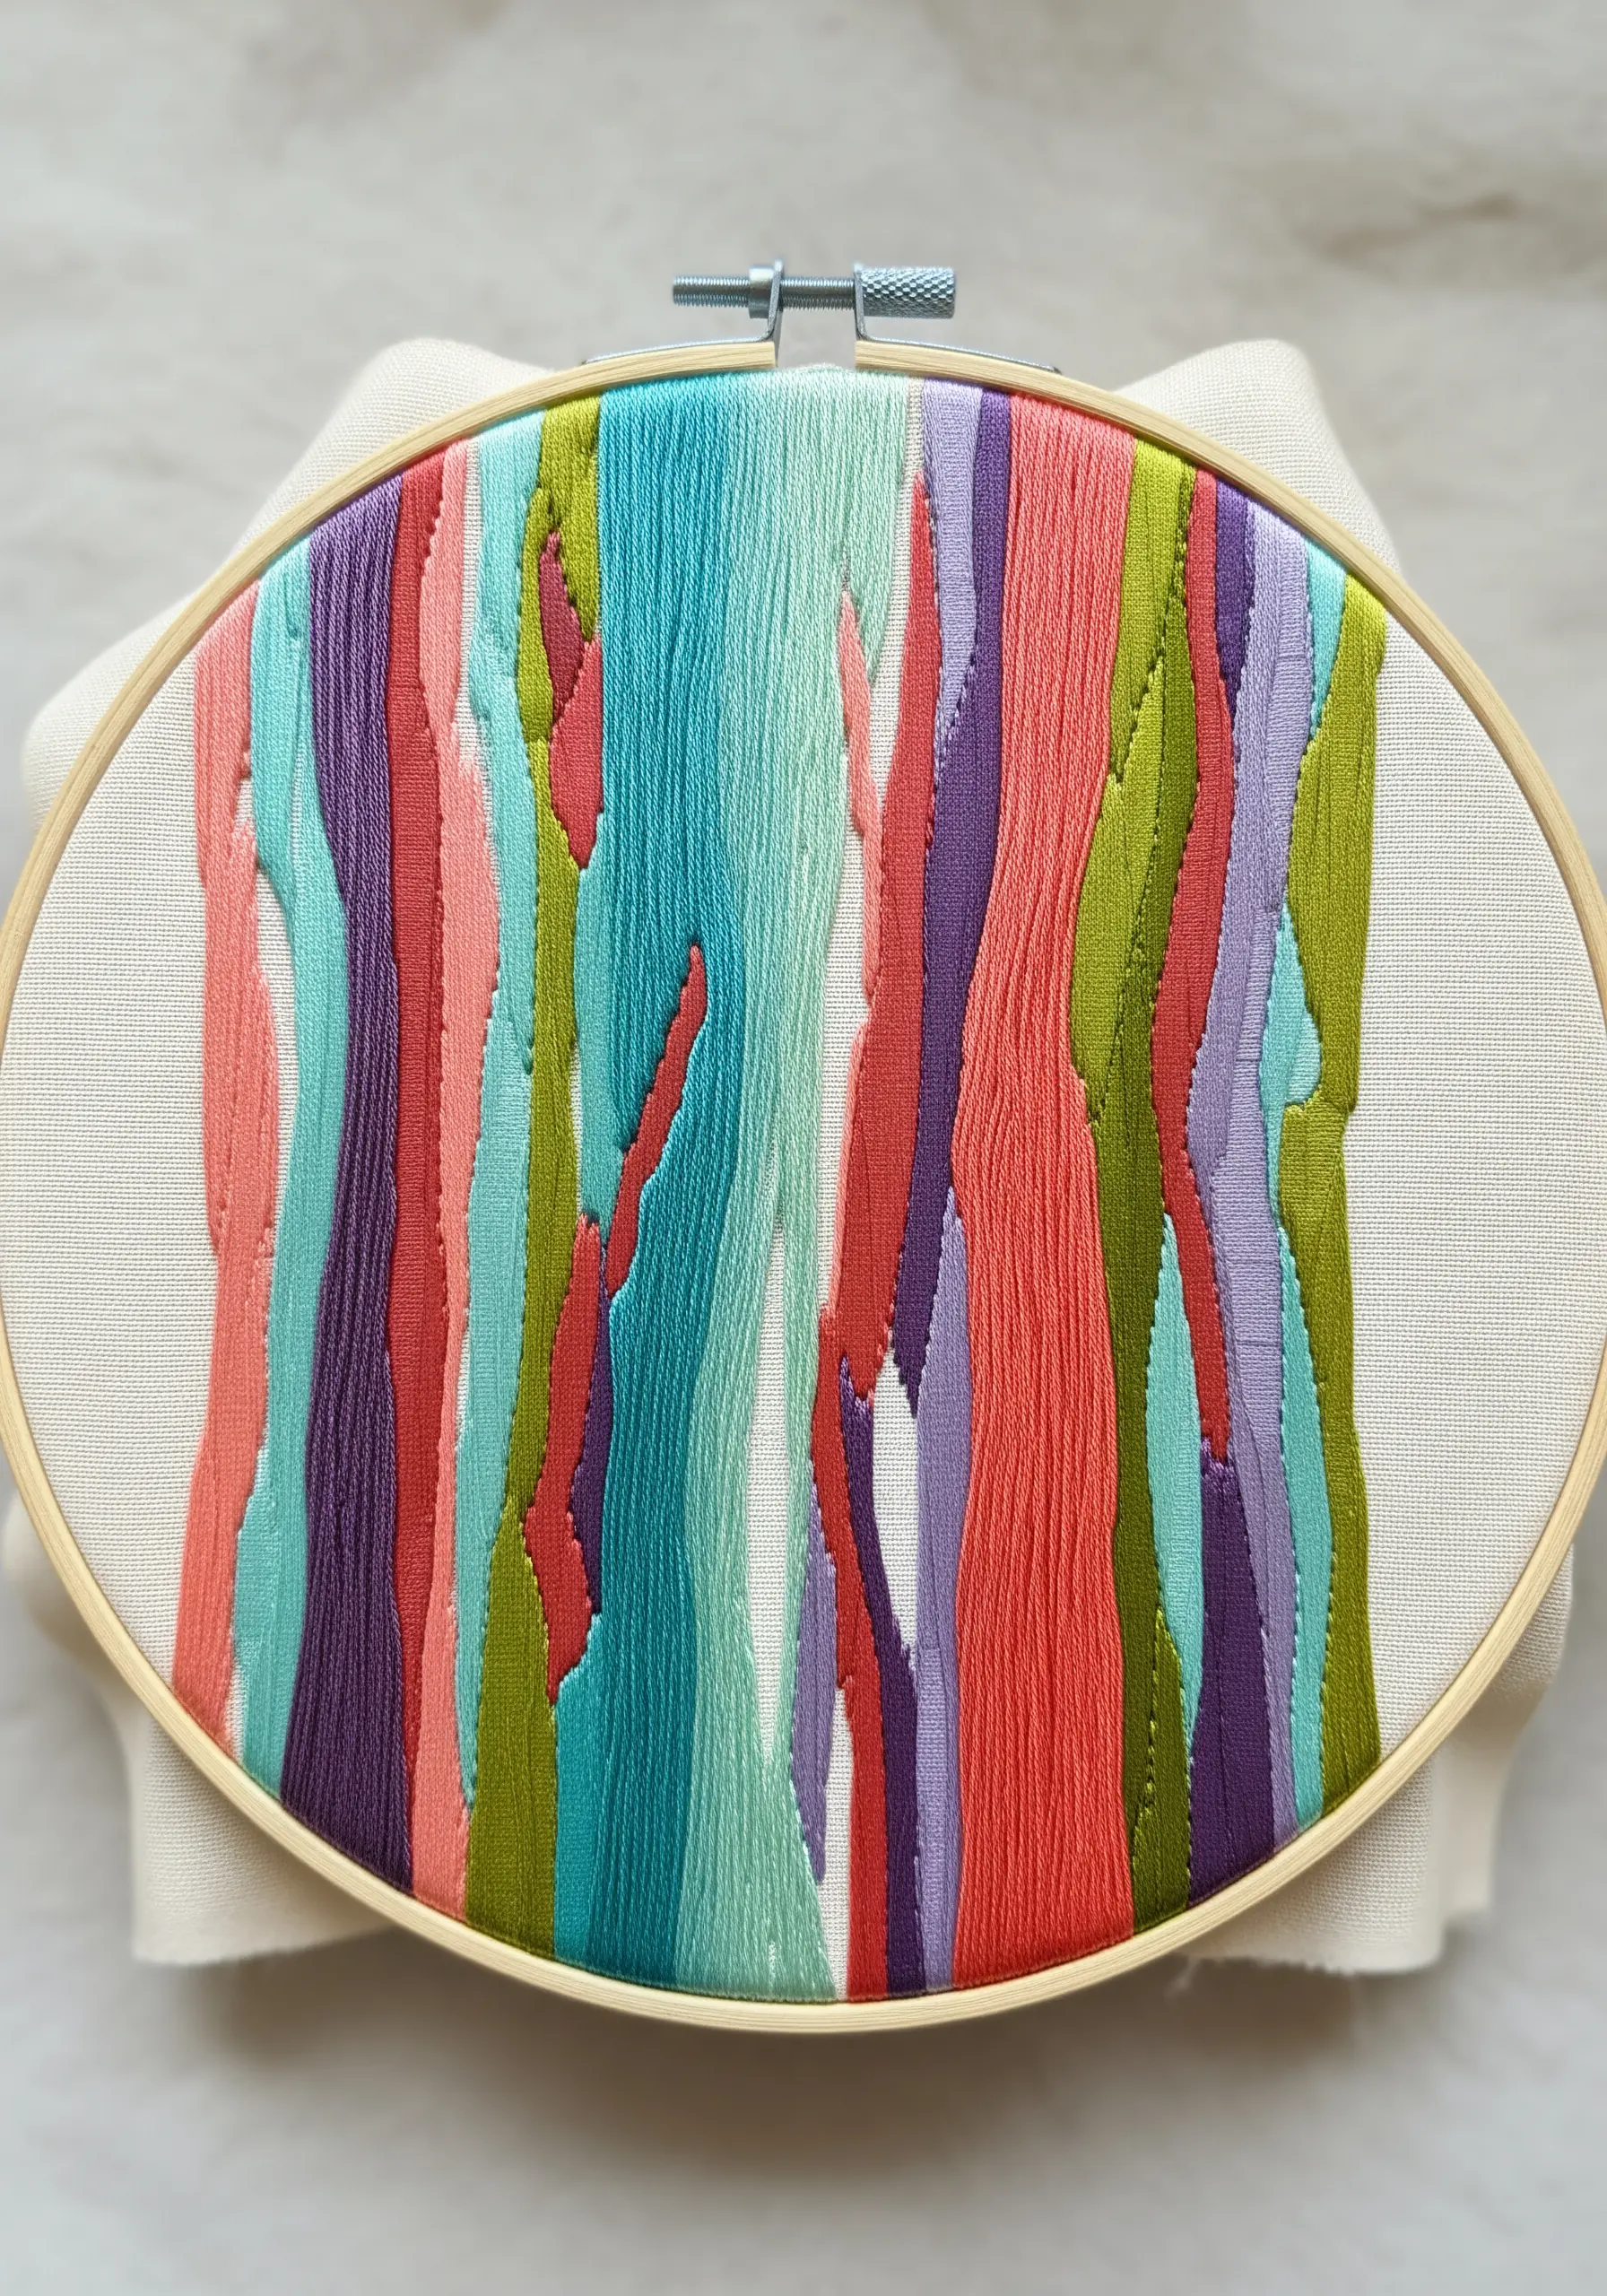
Move beyond realistic color palettes and interpret the texture of peeling bark through vibrant, unexpected hues.
Use long-and-short stitch to fill vertical, irregular shapes, allowing the colors to interact and overlap organically.
Define the edges where colors meet with a crisp split stitch outline in a darker shade to create definition and prevent visual muddiness.
This technique is less about realism and more about capturing the energetic, layered feeling of bark in a contemporary style.
7. Large-Scale Texture with Bulky Roving
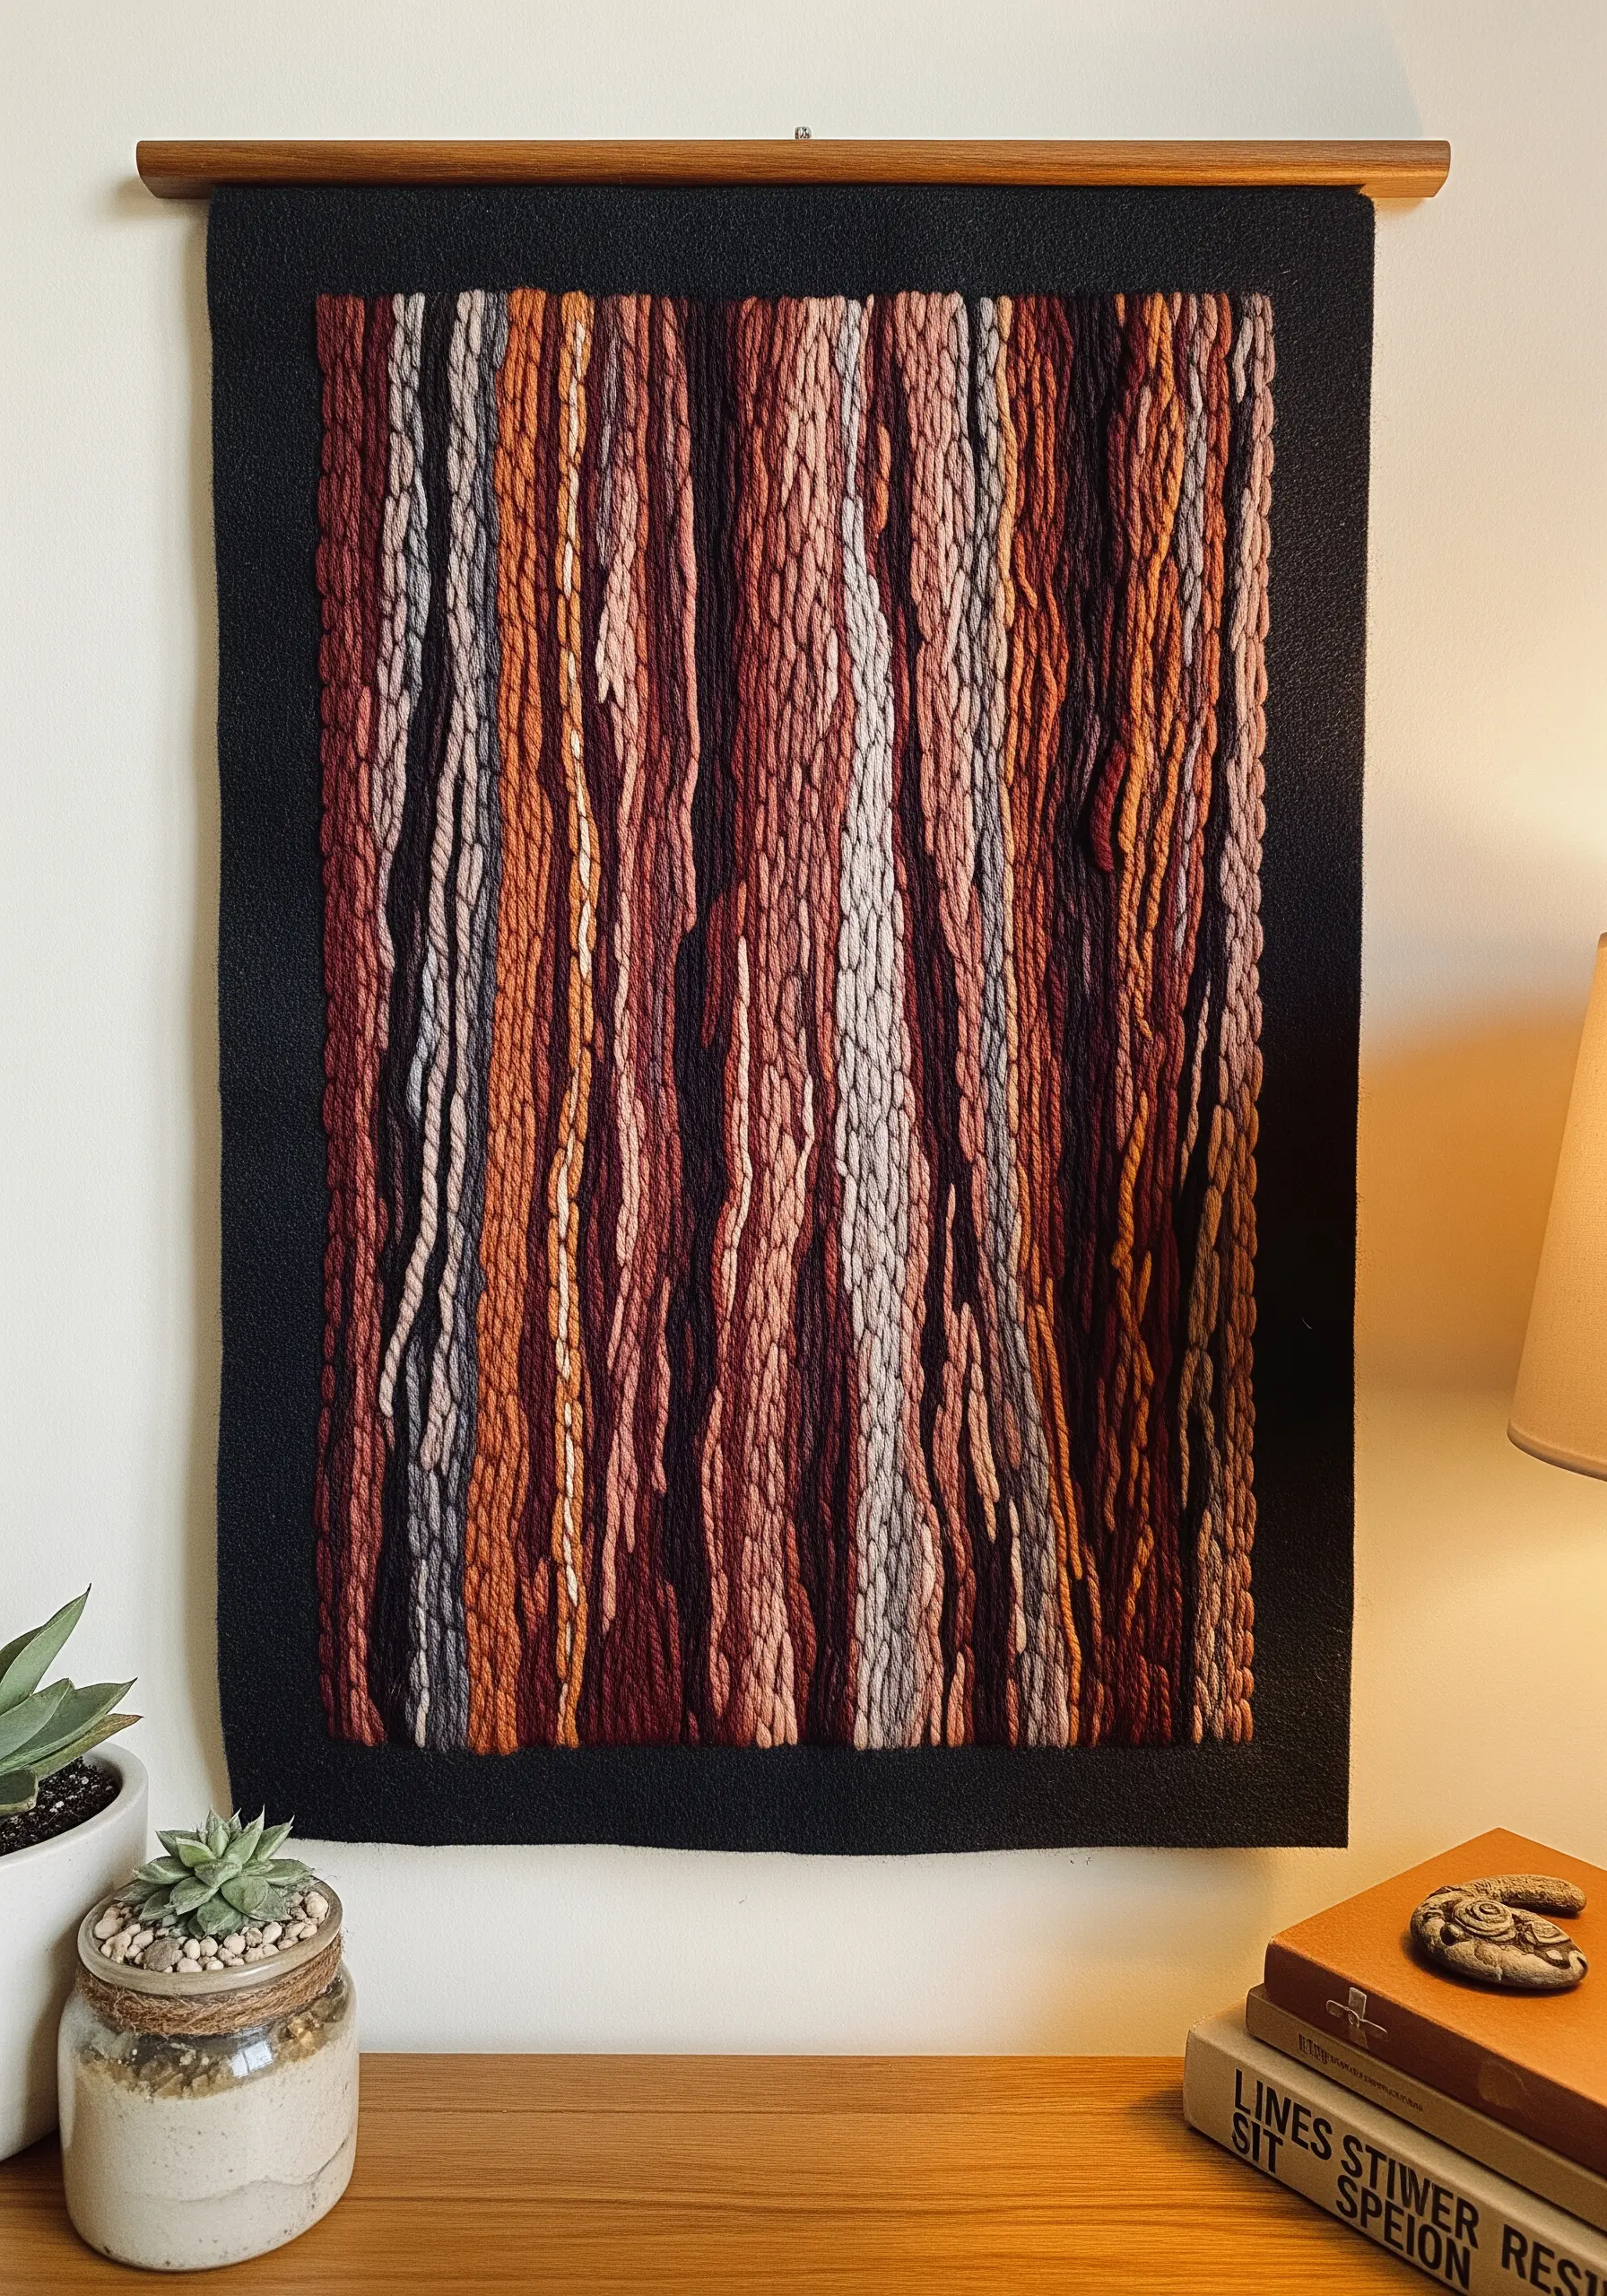
To create a statement piece with deep texture, switch from embroidery floss to thick wool roving or chunky yarn.
Fill the entire surface with vertical couching stitches, laying down the bulky fibers and securing them with a standard six-strand floss.
Vary the colors of the roving subtly to create a gradient effect that suggests light and shadow.
This method works up quickly and is ideal for statement-size embroidered textile hangings, transforming a simple stitch into a dramatic wall feature.
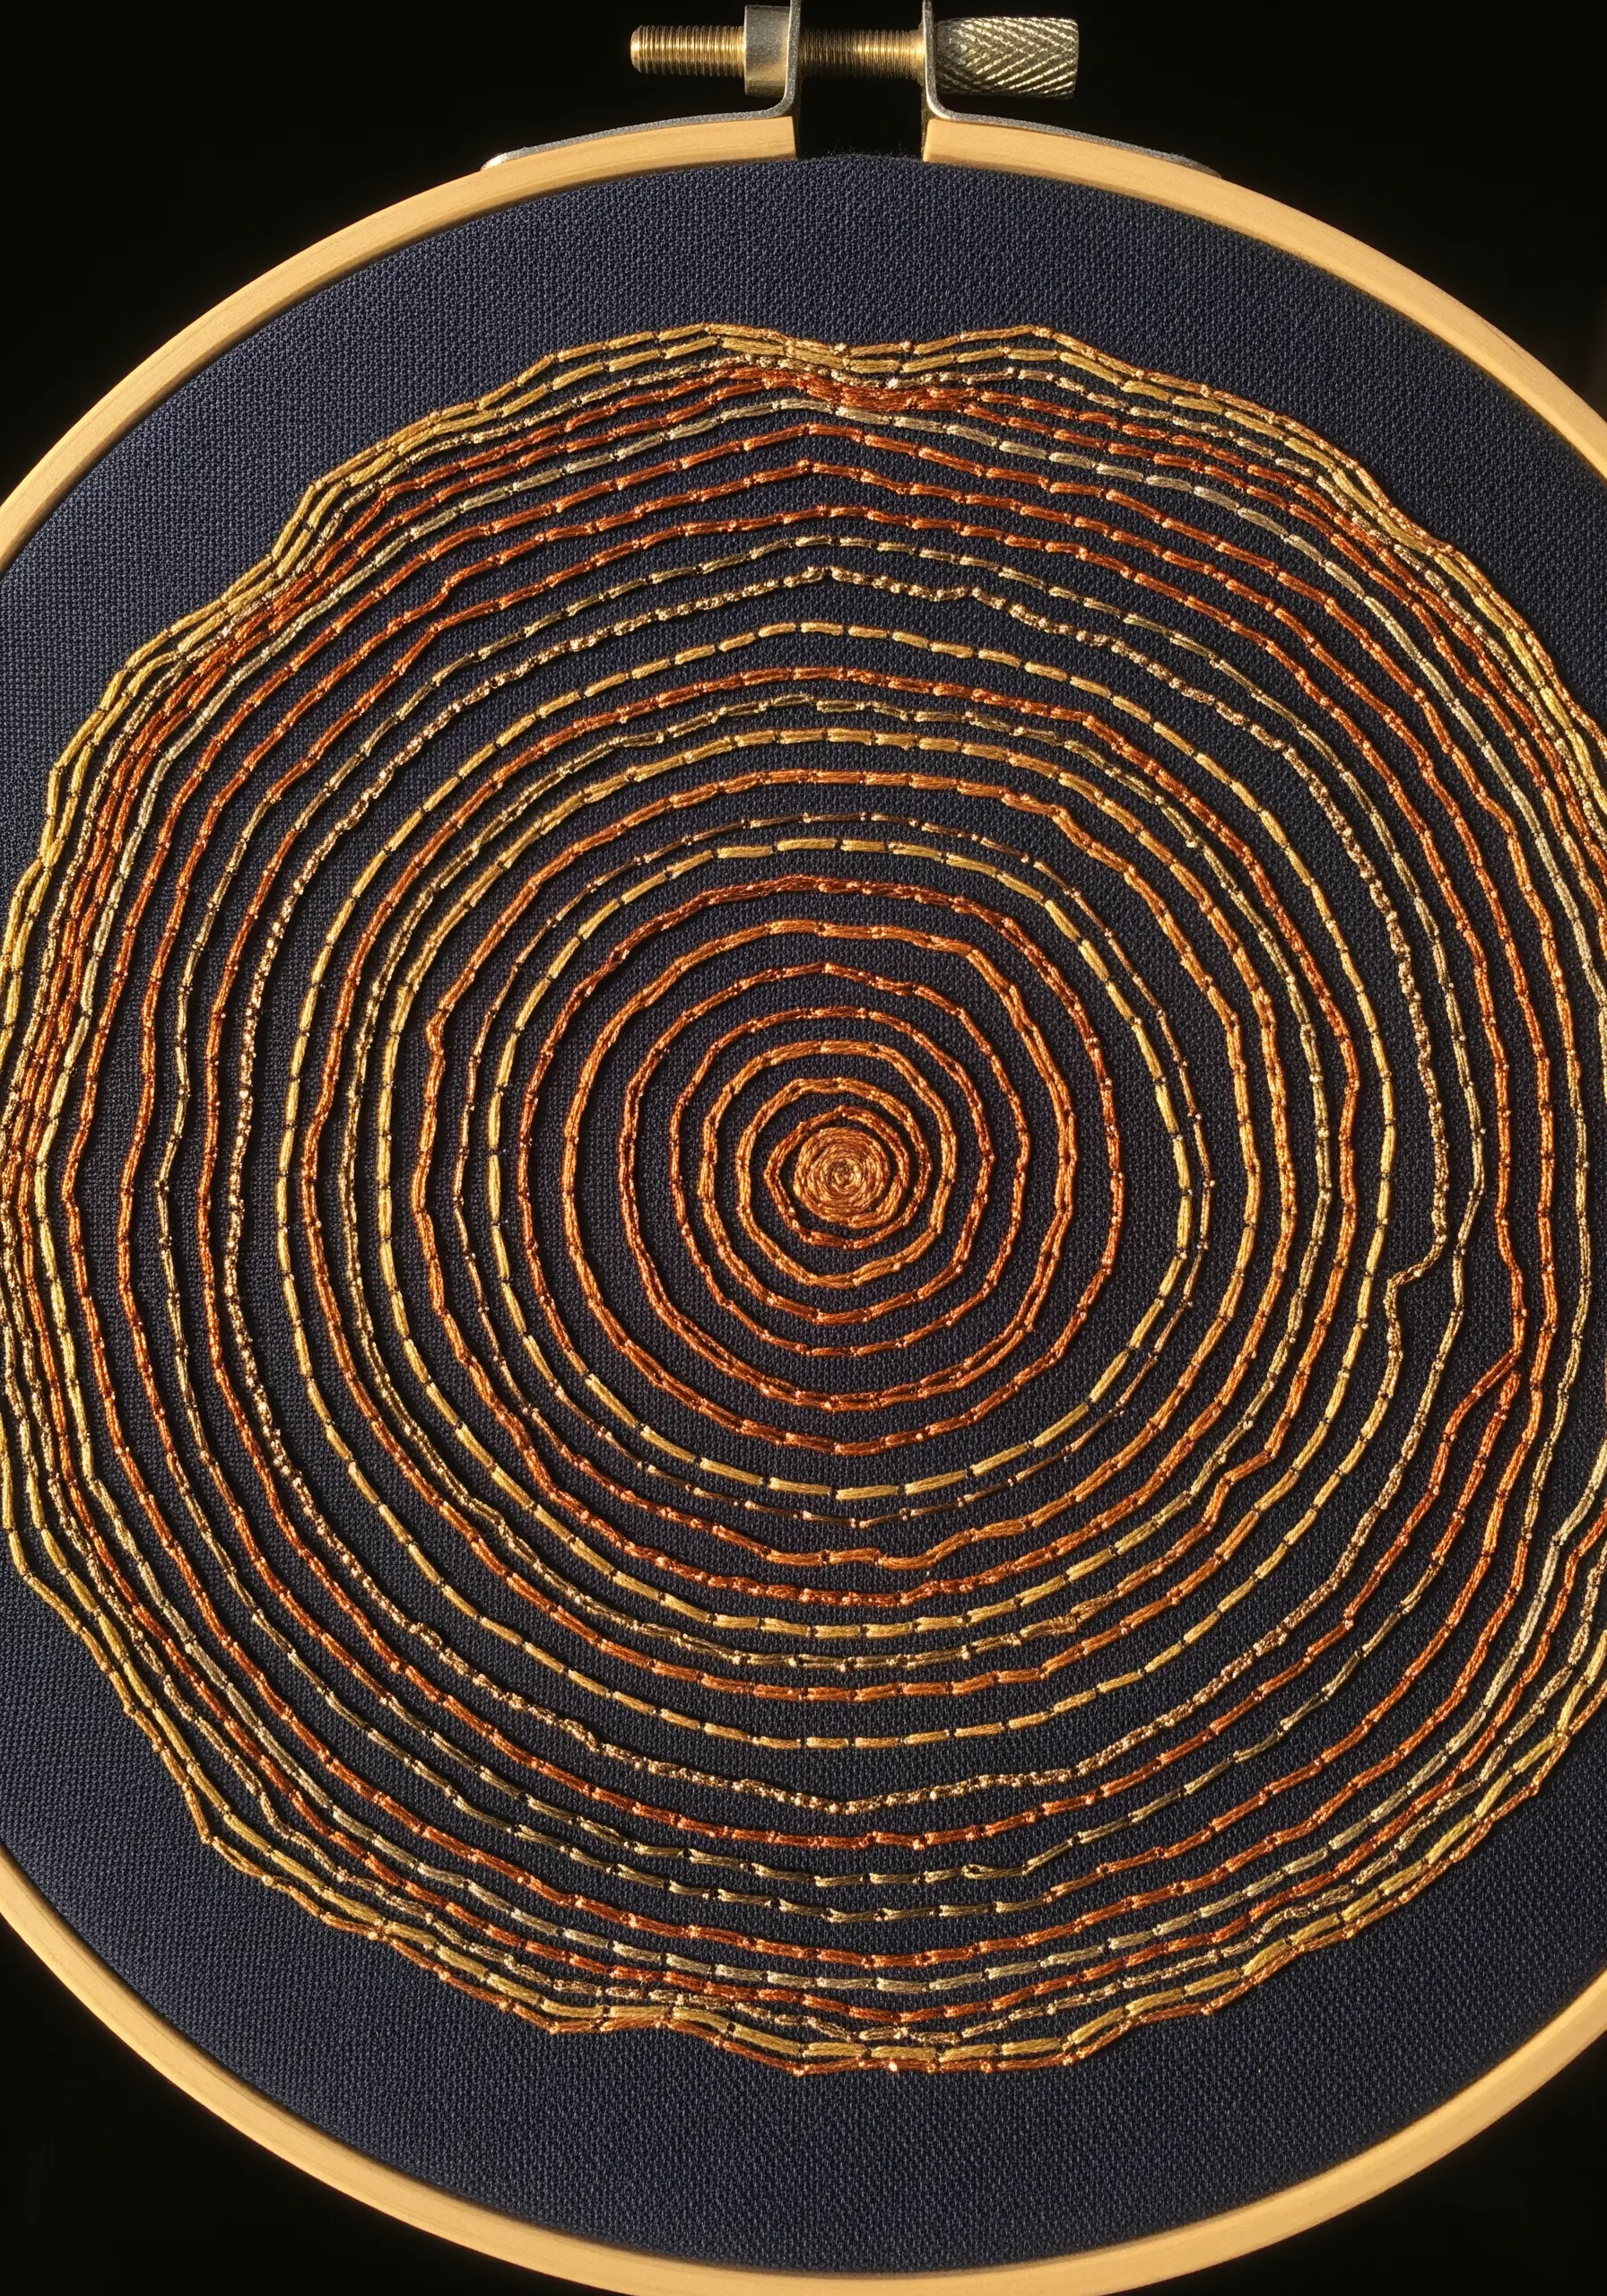
8. Spiraled Couching for a Rustic Finish
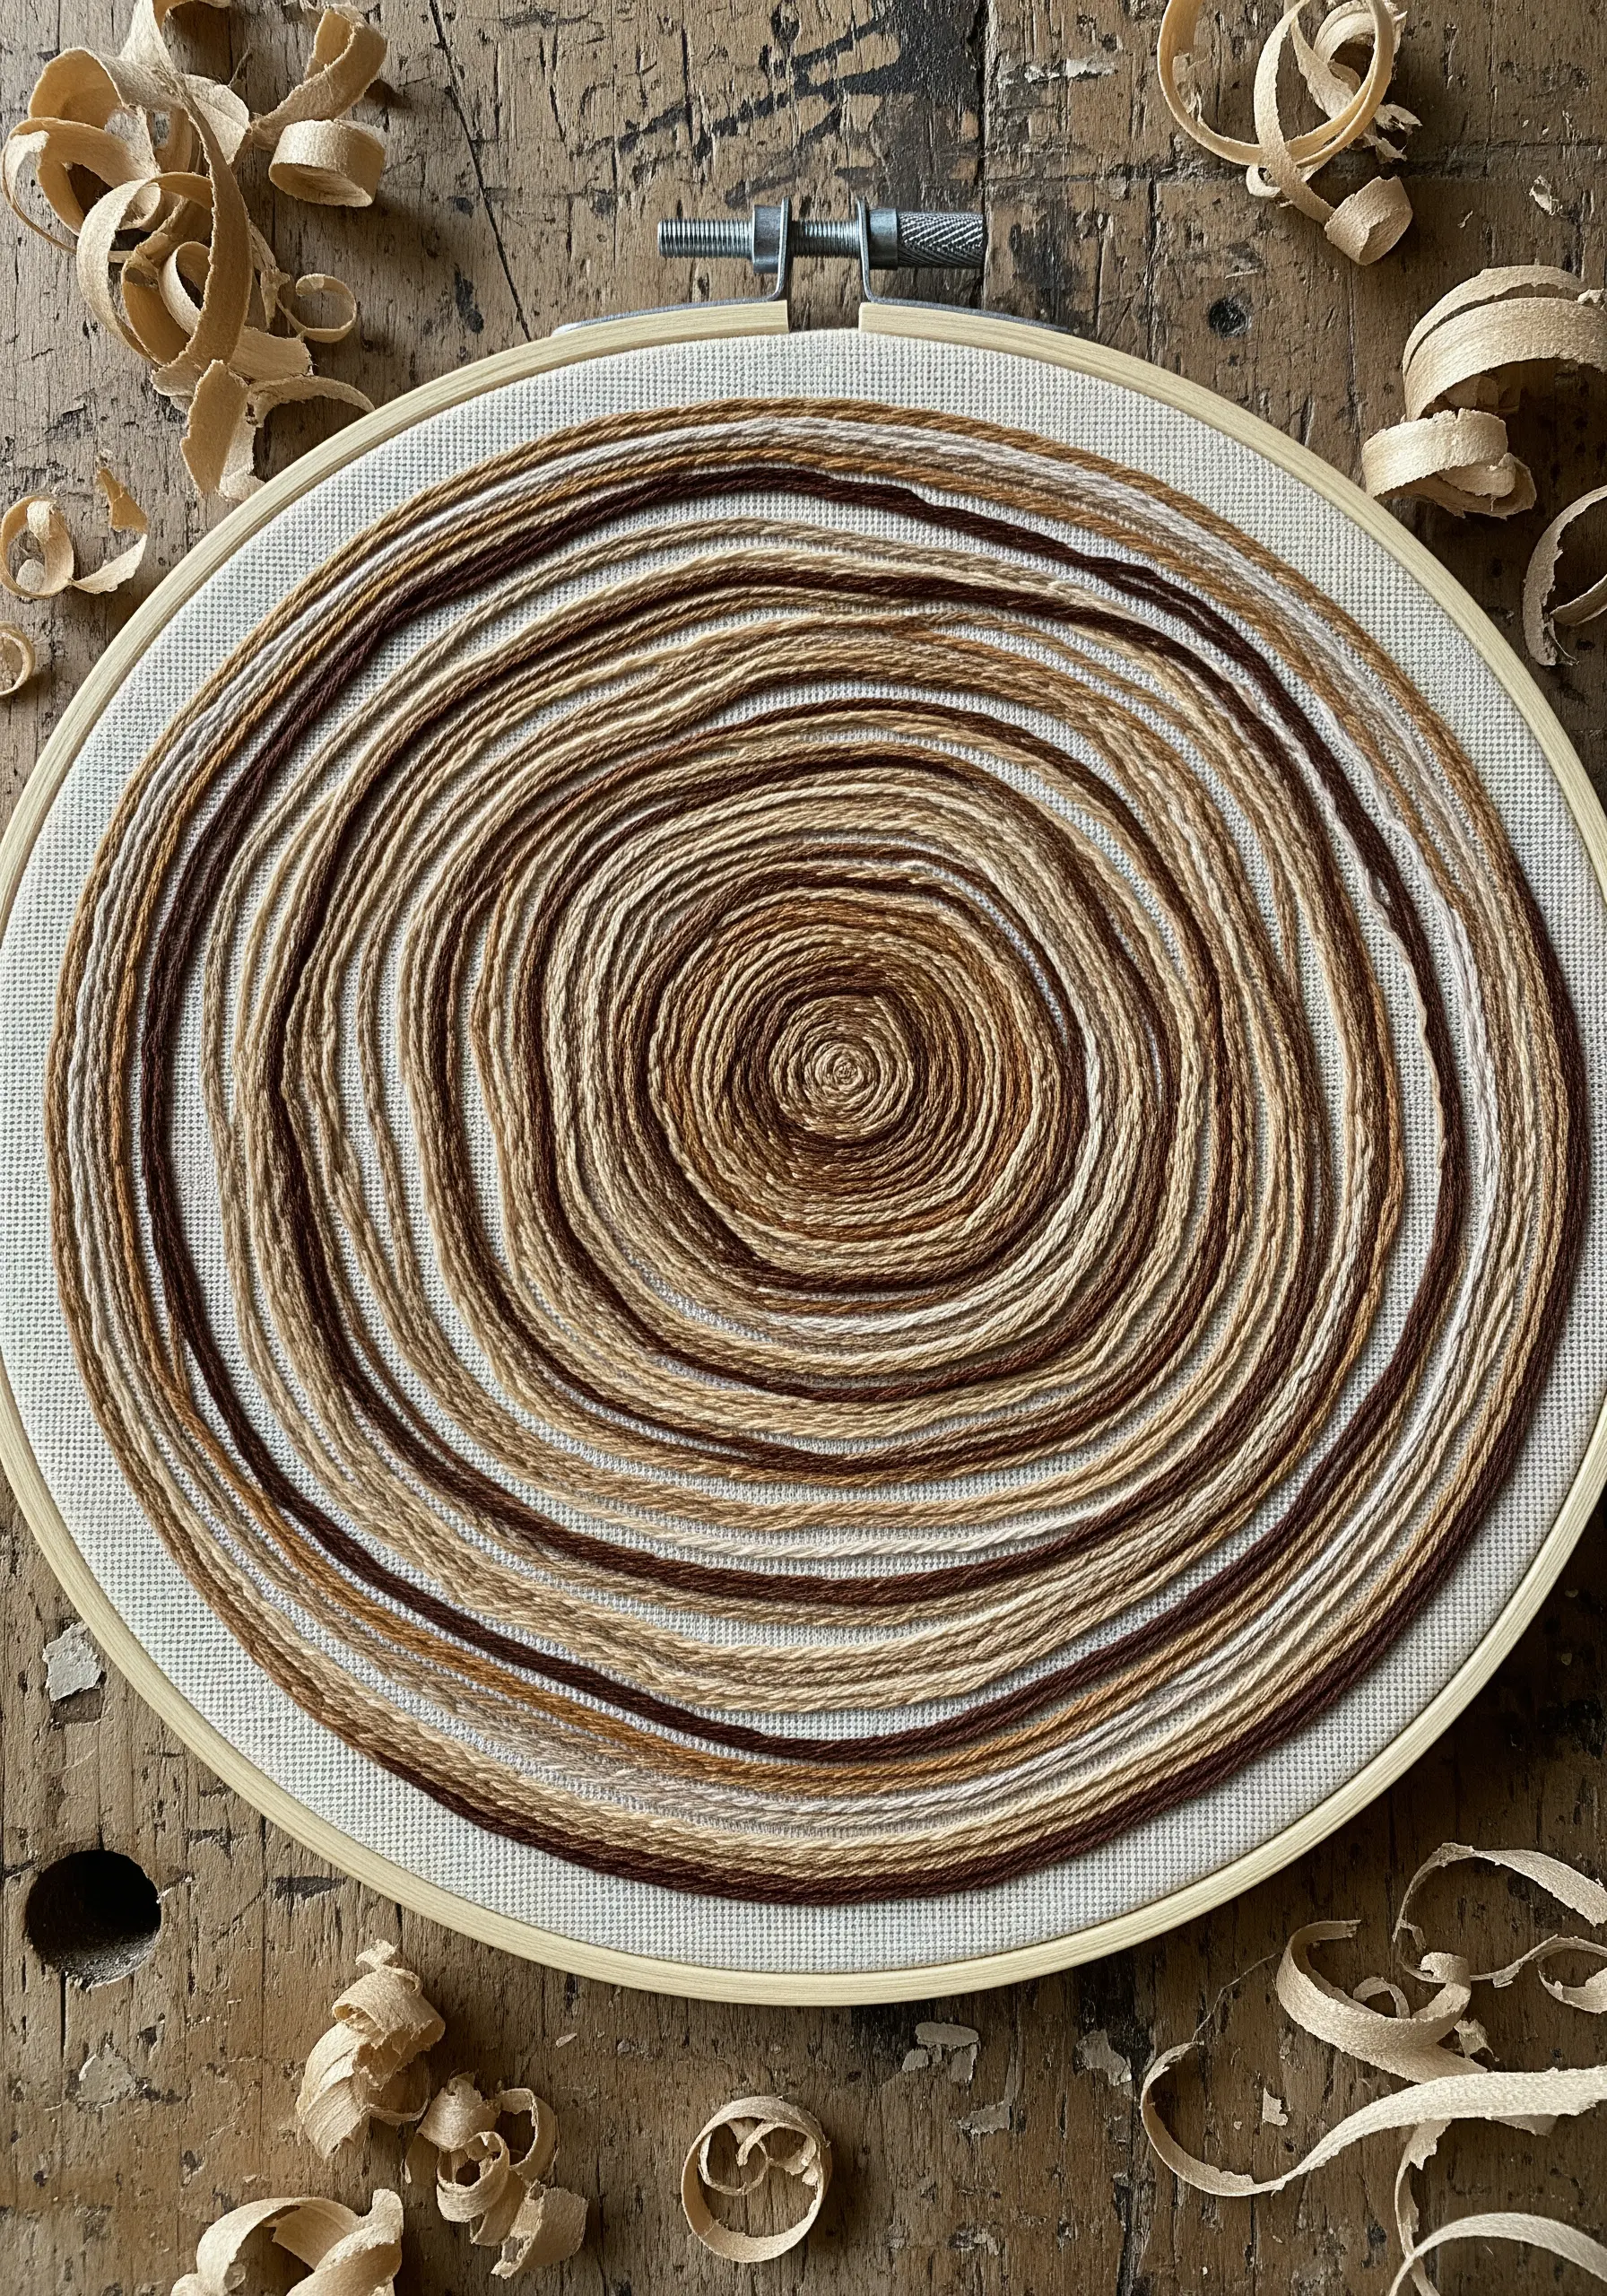
Achieve a rustic, hand-spun look by couching thick jute, twine, or variegated yarn in a continuous spiral.
Start from the center and work your way out, tacking down the cord with a simple, perpendicular stitch every half-inch or so.
The key to a clean look is maintaining even spacing between the rows of the spiral.
Using a variegated or hand-dyed cord adds instant depth and color variation without any extra effort, perfectly capturing the subtle tonal shifts in a cross-section of wood.
9. Directional Fill for Abstract Shapes
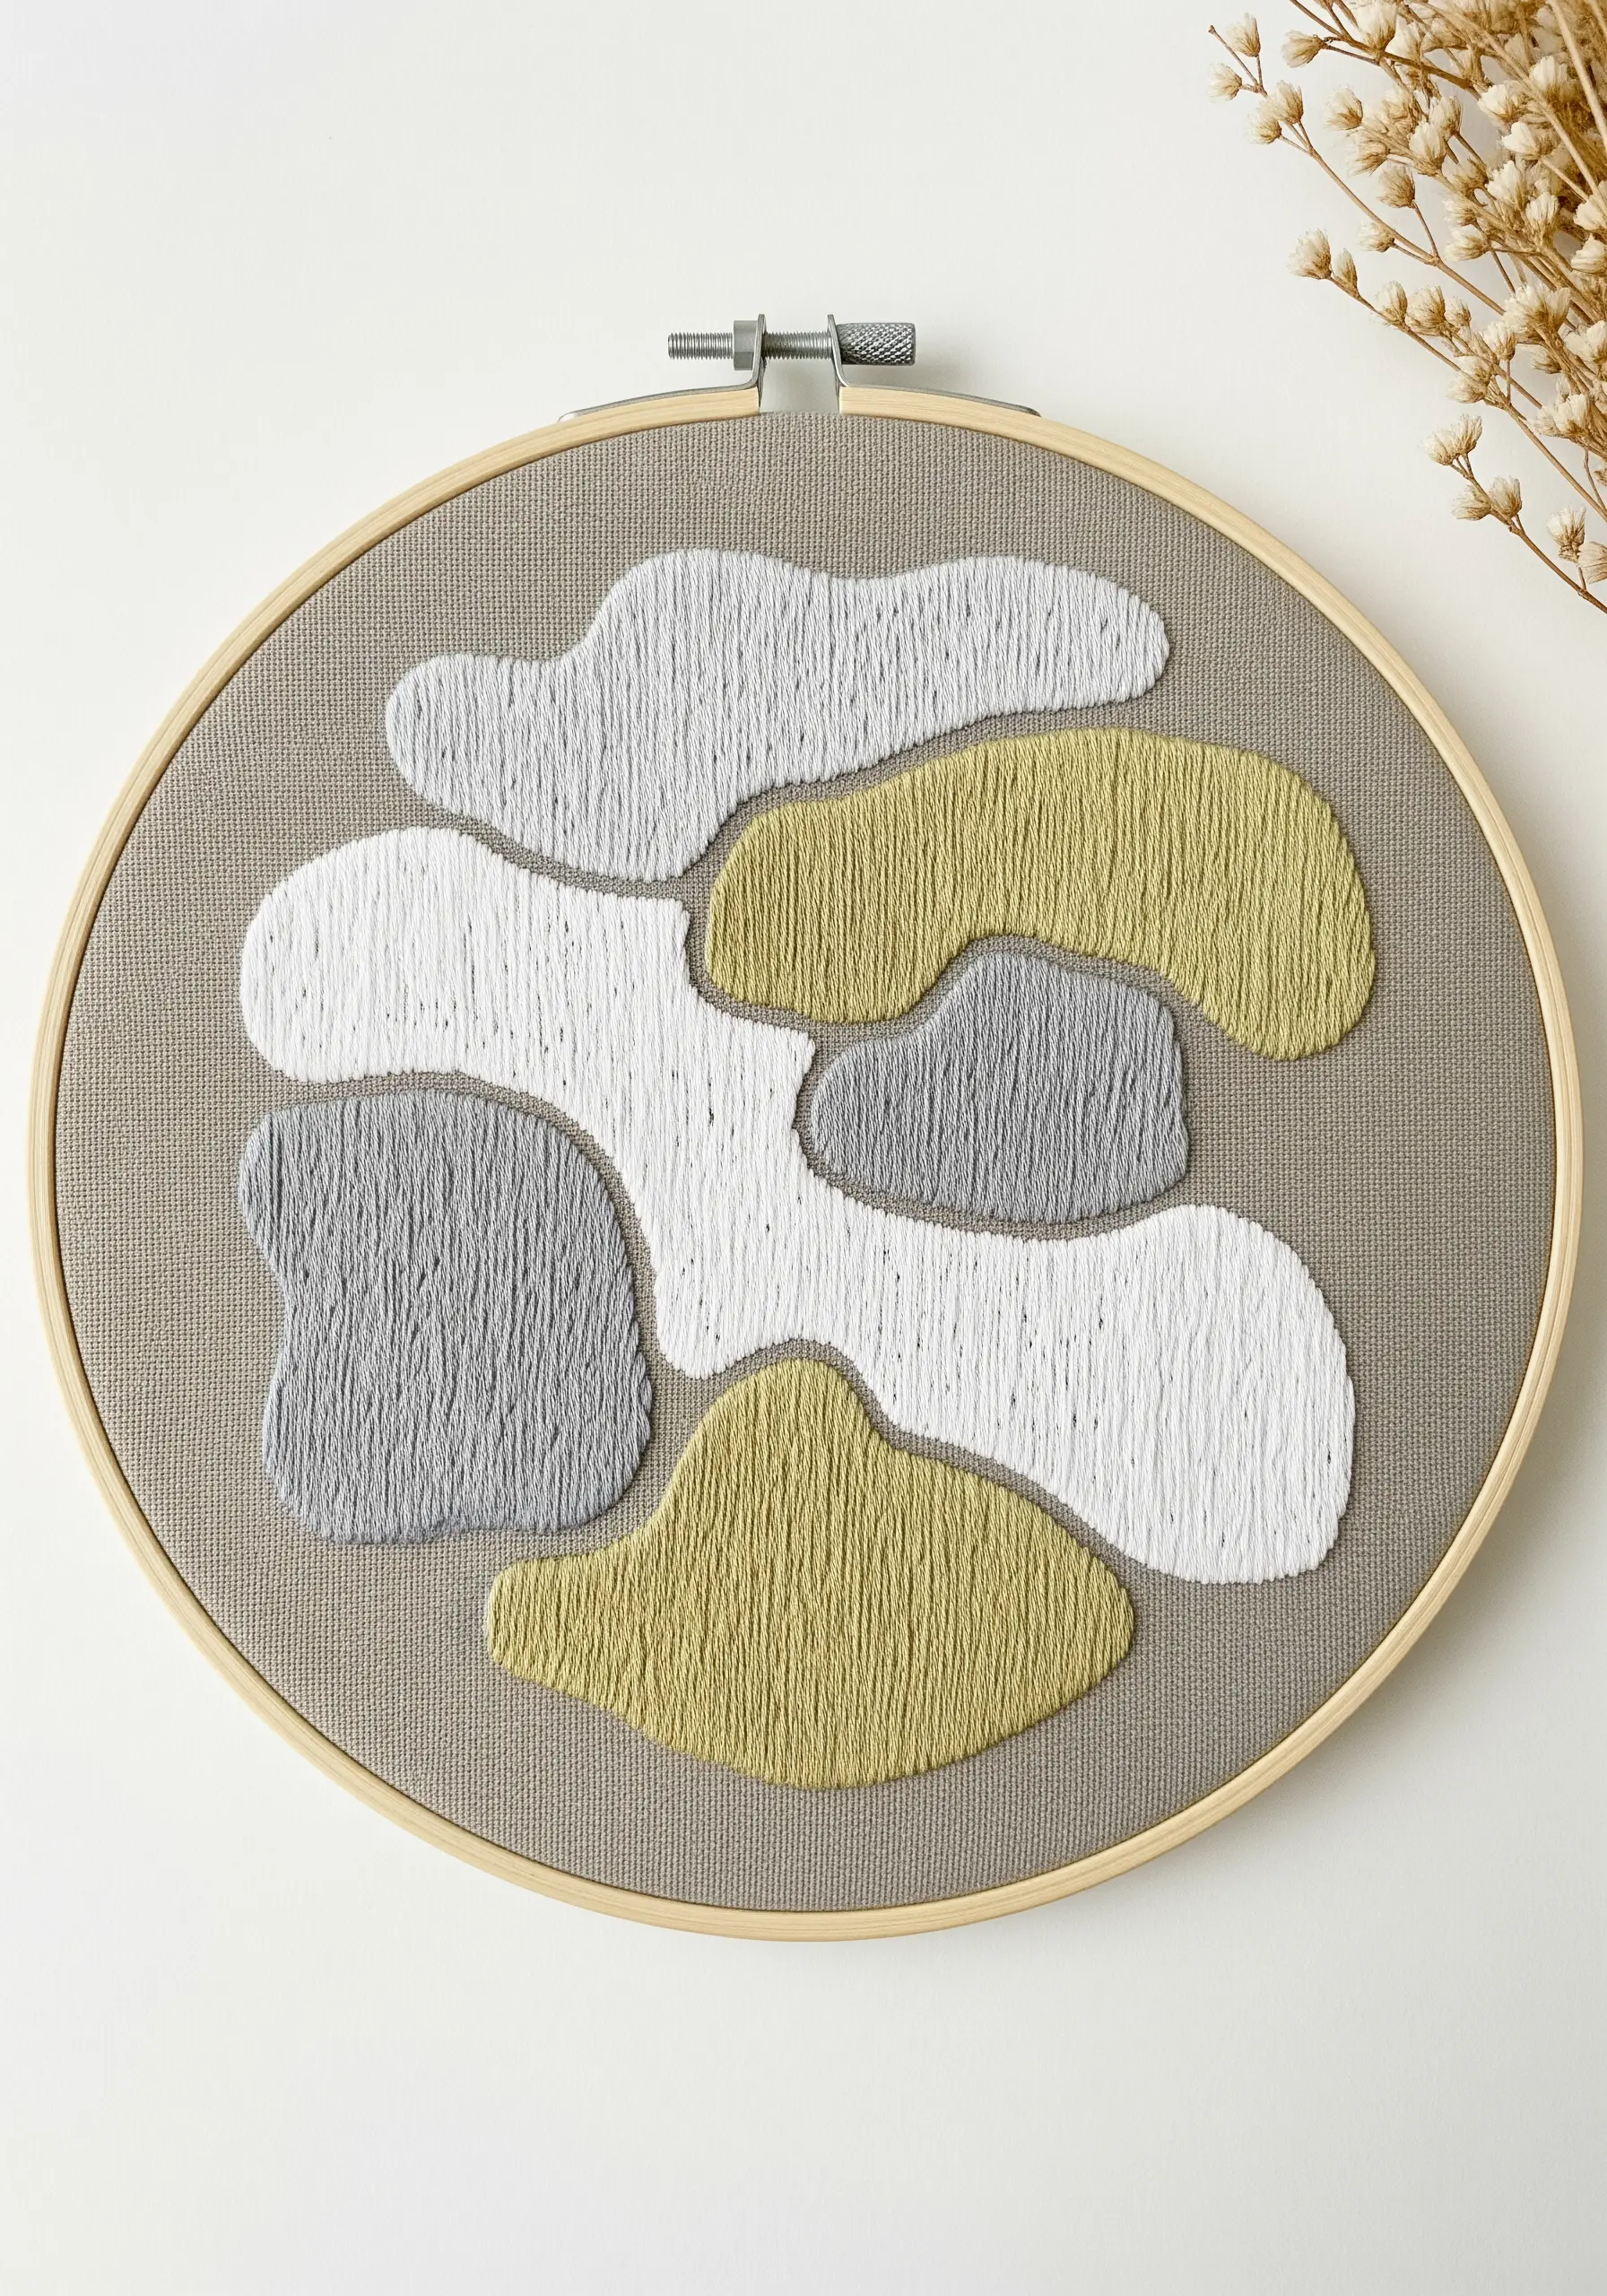
When filling abstract shapes, the direction of your stitches is just as important as the color.
Use a simple satin stitch or long-and-short stitch, but alter the angle of your stitches within each shape to create a sense of texture and movement.
Stitching horizontally in one shape and vertically or diagonally in an adjacent one creates subtle visual tension and definition.
This technique adds a layer of sophistication to abstract embroidery patterns, making the surface feel dynamic and alive.
10. Beaded Couching for a Glimmering Surface
Incorporate beads to give your tree rings a unique, light-catching texture that thread alone cannot achieve.
Instead of stitching with floss, thread long strands of tiny seed beads and couch them down in concentric circles.
To do this, bring your needle up through the fabric, string on five to seven beads, and then take the needle back down.
Secure the beaded strand with a tiny tacking stitch between every few beads. This technique transforms a rustic motif into a delicate, jewelry-like piece of art.
11. Hyperrealism Through Thread Painting
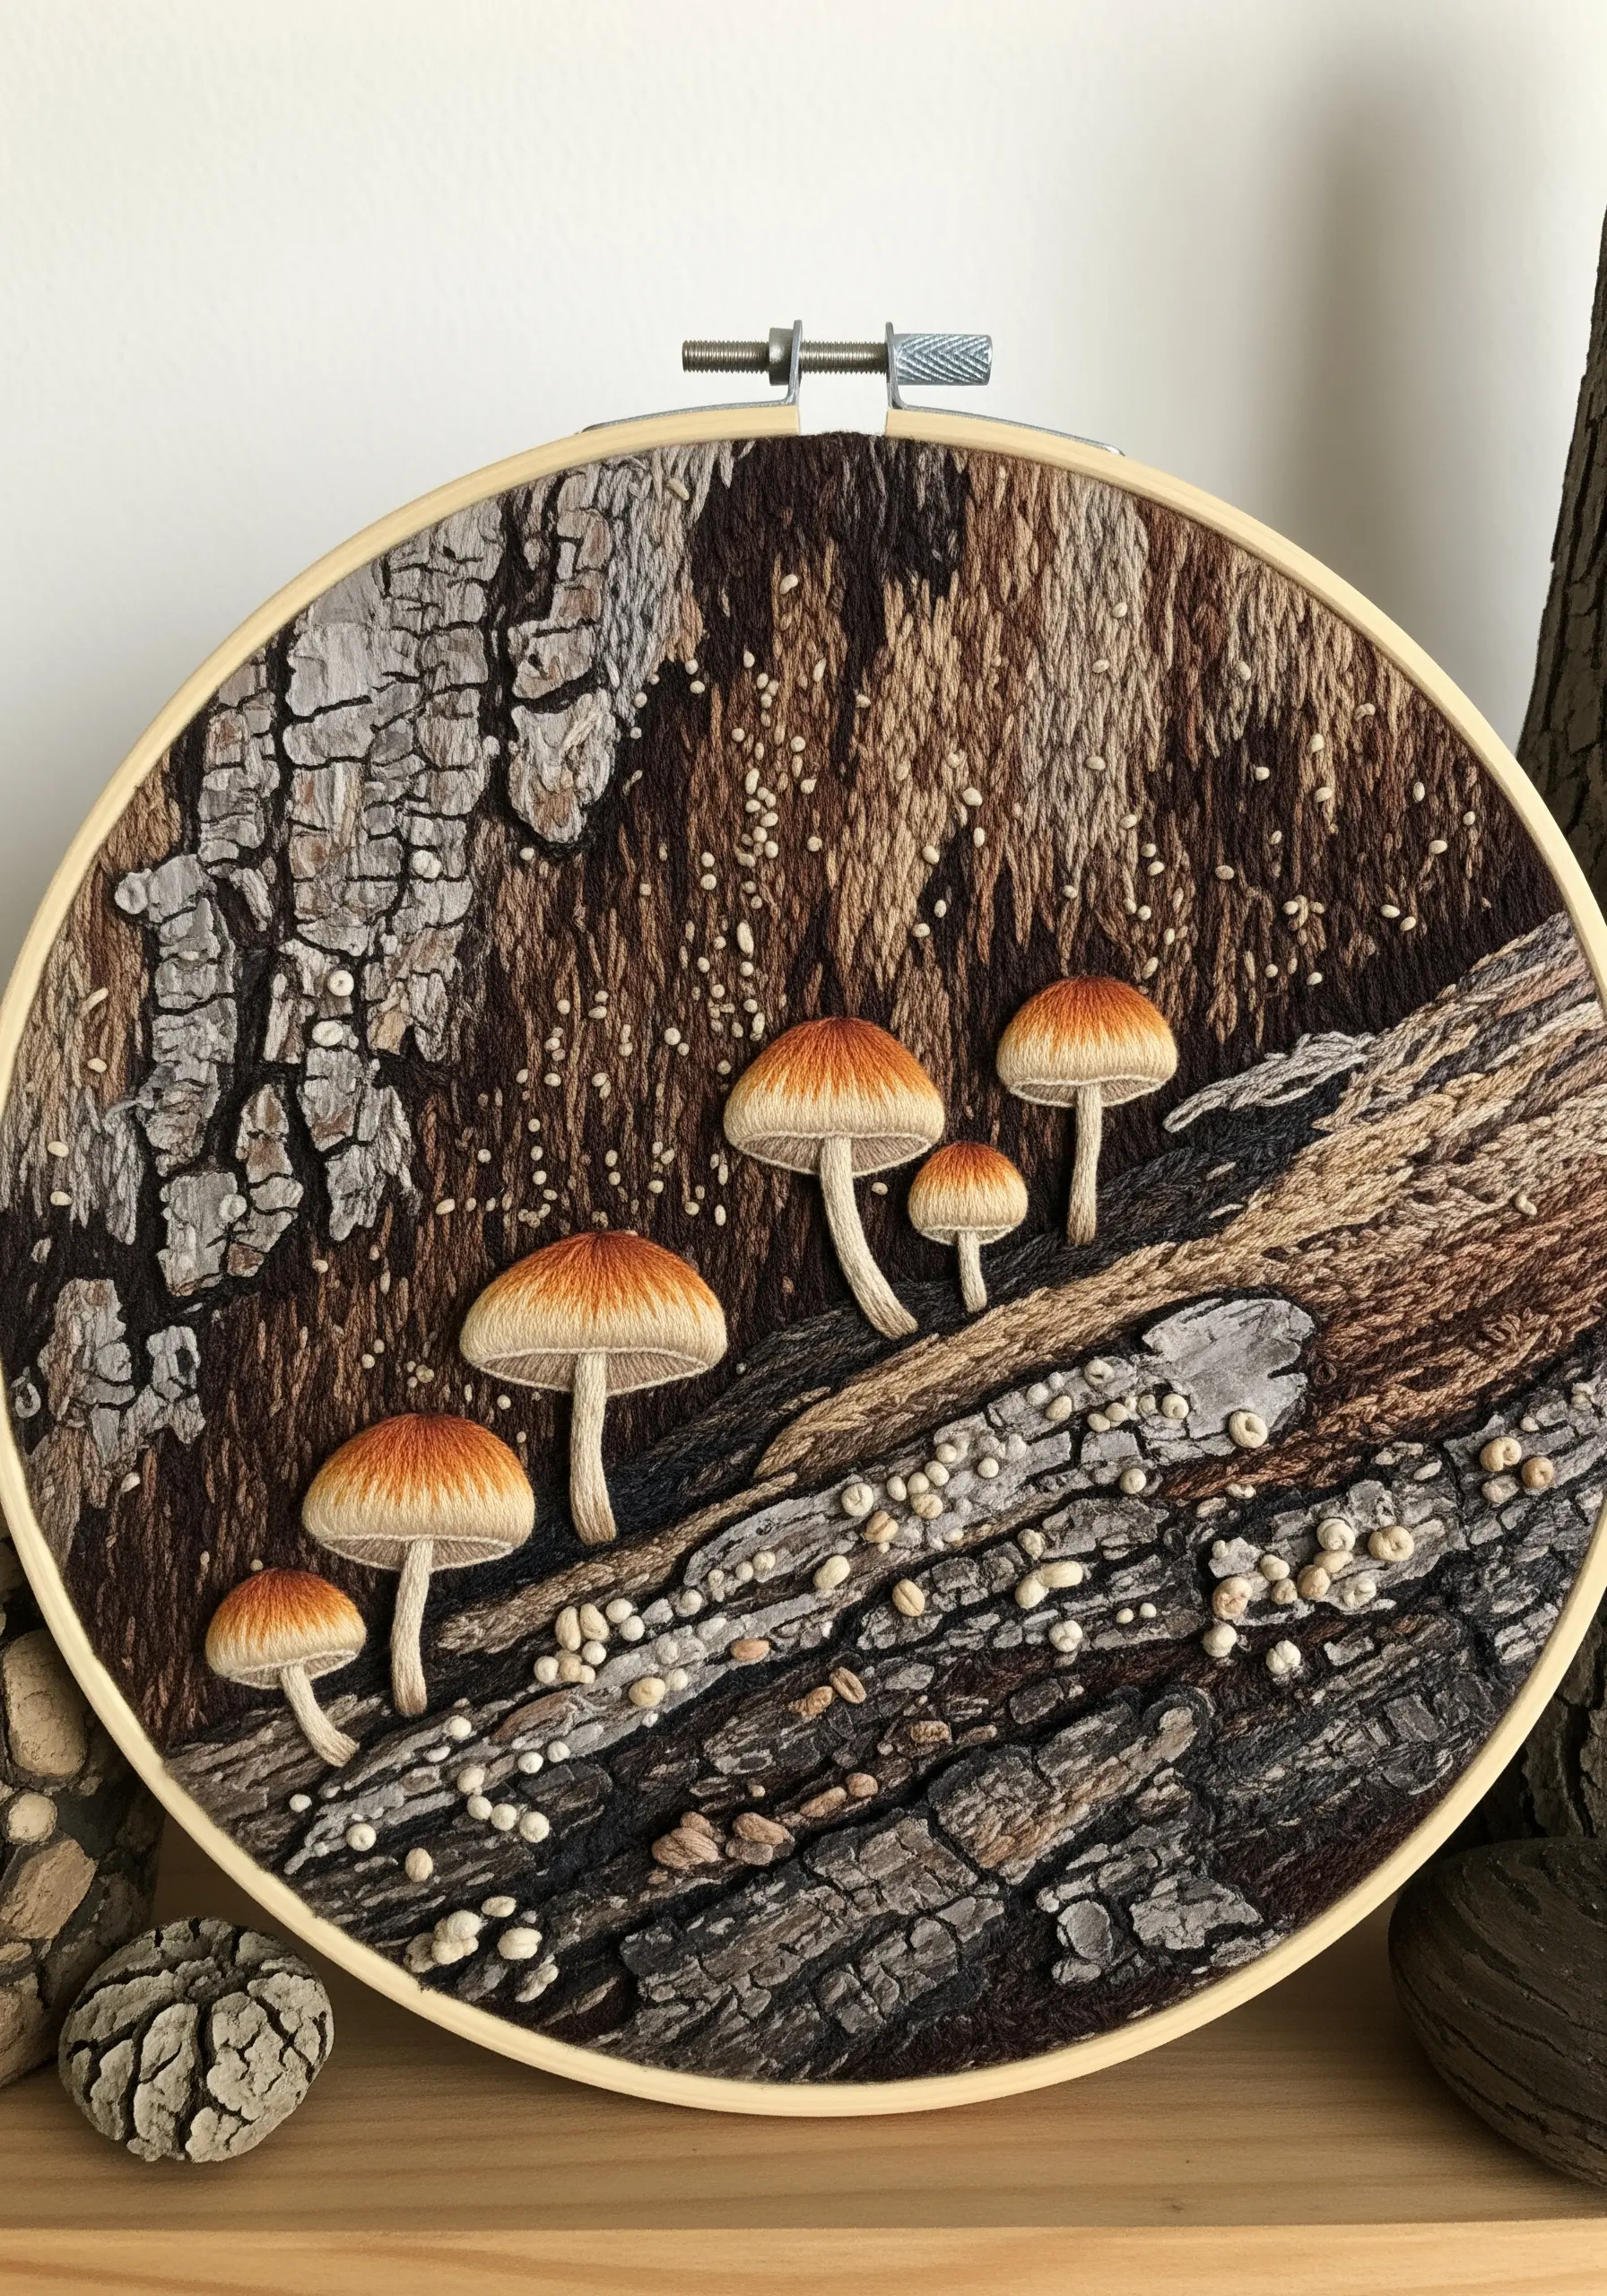
Achieve photorealistic bark by using thread painting, a technique that blends colors like paint.
Work with a single strand of floss in a long-and-short stitch, filling small, irregular patches of the bark.
Use a wide range of browns, grays, and ochres, and let your stitches follow the direction of the bark’s grain and cracks.
For the mushrooms, use a padded satin stitch to give them a rounded, 3D form. Tiny French knots can be scattered to represent moss or other small growths, completing the illusion of a forest floor scene.
12. Padded Appliqué for Sculptural Form
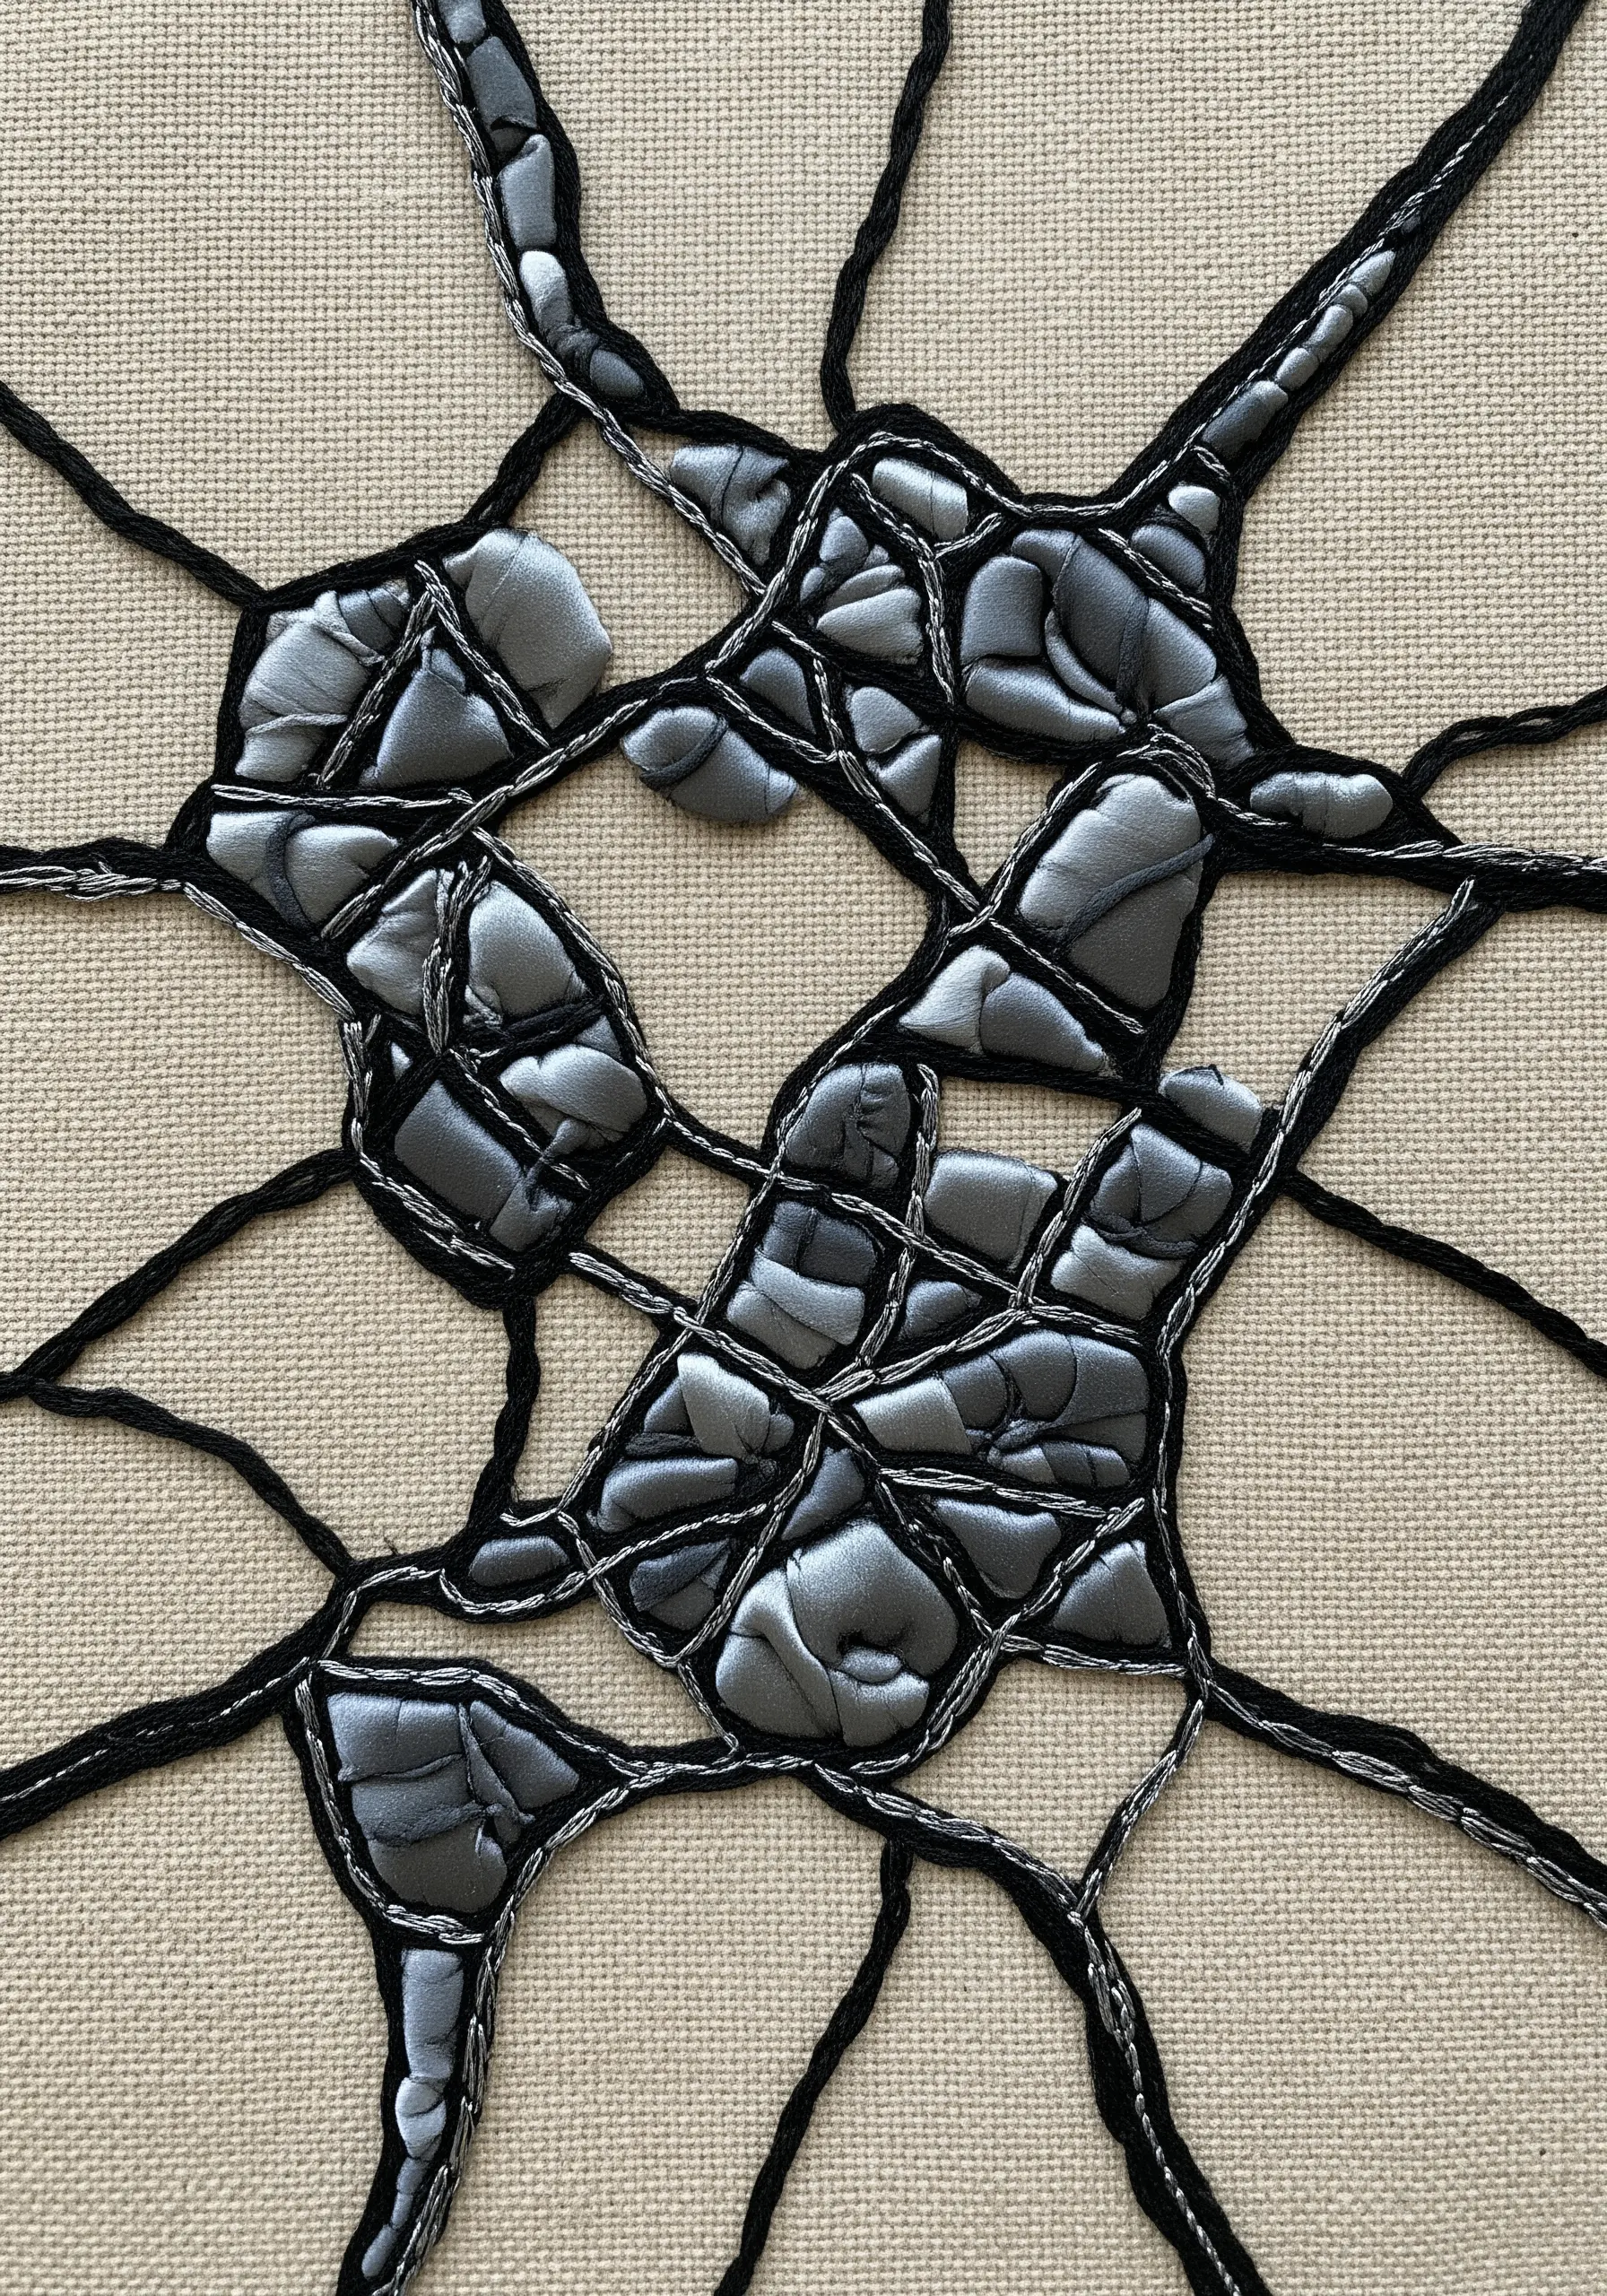
Create a dramatic, fractured texture by combining padded appliqué with heavy outlines.
Cut shapes from a lustrous fabric like satin or silk and place a thin layer of felt or cotton batting underneath before stitching them down.
Secure the shapes with a couched outline, using a thick, contrasting thread like a metallic or perle cotton to create a strong visual border.
This method gives the piece a high-relief, almost geologic quality, turning simple fabric into a sculptural surface.
13. Atmospheric Perspective with Minimal Stitches
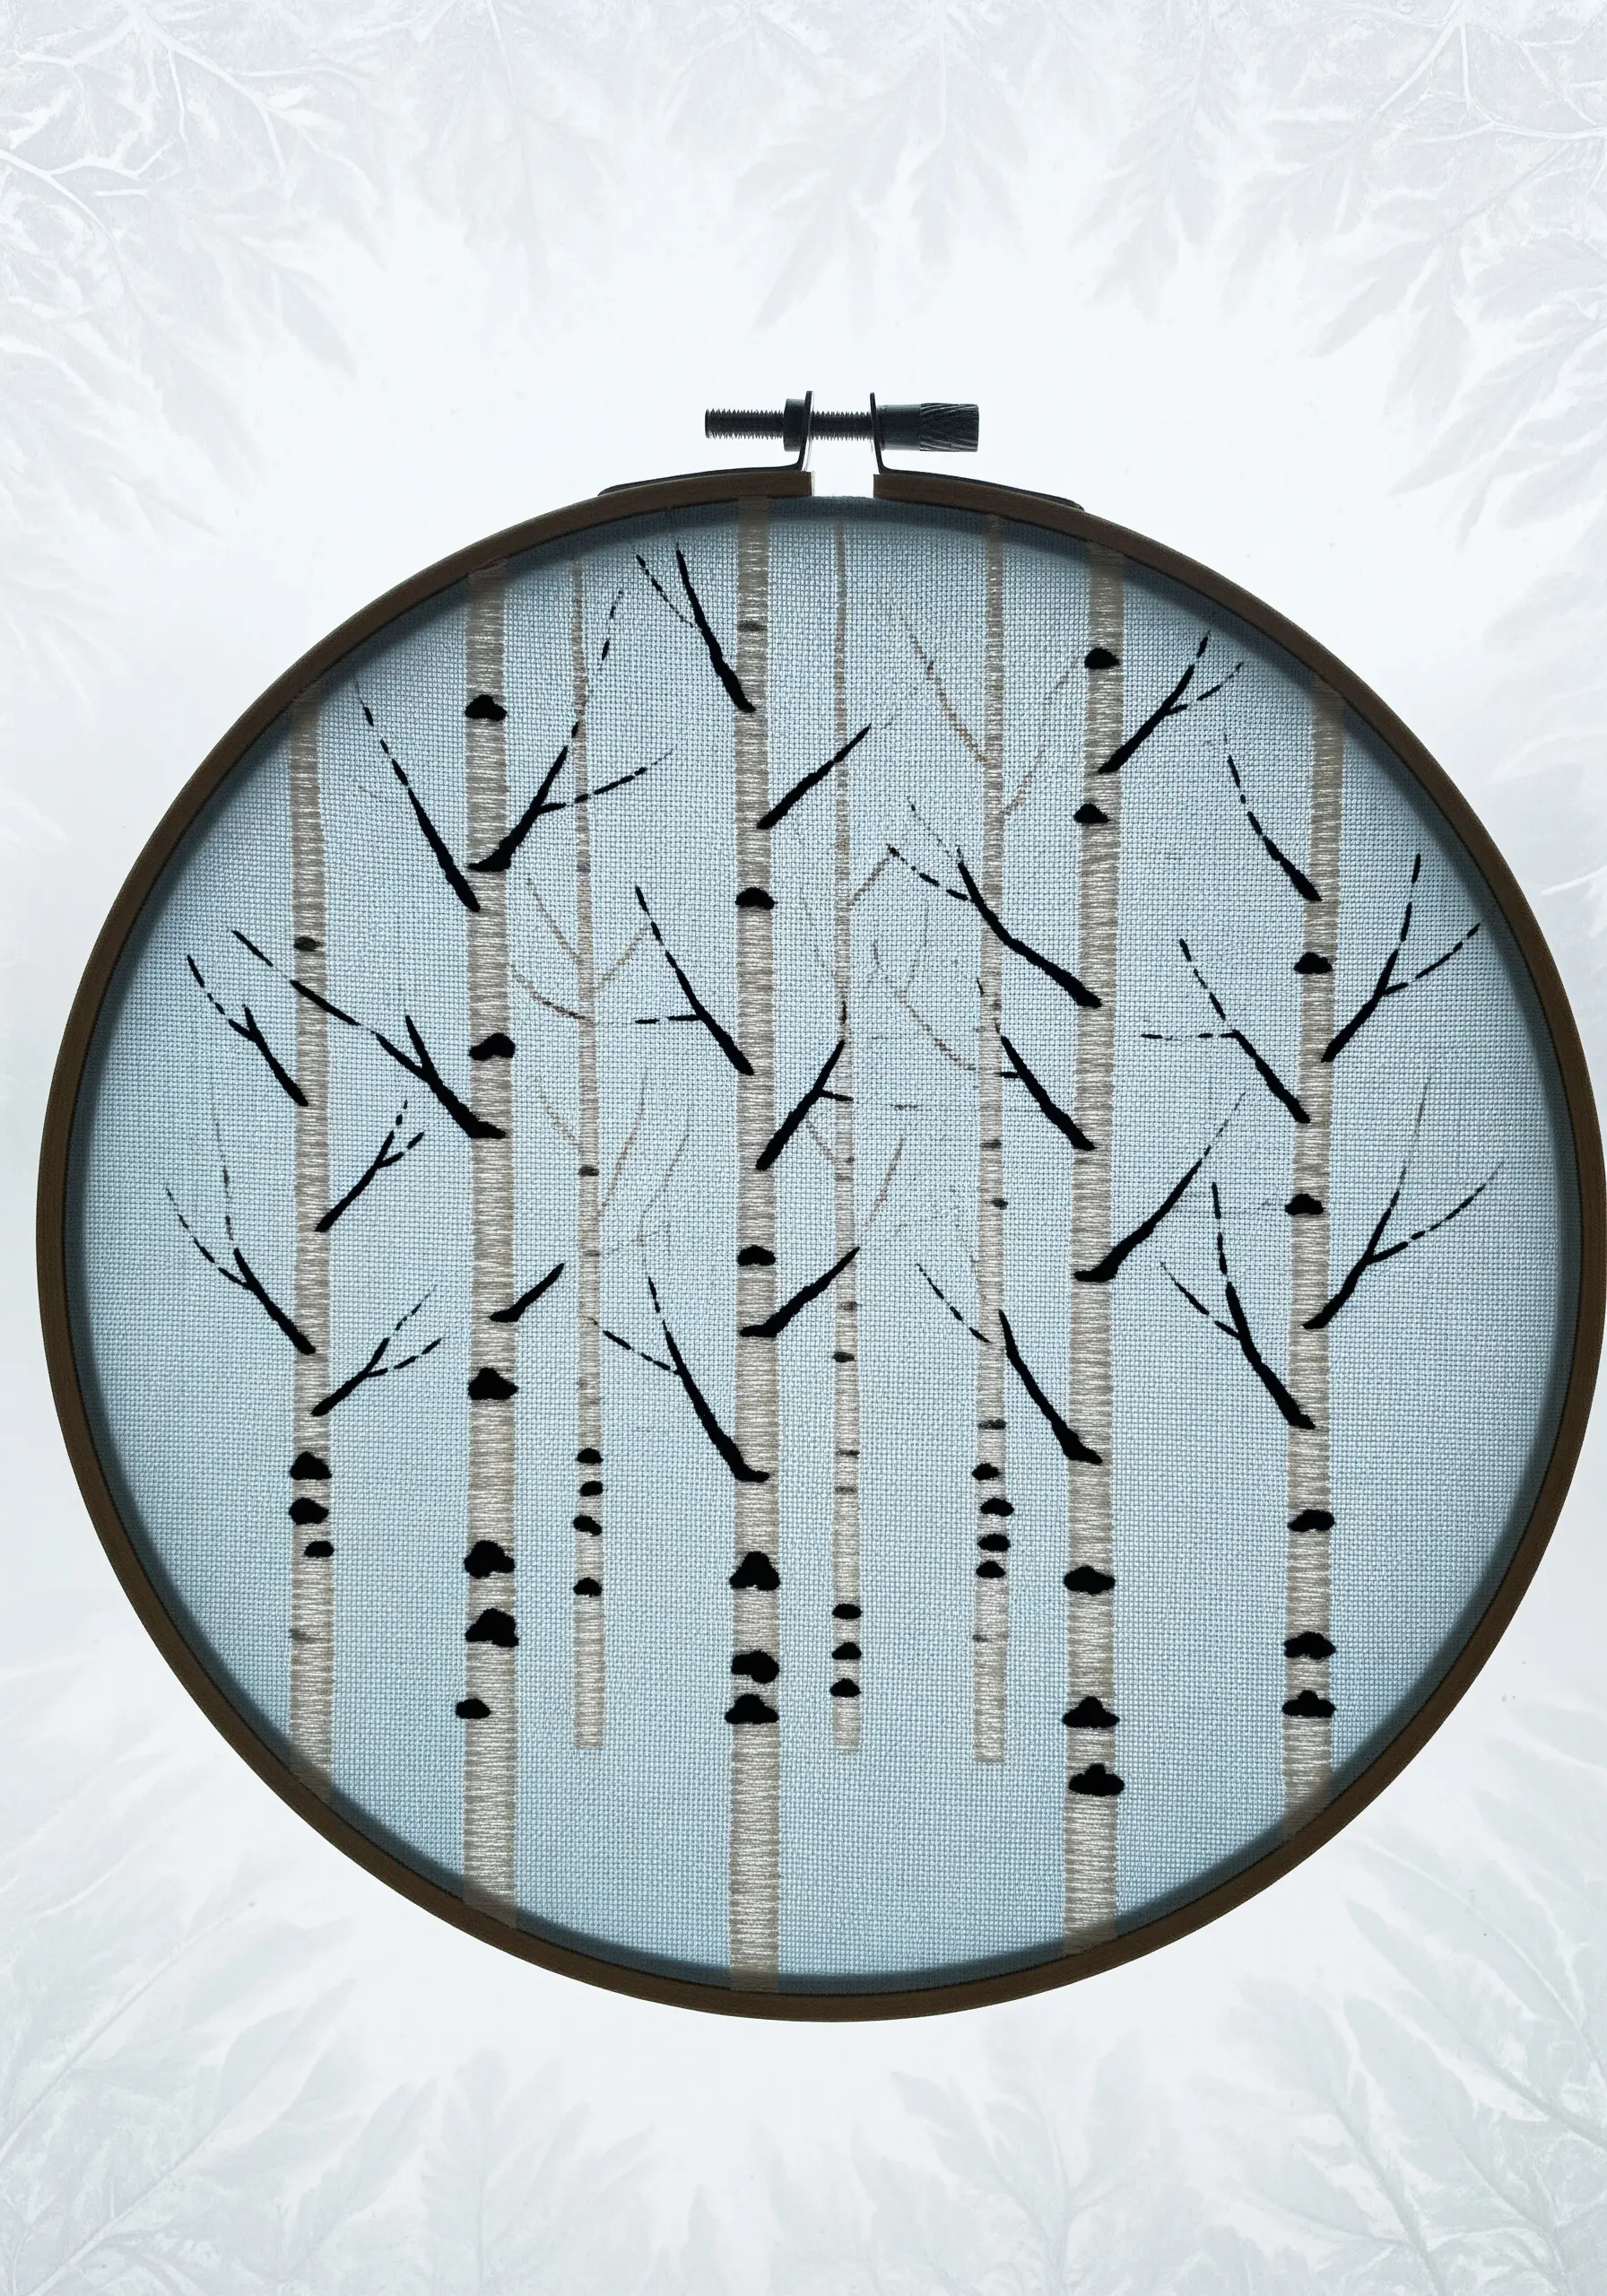
Suggest a forest of birch trees with an economy of stitches to create a calm, atmospheric scene.
Use a simple vertical satin stitch for the tree trunks, using a slightly variegated white or pale gray thread to give them subtle texture.
For the bark’s markings, use single, decisive straight stitches in black. The key is the negative space; the unstitched background becomes as important as the trees themselves.
This approach transforms a simple nature scene into a piece of serene, luxe minimalist wall art.
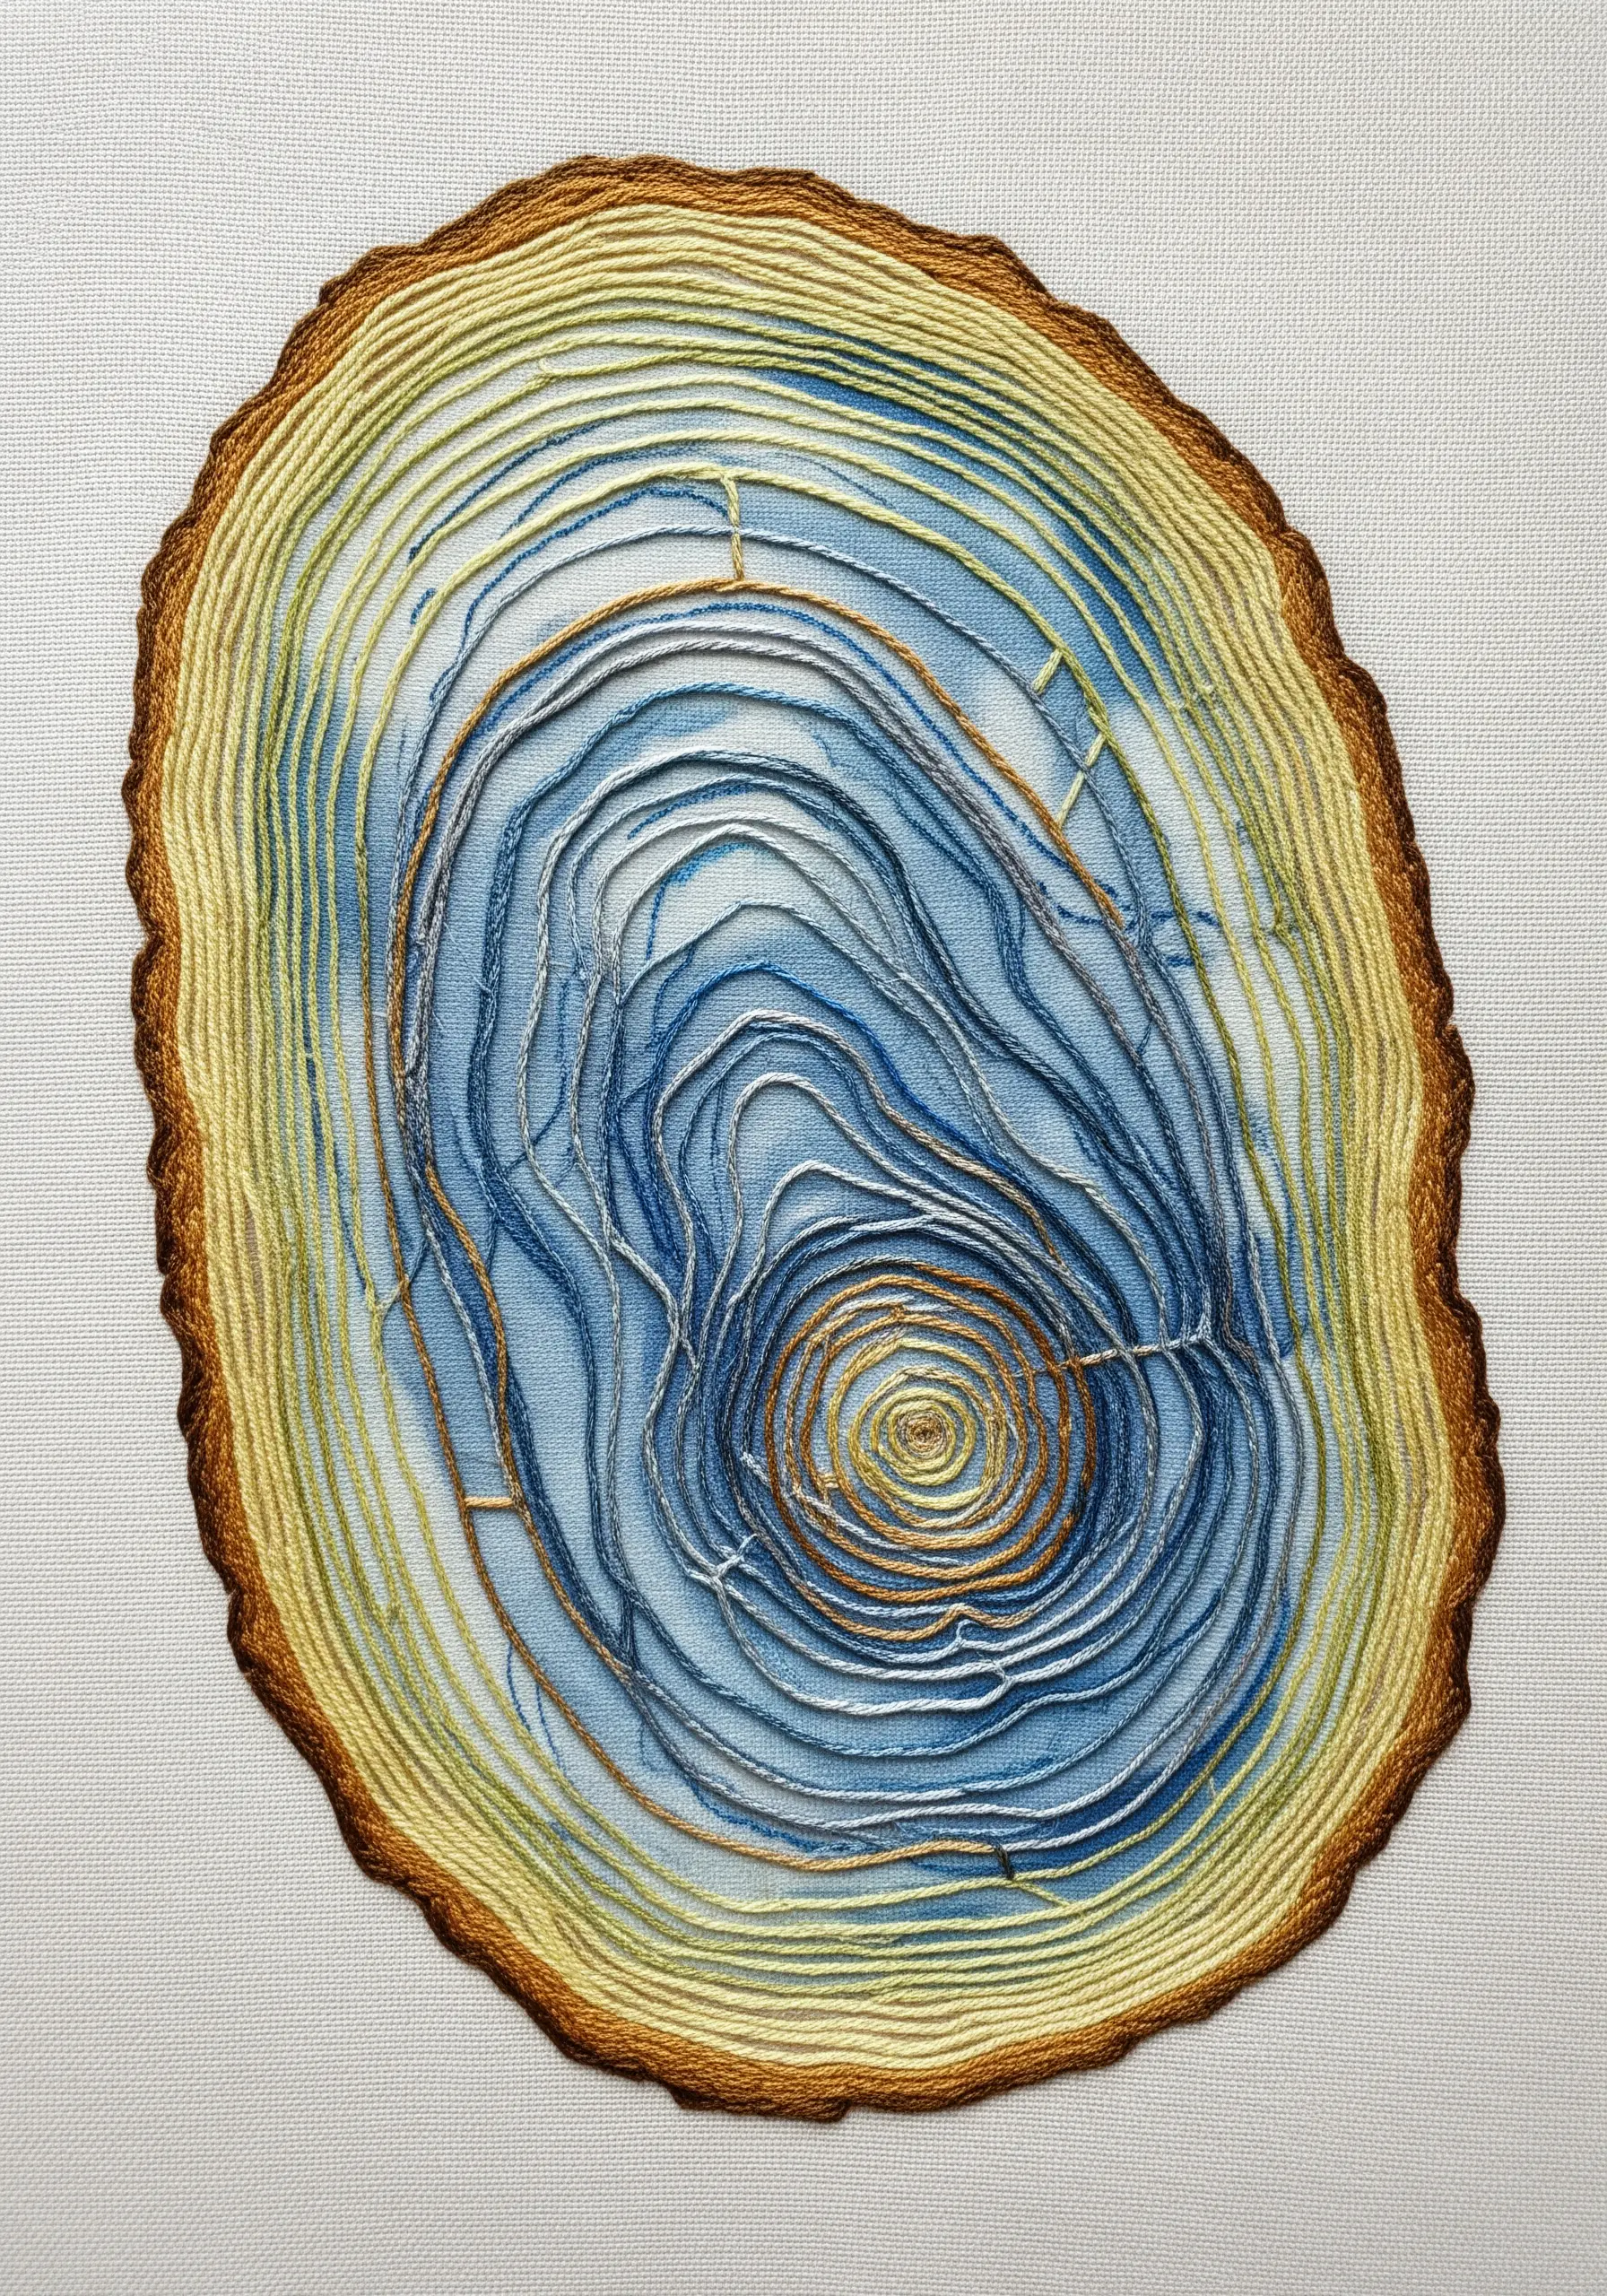
14. Concentric Split Stitch for Smooth Gradients
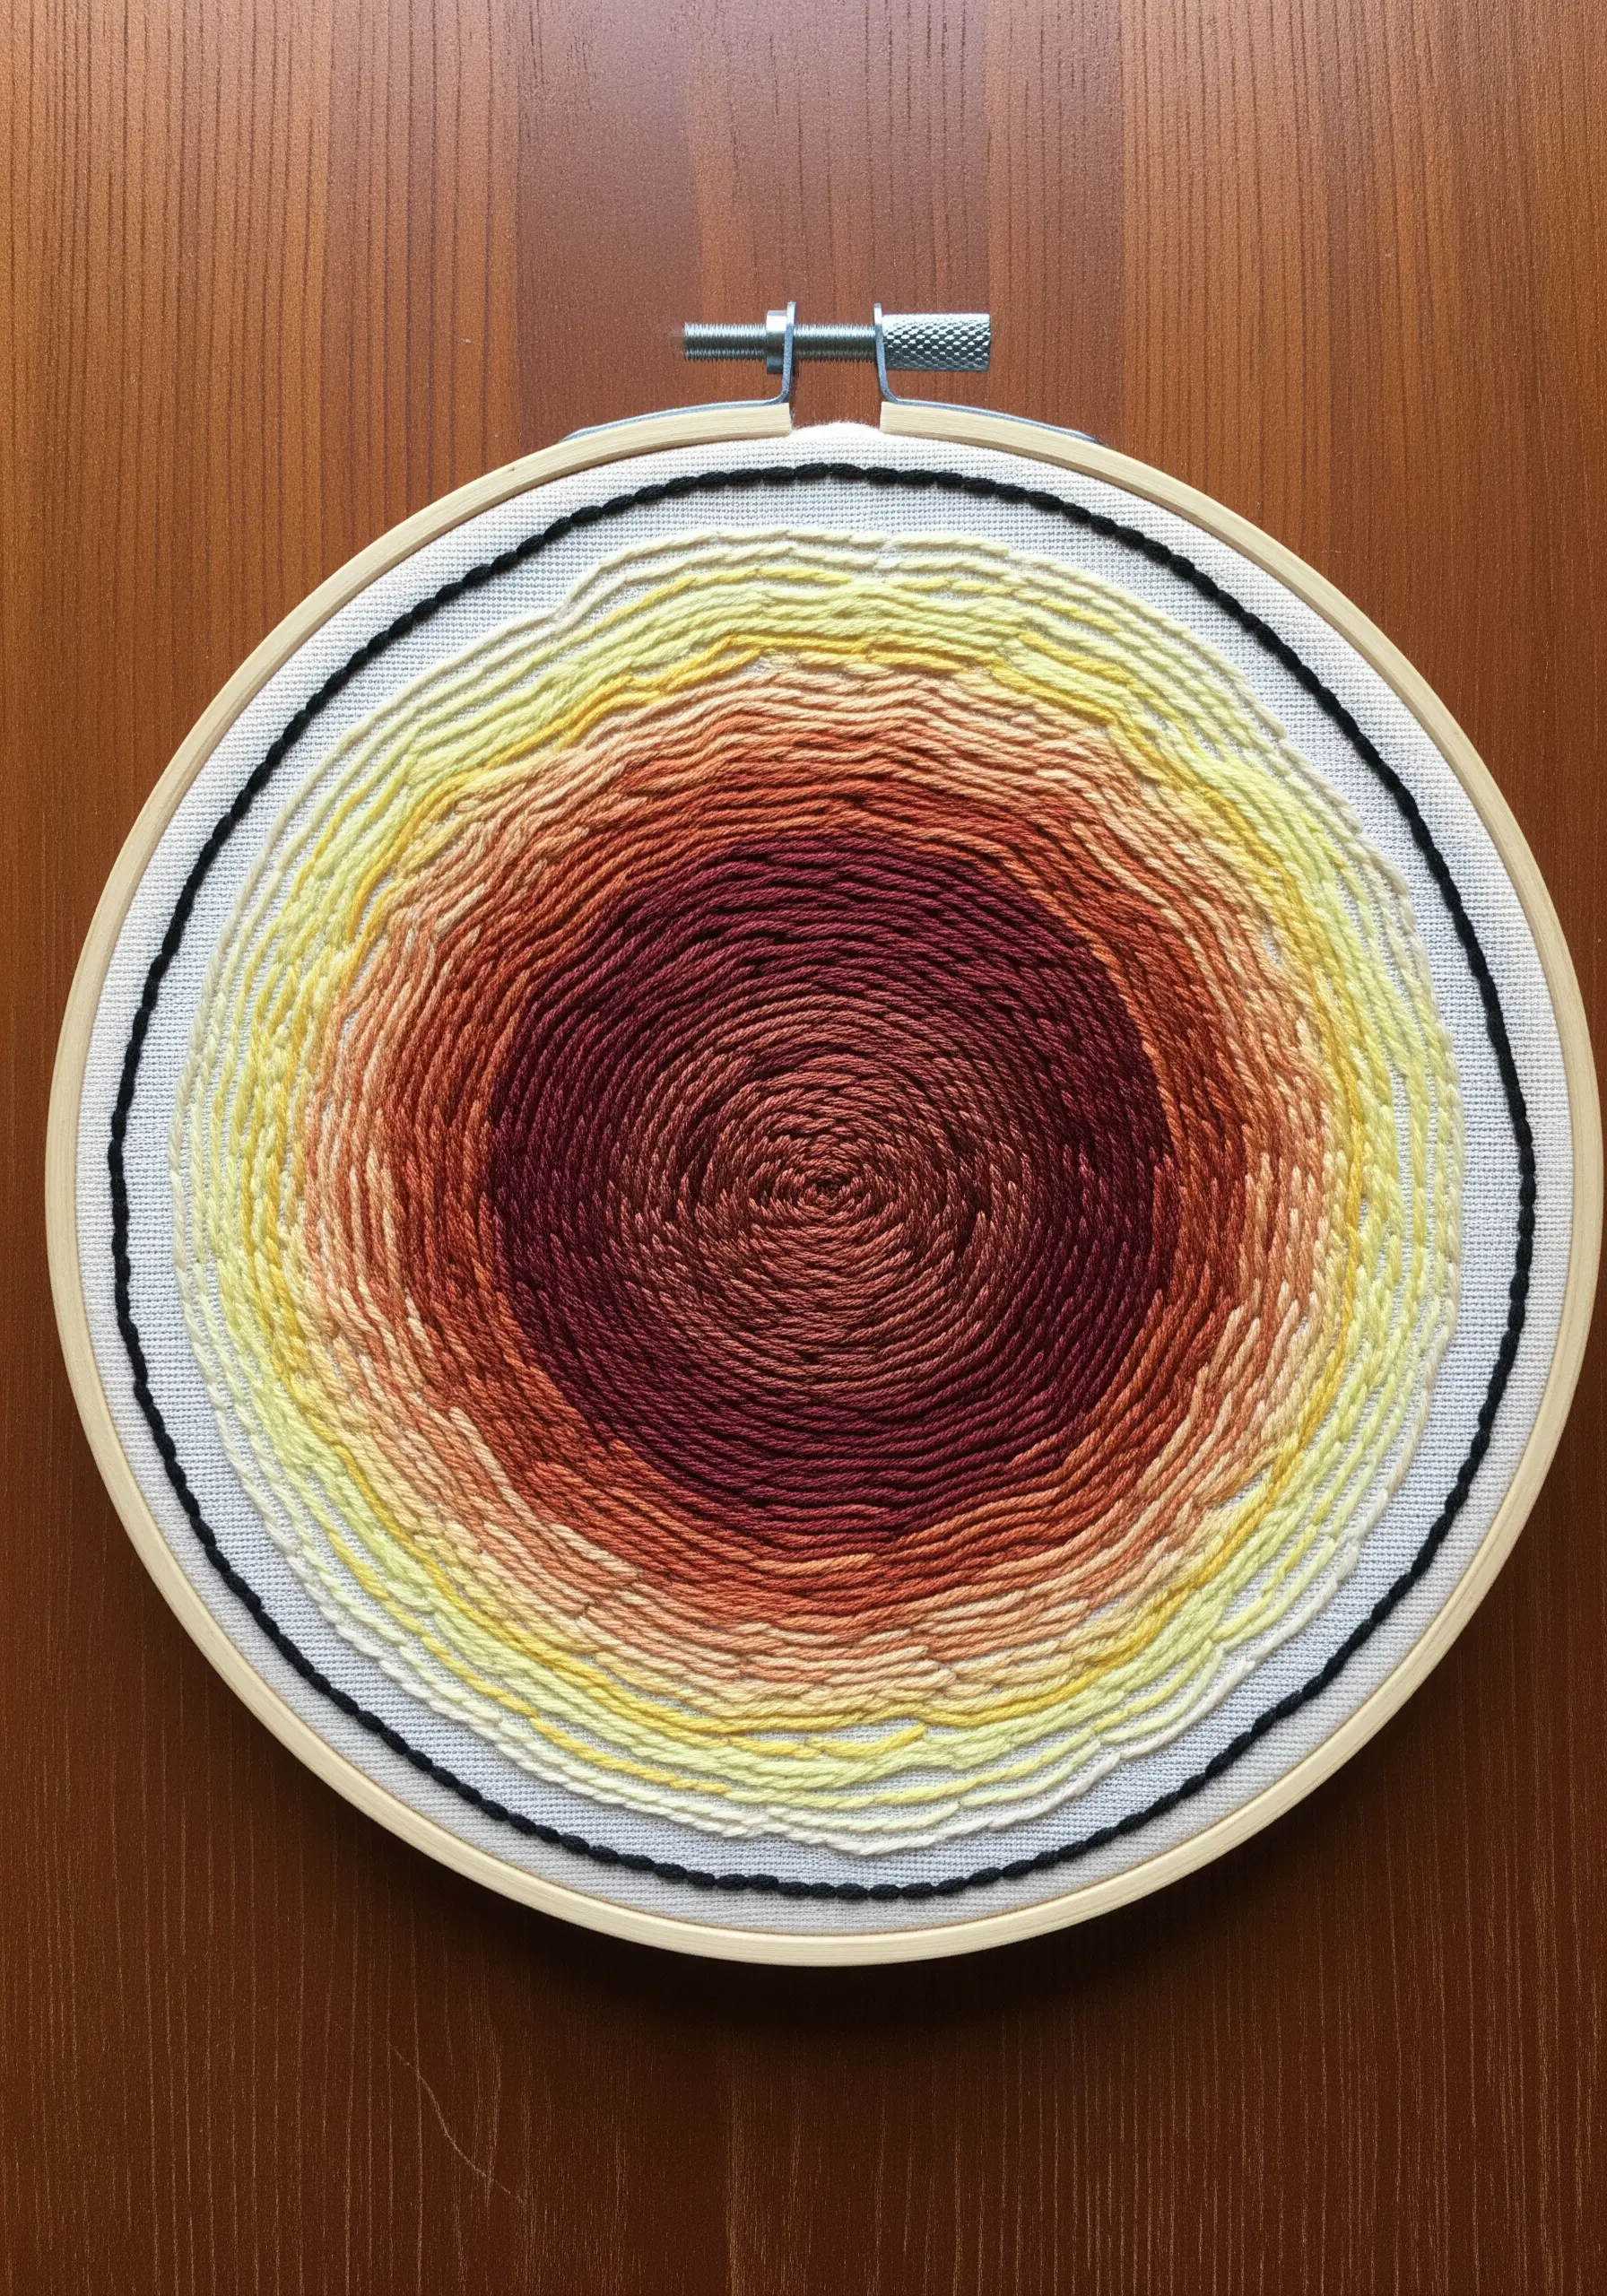
For a tree ring with a soft, gradient glow, use concentric circles of split stitch.
This stitch creates a texture similar to a fine chain, and its density is perfect for smooth color transitions.
Work with only two or three strands of floss at a time, gradually introducing new shades by blending them into your working thread.
Start with your darkest color in the center and work outwards to lighter shades to create a radiating effect that draws the eye inward.
15. A Sampler of Bark Textures
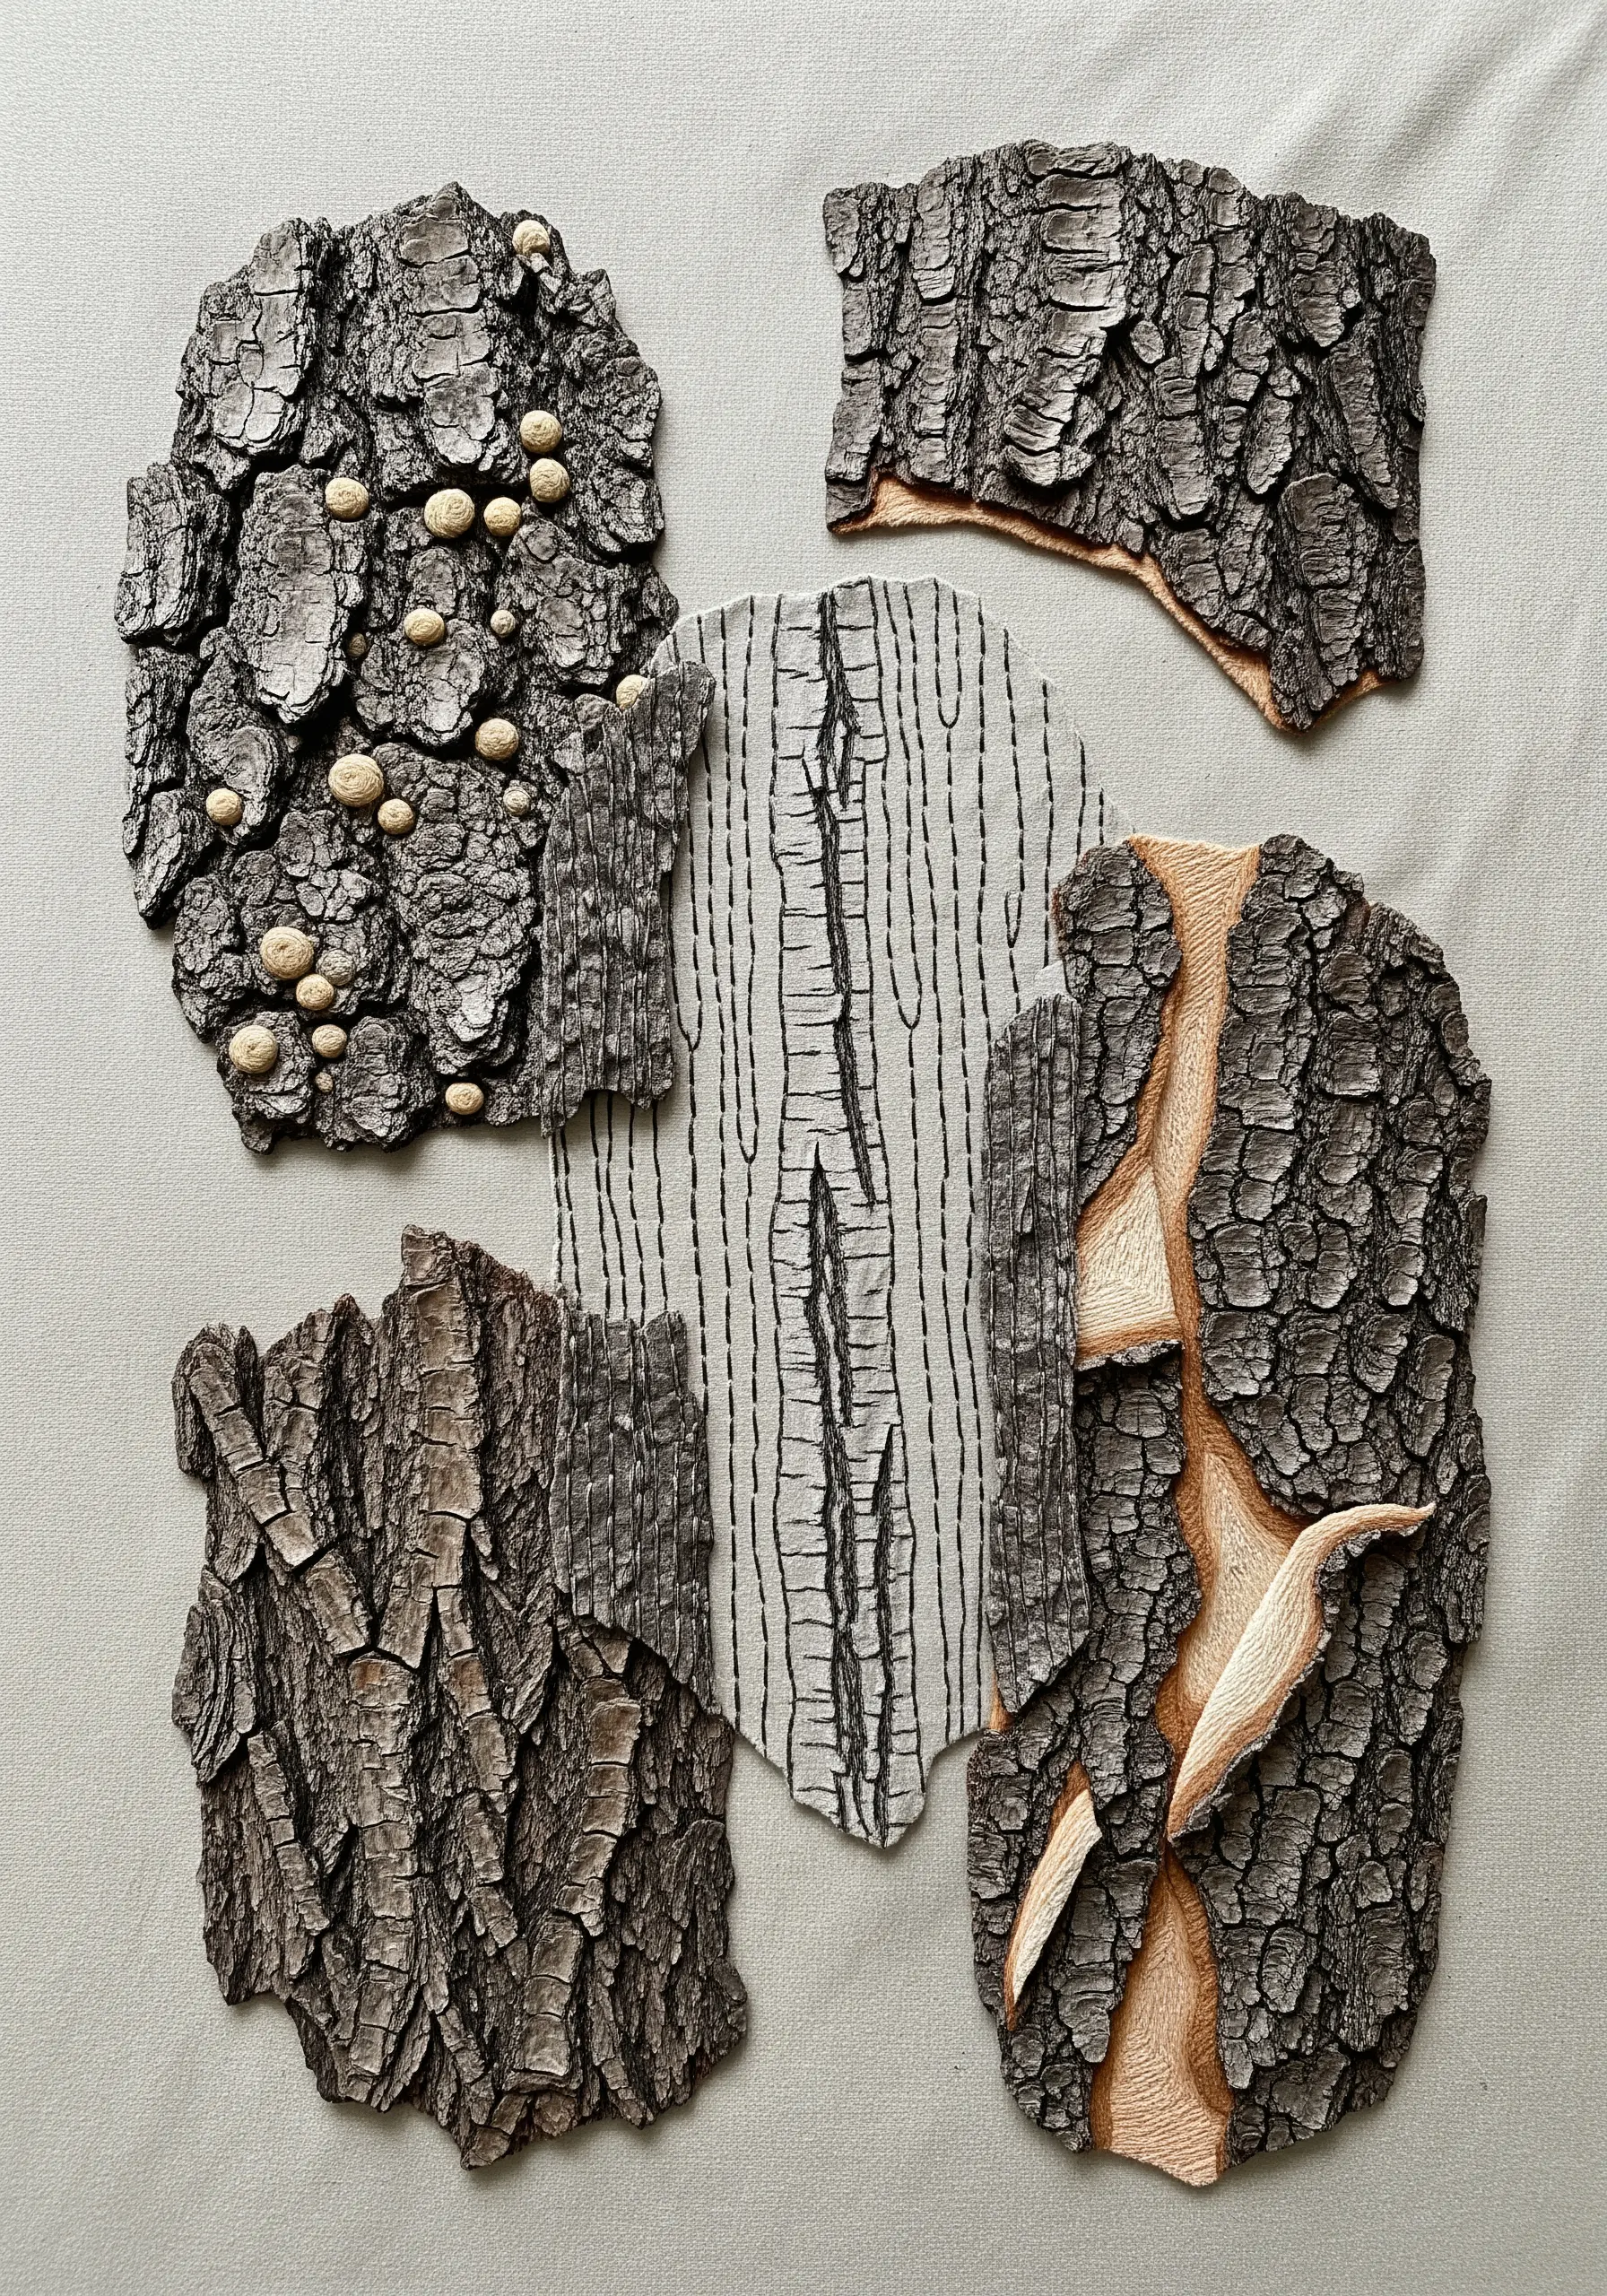
Create a compelling composition by treating it as a sampler of different bark textures.
Dedicate each fabric appliqué shape to a different technique. Use fine backstitch on one, dense thread painting on another, and raised French knots on a third.
This approach allows you to experiment with various stitches while creating a cohesive piece unified by its subject matter.
It’s a fantastic way to build your skills and create a visual catalog of stunning natural texture embroidery patterns.
16. Deconstructed Floss for Ethereal Texture
Create a uniquely soft and delicate texture by using floss that has been deconstructed into its individual strands.
Separate a full six-strand floss into its single plies. Gather a bundle of these fine threads and couch them down onto the fabric in a circular shape.
The individual strands will lie imperfectly, creating a subtle, airy texture that has more life and variation than a solid, twisted thread.
This technique is perfect for adding a touch of organic softness to minimalist designs.
17. Geologic Rings with an Unexpected Palette

Reimagine tree rings as geologic formations by using an earthy, mineral-inspired color palette.
Choose muted tones like slate blue, dusty rose, granite gray, and sandy beige.
Work in a whipped backstitch or stem stitch to create solid, defined lines, and allow the rings to be irregular and angular, like the layers of an agate stone.
This color choice elevates the design from a simple tree slice to a more abstract, earth-inspired embroidery piece.
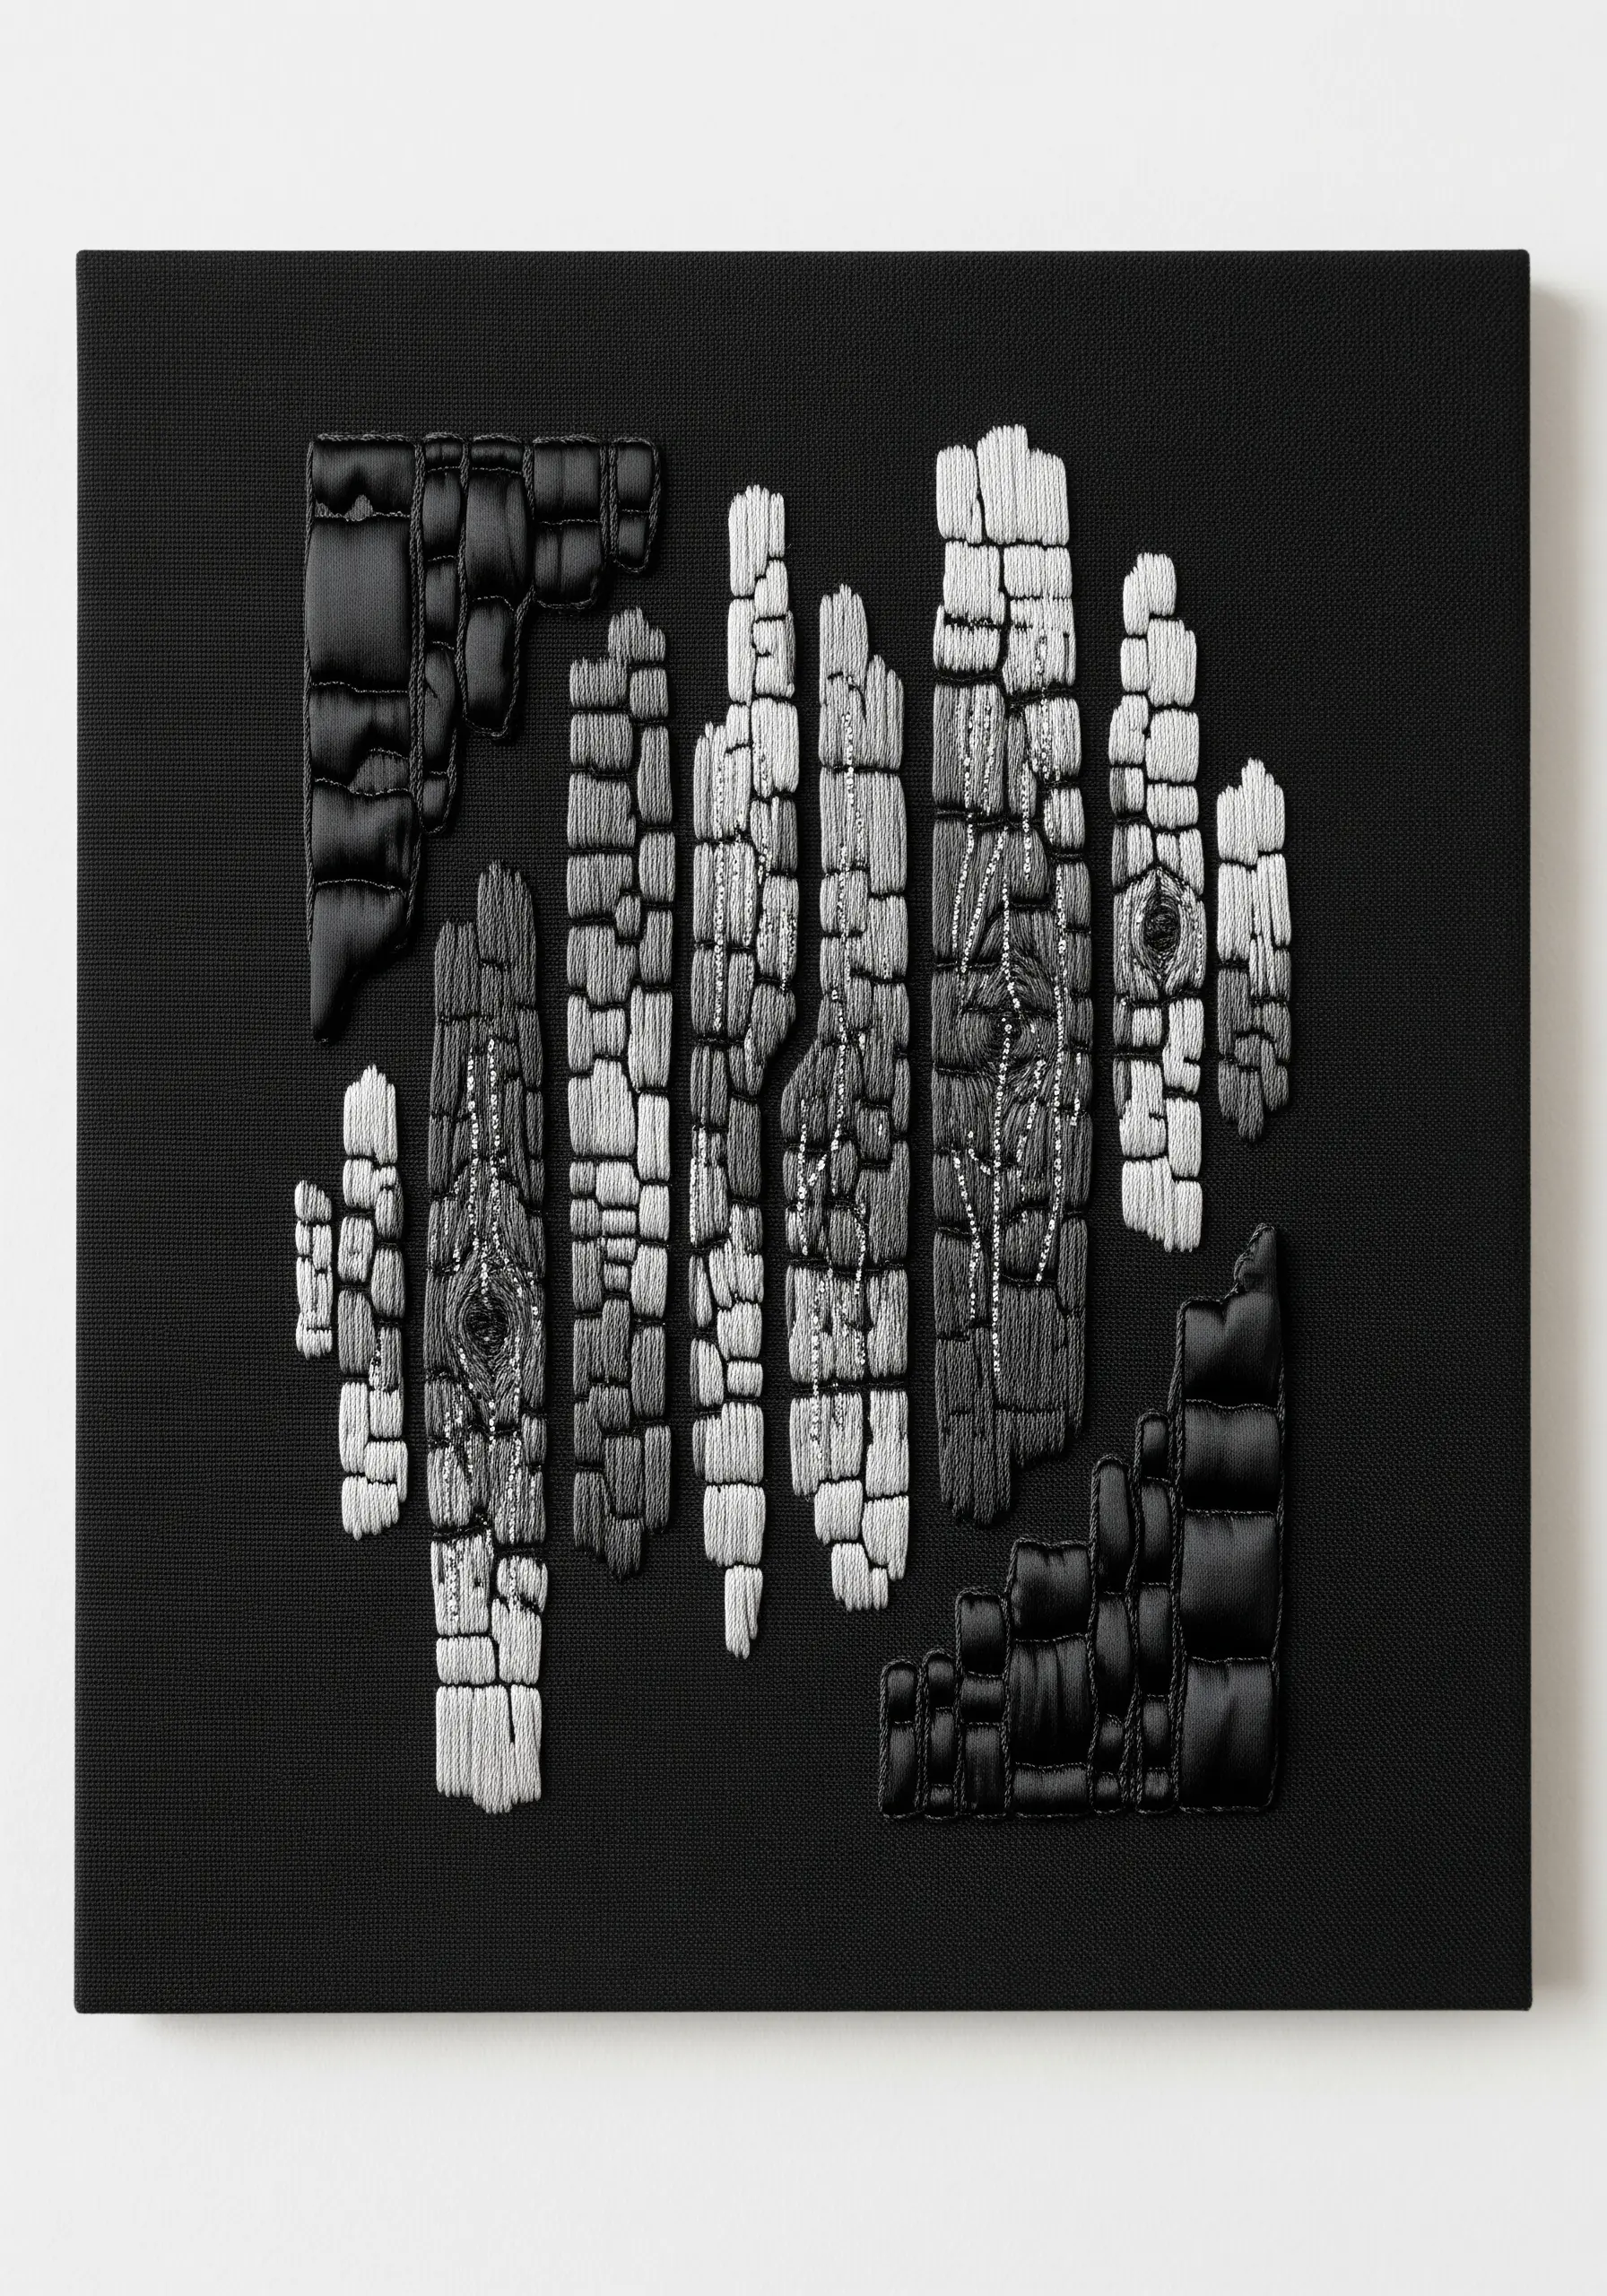
18. Sculptural Charred Wood Effects
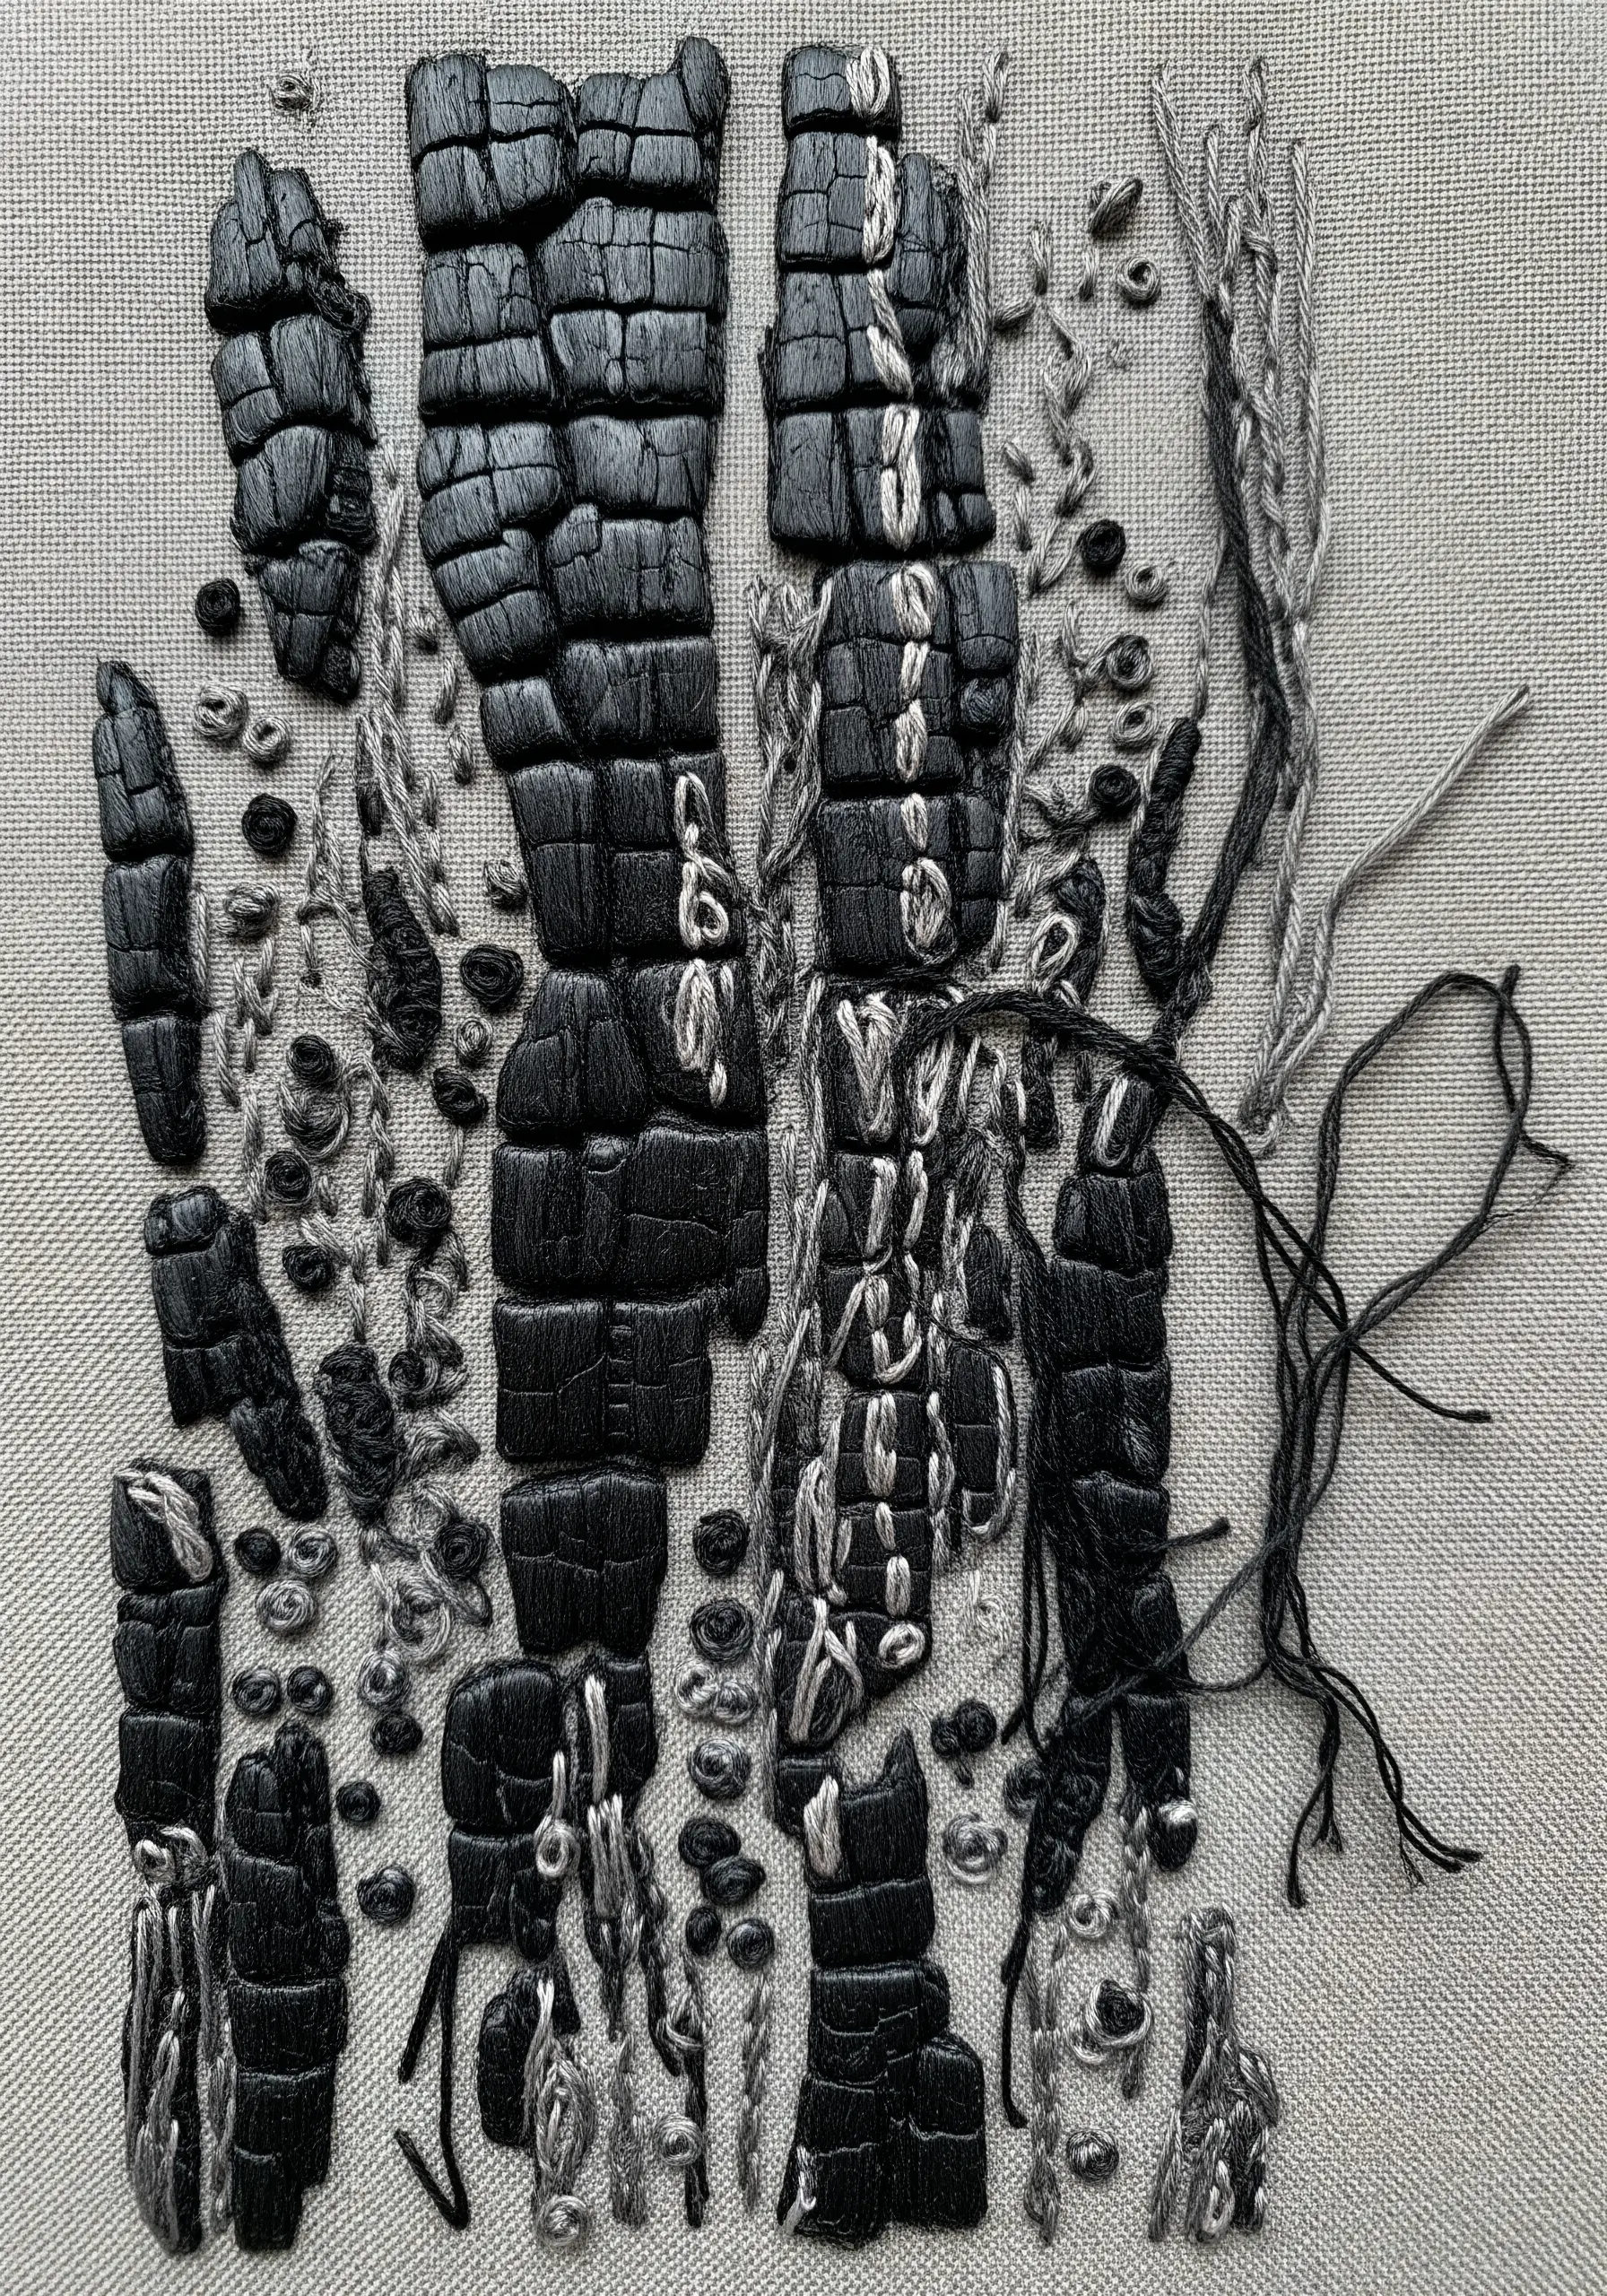
Recreate the brittle, blocky texture of charred wood using padded appliqué and loose thread work.
Create small, rectangular padded shapes and cover them with black satin stitch to form the charcoal blocks.
Between these solid shapes, use loose, looping stitches and turkey work with gray and black threads to represent the ash and splintered fibers.
This multi-layered approach creates a highly sculptural and tactile piece that tells a story of transformation.
19. High-Pile Knots for Lush Moss
To create the dense, velvety texture of moss, nothing works better than high-pile stitches.
Use turkey work (also known as the Ghiordes knot) and leave the loops uncut for a bumpy, rounded texture. Pack the stitches tightly together to build up a thick, plush surface.
Alternatively, use a dense field of French knots made with a thicker wool or tapestry thread.
Placing these mossy clusters over flat, vertical stitches enhances the contrast and makes the 3D element even more impactful.
20. Stitched Lines Over a Watercolor Base
Add depth and subtlety to your work by stitching over a painted fabric base.
Lightly wash your fabric with watercolors or fabric paint in blues and golds, allowing the colors to bleed and blend organically.
Once dry, use this painted canvas as your guide. Stitch fine, concentric lines with a simple backstitch, allowing the color from beneath to show through.
The paint provides a layer of soft color and depth that would be difficult to achieve with thread alone, making the piece feel luminous.
21. Sweeping Lines for Fluid Wood Grain
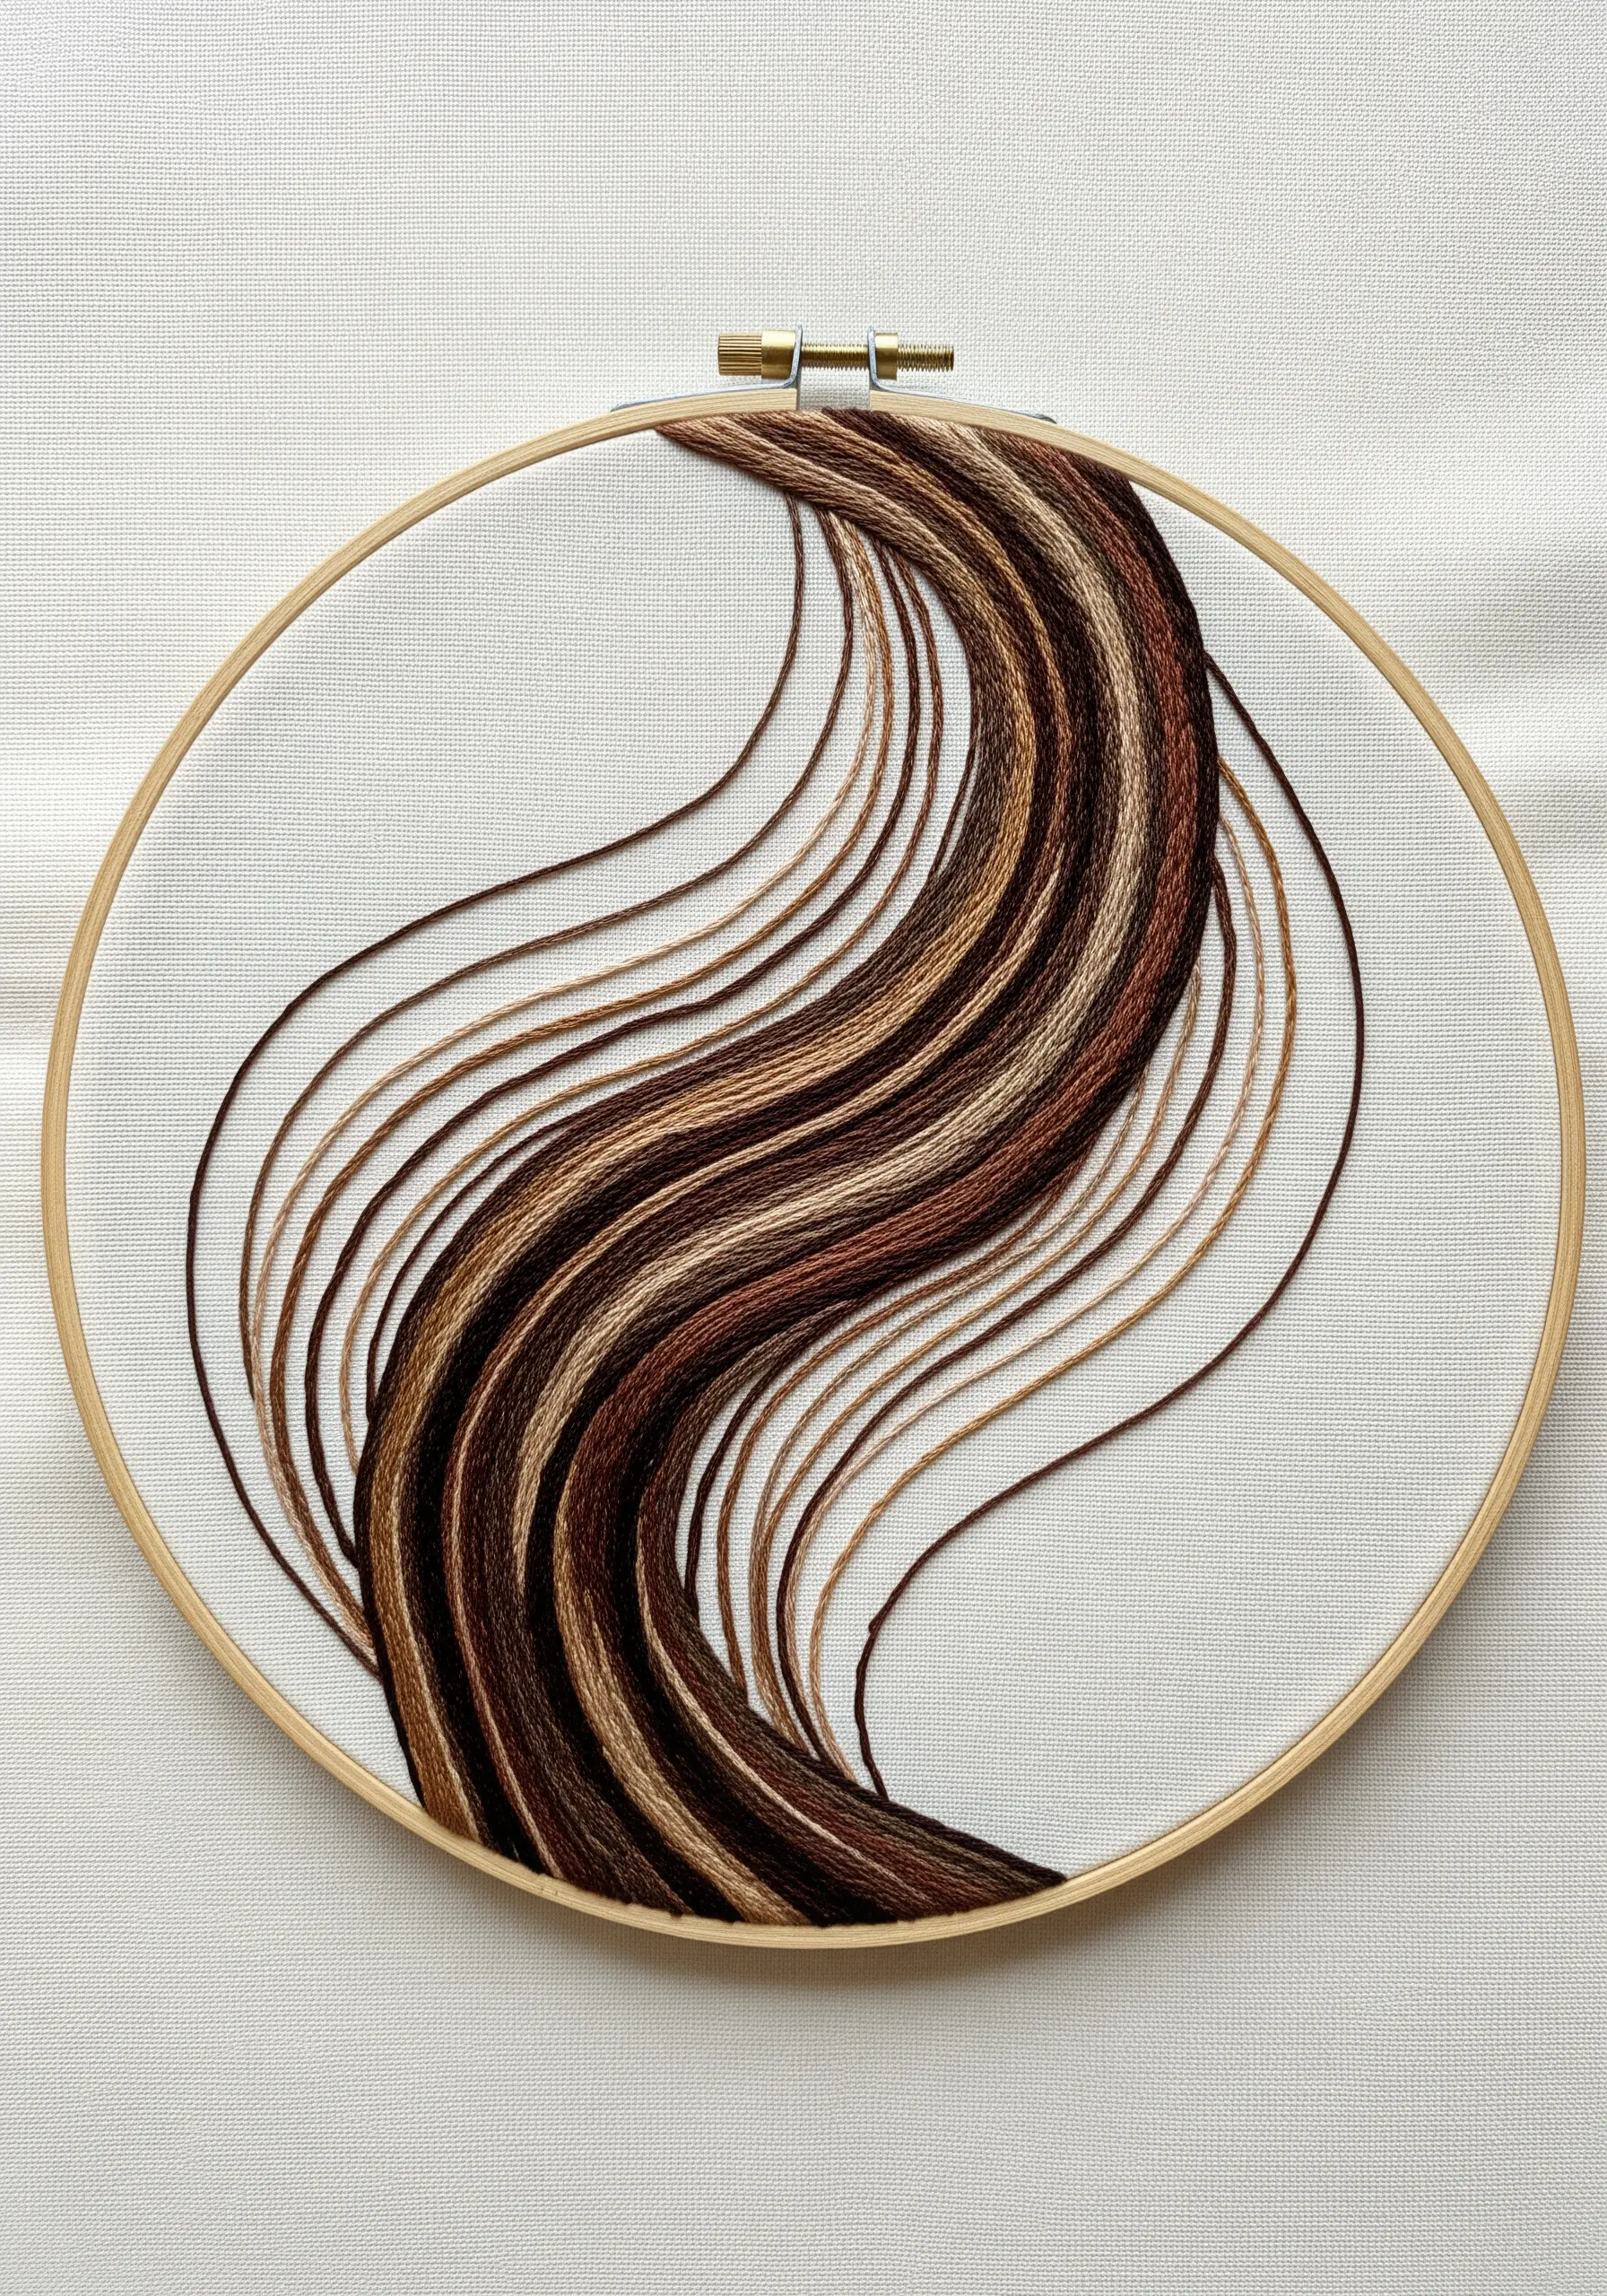
Capture the elegant, flowing movement of wood grain with long, uninterrupted stitches.
Use a single strand of floss and a split stitch or stem stitch to trace graceful, curving lines across your fabric.
Group threads of similar colors—like various shades of brown and tan—to create bands of color that flow together.
The key is to keep your stitches smooth and consistent, letting the elegant curves of the lines themselves create the visual interest.
22. Integrating Knots and Weaving
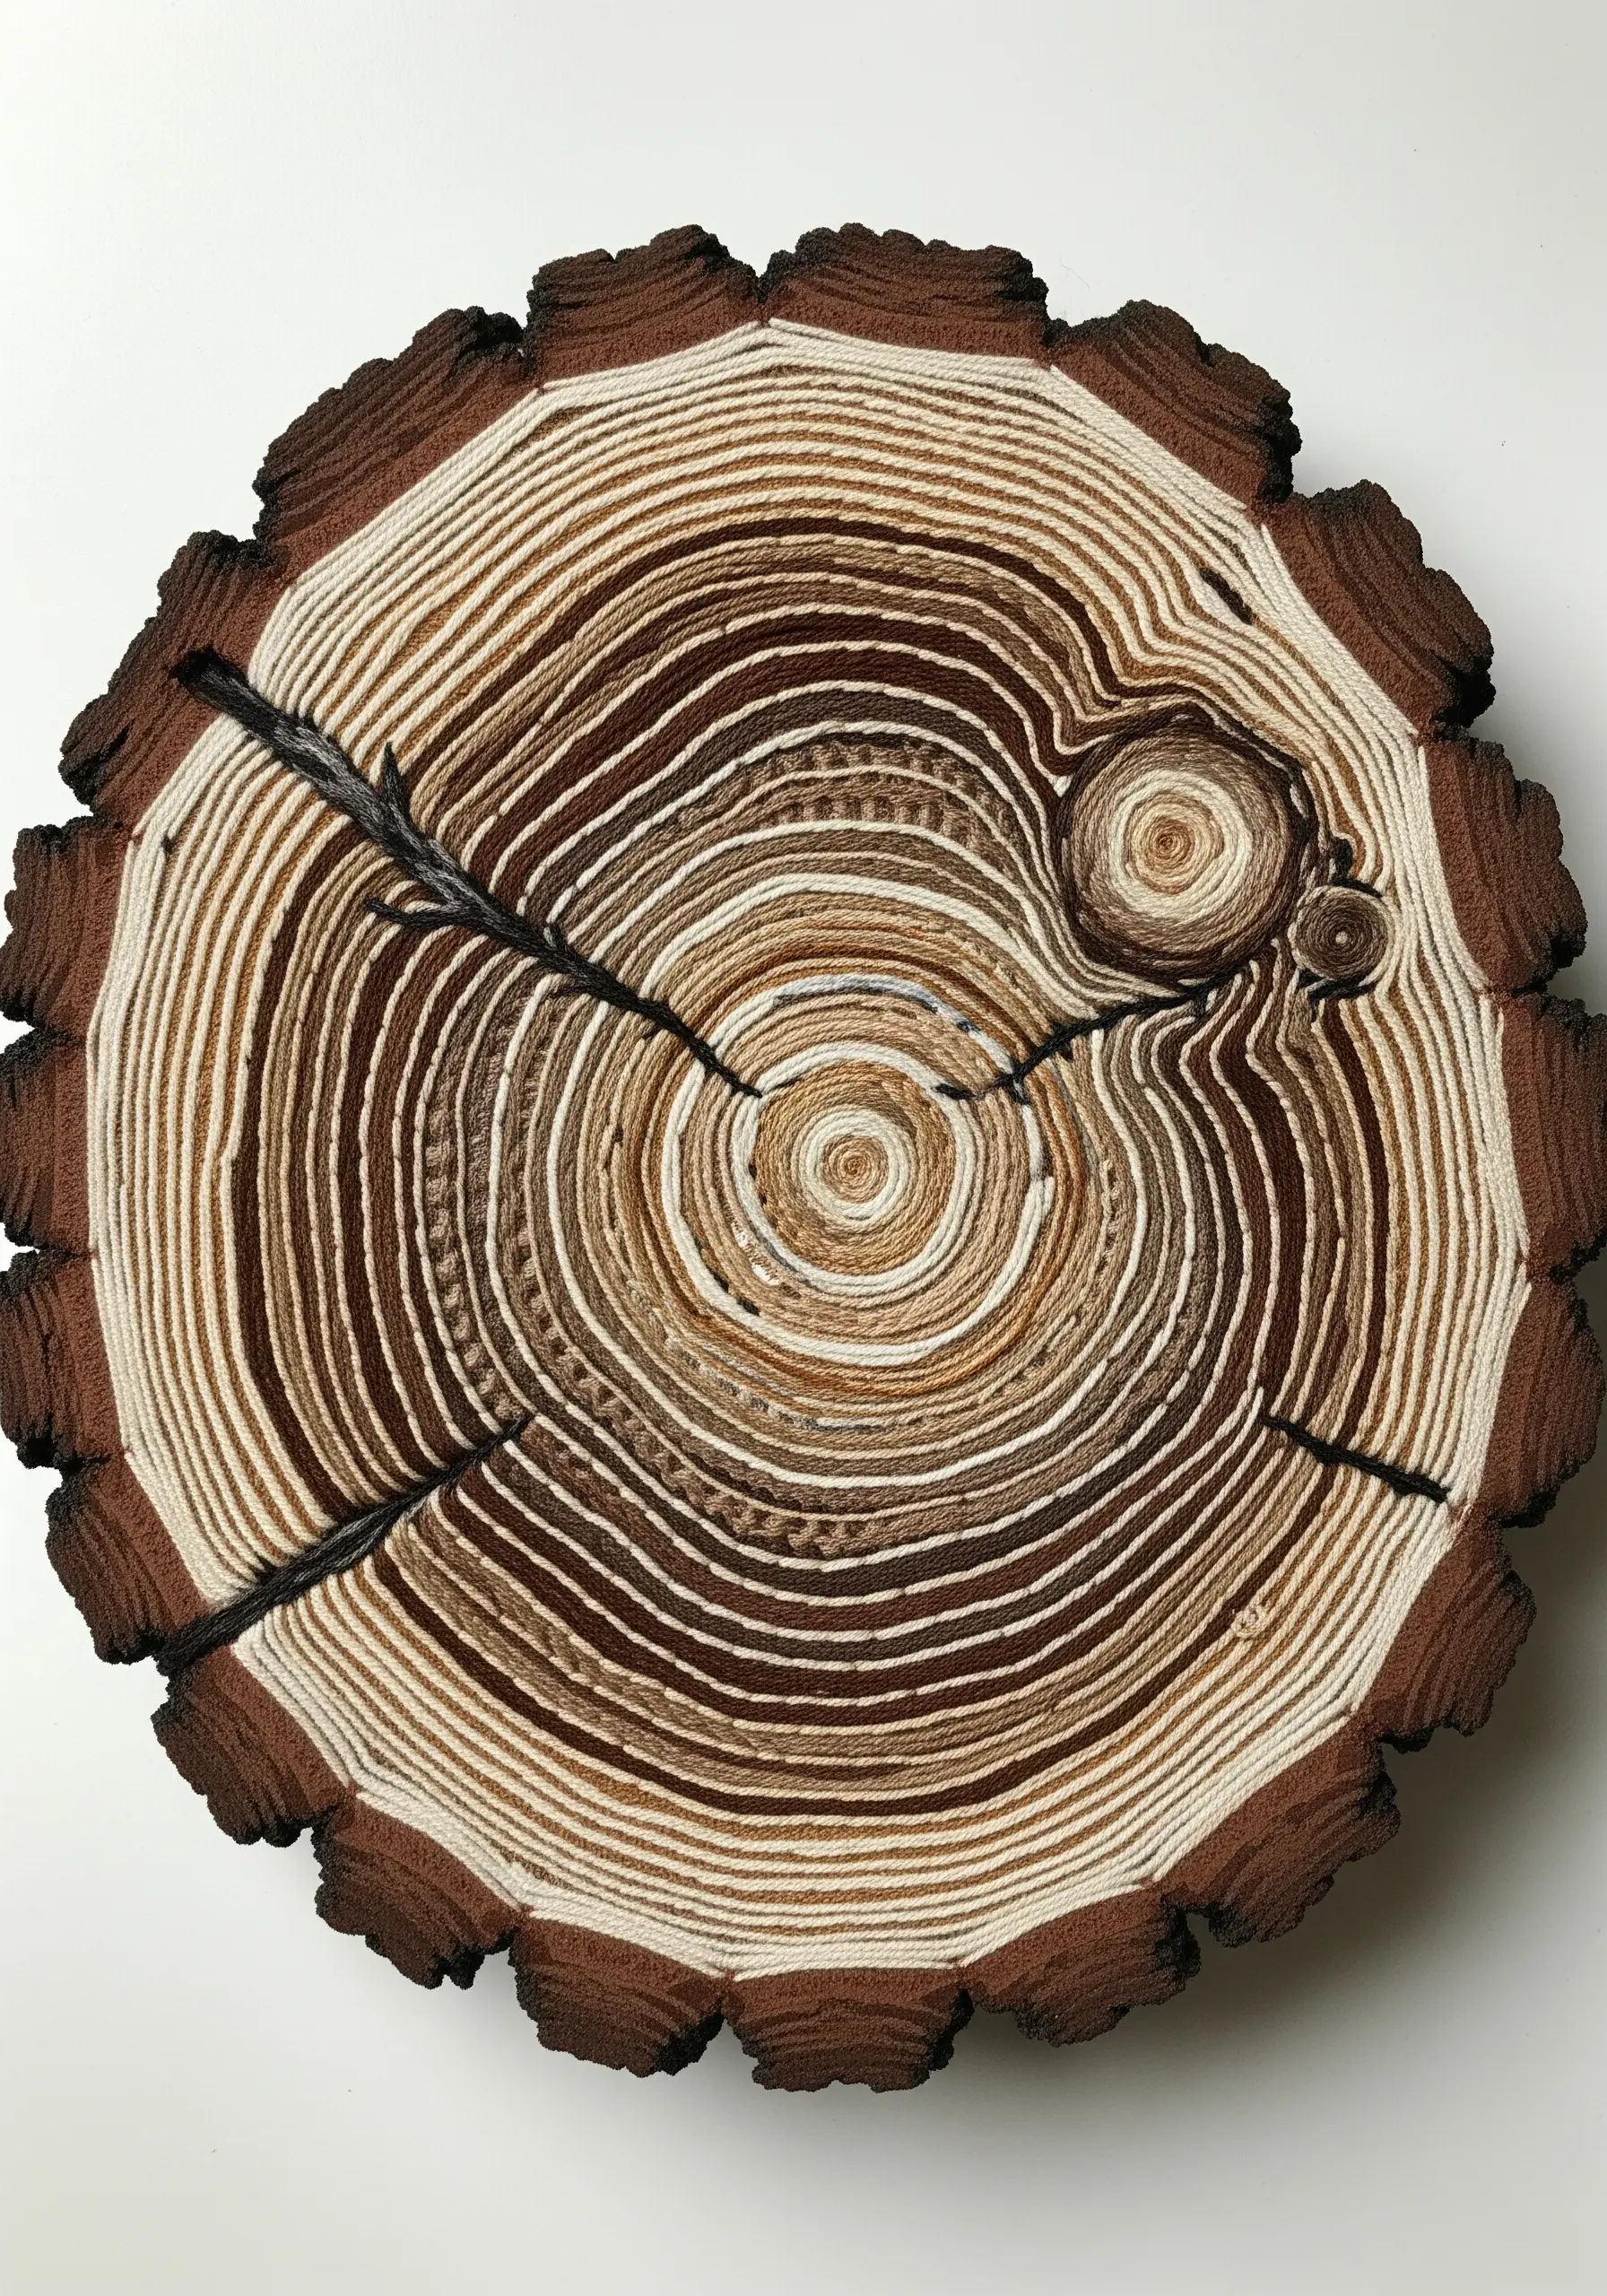
Add intricate detail to your tree rings by incorporating different stitches within the concentric circles.
While most of the rings can be simple backstitch or stem stitch, interrupt a few of them with a row of French knots, seed stitches, or even a woven wheel stitch.
This variation breaks up the rhythm of the lines and draws the eye to specific areas, mimicking the natural knots, cracks, and imperfections found in real wood.
It’s a simple way to add complexity and a signature touch to your design.
23. Creating a Durable Embroidered Patch
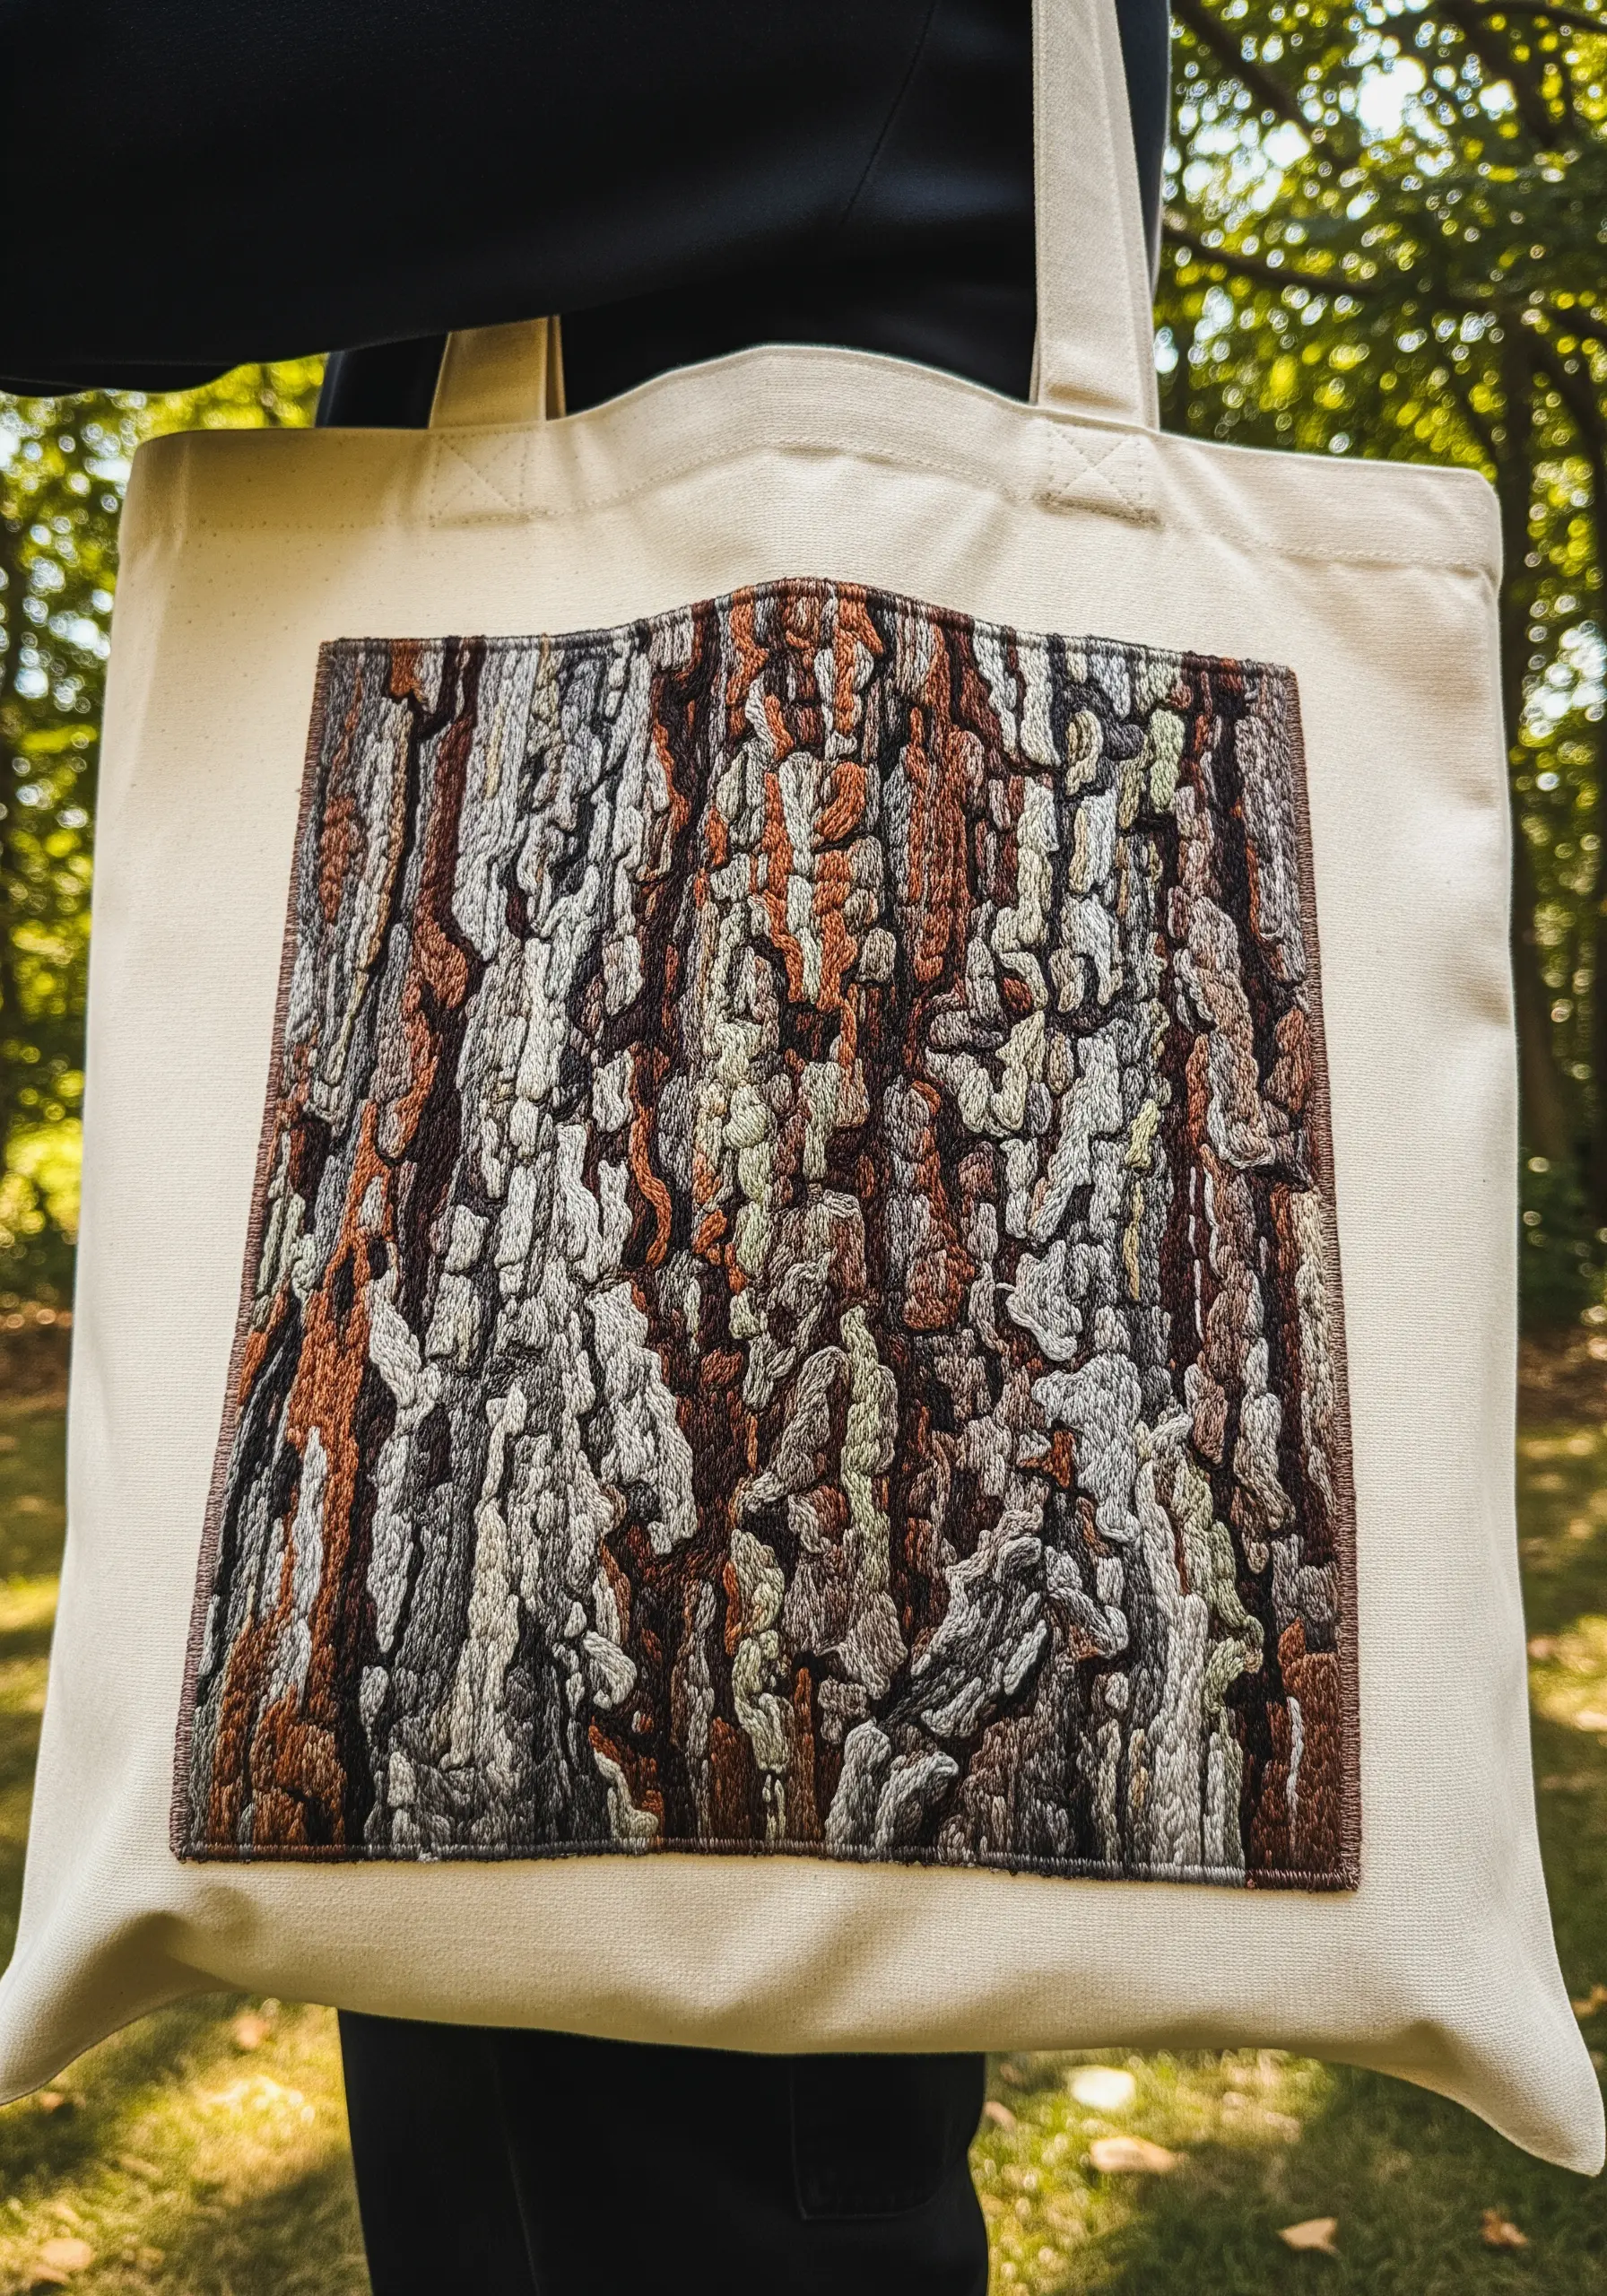
To turn your detailed bark embroidery into a wearable or functional patch, proper finishing is essential.
After completing your stitching on a piece of canvas or non-stretch cotton, apply an iron-on stabilizer to the back to secure the stitches.
Trim the fabric, leaving a small border, and finish the edge with a dense satin stitch or a blanket stitch to prevent fraying.
This creates a sturdy, professional-looking patch that can be sewn onto a tote bag, jacket, or backpack, allowing you to take your art with you.
24. The Precision of Scientific Illustration
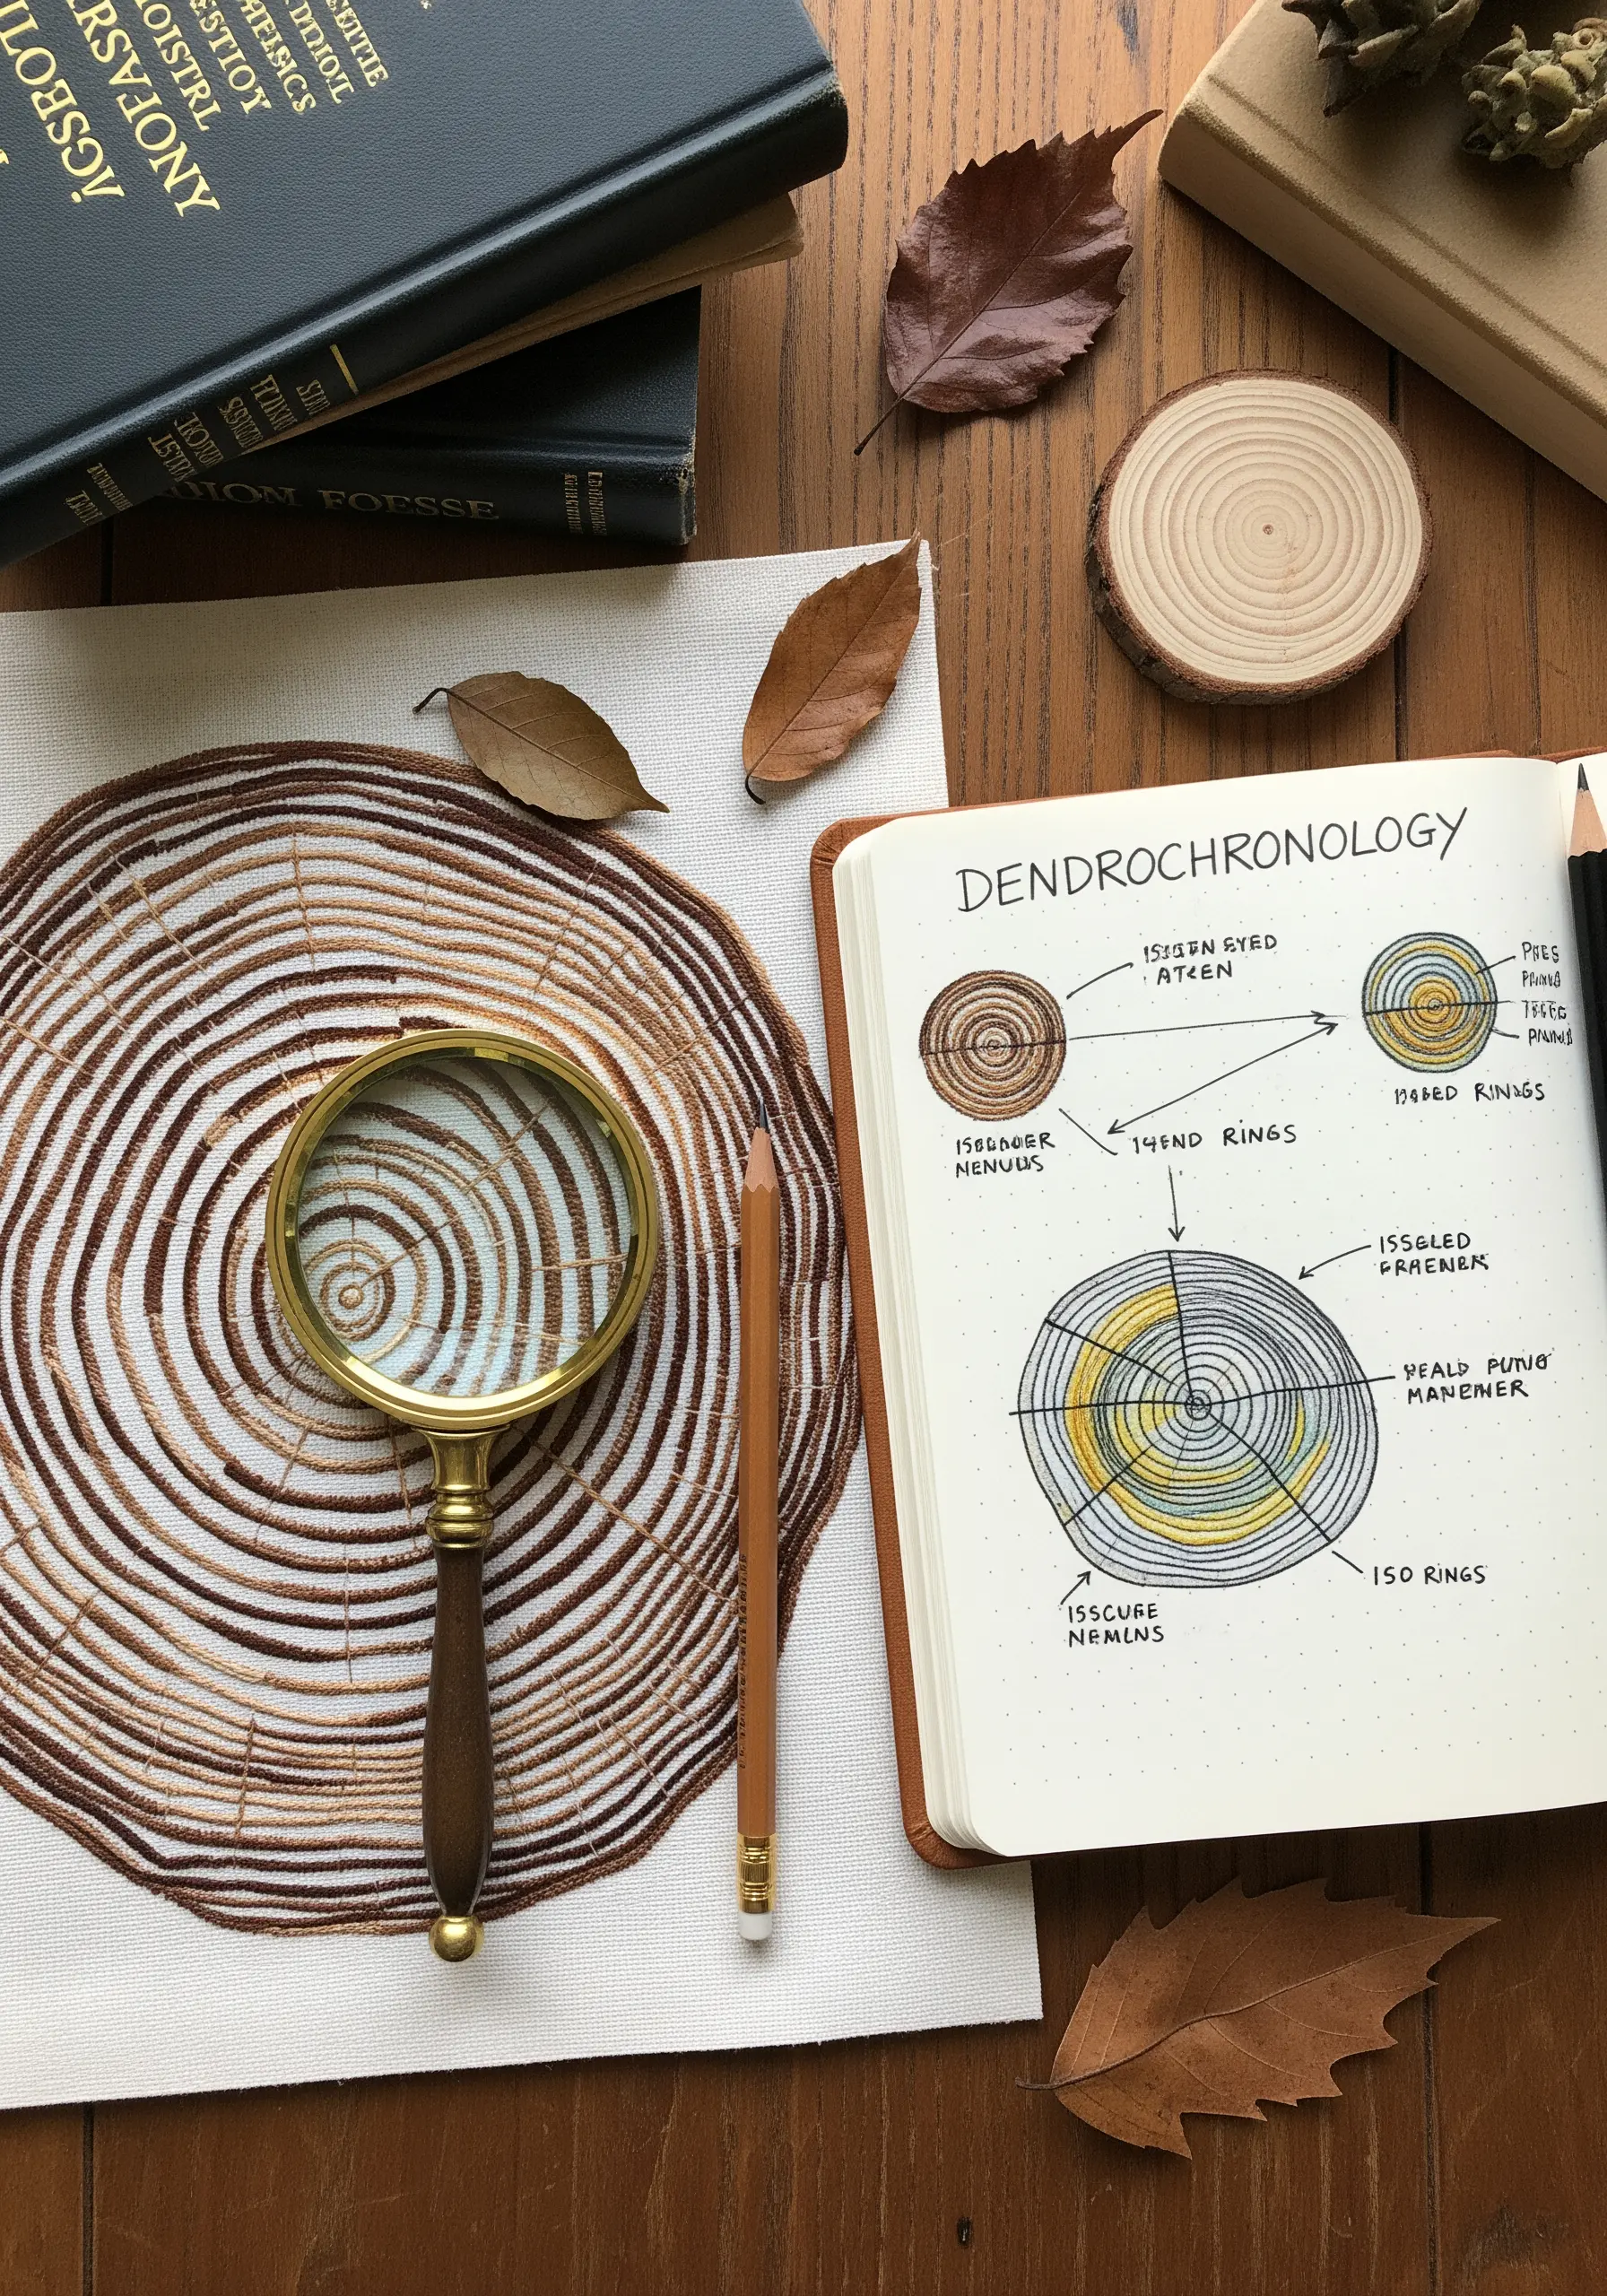
Embrace a precise, analytical style by treating your embroidery like a scientific illustration in a notebook.
Use a very fine, single strand of dark brown or black thread on a light background.
Work with a tiny backstitch or split stitch to create clean, unwavering lines. The goal isn’t expressive texture, but clarity and accuracy.
This approach highlights the beautiful geometry inherent in nature and pairs perfectly with annotations or diagrams for a unique, intellectual aesthetic.
25. Padded Satin Stitch for 3D Blocks
For a clean, graphic, and highly dimensional effect, use padded satin stitch to create your shapes.
Cut your desired shapes from one or two layers of felt and tack them to your background fabric.
Then, completely cover the felt padding with smooth, even satin stitches. The underlying felt lifts the stitches off the surface, creating a distinct shadow line and a plush, 3D form.
This technique is perfect for representing solid, blocky textures like charred wood or geometric bark patterns.
26. Combining Texture and Personalization

Create a meaningful keepsake by integrating a personalized element into a natural texture.
Stitch the birch bark trunks using a wrapping or long-and-short stitch technique with variegated thread to achieve a realistic, uneven texture.
Carve out a space in one of the trunks and stitch a heart with initials using a clean, contrasting outline stitch like a simple backstitch in red.
The contrast between the organic texture of the bark and the crisp, personal symbol makes the design feel both timeless and intimate.
27. Deconstructed Fabric for Peeling Bark
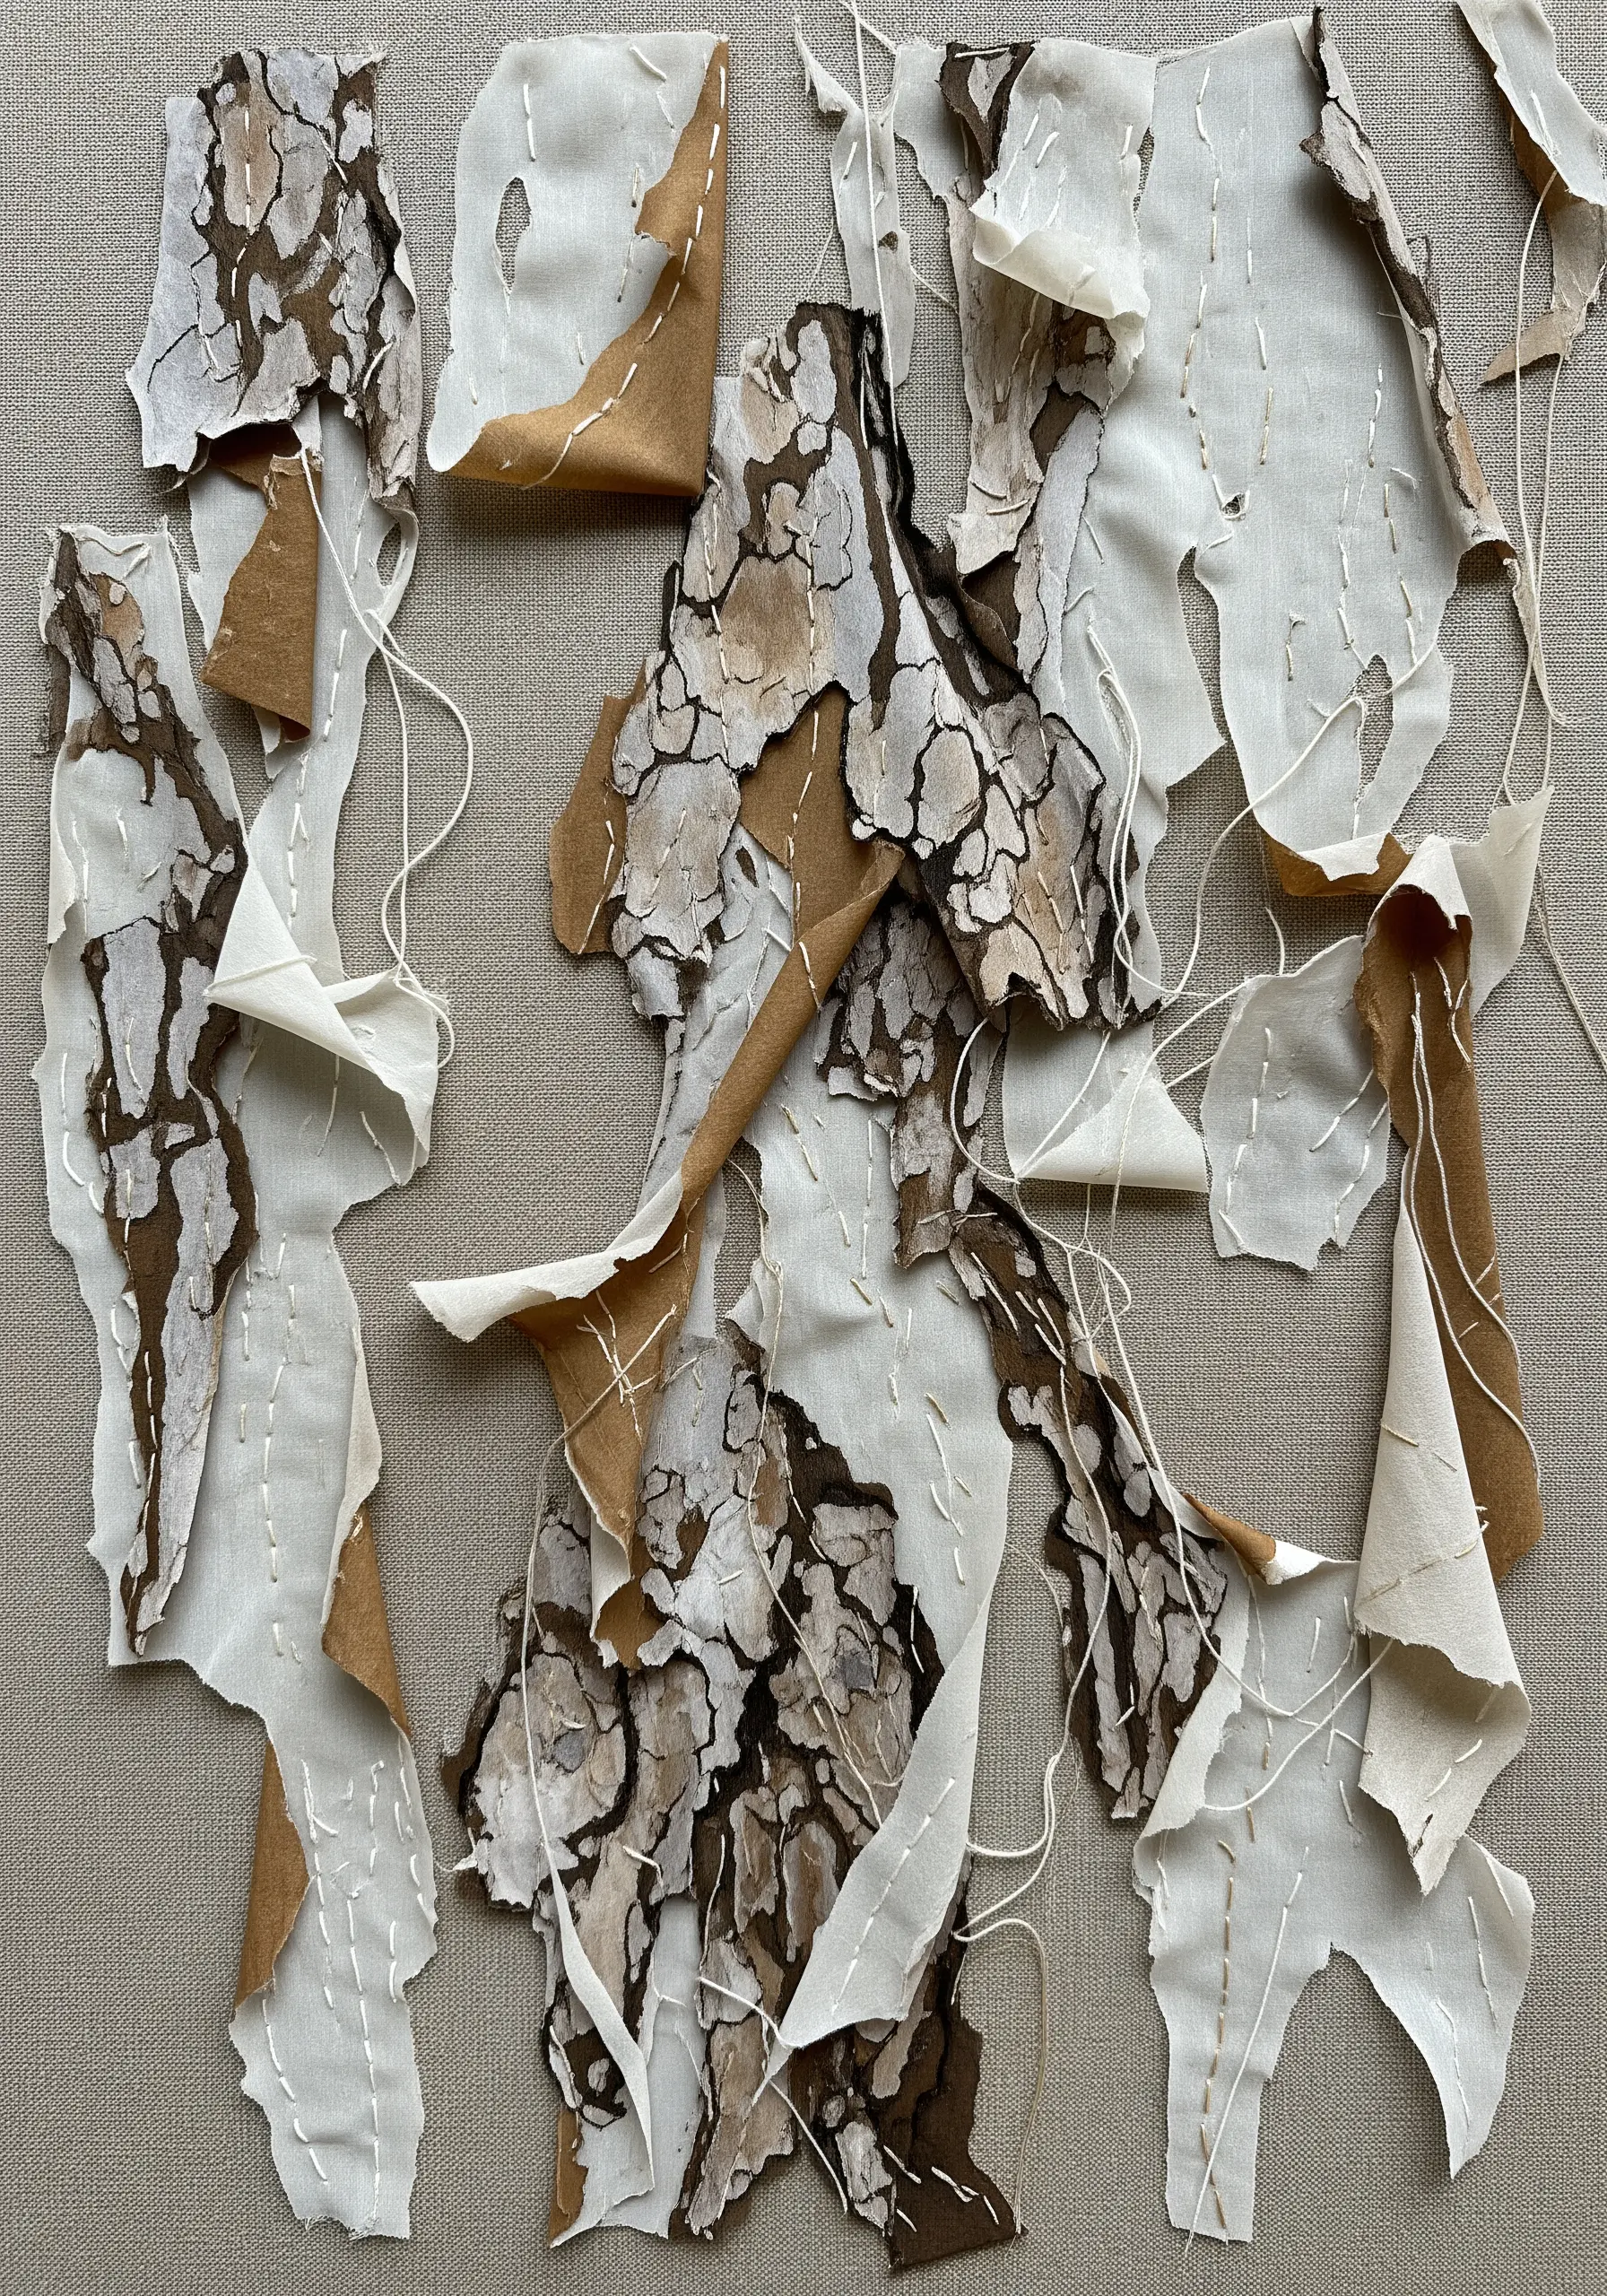
Capture the delicate, flaky nature of peeling bark using fabric collage and raw-edge appliqué.
Layer pieces of fine, lightweight fabrics like linen, cotton lawn, or even painted interfacing.
Allow the edges to fray and tear naturally. Secure these fabric layers with just a few simple, scattered running stitches in a contrasting thread.
The goal is not to secure every edge but to allow the fabric to lift and curl, creating authentic dimension and a sense of decay and renewal.
28. Directional Stitching to Sculpt Form
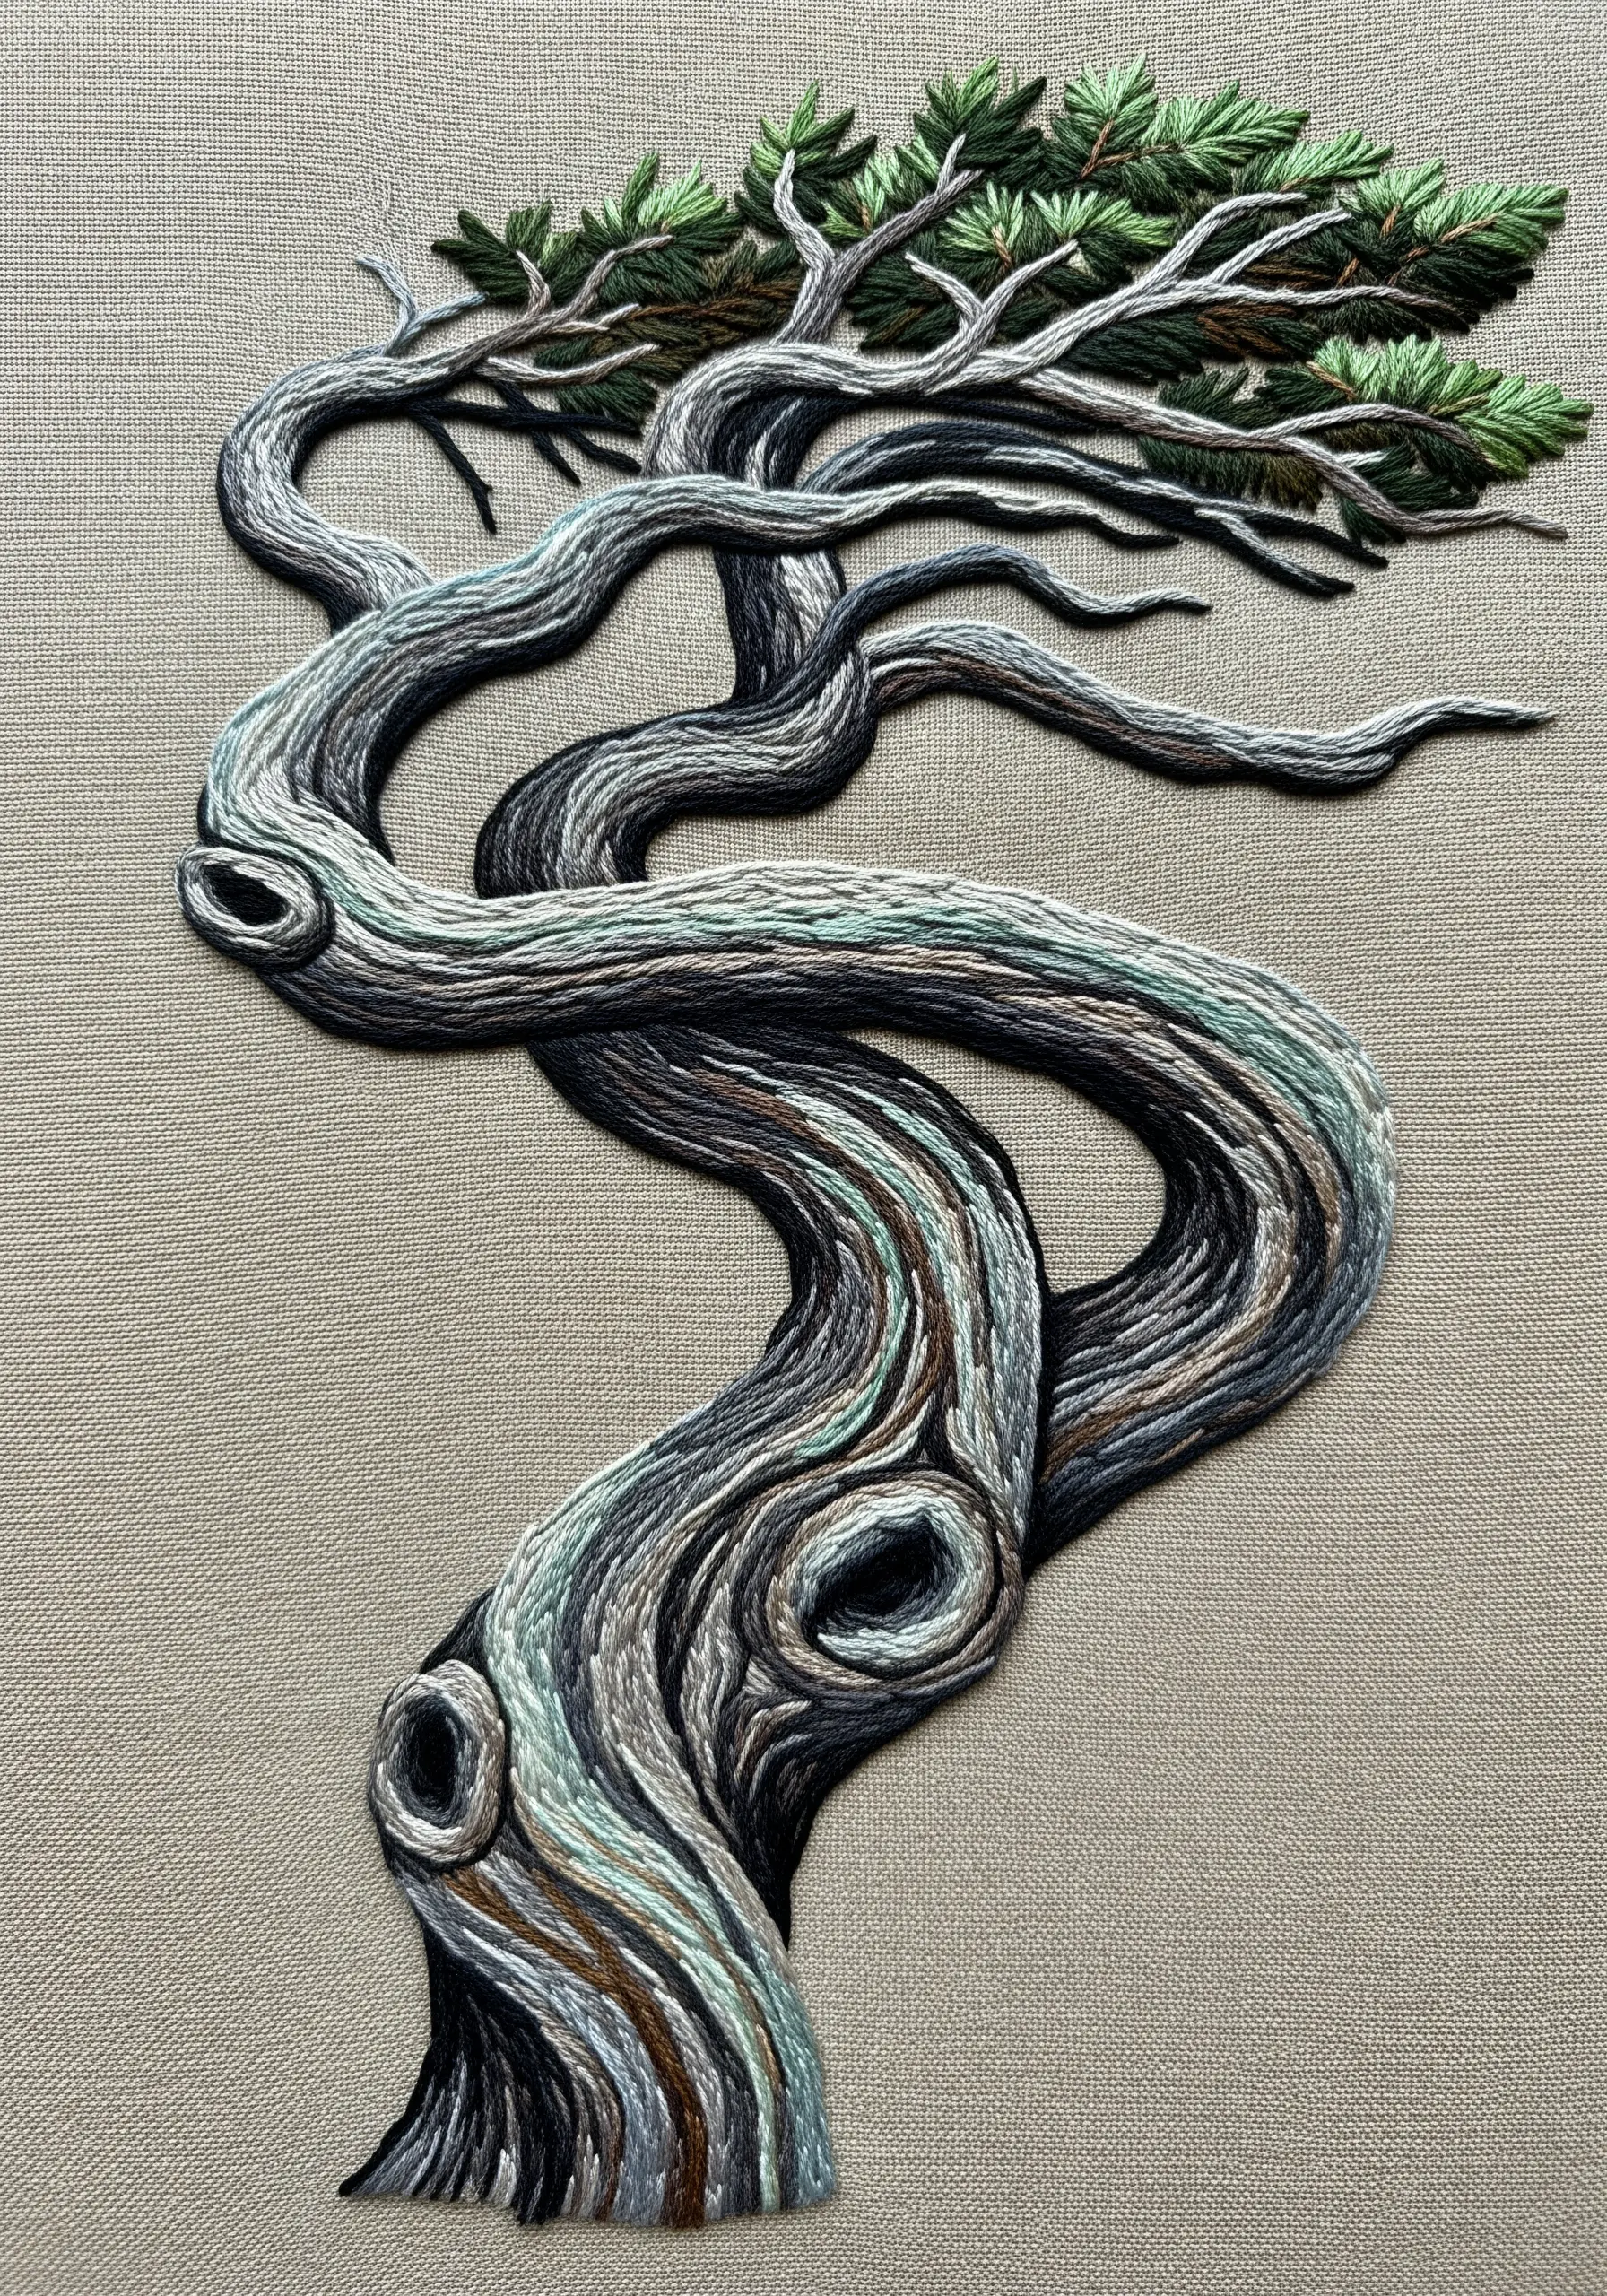
When embroidering a complex shape like a twisted tree trunk, let your stitch direction do the sculpting.
Use a dense long-and-short stitch or split stitch, but always ensure your stitches follow the contours and curves of the trunk.
Where the trunk twists, your stitches should twist with it. Where it swells, they should radiate outwards.
This meticulous attention to stitch direction is the key to creating a convincing illusion of three-dimensional form and movement on a flat surface, turning thread into sculpture.
29. Curating a Cohesive Hoop Art Triptych
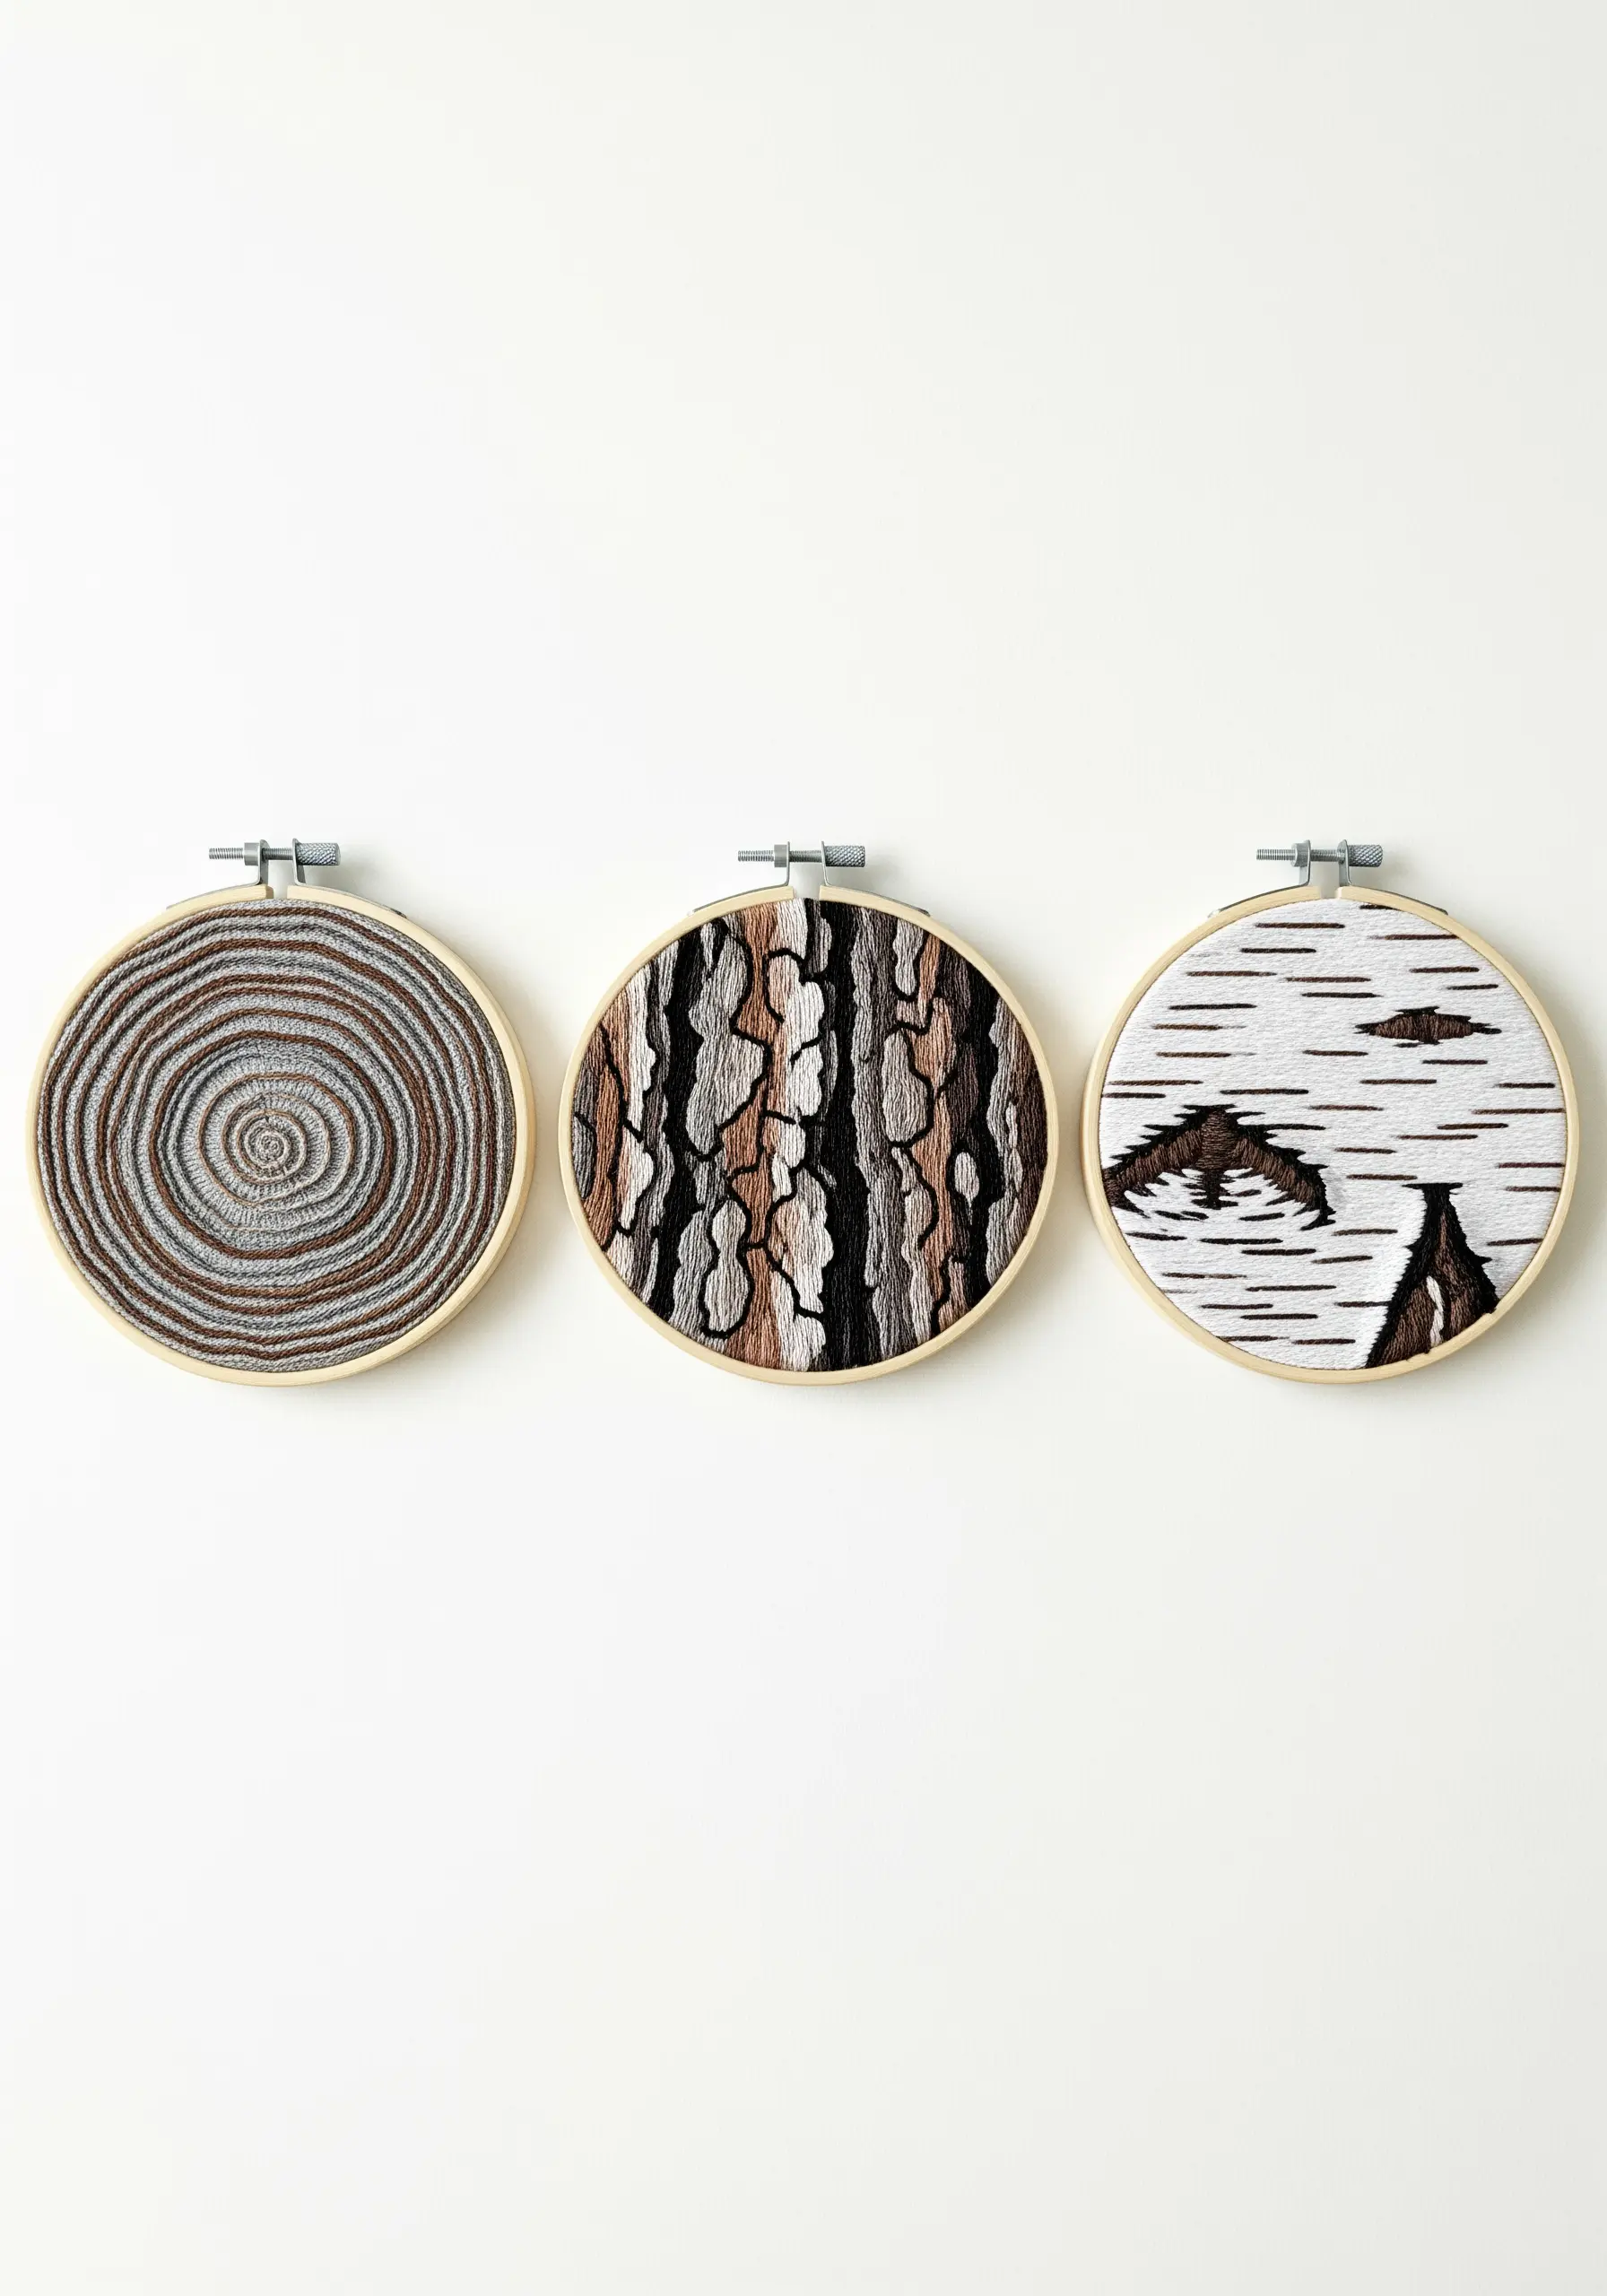
Elevate your small embroidery pieces by displaying them as a curated, intentional set.
Work on three different nature textures—such as a tree ring, a close-up of bark, and a birch pattern—but unite them with a shared element.
This unifying element could be a consistent color palette, the use of the same variegated thread in each piece, or the same finishing style in identical hoops.
This transforms individual studies into a cohesive collection that tells a larger story about the beauty of organic texture embroidery designs.


