

Sometimes the most beautiful embroidery isn’t about learning a hundred complex stitches, but about discovering how to use a few simple ones with intention. It’s about seeing how a slight change—a few extra strands of thread, a different stitch direction—can transform a flat line into something with weight, texture, and emotion.
Think of these small hoops not as final masterpieces, but as quiet conversations between you, your thread, and your fabric. Each project is a chance to practice a single idea: how to make a line smoother, a fill more textured, or a color more vibrant. This is where you build confidence and develop your unique artistic voice.
Whether you’re stitching alone with a cup of tea or sharing an afternoon with friends, these small projects are designed to give you a visible, satisfying result in a short amount of time. They are perfect reminders that with every stitch, you are becoming a more thoughtful and skilled artist.
1. Render Lavender with Dimensional Stitches
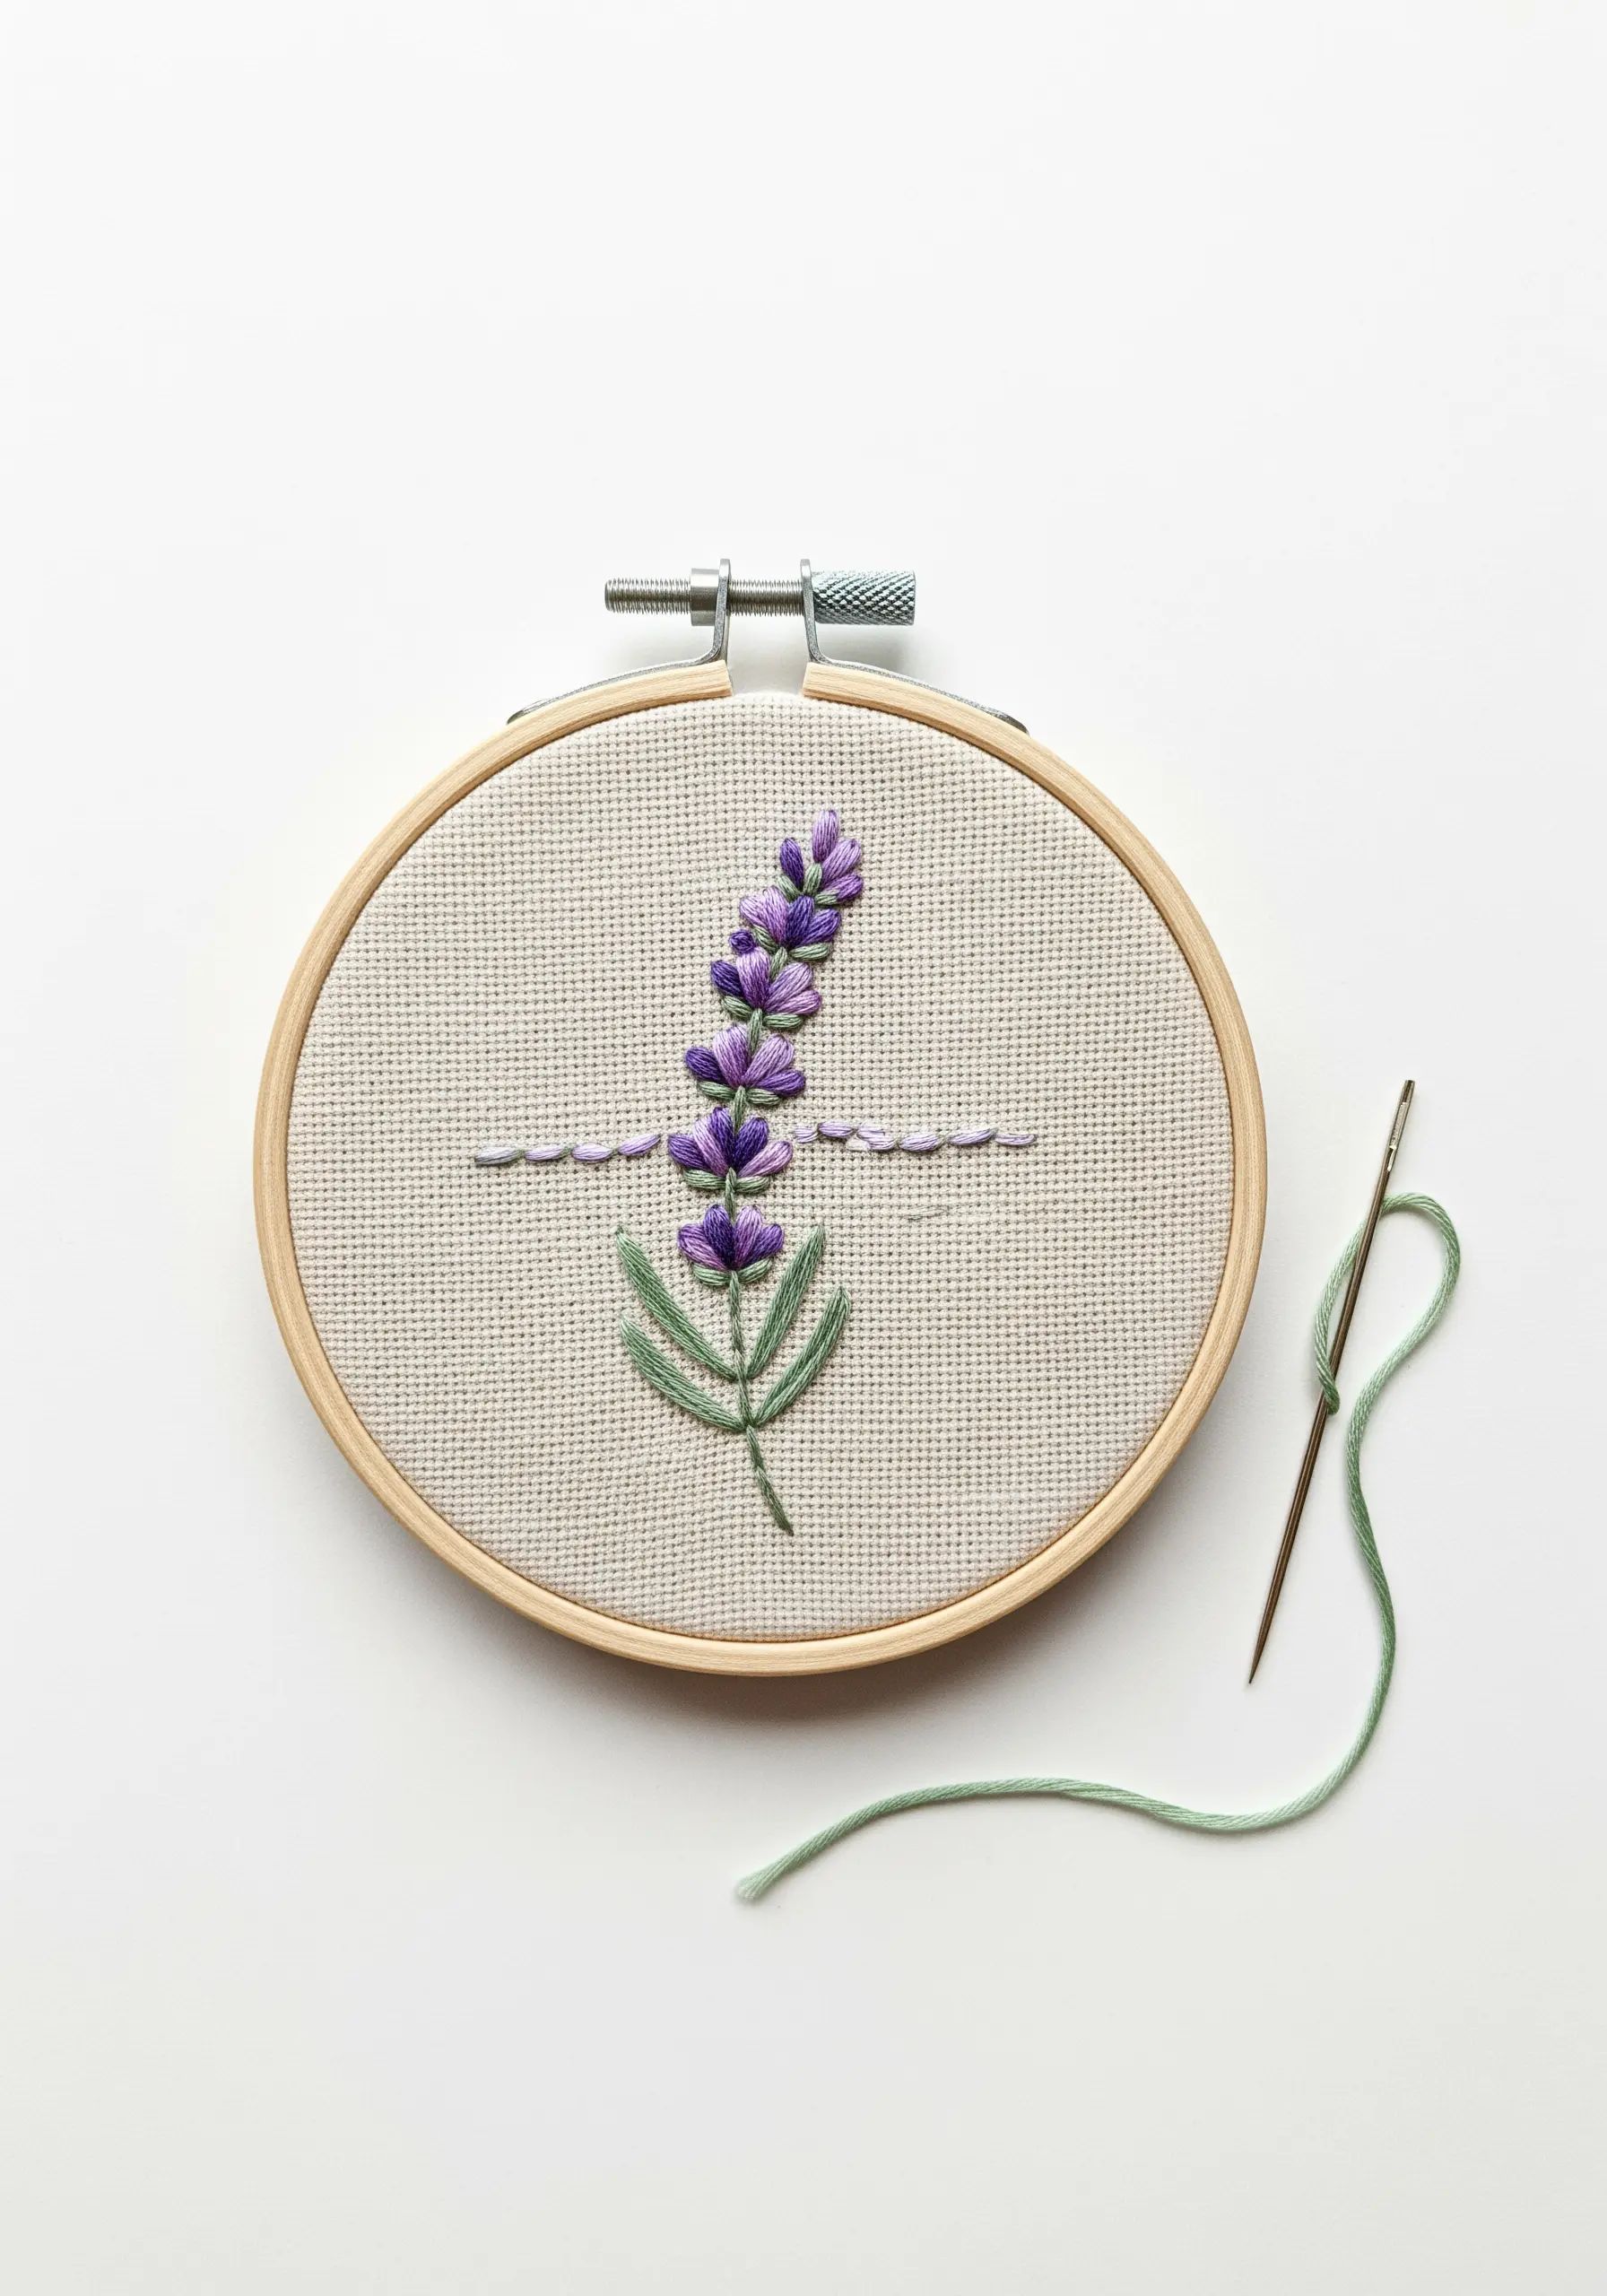
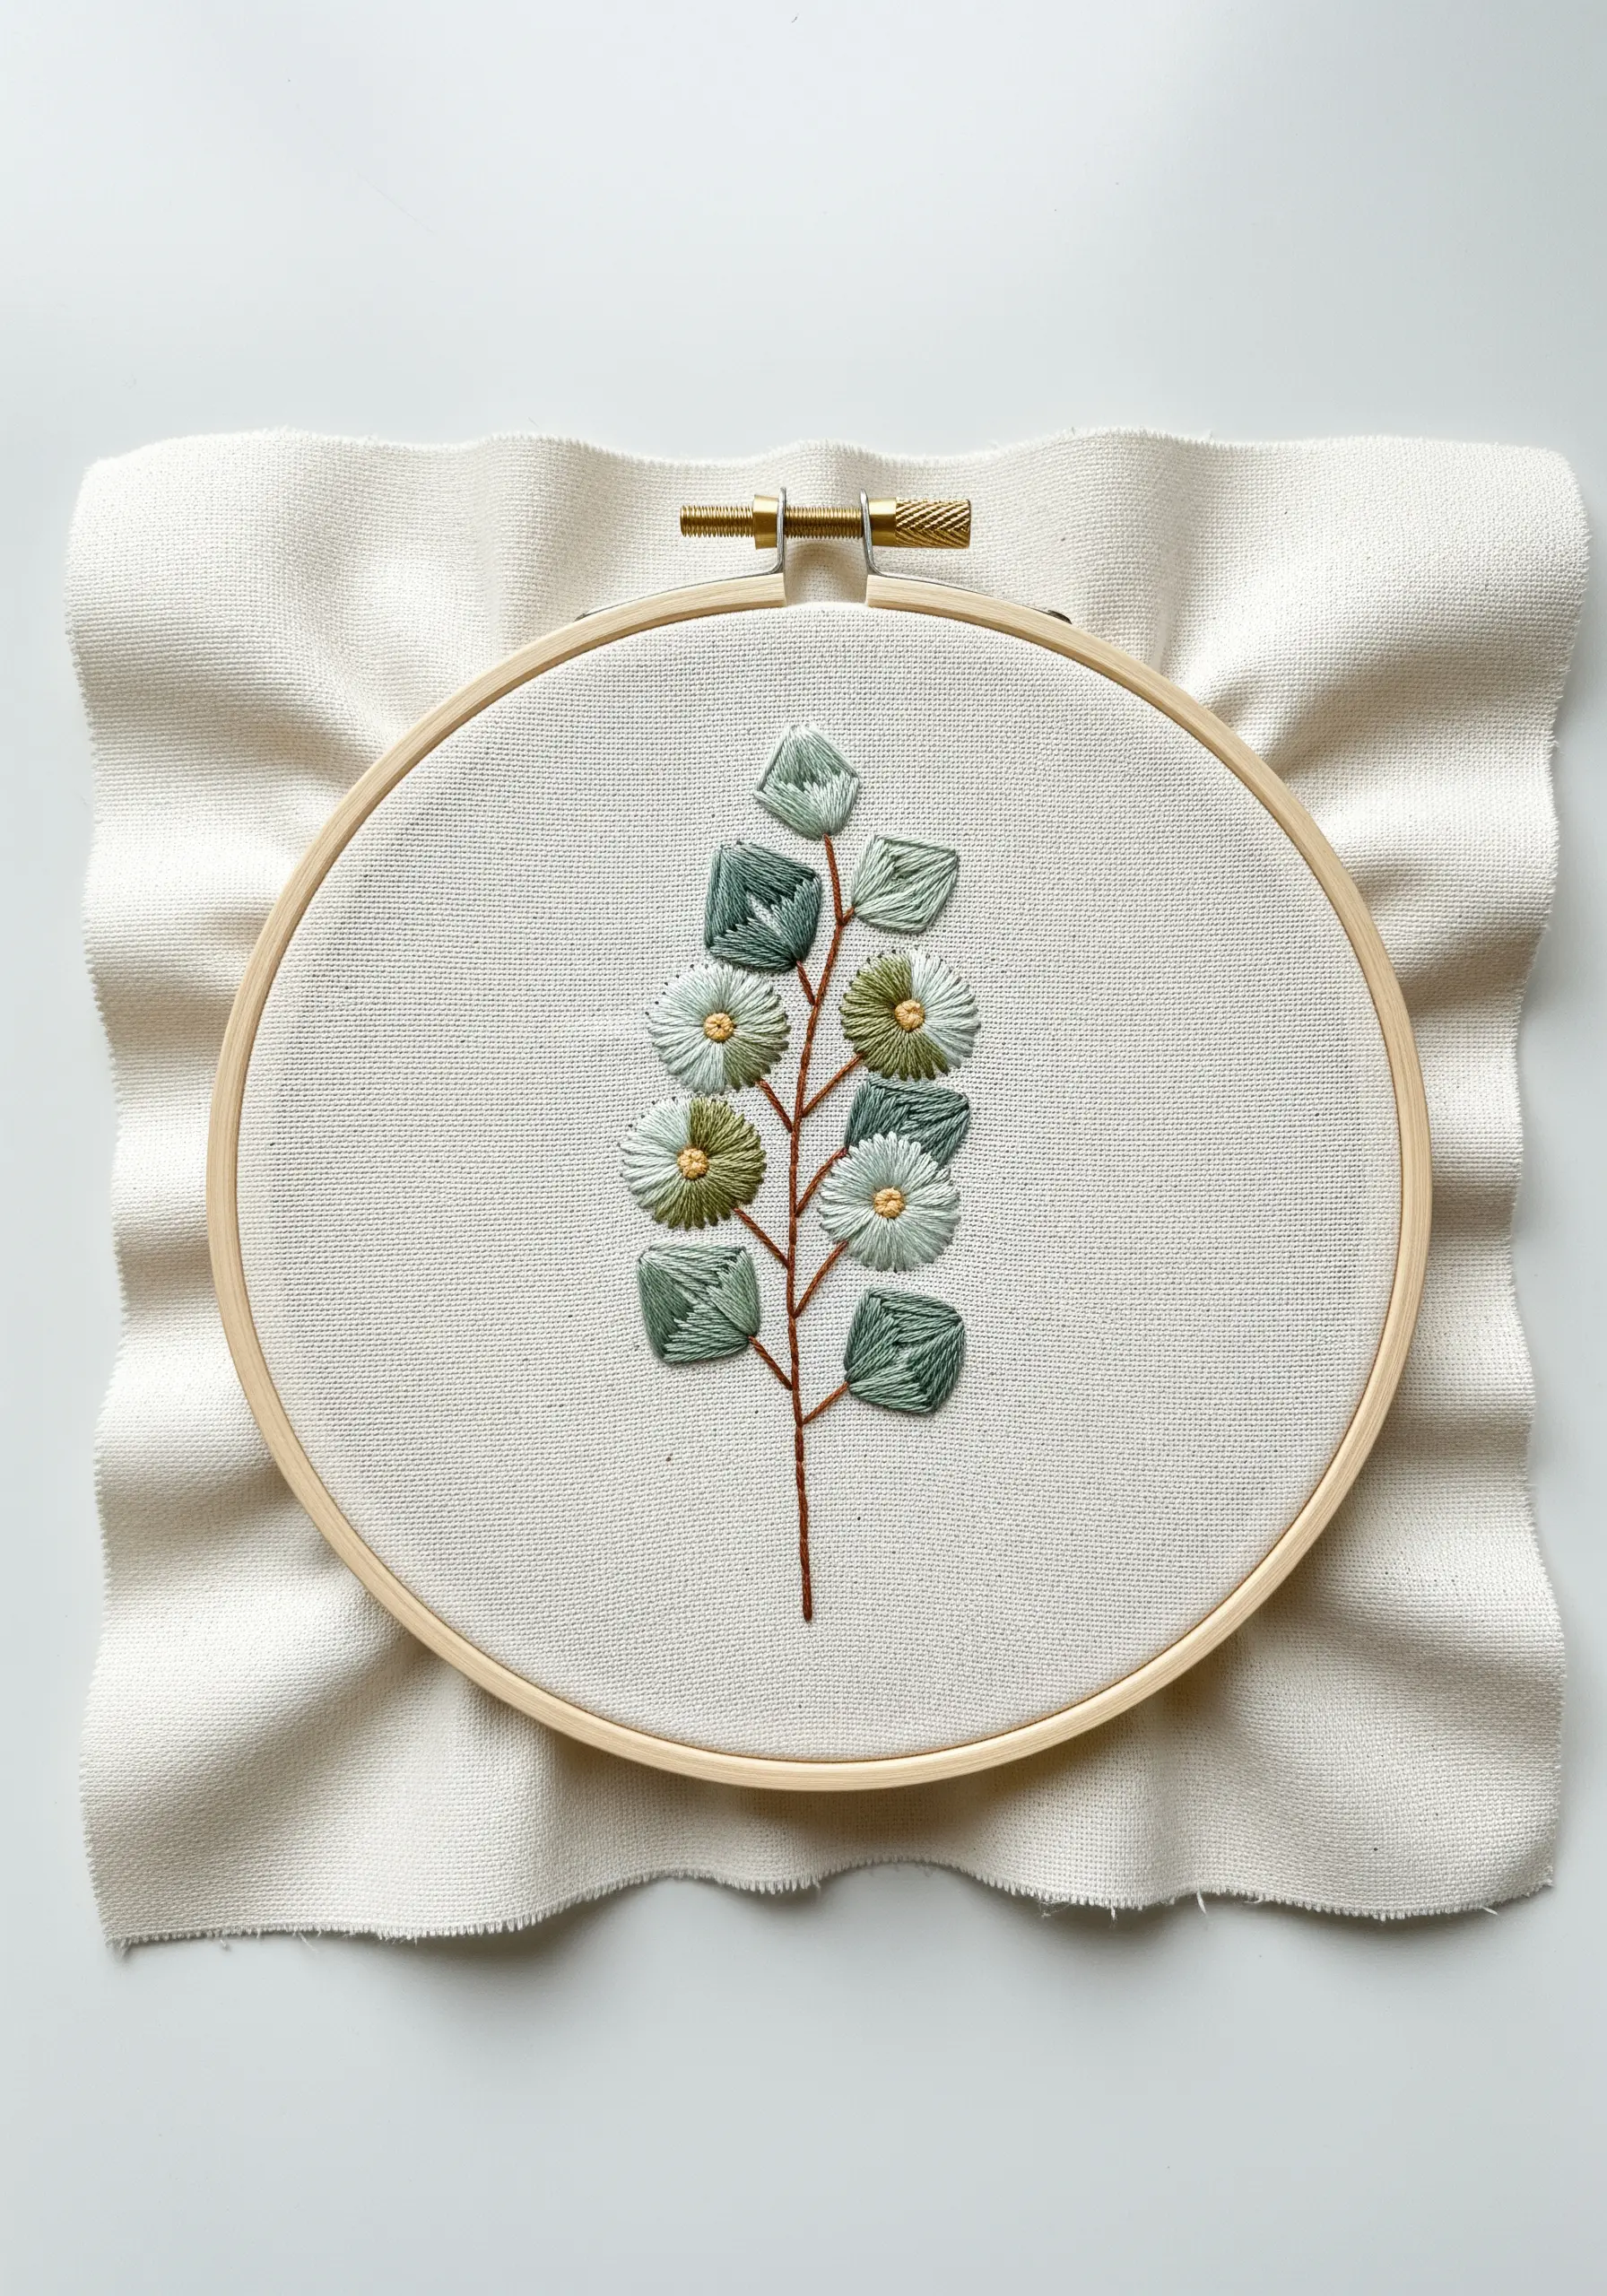
To give your lavender sprigs a lifelike texture, use bullion knots or tightly packed French knots for the purple buds instead of a simple satin stitch.
This technique creates a raised, touchable surface that catches the light beautifully.
For the stem, elevate a standard backstitch by wrapping it with a second thread (a whipped backstitch) to create a rounded, more defined line.
Use two or three shades of purple, placing the darker tones at the base of the flower head to suggest depth and shadow.
2. Define Arcs with a Split-Stitch Base

Create impeccably smooth and raised satin stitch arcs by first outlining each band with a split stitch.
This foundational layer acts as a guide and a subtle bumper, allowing your satin stitches to stack neatly against a defined edge.
Work your satin stitch directly over the split stitch outline, ensuring your needle enters and exits just outside the line for full coverage.
This method prevents uneven edges and gives your shapes a clean, almost graphic quality that makes colors pop.
3. Capture Fluidity with a Whipped Backstitch Outline
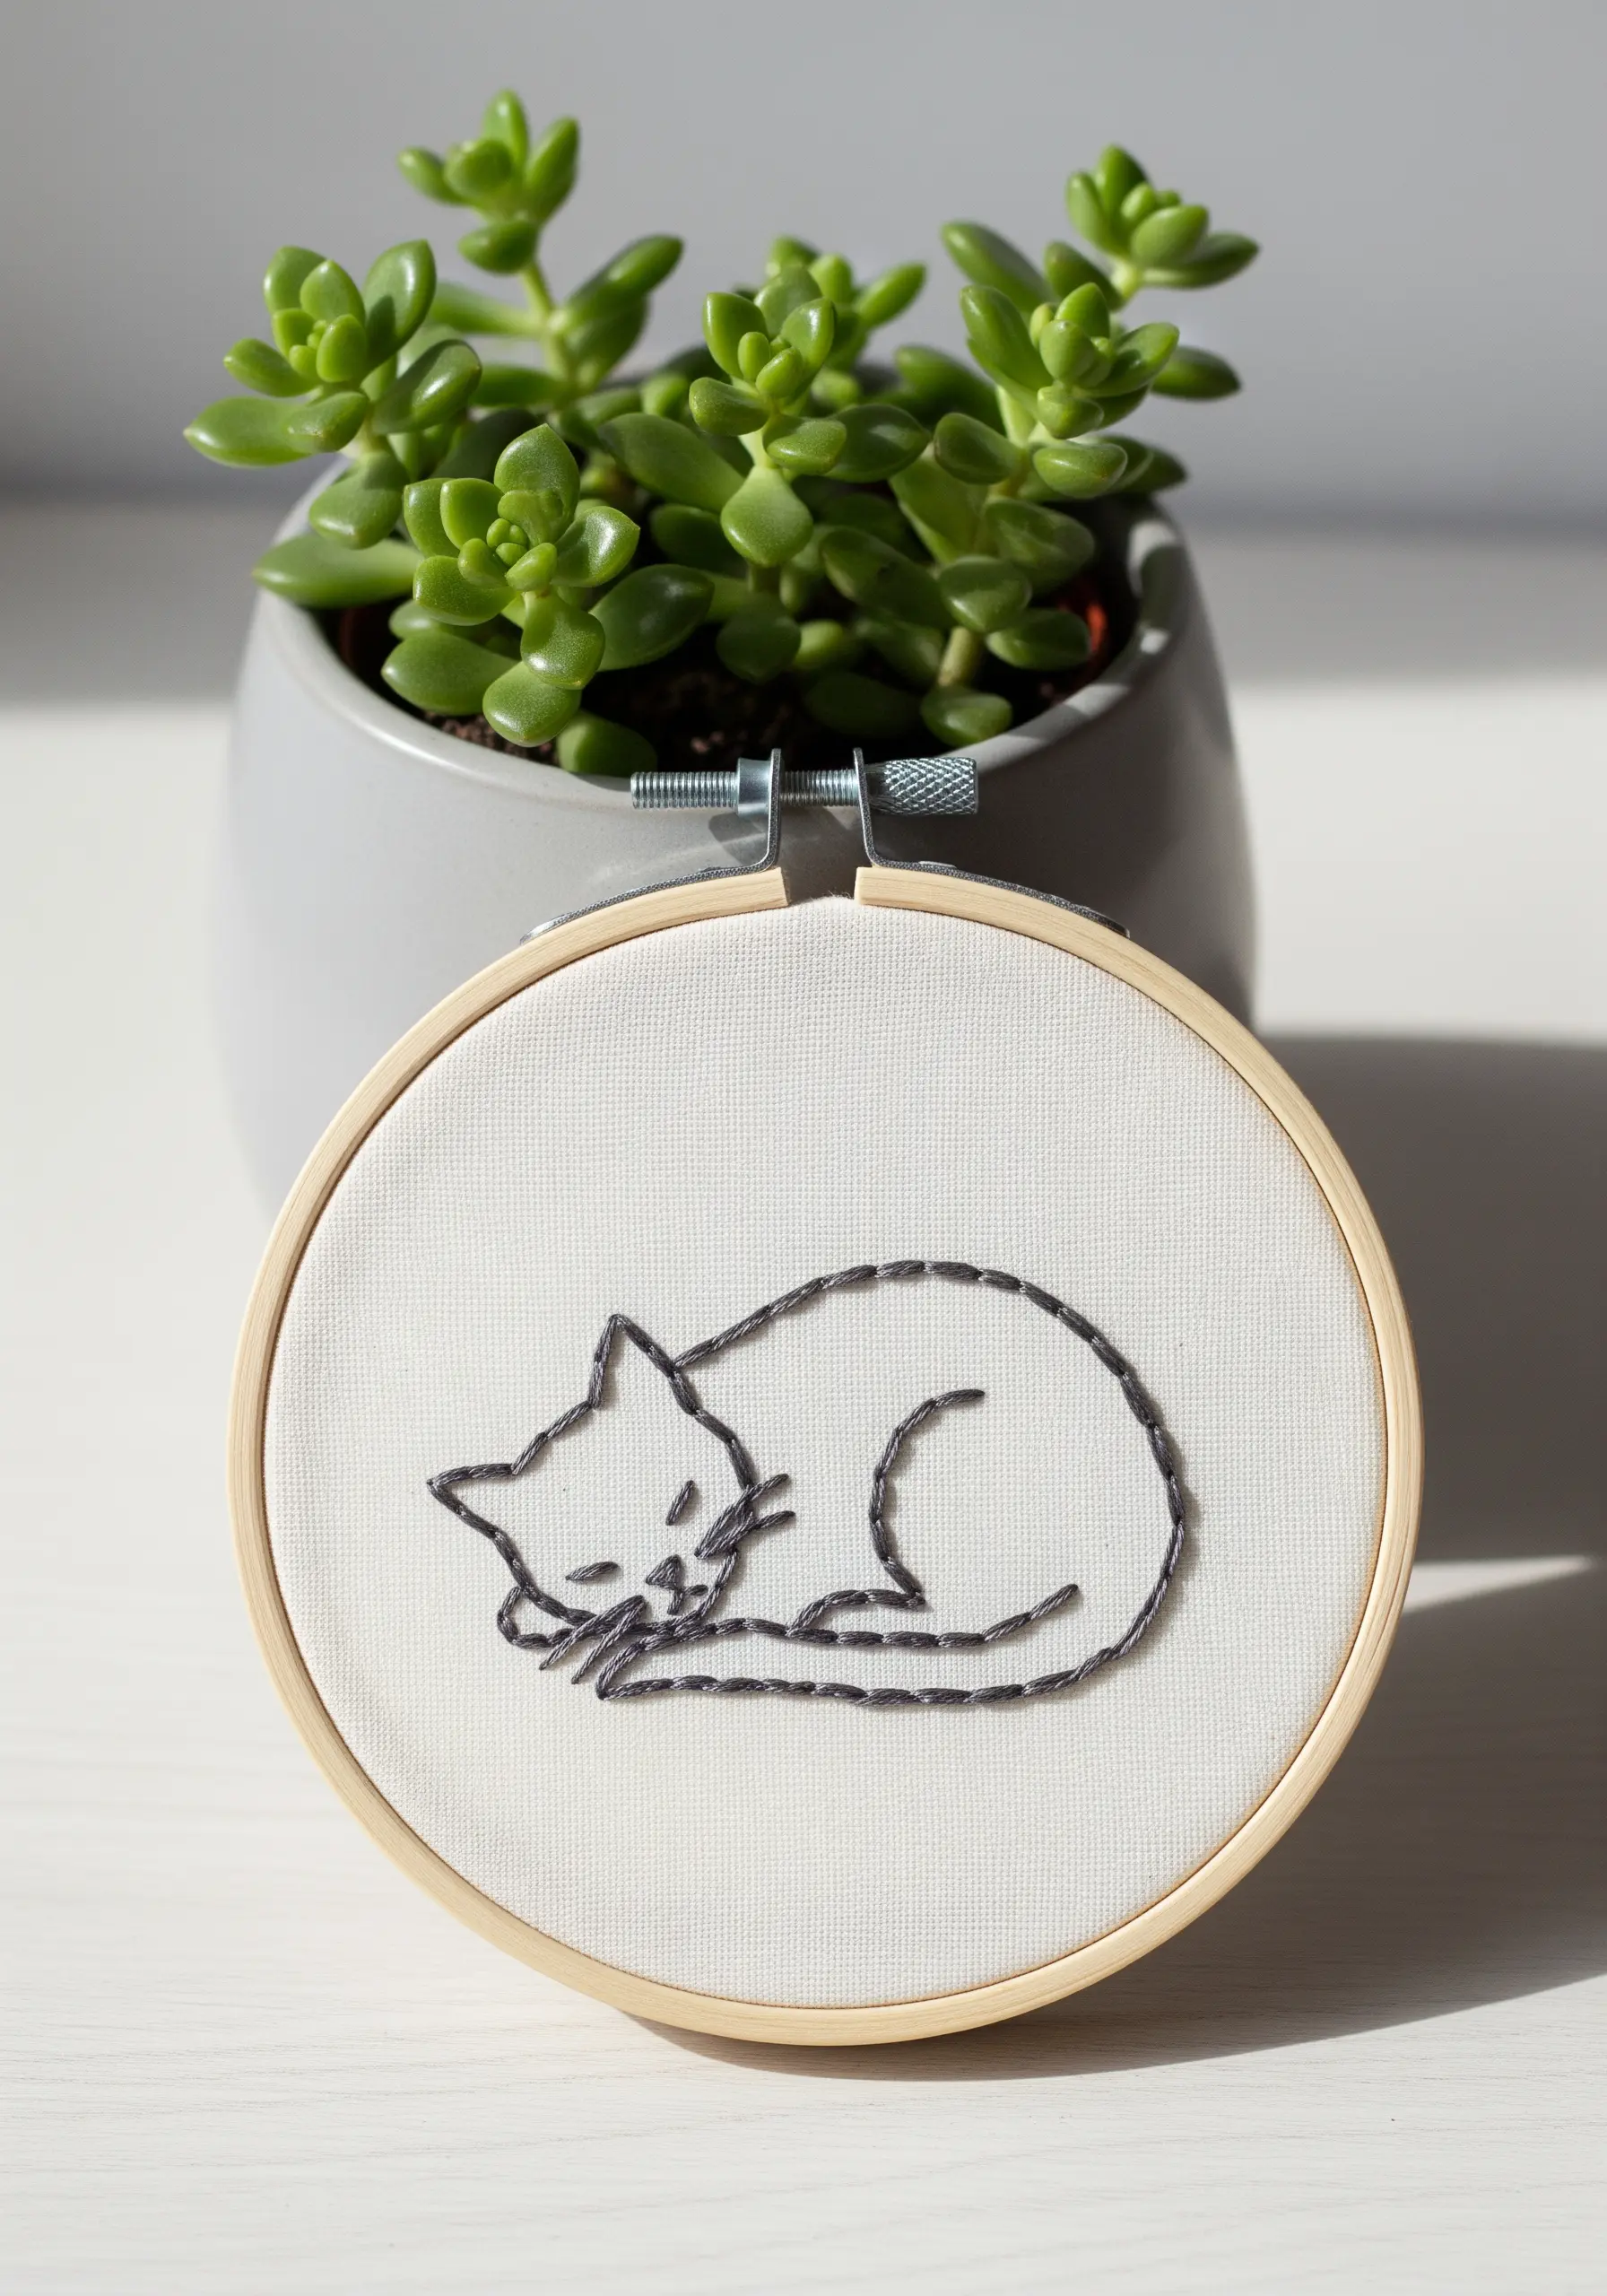
For minimalist line art, especially with curves, a standard backstitch can appear dotted or uneven.
Instead, use a whipped backstitch to create a single, continuous line that flows smoothly around the shape of the sleeping cat.
First, complete the outline with a regular backstitch, keeping your stitches small and consistent.
Then, using the same thread, pass your needle under each backstitch without piercing the fabric, effectively wrapping the line for a solid, cord-like finish.
4. Build Celestial Texture with French Knots

Fill your crescent moon with hundreds of tiny French knots to create a shimmering, crater-like texture that far surpasses a flat fill stitch.
To keep the knots uniform, use the same number of thread wraps for each one—two wraps with three strands of floss is ideal for density.
Work from the outer edges inward to maintain a sharp silhouette.
Choosing a metallic or silk thread will enhance the celestial glow, especially against a dark navy or black fabric, which makes the texture the star of the piece.
5. Combine Stitches for a Tactile Bumblebee
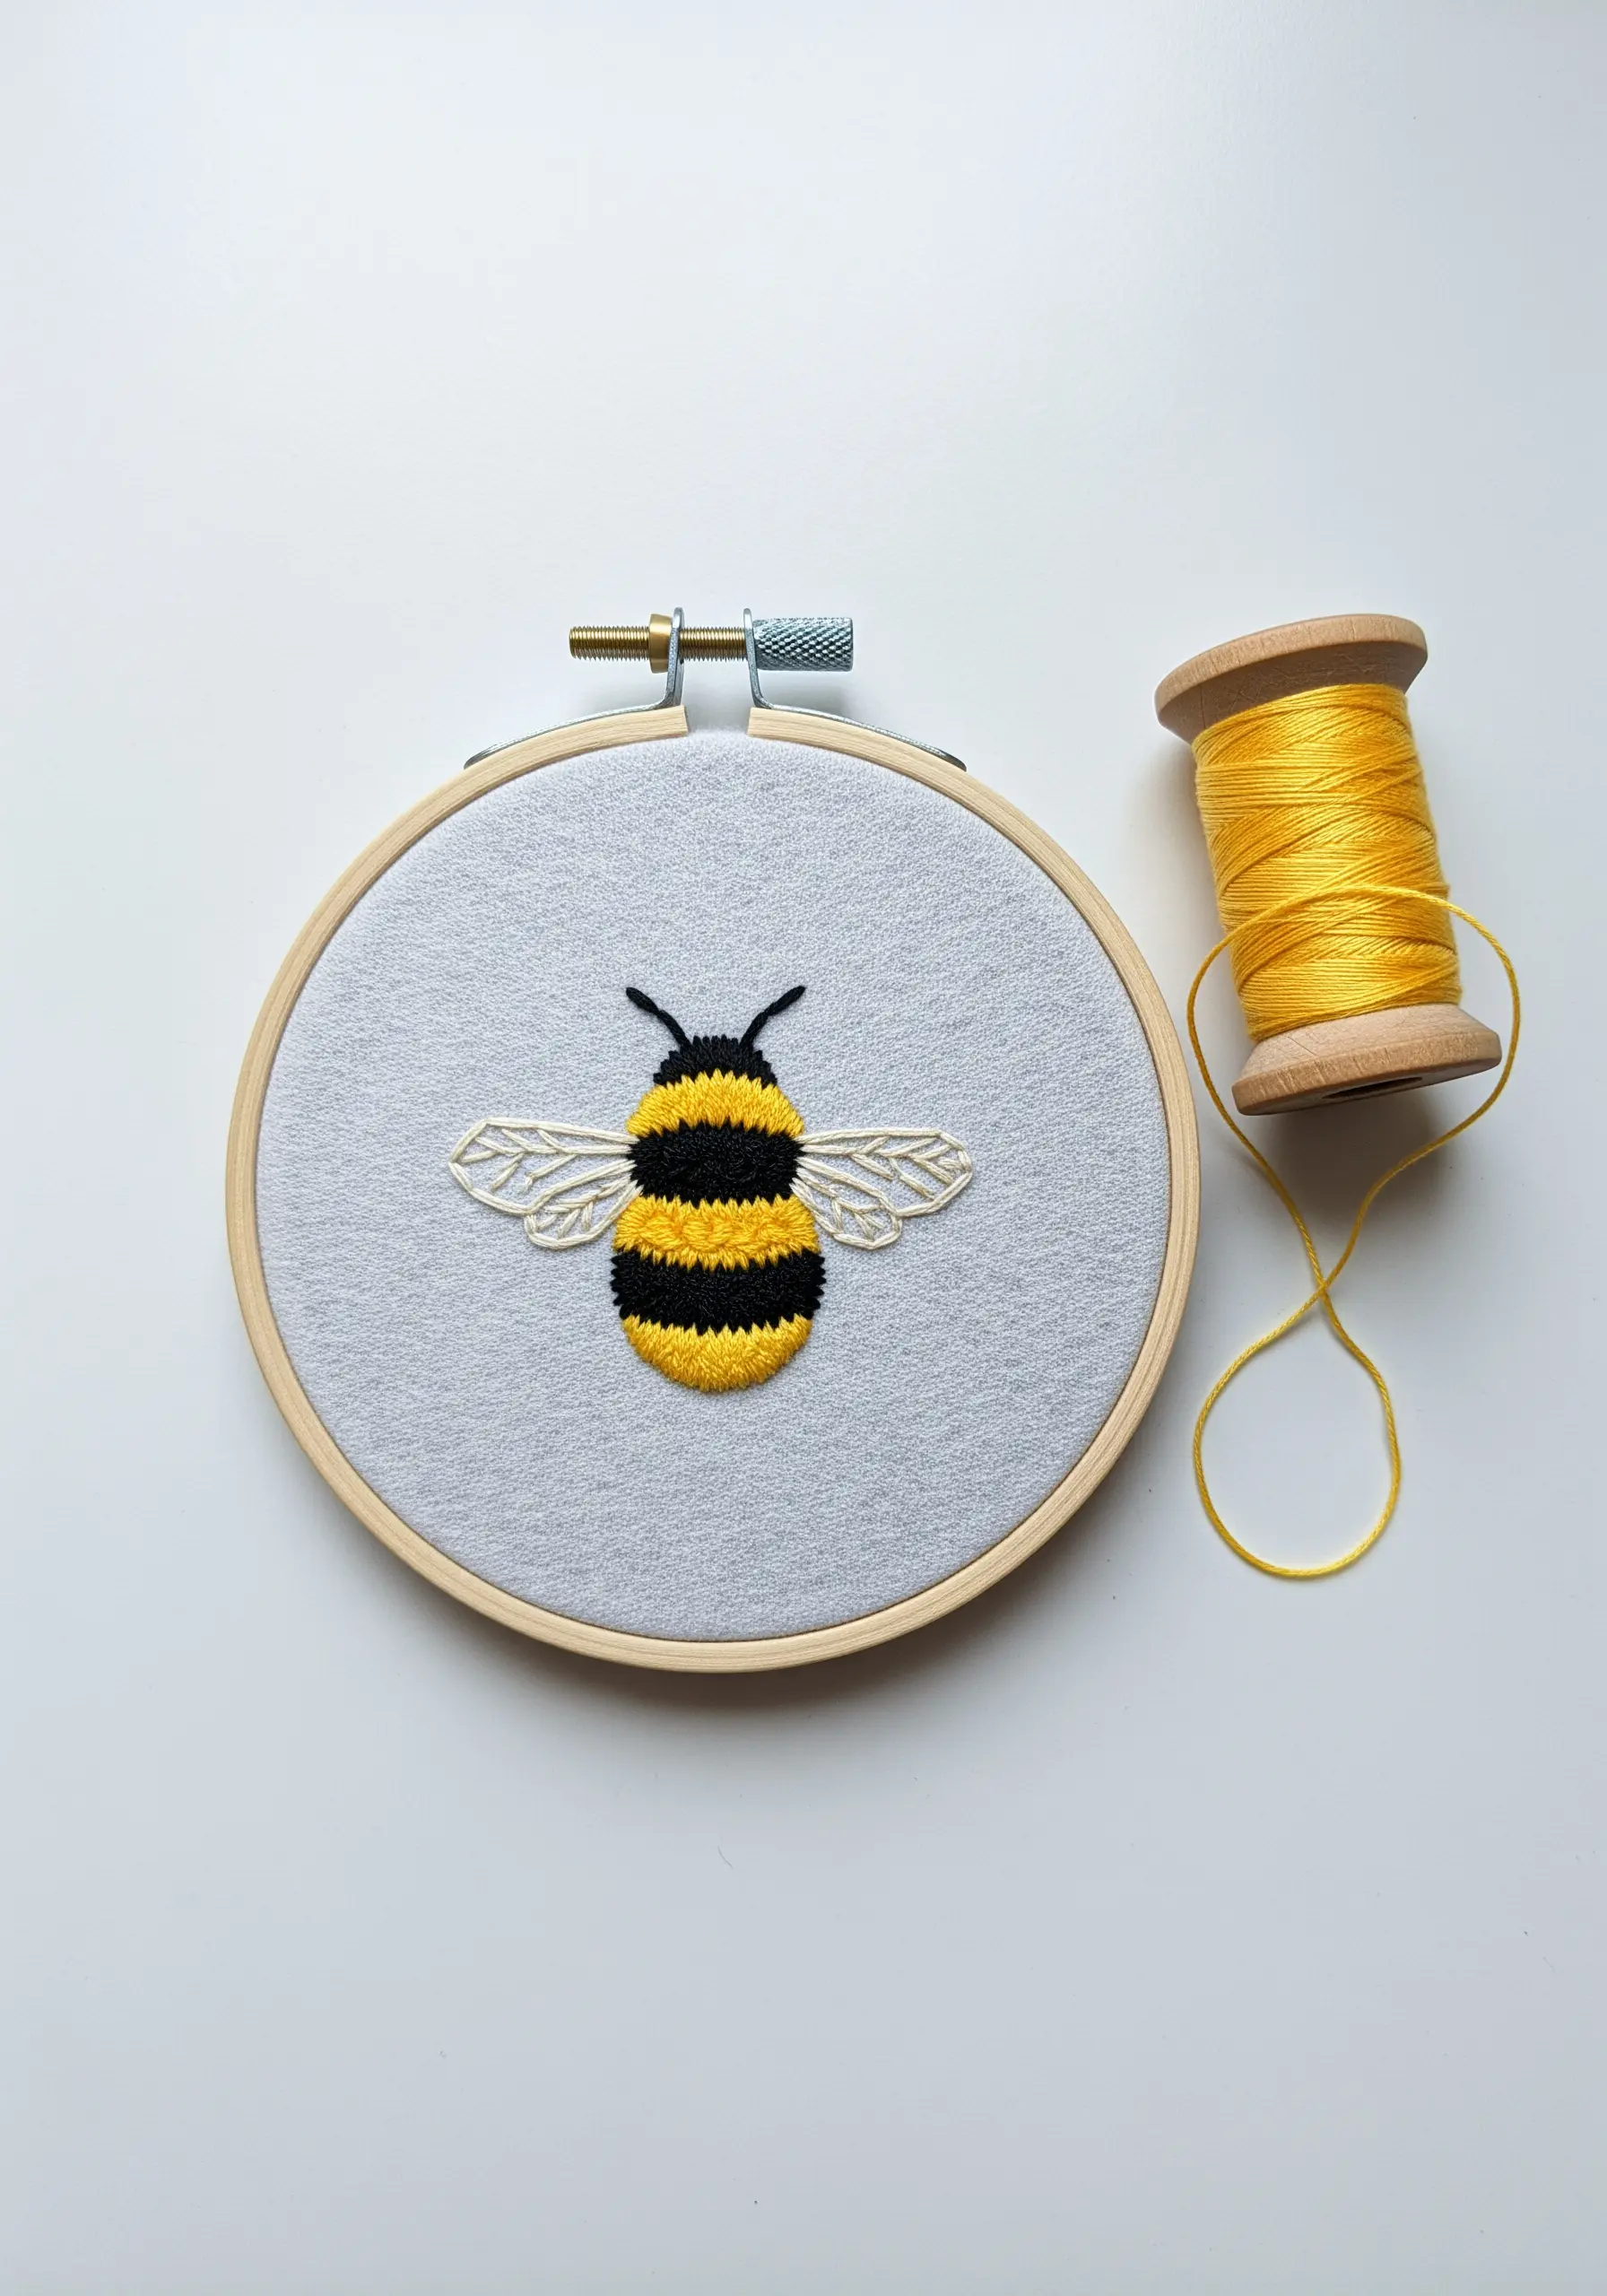
Bring a simple bee motif to life by assigning a different stitch to each texture.
Use a dense, vertical satin stitch for the smooth black and yellow stripes, ensuring the stitches lie flat and parallel.
For the fuzzy thorax, create a small patch of Turkey work or tightly packed French knots to mimic pollen-dusted fuzz.
The wings should feel delicate, so use a single strand of an off-white or light gray thread to outline them with a simple backstitch.
6. Add Depth to Fruit with Layered Details
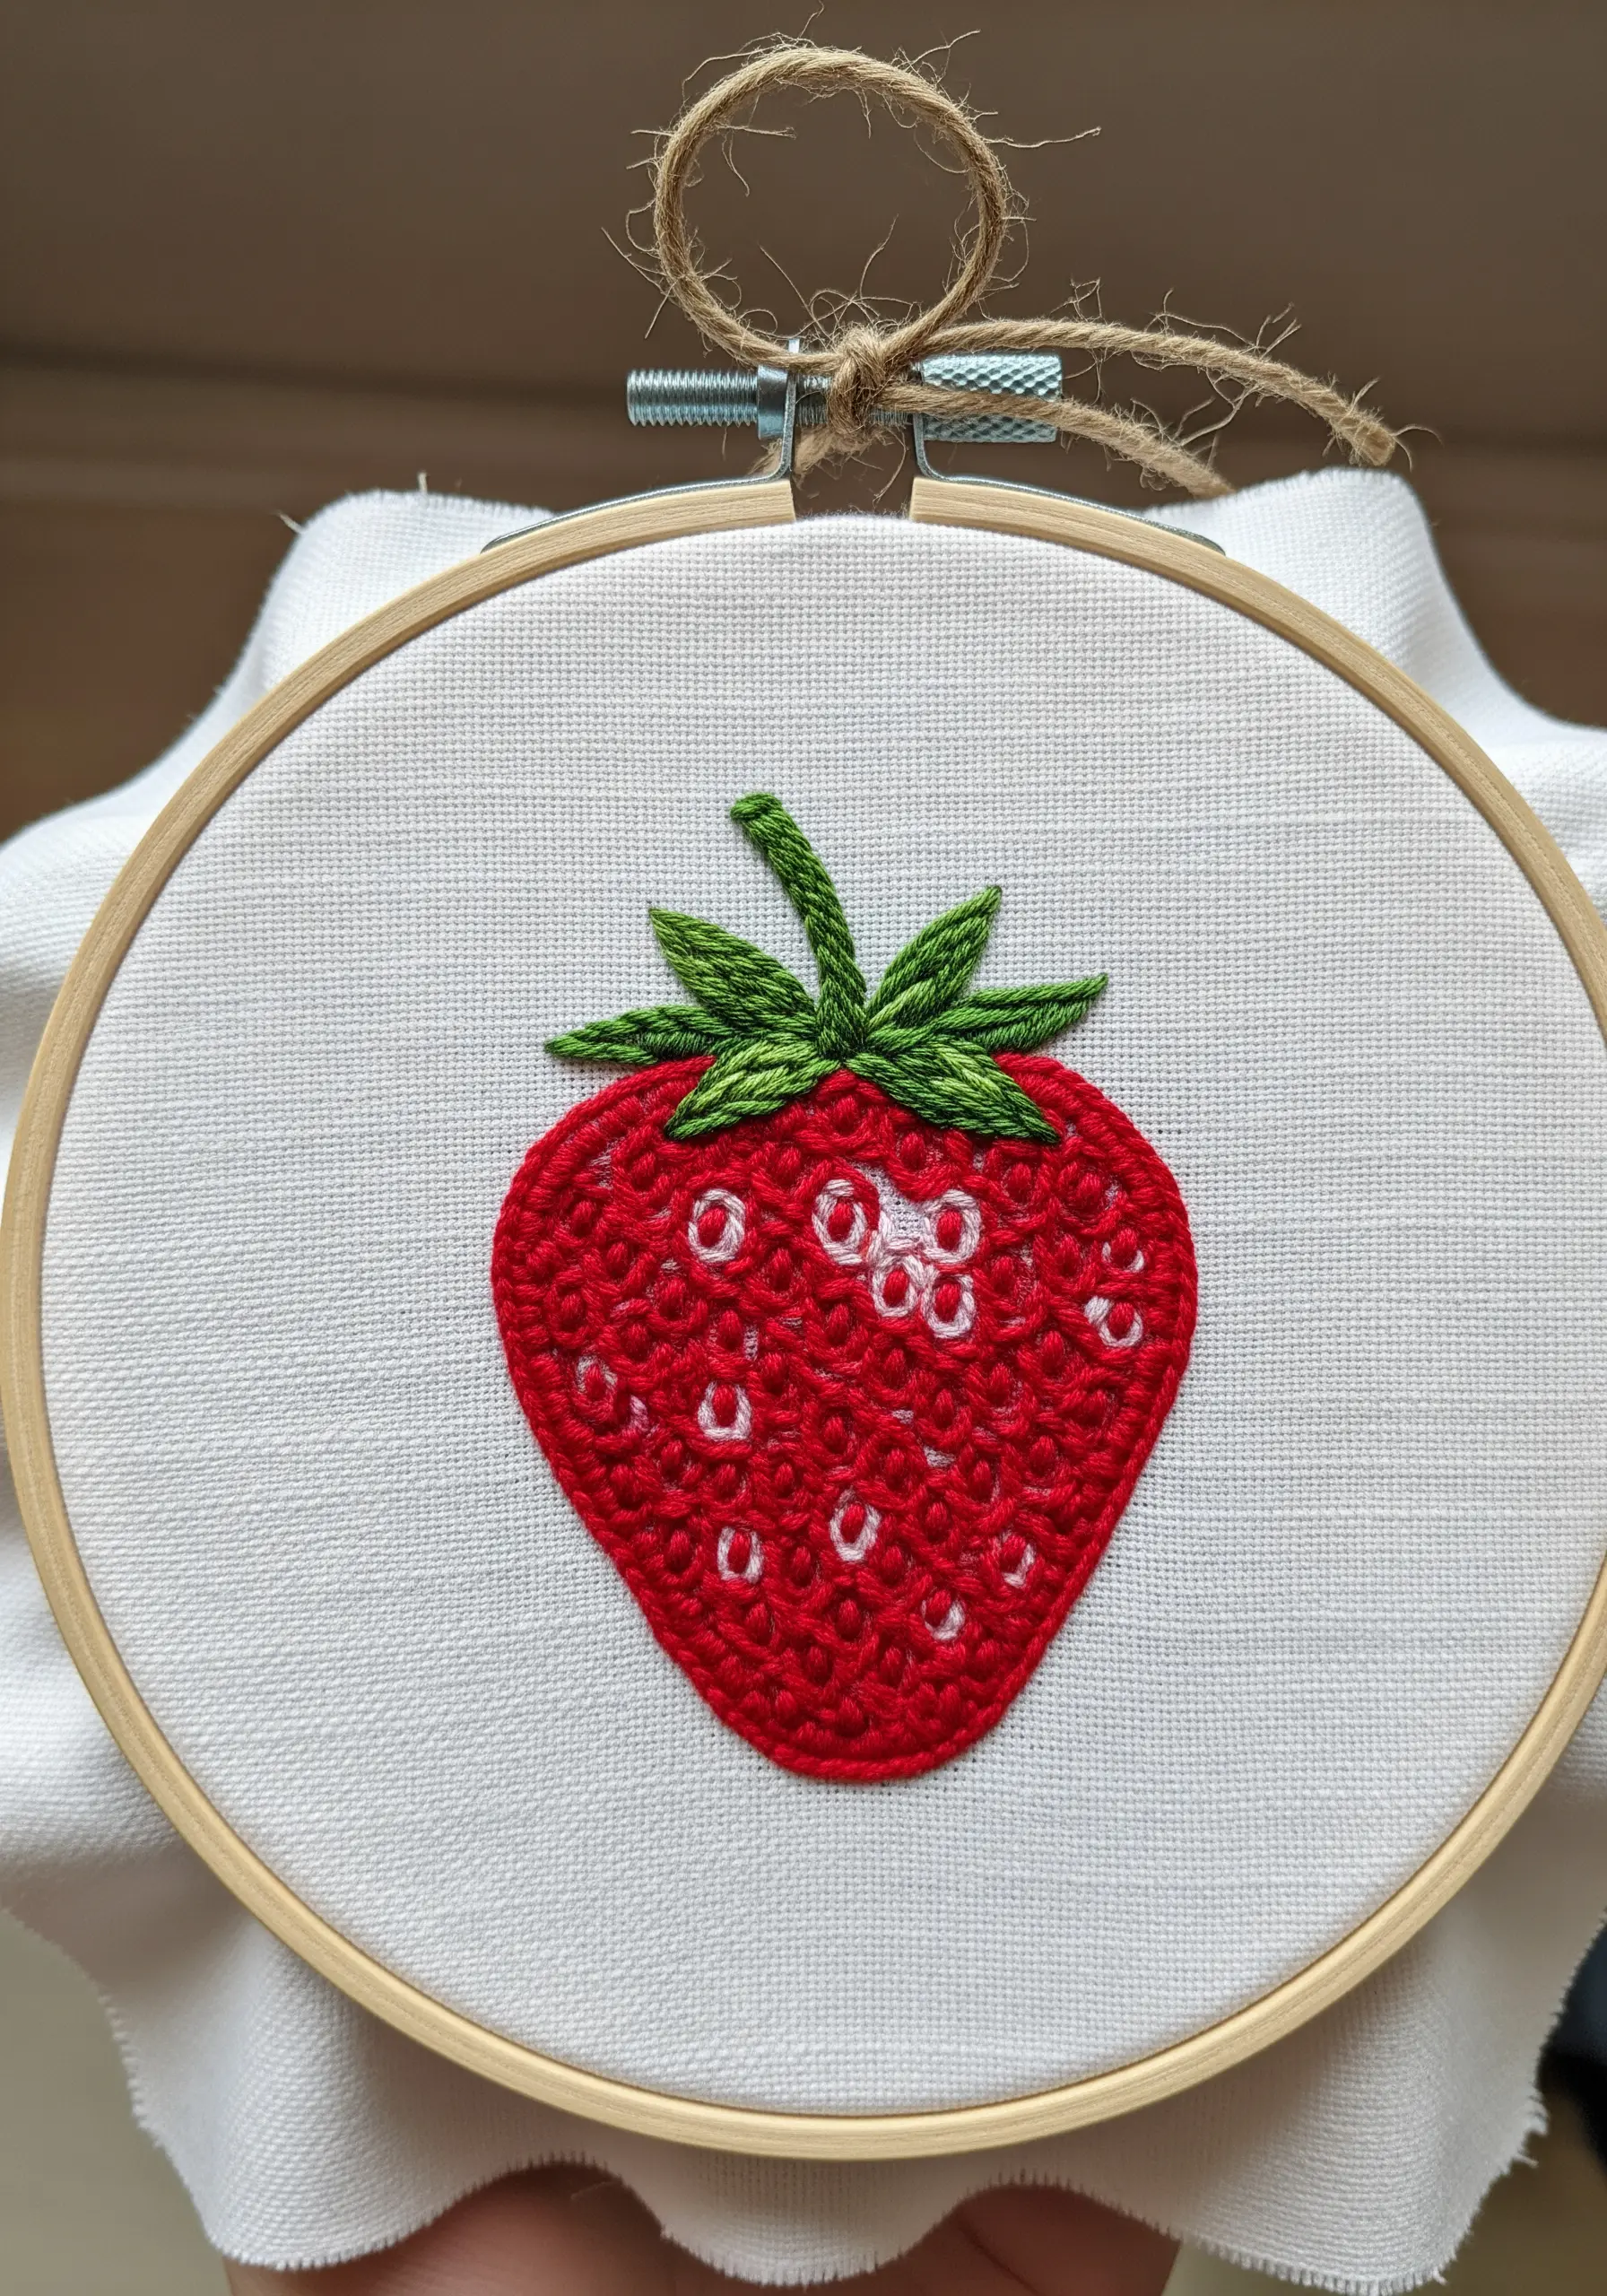
Avoid a flat-looking strawberry by using long-and-short stitch for the red fill, which allows for subtle color blending and avoids overly long, snag-prone satin stitches.
Instead of yellow seeds, try using white or pale pink French knots to represent the achenes (the true fruit), which adds a delicate highlight and textural contrast.
For the leaves, a fishbone stitch will create a natural-looking central vein and give each leaf a gentle, dimensional curve.
7. Achieve Graphic Precision in Mountainscapes
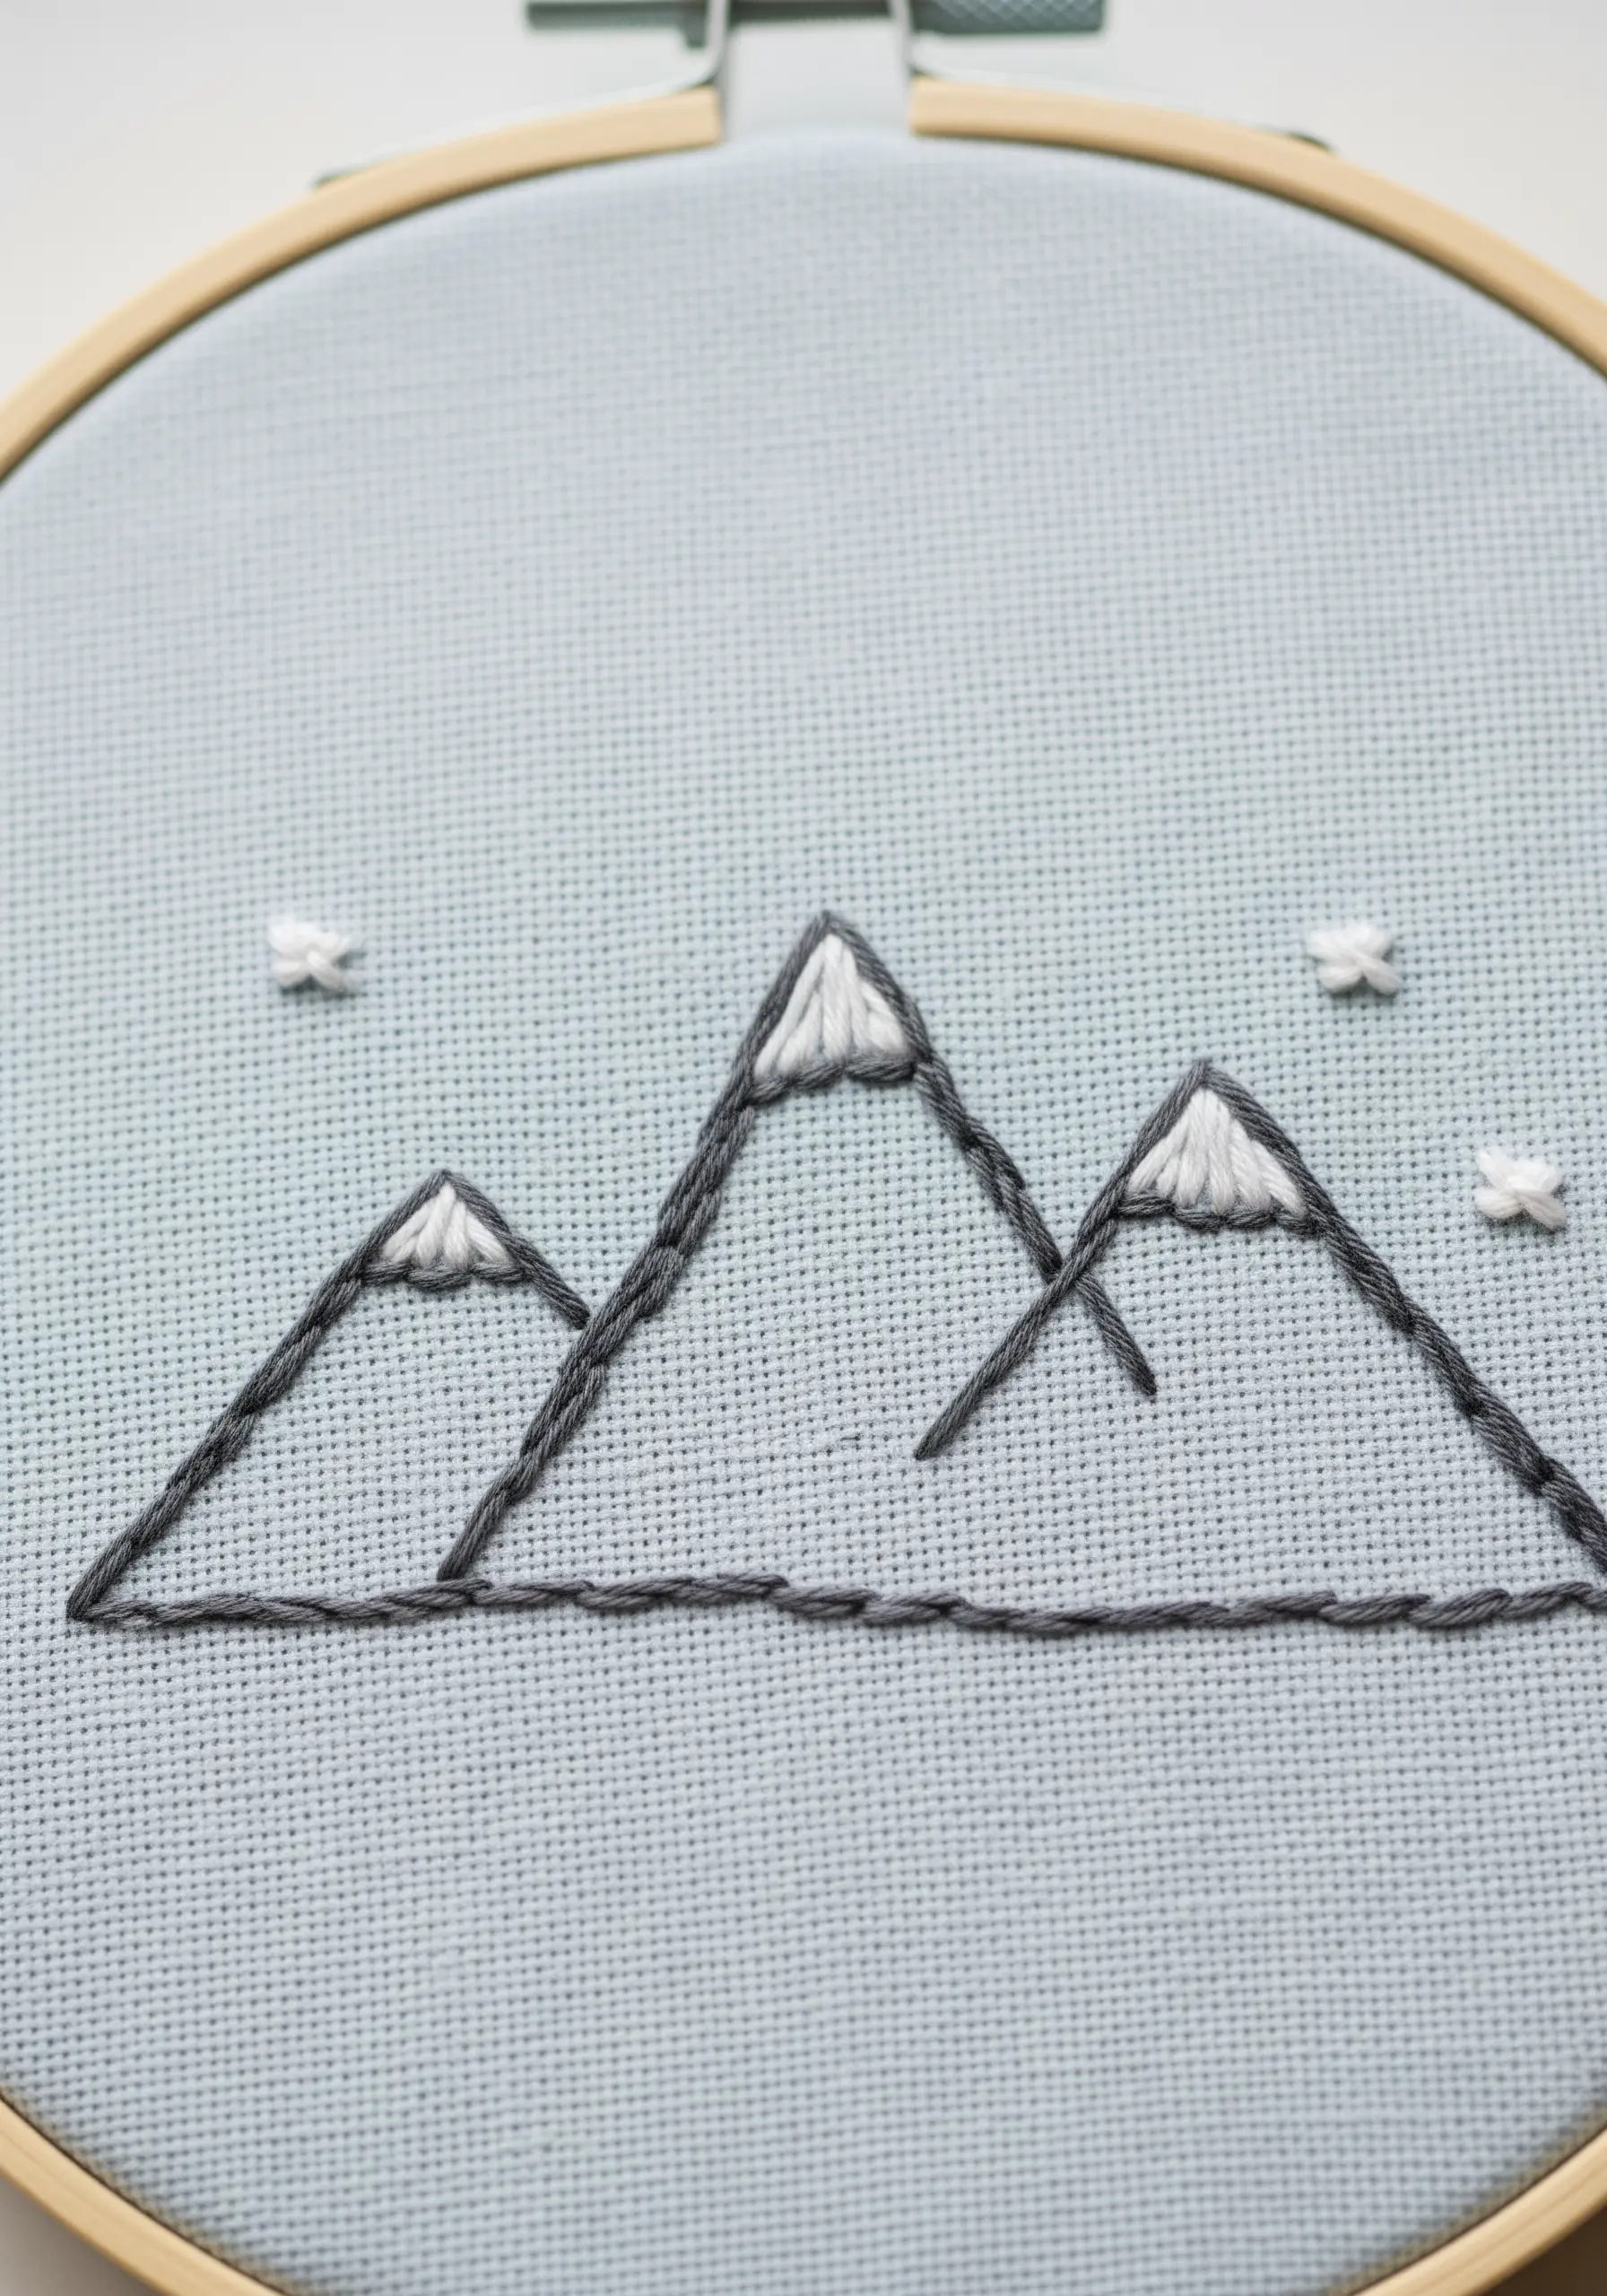
Elevate a simple mountain outline by focusing on line weight and clean fills.
Use a thicker thread (4-6 strands) or a whipped backstitch for the mountain slopes to create a bold, graphic line that stands out against the fabric.
Fill the snowcaps with a dense, perfectly aligned satin stitch, ensuring each stitch is parallel to the next for a smooth, solid block of white.
The tiny stars, made from two crossed stitches, add a touch of whimsy without distracting from the minimalist composition.
8. Create Movement with Detached Chain Stitches
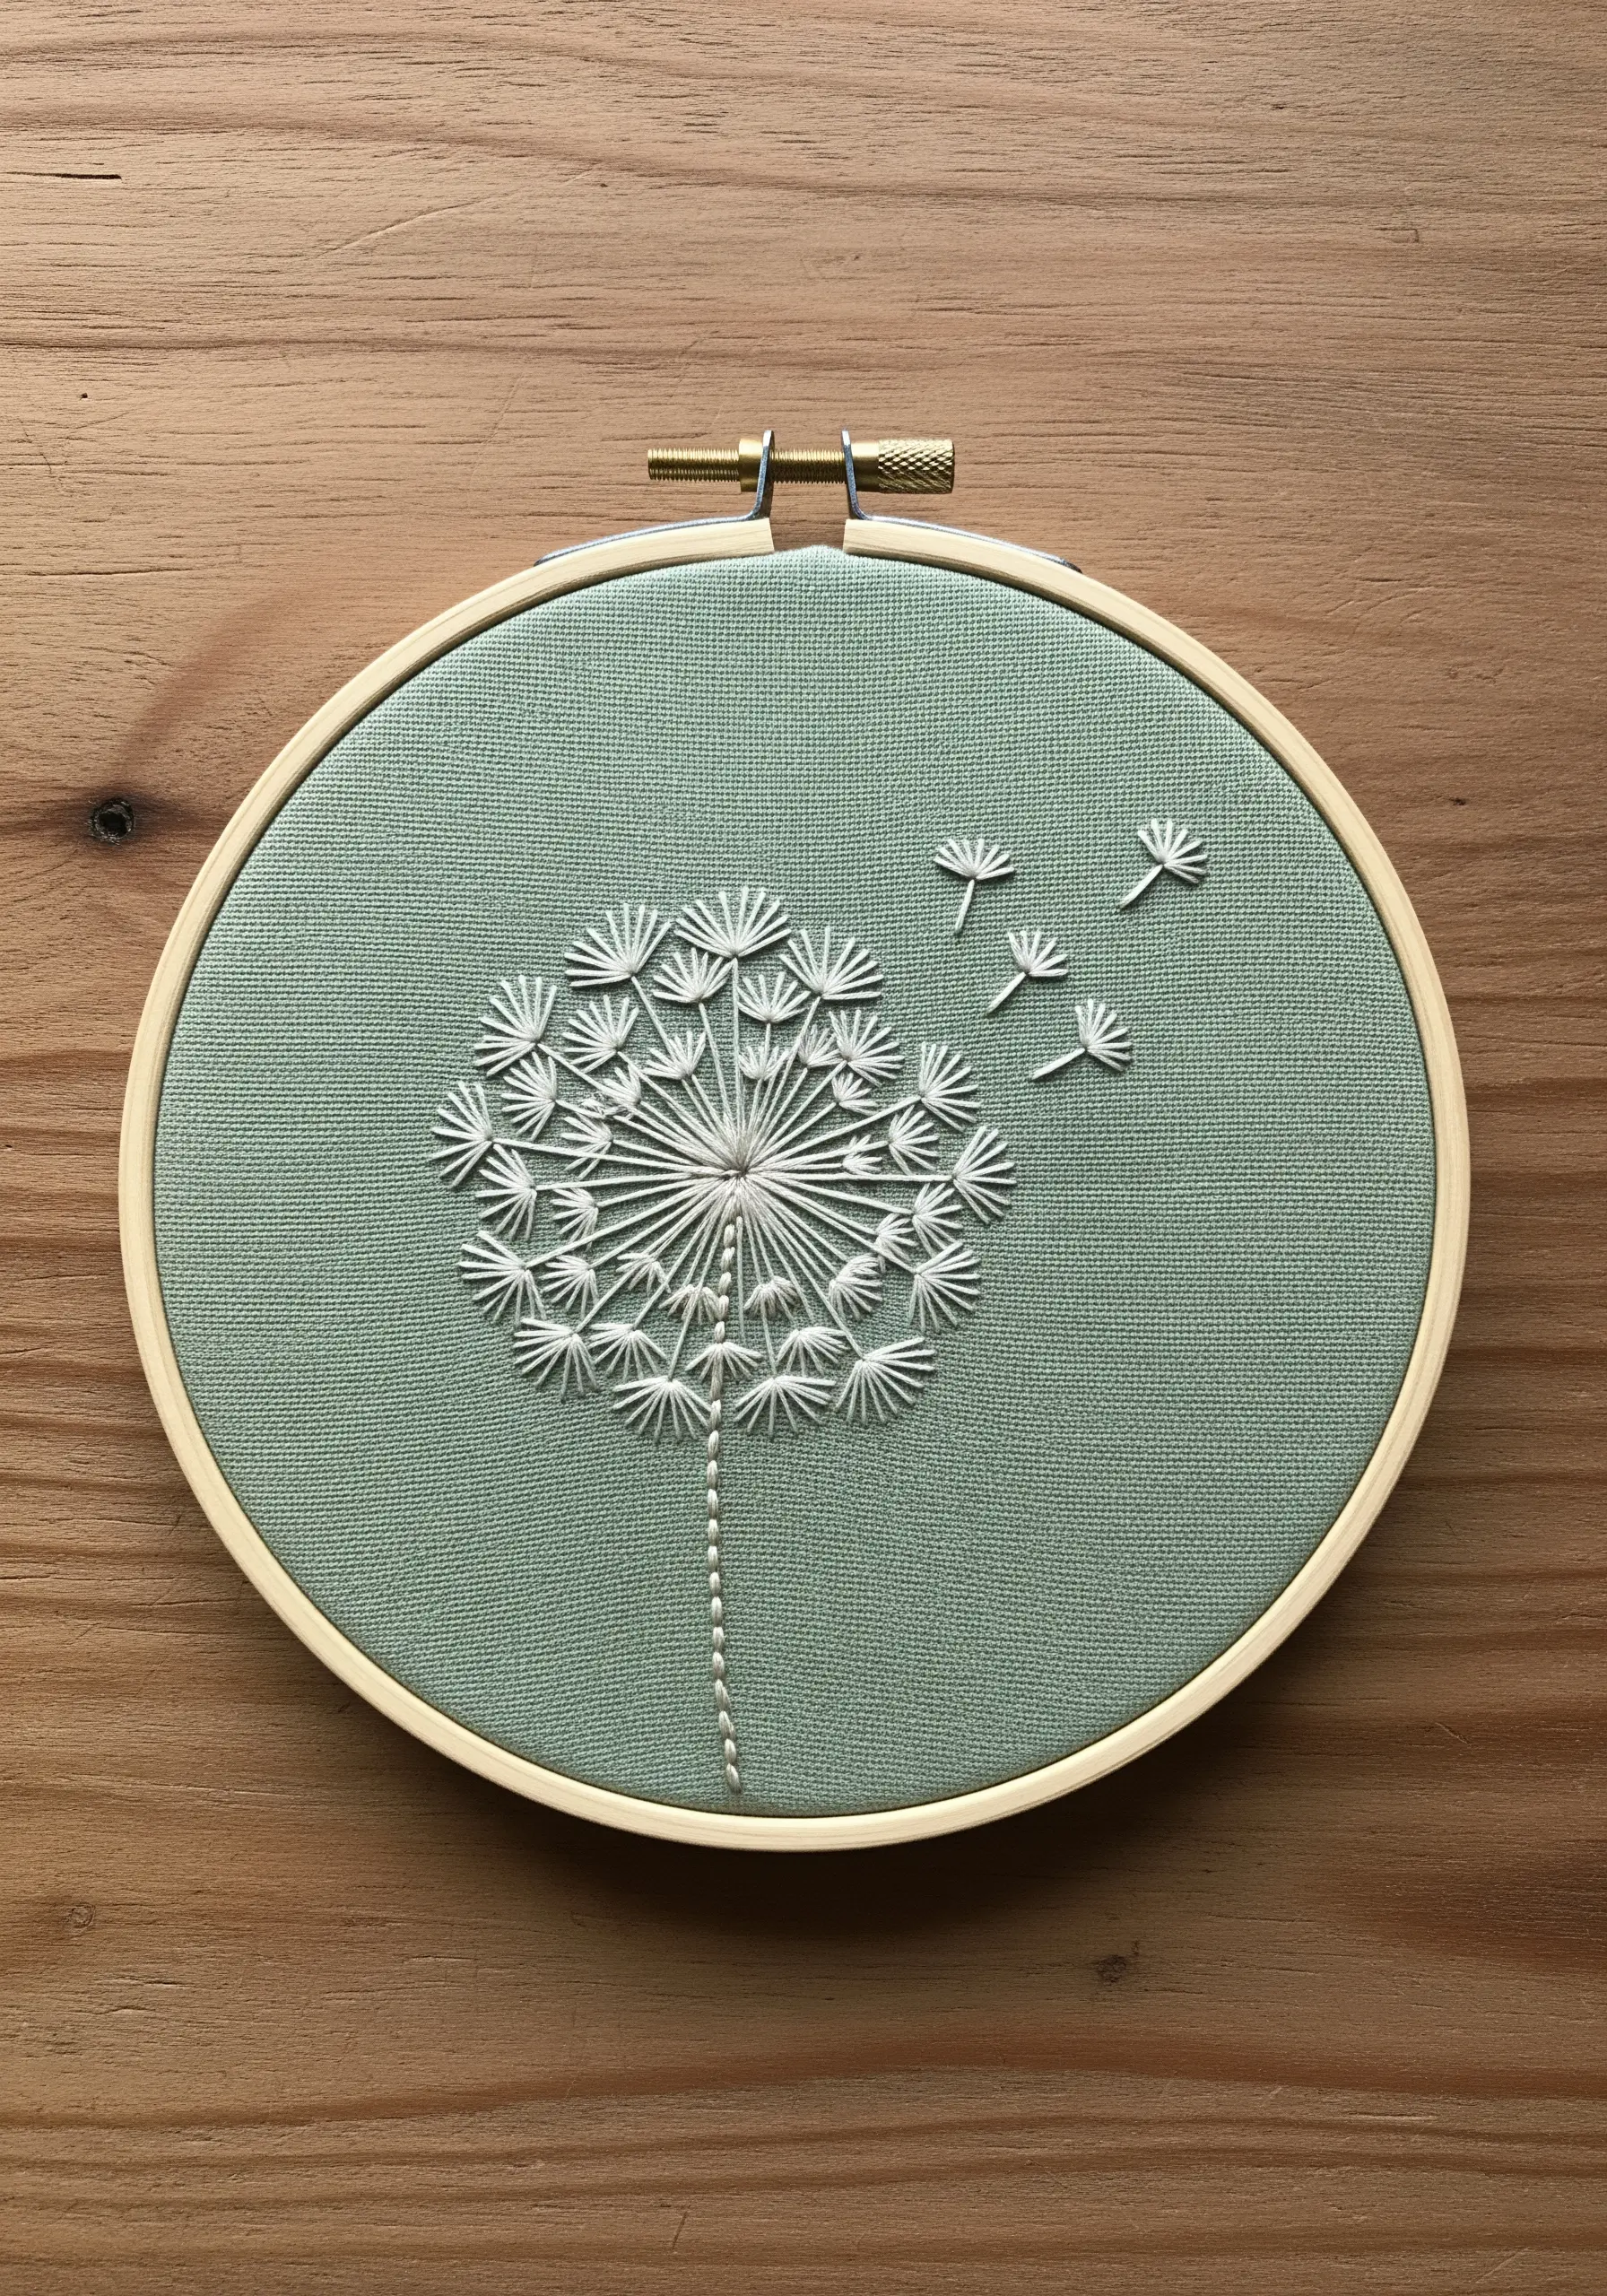
Capture the airy, delicate nature of a dandelion seed head using detached chain stitches (lazy daisies) for each floret.
Arrange them in a radial pattern around a central point, which you can mark with a tiny French knot.
For the seeds floating away, pair a single detached chain stitch with a short straight stitch for the stem.
This combination perfectly mimics the form and suggests a sense of gentle movement across the fabric.
9. Weave Interlocking Rings with Directional Fill
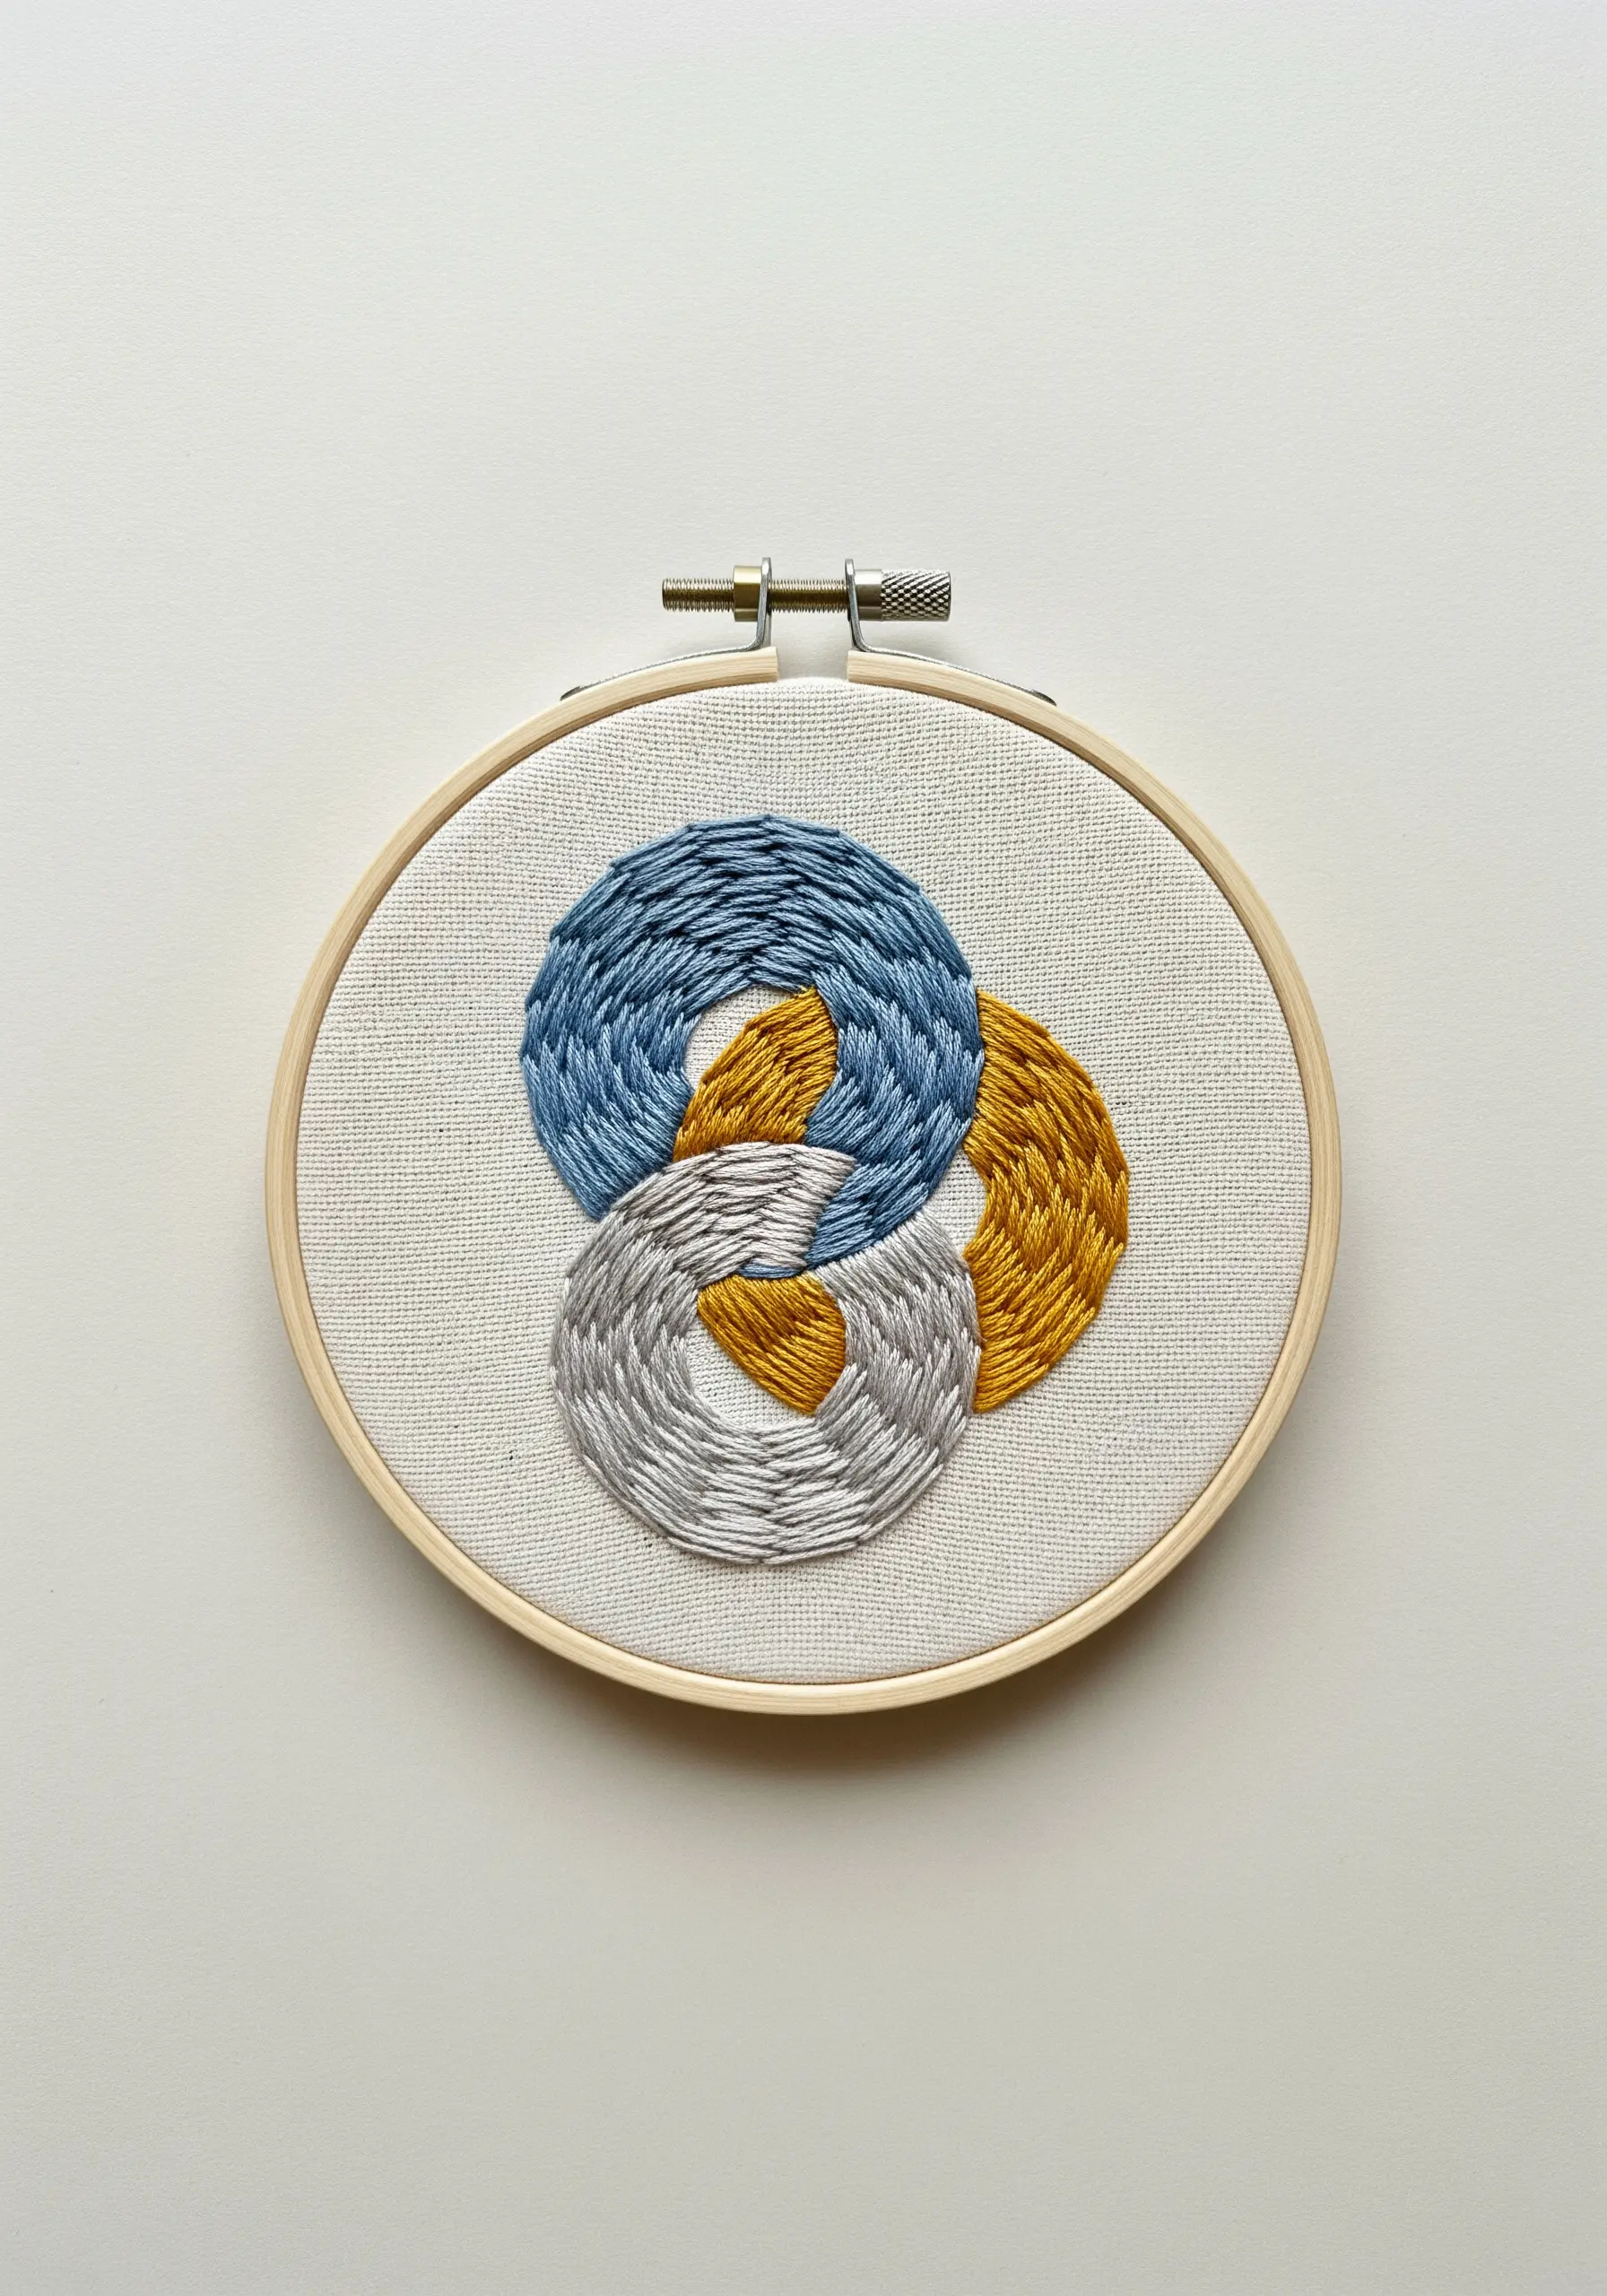
Create the illusion of interwoven rings by carefully planning the direction of your fill stitches.
Use a brick stitch or a directional satin stitch, angling the threads to follow the curve of each ring segment.
To achieve the overlapping effect, you must complete the section of the ‘bottom’ ring first, then stitch the ‘top’ ring’s segment directly over it.
This thoughtful layering is what makes the simple geometric form feel dynamic and three-dimensional.
10. Perfect Your Outlines with a Stem Stitch

For clean, elegant outlines like this oak leaf, the stem stitch is your best tool. It creates a slightly raised, rope-like line that is smoother and more substantial than a basic backstitch.
To execute it perfectly, always bring your needle up on the same side of the previous stitch.
This consistency is what produces the twisted, corded effect that defines the stitch and makes your line art look intentional and polished.
11. Convey Delicacy in Line Art with Thread Weight

When stitching fine line art, the number of threads you use is as important as the stitch itself.
For this delicate coffee cup, use only two strands of floss for the backstitch outline. This keeps the lines crisp and prevents them from looking bulky, especially on the curves.
For the steam, switch to a single strand of floss and use a gentle, curving stem stitch. The reduced thread weight makes the steam appear ethereal and light.
12. Create a Bold Pattern with Raised Cross Stitches
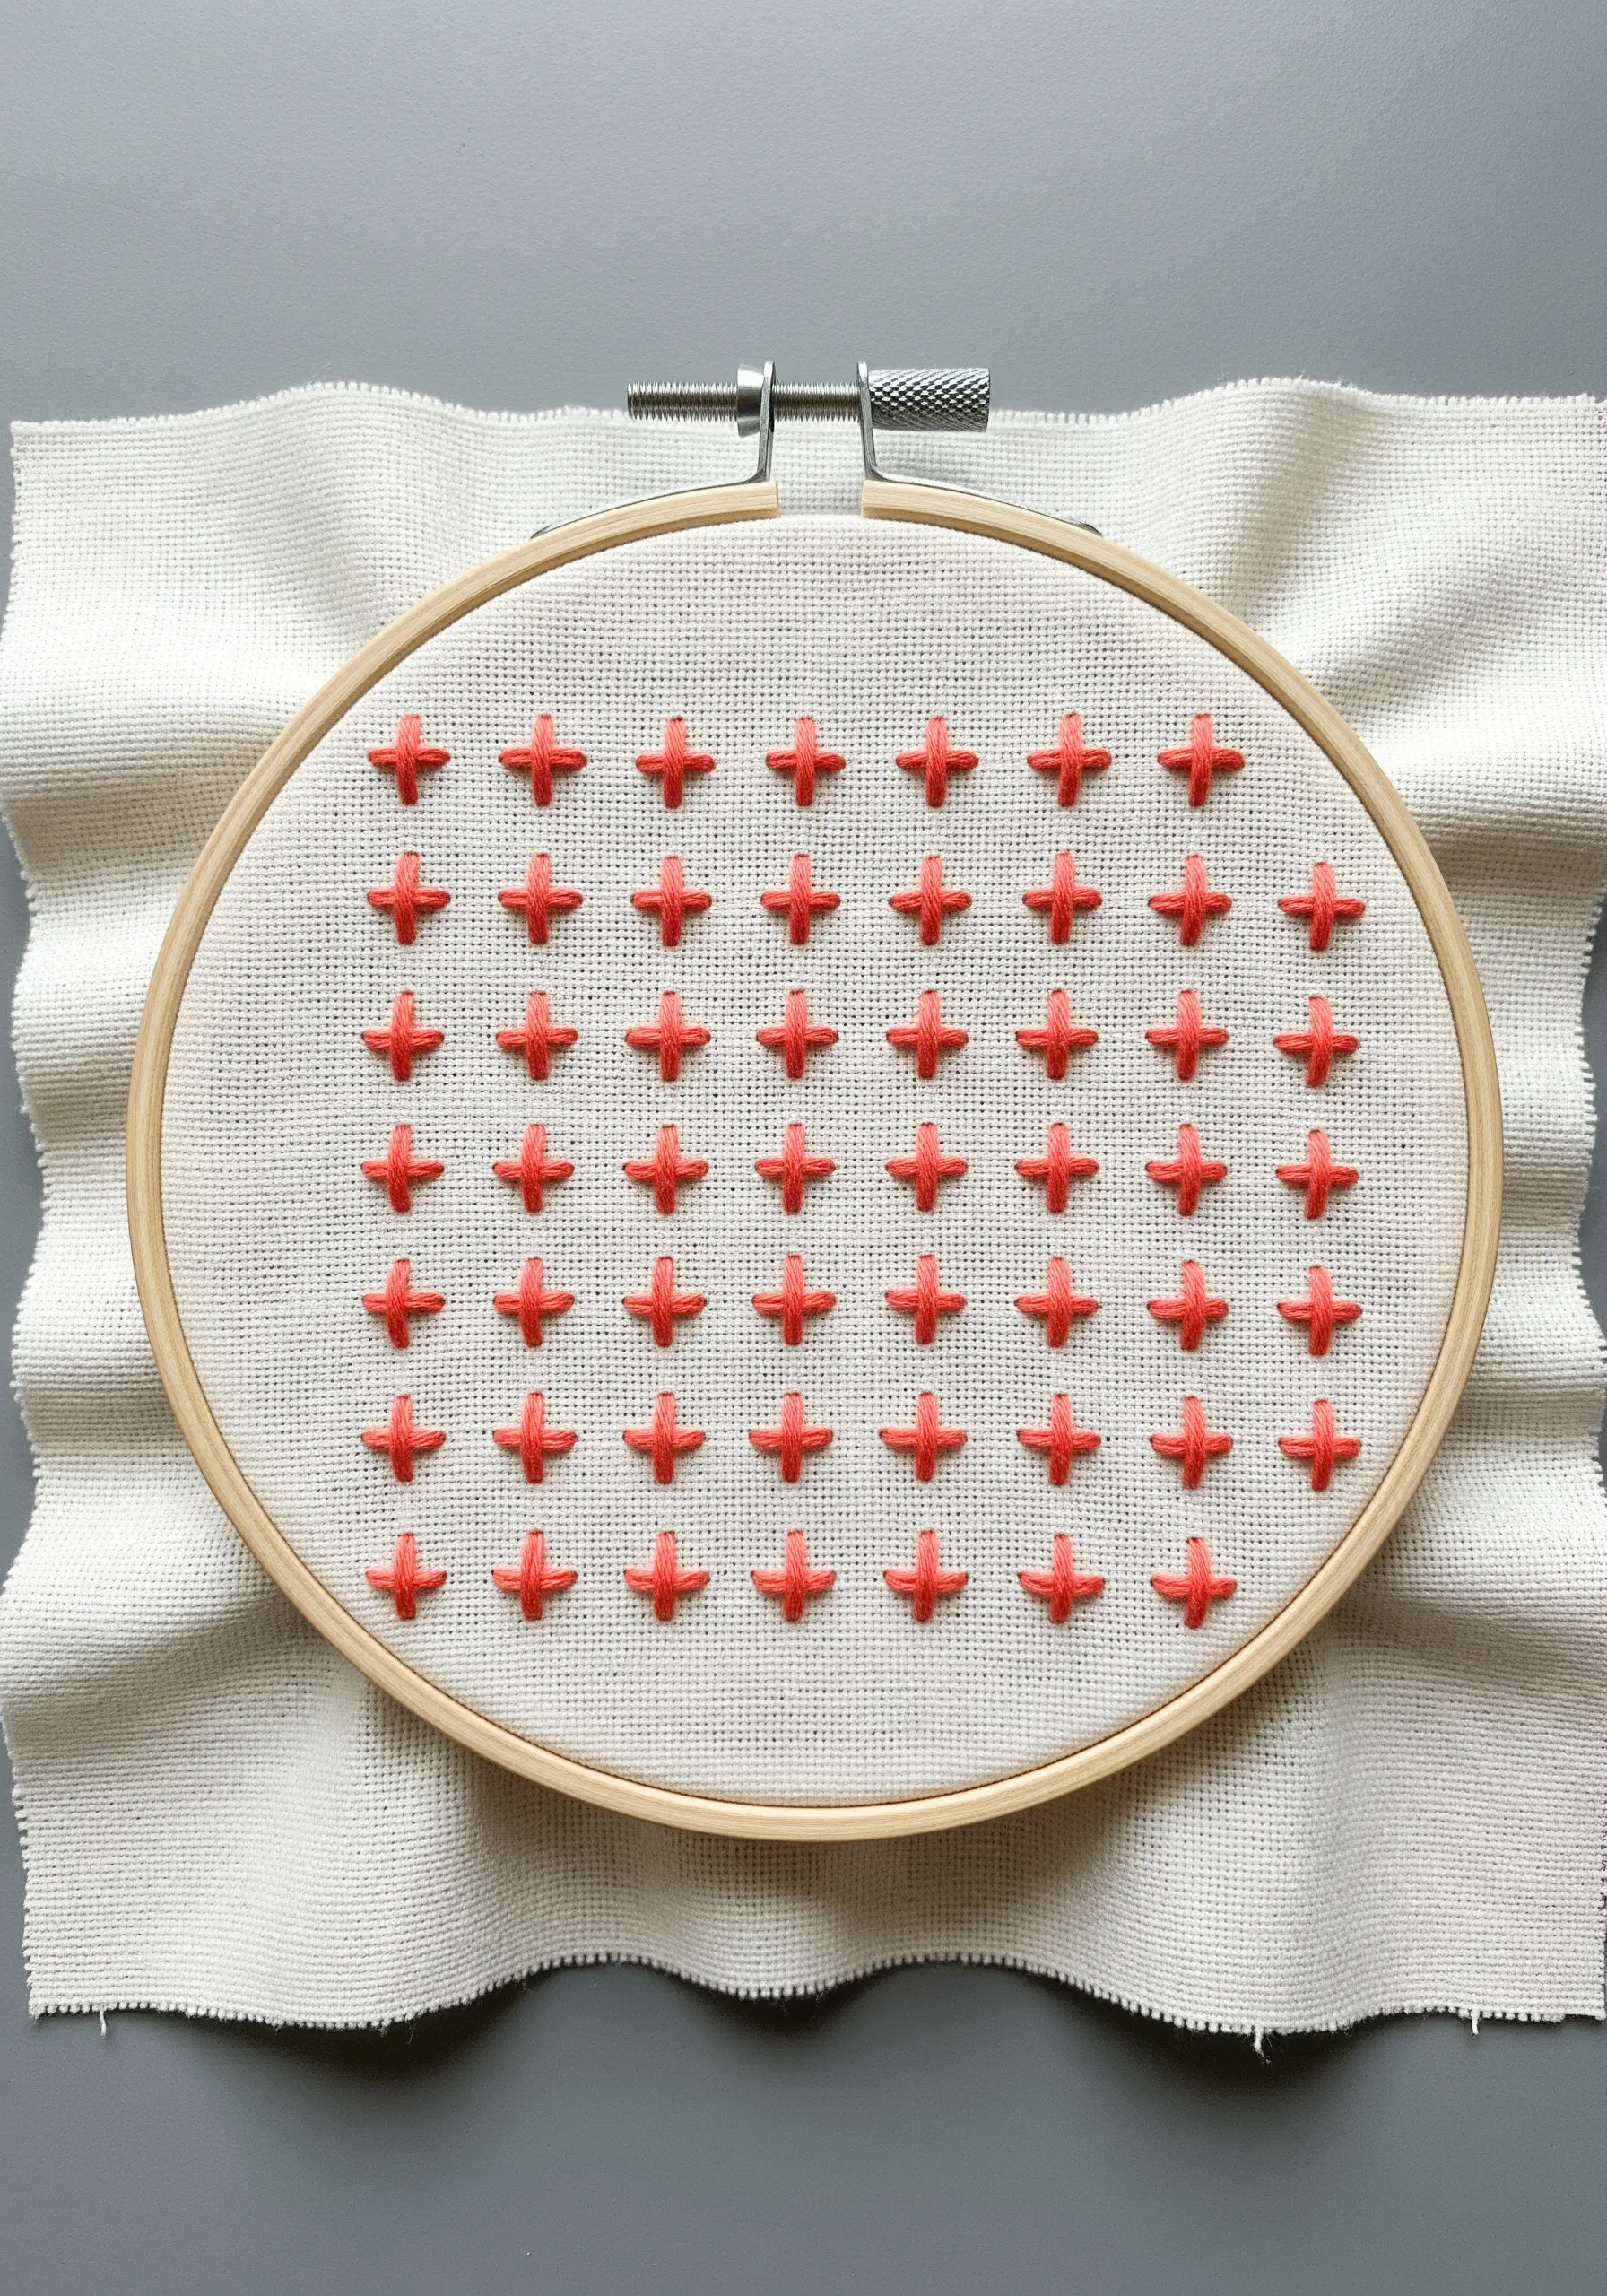
Transform a simple grid of cross stitches into a tactile, graphic pattern by increasing the thread weight.
Use all six strands of embroidery floss or even a size 8 perle cotton to give each stitch a puffy, raised appearance.
To ensure perfect alignment, lightly draw a grid on your fabric with a water-soluble marker before you begin.
This simple adjustment in material turns a basic stitch into a statement texture.
13. Form 3D Leaves with a Woven Picot Stitch
Give your botanical embroidery a sculptural quality by using a woven picot stitch for the leaves and flowers.
This technique involves creating a scaffold of three straight stitches and then weaving your thread through them to build a raised, petal-like shape that stands away from the fabric.
By varying the tension and number of woven rows, you can control the shape and fullness of each element.
A soft neutral color palette keeps this textural design feeling serene and sophisticated.
14. Embrace Simplicity with a Bold Backstitch
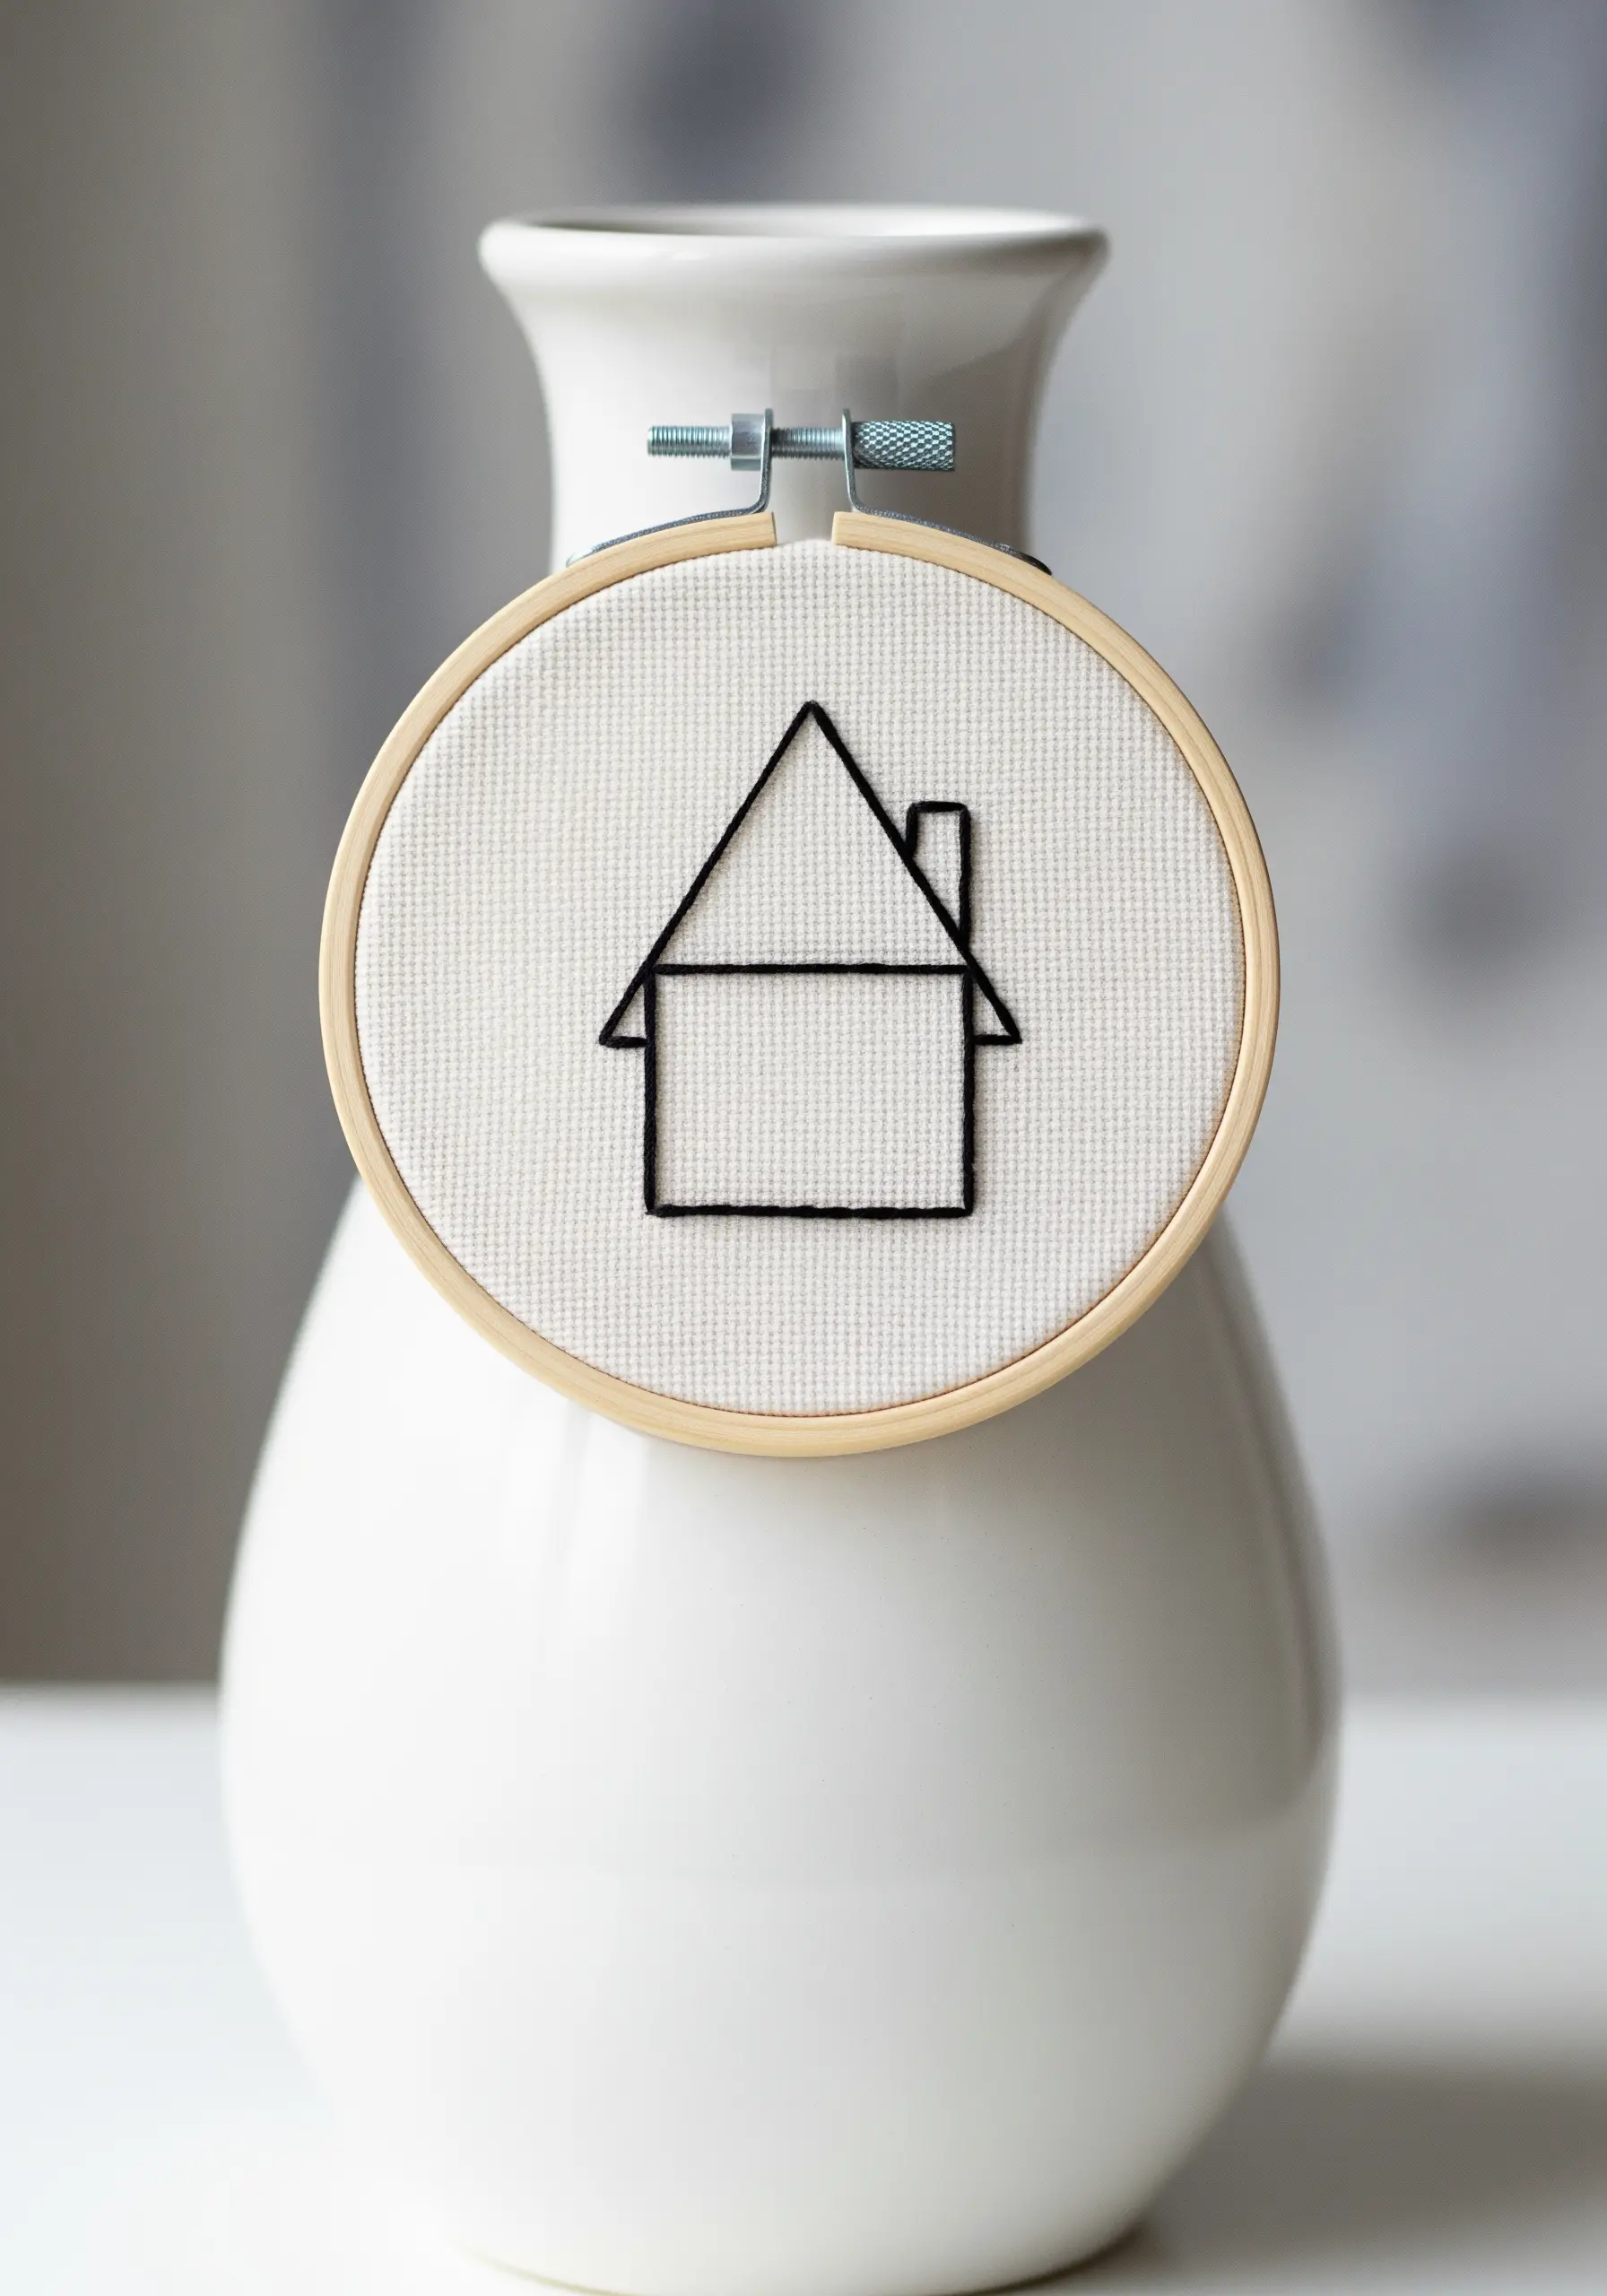
Sometimes, the simplest design makes the strongest statement. This minimalist house gains its power from a clean, unwavering outline.
To achieve this, use a thick thread (all six strands of floss) and a confident backstitch.
Draw your lines with a ruler and a removable fabric pen beforehand to guarantee perfectly straight walls and a crisp roofline.
The high-contrast black thread on white Aida cloth enhances the graphic, iconic feel of the motif.
15. Build a Textured Rainbow with Colonial Knots
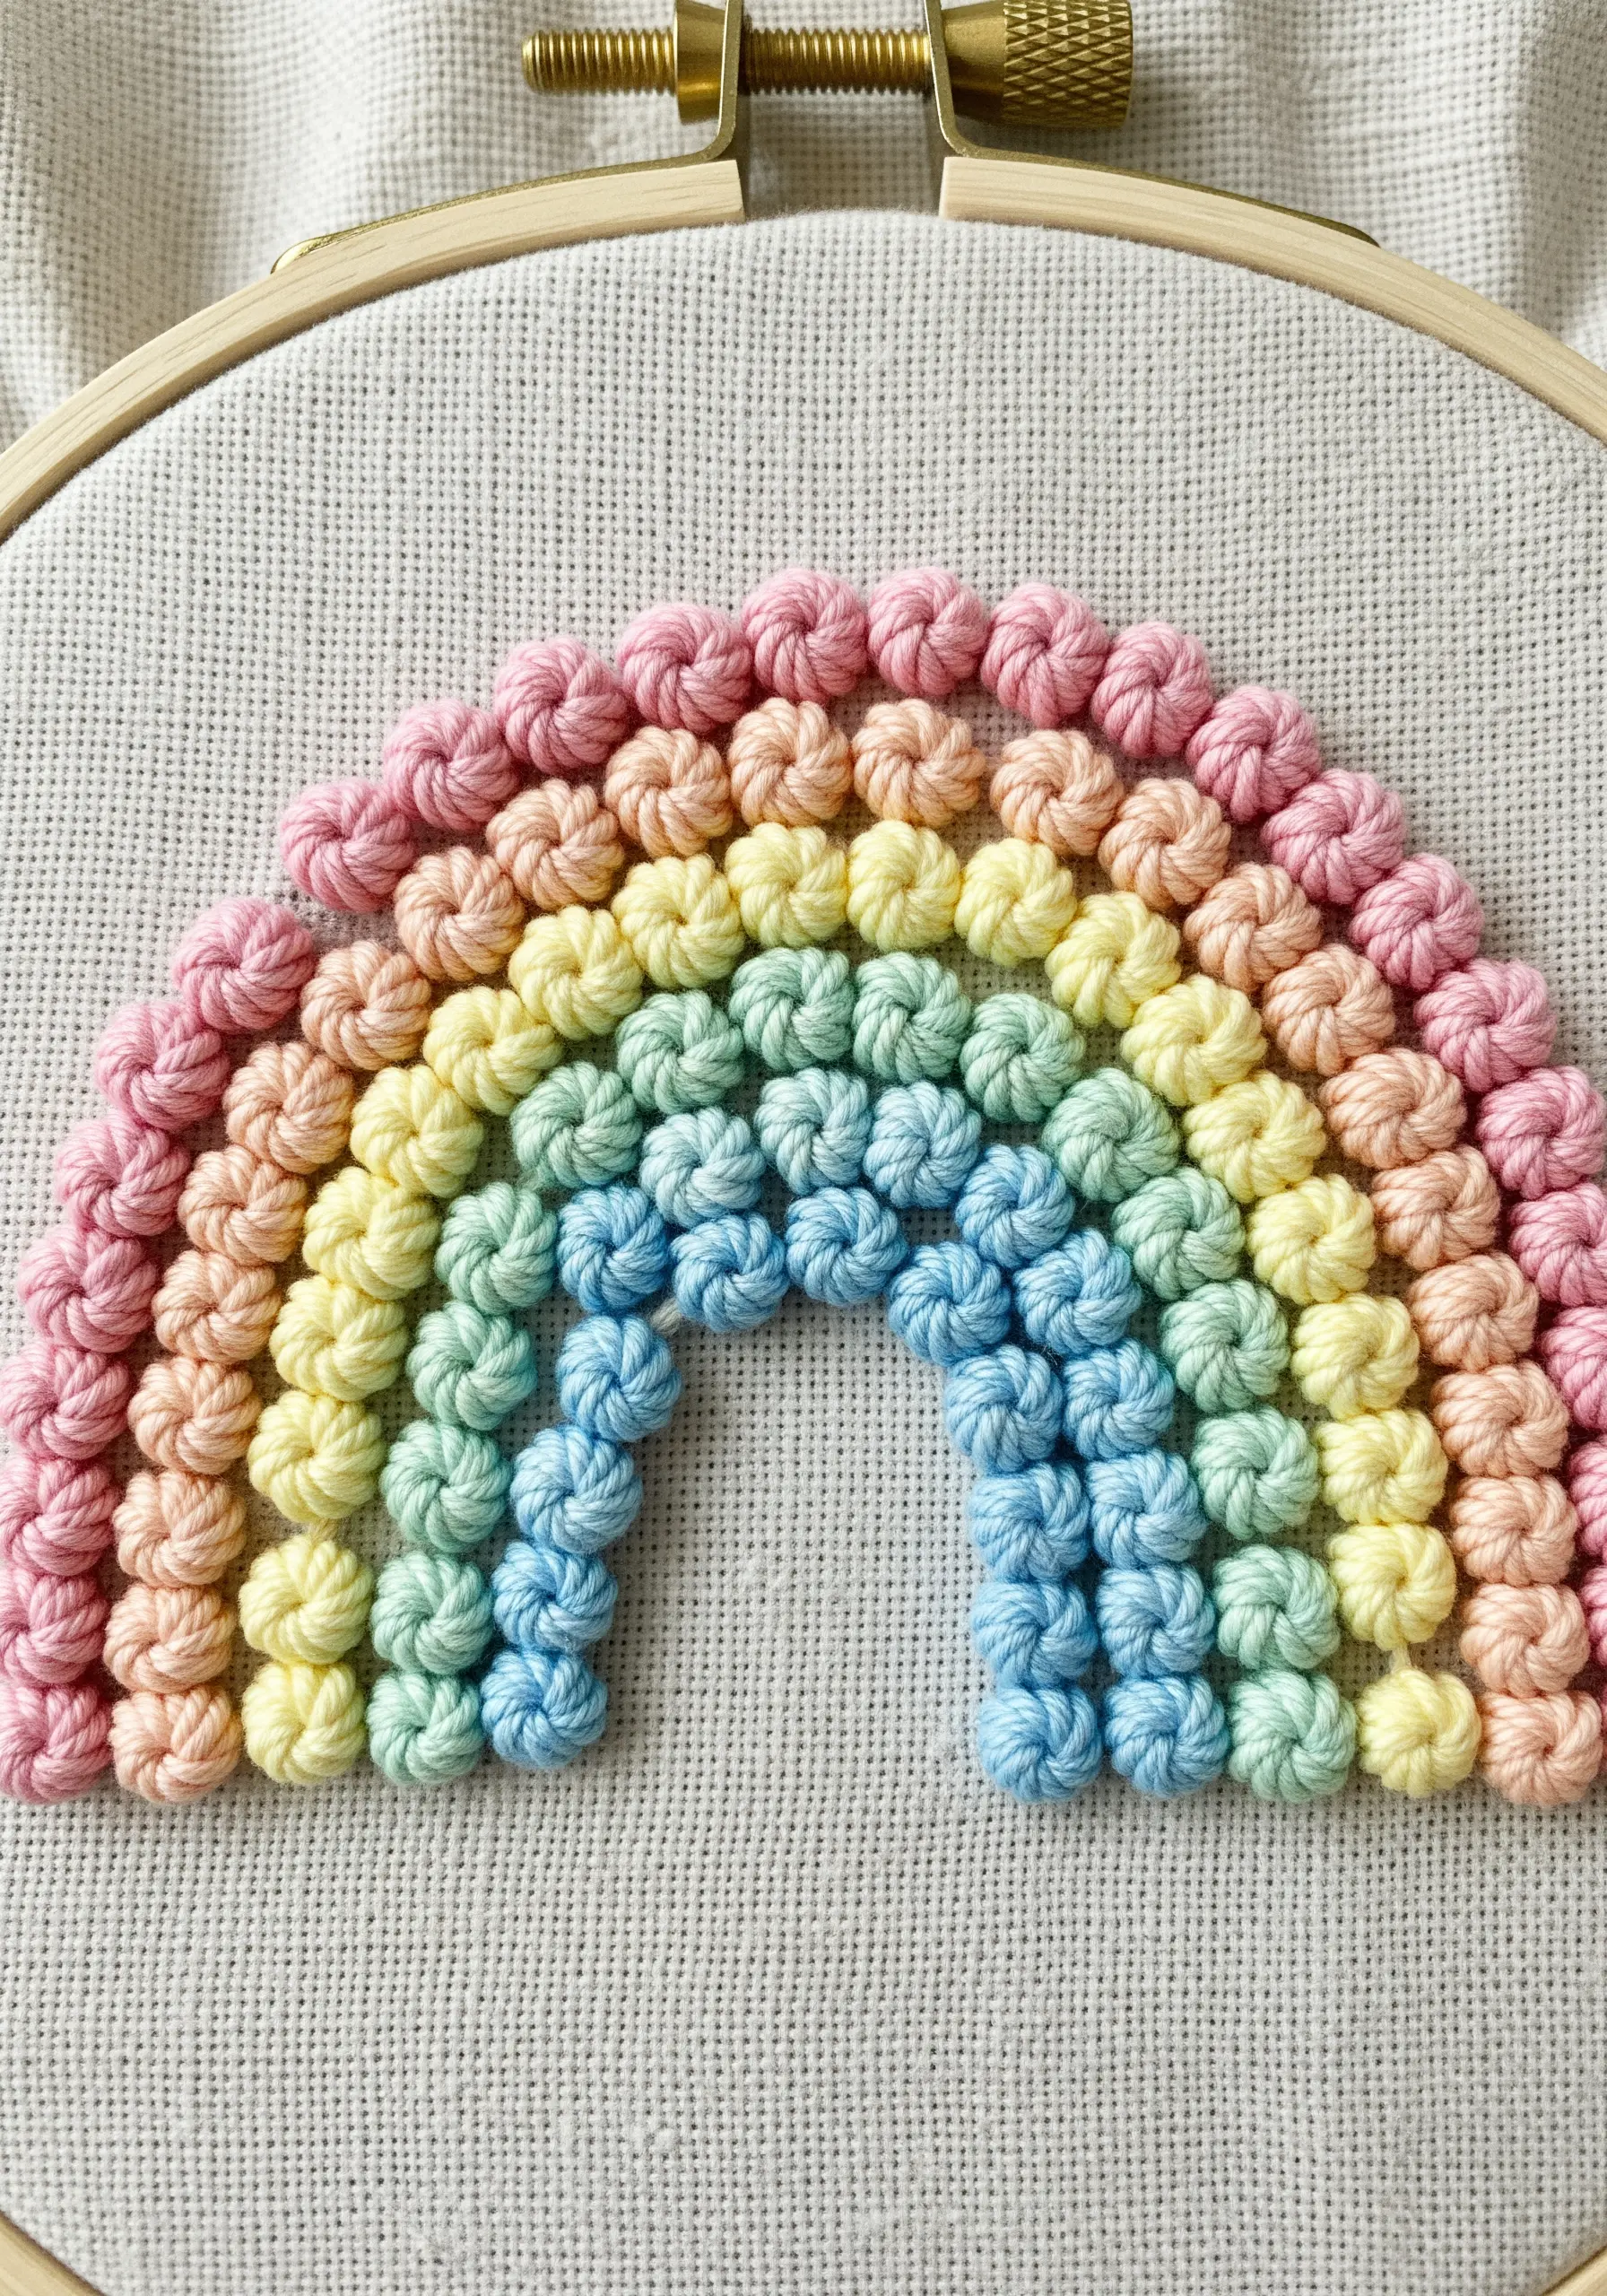
Create a beautifully textured, bobble-like rainbow using Colonial knots instead of the more common French knot.
The Colonial knot is sturdier and creates a rounder, more defined shape, which is perfect for building rows of color.
To make the knots pop, use a thicker thread like perle cotton or all six strands of floss.
Stitch the knots closely together in neat arcs to form a dense, touchable pattern that celebrates both color and texture.
16. Master Clean Lines with a Stem Stitch Outline
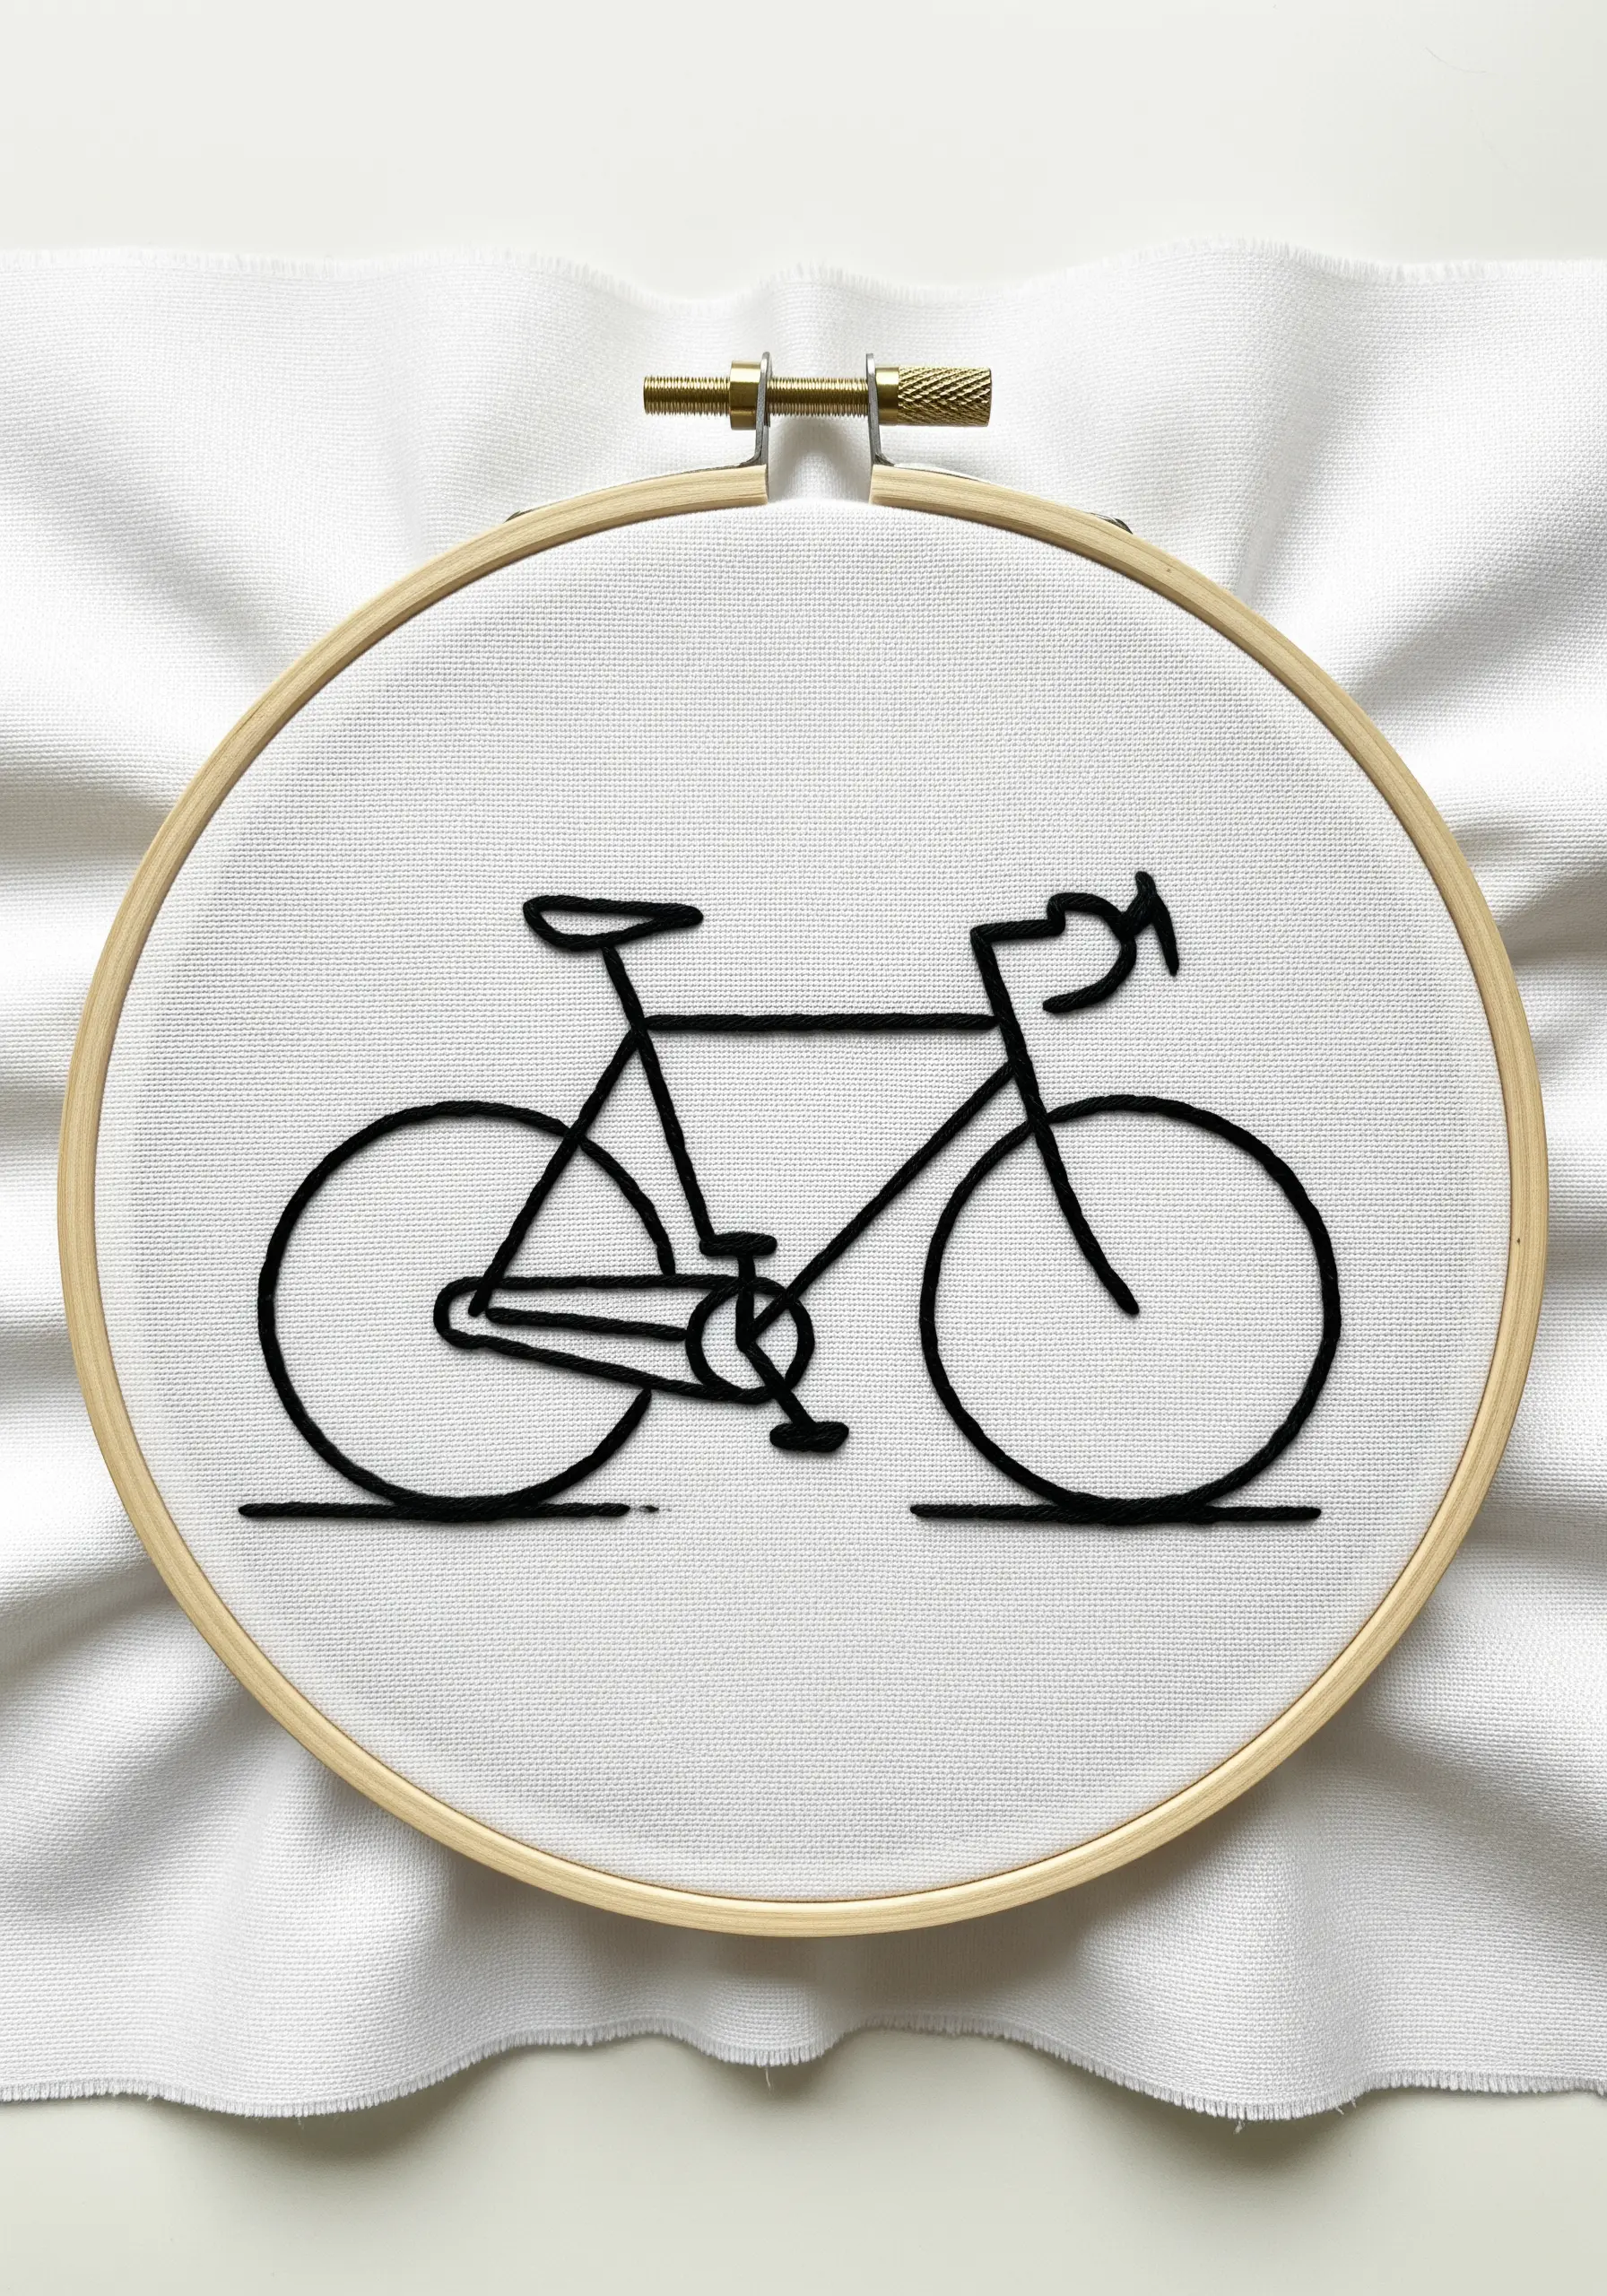
For precise line drawings like this bicycle, a stem stitch provides a smoother and more substantial line than a backstitch.
Keep your stitches small and consistent in length, especially as you navigate the curves of the wheels and frame.
Maintaining even tension is critical; pulling the thread too tight will cause the fabric to pucker and distort the geometric shapes.
This focus on consistency is what will make your finished piece look crisp and professional.
17. Achieve a Classic Daisy with Two Simple Stitches
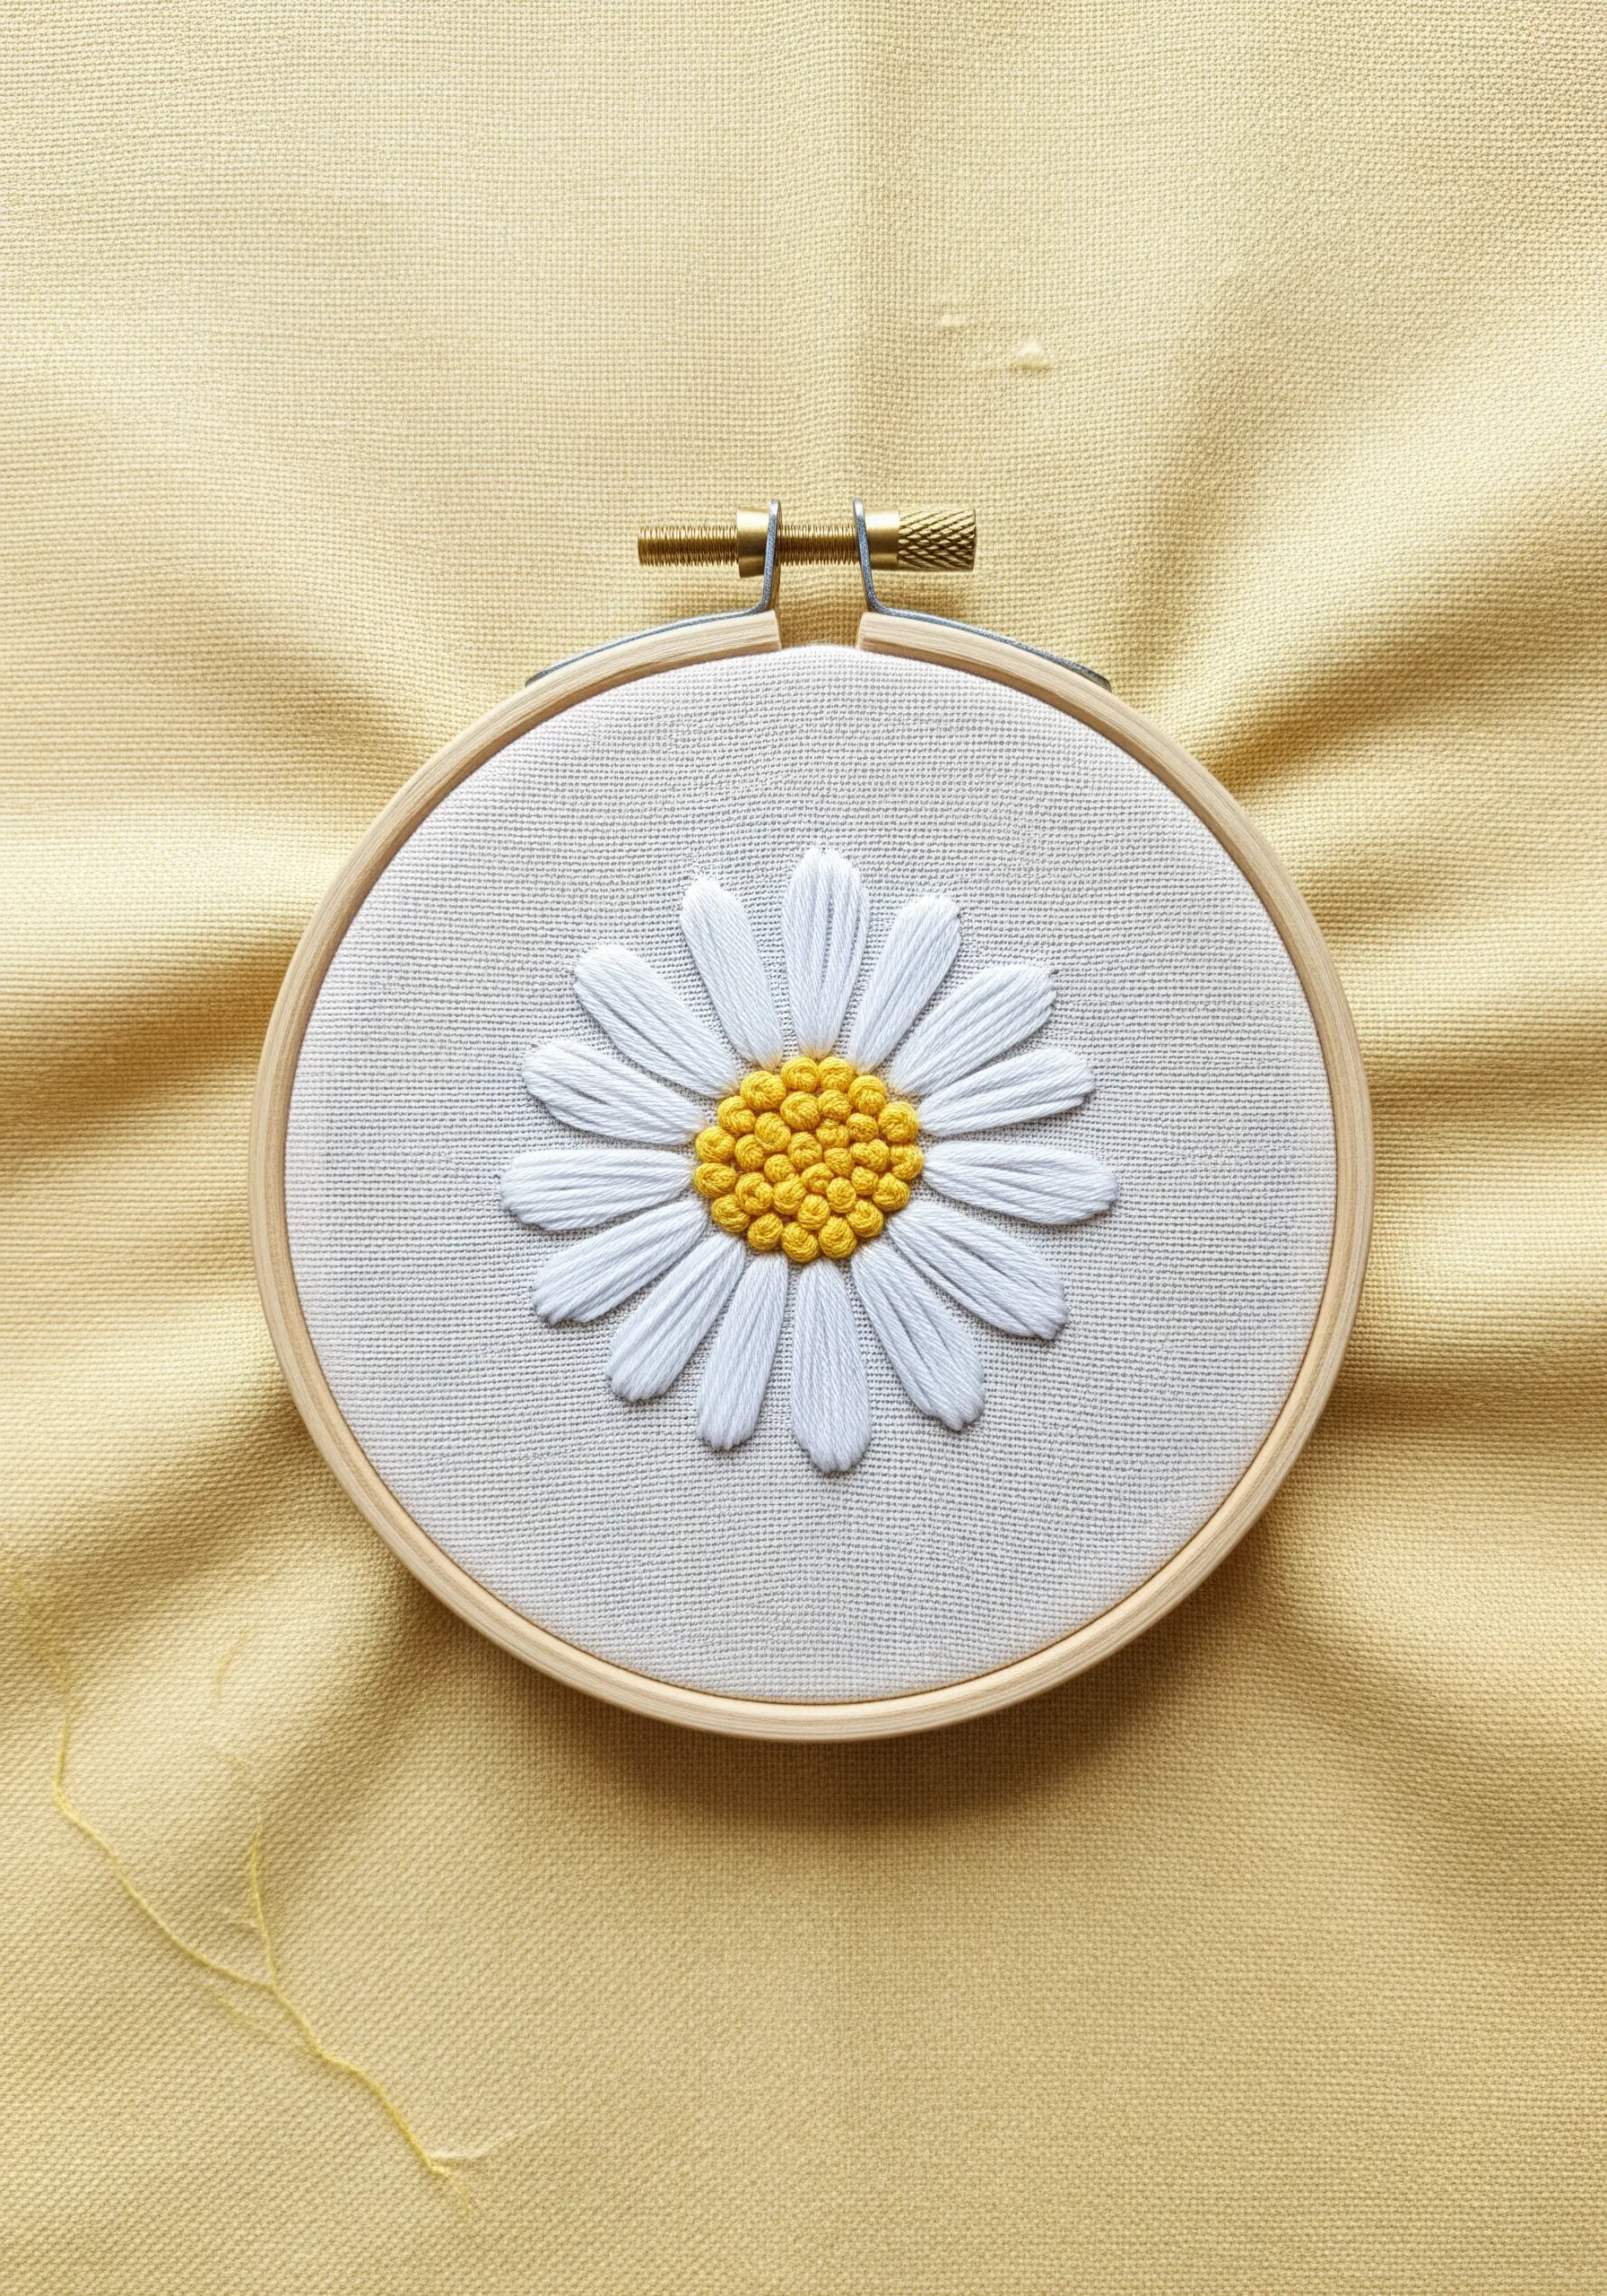
You can create a timeless daisy with just two foundational stitches: the satin stitch and the French knot.
For the petals, use long satin stitches that all meet in the center. To keep them neat, always start your stitch at the petal’s outer tip and bring the needle down in the middle.
Fill the center with a dense cluster of French knots, using a vibrant yellow to contrast with the white petals.
This combination of smooth and textured stitches gives the simple flower a classic, charming appeal.
18. Capture Fine Detail with Short Backstitches
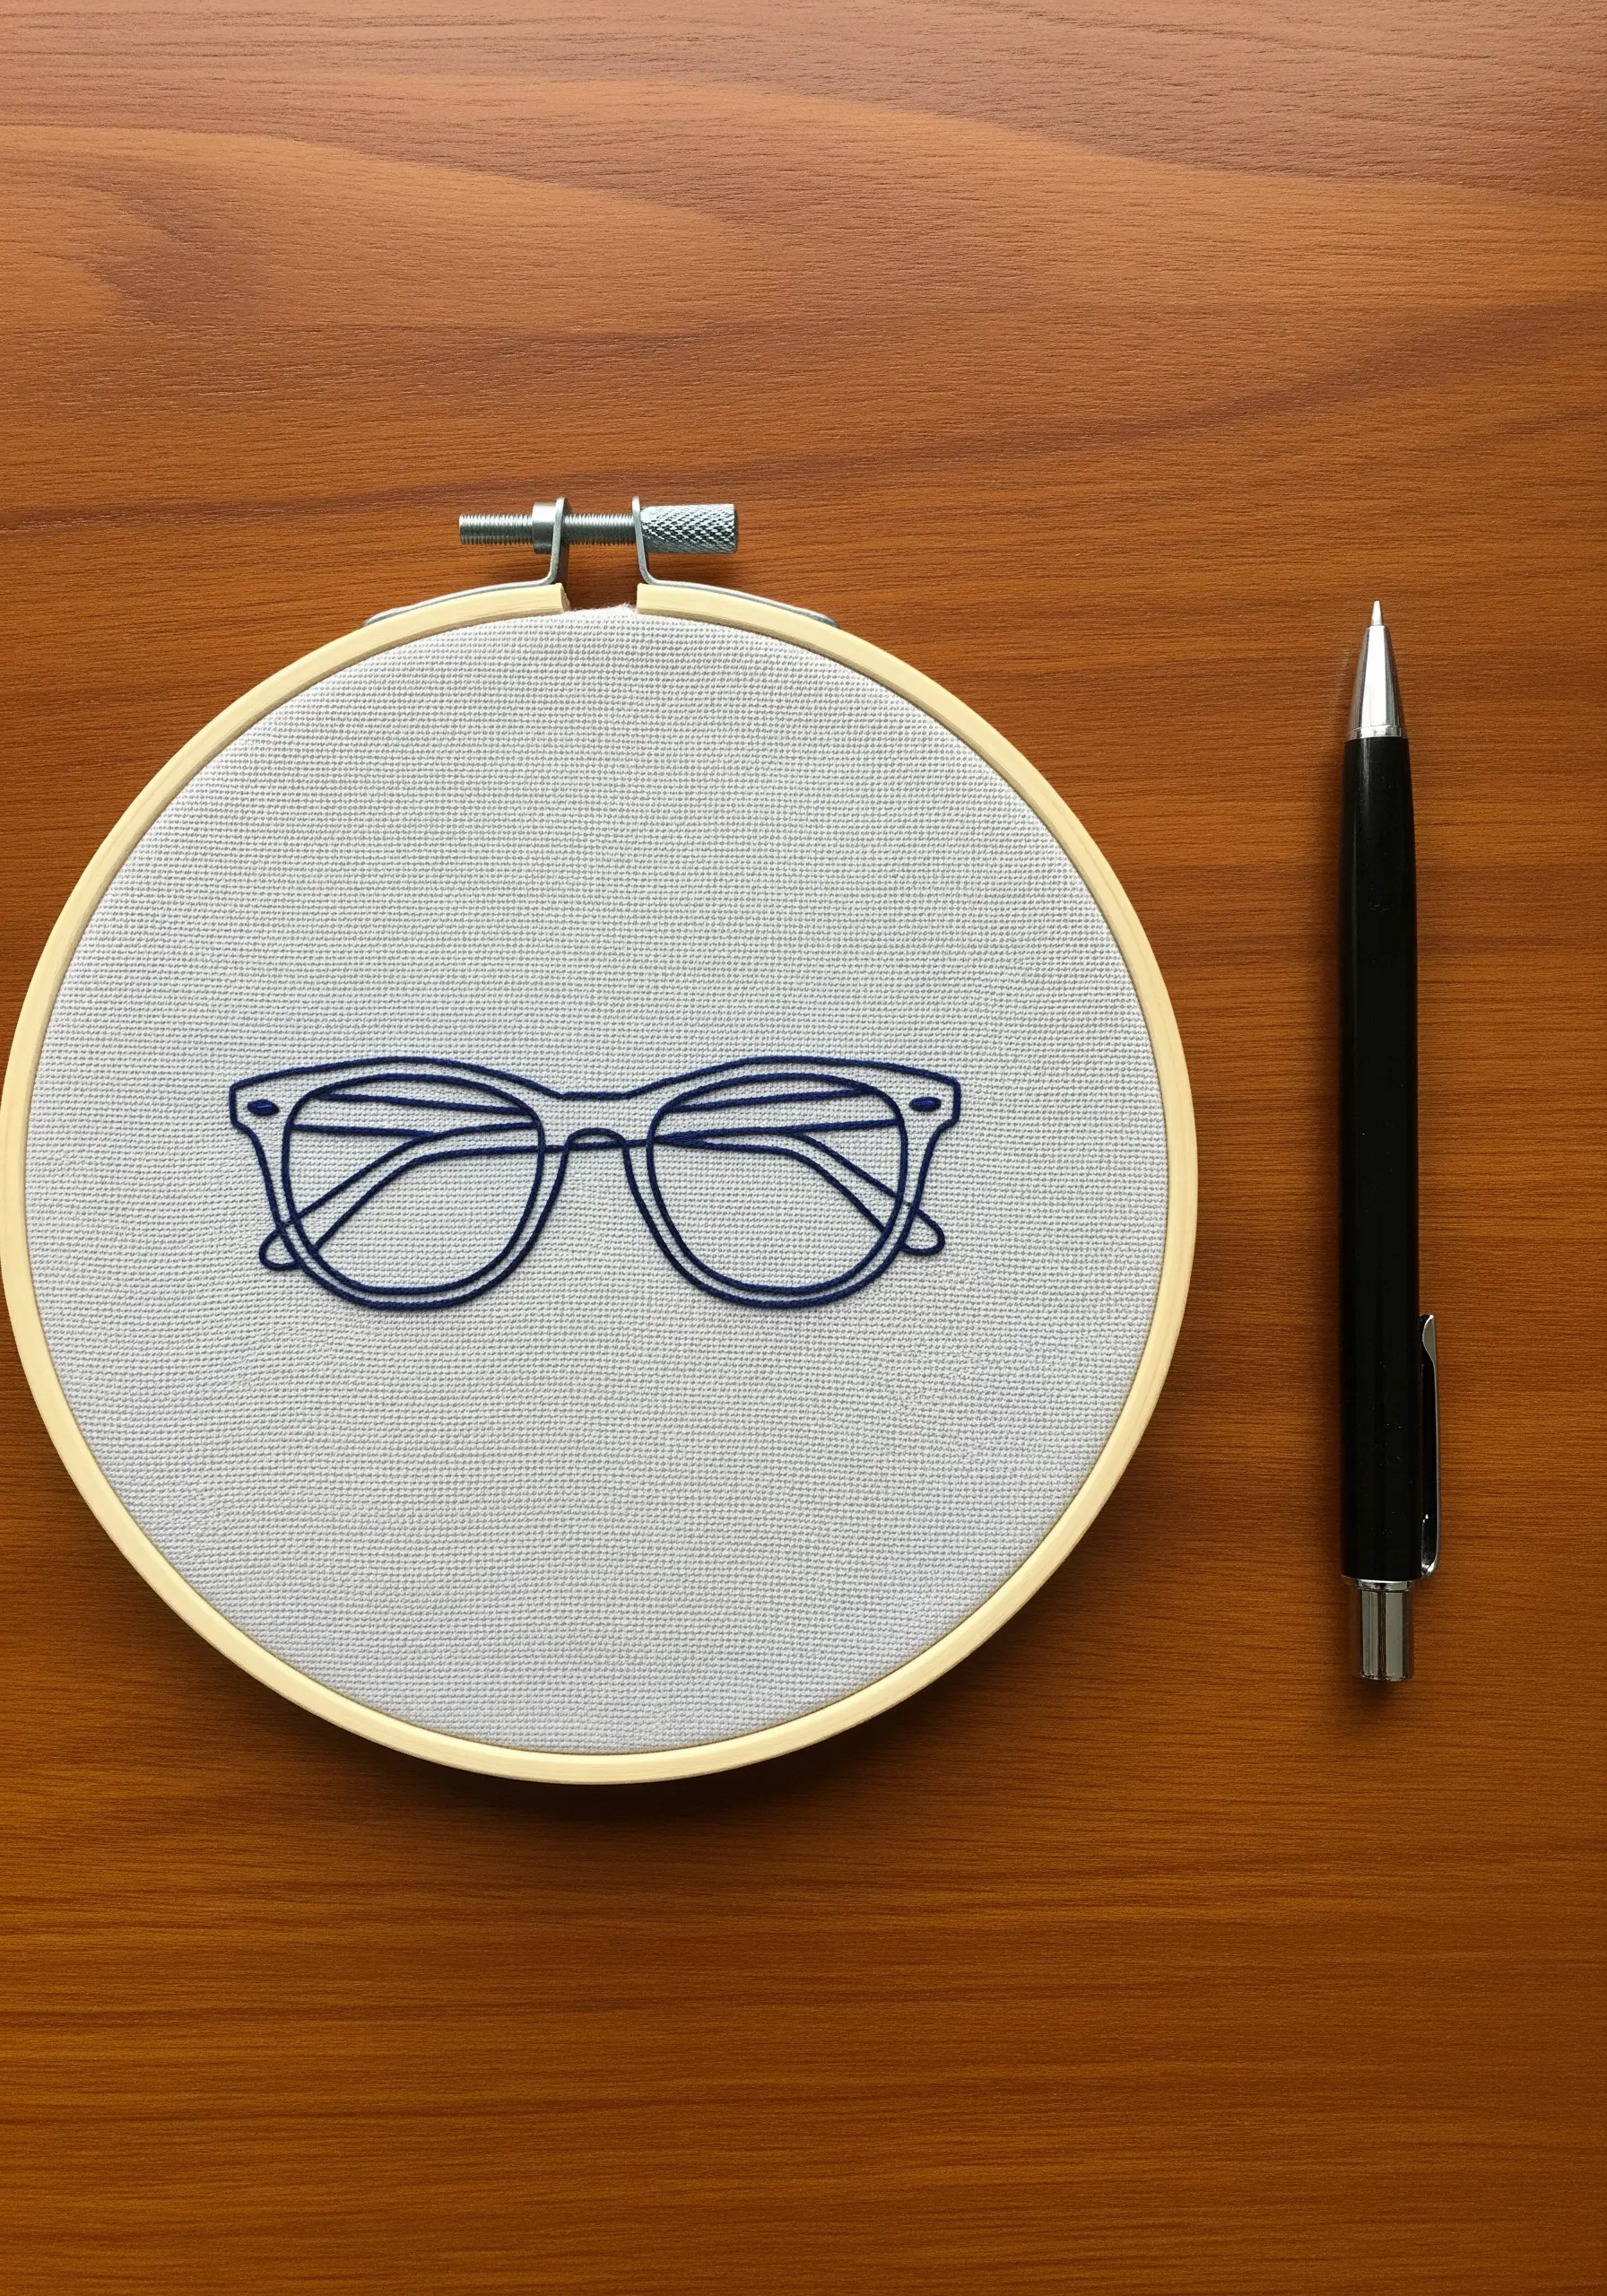
When your design involves intricate details and tight curves, like these eyeglasses, the secret to a clean line is a short stitch length.
Use a fine thread (two strands is ideal) and shorten your backstitches to about 1-2mm as you work around the corners of the frames and the bridge of the nose.
This allows you to control the thread with greater precision, preventing jagged edges and ensuring the final shape is accurate and sharp.
19. Stitch a Constellation with Star Stitches
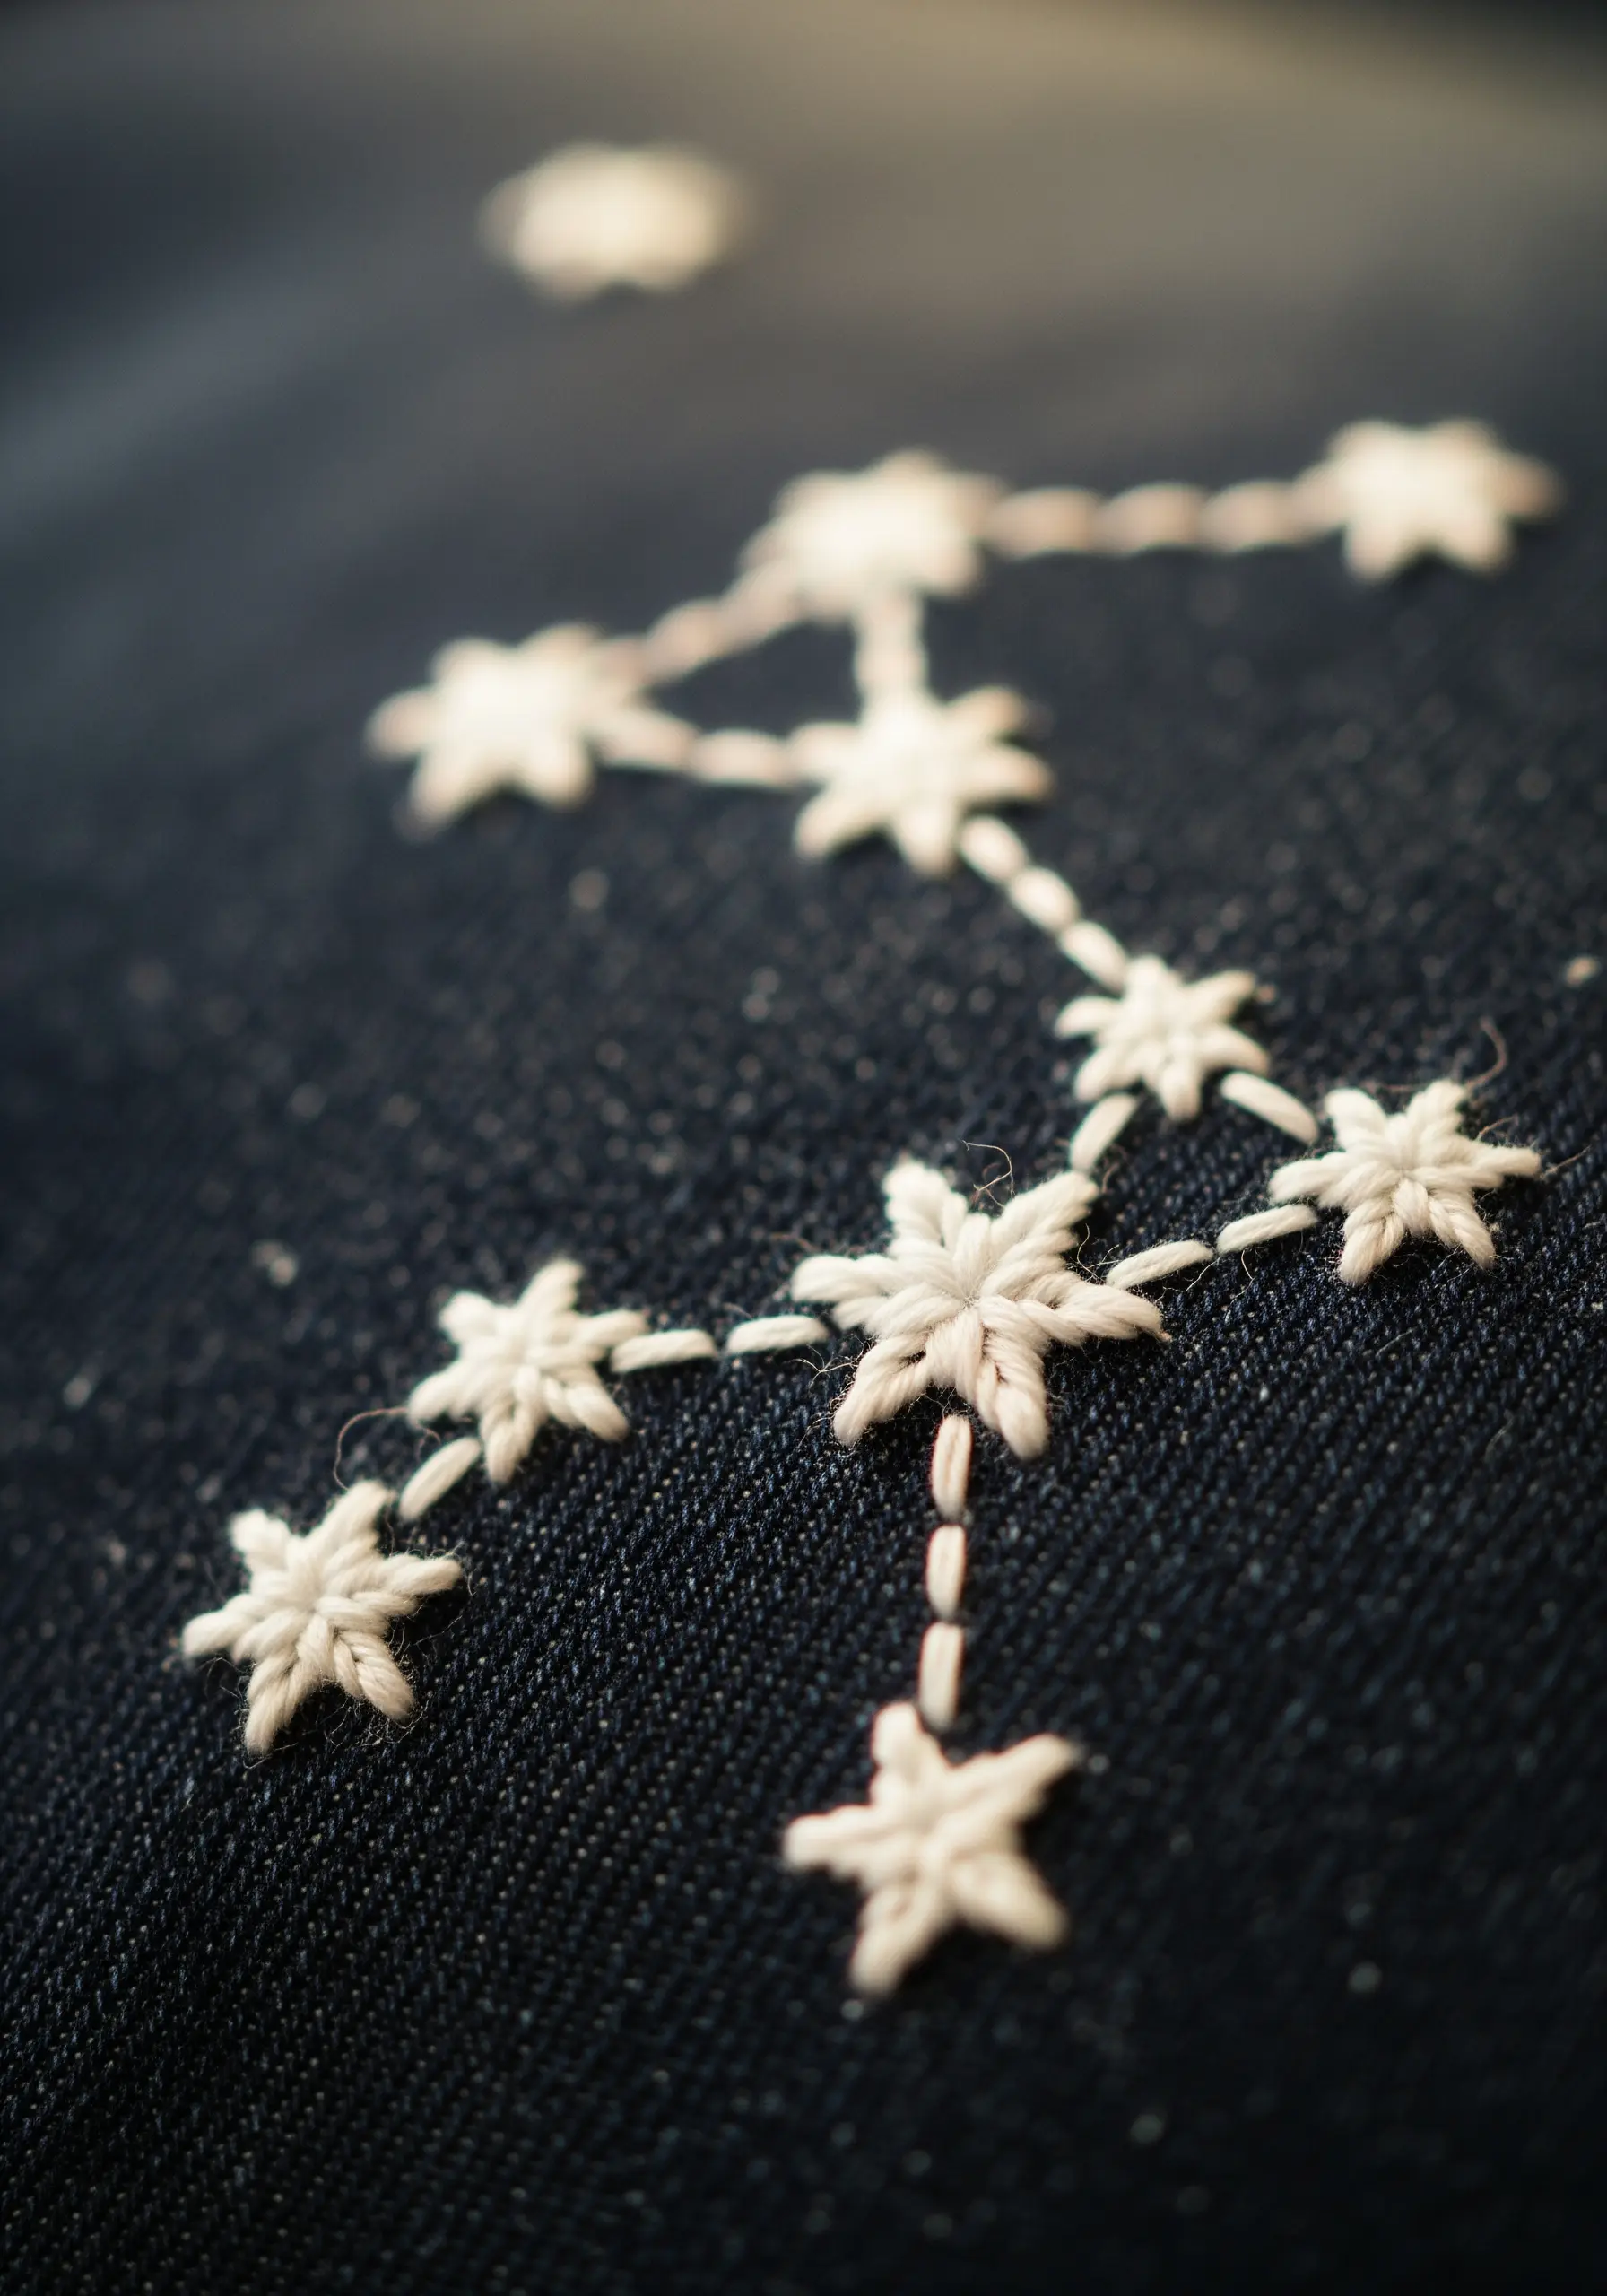
Create a delicate constellation directly onto dark denim or canvas for a high-contrast effect.
Form each star using a star stitch, which is essentially several straight stitches layered over one another in a radial pattern.
For a softer look, you can also use a lazy daisy stitch for each point of the star, meeting in the center.
Connect them with a single strand of thread and a simple running stitch to create the faint constellation lines, letting the stars themselves be the focus.
20. Create Realistic Citrus with Directional Satin Stitch
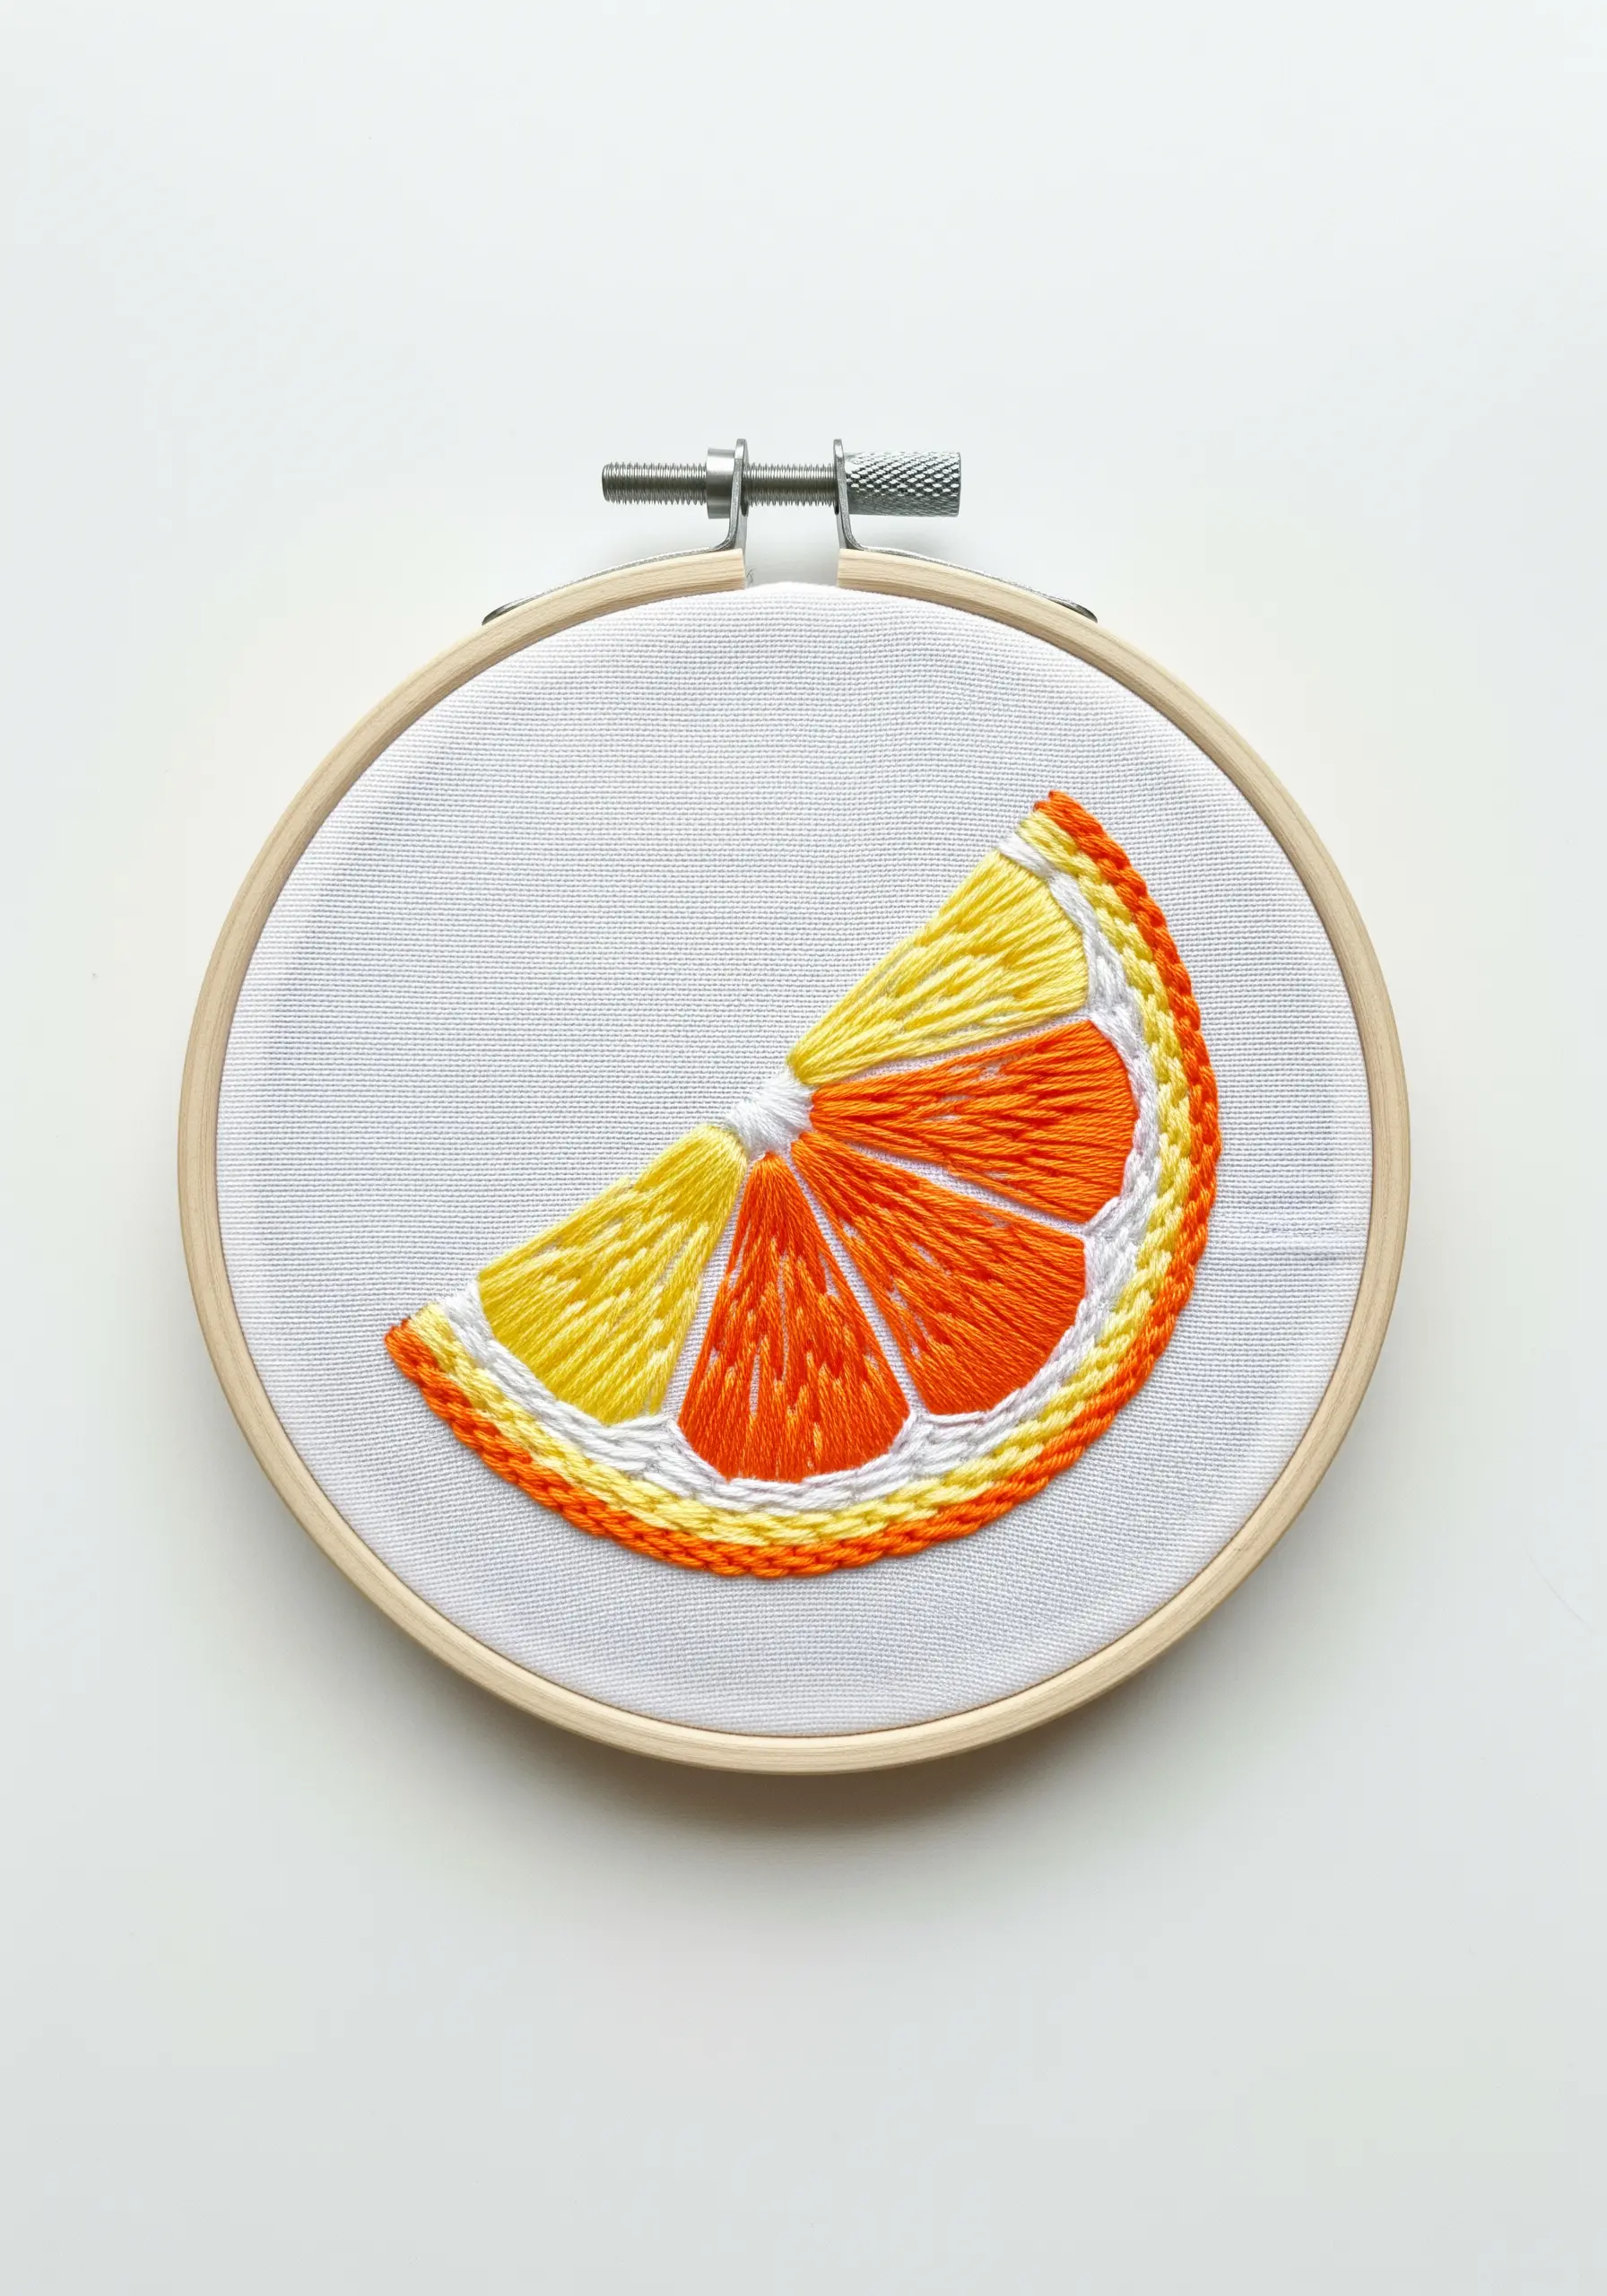
To make this citrus slice look juicy and realistic, use directional satin stitch for the segments.
Angle your stitches so they radiate from the center outwards, mimicking the natural structure of the fruit’s pulp.
Before you fill the segments, outline each one with a split stitch. This creates a clean boundary and makes your fill even neater.
Finish with a textured whipped chain stitch for the rind to create a clear distinction between the pulp and the peel.
21. Suggest Movement with Varied Stitches
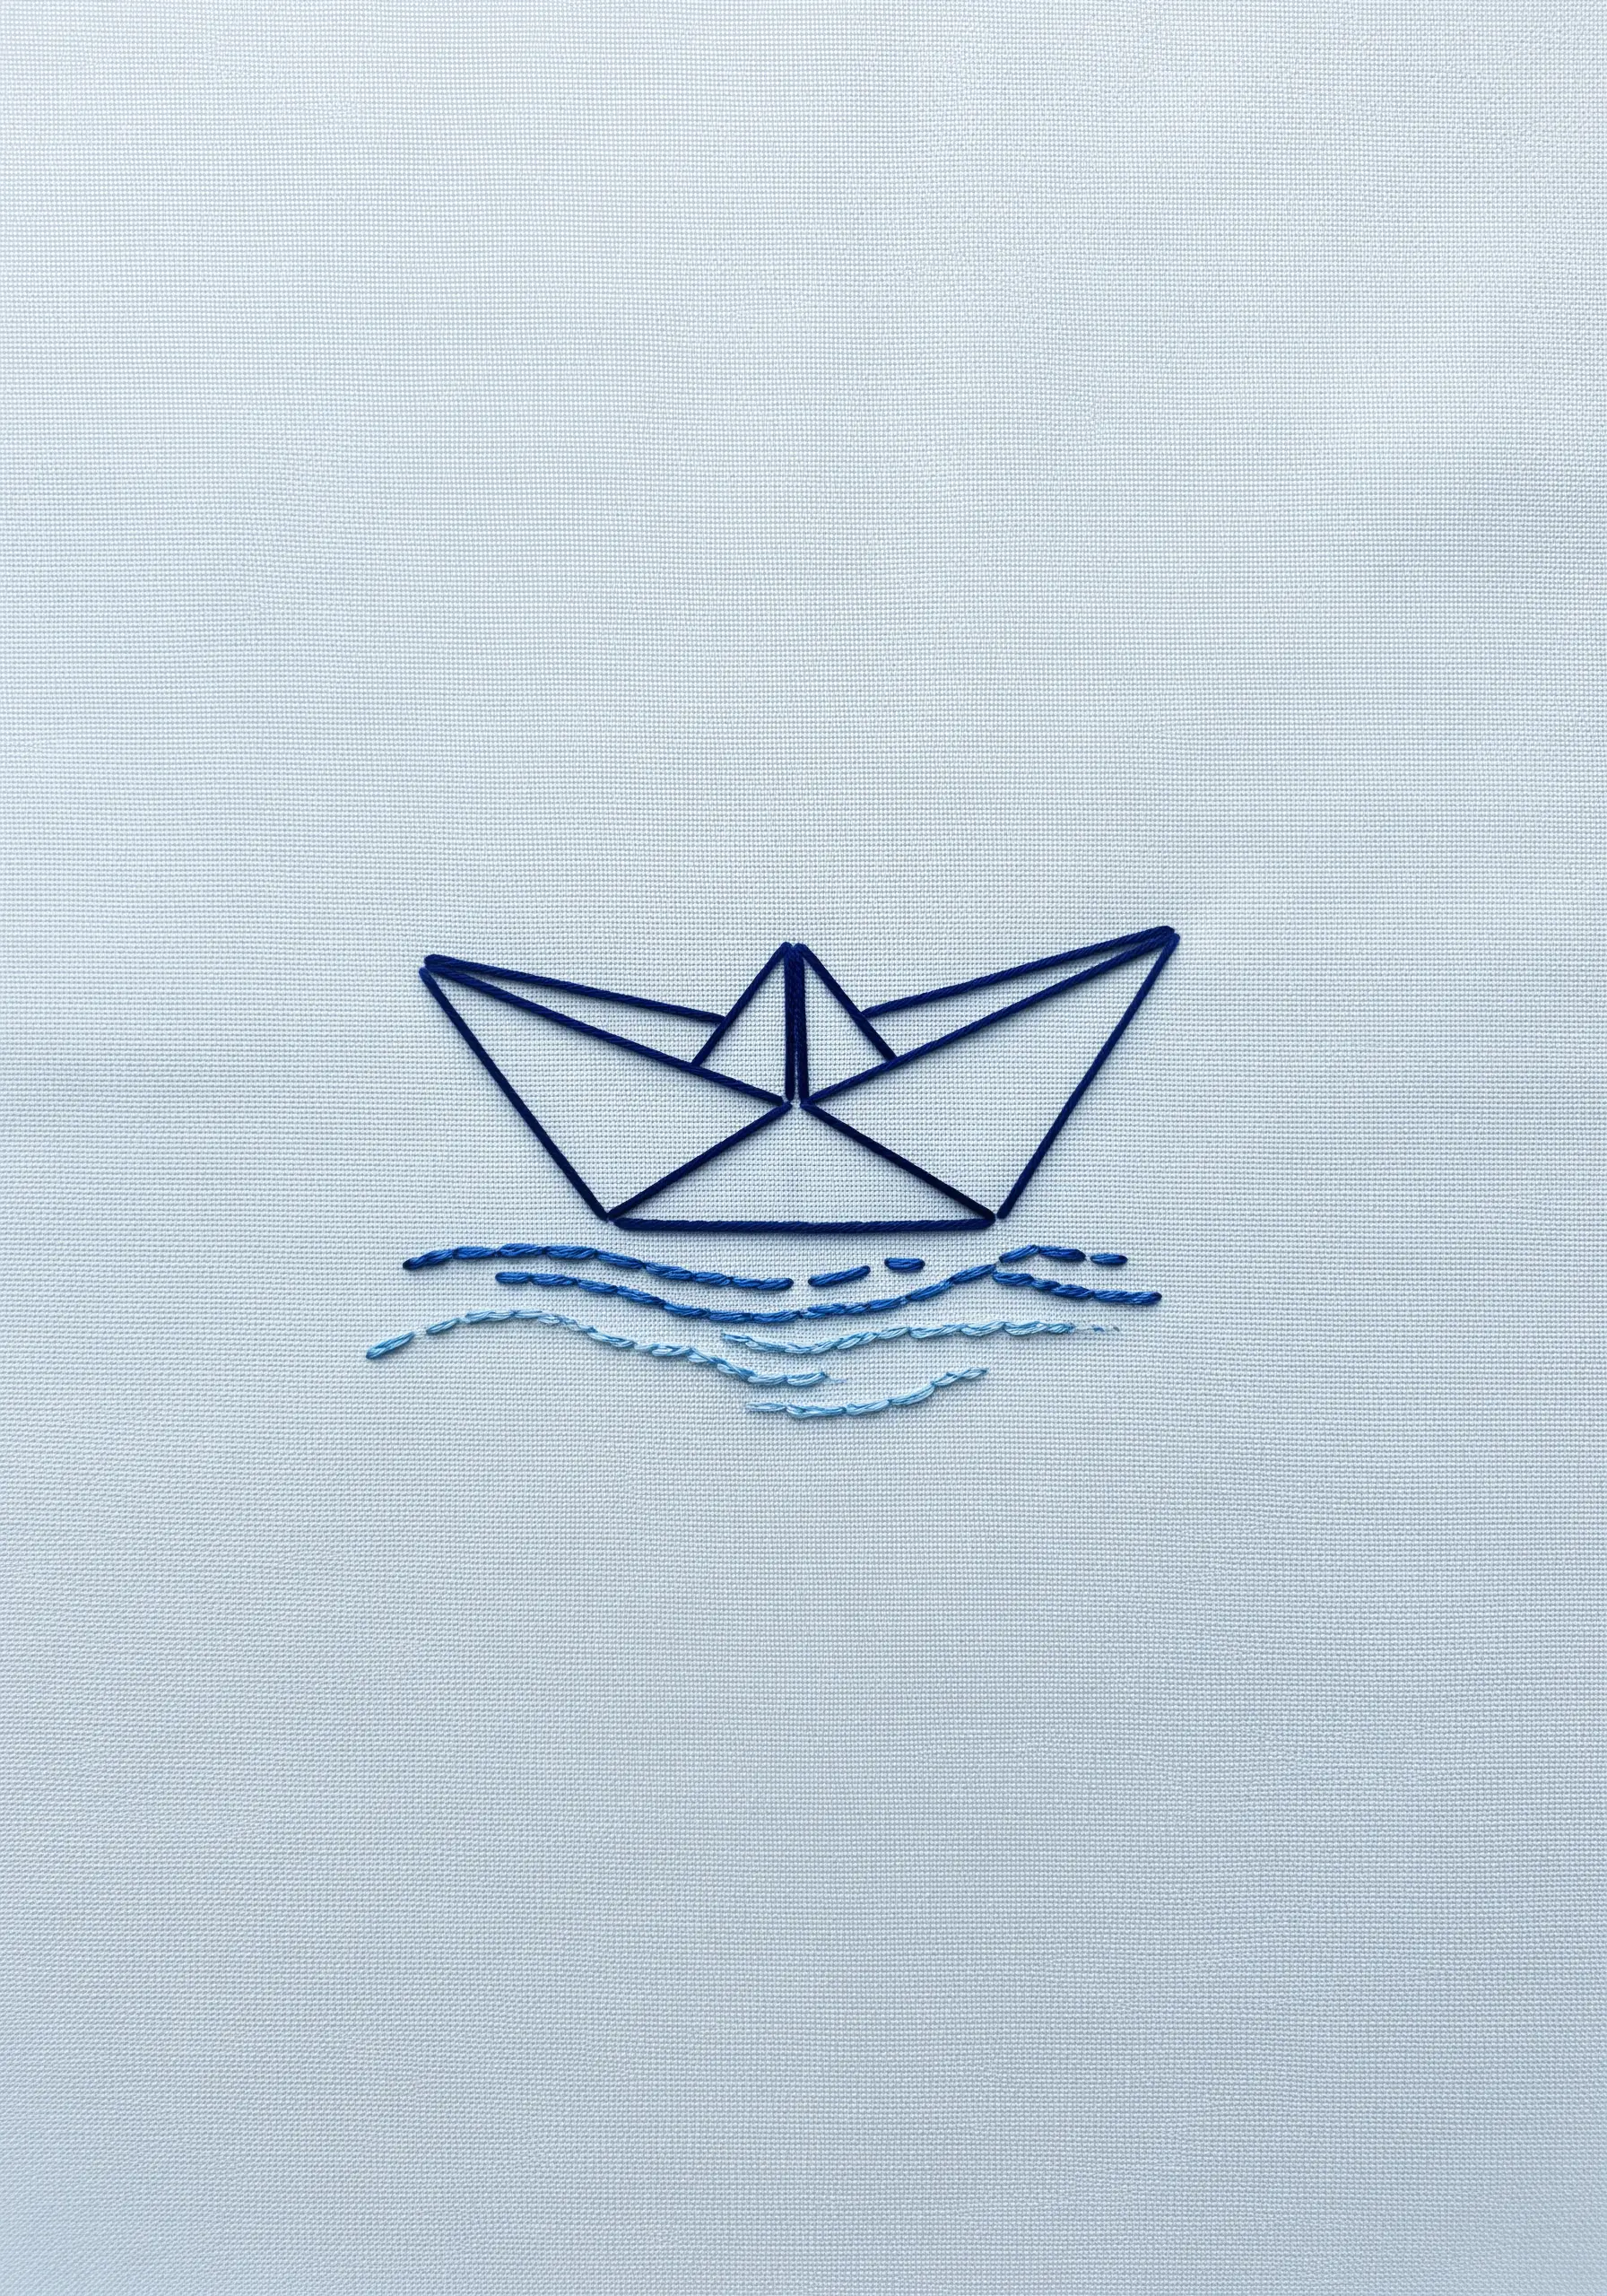
Bring a static image to life by varying your stitches to imply texture and movement.
Use a crisp, solid stem stitch for the geometric folds of the paper boat, giving it structure and definition.
For the water, break from uniformity. Use a mix of short backstitches, seed stitches, and even tiny straight stitches in varying shades of blue.
This subtle chaos creates a gentle ripple effect, making the water feel dynamic in contrast to the still boat.
22. Master Natural Forms with the Fishbone Stitch
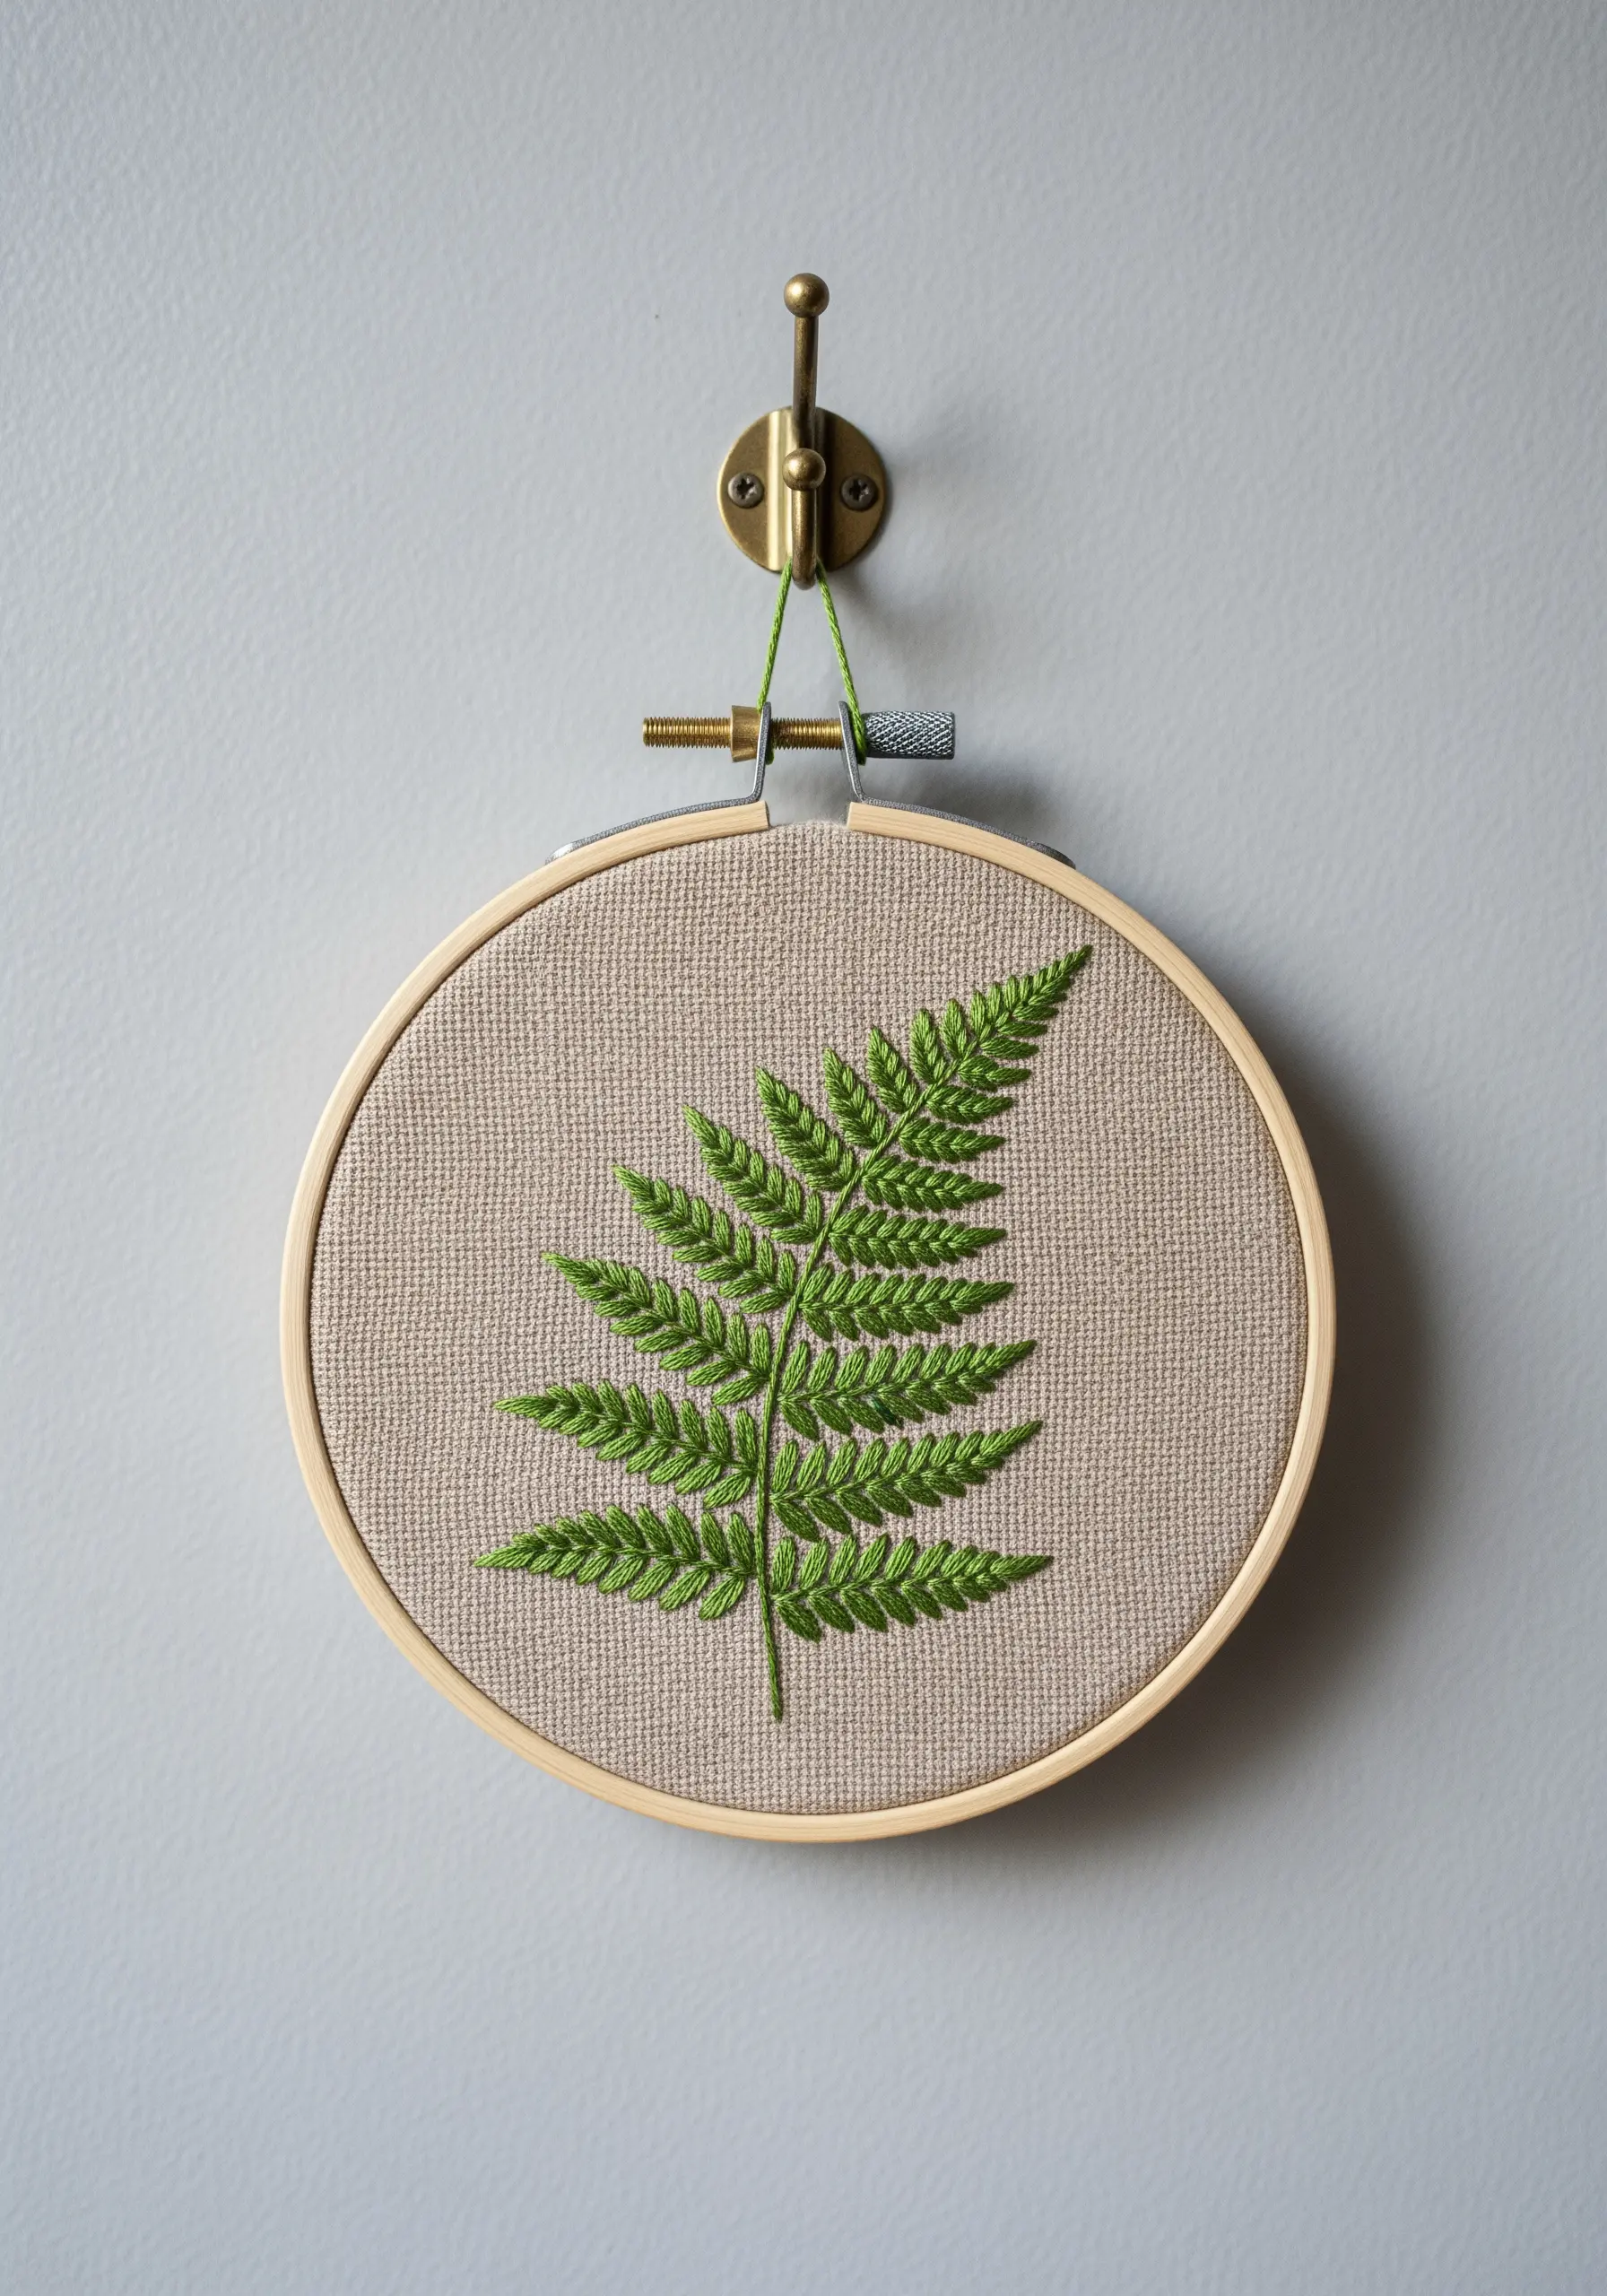
The fishbone stitch is the perfect choice for embroidering leaves like this fern, as it creates the stem and leaflets all in one fluid motion.
You work the stitch from the tip of the leaf downwards, alternating long, diagonal stitches from side to side that cross over in the middle.
This technique naturally forms a central rib and gives the leaf a beautiful, organic texture and shape.
Using a slightly variegated green thread can further enhance the realistic effect with subtle shifts in color.
23. Build Your Stitch Vocabulary with a Sampler
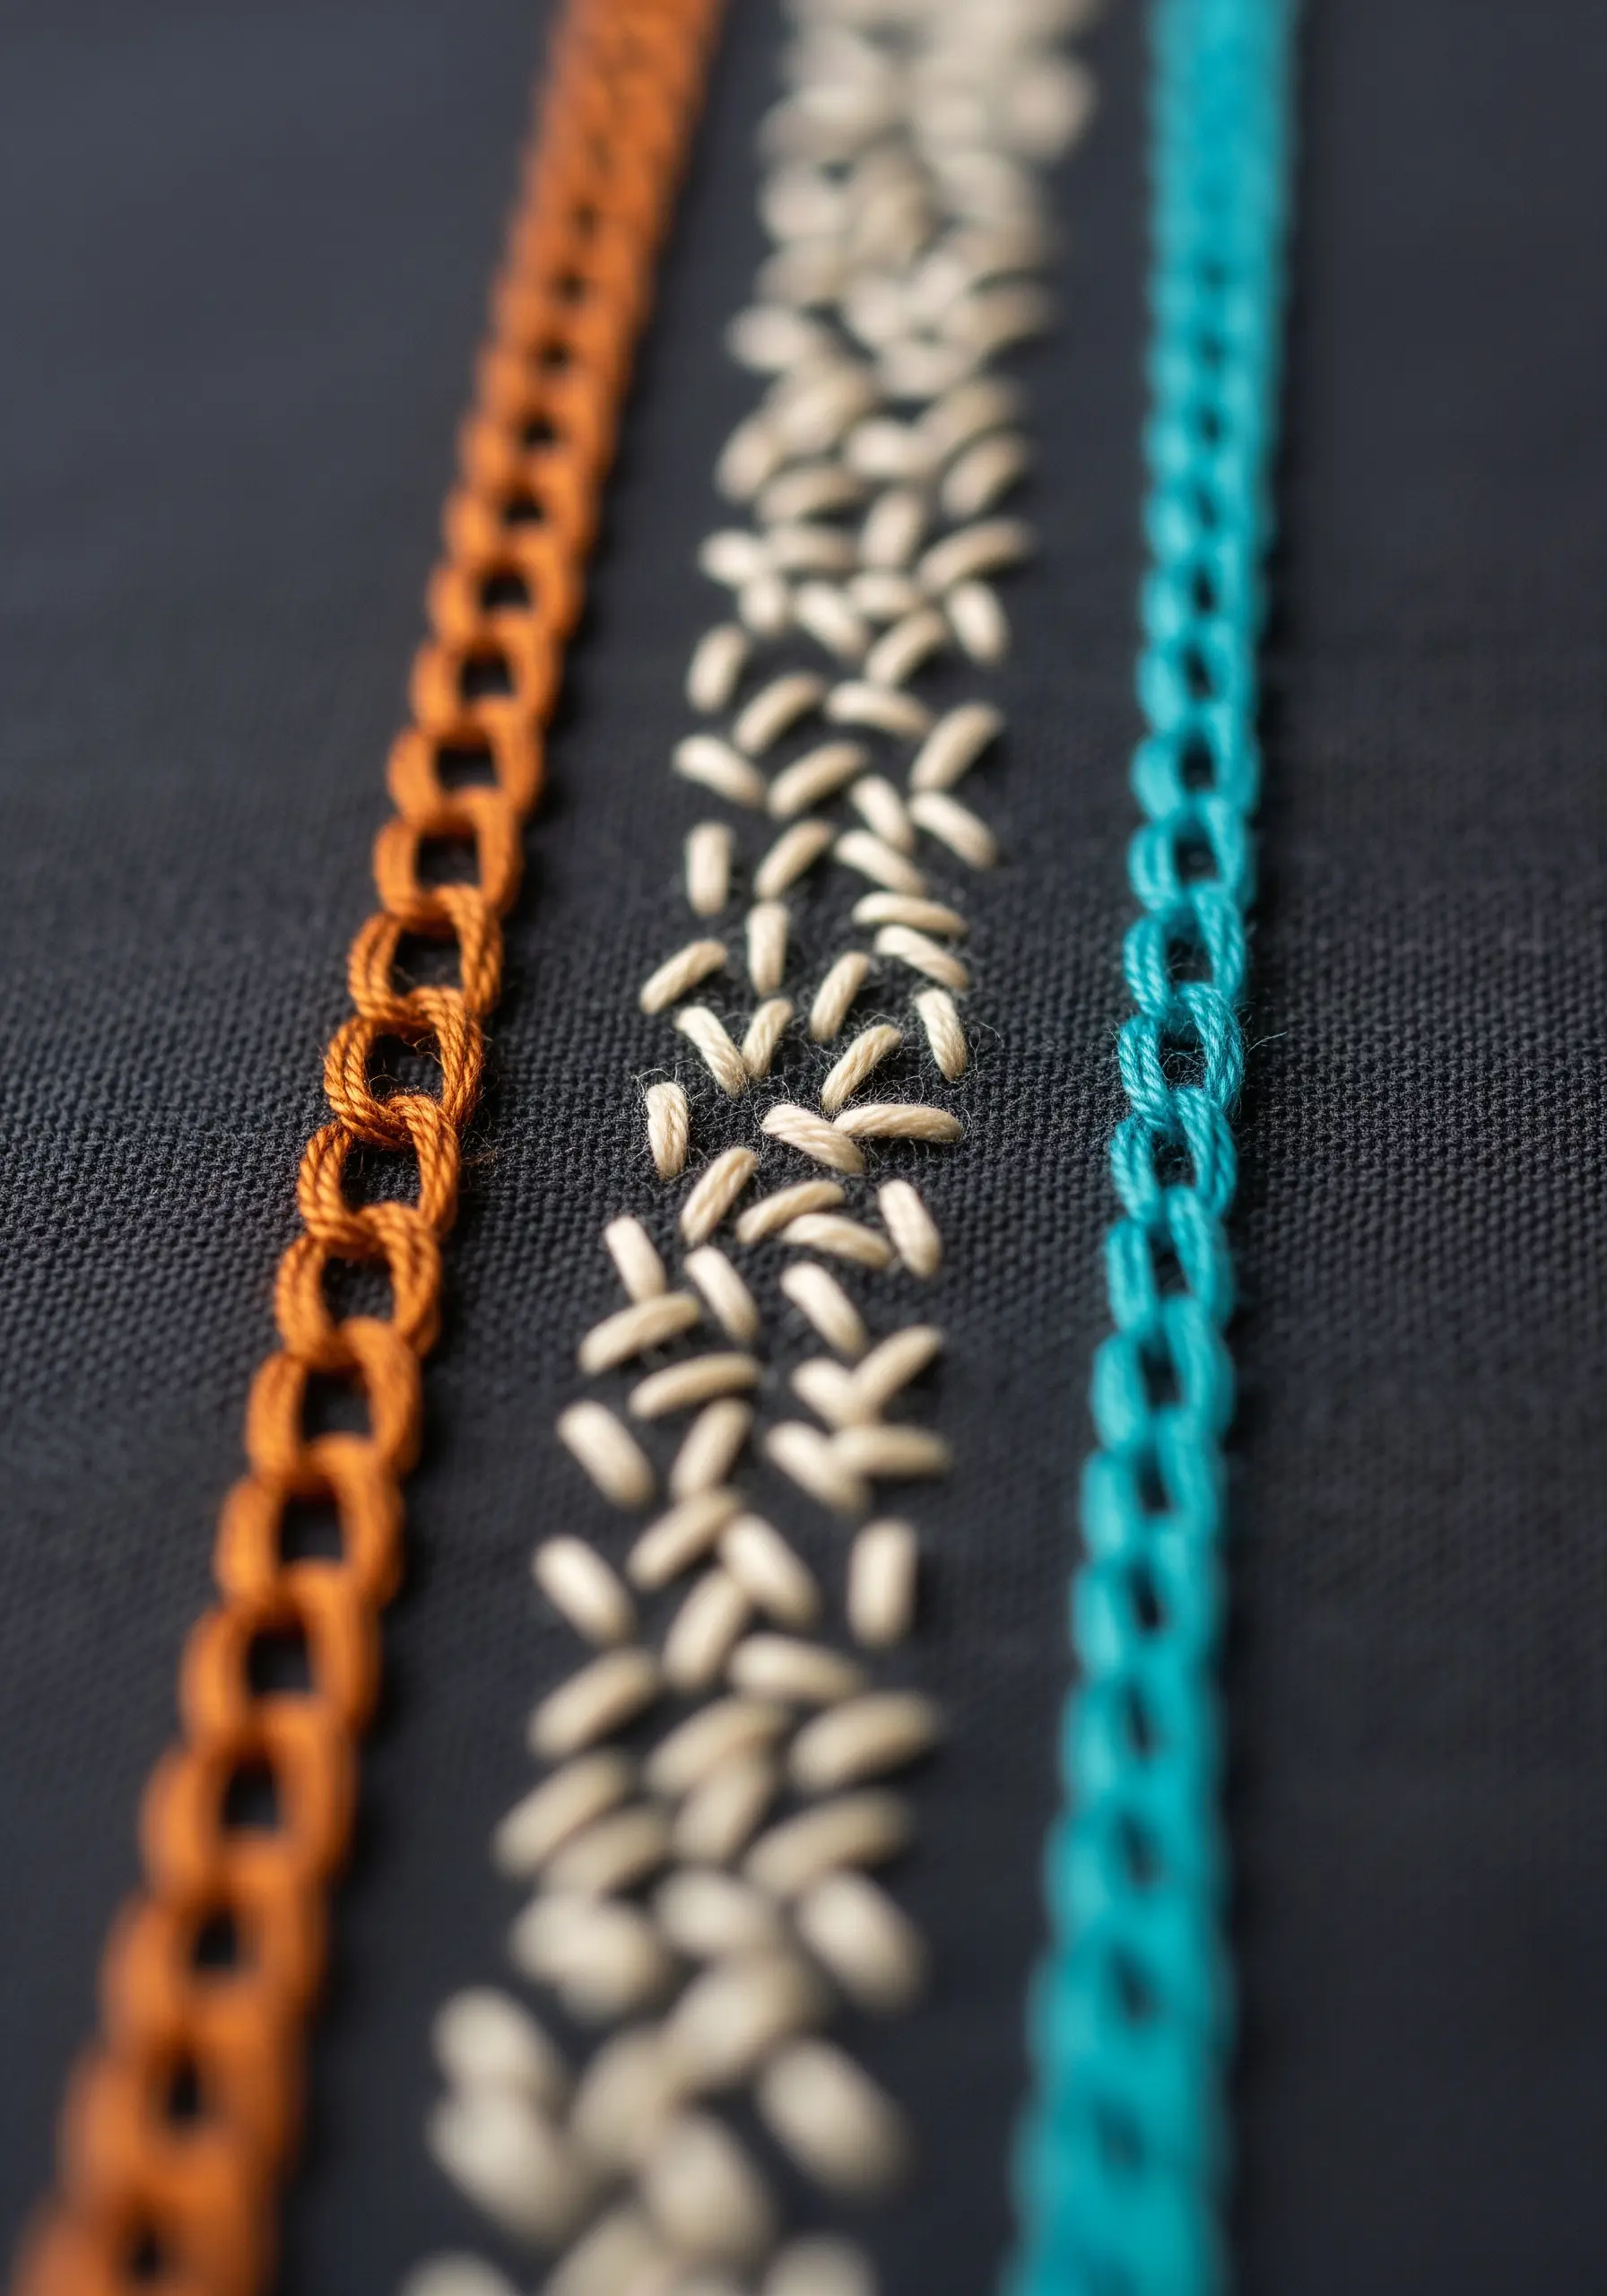
Dedicate a small hoop to practicing and perfecting different stitches. It’s a low-pressure way to build your skills and create a beautiful reference piece.
Here, you can try an open chain stitch (left), a textured rice stitch (center), and a heavy chain stitch (right).
Experiment with different thread counts and colors to see how they change the character of each stitch.
This exercise is not just practice; it’s a way to understand how texture and line can work together in future compositions.
24. Create Root Vegetable Texture with Wrapped Stitches
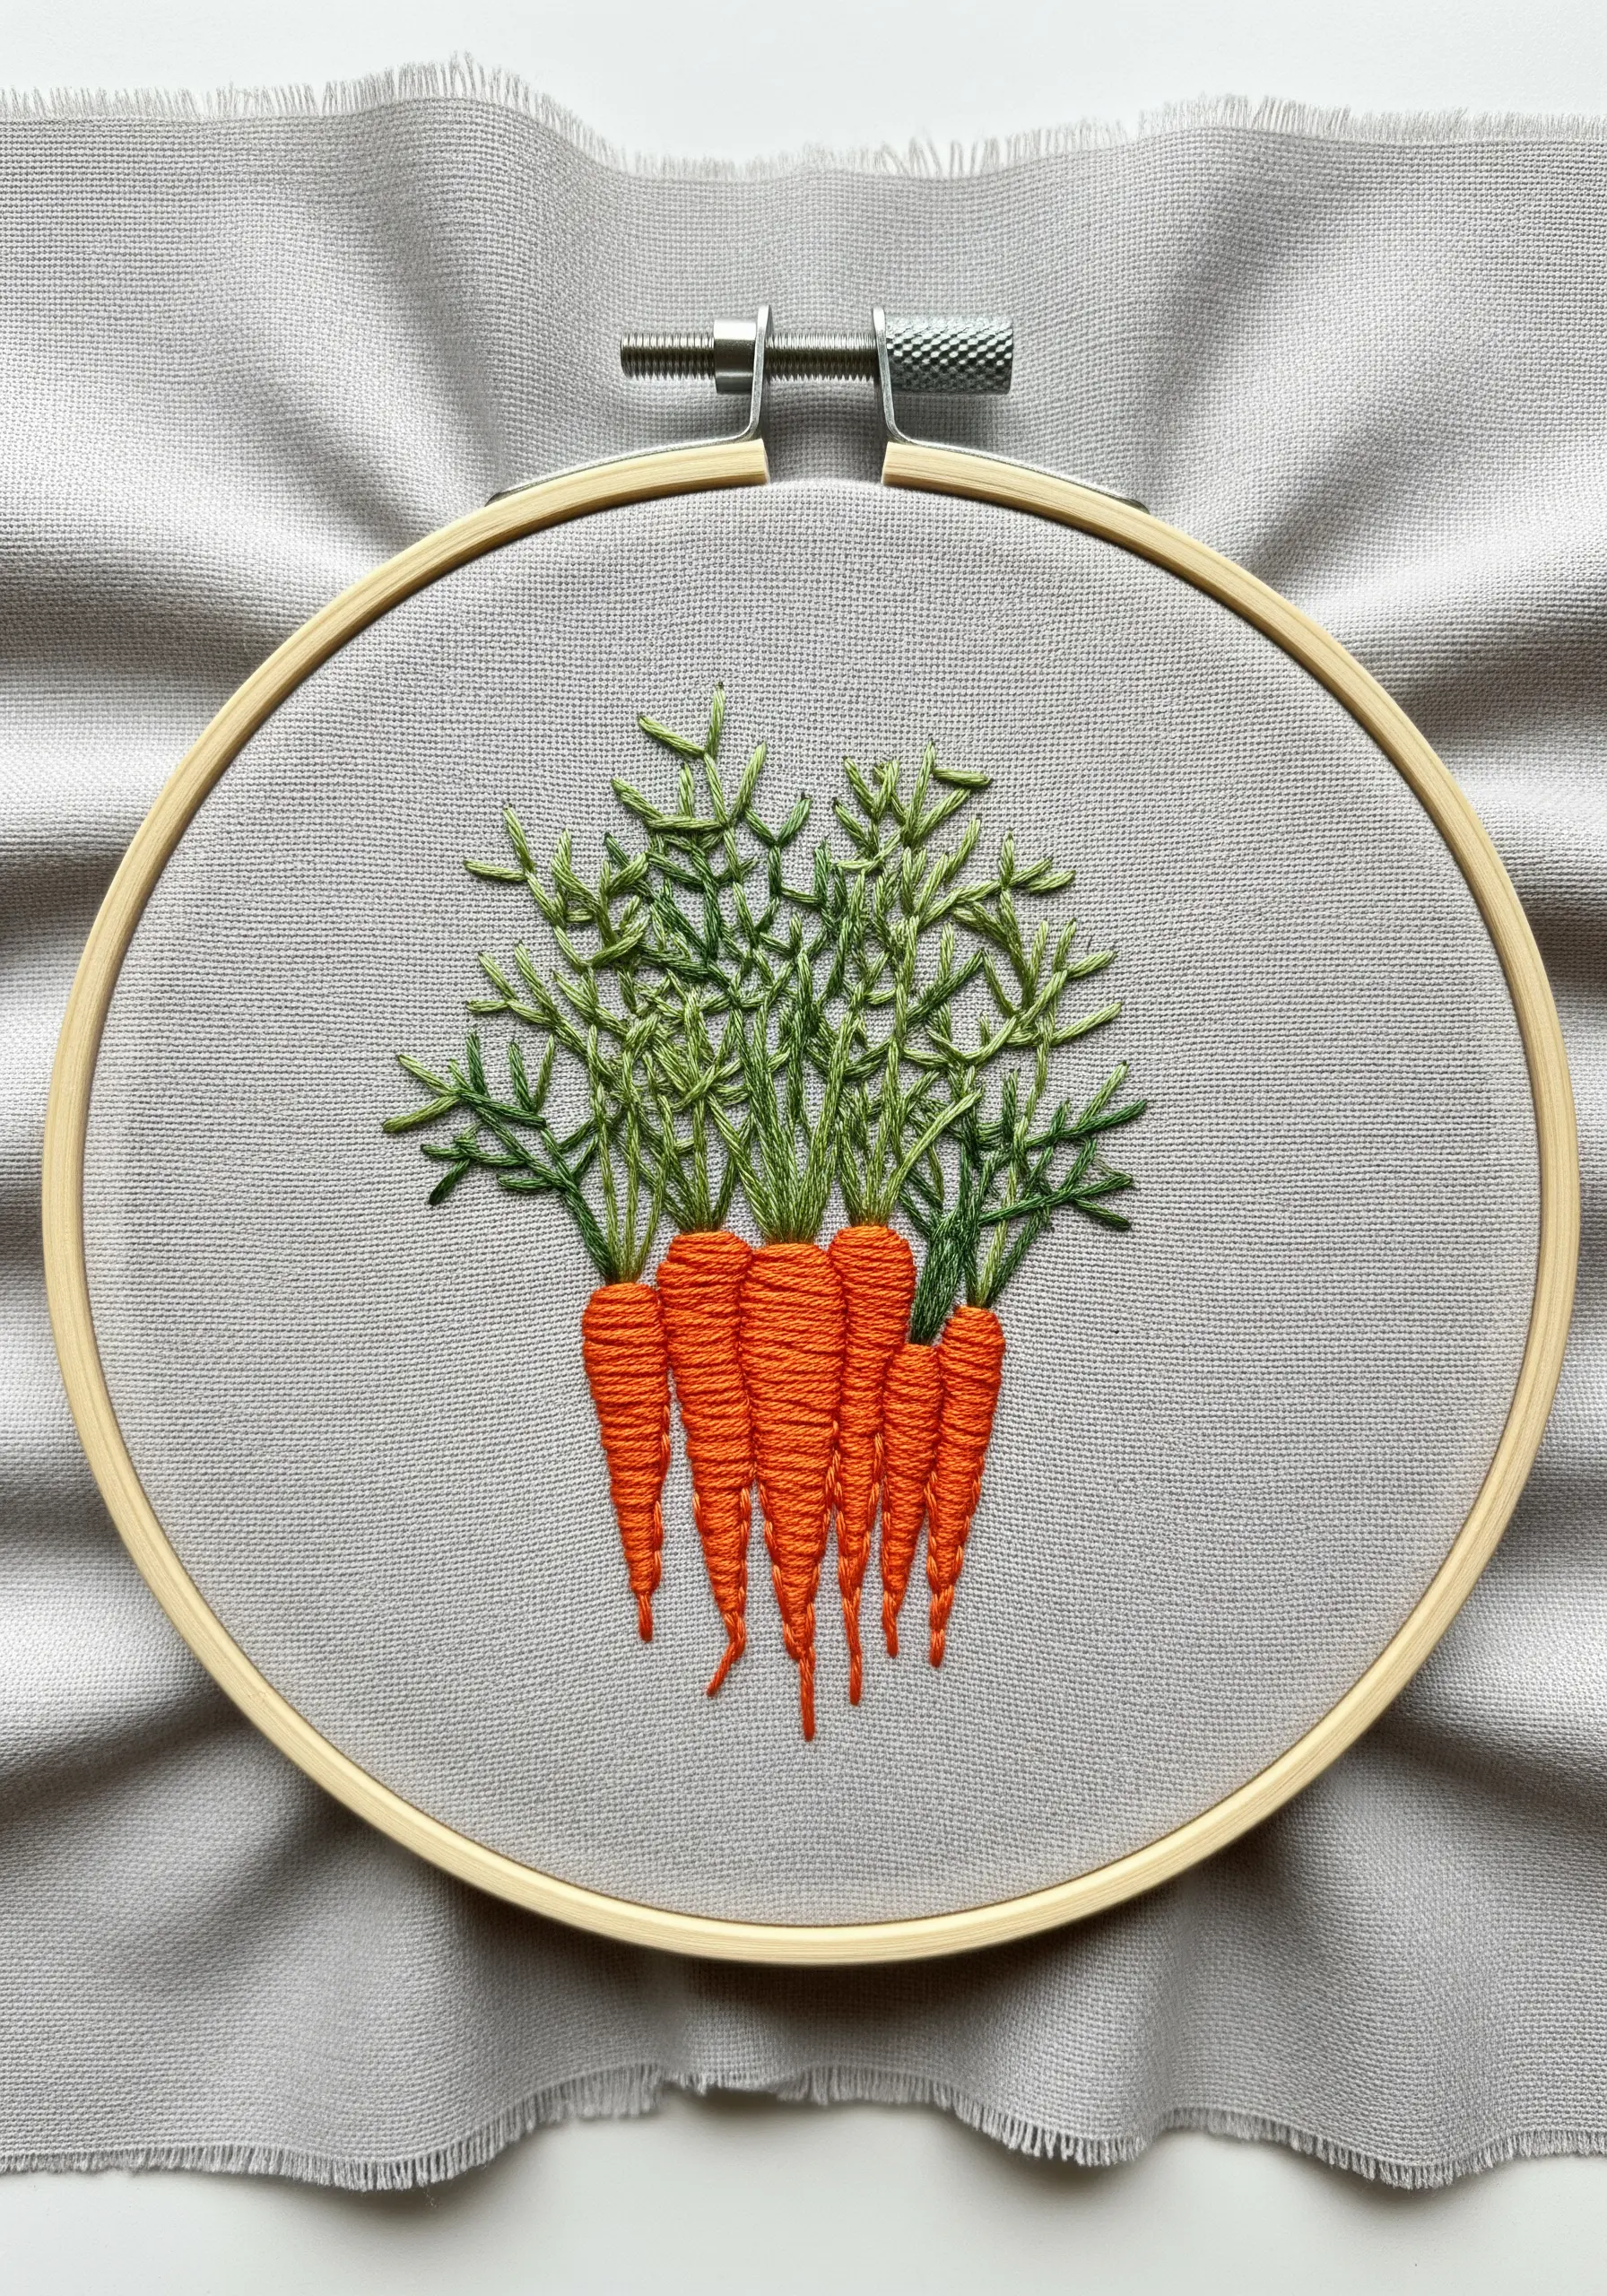
To give your carrots a realistic, ridged texture, use a wrapped backstitch or horizontal satin stitches.
First, fill the carrot shape with vertical straight stitches. Then, come back with a second thread and wrap it horizontally around those stitches, creating the subtle lines of a real carrot.
For the leafy tops, use a chaotic mix of fly stitches and straight stitches in several shades of green. This freeform approach makes them look lush and naturally untamed.
25. Form a Delicate Ginkgo with Radiating Stitches

This elegant ginkgo leaf is created entirely with strategically placed straight stitches.
The key is to establish the anchor points first: the base of the stem and the scalloped outer edge of the leaf.
Then, simply fill the shape with long straight stitches that radiate from the base to the top edge, fanning out as you go.
A backstitched outline adds the final touch of definition, turning a series of simple lines into a recognizable and graceful botanical form.
26. Give Coffee Beans a 3D Effect with Padding
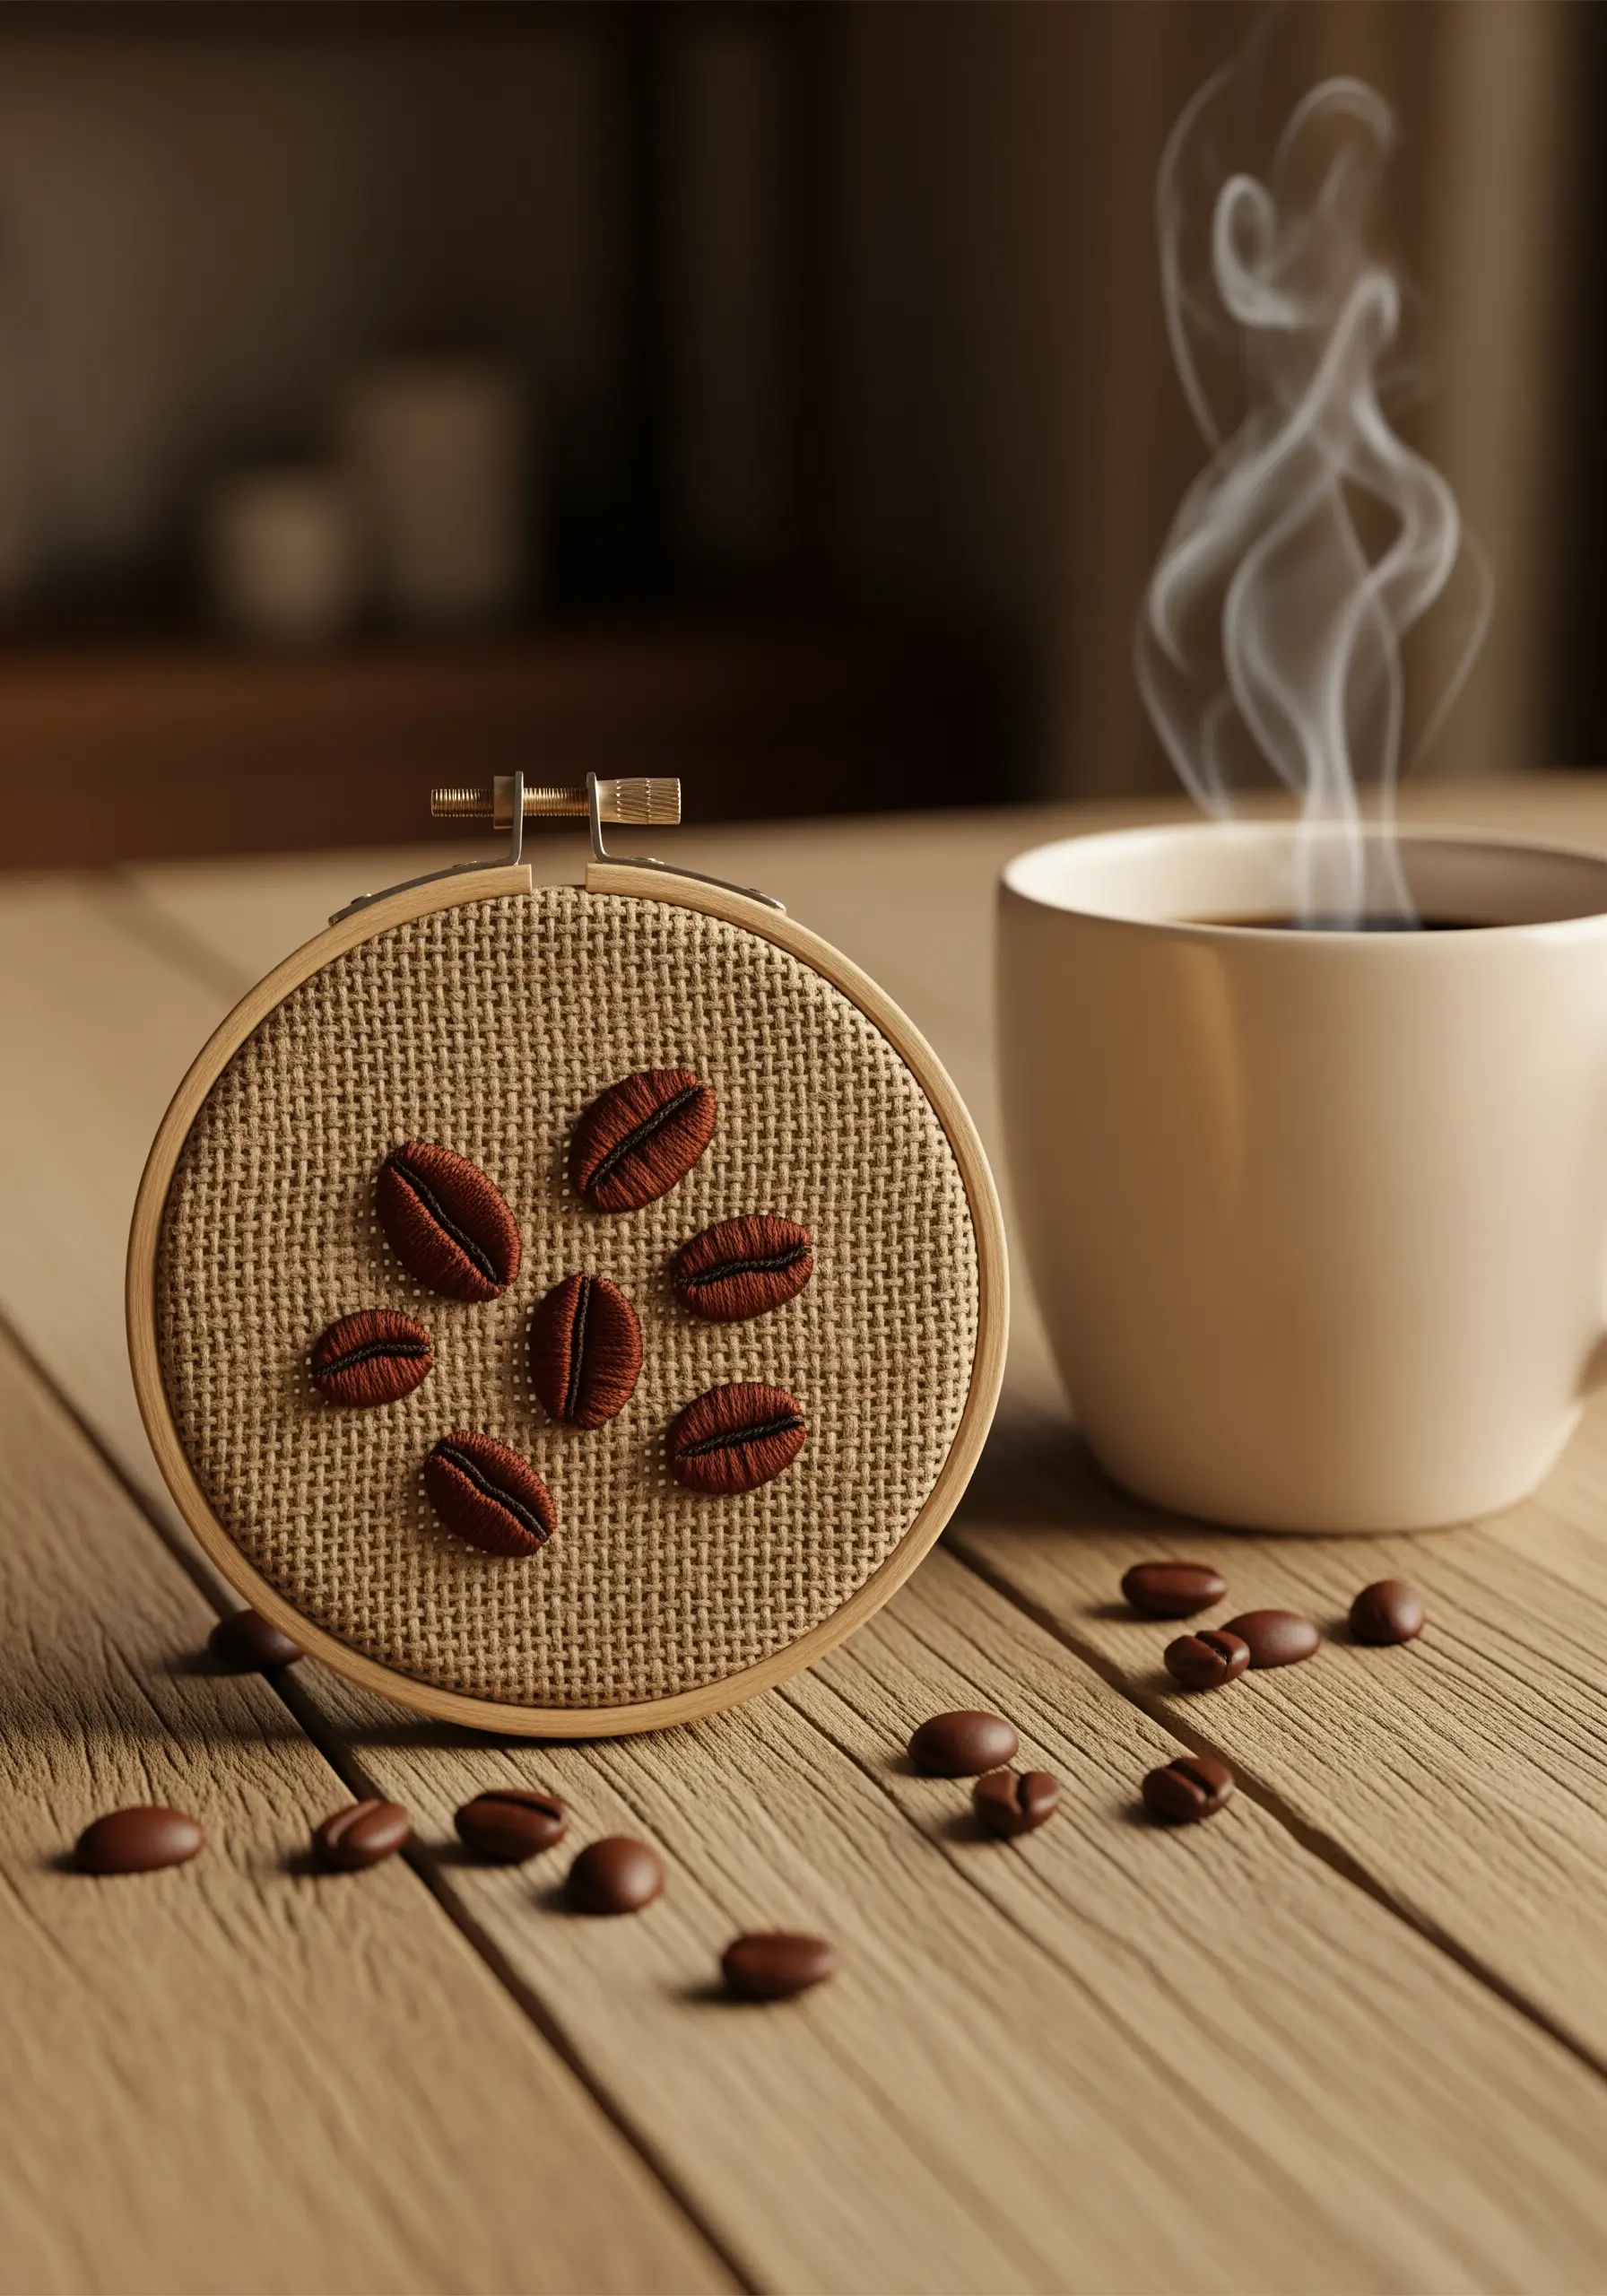
To make your embroidered coffee beans look convincingly plump and three-dimensional, use a padded satin stitch.
First, fill the bean shape with a base layer of small running stitches or seed stitches. This creates a small mound for your final stitches to sit on.
Then, cover this padding with smooth, dense satin stitches, angling them slightly to mimic the curve of the bean.
Add the central crevice with a single straight stitch in a darker brown thread to complete the realistic effect.
27. Achieve a Woven Texture with Brick Stitch
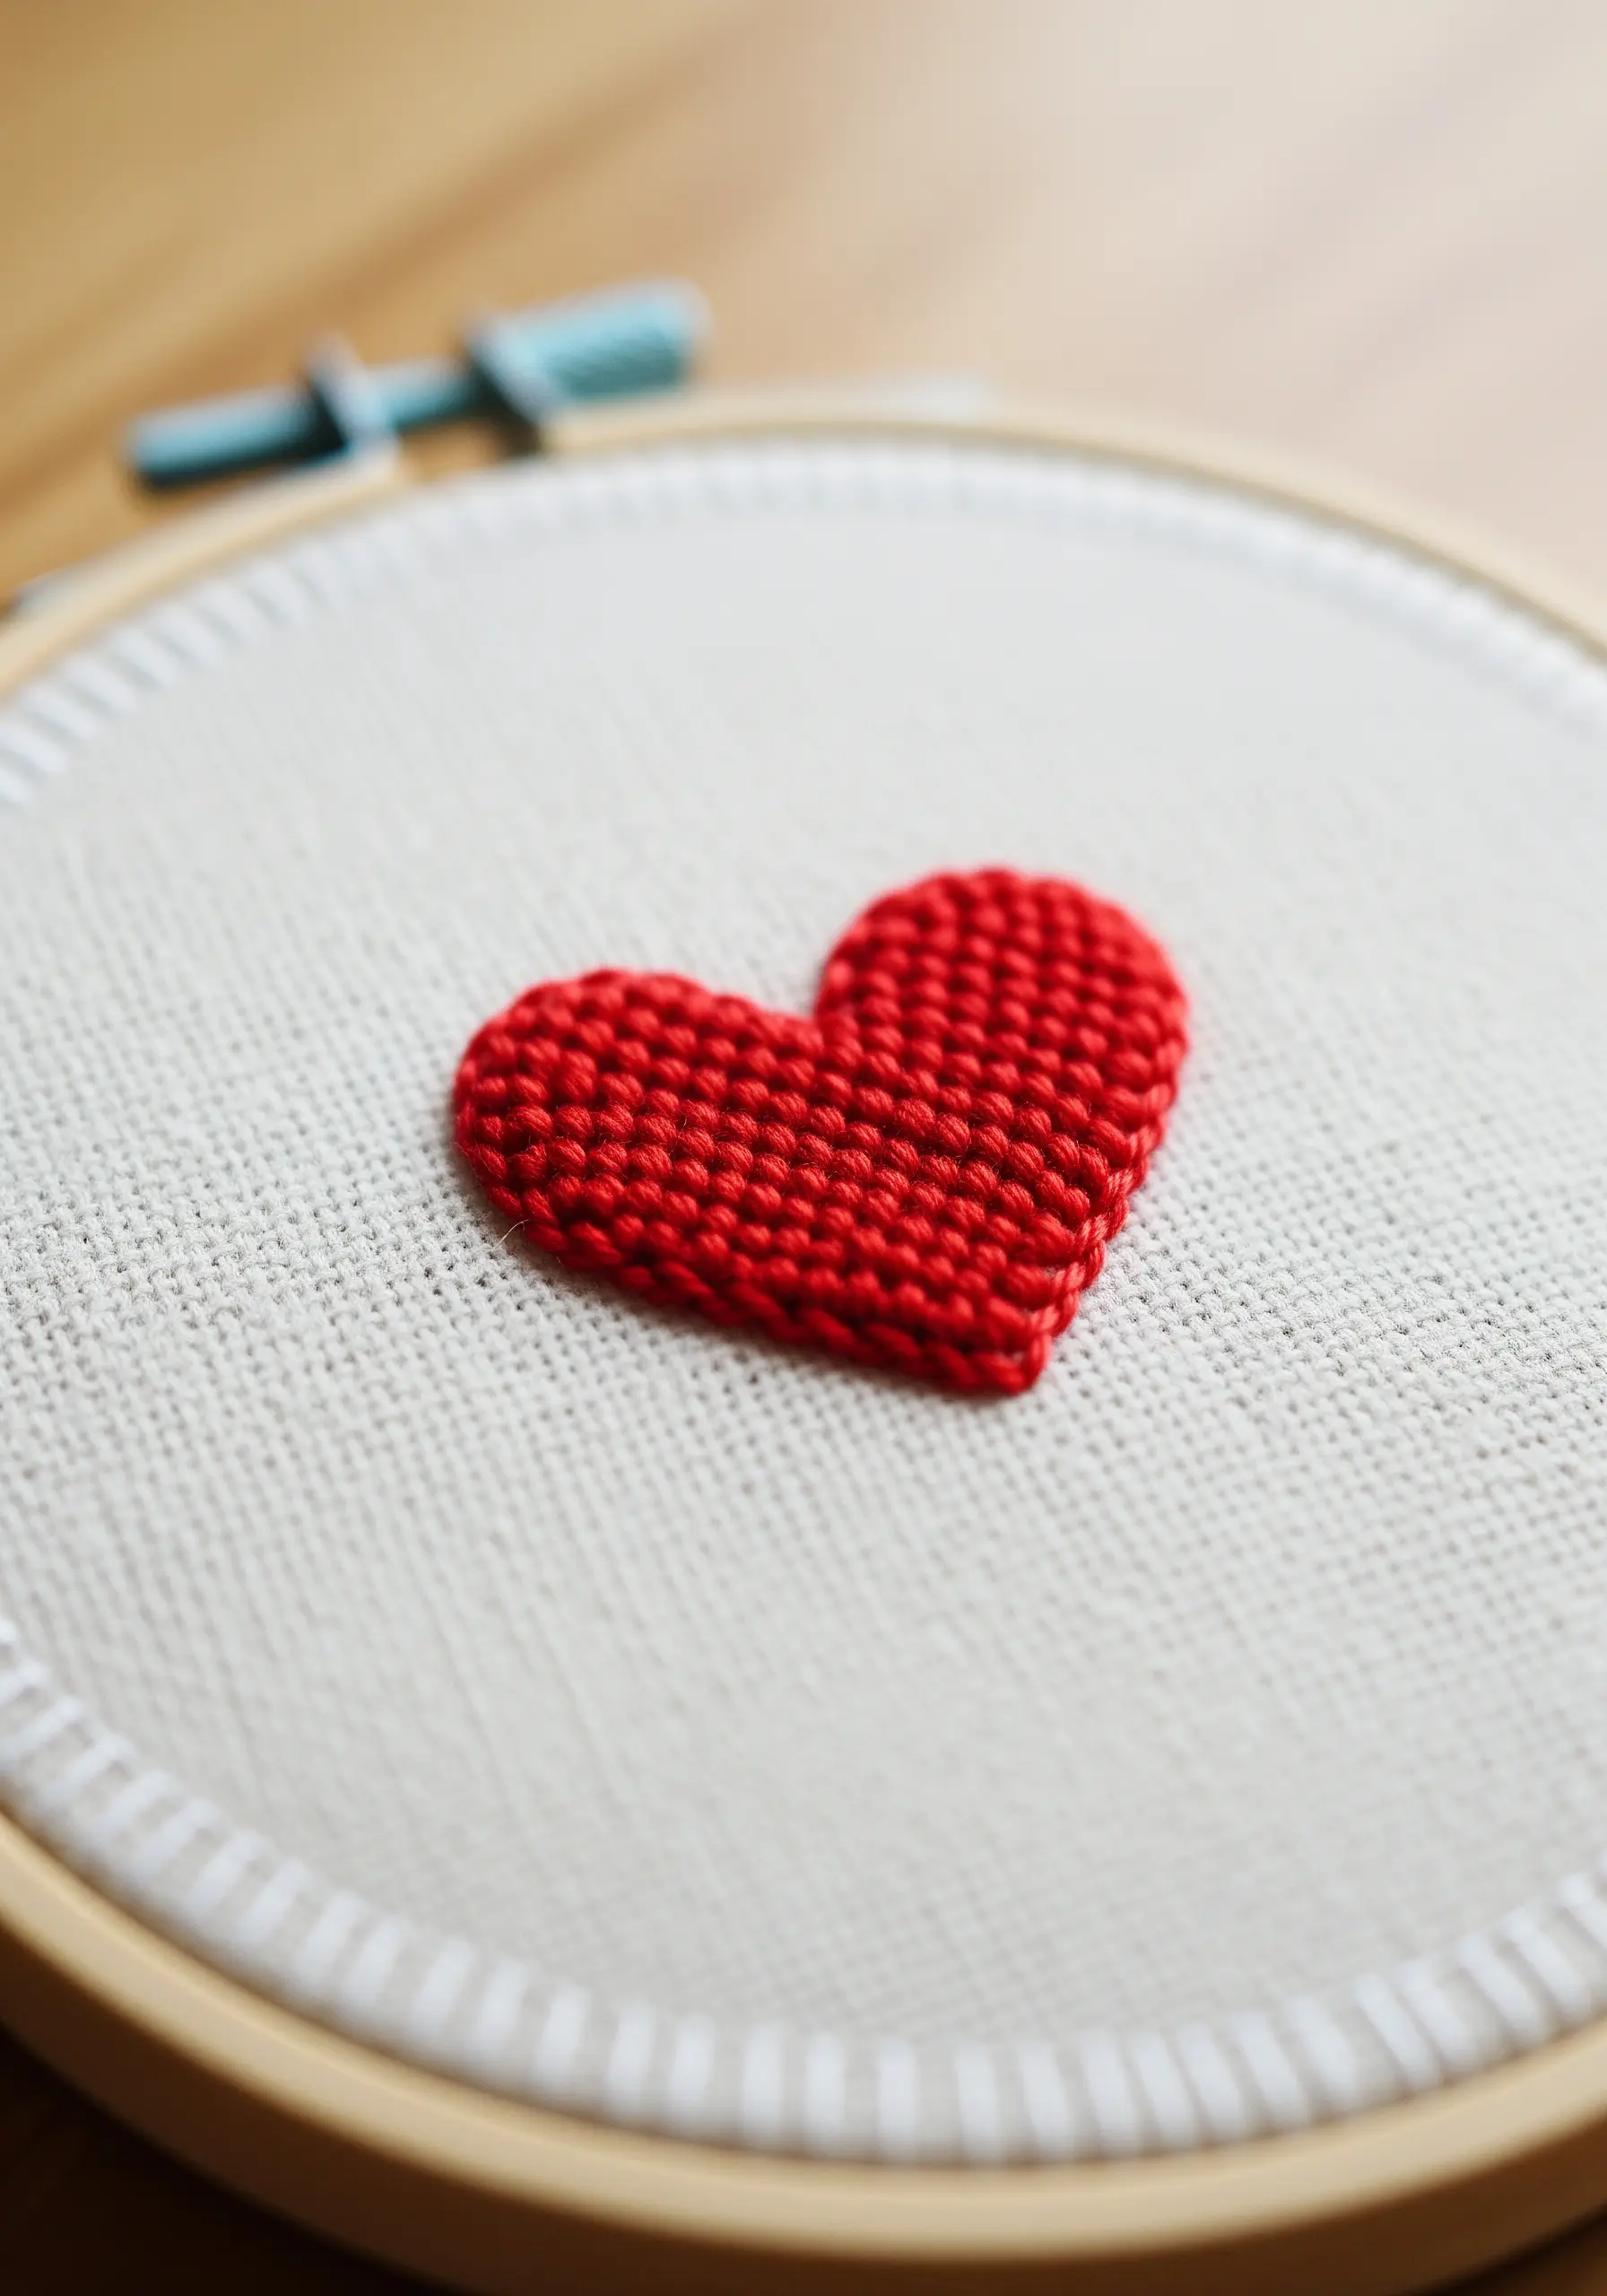
For a perfectly smooth, solid fill that has a subtle woven texture, use the brick stitch.
This technique involves rows of straight satin stitches, but you intentionally stagger the beginning of each stitch in the subsequent row, just like laying bricks.
This method eliminates the gaps that can sometimes appear between rows of standard satin stitch and creates a beautiful, interlocking surface.
It’s an excellent choice for filling solid shapes like this heart, giving it a neat, tactile finish.
28. Define Geometric Shapes with a Raised Outline
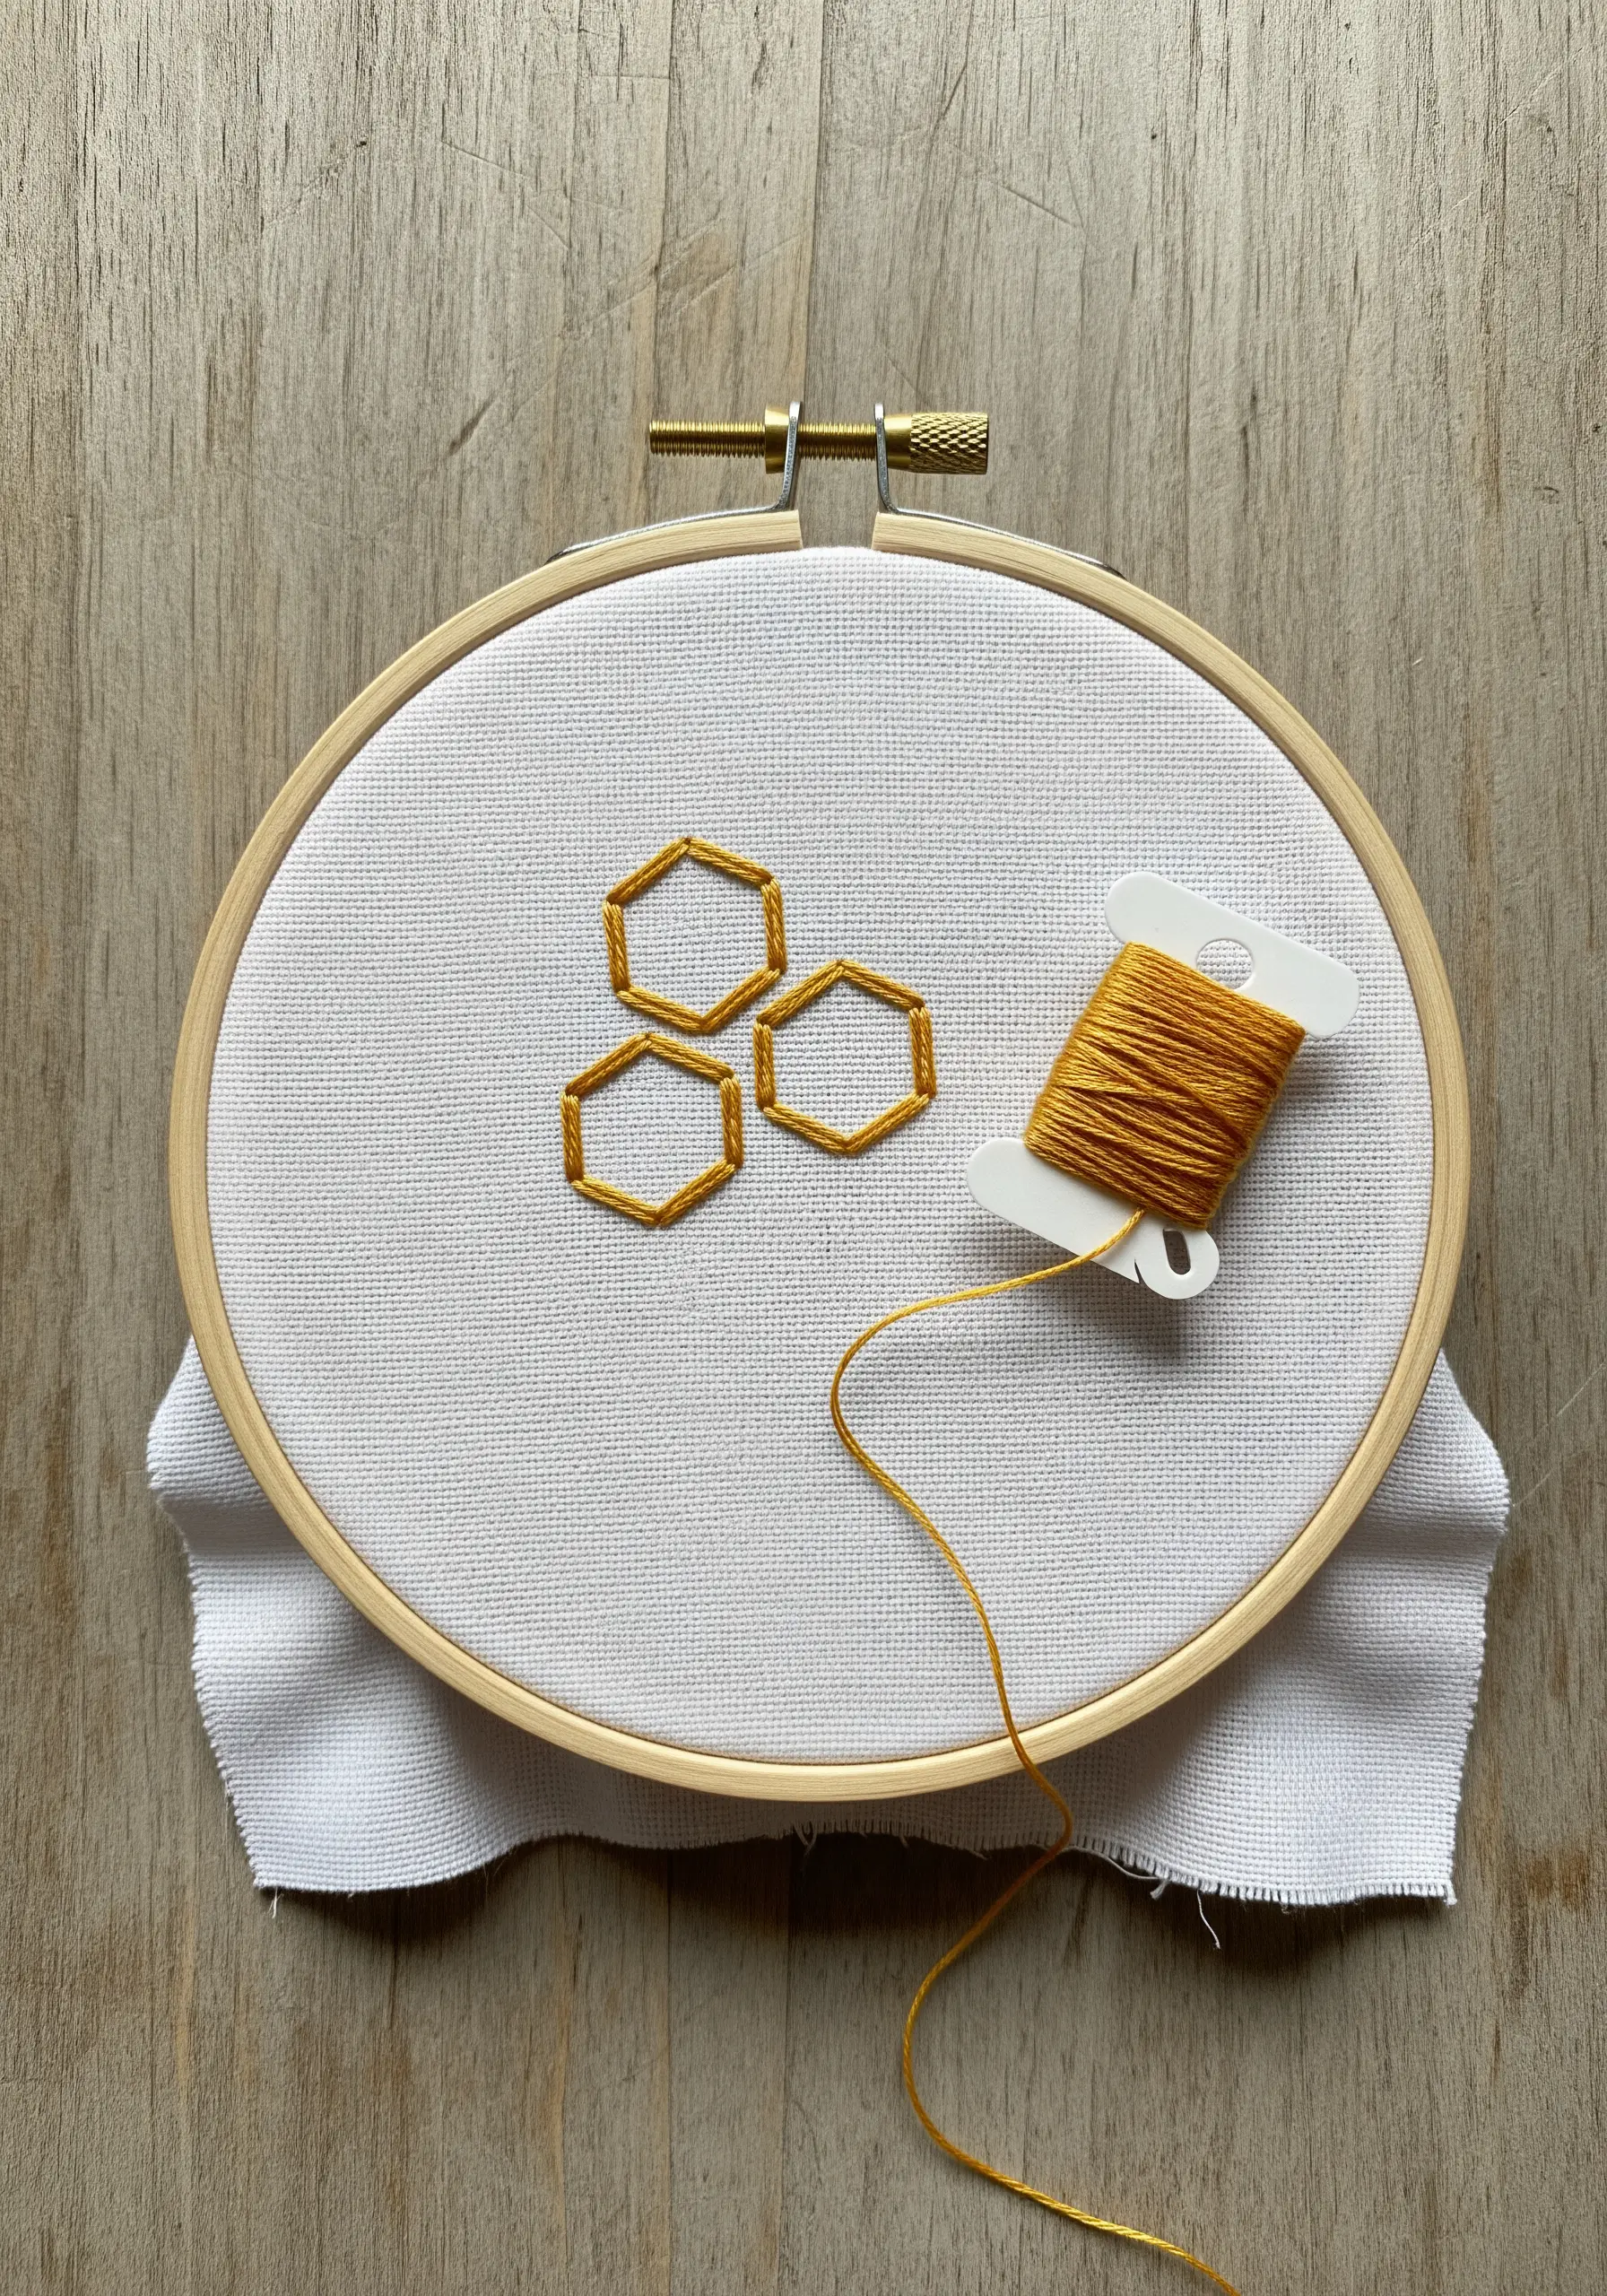
Make simple geometric shapes like these honeycombs pop by giving them a raised, defined edge.
First, create the hexagonal outlines using a simple backstitch. This will serve as your guide.
Next, fill each side of the hexagon with short, dense satin stitches laid perpendicularly over the backstitch line.
This technique creates a sharp, dimensional border that gives the minimalist design a clean, polished, and almost architectural feel.
29. Combine Stitches for a Graphic Sailboat
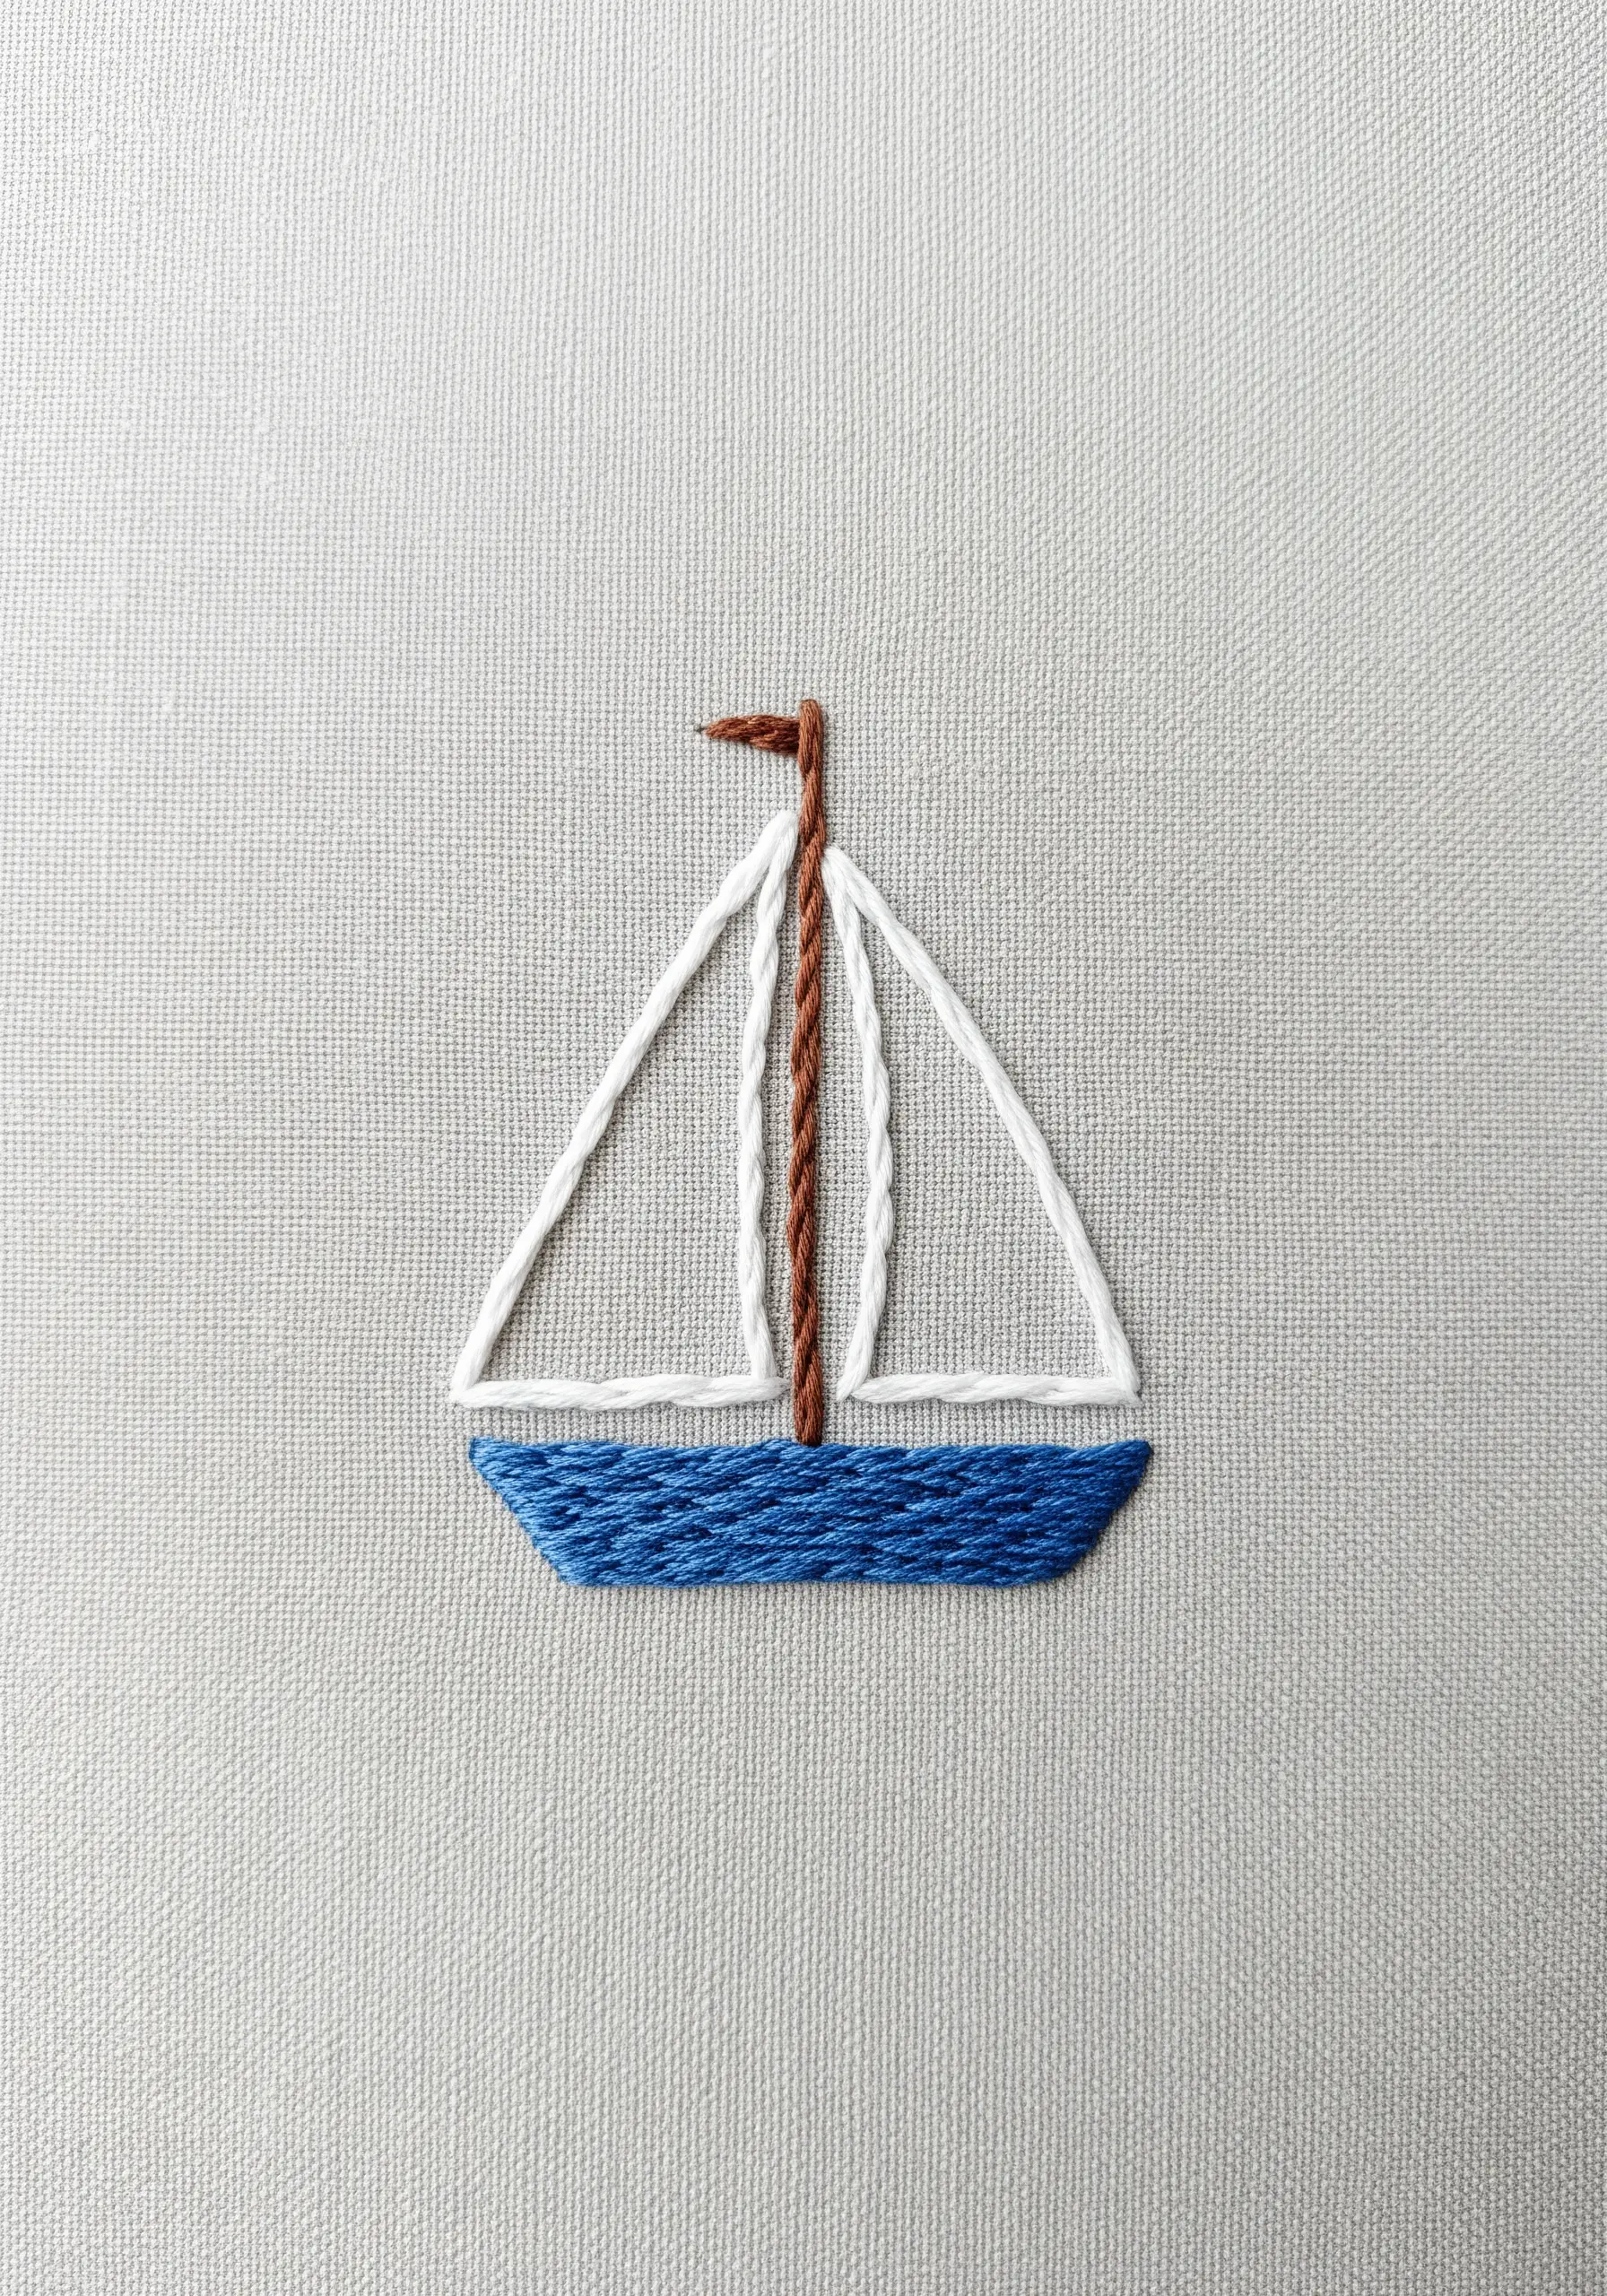
This simple sailboat design is elevated by the thoughtful combination of different stitches and textures.
Use a smooth satin stitch to fill the boat’s hull, creating a solid block of color.
For the mast and sail outlines, use a whipped backstitch to create clean, continuous lines that stand out.
To create the twisted rope texture on the mast, simply twist two colors of floss together before threading your needle and stitching as usual.
30. Blend Colors with Long-and-Short Stitch
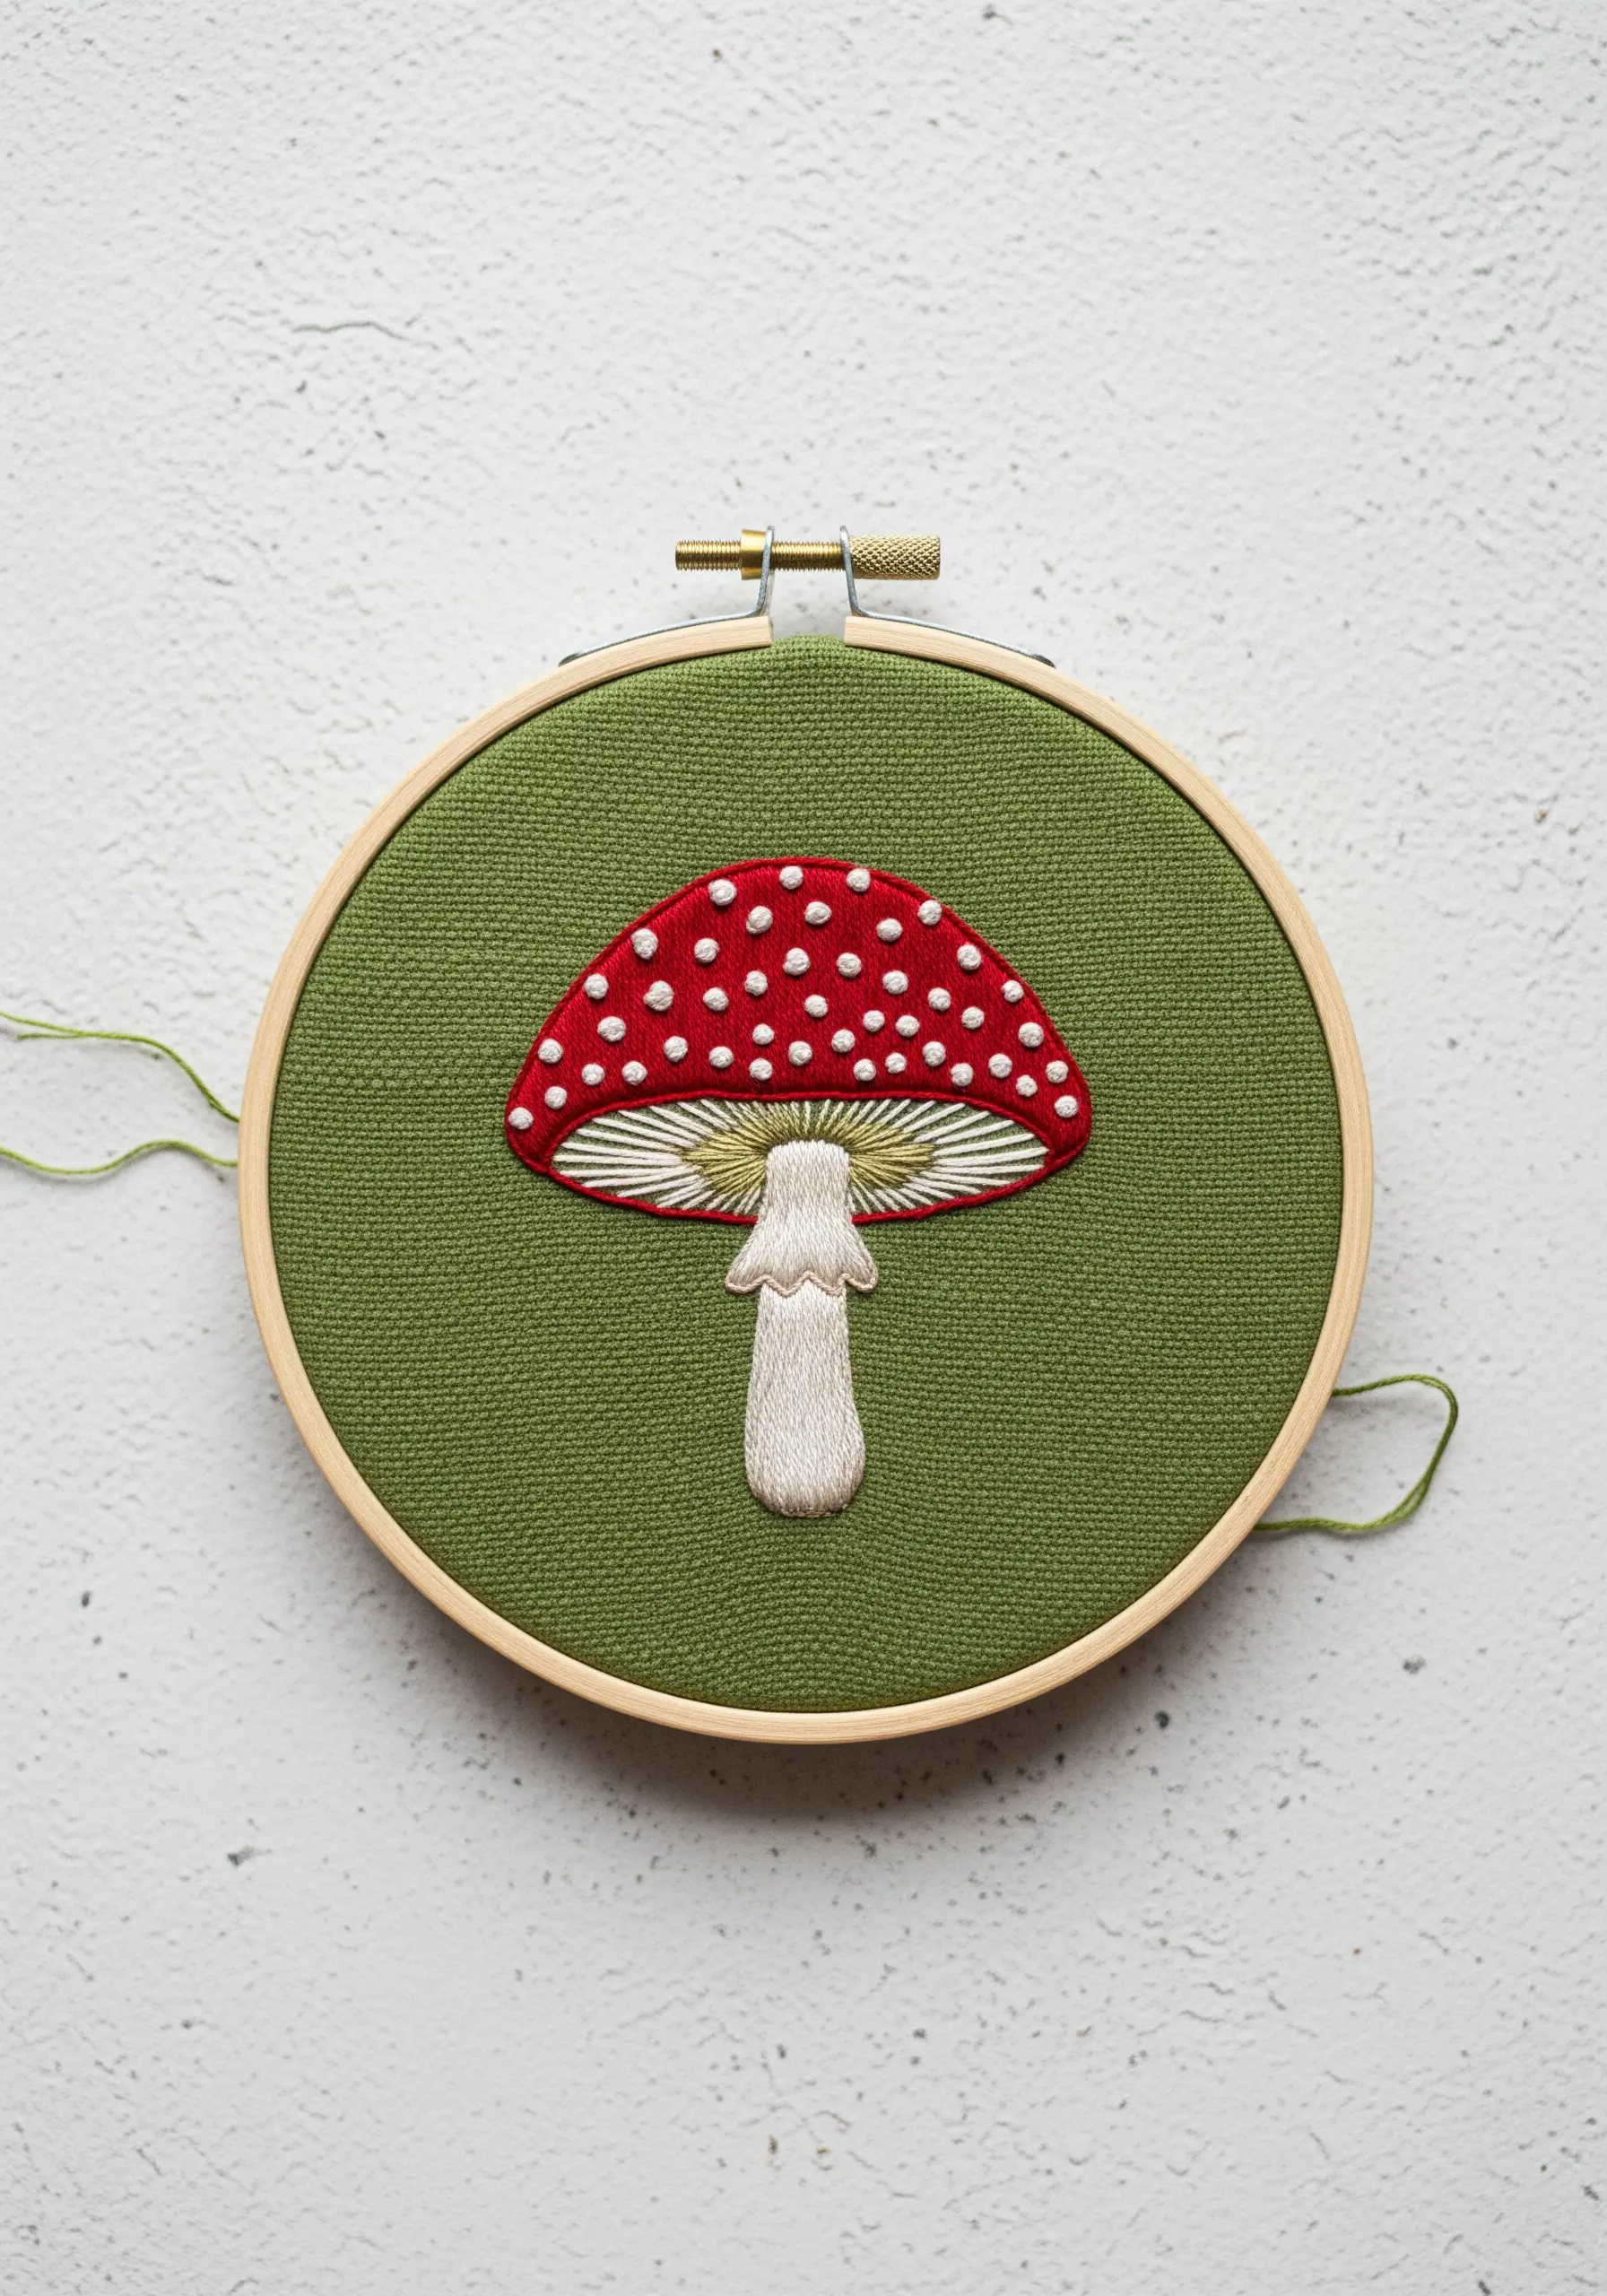
Create a soft, painted look on this mushroom cap using the long-and-short stitch, also known as thread painting.
Start with a row of alternating long and short stitches along the edge of the shape. The next row of stitches comes up through the fabric and goes down into the first layer, interlocking the colors.
This technique allows you to blend shades of red and white seamlessly, creating soft gradients and highlights.
Finish with tiny white French knots for the iconic spots.
31. Add Contour with Color Blocking and Outlines
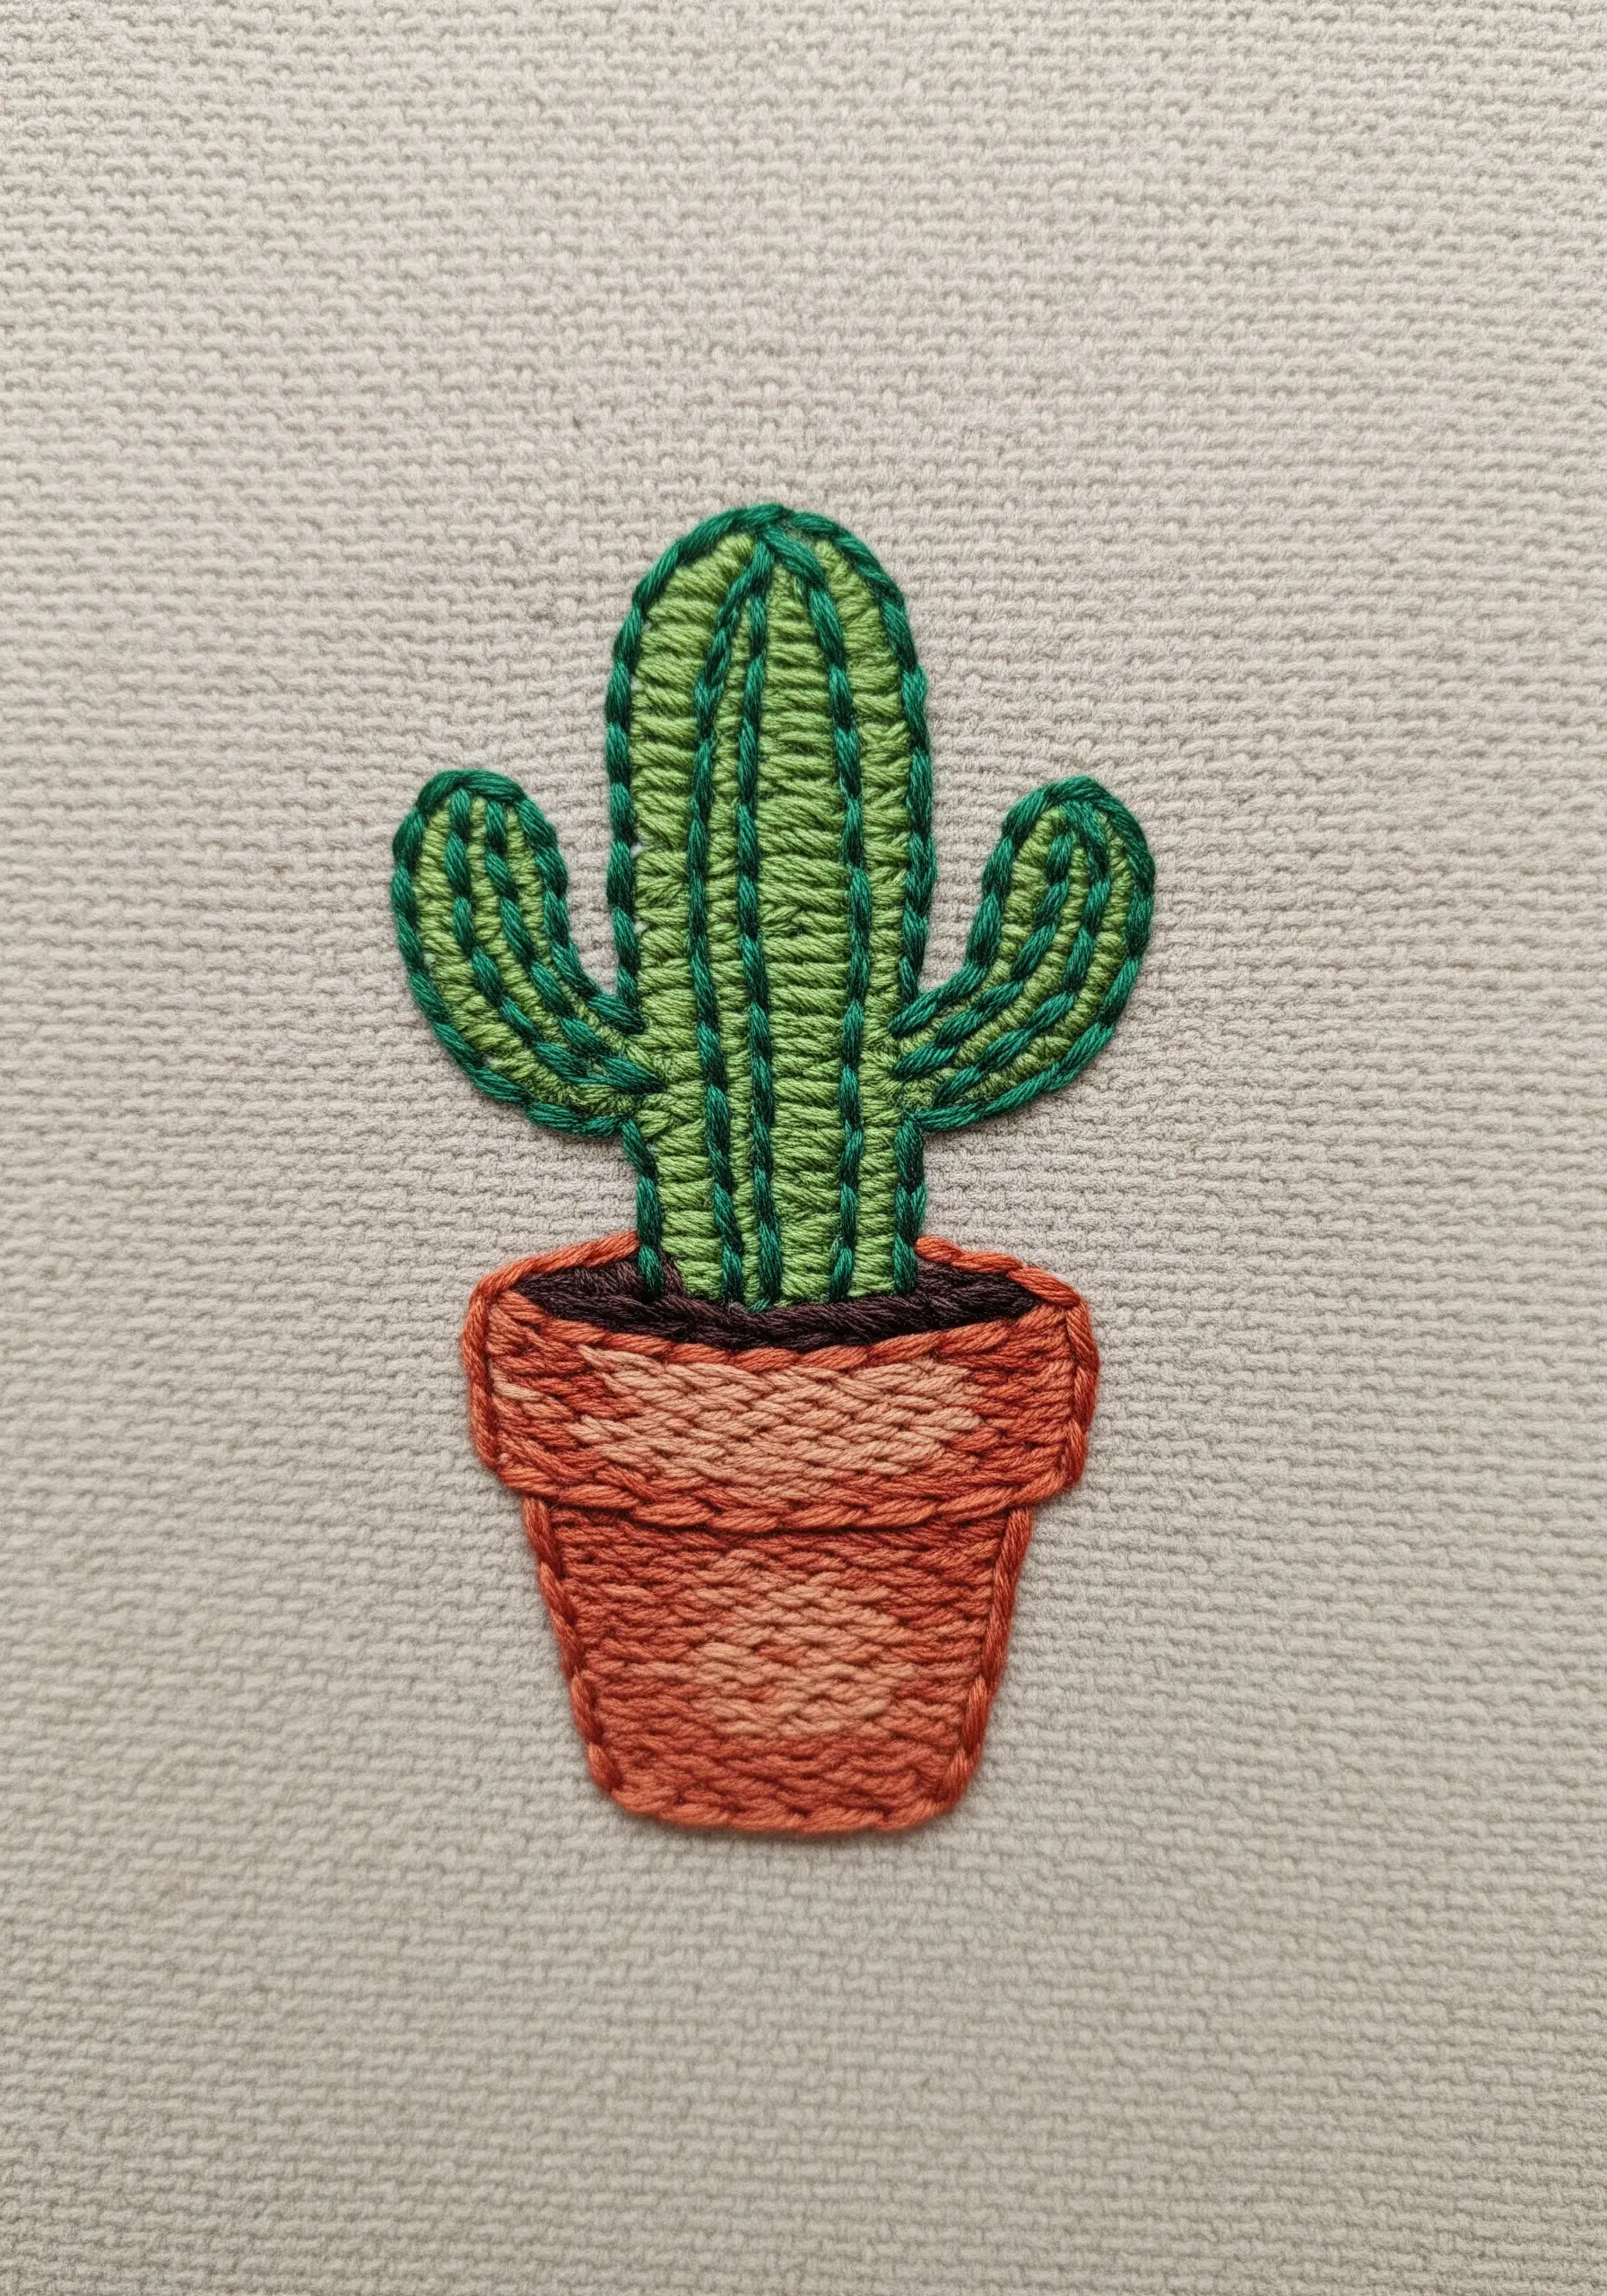
Even without complex shading, you can create a sense of dimension in this potted cactus.
Use a long-and-short stitch to blend two shades of green in the cactus and two shades of terracotta in the pot. This creates a subtle gradient.
The key to making it look defined is to then go back and add a crisp outline in a darker shade using a backstitch or stem stitch.
This outline acts like a contour line in a drawing, clearly separating the shapes and giving the piece a clean, illustrative finish.
32. Create Playful Texture with Bullion Knots
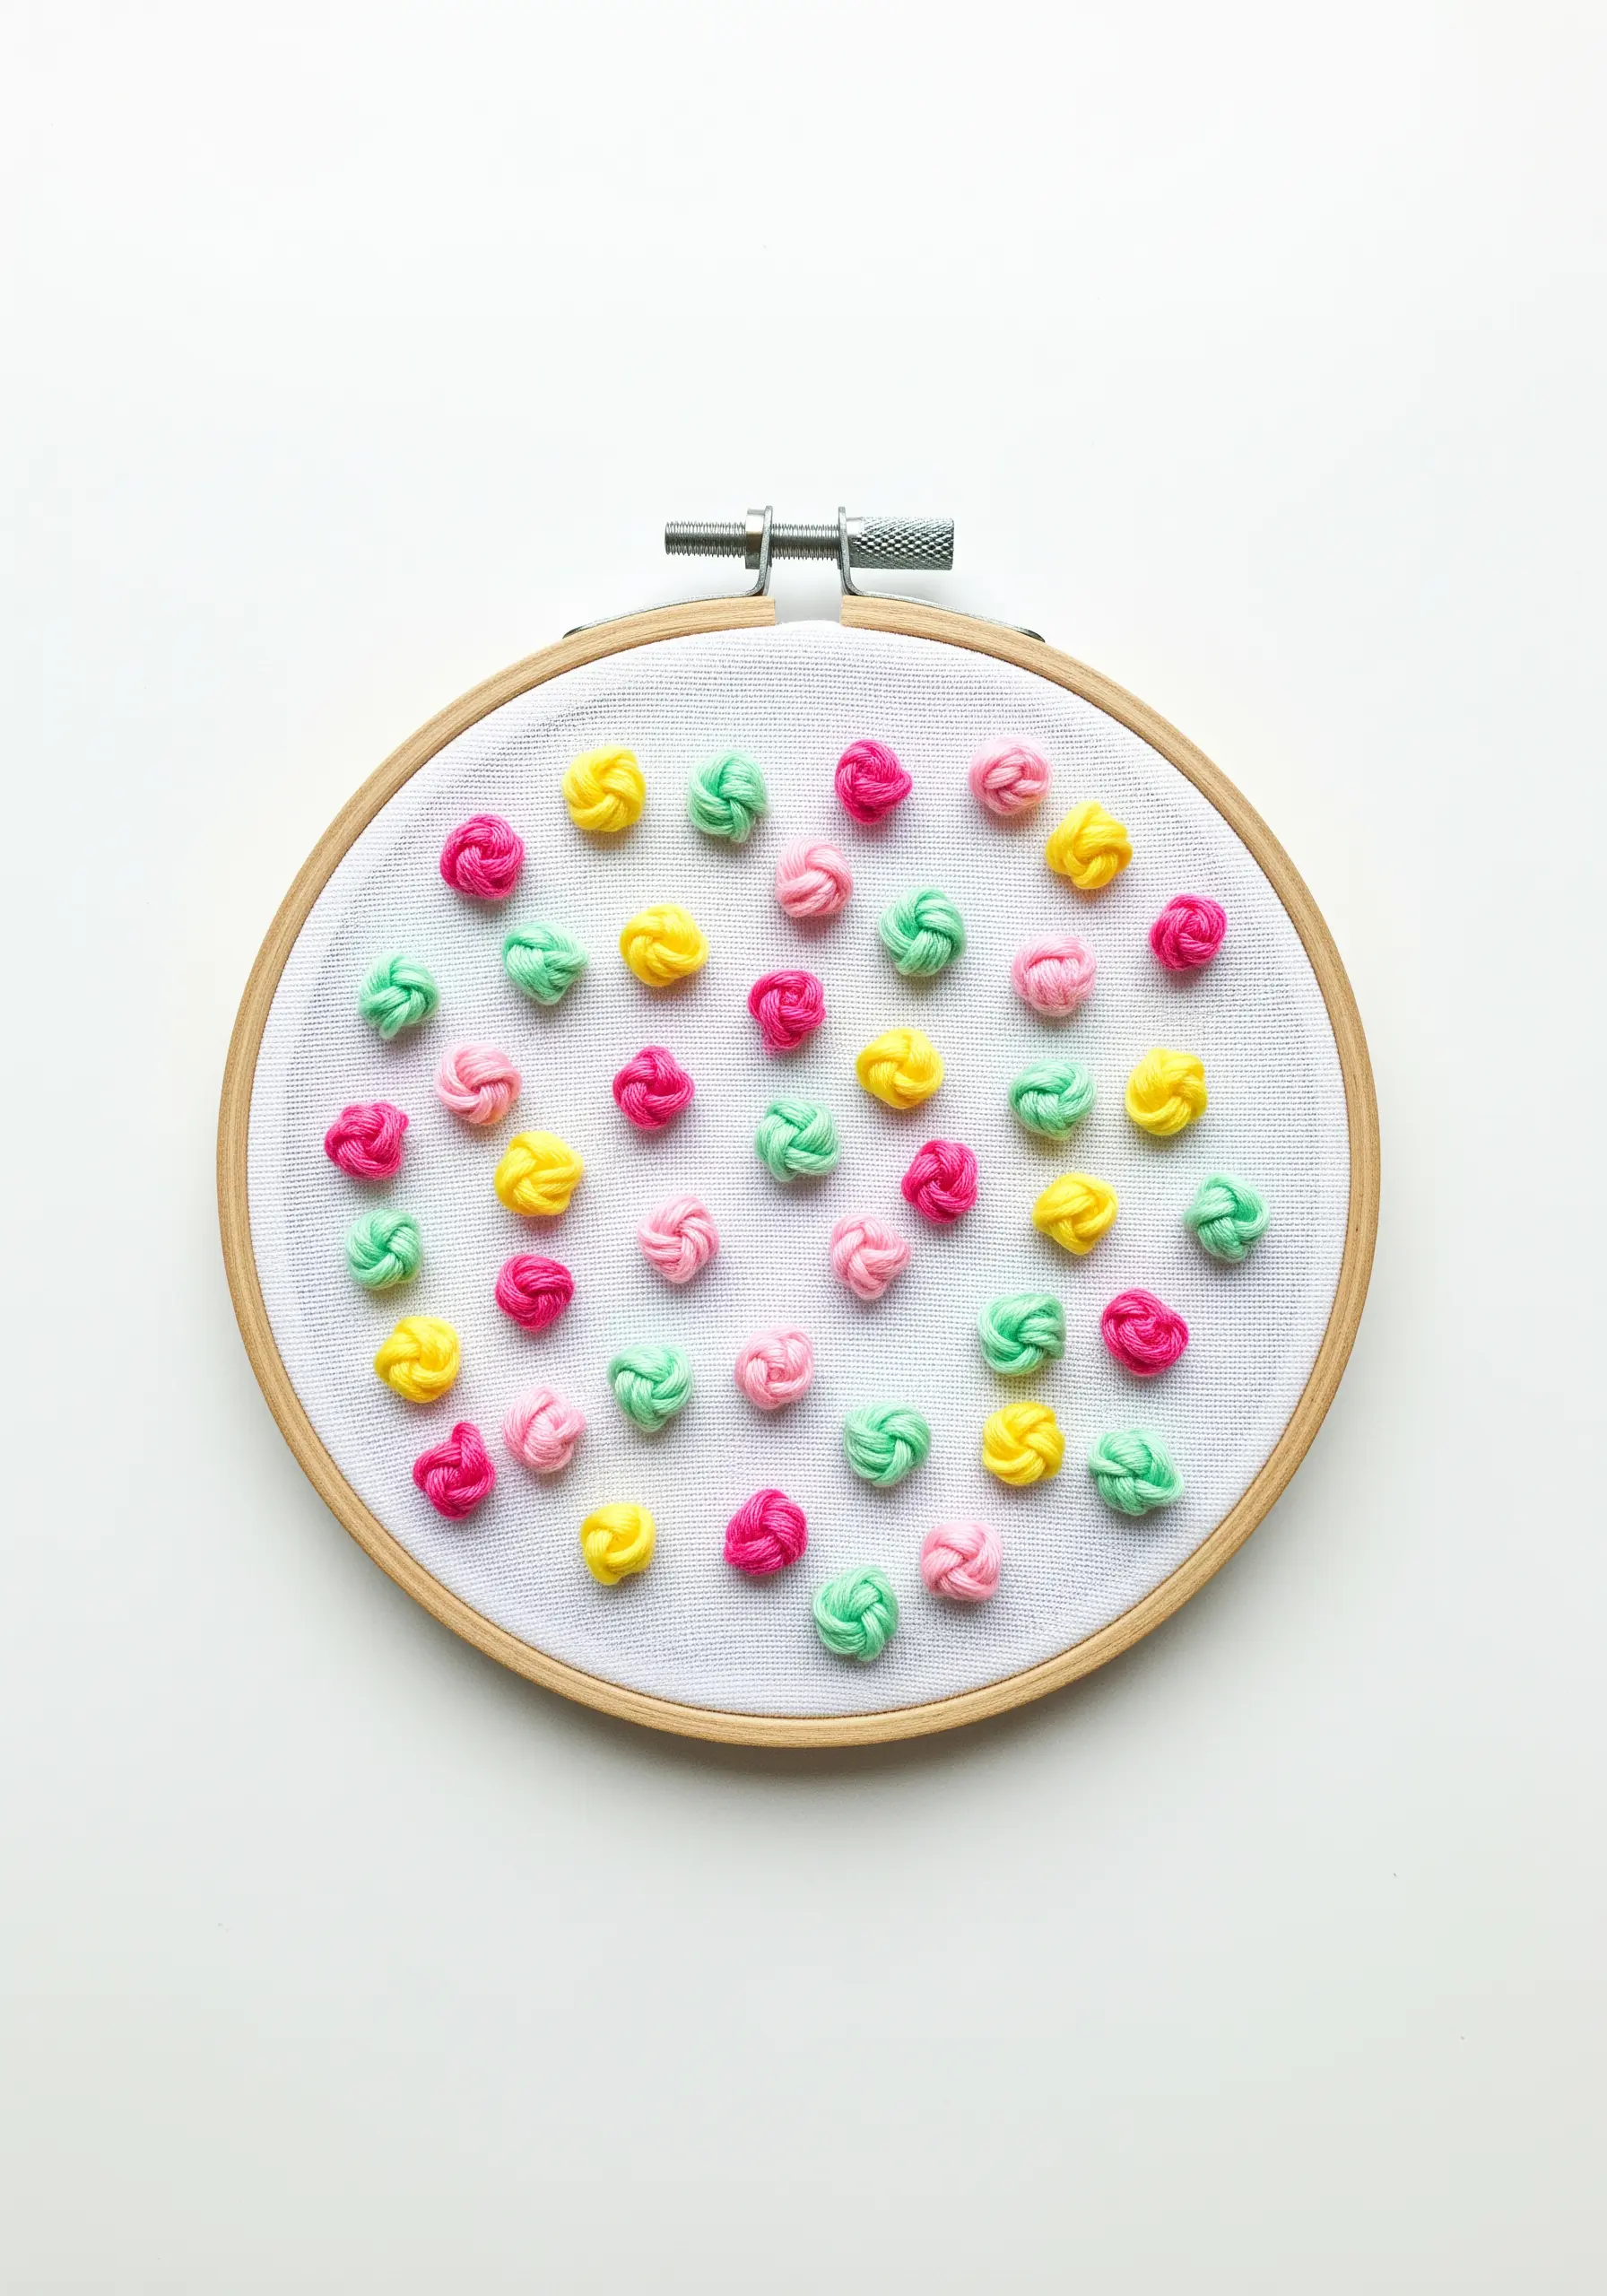
For a fun, highly textured surface, fill your hoop with colorful bullion knots.
These stitches are made by wrapping the thread multiple times around the needle before pulling it through the fabric, creating a small, worm-like coil.
To make them chunky and substantial, use all six strands of embroidery floss. By scattering them in a random pattern, you can create a piece that feels playful, energetic, and wonderfully tactile, like a hoop full of candy.
33. Elevate Outlines with a Whipped Backstitch
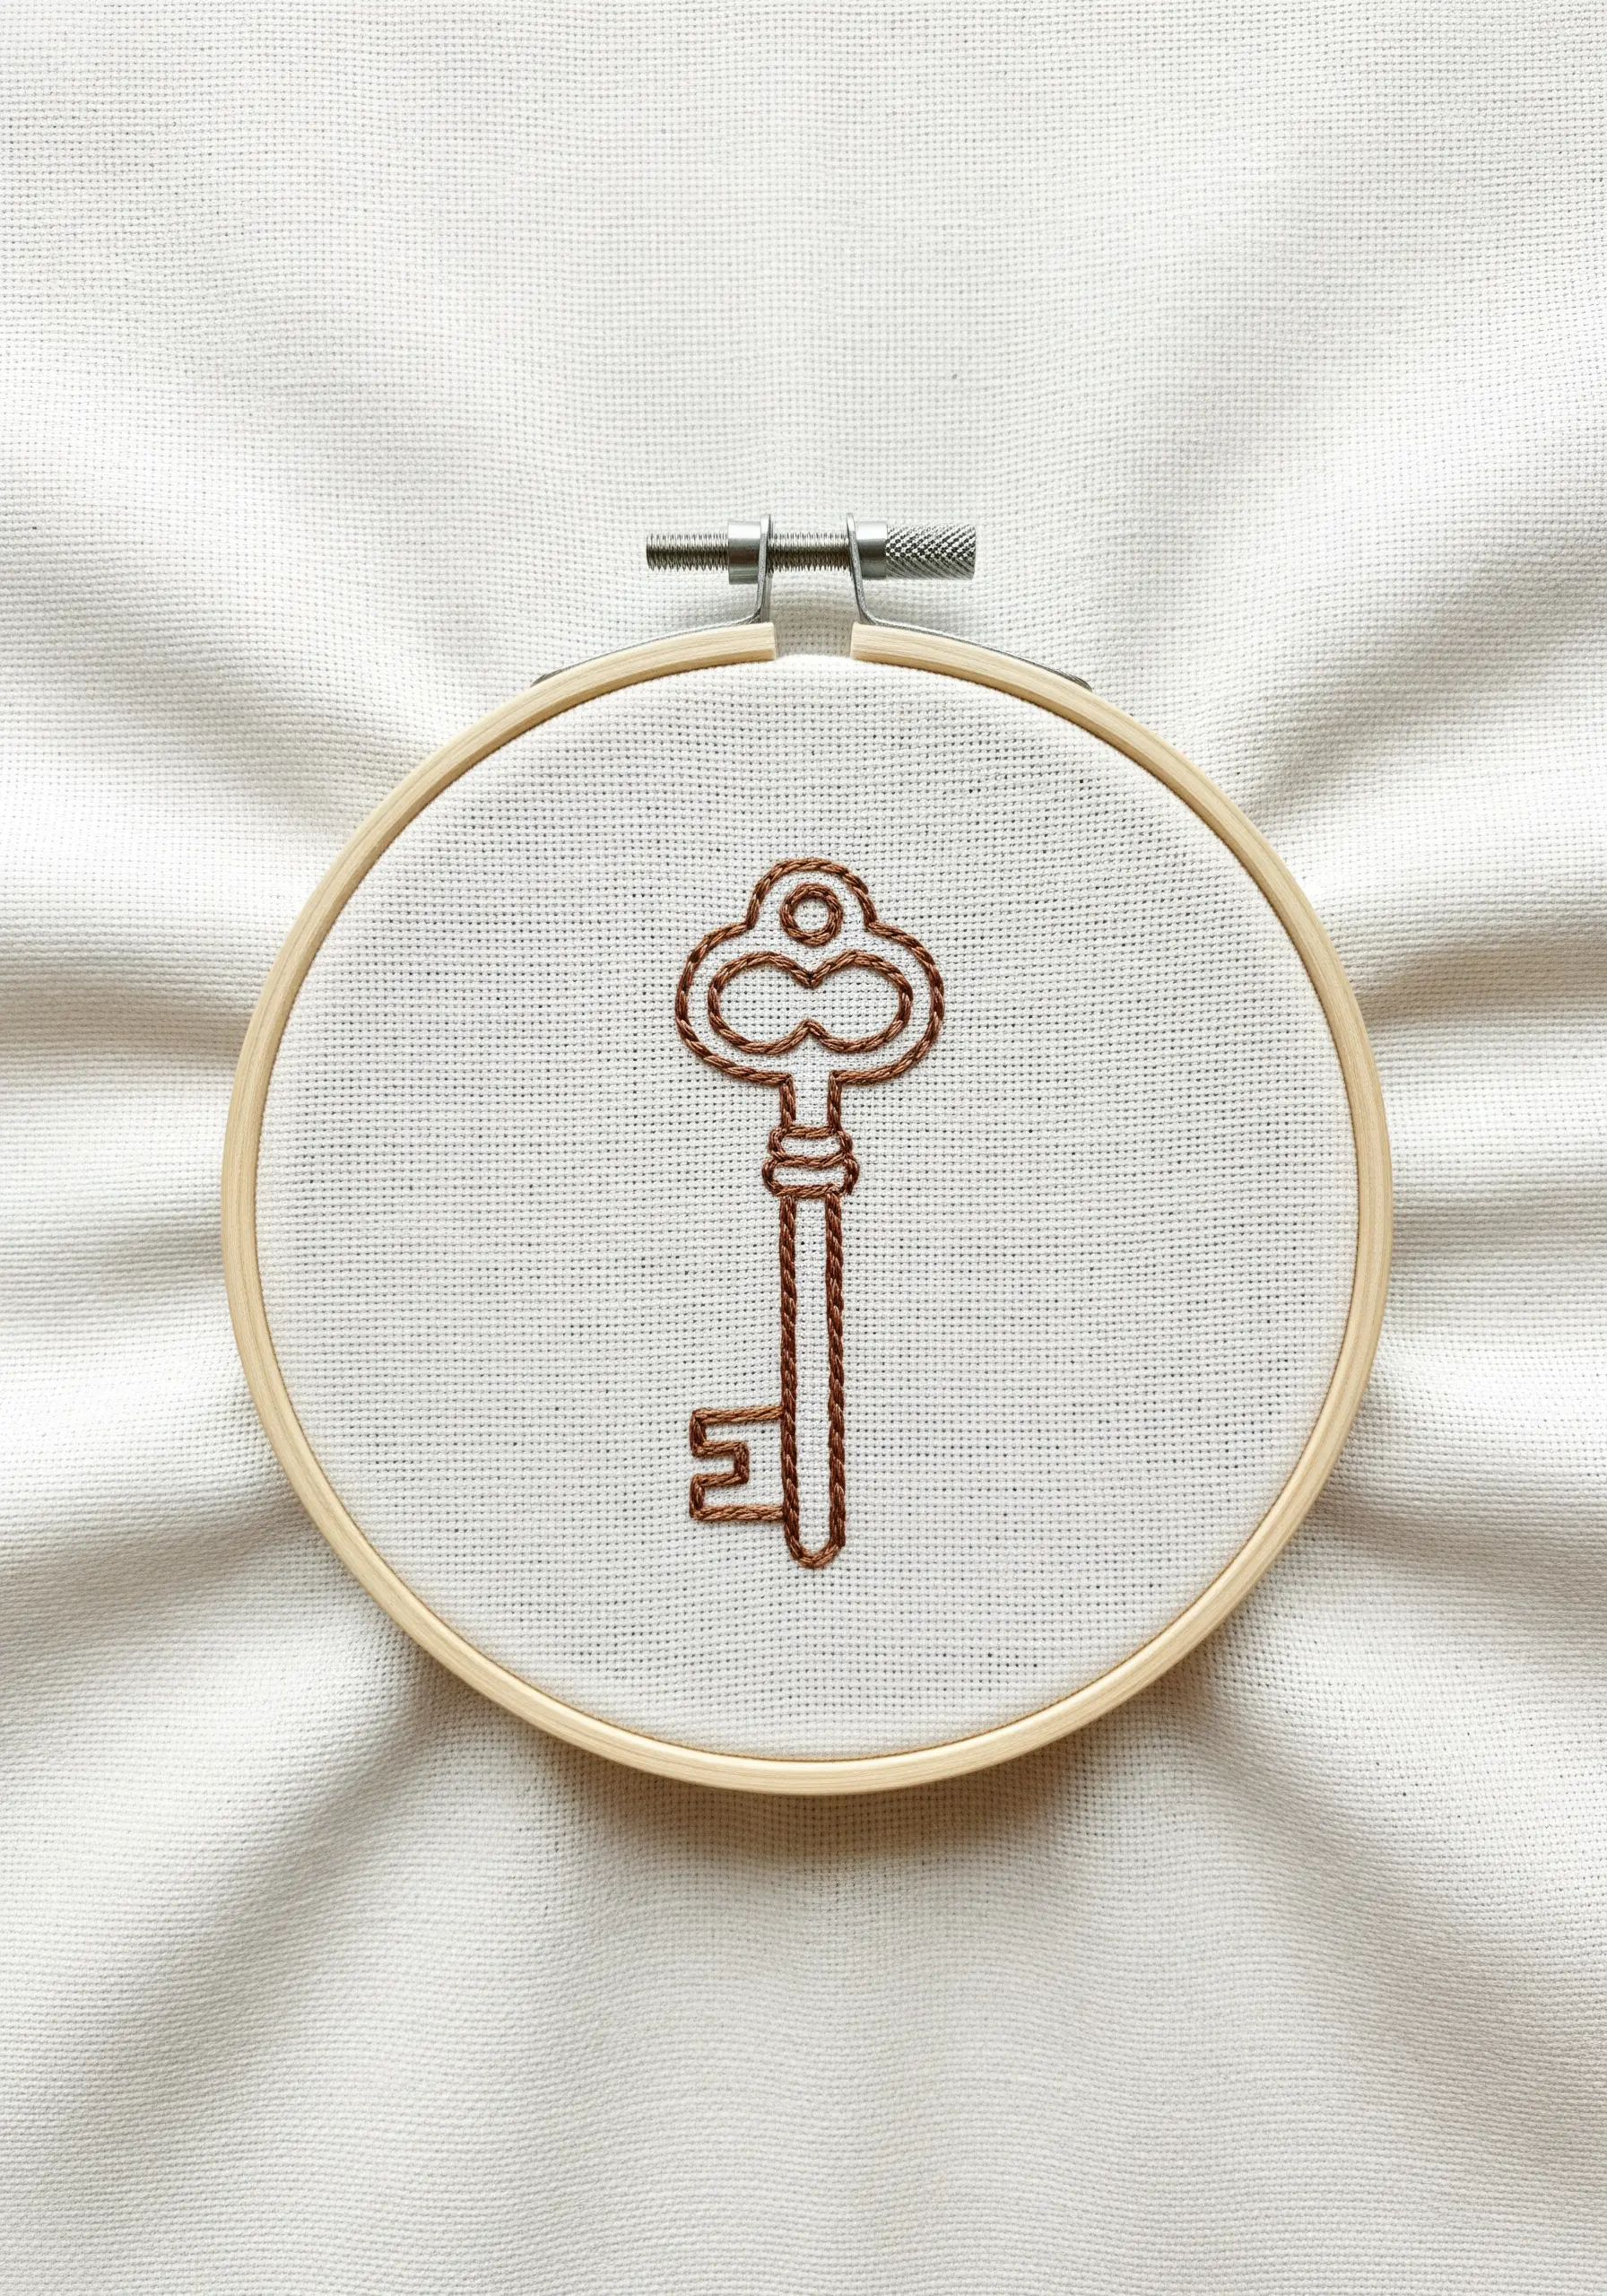
For a single-color outline like this vintage key, you want the line to be smooth and solid, not broken up by the gaps in a standard backstitch.
Achieve this by using a whipped backstitch. First, stitch the entire outline with a regular backstitch.
Then, without piercing the fabric, use your needle to weave a second strand of the same thread under each stitch, creating a solid, rope-like line.
This simple second step makes a huge difference in the final polish of the piece.
34. Build a Pine Tree with Layered Stitches
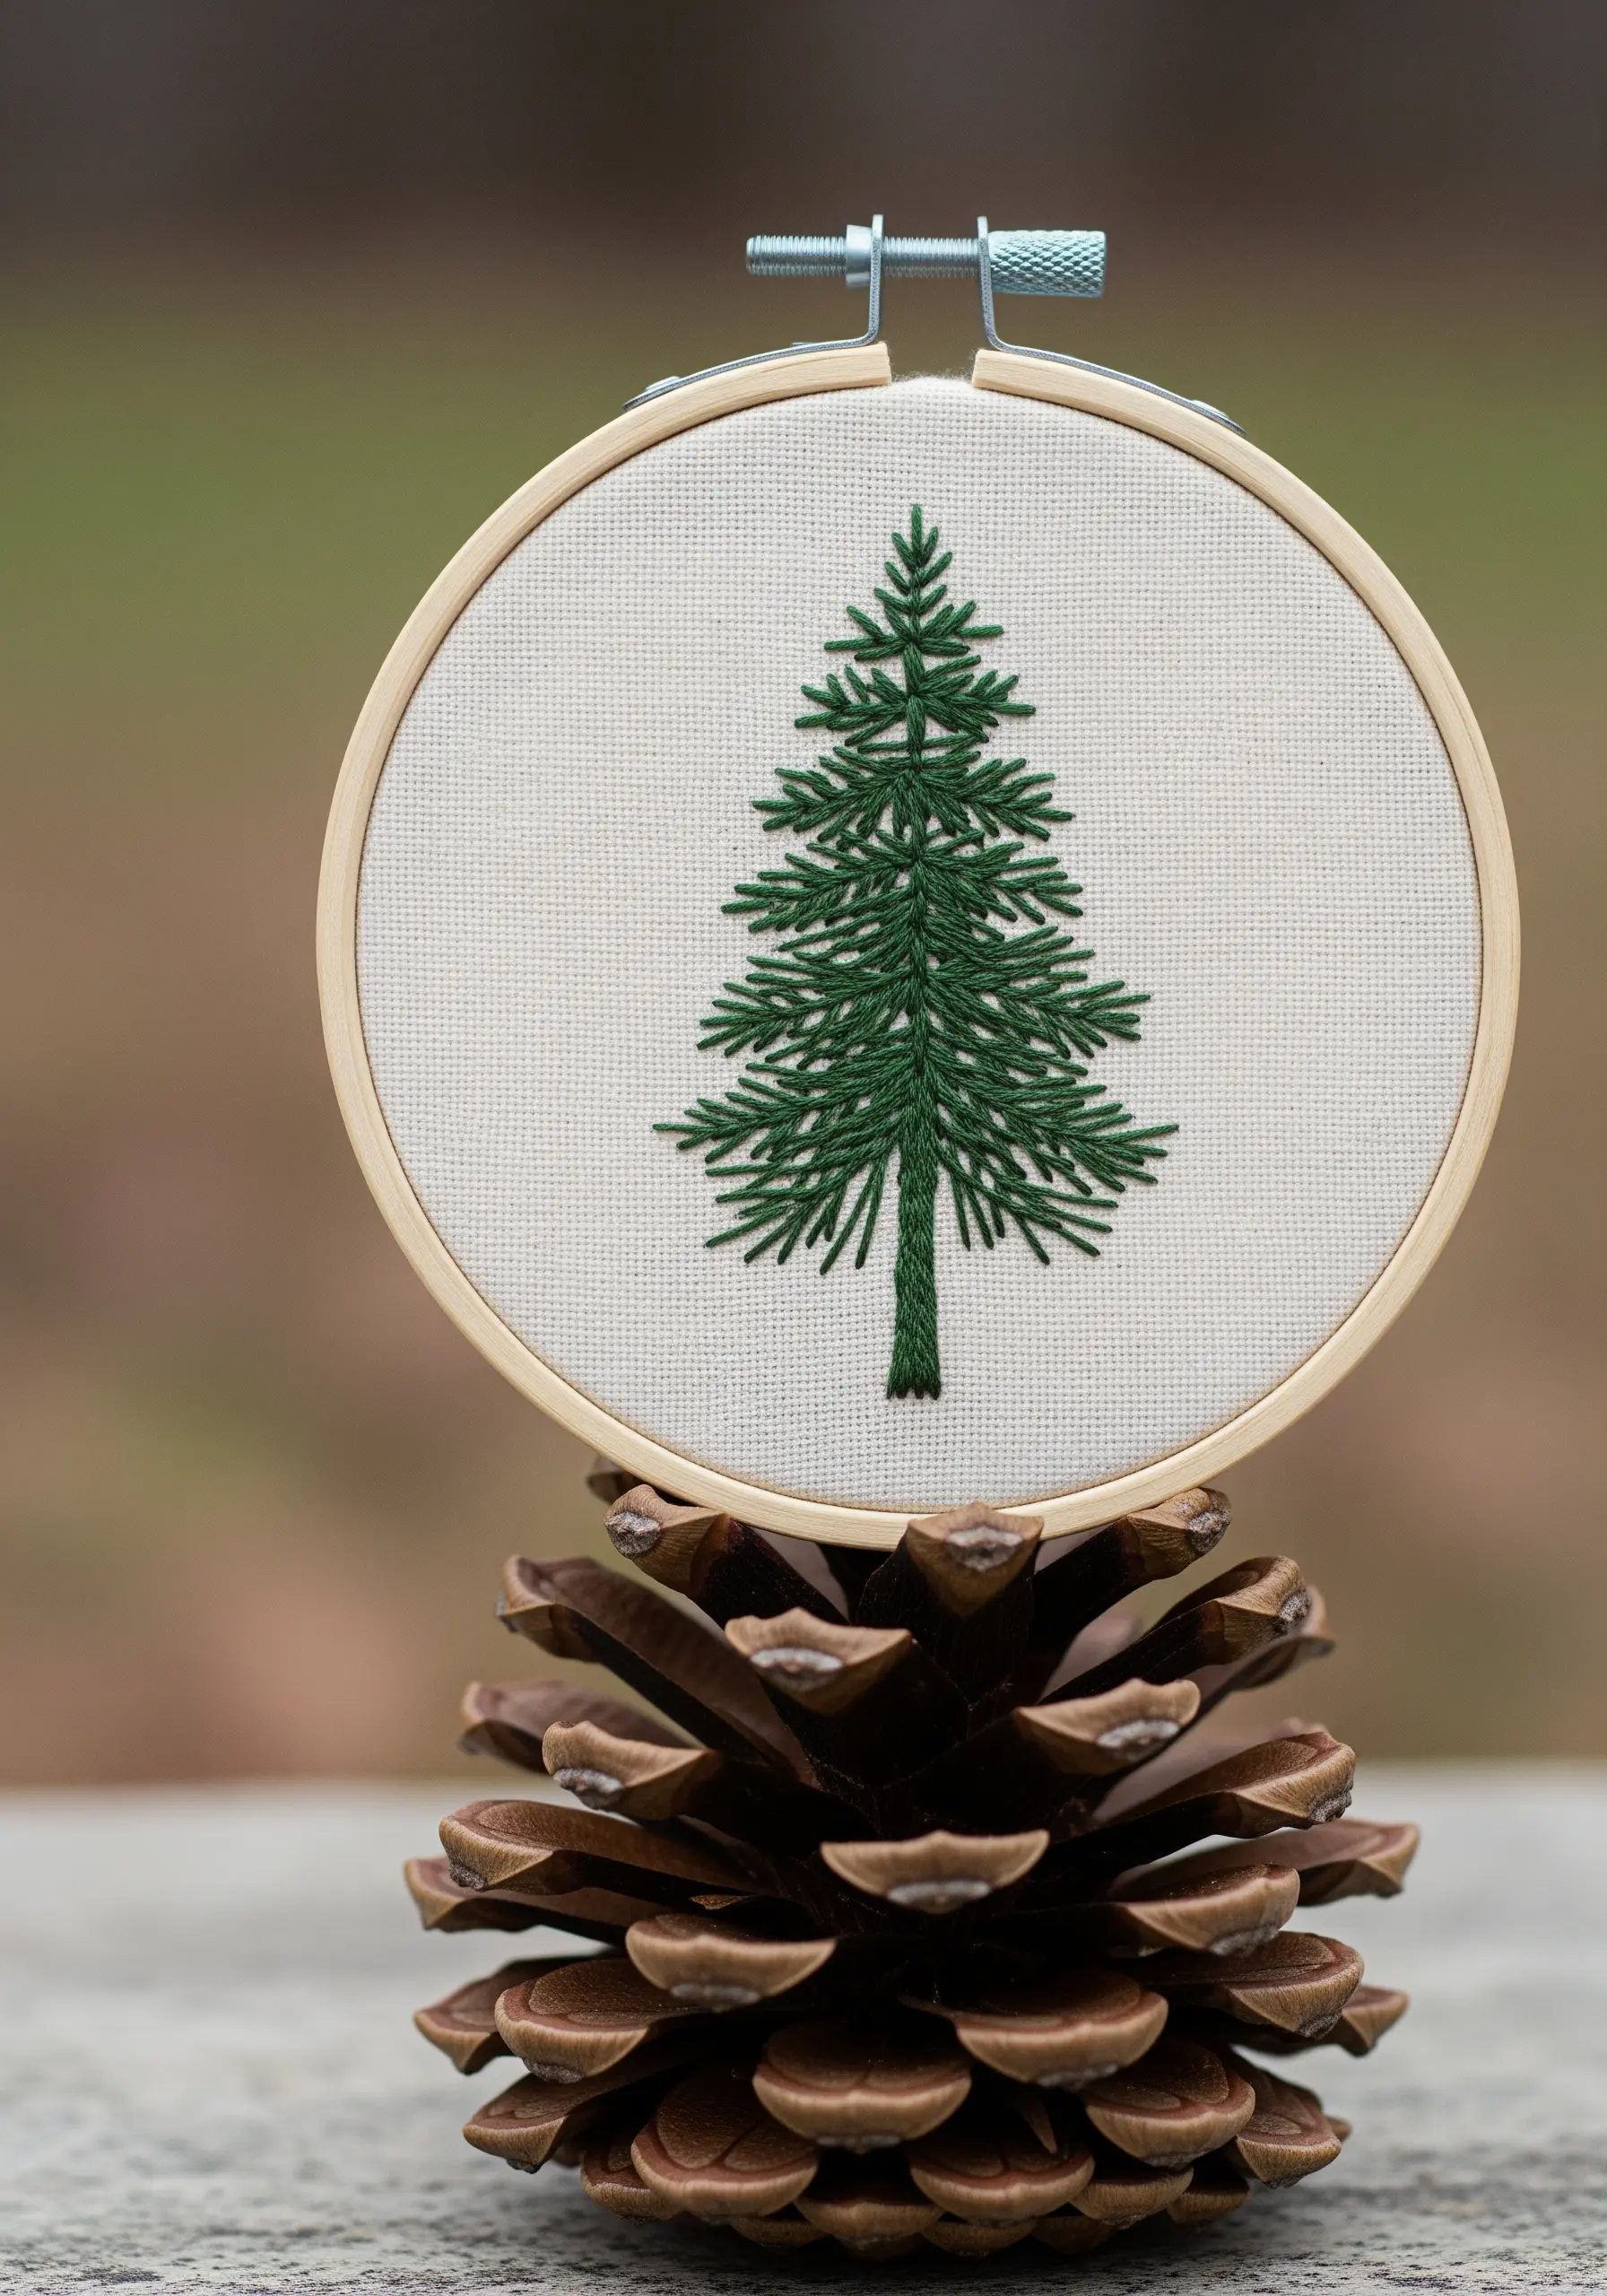
Create a full, realistic pine tree by layering simple stitches to build texture and density.
Use a single backstitch for the trunk. For the branches, use a combination of straight stitches and fly stitches, angling them slightly downwards.
Start stitching from the top of the tree and work your way down, allowing each subsequent layer of branches to slightly overlap the one above it.
This layering technique is what gives the tree its natural shape and sense of fullness.
35. Perfect Your Satin Stitch for a Liquid Sheen
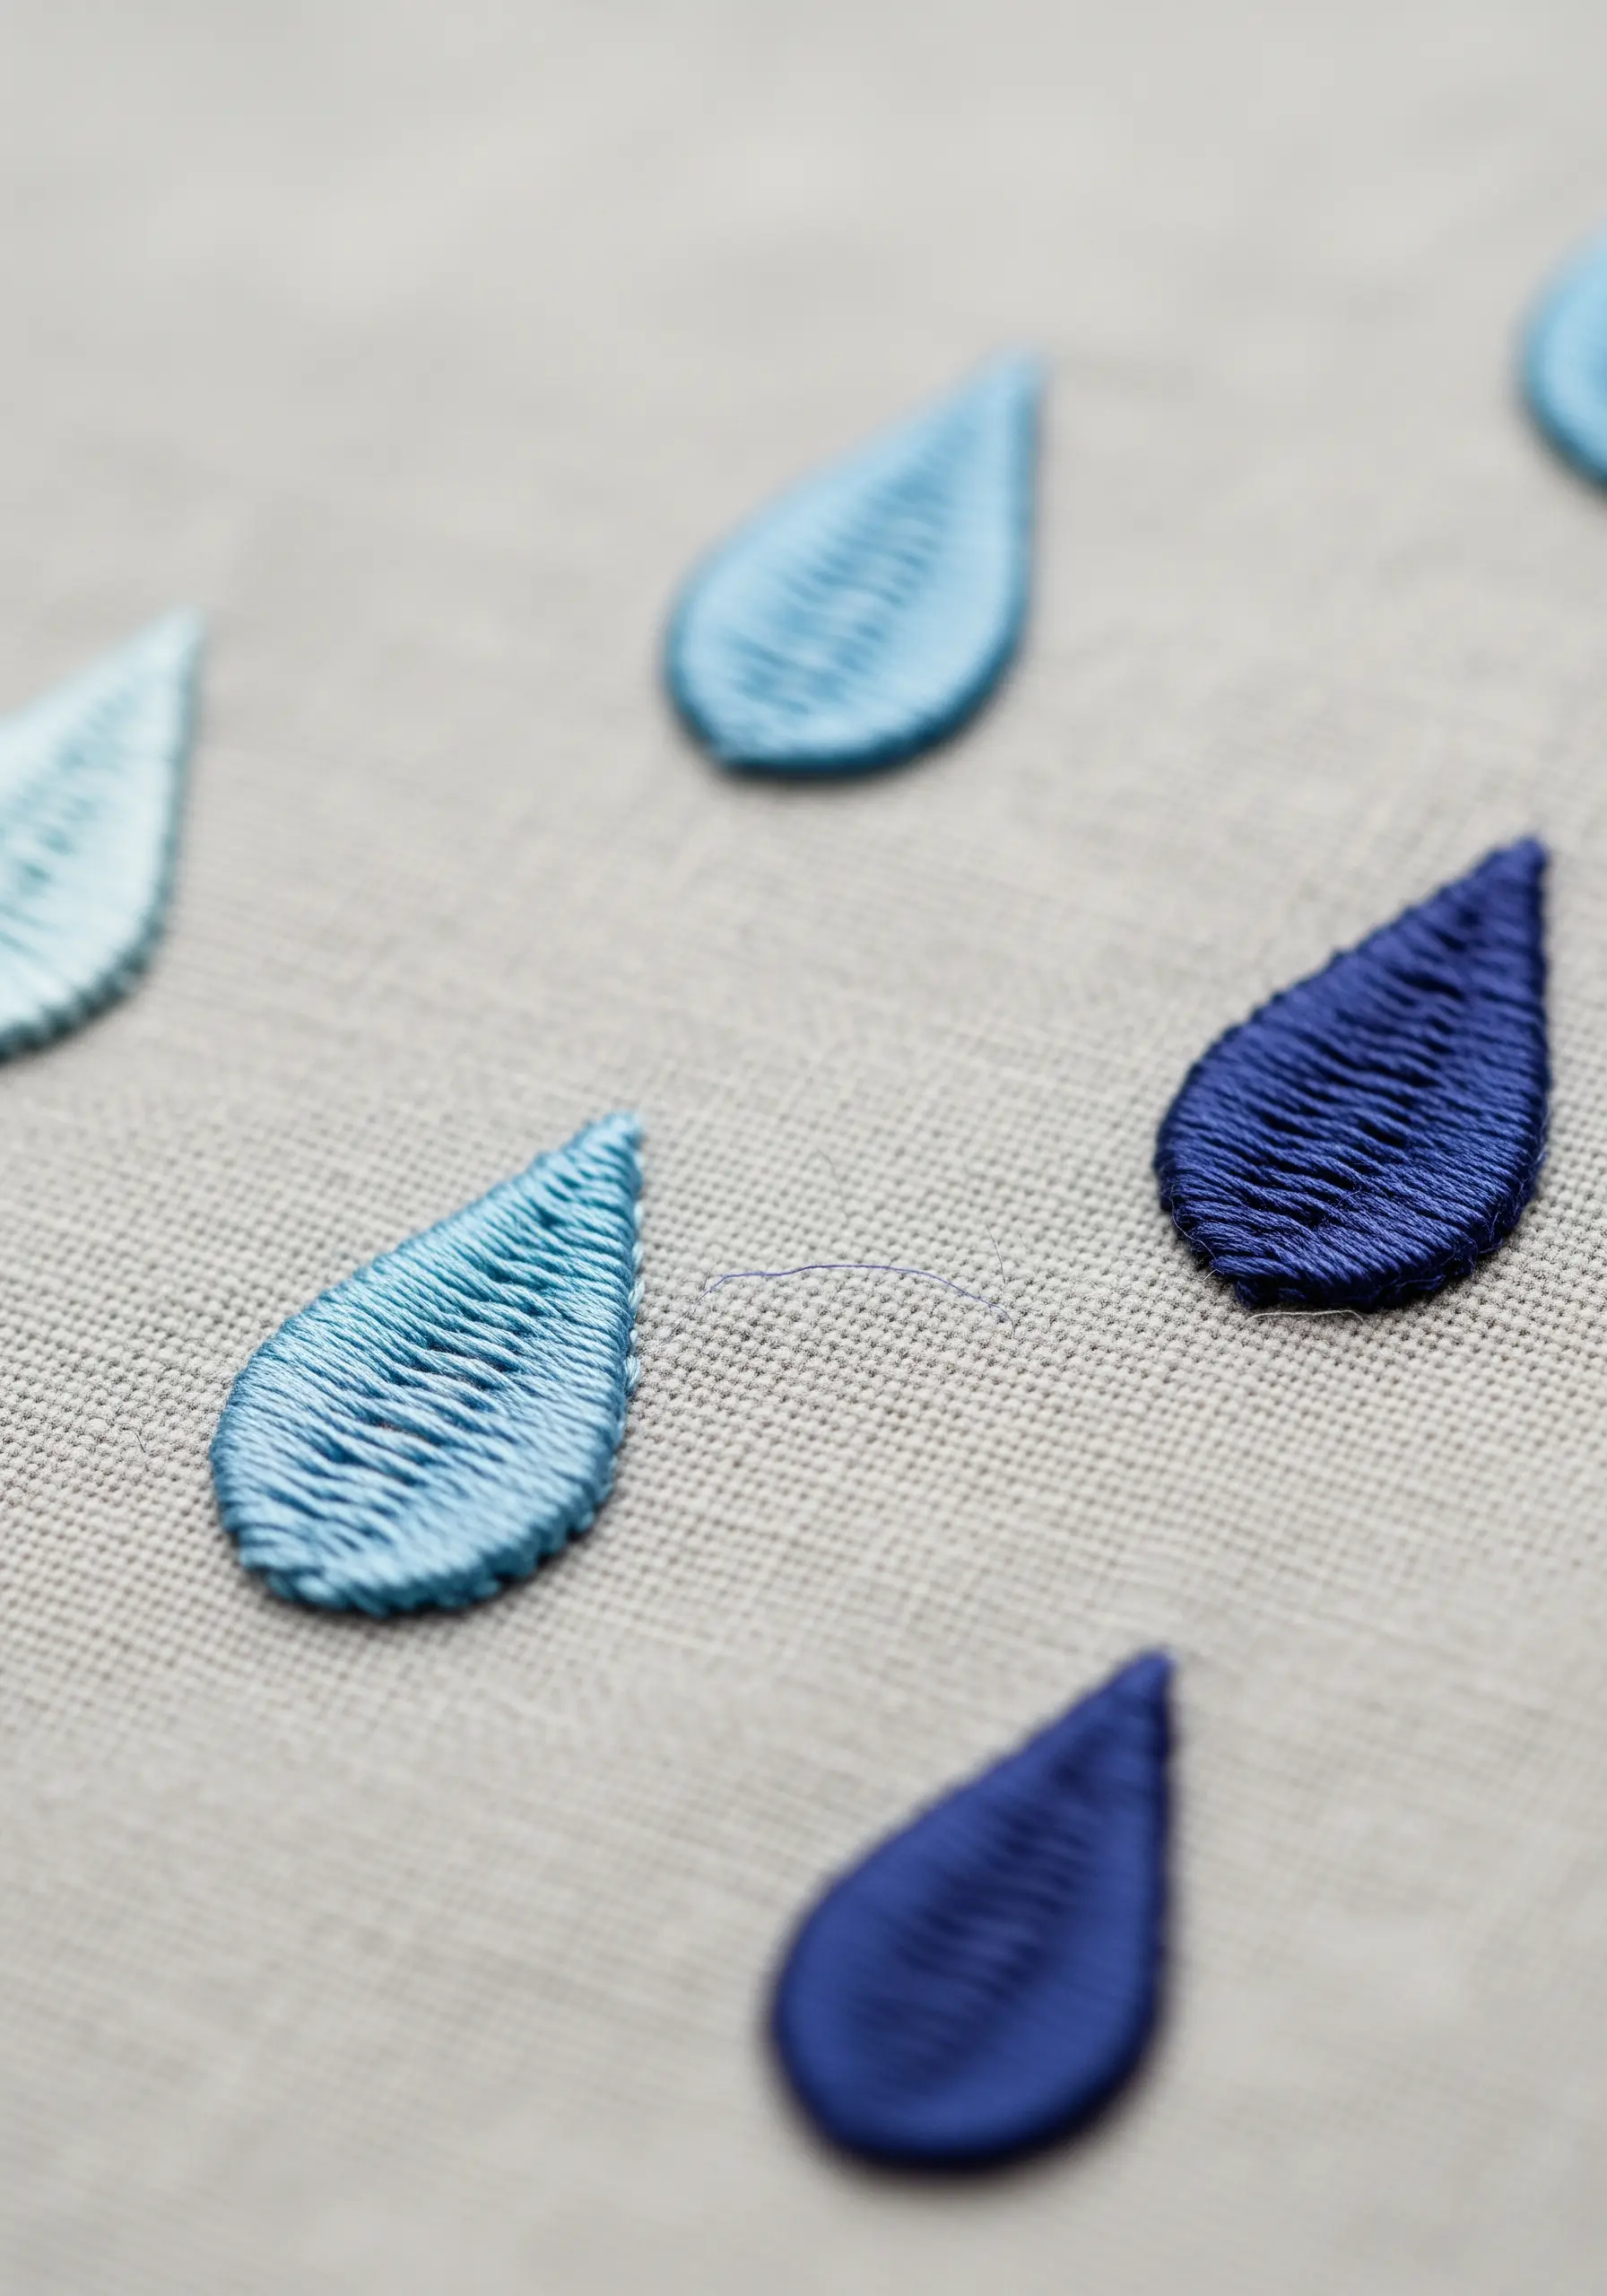
The satin stitch is perfect for conveying a smooth, liquid surface like these raindrops, but success lies in the details.
To get that glossy finish, ensure your threads lie perfectly parallel and flat, with no twists. You can achieve this by letting your needle dangle periodically to unwind the floss.
Using a slightly thinner thread (like 3-4 strands) can also make it easier to maintain even tension and coverage.
The result is a smooth, light-reflecting surface that truly shines.
36. Stitch Dimensional Berries with Woven Wheels

Create perfectly round, raised berries using the woven wheel stitch, also known as a spider web rose stitch.
First, create a foundation of straight stitches that act as spokes (an odd number, like five, works best).
Then, weave your working thread over and under these spokes in a circular pattern until they are completely covered.
This technique builds a beautiful, dimensional rosette that sits on top of the fabric, perfect for flowers or, in this case, plump red berries on a branch.


