

A garden is a fleeting thing—blossoms open, leaves unfurl, and seasons turn. But with a needle and thread, you can capture that quiet beauty and hold it in your hands. You can translate the texture of a petal or the curve of a vine into a language of stitches.
This isn’t about creating impossibly complex masterpieces. It’s about slowing down and noticing the details—the way light hits a leaf, the soft fuzz on a bee, the delicate cluster of lavender buds. Each of these projects is an invitation to translate those observations into thread.
Think of your hoop as a small plot of earth. Here, you can cultivate patience, practice a new stitch, and watch something beautiful grow from a simple strand of cotton. You have everything you need to begin right now.
1. Render a Lavender Wreath with Sculptural Stitches

Move beyond flat satin stitch for your lavender buds and embrace texture.
Create each floret with raised stem stitch bands or small bullion knots, which gives them a plump, three-dimensional quality that mimics real lavender.
For the stems, use a fine whipped backstitch to keep the lines smooth and elegant, allowing the textured buds to be the main focus.
Use a neutral, tightly woven linen fabric; its natural texture complements the organic motif without distracting from your stitch work.
2. Master 3D Texture for Lifelike Insects

Bring a bumblebee to life by giving its body a soft, fuzzy texture that invites touch.
Use the turkey work stitch for the yellow and black stripes, leaving the loops long and then carefully trimming them to create a dense, plush pile.
For the delicate wings, outline them with a single strand of grey or silver thread, then fill with widely spaced seed stitches to suggest transparency.
This contrast between the fluffy body and the ethereal wings is what makes the final piece so captivating.
3. Elevate Kitchen Linens with Appliqué and Embroidery

Transform a simple kitchen towel with the clean, graphic look of appliqué.
Cut your carrot shapes from orange felt and secure them with a neat, even blanket stitch around the edge—this provides a crisp outline and durability for washing.
Add dimension with vertical satin stitches for the leafy tops and a few simple straight stitches in black for root details.
This combination of techniques creates a bold, charming design that is much faster to complete than filling the entire shape with thread.
4. Create Graphic Elegance with Radiating Stitches

For a modern take on botanical embroidery, use negative space and directional stitching to your advantage.
Instead of a solid fill, trace the elegant shape of ginkgo leaves and fill them with radiating straight stitches, fanning out from the stem.
This technique creates a sense of movement and light, turning a simple leaf into a graphic art piece.
Stitching with a high-contrast metallic gold thread on dark navy or black fabric amplifies the drama and sophistication.
5. Paint with Thread for Photorealistic Florals

Capture the delicate, paper-thin quality of poppy petals using the long-and-short stitch technique.
Work with at least three shades of red—a deep shadow, a mid-tone, and a light highlight—blending them seamlessly to create depth and movement.
Angle your stitches to follow the natural curve and folds of each petal, which is the key to achieving realism.
For the center, use tightly packed French knots in black and chartreuse to build a dense, pollen-rich texture that contrasts beautifully with the smooth petals.
6. Frame Your Botanicals with a Braided Border

Add a refined finishing touch to your hoop art by encircling your motif with a textural border.
A plaited braid stitch or a heavy chain stitch worked in a complementary color creates a substantial, rope-like frame that makes the central design feel more intentional.
For the central rosemary sprig, use a detached chain stitch for the needles; this allows them to lift slightly from the fabric, enhancing their texture.
This combination of a clean central motif and a decorative border creates a balanced, polished piece worthy of display.
7. Embellish Apparel with Delicate, Durable Stitches

When adding embroidery to clothing, choose stitches that are both beautiful and resilient.
For this strawberry collar, use a padded satin stitch for the berries to give them a subtle, raised shape, and add tiny yellow seed stitches that won’t snag.
The winding vines can be stitched with a split stitch, which is more durable than a stem stitch for items that will be worn and washed.
Always use a lightweight stabilizer on the back of the fabric to prevent puckering and ensure your small embroidery ideas on clothing remain crisp.
8. Build Woodland Textures with Knots and Lines
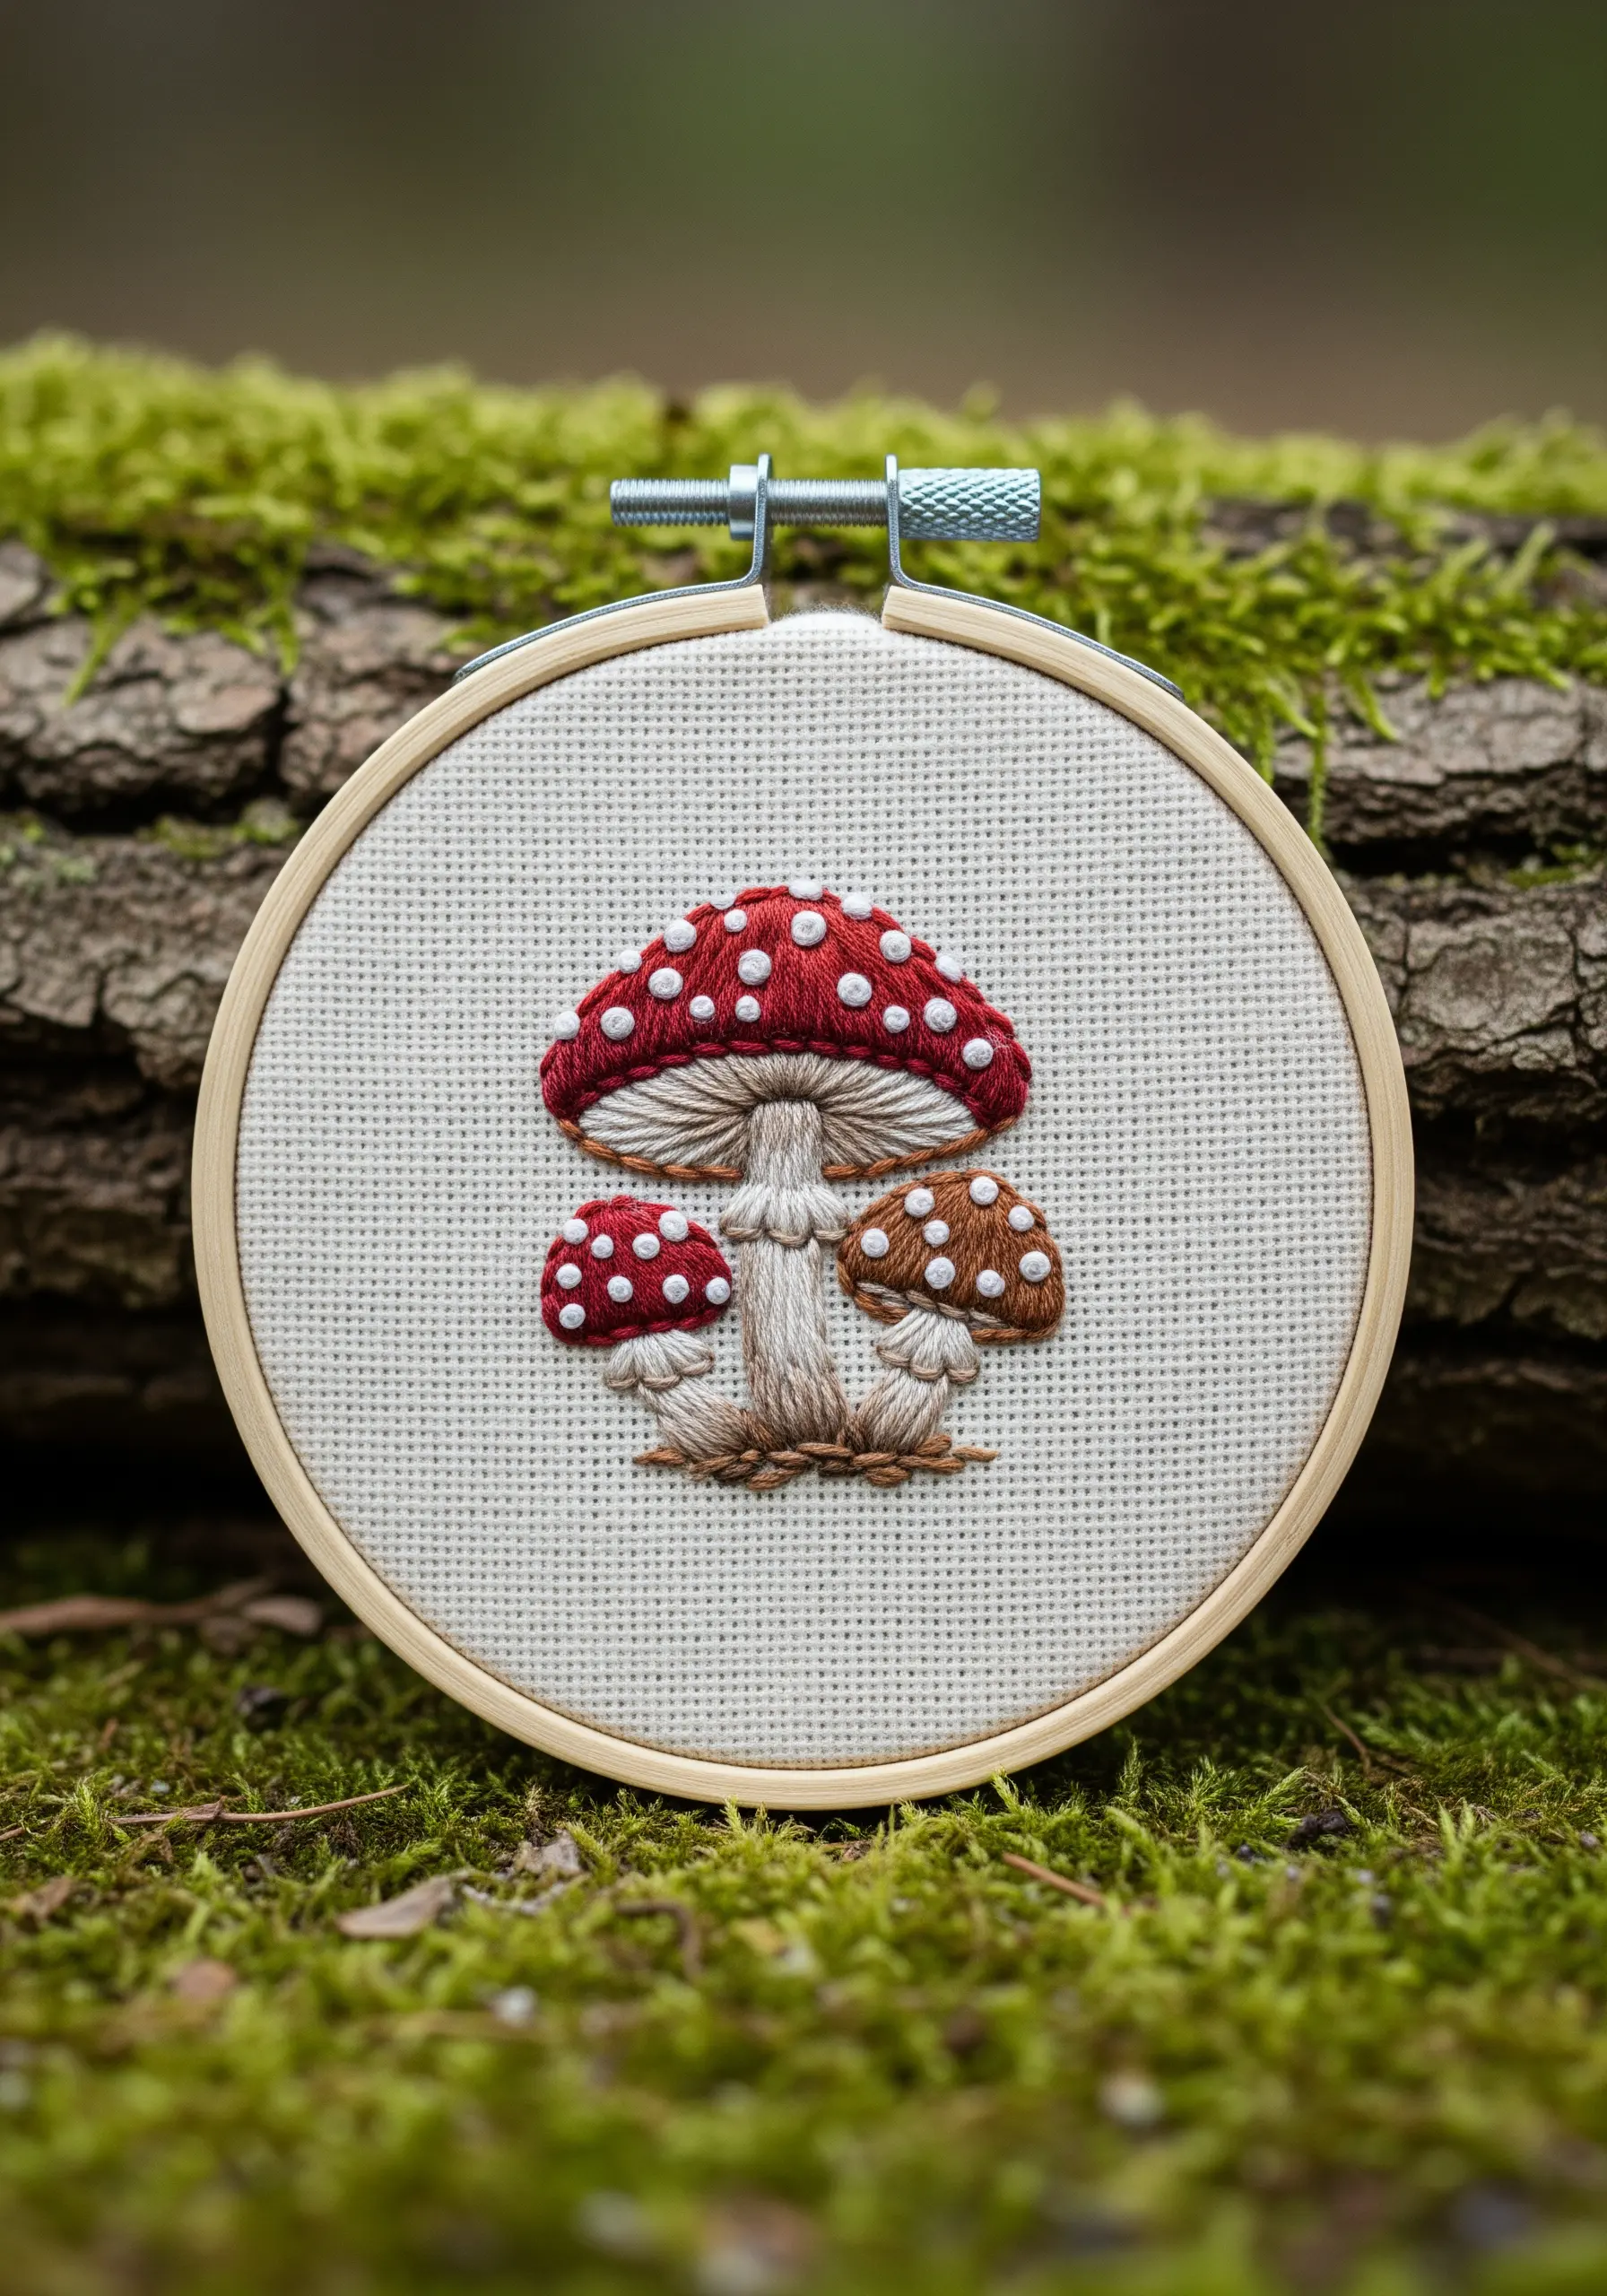
Capture the charming, earthy texture of mushrooms by combining different stitch densities.
Use French knots for the white spots on the cap, varying their size slightly for a more organic look.
For the delicate gills underneath, stitch a series of straight stitches fanning out from the stem; this simple technique creates a perfect illusion of depth.
Stitching on Aida cloth, typically used for cross-stitch, lends a rustic, woven quality to the background that enhances the woodland theme.
9. Use Directional Satin Stitch for Vibrant Petals

The secret to a dynamic sunflower isn’t just color, but the direction of your stitches.
Fill each petal with long satin stitches, angling them from the outer tip inward toward the center, following the petal’s natural growth pattern.
This directional stitching reflects light differently across the surface, creating an illusion of depth and movement without complex shading.
Pack the center with a dense field of French knots in multiple shades of brown and black to mimic the texture of seeds.
10. Capture Delicate Forms with Minimalist Knots

Sometimes, the most impactful designs are the most restrained.
To create the airy clusters of Queen Anne’s lace, rely solely on French knots and a fine stem stitch.
Group the knots tightly at the end of each stem, varying their tension and size slightly to create a soft, cloud-like effect.
Stitching in all-white thread on a neutral grey fabric shifts the focus from color to form and texture, resulting in an elegant, contemporary piece. This is one of those minimalist embroidery projects that double as gifts.
11. Achieve Crisp Detail with a Split Backstitch Outline

When creating a design with intricate details like a monarch butterfly’s wings, a clean outline is non-negotiable.
Before you begin thread painting the orange sections, establish the black borders using a two-strand split backstitch. This creates a sharp, solid line that contains your fill stitches and gives the design a professional finish.
Fill the wing sections with long-and-short stitch, blending your oranges and yellows for a smooth gradient.
The white dots can be added last using single French knots for perfect, crisp circles.
12. Explore Color Variation within a Single Motif
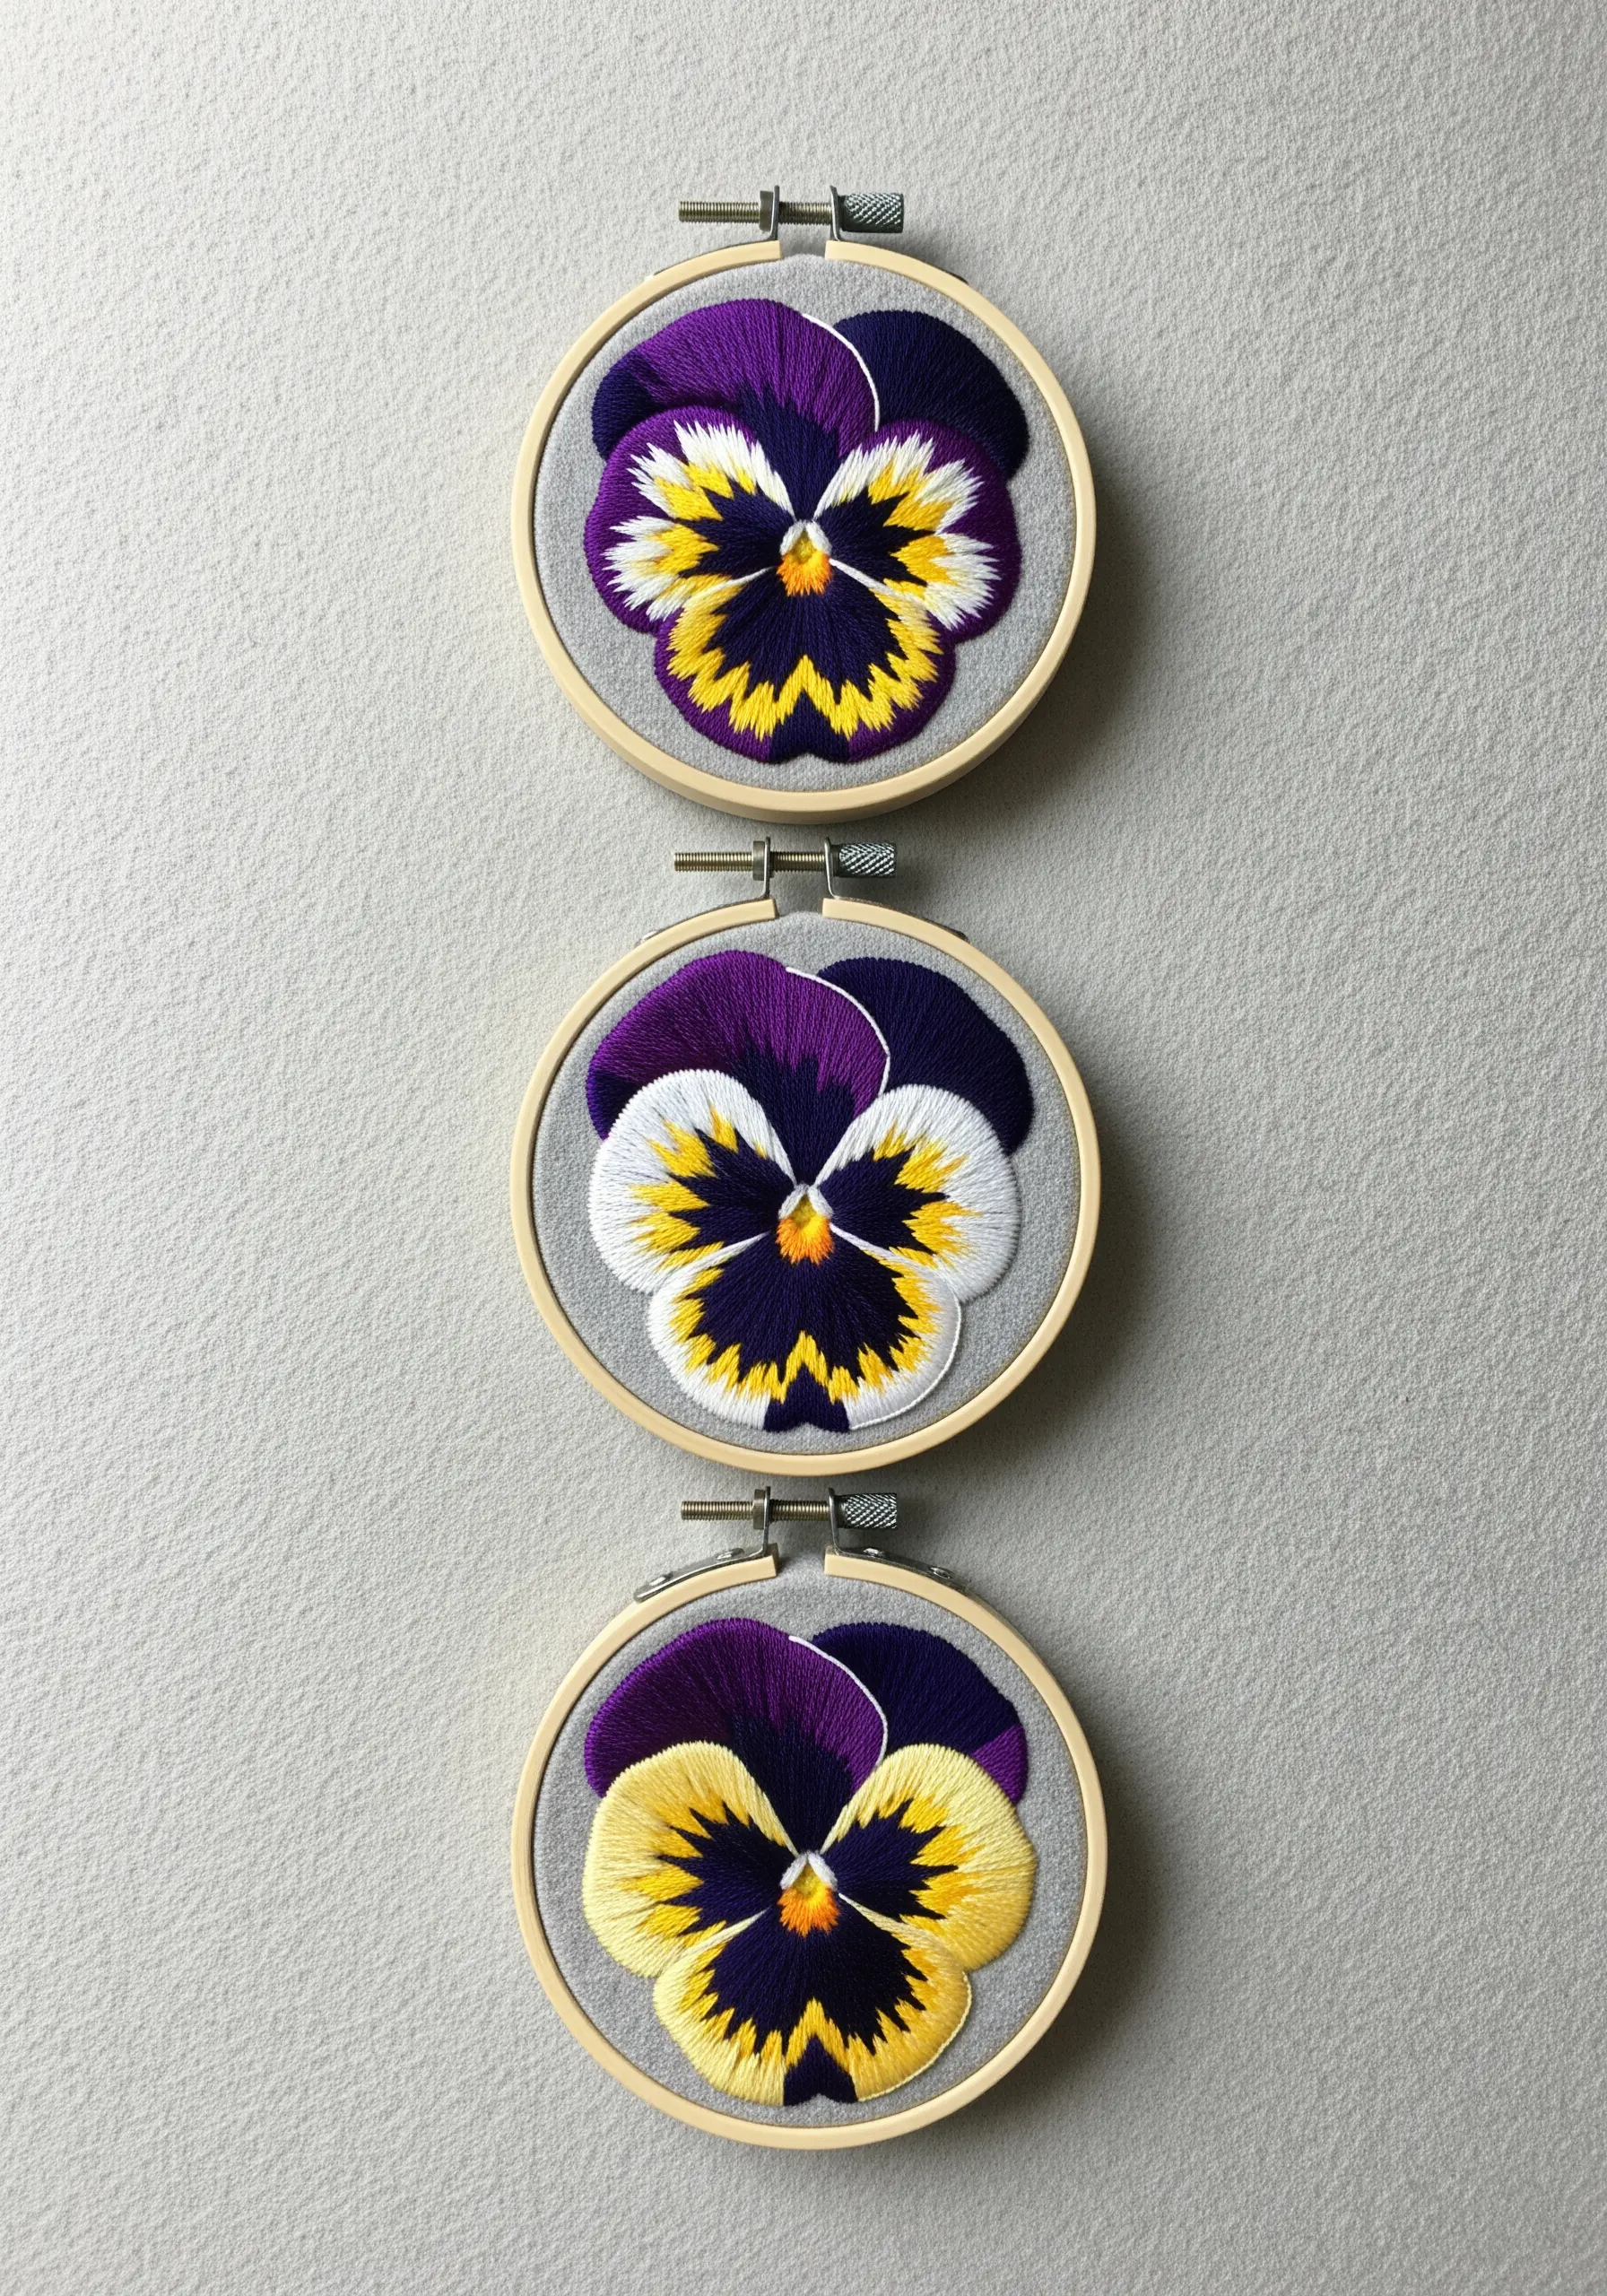
A simple pansy pattern becomes a fascinating study in color theory when you stitch it multiple times.
Create a series of three small hoops using the same design, but intentionally swap the placement of your primary colors—in this case, purple and yellow.
Notice how placing the darker color on the top petals versus the bottom petals completely changes the flower’s visual weight and expression.
This exercise sharpens your intuition about color harmony and provides a stunning, cohesive set of art to display together.
13. Create Realistic Gradients for Root Vegetables

To give a simple radish a lifelike, rounded appearance, you must master the art of the color gradient.
Using long-and-short stitch, begin at the bottom with a bright white thread, gradually blending into pale pink, and finally into a deep magenta at the top.
Keep your stitches directional, curving them slightly to follow the contour of the radish. This enhances the illusion of a three-dimensional, spherical shape.
The leaves, stitched in a contrasting fishbone stitch, add textural variety and a fresh, just-picked look.
14. Design an Asymmetrical Vine for Dynamic Composition

Create visual interest by breaking the symmetry of a traditional wreath.
Instead of a full circle, stitch a single, gracefully curving ivy vine that sweeps across one side of the hoop, leaving elegant negative space.
This asymmetrical composition feels more organic and modern than a perfectly centered design.
Use a simple satin stitch for the leaves, but vary their size and the shades of green to mimic the new and old growth on a real plant.
15. Select Hardy Stitches for Everyday Items

A canvas tote bag needs embroidery that can withstand daily use.
Choose flat, durable stitches like the stem stitch for stalks and the fishbone stitch for leaves. These stitches lie close to the fabric and are less likely to snag than looped or raised stitches.
Using two or three strands of floss provides good coverage without adding excessive bulk.
These botanical stitch art ideas to transform plain tote bags are not only beautiful but practical for functional items.
16. Sculpt Petals with Directional Shading

The key to a realistic rosebud is creating the illusion that petals are wrapping around one another.
Achieve this with meticulously placed long-and-short stitches, paying close attention to light and shadow.
Use your darkest pink thread where one petal tucks under another, and your lightest shades on the outermost edges where light would hit.
Direct your stitches to follow the curve of each individual petal. This directional work is what transforms a flat shape into a three-dimensional bloom.
17. Combine Thread Painting with 3D Florals
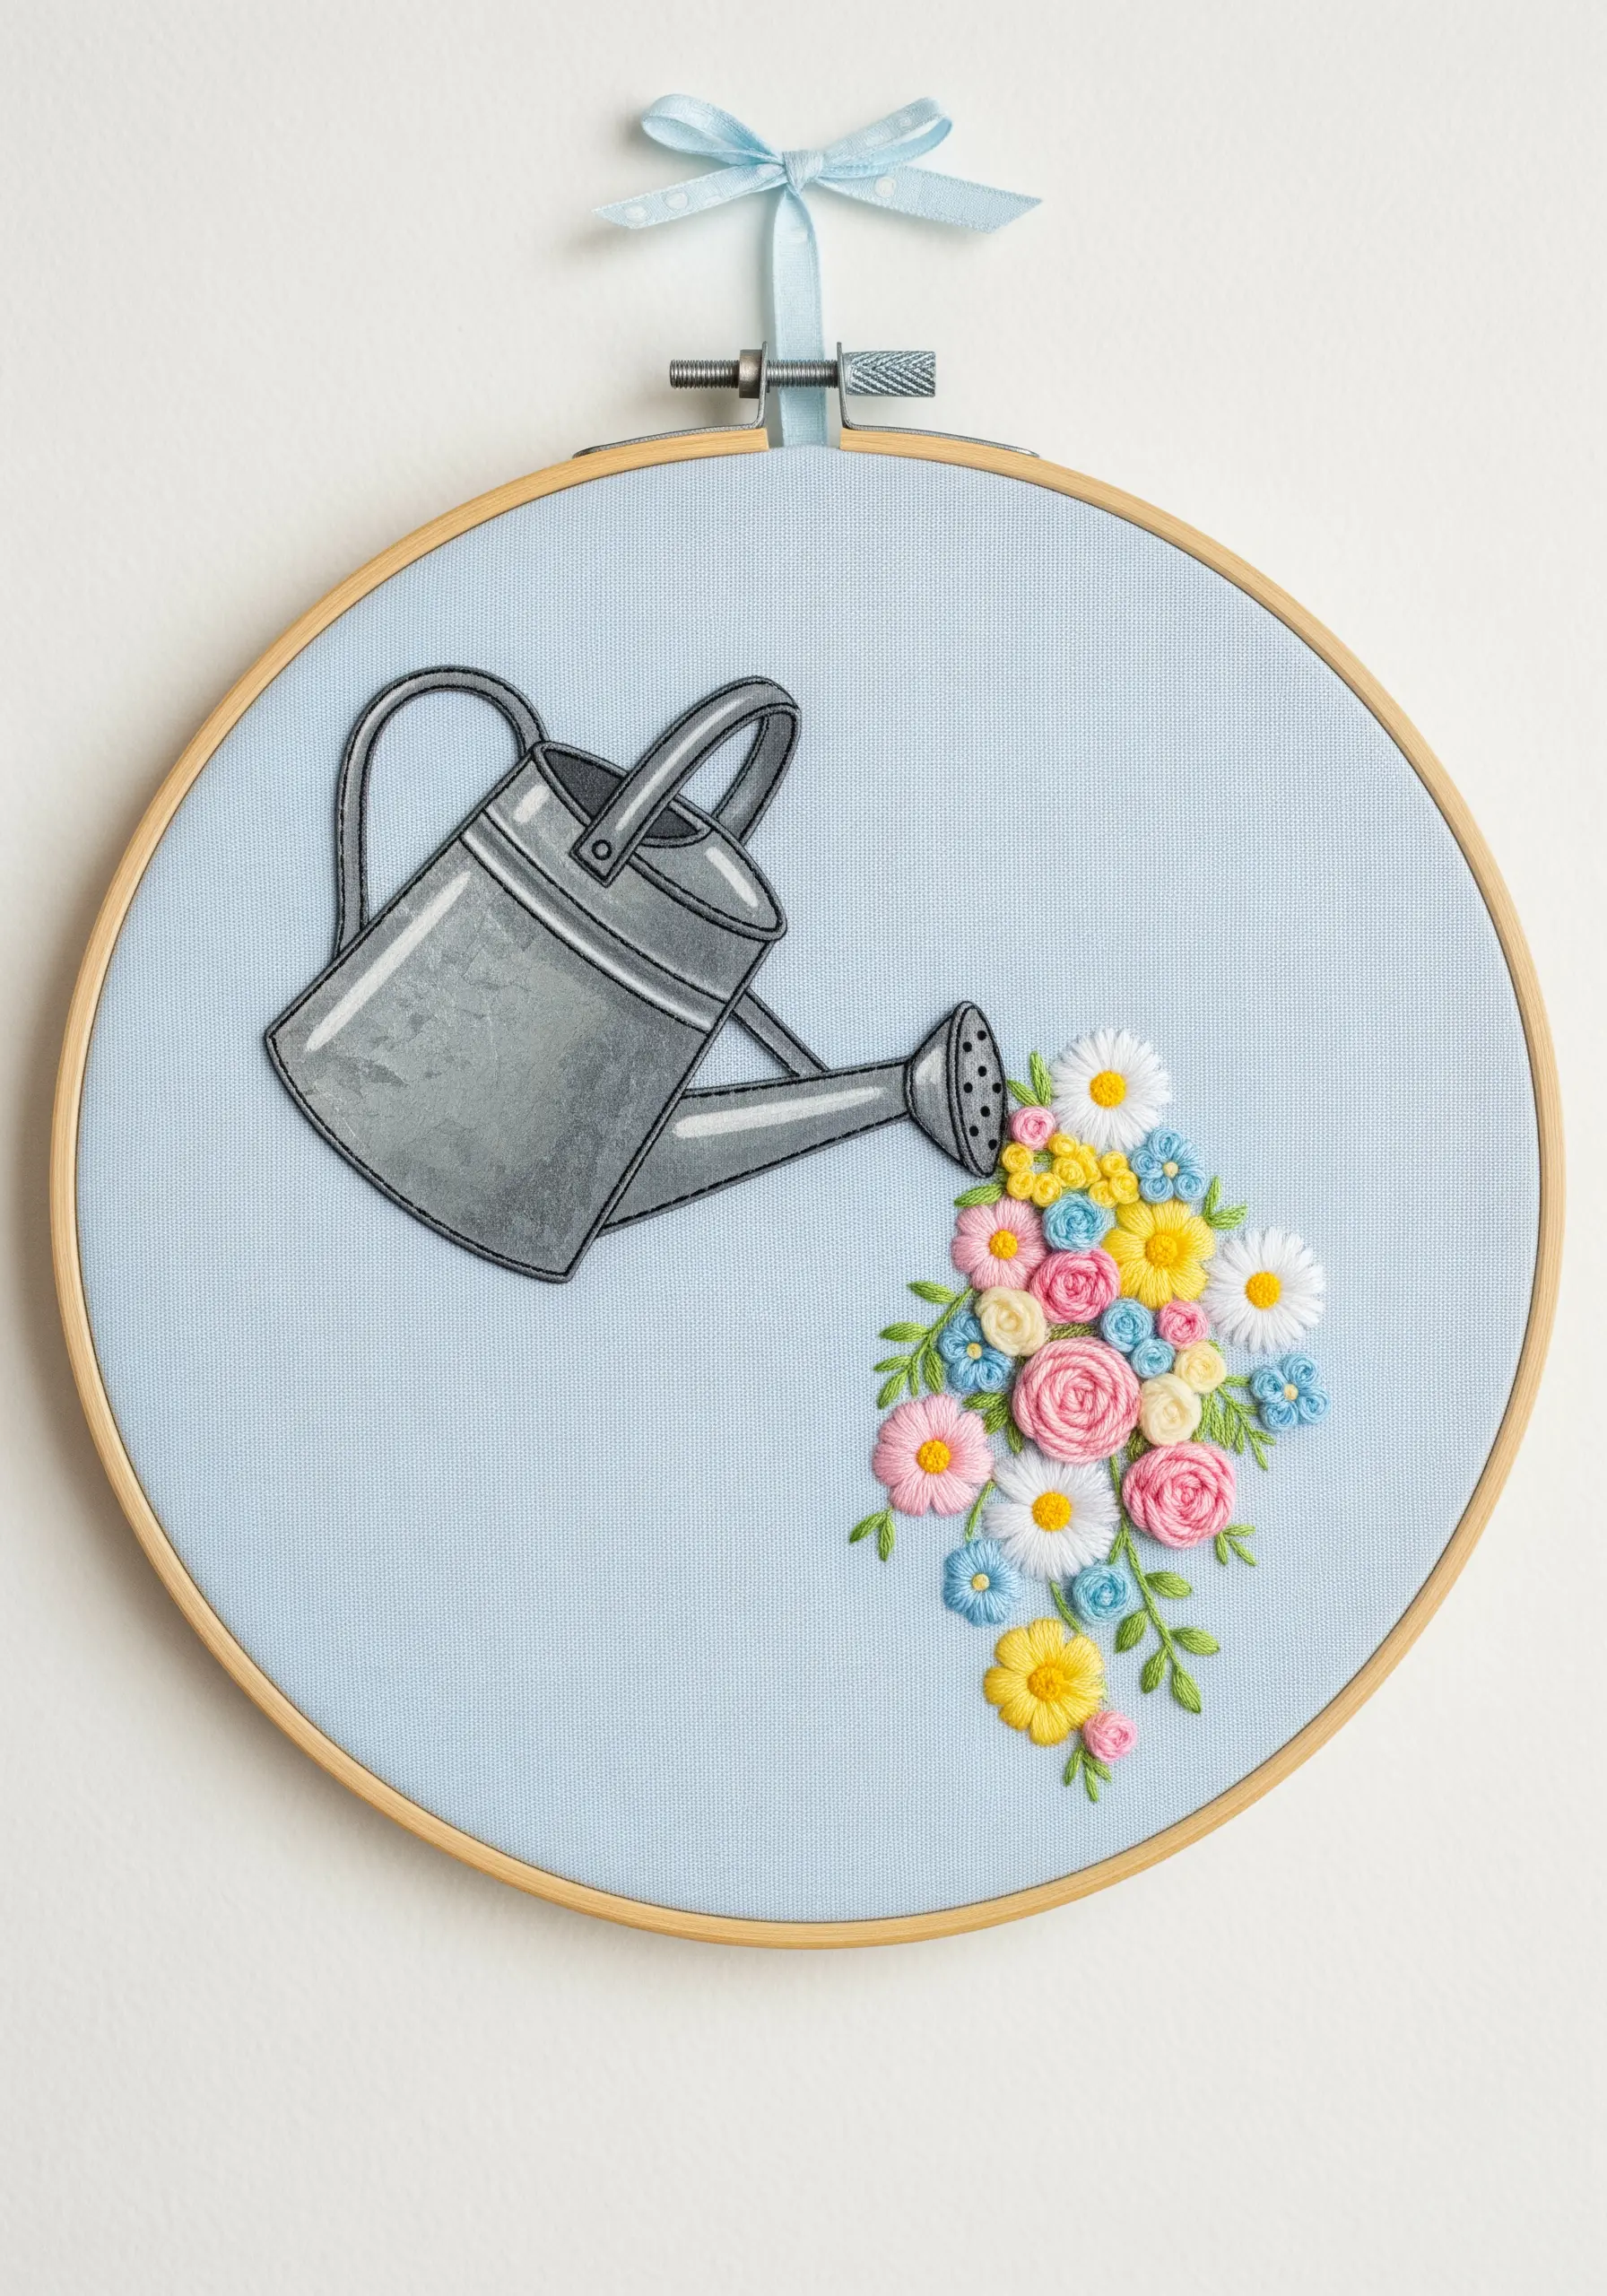
Create a playful, story-filled piece by mixing flat and dimensional techniques.
Render the watering can with flat thread painting, using shades of grey and white to suggest a metallic sheen and subtle reflections.
For the overflowing flowers, switch to highly textural stitches. Use woven wheel stitches for the roses, lazy daisy stitches for petals, and French knots for flower centers.
This contrast makes the flowers appear to burst forth from the two-dimensional illustration, adding a touch of magic. It’s one of those wildflower hoop art projects that look like miniature meadow paintings for your wall.
18. Integrate Embroidery into Quilted Home Goods

Extend your embroidery beyond hoop art by incorporating it into functional home decor like this quilted mug rug.
Complete your central embroidery design first—simple lazy daisy stitches and French knots are perfect for these chamomile flowers.
Once the stitching is done, layer the fabric with batting and a backing, then quilt around your design to make it pop.
The quilting not only adds a beautiful texture but also protects your stitches, making the piece both lovely and durable.


