

That stack of plain, forgotten linens in your cupboard holds more potential than you know. They aren’t just old sheets or spare napkins; they are blank canvases waiting for a story, a touch of color, a line of thread that gives them a new purpose.
Elevating your embroidery isn’t about learning dozens of complex stitches. It’s about learning to see. It’s choosing the perfect stitch to capture the curve of a petal, blending threads to mimic the afternoon sun on a leaf, or using texture to make a simple design feel extraordinary.
These ideas are designed to shift your perspective. They are your guide to transforming simple cloth into something personal and luxurious—a small work of art for your daily life. You have the skill; now, let’s give it intention.
1. Frame Your Table with Art Deco Radiance
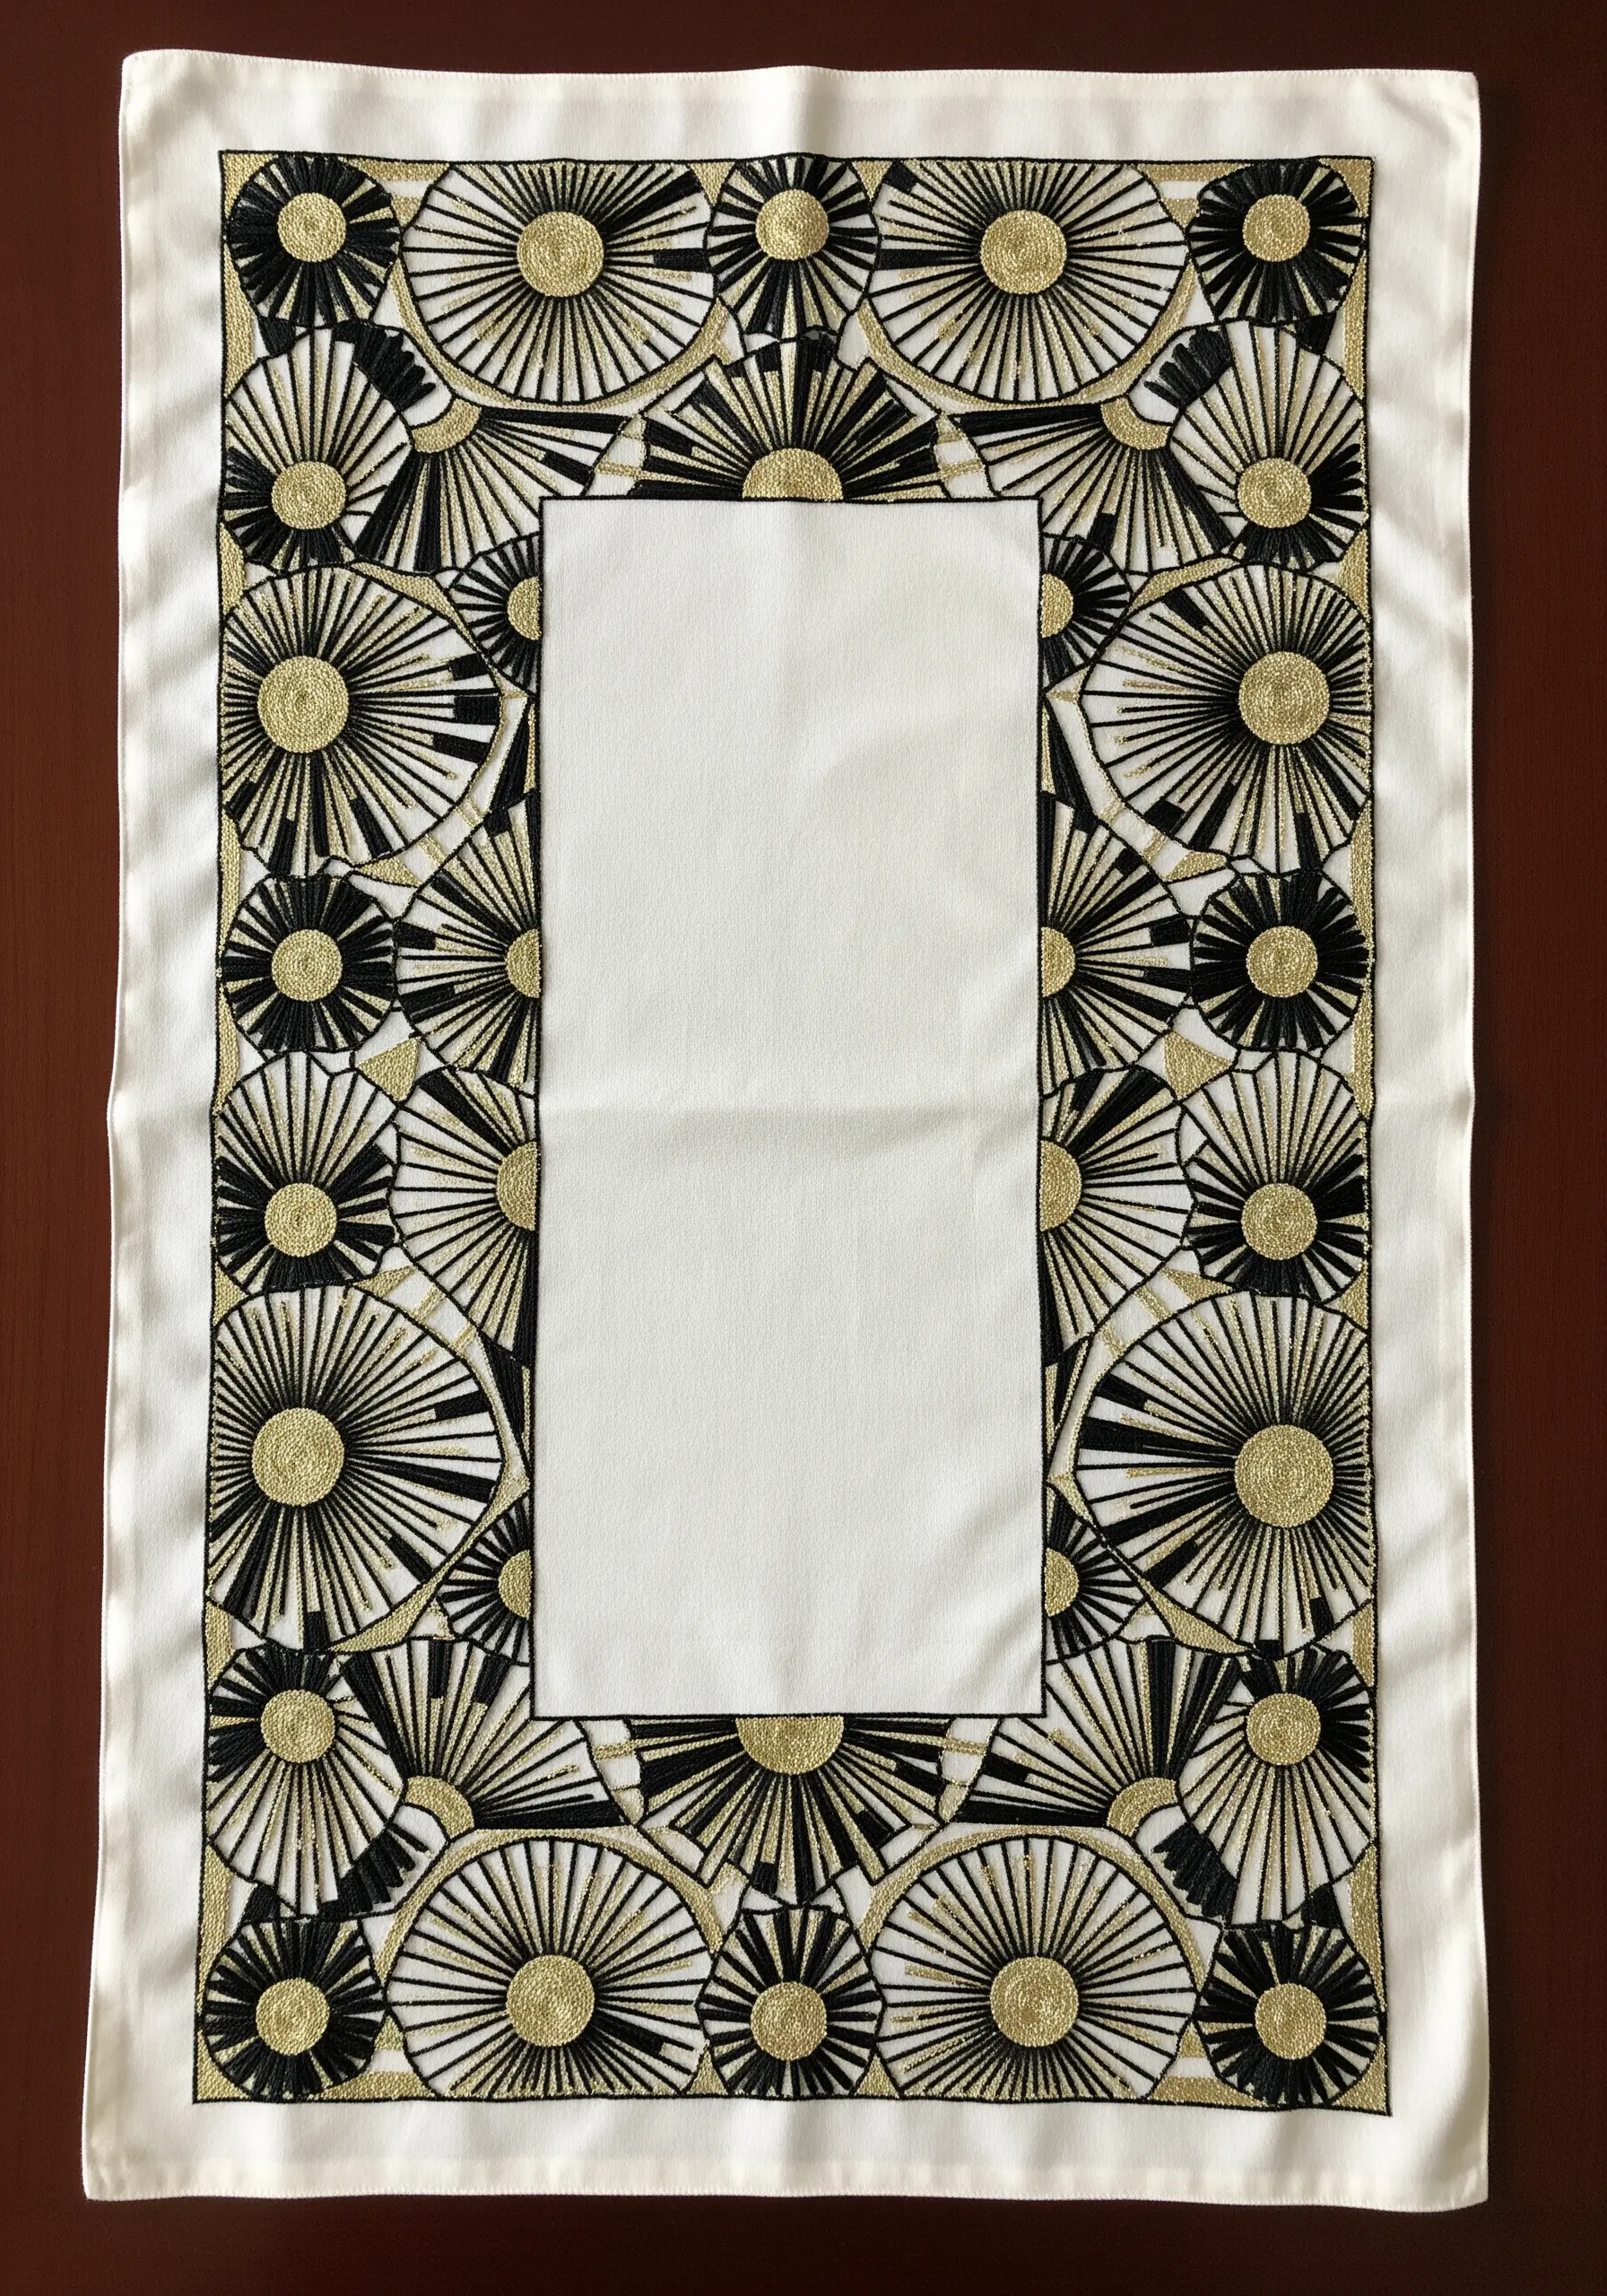
Create a bold, graphic border using satin stitch and high-contrast thread.
To achieve the crisp, sunburst effect, always stitch from the center outward, which helps the thread lay flat and catch the light evenly.
Use a shimmering metallic gold against a matte black floss. The textural difference is what creates visual depth and a sense of luxury.
For perfectly sharp edges between colors, outline the gold shapes with a single strand of black thread using a split stitch before you begin filling.
2. Capture Botanical Realism with Shaded Ferns
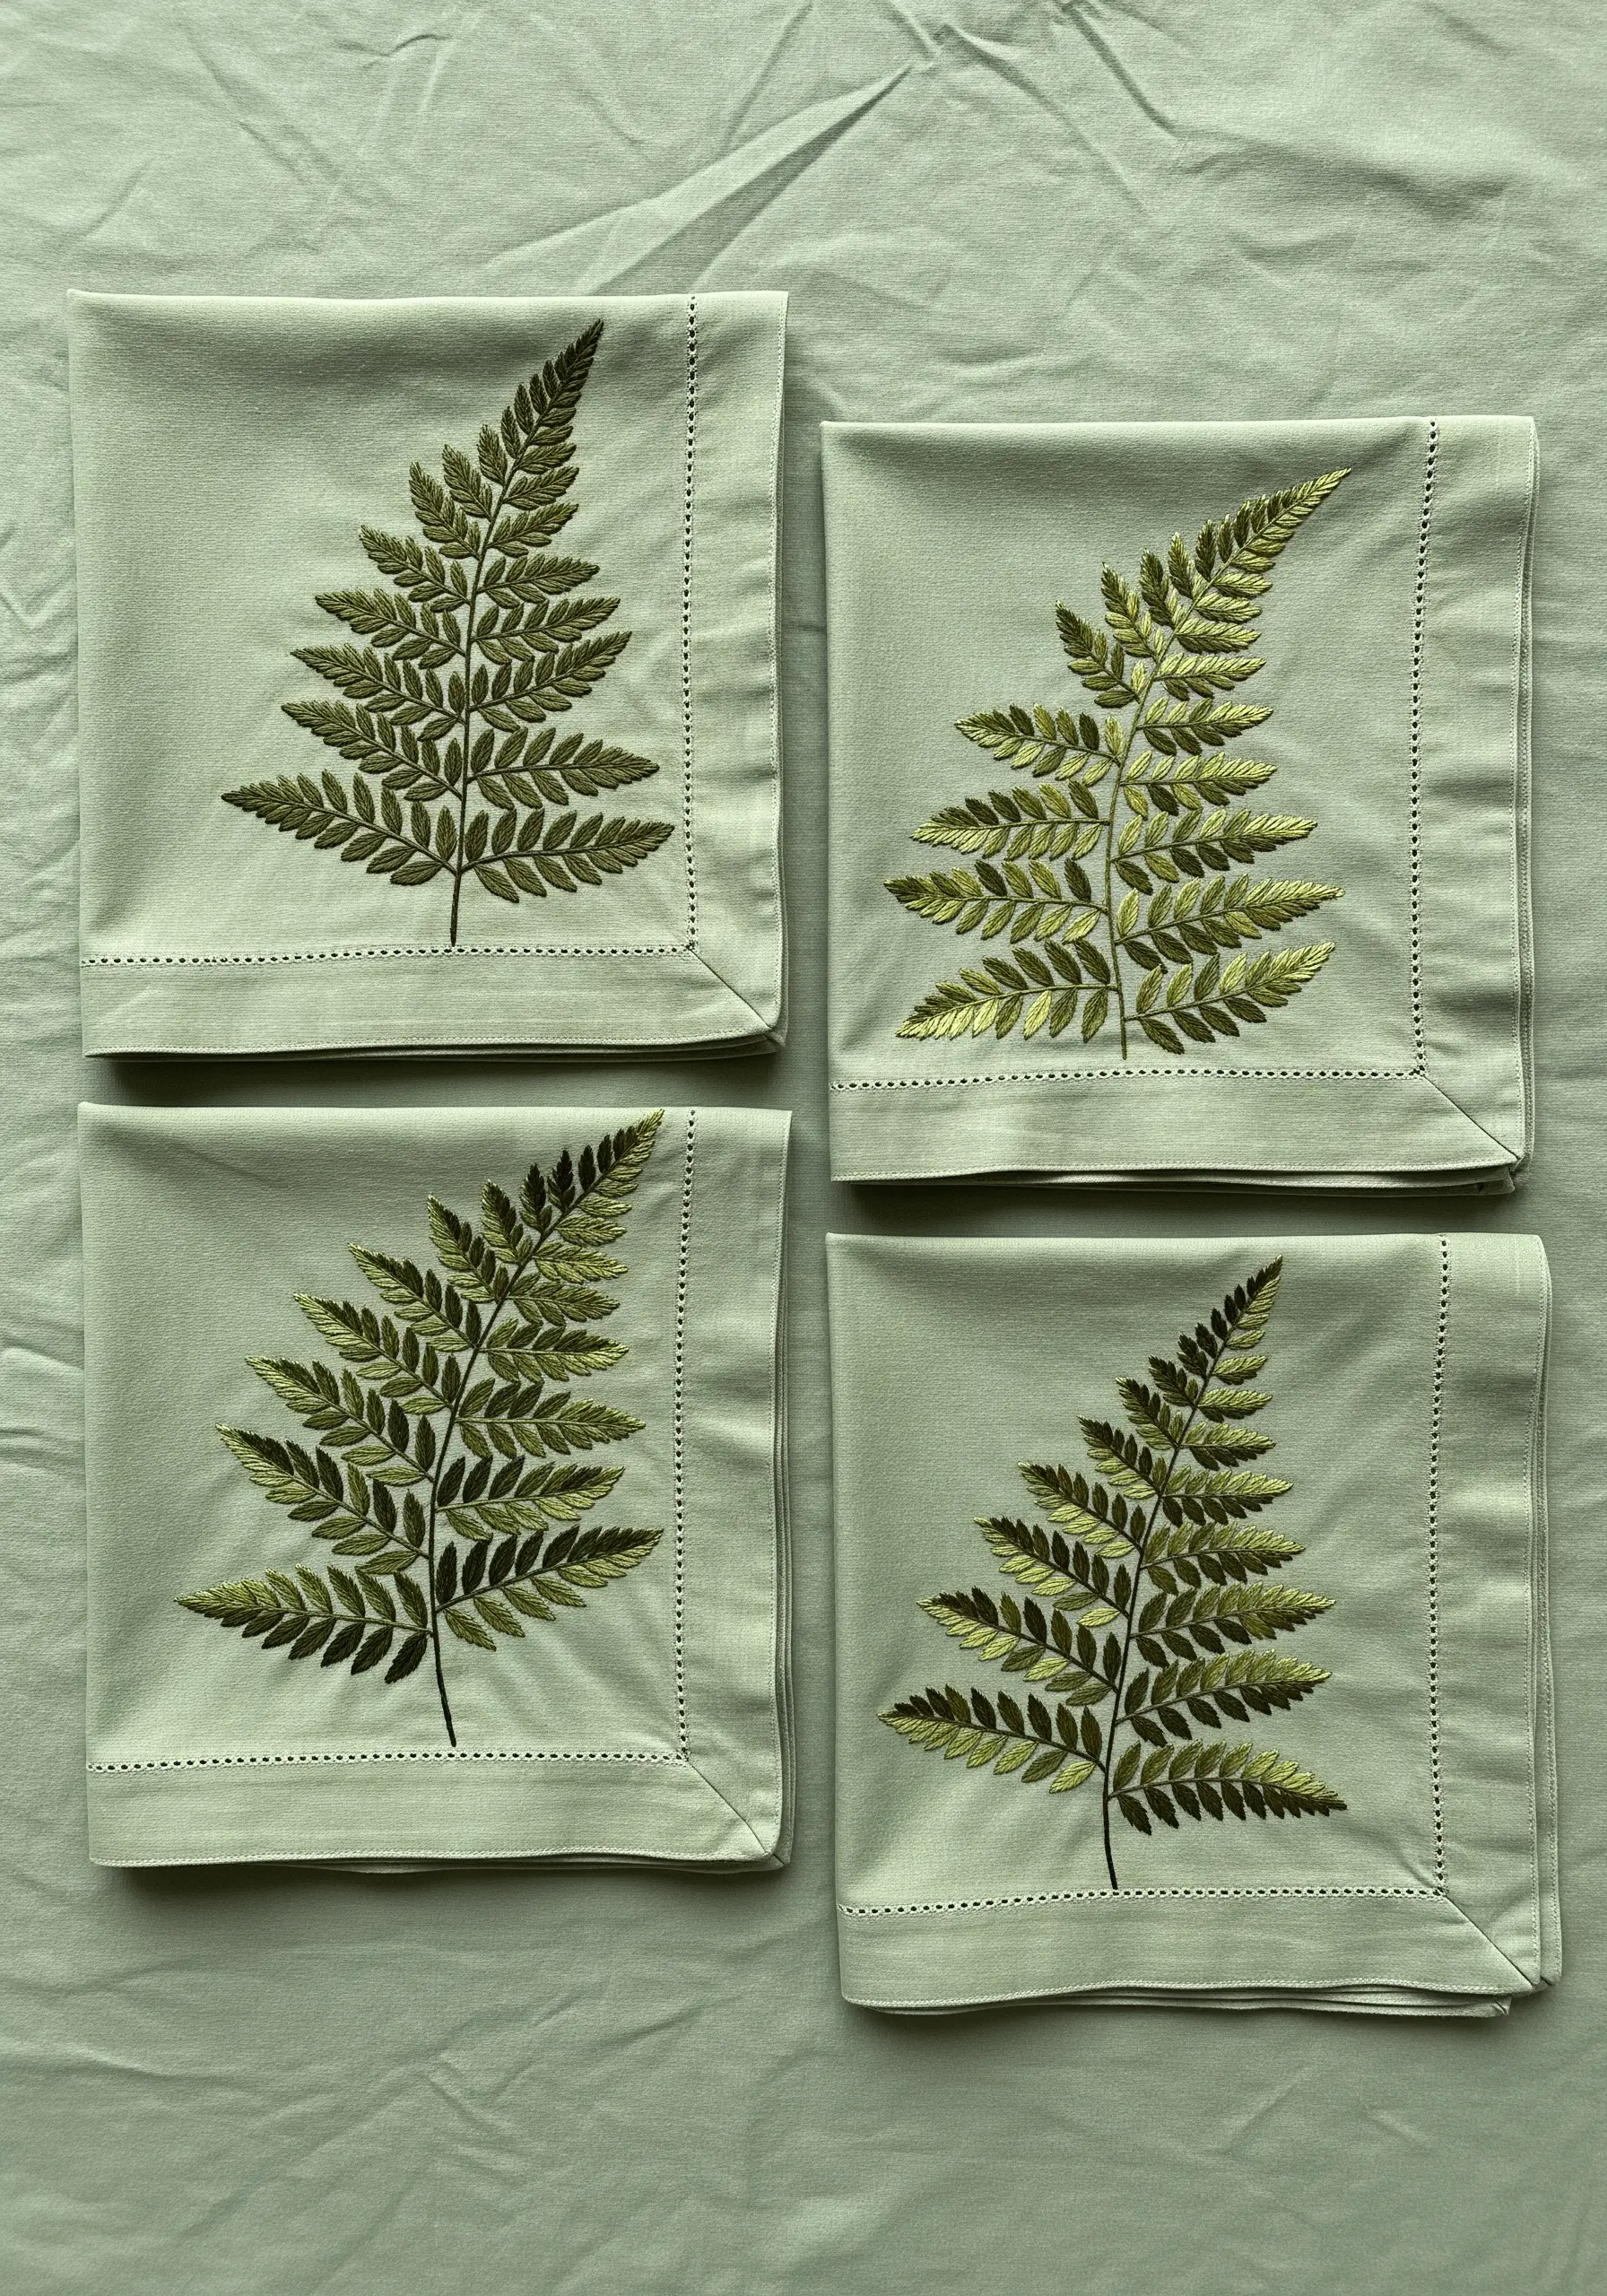
Bring a single fern leaf to life by using three or four shades of green, from deep forest to light moss.
Instead of satin stitch, use the long-and-short stitch to blend the colors seamlessly, giving the leaflets a soft, realistic gradient.
Vary the angle of your stitches slightly on each leaflet to mimic the way a real fern frond grows, adding subtle movement to the design.
This is one of the best plant-inspired embroidery patterns for practicing thread painting on a small, manageable scale.
3. Stitch a Zesty, Sun-Drenched Lemon Border
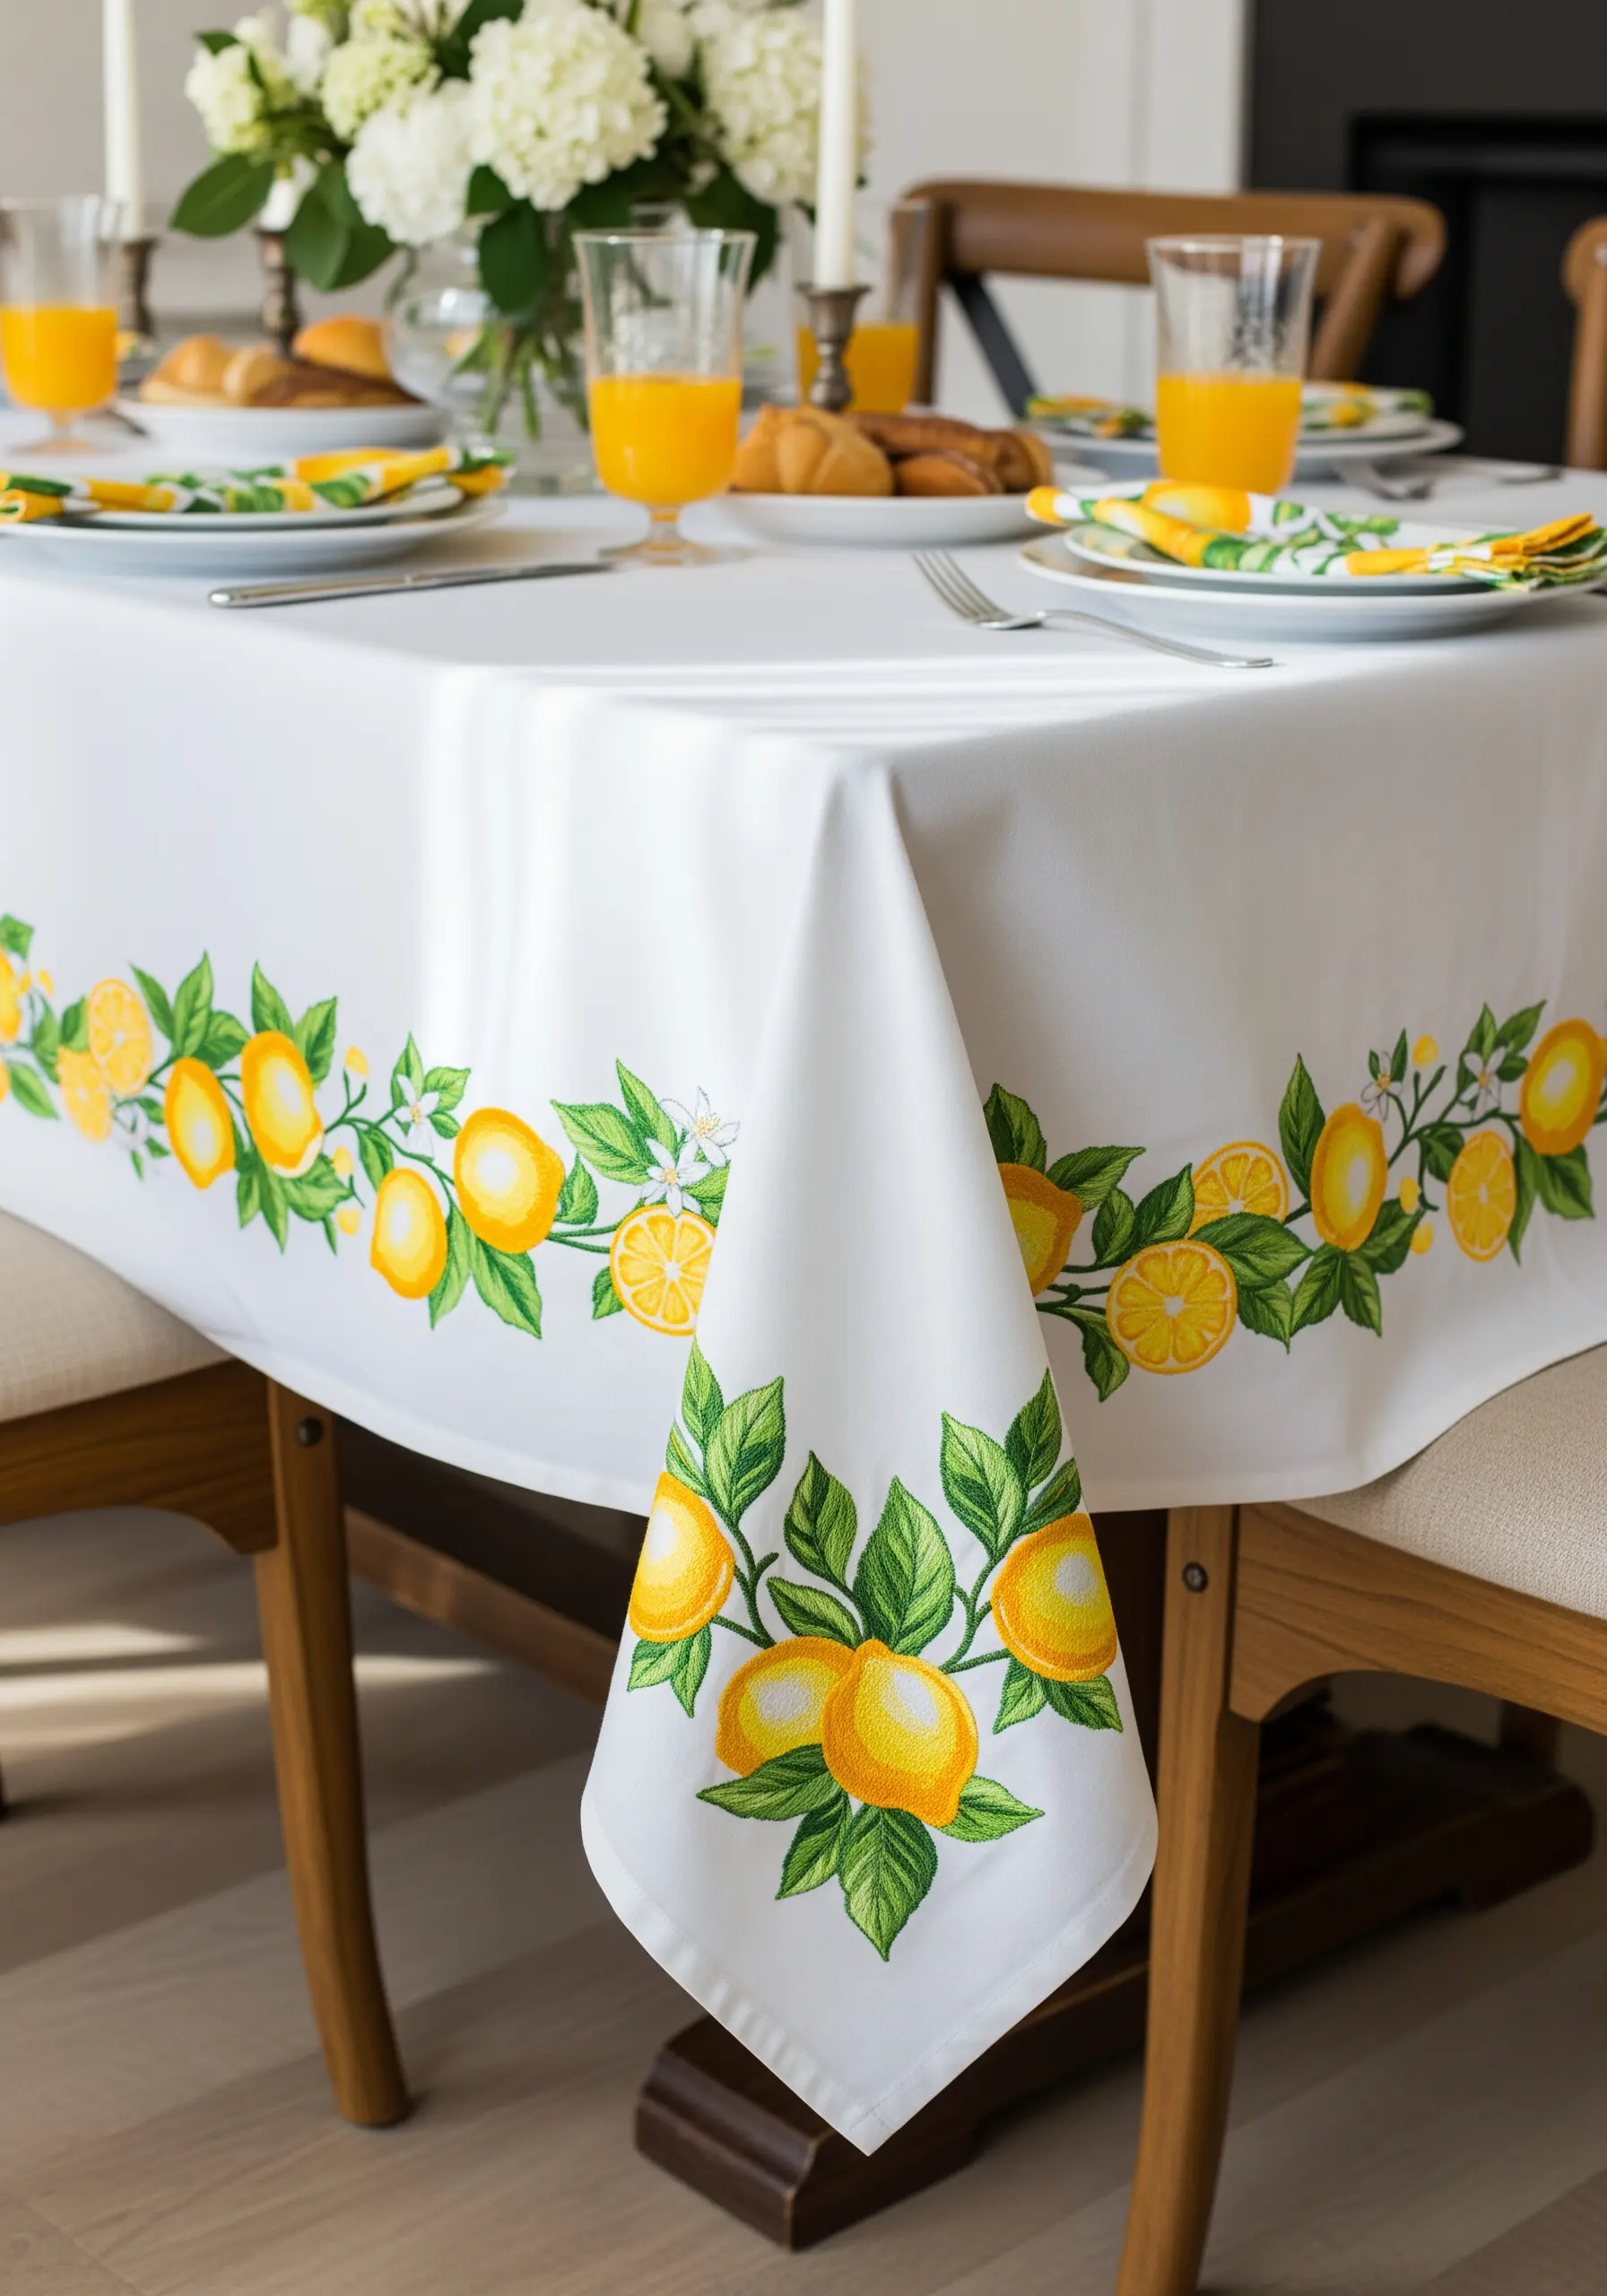
Give your lemons a plump, three-dimensional feel with a padded satin stitch.
First, fill the lemon shape with a base of horizontal straight stitches, then cover it with vertical satin stitches. This underlying layer pushes the top stitches upward, creating a gentle curve.
For the leaves, a fishbone stitch creates a beautiful central vein and directs the stitches outward at a natural angle.
Balance the vibrant yellows with a few white blossoms and small, cut-open fruit details to create a dynamic, repeating garland around your tablecloth’s edge.
4. Weave Japanese-Inspired Waves with a Single Line
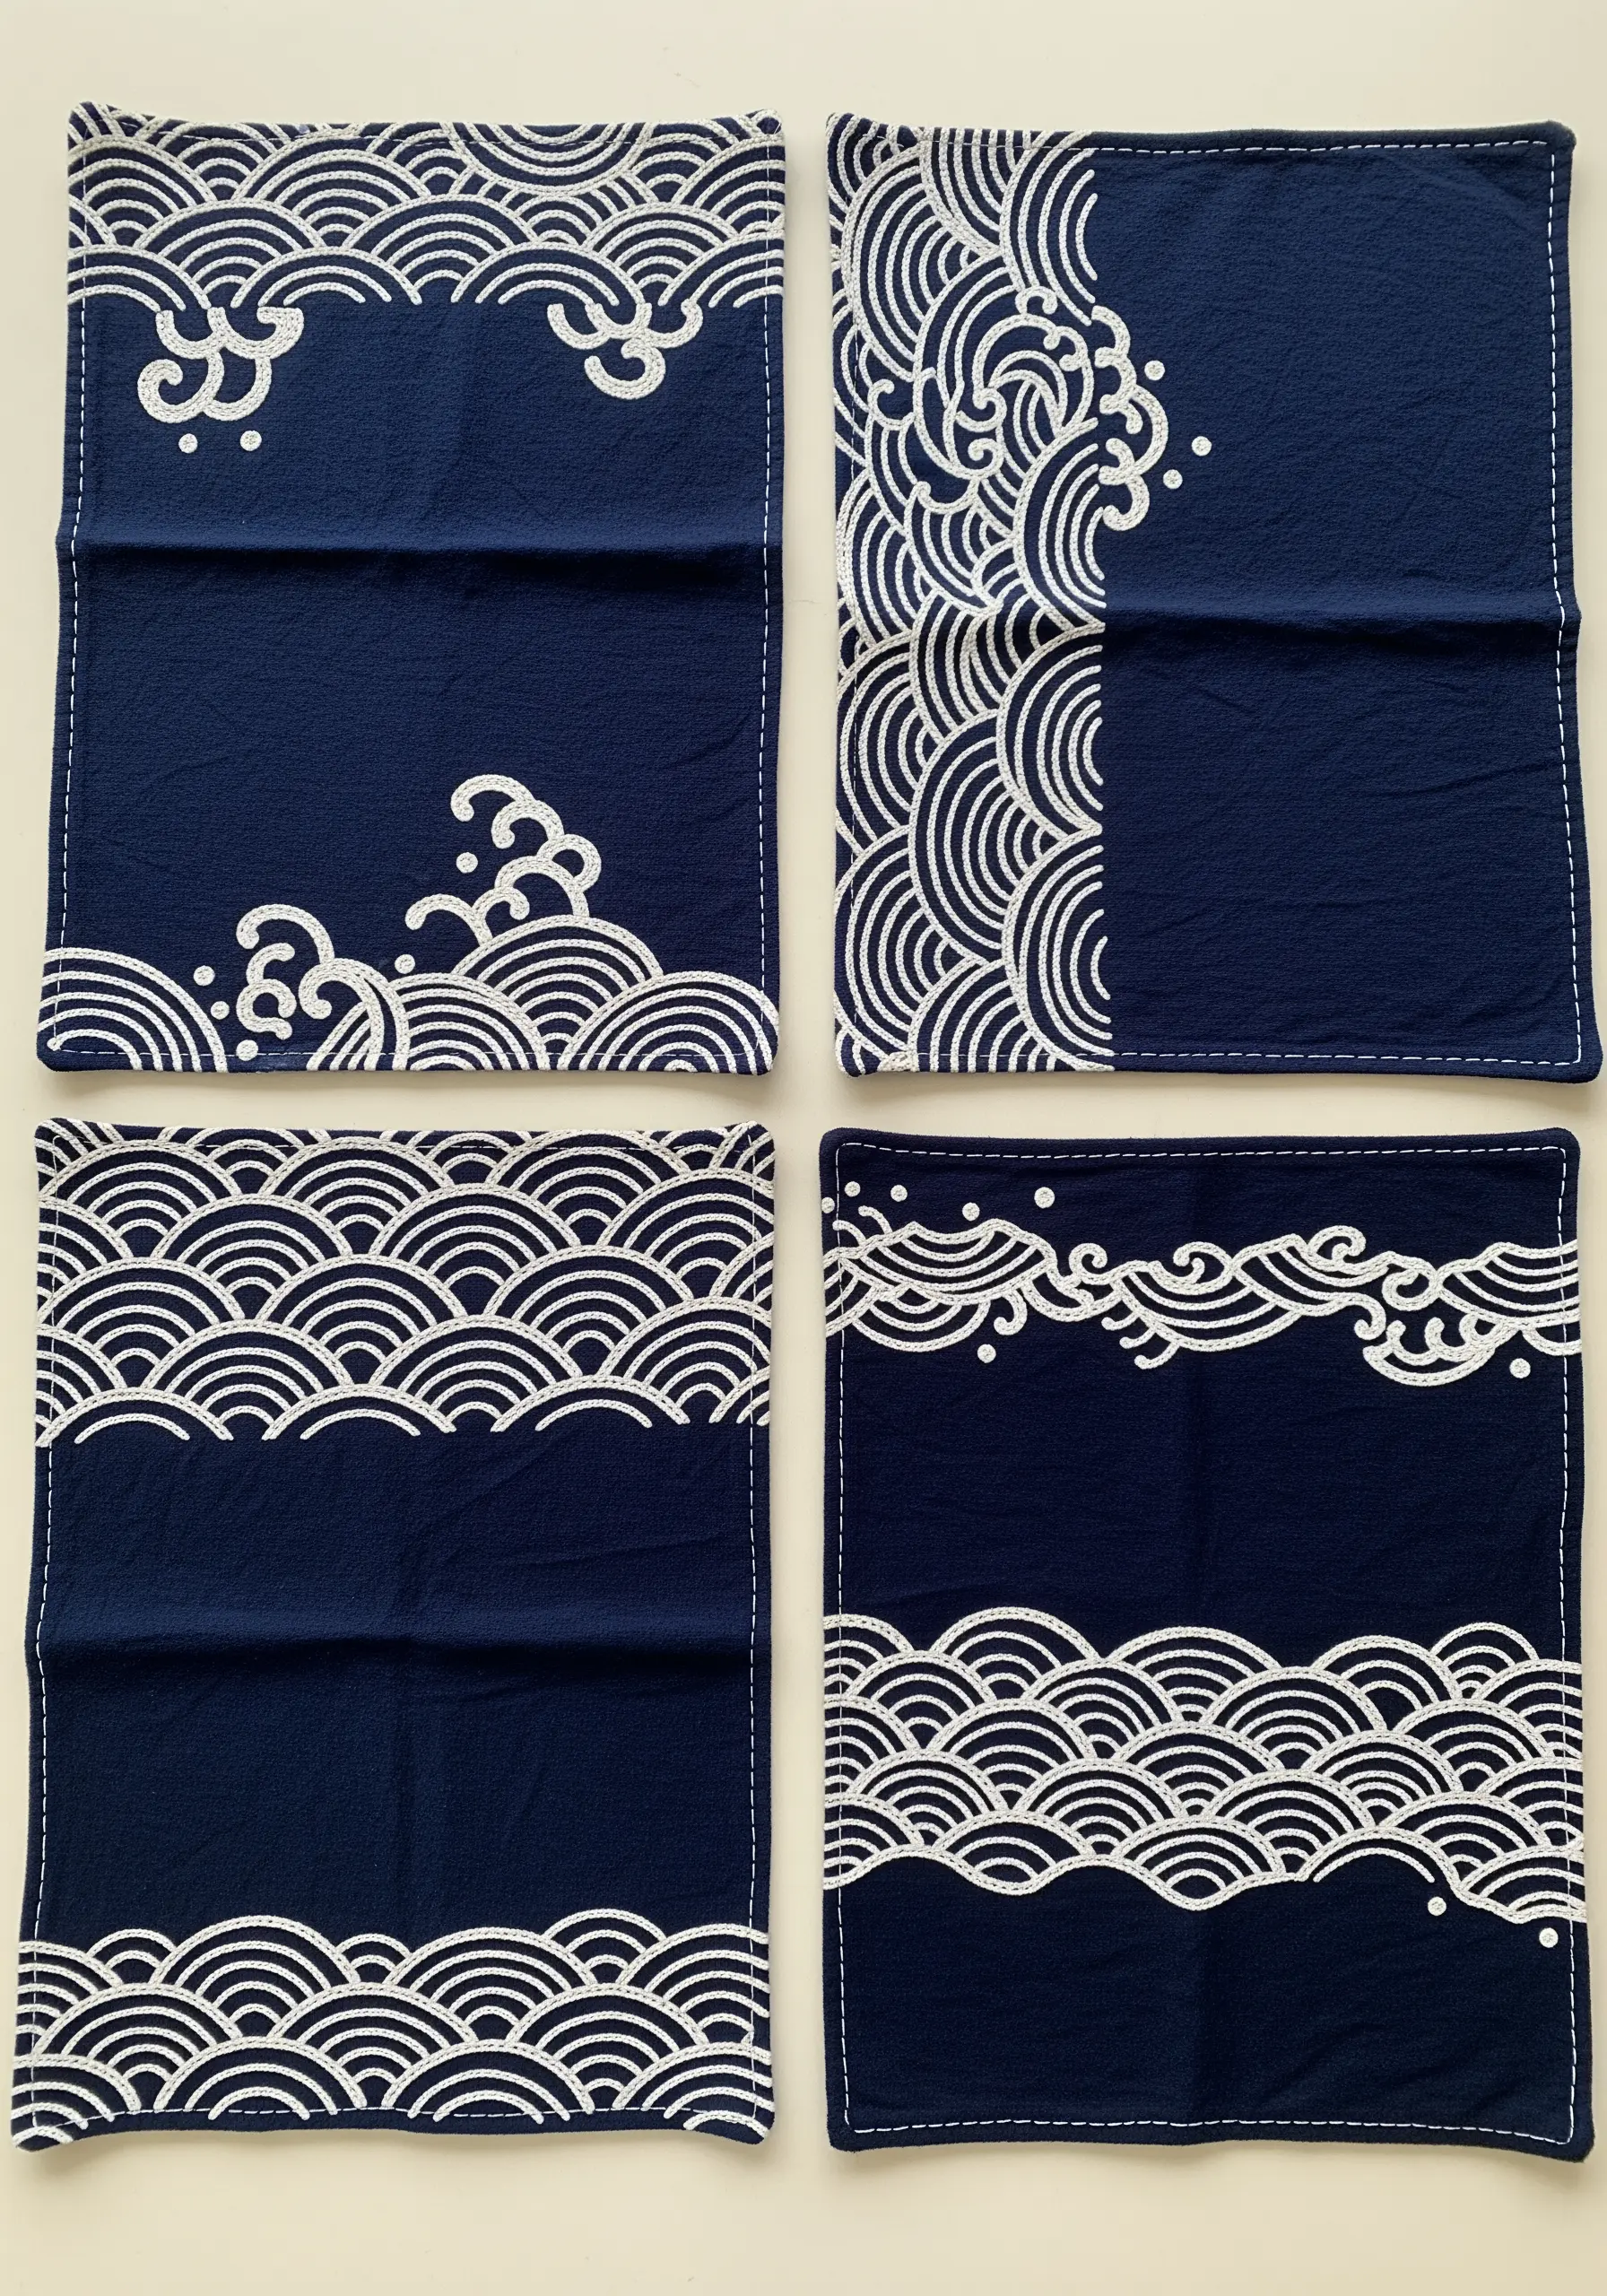
This design celebrates the power of line art. The key to its success is a perfectly smooth, unbroken line.
Opt for a whipped backstitch or a stem stitch instead of a standard backstitch. Whipping the stitches wraps the thread over the joints, eliminating the dotted look and creating a fluid, cord-like line.
Use a high-contrast, crisp white thread on dark indigo linen to make the graphic shapes pop.
Arrange different wave motifs on each napkin for a coordinated set that feels uniquely artistic and avoids simple repetition.
5. Cultivate a Meandering Meadow Table Runner
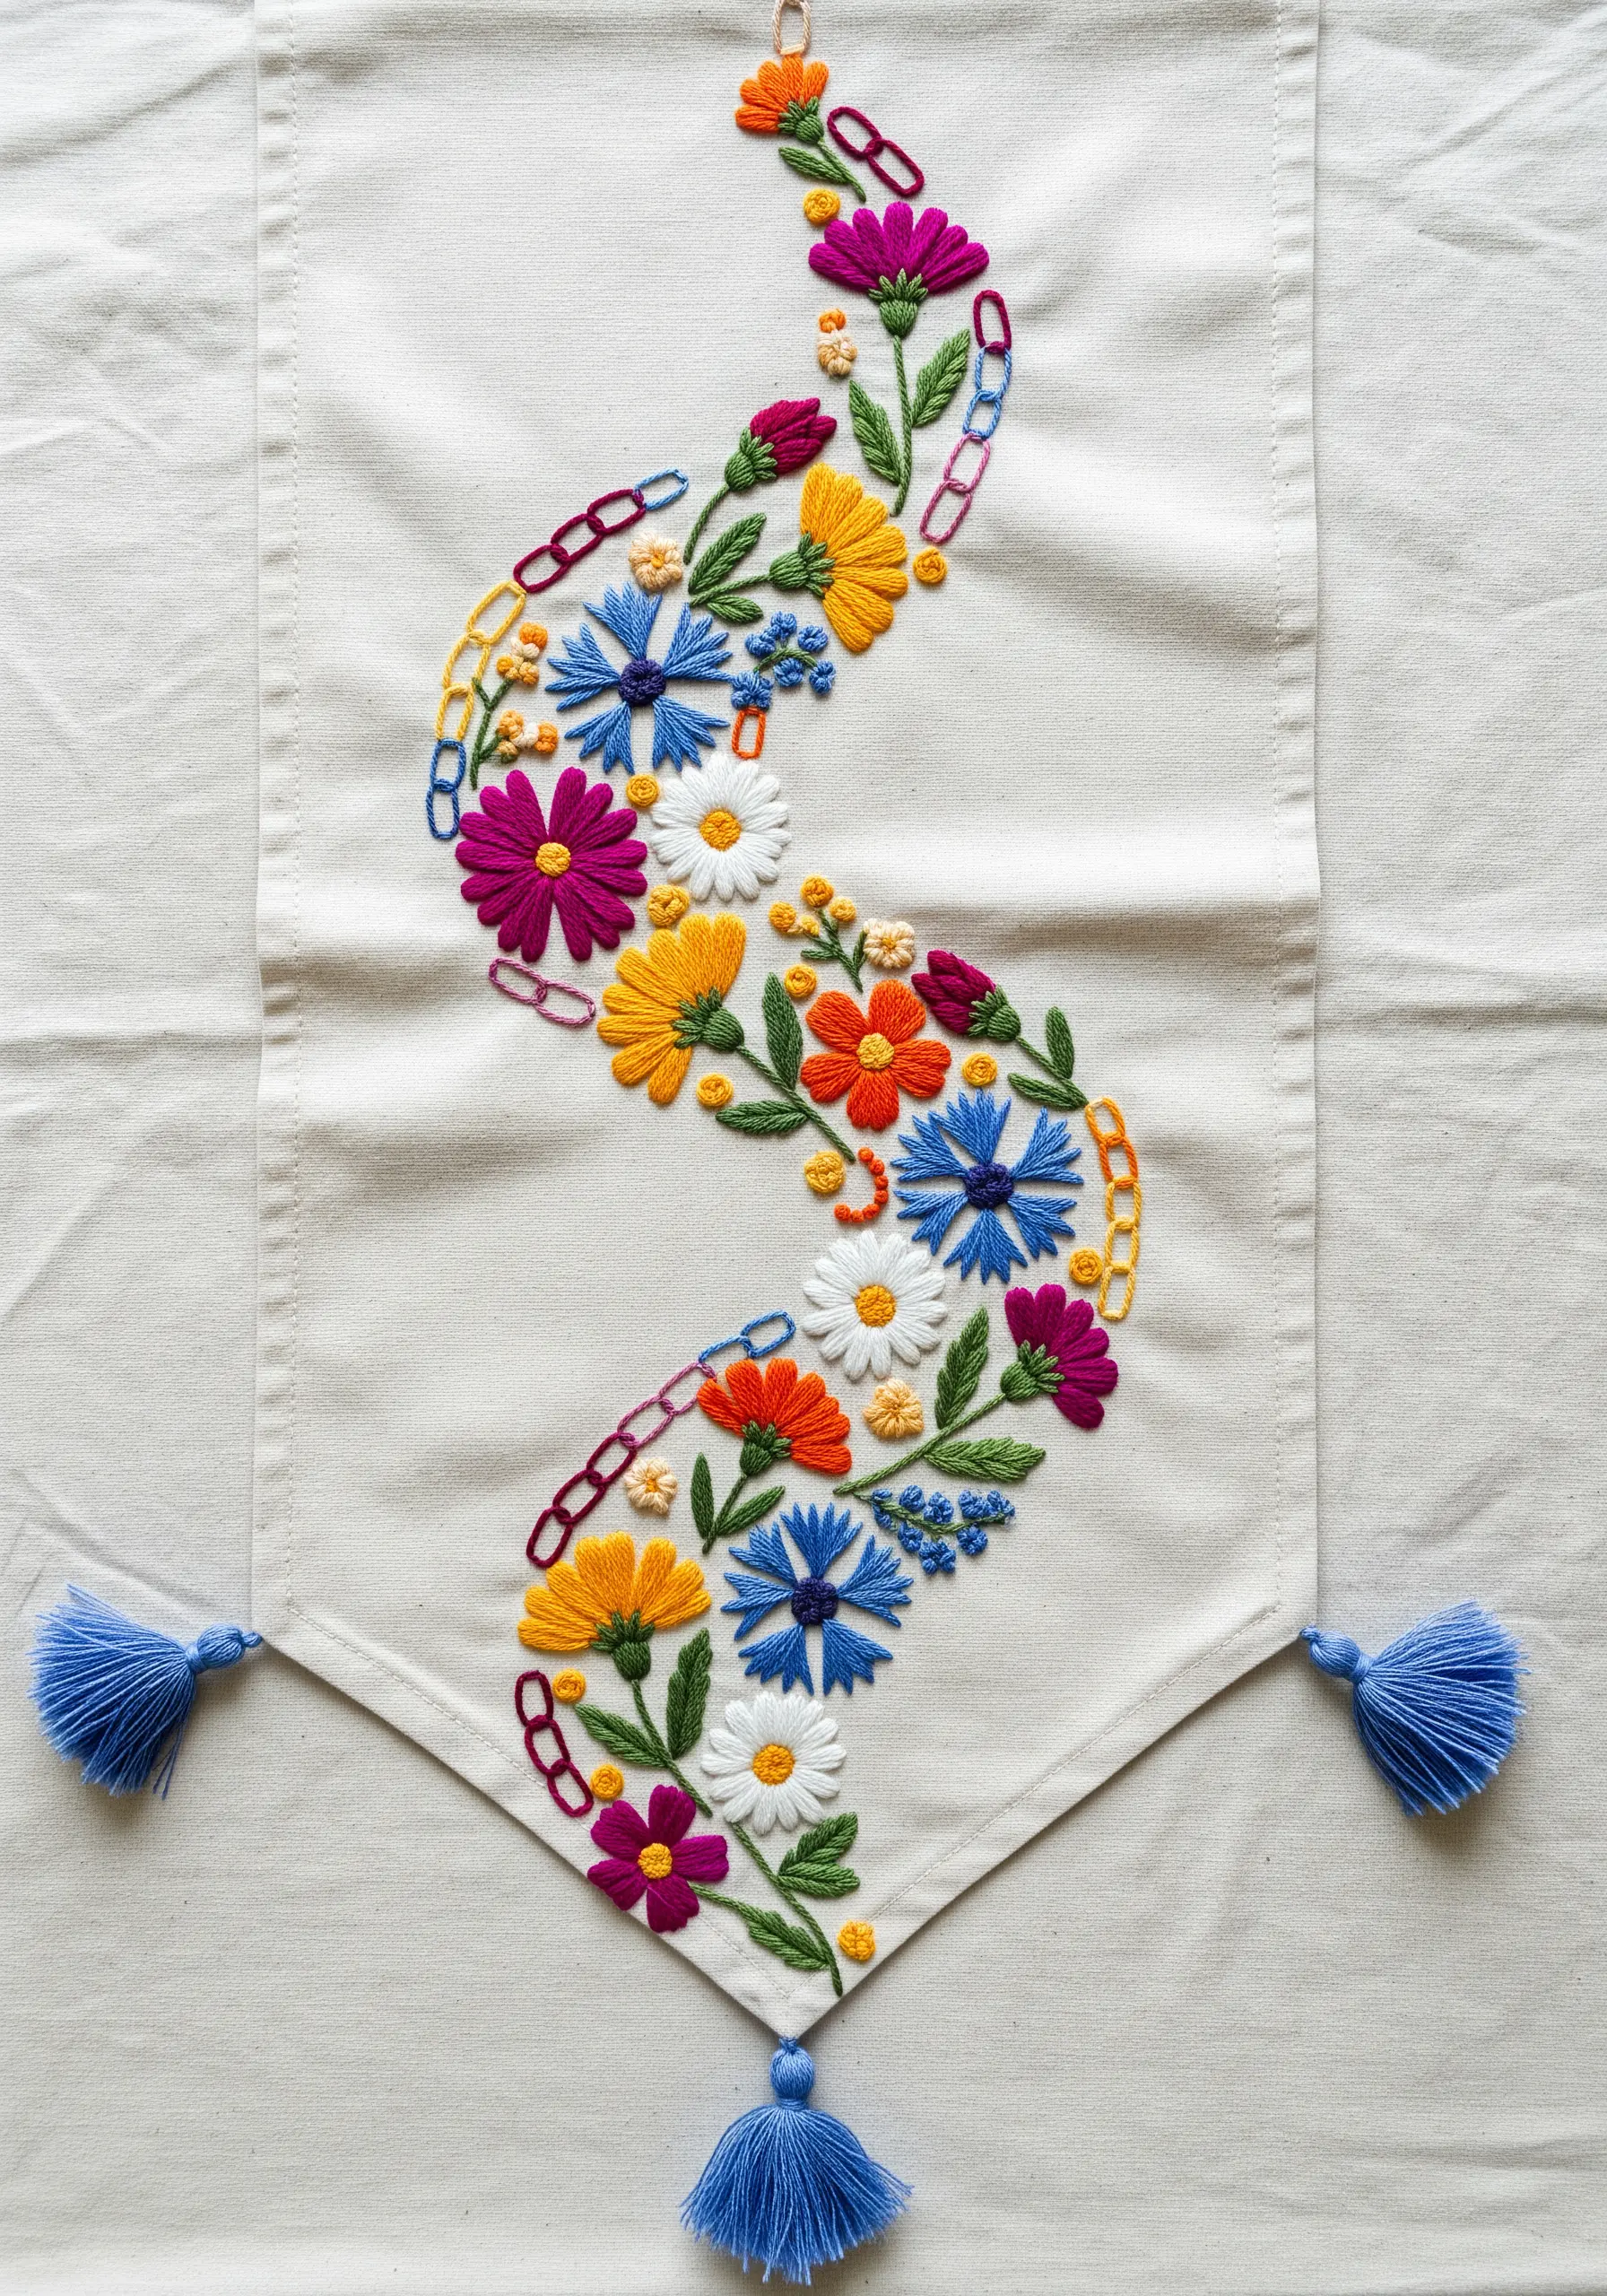
Create an organic, flowing design by arranging simple floral motifs in a serpentine ‘S’ shape down the center of the runner.
Use a diverse vocabulary of stitches to add texture: chunky satin stitch for daisy petals, dense French knots for flower centers, and detached chain stitches for small buds.
The playful chain link motifs are made with a simple chain stitch, which adds a graphic element that guides the eye through the floral arrangement.
Don’t be afraid to use all six strands of your embroidery floss for the flowers; the thickness adds bold color and a charming, handcrafted quality.
6. Sculpt an Underwater Coral Garden
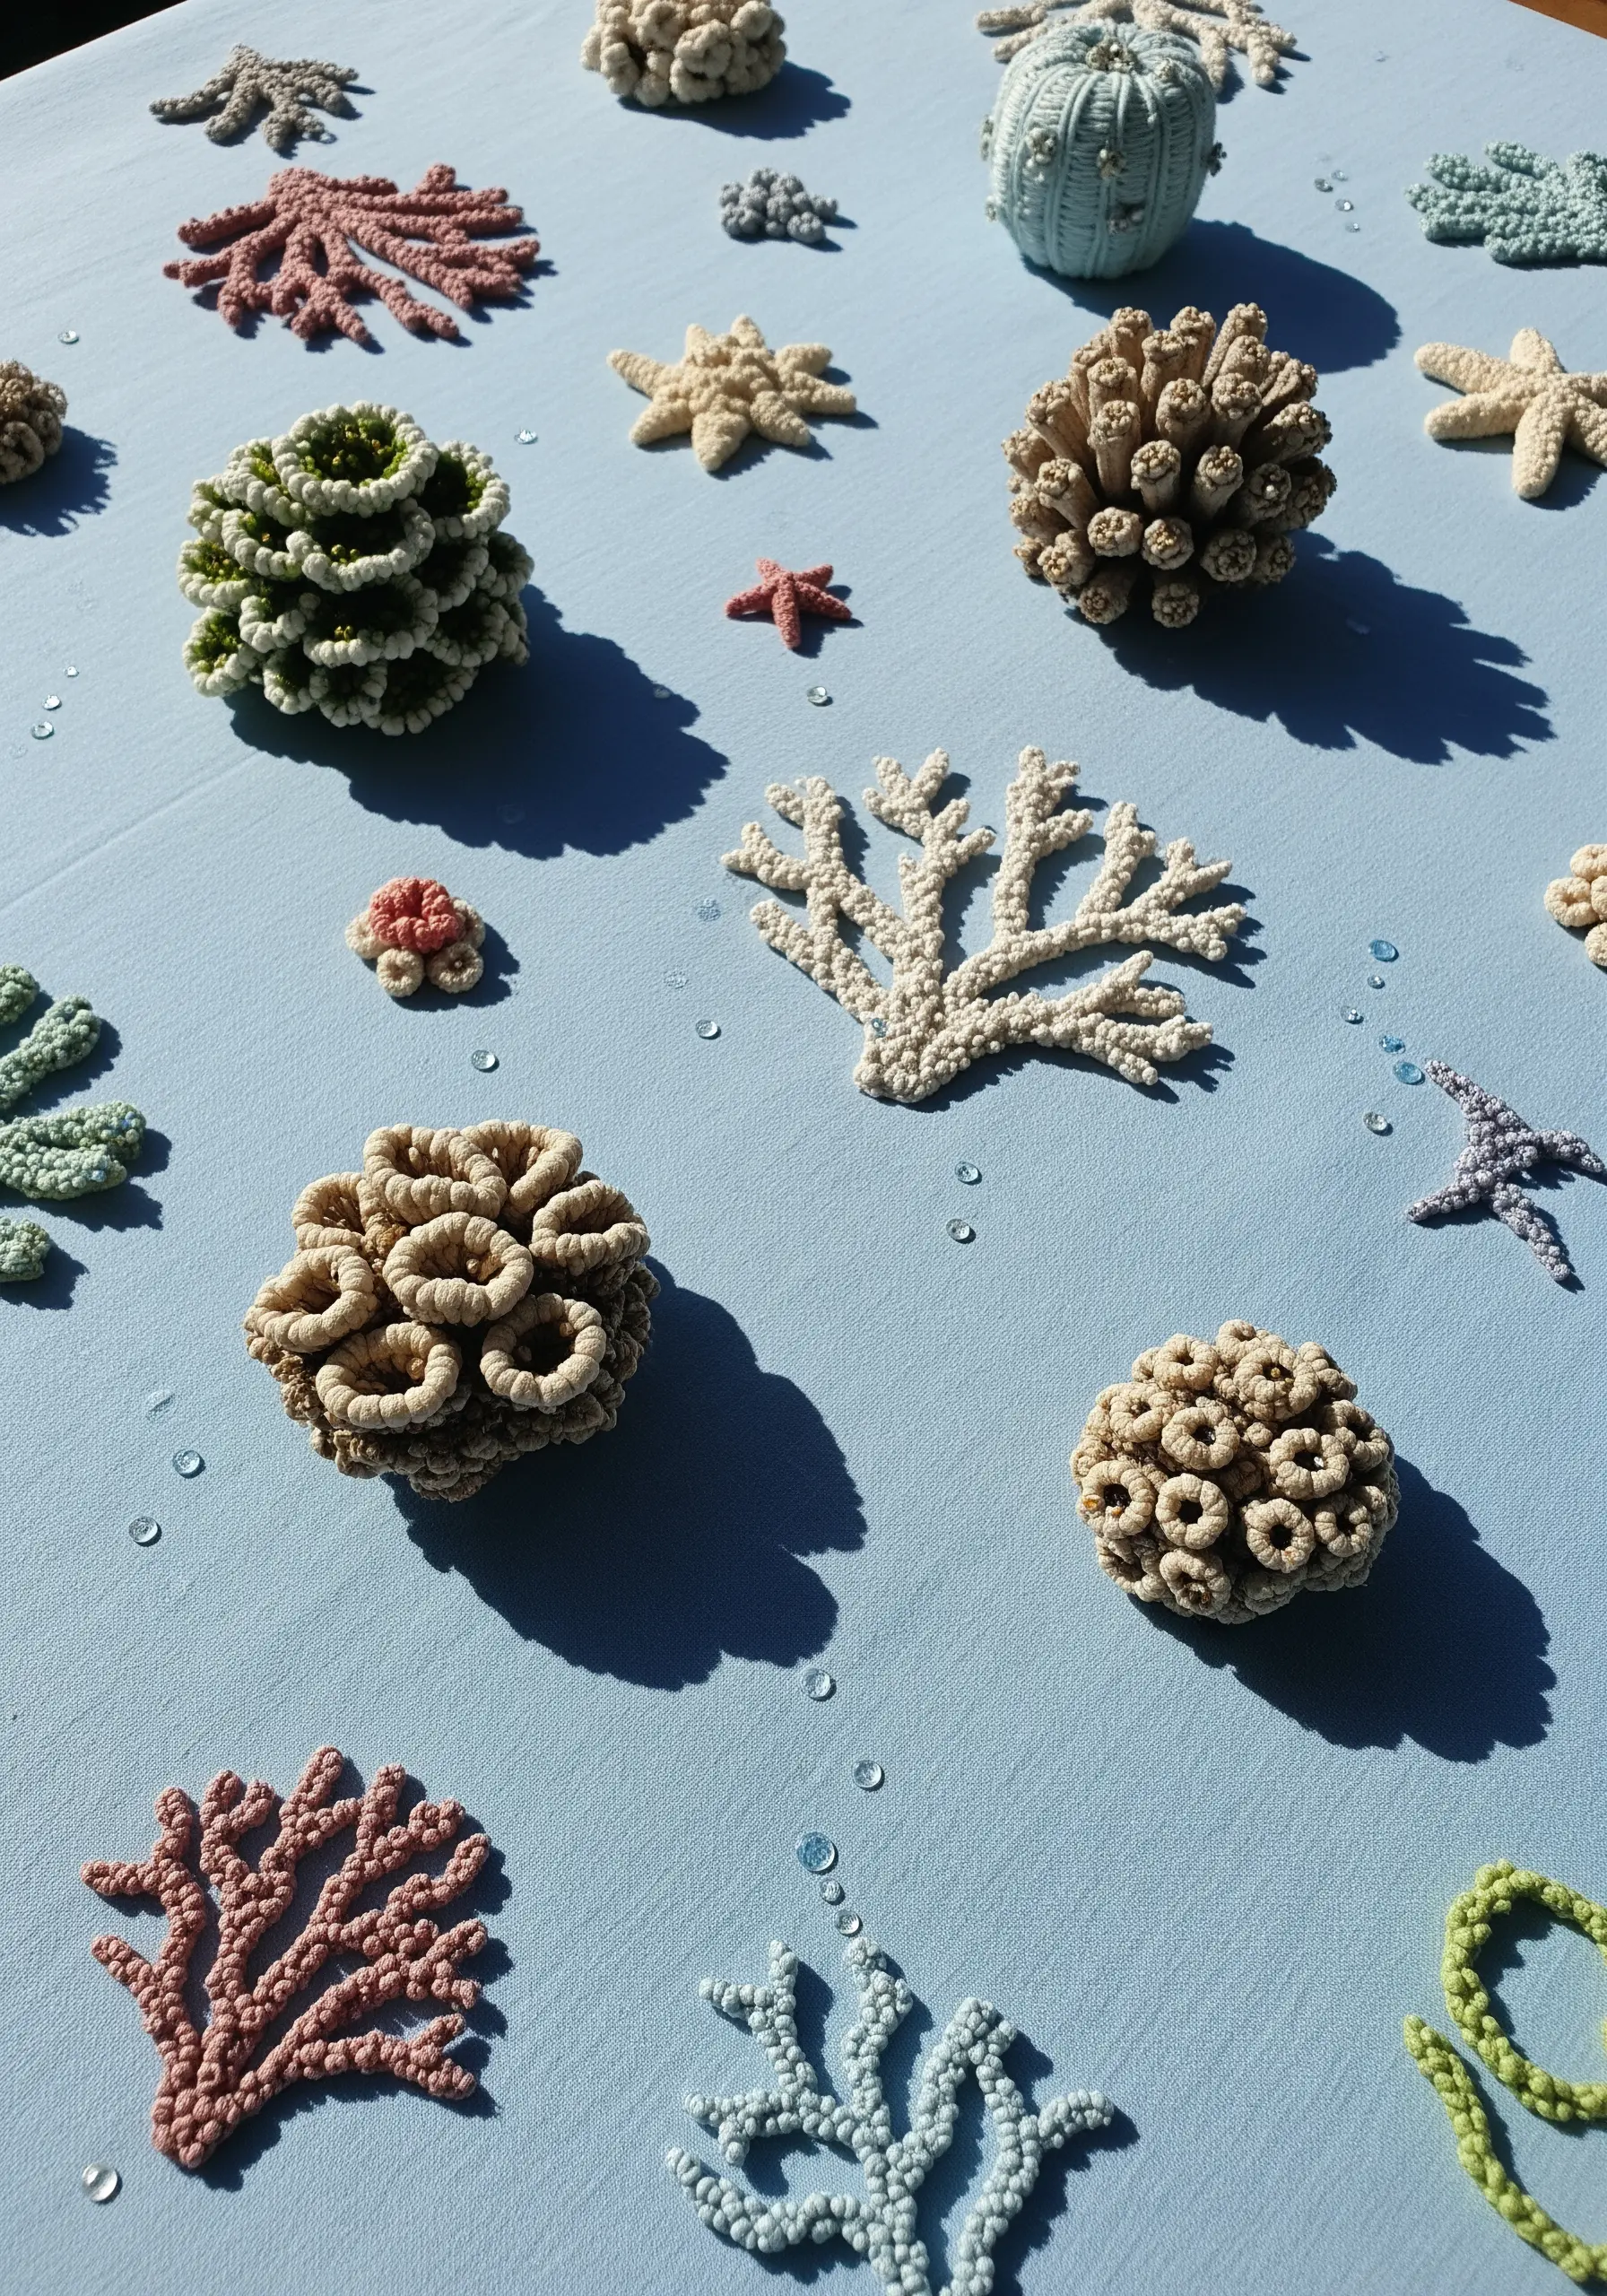
Move beyond flat embroidery and create a tactile, three-dimensional tablescape using textured stitches.
For the tube-like coral, use bullion knots, varying the number of wraps around the needle to create different heights and thicknesses.
Dense clusters of French knots in variegated thread are perfect for brain coral textures. For the branching sea fans, use a whipped backstitch to create raised, delicate lines.
Scatter your motifs organically across the fabric instead of placing them in a formal pattern to evoke the beautiful chaos of a natural reef.
7. Layer Autumnal Hues on a Harvest Placemat
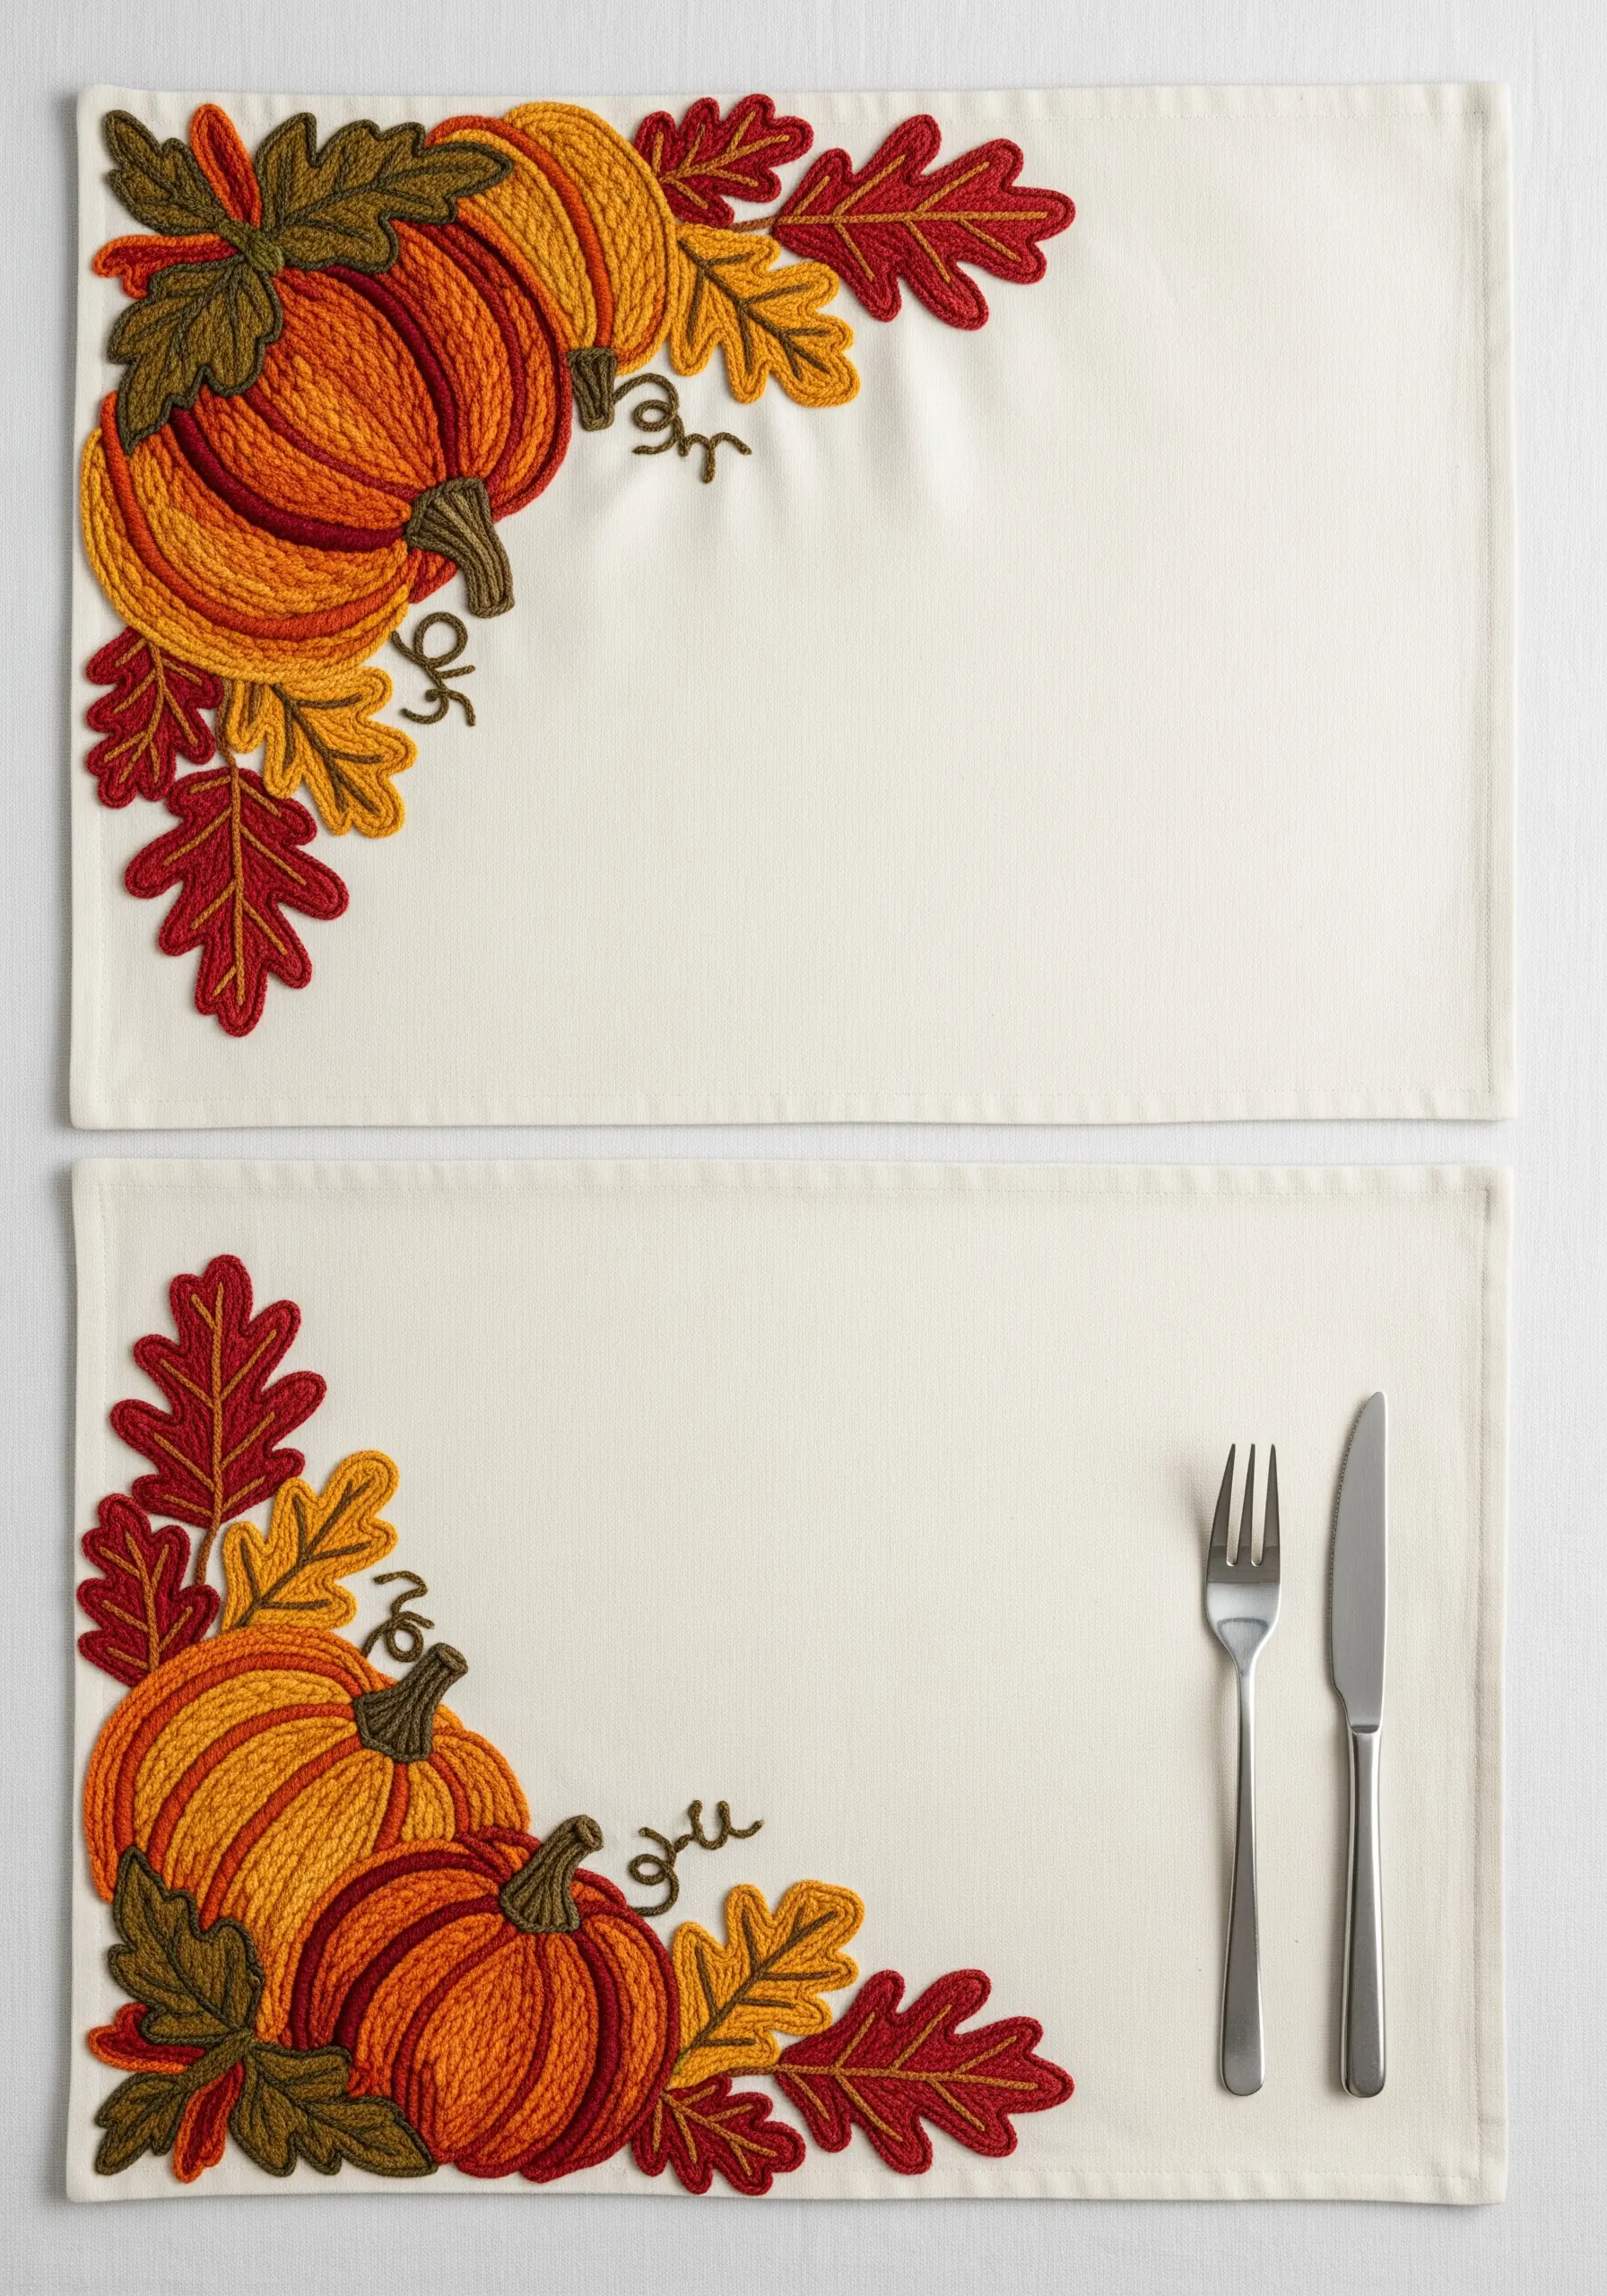
Achieve that satisfyingly plump pumpkin shape by blending three or four autumnal tones with a long-and-short stitch.
Work each pumpkin segment individually, directing your stitches from the outer edge toward the center. This creates the subtle shading that defines its form.
Before filling the shapes, secure the edges with a split stitch outline. This simple step acts as a ‘wall,’ preventing the fill stitches from straying and keeping your shapes crisp.
The mix of oak leaves and pumpkin vines offers a chance to combine different stitch directions—fishbone for the leaves and a simple stem stitch for the curling tendrils.
8. Paint with Thread in a Chinoiserie Style
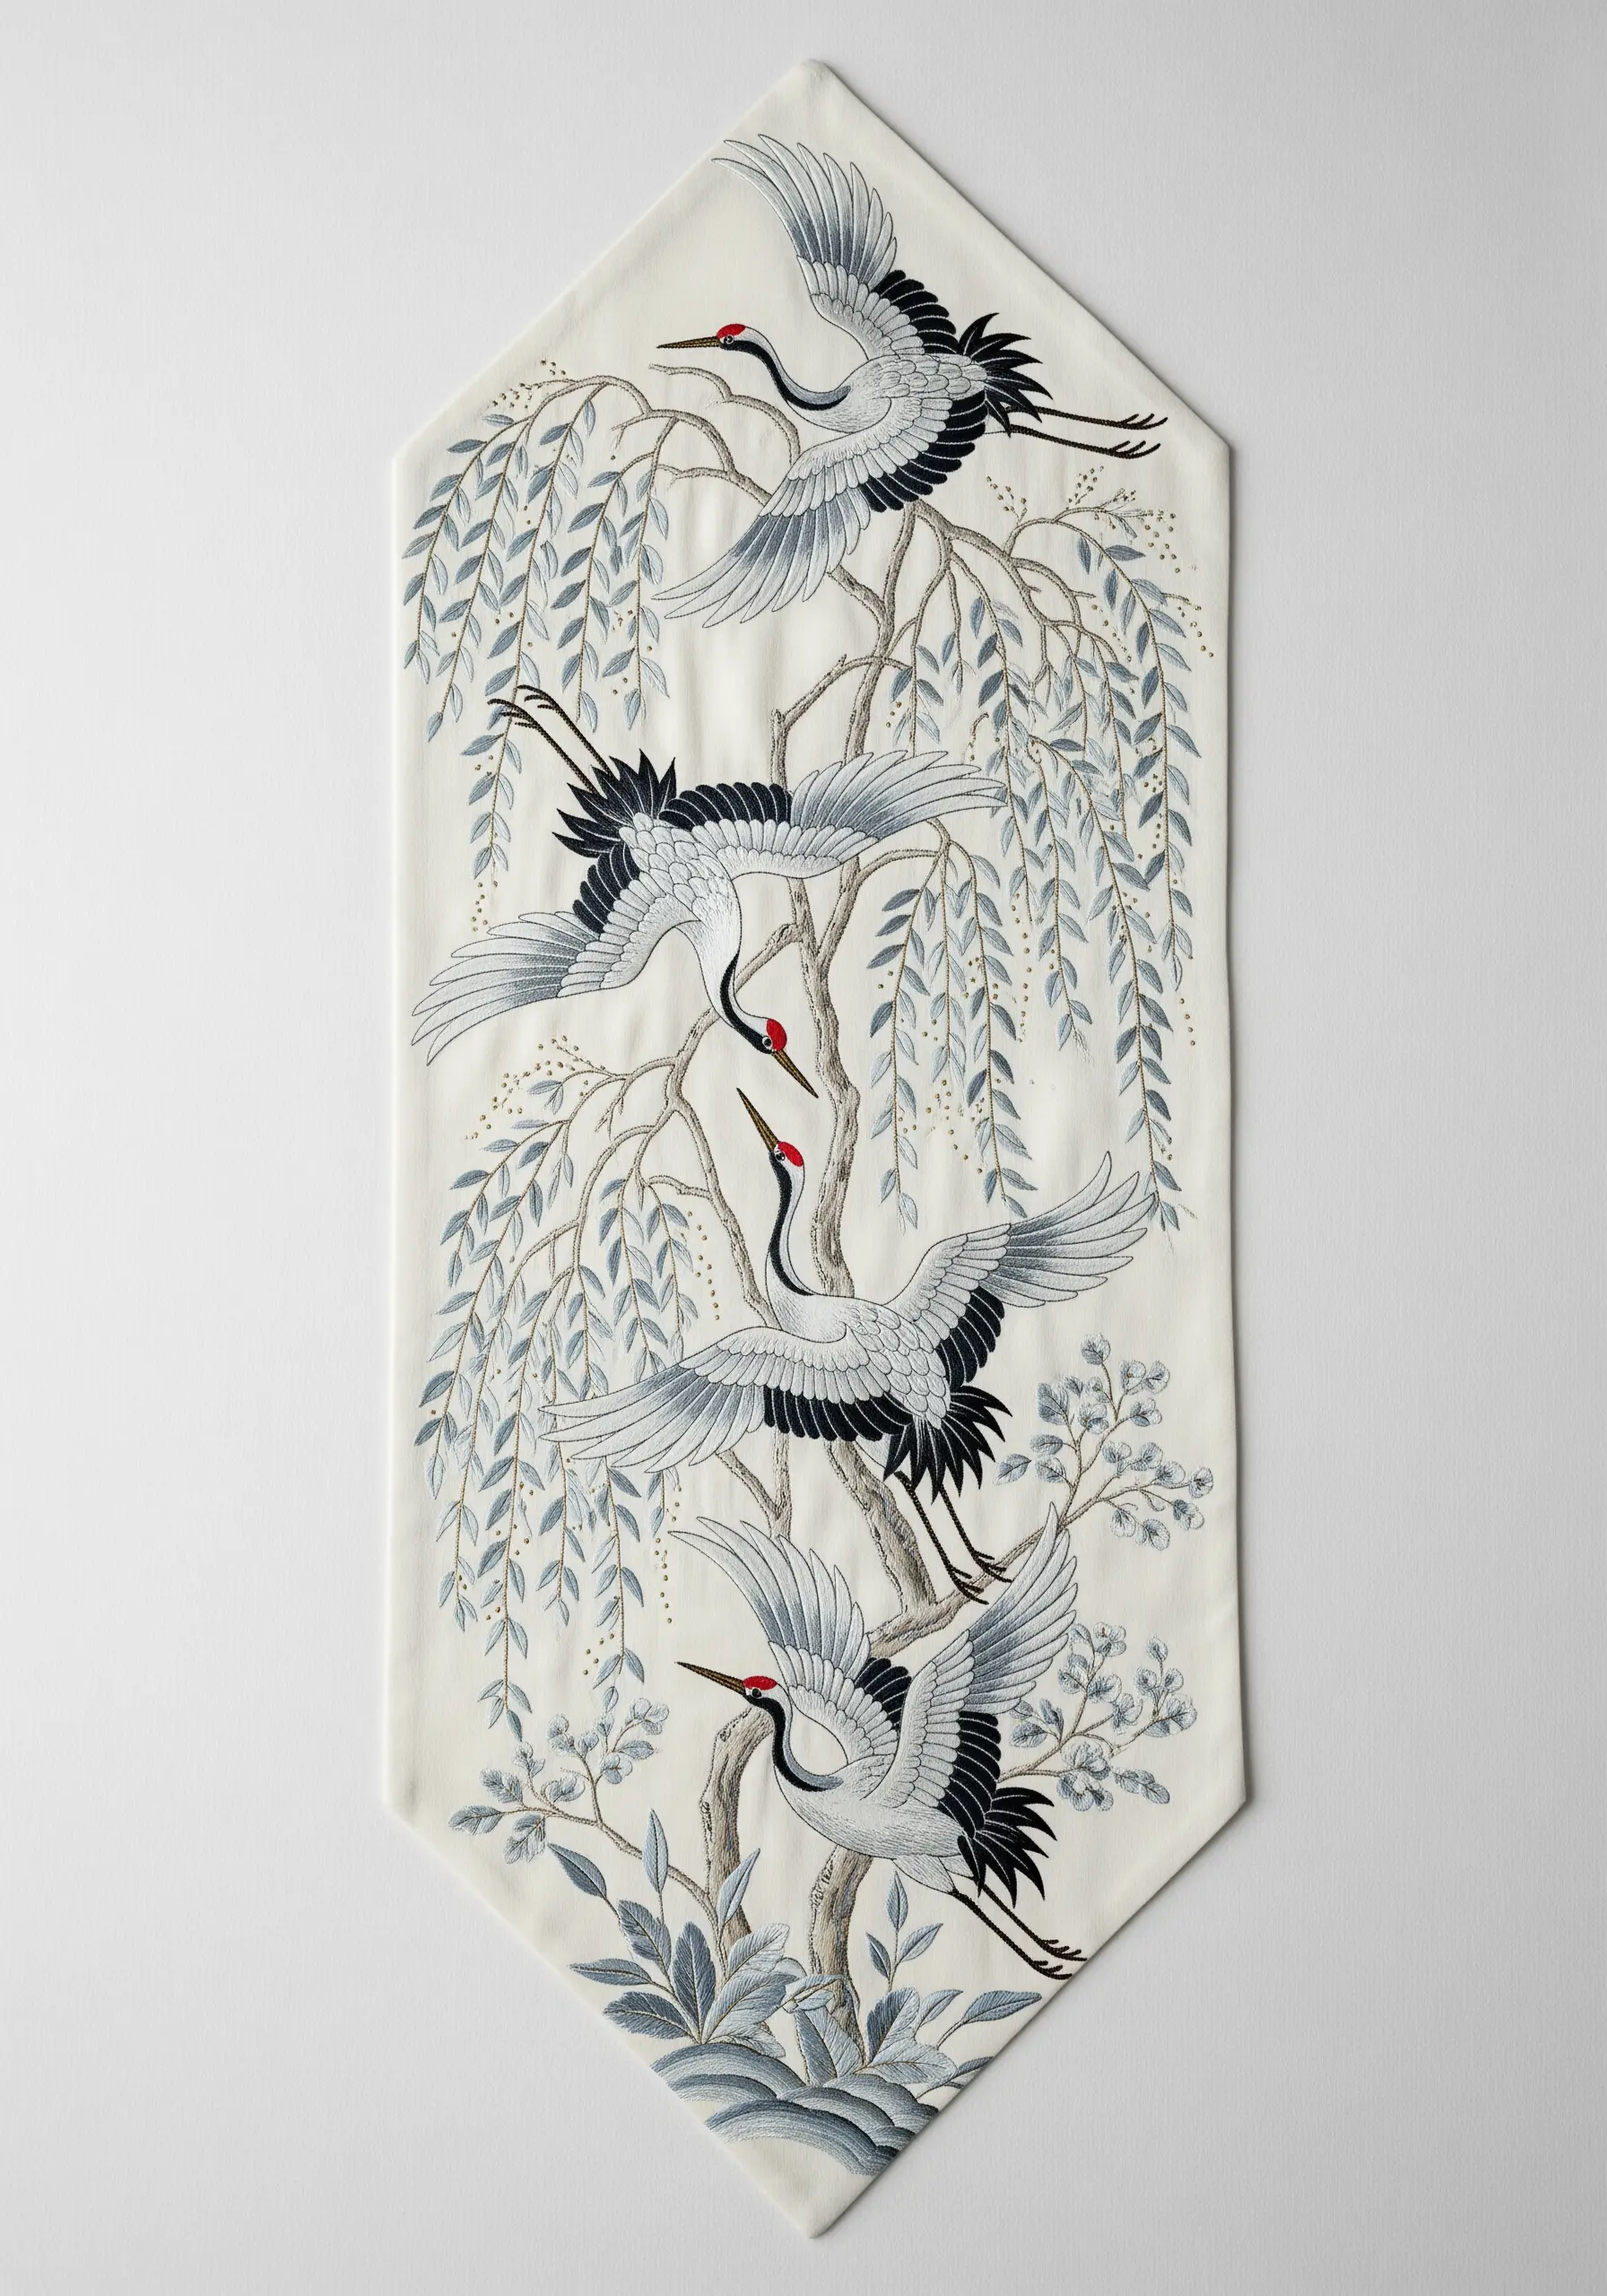
Capture the elegance of a traditional ink wash painting by using a very limited color palette and focusing on fine detail.
Use only a single strand of six-strand floss for the entire piece. This allows for incredibly delicate shading, especially in the cranes’ feathers and the wispy willow branches.
Blend shades of grey, white, and dusty blue with tiny long-and-short stitches to create a soft, watercolor-like effect on the fabric.
The sharp red crowns are stitched last, using two strands for a tiny pop of color that draws the eye without overwhelming the serene composition.
9. Refine Tradition with Graphic Cross-Stitch
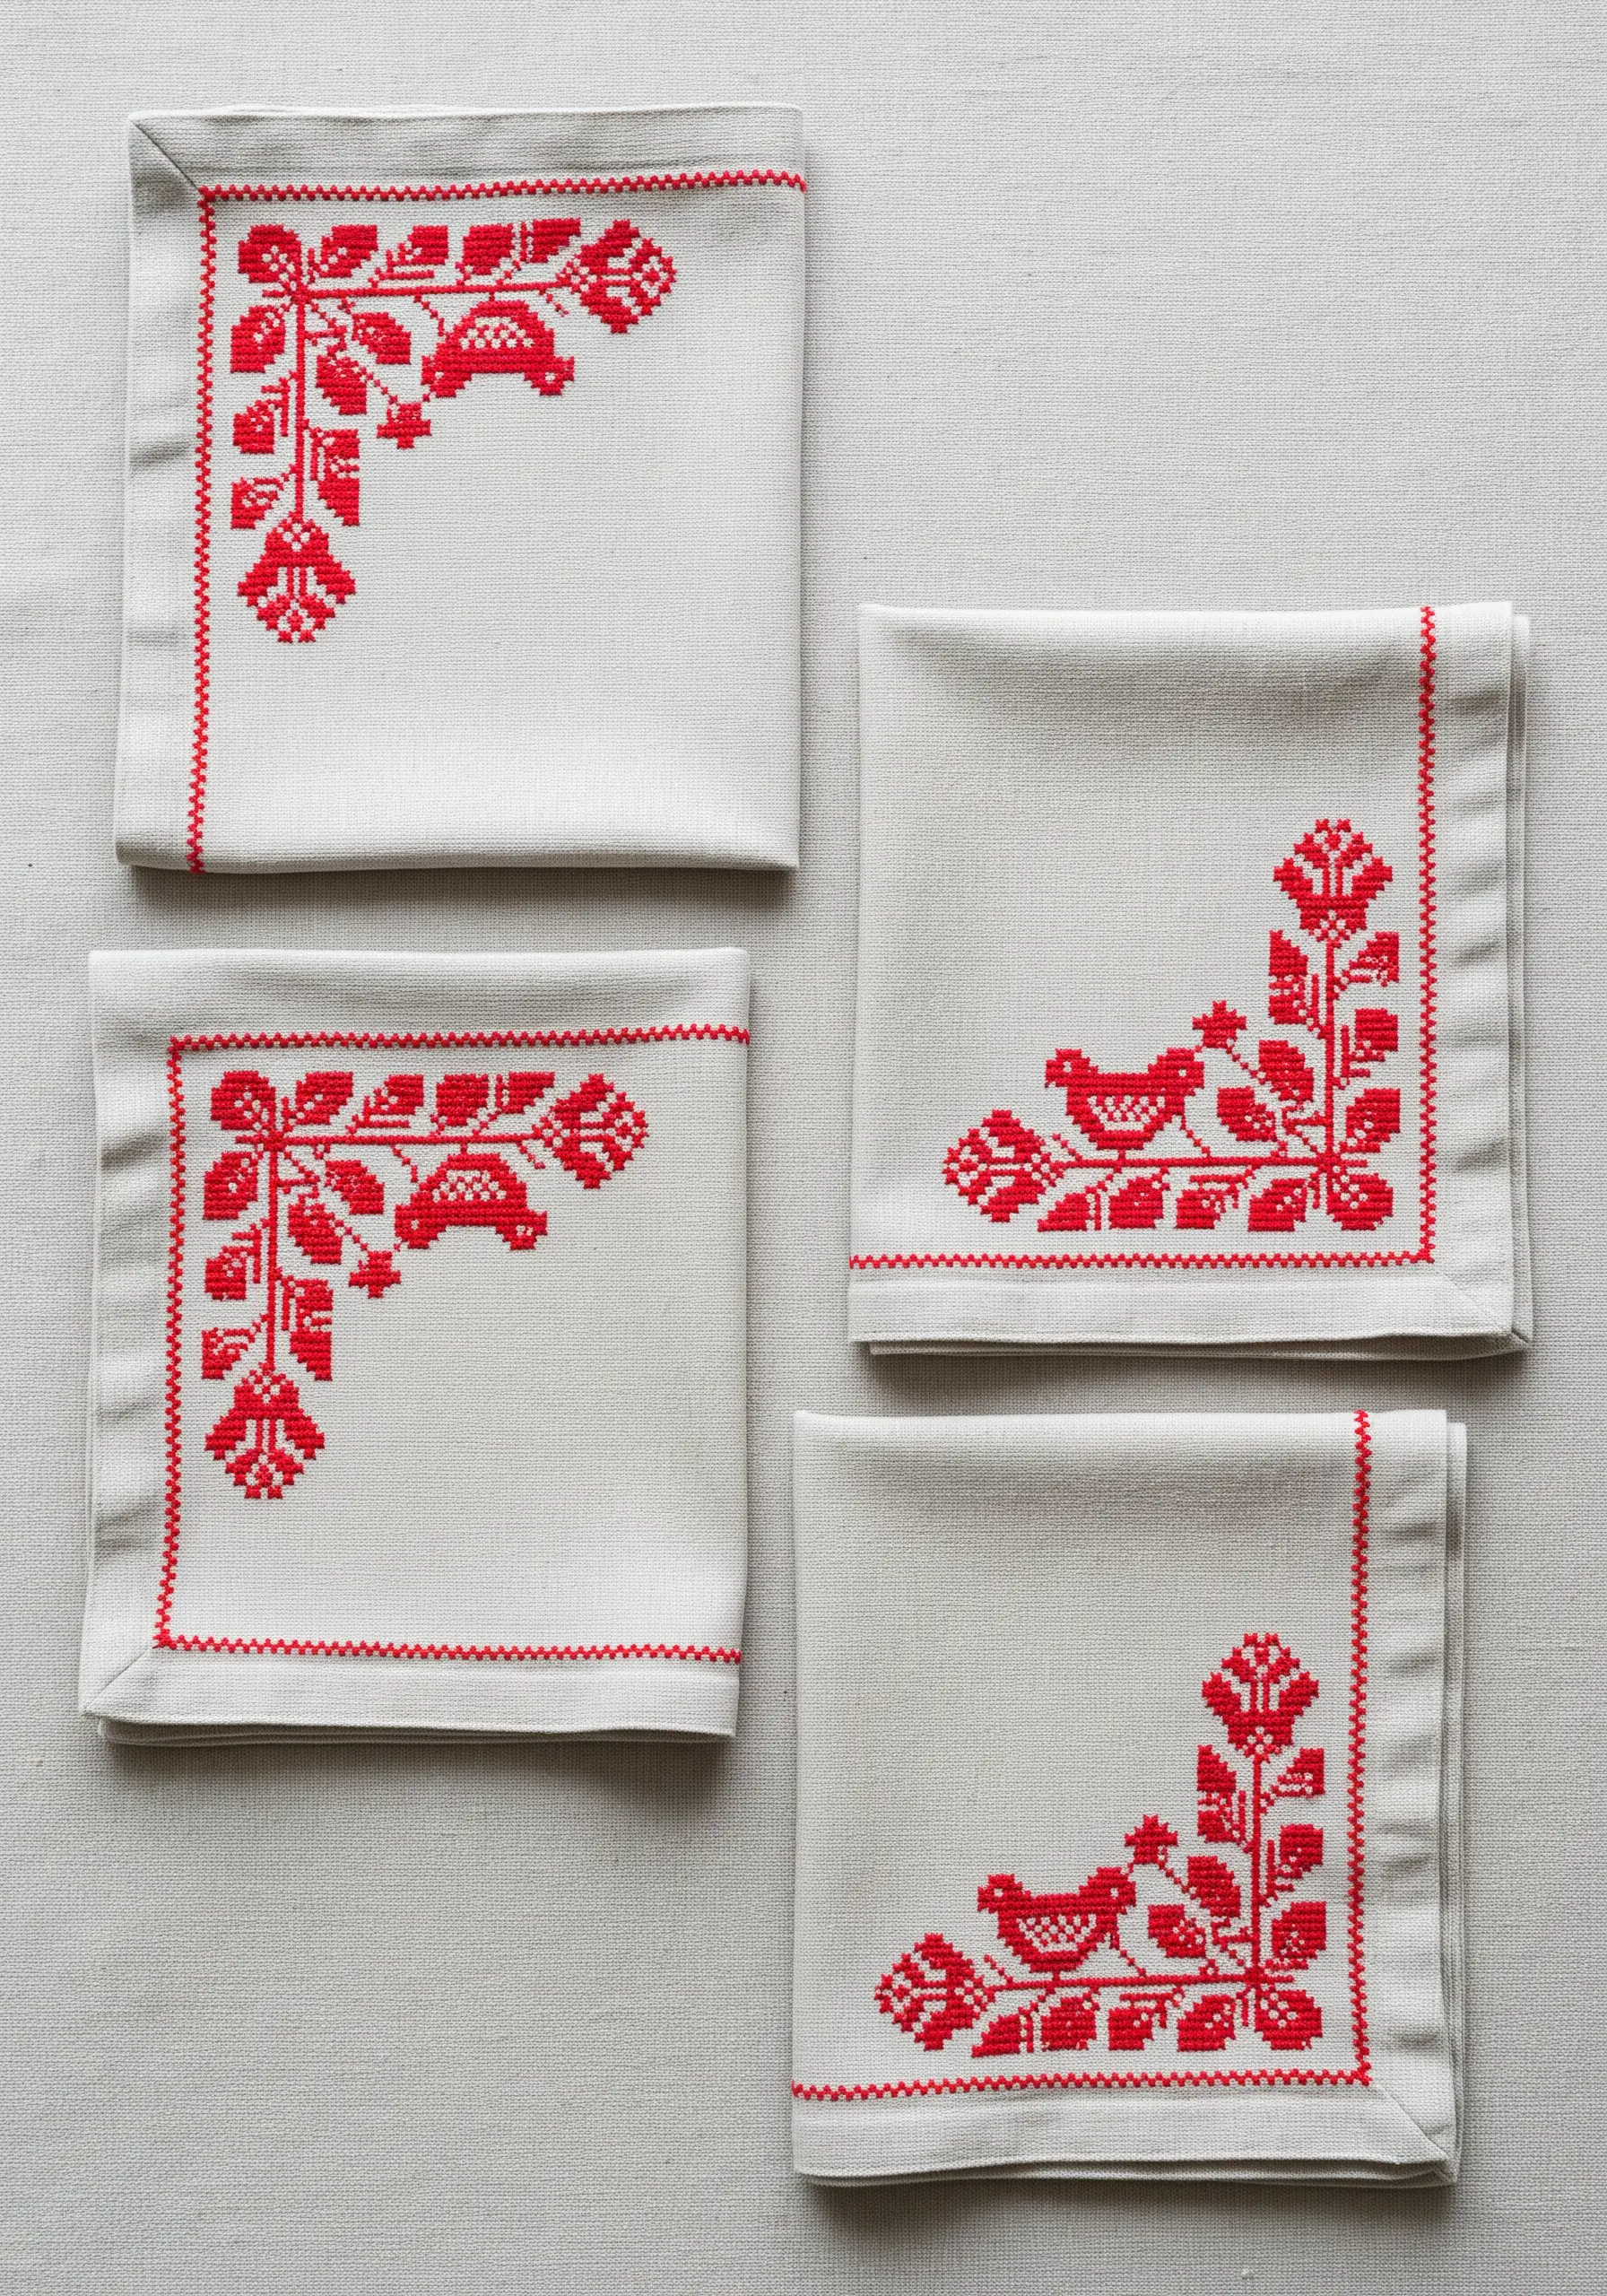
Elevate a simple cross-stitch pattern by focusing on flawless execution and fabric choice.
Use an even-weave linen or cotton. The visible grid of the fabric is your guide, ensuring every ‘X’ is perfectly uniform in size and tension, which is the secret to professional-looking cross-stitch.
Choose a single, bold color like this vibrant red. The impact comes from the sharp, geometric contrast against the neutral linen.
To add a subtle touch of dimension without changing the design, try a variegated thread that shifts slightly in tone. It will give the flat pattern a beautiful, subtle depth.
10. Explore Texture with Monochrome Embroidery
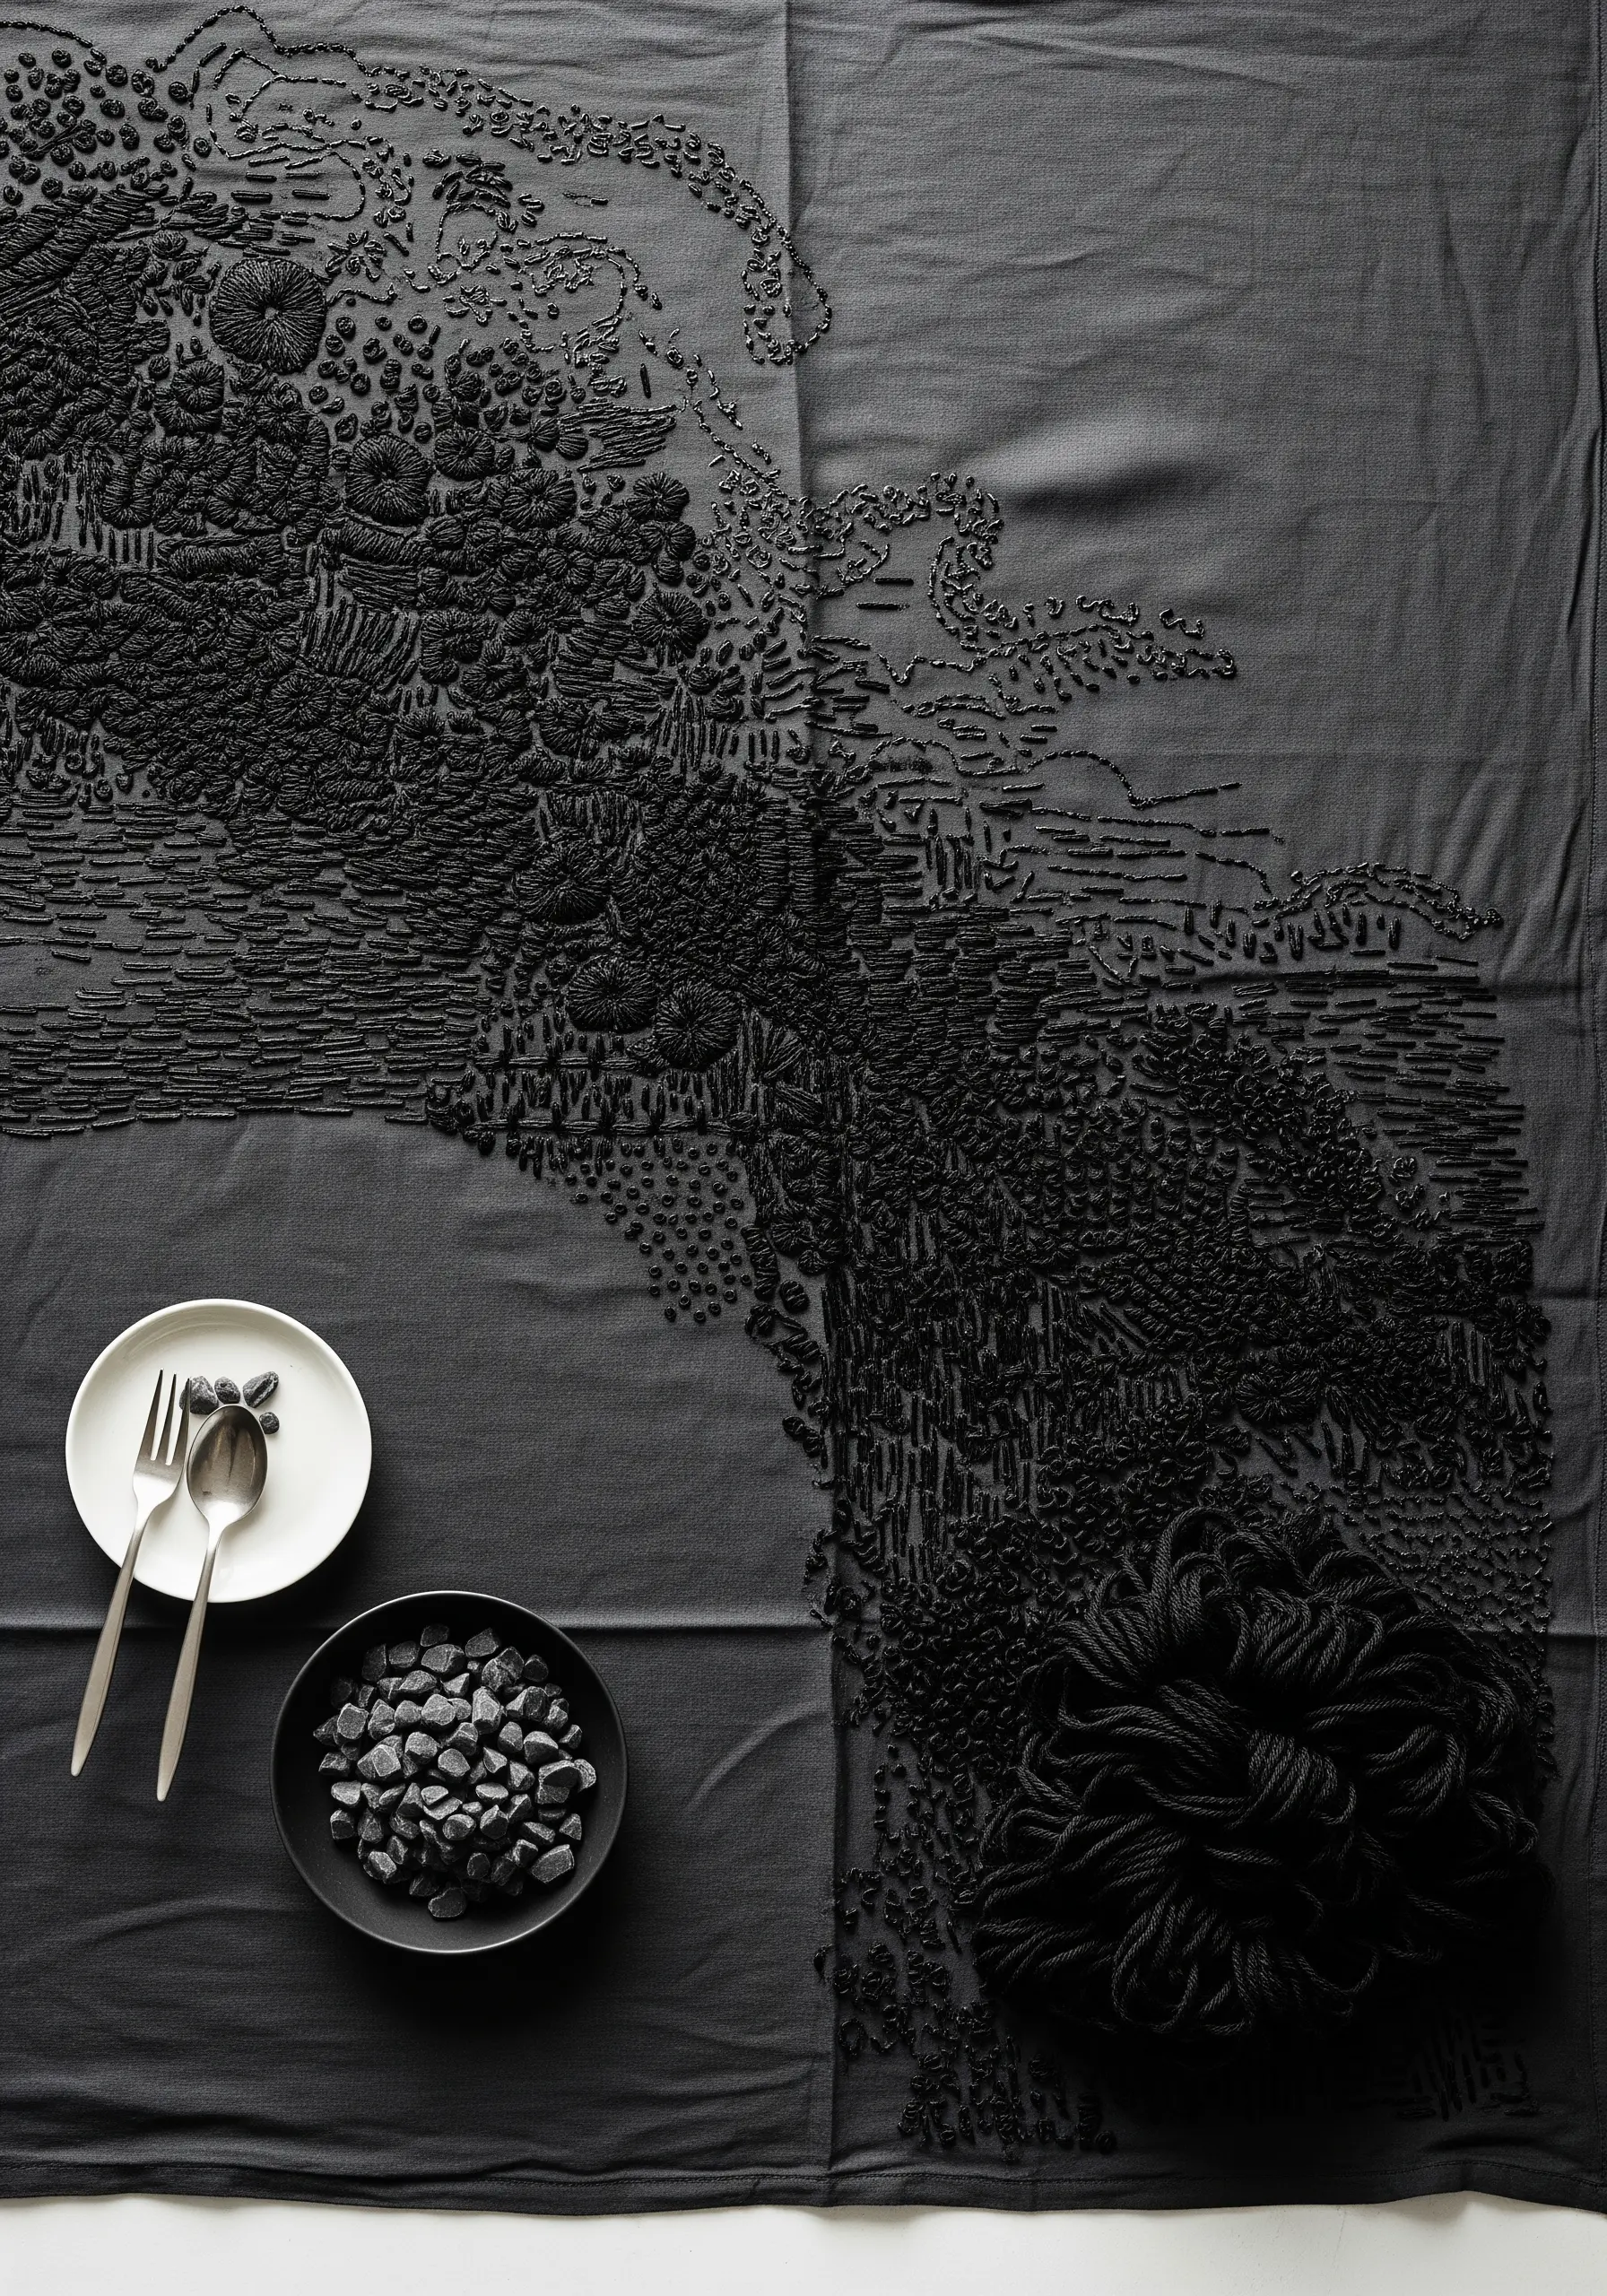
Create a dramatic, sophisticated design using only black thread on black fabric, forcing texture to become the star.
The entire composition is built from the interplay of light on different stitch types. Use dense French knots for a stippled, matte effect and satin stitches for smooth, light-reflecting areas.
Vary the density of your stitches—from tightly packed knots to sparsely placed seed stitches—to create gradients of texture rather than color.
This is one of those dramatic dark thread embroidery designs that feels incredibly luxurious and encourages guests to not just see, but also touch the art.
11. Scatter a Field of Lavender and Bees

Create a light, airy pattern by scattering small, delicate motifs across the fabric rather than clustering them in a heavy border.
For the lavender blossoms, use detached chain stitches (lazy daisies) and a few French knots, which are faster than satin stitch and give a lovely, nubby texture.
The bees’ bodies can be made with a few simple satin stitches in yellow and black, while their wings are just two small, detached chain stitches in a light grey or metallic silver.
This design is perfect for a calm, garden-inspired feel and works beautifully on lighter fabrics like pale lavender or cream linen.
12. Embroider a Celestial Map on Tie-Dye
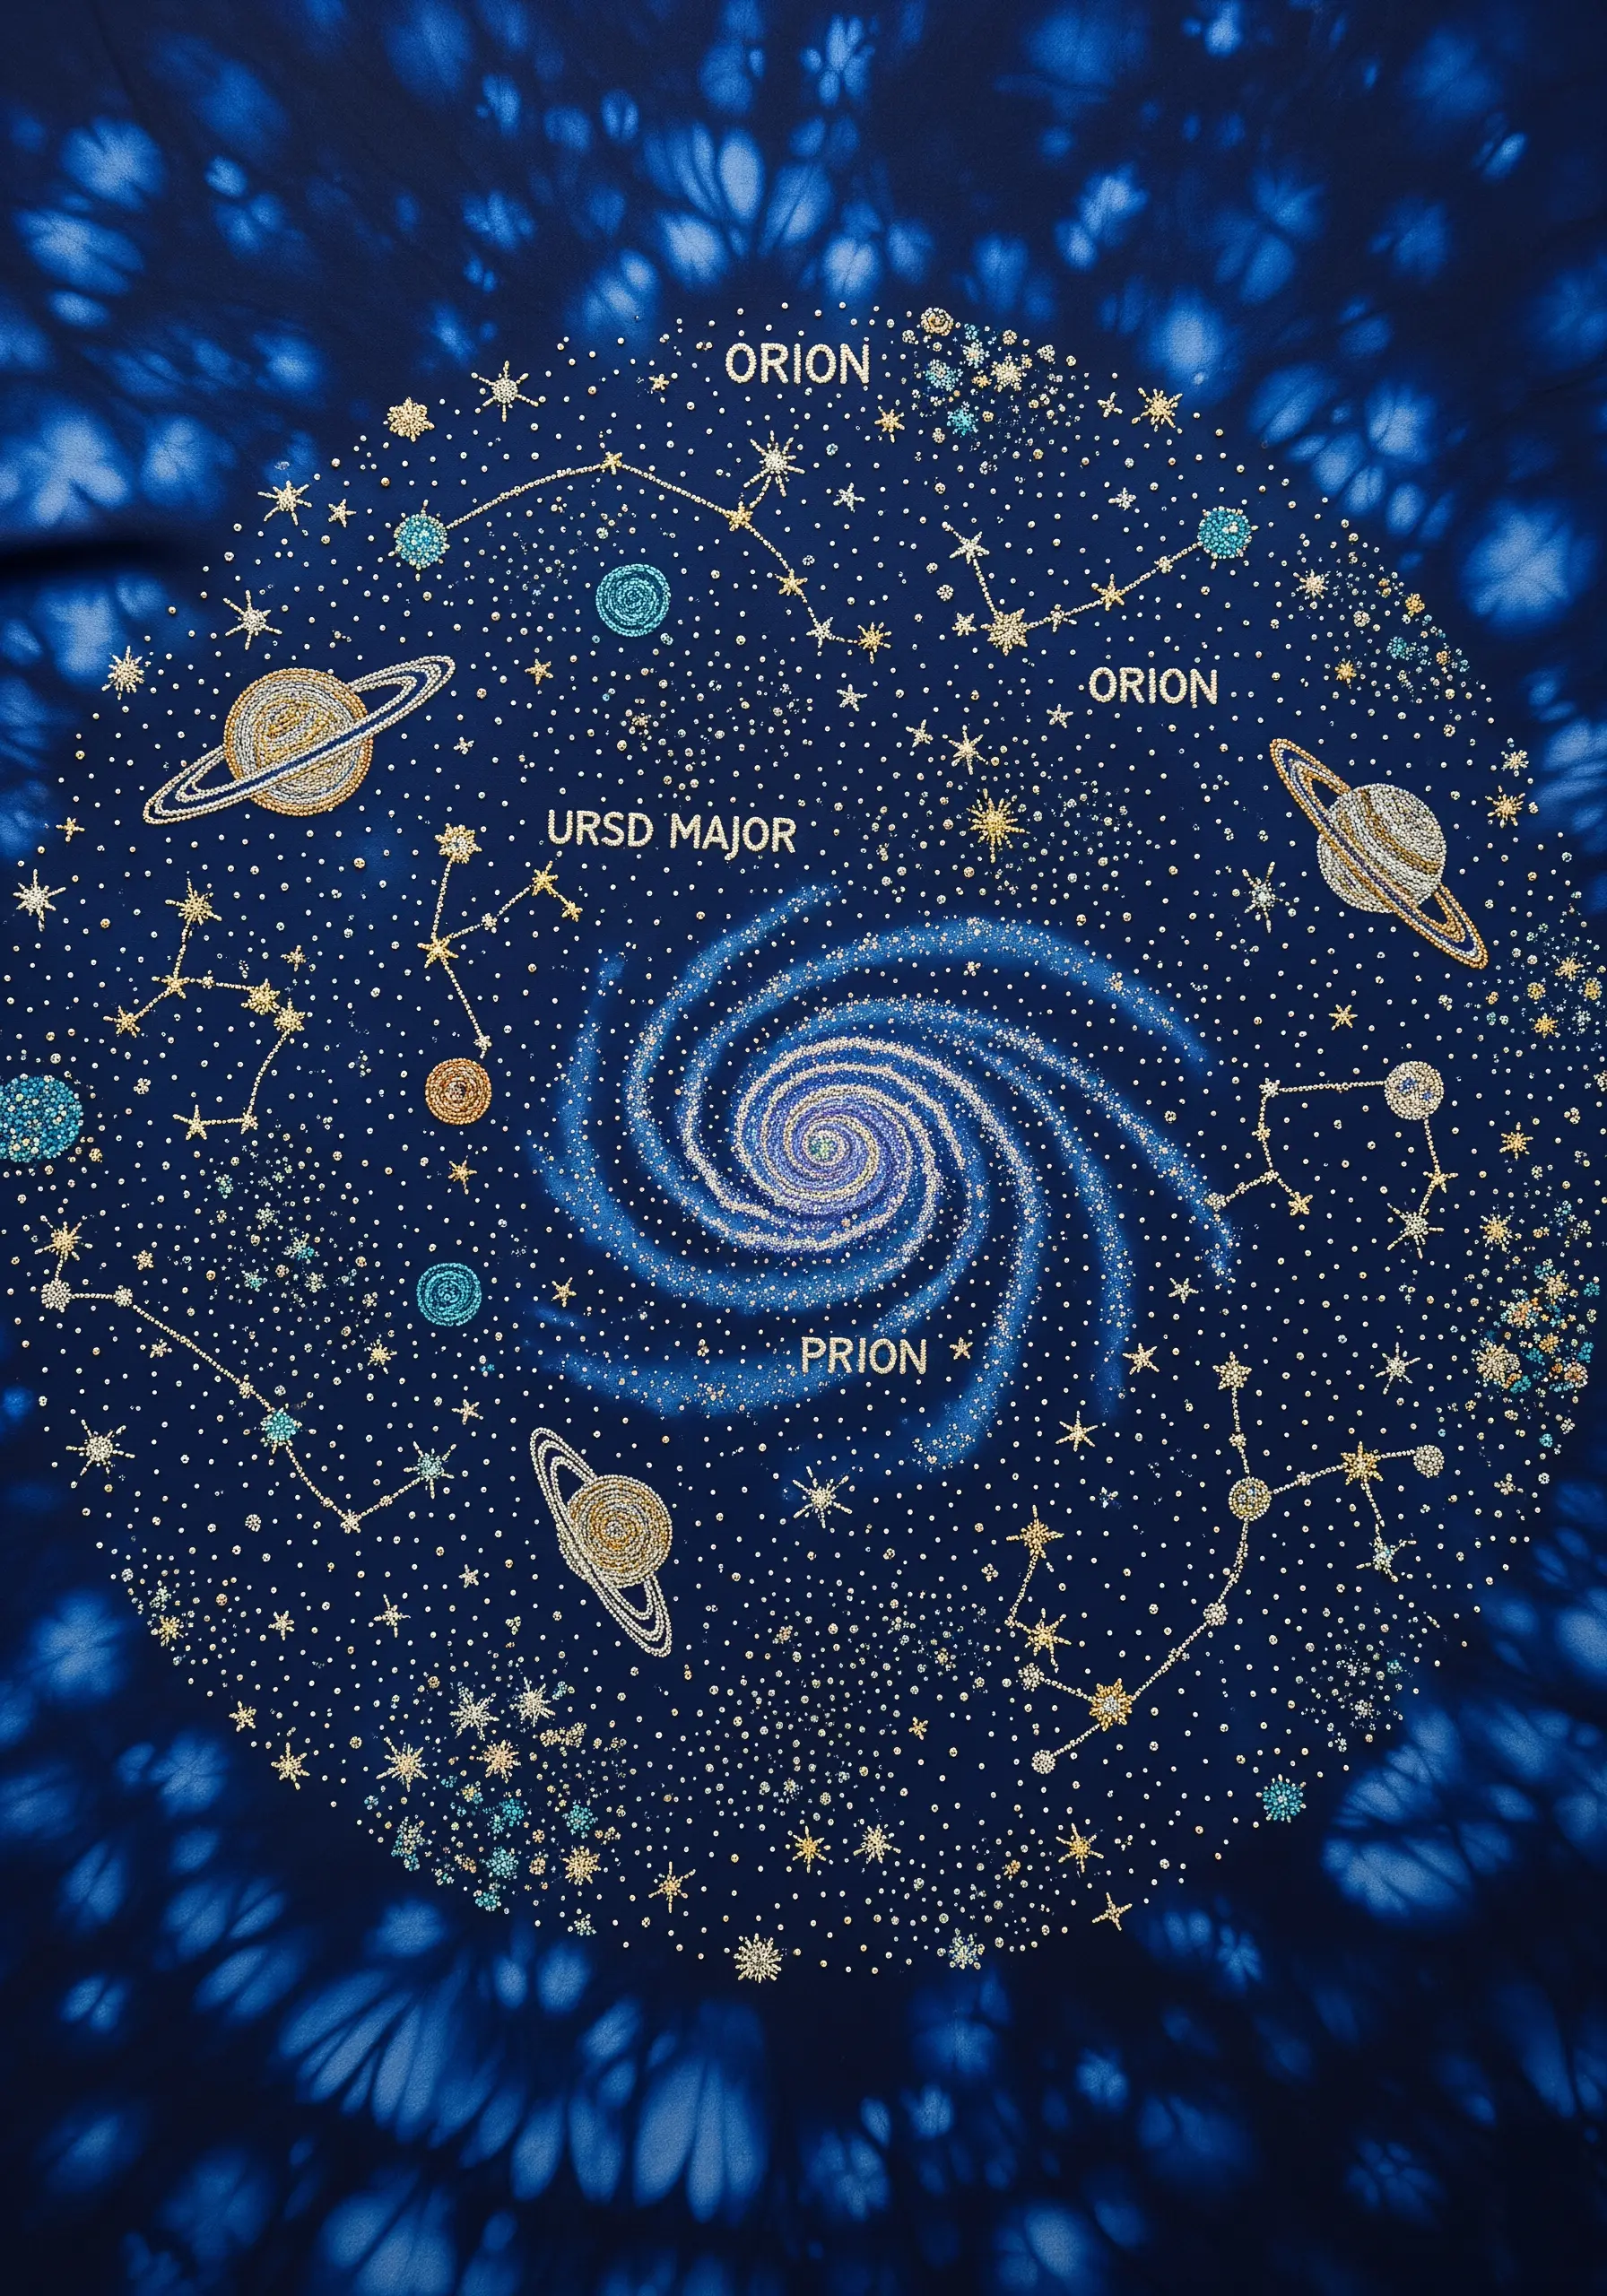
Transform a simple tie-dyed cloth into a cosmic masterpiece by using it as a galactic backdrop.
Use metallic threads in gold, silver, and copper for the stars and planets to create a shimmering, otherworldly effect against the deep blue.
The constellations are simple backstitched lines connecting tiny French knot stars. For the planets, use satin stitch, and consider adding a ring with a delicate whipped backstitch.
The spiral galaxy at the center is a dense cloud of French knots in white, silver, and pale blue, creating a focal point with immense texture.
13. Master the Art of Thread-Painted Leaves
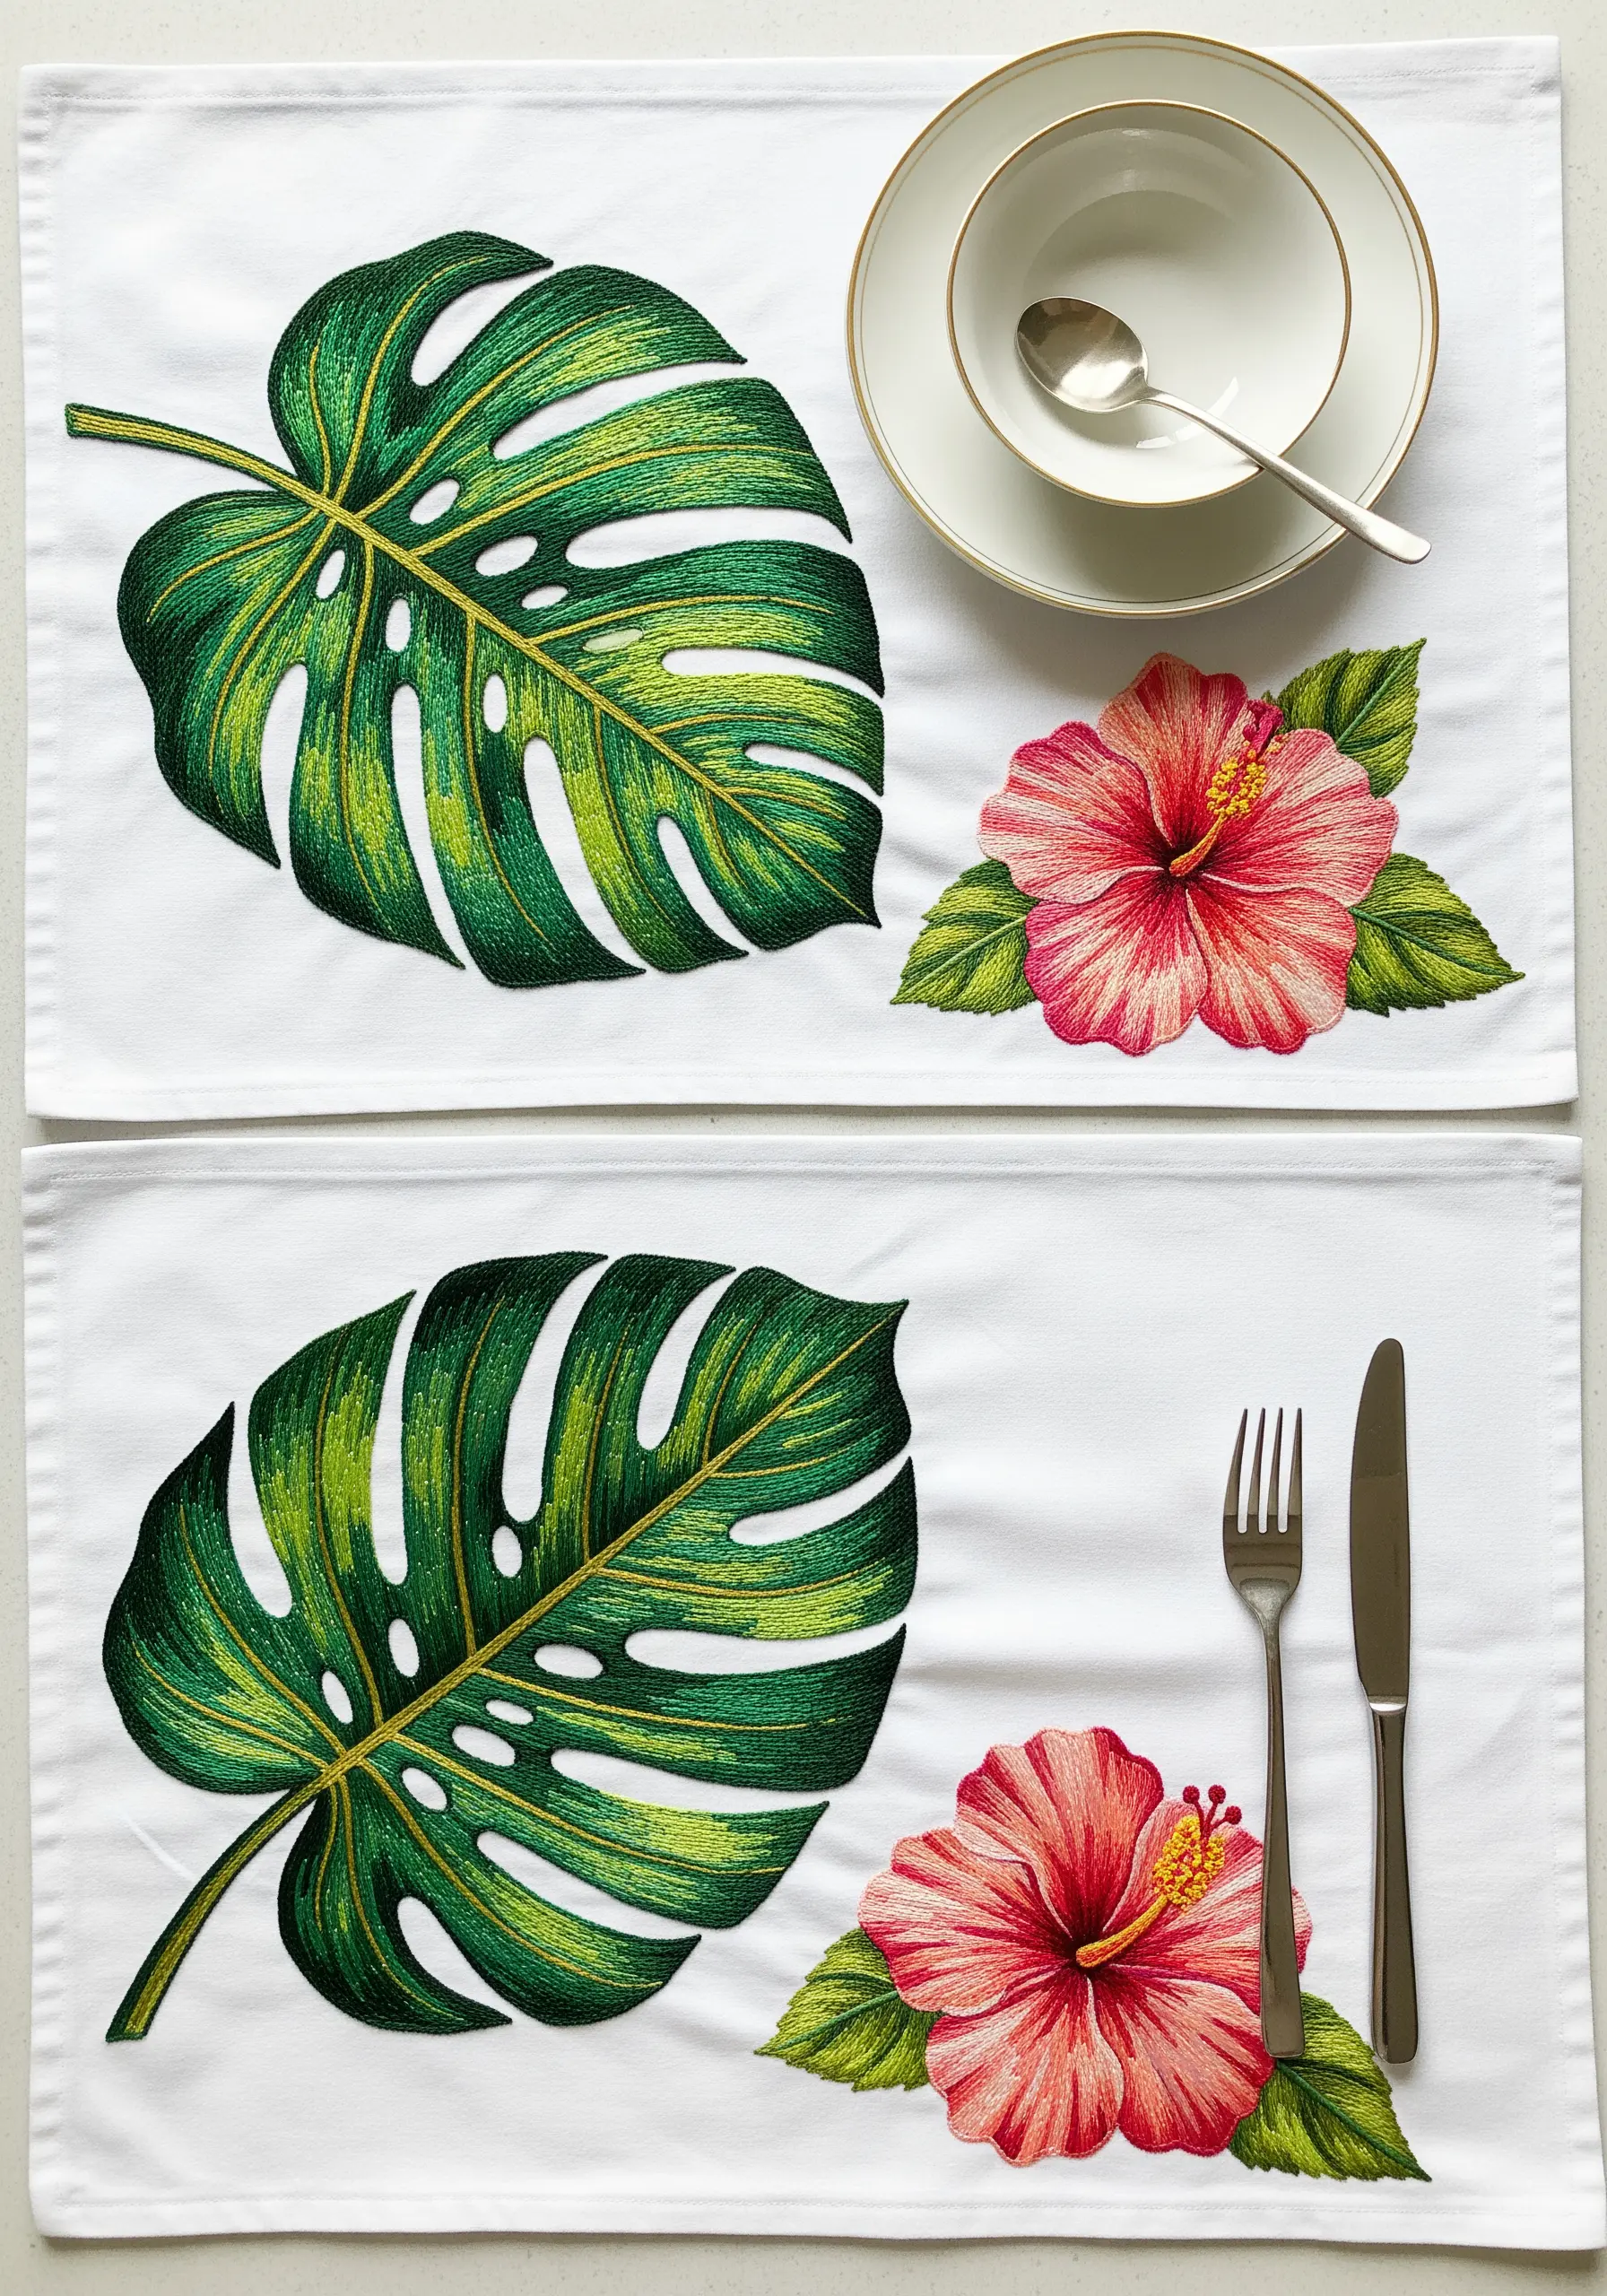
To tackle a large, complex shape like a monstera leaf, begin by lightly sketching color zones onto your fabric with a water-soluble pen.
Use the long-and-short stitch, always angling your stitches to follow the natural direction of the leaf’s veins. This technique is the key to creating realistic flow and movement.
Don’t be afraid to use a dozen shades of green. The subtle shifts in color are what give the leaf its dimension and stop it from looking flat.
This is a perfect example of wildflower thread painting techniques applied to foliage, creating a bold, botanical statement piece.
14. Frame Your Napkins with Art Nouveau Irises
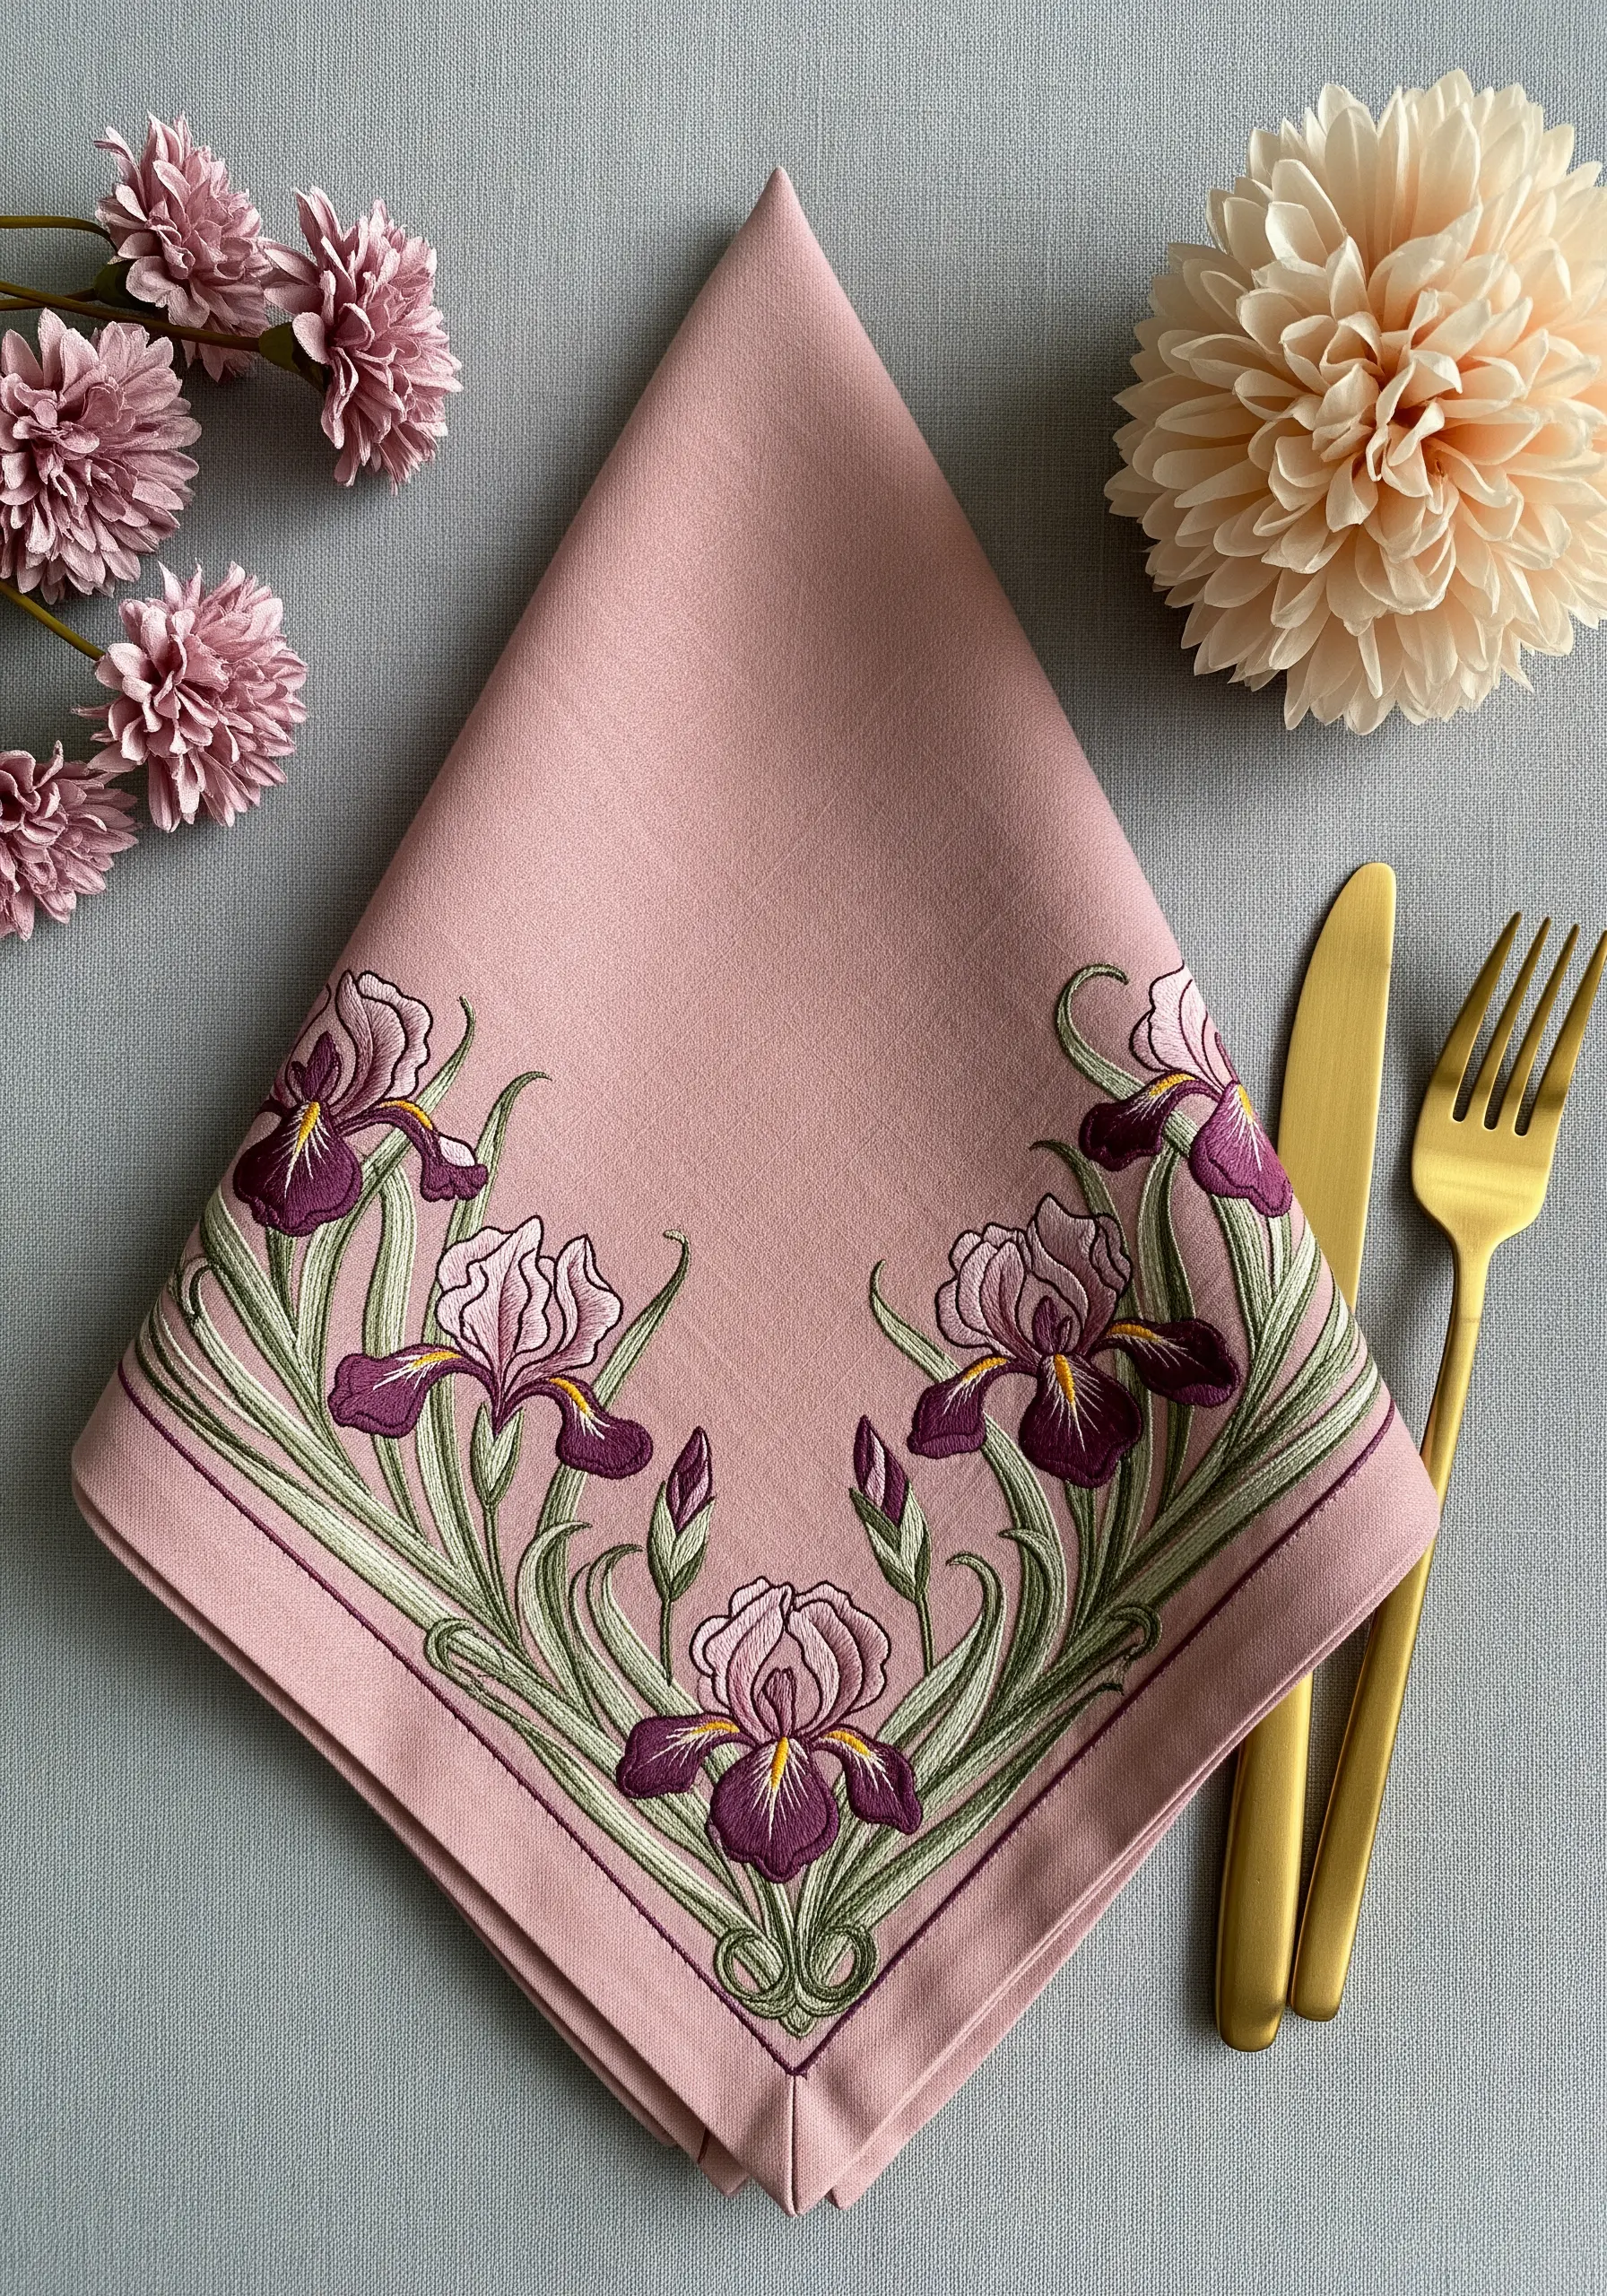
Channel the elegance of Art Nouveau by using graceful, curving lines and a sophisticated color palette.
Outline every element of the iris and leaves with a dark, contrasting split stitch *before* filling them in. This creates the distinct, illustrative look that defines the style.
When filling the petals with satin stitch, keep all your stitches parallel. The uniform direction creates a beautiful, silk-like sheen that highlights the flower’s shape.
The double-line border, stitched in a simple backstitch, elegantly frames the composition and ties the whole design together.
15. Create a Classic Farmhouse Accent with Redwork
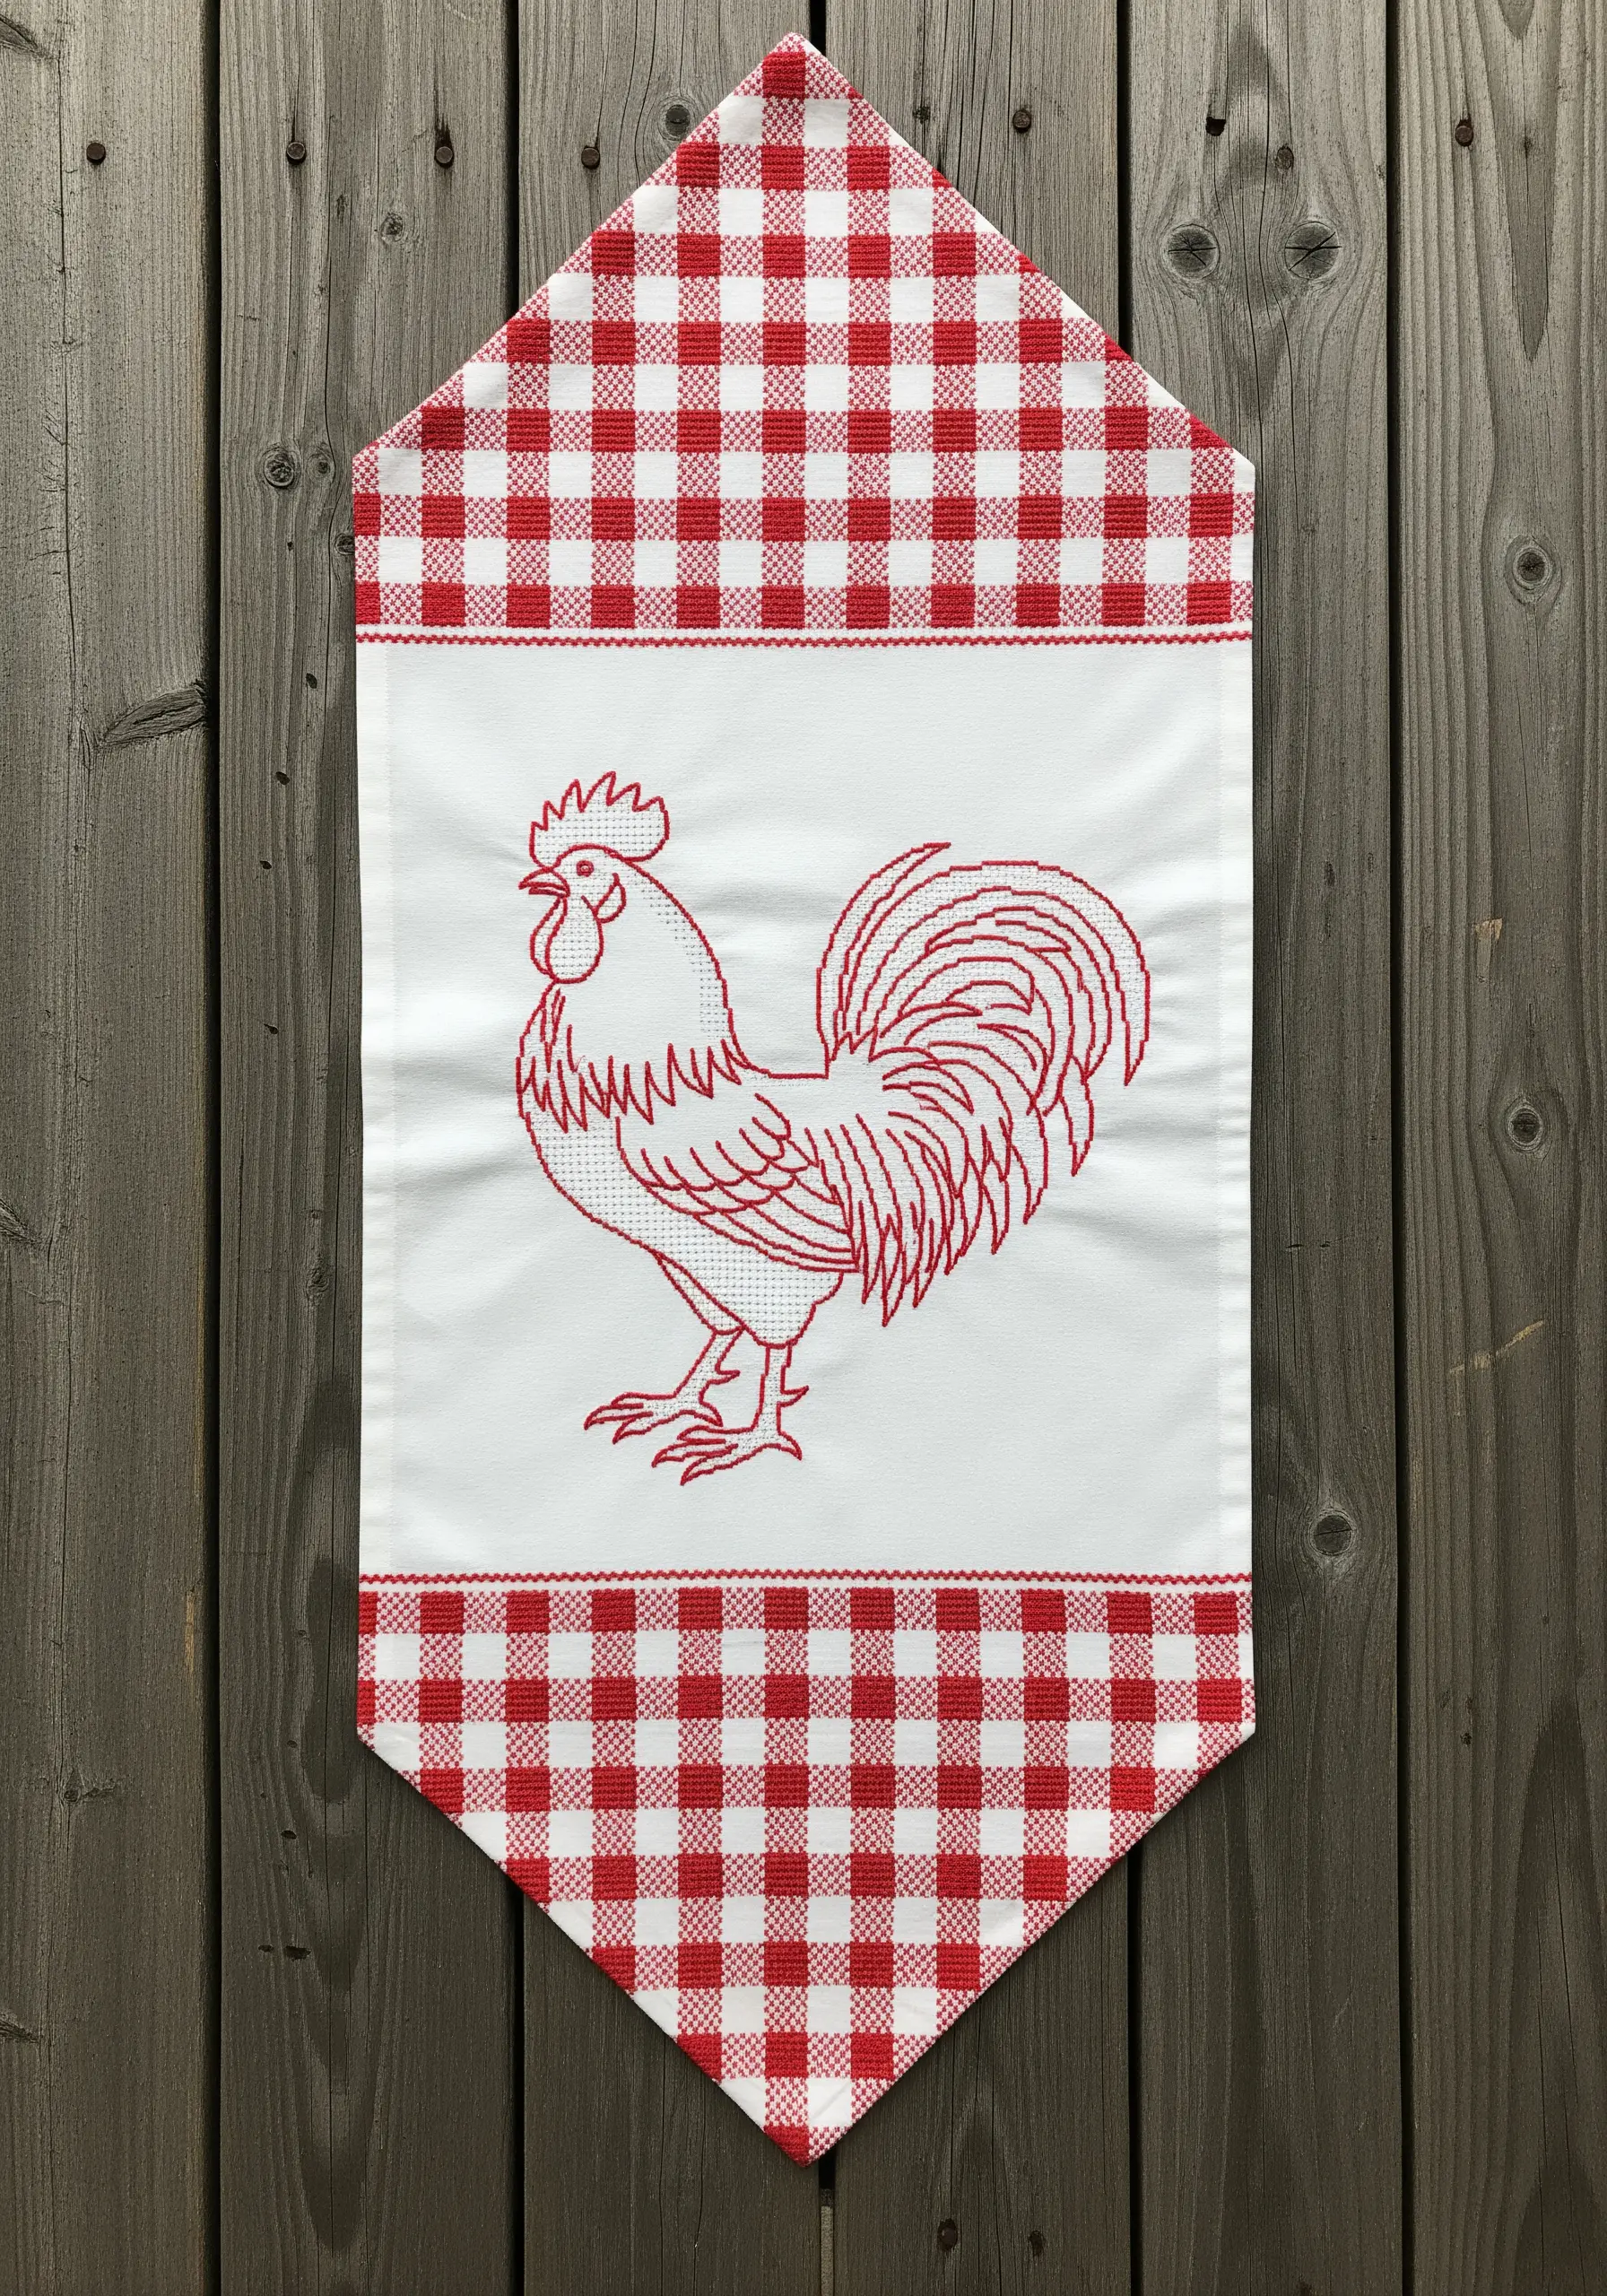
Redwork embroidery celebrates the simplicity of the line. Your goal is to create a clean, continuous-looking outline with no gaps.
The stem stitch is the ideal choice for this style, as it creates a slightly raised, rope-like line that is perfect for navigating curves smoothly.
Consistency is everything. Focus on keeping your stitch length uniform throughout the entire design. This discipline is what gives the finished piece its polished, professional look.
Combine your redwork panel with a classic gingham fabric to create a charming, rustic cottagecore table linen that feels both timeless and fresh.
16. Stitch an Intricate Mediterranean Tile Mosaic
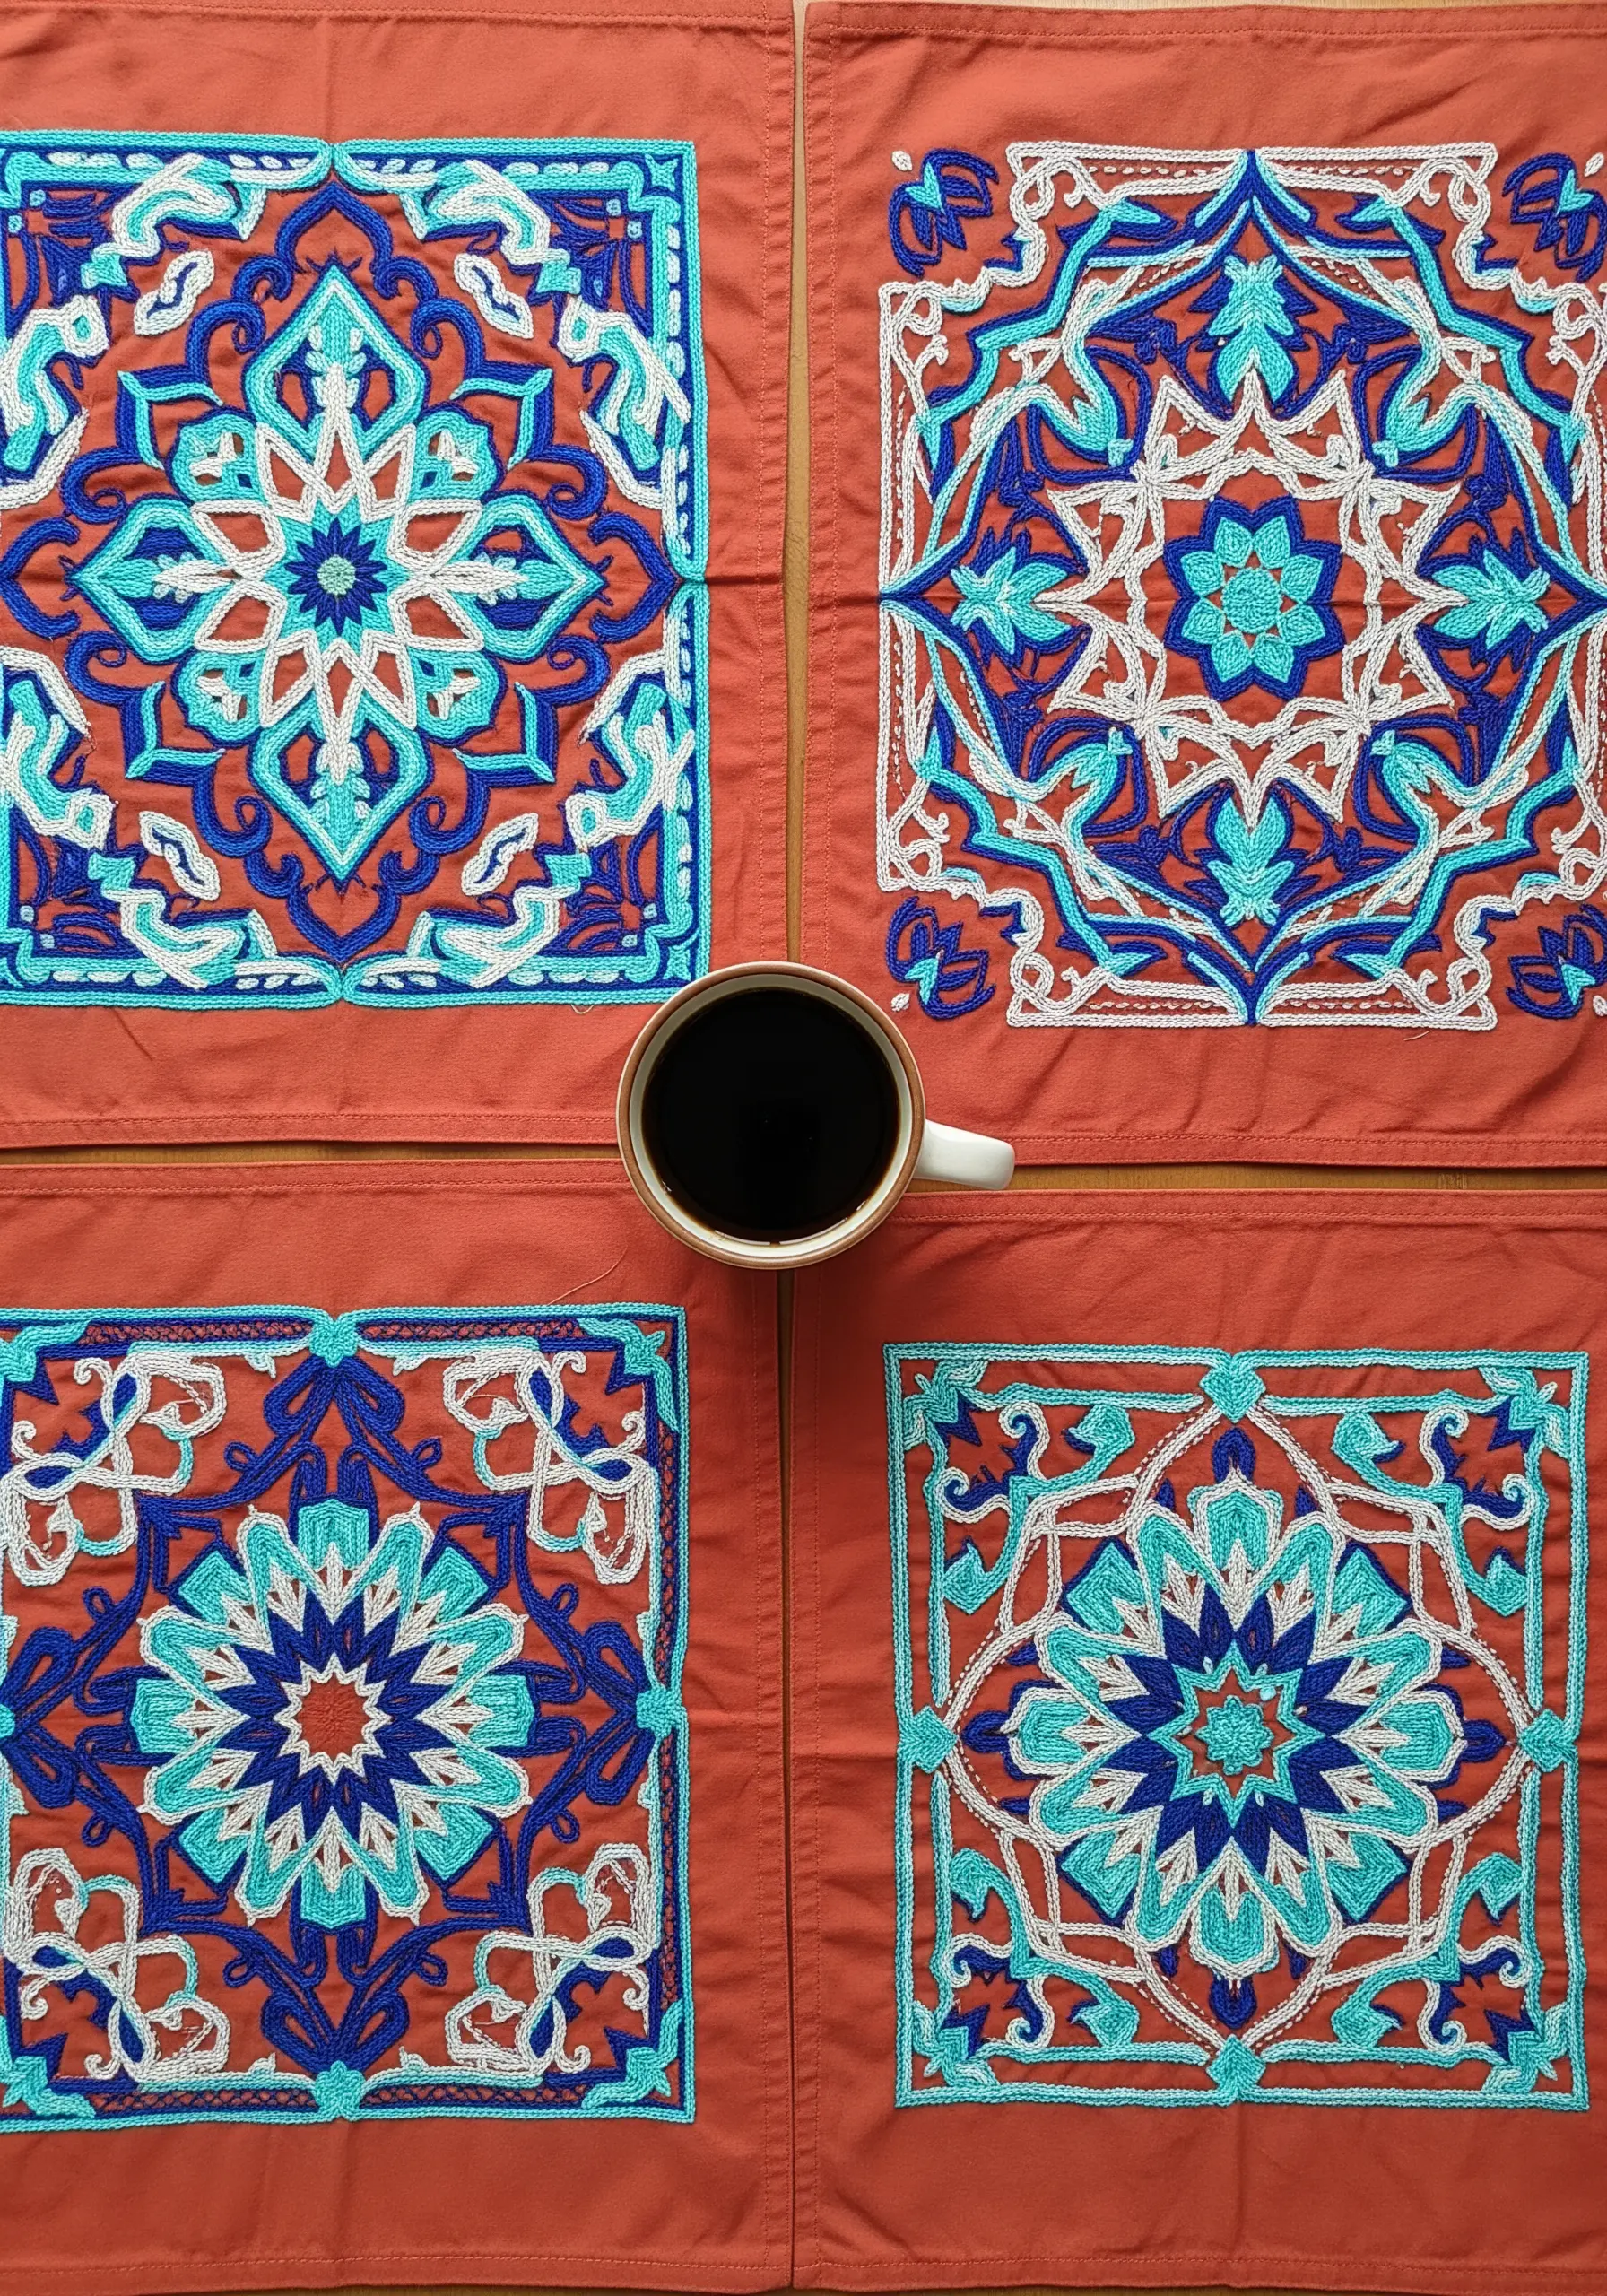
Recreate the beauty of geometric tilework by breaking the design down into small, manageable color blocks.
Use a heavy-duty stabilizer on the back of your fabric. This is non-negotiable for dense, full-coverage embroidery, as it prevents the fabric from puckering and distorting the geometric shapes.
Fill each colored section with a directional satin stitch. For example, stitch all the blue elements vertically and all the white elements horizontally. The shifting light reflection will add another layer of dimension.
This design is a stunning way to try Mediterranean-inspired table linen embroidery motifs with a modern, graphic feel.
17. Build Dimension with Appliqué and Embroidery
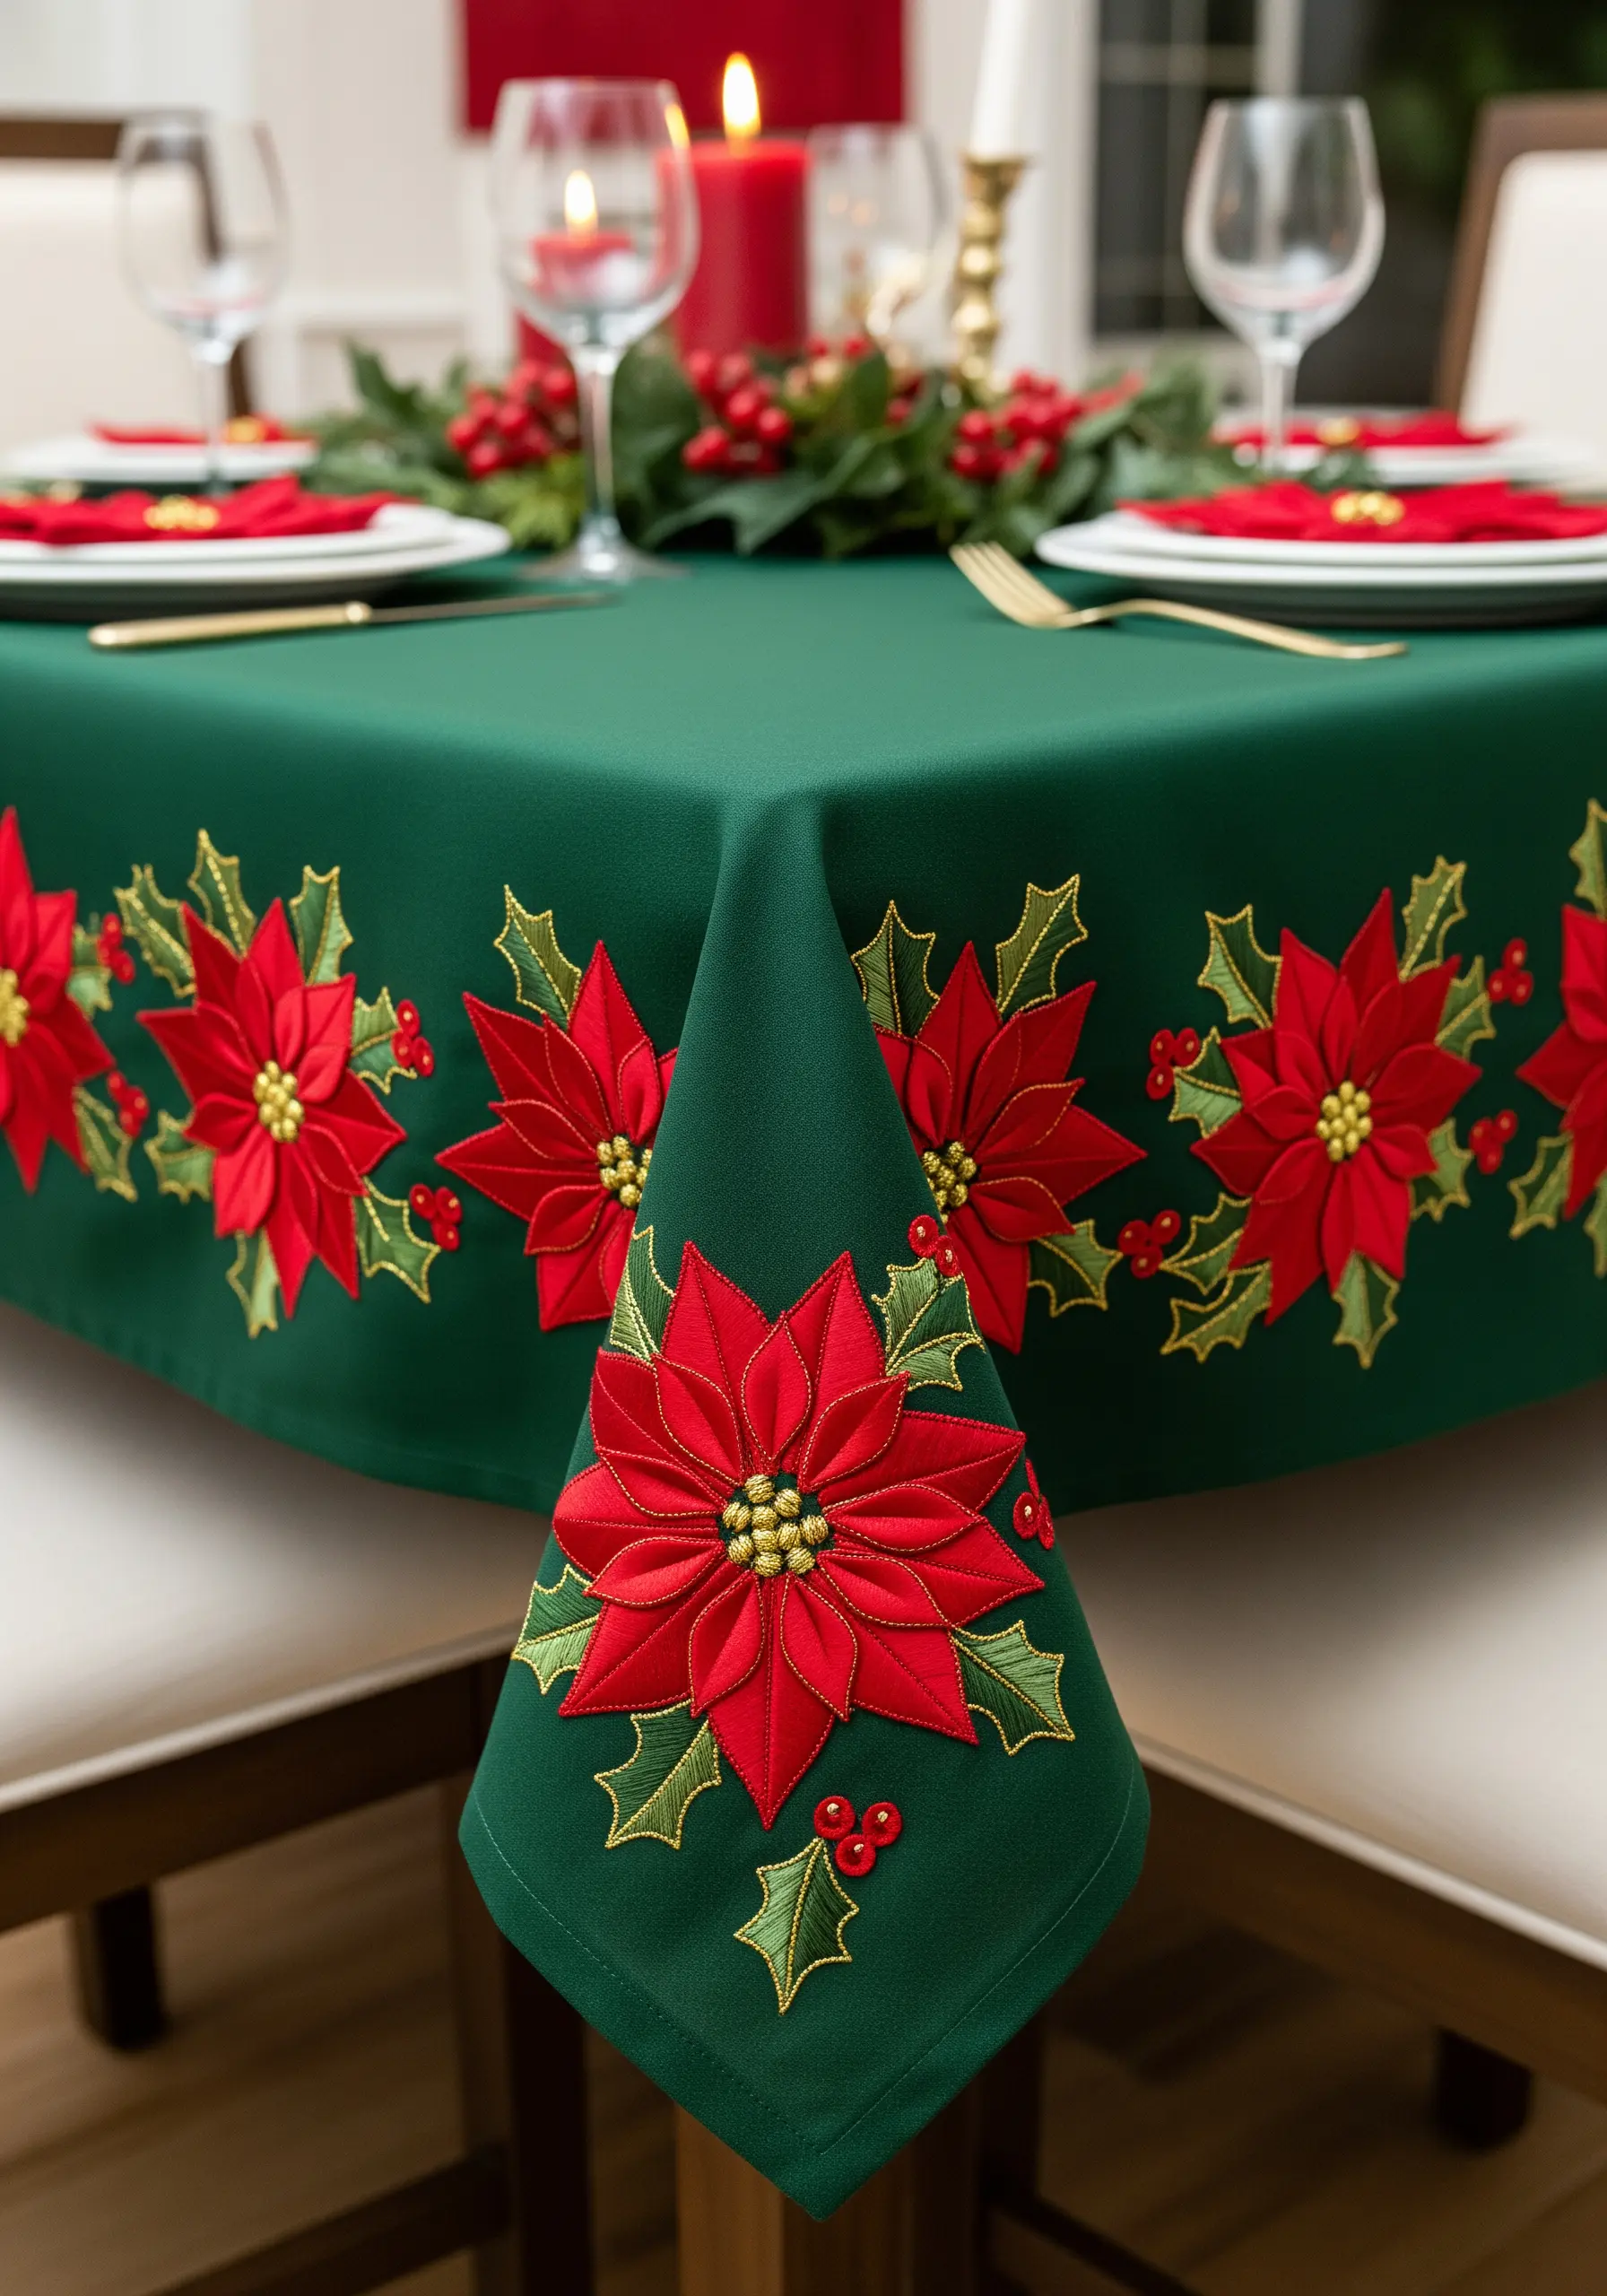
Combine fabric appliqué with embroidery to create a design that has immediate, touchable dimension.
Cut the poinsettia petals from a separate piece of red fabric, tuck the raw edges under, and secure them to the tablecloth with a few small, hidden stitches at the base of each petal.
Once the appliqué pieces are attached, embroider the veins and outlines directly on top using a contrasting satin stitch. This integrates the appliqué seamlessly into the design.
A dense cluster of golden French knots forms the center, while delicate holly leaves stitched in green provide a festive backdrop for your 3D flowers.
18. Capture the Weightless Drift of Dandelion Seeds
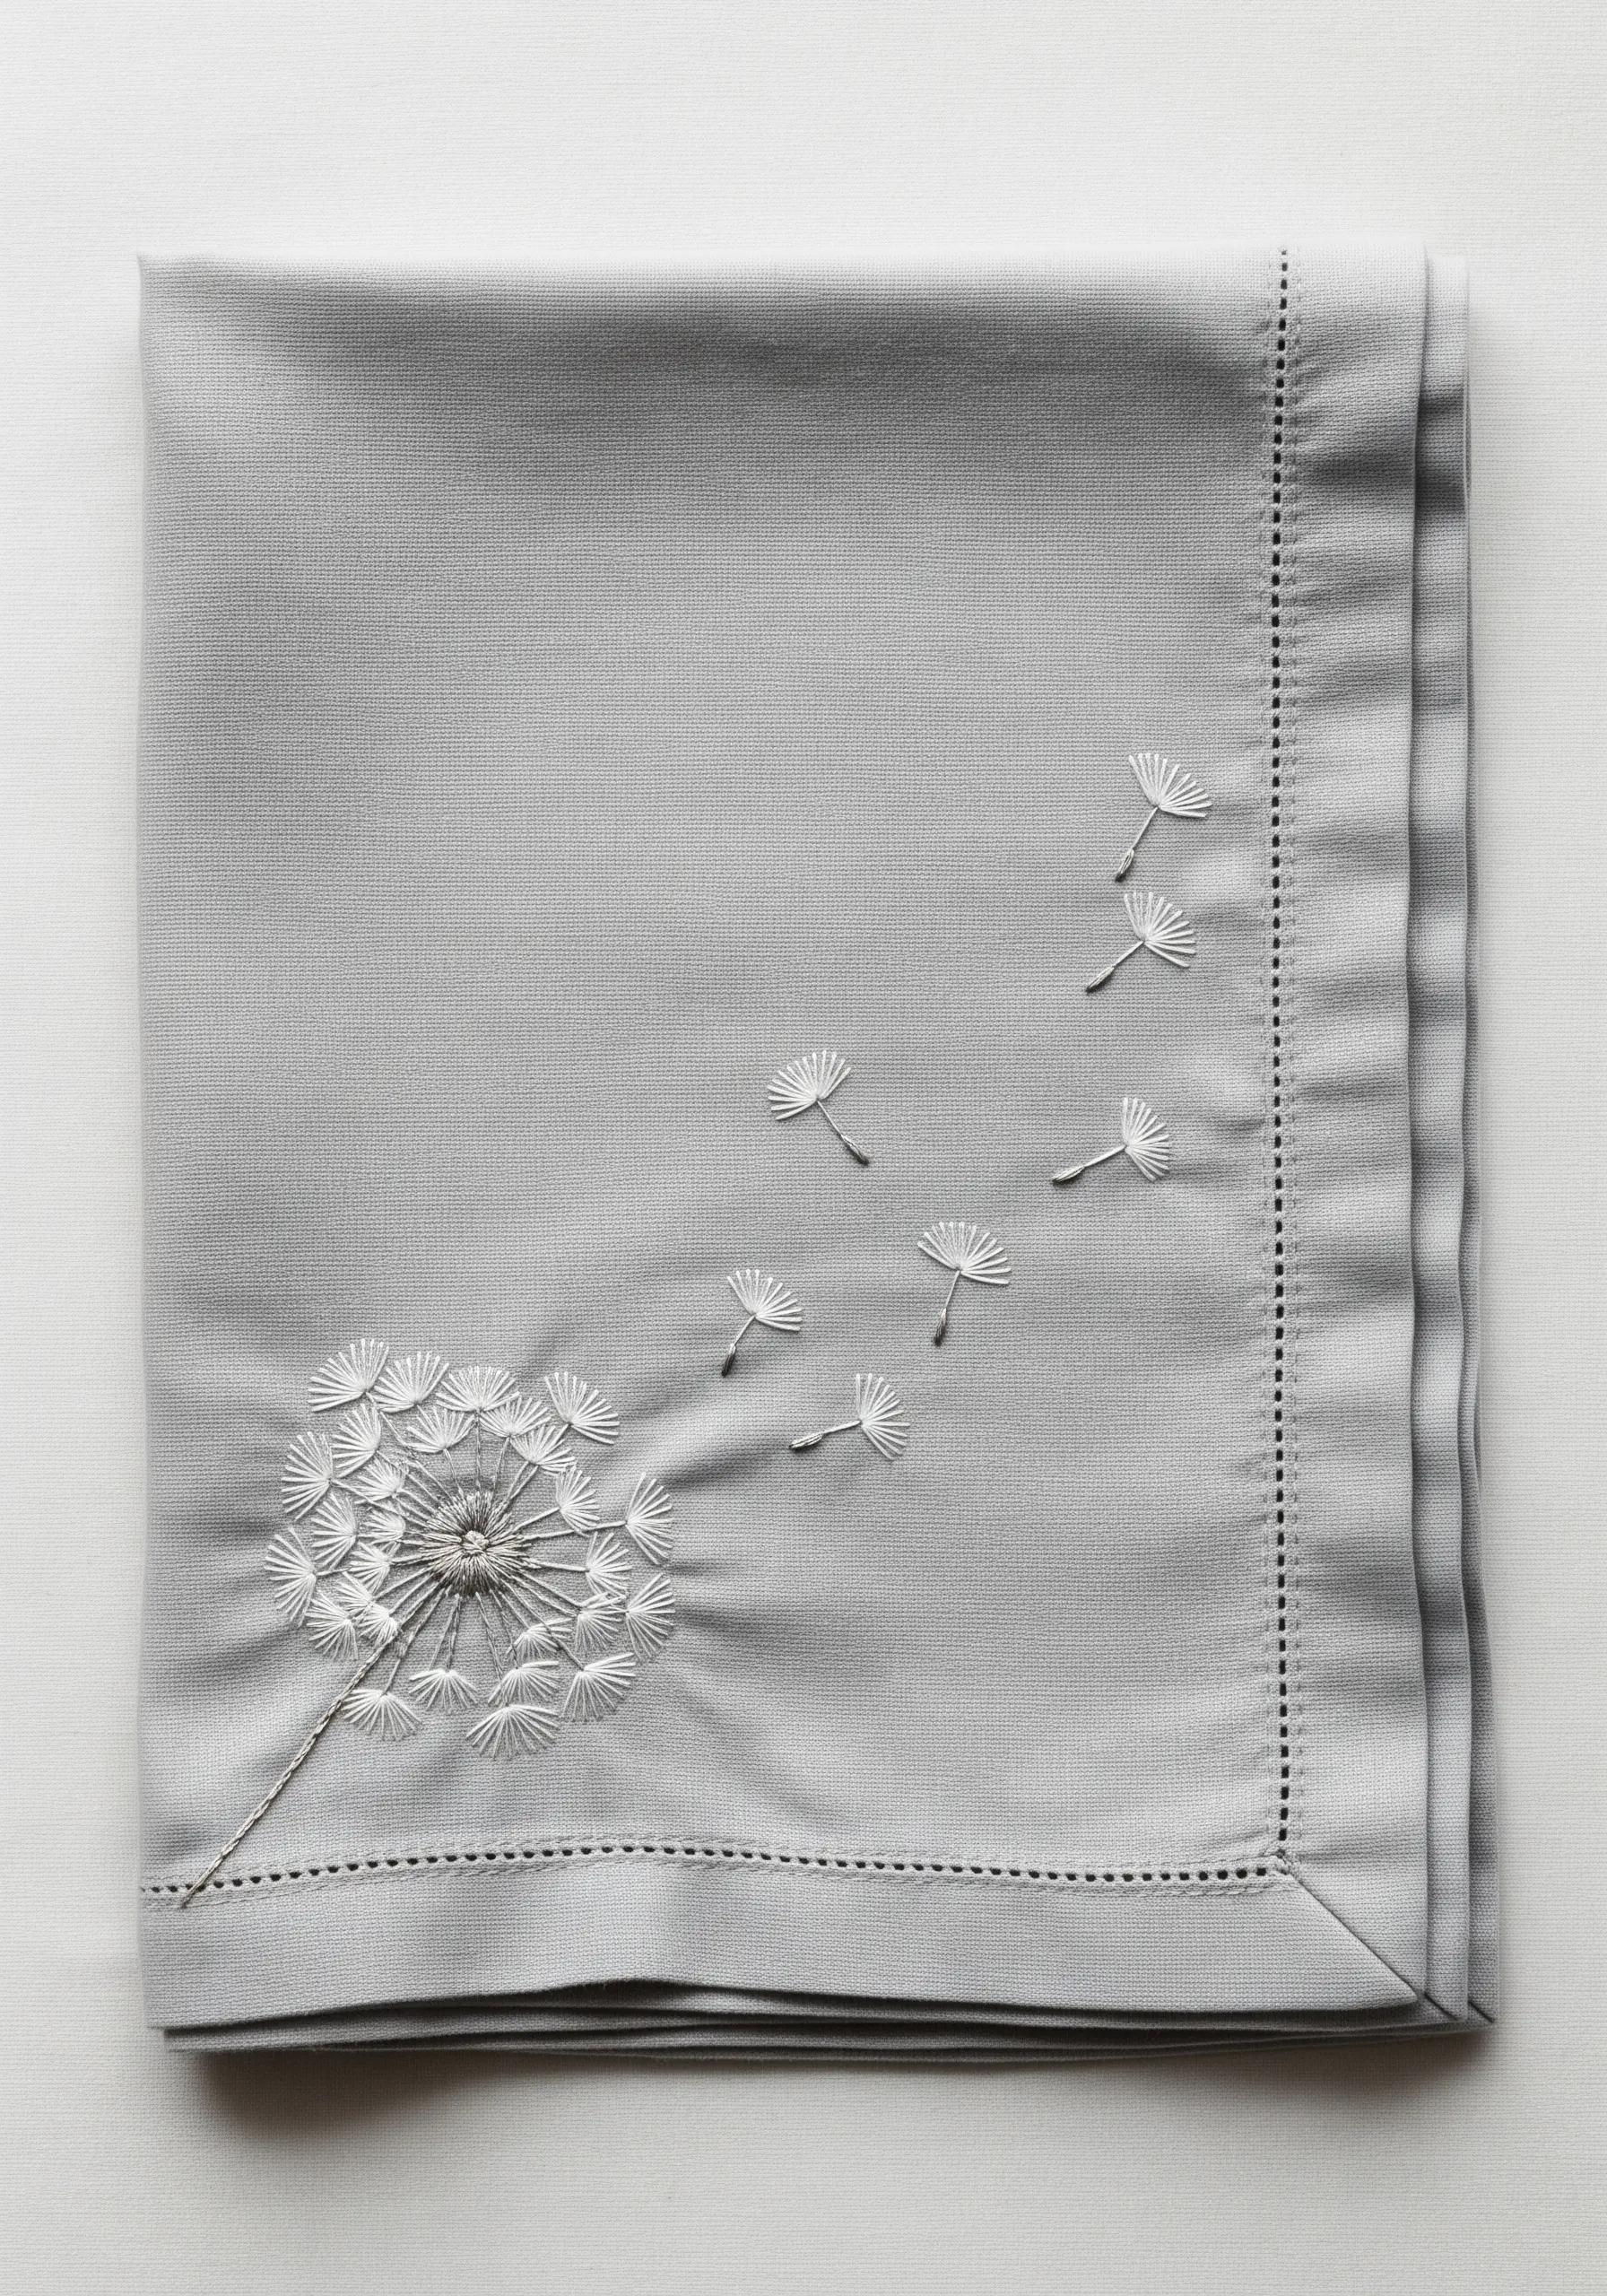
Evoke a sense of delicate movement by using a few simple, well-placed stitches.
The main dandelion head is created with straight stitches radiating from a central point, with tiny French knots at the end of each one to suggest the fluffy texture.
For the floating seeds, use a single, long straight stitch for the stem and top it with a fan of three to five smaller straight stitches. This creates the iconic parachute shape with minimal effort.
Stitching this light and breezy design in white thread on a muted grey linen creates a sophisticated, minimalist look that is both modern and timeless.


