
You’ve mastered the satin stitch and your French knots are perfect. But you feel a quiet desire to push your embroidery beyond the hoop, to give it a new kind of presence and structure. The answer, surprisingly, might be in the paper aisle of the art store.
Pairing thread with paper isn’t just a mixed-media experiment; it’s a way to introduce sharp lines, sculptural forms, and a clean, graphic quality that fabric alone can’t provide. Paper offers a stable foundation that makes your stitches pop, turning them into focused, intentional details on cards, bookmarks, and even three-dimensional art.
These ideas are not about learning complex new skills. They are about seeing the materials you already love in a new light. Let paper be the frame, the background, or the structure that allows your floral embroidery to truly bloom in unexpected ways.
1. Create Embossed Details with Stitched Cardstock
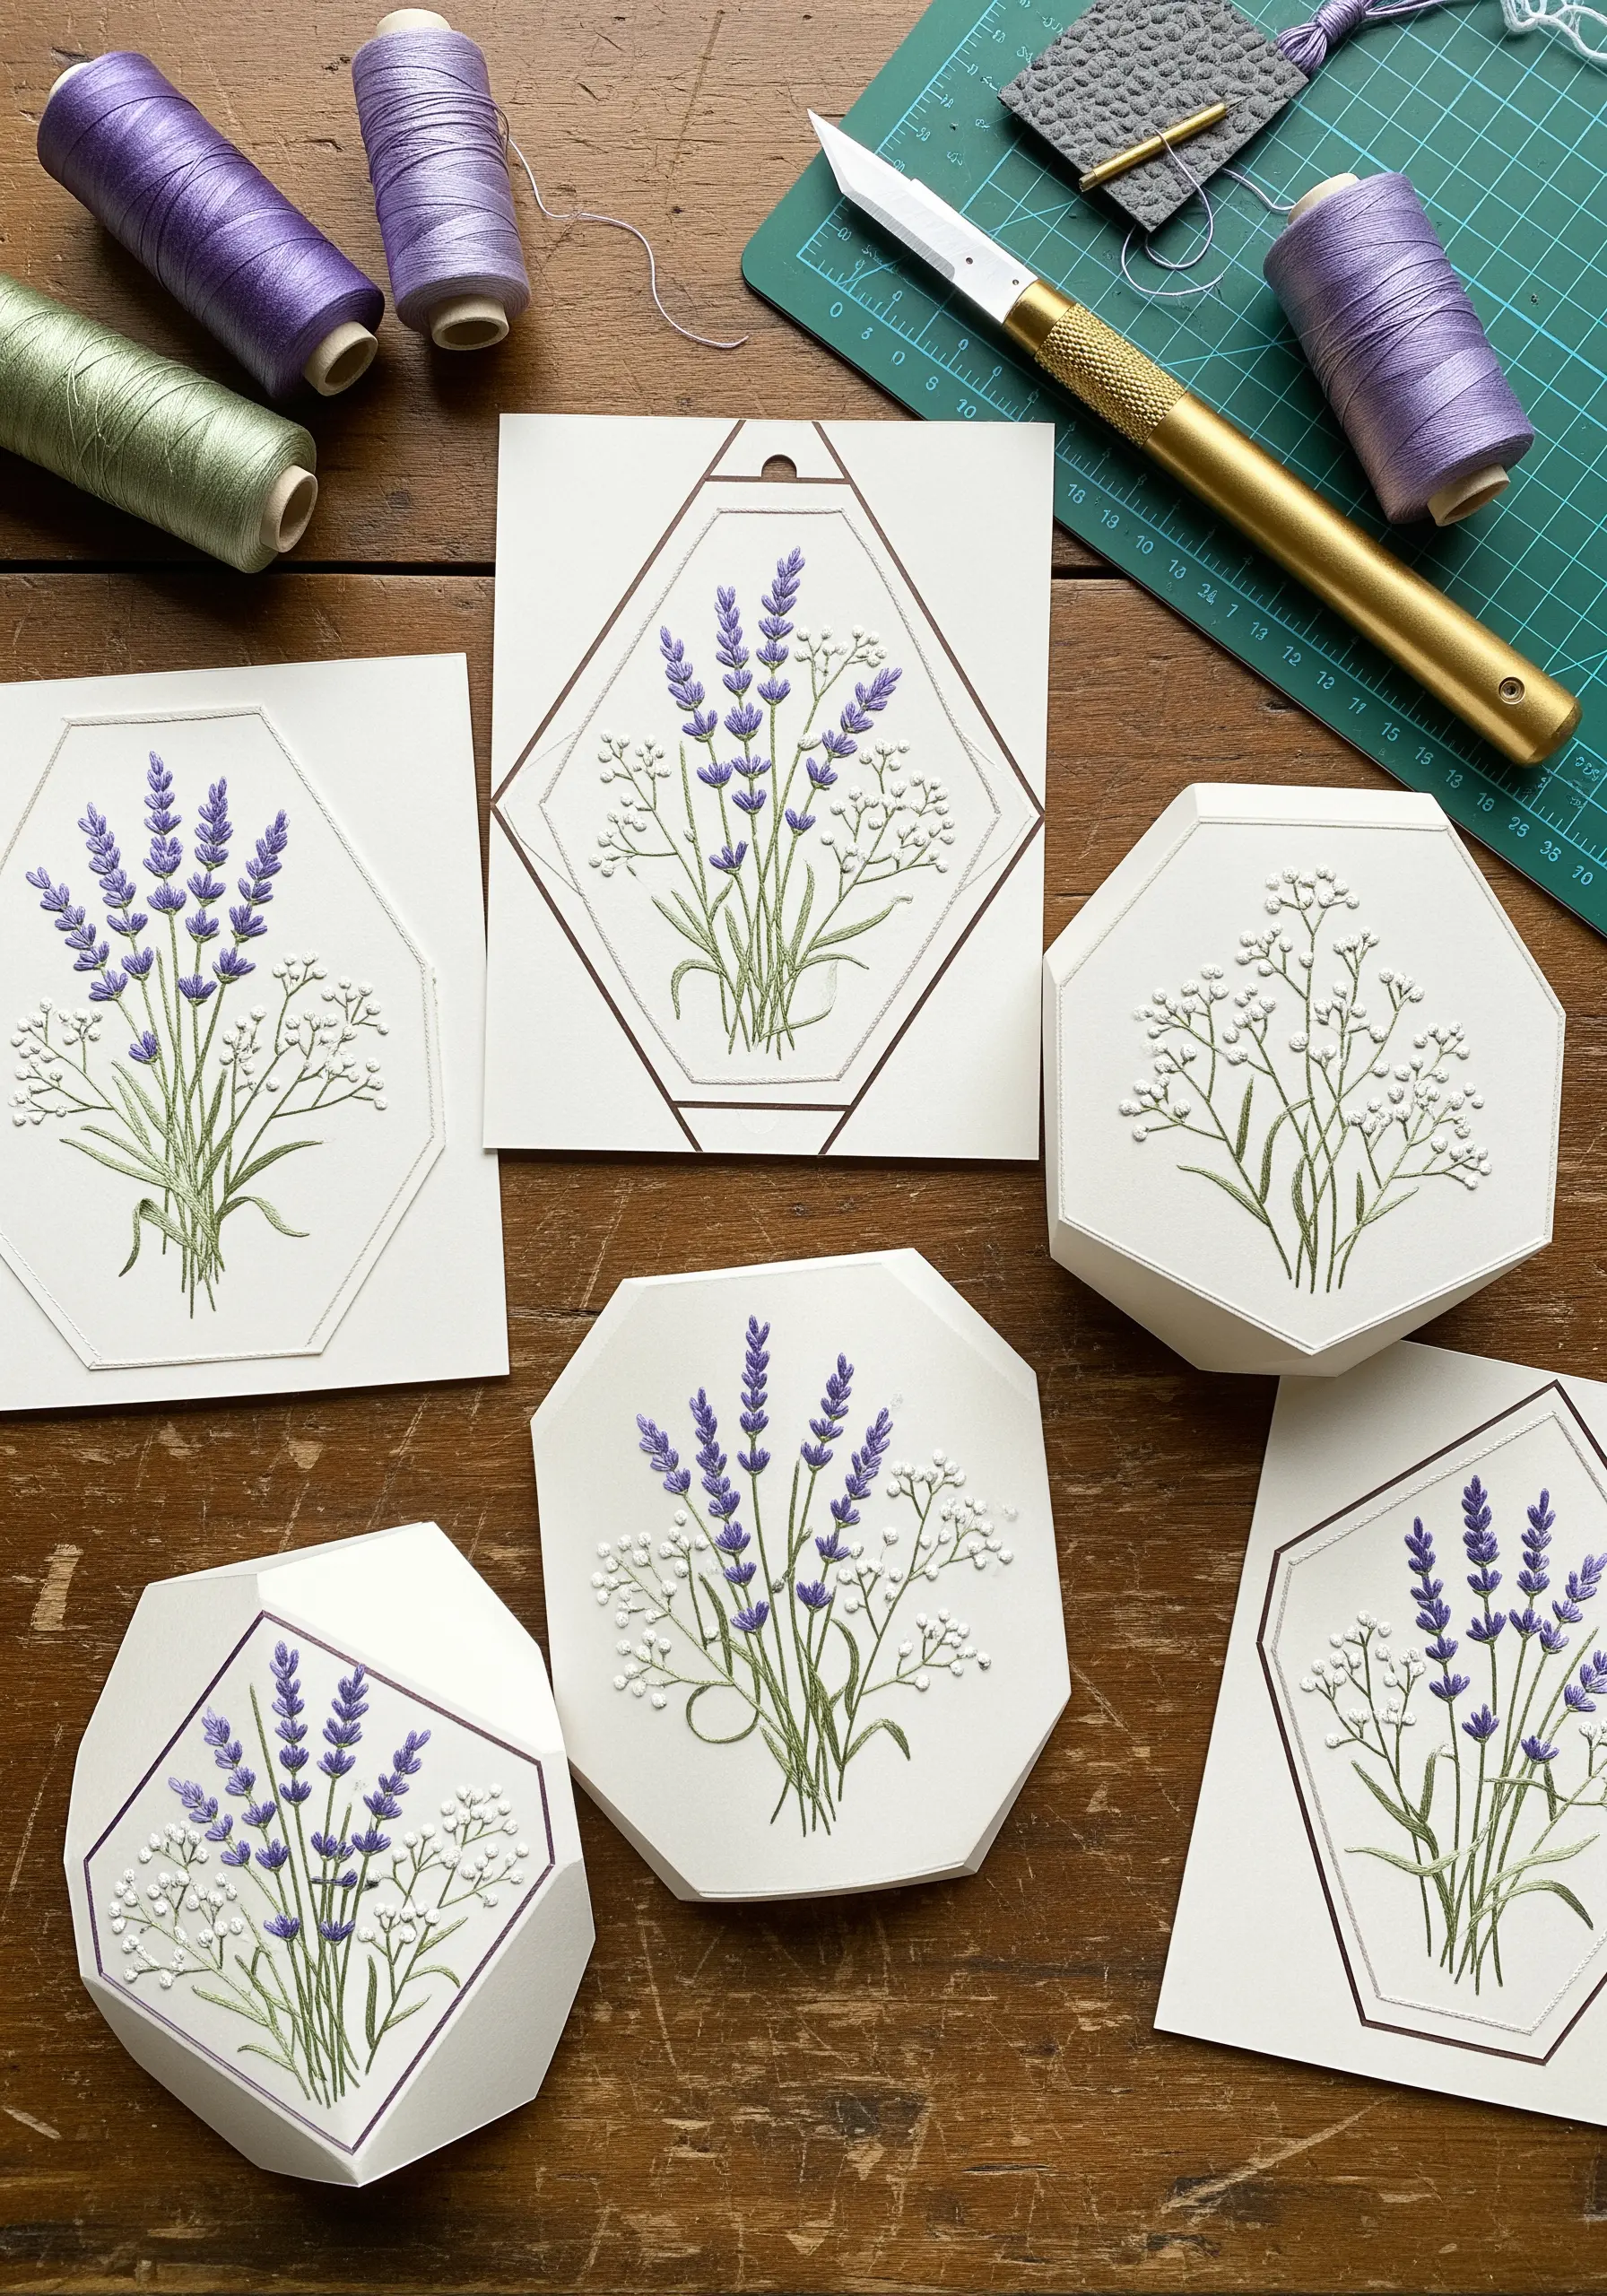
When you stitch directly onto heavy cardstock, the tension of the thread creates a subtle, elegant debossed effect around your design.
To ensure your paper doesn’t tear, pre-pierce your stitching holes with a fine needle or awl before you begin.
Use a single strand of six-strand floss for delicate florals like lavender, as this preserves the paper’s integrity and results in a clean, refined finish.
The paper itself becomes an integral part of the design, framing the stitchwork with crisp, geometric lines.
2. Stitch into Textured Cotton Rag Paper
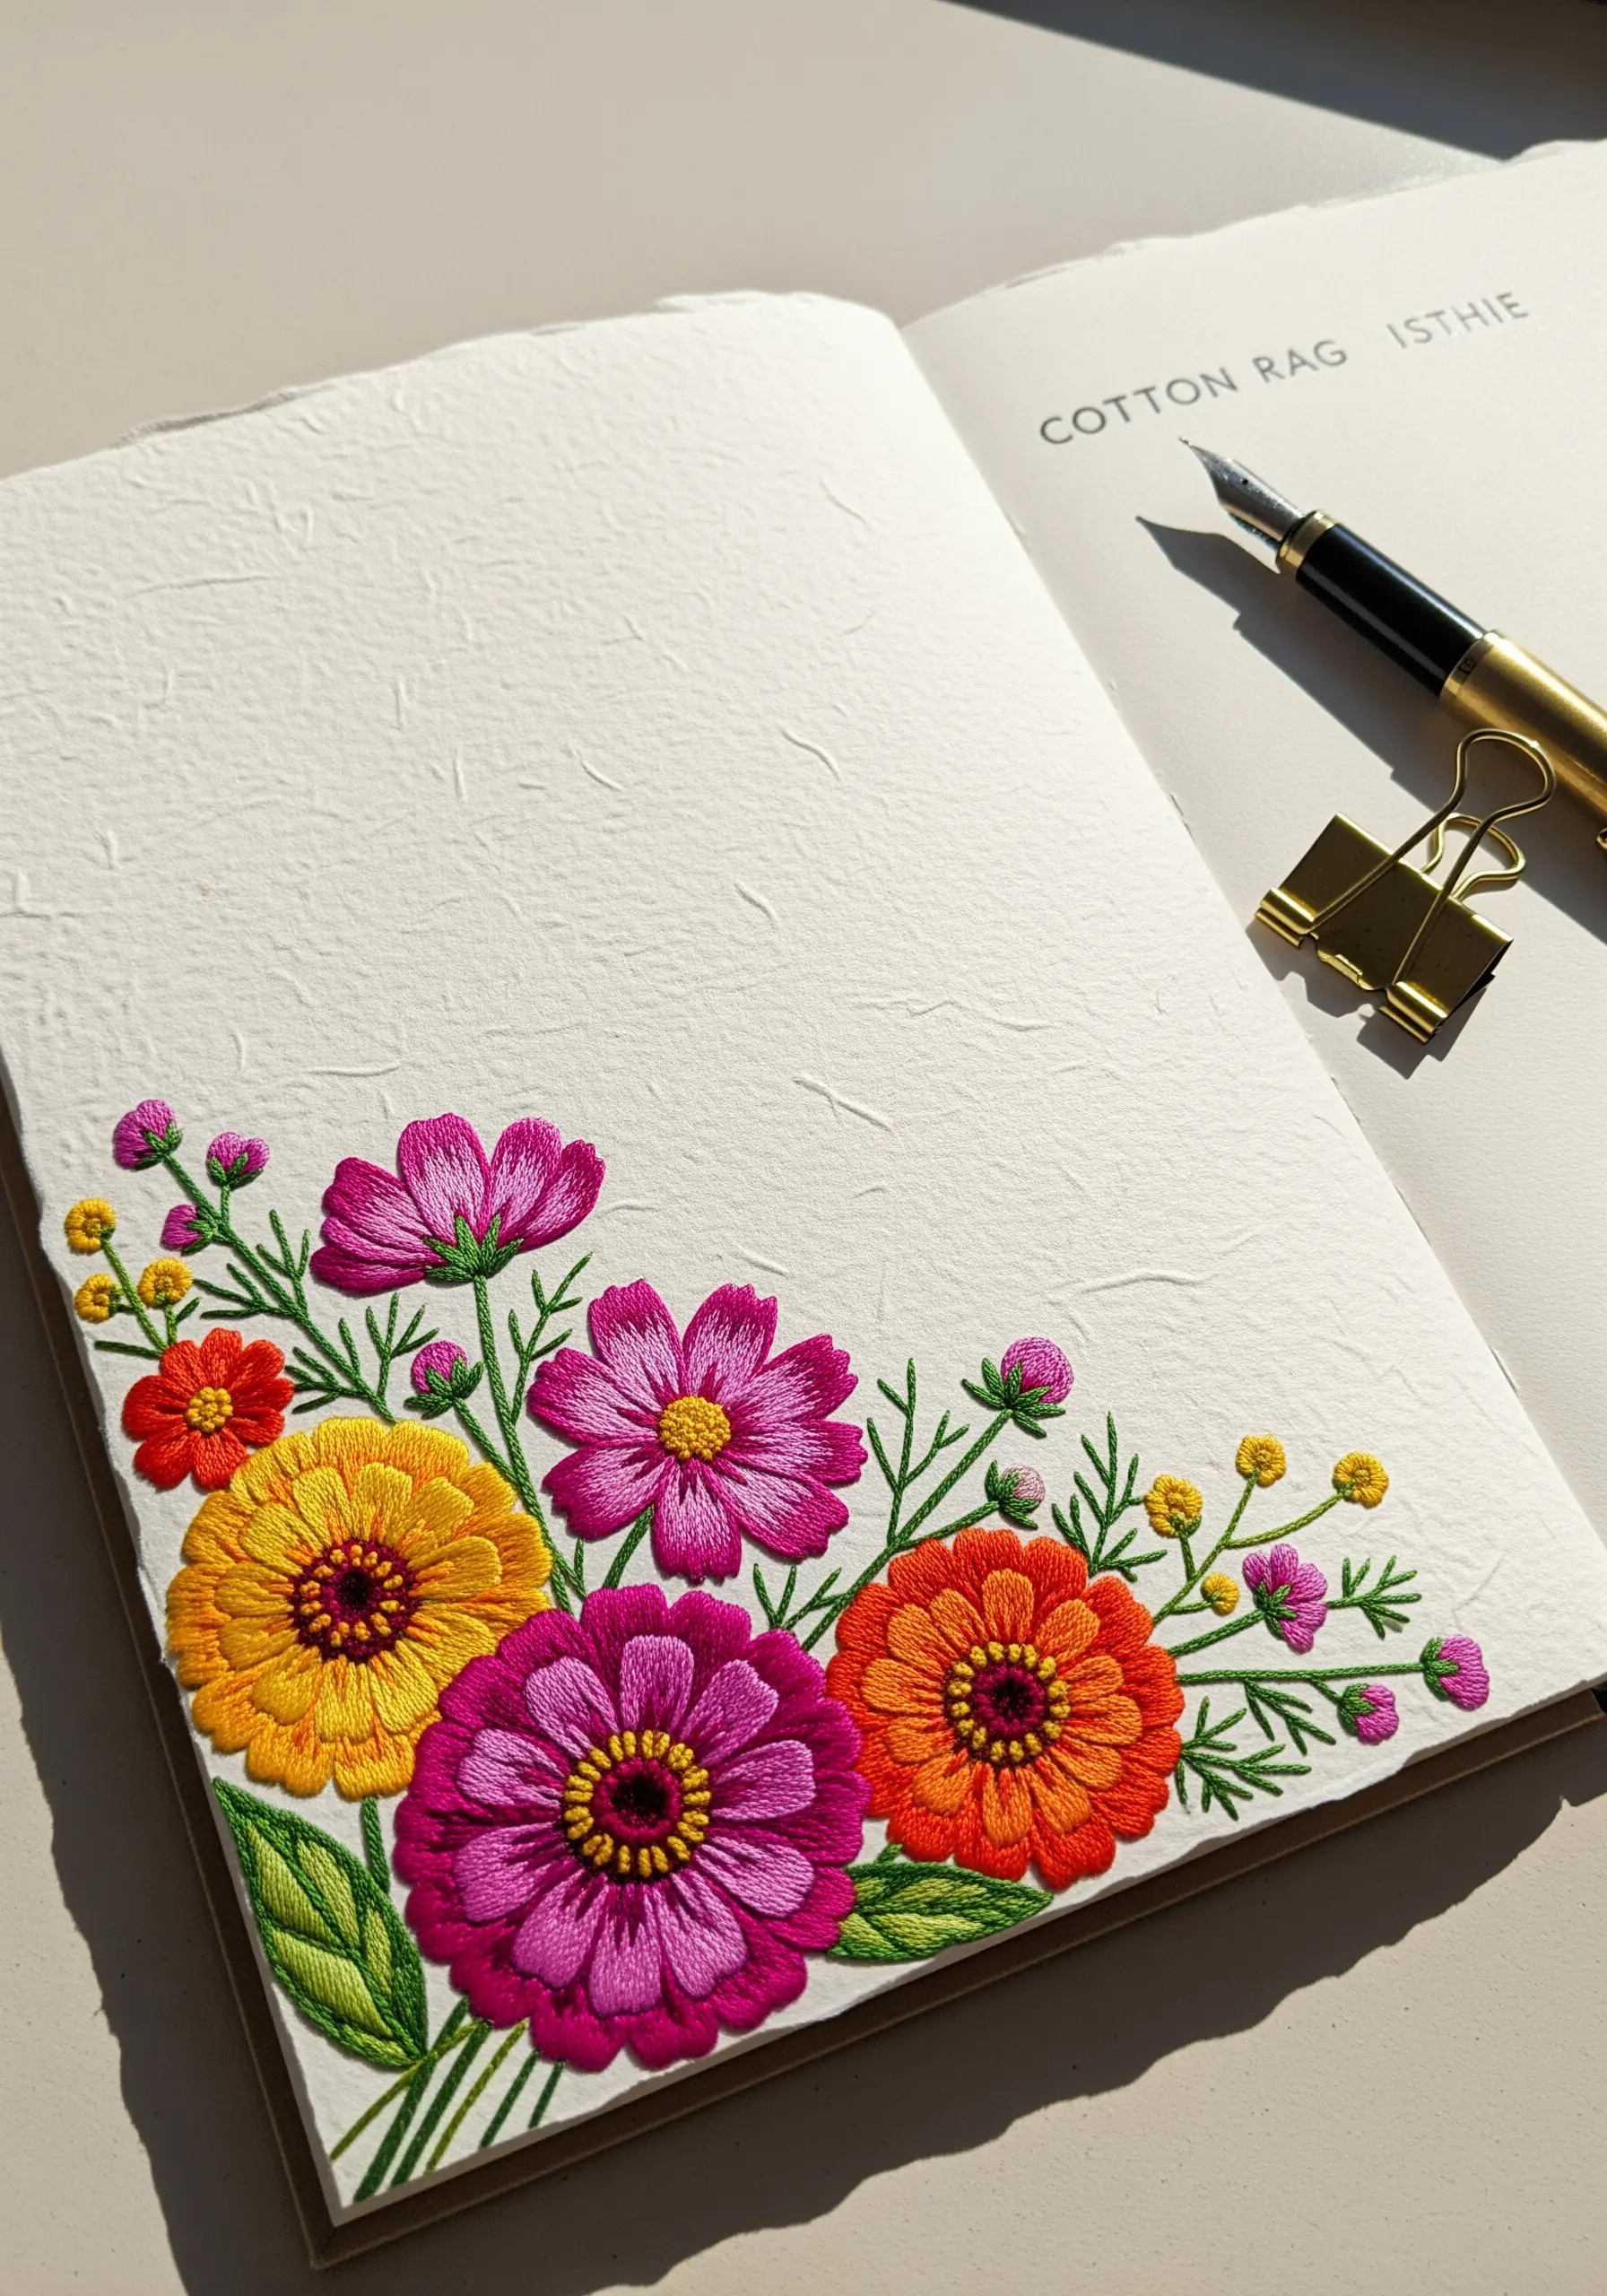
Embrace the tactile quality of handmade paper by embroidering directly onto it, turning a journal or art print into a mixed-media piece.
Choose a cotton rag paper with a high weight (300 gsm or more) to support the stitches without buckling.
Use a tapestry needle with a slightly rounded tip to part the paper fibers rather than cutting them, which prevents tearing.
Fill in bold petals with a dense satin stitch; the thread’s smooth sheen creates a beautiful contrast against the paper’s matte, fibrous texture.
3. Design Ethereal Scrolls with Translucent Paper
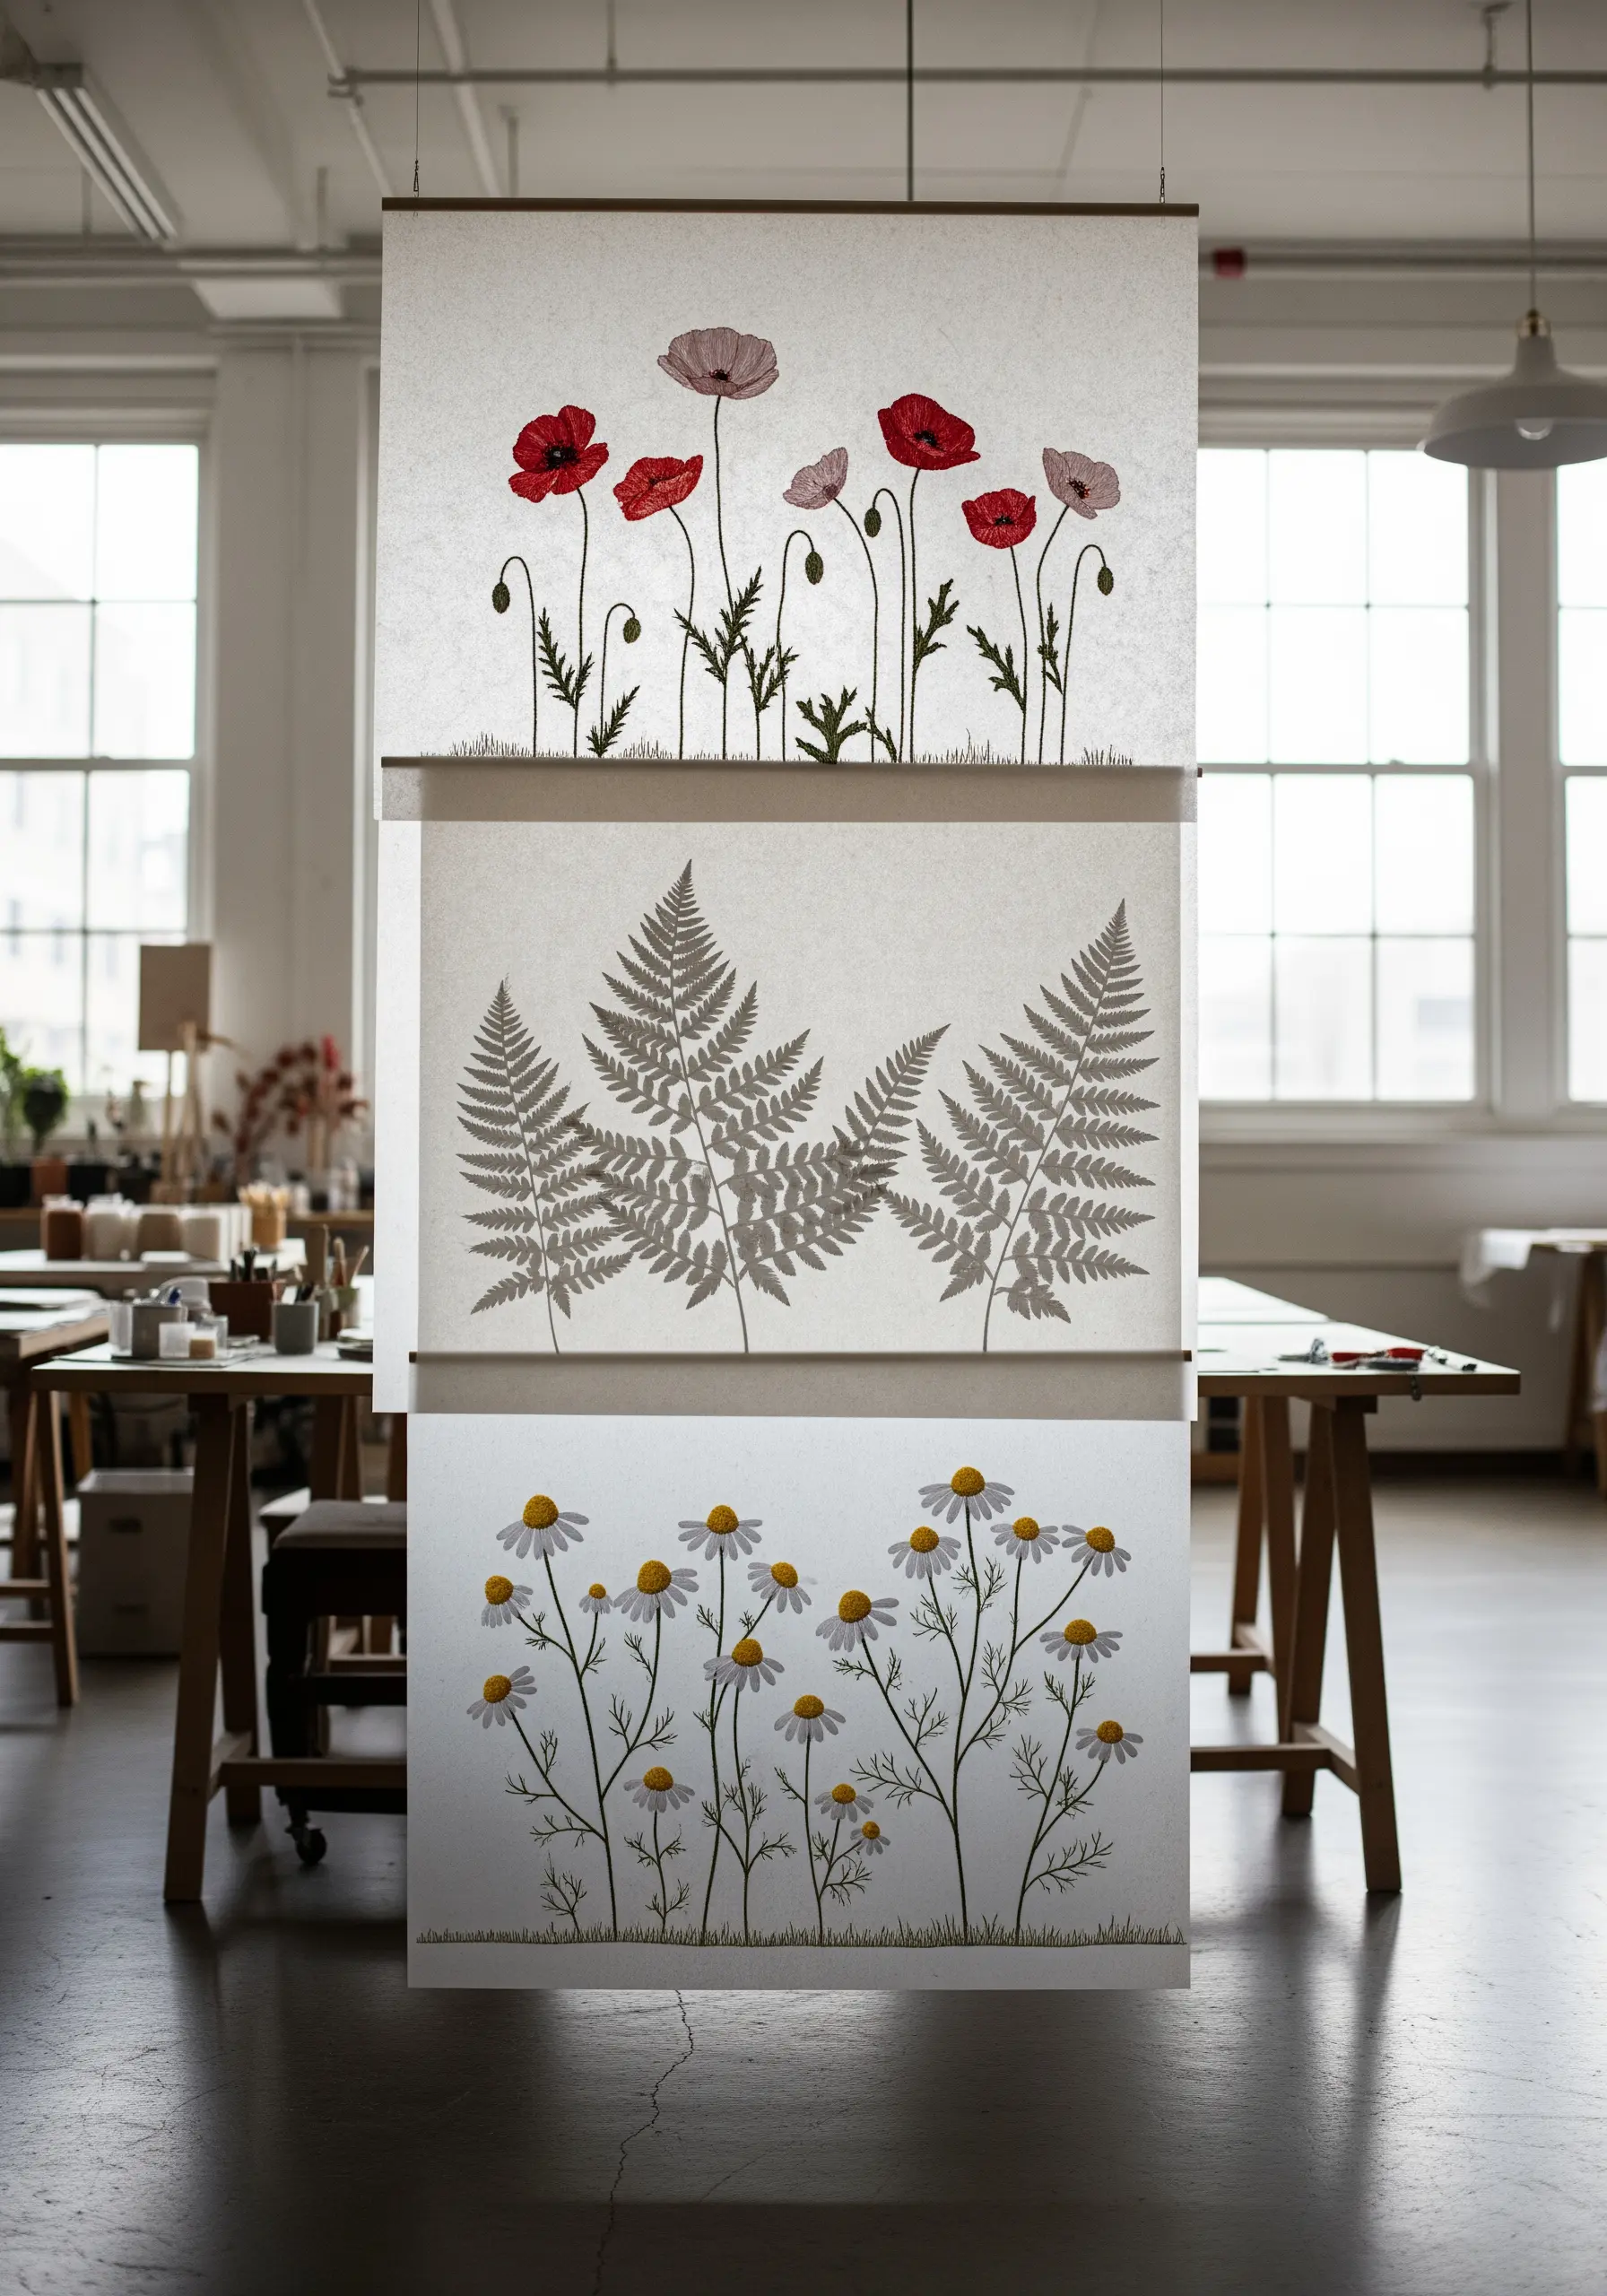
To create large-scale art that feels light and airy, print high-resolution scans of your finished embroidery onto vellum or rice paper.
This technique allows you to reproduce your detailed stitchwork at a scale that would be incredibly time-consuming to embroider by hand.
Mount the prints on wooden dowels to create hanging scrolls that catch the light, highlighting the delicate texture of both the thread and the paper.
The translucency gives the illusion of thread floating, offering a modern, minimalist take on textile art display.
4. Craft Miniature Stitched Gift Embellishments
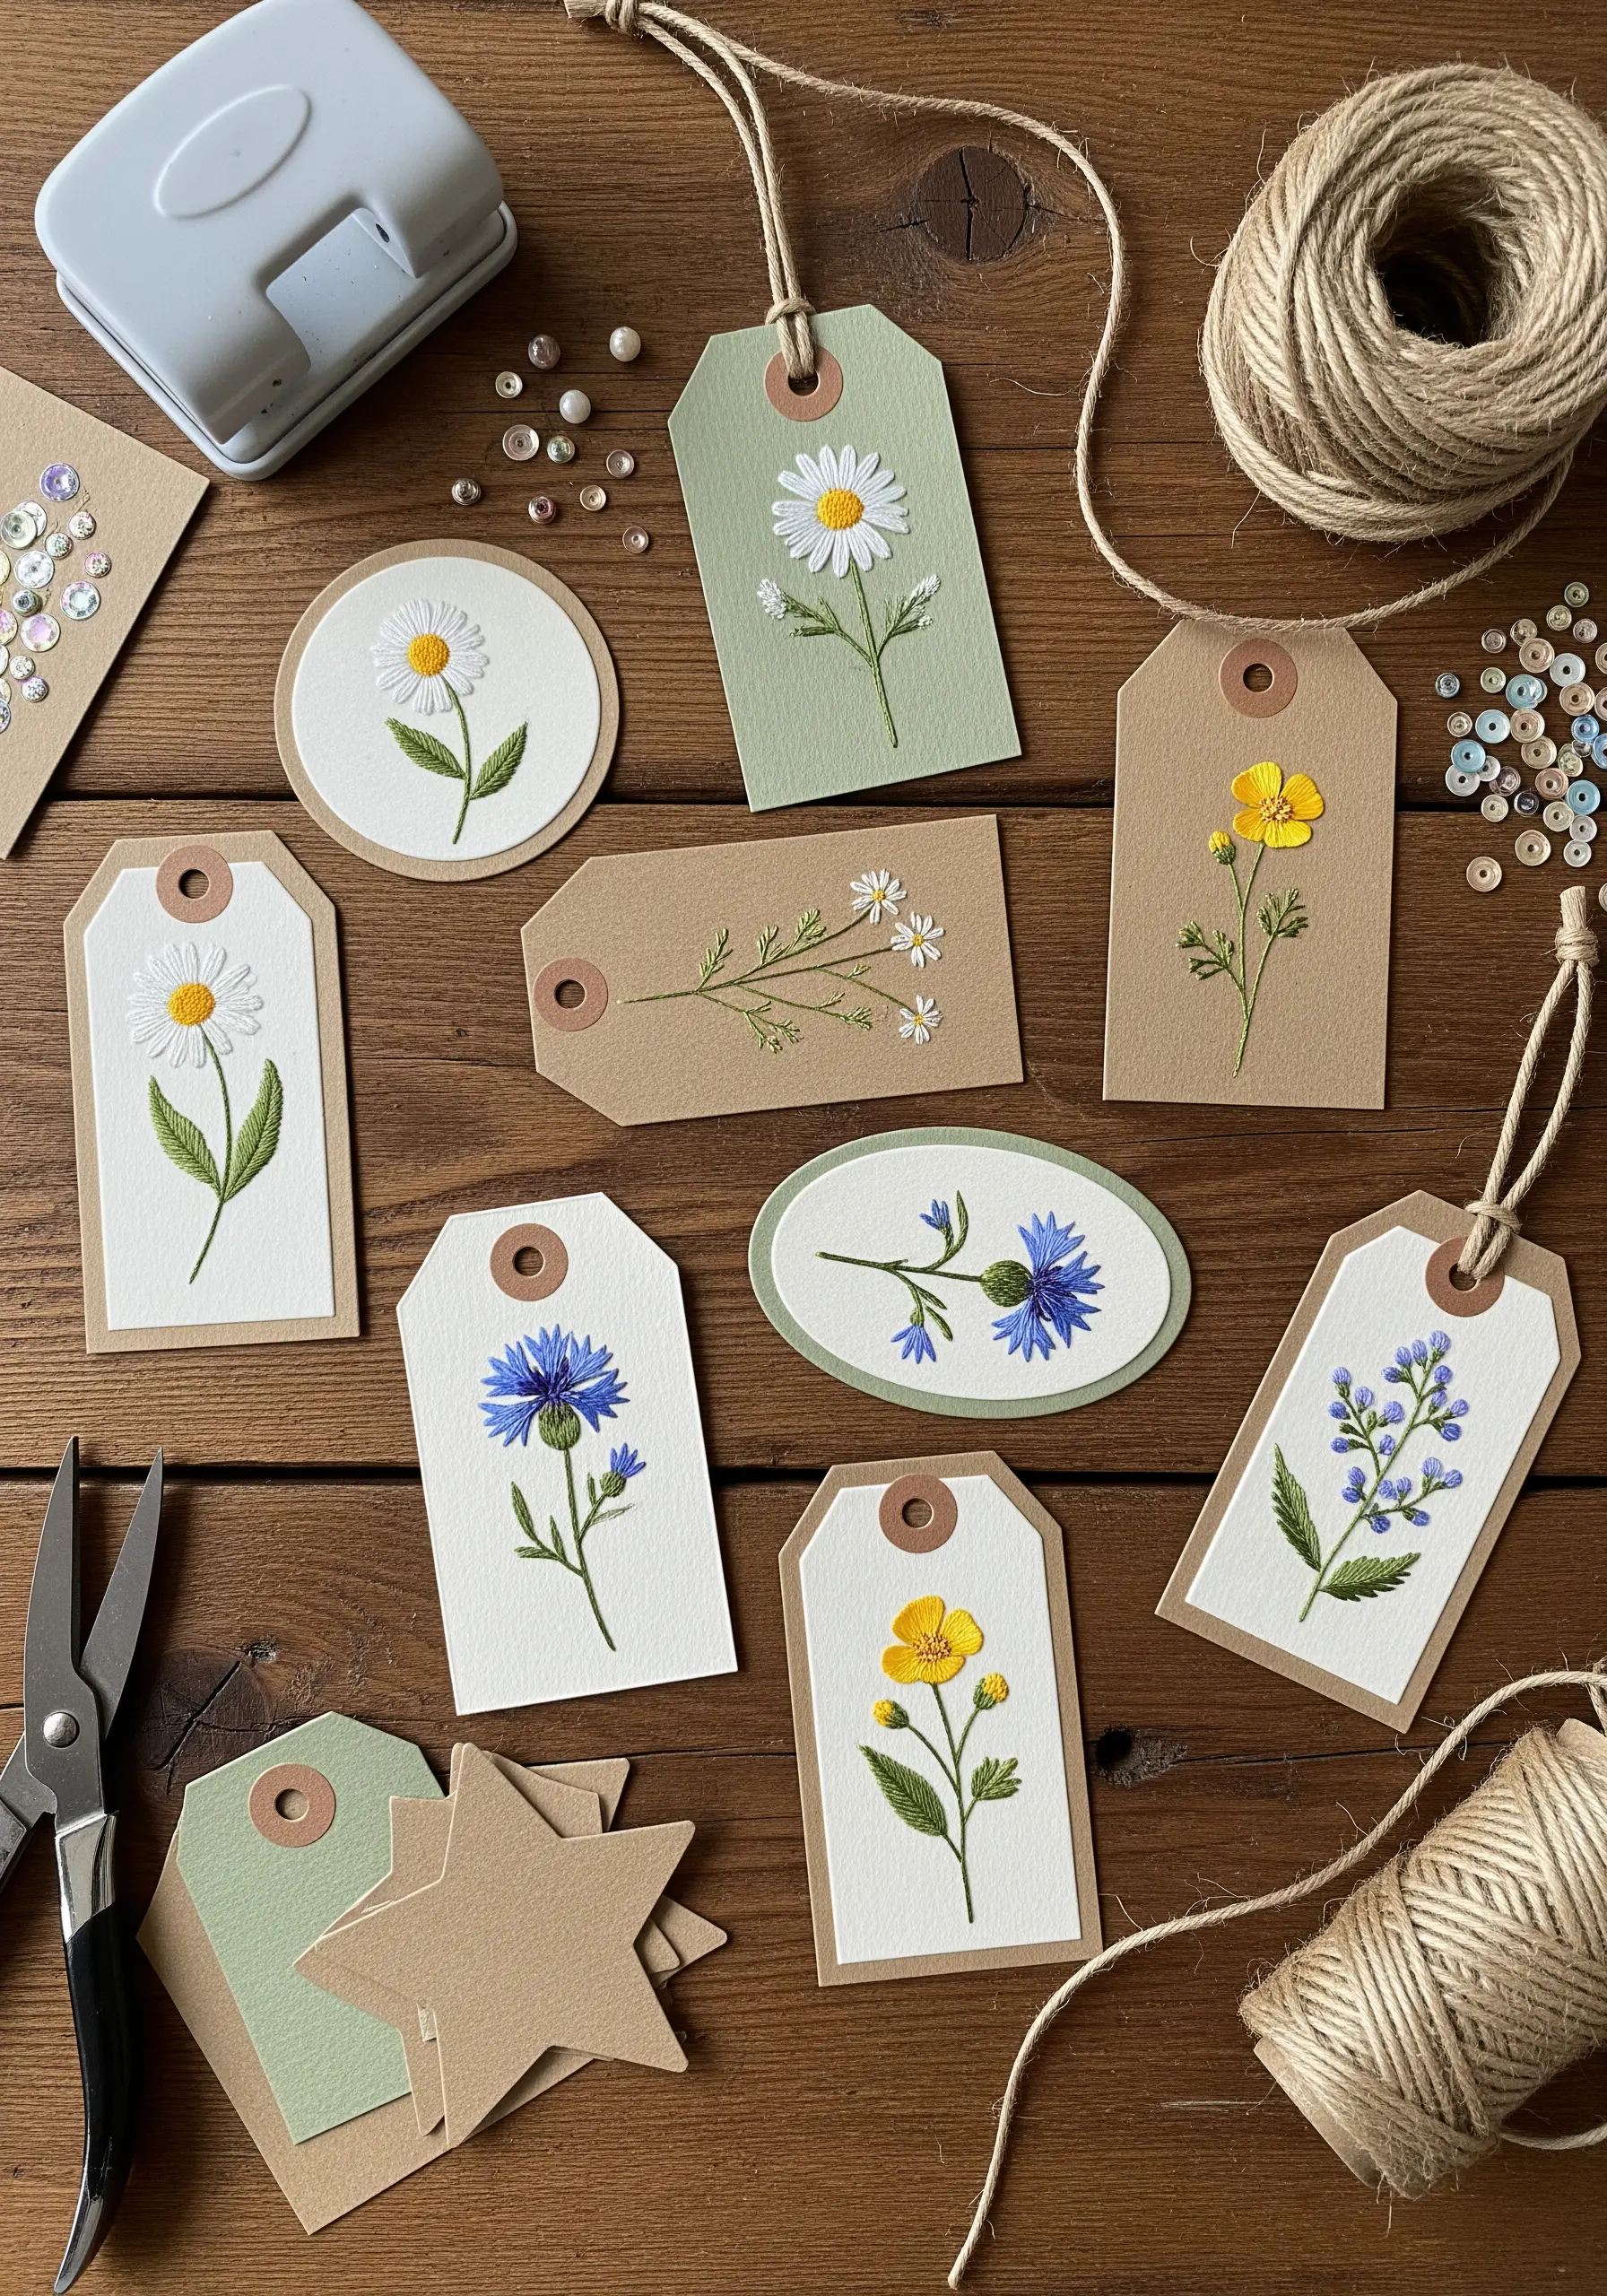
Elevate your gift wrapping by creating tiny embroidered tags from layered cardstock.
Work with just one or two strands of floss to keep the scale delicate and prevent the small paper shapes from becoming overwhelmed.
Simple stitches like a single lazy daisy for a petal or a straight stitch for a stem are all you need for these impactful miniatures.
These minimal embroidery projects that double as thoughtful gifts ensure the presentation is as meaningful as the present itself.
5. Add Thread Veining to Sculptural Paper Flowers
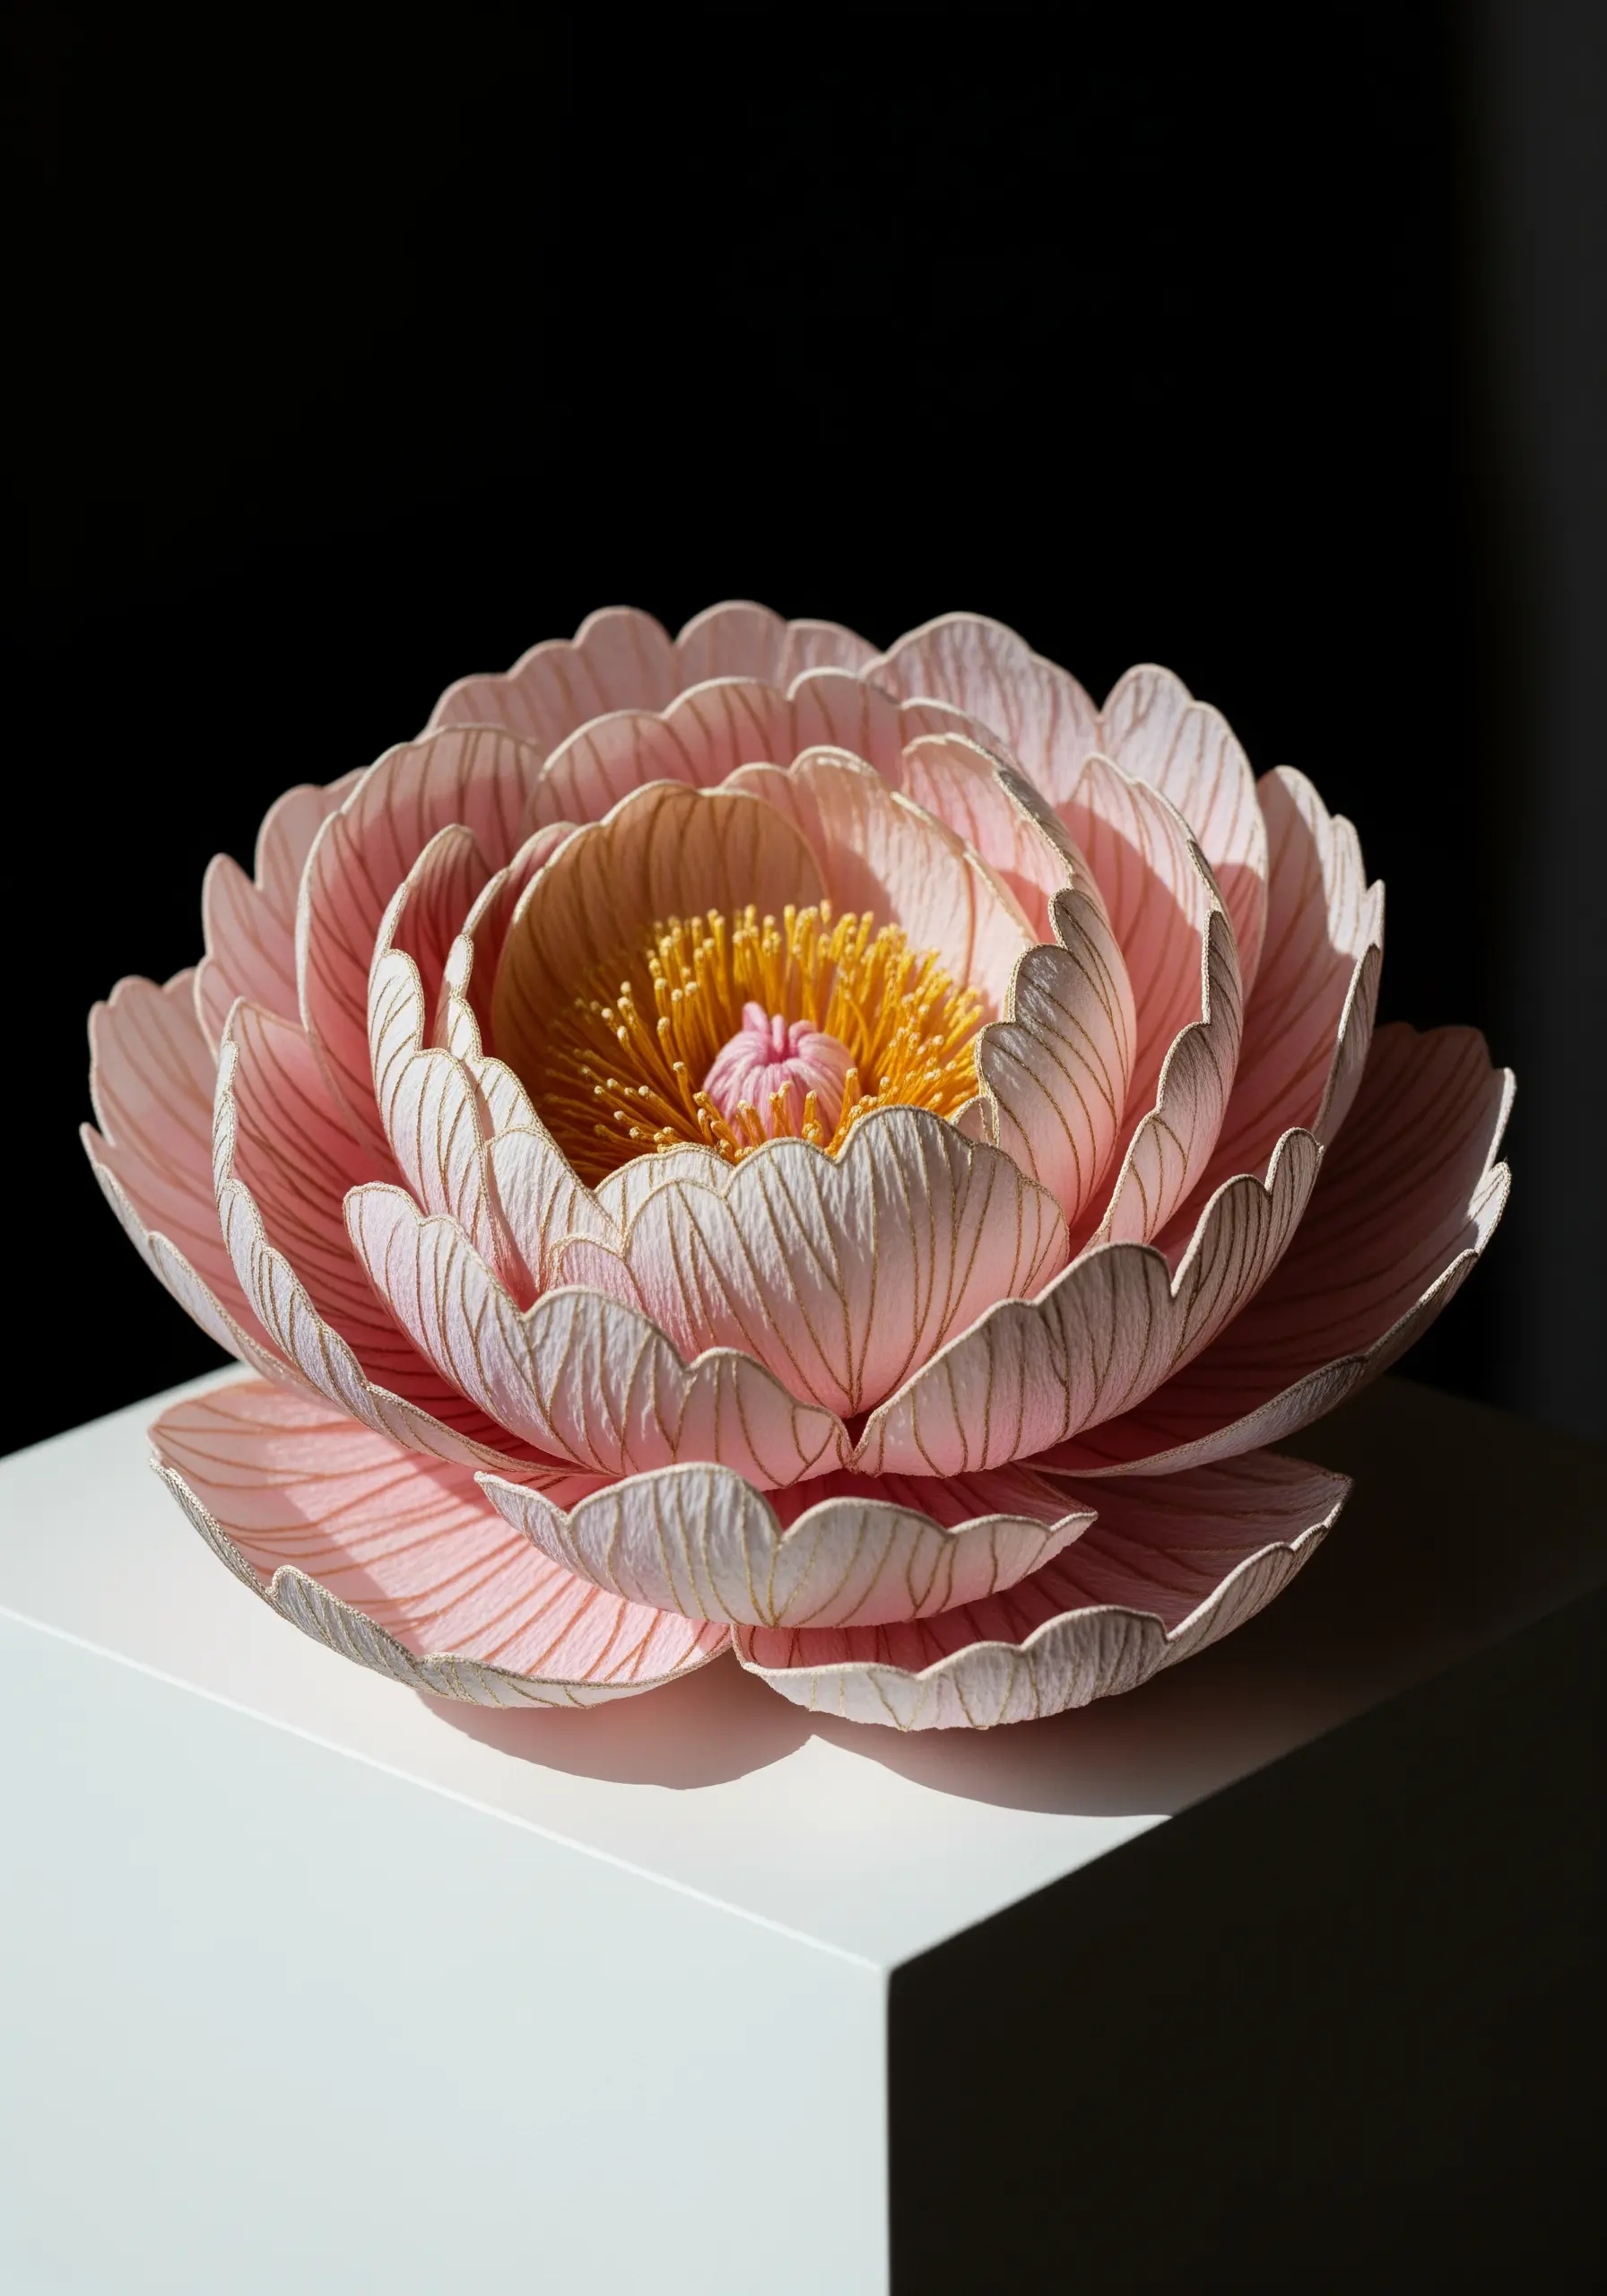
Combine the art of papercraft with embroidery to give your 3D flowers hyper-realistic detail.
After cutting and shaping each petal from crepe or cardstock, use a single strand of thread to add delicate veining with a simple running stitch.
This technique adds a layer of texture and shadow that brings the paper sculpture to life, mimicking the organic patterns found in nature.
This is one of those DIY art objects that look expensive but are surprisingly easy to master.
6. Assemble a Hoop & Origami Mobile
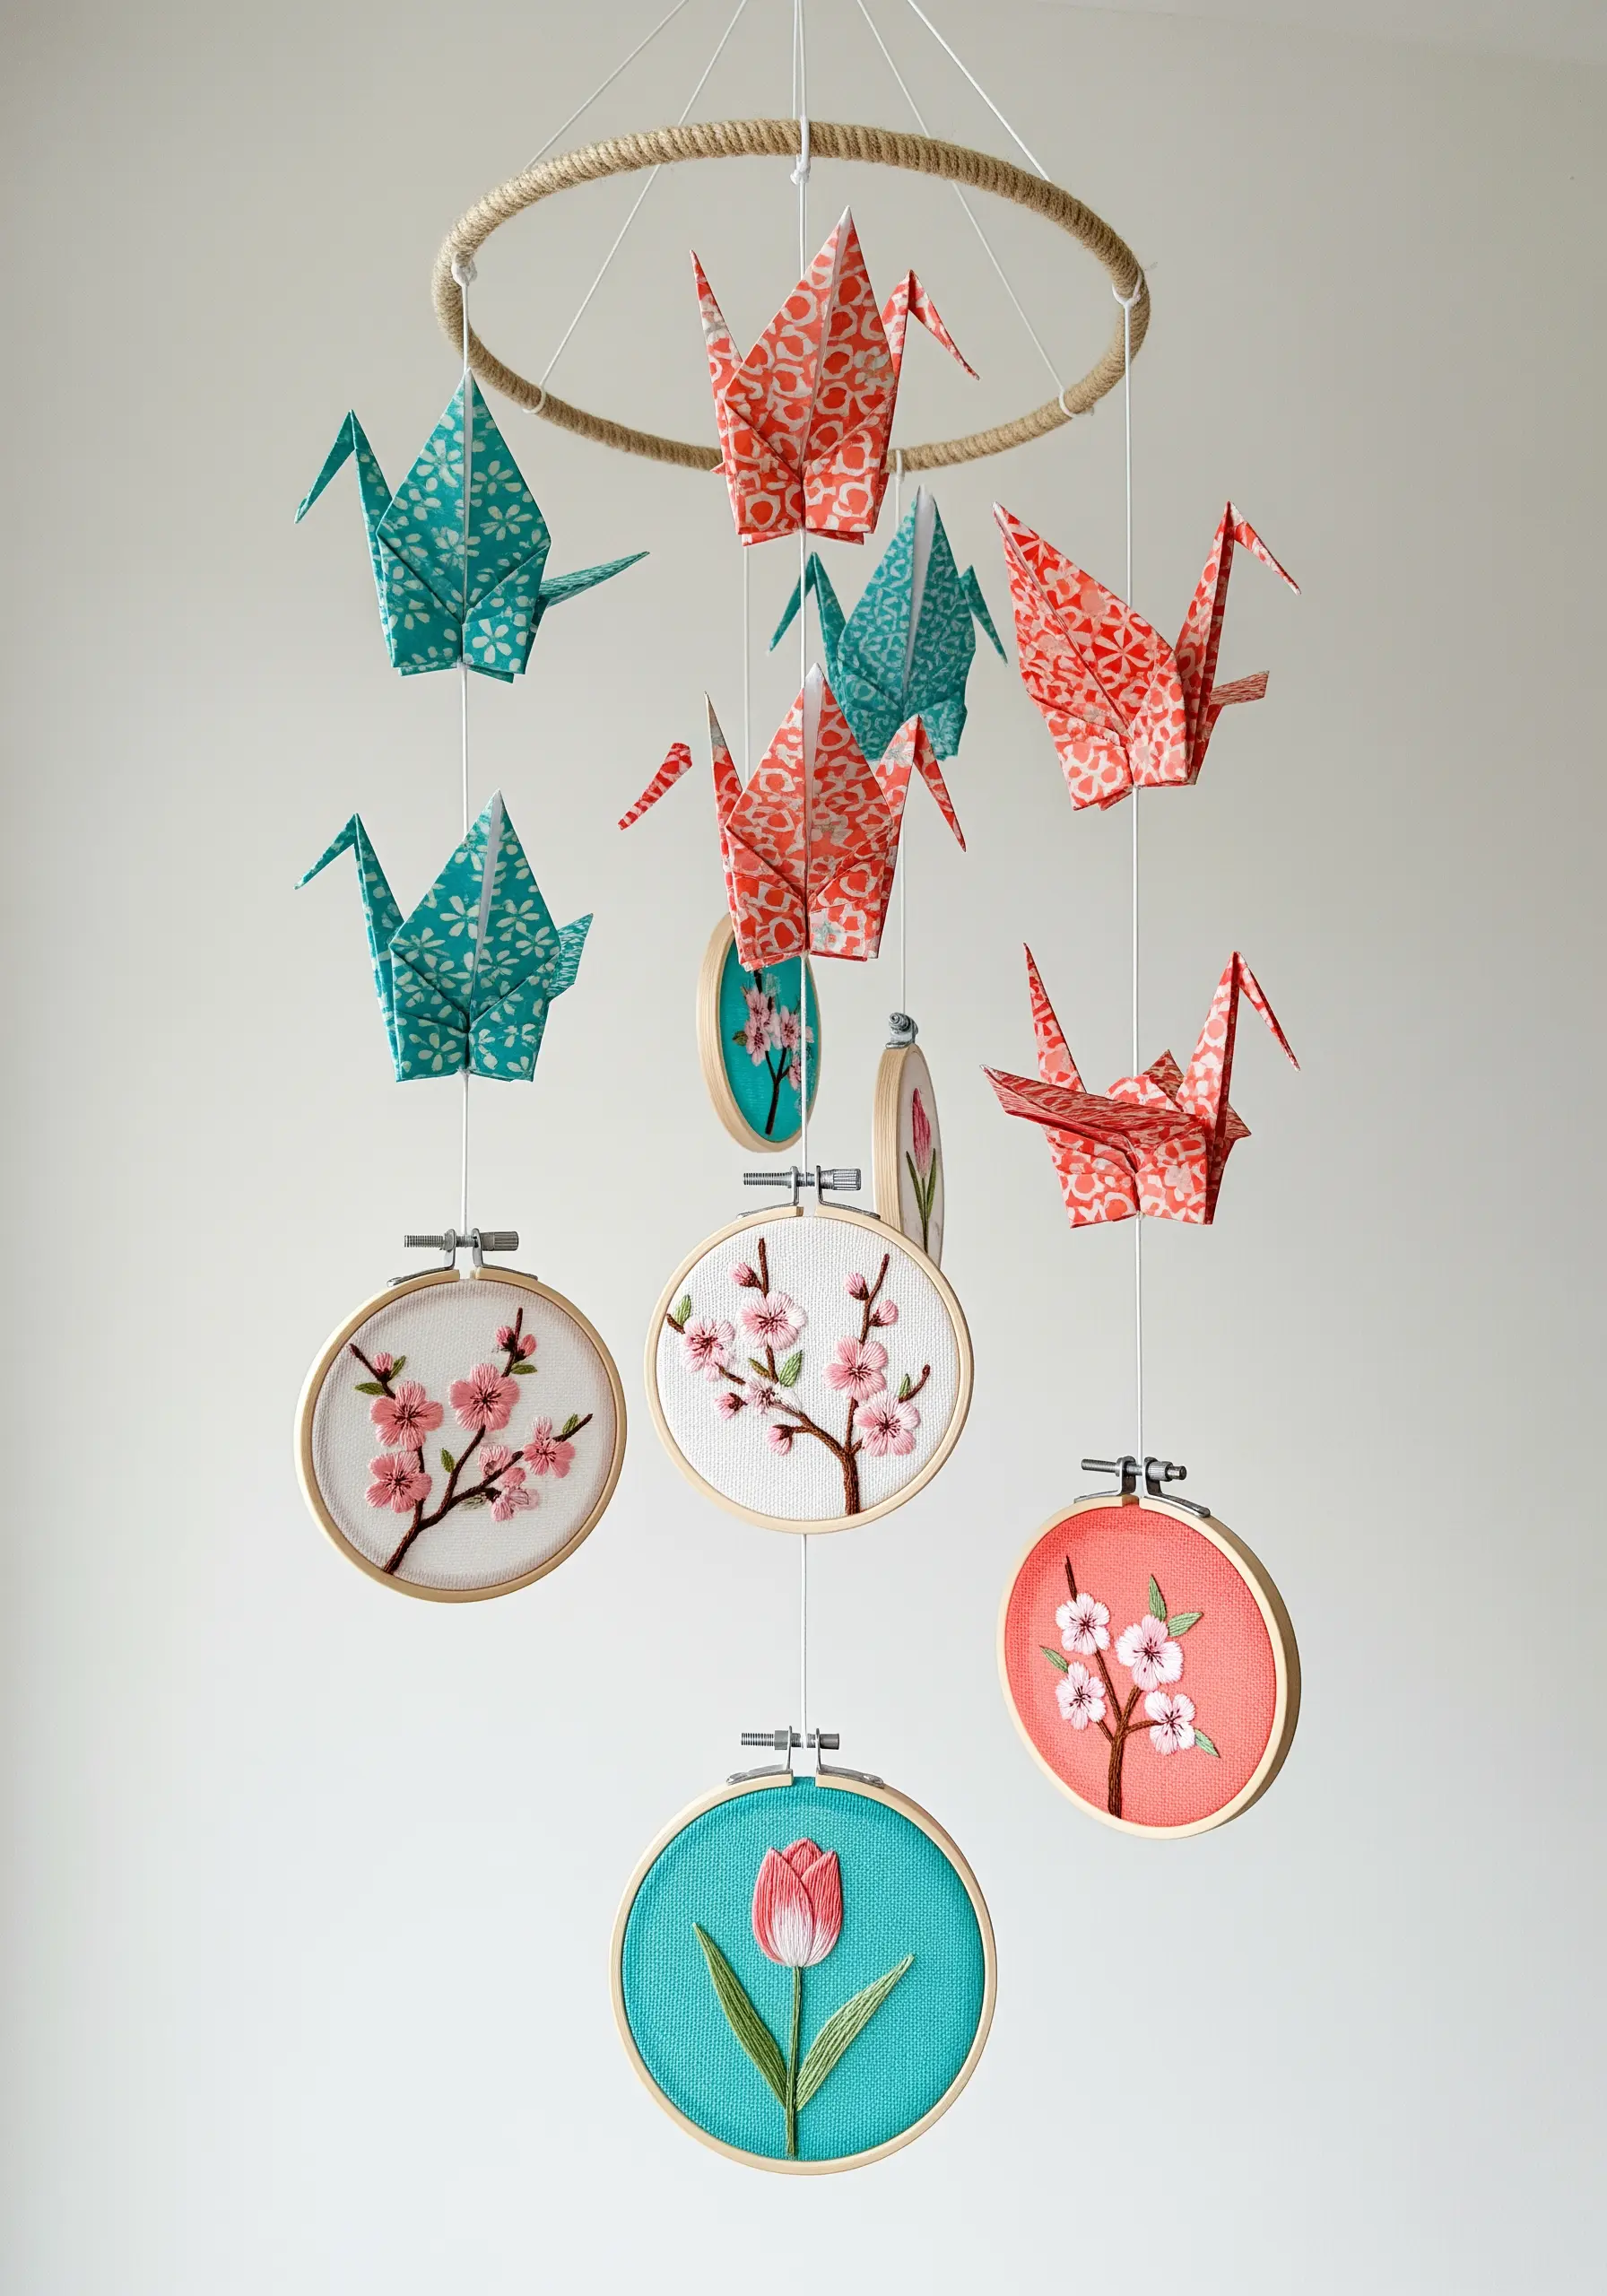
Create a beautifully balanced mobile by pairing the soft texture of embroidery with the crisp, clean folds of origami.
Stitch small floral motifs in mini hoops, choosing thread colors that coordinate with a selection of patterned origami papers.
The combination of forms—the circular hoops and the geometric cranes—creates visual harmony, while the mix of thread and paper adds tactile interest.
This project is perfect for creating soft, dreamy baby room decor or a whimsical piece of art for any corner.
7. Design Bespoke Stationery with Stitched Patches
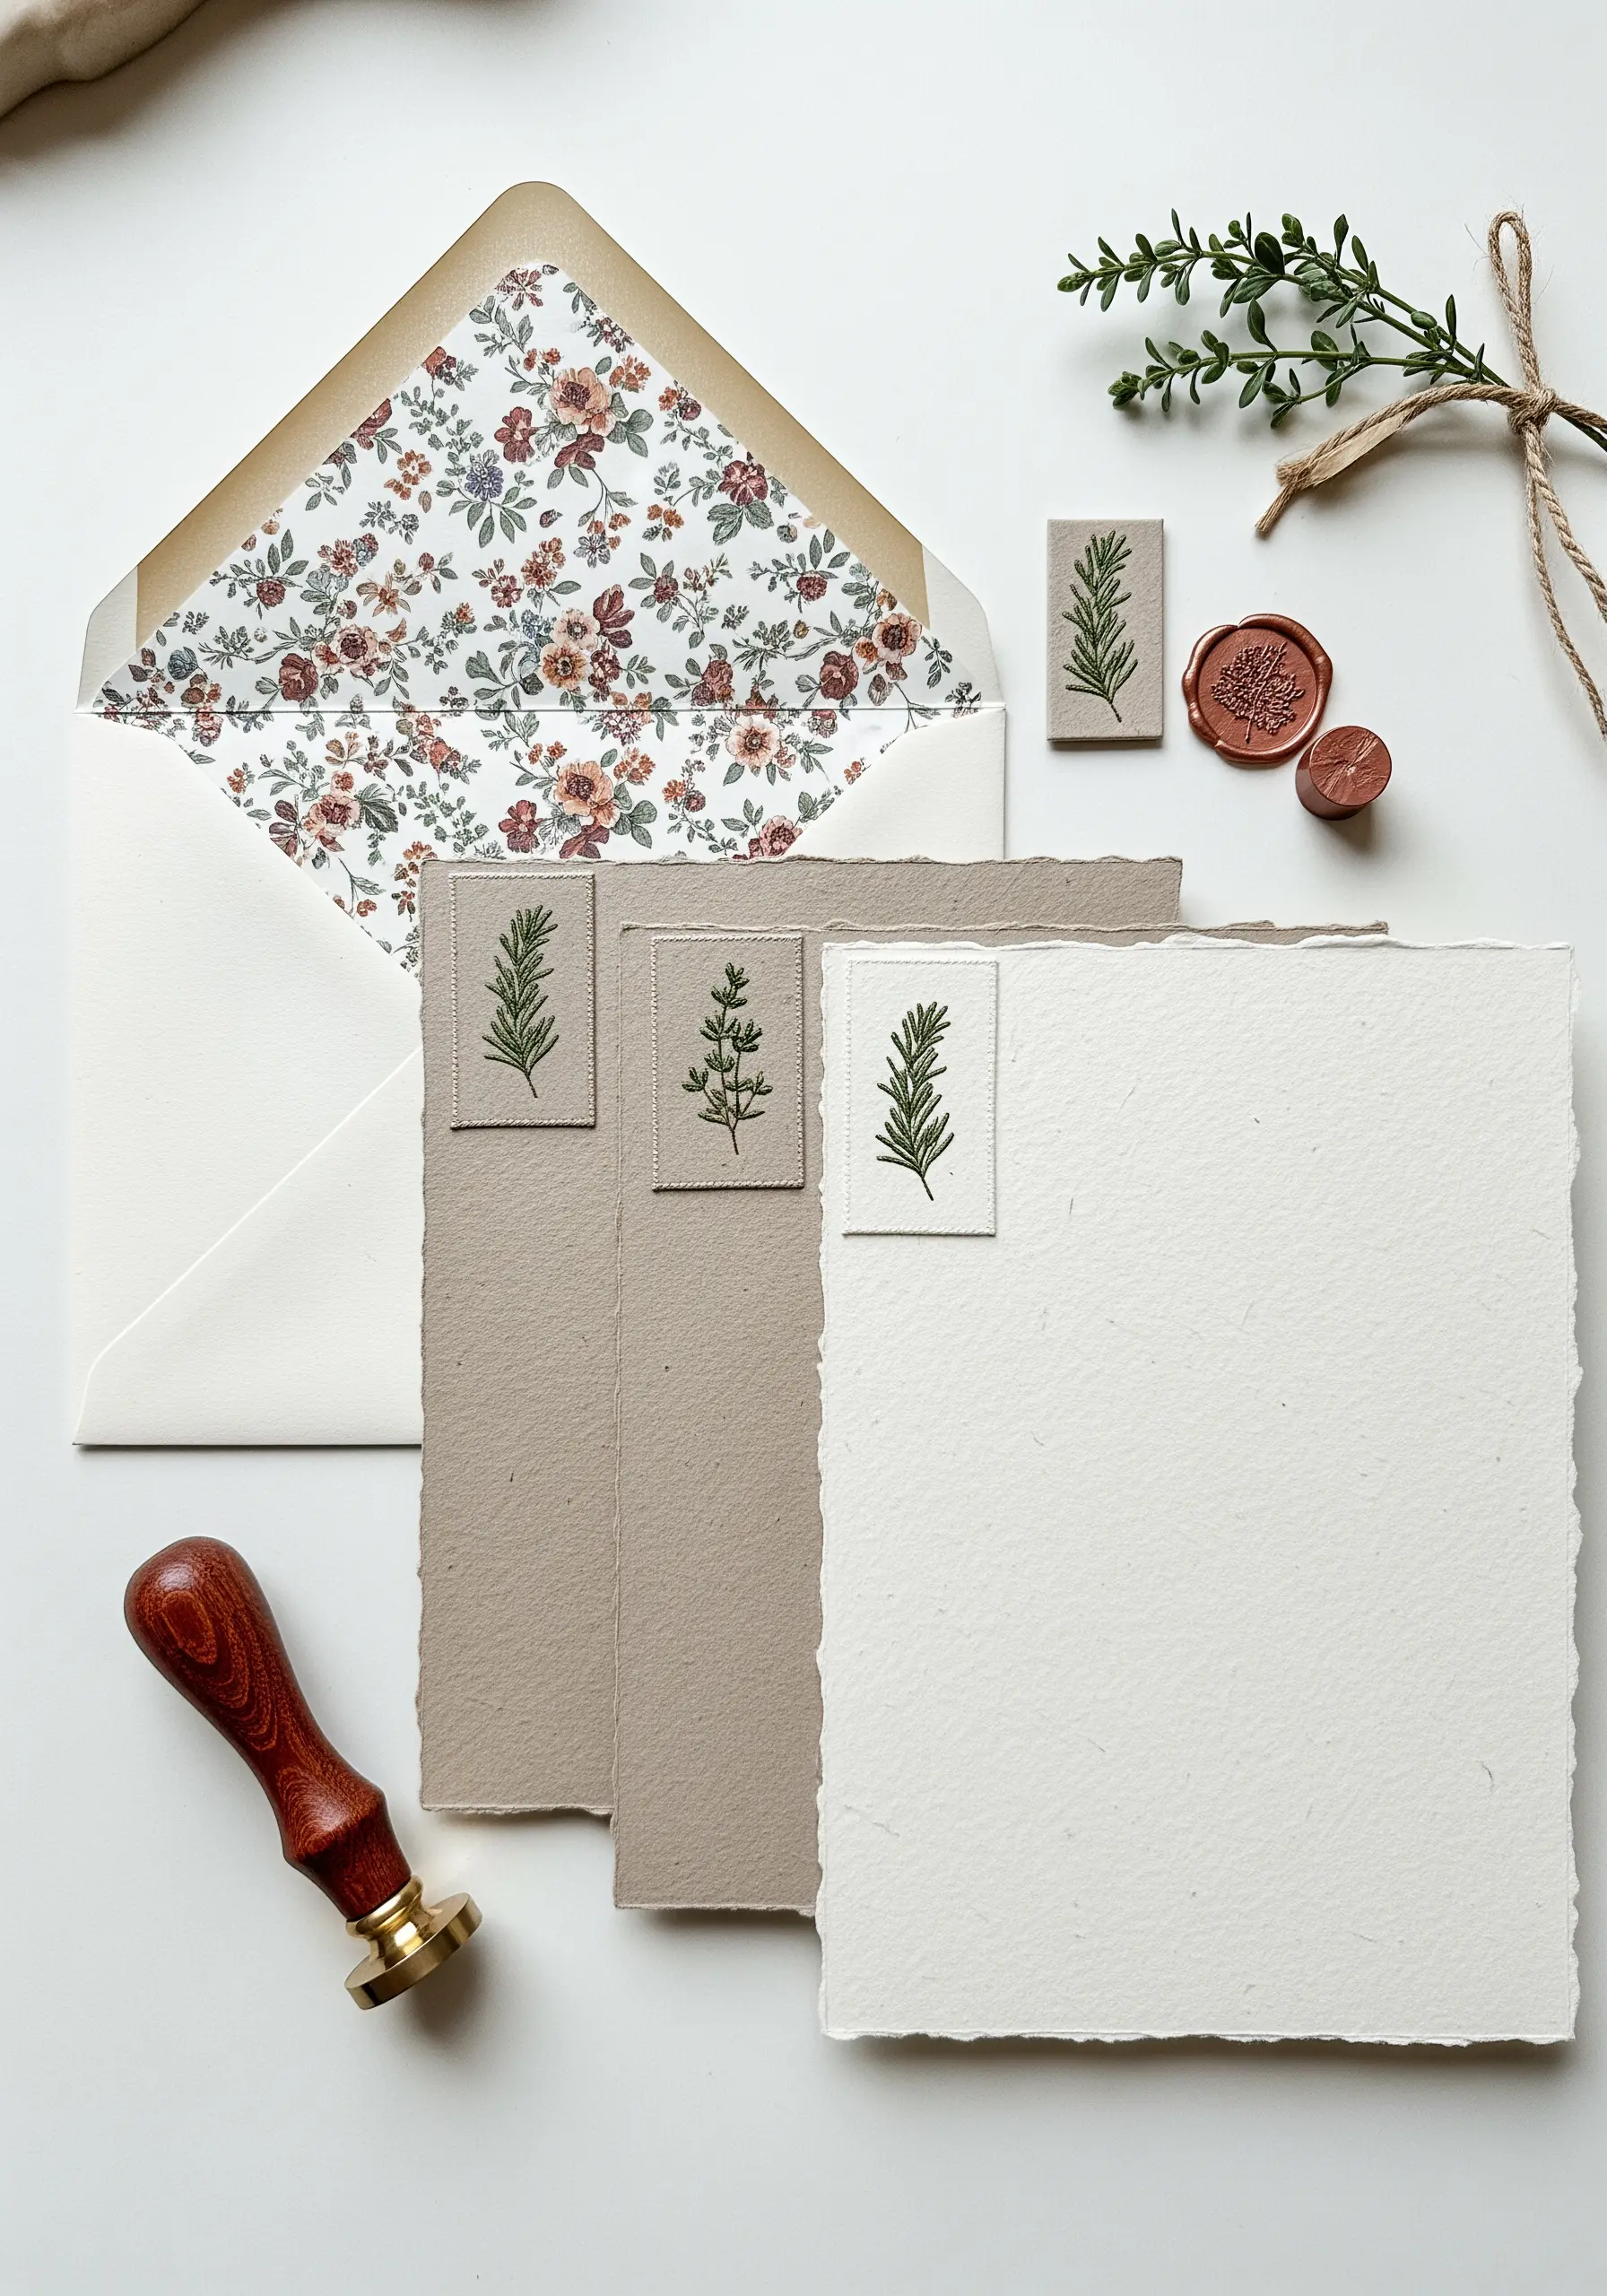
Instead of stitching directly onto your fine stationery, create small embroidered patches on linen or canvas and apply them to the paper.
This method preserves the integrity of the cardstock and adds a beautiful, raised textural element.
Embroider a simple sprig of rosemary or a single leaf, cut it out with a small, frayed border, and affix it with fabric glue.
This layered approach gives your correspondence a luxurious, handcrafted feel that is both seen and felt.
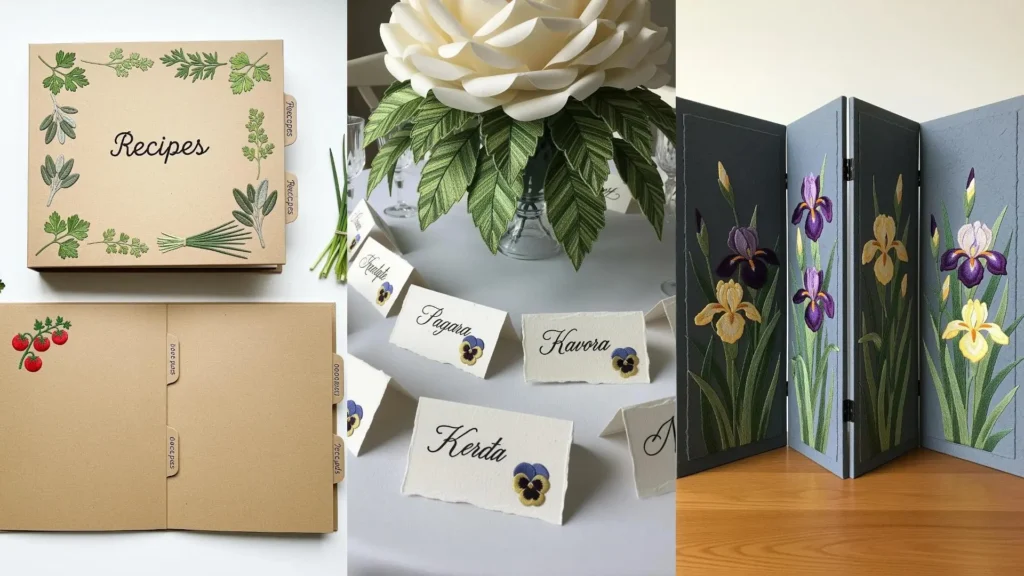
8. Construct an Embroidered Folding Screen

Transform your embroidery from simple hoop art into a functional, decorative object by creating a miniature folding screen.
Stitch your floral designs onto fabric panels, then carefully mount them onto sturdy cardstock or thin basswood boards.
Use small craft hinges or bookbinding tape to connect the panels, creating a freestanding piece of art perfect for a bookshelf or mantel.
This method allows you to display a series of related designs together, telling a cohesive botanical story.
9. Build a Diorama with an Embroidered Focal Point
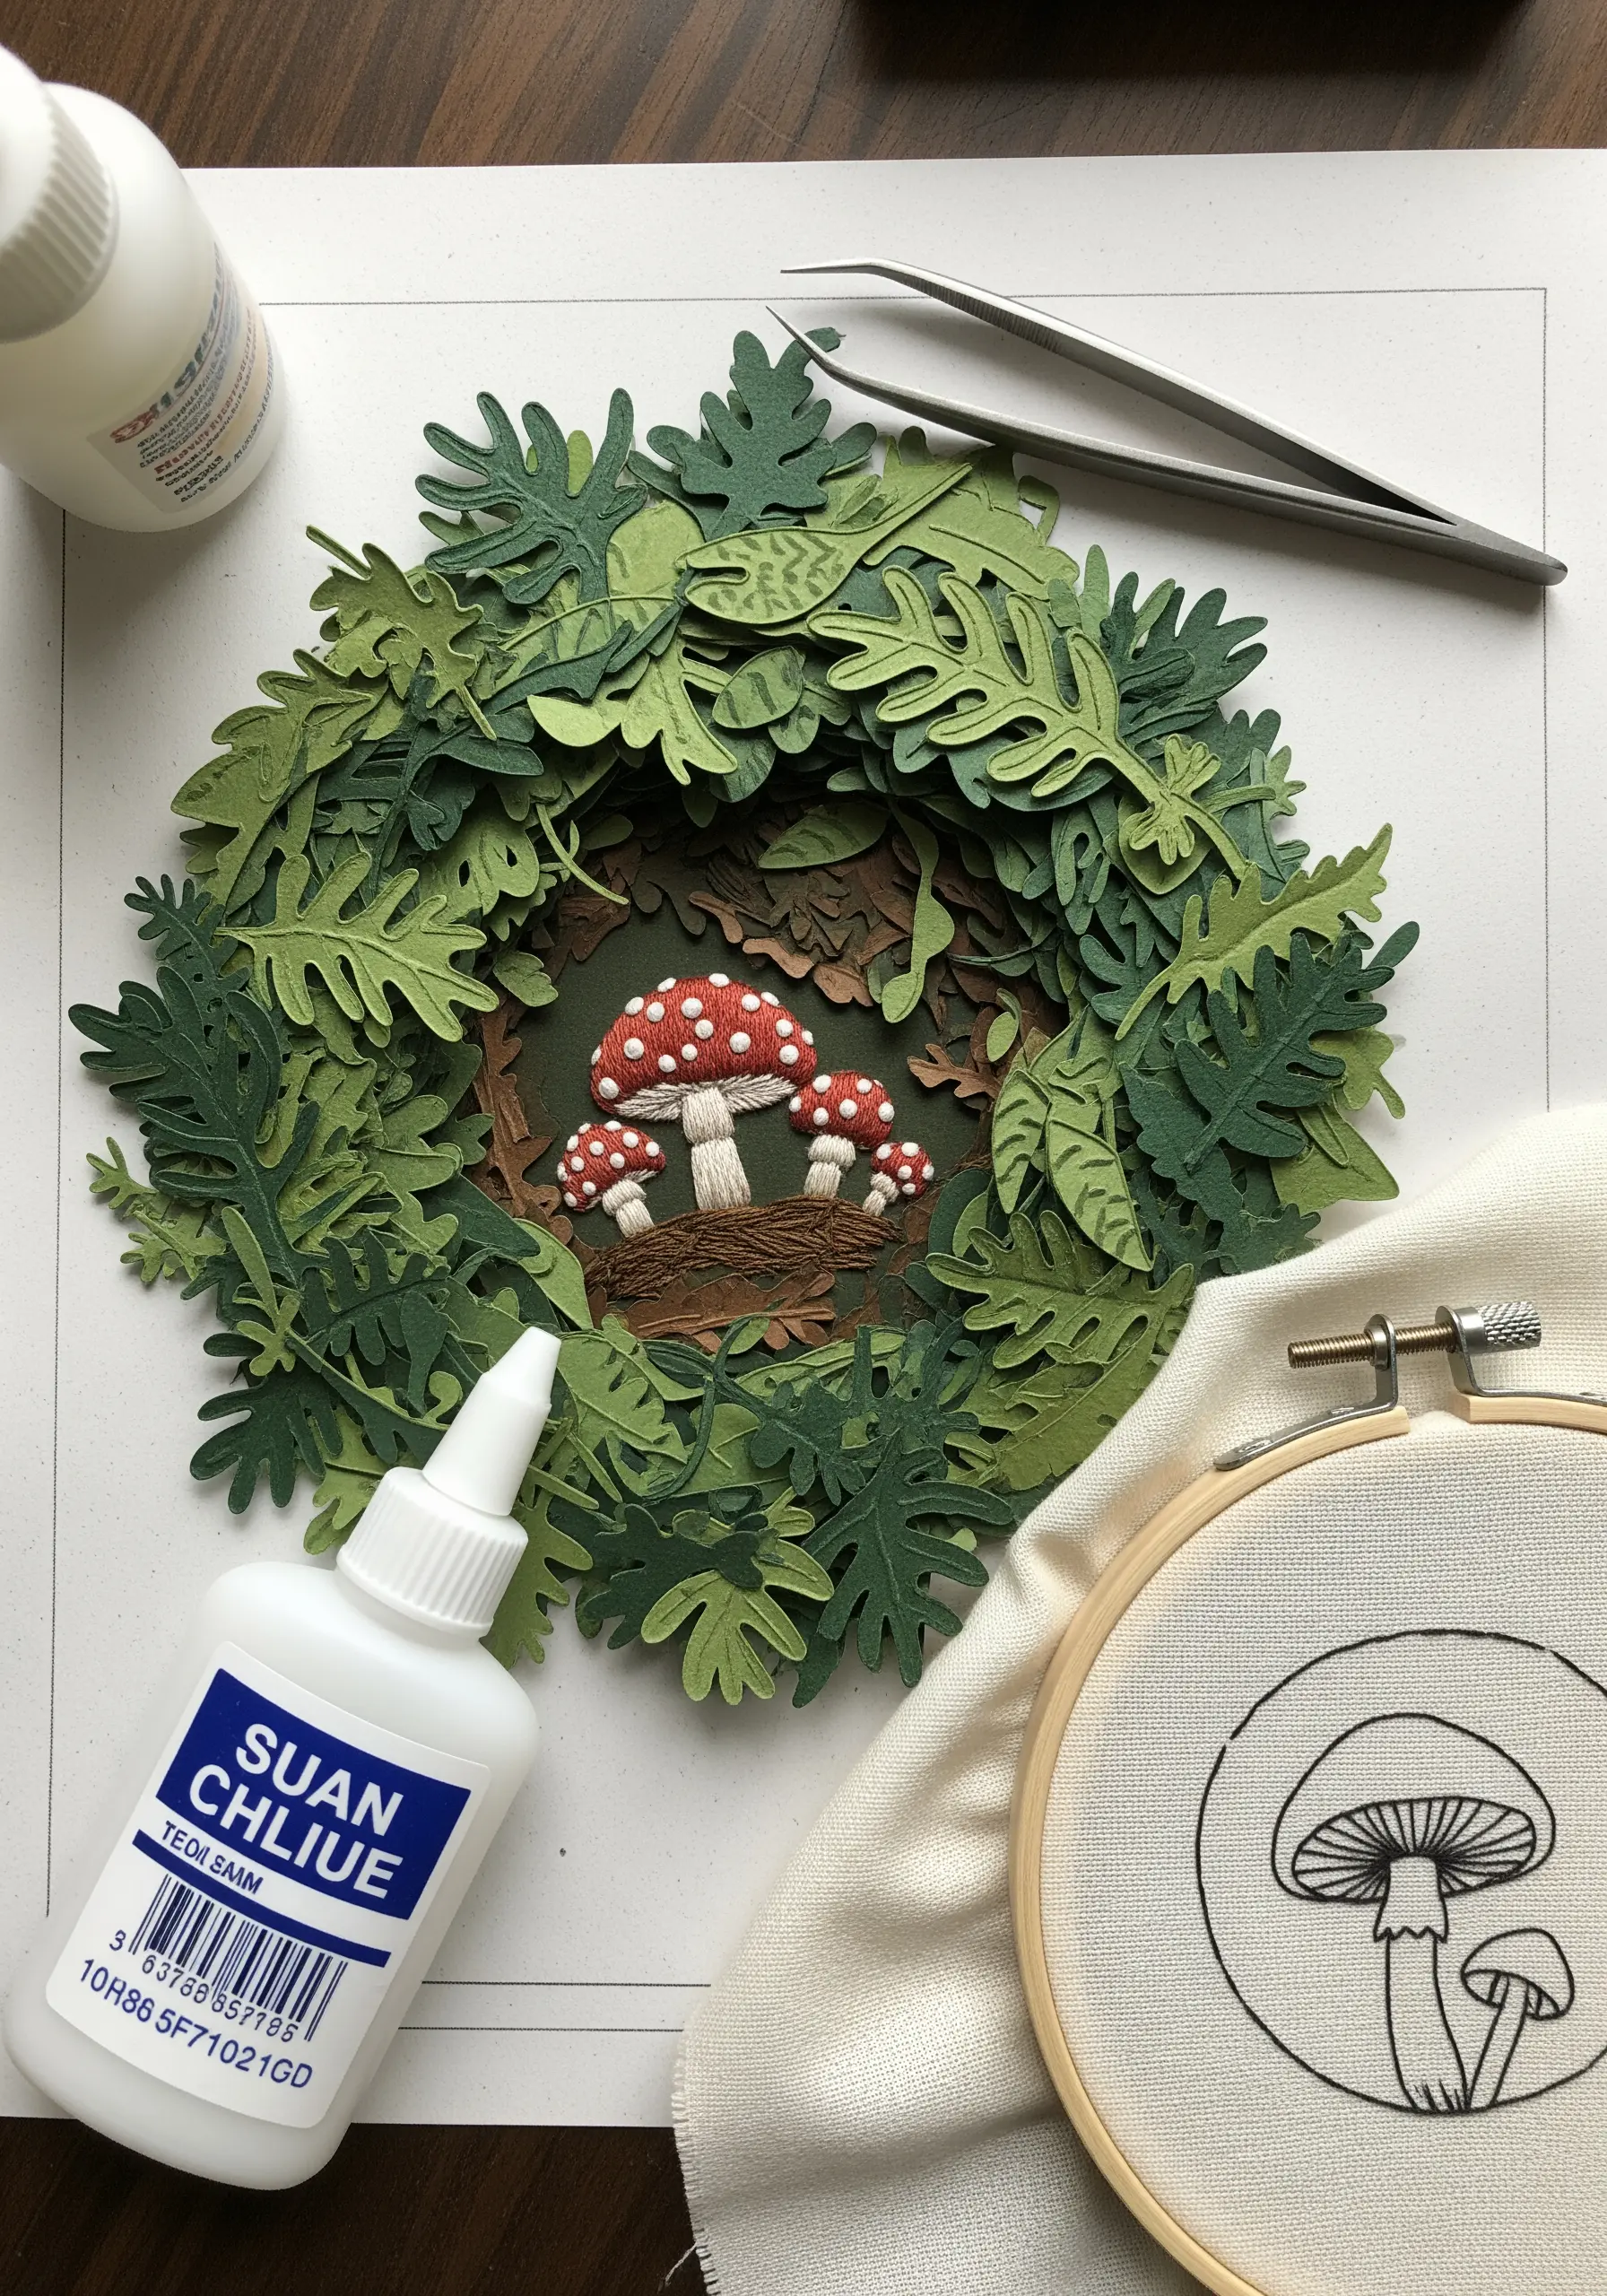
Create a captivating sense of depth by building a diorama with layered paper-cut elements that frame a central embroidered piece.
Use various shades of green cardstock to cut leaf and fern shapes, arranging them in layers to create a forest-like scene.
In the center, feature a small, richly textured embroidery—like these mushrooms stitched with French knots and satin stitch—to serve as the focal point.
The contrast between the flat paper and the three-dimensional thread creates a magical, immersive world in miniature.
10. Craft Heirloom-Quality Embroidered Bookmarks
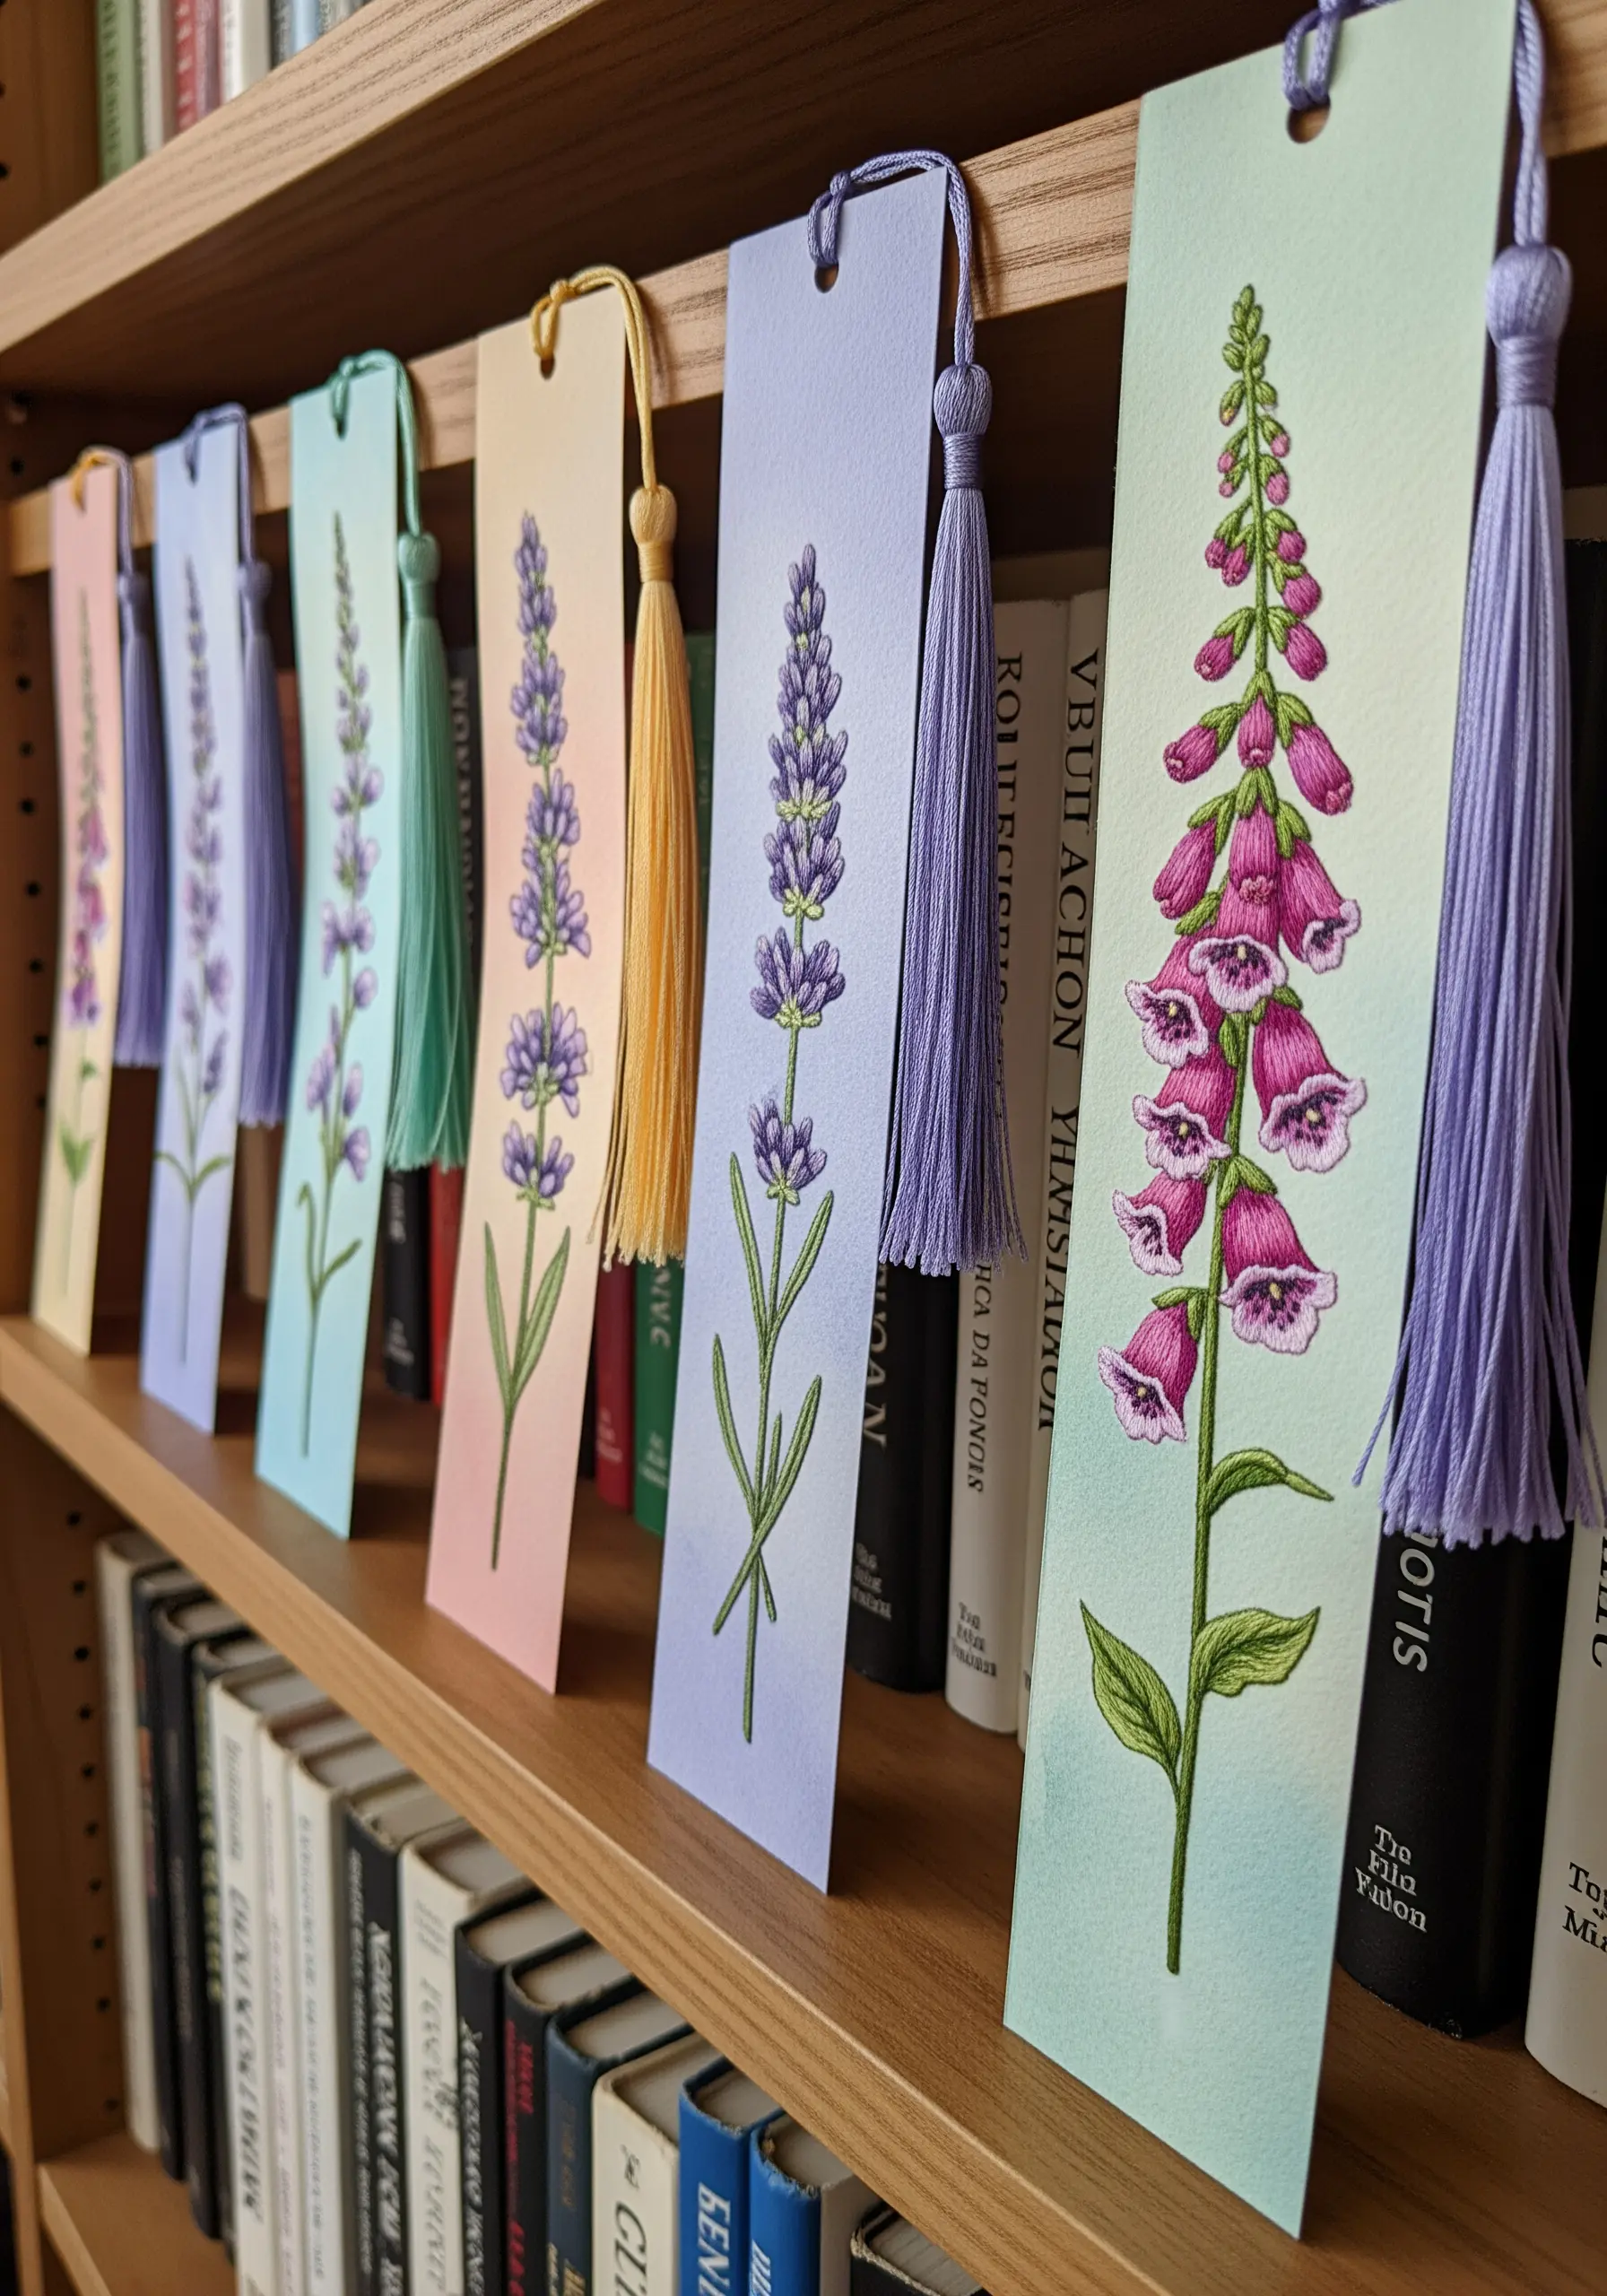
Create durable and beautiful bookmarks by stitching floral motifs directly onto heavy-weight watercolor paper.
Use just two or three strands of floss to maintain delicate detail without stressing the paper.
For a fully integrated design, create a custom tassel using the same floss colors featured in your embroidered flower.
These make for beautiful and functional easy DIY embroidered mixed media bookmarks you’ll love to gift or keep.
11. Fashion a Seasonal Garland with Stitched Medallions
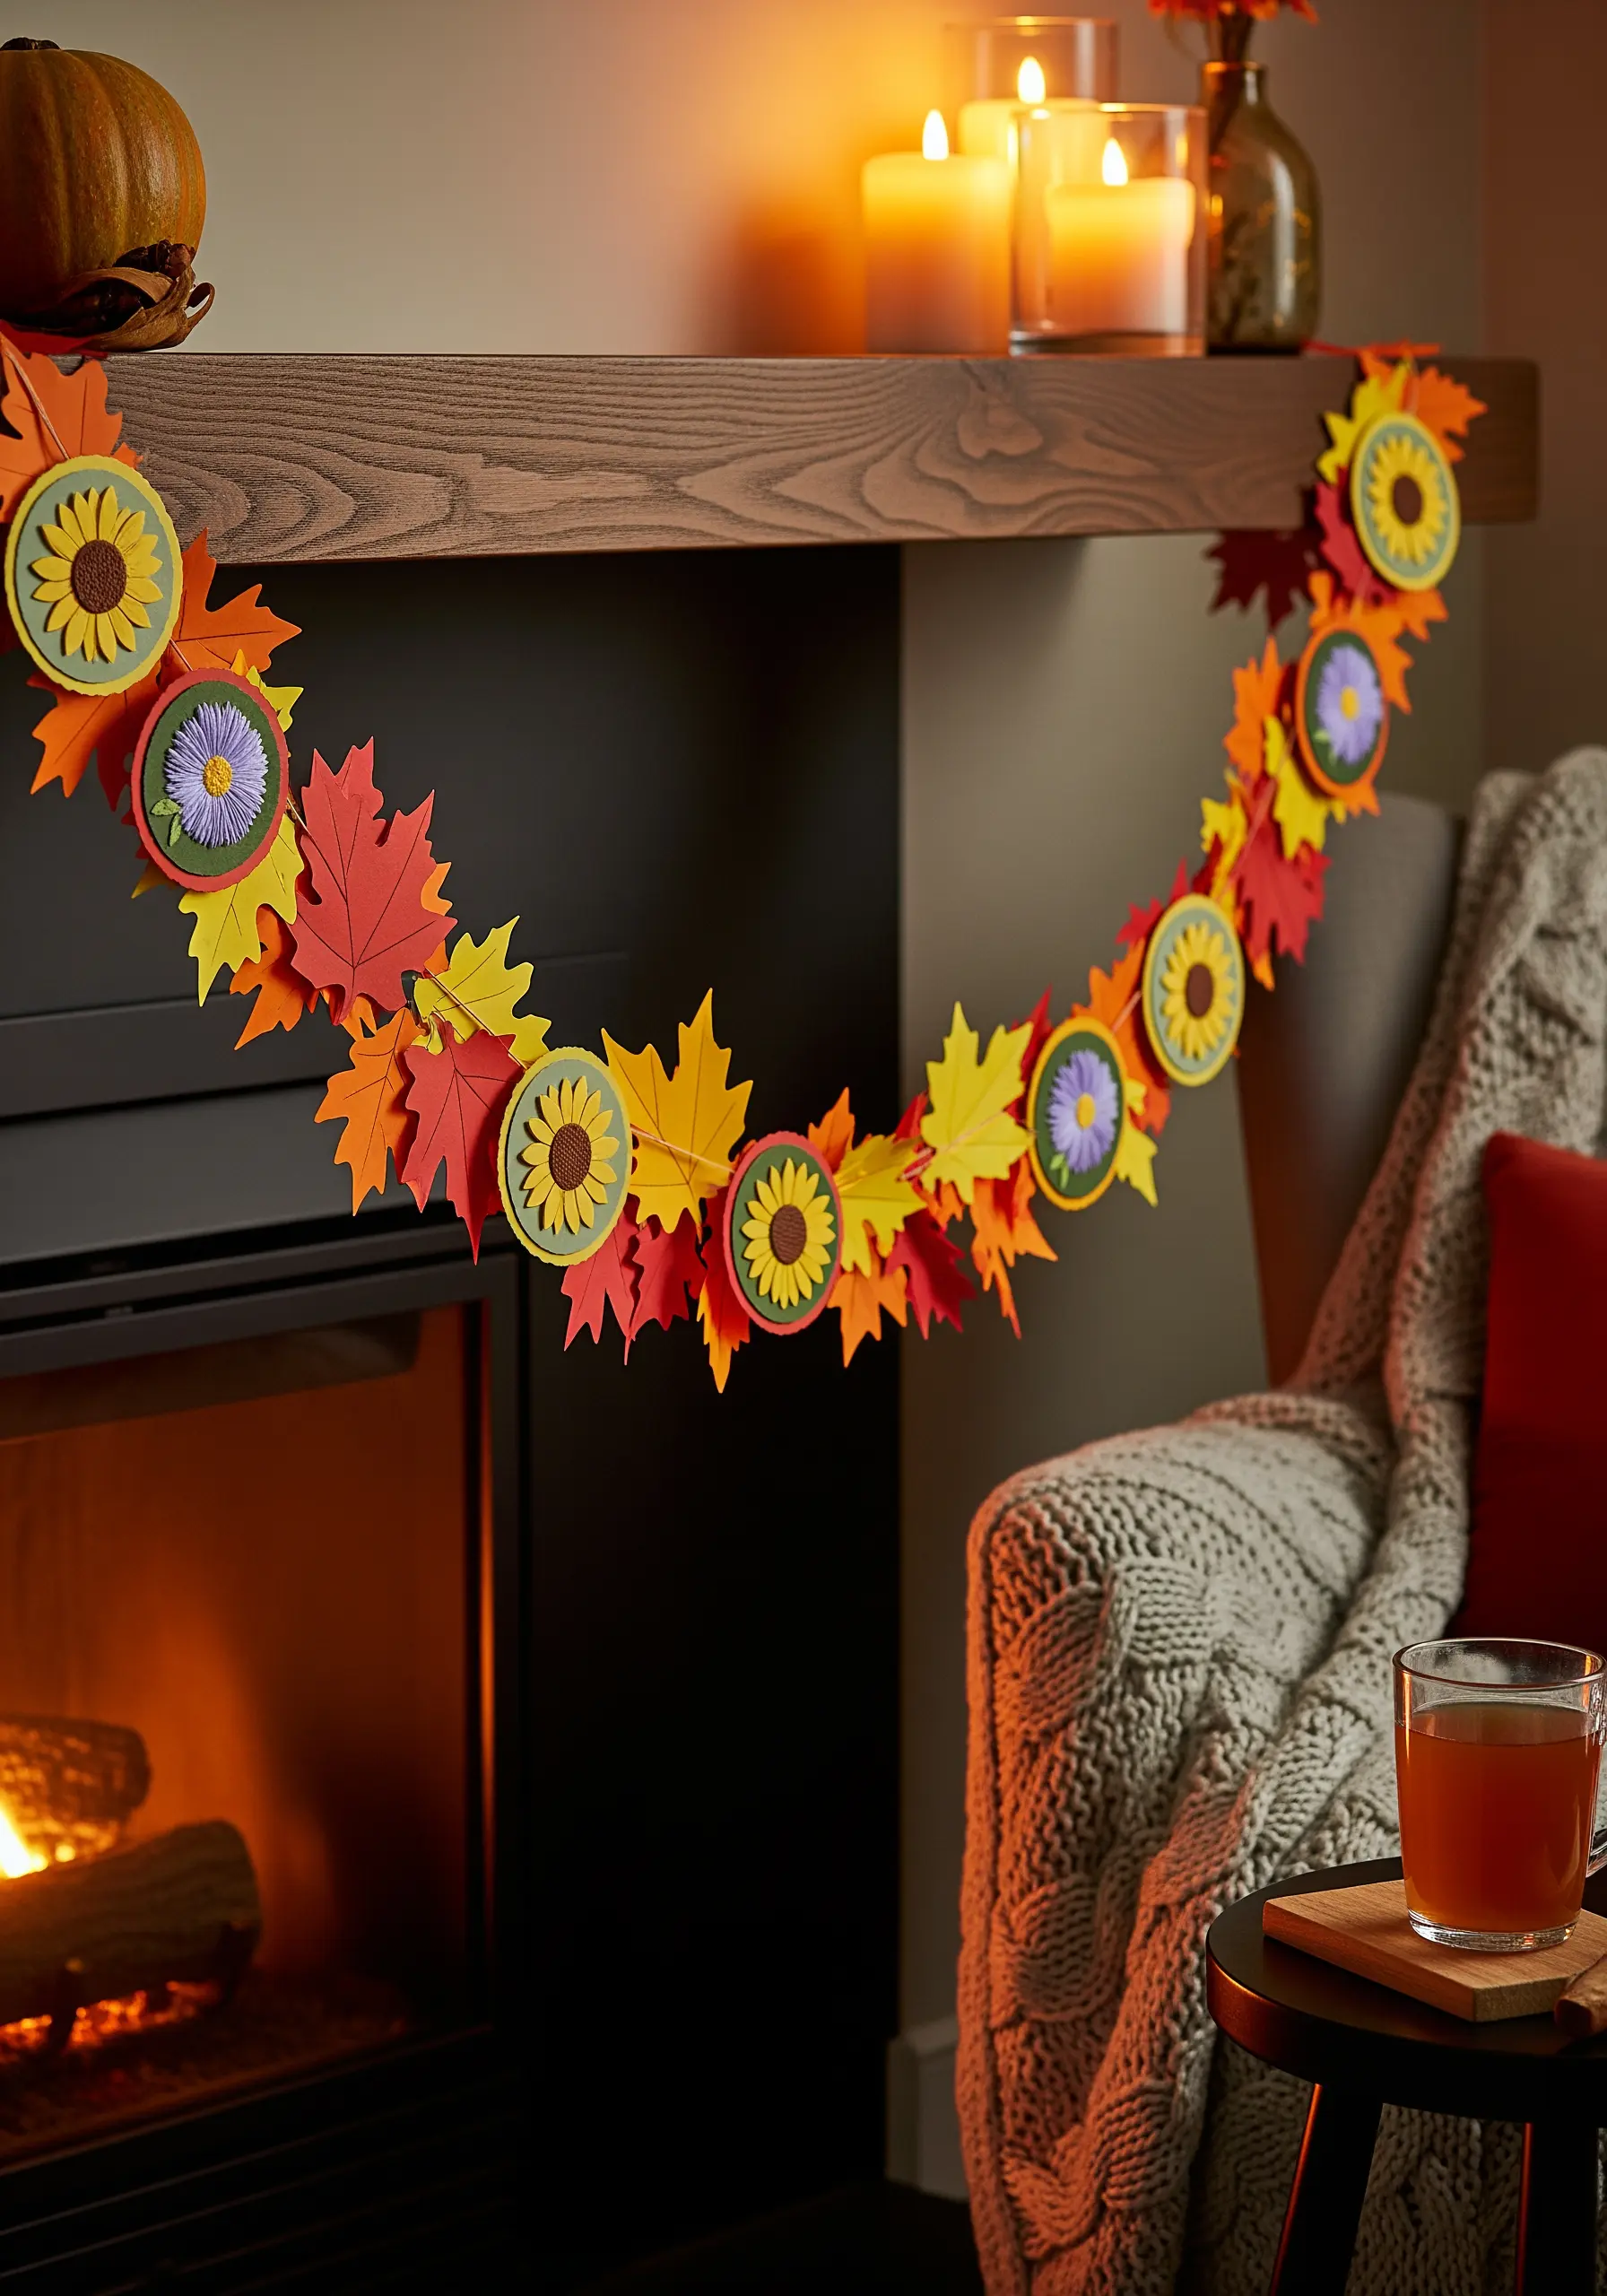
Combine papercraft and embroidery to create a festive garland with wonderful texture and dimension.
Embroider floral motifs onto felt or linen, cut them into circles, and mount them on scalloped paper backings.
Alternate these stitched medallions with colorful paper-cut leaves along a single length of twine.
This mixed-media approach results in a dynamic, tactile decoration that feels both rustic and refined.
12. Weave Geometric Patterns on Paper Coasters
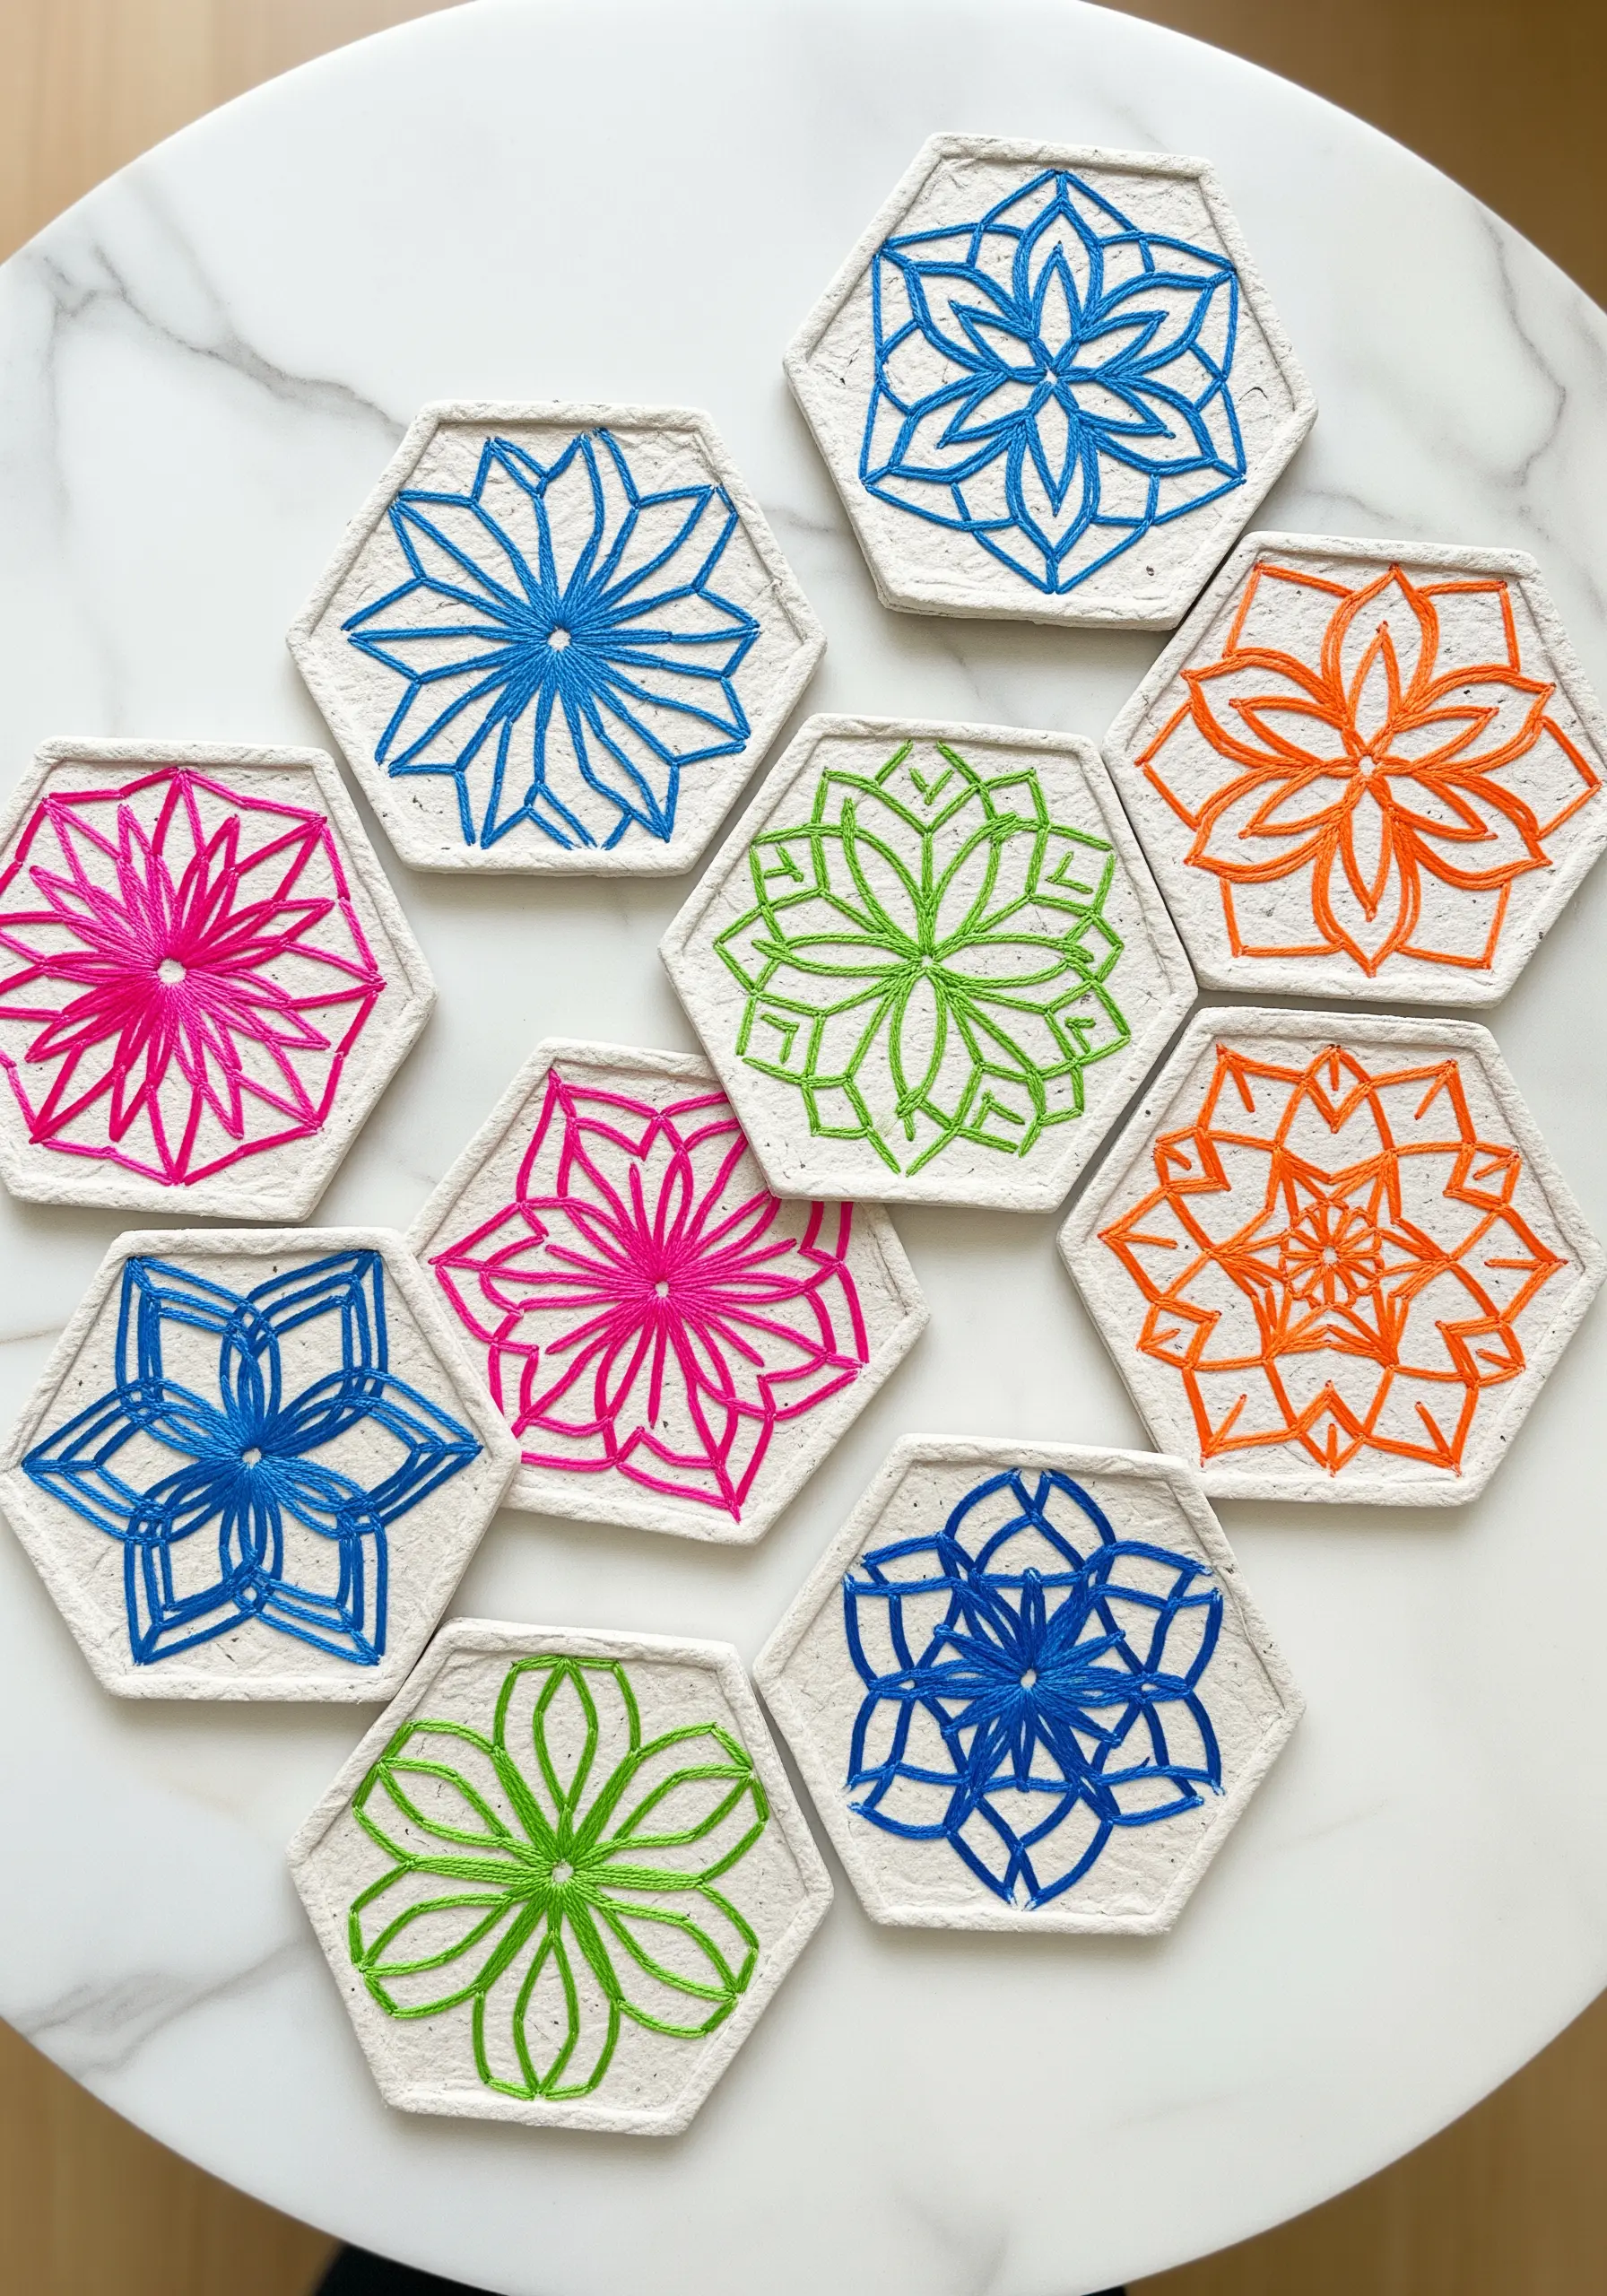
Explore a different kind of needlework by creating string art on sturdy paper-pulp coasters.
First, punch a series of evenly spaced holes around the perimeter of the coaster and in a pattern toward the center.
Then, weave embroidery floss between the holes to build geometric, mandala-like floral designs.
The technique is methodical and relaxing, and a coat of waterproof sealant can make these art objects functional.
13. Design Layered Pendants with Micro-Embroidery
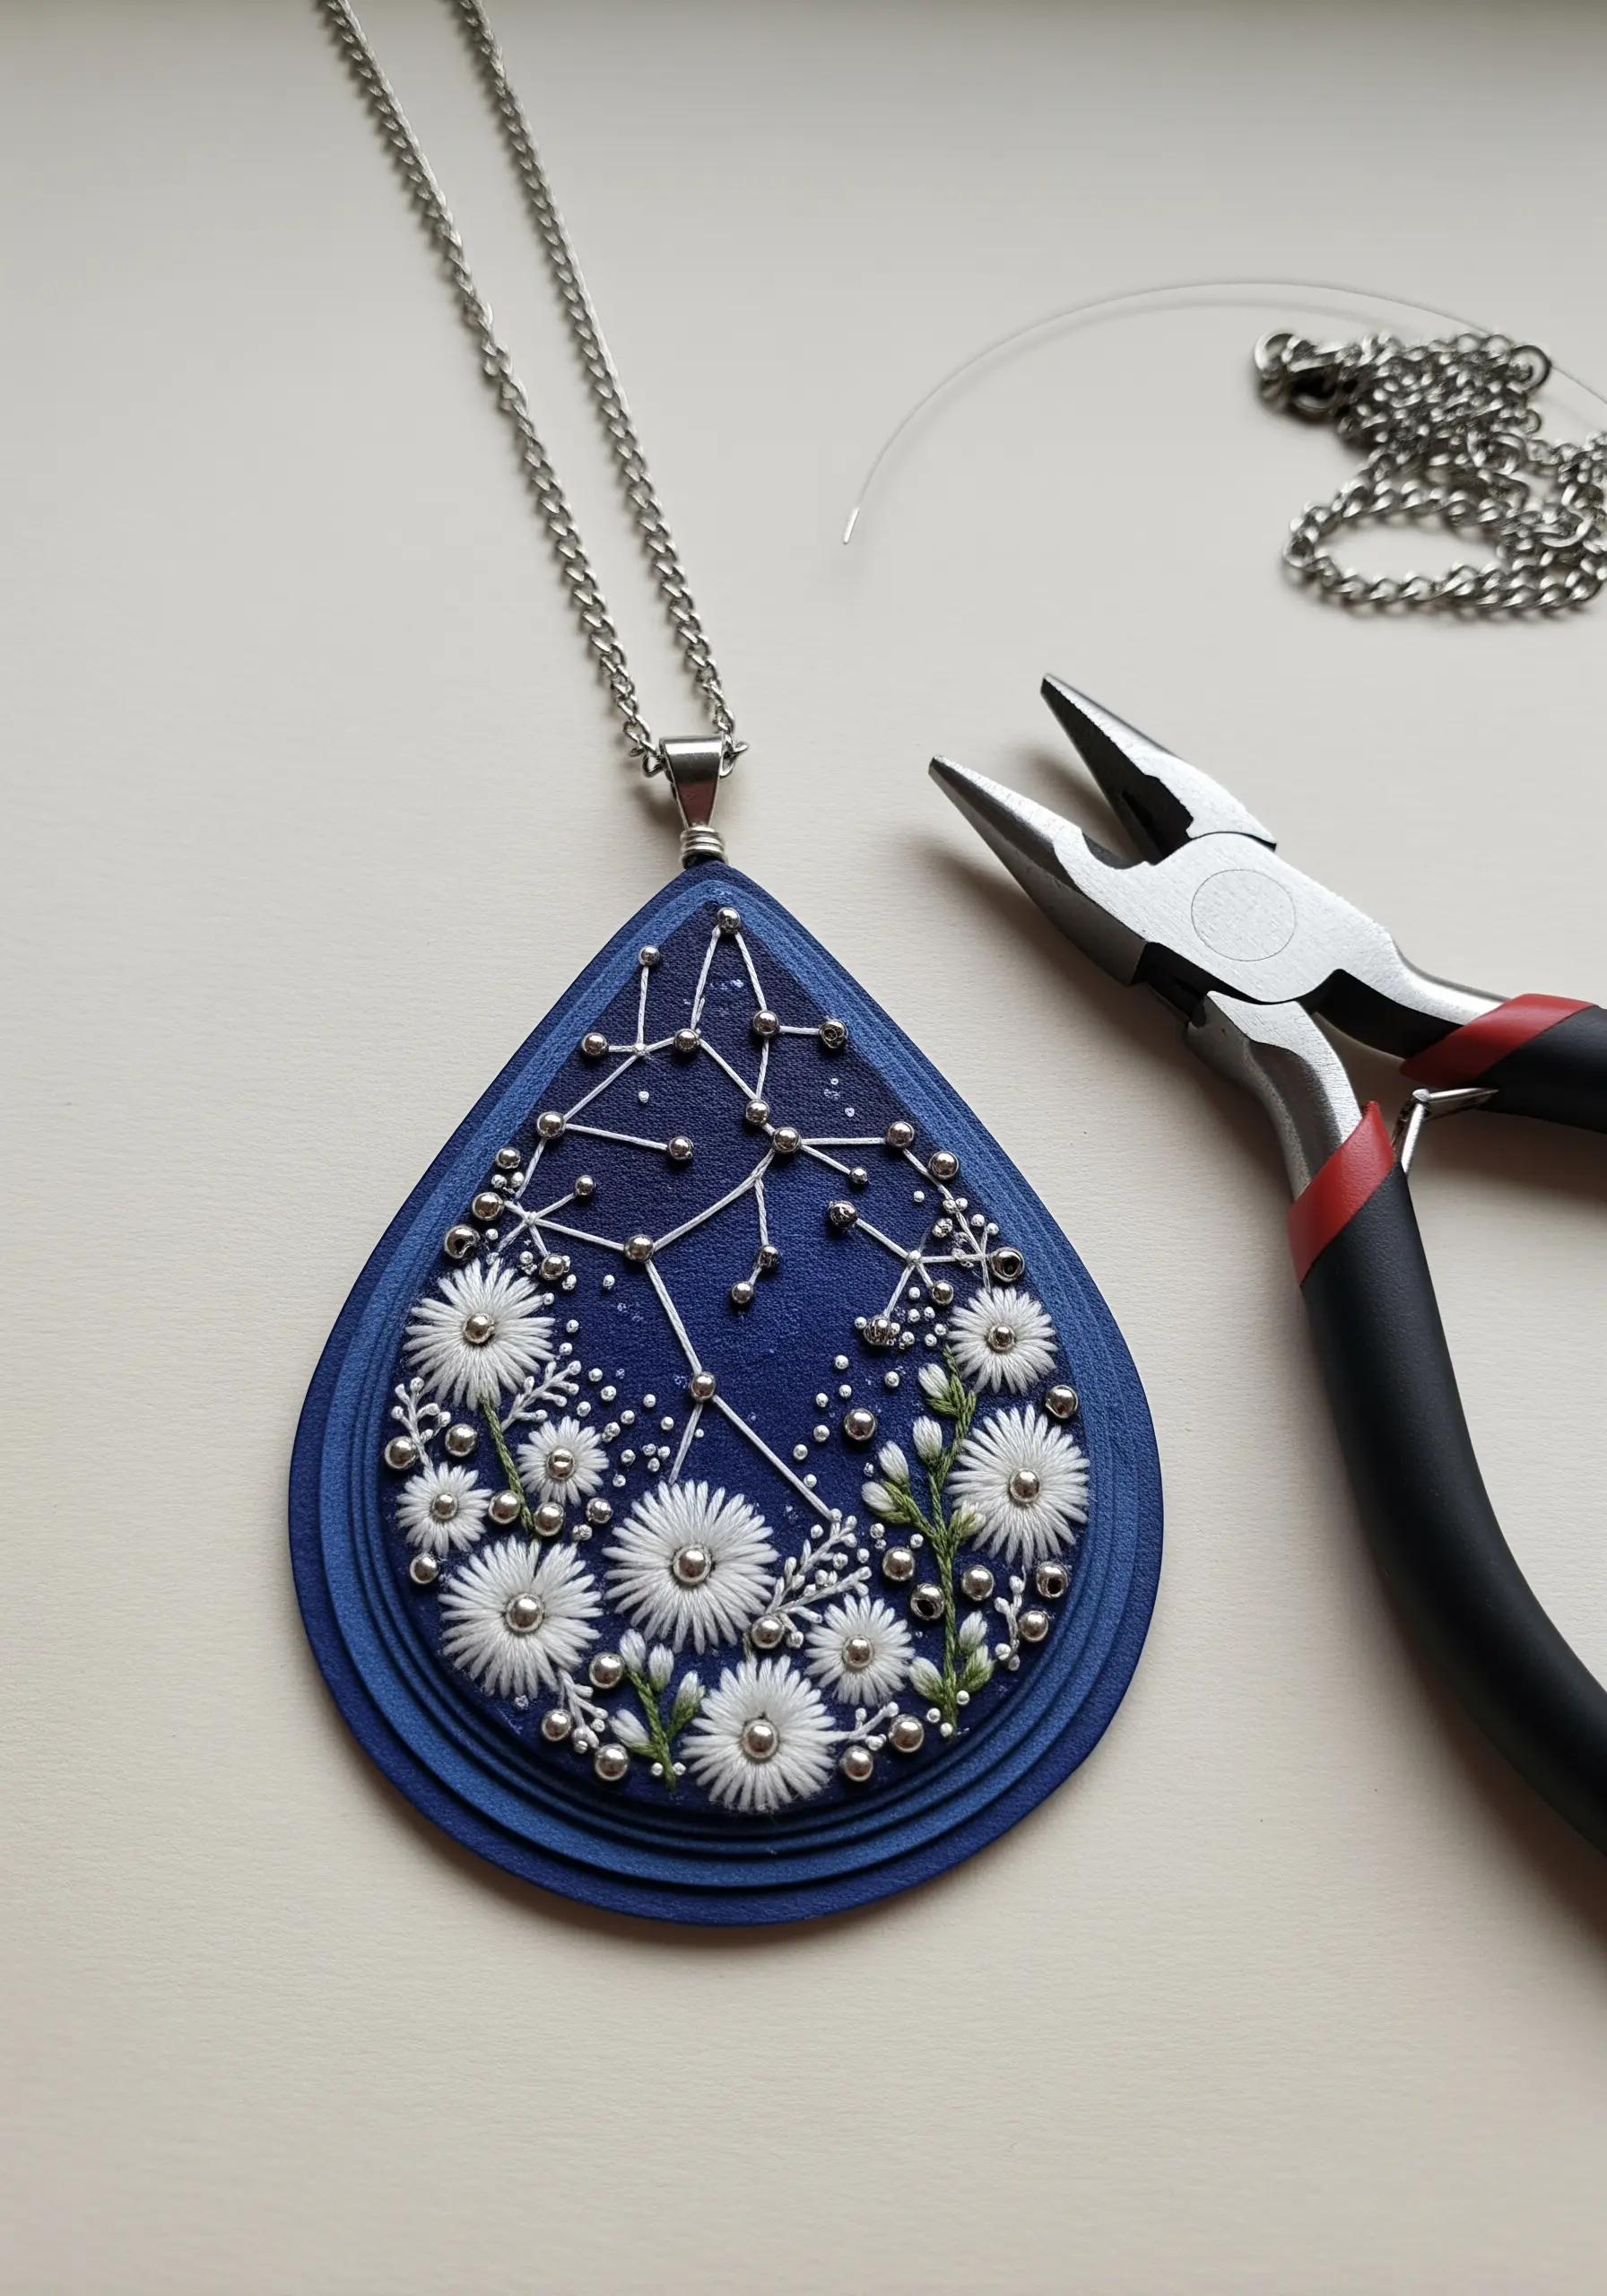
Create stunning, wearable art by framing miniature embroidery inside layered paper pendants.
Cut multiple identical teardrop shapes from heavy cardstock. On the bottom layer, stitch a celestial scene, incorporating tiny metallic beads for stars and abstract micro-embroidery designs for flowers.
Glue the top layers, each with a slightly smaller cutout, over the base to create a beveled frame that adds depth and protects the delicate stitches.
14. Personalize a Binder with Embroidered Herbs
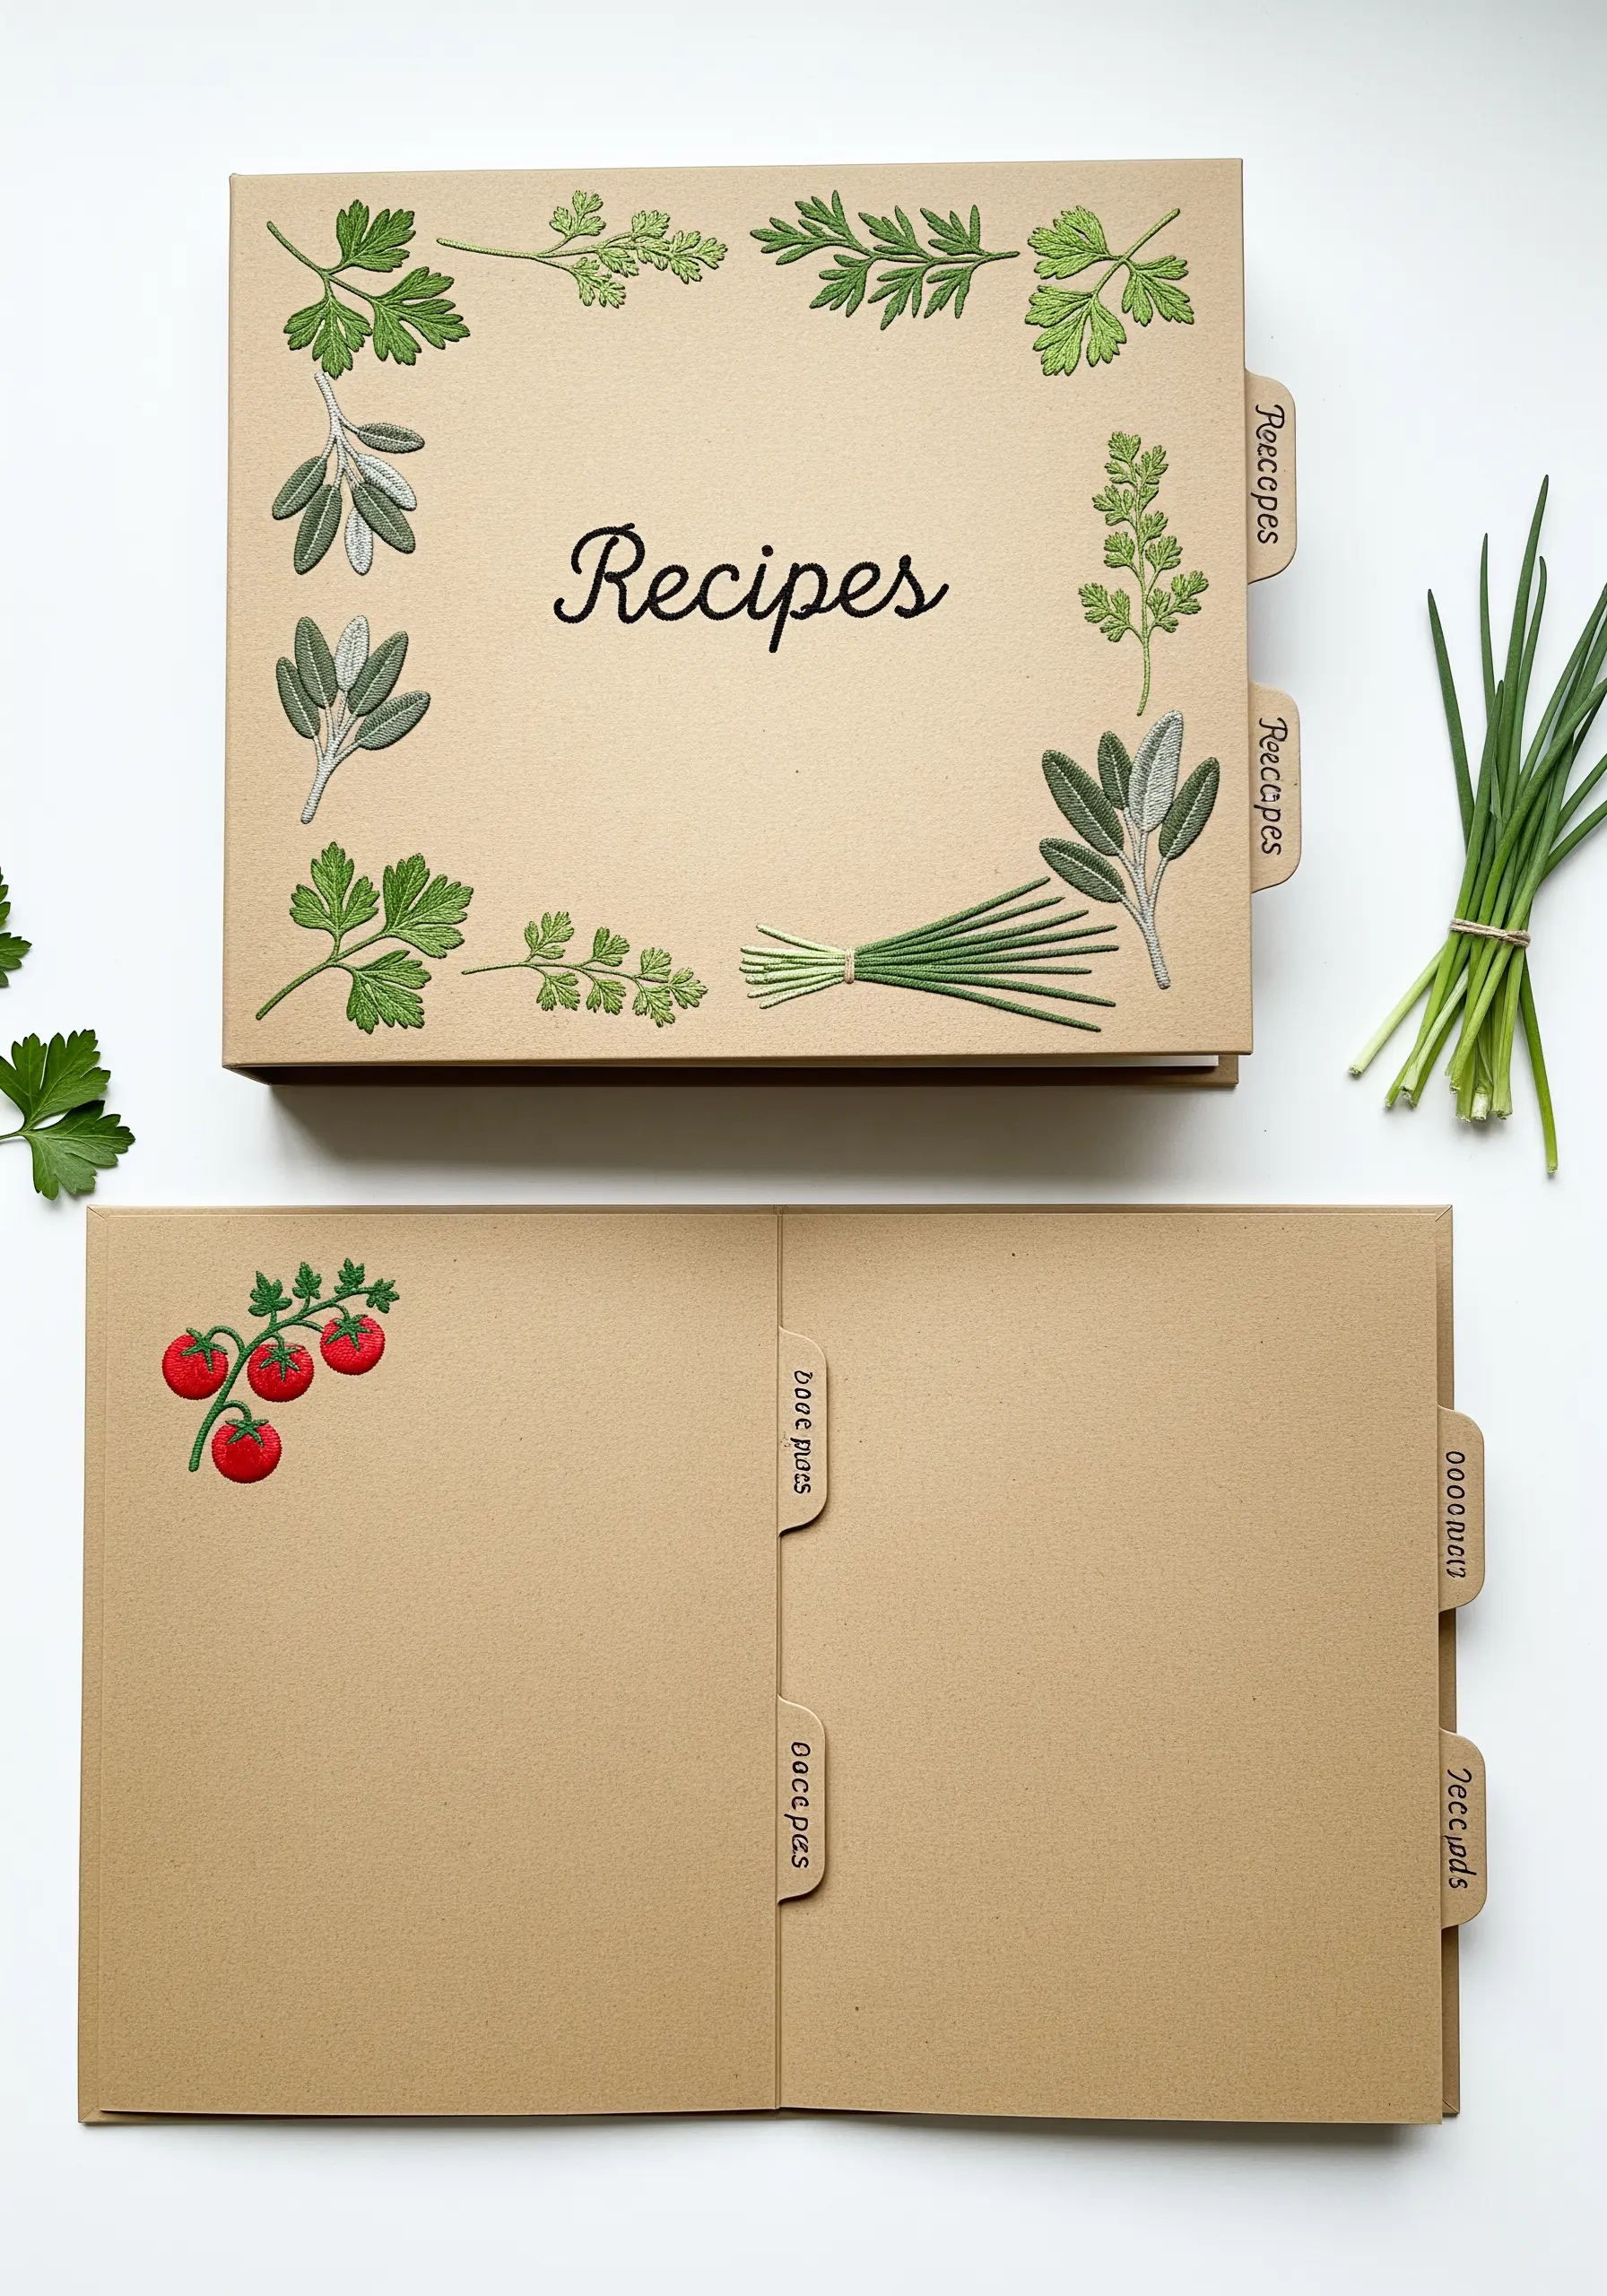
Transform a simple kraft paper recipe binder into a cherished heirloom by stitching directly onto the cover.
Lightly sketch a botanical border, then use foundational stitches like stem stitch for outlines and small satin stitches for leaves.
Punching the holes with a sharp needle before stitching will give you the cleanest result on a paper surface.
This thoughtful detail elevates a practical object into a piece of personalized art for the heart of the home.
15. Create Elegant Place Cards with a Floral Touch
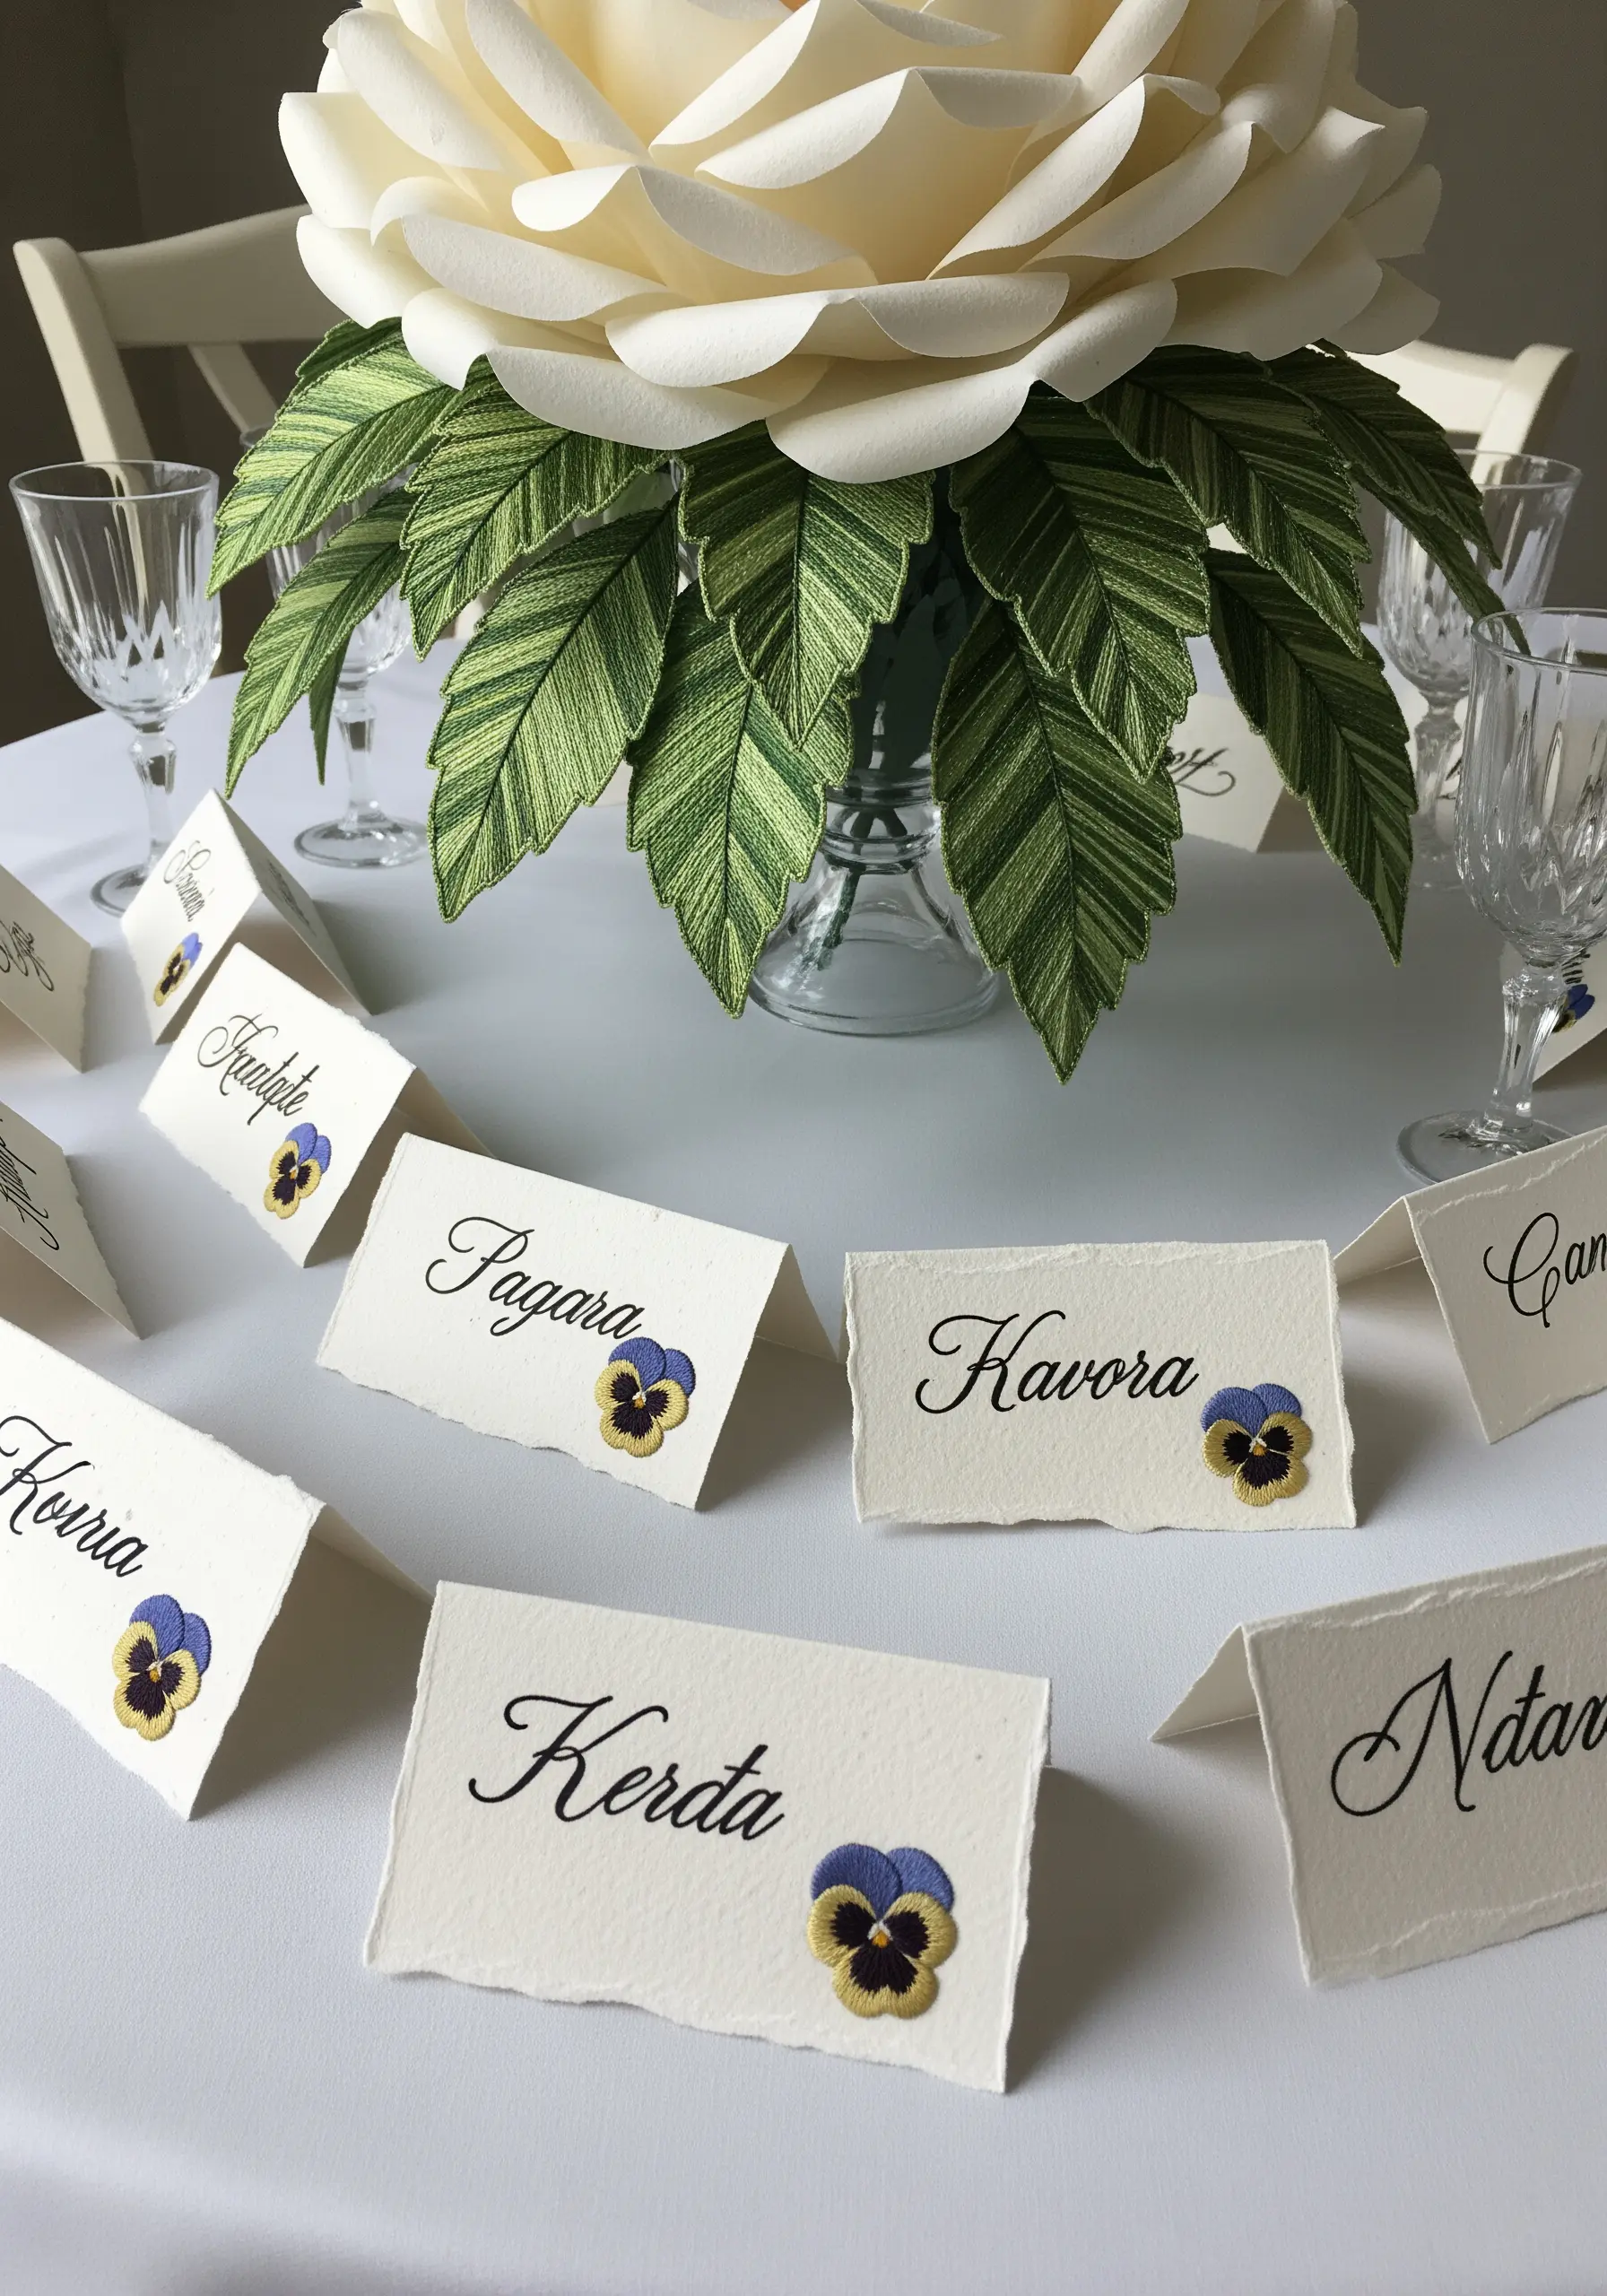
For an event your guests won’t forget, add a tiny, hand-stitched detail to each place card.
Choose a thick, textured paper with a high cotton content, which is more forgiving to a needle and thread.
A single pansy, stitched with just a few carefully placed satin stitches and French knots, adds a touch of bespoke luxury.
It’s an intimate detail that signals care and elevates the entire tablescape.
16. Illustrate a Story with an Embroidered Map
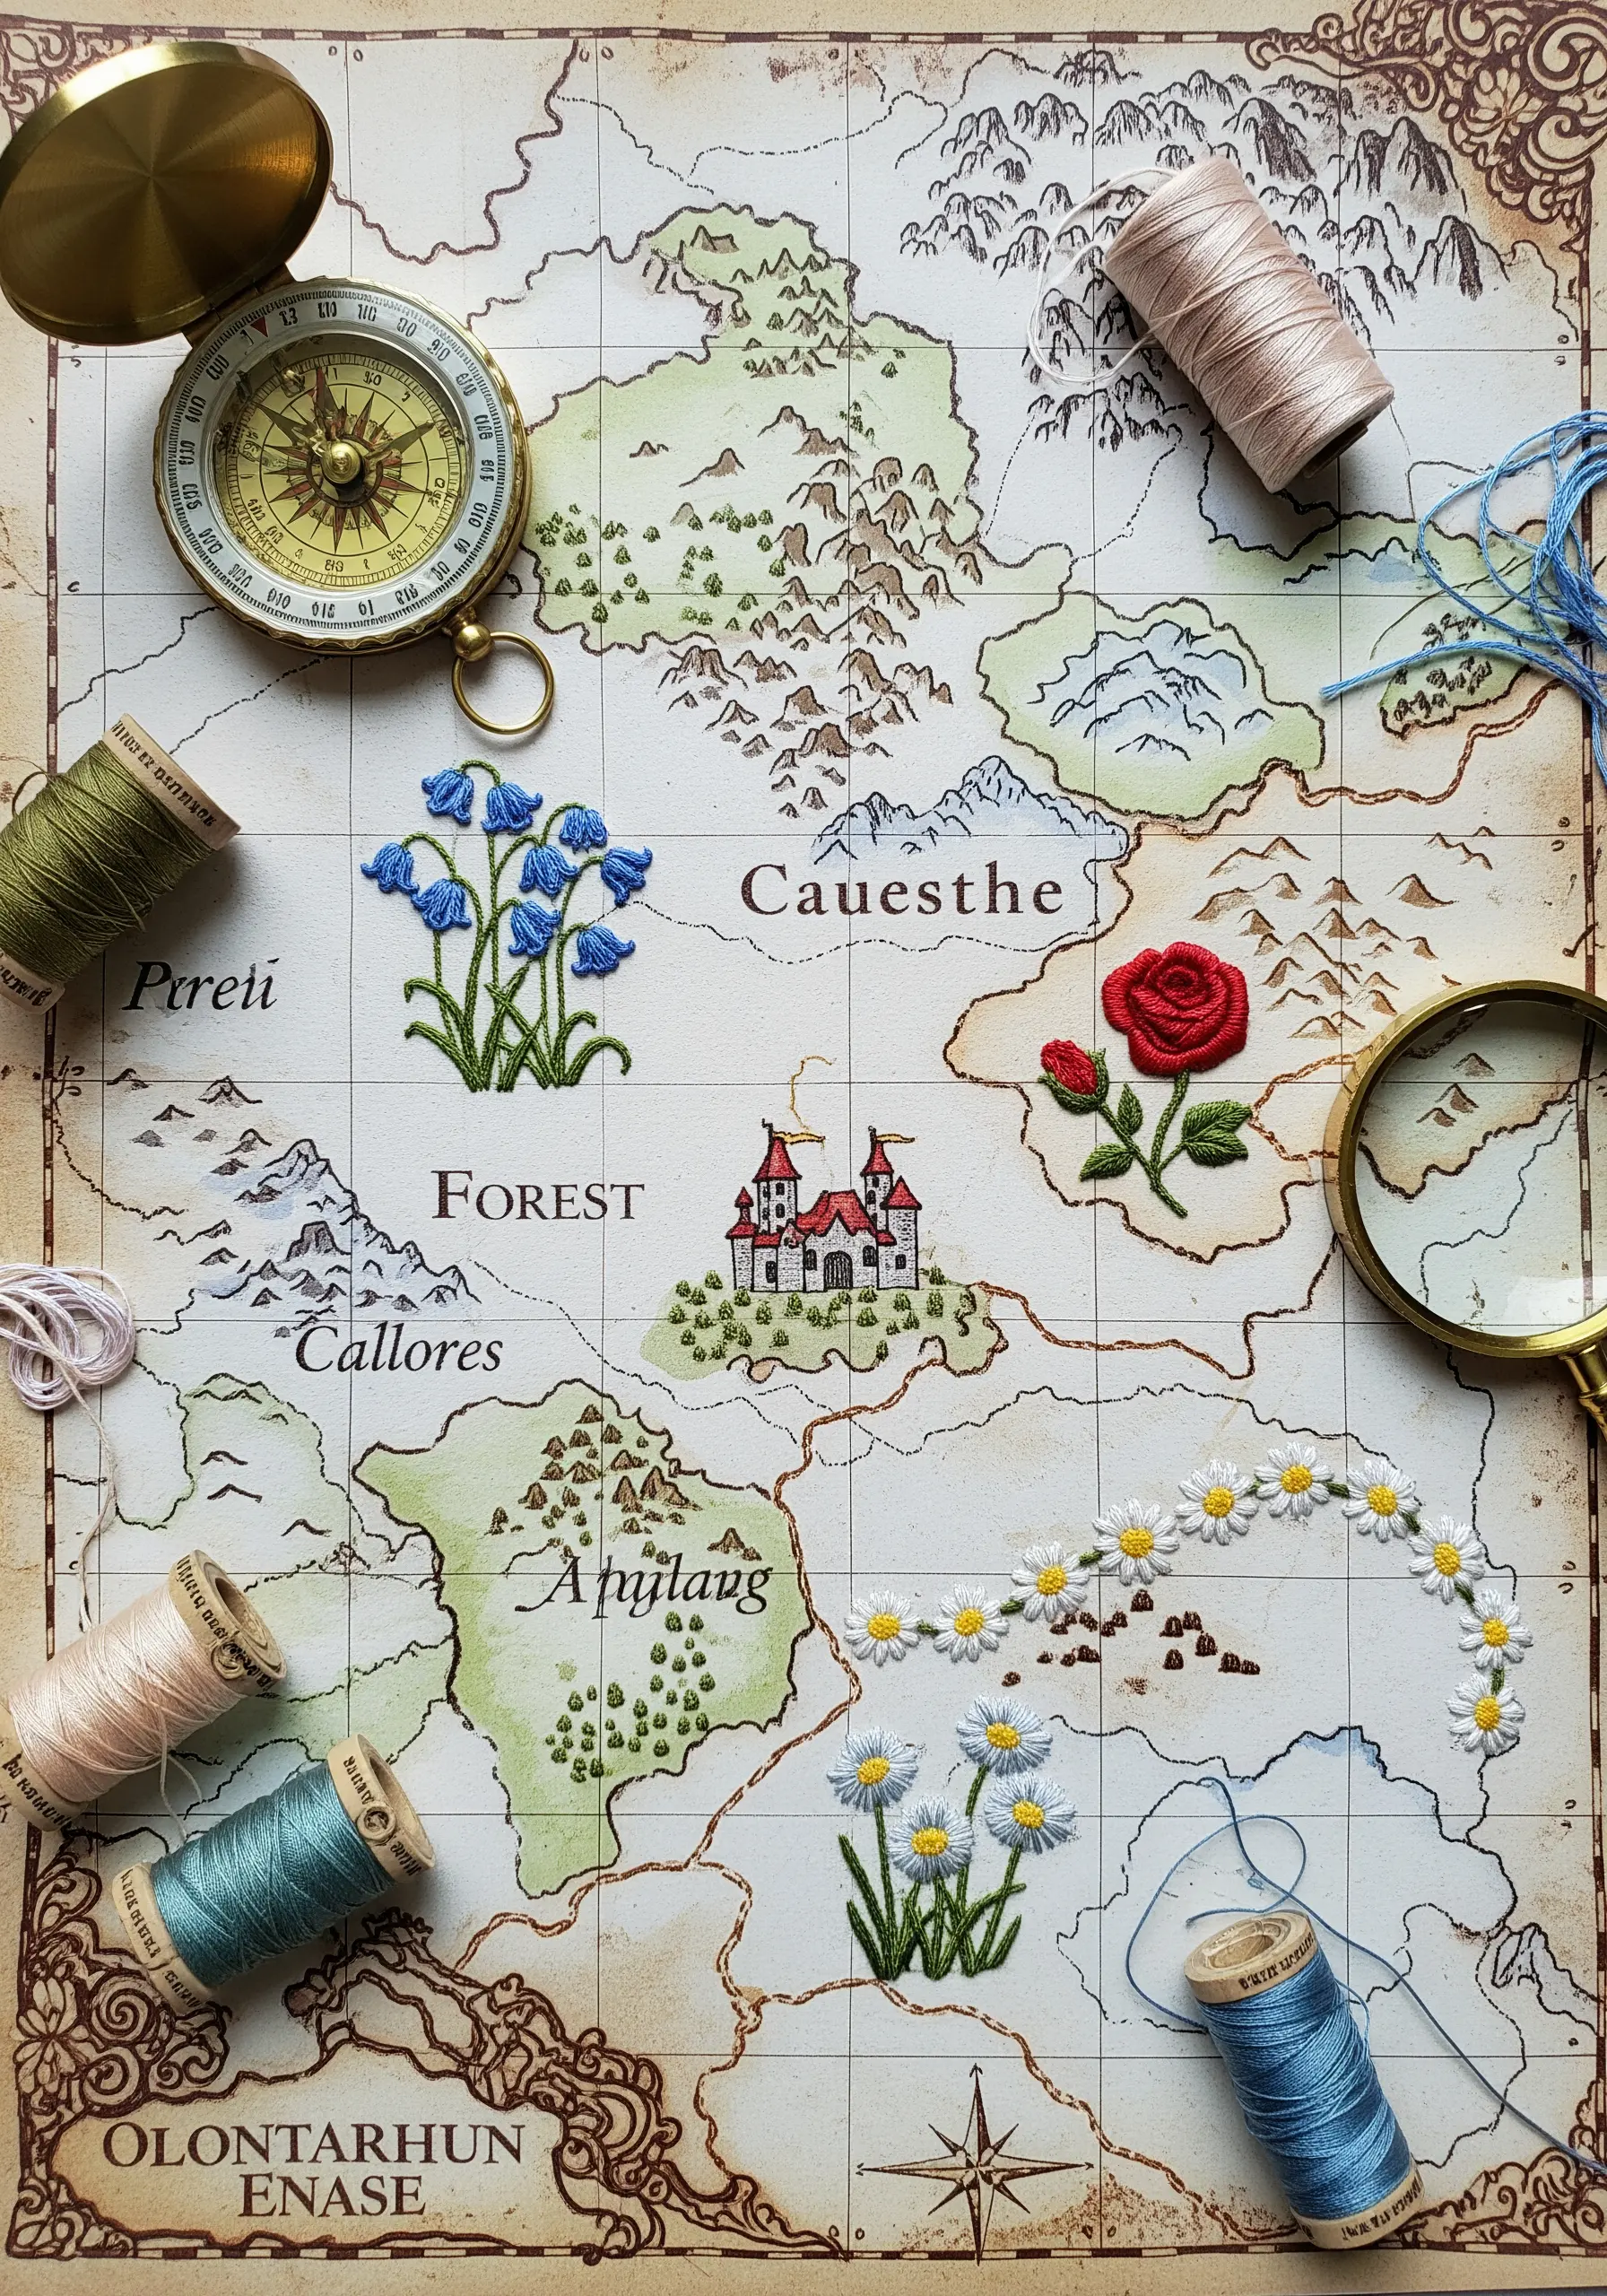
Bring a fantasy map to life by using thread to add texture and significance to its key landmarks.
Start by printing a map design onto a sturdy sheet of paper or printable fabric.
Use embroidery to define different territories: fill a forest with French knots, outline mountains with seed stitch, and trace rivers with a shimmering blue thread.
The tactile quality of the stitches makes the world feel real and invites the viewer to explore the story.
17. Adorn a Keepsake Box with a Stitched Panel
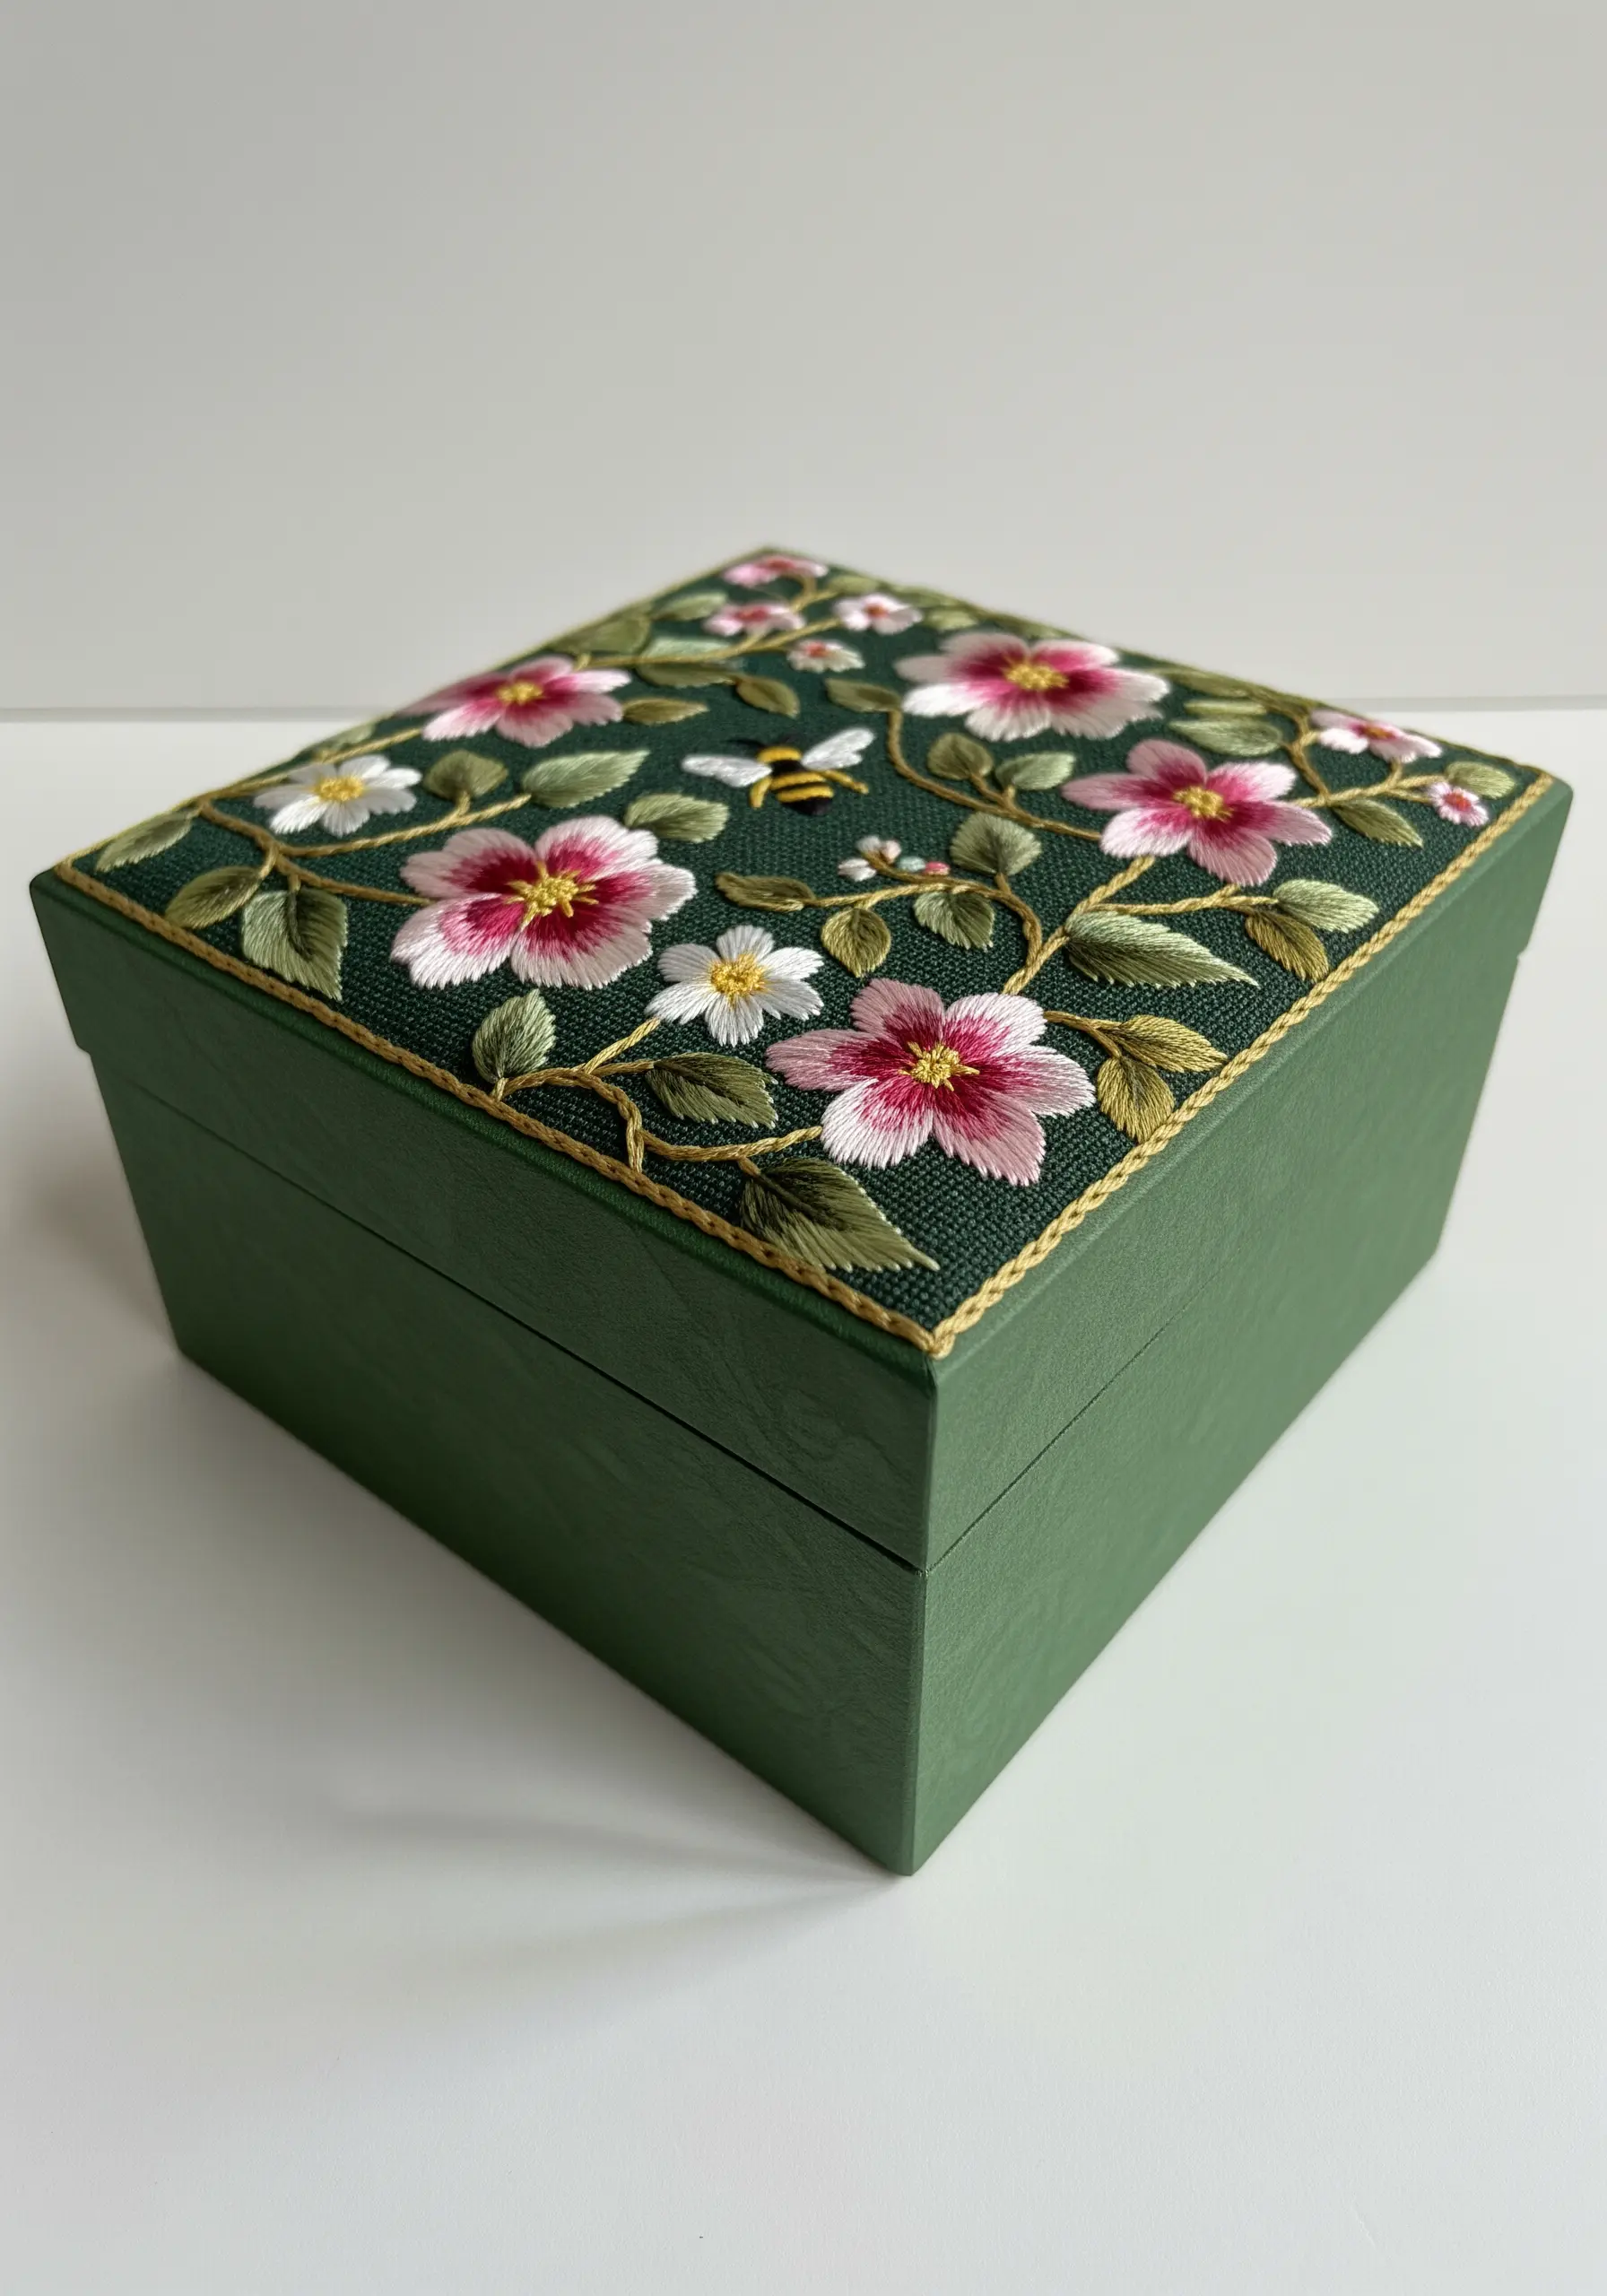
Upgrade a plain paper-mâché or wooden box by mounting a beautifully embroidered panel onto its lid.
Stitch a dense floral composition on a piece of even-weave fabric like linen, ensuring your stitches are tight and even.
Cut the finished embroidery to size and adhere it to the box lid with strong craft glue for a permanent, seamless finish.
Adding a decorative braided trim around the edge of the fabric panel will conceal the raw edges and provide a professional look.
18. Craft an Illuminated Lampshade with Stitched Details
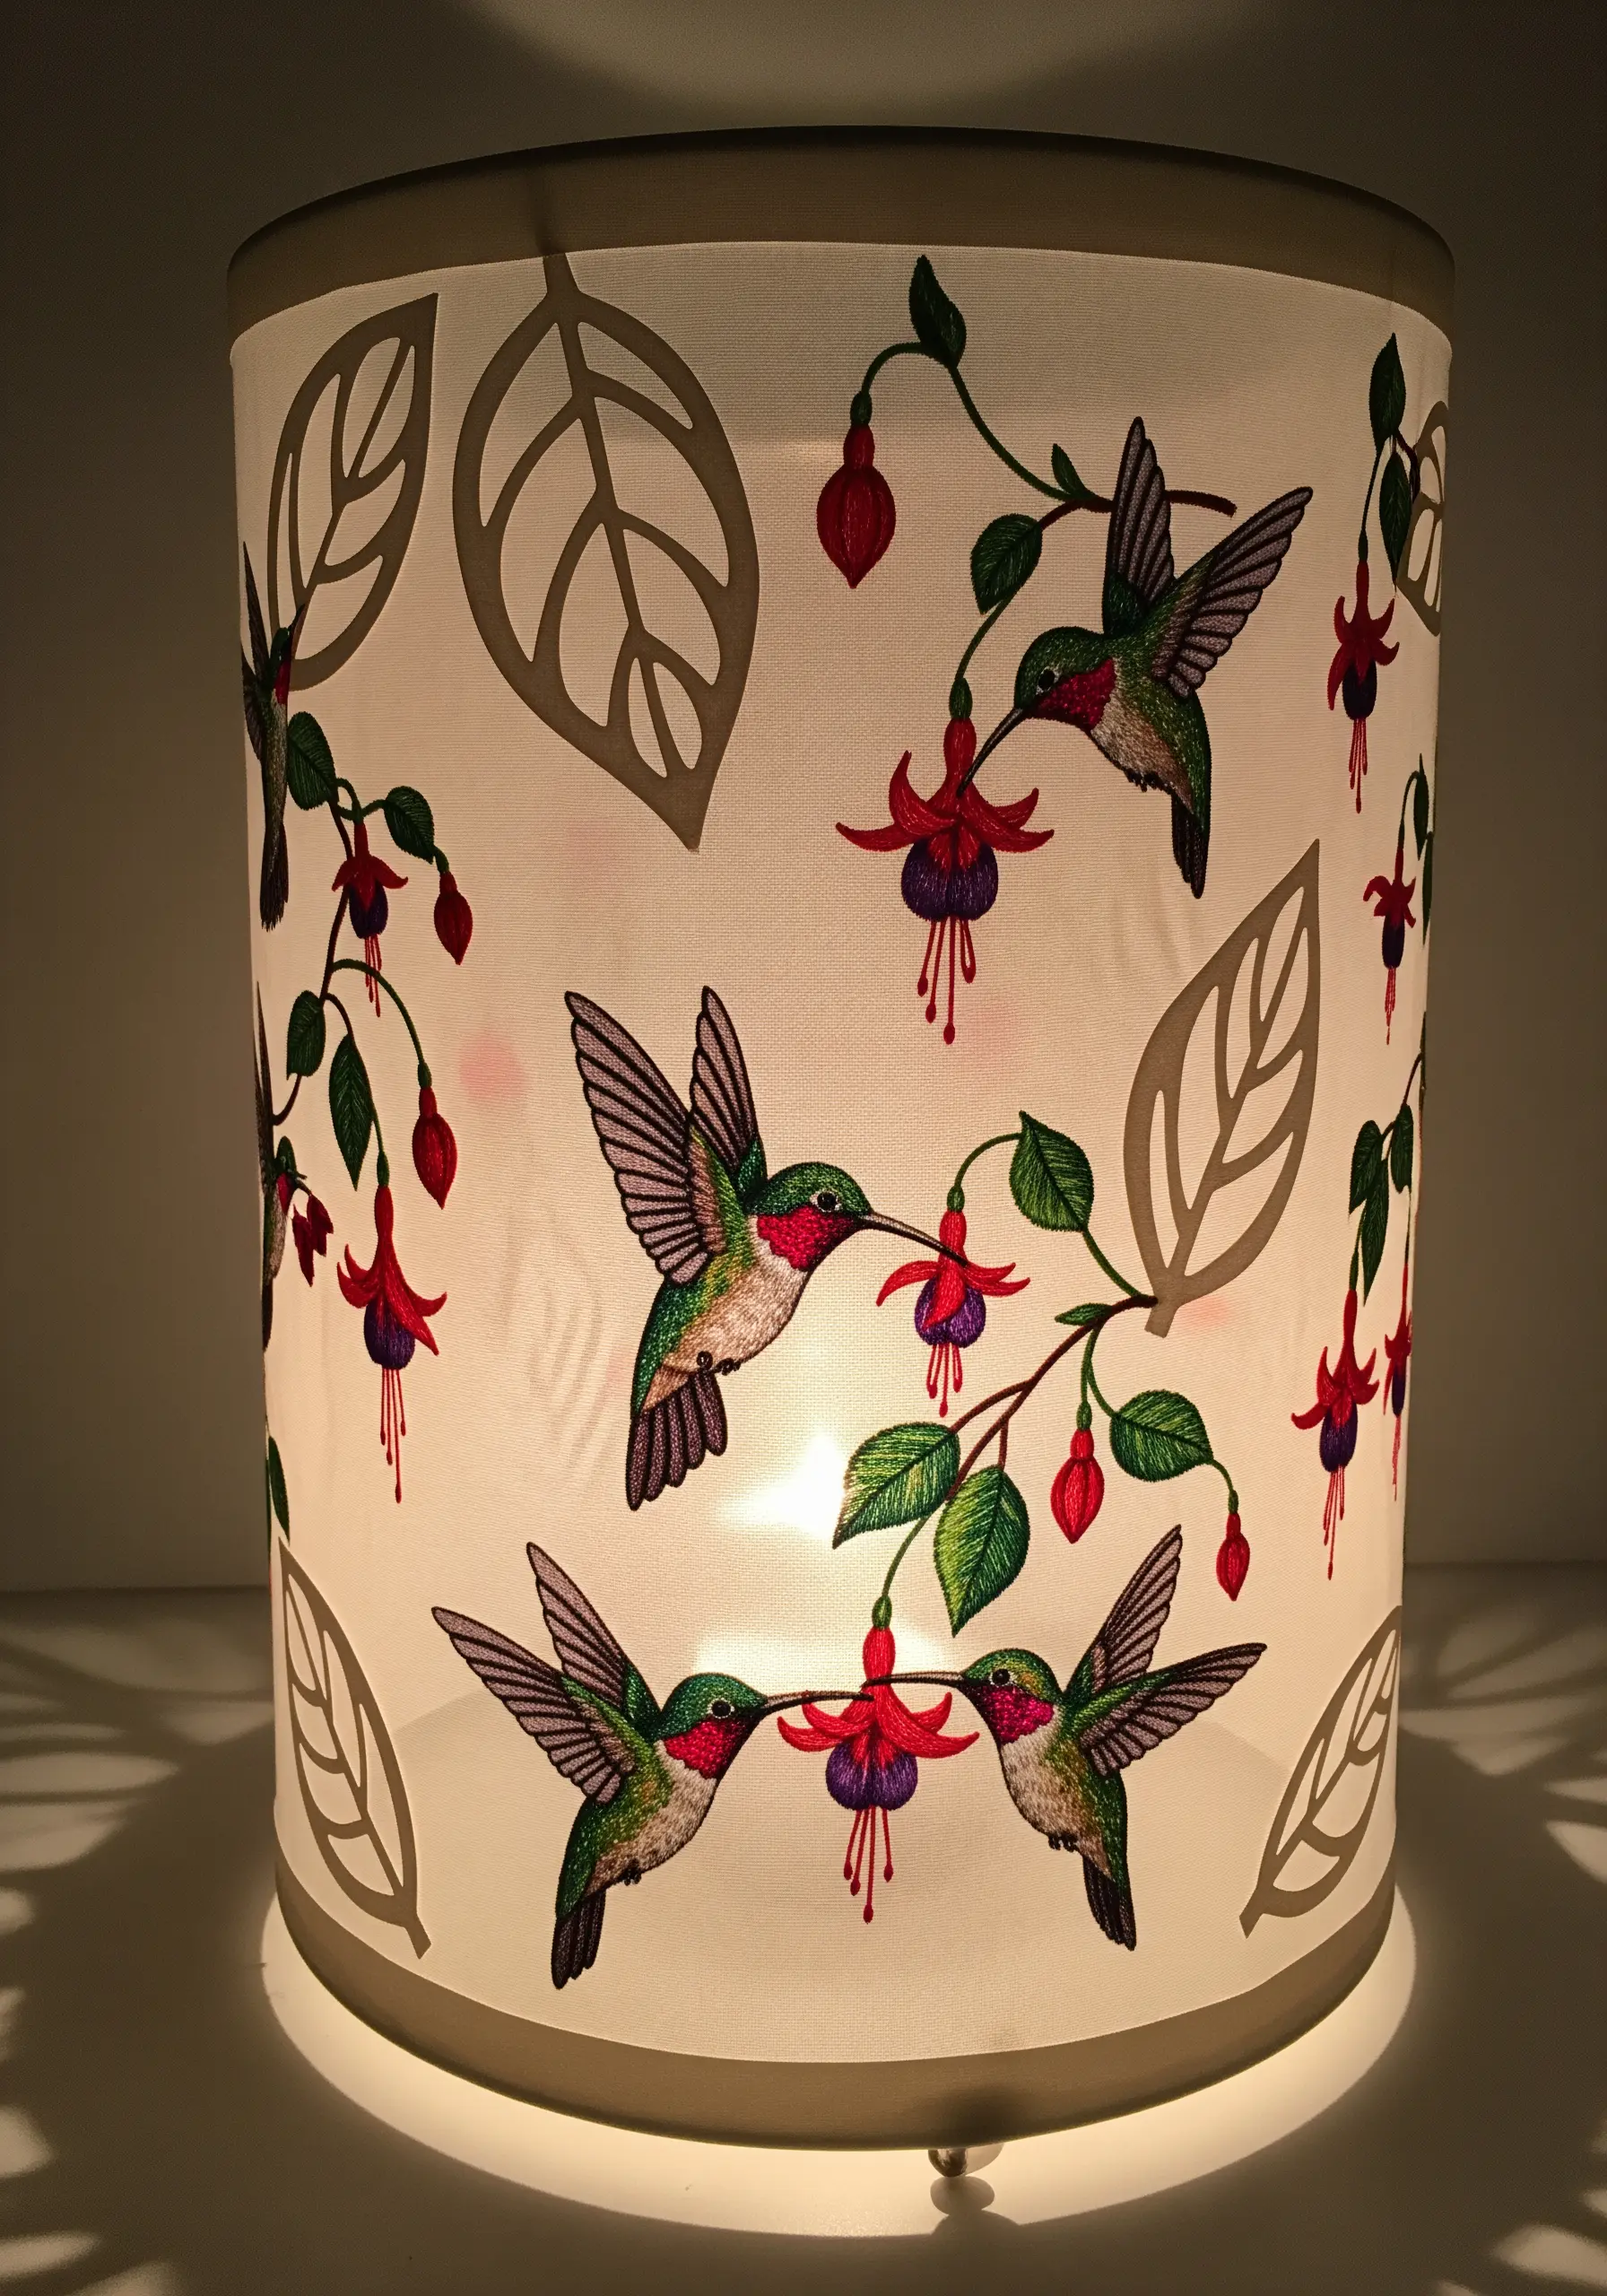
Explore how light interacts with thread by decorating a paper lampshade with stitched or appliqué elements.
For a no-tear approach, embroider your floral and hummingbird motifs onto a sheer fabric like organza, cut them out, and carefully affix them to the shade.
When the lamp is turned on, the light will illuminate the threads and create beautiful silhouettes and shadows.
This project turns a simple light source into a dynamic piece of glowing art.
19. Use a Paper Collage as a Dynamic Background
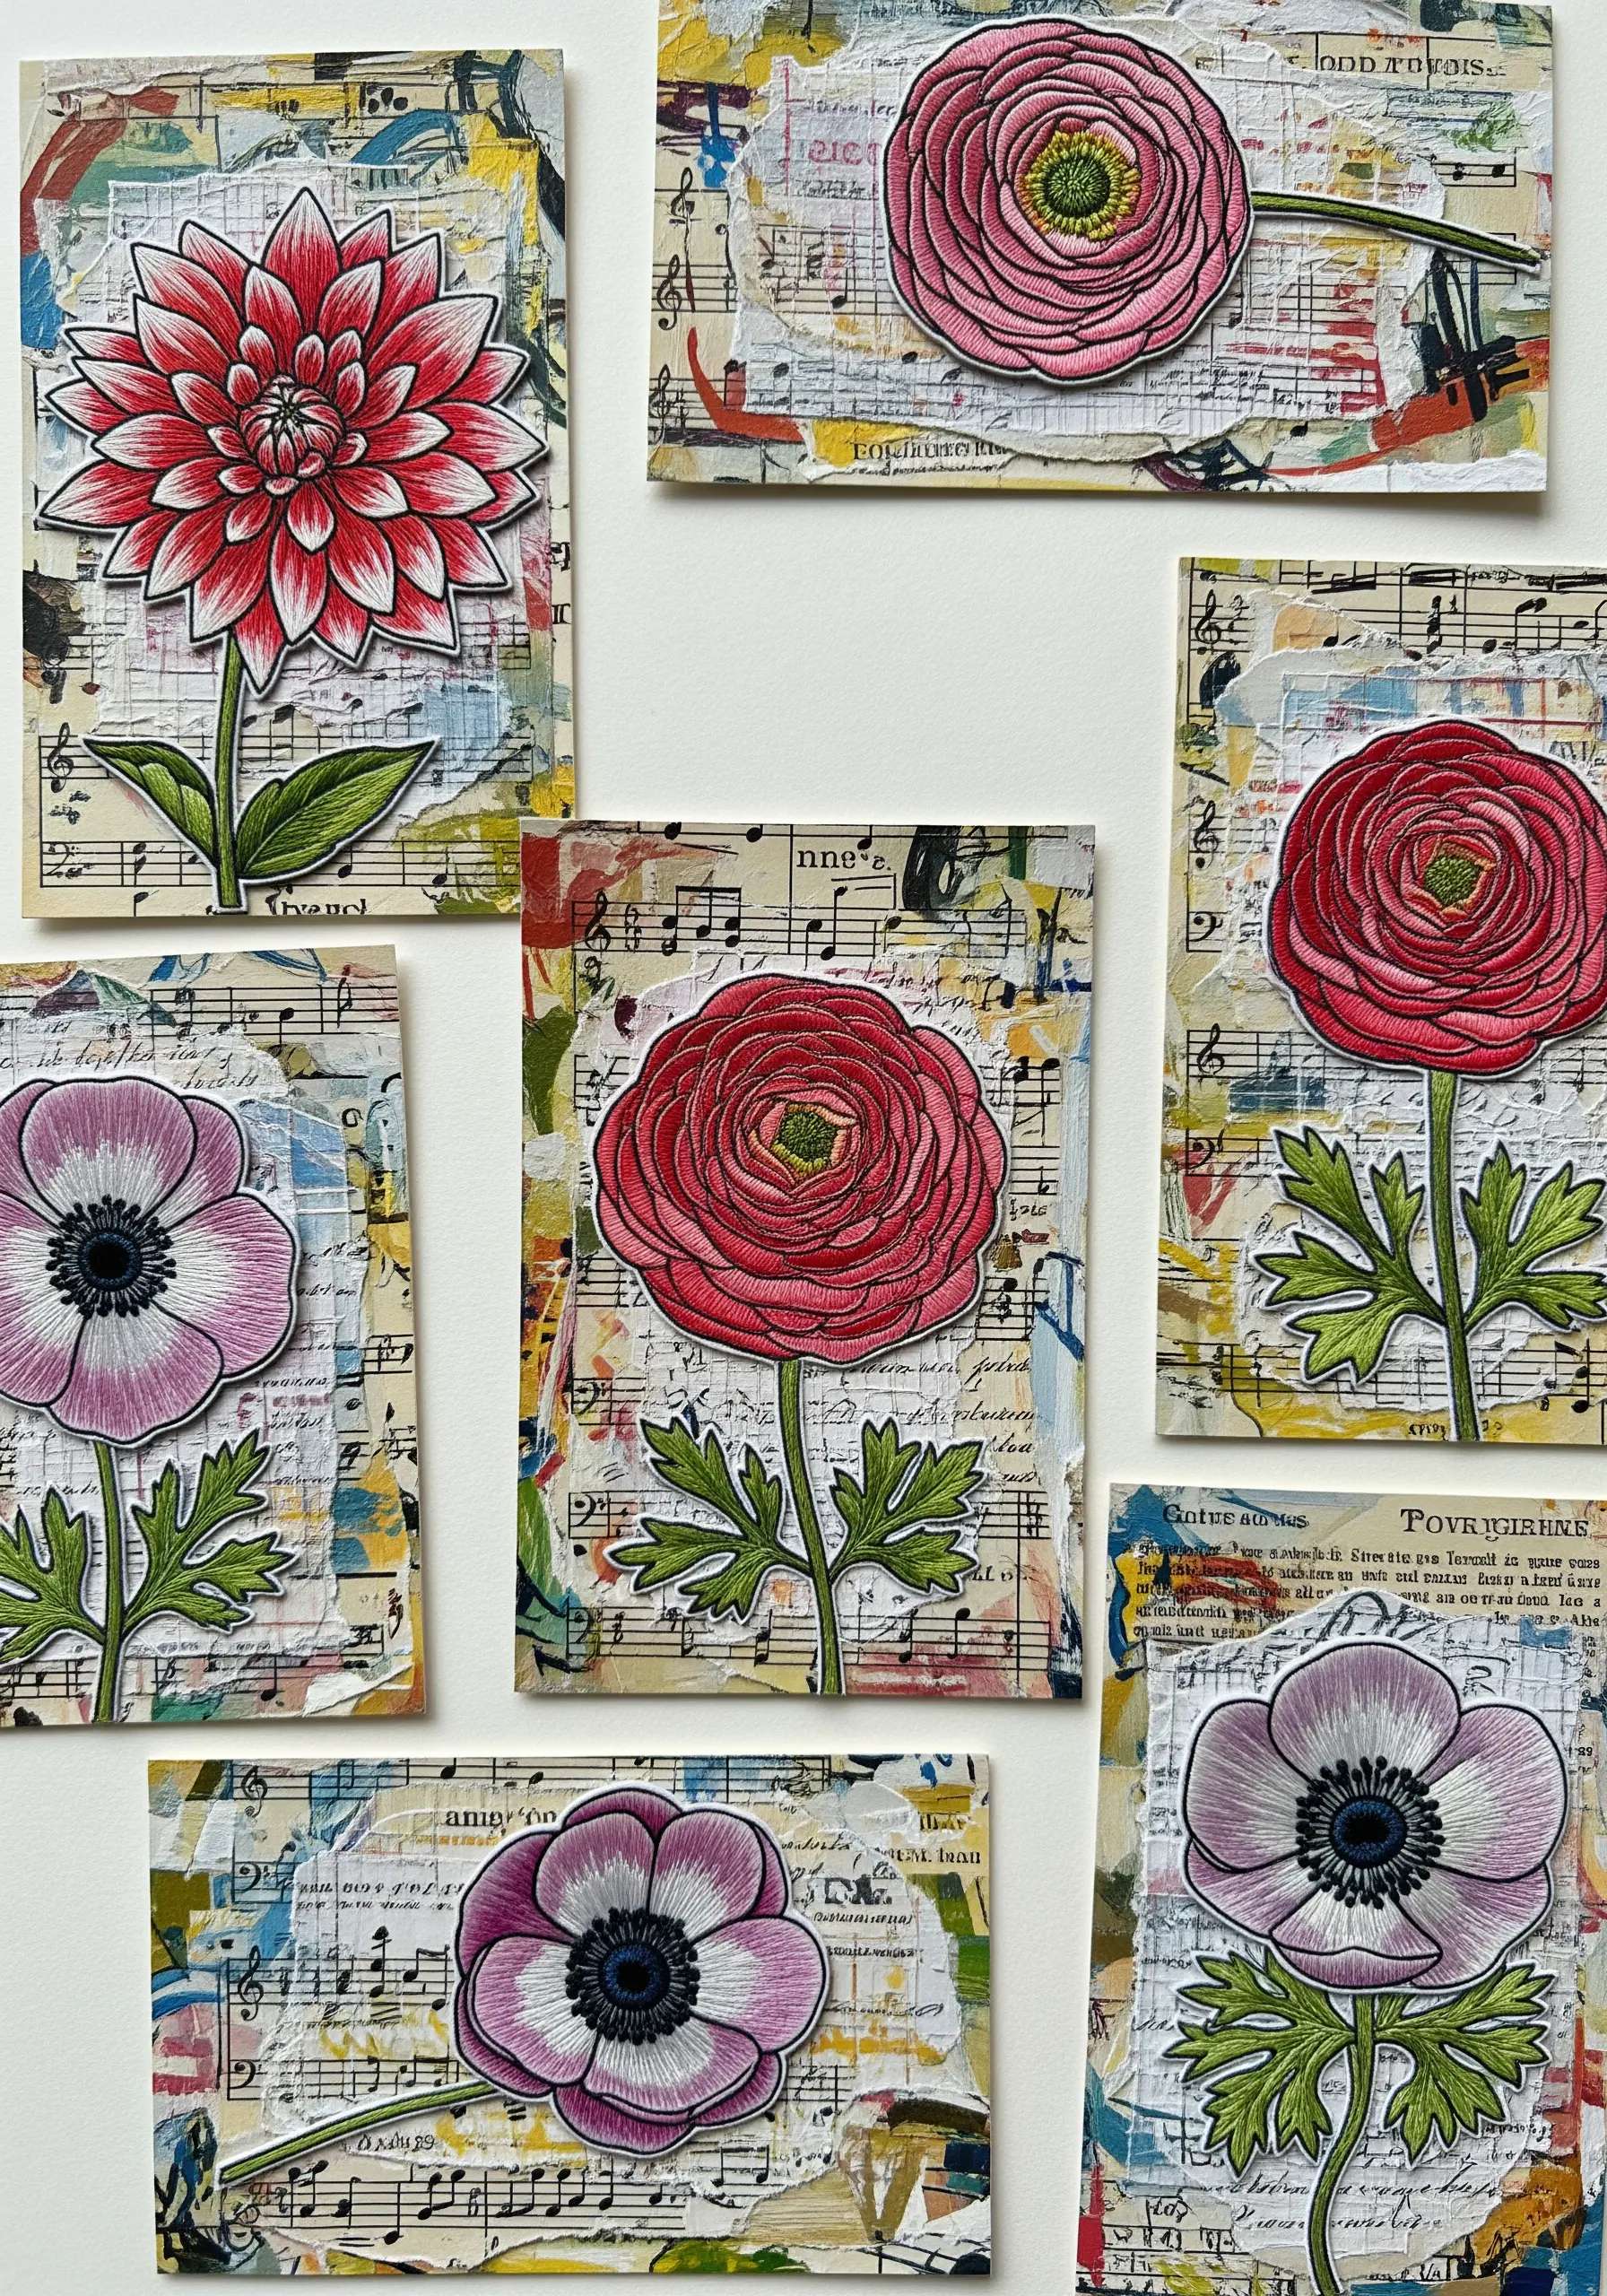
Add layers of meaning and texture to your work by mounting your embroidered pieces onto a mixed-media collage.
Create a background from torn sheet music, vintage book pages, and painted paper scraps, adhering them to a sturdy card.
Embroider a botanical motif on a separate piece of fabric, carefully cut it out, and mount it on top of the collage.
These DIY collage ideas where paper meets thread in unexpected ways create a rich, storied context for your stitchwork.
20. Design a Custom Photo Mat with an Embroidered Border
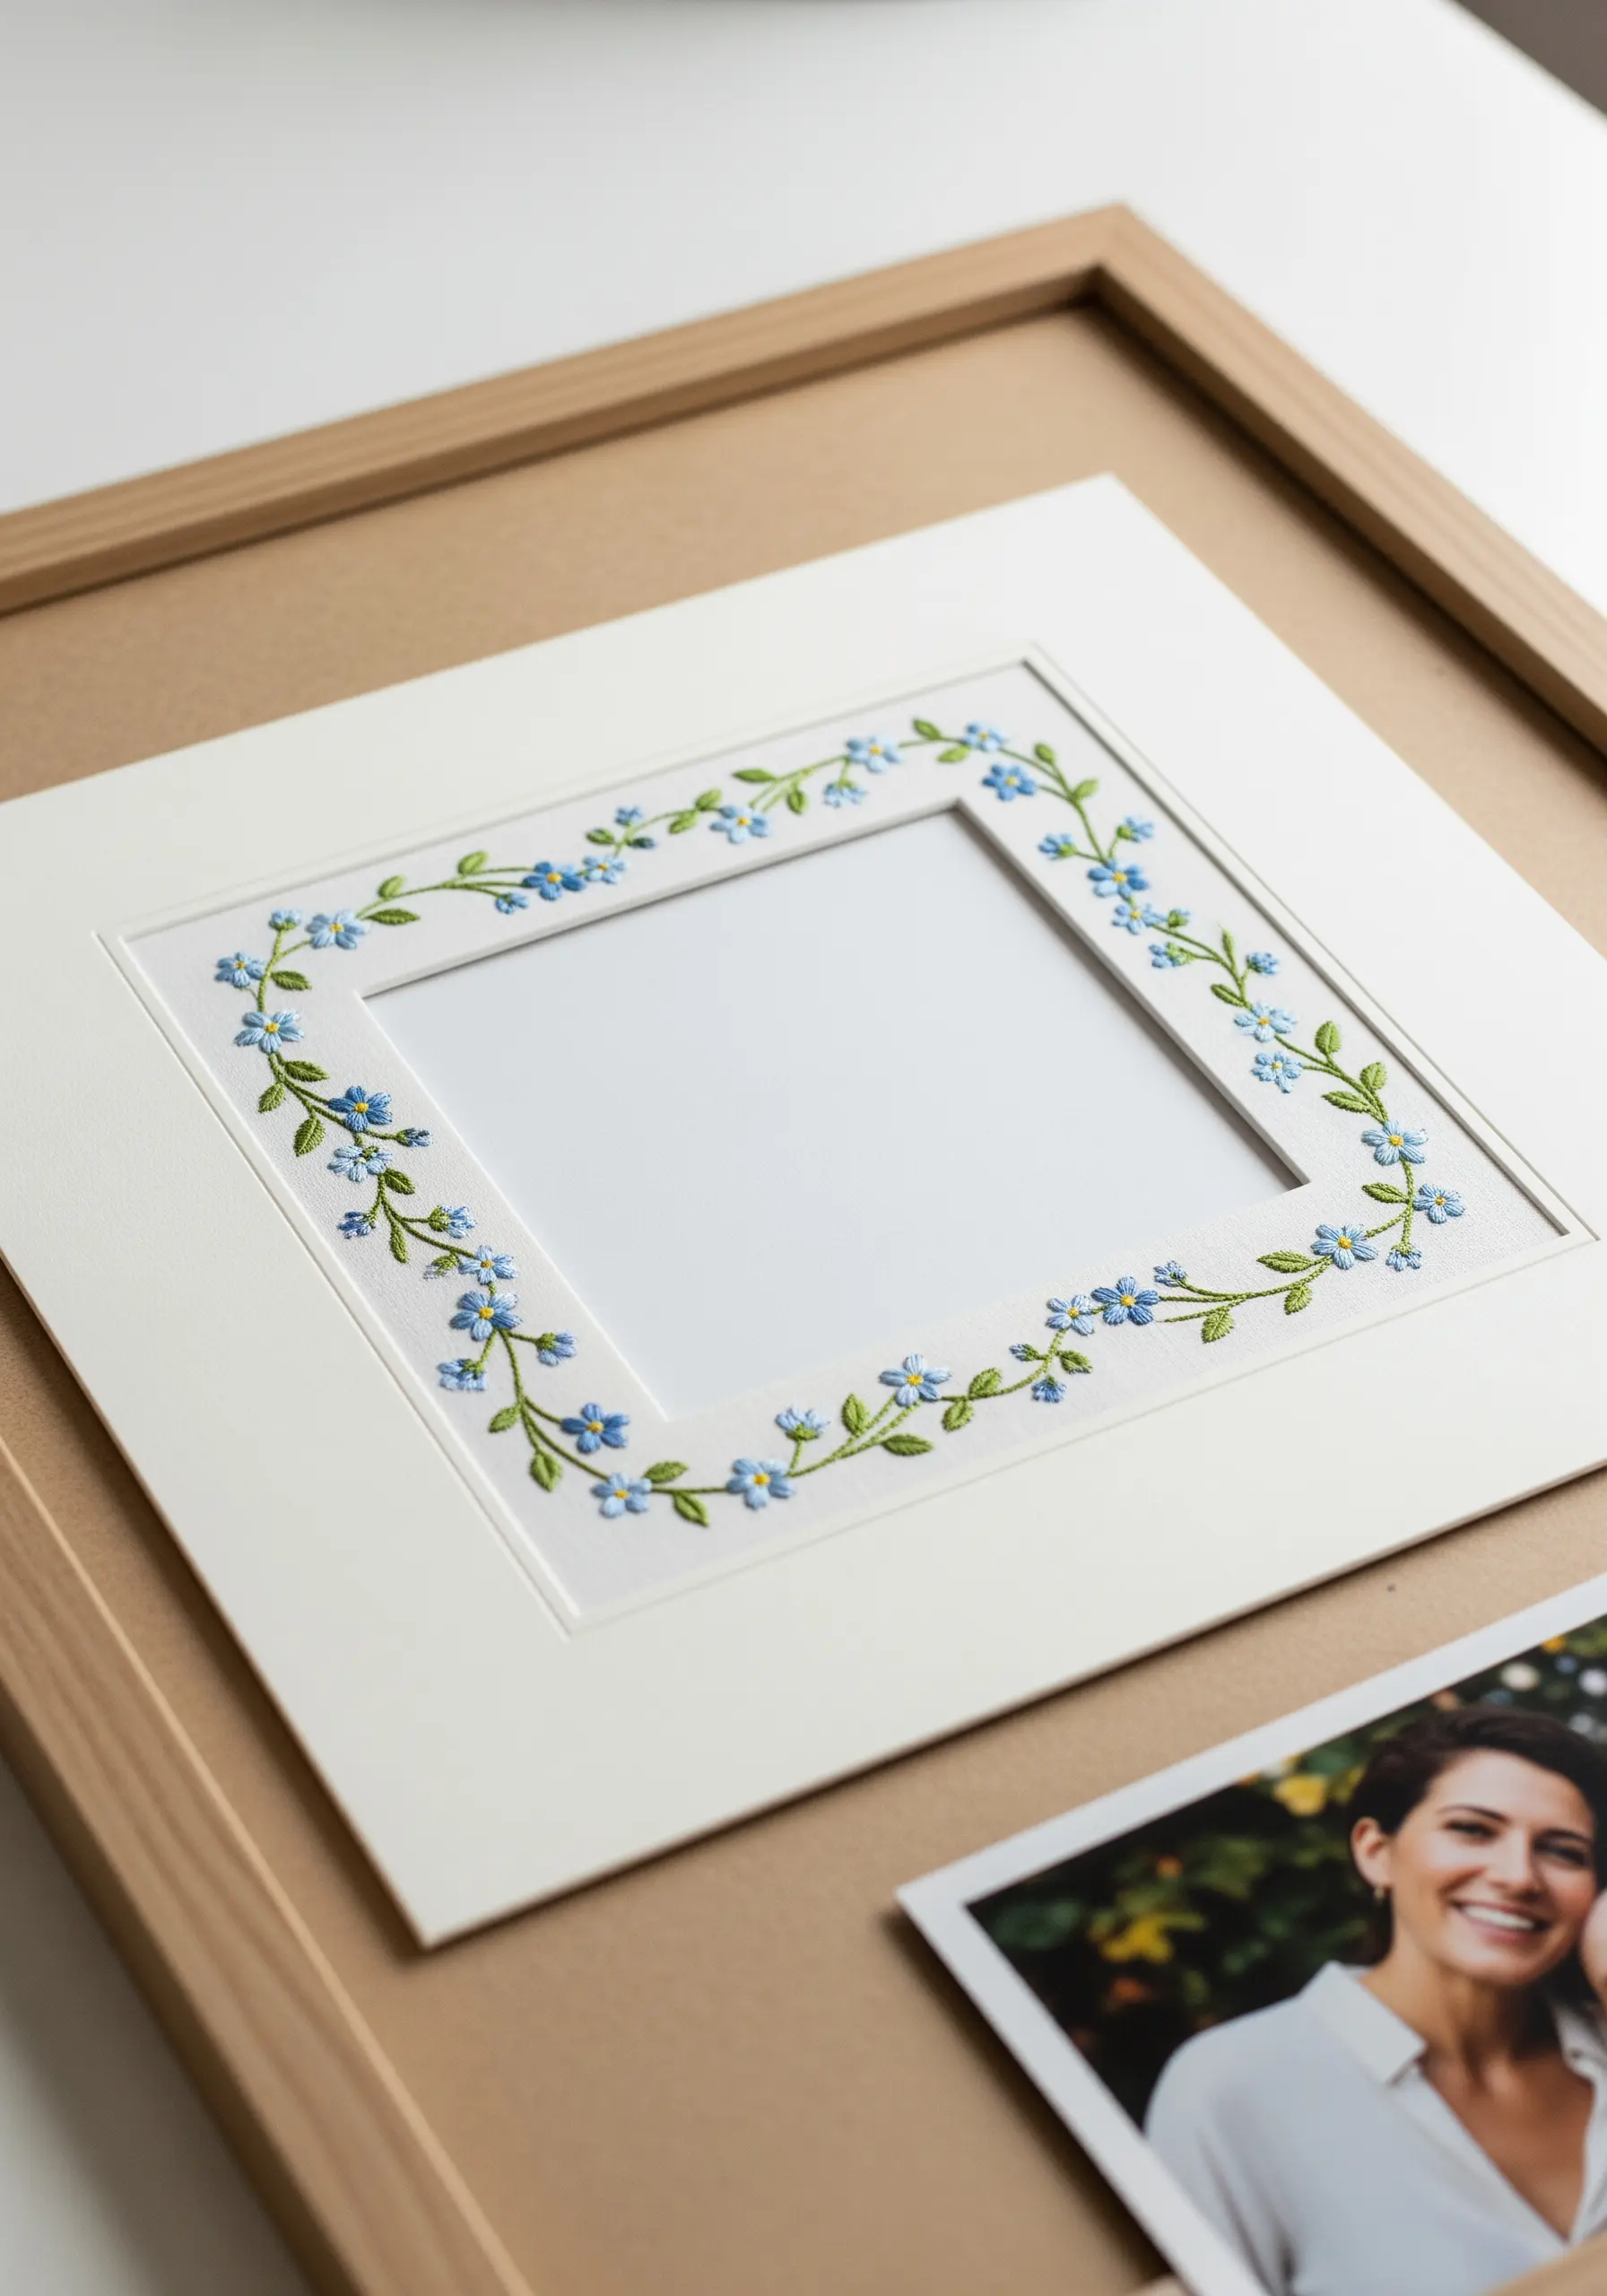
Frame your most cherished photographs with a truly personal touch by embroidering the mat board.
Wrap a standard acid-free mat with a piece of linen or other even-weave fabric, securing it tightly on the back.
Stitch a delicate vine of forget-me-nots or a simple leafy border around the central opening using two strands of floss.
This thoughtful, handmade detail draws the eye inward and makes the entire framed piece a cohesive work of art.


