

Before you pick up your needle for that next gift, take a moment. The difference between a simple craft and a cherished keepsake isn’t about complexity—it’s about intention. It’s in the smoothness of a single line, the perfect tension of a knot, and the thoughtful choice of color and texture.
Minimal embroidery isn’t about doing less; it’s about making every stitch count. It’s a quiet language of detail that communicates care and artistry. In these projects, you’ll discover how a small adjustment in technique—like switching to a single strand of thread or outlining your shape first—can elevate your work instantly.
Let these ideas guide you toward creating gifts that feel both modern and timeless. You already have the skill. Now, let’s refine the execution and turn your thoughtful gestures into beautiful, tangible expressions of love that will be treasured for years to come.
1. Master the Monogram with Satin Stitch
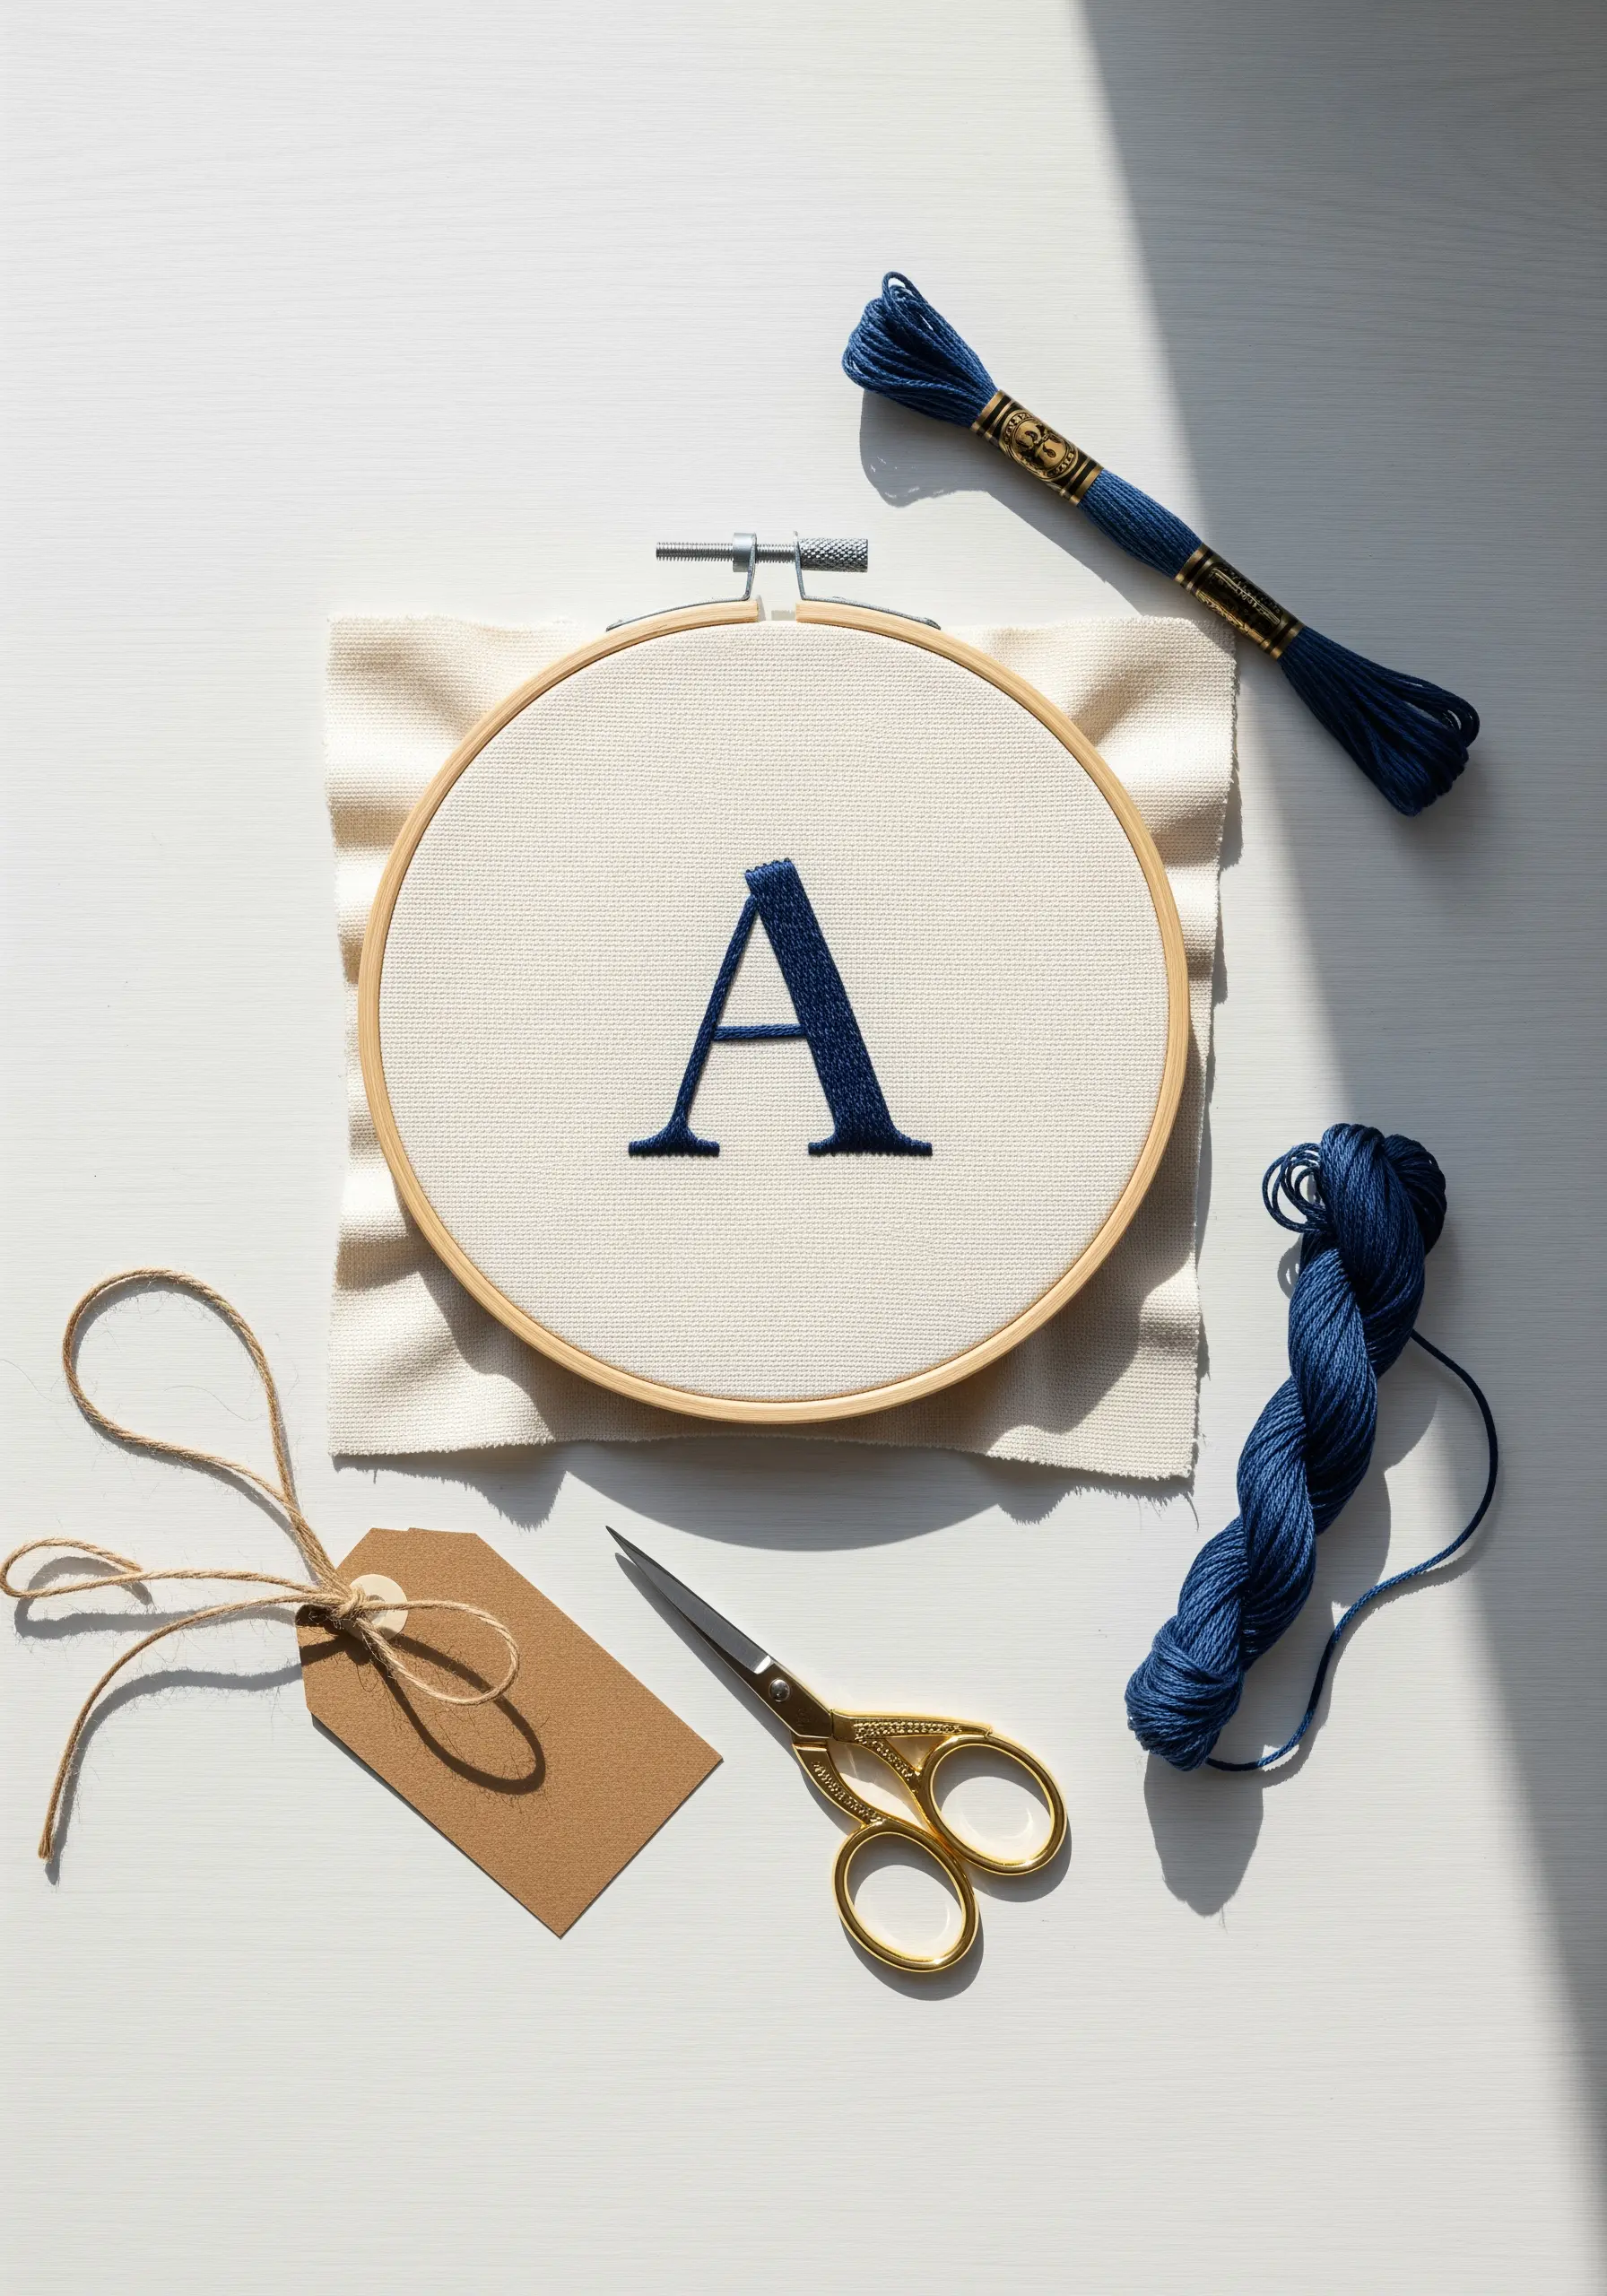
To achieve a flawless satin stitch on letters, your preparation is everything.
First, outline the entire letter with a split stitch using a single strand of the same color.
This creates a raised, stable edge that guides your satin stitches and prevents them from sinking into the fabric, giving you a sharp, professional finish.
Work your satin stitches at a slight angle rather than perfectly horizontal or vertical—this helps the threads lie closer together and better reflects light, creating a subtle sheen.
Using all six strands of floss gives your monogram a bold, substantial feel, perfect for gift items like towels or hoop art.
2. Create Graphic Impact with Textured Blocks

Transform a plain tote bag by adding a bold geometric border using a dense filler stitch, like the basketweave stitch or brick stitch.
Unlike satin stitch, these stitches create a woven texture that is more durable and less likely to snag—ideal for a high-use item.
To keep your lines perfectly straight, use a water-soluble marker and a ruler to draw your grid directly onto the canvas before you begin.
A two-tone palette in neutral shades adds sophistication, allowing the texture itself to become the focal point of the design.
3. Stitch Delicate Botanicals on Linens

For elegant botanical details on tea towels or napkins, combine two simple stitches for a refined look.
Use a delicate stem stitch for the lavender stalks; its rope-like texture perfectly mimics the rigidity of a real stem.
For the blossoms, switch to tiny, straight satin stitches or lazy daisy stitches clustered together.
This contrast in texture—the smooth line of the stem against the clustered buds—creates visual interest and realism.
Choosing a single color, like this lavender-inspired purple, ensures the design feels intentional and uncluttered.
4. Embellish Denim with Celestial Motifs
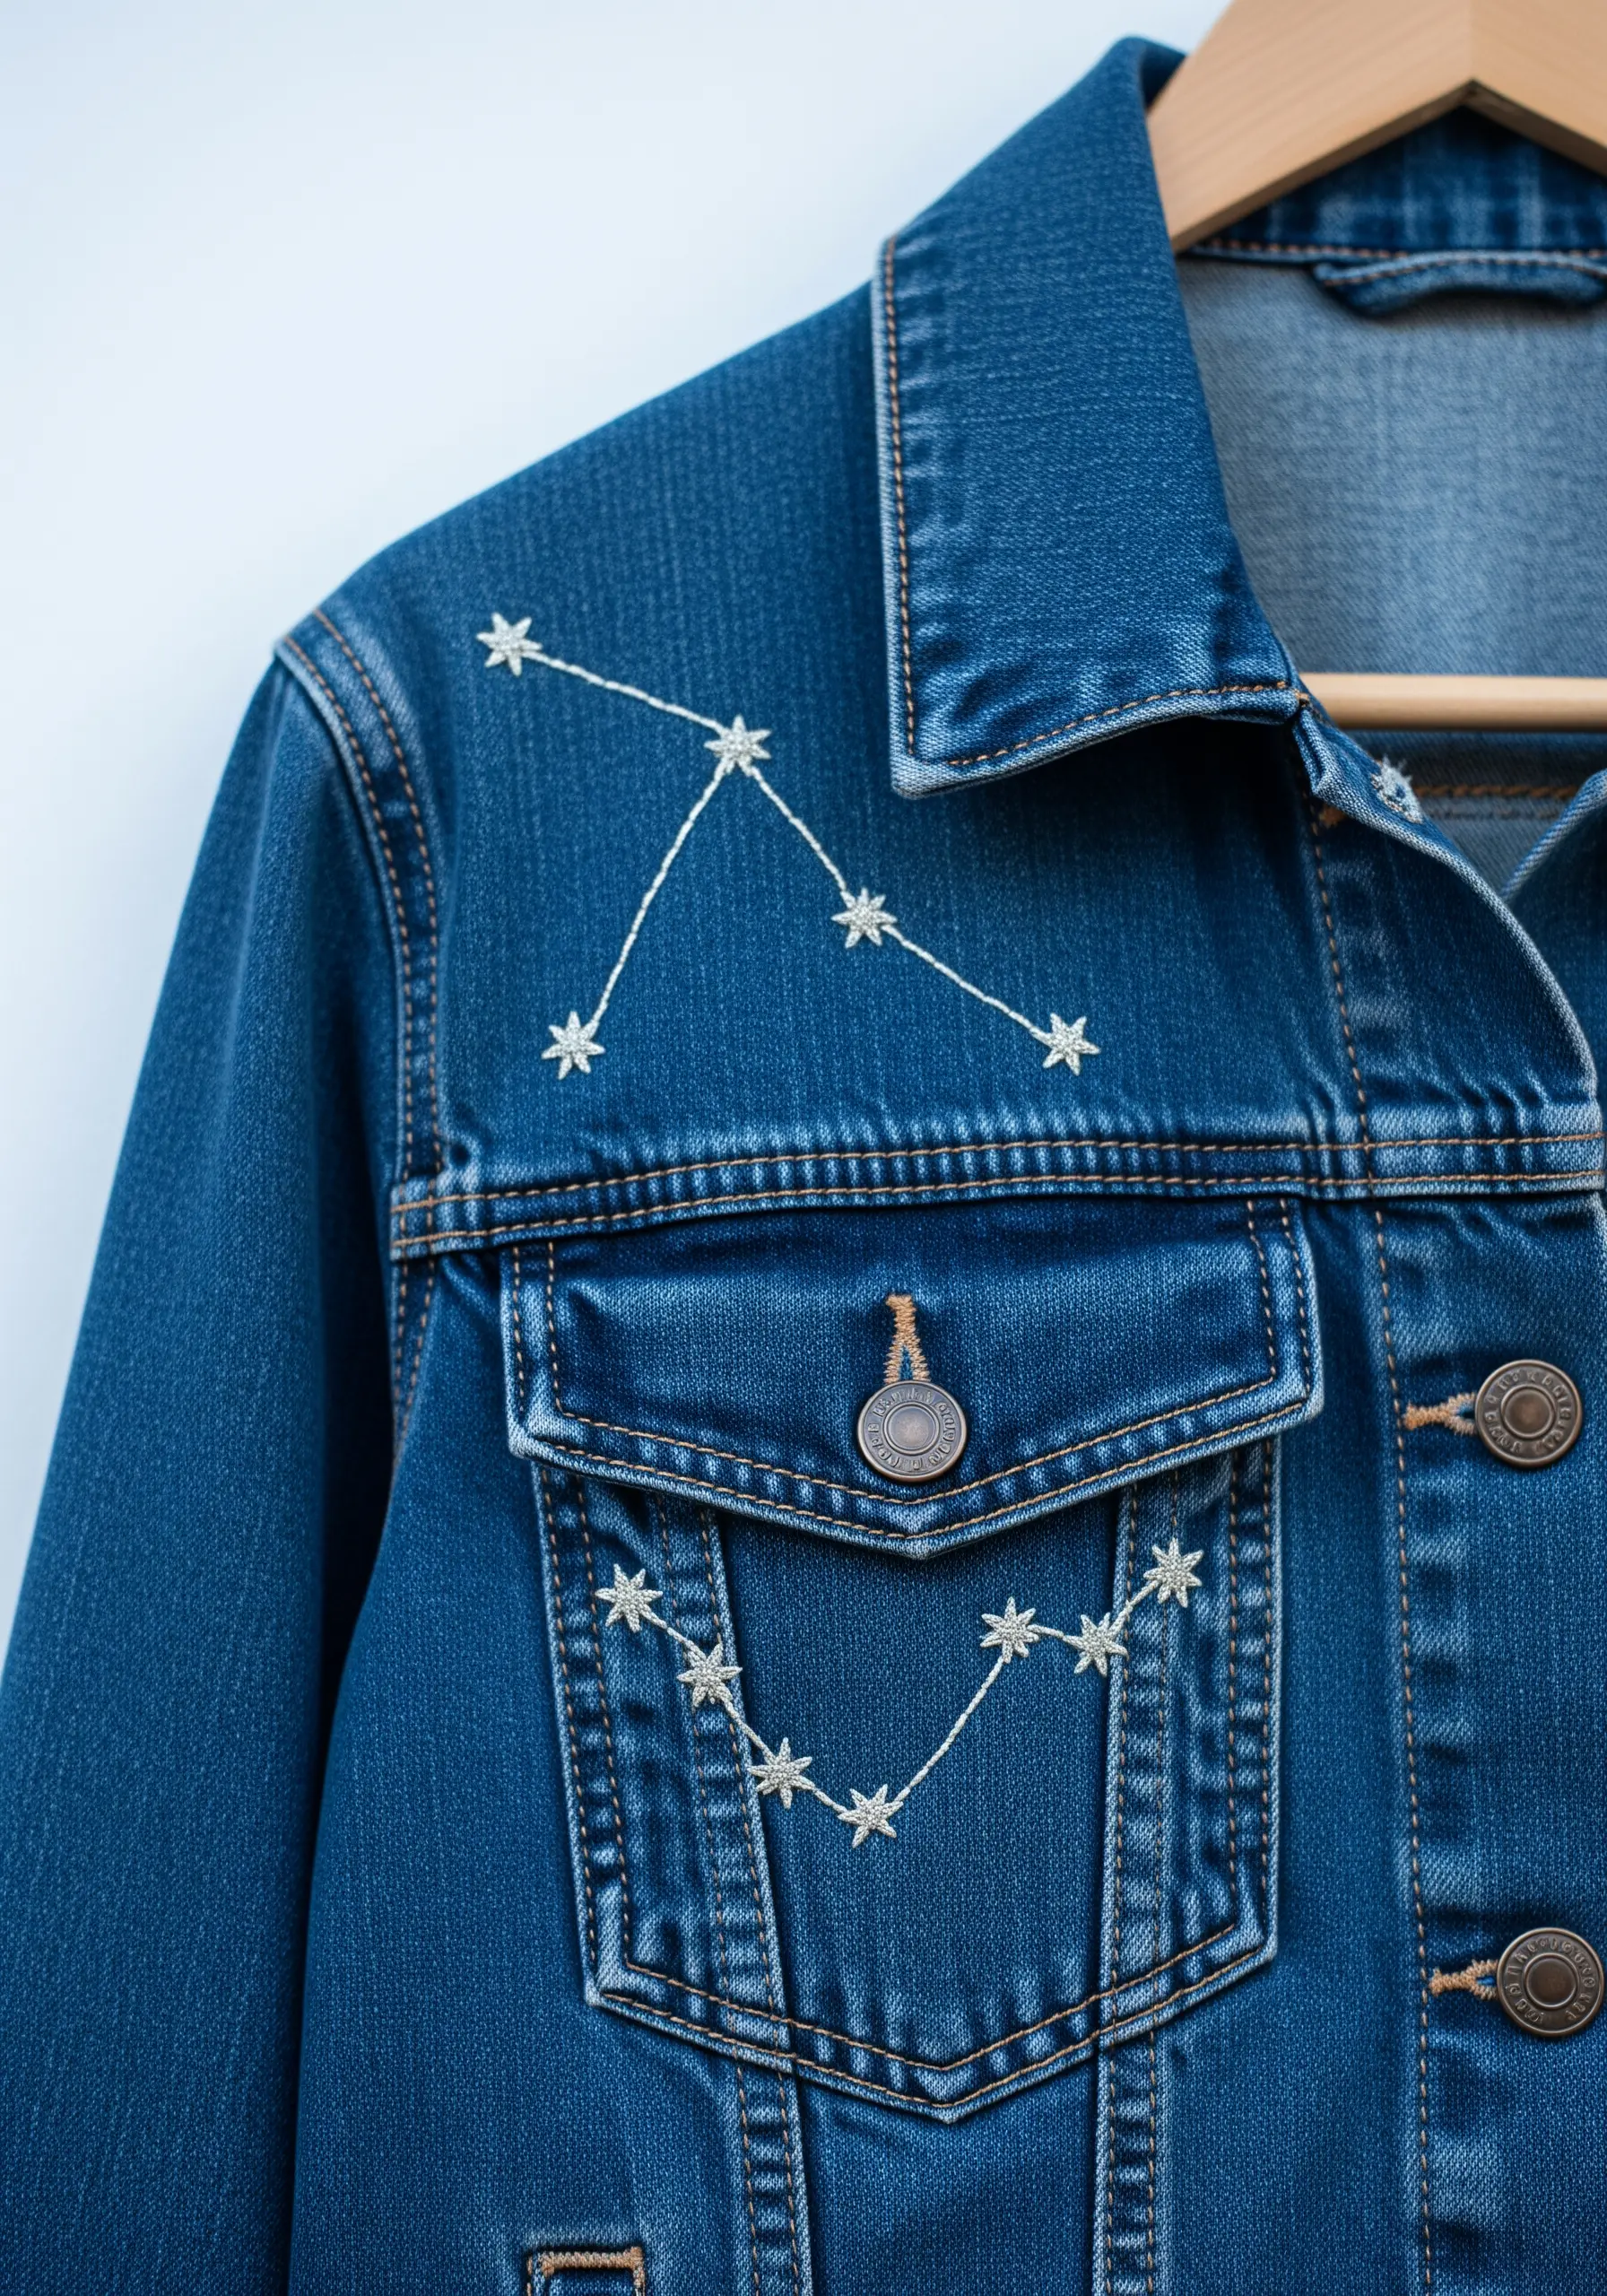
Stitching on denim requires a few adjustments for a clean result.
Always use a stabilizer on the inside of the jacket to prevent the fabric from puckering as you stitch.
A simple stick-and-stitch stabilizer is perfect for this—you can print or draw your design on it, stitch through it, and then dissolve it in water.
For the stars, use a star stitch or a woven wheel stitch with a metallic or high-sheen white thread to make them pop against the dark denim.
Use a sharp, sturdy needle (a size 7 embroidery needle works well) to easily pierce the thick fabric.
5. Perfect Your Line Art with a Consistent Backstitch

The key to successful line art embroidery is an impeccably smooth and consistent backstitch.
To achieve this, focus on making every single stitch the exact same length—even around tight curves.
Shorten your stitch length significantly when navigating corners to avoid a jagged, segmented look.
Using a thicker thread, like Perle cotton #8 or all six strands of embroidery floss, gives the line weight and presence, turning a simple drawing into a confident piece of minimalist thread art.
Stretch your Aida or linen fabric drum-tight in the frame to ensure your lines don’t warp.
6. Add Whispers of Detail with Single-Strand Stitches

For exceptionally delicate motifs like this dandelion, switch to a single strand of embroidery floss.
This allows you to create fine, whisper-thin lines that convey fragility and detail without overwhelming the design.
Use simple straight stitches for the seed heads, radiating from a central point, and a tiny backstitch for the stem.
Stitching on felt provides a soft, matte background that makes the subtle thread work stand out.
This technique is perfect for small, thoughtful gifts like bookmarks, letter openers, or glasses cases where subtlety is key.
7. Build Tactile Surfaces with French Knots

Move beyond flat color and explore texture by filling shapes with dense French knots.
This technique transforms simple semi-circles into plush, dimensional forms that invite touch.
To ensure your knots are uniform, always wrap the thread around the needle the same number of times (once or twice is standard) and maintain consistent tension as you pull the needle through.
Arrange your knots in neat rows for a structured look, or scatter them randomly for a more organic feel.
This is an excellent way to add abstract shapes to pillow covers, making them both visual and tactile focal points.
8. Achieve Flawless Script with a Whipped Backstitch

If you want your embroidered text to look like smooth, flowing calligraphy, the whipped backstitch is your best friend.
First, complete your word using a standard backstitch, keeping your stitches small and even.
Then, without piercing the fabric, take a new thread and weave it under and over each backstitch, creating a seamless, rope-like line.
This technique eliminates the segmented look of a plain backstitch, resulting in a continuous curve that is perfect for script.
Mounting the finished piece on a simple canvas banner with frayed edges adds a soft, rustic charm.
9. Create a Miniature Motif for a Subtle Surprise

A tiny, unexpected detail can elevate an entire garment.
Placing a miniature embroidered bee on the point of a shirt collar adds a playful and personal touch that is both subtle and stylish.
Use the thread painting technique—small, directional straight stitches in different shades—to blend the yellow and black for the body, creating dimension even on a tiny scale.
For the delicate wings, use a single strand of light gray or silver thread in an open fishbone stitch to give them a sheer, translucent quality.
10. Stitch Precise Patterns for a Cohesive Set
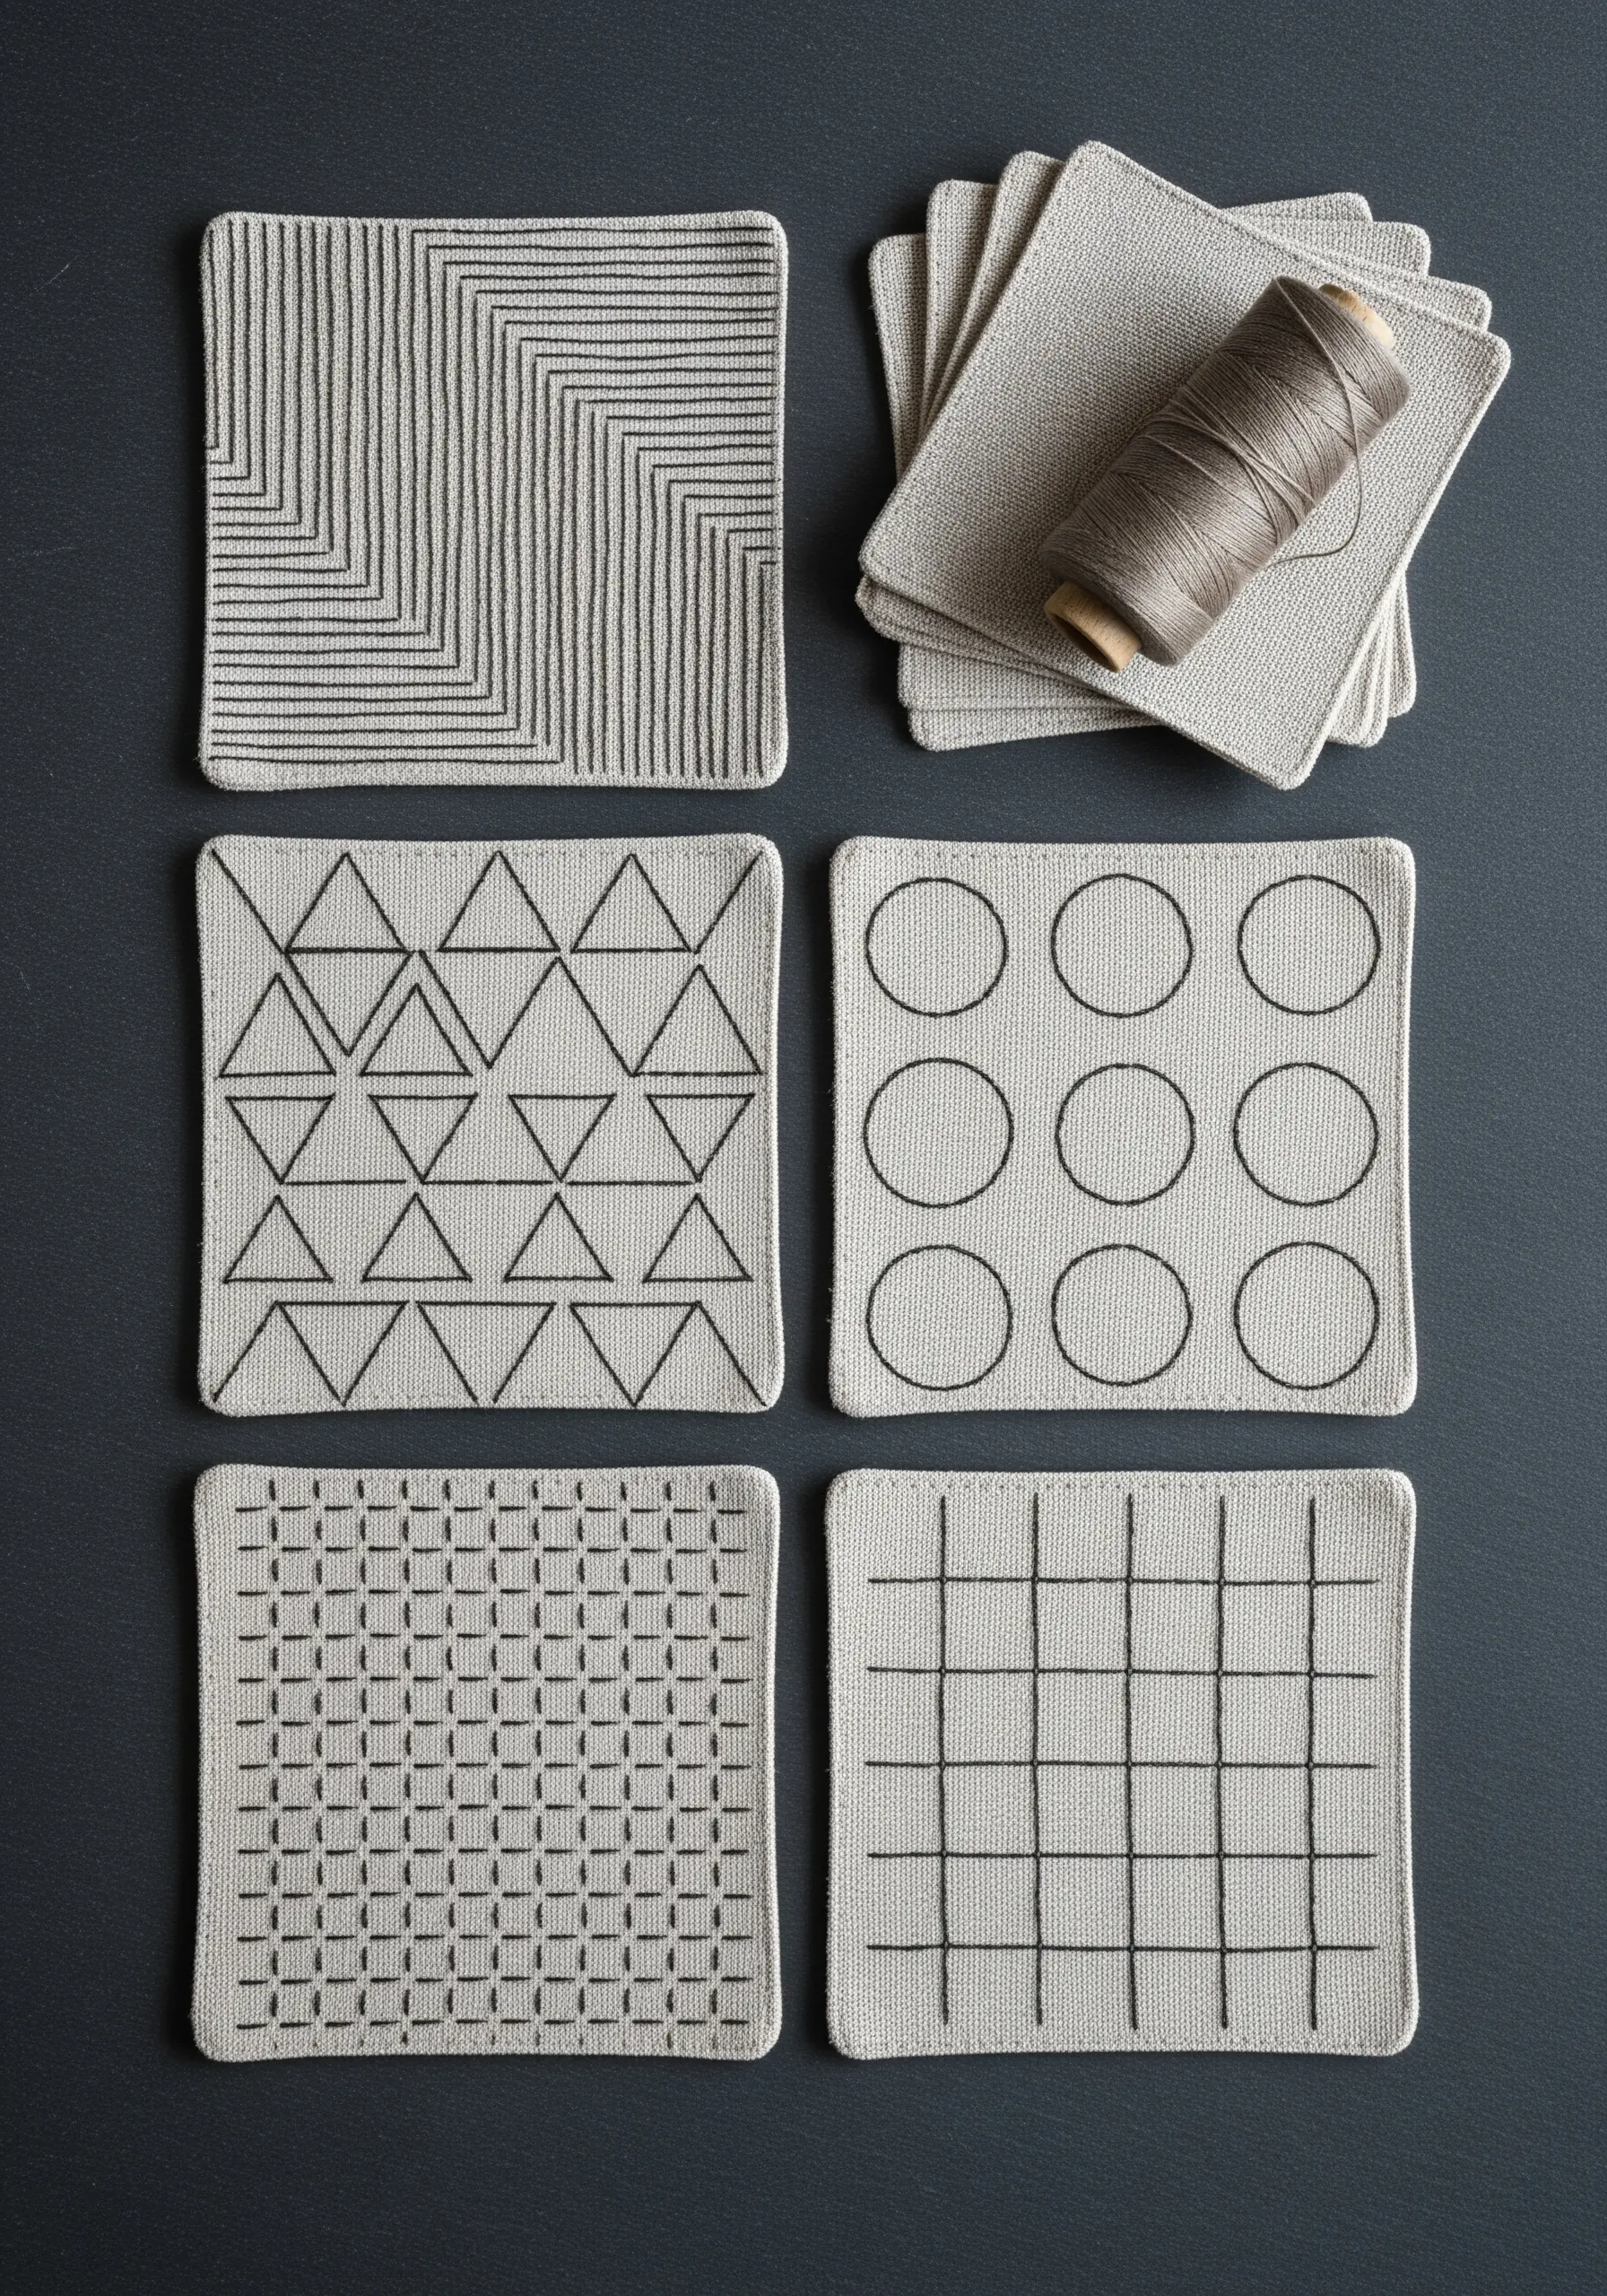
When creating a set of items like coasters, consistency is what makes them look polished and professional.
For these geometric designs, use aida cloth or a high-count evenweave linen, as the grid of the fabric helps guide your stitches for perfect symmetry.
A simple backstitch is all you need, but precision is crucial.
Count the threads of the fabric to ensure every line is straight and every shape is uniform across the entire set.
Sticking to a single thread color creates a cohesive, modern aesthetic that highlights the beauty of the patterns themselves.
11. Convey Depth with Grayscale Shading
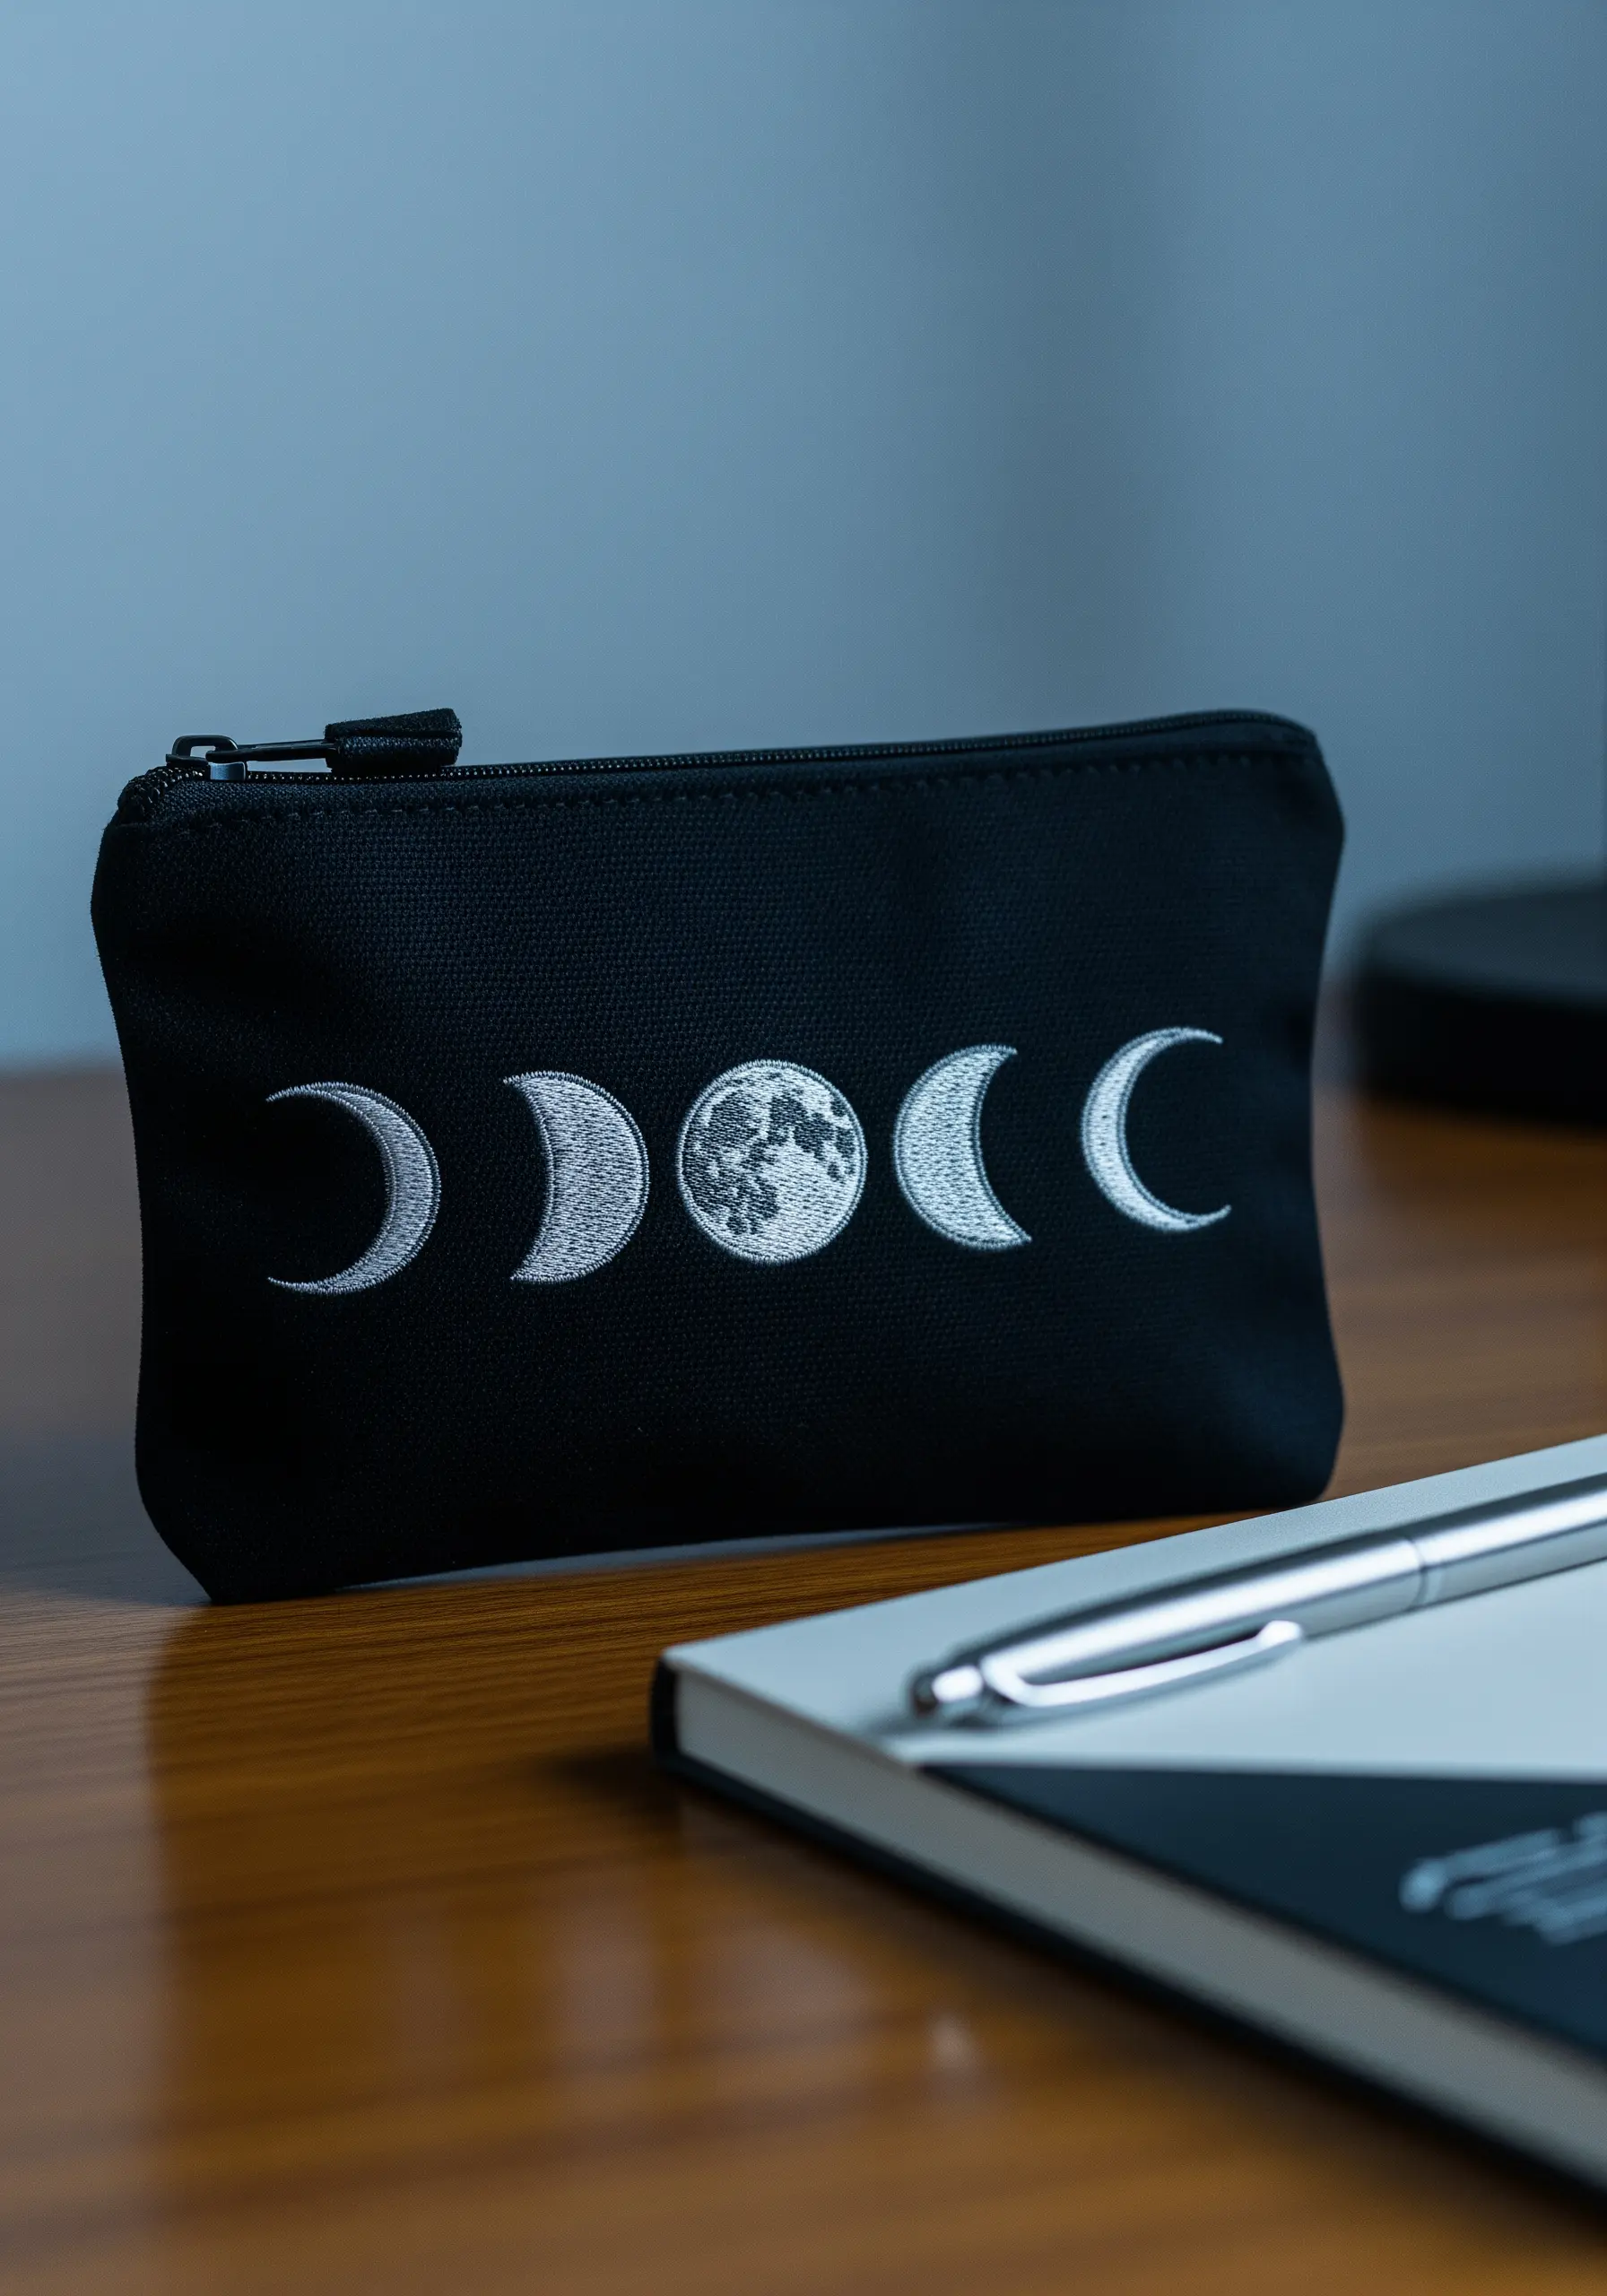
To give your moon phases a realistic, three-dimensional look, use thread painting with a grayscale palette.
Select four or five shades of gray, from dark charcoal to bright white. Fill the shapes using long-and-short stitch, blending the shades to create a smooth gradient that mimics lunar shadows.
For the cratered texture of the full moon, add a scattering of tiny, single-strand French knots in various gray tones over your stitching.
This layering technique adds remarkable depth and makes the design stand out, especially against a black fabric background.
12. Embroider Crisp Lines on Challenging Surfaces
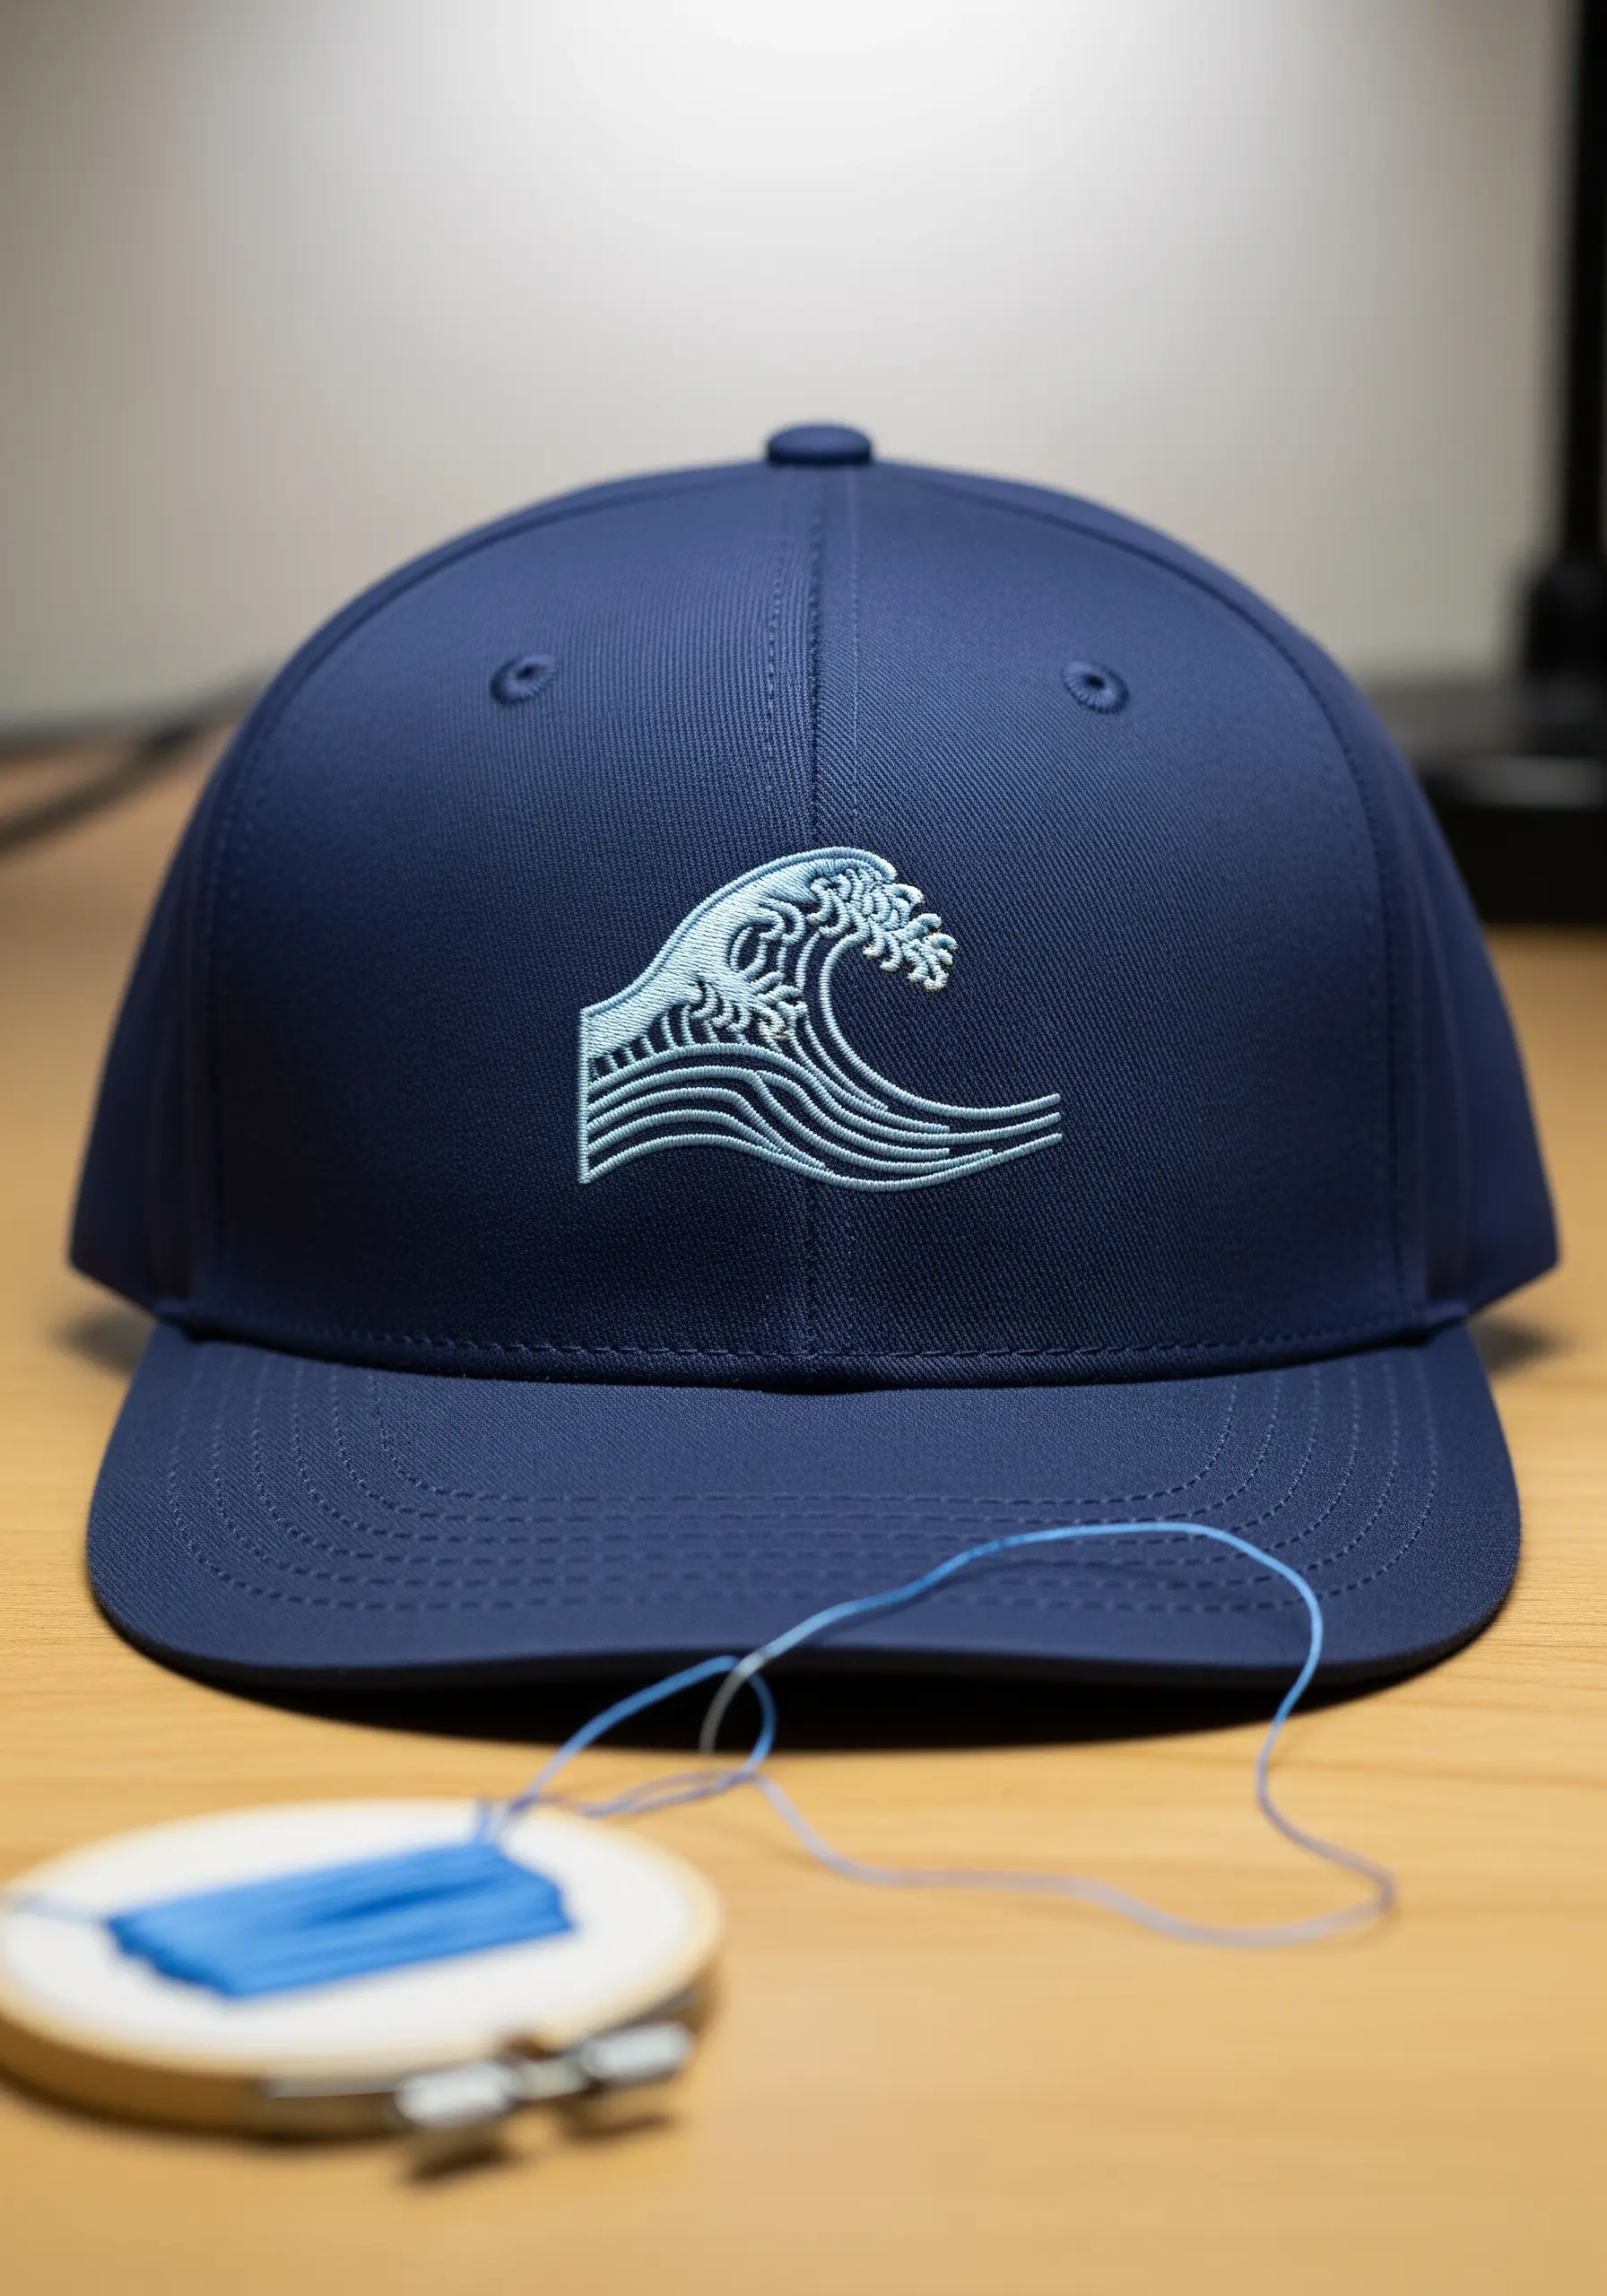
Embroidering on a structured, curved item like a baseball cap requires stability.
Use a sticky, water-soluble stabilizer on the front of the cap to prevent your design from shifting and your stitches from sinking.
To create the layered effect of a wave, stitch each line with a simple backstitch, but vary your thread weight.
Use three strands for the boldest lines and reduce to one or two strands for the finer, more delicate details.
This subtle variation in line thickness adds dimension and movement to the minimal ocean-inspired embroidery, making it feel dynamic and alive.
13. Personalize Heirlooms with Tiny Lettering

When embroidering small dates or initials, clarity is paramount.
Use a single strand of embroidery floss for the crispest possible result.
Trace your text with a fine-tipped, air-erasable pen to create a precise guide.
For the letters and numbers, use a tiny backstitch, ensuring your stitches are no more than a millimeter or two long.
This technique is perfect for adding a discreet, meaningful date to a wedding handkerchief, a baby blanket, or the inside of a tie—a truly personal and timeless gift.
14. Transfer Line Art to Stretchy Fabrics

Embroidering on sweatshirt fleece or jersey knit can be tricky because the fabric stretches.
The solution is an iron-on or sticky stabilizer applied to the back of your design area. This provides a rigid foundation that prevents the fabric from distorting as you work.
For a clean, bold outline, use a stem stitch or a split stitch instead of a backstitch.
These stitches create a slightly thicker, more solid line that won’t get lost in the texture of the fleece, ensuring your modern line art remains crisp and clear.
15. Craft Charming and Functional Garden Markers

Combine utility and beauty by creating embroidered herb markers.
Stitch simple botanical line drawings onto small rectangles of durable canvas or linen using a basic backstitch.
Use a permanent, fine-tipped pen to add the herb names for clarity.
To make them garden-ready, stitch the fabric panels onto wooden stakes or seal the edges with fray check and attach them with waterproof glue.
This thoughtful gift is perfect for gardeners, cooks, or anyone who appreciates a touch of handmade charm in their home.
16. Add a Playful Touch to Everyday Socks
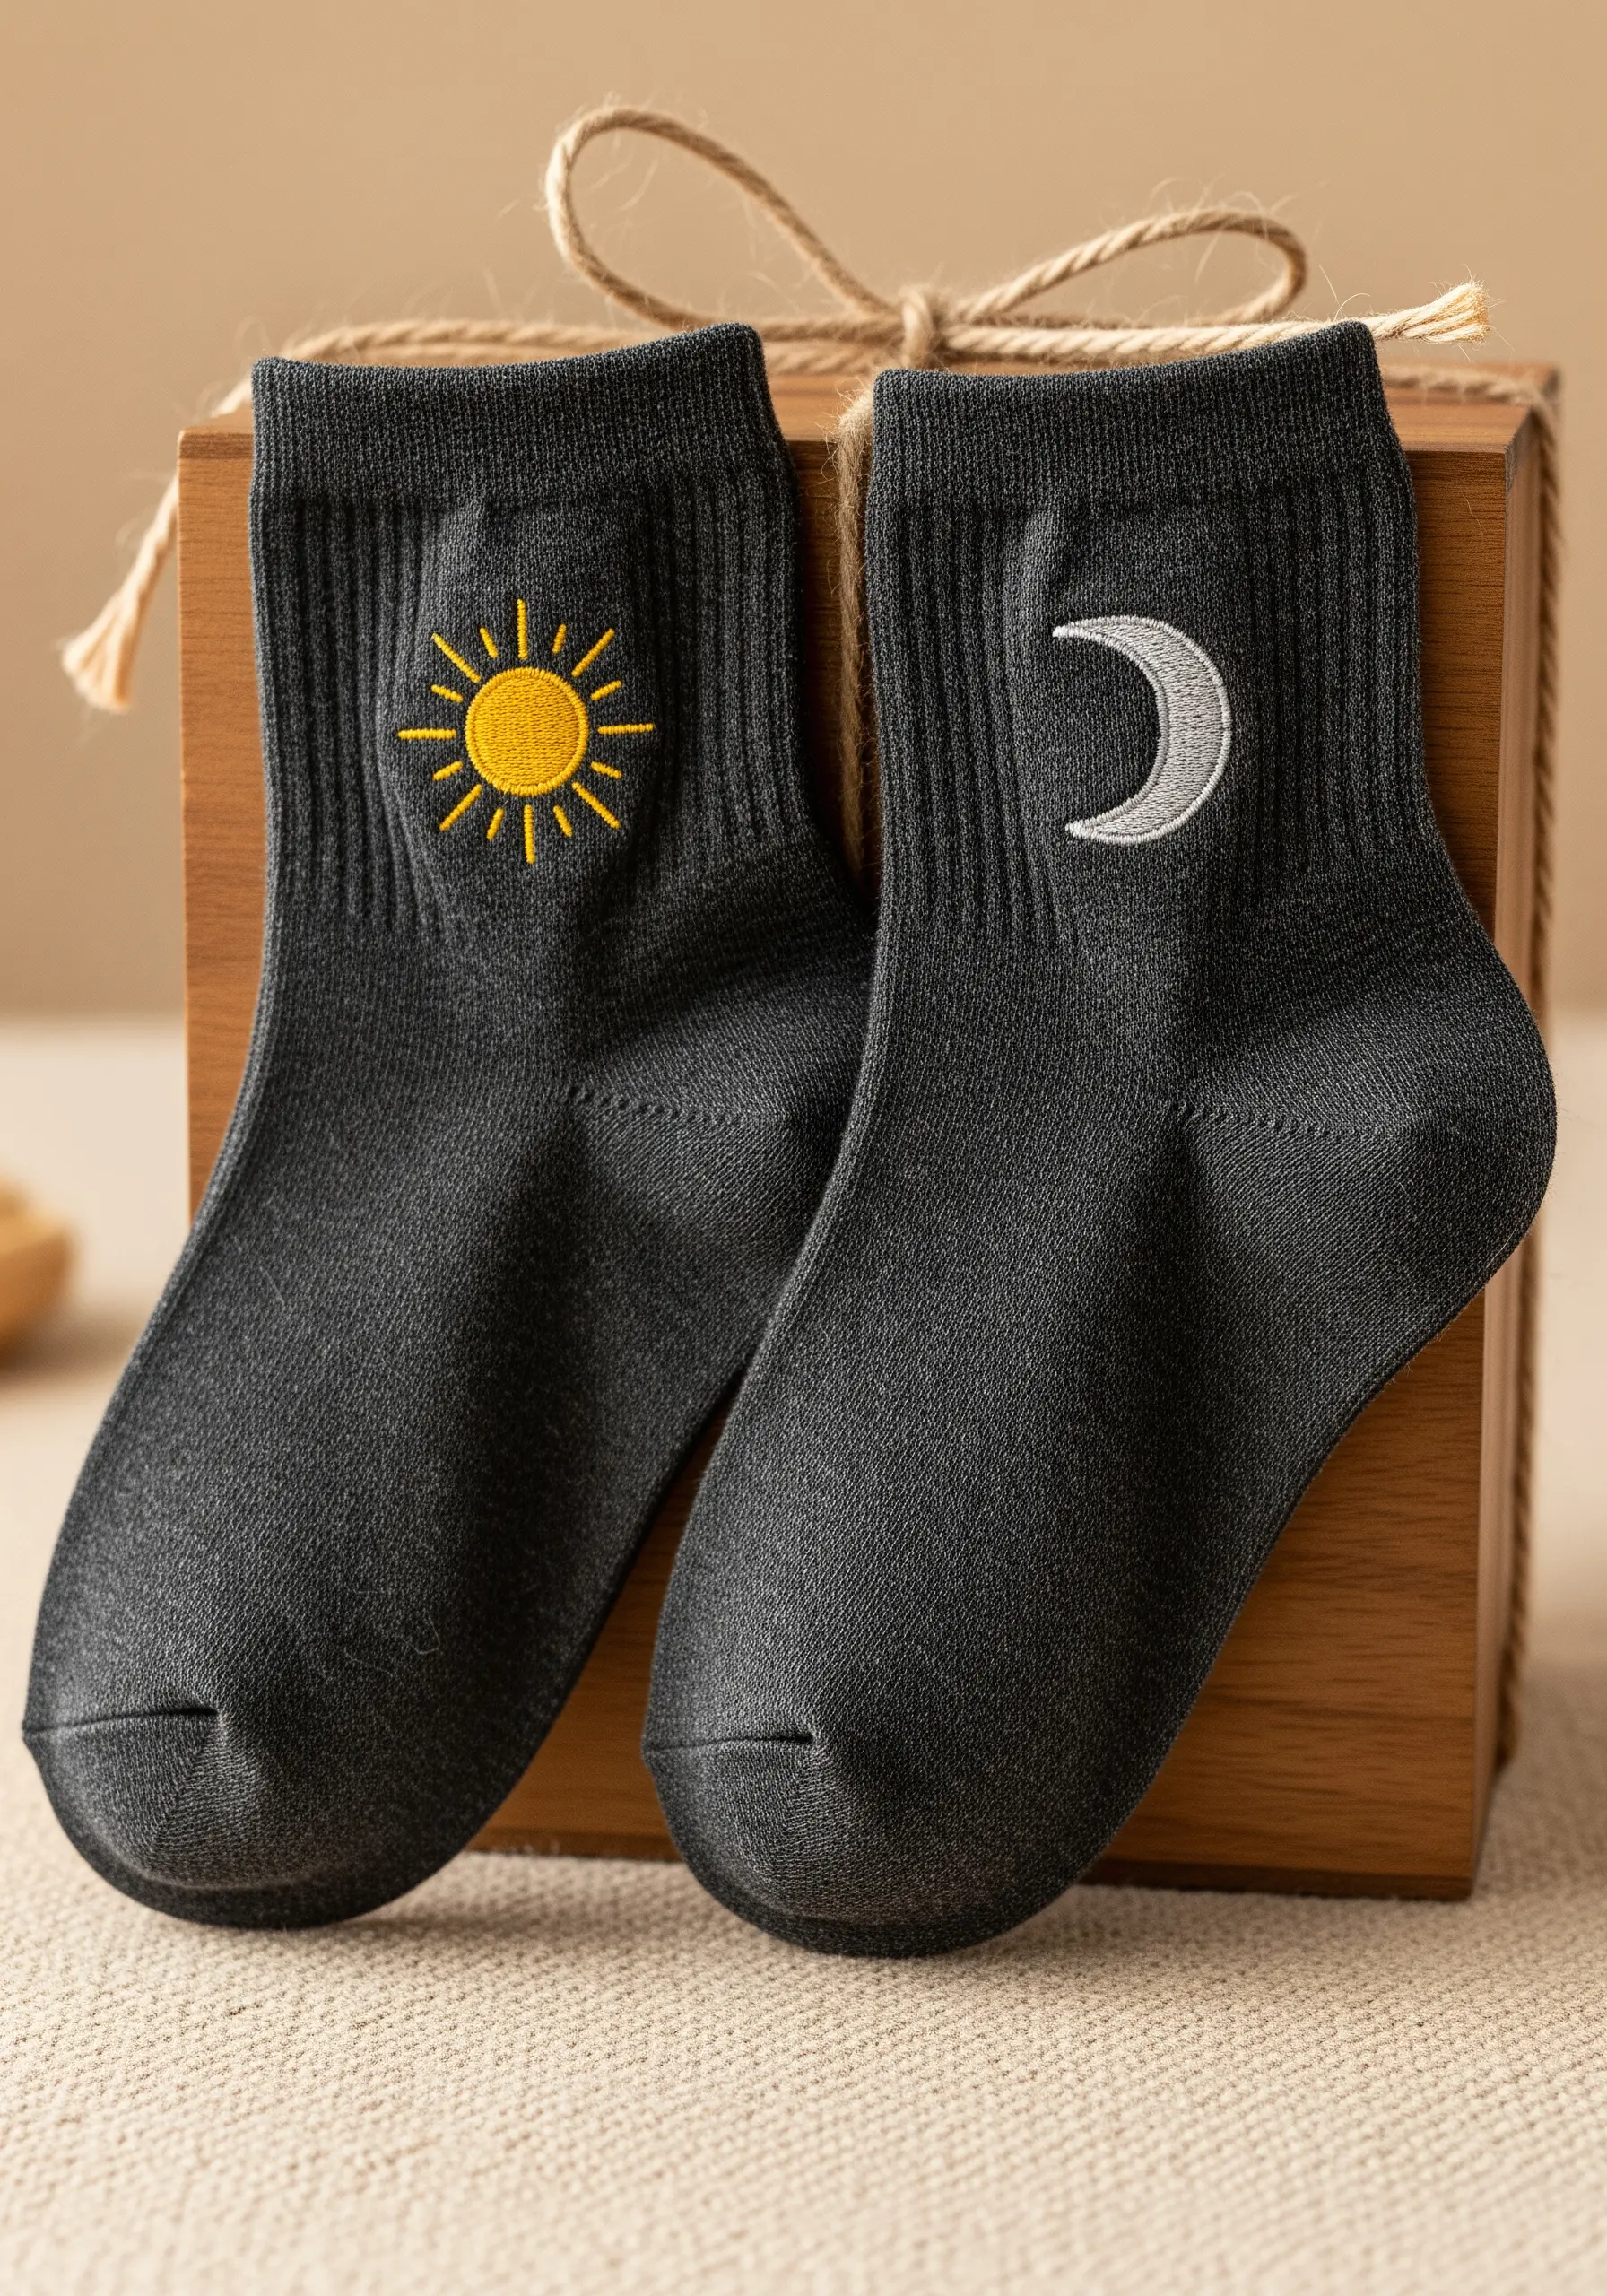
Stitching on ribbed, stretchy socks requires a flexible approach.
To prevent your design from puckering or distorting when worn, stretch the sock slightly over a small embroidery hoop or a darning egg while you stitch.
Use a simple satin stitch for the solid shapes and a backstitch for the outlines.
Keep your stitches slightly looser than you normally would to allow the embroidery to stretch with the fabric.
A mismatched pair with complementary designs like a sun and moon makes for a quirky and charming gift.
17. Capture Botanical Elegance on a Journal Cover
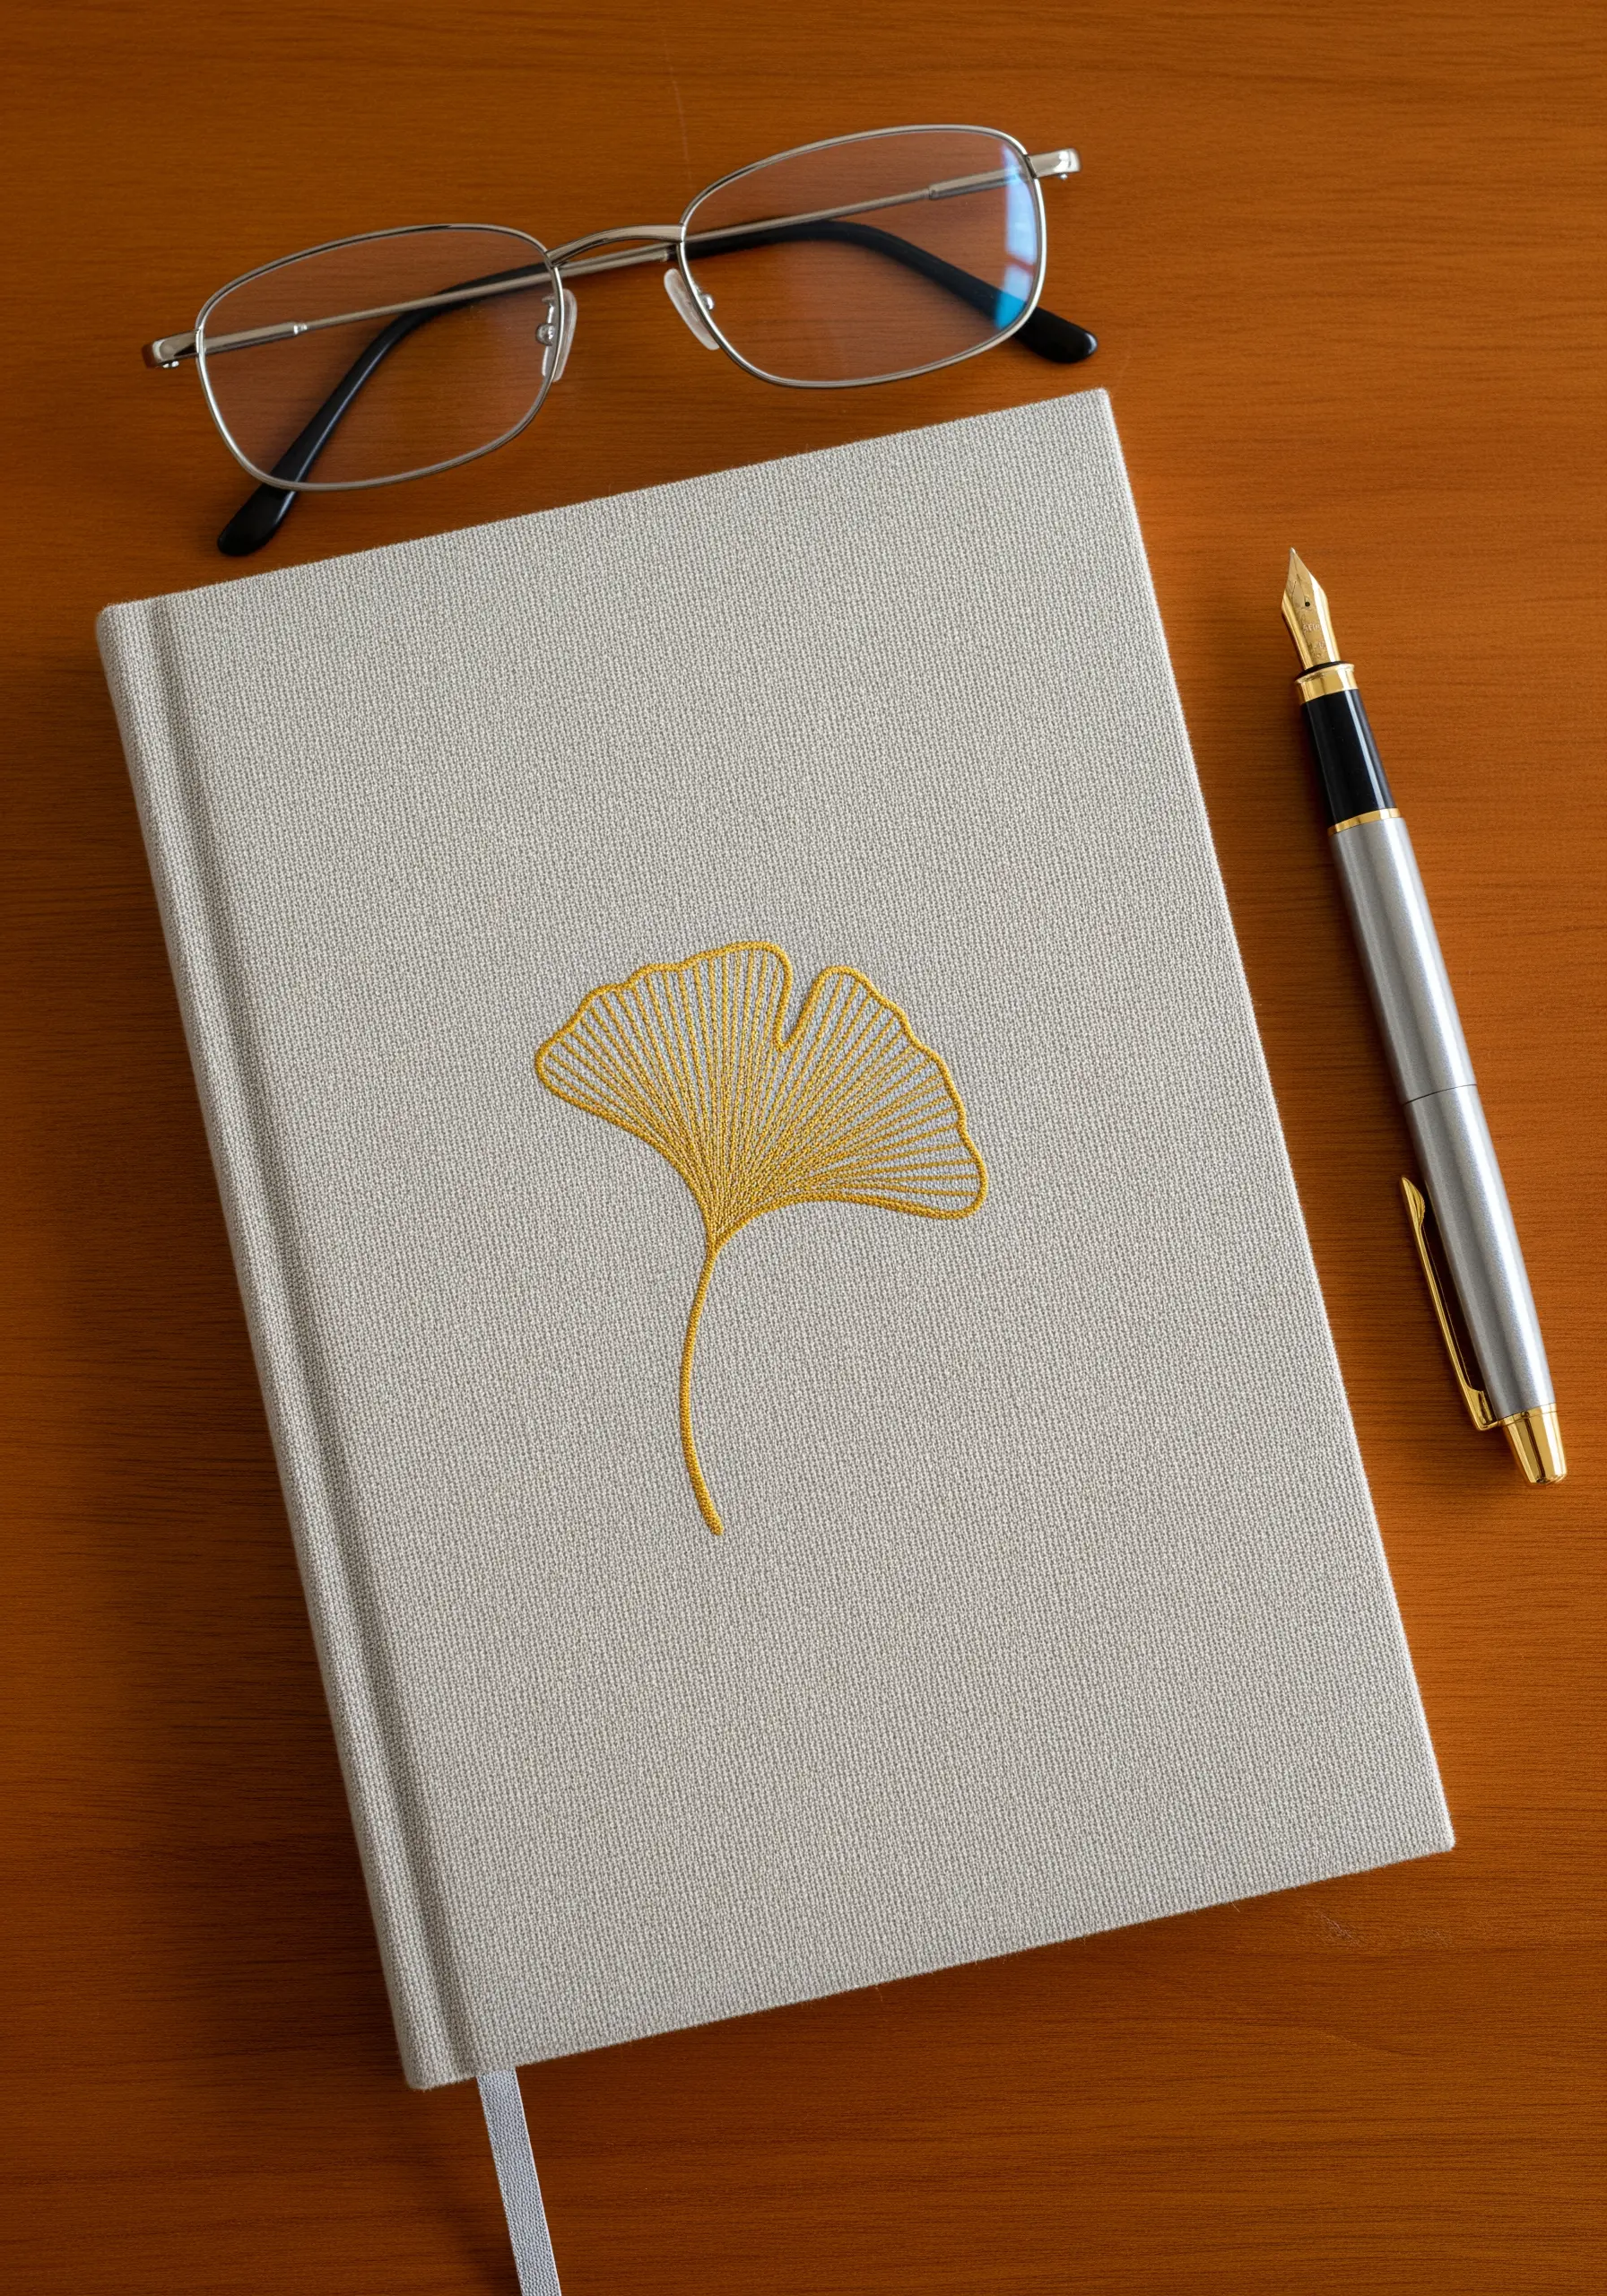
A single, elegant motif can transform a simple object into a cherished possession.
For the delicate veins of a ginkgo leaf, a split stitch executed with two strands of floss is ideal.
It creates a finer, more detailed line than a backstitch, closely mimicking the organic flow of nature.
First, stitch the central stem, then branch out to create the fanned shape of the leaf, ensuring your stitches follow the natural growth direction.
Choosing a metallic or silk thread in gold adds a touch of luxury that beautifully complements the tactile surface of a linen-bound journal.
18. Create Smooth Curves on Baby Apparel
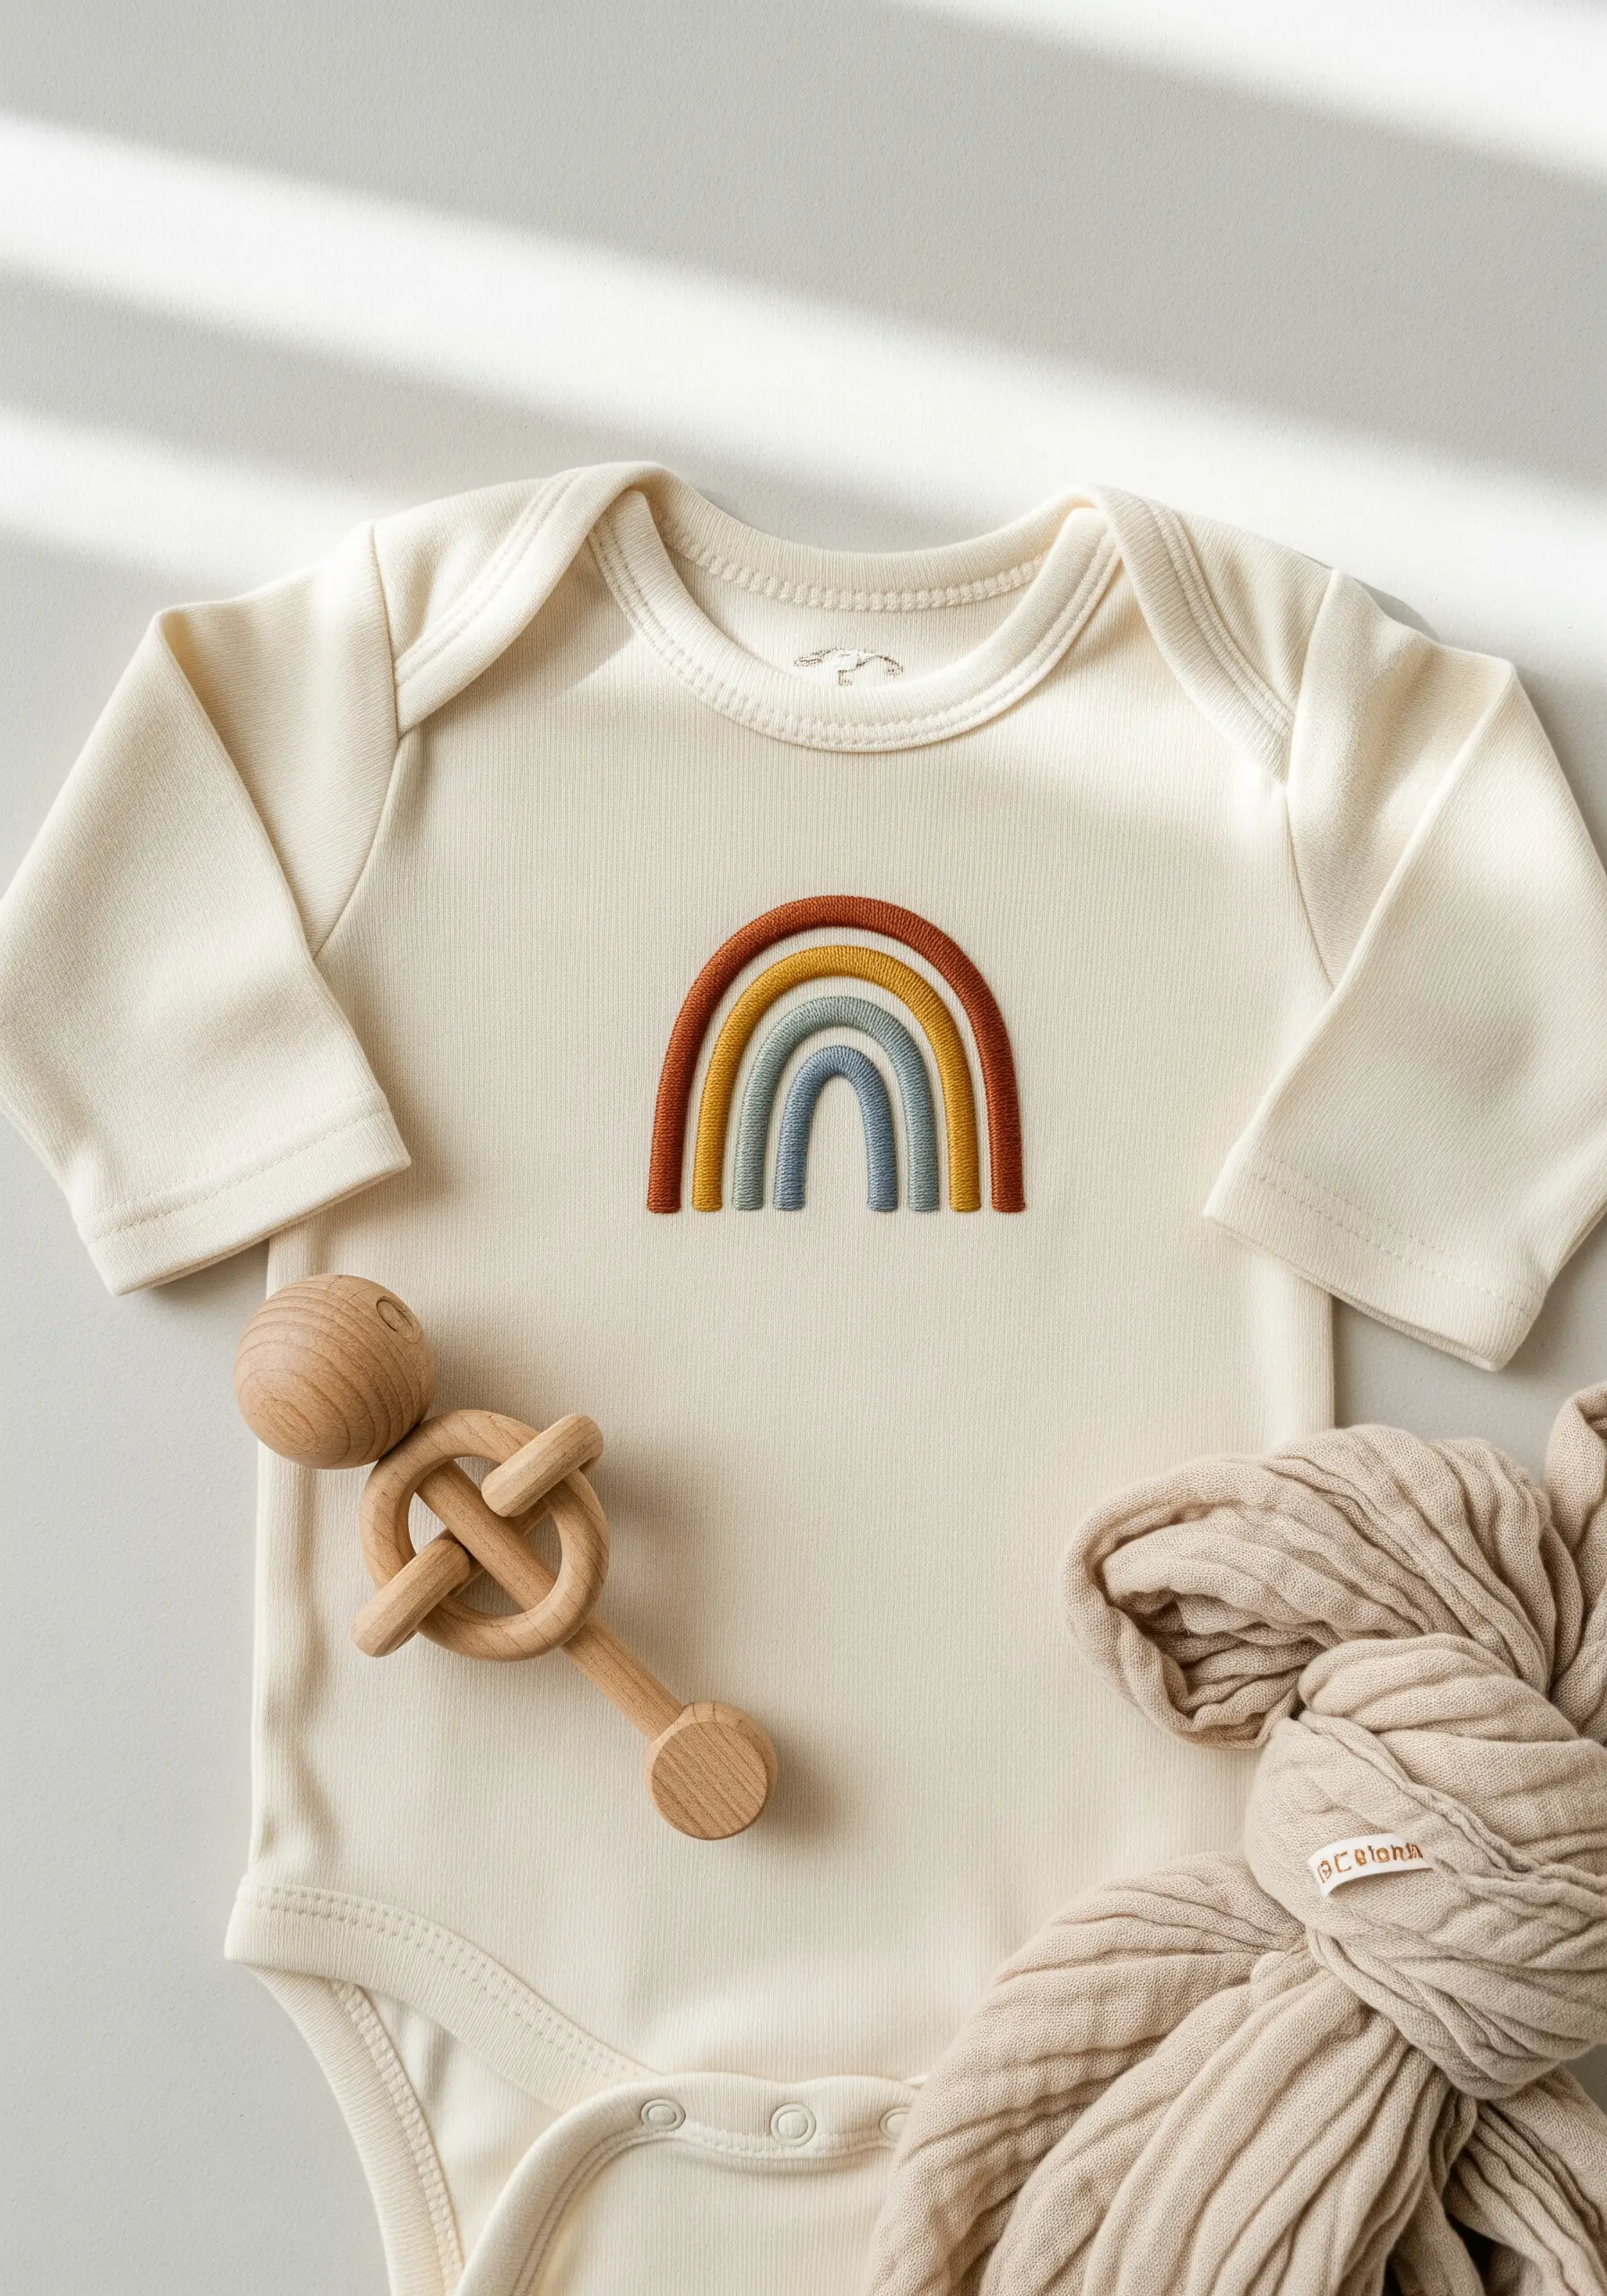
When stitching satin stitch arcs like this rainbow, the key to a smooth edge is the stitch direction.
Instead of stitching straight across, angle your stitches slightly so they fan around the curve. This prevents gaps from forming on the outer edge and bunching on the inner edge.
To keep the design soft against a baby’s skin, use a soft, iron-on backing like Sulky Tender Touch on the inside of the garment after you’re finished.
A muted, earthy color palette gives the classic rainbow motif a modern, gentle feel, perfect for minimal baby clothes.
19. Stitch a Heartfelt Hand Warmer
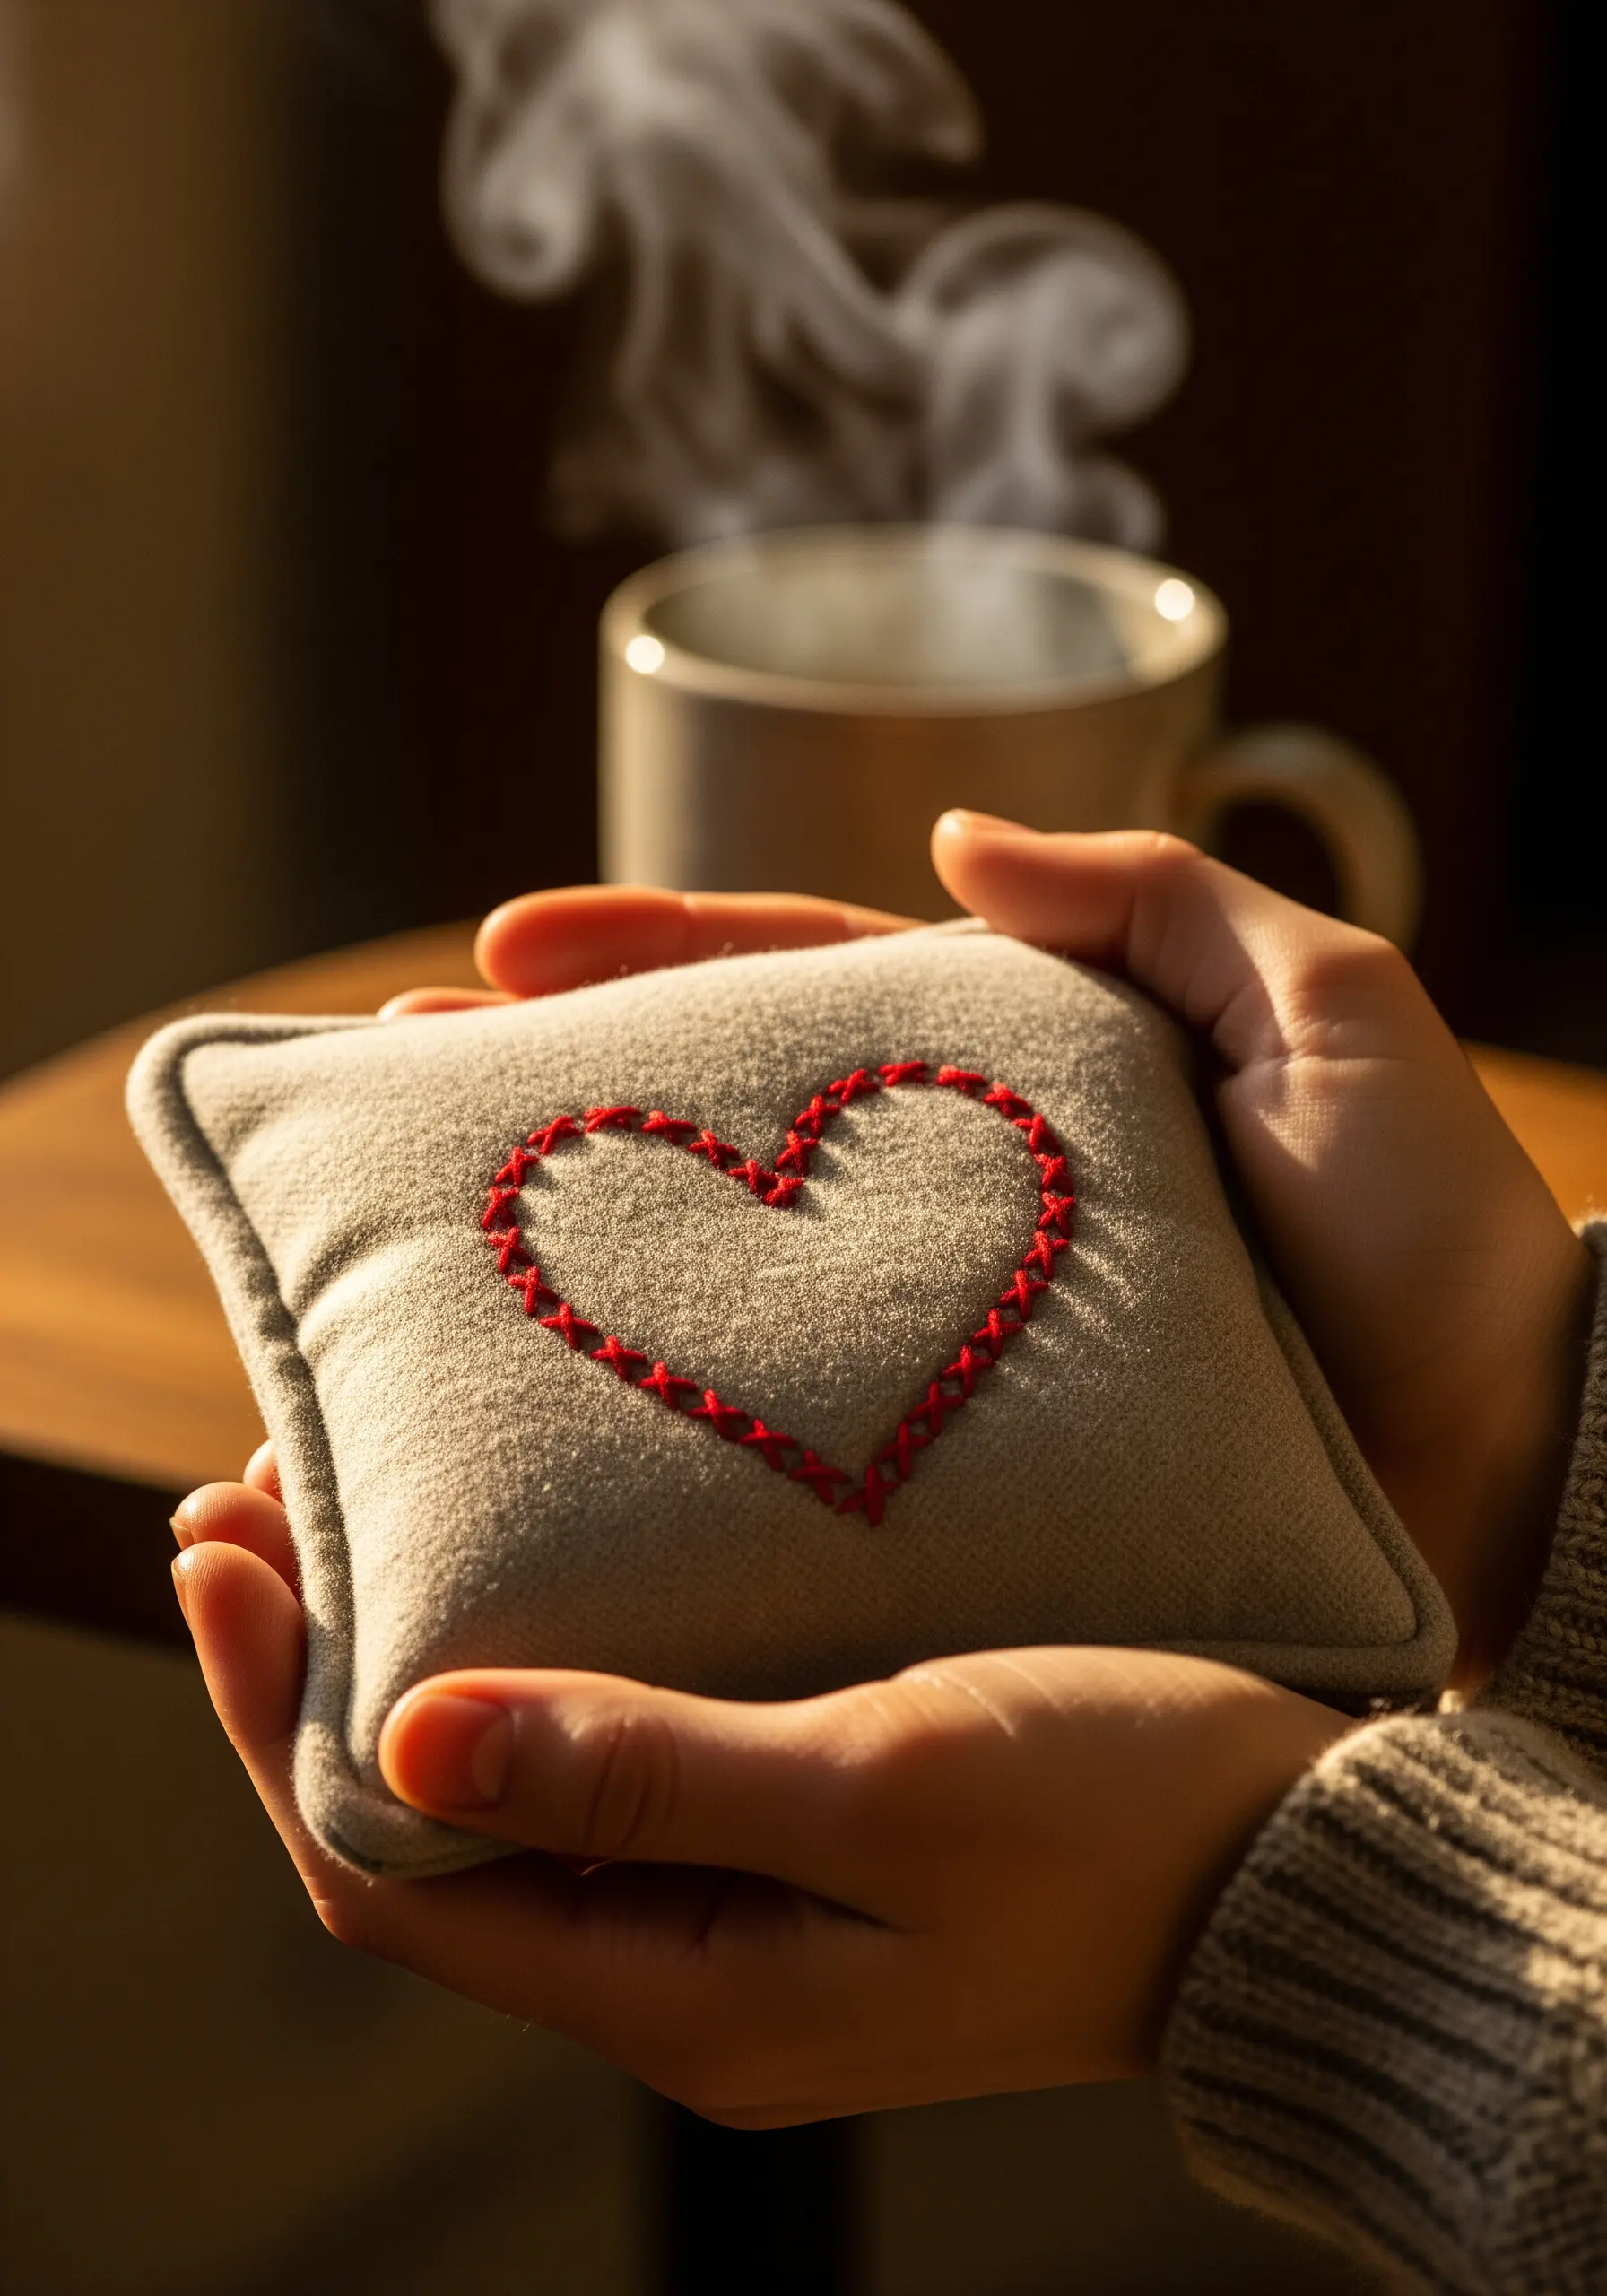
For a gift that offers literal warmth, create a simple embroidered hand warmer.
Use a thick, rustic thread like Perle cotton or multiple strands of floss to stitch a simple heart outline onto soft flannel or felt fabric.
A basic chain stitch or even a simple running stitch gives the design a charming, handmade quality.
Sew two squares together, leaving a small opening to fill with rice or flaxseed, then stitch it closed.
This quick and cozy project is a wonderfully thoughtful gift for cold winter days.
20. Capture a Skyline with Minimalist Lines

Immortalize a favorite city with a minimalist skyline embroidery.
The success of this design lies in its simplicity. Use a backstitch with two or three strands of black floss to create a clean, graphic silhouette.
Focus on capturing the most iconic peaks and shapes of the skyline rather than every single detail.
Stitching on a sturdy, non-stretch fabric like canvas or tightly woven linen ensures your lines remain straight and crisp.
This is a sophisticated way to personalize a travel accessory like a passport holder or journal for the adventurer in your life.
21. Paint with Thread for Floral Realism
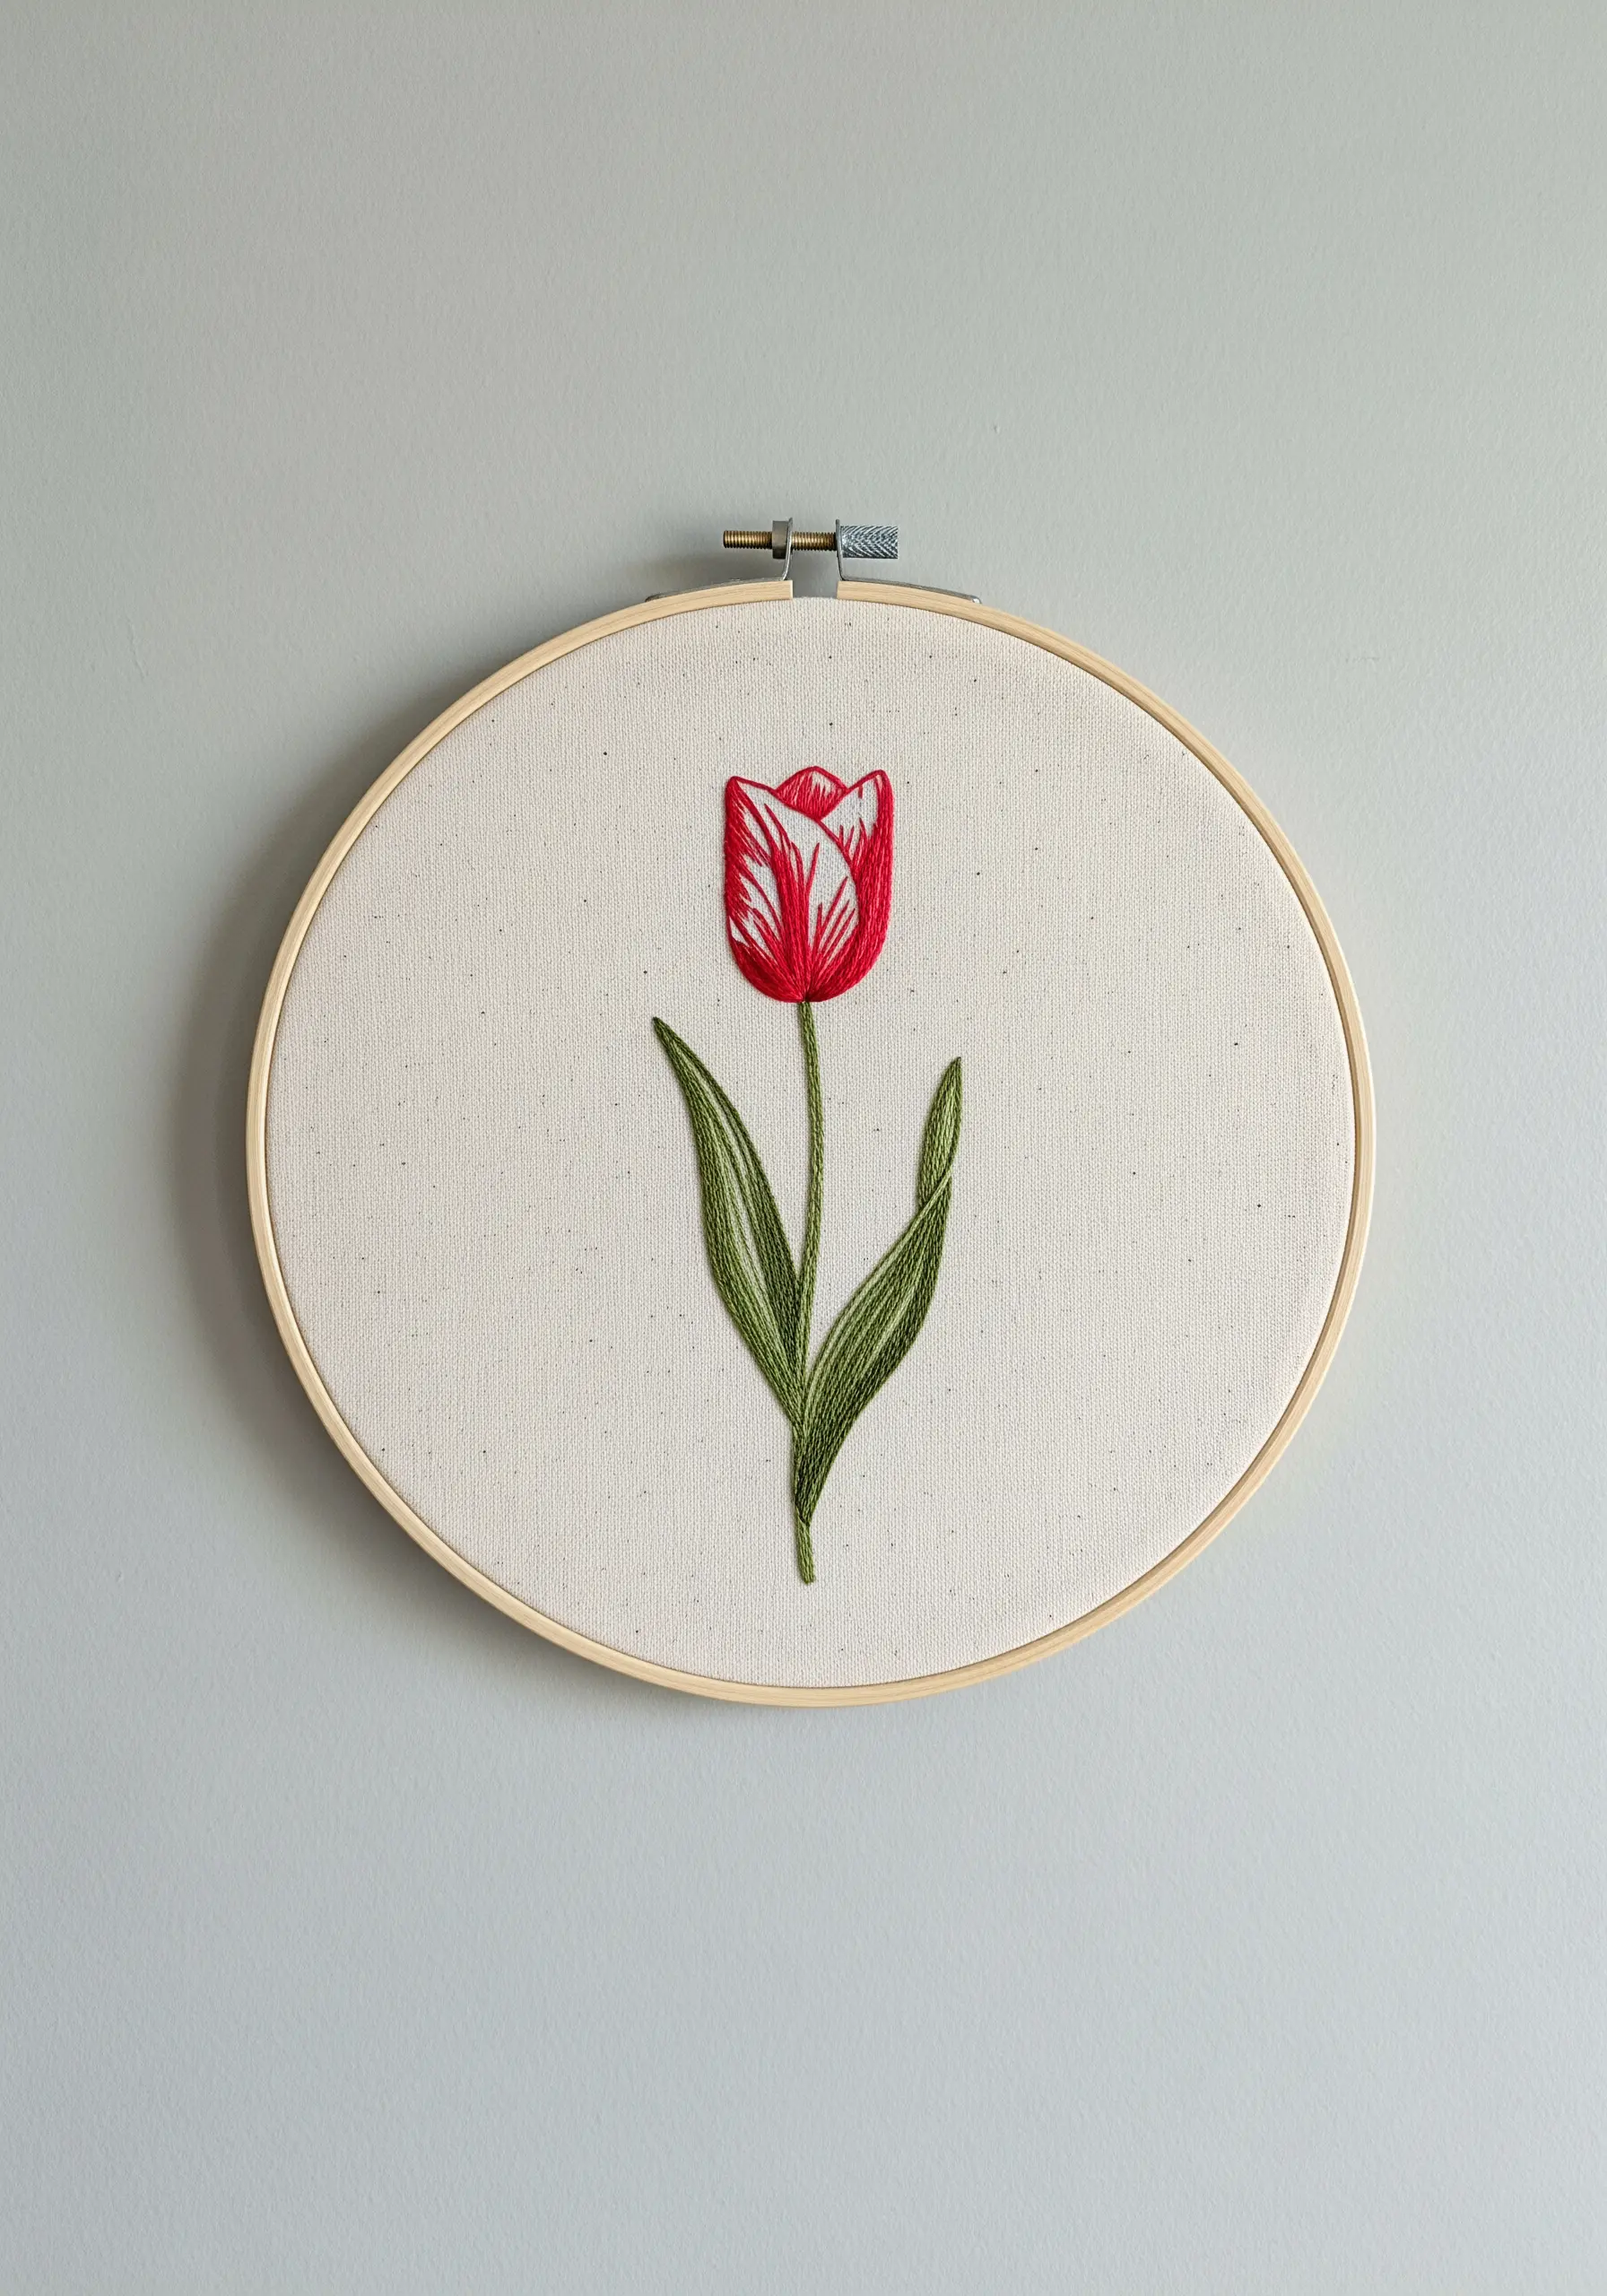
Bring a simple flower to life using the long-and-short stitch, also known as thread painting.
To create the soft gradient on the tulip petals, choose three or four shades of the same color, from light to dark.
Fill the shape with interlocking straight stitches of varying lengths, blending the colors where they meet to create a smooth transition.
Always follow the natural direction of the petal’s growth with your stitches; this simple rule adds an incredible amount of realism and movement to your botanical work.
It transforms a flat design into a dynamic, lifelike piece of botanical textile art.
22. Use Bold Stitches on Soft Felt
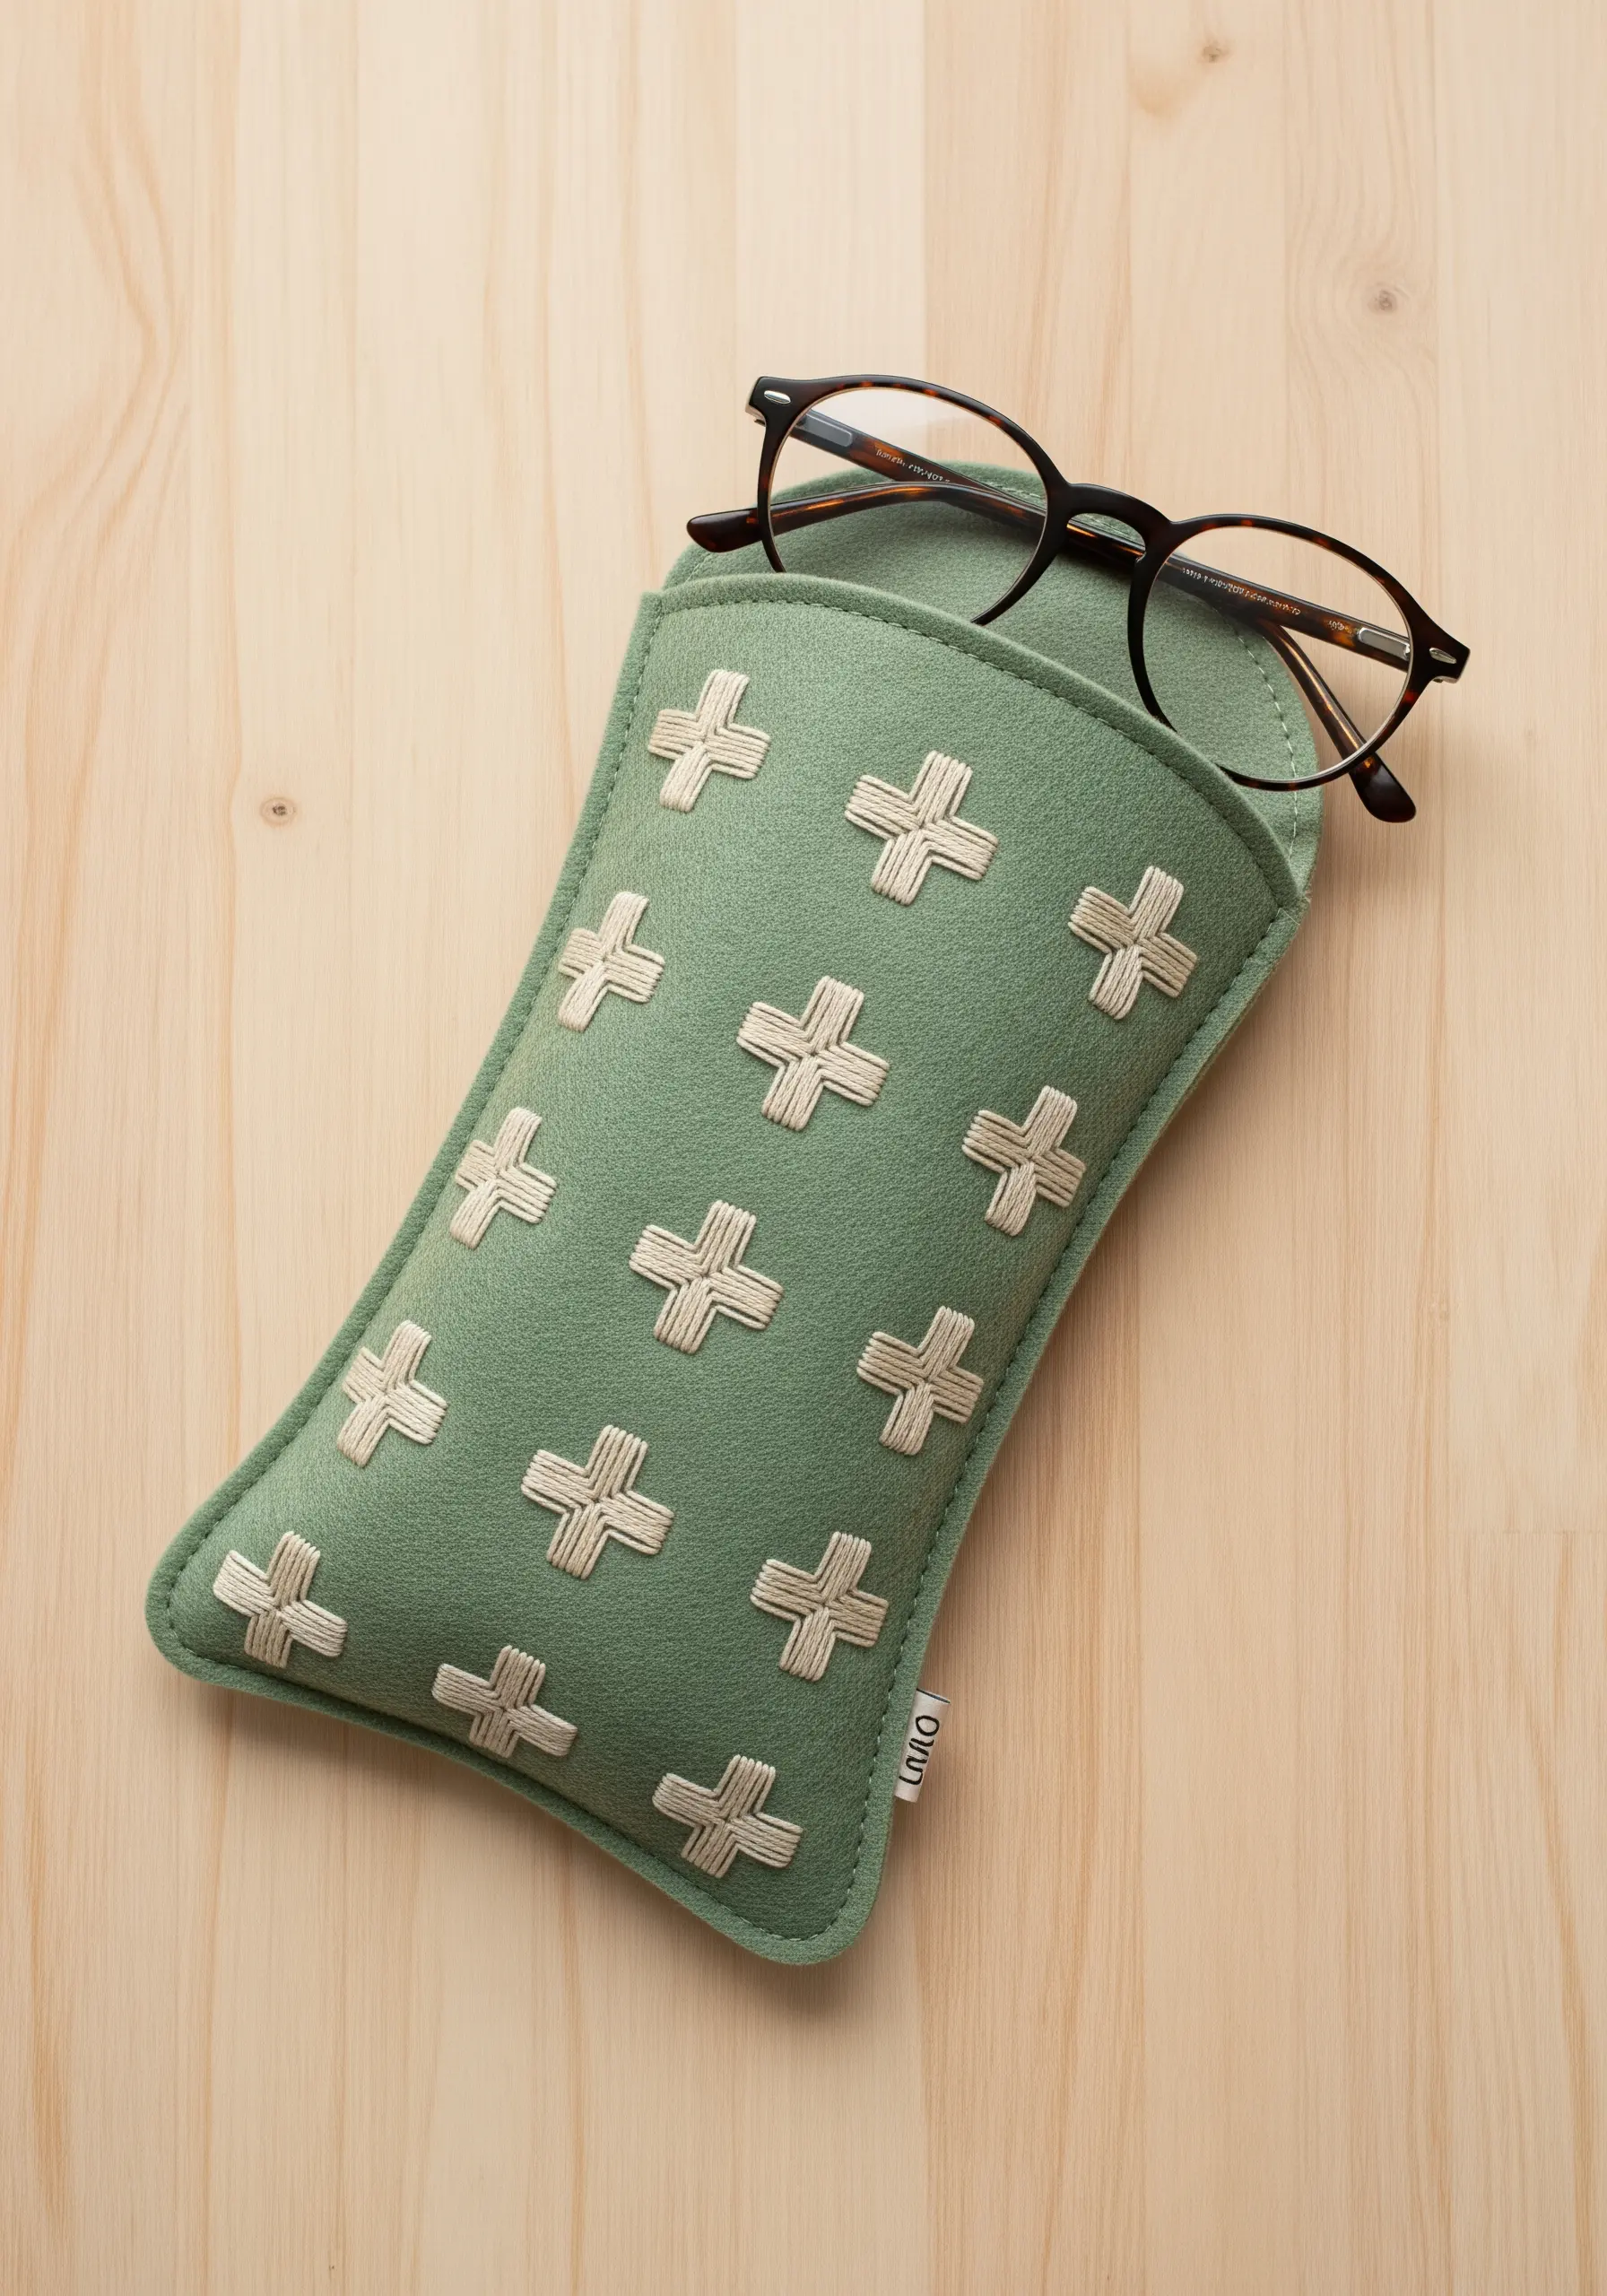
Felt is a forgiving and wonderful fabric for beginners, as it doesn’t fray and has a stable structure.
To create a bold, graphic pattern that stands out against the soft texture of felt, use a thick thread like Perle cotton #5 or even fine tapestry wool.
Stitch a simple repeating motif, like these crosses, using just a few straight stitches for each one.
The contrast between the thick, slightly glossy thread and the matte felt creates a compelling visual and tactile experience.
This technique is perfect for creating durable and stylish pouches, coasters, or ornaments.
23. Define an Icon with Negative Space
Sometimes, the most powerful designs are the simplest.
For a clean, modern look, stitch a recognizable icon using only outlines and allowing the fabric color to fill the shape.
Use a fine, whipped backstitch or stem stitch to create a smooth, solid line that reads clearly from a distance.
Placing a small, single-color motif on a functional item like an apron adds a touch of personal flair without being distracting.
This less-is-more approach is perfect for creating sophisticated, understated gifts for coffee lovers, bakers, or gardeners.
24. Construct Geometric Forms with Straight Stitches
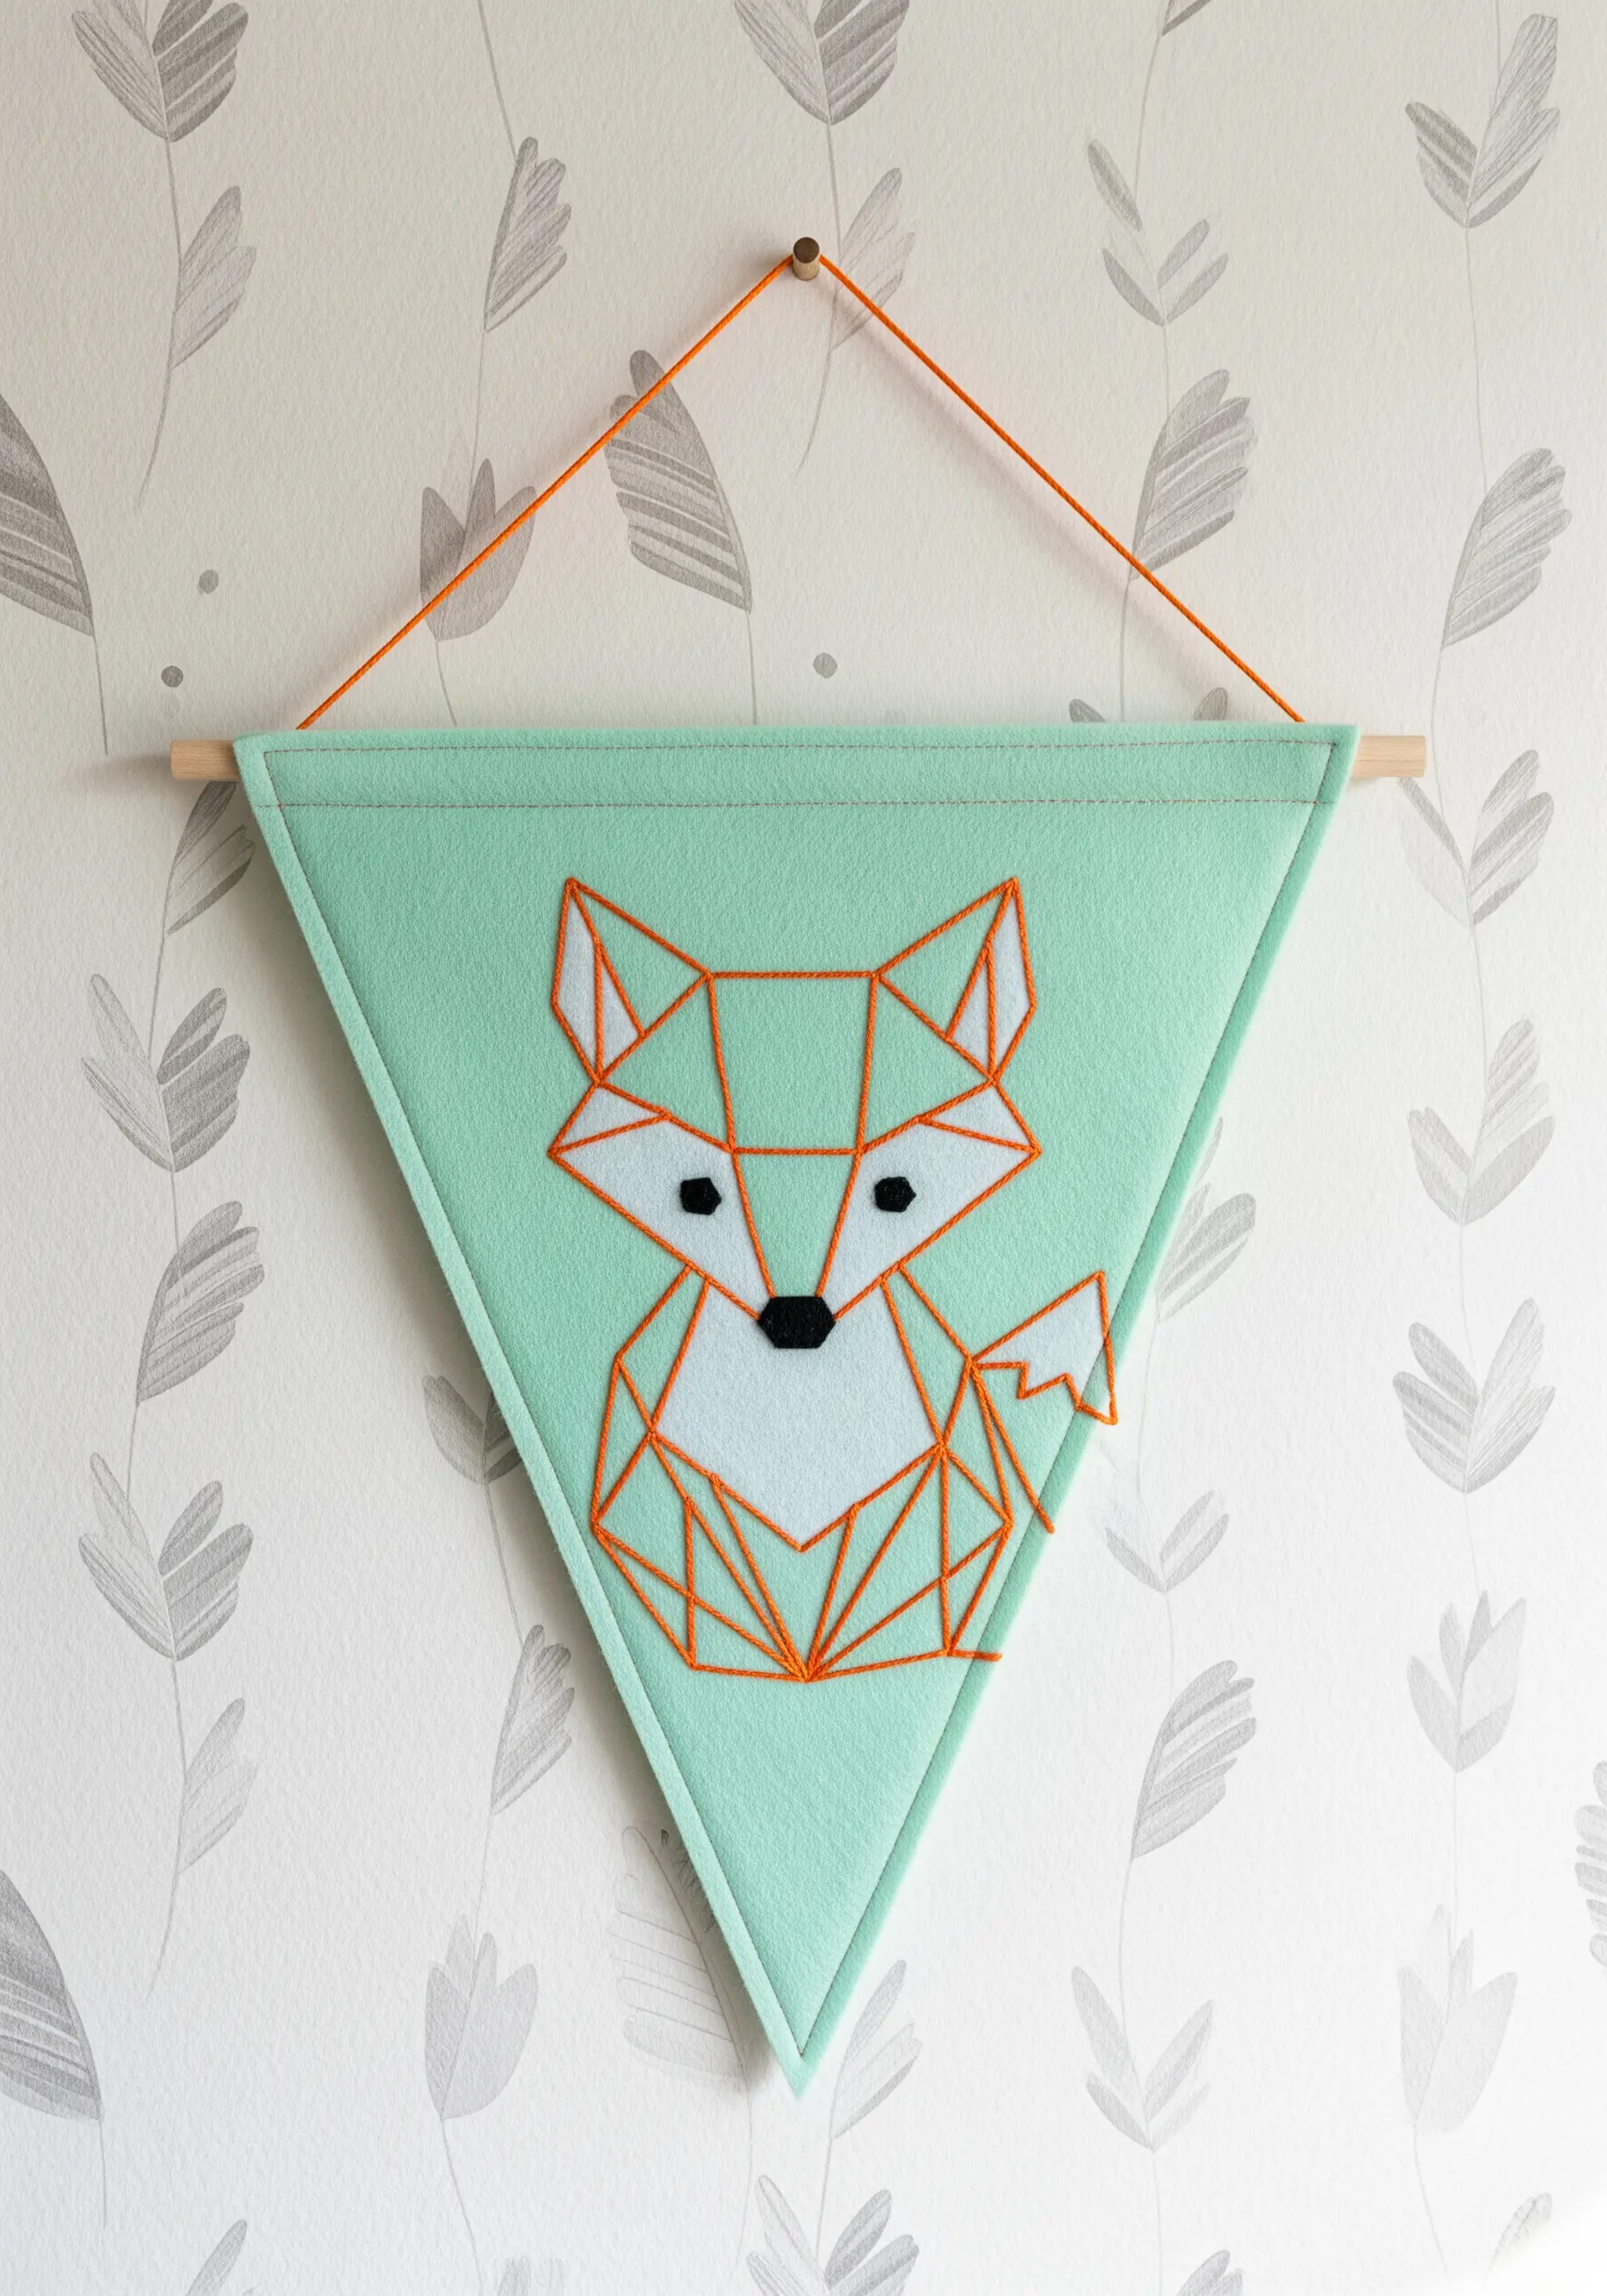
You can build complex, faceted designs using only the most basic stitch.
This geometric fox is created entirely with straight stitches. The key is to precisely place each stitch to form the different triangular planes.
To achieve this crisp, architectural look, use a water-soluble sticker or pen to transfer the pattern accurately onto your felt pennant.
A bright, contrasting thread color like orange makes the geometric lines pop, turning a simple animal shape into a striking piece of modern yarn wall art for a nursery or office.


