

When you begin to stitch for a new baby’s room, you’re doing more than just decorating. You are weaving softness, warmth, and quiet intention into the very first space they will call their own. Think of your needle and thread not just as tools for making pictures, but as instruments for creating texture, comfort, and calm.
Each idea here is a starting point—a technique to explore. Perhaps you’ll fall in love with the smooth, painterly finish of long-and-short stitch, or the wonderfully plush texture of dense French knots. This isn’t about following patterns perfectly; it’s about discovering which stitches feel right in your hands and best express the gentle atmosphere you want to create.
Let these projects give you the confidence to play with color, to explore new textures, and to trust your own creative instincts. The most beautiful nursery art is not the most complex, but the piece that is stitched with the most heart. You have everything you need to make something truly special.
1. Master Soft Fur with Directional Satin Stitch

To give woodland creatures a soft, realistic coat, adjust the direction of your satin stitch to follow the natural flow of fur.
Use just two or three strands of floss; this allows the colors to blend gently without creating harsh lines, giving the animal a softer, more touchable appearance.
For the fine details like whiskers and sleepy eyes, switch to a single strand of a darker contrasting color worked in a simple backstitch.
This contrast between the soft fill and the crisp outline is what makes the final piece look so polished and intentional.
2. Create Tactile Rainbows with Wrapped Fiber Art

This textural rainbow isn’t traditional embroidery, but a form of fiber art that adds incredible softness and dimension to a nursery wall.
You achieve this look by wrapping thick cotton rope with various colors of yarn, securing the ends discreetly on the back.
Shape the wrapped ropes into an arch and stitch them together firmly to build the rainbow structure.
The clouds are created with macrame knotting techniques, adding another layer of texture that contrasts beautifully with the smooth, wrapped arches.
This project is perfect for using up leftover yarn and creating colorful fiber art installations that will make your walls come alive.
3. The Elegance of Minimalist Line-Art Menageries
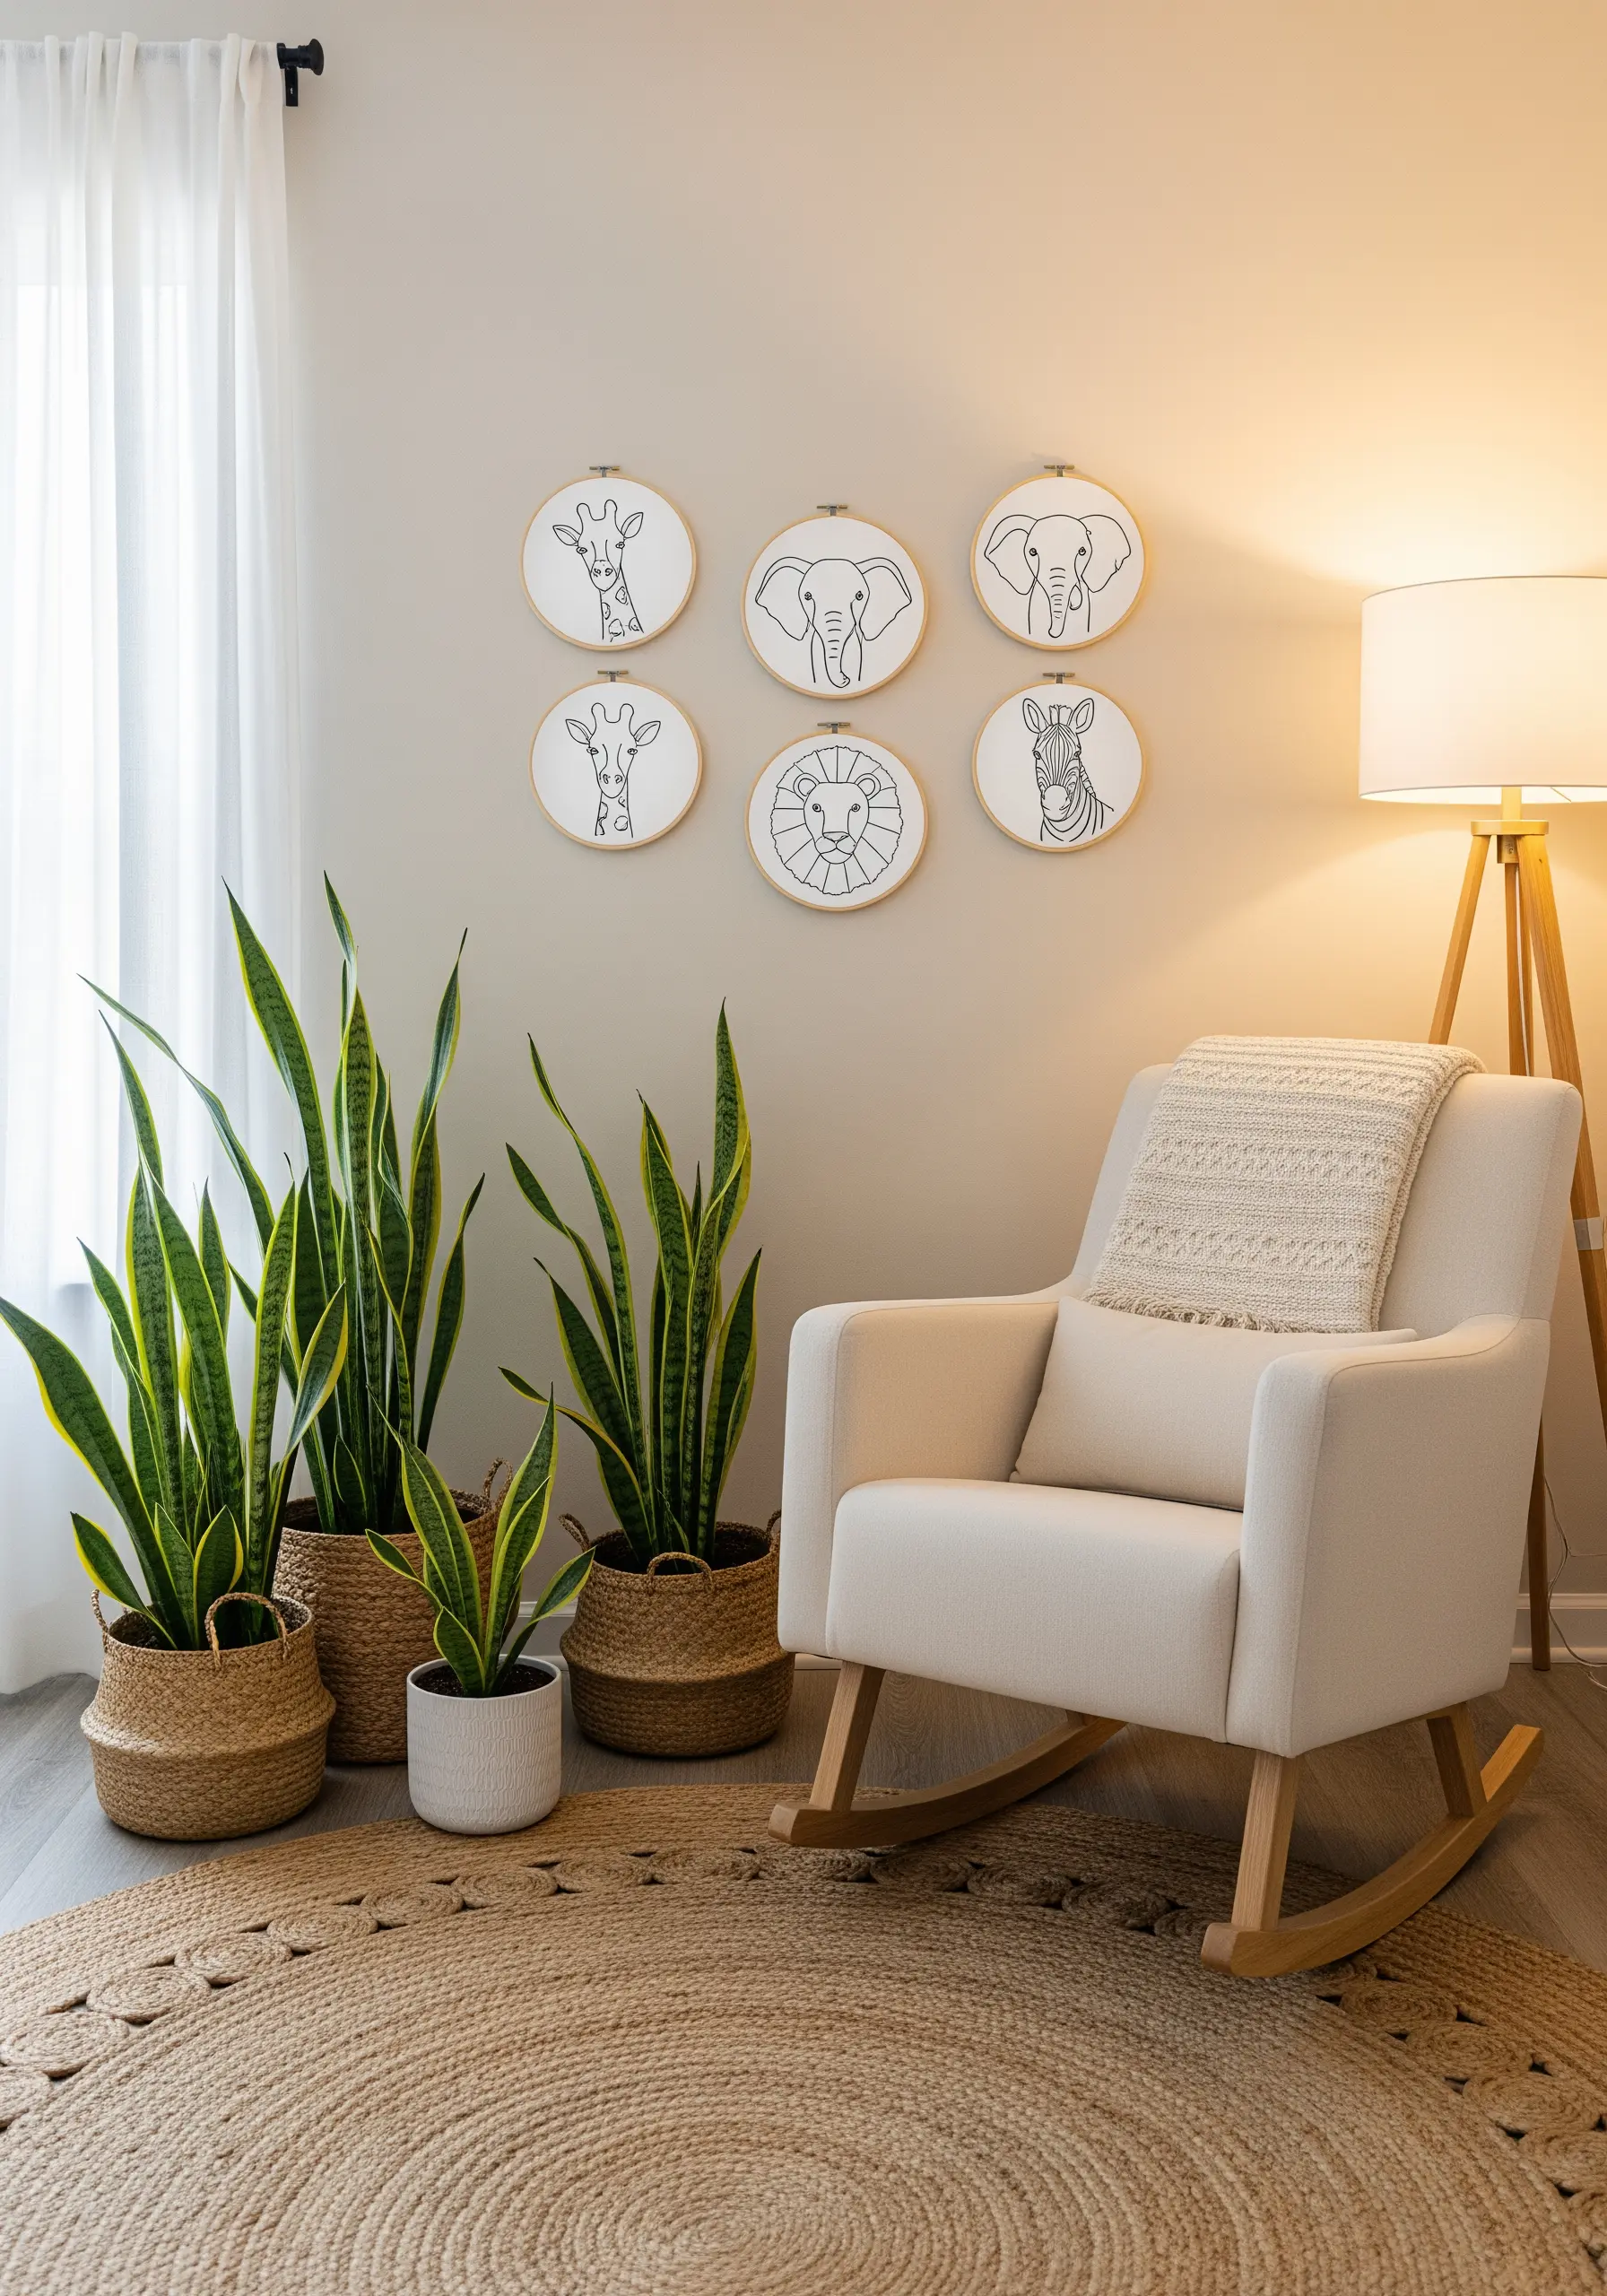
Embrace the power of negative space to create a modern and serene nursery gallery wall.
For these simple line art embroidery ideas, use a whipped backstitch or a stem stitch with three strands of black floss to achieve a smooth, slightly raised line that has presence without being heavy.
The key to this style’s success is consistency in your stitch length and tension, which results in lines that look as clean and effortless as an ink drawing.
Grouping several simple motifs together creates a more impactful display than a single, complex piece.
4. Stitch a Celestial Scene on a High-Contrast Canvas
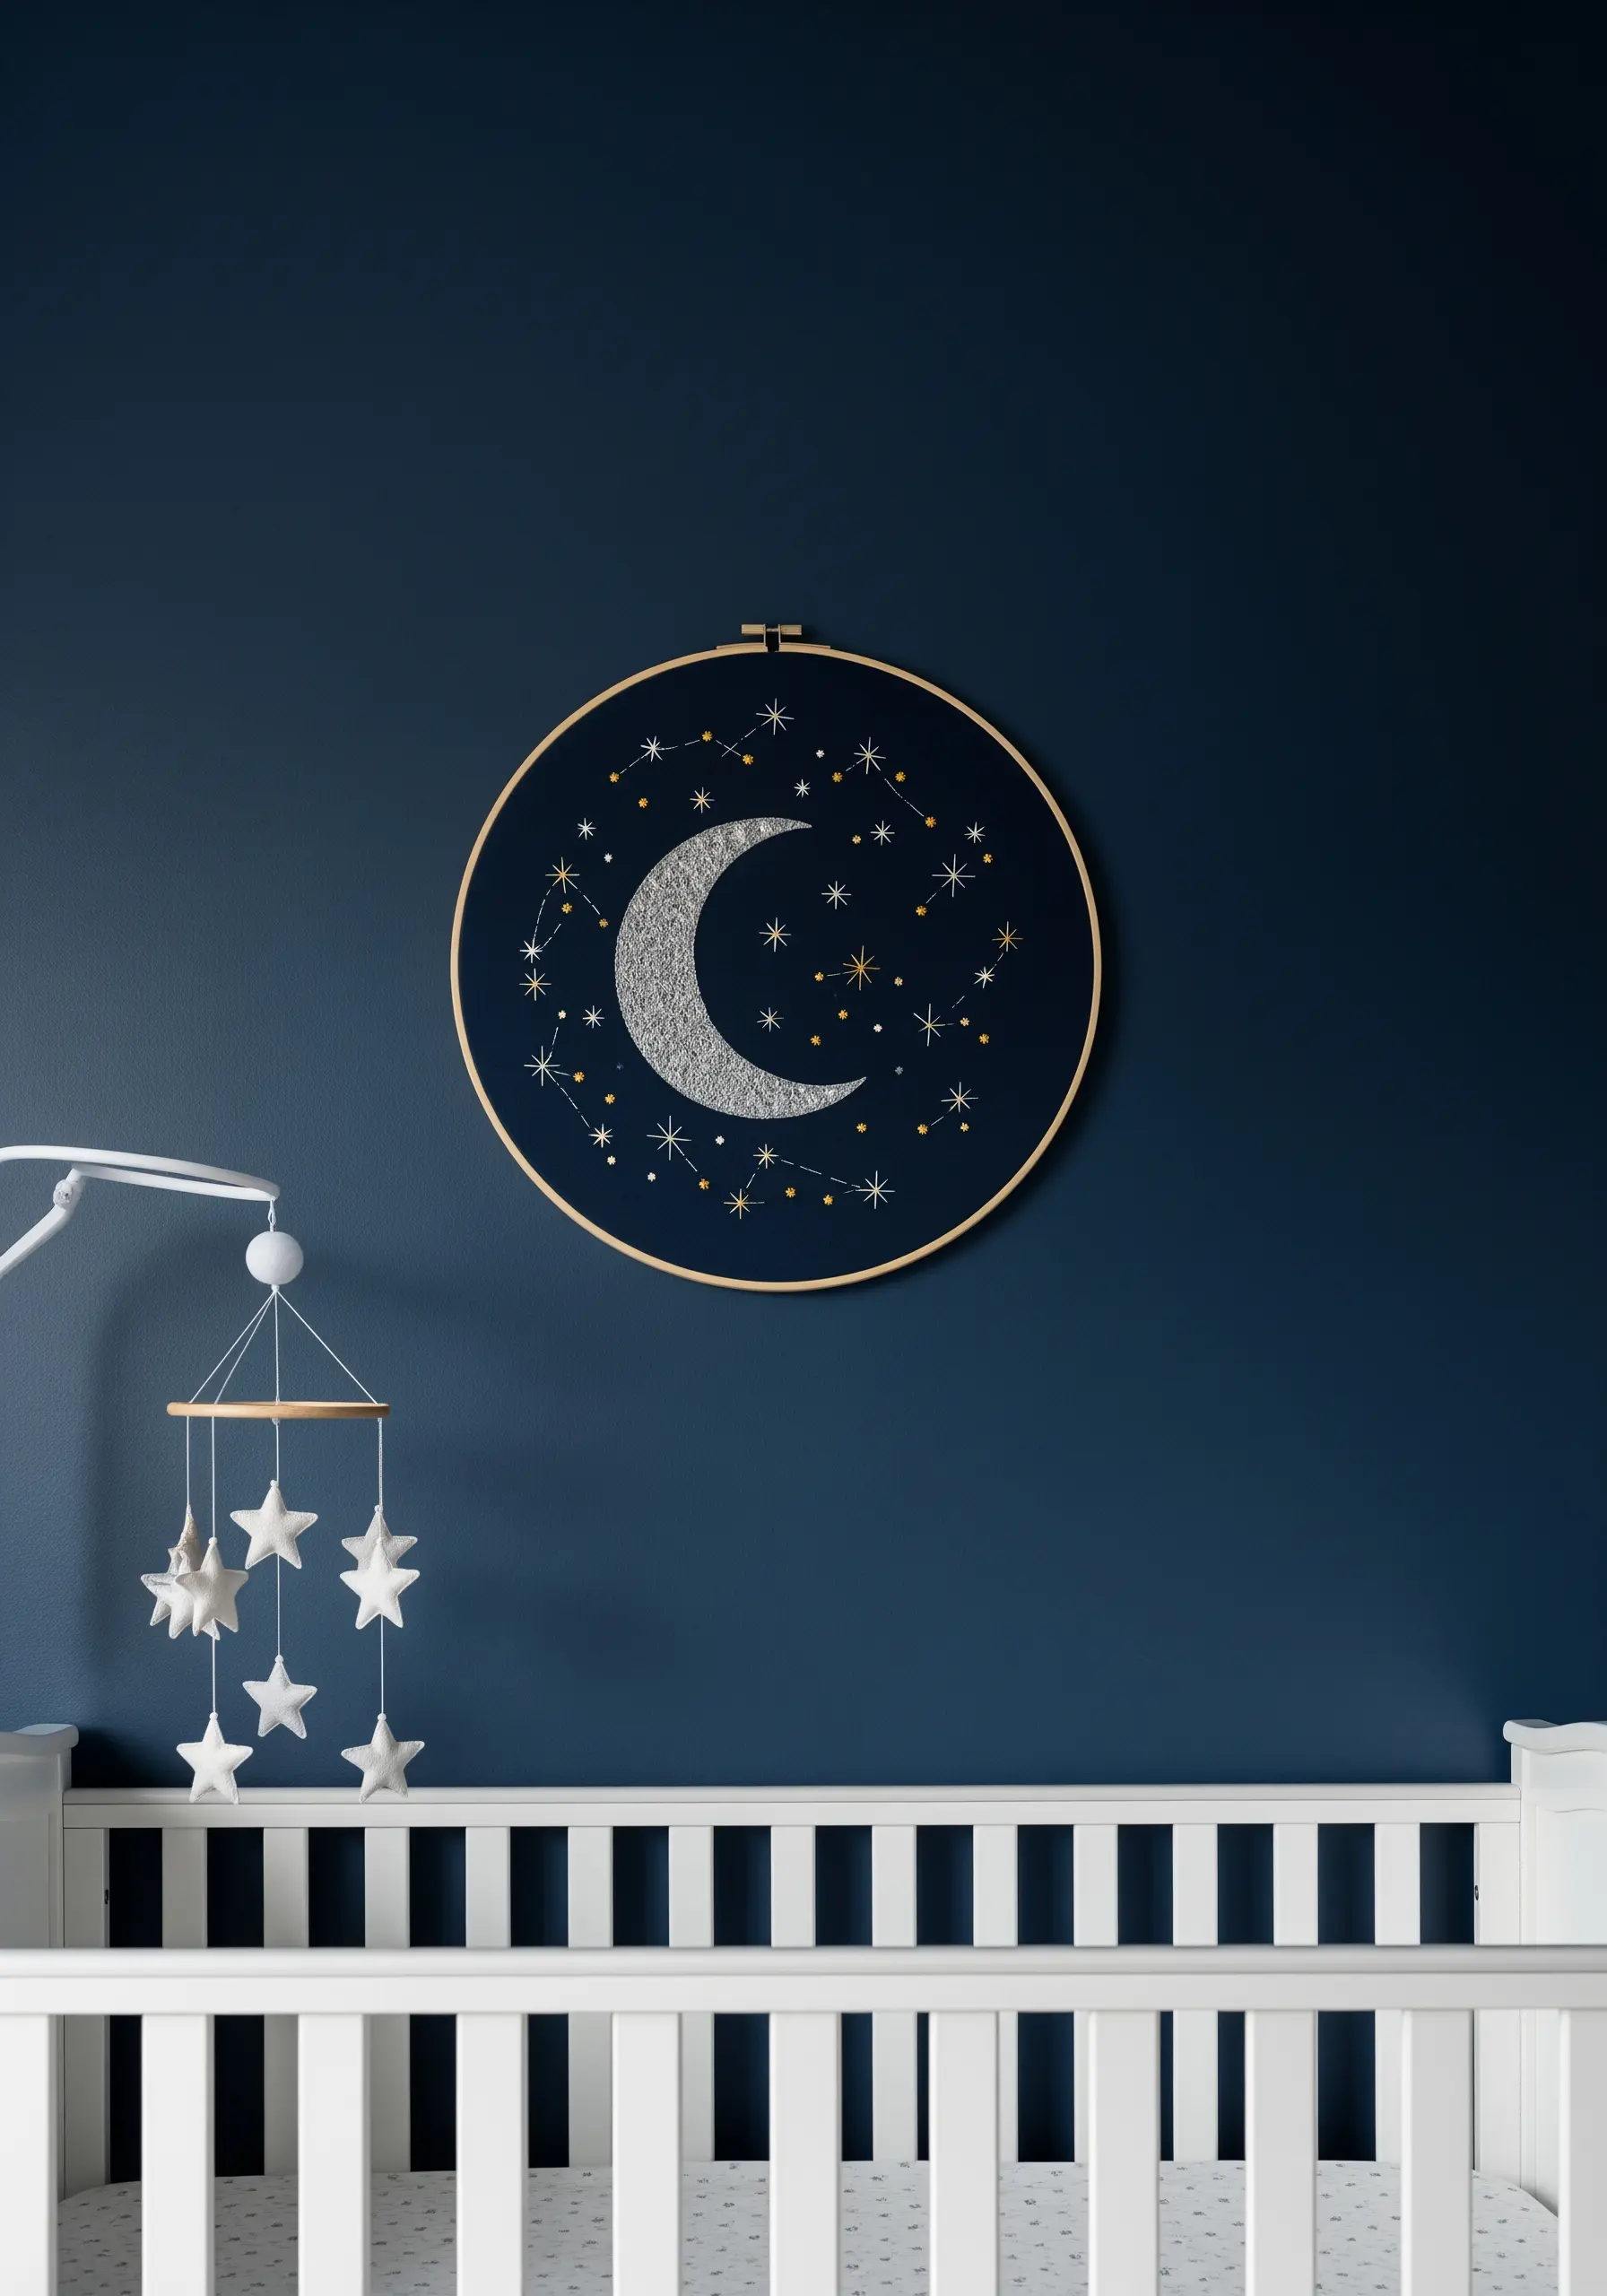
Working on dark fabric makes light and metallic threads truly radiate, creating a dramatic and magical effect perfect for a celestial theme.
Use a silver metallic thread for the moon, filling it with a dense satin stitch to create a solid, light-catching surface that mimics moonlight.
For the constellations, use a mix of tiny star stitches and French knots with one or two strands of gold or high-sheen white thread.
This variation in stitch and thread type adds subtle complexity and makes your night sky twinkle with depth and personality.
5. Add Gentle Dimension with Stuffed Appliqué
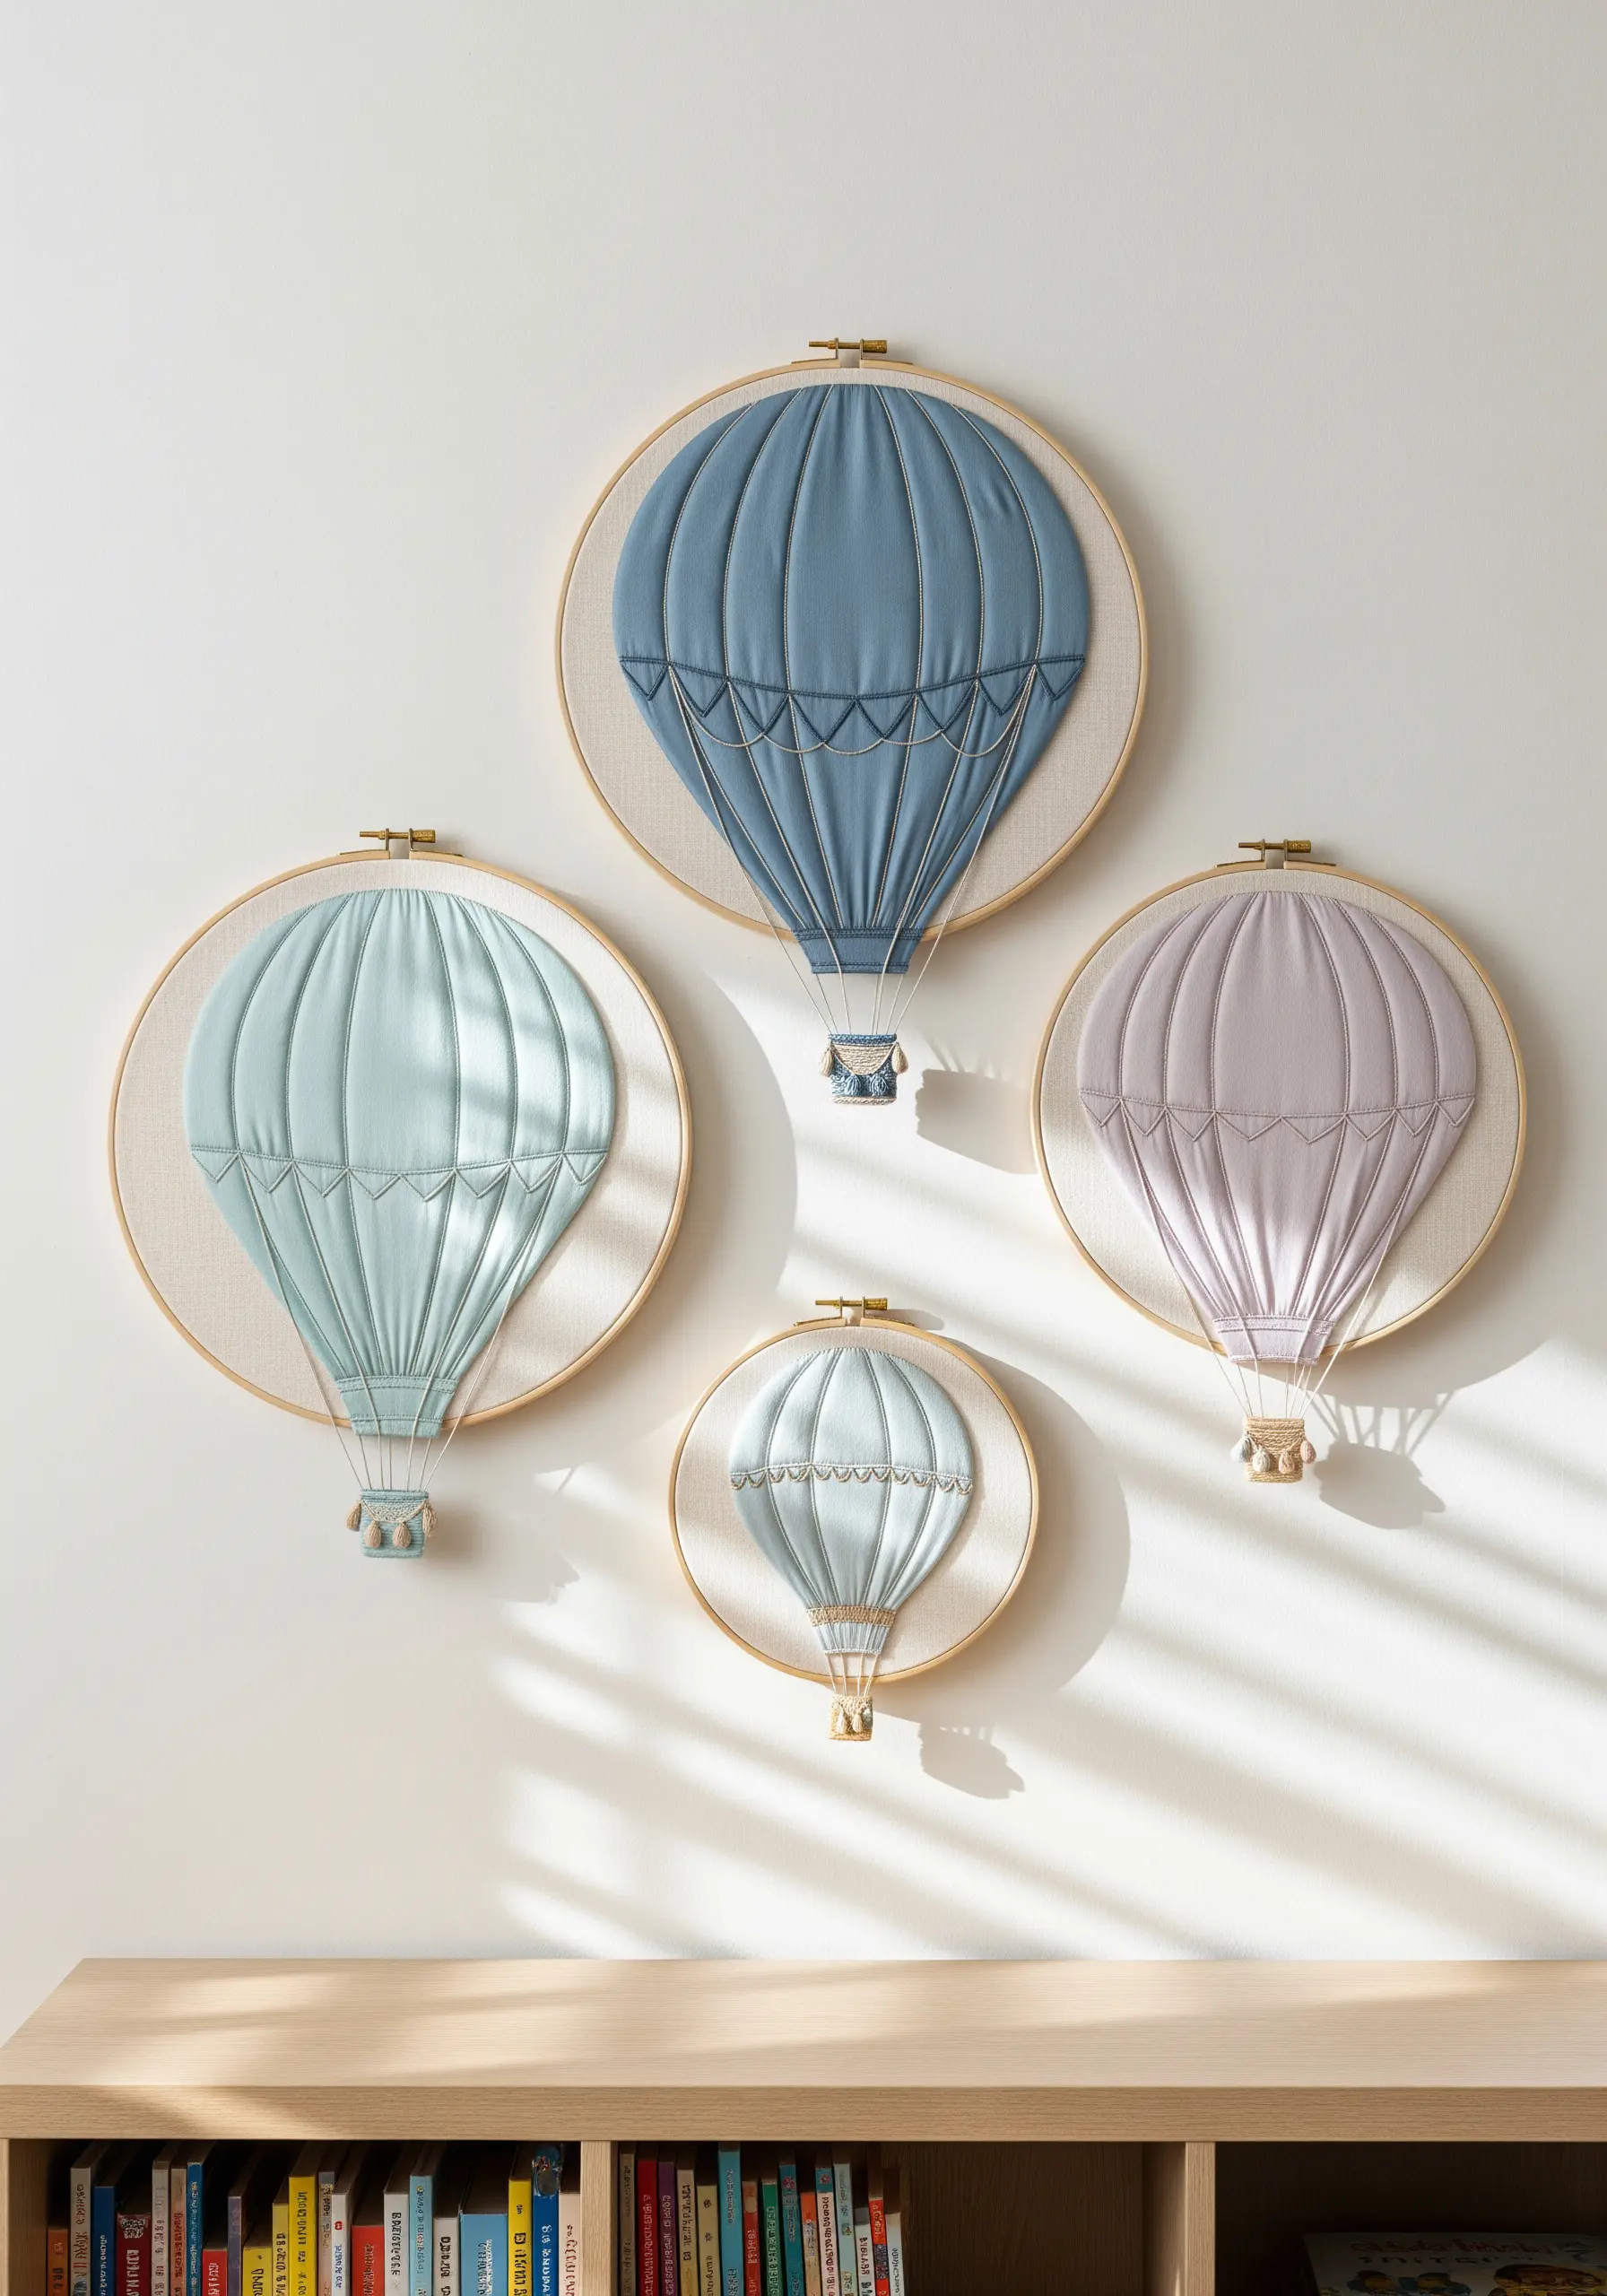
Lift your designs off the fabric with a soft, sculptural technique known as trapunto or stuffed appliqué.
Stitch two layers of your balloon-panel fabric together, leaving a small opening at the bottom.
Gently fill the shape with polyester fiberfill to your desired puffiness before stitching the opening closed.
Finally, couch thin cords over the seams to define the balloon’s structure, creating a charming 3D effect that adds gentle dimension without being overwhelming.
6. Combine Knitting and Fabric for a Tactile Alphabet
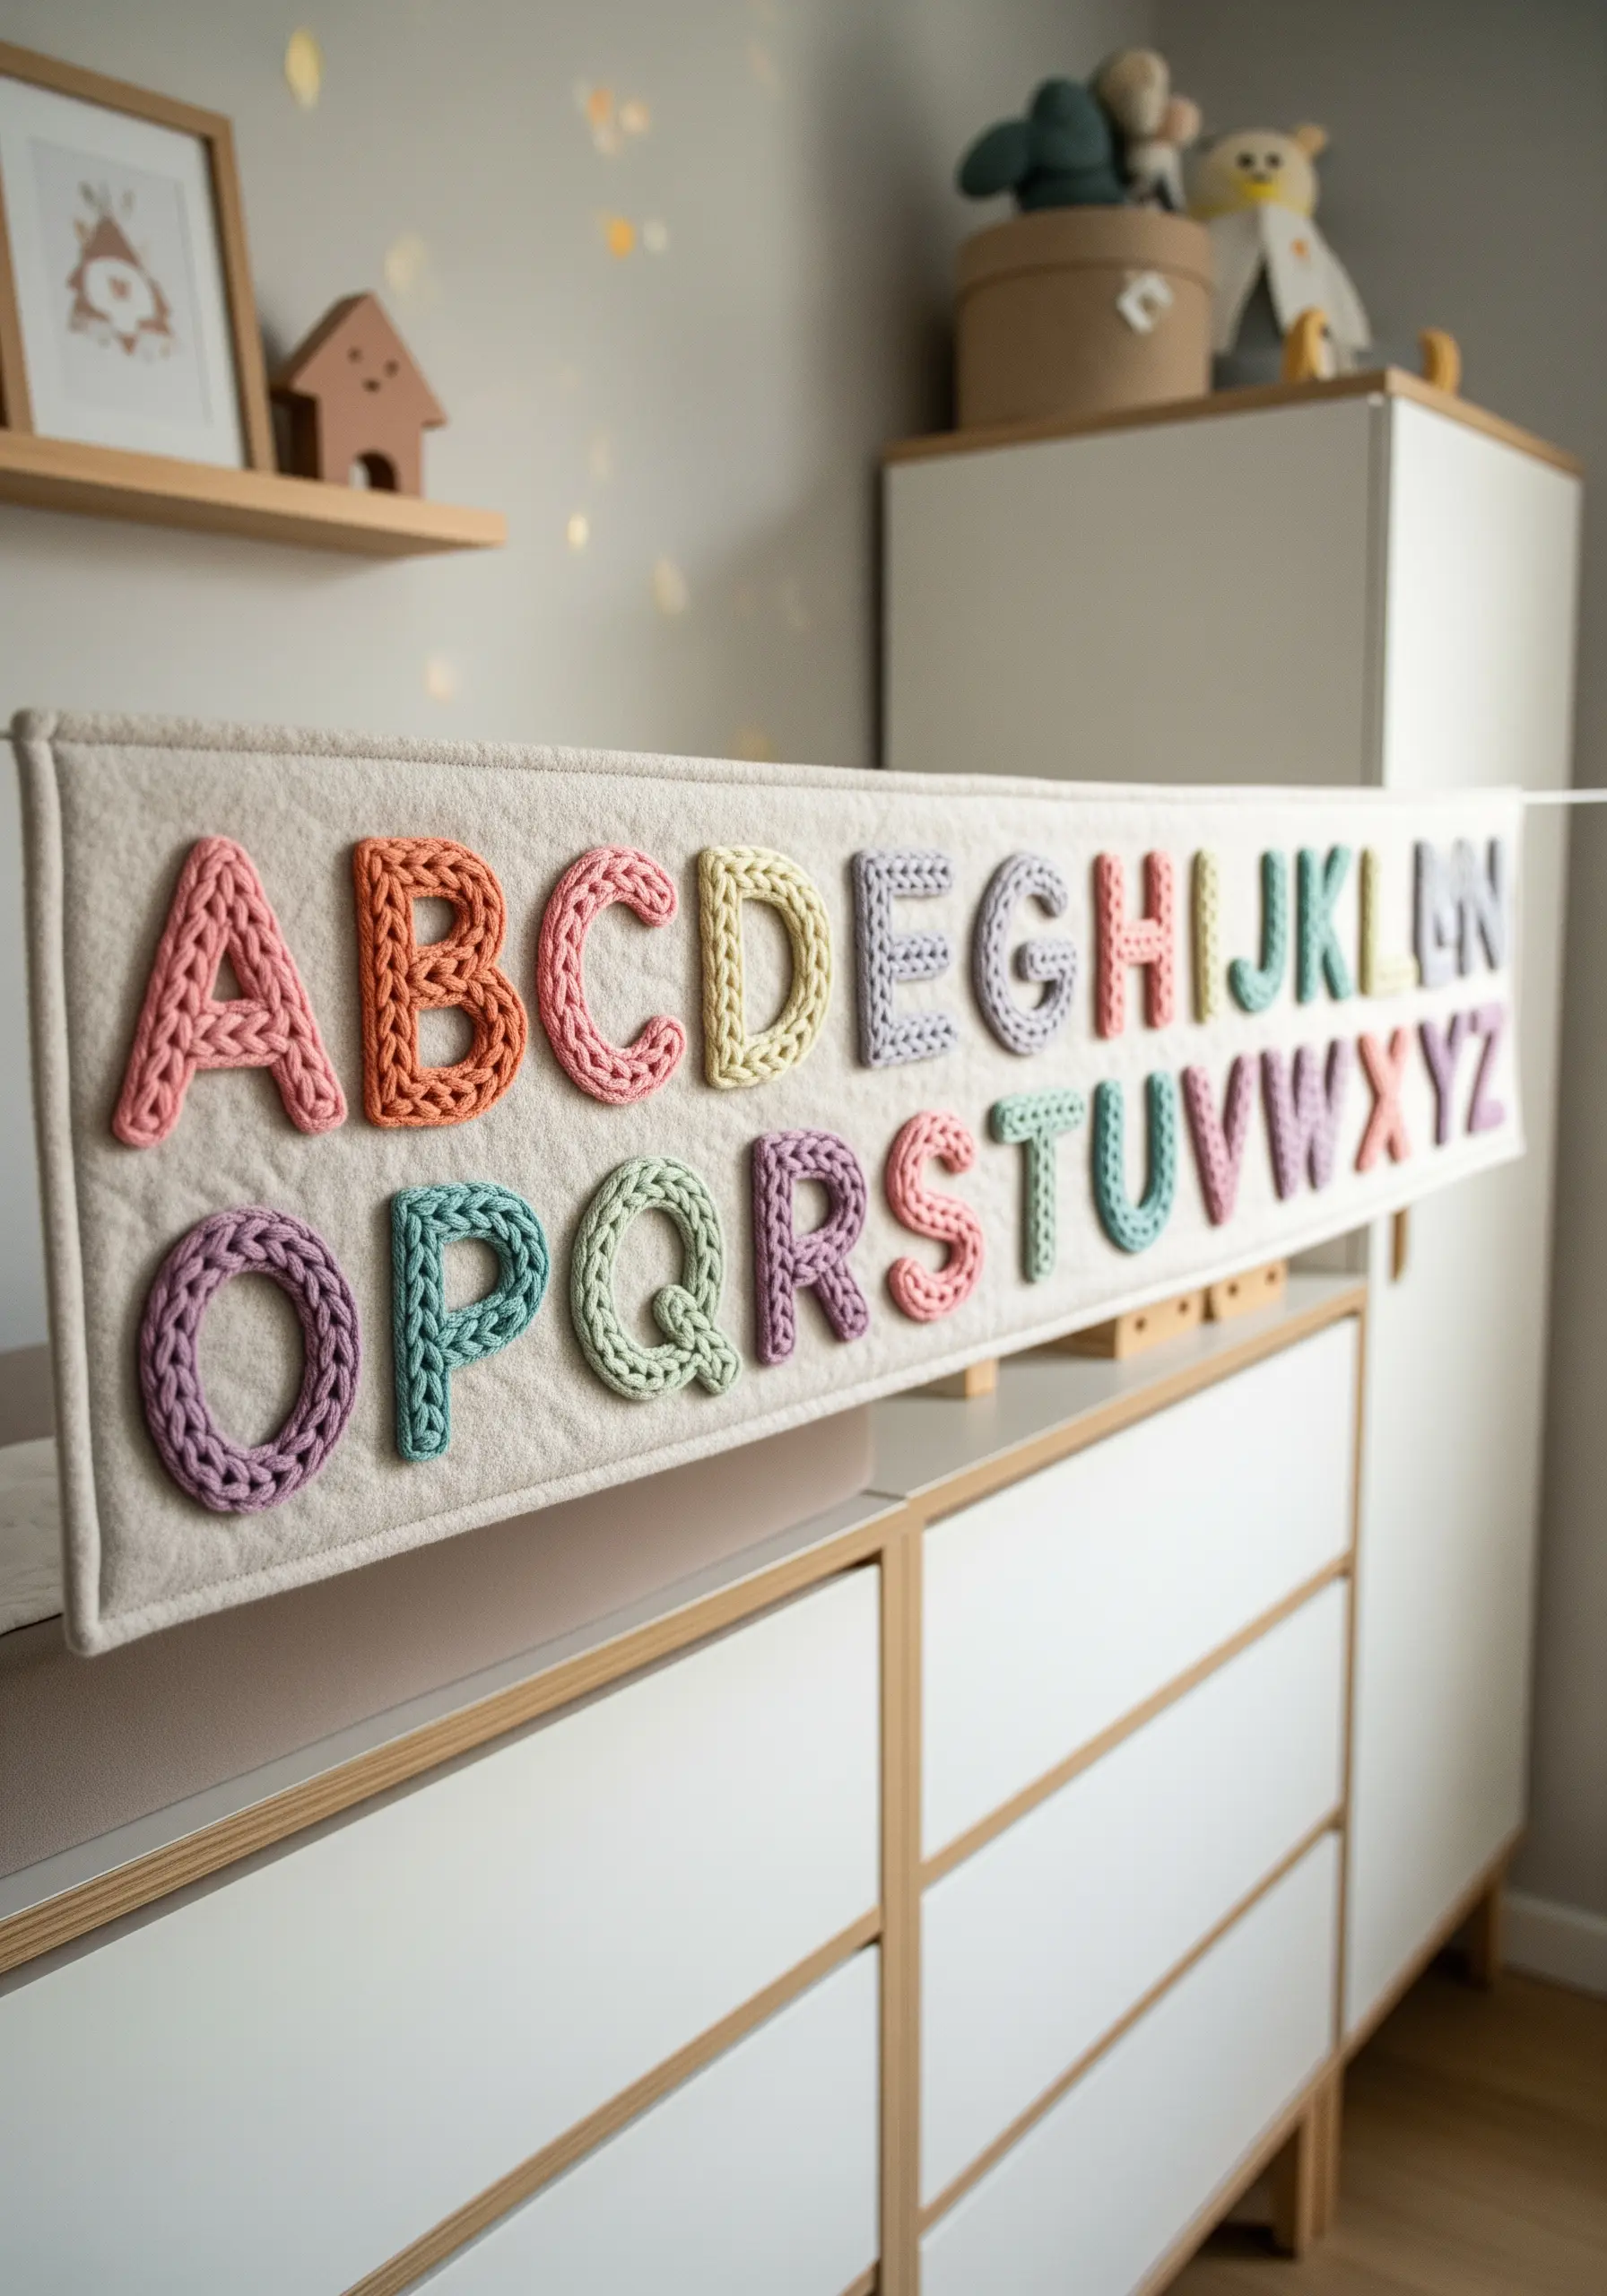
Introduce a wonderfully chunky and soft texture by creating letters from knitted I-cord and applying them to a fabric banner.
You can create the I-cord yourself with two double-pointed needles or use a small knitting mill for faster results.
Once your cords are complete, shape them into letters and use a couching stitch with a matching thread color to securely attach them to a sturdy felt or canvas backing.
This mixed-media approach results in a playful, touchable piece of educational art.
7. Weave Warmth into the Room with a Macrame Sun

This is another beautiful example of fiber art that brings incredible texture and warmth to a nursery.
The sun’s center is crafted using a coiling technique, where you wrap a core rope with yarn and coil it into a flat circle, stitching it together as you go.
The rays are formed by attaching dozens of pieces of cord to the outer ring with lark’s head knots, creating a lush fringe that embodies the sun’s radiant energy.
This is one of those yarn wall art projects that blend modern and boho aesthetics perfectly.
8. Create Painterly Depth with Seed Stitch Pointillism
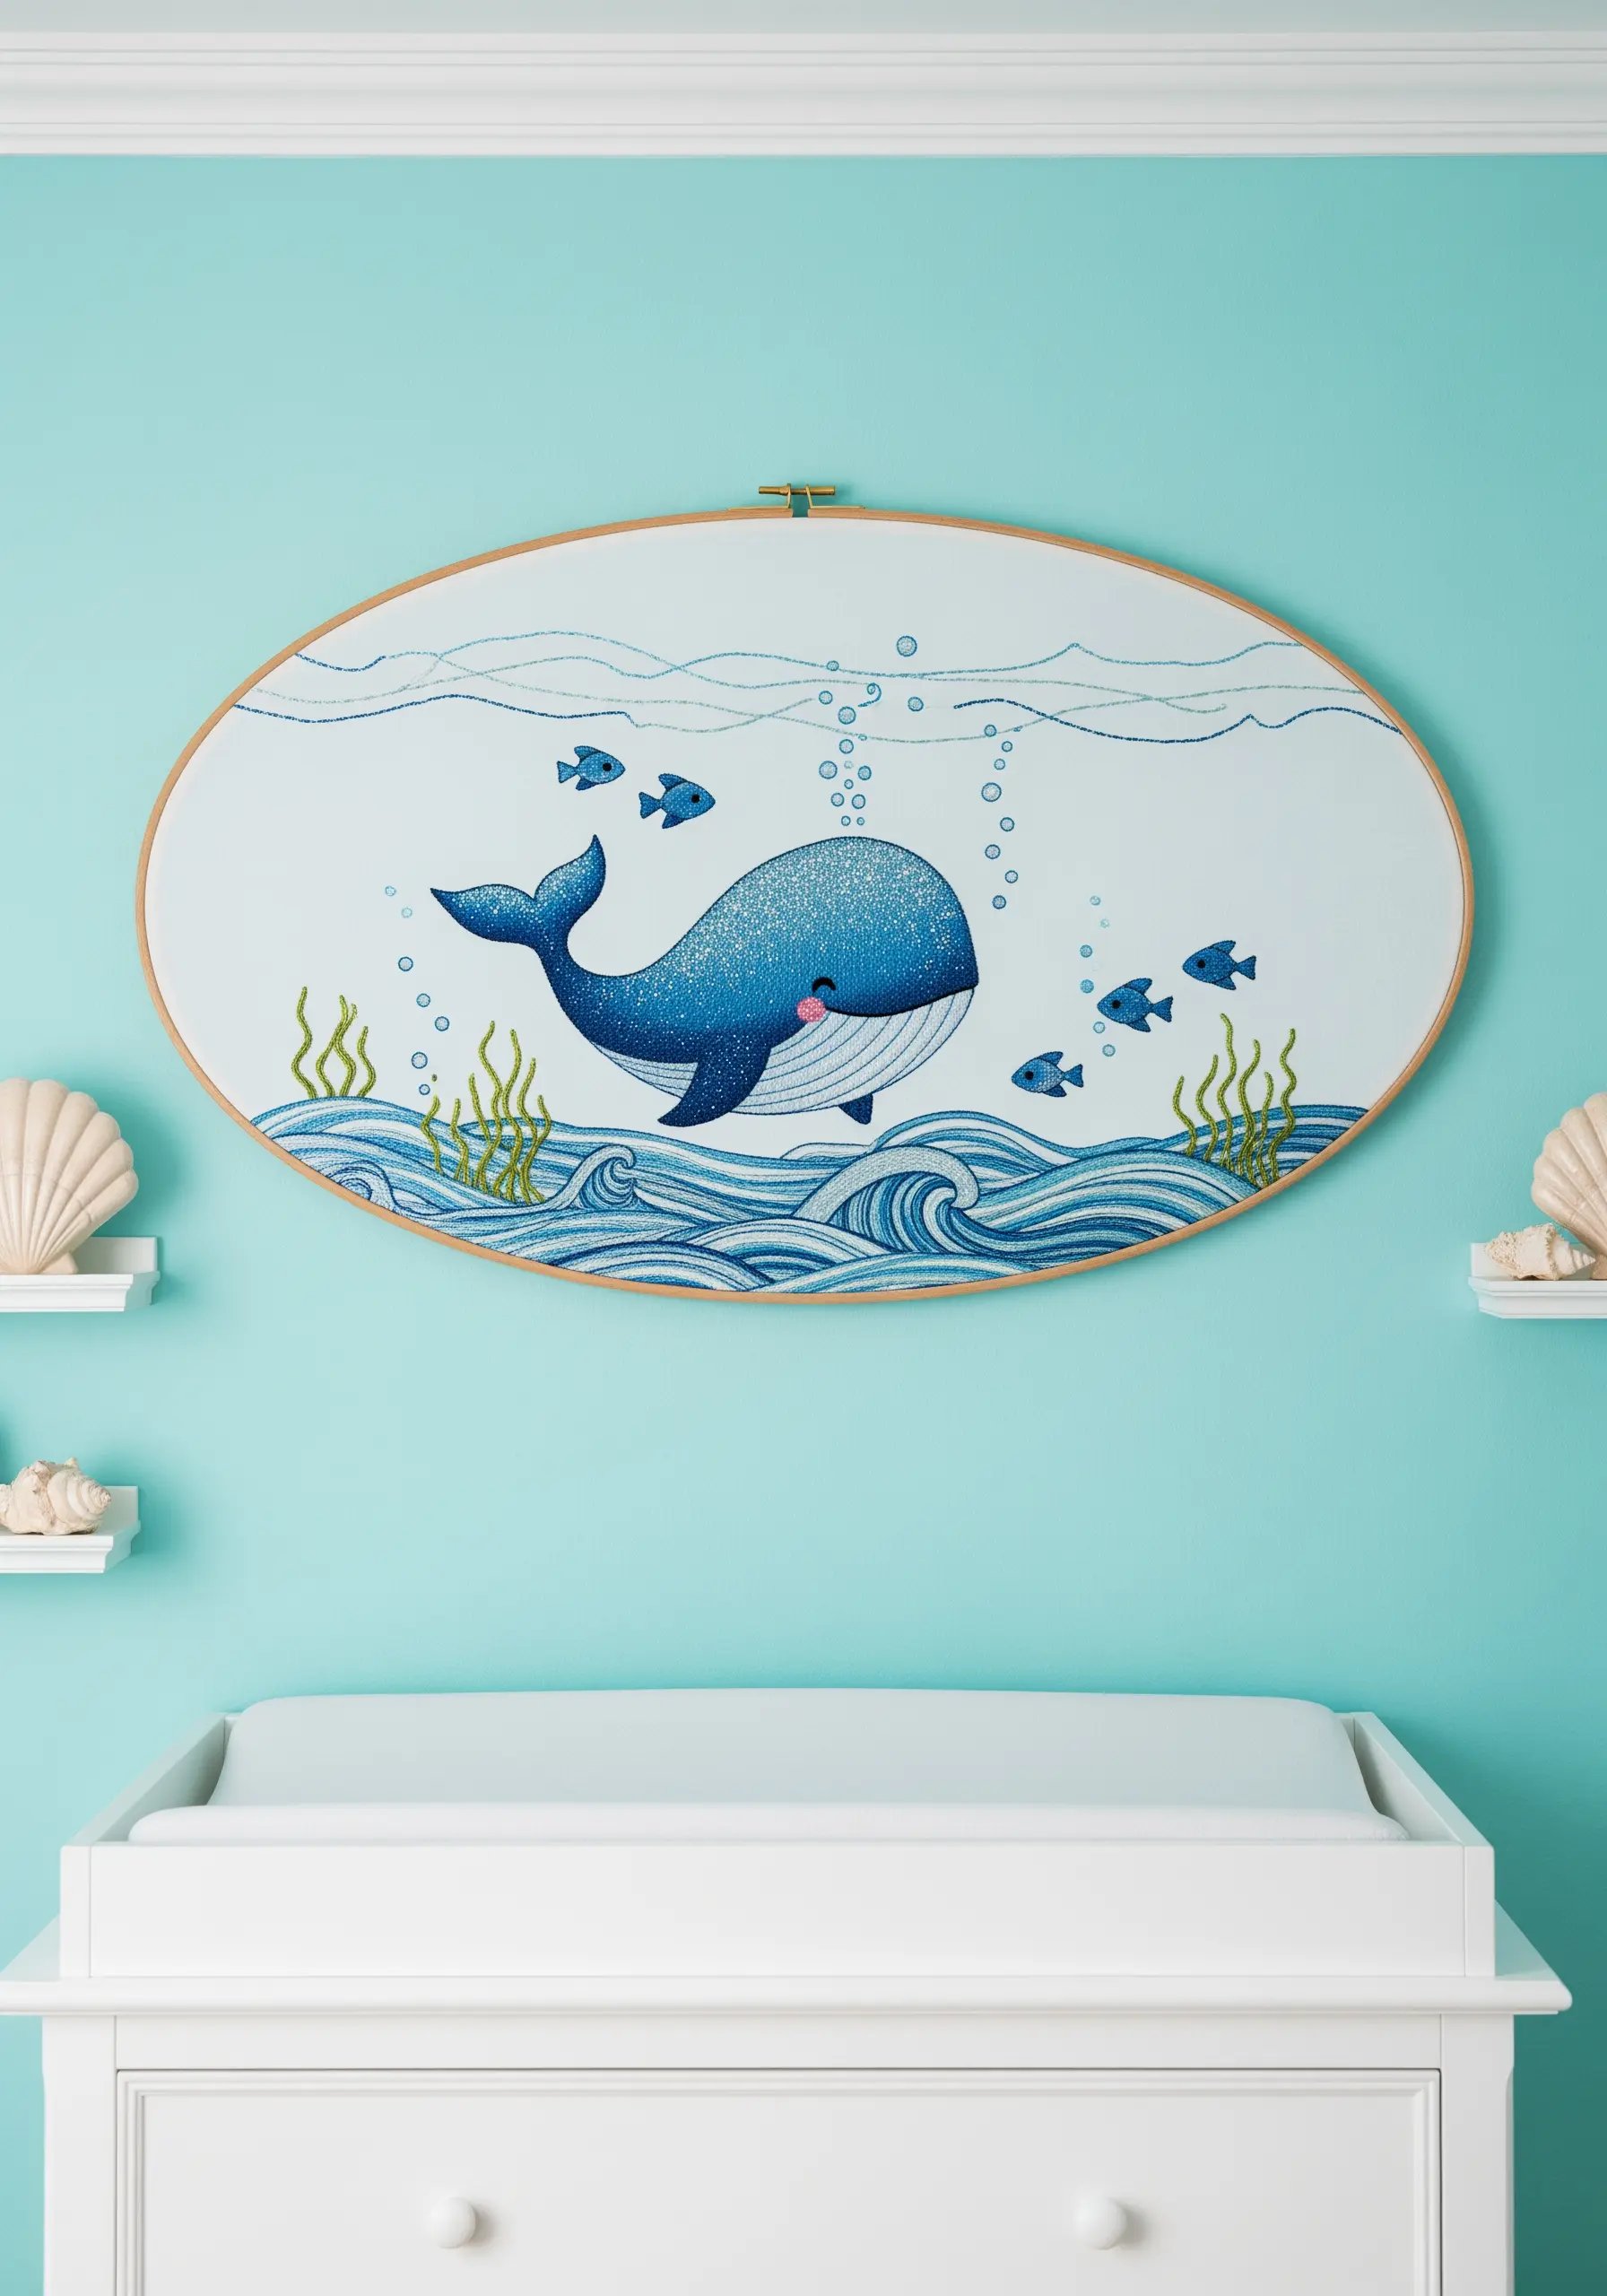
To give large motifs like this whale a textured, gradient effect, fill the area with thousands of tiny, scattered seed stitches.
Instead of a solid fill, this pointillist-style technique uses small, individual stitches to build up color and shading, much like a painting.
Use several shades of blue floss, stitching more densely with darker threads in shadow areas and more sparsely with lighter threads on highlighted surfaces.
This meticulous process rewards you with a piece that has incredible depth and visual texture.
9. Build a Landscape with Thread-Blocking
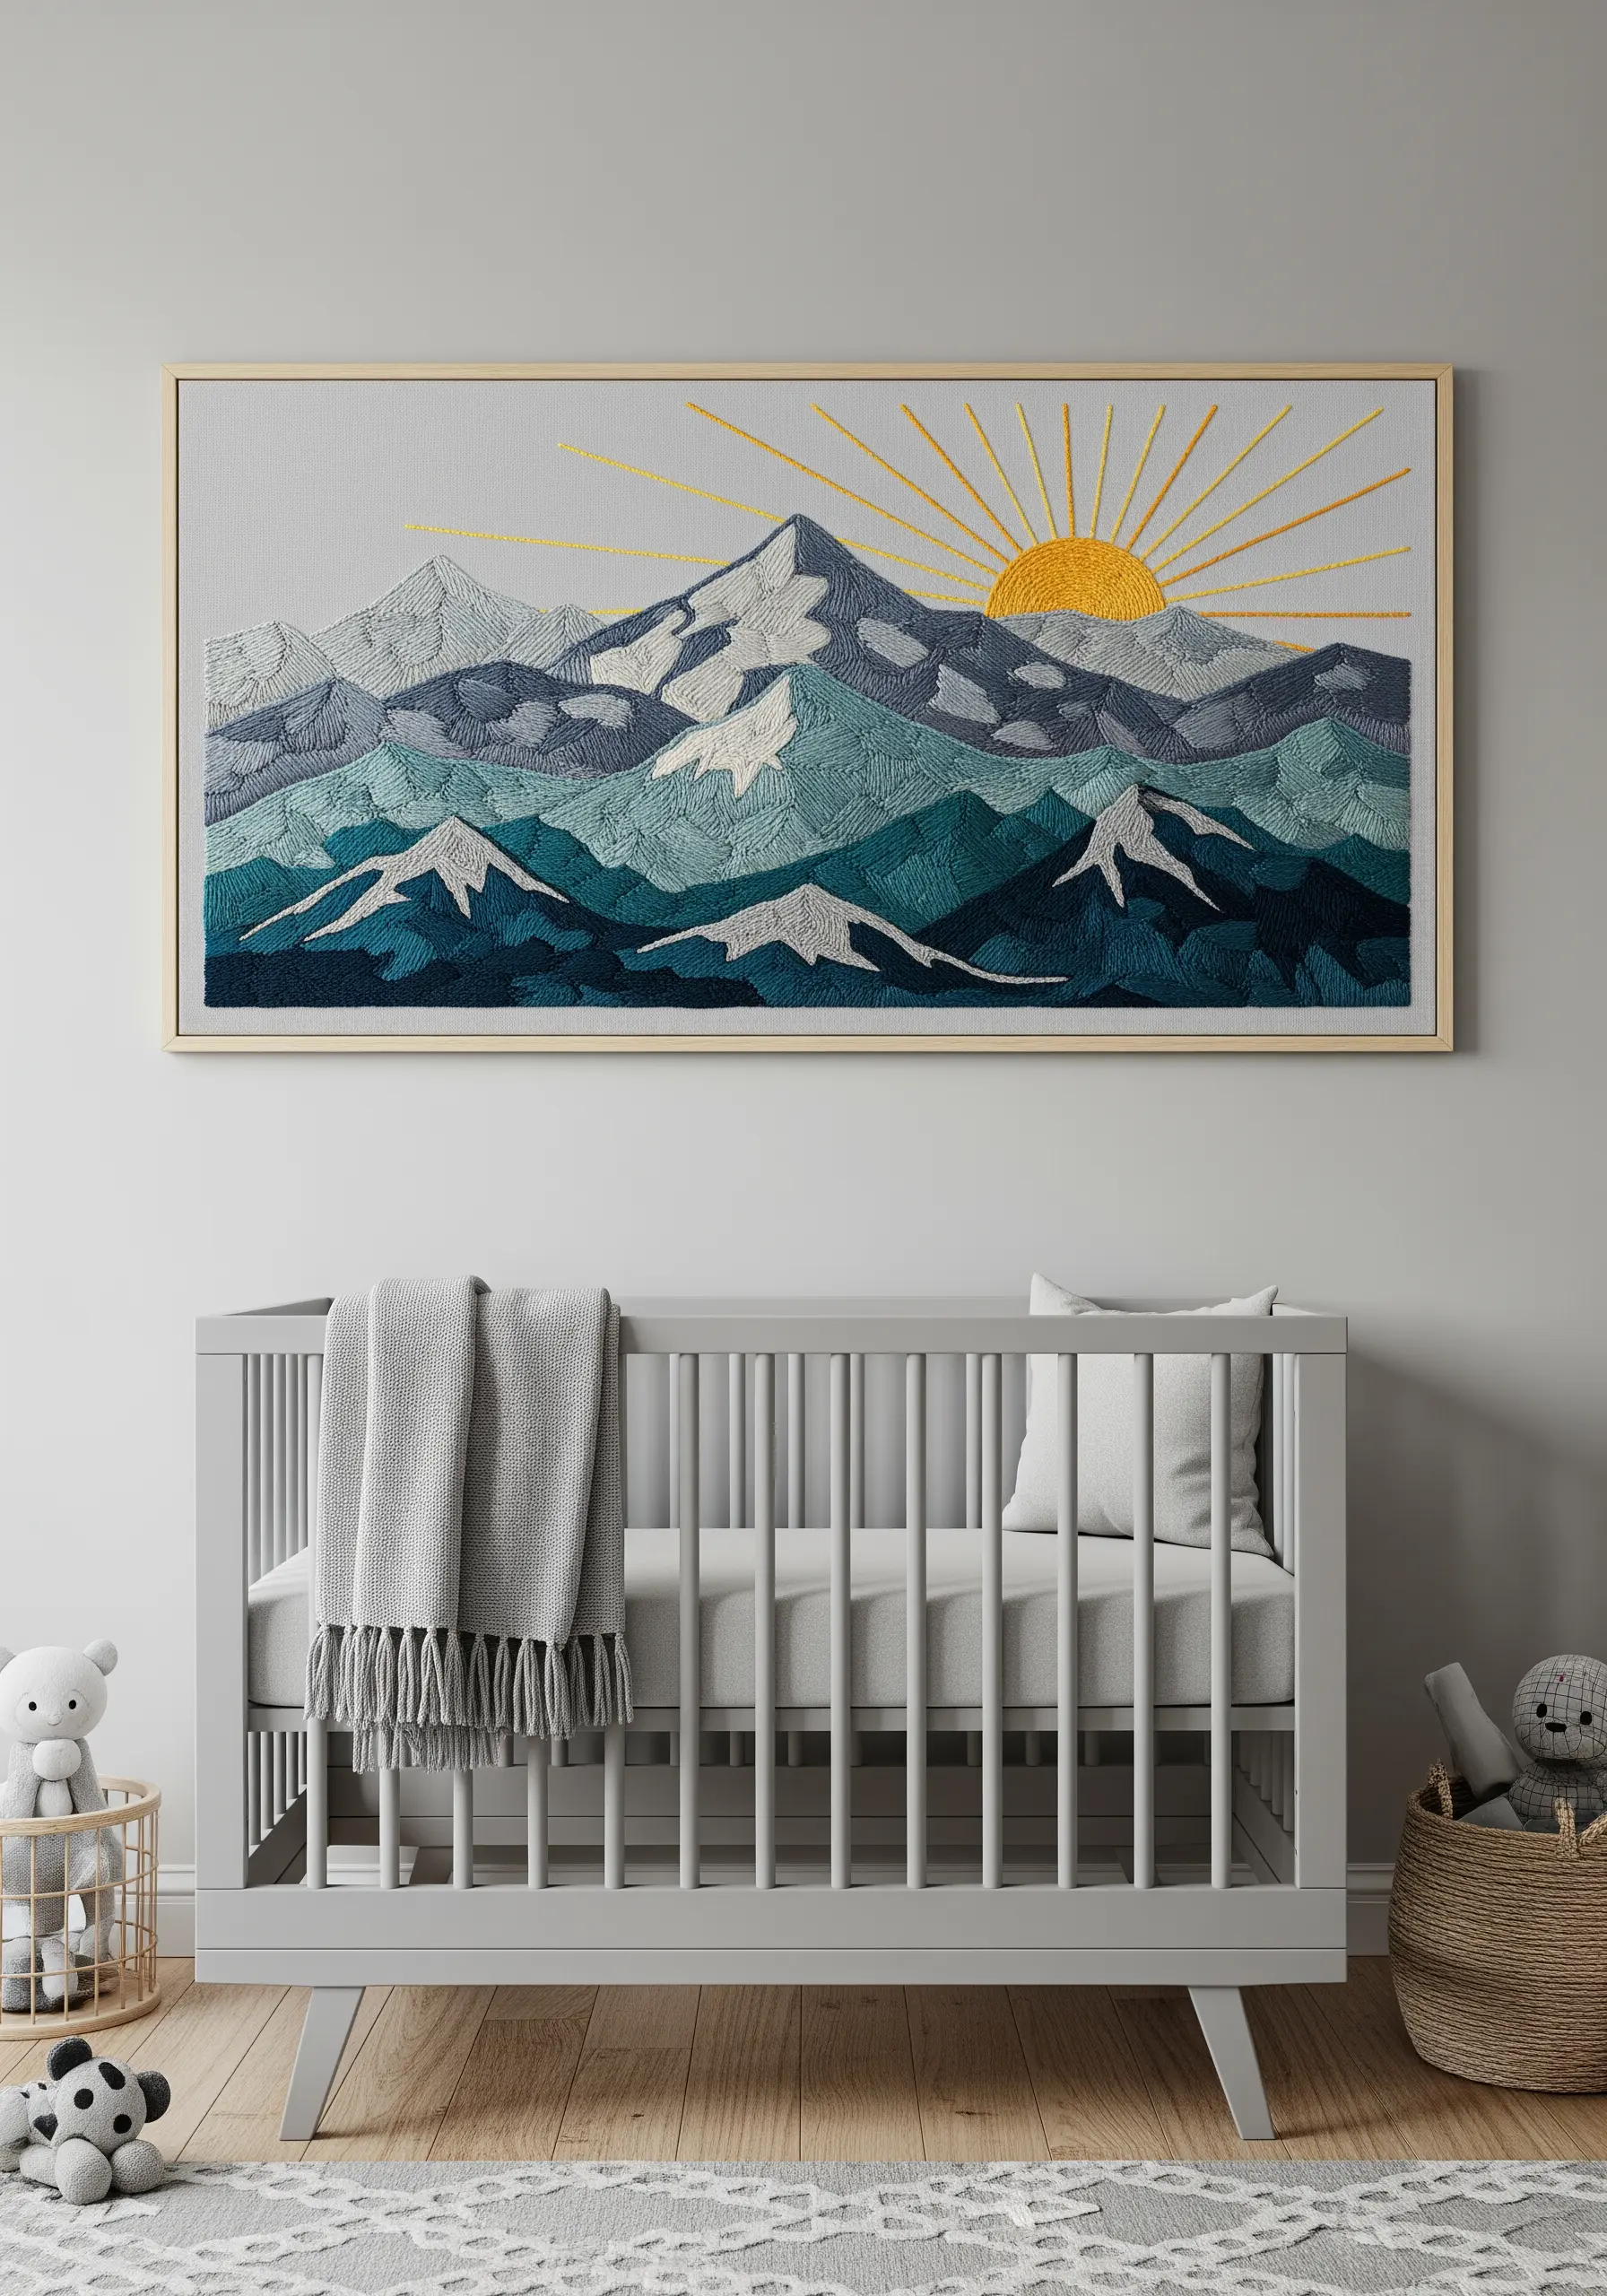
Construct a serene mountain scene by using distinct blocks of color, a technique that feels like painting with thread.
Fill each section of the mountains with long-and-short stitch, ensuring your stitches all lie in the same direction within a single shape to create a clean, unified surface.
To create a sense of distance, use slightly muted or lighter tones for the mountains farther away.
A few simple straight stitches for the sun’s rays provide a delicate contrast to the densely filled landscape, resulting in a balanced and peaceful composition.
10. Isolate Textures for Playful Animal Portraits

Instead of aiming for full realism, you can create immense charm by focusing on a single, defining texture for each animal.
Give the sheep a wonderfully bumpy coat by covering its body in tightly packed French knots, using an off-white or cream thread for a natural look.
For the pig and cow, use a smooth, neat satin stitch to create a graphic, clean finish that contrasts with the sheep’s texture.
Framing them individually as a set allows each unique texture to stand out, creating a cohesive yet varied display.
11. Stitch a Woodland Scene with Layered Textures

Create a rich, dimensional forest floor by combining a variety of simple stitches, each chosen to represent a different natural element.
Use vertical satin stitch for the smooth bark of the trees and dense French knots for the iconic red-and-white mushroom caps.
Fill the grassy areas with a mix of straight stitches and lazy daisy stitches in several shades of green to mimic the chaotic beauty of a real forest.
This layering of different textures is what brings the enchanting scene to life.
12. Achieve a Watercolor Effect with Thread Blending

To give your florals a soft, painted appearance, work with single strands of embroidery floss and blend your colors meticulously.
Use the long-and-short stitch, allowing the stitches of one color to overlap slightly with the next, creating a seamless transition that mimics a watercolor wash.
Choose a palette of closely related shades for each flower and leaf to ensure the gradients are subtle and natural.
This technique transforms simple floral wreaths into delicate, heirloom-quality art.
13. Define Modern Animals with Geometric Precision

This crisp, modern aesthetic is all about clean lines and uniform fill stitches. It’s a style that demands precision.
Before you begin filling, outline each geometric facet with a single backstitch line. This creates a sharp edge and acts as a perfect guide for your fill.
Use a satin stitch to fill each shape, ensuring all your stitches lie perfectly parallel to one another.
Maintaining consistent thread tension is critical here to prevent fabric puckering and keep the surfaces flawlessly smooth.
14. Design a Dynamic Scene with a Multi-Hoop Layout
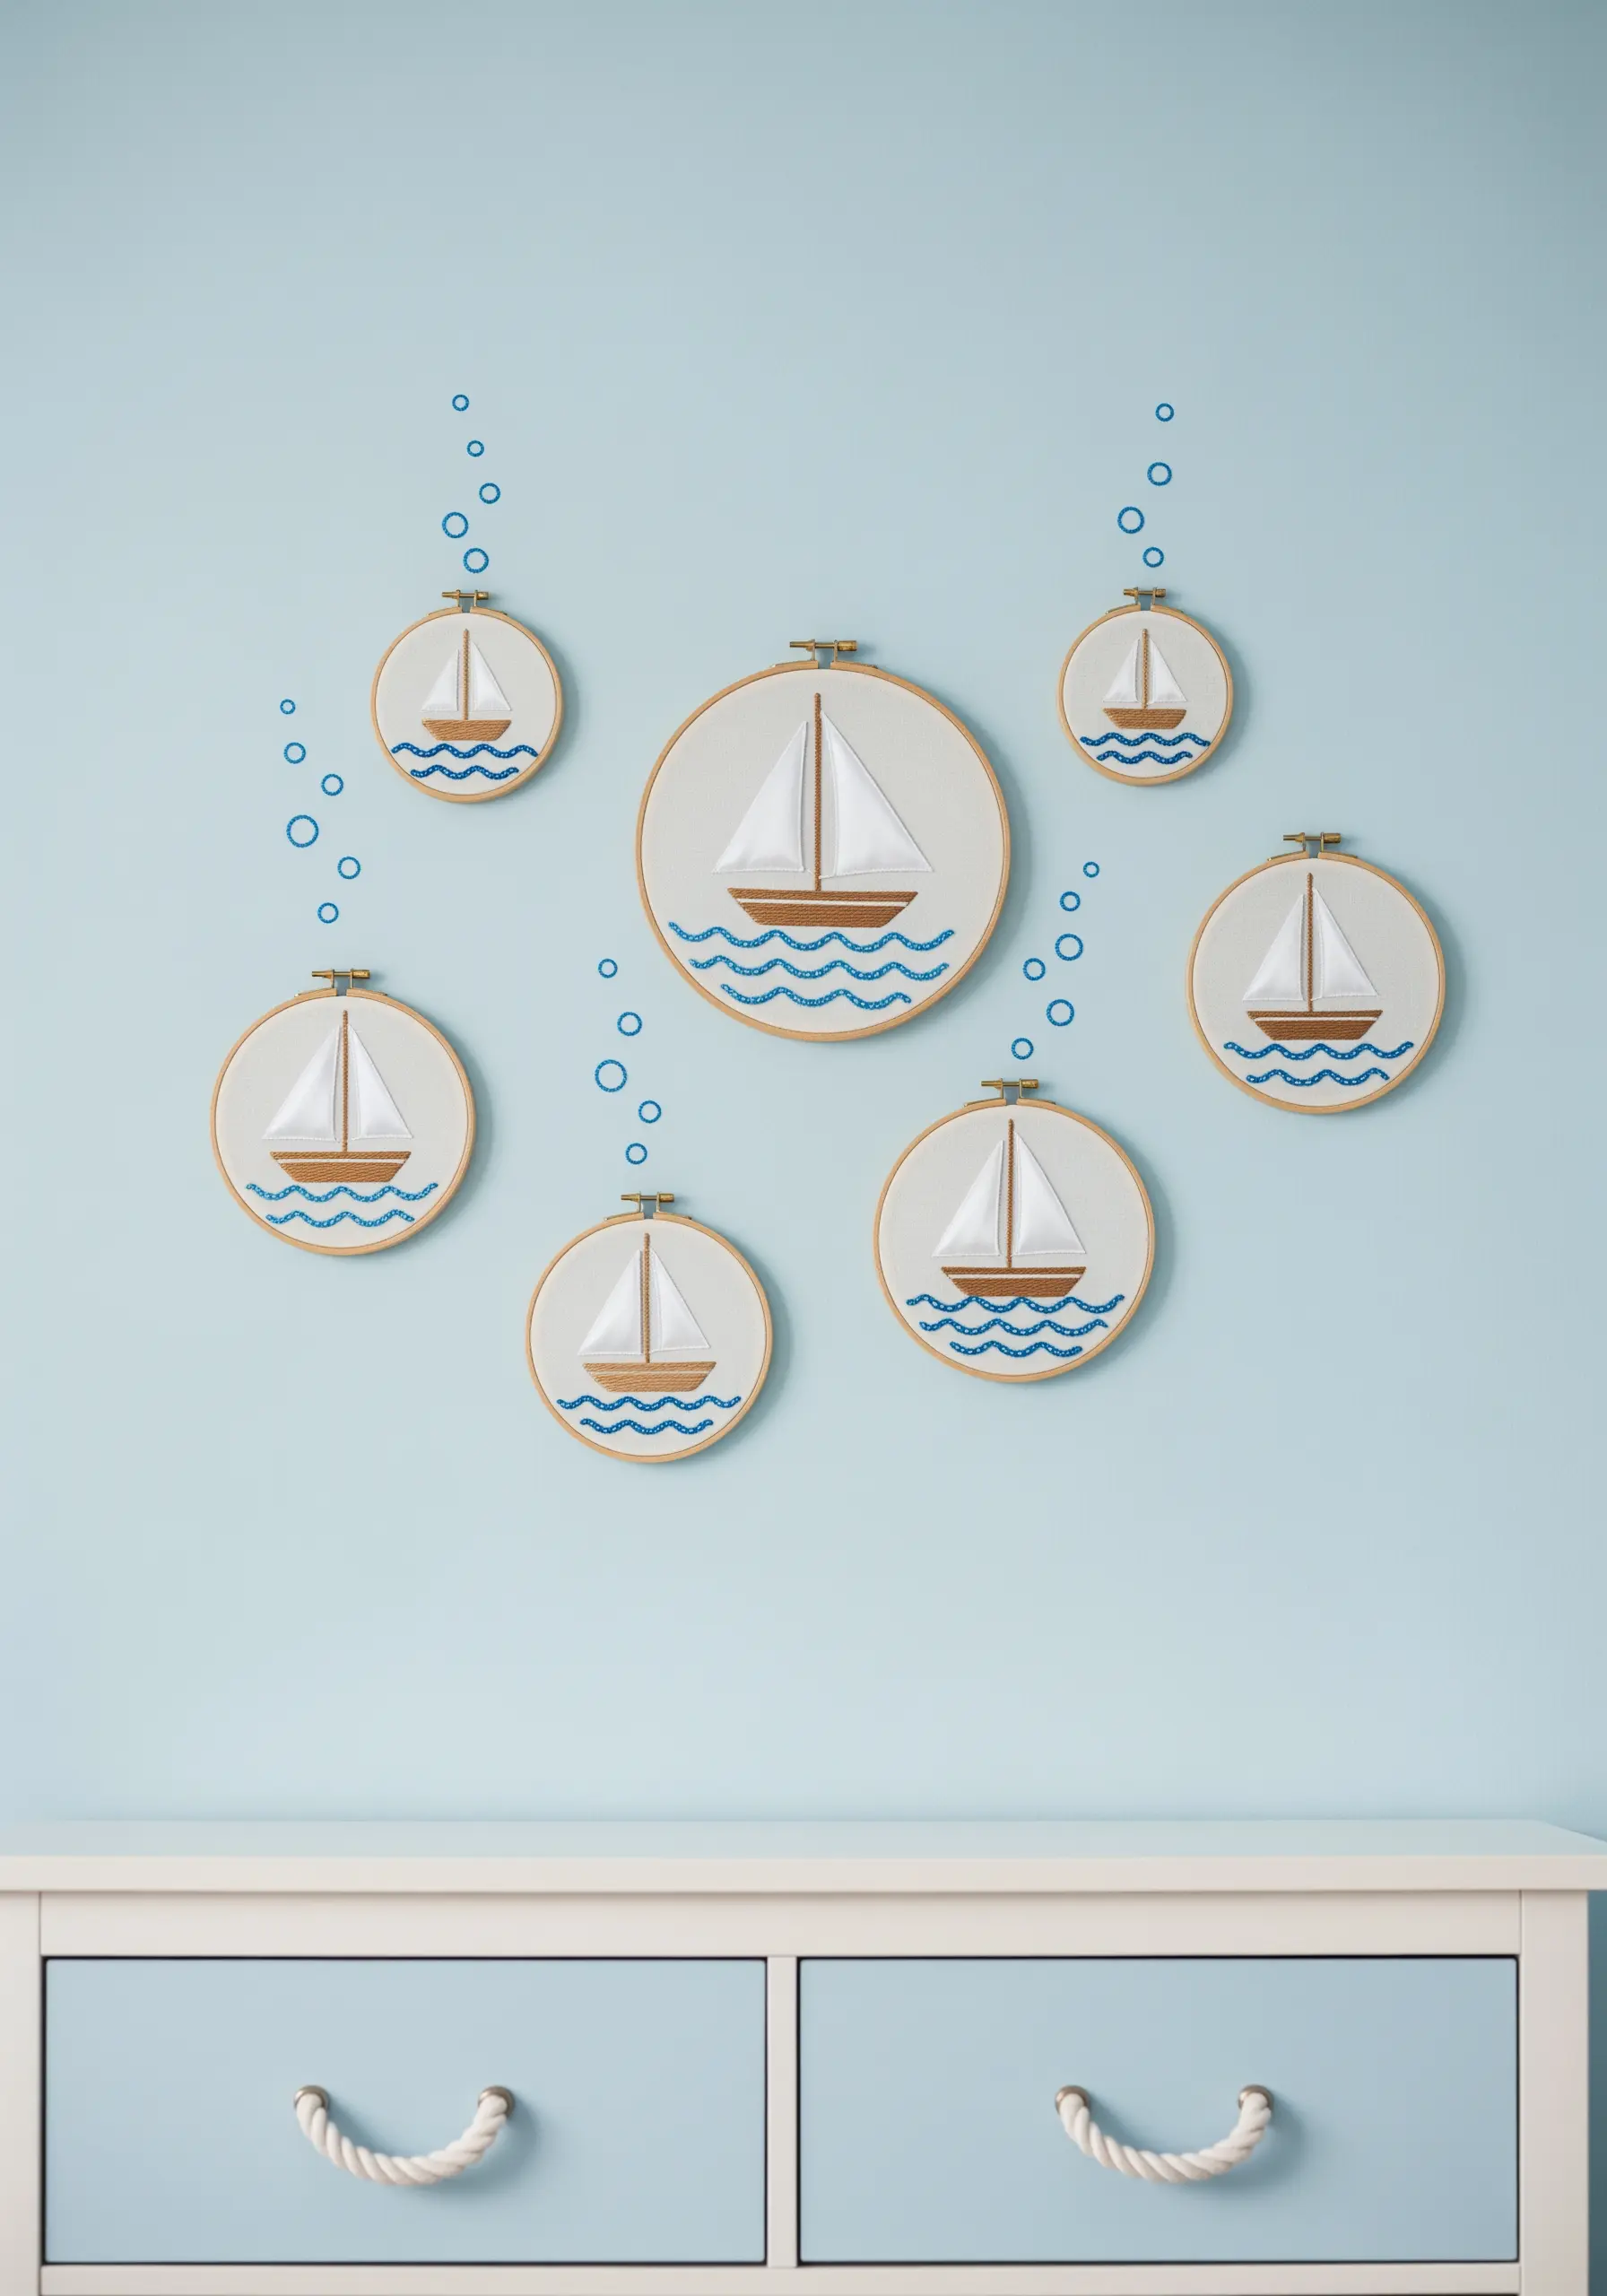
Turn a simple motif into a captivating wall installation by stitching it across multiple hoops of varying sizes.
Keep the individual sailboat designs minimal and consistent to create a sense of unity across the collection.
The magic happens in the arrangement; clustering the hoops and adding painted or vinyl bubble decals creates a sense of movement and tells a larger story.
This approach allows you to fill a large wall space with small embroidery projects that make perfect handmade gifts and decor pieces.
15. Sculpt a Mythical Creature with Dense French Knots

Create an incredibly tactile and visually stunning piece by filling large areas with a carpet of French knots.
To achieve this pebbly, three-dimensional texture, work on a sturdy fabric that can support the weight of the thread, and use a frame to keep it drum-tight.
Vary the number of times you wrap the thread around the needle (once, twice, or three times) to create knots of different sizes, adding subtle variation to the dragon’s scales.
This technique transforms your embroidery into a low-relief sculpture.
16. Embroider a Cosmos with Gradient Thread Painting

Capture the fiery surface of the sun and the swirling atmospheres of planets using the long-and-short stitch thread painting technique.
To create smooth, believable gradients, select a range of 4-5 shades for each celestial body, moving from light to dark.
Work in concentric rings or curved sections, allowing your stitches to blend into one another to create a seamless flow of color.
The result is a vibrant, dynamic solar system that feels both artistic and educational.
17. Capture a Meadow’s Energy with a Mix of Stitches

A wildflower meadow is defined by its beautiful chaos, so avoid uniformity in your stitching to capture that spirit.
Use a freeform approach, combining different stitches: bullion knots for lavender, woven wheel stitches for poppies, lazy daisy stitches for small petals, and layered straight stitches for grasses.
Work with different numbers of floss strands for each element to vary the texture and weight.
This rich combination of techniques transforms a simple panorama into a vibrant, living wildflower hoop art project.
18. Compose a Serene Gallery with Abstract Shapes
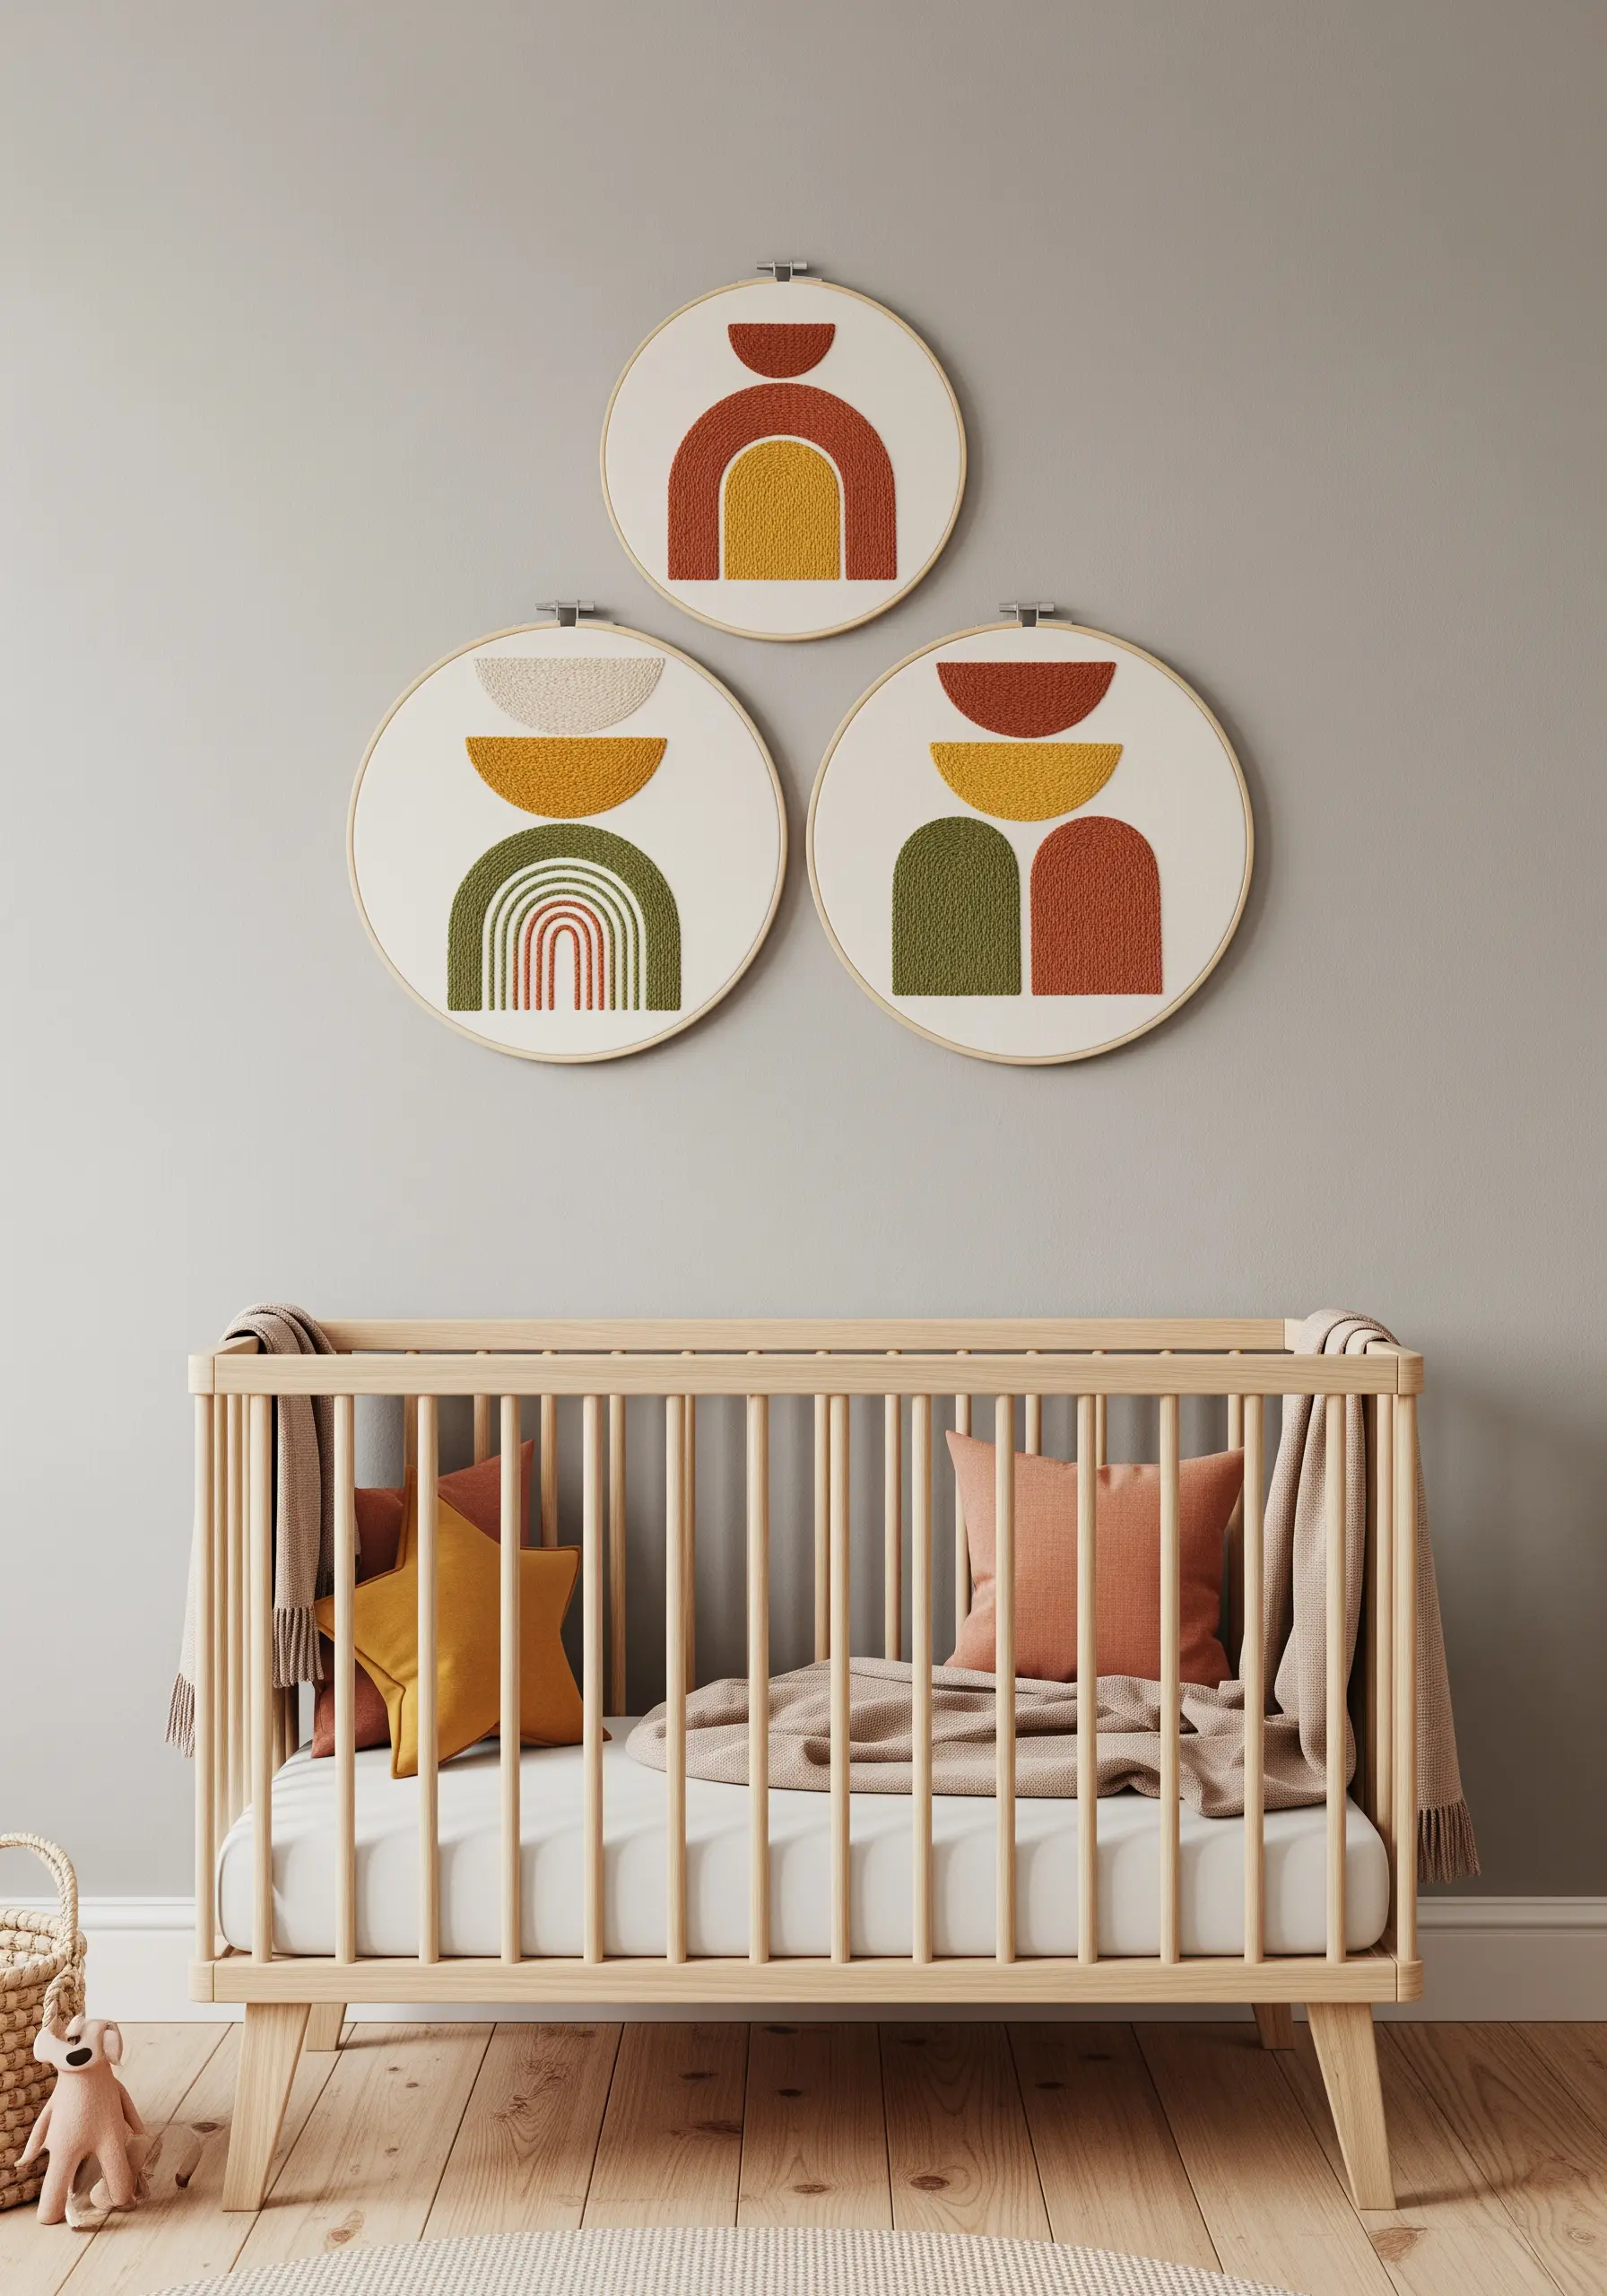
This style focuses on the quiet interplay of color, shape, and texture to create a calming, modern aesthetic.
Choose a muted, earthy color palette to maintain a sense of tranquility. Fill the bold, geometric shapes with a dense but smooth fill stitch, such as brick stitch or a meticulously neat satin stitch.
The key to the composition is balance; pay close attention to the negative space within the hoop, as it’s just as important as the stitched areas.
These subtle earth tone embroidery designs are perfect for creating a peaceful atmosphere.
19. Achieve a Fluffy Coat with Textured Knot Work
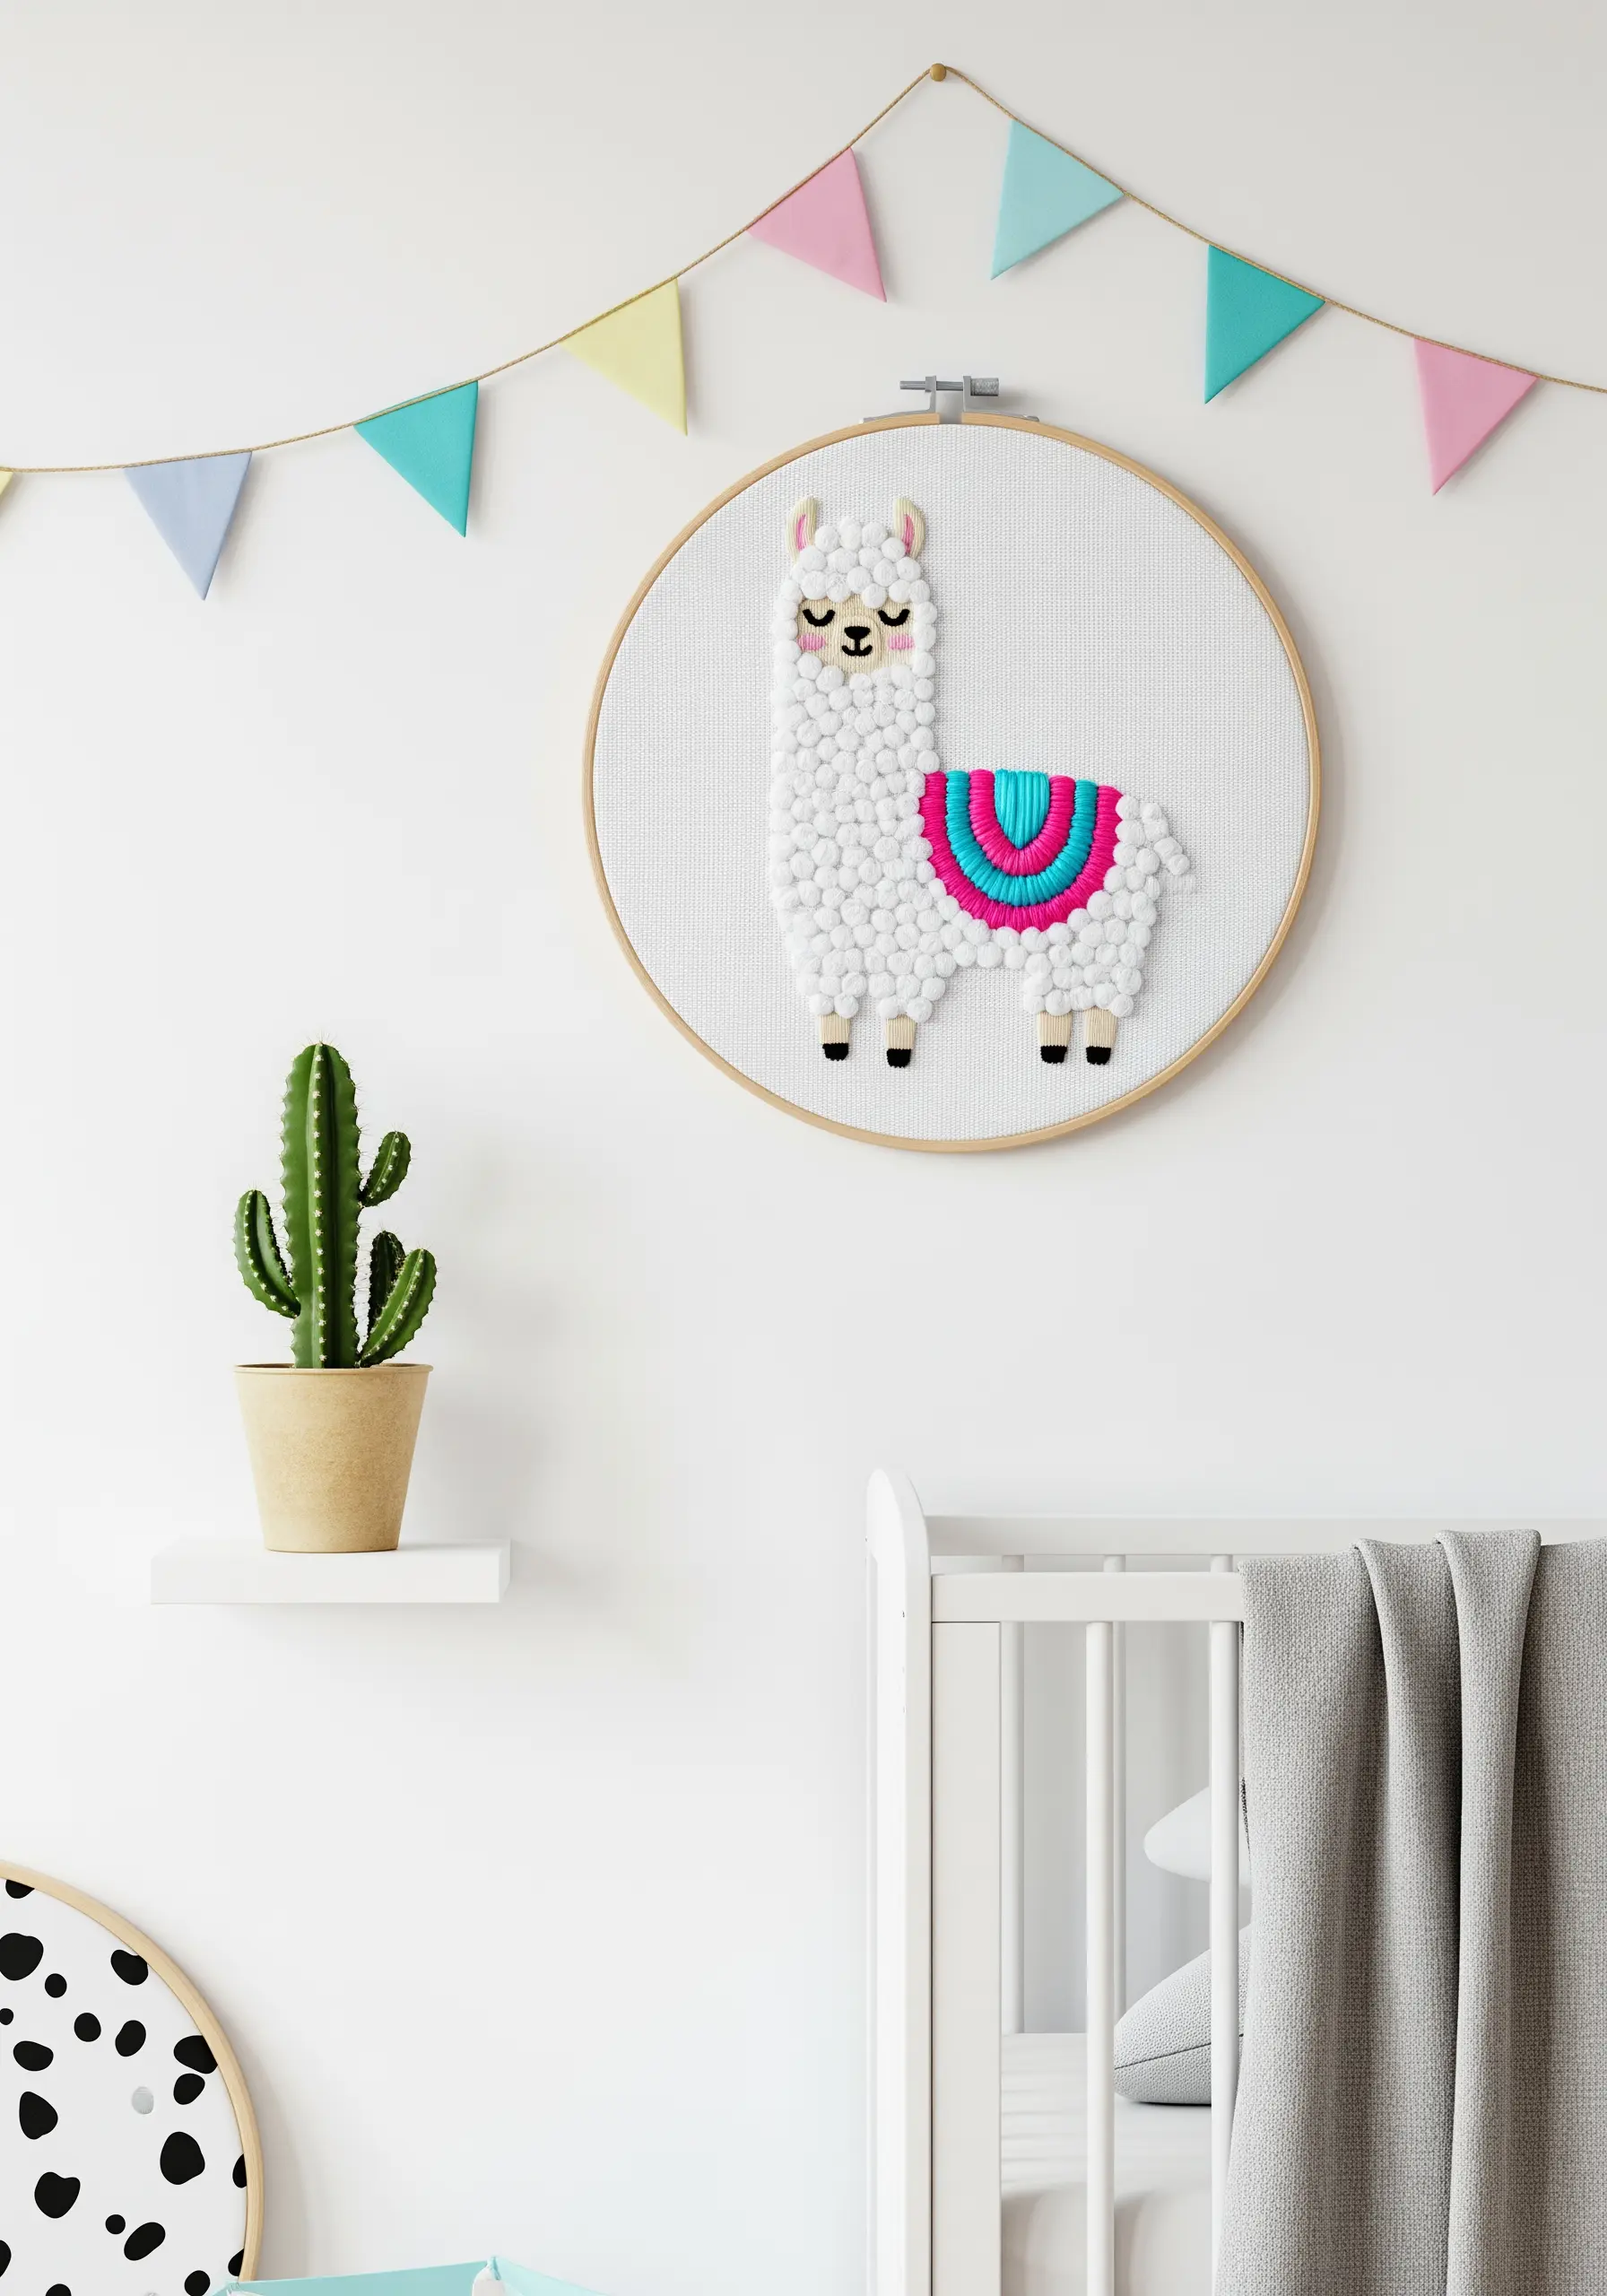
To give an animal like a llama a wonderfully fluffy and touchable coat, fill its body with dense French knots or the turkey stitch.
French knots will give you a bumpy, bobbled texture that is visually soft and inviting.
For an even fluffier, shaggier look, use the turkey stitch to create loops of thread that you can then trim to your desired length, creating a soft, plush pile.
This focus on a single, dominant texture makes the piece instantly charming.
20. Mimic Natural Fur with Directional Stitching
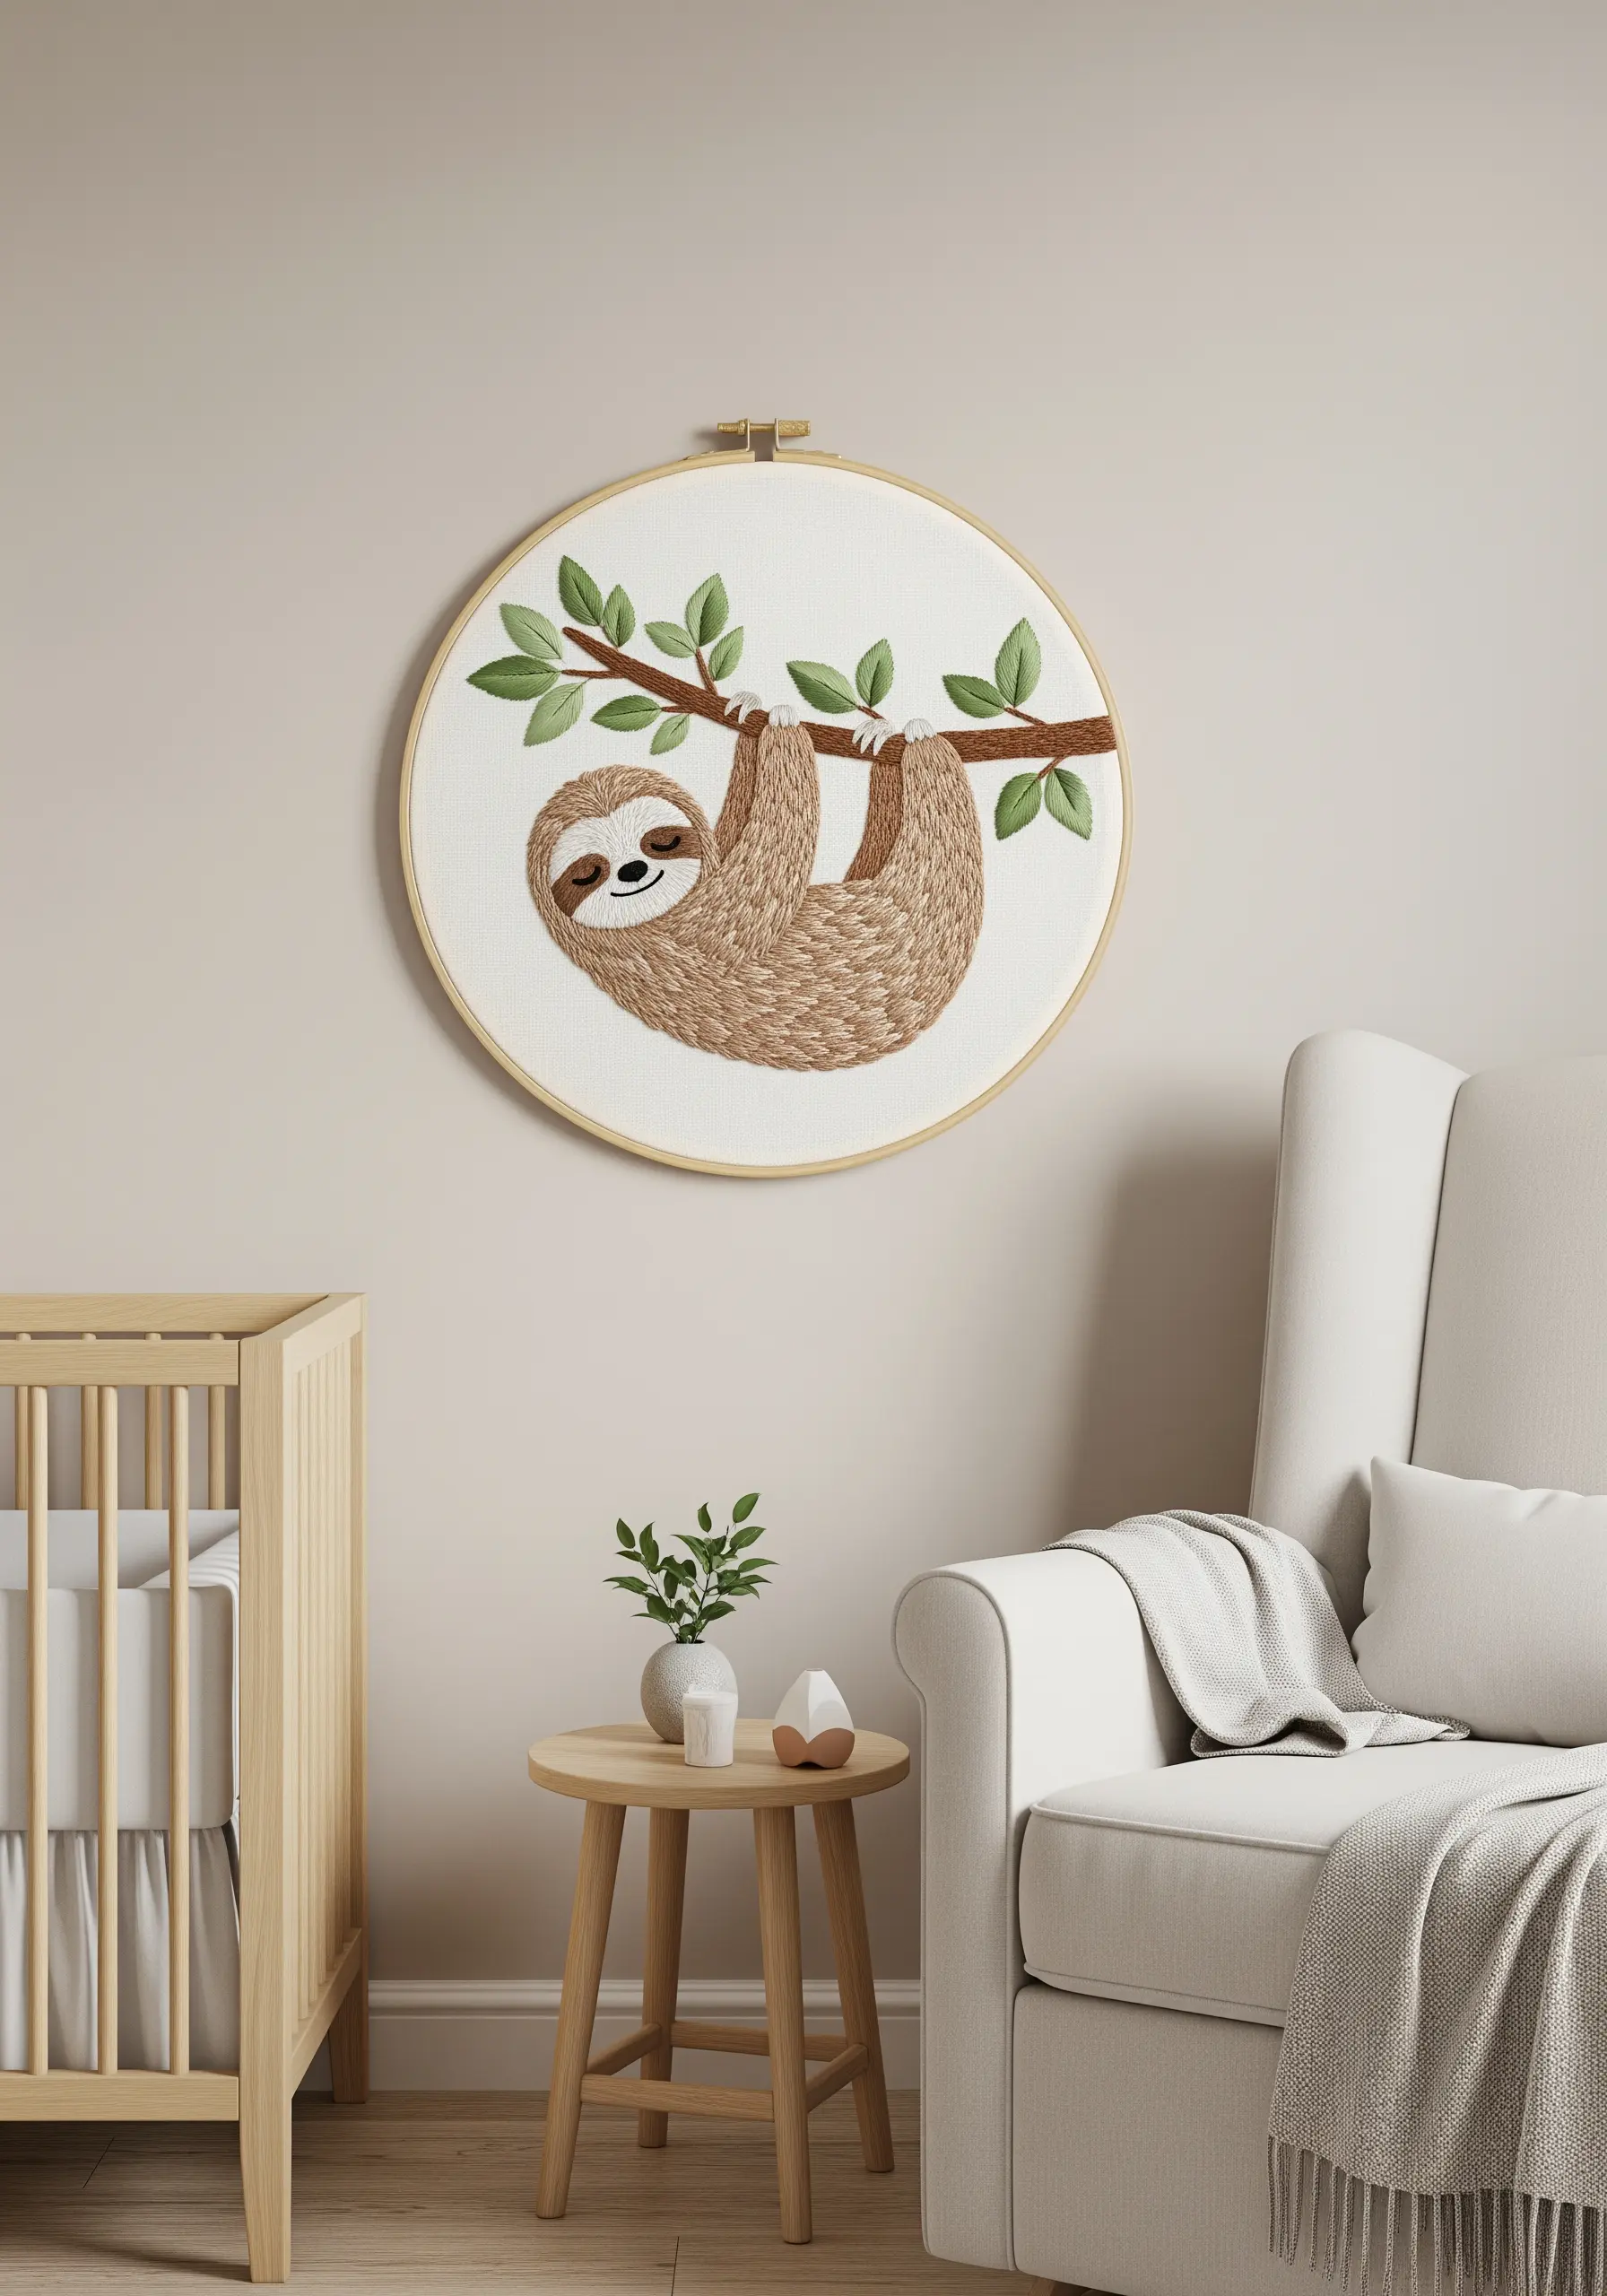
The secret to realistic embroidered fur lies in making your stitches follow the direction of natural hair growth.
Use a long-and-short stitch with two or three closely related shades of brown to create the sloth’s coat.
Study a reference photo to see how the fur flows around the face, over the shoulders, and down the arms, and angle your stitches to match that movement.
This attention to directional detail is what elevates a simple animal portrait into a lifelike piece of thread painting.
21. Capture Botanical Details with the Fishbone Stitch
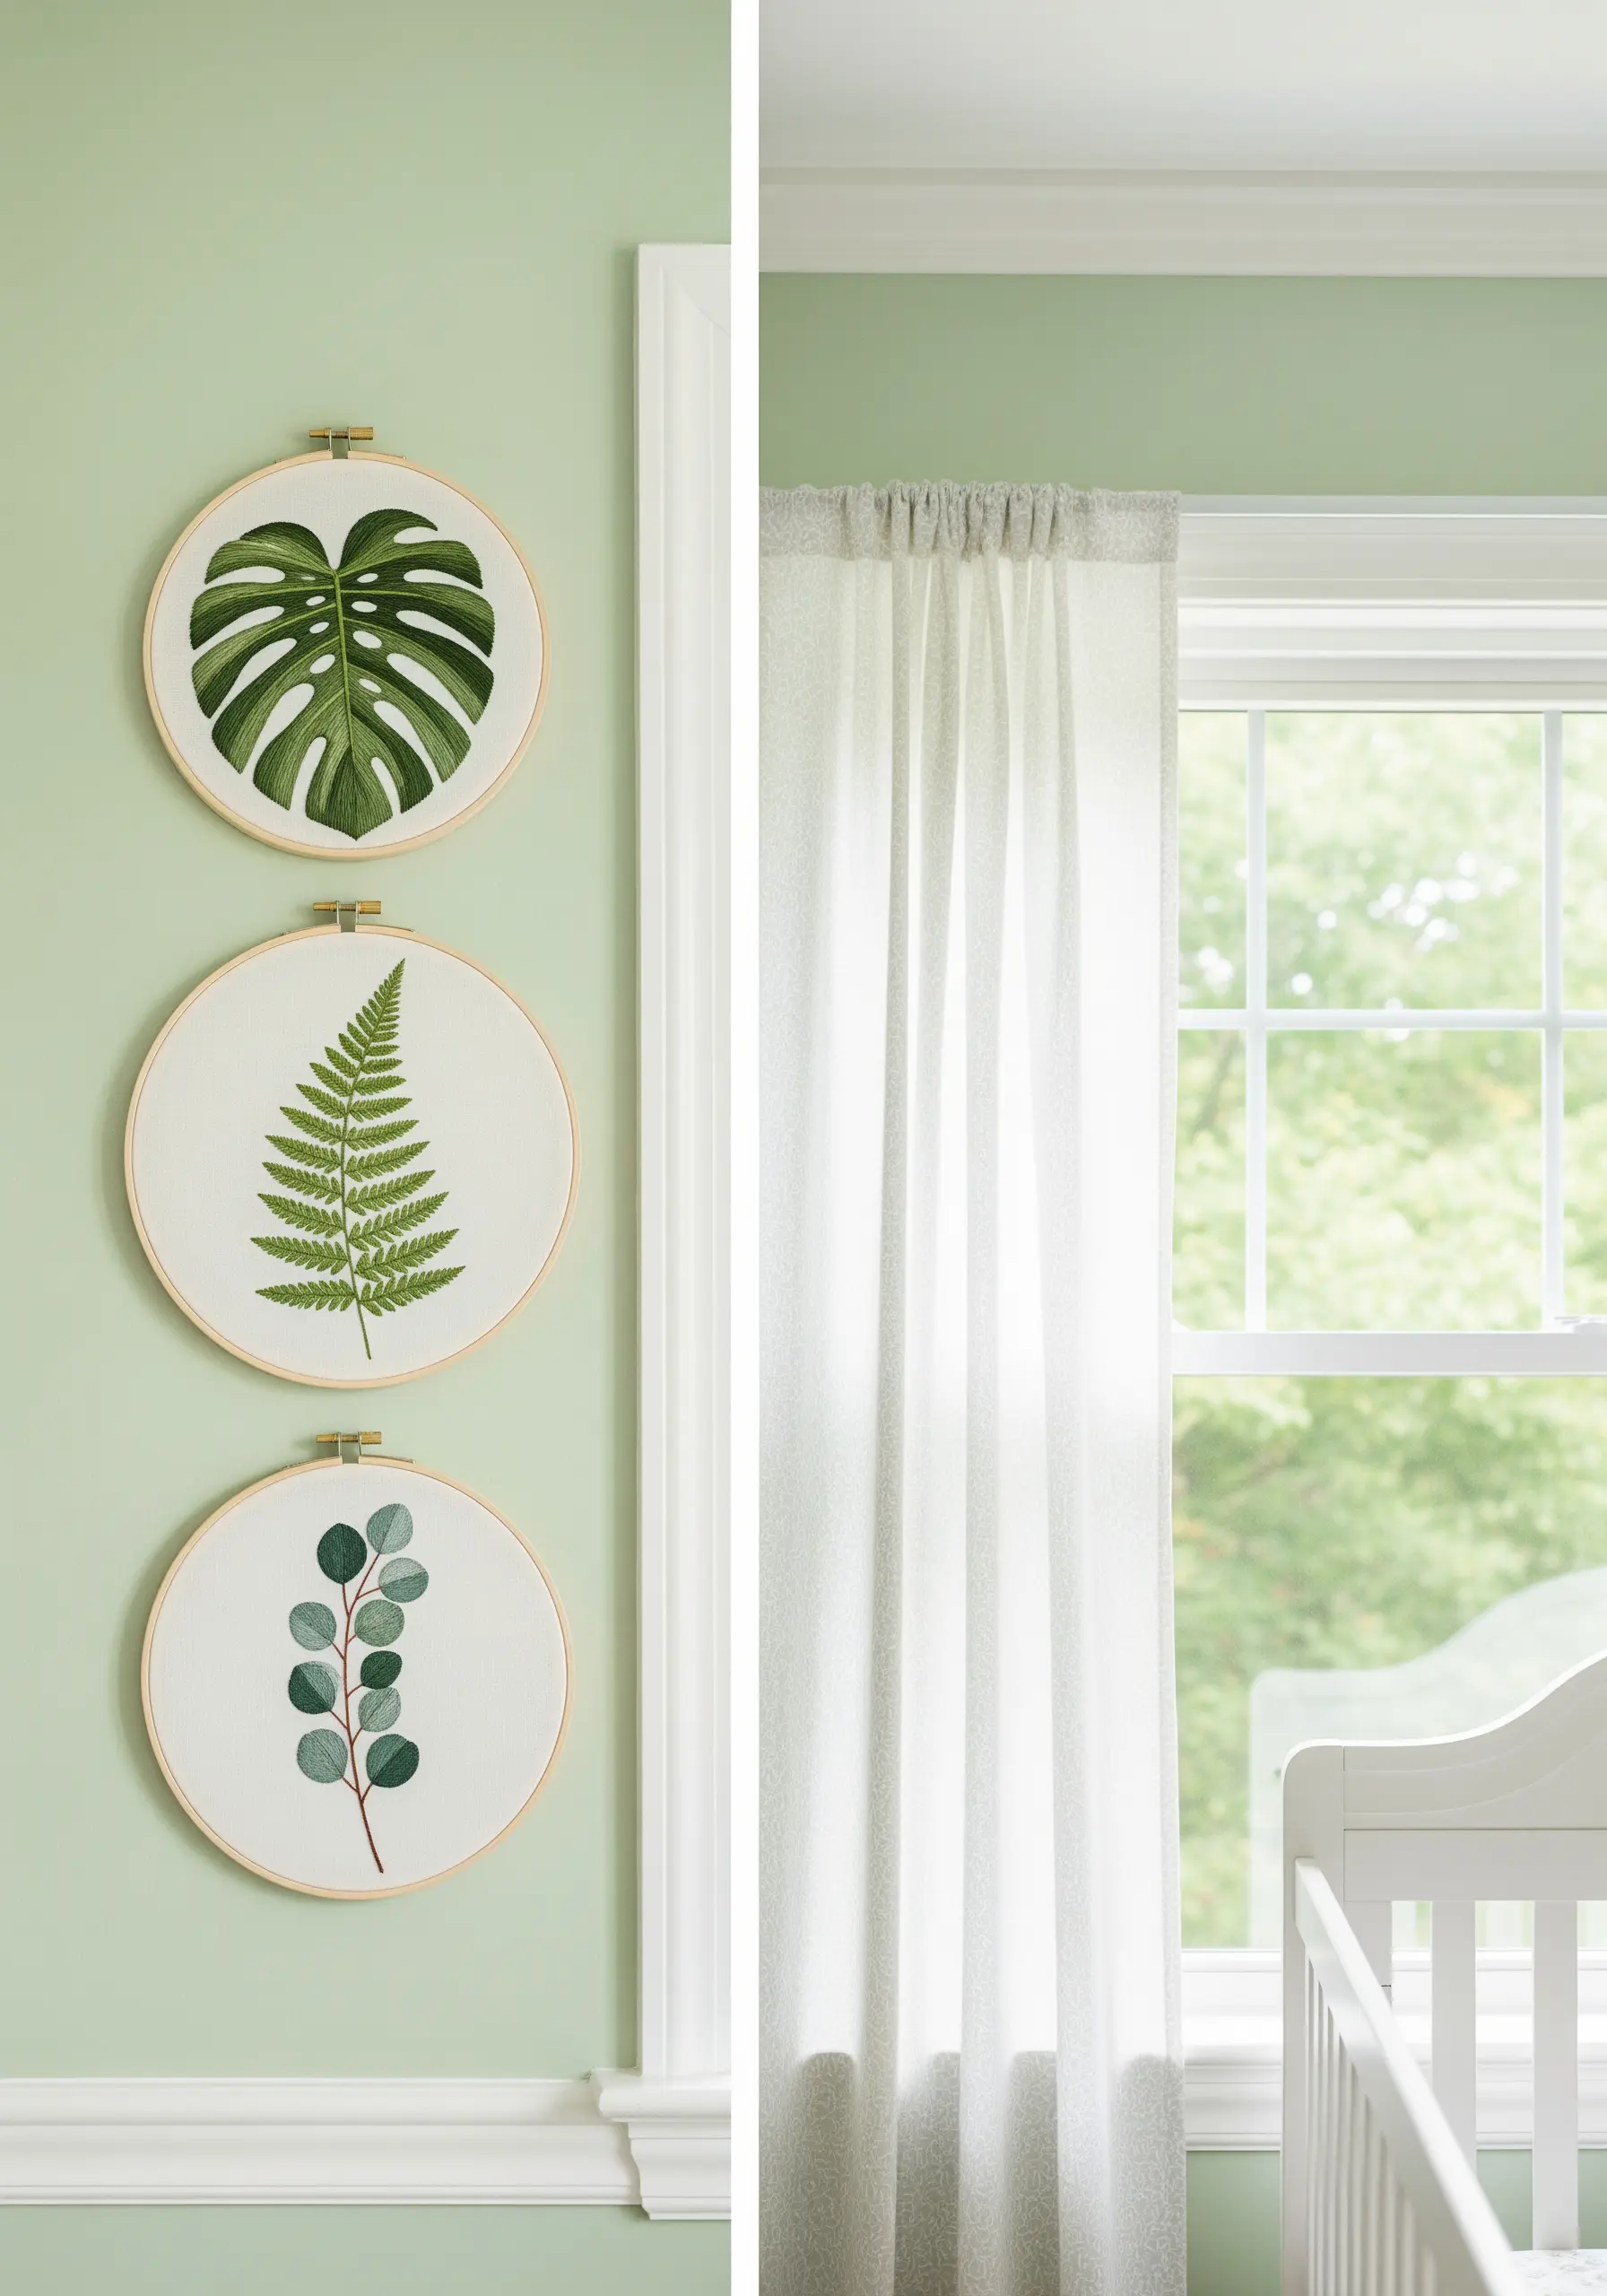
The fishbone stitch is your best tool for creating realistic leaves, as the stitch structure naturally forms a central vein.
Start your stitch at the tip of the leaf and work your way down, angling your stitches to create the leaf’s shape.
For a variegated leaf like the monstera, switch between two or three shades of green floss randomly as you stitch.
This technique is both efficient and elegant, allowing you to create a beautiful collection of nature-inspired framed embroidery designs for calm spaces.
22. Map the World with a Pointillist Knot Tapestry
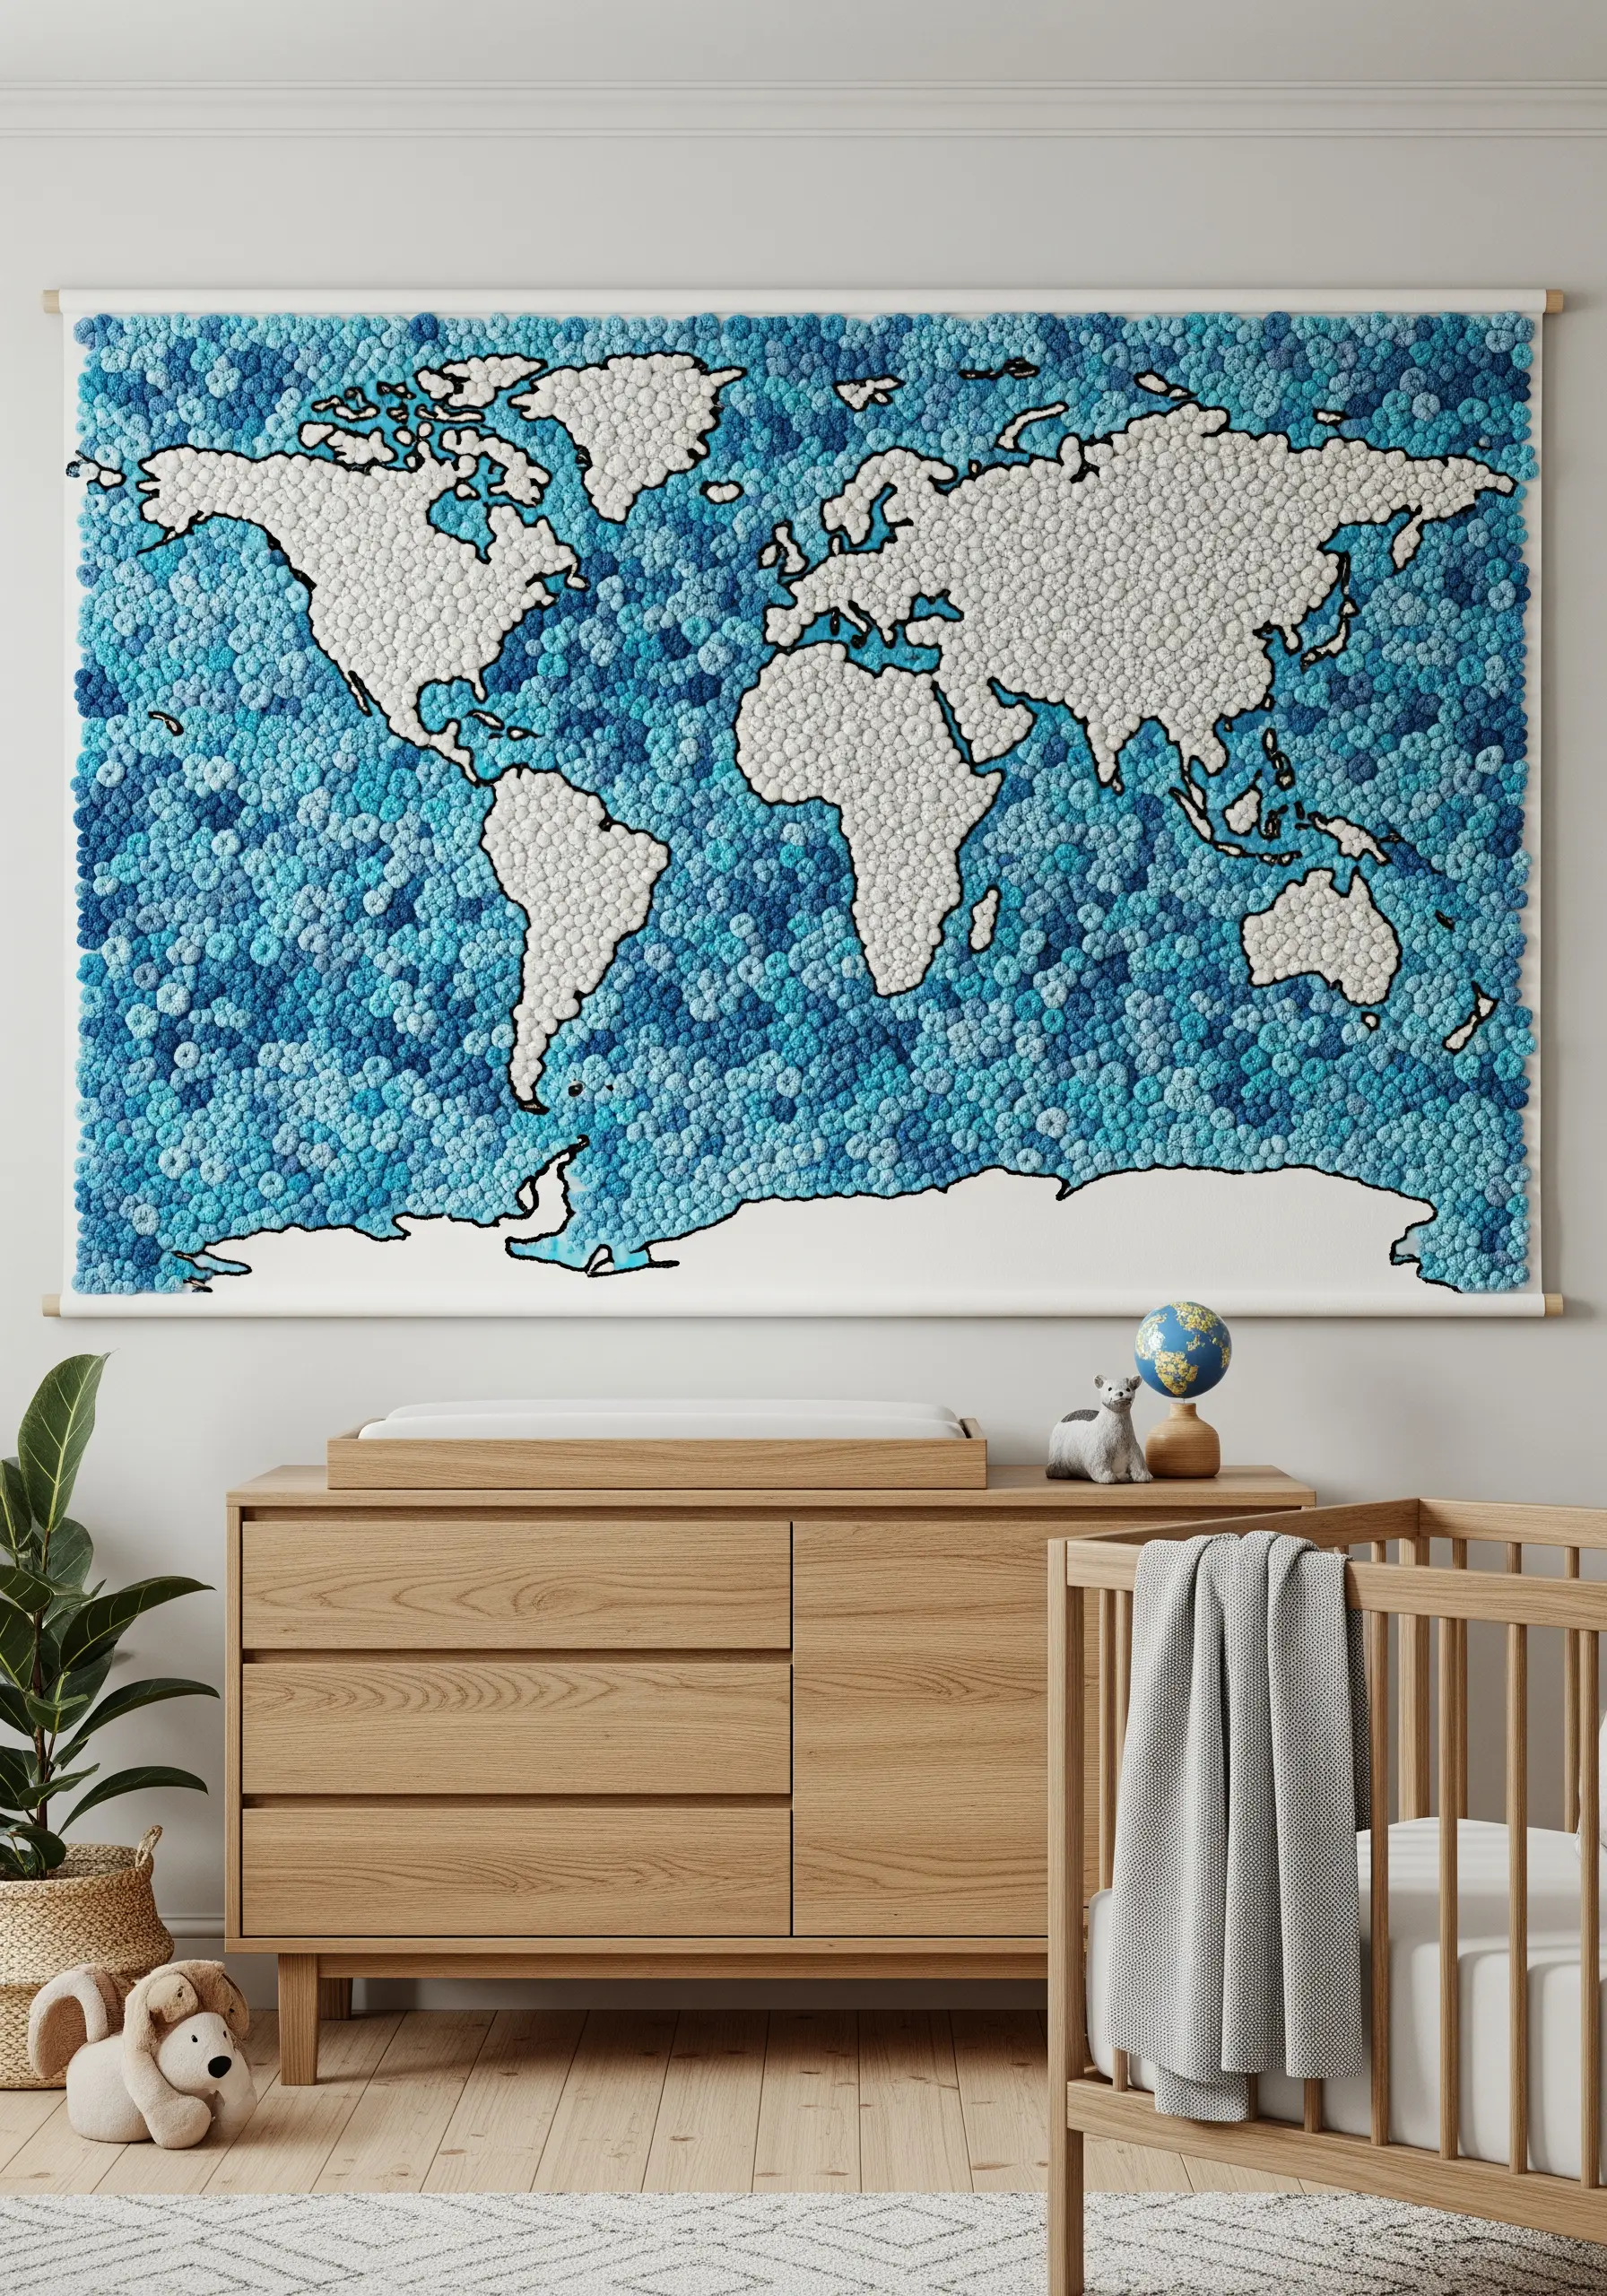
This monumental piece is a true labor of love, creating a stunning visual effect with a single, repeated stitch.
To tackle a project of this scale, use a large scroll frame rather than a hoop to maintain even tension across the entire piece of fabric.
Create depth in the oceans by using several shades of blue floss, clustering darker knots to represent deeper waters.
The result is a breathtaking, heirloom-quality tapestry with unparalleled texture.
23. Build a Soft Skyline with Satin Stitch Blocks

A minimalist city skyline relies on the perfection of its shapes and the harmony of its color palette.
To keep your large, filled areas from puckering, iron a stabilizer onto the back of your fabric before you begin stitching.
Use a vertical satin stitch to fill each building, ensuring your stitches are flat, even, and packed tightly together for a solid block of color.
The beauty of this design is its simplicity, making it a perfect piece of modern minimalist textile wall art.
24. Create a Buzz-Worthy Motif with Mixed Textures
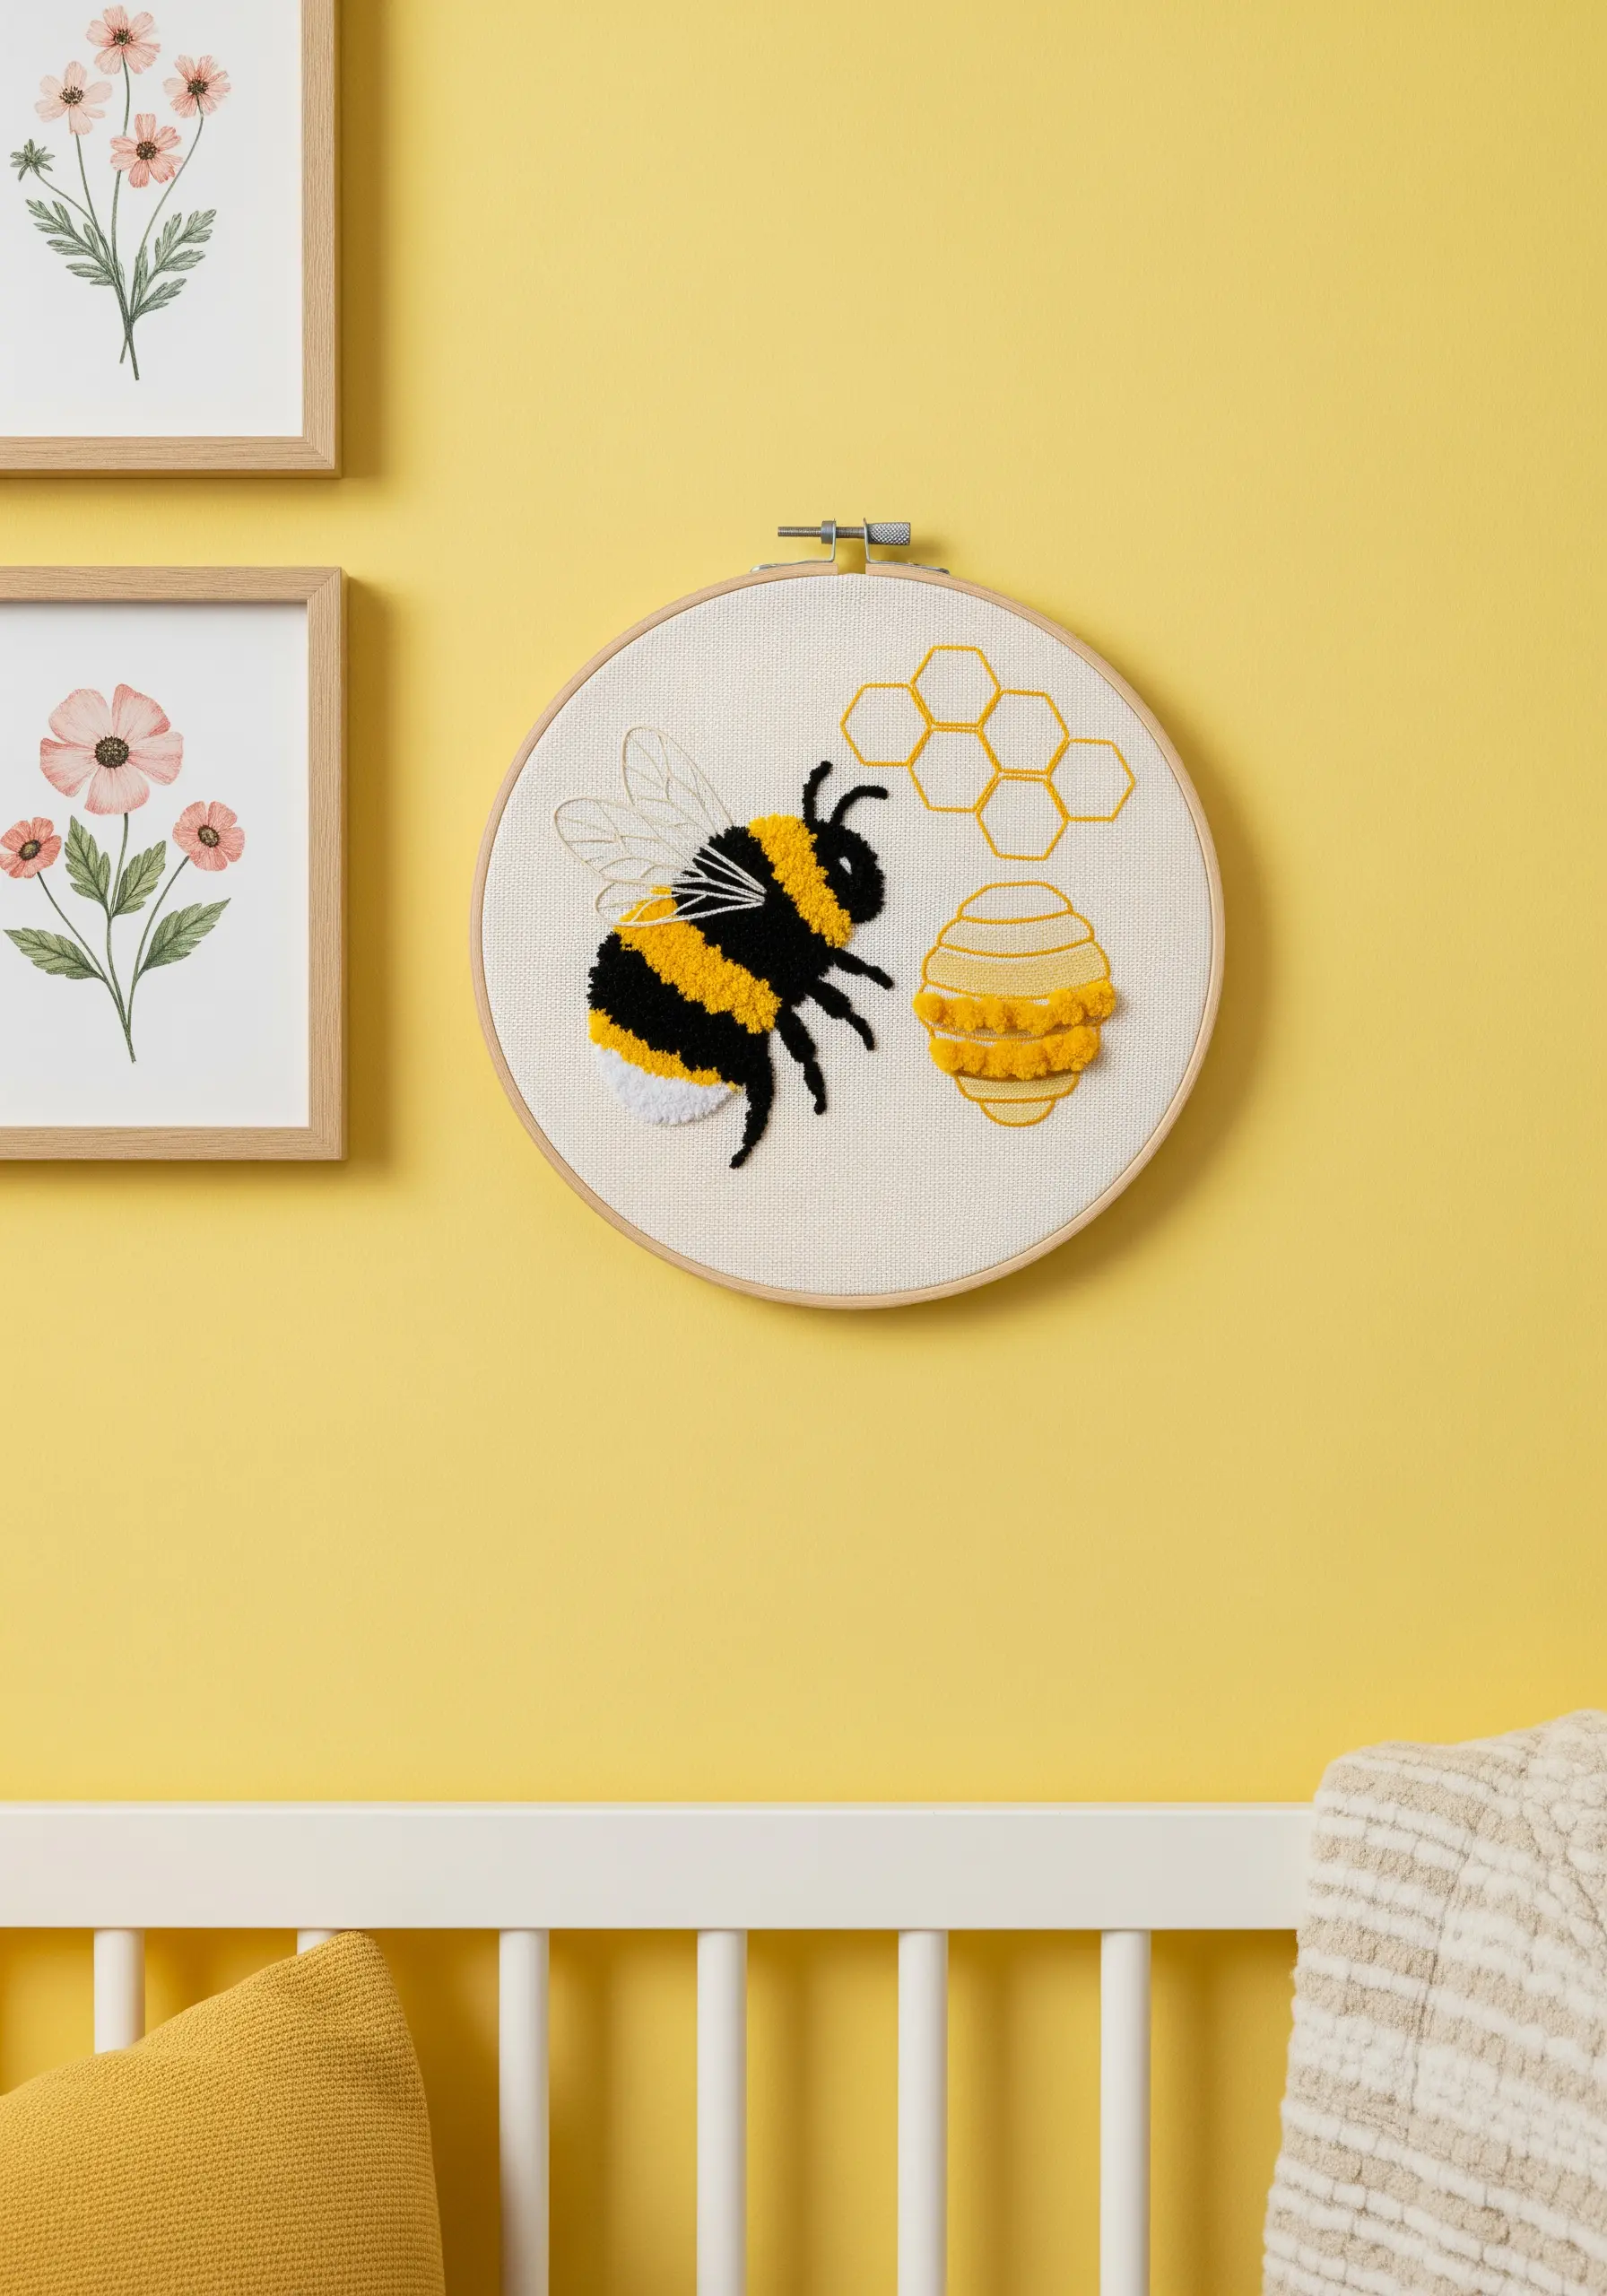
Make a simple subject like a bee more dynamic by assigning a different stitch or texture to each part of its anatomy.
Use a fluffy turkey stitch for the fuzzy yellow stripes on its body and a sleek satin stitch for the black stripes.
For the delicate wings, use an outline stitch filled with sparsely spaced seed stitches to give them a transparent quality.
This thoughtful combination of textures is what makes the final piece so engaging and fun.
25. Illustrate a Weather Report in a Hoop Quad

This charming set is a perfect way to practice a variety of fundamental stitches, with each hoop showcasing a different technique.
Create a raised, dimensional sun using a padded satin stitch, where you lay down foundation stitches before covering them.
For the knotted cloud, use a couching technique to stitch down a thicker cord or piece of yarn in your desired shape.
Arranging these simple but distinct pieces together as a quartet creates a cohesive and educational piece of wall art.
26. Weave a Magical Mane with Dimensional Stitches

The unicorn’s mane is the perfect opportunity to play with highly textural, dimensional stitches that create movement and magic.
Use woven wheel stitches (or spider web roses) to create the round, floral-like elements, and use a plaited braid stitch for the flowing, woven sections.
Choosing a variegated or silk floss will enhance the effect, adding a natural shimmer and color variation that makes the mane look truly enchanted.
This is a perfect project for horse & unicorn embroidery motifs.
27. Create Smooth, Graphic Dinosaurs with Appliqué

To achieve this clean, cartoon-style look with perfectly smooth surfaces, fabric appliqué is an excellent technique.
Trace your dinosaur shapes onto a paper-backed fusible web, iron it onto your chosen fabric colors, and then cut the shapes out.
Peel the paper backing and iron the fabric shapes onto your background fabric for a permanent bond.
Finish the design by outlining the appliqué with a neat backstitch or blanket stitch to give it a crisp, defined edge.


