
You have the threads, the fabric, and a love for the quiet focus that stitching brings. But how do you move from a single, lovely hoop to a wall that tells a story? How do you make your art feel like a cohesive, intentional statement?
A story-wall isn’t about filling space; it’s about curating a narrative. It’s a collection of moments—stitched in thread—that flow together, creating a mural that is uniquely yours. Whether you’re mapping the stars, charting the life of a flower, or building a mountain range, the secret lies in connecting each piece to a larger idea.
Here, you’ll find not just inspiration, but the techniques behind the magic. Discover how to use texture to evoke emotion, how to arrange hoops to create movement, and how to blend different styles into a harmonious whole. It’s time to transform your collection of individual hoops into an immersive world that your guests—and you—can get lost in.
1. Create a Celestial Arc Narrative
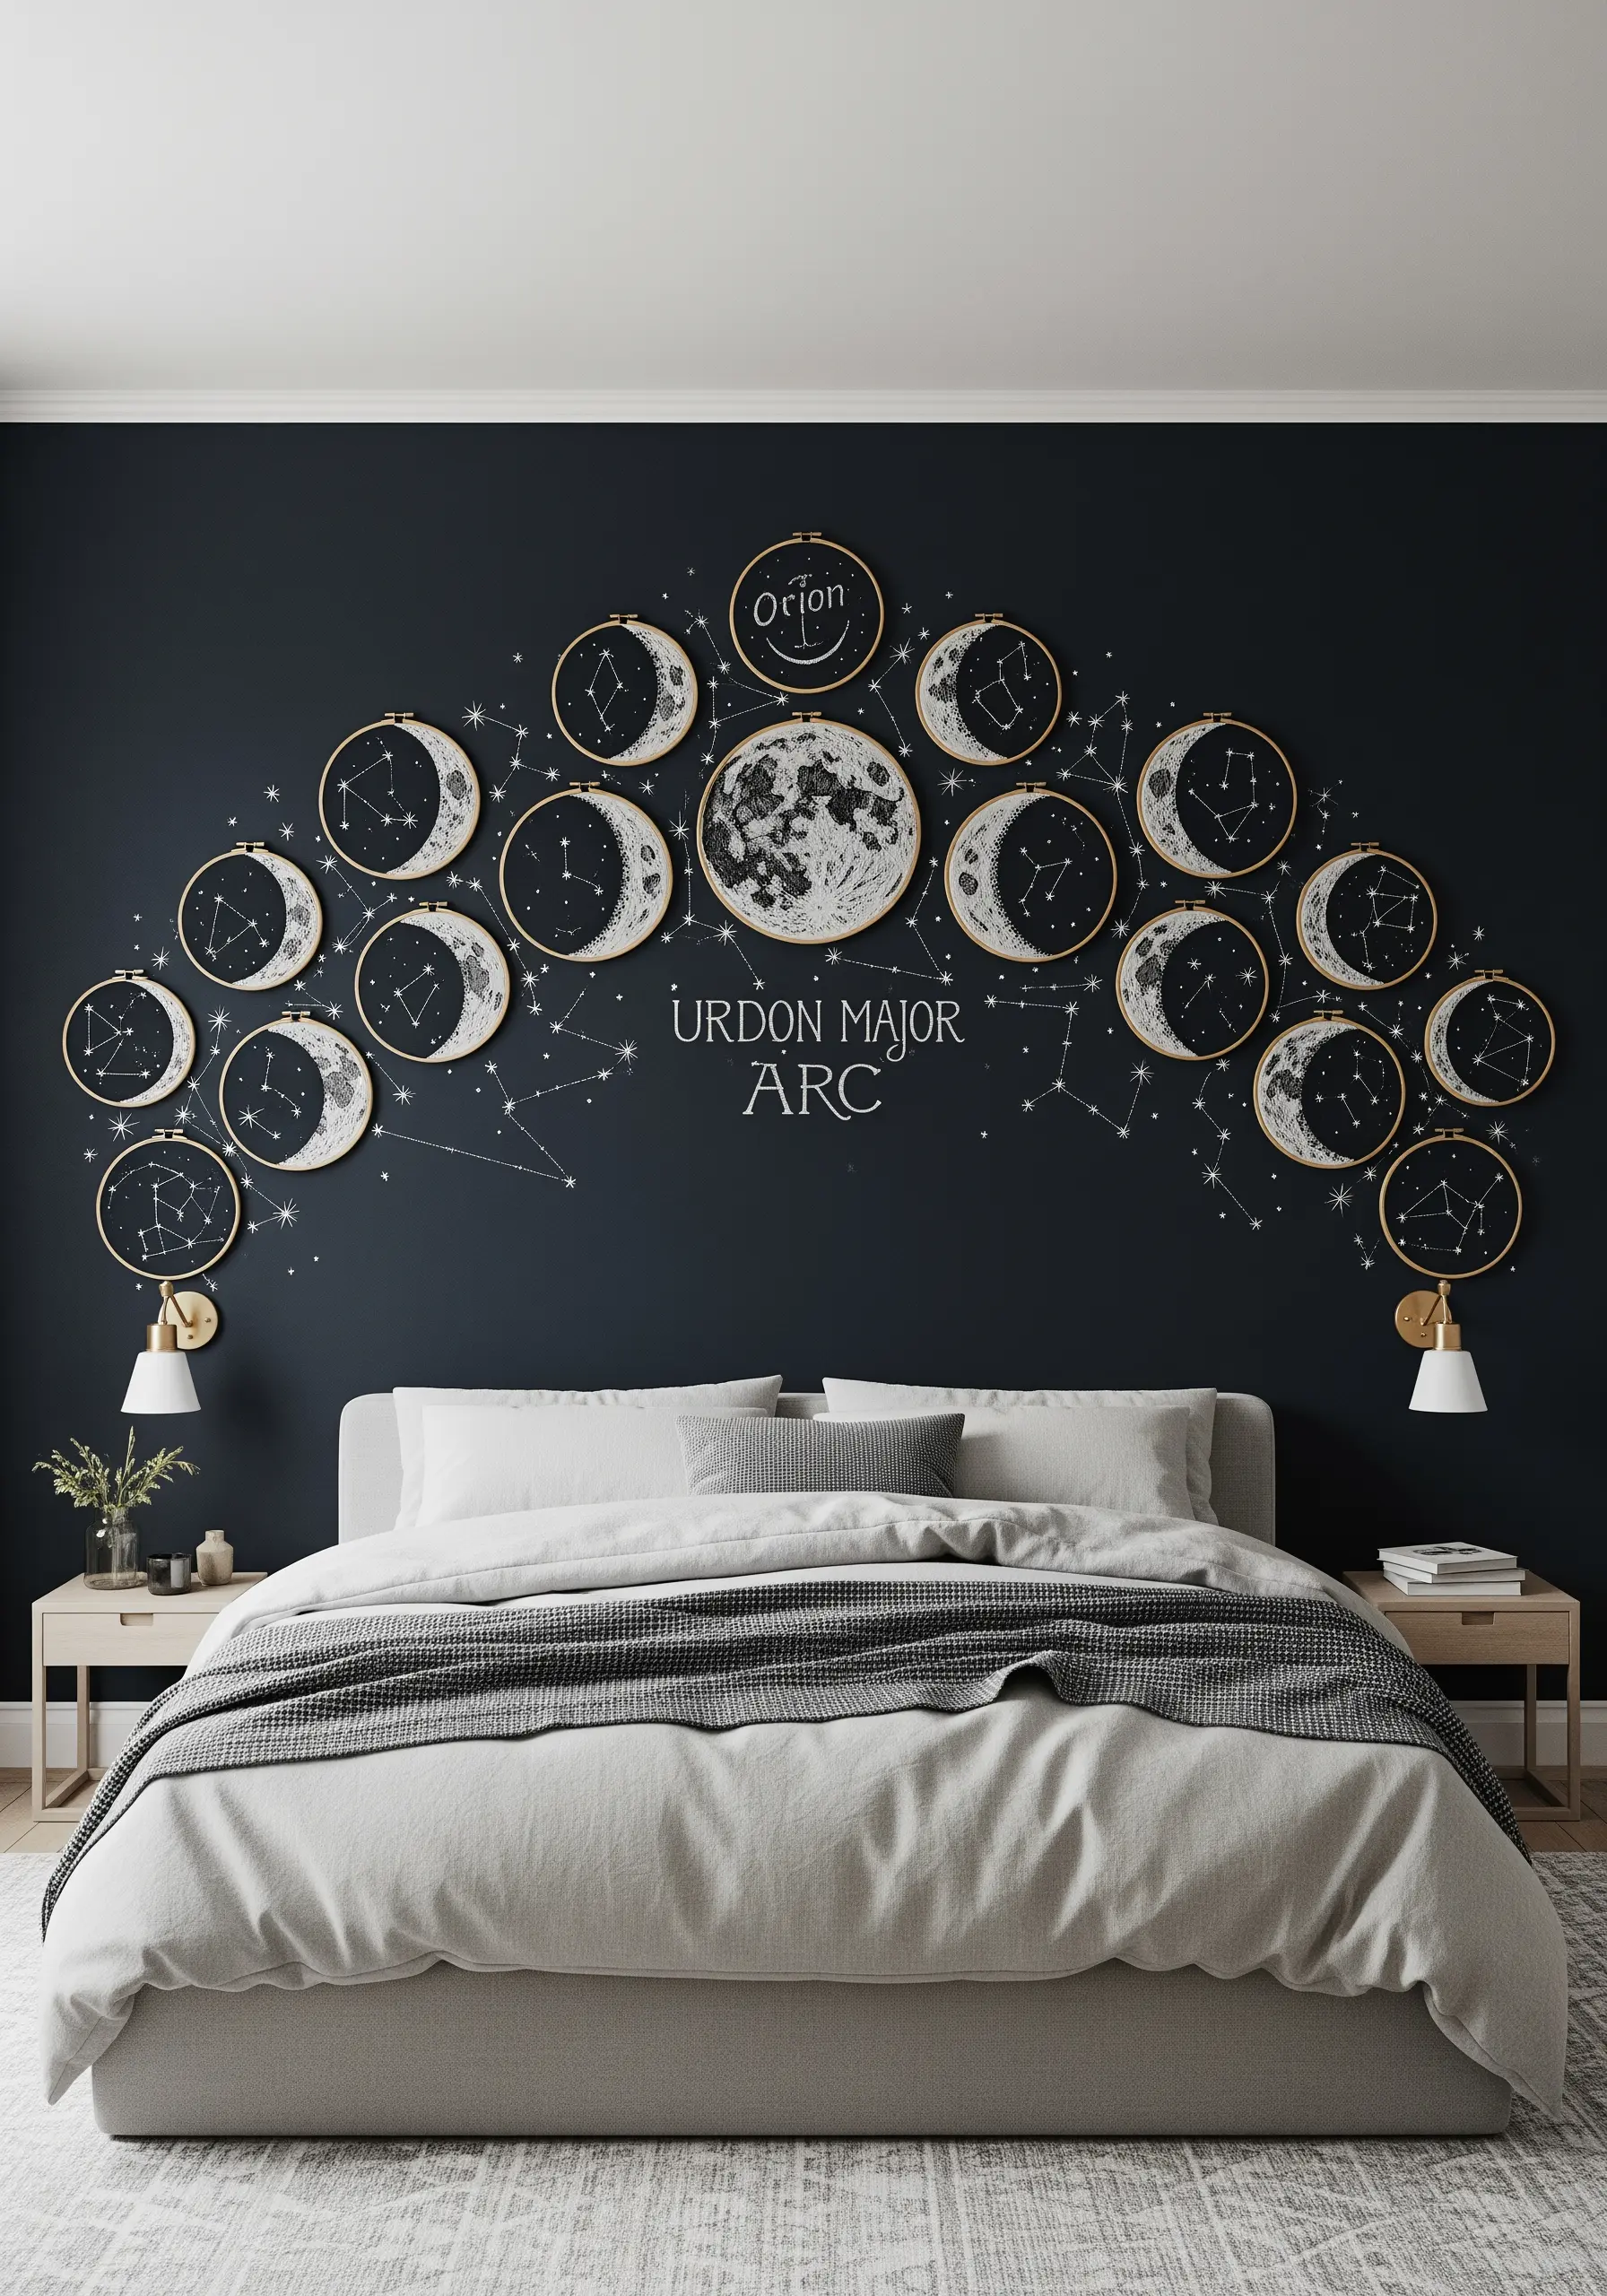
To build a large-scale mural like this, map your composition on the wall first with painter’s tape to perfect the spacing and flow between hoops.
Use a high-contrast palette—brilliant white thread on navy or black fabric—to make every stitch pop, even from a distance.
Vary the density of your stars by using single, double, or triple French knots, which gives the constellations a realistic sense of depth and brightness.
For the central moon, use a tight satin stitch with a single strand of gray or silver thread, ensuring your stitches lie flat and parallel for a smooth, cratered texture.
2. Illustrate Botanical Growth Over Time
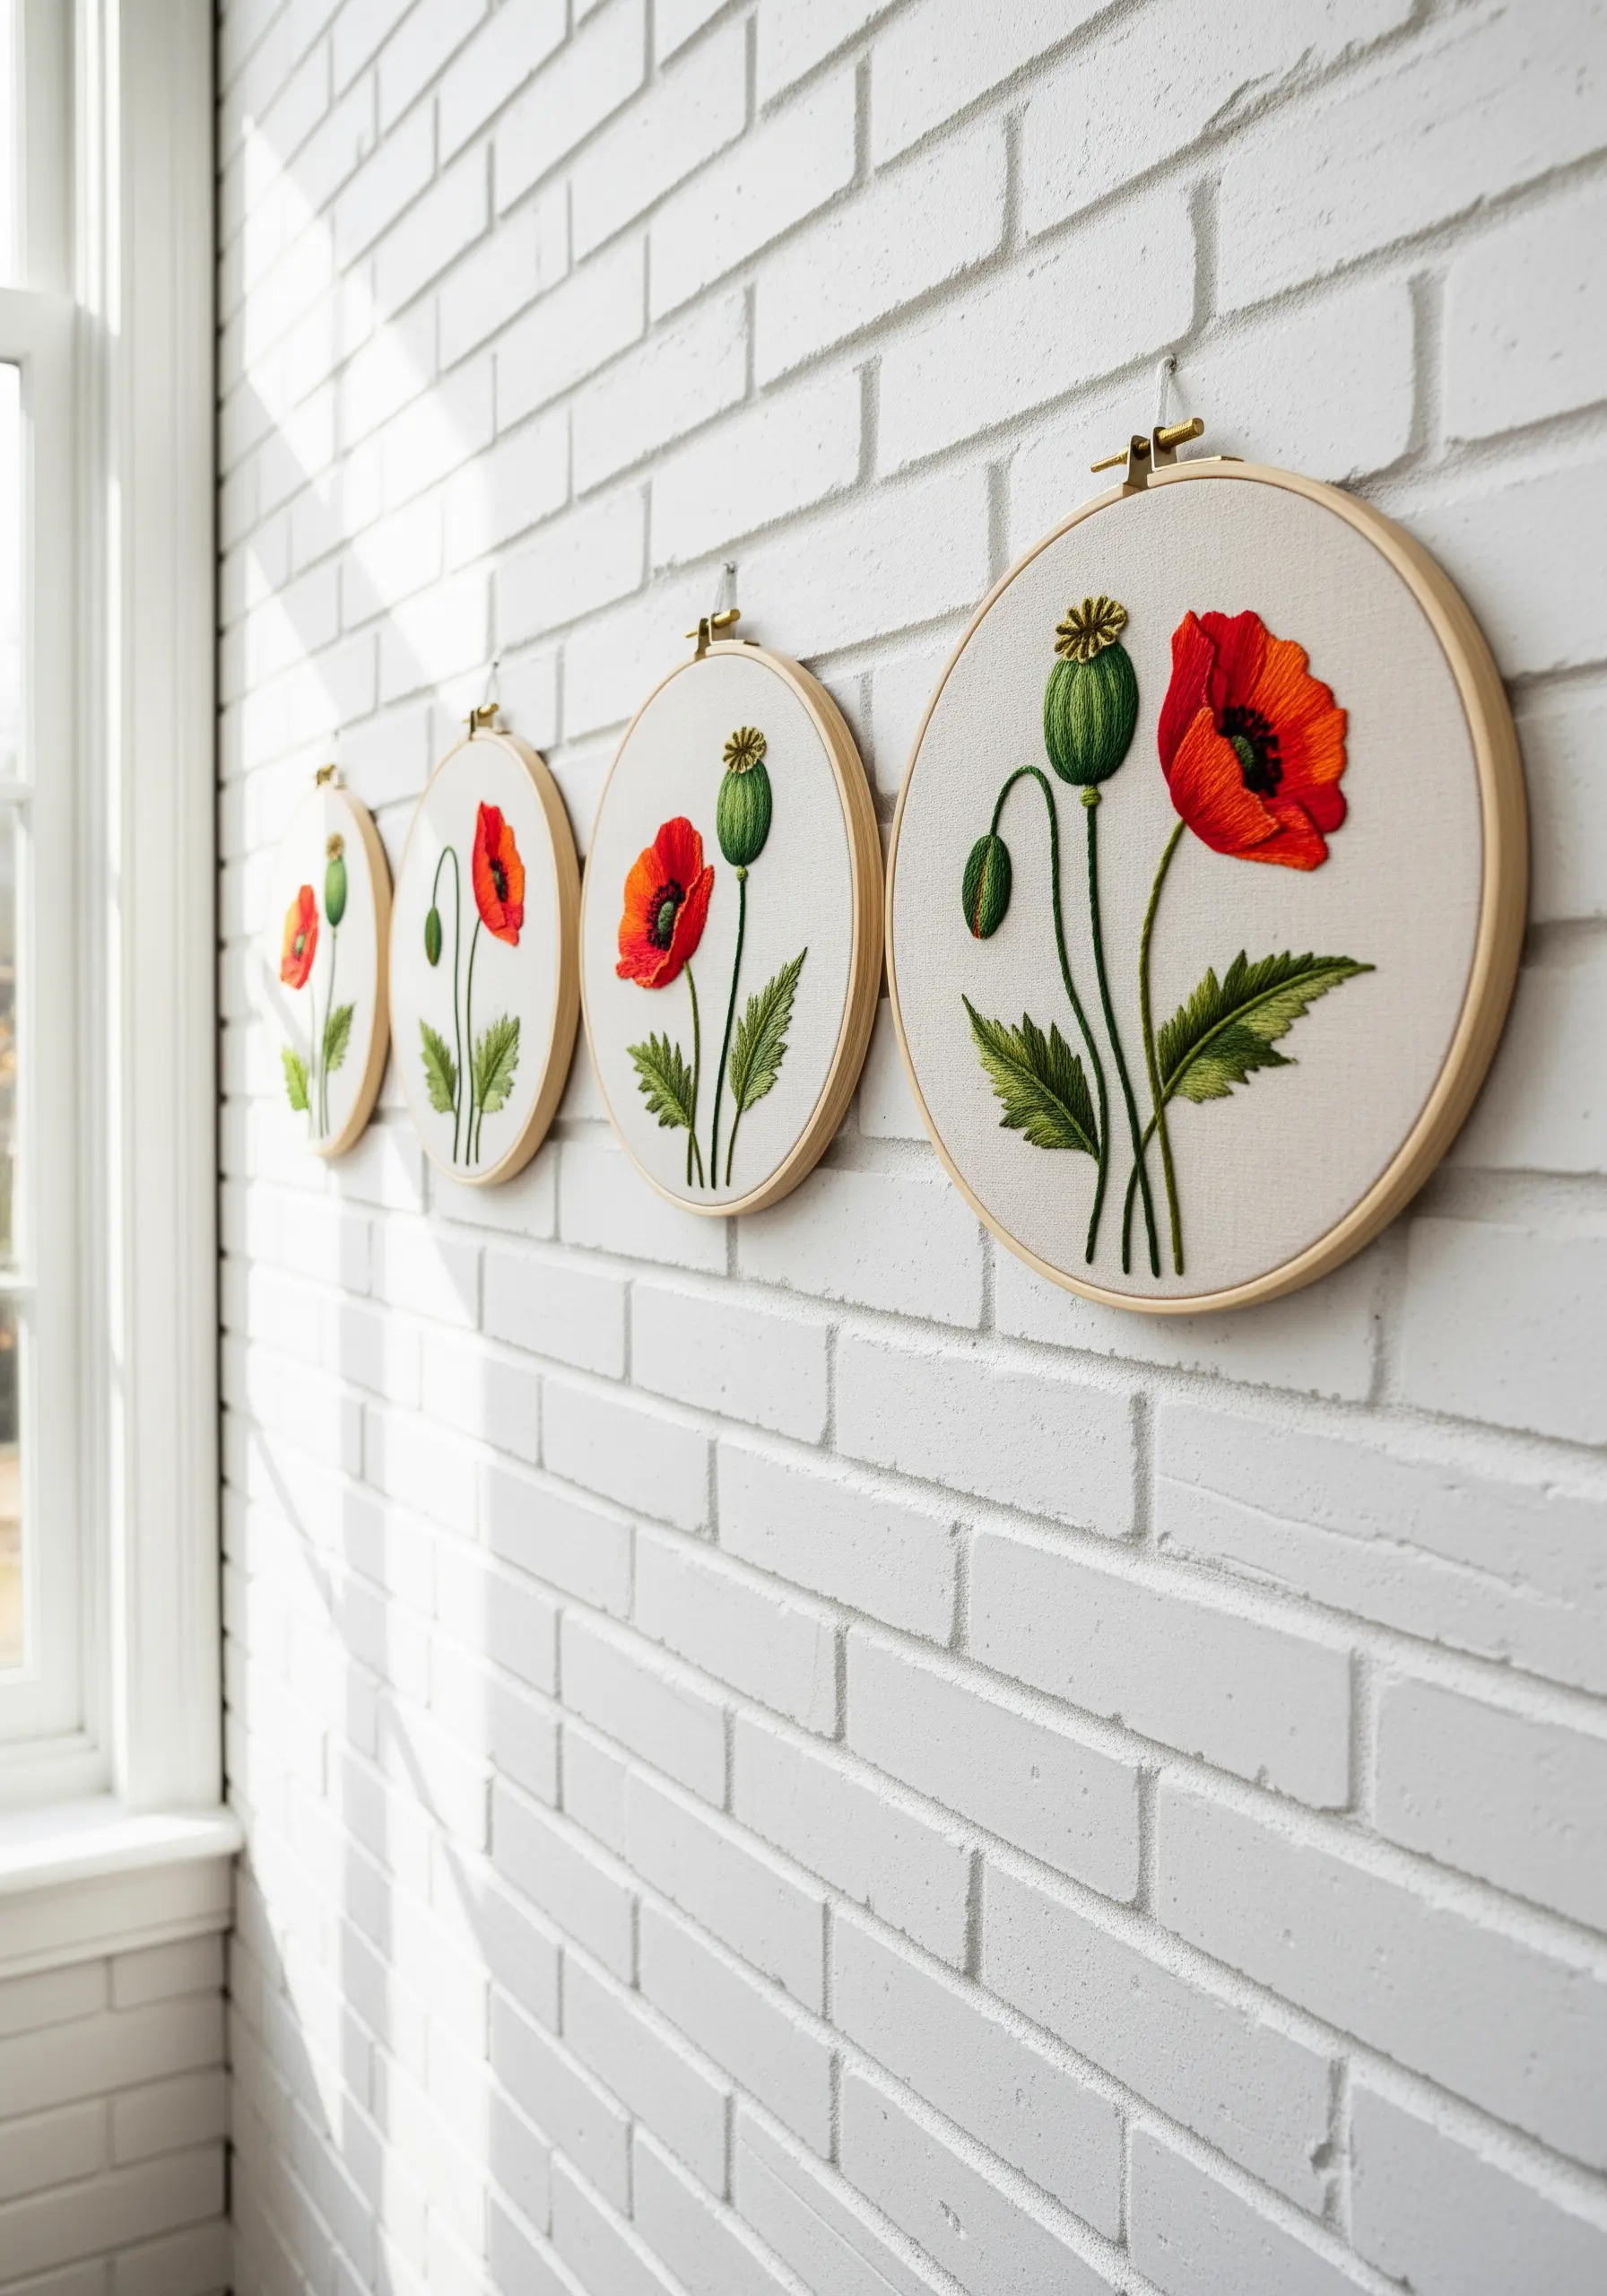
Tell a visual story by dedicating each hoop to a different stage of a plant’s life, from bud to full bloom.
Arrange the hoops sequentially by size, moving from smallest to largest, to create a natural sense of progression and visual rhythm.
Achieve petal realism with the long-and-short stitch, blending two or three shades of red to mimic how light hits the flower.
For the poppy stems and seed pods, use a whipped backstitch to create a solid, raised line that adds dimension and stands out against the fabric.
3. Build a Landscape with Sculptural Yarn
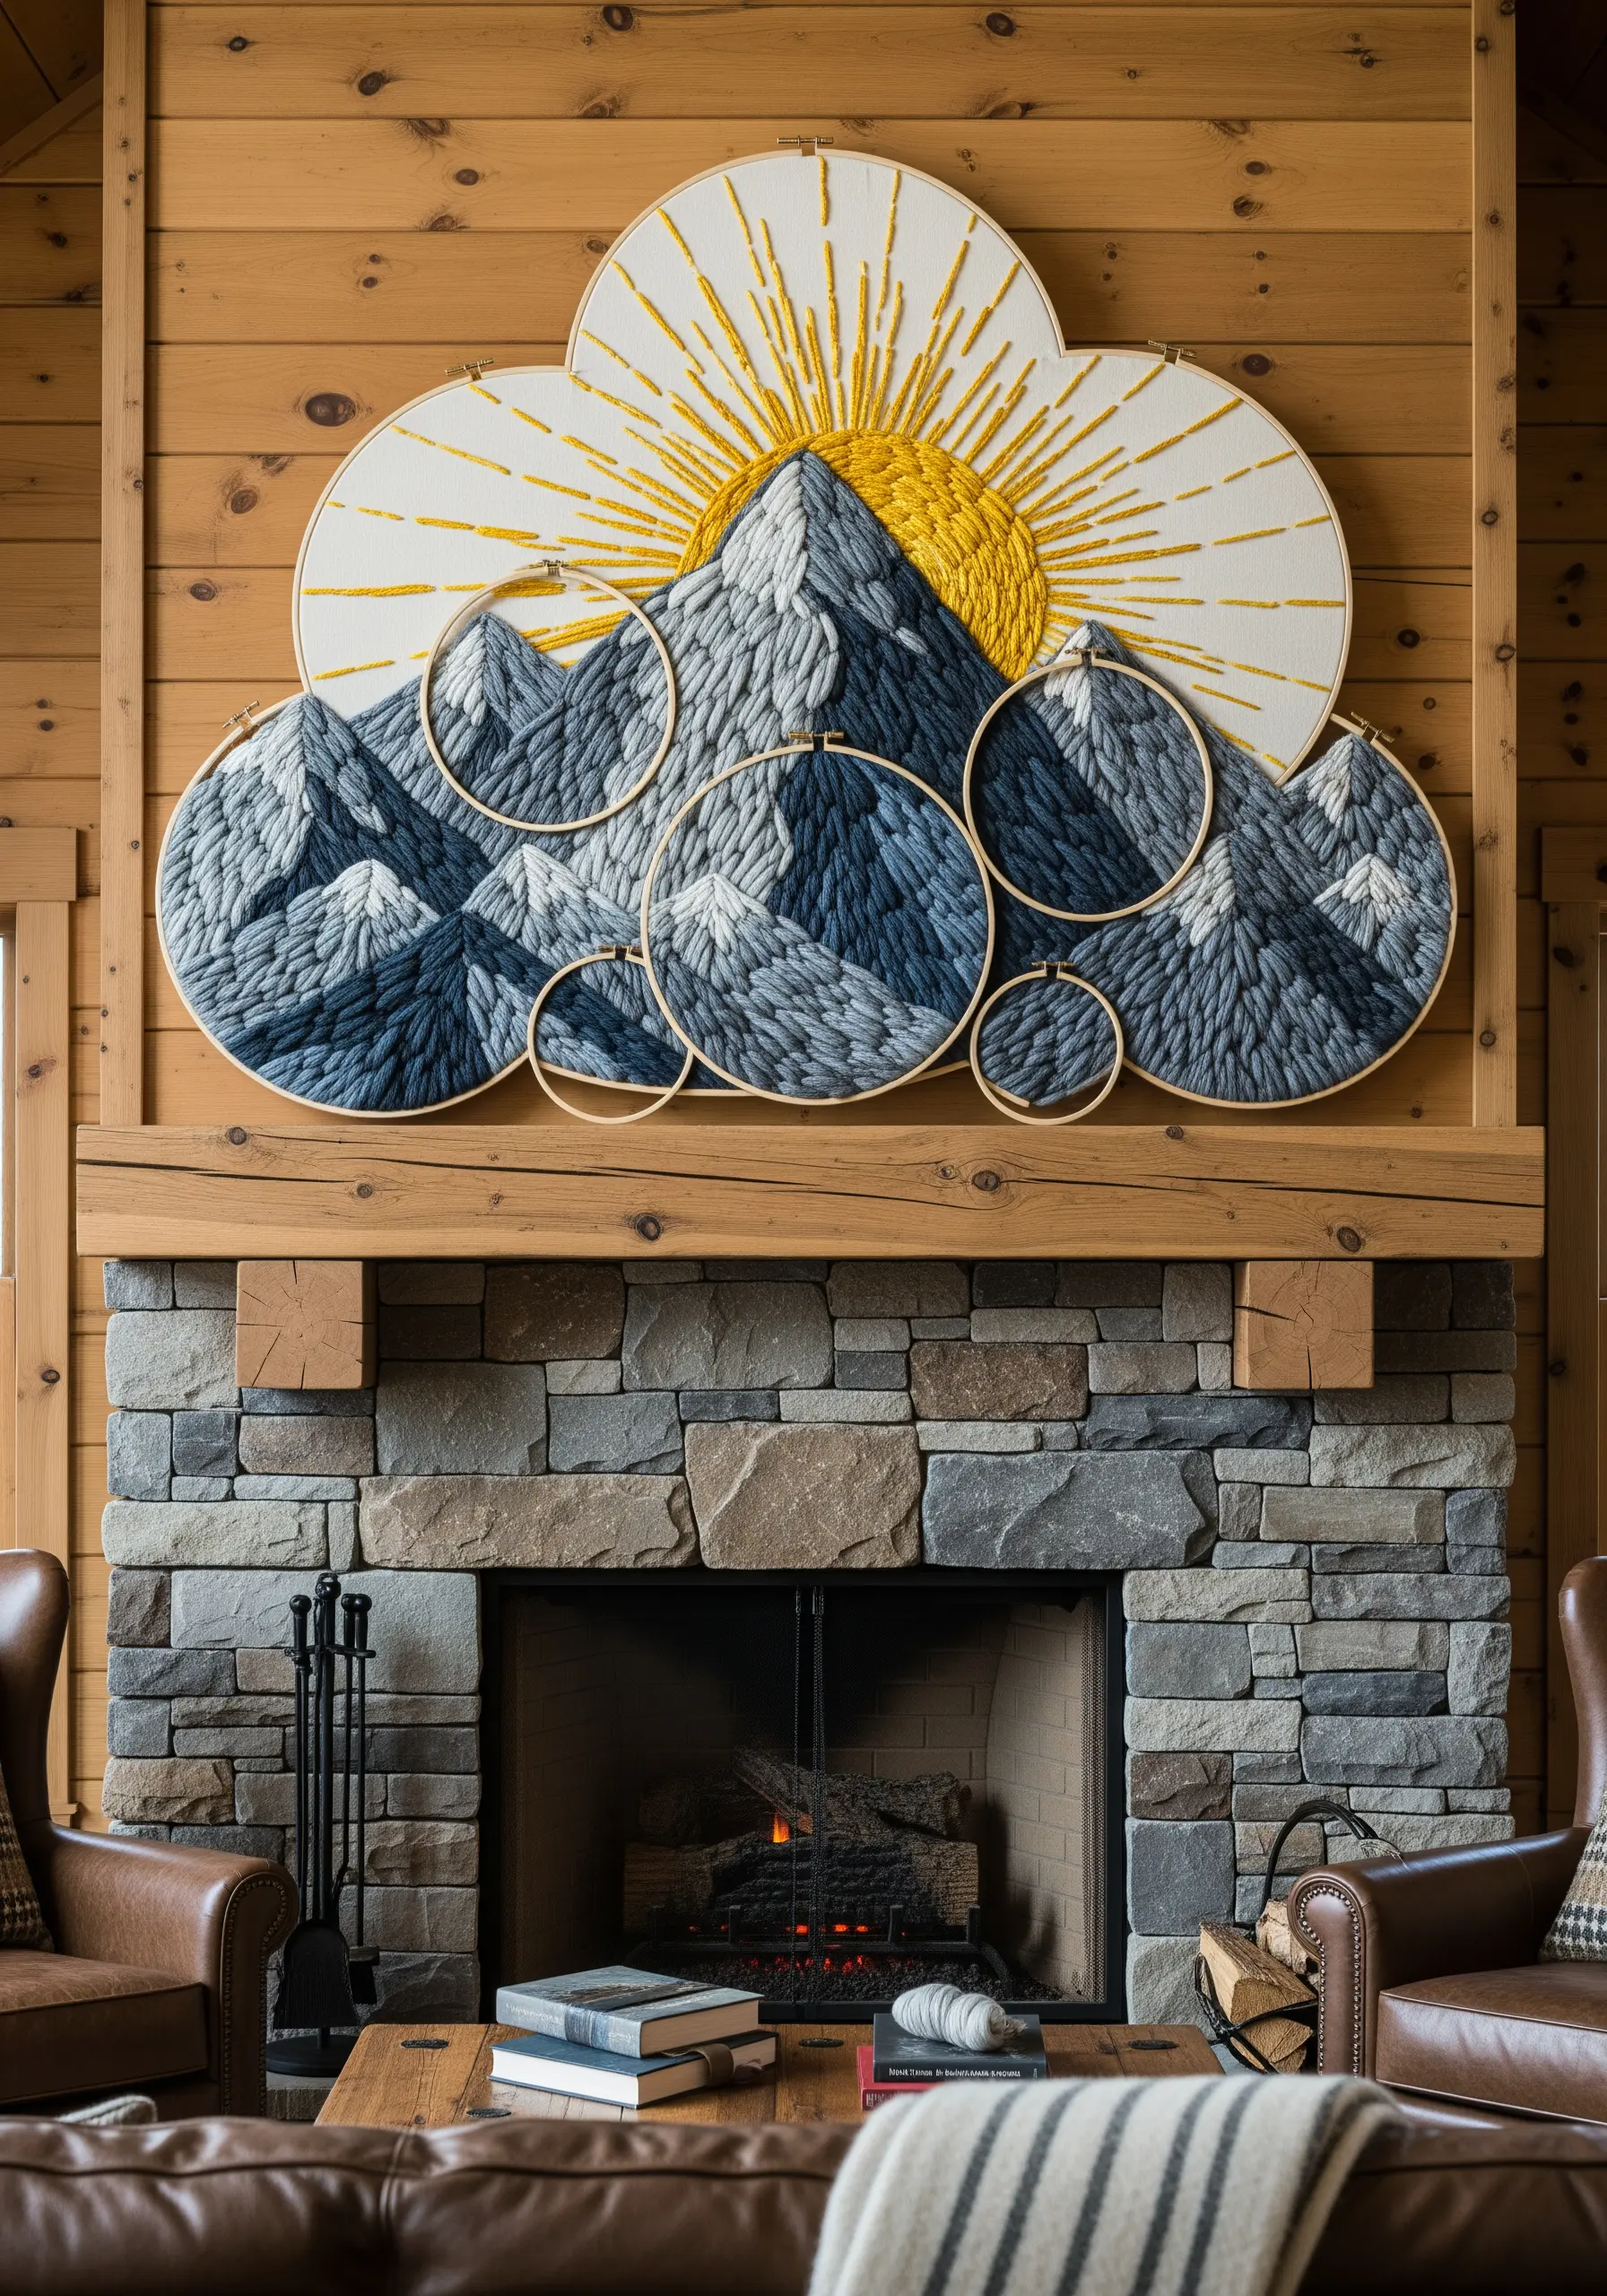
Break a single landscape into multiple hoops to create a dynamic, abstract composition that draws the eye across the entire piece.
Instead of floss, use thick wool yarn or roving with a punch needle to build heavy texture that mimics rugged mountain terrain.
Create shadows and highlights by dividing the mountains into distinct color-blocked sections, using directional satin stitches to guide the viewer’s gaze.
The sun’s rays are simple straight stitches, but their power comes from their length and density; use a bright, contrasting yellow to make it the focal point.
4. Stitch a Vibrant, Textured Coral Reef

Bring an underwater world to life by focusing on textural stitches that mimic organic shapes.
Use bullion knots for worm-like corals, cast-on stitches for branching forms, and dense French knots for rounded textures.
Choose a bold, dark fabric like teal or navy to make neon and fluorescent threads appear to glow, just like a bioluminescent reef.
Incorporate beads or metallic threads sparingly to add a subtle sparkle that catches the light and suggests the movement of water.
5. Frame a Cityscape with Isolating Hoops
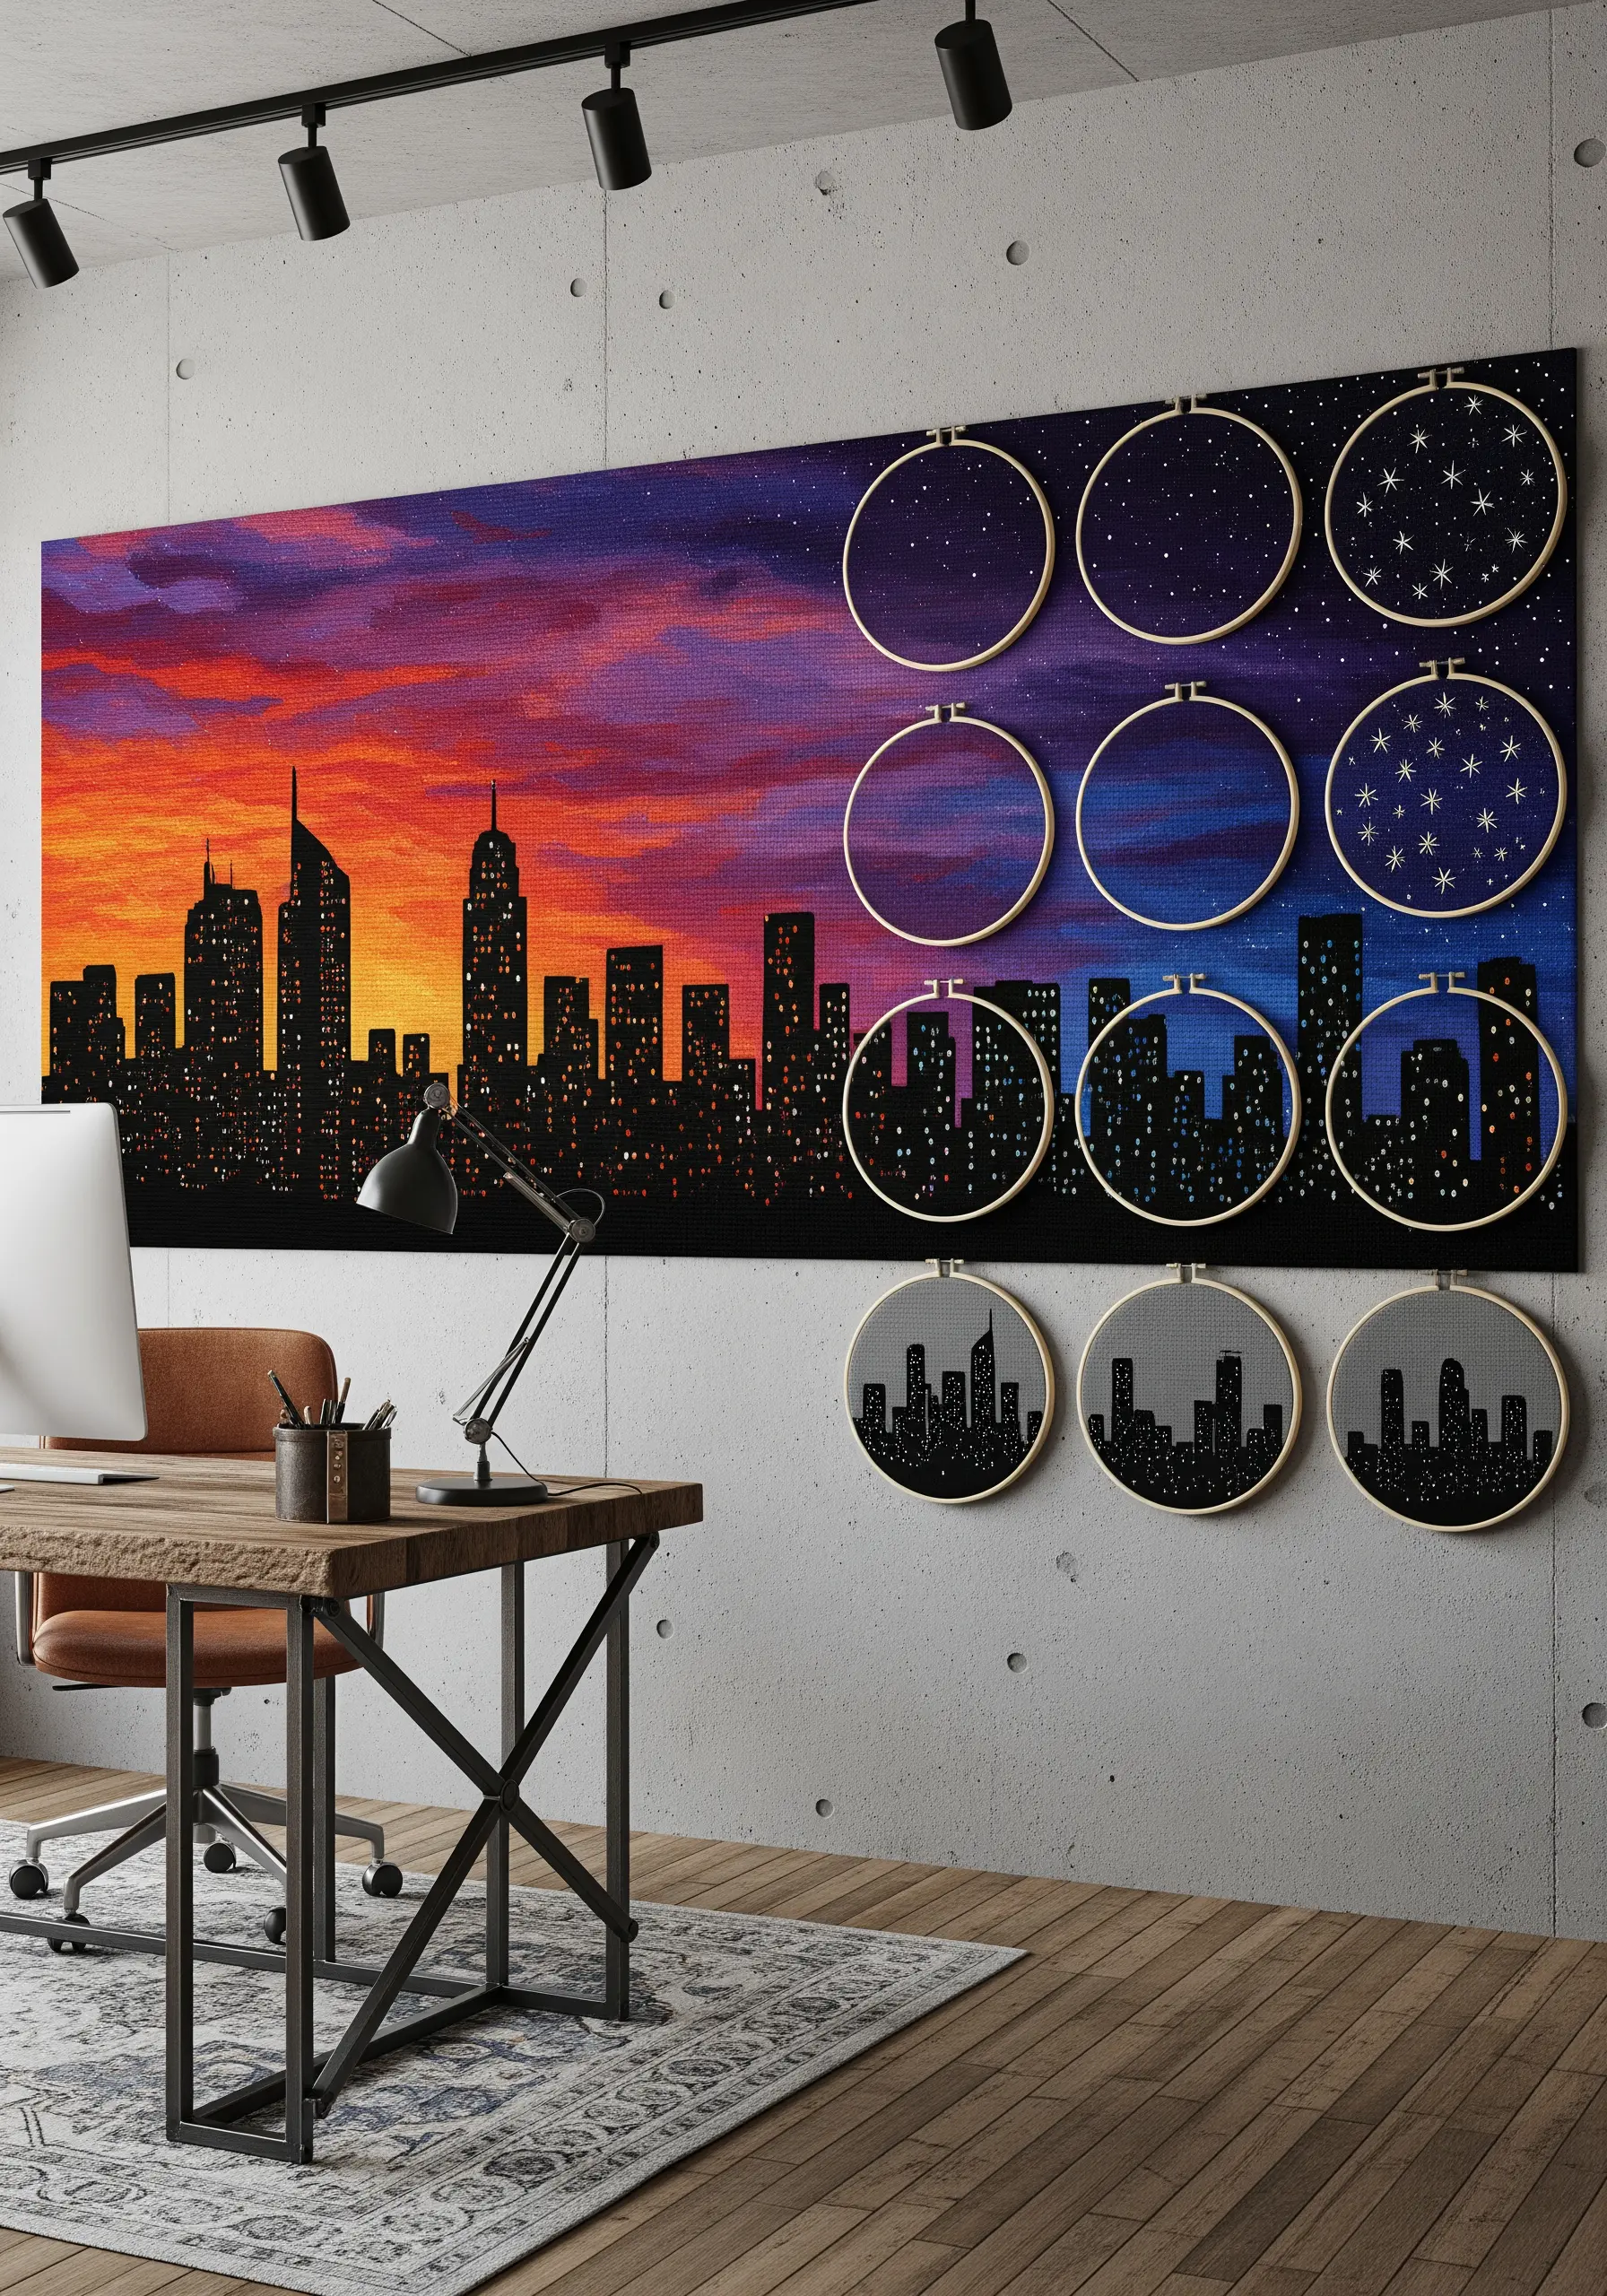
Tackle a large, complex scene by stitching it on a single large canvas and then using empty hoops to frame and highlight specific details.
This technique allows you to create a fluid, panoramic background while directing focus to key moments within the larger piece.
For the sunset gradient, use a thread painting technique, blending dozens of colors with long-and-short stitches to create a seamless transition from day to night.
The city silhouettes can be achieved with simple backstitching for outlines and sparse satin stitches for lit windows, keeping the focus on the dramatic sky.
6. Connect a Story with Stitched Branches
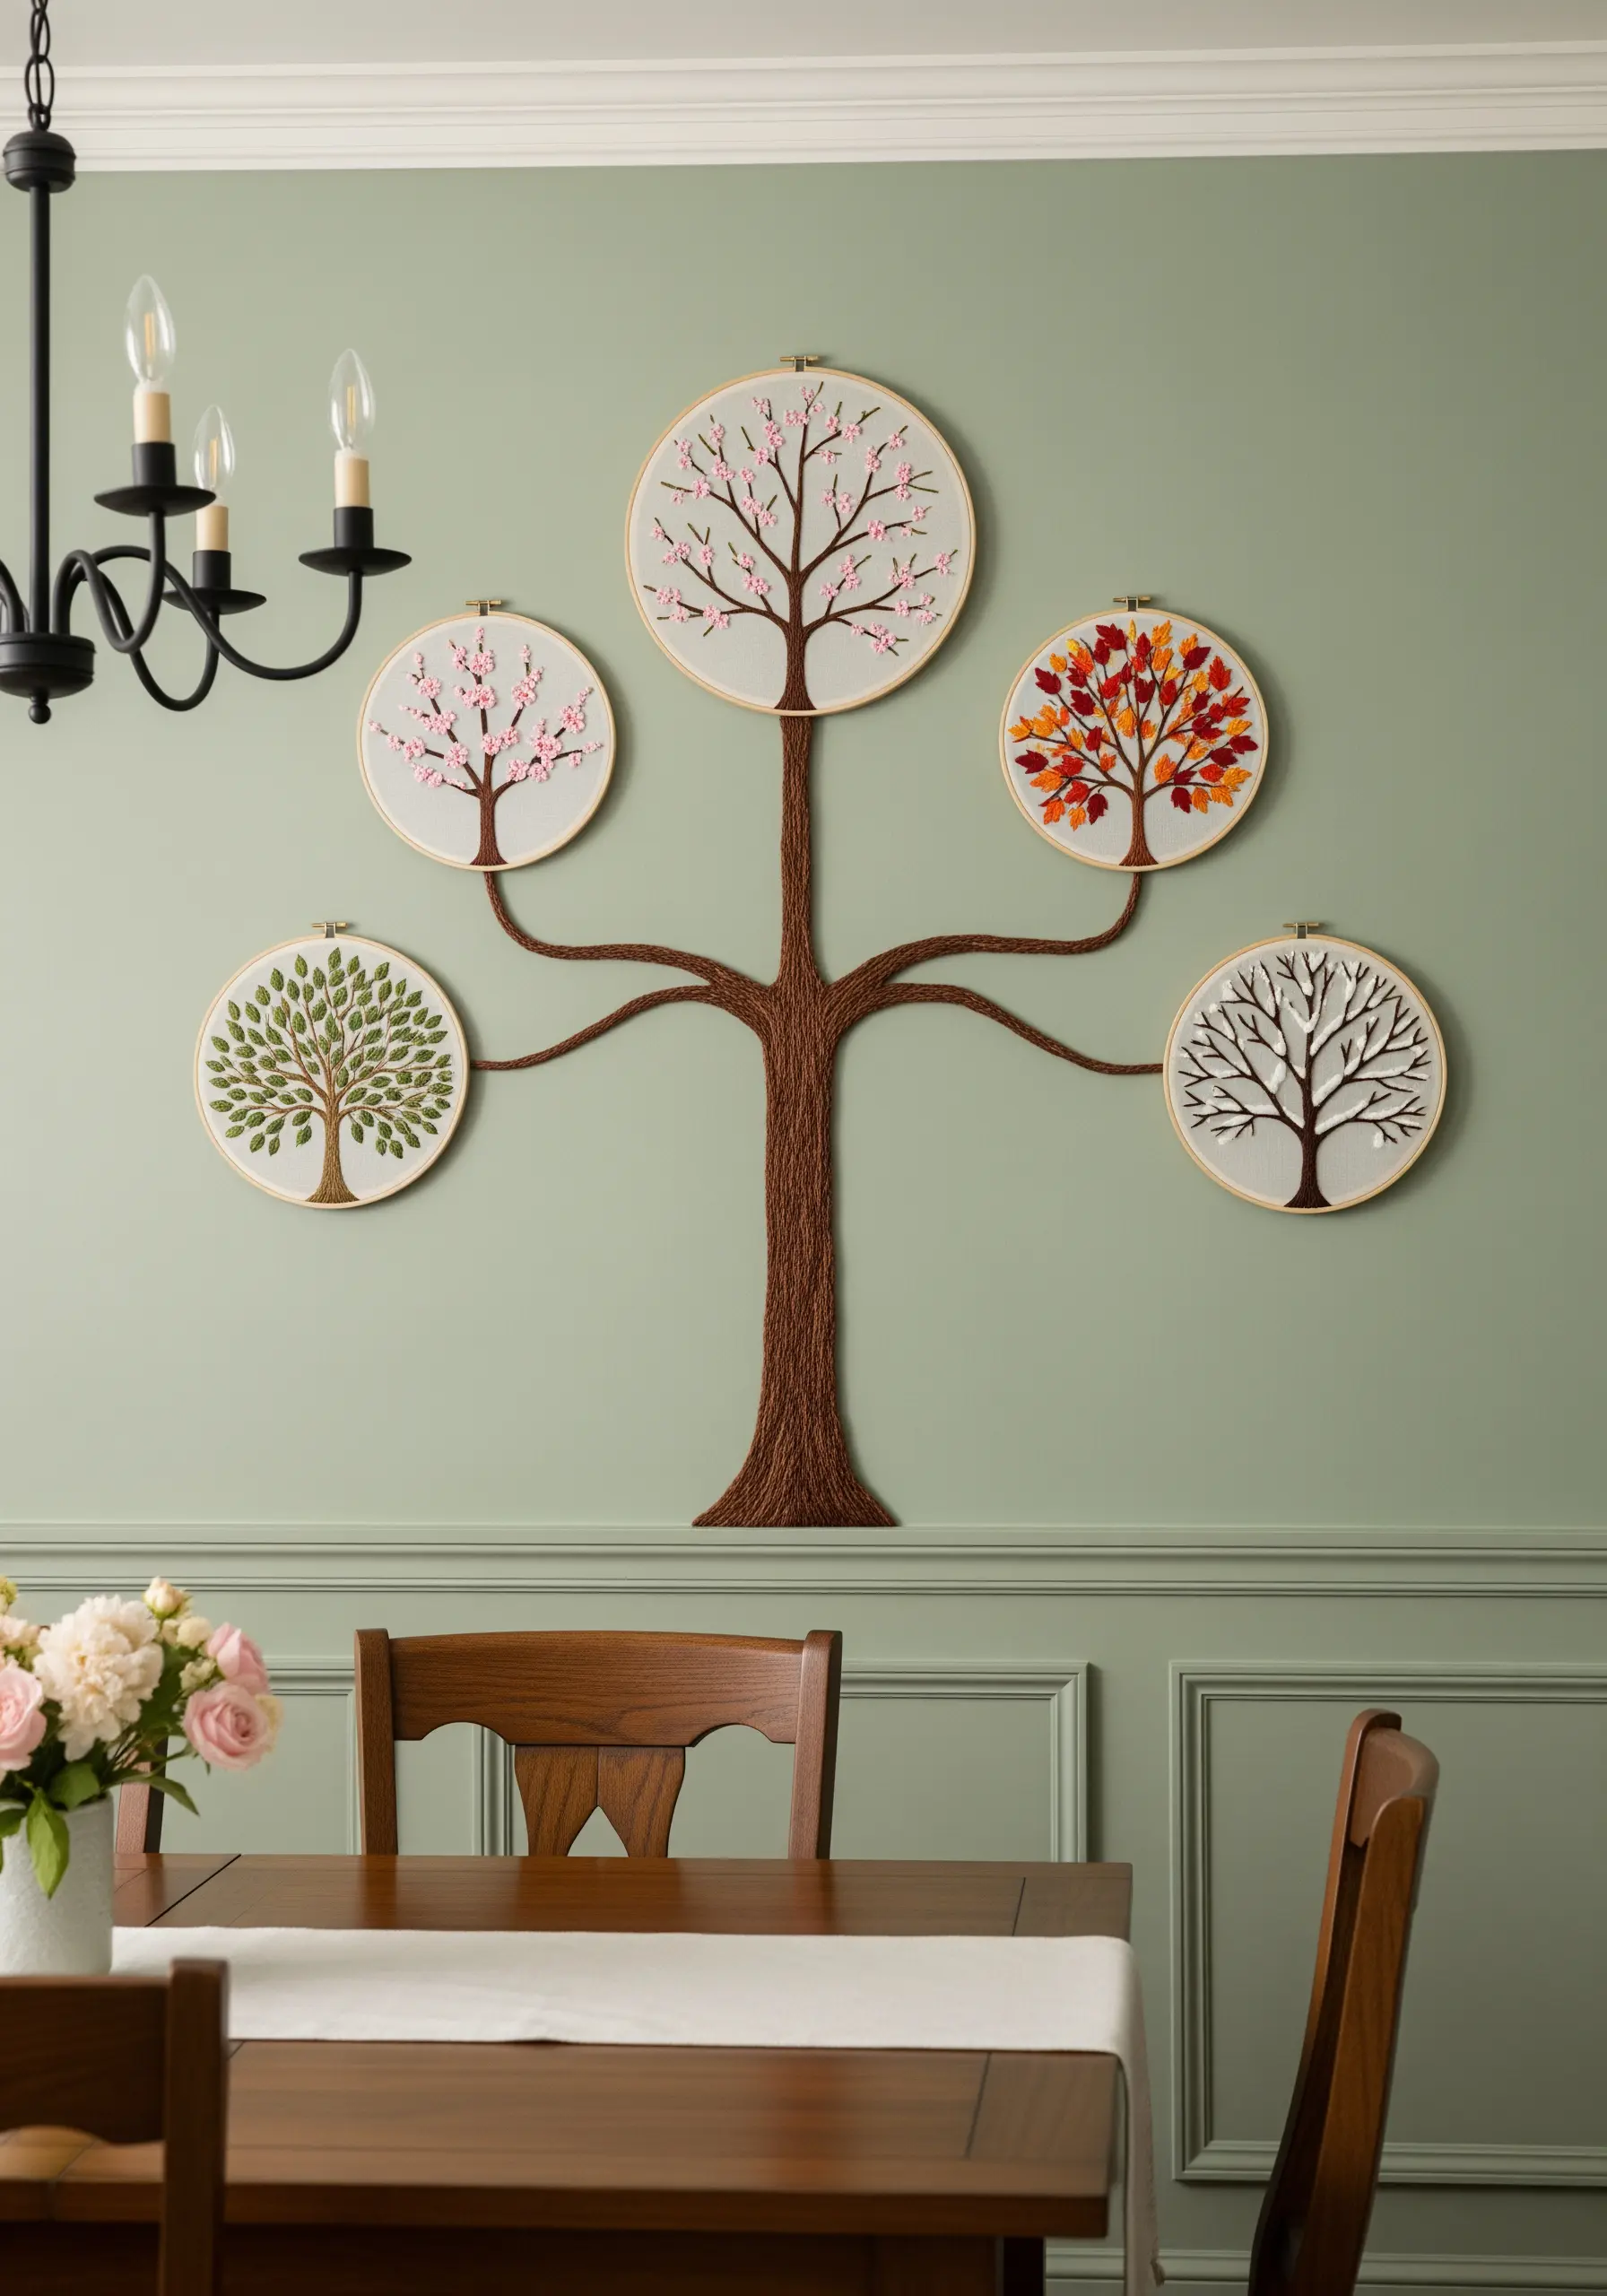
Unify separate hoops into a single narrative by stitching connecting elements directly onto the wall or a fabric backdrop.
To create the thick tree trunk and branches, use a couching stitch: lay down thick yarn in your desired shape and use a thinner, matching thread to tack it down.
This method adds sculptural dimension and transforms the individual hoops from a simple gallery into one cohesive, sprawling tree.
Dedicate each hoop to a different season or family member, using color and detail to personalize each element of your story.
7. Layer Appliqué for Whimsical Depth
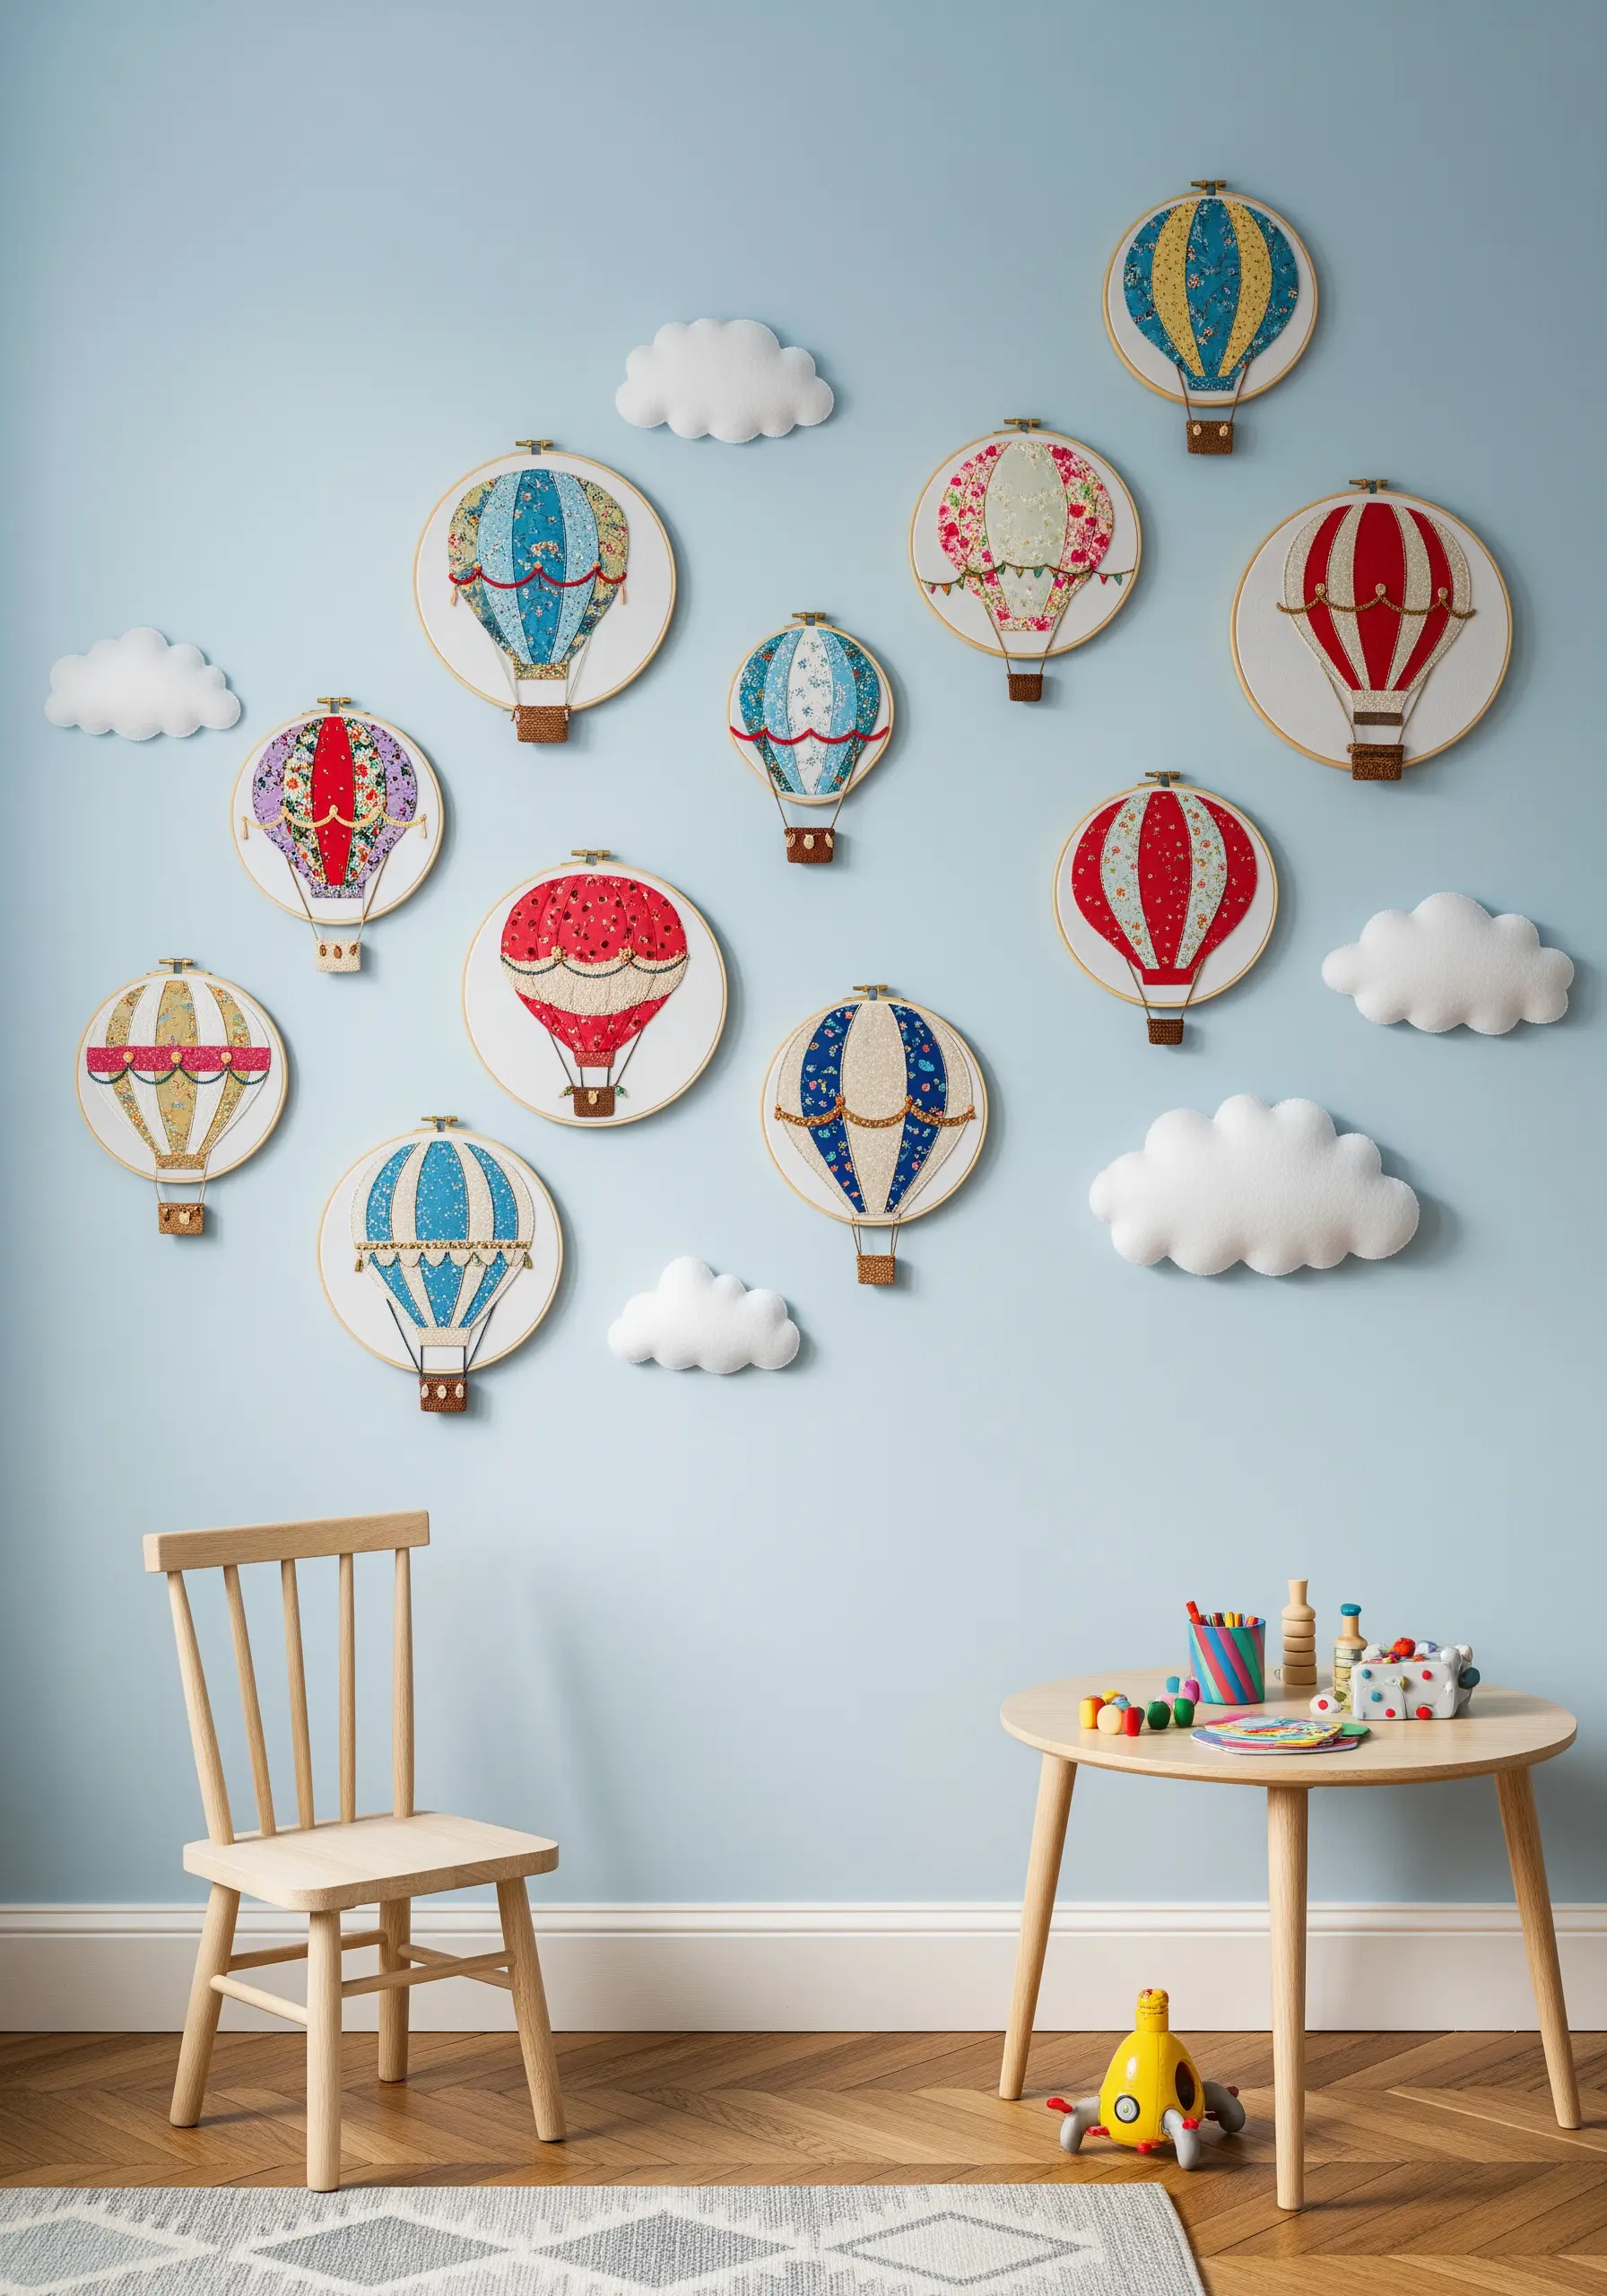
Combine fabric appliqué with embroidery to create charming, multi-layered scenes with less stitching time.
Cut the main balloon shapes from patterned fabrics and secure them to your base fabric with a neat blanket stitch around the edges.
Embroider finer details like the baskets and ropes directly over the appliqué, which integrates the layers and adds handcrafted character.
For the fluffy clouds, use soft felt or fleece stitched directly to the wall, adding a gentle 3D element that enhances the playful, airy feel of the mural.
8. Define Shapes with Graphic Chain Stitch
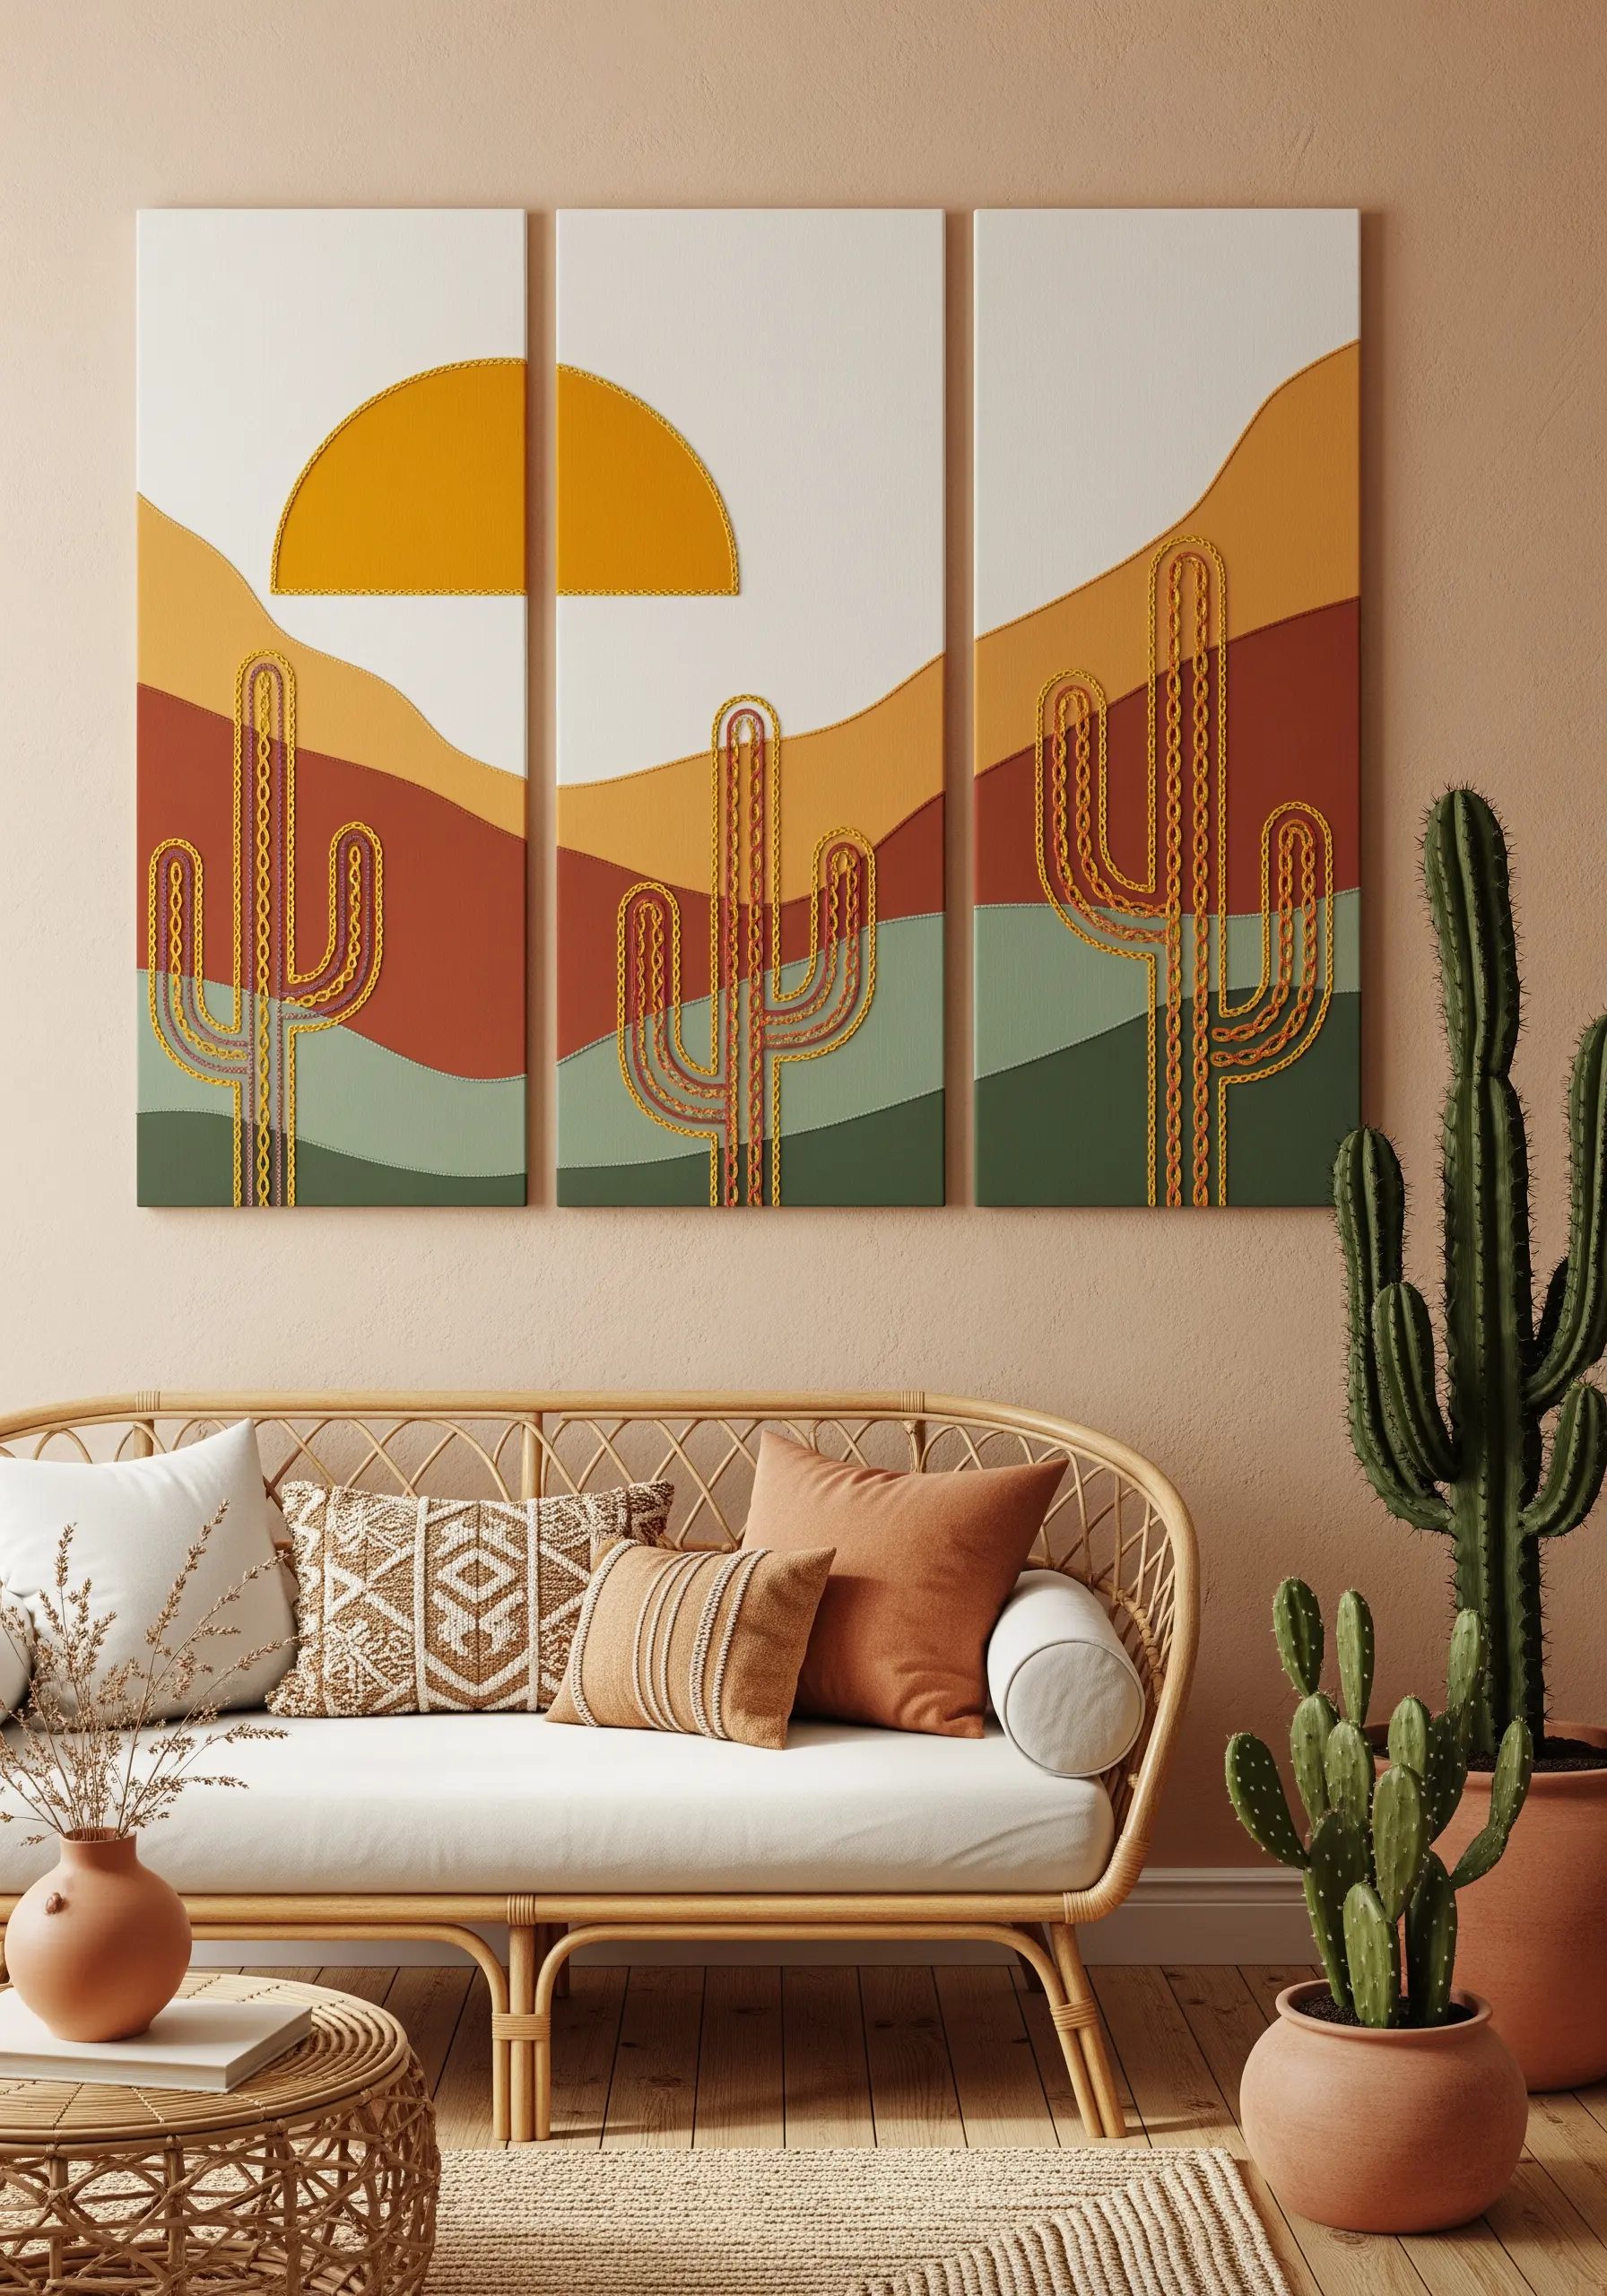
Create a bold, modern look by using embroidery as a graphic outline rather than a fill.
This triptych uses felt appliqué for the colored landscape shapes, creating a clean, color-blocked background with sharp edges.
A thick, uniform chain stitch in a contrasting color traces the cacti and sun, transforming simple lines into a key design element.
This technique celebrates negative space and clean composition, proving that what you don’t stitch can be just as powerful as what you do.
9. Extend Your Stitches Beyond the Hoop

Create a sense of movement and whimsy by allowing your design to escape the confines of the hoop.
For the dandelion, stitch the main flower head within the hoop using radiating straight stitches, but let the stems trail down onto the wall.
The floating seeds are stitched directly onto the wall, transforming the flat surface into part of your canvas and making the artwork feel dynamic and alive.
Use a single strand of thread for the delicate parachute seeds to create a barely-there effect that conveys lightness and air.
10. Balance Florals and Lettering with Care
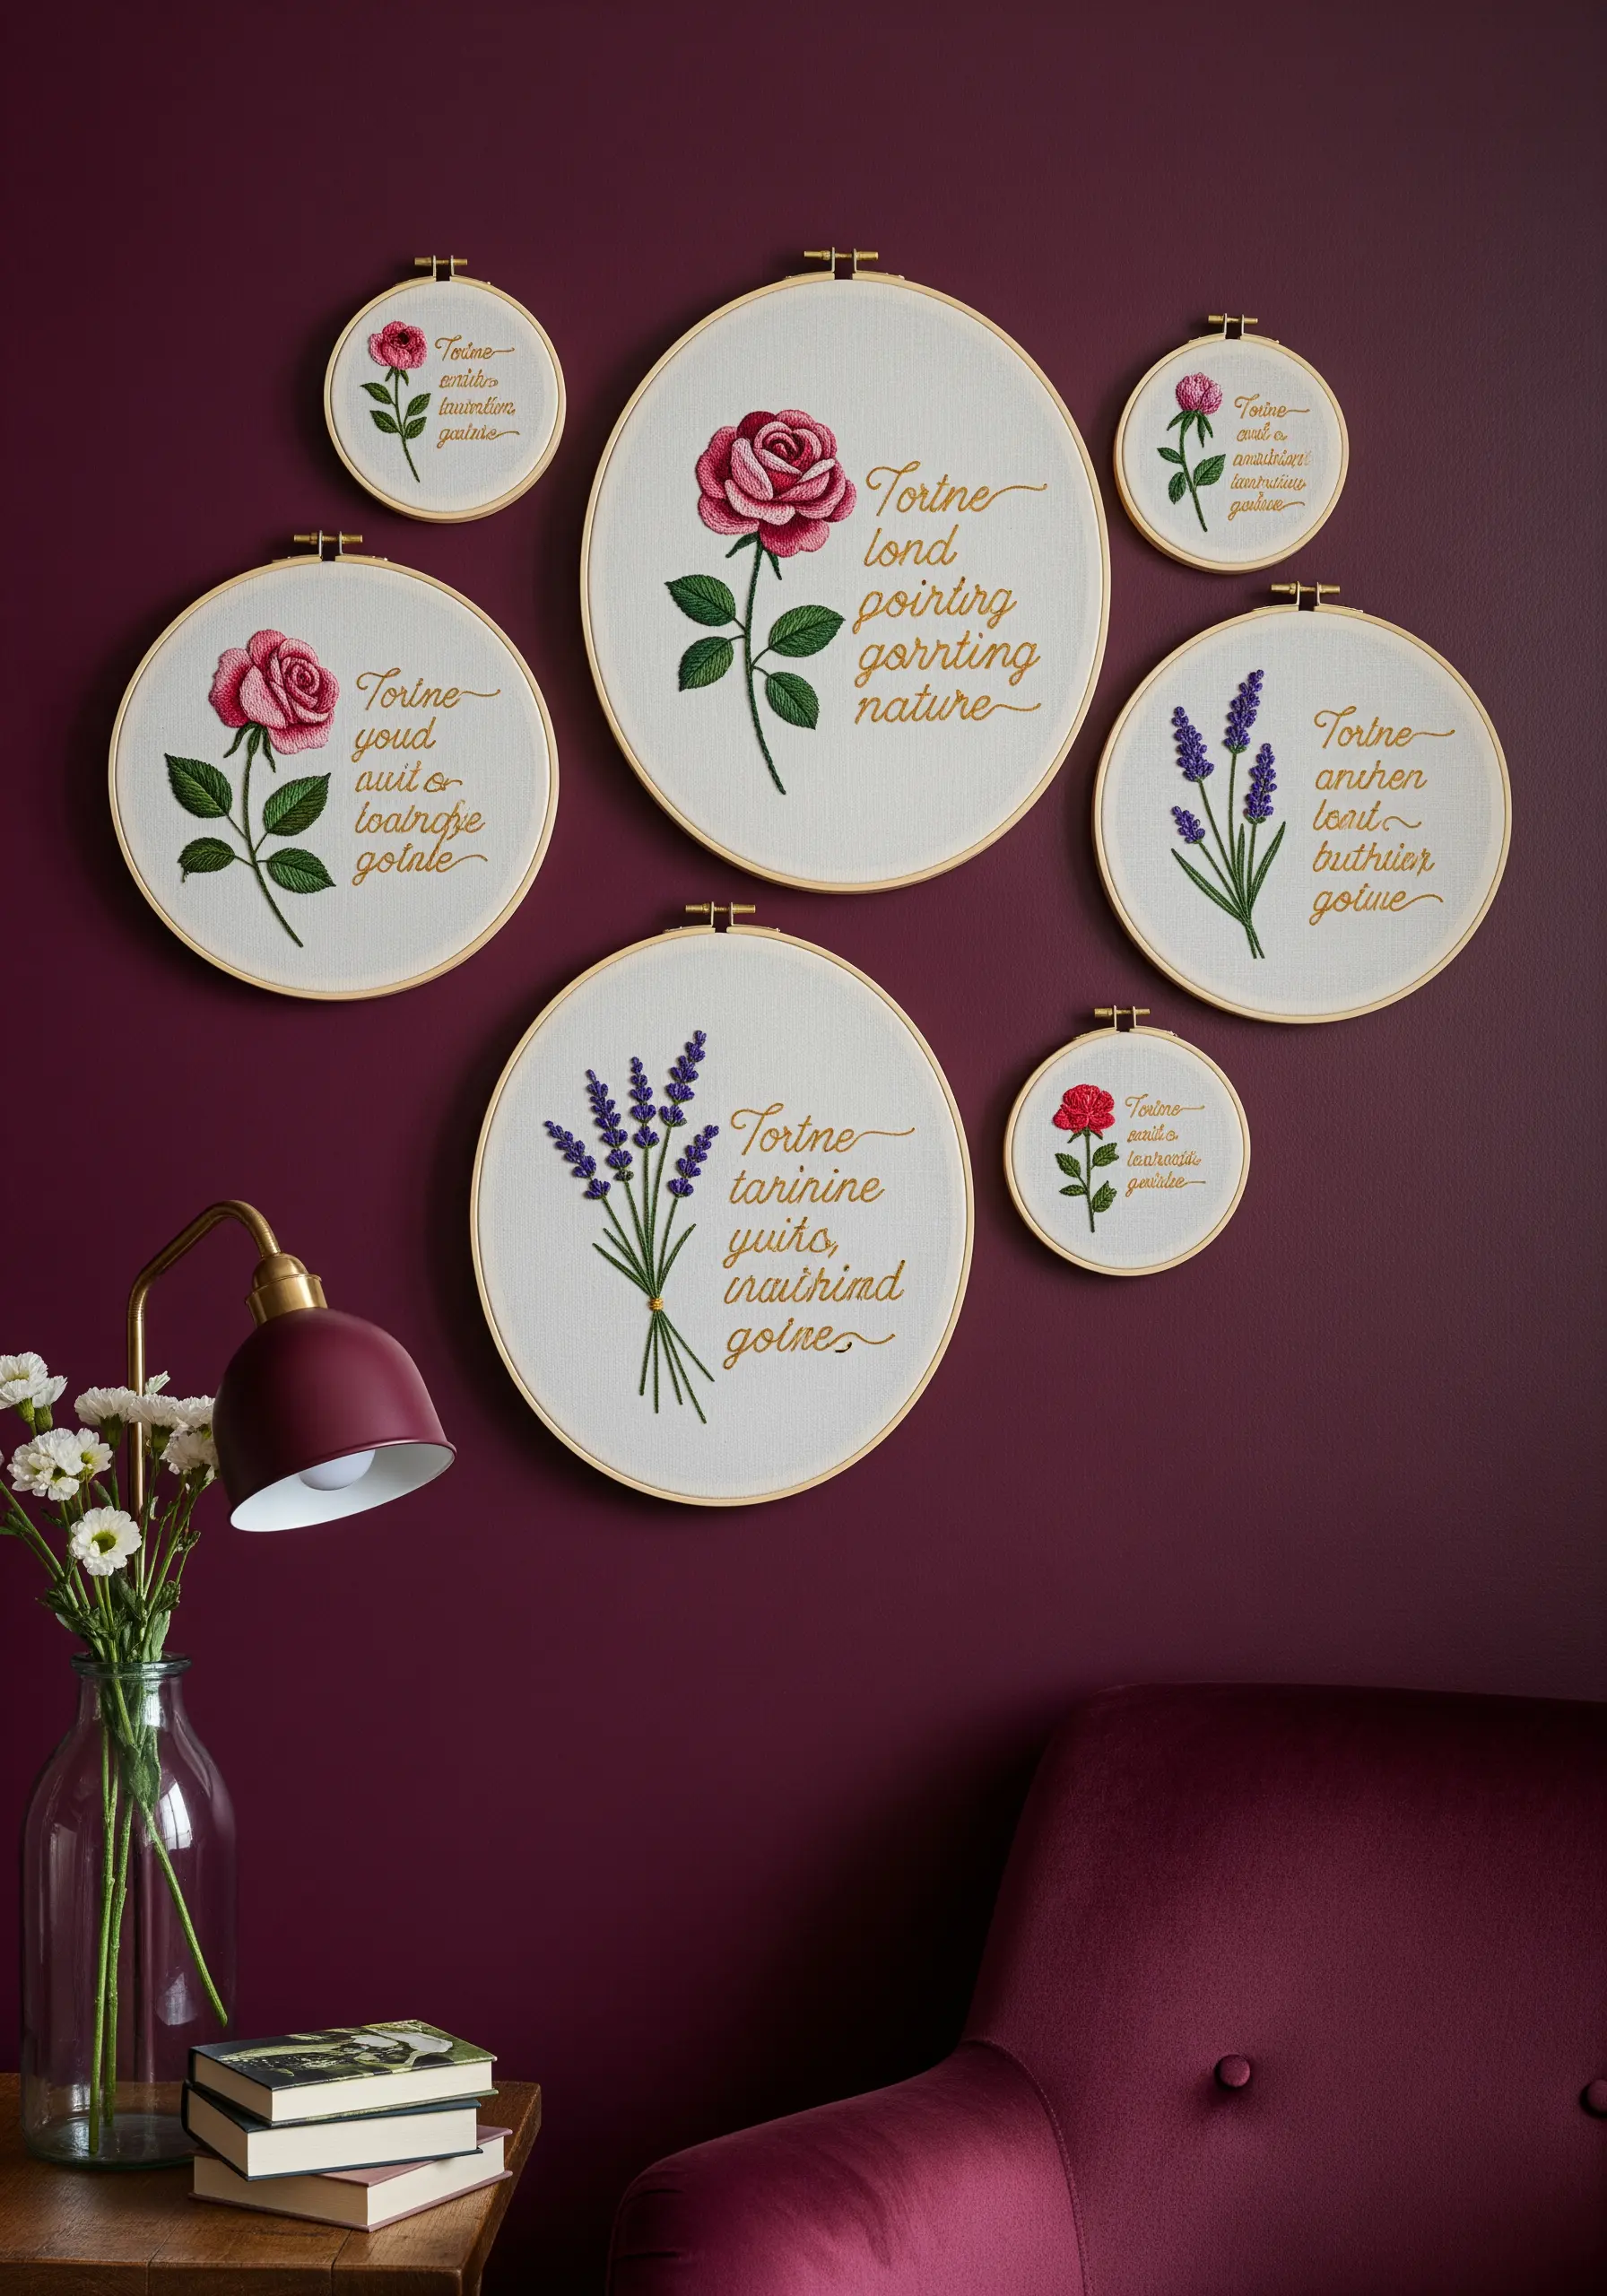
When combining text and imagery, establish a clear hierarchy to guide the viewer’s eye.
Use a clean, legible backstitch or stem stitch for the lettering, ensuring the words are the primary focus.
Keep the floral motifs elegant and slightly understated, placing them in a way that frames or accents the text rather than competing with it.
Varying the size of the hoops and the complexity of the florals creates a balanced, rhythmic gallery wall that feels intentional and harmonious.
11. Create a Visual Recipe with Simple Outlines
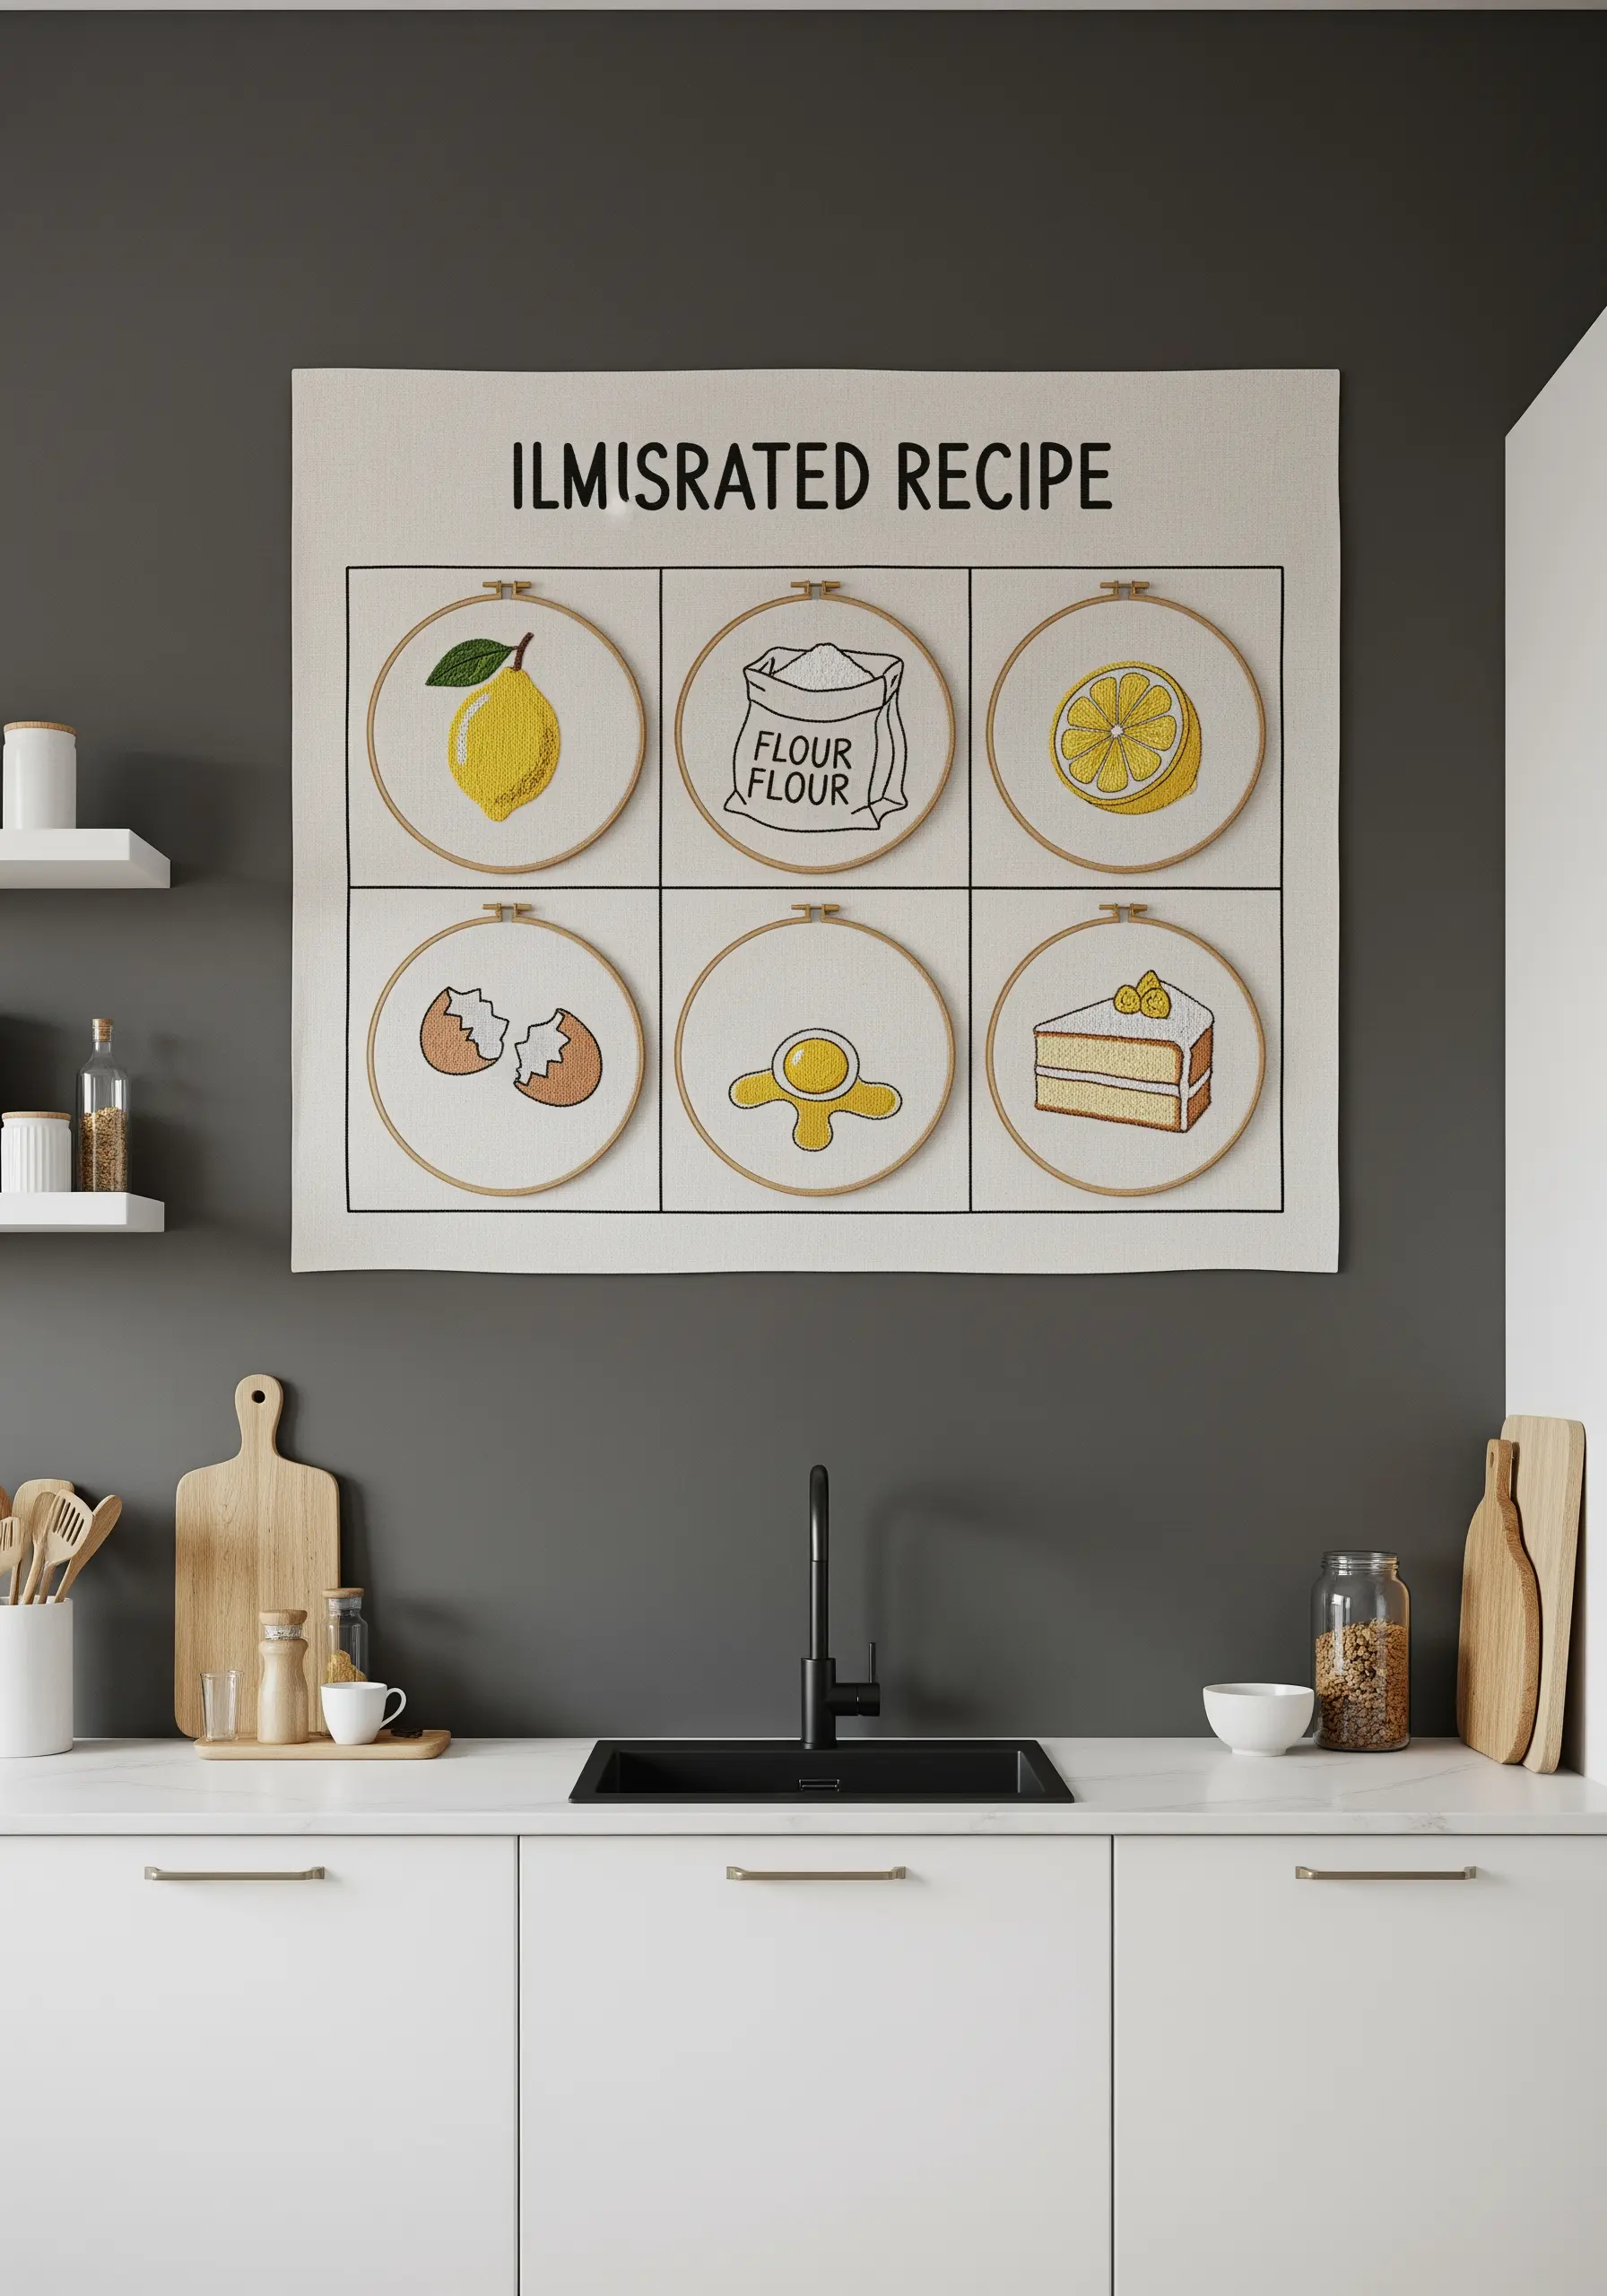
Tell a story or explain a process by breaking it down into a grid of simple, icon-like illustrations.
Mount individual hoops onto a larger piece of canvas to create a structured, comic-strip-style layout that’s easy to read.
Use a clean backstitch for all outlines to maintain a consistent, graphic style across each element of the recipe.
A limited color palette and minimal fill stitching—like the satin stitch on the lemon—keep the focus on the narrative and prevent visual clutter.
12. Map a Solar System with Texture and Scale
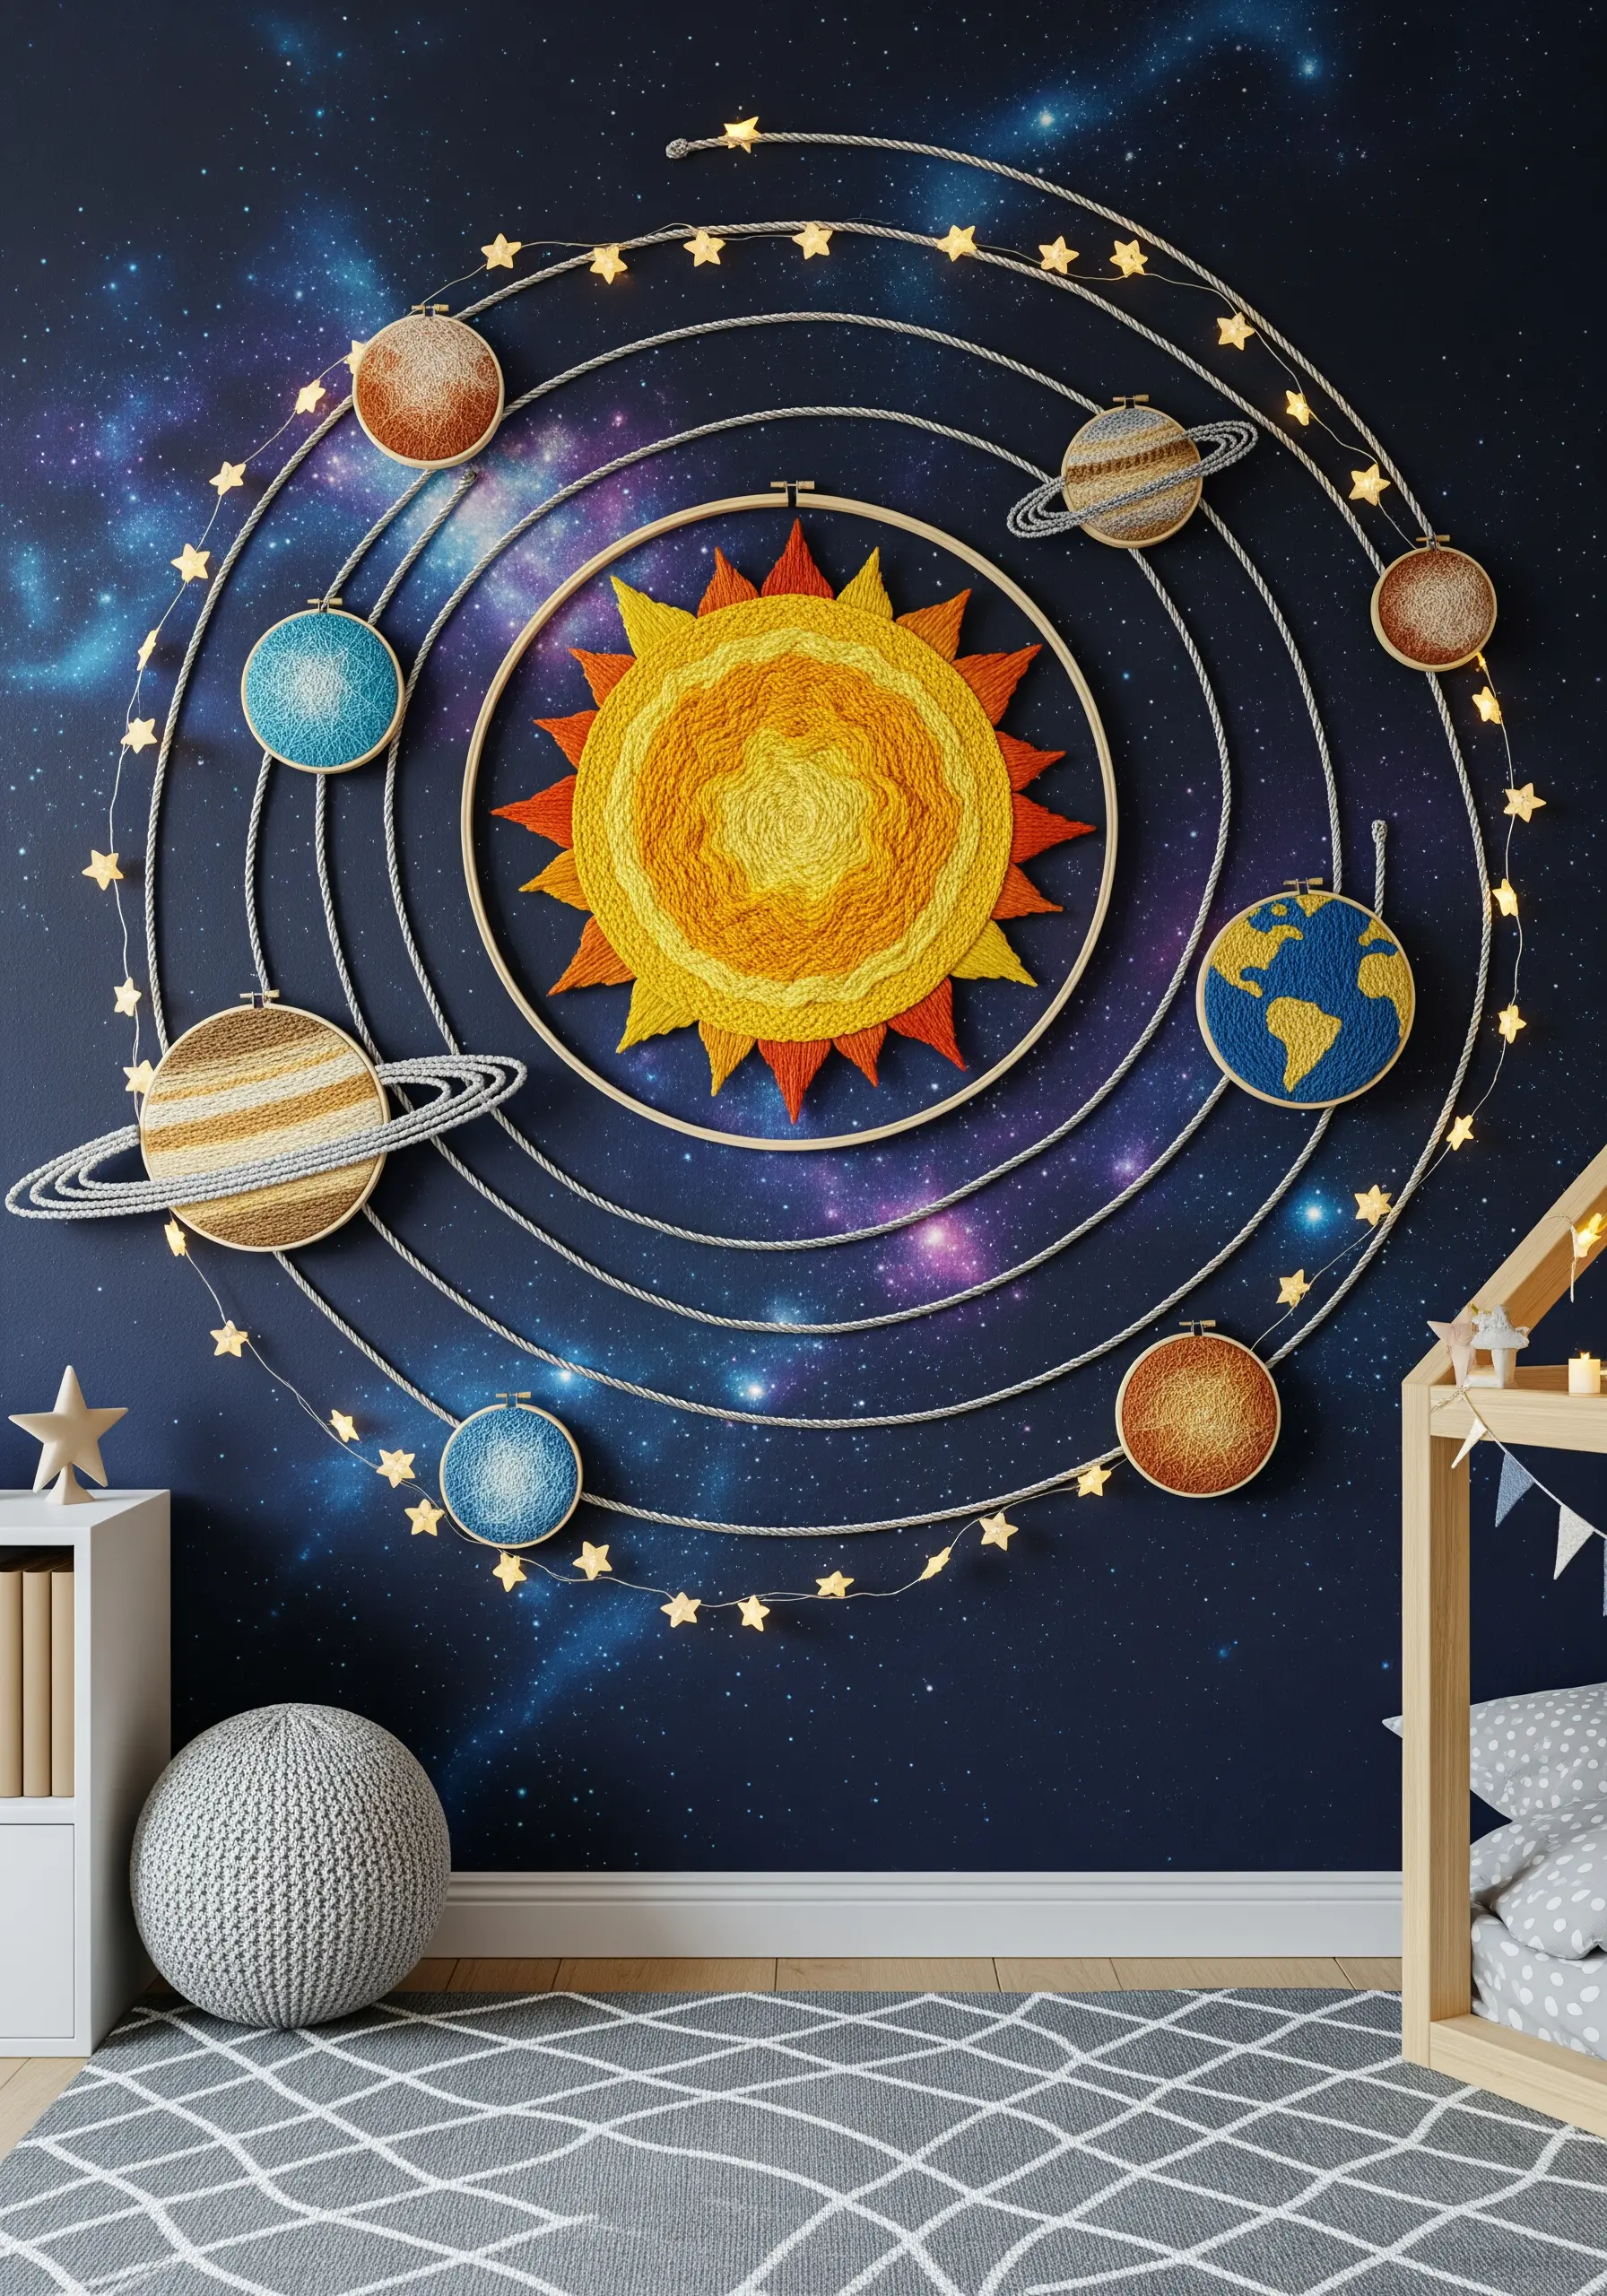
Give each planet its own distinct personality by using a different stitch or texture.
For the sun, blend yellows and oranges with a dense, chaotic seed stitch to suggest fiery energy.
Use a smooth, circular satin stitch for planets like Earth and Mars, and couch a metallic cord around a striped planet for Saturn’s iconic rings.
Connect the planets with wrapped cord or couched yarn to map out their orbits, transforming a collection of hoops into a cohesive solar system perfect for nursery stitch art wall ideas.
13. Stitch a Library of Classic Spines
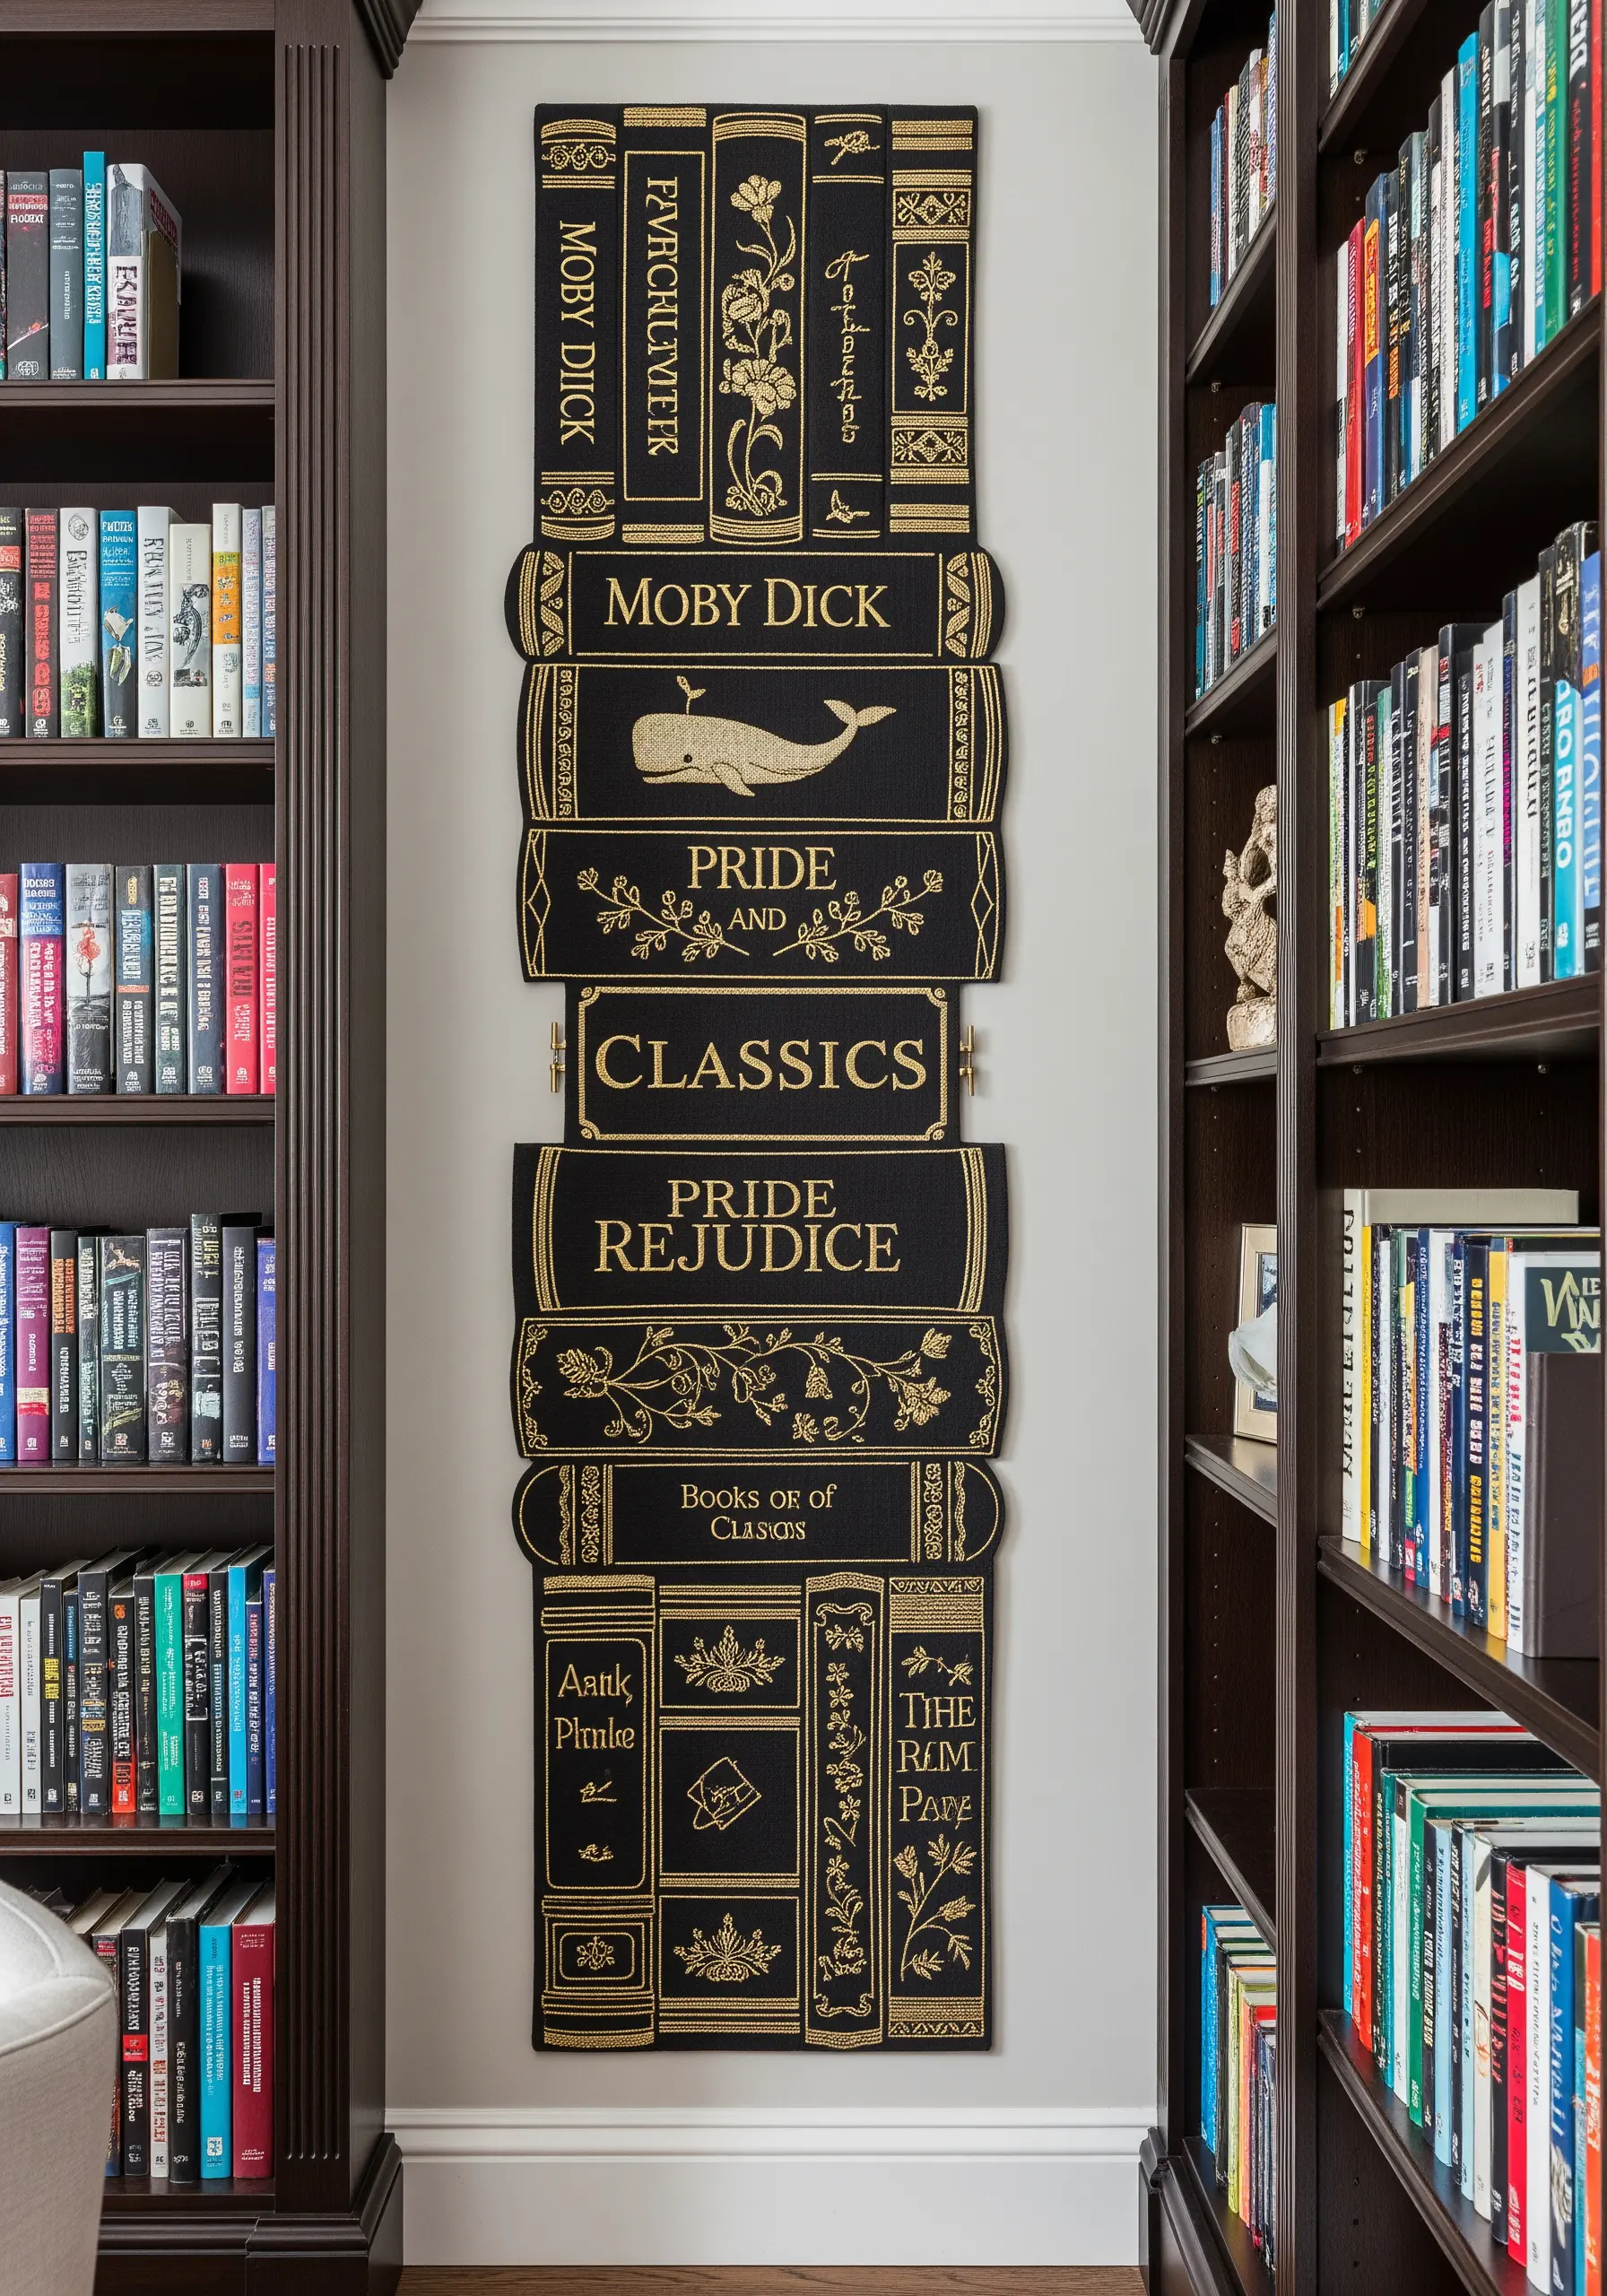
Create a sophisticated, literary-themed mural by arranging embroidered book spines into a vertical stack.
Use a rich, dark fabric like black or navy velvet and stitch with a high-sheen gold metallic thread for a luxurious, classic look.
Ensure your lettering is perfectly aligned by using a water-soluble transfer marker and a precise, tiny backstitch.
Vary the shapes and sizes of the fabric panels to mimic a real, slightly irregular stack of antique books, adding authenticity and visual interest.
14. Blend a Tapestry with Spotlight Hoops
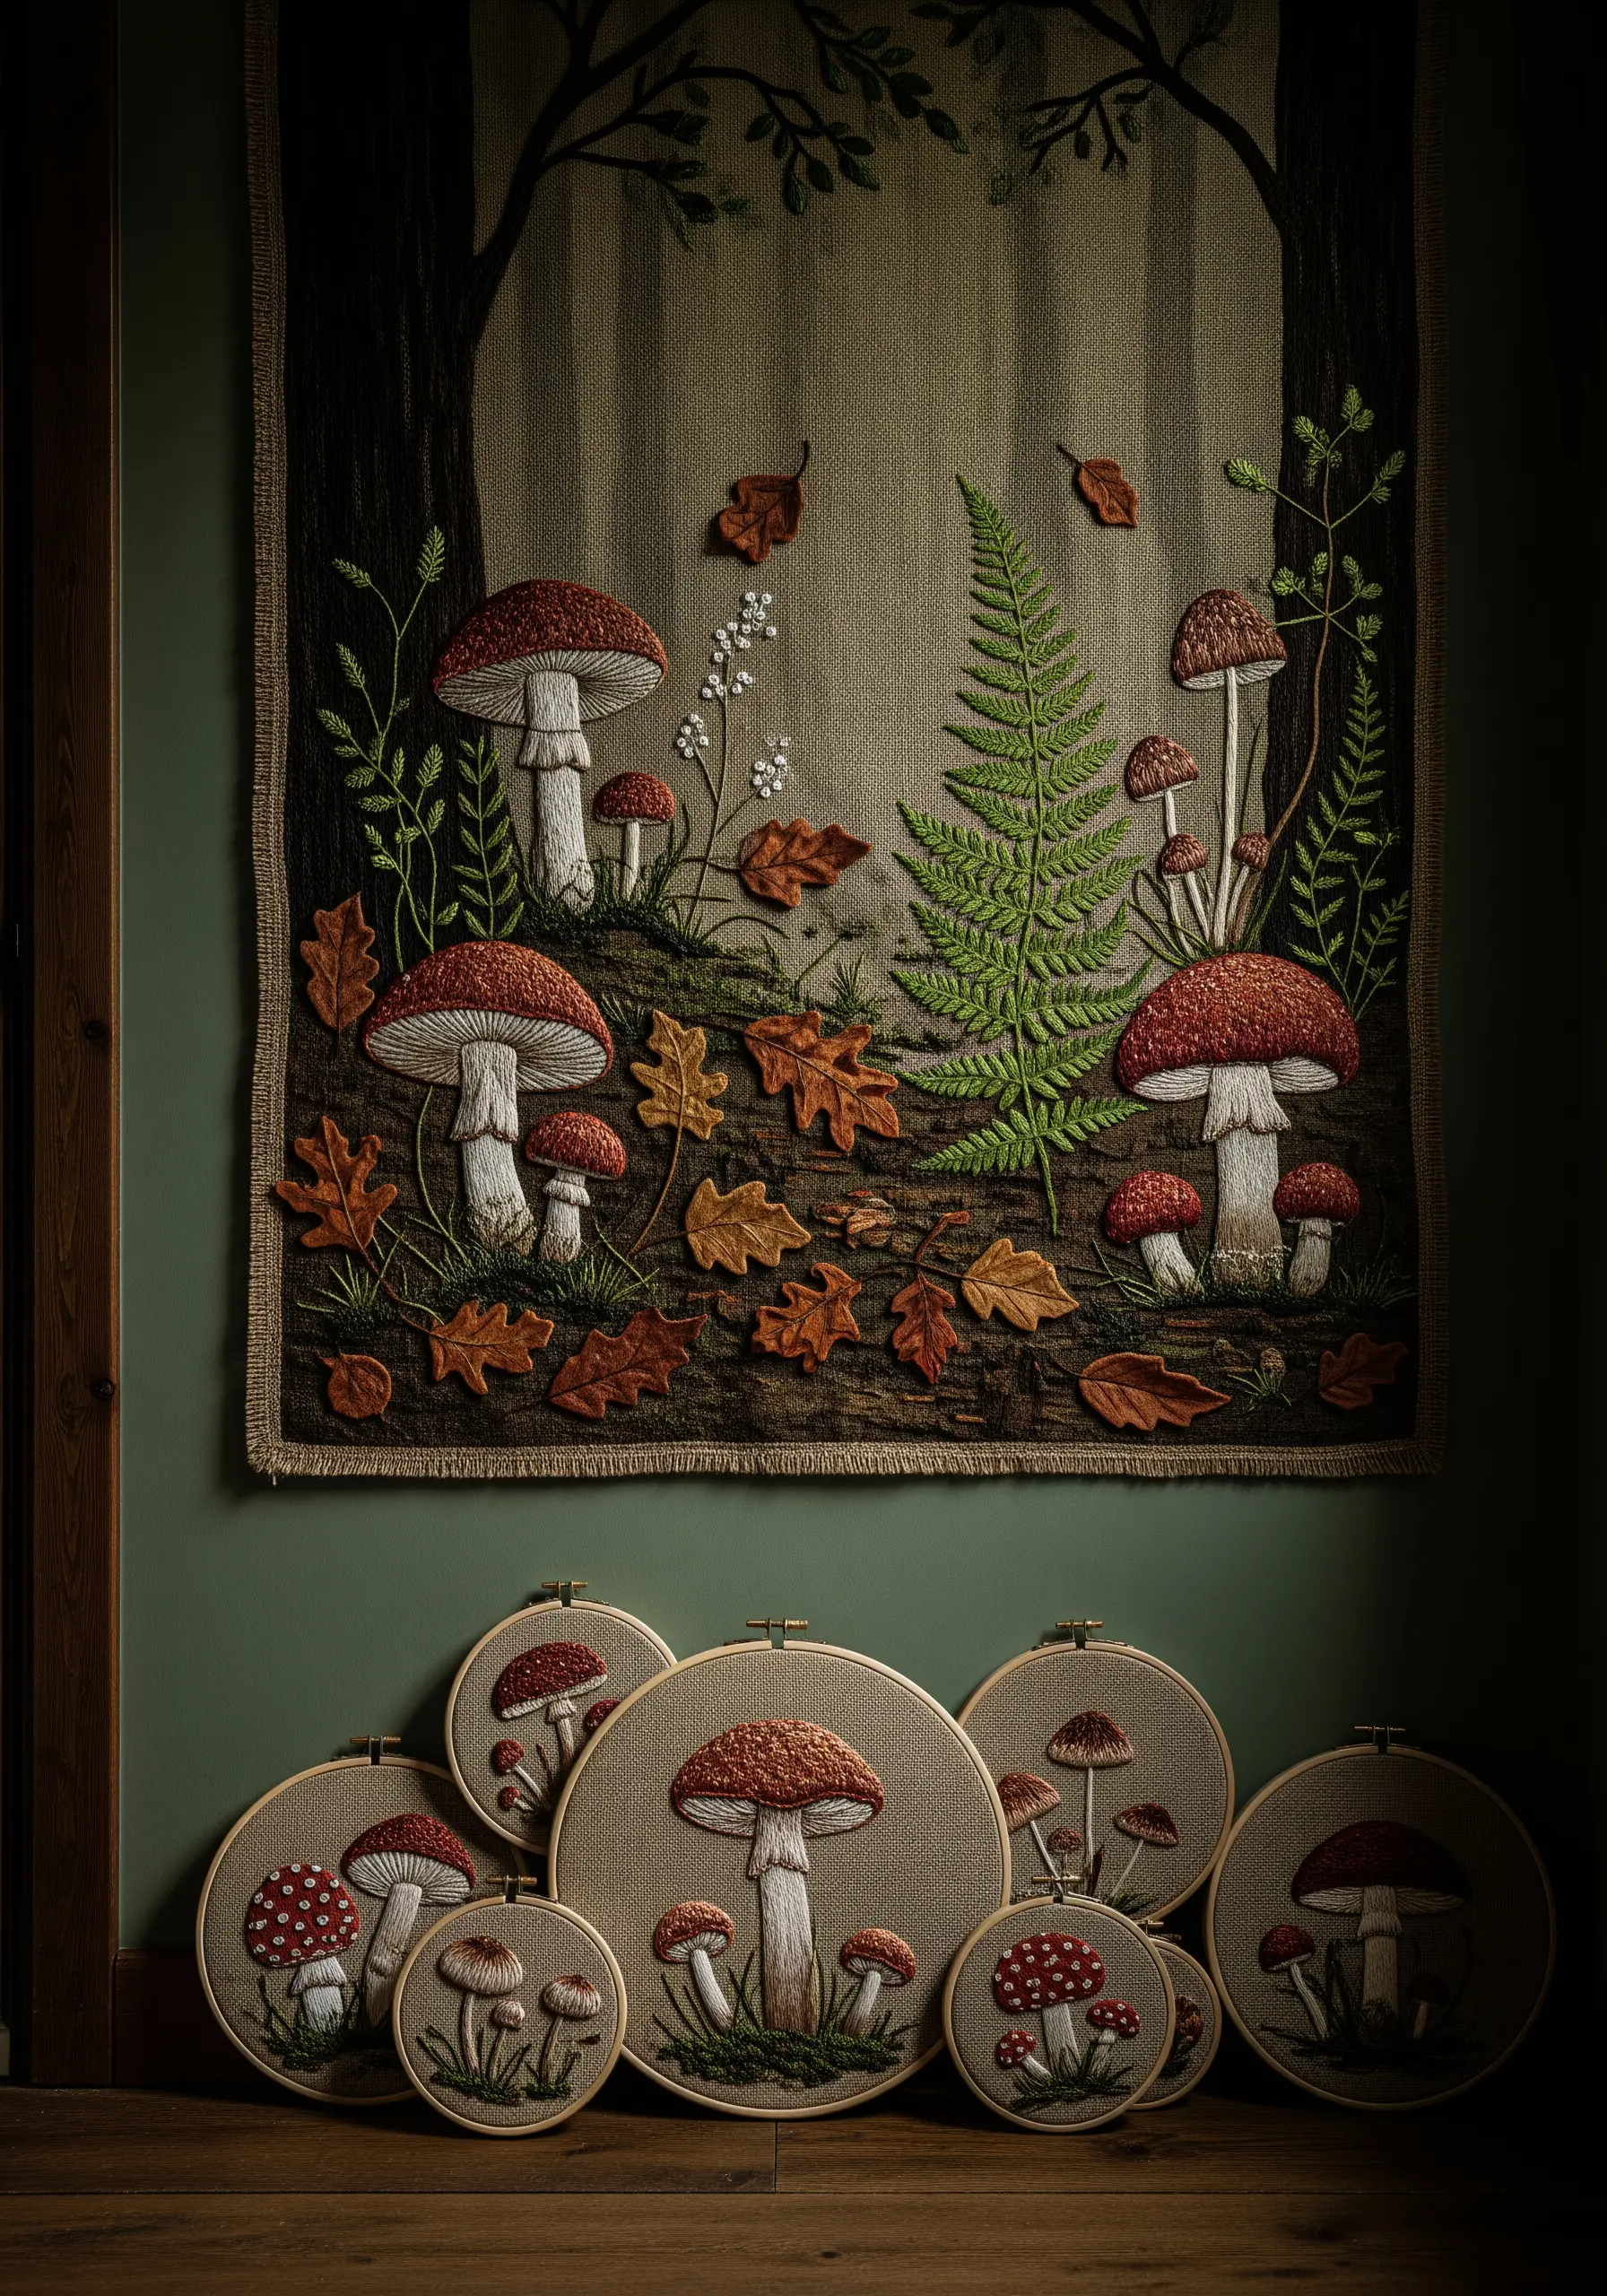
Create an immersive scene by combining a large, embroidered tapestry with smaller hoops that act as spotlights.
The tapestry serves as the main background, setting the mood and environment of your woodland forest.
The individual hoops can then zoom in on specific details—a single mushroom, a fern, or a fallen leaf—adding layers of focus and storytelling.
This technique allows you to explore both the wide-angle view and the intimate close-up within a single, cohesive wall mural.
15. Form an Abstract Shape Through Repetition
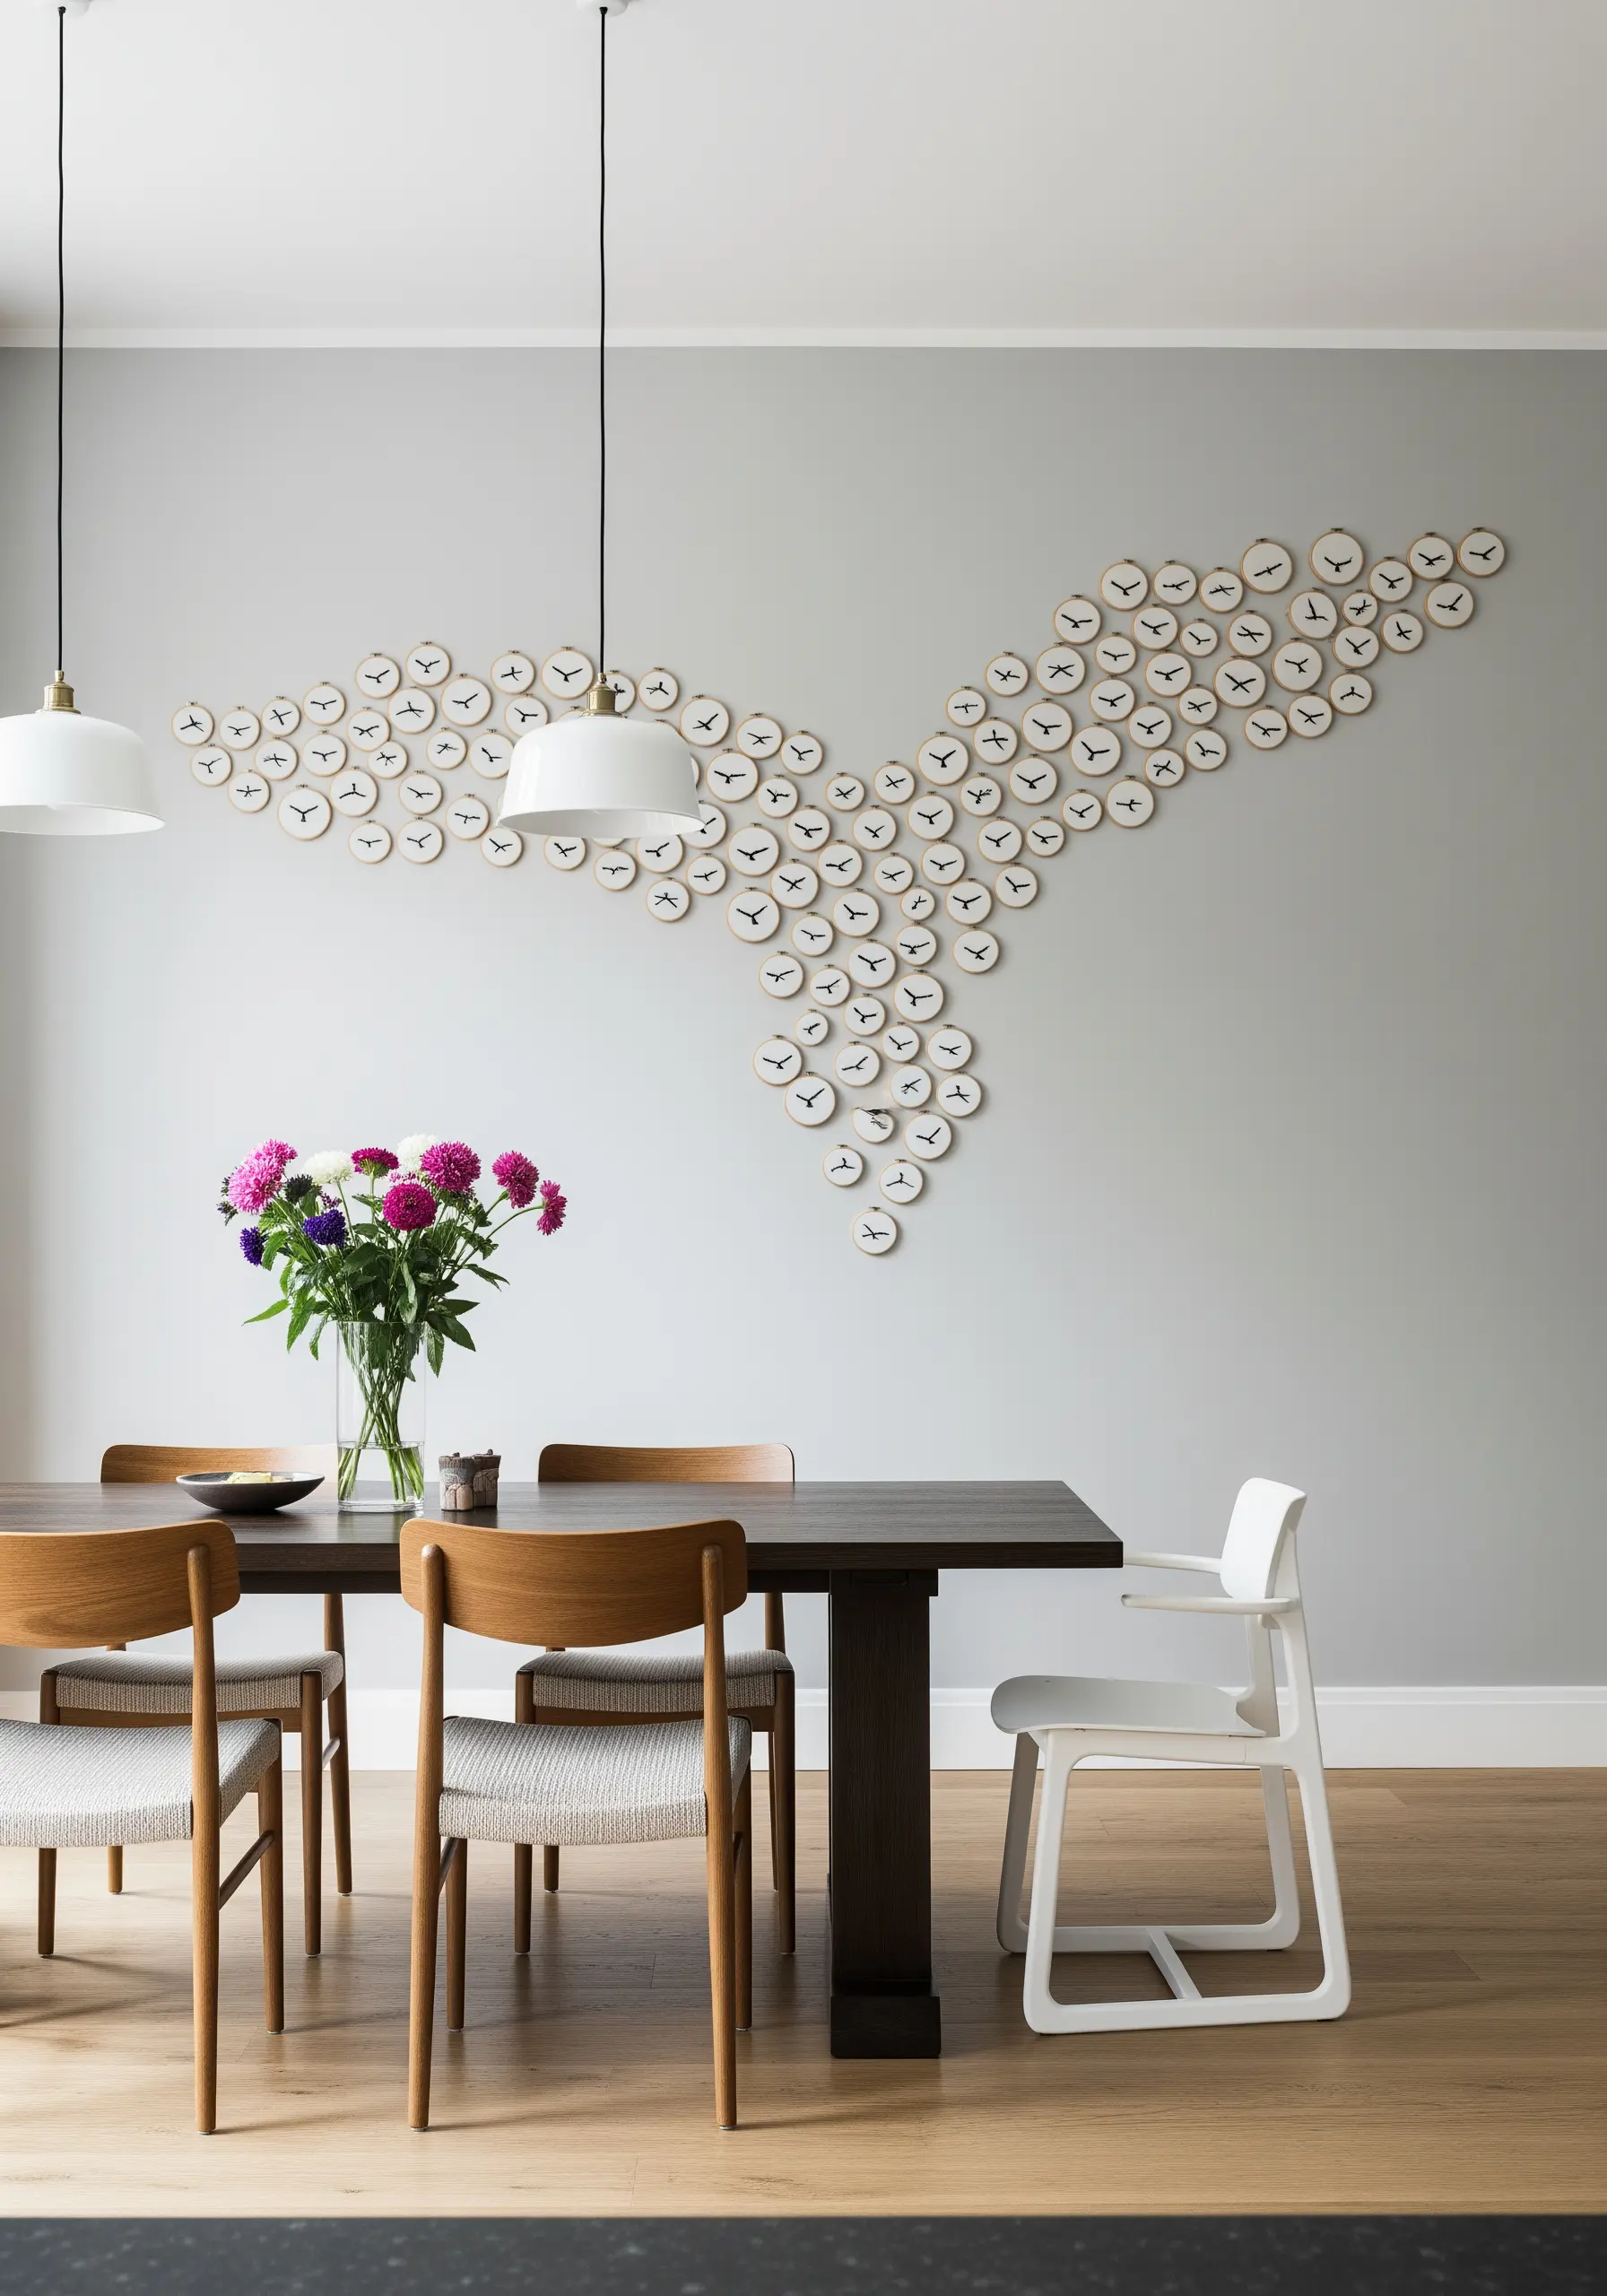
Make a powerful statement not with complex stitches, but with the sheer volume and arrangement of simple hoops.
Each tiny hoop contains a minimal, quickly stitched clock face, making the individual pieces easy to produce.
The artistic impact comes from clustering dozens of these hoops together to form a larger, abstract shape, like the whale tail shown here.
This method proves that you can create a high-impact mural by focusing on composition and repetition rather than intricate embroidery techniques.
16. Convey Delicacy with Tulle and Trailing Threads
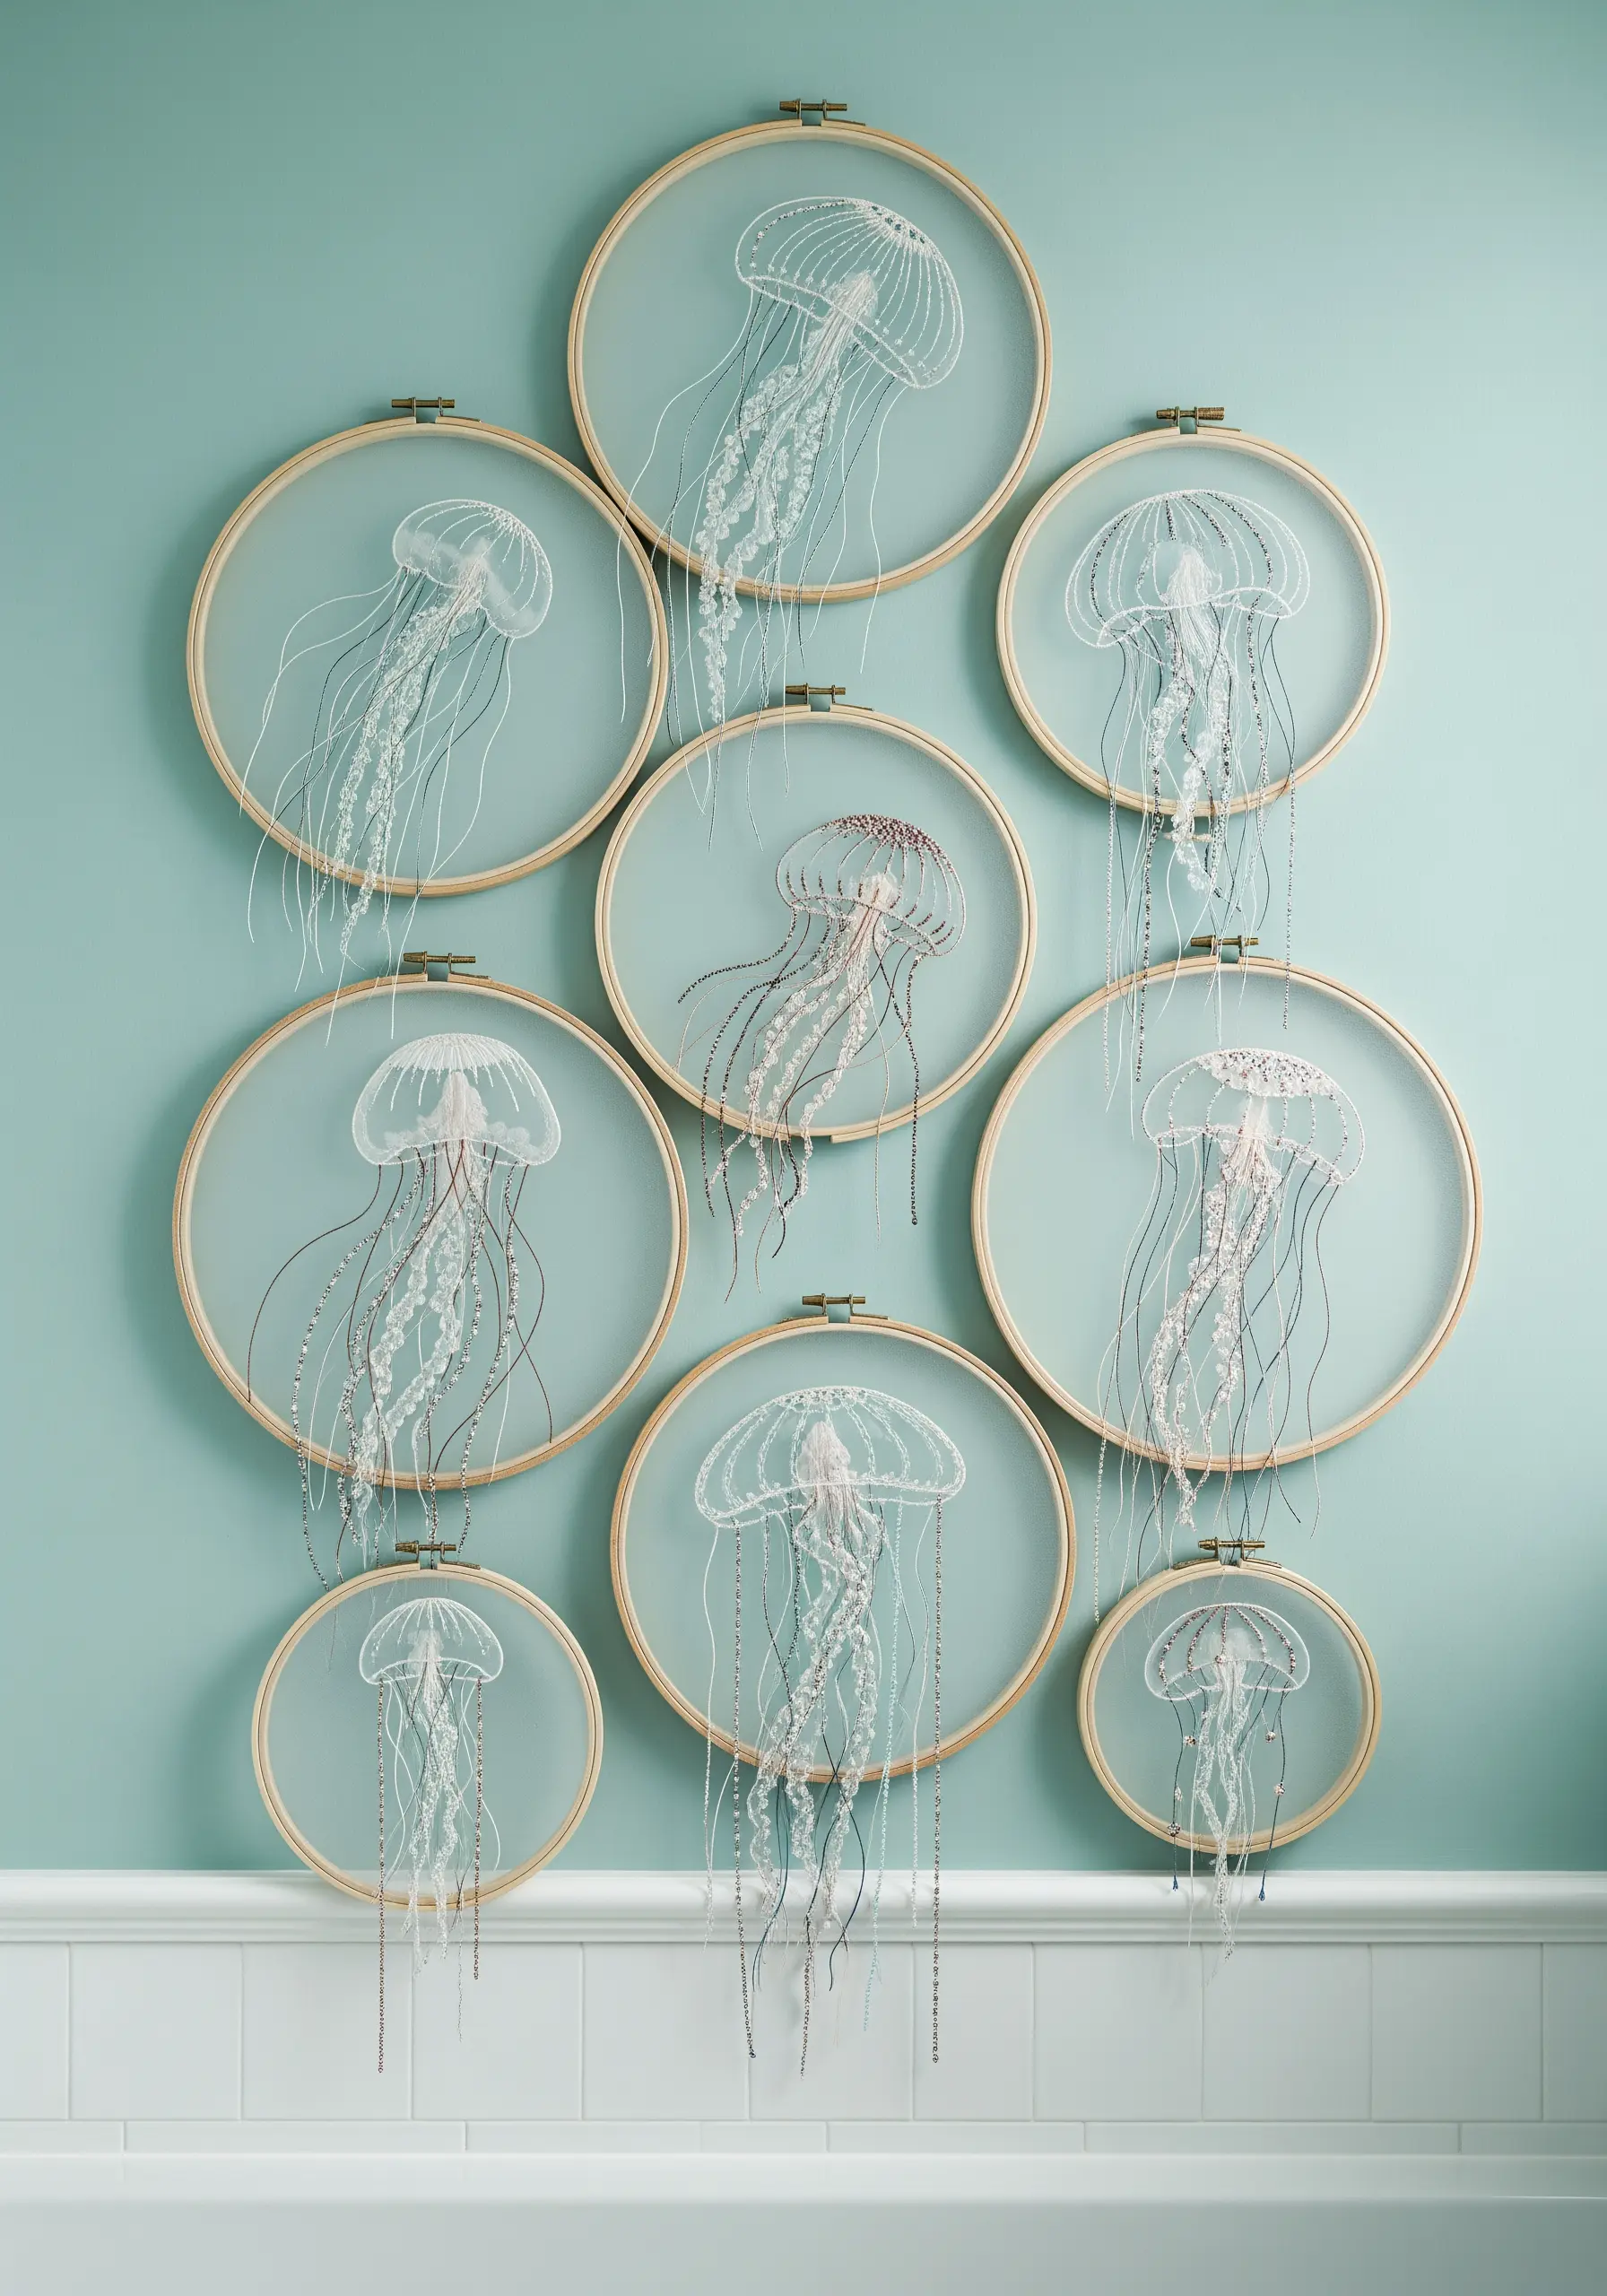
To capture the ethereal quality of jellyfish, switch your fabric from opaque cotton to translucent tulle or organza.
Stitch the bell of the jellyfish with a fine, white thread using a backstitch for the outline and seed stitches for subtle shading.
Create the tentacles by letting threads, delicate chains, and even beaded strands hang freely below the hoop, giving them graceful movement.
The transparent fabric allows the wall color to show through, making the jellyfish appear to float weightlessly in the water.
17. Recreate Blueprints with Precision Stitching
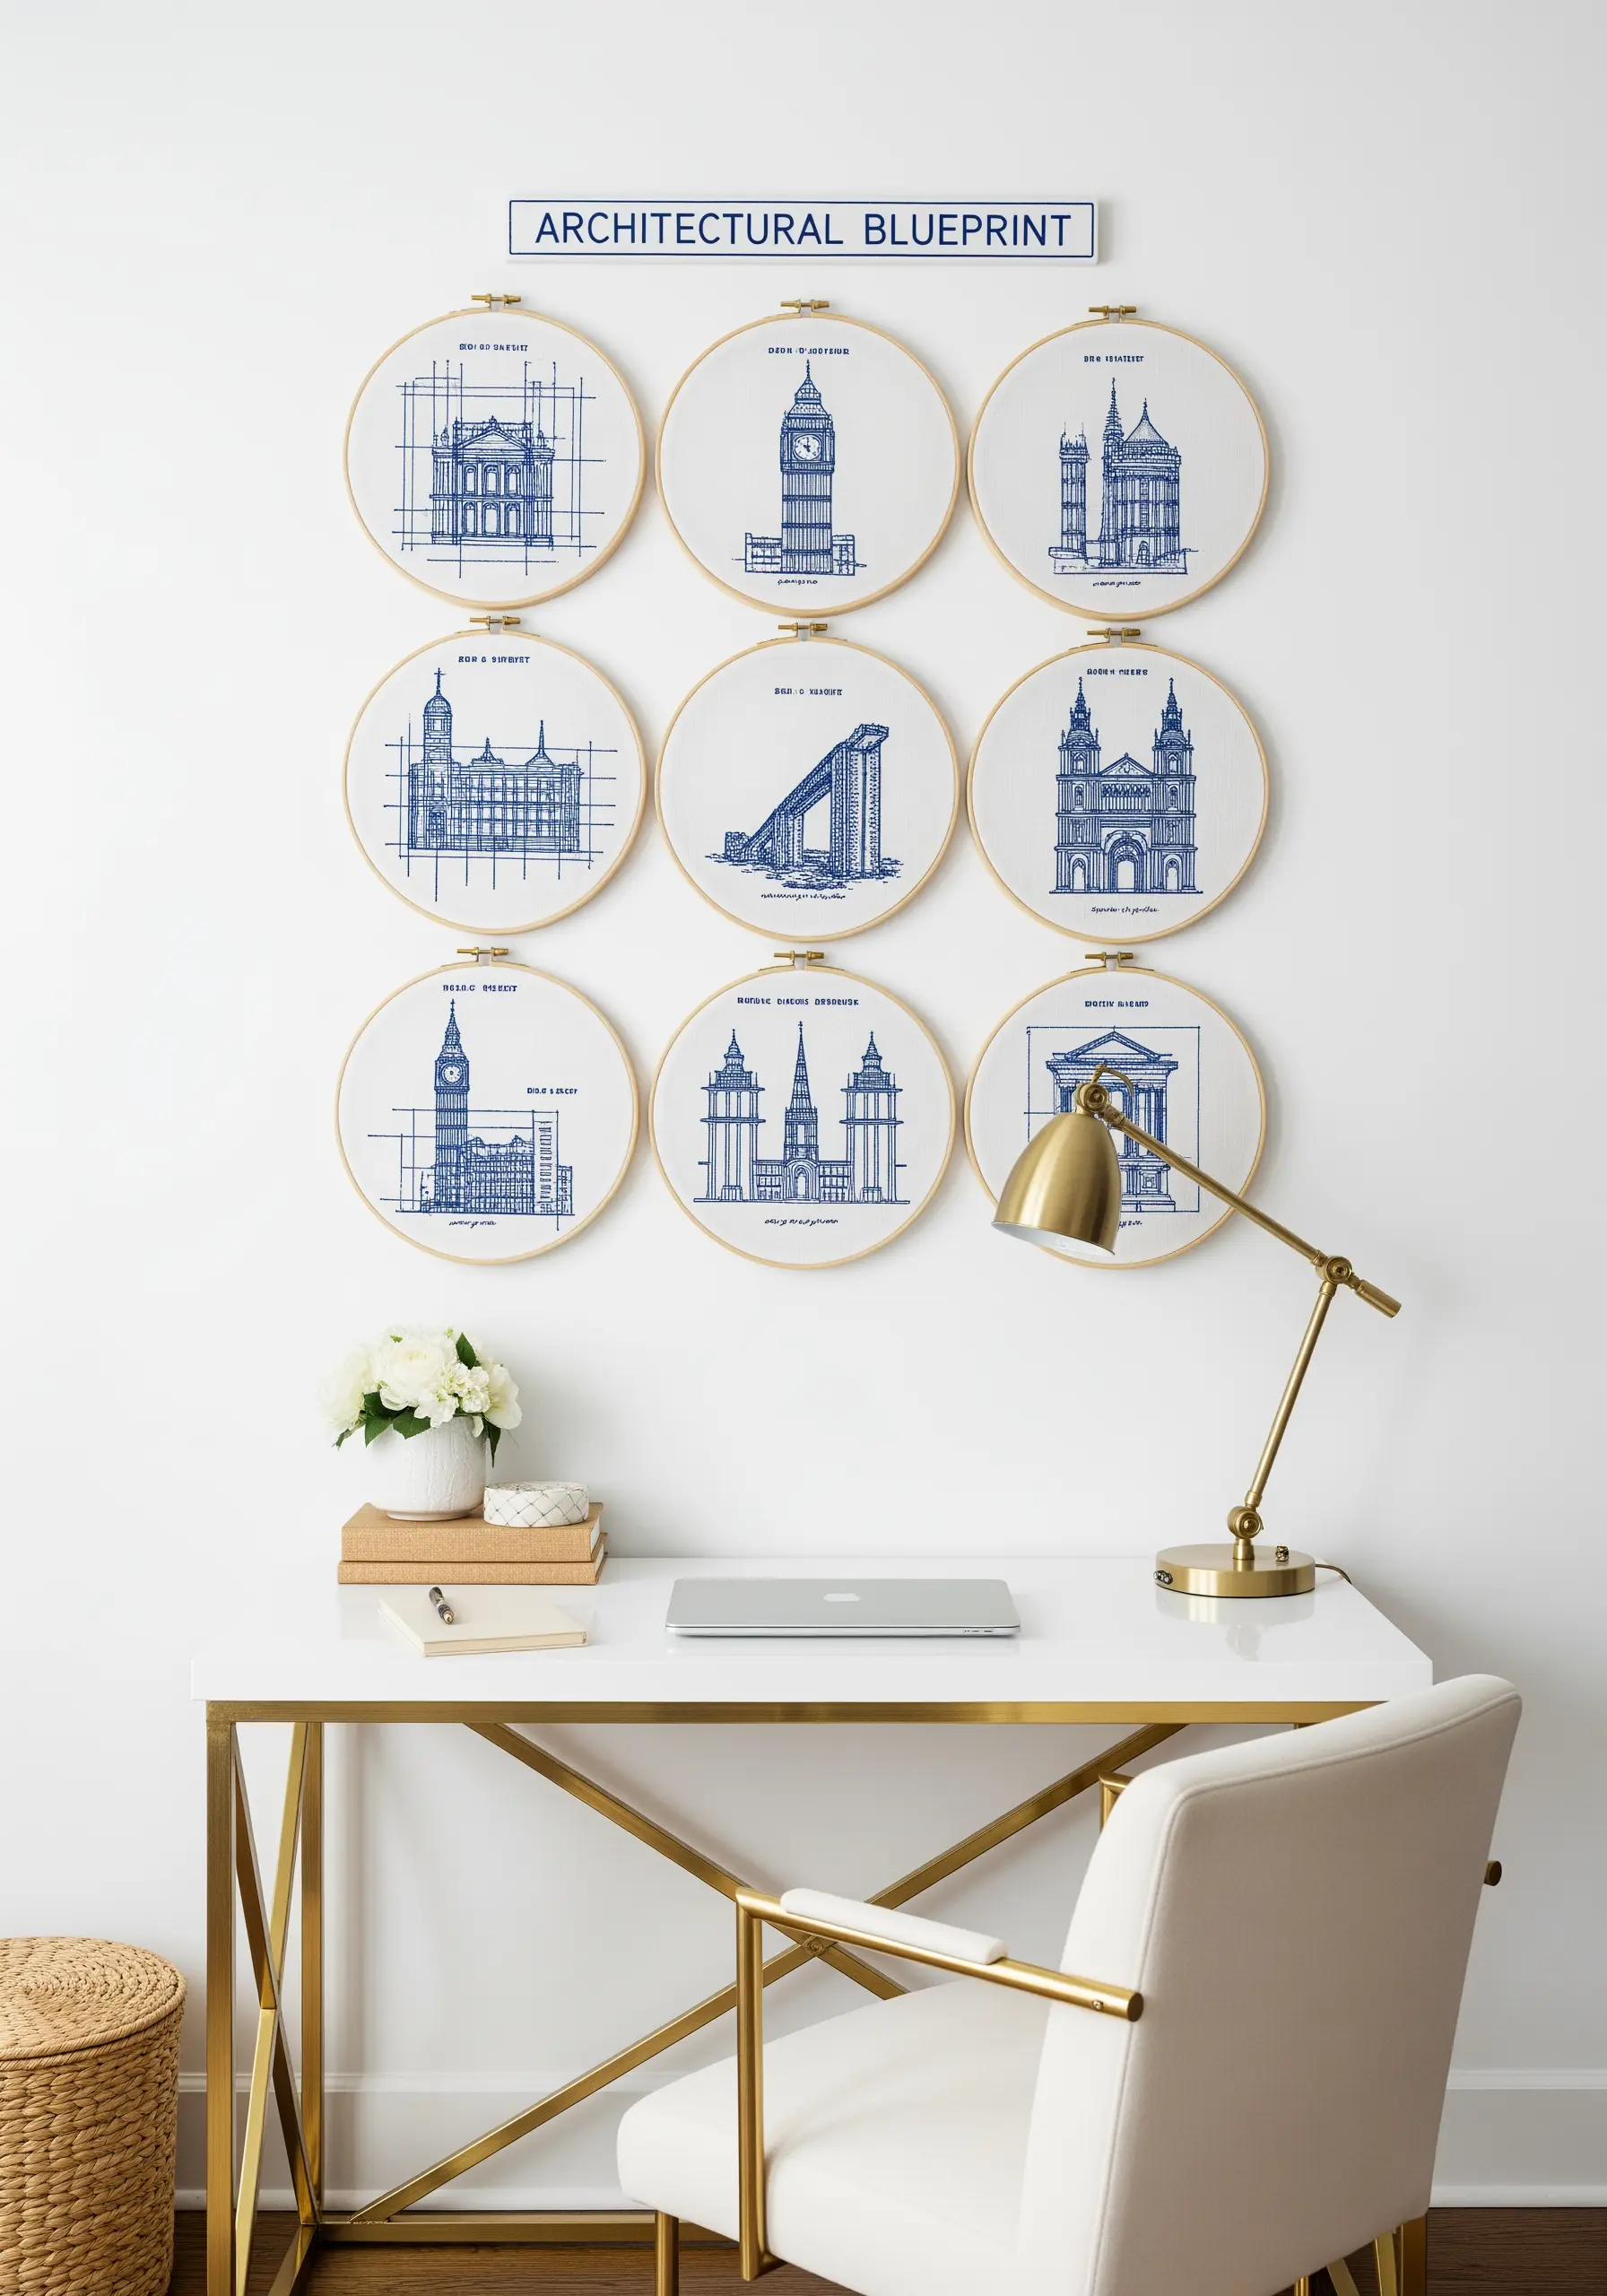
Achieve the clean, technical look of an architectural drawing by using a single color of thread on a crisp white background.
A precise backstitch or split stitch is essential for creating the sharp, unbroken lines required for these detailed building schematics.
Use a water-soluble stabilizer or transfer paper to accurately trace your design onto the fabric, as free-handing is not an option for this level of detail.
Arrange the finished hoops in a perfect grid to enhance the methodical, blueprint-like aesthetic of the collection.
18. Personalize a Family Tree with Mixed Media
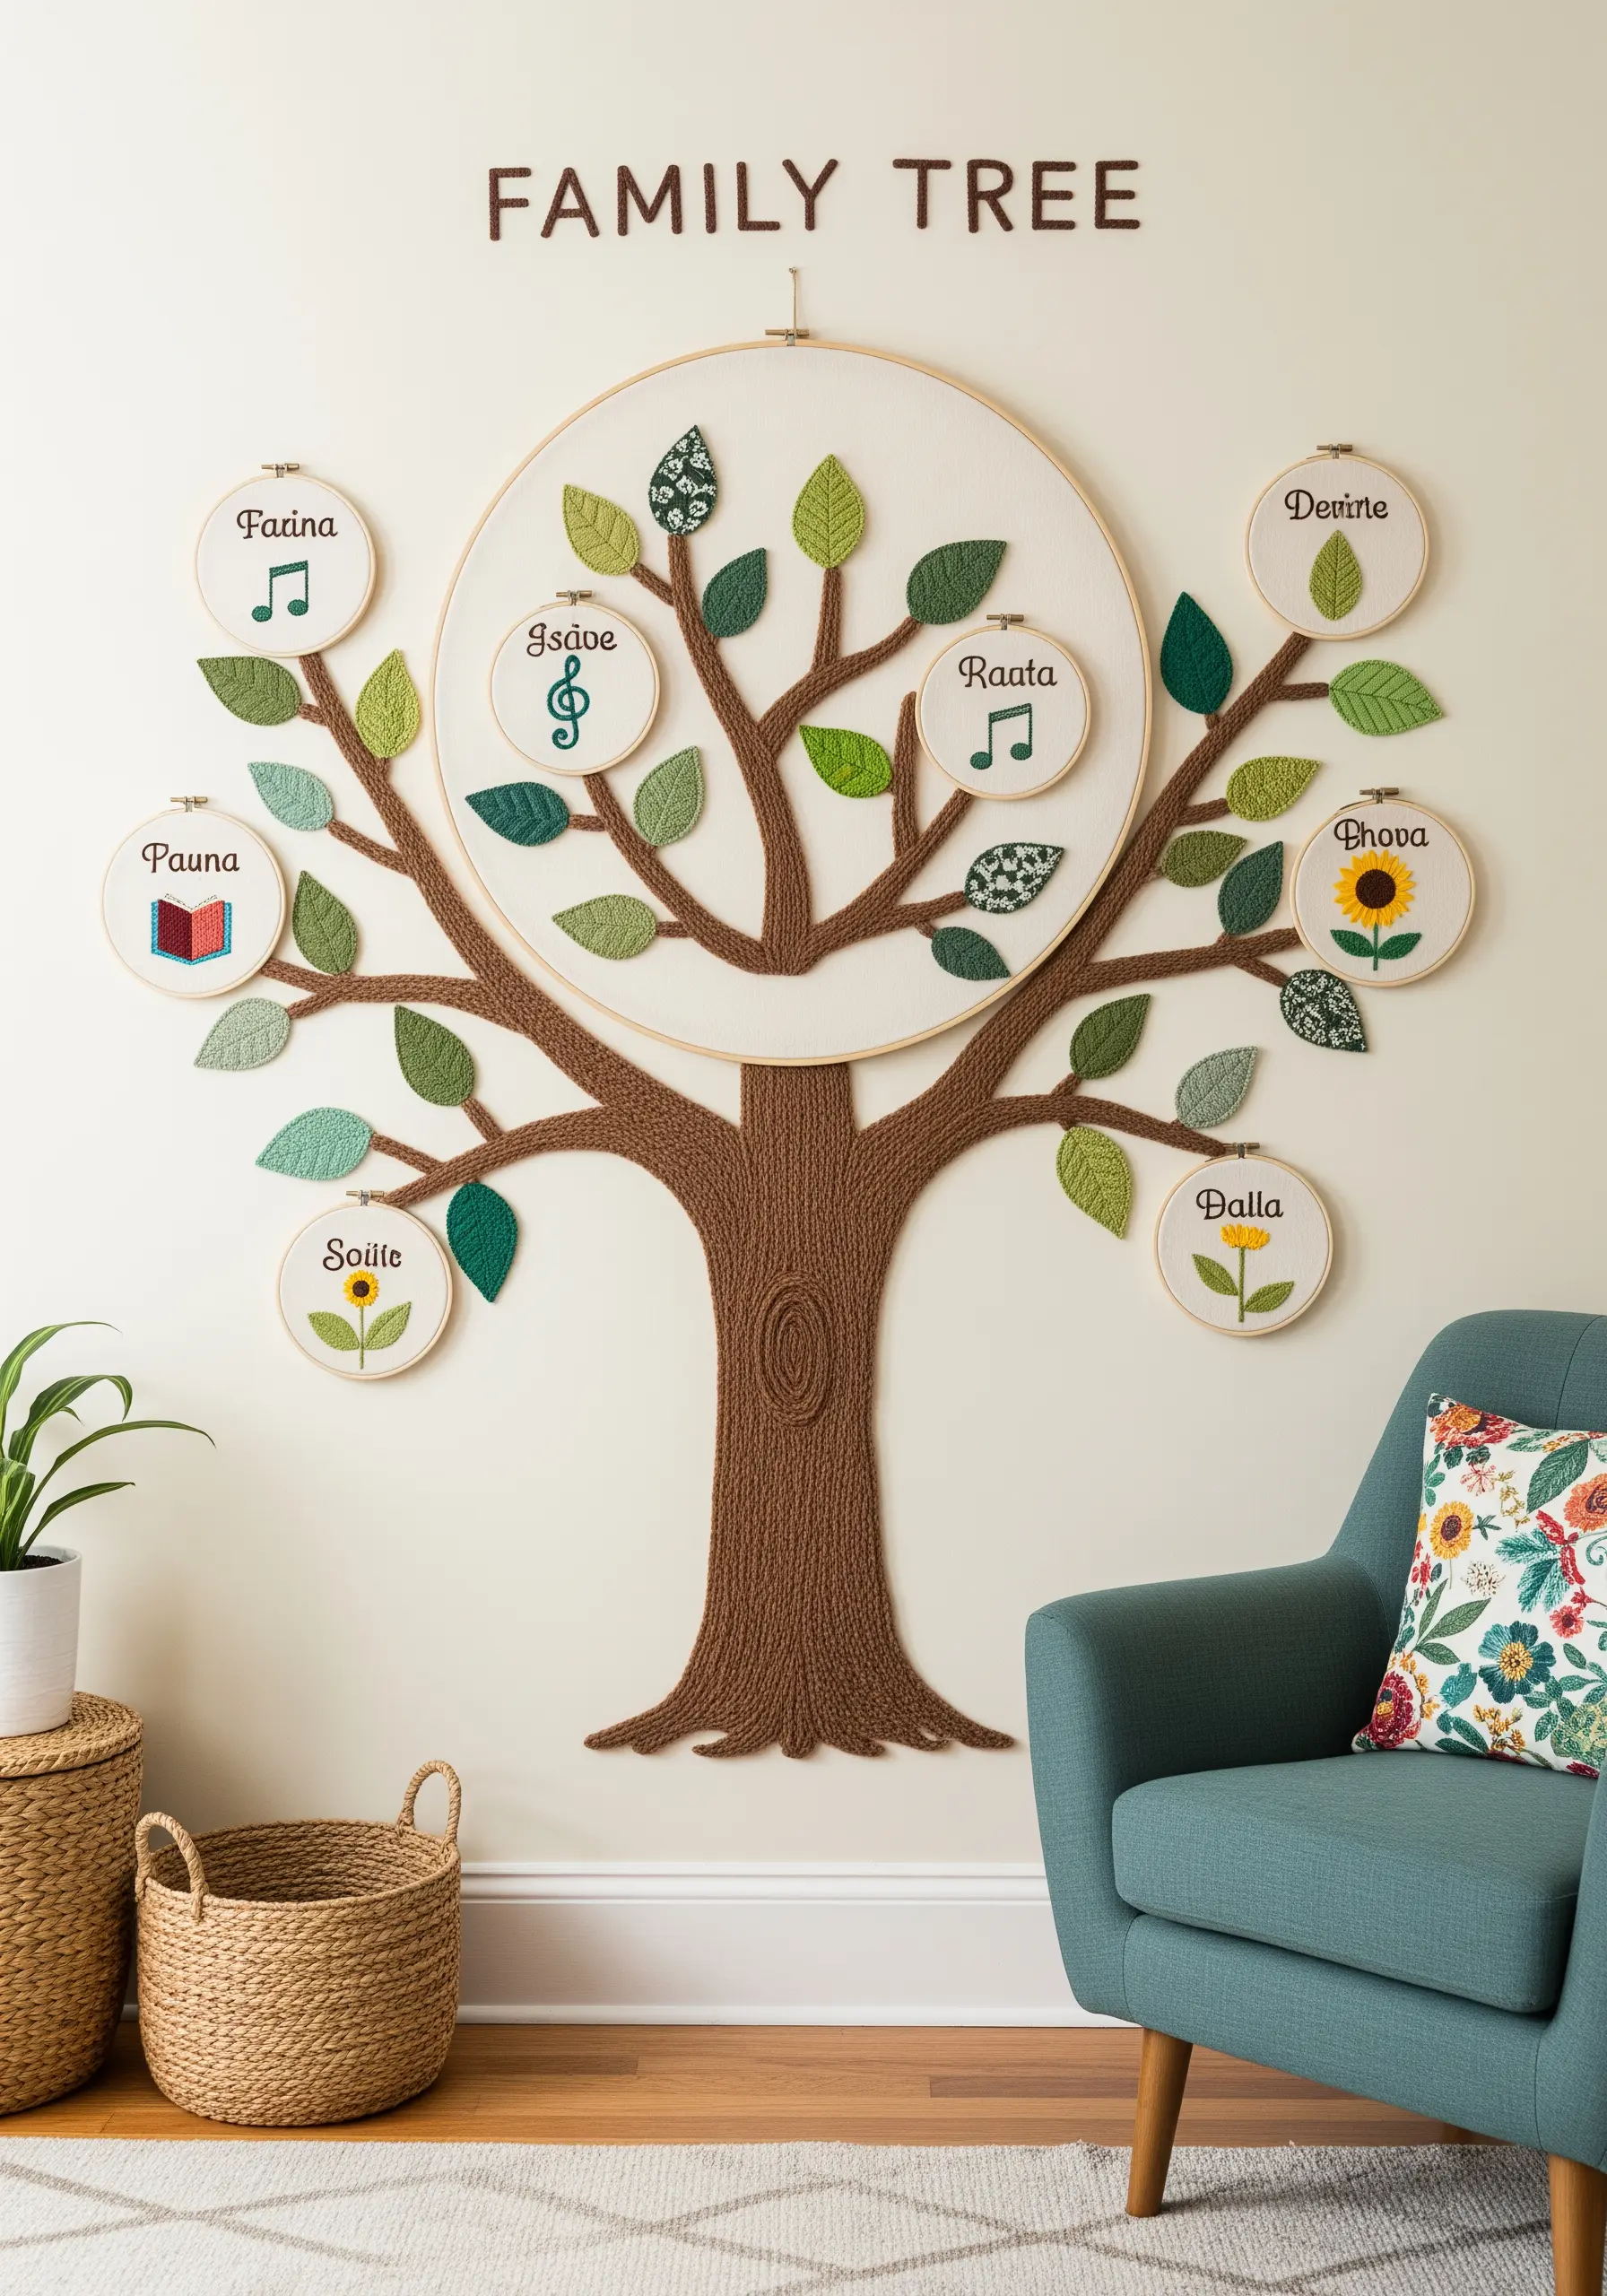
Make your family tree deeply personal by assigning a unique icon or fabric to each member.
Combine simple embroidered leaves with appliqué leaves made from meaningful fabrics, like a scrap from a baby blanket or a favorite old shirt.
The names and symbols in each smaller hoop can represent a person’s passions—a book for a reader, a musical note for a musician.
This turns a decorative piece into a rich tapestry of family history and personality, making it a true conversation starter.
19. Integrate Embroidery with Wall Decals
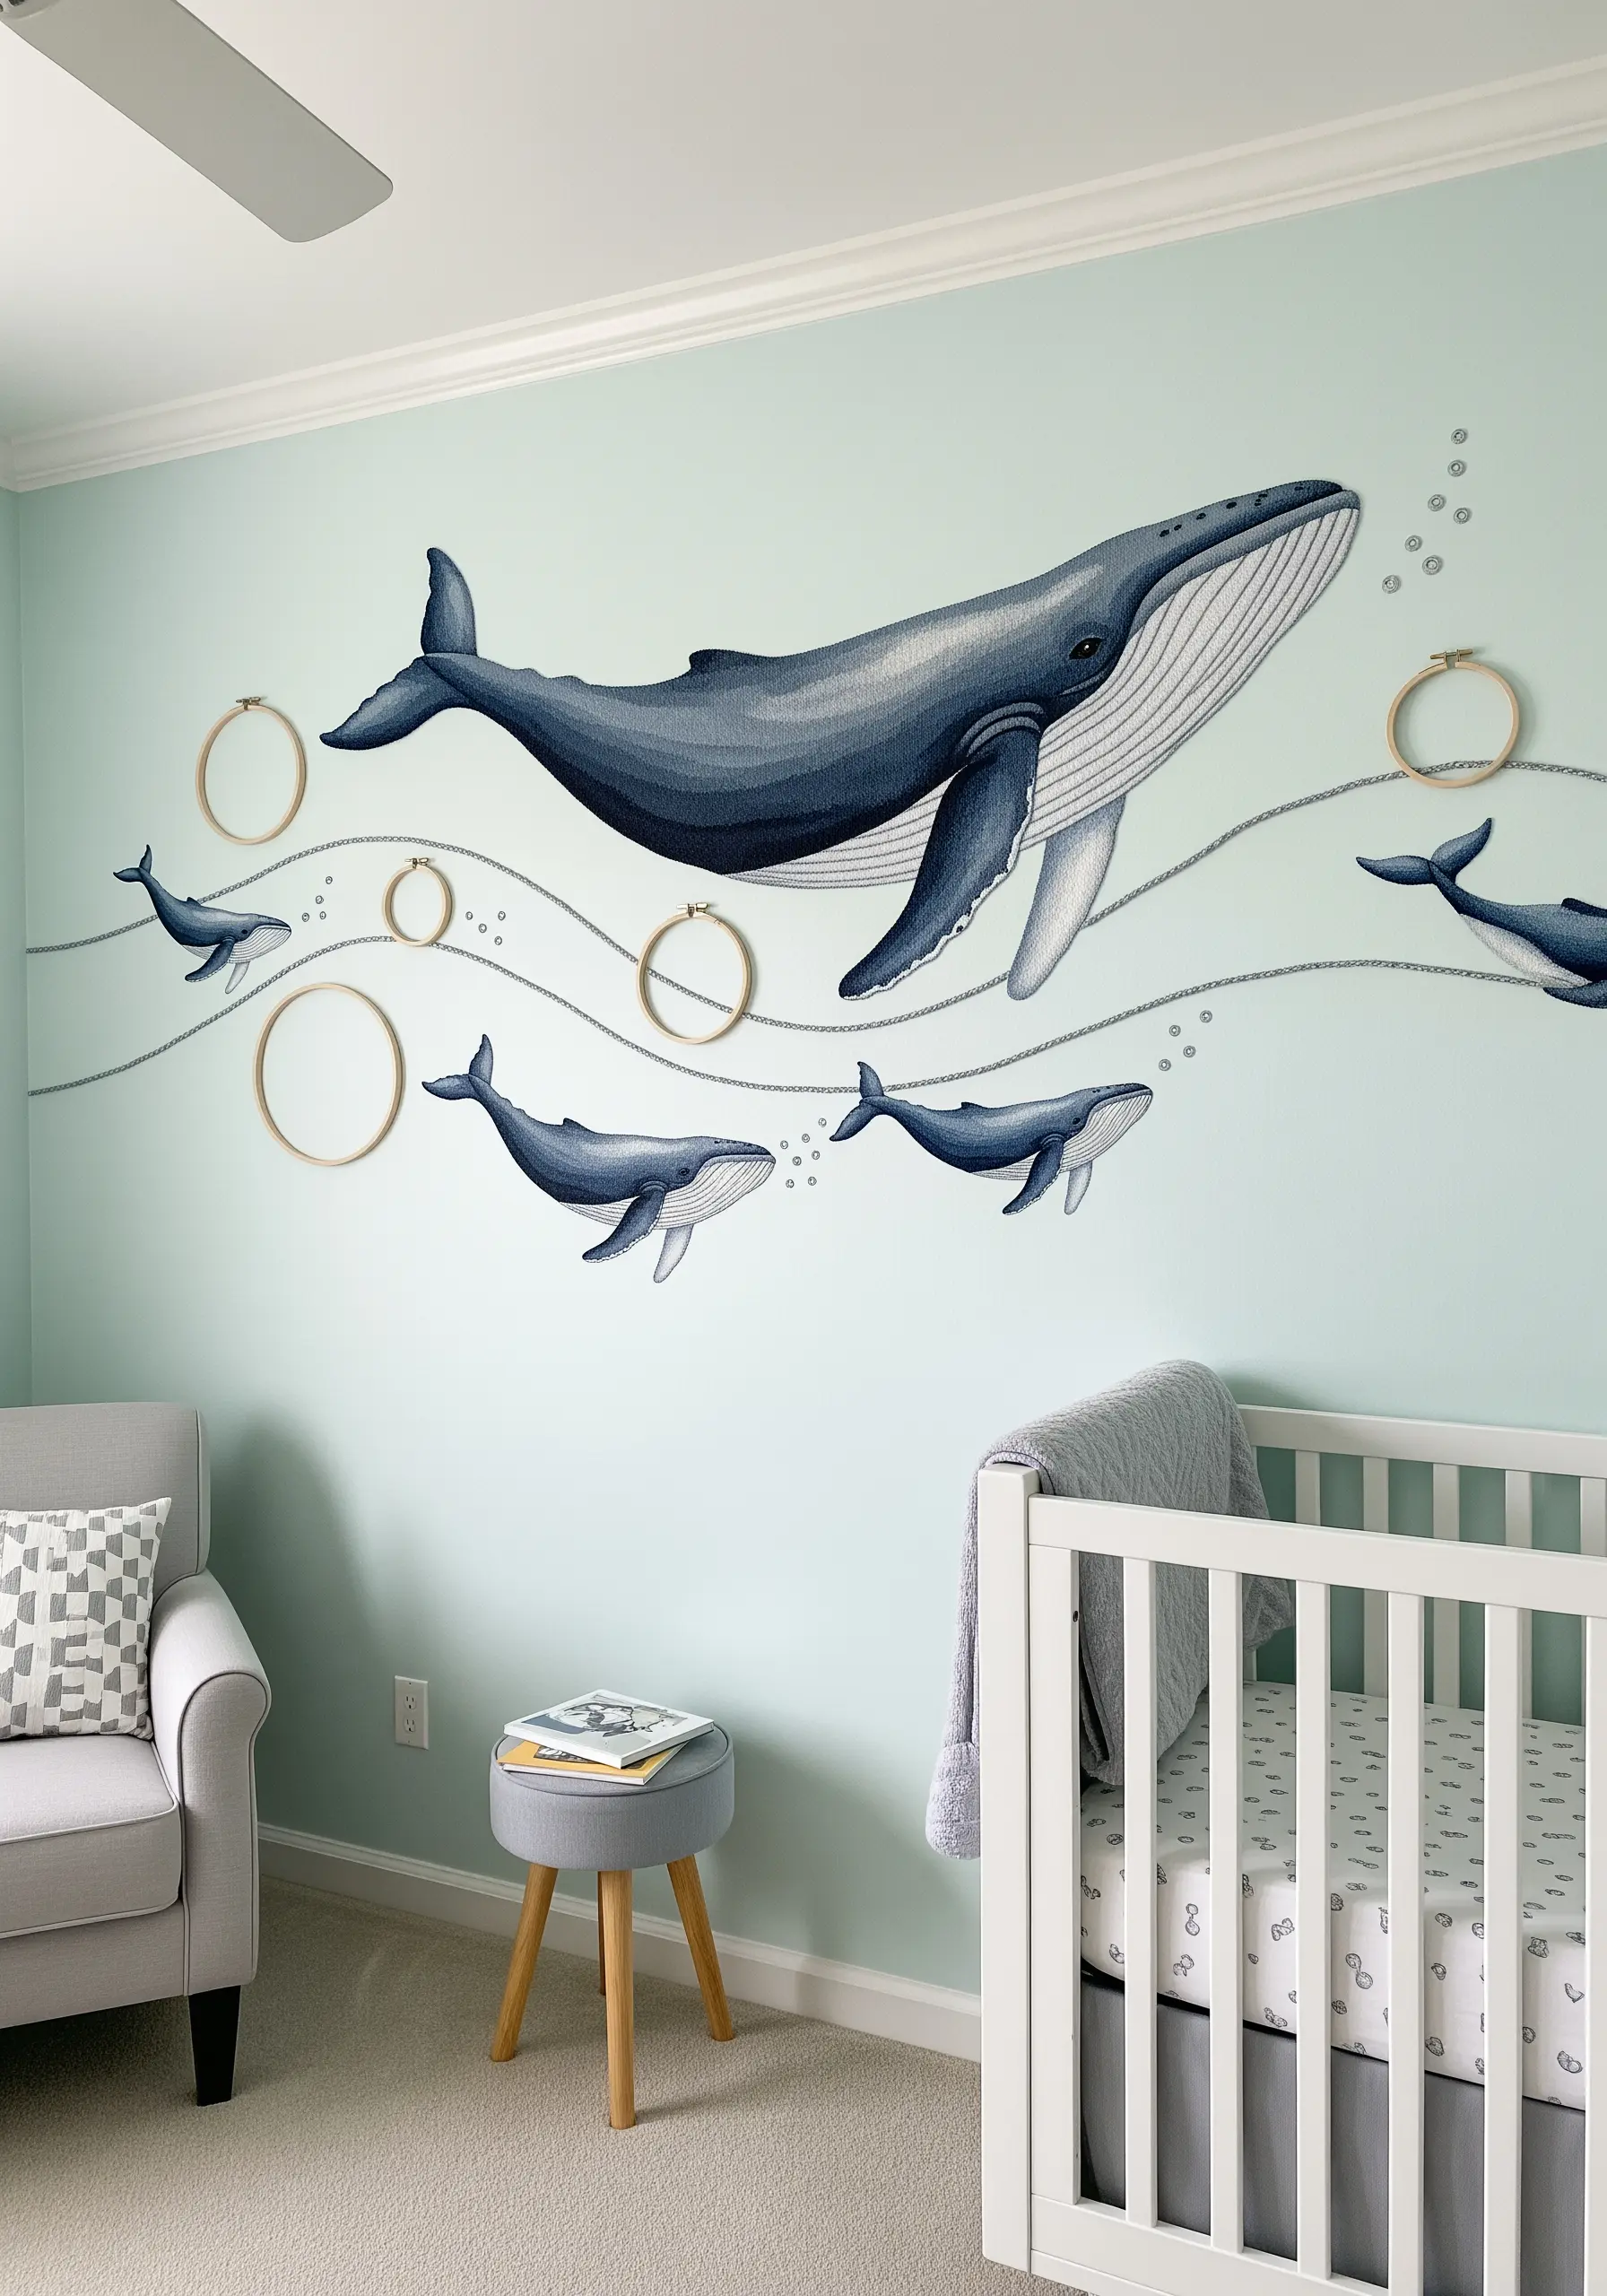
Create a stunning, large-scale mural by combining a painted or vinyl wall decal with subtle embroidered accents.
The decal provides the main visual impact, while your embroidery adds texture, depth, and a unique handmade touch.
Here, stitched chain lines create a sense of flowing water, and empty hoops are strategically placed to represent air bubbles.
This mixed-media approach allows you to create an epic scene without having to embroider the entire image, saving time while maximizing artistic effect.
20. Design a Vertical Herb Garden Panel
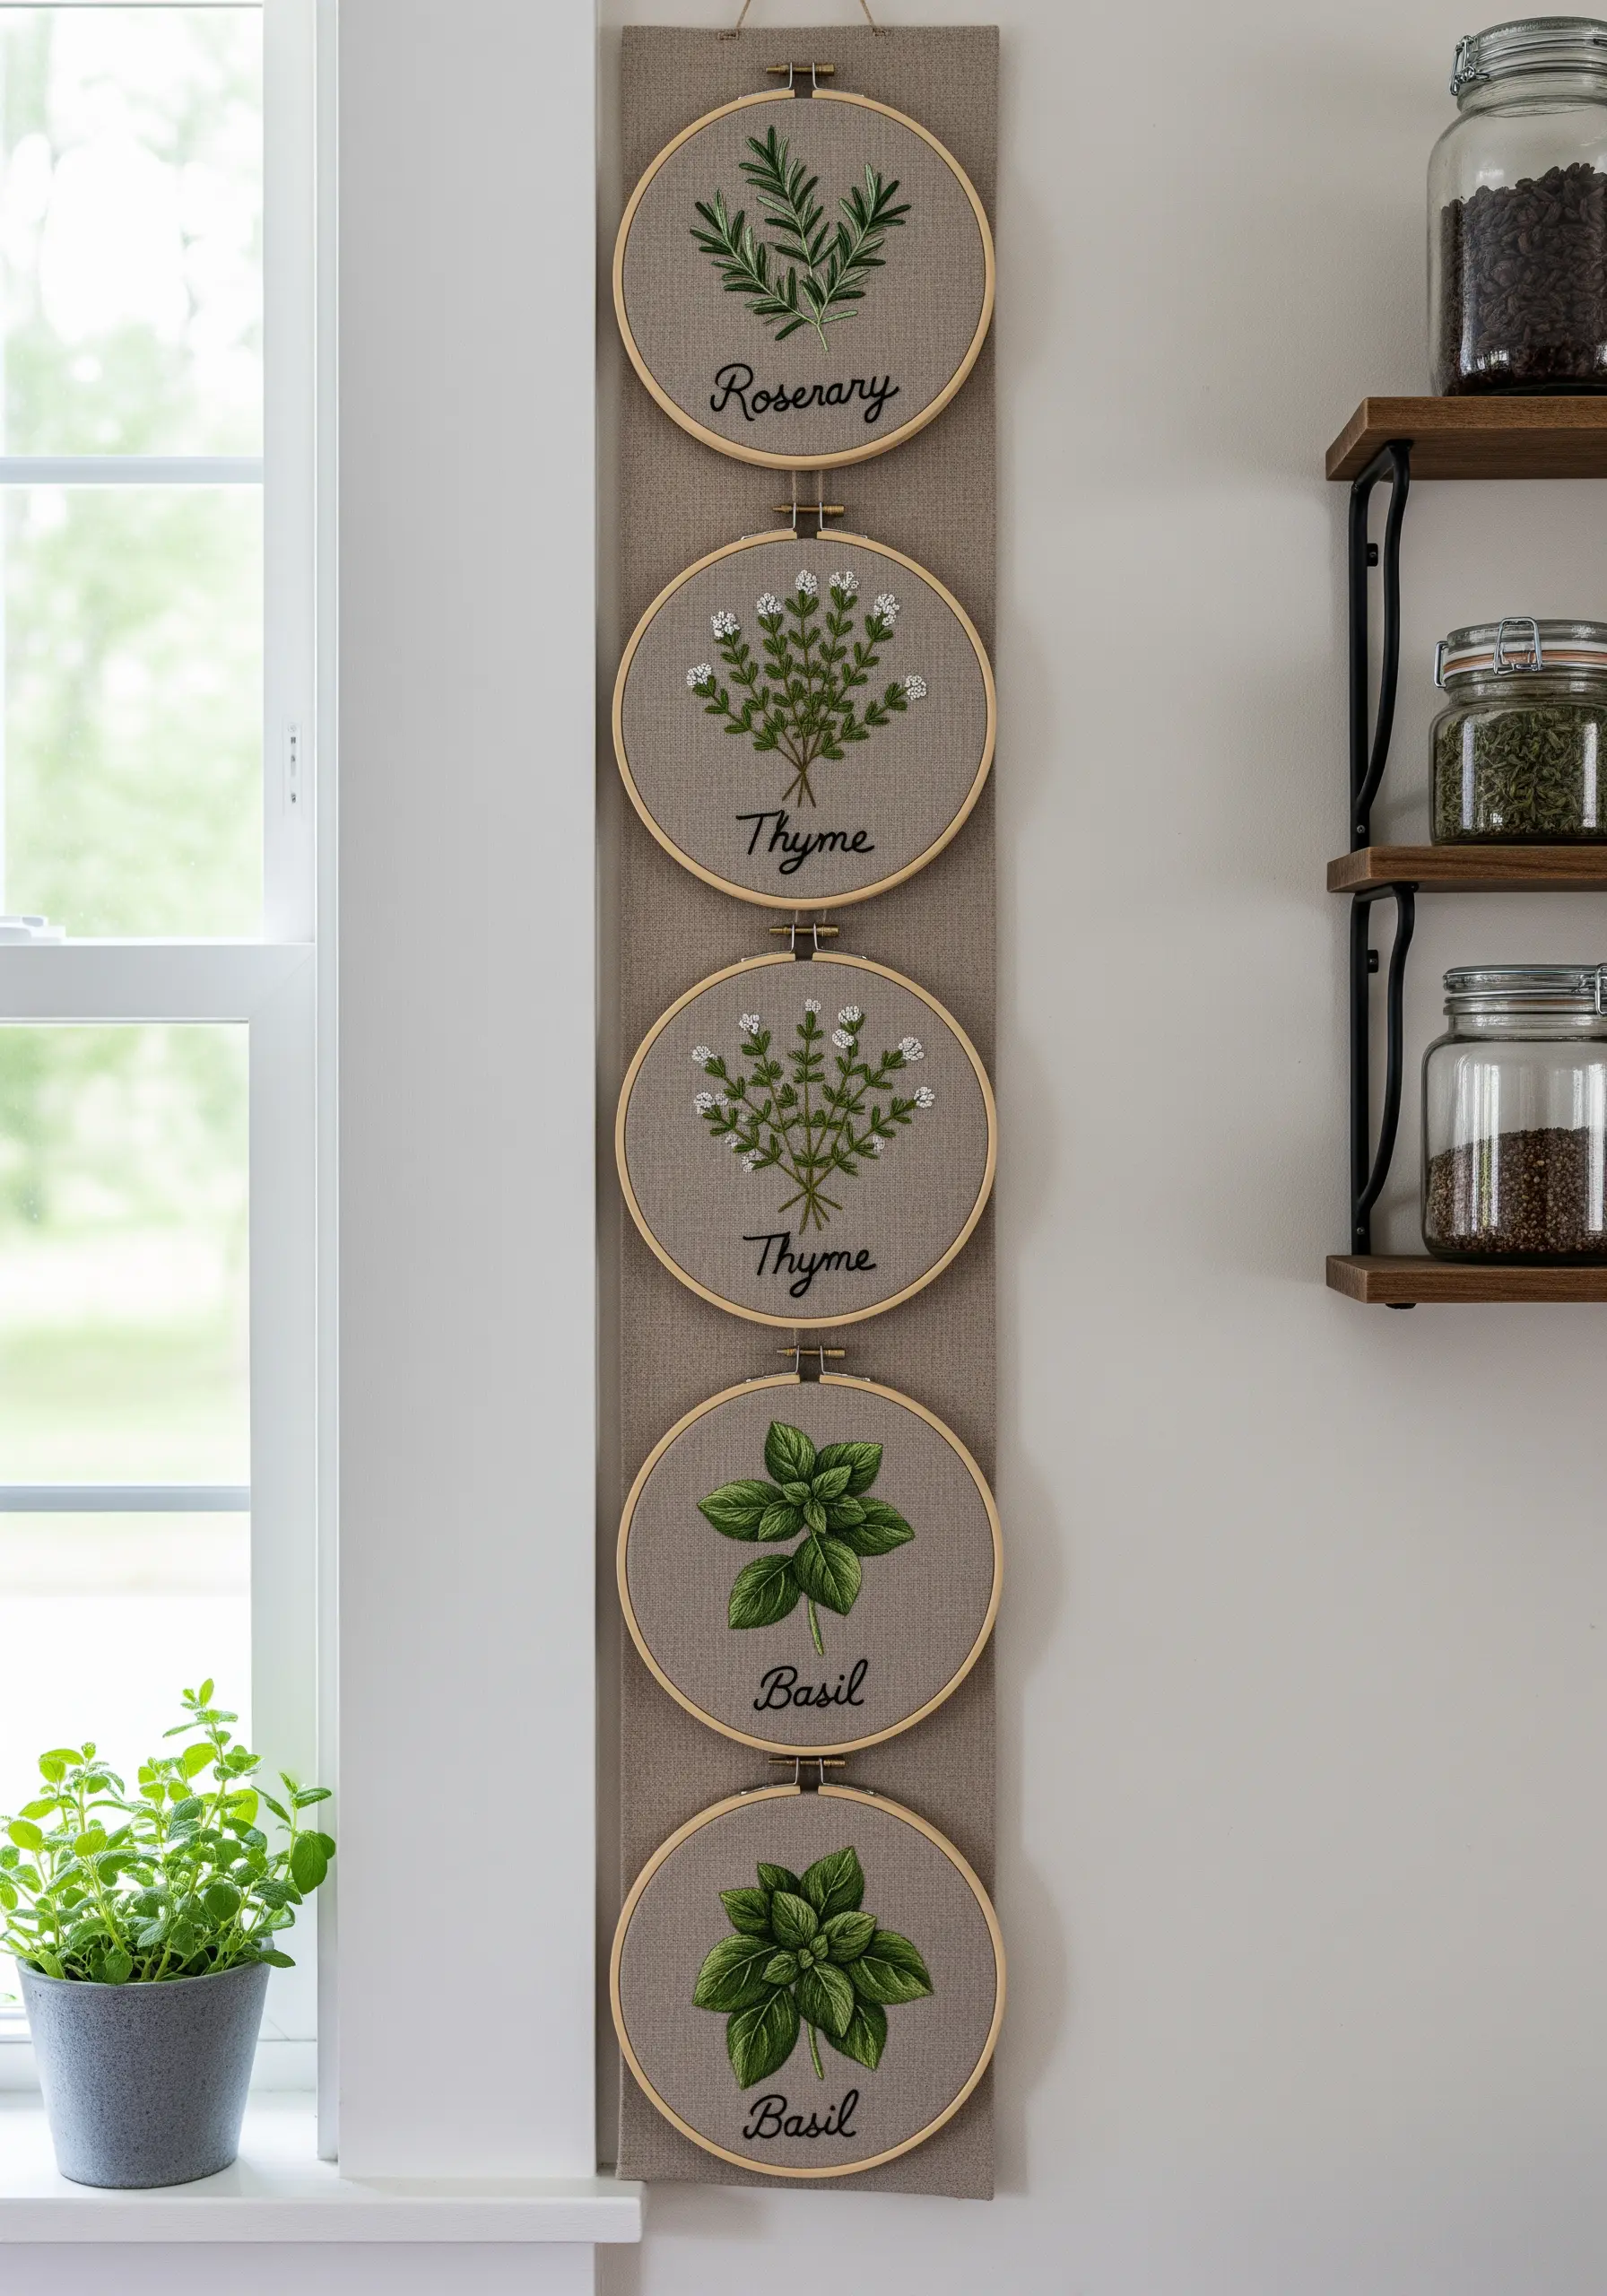
For narrow wall spaces, a vertical arrangement is an elegant solution that draws the eye upward.
Mount your finished hoops onto a single long strip of linen or canvas to create a cohesive panel that is easy to hang.
To give your embroidered herbs realism, use a fishbone stitch for broad leaves like basil and a delicate detached chain stitch for thyme blossoms.
A simple, cursive backstitch for the lettering adds a classic, botanical illustration feel to the entire piece.
21. Stitch a Soundwave of a Special Moment

Translate a meaningful sound—a favorite song, a laugh, or a spoken phrase—into a modern, abstract piece of art.
Use a soundwave generator app to create a visual pattern, then transfer it onto your fabric.
Fill the shape with a dense, vertical satin stitch in a high-contrast color like black to create a bold, graphic statement.
The surrounding empty hoops of varying sizes can be used to represent the echo or vibration of the sound, adding a conceptual layer to the design.
22. Create a Celestial Canopy with Glow Thread
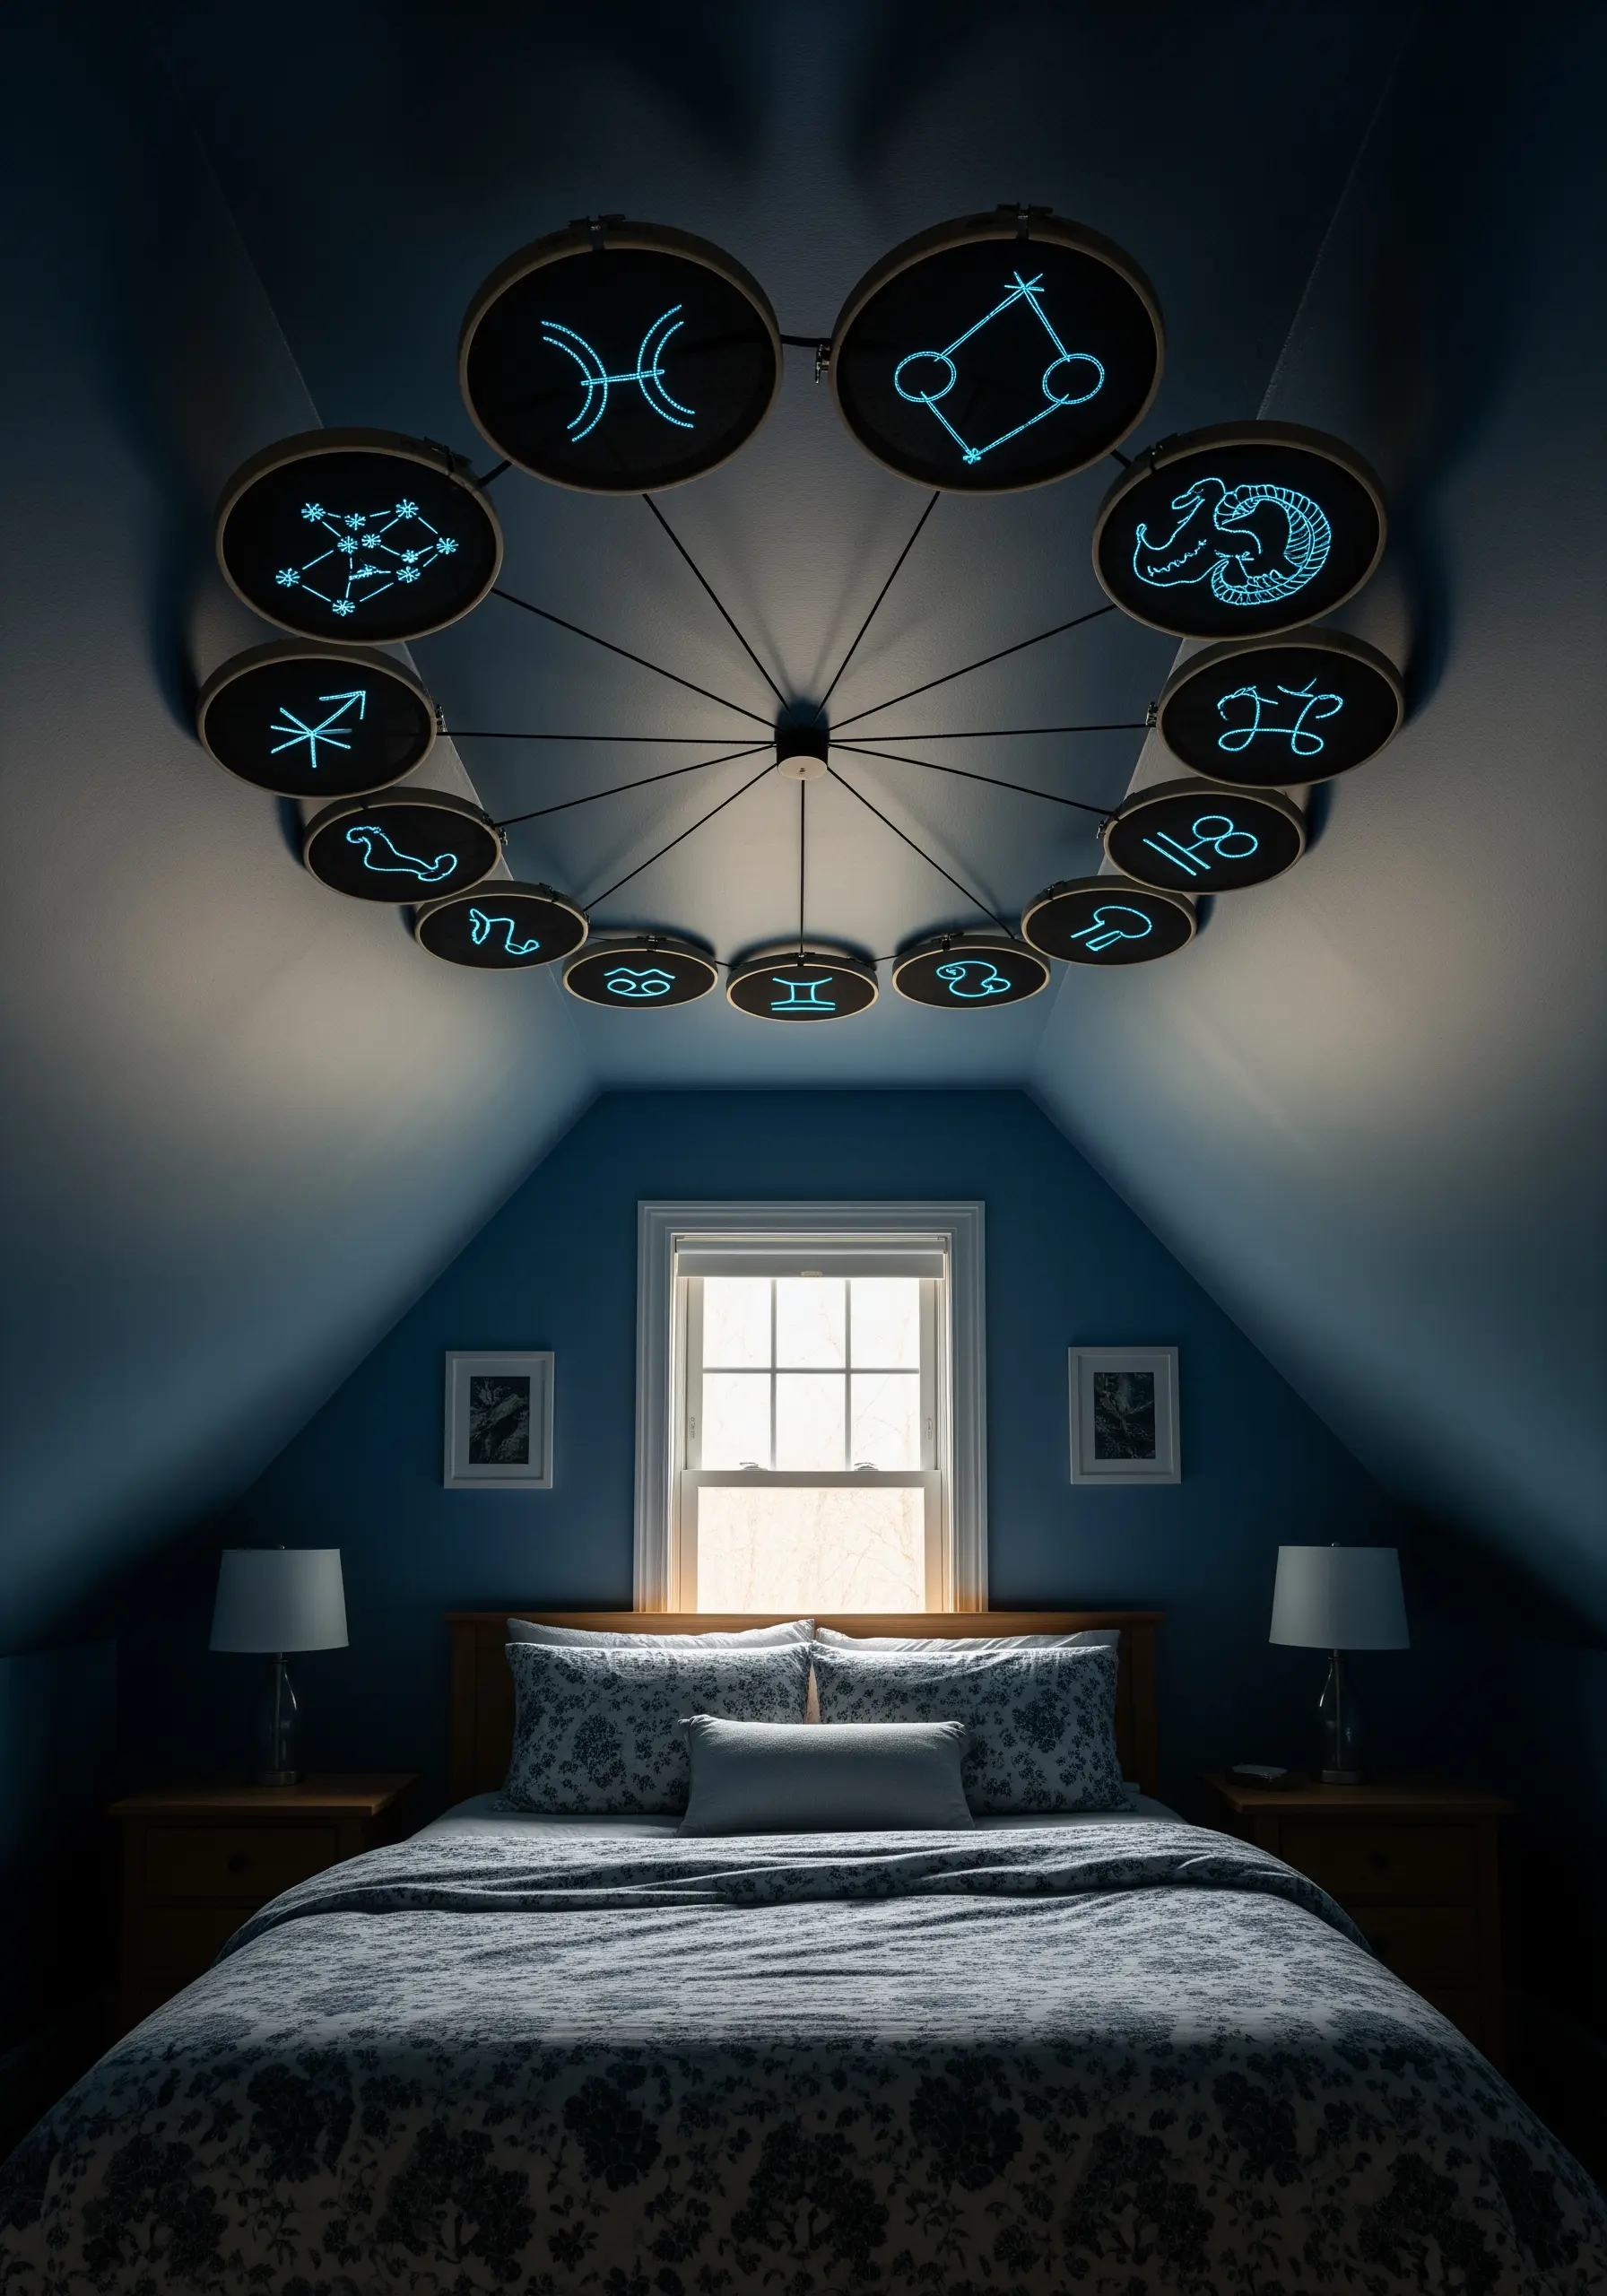
Design a piece that transforms when the lights go out by using glow-in-the-dark embroidery floss.
Keep the designs simple—like these zodiac-inspired patterns—using a basic backstitch for clean, graphic lines that will charge easily and glow brightly.
Stitch on black or navy fabric to maximize the glowing effect and mimic the night sky.
Arrange the hoops on the ceiling or high on a wall to create an immersive, planetarium-like experience in a bedroom or attic space.
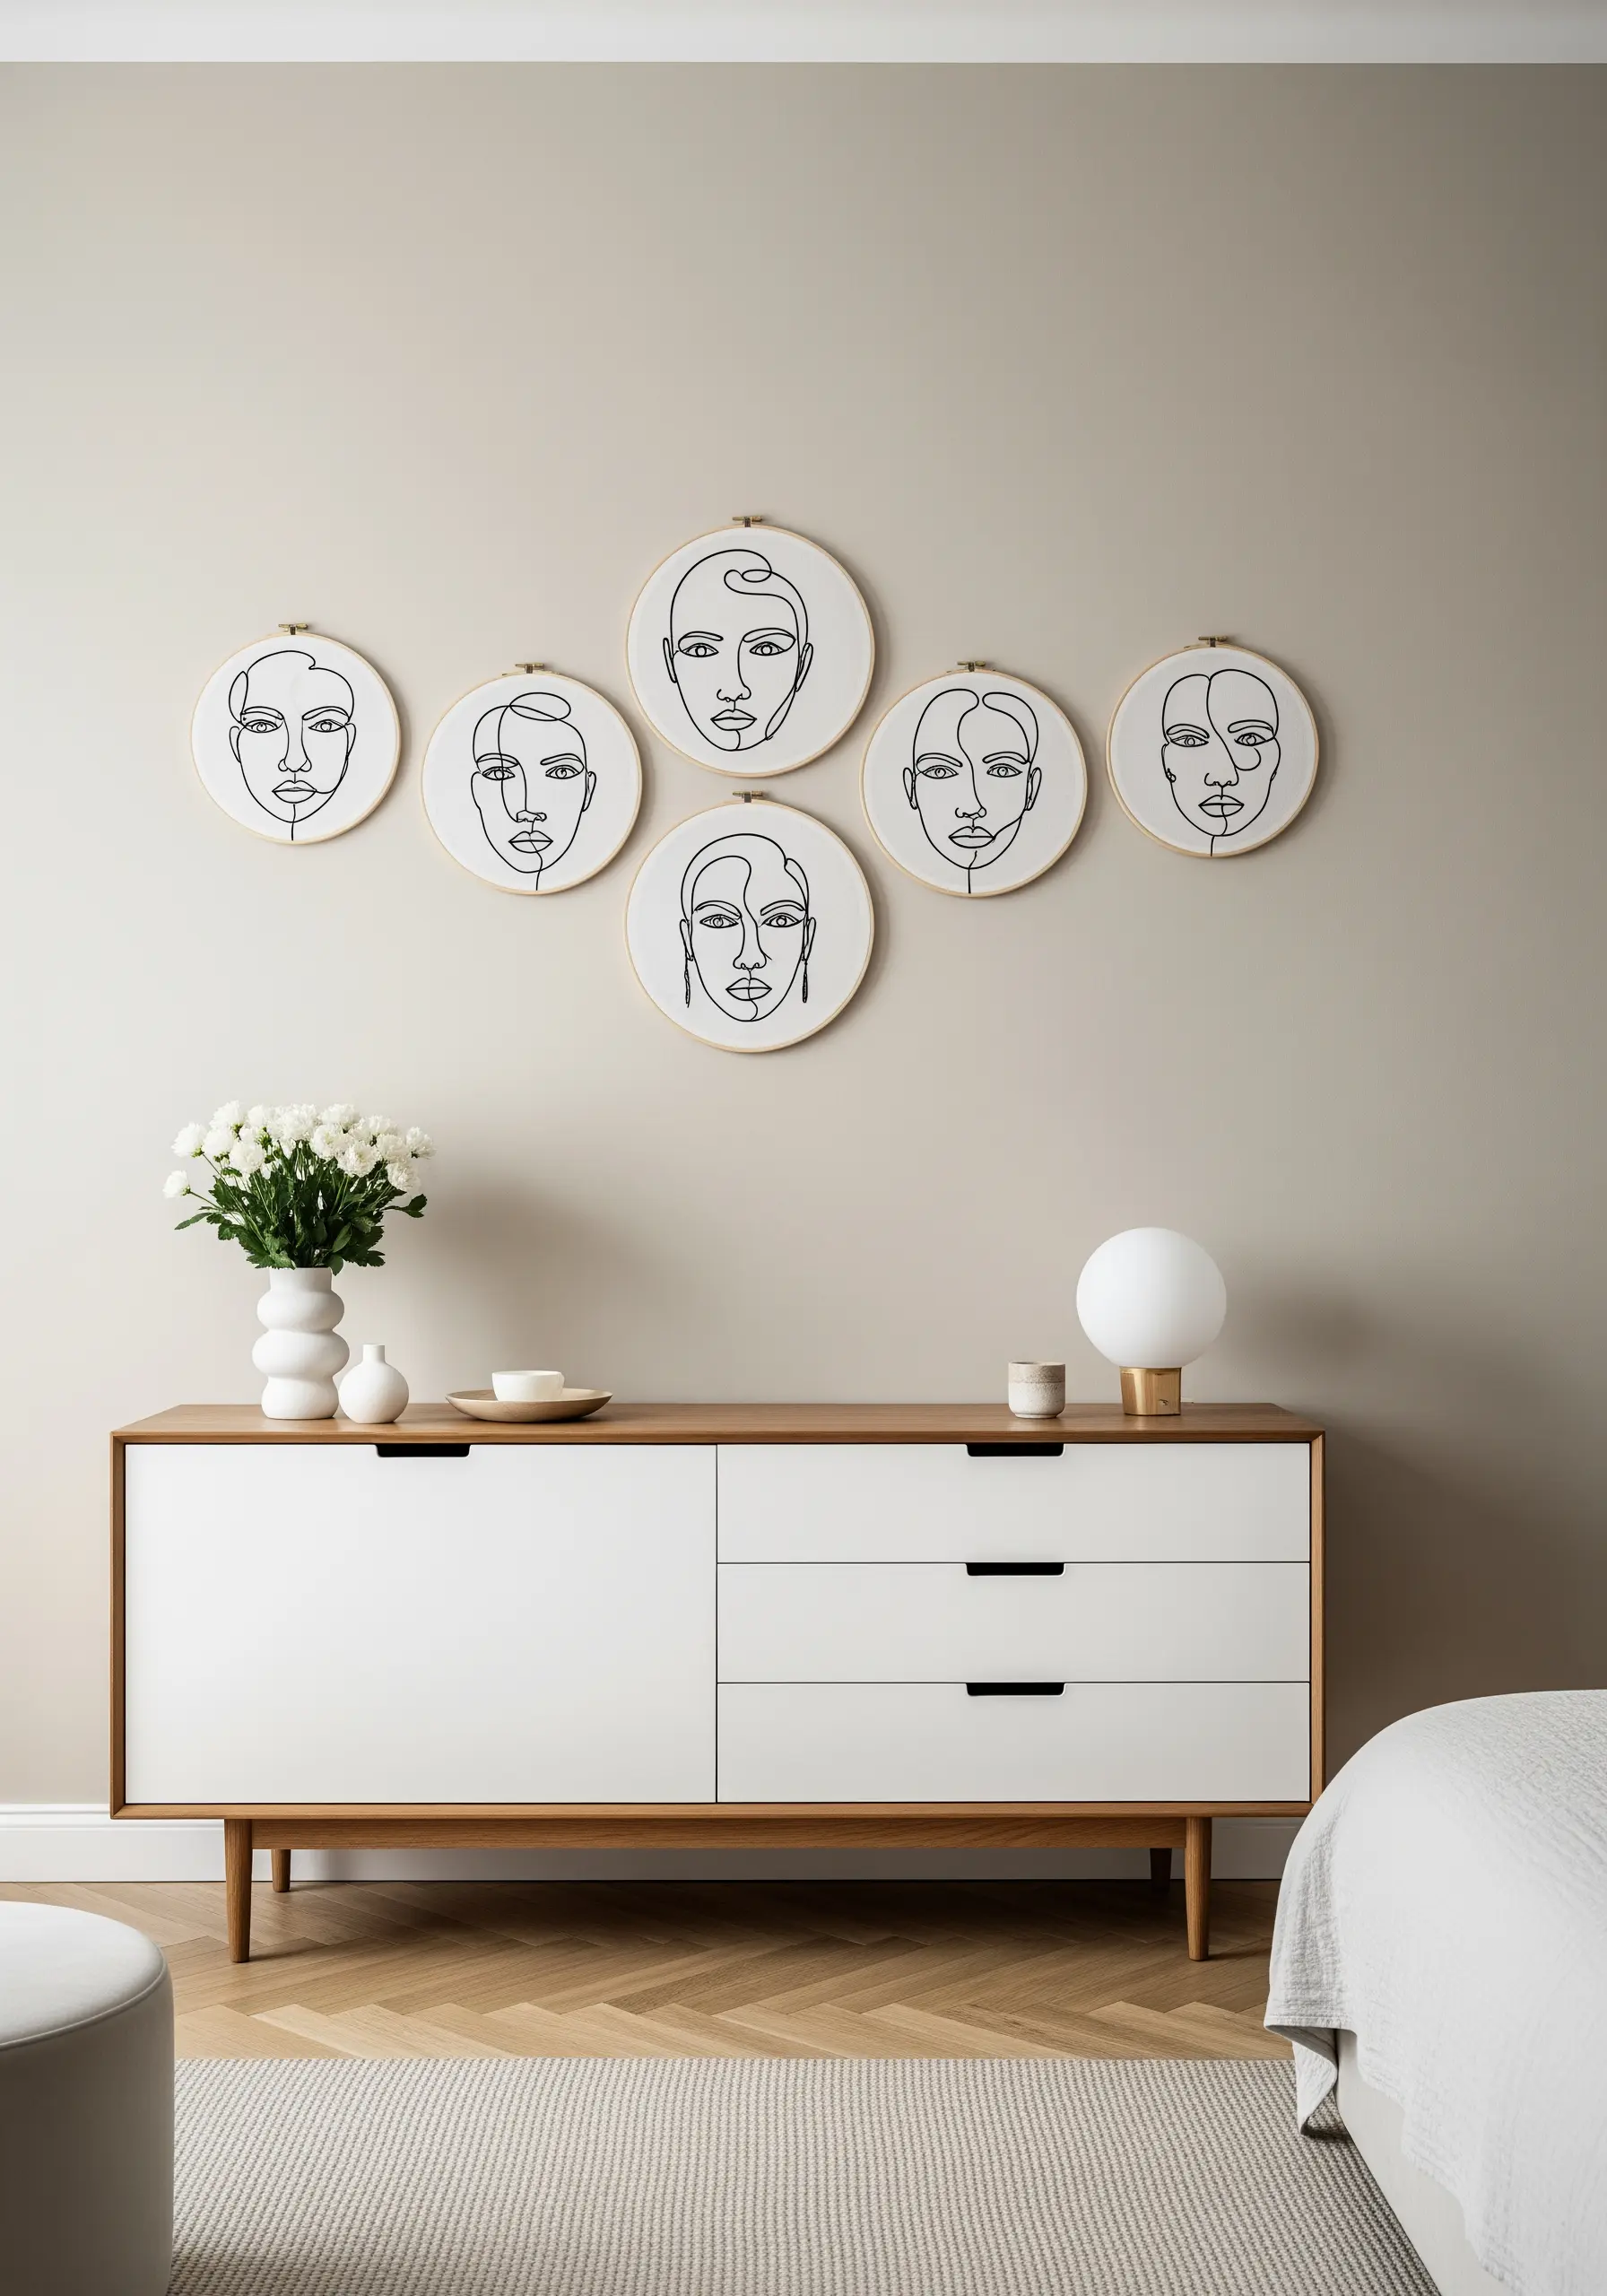
23. Curate a Gallery of Embroidered Portraits
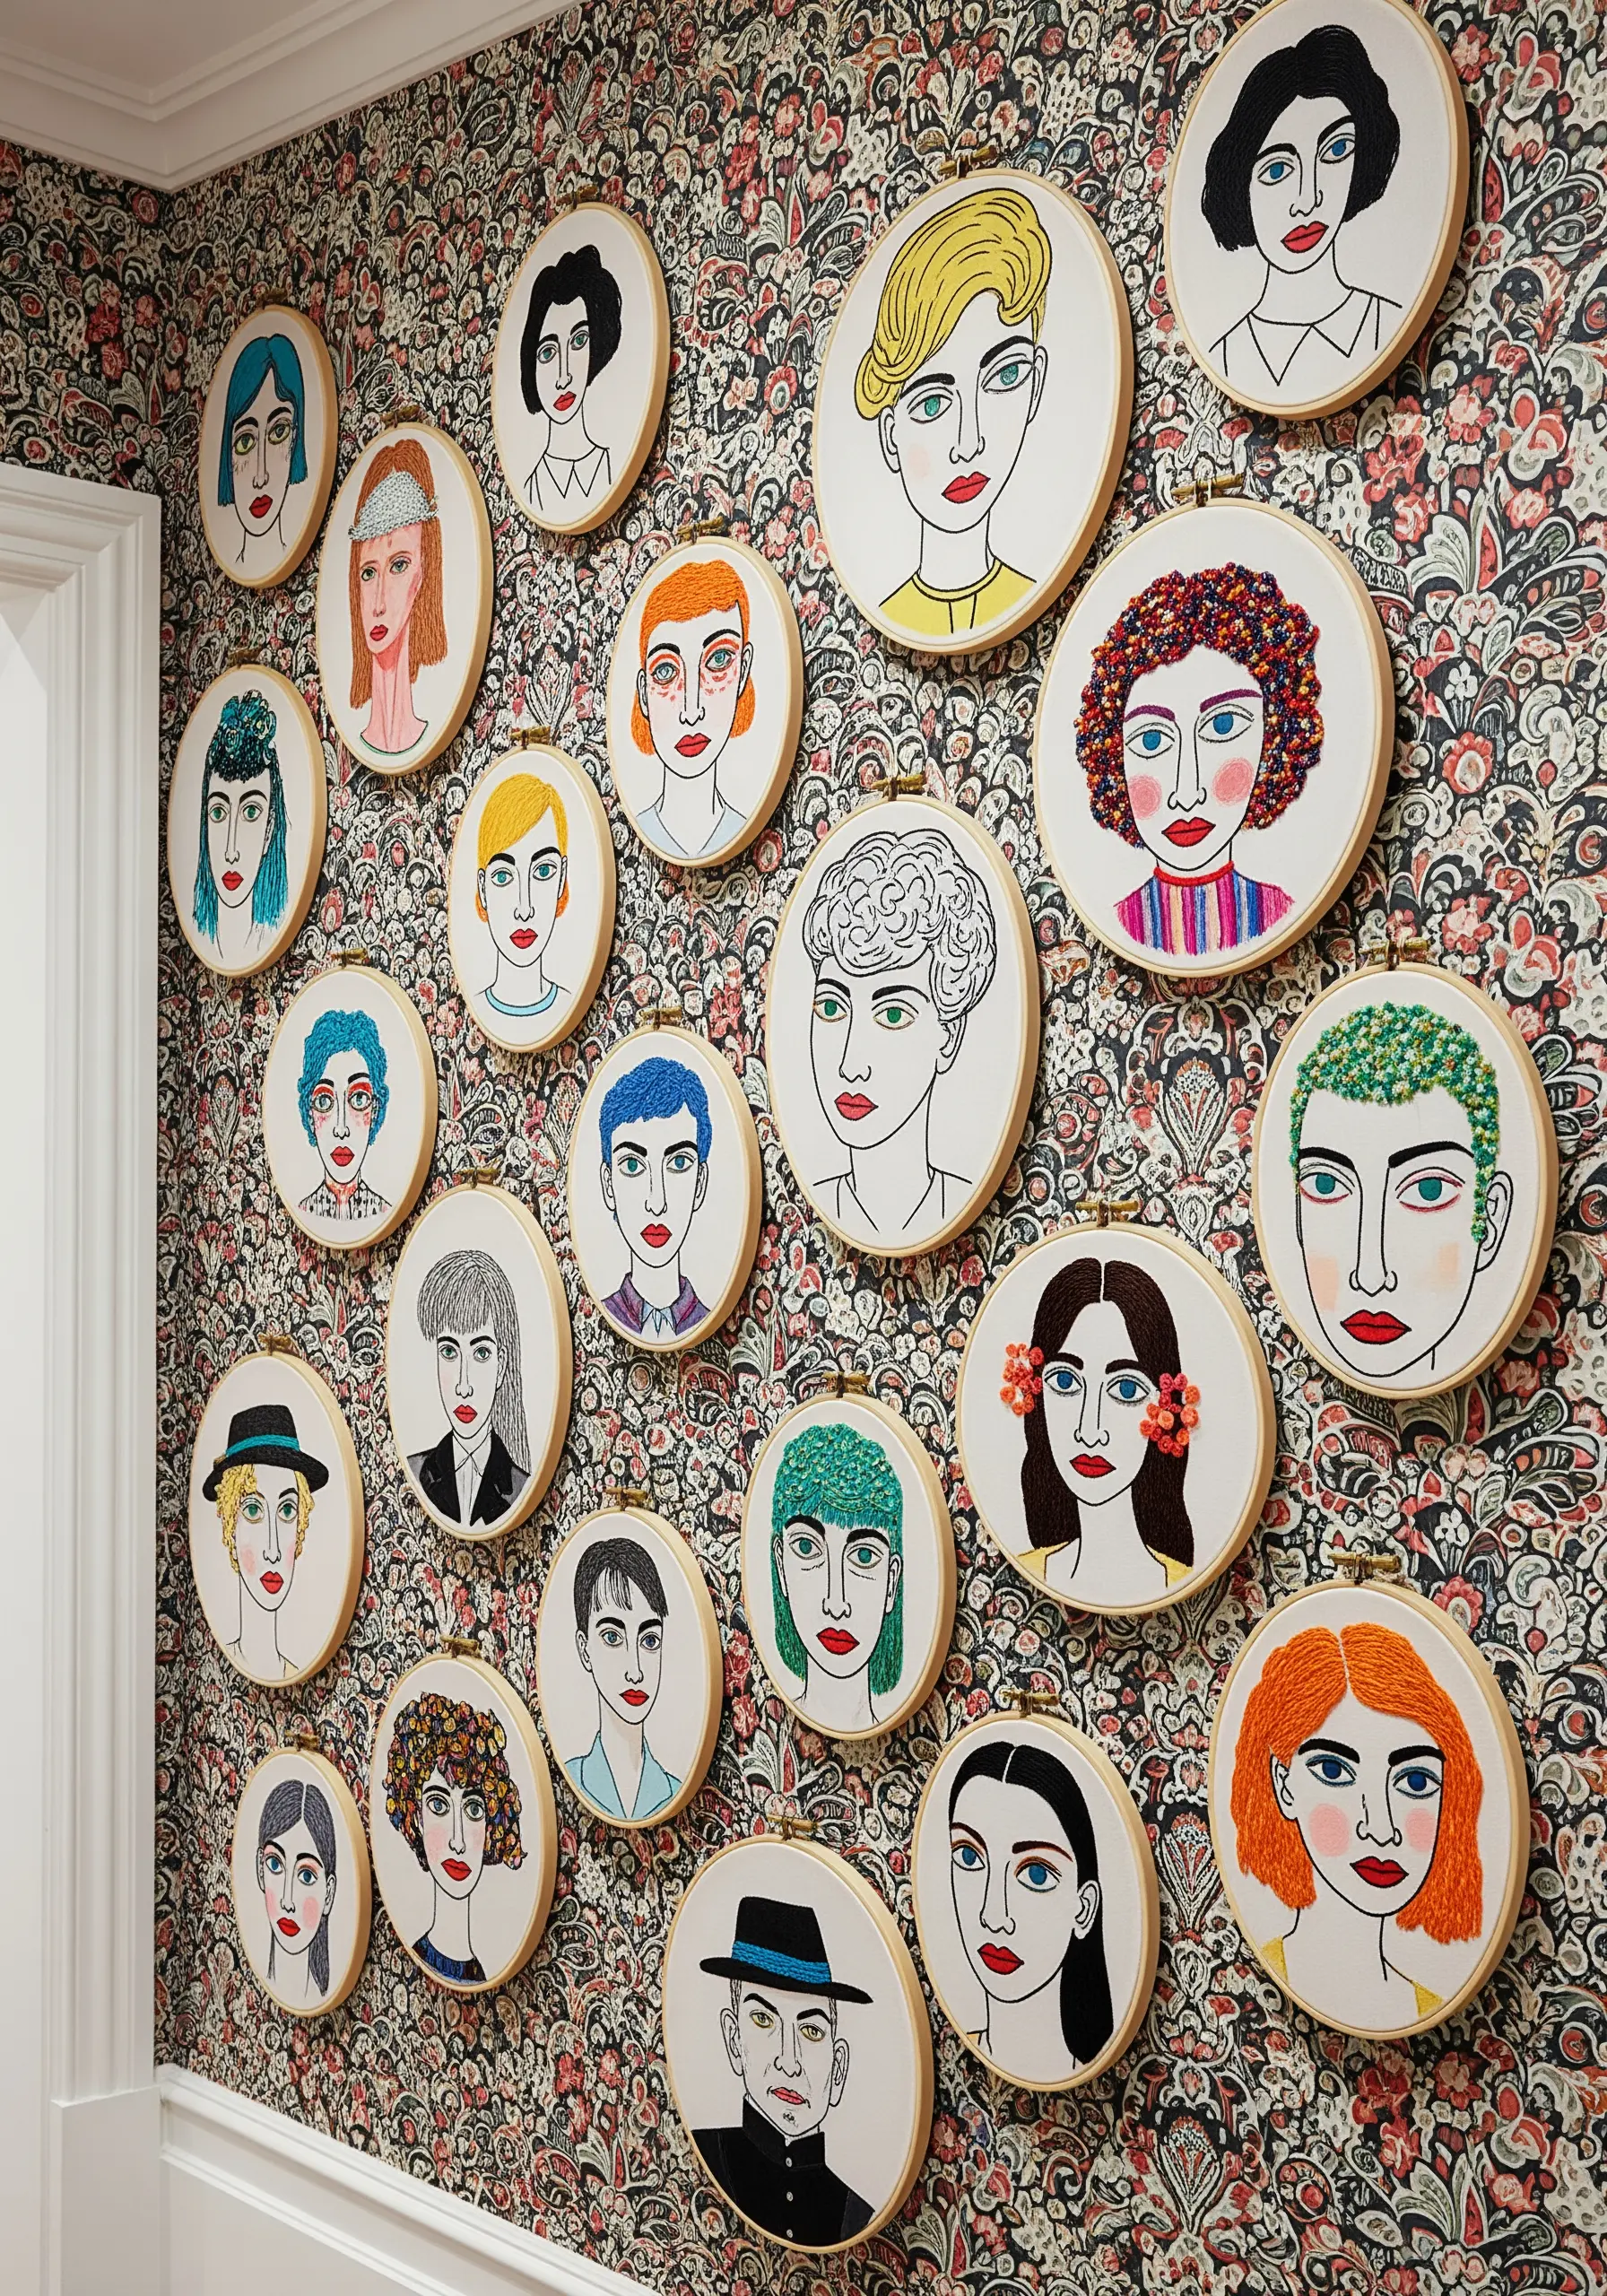
Create a vibrant and eclectic gallery wall by filling hoops with unique, character-filled portraits.
Use a simple backstitch for the facial outlines to keep the features clean and expressive, a technique perfect for line art portrait embroidery.
Experiment with different fill stitches, colors, and thread types for the hair to give each character a distinct personality and texture.
By mounting them on a patterned wallpaper, you create a dynamic interplay between the stitched art and its background, adding another layer of visual interest.
24. Design a Cascading Ginkgo Installation
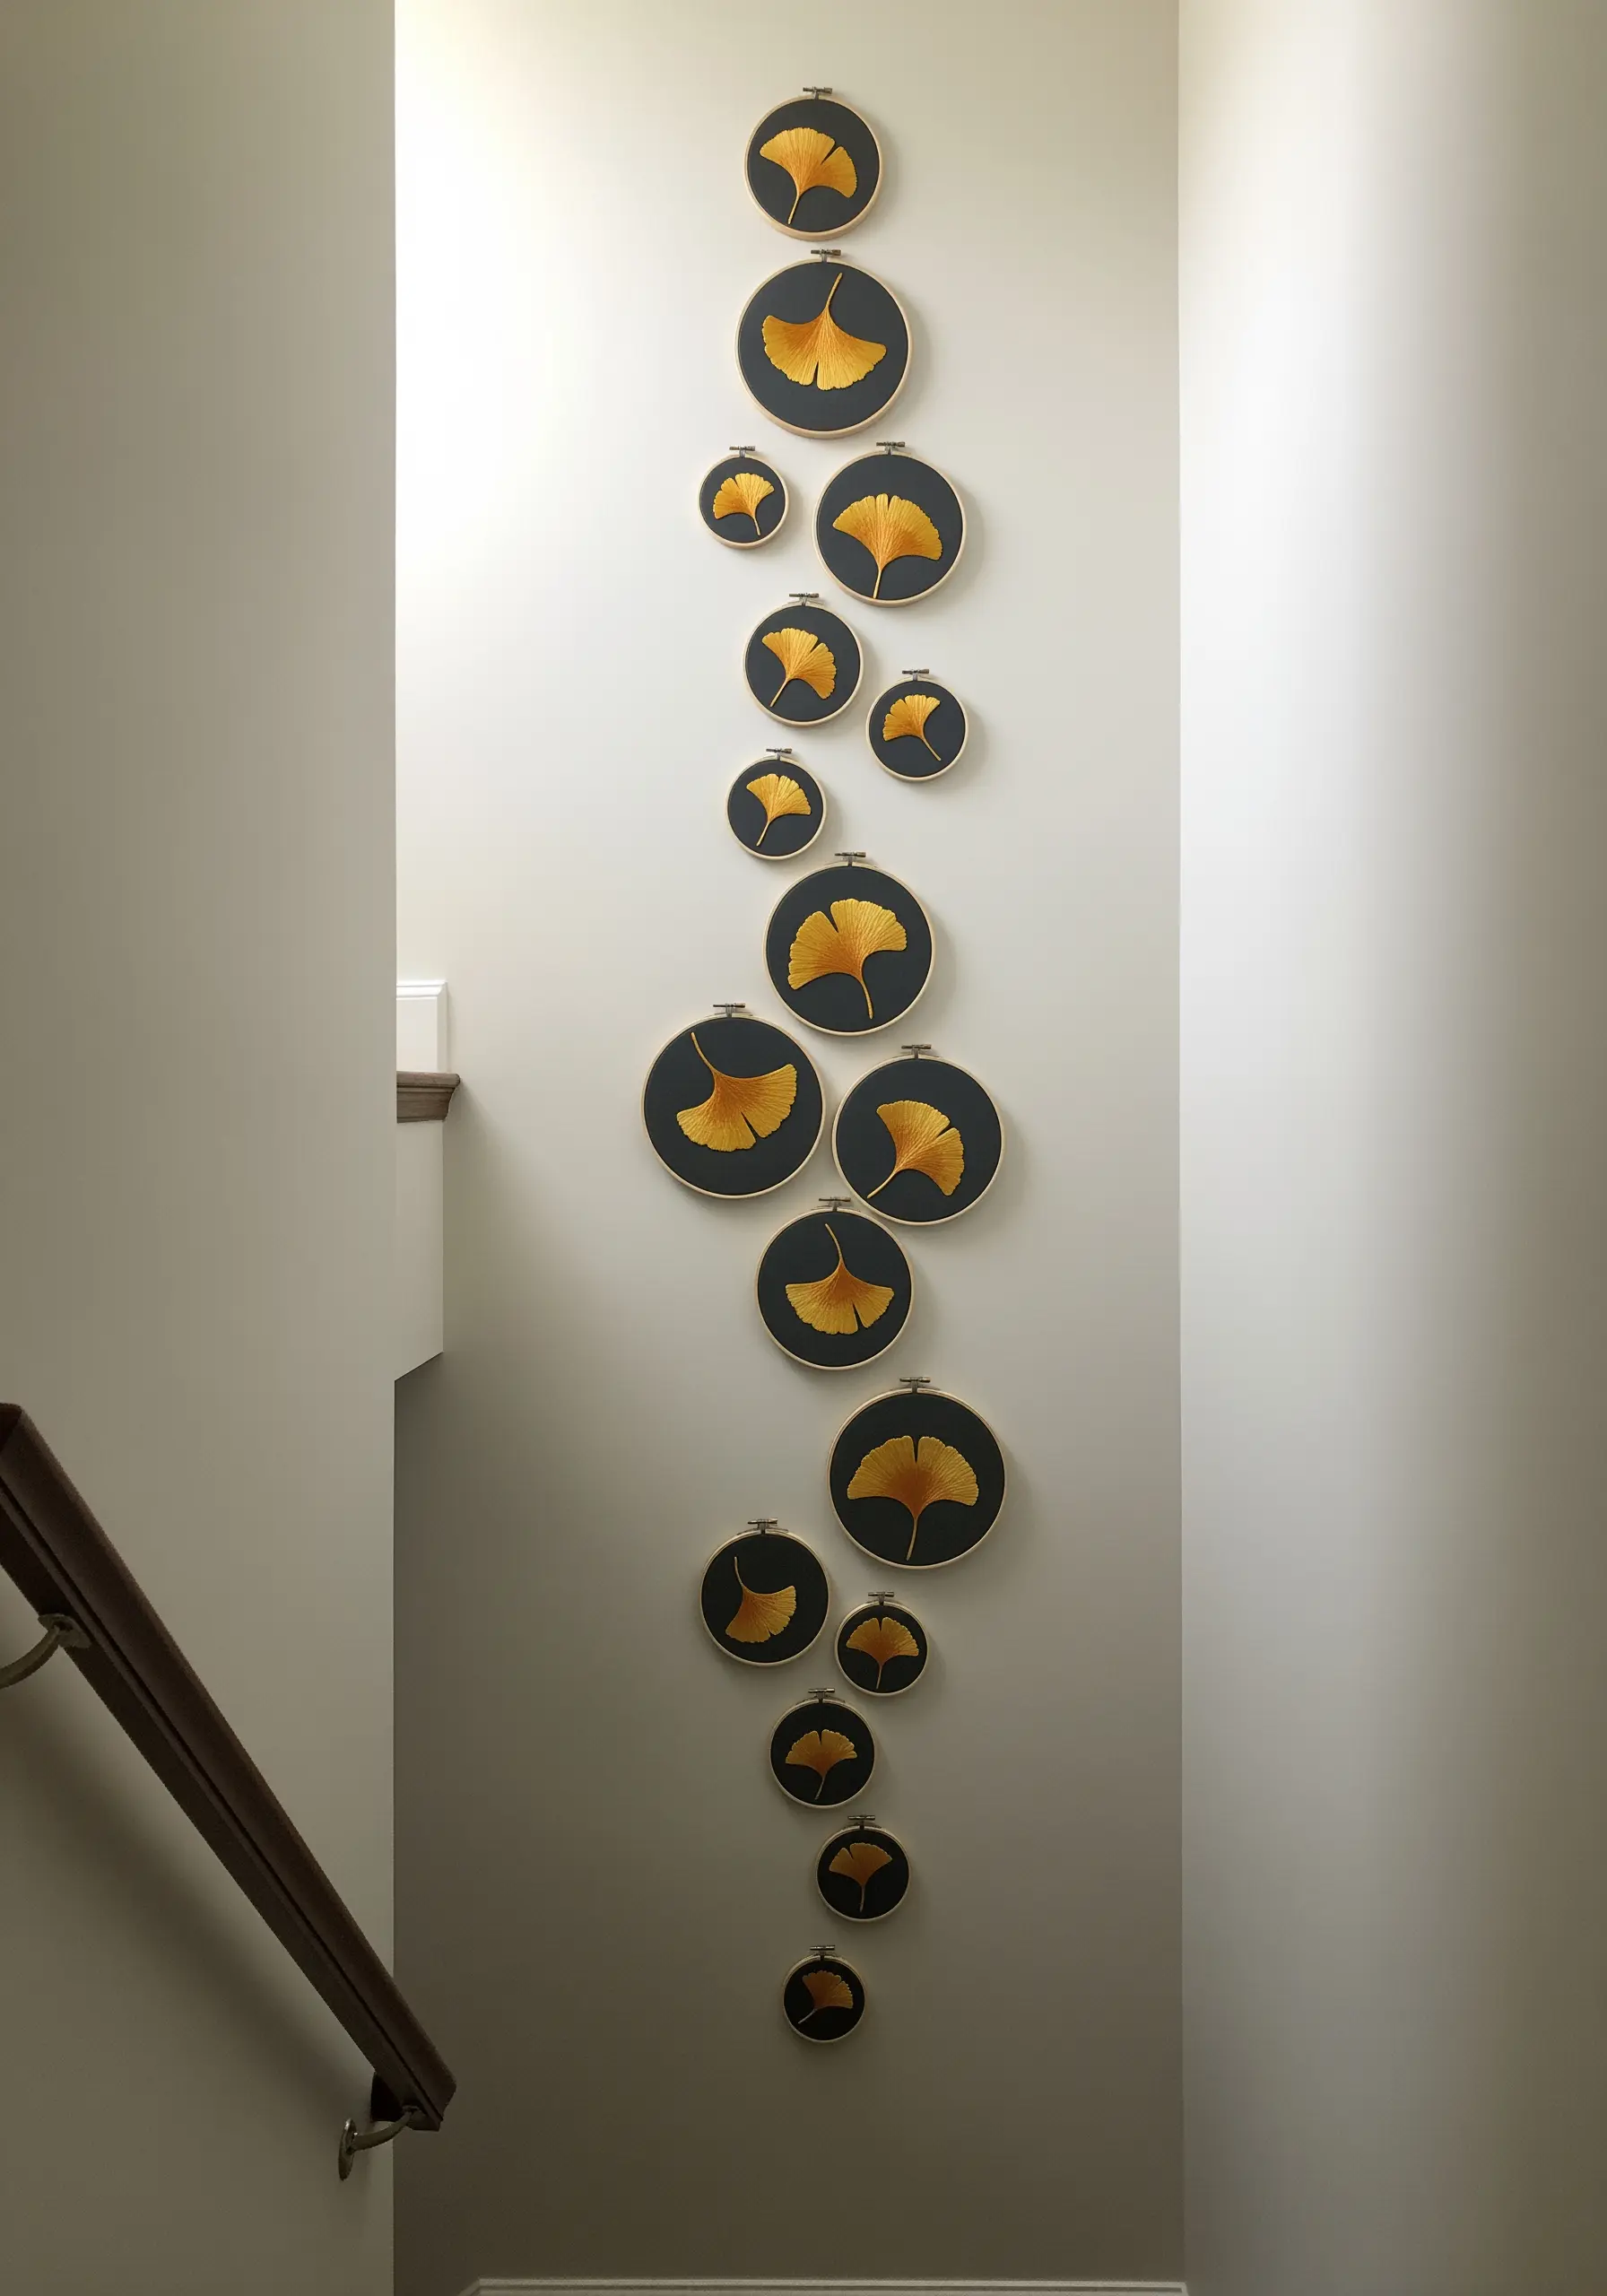
Guide the eye and create a sense of graceful movement by arranging your hoops in a flowing, downward cascade.
Stitch the ginkgo leaves with a satin stitch, making sure all your stitches follow the natural direction of the leaf’s veins for a smooth, cohesive sheen.
Using a rich gold or ochre thread against a dark charcoal or black fabric creates a dramatic contrast that feels both modern and timeless.
Varying the hoop sizes and their spacing adds to the organic, falling-leaf effect, making the installation feel light and dynamic.
25. Build a Lush, Overlapping Jungle
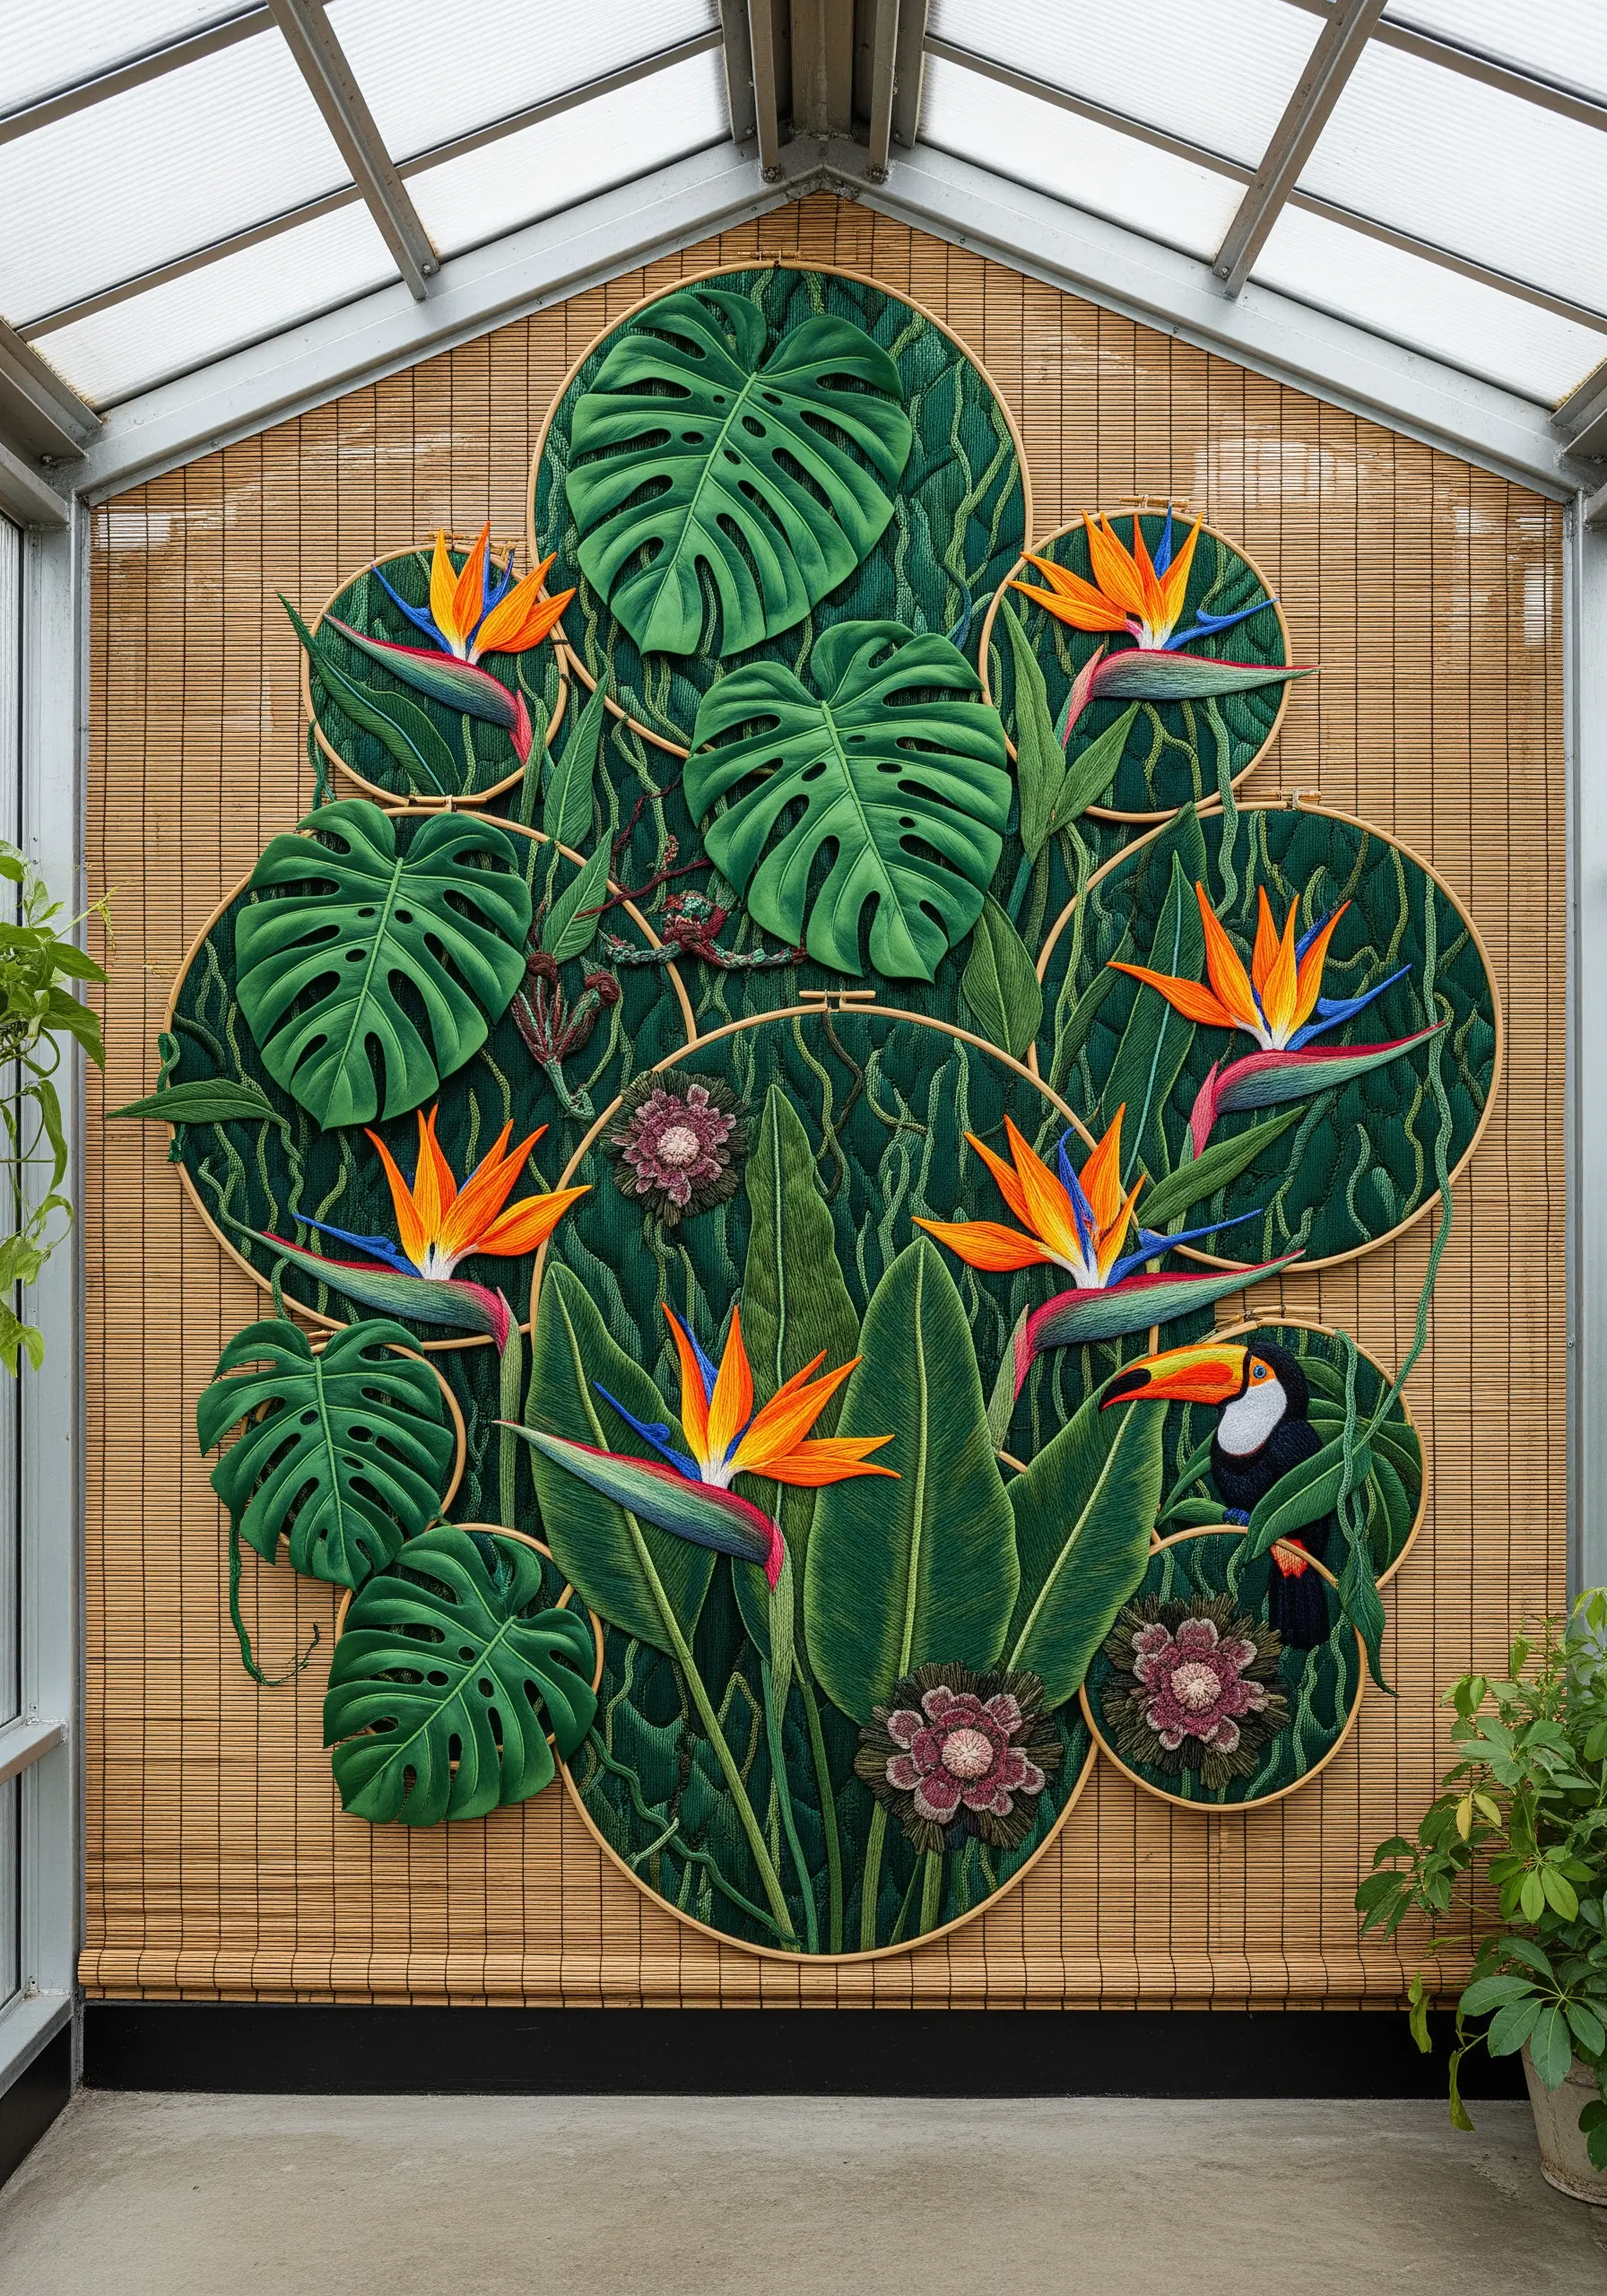
Achieve the density of a tropical rainforest by layering hoops and allowing stitched elements to overlap.
Use a long-and-short stitch to blend multiple shades of green within each leaf, giving them realistic depth and dimension.
Incorporate stumpwork techniques for key elements like the flowers or a perched toucan, wiring the pieces so they physically lift off the fabric for a stunning 3D effect.
Tuck smaller hoops partially behind larger ones to create a layered composition that feels immersive and packed with life.
26. Let Printed Fabric Guide Your Stitches
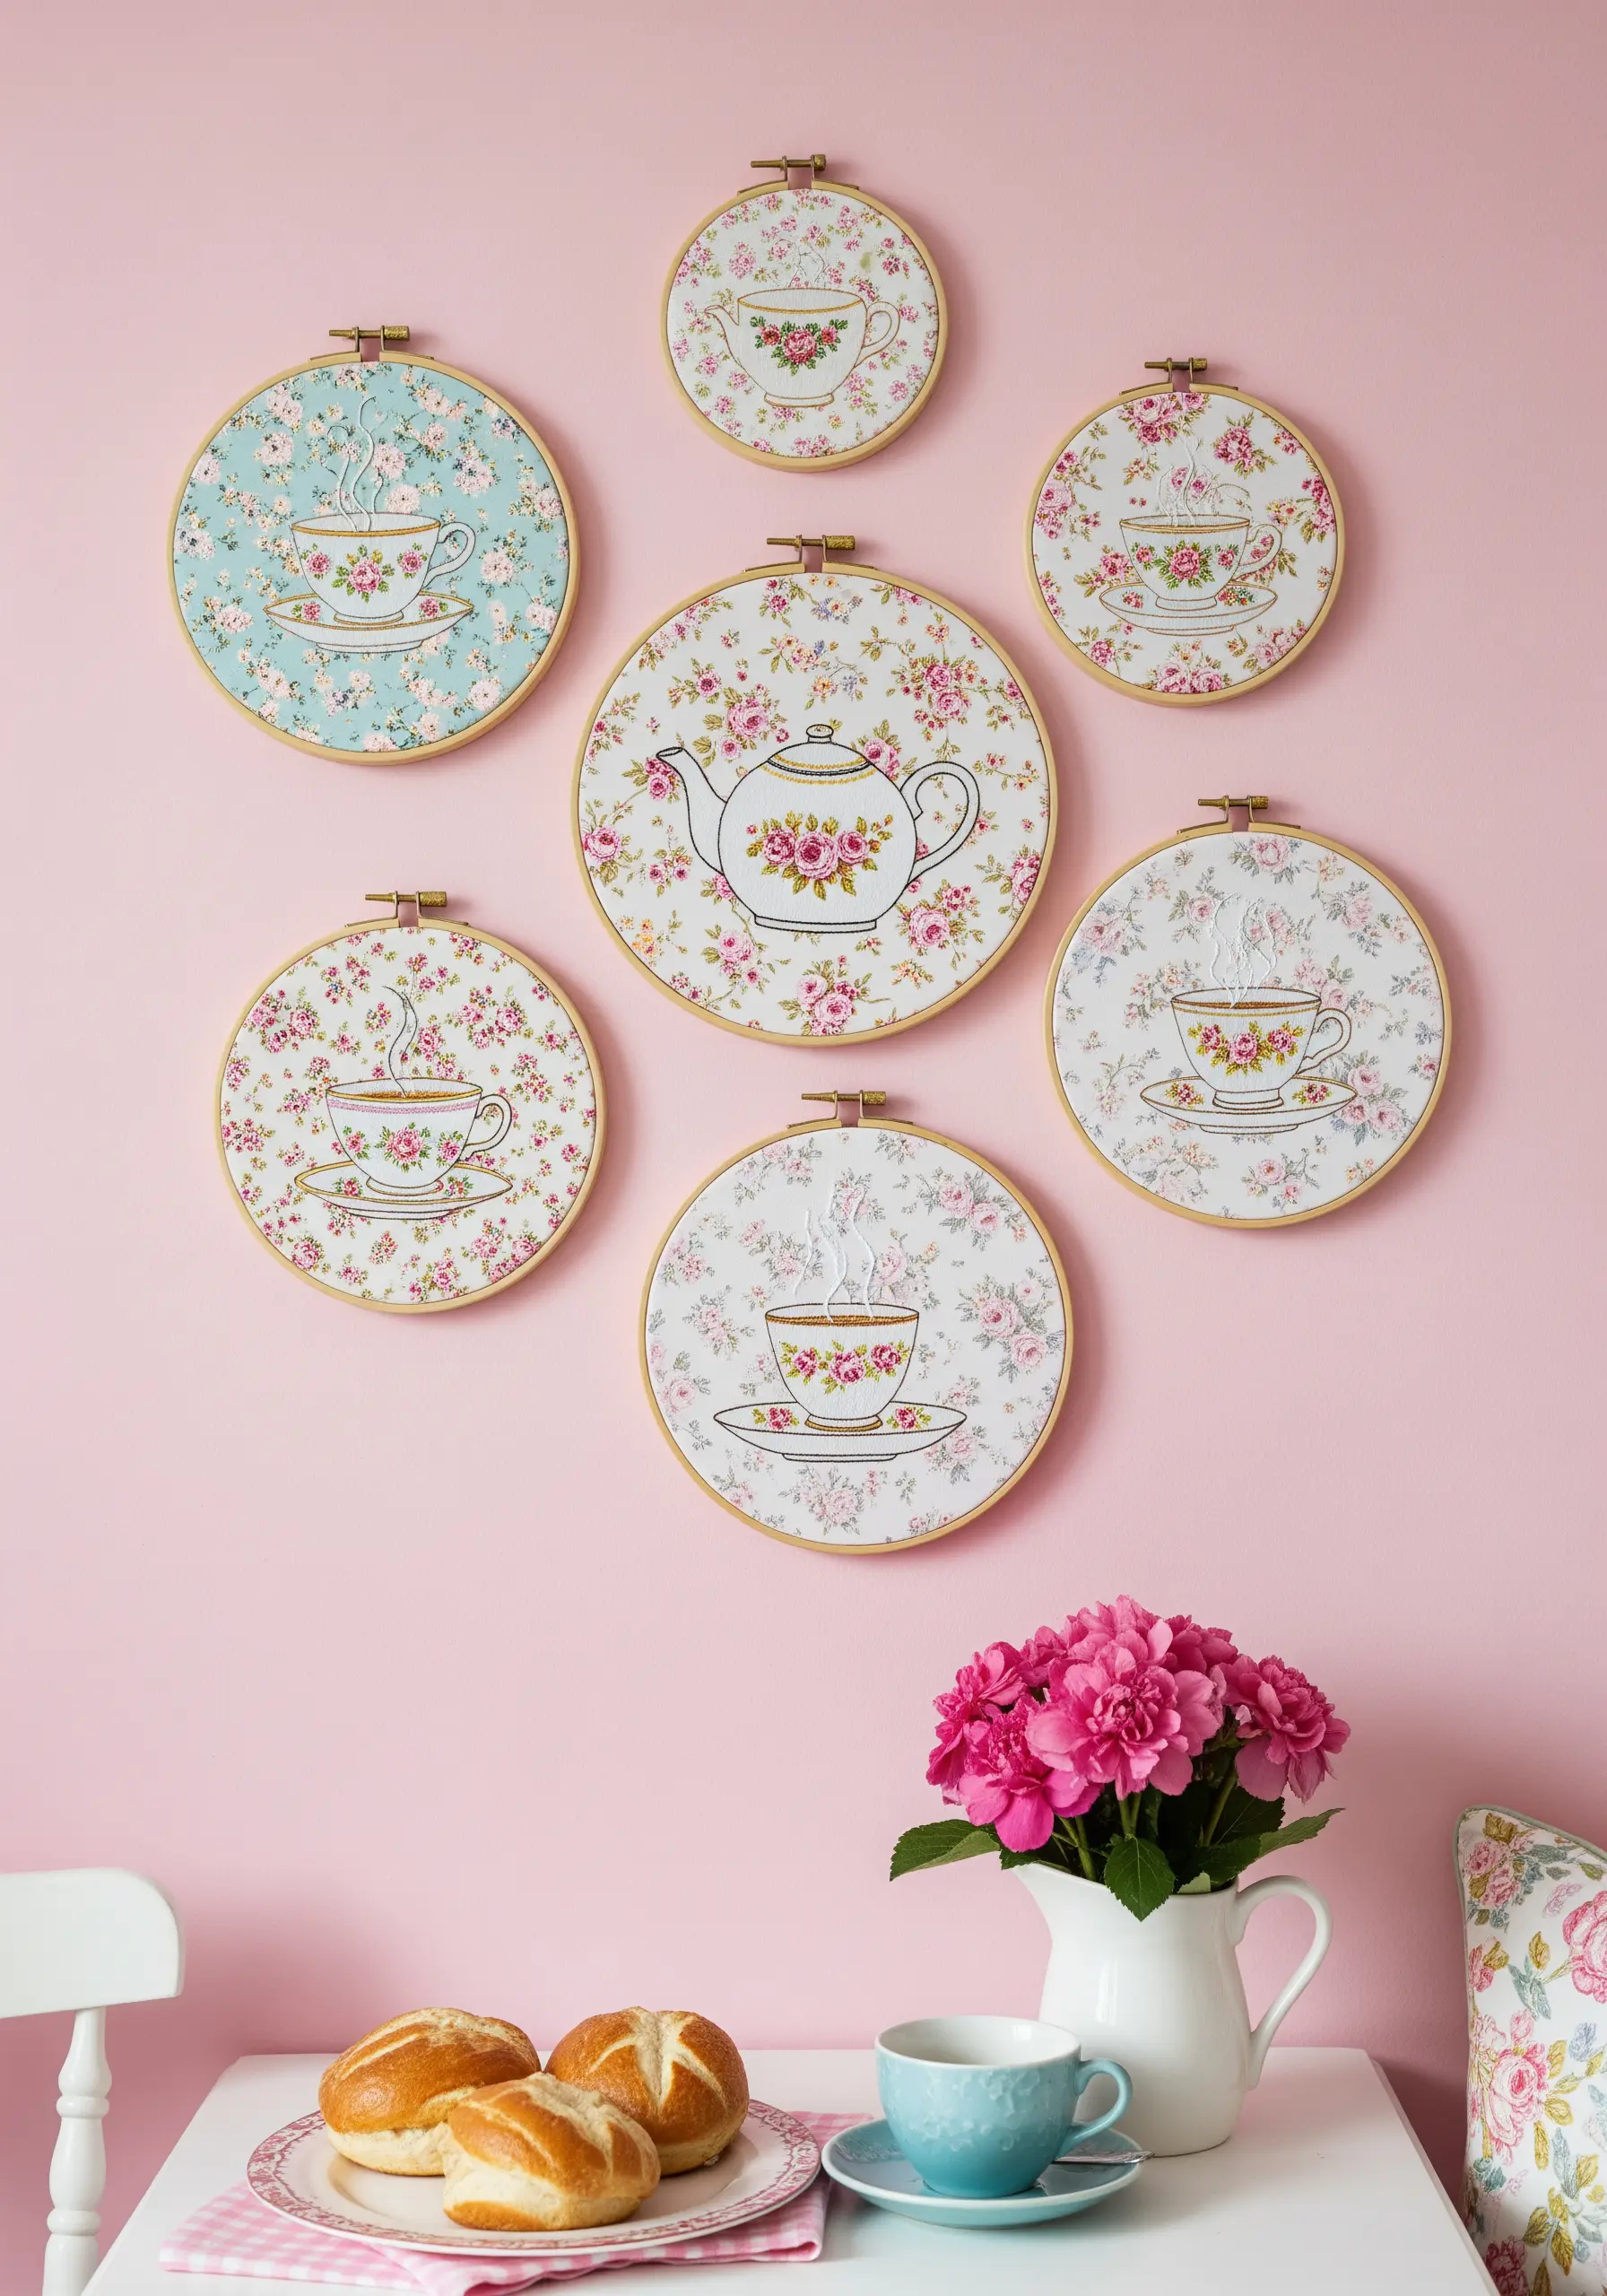
For a quick yet cohesive collection, use patterned fabric as your canvas and embroider only simple outlines over the top.
Choose a fabric with a motif you love, like this floral chintz, which provides instant color and texture.
Your stitching then acts as a focal point, highlighting specific elements like the teapot and teacups with a clean, dark backstitch.
This technique is perfect for creating a themed gallery wall that feels charming and complete without requiring hours of dense fill stitching.
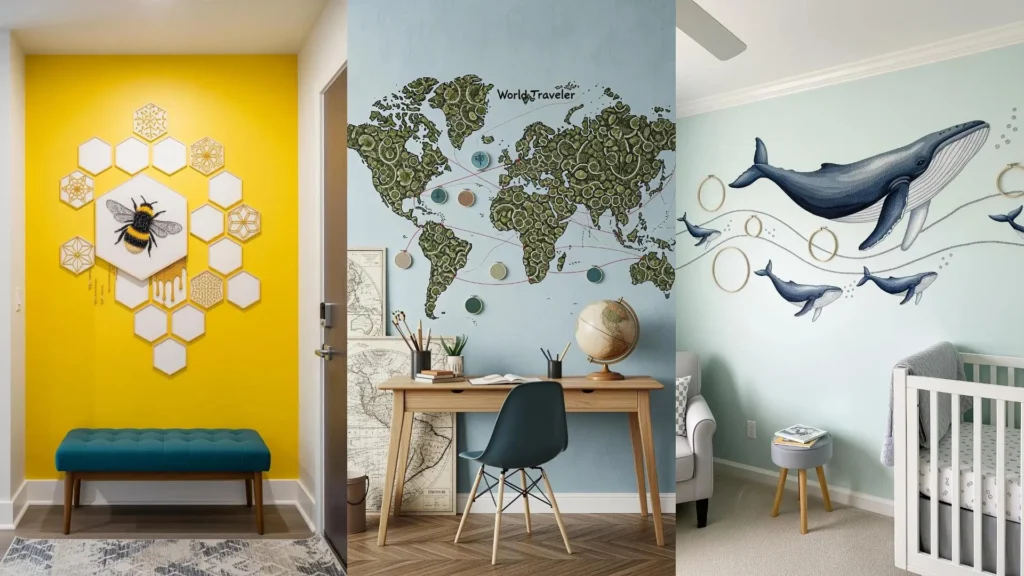
27. Play with Unconventional Hoop Shapes
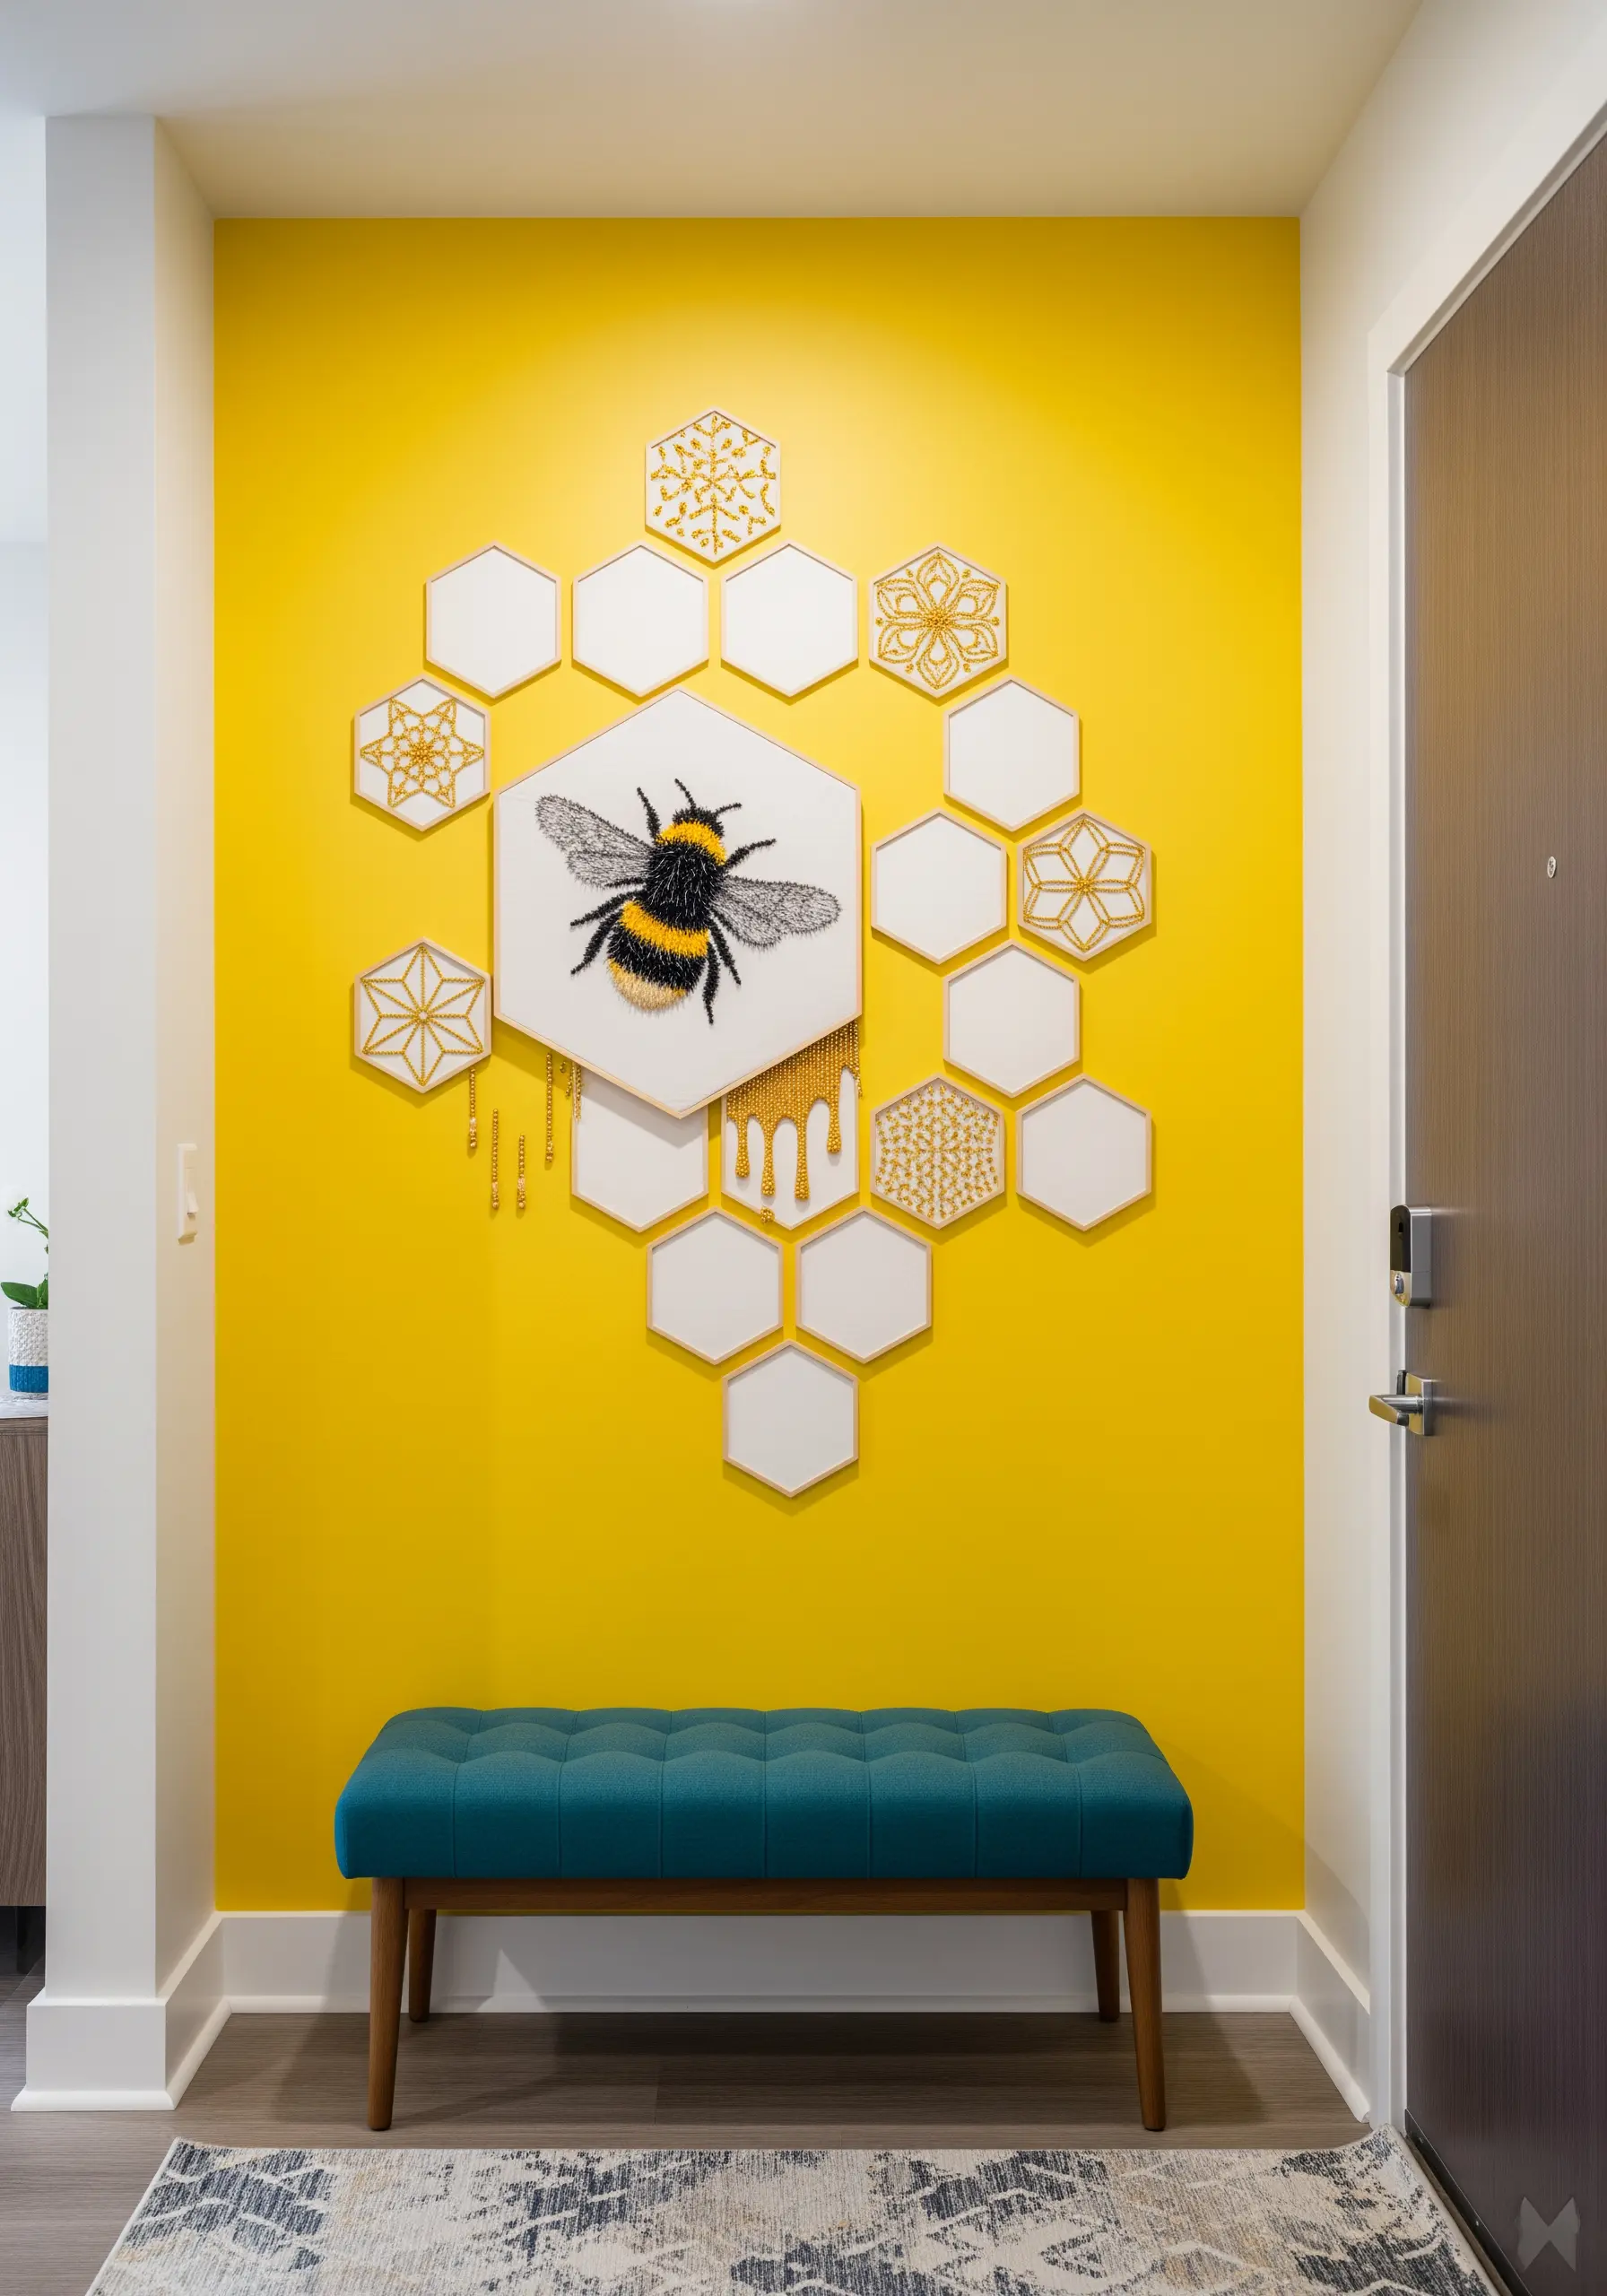
Move beyond the traditional circle and use geometric hoop shapes, like these hexagons, to create a modern, modular mural.
The central bee becomes the hero piece, brought to life with fuzzy turkey work for the body and delicate organza appliqué for the wings.
Fill the surrounding hexagons with complementary geometric patterns or mandalas to build on the honeycomb theme.
Adding a dangling bead fringe to one of the hexagons introduces movement and a touch of bohemian flair, contrasting beautifully with the clean lines.
28. Chronicle a Natural Transformation
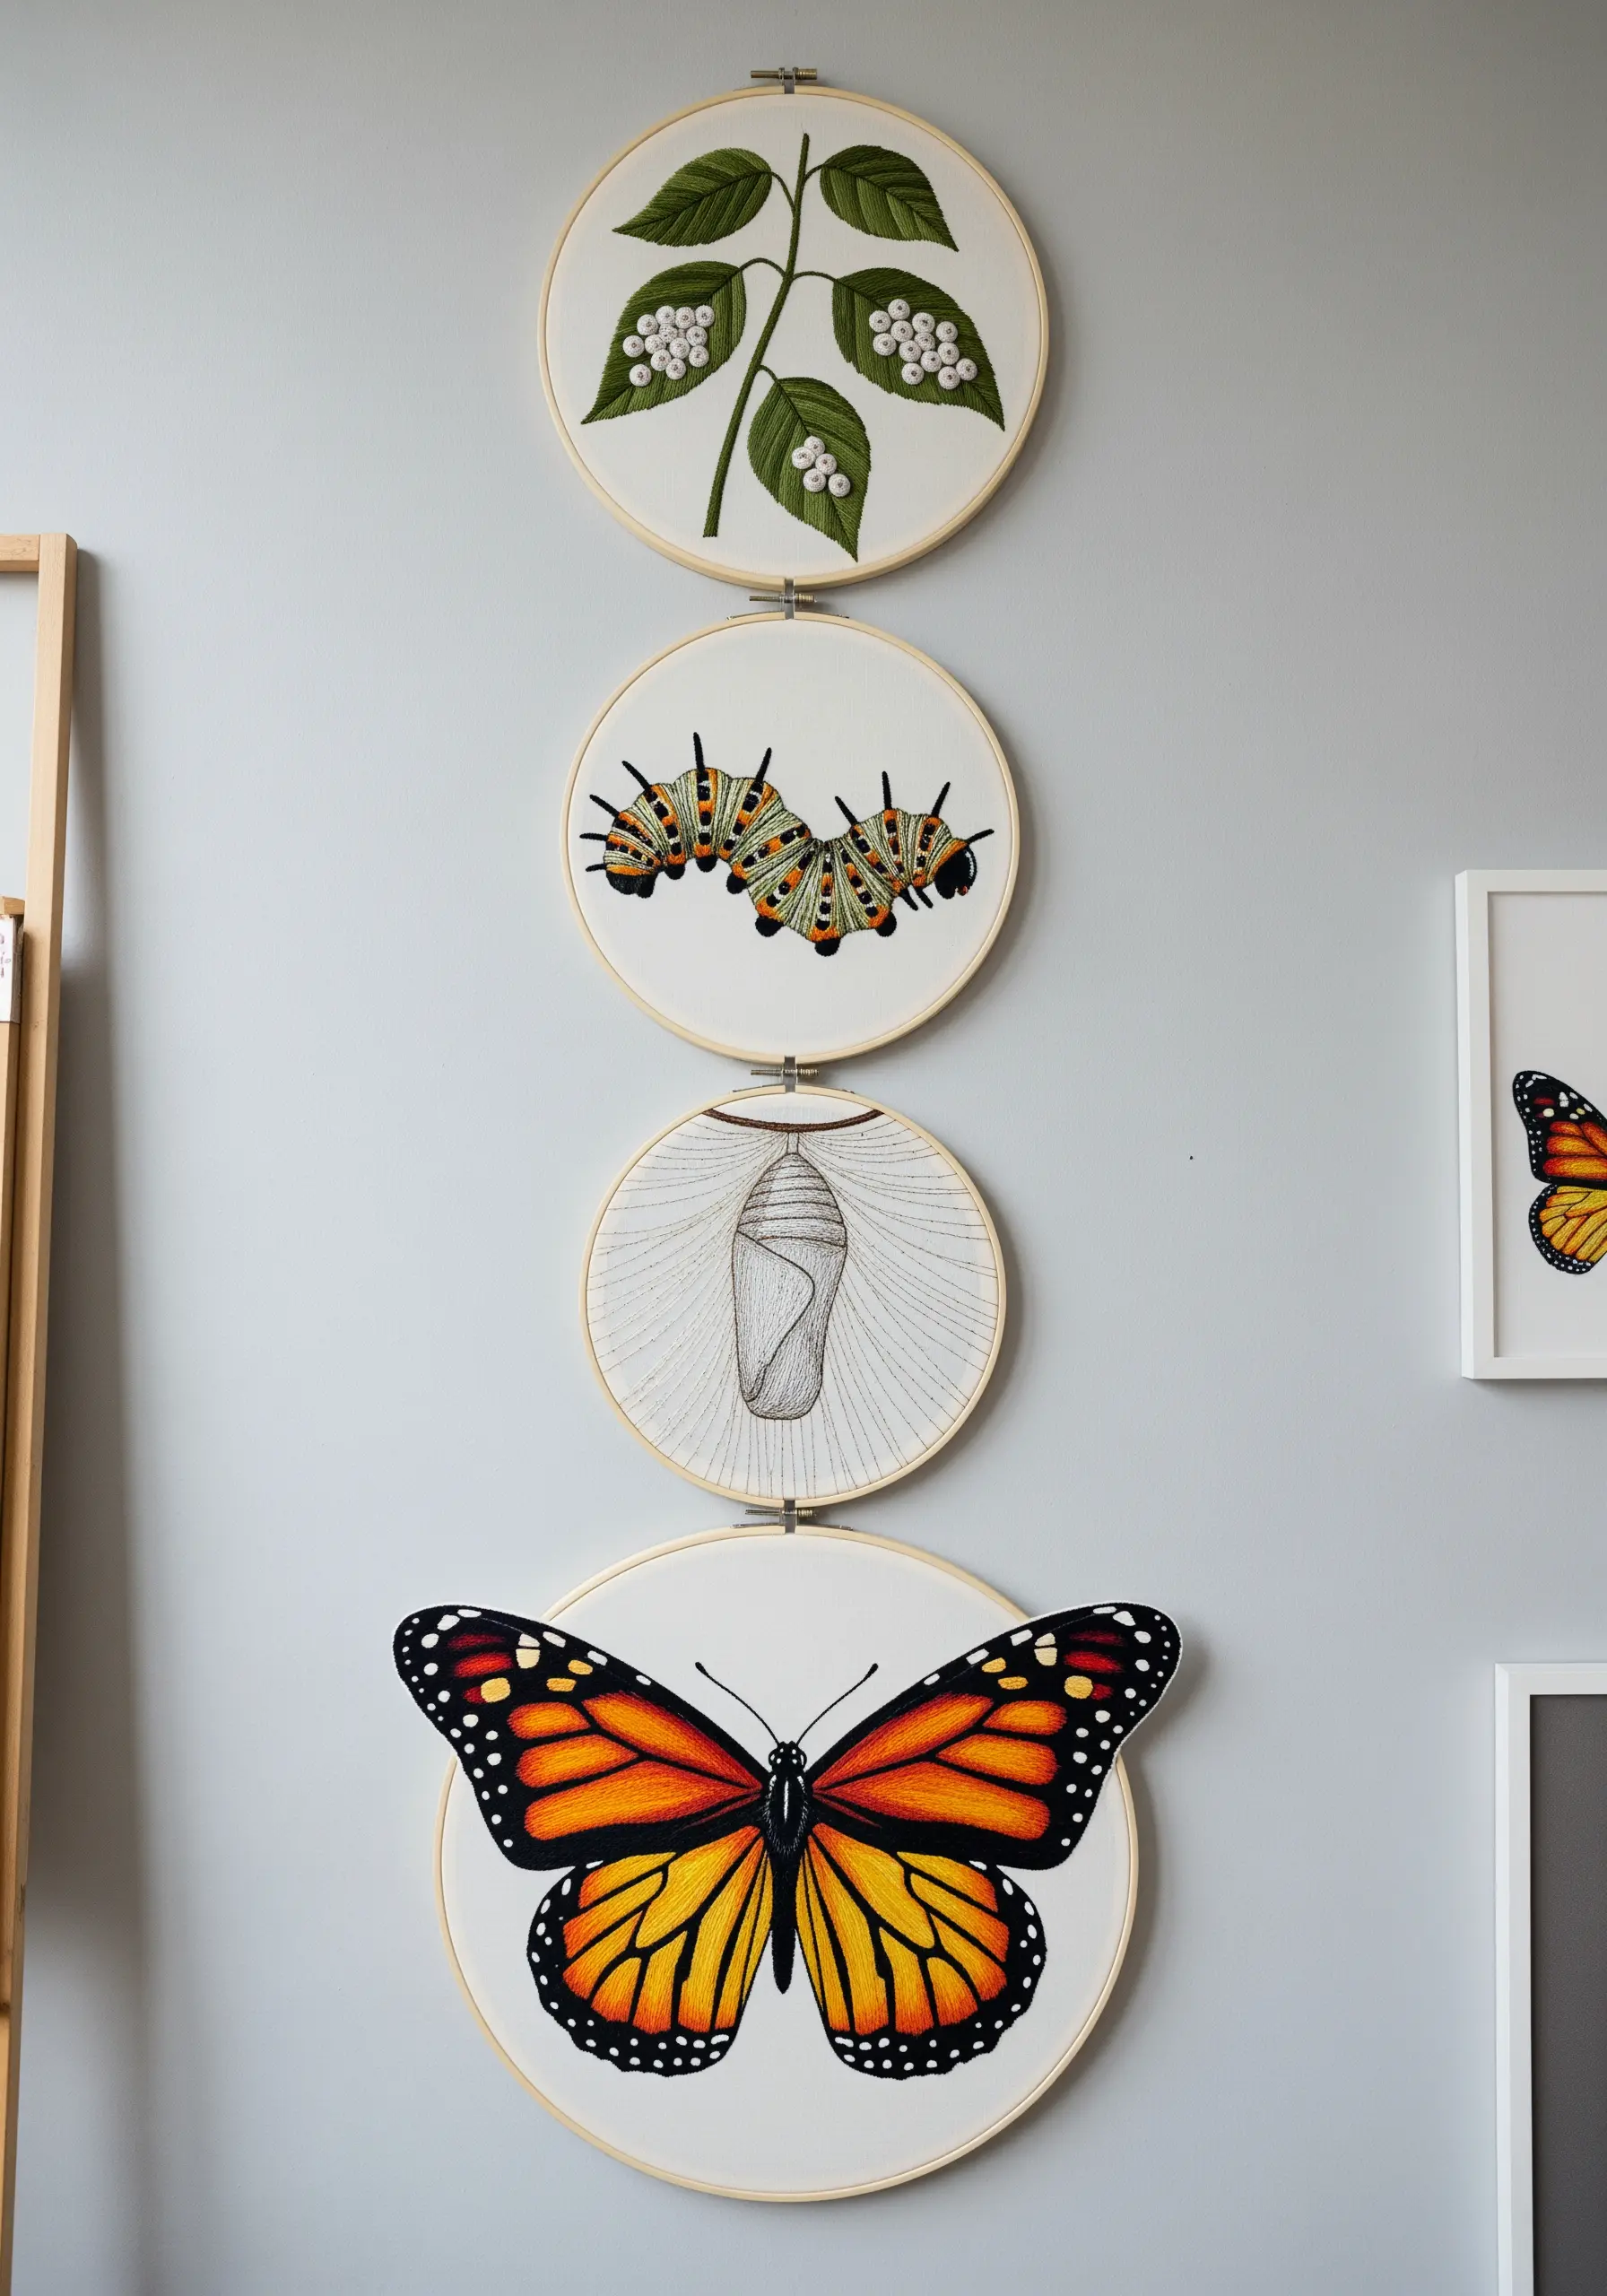
Document the magic of metamorphosis by dedicating each hoop in a vertical series to a different life stage.
Use texture to tell the story: tiny, bead-like French knots for the eggs, a segmented satin stitch for the caterpillar, and smooth thread painting for the chrysalis.
For the final butterfly, use a bold long-and-short stitch to blend the vibrant oranges and reds of the wings, making it the triumphant finale of the series.
This narrative approach turns a simple nature study into a powerful story about growth and change.
29. Master Elegance with Continuous Line Art
Capture the essence of a subject with the ultimate minimalist challenge: a single, unbroken line.
This technique, perfect for minimalist hoop art pieces, relies on a perfectly smooth stitch, like a whipped backstitch or a stem stitch, to avoid any jagged edges.
Trace your design with a fine, heat-erasable pen to ensure you have a clear path to follow.
The beauty of this style lies in its simplicity and the quiet confidence of the line itself, proving that less is truly more.
30. Map Your World with Texture and Stitches
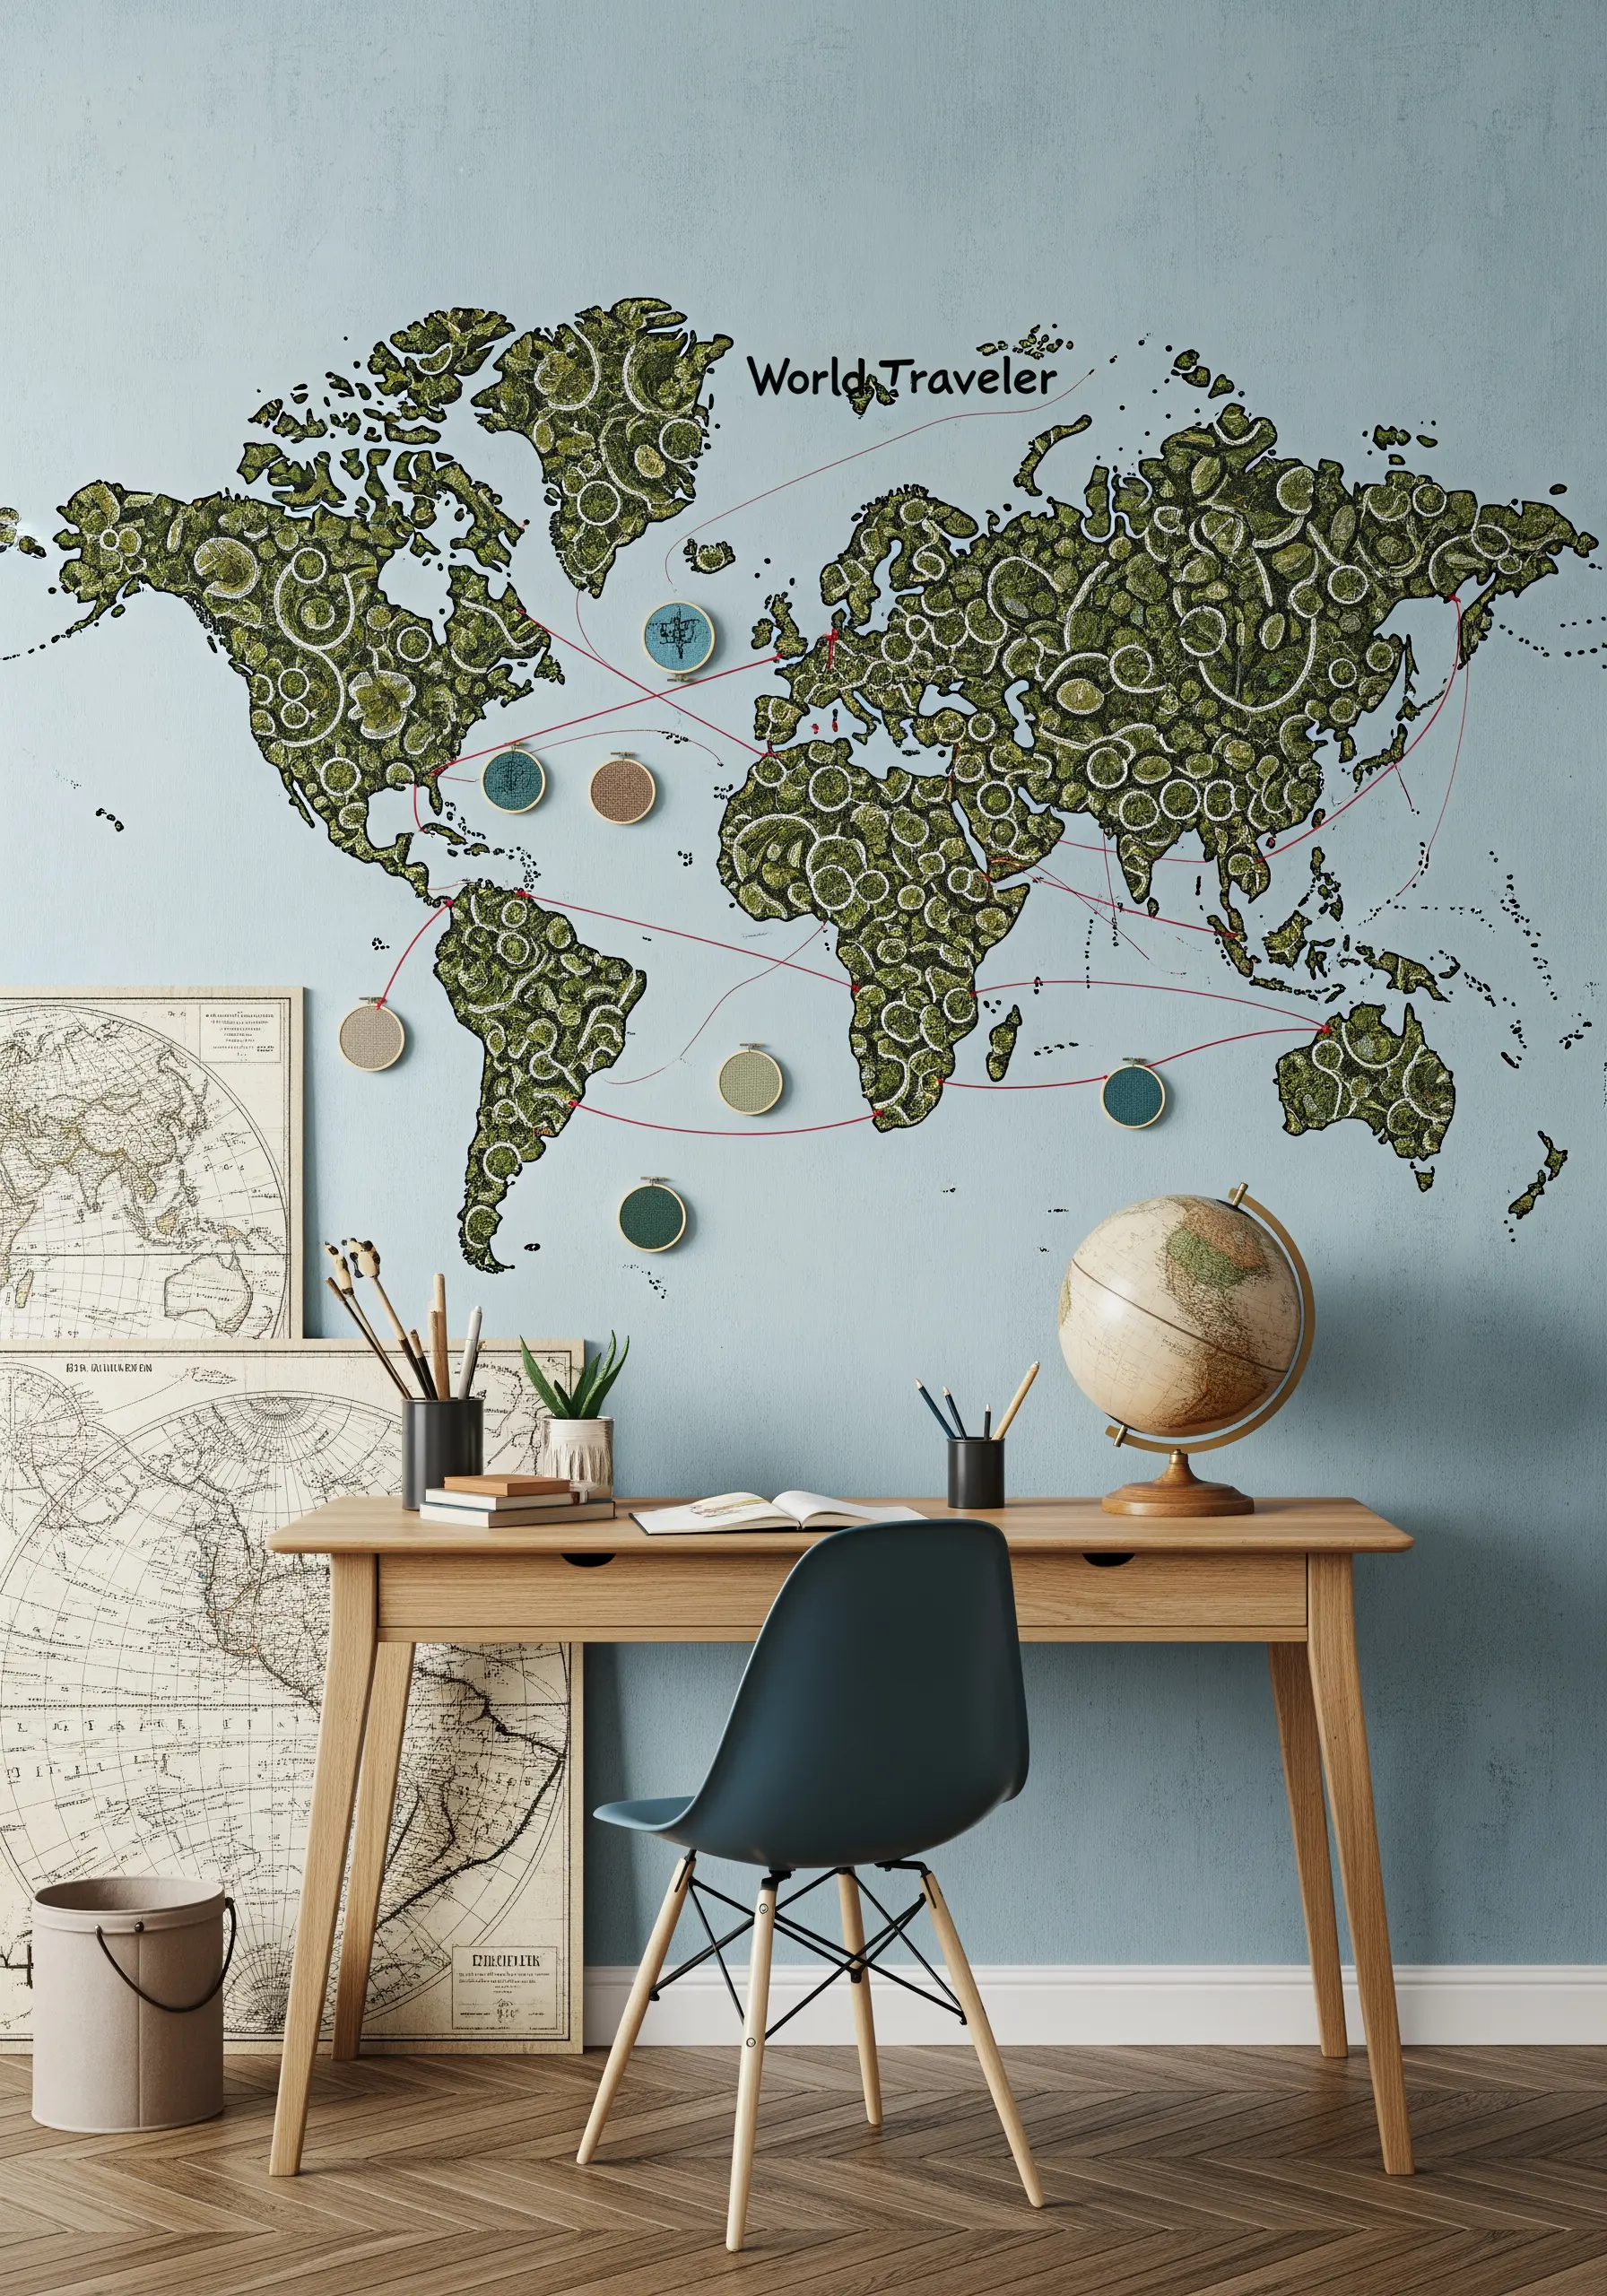
Create an epic, personal world map by filling each continent with unique stitches, colors, and textures.
Use dense French knots, seed stitches, or even small fabric appliqués to give different regions their own distinct character.
Connect significant locations with red thread, marking important journeys, family origins, or dream destinations with tiny, color-coded hoops.
This turns a decorative map into a living document of your life’s story, making it one of the most personal mixed-media art projects you can create.
31. Create a Charming Laundry Room Garland
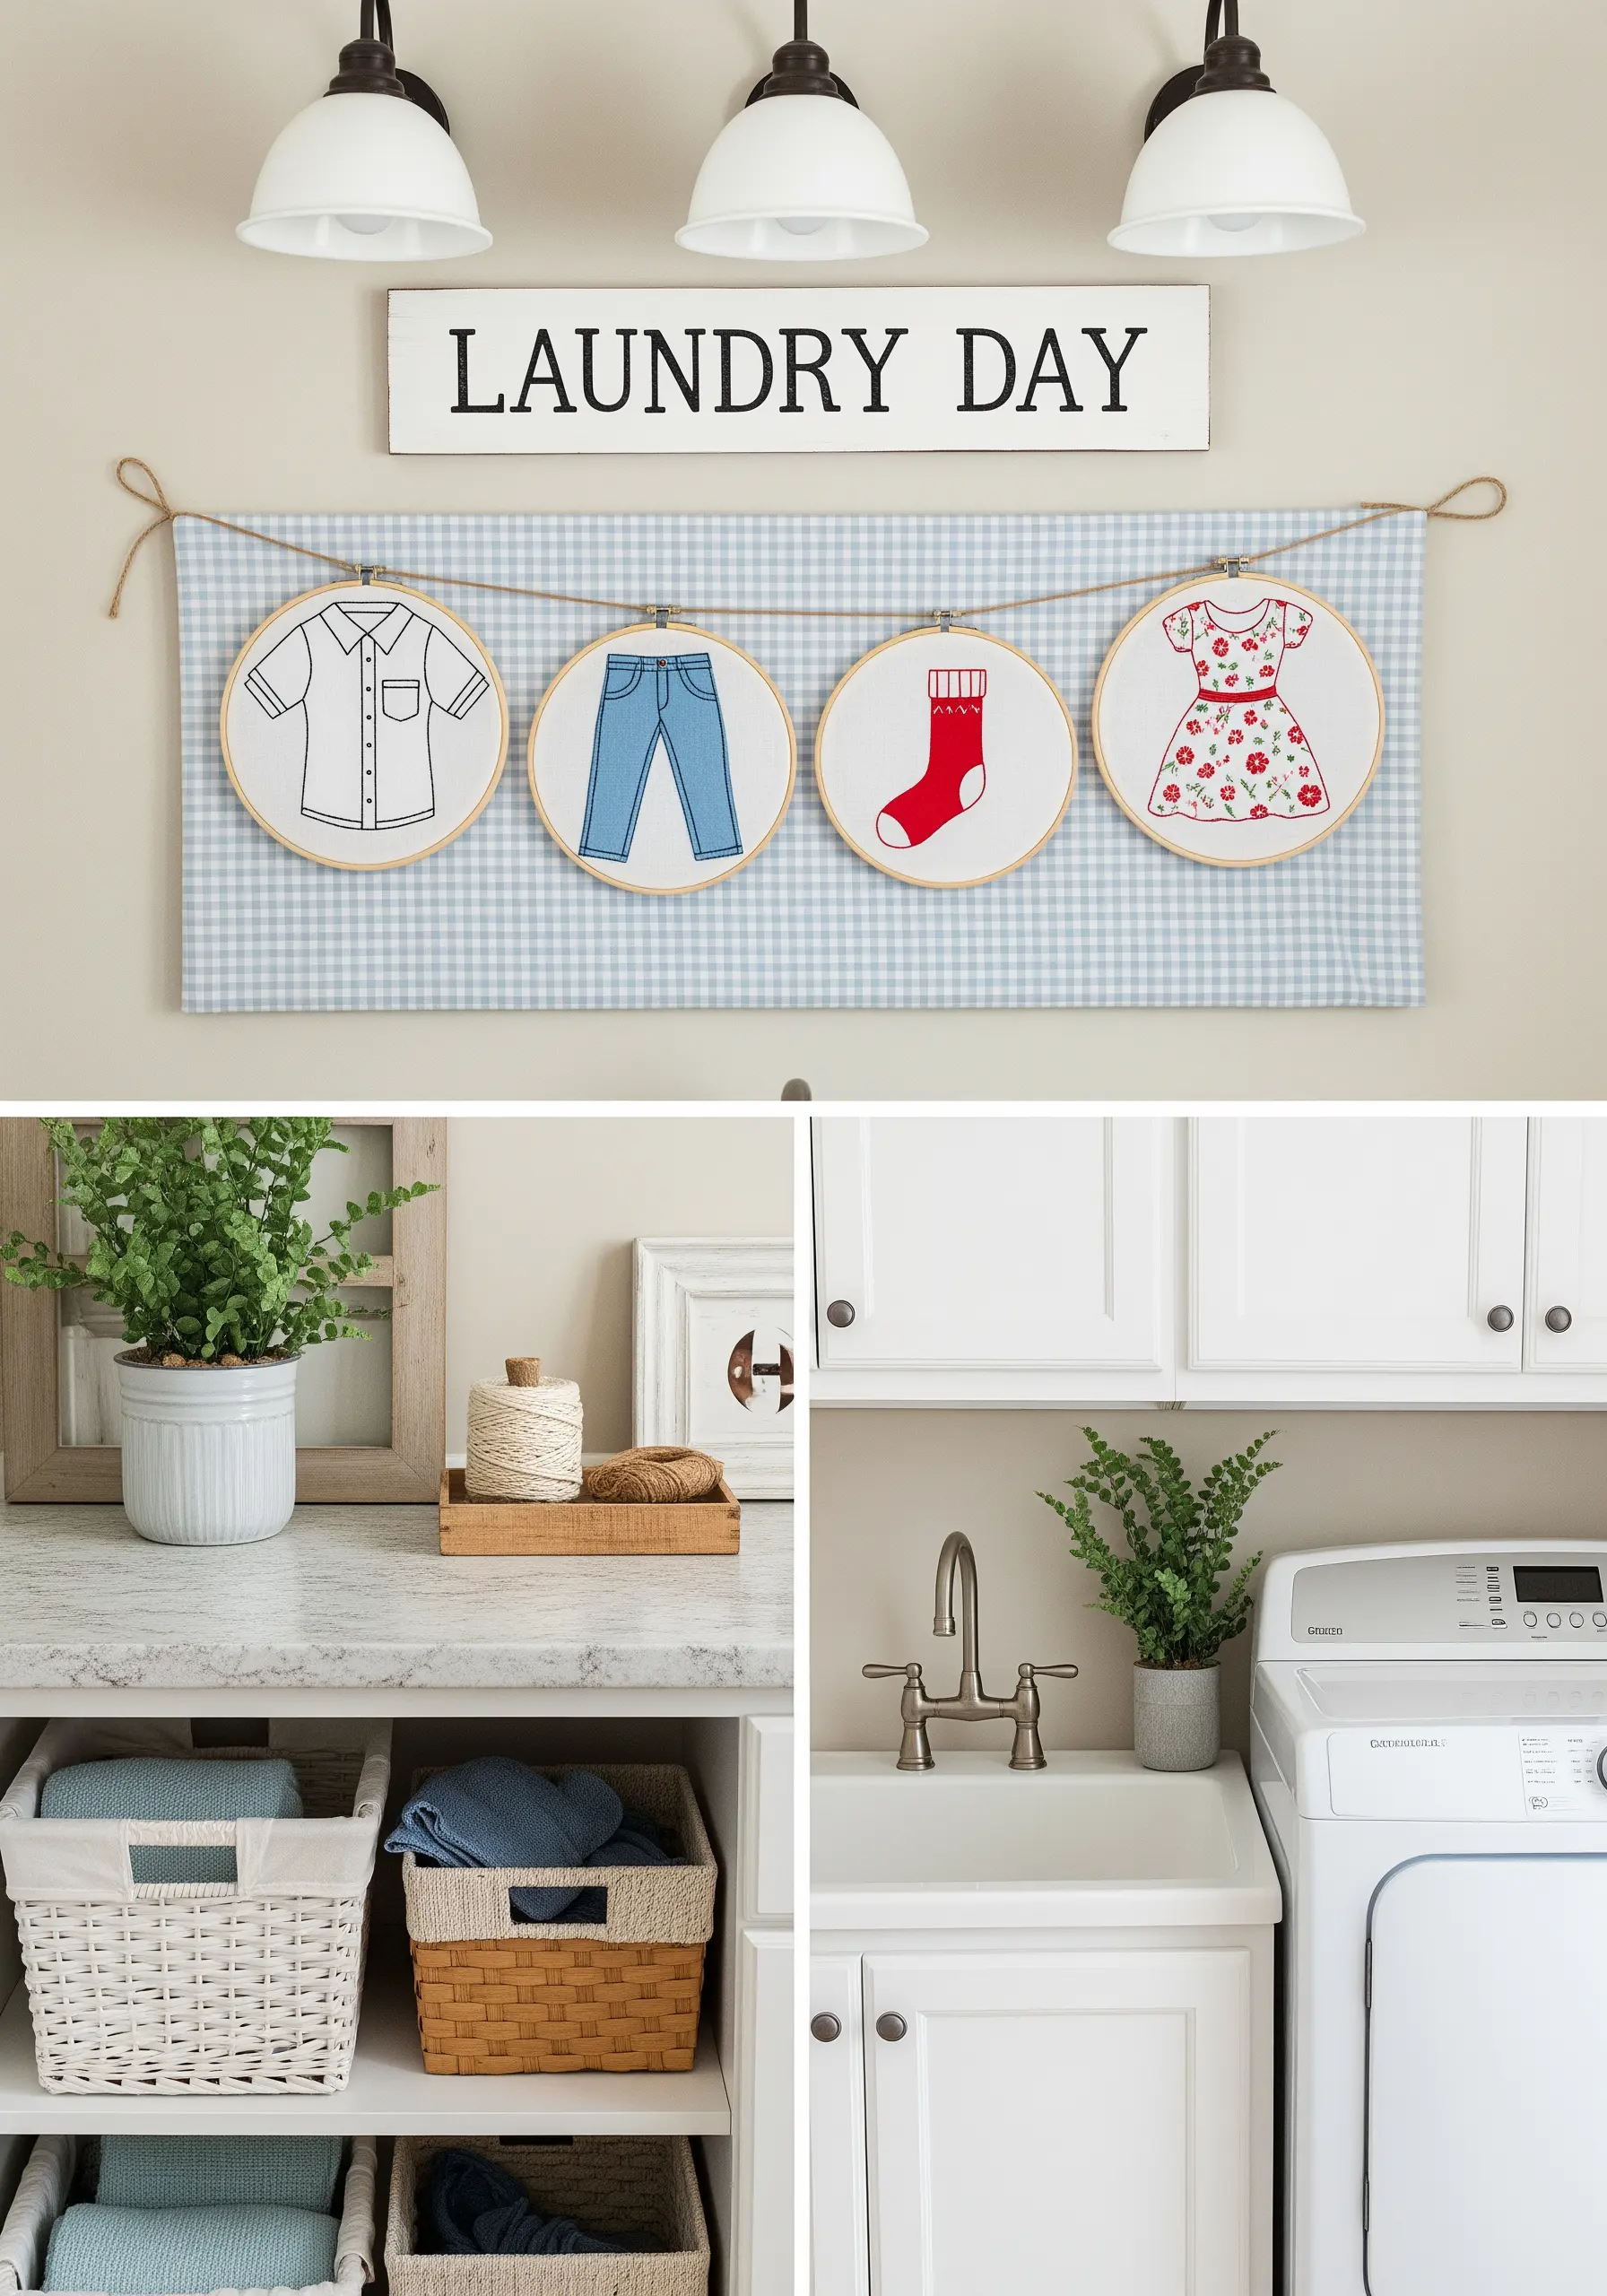
Add a touch of handmade charm to a functional space by creating a themed garland with multiple hoops.
Stitch simple, clean outlines of clothing items onto a classic gingham fabric for a nostalgic, laundry-day feel.
Mount the hoops onto a larger fabric banner and string it up with rustic twine to create a single, easy-to-hang piece.
This approach is lighthearted and practical, proving that beautiful embroidery can elevate even the most mundane of spaces.
32. Paint a Seascape with Varied Stitches
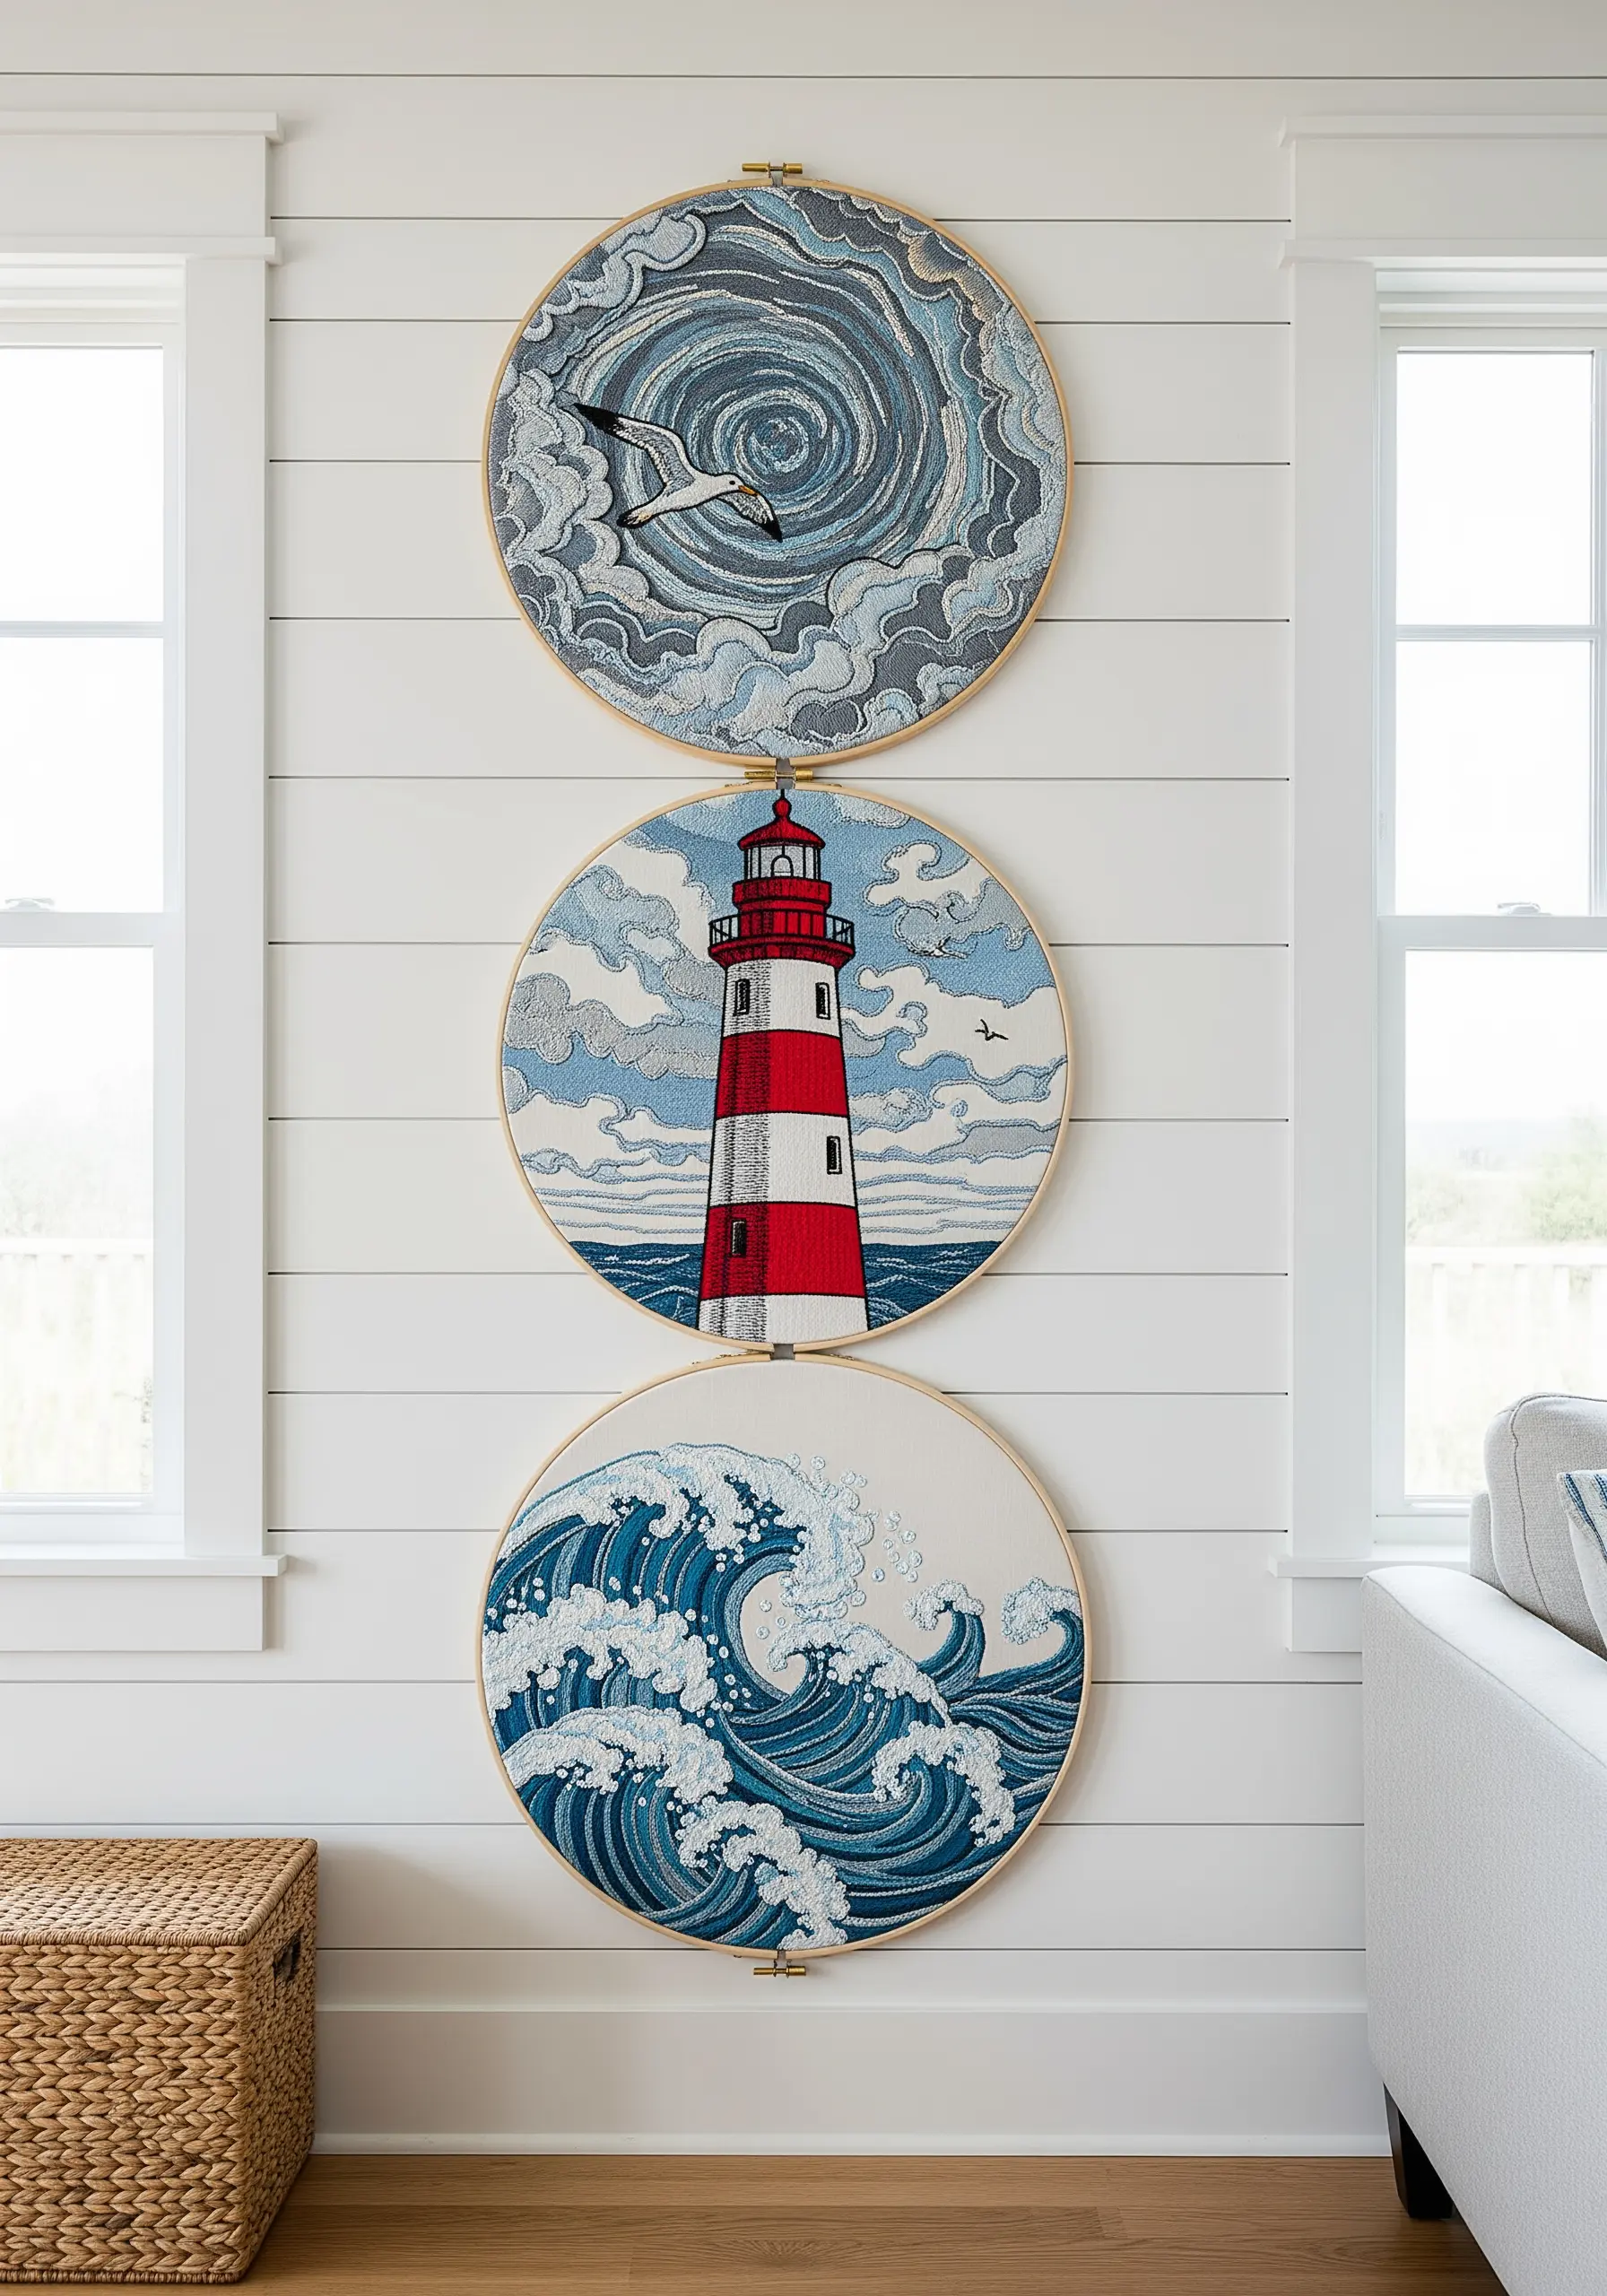
Use a triptych of hoops to capture the different energies of a coastal scene, assigning a specific stitch technique to each element.
For the turbulent sky, use directional stem stitches in swirling patterns to create a sense of wind and movement.
The crashing wave at the bottom comes to life with a dense collection of French knots and bullion stitches, mimicking the texture of sea foam.
A clean, solid satin stitch for the lighthouse provides a strong, stable anchor in the middle of the composition, balancing the chaos of the elements.


