

Have you ever finished a piece and felt it was missing a certain… spark? You’ve followed the pattern, used the right colors, but it doesn’t quite have the life you envisioned. It feels more like ‘coloring in’ than creating art. I understand that feeling completely.
The secret to transforming your work isn’t about learning dozens of complex new stitches. It’s about rethinking how you use the ones you already know. It’s about learning to see thread as paint, a needle as a brush, and fabric as your canvas. By focusing on the direction of a stitch, the way you blend two shades, or the texture you build with a simple knot, you can add depth, light, and emotion to every piece.
These floral bouquets are more than just project ideas; they are invitations to explore technique. Look at how a change in thread weight can distinguish a bold petal from a delicate leaf, or how a dark background can make simple colors vibrate with energy. Let’s move beyond just stitching and start sculpting, painting, and telling stories with thread.
1. Achieve Painterly Depth in Peonies
To create the soft, overlapping quality of peony petals, abandon satin stitch in favor of the long-and-short stitch.
Work in concentric circles from the outer edge inward, using three to four shades of a single color family—a deep crimson for the shadows, a mid-tone rose, a soft pink, and a final off-white for the highlights.
This technique mimics how light hits the flower, giving it a realistic volume that a solid fill can never achieve.
For the delicate gold wisps, use a single strand of metallic thread and a couching stitch to lay it on the surface, ensuring it floats elegantly without pulling the base fabric.
2. Maximize Color Impact on Dark Fabric

When working on black or dark-colored fabric, your thread choice is critical for vibrancy.
Select high-sheen rayon or silk threads for the main flowers, like these poppies, as their reflective quality catches the light and prevents the colors from looking flat.
Before you begin your satin stitch, outline each petal with a split stitch in the same color. This creates a slightly raised edge, which makes your fill stitches look cleaner and more defined against the dark background.
For the delicate blue cornflowers, use a lighter-weight cotton floss to create contrast in texture and finish.
3. Build Realistic Sunflower Texture

The key to a convincing sunflower is capturing the dense, complex texture of its center.
Fill the area with a tight field of French knots, using a mix of dark brown, black, and a touch of deep gold thread to create depth.
For the petals, stitch them individually with directional satin stitches that radiate from the center, slightly overlapping each one to avoid gaps and build dimension.
Introduce smaller, textural filler flowers using bullion knots or woven wheel stitches to complement the sunflowers without competing for attention.
4. Master Elegance with Minimal Stitches
A refined bouquet doesn’t always require complex stitches; sometimes, simplicity is more impactful.
For lavender stalks, use angled satin stitches or a fishbone stitch, which creates a subtle central line that mimics the plant’s natural structure.
Pair this with tiny, tightly clustered white French knots for the baby’s breath. Using only two simple stitch types creates a clean, balanced composition.
The negative space around the bouquet is just as important as the stitches themselves, allowing the delicate forms to breathe and stand out on the neutral gray linen.
5. Use Directional Stitching to Sculpt with Light
To make flowers feel three-dimensional, especially on a dark canvas, you must control how light reflects off your thread.
For these anemones and roses, notice how the long-and-short stitches follow the curve of each petal. This isn’t random; it directs the viewer’s eye and creates highlights and shadows.
When stitching a rose, imagine the center as a spiral and angle your stitches to flow outward from that point. For the anemones, pull your stitches toward the center.
This methodical approach to stitch direction is the secret to embroidery that looks painted.
6. Capture Tropical Vibrancy with Sharp Outlines
The sharp, graphic shapes of tropical flowers like the bird of paradise and hibiscus demand clean, crisp edges.
Before filling the petals with a long-and-short stitch, secure the perimeter with a perfectly even split stitch. This foundational outline acts as a containing wall, ensuring your fill stitches have a sharp, defined border.
For the large monstera leaves, use a fishbone stitch down the center of each segment. This creates a natural-looking vein and ensures the fill stitches lie at a consistent, pleasing angle, adding to the overall polished finish.
7. Create Cascading Wisteria on Sheen Fabric
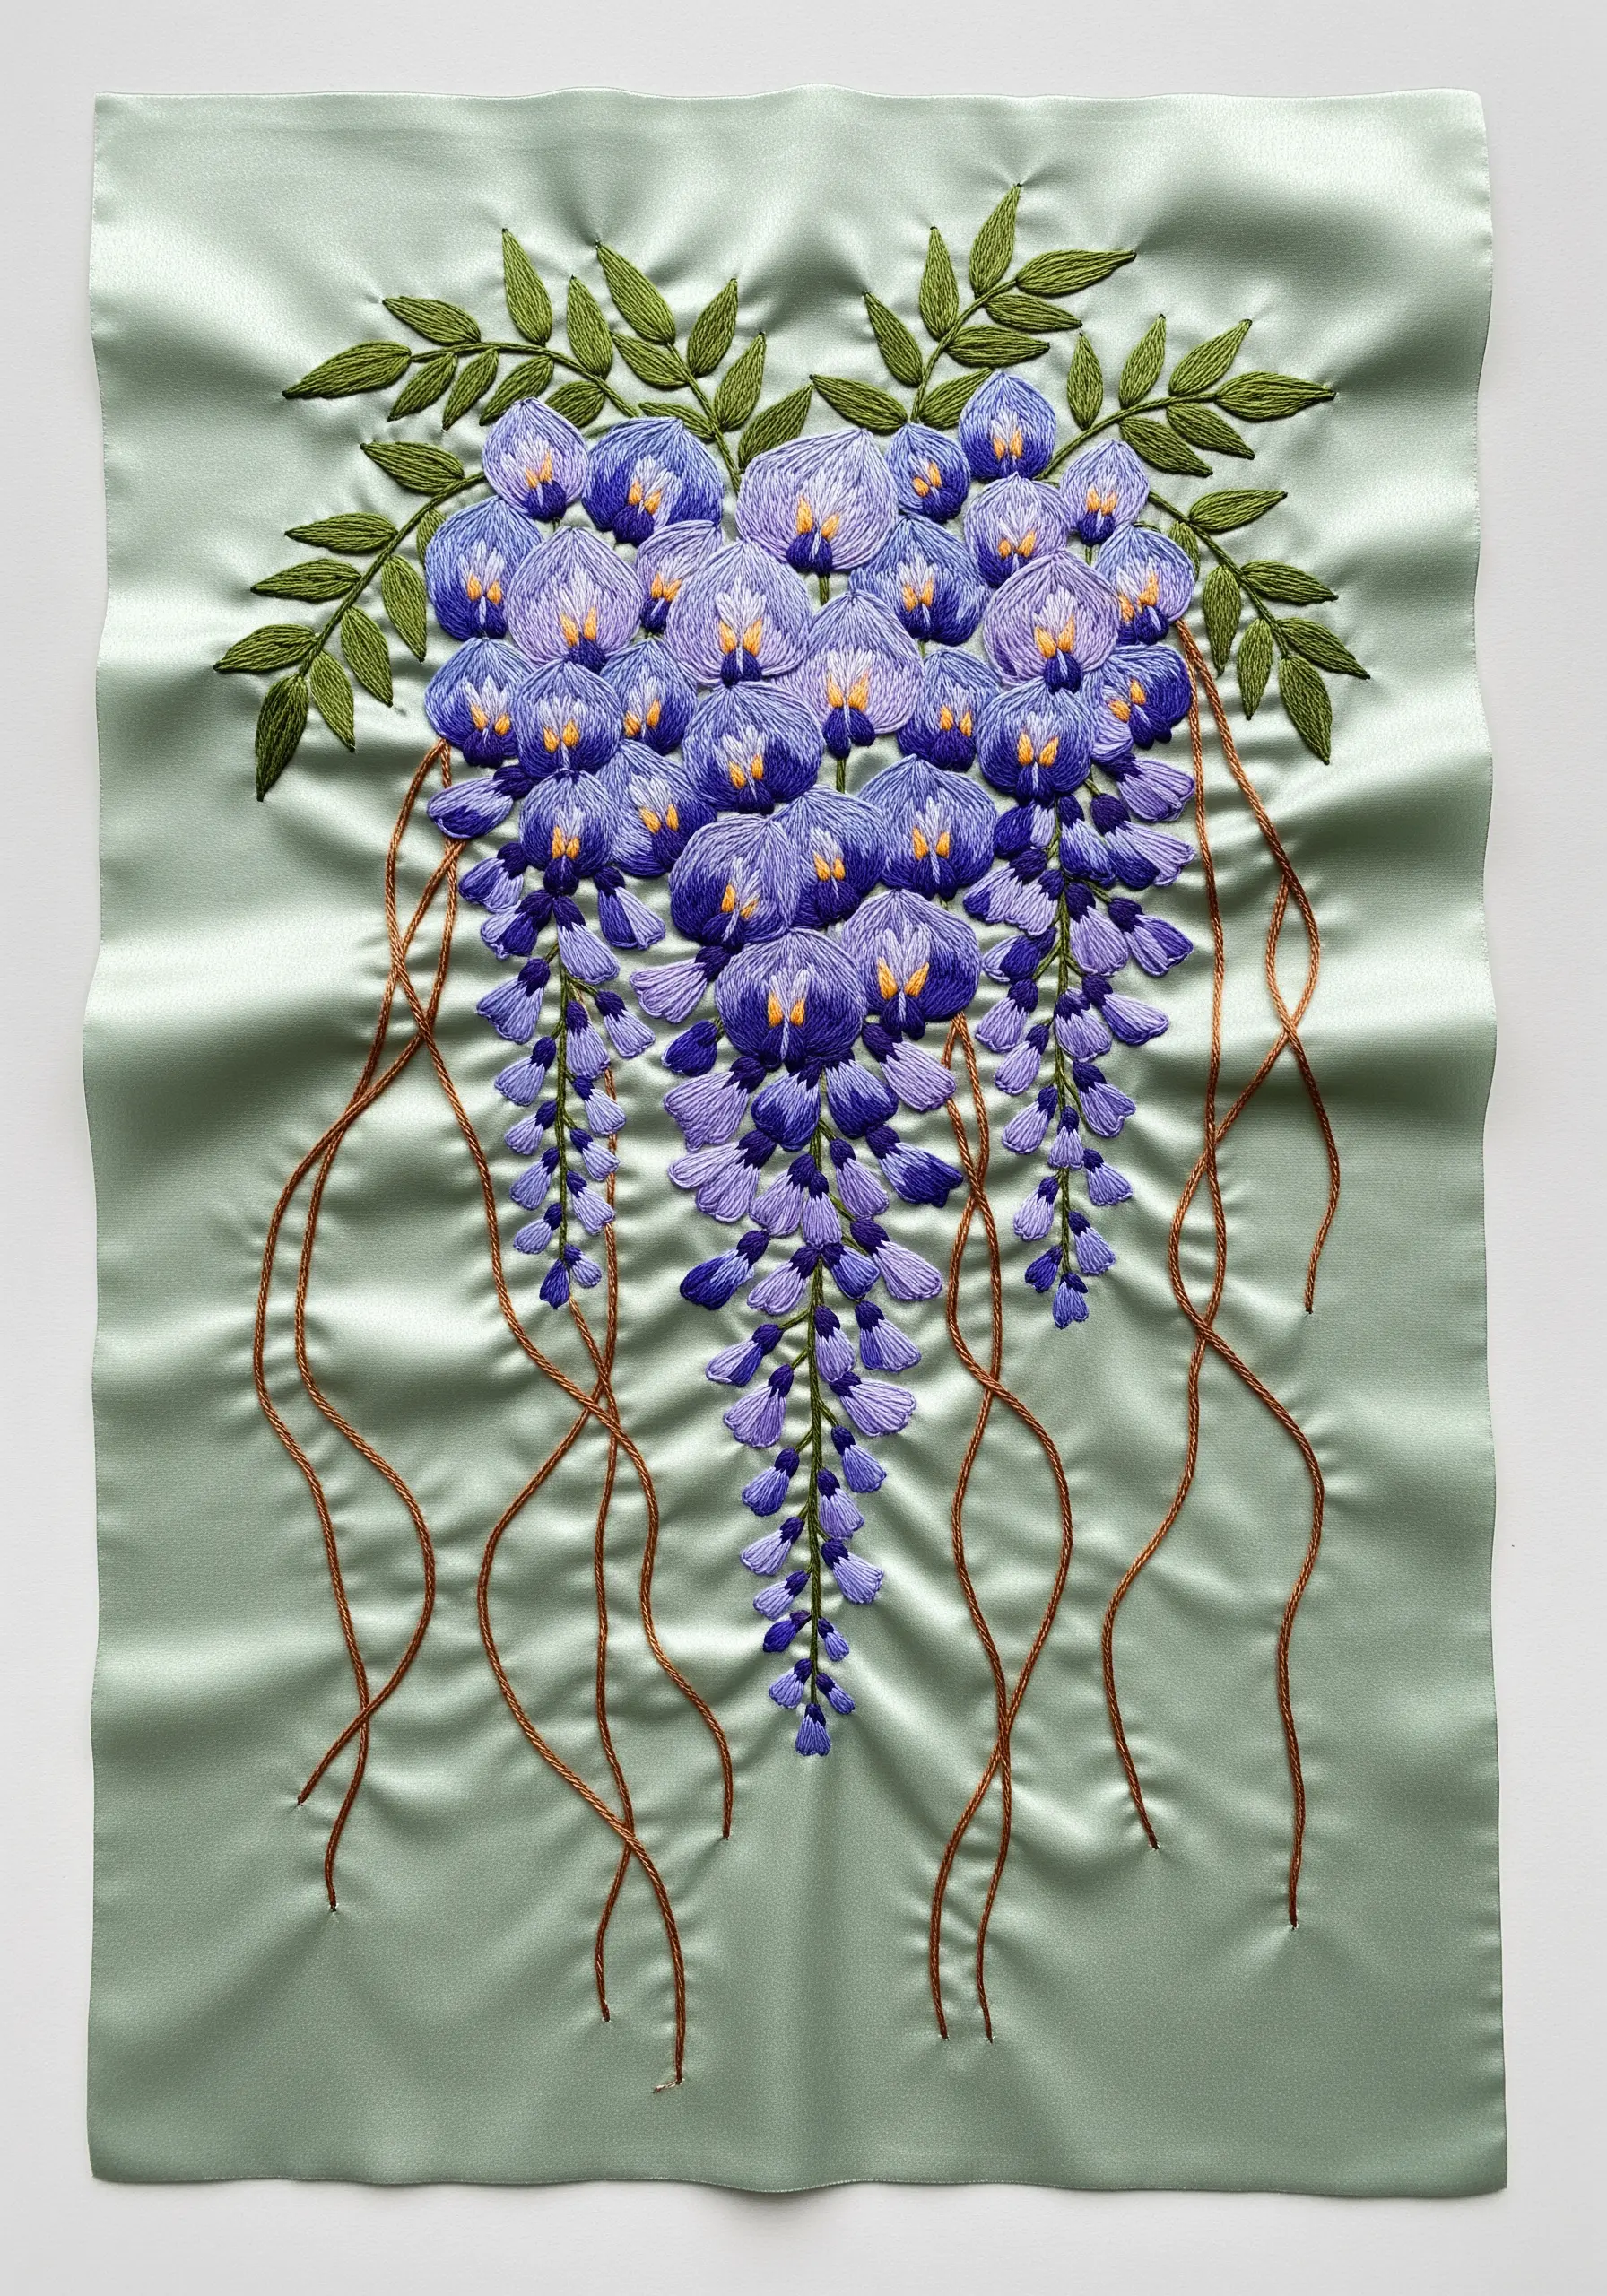
Stitching on satin or silk requires a gentle hand, but the fabric’s natural luster enhances the floral design beautifully.
To create the cascading effect of wisteria, use a combination of French knots and detached chain stitches (lazy daisies) in shades of purple and blue.
Start with the darkest shade at the top of each cluster and gradually introduce lighter threads as you work your way down. This subtle gradient gives the impression of weight and depth.
Use a smaller needle to minimize holes in the delicate fabric, and always back your work with a stabilizer for support.
8. Translate String Art into Modern Embroidery
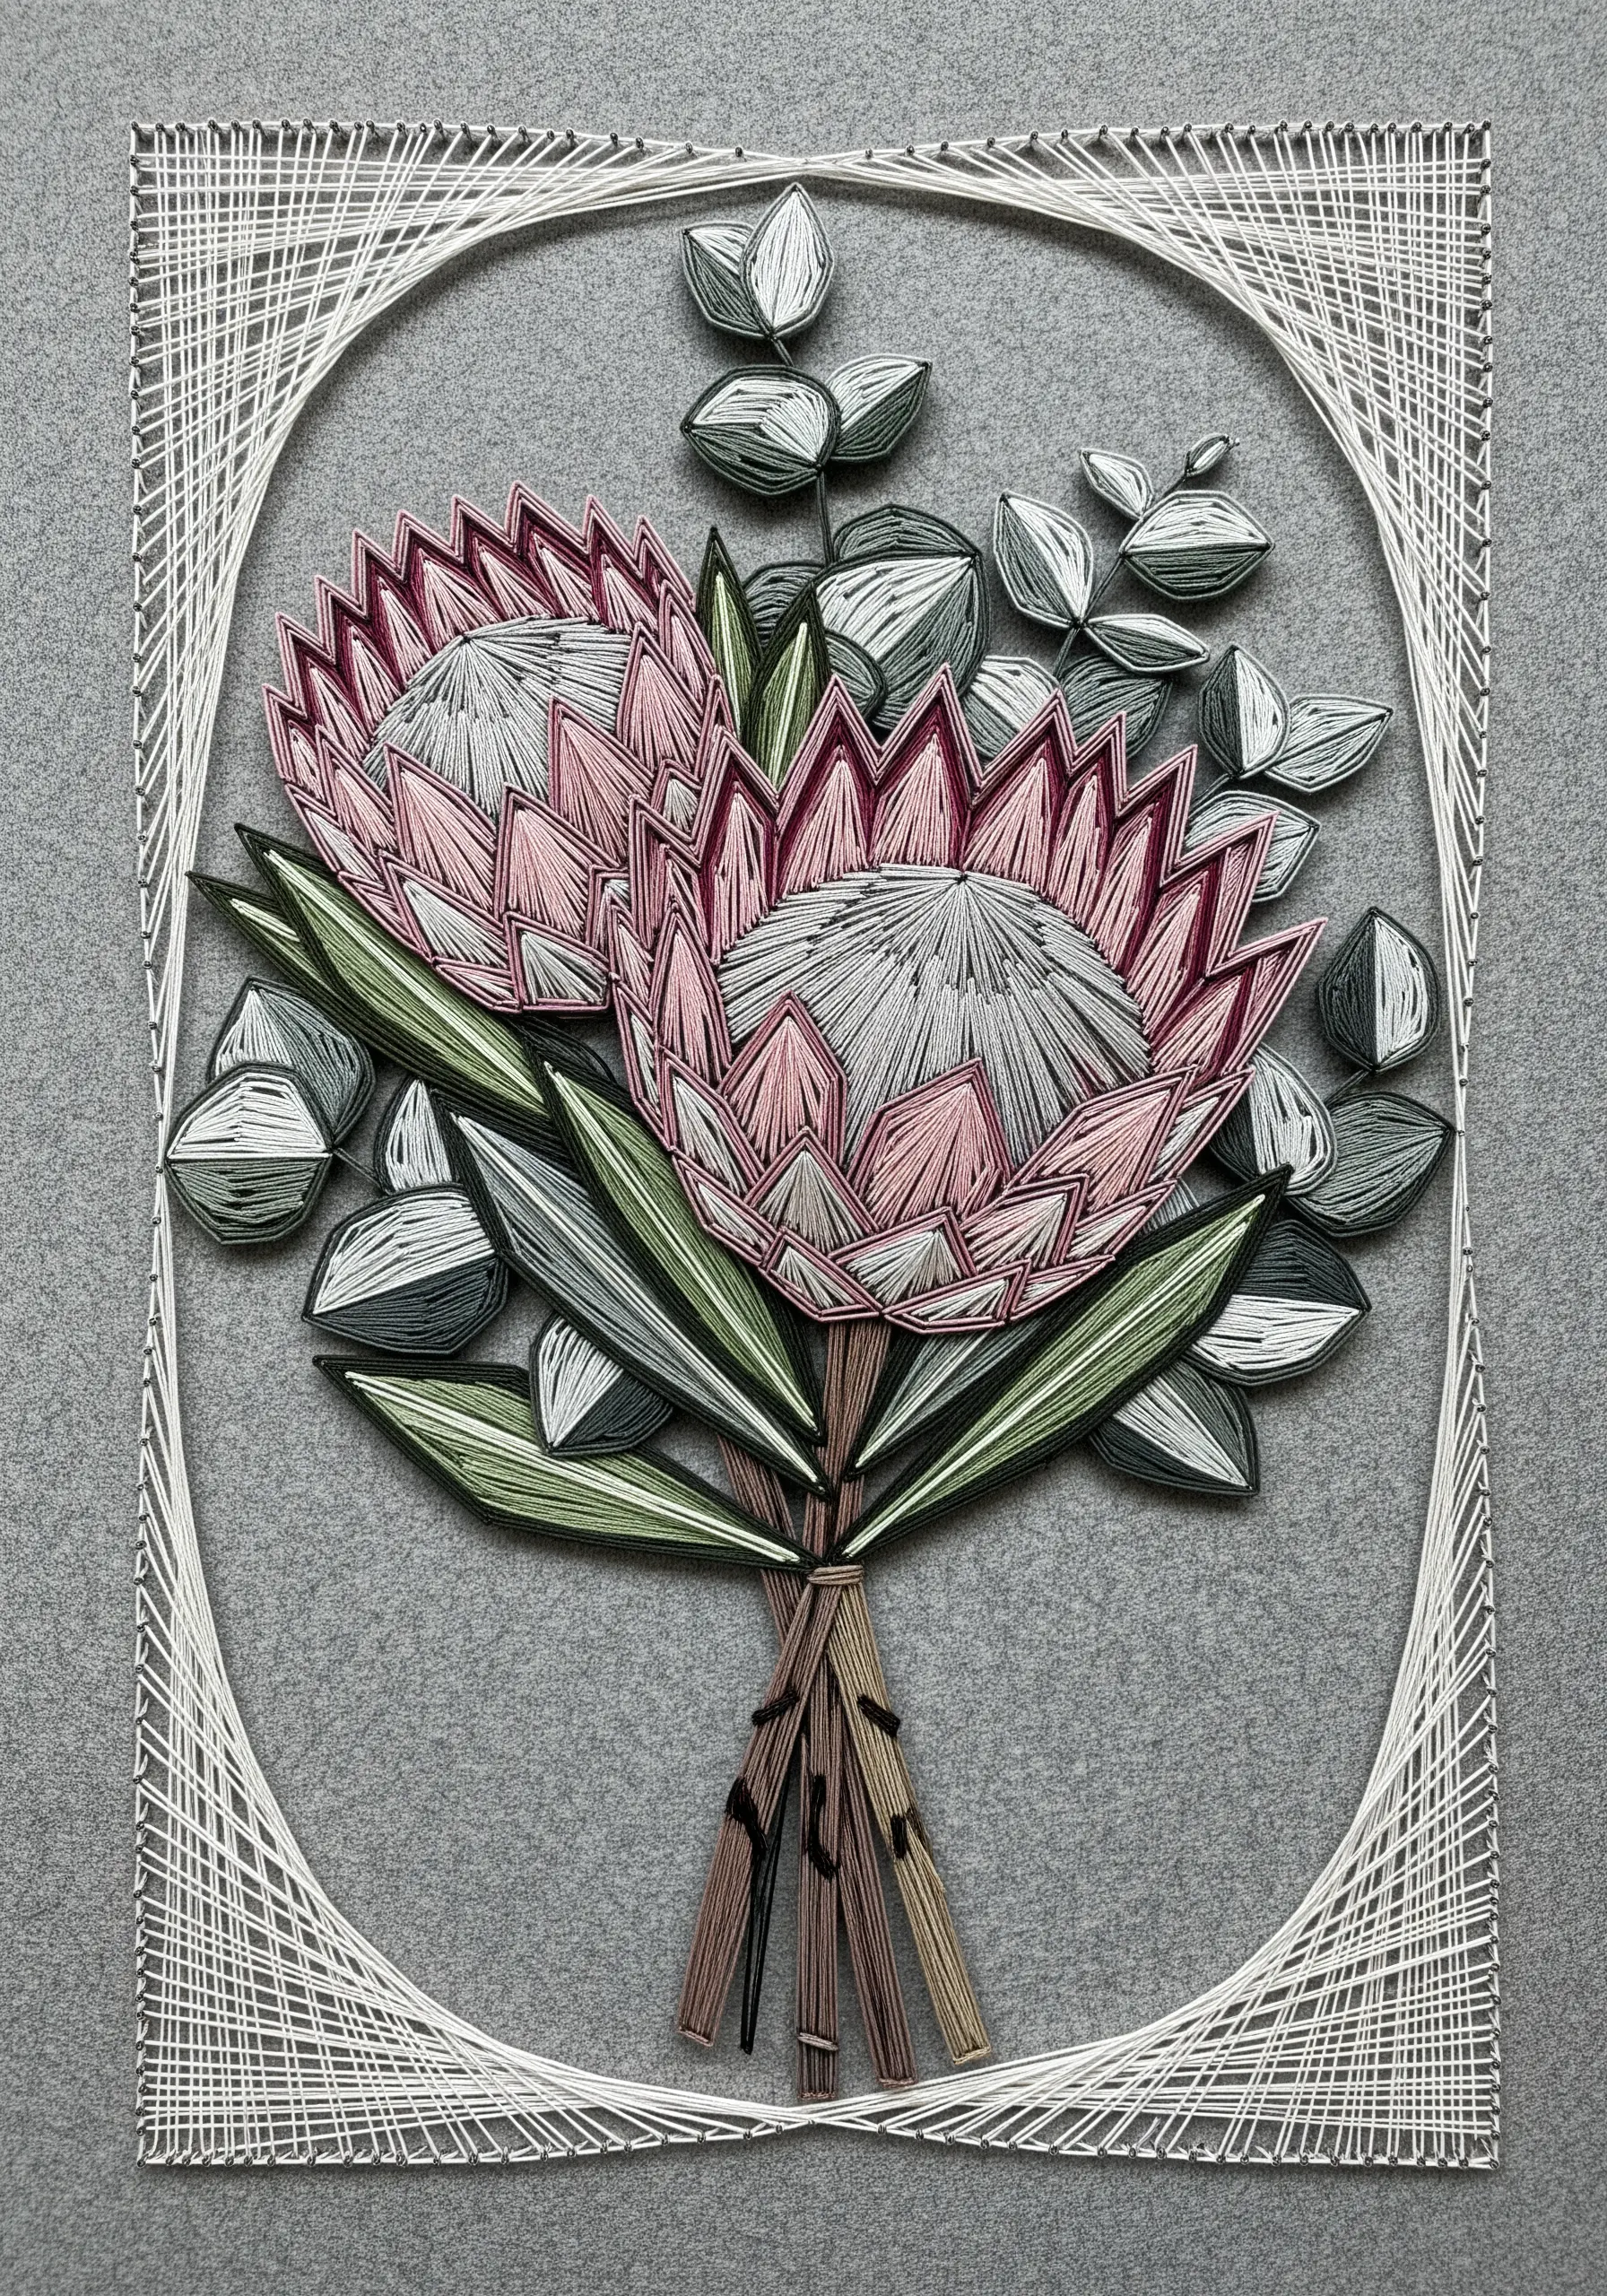
This string art-inspired design translates into a stunning piece of modern embroidery by focusing on line and tension.
Recreate the look of the protea petals using long, straight stitches pulled taut between two outline points. Use a backstitch or stem stitch for the outlines to keep them sharp.
For the eucalyptus leaves, fill them with a satin stitch using threads that blend from gray to green, mimicking the plant’s dusty tones.
The geometric frame can be replicated with a couching stitch, laying down a thicker thread and tacking it into place with a finer, matching one for perfect lines.
9. Blend Variegated Thread for Effortless Tulip Petals
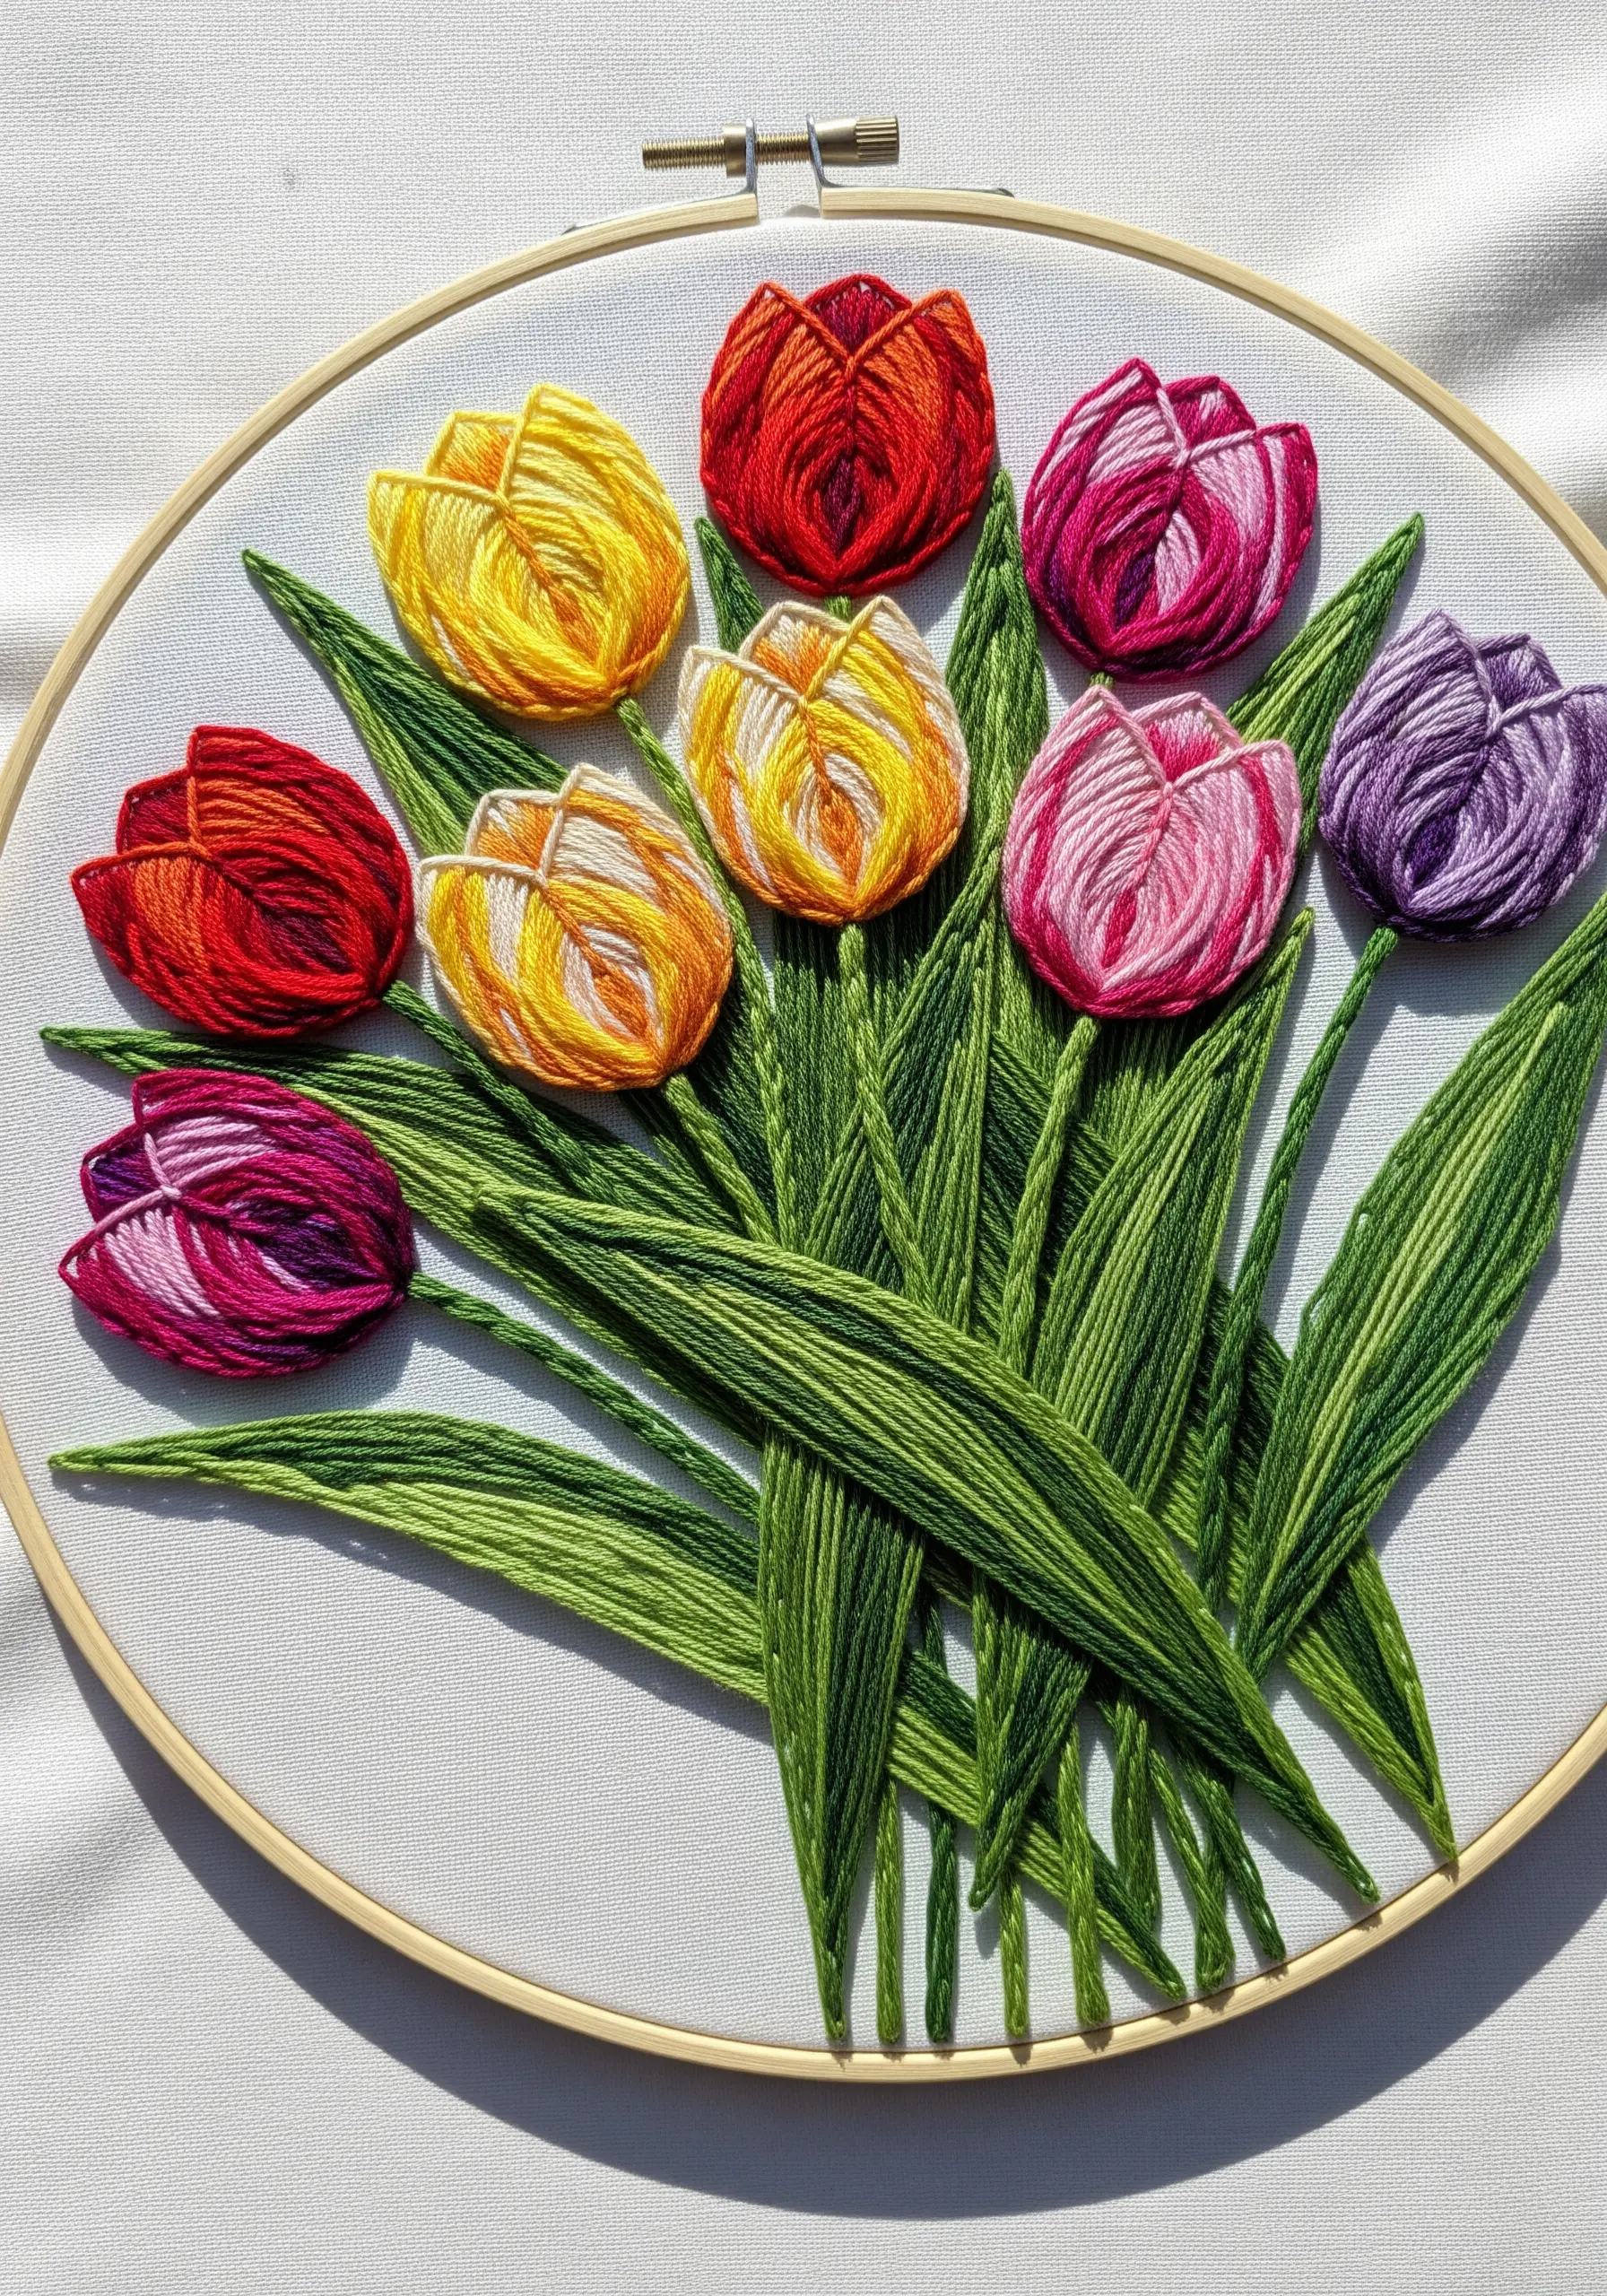
Achieving a multi-tonal, striped effect in tulip petals is simpler than it looks.
Instead of manually changing colors, select a high-quality variegated floss that contains all the shades you need in a single strand.
Use a long-and-short stitch to fill each petal, allowing the thread’s natural color transitions to create organic stripes and gradients.
The key is to let the thread do the work. This technique produces a beautiful, painterly result without the tedious process of blending multiple single-color threads.
10. Build Depth with a Monochromatic Palette
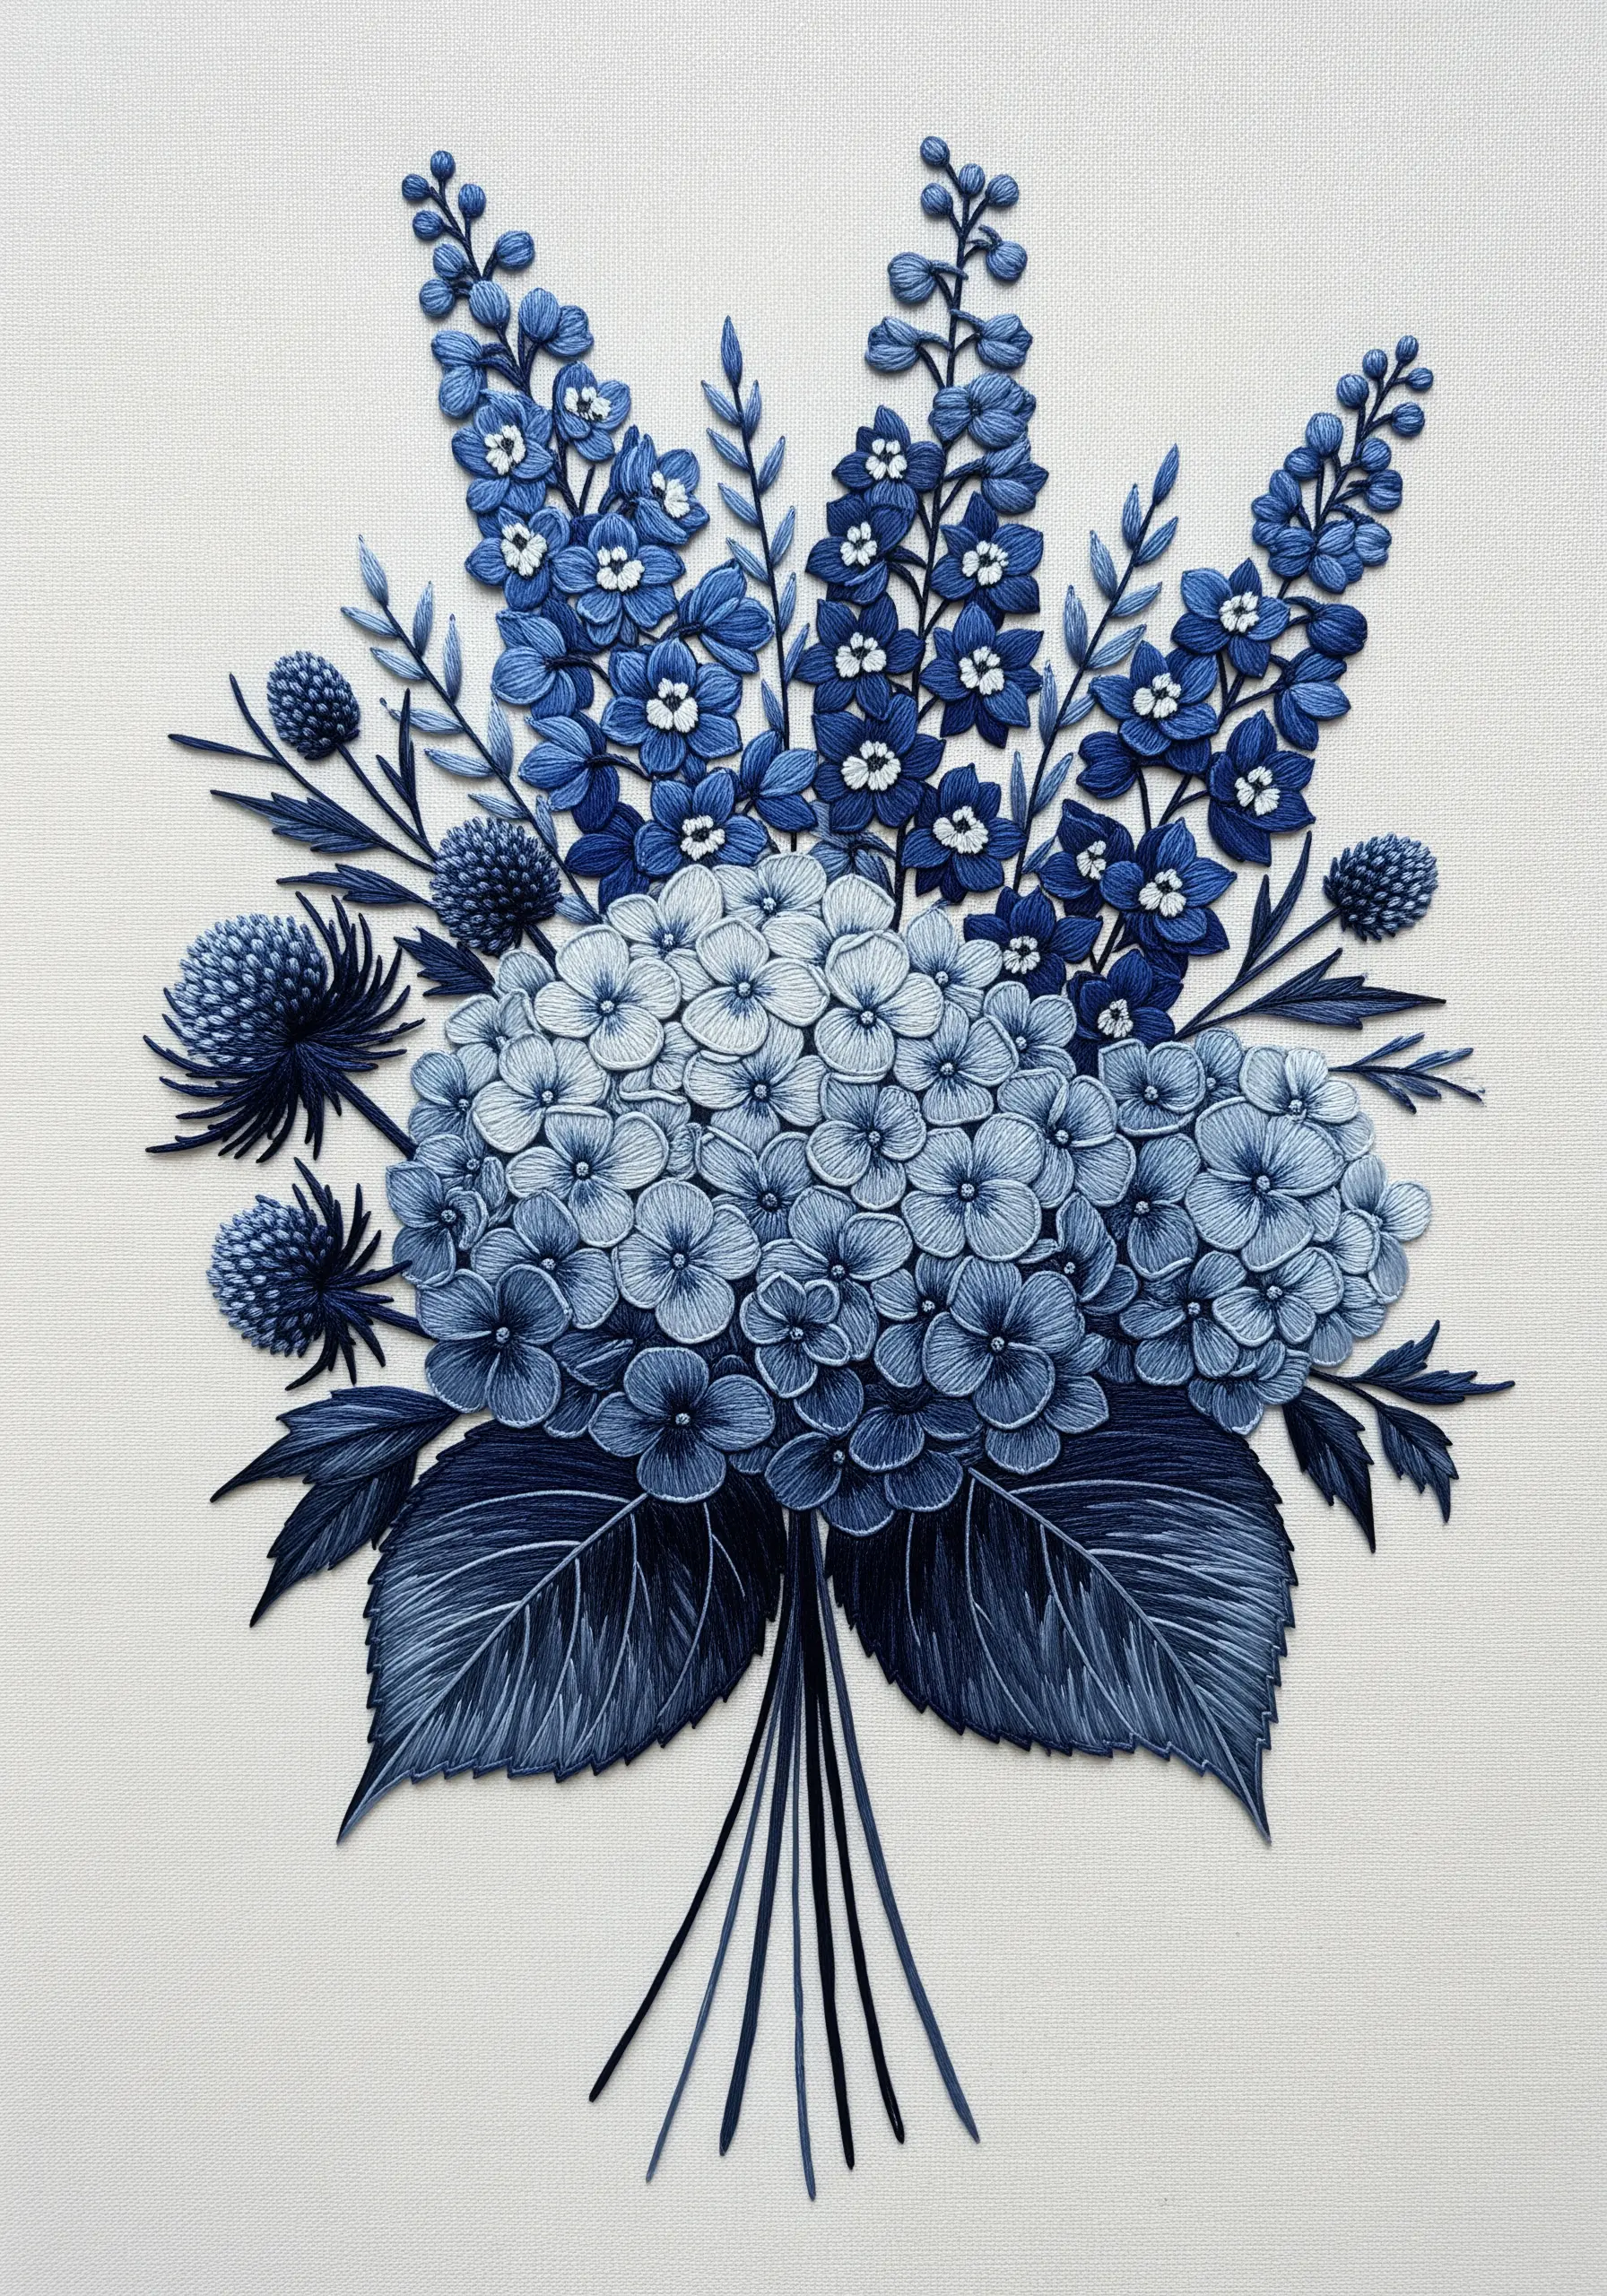
A single-color palette forces you to focus on texture and tone to create visual interest.
For this monochromatic blue bouquet, use at least four to five different shades of blue, from a deep navy to a sky blue and a near-white.
Construct the hydrangea clusters with thousands of tiny French knots or lazy daisy stitches, mixing the shades randomly to create a natural, voluminous look.
For the larger leaves and delphiniums, use your darkest and lightest blues to create strong highlights and shadows with thread painting, making the composition dynamic despite the limited palette.
11. Weave Texture into an Autumnal Bouquet

Capture the cozy, rustic feel of autumn by incorporating highly textural stitches.
Use a woven wheel stitch for the chrysanthemums, which creates a dense, raised, spiral effect that mimics their complex petal structure.
For the simpler dahlias, a classic lazy daisy stitch works beautifully. The contrast between the open loops of the daisies and the solid weave of the mums adds instant dimension.
Work on a fabric with a visible weave, like burlap or Aida cloth, to enhance the overall rustic aesthetic of your piece.
12. Add Delicate Embellishment to Cherry Blossoms
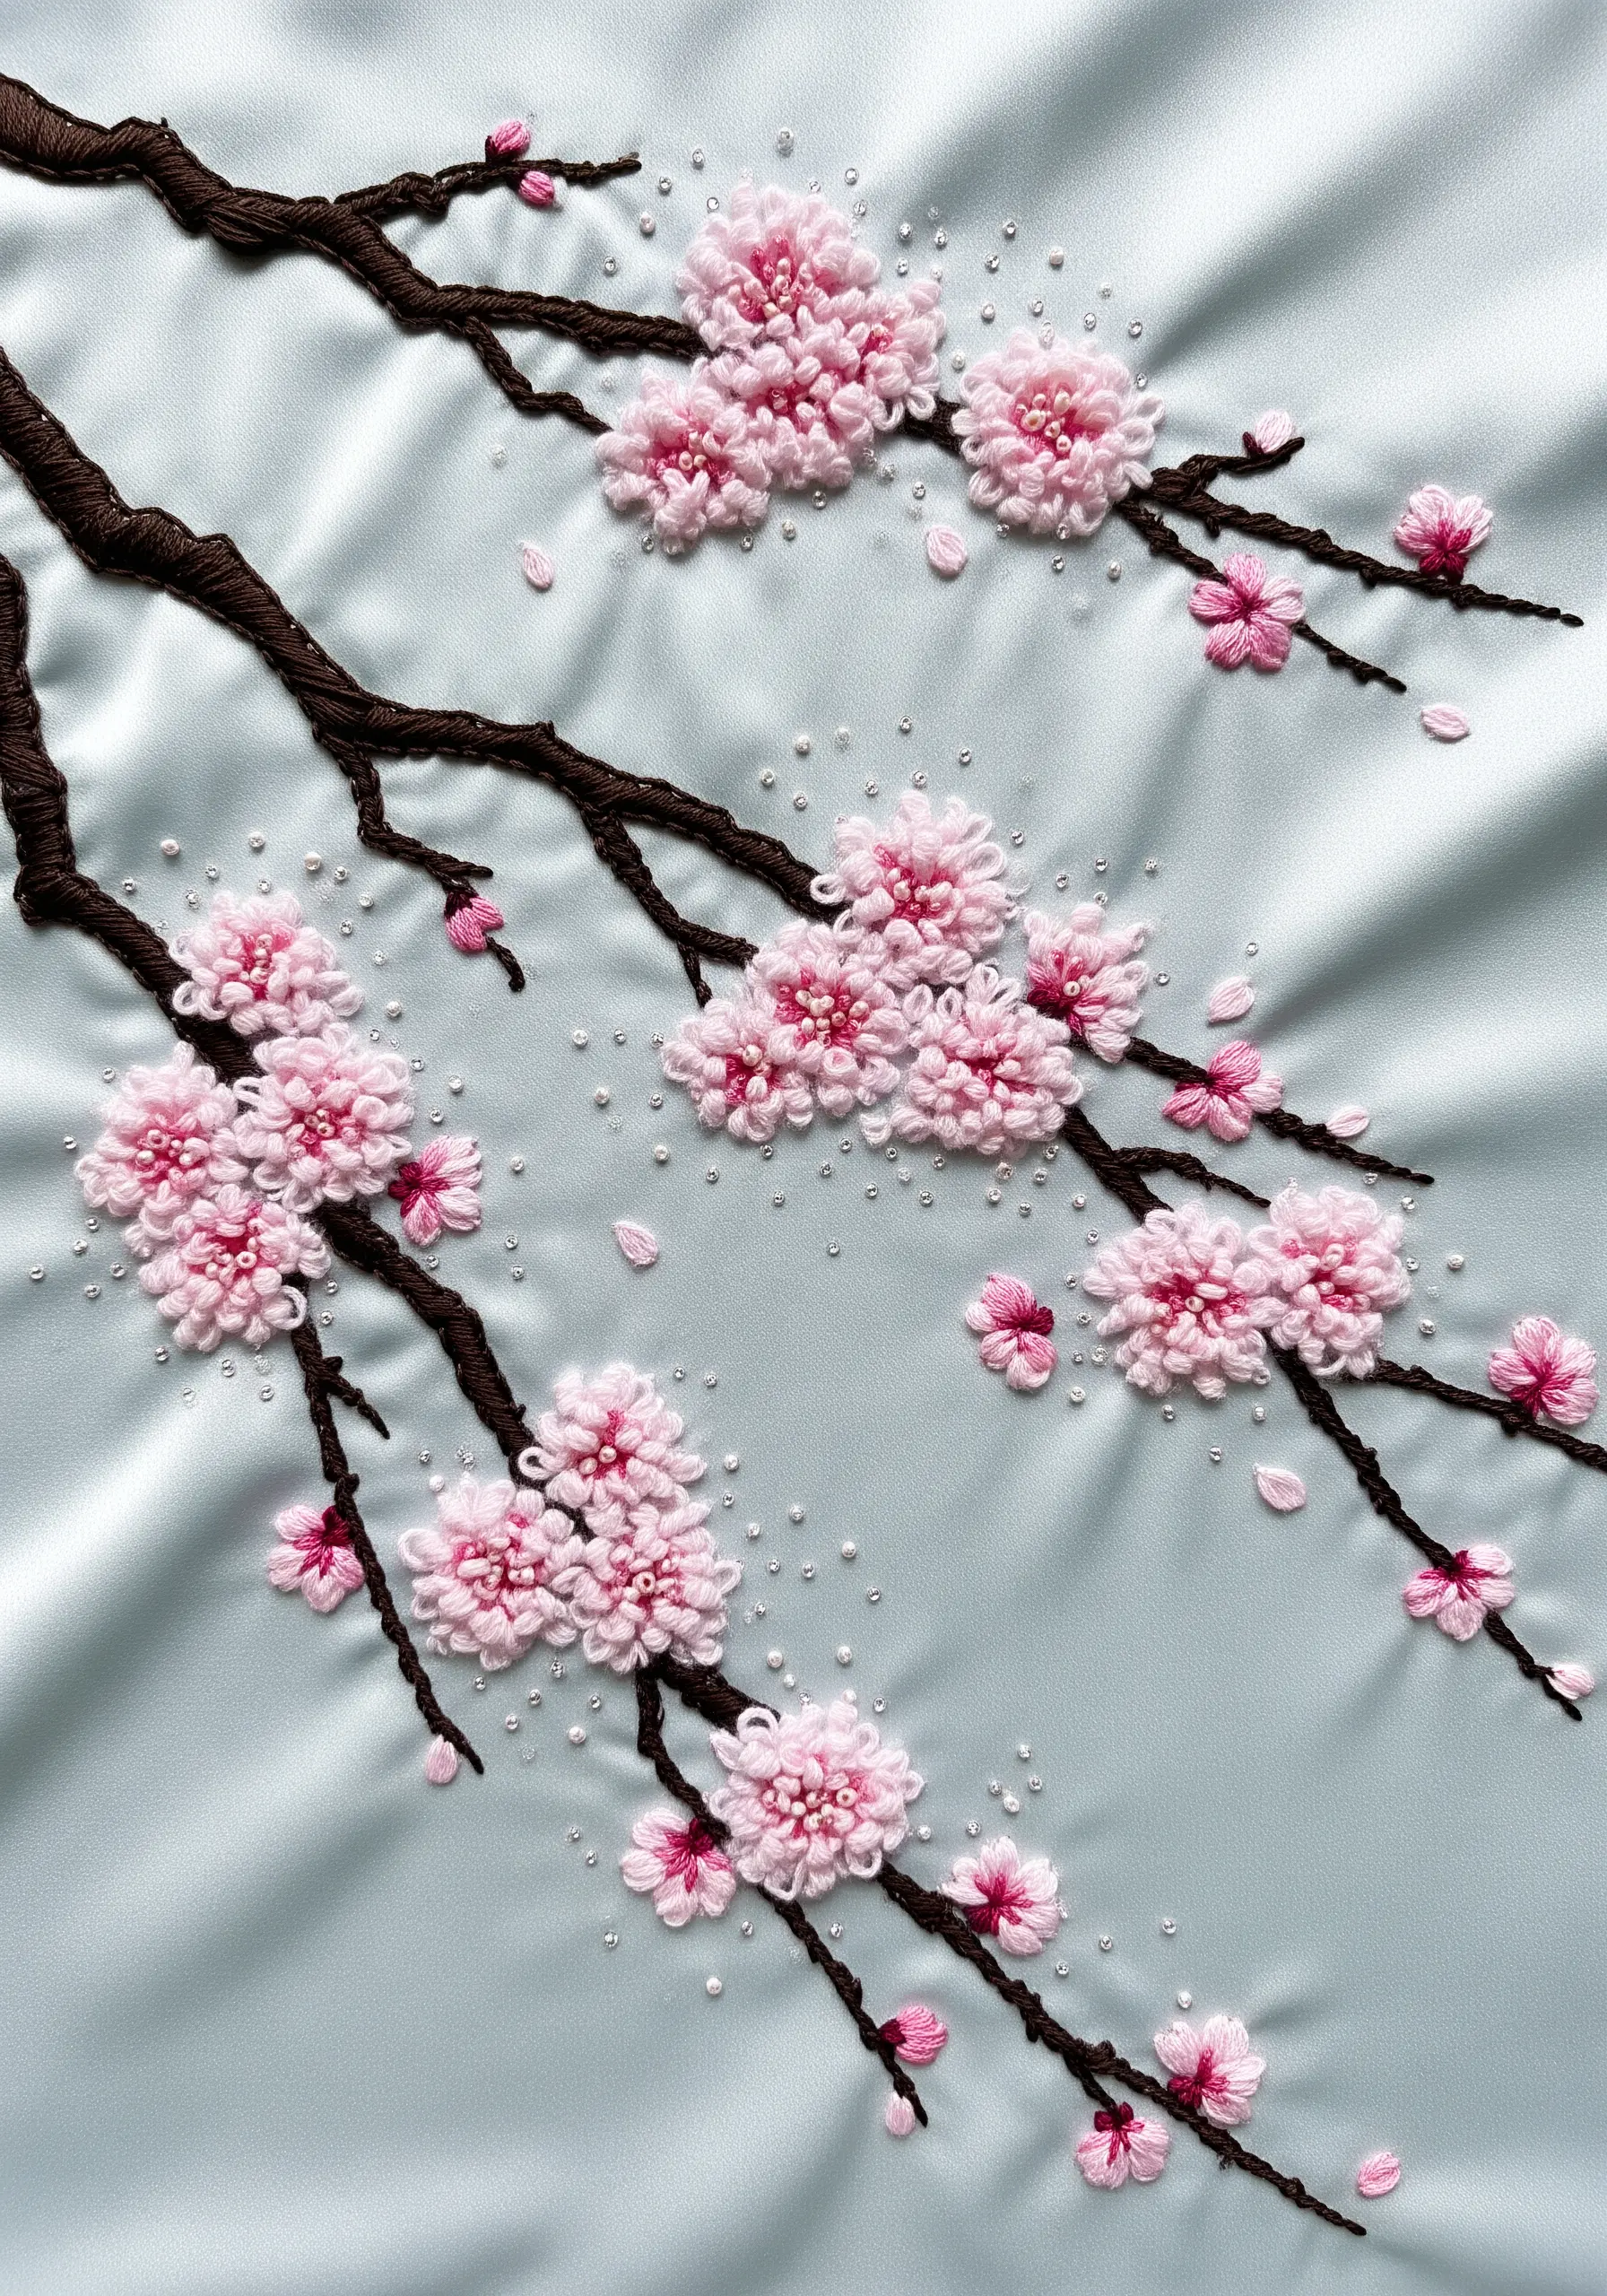
Elevate the simple beauty of cherry blossoms by adding a subtle, textural embellishment.
Stitch the blossoms using clusters of pale pink French knots. For a more open, airy look, use a detached chain stitch for each of the five petals.
The magic is in the details: once the thread work is complete, scatter a few tiny seed beads or pearl beads among the blossoms. Secure them with a single stitch of matching thread.
This touch of mixed media adds a delicate shimmer and sophistication that thread alone cannot replicate, perfect for the reflective satin background.
13. Explore Stumpwork for 3D Desert Florals
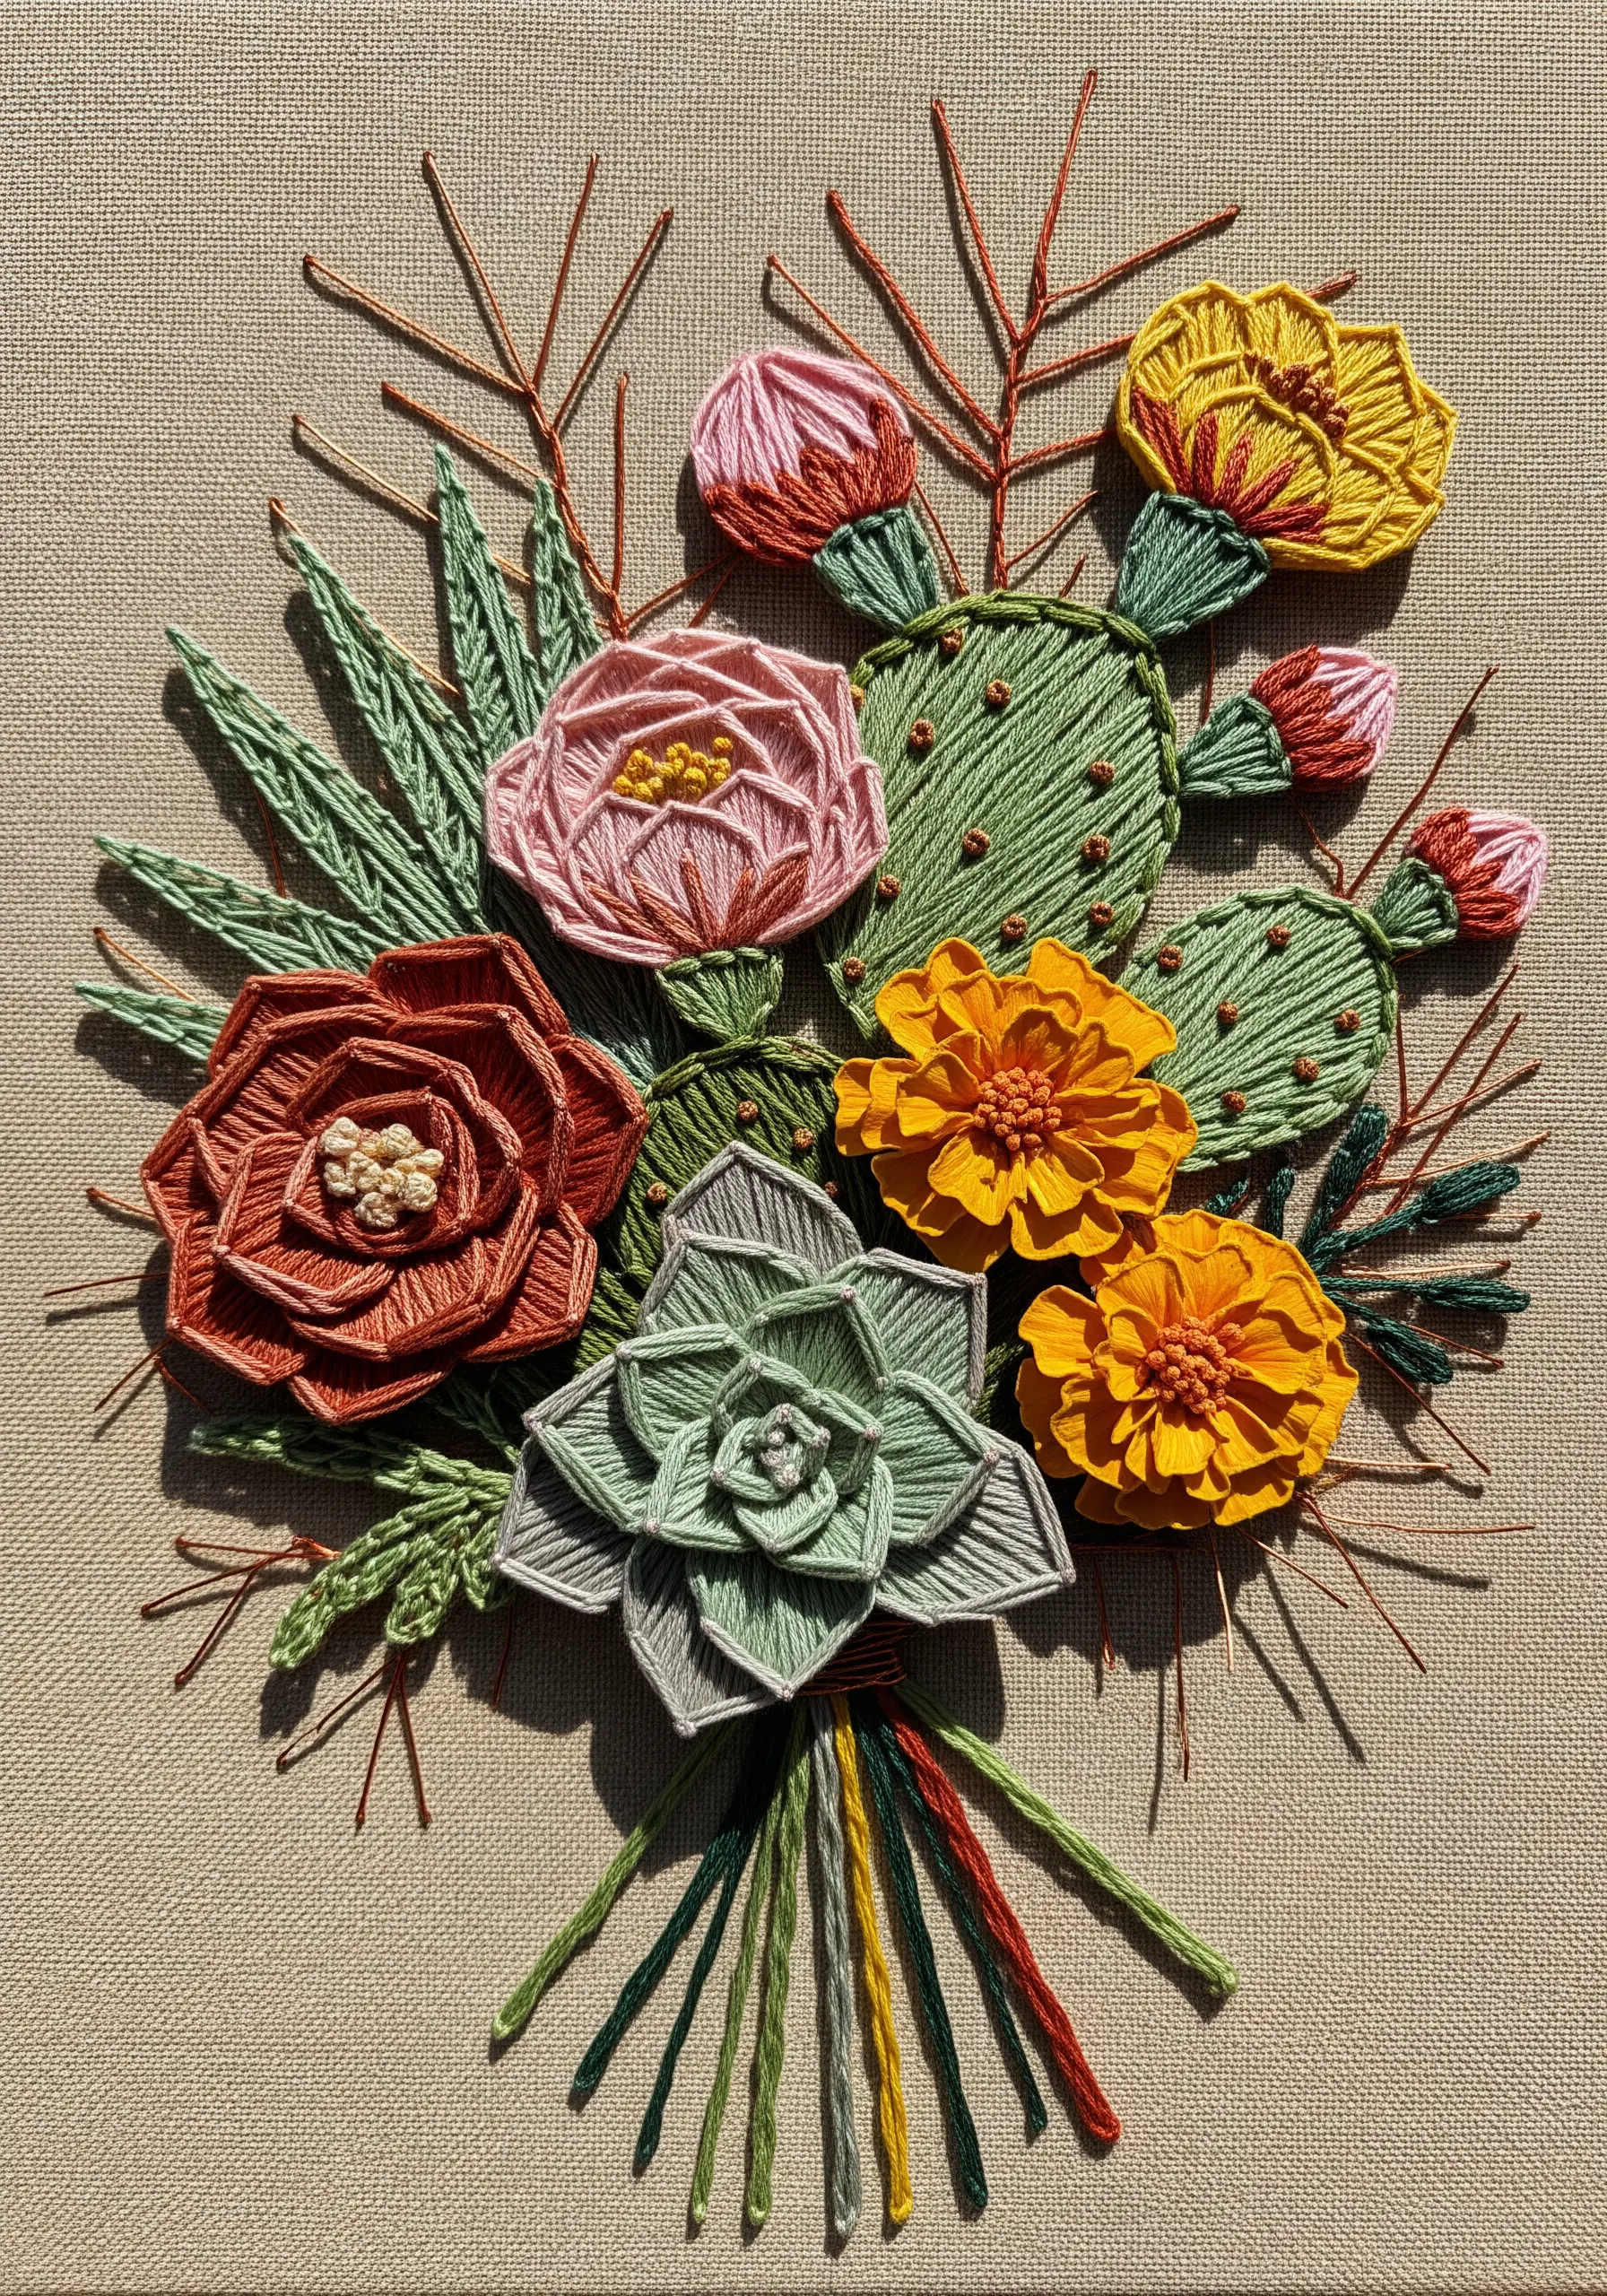
To make your embroidery literally stand off the fabric, explore the basics of stumpwork.
For the succulent and cactus pads, you can create detached elements. Stitch your design onto a separate piece of fabric with a wire outline, cover it with buttonhole stitches, and then cut it out and attach it to your main piece.
For a simpler approach, use padding. Place a layer of felt or several layers of straight stitches underneath your satin stitch to create a raised, dimensional effect.
This technique turns a flat image into a tactile, sculptural piece of abstract thread sculpting.
14. Capture Elegance with Directional Satin Stitch
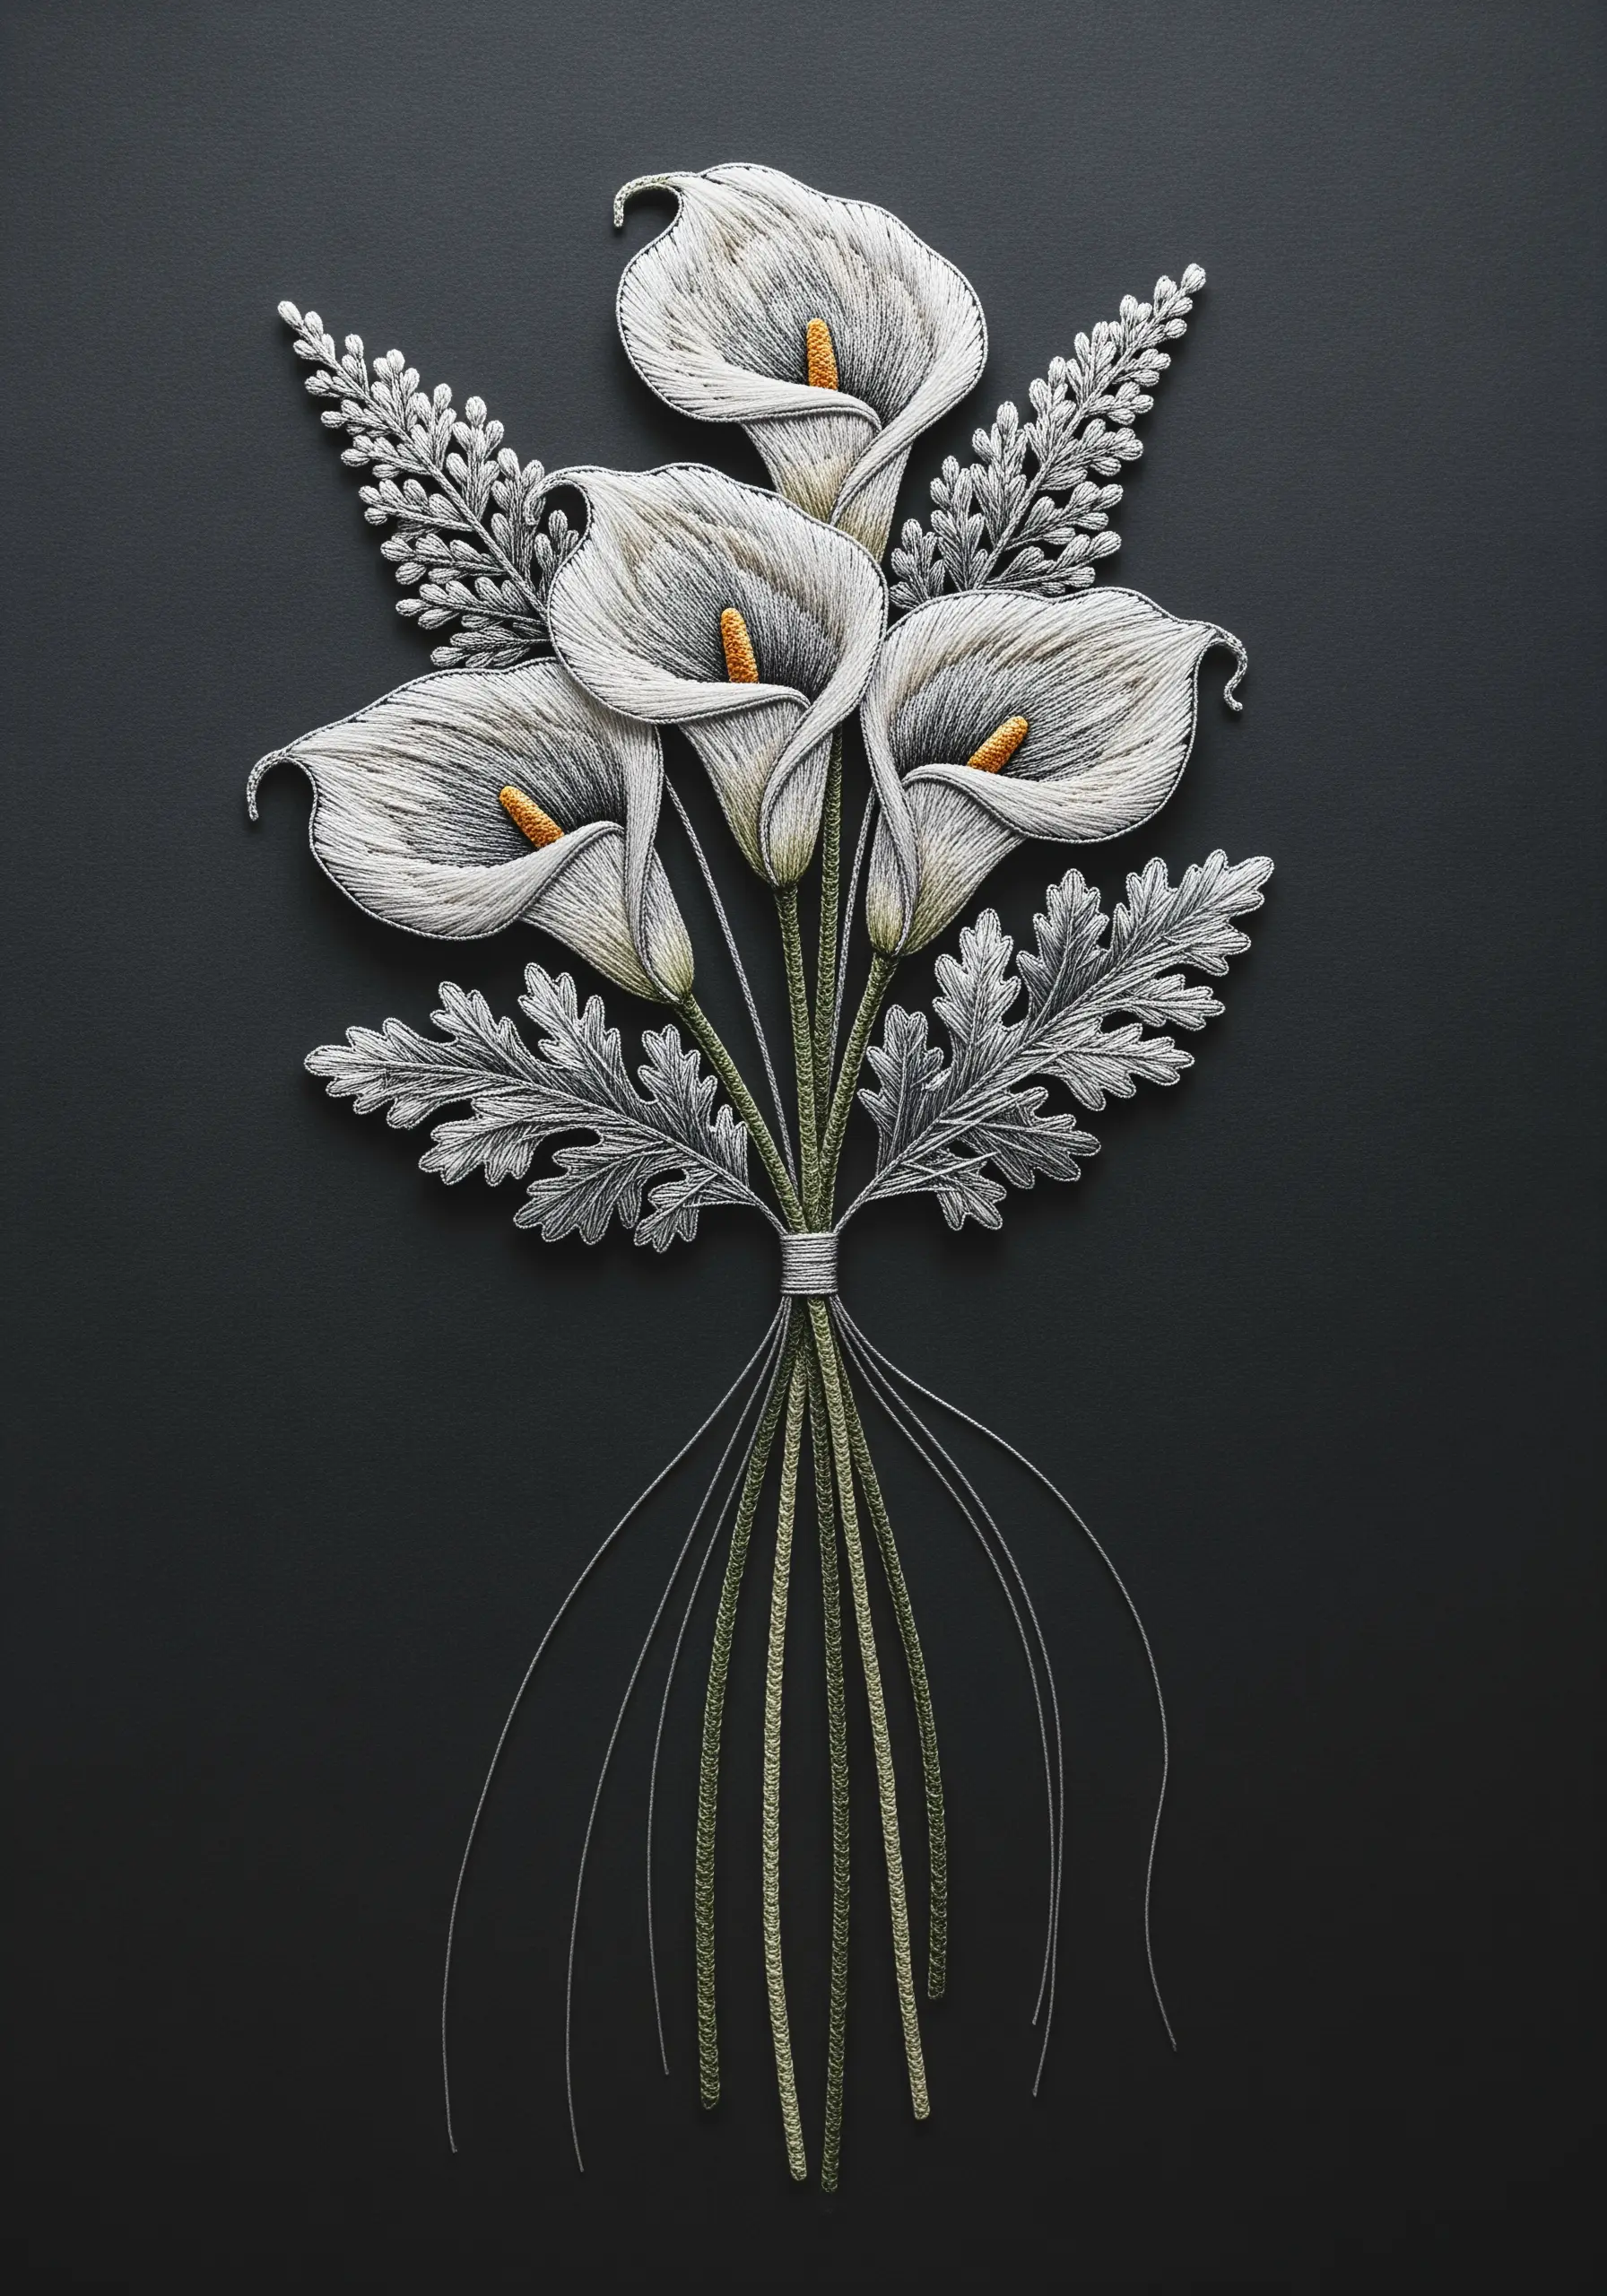
The smooth, sculptural form of a calla lily is the perfect subject for perfecting your satin stitch.
The entire illusion depends on stitch direction. Your stitches should follow the flower’s natural, elegant curve, wrapping from the outer edge toward the center.
Use a single strand of floss for a smooth, seamless finish, and consider adding a very light gray or cream thread along one edge to create a subtle highlight.
A split stitch outline is essential here; it provides a crisp edge and a guide for keeping your satin stitches perfectly uniform.
15. Create Stylized Roses with Whipped Stitches
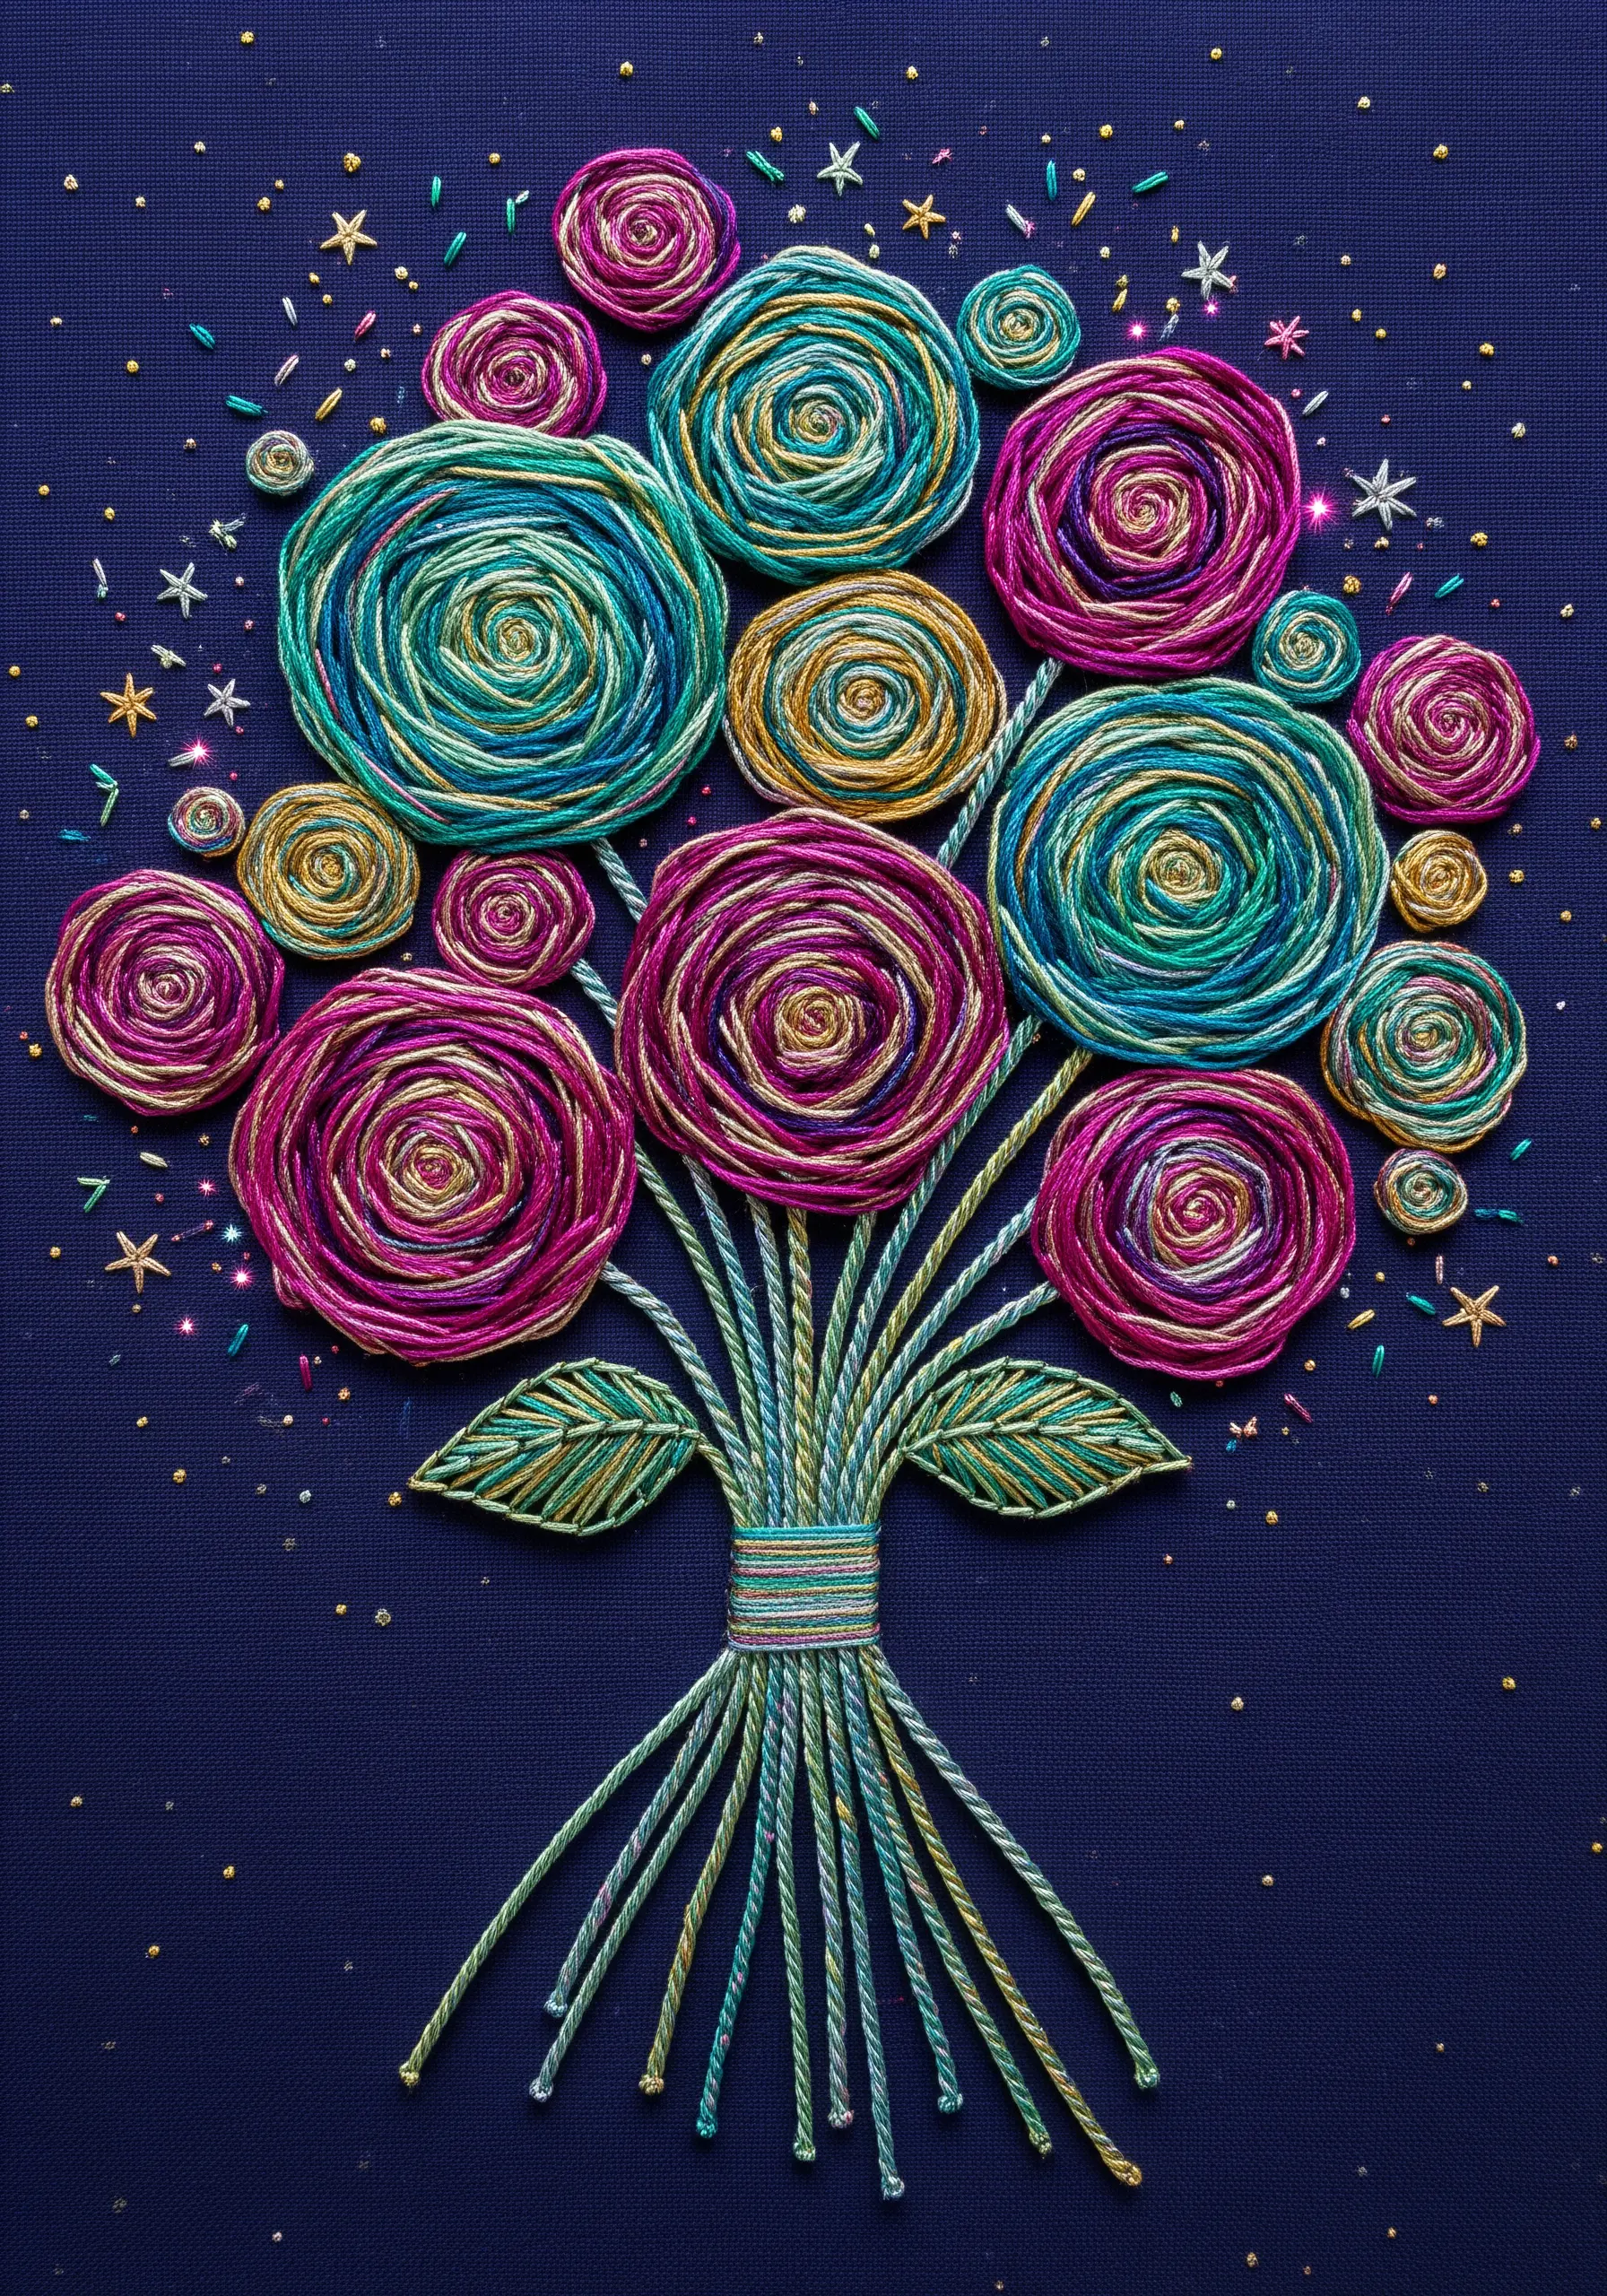
For a modern, graphic interpretation of a rose, build the form with concentric lines instead of traditional shading.
First, lay down a spiral of backstitches. Then, using a blunt tapestry needle and a contrasting or variegated thread, whip the stitches without piercing the fabric. This creates a smooth, raised, cord-like effect.
Alternatively, use a heavy chain stitch worked in a spiral. Variegated thread is ideal for this technique, as it creates automatic color variation and depth.
Add tiny metallic seed stitches as accents to catch the light and add a touch of magic.
16. Master Pansy Petals with Thread Painting
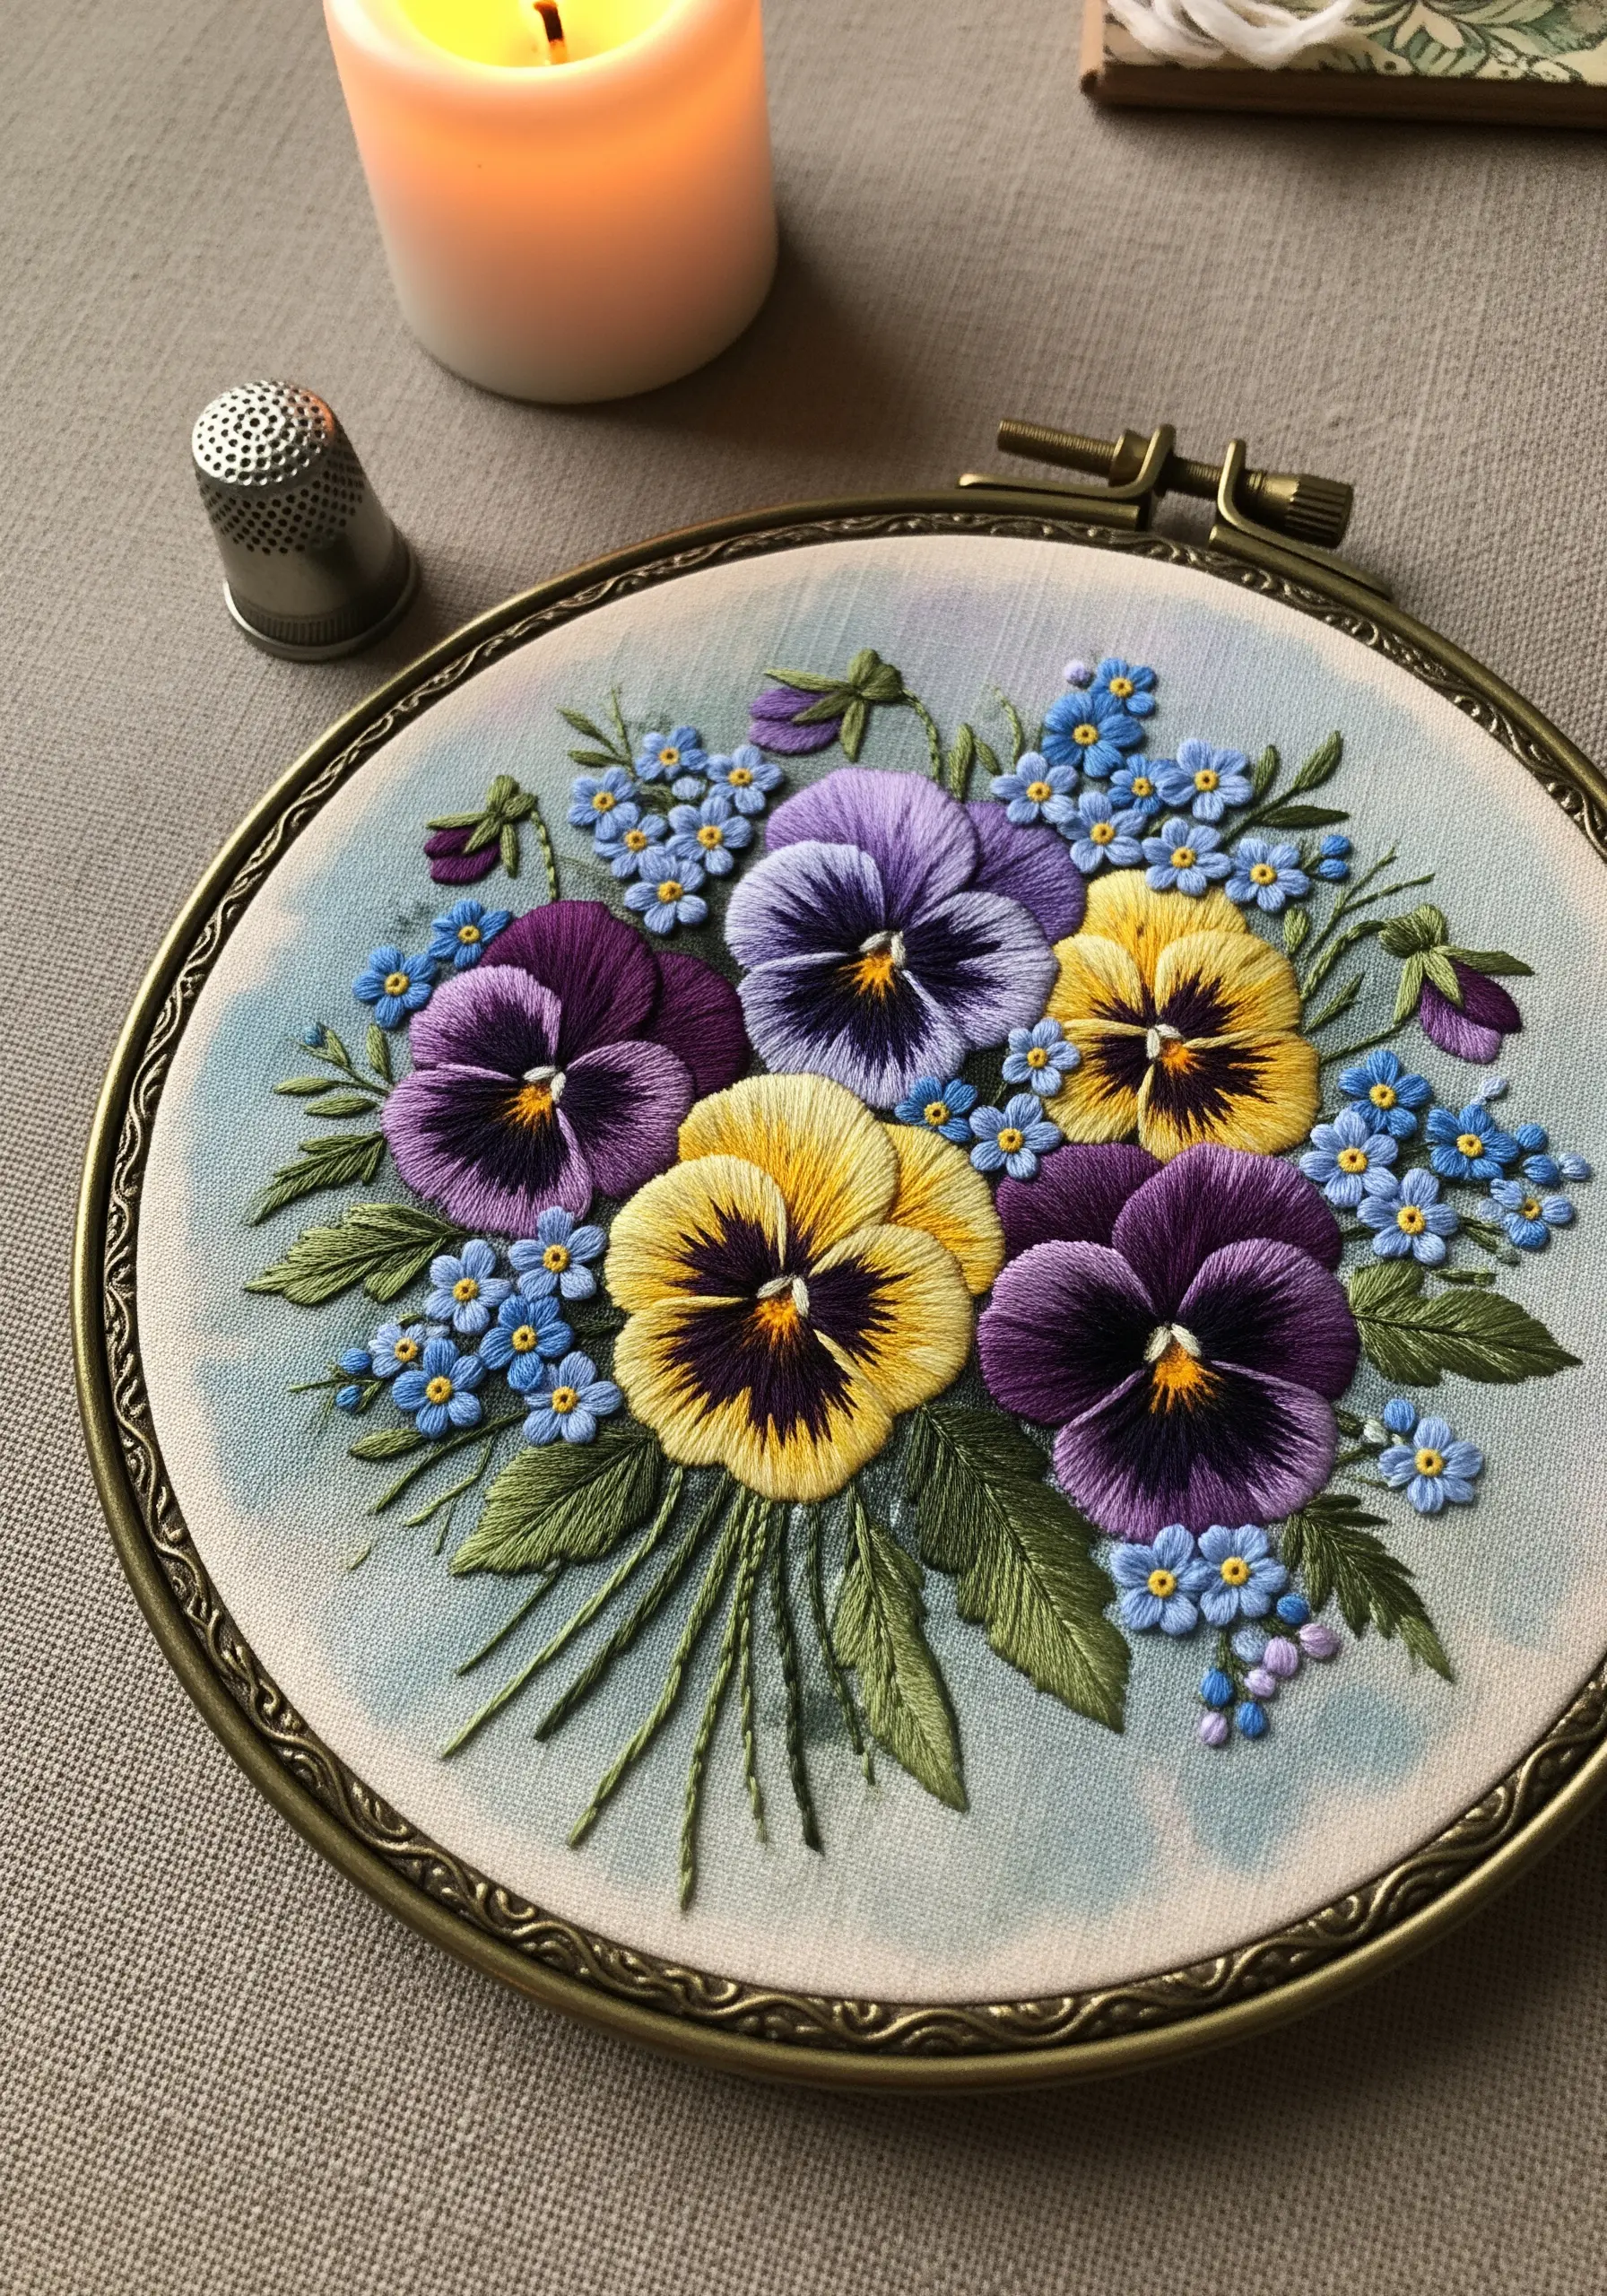
Pansies are the ideal flower for practicing thread painting due to their distinct color blocking.
Map out the color zones on your fabric lightly with a pencil. Begin with the darkest color at the center, using short, straight stitches fanning outward.
Next, bring your needle up through the middle of those existing stitches with your second color, creating a soft, blended transition. This is the essence of the long-and-short stitch.
Finish with the lightest color at the petal’s edge. The key is to make your stitches blend like brushstrokes, creating a soft, painterly effect.
17. Achieve Art Deco Precision with Clean Lines
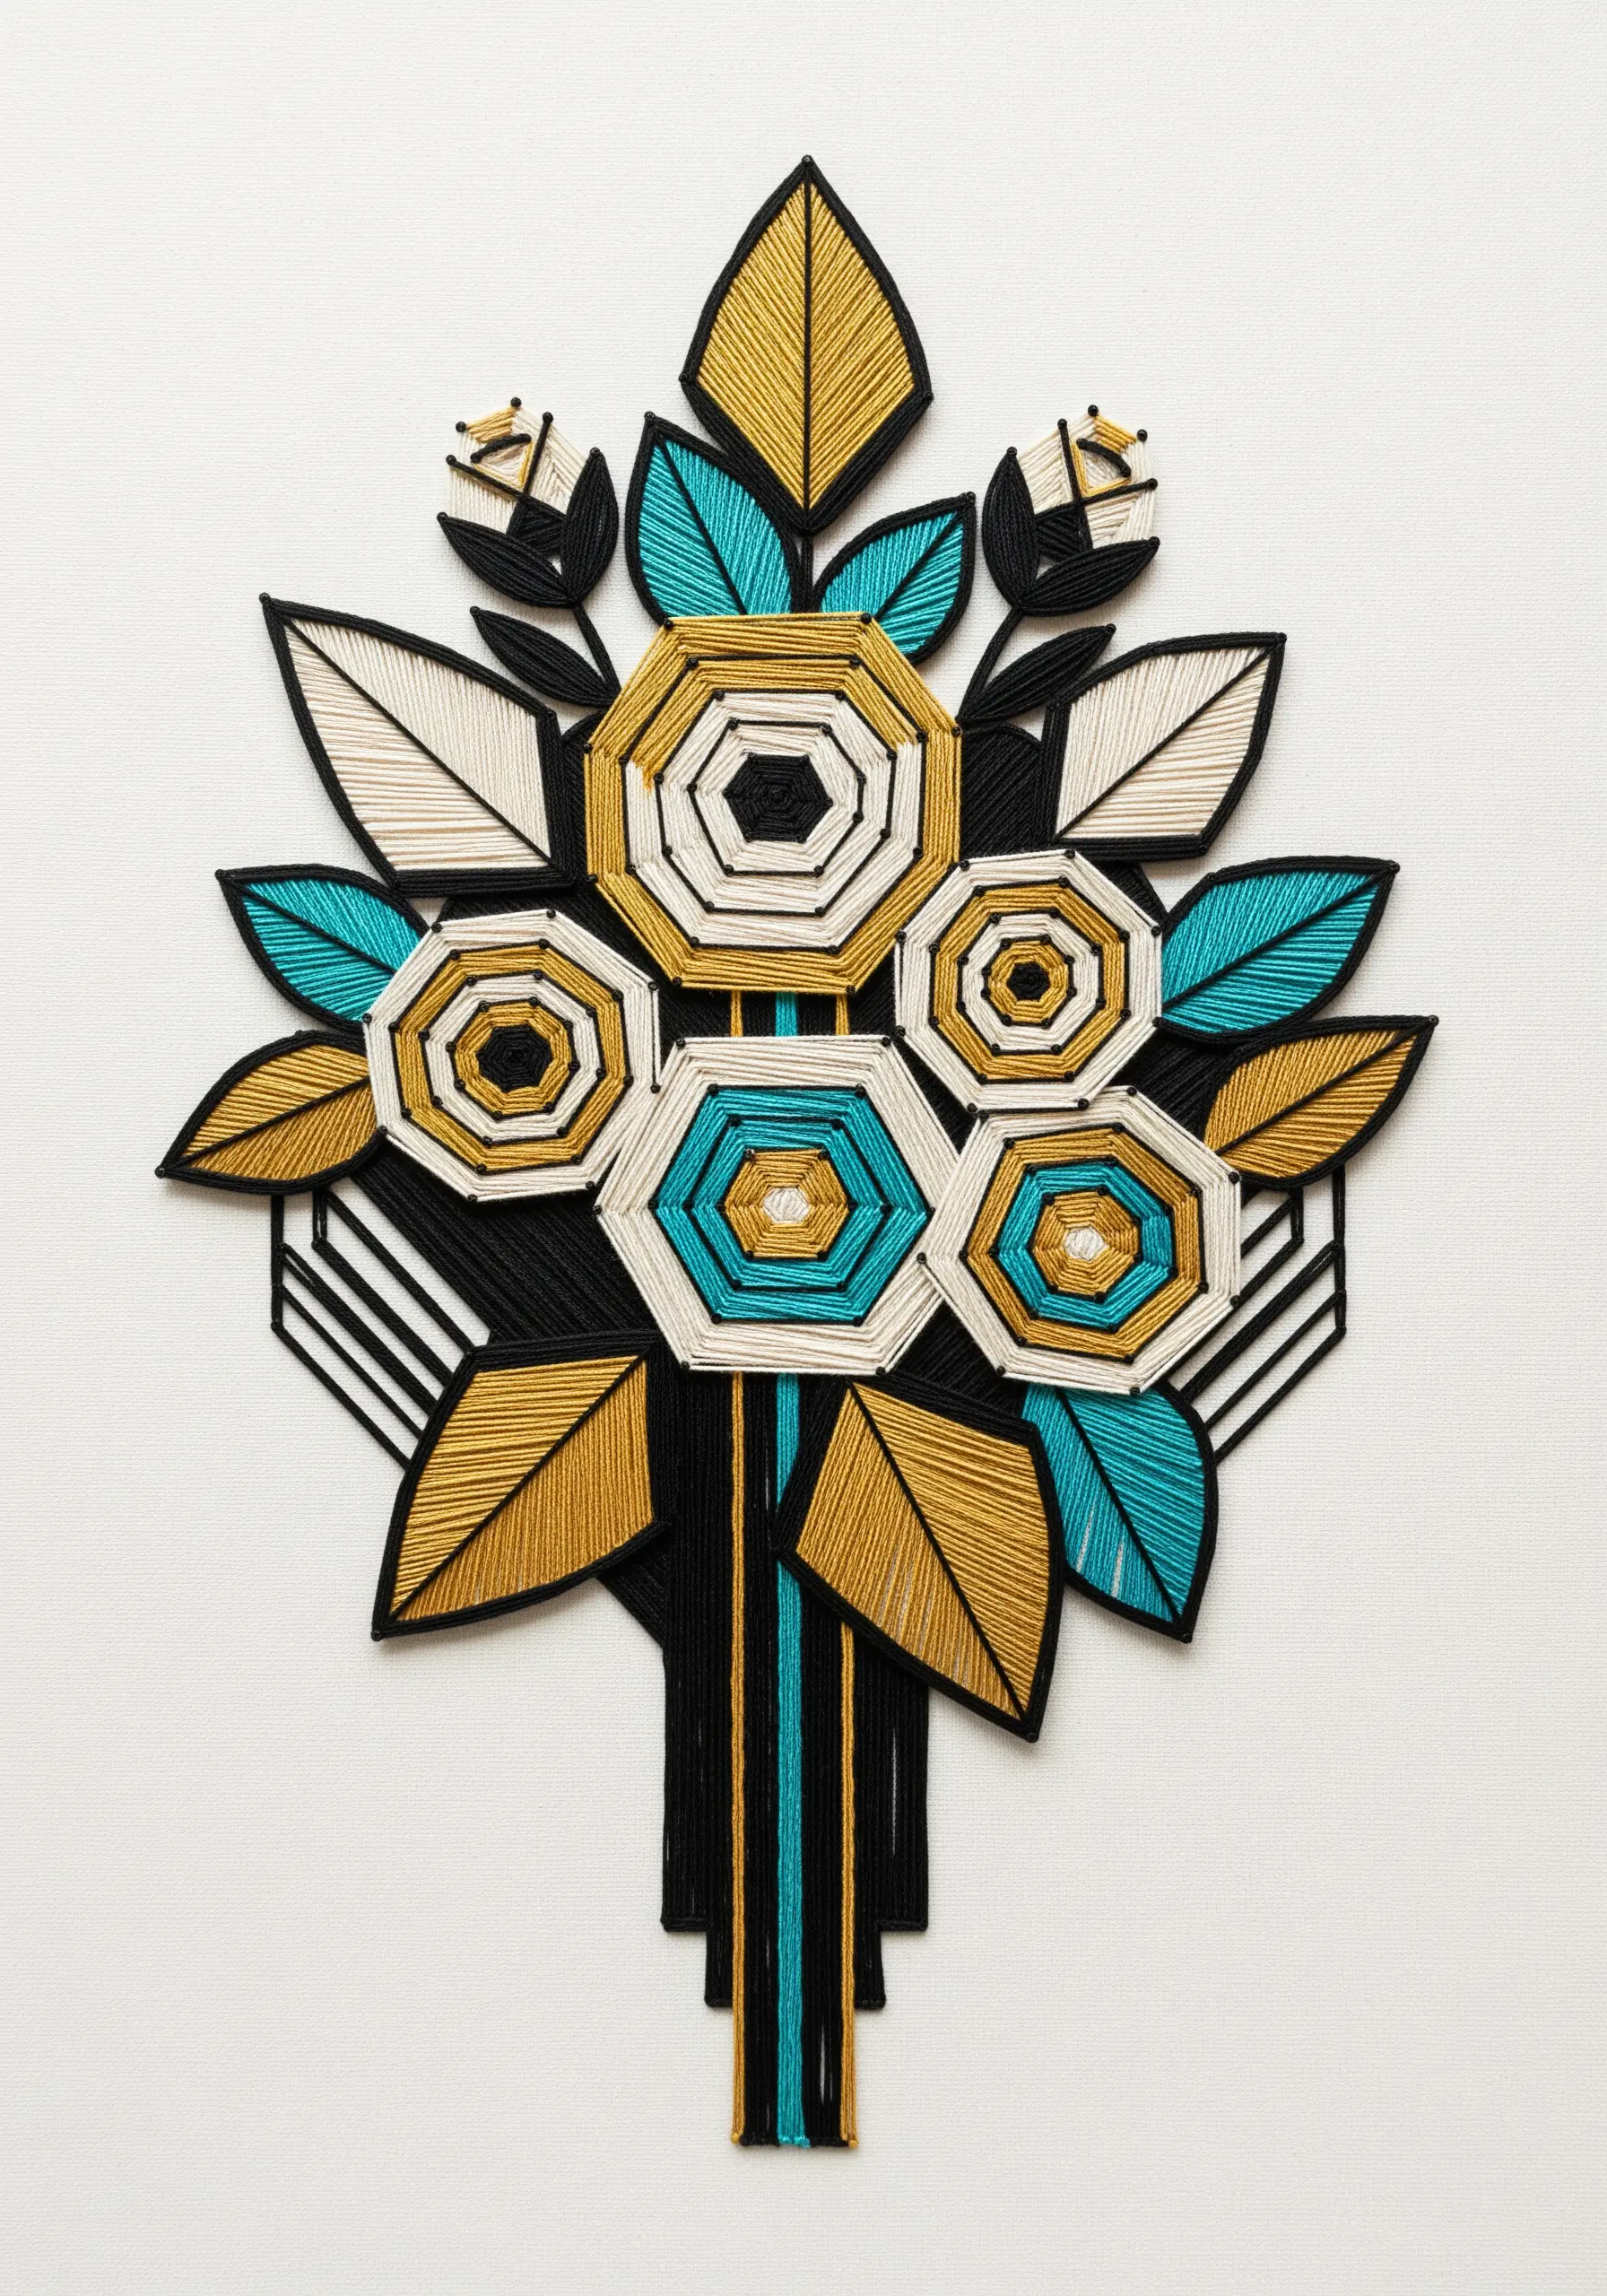
The sharp, geometric feel of Art Deco design relies on precision and bold outlines.
Use a thicker thread, like a Perle cotton, for the black outlines to give them weight and importance in the composition. A stem stitch or a heavy backstitch will create a solid, rope-like line.
Fill the geometric shapes with a perfectly flat, angled satin stitch. The direction of your stitches matters immensely; keep it consistent within each shape to create a clean, uniform sheen.
This style is less about realism and more about graphic impact, so focus on stitch quality and line work.
18. Combine Embroidery with Dried Florals

Create a unique piece of mixed-media art by integrating real dried flowers into your embroidery.
Begin by arranging and securing your main dried flowers, like these strawflowers, to the fabric using a strong craft glue or a few careful stitches through their base.
Then, use embroidery to add the delicate elements—the stems, leaves, and wispy fillers like bunny tails and statice.
Stitch the stems with a simple backstitch or stem stitch. This technique creates a beautiful interplay between the flat, stitched elements and the three-dimensional, natural textures of the pressed flower designs.
19. Design with Glow-in-the-Dark Thread
Create a design with a hidden dimension by using glow-in-the-dark or fluorescent threads.
These specialty threads work best on a dark, solid background where their effect will be most dramatic. Stitch your design as you normally would, using thread painting to blend colors and create form.
To amplify the effect, strategically outline certain petals or veins with the specialty thread. It will appear as a subtle white or pastel in daylight but reveal a magical glow in the dark.
This technique is perfect for creating art that transforms and offers a surprising, interactive element.
20. Stitch Vibrant Citrus with Textural Details

Capture the juicy, vibrant look of a citrus bouquet by focusing on texture and form.
For the citrus slices, outline each segment with a white split stitch, then fill with a directional satin stitch to mimic the fruit’s pulp.
Create the textured rind of the whole fruits using a dense layer of French knots or a woven wheel stitch worked over a padded base.
The white blossoms are perfect for a detached chain stitch (for petals) and yellow French knots (for the stamen), adding a delicate contrast to the bold, graphic fruit.
21. Balance Detail and Simplicity in a Classic Bouquet
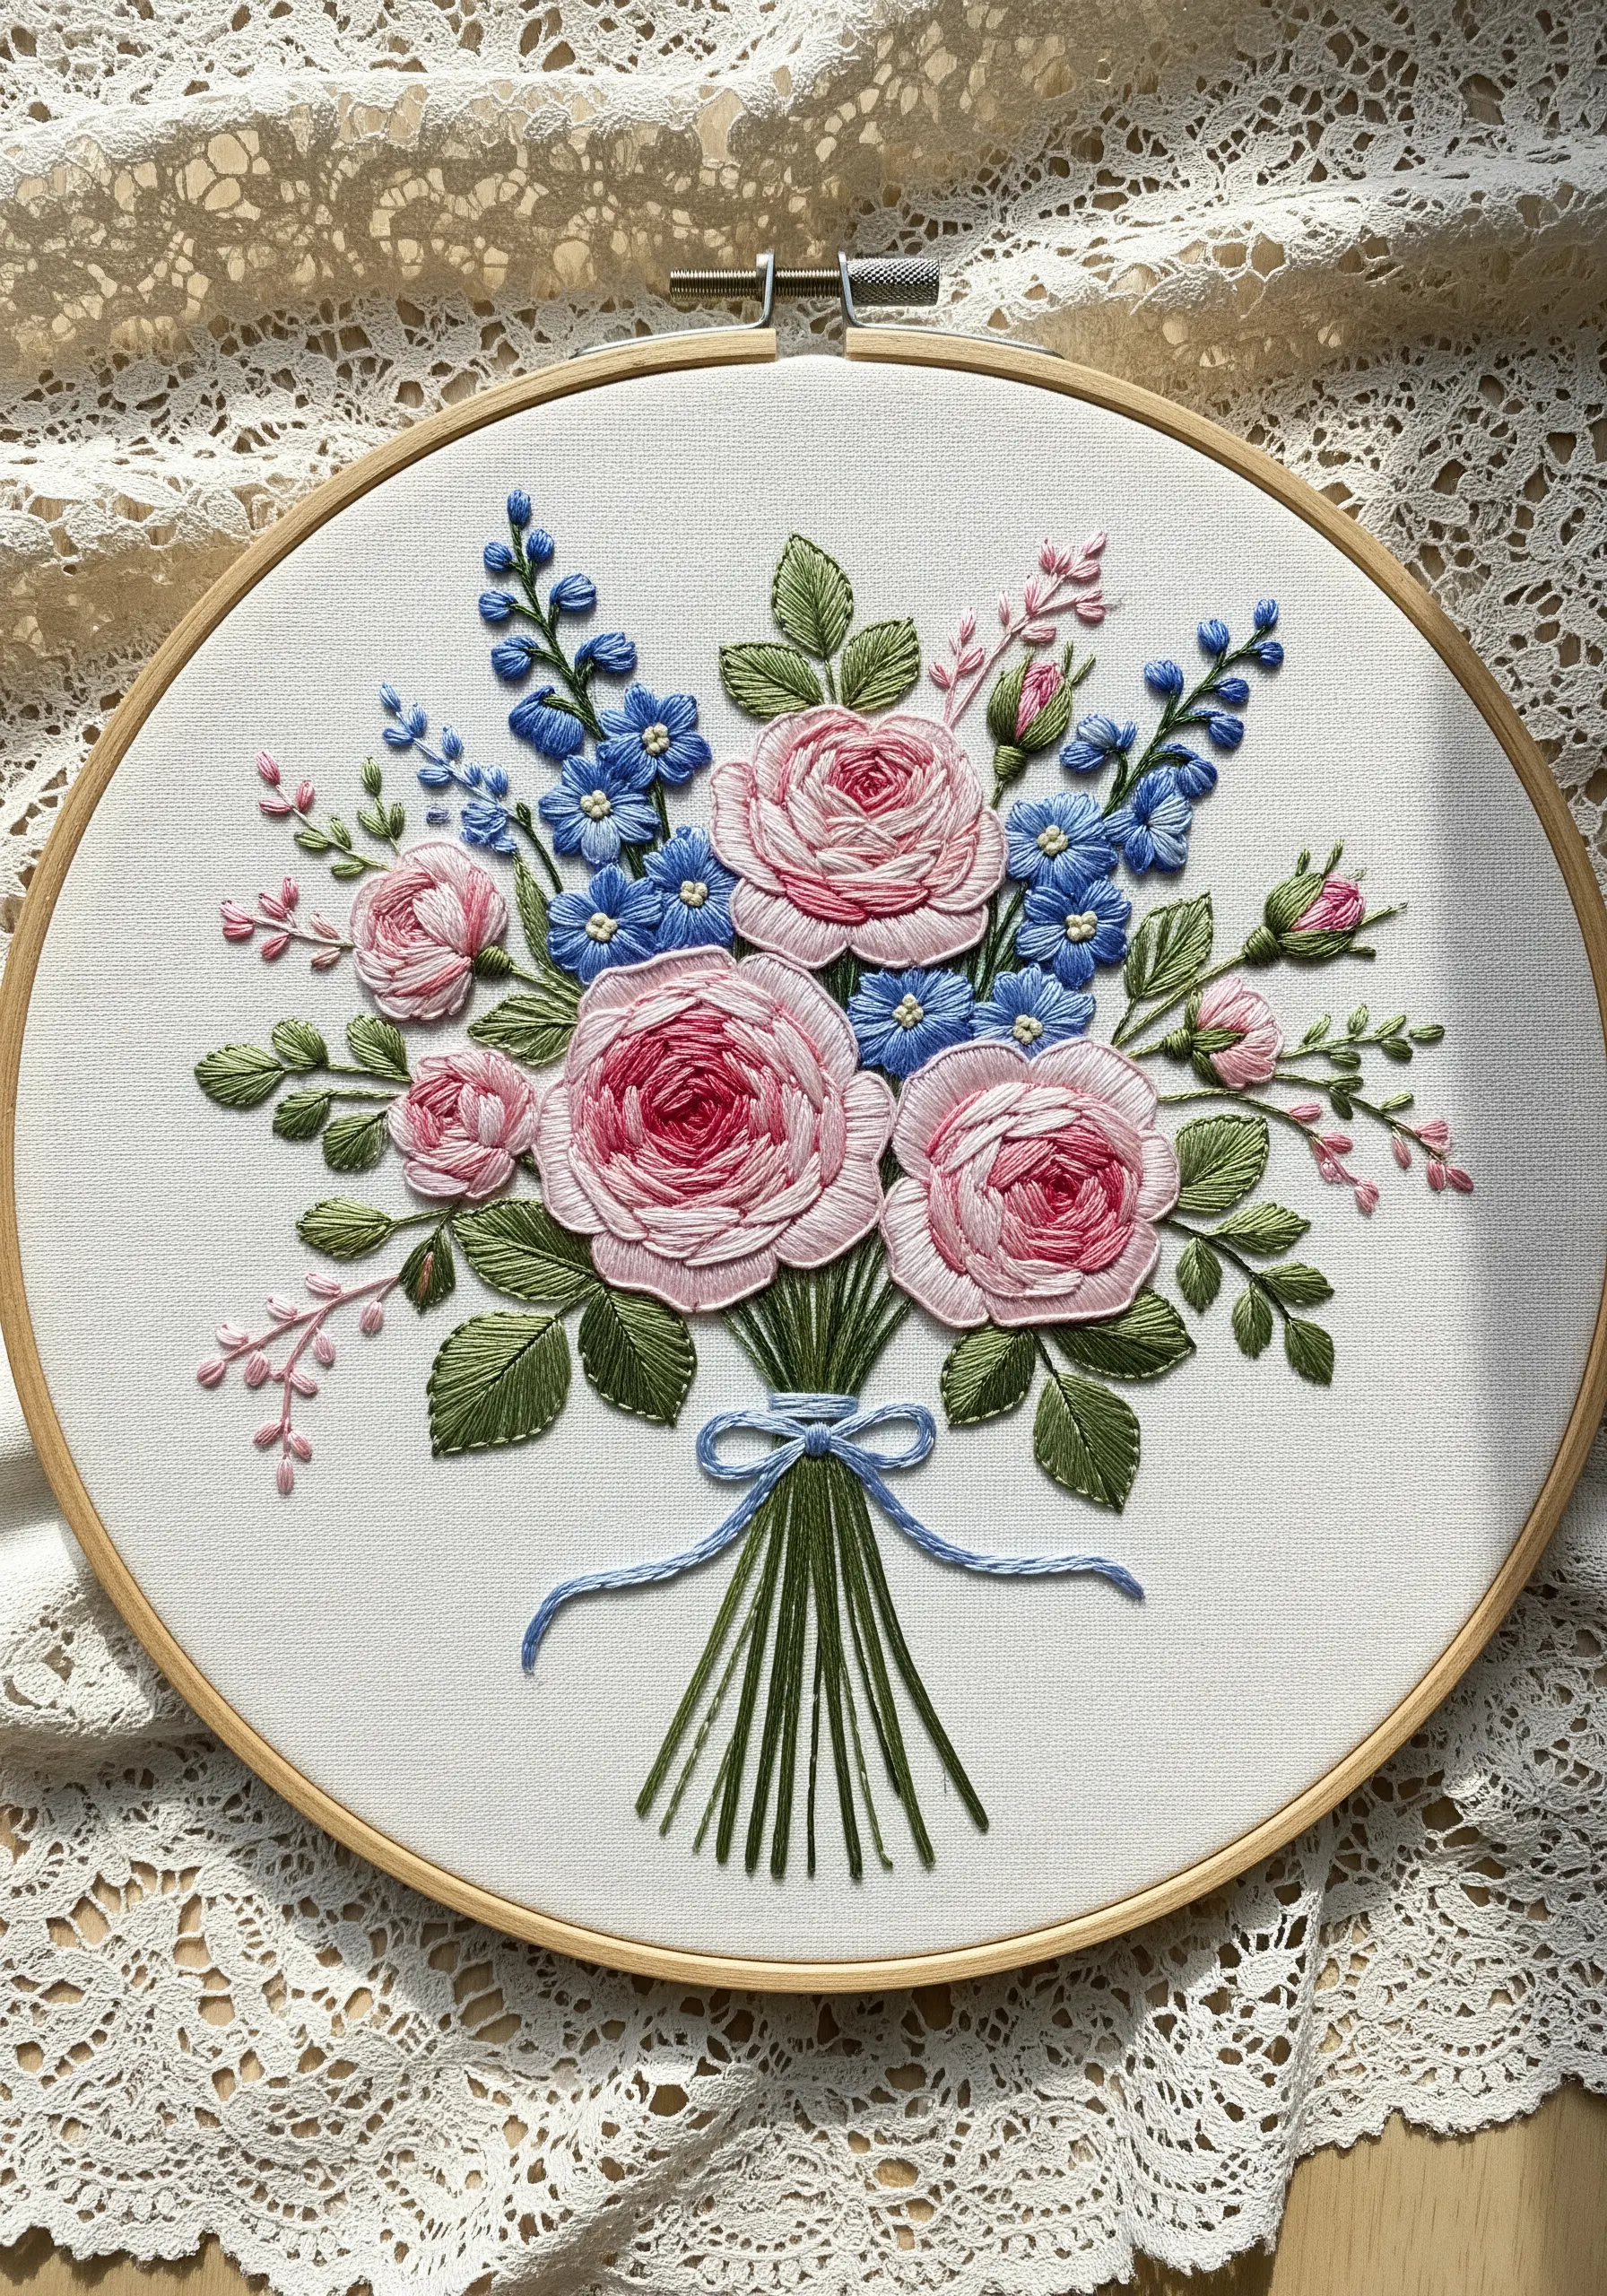
A successful bouquet composition balances highly detailed focal flowers with simpler, supporting elements.
Render the roses with careful long-and-short stitch shading to create realistic, layered petals. These are your ‘hero’ flowers and deserve the most time and detail.
For the blue forget-me-nots and other small fillers, use simple stitches like lazy daisies and French knots. Their simple forms provide color and texture without competing with the complexity of the roses.
This strategic use of detail guides the viewer’s eye and creates a harmonious, uncluttered piece.
22. Embody Abstract Concepts with Color and Stitch

Translate an abstract idea like ‘heat’ or ‘fire’ into your bouquet by using strategic color and stitch direction.
Work with an analogous color palette of reds, oranges, and yellows to create a feeling of warmth. Use long, upward-sweeping satin stitches for the chili peppers to mimic the shape of flames.
For the marigolds, use a woven wheel stitch to create a dense, fiery center. Introduce contrasting textures, like the netted look on the cockscomb flowers, by layering straight stitches in a grid pattern.
This approach tells a story beyond just depicting flowers; it evokes a feeling.
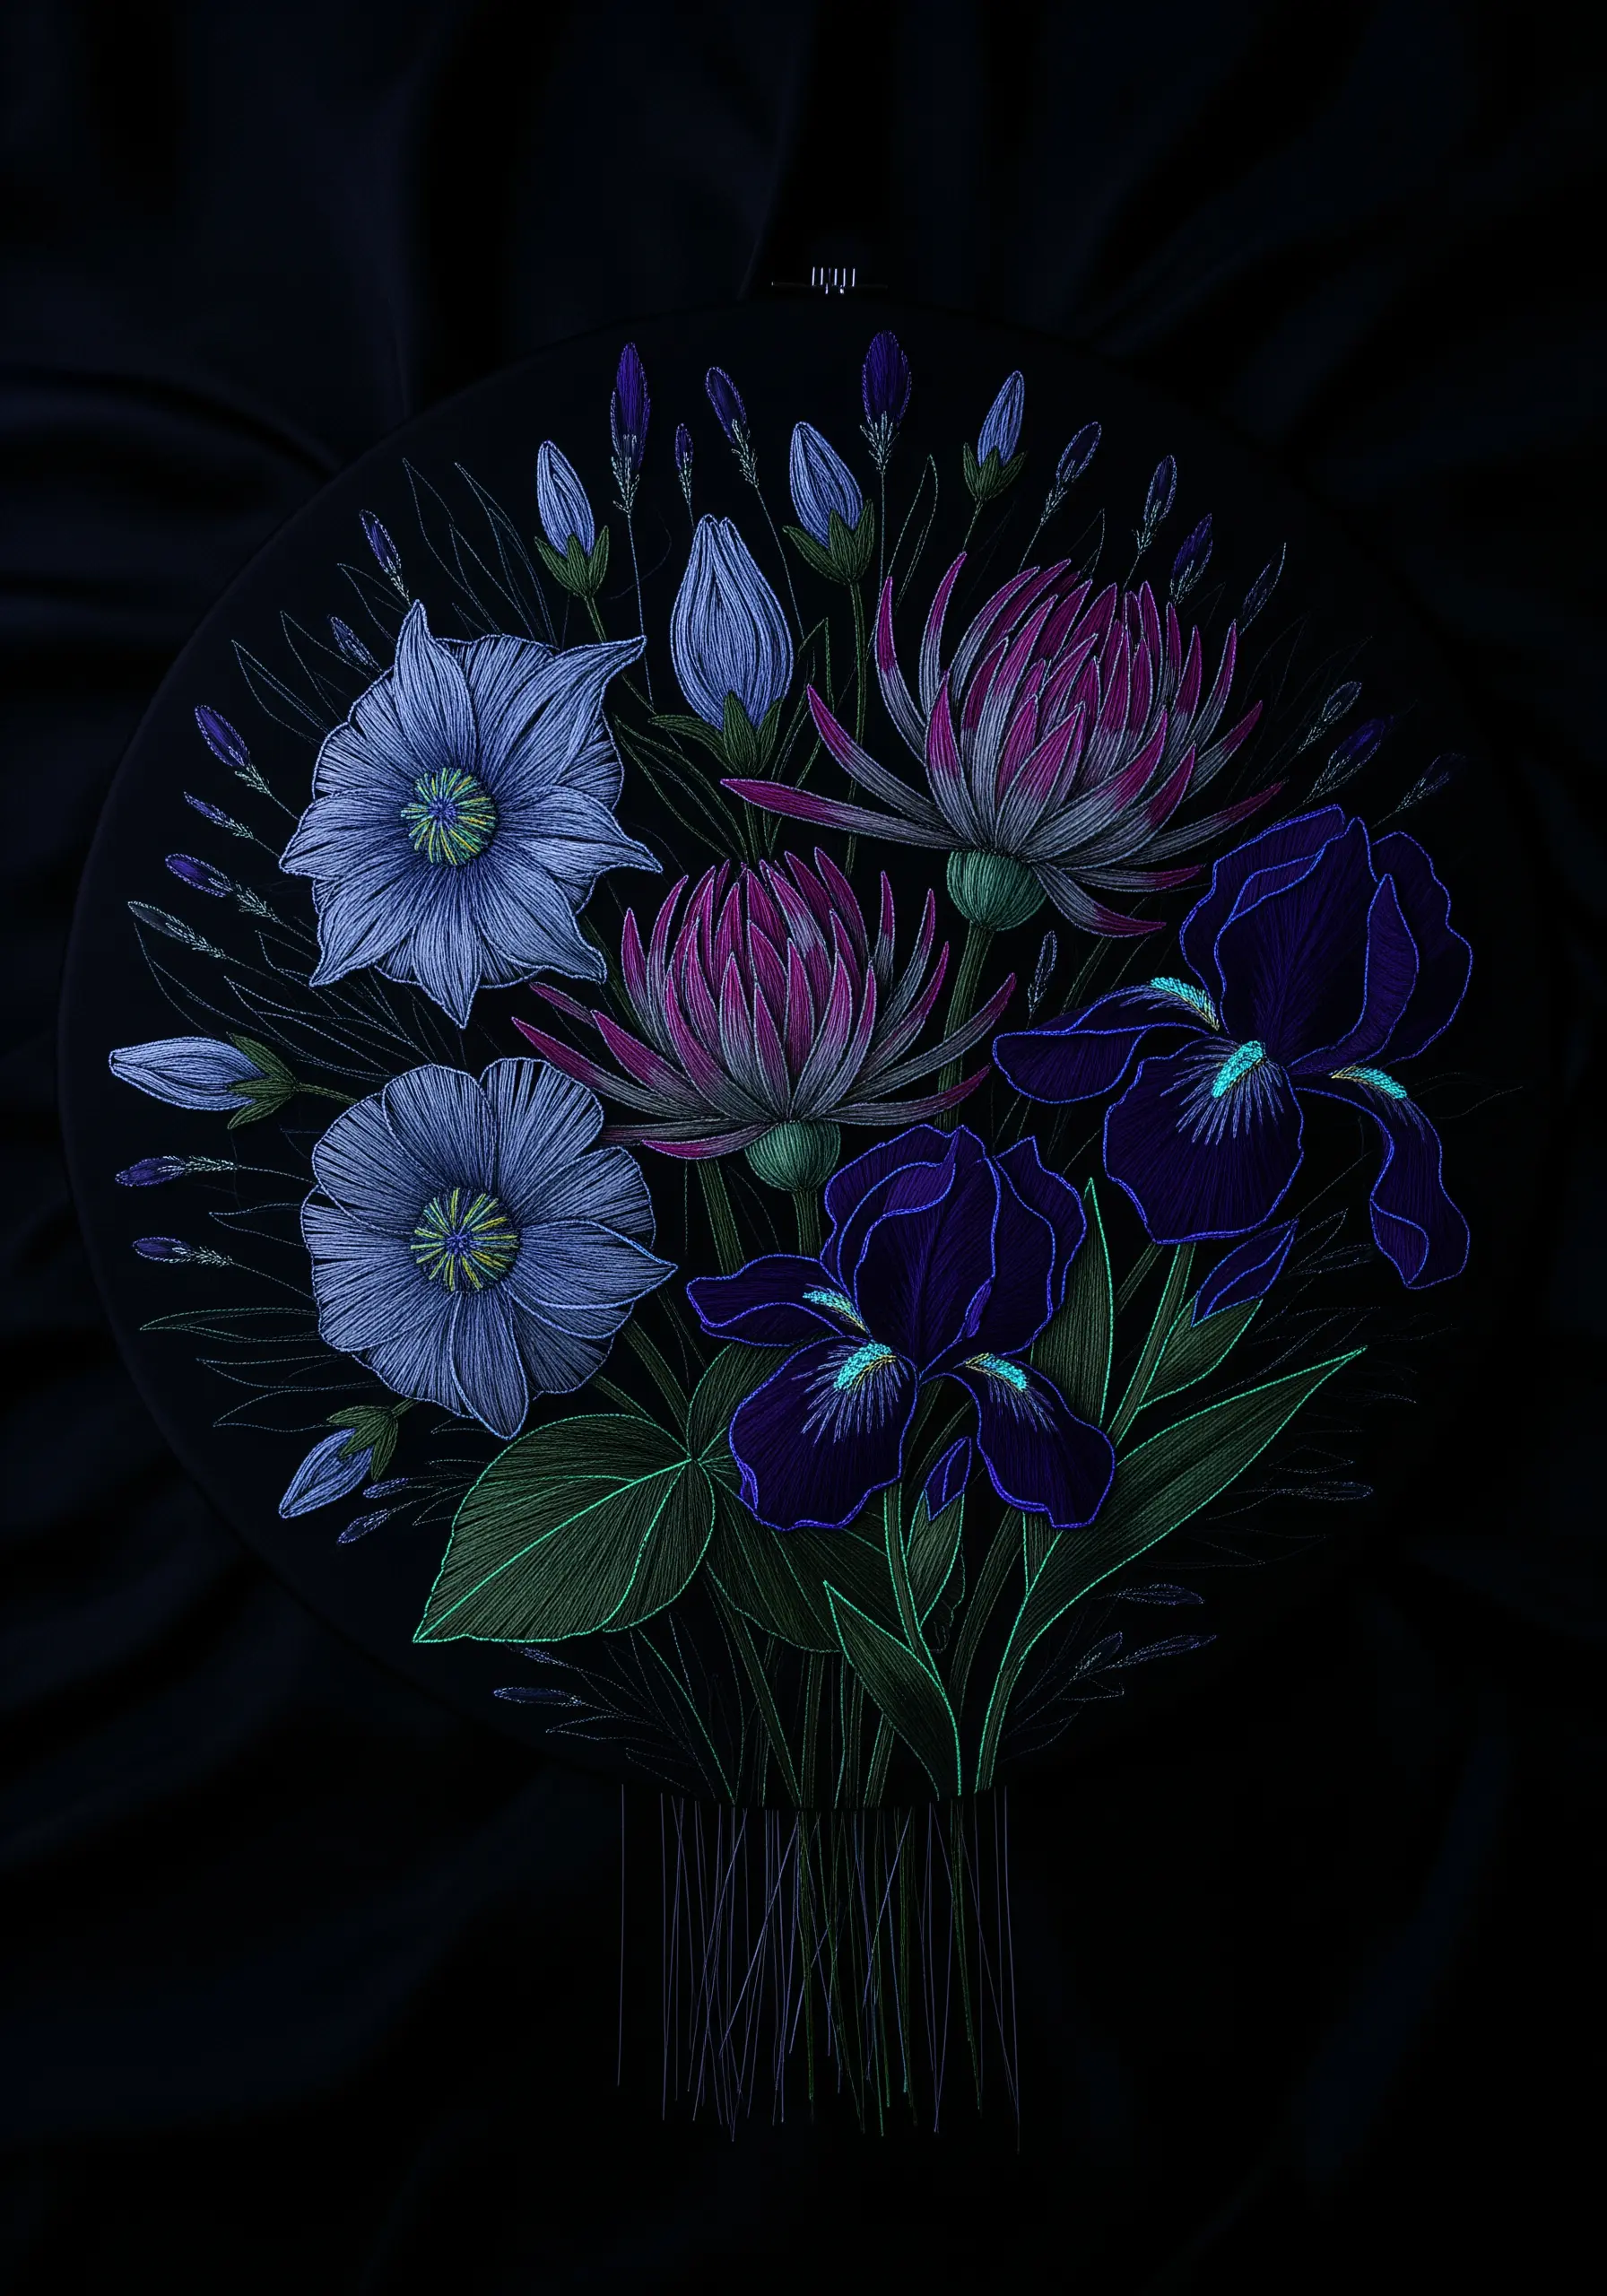
23. Create an Underwater Effect with Neon Threads
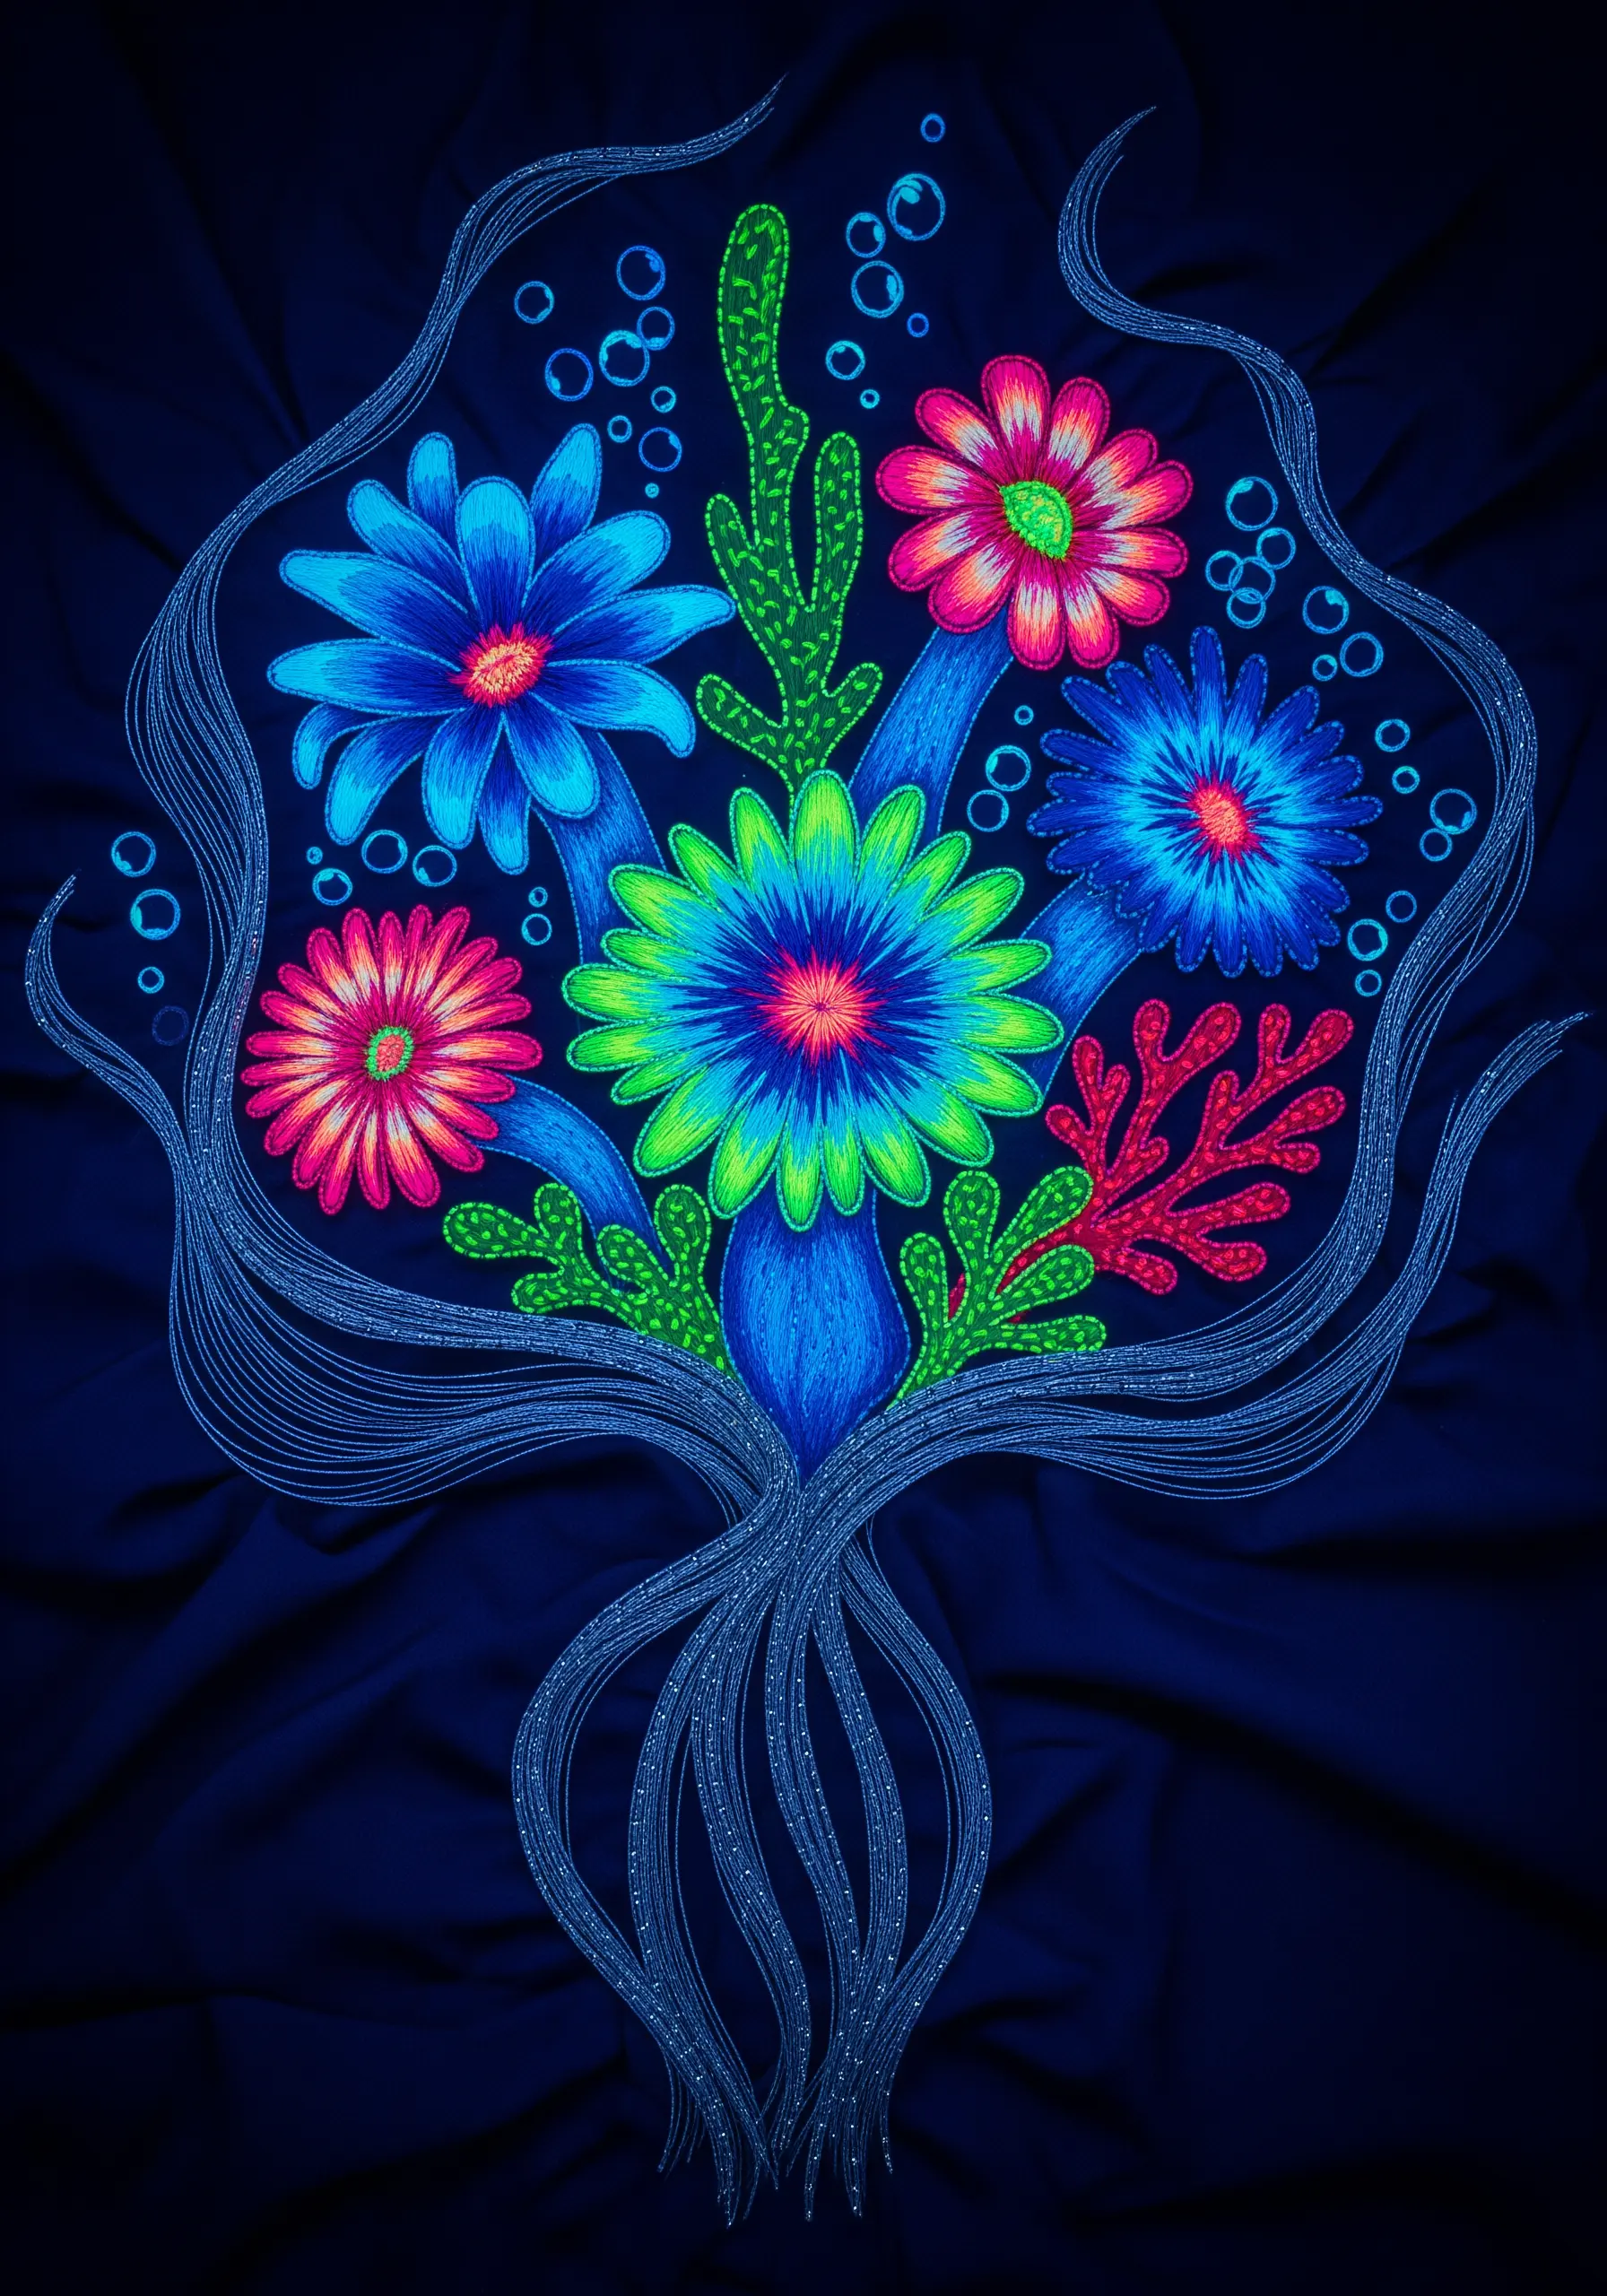
To give your bouquet a surreal, bioluminescent quality, choose neon threads and stitch on a deep navy or black fabric.
Use long-and-short stitch to blend bright, contrasting colors like electric blue, hot pink, and lime green within a single petal. This creates an otherworldly glow that feels intentional and artistic.
Scatter small French knots or seed stitches in a light, iridescent thread to represent air bubbles. The fine, shimmering lines forming the bouquet’s outline can be achieved with a whipped backstitch using a thin metallic thread.
24. Capture Delicate Forms with Sheer Fabric
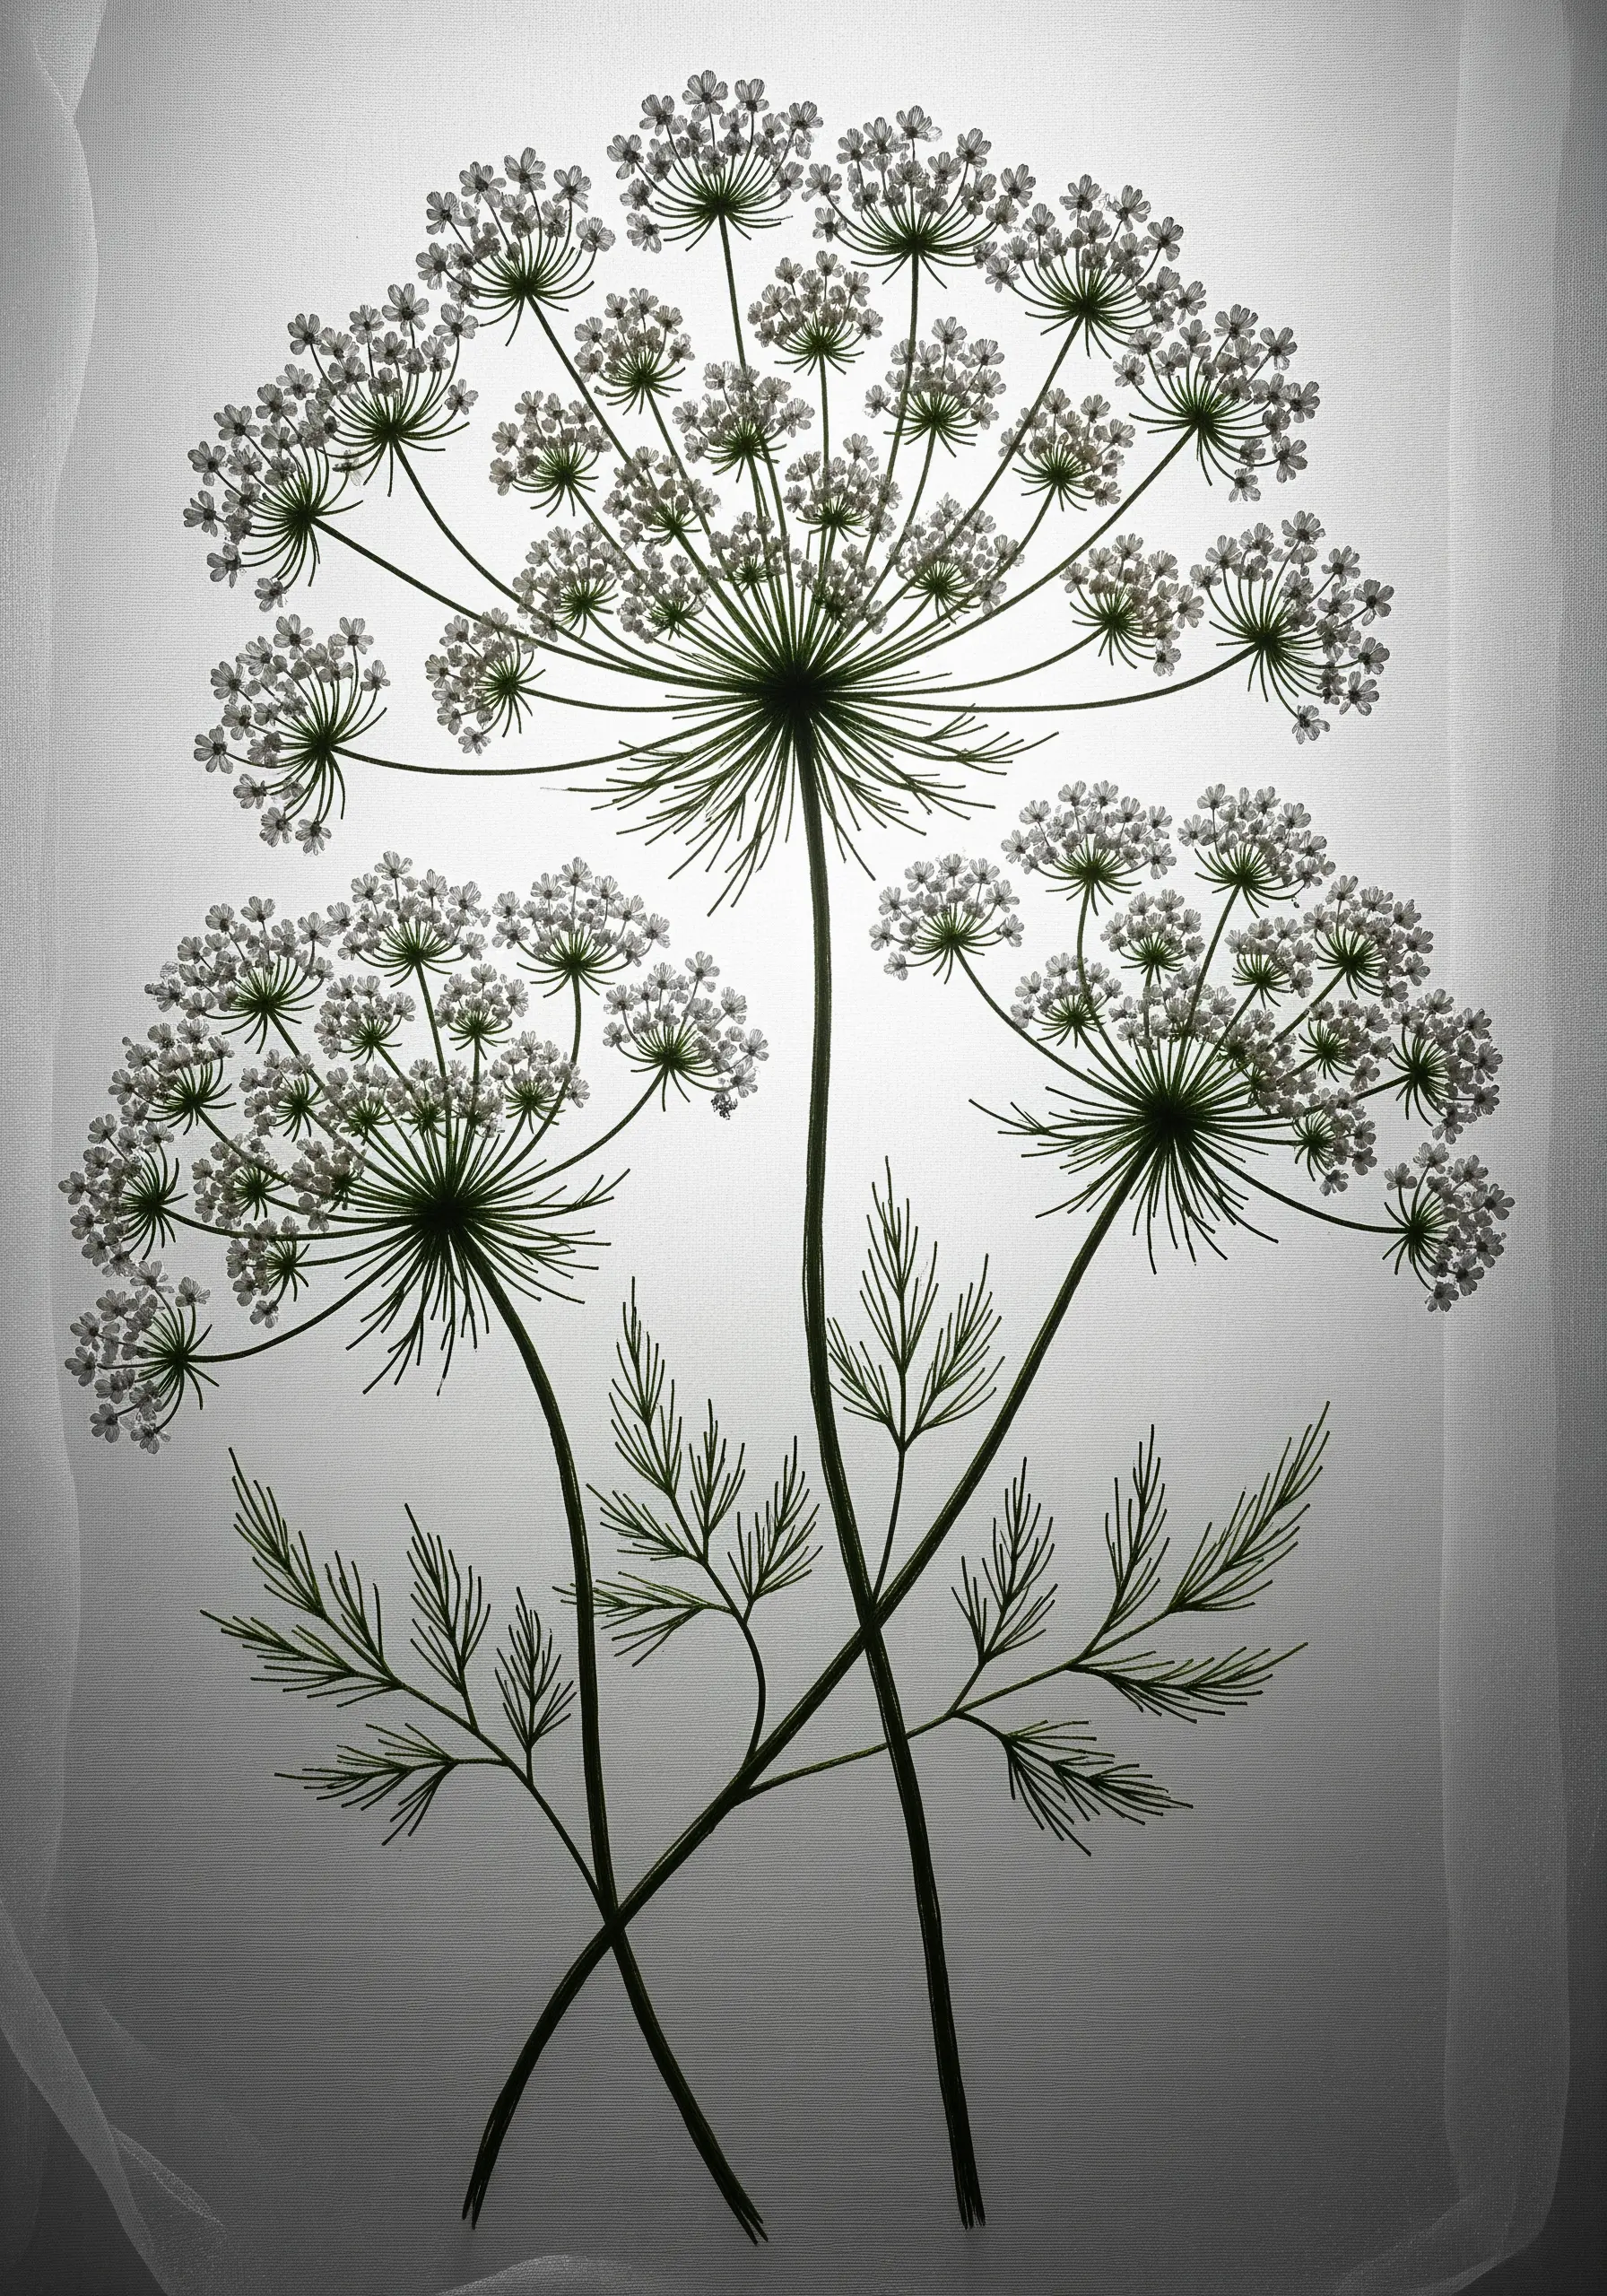
Stitching on organza or other sheer fabrics allows you to play with light and create incredibly delicate, ethereal designs.
To stitch something as fine as Queen Anne’s lace, use a single strand of floss. Create the tiny flower clusters with miniature French knots or seed stitches.
The transparency of the fabric makes the stems and leaves appear as if they are floating. When framed or hung in a window, light will pass through the fabric, highlighting the threadwork in a way that opaque fabric cannot.
Always use a stabilizer that can be washed away or carefully trimmed after stitching.
25. Compose a Master Study in Floral Texture
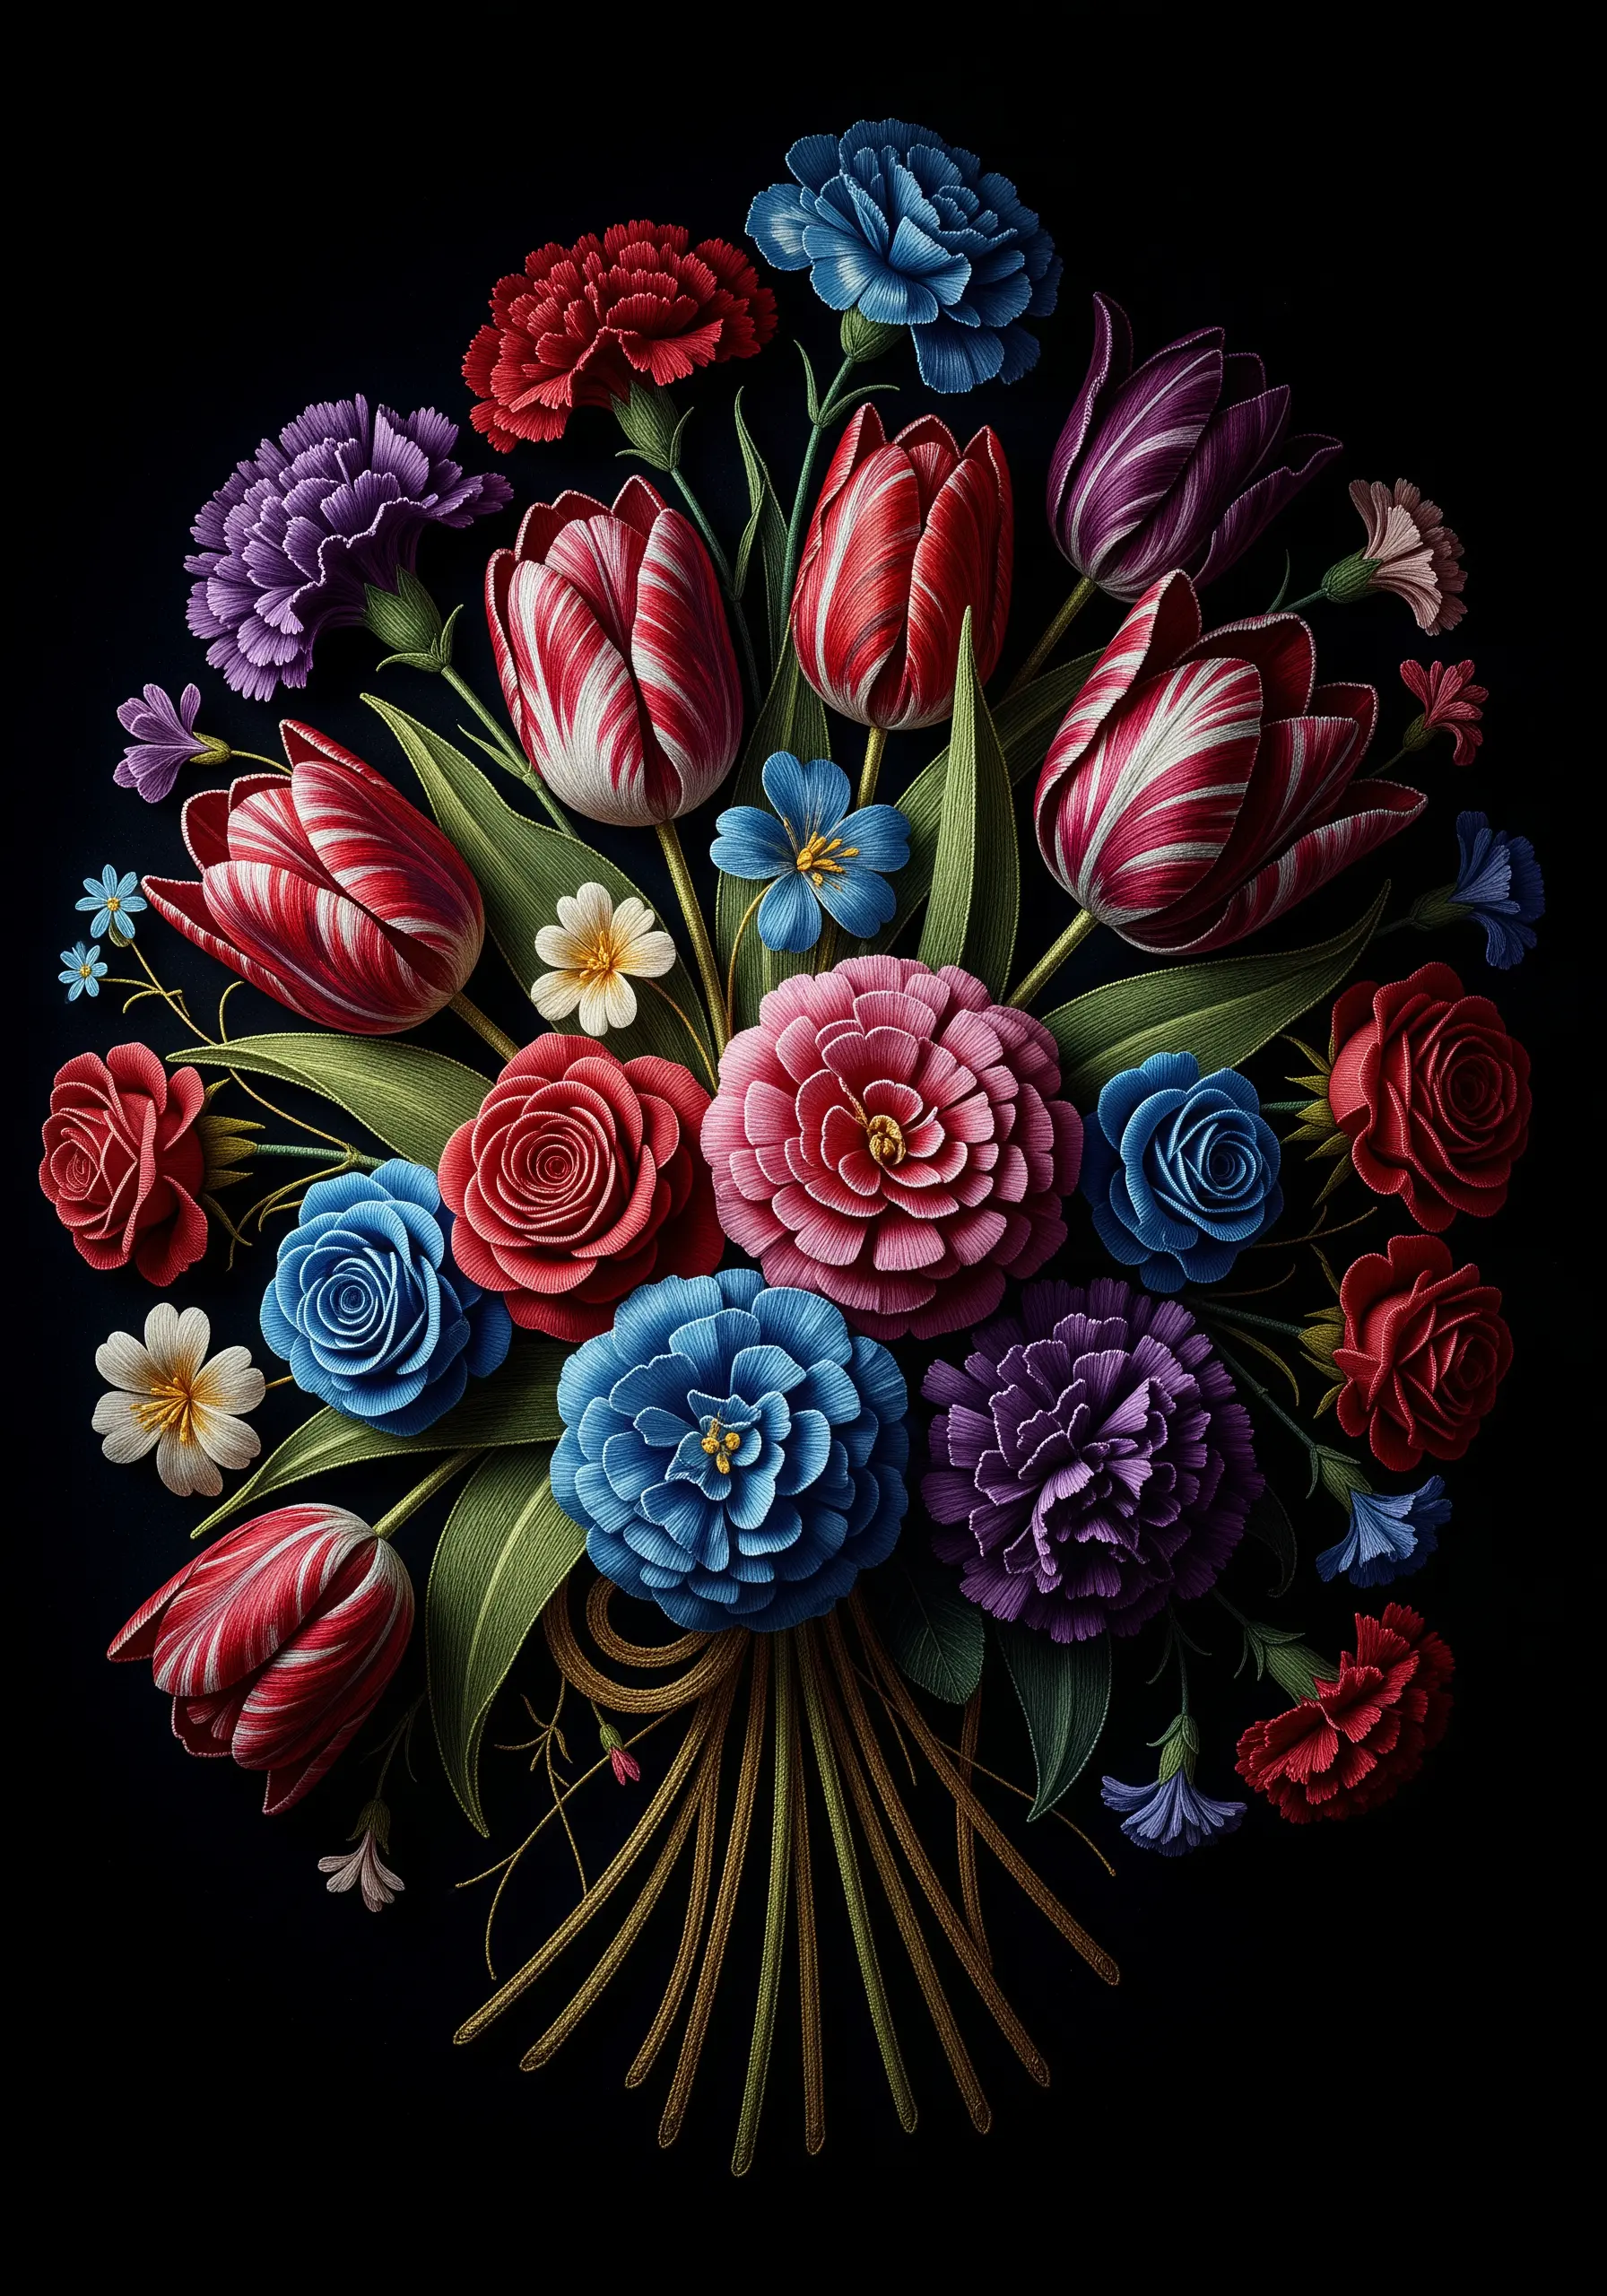
A dense, multi-flower bouquet is the ultimate practice in creating distinct textures that work together harmoniously.
Assign a unique stitch strategy to each flower type. Use padded satin stitch for the tightly coiled rose centers, long-and-short stitch for the larger petals, and bullion knots for the carnations.
The key to a cohesive look is a unified color palette. Even with varied stitches, tying the composition together with recurring shades of red, blue, and pink prevents it from looking chaotic.
This piece becomes less of a simple bouquet and more of an intricate sampler of modern embroidery stitches.
26. Layer Stitches for Uniquely Shaped Flowers
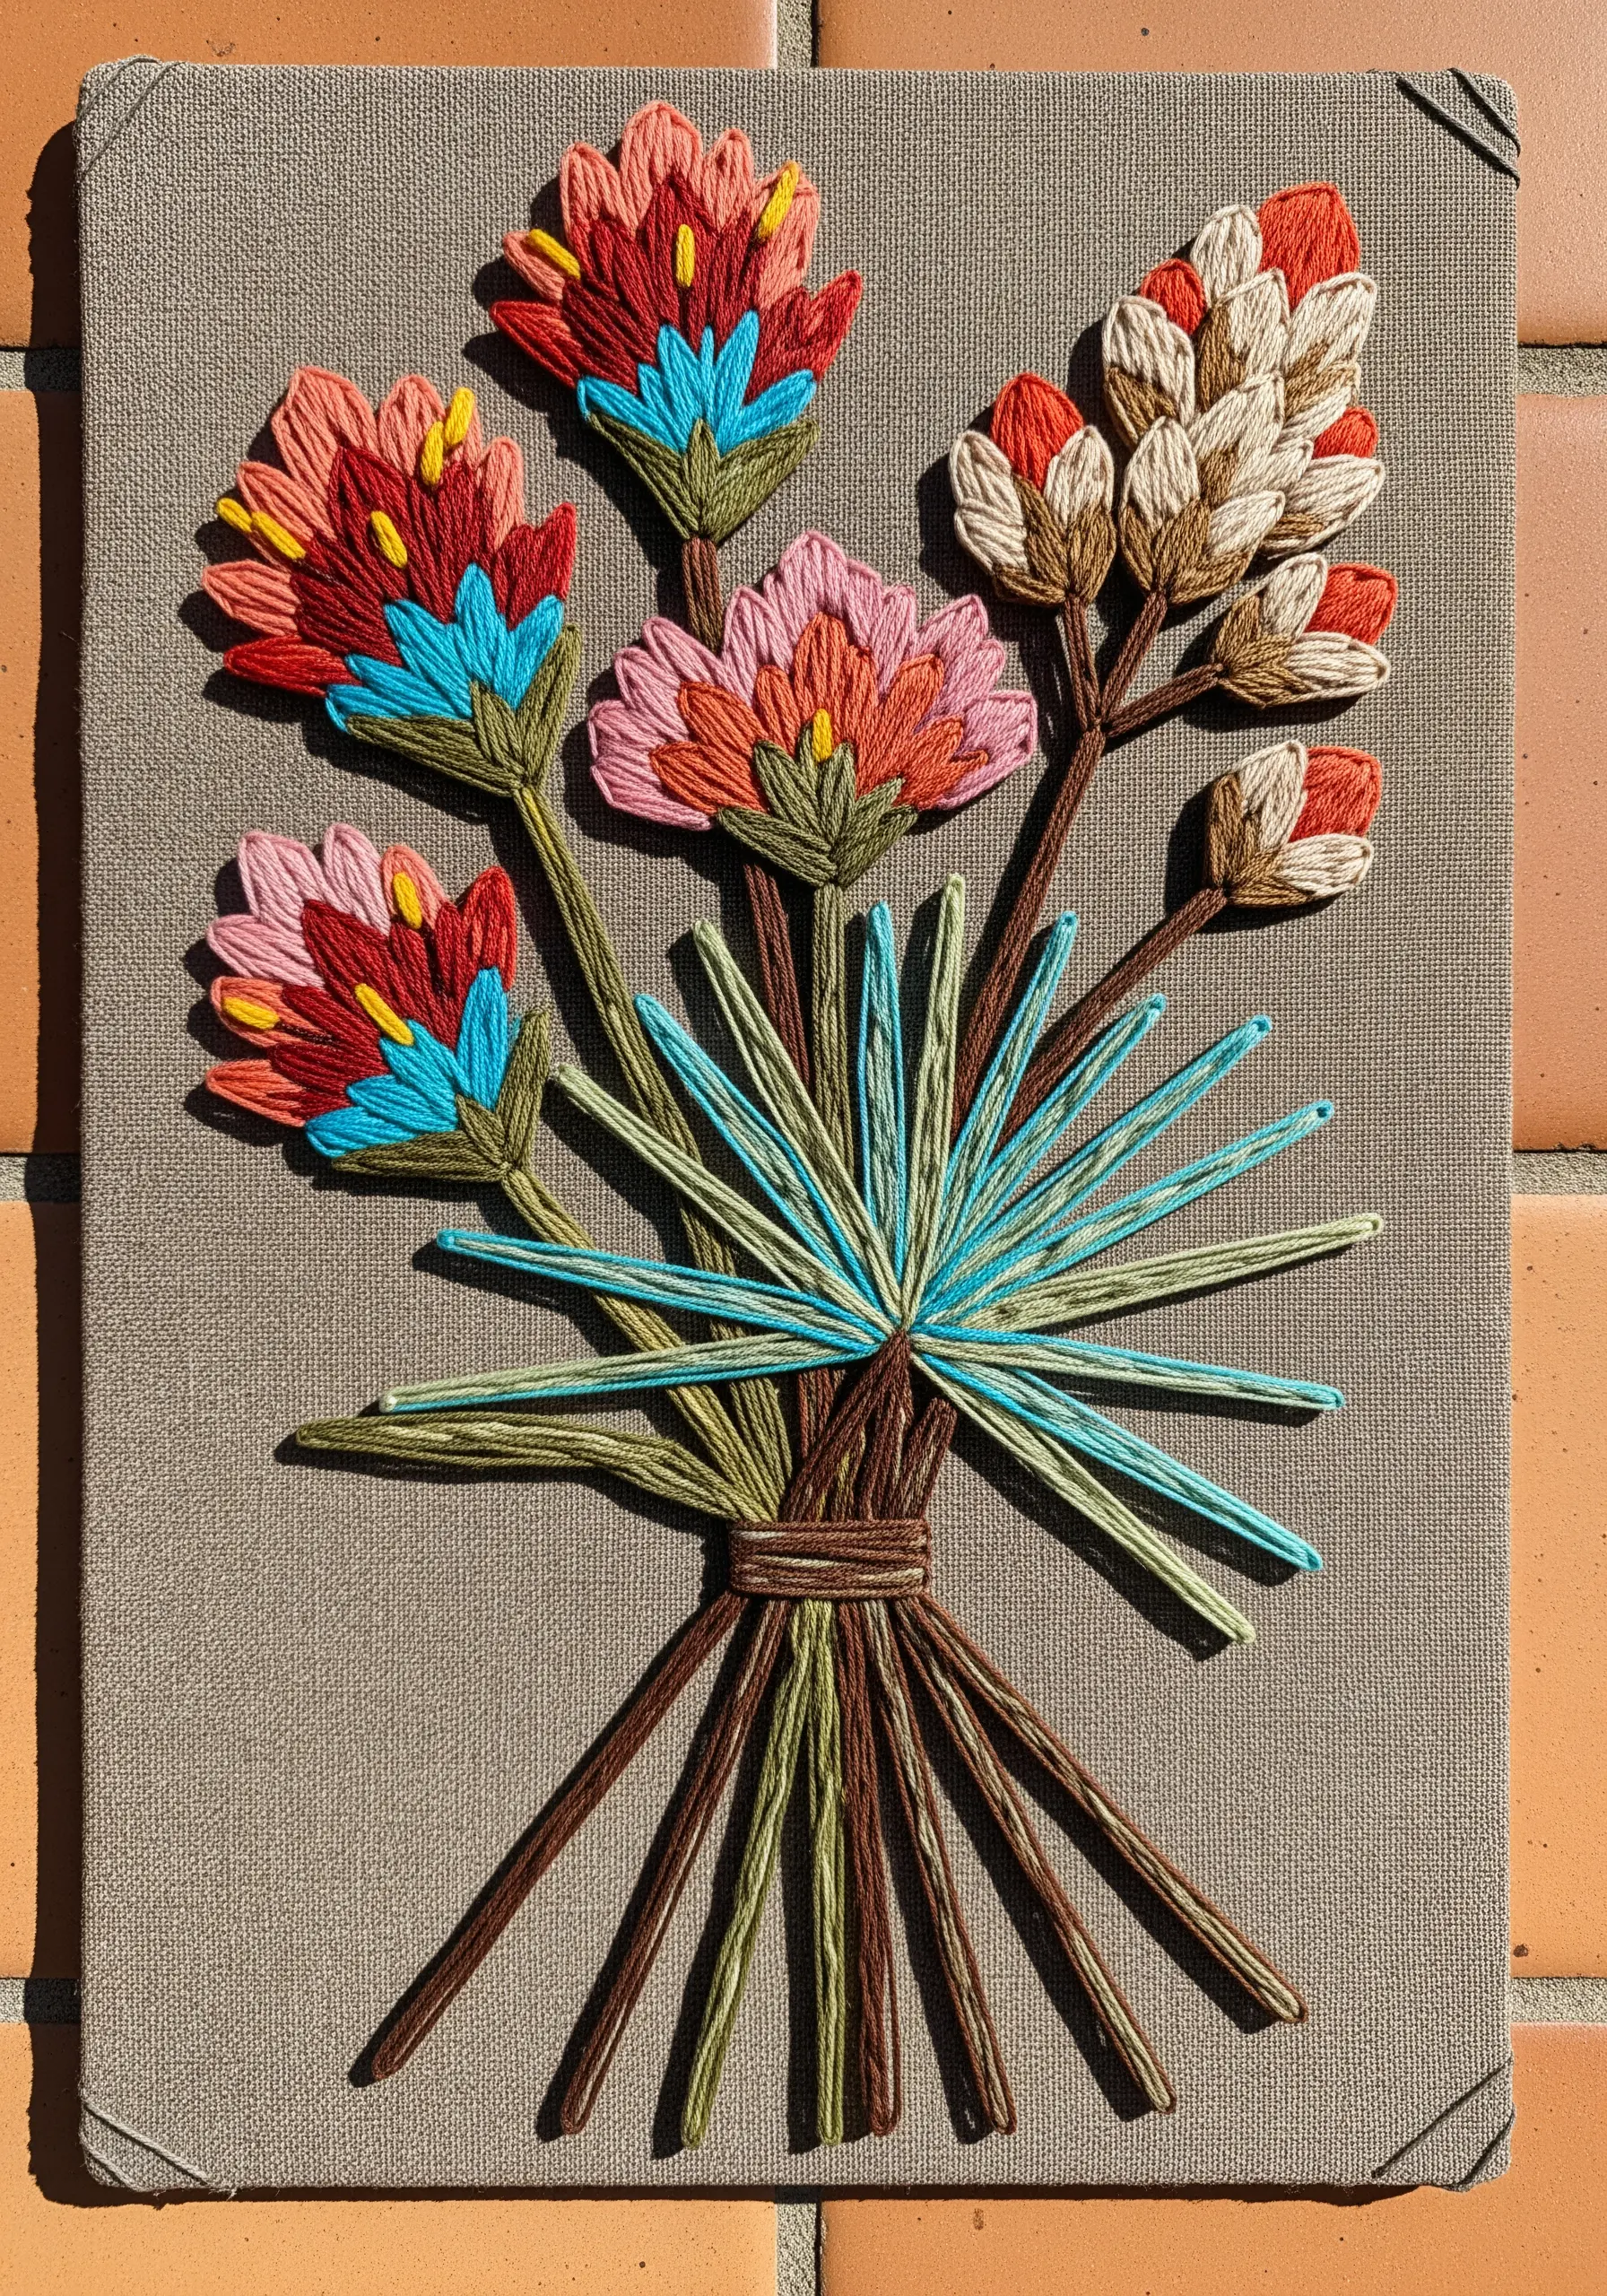
For flowers with a complex structure like Indian paintbrush, layering is essential to capture their form.
Start by creating a base of shorter satin stitches in a dark red or brown. Then, layer longer satin stitches in brighter oranges, pinks, and blues over the top, extending them upward.
For the feathery leaves, use a fan of straight stitches in contrasting shades of green and teal. This creates a spiky, dynamic texture that complements the upward motion of the flowers.
This method of building color and form in layers adds a sense of depth and realism to your work.
27. Shade Large Petals for Soft Realism
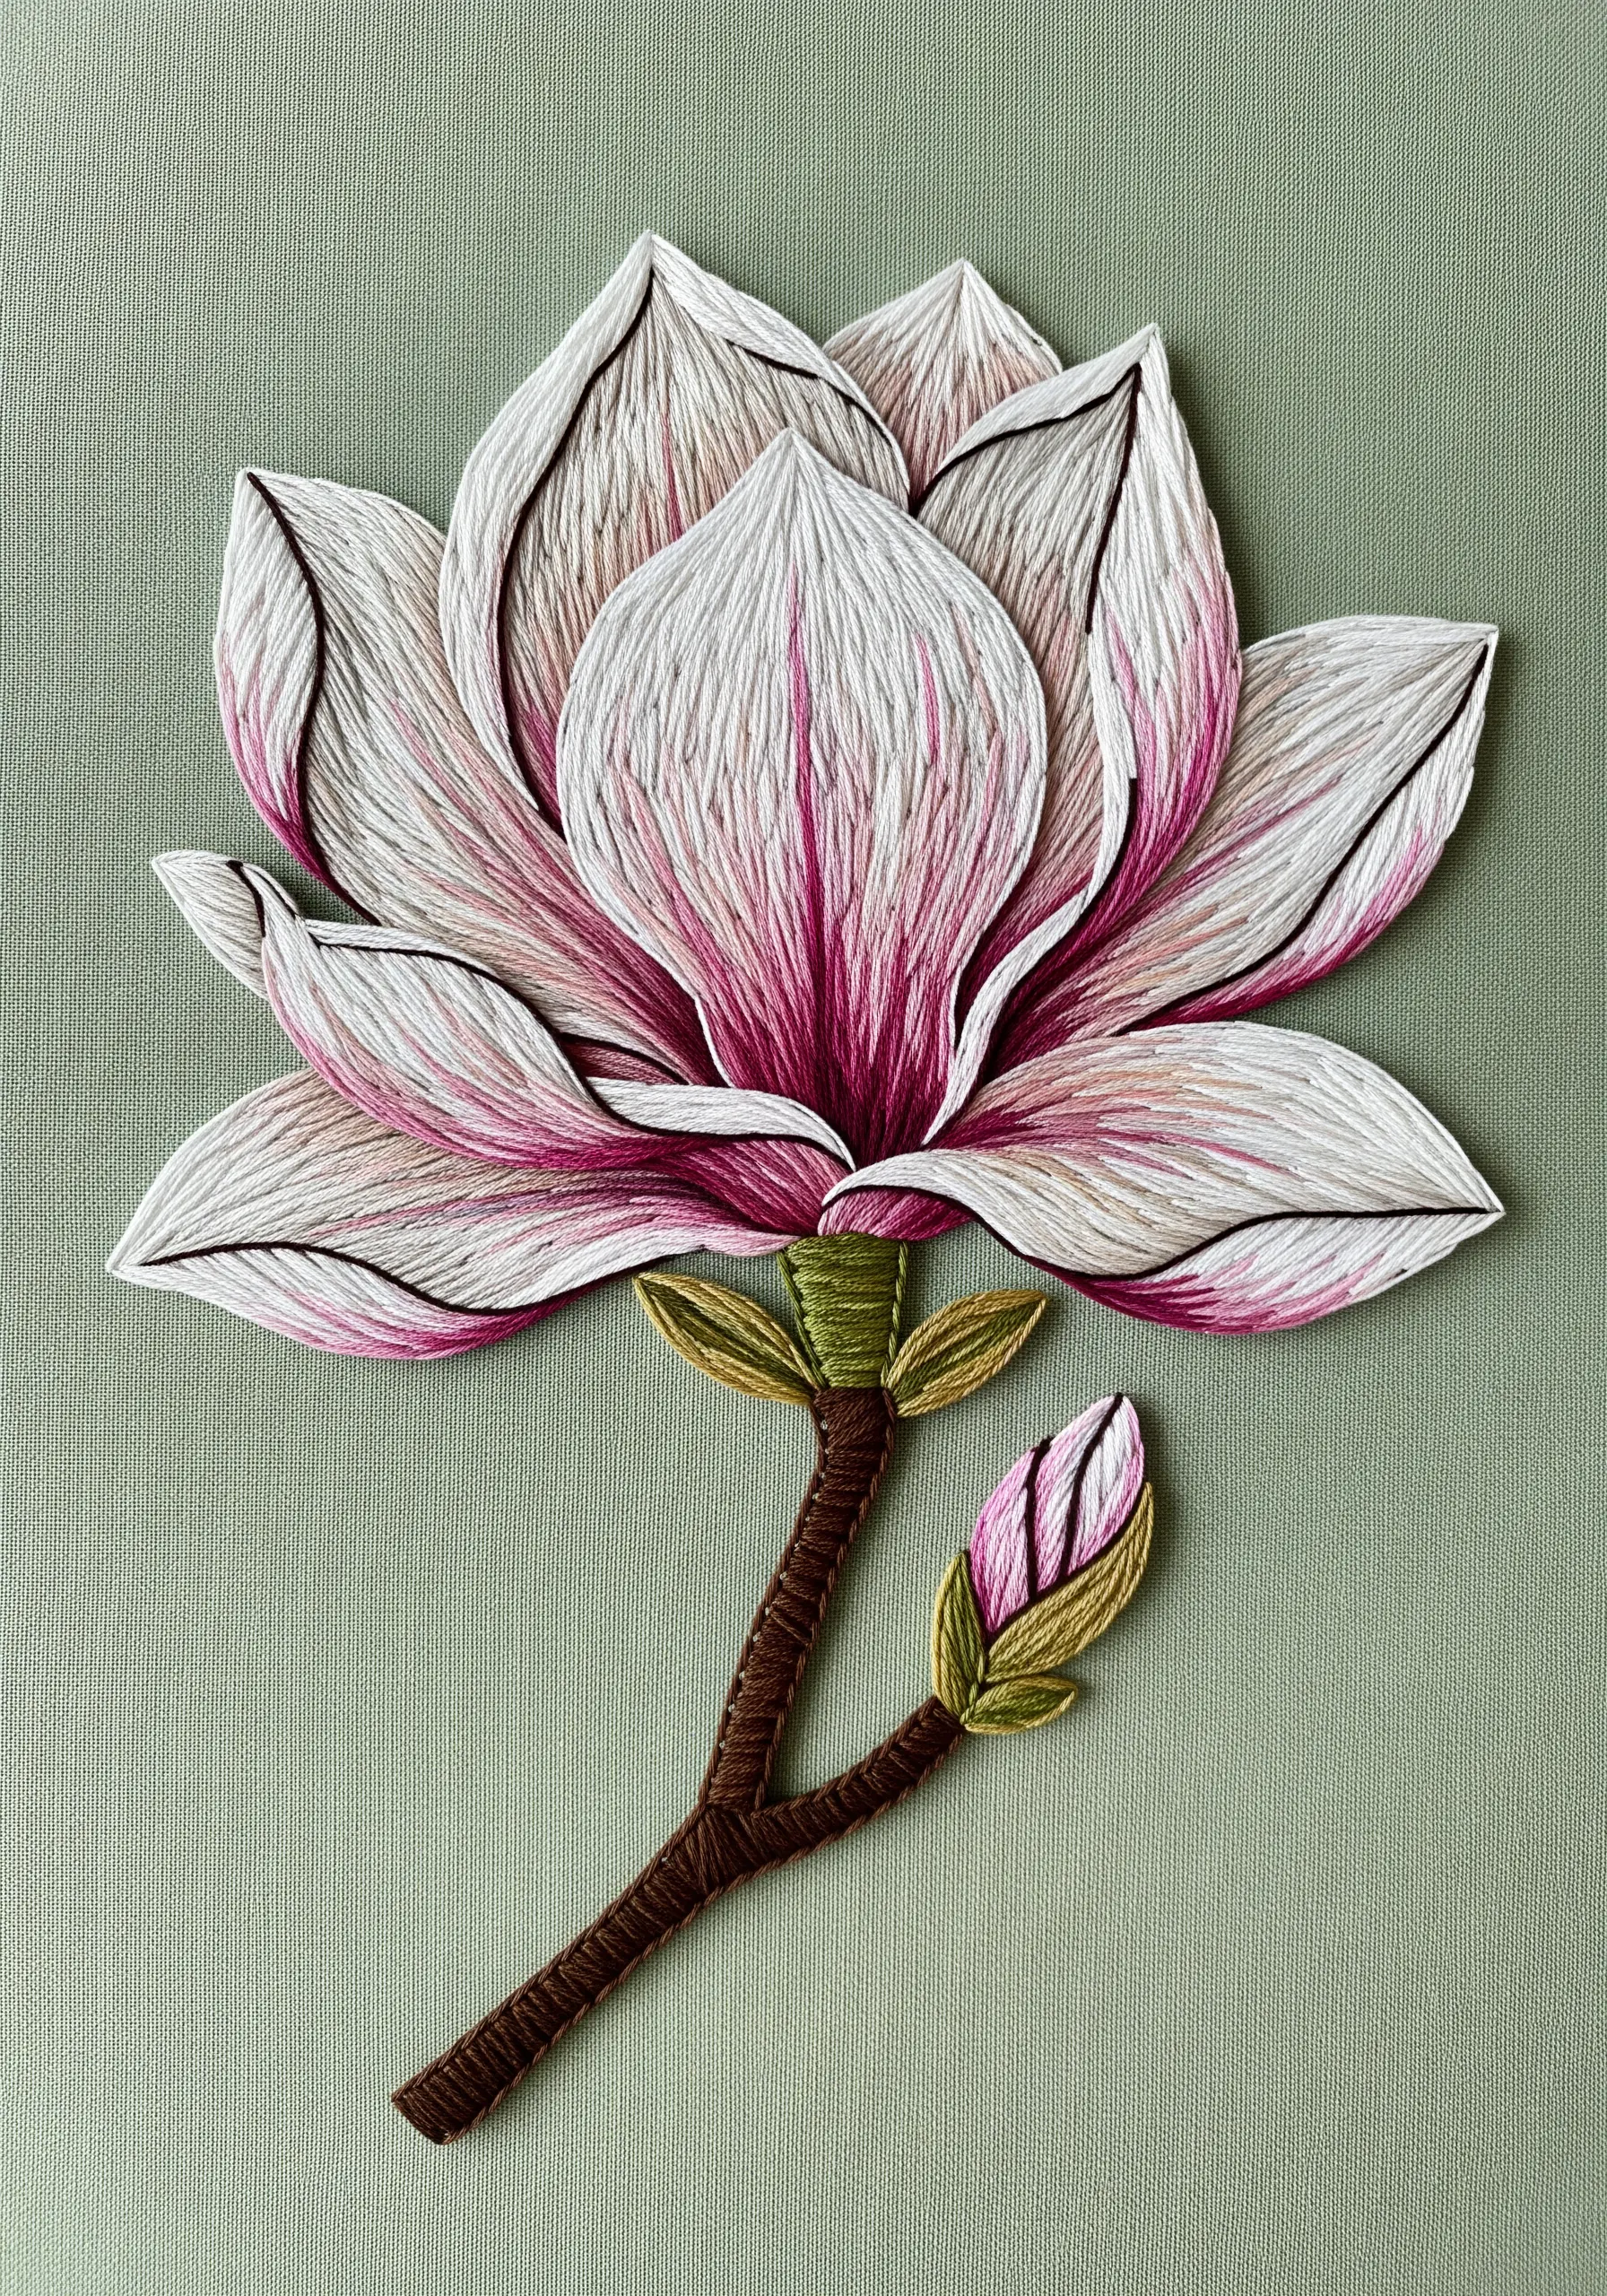
The large, graceful petals of a magnolia are the perfect canvas for practicing subtle, realistic shading.
Using the long-and-short stitch, fill the majority of each petal with an off-white or cream thread. Follow the natural curve of the petal with your stitches.
Introduce the pink and magenta shades at the base of the petal, using fewer and shorter stitches. Blend them gently into the white, allowing the color to fade naturally toward the edge.
Use a single strand of dark thread to add the finest veins and outlines, which gives the soft petals a crisp, defined structure.
28. Embrace Bold Folk Art with Solid Fills

Folk art embroidery celebrates color and form over realism, making it wonderfully freeing to stitch.
Use a thicker thread, such as all six strands of cotton floss or a size 8 Perle cotton, to achieve a bold, graphic look.
Fill each shape with a dense, smooth satin stitch. The key to this style is flawless execution of simple stitches. Ensure your edges are crisp and your stitches lie perfectly flat and parallel.
Don’t be afraid of primary colors and high contrast; this style is meant to be joyful and eye-catching.
29. Create Water and Light with Thread
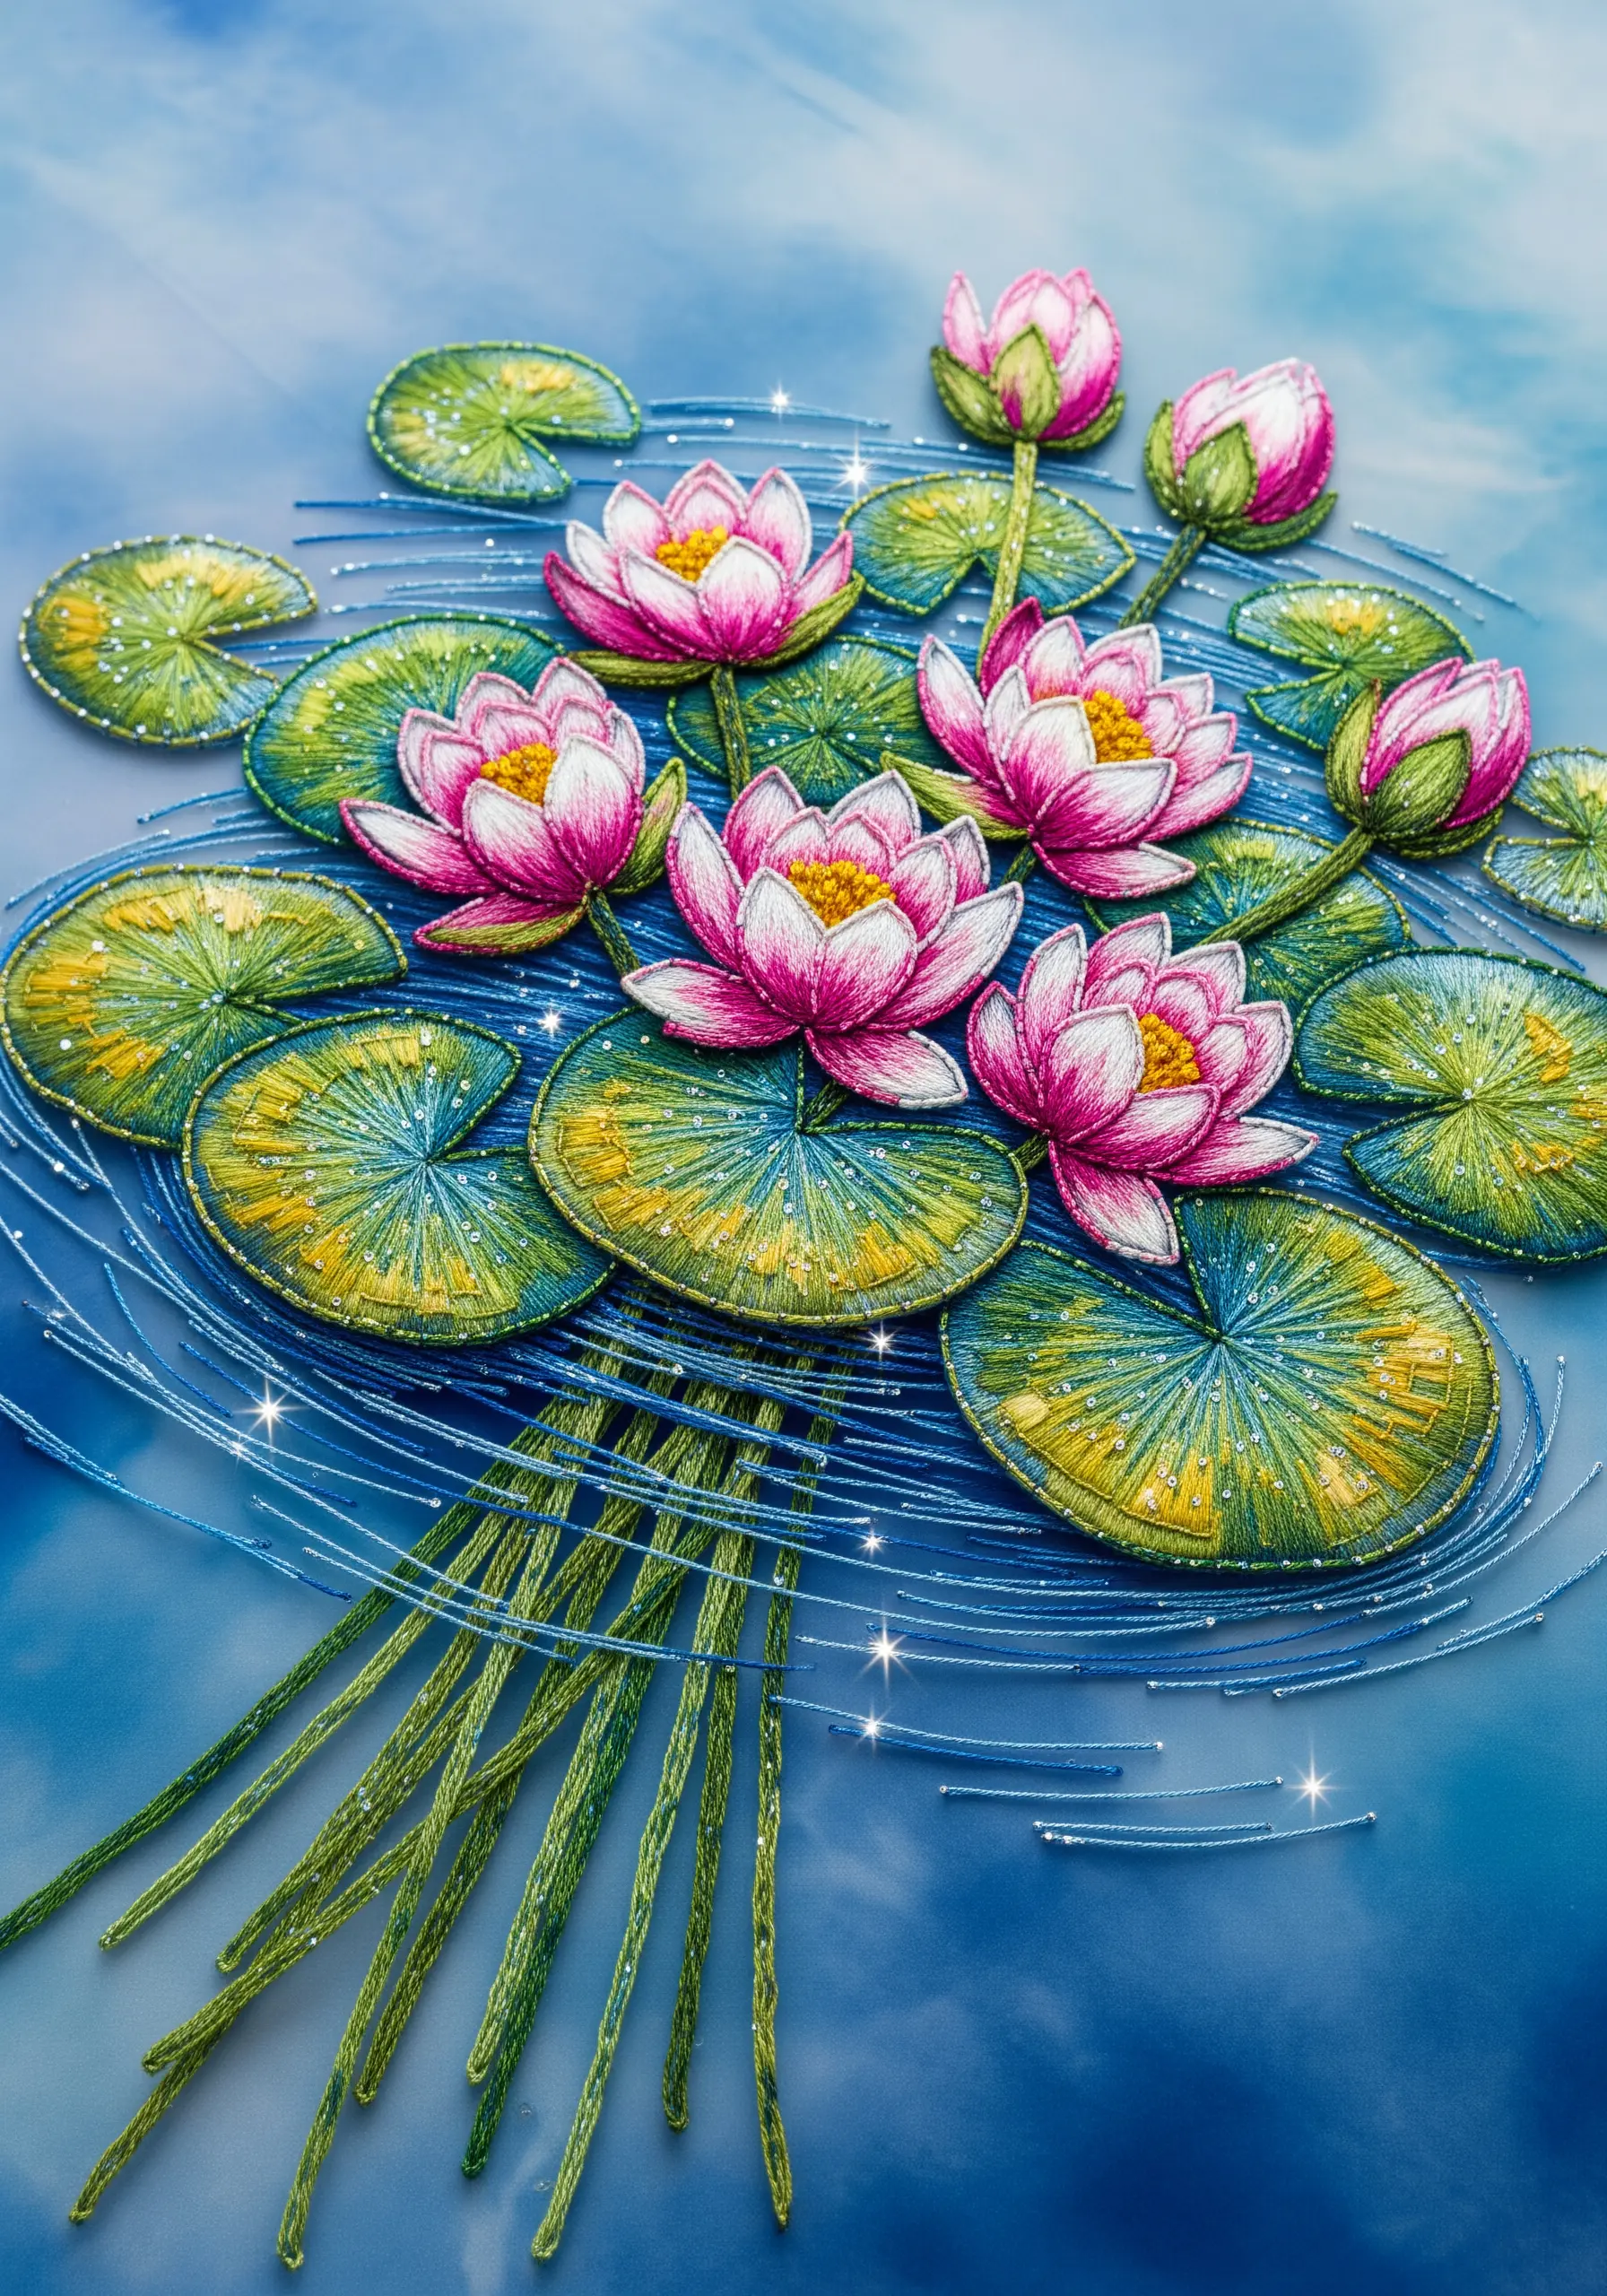
Suggest the surface of water not by coloring it in, but by stitching the reflection and movement.
Use long, horizontal straight stitches with a high-sheen rayon or metallic thread in shades of blue and silver. Vary the length and spacing of your stitches to create a sense of shimmering movement.
For the lily pads, use a blend of green and yellow threads in a directional satin stitch. Add a touch of sparkle with tiny, scattered seed stitches or beads to mimic water droplets.
This technique focuses on creating an atmosphere rather than a literal depiction.
30. Achieve Gothic Drama with a Monochrome Palette
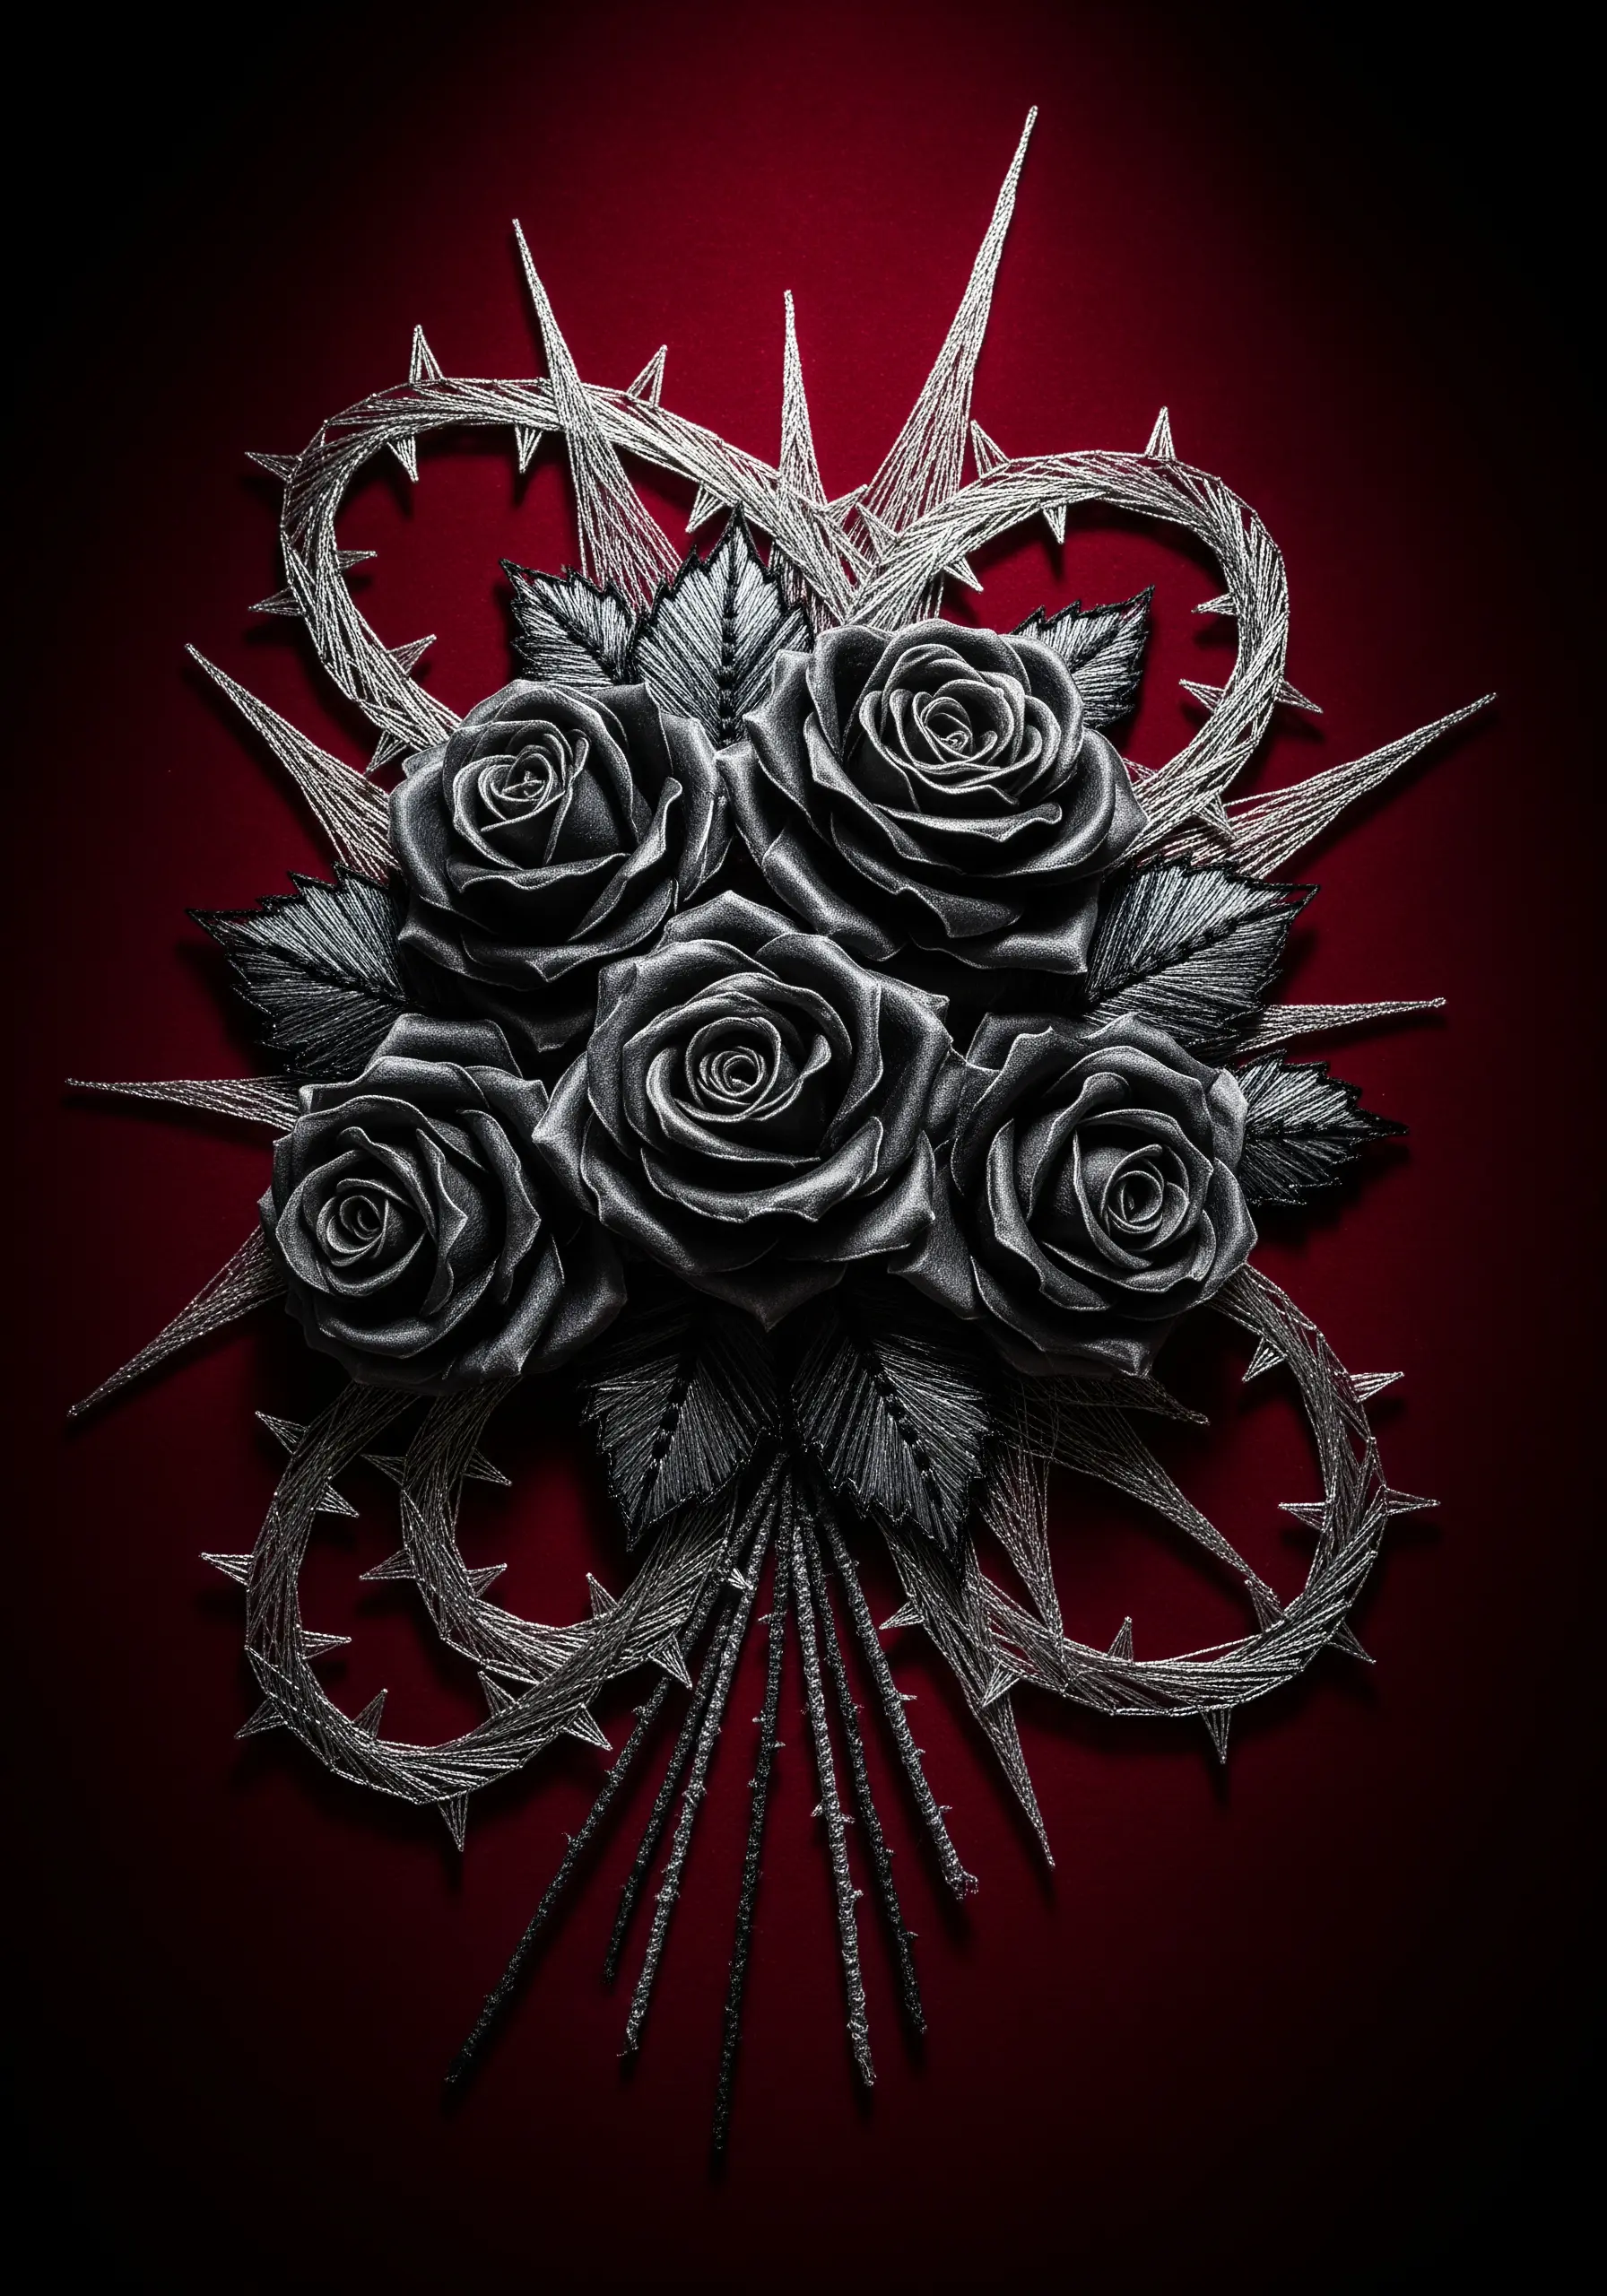
Create a powerful, dramatic mood by stripping away color and focusing on form, texture, and a touch of metallic shine.
Use a range of gray and black threads to thread-paint the roses, relying on stitch direction to create highlights and deep shadows. This gives them a sculptural, almost metallic look.
For the thorny branches, use a wrapped backstitch or couch a textured silver metallic braid onto the surface. This adds a sharp, dangerous texture that contrasts beautifully with the soft rose petals.
Stitching on a deep red or velvet background enhances the gothic, romantic atmosphere.
31. Capture the Nuances of an Herb Bouquet
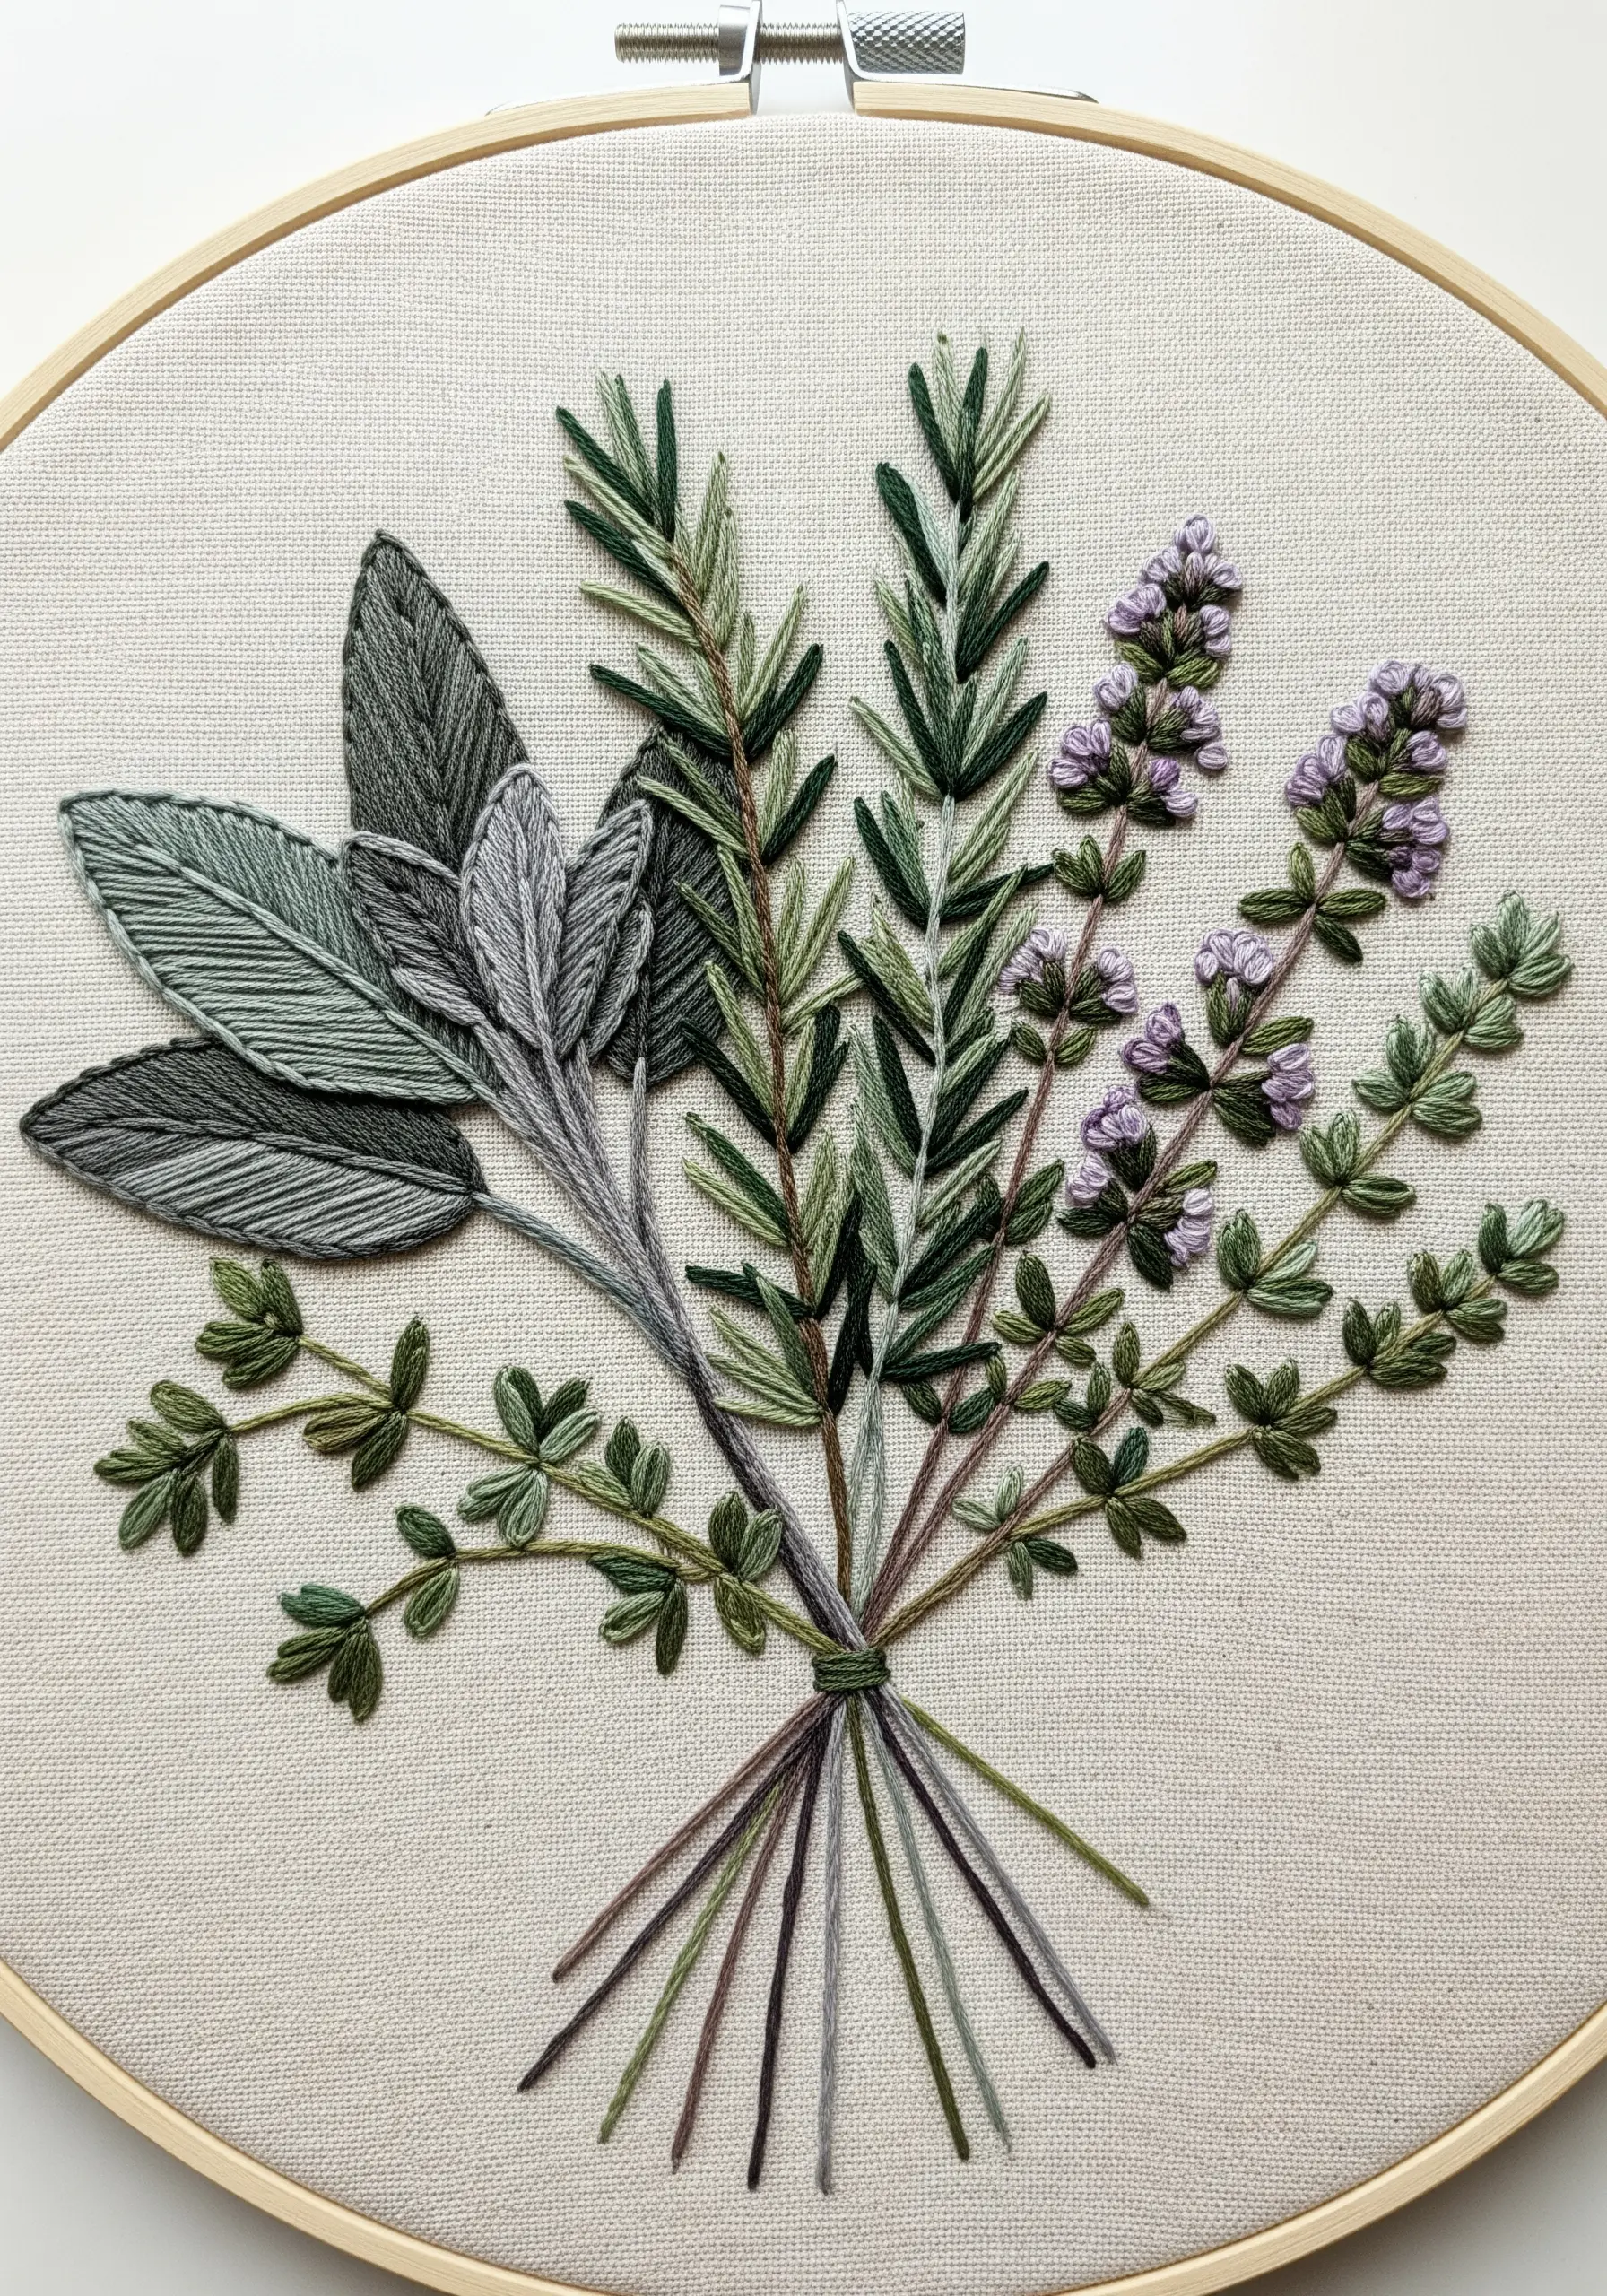
An herb bouquet is a fantastic study in subtle color variation and distinct leaf textures.
For the fuzzy leaves of the sage, use a long-and-short stitch with silvery-green and gray threads, keeping your stitches slightly looser to create a soft texture.
Use short, sharp straight stitches or a fishbone stitch for the rosemary needles. For the thyme, create the leaves with tiny lazy daisy stitches and the flowers with small purple French knots.
Grouping these different textures together in a natural arrangement makes the piece visually and texturally engaging.
32. Convey Petal Translucency with Open Stitches

Some flowers, like California poppies, have petals so delicate they seem almost translucent.
You can replicate this effect by using a sparse fill stitch. Instead of a dense satin stitch, use long, straight stitches with small gaps between them, allowing the background fabric to show through slightly.
Work with only one or two strands of floss to keep the stitches fine and light. This technique creates an airy, light-filled quality that a solid fill would overwhelm.
Stitching on a light blue fabric with faint clouds enhances the illusion of an open, sunny sky.
33. Master the Art of Miniature Embroidery
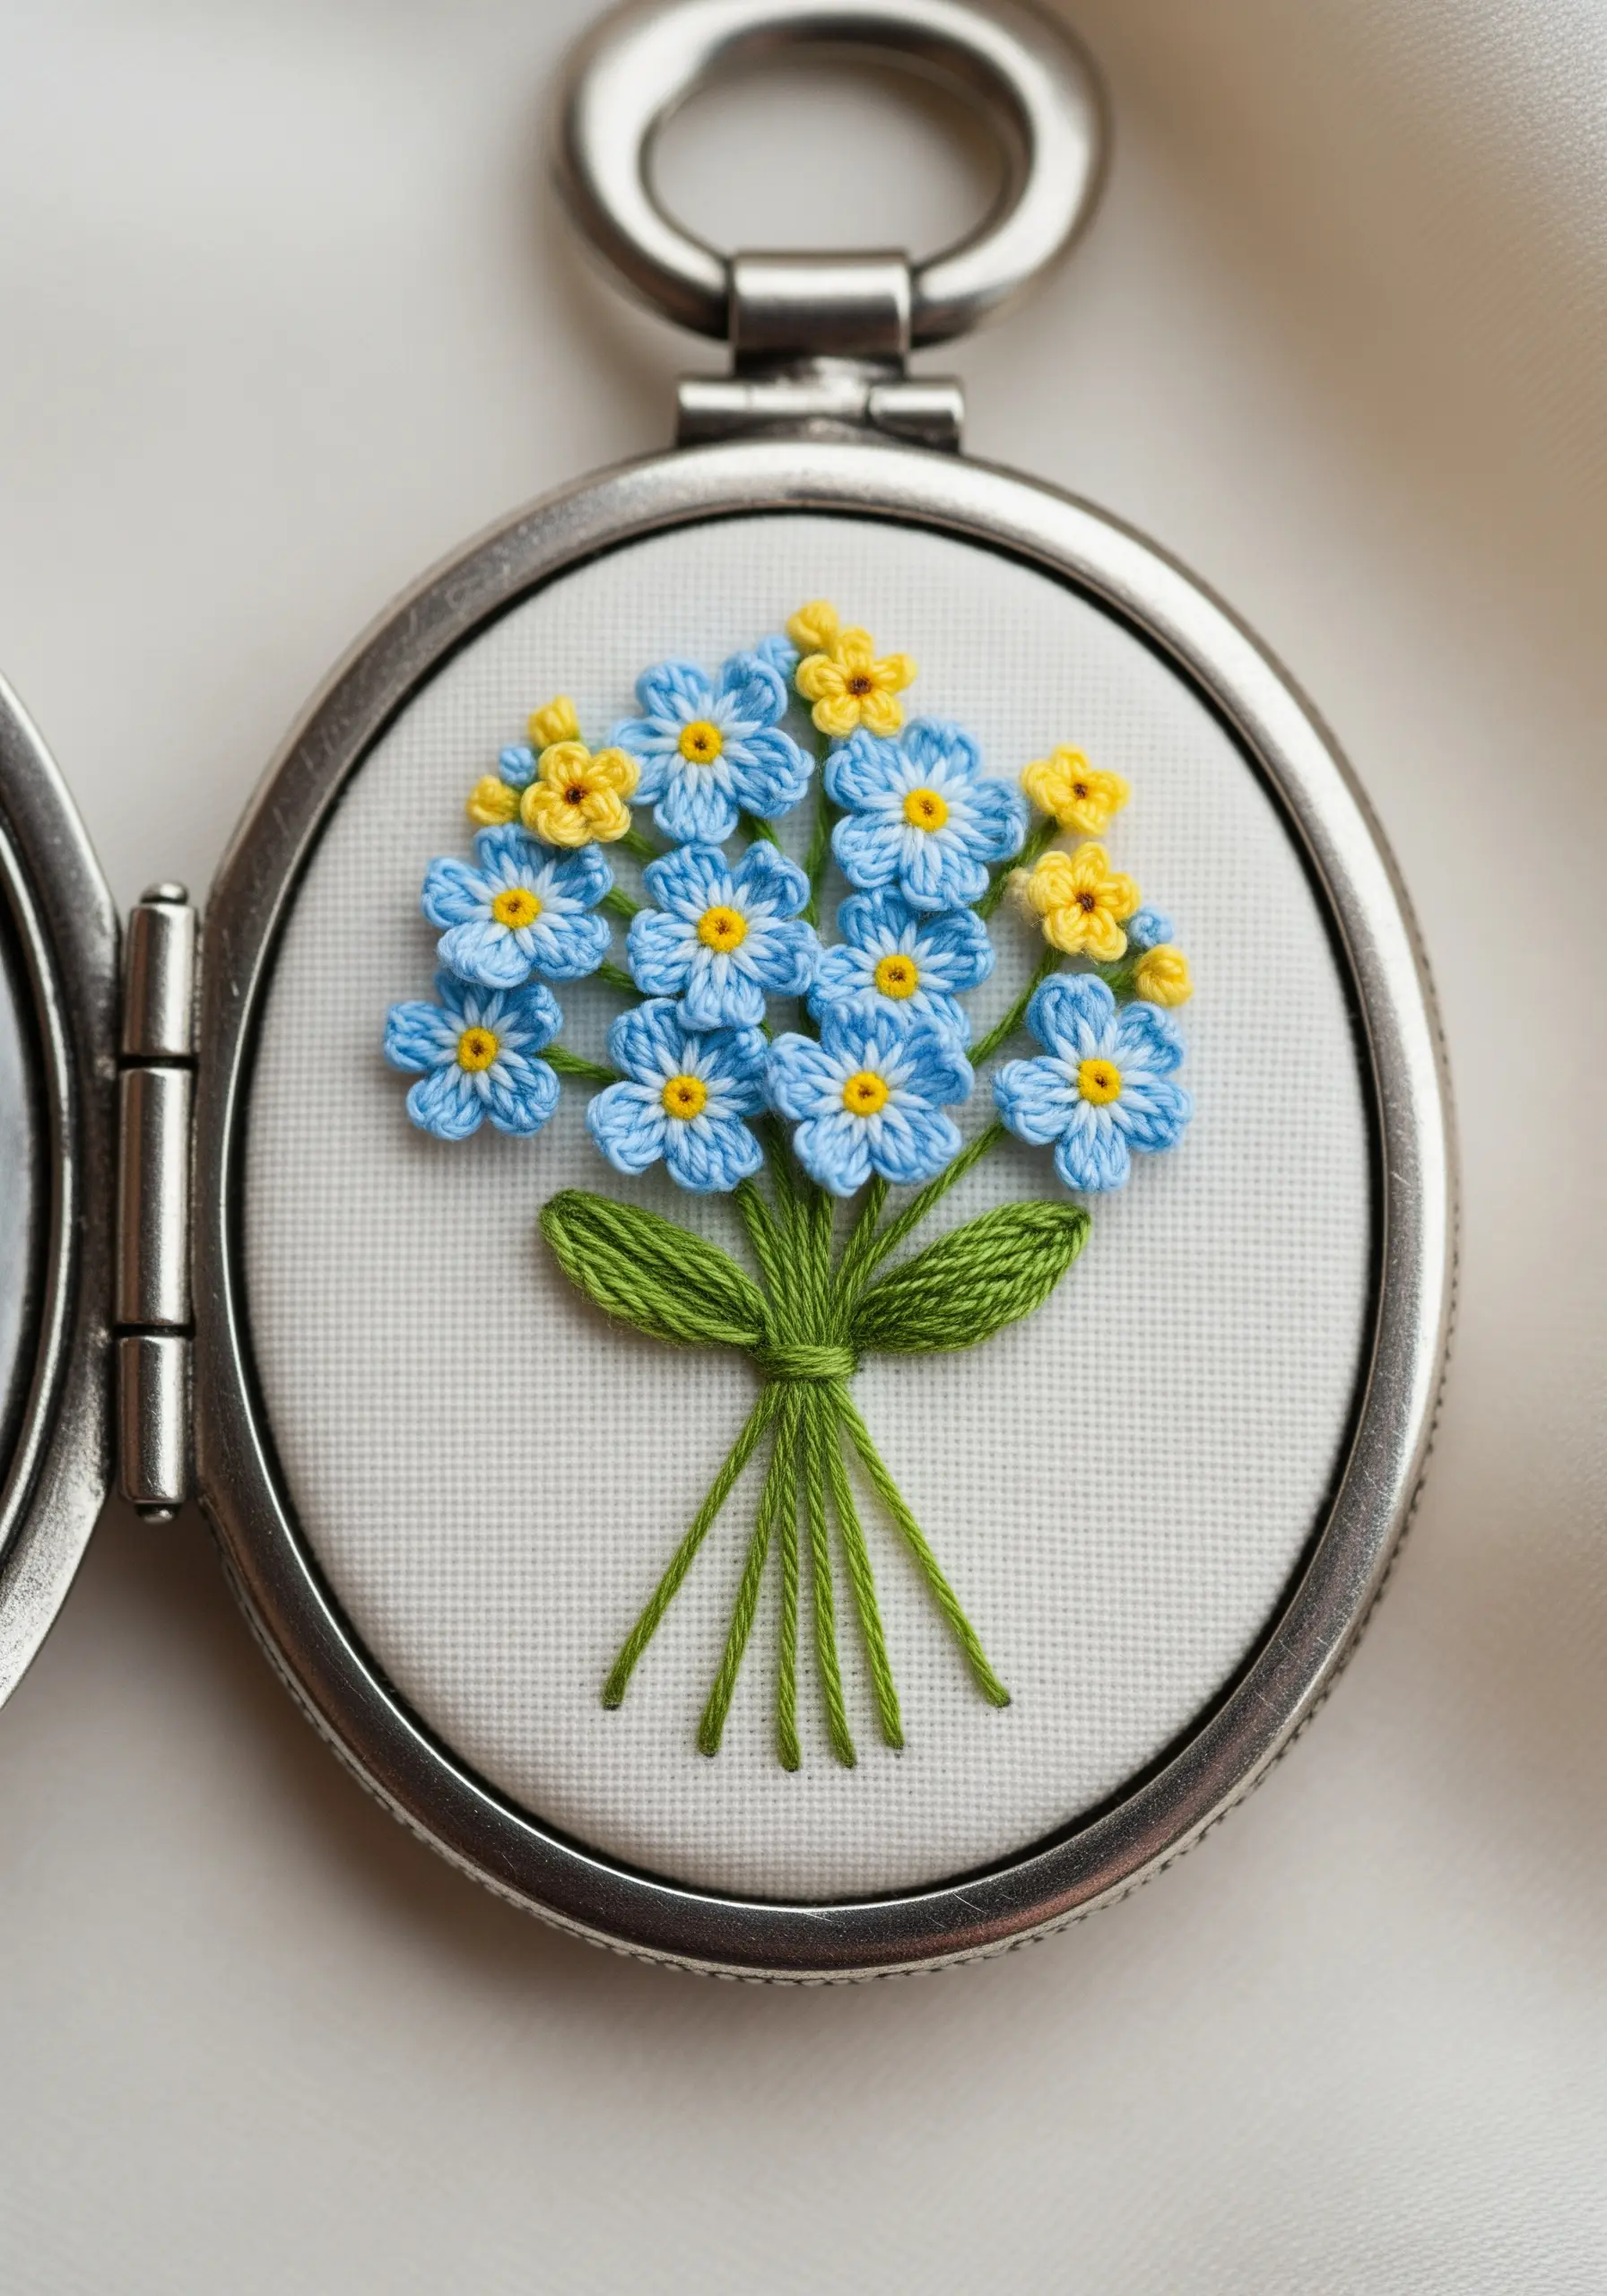
Working on a miniature scale, like for a locket, requires precision and simplification.
Use only a single strand of embroidery floss for all your stitches. This allows you to create fine detail without overwhelming the small space.
Simplify your stitches: use five small lazy daisy stitches to form each forget-me-not flower, and a single French knot for the yellow center.
Choose a high-count fabric, like linen or evenweave, which provides a smooth, stable surface for tiny, detailed work. These make incredible personalized DIY embroidery ideas.
34. Define Form with Line and Texture Alone
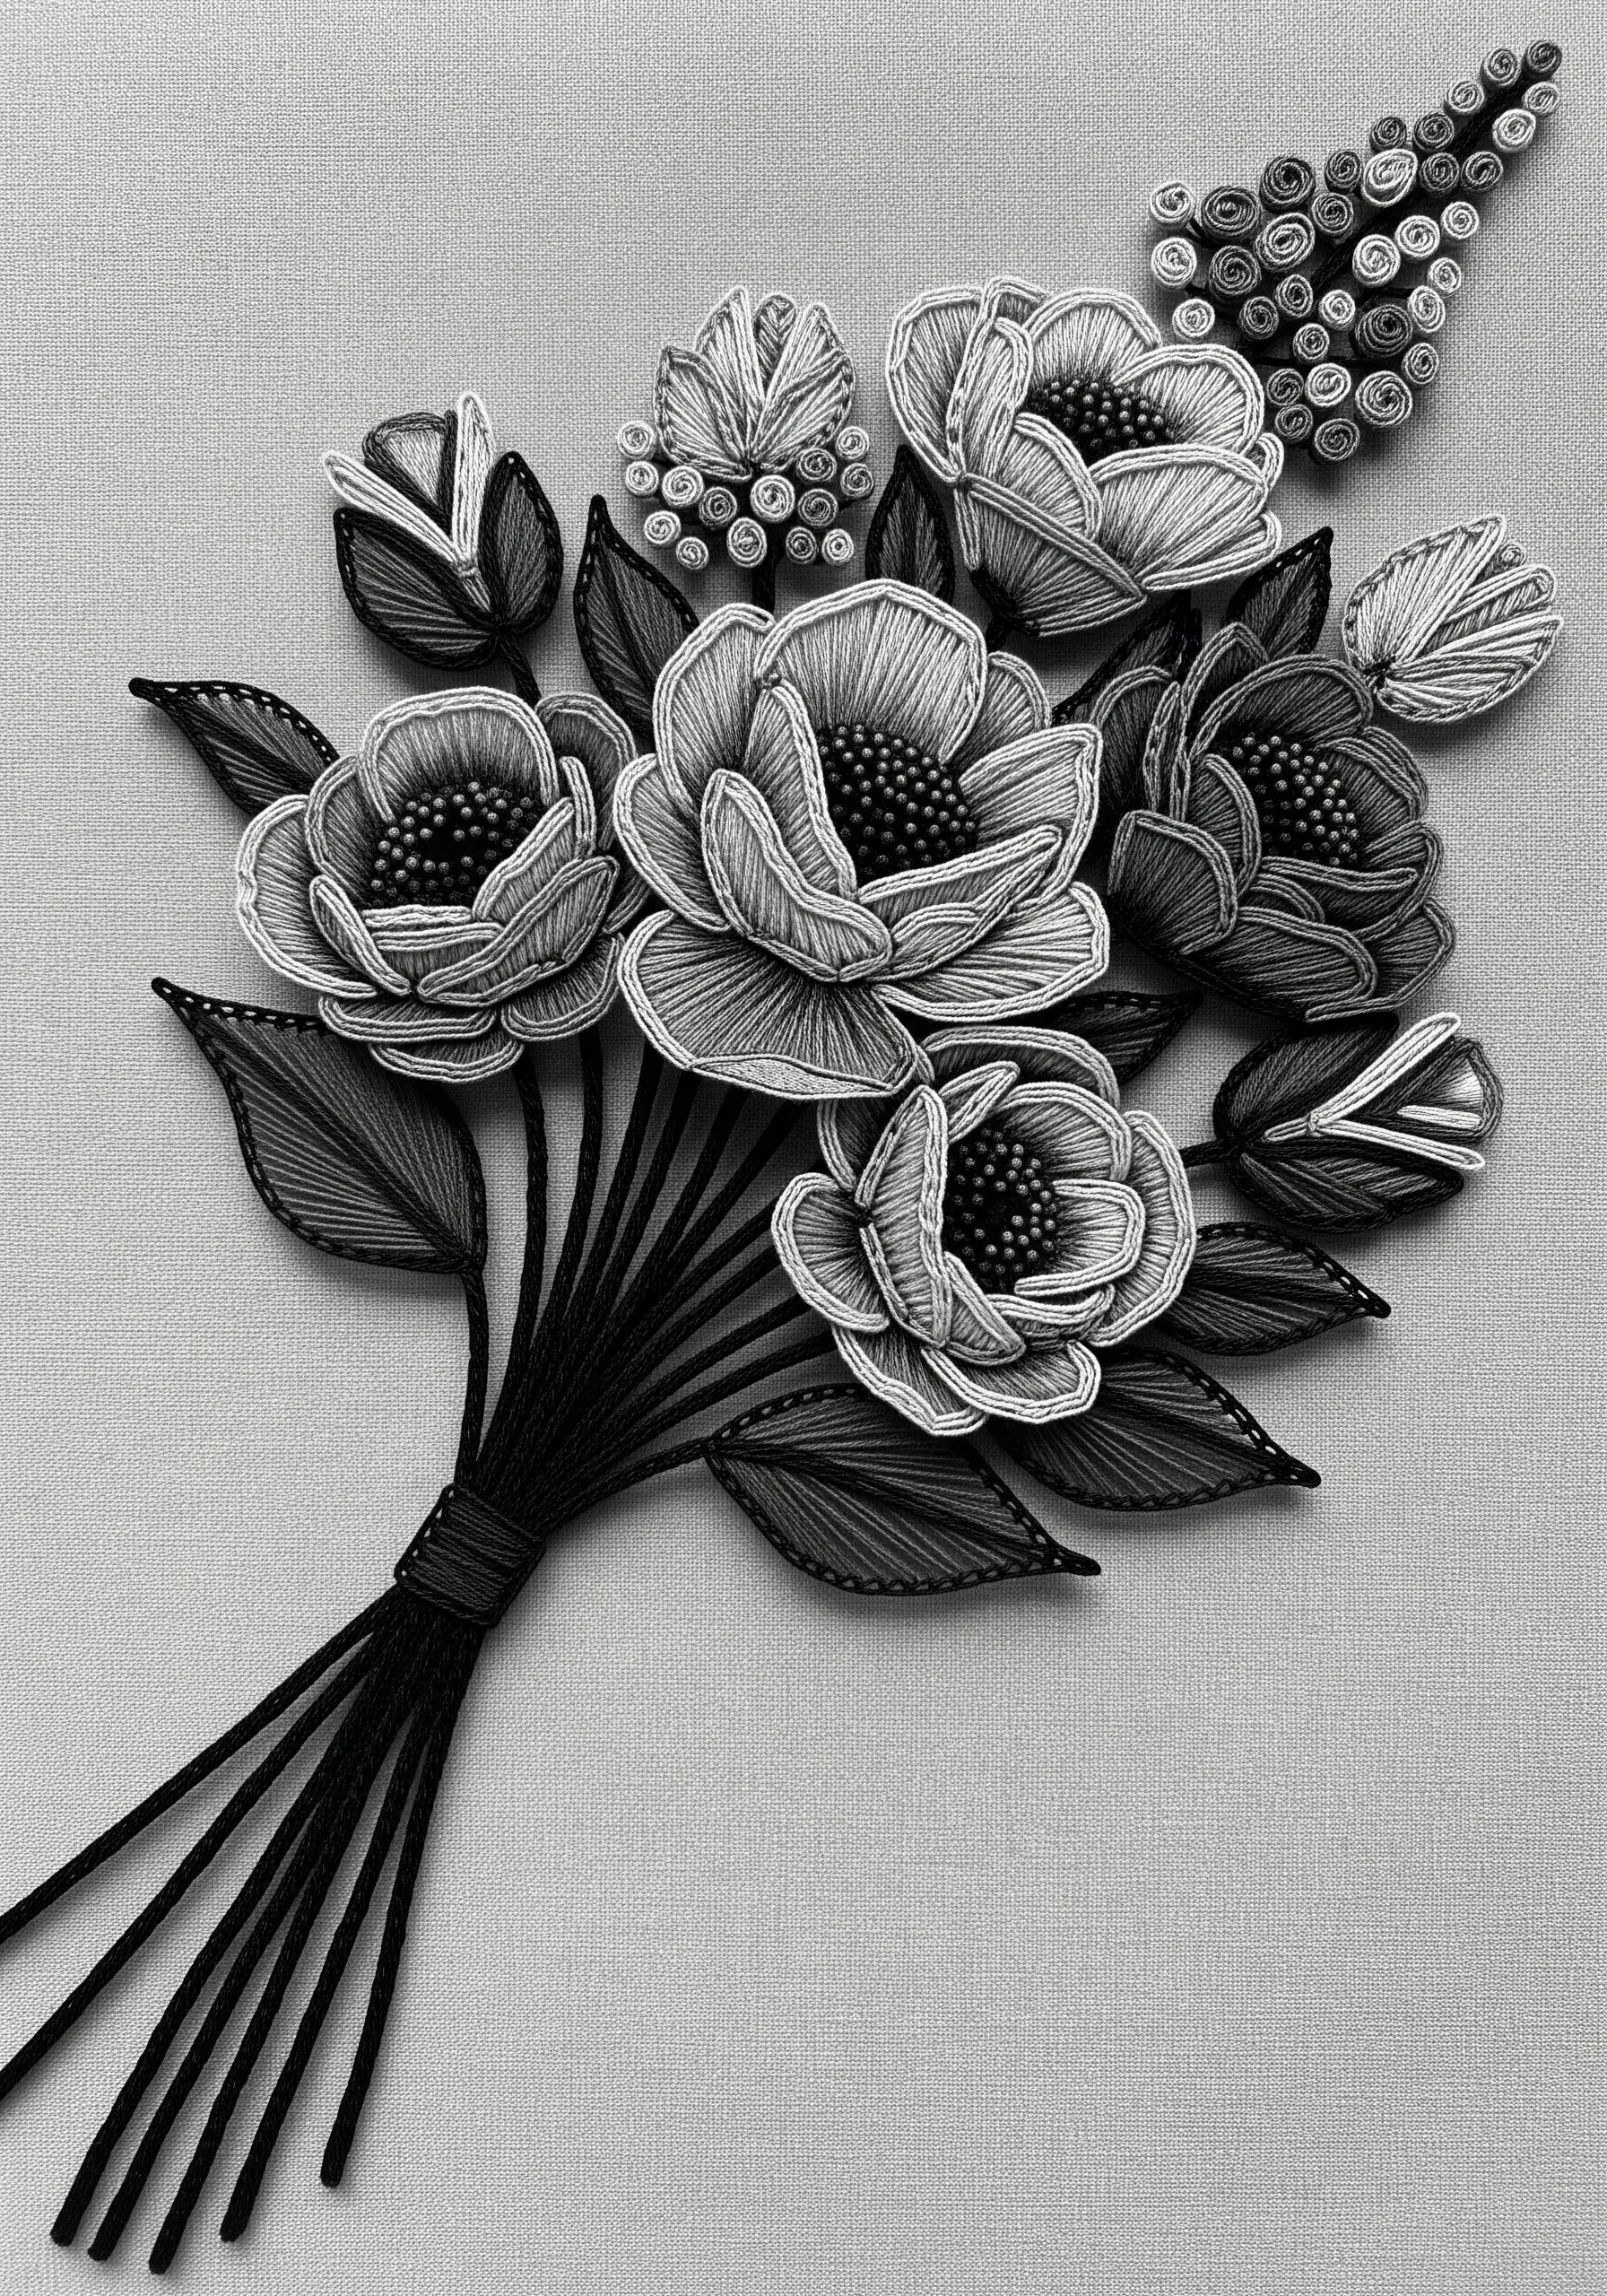
When you remove color, your embroidery becomes a pure study of line, shape, and texture.
To create this layered, graphic look, use a heavy black thread to outline every single element. A stem stitch will give you a clean, corded line.
Fill the shapes with straight stitches, paying close attention to their direction. Use radiating stitches for the flowers and vertical stitches for the leaves to create contrast.
The coiled elements can be made separately using a quilling technique with thread and attached to the surface, adding a sculptural, 3D element to the monochrome design.
35. Craft a Jeweled Bouquet with Metallic Threads
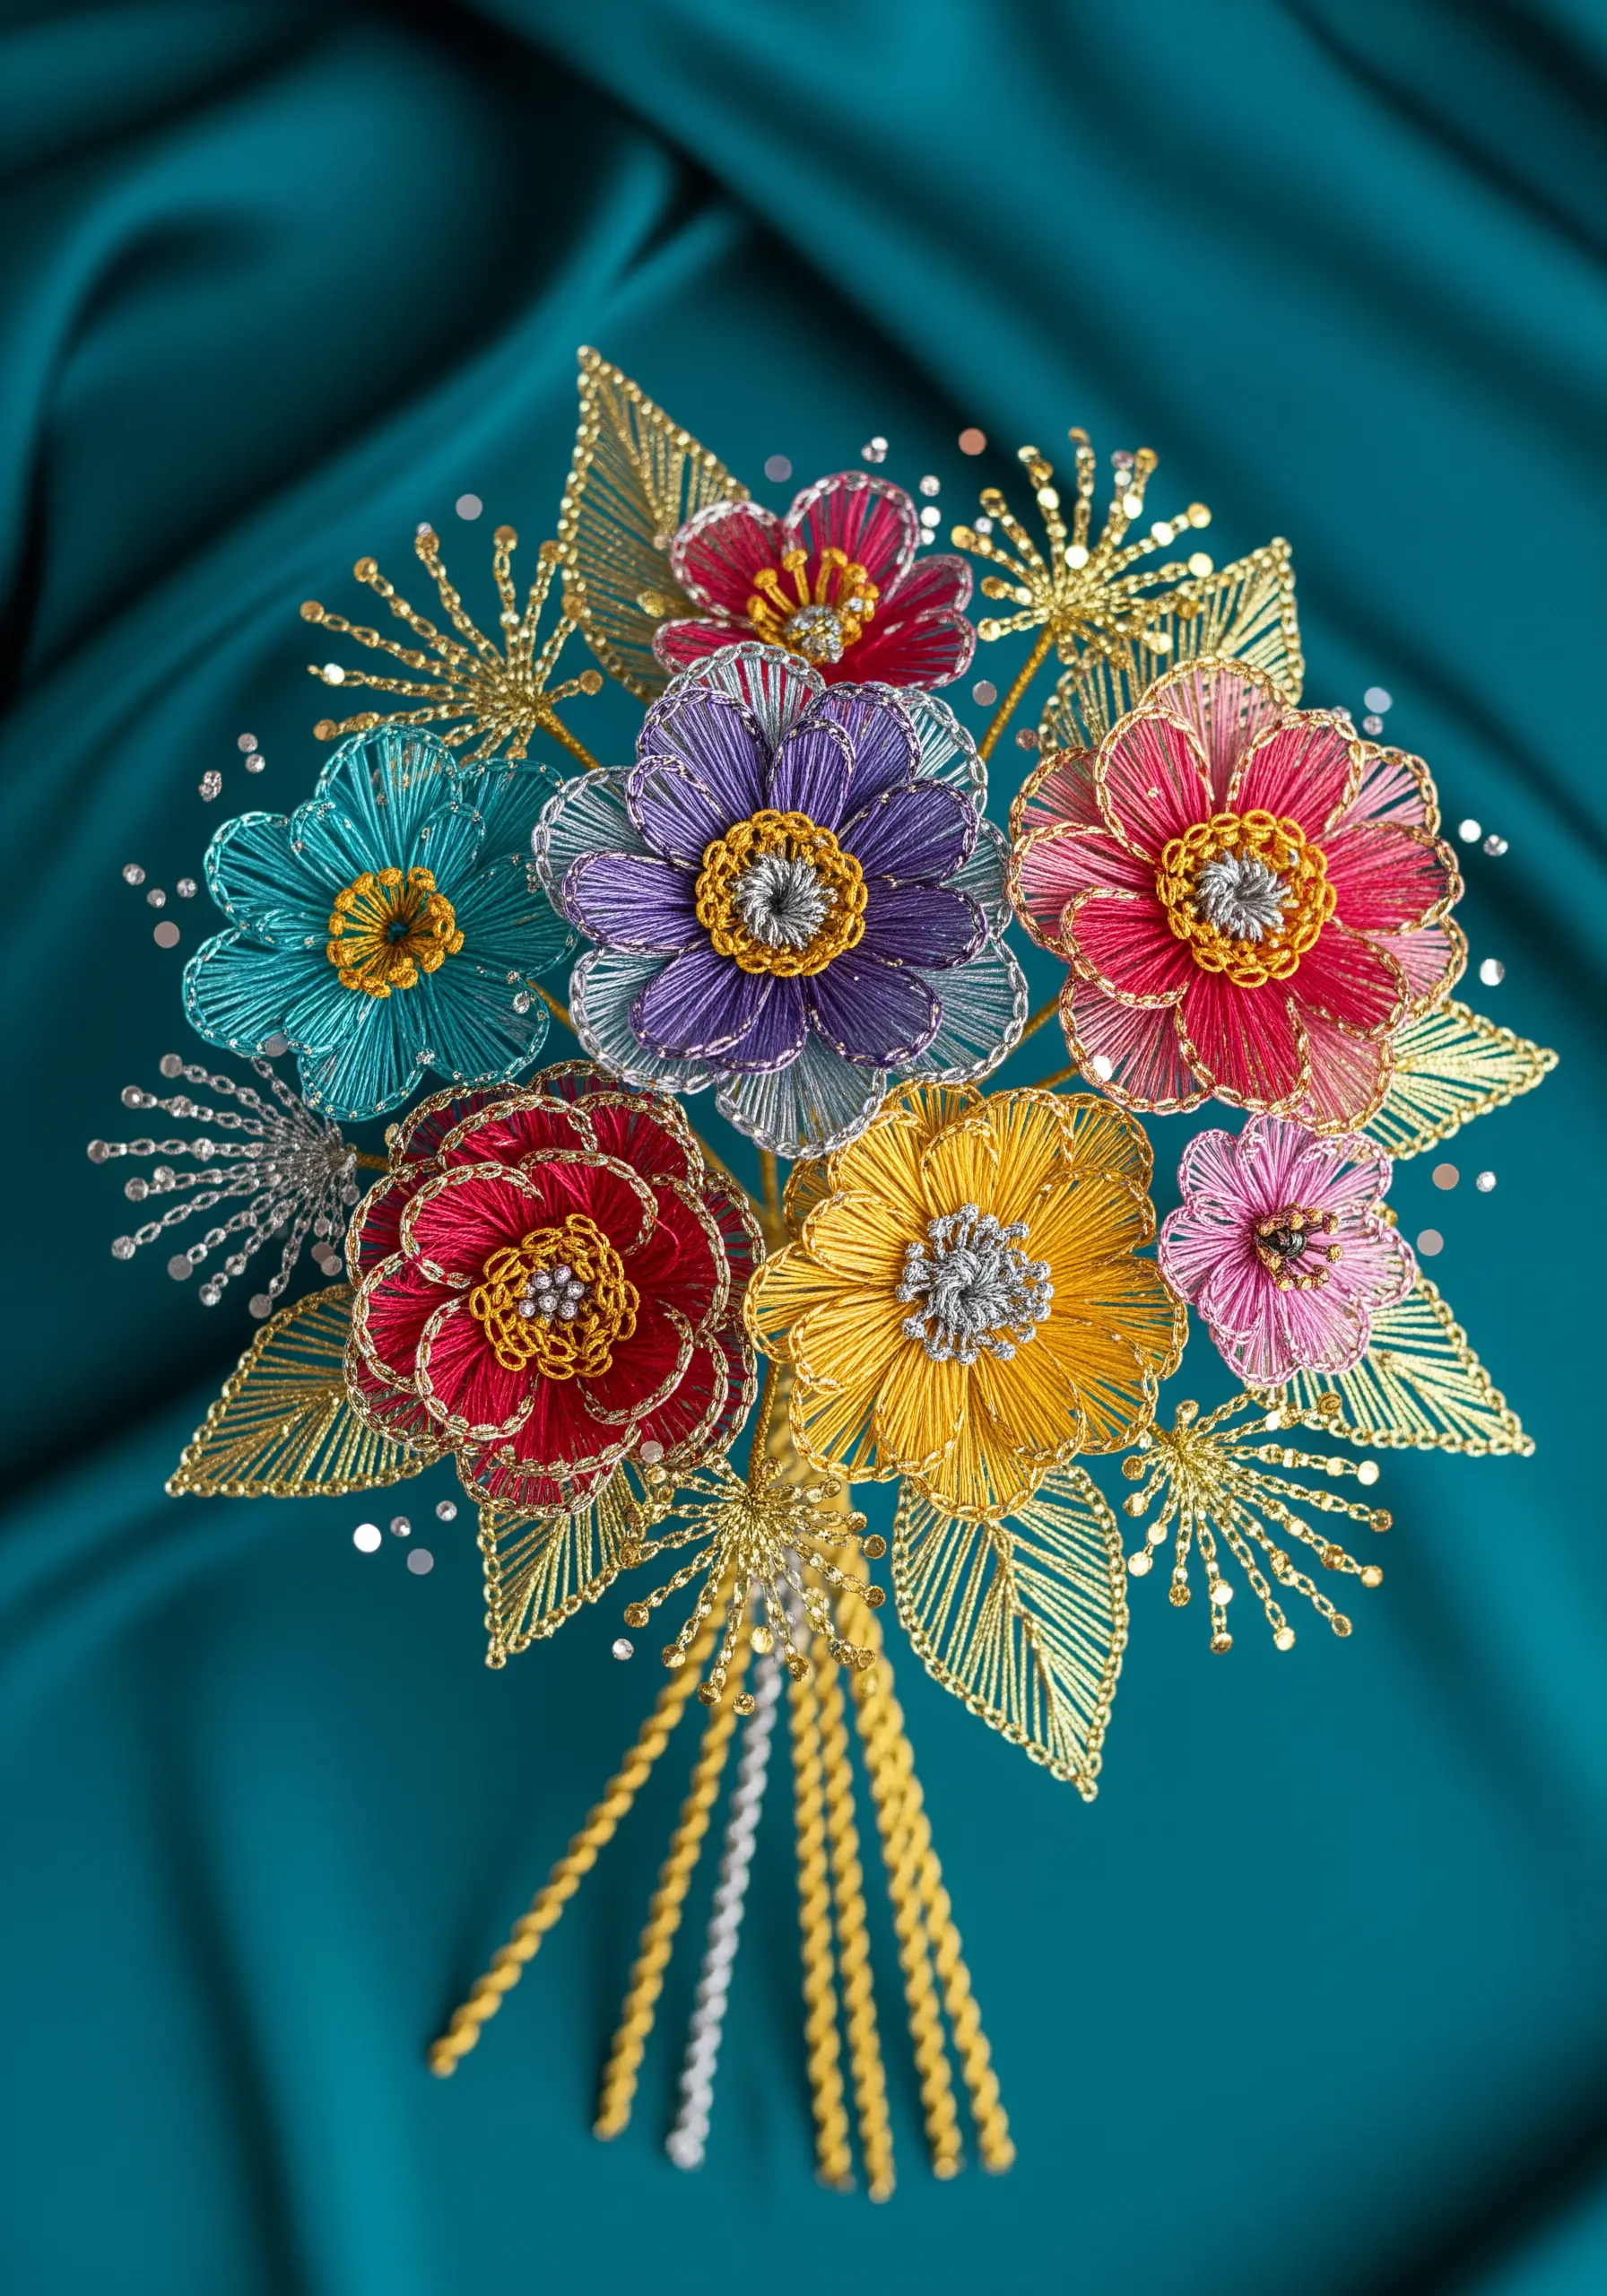
Turn your embroidery into a piece of jewelry for your wall by incorporating metallic threads and beads.
Use a satin stitch with vibrant floss for the flower petals, then outline them with a gold or silver backstitch. This gives each flower a clean, finished edge like a cloisonné pin.
Create intricate centers by couching down a loop of metallic thread and filling it with seed beads or French knots.
For the sparkling leaves and accents, use a fishbone stitch with a fine metallic thread. Remember to use shorter lengths of metallic floss to prevent fraying and tangling.
36. Achieve Airiness with Delicate Stitches
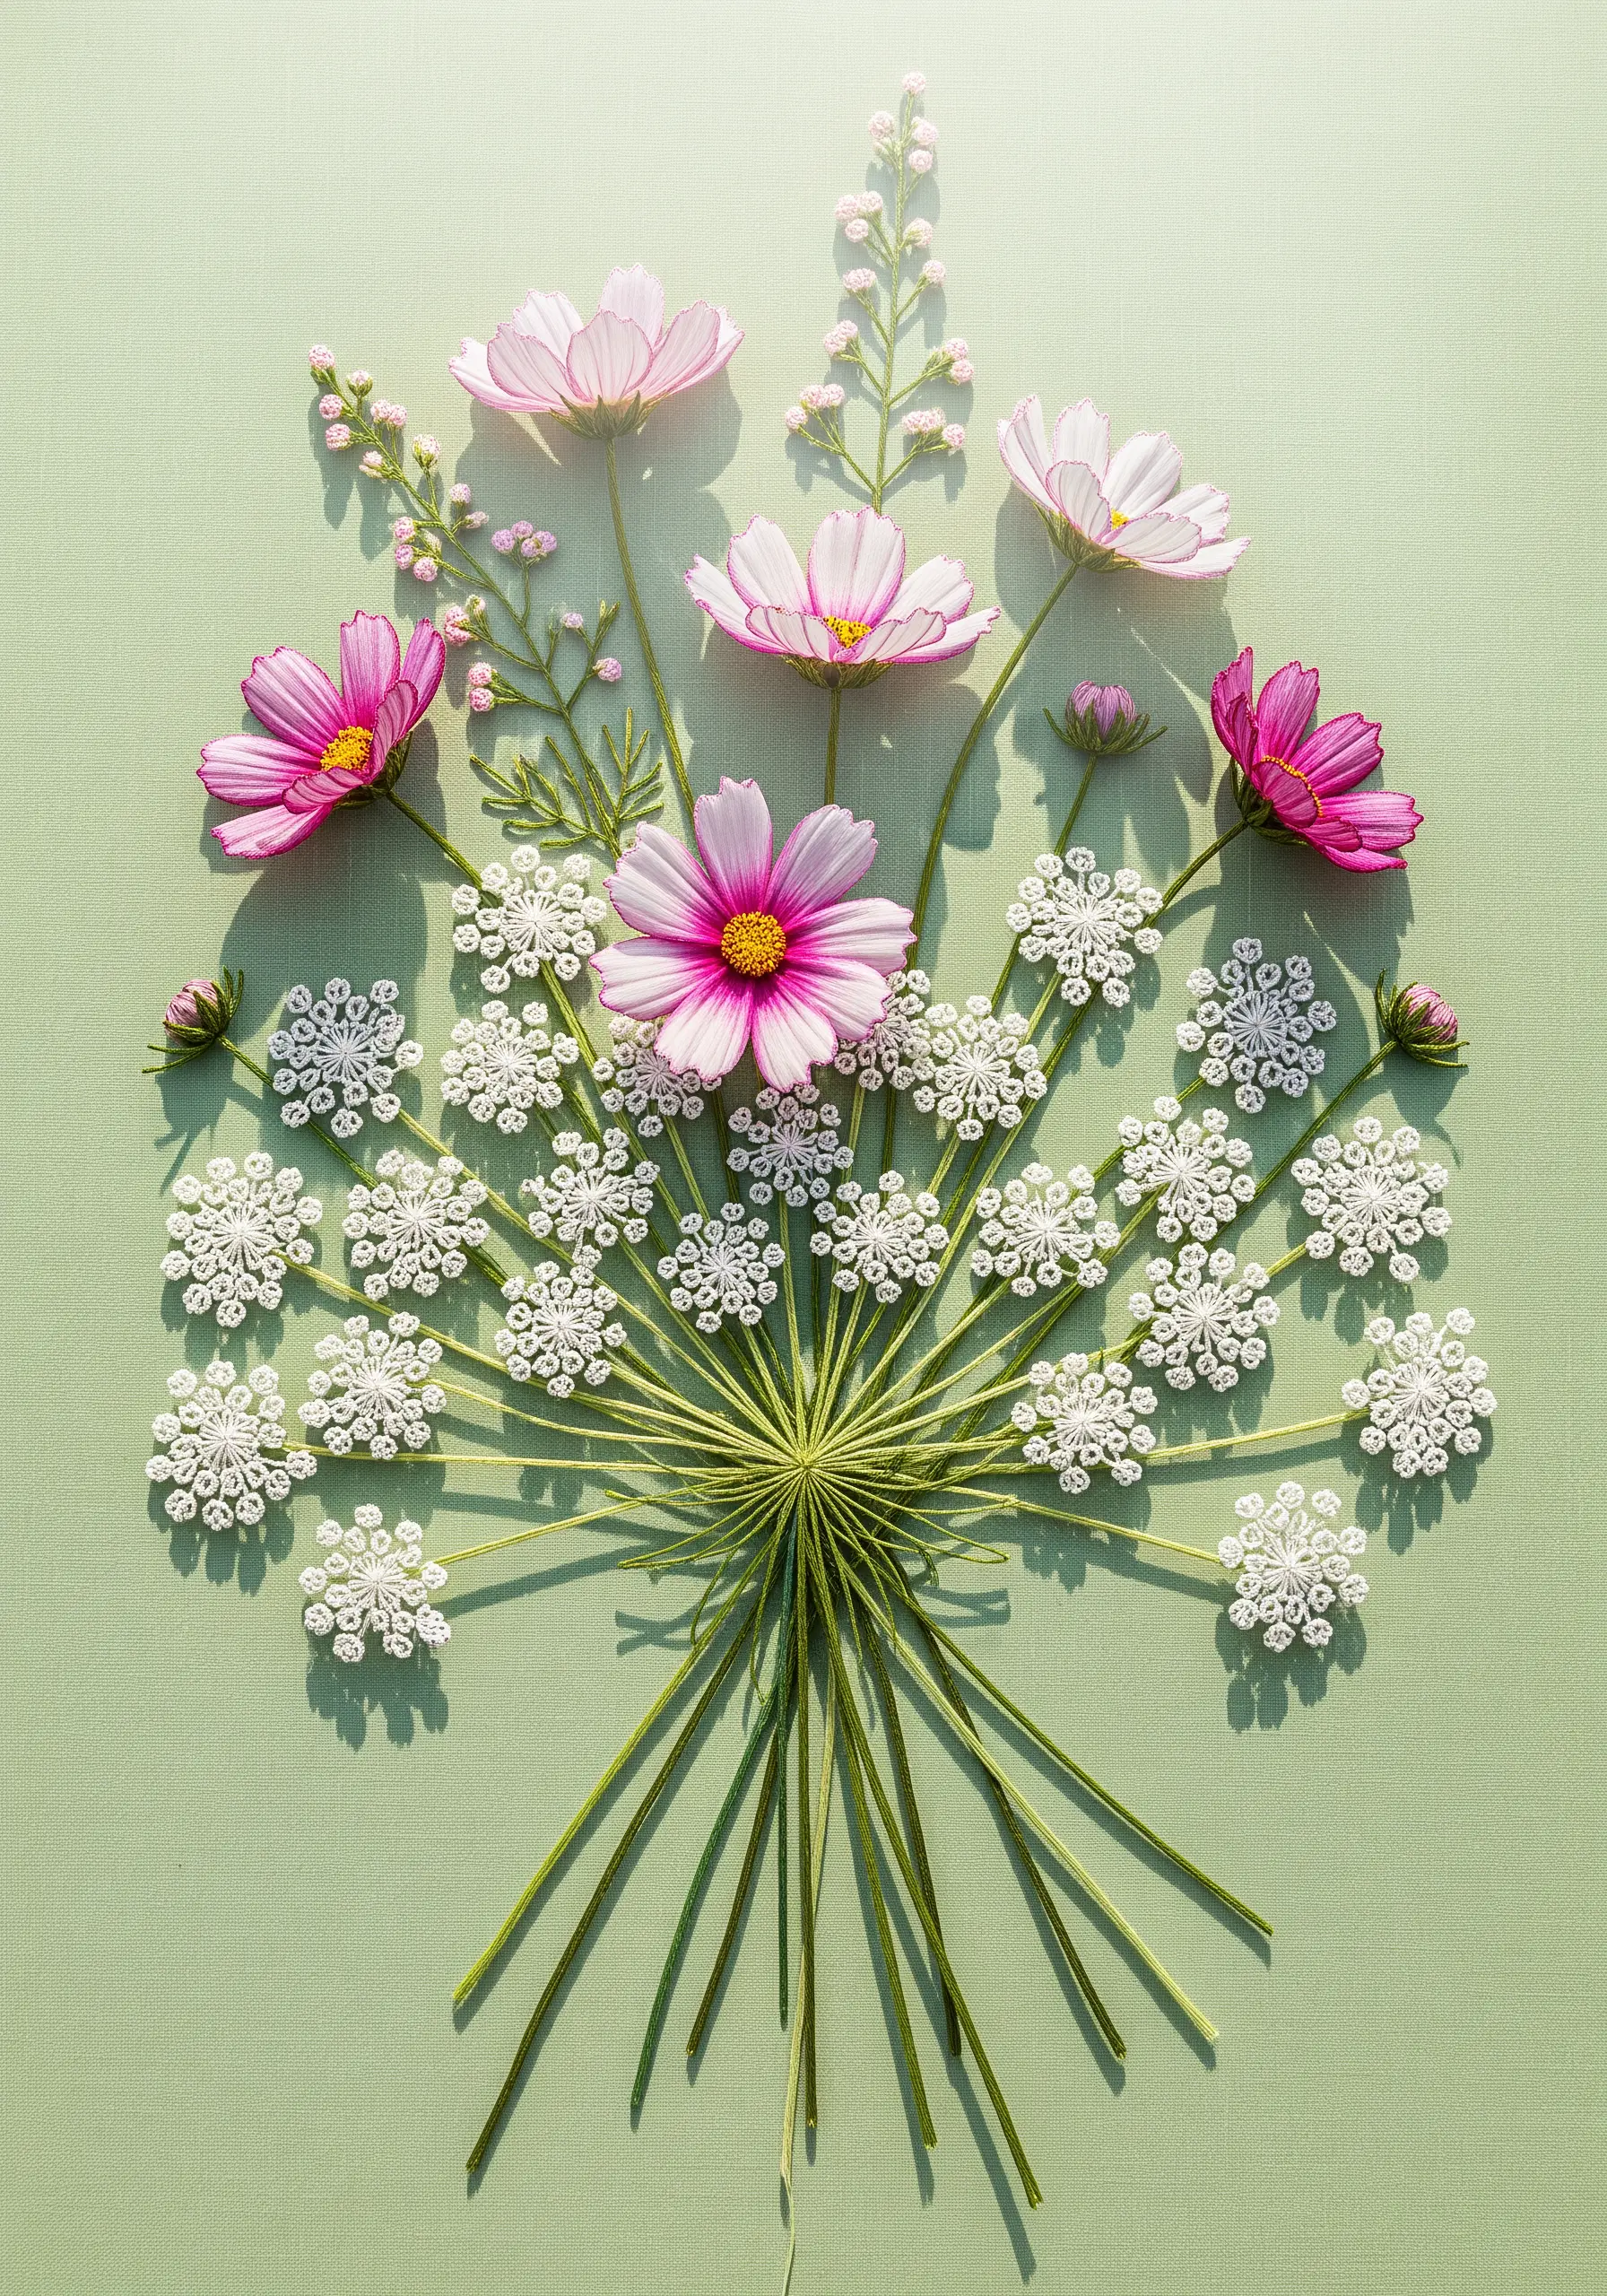
To capture the light, airy feeling of wildflowers like cosmos and Queen Anne’s lace, your stitch choice and composition are key.
For the Queen Anne’s lace, you can use a detached buttonhole stitch to create small, lacy, snowflake-like shapes that are only tacked down in the center, allowing them to float above the fabric.
Stitch the cosmos petals with a sparse long-and-short stitch, letting the background show through to convey their delicate nature.
A loose, asymmetrical arrangement with plenty of negative space is essential for creating that breezy, just-picked-from-a-meadow feeling.


