

If you’re seeking a way to make your embroidery feel less like a hobby and more like an art form, I want you to reconsider the power of simplicity.
Minimalism in stitching isn’t about doing less; it’s about making every single stitch matter. It’s choosing the perfect curve of a line, the right amount of negative space, and the subtle texture of a single color. This approach transforms fabric and thread into quiet statements that bring a sense of calm and intention to your home.
Here, you won’t find overly complex patterns. Instead, you’ll discover how a deliberate choice—a change in stitch direction, a variation in thread weight, or a carefully placed motif—can elevate your work instantly. Let these ideas guide you toward creating pieces that feel both personal and polished, turning your space into a sanctuary of cozy, modern craft.
1. Master the Radiating Stitch for Botanical Grace
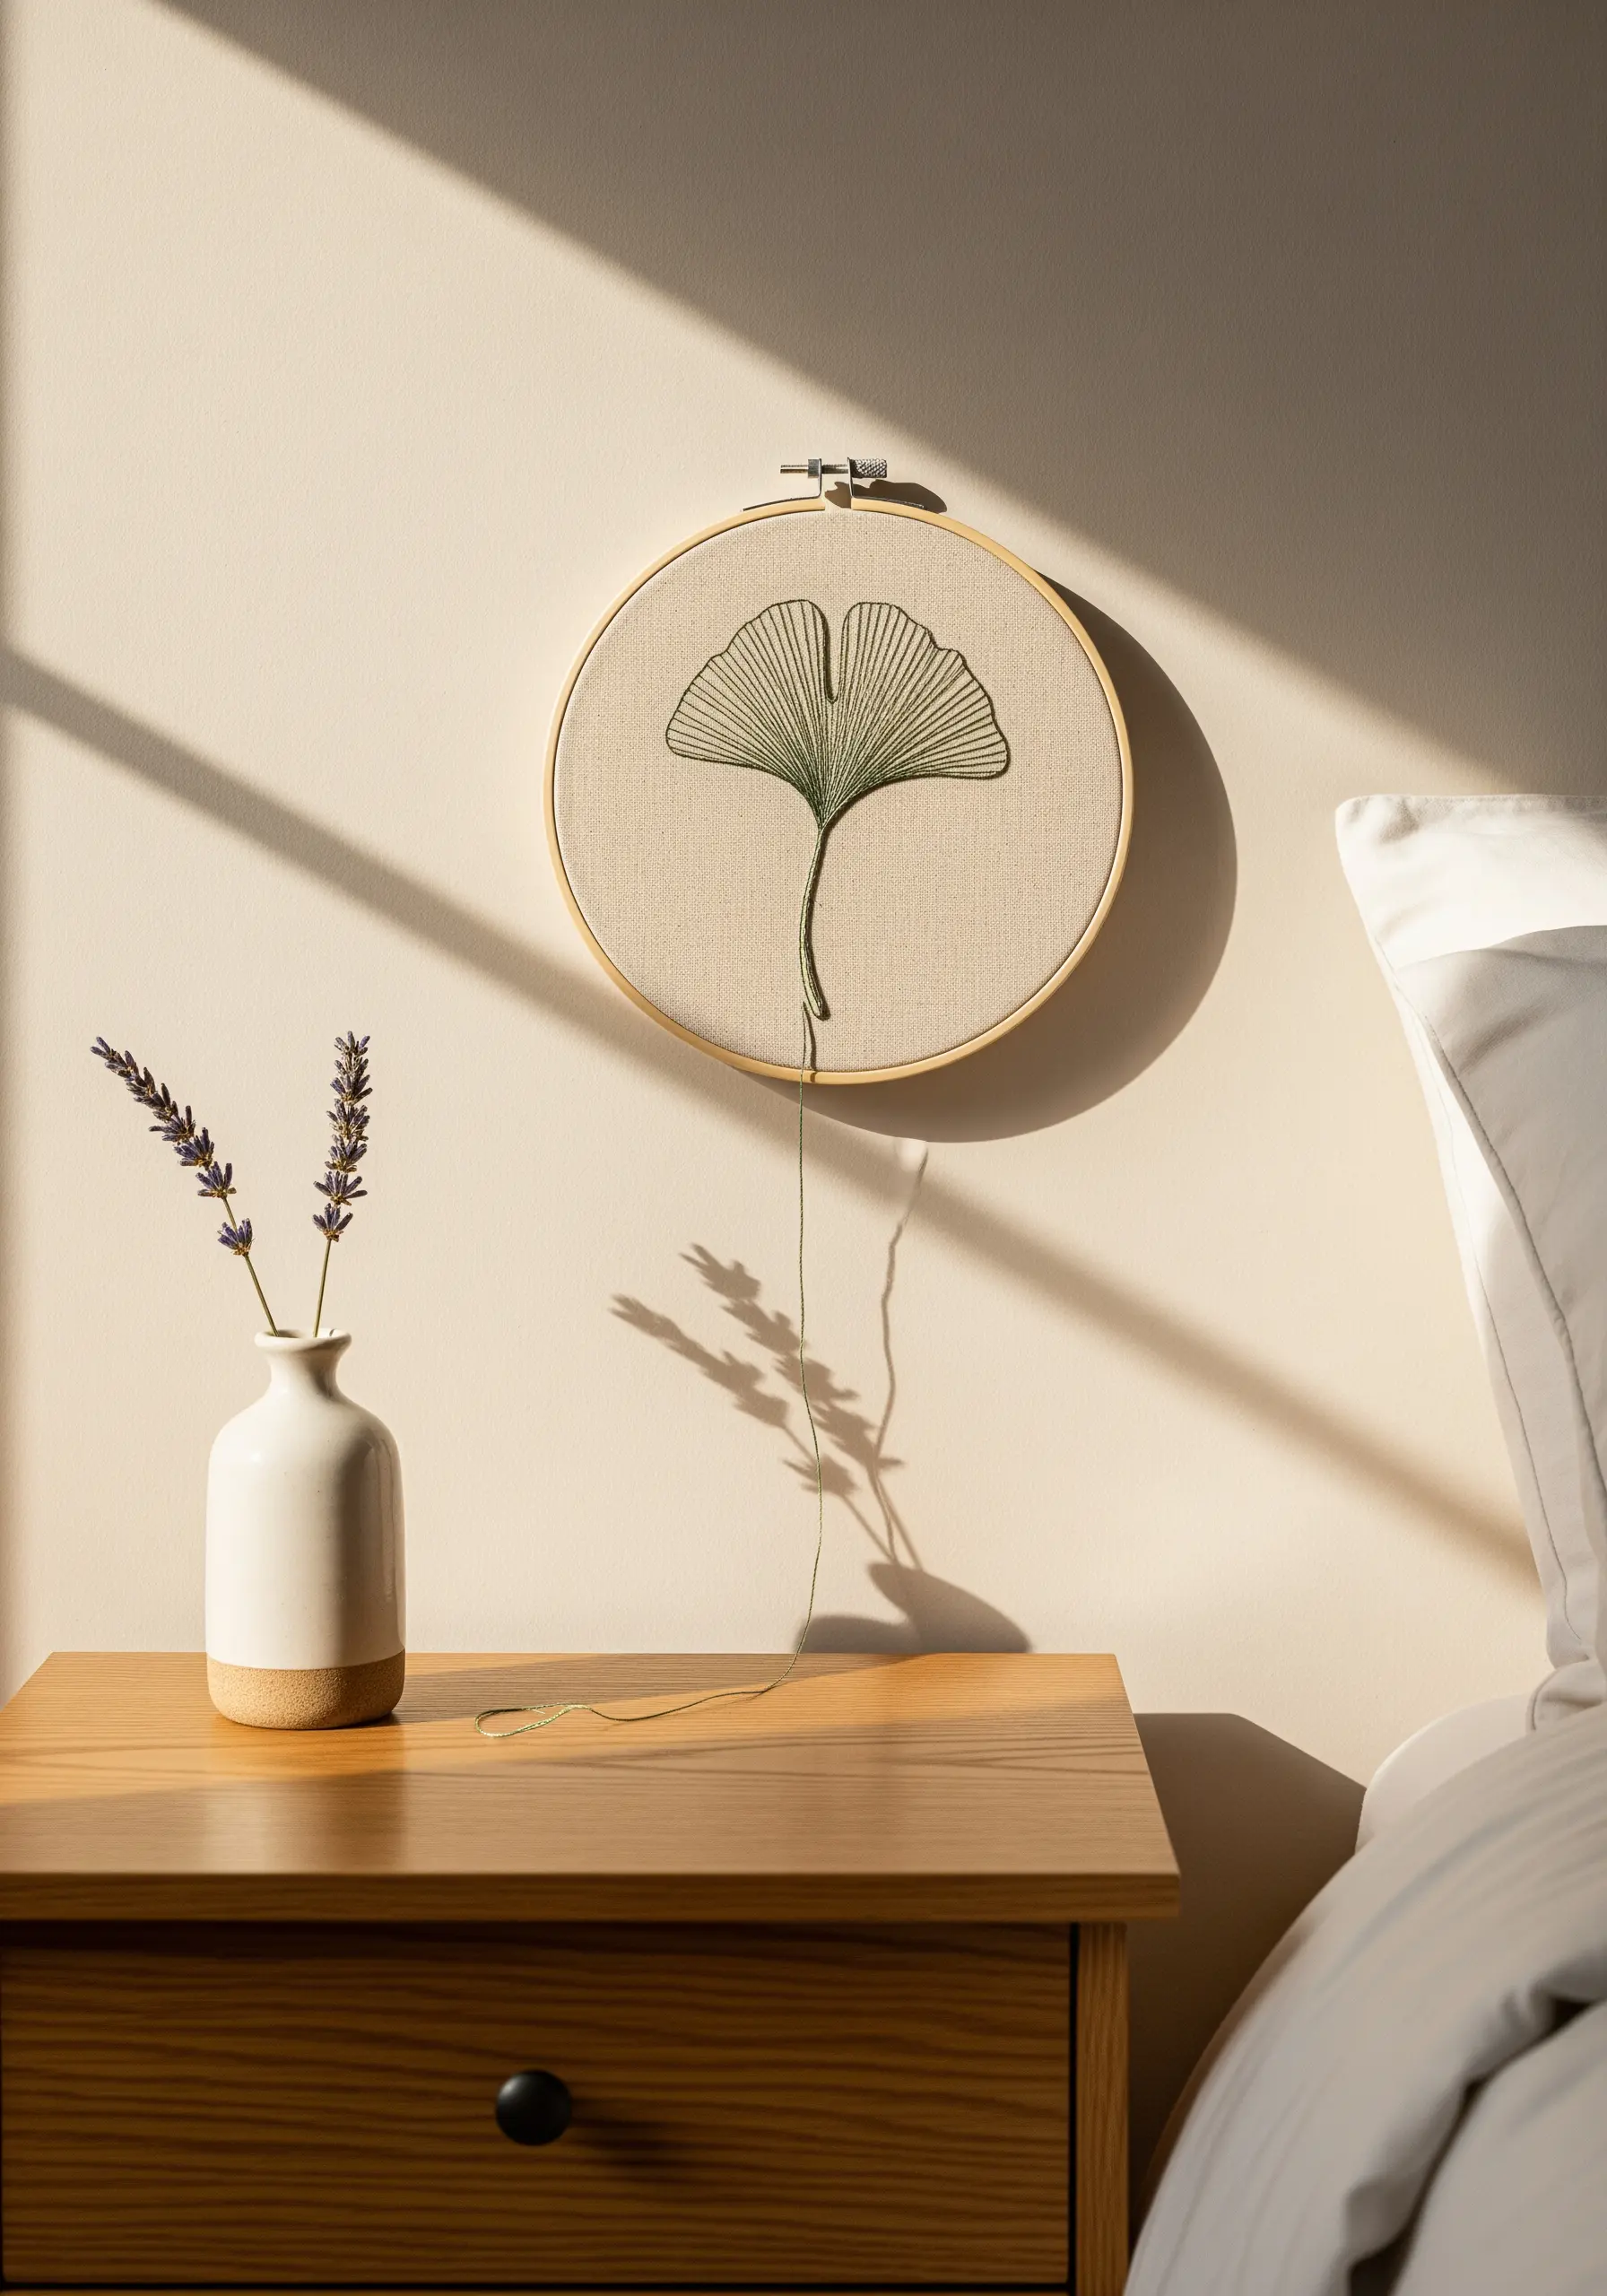
To create the elegant fan shape of a ginkgo leaf, focus on precise, radiating lines stitched from a single anchor point.
Use a two-strand backstitch for clean, defined veins that don’t add bulk.
Before you begin, lightly mark your radiating lines with a water-soluble pen to ensure perfect symmetry and spacing—this structure is what gives the design its serene, architectural quality.
For a modern twist, leave a single thread hanging long, transforming the finished piece into a subtle, contemplative object.
This technique elevates simple organic embroidery designs into refined wall art.
2. Stitching on Canvas for Graphic Landscapes
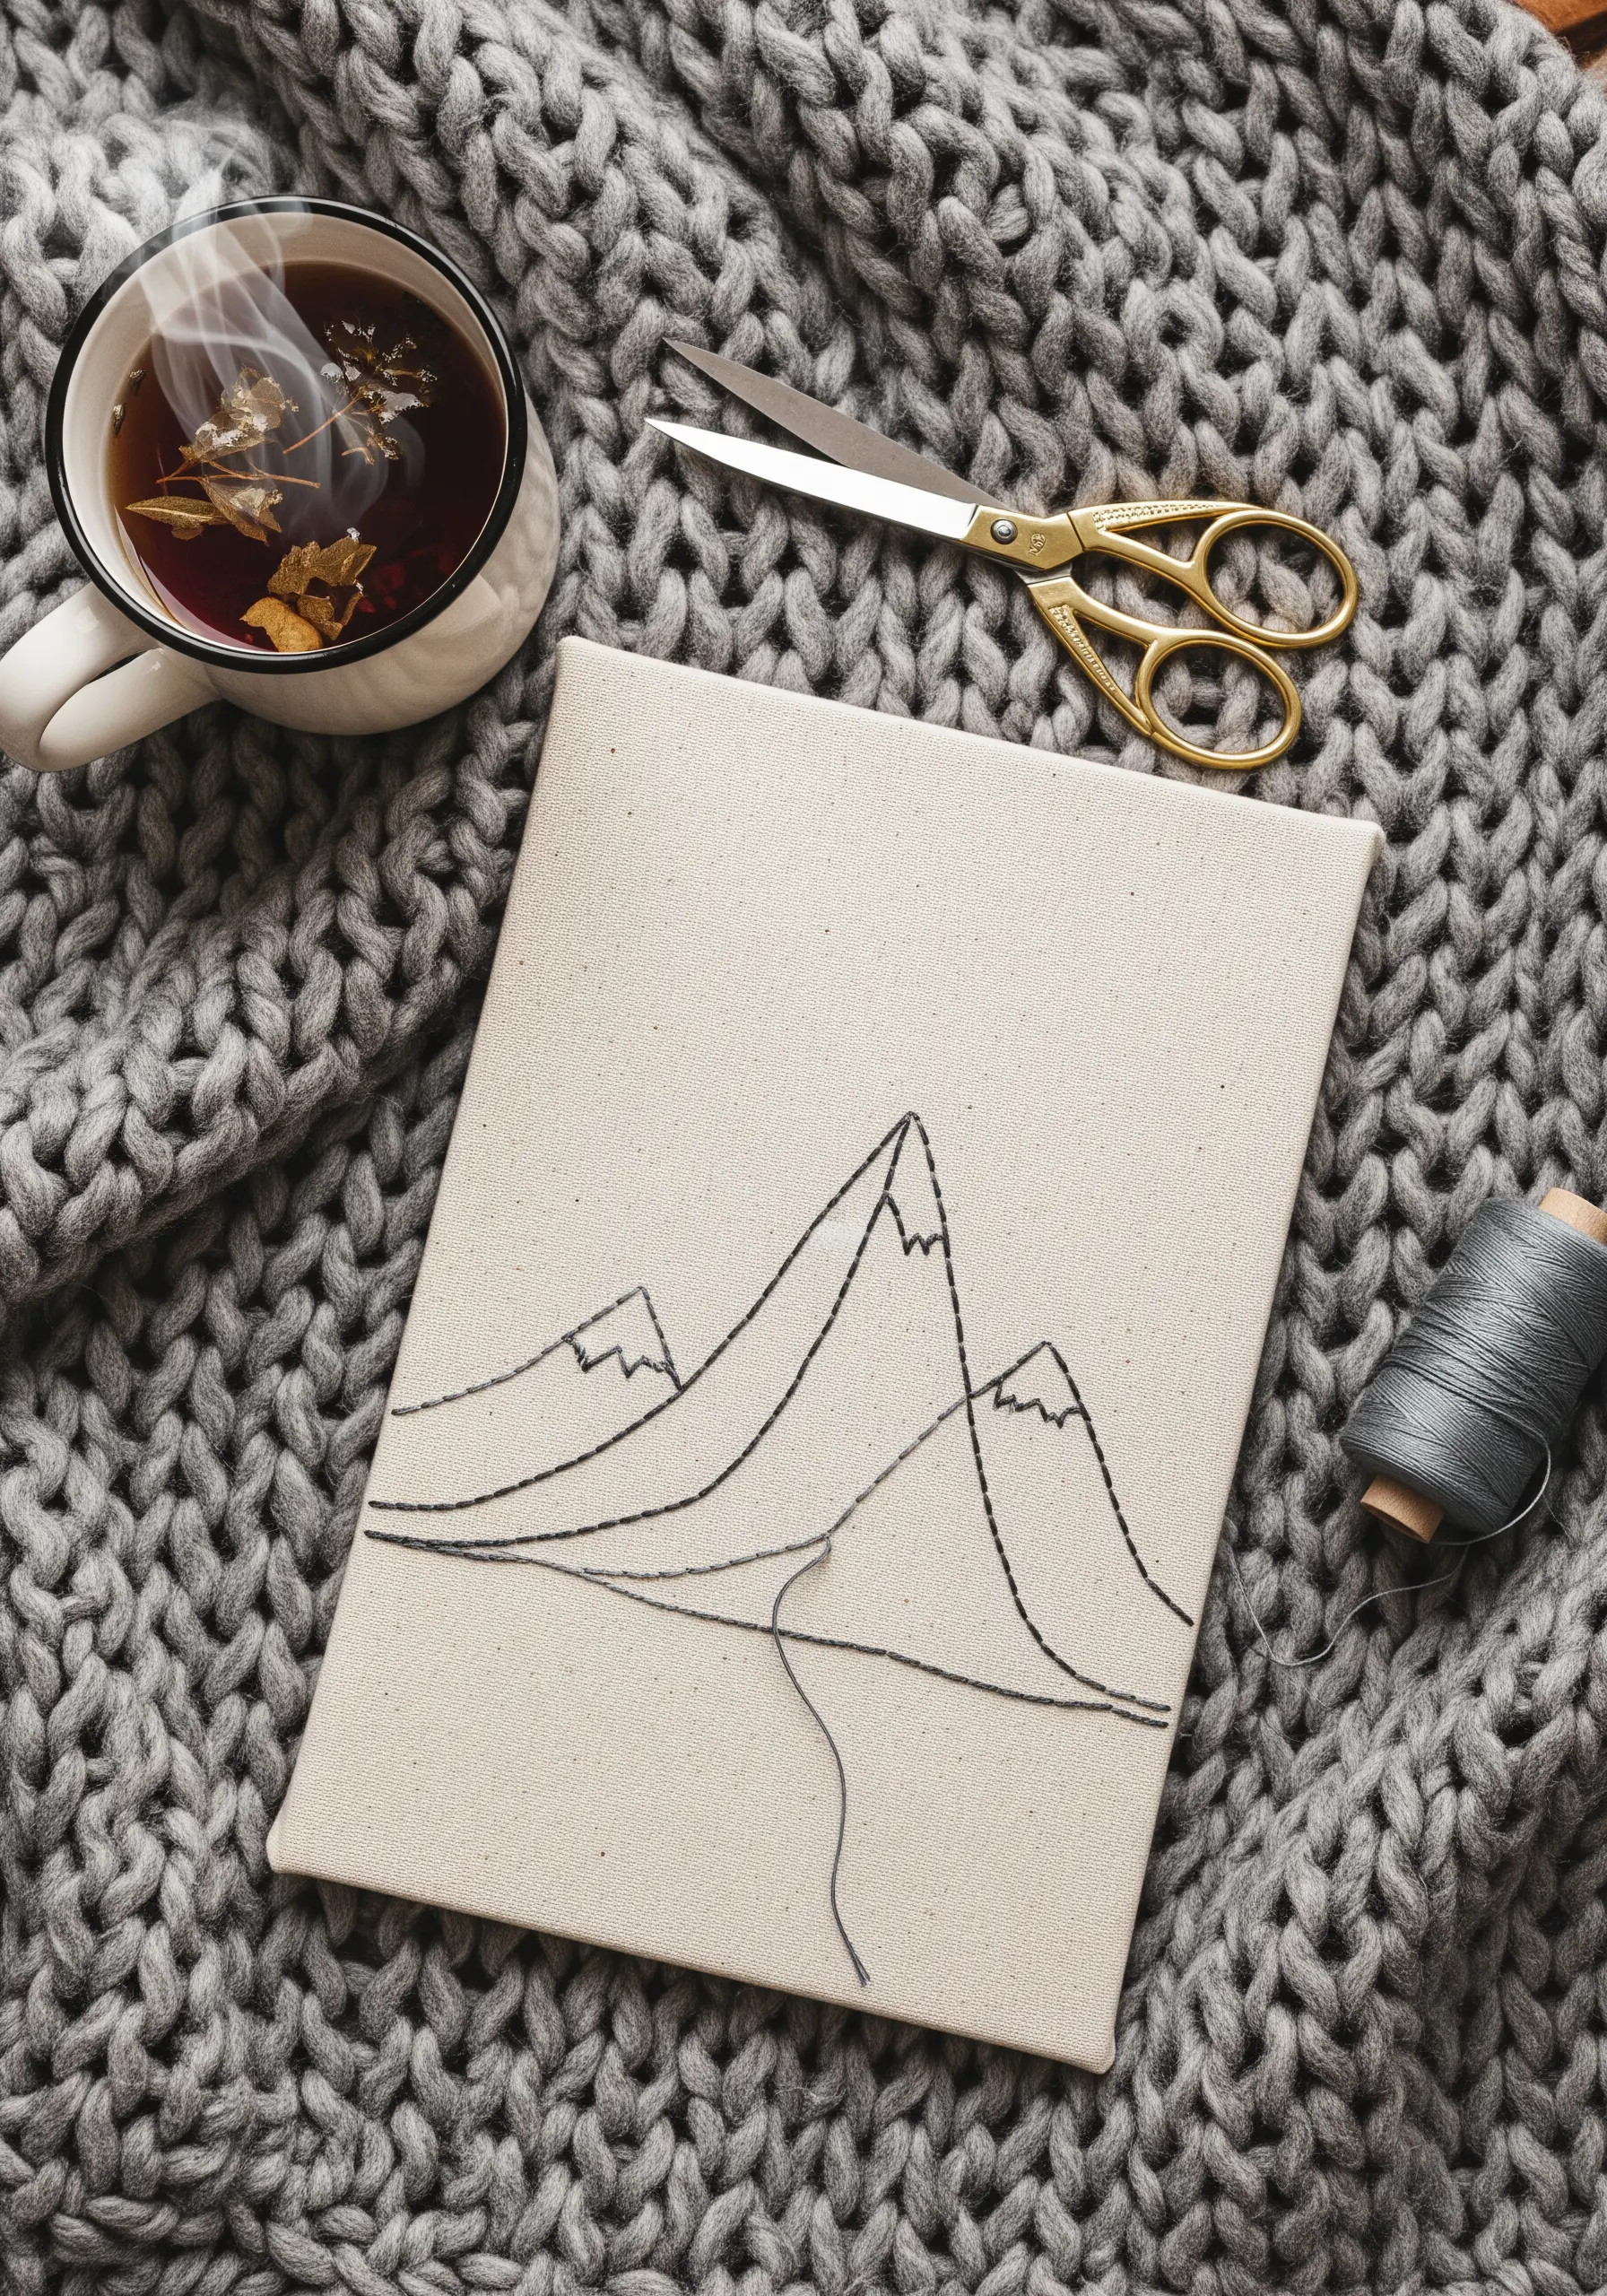
Embroidering on stretched canvas offers a firm, satisfying surface for sharp, graphic line art like mountain ranges.
Use a sturdy, sharp needle and a thimble to pierce the canvas cleanly, as it has less give than traditional linen.
Create a sense of atmospheric depth by using different thread weights or shades for foreground and background peaks—a single strand for distant mountains, and two or three for those closer up.
A simple backstitch is all you need; the tension and straightness of your lines against the rigid canvas will create the minimalist effect.
3. Create Raised Texture with Yarn Couching
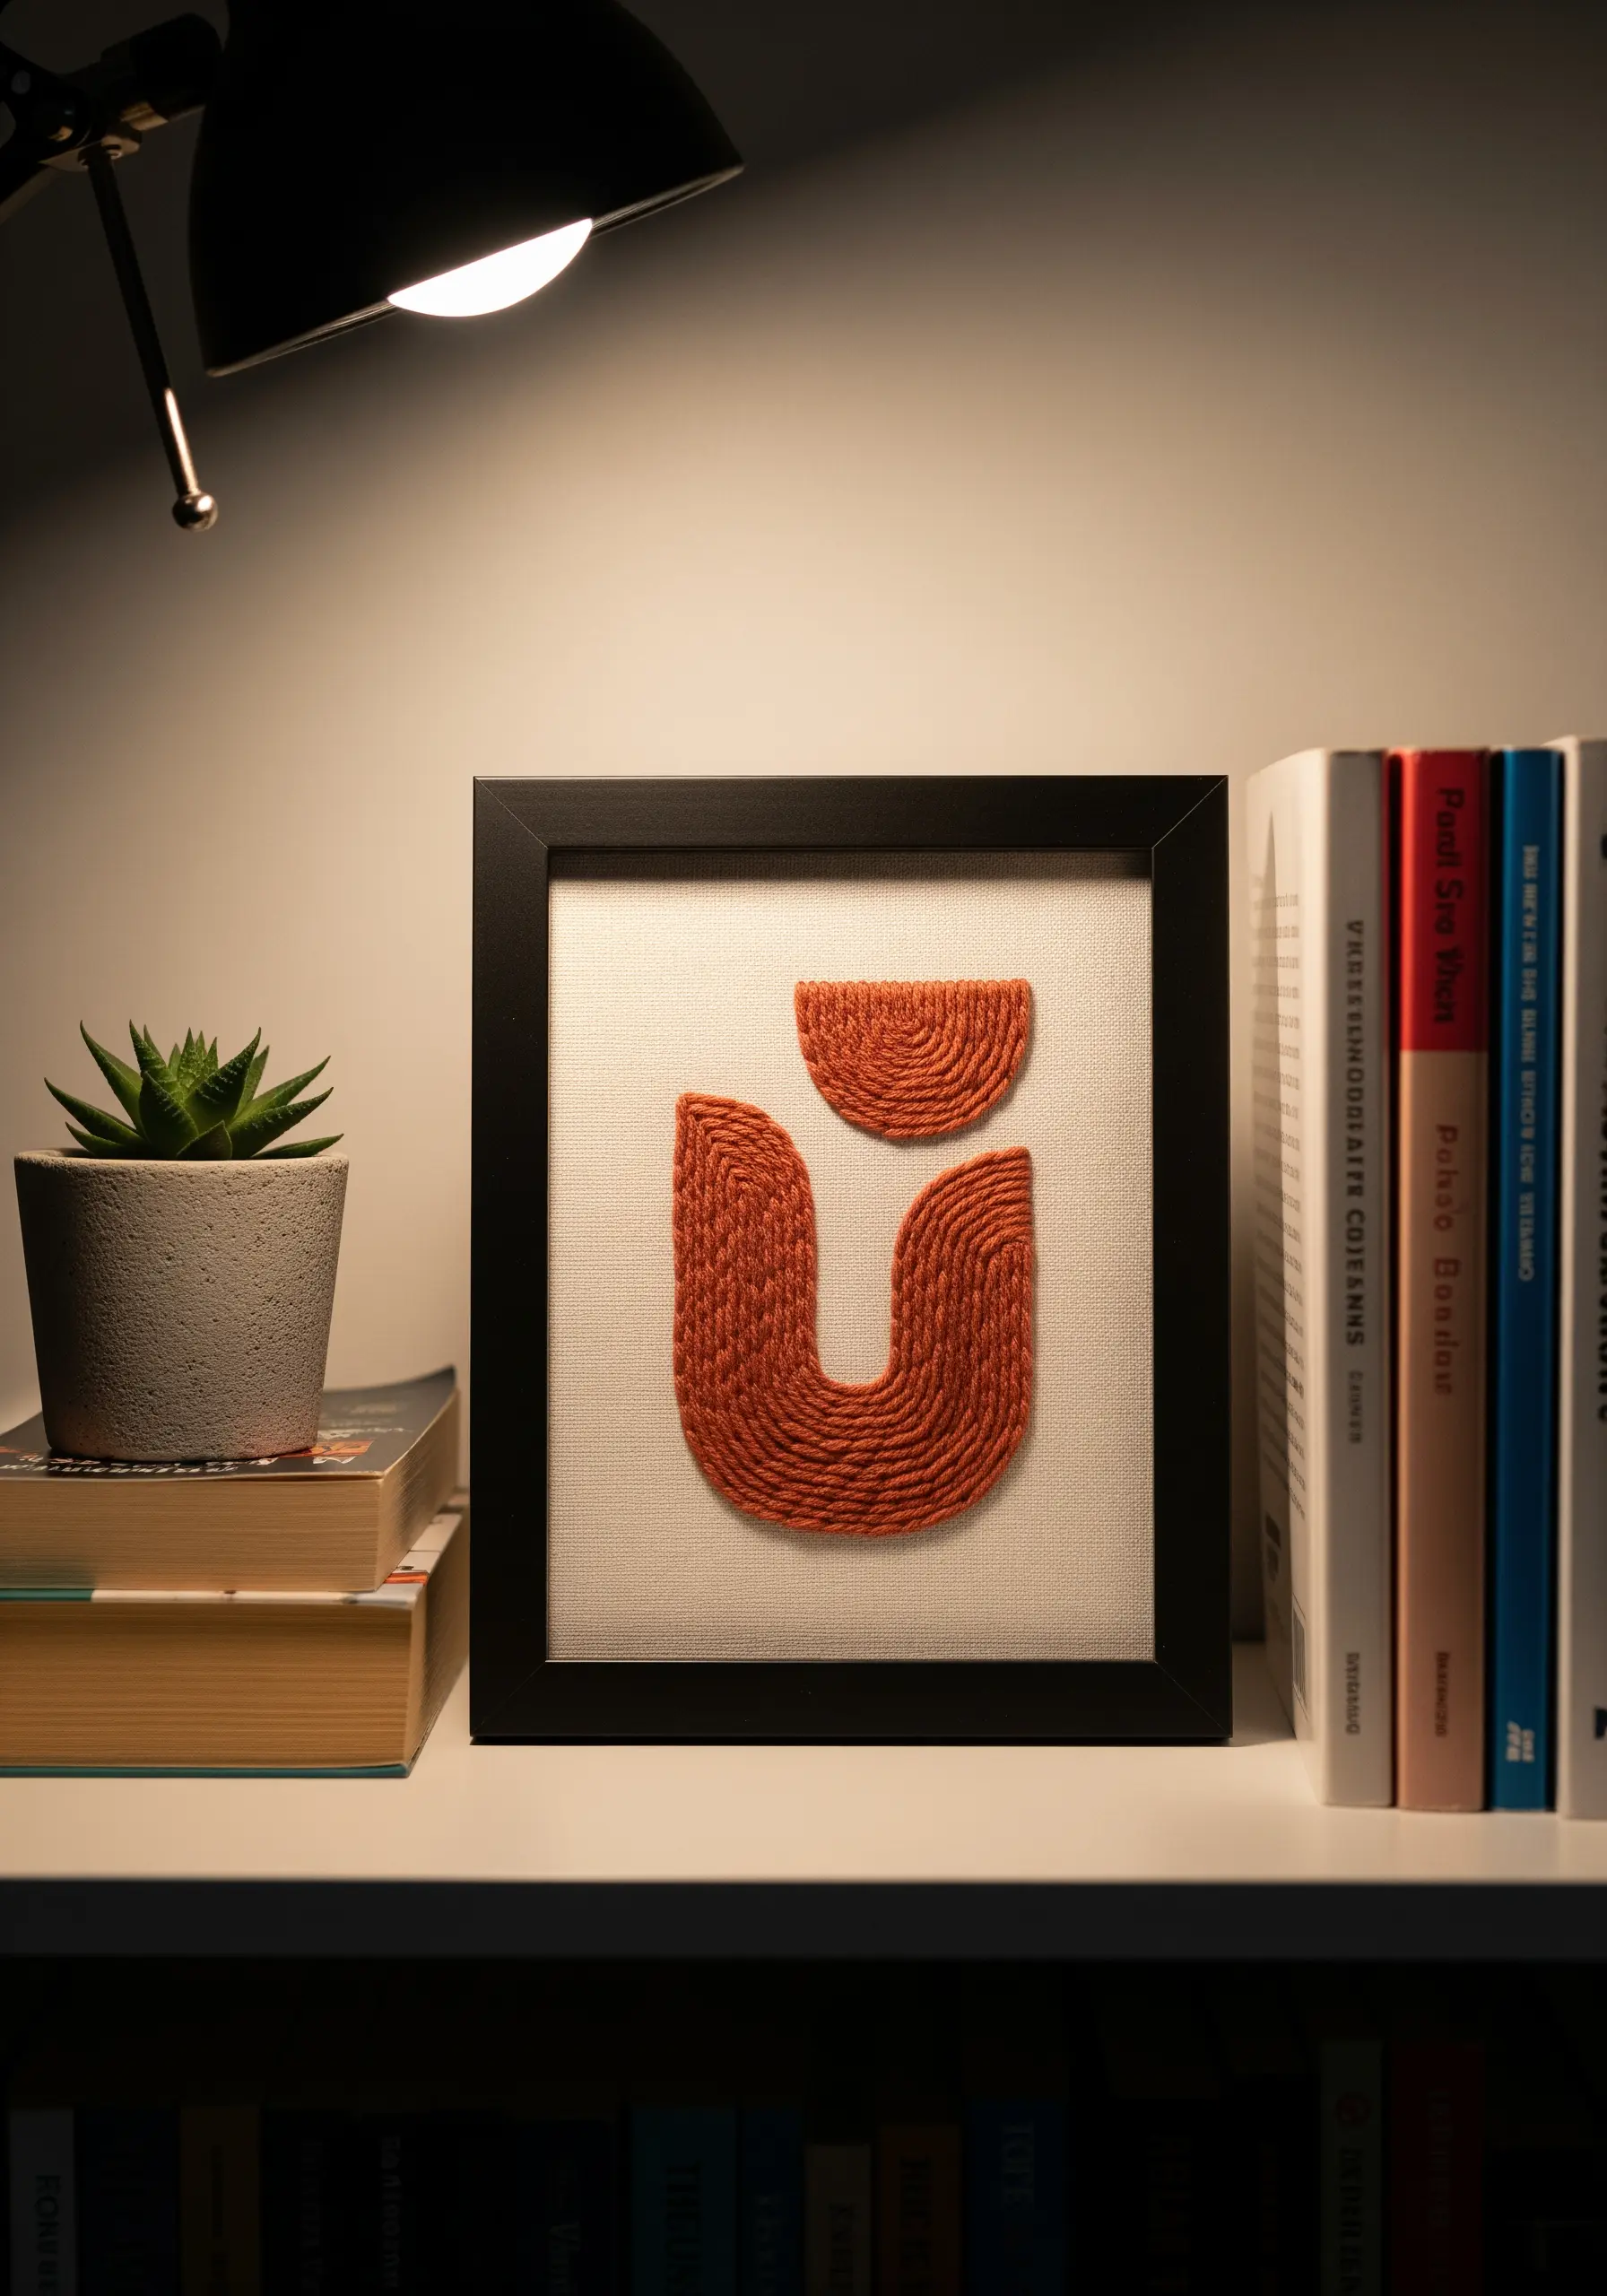
For bold, abstract shapes with sculptural depth, use the couching technique with thick yarn or cord.
Instead of pulling the thick yarn through the fabric, you lay it on the surface and tack it down with a thinner, matching embroidery floss.
Space your couching stitches about a quarter-inch apart along the curves to secure the yarn smoothly without interrupting its form.
This method allows you to work with heavy fibers, creating high-impact yarn wall art that feels both graphic and tactile.
Choose a rich, earthy color like terracotta to add warmth to a neutral interior.
4. Curate a Cohesive Botanical Gallery
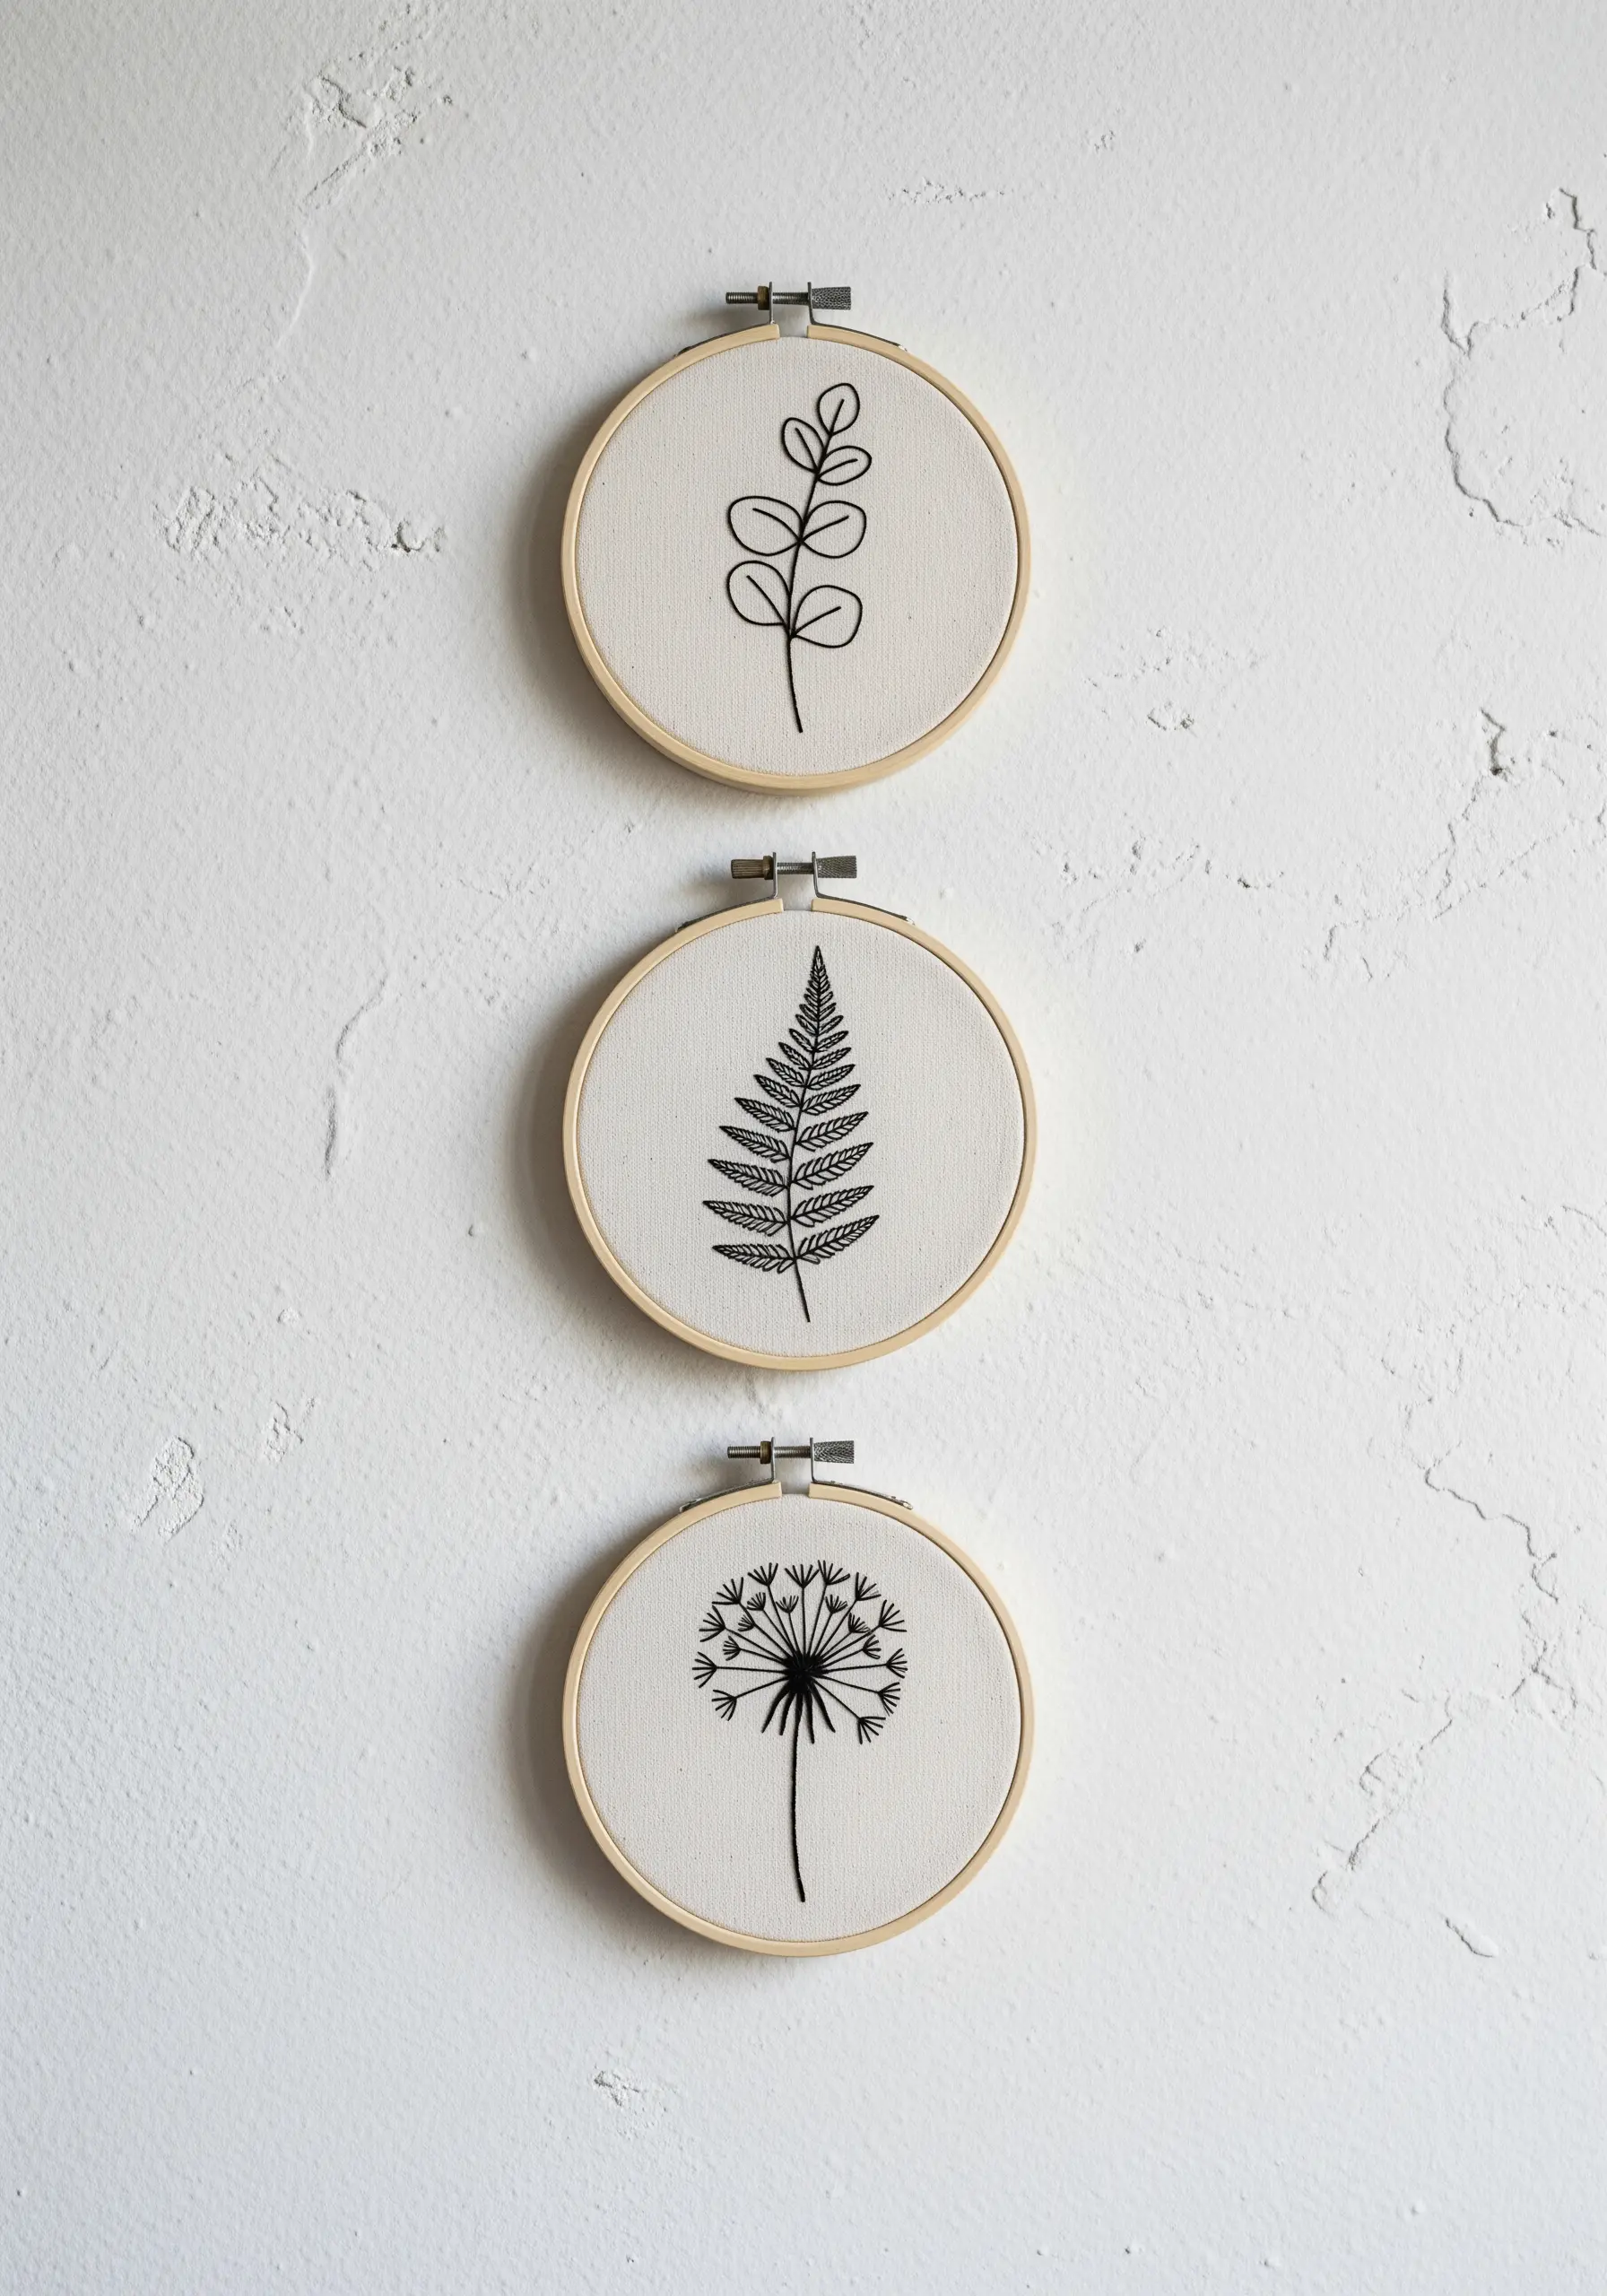
To design a sophisticated trio of hoops, select botanical motifs that share a similar visual language—delicate, bold, or intricate.
Use the same thread weight (two or three strands of black floss is ideal) and the same core stitches, like stem stitch or backstitch, across all pieces to ensure they feel like a curated set.
Vary the complexity—one simple sprig, one detailed fern, one airy dandelion—to create rhythm and interest without sacrificing cohesion.
Hanging them vertically creates an elegant focal point on a narrow wall, drawing the eye upward.
5. Add Subtle Radiance to a Pillow Cover
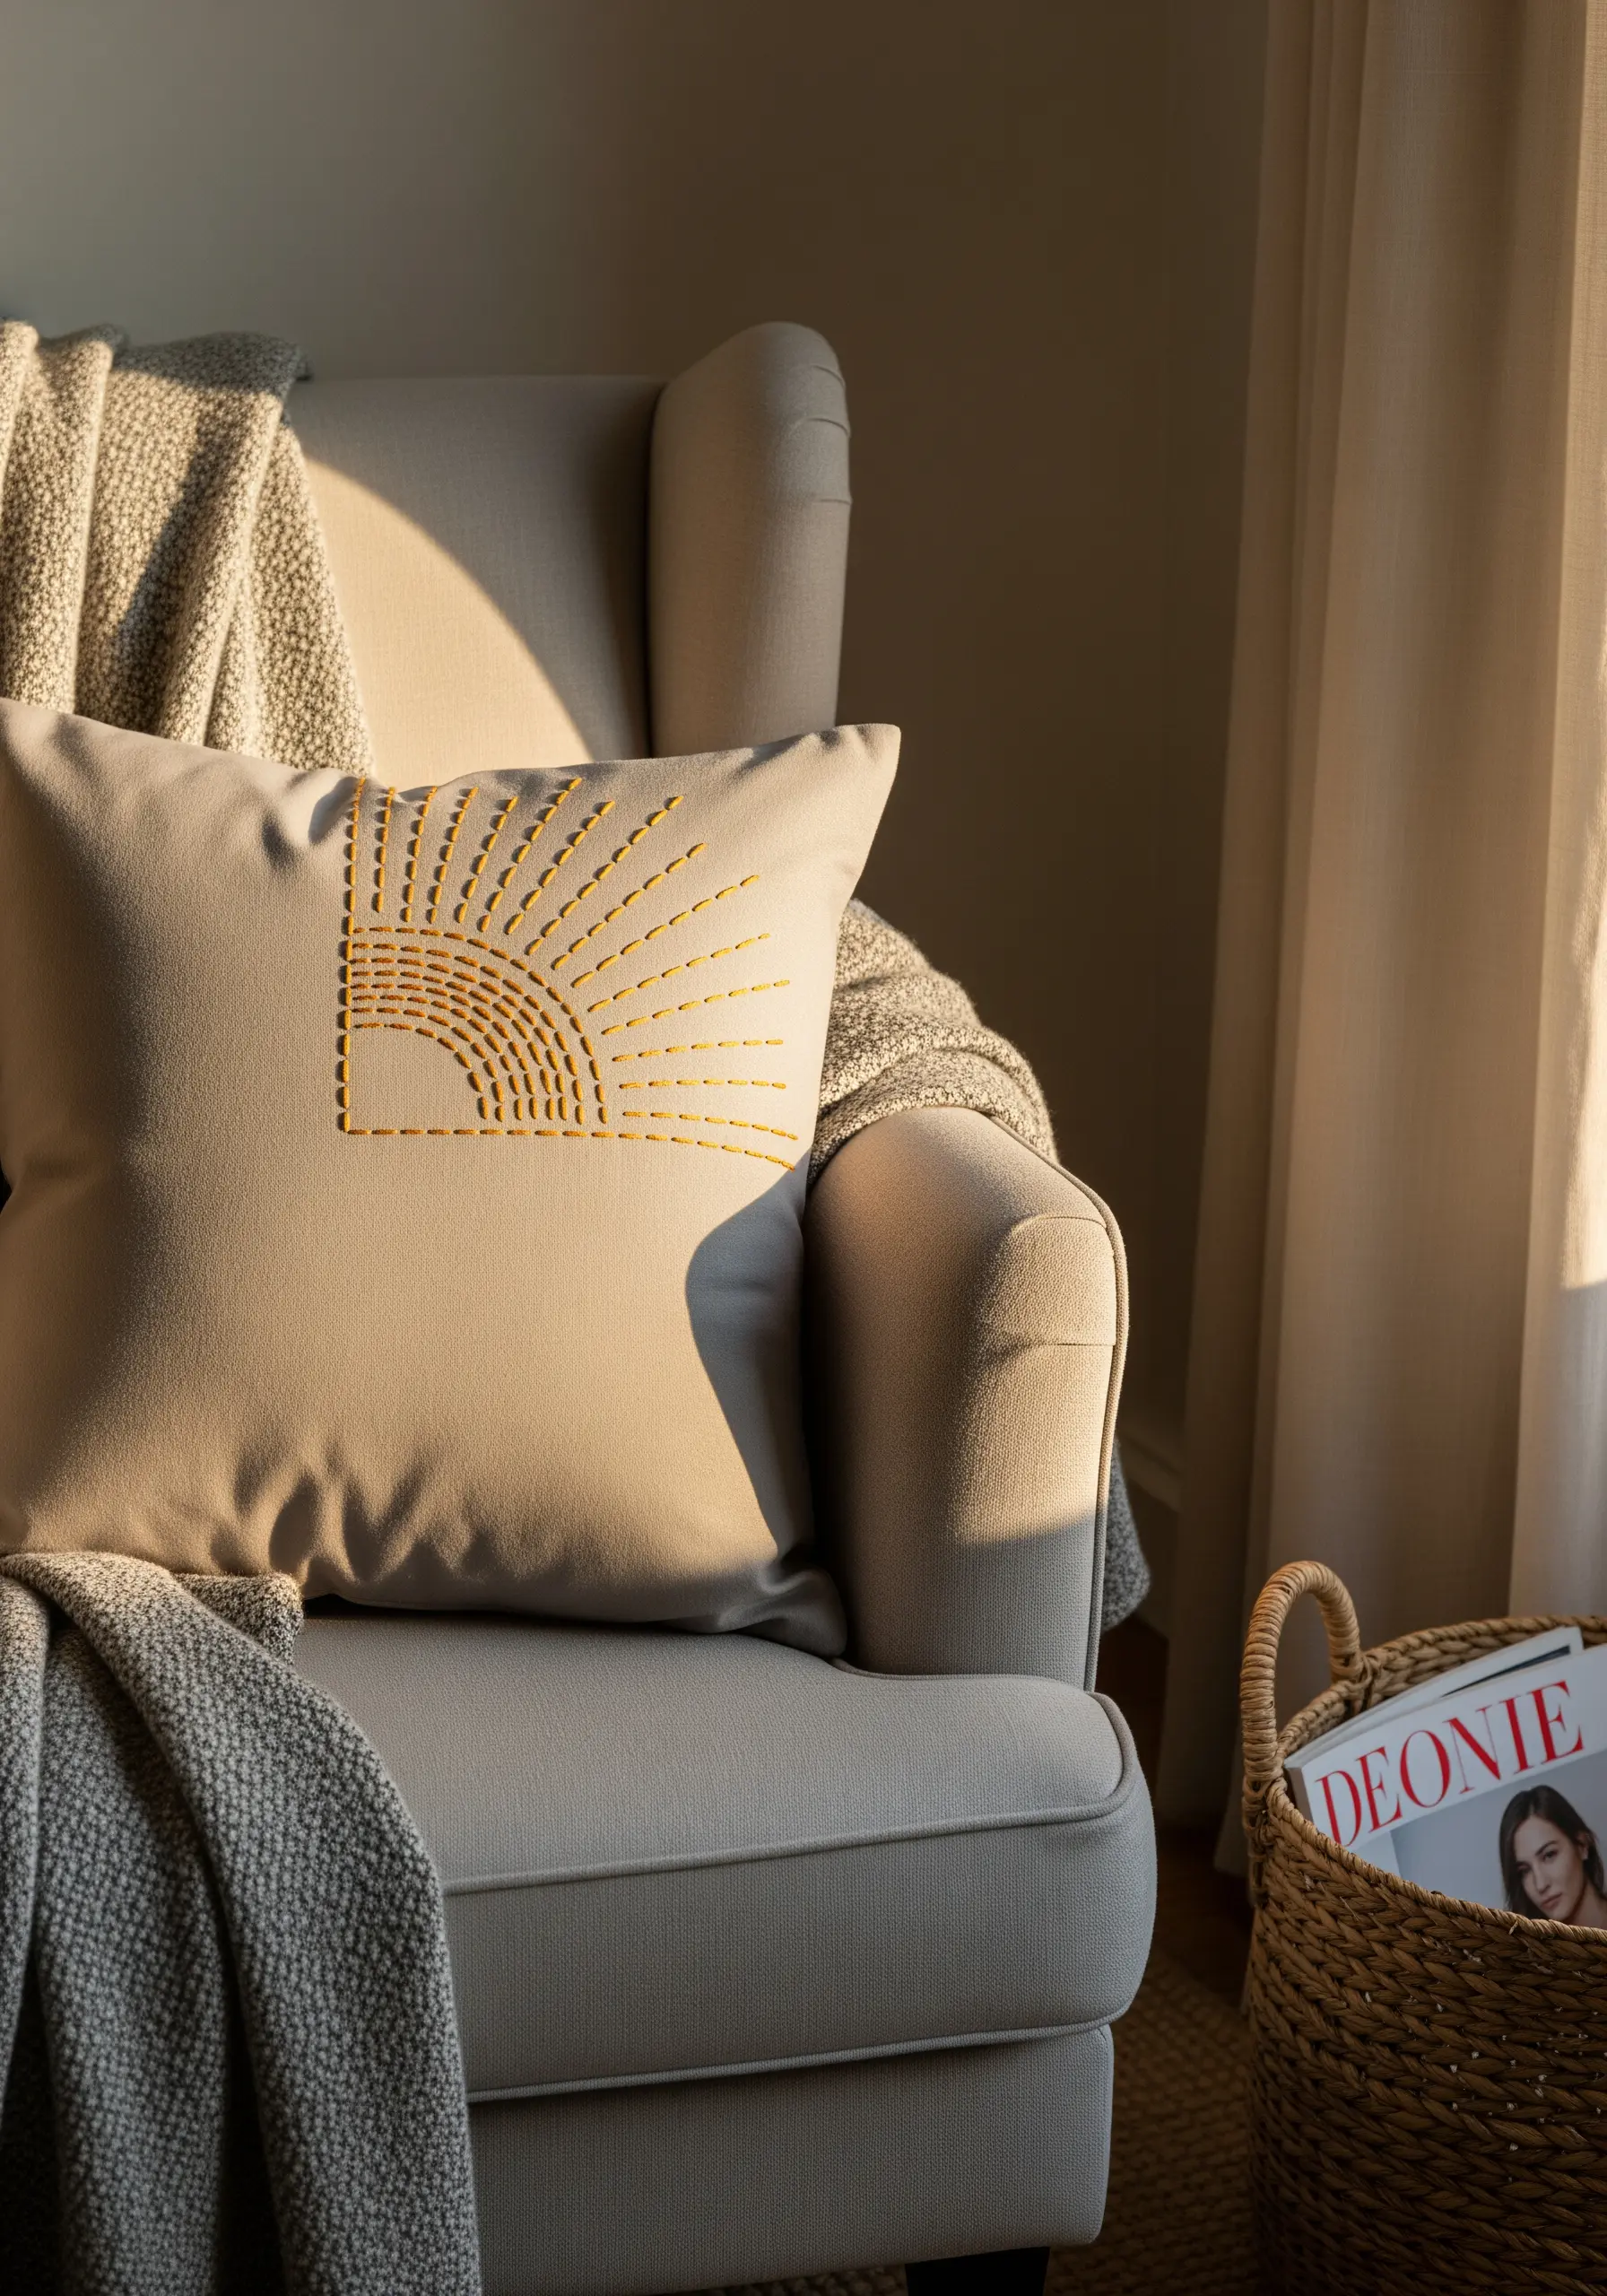
Embellish a cushion with a simple sunburst using radiating running stitches for a touch of handmade warmth.
To create a subtle gradient, use three similar shades of gold or yellow, transitioning from the lightest on the outer rays to the darkest near the base.
This isn’t just decorative; it subtly mimics the way light diffuses.
Keep your stitches evenly spaced but vary their lengths slightly to give the motif an organic, hand-drawn feel.
These minimal stitch patterns work best on solid, medium-weight fabrics that allow the thread to be the hero.
6. Capture Fluidity with Large-Scale Line Art
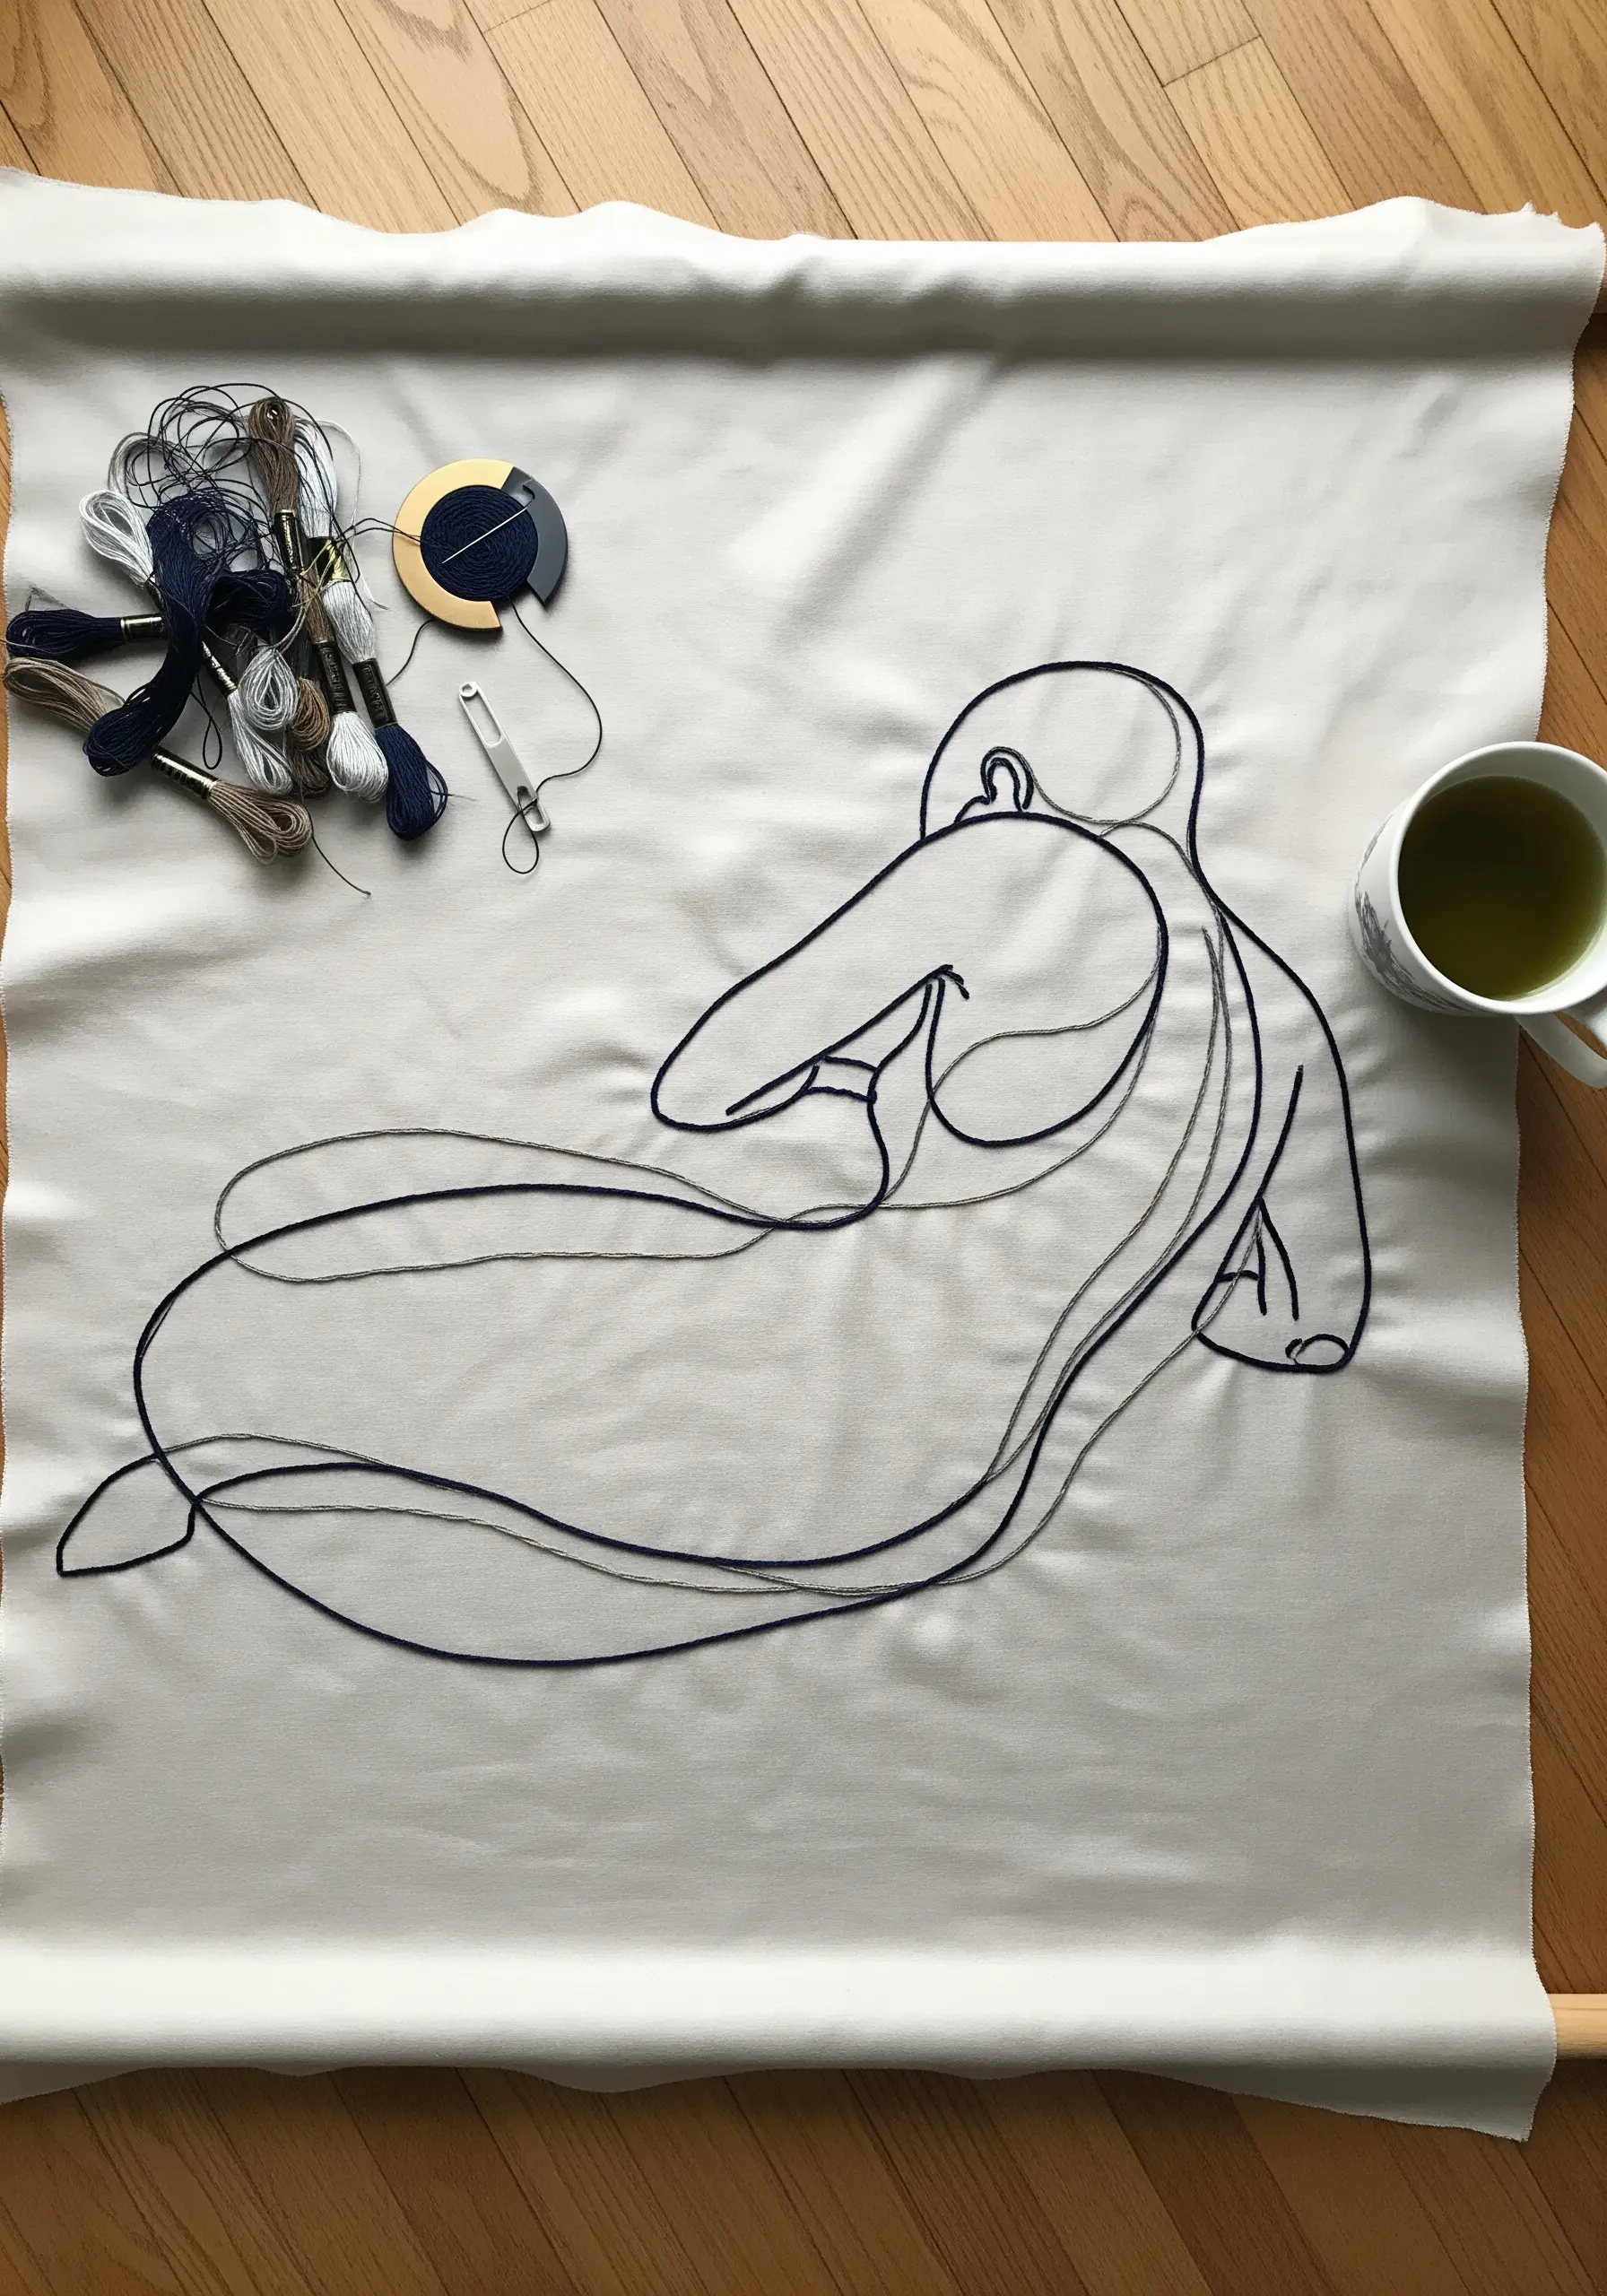
When tackling a large-scale line drawing, the goal is to maintain a smooth, unbroken line that feels effortless.
Use a whipped backstitch or a stem stitch, as both create a fluid, rope-like line that masks the individual stitches, perfect for rendering continuous forms.
To transfer the design accurately, project the image onto your fabric and trace it with a pencil, ensuring the proportions are correct before you stitch.
Use multiple shades of a single color family to define overlapping forms, adding depth without cluttering the minimalist aesthetic of these gallery-style hoop art pieces.
7. Weave a Textured Crescent Moon
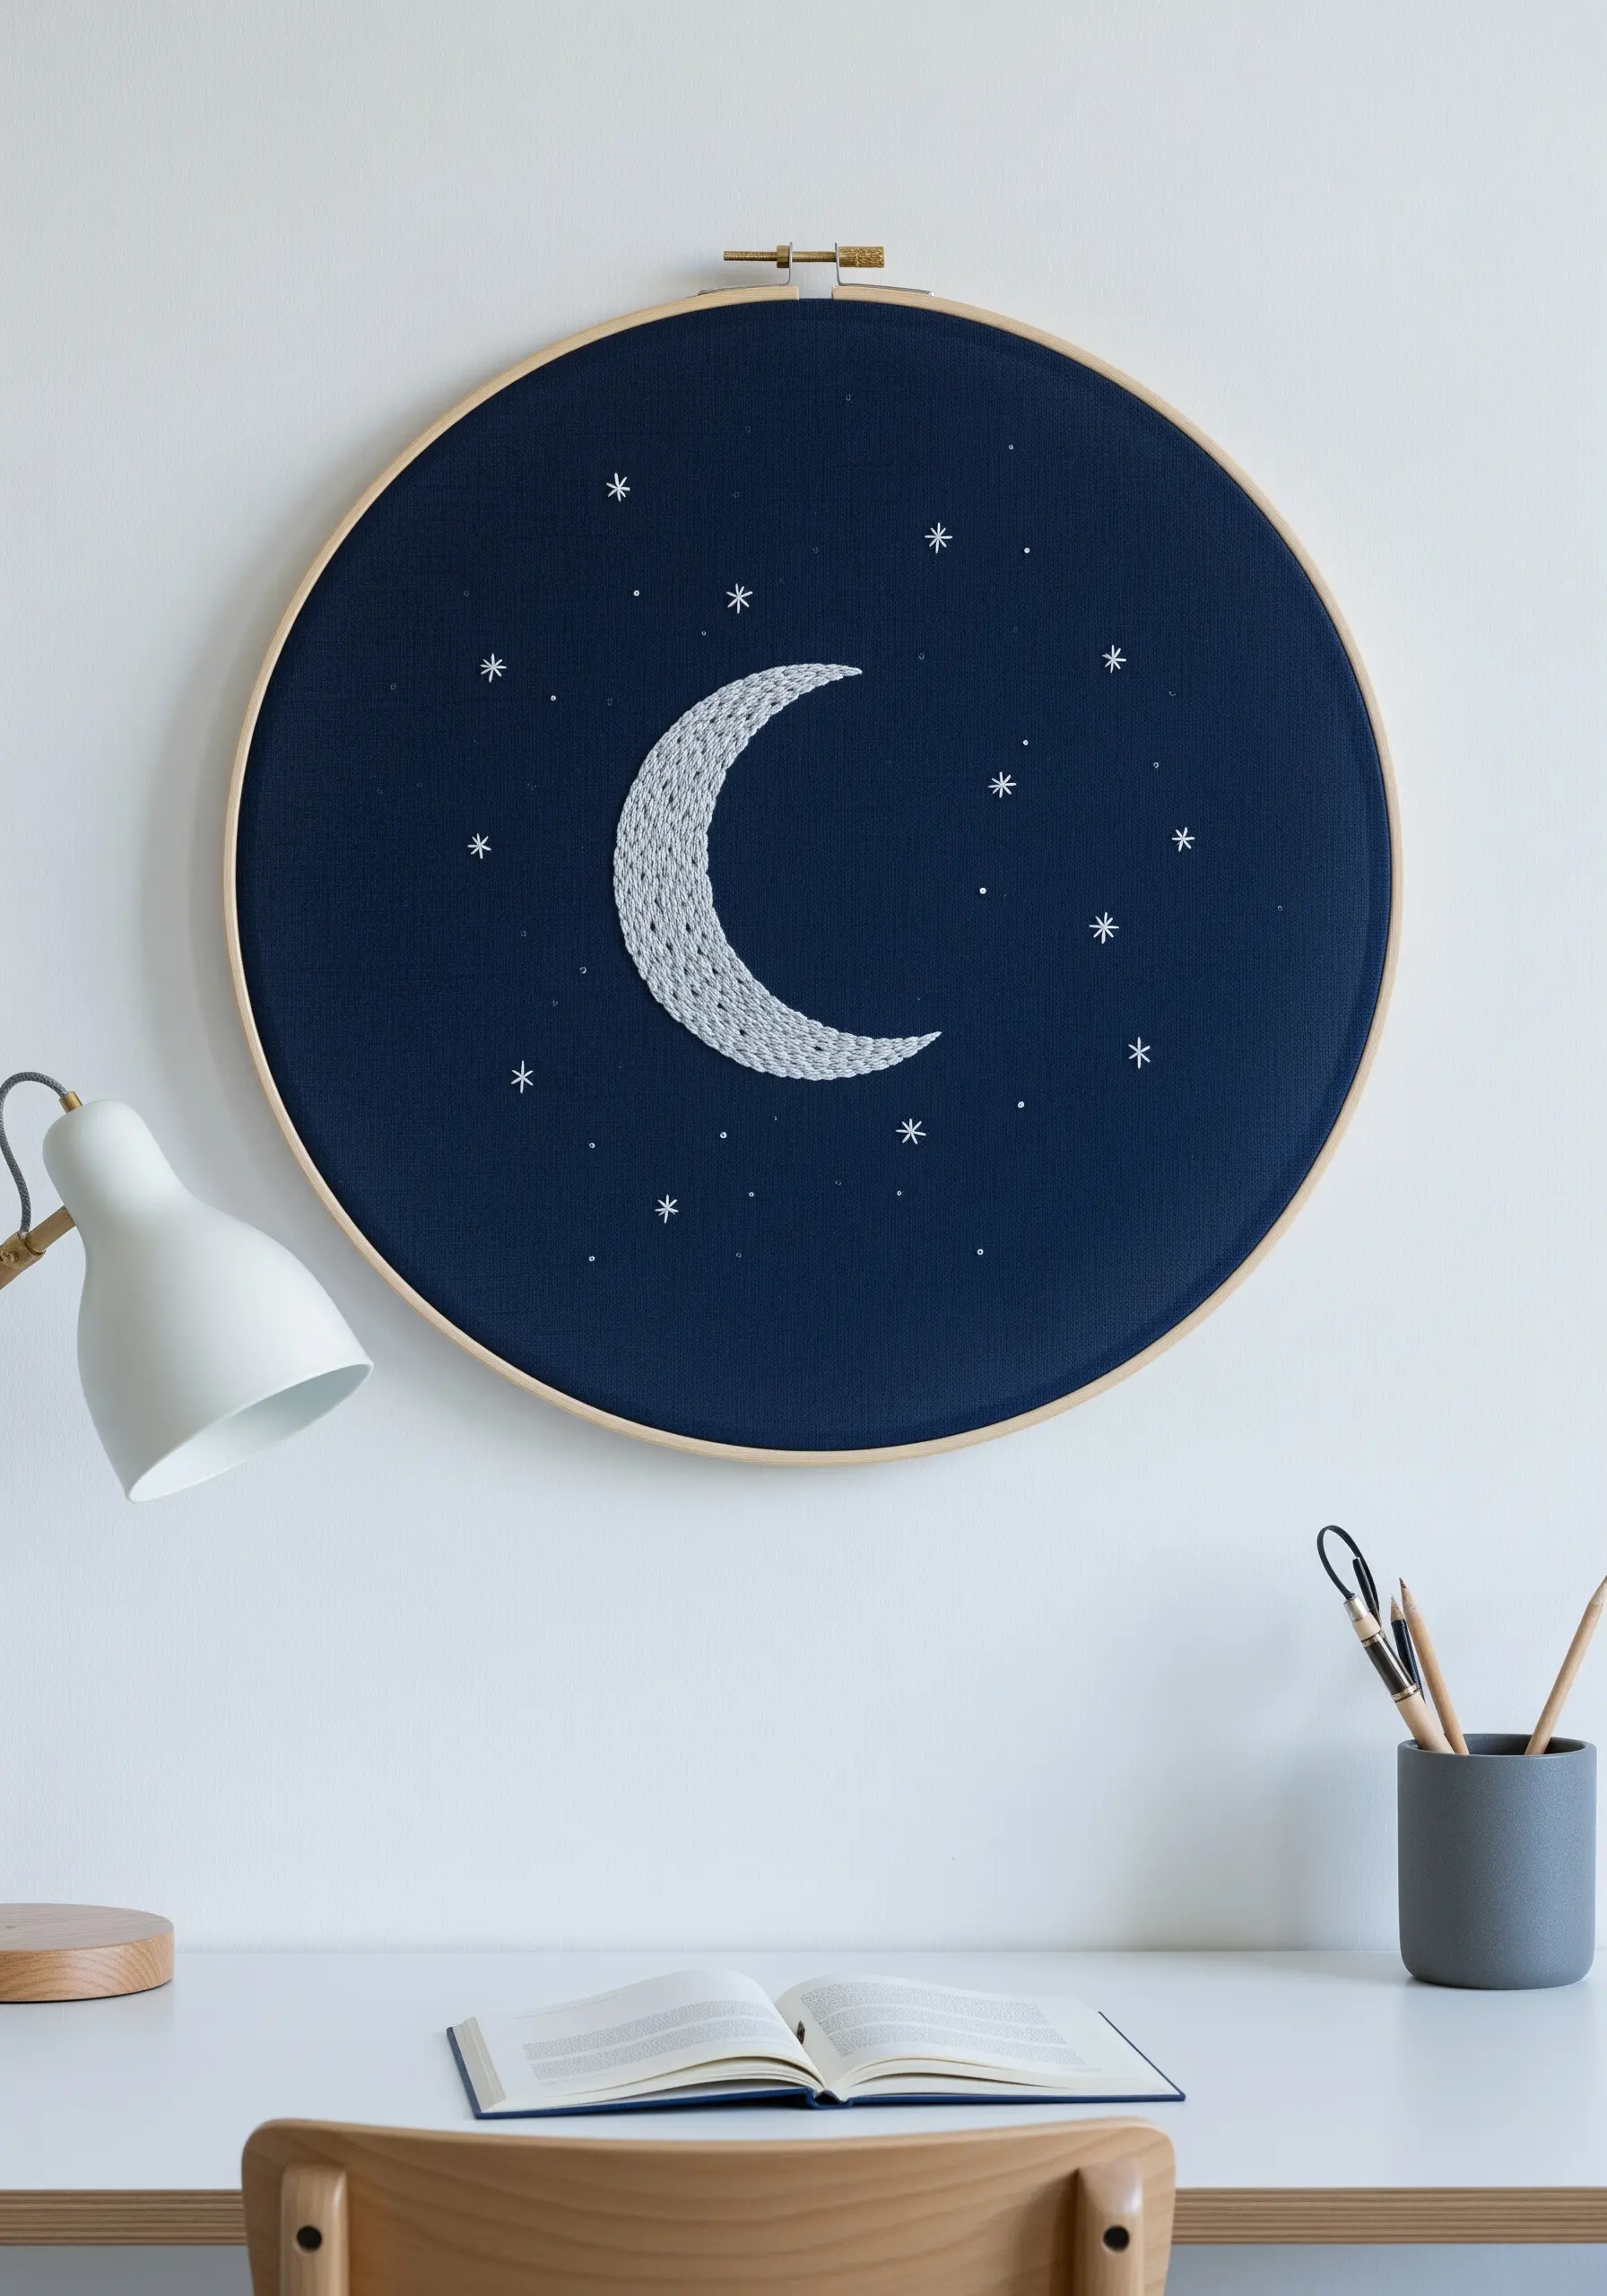
Create a luminous, textured moon by filling its crescent shape with densely packed seed stitches or short straight stitches.
Instead of a flat satin stitch, this method creates a tactile surface that beautifully catches the light, making the moon feel dimensional against the dark fabric.
Vary the direction of your stitches slightly to mimic the craters and shadows of the lunar surface.
Contrast this textured element with tiny, delicate star stitches made with a single strand of white floss to create a balanced and serene cosmic scene.
8. Embellish Linens with Delicate Herbal Motifs
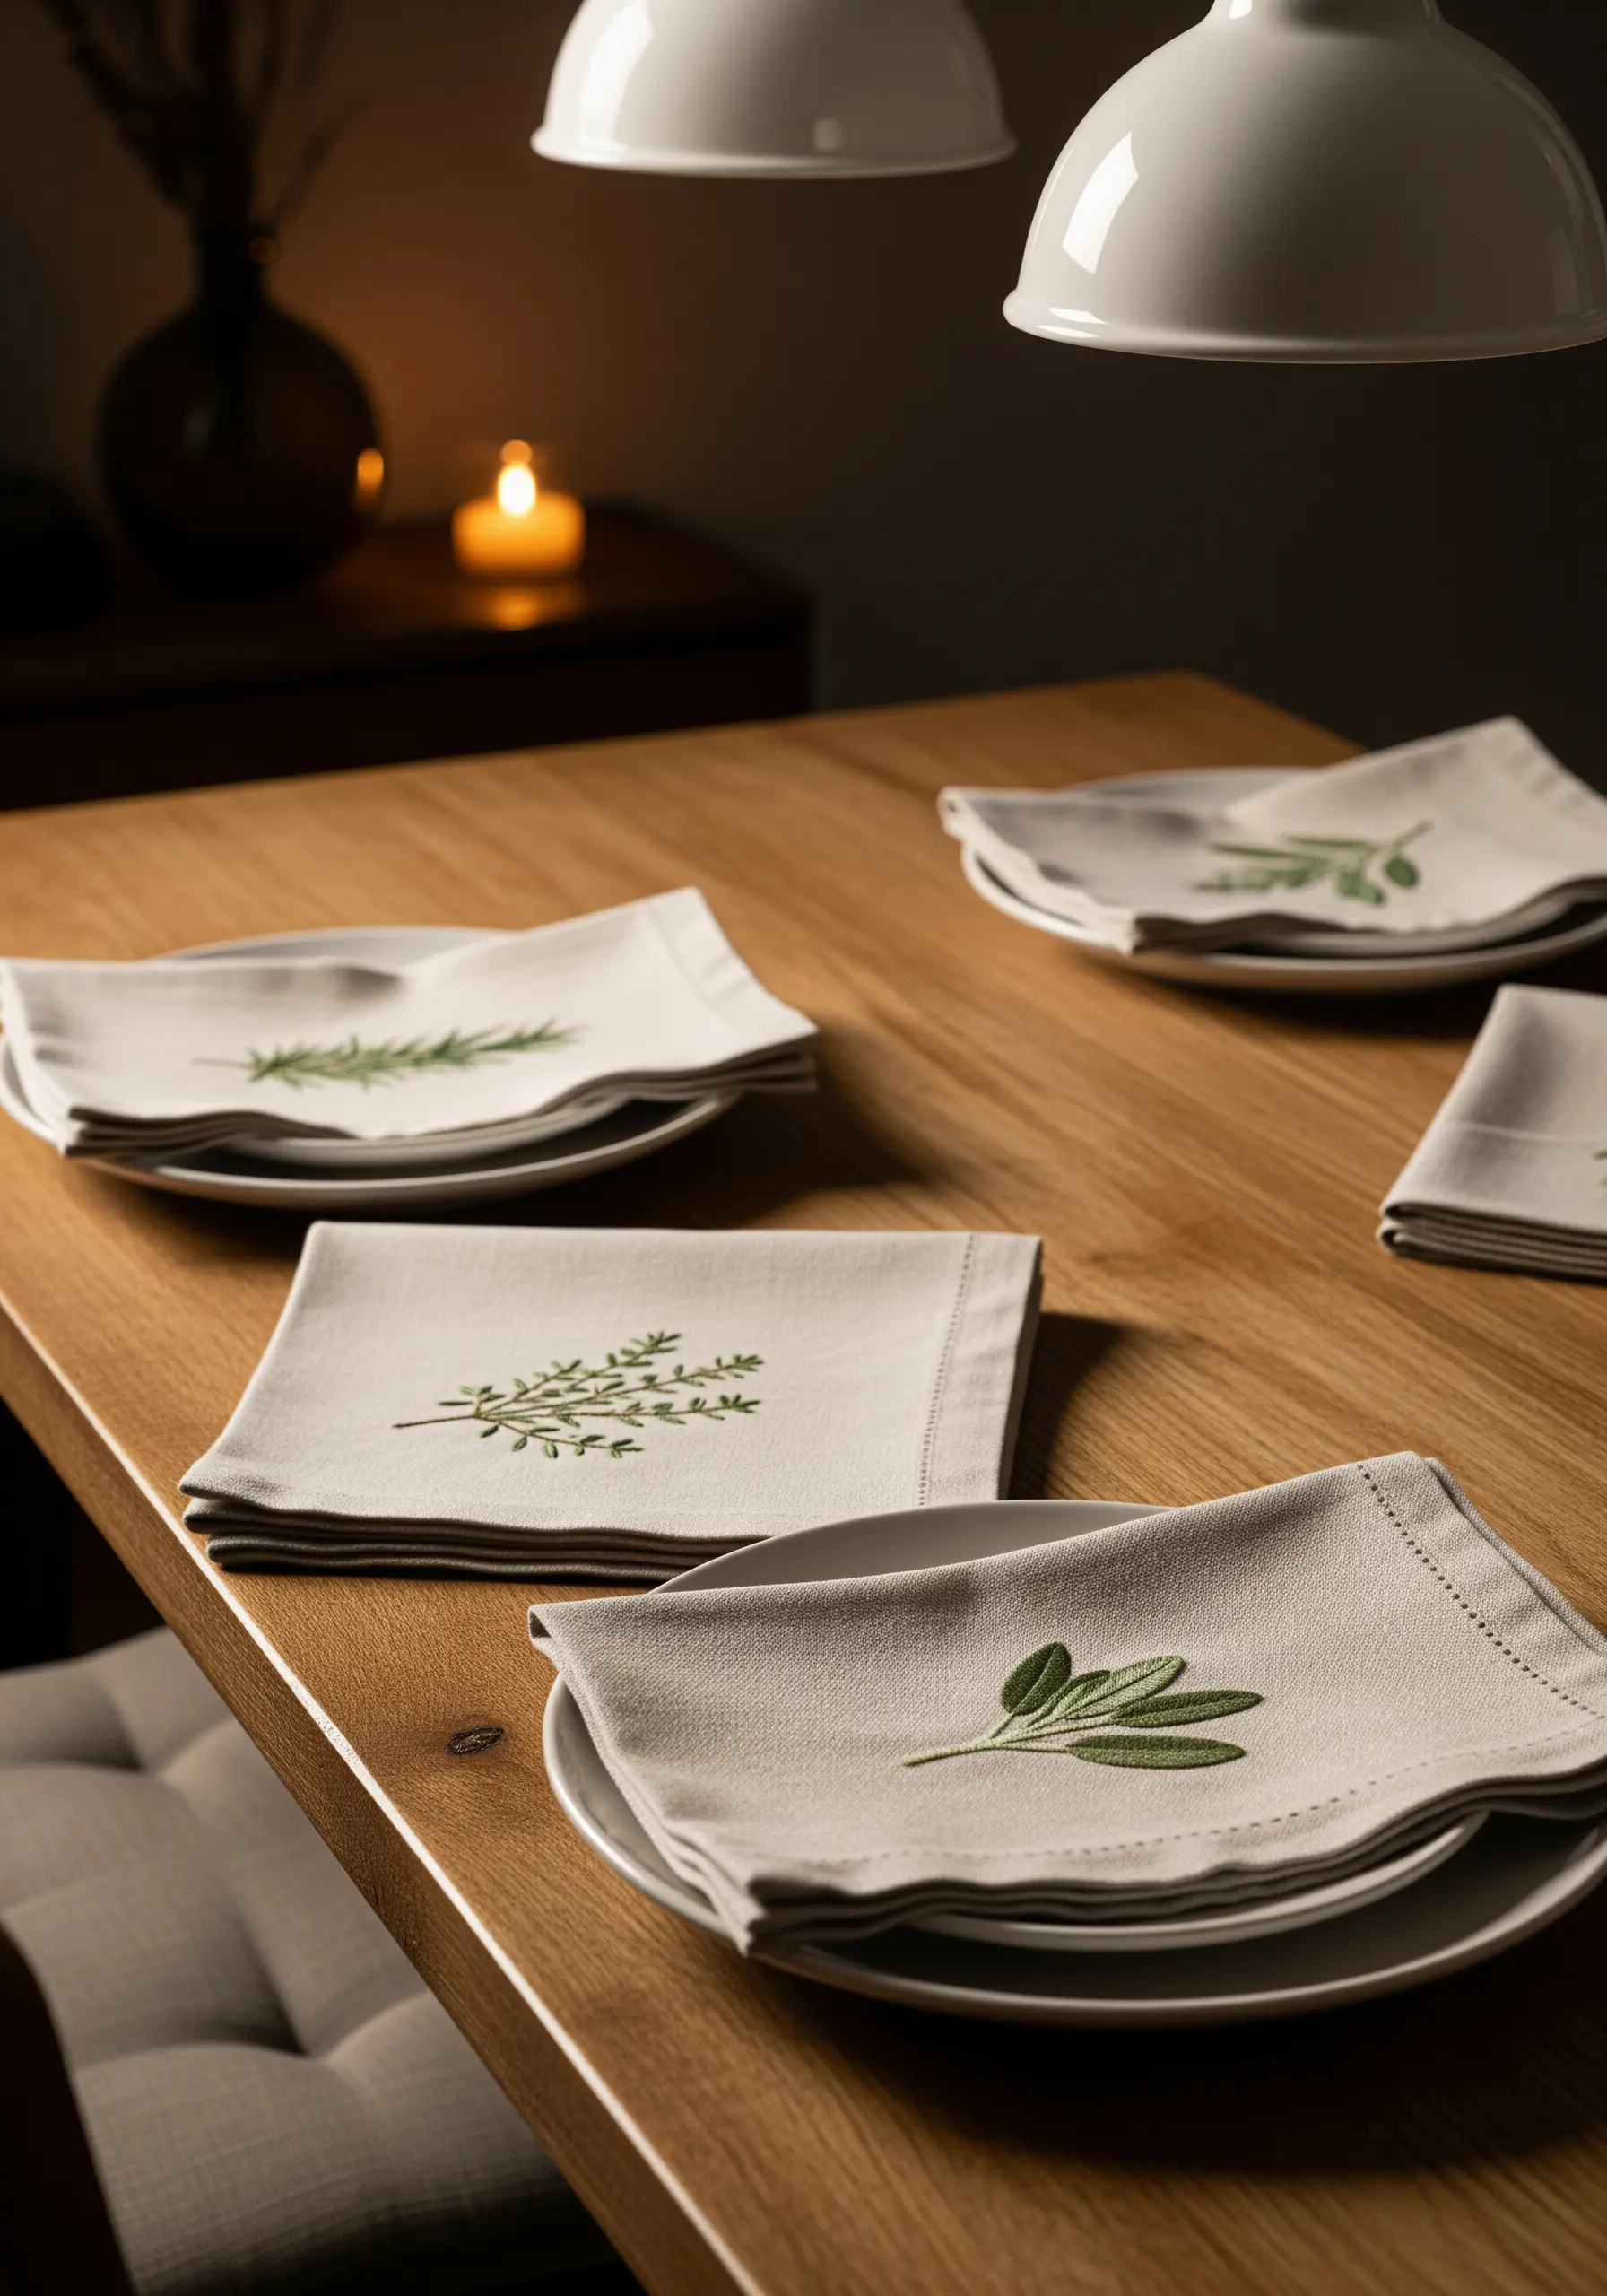
Elevate simple table napkins with small, realistic herb motifs that add a touch of bespoke elegance.
Use a combination of satin stitch for the leaves and stem stitch for the stalks to give each sprig dimension and realism.
Choose a high-quality, colorfast cotton floss that will hold up to washing and use.
For a cohesive set, embroider a different herb on each napkin—sage, rosemary, thyme—creating a subtle theme for your tablescape without being repetitive.
These leaf & plant embroidery ideas make functional items feel personal.
9. Explore Precision with Geometric String Art

This technique blends the precision of geometry with the softness of thread, creating a striking piece of wall art.
Work on a stiff base like felt or cardstock, lightly marking your anchor points in a geometric pattern before you begin.
Use a single, continuous strand of thread, weaving it from point to point to build your shape.
The magic is in the tension—keep it consistent and taut to ensure your lines are crisp and your angles sharp, showcasing the beauty of mathematical patterns.
10. Create Atmosphere with Scattered Motifs
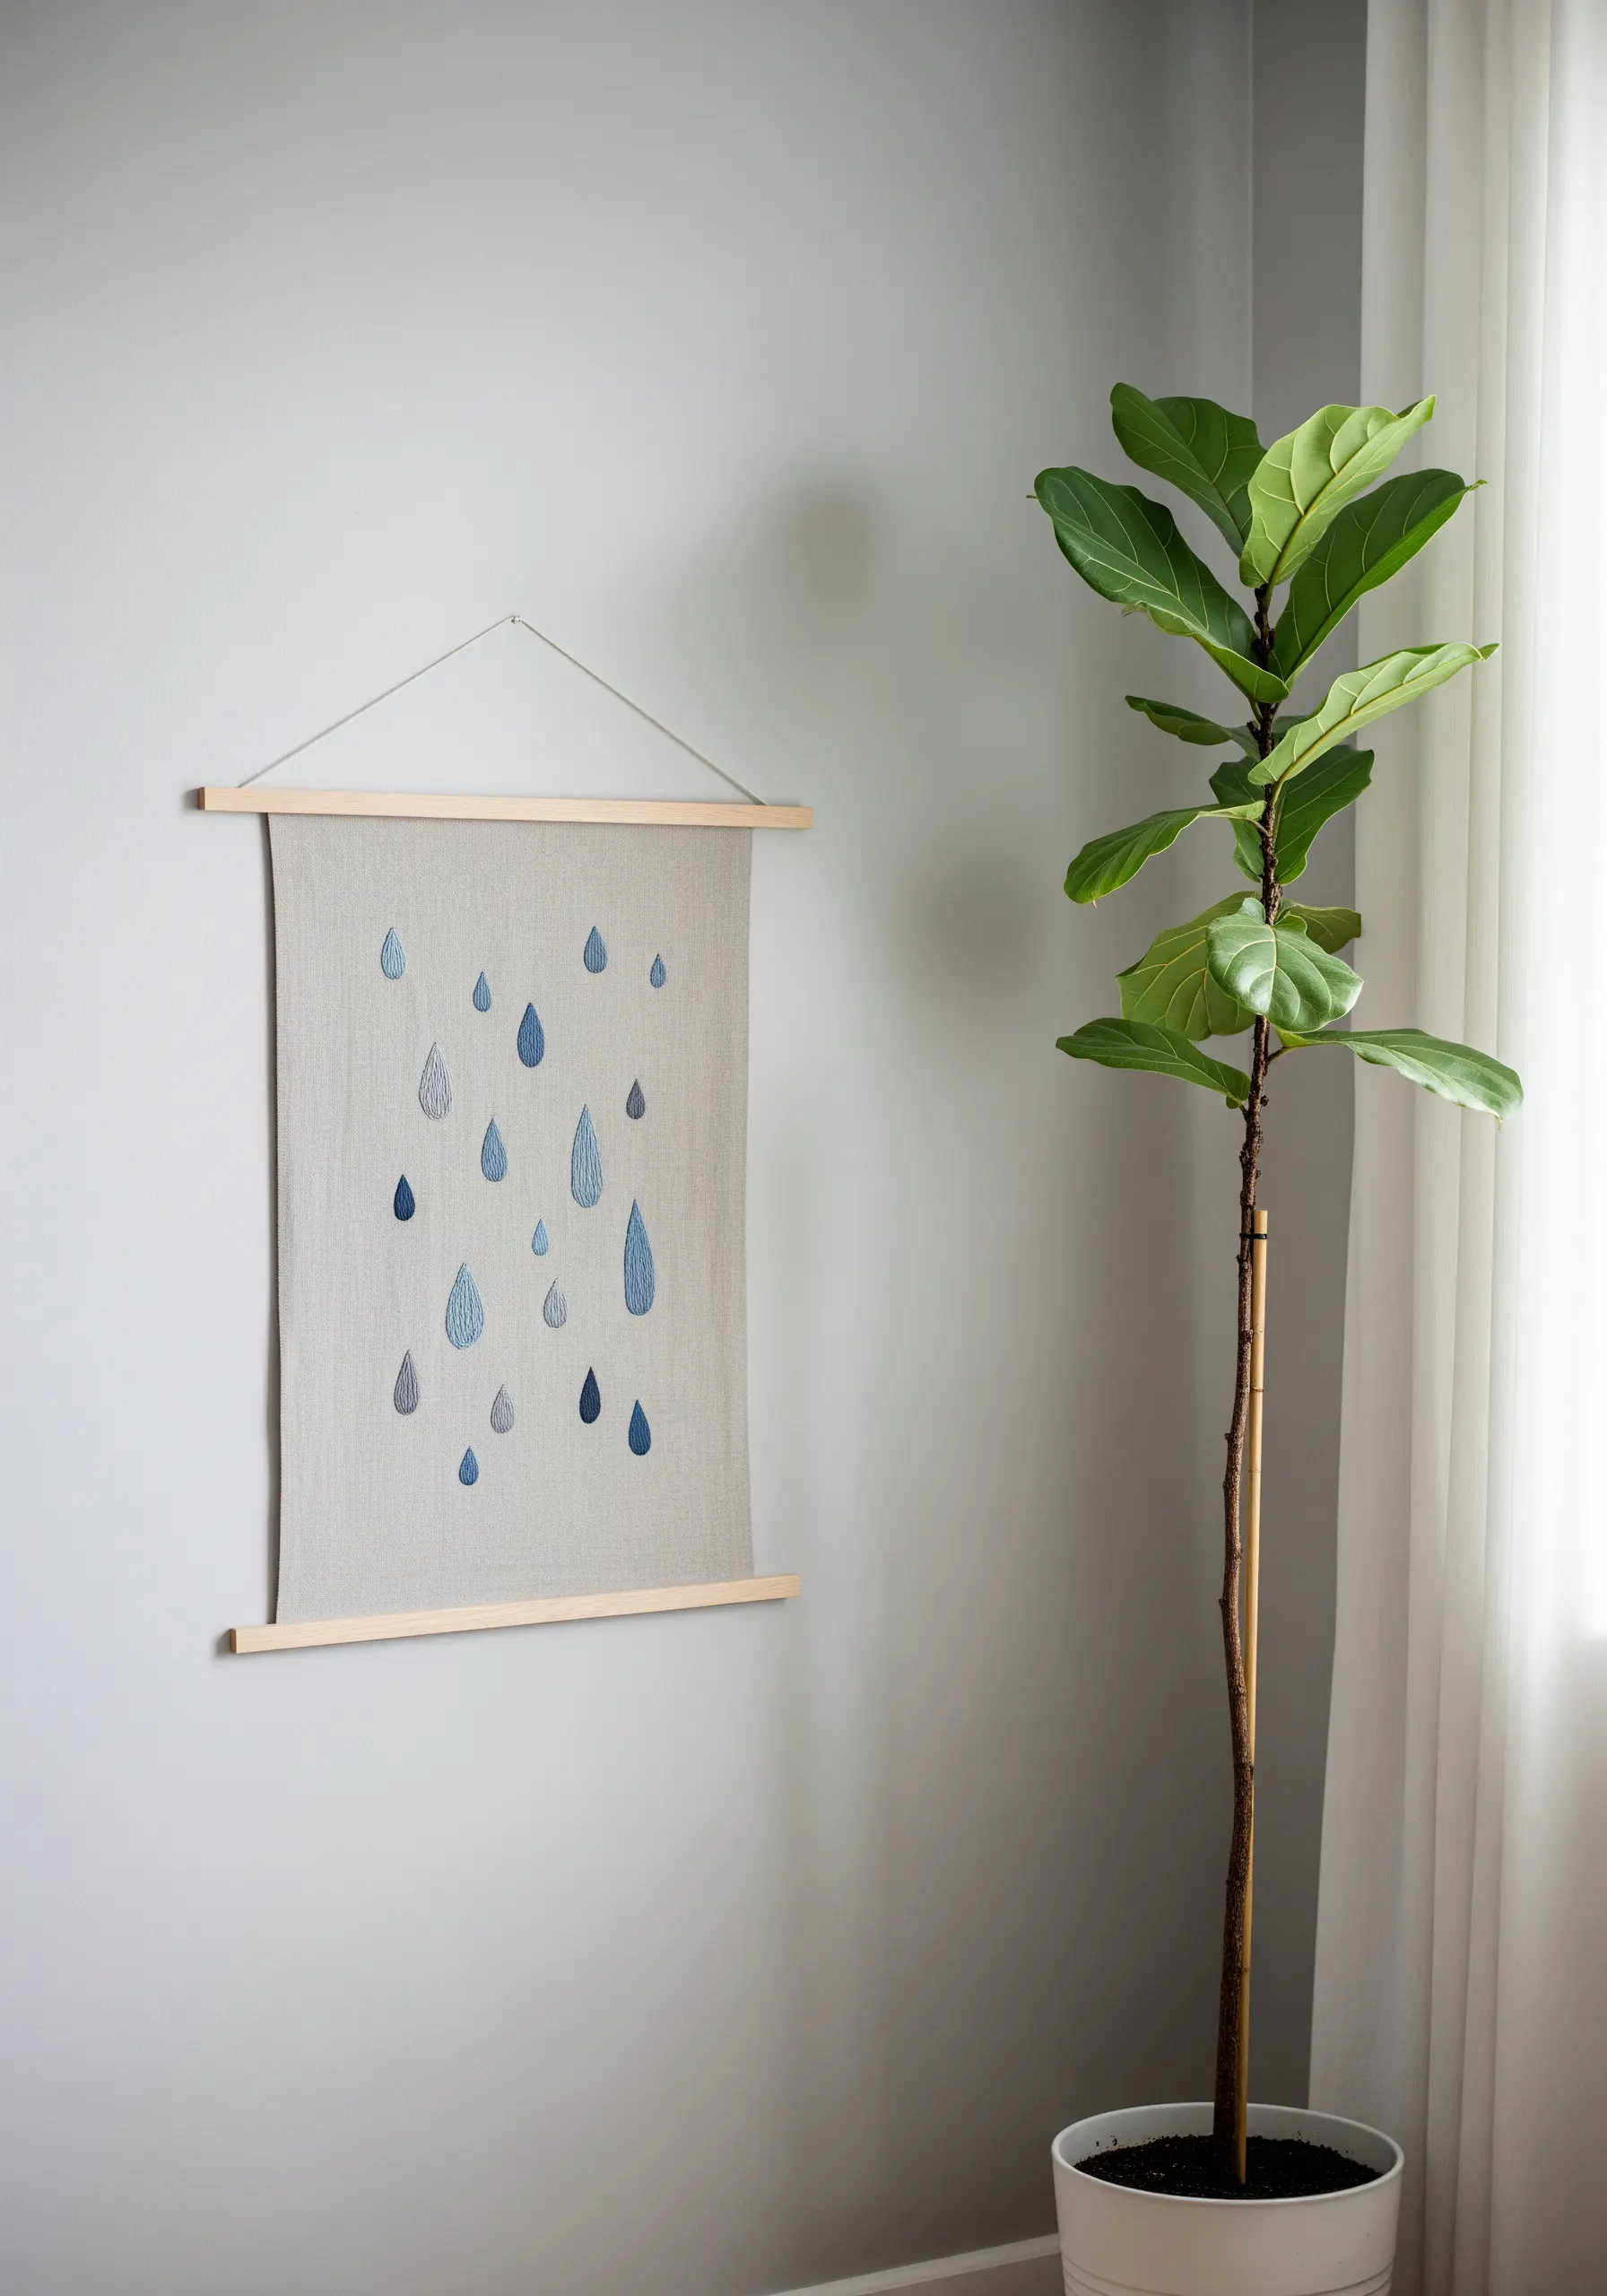
Design a calming wall hanging by scattering simple shapes, like these raindrops, across the fabric instead of clustering them in the center.
This use of negative space creates a sense of peace and movement.
Fill each raindrop with a vertical satin stitch, which naturally elongates the shape and adds a subtle sheen.
Create a gentle color story by using several shades of blue and grey, distributing them randomly for an organic, natural feel. This approach makes for wonderfully calming DIY embroidery projects.
11. Build a Meditative Field of French Knots
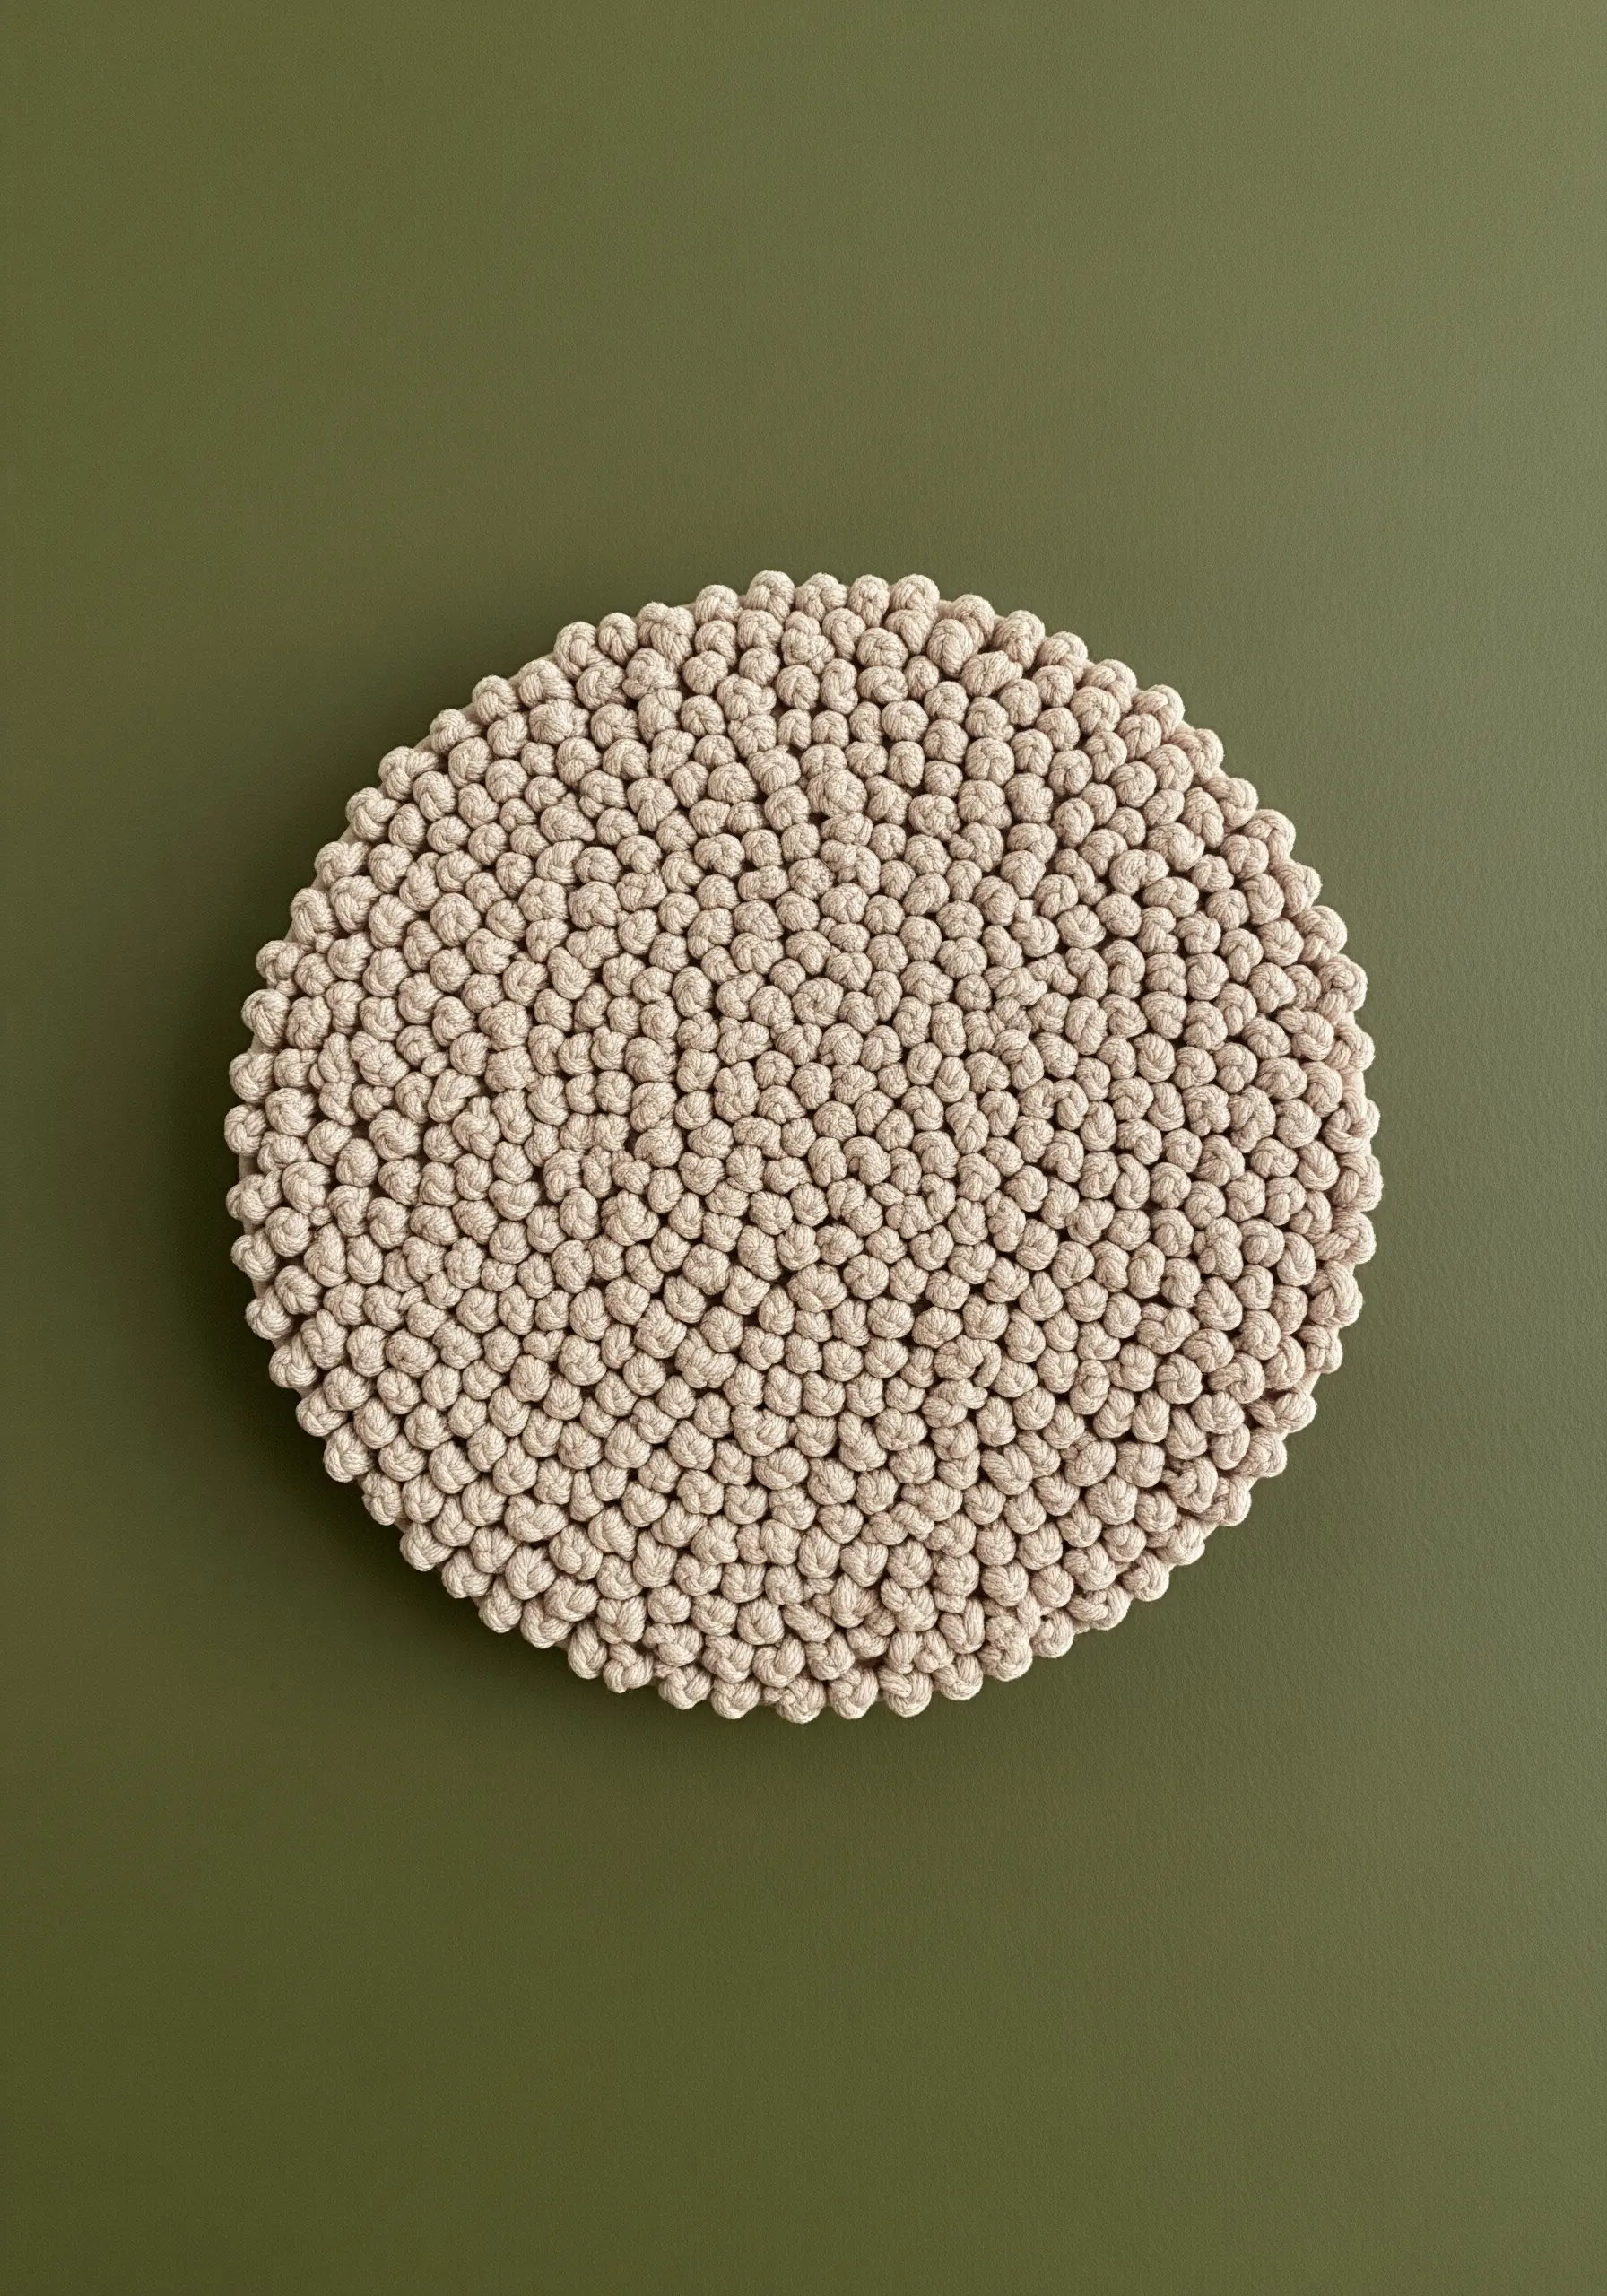
Craft a deeply textural, monochrome art piece using only one stitch: the French knot.
The key to this pebble-like surface is density. Pack your knots tightly together, ensuring the fabric beneath is completely covered.
To maintain a neat circular shape, work from the outside edge inward, following concentric guidelines you’ve lightly drawn on the fabric.
Use a sturdy, non-stretch fabric like cotton canvas, pulled taut in a hoop, to support the weight and tension of thousands of knots. It’s a meditative process that produces stunning texture-rich thread art.
12. Give Small Motifs a Professional Finish
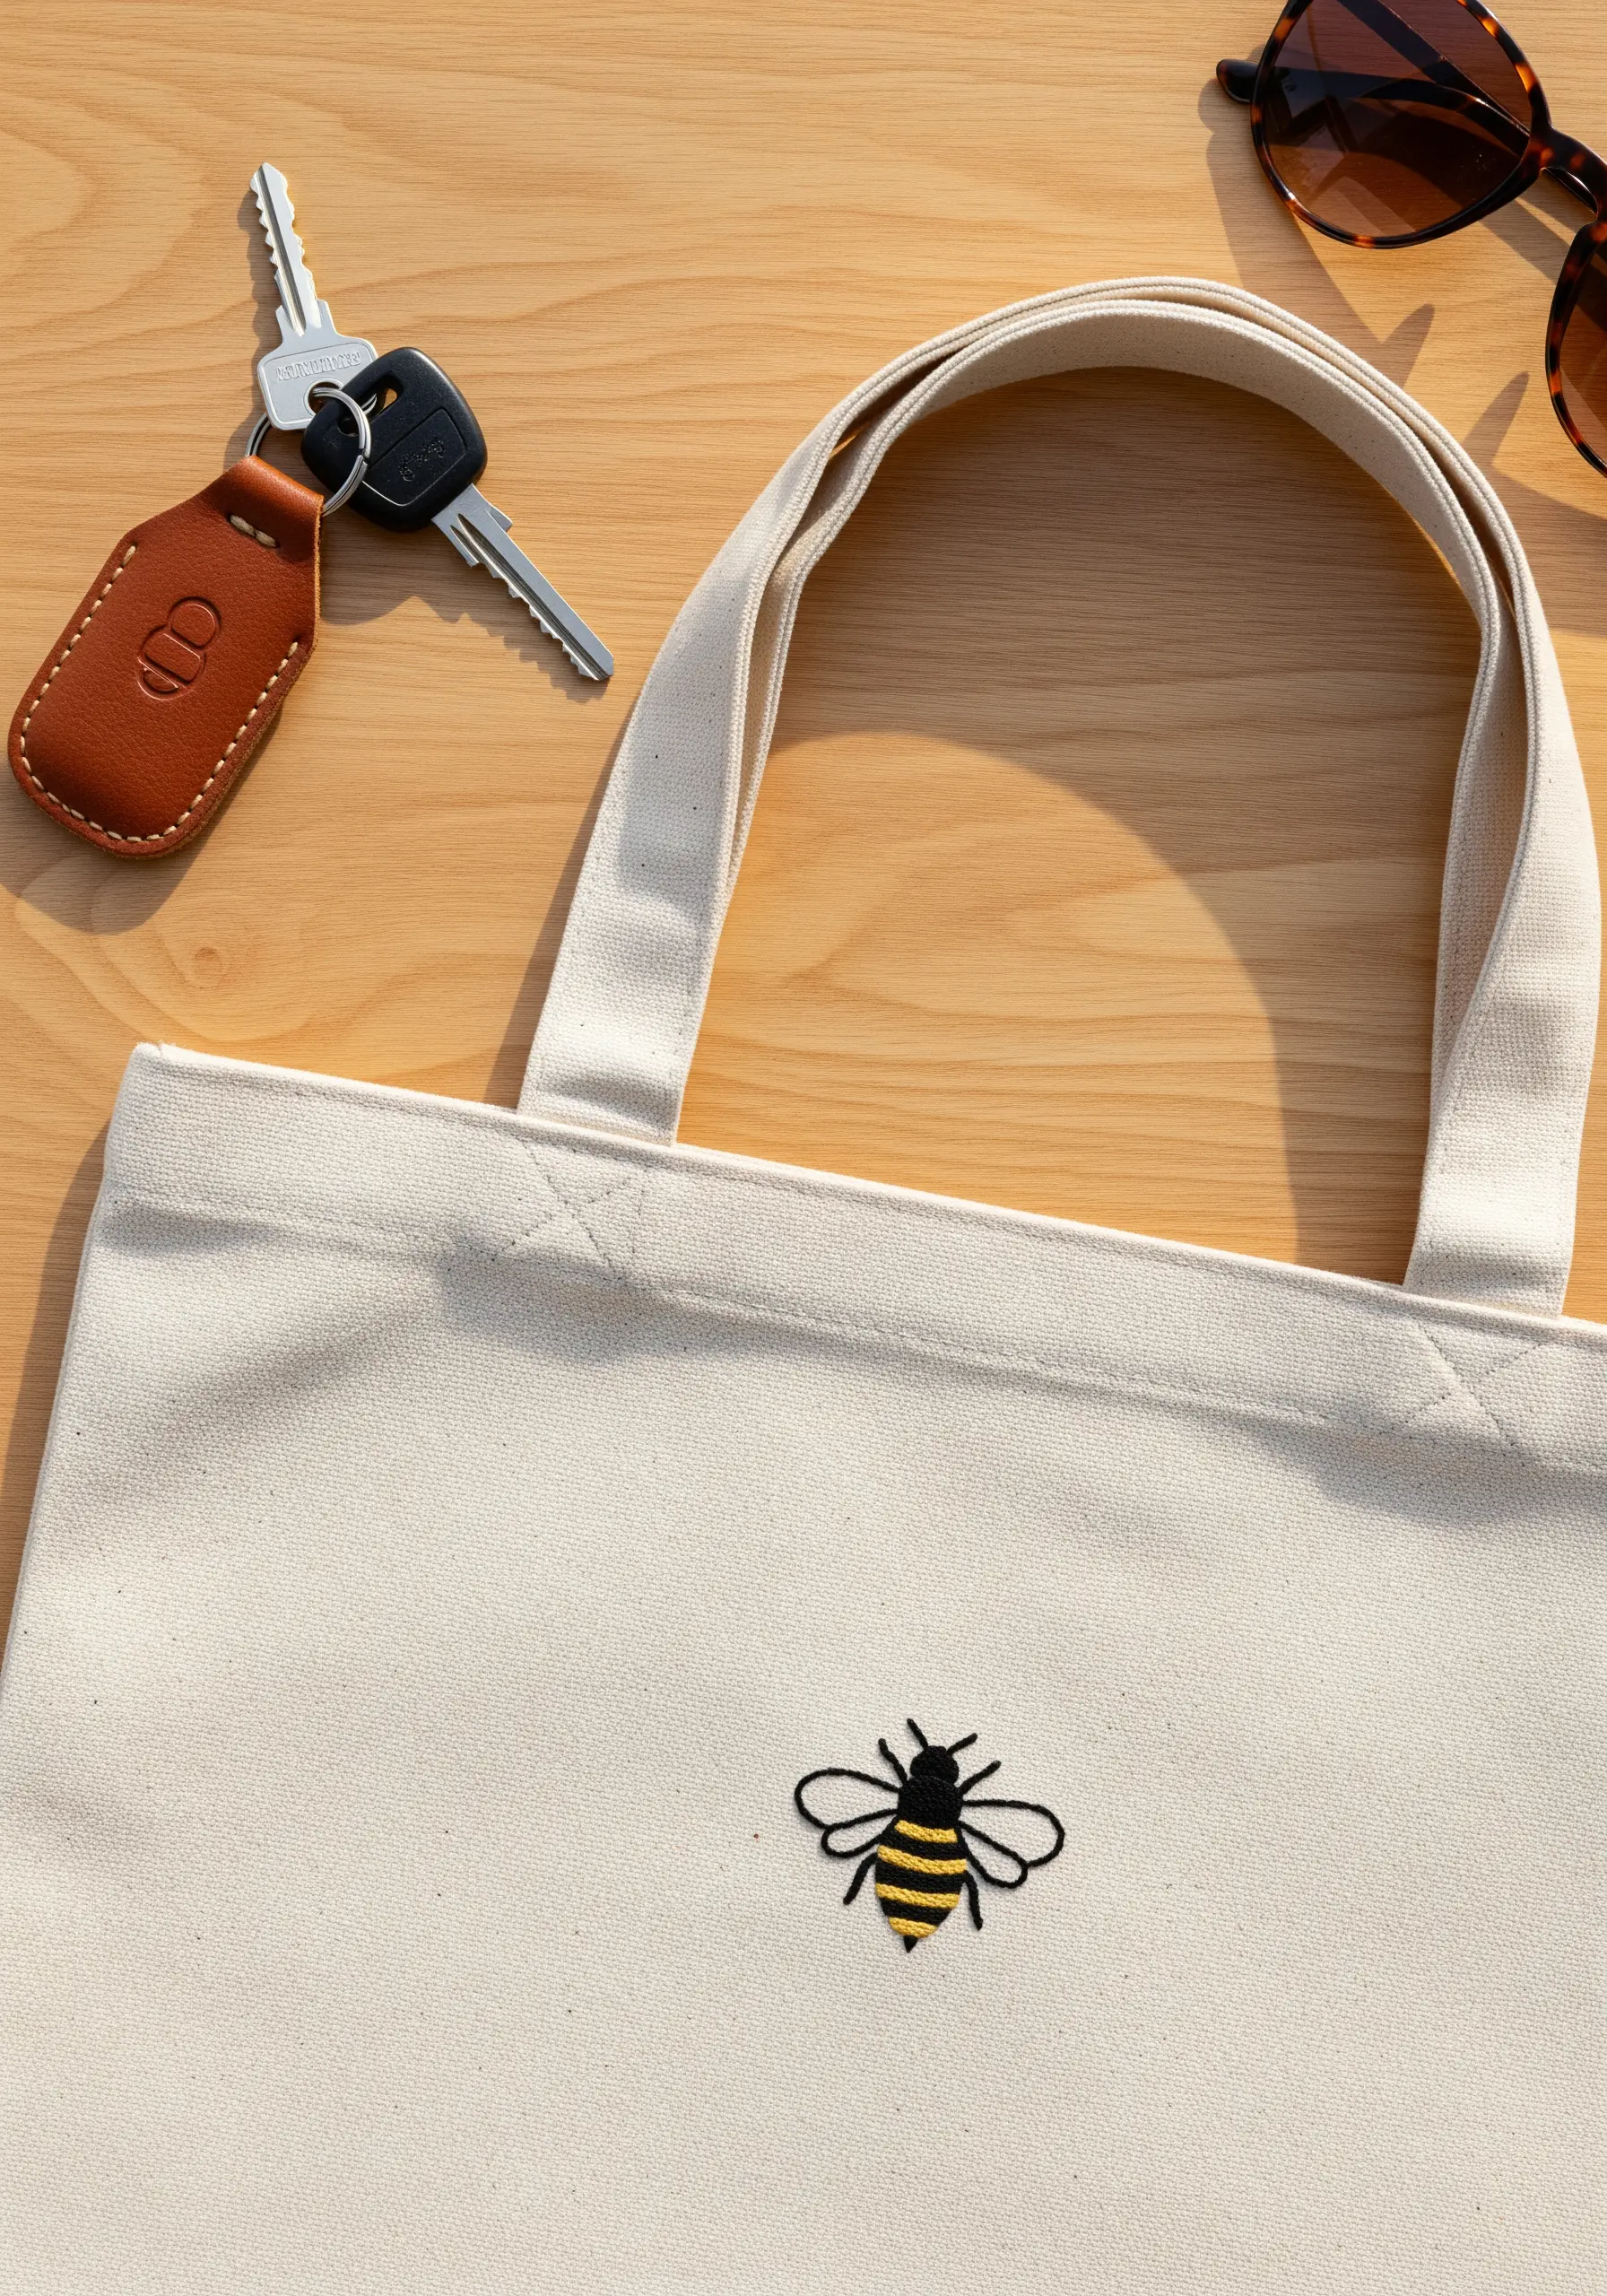
To make a tiny motif like this bee look sharp and intentional, first outline the entire shape with a single-strand backstitch in black.
This creates a clean, crisp boundary for your fill stitches and prevents them from looking fuzzy.
Next, fill the sections with a directional satin stitch. Angle the stitches on the body to suggest roundness and the stitches on the wings to suggest transparency.
This combination of outlining and strategic filling makes even easy, small embroidery patterns look polished and professional.
13. Go Big with a Yarn-Couched Statement Piece
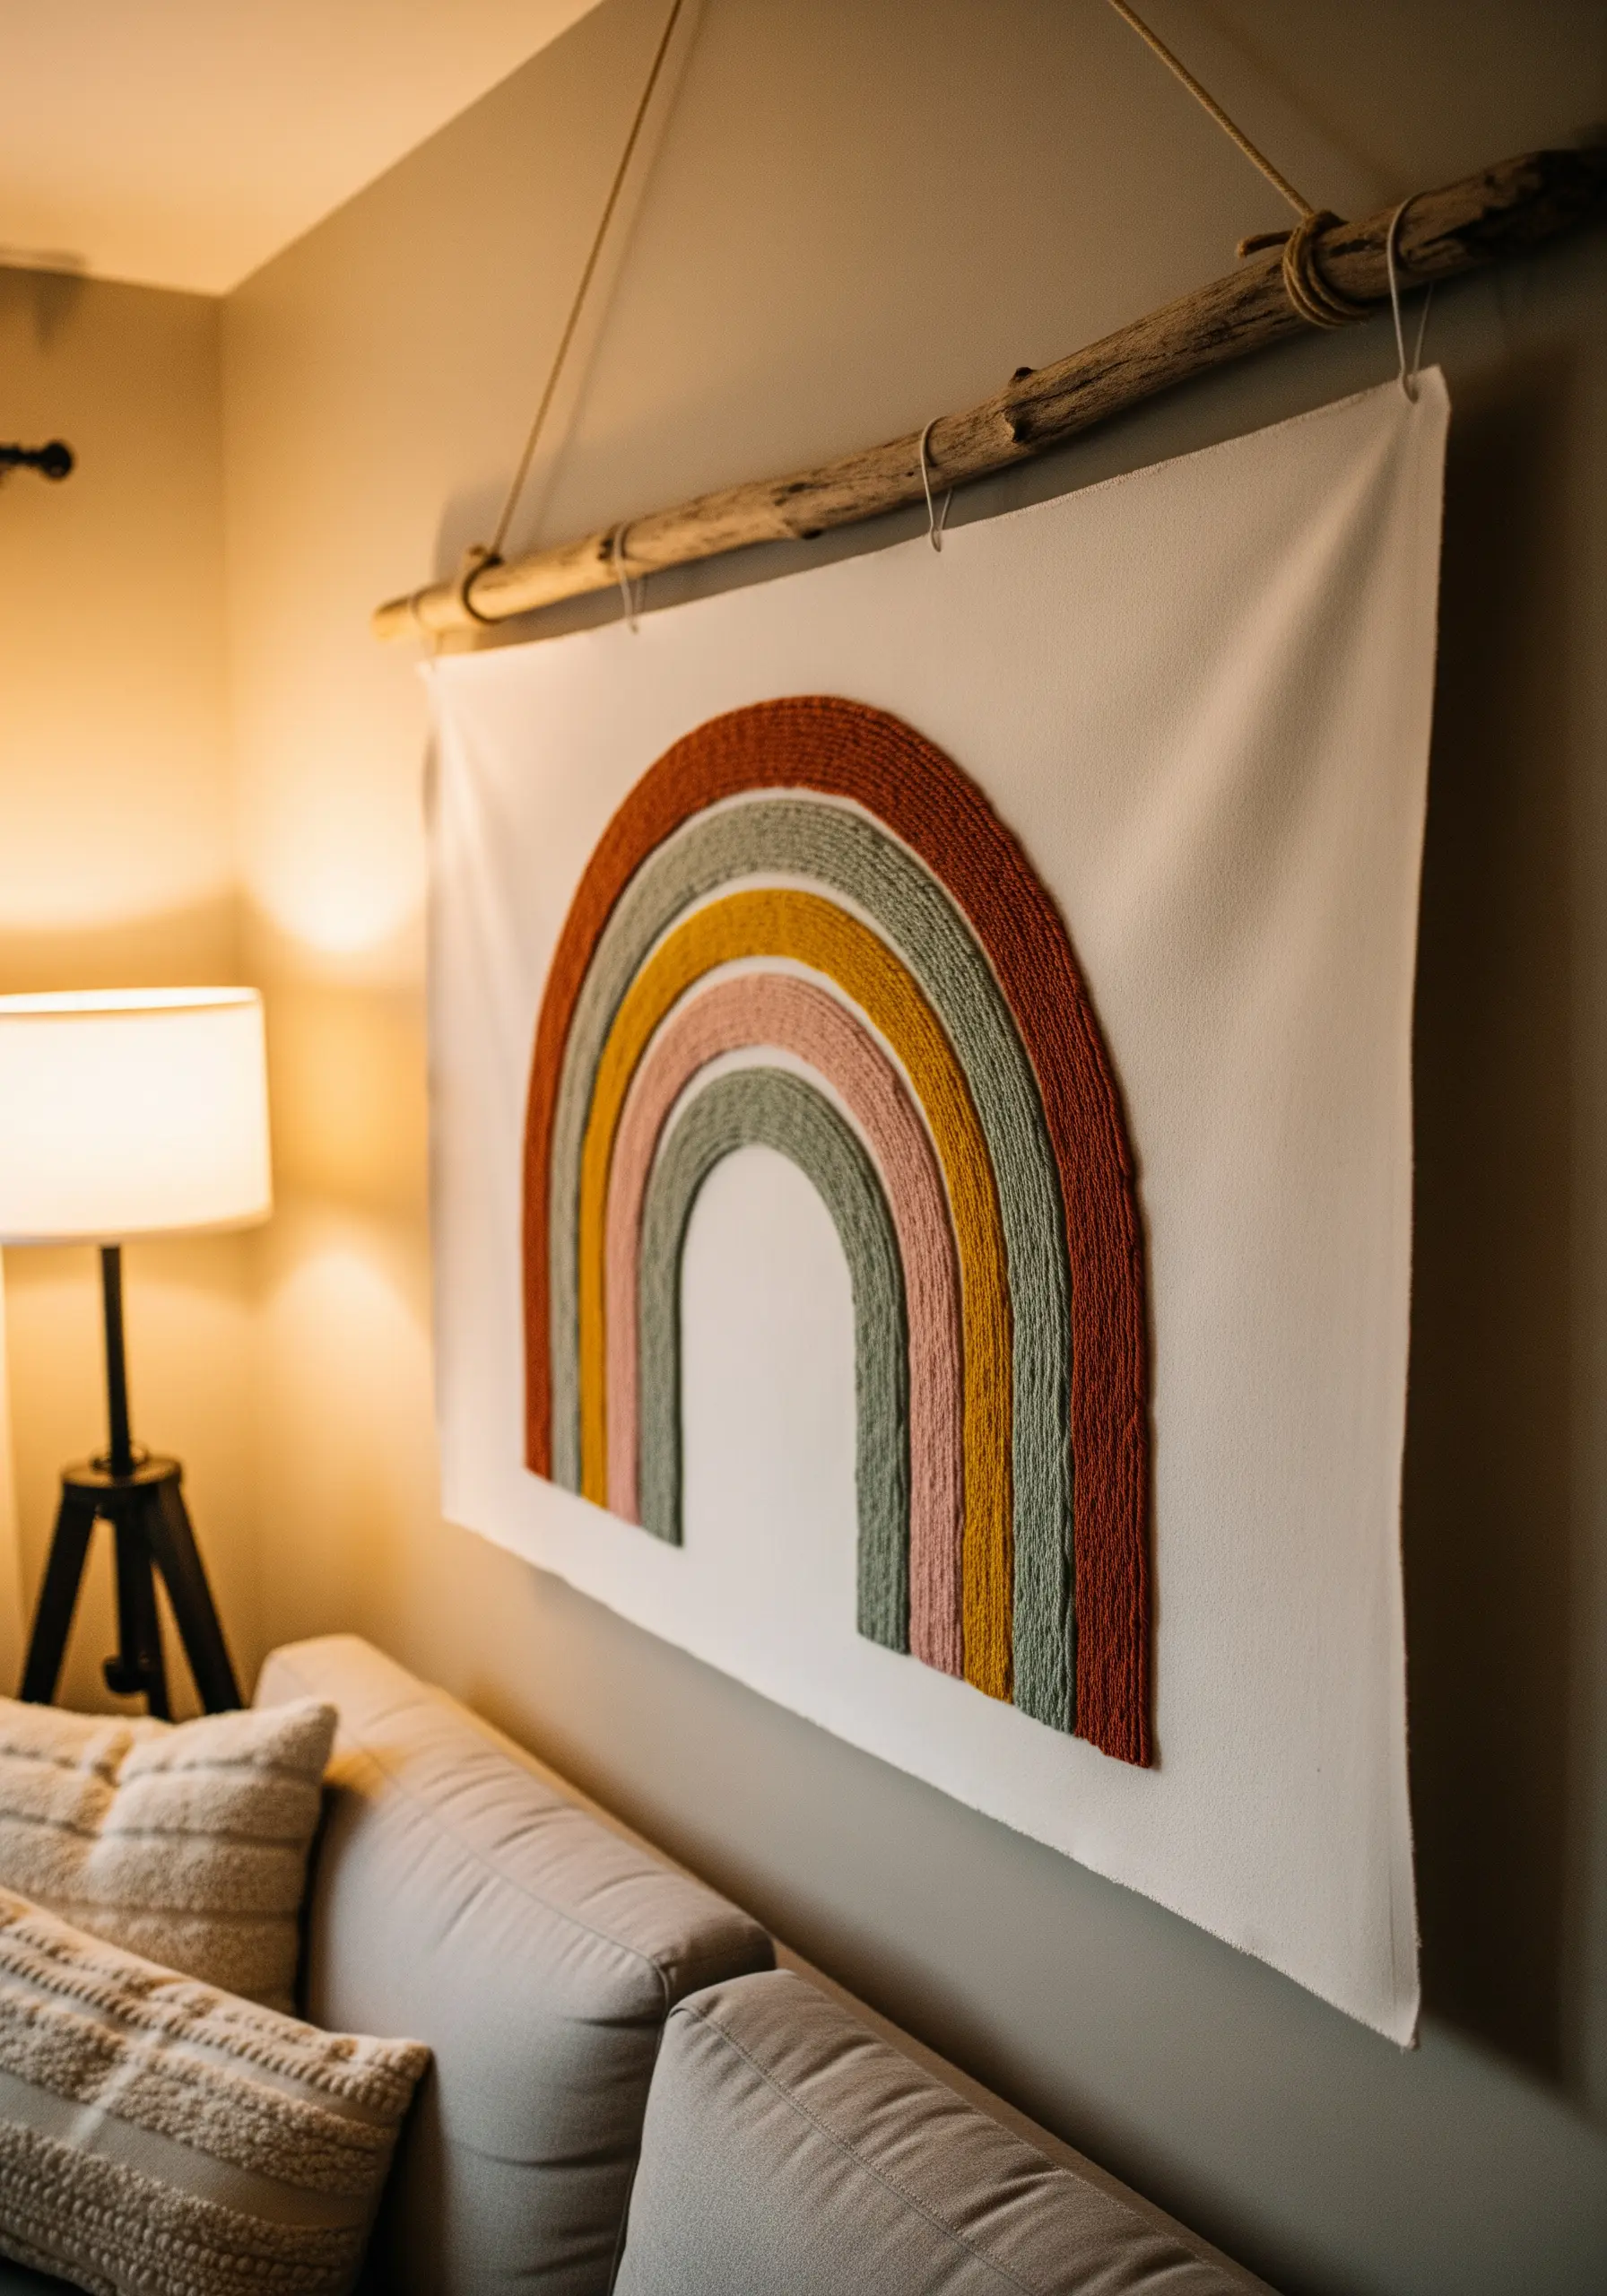
Create a large-scale, high-impact wall hanging by couching thick yarn onto a simple cotton or linen panel.
Start by drawing your rainbow arcs onto the fabric with a removable marker to serve as your guide.
Lay down one strand of yarn at a time, securing it with small, evenly spaced stitches using a matching single strand of embroidery floss.
The invisible tacking stitches are the secret to a clean, graphic finish. To display it, simply hang the fabric from a found branch for a rustic, organic touch.
14. Perfect Your Linework for Delicate Motifs
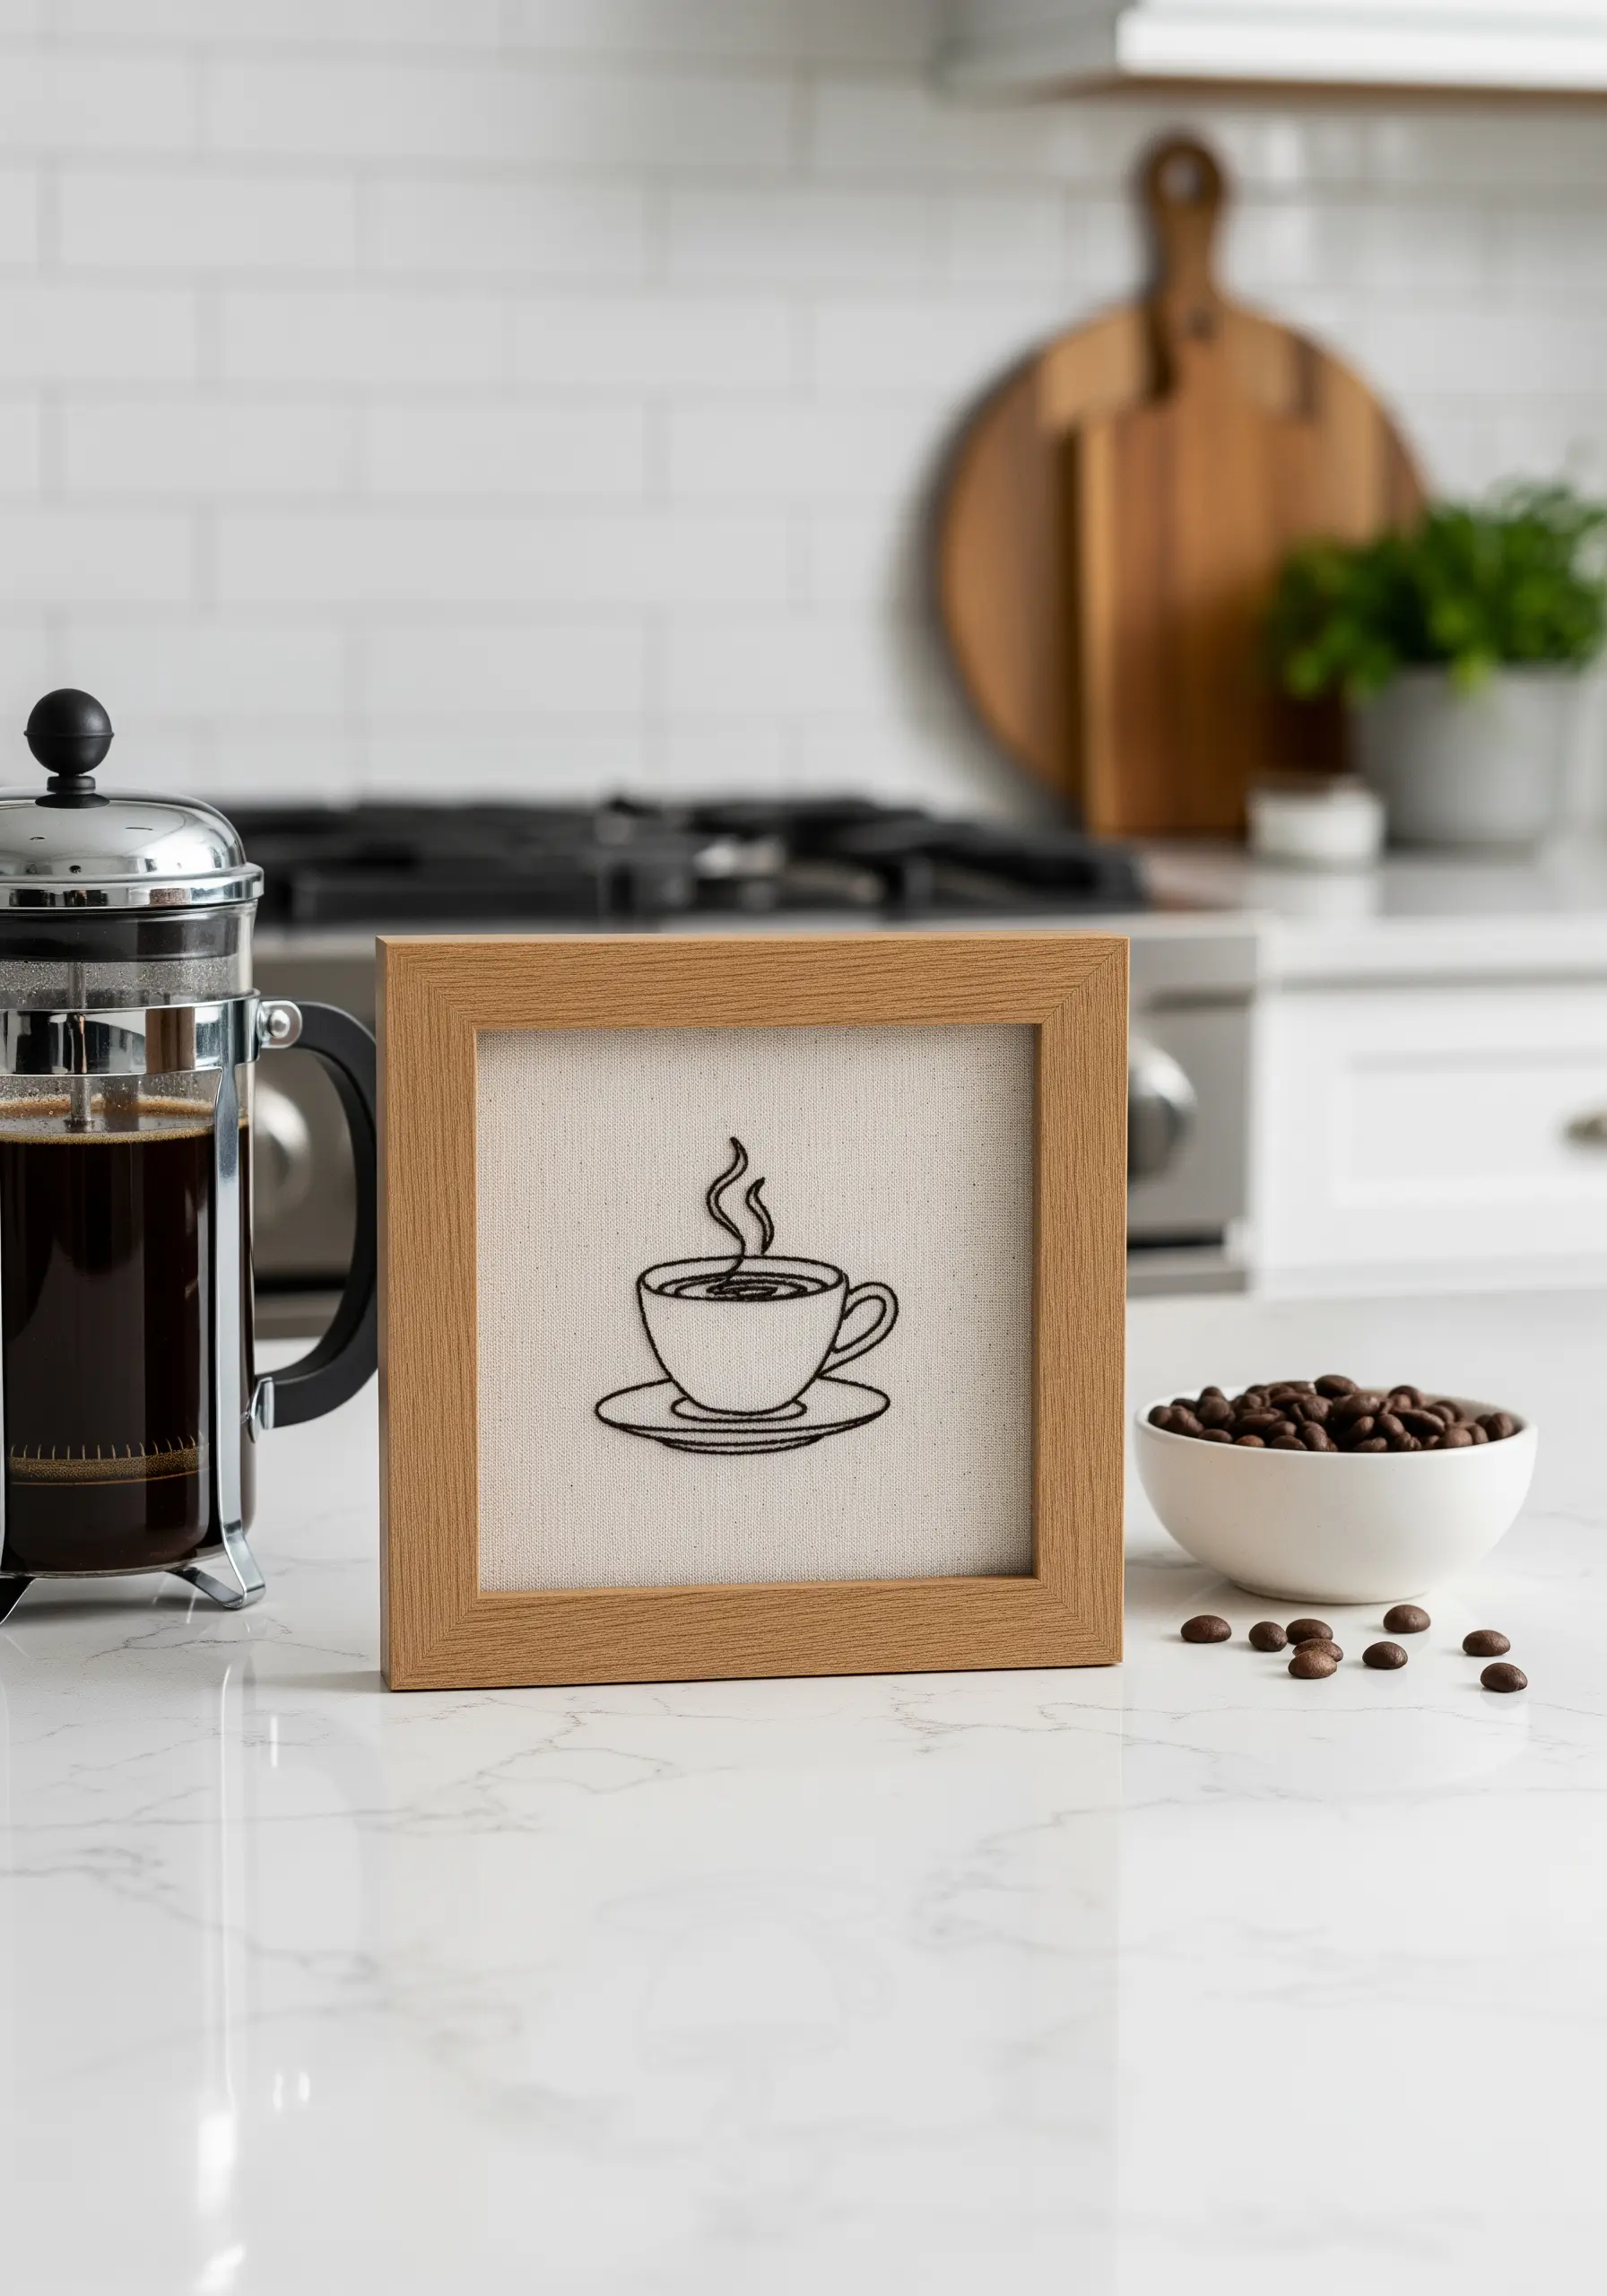
For a minimalist motif like a steaming coffee cup, the quality of your line is everything.
Use a two-strand stem stitch for the cup and saucer; it creates a slightly raised, rope-like line that is smoother and more substantial than a backstitch.
For the delicate steam, switch to a single strand of thread to give it a lighter, more ethereal quality.
This subtle shift in thread weight adds sophistication and visual interest to simple minimal food & coffee motifs.
15. Add Character with Intentional Stitch Variation
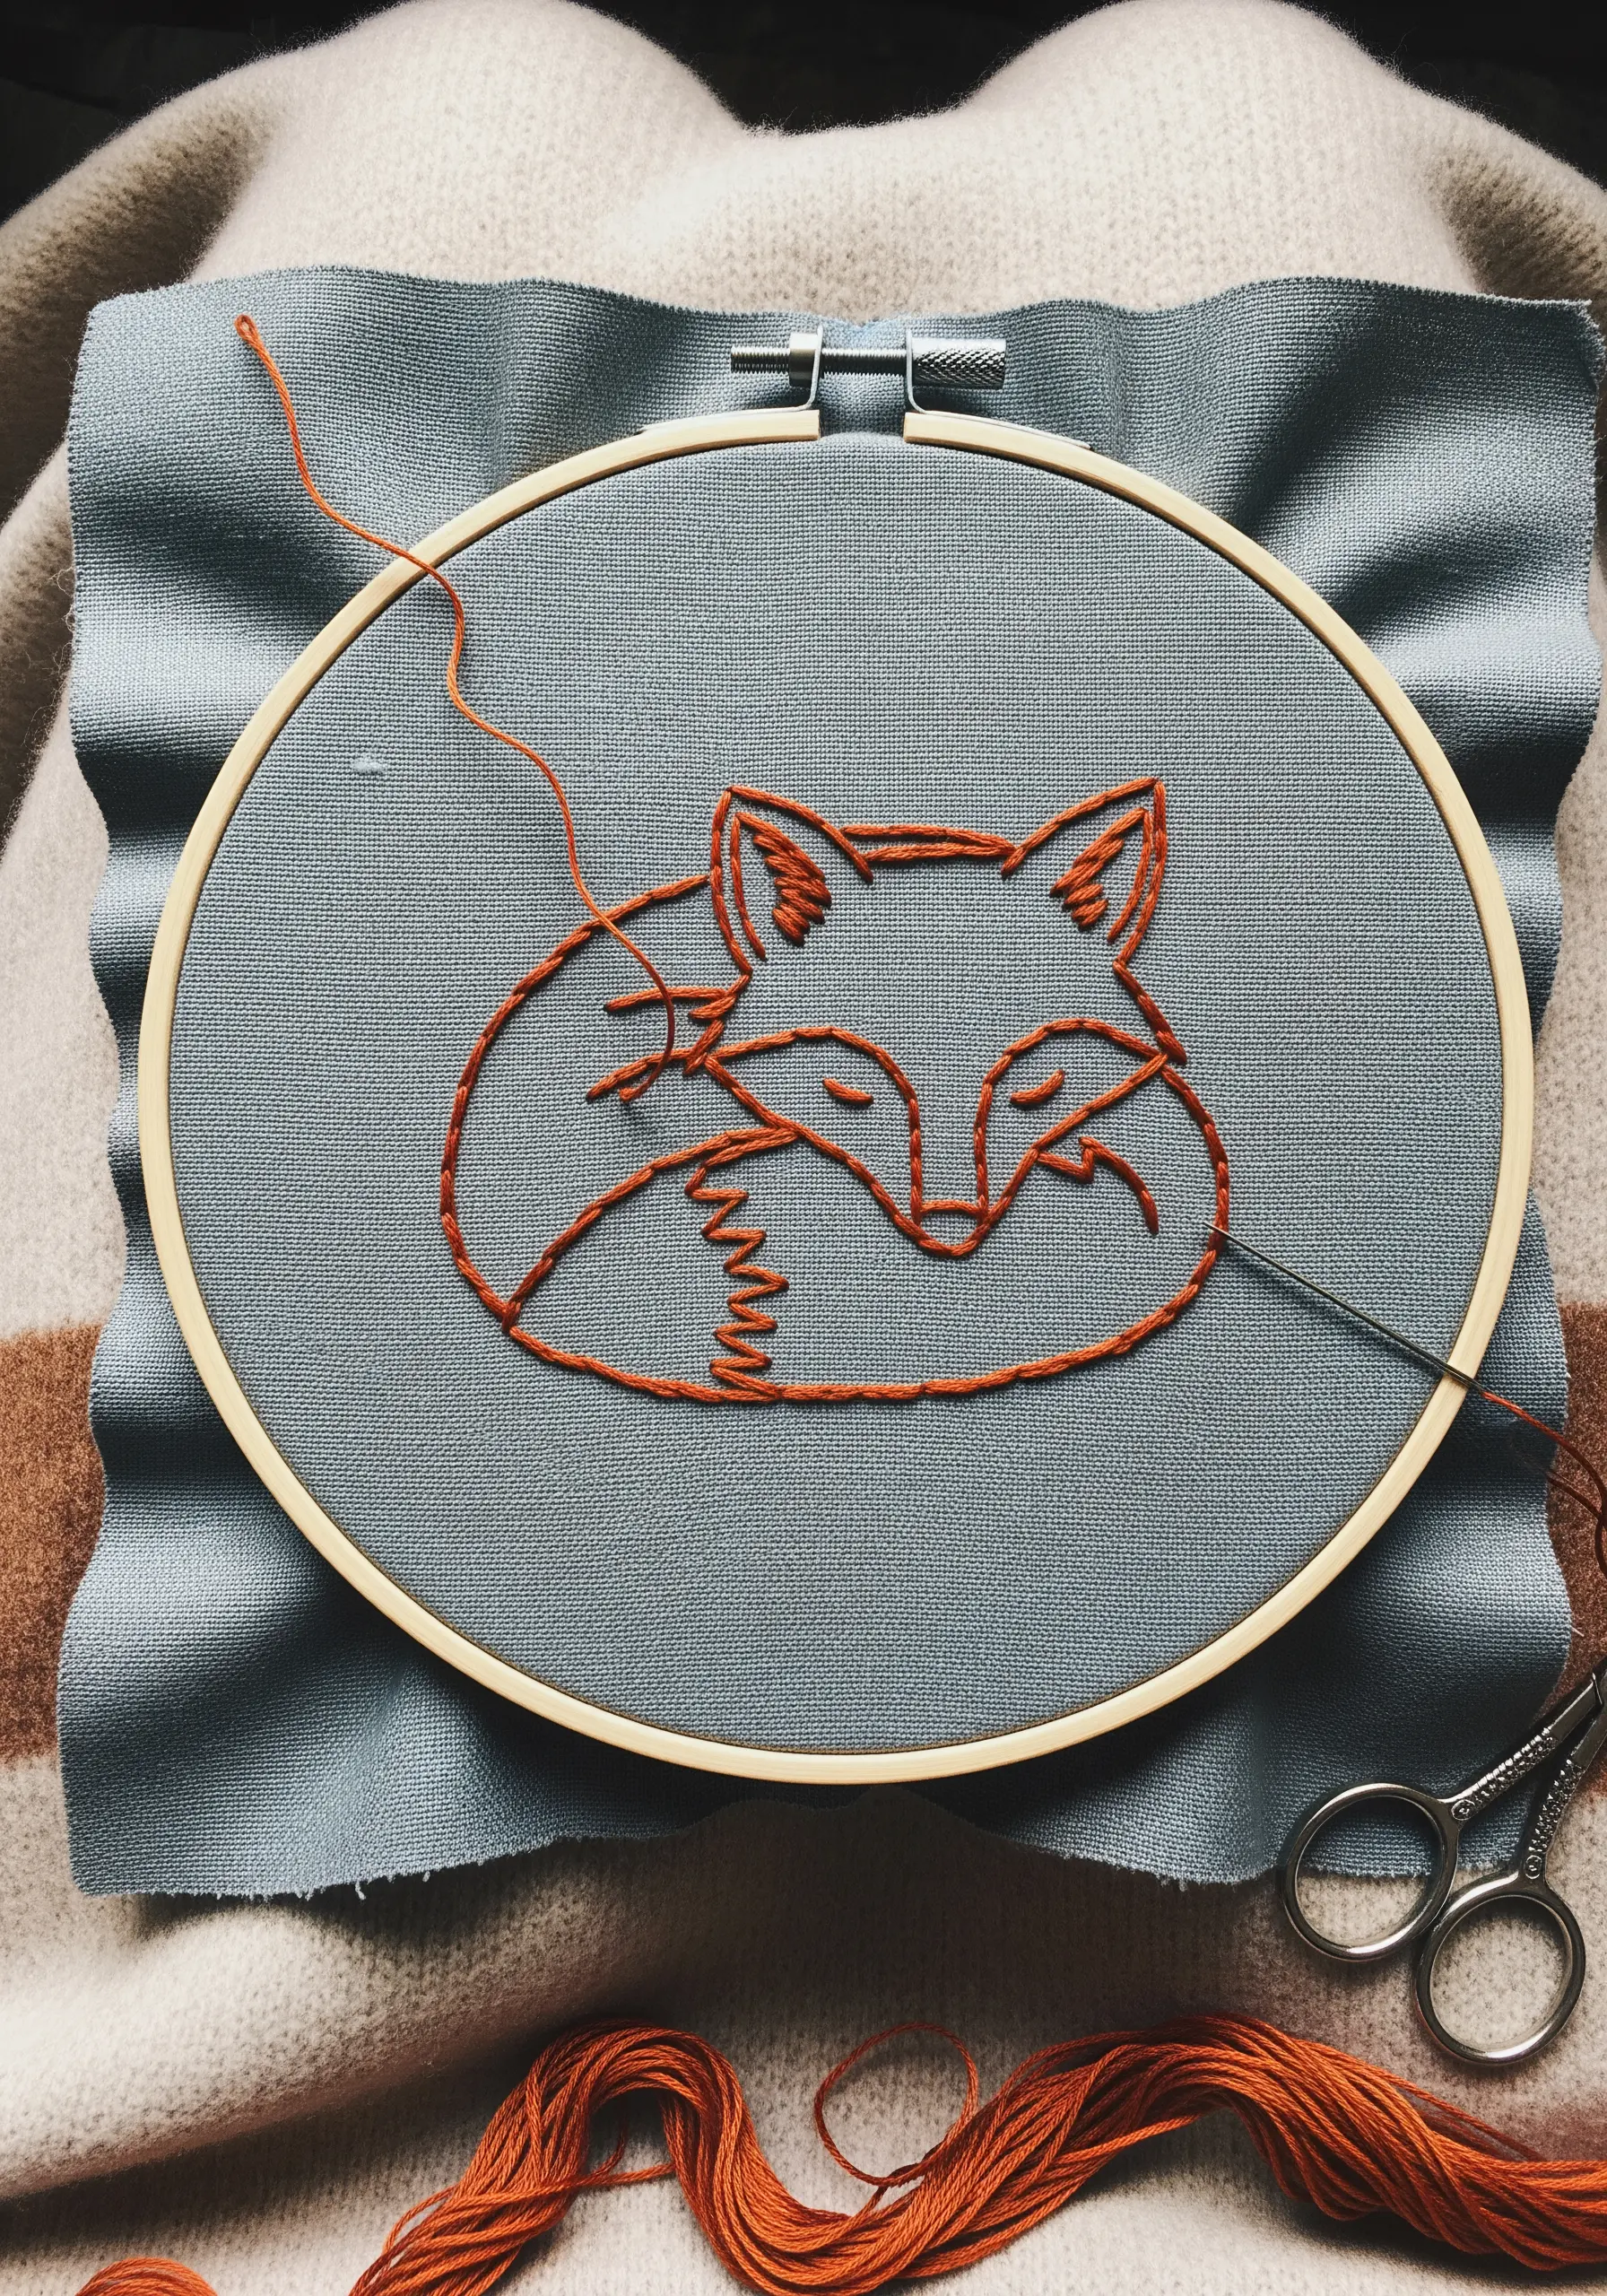
Bring a simple line-art animal to life by varying your stitch length and direction.
Use a consistent backstitch for the smooth outlines of the fox’s face and back.
Then, for the fluffy texture of the chest and tail, switch to short, varied straight stitches angled in different directions.
This simple adjustment transforms a flat outline into a dynamic sketch, suggesting texture and softness without adding complexity. It’s a clever way to make realistic animal patterns feel more expressive.
16. Embrace the Power of a Single Line
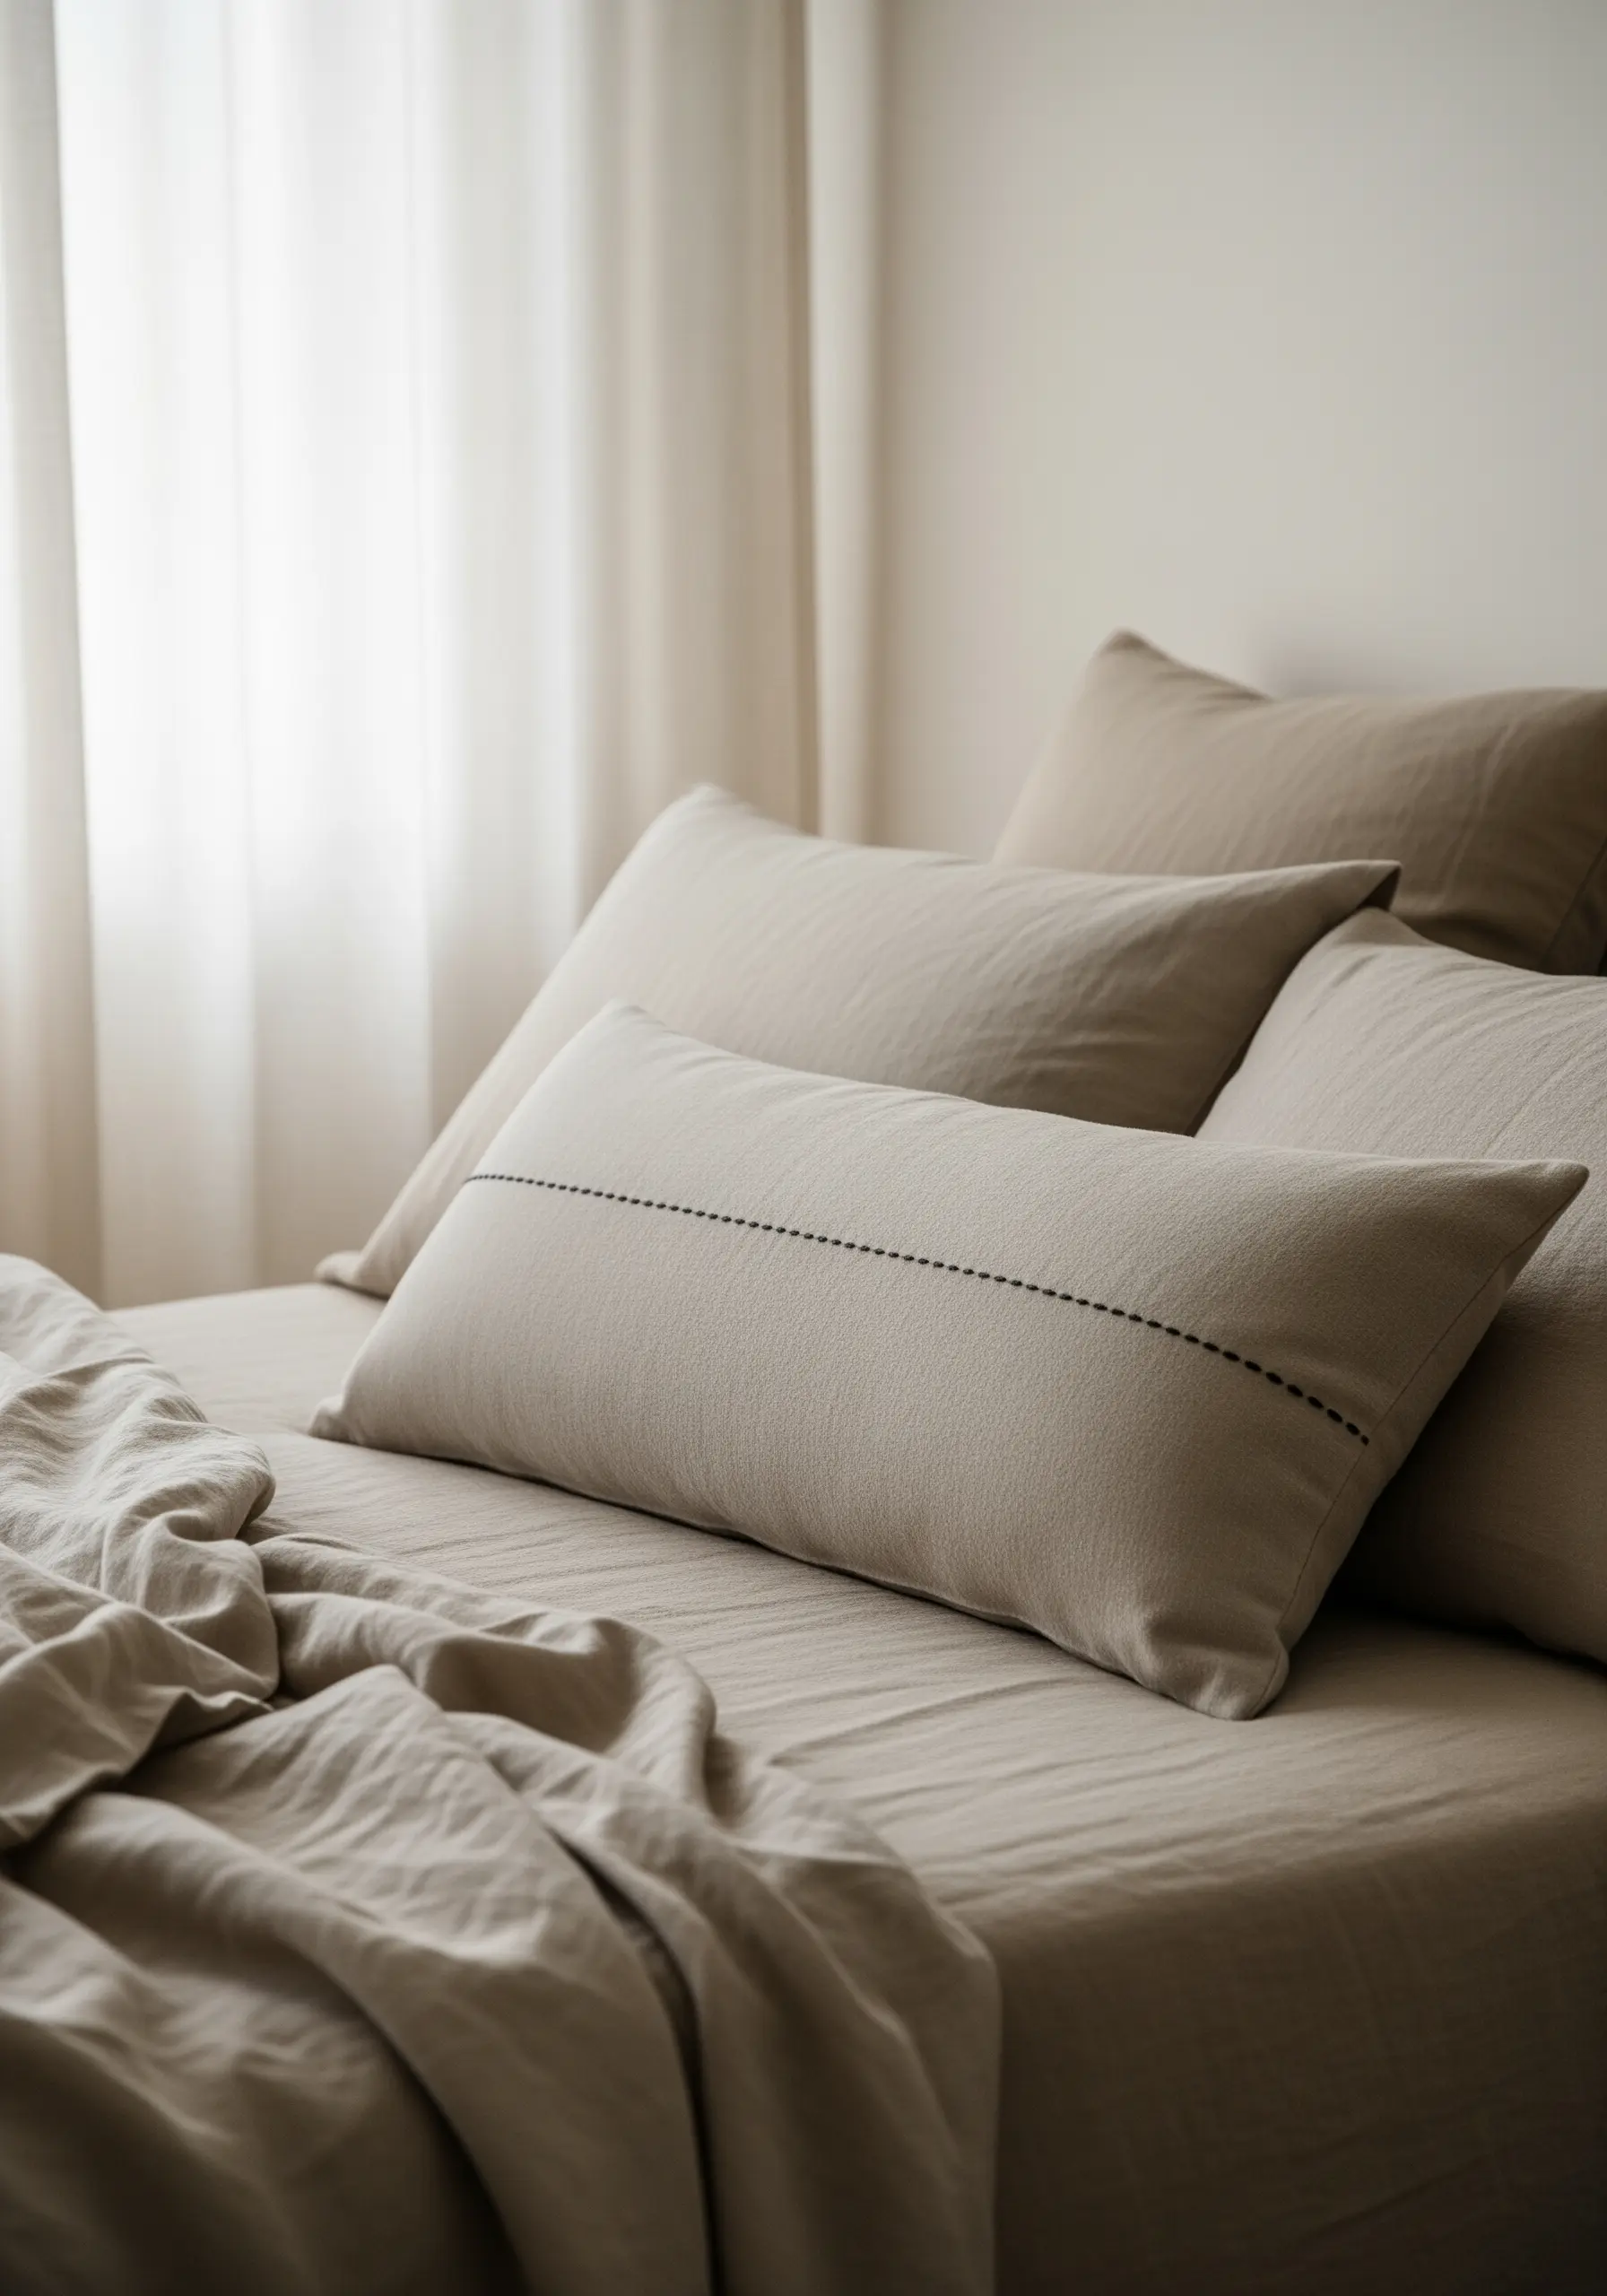
Turn a lumbar pillow into a piece of minimalist art with a single, perfectly executed line of running stitches.
The success of this design lies in its precision. Use a ruler and a disappearing ink pen to draw a guideline, ensuring your stitches are perfectly straight.
Then, focus on making each stitch and the space between them identical in length. This repetition creates a calming, rhythmic pattern.
Using a contrasting thread color, like dark charcoal on natural linen, makes the simple design bold and intentional.
17. Paint with Thread Using Directional Satin Stitch
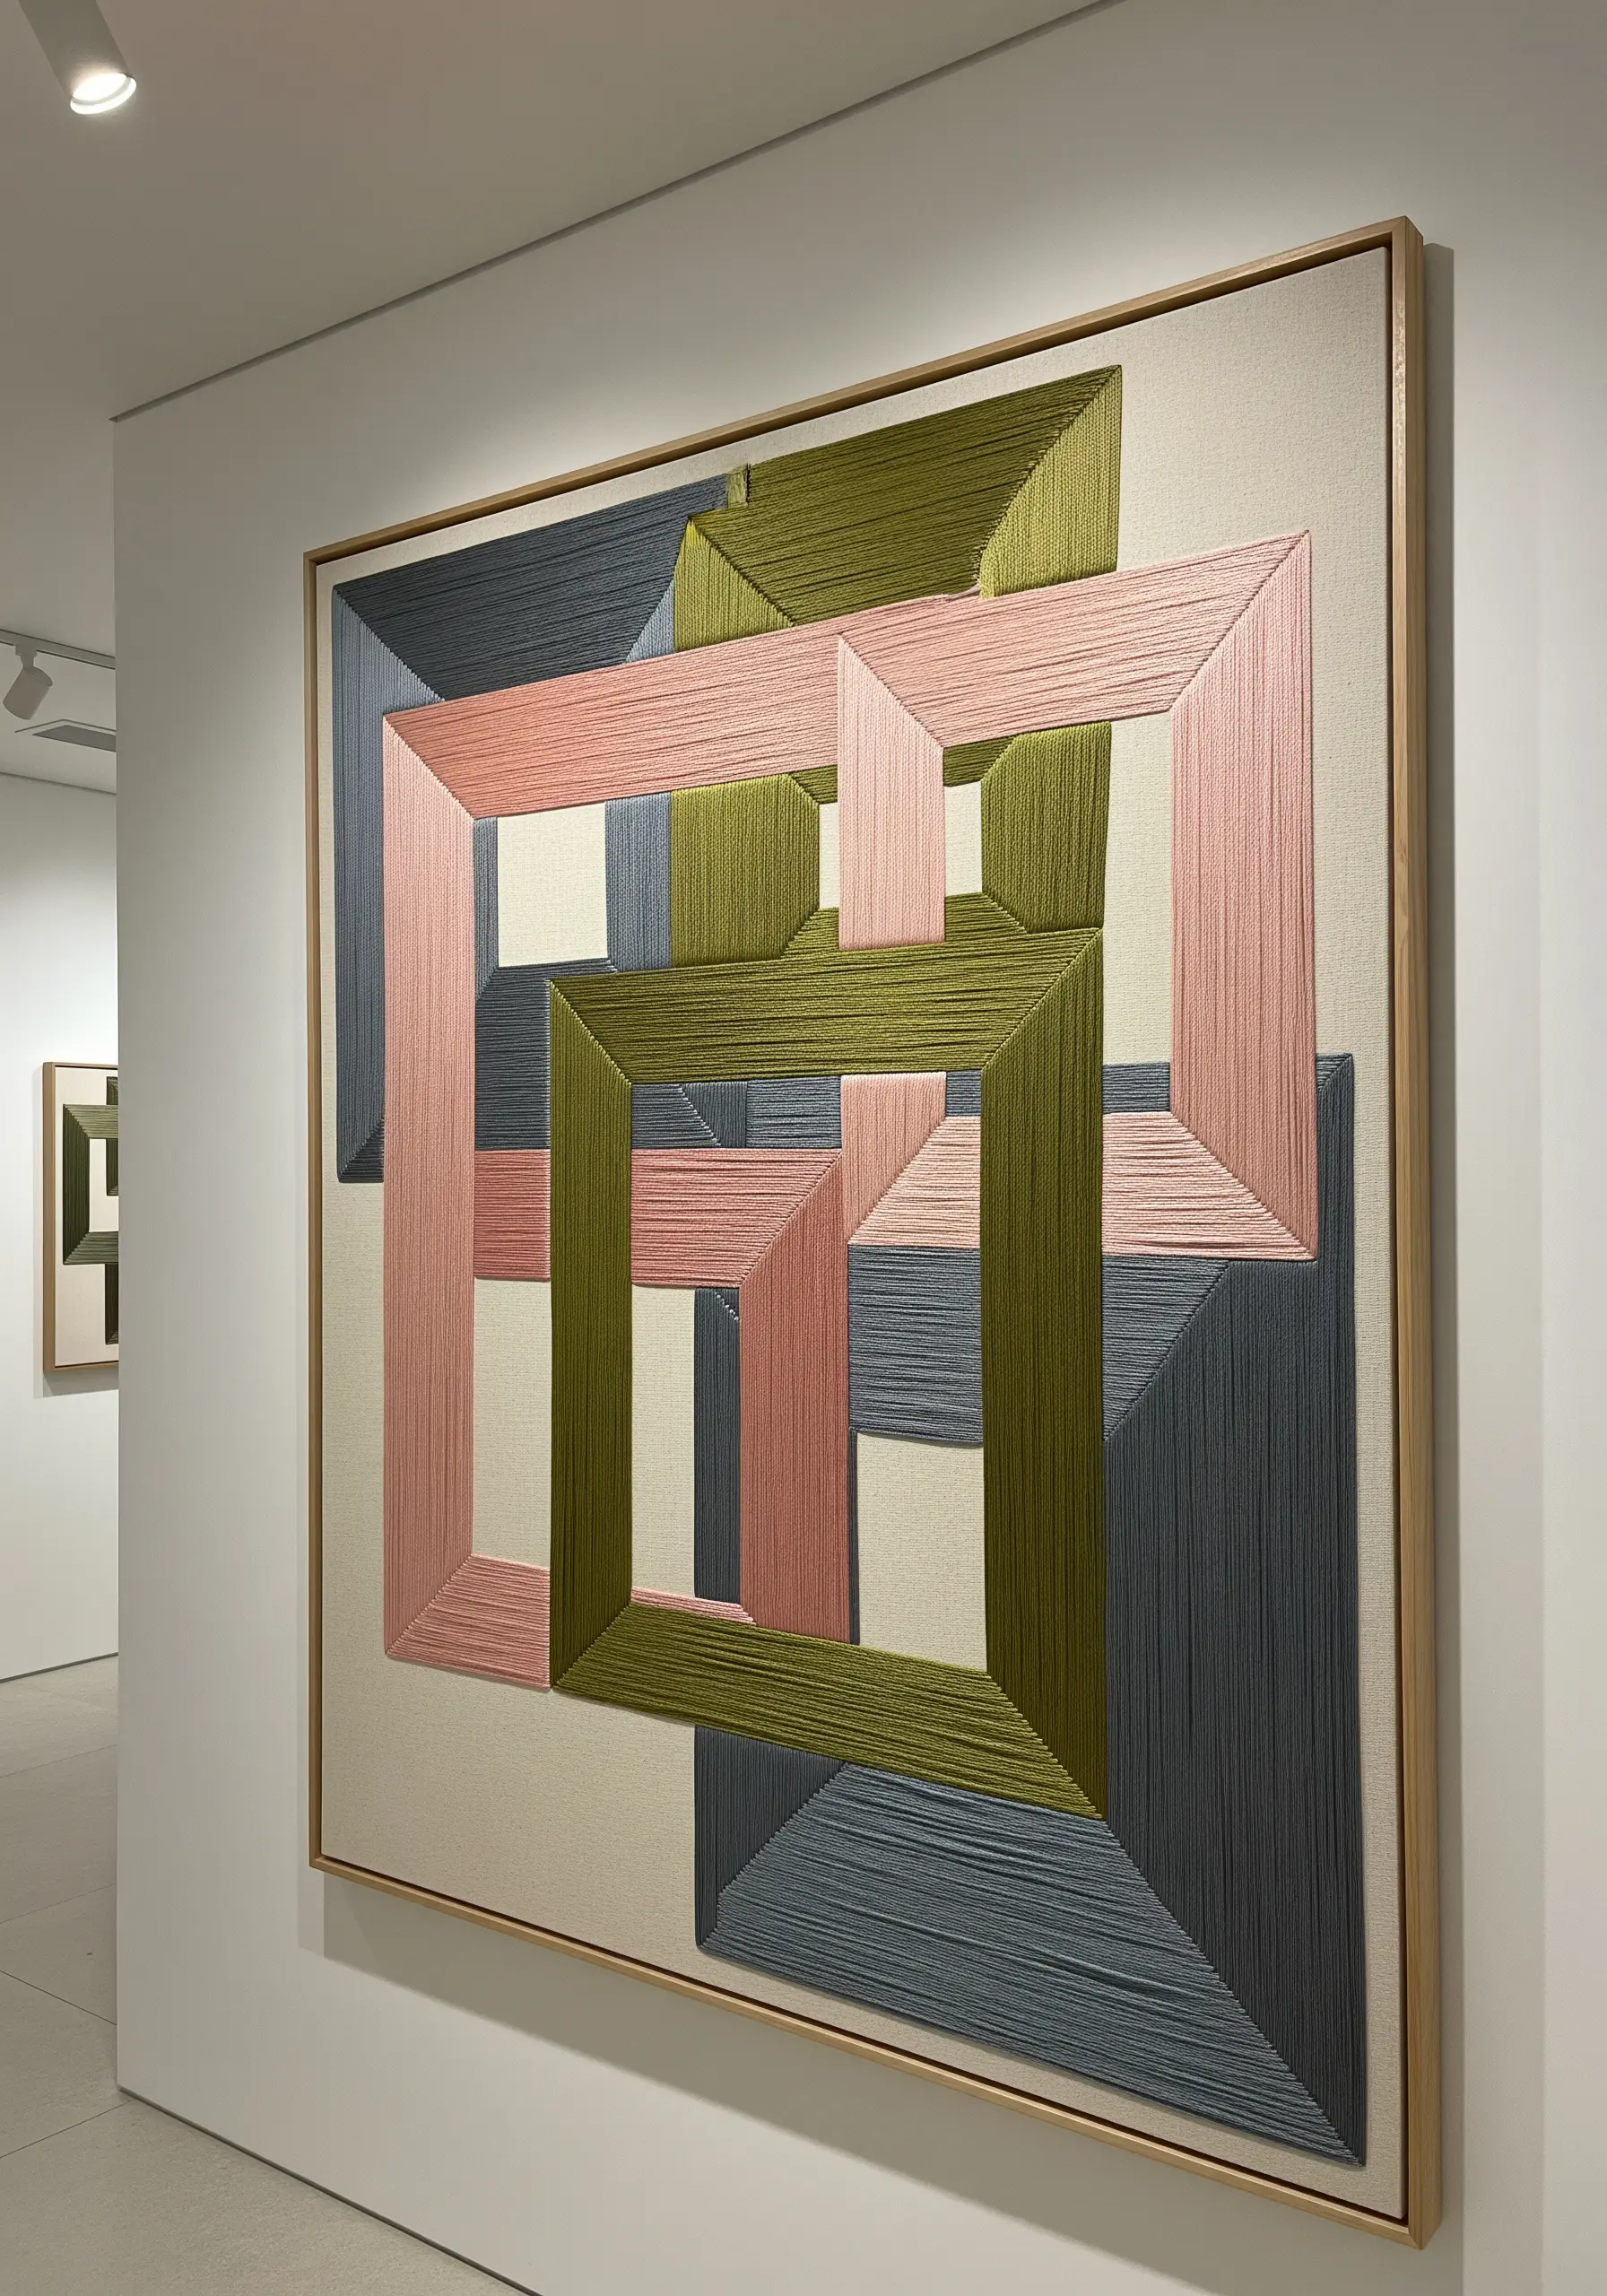
Create the illusion of three-dimensional, interlocking shapes by treating your thread like paint.
Fill each geometric section with long, straight satin stitches, paying close attention to the direction of your stitches.
By changing the angle of the stitches in adjacent planes—for example, from vertical to horizontal—you can create the effect of light and shadow, giving the flat design incredible depth.
This technique, known as thread painting, turns simple shapes into complex, architectural art, creating framed embroidery patterns that command attention.
18. Incorporate Unexpected Materials

Combine embroidery with non-traditional materials to create a piece of conceptual art.
Here, a simple two-leaf sprout is stitched directly onto the cloth spine of a book, transforming it into a symbol of growth and knowledge.
When stitching on paper or book cloth, use a very fine, sharp needle to make clean perforations and keep your thread tension loose to prevent tearing.
The minimalism of the single motif is what gives the piece its power and poetry.
19. Capture Motion with Textured Stitches
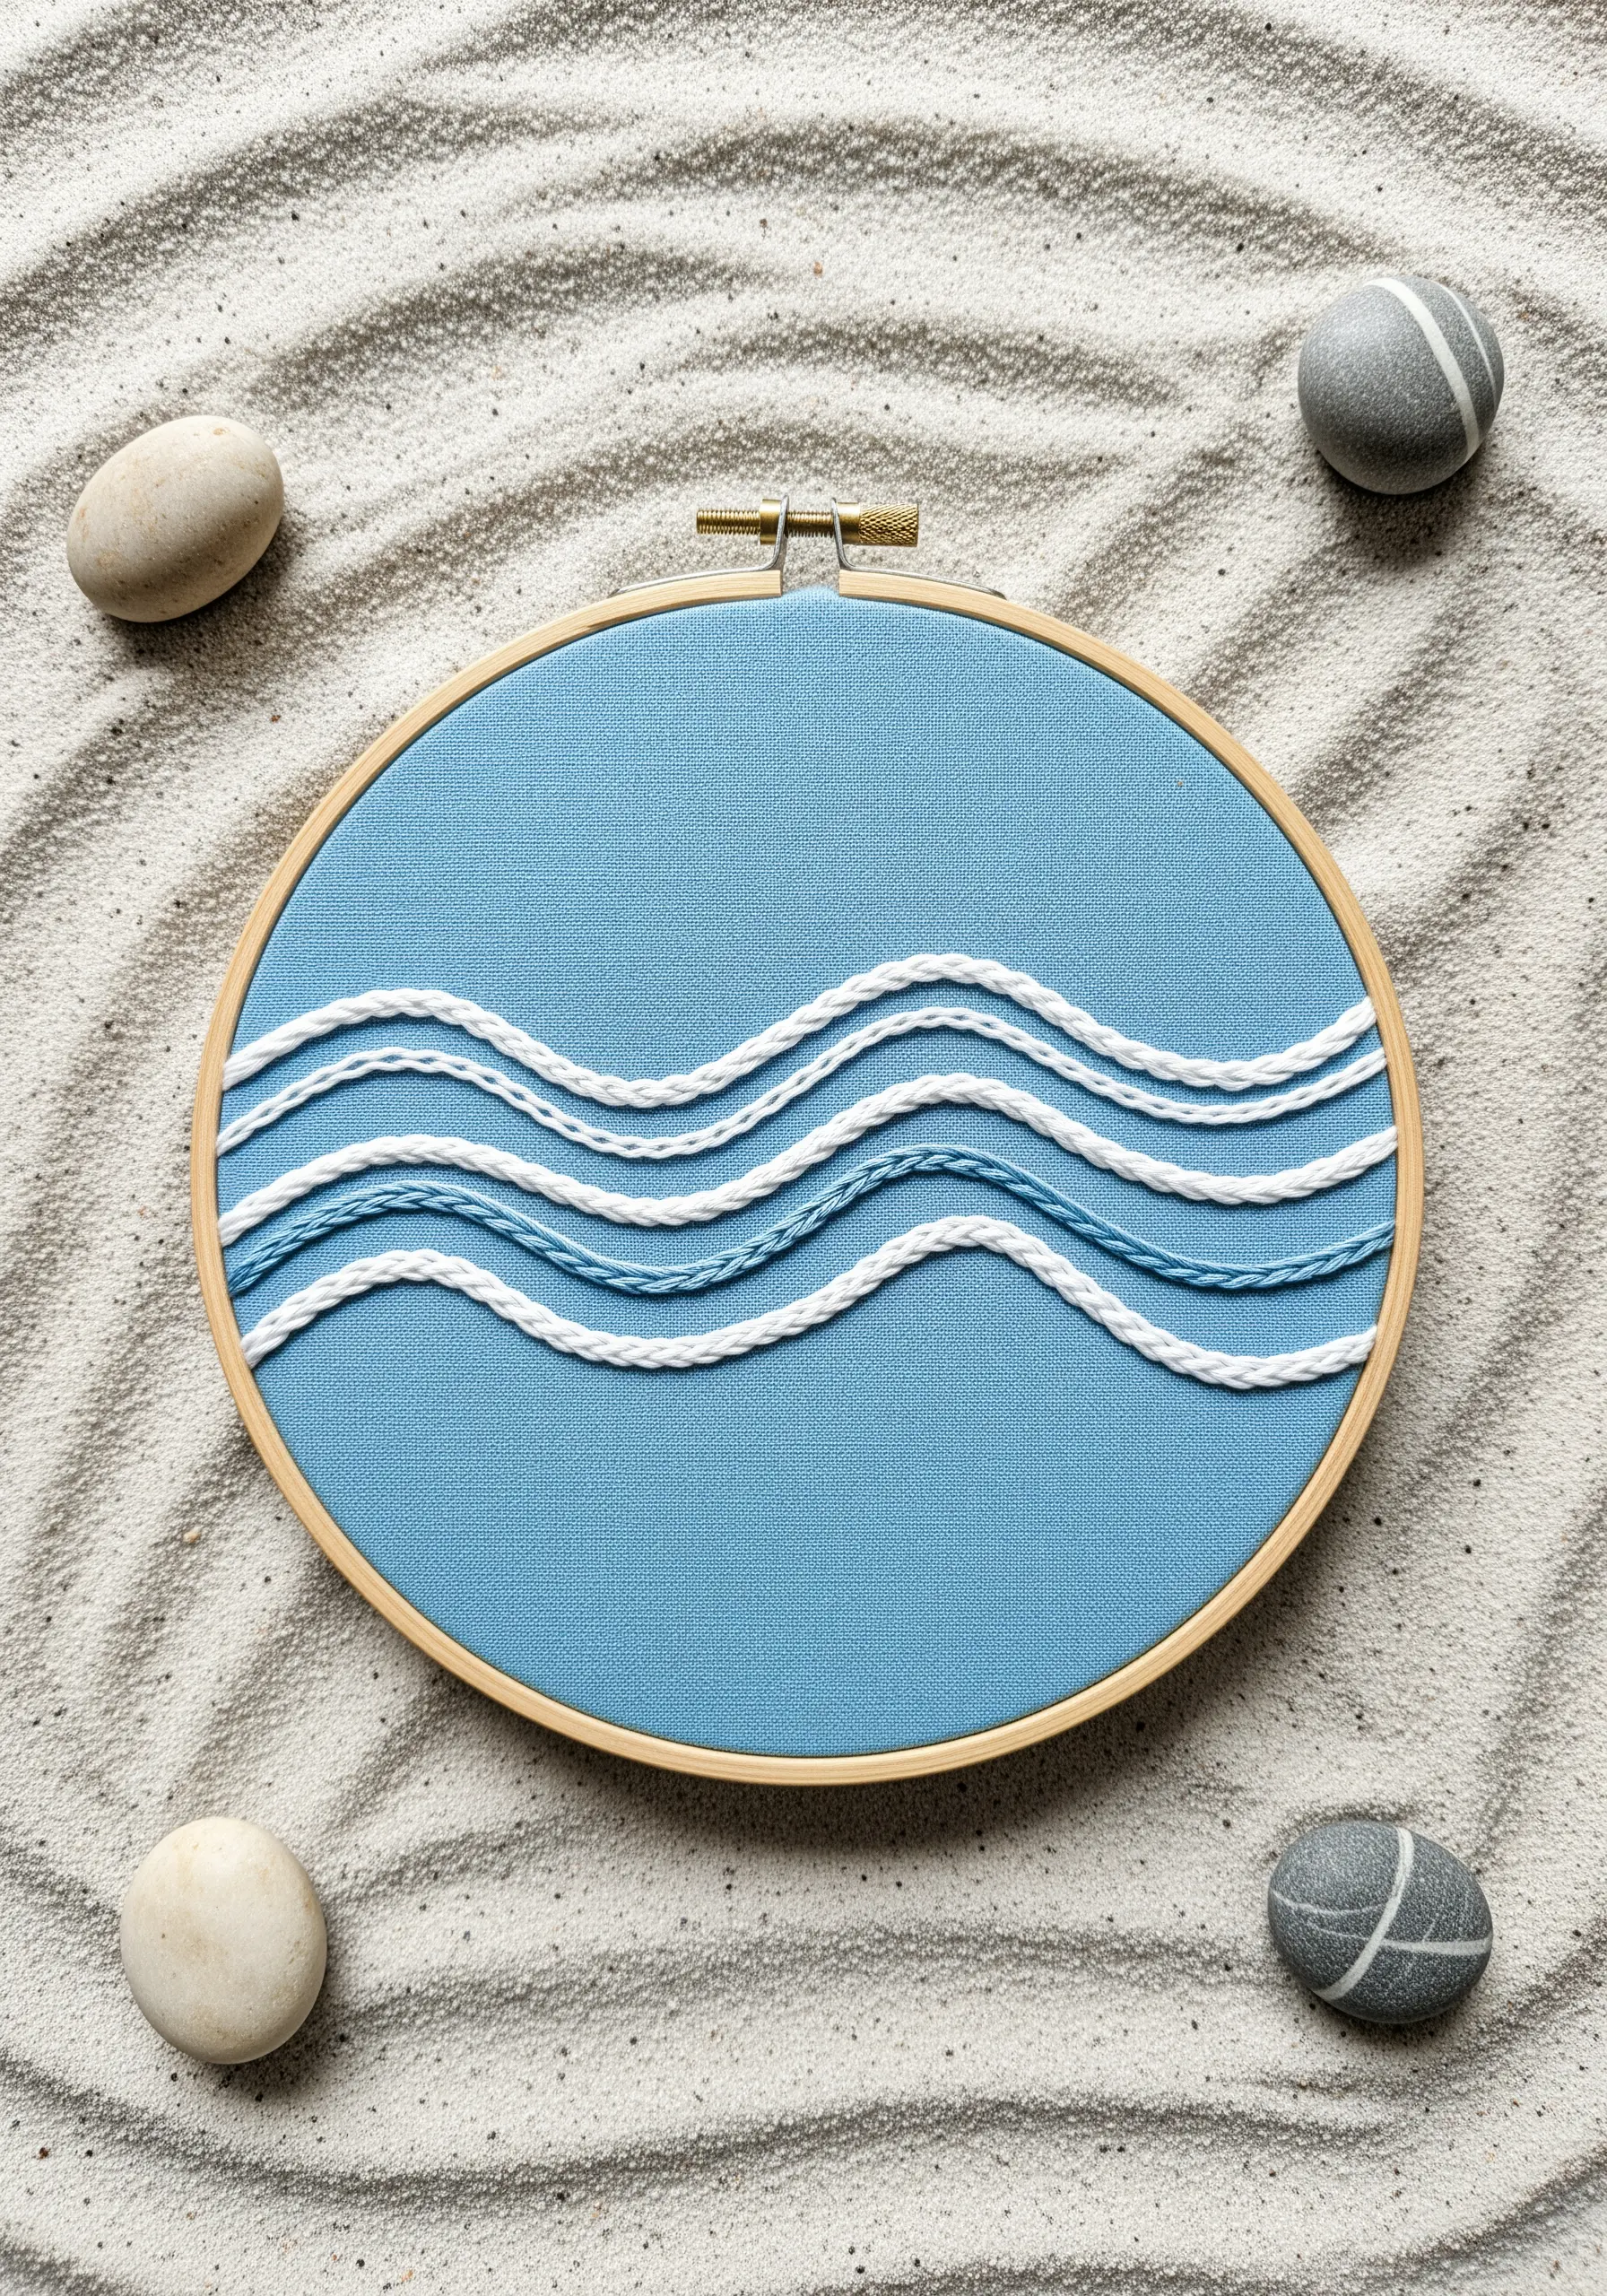
Evoke the movement of ocean waves by using stitches that have inherent texture and dimension.
Use a whipped backstitch or a heavy chain stitch to create the thick, rope-like lines that suggest rolling water.
Alternate thread weights and colors—a thick, bright white floss next to a thinner, tonal blue—to create the look of cresting waves and seafoam.
This layering of textures is far more dynamic than using a simple backstitch, perfect for coastal-theme tiny embroidery art.
20. Add Graphic Detail to Everyday Objects
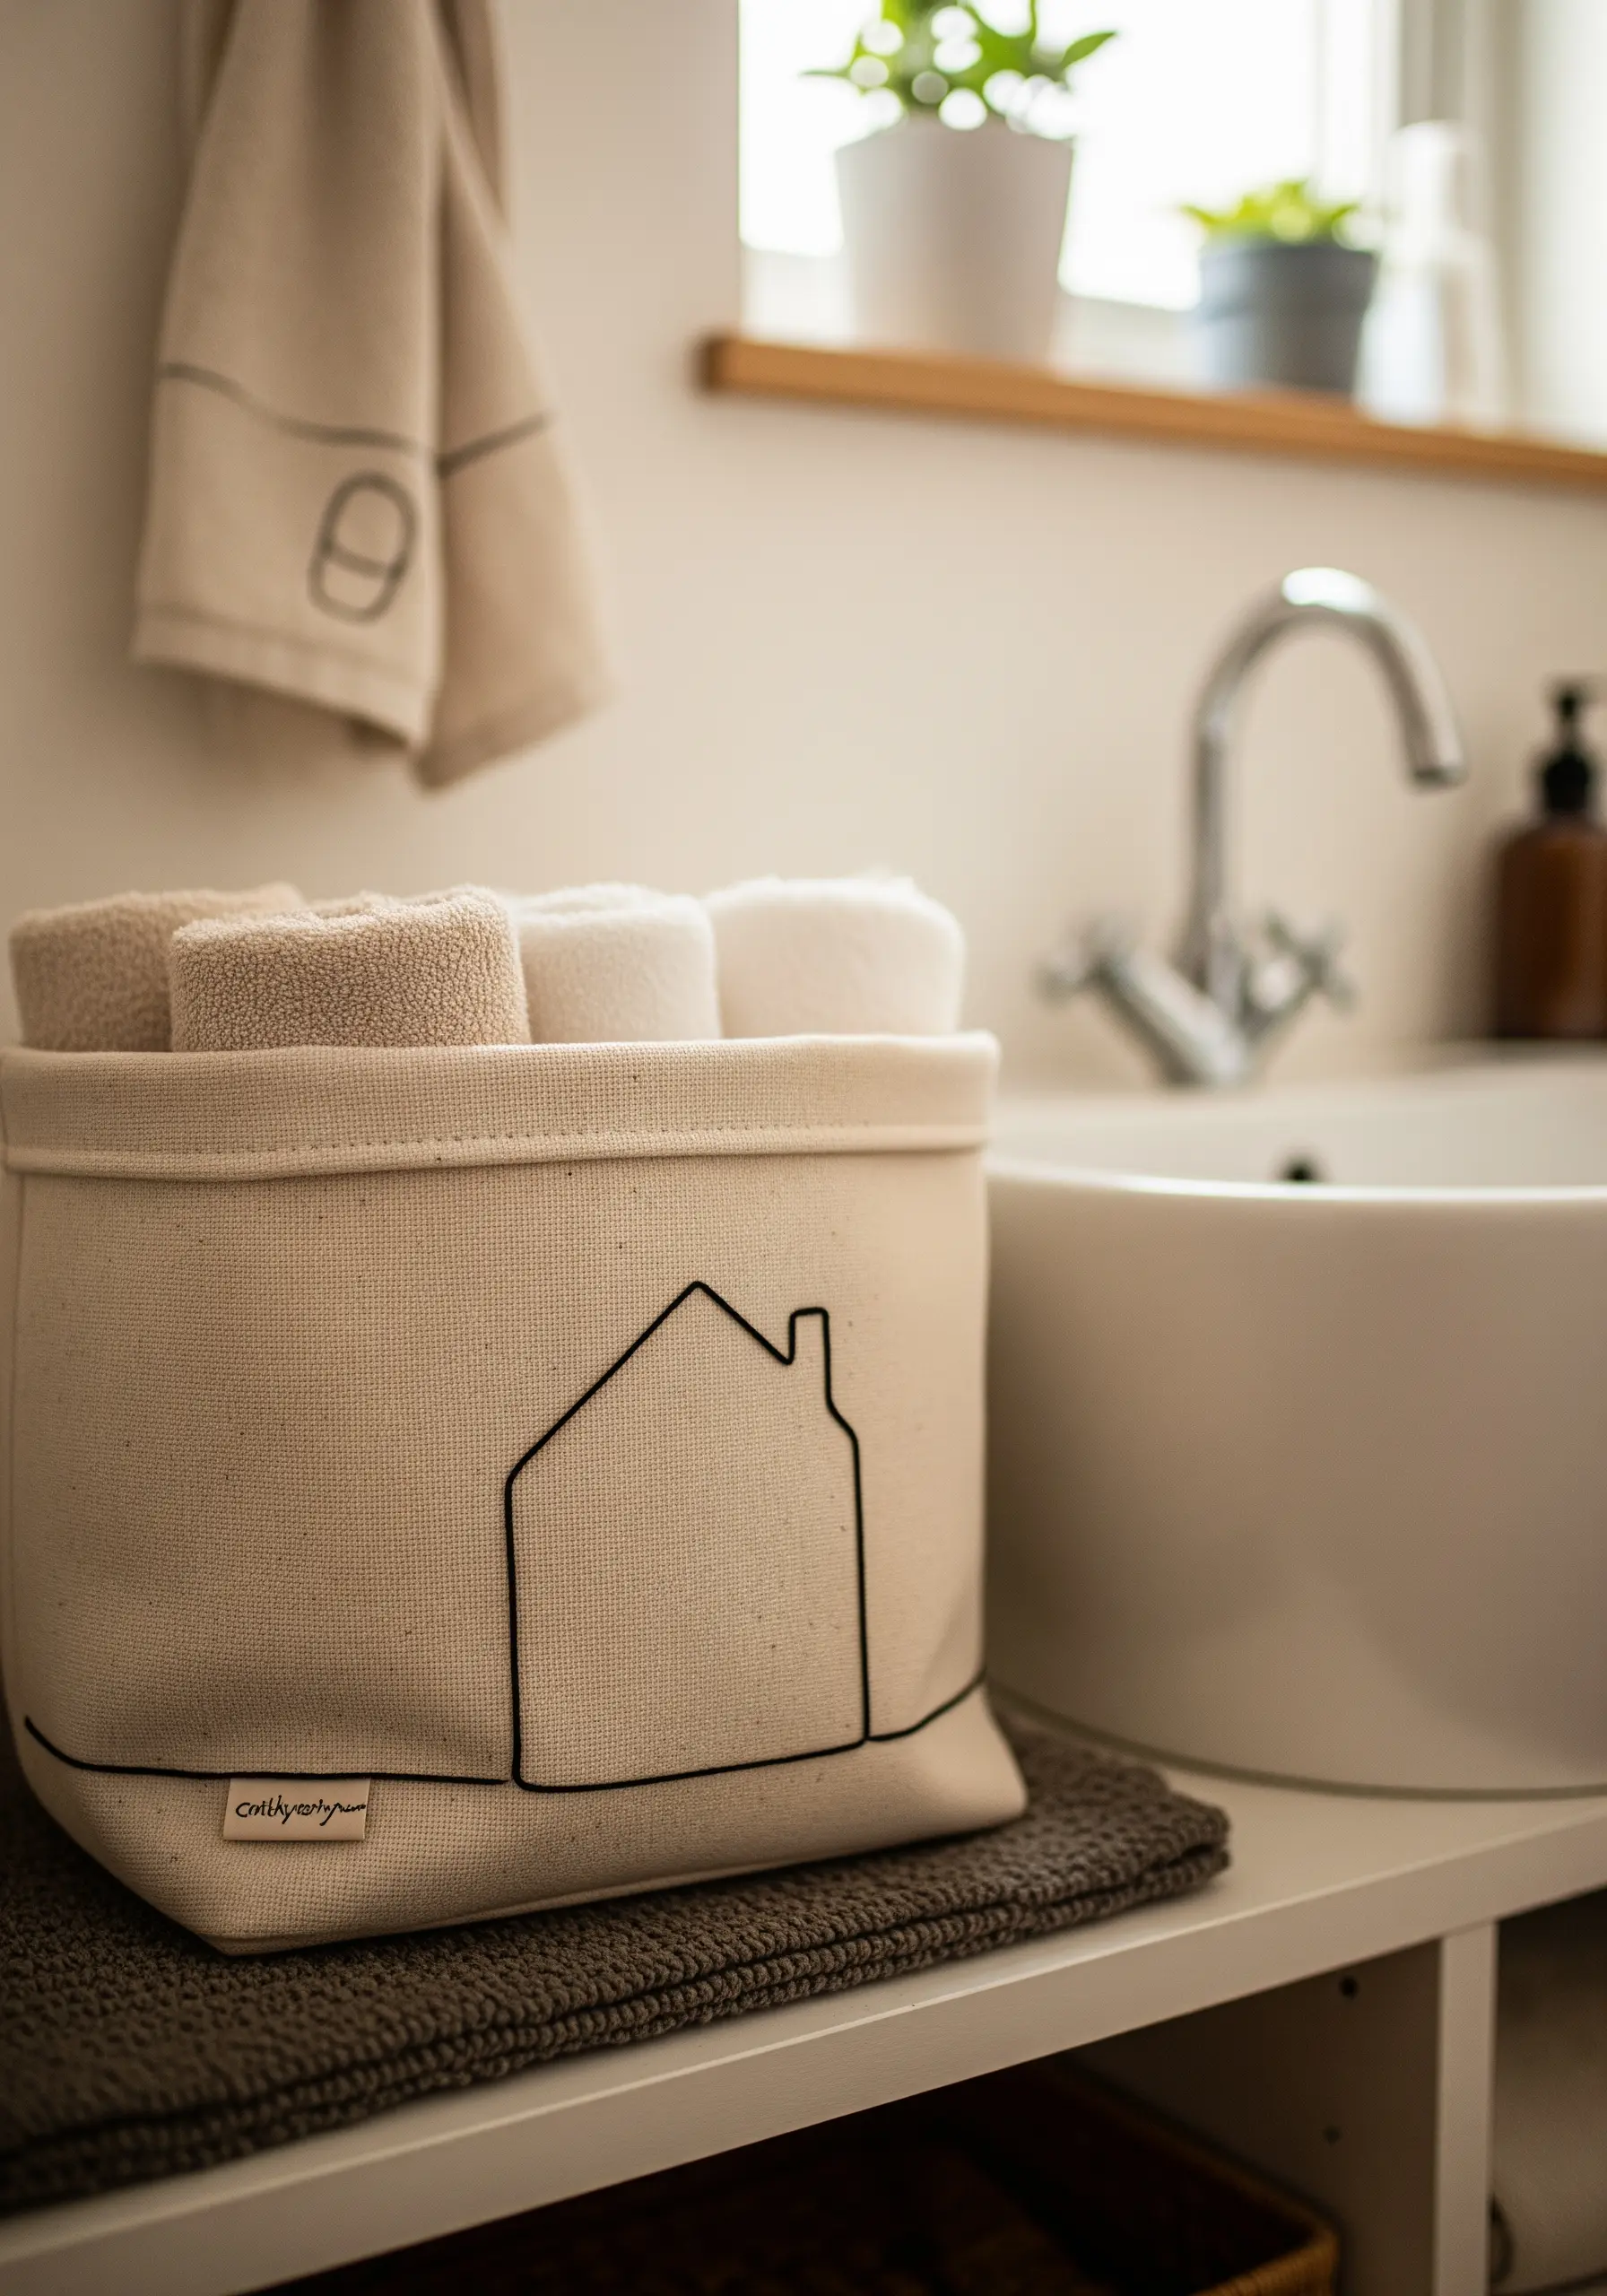
Transform a simple canvas storage basket with a bold, graphic house outline.
A stem stitch is the perfect choice for this project, as it creates a solid, defined line that stands out even on a textured surface like canvas.
Since you can’t use a hoop on a structured item, focus on maintaining even tension by hand, pulling each stitch taut but not so tight that it puckers the fabric.
This simple addition turns a utilitarian object into a piece of charming, personalized decor, one of many tiny handmade decor ideas that elevate your space.


