

You’ve mastered the basic stitches, and now you find yourself looking at your foliage embroidery, wondering how to give it that spark of life. How do you move from simply filling in a shape to creating something that feels lush, textured, and truly alive?
The secret isn’t in learning dozens of complicated new stitches. It’s in the subtle, intentional choices you make—the direction of a single stitch, the number of threads you use, the way you blend two similar colors to create a soft shadow. It’s about learning to see the world like an artist and translate that vision into thread.
These 24 variations are more than just ideas; they are invitations to refine your technique. Each one offers a specific way to control texture, light, and dimension. You have the skills. Now, let’s give them intention and purpose, transforming your nature art one deliberate, beautiful stitch at a time.
1. Build Depth with Analogous Color Gradients
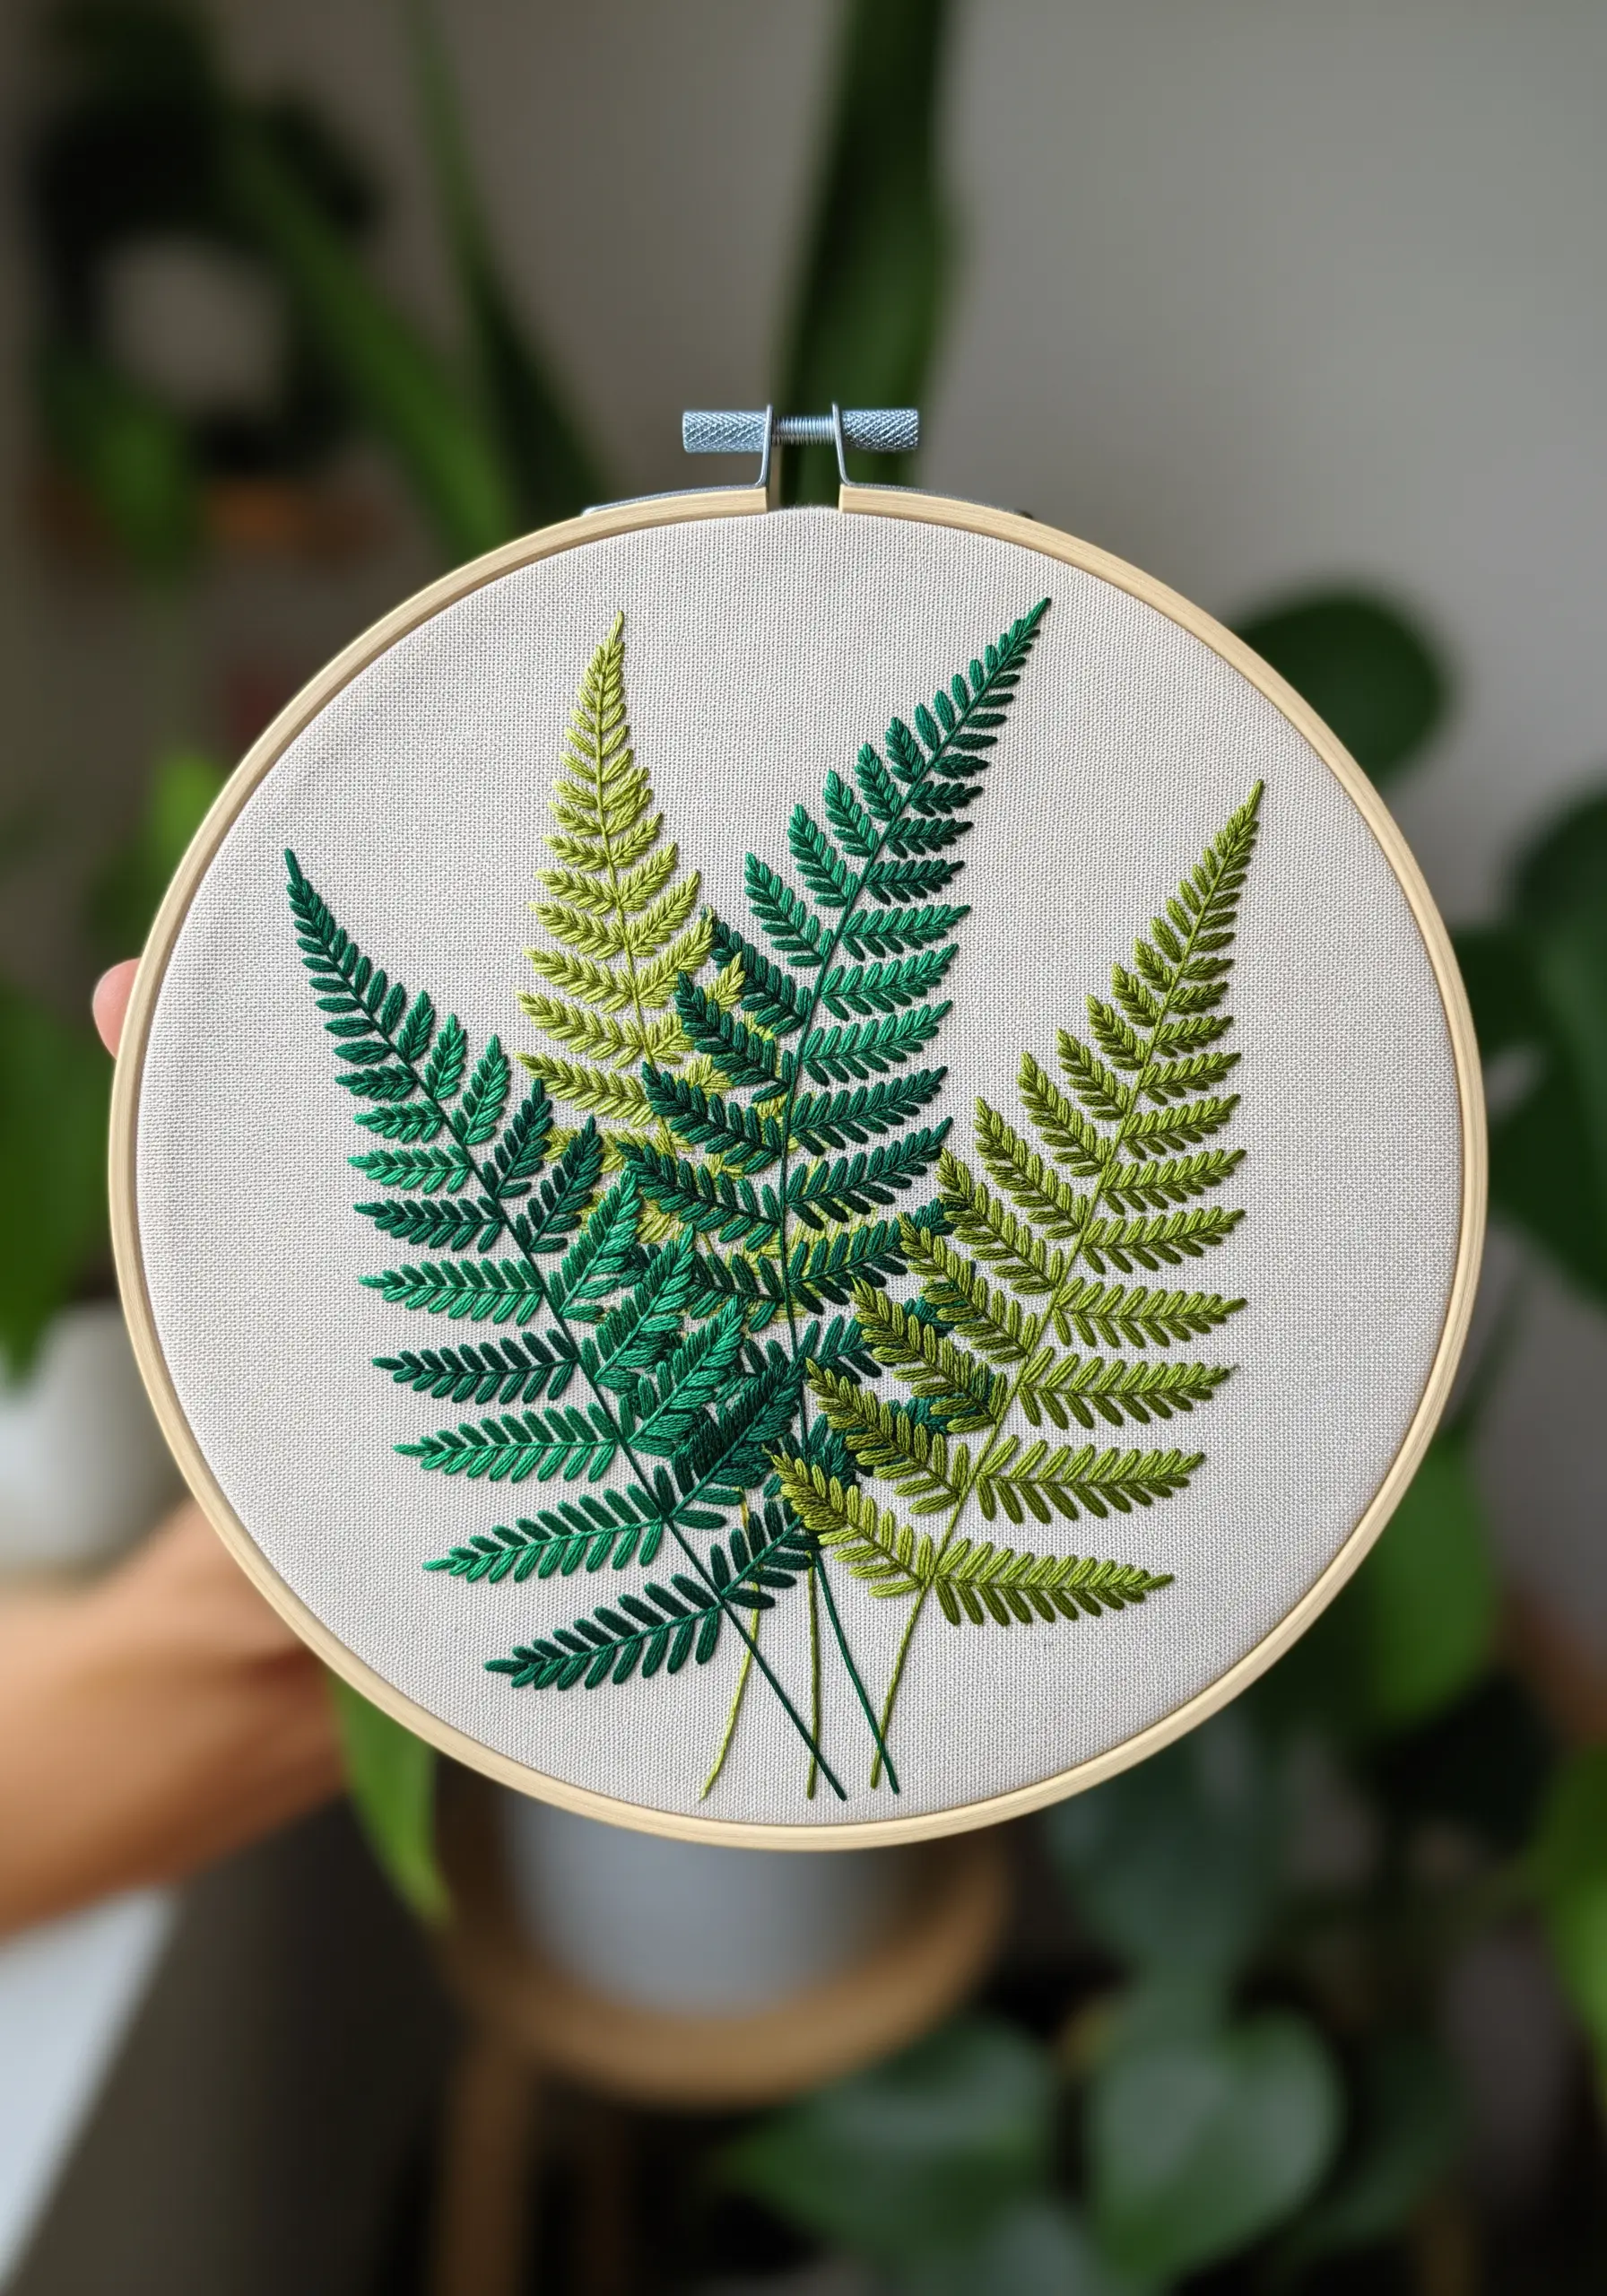
To give your fern fronds realistic depth, select three to four shades of the same green, ranging from light to dark.
Work the center fern in your mid-tones, then use the lightest and darkest shades for the ferns on either side to create the illusion of light and shadow.
Use short, angled satin stitches for each leaflet, ensuring they all slant in the same natural direction away from the central stem.
Using only two strands of floss will keep your stitches sharp and prevent the delicate leaflets from looking bulky.
2. Contrast Thread and Surface with Raised Satin Stitch
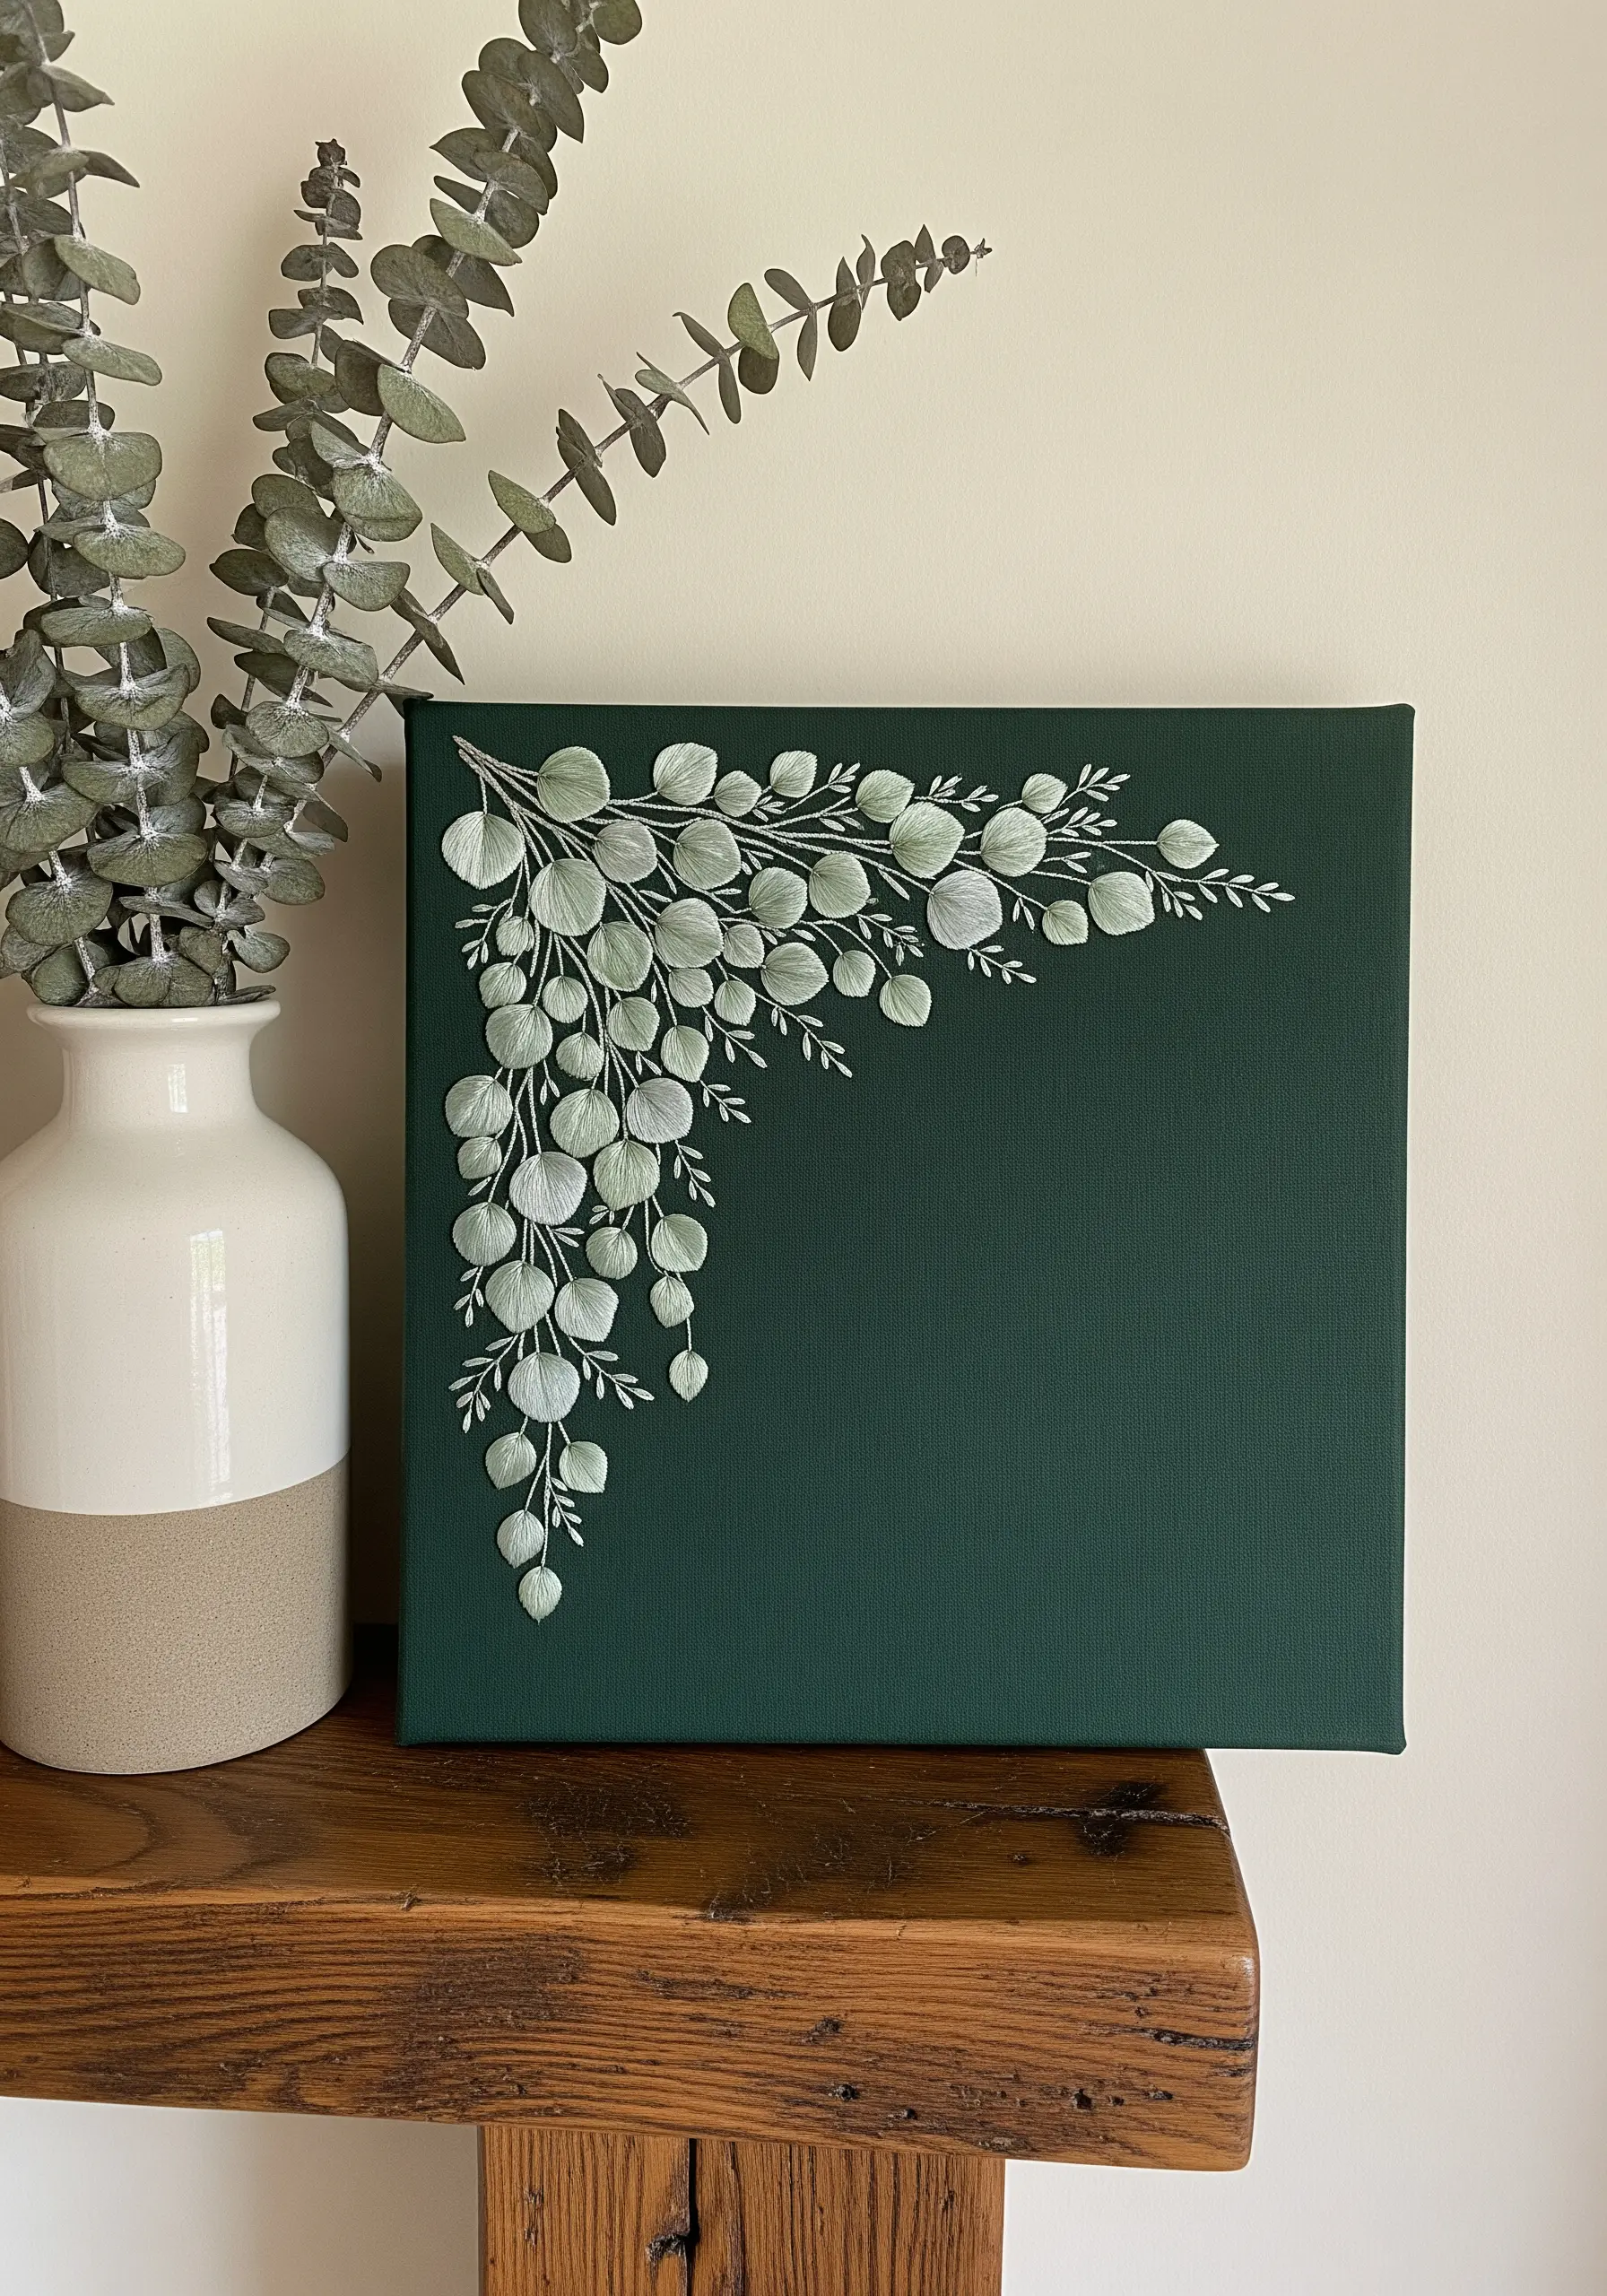
Make foliage pop on dark, unconventional surfaces like a painted canvas by using a high-contrast thread color, like this soft white on forest green.
Before you begin the satin stitch, create a small padded base with seed stitches or smaller straight stitches within the shape of each leaf.
Stitching over this padding lifts the eucalyptus leaves from the surface, creating subtle shadows and a tangible, three-dimensional quality.
This technique turns a simple corner design into a focal point, perfect for handmade art pieces that tell a story through texture.
3. Capture Organic Texture with Directional Stitching
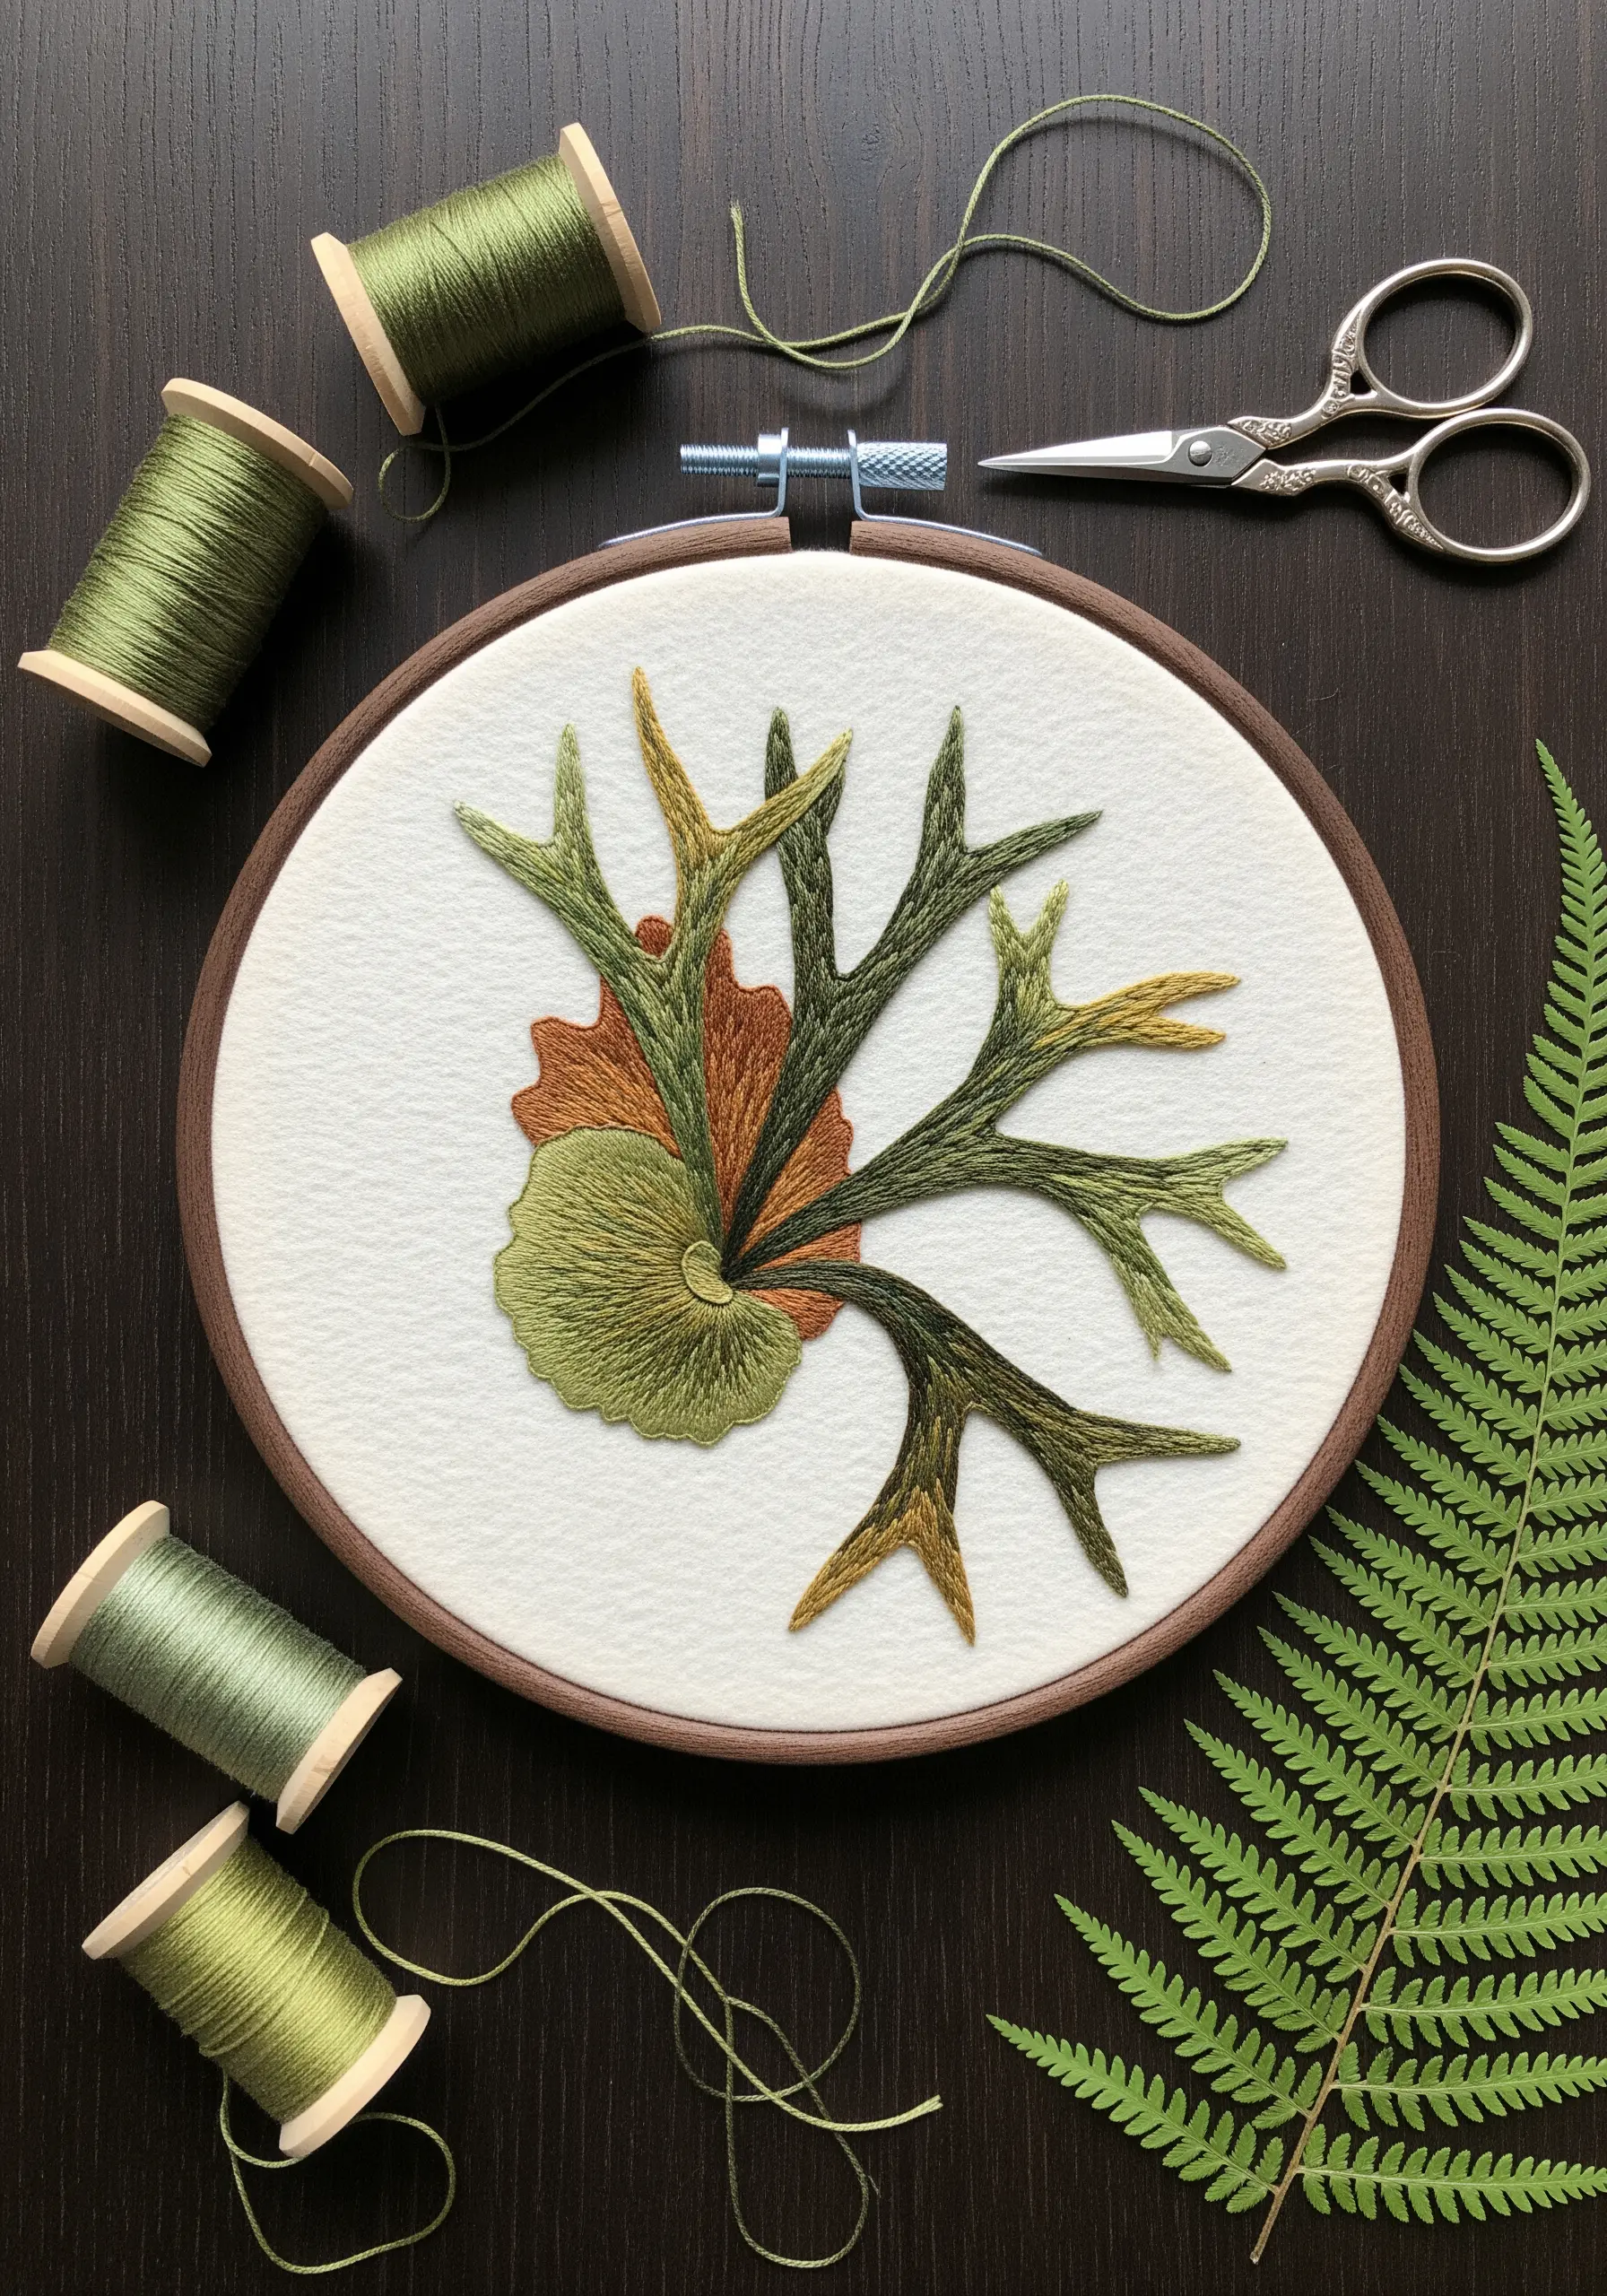
Recreate the unique structure of a staghorn fern by varying your stitch direction and type.
Use a long-and-short stitch for the flat, shield-like frond at the base, blending earthy greens and browns to suggest age and growth.
For the antler fronds, switch to a directional satin stitch, angling your stitches to follow the curve of each branch.
This careful attention to the direction of your stitches is what transforms a flat shape into a dynamic, realistic botanical form.
4. Define Form with Geometric Line Art
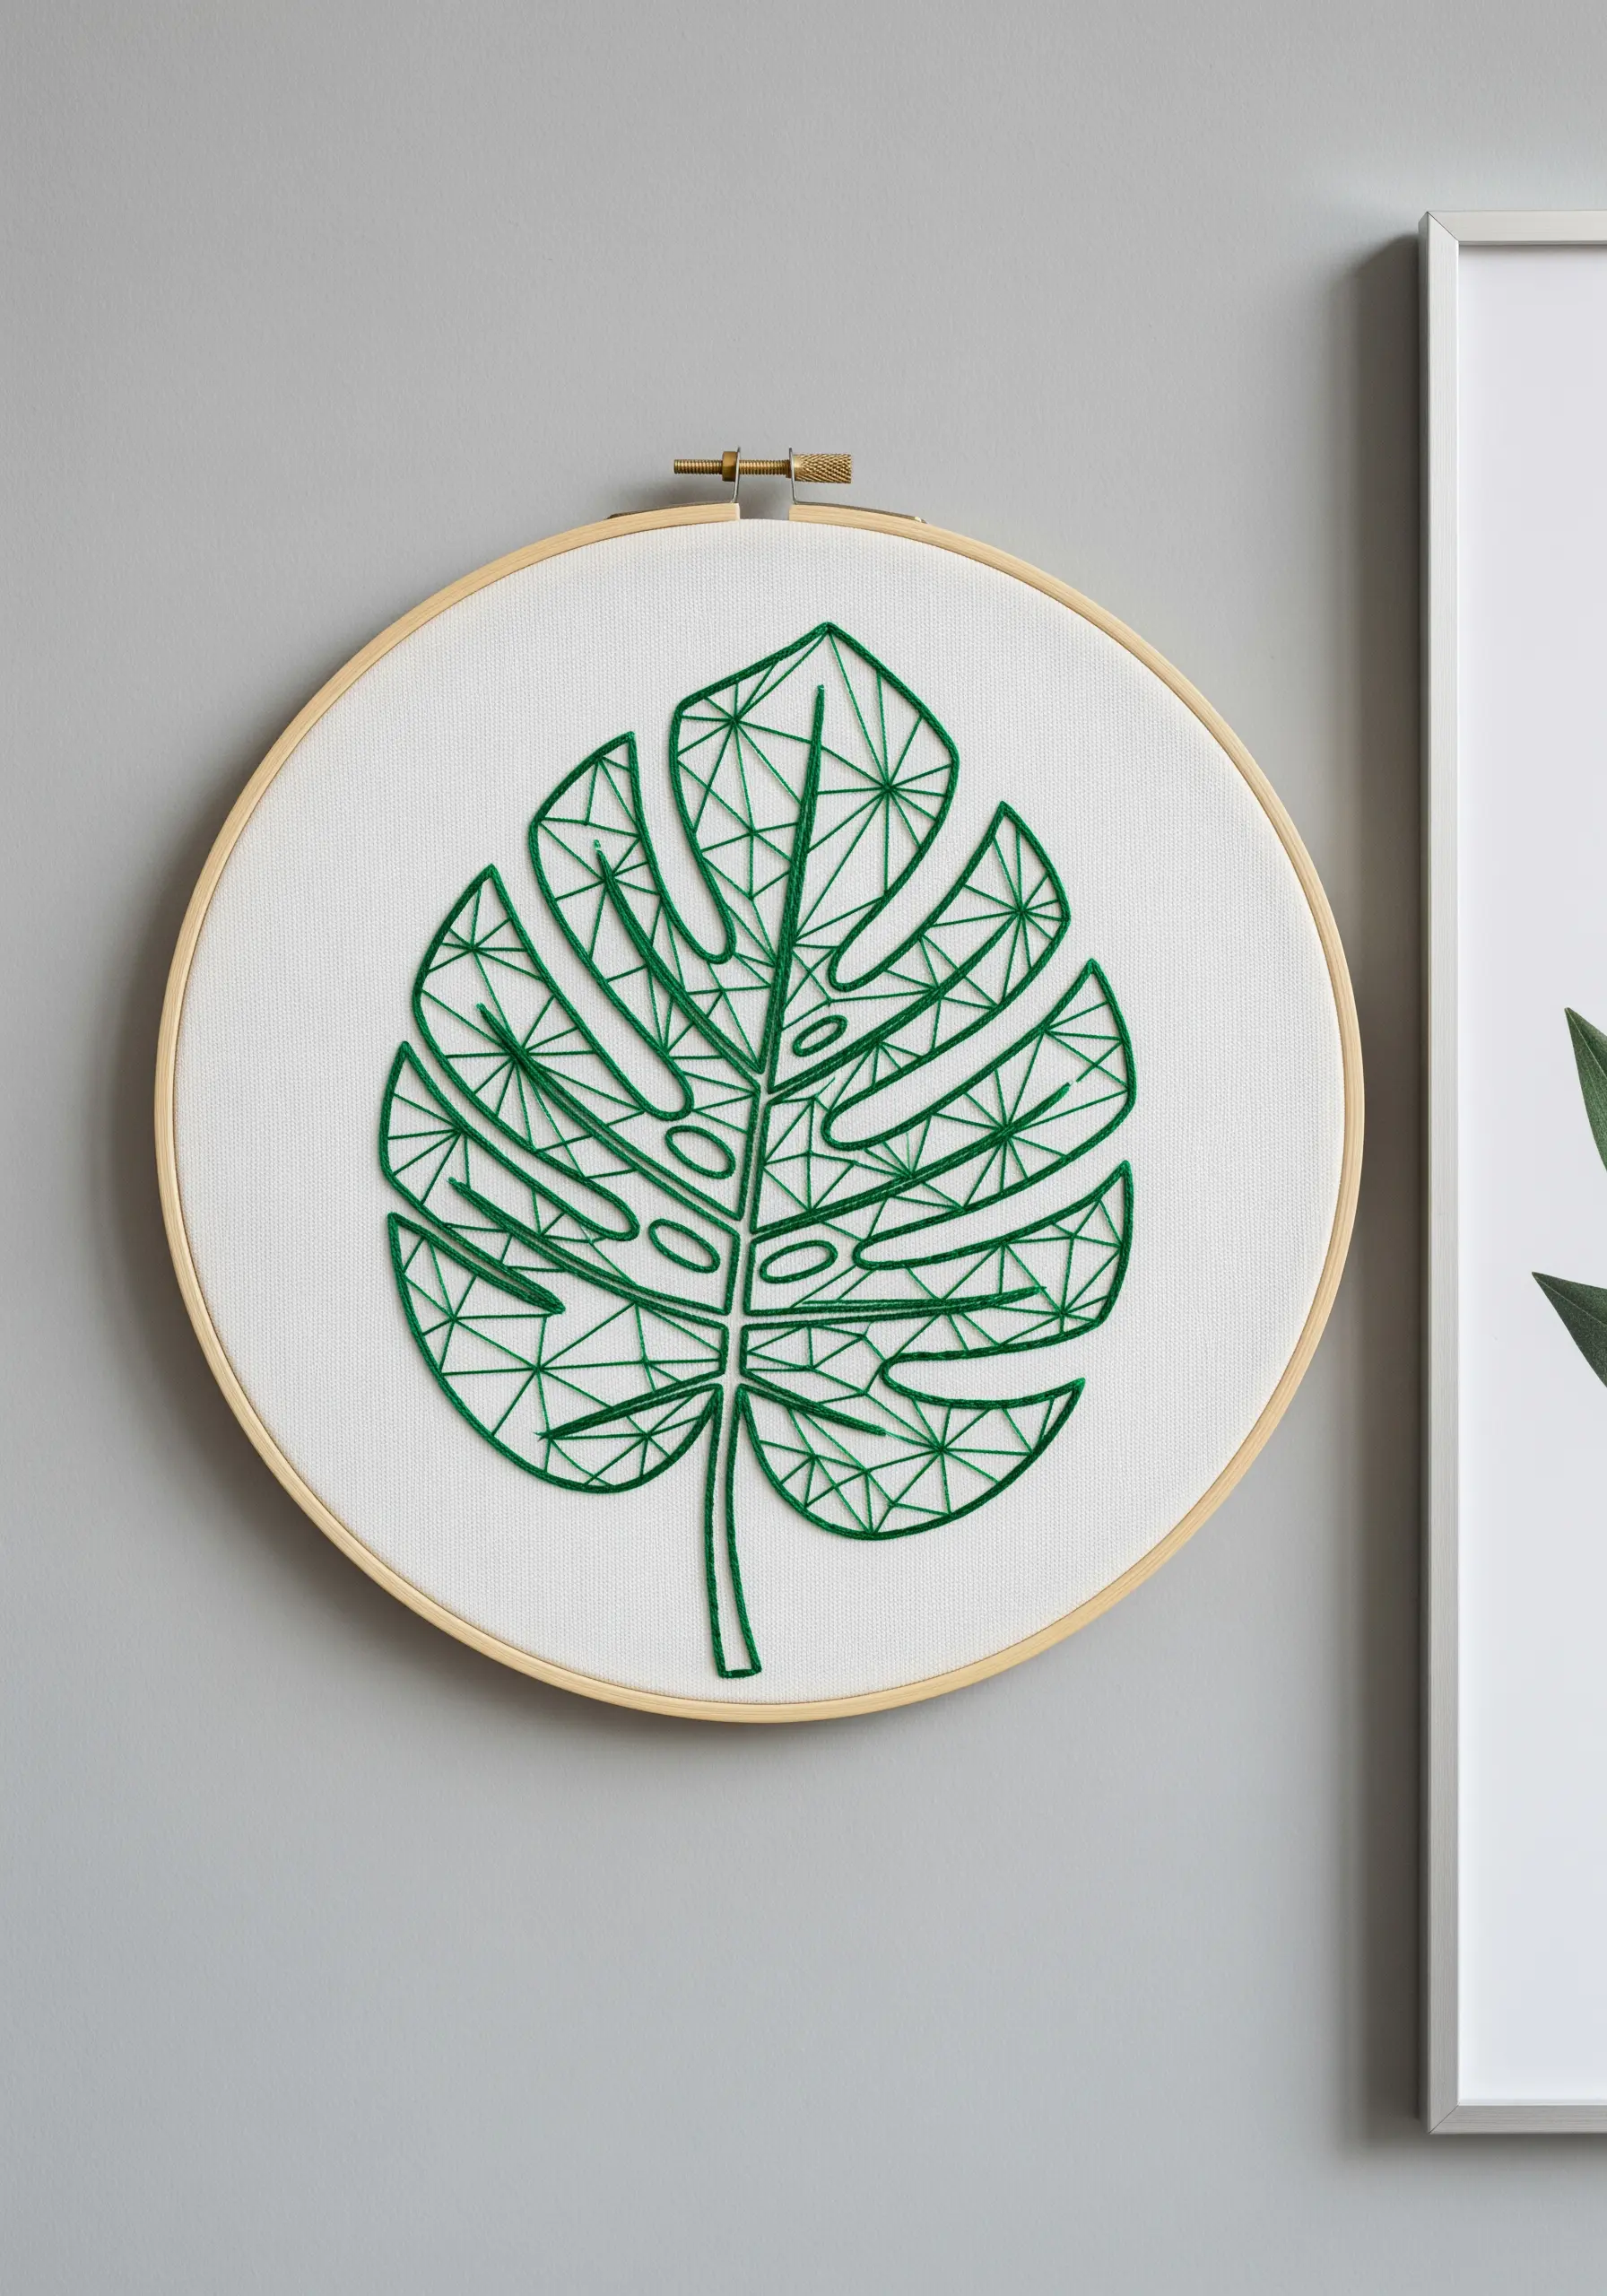
Transform a familiar leaf shape like a monstera into a modern graphic design using only line work.
Use a crisp backstitch or stem stitch with three strands of floss to ensure your lines are bold and consistent.
To prevent sagging on the long straight lines, break them into a series of smaller, connected stitches that meet at precise intersections.
This technique emphasizes structure over realism, creating a clean, architectural piece perfect for minimalist embroidery decor.
5. Combine Couching and Satin Stitch for Dimension
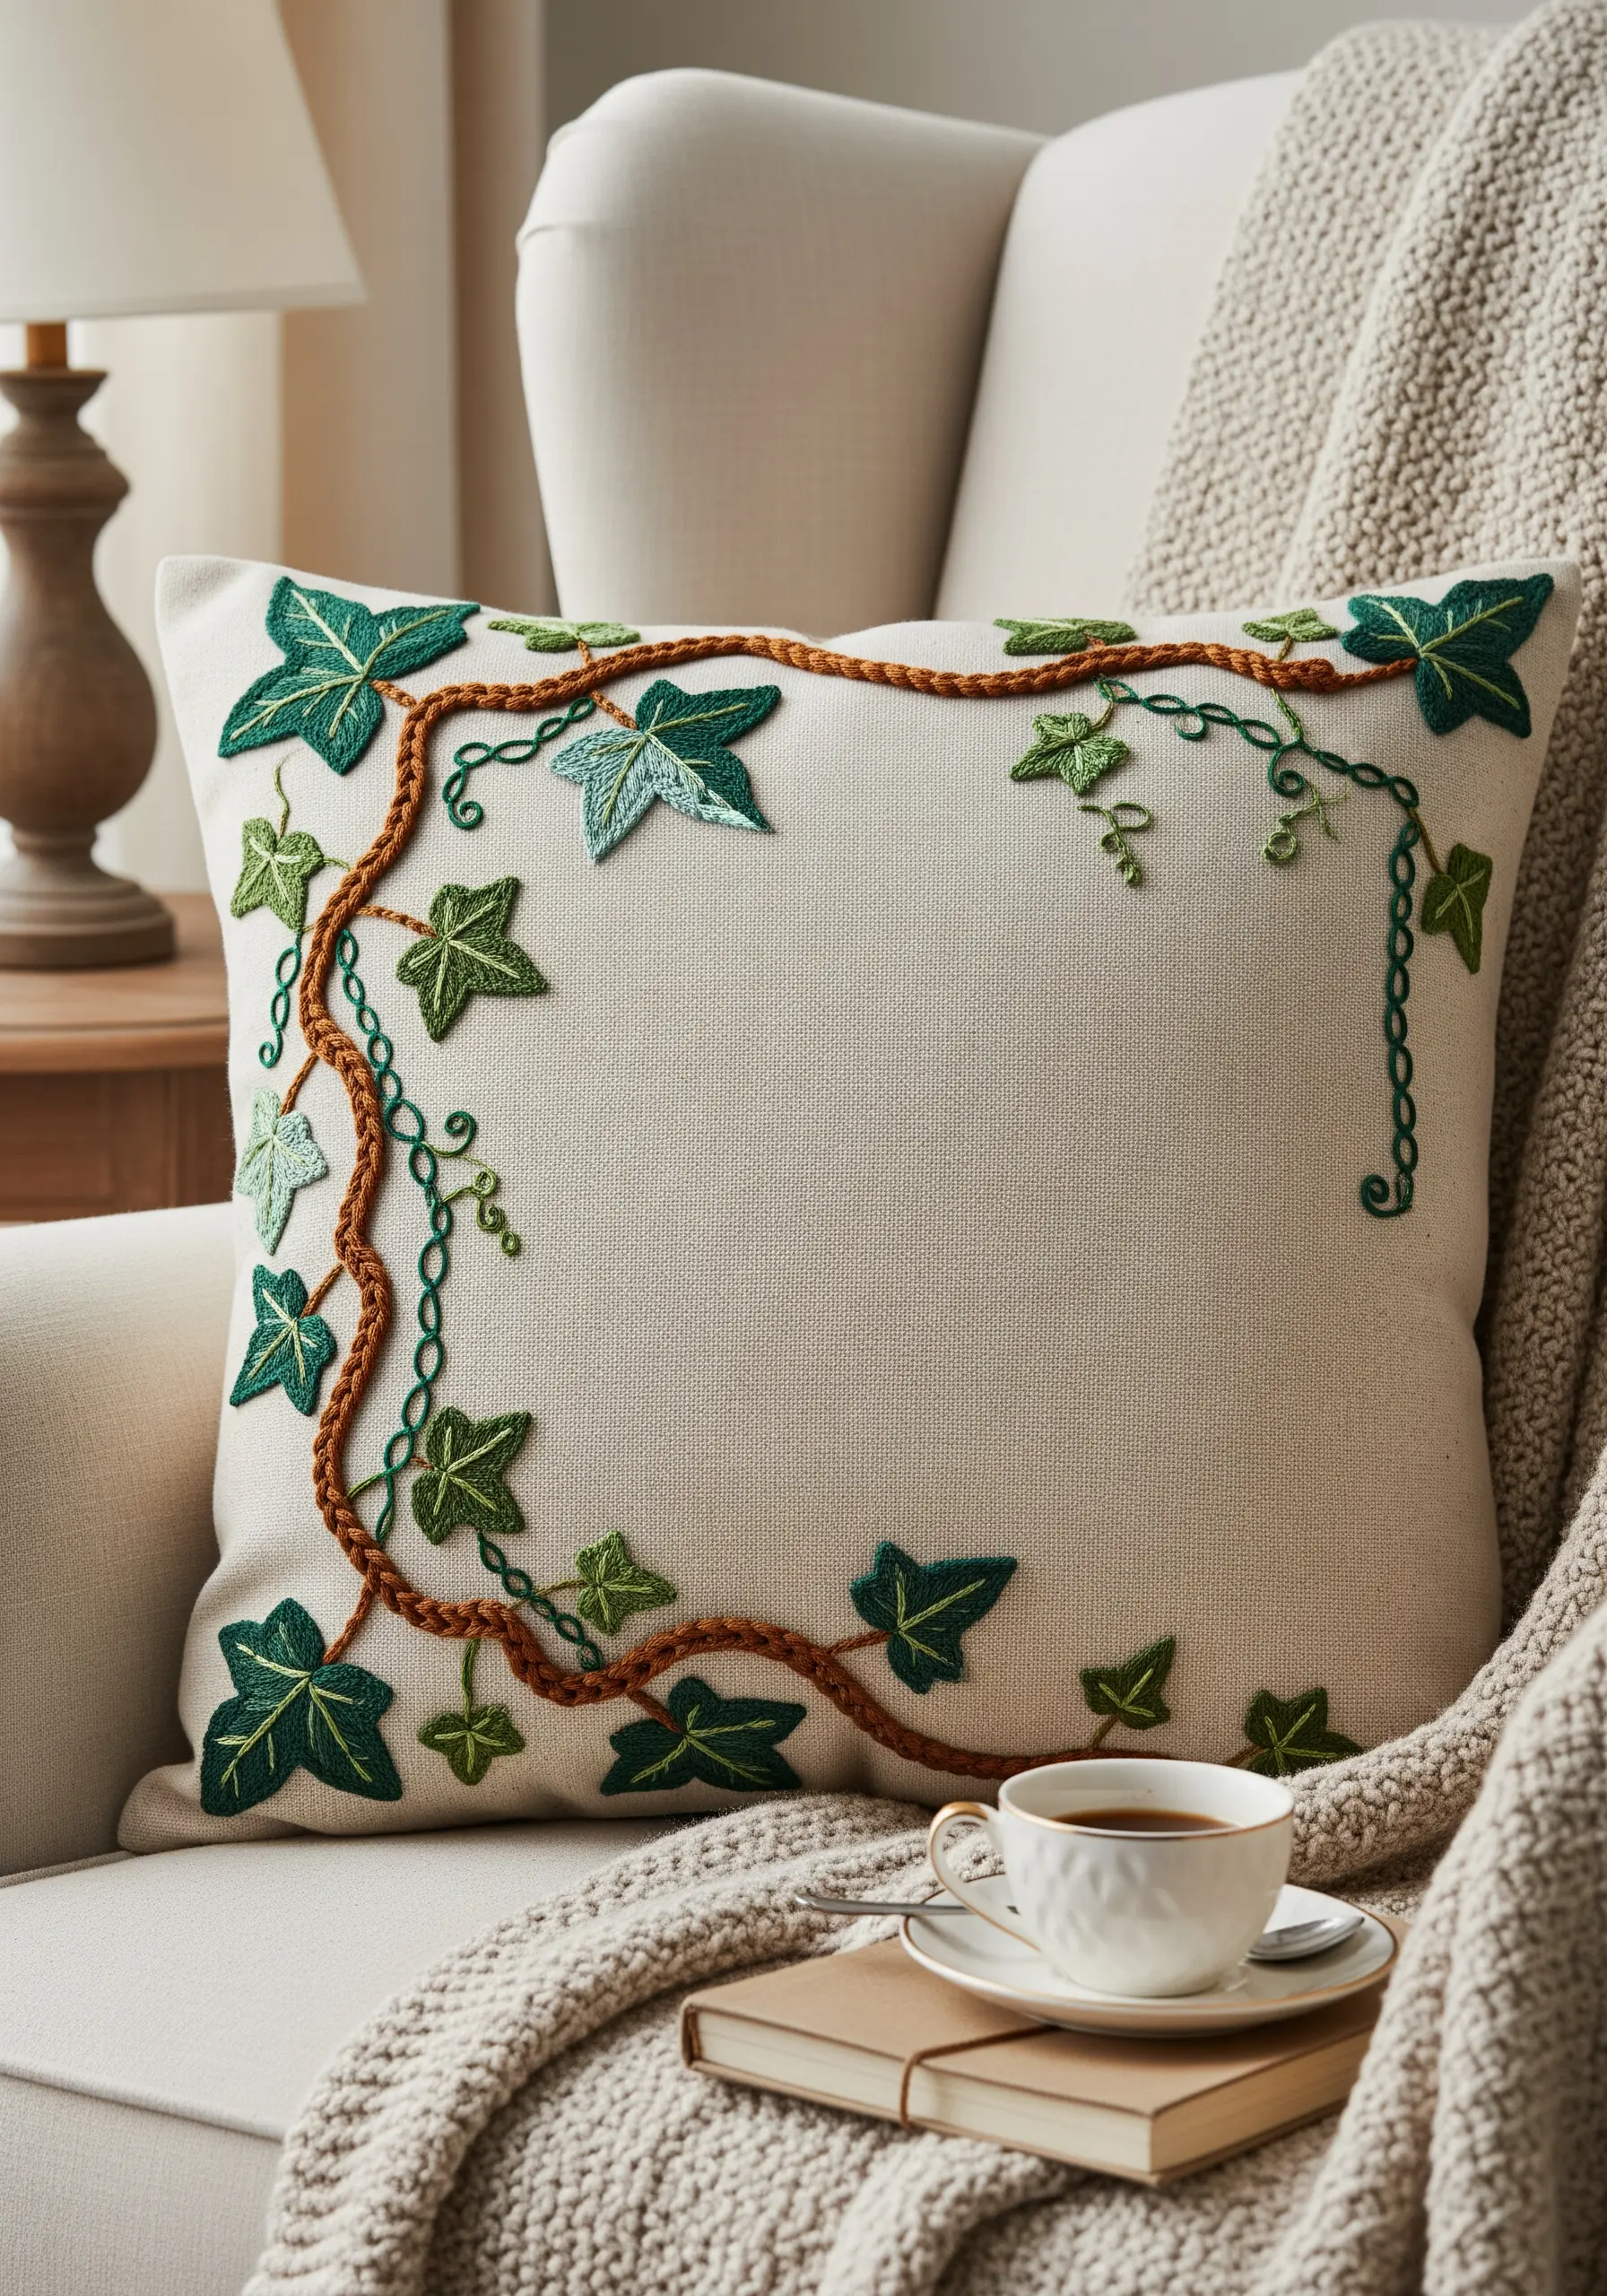
Create a bold, trailing vine by using couching for the main stem.
Lay down a thicker material, like yarn or multiple strands of floss twisted together, and tack it down with single, perpendicular stitches in a matching color.
For the ivy leaves, use a classic satin stitch, varying the shades of green to add visual interest and a sense of movement.
This combination of high-relief couching and smooth satin stitch adds both textural and visual hierarchy to your design, making it ideal for tactile items like pillows.
6. Master Realism with Small-Scale Botanical Studies

Improve your ability to capture fine detail by creating a series of single-specimen studies in small hoops.
Focus on what makes each plant unique—the feathery texture of rosemary, the smooth ovals of eucalyptus, the sharp precision of a fern frond.
Use a single strand of floss for hyper-realistic detail, especially for stems and leaf veins.
Grouping these tiny embroidery ideas creates a beautiful gallery wall that also serves as your personal stitch library.
7. Create Atmosphere with Negative Space and Accents
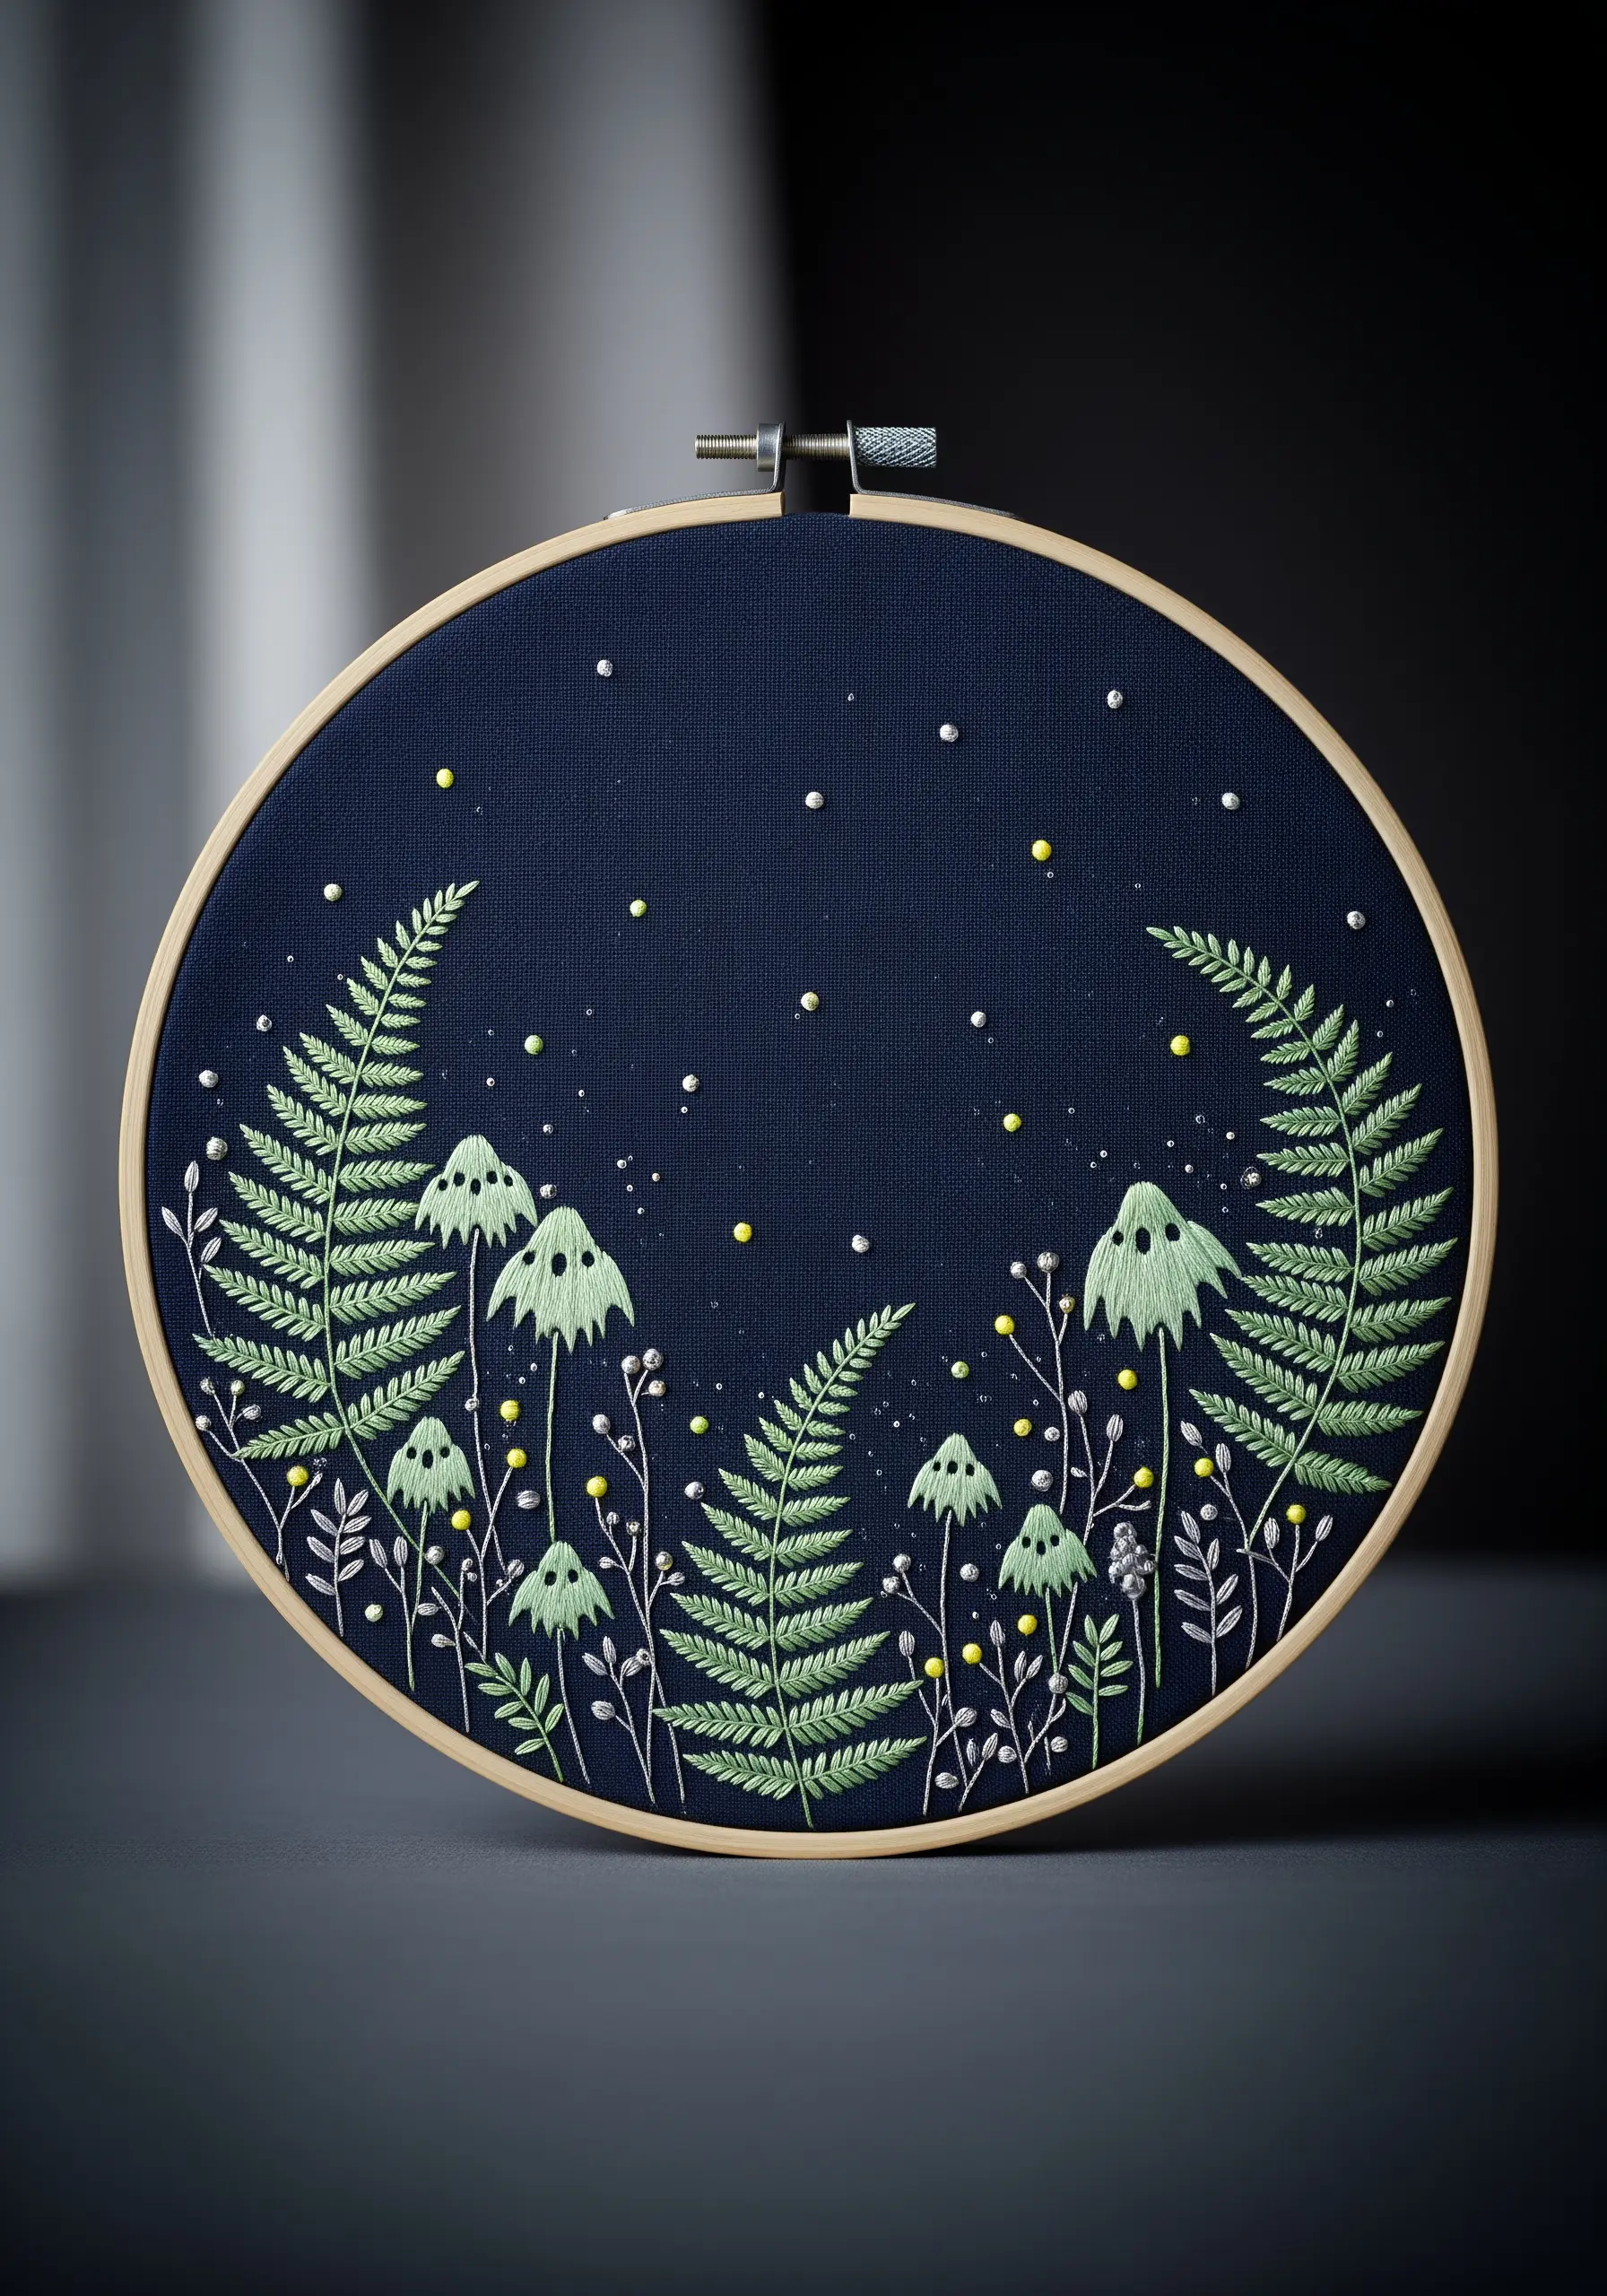
Tell a story with your foliage by stitching on dark fabric and using an ethereal color palette.
The deep navy background makes the pale green ferns and whimsical ghost-like flowers feel like they are glowing.
Use tiny, scattered French knots in a contrasting bright color to represent spores, stars, or fireflies, adding a layer of magic and movement.
This approach proves that the space you leave empty is just as important as the stitches you make.
8. Achieve Delicate Transparency on Tulle
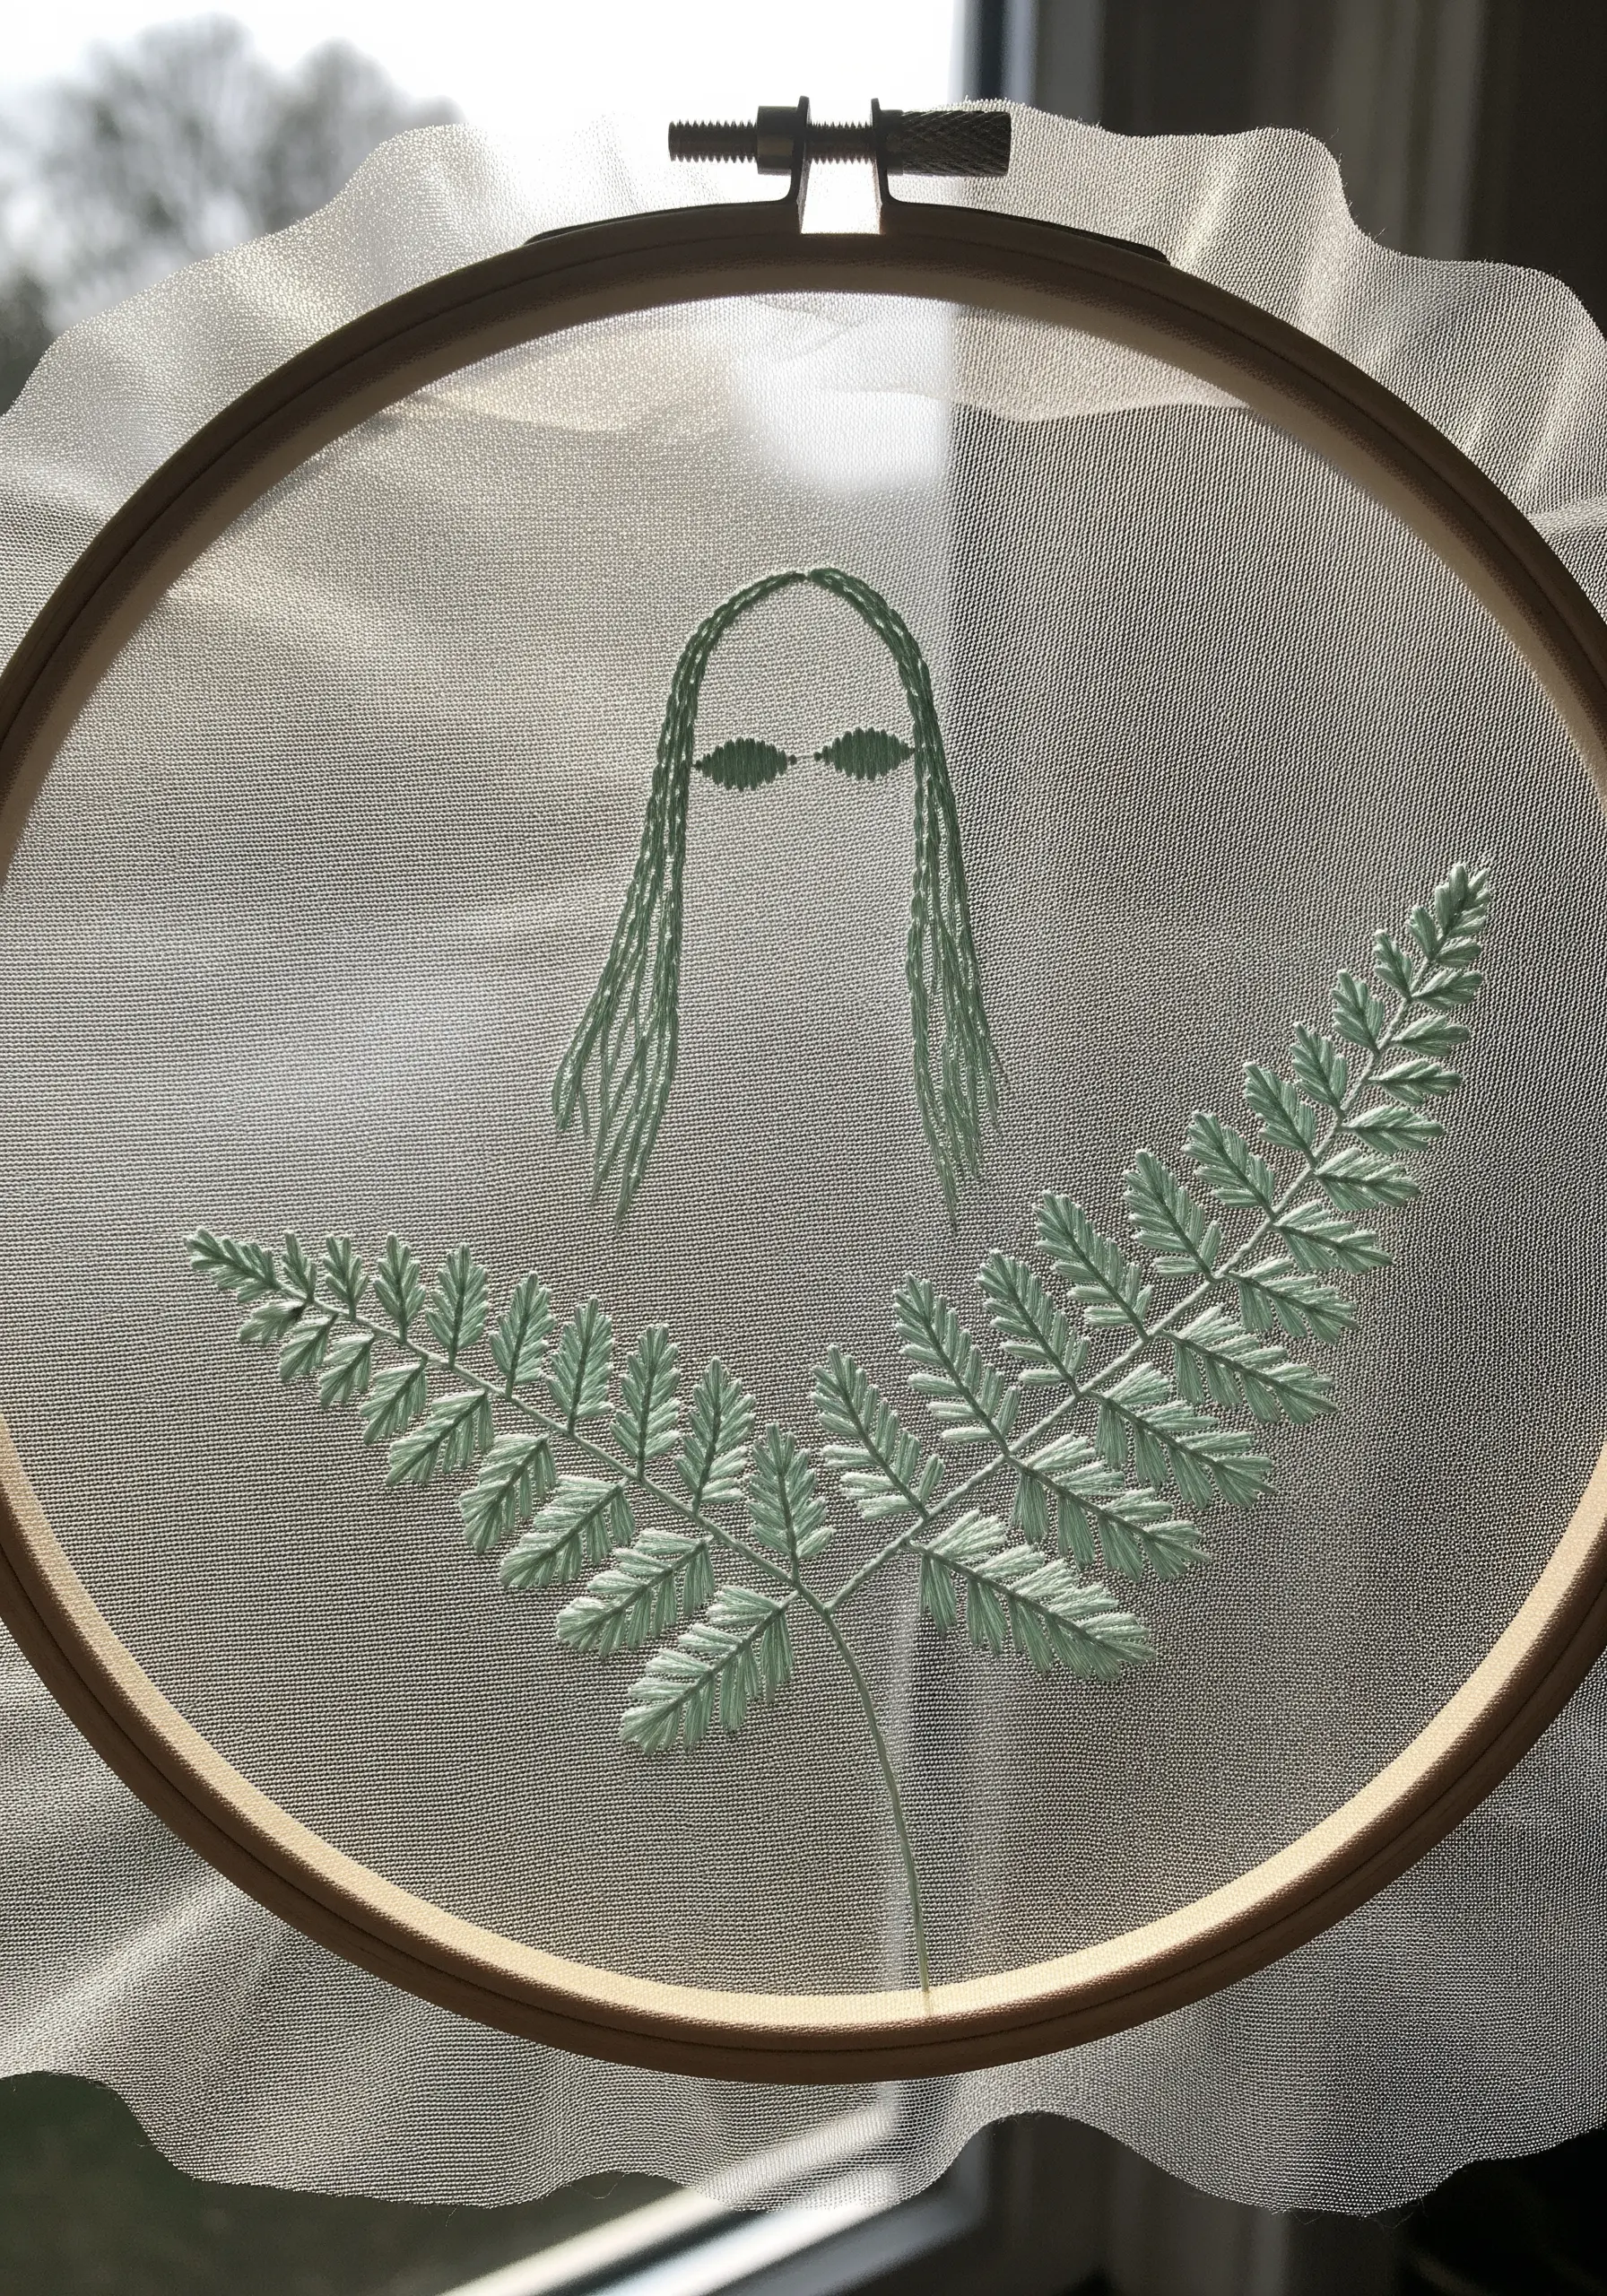
Embroidering on sheer tulle or organza creates a stunning, ethereal effect where your foliage appears to float.
To prevent puckering, use a water-soluble stabilizer on top of the fabric while you stitch, then gently rinse it away once you are finished.
Keep your tension even and your stitches deliberate, as the back of your work will be partially visible.
A simple satin stitch with a limited color palette looks incredibly elegant and allows the delicate nature of the fabric to shine.
9. Design a Lush, Overlapping Foliage Pattern
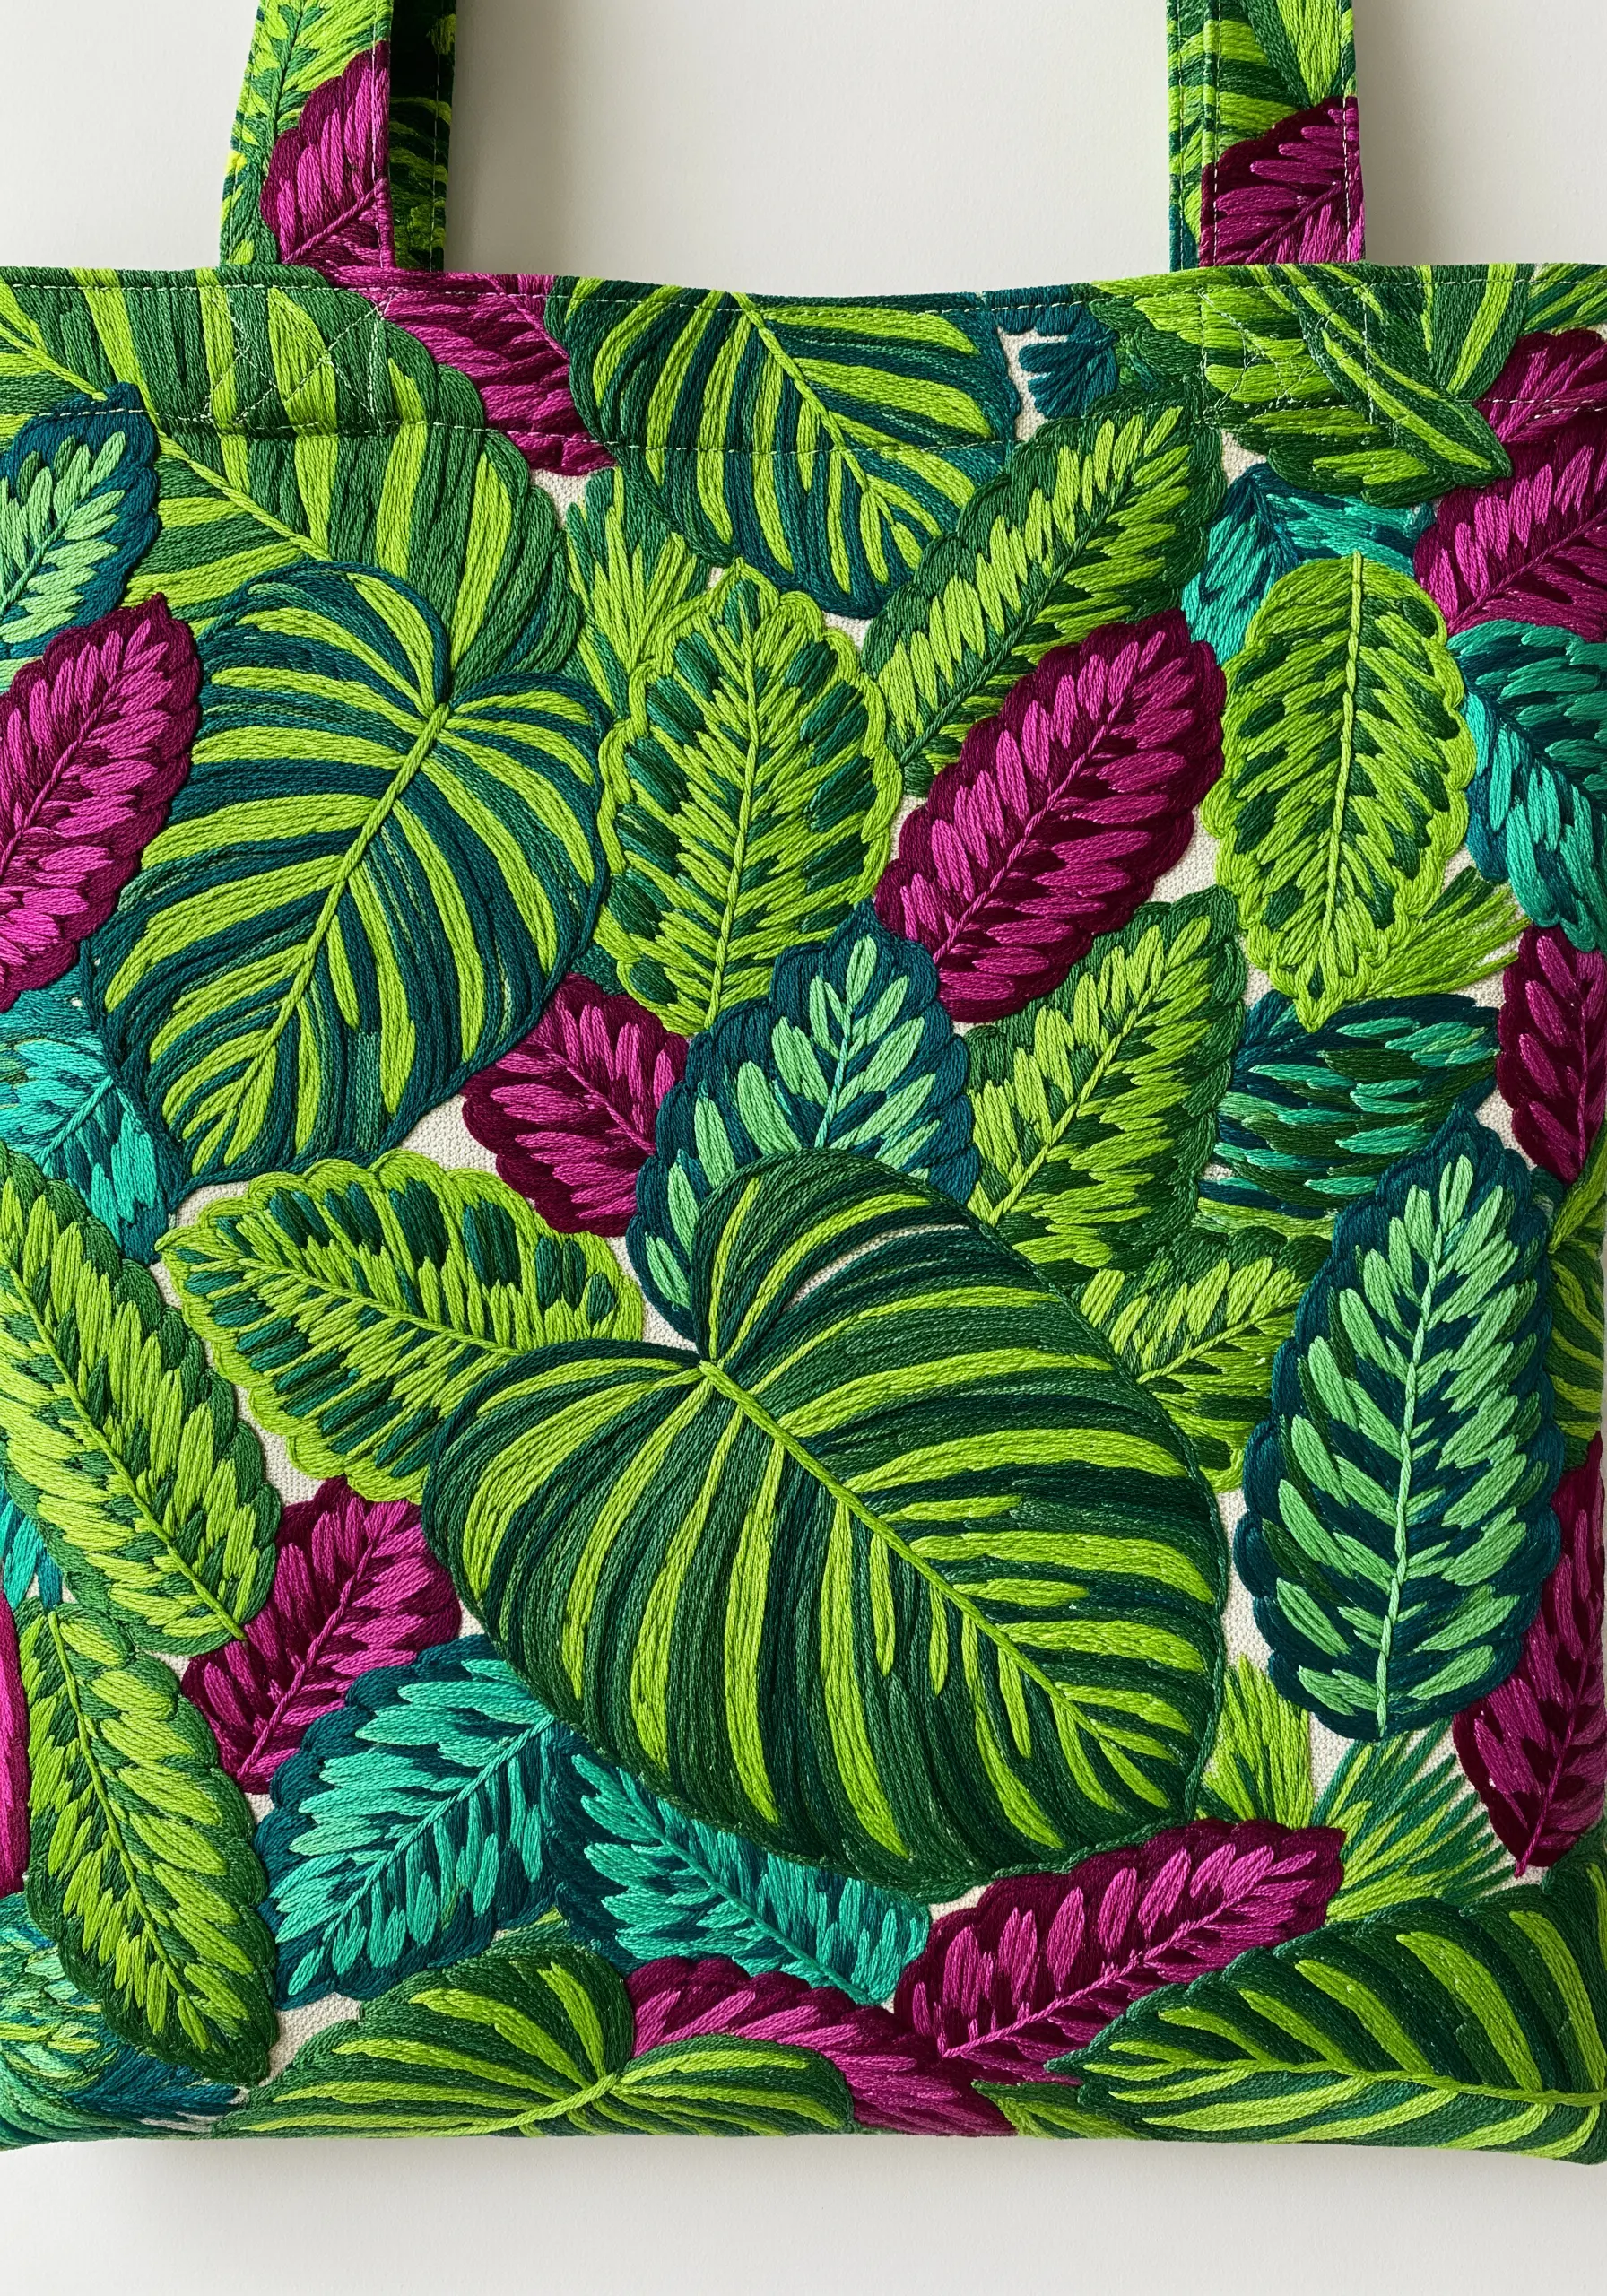
Create the feeling of a dense jungle by filling your fabric surface entirely with overlapping leaves.
Use long-and-short stitch to blend colors within each leaf, giving them individual vibrancy and dimension.
Don’t be afraid to use bold, unexpected colors like magenta and teal alongside traditional greens to create a dynamic, modern composition.
This all-over technique is perfect for functional items like tote bags, turning an everyday object into wearable art.
10. Mimic Moss with High-Texture Stitches

Move beyond traditional stitches to recreate the unique textures of a forest floor.
Use a dense collection of French knots for bumpy moss, and try Turkey work (cut pile stitch) for a shaggier, more delicate texture.
Incorporate chunky or velvet yarn, tied in knots and couched onto the surface, to mimic lichen or fungi.
This tactile approach to moss and fern embroidery is more like sculpting with thread, creating a piece that invites touch.
11. Imply a Landscape with Rhythmic Repetition
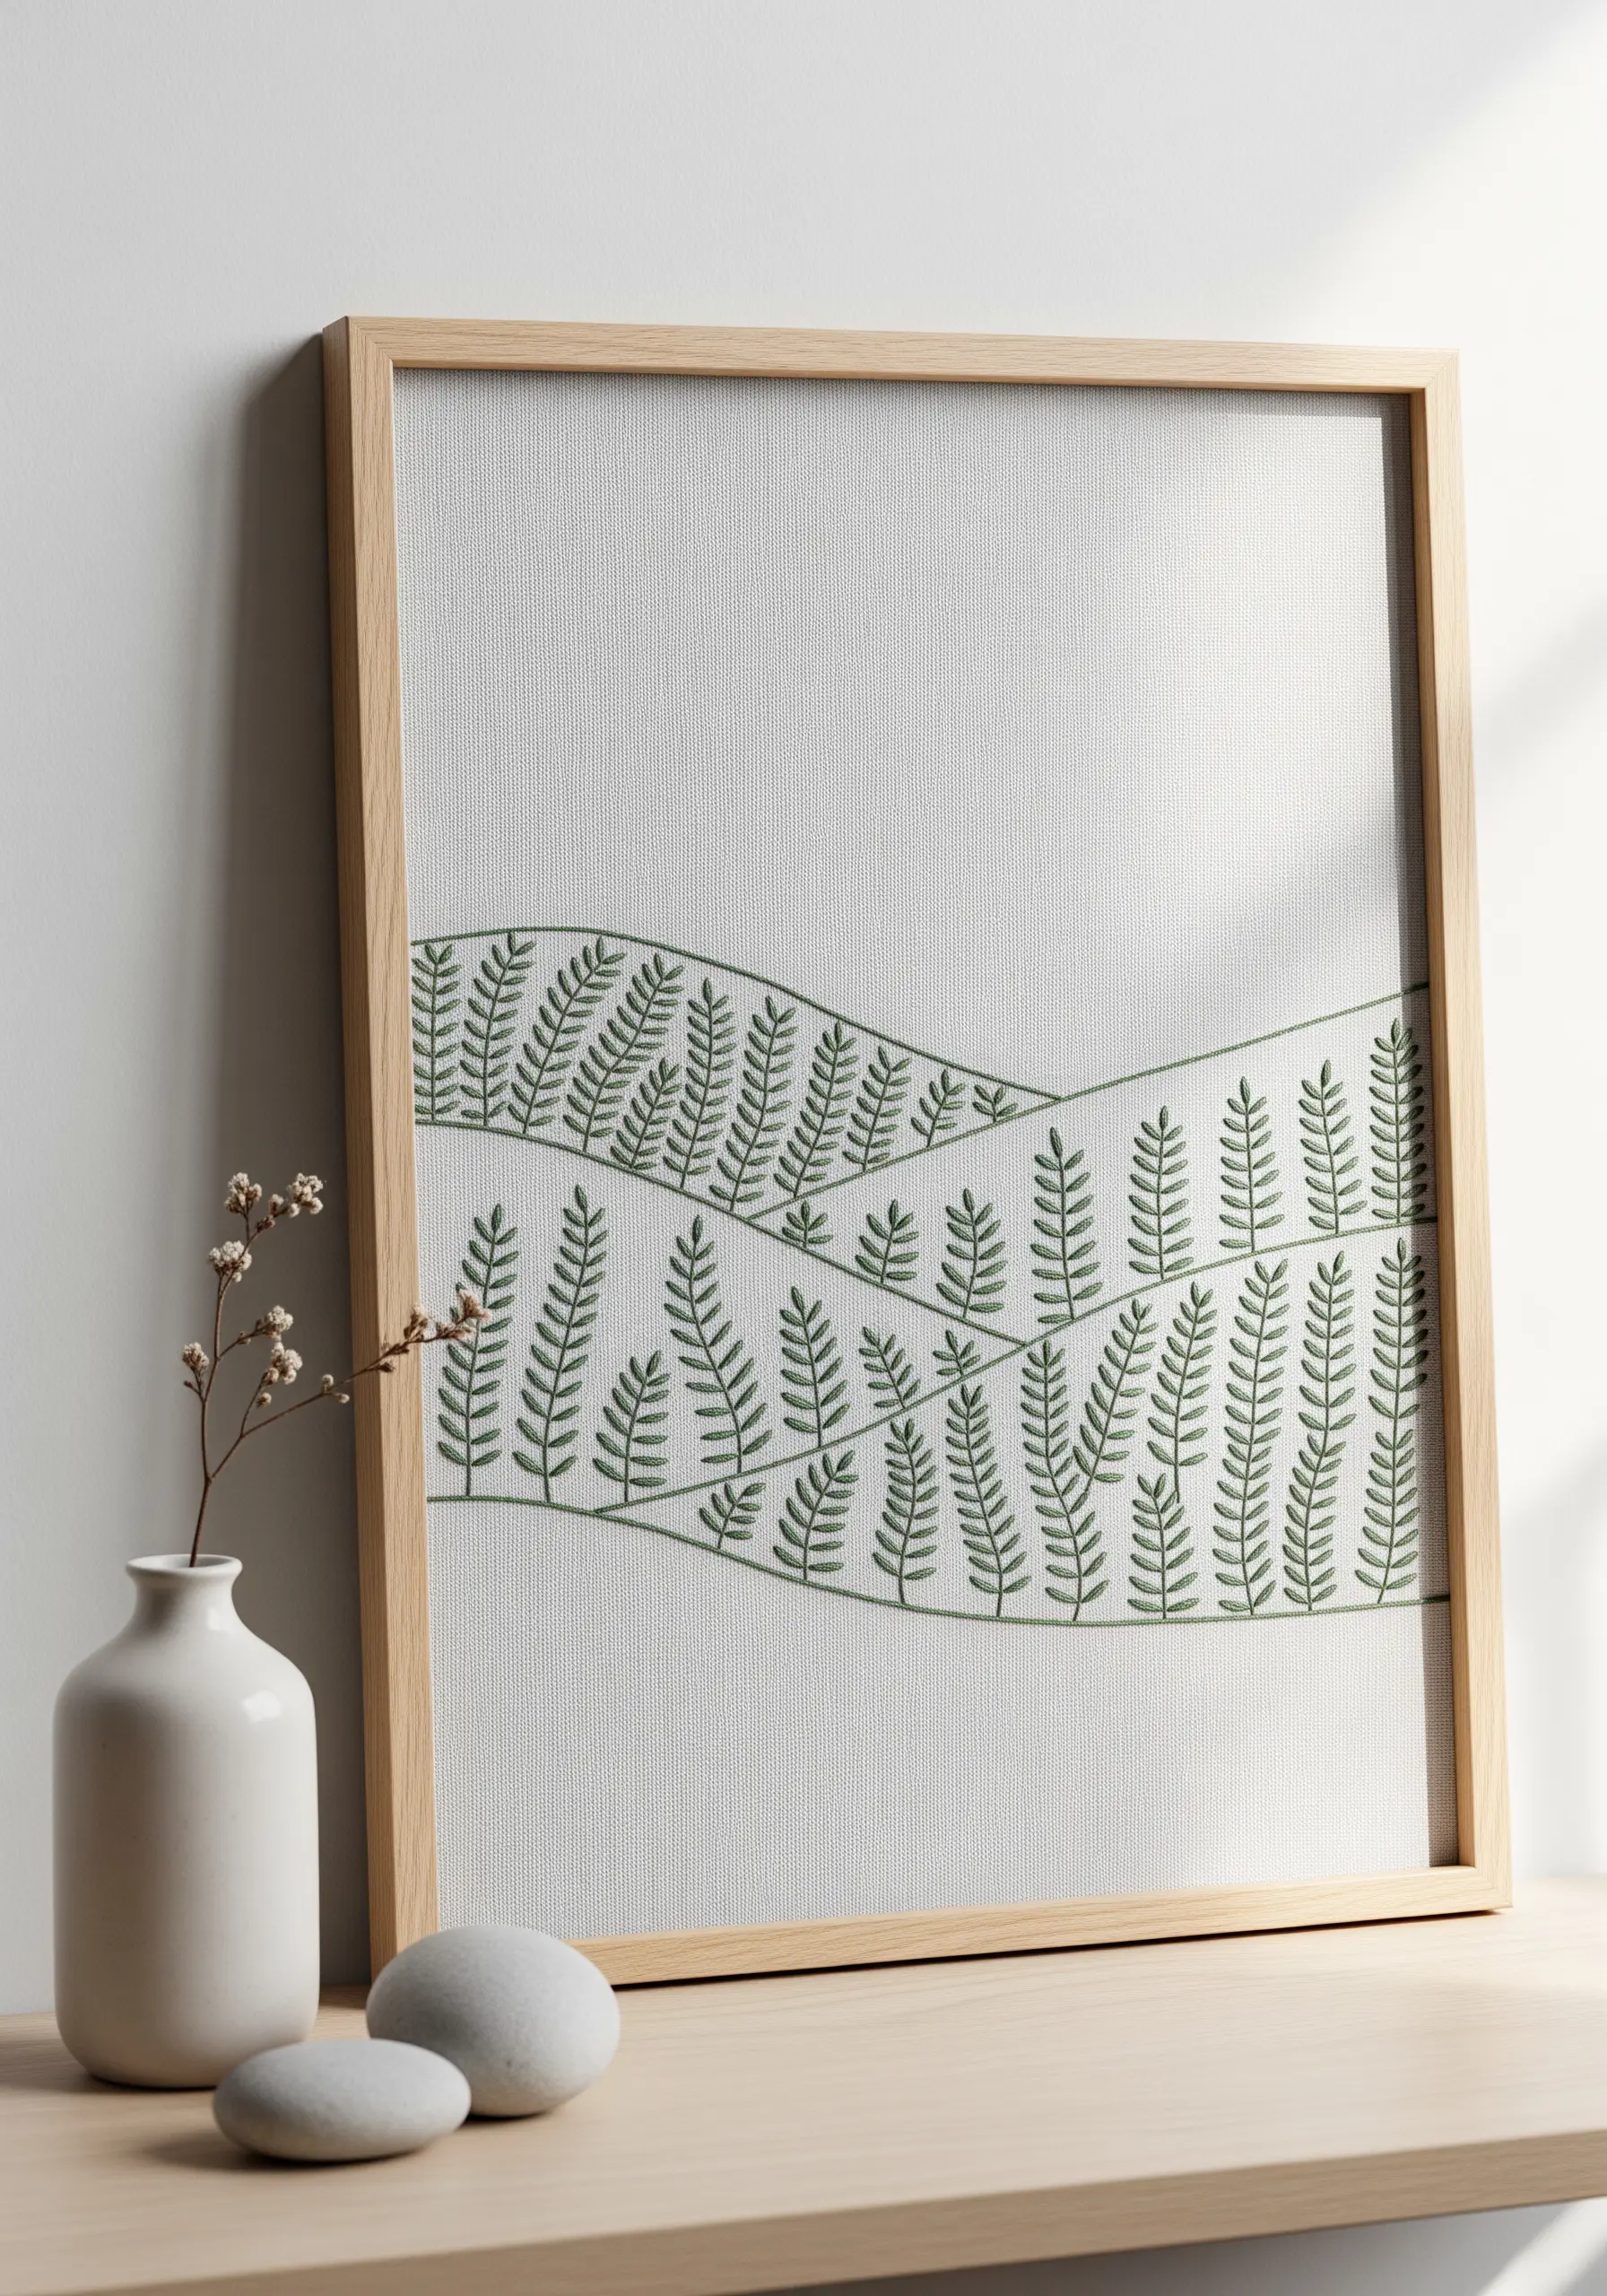
You don’t need to stitch an entire scene to evoke a landscape; you can suggest it with simple, repeating forms.
Use a single, elegant stitch like fishbone or fly stitch to create stylized ferns.
Arrange them in undulating rows that follow hand-drawn contour lines to create the impression of rolling hills covered in foliage.
This minimalist approach turns simple stitches into stunning decor by focusing on pattern and rhythm rather than intricate detail.
12. Harness Variegated Thread for Natural Color Shifts
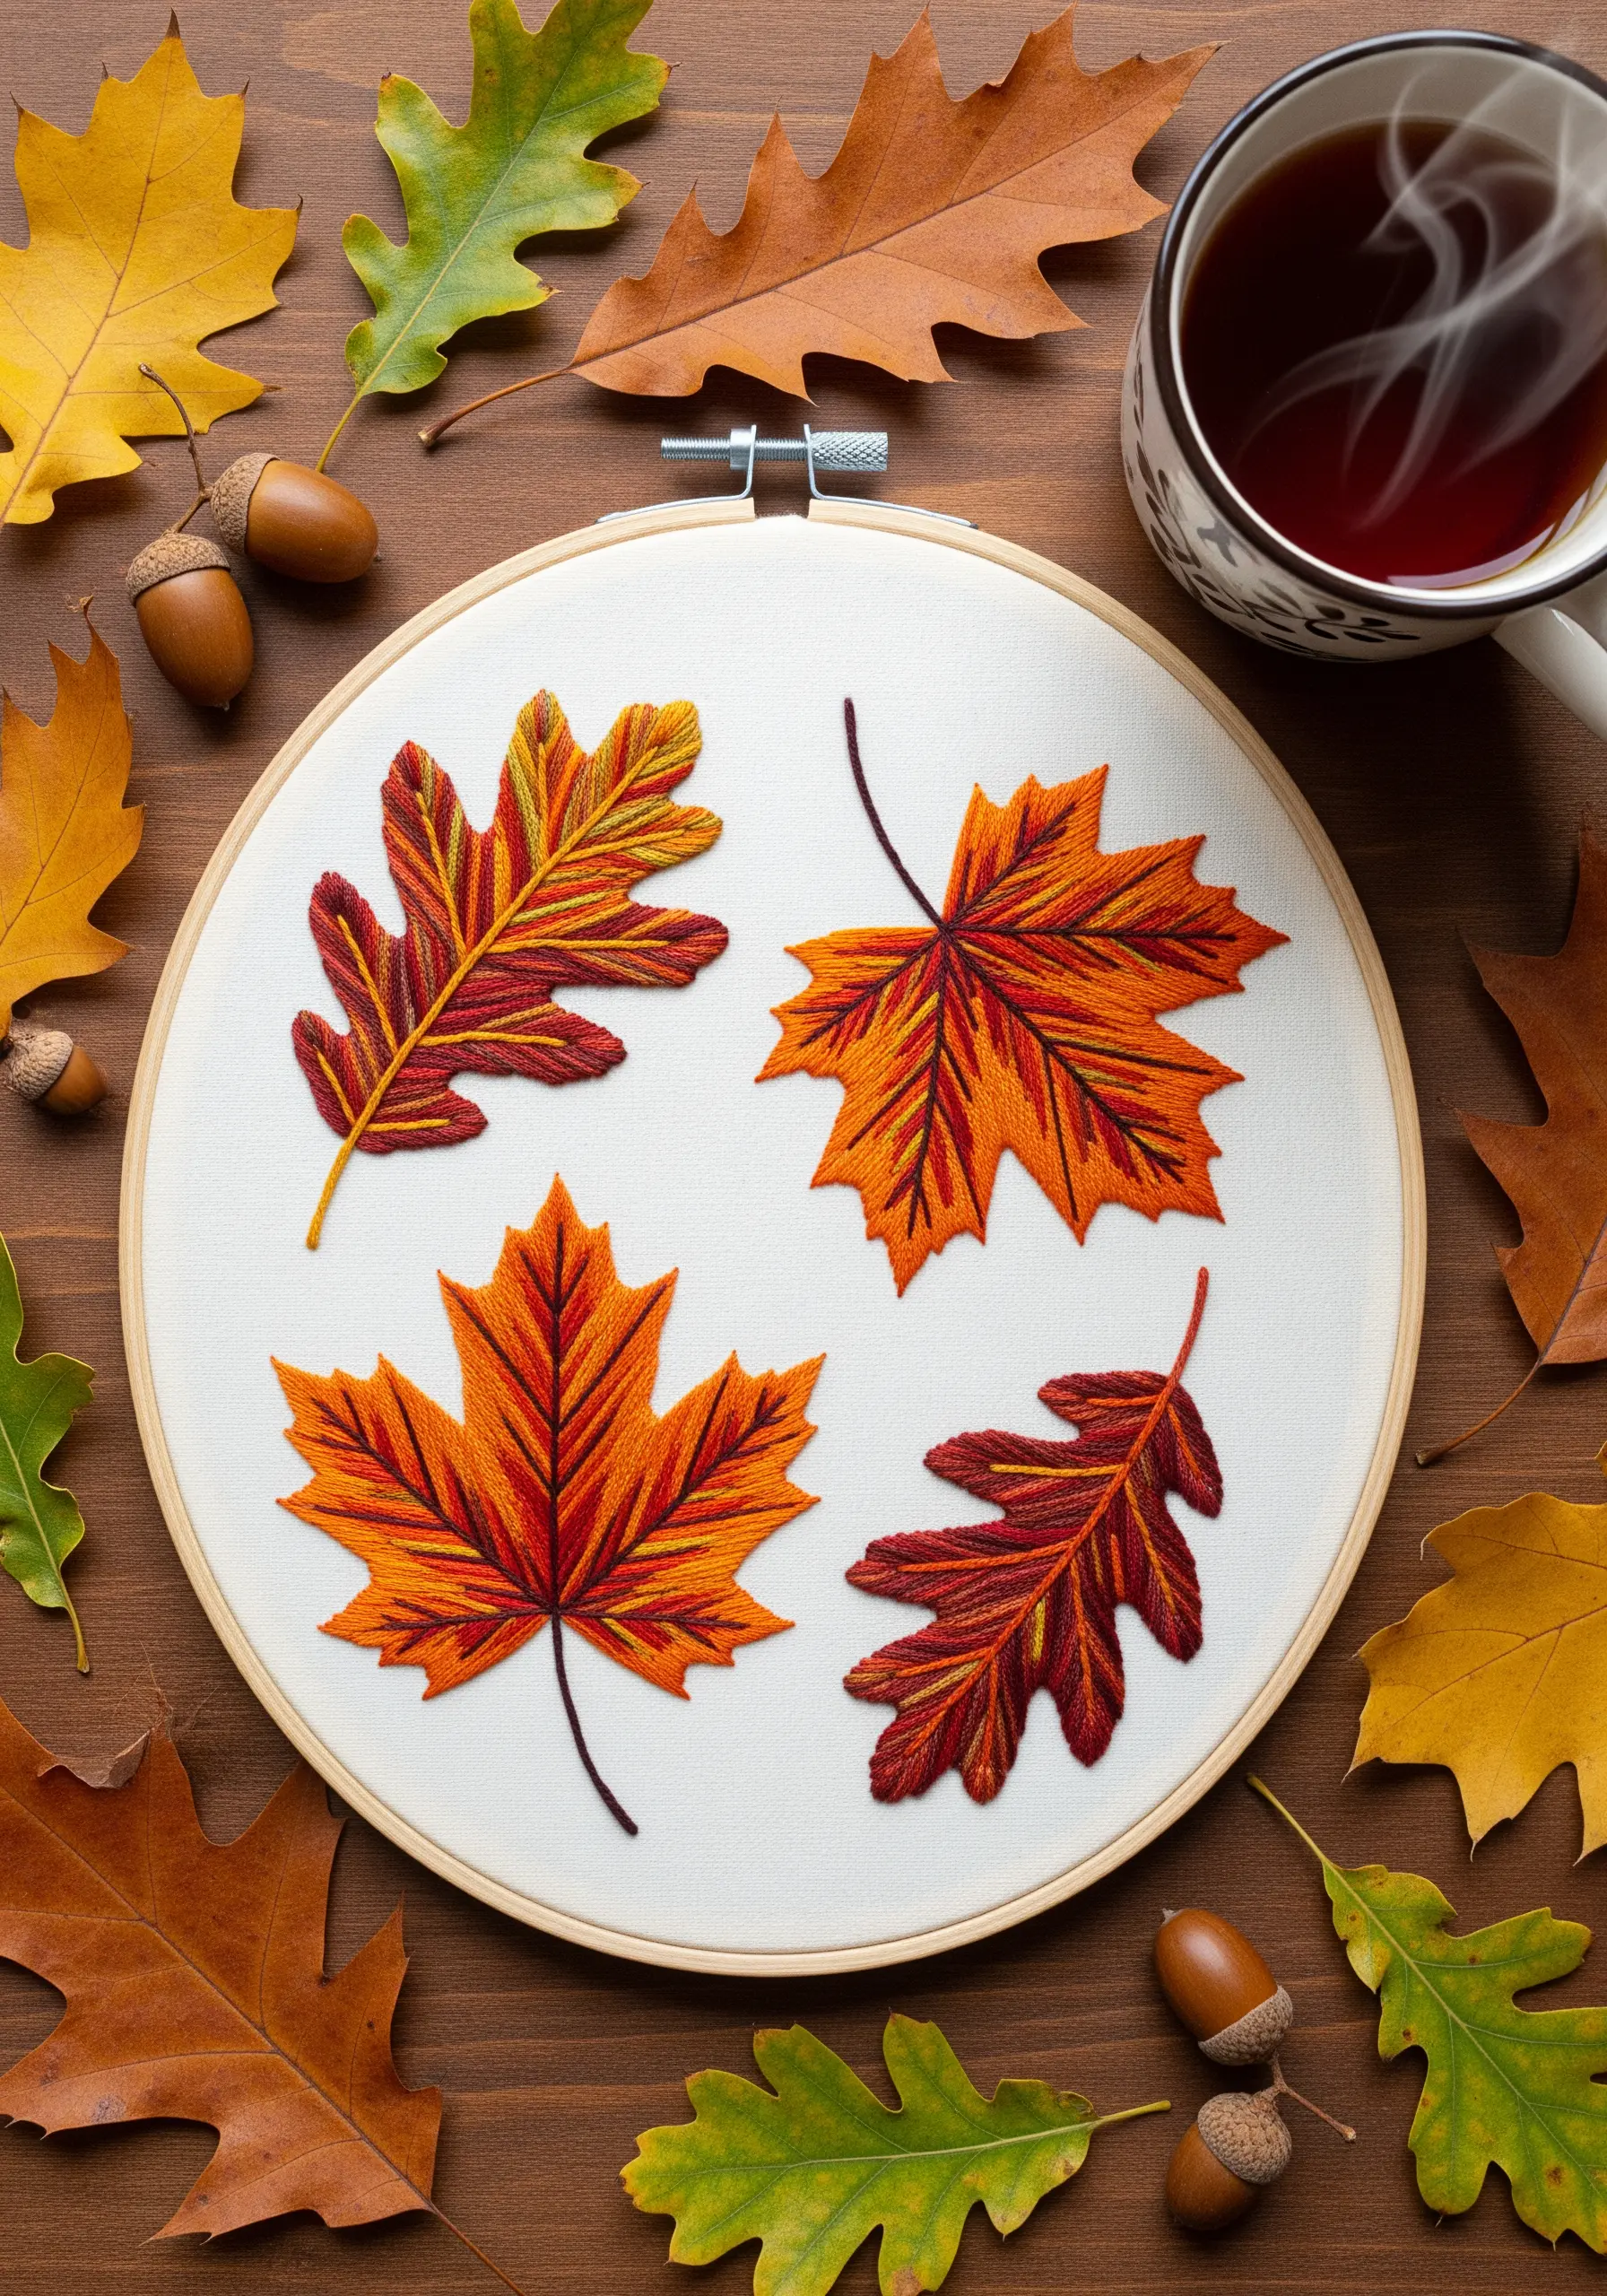
Achieve complex color blending in your autumn leaves with minimal effort by using variegated floss.
Instead of switching colors, let the thread do the work. Use a long-and-short stitch, placing your stitches strategically to control where the colors land.
For a more painterly effect, stitch from the center of the leaf outwards, allowing the thread’s natural color changes to mimic the way pigments spread in a real leaf.
Outline the finished leaf with a sharp split stitch in a dark color to define its edges and make the internal colors pop.
13. Render Fine Detail with Single-Thread Line Work
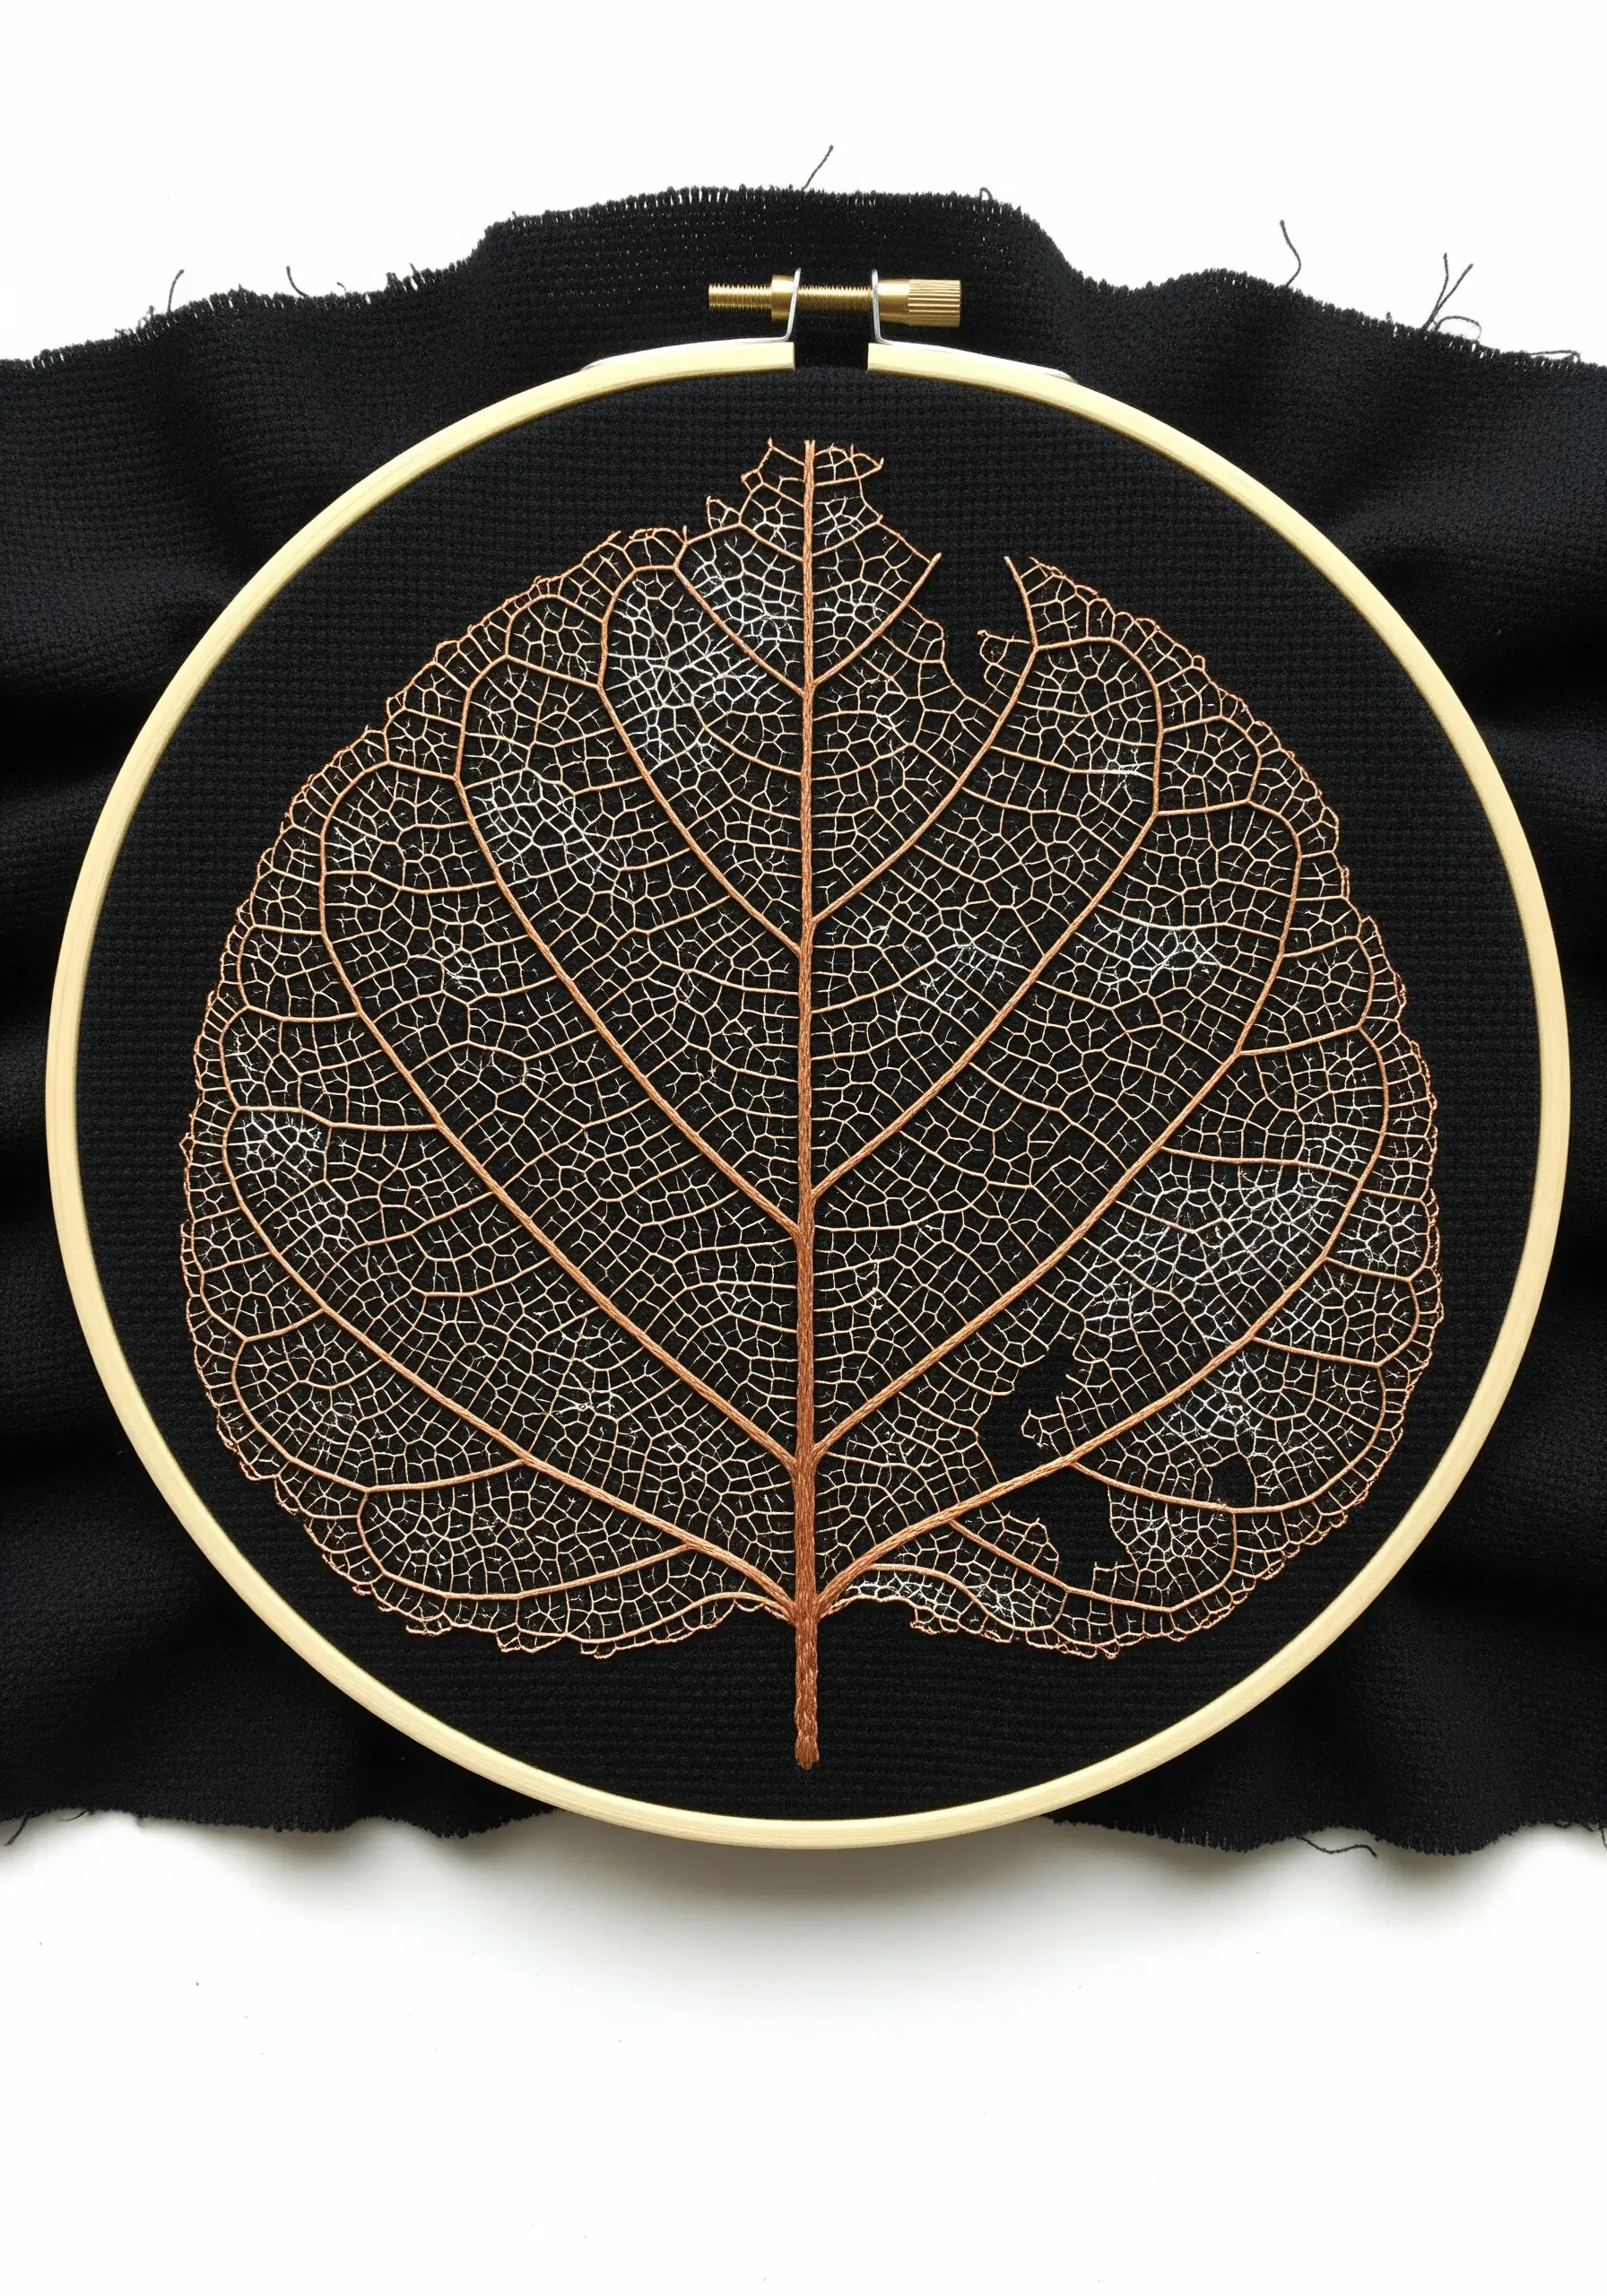
Capture the delicate structure of a skeleton leaf by focusing entirely on precise line work.
Use a single strand of floss on a high-contrast fabric, like this copper thread on black linen, for maximum visibility.
Trace the main veins with a clean backstitch, then use tiny individual straight stitches to create the intricate, web-like cellular structure.
This advanced technique is a true test of patience and precision, resulting in a breathtakingly delicate piece of art.
14. Build a Visual Stitch Dictionary with Leaf Motifs

Instead of practicing new stitches in straight lines, apply them to a simple, repeating leaf shape to build a functional stitch library.
This method helps you understand how different stitches create unique textures and light reflections on an organic form.
You’ll quickly learn whether a chain stitch, satin stitch, or fishbone stitch best achieves the effect you want for your next project.
This exercise transforms practice into a beautiful nature-themed embroidery sampler you’ll be proud to display.
15. Combine Felt Appliqué and Stitching for Soft Dimension
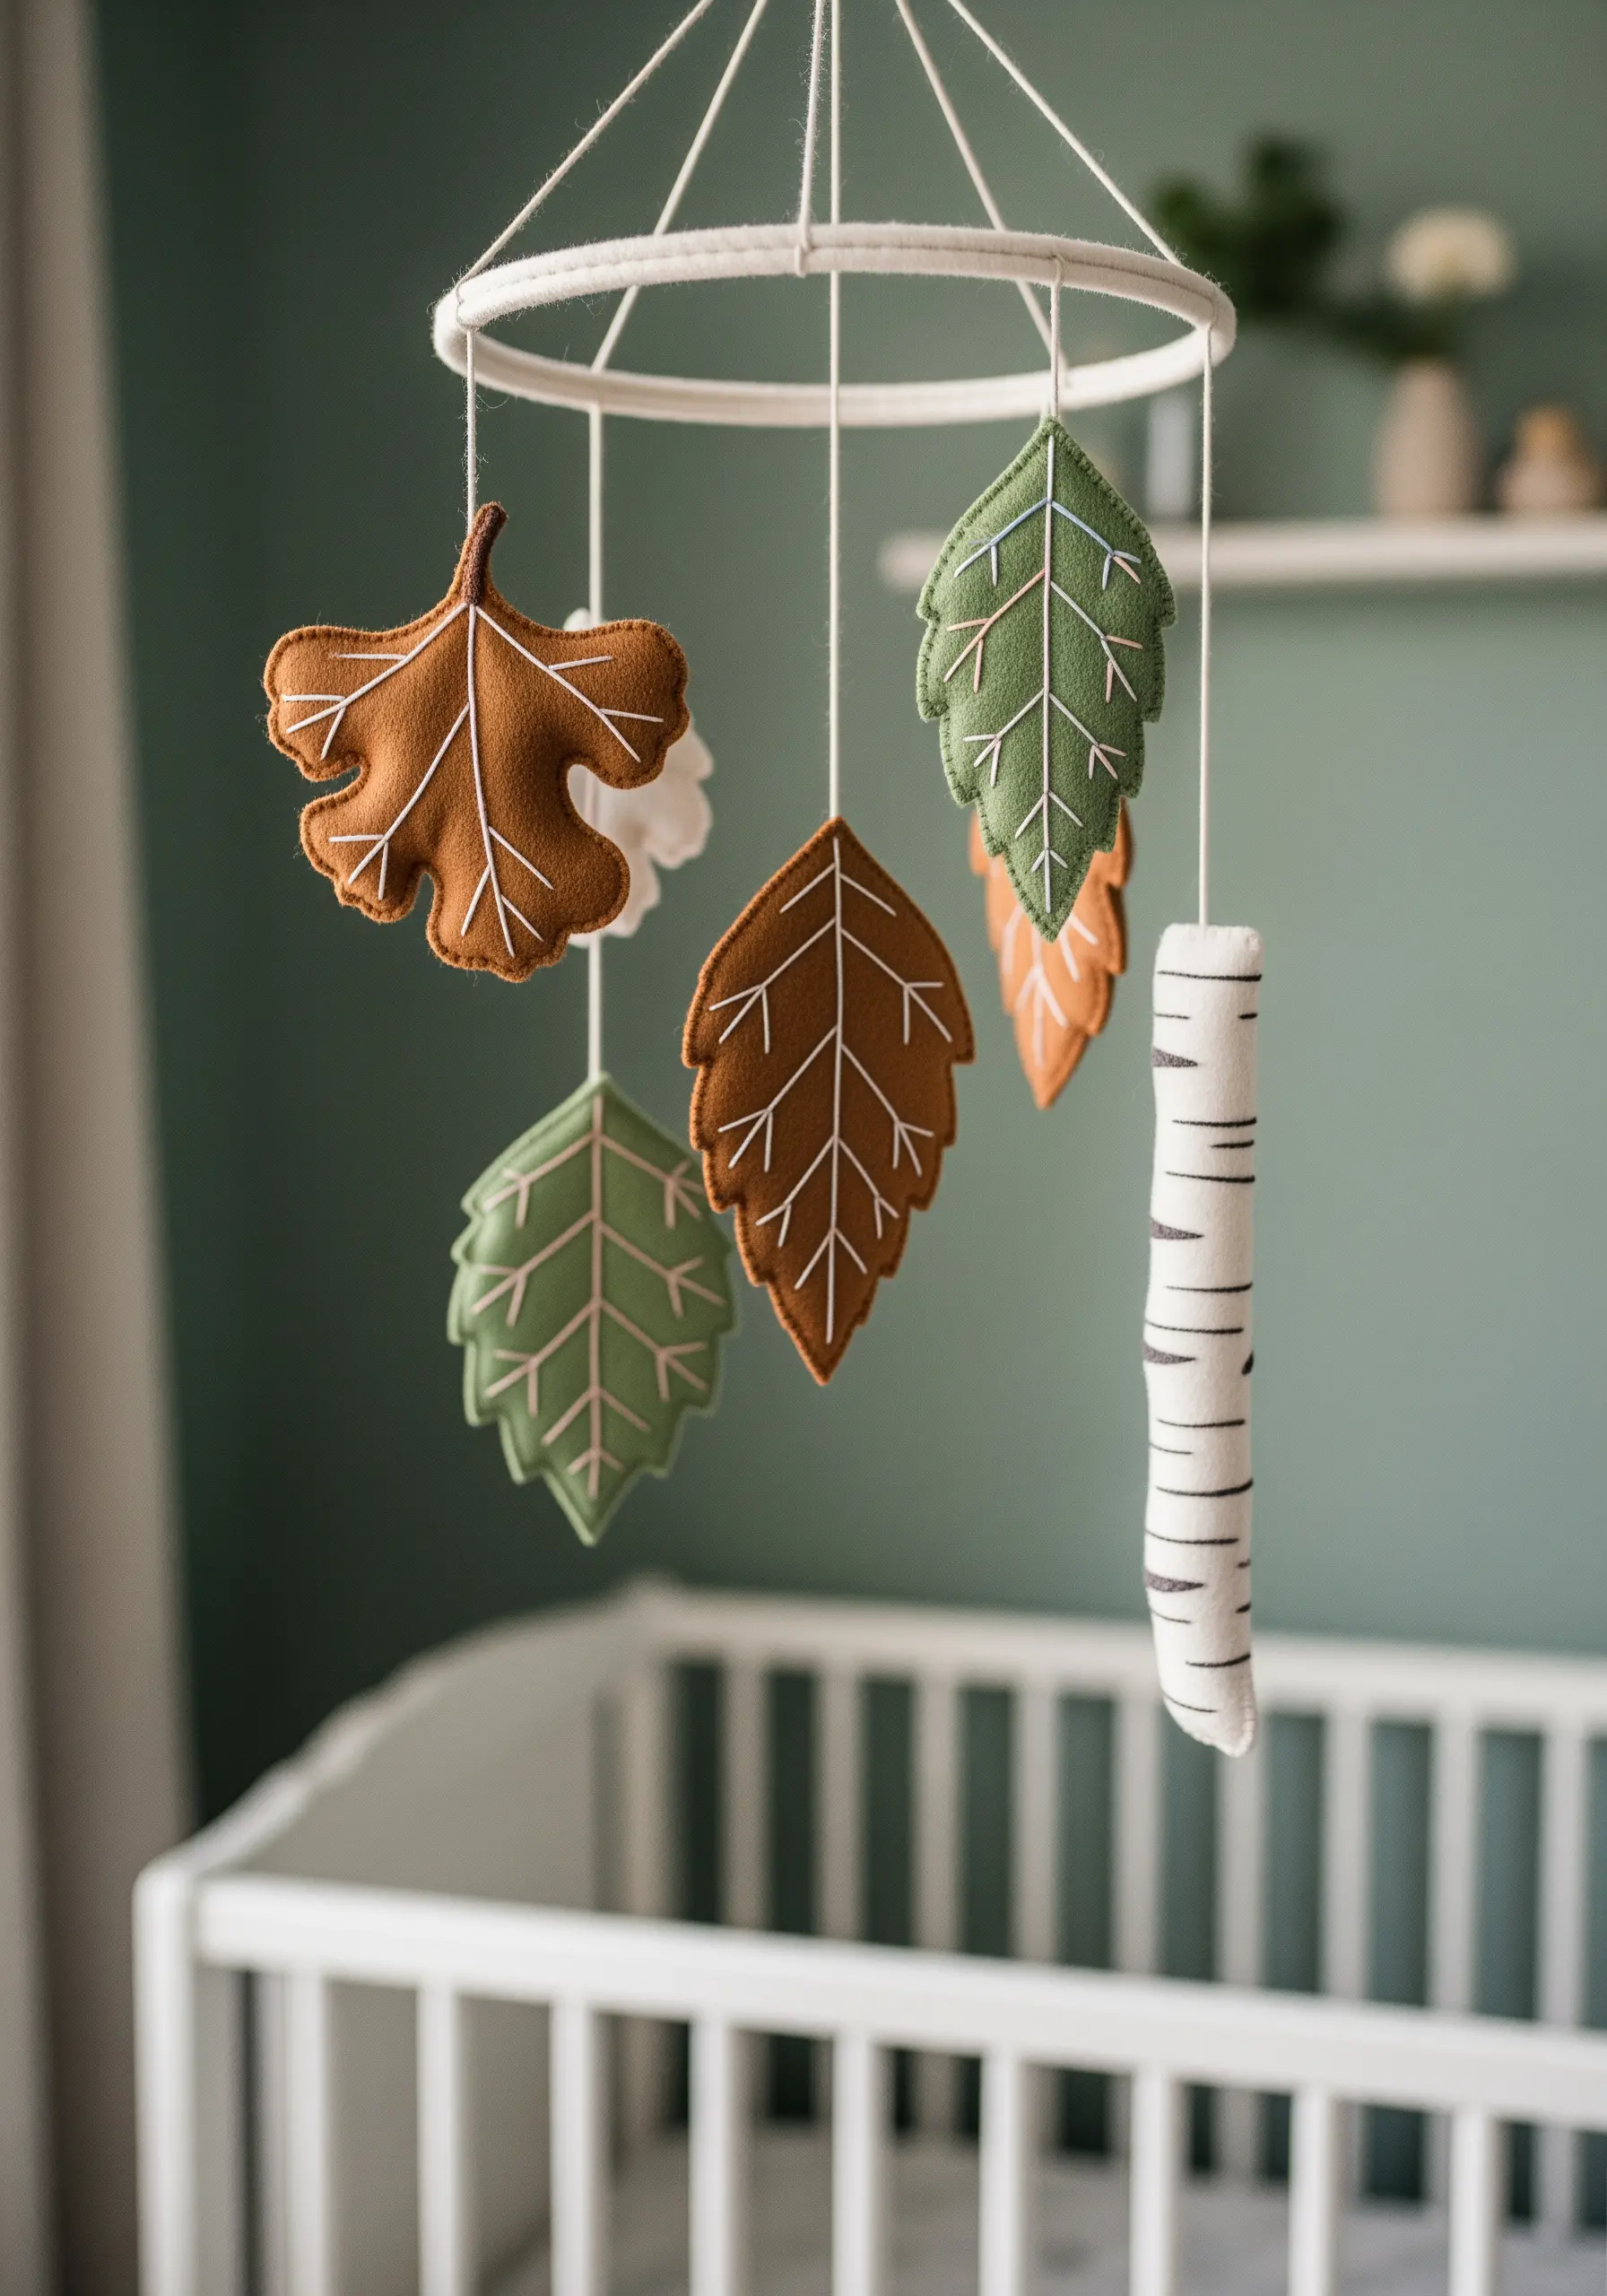
Create soft, dimensional leaves perfect for a nursery mobile by combining felt appliqué with simple embroidery.
Cut your leaf shapes from high-quality felt, then add veins and details using a contrasting thread and a simple backstitch or running stitch.
Lightly stuff the leaves with a bit of poly-fil before stitching the edges closed to give them a gentle, pillowy shape.
This mixed-media technique is playful, tactile, and comes together much faster than a fully embroidered piece.
16. Translate Botanical Illustrations into Thread

Use a detailed botanical drawing as your guide to practice precision and complex shaping.
For the tightly coiled fiddlehead ferns, use concentric circles of split stitch or tiny French knots to build up the dense, circular pattern.
Follow the illustration’s shading with your stitch direction, using directional satin stitch to create highlights and shadows that mimic the artist’s pen strokes.
This thoughtful study bridges the gap between drawing and stitching, elevating your ability to interpret form.
17. Adapt Your Stitches for Coarse Fabrics
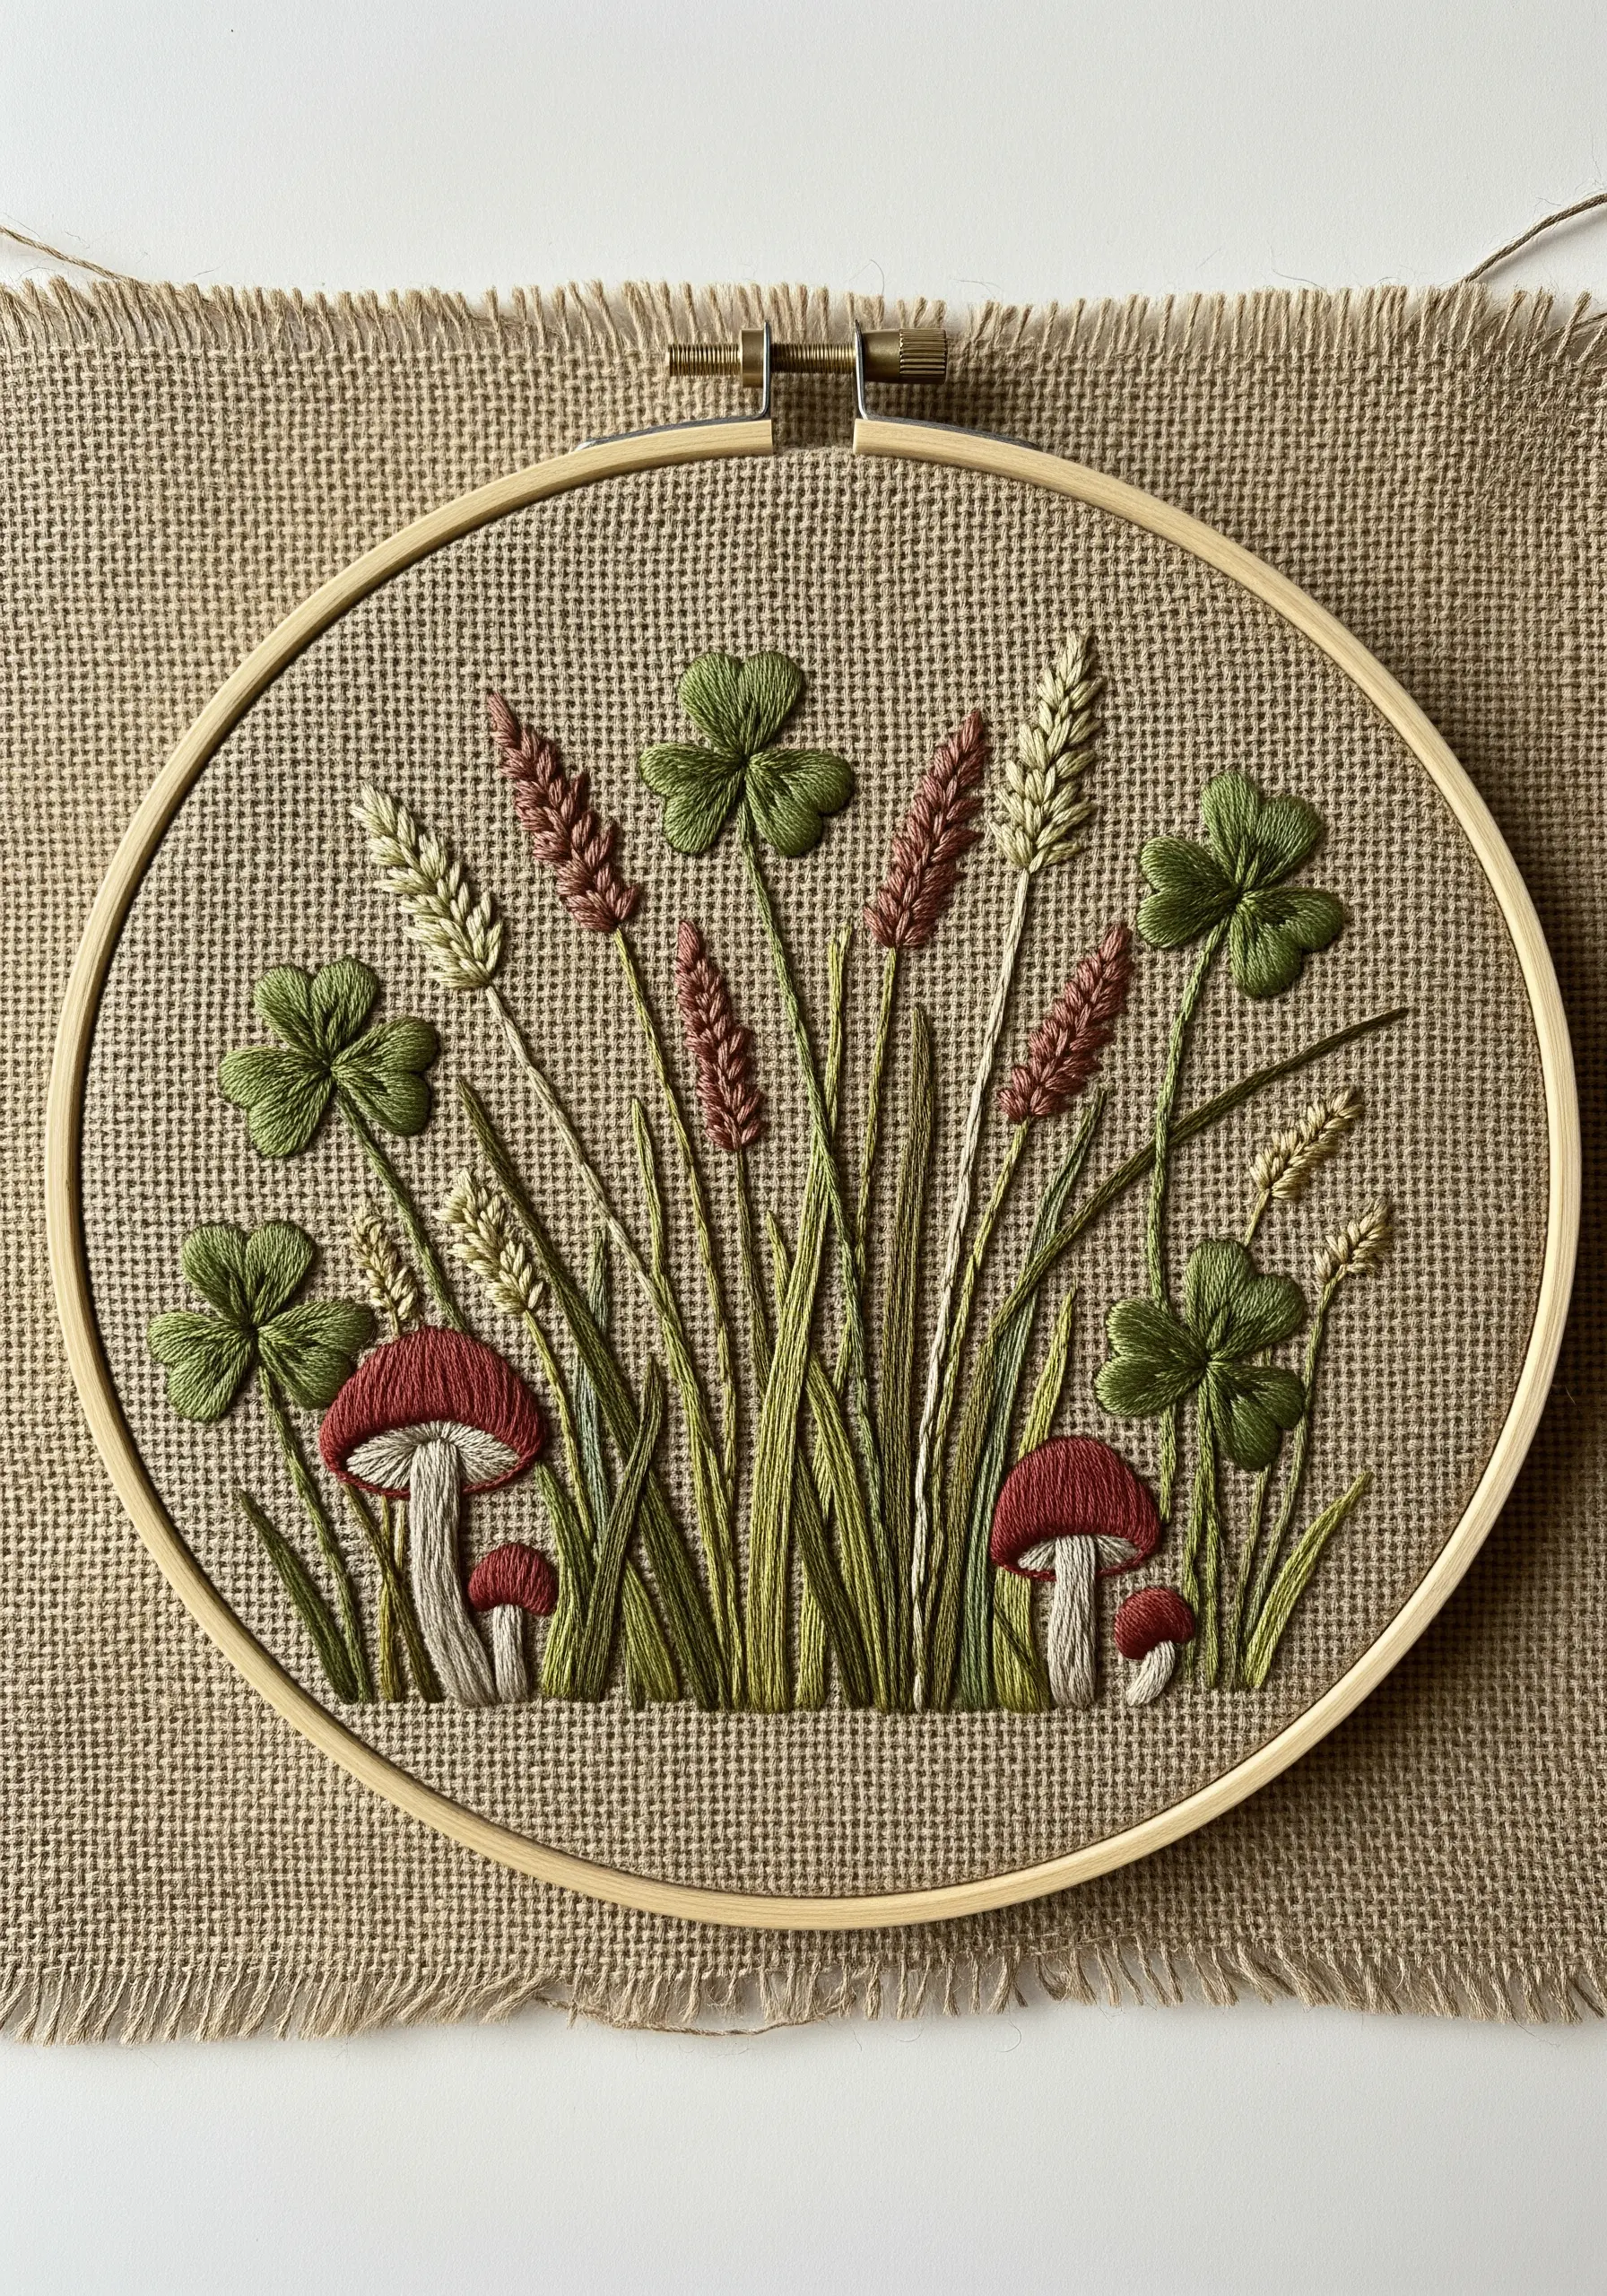
Embrace the rustic charm of fabrics like burlap by choosing stitches and threads that complement its open weave.
Use thicker threads, like pearl cotton or all six strands of embroidery floss, to ensure your stitches don’t get lost in the fabric’s texture.
Simple, bold stitches like lazy daisy for the clover, wheat stitch for the grasses, and satin stitch for the mushroom caps work beautifully here.
The texture of the fabric becomes an integral part of the design, adding to the overall earthy, pastoral feel.
18. Embellish Apparel with Symmetrical Foliage Designs
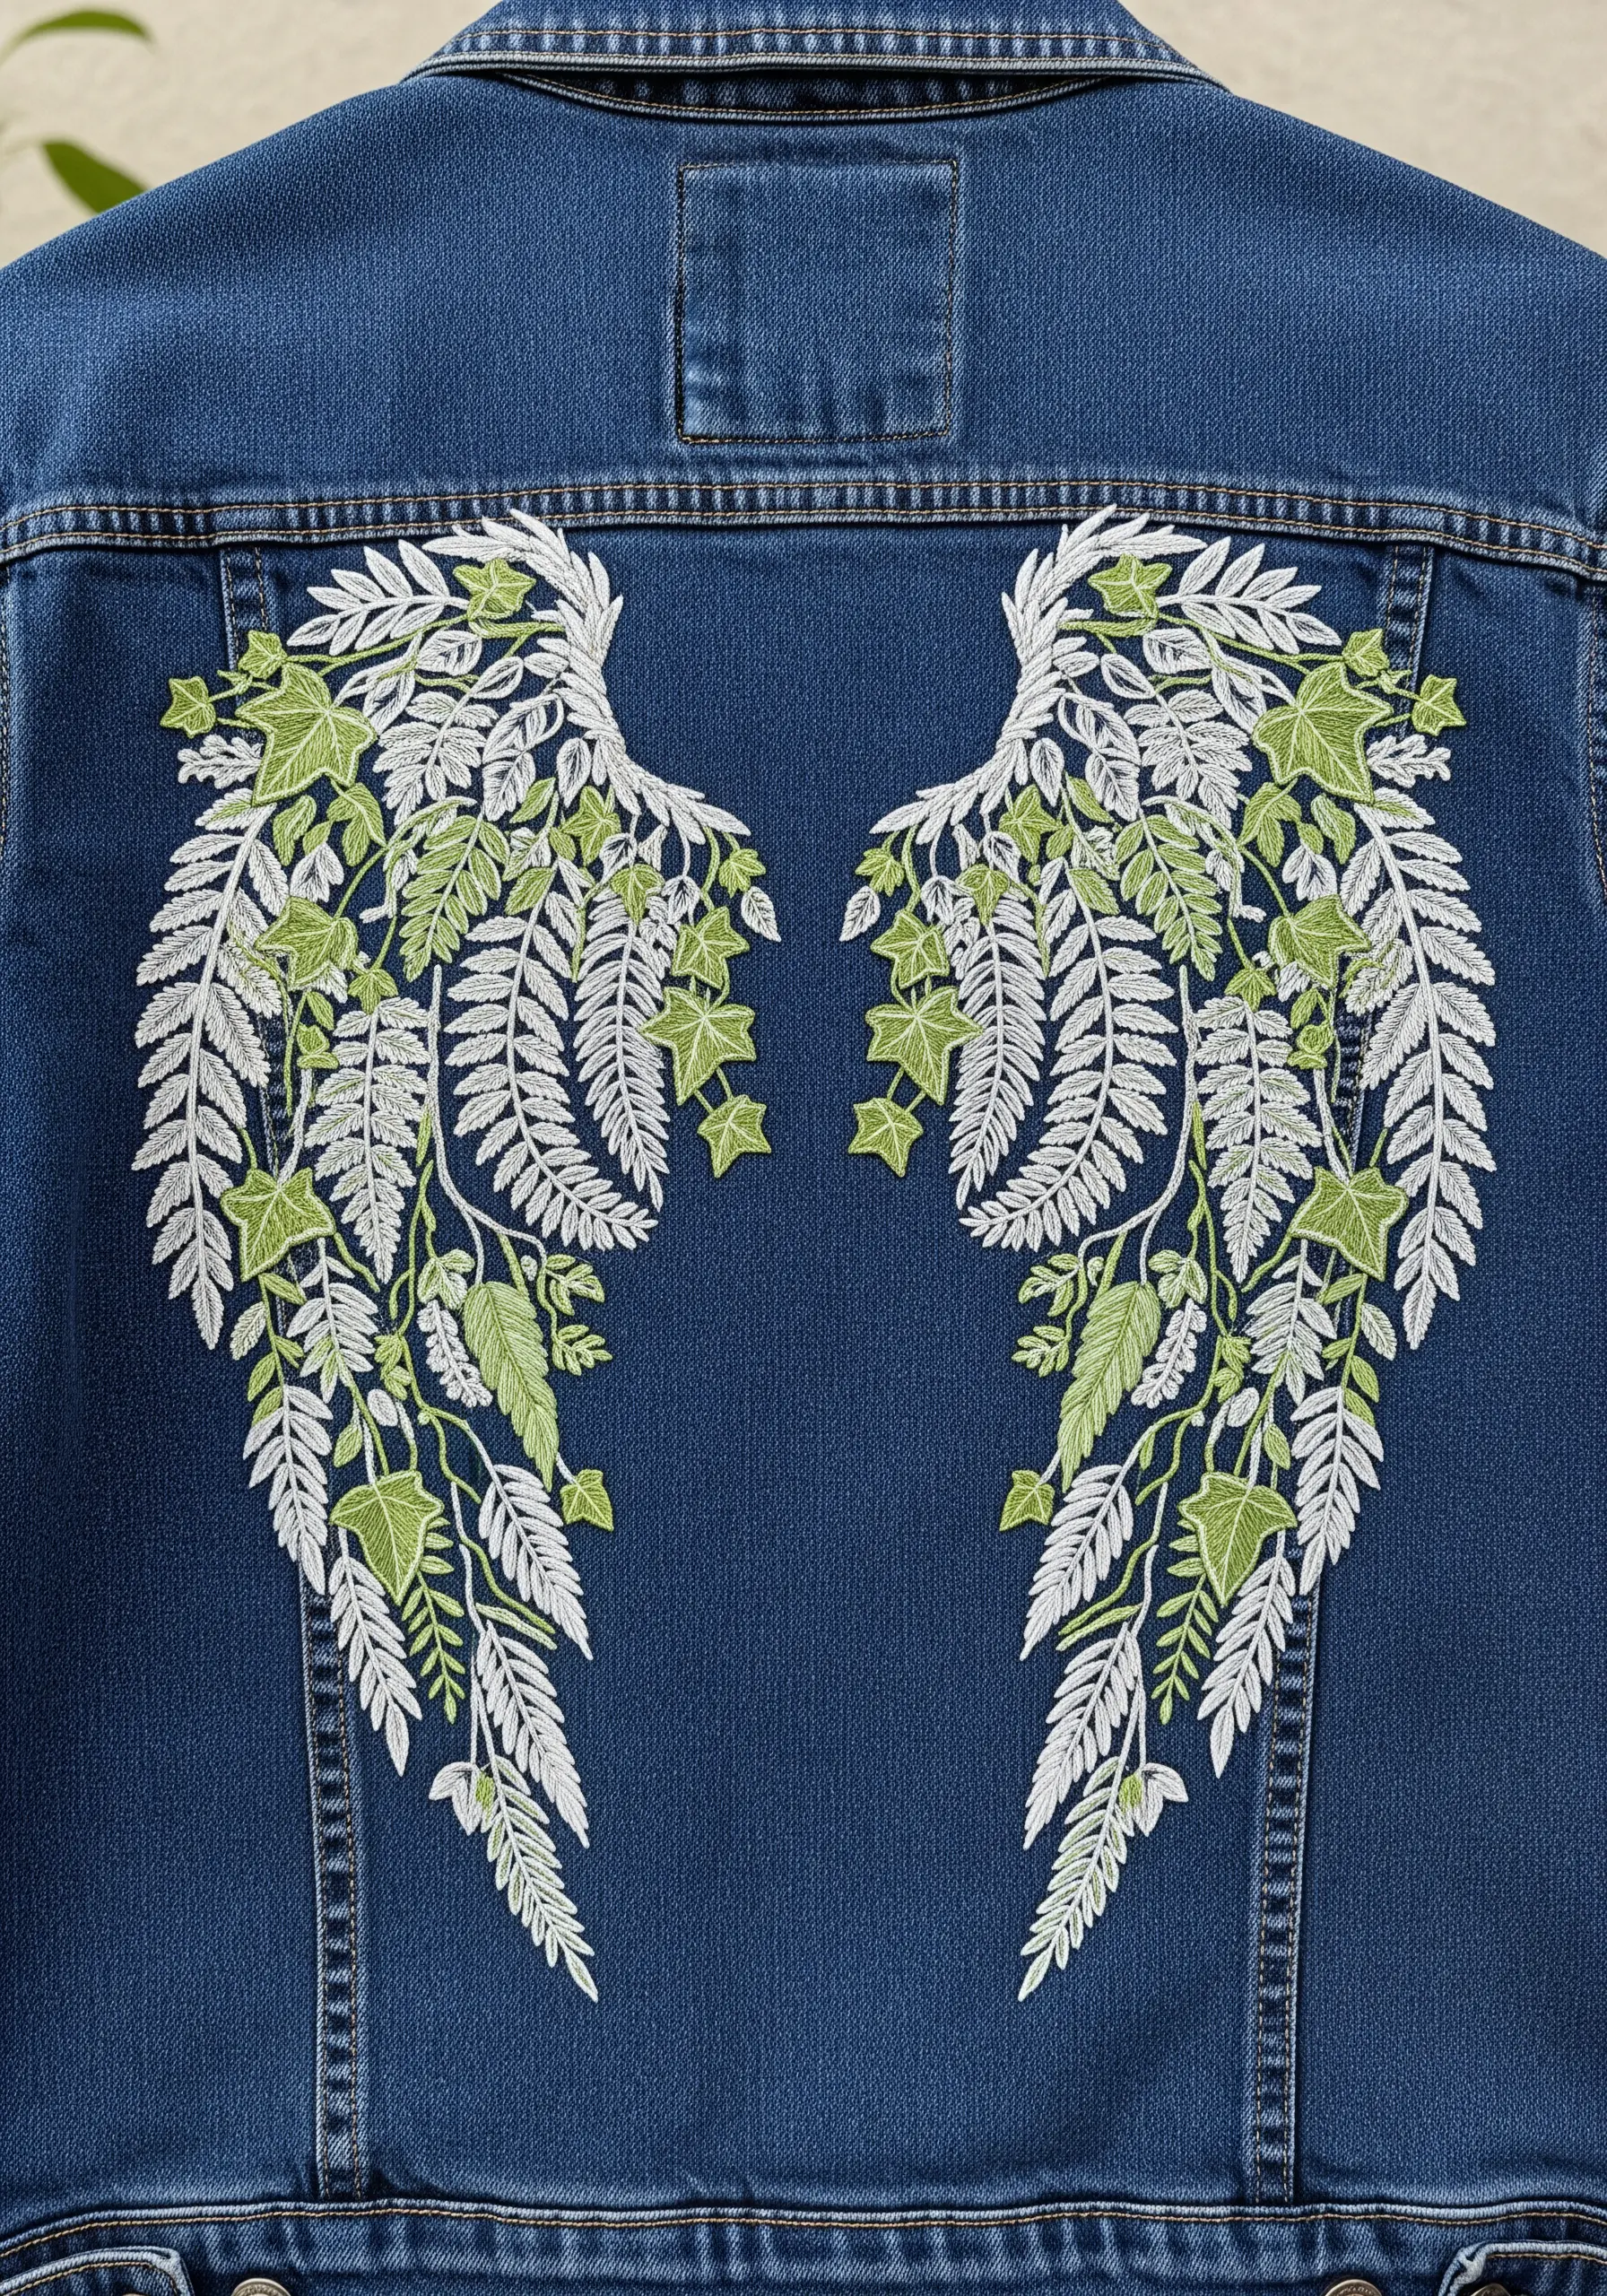
Transform a plain denim jacket into a statement piece with a large-scale, symmetrical foliage design.
To ensure your embroidery is durable, always use a medium-weight cut-away stabilizer on the inside of the garment. This prevents the fabric from puckering and protects the stitches during washing.
Create a dynamic look by layering different types of foliage, like the fine fronds of a fern and the bold shapes of ivy leaves.
The high contrast between the white and green threads and the dark denim makes the design visible and impactful from a distance.
19. Add Elegance to Linens with Tonal Thread Painting

Elevate simple table linens with a touch of sophisticated embroidery, like these ginkgo leaves.
Use long-and-short stitch with two or three closely related shades to create a subtle, elegant gradient. This technique, also known as thread painting, gives the leaves a soft, realistic sheen.
When embroidering functional items that will be laundered, be sure to secure your thread tails meticulously by weaving them under the back of your stitches.
This small detail adds a touch of bespoke luxury to everyday objects.
20. Create Realistic Textures with Mixed Appliqué

Combine different materials and techniques in a single piece to capture the varied textures of an herb garden.
For the soft, fuzzy sage, cut leaf shapes from a gray-green felt or velvet fabric and appliqué them onto your base fabric.
Contrast this soft texture with finely stitched rosemary and thyme using simple straight stitches and detached chain stitches.
This mixed-media crafts approach creates a design that is visually and texturally engaging, inviting a closer look.
21. Introduce Glamour with Metallic and Satin Threads
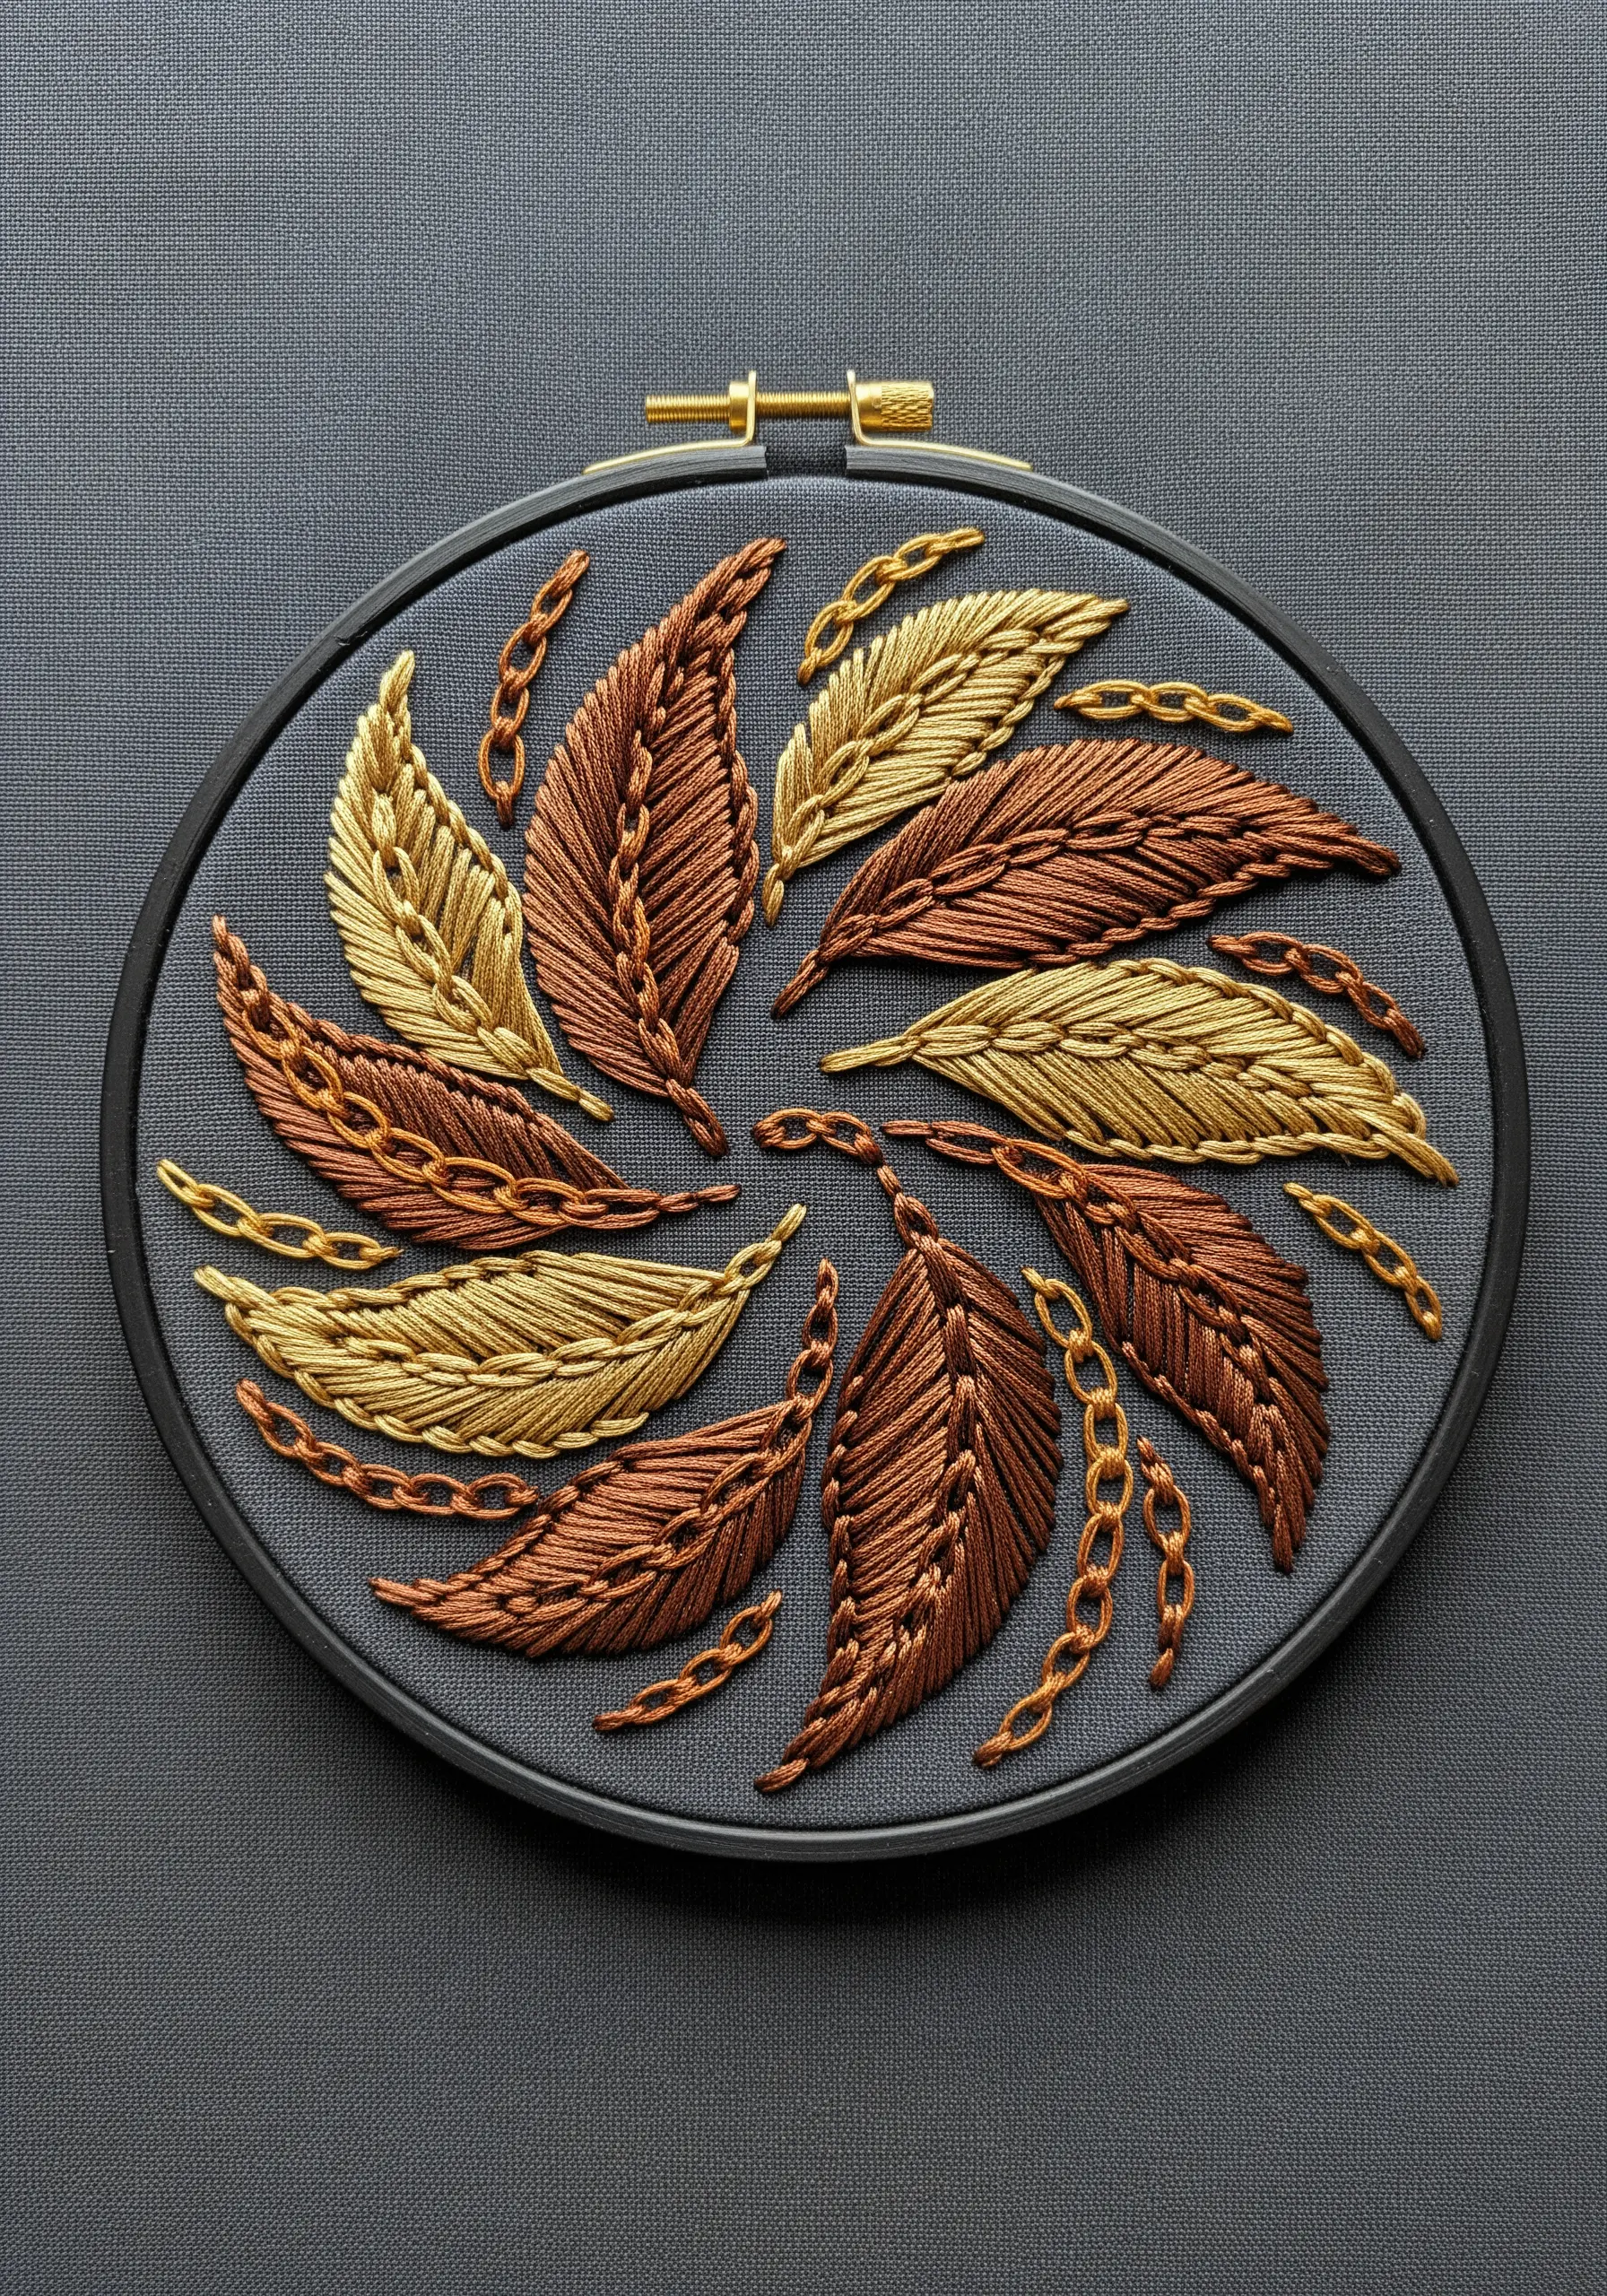
Create a dynamic, light-catching composition by pairing lustrous satin floss with shimmering metallic thread.
Use satin stitch for the body of the leaves to create a smooth, reflective surface that highlights the sheen of the thread.
To combat the notorious difficulty of metallic thread, use a thread conditioner or beeswax and work with shorter lengths to prevent fraying and tangling.
The addition of the chain stitch, rendered in metallic floss, introduces a contrasting texture and a touch of industrial elegance to the organic leaf shapes.
22. Finish Your Work with a Professional Satin-Stitch Border
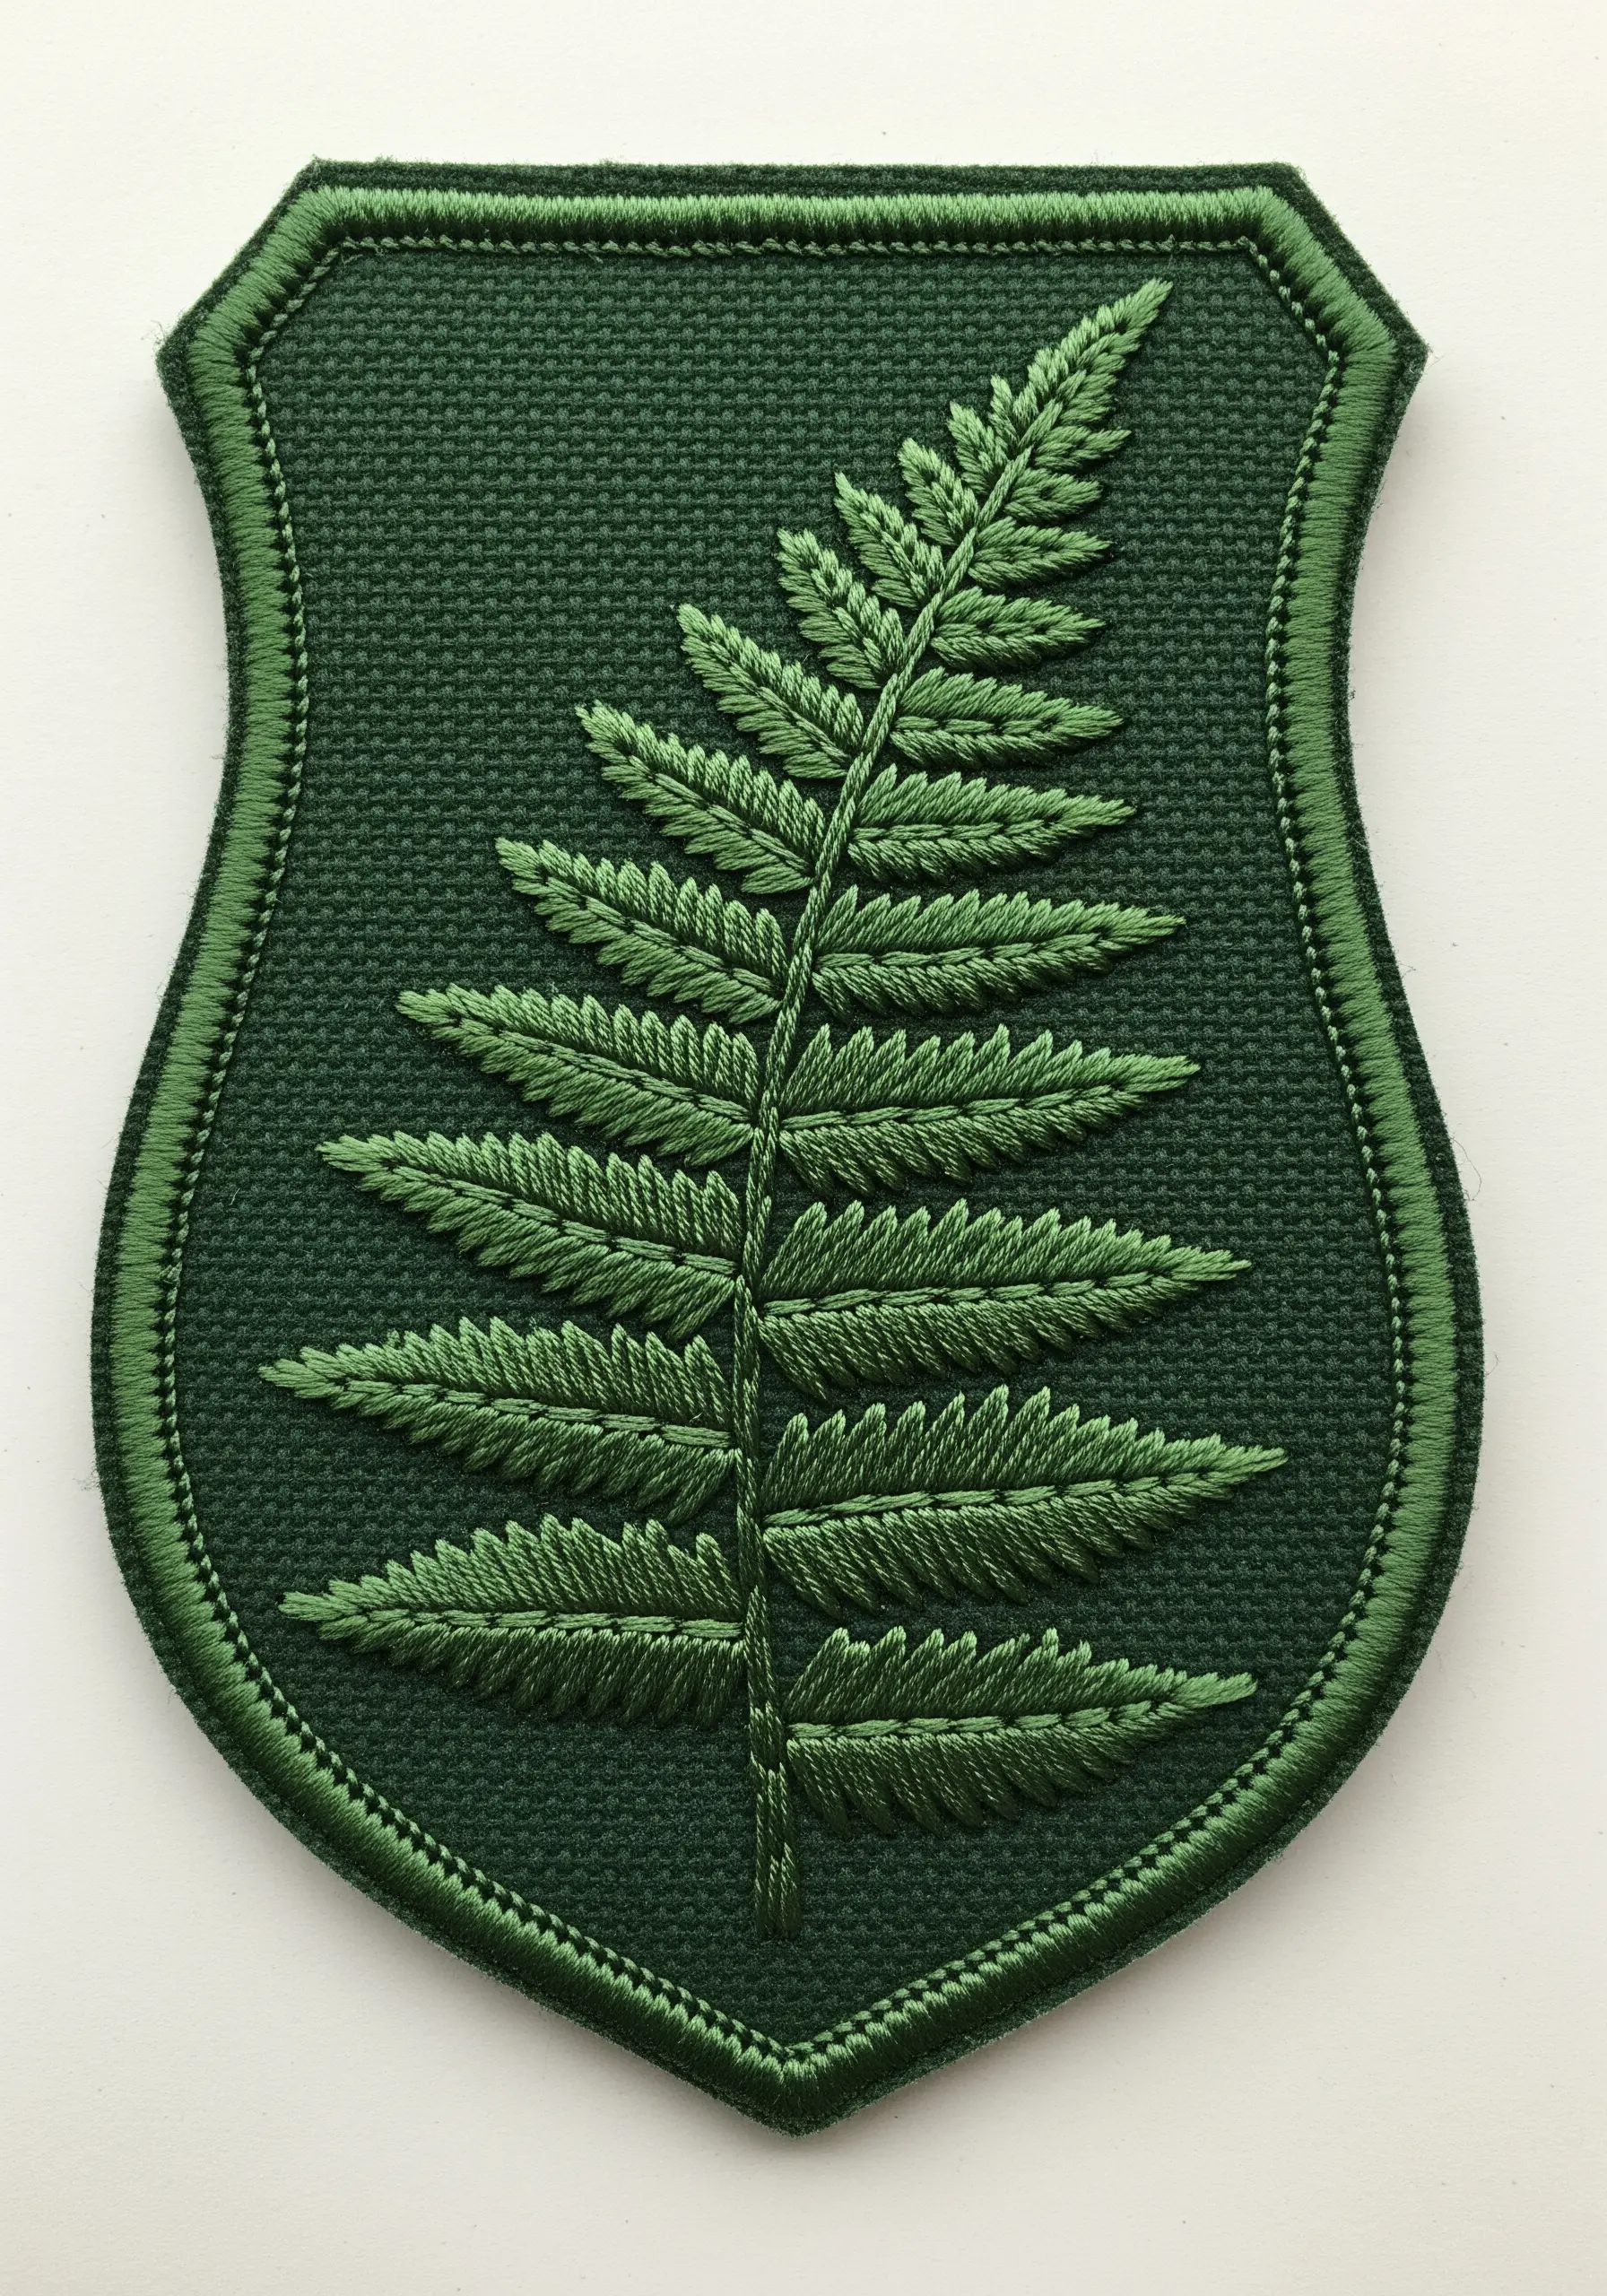
Turn a simple foliage motif into a clean, professional-looking patch with a dense satin stitch border.
First, outline the shield shape with a split stitch or backstitch. This raised line will act as a guide and give your satin stitches a clean, padded edge to wrap around.
Keep your satin stitches extremely close together, ensuring they are all perpendicular to the outline for a smooth, uniform finish.
This technique gives your work a durable and polished edge, perfect for applying to bags, jackets, or banners.
23. Capture Graceful Movement with Hanging Stitches
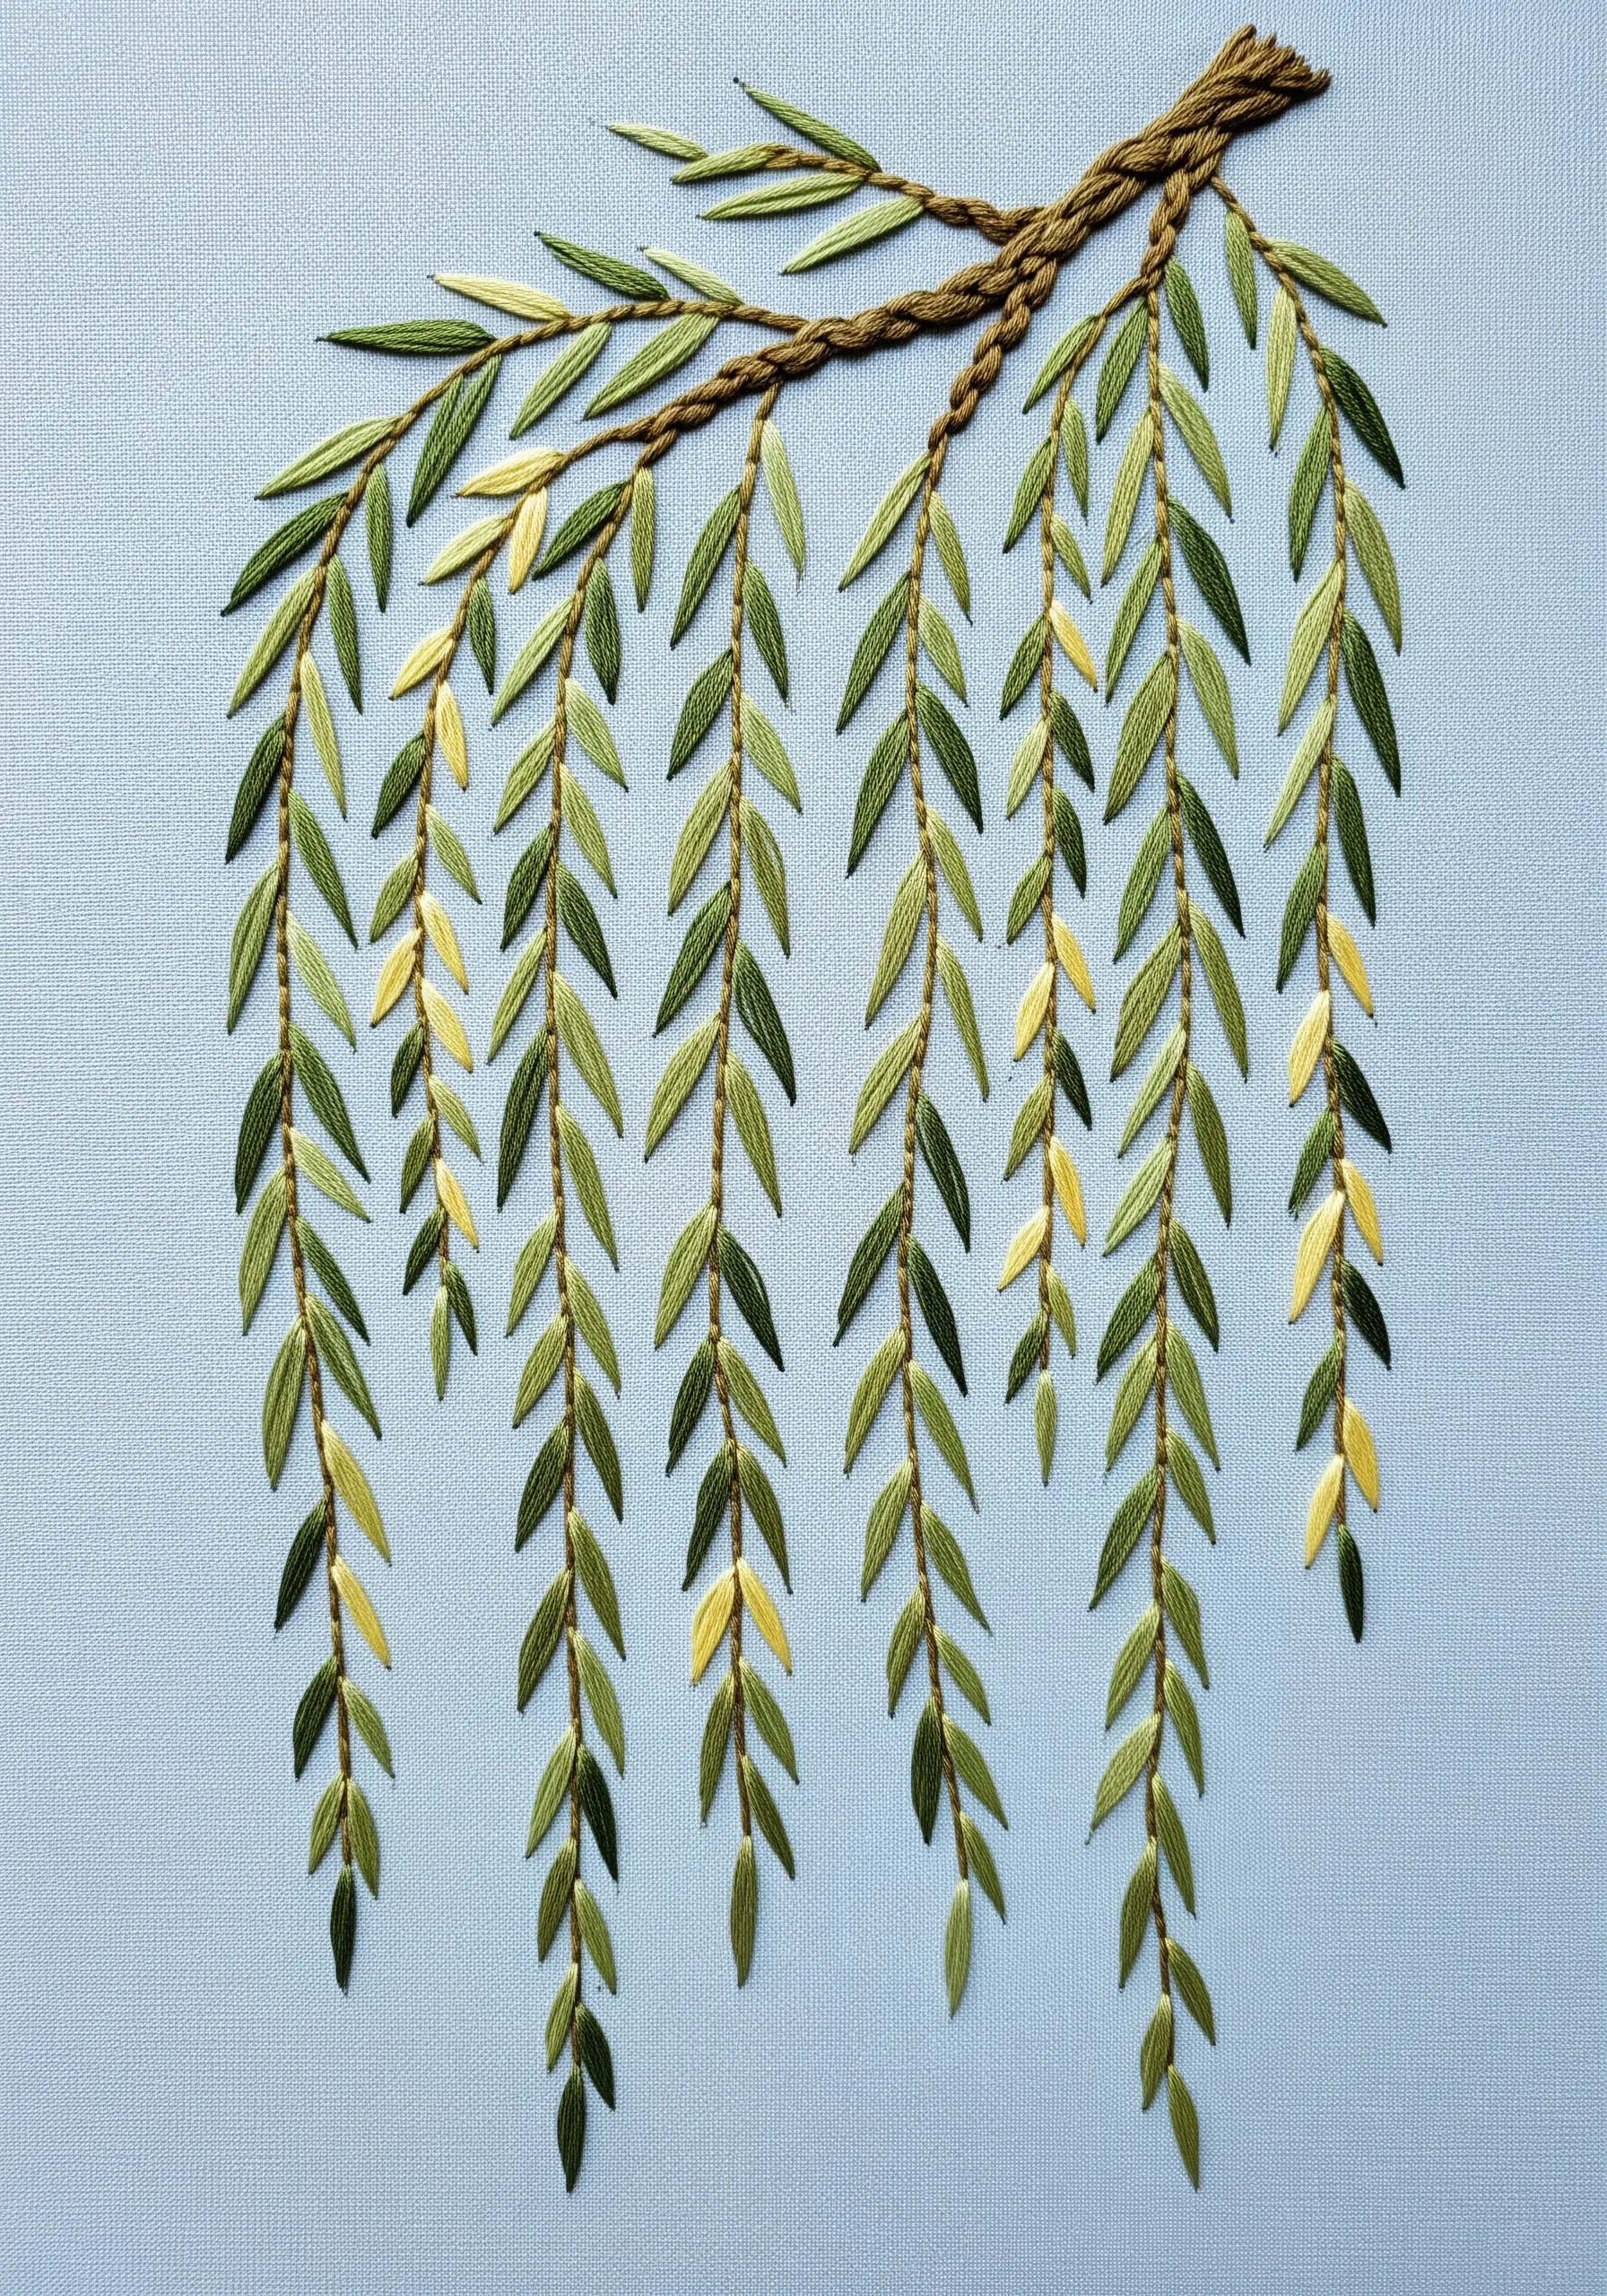
Evoke the gentle drape of a weeping willow by focusing on long, flowing stitches.
Use a twisted chain stitch for the main branch to give it a woody, rope-like texture.
For the delicate hanging leaves, use single, detached chain stitches or long, thin straight stitches, varying their length and shades of green to create a sense of natural, layered movement.
The beauty of this design lies in its simplicity and elegant vertical lines, which guide the eye downward.
24. Create a Tree of Life with Intricate Root and Branch Work
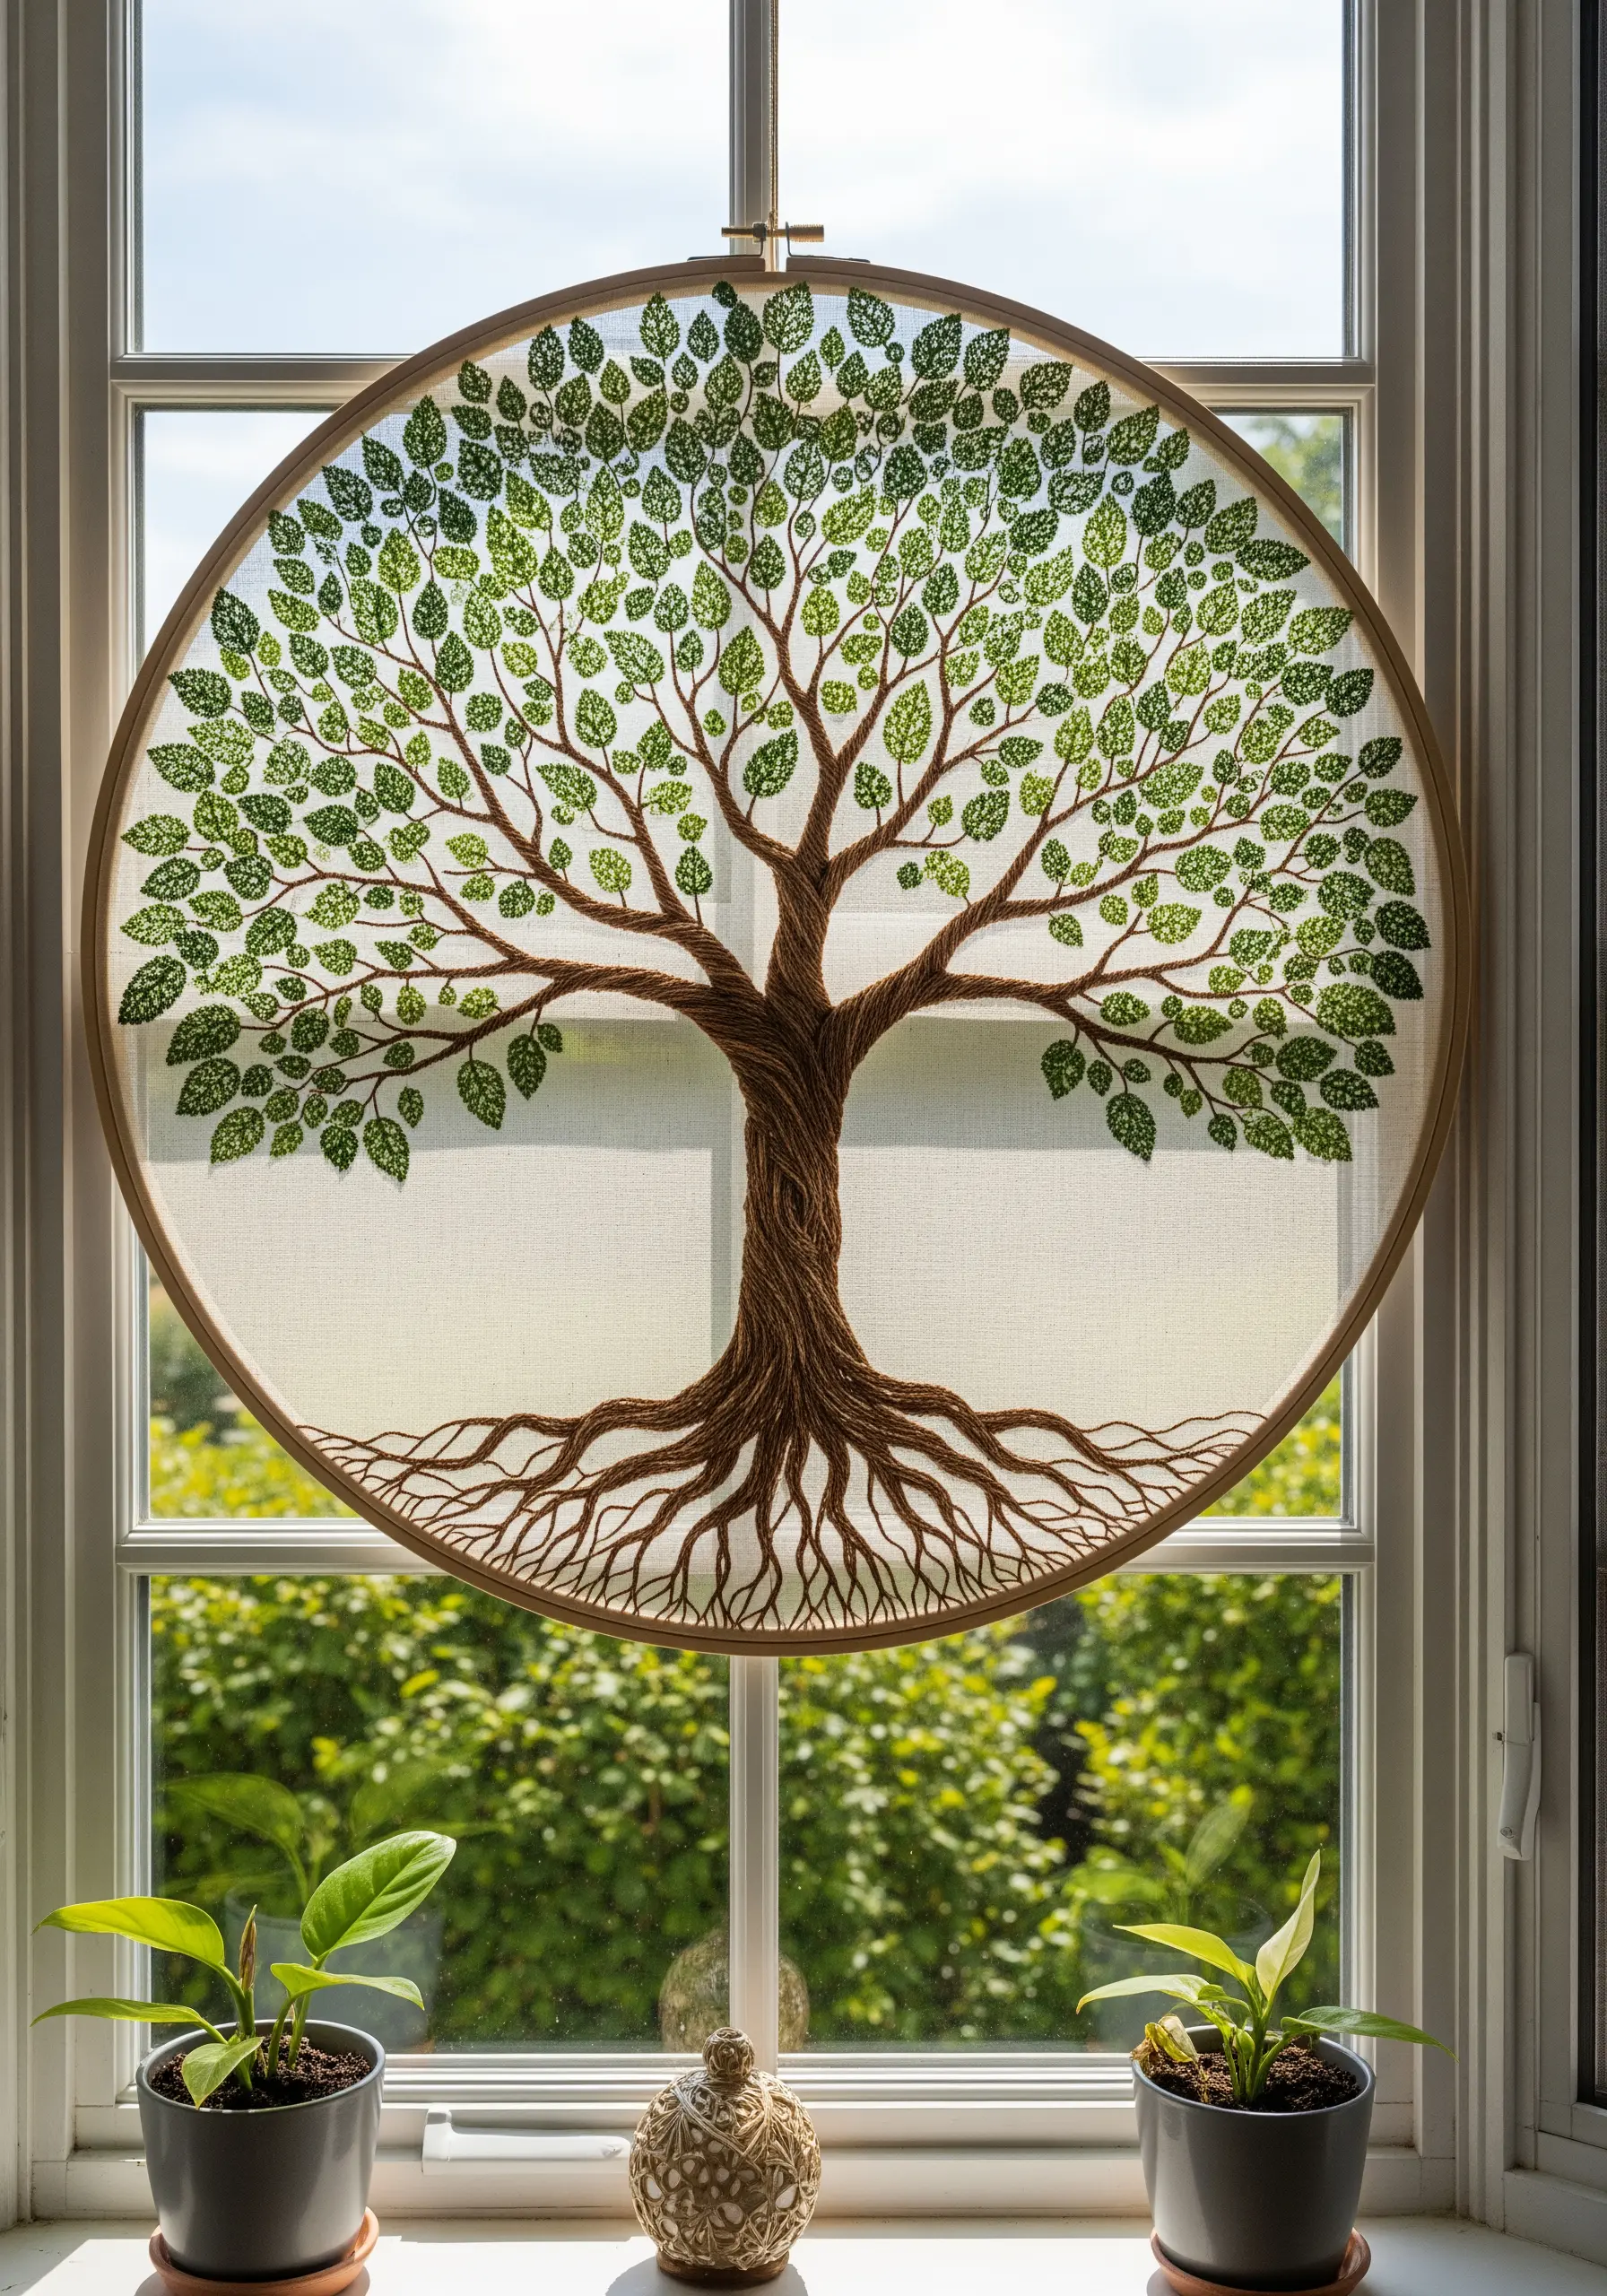
For a complex and meaningful project, tackle a “Tree of Life” on a sheer or semi-sheer fabric to let the light shine through.
Build up the trunk’s texture by twisting multiple shades of brown thread together or by using a heavily padded satin stitch.
Use a meticulous whipped backstitch or stem stitch for the intricate network of roots and branches to ensure they are smooth, continuous, and well-defined.
Stitching the tiny leaves with a simple seed stitch creates a dappled canopy that looks magnificent when hung in a window.


