

Before you even thread your needle, go outside and pick up a leaf. Hold it in your hand. Notice the perfect, unthinking design of its veins, the subtle shift of color from stem to tip, the texture of its edge. This is the feeling we are chasing with embroidery—not just the image of a leaf, but its essence.
Using a real leaf as your template grounds your creativity in tangible truth. It’s a direct connection to the natural world that guides your hand and your color choices. You’re no longer just stitching a shape; you’re translating a piece of living architecture into thread.
This isn’t about achieving flawless realism. It’s about learning to see—to recognize how a central vein acts as an anchor, how light creates planes of color, and how imperfection is the most beautiful detail of all. Let the leaf teach you, and you will find your stitches becoming more intentional, more expressive, and more alive than ever before.
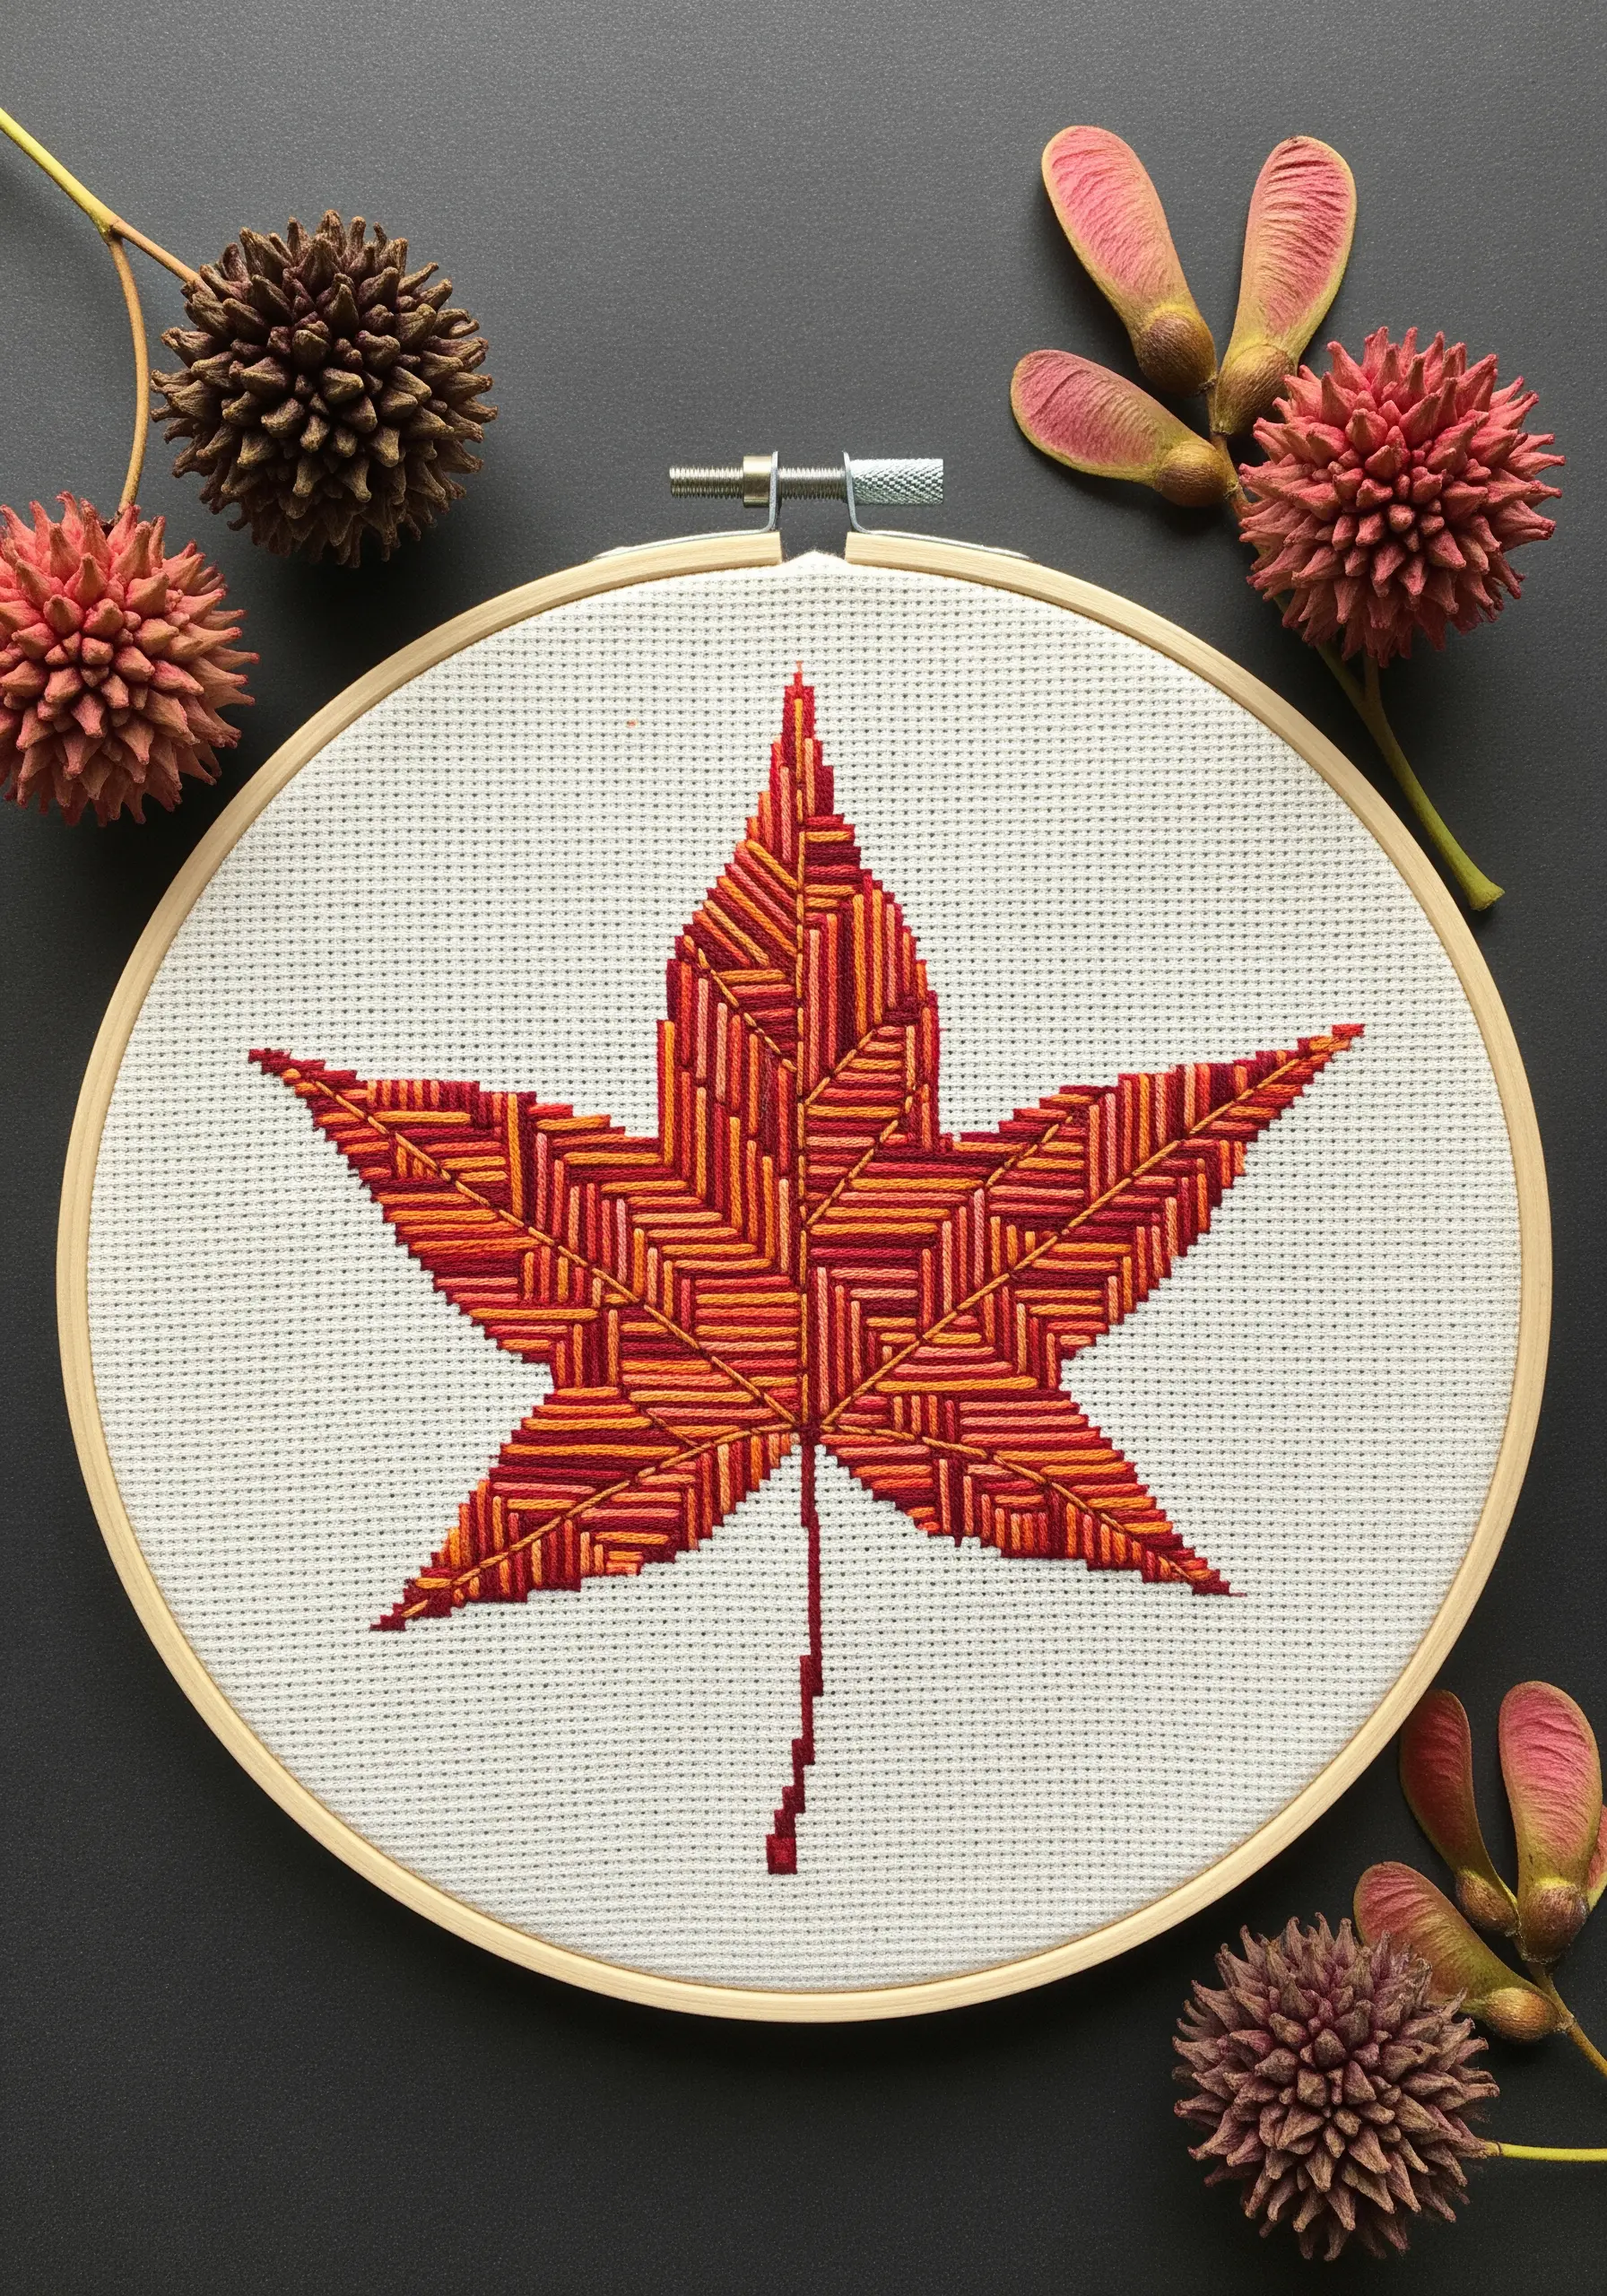
1. The Gradated Autumn Leaf
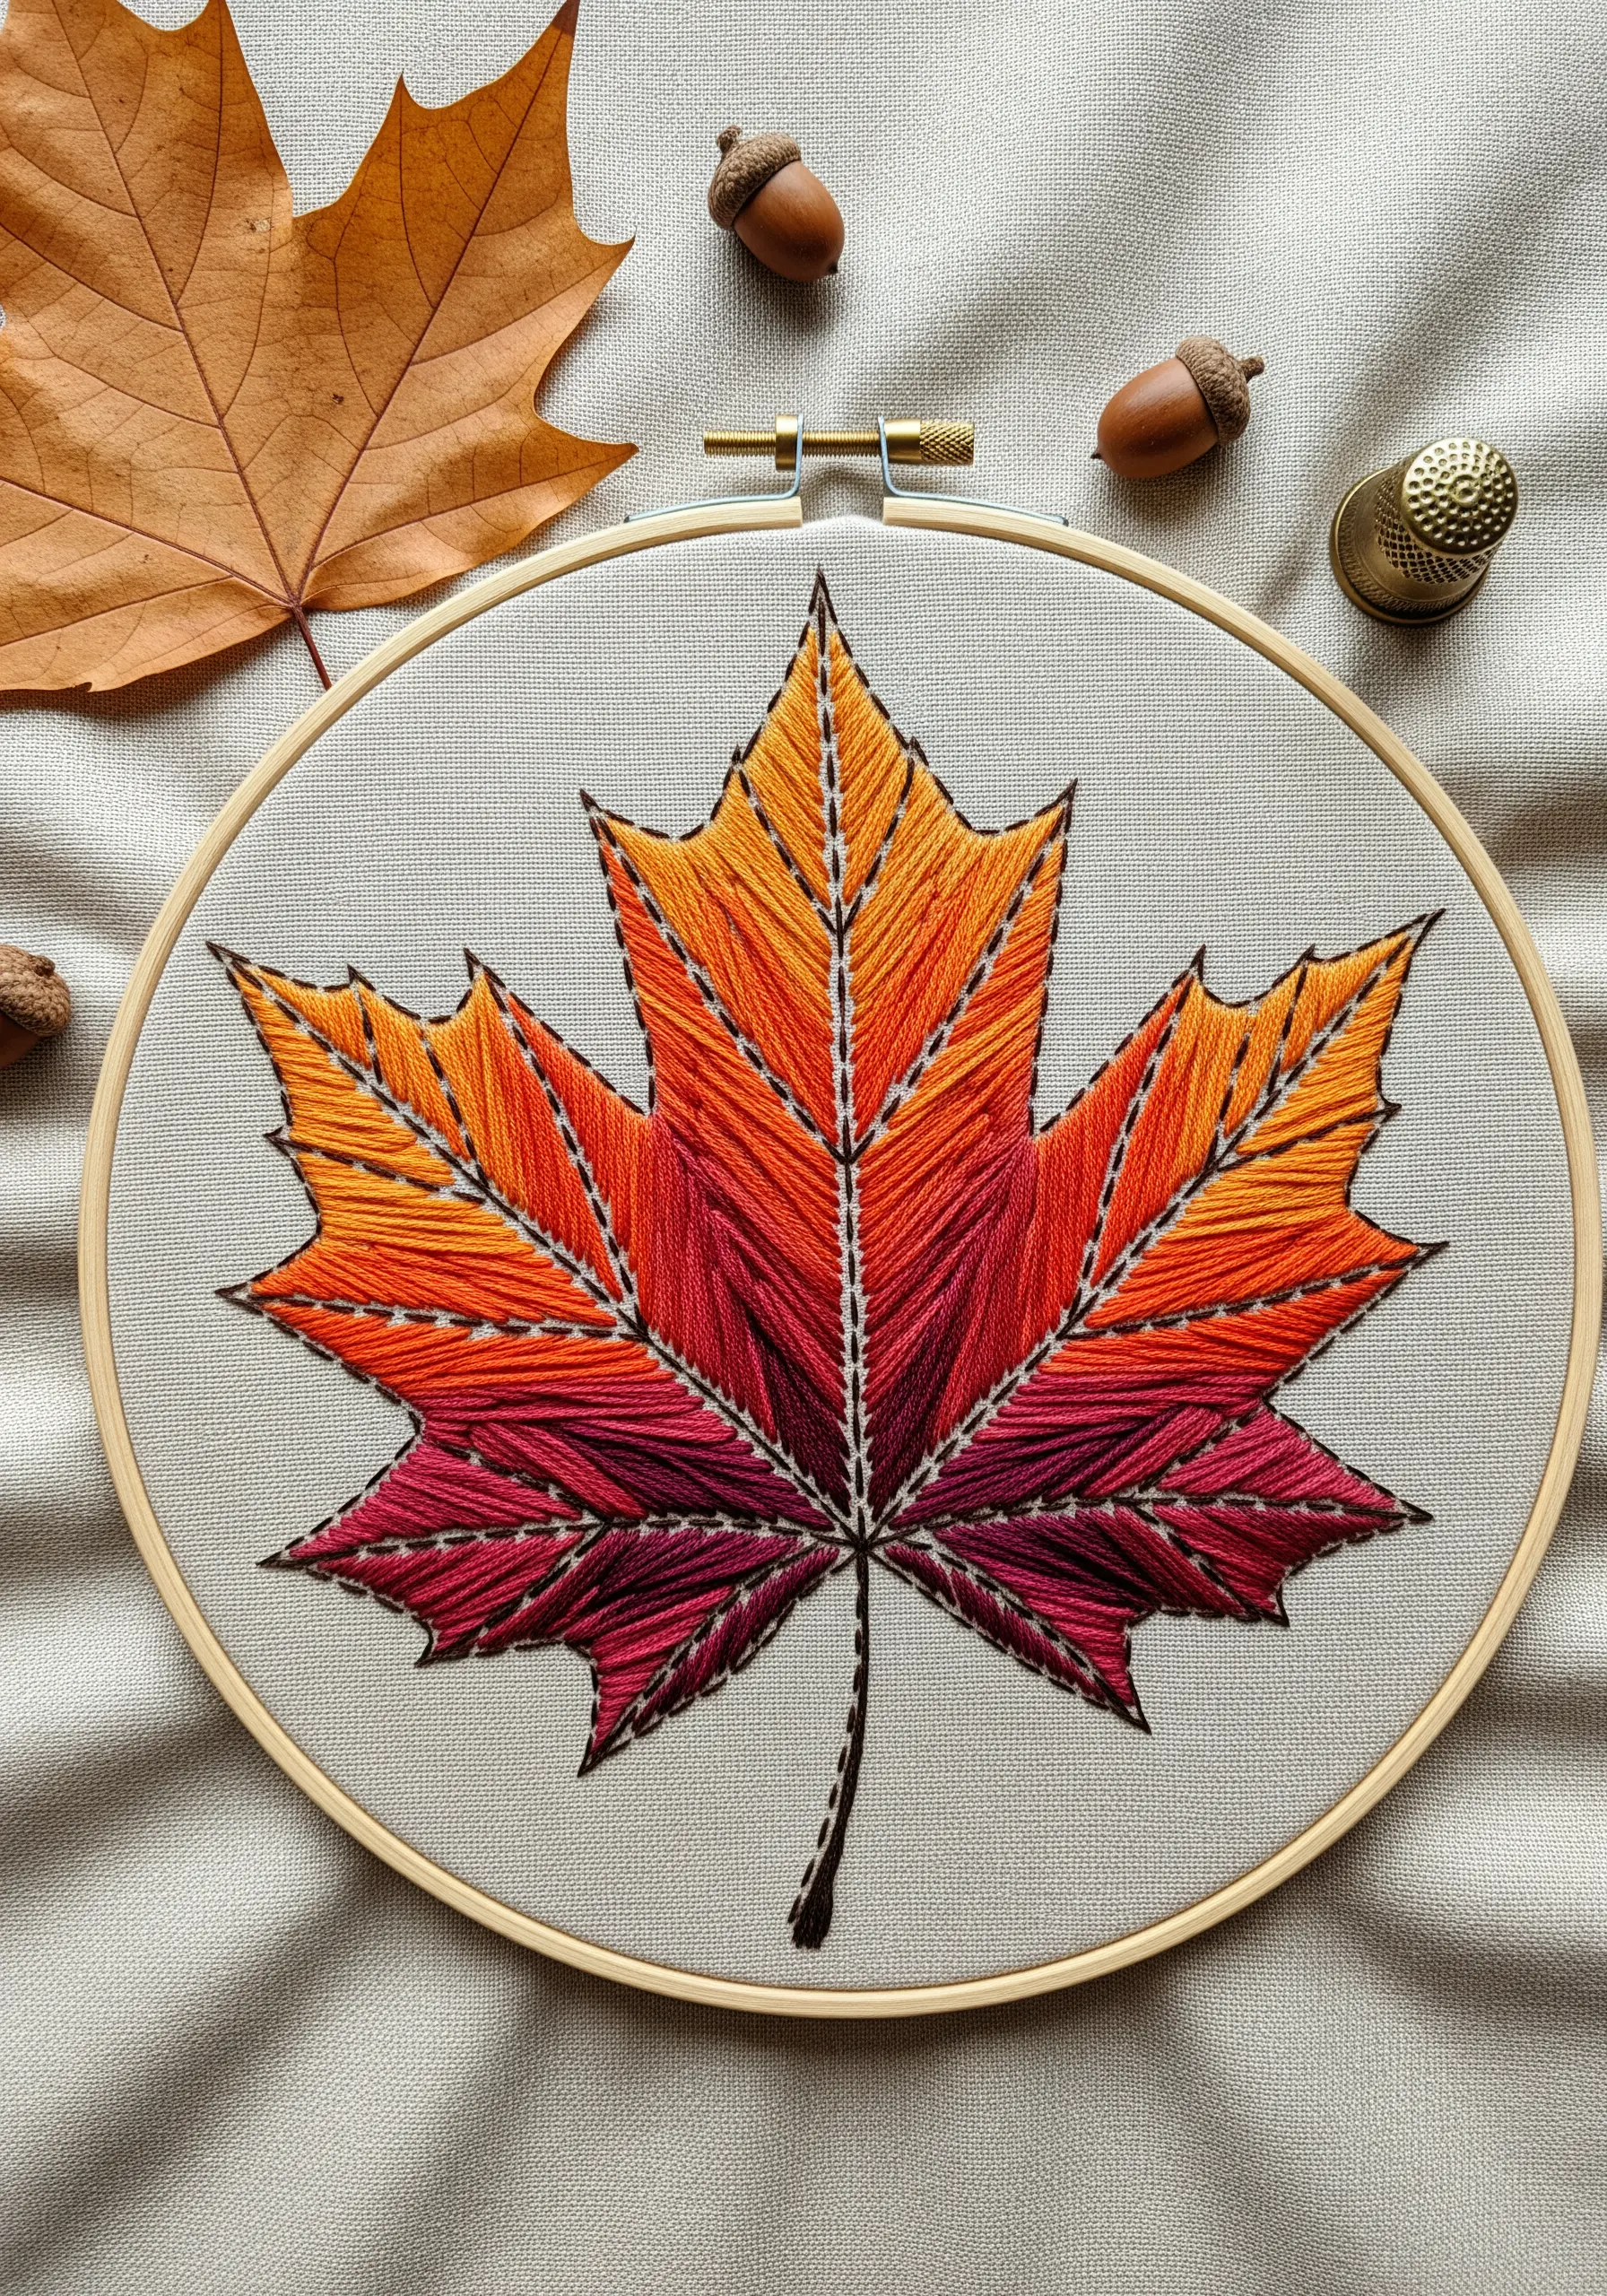
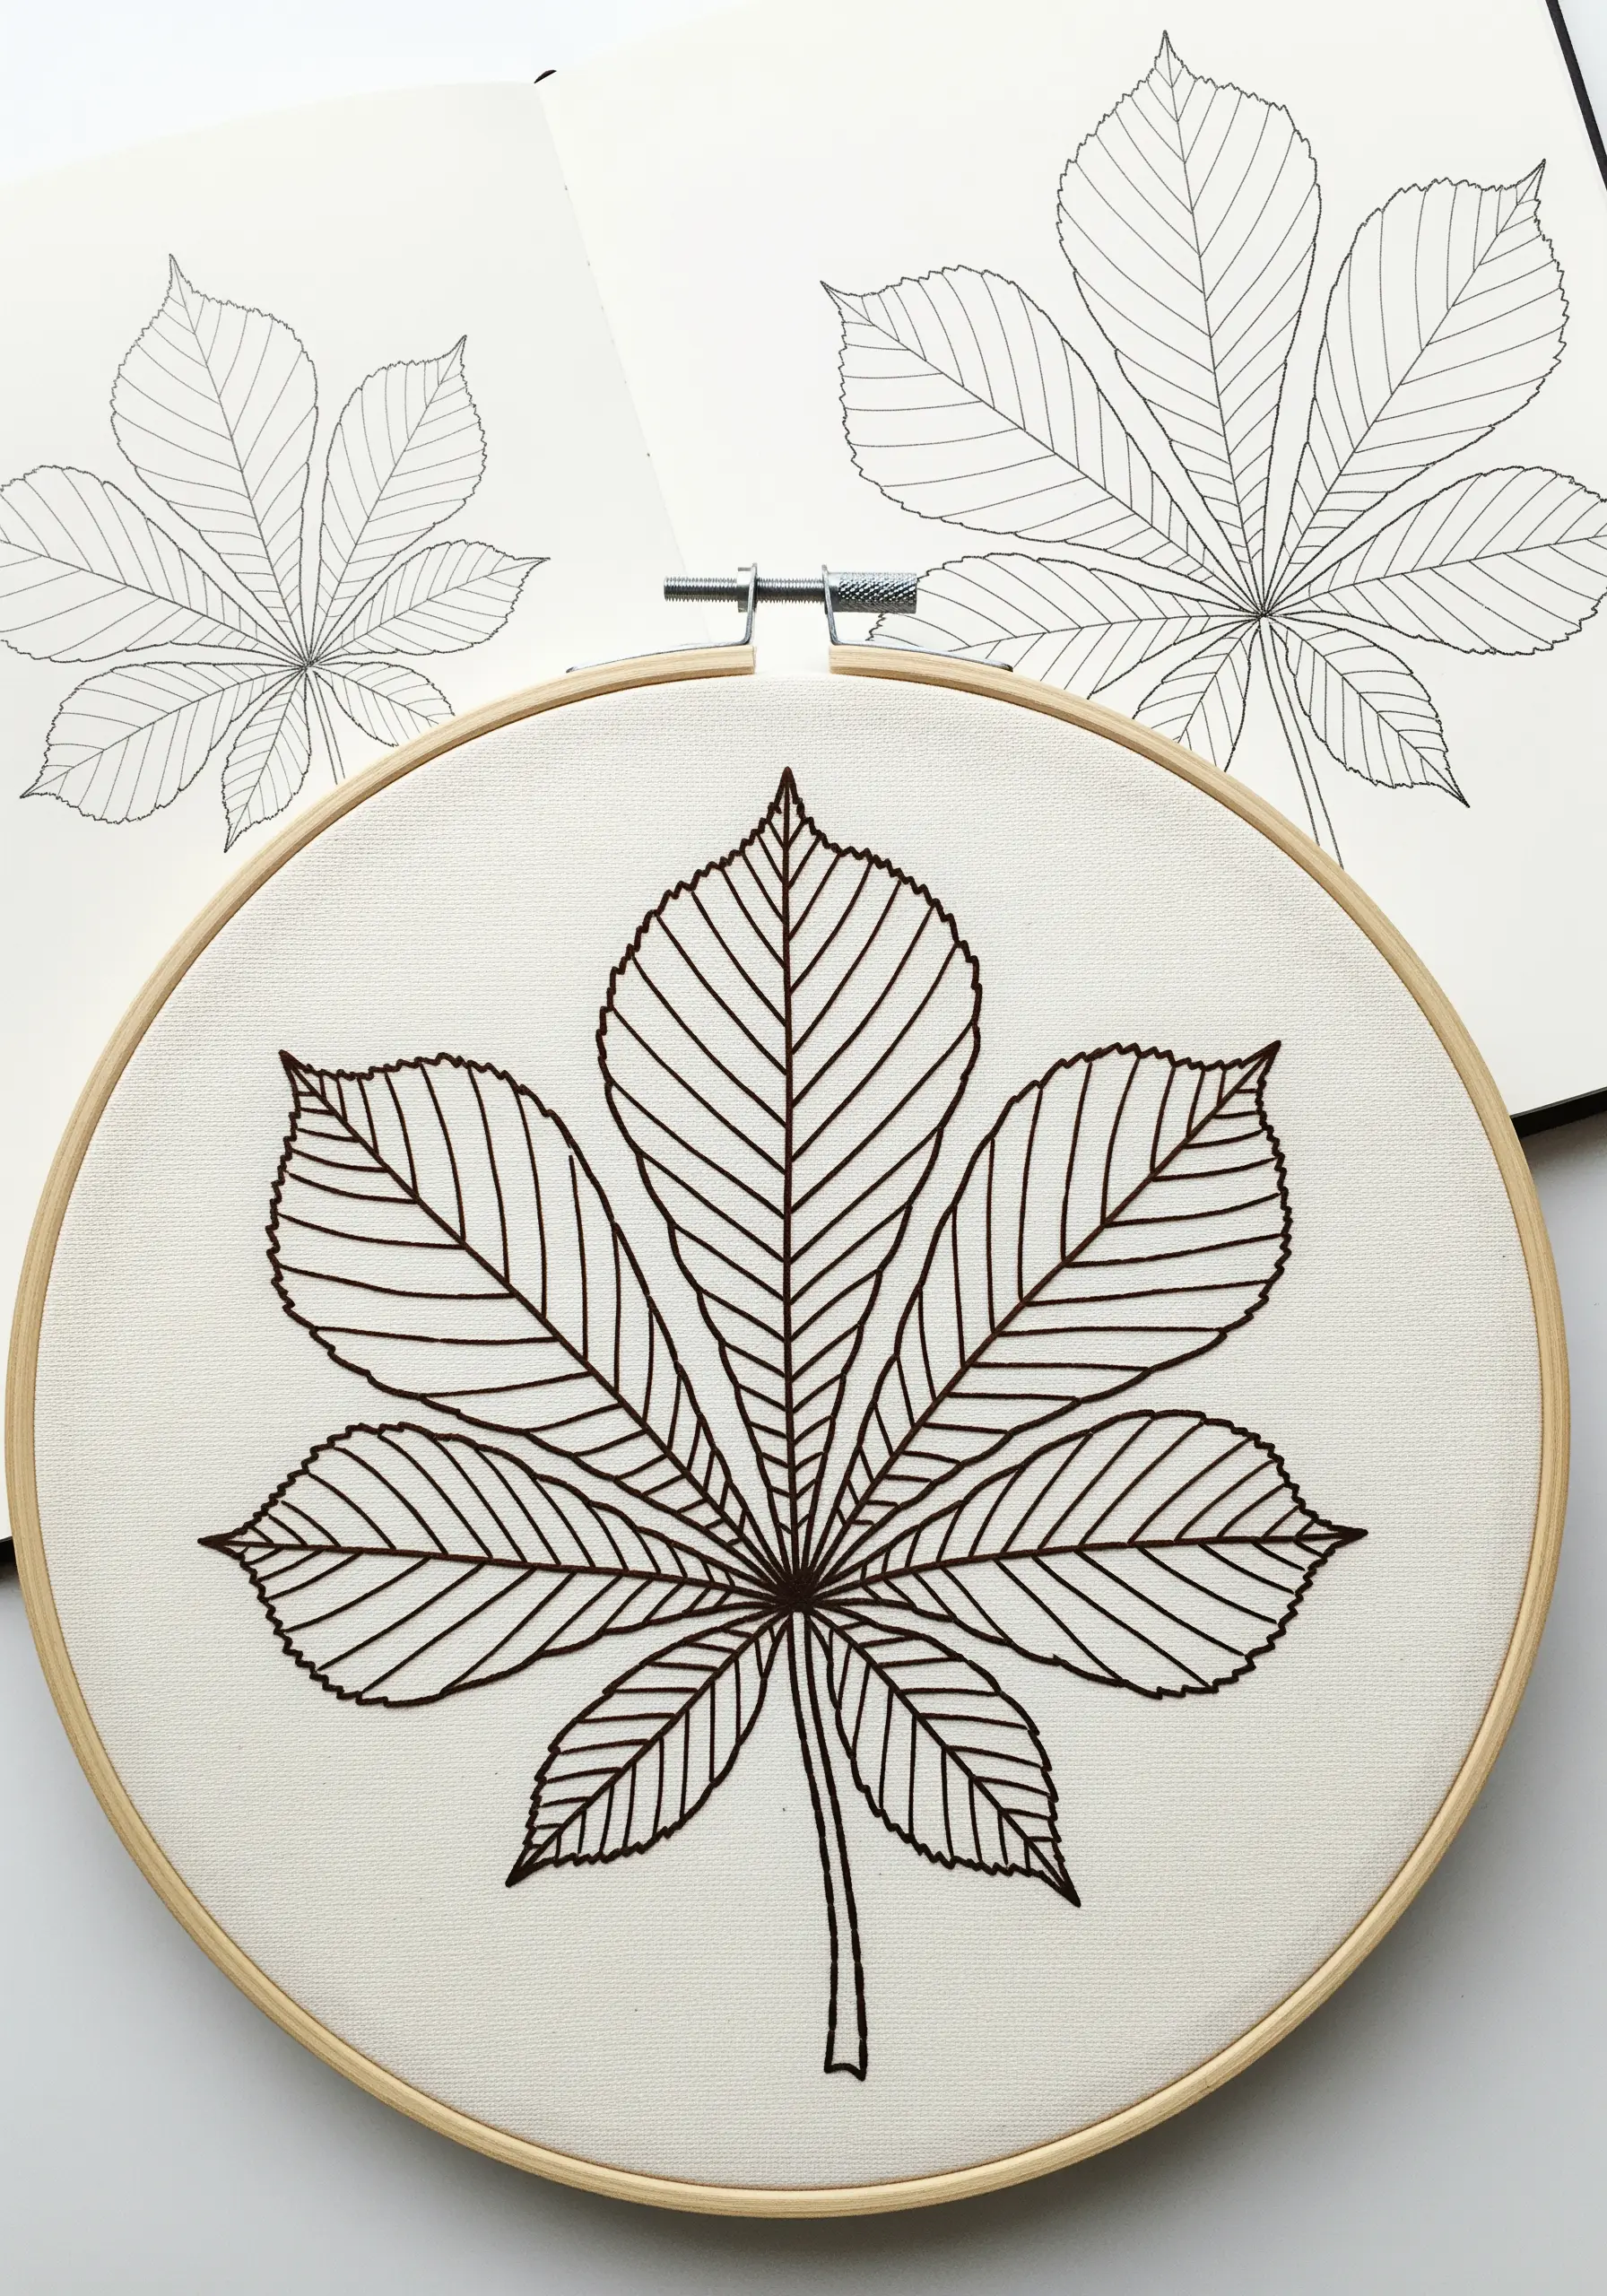
To create a seamless autumn gradient, trace a real maple leaf and divide it into sections for each color.
Instead of a standard satin stitch, use a long-and-short stitch, allowing the colors to interlock softly where they meet—this prevents harsh, blocky transitions.
Outline the veins and edges with a simple, dark running stitch last. This adds a graphic definition that makes the blended colors feel more vibrant and contained.
Choose at least four distinct shades, from deep burgundy to a light, golden yellow, to achieve a rich and realistic fade.
2. Capturing Light with Directional Stitches
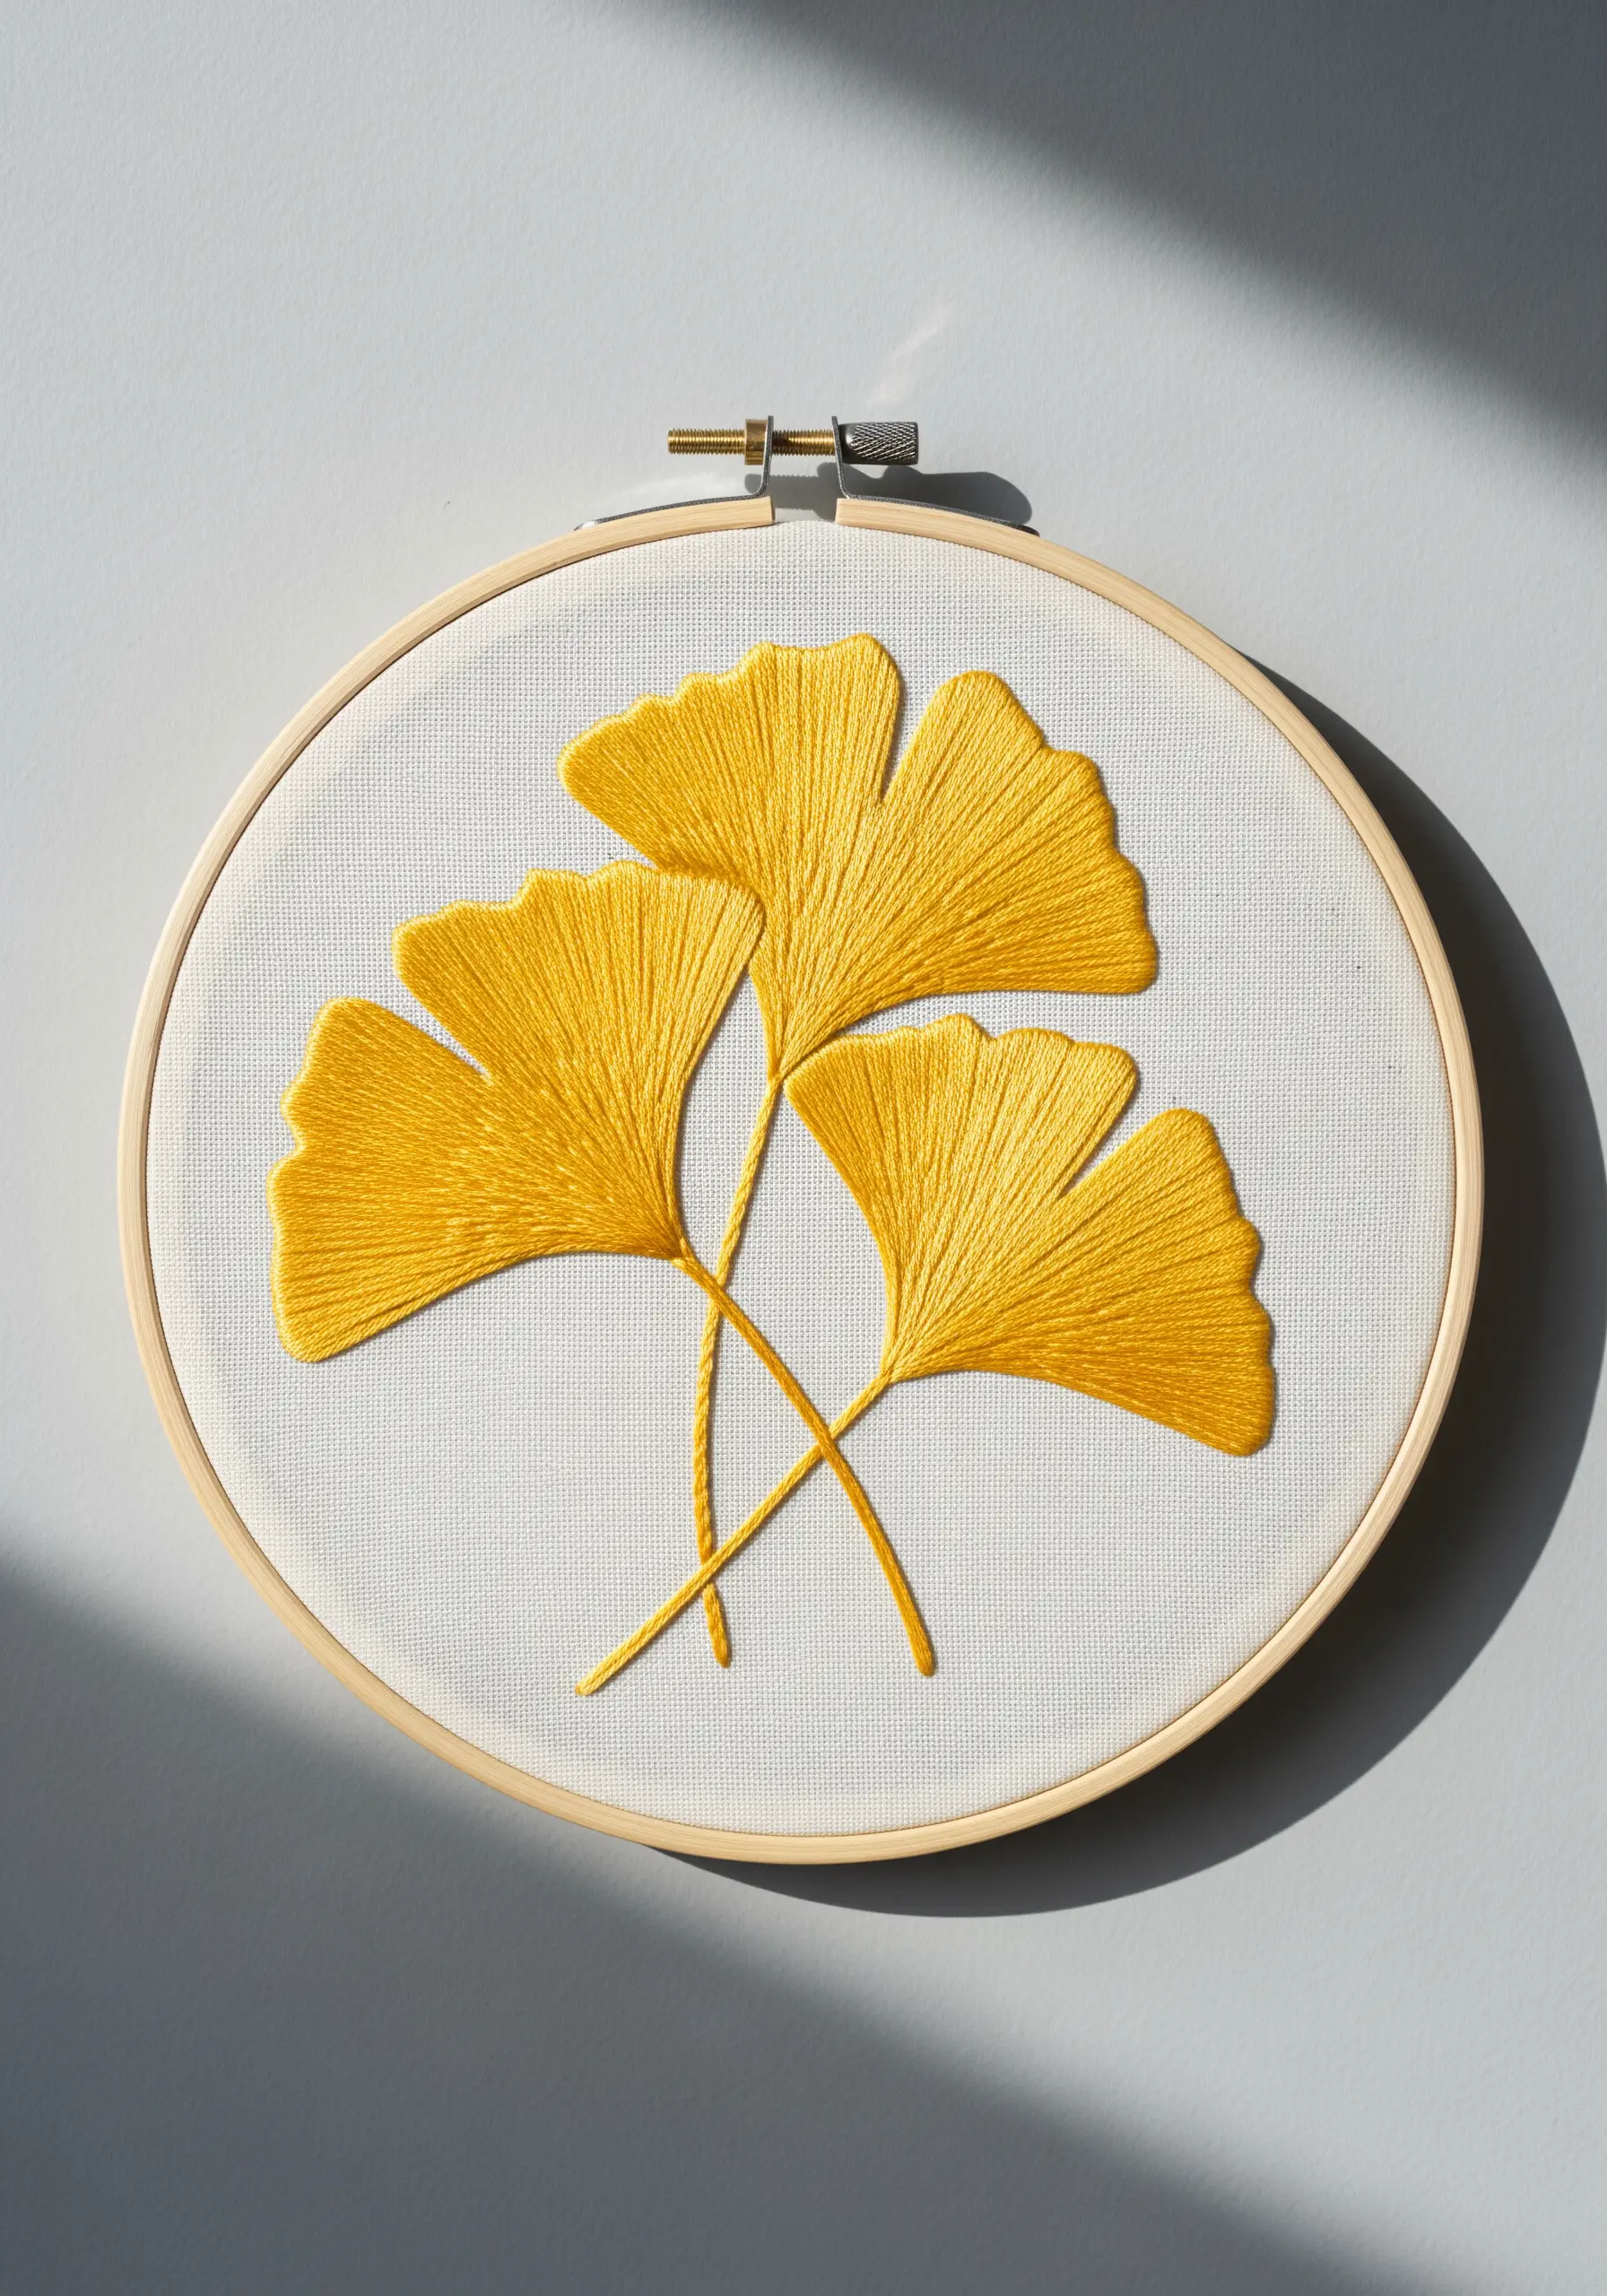
The elegance of a ginkgo leaf comes from its delicate, fanned shape—something you can replicate with your stitch direction.
Instead of filling the entire leaf with stitches going in one direction, angle your satin stitches to radiate outward from the base of each lobe.
This simple adjustment mimics how light would naturally hit the leaf’s surface, creating a subtle sheen and sense of movement.
For this technique, use a high-sheen rayon or silk floss to maximize the light-reflective quality of your work.
3. Thread Painting for Natural Imperfection
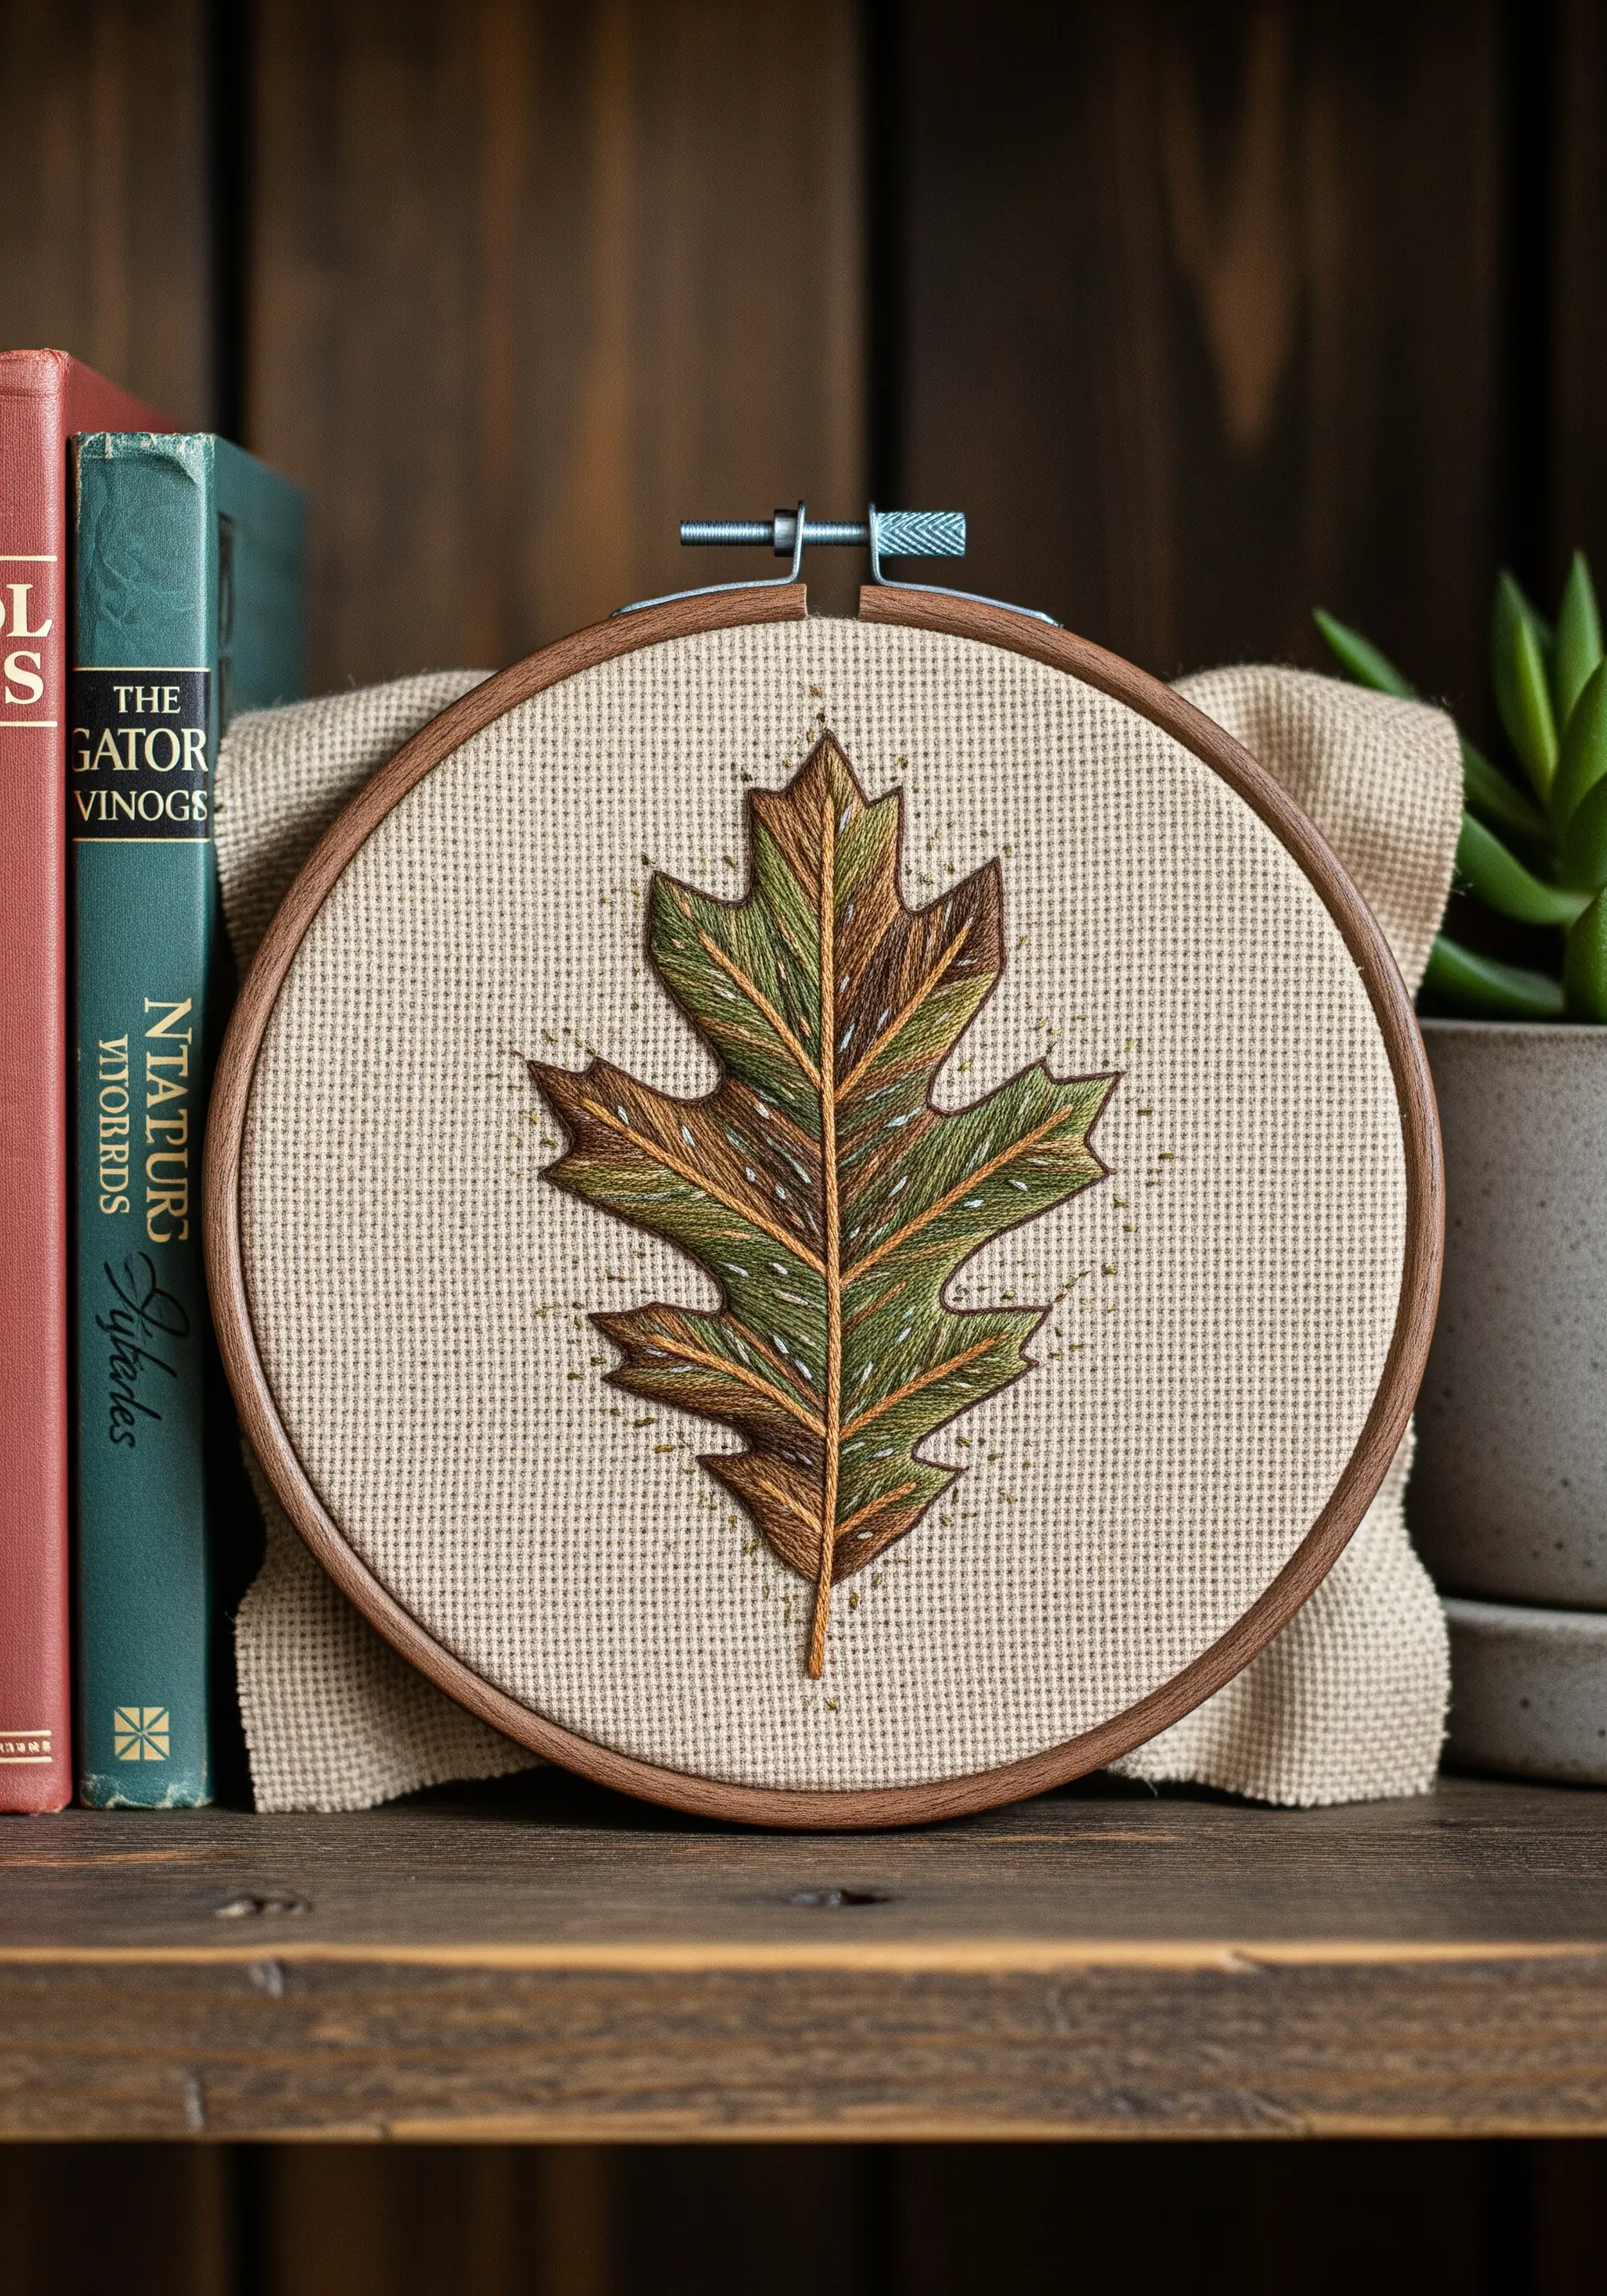
Recreate the mottled, imperfect beauty of a turning oak leaf using a thread painting technique.
Select four to five shades of green, brown, and ochre, and use only a single strand of each in your needle.
Place your long-and-short stitches irregularly, allowing the colors to blend organically rather than in perfect gradients. Let some brown stitches interrupt a patch of green, just as it happens in nature.
Finish by scattering tiny seed stitches across the surface to add a final layer of texture that mimics the leaf’s delicate surface.
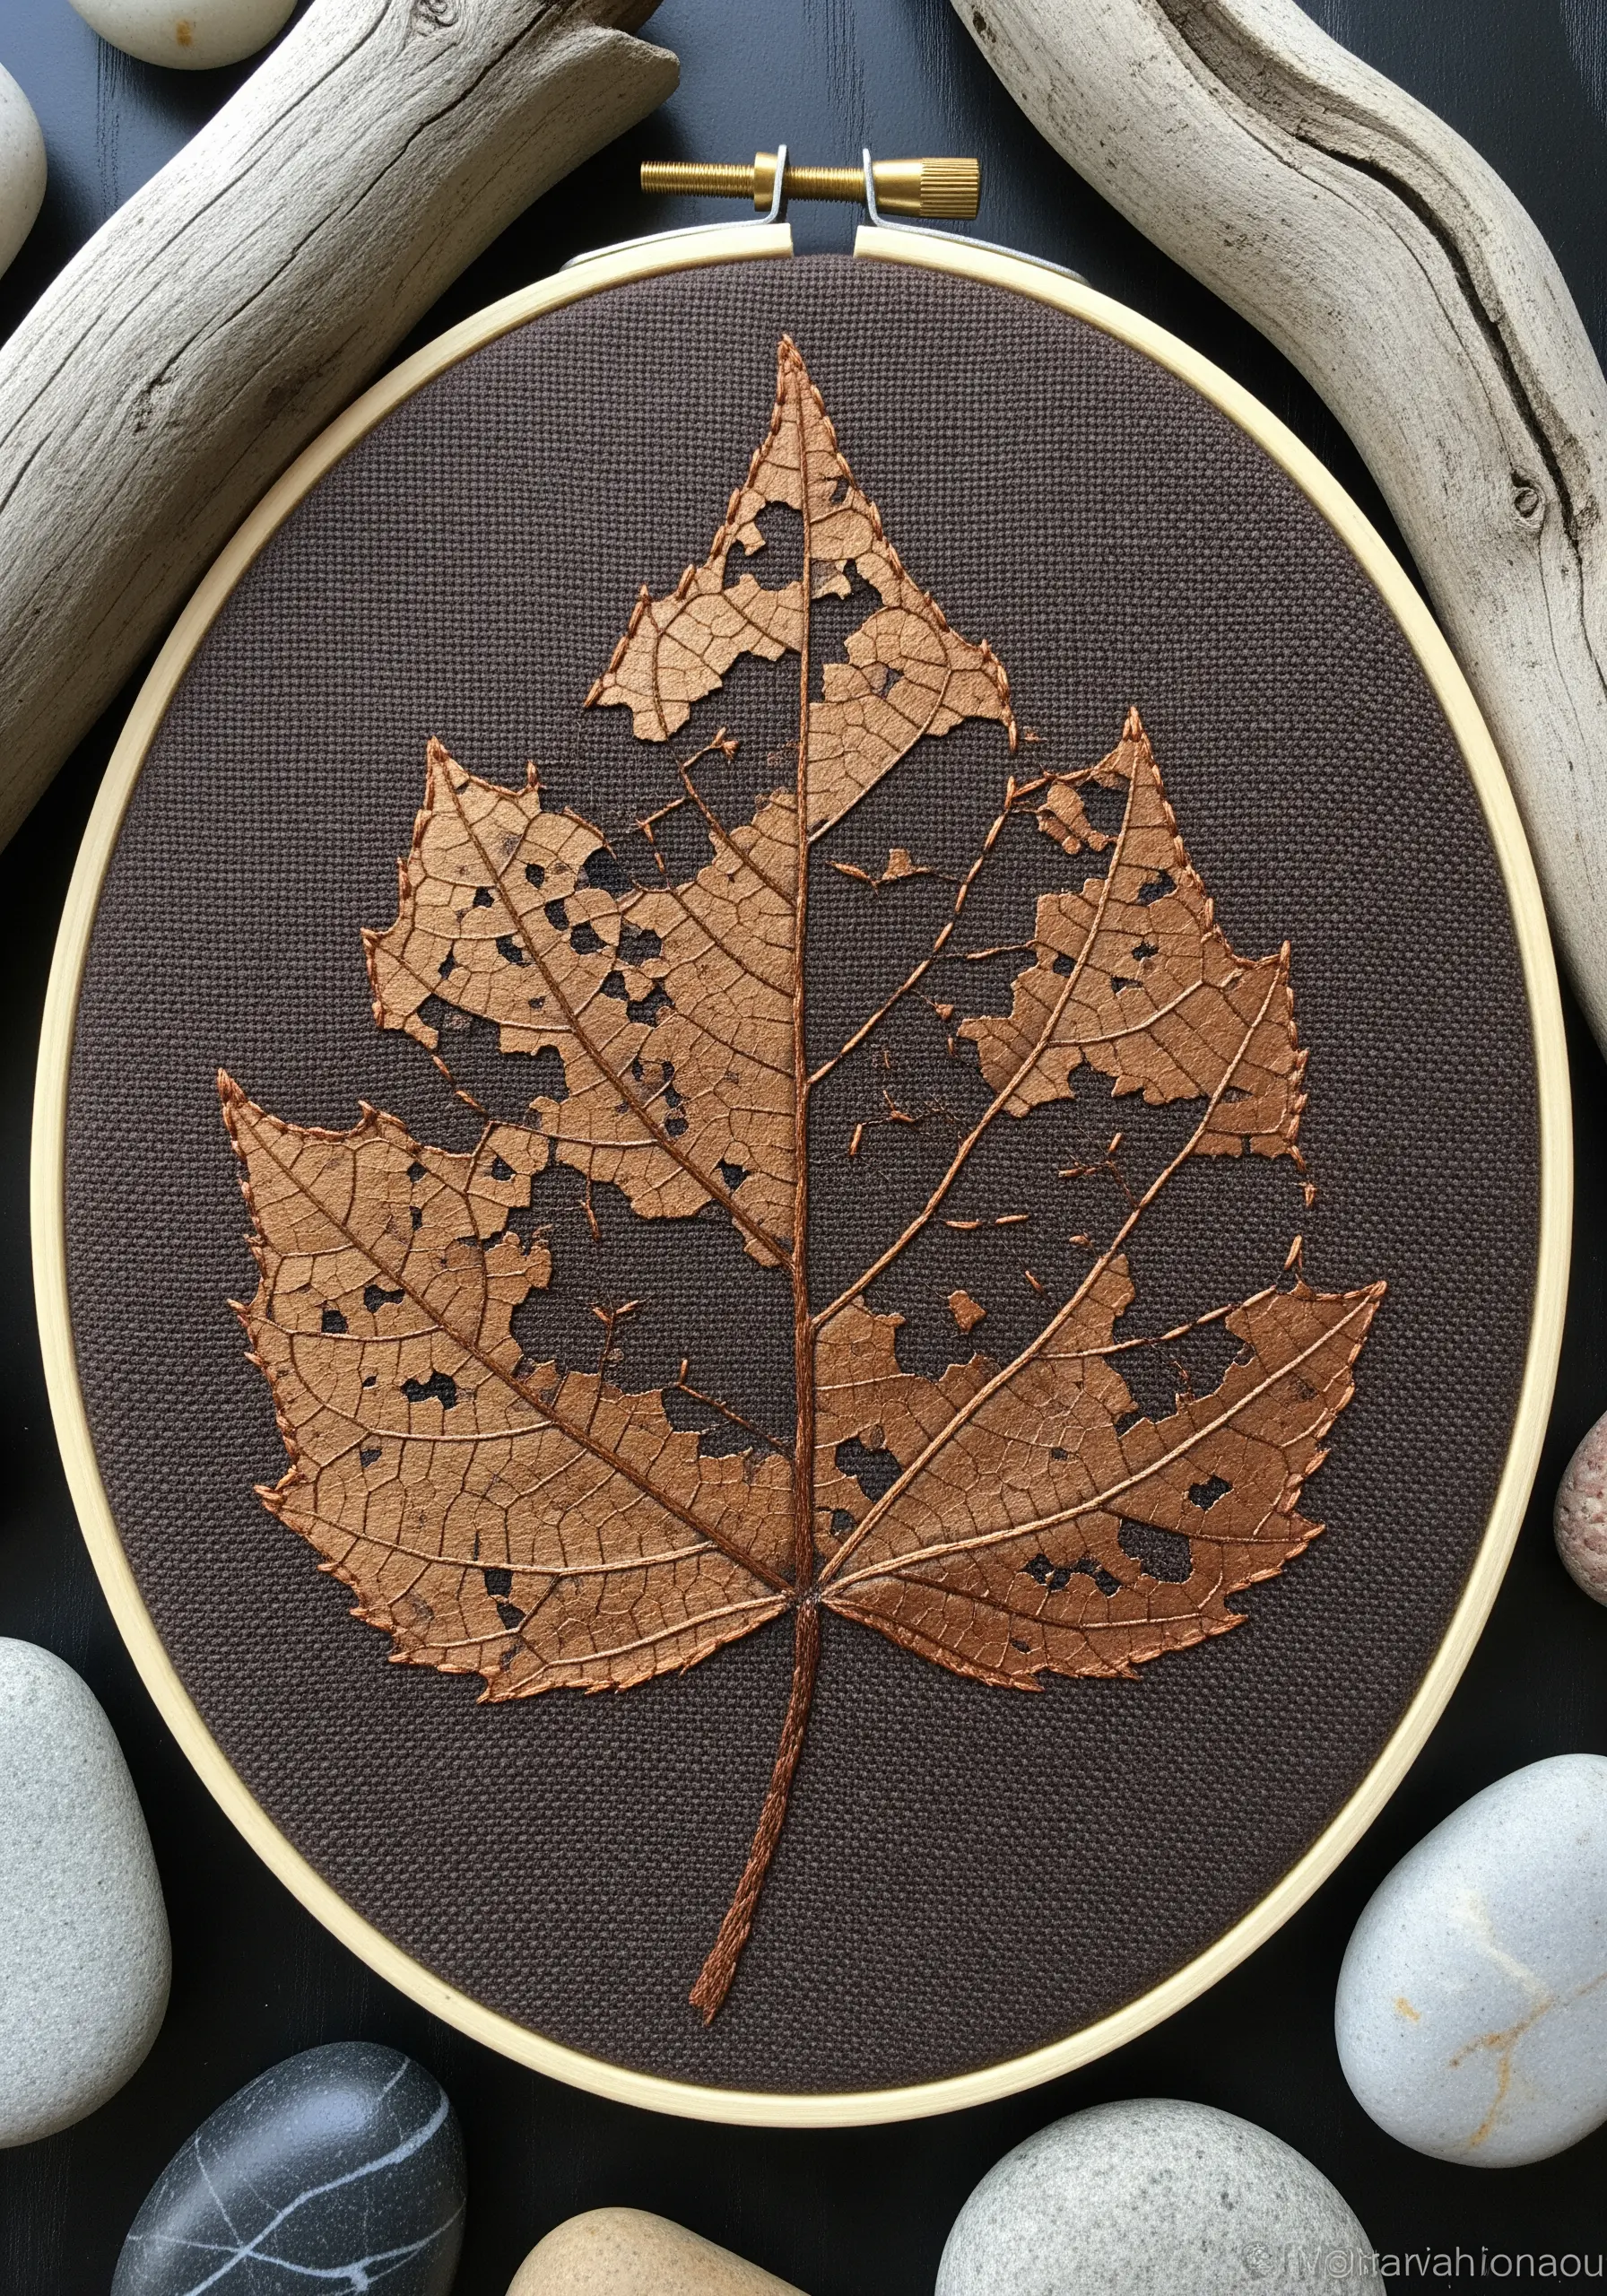
4. The Delicate Architecture of a Skeleton Leaf
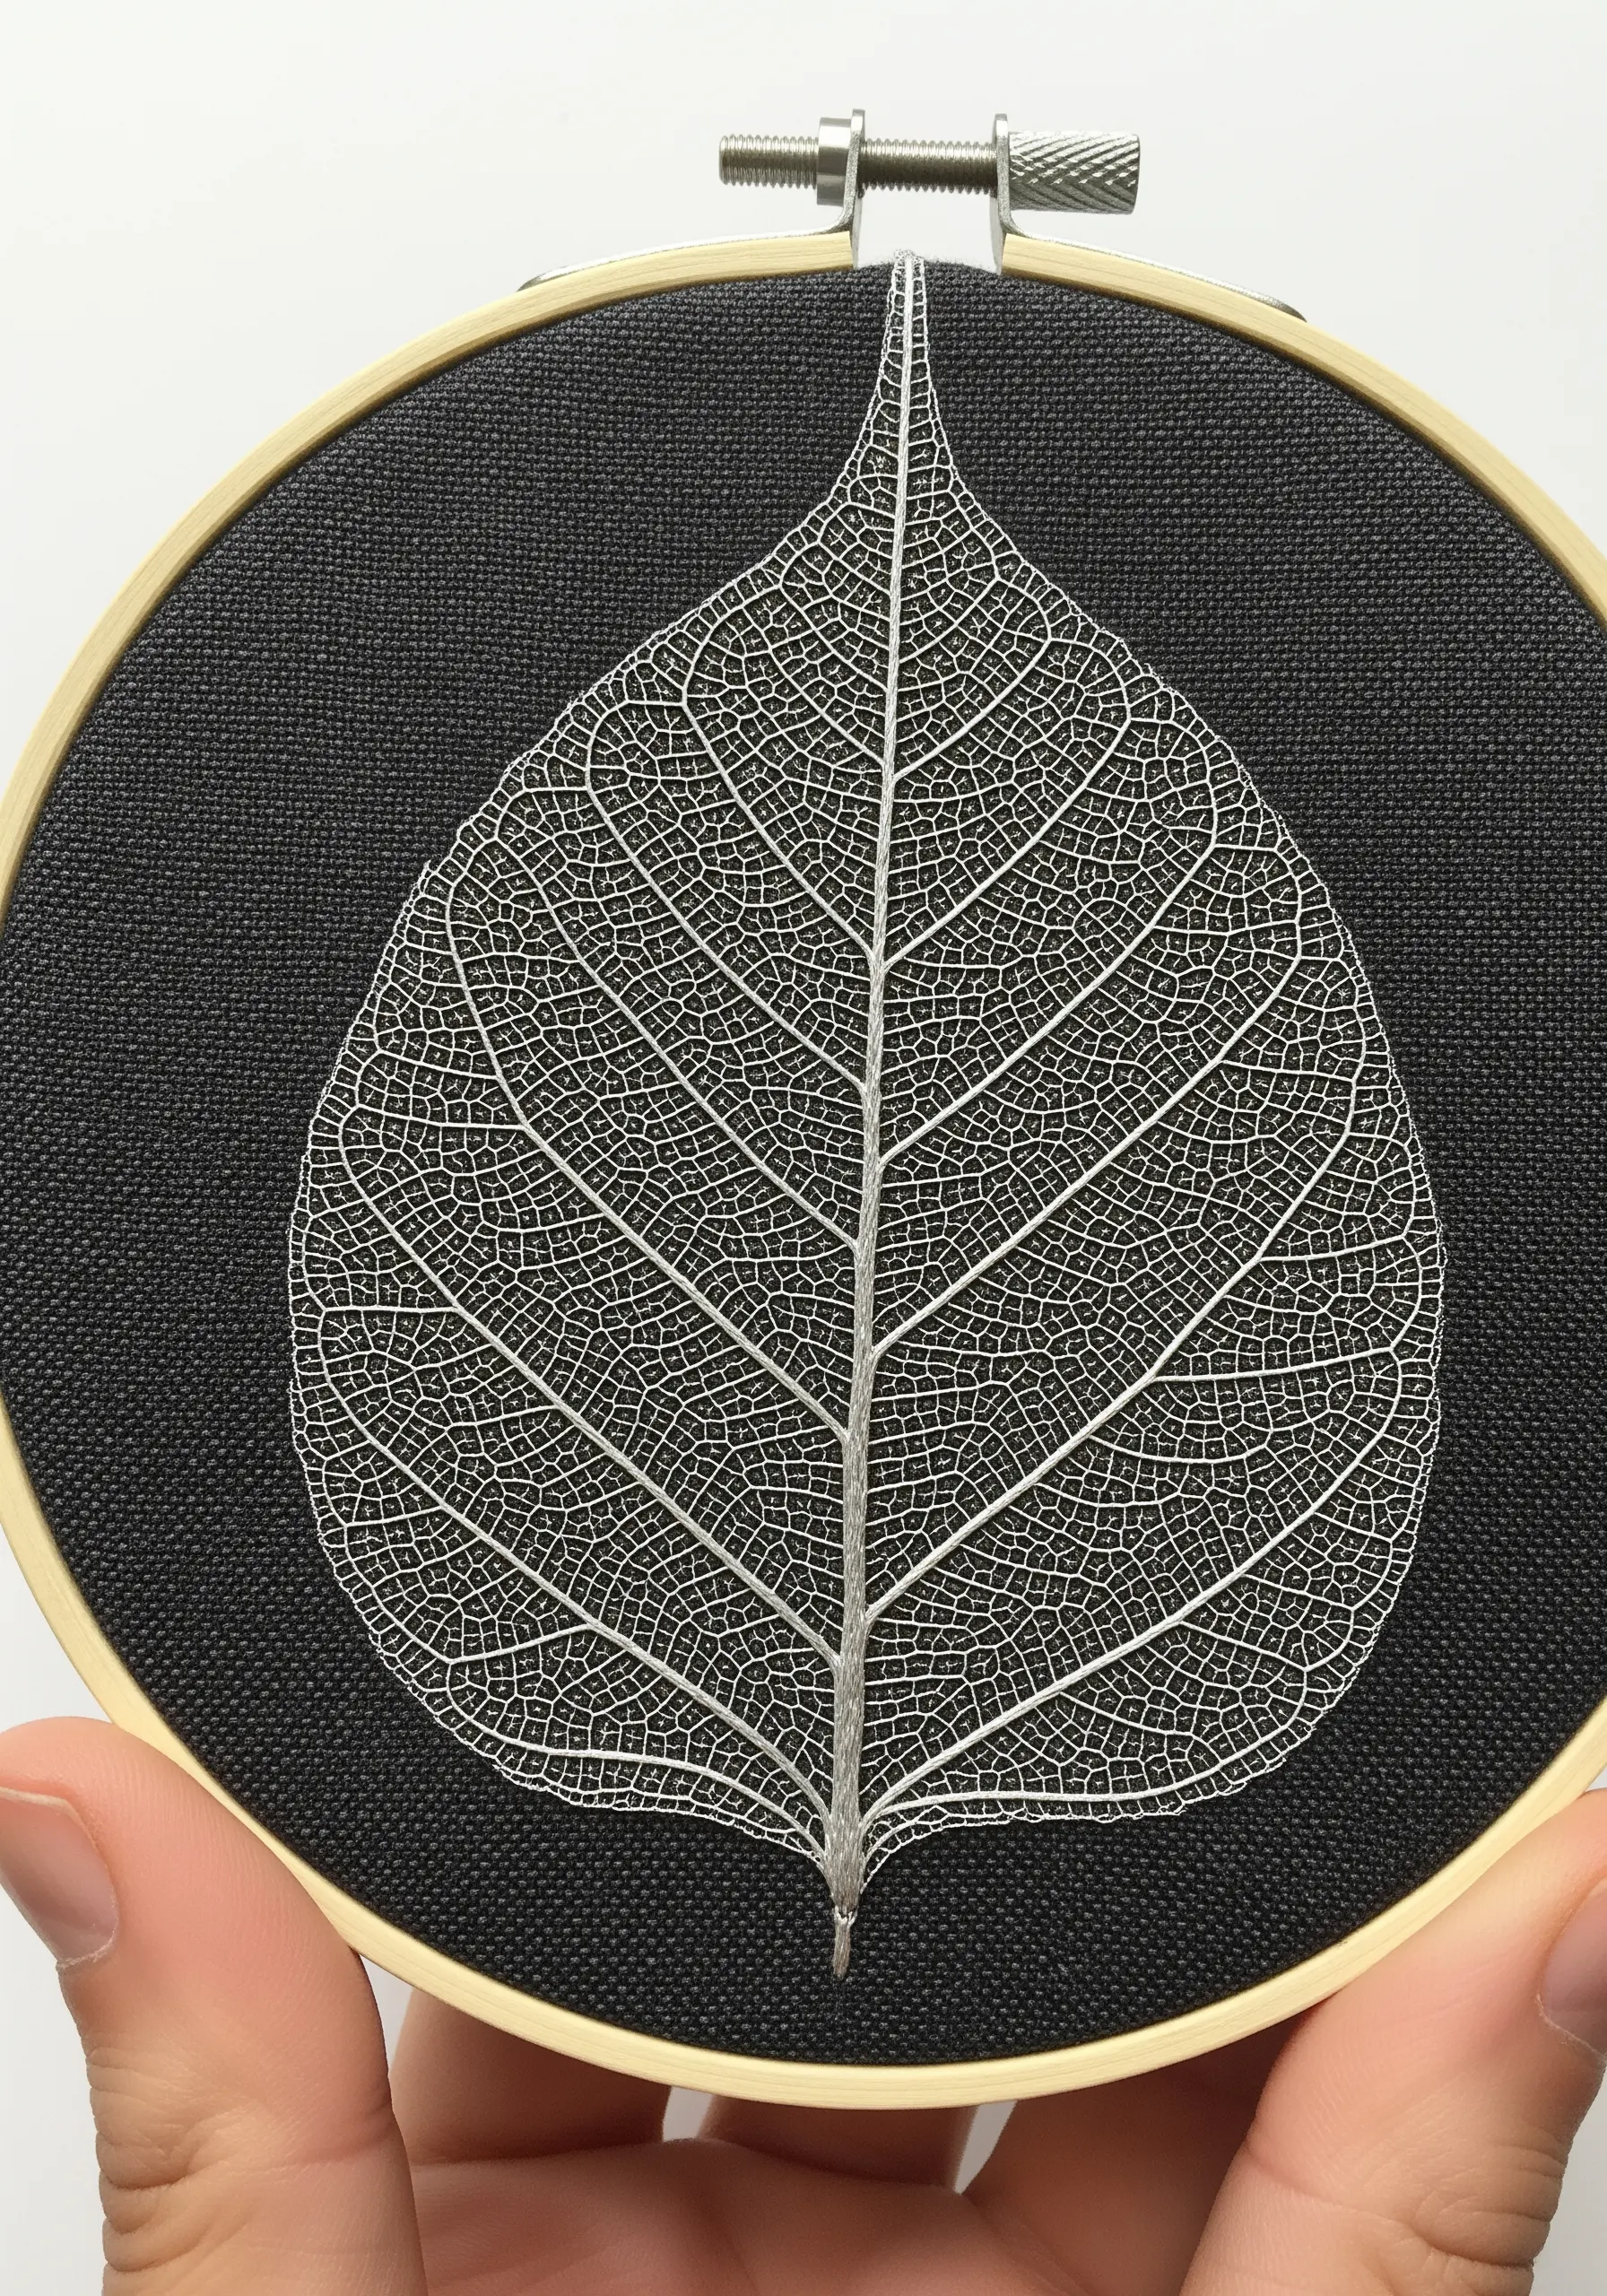
To capture the intricate detail of a skeleton leaf, traditional outlining stitches are too bulky. Instead, use couching.
First, trace the leaf’s structure onto dark, tightly woven fabric. Then, lay a single strand of fine, light-colored thread along the traced lines.
Using a second, near-invisible thread, make tiny tacking stitches over the first thread to hold it in place. This technique gives you unparalleled precision for delicate, web-like patterns.
5. Building Dimension in a Monochrome Motif
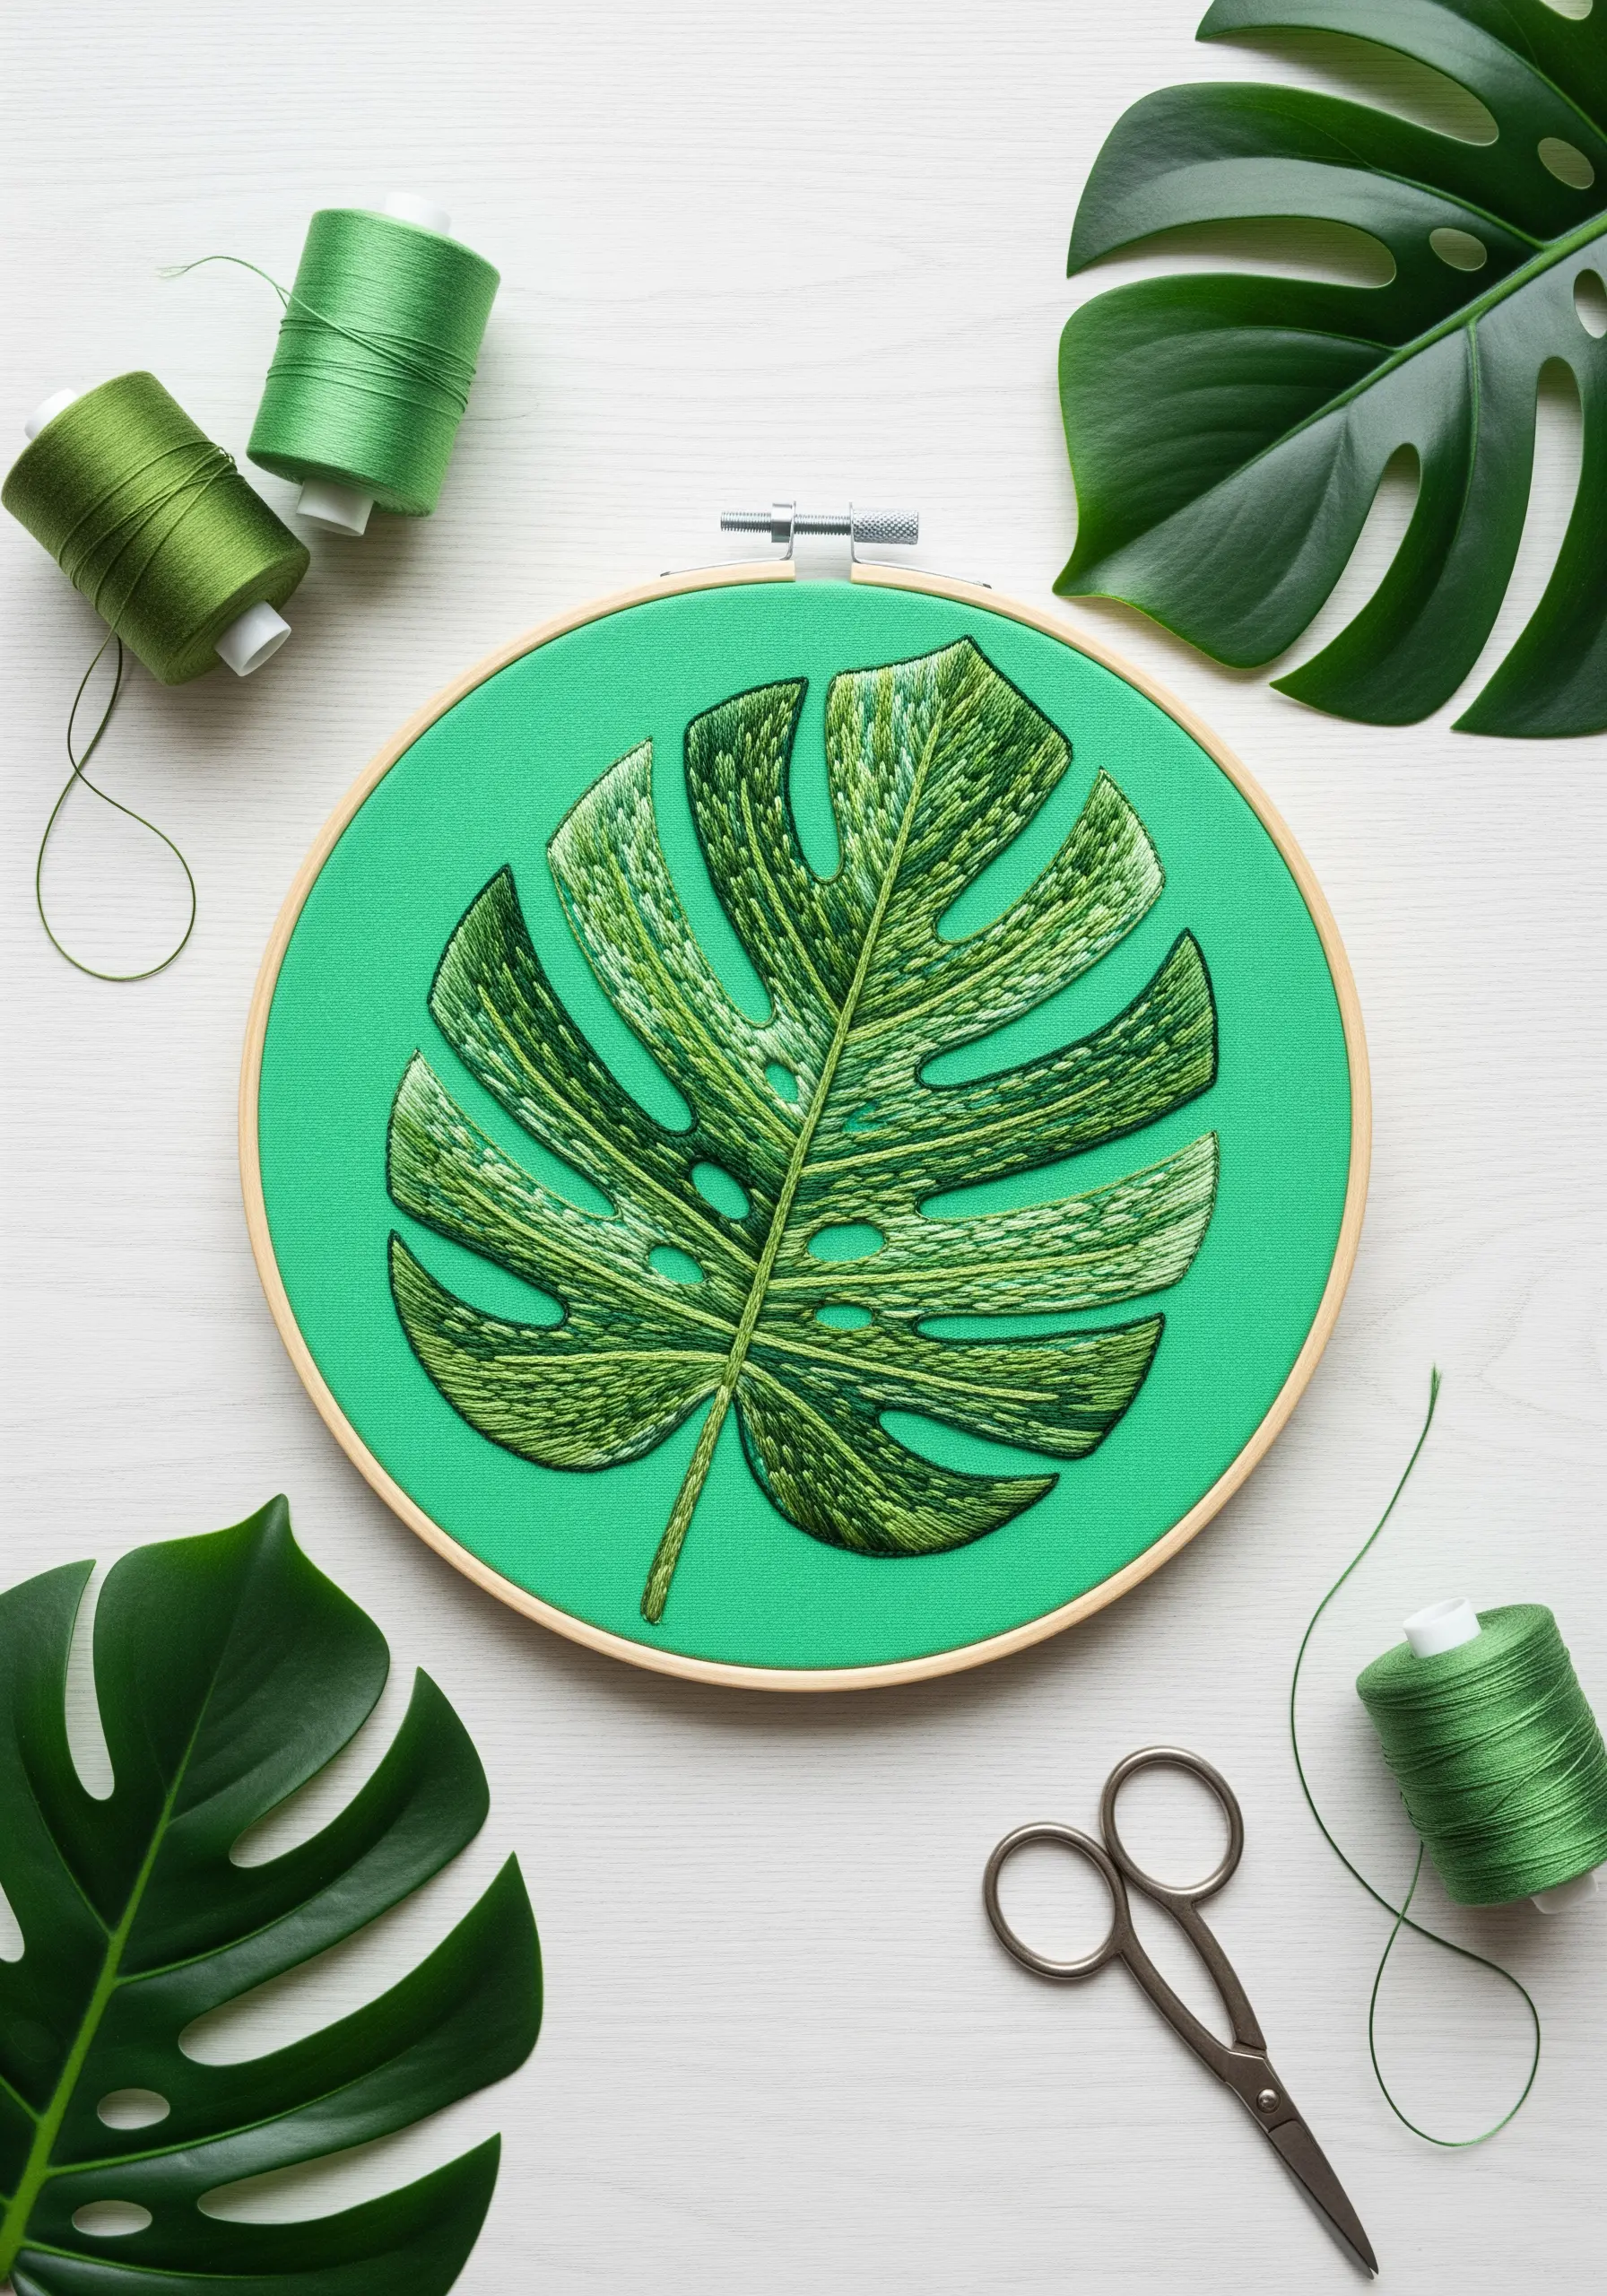
A single-color design doesn’t have to be flat. Give this monstera leaf life by varying your stitch direction and length.
Divide the leaf into its natural segments and fill each one with long-and-short stitches angled toward the central vein. This immediately creates a sense of depth and form.
Slightly overlap your stitches and avoid perfect uniformity; this controlled chaos results in a texture that feels organic and touchable.
Using two or three very similar shades of green will enhance the effect without complicating the design.
6. The Serene Eucalyptus Triptych

To create a sophisticated and cohesive wall display, repeat a simple form but vary the color story.
Trace the same eucalyptus branch onto three hoops. For the first, use shades of sage and mint. For the second, dusty blues. For the third, shift into cool lavenders and greys.
Use a simple satin stitch for the leaves and a clean split stitch for the stems. The consistency in technique allows the subtle color shift to become the main focus, creating a calm, gallery-like effect.
7. Extending Your Design Beyond the Hoop
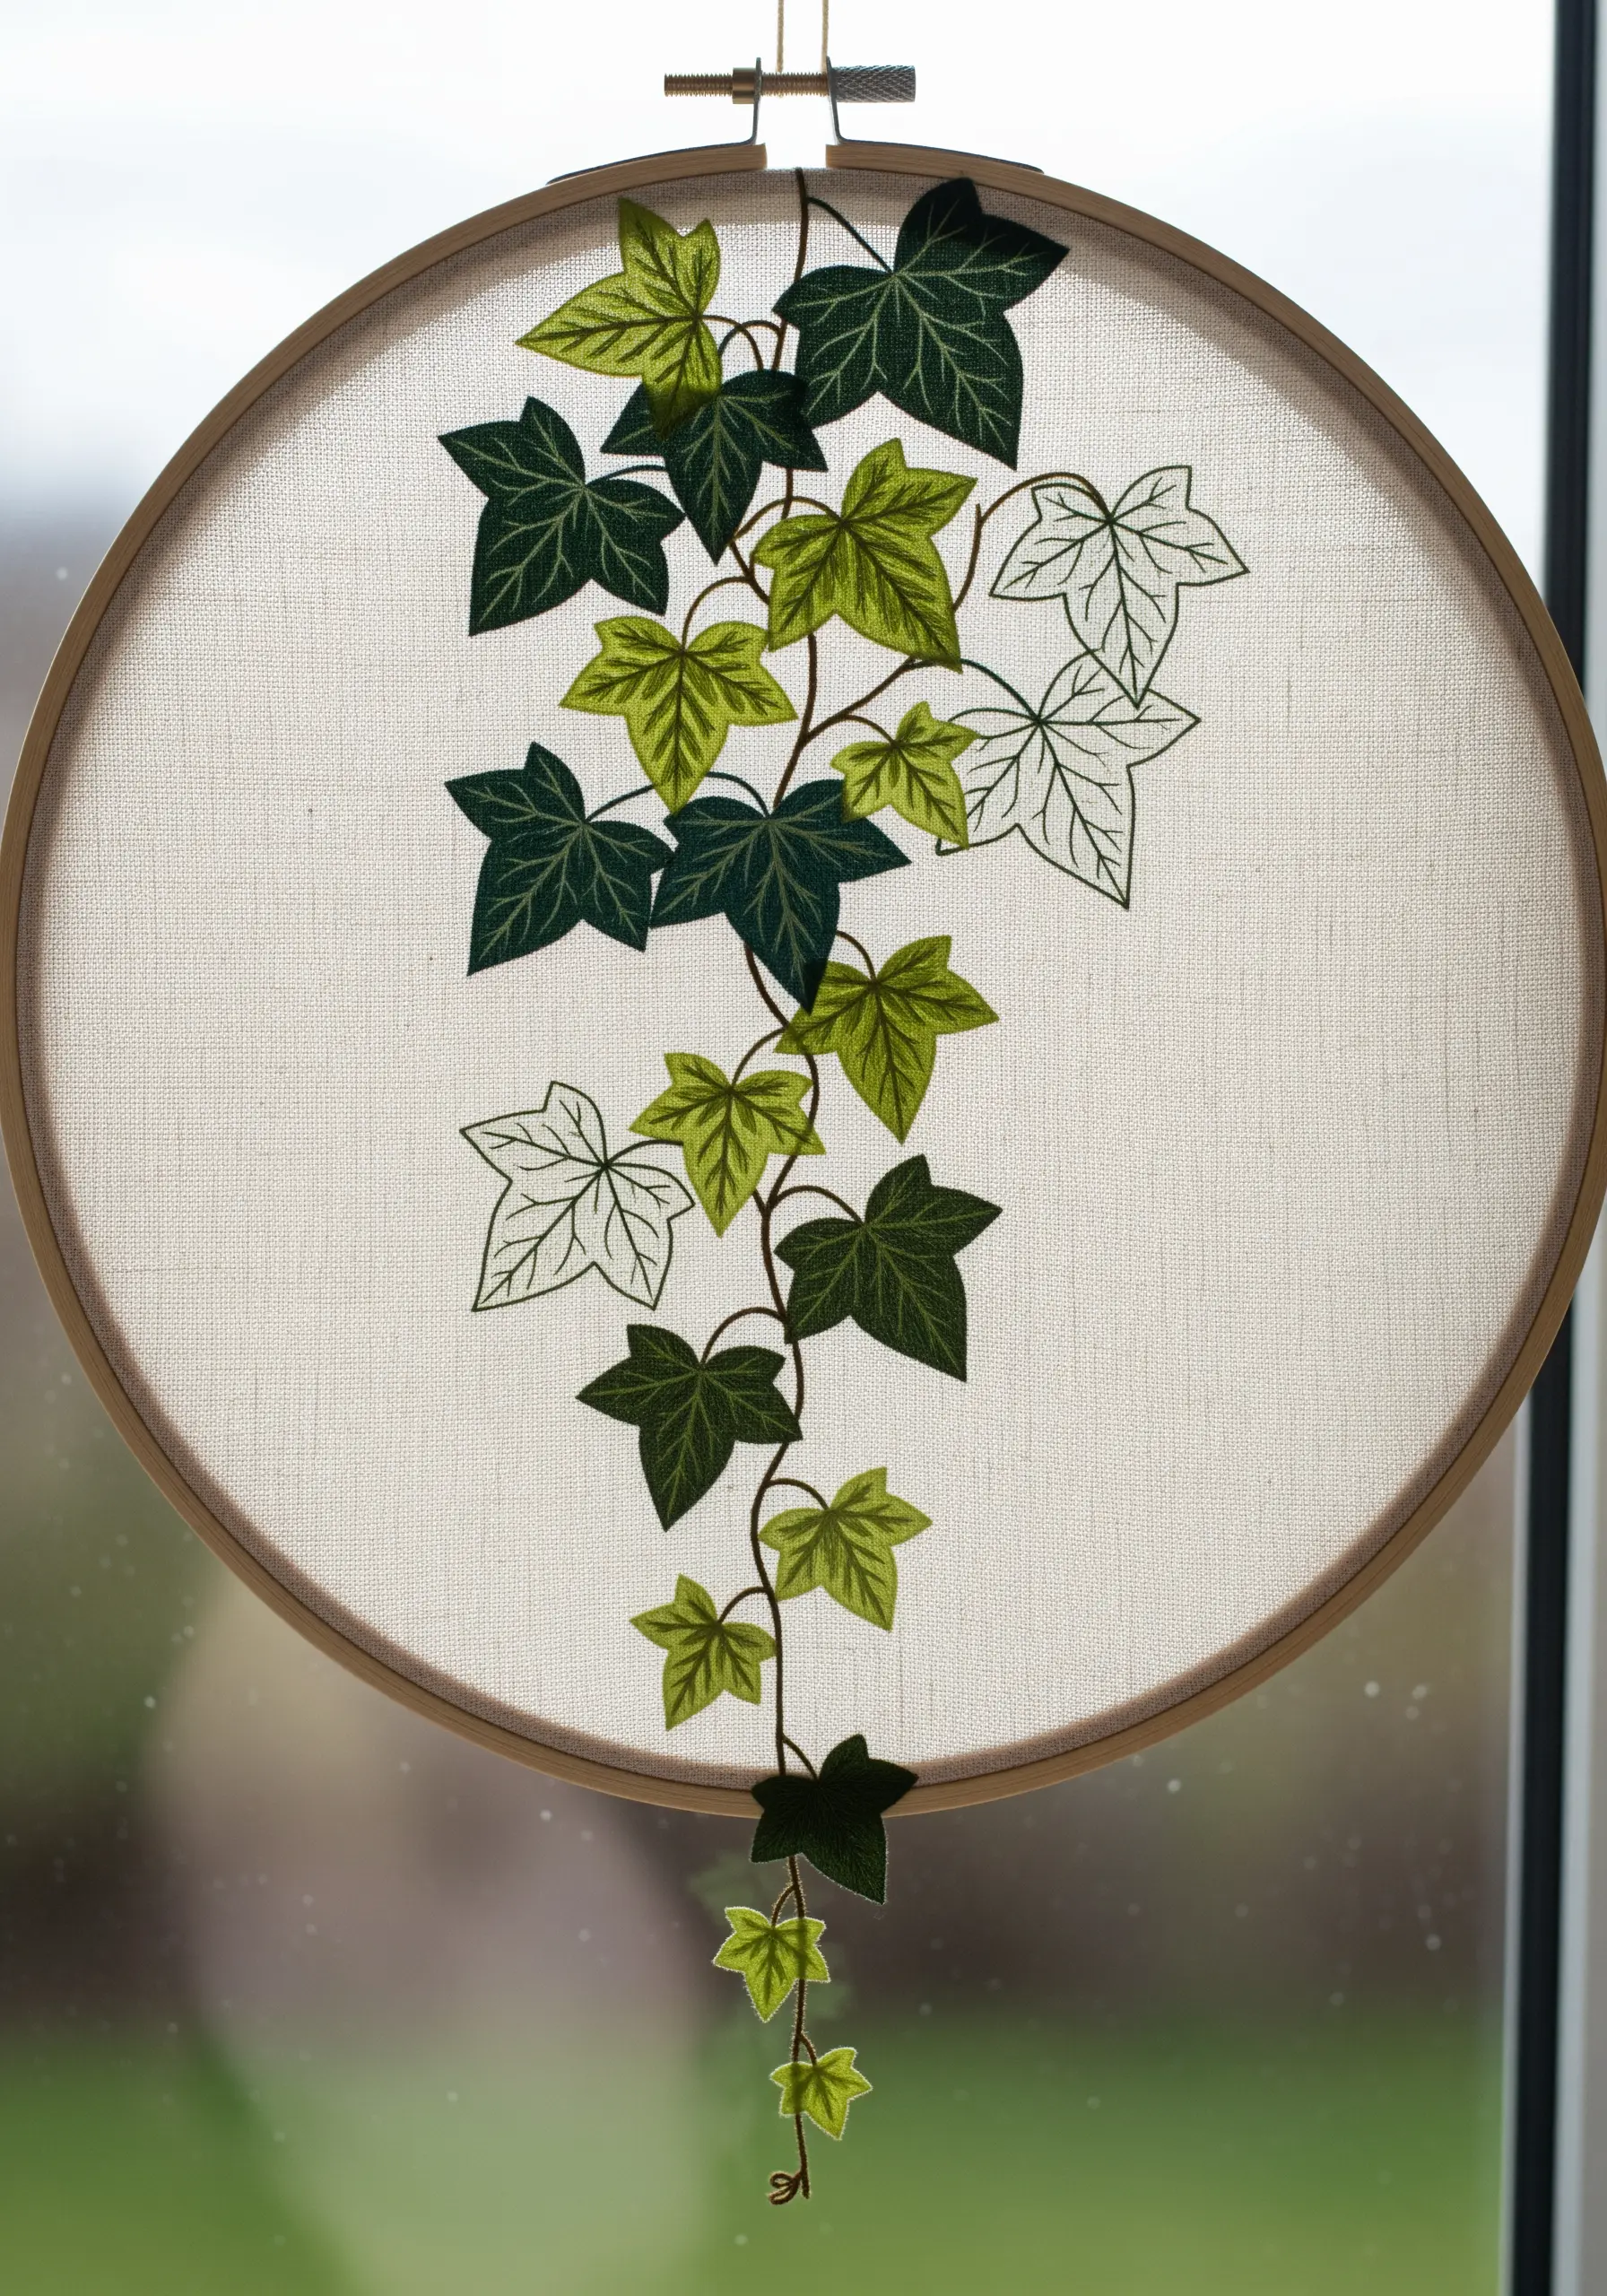
Allow your embroidery to break free from its circular frame for a surprising, three-dimensional effect.
Embroider the main ivy vine directly onto the hooped fabric. For the cascading leaves, stitch them separately onto a sturdy piece of felt or double-layered fabric backed with stabilizer.
Carefully cut out the felt leaves, leaving a tiny border. Then, attach them with a few secure stitches to the main vine, letting them dangle below the hoop’s edge.
8. Fusing Watercolor and Thread
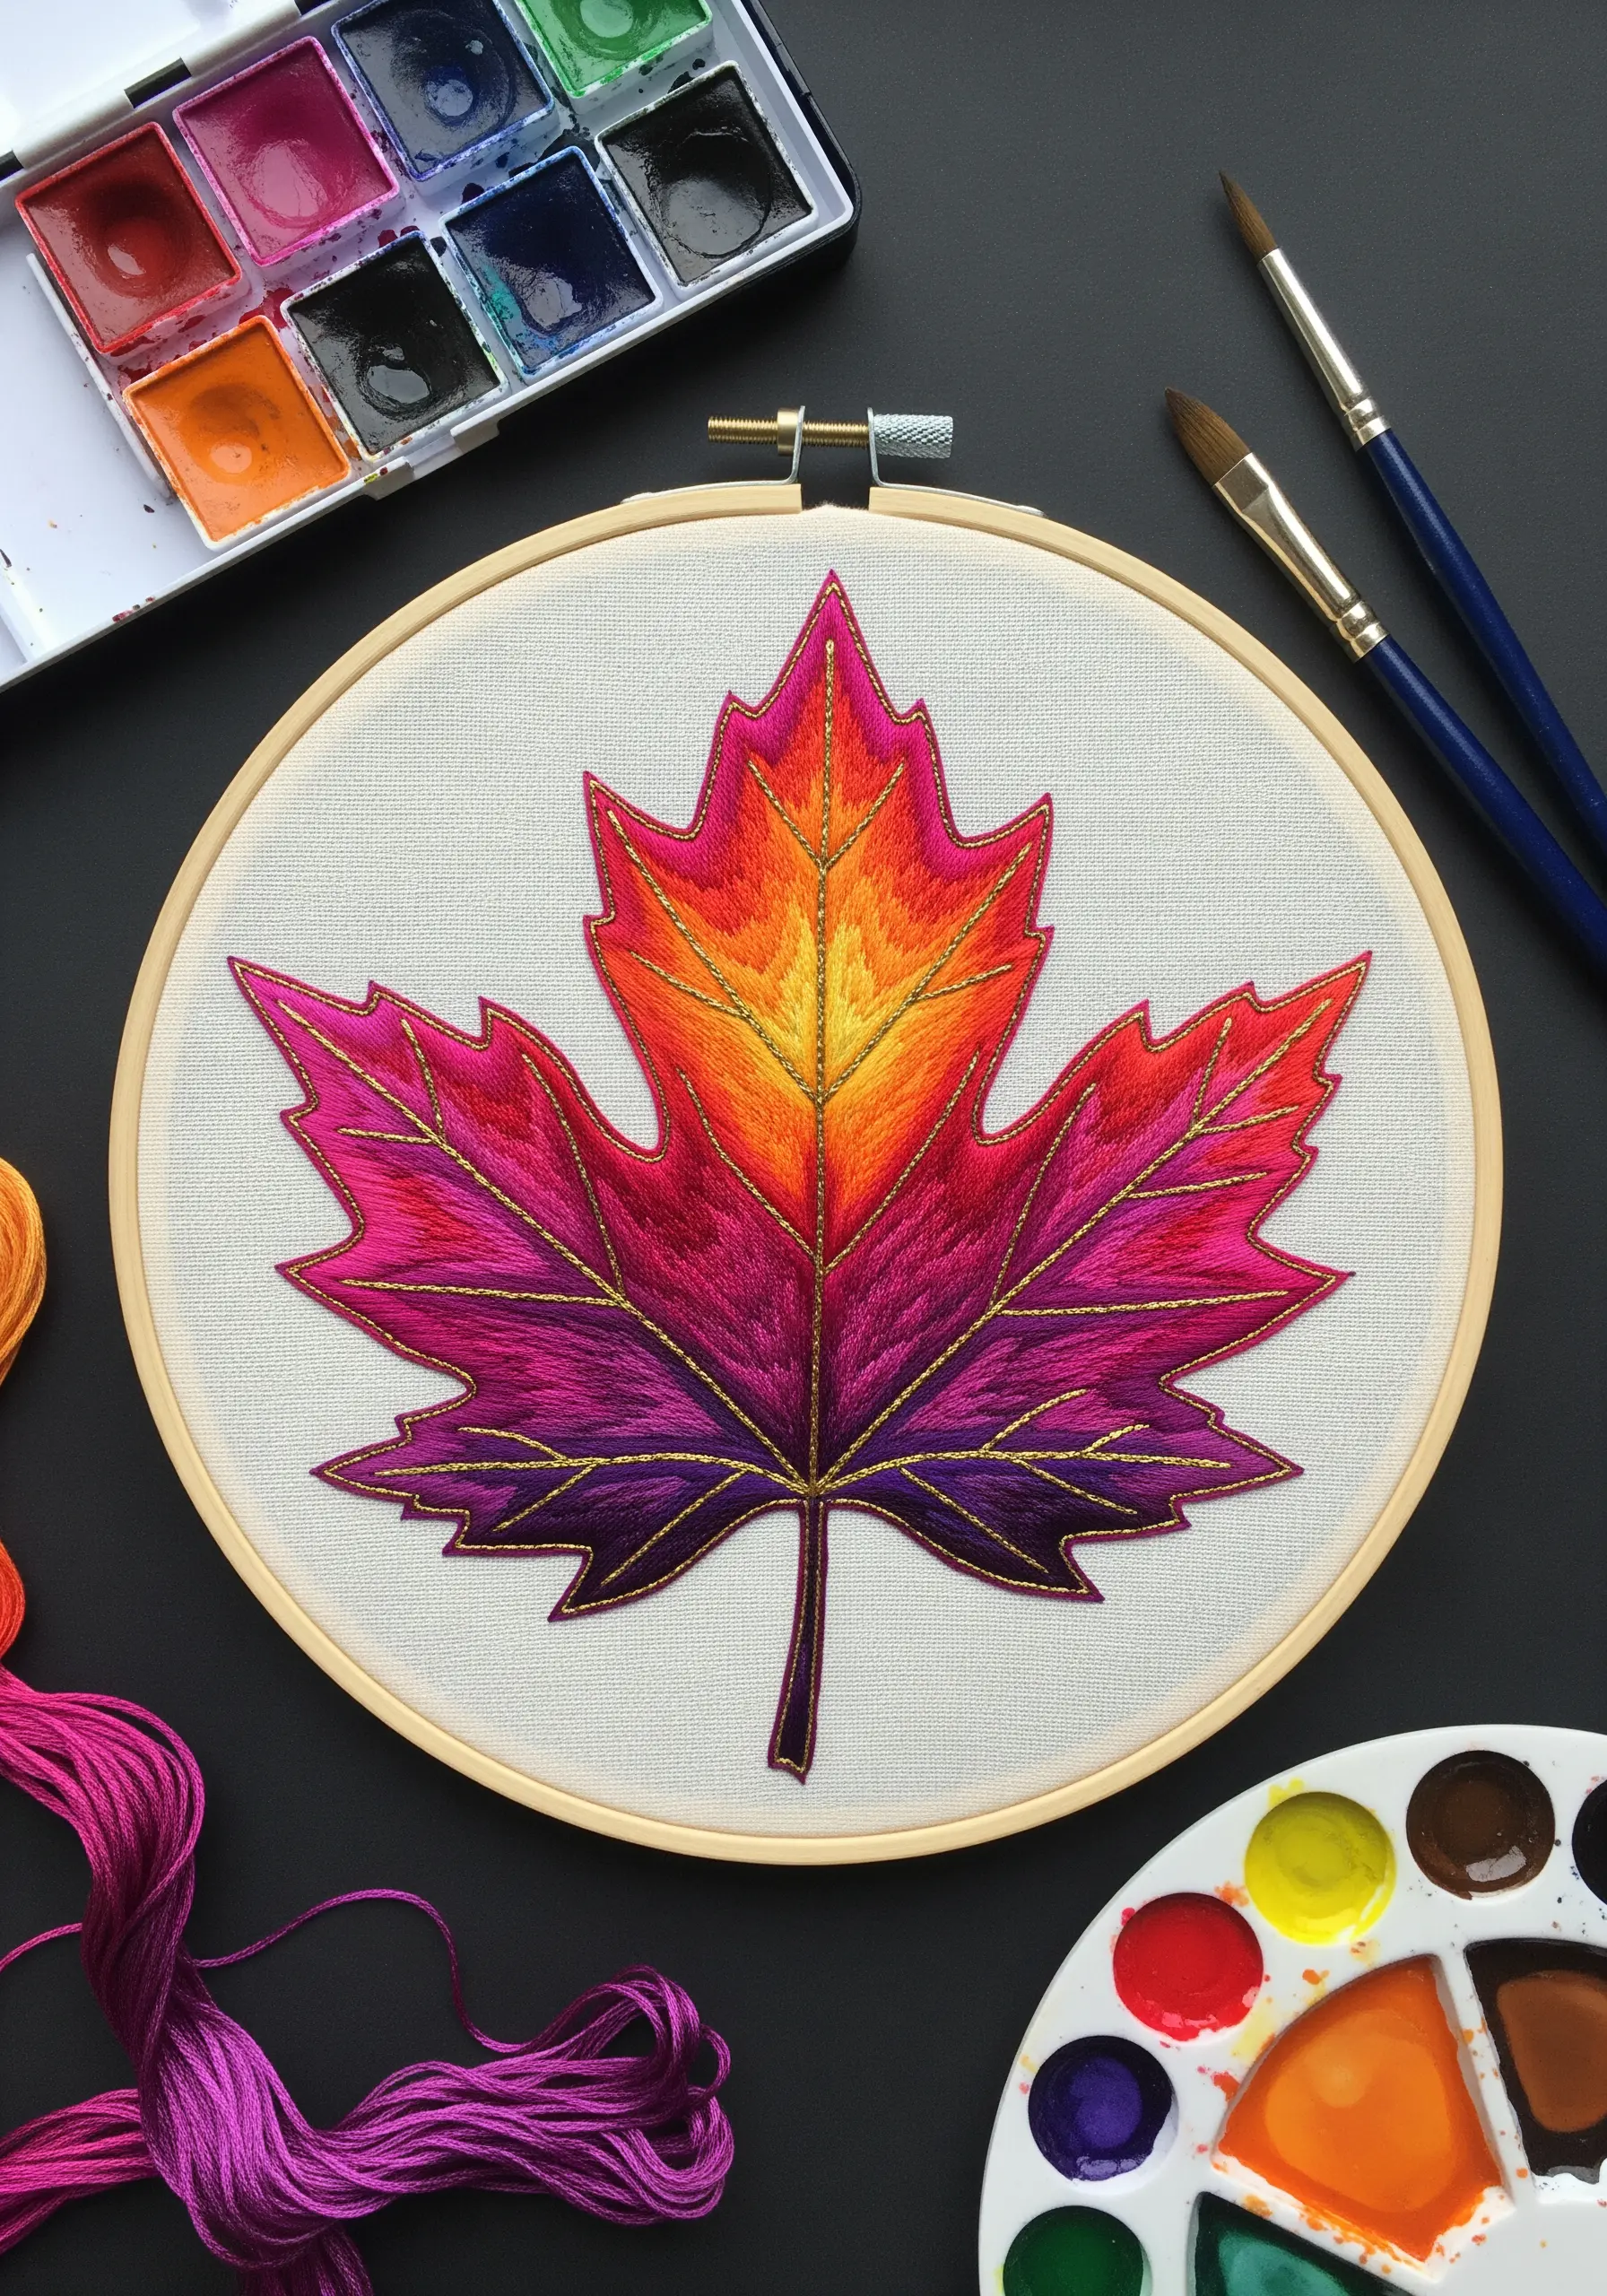
Begin this project with a brush, not a needle. Lightly paint a soft watercolor gradient in the shape of a maple leaf onto your fabric and let it dry completely.
The paint creates a beautiful, soft base that adds depth to your stitching. Use long-and-short stitch to embroider over the colors, enhancing the gradient rather than covering it.
Finally, outline the leaf with a fine metallic gold thread using a simple backstitch. This adds a touch of light and definition that makes the whole piece shimmer.
9. Adding a Touch of Frost with Beads
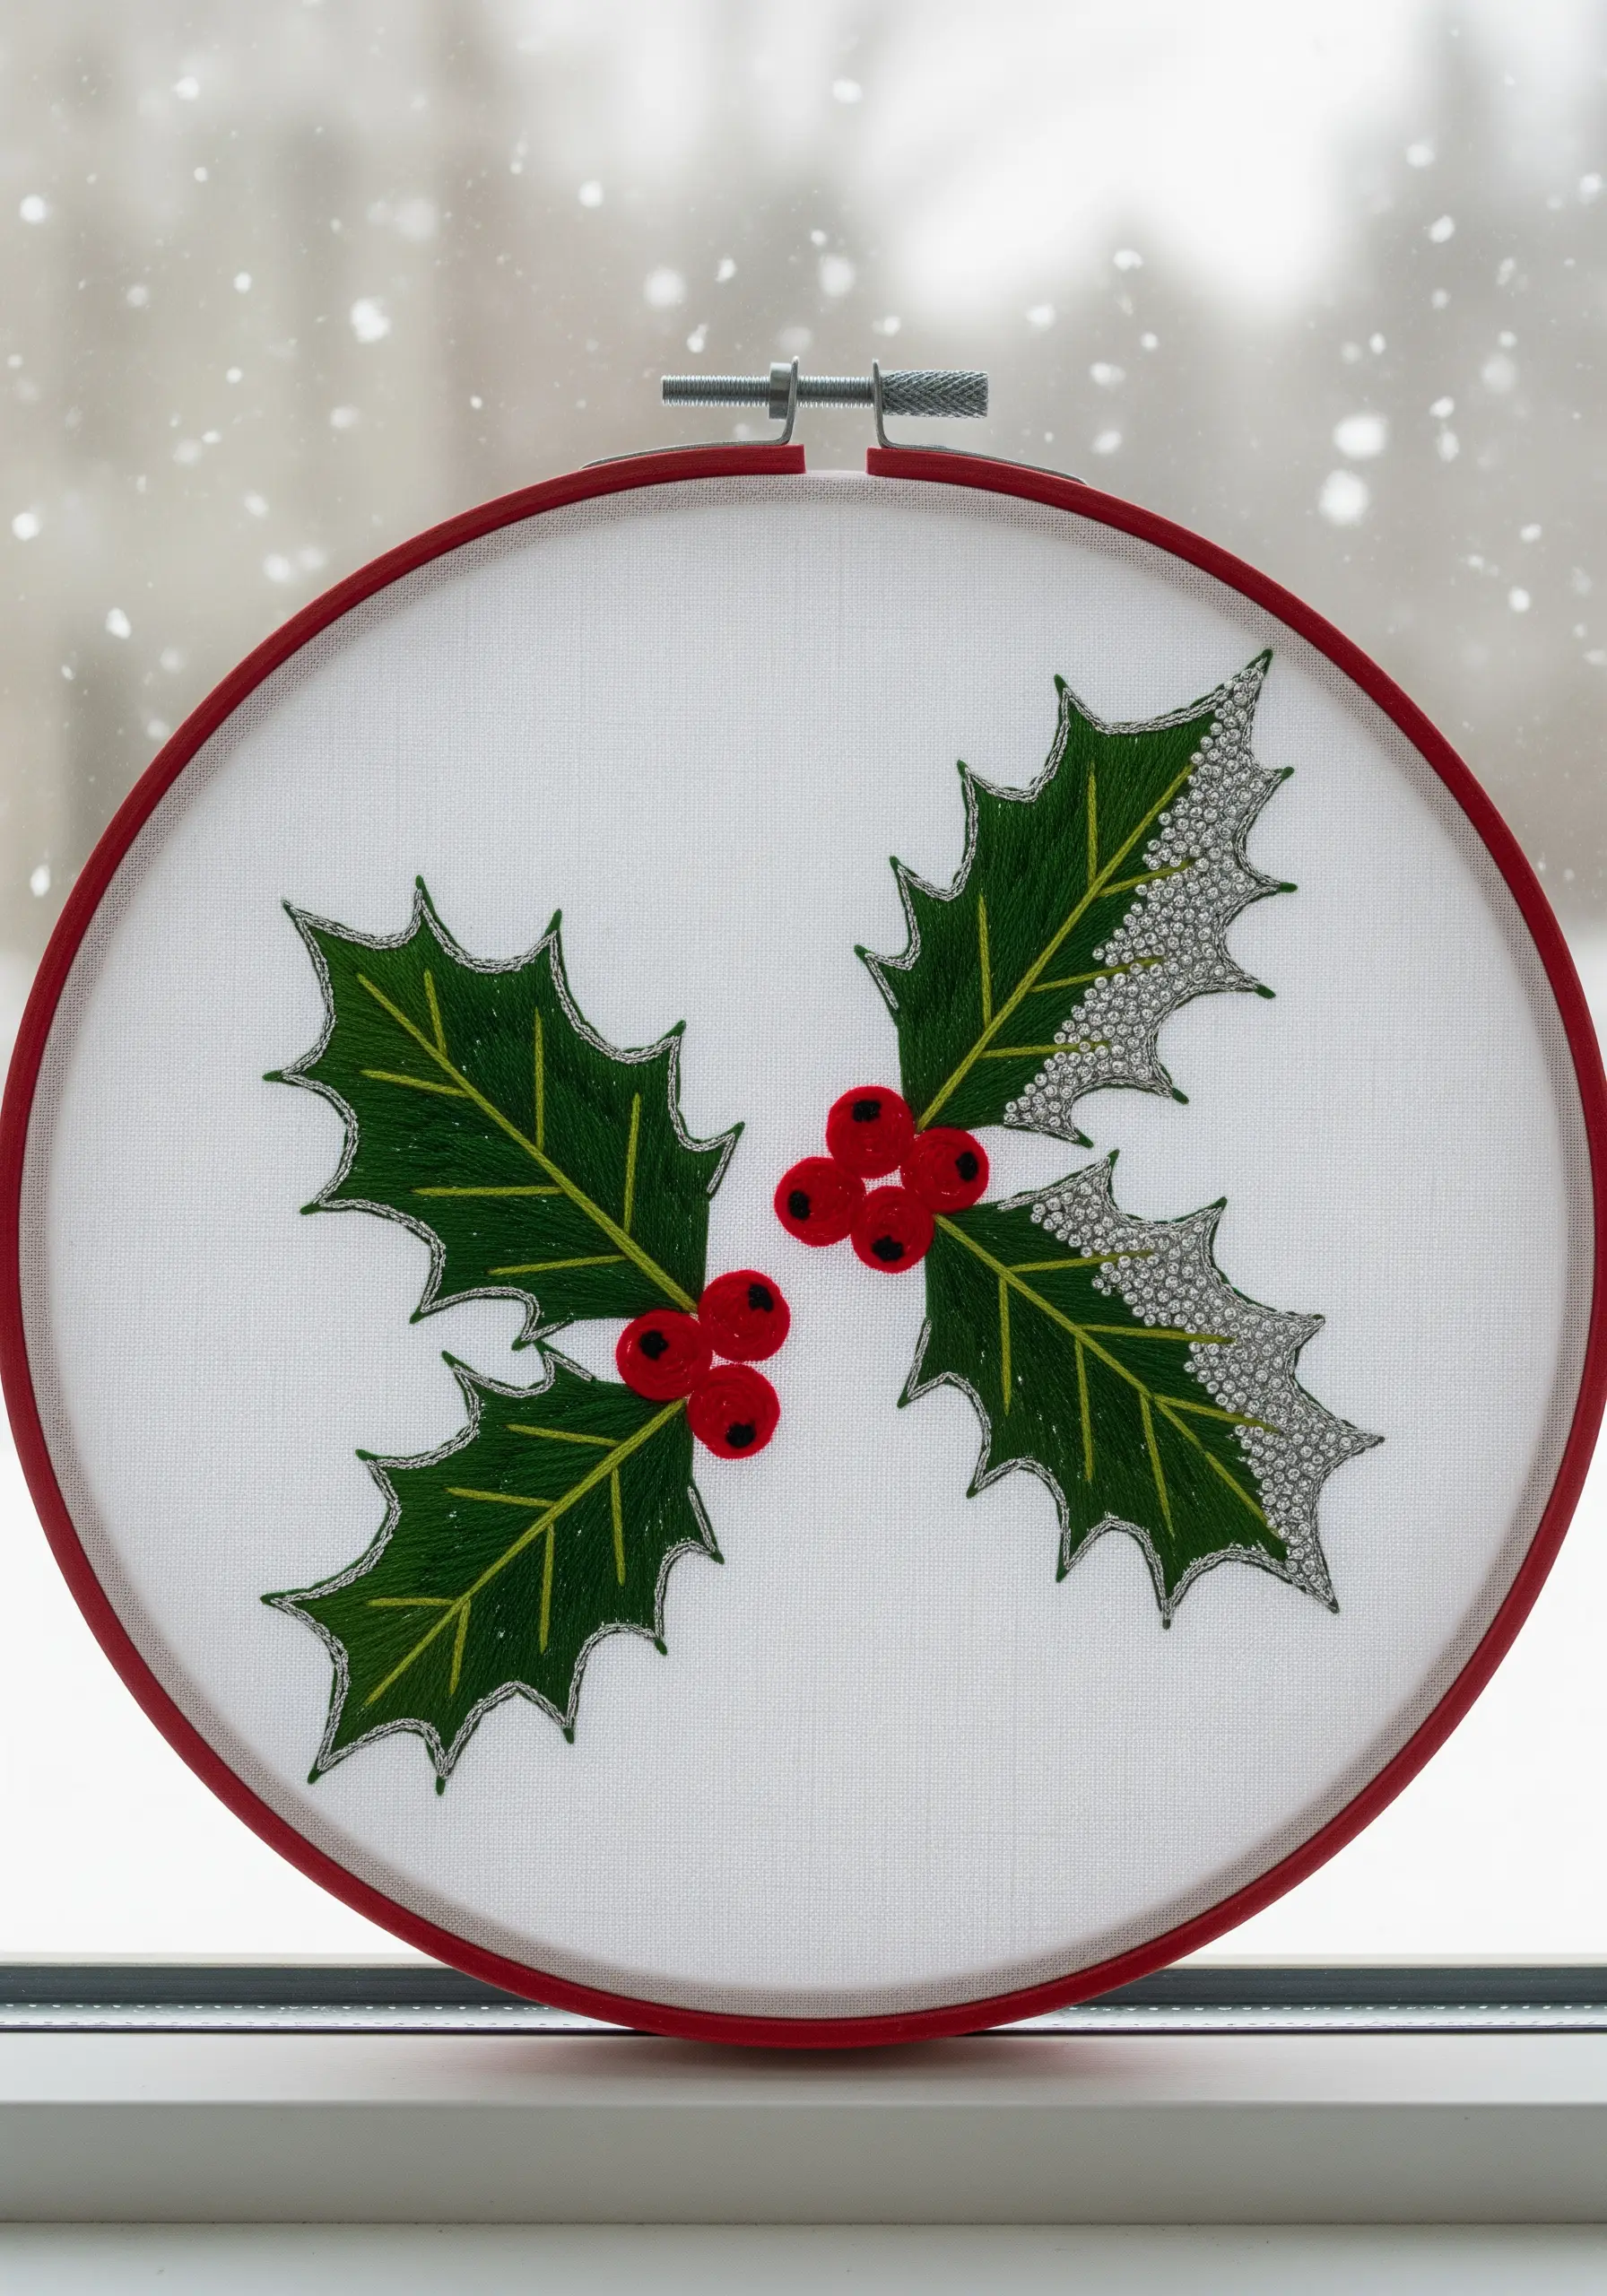
Transform a classic holiday motif with delicate, textural accents. After filling your holly leaves with green satin stitch, add the illusion of frost.
Using a single strand of white or silver thread, secure tiny clear or white seed beads along the pointed edges of the leaves. This adds a subtle sparkle and tactile dimension.
For the berries, use a high-sheen red thread to make plump French knots. Wrapping the thread three or four times around the needle will give them a perfectly round, dimensional form.
10. Graphic Botanicals for Everyday Use
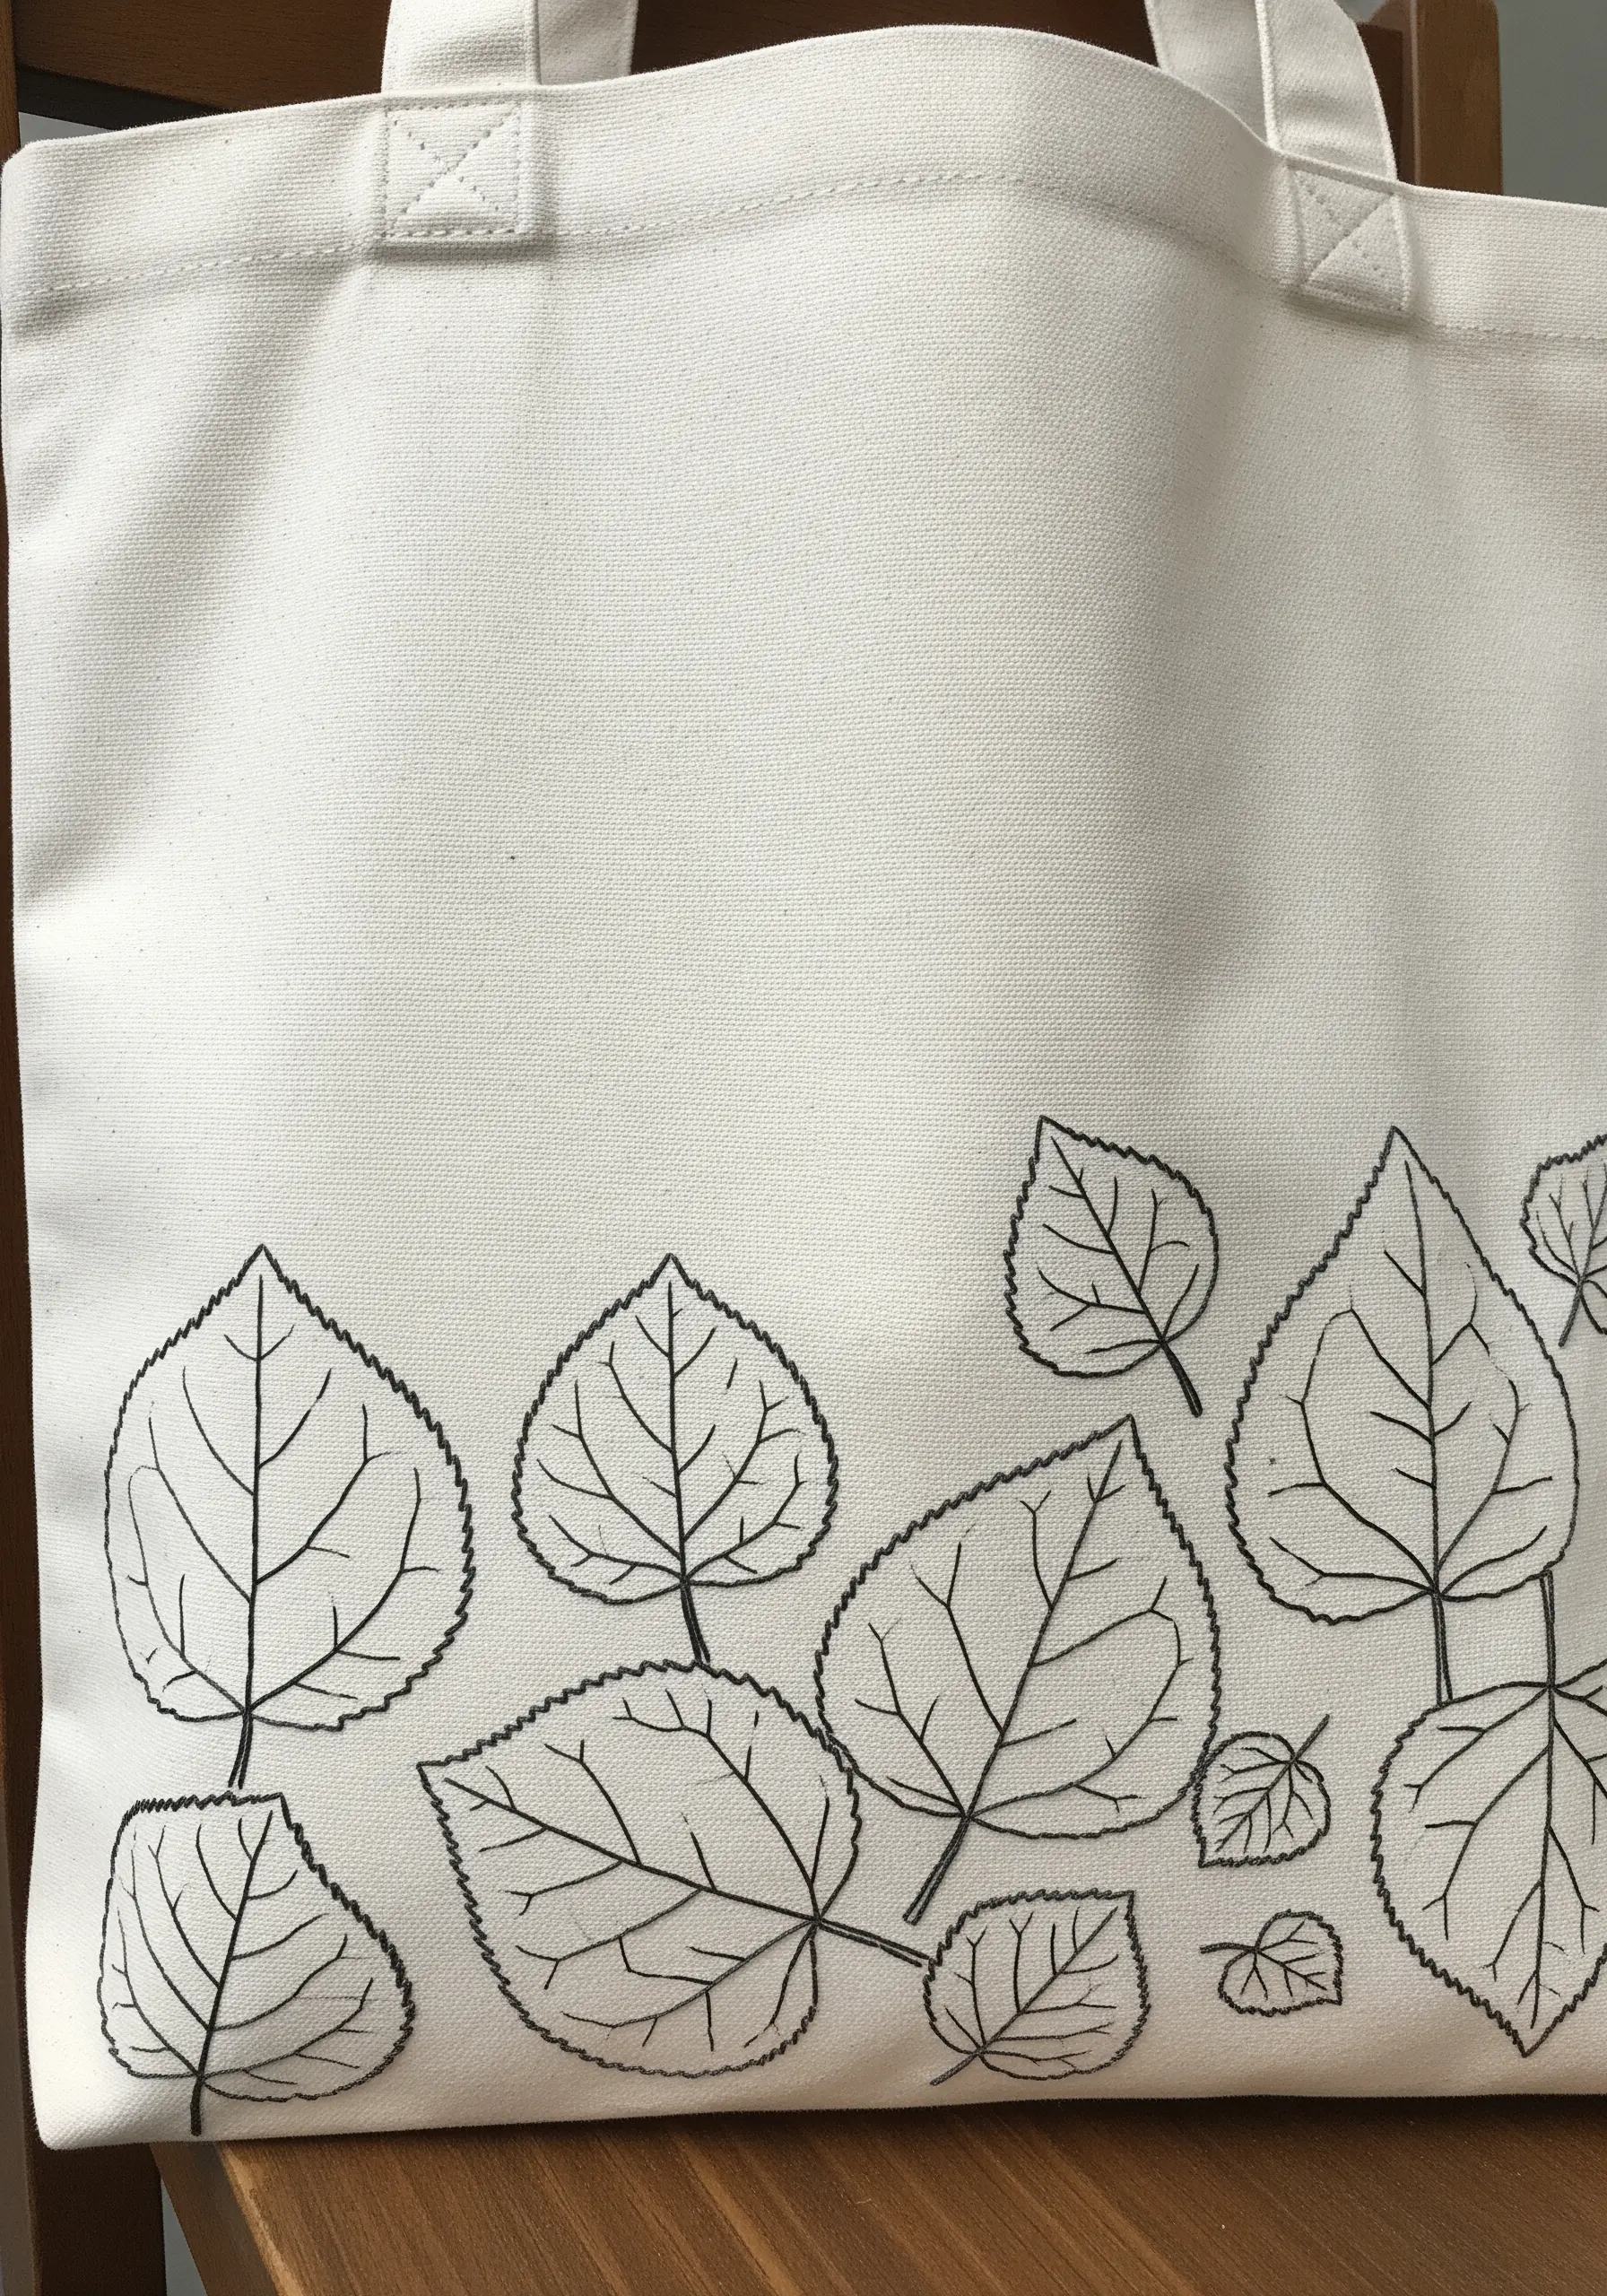
For an item that gets a lot of use, like a tote bag, durability and clarity are essential. A simple backstitch is the perfect choice.
Use all six strands of standard embroidery floss or a thicker Perle cotton to make your lines bold and clear. Trace different leaf shapes along the bottom edge to create an upward-growing, organic border.
To ensure your work lasts through washes and wear, apply an iron-on stabilizer to the inside of the bag before you begin stitching. This prevents the fabric from stretching and secures your stitches.
11. The Mixed-Media Botanical Press
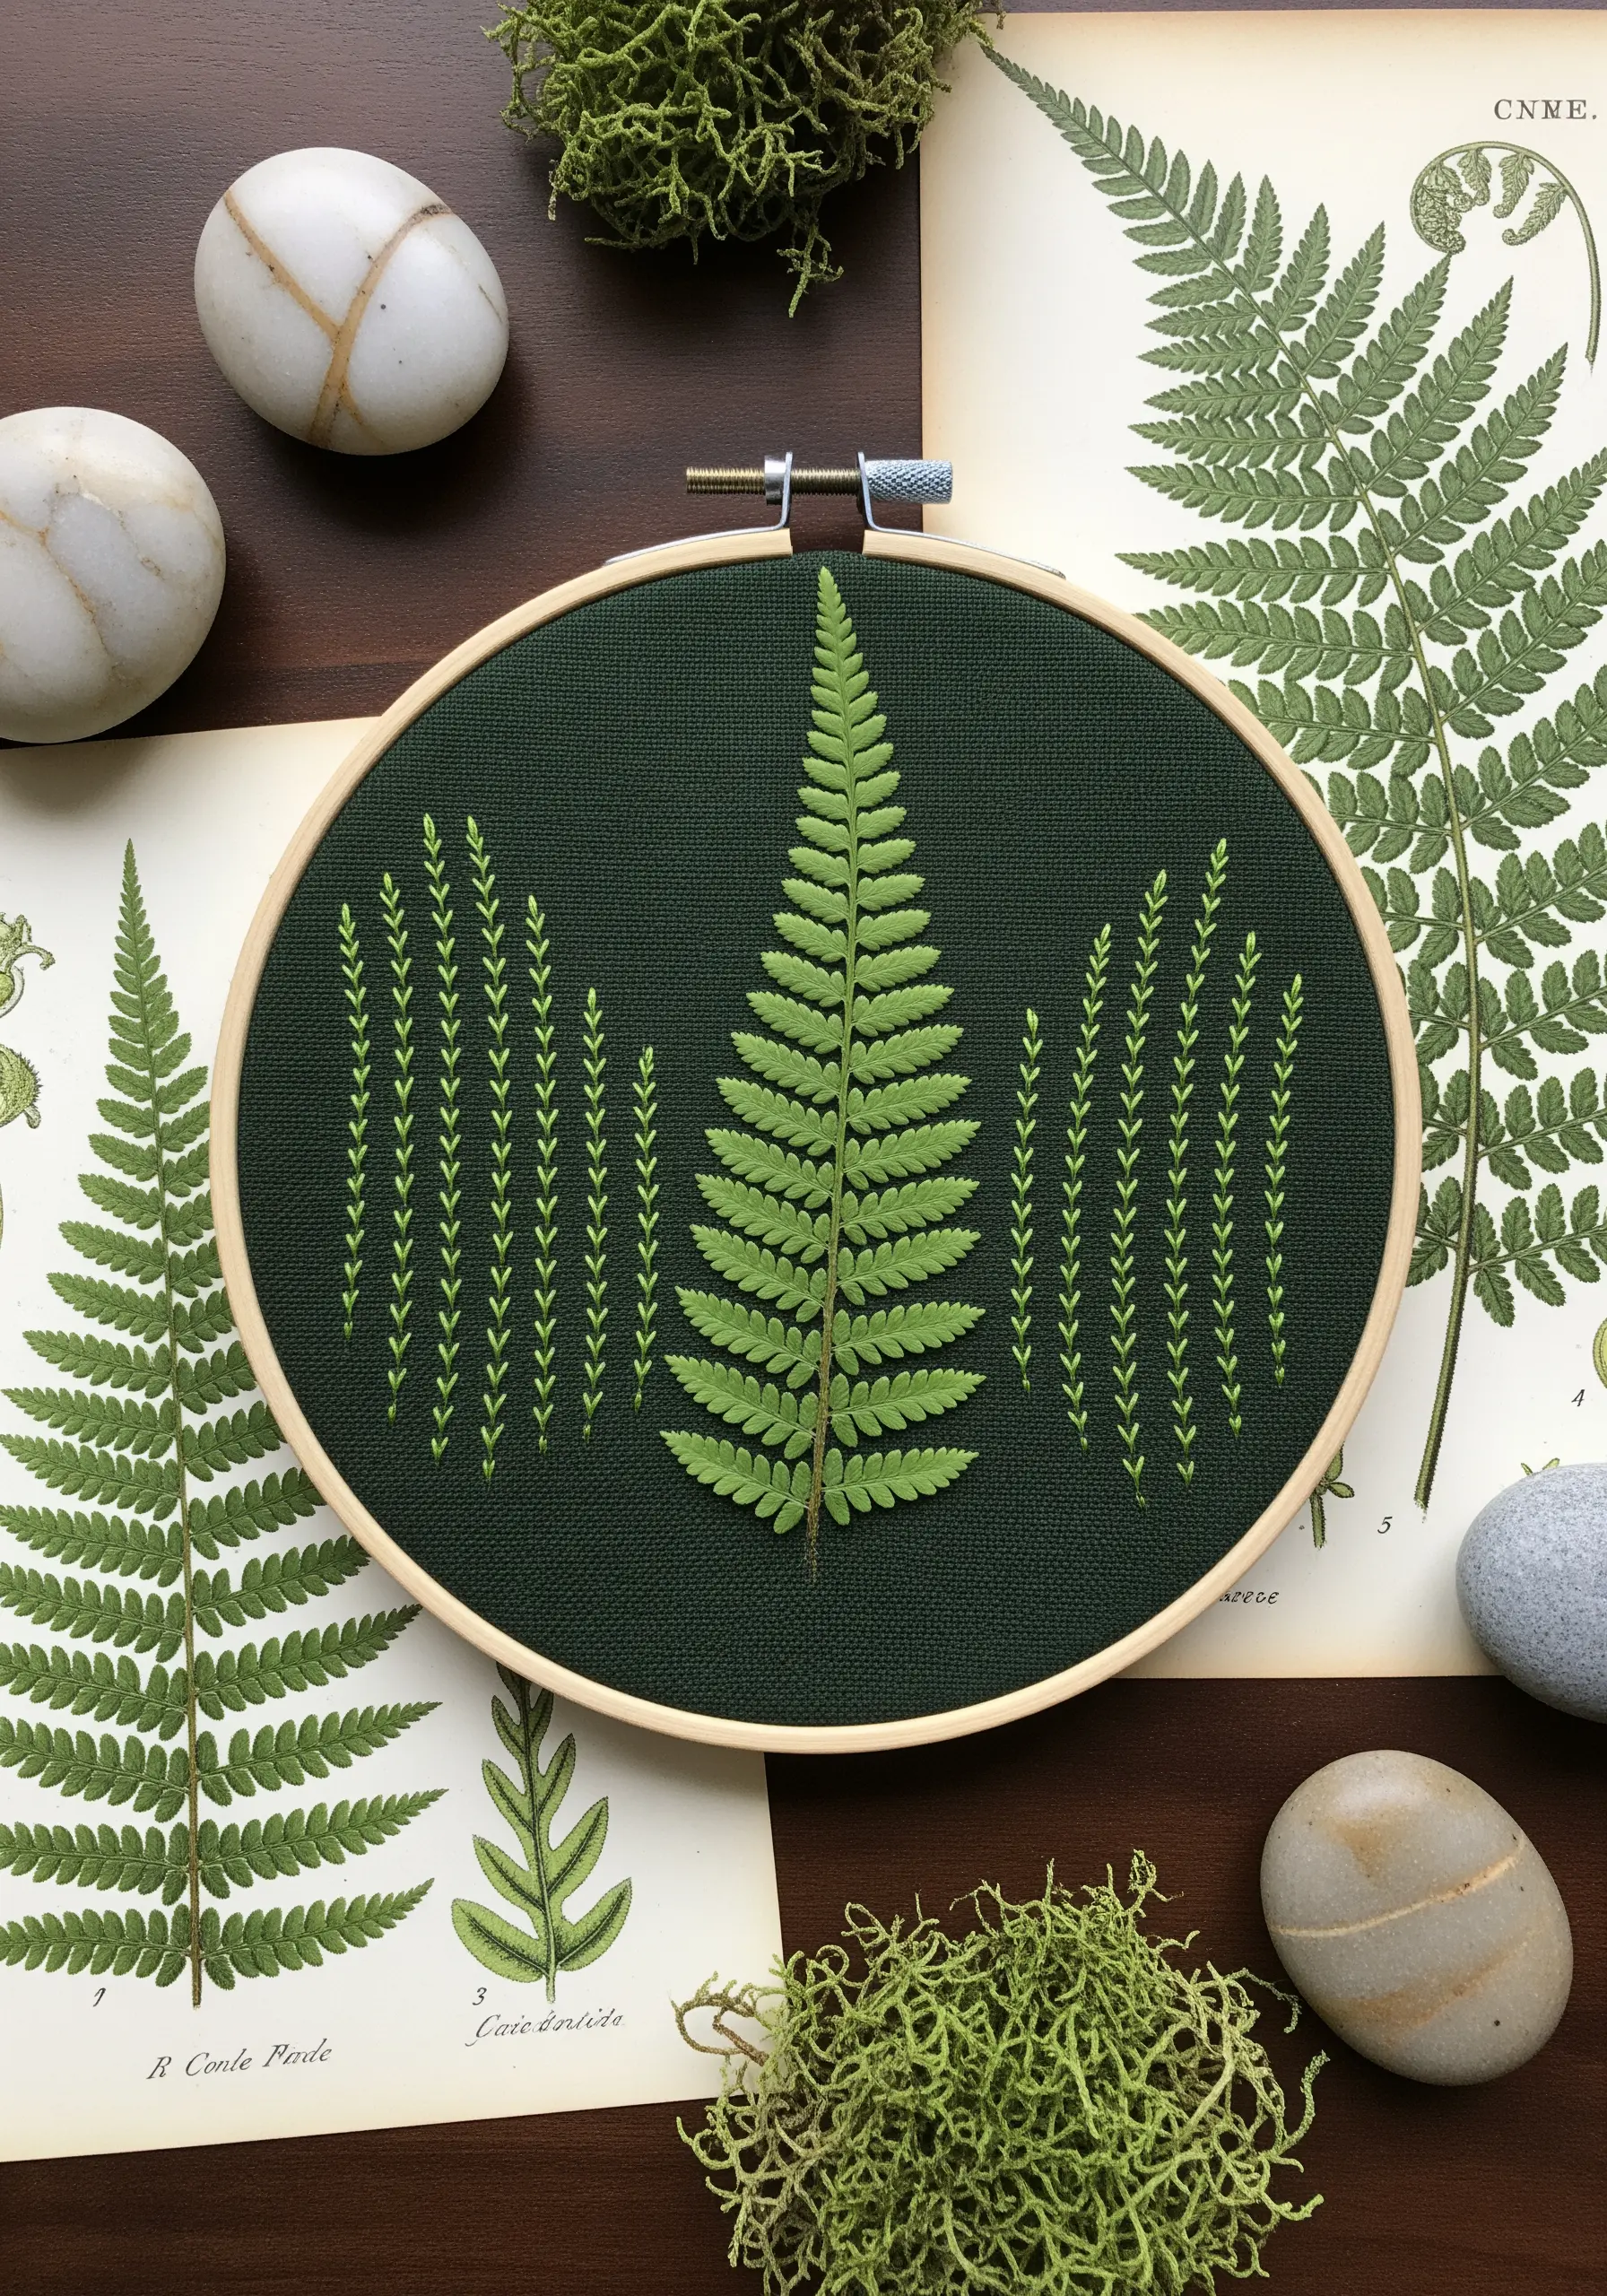
Create a dialogue between real nature and your interpretation of it. This mixed-media contemporary embroidery project begins with a real, pressed fern.
Carefully attach the fern to your fabric with a few tiny, hidden stitches or a dab of acid-free fabric glue.
Then, surround it with an embroidered “sampler” of textures inspired by the fern. Use fly stitches to mimic the individual fronds and French knots for spores. This juxtaposition turns a simple leaf into a piece of conceptual art.
12. High-Impact Texture with Couched Yarn
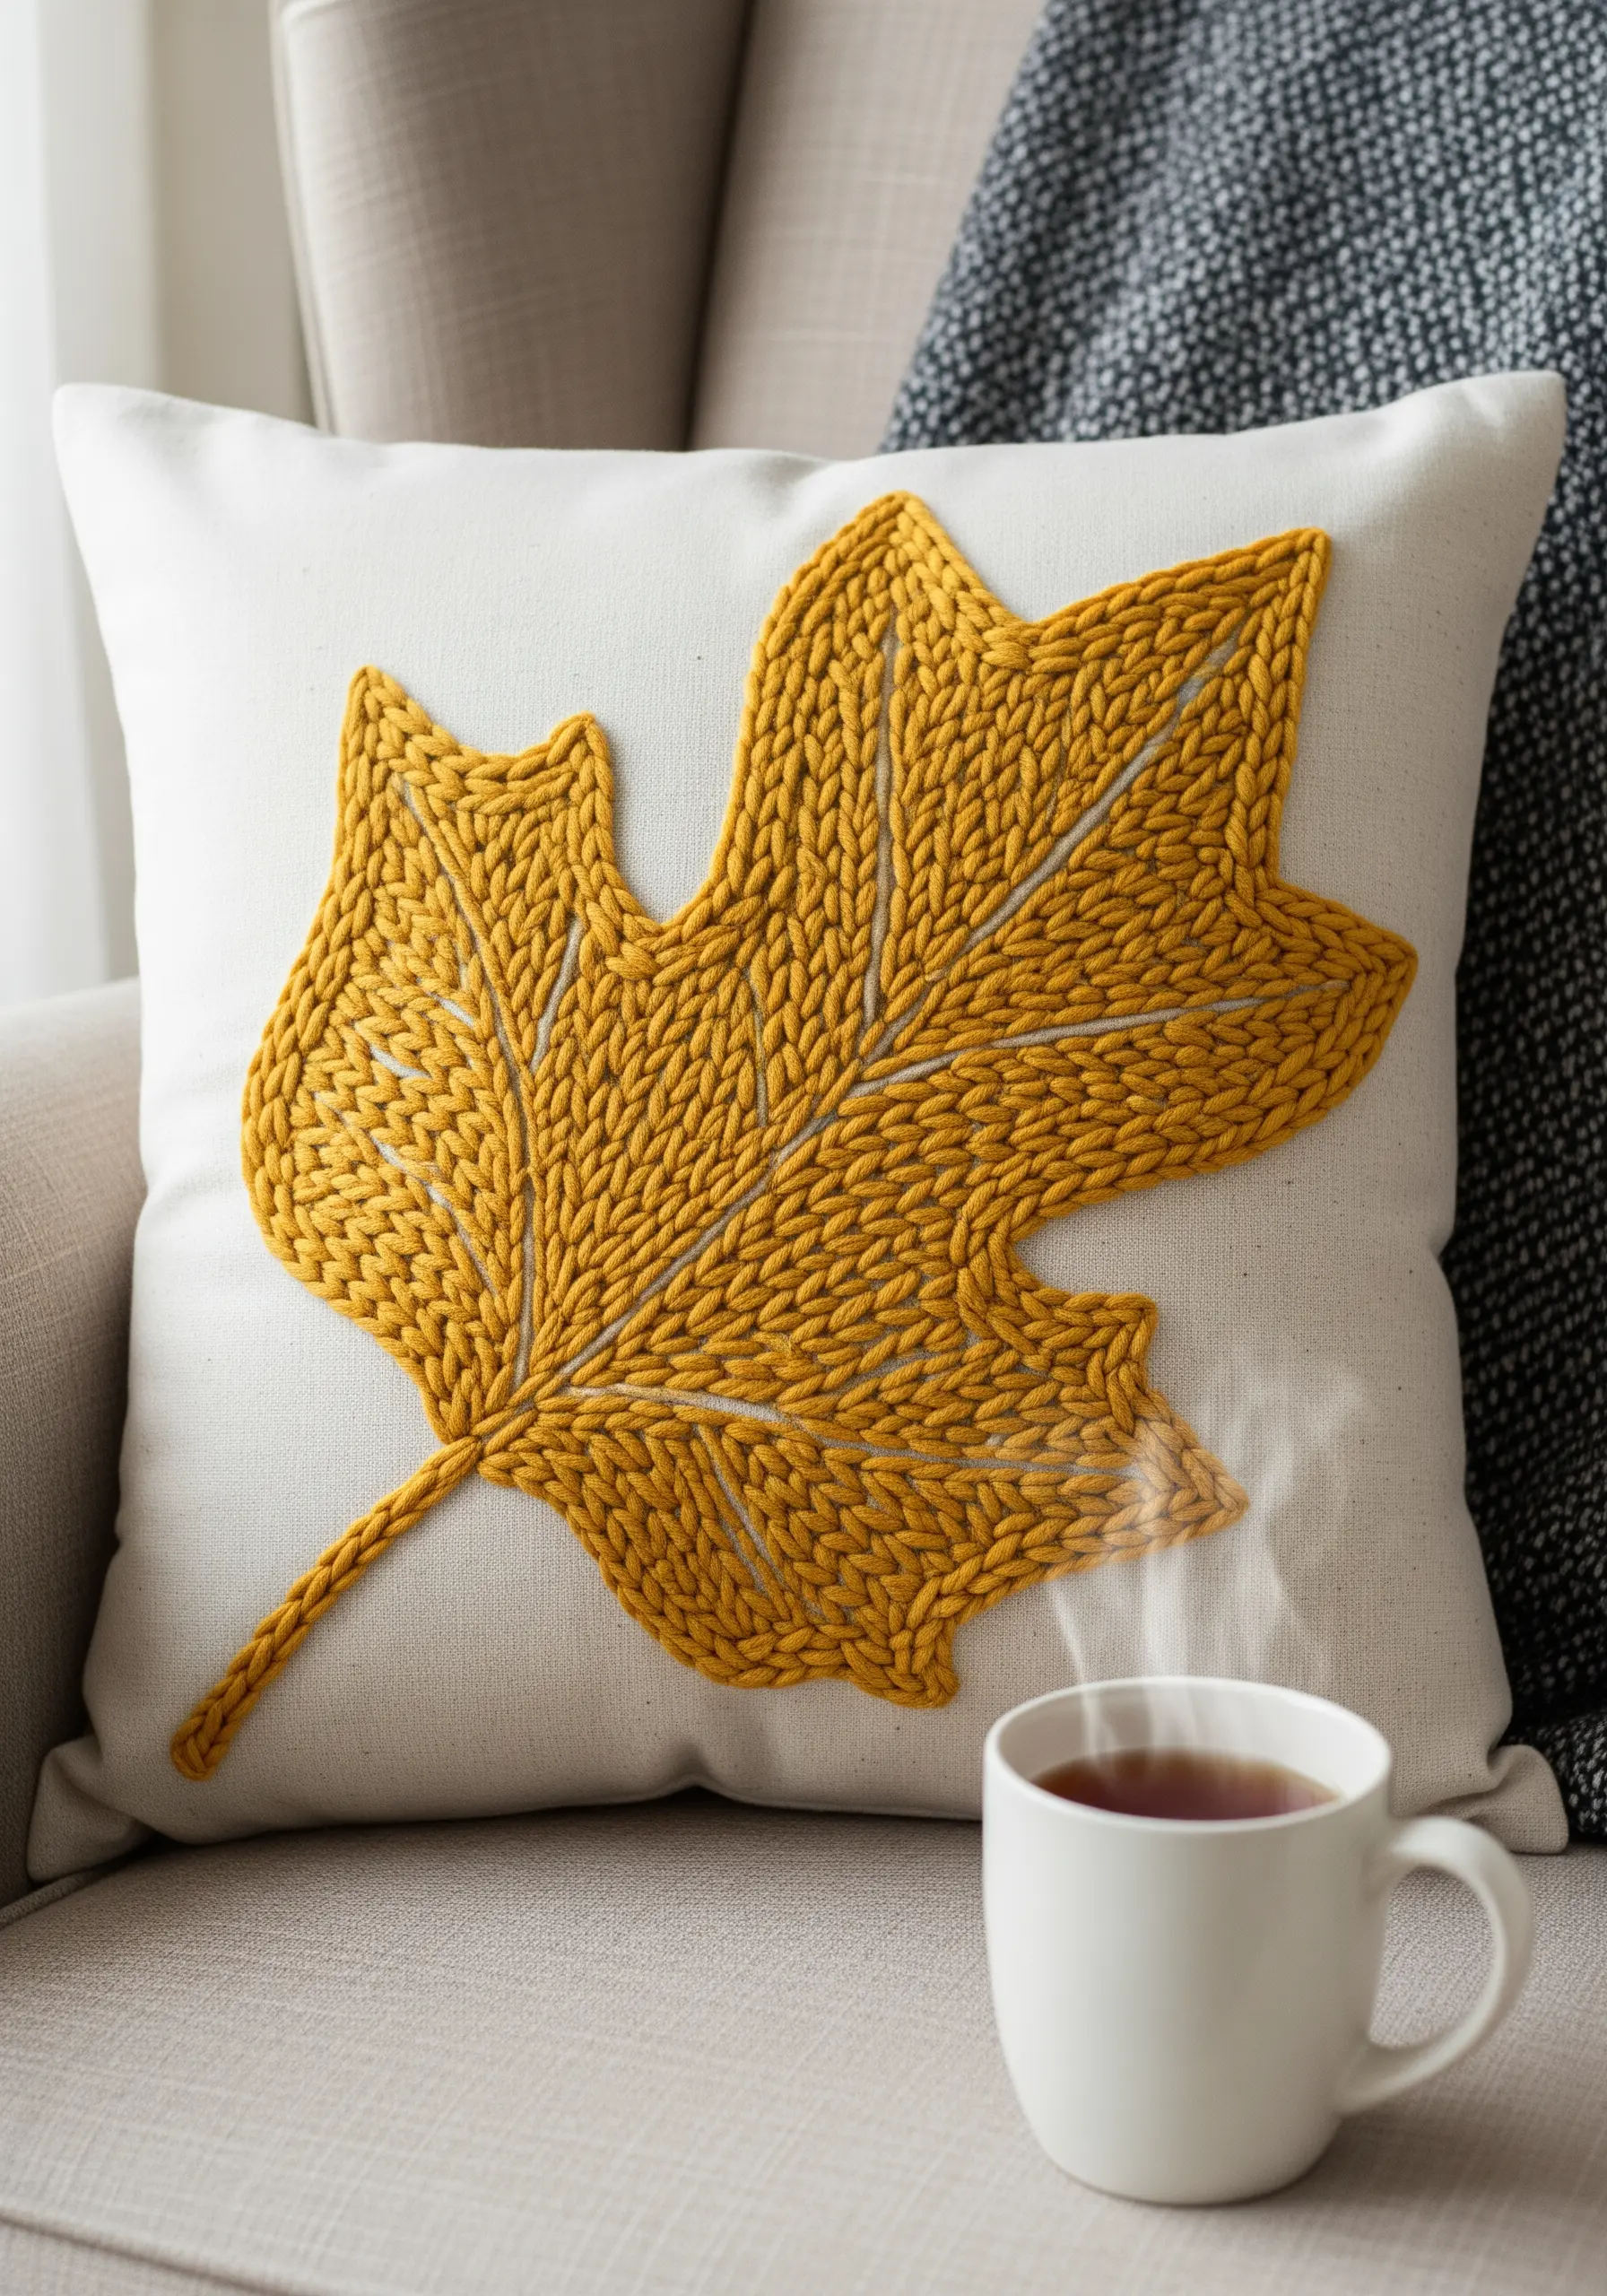
For a bold, cozy texture that regular floss can’t provide, switch to yarn. This technique, called couching, is perfect for home décor like pillows.
Instead of pulling the thick yarn through the fabric, lay it on the surface. Then, use a matching color of standard embroidery floss to make small, evenly spaced tacking stitches that hold the yarn in place.
By laying the yarn in tight rows following the leaf’s shape, you create a dense, knitted effect with a wonderful, tactile quality.
13. A Monochrome Study in Light and Shadow
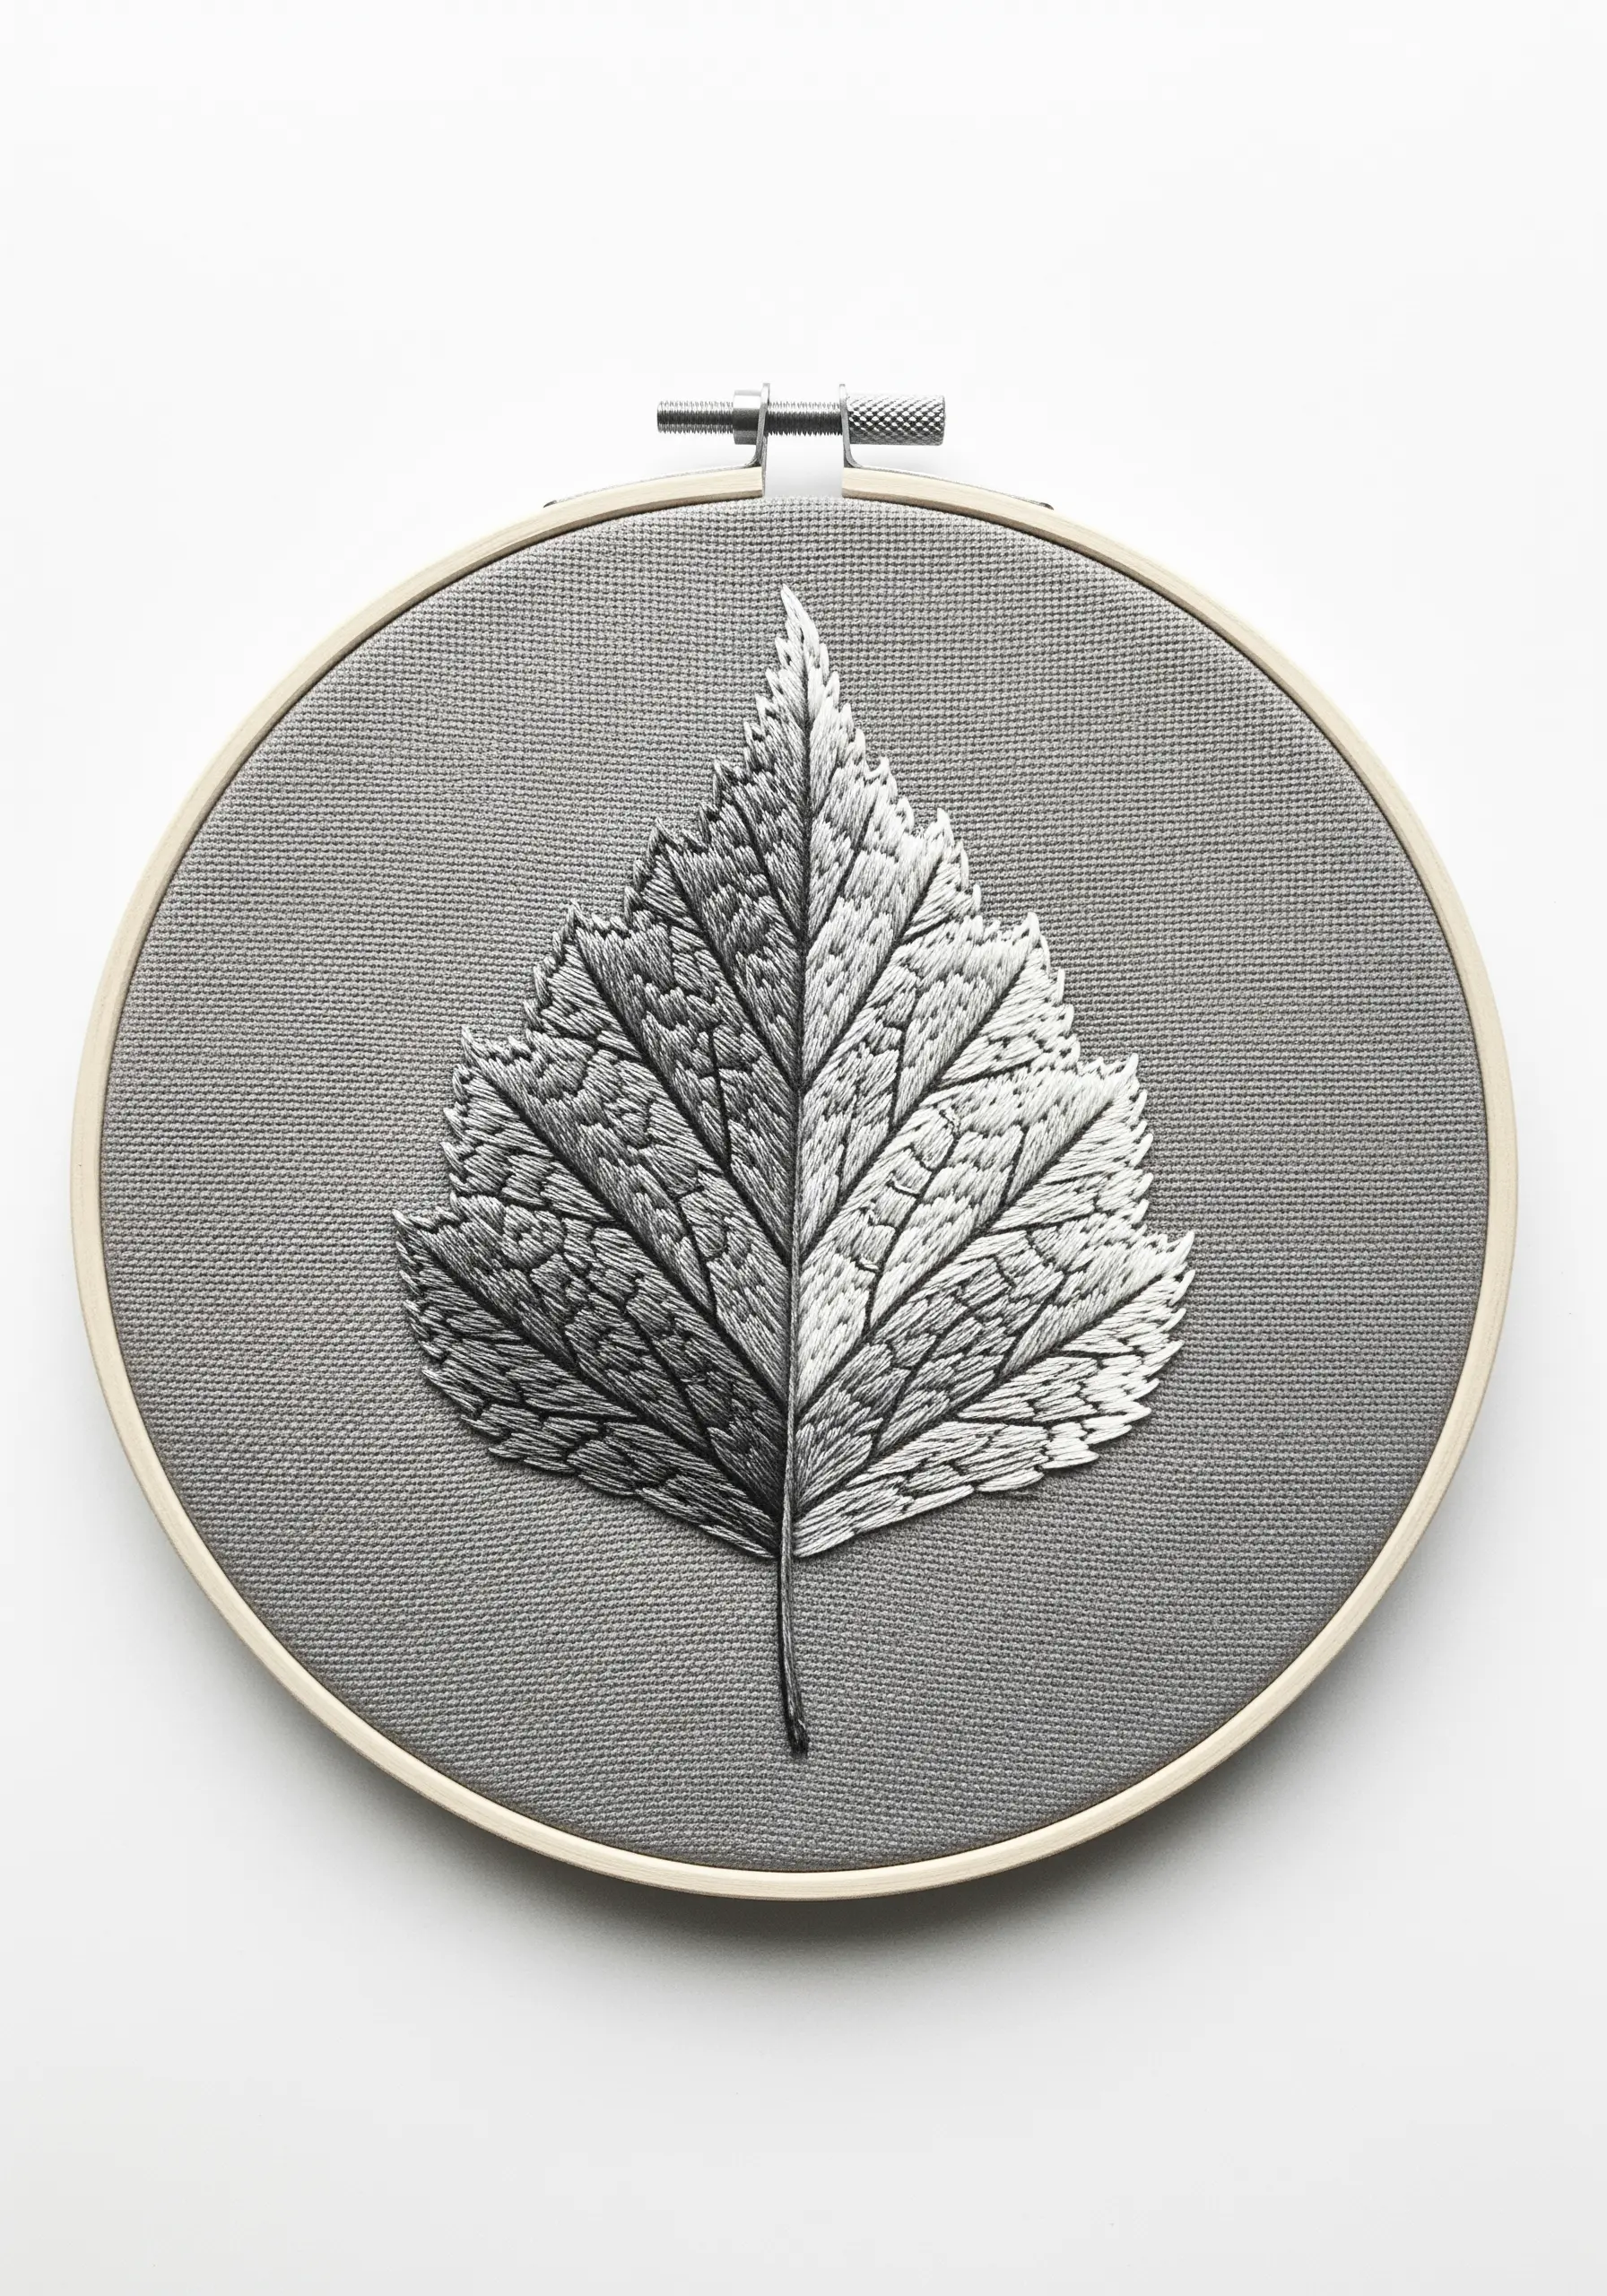
This project is a powerful exercise in understanding value—the relative lightness or darkness of a color.
Divide your leaf template down the central vein. On one side, work with a palette of light greys and off-white. On the other, use dark charcoals and black.
Use long-and-short stitch to blend the shades seamlessly within each half. This forces you to focus on how light and shadow create form, a skill that will improve all of your colorwork.
14. Creating Drama on a Dark Background
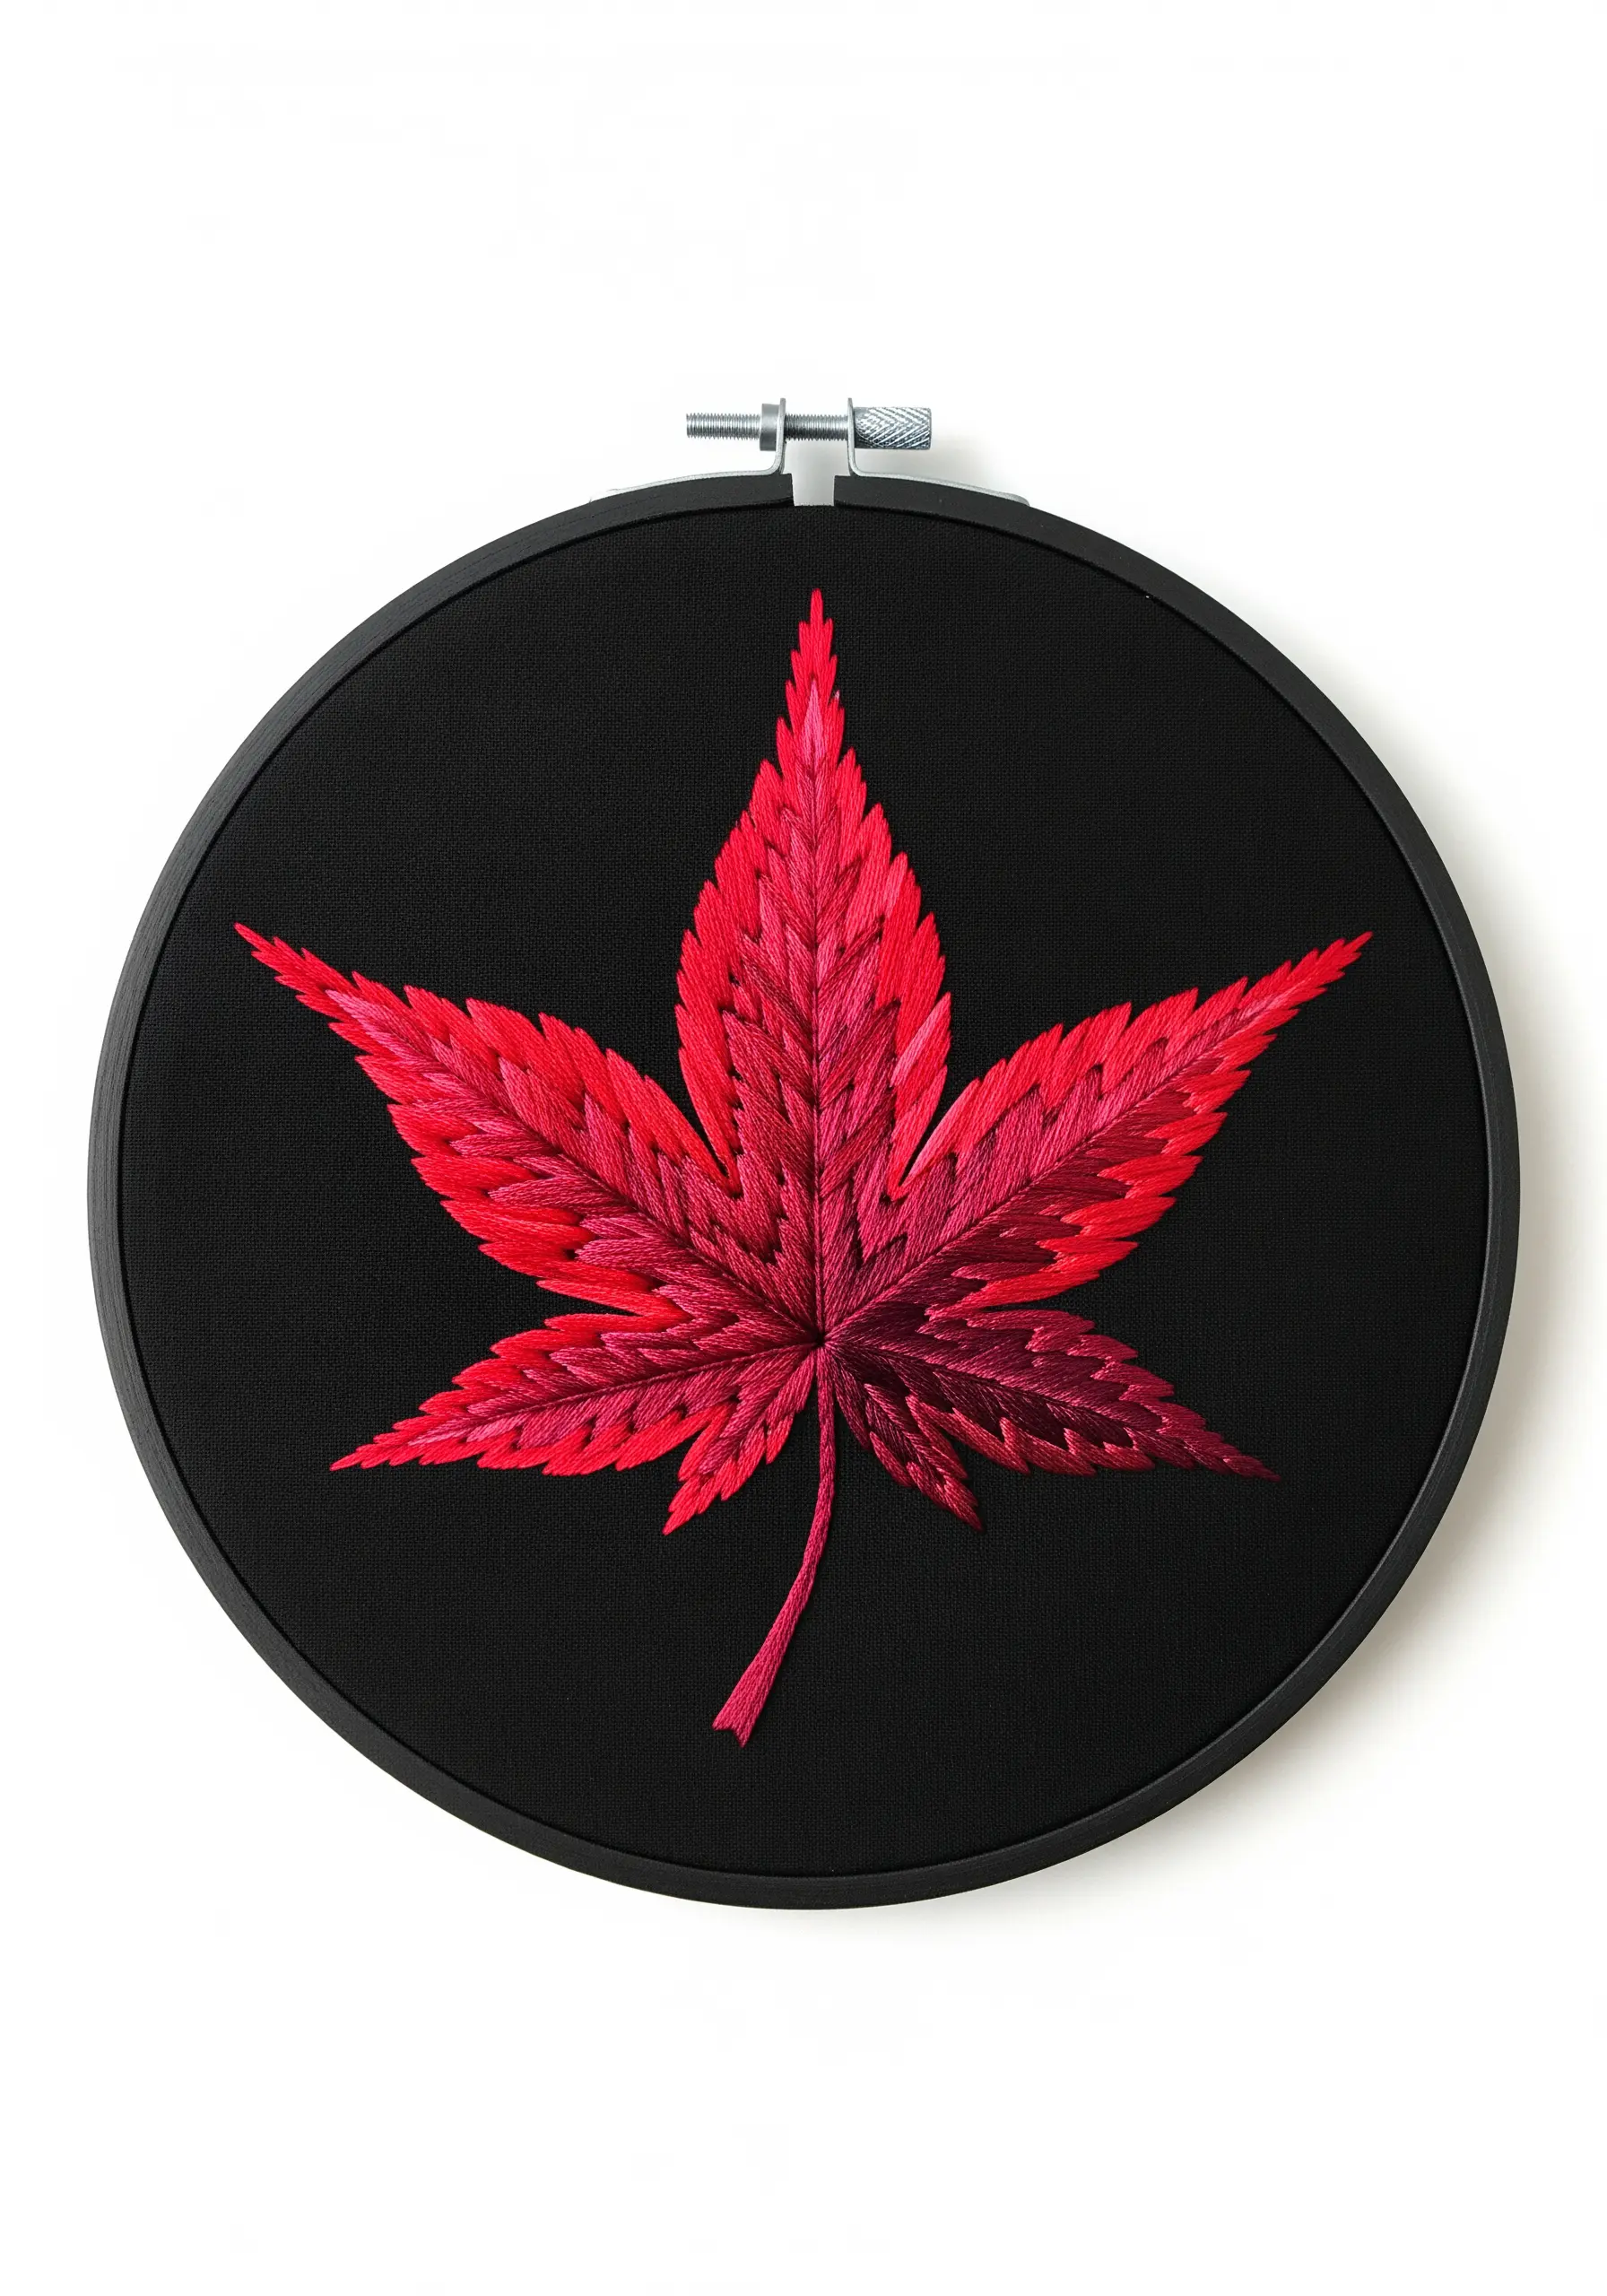
Stitching with vibrant color on a stark black background creates immediate, dramatic contrast. The key to making this Japanese maple leaf feel alive is a sophisticated color palette.
Use at least five shades of red, from a deep, shadowy crimson for the lower parts to a fiery scarlet for the tips where light would hit.
The long-and-short stitch technique is essential here, as it allows you to blend the tones so subtly that the leaf appears to glow from within.
15. Subtle Embellishments for Table Linens
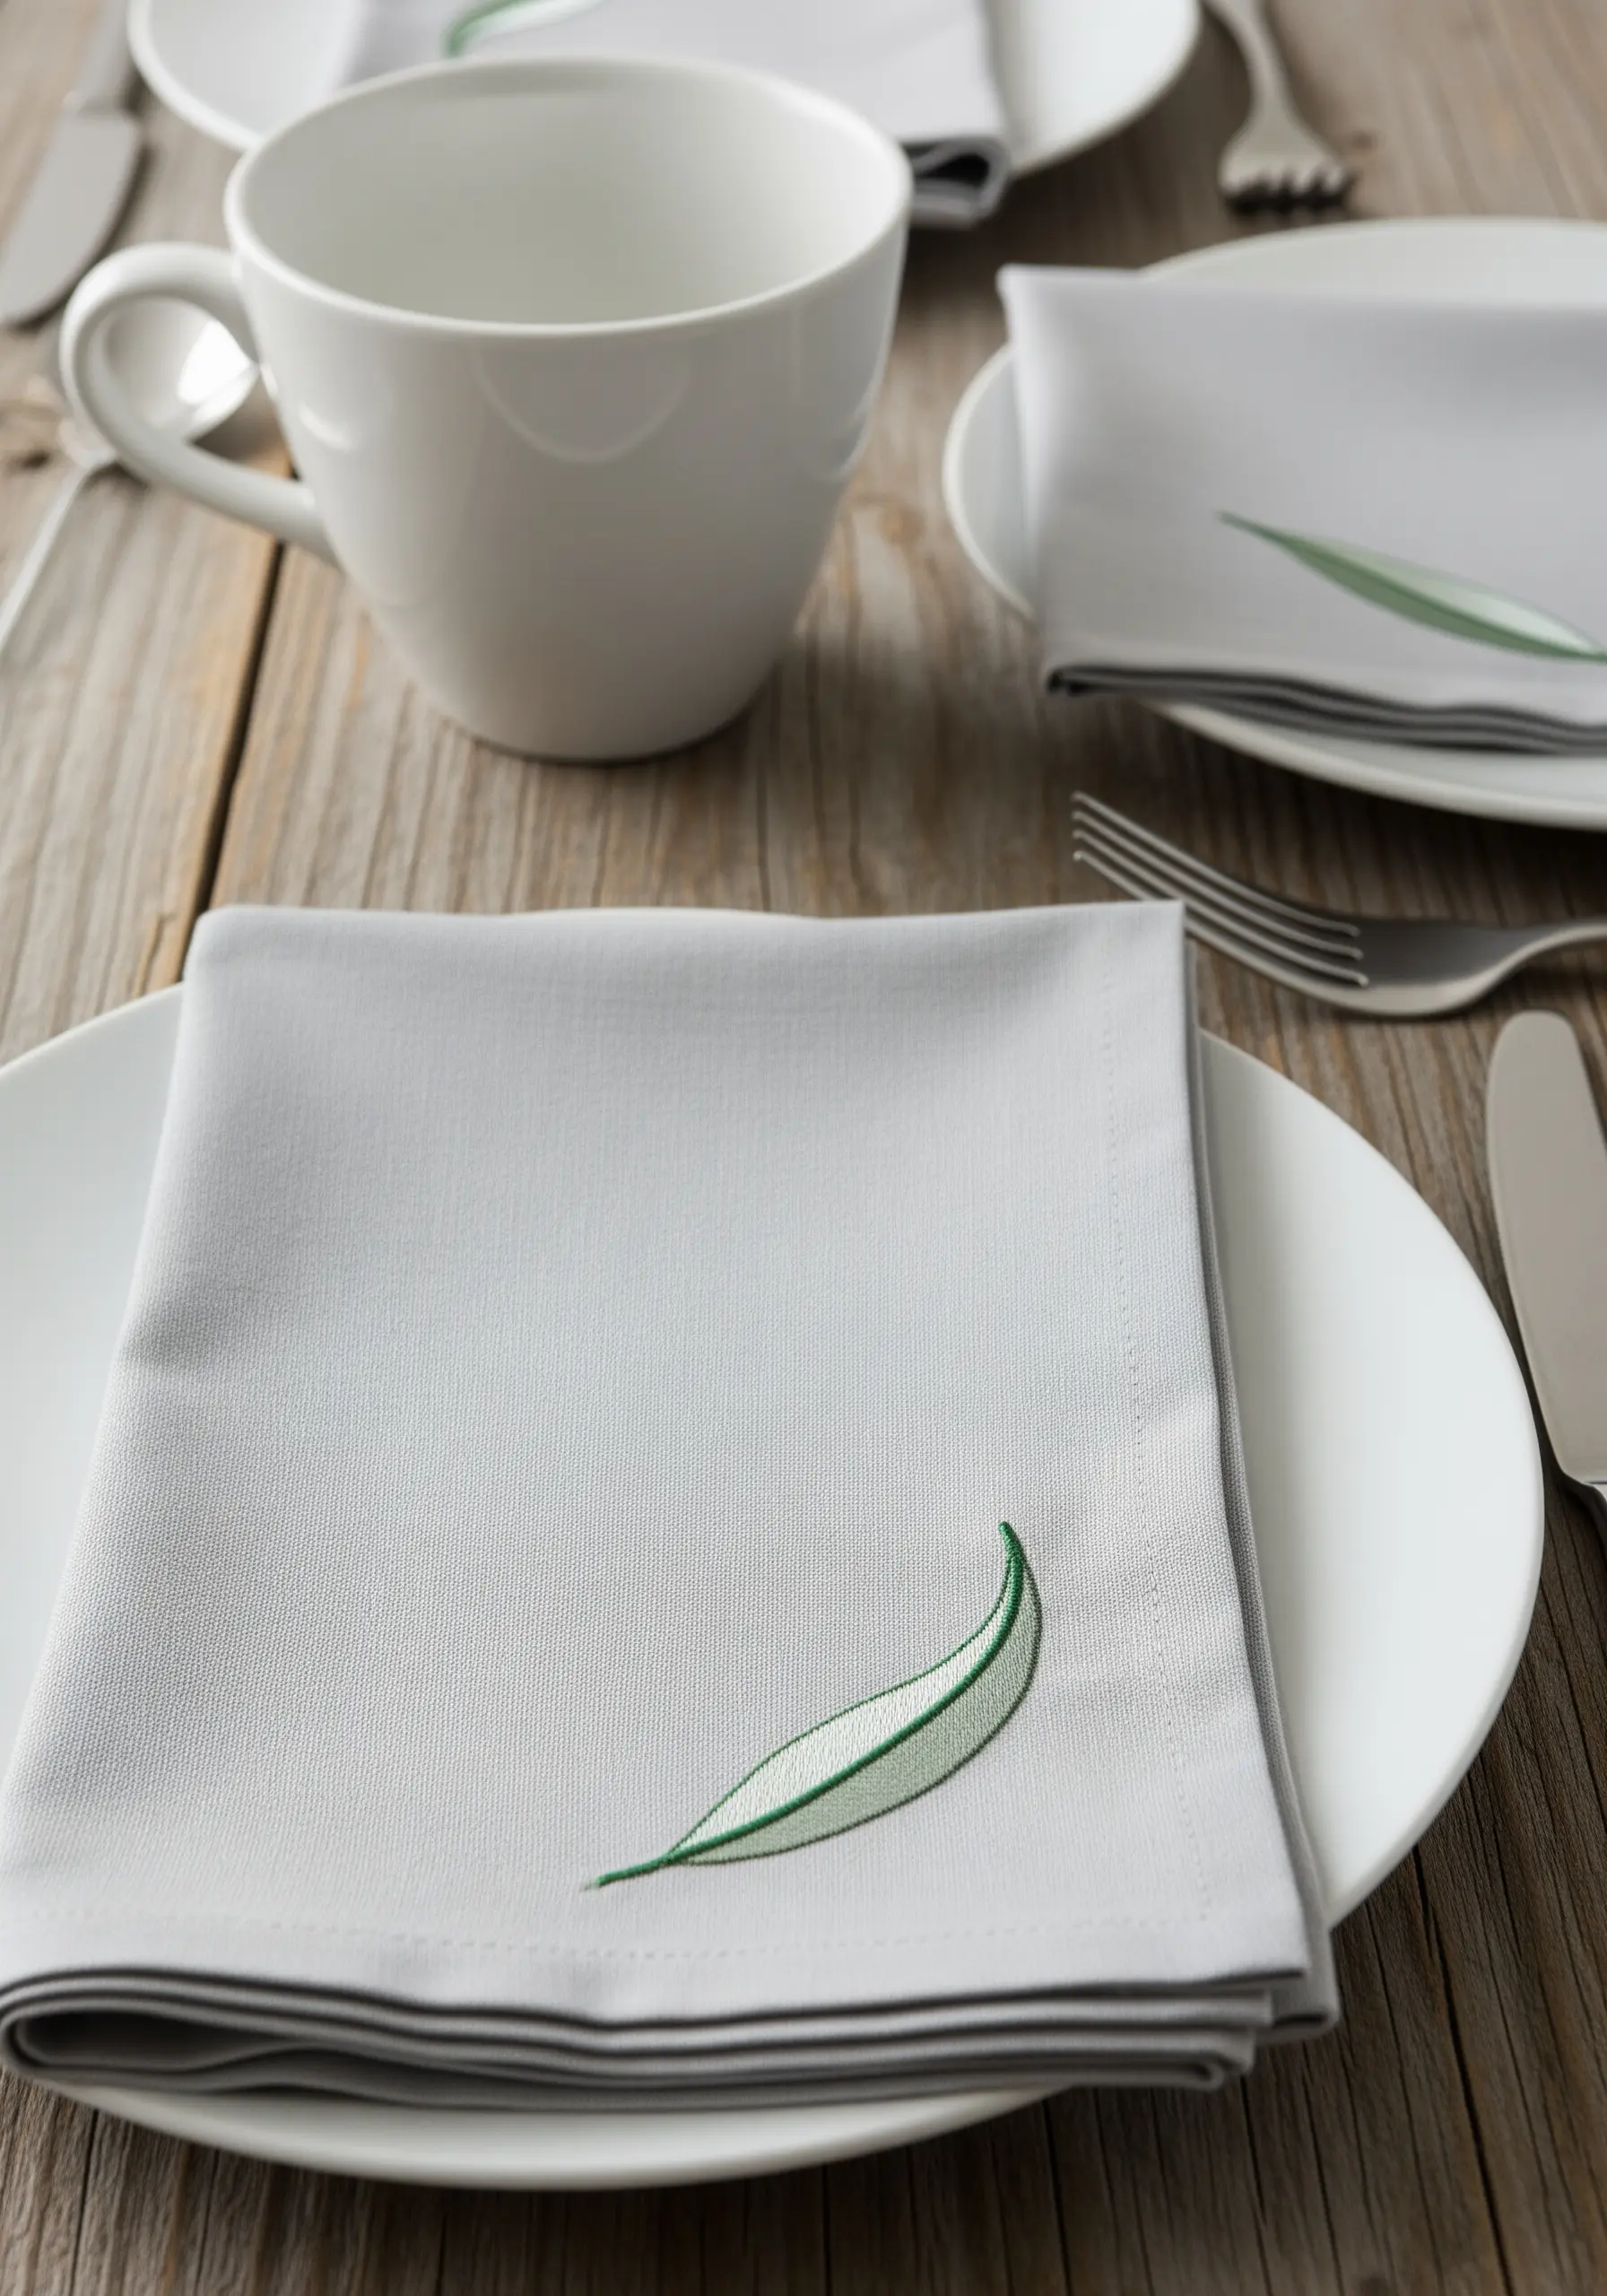
When embroidering functional items like napkins, elegance lies in restraint. A single, perfectly executed motif is more impactful than a large, busy design.
Choose a simple leaf shape and place it in a corner. Use just two or three shades of thread to create a small, gentle gradient with satin stitch.
This is one of those minimalist table linen embroidery ideas that elevates an everyday object into something special and personal.
16. The Scattered Meadow Composition

Break free from the single, centered motif and create a design that feels more organic and alive.
Sketch a scattered arrangement of small clovers, violets, and leaves, varying their orientation and spacing to mimic a natural meadow.
Use a mix of stitches: satin stitch for some clover leaves, simple backstitch outlines for others, and tiny lazy daisy stitches for the flower petals.
This approach transforms a simple hoop into one of your own nature-themed embroidery samplers, perfect for practicing different techniques in one piece.
17. The Flawless Whipped Backstitch Outline
For a complex shape with many curves, a standard backstitch can appear jagged. To achieve a perfectly smooth, continuous line, use a whipped backstitch.
First, stitch the entire outline with a basic backstitch. Then, using a second length of the same thread, pass your needle under each backstitch from the same direction—without piercing the fabric.
This ‘whipping’ motion wraps the original stitches, covering the gaps and creating a beautiful, cord-like line that gives your line art a professional finish.
18. Large-Scale Stitching for Statement Art
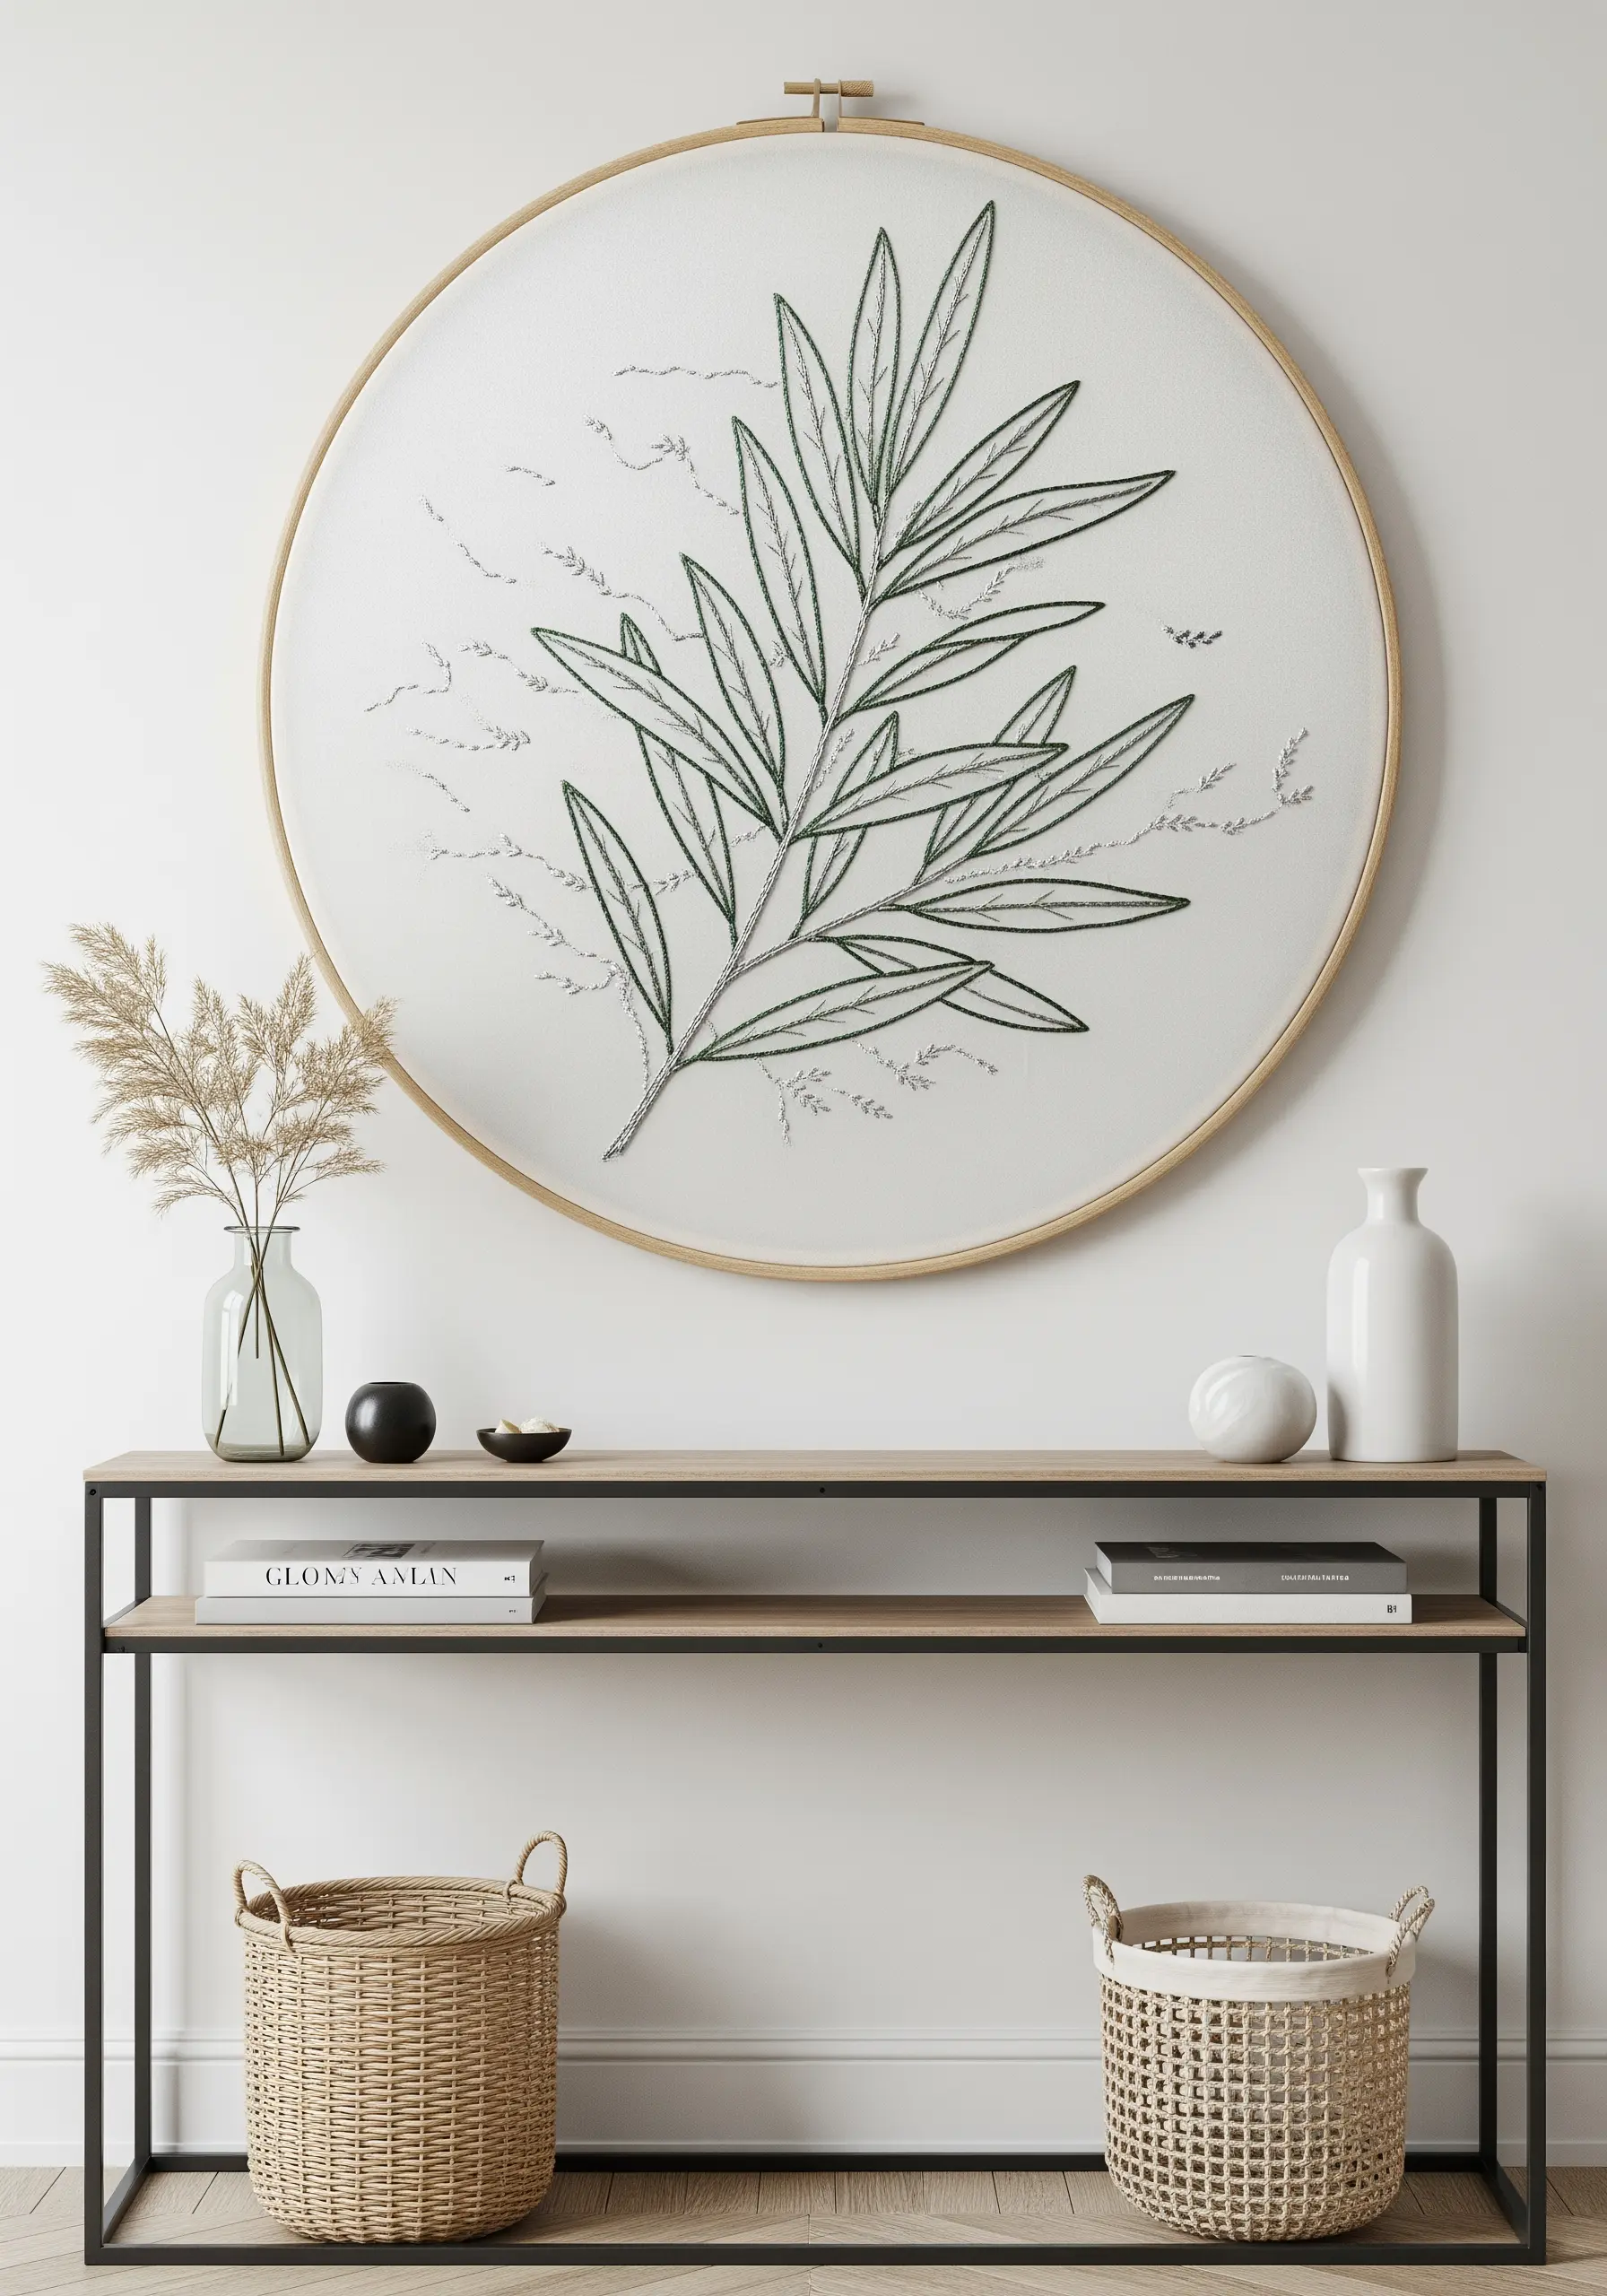
When you scale up your embroidery, your technique should adapt. For an oversized piece of wall art, simplicity and negative space are your most powerful tools.
Choose a simple, elegant form like an olive branch. Use a textured but straightforward stitch, like a split stitch or stem stitch, for the entire design.
The empty space around the motif becomes a critical part of the composition. You can add a few scattered, tiny straight stitches in the background to create a sense of atmosphere and prevent the piece from feeling stark.
19. Capturing Decay with Negative Space
This advanced technique challenges you to see what isn’t there. Instead of stitching the leaf itself, you will stitch the solid parts to reveal the delicate, decayed holes.
Trace a real decaying leaf onto your fabric, carefully marking the empty spaces. Then, using a dense long-and-short stitch, fill in only the solid sections of the leaf.
The un-stitched areas of fabric become the holes, creating a stunningly realistic and poignant illusion of fragility and the passage of time.
20. The Pop-Art Botanical Pattern
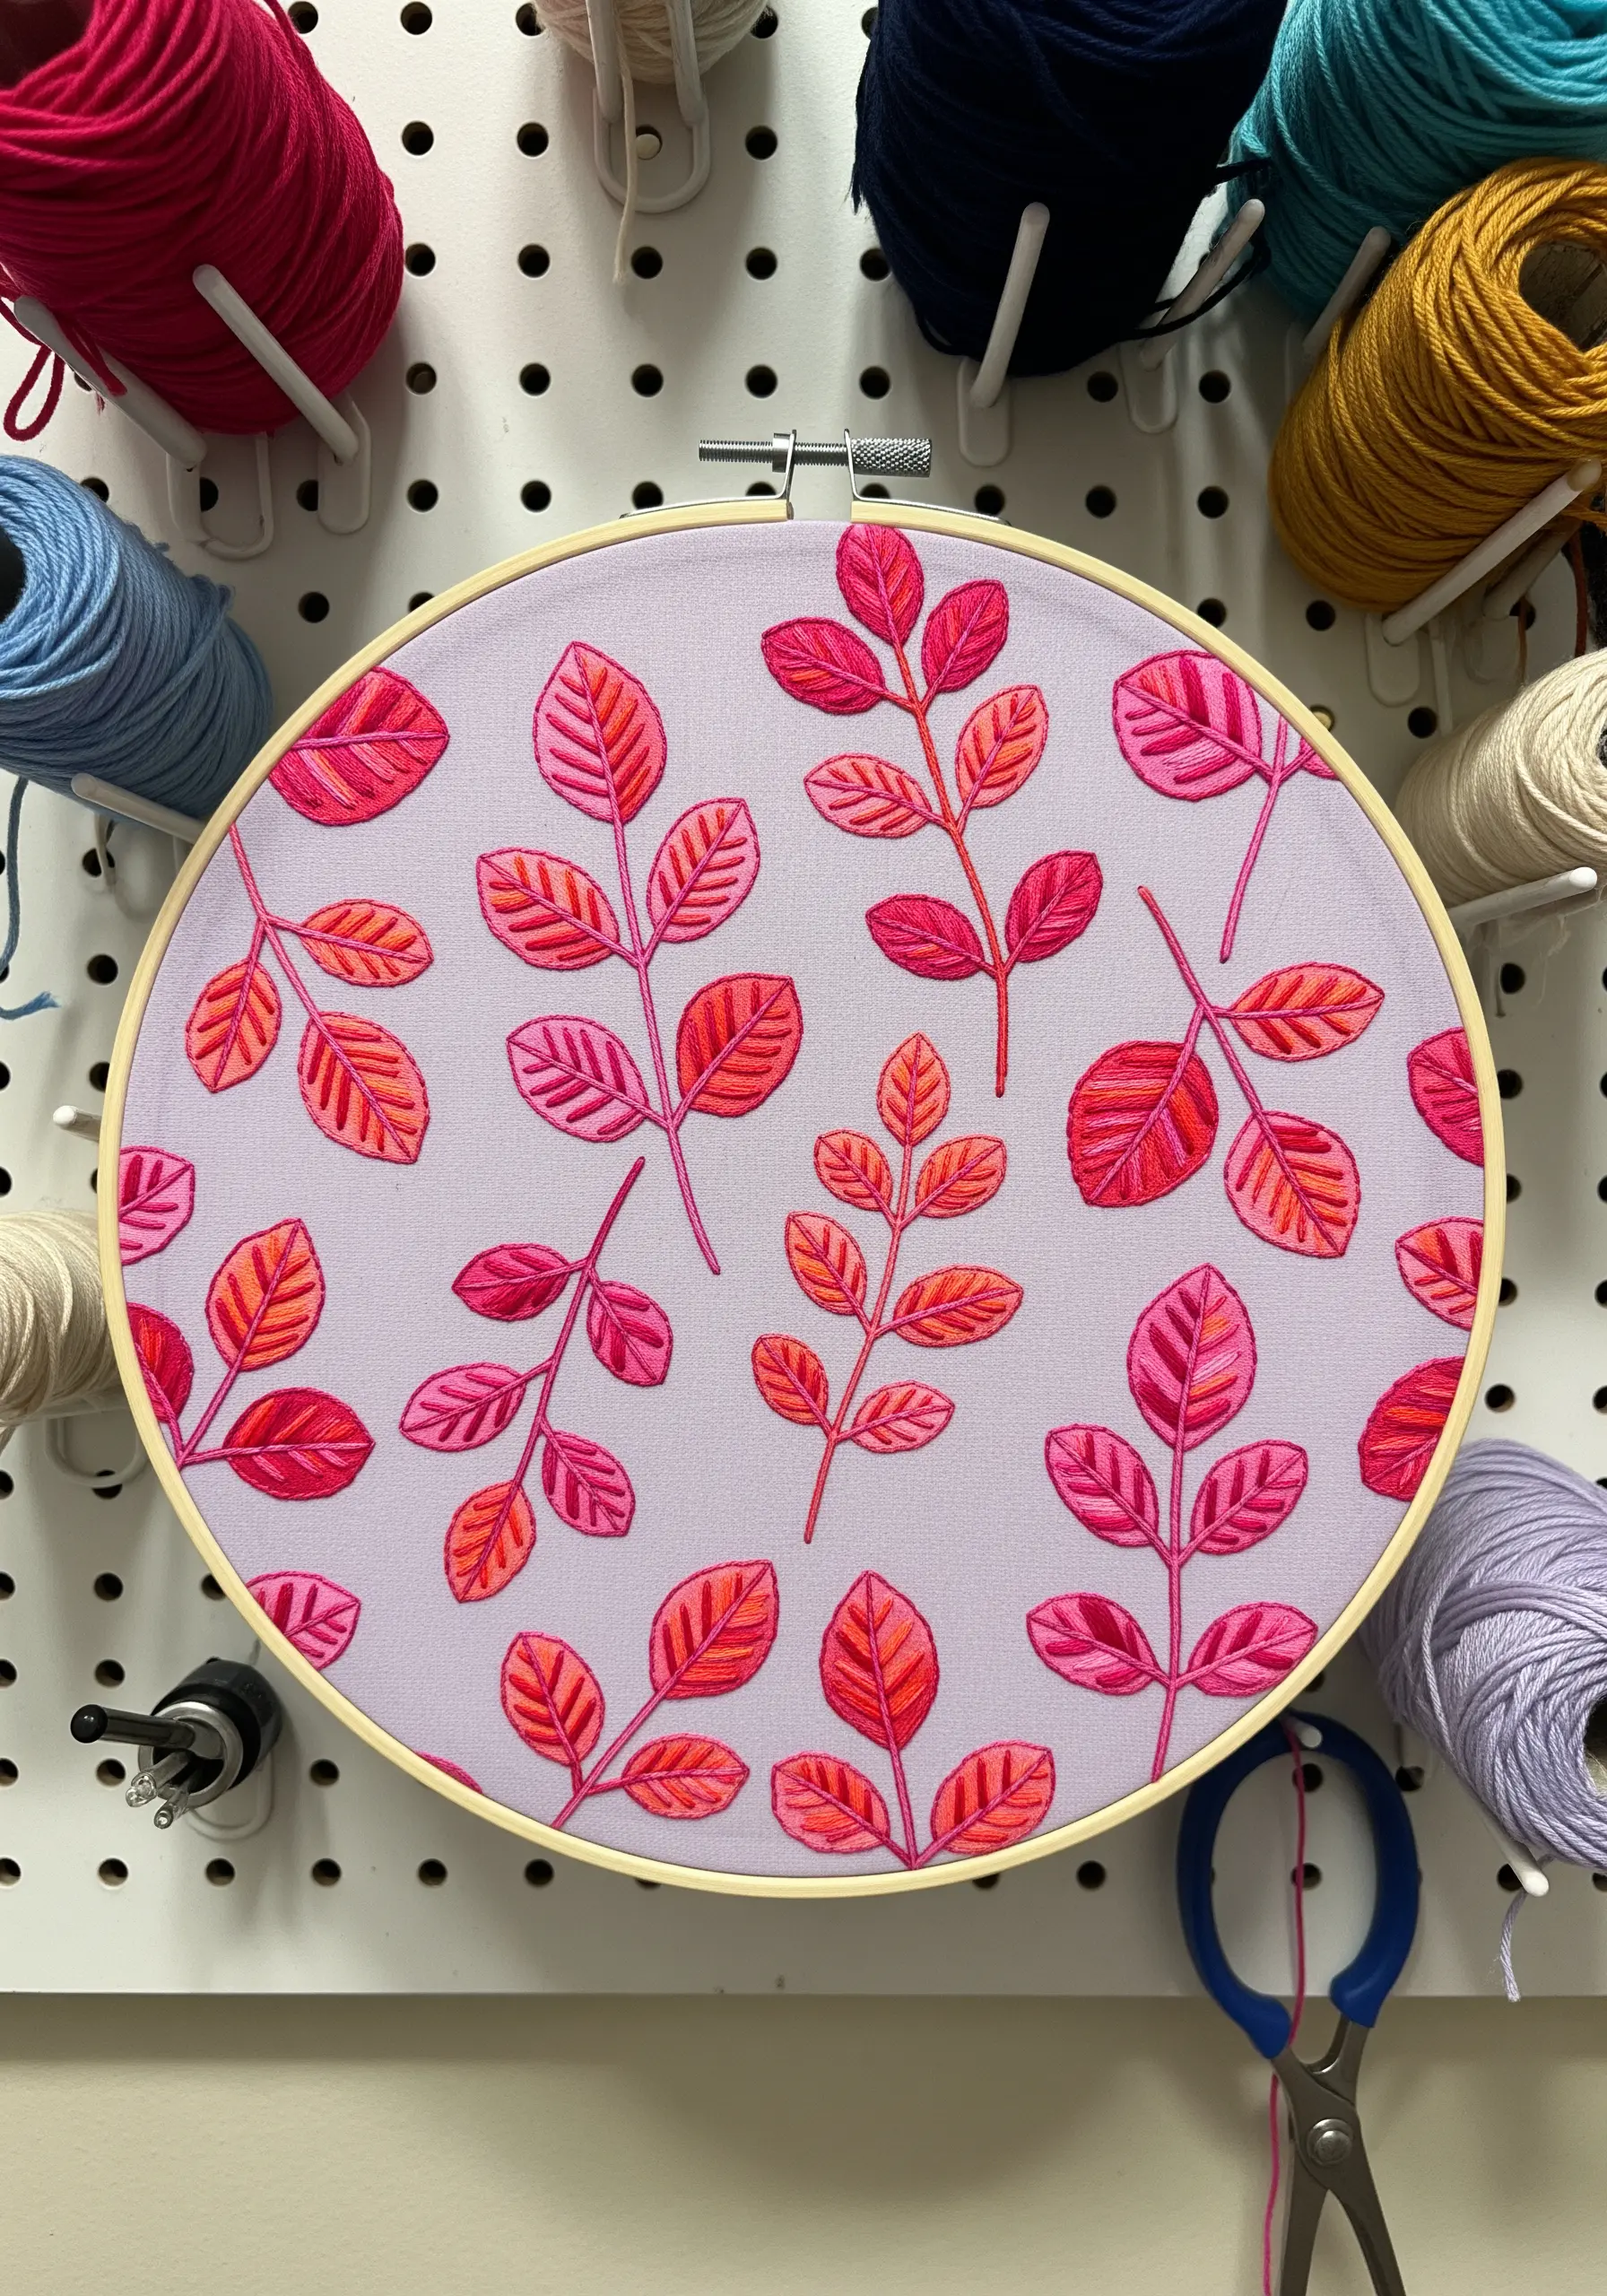
Create your own modern, patterned fabric by repeating a simple leaf motif in a bold, unexpected color palette.
Choose a stylized leaf template and trace it multiple times onto your fabric, varying the angle and placement to create a dynamic, all-over pattern.
Fill each leaf with a flat, clean satin stitch. The magic comes from the high-contrast color choices—like hot pinks, oranges, and reds against a cool lavender background—which gives the traditional subject matter a contemporary, pop-art energy.
21. A Focal Point on Denim
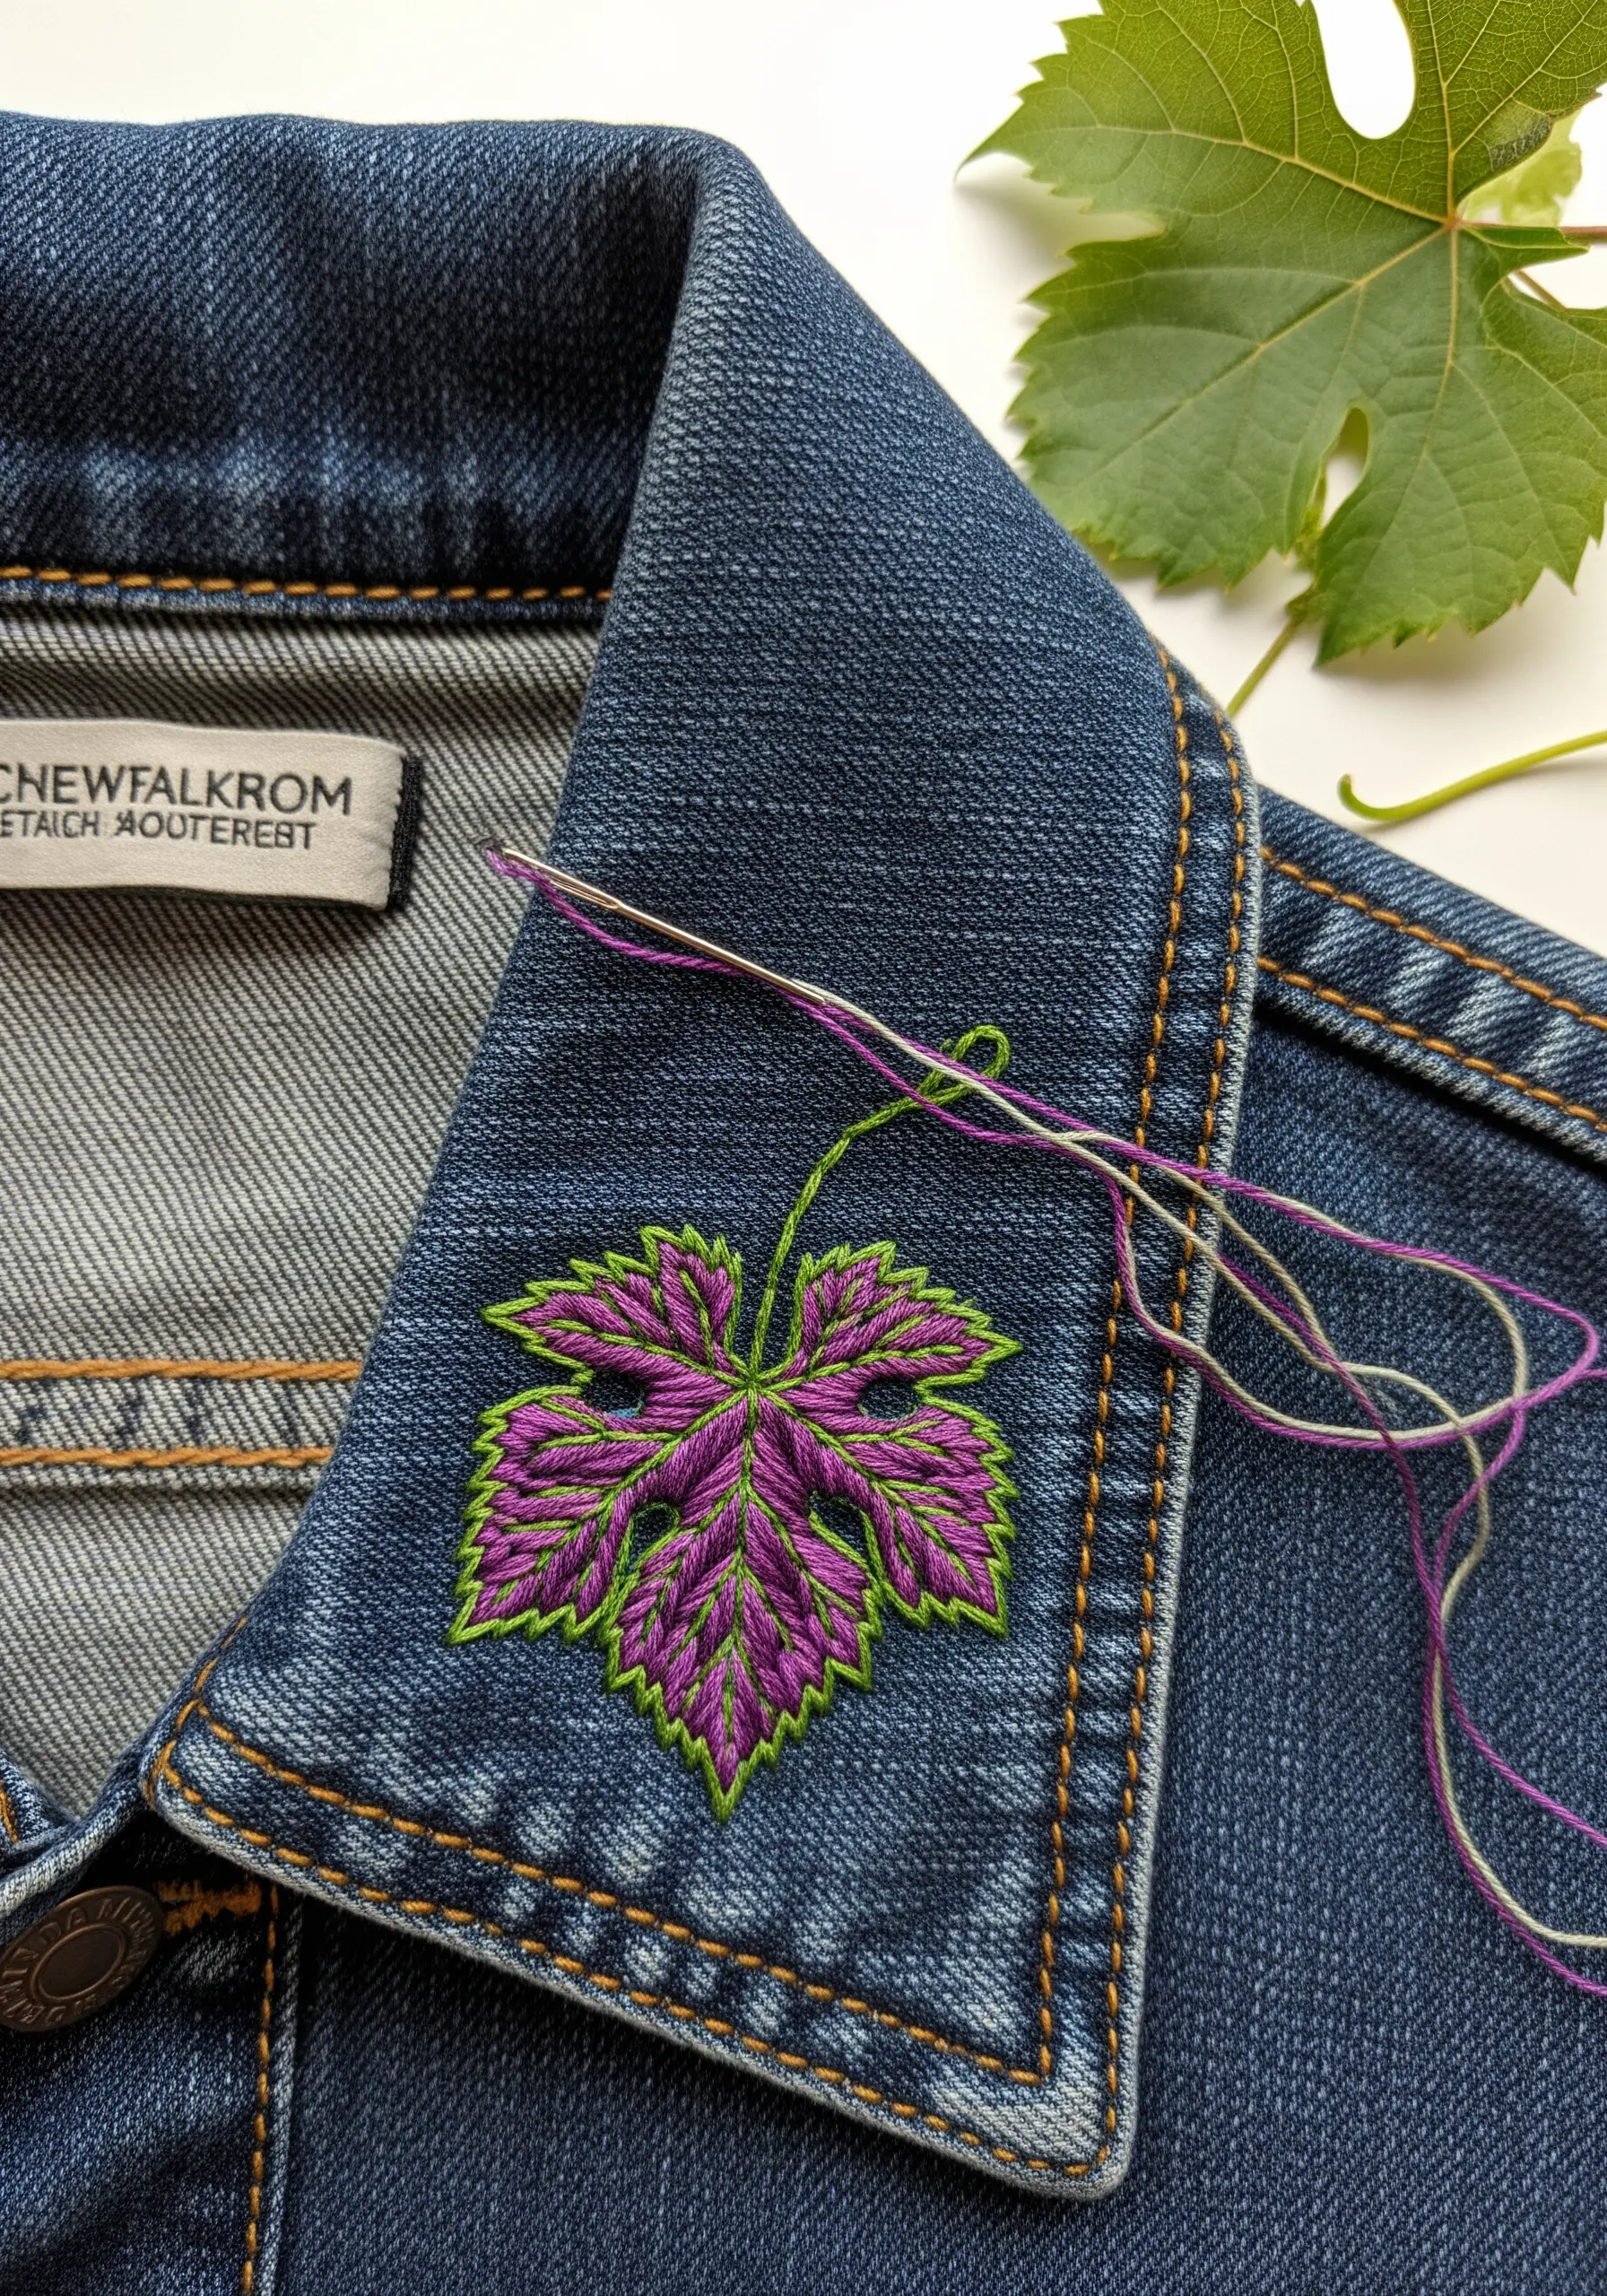
When embellishing a piece of clothing, strategic placement transforms a simple stitch into a designer detail.
Choose a high-visibility area like a jacket collar, cuff, or pocket. A single, beautifully executed motif here has more impact than an all-over design.
Use a sharp, strong needle to easily pierce the thick denim, and always back your work with a stabilizer to prevent the fabric from puckering. Choosing a variegated thread is a clever way to introduce multiple colors without constantly changing your floss.
22. Defining Form with a Split Stitch Frame
This is a fantastic exercise for achieving exceptionally neat satin stitches. Before you begin filling the leaf, create an internal ‘frame’ with split stitch.
Stitch the leaf’s outline and central vein using a precise split stitch. This raised line provides a perfect edge to tuck your satin stitches against.
When you fill each section, your satin stitches will lay flat and have a crisp, clean boundary, giving the small leaf a remarkably professional and defined appearance.
23. Embellishing Nature’s Lace

This project elevates a natural object into a piece of art. You will stitch directly onto the delicate structure of a preserved skeleton leaf.
Place the leaf on a water-soluble stabilizer for support while you work. Using a single strand of thread and a fine needle, add tiny lazy daisy stitches to create blossoms and straight stitches for stems, following the natural flow of the veins.
Once complete, dissolve the stabilizer, leaving behind a breathtakingly fragile piece. This is one of those handmade objects that make your home a mini art gallery; display it under a glass cloche for protection.
24. Abstracting the Essence of a Leaf
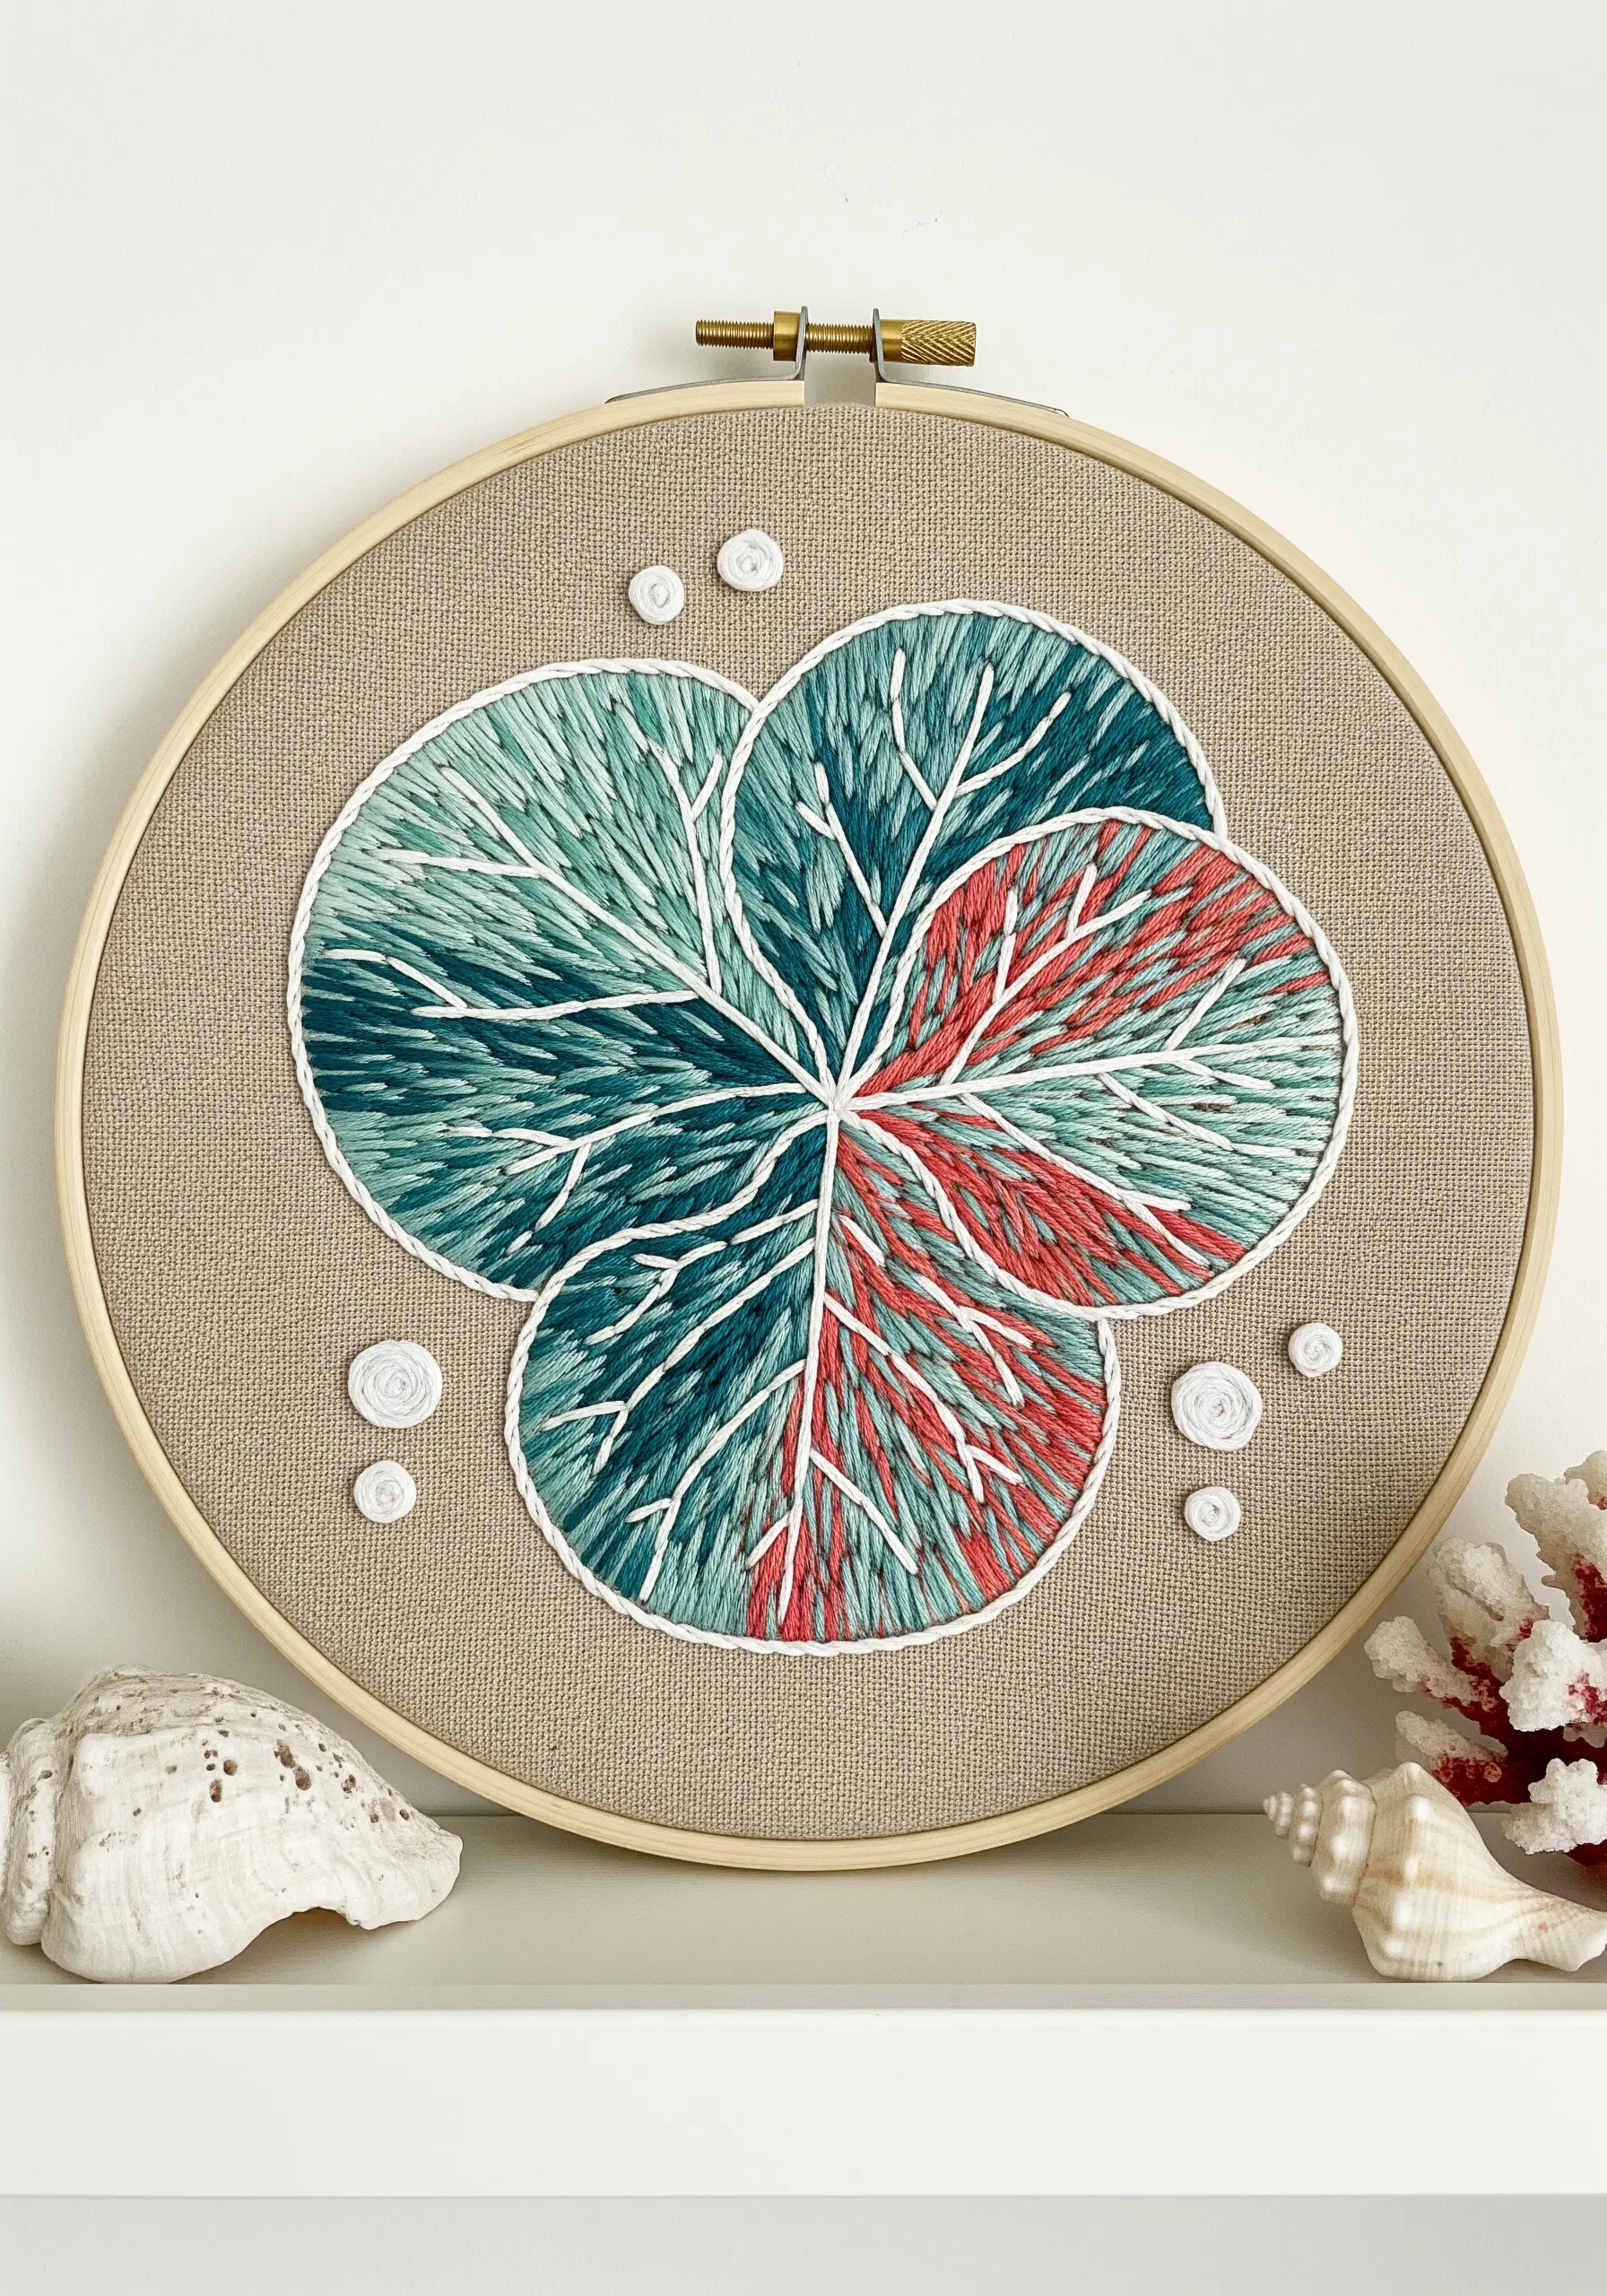
Move beyond realism to capture the feeling of a leaf. Deconstruct its form into simple, overlapping circular shapes.
Fill these shapes with directional satin stitches using a variegated thread. The thread will create effortless, watercolor-like color shifts within each shape.
Once the shapes are filled, add the suggestion of veins with a few simple straight stitches in a contrasting color, like white. The result is one of those abstract thread waves & swirls that feels both organic and modern.
25. The Geometric Cross-Stitch Translation
Merge the organic world with the structured world of cross-stitch. Trace a maple leaf onto graph paper to create a pixelated, geometric pattern.
Working on Aida cloth, you’ll translate this grid into cross-stitches. The beauty of this technique is in the color choices.
Use a palette of autumn colors, arranging them in blocks and gradients to give the rigid, geometric shape a sense of warmth and dimension.
This method combines the meditative precision of cross-stitch with the flowing beauty of a natural template.


