

You sit with your hoop, thread, and fabric, ready to create something beautiful. But perhaps you feel a small gap between the work you envision and the work that appears under your needle. You’re ready to move beyond just following a pattern and want to start making choices that feel intentional, polished, and uniquely yours.
The secret isn’t in mastering dozens of complicated stitches or buying expensive new materials. It lies in the subtle art of observation—in seeing the world around you not just as objects, but as shapes, textures, and lines waiting to be translated into thread.
These tiny designs, inspired by the quiet moments of everyday life, are more than just quick projects. They are invitations to practice. Each one is a small study in how a change in stitch direction can create form, how a single pop of texture can bring a simple outline to life, and how a thoughtful color choice can tell a story. Let’s begin.
1. Combine Delicate Outlines with a Single Textural Focus
To create an elegant composition, use a fine outline stitch like a single-strand backstitch for the main form.
This preserves a light, airy feel and prevents the design from becoming too heavy.
Introduce a single, high-texture element, such as a woven wheel rose or a cluster of French knots, to act as a focal point.
This contrast between the flat outline and the dimensional stitch creates visual interest and sophistication without overwhelming the small design.
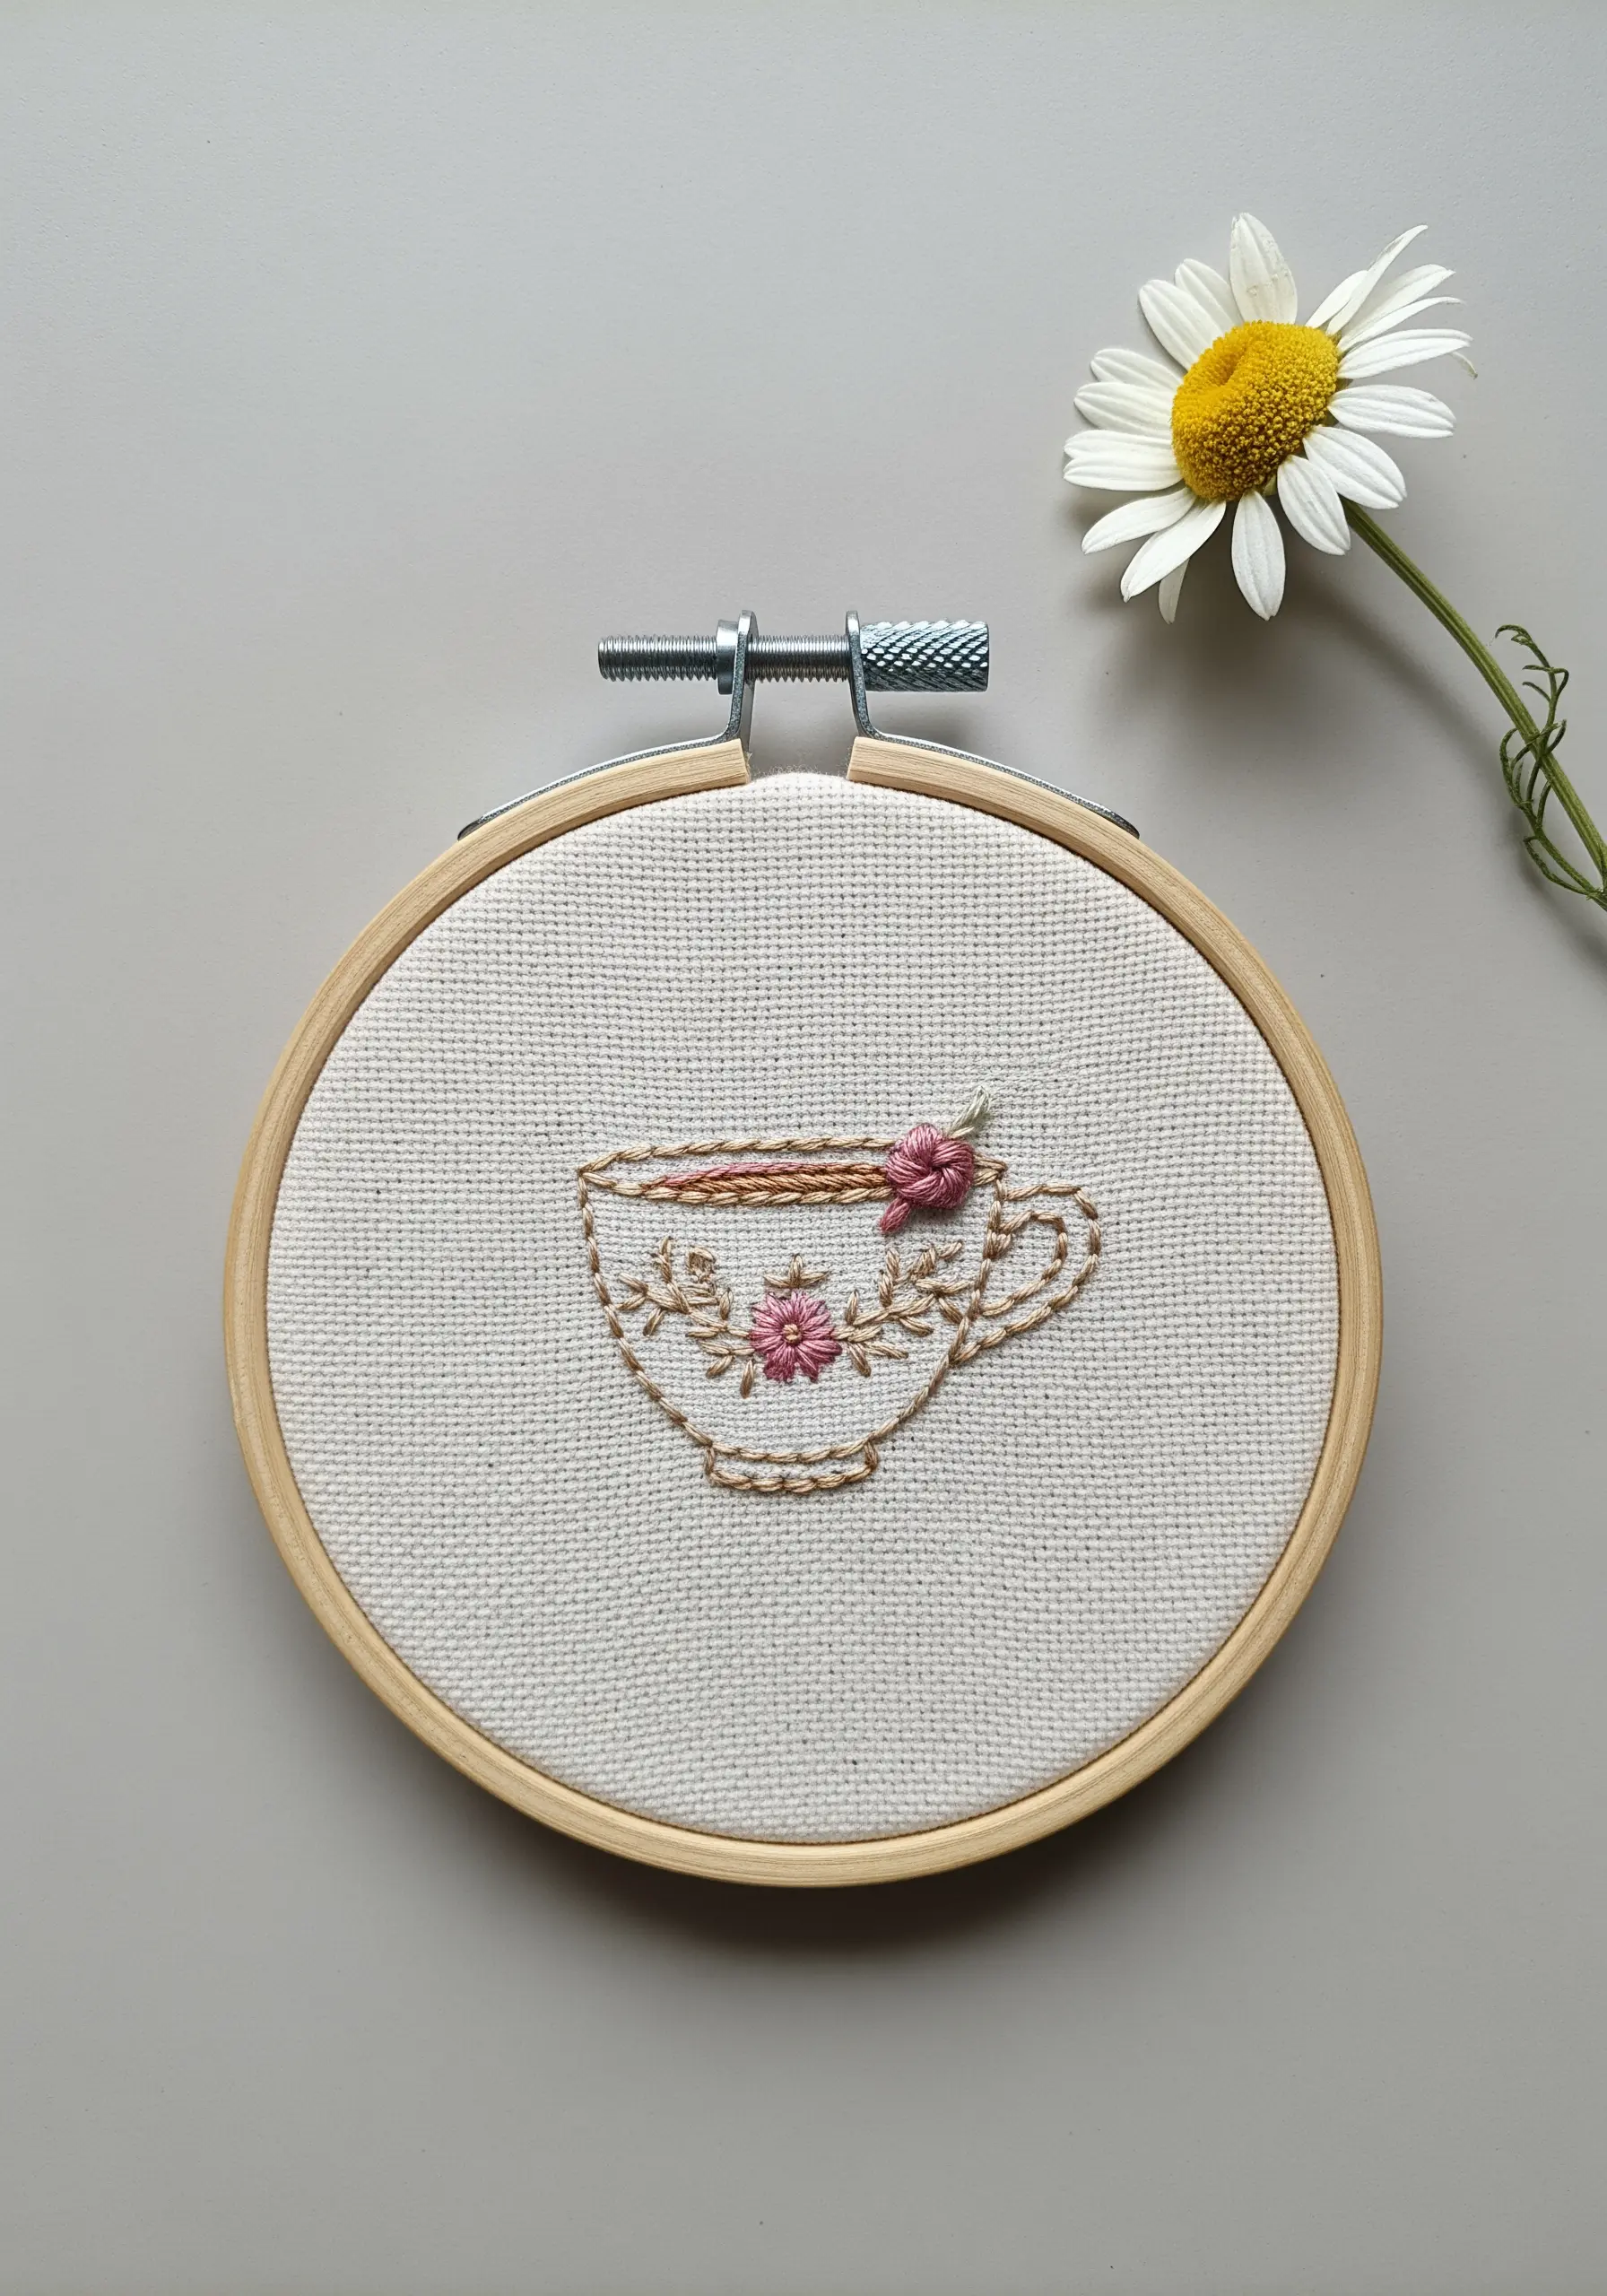
2. Create Depth with Directional, Multi-Tonal Stitches

Instead of a standard satin stitch, fill solid shapes with a diagonal chain stitch to build dynamic texture.
The interlocking loops of the chain stitch create a woven, tactile surface that feels more substantial.
For subtle color variation, combine two closely related shades of thread in your needle at once.
This marled effect mimics natural light and shadow, giving a simple object like a mug instant depth and realism.
Finish with a few wispy stem stitches for the steam, using a lighter thread to suggest transparency.
3. Engineer a Refined Appliqué Patch for Apparel
Elevate a simple garment by creating a standalone embroidered patch.
Work your design on a separate piece of tightly woven fabric, like cotton canvas, for stability.
Use a padded satin stitch—by first creating a foundation of split stitches—to give your motif a raised, three-dimensional quality.
Once complete, back the embroidery with iron-on interfacing, trim the excess fabric, and whipstitch the patch onto a collar or cuff for a bespoke detail.
4. Use Felt as a Forgiving Base for Crisp Patches

For creating patches with clean, non-fraying edges, high-quality felt is an excellent choice.
Its stable structure prevents distortion, allowing you to focus on achieving a perfect outline.
Use a simple backstitch with three or four strands of floss to create a bold, graphic line that stands out against the felt’s soft texture.
Keep your stitches small and consistent, especially on curves, to ensure the final shape is precise and professional.
5. Practice Painterly Effects with Color-Blocked Fills

Achieve a modern, artistic look by blocking colors rather than blending them seamlessly.
Sketch your leaf design and divide it into distinct sections for highlights, mid-tones, and shadows.
Fill each section with long-and-short stitch, allowing the directional stitches to define the leaf’s planes.
This approach gives you a chance to study how to embroider realistic shadows under leaves, creating depth that feels both intentional and organic.
6. Define Form with a Heavy, Textured Outline
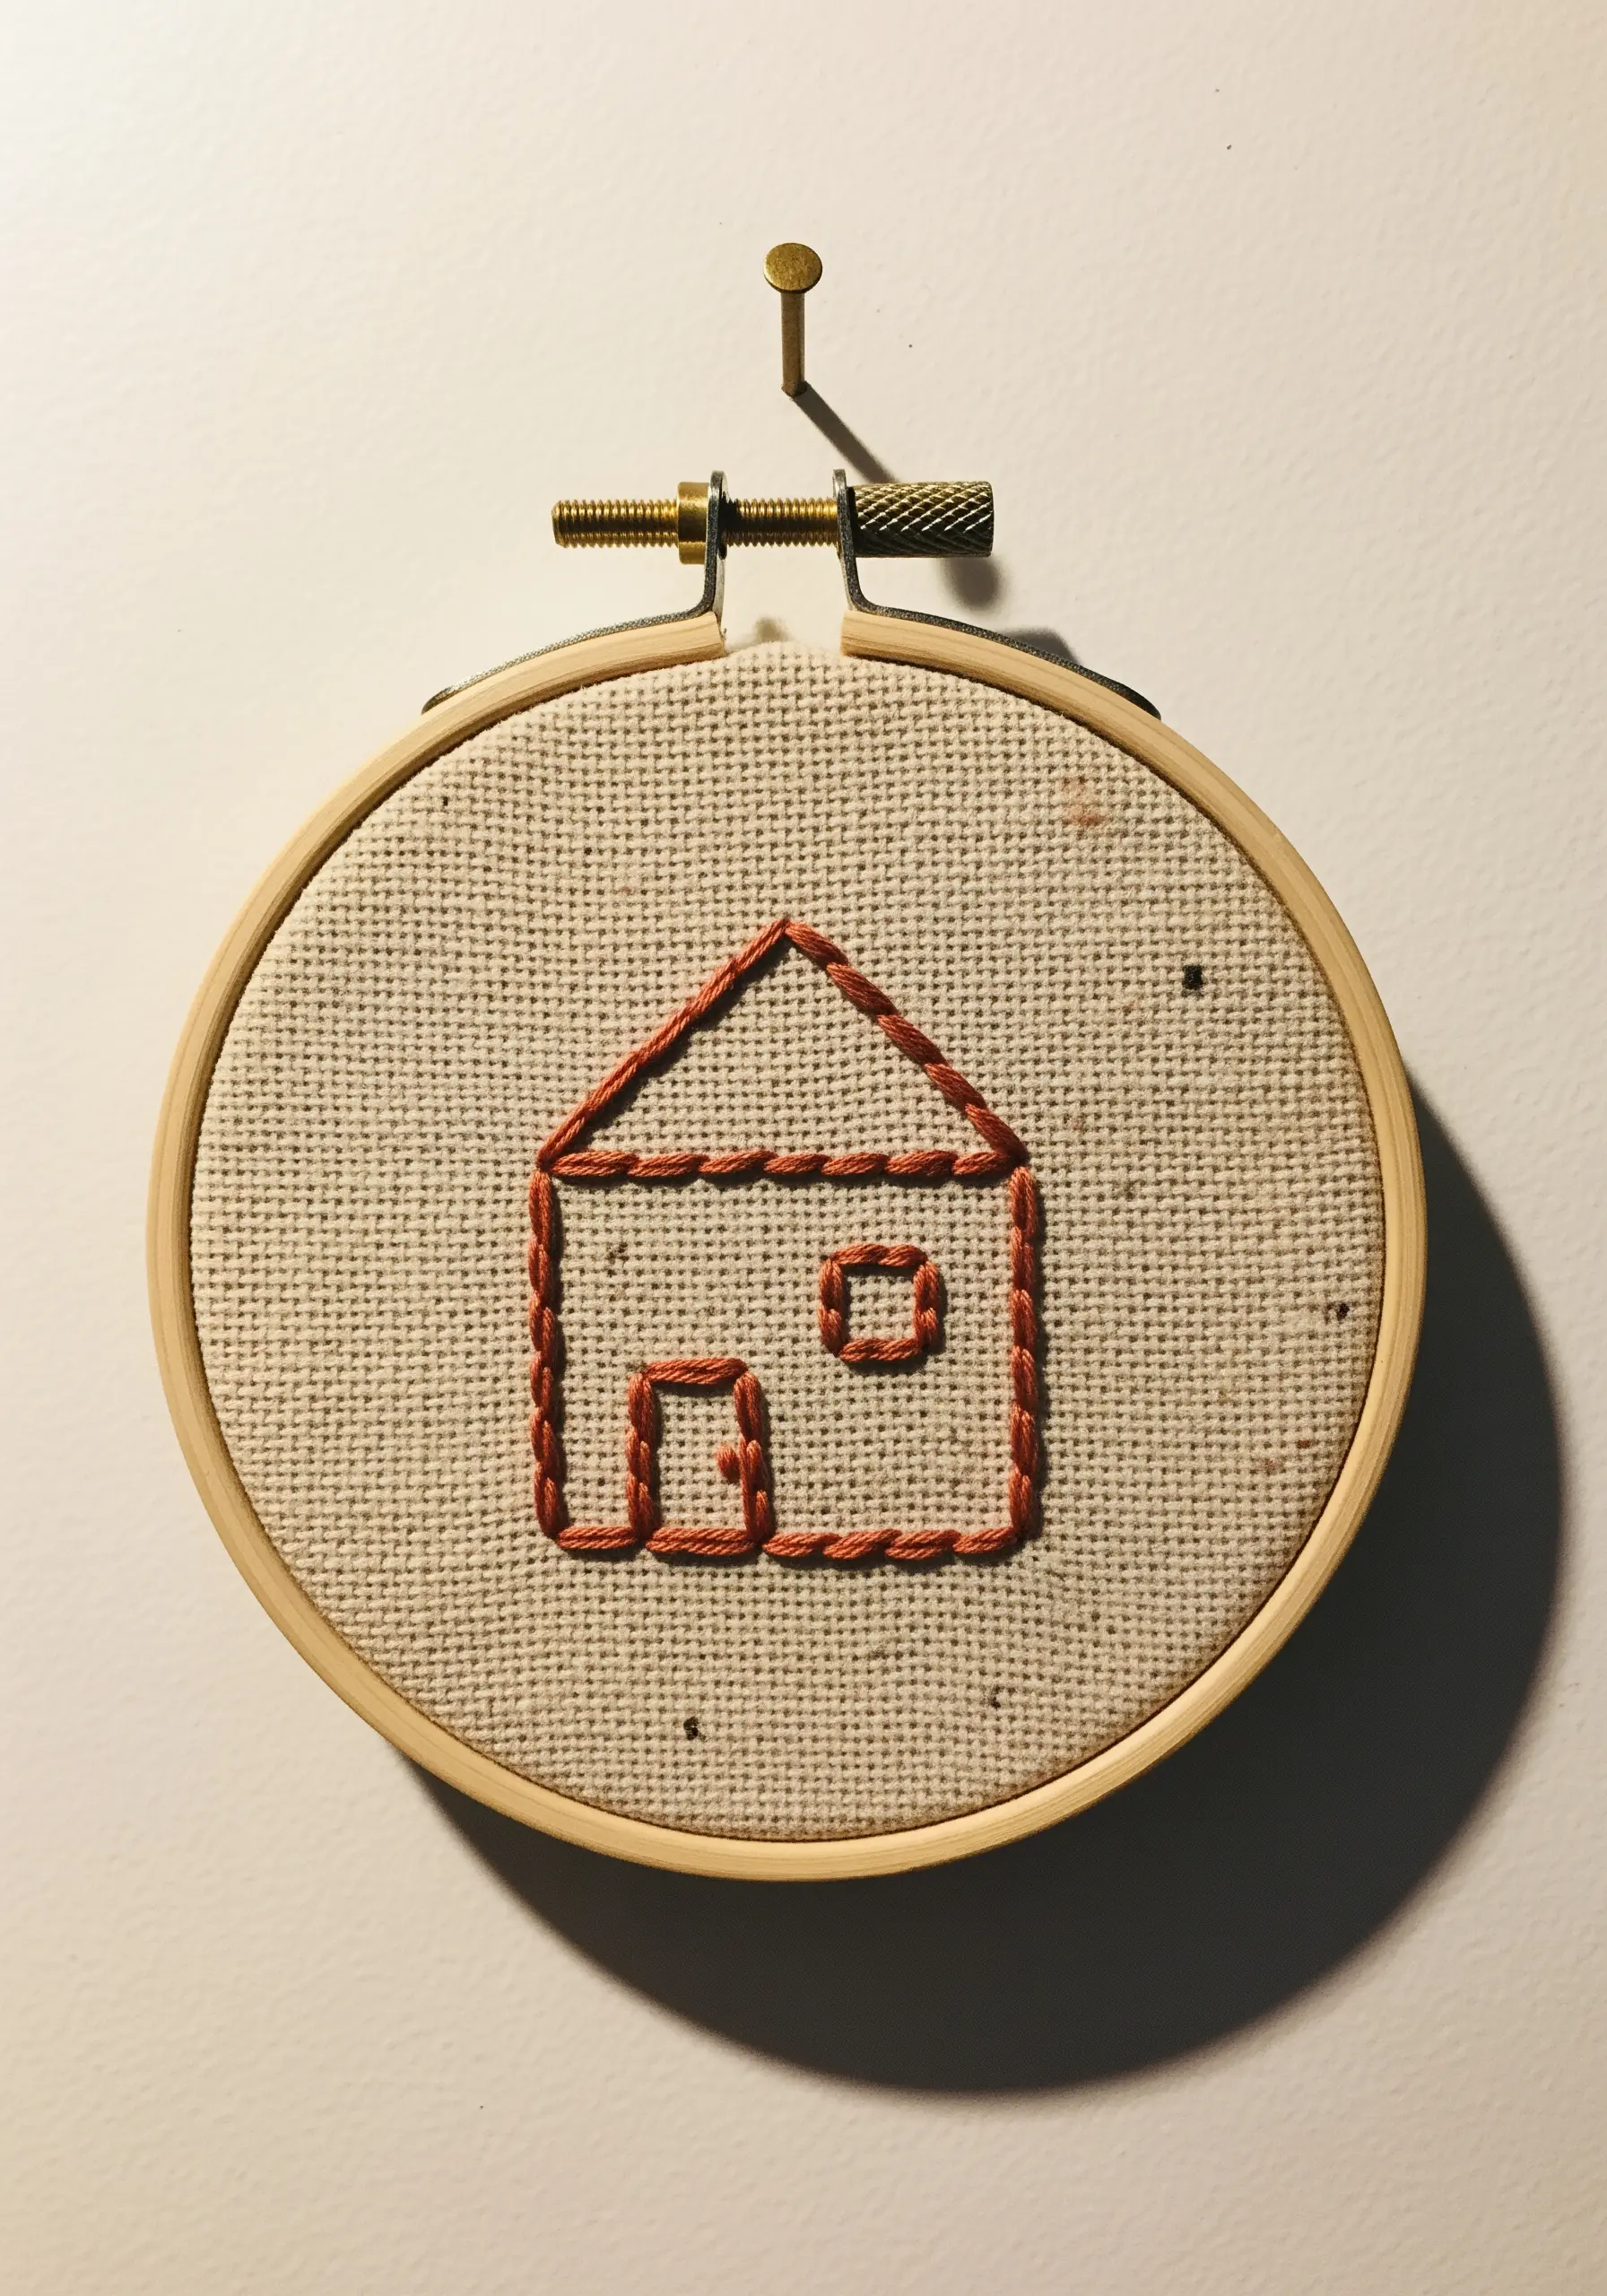
Give simple line drawings a rustic, handmade feel by using a thicker outline stitch.
Instead of backstitch, try a stem stitch or a whipped backstitch using all six strands of floss.
This technique creates a bold, rope-like line that emphasizes the object’s shape and adds tactile dimension.
It transforms a basic drawing into one of the most stunning framed embroidery pieces, perfect for minimalist decor.
7. Create a Metallic Sheen with Couching Stitch
To give an object a sleek, metallic look without using finicky metallic thread, employ the couching technique.
Lay down a thicker, shinier thread (like pearl cotton or a fine cord) along your design outline.
Then, use a second, finer thread (in a matching or contrasting color) to tack the main thread down with small, evenly spaced stitches.
This method ensures perfect curves and a uniform metallic sheen that a simple backstitch cannot achieve.
8. Align Your Stitches to a Patterned Background
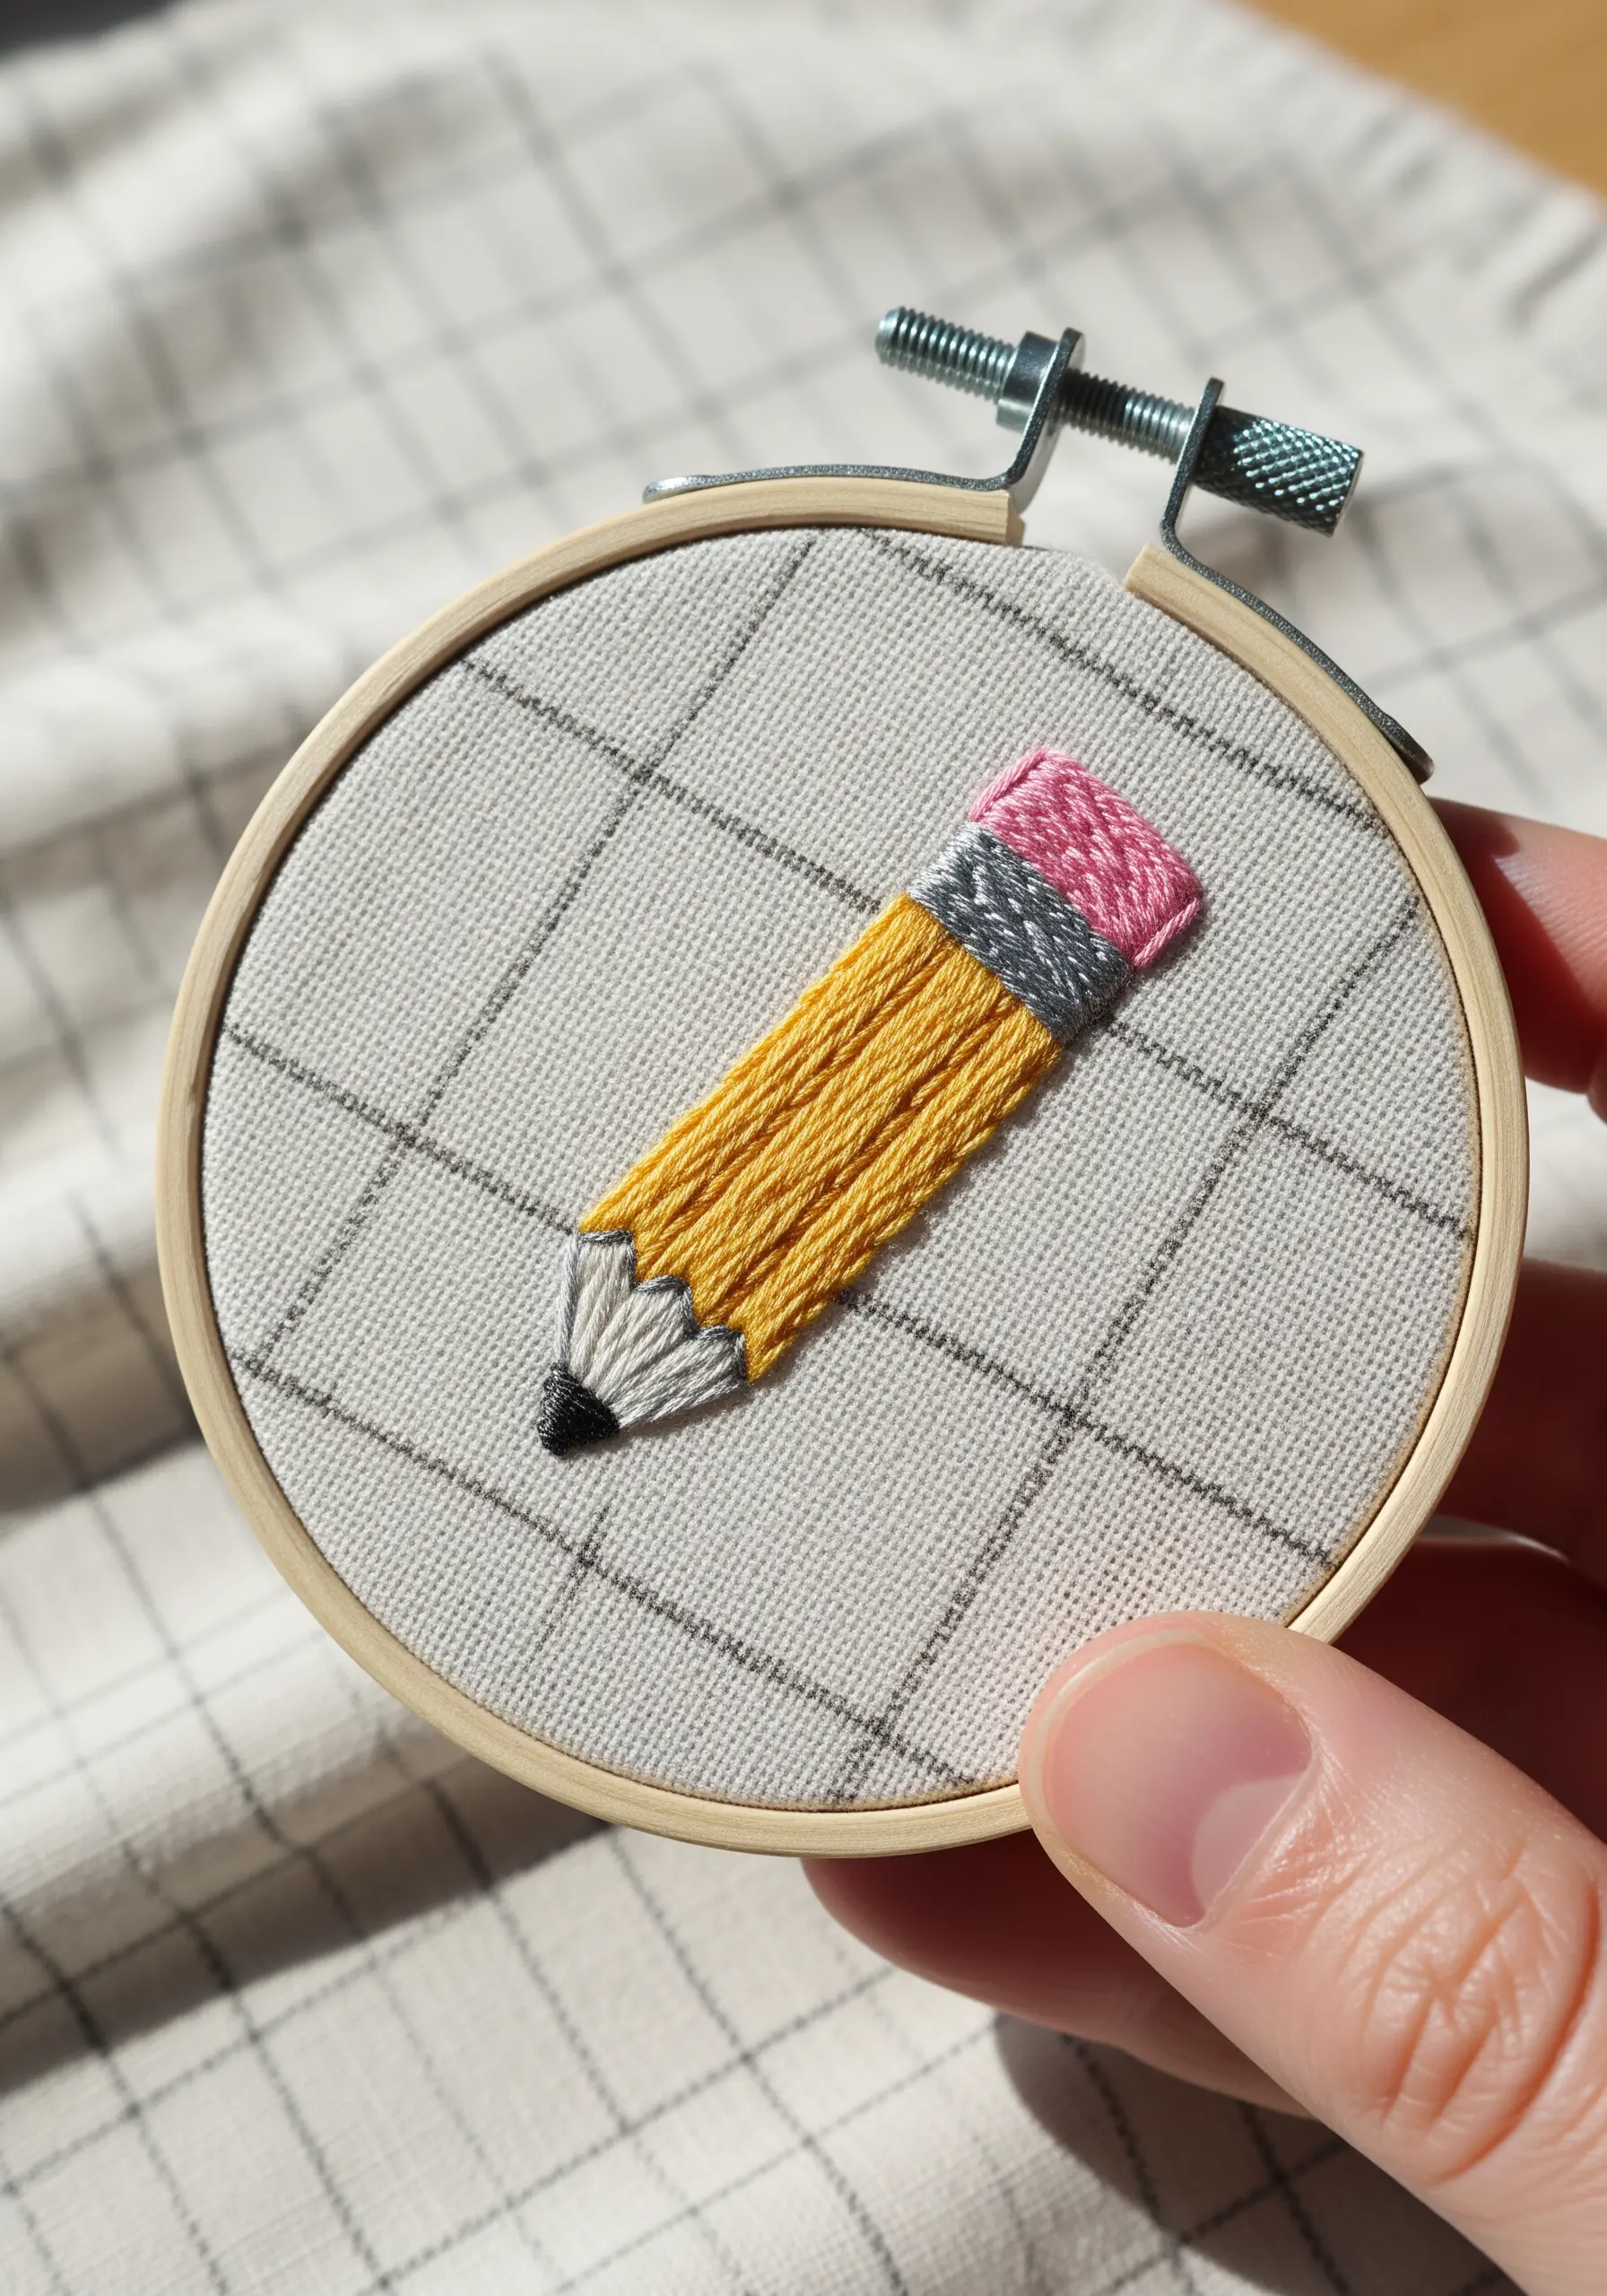
When working on patterned fabric like gingham or grid-print, use the existing lines as your guide.
Align your satin stitches with the pattern to create a sense of order and intentionality.
Here, the pencil’s body is stitched horizontally, echoing the fabric’s grid, while the metal ferrule is stitched vertically for contrast.
This small detail makes the embroidery feel integrated with the fabric, resulting in a cohesive and polished design.
9. Use Double Outlines for Graphic Definition

For crisp, illustrative motifs on table linens, a double outline adds polish and visual weight.
Stitch the main outline with a clean backstitch or stem stitch.
Then, add a parallel ‘shadow’ line just inside the main shape using the same stitch.
This technique mimics the look of a vintage illustration and ensures your designs are sharp and clear, making it perfect for line art garden motifs that transform table runners or kitchen towels.
10. Layer Stitches to Create Dimension and Detail

Build up layers of simple stitches to create a design with surprising depth.
Start by filling the main book cover with a dense, vertical satin stitch.
Next, add the book’s spine and page details by stitching directly over the base layer with a contrasting color.
Use single straight stitches for the page edges and a whipped backstitch for the binding to create different textures that make the tiny object look realistic.
11. Imply Light with Contrasting Thread Colors
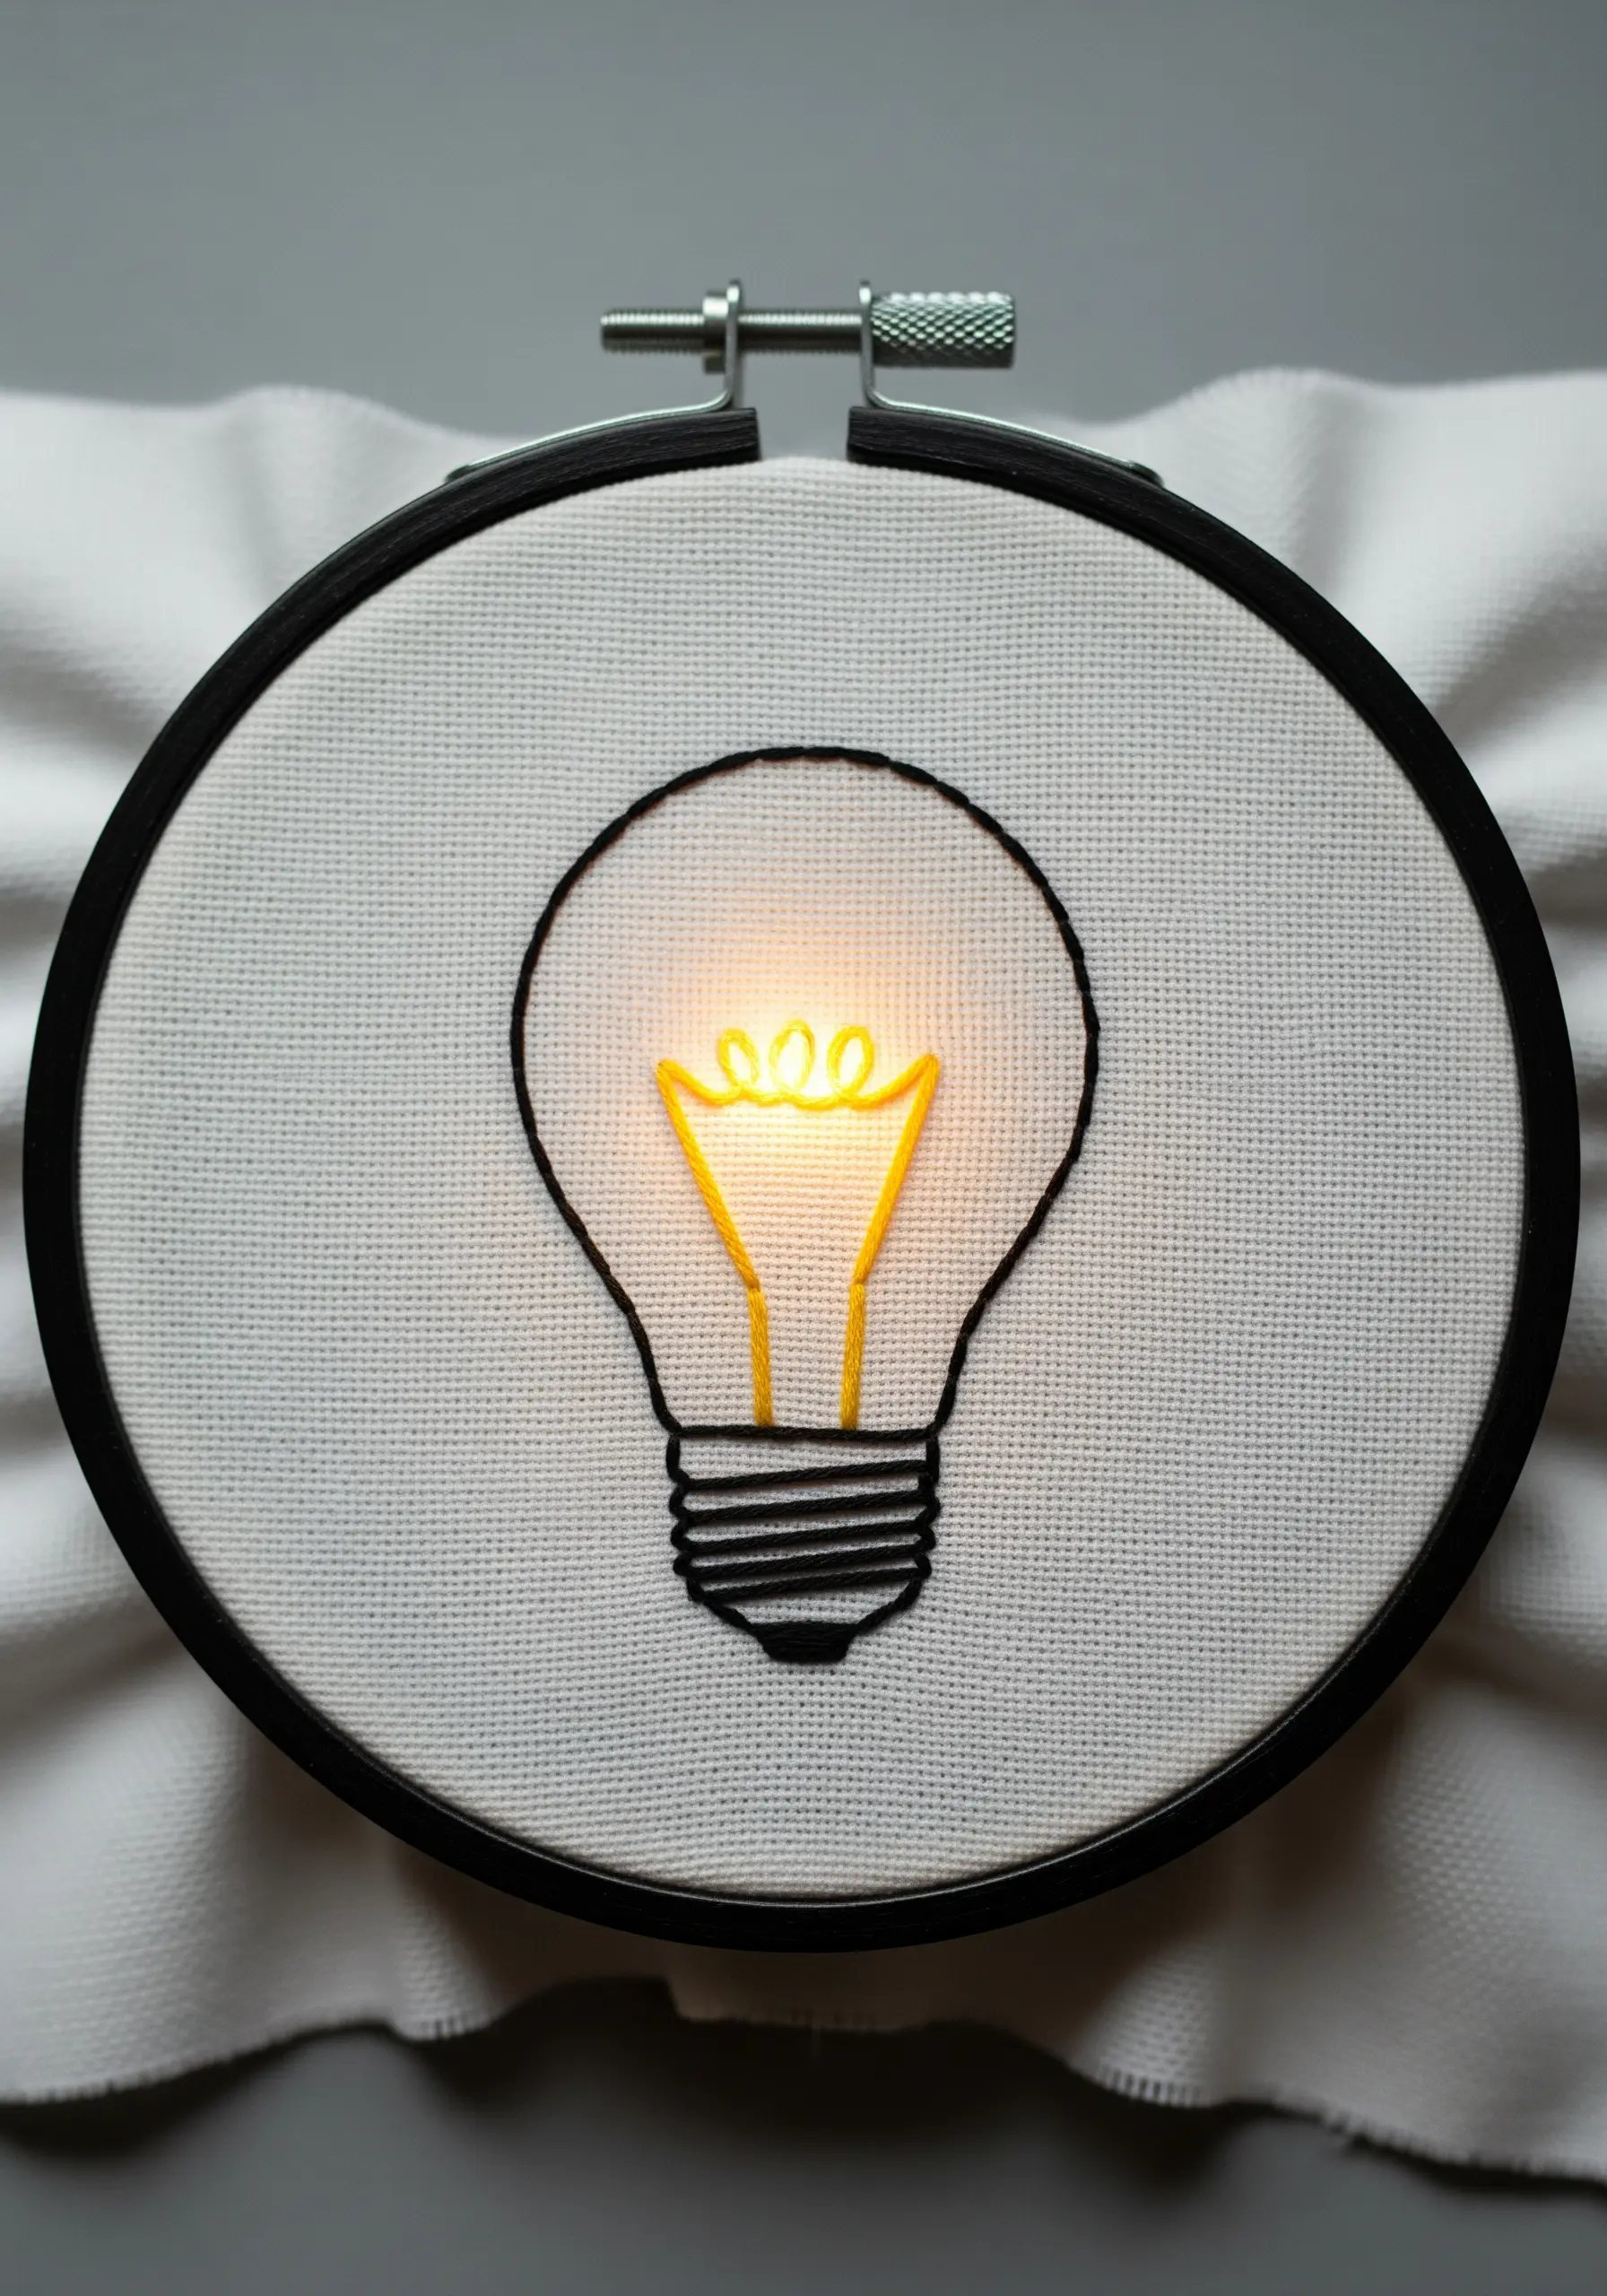
Create the illusion of a glowing filament by using a bright, high-contrast thread color like yellow or gold.
Use a simple chain stitch or backstitch to form the filament shape, ensuring the stitches are neat and defined.
Surround it with a stark black outline for the bulb to make the central color appear more luminous.
This simple color theory trick creates a powerful visual effect with minimal effort.
12. Choose Bold Colors for High-Impact Apparel Art

When embroidering on functional items like tote bags, select a thread color that offers strong contrast against the fabric.
A vibrant turquoise on a neutral canvas ensures the design is immediately visible and impactful.
Keep the design clean and graphic; a simple, filled outline is more effective from a distance than a design with intricate, tiny details.
This approach turns everyday items into bold statements and is perfect for line art travel adventure symbols.
13. Build Tactile Surfaces with Clustered Knots

Move beyond flat fills by using colonial knots or French knots to create highly textured surfaces.
For the pot, pack the knots tightly together, arranging them in neat rows to create a pattern resembling terracotta or woven basketry.
For a different texture on the plant, use detached chain stitches or lazy daisies radiating from a central point.
This is a great way to build up nature-themed embroidery samplers to practice real plant shapes and textures.
14. Communicate an Idea with Minimalist Stitches
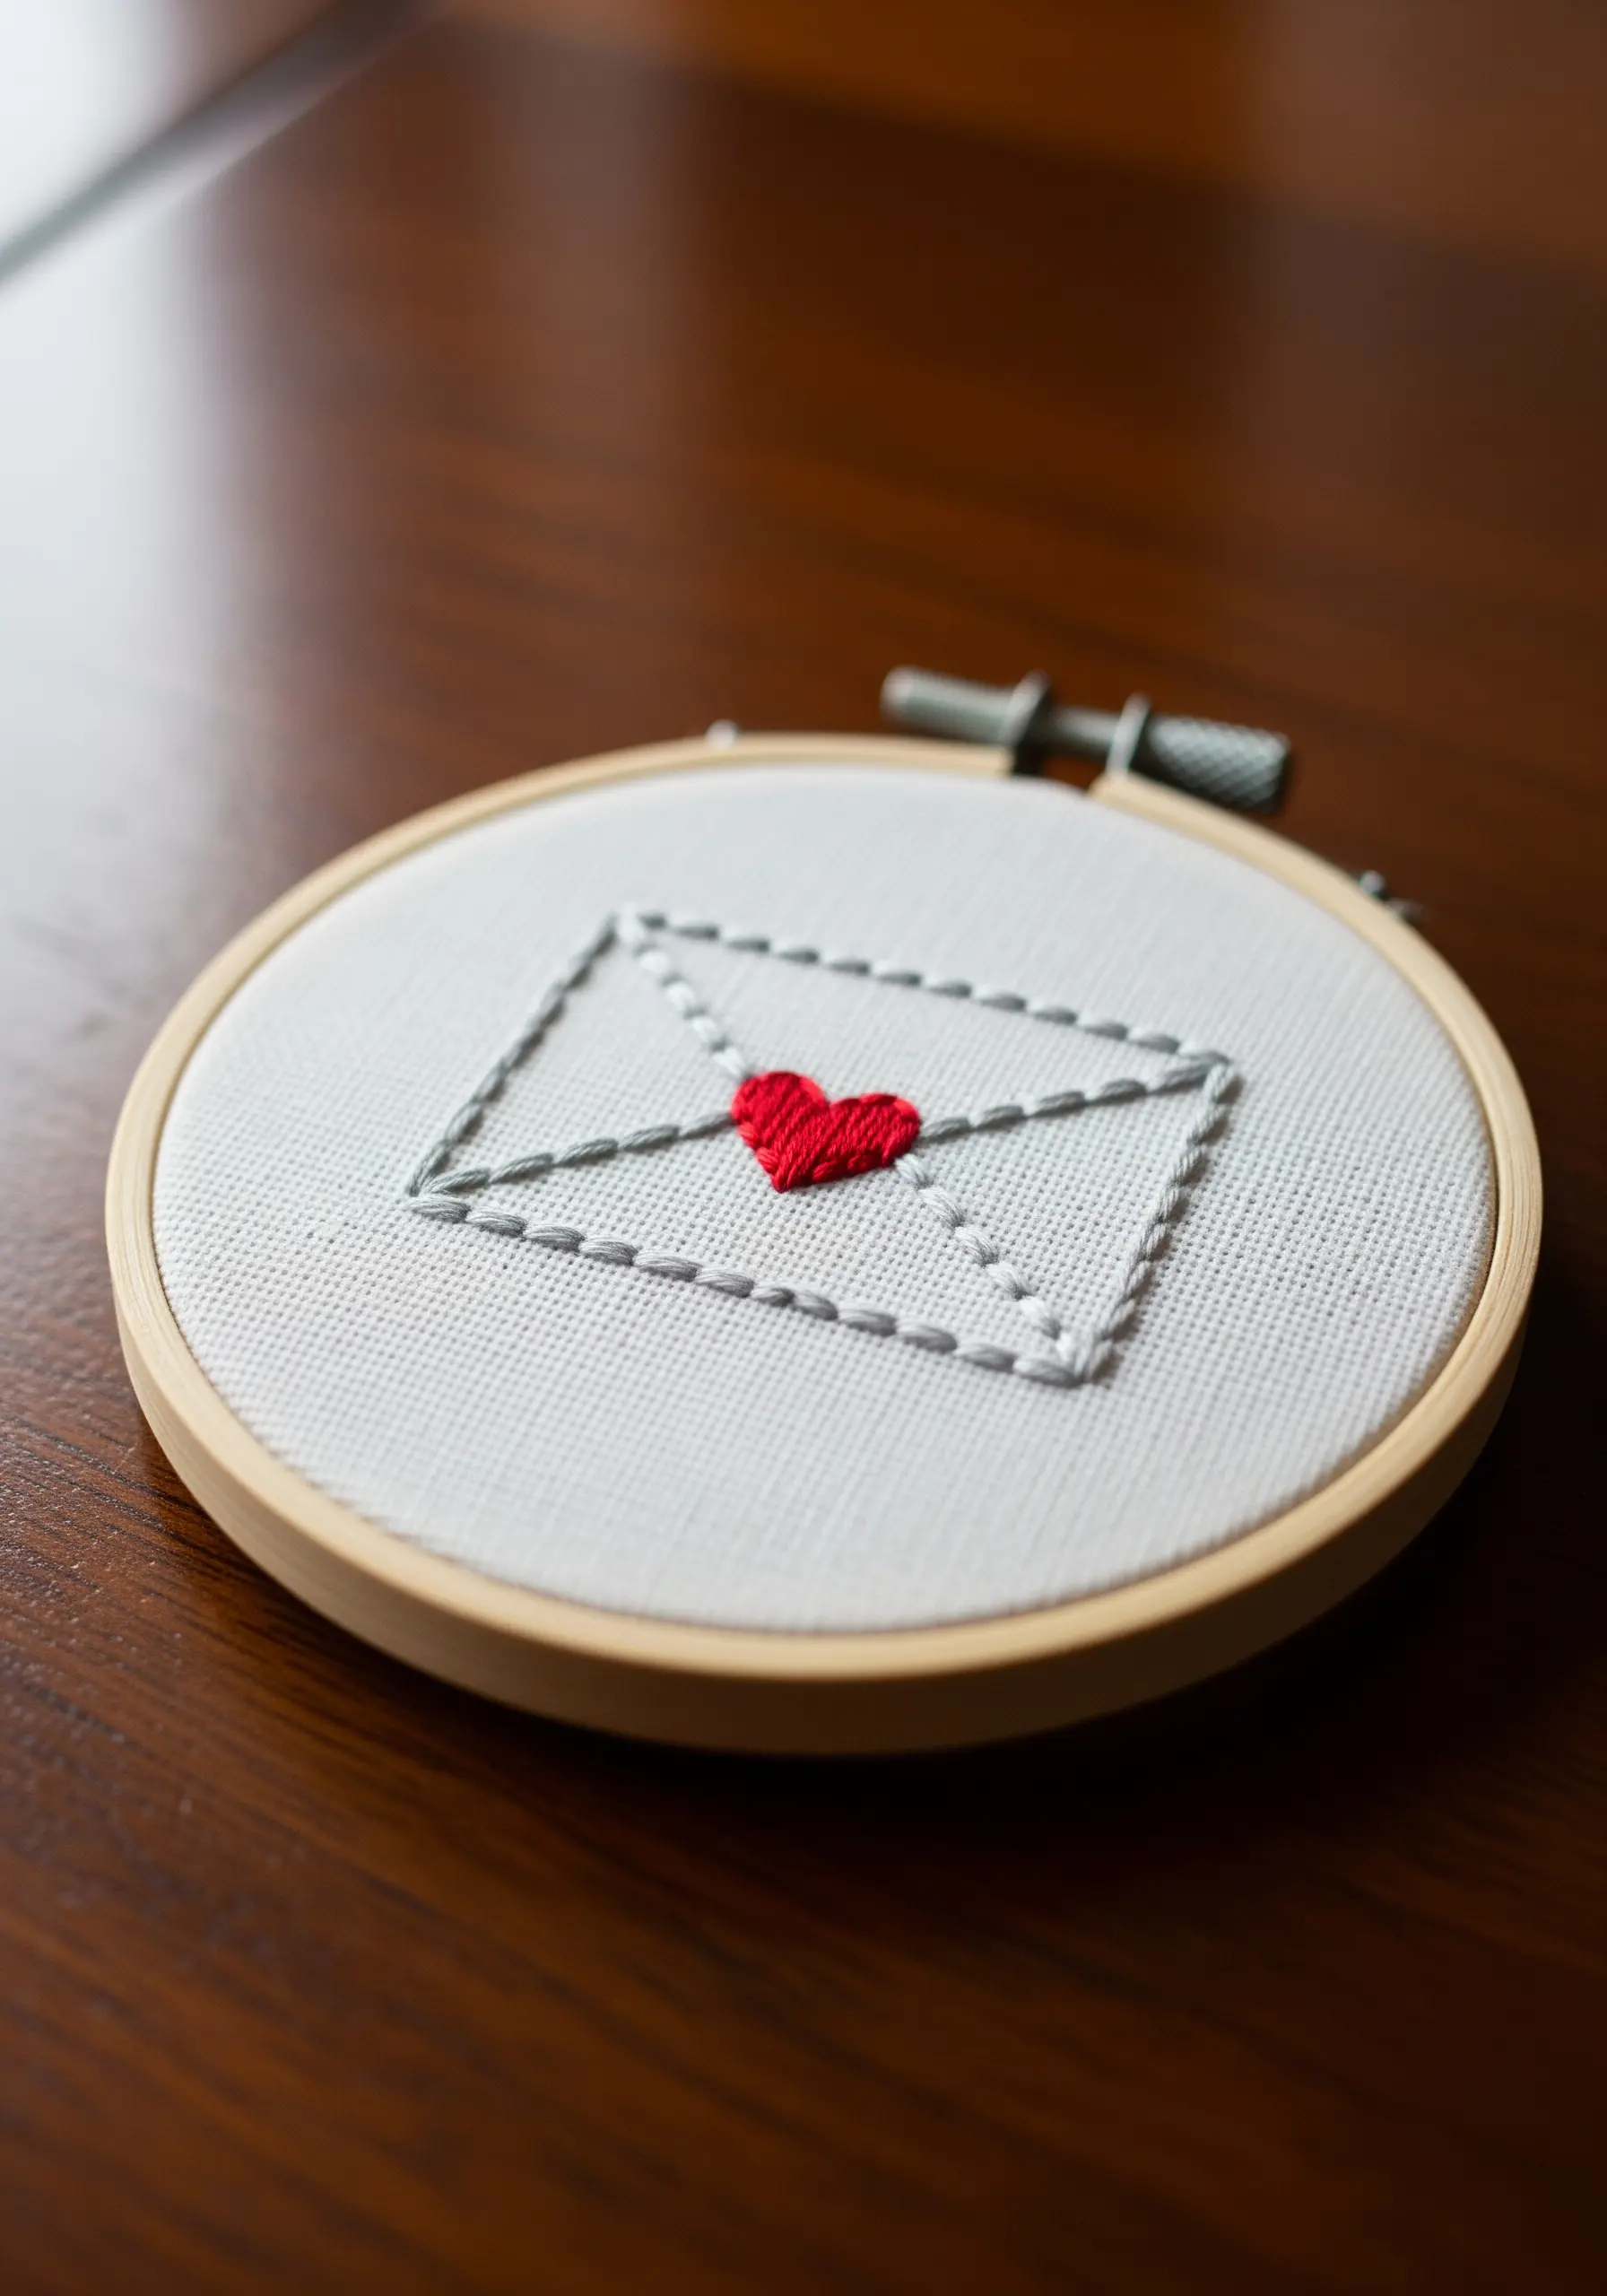
You don’t need complex fills to tell a story; sometimes, a few well-placed stitches are more powerful.
Use a simple running stitch to create a dashed outline, which adds a sense of lightness and charm.
Place a small, solid element—like this tiny satin-stitched heart—as the focal point.
The contrast between the airy outline and the solid heart draws the eye and communicates the message with elegance, making it ideal for minimal festive motifs.
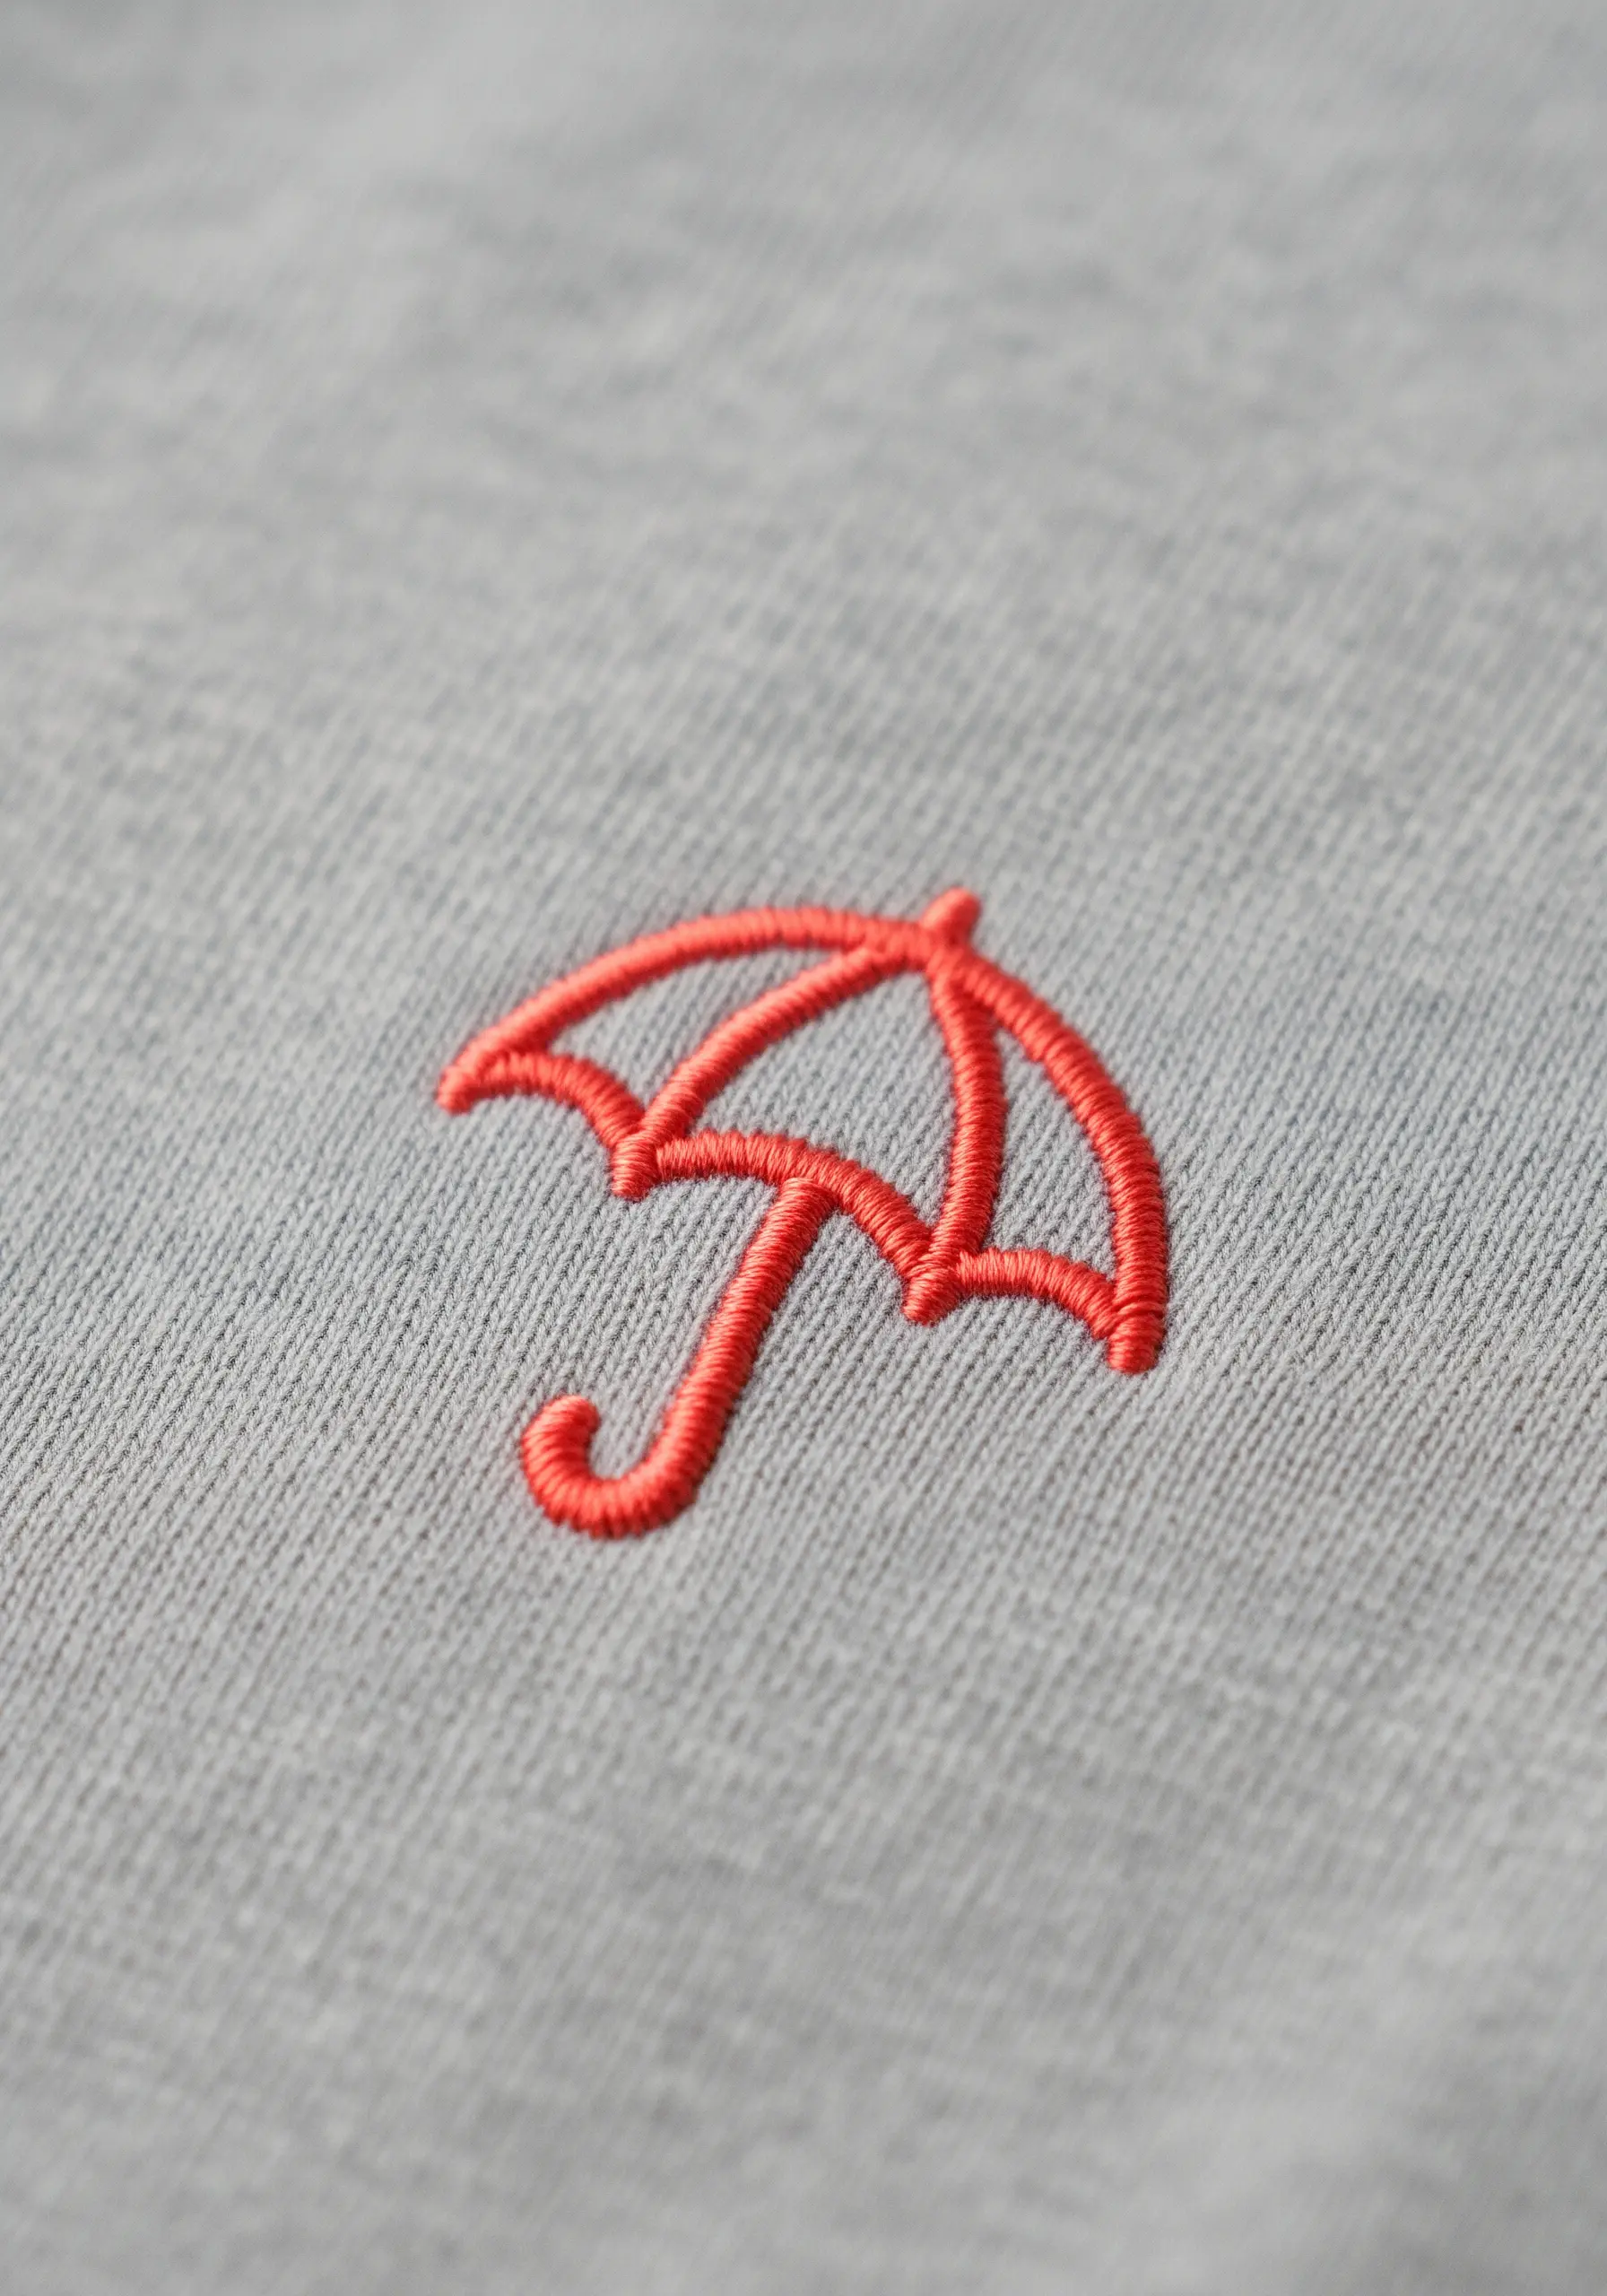
15. Master the Miniature Satin Stitch for Logos

To create a tiny, logo-like embellishment, precision is key.
Outline your shape first with a tiny split stitch to create a raised, defined edge for your satin stitches to rest against.
Use only one or two strands of floss and keep your satin stitches short, dense, and perfectly parallel.
This technique is how you create professional-looking tiny embroidery patterns that make your clothes look custom-made.
16. Combine Appliqué with Embroidery for Layered Texture

Create depth and texture by layering felt appliqué with simple embroidery stitches.
Cut your main shapes from felt and secure them to your base fabric with a few small stitches or fabric glue.
Then, add details and outlines using a contrasting thread color.
A blanket stitch around the edge of the appliqué pieces not only secures them but also adds a decorative, handcrafted finish.
The combination of soft felt and sharp stitches makes for a highly tactile piece.
17. Integrate Real-World Objects into Your Design
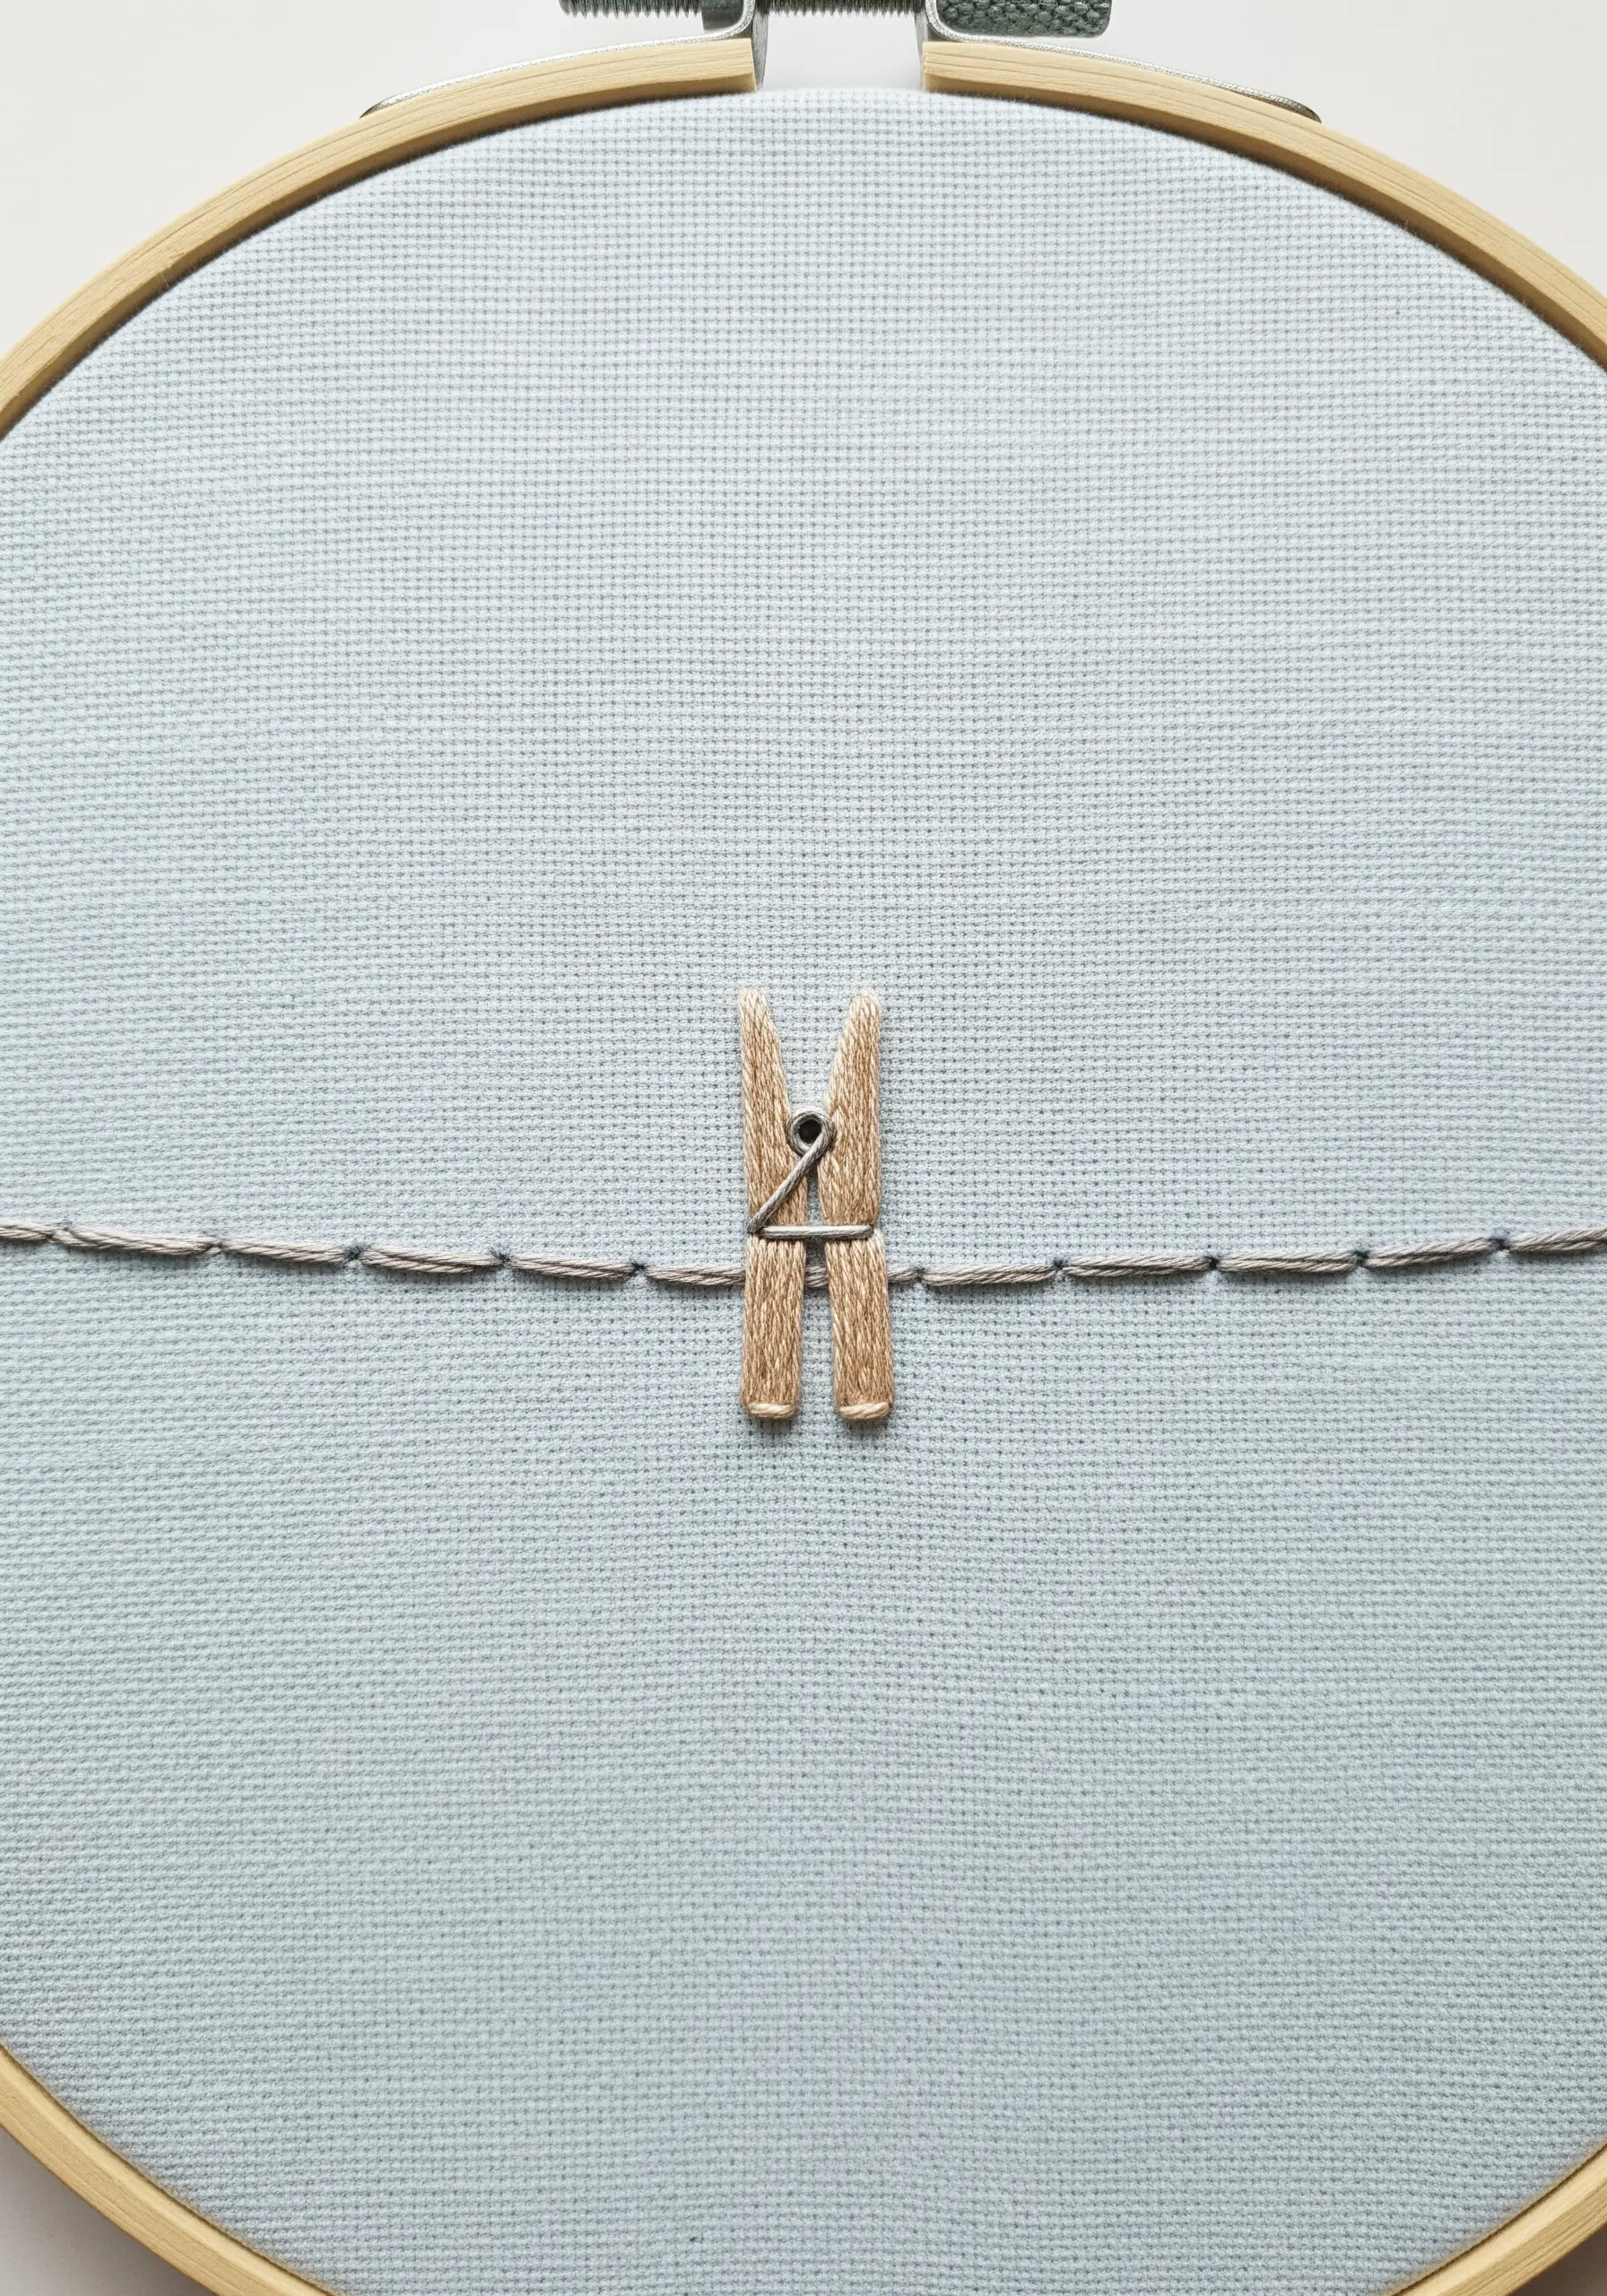
Challenge the boundaries of your hoop by incorporating a small, everyday object into your embroidery.
Here, a real wooden clothespin is secured to the fabric, and the embroidered clothesline runs through it.
This blend of textile art and mixed media creates a surprising and delightful composition.
Ensure the object is lightweight and can be securely stitched or glued to the fabric without causing sagging or damage.
Explore these abstract mixed-media embroidery ideas using fabric scraps for more inspiration.
18. Achieve Flawless Fills with a Satin Stitch Underlay

For exceptionally smooth and raised satin stitching, especially on dense fabrics like denim, always use an underlay.
First, fill the entire shape with a layer of running stitches or a thin satin stitch in the opposite direction of your final layer.
Then, cover this underlay with your top layer of satin stitches.
This padding eliminates fabric show-through, raises the design slightly, and provides a stable foundation for a perfectly uniform finish.
19. Use Outlines to Define Satin Stitch Sections

When a design has multiple adjacent sections of satin stitch, defining each area first is crucial for a clean result.
Before filling the lemon segments, outline each one with a split stitch or backstitch using the same yellow thread.
This creates a subtle, raised border that your satin stitches can tuck up against, preventing them from bleeding into each other and keeping the segments distinct.
A heavier whipped backstitch for the rind adds textural contrast.
20. Vary Your Stitch Width for Dynamic Outlines
Create a more dynamic and elegant outline by varying the width of your stitches.
Use a thicker stitch, like a satin stitch or a wide stem stitch band, for the main structural lines of the object.
For the finer, more delicate details, switch to a single backstitch or a thinner line.
This variation in line weight adds visual interest and sophistication, making the design feel more like a deliberate illustration than a simple tracing.
21. Create Soft Volume with Wool Roving and Needle Felting

For a soft, fluffy, three-dimensional effect, incorporate wool roving directly into your embroidery.
Place small tufts of unspun wool onto your fabric in the desired shape and use a felting needle to gently poke the fibers into the fabric until they are secure.
This technique is perfect for creating clouds, smoke, or animal fur. Contrast the soft, voluminous shape with traditional embroidery stitches, like the satin-stitched raindrops, to highlight the different textures.
It’s a wonderful way to experiment with high-texture fabric collage embroidery projects.
22. Add a Touch of Magic with Metallic Threads

When working on a dark, luxurious fabric like navy linen or velvet, a touch of metallic thread adds instant elegance.
To make metallics easier to work with, use shorter lengths of thread and a thread conditioner like beeswax.
For the moon, use a padded satin stitch to help the metallic thread catch the light. For the stars, a few simple straight stitches or a star stitch in a bright gold thread is all you need for a magical effect.
These handmade embroidery touches that make every room feel natural and enchanting.
23. Contrast Geometric Lines with Organic Fills

Create a striking visual balance by pairing a rigid, geometric shape with a soft, organic one.
Use a clean, precise backstitch or stem stitch in a neutral color to create the geometric planter.
Then, fill the plant itself with a more textured, natural stitch like the fishbone stitch for the leaves, which mimics the structure of a real leaf.
This juxtaposition of hard and soft, linear and organic, makes the entire composition more dynamic and visually engaging.
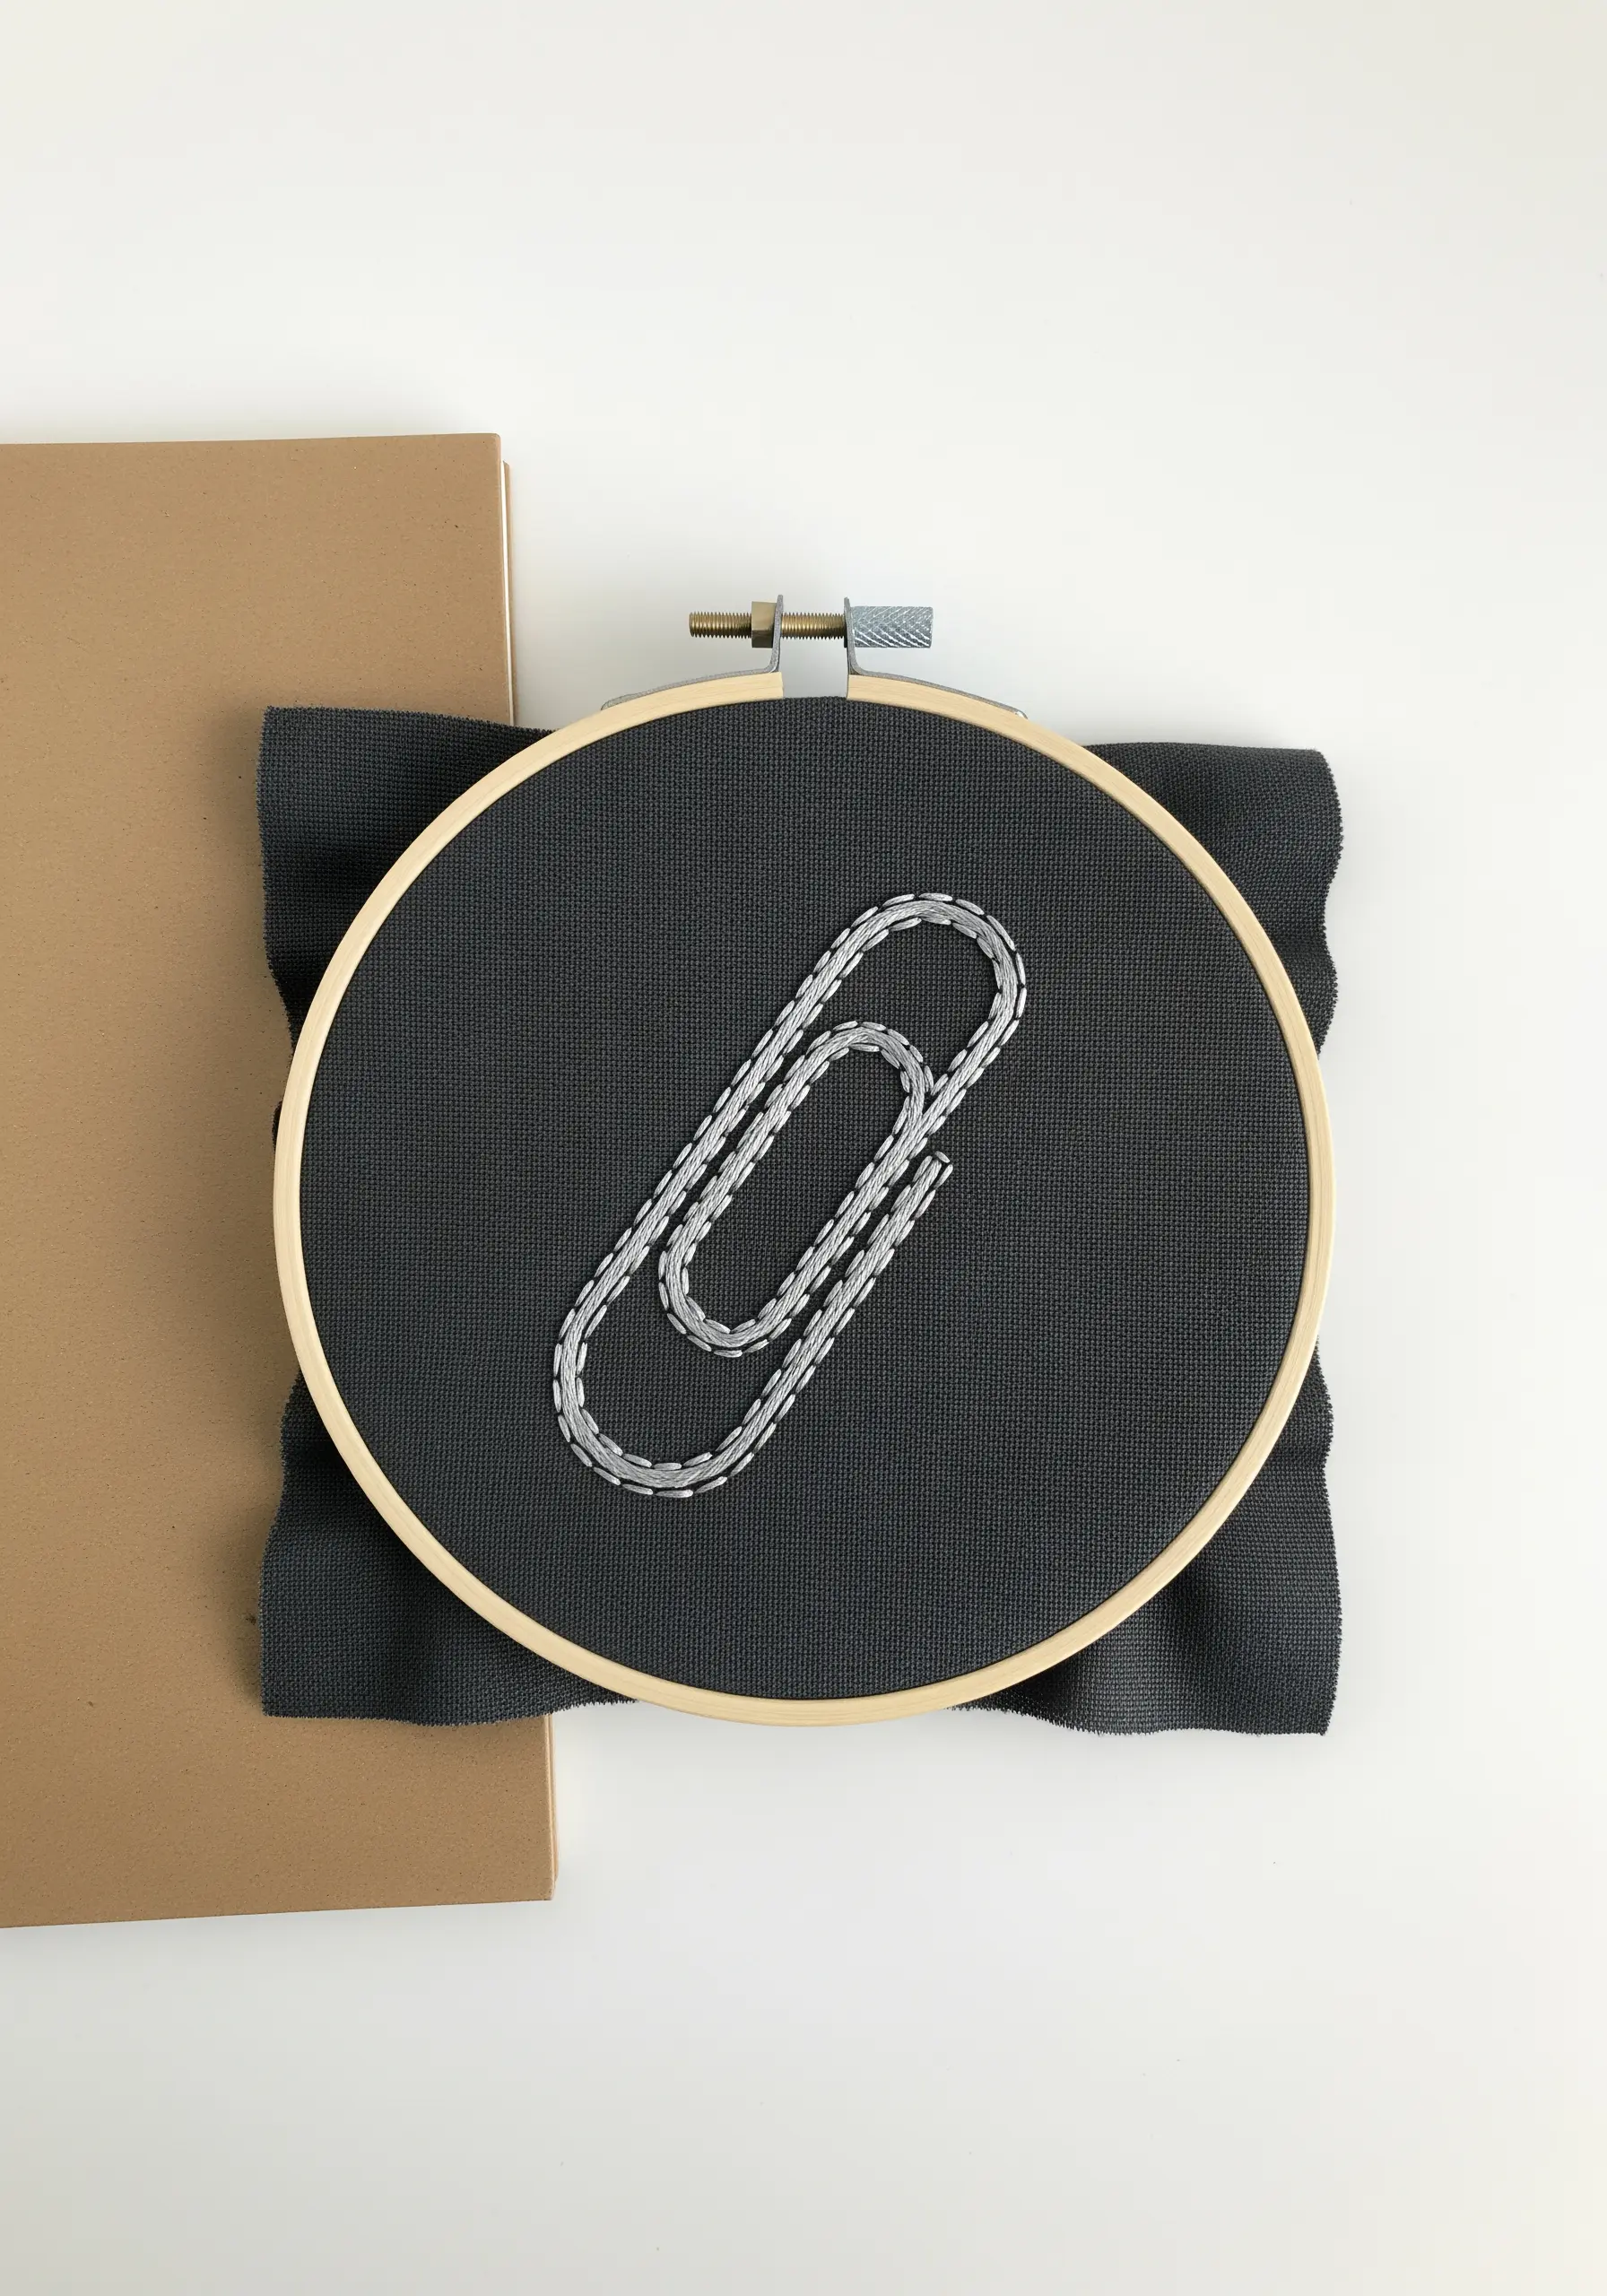
24. Make a Statement with High-Contrast Line Art
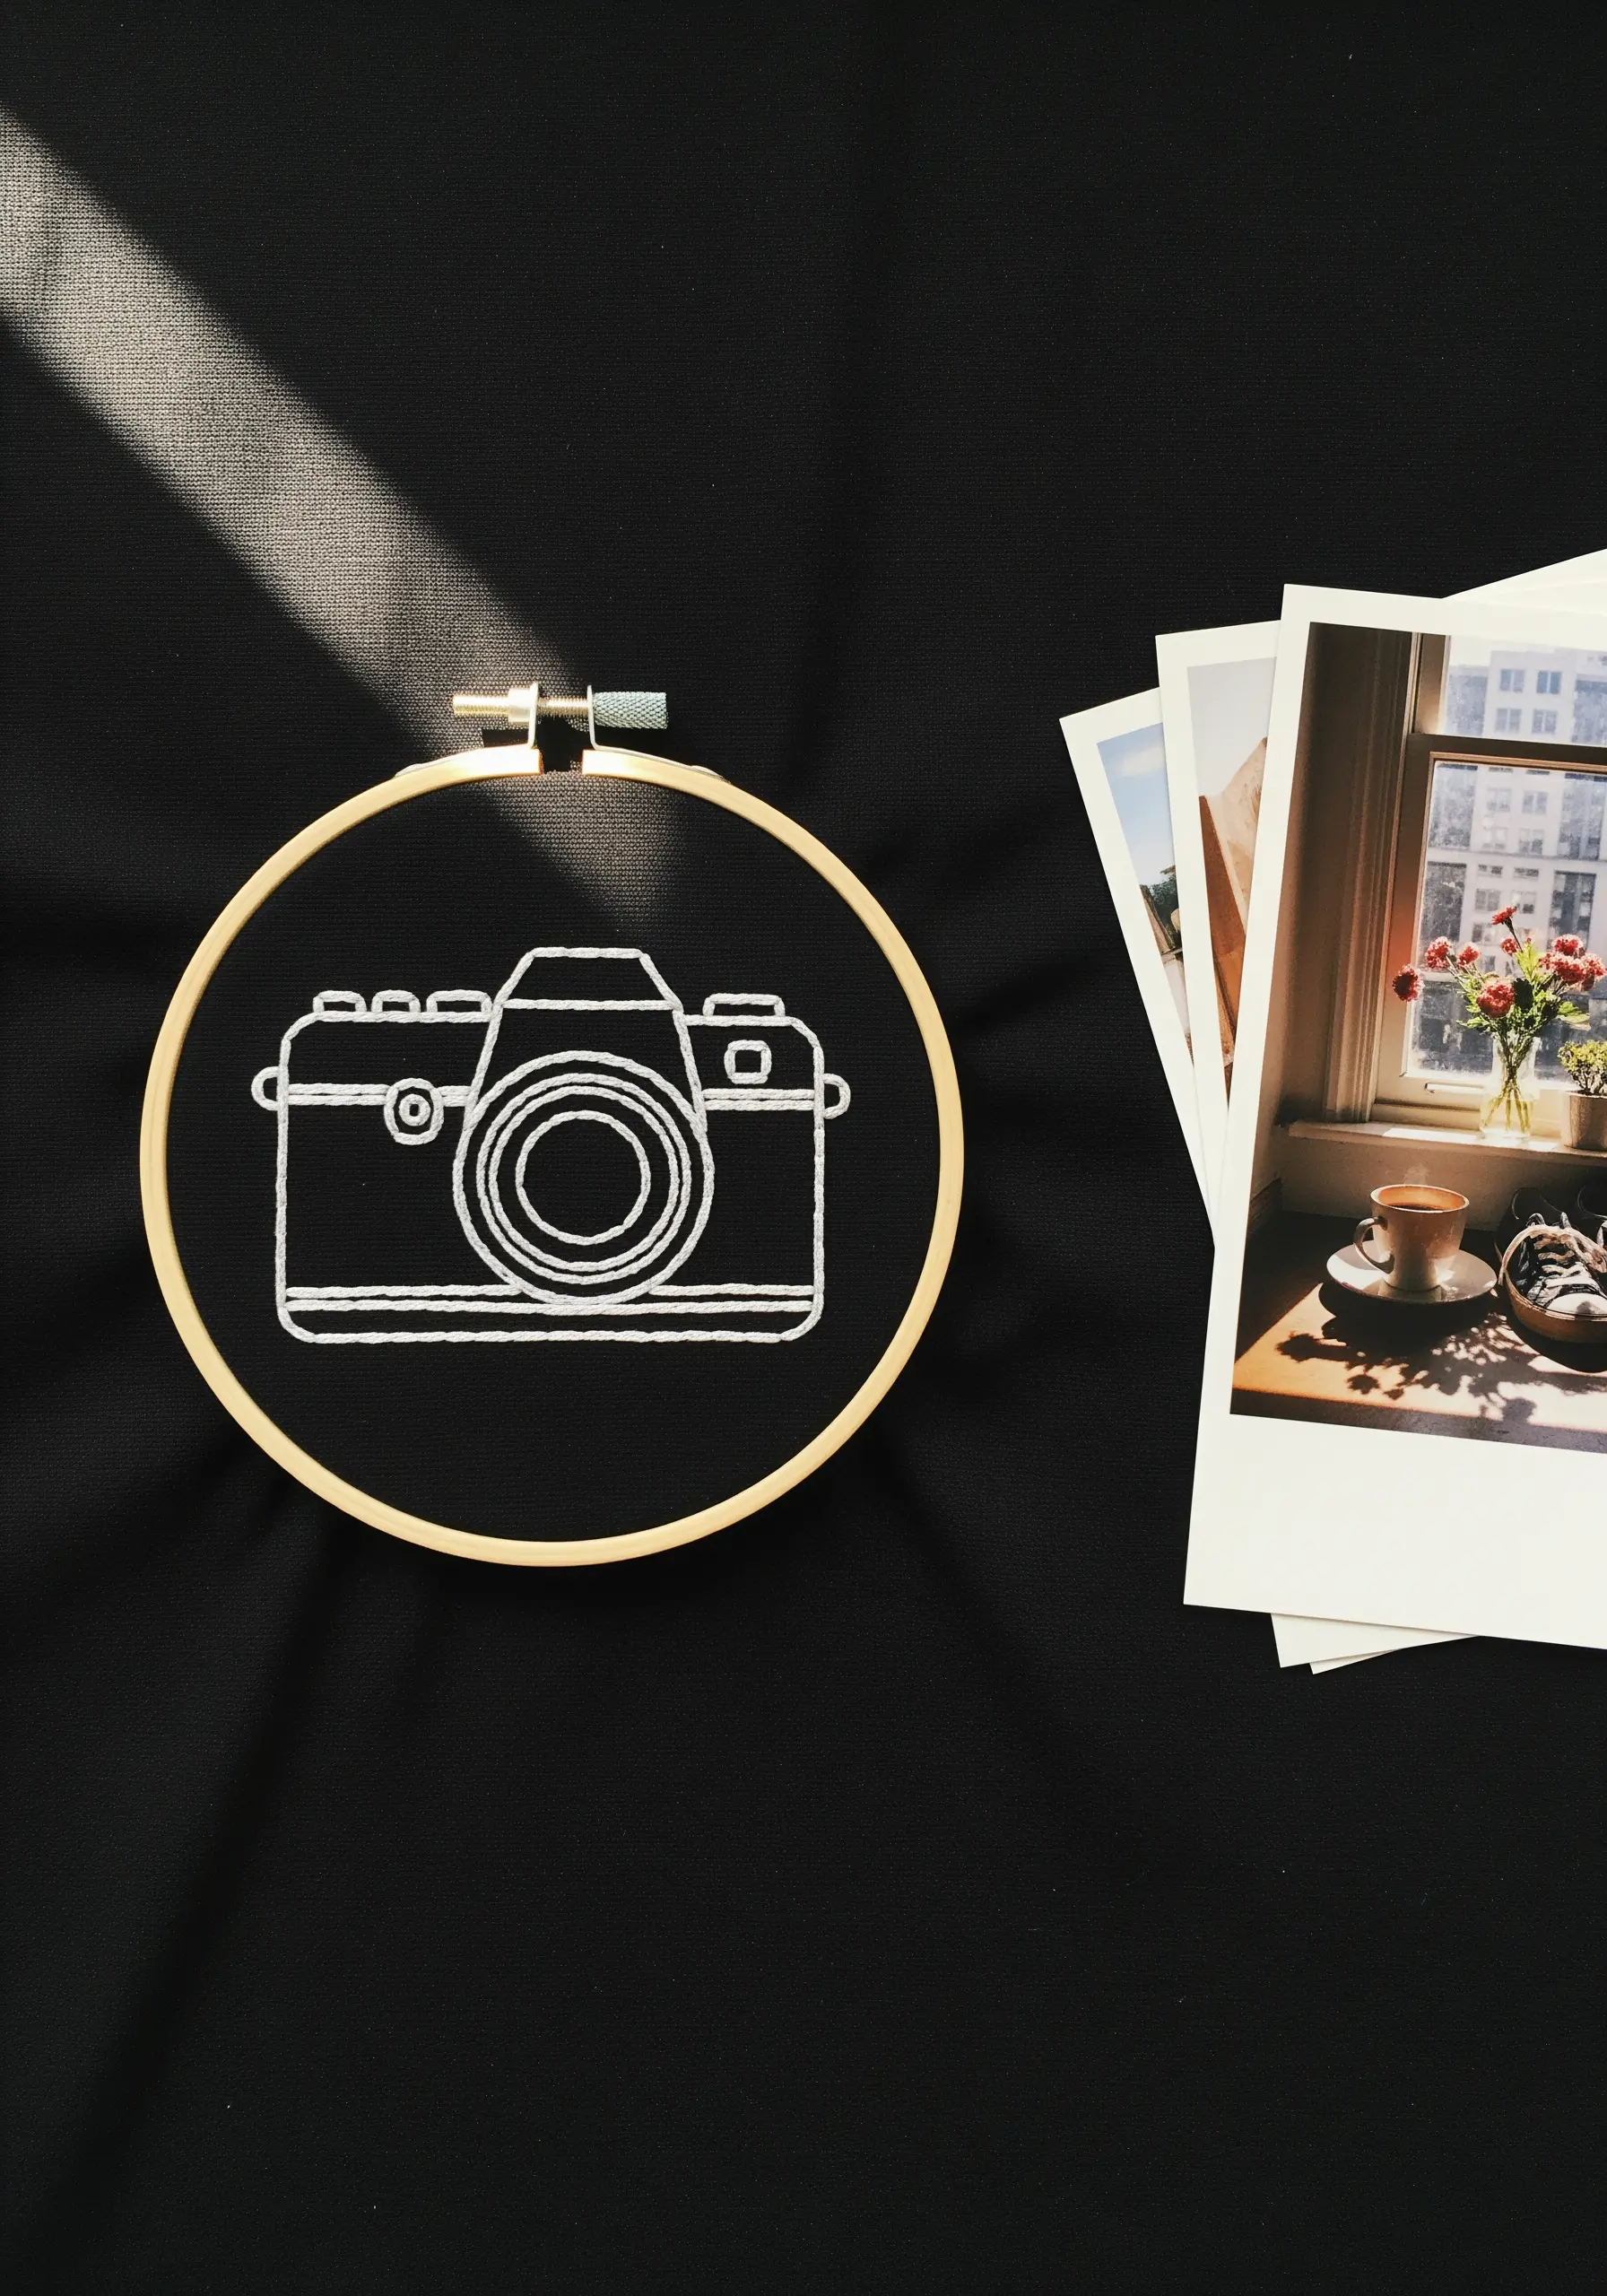
For a bold, graphic statement, you cannot beat the clarity of white thread on black fabric.
Choose a simple, recognizable outline that translates well into line art, like a camera or a pair of scissors.
Use a consistent backstitch with two or three strands of floss to ensure the line is solid and easy to read.
This minimalist approach emphasizes form and is a powerful way to turn a simple object into a piece of modern art.
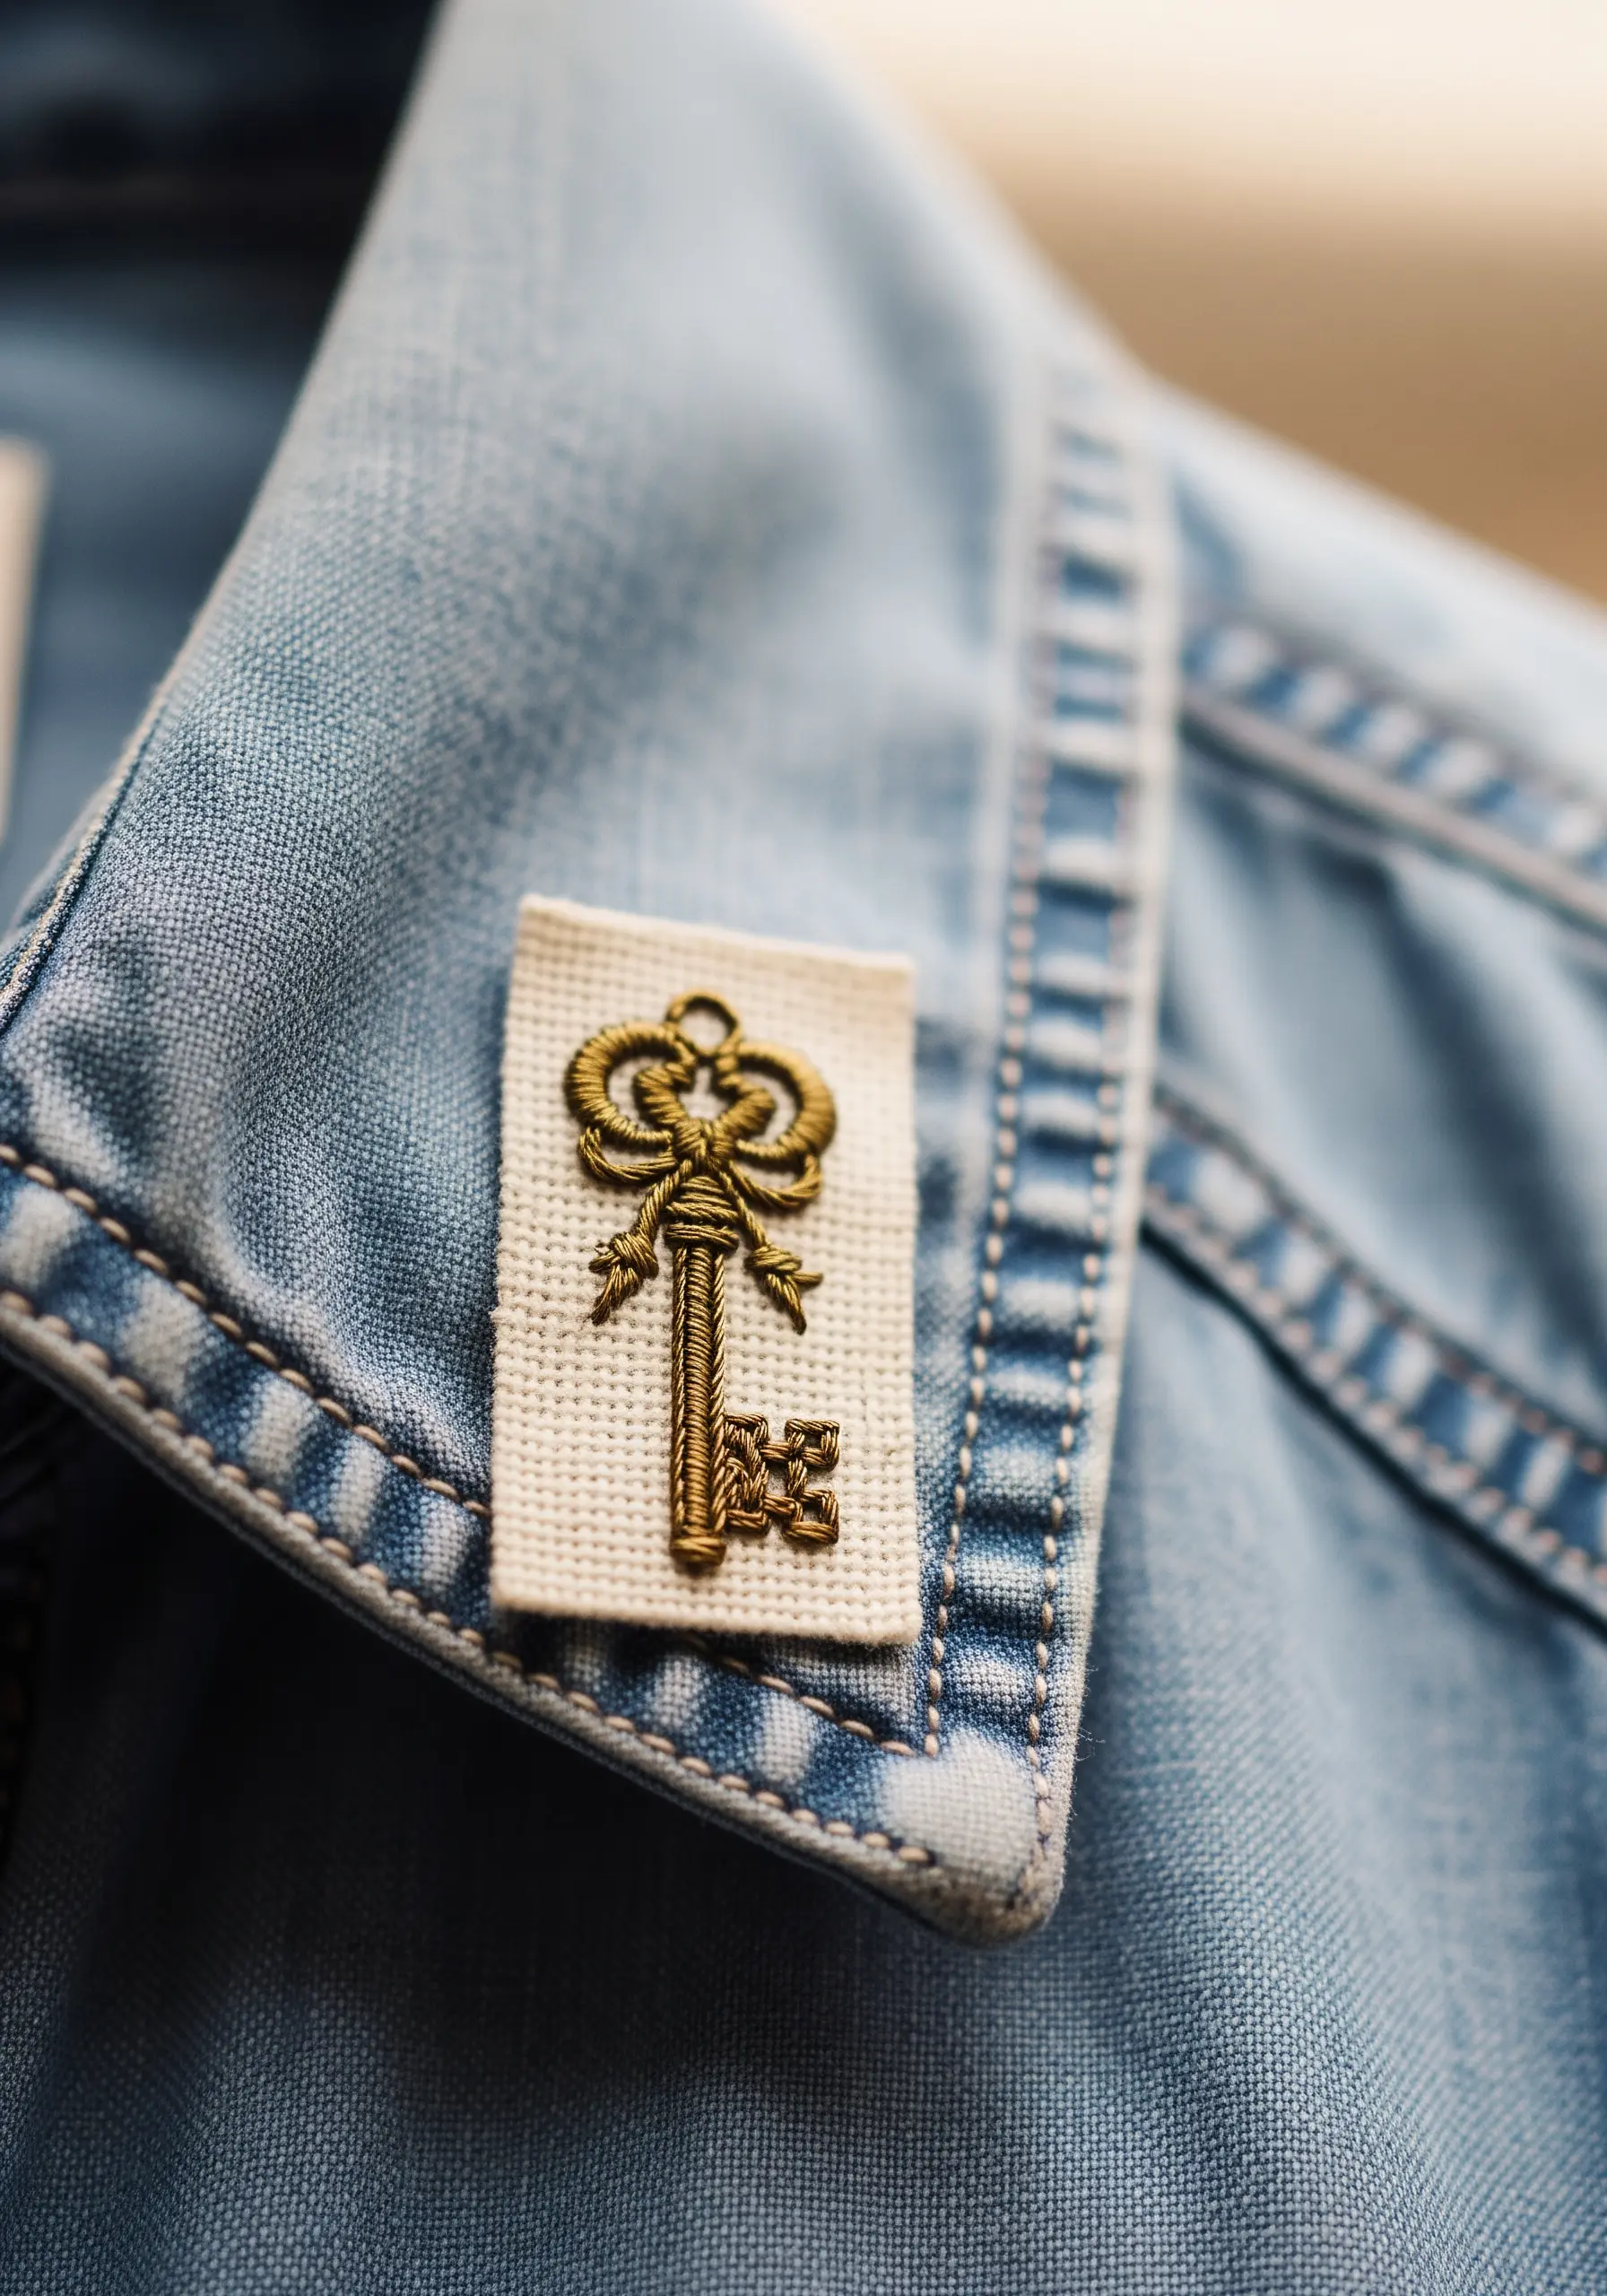
25. Achieve a Realistic Metallic Texture with Thread Weaving

To mimic the look of woven or twisted metal, use a technique that layers and wraps your threads.
First, create a base of long, parallel straight stitches (a laid stitch) across the shape you want to fill.
Then, come up from the back and weave your needle over and under these base stitches without piercing the fabric.
This weaving technique, often called surface couching or weaving, creates a textured, metallic sheen that is perfect for objects like scissors, keys, or jewelry.
26. Mimic Yarn Texture with Variegated Floss and Whipped Stitch

To embroider a ball of yarn that looks truly authentic, thread choice and stitch direction are everything.
Use a variegated floss in natural wool tones to replicate the subtle color shifts in real yarn.
Create the rounded shape by stitching curved lines of split stitch, following the contours of a sphere.
Then, whip the outlines with a contrasting color to define the ball and make the knitting needles pop against the textured background.
27. Create a Concentric Fill for a Hand-Drawn Feel

For a playful, slightly imperfect circular fill, use a spiraling backstitch or stem stitch.
Start at the outer edge of your circle and work your way inward in a continuous spiral.
This method creates a beautiful, subtle texture that looks like a hand-drawn doodle and is much faster than satin stitch for filling a large area.
A few contrasting straight stitches in the center complete the look of a simple, charming button.
28. Adapt Your Technique for Stretchy Fabrics

Embroidering on knit fabrics like socks requires a special approach to prevent puckering and distortion.
First, apply a lightweight, iron-on stabilizer to the back of the area you plan to stitch. This will prevent the fabric from stretching as you work.
Use a simple backstitch for outlines and keep your tension slightly looser than you would on woven fabric.
After stitching, carefully trim away the excess stabilizer for a clean, flexible finish.
29. Direct Your Stitches to Describe an Object’s Form

Make your fill stitches do more than just add color—use their direction to describe the shape of the object.
For the body of the watering can, use long, vertical satin stitches to suggest a tall, cylindrical form.
For the spout and handle, angle your stitches to follow their curves and direction.
This thoughtful placement of stitches, known as thread painting, creates a more realistic and dynamic result, turning a flat design into a three-dimensional object.
30. Use Patterned Fabric as an Integrated Background
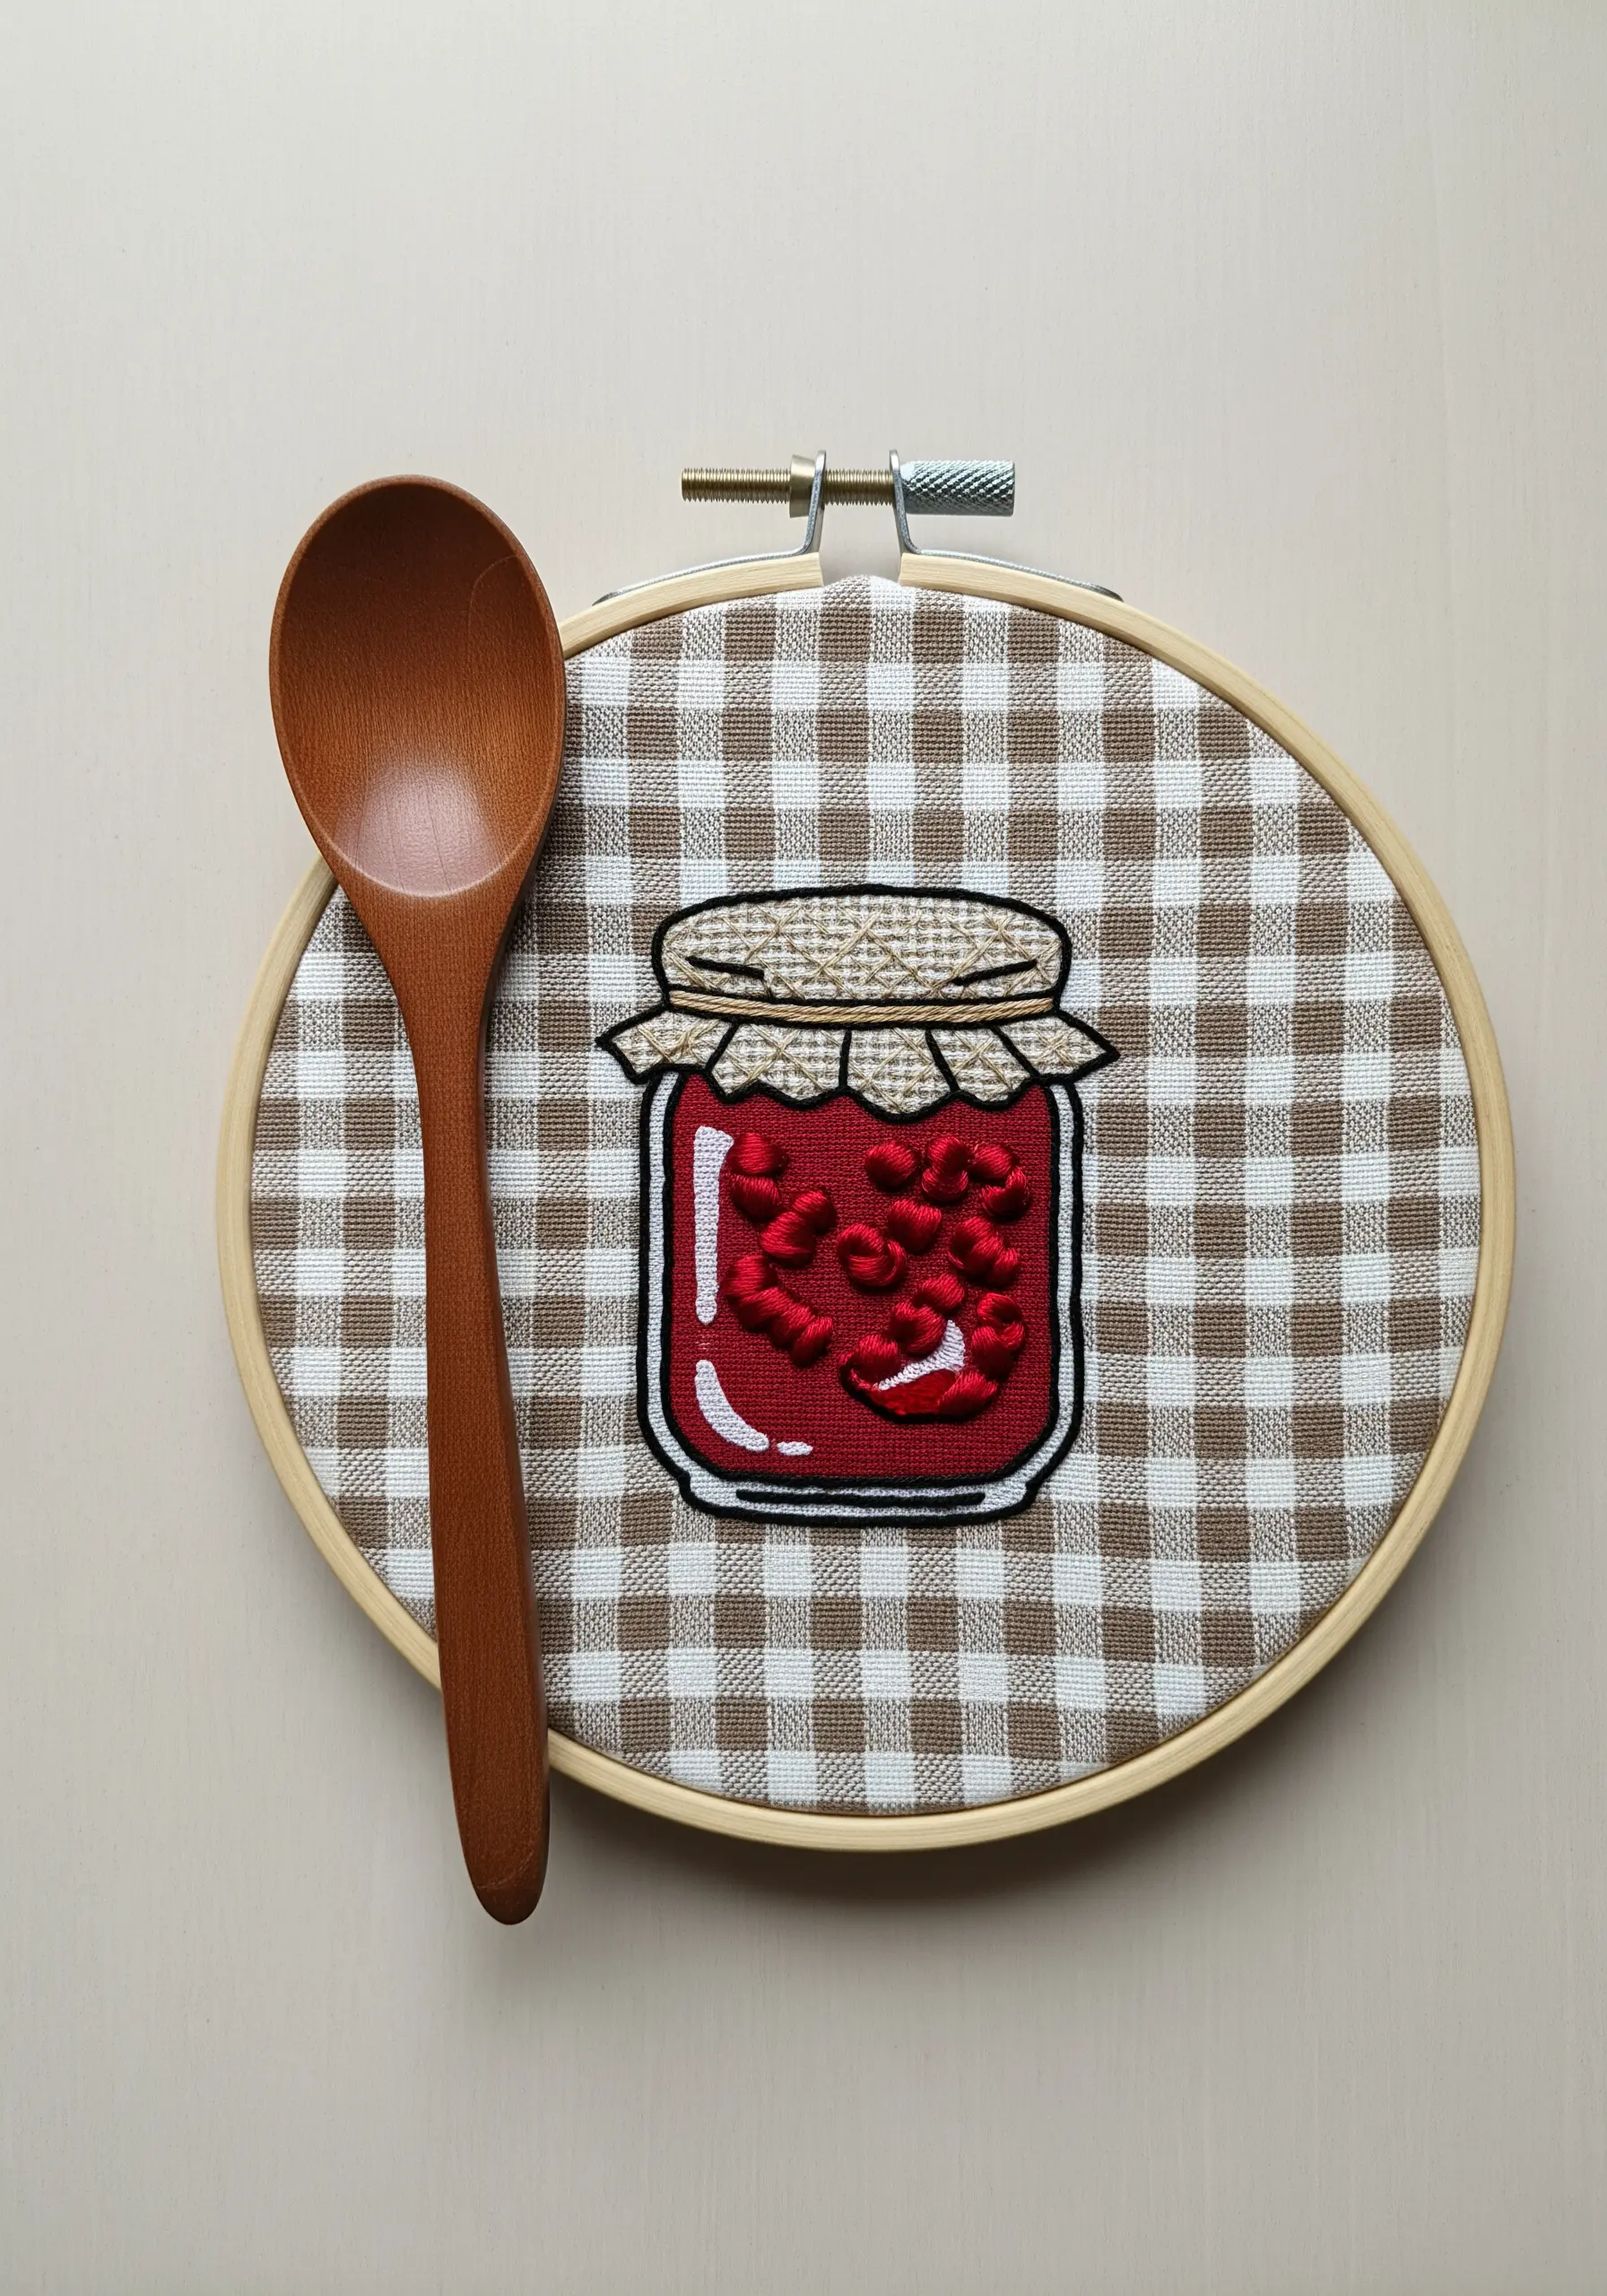
Instead of stitching on plain fabric, choose a pattern that complements your subject matter.
A classic gingham or checkered fabric instantly evokes a picnic or kitchen setting for a jar of jam.
This simple choice adds a layer of narrative and visual interest to your work before you’ve even made a stitch.
It also means you don’t have to stitch a background, allowing your central motif to be the hero.
31. Build Texture with Layered French Knots

To create the varied, organic texture of stacked stones, use French knots in different sizes and densities.
For the darker, rougher-looking stones, pack your knots tightly and use more strands of floss (three or four) for a larger knot.
For the smoother, lighter stones, use fewer strands (one or two) and leave a little space between each knot.
This is one of the best embroidery projects inspired by textures you’d find on a nature walk, teaching you how to translate natural surfaces into thread.
32. Suggest Movement with a Simple Running Stitch

A running stitch is the perfect tool for creating a sense of motion and direction in your embroidery.
The dashed line naturally draws the eye along a path, making it ideal for flight paths, trails, or steam.
Keep the stitches and the gaps between them consistent for a clean, rhythmic line.
Pair this simple stitch with a small, solid object, like this satin-stitched paper plane, to give the implied movement a clear origin point.


