
When you look at a bird or a butterfly, you see more than just a shape. You see the iridescent sheen on a feather, the paper-thin texture of a wing, the subtle shift of color in the light. Your embroidery can capture that same living detail, and it often comes down to small, intentional choices in your technique.
This is where your work transforms from simply following a pattern to creating a piece of art. It’s about deciding to use one strand of thread instead of two for finer detail, or choosing a bullion knot over a French knot to give a berry a more dimensional form. It’s about understanding how the direction of a single stitch can change the way light plays across a surface.
Let these ideas be a starting point not just for what to stitch, but how to see. Look closer at the way feathers overlap, how wings catch the sun, and how a simple change in thread texture can bring your subject to life. You have the ability to stitch more than an image—you can stitch a feeling, a moment, a breath of life onto your fabric.
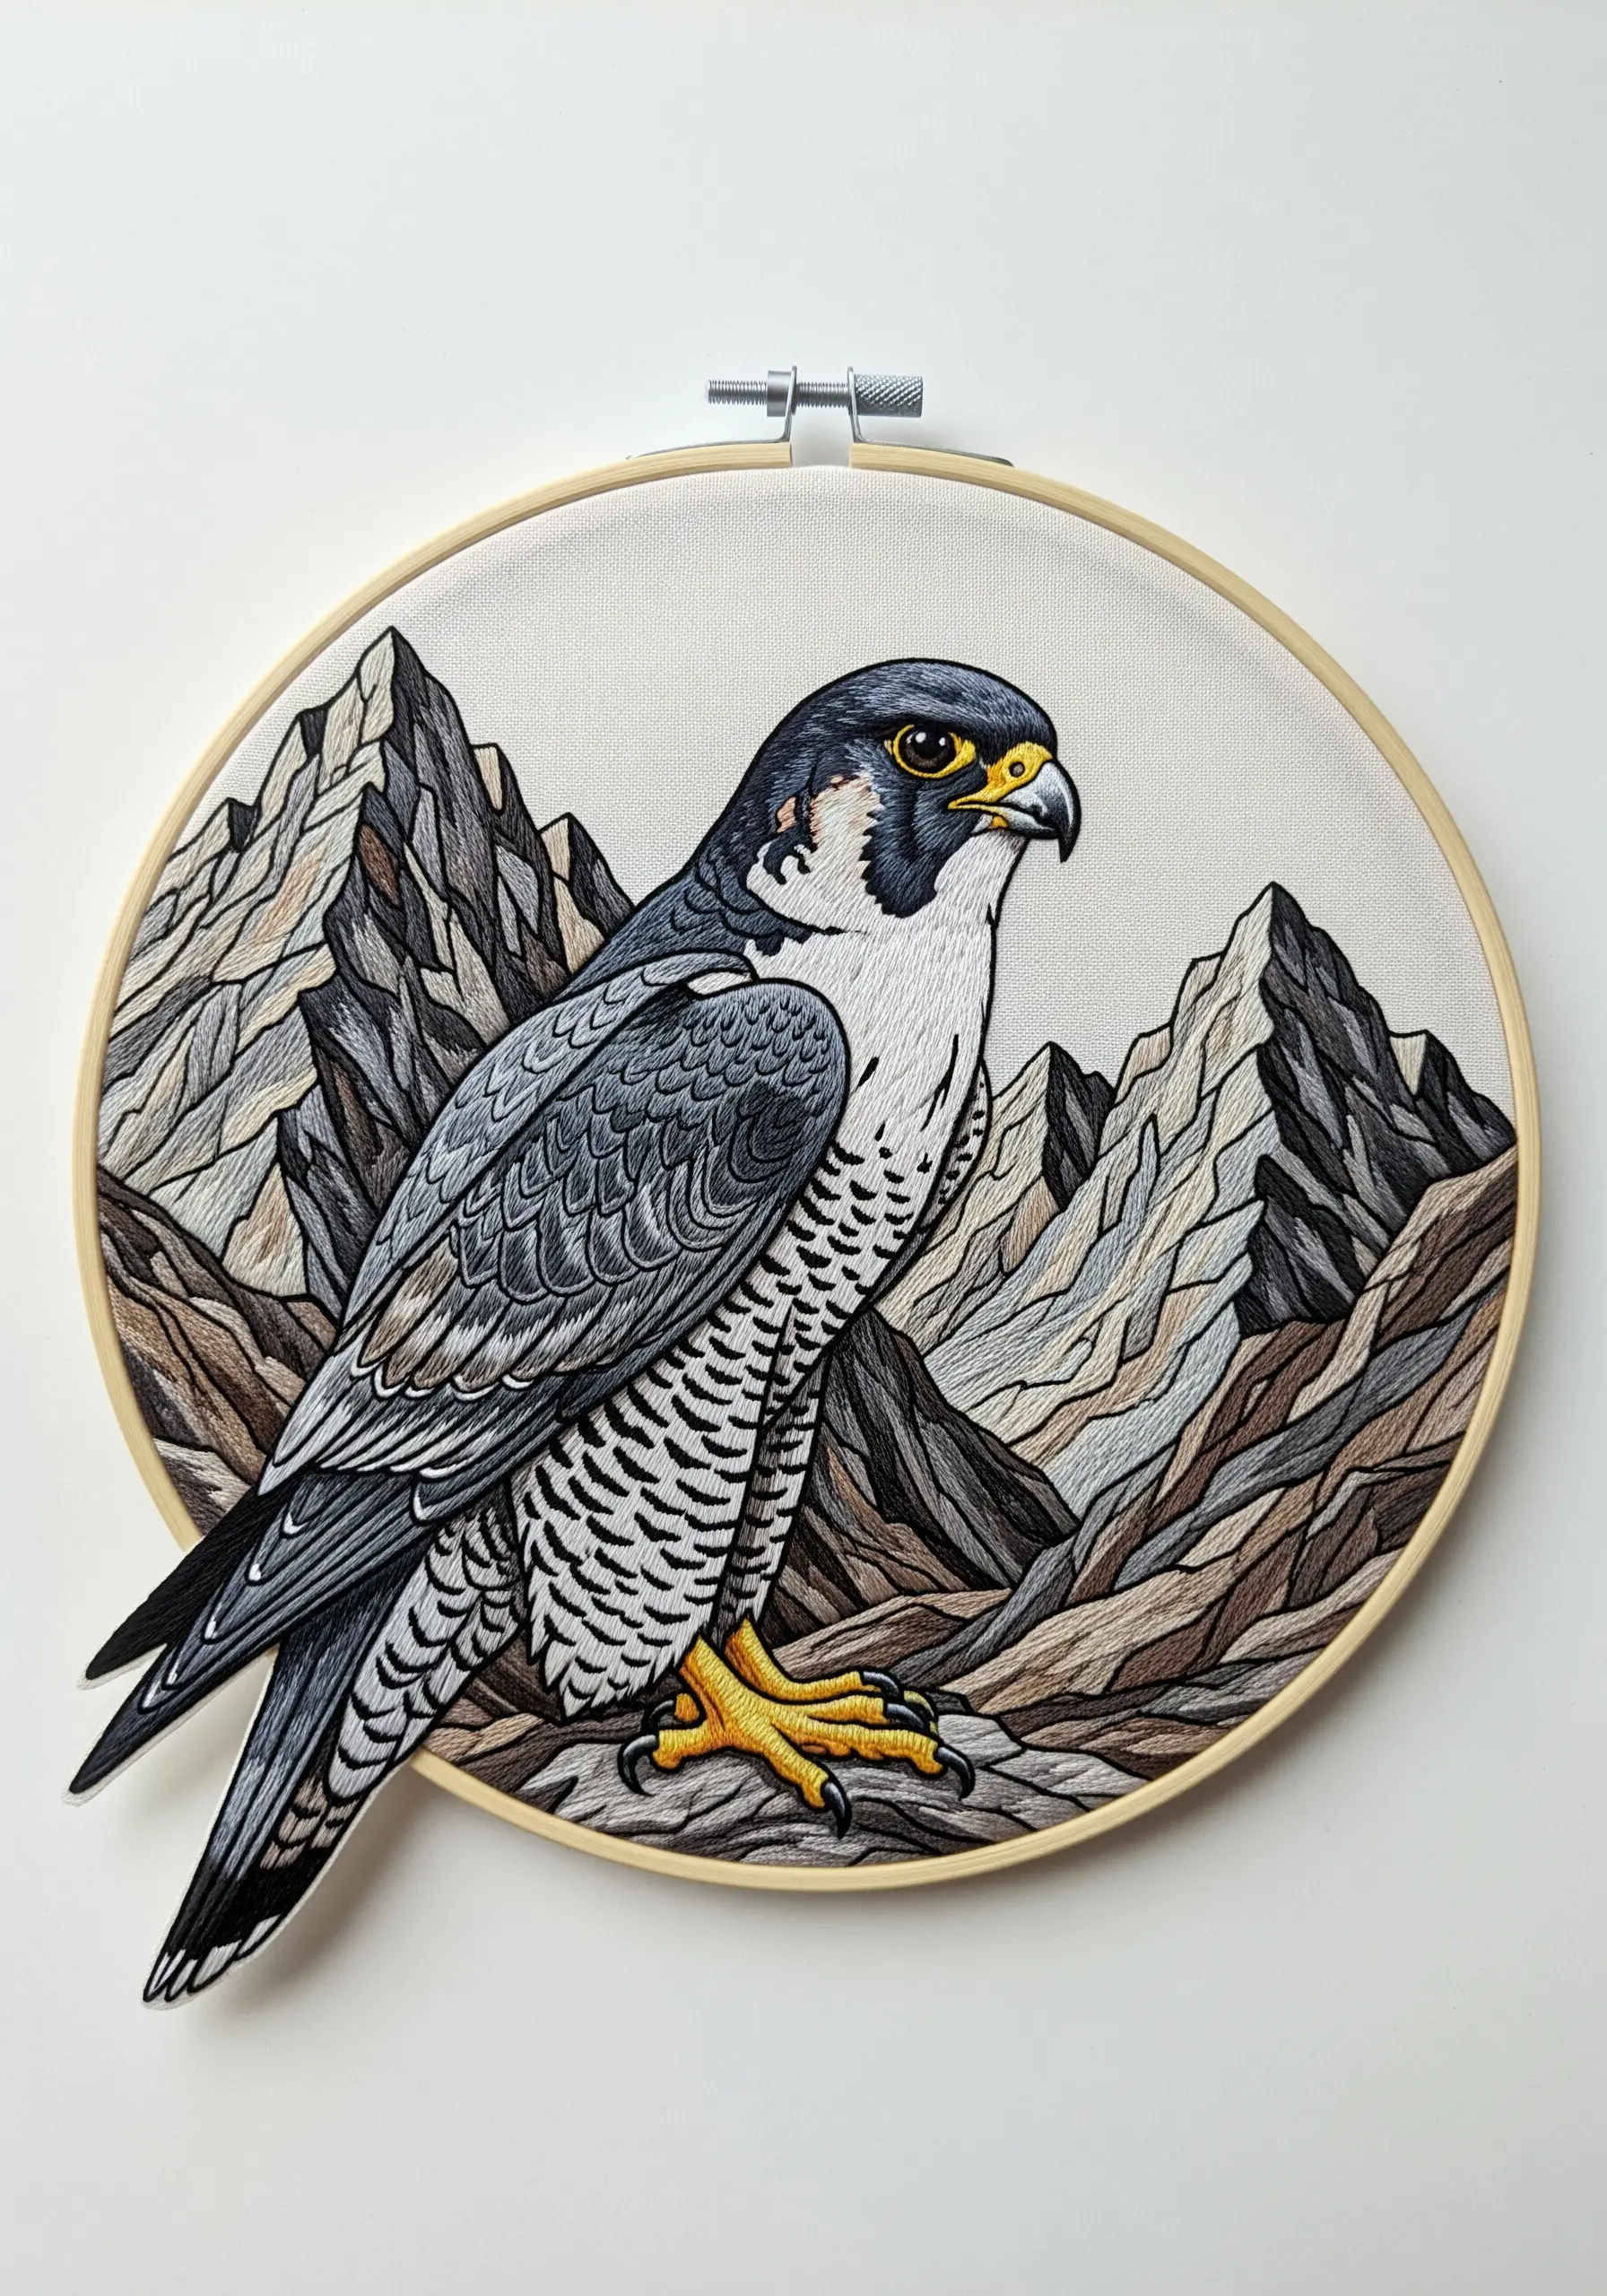
1. Achieve Iridescence with Directional Thread Painting

To capture a hummingbird’s shimmer, use a single strand of floss and pay close attention to stitch direction.
Think of your needle as a paintbrush, laying down stitches that follow the natural contours and growth of the feathers.
Vary the angle of your long-and-short stitches on the throat and head to catch the light from different directions, creating an iridescent effect without needing metallic thread.
This technique, known as contemporary thread painting, is what separates a flat motif from a dynamic, lifelike bird.
2. Define Wings with a Crisp Satin Stitch Outline

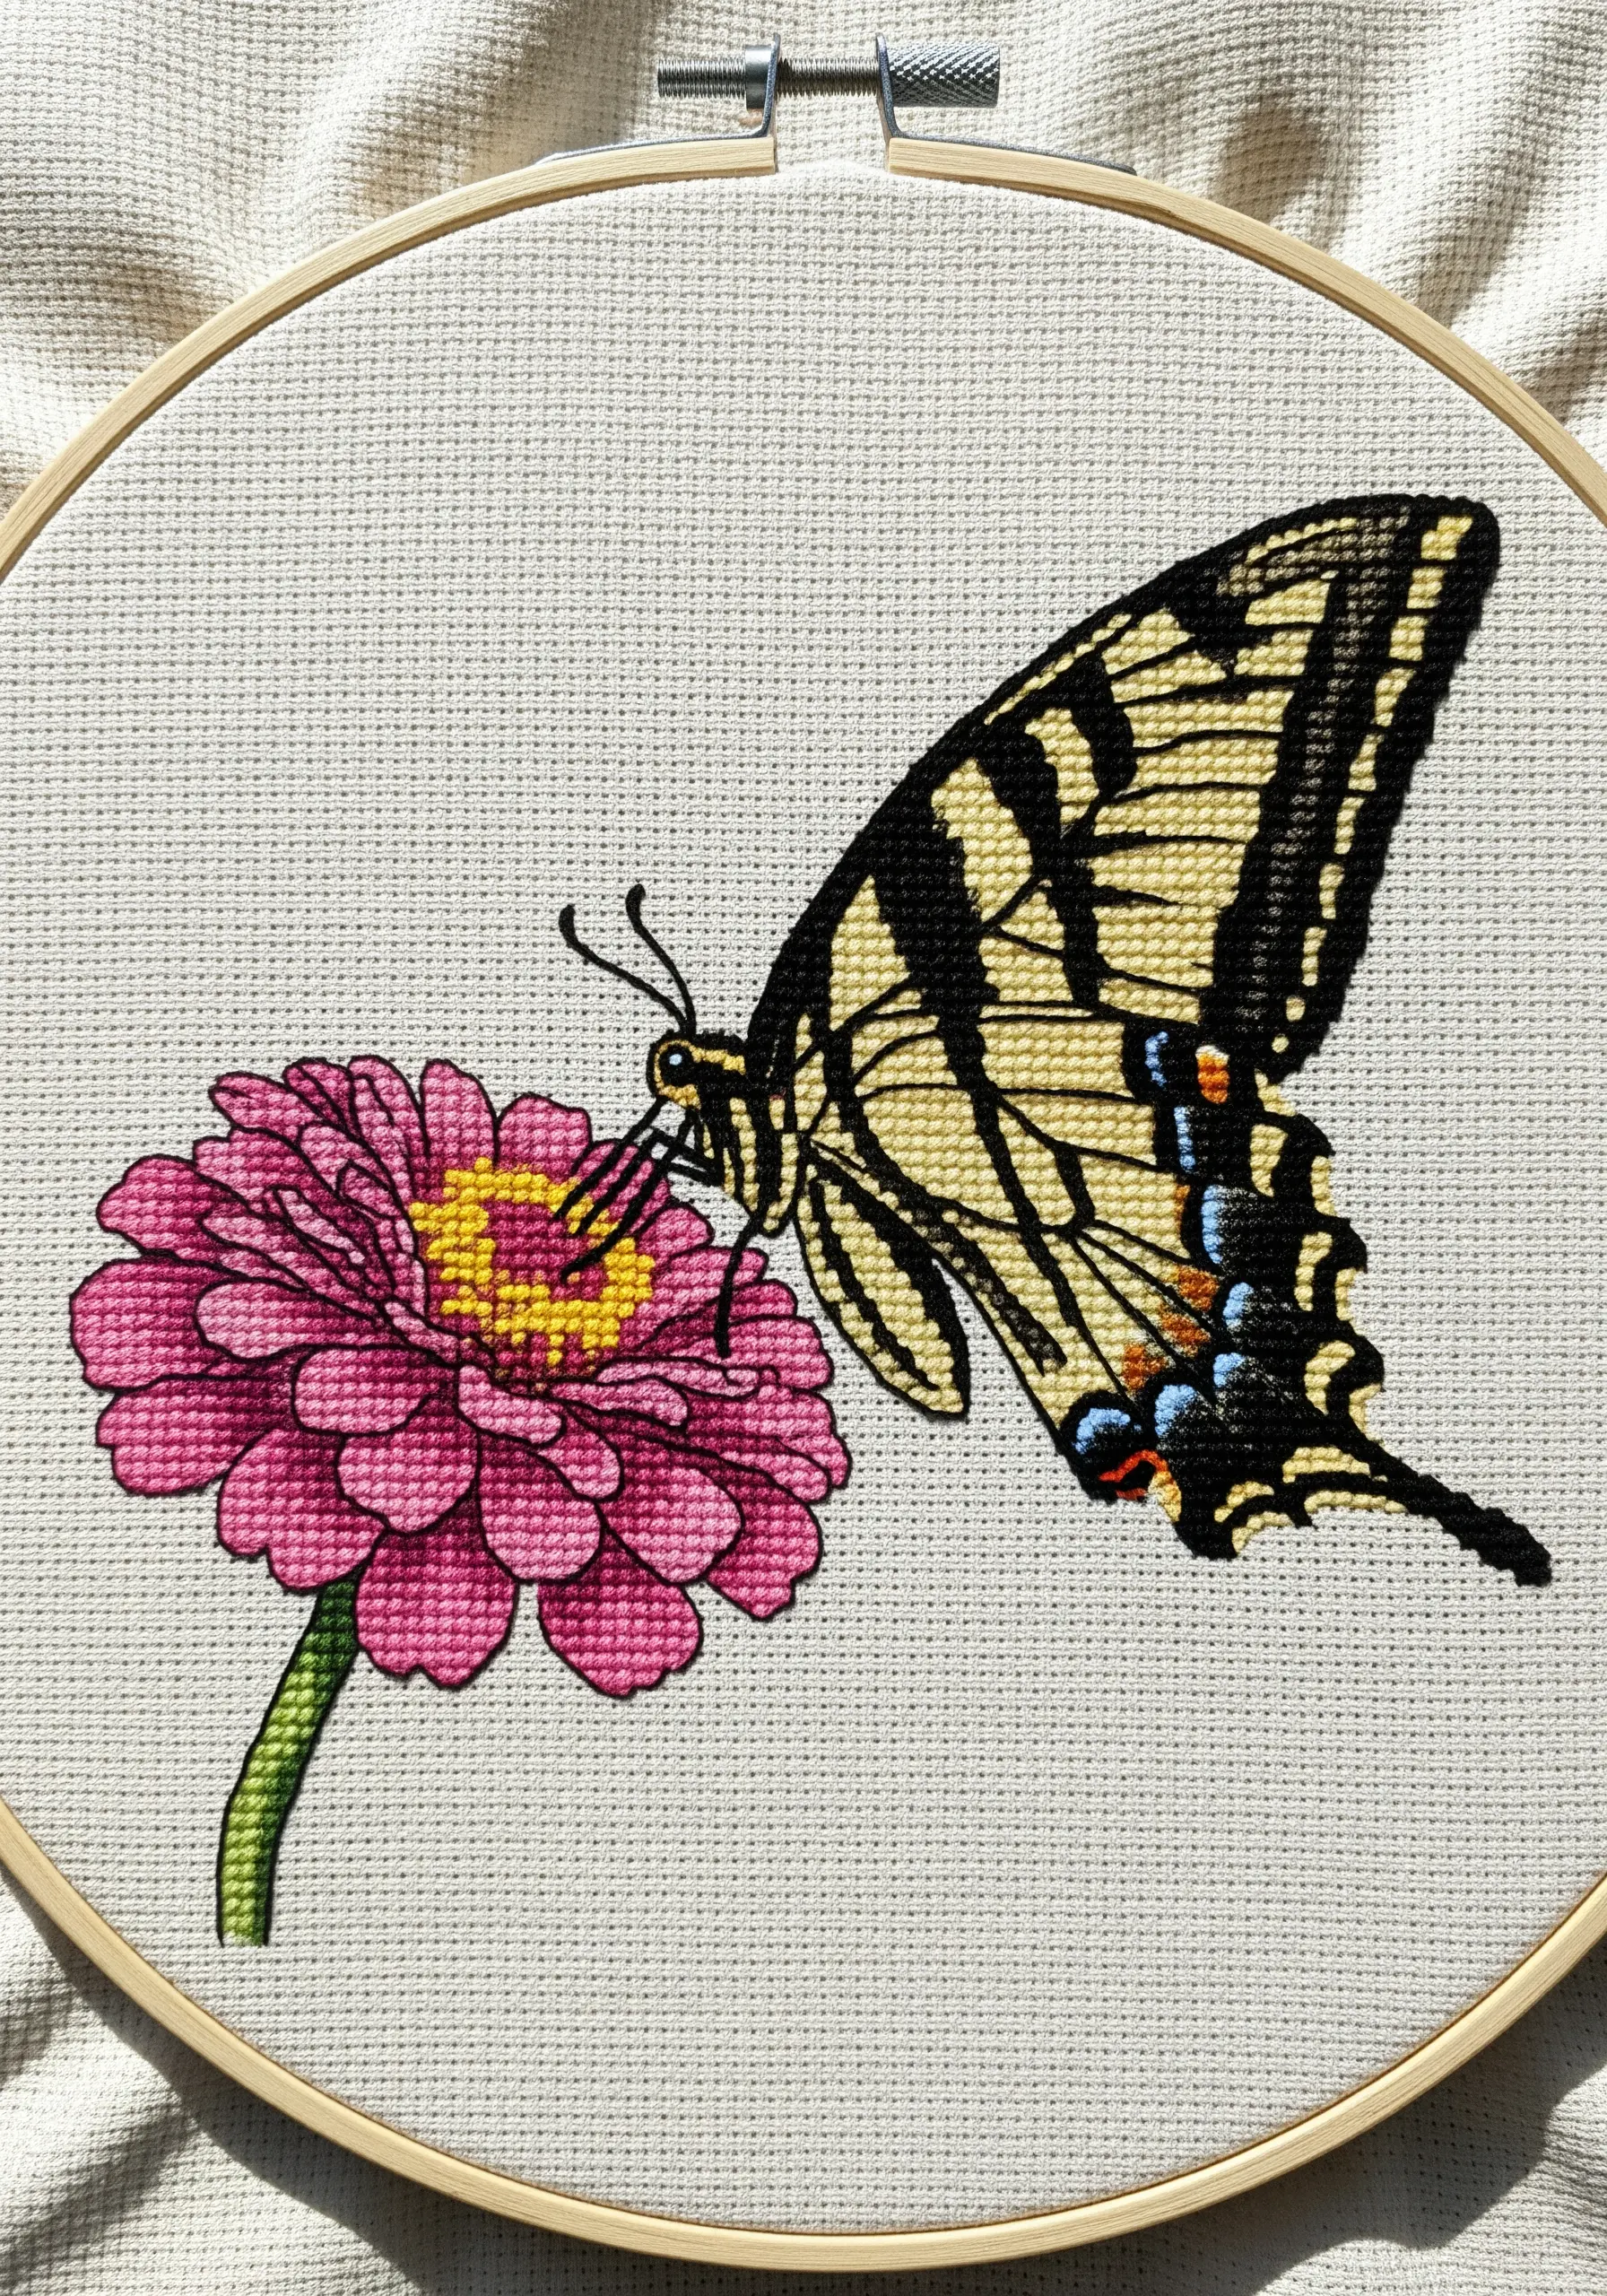
For bold, graphic butterflies like the Monarch, precision is key.
Before filling the wings, create a sharp boundary by outlining each color section with one or two rows of split stitch.
This raised edge acts as a guide and a barrier, allowing you to nestle your satin stitches tightly against it for a clean, professional finish.
It prevents colors from bleeding into one another and gives the wings a defined, almost illustrative quality that makes the design pop.
3. Blend a Watercolor Effect on Butterfly Wings

To give large butterfly wings a soft, painterly look, blend multiple shades of blue using only two strands of floss at a time.
Instead of creating harsh lines, allow your long-and-short stitches to overlap organically, pulling one color slightly into the next to create a gentle gradient.
Contrast this softness with textured French knots for the surrounding Queen Anne’s Lace.
This textural difference makes the smooth wings the undeniable focal point on embroidered pillow covers.
4. Imply Motion with Scattered, Minimalist Details
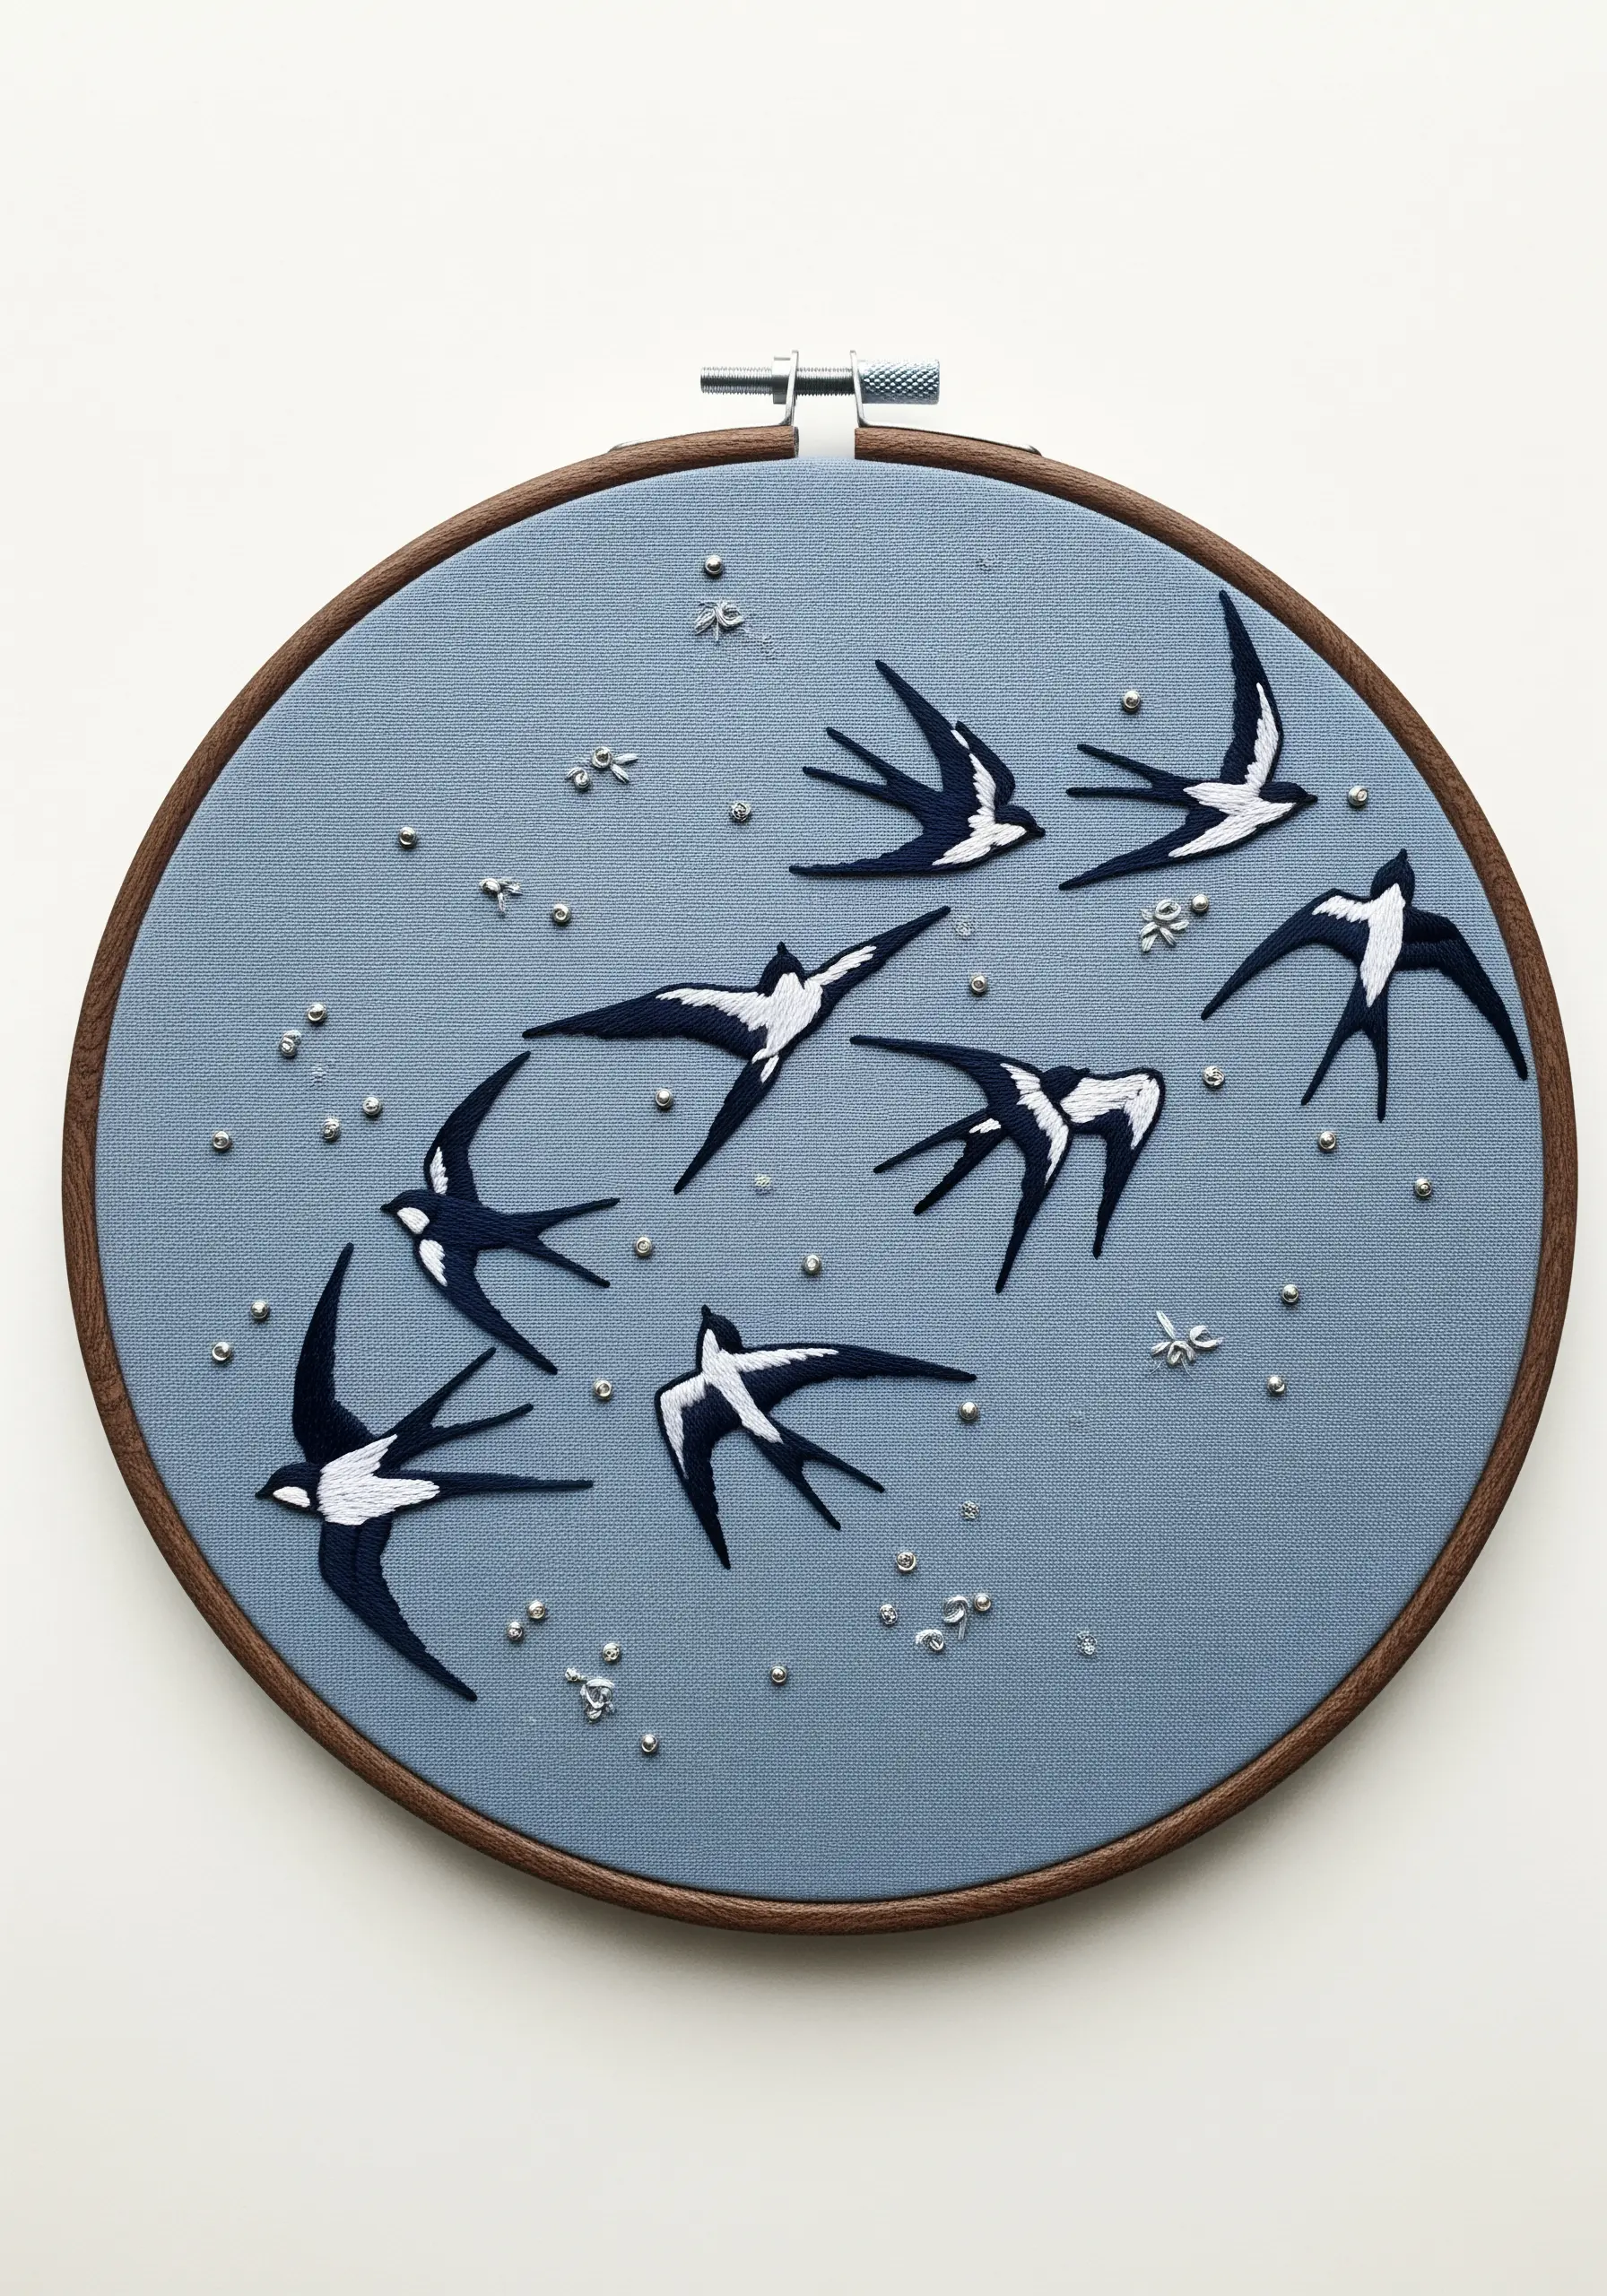
Create the illusion of a flock in flight by arranging your birds in a dynamic, sweeping curve across the hoop.
Instead of filling the entire background, use sparse details like tiny seed beads or single-strand French knots to suggest a shimmering sky.
This negative space is powerful; it directs the viewer’s eye along the path of the birds and makes the composition feel alive and unconstrained.
The dusty blue fabric provides a calm, atmospheric backdrop that enhances the feeling of open air.
5. Master Embroidery on Denim with Proper Preparation

Stitching on heavy fabric like denim requires the right tools to avoid frustration and achieve clean results.
Always use a stick-and-stitch stabilizer to transfer your pattern and prevent the fabric from stretching.
Opt for a sharp, strong needle (size 7 or 8 embroidery needle) that can pierce the dense twill weave without snagging.
The solid, stable surface of denim makes it an ideal canvas for dense satin stitching, as it holds the thread tension beautifully and makes your colors appear exceptionally vibrant.
These tiny embroidery ideas can completely transform a piece of clothing.
6. Unify a Composition with a Cohesive Color Story

When stitching multiple elements in one hoop, create harmony by repeating colors across different motifs.
Notice how the pale yellow and blue on the butterfly wings are subtly echoed in the design, tying them together.
Work with a limited palette—here, soft purples, yellows, and a touch of red—to ensure the composition feels curated, not chaotic.
Even the delicate chain link detail uses a muted green that connects back to the lavender stems, creating a balanced visual rhythm.
7. Build Dimensional Feathers with Mixed Fibers

To achieve the extraordinary texture of an owl’s plumage, move beyond standard floss and incorporate thicker fibers like wool yarn or roving.
Use a couching stitch to tack down the thick yarn for the wing outlines, creating a bold, raised edge.
Fill in the feather sections with long-and-short stitch using floss, but lay down a padded satin stitch base first.
This padding gives the feathers a plush, three-dimensional quality that makes the owl feel like it could lift right off the fabric, turning it into one of those handmade objects that make your home a mini art gallery.
8. Soften Nursery Décor with a Gentle Stitch Approach
For a nursery, the goal is softness in both color and texture.
Use only two or three strands of floss instead of the full six to keep the stitching delicate and light.
Choose a muted color palette that complements the room’s decor, focusing on gentle blues, pinks, and greens.
The simplicity of the satin-stitched birds and lazy daisy flowers creates a serene and calming effect, perfect for baby rooms and cozy corners.
9. Create Iridescent Eyespots with Layered Colors
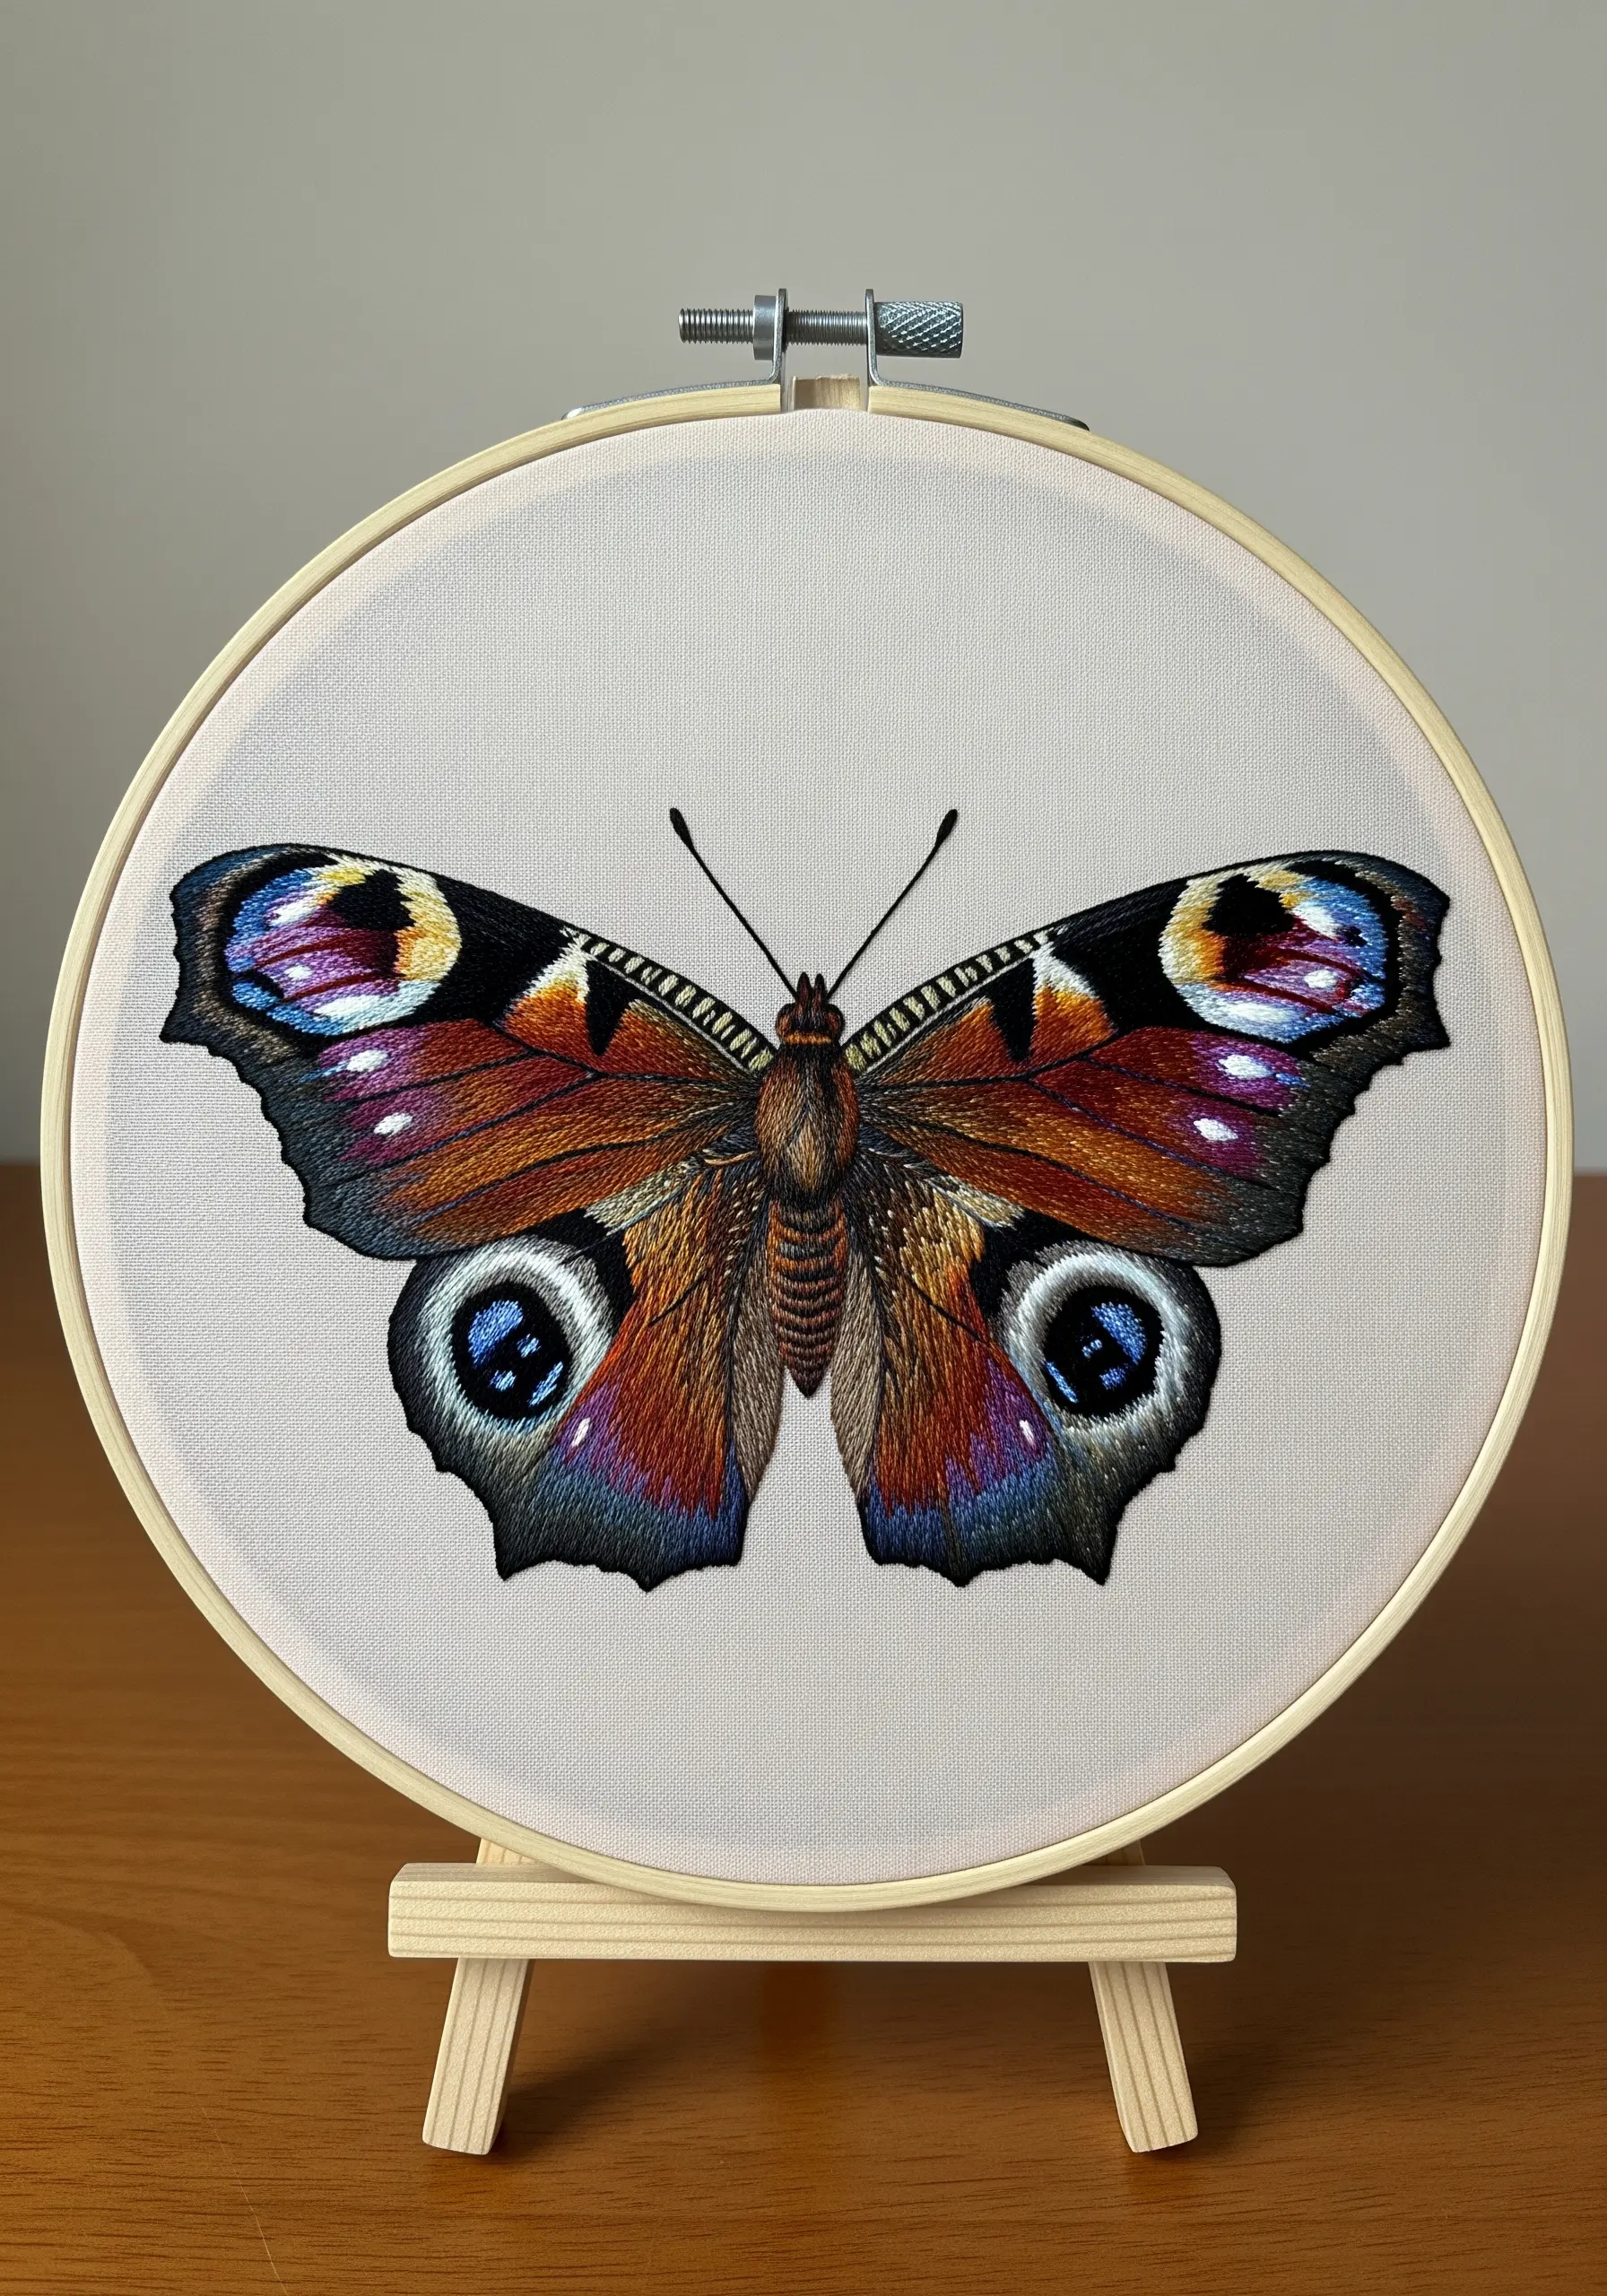
The ‘eyes’ on a Peacock butterfly’s wings are its most captivating feature, and you can recreate their depth with strategic layering.
Start with the darkest color at the base, then work your way up with progressively lighter shades of blue, purple, and white.
Use a single strand of metallic or rayon thread in the final layer to add a hint of shimmer that mimics natural iridescence.
By stitching from dark to light, you create a convincing illusion of depth and luminosity.
10. Frame Your Motif for a Modern, Graphic Impact
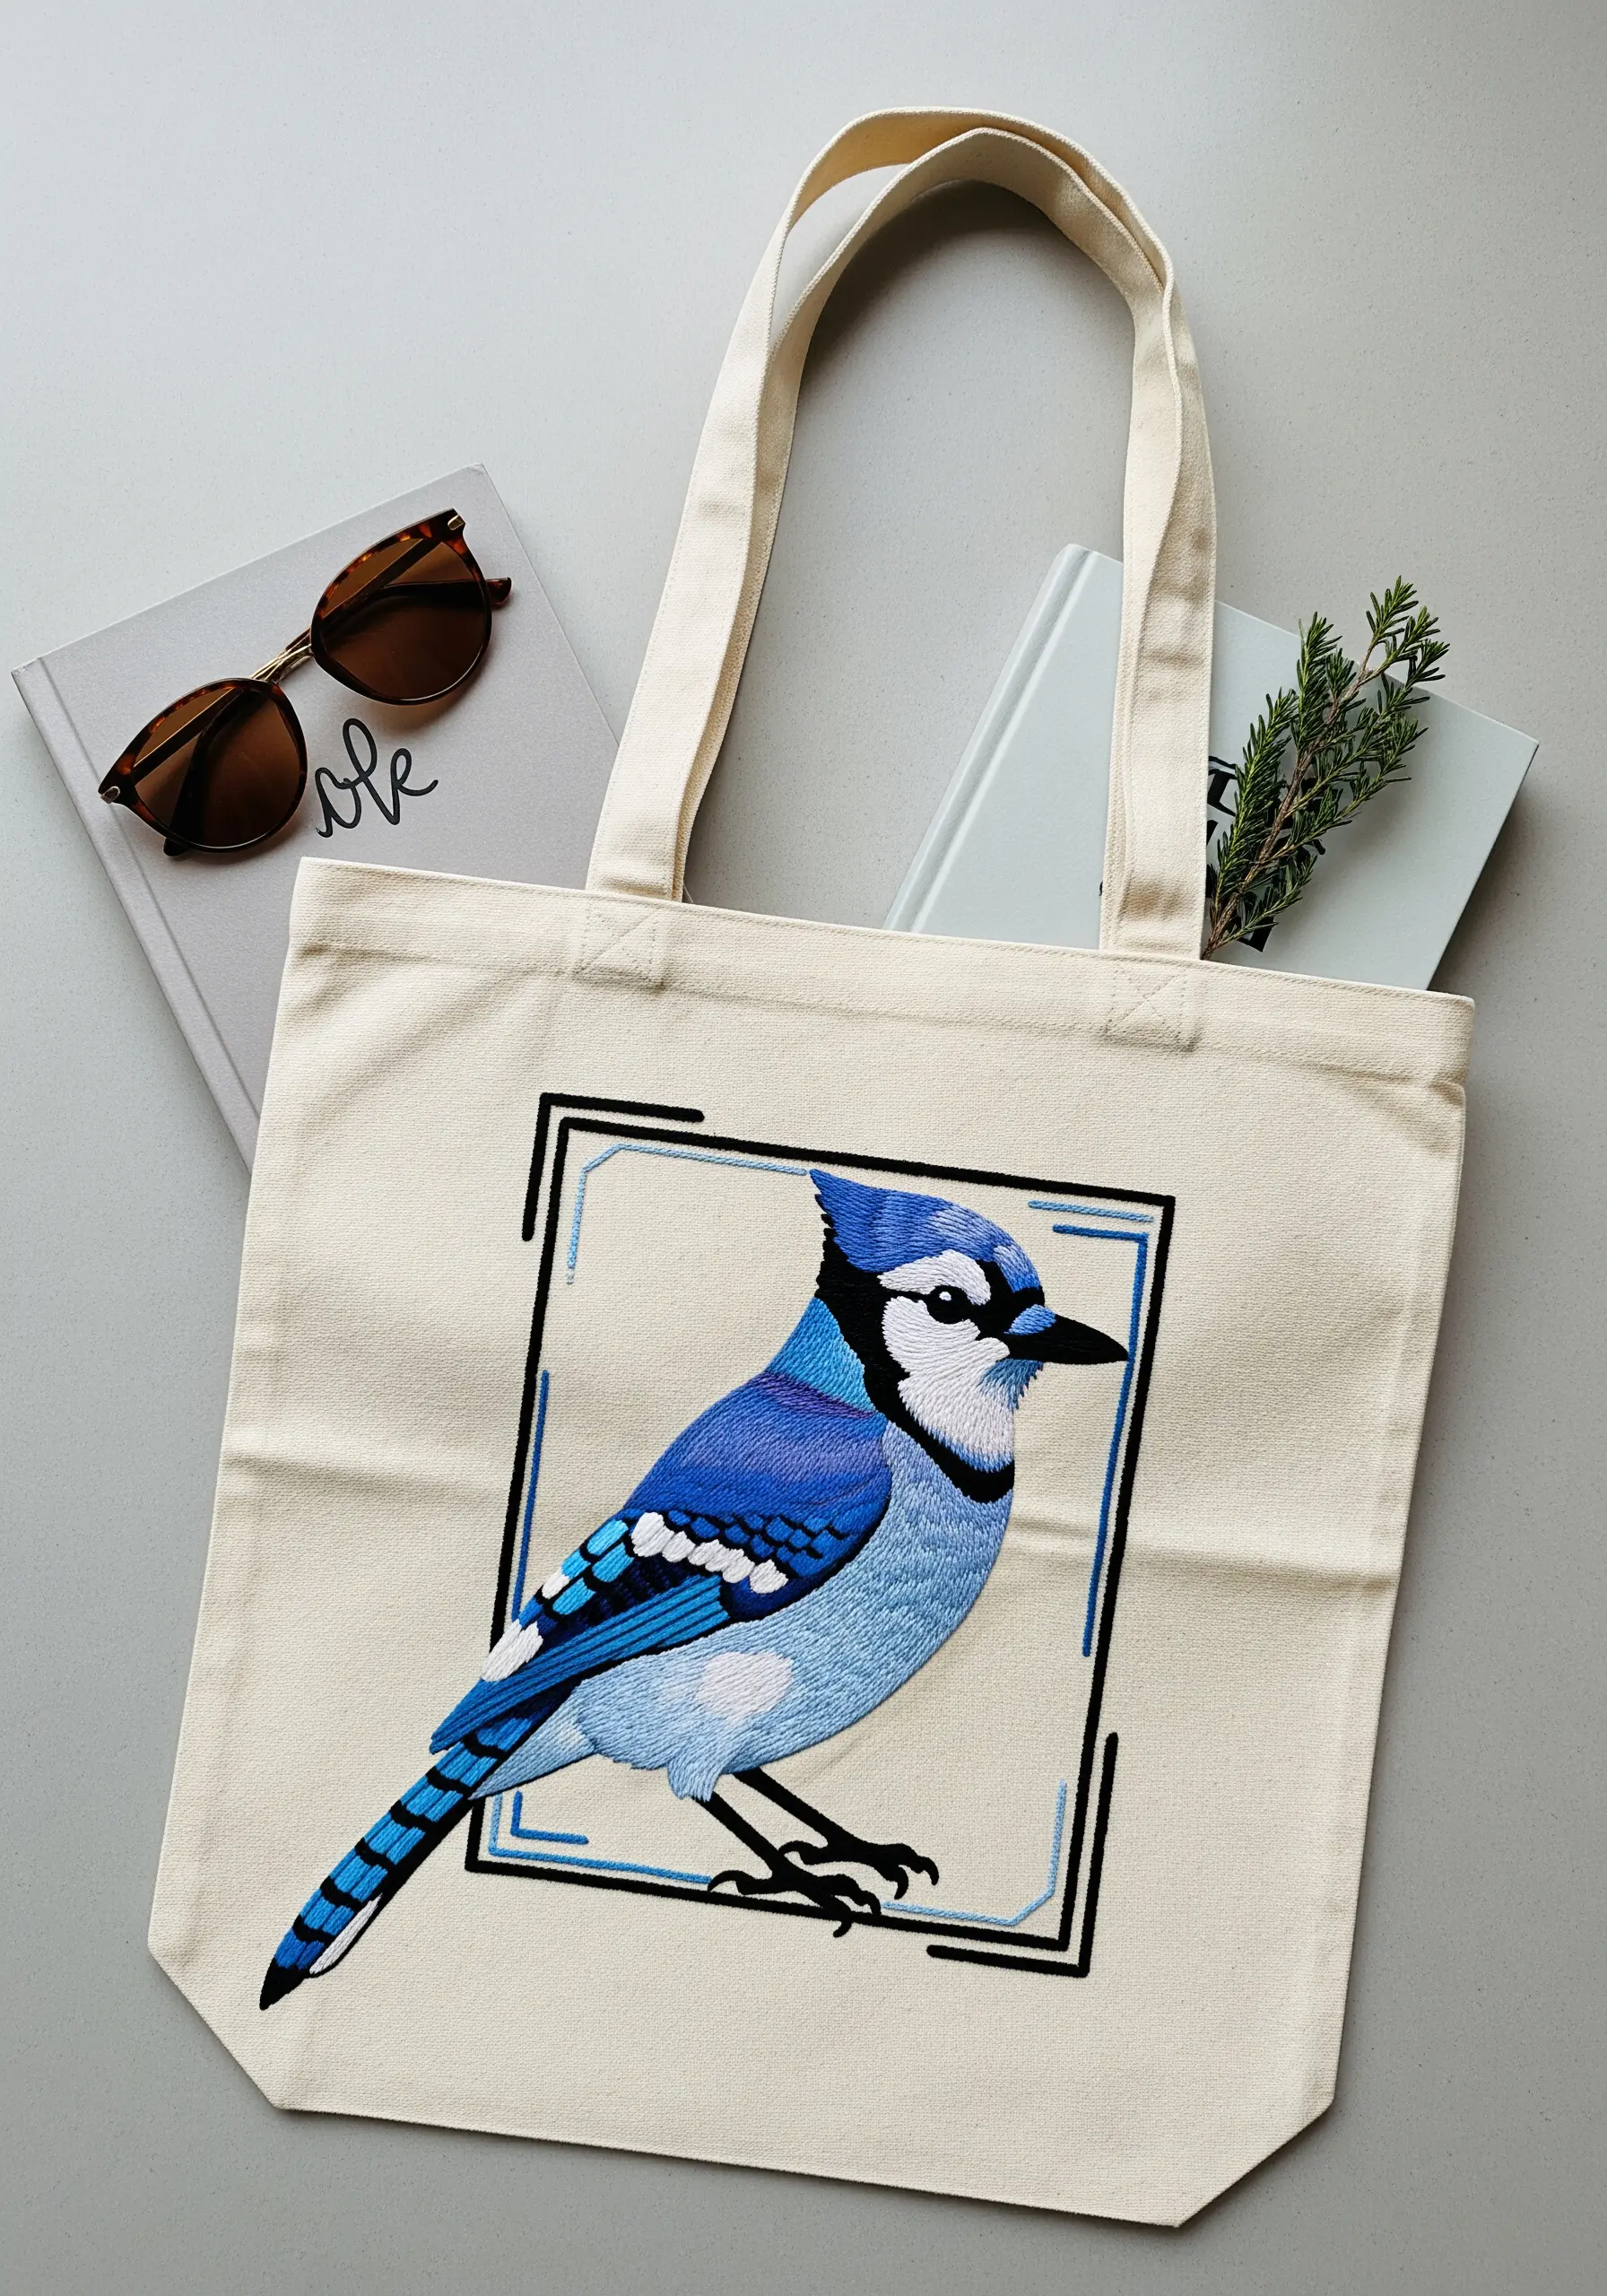
Elevate a simple tote bag design by containing your subject within a clean, geometric frame.
Use a simple backstitch or stem stitch in a contrasting color, like black, to create a sharp border.
This technique draws the eye directly to the bird and gives the entire piece a finished, intentional look.
It transforms a straightforward nature motif into a modern statement piece, making your personalized tote bag embroidery designs look polished and contemporary.
11. Capture a Moment of Action with Metallic Thread
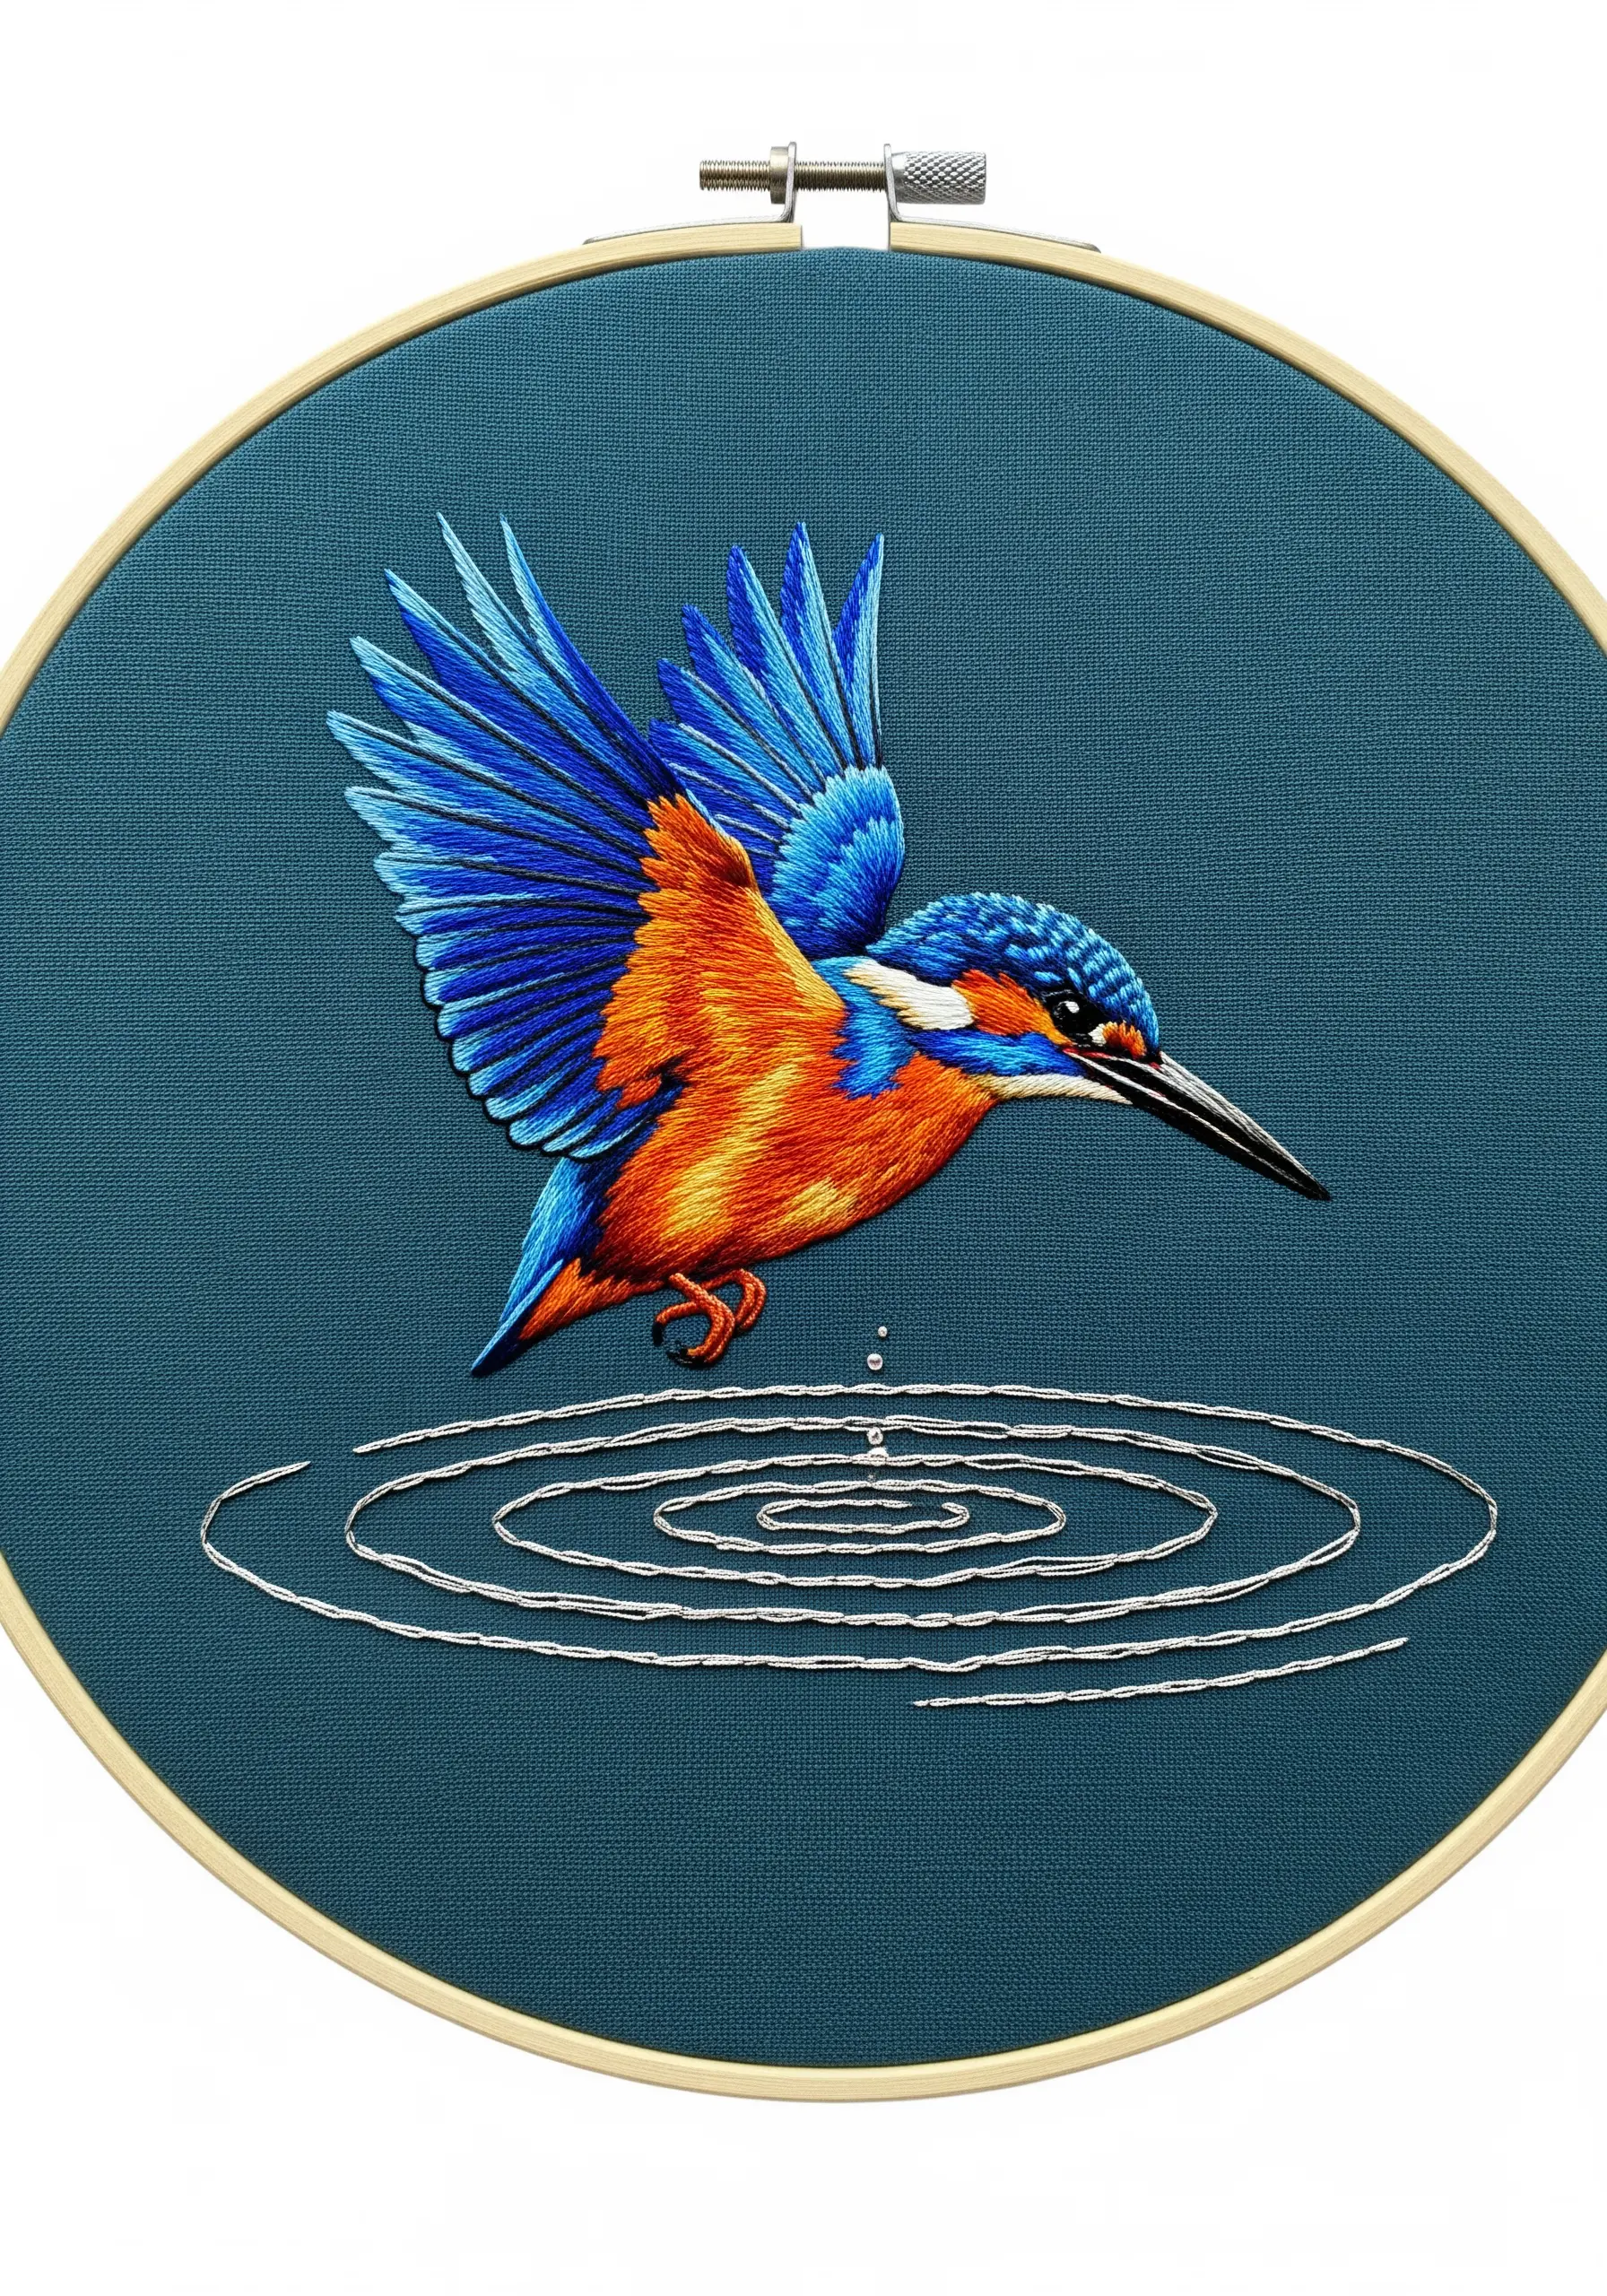
To freeze a bird in motion, focus on the details that tell the story.
The water ripples are crucial here; render them with a single strand of silver metallic thread to create a bright, reflective shimmer that contrasts beautifully with the matte teal fabric.
Use a simple backstitch for the ripples, keeping the stitches small and tight on the curves to maintain a perfect circle.
This small touch of metallic thread adds energy and a focal point, making the entire scene feel dynamic.
12. Build Up Mossy Texture with Dense French Knots
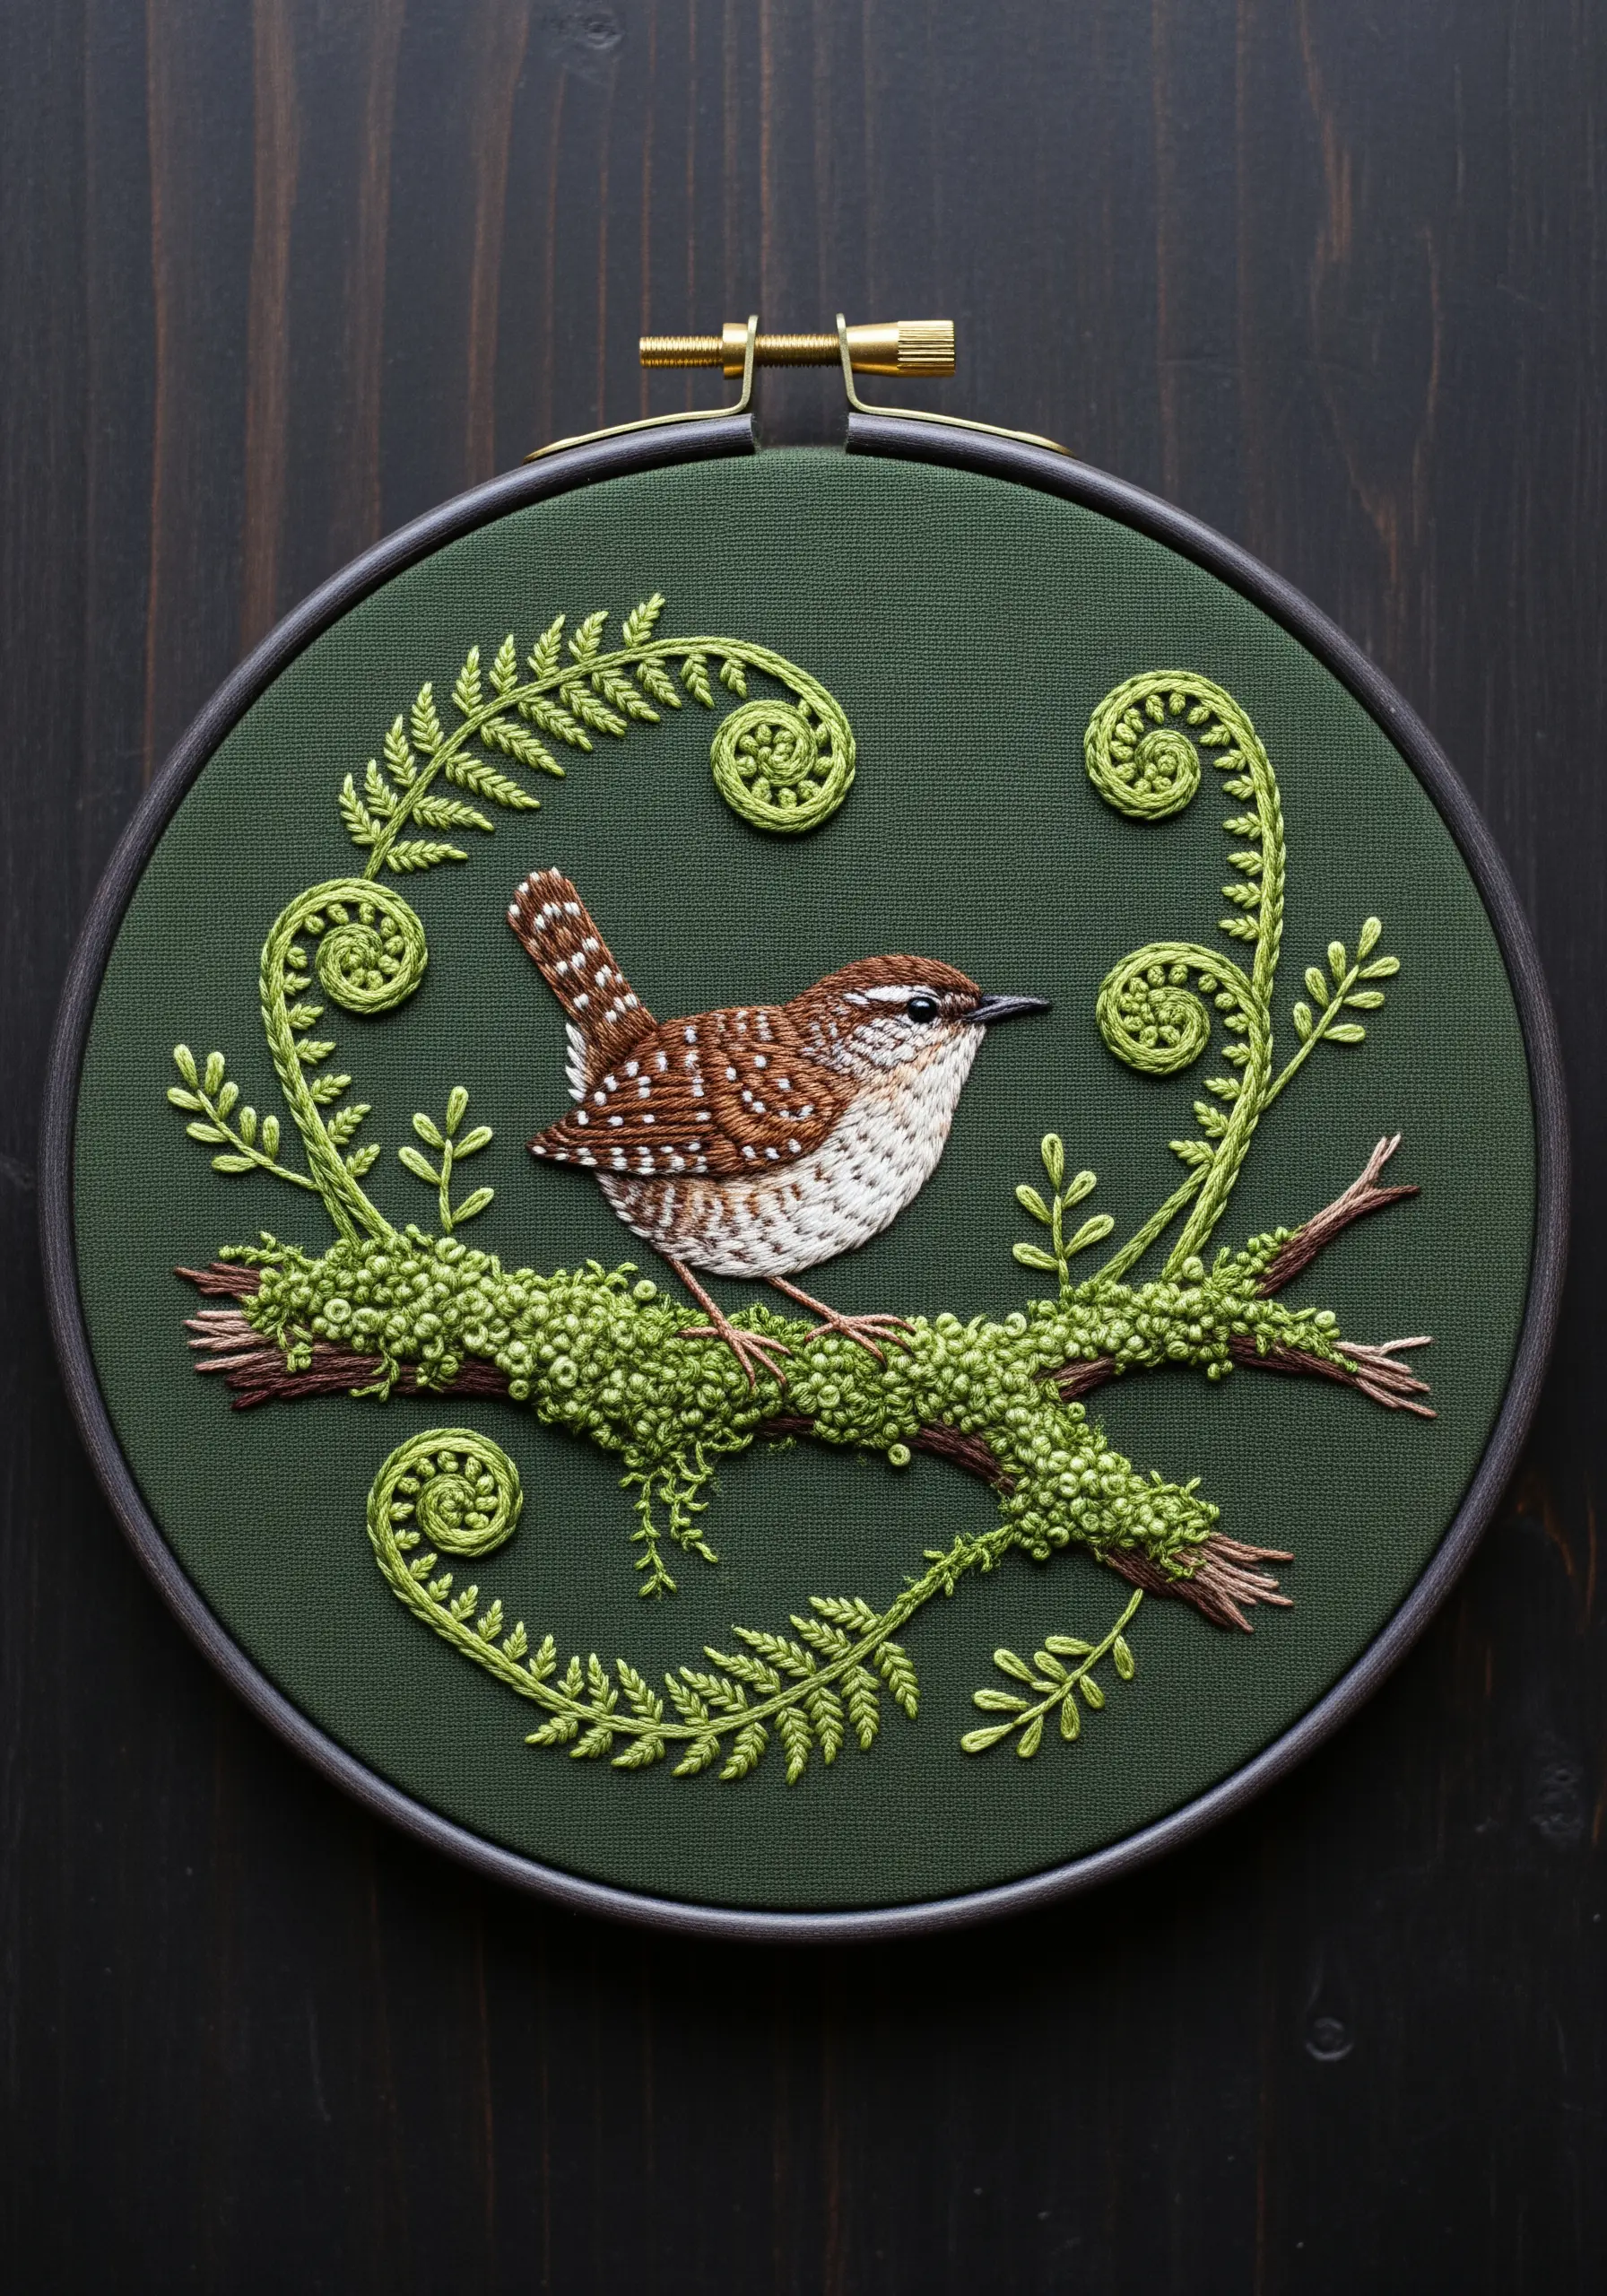
To create a realistic mossy branch, the key is dense, varied texture.
Fill the main areas of the branch with tightly packed French knots using several shades of green and chartreuse floss.
Vary the number of wraps around your needle (one, two, or three) to create knots of different sizes, mimicking the organic irregularity of real moss.
This highly tactile effect provides a stunning contrast to the smooth, thread-painted feathers of the wren, making it a masterclass in ways to capture nature’s textures.
13. Choose Practical Stitches for Functional Linens
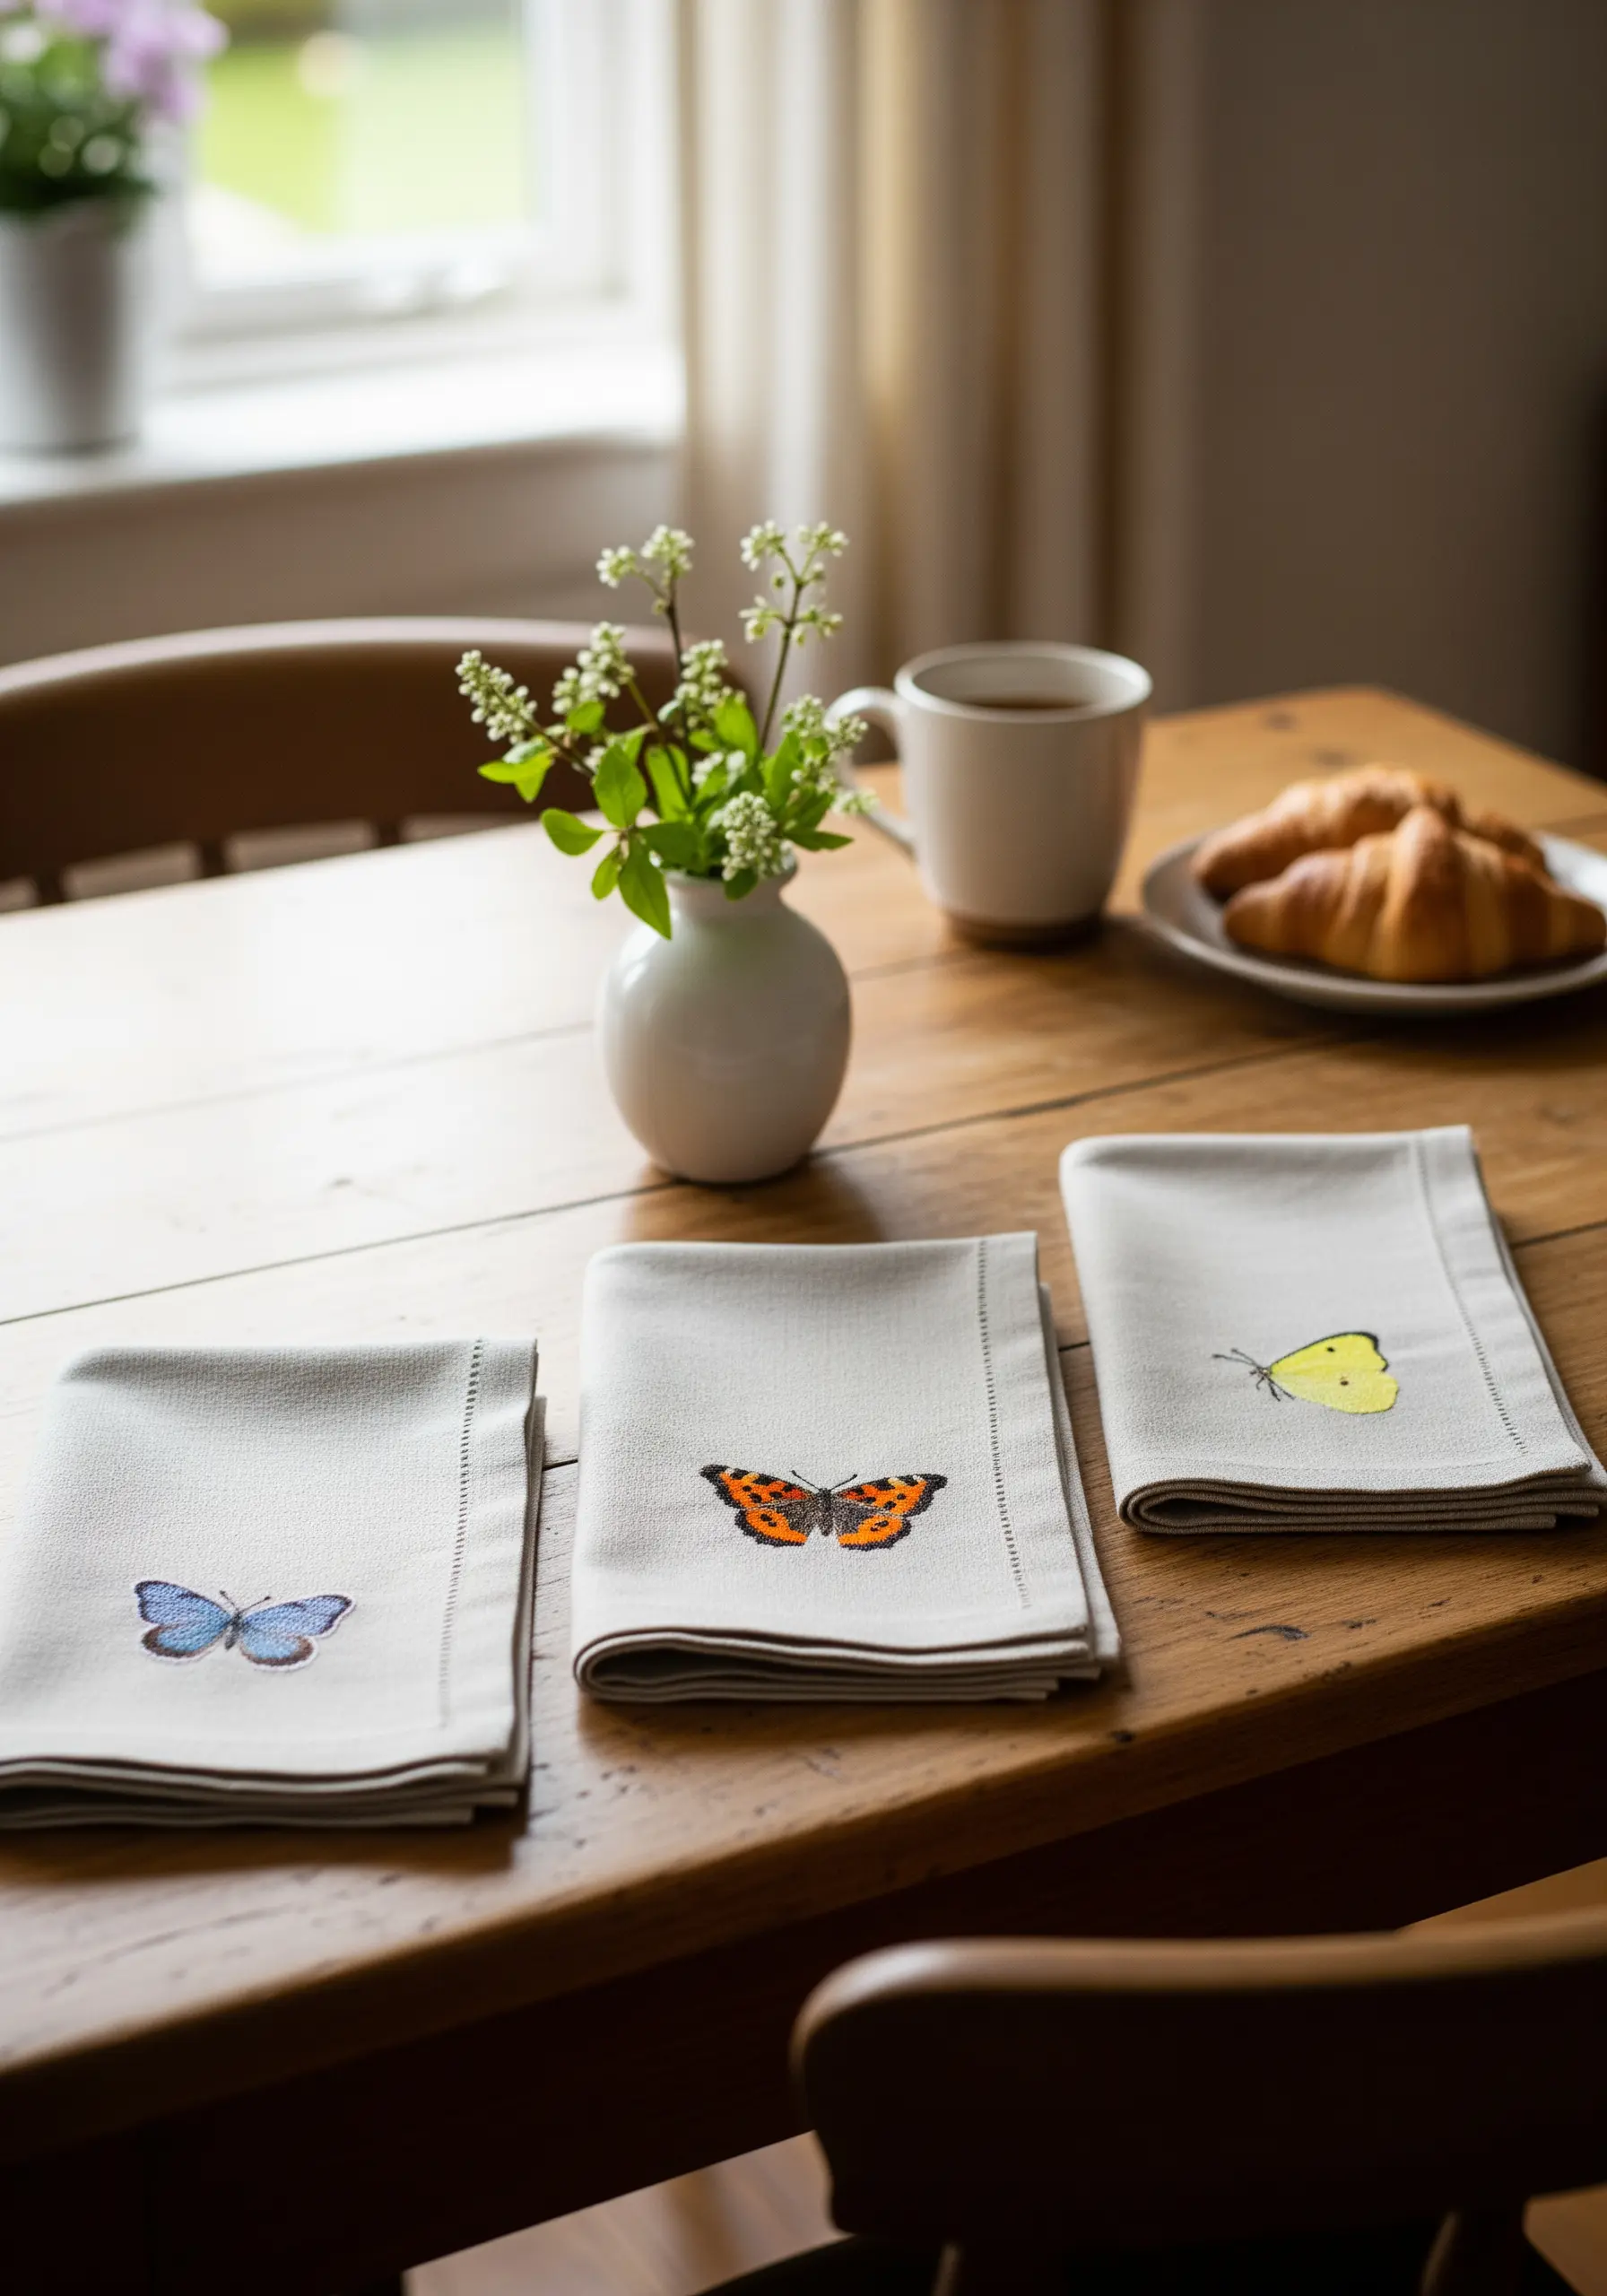
When embroidering items that will be used and washed, like napkins, durability is as important as beauty.
Opt for stitches that lie flat and are less likely to snag, such as short satin stitches, seed stitches, or even small-scale cross-stitches.
Always use high-quality, colorfast cotton floss to prevent bleeding in the wash.
A minimalist embroidery accent on one corner is all you need to add a touch of handmade elegance to your table setting.
14. Sculpt Feathers with Directional “Fur” Stitches

To capture the dense, soft plumage of a snowy owl, rely on thousands of tiny, directional straight stitches.
Using a single strand of floss, layer short stitches that mimic the way feathers grow and overlap, especially around the eyes and beak.
Work in sections, angling your stitches to create contours and shadows.
This meticulous technique, often called ‘fur stitch,’ builds incredible depth and realism, making the owl’s gaze feel intense and alive.
15. Create Smooth Gradients in Cross-Stitch
Even within the grid of Aida cloth, you can achieve beautiful color blending.
Instead of blocking colors, strategically scatter individual cross-stitches of a transitional shade between two solid color sections.
This technique, called dithering, tricks the eye into seeing a smooth gradient from a distance.
It’s particularly effective for creating the soft transitions on flower petals and butterfly wings, giving your cross-stitch a more painterly, nuanced finish.
16. Add Dimension to a Winter Scene with 3D Stitches

Make the snow in your winter embroidery feel freshly fallen and tangible by using dimensional stitches.
Create clusters of chunky French knots or use a series of bullion knots along the branches to mimic clumps of snow.
Using a slightly thicker thread, like pearl cotton, for the snow will enhance the effect and create a wonderful textural contrast with the flat, smooth stitching of the robin’s feathers.
This tactile detail brings the entire scene to life.
17. Demystify Thread Painting with a Simple Plan

Thread painting can feel intimidating, but it’s simply a process of layering colors according to a plan.
Start by transferring a clear outline onto your fabric, dividing it into small, manageable sections for each color.
Create a thread key that maps out which color goes where, just like a paint-by-numbers guide.
By working in small areas and focusing on one color transition at a time, you can tackle a complex design with confidence and precision.
18. Curate a Cohesive Hoop Art Gallery Wall

To create a polished gallery wall, establish a consistent visual theme across your hoops.
Use the same type and color of fabric for each piece, such as a neutral linen or cotton, to unify the collection.
Stick to a complementary color palette, allowing certain hues to appear in multiple designs.
This thoughtful curation ensures that your individual pieces—whether bird, butterfly, or botanical—work together as a harmonious whole, making for stunning embroidered wall art ideas.
19. Juxtapose Organic Fills and Geometric Lines
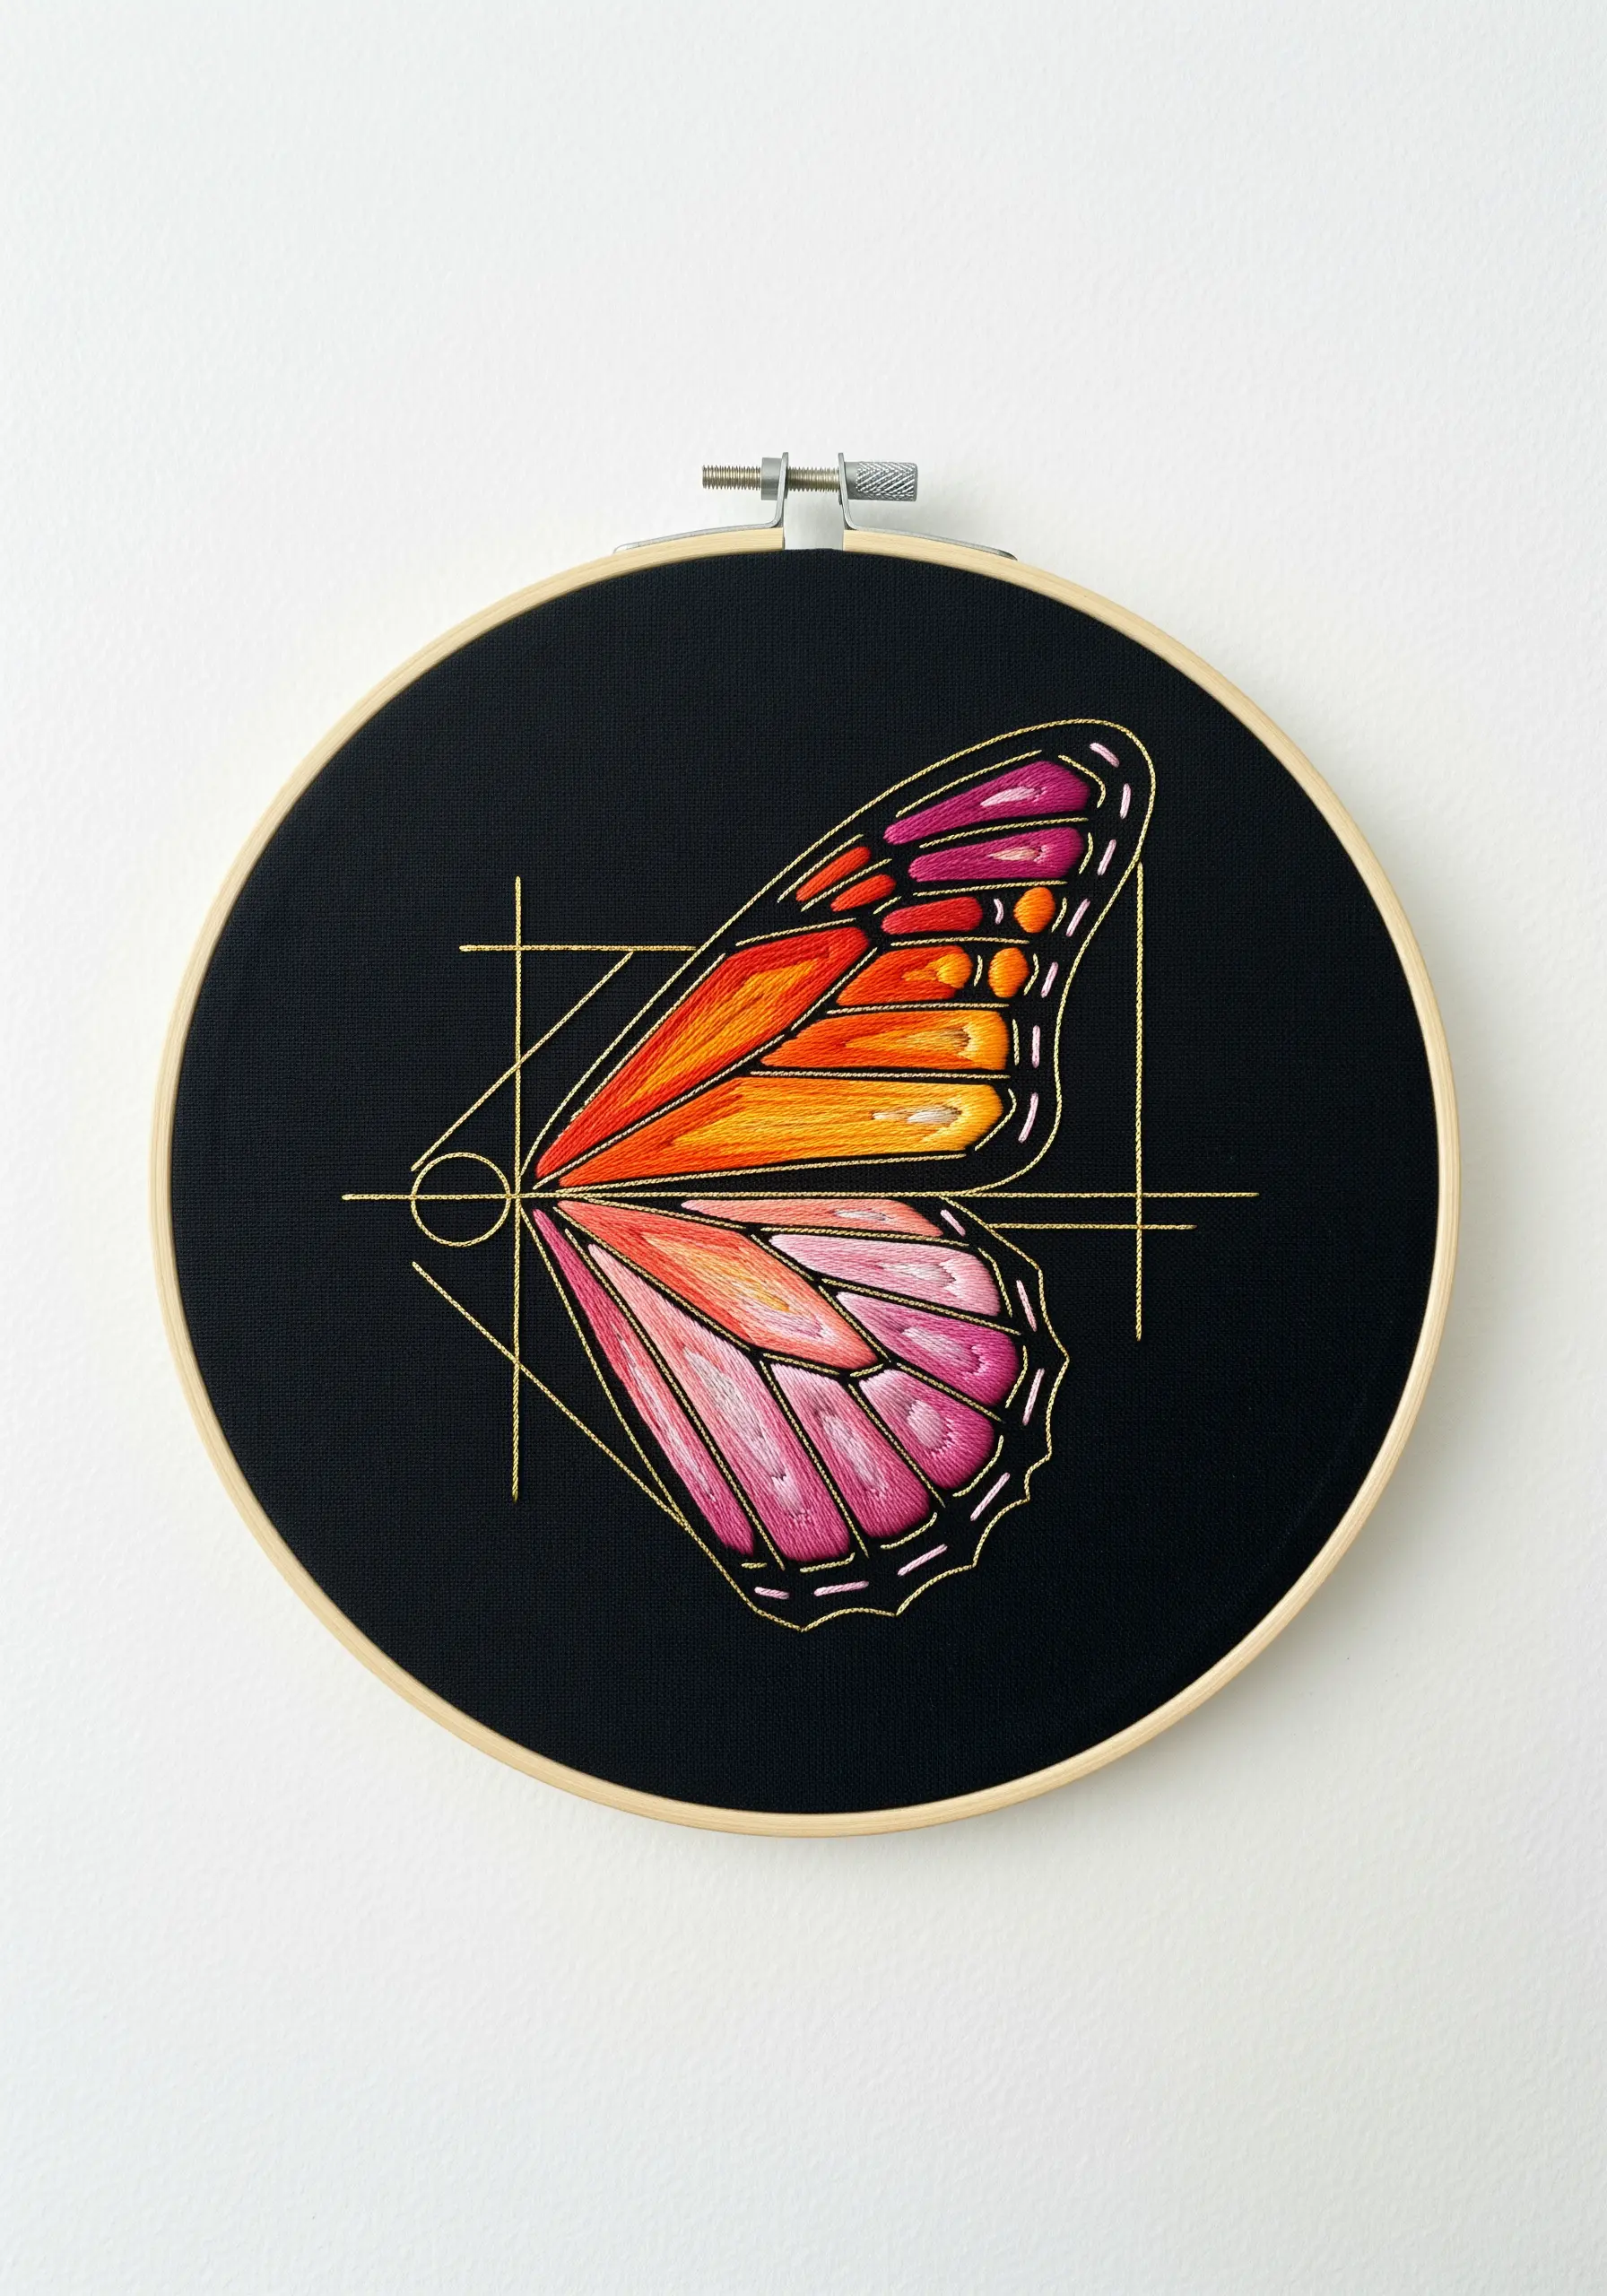
Create a striking modern design by combining the soft texture of thread painting with the rigid structure of geometry.
First, complete the satin stitch fill of the butterfly wing, blending vibrant colors to create a soft gradient.
Then, using a single strand of bright gold metallic thread, stitch the geometric lines over the top.
This contrast between the soft, organic wing and the sharp, metallic overlay results in a dynamic and contemporary piece of art.
20. Paint a Landscape with Varied Stitch Lengths

You can create the illusion of a vast landscape by varying the texture and direction of your stitches.
Use long, flowing straight stitches for the golden hills to suggest rolling fields, layering shades of ochre and brown for depth.
For the sky, use shorter, more sporadic seed stitches in blues and pinks to create a sense of atmospheric distance.
This intentional variation in stitch style is a simple yet powerful way to build perspective in your embroidery.
21. Add Whimsy with a 3D Floral Crown
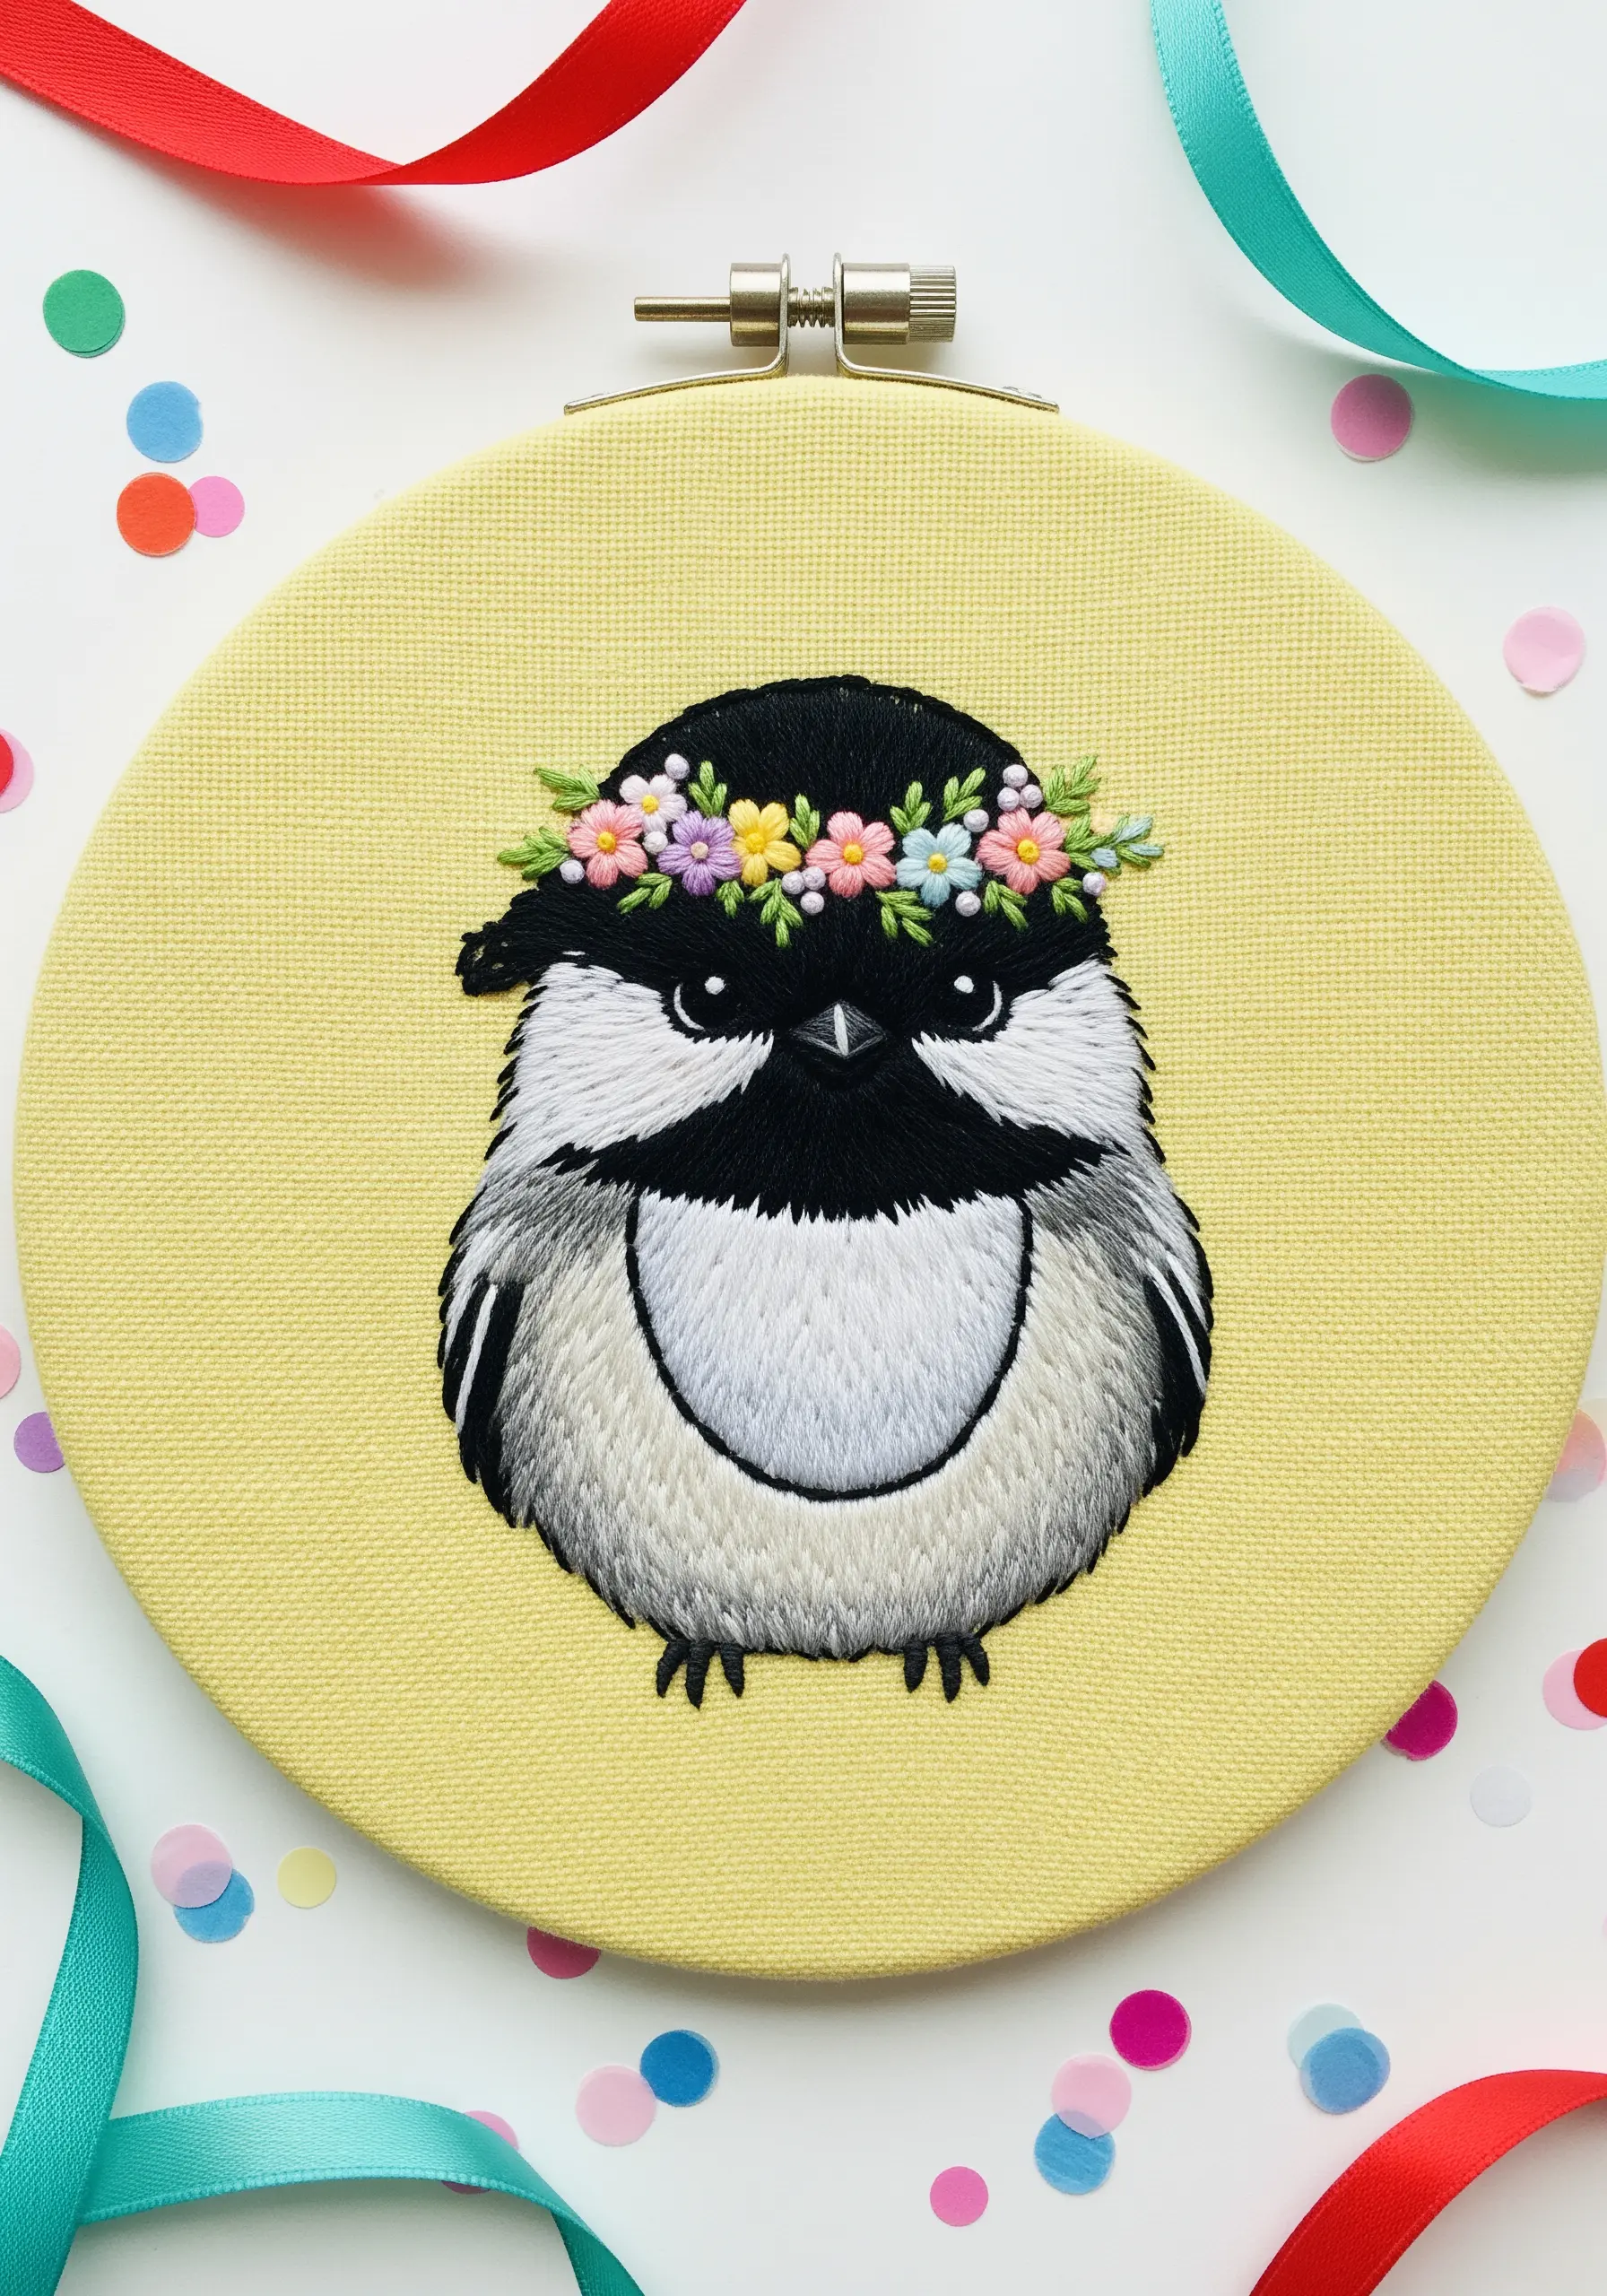
Elevate a simple bird portrait by adding a charming, three-dimensional detail like a flower crown.
Use woven wheel stitches (or spider web roses) for the larger flowers to create a raised, petal-like effect.
Incorporate detached chain stitches (lazy daisies) and French knots for smaller blossoms and filler, varying the colors for a vibrant, meadow-like feel.
This small touch adds personality and transforms the piece from a simple portrait into a delightful character study.
22. Create Ethereal Botanicals on Dark Fabric

Make your stitches glow by working on a black or navy background.
Choose high-contrast threads like pale greens, whites, and silvers to create a dramatic, moonlit effect.
To give the flower petals a delicate, almost translucent appearance, use long-and-short stitches that are slightly spaced out, allowing a hint of the dark fabric to show through.
For stars, use single French knots or tiny straight stitches with a fine metallic thread to complete the night garden embroidery.
23. Replicate Birch Bark with Variegated Thread
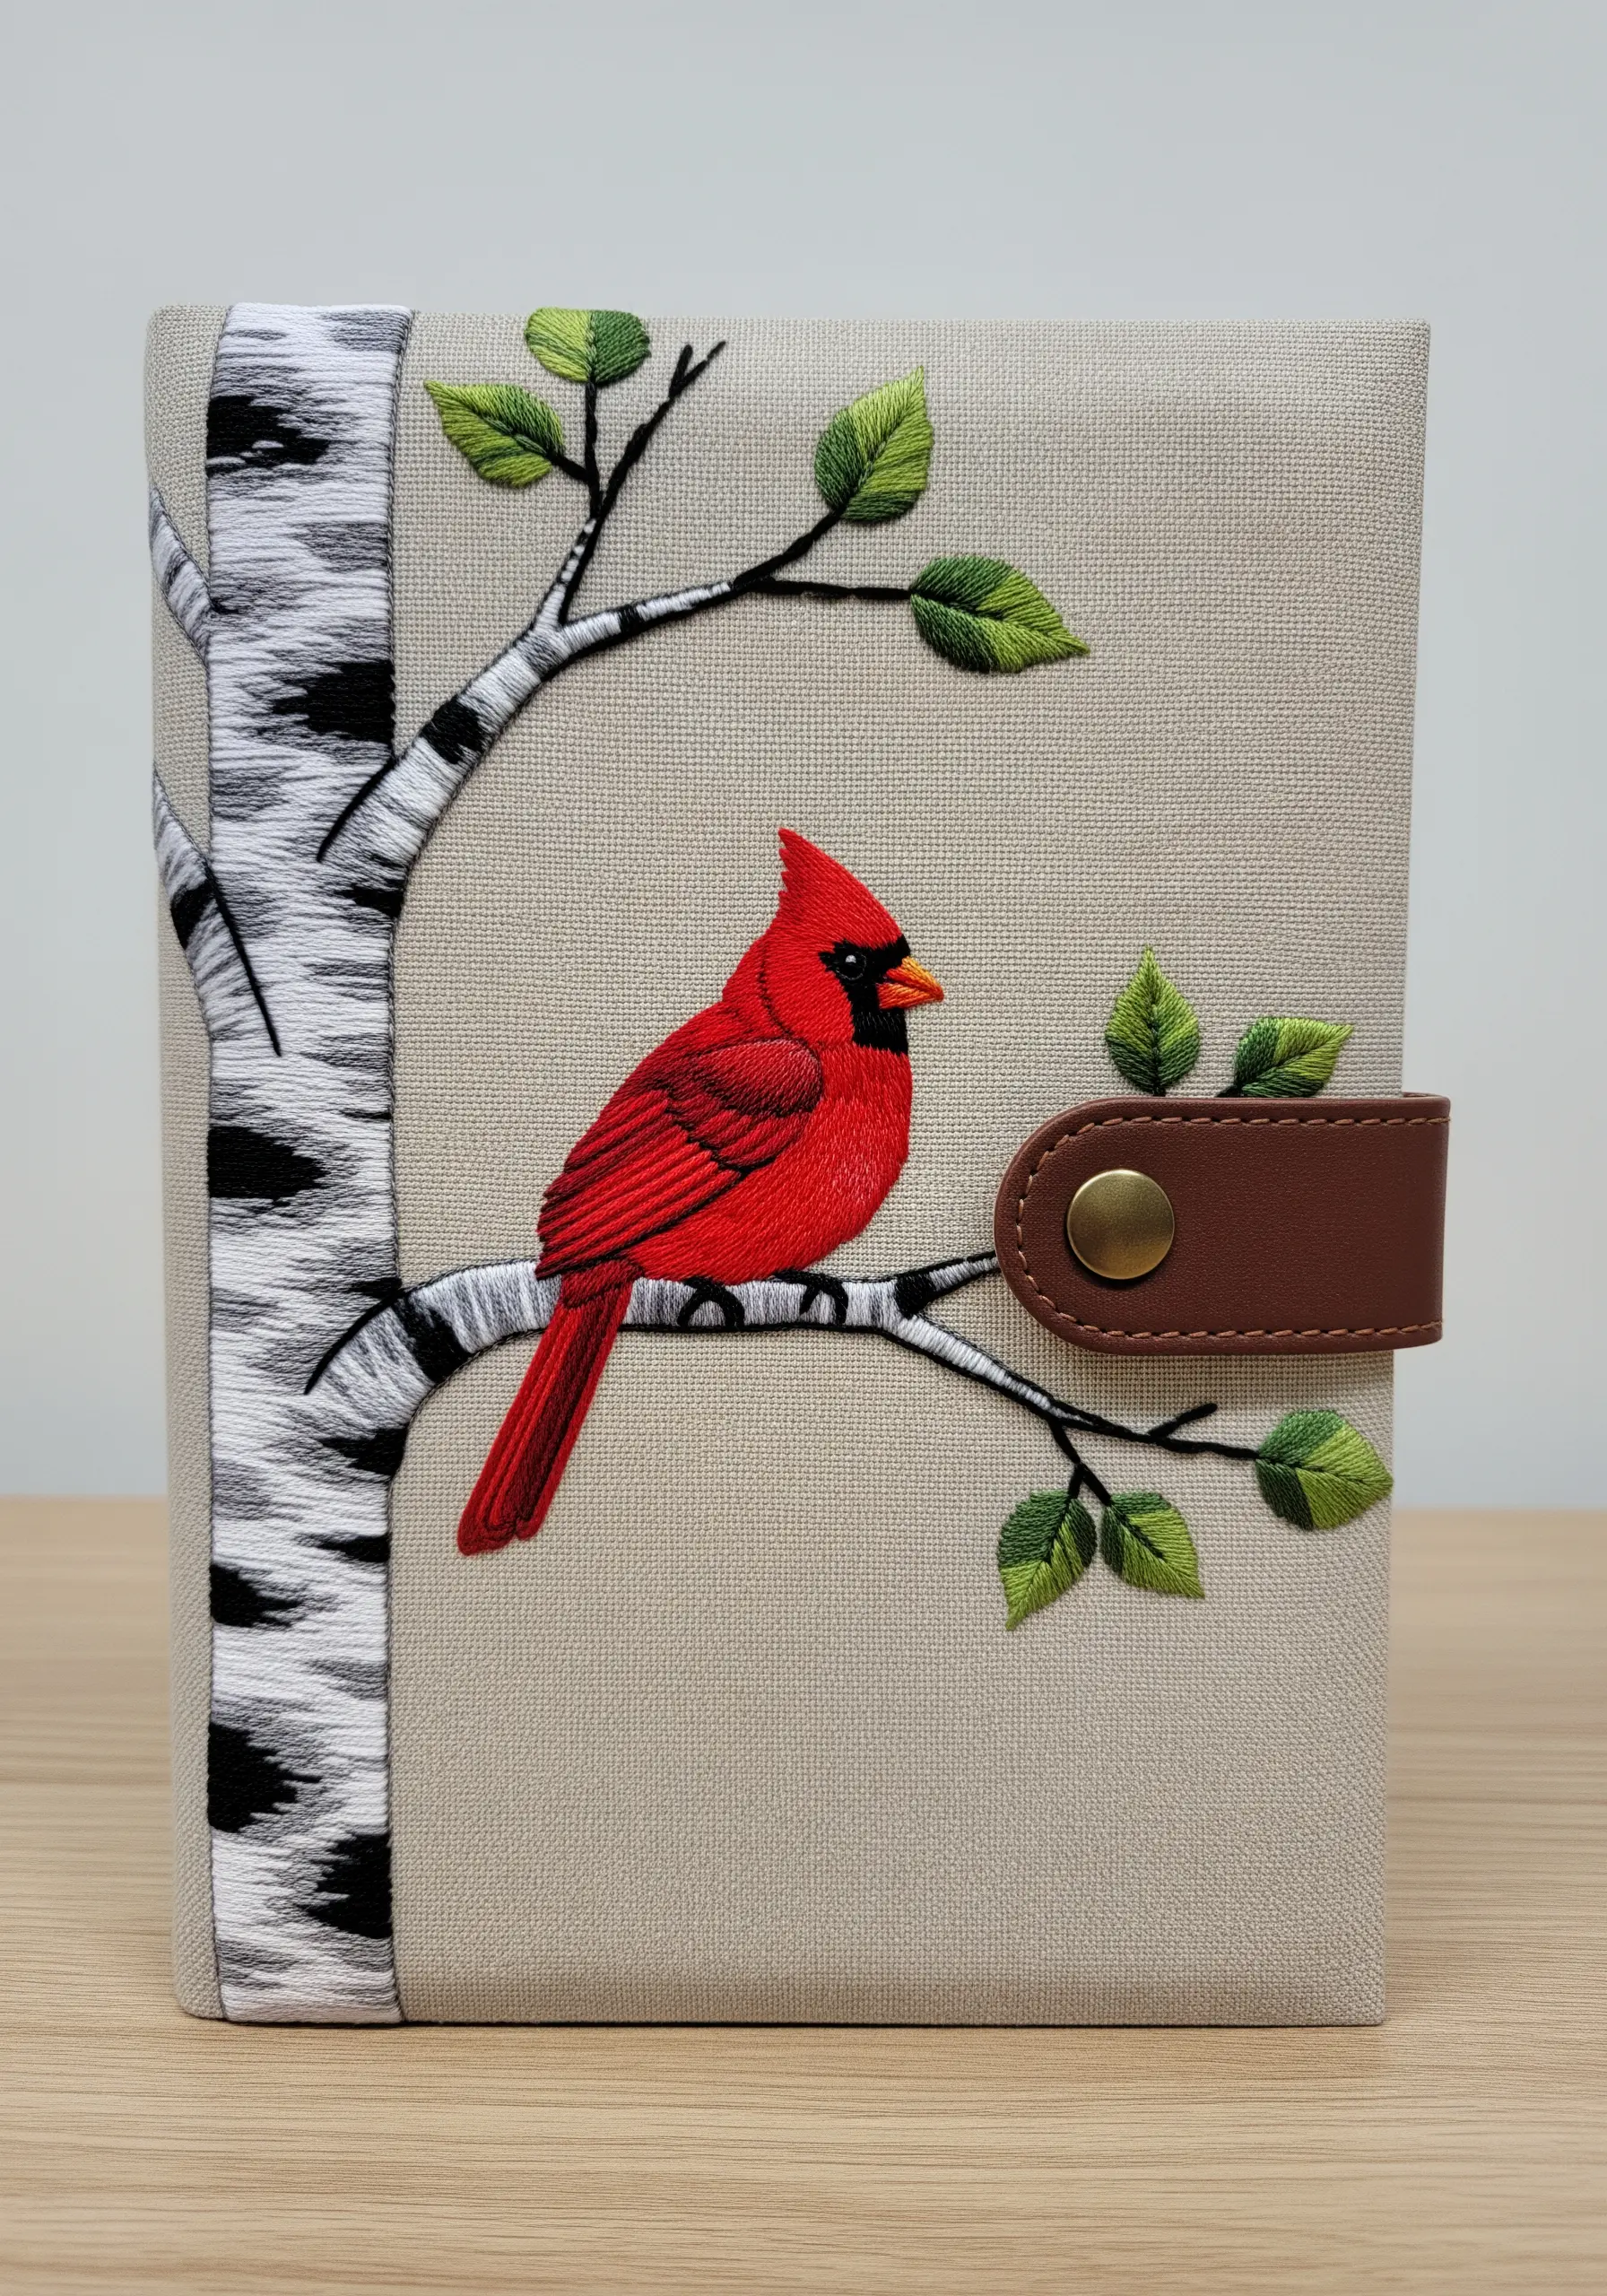
To create the distinctive look of a birch tree, you don’t need dozens of colors—just one clever technique.
Use long, vertical satin stitches with a white or off-white thread for the main trunk.
Then, come back with a single strand of black or dark gray floss to add short, horizontal straight stitches that mimic the characteristic lines in the bark.
This simple combination of directional stitches is incredibly effective at creating a realistic and recognizable texture.
24. Achieve an Antique Look with a Tea-Stained Fabric
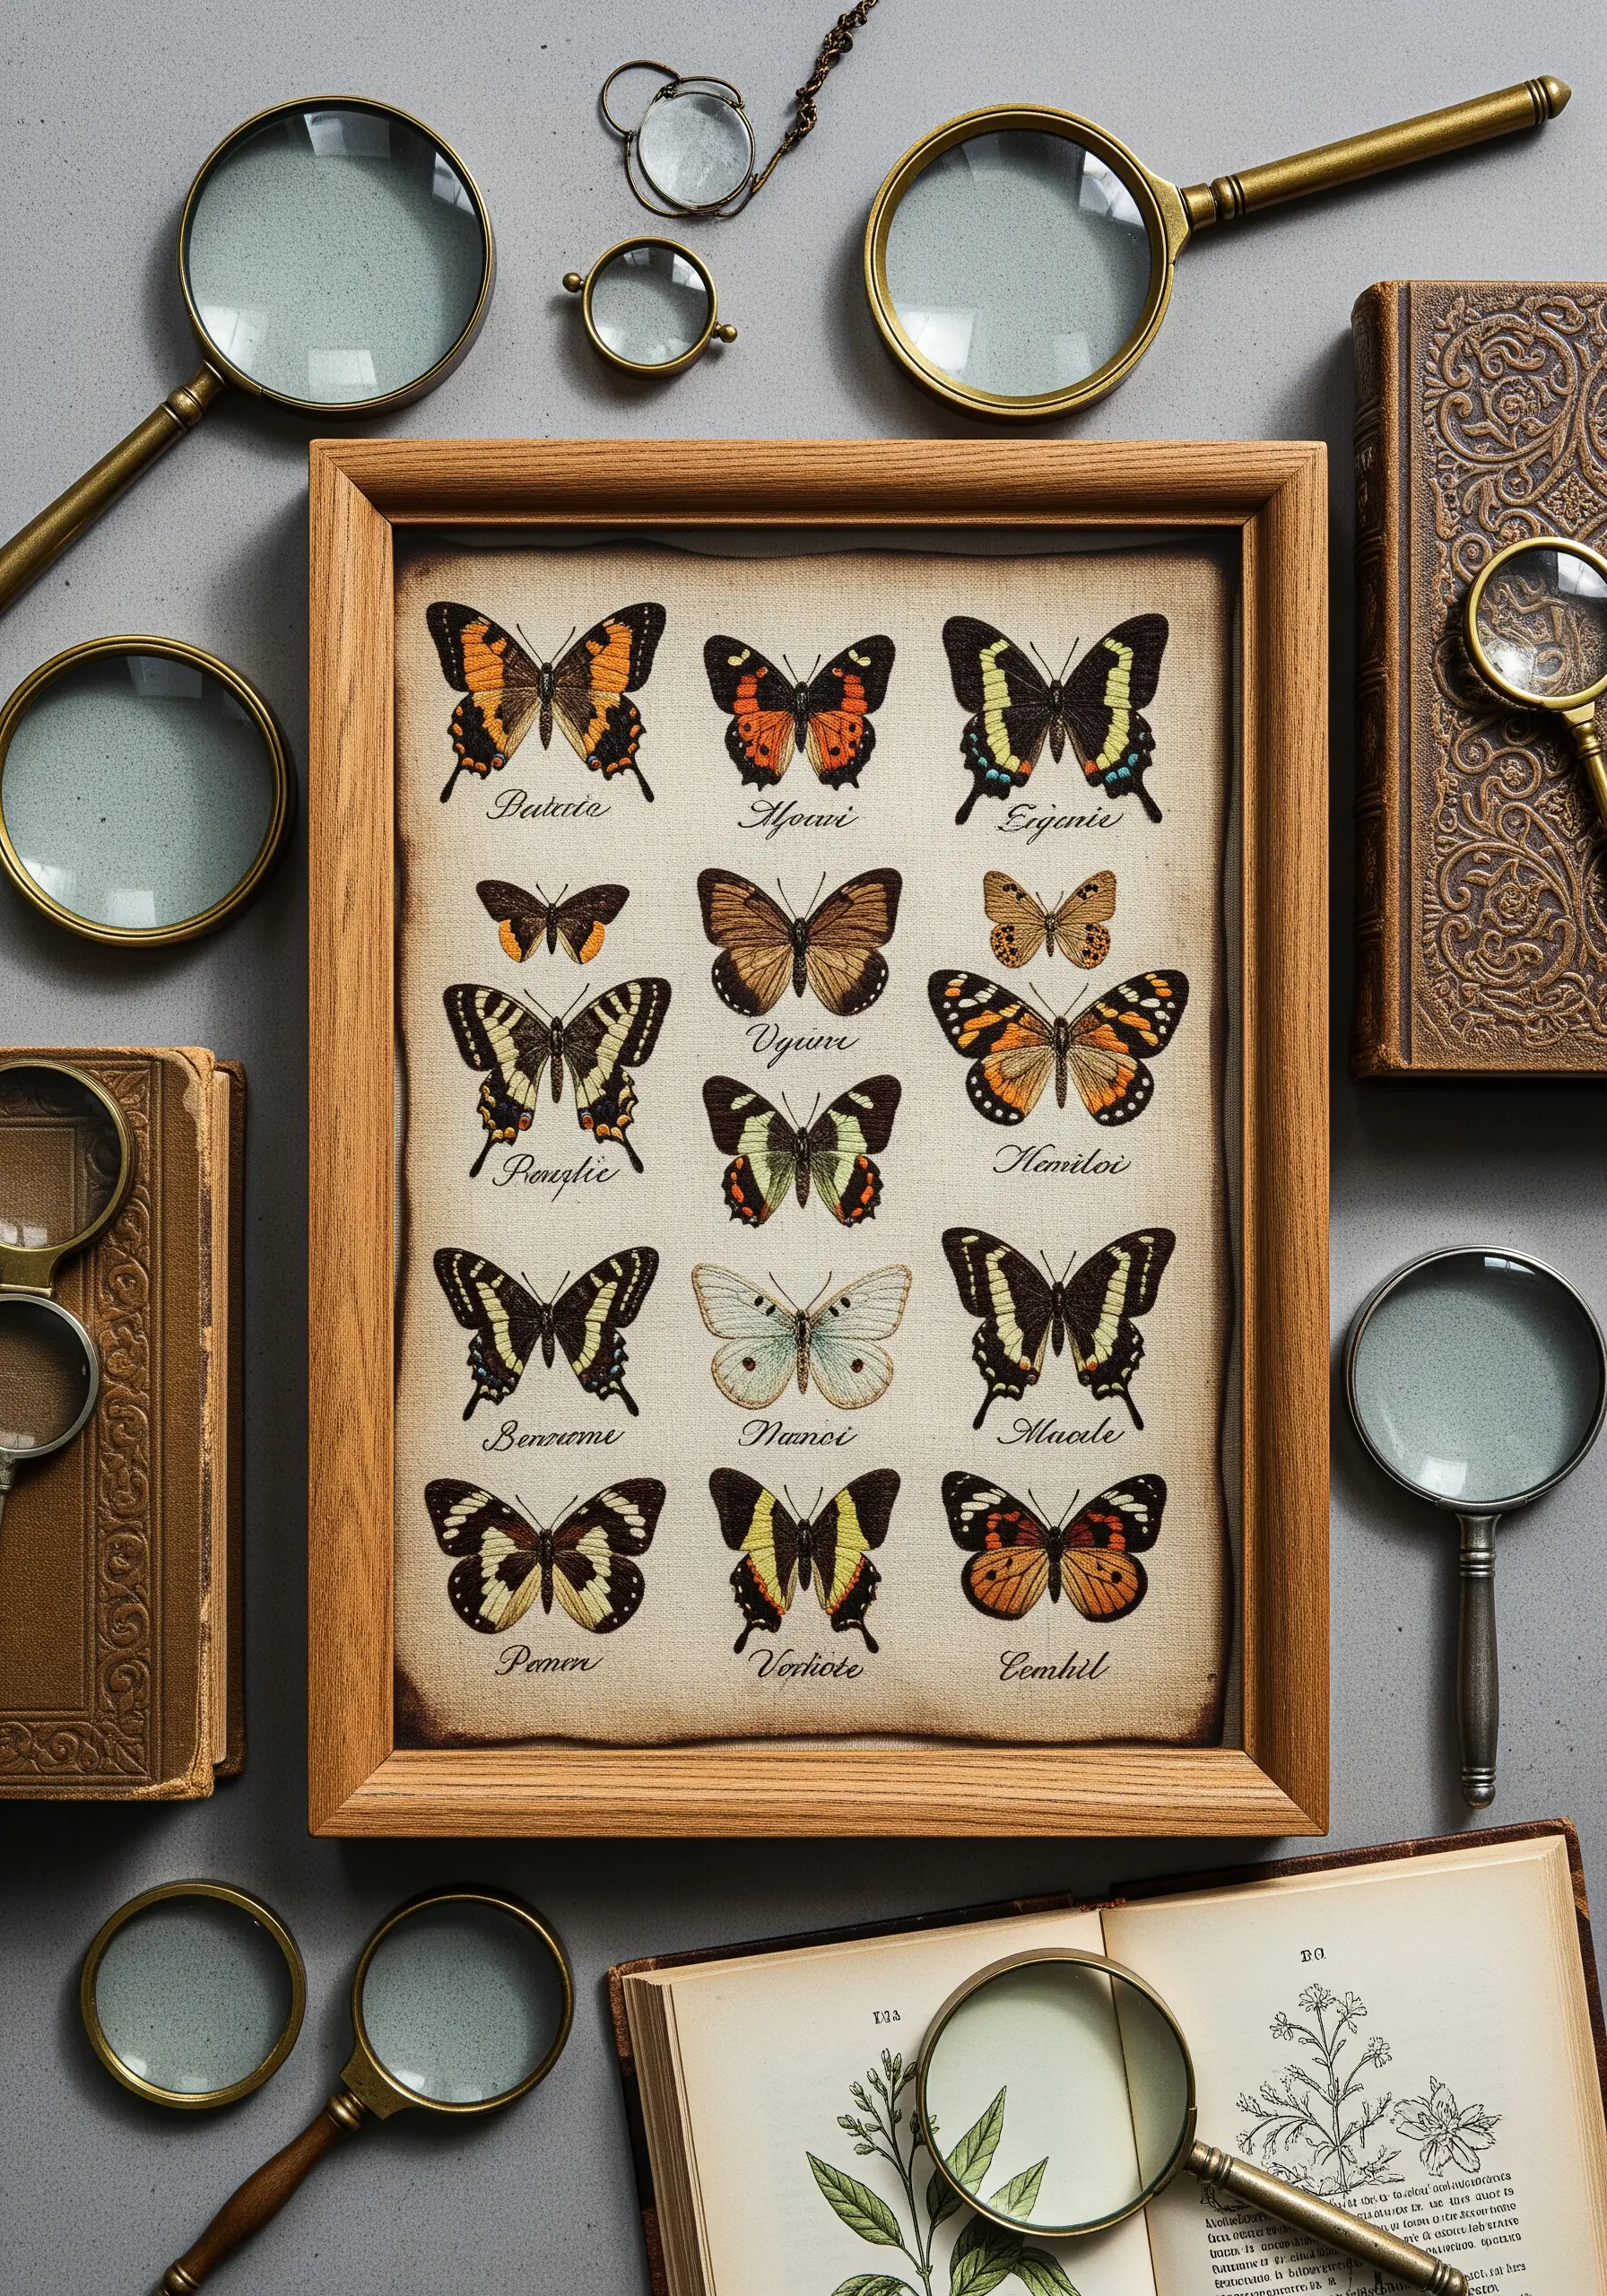
Give your project a vintage, scientific illustration feel before you even start stitching.
Soak your linen or cotton fabric in strongly brewed black tea for 15-30 minutes, then let it air dry completely.
This will give the fabric a warm, aged patina that beautifully complements botanical or entomological subjects.
Stitch your butterflies and use a fine-tipped, permanent pen or a single strand of dark floss for the delicate script to complete the specimen chart aesthetic.
25. Integrate 3D Elements for a Statement Wall Hanging
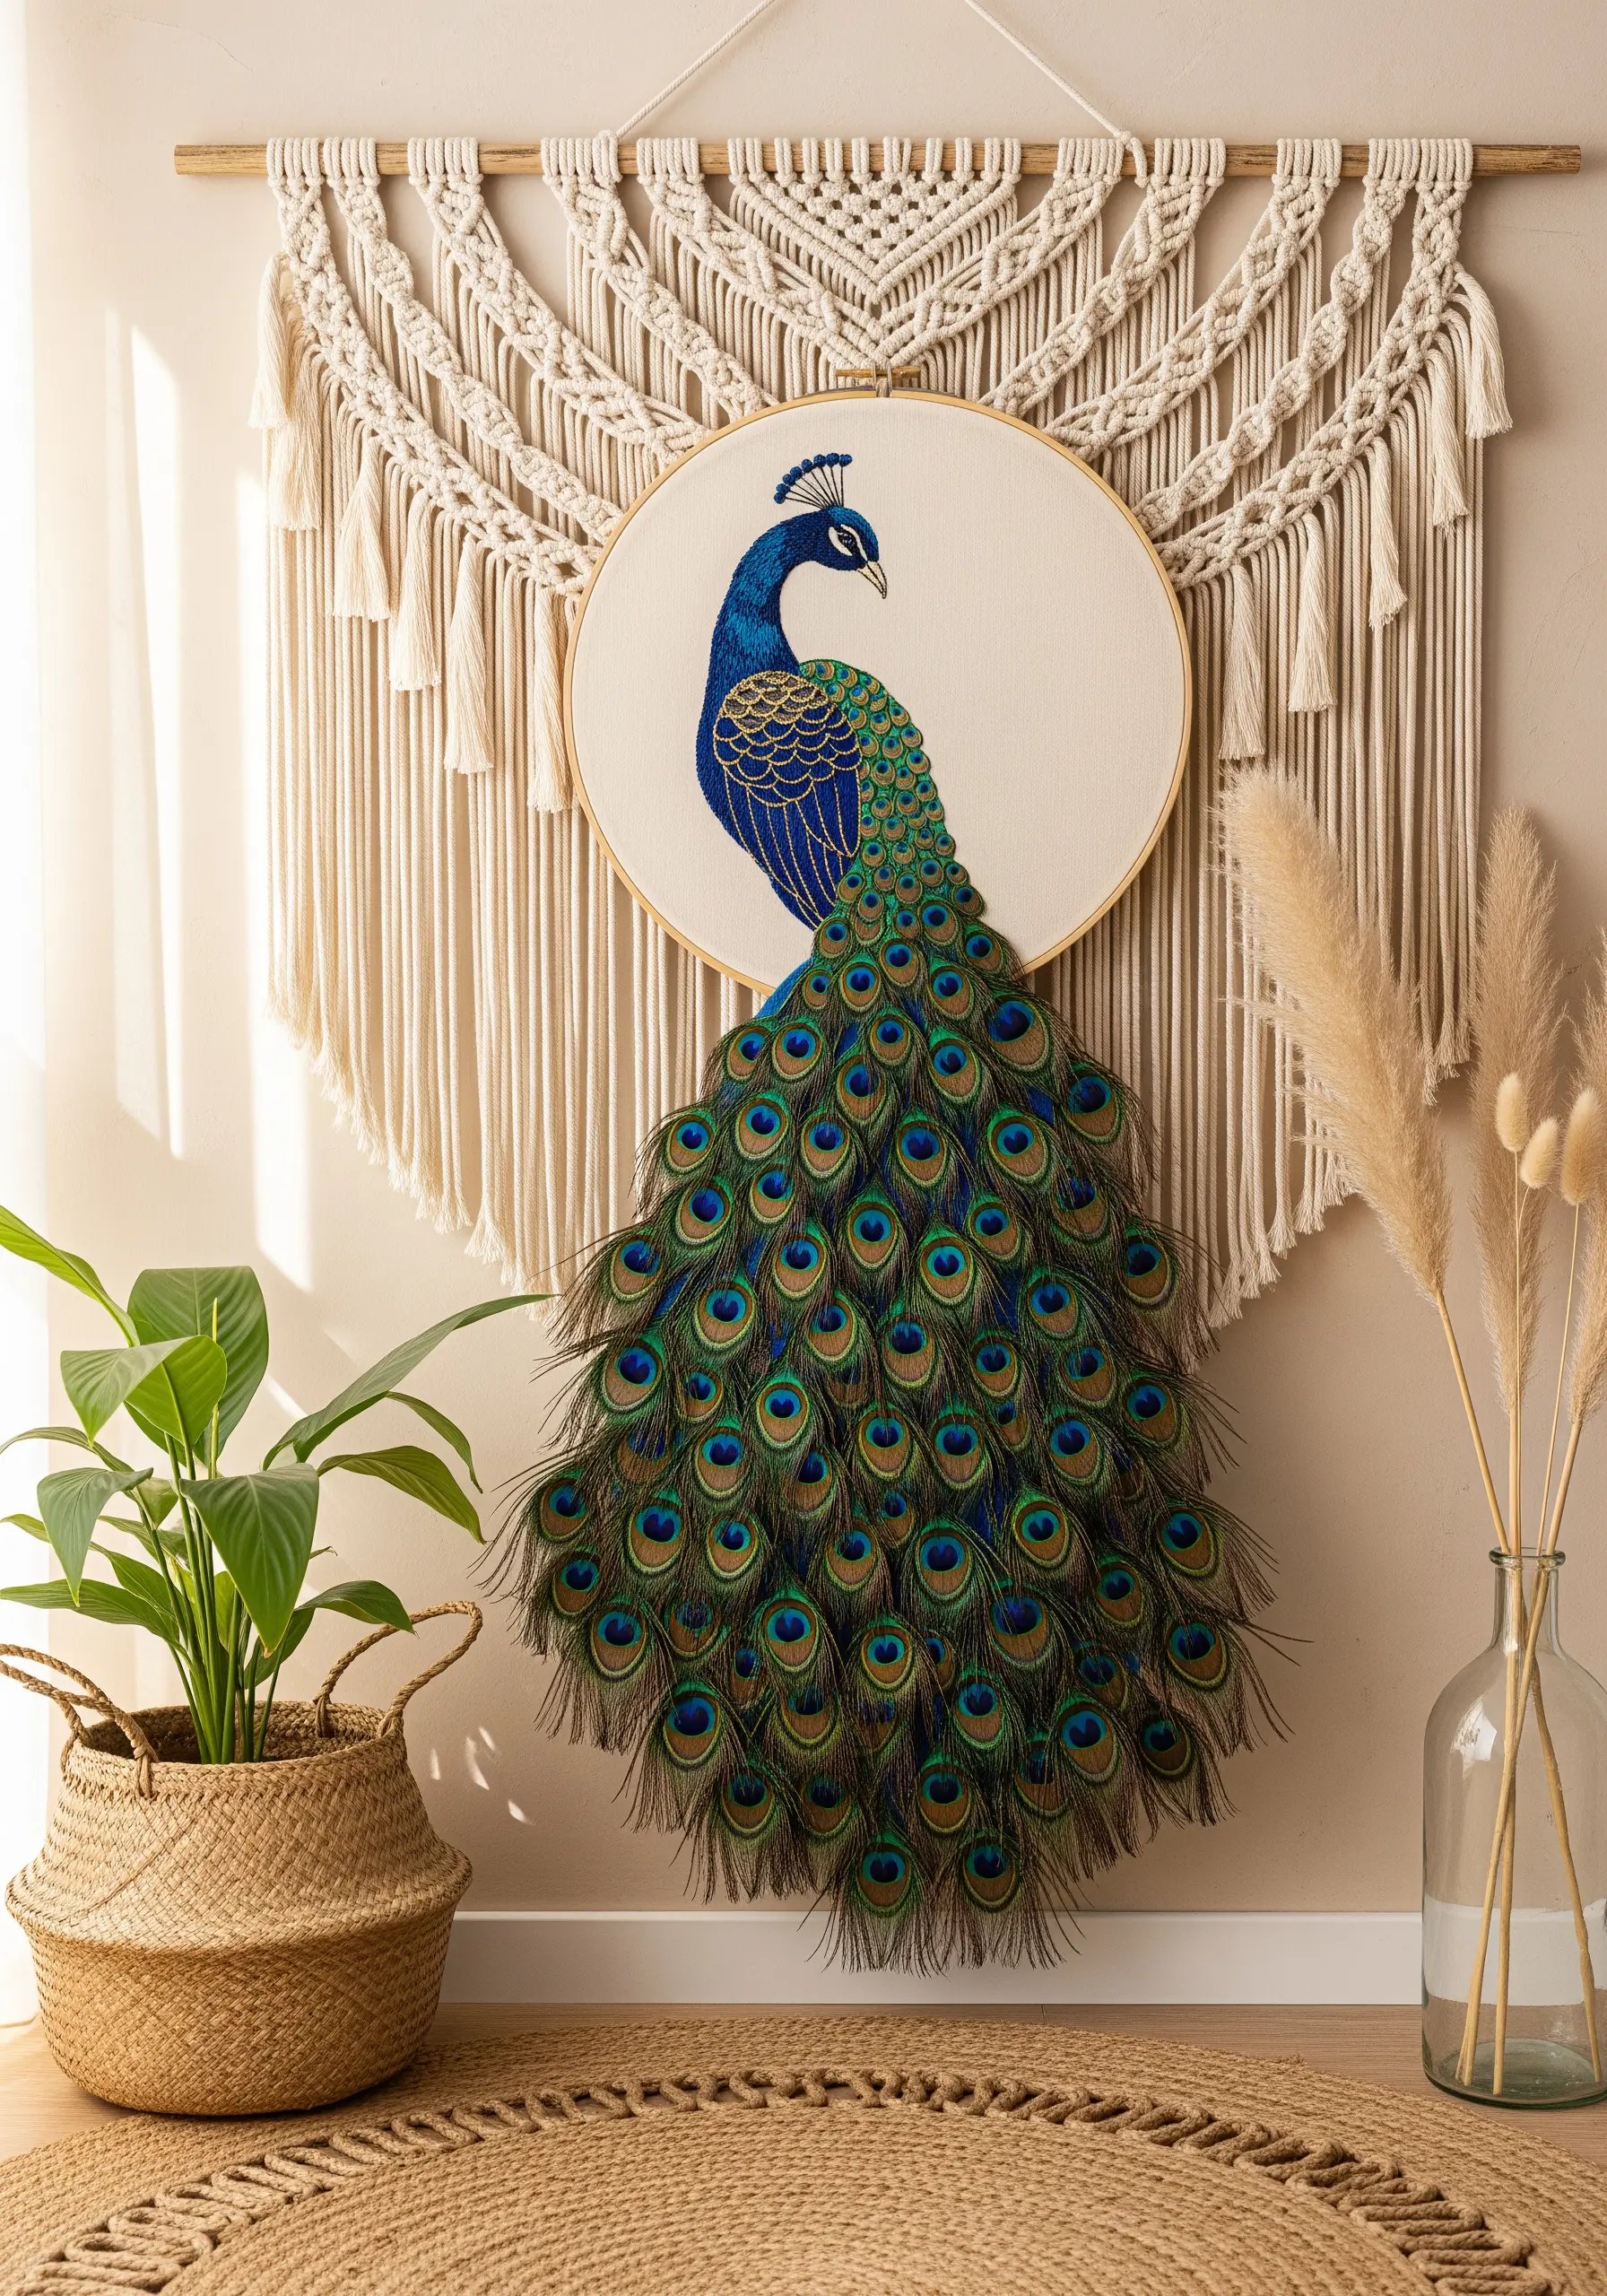
Take your embroidery off the hoop by combining it with mixed-media elements.
After completing the embroidered portion of the peacock on fabric, carefully cut it out, leaving a small margin.
Mount this piece onto a sturdy backing like felt, and then artfully arrange and attach real peacock feathers behind it to create the dramatic, cascading tail.
This combination of textures transforms the piece into a stunning large-scale embroidery tapestry.
26. Achieve a “Feathered” Blend with Long-and-Short Stitch

The key to a seamless color gradient on a bird’s breast is the long-and-short stitch.
Begin with your first color, making a row of alternating long and short satin stitches.
Then, bring your next color up through the fabric, splitting the threads of the previous row’s stitches to blend the new color in.
This technique creates a soft, ‘feathered’ transition between hues, which is essential for achieving the realistic, fiery plumage of an oriole.
27. Create a “Glasswing” Effect on Sheer Fabric
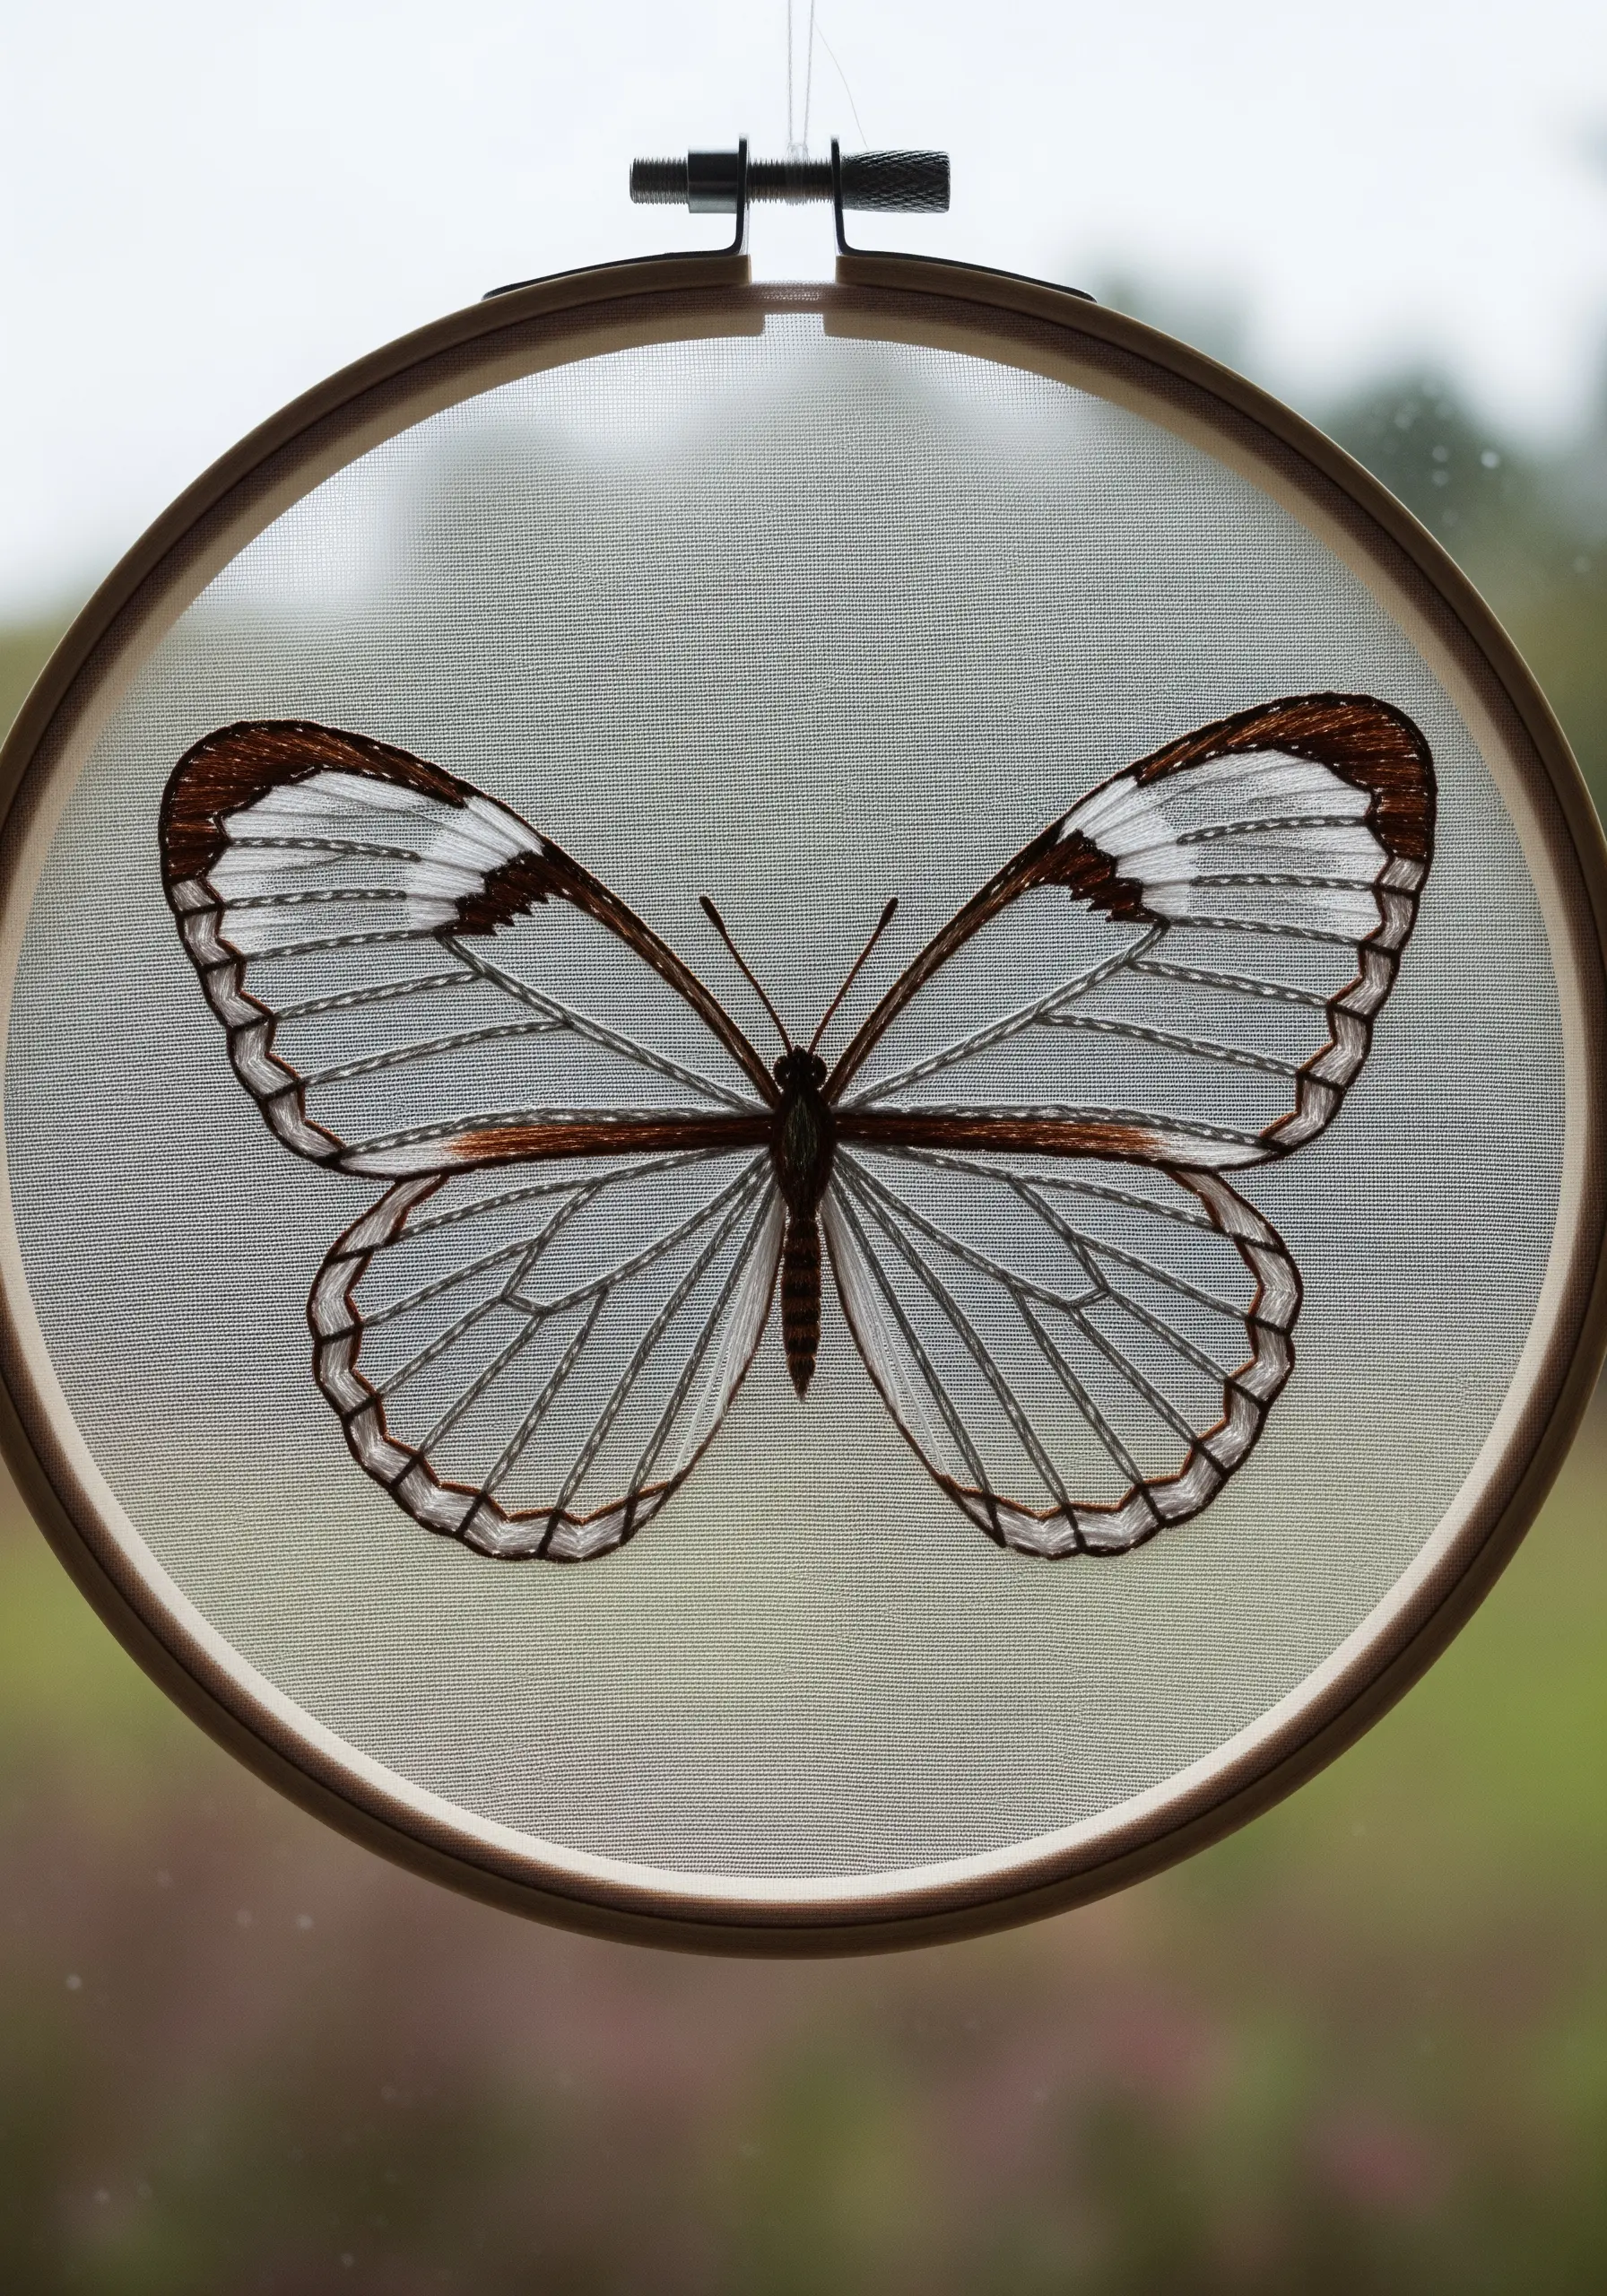
To replicate the transparent wings of a Glasswing butterfly, you need to work on a sheer fabric like tulle or organza.
Stretch the fabric tightly in a hoop with a layer of water-soluble stabilizer underneath for support.
Stitch only the opaque veins and borders of the wings using a simple backstitch or stem stitch.
Once you are finished, rinse away the stabilizer, leaving behind a delicate, ethereal design that appears to float in the air.
28. Design Elegant and Practical Embroidered Bookmarks
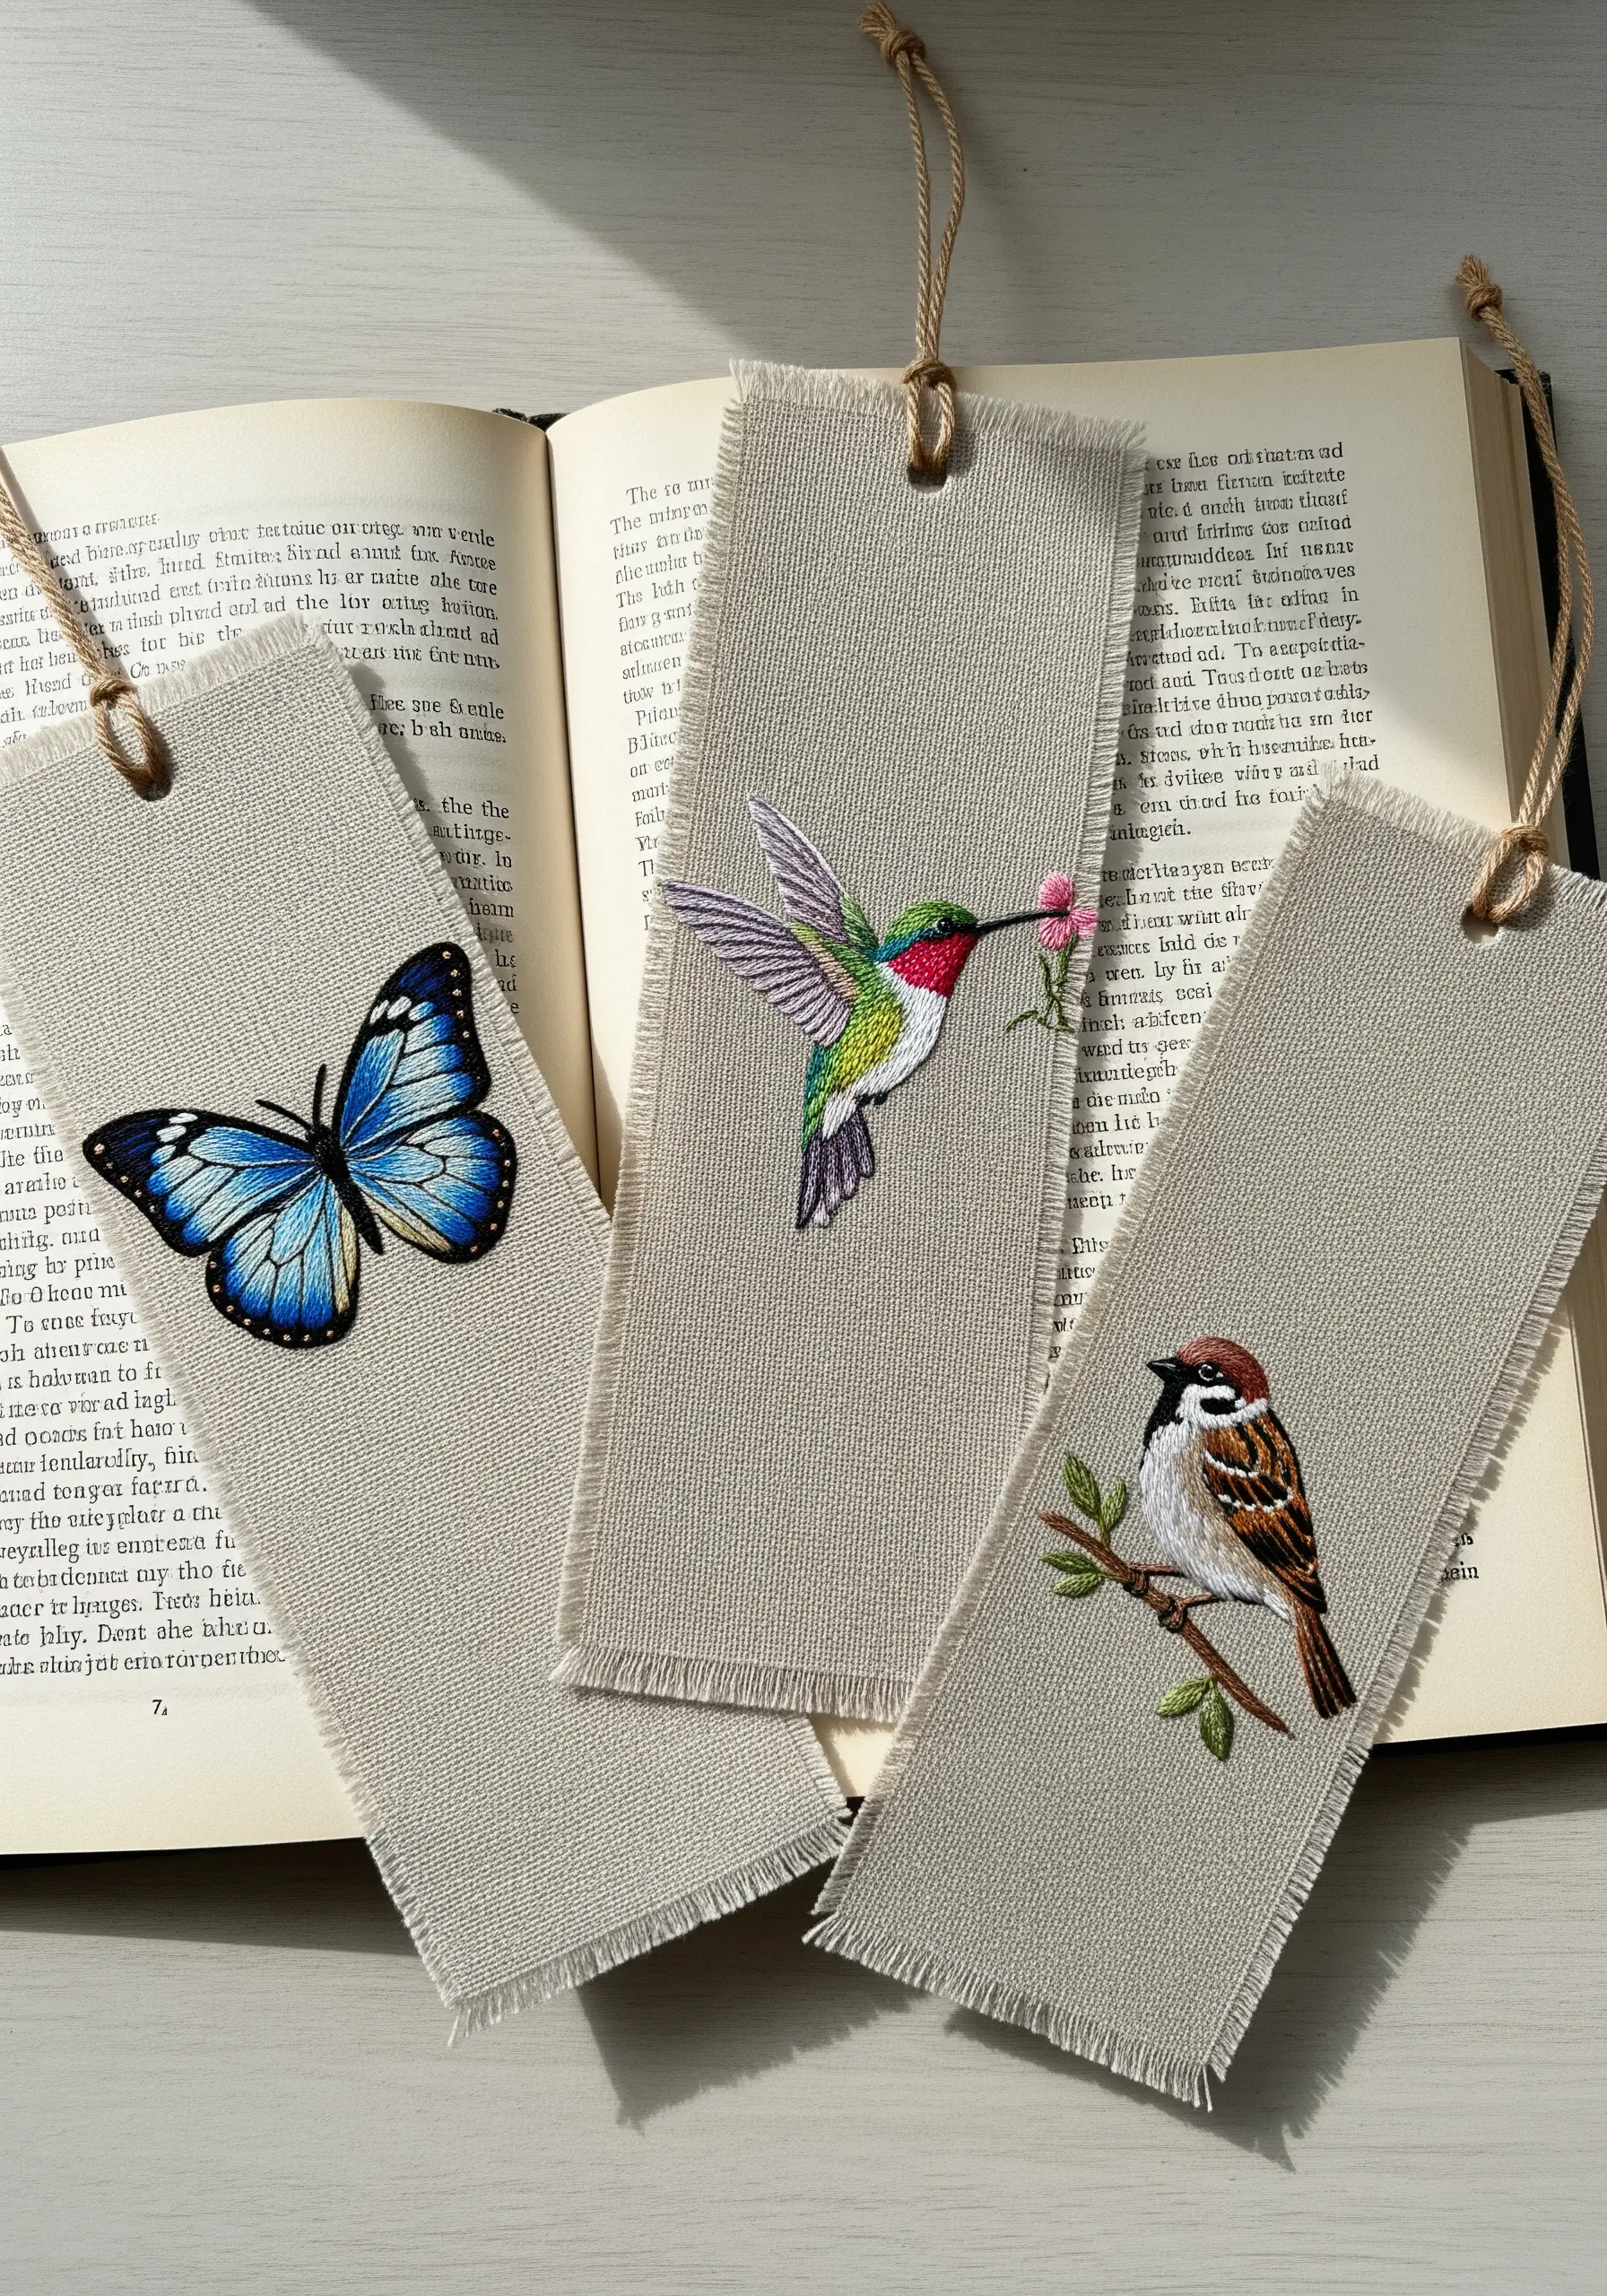
Create a beautiful and functional gift by stitching small motifs on a narrow strip of fabric.
Choose a tightly woven fabric like linen or evenweave cotton that won’t easily fray.
After stitching your design, finish the edges neatly. You can either create a short, soft fringe by pulling a few threads from each side, or fold the raw edges under and secure them with a line of backstitching.
These make perfect handmade embroidery gifts that double as mini art pieces.
29. Use Stitch Direction to Sculpt Rocky Textures
To create a craggy, mountainous backdrop, use stitch direction to your advantage.
Divide the mountain into sharp, angular planes, and fill each plane with satin or long-and-short stitches that all go in the same direction.
By changing the stitch direction for each adjacent plane, you create facets that catch the light differently, giving the rocks a hard, chiseled appearance.
This technique adds immense depth and drama to your background with minimal effort.
30. Construct 3D Stuffed Figures for a Nursery Mobile
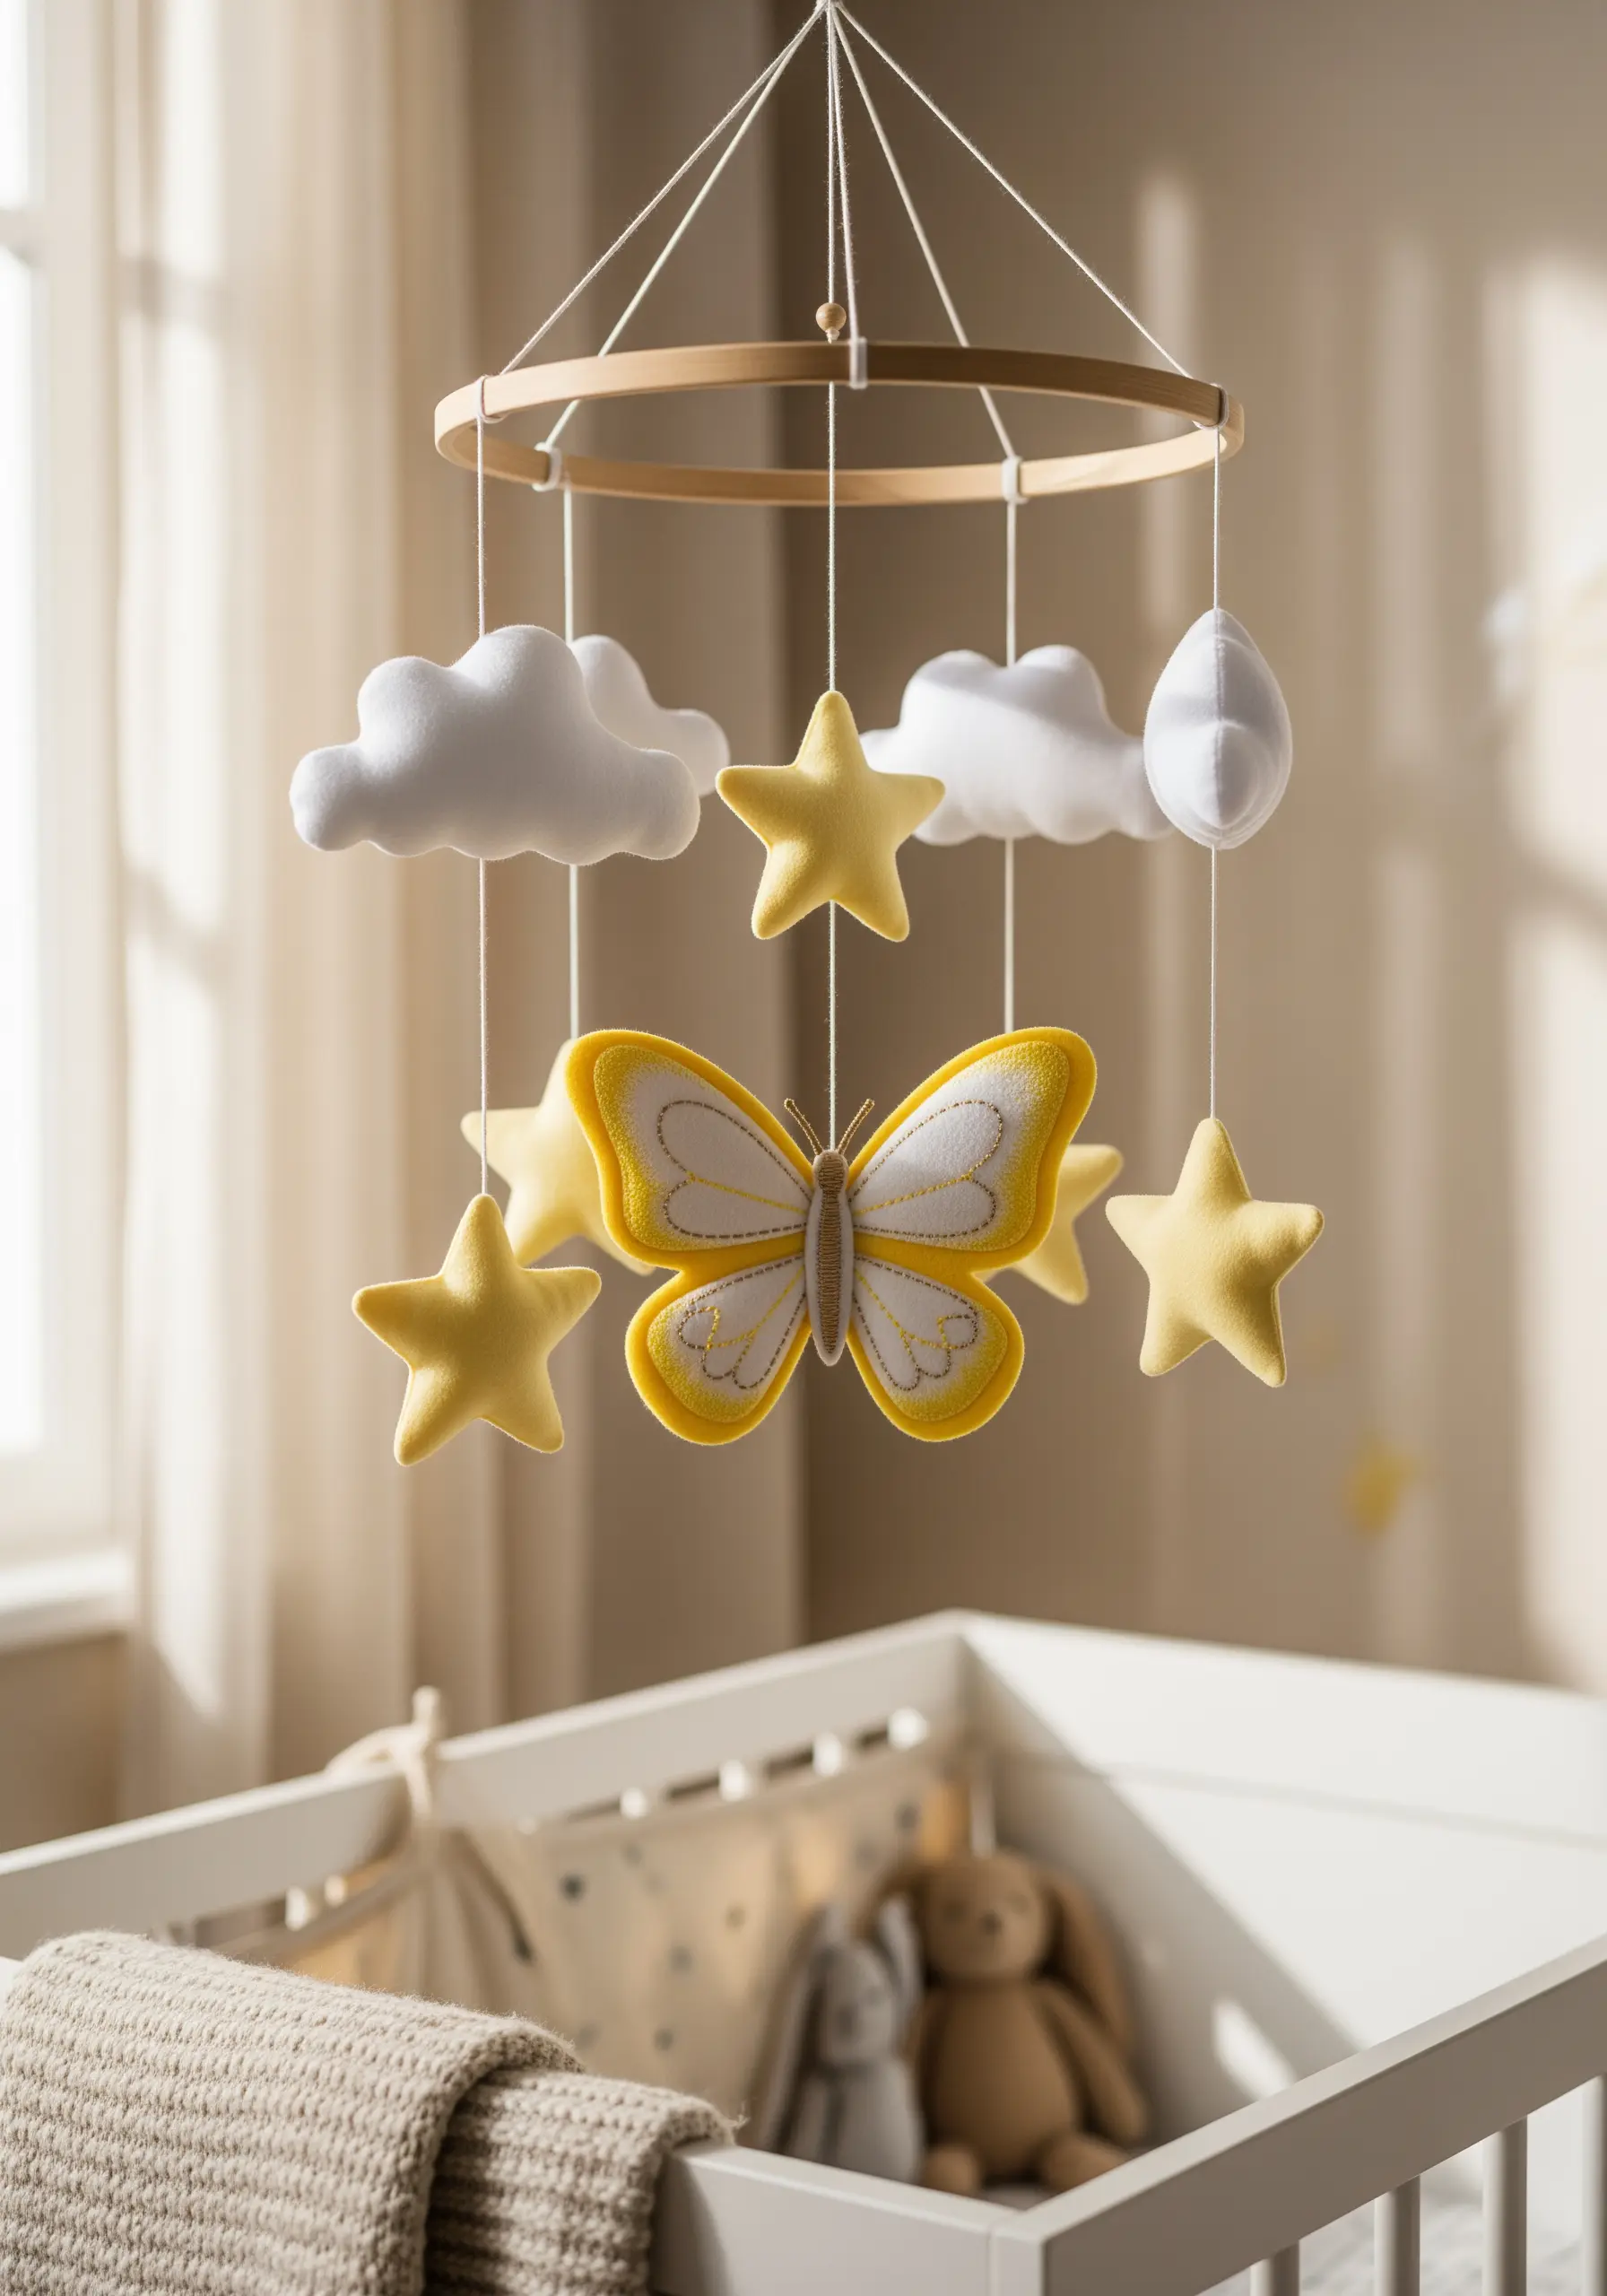
Turn your embroidery into soft, three-dimensional objects perfect for a baby mobile.
Embroider your design onto a piece of felt or sturdy cotton. Create an identical, plain backing piece.
Place the two pieces together, right sides out, and stitch around the edge with a blanket stitch, leaving a small gap.
Gently fill with polyester stuffing, then stitch the opening closed. This technique creates charming, tactile figures that are soft and safe for a nursery.
31. Explore Contrast with Monochrome Thread Painting
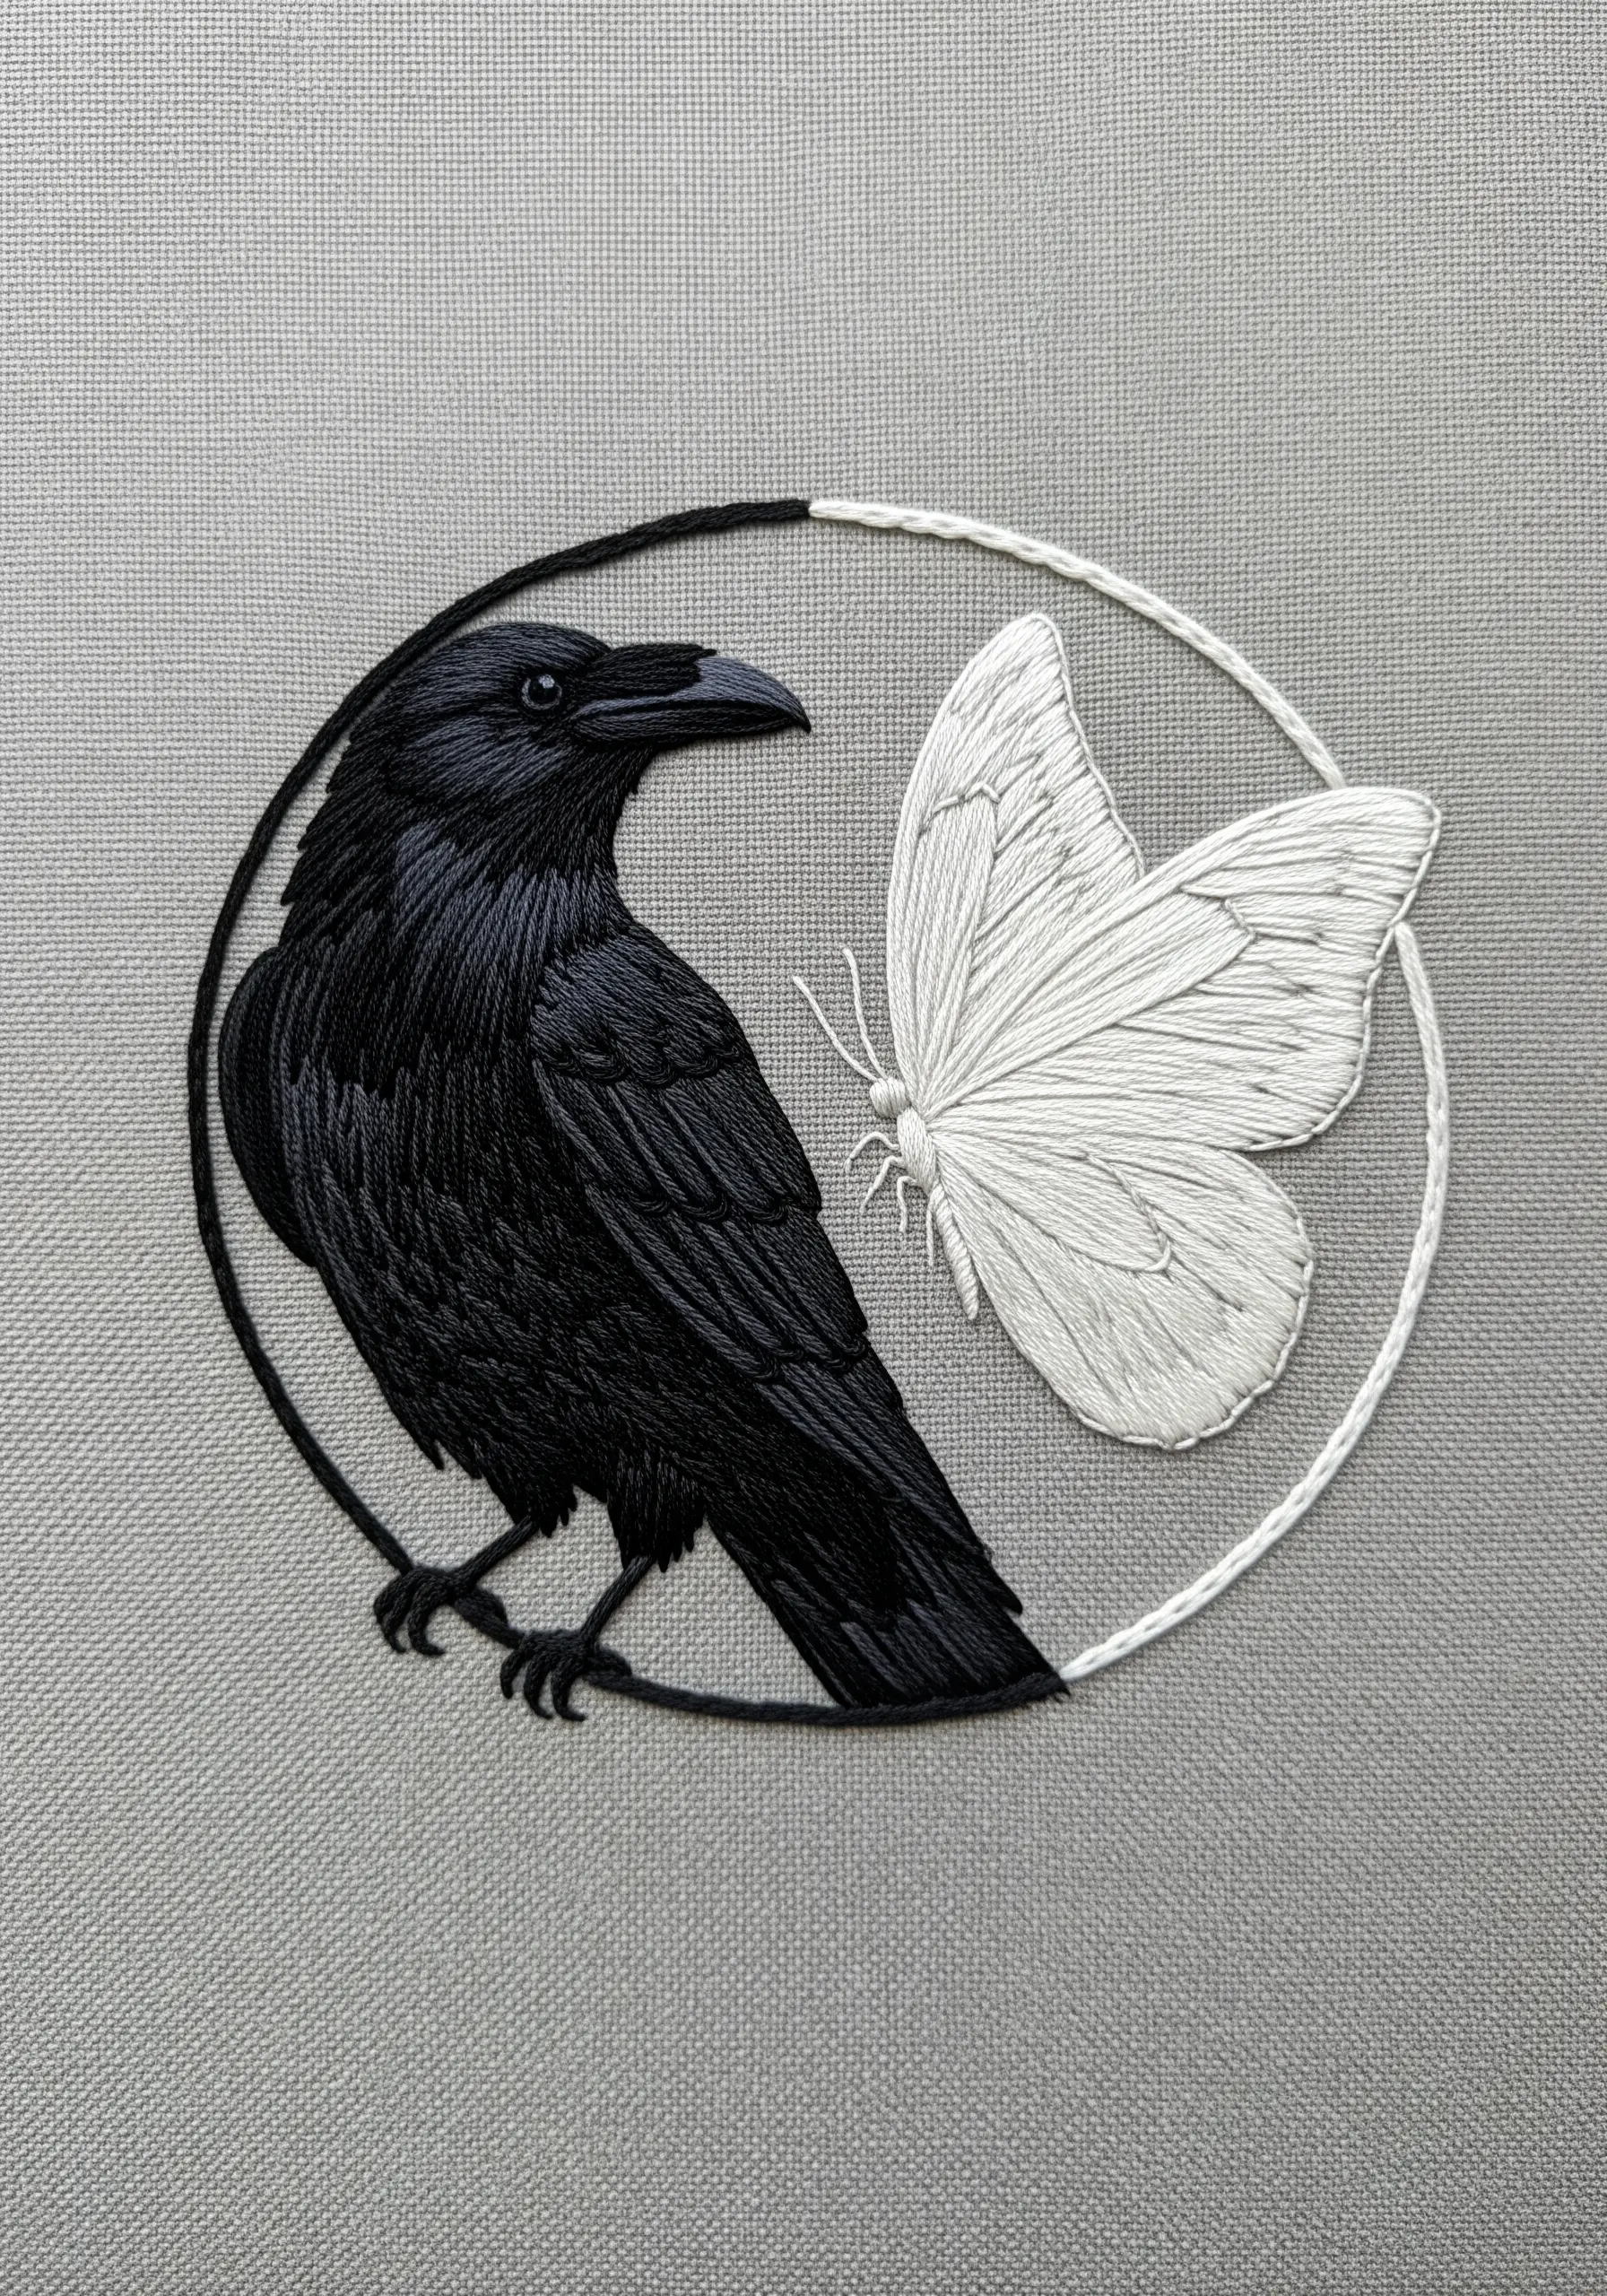
Create a powerful design using only black and white thread by focusing on texture and light.
For the raven’s feathers, use directional satin stitch with black thread, angling the stitches to create the subtle sheen of plumage.
For the butterfly, use white thread with long-and-short stitches to give the wings a softer, more matte appearance.
This contrast in texture—sheen versus matte—adds a layer of sophistication to the high-contrast color scheme, perfect for monochrome black thread designs.
32. Craft Durable Iron-On Patches from Your Designs
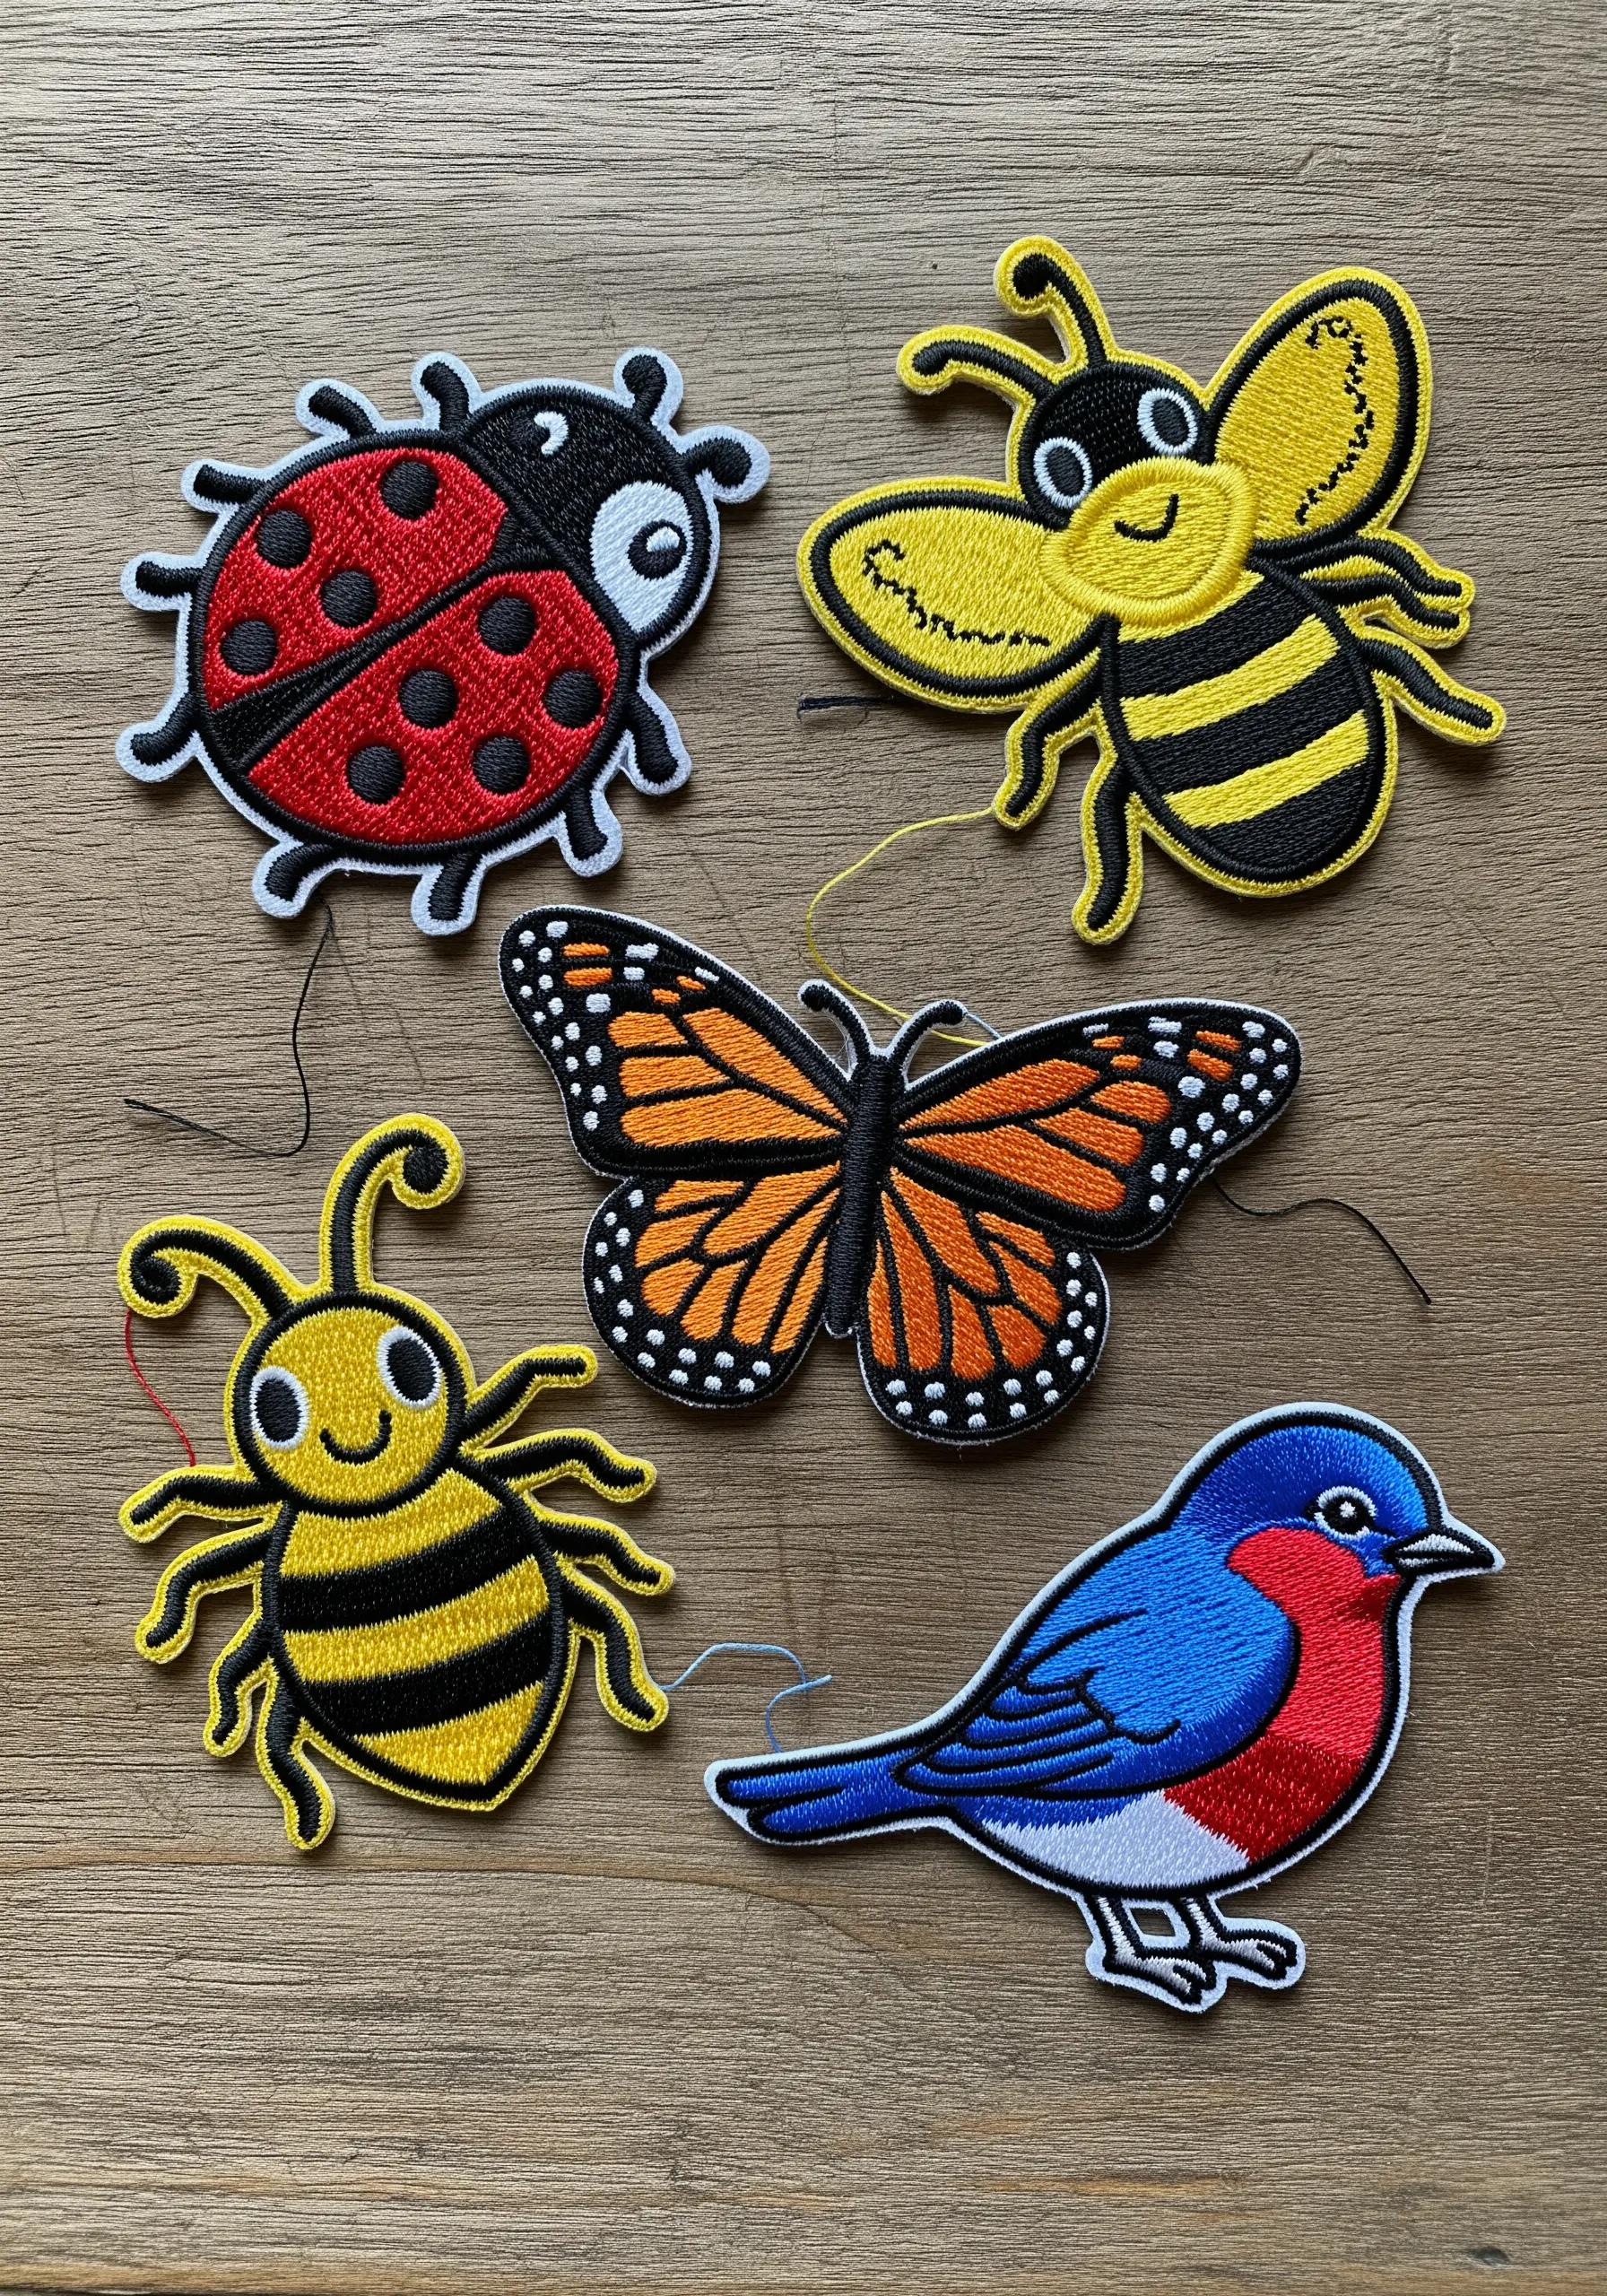
Turn any small embroidery into a wearable patch with a few simple steps.
Stitch your design on a non-stretchy fabric like felt or cotton twill for stability.
Once complete, outline the entire design with a thick, dense satin stitch border—this will prevent fraying when you cut it out.
Apply an iron-on adhesive backing (like HeatnBond) to the reverse side before carefully cutting along the outer edge of your satin stitch border.
33. Create Plump, 3D Berries with Bullion Knots

To make the rowan berries look juicy and three-dimensional, bullion knots are the perfect choice.
This stitch involves wrapping the thread around the needle multiple times before pulling it through the fabric, creating a small, cylindrical knot.
Cluster these knots tightly together using a vibrant red thread to form the bunches of berries.
Their raised, coiled texture provides a wonderful contrast to the sleek, smooth thread painting of the birds’ wings.
34. Convey Weightlessness with Minimalist Stitches
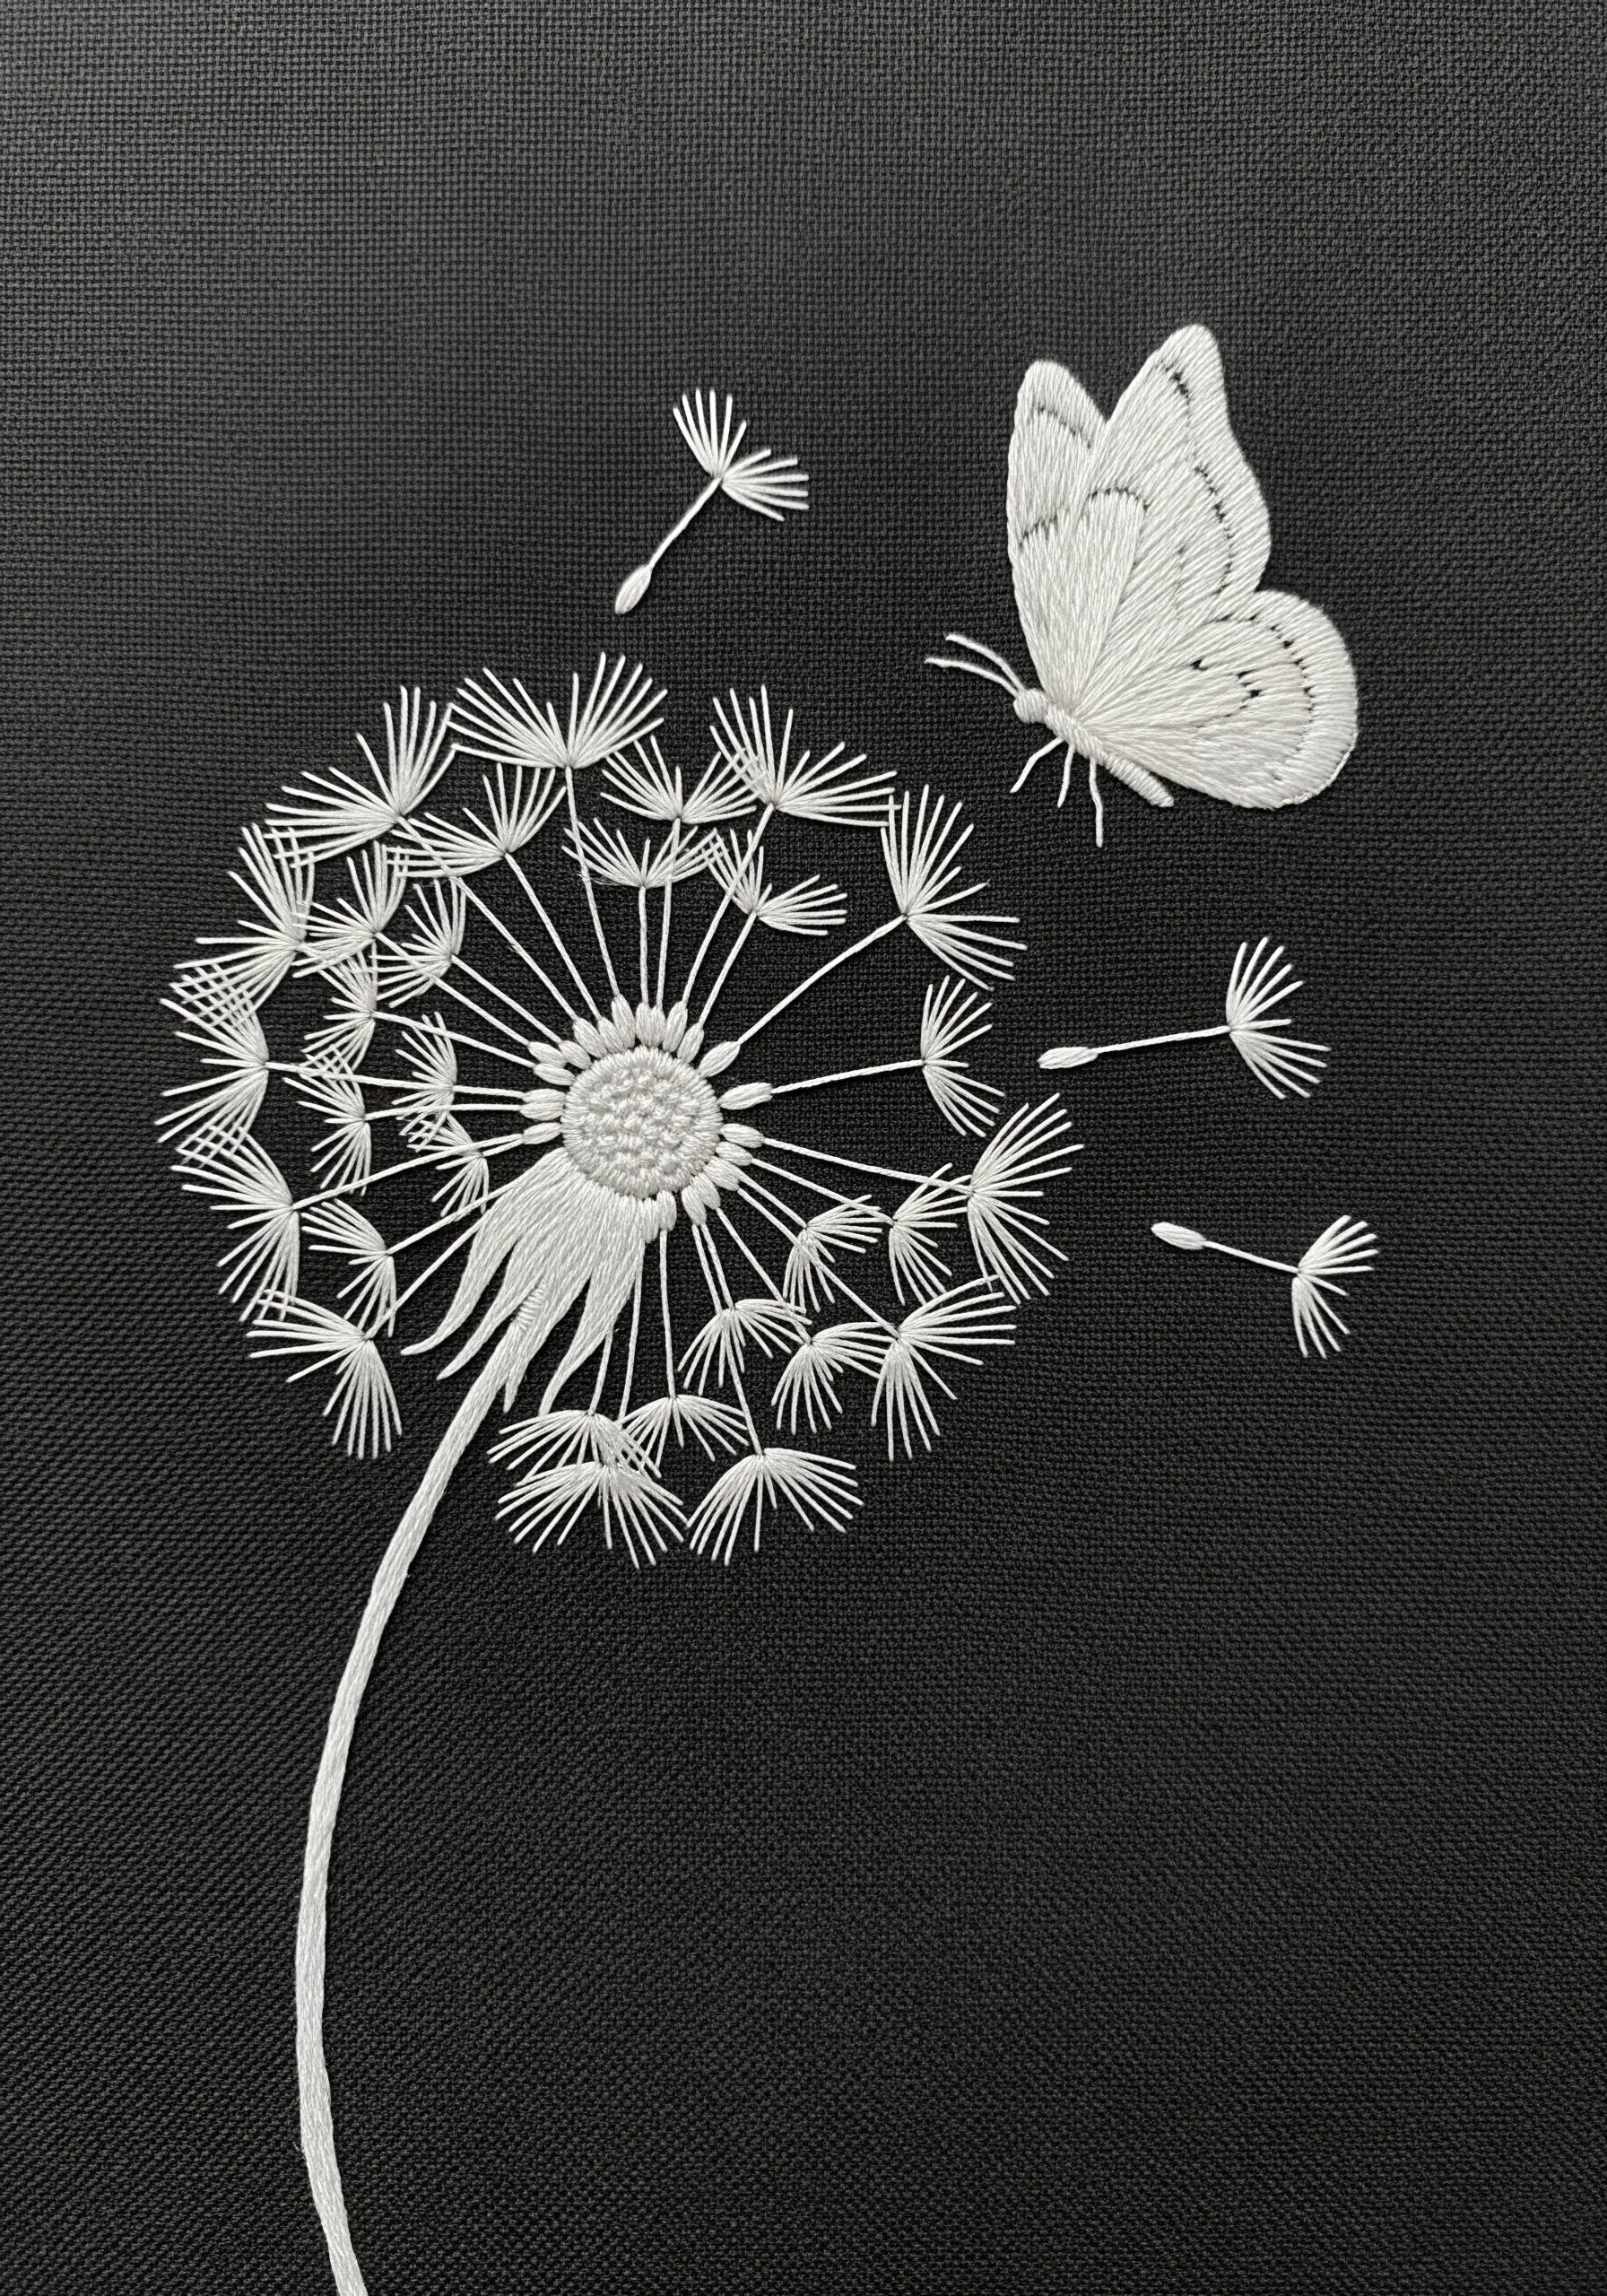
To capture the delicate nature of a dandelion, less is more.
Use a single strand of white floss for the entire design to maintain a light, airy feel against the dark fabric.
For the floating seeds, use a combination of a single detached chain stitch for the seed head and a simple straight stitch for the stem.
This minimalist approach ensures the composition feels ethereal and captures the effortless drift of the seeds on the wind.


